Preparing for disaster recovery with Identity Management
Mitigating the effects of server and data loss scenarios in IdM environments
Abstract
Providing feedback on Red Hat documentation
We appreciate your feedback on our documentation. Let us know how we can improve it.
Submitting feedback through Jira (account required)
- Log in to the Jira website.
- Click Create in the top navigation bar
- Enter a descriptive title in the Summary field.
- Enter your suggestion for improvement in the Description field. Include links to the relevant parts of the documentation.
- Click Create at the bottom of the dialogue.
Chapter 1. Disaster recovery tools in IdM
A good disaster recovery strategy combines the following tools to recover from a disaster as soon as possible with minimal data loss:
- Replication
- Replication copies database contents between IdM servers. If an IdM server fails, you can replace the lost server by creating a new replica based on one of the remaining servers.
- Virtual machine (VM) snapshots
- A snapshot is a view of a VM’s operating system and applications on any or all available disks at a given point in time. After taking a VM snapshot, you can use it to return a VM and its IdM data to a previous state.
- IdM backups
-
The
ipa-backuputility allows you to take a backup of an IdM server’s configuration files and its data. You can later use a backup to restore an IdM server to a previous state.
Chapter 2. Disaster scenarios in IdM
Prepare and respond to various disaster scenarios in Identity Management (IdM) systems that affect servers, data, or entire infrastructures.
| Disaster type | Example causes | How to prepare | How to respond |
|---|---|---|---|
| Server loss: The IdM deployment loses one or several servers. |
| ||
| Data loss: IdM data is unexpectedly modified on a server, and the change is propagated to other servers. |
| ||
| Total infrastructure loss: All IdM servers or Certificate Authority (CA) replicas are lost with no VM snapshots or data backups available. |
| This situation is a total loss. |
A total loss scenario occurs when all Certificate Authority (CA) replicas or all IdM servers are lost, and no virtual machine (VM) snapshots or backups are available for recovery. Without CA replicas, the IdM environment cannot deploy additional replicas or rebuild itself, making recovery impossible. To avoid such scenarios, ensure backups are stored off-site, maintain multiple geographically redundant CA replicas, and connect each replica to at least two others.
Chapter 3. Preparing for server loss with replication
Follow these guidelines to establish a replication topology that will allow you to respond to losing a server.
3.1. Guidelines for connecting IdM replicas in a topology
- Connect each replica to at least two other replicas
- This ensures that information is replicated not just between the initial replica and the first server you installed, but between other replicas as well.
- Connect a replica to a maximum of four other replicas (not a hard requirement)
A large number of replication agreements per server does not add significant benefits. A receiving replica can only be updated by one other replica at a time and meanwhile, the other replication agreements are idle. More than four replication agreements per replica typically means a waste of resources.
NoteThis recommendation applies to both certificate replication and domain replication agreements.
There are two exceptions to the limit of four replication agreements per replica:
- You want failover paths if certain replicas are not online or responding.
- In larger deployments, you want additional direct links between specific nodes.
Configuring a high number of replication agreements can have a negative impact on overall performance: when multiple replication agreements in the topology are sending updates, certain replicas can experience a high contention on the changelog database file between incoming updates and the outgoing updates.
If you decide to use more replication agreements per replica, ensure that you do not experience replication issues and latency. However, note that large distances and high numbers of intermediate nodes can also cause latency problems.
- Connect the replicas in a data center with each other
- This ensures domain replication within the data center.
- Connect each data center to at least two other data centers
- This ensures domain replication between data centers.
- Connect data centers using at least a pair of replication agreements
- If data centers A and B have a replication agreement from A1 to B1, having a replication agreement from A2 to B2 ensures that if one of the servers is down, the replication can continue between the two data centers.
3.2. Replica topology examples
You can create a reliable replica topology by using one of the following examples.
Figure 3.1. Replica topology with four data centers, each with four servers that are connected with replication agreements
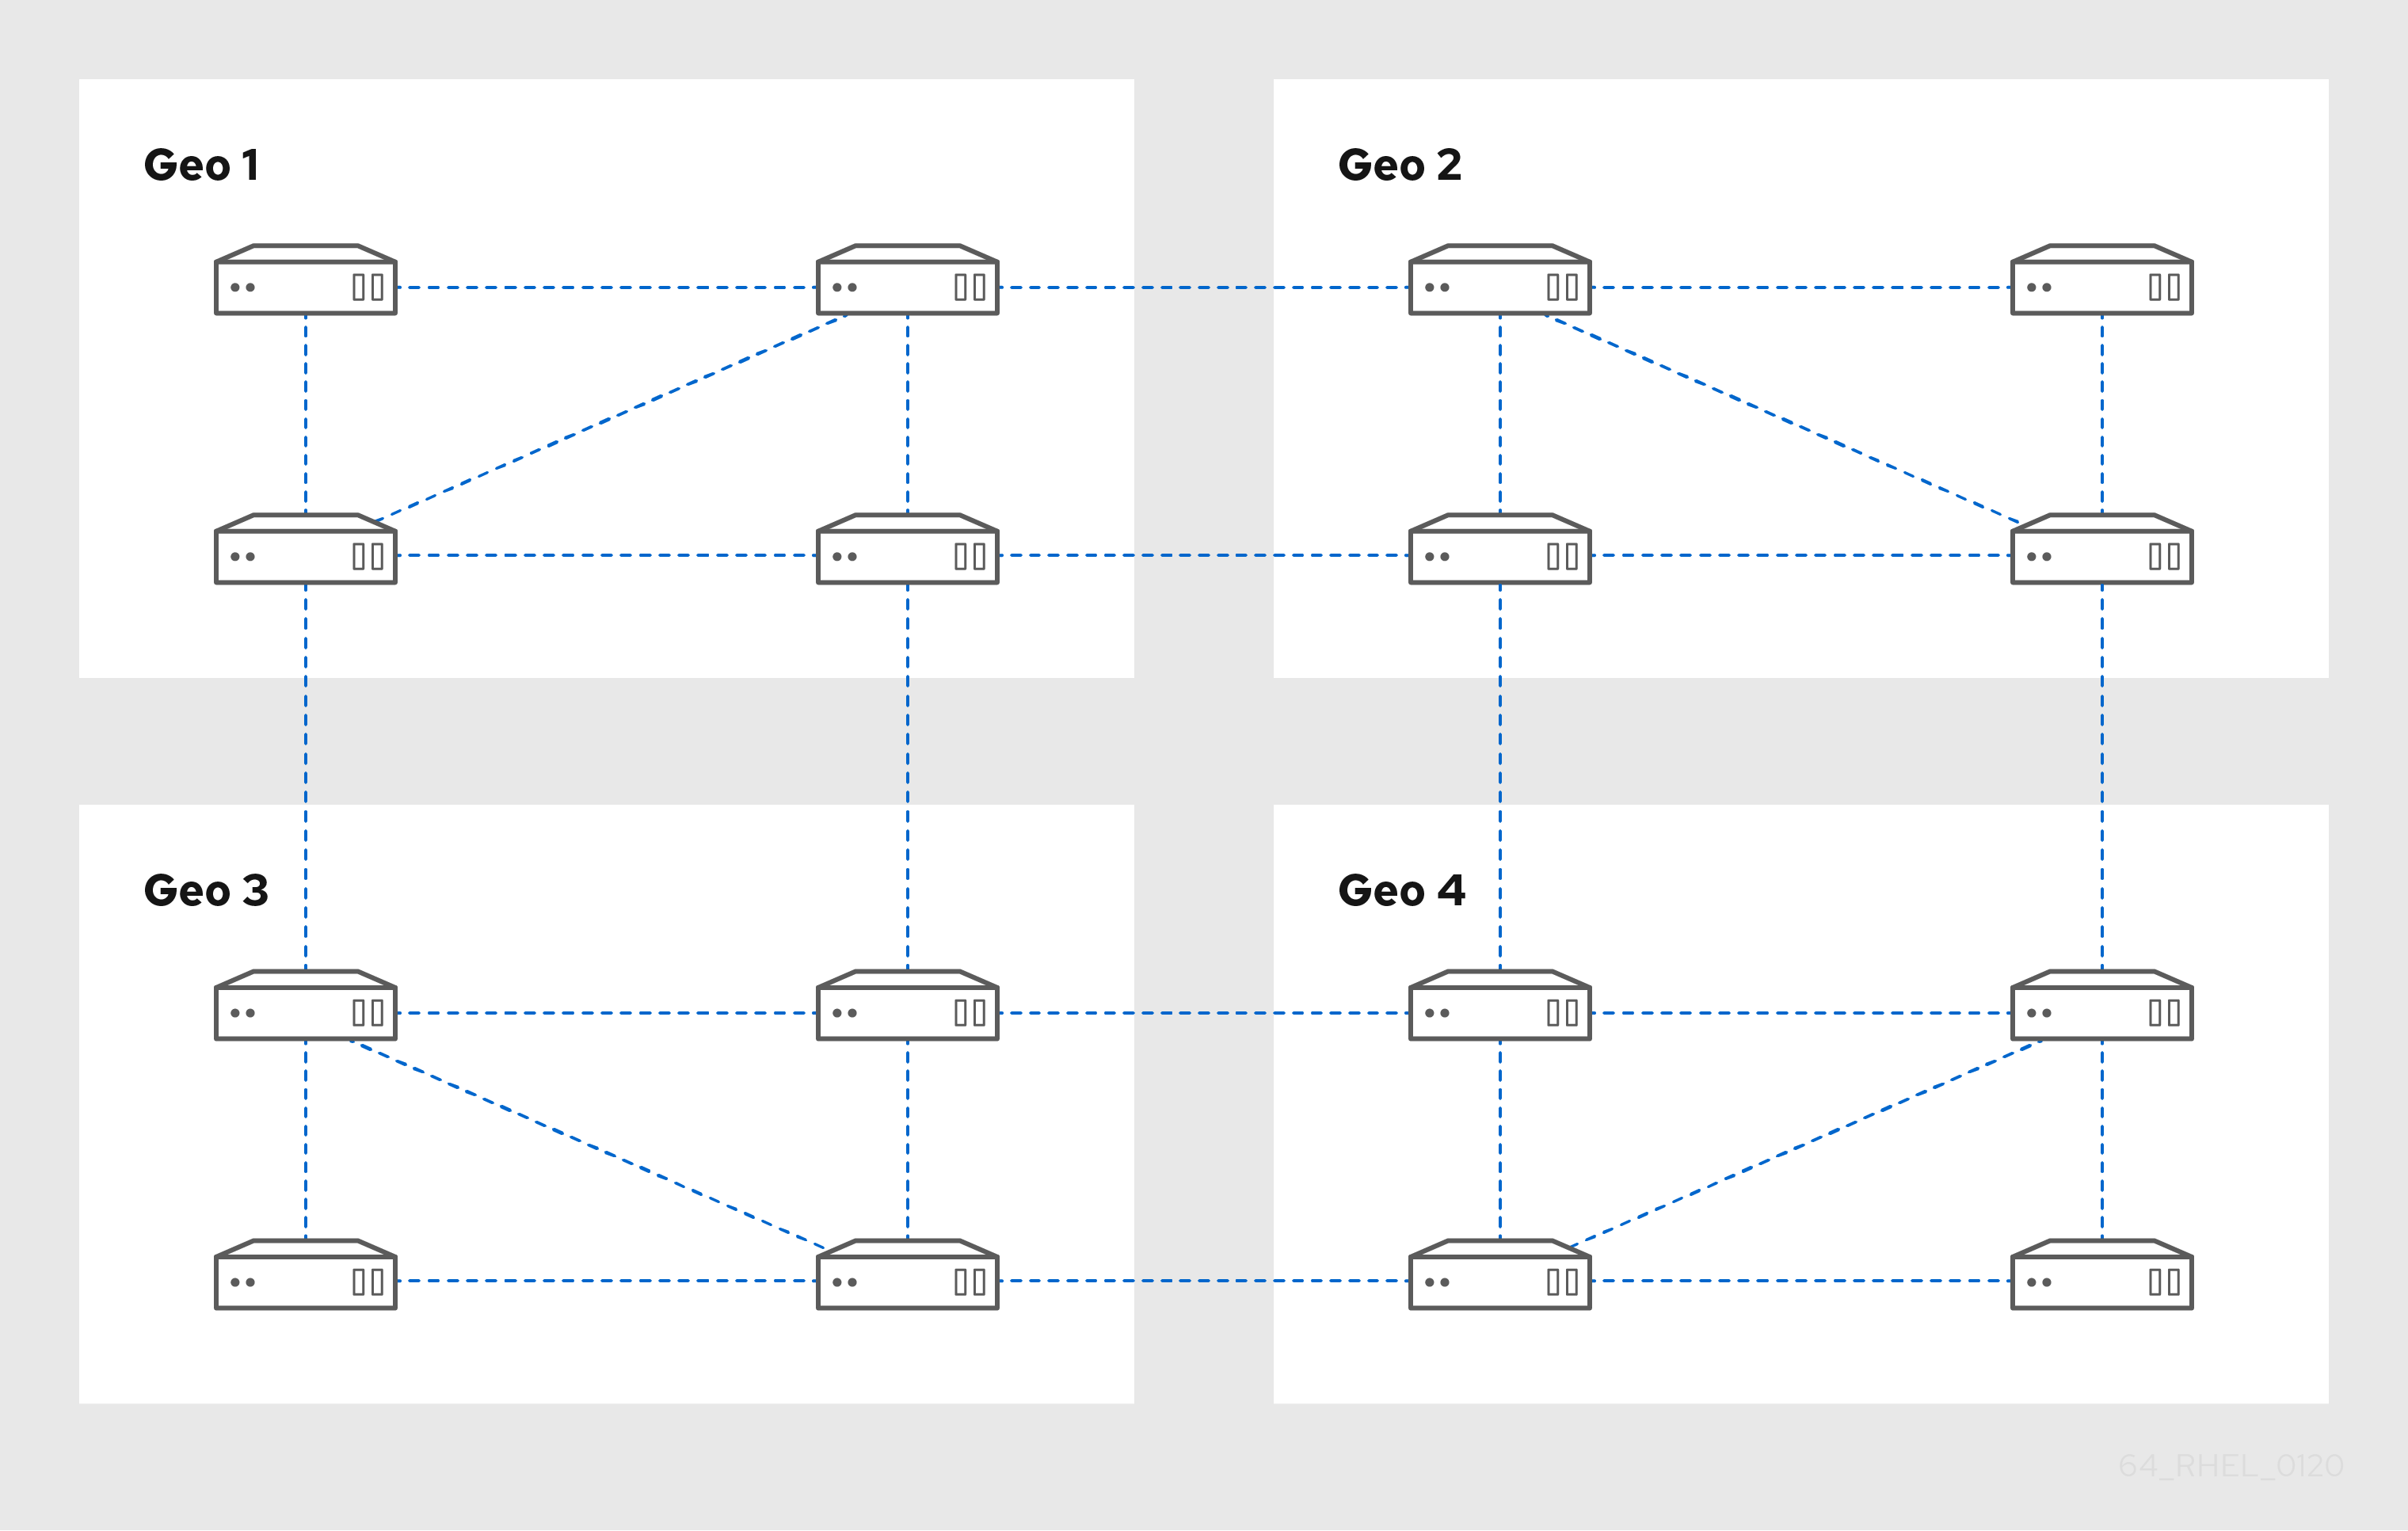
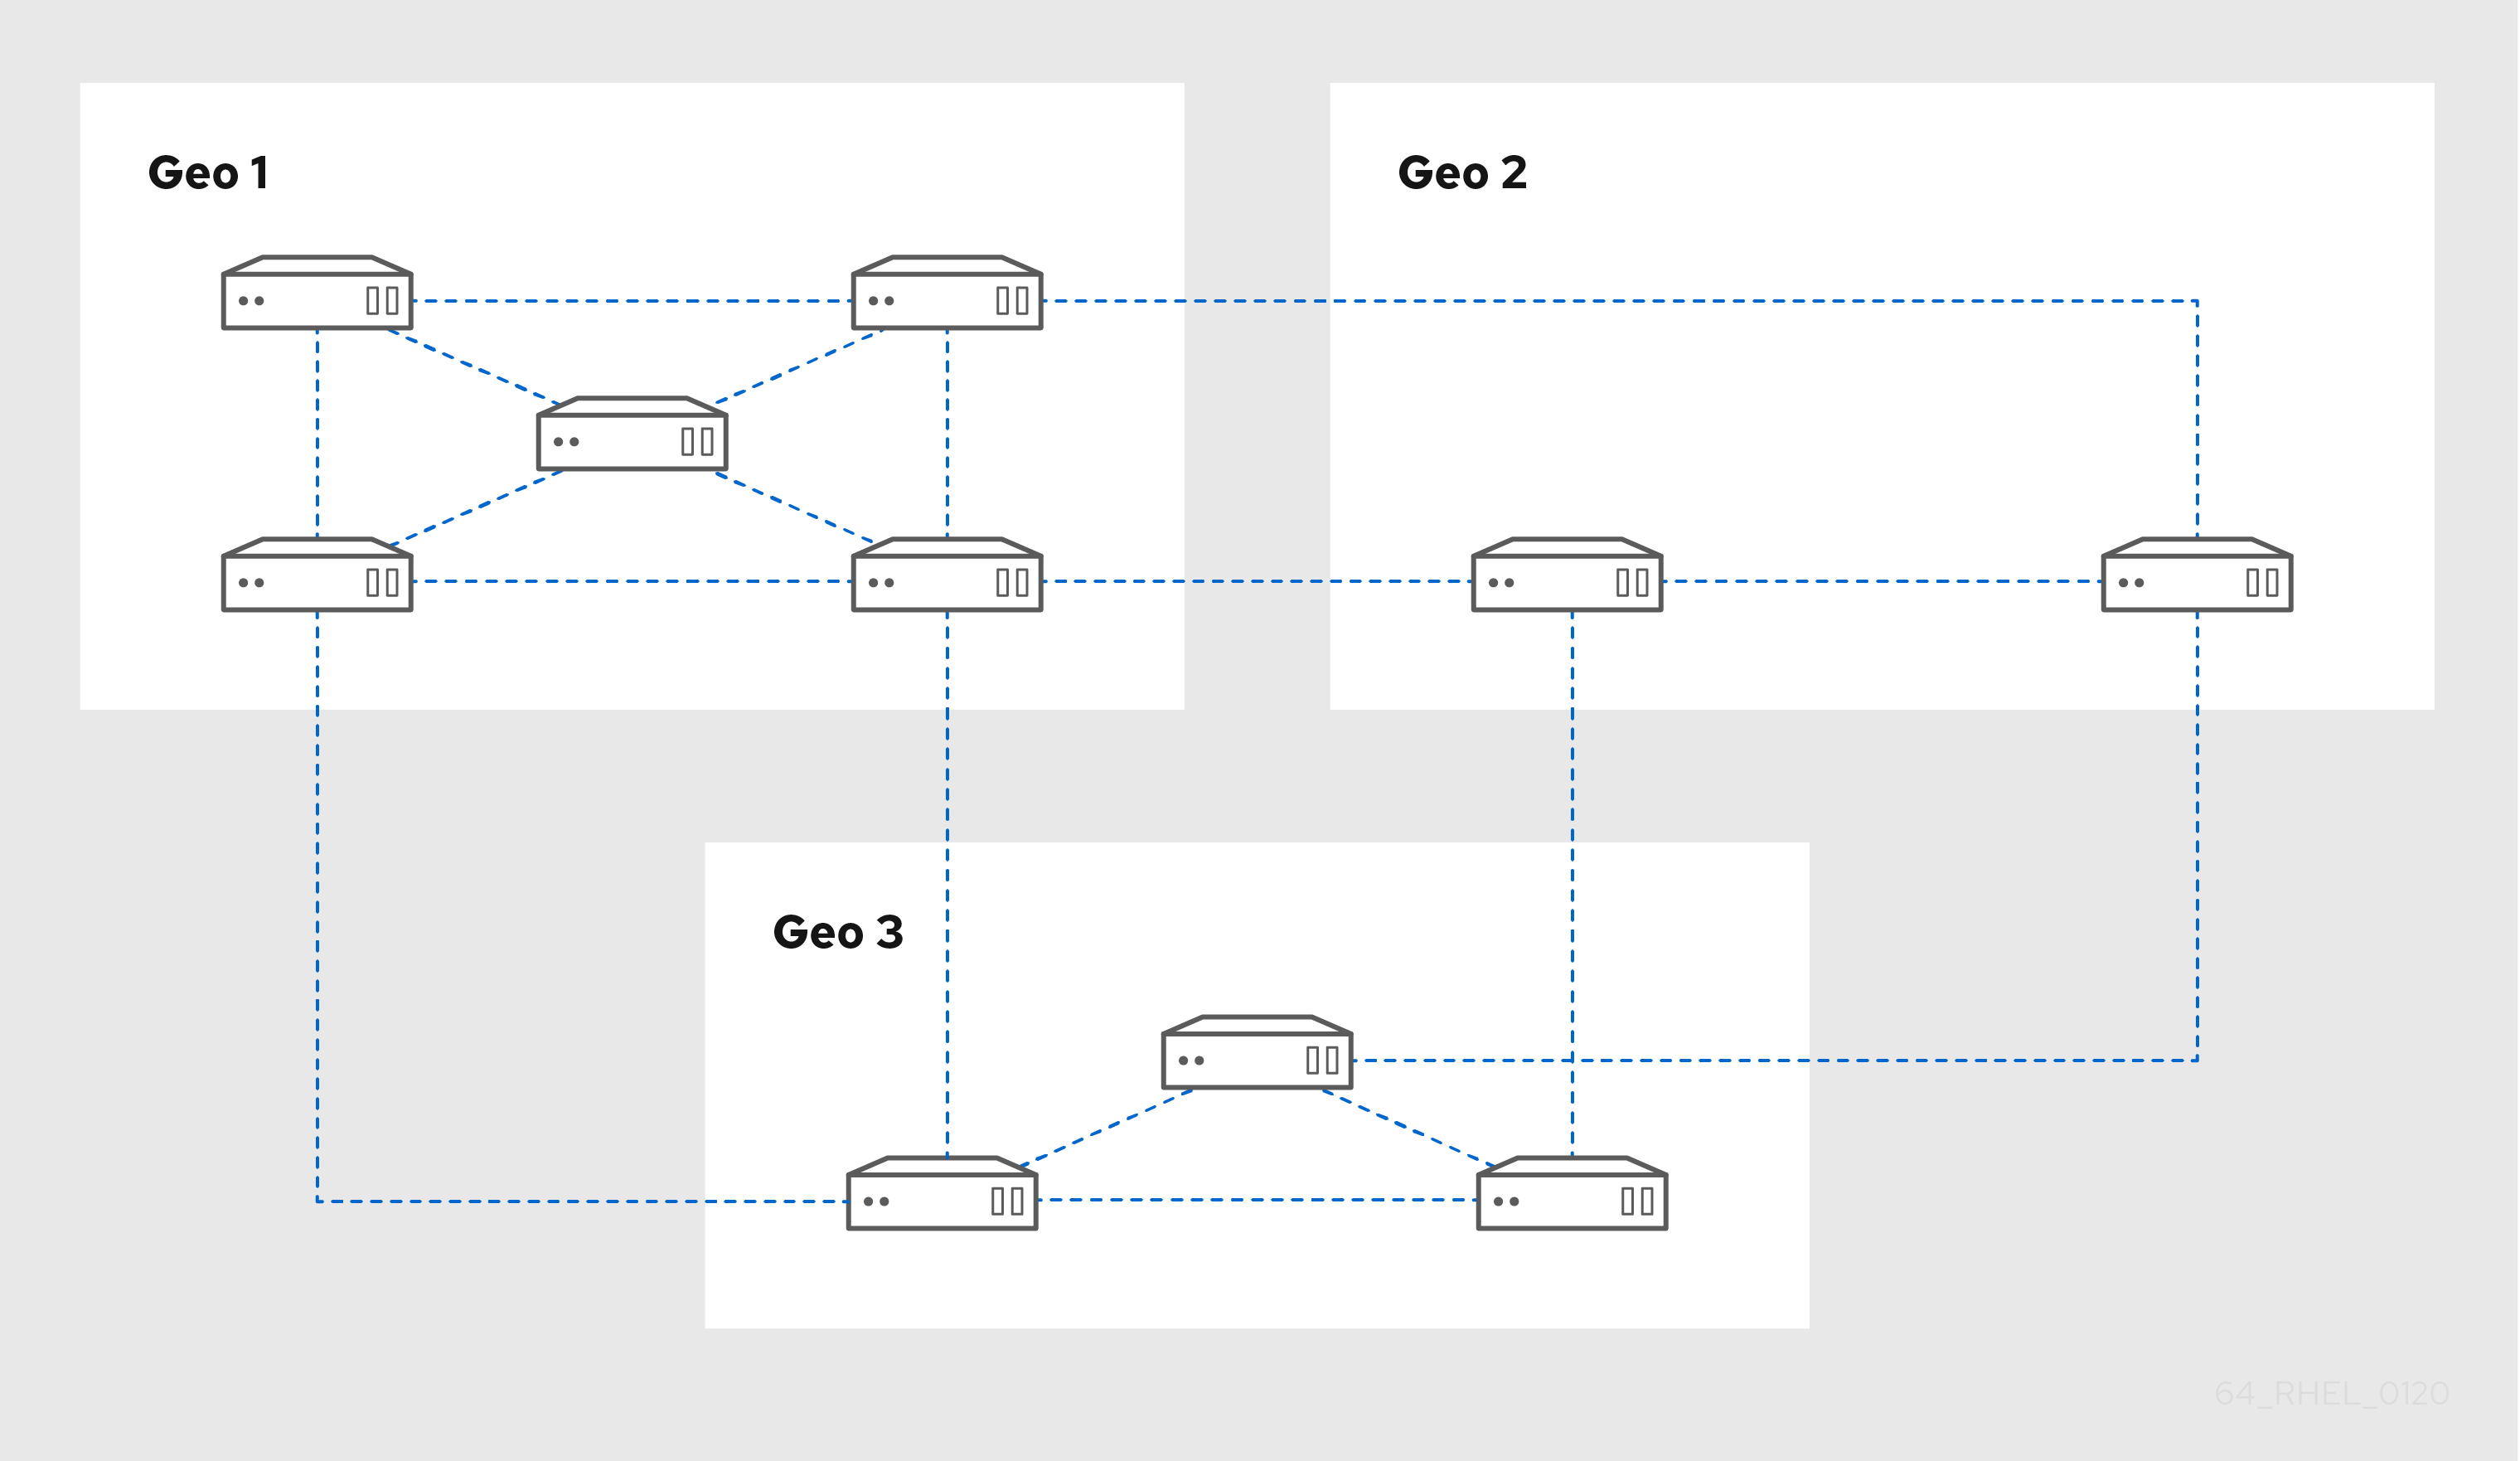
Figure 3.2. Replica topology with three data centers, each with a different number of servers that are all interconnected through replication agreements
3.3. Protecting IdM CA data
If your deployment contains the integrated IdM Certificate Authority (CA), install several CA replicas so you can create additional CA replicas if one is lost.
Procedure
Configure three or more replicas to provide CA services.
To install a new replica with CA services, run
ipa-replica-installwith the--setup-caoption.ipa-replica-install --setup-ca
[root@server ~]# ipa-replica-install --setup-caCopy to Clipboard Copied! Toggle word wrap Toggle overflow To install CA services on a preexisting replica, run
ipa-ca-install.ipa-ca-install
[root@replica ~]# ipa-ca-installCopy to Clipboard Copied! Toggle word wrap Toggle overflow
Create CA replication agreements between your CA replicas.
Copy to Clipboard Copied! Toggle word wrap Toggle overflow
If only one server provides CA services and it is damaged, the entire environment will be lost. If you use the IdM CA, Red Hat strongly recommends having three or more replicas with CA services installed, with CA replication agreements between them.
Chapter 4. Preparing for data loss with VM snapshots
Virtual machine (VM) snapshots are an integral component of a data recovery strategy, since they preserve the full state of an IdM server:
- Operating system software and settings
- IdM software and settings
- IdM customer data
Preparing a VM snapshot of an IdM Certificate Authority (CA) replica allows you to rebuild an entire IdM deployment after a disaster.
If your environment uses the integrated CA, a snapshot of a replica without a CA will not be sufficient for rebuilding a deployment, because certificate data will not be preserved.
Similarly, if your environment uses the IdM Key Recovery Authority (KRA), make sure you create snapshots of a KRA replica, or you might lose the storage key.
Red Hat recommends creating snapshots of a VM that has all of the IdM server roles installed which are in use in your deployment: CA, KRA, DNS.
Prerequisites
- A hypervisor capable of hosting RHEL VMs.
Procedure
Configure at least one CA replica in the deployment to run inside a VM.
- If IdM DNS or KRA are used in your environment, consider installing DNS and KRA services on this replica as well.
- Optional: Configure this VM replica as a hidden replica.
- Periodically shutdown this VM, take a full snapshot of it, and bring it back online so it continues to receive replication updates. If the VM is a hidden replica, IdM Clients will not be disrupted during this procedure.
Chapter 5. Preparing for data loss with IdM backups
IdM provides the ipa-backup utility to backup IdM data, and the ipa-restore utility to restore servers and data from those backups.
Red Hat recommends running backups as often as necessary on a hidden replica with all server roles installed, especially the Certificate Authority (CA) role if the environment uses the integrated IdM CA. See Installing an IdM hidden replica.
5.1. IdM backup types
With the ipa-backup utility, you can create two types of backups:
- Full-server backup
- Contains all server configuration files related to IdM, and LDAP data in LDAP Data Interchange Format (LDIF) files
- IdM services must be offline.
- Suitable for rebuilding an IdM deployment from scratch.
- Data-only backup
- Contains LDAP data in LDIF files and the replication changelog
- IdM services can be online or offline.
- Suitable for restoring IdM data to a state in the past
5.2. Naming conventions for IdM backup files
By default, IdM stores backups as .tar archives in subdirectories of the /var/lib/ipa/backup/ directory.
The archives and subdirectories follow these naming conventions:
- Full-server backup
An archive named
ipa-full.tarin a directory namedipa-full-<YEAR-MM-DD-HH-MM-SS>, with the time specified in GMT time.ll /var/lib/ipa/backup/ipa-full-2021-01-29-12-11-46
[root@server ~]# ll /var/lib/ipa/backup/ipa-full-2021-01-29-12-11-46
total 3056
-rw-r--r--. 1 root root     158 Jan 29 12:11 header
-rw-r--r--. 1 root root 3121511 Jan 29 12:11 ipa-full.tar
Copy to Clipboard Copied! Toggle word wrap Toggle overflow - Data-only backup
An archive named
ipa-data.tarin a directory namedipa-data-<YEAR-MM-DD-HH-MM-SS>, with the time specified in GMT time.ll /var/lib/ipa/backup/ipa-data-2021-01-29-12-14-23
[root@server ~]# ll /var/lib/ipa/backup/ipa-data-2021-01-29-12-14-23
total 1072
-rw-r--r--. 1 root root     158 Jan 29 12:14 header
-rw-r--r--. 1 root root 1090388 Jan 29 12:14 ipa-data.tar
Copy to Clipboard Copied! Toggle word wrap Toggle overflow
Uninstalling an IdM server does not automatically remove any backup files.
5.3. Considerations when creating a backup
The important behaviors and limitations of the ipa-backup command include the following:
-
By default, the
ipa-backuputility runs in offline mode, which stops all IdM services. The utility automatically restarts IdM services after the backup is finished. - A full-server backup must always run with IdM services offline, but a data-only backup can be performed with services online.
-
By default, the
ipa-backuputility creates backups on the file system containing the/var/lib/ipa/backup/directory. Red Hat recommends creating backups regularly on a file system separate from the production filesystem used by IdM, and archiving the backups to a fixed medium, such as tape or optical storage.
- Consider performing backups on hidden replicas. IdM services can be shut down on hidden replicas without affecting IdM clients.
The
ipa-backuputility checks if all of the services used in your IdM cluster, such as a Certificate Authority (CA), Domain Name System (DNS), and Key Recovery Agent (KRA), are installed on the server where you are running the backup. If the server does not have all these services installed, theipa-backuputility exits with a warning, because backups taken on that host would not be sufficient for a full cluster restoration.For example, if your IdM deployment uses an integrated Certificate Authority (CA), a backup run on a non-CA replica will not capture CA data. Red Hat recommends verifying that the replica where you perform an
ipa-backuphas all of the IdM services used in the cluster installed.You can bypass the IdM server role check with the
ipa-backup --disable-role-checkcommand, but the resulting backup will not contain all the data necessary to restore IdM fully.
5.4. Creating an IdM backup
Create a full-server and data-only backup in offline and online modes using the ipa-backup command.
Prerequisites
-
You must have
rootprivileges to run theipa-backuputility.
Procedure
To create a full-server backup in offline mode, use the
ipa-backuputility without additional options.Copy to Clipboard Copied! Toggle word wrap Toggle overflow To create an offline data-only backup, specify the
--dataoption.ipa-backup --data
[root@server ~]# ipa-backup --dataCopy to Clipboard Copied! Toggle word wrap Toggle overflow To create a full-server backup that includes IdM log files, use the
--logsoption.ipa-backup --logs
[root@server ~]# ipa-backup --logsCopy to Clipboard Copied! Toggle word wrap Toggle overflow To create a data-only backup while IdM services are running, specify both
--dataand--onlineoptions.ipa-backup --data --online
[root@server ~]# ipa-backup --data --onlineCopy to Clipboard Copied! Toggle word wrap Toggle overflow
If the backup fails due to insufficient space in the /tmp directory, use the TMPDIR environment variable to change the destination for temporary files created by the backup process:
TMPDIR=/new/location ipa-backup
[root@server ~]# TMPDIR=/new/location ipa-backupVerification
Ensure the backup directory contains an archive with the backup.
ls /var/lib/ipa/backup/ipa-full-2020-01-14-11-26-06
[root@server ~]# ls /var/lib/ipa/backup/ipa-full-2020-01-14-11-26-06
header  ipa-full.tar
Copy to Clipboard Copied! Toggle word wrap Toggle overflow
5.5. Creating a GPG2-encrypted IdM backup
You can create encrypted backups using GNU Privacy Guard (GPG) encryption. The following procedure creates an IdM backup and encrypts it using a GPG2 key.
Prerequisites
- You have created a GPG2 key. See Creating a GPG2 key.
Procedure
Create a GPG-encrypted backup by specifying the
--gpgoption.Copy to Clipboard Copied! Toggle word wrap Toggle overflow
Verification
Ensure that the backup directory contains an encrypted archive with a
.gpgfile extension.ls /var/lib/ipa/backup/ipa-full-2020-01-13-14-38-00
[root@server ~]# ls /var/lib/ipa/backup/ipa-full-2020-01-13-14-38-00
header  ipa-full.tar.gpg
Copy to Clipboard Copied! Toggle word wrap Toggle overflow
5.6. Creating a GPG2 key
The following procedure describes how to generate a GPG2 key to use with encryption utilities.
Prerequisites
-
You need
rootprivileges.
Procedure
Install and configure the
pinentryutility.dnf install pinentry mkdir ~/.gnupg -m 700 echo "pinentry-program /usr/bin/pinentry-curses" >> ~/.gnupg/gpg-agent.conf
[root@server ~]# dnf install pinentry
[root@server ~]# mkdir ~/.gnupg -m 700
[root@server ~]# echo "pinentry-program /usr/bin/pinentry-curses" >> ~/.gnupg/gpg-agent.conf
Copy to Clipboard Copied! Toggle word wrap Toggle overflow Create a
key-inputfile used for generating a GPG keypair with your preferred details. For example:Copy to Clipboard Copied! Toggle word wrap Toggle overflow Optional: By default, GPG2 stores its keyring in the
~/.gnupgfile. To use a custom keyring location, set theGNUPGHOMEenvironment variable to a directory that is only accessible by root.export GNUPGHOME=/root/backup mkdir -p $GNUPGHOME -m 700
[root@server ~]# export GNUPGHOME=/root/backup

[root@server ~]# mkdir -p $GNUPGHOME -m 700
Copy to Clipboard Copied! Toggle word wrap Toggle overflow Generate a new GPG2 key based on the contents of the
key-inputfile.gpg2 --batch --gen-key key-input
[root@server ~]# gpg2 --batch --gen-key key-inputCopy to Clipboard Copied! Toggle word wrap Toggle overflow Enter a passphrase to protect the GPG2 key. You use this passphrase to access the private key for decryption.
Copy to Clipboard Copied! Toggle word wrap Toggle overflow Confirm the correct passphrase by entering it again.
Copy to Clipboard Copied! Toggle word wrap Toggle overflow Verify that the new GPG2 key was created successfully.
Copy to Clipboard Copied! Toggle word wrap Toggle overflow
Verification
List the GPG keys on the server.
Copy to Clipboard Copied! Toggle word wrap Toggle overflow
Chapter 6. Backing up IdM servers using Ansible playbooks
Using the ipabackup Ansible role, you can automate backing up an IdM server and transferring backup files between servers and your Ansible controller.
6.1. Preparing your Ansible control node for managing IdM
As a system administrator managing Identity Management (IdM), when working with Red Hat Ansible Engine, it is good practice to do the following:
- Create a subdirectory dedicated to Ansible playbooks in your home directory, for example ~/MyPlaybooks.
-
Copy and adapt sample Ansible playbooks from the
/usr/share/doc/ansible-freeipa/*and/usr/share/doc/rhel-system-roles/*directories and subdirectories into your ~/MyPlaybooks directory. - Include your inventory file in your ~/MyPlaybooks directory.
By following this practice, you can find all your playbooks in one place and you can run your playbooks without invoking root privileges.
You only need root privileges on the managed nodes to execute the ipaserver, ipareplica, ipaclient, ipabackup, ipasmartcard_server and ipasmartcard_client ansible-freeipa roles. These roles require privileged access to directories and the dnf software package manager.
Follow this procedure to create the ~/MyPlaybooks directory and configure it so that you can use it to store and run Ansible playbooks.
Prerequisites
- You have installed an IdM server on your managed nodes, server.idm.example.com and replica.idm.example.com.
- You have configured DNS and networking so you can log in to the managed nodes, server.idm.example.com and replica.idm.example.com, directly from the control node.
-
You know the IdM
adminpassword.
Procedure
Create a directory for your Ansible configuration and playbooks in your home directory:
mkdir ~/MyPlaybooks/
$ mkdir ~/MyPlaybooks/Copy to Clipboard Copied! Toggle word wrap Toggle overflow Change into the ~/MyPlaybooks/ directory:
cd ~/MyPlaybooks
$ cd ~/MyPlaybooksCopy to Clipboard Copied! Toggle word wrap Toggle overflow Create the ~/MyPlaybooks/ansible.cfg file with the following content:
[defaults]
inventory = /home/your_username/MyPlaybooks/inventory

[privilege_escalation]
become=True
[defaults]
inventory = /home/your_username/MyPlaybooks/inventory

[privilege_escalation]
become=True
Copy to Clipboard Copied! Toggle word wrap Toggle overflow Create the ~/MyPlaybooks/inventory file with the following content:
Copy to Clipboard Copied! Toggle word wrap Toggle overflow This configuration defines two host groups, eu and us, for hosts in these locations. Additionally, this configuration defines the ipaserver host group, which contains all hosts from the eu and us groups.
Optional: Create an SSH public and private key. To simplify access in your test environment, do not set a password on the private key:
ssh-keygen
$ ssh-keygenCopy to Clipboard Copied! Toggle word wrap Toggle overflow Copy the SSH public key to the IdM
adminaccount on each managed node:ssh-copy-id admin@server.idm.example.com ssh-copy-id admin@replica.idm.example.com
$ ssh-copy-id admin@server.idm.example.com
$ ssh-copy-id admin@replica.idm.example.com
Copy to Clipboard Copied! Toggle word wrap Toggle overflow You must enter the IdM
adminpassword when you enter these commands.
6.2. Using Ansible to create a backup of an IdM server
You can use the ipabackup role in an Ansible playbook to create a backup of an IdM server and store it on the IdM server.
Prerequisites
You have configured your Ansible control node to meet the following requirements:
- You are using Ansible version 2.14 or later.
-
You have installed the
ansible-freeipapackage. - The example assumes that in the ~/MyPlaybooks/ directory, you have created an Ansible inventory file with the fully-qualified domain name (FQDN) of the IdM server.
-
The example assumes that the secret.yml Ansible vault stores your
ipaadmin_password.
-
The target node, that is the node on which the
ansible-freeipamodule is executed, is part of the IdM domain as an IdM client, server or replica.
Procedure
Navigate to the
~/MyPlaybooks/directory:cd ~/MyPlaybooks/
$ cd ~/MyPlaybooks/Copy to Clipboard Copied! Toggle word wrap Toggle overflow Make a copy of the
backup-server.ymlfile located in the/usr/share/doc/ansible-freeipa/playbooksdirectory:cp /usr/share/doc/ansible-freeipa/playbooks/backup-server.yml backup-my-server.yml
$ cp /usr/share/doc/ansible-freeipa/playbooks/backup-server.yml backup-my-server.ymlCopy to Clipboard Copied! Toggle word wrap Toggle overflow -
Open the
backup-my-server.ymlAnsible playbook file for editing. Adapt the file by setting the
hostsvariable to a host group from your inventory file. In this example, set it to theipaserverhost group:Copy to Clipboard Copied! Toggle word wrap Toggle overflow - Save the file.
Run the Ansible playbook, specifying the inventory file and the playbook file:
ansible-playbook --vault-password-file=password_file -v -i ~/MyPlaybooks/inventory backup-my-server.yml
$ ansible-playbook --vault-password-file=password_file -v -i ~/MyPlaybooks/inventory backup-my-server.ymlCopy to Clipboard Copied! Toggle word wrap Toggle overflow
Verification
- Log into the IdM server that you have backed up.
Verify that the backup is in the
/var/lib/ipa/backupdirectory.ls /var/lib/ipa/backup/
[root@server ~]# ls /var/lib/ipa/backup/
ipa-full-2021-04-30-13-12-00
Copy to Clipboard Copied! Toggle word wrap Toggle overflow
6.3. Using Ansible to create a backup of an IdM server on your Ansible controller
You can use the ipabackup role in an Ansible playbook to create a backup of an IdM server and automatically transfer it on your Ansible controller. Your backup file name begins with the host name of the IdM server.
Prerequisites
You have configured your Ansible control node to meet the following requirements:
- You are using Ansible version 2.14 or later.
-
You have installed the
ansible-freeipapackage. - The example assumes that in the ~/MyPlaybooks/ directory, you have created an Ansible inventory file with the fully-qualified domain name (FQDN) of the IdM server.
-
The example assumes that the secret.yml Ansible vault stores your
ipaadmin_password.
-
The target node, that is the node on which the
ansible-freeipamodule is executed, is part of the IdM domain as an IdM client, server or replica.
Procedure
To store the backups, create a subdirectory in your home directory on the Ansible controller.
mkdir ~/ipabackups
$ mkdir ~/ipabackupsCopy to Clipboard Copied! Toggle word wrap Toggle overflow Navigate to the
~/MyPlaybooks/directory:cd ~/MyPlaybooks/
$ cd ~/MyPlaybooks/Copy to Clipboard Copied! Toggle word wrap Toggle overflow Make a copy of the
backup-server-to-controller.ymlfile located in the/usr/share/doc/ansible-freeipa/playbooksdirectory:cp /usr/share/doc/ansible-freeipa/playbooks/backup-server-to-controller.yml backup-my-server-to-my-controller.yml
$ cp /usr/share/doc/ansible-freeipa/playbooks/backup-server-to-controller.yml backup-my-server-to-my-controller.ymlCopy to Clipboard Copied! Toggle word wrap Toggle overflow -
Open the
backup-my-server-to-my-controller.ymlfile for editing. Adapt the file by setting the following variables:
-
Set the
hostsvariable to a host group from your inventory file. In this example, set it to theipaserverhost group. Optional: To maintain a copy of the backup on the IdM server, uncomment the following line:
ipabackup_keep_on_server: true
# ipabackup_keep_on_server: trueCopy to Clipboard Copied! Toggle word wrap Toggle overflow
-
Set the
By default, backups are stored in the present working directory of the Ansible controller. To specify the backup directory you created in Step 1, add the
ipabackup_controller_pathvariable and set it to the/home/user/ipabackupsdirectory.Copy to Clipboard Copied! Toggle word wrap Toggle overflow - Save the file.
Run the Ansible playbook, specifying the inventory file and the playbook file:
ansible-playbook --vault-password-file=password_file -v -i ~/MyPlaybooks/inventory backup-my-server-to-my-controller.yml
$ ansible-playbook --vault-password-file=password_file -v -i ~/MyPlaybooks/inventory backup-my-server-to-my-controller.ymlCopy to Clipboard Copied! Toggle word wrap Toggle overflow
Verification
Verify that the backup is in the
/home/user/ipabackupsdirectory of your Ansible controller:ls /home/user/ipabackups
[user@controller ~]$ ls /home/user/ipabackups
server.idm.example.com_ipa-full-2021-04-30-13-12-00
Copy to Clipboard Copied! Toggle word wrap Toggle overflow
6.4. Using Ansible to copy a backup of an IdM server to your Ansible controller
You can use an Ansible playbook to copy a backup of an IdM server from the IdM server to your Ansible controller.
Prerequisites
You have configured your Ansible control node to meet the following requirements:
- You are using Ansible version 2.14 or later.
-
You have installed the
ansible-freeipapackage. - The example assumes that in the ~/MyPlaybooks/ directory, you have created an Ansible inventory file with the fully-qualified domain name (FQDN) of the IdM server.
-
The example assumes that the secret.yml Ansible vault stores your
ipaadmin_password.
-
The target node, that is the node on which the
ansible-freeipamodule is executed, is part of the IdM domain as an IdM client, server or replica.
Procedure
To store the backups, create a subdirectory in your home directory on the Ansible controller.
mkdir ~/ipabackups
$ mkdir ~/ipabackupsCopy to Clipboard Copied! Toggle word wrap Toggle overflow Navigate to the
~/MyPlaybooks/directory:cd ~/MyPlaybooks/
$ cd ~/MyPlaybooks/Copy to Clipboard Copied! Toggle word wrap Toggle overflow Make a copy of the
copy-backup-from-server.ymlfile located in the/usr/share/doc/ansible-freeipa/playbooksdirectory:cp /usr/share/doc/ansible-freeipa/playbooks/copy-backup-from-server.yml copy-backup-from-my-server-to-my-controller.yml
$ cp /usr/share/doc/ansible-freeipa/playbooks/copy-backup-from-server.yml copy-backup-from-my-server-to-my-controller.ymlCopy to Clipboard Copied! Toggle word wrap Toggle overflow -
Open the
copy-my-backup-from-my-server-to-my-controller.ymlfile for editing. Adapt the file by setting the following variables:
-
Set the
hostsvariable to a host group from your inventory file. In this example, set it to theipaserverhost group. -
Set the
ipabackup_namevariable to the name of theipabackupon your IdM server to copy to your Ansible controller. By default, backups are stored in the present working directory of the Ansible controller. To specify the directory you created in Step 1, add the
ipabackup_controller_pathvariable and set it to the/home/user/ipabackupsdirectory.Copy to Clipboard Copied! Toggle word wrap Toggle overflow
-
Set the
- Save the file.
Run the Ansible playbook, specifying the inventory file and the playbook file:
ansible-playbook --vault-password-file=password_file -v -i ~/MyPlaybooks/inventory copy-backup-from-my-server-to-my-controller.yml
$ ansible-playbook --vault-password-file=password_file -v -i ~/MyPlaybooks/inventory copy-backup-from-my-server-to-my-controller.ymlCopy to Clipboard Copied! Toggle word wrap Toggle overflow
To copy all IdM backups to your controller, set the ipabackup_name variable in the Ansible playbook to all:
  vars:
    ipabackup_name: all
    ipabackup_to_controller: true
  vars:
    ipabackup_name: all
    ipabackup_to_controller: true
For an example, see the copy-all-backups-from-server.yml Ansible playbook in the /usr/share/doc/ansible-freeipa/playbooks directory.
Verification
Verify your backup is in the
/home/user/ipabackupsdirectory on your Ansible controller:ls /home/user/ipabackups
[user@controller ~]$ ls /home/user/ipabackups
server.idm.example.com_ipa-full-2021-04-30-13-12-00
Copy to Clipboard Copied! Toggle word wrap Toggle overflow
6.5. Using Ansible to copy a backup of an IdM server from your Ansible controller to the IdM server
You can use an Ansible playbook to copy a backup of an IdM server from your Ansible controller to the IdM server.
Prerequisites
You have configured your Ansible control node to meet the following requirements:
- You are using Ansible version 2.14 or later.
-
You have installed the
ansible-freeipapackage. - The example assumes that in the ~/MyPlaybooks/ directory, you have created an Ansible inventory file with the fully-qualified domain name (FQDN) of the IdM server.
-
The example assumes that the secret.yml Ansible vault stores your
ipaadmin_password.
-
The target node, that is the node on which the
ansible-freeipamodule is executed, is part of the IdM domain as an IdM client, server or replica.
Procedure
Navigate to the
~/MyPlaybooks/directory:cd ~/MyPlaybooks/
$ cd ~/MyPlaybooks/Copy to Clipboard Copied! Toggle word wrap Toggle overflow Make a copy of the
copy-backup-from-controller.ymlfile located in the/usr/share/doc/ansible-freeipa/playbooksdirectory:cp /usr/share/doc/ansible-freeipa/playbooks/copy-backup-from-controller.yml copy-backup-from-my-controller-to-my-server.yml
$ cp /usr/share/doc/ansible-freeipa/playbooks/copy-backup-from-controller.yml copy-backup-from-my-controller-to-my-server.ymlCopy to Clipboard Copied! Toggle word wrap Toggle overflow -
Open the
copy-my-backup-from-my-controller-to-my-server.ymlfile for editing. Adapt the file by setting the following variables:
-
Set the
hostsvariable to a host group from your inventory file. In this example, set it to theipaserverhost group. Set the
ipabackup_namevariable to the name of theipabackupon your Ansible controller to copy to the IdM server.Copy to Clipboard Copied! Toggle word wrap Toggle overflow
-
Set the
- Save the file.
Run the Ansible playbook, specifying the inventory file and the playbook file:
ansible-playbook --vault-password-file=password_file -v -i ~/MyPlaybooks/inventory copy-backup-from-my-controller-to-my-server.yml
$ ansible-playbook --vault-password-file=password_file -v -i ~/MyPlaybooks/inventory copy-backup-from-my-controller-to-my-server.ymlCopy to Clipboard Copied! Toggle word wrap Toggle overflow
6.6. Using Ansible to remove a backup from an IdM server
You can use an Ansible playbook to remove a backup from an IdM server.
Prerequisites
You have configured your Ansible control node to meet the following requirements:
- You are using Ansible version 2.14 or later.
-
You have installed the
ansible-freeipapackage. - The example assumes that in the ~/MyPlaybooks/ directory, you have created an Ansible inventory file with the fully-qualified domain name (FQDN) of the IdM server.
-
The example assumes that the secret.yml Ansible vault stores your
ipaadmin_password.
-
The target node, that is the node on which the
ansible-freeipamodule is executed, is part of the IdM domain as an IdM client, server or replica.
Procedure
Navigate to the ~/MyPlaybooks/ directory:
cd ~/MyPlaybooks/
$ cd ~/MyPlaybooks/Copy to Clipboard Copied! Toggle word wrap Toggle overflow Make a copy of the
remove-backup-from-server.ymlfile located in the/usr/share/doc/ansible-freeipa/playbooksdirectory:cp /usr/share/doc/ansible-freeipa/playbooks/remove-backup-from-server.yml remove-backup-from-my-server.yml
$ cp /usr/share/doc/ansible-freeipa/playbooks/remove-backup-from-server.yml remove-backup-from-my-server.ymlCopy to Clipboard Copied! Toggle word wrap Toggle overflow -
Open the
remove-backup-from-my-server.ymlfile for editing. Adapt the file by setting the following variables:
-
Set the
hostsvariable to a host group from your inventory file. In this example, set it to theipaserverhost group. Set the
ipabackup_namevariable to the name of theipabackupto remove from your IdM server.Copy to Clipboard Copied! Toggle word wrap Toggle overflow
-
Set the
- Save the file.
Run the Ansible playbook, specifying the inventory file and the playbook file:
ansible-playbook --vault-password-file=password_file -v -i ~/MyPlaybooks/inventory remove-backup-from-my-server.yml
$ ansible-playbook --vault-password-file=password_file -v -i ~/MyPlaybooks/inventory remove-backup-from-my-server.ymlCopy to Clipboard Copied! Toggle word wrap Toggle overflow
To remove all IdM backups from the IdM server, set the ipabackup_name variable in the Ansible playbook to all:
  vars:
    ipabackup_name: all
  vars:
    ipabackup_name: all
For an example, see the remove-all-backups-from-server.yml Ansible playbook in the /usr/share/doc/ansible-freeipa/playbooks directory.