Fuse on OpenShift Guide
Installing and developing with Red Hat Fuse on OpenShift
Abstract
Chapter 1. Before You Begin
1.1. Release Notes
See the Release Notes for important information about this release.
1.2. Version Compatibility and Support
See the Red Hat JBoss Fuse Supported Configurations page for details of version compatibility and support.
1.3. Support for Windows O/S
The developer tooling (oc client and Container Development Kit) for Fuse on OpenShift is fully supported on the Windows O/S. The examples shown in Linux command-line syntax can also work on the Windows O/S, provided they are modified appropriately to obey Windows command-line syntax.
1.4. Comparison: Fuse Standalone and Fuse on OpenShift
There are several major functionality differences:
- An application deployment with Fuse on OpenShift consists of an application and all required runtime components packaged inside a Docker image. Applications are not deployed to a runtime as with Fuse Standalone, the application image itself is a complete runtime environment deployed and managed through OpenShift.
- Patching in an OpenShift environment is different from Fuse Standalone, as each application image is a complete runtime environment. To apply a patch, the application image is rebuilt and redeployed within OpenShift. Core OpenShift management capabilities allow for rolling upgrades and side-by-side deployment to maintain availability of your application during upgrade.
- Provisioning and clustering capabilities provided by Fabric in Fuse have been replaced with equivalent functionality in Kubernetes and OpenShift. There is no need to create or configure individual child containers as OpenShift automatically does this for you as part of deploying and scaling your application.
- Fabric endpoints are not used within an OpenShift environment. Kubernetes services must be used instead.
- Messaging services are created and managed using the A-MQ for OpenShift image and not included directly within a Karaf container. Fuse on OpenShift provides an enhanced version of the camel-amq component to allow for seamless connectivity to messaging services in OpenShift through Kubernetes.
- Live updates to running Karaf instances using the Karaf shell is strongly discouraged as updates will not be preserved if an application container is restarted or scaled up. This is a fundamental tenet of immutable architecture and essential to achieving scalability and flexibility within OpenShift.
- Maven dependencies directly linked to Red Hat Fuse components are supported by Red Hat. Third-party Maven dependencies introduced by users are not supported.
- The SSH Agent is not included in the Apache Karaf micro-container, so you cannot connect to it using the bin/client console client.
- Protocol compatibility and Camel components within a Fuse on OpenShift application: non-HTTP based communications must use TLS and SNI to be routable from outside OpenShift into a Fuse service (Camel consumer endpoint).
Chapter 2. Get Started for Administrators
If you are an OpenShift administrator, you can prepare an OpenShift cluster for Fuse on OpenShift deployments by installing the Fuse on OpenShift images and templates as described here.
2.1. Prepare the OpenShift Server
- Start the OpenShift Server.
Log in to the OpenShift Server as an administrator, as follows:
oc login -u system:admin
oc login -u system:adminCopy to Clipboard Copied! Toggle word wrap Toggle overflow Install the Fuse on OpenShift image streams. Enter the following commands at a command prompt:
BASEURL=https://raw.githubusercontent.com/jboss-fuse/application-templates/application-templates-2.1.fuse-000099-redhat-5
oc create -n openshift -f ${BASEURL}/fis-image-streams.json
BASEURL=https://raw.githubusercontent.com/jboss-fuse/application-templates/application-templates-2.1.fuse-000099-redhat-5 oc create -n openshift -f ${BASEURL}/fis-image-streams.jsonCopy to Clipboard Copied! Toggle word wrap Toggle overflow Install the quickstart templates. Enter the following commands at a command prompt:
Copy to Clipboard Copied! Toggle word wrap Toggle overflow Install the templates for Fuse Console (Hawtio). Enter the following commands at a command prompt:
oc create -n openshift -f https://raw.githubusercontent.com/jboss-fuse/application-templates/application-templates-2.1.fuse-000099-redhat-5/fis-console-cluster-template.json
oc create -n openshift -f https://raw.githubusercontent.com/jboss-fuse/application-templates/application-templates-2.1.fuse-000099-redhat-5/fis-console-namespace-template.json
Copy to Clipboard Copied! Toggle word wrap Toggle overflow
Chapter 3. Get Started for Developers
You can start using Fuse on OpenShift by creating an application and deploying it to OpenShift using one of the following OpenShift Source-to-Image (S2I) application development workflows:
- S2I binary workflow
- S2I with build input from a binary source. This workflow is characterized by the fact that the build is partly executed on the developer’s own machine. After building a binary package locally, this workflow hands off the binary package to OpenShift. For more details, see Binary Source from the OpenShift 3.9 Developer Guide.
- S2I source workflow
- S2I with build input from a Git source. This workflow is characterised by the fact that the build is executed entirely on the OpenShift server. For more details, see Git Source from the OpenShift 3.9 Developer Guide.
3.1. Prerequisites
3.1.1. Access to an OpenShift Server
The fundamental requirement for developing and testing Fuse on OpenShift projects is having access to an OpenShift Server. You have the following basic alternatives:
3.1.1.1. Install Container Development Kit (CDK) on Your Local Machine
To get started quickly, the most practical alternative for a developer is to install Red Hat CDK on their local machine. Using CDK, you can boot a virtual machine (VM) instance that runs an image of OpenShift on Red Hat Enterprise Linux (RHEL) 7. An installation of CDK consists of the following key components:
- A virtual machine (libvirt, VirtualBox, or Hyper-V)
- Minishift to start and manage the Container Development Environment
For Fuse on OpenShift, we recommend you install version 3.4 of CDK. Detailed instructions for installing and using CDK 3.4 are provided in the following guide:
If you opt to use CDK, we recommend that you read and thoroughly understand the content of the preceding guide before proceeding with the examples in this chapter.
Recent versions of CDK have Fuse on OpenShift images and templates pre-installed. If the images and templates are not pre-installed, however, or if the provided versions are out of date, you will need to install (or update) the Fuse on OpenShift images and templates manually — see Chapter 2, Get Started for Administrators.
Red Hat CDK is intended for development purposes only. It is not intended for other purposes, such as production environments, and may not address known security vulnerabilities. For full support of running mission-critical applications inside of docker-formatted containers, you need an active RHEL 7 or RHEL Atomic subscription. For more details, see Support for Red Hat Container Development Kit (CDK).
3.1.1.2. Get Remote Access to an Existing OpenShift Server
Your IT department might already have set up an OpenShift cluster on some server machines. In this case, the following requirements must be satisfied for getting started with Fuse on OpenShift:
- The server machines must be running a supported version of OpenShift Container Platform (as documented in the Supported Configurations page). The examples in this guide have been tested against version 3.9.
- Ask the OpenShift administrator to install the latest Fuse on OpenShift container base images and the Fuse on OpenShift templates on the OpenShift servers.
- Ask the OpenShift administrator to create a user account for you, having the usual developer permissions (enabling you to create, deploy, and run OpenShift projects).
-
Ask the administrator for the URL of the OpenShift Server (which you can use either to browse to the OpenShift console or connect to OpenShift using the
occommand-line client) and the login credentials for your account.
3.1.2. Java Version
On your developer machine, make sure you have installed a Java version that is supported by Fuse 7.0. For details of the supported Java versions, see Supported Configurations.
3.1.3. Install the Requisite Client-Side Tools
We recommend that you have the following tools installed on your developer machine:
- Apache Maven 3.3.x
- Required for local builds of OpenShift projects. Download the appropriate package from the Apache Maven download page. Make sure that you have at least version 3.3.x (or later) installed, otherwise Maven might have problems resolving dependencies when you build your project.
- Git
- Required for the OpenShift S2I source workflow and generally recommended for source control of your Fuse on OpenShift projects. Download the appropriate package from the Git Downloads page.
- OpenShift client
If you are using CDK, you can add the
ocbinary to your PATH usingminishift oc-envwhich displays the command you need to type into your shell (the output ofoc-envwill differ depending on OS and shell type):minishift oc-env export PATH="/Users/john/.minishift/cache/oc/v1.5.0:$PATH" # Run this command to configure your shell: eval $(minishift oc-env)
$ minishift oc-env
export PATH="/Users/john/.minishift/cache/oc/v1.5.0:$PATH"
# Run this command to configure your shell:
# eval $(minishift oc-env)
Copy to Clipboard Copied! Toggle word wrap Toggle overflow For more details, see Using the OpenShift Client Binary in CDK 3.4 Getting Started Guide.
If you are not using CDK, follow the instructions in the CLI Reference to install the
occlient tool.- (Optional) Docker client
Advanced users might find it convenient to have the Docker client tool installed (to communicate with the docker daemon running on an OpenShift server). For information about specific binary installations for your operating system, see the Docker installation site.
For more details, see Reusing the docker Daemon in CDK 3.4 Getting Started Guide.
Make sure that you install versions of the oc tool and the docker tool that are compatible with the version of OpenShift running on the OpenShift Server.
3.2. Prepare Your Development Environment
After installing the required software and tools, prepare your development environment as follows.
3.2.1. Configure Maven Repositories
Configure the Maven repositories, which hold the archetypes and artifacts you will need for building an Fuse on OpenShift project on your local machine. Edit your Maven settings.xml file, which is usually located in ~/.m2/settings.xml (on Linux or macOS) or Documents and Settings\<USER_NAME>\.m2\settings.xml (on Windows). The following Maven repositories are required:
-
Maven central:
https://repo1.maven.org/maven2 -
Red Hat GA repository:
https://maven.repository.redhat.com/ga -
Red Hat EA repository:
https://maven.repository.redhat.com/earlyaccess/all
You must add the preceding repositories both to the dependency repositories section as well as the plug-in repositories section of your settings.xml file.
3.2.2. (Optional) Install Developer Studio
Red Hat JBoss Developer Studio is an Eclipse-based development environment, which includes support for developing Fuse on OpenShift applications. For details about how to install this development environment, see Install Red Hat JBoss Developer Studio.
3.3. Create and Deploy a Project Using the S2I Binary Workflow
In this section, you will use the OpenShift S2I binary workflow to create, build, and deploy an Fuse on OpenShift project.
Create a new Fuse on OpenShift project using a Maven archetype. For this example, we use an archetype that creates a sample Spring Boot Camel project. Open a new shell prompt and enter the following Maven command:
mvn org.apache.maven.plugins:maven-archetype-plugin:2.4:generate \
  -DarchetypeCatalog=https://maven.repository.redhat.com/ga/io/fabric8/archetypes/archetypes-catalog/2.2.0.fuse-000110-redhat-5/archetypes-catalog-2.2.0.fuse-000110-redhat-5-archetype-catalog.xml \
  -DarchetypeGroupId=org.jboss.fuse.fis.archetypes \
  -DarchetypeArtifactId=spring-boot-camel-xml-archetype \
  -DarchetypeVersion=2.2.0.fuse-000110-redhat-5
Copy to Clipboard Copied! Toggle word wrap Toggle overflow The archetype plug-in switches to interactive mode to prompt you for the remaining fields:
Copy to Clipboard Copied! Toggle word wrap Toggle overflow When prompted, enter
org.example.fisfor thegroupIdvalue andfuse70-spring-bootfor theartifactIdvalue. Accept the defaults for the remaining fields.-
If the previous command exited with the
BUILD SUCCESSstatus, you should now have a new Fuse on OpenShift project under thefuse70-spring-bootsubdirectory. You can inspect the XML DSL code in thefuse70-spring-boot/src/main/resources/spring/camel-context.xmlfile. The demonstration code defines a simple Camel route that continuously sends message containing a random number to the log. In preparation for building and deploying the Fuse on OpenShift project, log in to the OpenShift Server as follows:
oc login -u developer -p developer https://OPENSHIFT_IP_ADDR:8443
oc login -u developer -p developer https://OPENSHIFT_IP_ADDR:8443Copy to Clipboard Copied! Toggle word wrap Toggle overflow Where,
OPENSHIFT_IP_ADDRis a placeholder for the OpenShift server’s IP address as this IP address is not always the same.NoteThe
developeruser (withdeveloperpassword) is a standard account that is automatically created on the virtual OpenShift Server by CDK. If you are accessing a remote server, use the URL and credentials provided by your OpenShift administrator.Create a new project namespace called
test(assuming it does not already exist), as follows:oc new-project test
oc new-project testCopy to Clipboard Copied! Toggle word wrap Toggle overflow If the
testproject namespace already exists, you can switch to it using the following command:oc project test
oc project testCopy to Clipboard Copied! Toggle word wrap Toggle overflow You are now ready to build and deploy the
fuse70-spring-bootproject. Assuming you are still logged into OpenShift, change to the directory of thefuse70-spring-bootproject, and then build and deploy the project, as follows:cd fuse70-spring-boot mvn fabric8:deploy -P openshift
cd fuse70-spring-boot mvn fabric8:deploy -P openshiftCopy to Clipboard Copied! Toggle word wrap Toggle overflow At the end of a successful build, you should see some output like the following:
Copy to Clipboard Copied! Toggle word wrap Toggle overflow NoteThe first time you run this command, Maven has to download a lot of dependencies, which takes several minutes. Subsequent builds will be faster.
-
Navigate to the OpenShift console in your browser and log in to the console with your credentials (for example, with username
developerand password,developer). - In the OpenShift console, scroll down to find the test project namespace. Click the test project to open the test project namespace. The Overview tab of the test project opens, showing the fuse70-spring-boot application.
Click the arrow on the left of the fuse70-spring-boot deployment to expand and view the details of this deployment, as shown.

Click in the centre of the pod icon (blue circle) to view the list of pods for fuse70-spring-boot.
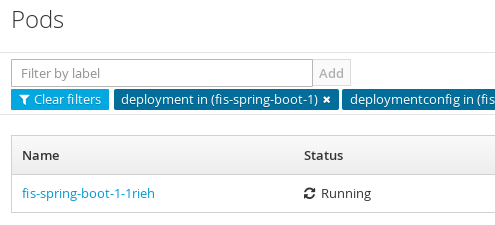
Click on the pod Name (in this example,
fuse70-spring-boot-1-kxdjm) to view the details of the running pod.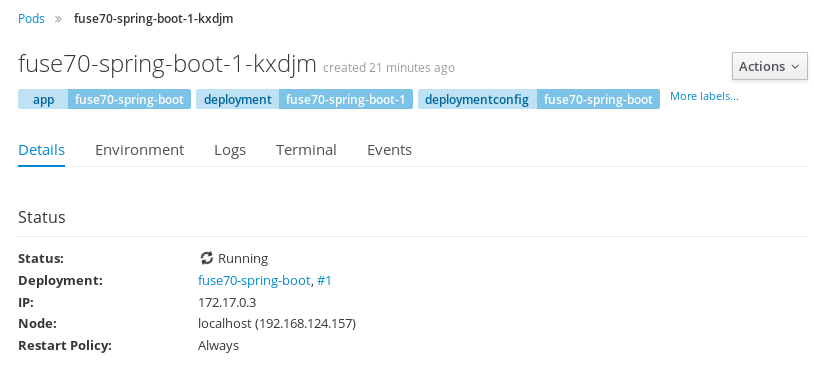
Click on the Logs tab to view the application log and scroll down the log to find the random number log messages generated by the Camel application.
Copy to Clipboard Copied! Toggle word wrap Toggle overflow -
Click Overview on the left-hand navigation bar to return to the applications overview in the
testnamespace. To shut down the running pod, click the down arrow beside the pod icon. When a dialog prompts you with the question Scale down deployment fuse70-spring-boot-1?, click Scale Down.
(Optional) If you are using CDK, you can shut down the virtual OpenShift Server completely by returning to the shell prompt and entering the following command:
minishift stop
minishift stopCopy to Clipboard Copied! Toggle word wrap Toggle overflow
3.3.1. Undeploy and Redeploy the Project
You can undeploy or redeploy your projects, as follows:
To undeploy the project, enter the command:
mvn fabric8:undeploy
mvn fabric8:undeployCopy to Clipboard Copied! Toggle word wrap Toggle overflow To redeploy the project, enter the commands:
mvn fabric8:undeploy
mvn fabric8:deploy -P openshift
mvn fabric8:undeploy
mvn fabric8:deploy -P openshift
Copy to Clipboard Copied! Toggle word wrap Toggle overflow
3.3.2. Opening the HawtIO Console
To open the HawtIO console for a pod running the Fuse on OpenShift Spring Boot example, proceed as follows:
From the Applications → Pods view in your OpenShift project, click on the pod name to view the details of the running Fuse on OpenShift Spring Boot pod. On the right-hand side of this page, you see a summary of the container template:

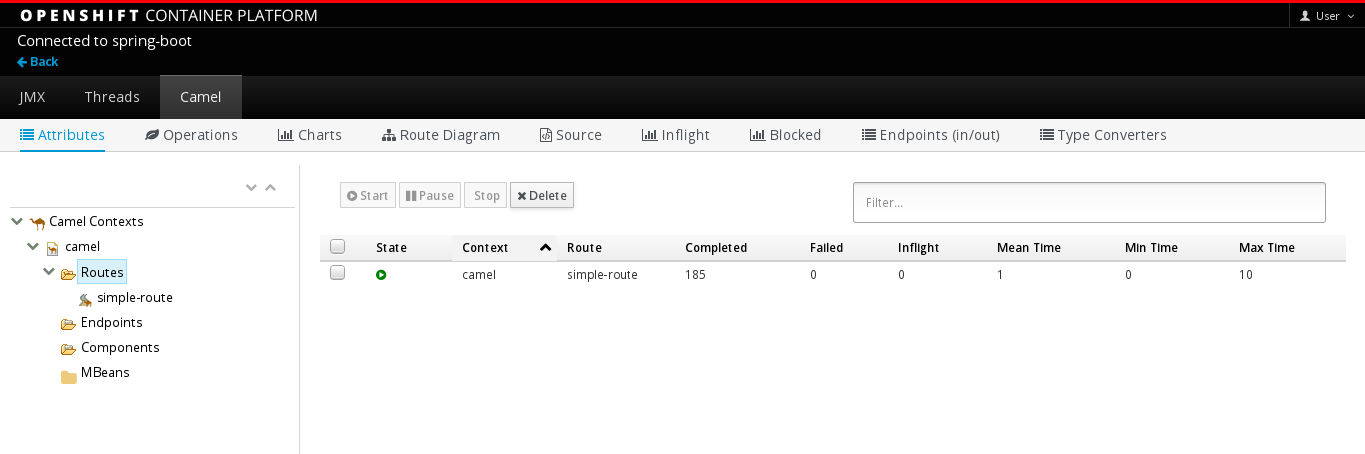
From this view, click on the Open Java Console link to open the HawtIO console.
 Note
NoteIn order to configure OpenShift to display a link to HawtIO console in the pod view, the pod running a Fuse on OpenShift image must declare a tcp port within a name attribute set to
jolokia:Copy to Clipboard Copied! Toggle word wrap Toggle overflow
3.4. Create and Deploy a Project Using the S2I Source Workflow
In this section, you will use the OpenShift S2I source workflow to build and deploy a Fuse on OpenShift project based on a template. The starting point for this demonstration is a quickstart project stored in a remote Git repository. Using the OpenShift console, you will download, build, and deploy this quickstart project in the OpenShift server.
-
Navigate to the OpenShift console in your browser (https://OPENSHIFT_IP_ADDR:8443, replace
OPENSHIFT_IP_ADDRwith the IP address that was displayed in the case of CDK) and log in to the console with your credentials (for example, with usernamedeveloperand password,developer). In the Catalog search field, enter
Red Hat Fuse 7.0 Camel XML DSL with Spring Bootas the search string and select the Red Hat Fuse 7.0 Camel XML DSL with Spring Boot template.
The Information step of the template wizard opens. Click Next.

The Configuration step of the template wizard opens, as shown. From the Add to Project dropdown, select test. You can accept the default values for the rest of the settings in the Configuration step.
NoteAlternatively, if you prefer to create a new project for this example, select Create Project from the Add to Project dropdown. A Project Name field then appears for you to fill in the name of the new project.
 Note
NoteIf you want to modify the application code (instead of just running the quickstart as is), you would need to fork the original quickstart Git repository and fill in the appropriate values in the Git Repository URL and Git Reference fields.
The Bindings option creates a secret with necessary information for an application to use a service. Click Create.

- The Results step of the template wizard opens. Click Close.
- In the right-hand My Projects pane, click test. The Overview tab of the test project opens, showing the s2i-fuse70-spring-boot-camel-xml application.
Click the arrow on the left of the s2i-fuse70-spring-boot-camel-xml deployment to expand and view the details of this deployment, as shown.

In this view, you can see the build log. If the build should fail for any reason, the build log can help you to diagnose the problem.
NoteThe build can take several minutes to complete, because a lot of dependencies must be downloaded from remote Maven repositories. To speed up build times, we recommend you deploy a Nexus server on your local network.
If the build completes successfully, the pod icon shows as a blue circle with 1 pod running. Click in the centre of the pod icon (blue circle) to view the list of pods for s2i-fuse70-spring-boot-camel-xml.
NoteIf multiple pods are running, you would see a list of running pods at this point. Otherwise (if there is just one pod), you get straight through to the details view of the running pod.
The pod details view opens. Click on the Logs tab to view the application log and scroll down the log to find the log messages generated by the Camel application.

-
Click Overview on the left-hand navigation bar to return to the overview of the applications in the
testnamespace. To shut down the running pod, click the down arrow
beside the pod icon. When a dialog prompts you with the question Scale down deployment s2i-fuse70-spring-boot-camel-xml-1?, click Scale Down.
(Optional) If you are using CDK, you can shut down the virtual OpenShift Server completely by returning to the shell prompt and entering the following command:
minishift stop
minishift stopCopy to Clipboard Copied! Toggle word wrap Toggle overflow
Chapter 4. Develop an Application for the Spring Boot Image
4.1. Overview
This chapter explains how to develop applications for the Spring Boot image.
4.2. Create a Spring Boot Project using Maven Archetype
To create a Spring Boot project, follow these steps:
- Go to the appropriate directory on your system.
In a shell prompt, enter the following the
mvncommand to create a Spring Boot projectmvn org.apache.maven.plugins:maven-archetype-plugin:2.4:generate \ -DarchetypeCatalog=https://maven.repository.redhat.com/ga/io/fabric8/archetypes/archetypes-catalog/2.2.0.fuse-000110-redhat-5/archetypes-catalog-2.2.0.fuse-000110-redhat-5-archetype-catalog.xml \ -DarchetypeGroupId=org.jboss.fuse.fis.archetypes \ -DarchetypeArtifactId=spring-boot-camel-xml-archetype \ -DarchetypeVersion=2.2.0.fuse-000110-redhat-5
mvn org.apache.maven.plugins:maven-archetype-plugin:2.4:generate \ -DarchetypeCatalog=https://maven.repository.redhat.com/ga/io/fabric8/archetypes/archetypes-catalog/2.2.0.fuse-000110-redhat-5/archetypes-catalog-2.2.0.fuse-000110-redhat-5-archetype-catalog.xml \ -DarchetypeGroupId=org.jboss.fuse.fis.archetypes \ -DarchetypeArtifactId=spring-boot-camel-xml-archetype \ -DarchetypeVersion=2.2.0.fuse-000110-redhat-5Copy to Clipboard Copied! Toggle word wrap Toggle overflow The archetype plug-in switches to interactive mode to prompt you for the remaining fields
Copy to Clipboard Copied! Toggle word wrap Toggle overflow When prompted, enter
org.example.fisfor thegroupIdvalue andfuse70-spring-bootfor theartifactIdvalue. Accept the defaults for the remaining fields.
Then, follow the instructions in the quickstart on how to build and deploy the example.
For the full list of available Spring Boot archetypes, see Section 4.4, “Spring Boot Archetype Catalog”.
4.3. Structure of the Camel Spring Boot Application
The directory structure of a Camel Spring Boot application is as follows:
Where the following files are important for developing an application:
- pom.xml
-
Includes additional dependencies. Camel components that are compatible with Spring Boot are available in the starter version, for example
camel-jdbc-starterorcamel-infinispan-starter. Once the starters are included in thepom.xmlthey are automatically configured and registered with the Camel content at boot time. Users can configure the properties of the components using theapplication.propertiesfile. - application.properties
Allows you to externalize your configuration and work with the same application code in different environments. For details, see Externalized Configuration
For example, in this Camel application you can configure certain properties such as name of the application or the IP addresses, and so on.
application.properties
Copy to Clipboard Copied! Toggle word wrap Toggle overflow - Application.java
It is an important file to run your application. As a user you will import here a file
camel-context.xmlto configure routes using the Spring DSL.The
Application.java filespecifies the@SpringBootApplicationannotation, which is equivalent to@Configuration,@EnableAutoConfigurationand@ComponentScanwith their default attributes.Application.java
@SpringBootApplication
// load regular Blueprint file from the classpath that contains the Camel XML DSL
@ImportResource({"classpath:blueprint/camel-context.xml"})
@SpringBootApplication // load regular Blueprint file from the classpath that contains the Camel XML DSL @ImportResource({"classpath:blueprint/camel-context.xml"})Copy to Clipboard Copied! Toggle word wrap Toggle overflow It must have a
mainmethod to run the Spring Boot application.Application.java
Copy to Clipboard Copied! Toggle word wrap Toggle overflow - camel-context.xml
The
src/main/resources/spring/camel-context.xmlis an important file for developing application as it contains the Camel routes.NoteYou can find more information on developing Spring-Boot applications at Developing your first Spring Boot Application
- src/main/fabric8/deployment.yml
Provides additional configuration that is merged with the default OpenShift configuration file generated by the fabric8-maven-plugin.
NoteThis file is not used part of Spring Boot application but it is used in all quickstarts to limit the resources such as CPU and memory usage.
4.4. Spring Boot Archetype Catalog
The Spring Boot Archetype catalog includes the following examples.
| Name | Description |
|---|---|
|
| Demonstrates how to use Apache Camel with Spring Boot based on a fabric8 Java base image. |
|
| Demonstrates how to connect a Spring-Boot application to an ActiveMQ broker and use JMS messaging between two Camel routes using Kubernetes or OpenShift. |
|
| Demonstrates how to configure a Spring-Boot application using Kubernetes ConfigMaps and Secrets. |
|
| Demonstrates how to use Apache Camel to integrate a Spring-Boot application running on Kubernetes or OpenShift with a remote Kie Server. |
|
| Demonstrates how to connect a Spring-Boot application to a JBoss Data Grid or Infinispan server using the Hot Rod protocol. |
|
| Demonstrates how to connect Apache Camel to a remote JBoss Data Virtualization (or Teiid) Server using the JDBC protocol. |
|
| Demonstrates how to configure Camel routes in Spring Boot via a Blueprint configuration file. |
|
| Demonstrates how to use Apache CXF with Spring Boot based on a fabric8 Java base image. The quickstart uses Spring Boot to configure an application that includes a CXF JAXRS endpoint with Swagger enabled. |
|
| Demonstrates how to use Apache CXF with Spring Bootbased on a fabric8 Java base image. The quickstart uses Spring Boot to configure an application that includes a CXF JAXWS endpoint. |
A Technology Preview quickstart is also available. The Spring Boot Camel XA Transactions quickstart demonstrates how to use Spring Boot to run a Camel service that supports XA transactions. This quickstart shows the use of two external transactional resources: a JMS (AMQ) broker and a database (PostgreSQL). You can find this quickstart here: https://github.com/jboss-fuse/spring-boot-camel-xa.
Technology Preview features are not supported with Red Hat production service level agreements (SLAs), might not be functionally complete, and Red Hat does not recommend using them in production. These features provide early access to upcoming product features, enabling customers to test functionality and provide feedback during the development process. For more information, see Red Hat Technology Preview features support scope.
4.5. Camel Starter Modules
4.5.1. Overview
Starters are Apache Camel modules intended to be used in Spring Boot applications. There is a camel-xxx-starter module for each Camel component (with a few exceptions listed below).
Starters meet the following requirements:
- Allow auto-configuration of the component using native Spring Boot configuration system which is compatible with IDE tooling.
- Allow auto-configuration of data formats and languages.
- Manage transitive logging dependencies to integrate with Spring Boot logging system.
- Include additional dependencies and align transitive dependencies to minimize the effort of creating a working Spring Boot application.
Each starter has its own integration test in tests/camel-itest-spring-boot, that verifies the compatibility with the current release of Spring Boot.
4.5.2. Using Camel Starter Modules
Apache Camel provides a starter module that allows you to develop Spring Boot applications using starters.
To use the Spring Boot starter:
Add the following to your Spring Boot pom.xml file:
<dependency>
    <groupId>org.apache.camel</groupId>
    <artifactId>camel-spring-boot-starter</artifactId>
</dependency>
<dependency> <groupId>org.apache.camel</groupId> <artifactId>camel-spring-boot-starter</artifactId> </dependency>Copy to Clipboard Copied! Toggle word wrap Toggle overflow Add classes with your Camel routes such as:
Copy to Clipboard Copied! Toggle word wrap Toggle overflow
These routes will be started automatically.
To keep the main thread blocked so that Camel stays up, either include the spring-boot-starter-web dependency, or add camel.springboot.main-run-controller=true to your application.properties or application.yml file.
You can customize the Camel application in the application.properties or application.yml file with camel.springboot.* properties.
4.6. Unsupported Starter Modules
The following components do not have a starter because of compatibility issues:
- camel-blueprint (intended for OSGi only)
- camel-cdi (intended for CDI only)
- camel-core-osgi (intended for OSGi only)
- camel-ejb (intended for JEE only)
- camel-eventadmin (intended for OSGi only)
-
camel-ibatis (
camel-mybatis-starteris included) - camel-jclouds
-
camel-mina (
camel-mina2-starteris included) - camel-paxlogging (intended for OSGi only)
-
camel-quartz (
camel-quartz2-starteris included) - camel-spark-rest
-
camel-swagger (
camel-swagger-java-starteris included)
4.7. BOM file for Spring Boot
The purpose of a Maven Bill of Materials (BOM) file is to provide a curated set of Maven dependency versions that work well together, saving you from having to define versions individually for every Maven artifact.
The Fuse BOM for Spring Boot offers the following advantages:
- Defines versions for Maven dependencies, so that you do not need to specify the version when you add a dependency to your POM.
- Defines a set of curated dependencies that are fully tested and supported for a specific version of Fuse.
- Simplifies upgrades of Fuse.
Only the set of dependencies defined by a Fuse BOM are supported by Red Hat.
To incorporate a BOM file into your Maven project, specify a dependencyManagement element in your project’s pom.xml file (or, possibly, in a parent POM file), as shown in the following example:
The org.jboss.redhat-fuse BOM is new in Fuse 7.0 and has been designed to simplify BOM versioning. The Fuse quickstarts and Maven archetypes still use the old style of BOM, however, as they have not yet been refactored to use the new one. Both BOMs are correct and you can use either one in your Maven projects. In an upcoming Fuse release, the quickstarts and Maven archetypes will be refactored to use the new BOM.
After specifying the BOM using the dependency management mechanism, it becomes possible to add Maven dependencies to your POM without specifying the version of the artifact. For example, to add a dependency for the camel-hystrix component, you would add the following XML fragment to the dependencies element in your POM:
<dependency> <groupId>org.apache.camel</groupId> <artifactId>camel-hystrix-starter</artifactId> </dependency>
<dependency>
<groupId>org.apache.camel</groupId>
<artifactId>camel-hystrix-starter</artifactId>
</dependency>
Note how the Camel artifact ID is specified with the -starter suffix — that is, you specify the Camel Hystrix component as camel-hystrix-starter, not as camel-hystrix. The Camel starter components are packaged in a way that is optimized for the Spring Boot environment.
4.8. Spring Boot Maven plugin
The Spring Boot Maven plugin is provided by Spring Boot and it is a developer utility for building and running a Spring Boot project:
-
Building — create an executable Jar package for your Spring Boot application by entering the command
mvn packagein the project directory. The output of the build is placed in thetarget/subdirectory of your Maven project. -
Running — for convenience, you can run the newly-built application with the command,
mvn spring-boot:start.
To incorporate the Spring Boot Maven plugin into your project POM file, add the plugin configuration to the project/build/plugins section of your pom.xml file, as shown in the following example:
Chapter 5. Apache Camel in Spring Boot
5.1. Introduction to Camel Spring Boot
The Camel Spring Boot component provides auto configuration for Apache Camel. Auto-configuration of the Camel context auto-detects Camel routes available in the Spring context and registers the key Camel utilities such as producer template, consumer template, and the type converter as beans.
Every Camel Spring Boot application should use dependencyManagement with productized versions, see quickstart pom. Versions that are tagged later can be omitted to not override the versions from BOM.
camel-spring-boot jar comes with the spring.factories file which allows you to add that dependency into your classpath and hence Spring Boot will automatically auto-configure Camel.
5.2. Introduction to Camel Spring Boot Starter
Apache Camel includes a Spring Boot starter module that allows you to develop Spring Boot applications using starters.
For more details, see sample application in the source code.
To use the starter, add the following snippet to your Spring Boot pom.xml file:
<dependency>
    <groupId>org.apache.camel</groupId>
    <artifactId>camel-spring-boot-starter</artifactId>
</dependency>
<dependency>
    <groupId>org.apache.camel</groupId>
    <artifactId>camel-spring-boot-starter</artifactId>
</dependency>The starter allows you to add classes with your Camel routes, as shown in the snippet below. Once these routes are added to the class path the routes are started automatically.
You can customize the Camel application in the application.properties or application.yml file.
Camel Spring Boot now supports referring to bean by the id name in the configuration files (application.properties or yaml file) when you configure any of the Camel starter components. In the src/main/resources/application.properties (or yaml) file you can now easily configure the options on the Camel that refers to other beans by refering to the beans ID name. For example, the xslt component can refer to a custom bean using the bean ID as follows:
Refer to a custom bean by the id myExtensionFactory as follows:
camel.component.xslt.saxon-extension-functions=myExtensionFactory
camel.component.xslt.saxon-extension-functions=myExtensionFactoryWhich you can then create using Spring Boot @Bean annotation as follows:
@Bean(name = "myExtensionFactory")
public ExtensionFunctionDefinition myExtensionFactory() {
    }
@Bean(name = "myExtensionFactory")
public ExtensionFunctionDefinition myExtensionFactory() {
    }
Or, in case of a Jackson ObjectMapper in the camel-jackson data-format:
camel.dataformat.json-jackson.object-mapper=myJacksonMapper
camel.dataformat.json-jackson.object-mapper=myJacksonMapper5.3. Auto-configured Camel context
Camel auto-configuration provides a CamelContext instance and creates a SpringCamelContext. It also initializes and performs shutdown of that context. This Camel context is registered in the Spring application context under camelContext bean name and you can access it like other Spring bean.
For example, you can access the camelContext as shown below:
5.4. Auto-detecting Camel routes
Camel auto configuration collects all the RouteBuilder instances from the Spring context and automatically injects them into the CamelContext. It simplifies the process of creating new Camel route with the Spring Boot starter. You can create the routes by adding the @Component annotated class to your classpath.
To create a new route RouteBuilder bean in your @Configuration class, see below:
5.5. Camel properties
Spring Boot auto configuration automatically connects to Spring Boot external configuration such as properties placeholders, OS environment variables, or system properties with Camel properties support.
These properties are defined in application.properties file:
route.from = jms:invoices
route.from = jms:invoicesUse as system property
java -Droute.to=jms:processed.invoices -jar mySpringApp.jar
java -Droute.to=jms:processed.invoices -jar mySpringApp.jarUse as placeholders in Camel route:
5.6. Custom Camel context configuration
To perform operations on CamelContext bean created by Camel auto configuration, you need to register CamelContextConfiguration instance in your Spring context as shown below:
The method CamelContextConfiguration and beforeApplicationStart(CamelContext) will be called before the Spring context is started, so the CamelContext instance passed to this callback is fully auto-configured. You can add many instances of CamelContextConfiguration into your Spring context and all of them will be executed.
5.7. Disabling JMX
To disable JMX of the auto-configured CamelContext use camel.springboot.jmxEnabled property as JMX is enabled by default.
For example, you could add the following property to your application.properties file:
camel.springboot.jmxEnabled = false
camel.springboot.jmxEnabled = false5.8. Auto-configured consumer and producer templates
Camel auto configuration provides pre-configured ConsumerTemplate and ProducerTemplate instances. You can inject them into your Spring-managed beans:
By default consumer templates and producer templates come with the endpoint cache sizes set to 1000. You can change those values using the following Spring properties:
camel.springboot.consumerTemplateCacheSize = 100
camel.springboot.producerTemplateCacheSize = 200
camel.springboot.consumerTemplateCacheSize = 100
camel.springboot.producerTemplateCacheSize = 2005.9. Auto-configured TypeConverter
Camel auto configuration registers a TypeConverter instance named typeConverter in the Spring context.
5.10. Spring type conversion API bridge
Spring consist of type conversion API. Spring API is similar to the Camel type converter API. Due to the similarities between the two APIs Camel Spring Boot automatically registers a bridge converter (SpringTypeConverter) that delegates to the Spring conversion API. That means that out-of-the-box Camel will treat Spring Converters similar to Camel.
This allows you to access both Camel and Spring converters using the Camel TypeConverter API, as shown below:
Here, Spring Boot delegates conversion to the Spring’s ConversionService instances available in the application context. If no ConversionService instance is available, Camel Spring Boot auto configuration creates an instance of ConversionService.
5.11. Disabling type conversions features
To disable registering type conversion features of Camel Spring Boot such as TypeConverter instance or Spring bridge, set the camel.springboot.typeConversion property to false as shown below:
camel.springboot.typeConversion = false
camel.springboot.typeConversion = false5.12. Adding XML routes
By default, you can put Camel XML routes in the classpath under the directory camel, which camel-spring-boot will auto detect and include. From Camel version 2.17 onwards you can configure the directory name or disable this feature using the configuration option, as shown below:
// turn off
camel.springboot.xmlRoutes = false
// scan in the com/foo/routes classpath
camel.springboot.xmlRoutes = classpath:com/foo/routes/*.xml
// turn off
camel.springboot.xmlRoutes = false
// scan in the com/foo/routes classpath
camel.springboot.xmlRoutes = classpath:com/foo/routes/*.xml
The XML files should be Camel XML routes and not CamelContext such as:
When using Spring XML files with <camelContext>, you can configure Camel in the Spring XML file as well as in the application.properties file. For example, to set a name on Camel and turn On the stream caching, add:
camel.springboot.name = MyCamel
camel.springboot.stream-caching-enabled=true
camel.springboot.name = MyCamel
camel.springboot.stream-caching-enabled=true5.13. Adding XML Rest-DSL
By default, you can put Camel Rest-DSL XML routes in the classpath under the directory camel-rest, which camel-spring-boot will auto detect and include. You can configure the directory name or disable this feature using the configuration option, as shown below:
// turn off
camel.springboot.xmlRests = false
// scan in the com/foo/routes classpath
camel.springboot.xmlRests = classpath:com/foo/rests/*.xml
// turn off
camel.springboot.xmlRests = false
// scan in the com/foo/routes classpath
camel.springboot.xmlRests = classpath:com/foo/rests/*.xml
The Rest-DSL XML files should be Camel XML rests and not CamelContext such as:
5.14. Testing with Camel Spring Boot
In case on Camel running on Spring Boot, Spring Boot automatically embeds Camel and all its routes, which are annotated with @Component. When testing with Spring boot you use @SpringBootTest instead of @ContextConfiguration to specify which configuration class to use.
When you have multiple Camel routes in different RouteBuilder classes, Camel Spring Boot will include all these routes. Hence, when you wish to test routes from only one RouteBuilder class you can use the following patterns to include or exclude which RouteBuilders to enable:
- java-routes-include-pattern: Used for including RouteBuilder classes that match the pattern.
- java-routes-exclude-pattern: Used for excluding RouteBuilder classes that match the pattern. Exclude takes precedence over include.
You can specify these patterns in your unit test classes as properties to @SpringBootTest annonation, as shown below:
@RunWith(CamelSpringBootRunner.class)
@SpringBootTest(classes = {MyApplication.class);
   properties = {"camel.springboot.java-routes-include-pattern=**/Foo*"})
public class FooTest {
@RunWith(CamelSpringBootRunner.class)
@SpringBootTest(classes = {MyApplication.class);
   properties = {"camel.springboot.java-routes-include-pattern=**/Foo*"})
public class FooTest {
In the FooTest class, the include pattern is **/Foo*, which represents an Ant style pattern. Here, the pattern starts with double asterisk, which matches with any leading package name. /Foo* means the class name must start with Foo, for example, FooRoute. You can run a test using following maven command:
mvn test -Dtest=FooTest
mvn test -Dtest=FooTest5.15. See Also
Chapter 6. Integrate a Camel Application with the AMQ Broker
6.1. Example How to Deploy a Spring Boot Camel A-MQ Quickstart
This tutorial shows how to deploy a quickstart using the A-MQ image.
6.1.1. Prerequisites
- Ensure that OpenShift is running correctly and the Fuse image streams are already installed in OpenShift. See Section 3.1, “Prerequisites”.
- Ensure that Maven Repositories are configured for fuse, see Section 3.2.1, “Configure Maven Repositories”
6.1.2. Building and Deploying the Quickstart
This example requires a Red Hat A-MQ 6 image and deployment template. If you are using CDK 3.1.1+, Red Hat A-MQ 6 images and templates should be already installed in the openshift namespace by default.
To build and deploy the A-MQ quickstart, perform the following steps:
Log in to OpenShift as a developer, for example:
oc login -u developer -p developer
oc login -u developer -p developerCopy to Clipboard Copied! Toggle word wrap Toggle overflow Create a new project amq-quickstart
oc new-project amq-quickstart
oc new-project amq-quickstartCopy to Clipboard Copied! Toggle word wrap Toggle overflow Determine the version of the A-MQ 6 images and templates installed:
oc get template -n openshift
$ oc get template -n openshiftCopy to Clipboard Copied! Toggle word wrap Toggle overflow You should be able to find a template named
amqXX-basic, where XX is the version of A-MQ installed in Openshift.Deploy the A-MQ 6 image in the
amq-quickstartnamespace (replace XX with the actual version of A-MQ found in previous step):oc process openshift//amqXX-basic -p APPLICATION_NAME=broker -p MQ_USERNAME=admin -p MQ_PASSWORD=admin -p MQ_QUEUES=test -p MQ_PROTOCOL=amqp -n amq-quickstart | oc create -f -
$ oc process openshift//amqXX-basic -p APPLICATION_NAME=broker -p MQ_USERNAME=admin -p MQ_PASSWORD=admin -p MQ_QUEUES=test -p MQ_PROTOCOL=amqp -n amq-quickstart | oc create -f -Copy to Clipboard Copied! Toggle word wrap Toggle overflow NoteThis
occommand could fail, if you use an older version ofoc. This syntax works withocversions 3.5.x (based on Kubernetes 1.5.x).Add role which is needed for discovery of mesh endpoints (through Kubernetes REST API agent).
oc policy add-role-to-user view system:serviceaccount:amq-quickstart:default
$ oc policy add-role-to-user view system:serviceaccount:amq-quickstart:defaultCopy to Clipboard Copied! Toggle word wrap Toggle overflow Create the quickstart project using the Maven workflow:
mvn org.apache.maven.plugins:maven-archetype-plugin:2.4:generate \
-DarchetypeCatalog=https://maven.repository.redhat.com/ga/io/fabric8/archetypes/archetypes-catalog/2.2.0.fuse-000110-redhat-5/archetypes-catalog-2.2.0.fuse-000110-redhat-5-archetype-catalog.xml \
-DarchetypeGroupId=org.jboss.fuse.fis.archetypes \
-DarchetypeArtifactId=spring-boot-camel-amq-archetype \
-DarchetypeVersion=2.2.0.fuse-000110-redhat-5
$ mvn org.apache.maven.plugins:maven-archetype-plugin:2.4:generate \
-DarchetypeCatalog=https://maven.repository.redhat.com/ga/io/fabric8/archetypes/archetypes-catalog/2.2.0.fuse-000110-redhat-5/archetypes-catalog-2.2.0.fuse-000110-redhat-5-archetype-catalog.xml \
-DarchetypeGroupId=org.jboss.fuse.fis.archetypes \
-DarchetypeArtifactId=spring-boot-camel-amq-archetype \
-DarchetypeVersion=2.2.0.fuse-000110-redhat-5
Copy to Clipboard Copied! Toggle word wrap Toggle overflow The archetype plug-in switches to interactive mode to prompt you for the remaining fields:
Copy to Clipboard Copied! Toggle word wrap Toggle overflow When prompted, enter
org.example.fisfor thegroupIdvalue andfuse70-spring-boot-camel-amqfor theartifactIdvalue. Accept the defaults for the remaining fields.Navigate to the quickstart directory
fuse70-spring-boot-camel-amq:cd fuse70-spring-boot-camel-amq
$ cd fuse70-spring-boot-camel-amqCopy to Clipboard Copied! Toggle word wrap Toggle overflow Customize the client credentials for logging on to the broker, by setting the
ACTIVEMQ_BROKER_USERNAMEandACTIVEMQ_BROKER_PASSWORDenvironment variables. In thefuse70-spring-boot-camel-amqproject, edit thesrc/main/fabric8/deployment.ymlfile, as follows:Copy to Clipboard Copied! Toggle word wrap Toggle overflow Run the
mvncommand to deploy the quickstart to OpenShift server.mvn fabric8:deploy
mvn fabric8:deployCopy to Clipboard Copied! Toggle word wrap Toggle overflow - To verify that the quickstart is running successfully, navigate to the OpenShift console, select the project amq-quickstart, click Applications, select Pods, click fuse70-spring-boot-camel-amq-xxx, and click Logs.
The output shows the messages are sent successfully.
Copy to Clipboard Copied! Toggle word wrap Toggle overflow - To view the routes on the web interface, click Open Java Console and check the messages in the A-MQ queue.
Chapter 7. Integrate Spring Boot with Kubernetes
7.1. Introduction to Spring Boot with Kubernetes Integration
7.1.1. What are we Integrating?
The Spring Cloud Kubernetes plug-in currently enables you to integrate the following features of Spring Boot and Kubernetes:
7.1.2. Spring Boot Externalized Configuration
In Spring Boot, externalized configuration is the mechanism that enables you to inject configuration values from external sources into Java code. In your Java code, injection is typically enabled by annotating with the @Value annotation (to inject into a single field) or the @ConfigurationProperties annotation (to inject into multiple properties on a Java bean class).
The configuration data can come from a wide variety of different sources (or property sources). In particular, configuration properties are often set in a project’s application.properties file (or application.yaml file, if you prefer).
7.1.3. Kubernetes ConfigMap
A Kubernetes ConfigMap is a mechanism that can provide configuration data to a deployed application. A ConfigMap object is typically defined in a YAML file, which is then uploaded to the Kubernetes cluster, making the configuration data available to deployed applications.
7.1.4. Kubernetes Secrets
A Kubernetes Secrets is a mechanism for providing sensitive data (such as passwords, certificates, and so on) to deployed applications.
7.1.5. Spring Cloud Kubernetes Plug-In
The Spring Cloud Kubernetes plug-in implements the integration between Kubernetes and Spring Boot. In principle, you could access the configuration data from a ConfigMap using the Kubernetes API. It is much more convenient, however, to integrate Kubernetes ConfigMap directly with the Spring Boot externalized configuration mechanism, so that Kubernetes ConfigMaps behave as an alternative property source for Spring Boot configuration. This is essentially what the Spring Cloud Kubernetes plug-in provides.
7.1.6. How to Enable Spring Boot with Kubernetes Integration
In a typical Spring Boot Maven project, you can enable the integration by adding the following Maven dependency to your project’s POM file:
To complete the integration, you need to add some annotations to your Java source code, create a Kubernetes ConfigMap object, and modify the OpenShift service account permissions to allow your application to read the ConfigMap object. These steps are described in detail in Section 7.2, “Tutorial for ConfigMap Property Source”.
7.2. Tutorial for ConfigMap Property Source
The following tutorial is based on the spring-boot-camel-config-archetype Maven archetype, which enables you to experiment with setting Kubernetes Secrets and ConfigMaps. The Spring Cloud Kubernetes plug-in is also enabled, making it possible to integrate Kubernetes configuration objects with Spring Boot Externalized Configuration.
7.2.1. Build and run the spring-boot-camel-config quickstart
Perform the following steps to create a simple Camel Spring Boot project:
Open a new shell prompt and enter the following Maven command:
mvn org.apache.maven.plugins:maven-archetype-plugin:2.4:generate \
  -DarchetypeCatalog=https://maven.repository.redhat.com/ga/io/fabric8/archetypes/archetypes-catalog/2.2.0.fuse-000110-redhat-5/archetypes-catalog-2.2.0.fuse-000110-redhat-5-archetype-catalog.xml \
  -DarchetypeGroupId=org.jboss.fuse.fis.archetypes \
  -DarchetypeArtifactId=spring-boot-camel-config-archetype \
  -DarchetypeVersion=2.2.0.fuse-000110-redhat-5
Copy to Clipboard Copied! Toggle word wrap Toggle overflow The archetype plug-in switches to interactive mode to prompt you for the remaining fields:
Copy to Clipboard Copied! Toggle word wrap Toggle overflow When prompted, enter
org.example.fisfor thegroupIdvalue andfuse70-configmapfor theartifactIdvalue. Accept the defaults for the remaining fields.Log in to OpenShift and switch to the OpenShift project where you will deploy your application. For example, to log in as the
developeruser and deploy to thetestproject, enter the following commands:oc login -u developer -p developer oc project test
oc login -u developer -p developer oc project testCopy to Clipboard Copied! Toggle word wrap Toggle overflow At the command line, change to the directory of the new
fuse70-configmapproject and create the Secret object for this application:oc create -f sample-secret.yml
oc create -f sample-secret.ymlCopy to Clipboard Copied! Toggle word wrap Toggle overflow NoteIt is necessary to create the Secret object before you deploy the application, otherwise the deployed container enters a wait state until the Secret becomes available. If you subsequently create the Secret, the container will come out of the wait state.
Build and deploy the quickstart application. From the top level of the
fuse70-configmapproject, enter:mvn fabric8:deploy
mvn fabric8:deployCopy to Clipboard Copied! Toggle word wrap Toggle overflow -
View the application log as follows. Open the OpenShift console in your browser and select the relevant project namespace (for example,
test). Click in the center of the circular pod icon for thefuse70-configmapservice and then — in the Pods view — click on the pod Name to view the details of the running pod (alternatively, you will get straight through to the details page, if there is only one pod running). Now click on the Logs tag to view the application log and scroll down to find the log messages generated by the Camel application. The default recipient list, which is configured in
src/main/resources/application.properties, sends the generated messages to two dummy endpoints:direct:async-queueanddirect:file. This causes messages like the following to be written to the application log:5:44:57.376 [Camel (camel) thread #0 - timer://order] INFO generate-order-route - Generating message message-44, sending to the recipient list 15:44:57.378 [Camel (camel) thread #0 - timer://order] INFO target-route-queue - ----> message-44 pushed to an async queue (simulation) 15:44:57.379 [Camel (camel) thread #0 - timer://order] INFO target-route-queue - ----> Using username 'myuser' for the async queue 15:44:57.380 [Camel (camel) thread #0 - timer://order] INFO target-route--file - ----> message-44 written to a file
5:44:57.376 [Camel (camel) thread #0 - timer://order] INFO generate-order-route - Generating message message-44, sending to the recipient list 15:44:57.378 [Camel (camel) thread #0 - timer://order] INFO target-route-queue - ----> message-44 pushed to an async queue (simulation) 15:44:57.379 [Camel (camel) thread #0 - timer://order] INFO target-route-queue - ----> Using username 'myuser' for the async queue 15:44:57.380 [Camel (camel) thread #0 - timer://order] INFO target-route--file - ----> message-44 written to a fileCopy to Clipboard Copied! Toggle word wrap Toggle overflow Before you can update the configuration of the
fuse70-configmapapplication using a ConfigMap object, you must give thefuse70-configmapapplication permission to view data from the OpenShift ApiServer. Enter the following command to give theviewpermission to thefuse70-configmapapplication’s service account:oc policy add-role-to-user view system:serviceaccount:test:qs-camel-config
oc policy add-role-to-user view system:serviceaccount:test:qs-camel-configCopy to Clipboard Copied! Toggle word wrap Toggle overflow NoteA service account is specified using the syntax
system:serviceaccount:PROJECT_NAME:SERVICE_ACCOUNT_NAME. Thefis-configdeployment descriptor defines theSERVICE_ACCOUNT_NAMEto beqs-camel-config.To see the live reload feature in action, create a ConfigMap object as follows:
oc create -f sample-configmap.yml
oc create -f sample-configmap.ymlCopy to Clipboard Copied! Toggle word wrap Toggle overflow The new ConfigMap overrides the recipient list of the Camel route in the running application, configuring it to send the generated messages to three dummy endpoints:
direct:async-queue,direct:file, anddirect:mail. This causes messages like the following to be written to the application log:16:25:24.121 [Camel (camel) thread #0 - timer://order] INFO generate-order-route - Generating message message-9, sending to the recipient list 16:25:24.124 [Camel (camel) thread #0 - timer://order] INFO target-route-queue - ----> message-9 pushed to an async queue (simulation) 16:25:24.125 [Camel (camel) thread #0 - timer://order] INFO target-route-queue - ----> Using username 'myuser' for the async queue 16:25:24.125 [Camel (camel) thread #0 - timer://order] INFO target-route--file - ----> message-9 written to a file (simulation) 16:25:24.126 [Camel (camel) thread #0 - timer://order] INFO target-route--mail - ----> message-9 sent via mail
16:25:24.121 [Camel (camel) thread #0 - timer://order] INFO generate-order-route - Generating message message-9, sending to the recipient list 16:25:24.124 [Camel (camel) thread #0 - timer://order] INFO target-route-queue - ----> message-9 pushed to an async queue (simulation) 16:25:24.125 [Camel (camel) thread #0 - timer://order] INFO target-route-queue - ----> Using username 'myuser' for the async queue 16:25:24.125 [Camel (camel) thread #0 - timer://order] INFO target-route--file - ----> message-9 written to a file (simulation) 16:25:24.126 [Camel (camel) thread #0 - timer://order] INFO target-route--mail - ----> message-9 sent via mailCopy to Clipboard Copied! Toggle word wrap Toggle overflow
7.2.2. Configuration Properties bean
A configuration properties bean is a regular Java bean that can receive configuration settings by injection. It provides the basic interface between your Java code and the external configuration mechanisms.
7.2.2.1. Overview
Externalized Configuration and Bean Registry shows how Spring Boot Externalized Configuration works in the spring-boot-camel-config quickstart.
Externalized Configuration and Bean Registry
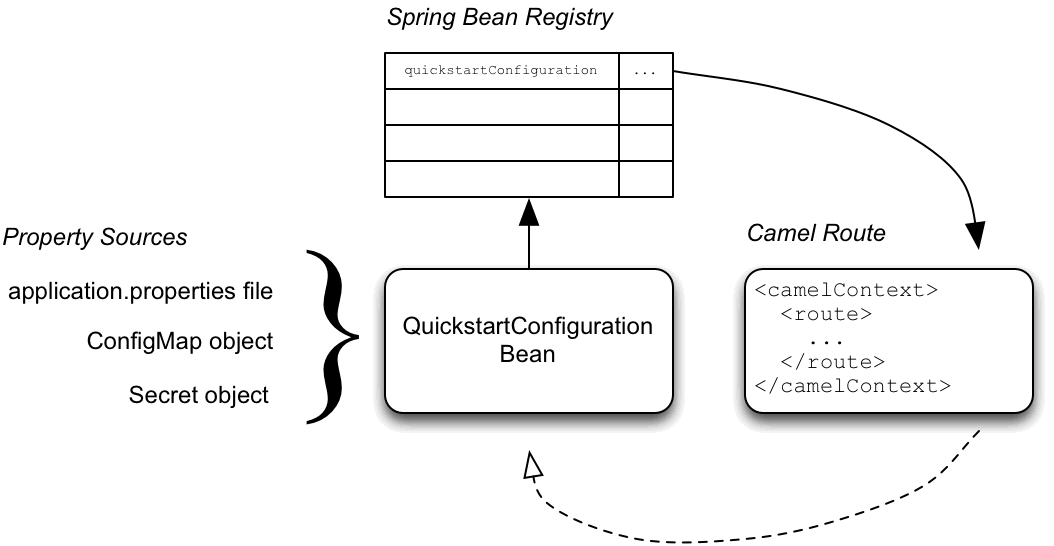
The configuration mechanism has the following main parts:
- Property Sources
-
Provides property settings for injection into configuration. The default property source is the application’s
application.propertiesfile, and this can optionally be overridden by a ConfigMap object or a Secret object. - Configuration Properties bean
-
Receives configuraton updates from the property sources. A configuration properties bean is a Java bean decorated by the
@Configurationand@ConfigurationPropertiesannotations. - Spring bean registry
- With the requisite annotations, a configuration properties bean is registered in the Spring bean registry.
- Integration with Camel bean registry
- The Camel bean registry is automatically integrated with the Spring bean registry, so that registered Spring beans can be referenced in your Camel routes.
7.2.2.2. QuickstartConfiguration class
The configuration properties bean for the fuse70-configmap project is defined as the QuickstartConfiguration Java class (under the src/main/java/org/example/fis/ directory), as follows:
- 1
- The
@Configurationannotation causes theQuickstartConfigurationclass to be instantiated and registered in Spring as the bean with ID,quickstartConfiguration. This automatically makes the bean accessible from Camel. For example, thetarget-route-queueroute is able to access thequeueUserNameproperty using the Camel syntax${bean:quickstartConfiguration?method=getQueueUsername}. - 2
- The
@ConfigurationPropertiesannotation defines a prefix,quickstart, that must be used when defining property values in a property source. For example, a properties file would reference therecipientsproperty asquickstart.recipients. - 3
- The
recipientproperty is injectable from property sources. - 4
- The
queueUsernameproperty is injectable from property sources. - 5
- The
queuePasswordproperty is injectable from property sources.
7.2.3. How to set up the Secret
The Kubernetes Secret in this quickstart is set up in the standard way, apart from one additional required step: the Spring Cloud Kubernetes plug-in must be configured with the mount paths of the Secrets, so that it can read the Secrets at run time.
For more details, see the chapter on Secrets in the Kubernetes reference documentation.
7.2.3.1. Sample Secret object
The quickstart project provides a sample Secret, sample-secret.yml, as follows:
Note the following settings:
- metadata.name
- Identifies the Secret. Other parts of the OpenShift system use this identifier to reference the Secret.
- quickstart.queue-username
-
Is meant to be injected into the
queueUsernameproperty of thequickstartConfigurationbean. The value must be base64 encoded. - quickstart.queue-password
-
Is meant to be injected into the
queuePasswordproperty of thequickstartConfigurationbean. The value must be base64 encoded.
Property values in Secret objects are always base64 encoded (use the base64 command-line utility). When the Secret is mounted in a pod’s filesystem, the values are automatically decoded back into plain text.
Kubernetes does not allow you to define property names in CamelCase (it requires property names to be all lowercase). To work around this limitation, use the hyphenated form queue-username, which Spring Boot matches with queueUsername. This takes advantage of Spring Boot’s relaxed binding rules for externalized configuration.
7.2.3.2. Configure volume mount for the Secret
The application must be configured to load the Secret at run time, by configuring the Secret as a volume mount. After the application starts, the Secret properties then become available at the specified location in the filesystem.
The Example 7.1, “deployment.yml file” listing shows the application’s deployment.yml file (located under src/main/fabric8/), which defines the volume mount for the Secret.
Example 7.1. deployment.yml file
- 1
- In the
volumessection, the deployment declares a new volume namedcamel-config, which references the Secret namedcamel-config. - 2
- In the
volumeMountssection, the deployment declares a new volume mount, which references thecamel-configvolume and specifies that the Secret volume should be mounted to the path/etc/secrets/camel-configin the pod’s filesystem.
7.2.3.3. Configure spring-cloud-kubernetes to read Secret properties
To integrate secrets with Spring Boot externalized configuration, the Spring Cloud Kubernetes plug-in must be configured with the secret’s mount path. Spring Cloud Kubernetes reads the secrets from the specified location and makes them available to Spring Boot as property sources.
The Spring Cloud Kubernetes plug-in is configured by settings in the bootstrap.yml file, located under src/main/resources in the quickstart project, as shown in the Example 7.2, “bootstrap.yml file” listing.
Example 7.2. bootstrap.yml file
The spring.cloud.kubernetes.secrets.paths property specifies the list of paths of secrets volume mounts in the pod.
A bootstrap.properties file (or bootstrap.yml file) behaves similarly to an application.properties file, but it is loaded at an earlier phase of application start-up. It is more reliable to set the properties relating to the Spring Cloud Kubernetes plug-in in the bootstrap.properties file.
7.2.4. How to set up the ConfigMap
In addition to creating a ConfigMap object and setting the view permission appropriately, the integration with Spring Cloud Kubernetes requires you to match the ConfigMap’s metadata.name with the value of the spring.application.name property configured in the project’s bootstrap.yml file.
7.2.4.1. Sample ConfigMap object
The quickstart project provides a sample ConfigMap, sample-configmap.yml, as follows:
Note the following settings:
- metadata.name
- Identifies the ConfigMap. Other parts of the OpenShift system use this identifier to reference the ConfigMap.
- data.application.properties
-
This section lists property settings that can override settings from the original
application.propertiesfile that was deployed with the application. - quickstart.recipients
-
Is meant to be injected into the
recipientsproperty of thequickstartConfigurationbean.
For more details about the format of this file, see Section 7.3, “ConfigMap PropertySource”.
7.2.4.2. Setting the view permission
As shown in the Example 7.1, “deployment.yml file” listing, the serviceAccountName is set to qs-camel-config in the project’s deployment.yml file. Hence, you need to enter the following command to enable the view permission on the quickstart application (assuming that it deploys into the test project namespace):
oc policy add-role-to-user view system:serviceaccount:test:qs-camel-config
oc policy add-role-to-user view system:serviceaccount:test:qs-camel-config7.2.4.3. Configuring the Spring Cloud Kubernetes plug-in
The Spring Cloud Kubernetes plug-in is configured by the following settings in the bootstrap.yml file, as shown in the Example 7.2, “bootstrap.yml file” listing:
- spring.application.name
-
This value must match the
metadata.nameof the ConfigMap object (for example, as defined insample-configmap.ymlin the quickstart project). It defaults toapplication. - spring.cloud.kubernetes.reload.enabled
-
Setting this to
trueenables dynamic reloading of ConfigMap objects.
For more details about the supported properties, see Section 7.5, “PropertySource Reload”.
7.3. ConfigMap PropertySource
Kubernetes has the notion of ConfigMap for passing configuration to the application. The Spring cloud Kubernetes plug-in provides integration with ConfigMap to make config maps accessible by Spring Boot.
The ConfigMap PropertySource when enabled will look up Kubernetes for a ConfigMap named after the application (see spring.application.name). If the map is found it will read its data and do the following:
7.3.1. Apply Individual Properties
Let’s assume that we have a Spring Boot application named demo that uses properties to read its thread pool configuration.
-
pool.size.core -
pool.size.max
This can be externalized to config map in YAML format:
7.3.2. Apply Property Named application.yaml
Individual properties work fine for most cases but sometimes we find YAML is more convenient. In this case we use a single property named application.yaml and embed our YAML inside it:
7.3.3. Apply Property Named application.properties
You can also define the ConfigMap properties in the style of a Spring Boot application.properties file. In this case we use a single property named application.properties and list the property settings inside it:
7.3.4. Deploying a ConfigMap
To deploy a ConfigMap and make it accessible to a Spring Boot application, perform the following steps:
-
In your Spring Boot application, use the externalized configuration mechanism to access the ConfigMap property source. For example, by annotating a Java bean with the
@Configurationannotation, it becomes possible for the bean’s property values to be injected by a ConfigMap. -
In your project’s
bootstrap.propertiesfile (orbootstrap.yamlfile), set thespring.application.nameproperty to match the name of the ConfigMap. Enable the
viewpermission on the service account that is associated with your application (by default, this would be the service account calleddefault). For example, to add theviewpermission to thedefaultservice account:oc policy add-role-to-user view system:serviceaccount:$(oc project -q):default -n $(oc project -q)
oc policy add-role-to-user view system:serviceaccount:$(oc project -q):default -n $(oc project -q)Copy to Clipboard Copied! Toggle word wrap Toggle overflow
7.4. Secrets PropertySource
Kubernetes has the notion of Secrets for storing sensitive data such as password, OAuth tokens, etc. The Spring cloud Kubernetes plug-in provides integration with Secrets to make secrets accessible by Spring Boot.
The Secrets property source when enabled will look up Kubernetes for Secrets from the following sources:
- Reading recursively from secrets mounts
-
Named after the application (see
spring.application.name) - Matching some labels
Please note that, by default, consuming Secrets via API (points 2 and 3 above) is not enabled.
If the secrets are found, their data is made available to the application.
7.4.1. Example of Setting Secrets
Let’s assume that we have a Spring Boot application named demo that uses properties to read its ActiveMQ and PostreSQL configuration.
amq.username
amq.password
pg.username
pg.password
amq.username
amq.password
pg.username
pg.password
These secrets can be externalized to Secrets in YAML format:
- ActiveMQ Secrets
Copy to Clipboard Copied! Toggle word wrap Toggle overflow - PostreSQL Secrets
7.4.2. Consuming the Secrets
You can select the Secrets to consume in a number of ways:
By listing the directories where the secrets are mapped:
-Dspring.cloud.kubernetes.secrets.paths=/etc/secrets/activemq,etc/secrets/postgres
-Dspring.cloud.kubernetes.secrets.paths=/etc/secrets/activemq,etc/secrets/postgresCopy to Clipboard Copied! Toggle word wrap Toggle overflow If you have all the secrets mapped to a common root, you can set them like this:
-Dspring.cloud.kubernetes.secrets.paths=/etc/secrets
-Dspring.cloud.kubernetes.secrets.paths=/etc/secretsCopy to Clipboard Copied! Toggle word wrap Toggle overflow By setting a named secret:
-Dspring.cloud.kubernetes.secrets.name=postgres-secrets
-Dspring.cloud.kubernetes.secrets.name=postgres-secretsCopy to Clipboard Copied! Toggle word wrap Toggle overflow By defining a list of labels:
-Dspring.cloud.kubernetes.secrets.labels.broker=activemq
-Dspring.cloud.kubernetes.secrets.labels.db=postgres
-Dspring.cloud.kubernetes.secrets.labels.broker=activemq
-Dspring.cloud.kubernetes.secrets.labels.db=postgres
Copy to Clipboard Copied! Toggle word wrap Toggle overflow
7.4.3. Secrets Configuration Properties
You can use the following properties to configure the Secrets property source:
- spring.cloud.kubernetes.secrets.enabled
-
Enable the Secrets property source. Type is
Booleanand default istrue. - spring.cloud.kubernetes.secrets.name
-
Sets the name of the secret to look up. Type is
Stringand default is${spring.application.name}. - spring.cloud.kubernetes.secrets.labels
-
Sets the labels used to lookup secrets. This property behaves as defined by Map-based binding. Type is
java.util.Mapand default isnull. - spring.cloud.kubernetes.secrets.paths
-
Sets the paths where secrets are mounted. This property behaves as defined by Collection-based binding. Type is
java.util.Listand default isnull. - spring.cloud.kubernetes.secrets.enableApi
-
Enable/disable consuming secrets via APIs. Type is
Booleanand default isfalse.
Access to secrets via API may be restricted for security reasons — the preferred way is to mount a secret to the POD.
7.5. PropertySource Reload
Some applications may need to detect changes on external property sources and update their internal status to reflect the new configuration. The reload feature of Spring Cloud Kubernetes is able to trigger an application reload when a related ConfigMap or Secret change.
This feature is disabled by default and can be enabled using the configuration property spring.cloud.kubernetes.reload.enabled=true (for example, in the bootstrap.properties file).
The following levels of reload are supported (property spring.cloud.kubernetes.reload.strategy):
- refresh
(default) only configuration beans annotated with
@ConfigurationPropertiesor@RefreshScopeare reloaded. This reload level leverages the refresh feature of Spring Cloud Context.NoteThe PropertySource reload feature can only be used for simple properties (that is, not collections) when the reload strategy is set to
refresh. Properties backed by collections must not be changed at runtime.- restart_context
- the whole Spring ApplicationContext is gracefully restarted. Beans are recreated with the new configuration.
- shutdown
- the Spring ApplicationContext is shut down to activate a restart of the container. When using this level, make sure that the lifecycle of all non-daemon threads is bound to the ApplicationContext and that a replication controller or replica set is configured to restart the pod.
7.5.1. Example
Assuming that the reload feature is enabled with default settings (refresh mode), the following bean will be refreshed when the config map changes:
A way to see that changes effectively happen is creating another bean that prints the message periodically.
The message printed by the application can be changed using a ConfigMap like the following one:
Any change to the property named bean.message in the Config Map associated with the pod will be reflected in the output of the program.
The full example is available in [spring-cloud-kubernetes-reload-example](spring-cloud-kubernetes-examples/spring-cloud-kubernetes-reload-example).
The reload feature supports two operating modes:
- event
-
(default) watches for changes in ConfigMaps or secrets using the Kubernetes API (web socket). Any event will produce a re-check on the configuration and a reload in case of changes. The
viewrole on the service account is required in order to listen for config map changes. A higher level role (eg.edit) is required for secrets (secrets are not monitored by default). - polling
-
re-creates the configuration periodically from config maps and secrets to see if it has changed. The polling period can be configured using the property
spring.cloud.kubernetes.reload.periodand defaults to 15 seconds. It requires the same role as the monitored property source. This means, for example, that using polling on file mounted secret sources does not require particular privileges.
The following properties can be used to configure the reloading feature:
- spring.cloud.kubernetes.reload.enabled
-
Enables monitoring of property sources and configuration reload. Type is
Booleanand default isfalse. - spring.cloud.kubernetes.reload.monitoring-config-maps
-
Allow monitoring changes in config maps. Type is
Booleanand default istrue. - spring.cloud.kubernetes.reload.monitoring-secrets
-
Allow monitoring changes in secrets. Type is
Booleanand default isfalse. - spring.cloud.kubernetes.reload.strategy
-
The strategy to use when firing a reload (
refresh,restart_context,shutdown). Type isEnumand default isrefresh. - spring.cloud.kubernetes.reload.mode
-
Specifies how to listen for changes in property sources (
event,polling). Type isEnumand default isevent. - spring.cloud.kubernetes.reload.period
-
The period in milliseconds for verifying changes when using the
pollingstrategy. Type isLongand default is15000.
Note the following points:
-
The
spring.cloud.kubernetes.reload.*properties should not be used in ConfigMaps or Secrets. Changing such properties at run time may lead to unexpected results; -
Deleting a property or the whole config map does not restore the original state of the beans when using the
refreshlevel.
Chapter 8. Develop an Application for the Karaf Image
8.1. Create a Karaf Project using Maven Archetype
To create a Karaf project using a Maven archetype, follow these steps:
- Go to the appropriate directory on your system.
Launch the Maven command to create a Karaf project
mvn org.apache.maven.plugins:maven-archetype-plugin:2.4:generate \
  -DarchetypeCatalog=https://maven.repository.redhat.com/ga/io/fabric8/archetypes/archetypes-catalog/2.2.0.fuse-000110-redhat-5/archetypes-catalog-2.2.0.fuse-000110-redhat-5-archetype-catalog.xml \
  -DarchetypeGroupId=org.jboss.fuse.fis.archetypes \
  -DarchetypeArtifactId=karaf-camel-log-archetype \
  -DarchetypeVersion=2.2.0.fuse-000110-redhat-5
Copy to Clipboard Copied! Toggle word wrap Toggle overflow The archetype plug-in switches to interactive mode to prompt you for the remaining fields
Copy to Clipboard Copied! Toggle word wrap Toggle overflow When prompted, enter
org.example.fisfor thegroupIdvalue andfuse70-karaf-camel-logfor theartifactIdvalue. Accept the defaults for the remaining fields.
Then, follow the instructions in the quickstart on how to build and deploy the example.
For the full list of available Karaf archetypes, see Section 8.3, “Karaf Archetype Catalog”.
8.2. Structure of the Camel Karaf Application
The directory structure of a Camel Karaf application is as follows:
Where the following files are important for developing a Karaf application:
- pom.xml
Includes additional dependencies. You can add dependencies in the
pom.xmlfile, for example for logging you can use SLF4J.<dependency> <groupId>org.slf4j</groupId> <artifactId>slf4j-api</artifactId> </dependency><dependency> <groupId>org.slf4j</groupId> <artifactId>slf4j-api</artifactId> </dependency>Copy to Clipboard Copied! Toggle word wrap Toggle overflow - org.ops4j.pax.logging.cfg
- Demonstrates how to customize log levels, sets logging level to DEBUG instead of the default INFO.
- camel-log.xml
- Contains the source code of the application.
- src/main/fabric8/deployment.yml
Provides additional configuration that is merged with the default OpenShift configuration file generated by the fabric8-maven-plugin.
NoteThis file is not used as part of the Karaf application, but it is used in all quickstarts to limit the resources such as CPU and memory usage.
8.3. Karaf Archetype Catalog
The Karaf archetype catalog includes the following examples.
| Name | Description |
|---|---|
|
| Demonstrates how to send and recieve messages to an Apache ActiveMQ message broker, using the Camel amq component. |
|
| Demonstrates a simple Apache Camel application that logs a message to the server log every 5th second. |
|
| Demonstrates how to use SQL via JDBC along with Camel’s REST DSL to expose a RESTful API. |
|
| Demonstrates how to create a RESTful(JAX-RS) web service using CXF and expose it through the OSGi HTTP Service. |
8.4. Fabric8 Karaf Features
Fabric8 provides support for Apache Karaf making it easier to develop OSGi apps for Kubernetes.
The important features of Fabric8 are as listed below:
- Different strategies to resolve placeholders in Blueprint XML files.
- Environment variables
- System properties
- Services
- Kubernetes ConfigMap
- Kubernetes Secrets
- Using Kubernetes configuration maps to dynamically update the OSGi configuration administration.
- Provides Kubernetes heath checks for OSGi services.
8.4.1. Adding Fabric8 Karaf Features
To use the features, add fabric8-karaf-features dependency to the project pom file.
These features will be installed into the Karaf server.
8.4.2. Fabric8 Karaf Core Bundle functionalities
The bundle fabric8-karaf-core provides functionalities used by Blueprint and ConfigAdmin extensions.
To add the feature in a custom Karaf distribution, add it to startupFeatures in the project pom.xml
<startupFeatures>
  ...
  <feature>fabric8-karaf-core</feature>
  ...
</startupFeatures>
<startupFeatures>
  ...
  <feature>fabric8-karaf-core</feature>
  ...
</startupFeatures>8.4.2.1. Property placeholders resolvers
The bundle fabric8-karaf-core exports a service PlaceholderResolver with the following interface:
The PlaceholderResolver service acts as a collector for different property placeholder resolution strategies. The resolution strategies it provides by default are listed in the table.
- List of resolution strategies
| Prefix | Example | Description |
| env | env:JAVA_HOME | lookup the property from OS environment variables. |
| sys | sys:java.version | lookup the property from Java JVM system properties. |
| service | service:amq | lookup the property from OS environment variables using the service naming idiom. |
| service.host | service.host:amq | lookup the property from OS environment variables using the service naming idiom returning the hostname part only. |
| service.port | service.port:amq | lookup the property from OS environment variables using the service naming idiom returning the port part only. |
| k8s:map | k8s:map:myMap/myKey | lookup the property from a Kubernetes ConfigMap (via API) |
| k8s:secret | k8s:secret:amq/password | lookup the property from a Kubernetes Secrets (via API or volume mounts) |
The property placeholder service supports the following options:
- List of property placeholder service options
| Name | Default | Description |
|---|---|---|
| fabric8.placeholder.prefix | $[ | The prefix for the placeholder |
| fabric8.placeholder.suffix | ] | The suffix for the placeholder |
| fabric8.k8s.secrets.path | null | A comma delimited list of paths were secrets are mapped |
| fabric8.k8s.secrets.api.enabled | false | Enable/Disable consuming secrets via APIs |
To set the property placeholder service options you can use system properties or environment variables or both.
To access ConfigMaps on OpenShift the service account needs view permissions
oc policy add-role-to-user view system:serviceaccount:$(oc project -q):default -n $(oc project -q)
oc policy add-role-to-user view system:serviceaccount:$(oc project -q):default -n $(oc project -q)Copy to Clipboard Copied! Toggle word wrap Toggle overflow - Mount secret to the POD as access to secrets through API might be restricted.
- Secrets available on the POD as volume mounts are mapped to a directory named as the secret, as shown below
8.4.2.2. Adding a custom property placeholders resolvers
You can add a custom placeholder resolver to support a specific need, such as custom encryption. You can also use the PlaceholderResolver service to make the resolvers available to Blueprint and ConfigAdmin.
To add a custom property placeholders resolvers, follow these steps:
Add the following mvn dependency to the project
pom.xml.pom.xml
Copy to Clipboard Copied! Toggle word wrap Toggle overflow Implement the PropertiesFunction interface and register it as OSGi service using SCR.
Copy to Clipboard Copied! Toggle word wrap Toggle overflow - You can reference the resolver in Configuration management as follows.
properties
my.property = $[myResolver:value-to-resolve]
my.property = $[myResolver:value-to-resolve]8.4.3. Adding Fabric8 Karaf Config Admin Support
To include Config Admin Support feature in your custom Karaf distribution, add fabric8-karaf-cm to startupFeatures in your project pom.xml
pom.xml
<startupFeatures>
  ...
  <feature>fabric8-karaf-cm</feature>
  ...
</startupFeatures>
<startupFeatures>
  ...
  <feature>fabric8-karaf-cm</feature>
  ...
</startupFeatures>8.4.3.1. Adding ConfigMap injection
The fabric8-karaf-cm provides a ConfigAdmin bridge that inject ConfigMap values in Karaf’s ConfigAdmin.
To be added by the ConfigAdmin bridge, a ConfigMap has to be labeled with karaf.pid, where its values corresponds to the pid of your component.
Individual properties work for most cases. But to define your configuration, you can use a single property names. It is same as the pid file in karaf/etc. For example,
8.4.3.2. Configuration plugin
The fabric8-karaf-cm provides a ConfigurationPlugin which resolves configuration property placeholders.
To enable property substitution with the fabric8-karaf-cm plug-in, you must set the Java property, fabric8.config.plugin.enabled to true. For example, you can set this property using the JAVA_OPTIONS environment variable in the Karaf image, as follows:
JAVA_OPTIONS=-Dfabric8.config.plugin.enabled=true
JAVA_OPTIONS=-Dfabric8.config.plugin.enabled=trueAn example of configuration property placeholders is shown below.
my.service.cfg
    amq.usr = $[k8s:secret:$[env:ACTIVEMQ_SERVICE_NAME]/username]
    amq.pwd = $[k8s:secret:$[env:ACTIVEMQ_SERVICE_NAME]/password]
    amq.url = tcp://$[env+service:ACTIVEMQ_SERVICE_NAME]
    amq.usr = $[k8s:secret:$[env:ACTIVEMQ_SERVICE_NAME]/username]
    amq.pwd = $[k8s:secret:$[env:ACTIVEMQ_SERVICE_NAME]/password]
amq.url = tcp://$[env+service:ACTIVEMQ_SERVICE_NAME]my-service.xml
Fabric8 Karaf Config Admin supports the following options.
| Name | Default | Description |
|---|---|---|
| fabric8.config.plugin.enabled | false | Enable ConfigurationPlugin |
| fabric8.cm.bridge.enabled | true | Enable ConfigAdmin bridge |
| fabric8.config.watch | true | Enable watching for ConfigMap changes |
| fabric8.config.merge | false | Enable merge ConfigMap values in ConfigAdmin |
| fabric8.config.meta | true | Enable injecting ConfigMap meta in ConfigAdmin bridge |
| fabric8.pid.label | karaf.pid | Define the label the ConfigAdmin bridge looks for (that is, a ConfigMap that needs to be selected must have that label; the value of which determines to what PID it gets associated) |
| fabric8.pid.filters | empty | Define additional conditions for the ConfigAdmin bridge to select a ConfigMap. The supported syntax is:
For example, a filter like -Dfabric8.pid.filters=appName=A;B,database.name=my.oracle.datasource translates to "give me all the ConfigMaps that have a label appName with values A or B and a label database.name equals to my.oracle.datasource". |
ConfigurationPlugin requires Aries Blueprint CM 1.0.9 or above.
8.4.4. Fabric8 Karaf Blueprint Support
The fabric8-karaf-blueprint uses Aries PropertyEvaluator and property placeholders resolvers from fabric8-karaf-core to resolve placeholders in your Blueprint XML file.
To include the feature for blueprint support in your custom Karaf distribution, add fabric8-karaf-blueprint to startupFeatures in your project pom.xml.
<startupFeatures>
  ...
  <feature>fabric8-karaf-blueprint</feature>
  ...
</startupFeatures>
<startupFeatures>
  ...
  <feature>fabric8-karaf-blueprint</feature>
  ...
</startupFeatures>
The fabric8 evaluator supports chained evaluators, such as ${env+service:MY_ENV_VAR}. You need to resolve MY_ENV_VAR variable against environment variables. The result is then resolved using service function. For example,
Nested property placeholder substitution requires Aries Blueprint Core 1.7.0 or above.
8.4.5. Fabric8 Karaf Health Checks
It is recommended to install the fabric8-karaf-checks as a startup feature. Once enable, your Karaf server can expose http://0.0.0.0:8181/readiness-check and http://0.0.0.0:8181/health-check URLs which can be used by Kubernetes for readiness and liveness probes.
These URLs will only respond with a HTTP 200 status code when the following is true:
- OSGi Framework is started.
- All OSGi bundles are started.
- All boot features are installed.
- All deployed BluePrint bundles are in the created state.
- All deployed SCR bundles are in the active, registered or factory state.
- All web bundles are deployed to the web server.
- All created Camel contexts are in the started state.
You can add the Karaf health checks feature to the project pom.xml using startupFeatures.
pom.xml
<startupFeatures>
  ...
  <feature>fabric8-karaf-checks</feature>
  ...
</startupFeatures>
<startupFeatures>
  ...
  <feature>fabric8-karaf-checks</feature>
  ...
</startupFeatures>
The fabric8-maven-plugin:resources goal will detect if your using the fabric8-karaf-checks feature and automatically add the Kubernetes for readiness and liveness probes to your container’s configuration.
8.4.5.1. Adding Custom Heath Checks
You can provide additional custom heath checks to prevent the Karaf server from receiving user traffic before it is ready to process the requests. TO enable custom health checks you need to implement the io.fabric8.karaf.checks.HealthChecker or io.fabric8.karaf.checks.ReadinessChecker interfaces and register those objects in the OSGi registry.
Your project will need to add the following mvn dependency to the project pom.xml file.
pom.xml
<dependency>
  <groupId>io.fabric8</groupId>
  <artifactId>fabric8-karaf-checks</artifactId>
</dependency>
<dependency>
  <groupId>io.fabric8</groupId>
  <artifactId>fabric8-karaf-checks</artifactId>
</dependency>The simplest way to create and registered an object in the OSGi registry is to use SCR.
An example that performs a health check to make sure you have some free disk space, is shown below:
Chapter 9. Develop an Application for the JBoss EAP Image
9.1. Create a Red Hat Fuse Camel CDI with EAP Project Using the S2I Source Workflow
To create a Red Hat Fuse 7.0 Camel CDI with EAP project using the S2I source workflow, follow these steps:
Before creating a project, add the
viewrole to the default service account to enable clustering. Enter the followingocclient commands in a shell prompt:oc login -u developer -p developer oc policy add-role-to-user view -z default
oc login -u developer -p developer oc policy add-role-to-user view -z defaultCopy to Clipboard Copied! Toggle word wrap Toggle overflow -
Navigate to the OpenShift console in your browser (https://OPENSHIFT_IP_ADDR:8443. Replace
OPENSHIFT_IP_ADDRwith the IP address that was displayed in the case of CDK) and log in to the console with your credentials (for example, with usernamedeveloperand password,developer). In the Catalog search field, enter
Red Hat Fuse 7.0 Camel CDI with EAPas the search string and select the Red Hat Fuse 7.0 Camel CDI with EAP template.
The Information step of the template wizard opens. Click Next.
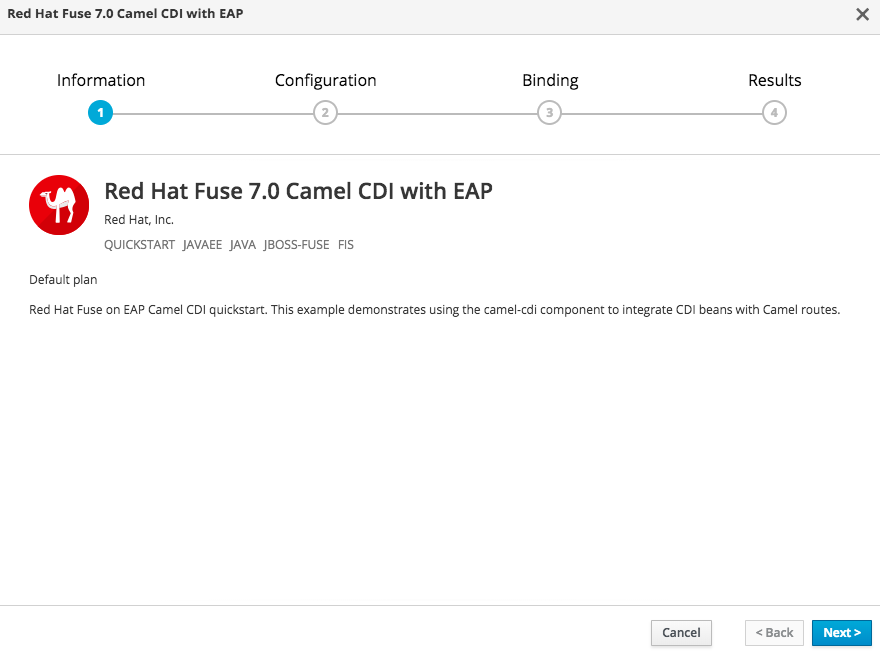
The Configuration step of the template wizard opens. From the Add to Project dropdown, select MyProject.
NoteAlternatively, if you prefer to create a new project for this example, select Create Project from the Add to Project dropdown. A Project Name field then appears for you to fill in the name of the new project.
You can accept the default values for the rest of the settings in the Configuration step.
 Note
NoteIf you want to modify the application code (instead of just running the quickstart as is), you would need to fork the original quickstart Git repository and fill in the appropriate values in the Git Repository URL and Git Reference fields.
The Bindings option creates a secret with necessary information for an application to use a service. Click Create.
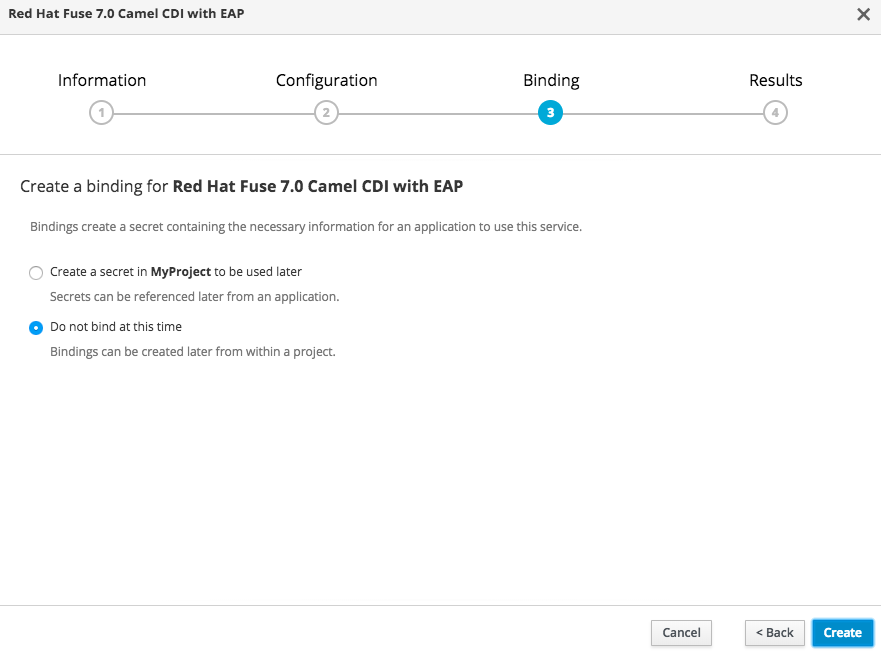
The Results step of the template wizard opens. Click Close.

- In the right-hand My Projects pane, click MyProject. The Overview tab of the MyProject project opens, showing the s2i-fuse70-eap-camel-cdi application.
Click the arrow on the left of the s2i-fuse70-eap-camel-cdi deployment to expand and view the details of this deployment, as shown.

In this view, you can see the build log. If the build should fail for any reason, the build log can help you to diagnose the problem.
 Note
NoteThe build can take several minutes to complete, because a lot of dependencies must be downloaded from remote Maven repositories. To speed up build times, we recommend you deploy a Nexus server on your local network.
If the build completes successfully, the pod icon shows as a blue circle with 1 pod running.

To open the application, click the link that is shown above the application details, which has the form
http://s2i-fuse70-eap-camel-cdi-myproject.IP_ADDRESS.nip.io/. This shows a message like the following in your browser:Hello world from 172.17.0.3
Hello world from 172.17.0.3Copy to Clipboard Copied! Toggle word wrap Toggle overflow You can also specify a name using the
nameparameter in the URL. For example, if you enter the URL,http://s2i-fuse70-eap-camel-cdi-myproject.IP_ADDRESS.nip.io/?name=jdoe, in your browser you see the response:Hello jdoe from 172.17.0.3
Hello jdoe from 172.17.0.3Copy to Clipboard Copied! Toggle word wrap Toggle overflow -
Click Overview on the left-hand navigation bar to return to the overview of the applications in the
MyProjectnamespace. To shut down the running pod, click the down arrow
beside the pod icon. When a dialog prompts you with the question Scale down deployment s2i-fuse70-eap-camel-cdi-1?, click Scale Down.
(Optional) If you are using CDK, you can shut down the virtual OpenShift Server completely by returning to the shell prompt and entering the following command:
minishift stop
minishift stopCopy to Clipboard Copied! Toggle word wrap Toggle overflow
9.2. Structure of the Red Hat Fuse 7.0 Camel CDI with EAP Application
You can find the source code for the Red Hat Fuse 7.0 Camel CDI with EAP example at the following location:
https://github.com/wildfly-extras/wildfly-camel-examples/tree/wildfly-camel-examples-5.1.0.fuse-000059-redhat-3/camel-cdi
https://github.com/wildfly-extras/wildfly-camel-examples/tree/wildfly-camel-examples-5.1.0.fuse-000059-redhat-3/camel-cdiThe directory structure of the Camel on EAP application is as follows:
Where the following files are important for developing a JBoss EAP application:
- pom.xml
- Includes additional dependencies.
9.3. JBoss EAP Quickstart Templates
The following S2I templates are provided for Red Hat Fuse on JBoss EAP:
| Name | Description |
|---|---|
|
Red Hat Fuse 7.0 Camel A-MQ with EAP ( | Demonstrates using the camel-activemq component to connect to an AMQ message broker running in OpenShift. It is assumed that the broker is already deployed. |
|
Red Hat Fuse 7.0 Camel CDI with EAP ( | Demonstrates using the camel-cdi component to integrate CDI beans with Camel routes. |
|
Red Hat Fuse 7.0 CXF JAX-RS with EAP ( | Demonstrates using the camel-cxf component to produce and consume JAX-RS REST services. |
|
Red Hat Fuse 7.0 CXF JAX-WS with EAP ( | Demonstrates using the camel-cxf component to produce and consume JAX-WS web services. |
|
Red Hat Fuse 7.0 Camel JPA + MySQL (Ephemeral) with EAP | Demonstrates how to connect a Camel application with Red Hat Fuse on EAP to a MySQL database and expose a REST API. This example creates two containers, one container to run as a MySQL server, and another running the Camel application which acts as as a client to the database. |
Chapter 10. Using Persistent Storage in Fuse on OpenShift
Fuse on OpenShift applications are based on OpenShift containers, which do not have a persistent filesystem. Every time you start an application, it is started in a new container with an immutable Docker-formatted image. Hence any persisted data in the file systems is lost when the container stops. But applications need to store some state as data in a persistent store and sometimes applications share access to a common data store. OpenShift platform supports provisioning of external stores as Persistent Storage.
10.1. Volumes
OpenShift allows pods and containers to mount Volumes as file systems which are backed by multiple host-local or network attached storage endpoints. Volume types include:
- emptydir (empty directory): This is a default volume type. It is a directory which gets allocated when the pod is created on a local host. It is not copied across the servers and when you delete the pod the directory is removed.
- configmap: It is a directory with contents populated with key-value pairs from a named configmap.
- hostPath (host directory): It is a directory with specific path on any host and it requires elevated privileges.
- secret (mounted secret): Secret volumes mount a named secret to the provided directory.
- persistentvolumeclaim or pvc (persistent volume claim): This links the volume directory in the container to a persistent volume claim you have allocated by name. A persistent volume claim is a request to allocate storage. Note that if your claim is not bound, your pods will not start.
Volumes are configured at the Pod level and can only directly access an external storage using hostPath. Hence it is harder to mange the access to shared resources for multiple Pods as hostPath volumes.
10.2. PersistentVolumes
PersistentVolumes allow cluster administrators to provision cluster wide storage which is backed by various types of network storage like NFS, Ceph RBD, AWS Elastic Block Store (EBS), etc. PersistentVolumes also specify capacity, access modes, and recycling policies. This allows pods from multiple Projects to access persistent storage without worrying about the nature of the underlying resource.
See the Configuring Persistent Storage for creating various types of PersistentVolumes.
10.3. Sample PersistentVolume configuration
The sample configuration below provisions a path on the host machine as a PersistentVolume named pv001:
Here the host path is /data/pv0001 and storage capacity is limited to 2MB. For example, when using OpenShift CDK it will provision the directory /data/pv0001 from the virtual machine hosting the OpenShift Cluster. To create this PersistentVolume, add the above configuration in a file pv.yaml and use the command:
oc create -f pv.yaml
oc create -f pv.yamlTo verify the creation of PersistentVolume, use the following command, which will list all the PersistentVolumes configured in your OpenShift cluster:
oc get pv
oc get pv10.4. PersistentVolumeClaims
A PersistentVolume exposes a storage endpoint as a named entity in an OpenShift cluster. To access this storage from Projects, PersistentVolumeClaims must be created that can access the PersistentVolume. PersistentVolumeClaims are created for each Project with customized claims for a certain amount of storage with certain access modes.
The sample configuration below creates a claim named pvc0001 for 1MB of storage with read-write-once access against a PersistentVolume named pv0001.
10.5. Volumes in Pods
Pods use Volume Mounts to define the filesystem mount location and Volumes to define reference PersistentVolumeClaims. The sample container configuration below mounts PersistentVolumeClaim pvc0001 at /usr/share/data in its filesystem.
Any data written by the application to the directory /usr/share/data is now persisted across container restarts. Add this configuration in the file src/main/fabric8/deployment.yml in a Fuse on OpenShift application and create OpenShift resources using command:
mvn fabric8:resource-apply
mvn fabric8:resource-applyTo verify that the created DeploymentConfiguration has the volume mount and volume use the command:
oc describe deploymentconfig <application-dc-name>
oc describe deploymentconfig <application-dc-name>For Fuse on OpenShift quickstarts, the <application-dc-name> is the Maven project name, for example spring-boot-camel.
Chapter 11. Patching Fuse on OpenShift
11.1. Important Note on BOMs and Maven Dependencies
In the context of Fuse on OpenShift, applications are built entirely using Maven artifacts downloaded from the Red Hat Maven repositories. Hence, to patch your application code, all that you need to do is to edit your project’s POM file, changing the Maven dependencies to use the appropriate Fuse on OpenShift patch version.
It is important to upgrade all of the Maven dependencies for Fuse on OpenShift together, so that your project uses dependencies that are all from the same patch version. The Fuse on OpenShift project consists of a carefully curated set of Maven artifacts that are built and tested together. If you try to mix and match Maven artifacts from different Fuse on OpenShift patch levels, you could end up with a configuration that is untested and unsupported by Red Hat. The easiest way to avoid this scenario is to use a Bill of Materials (BOM) file in Maven, which defines the versions of all the Maven artifacts supported by Fuse on OpenShift. When you update the version of a BOM file, you automatically update the versions for all the Fuse on OpenShift Maven artifacts in your project’s POM.
The POM file that is generated by a Fuse on OpenShift Maven archetype or by a Fuse on OpenShift template has a standard layout that uses a BOM file and defines the versions of certain required plugins. It is recommended that you stick to this standard layout in your own applications, because this makes it much easier to patch and upgrade your application’s dependencies.
11.2. Patching Overview
You might need to perform one or more of the following tasks to bring the Fuse on OpenShift product up to the latest patch level:
- Section 11.3, “Patch the Fuse on OpenShift Images”
- Update the Fuse on OpenShift images on your OpenShift server, so that new application builds are based on patched versions of the Fuse base images.
- Section 11.4, “Patch Application Dependencies Using the Old-Style BOM”
- Update the dependencies in your project POM file, so that your application uses patched versions of the Maven artifacts.
- Section 11.5, “Patch Application Dependencies Using the New-Style BOM”
- Update the dependencies in your project POM file, so that your application uses patched versions of the Maven artifacts.
- Section 11.6, “Patch the Fuse on OpenShift Templates”
- Update the Fuse on OpenShift templates on your OpenShift server, so that new projects created with the Fuse on OpenShift templates use patched versions of the Maven artifacts.
11.3. Patch the Fuse on OpenShift Images
The Fuse on OpenShift images are updated independently of the main Fuse product. If any patches are required for the Fuse on OpenShift images, updated images will be made available on the standard Fuse on OpenShift image streams and the updated images can be downloaded from the Red Hat image registry, registry.access.redhat.com. Fuse on OpenShift provides the following image streams (identified by their OpenShift image stream name):
-
jboss-fuse70-java-openshift -
jboss-fuse70-karaf-openshift -
jboss-fuse70-eap-openshift -
jboss-fuse70-console
These image streams are normally installed on the openshift project on the OpenShift server. To check the status of the Fuse on OpenShift images on OpenShift, login to OpenShift as an administrator and enter the following command:
You can now update each image stream one at a time:
oc import-image -n openshift jboss-fuse70-java-openshift:1.0
oc import-image -n openshift jboss-fuse70-karaf-openshift:1.0
oc import-image -n openshift jboss-fuse70-eap-openshift:1.0
oc import-image -n openshift jboss-fuse70-console:1.0
oc import-image -n openshift jboss-fuse70-java-openshift:1.0
oc import-image -n openshift jboss-fuse70-karaf-openshift:1.0
oc import-image -n openshift jboss-fuse70-eap-openshift:1.0
oc import-image -n openshift jboss-fuse70-console:1.0
The version tags in the image stream have the form 1.0-<BUILDNUMBER>. When you specify the tag as 1.0, you will get the latest build in the 1.0 stream.
You can also configure your Fuse applications so that a rebuild is automatically triggered whenever a new Fuse on OpenShift image becomes available. For details, see the section Setting Deployment Triggers in the OpenShift Container Platform 3.9 Developer Guide.
11.4. Patch Application Dependencies Using the Old-Style BOM
If your application pom.xml file is configured to use the old-style BOM, follow the instructions in this section to upgrade the Maven dependencies. To check whether your application is using an old-style BOM, compare the layout of your project’s pom.xml file with the examples in this section.
POM files that uses the old-style BOM have a similar layout to POM files from the previous major release of Fuse on OpenShift. As of Fuse 7.0 on OpenShift, projects generated from Maven archetypes and OpenShift templates are still using the old-style BOM by default.
11.4.1. Update Old-Style Dependencies in a Spring Boot Application
The following code fragment shows the standard layout of a POM file for a Spring Boot application in Fuse on OpenShift, highlighting some important property settings:
When it comes to patching or upgrading the application, the following version settings are important:
fabric8.version-
Defines the version of the
fabric8-project-bom-camel-spring-bootBOM file. fabric8.maven.plugin.version-
Defines the version of the
fabric8-maven-pluginplugin. Thefabric8-maven-pluginplugin is tightly integrated with each version of Fuse on OpenShift. Hence, whenever you patch or upgrade Fuse on OpenShift, it is essential to upgrade thefabric8-maven-pluginplugin to the matching version. spring-boot.version-
Defines the version of the
spring-boot-maven-pluginplugin.
11.4.2. Update Old-Style Dependencies in a Karaf Application
The following code fragment shows the standard layout of a POM file for a Karaf application in Fuse on OpenShift, highlighting some important property settings:
When it comes to patching or upgrading the application, the following version settings are important:
fabric8.version-
Defines the version of the
fabric8-project-bom-fuse-karafBOM file. fabric8.maven.plugin.version-
Defines the version of the
fabric8-maven-pluginplugin. Thefabric8-maven-pluginplugin is tightly integrated with each version of Fuse on OpenShift. Hence, whenever you patch or upgrade Fuse on OpenShift, it is essential to upgrade thefabric8-maven-pluginplugin to the matching version. karaf.plugin.version-
Defines the version of the
karaf-maven-pluginplugin.
11.4.3. Update Old-Style Dependencies in a JBoss EAP Application
The following code fragment shows the standard layout of a POM file for a JBoss EAP application in Fuse on OpenShift, highlighting some important property settings:
When it comes to patching or upgrading the application, the following version settings are important:
version.wildfly.camel-
Defines the version of the
wildfly-camel-bomBOM file. By updating the BOM version to a particular patch version, you are effectively updating all of the Fuse on JBoss EAP Maven dependencies as well.
11.4.4. Available Old-Style BOM Versions
The following table shows the old-style BOM versions corresponding to different patch releases of Red Hat Fuse.
| Red Hat Fuse Release | Fabric8 BOM Version | Fabric8 Maven Plugin Version | Wildfly Camel BOM Version |
|---|---|---|---|
| Red Hat Fuse 7.0.0 GA | 3.0.11.fuse-000039-redhat-1 | 3.5.33.fuse-000067-redhat-1 | 5.1.0.fuse-000063-redhat-1 |
| Red Hat Fuse 7.0.1 patch | 3.0.11.fuse-000065-redhat-3 | 3.5.33.fuse-000089-redhat-4 | 5.1.0.fuse-000083-redhat-3 |
To upgrade your Spring Boot or Apache Karaf application POM to a specific Red Hat Fuse patch release, set the fabric8.version property to the corresponding BOM version, and the fabric8.maven.plugin.version property to the corresponding Fabric8 Maven plugin version.
To upgrade your Fuse on JBoss EAP application POM, set the version.wildfly.camel property to the corresponding BOM version.
To discover the latest available versions, you can check the Red Hat Maven repository directly:
11.5. Patch Application Dependencies Using the New-Style BOM
If your application pom.xml file is configured to use the new-style BOM, follow the instructions in this section to upgrade the Maven dependencies. To check whether your application is using a new-style BOM, compare the layout of your project’s pom.xml file with the examples in this section.
11.5.1. Update New-Style Dependencies in a Spring Boot Application
The following code fragment shows the standard layout of a POM file for a Spring Boot application in Fuse on OpenShift, highlighting some important property settings:
When it comes to patching or upgrading the application, the following version settings are important:
bom.version-
Defines the version of the new-style
fuse-springboot-bomBOM, as well as the versions of thefabric8-maven-pluginplugin and thespring-boot-maven-pluginplugin.
11.5.2. Update New-Style Dependencies in a Karaf Application
The following code fragment shows the standard layout of a POM file for a Karaf application in Fuse on OpenShift, highlighting some important property settings:
When it comes to patching or upgrading the application, the following version settings are important:
bom.version-
Defines the version of the new-style
fuse-karaf-bomBOM, as well as the versions of thefabric8-maven-pluginplugin and thekaraf-maven-pluginplugin.
11.5.3. Update New-Style Dependencies in a JBoss EAP Application
The following code fragment shows the standard layout of a POM file for a JBoss EAP application in Fuse on OpenShift, highlighting some important property settings:
When it comes to patching or upgrading the application, the following version settings are important:
bom.version-
Defines the version of the
fuse-eap-bomBOM file (which replaces the old-stylewildfly-camel-bomBOM file). By updating the BOM version to a particular patch version, you are effectively updating all of the Fuse on JBoss EAP Maven dependencies as well.
11.5.4. Available New-Style BOM Versions
The following table shows the new-style BOM versions corresponding to different patch releases of Red Hat Fuse.
| Red Hat Fuse Release | org.jboss.redhat-fuse BOM Version |
|---|---|
| Red Hat Fuse 7.0.0 GA | 7.0.0.fuse-000027-redhat-1 |
| Red Hat Fuse 7.0.1 patch | 7.0.1.fuse-000008-redhat-4 |
To upgrade your application POM to a specific Red Hat Fuse patch release, set the bom.version property to the corresponding BOM version.
11.6. Patch the Fuse on OpenShift Templates
You must update the Fuse on OpenShift templates to the latest patch level, to ensure that new template-based projects are built using the correct patched dependencies. Patch the Fuse on OpenShift templates as follows:
You need administrator privileges to update the Fuse on OpenShift templates. Log in to the OpenShift Server as an administrator, as follows:
oc login URL -u ADMIN_USER -p ADMIN_PASS
oc login URL -u ADMIN_USER -p ADMIN_PASSCopy to Clipboard Copied! Toggle word wrap Toggle overflow Where
URLis the URL of the OpenShift server andADMIN_USER,ADMIN_PASSare the credentials of an administrator account on the OpenShift server.Install the patched Fuse on OpenShift templates. Enter the following commands at a command prompt:
Copy to Clipboard Copied! Toggle word wrap Toggle overflow NoteThe
BASEURLpoints at the GA branch of the Git repository that stores the quickstart templates and it will always have the latest templates atHEAD. So, any time you run the preceding commands, you will get the latest version of the templates.
Appendix A. Spring Boot Maven Plug-In
A.1. Spring Boot Maven Plugin Overview
This appendix describes the Spring Boot Maven Plugin. It provides the Spring Boot support in Maven and allows you to package the executable jar or war archives and run an application in-place.
A.2. Goals
The Spring Boot Plugin includes the following goals:
-
spring-boot:runruns your Spring Boot application. -
spring-boot:repackagerepackages your.jarand.warfiles to be executable. -
spring-boot:startandspring-boot:stopboth are used to manage the lifecycle of your Spring Boot application. -
spring-boot:build-infogenerates build information that can be used by the Actuator.
A.3. Usage
You can find general instructions on how to use the Spring Boot Plugin at: http://docs.spring.io/spring-boot/docs/current/maven-plugin/usage.html. Following is an example that illustrates the usage of the spring-boot-maven-plugin plugin:
For more information on Spring Boot Maven Plugin, refer the http://docs.spring.io/spring-boot/docs/current/maven-plugin link.
Appendix B. Karaf Maven Plug-In
B.1. Using the karaf-maven-plugin
The karaf-maven-plugin enables you to create a Karaf server assembly, which is a microservices style packaging of a Karaf container. That is, the finished assembly contains all of the essential components of a Karaf installation (for example, including the contents of the etc/, data/, lib, and system directories), but stripped down to the bare minimum required to run your application.
B.2. Karaf Maven Plug-In Goals
The following Karaf Maven plug-in goals are relevant to building server assemblies in Fuse on OpenShift:
B.2.1. karaf:assembly Goal
The recommended way to create a Karaf server assembly is to use the karaf:assembly goal provided by the karaf-maven-plugin. This assembles a server from the Maven dependencies in the project pom.
B.2.1.1. Example of a Maven Assembly
You can create a Karaf server assembly using the karaf:assembly goal provided by the karaf-maven-plugin. This goal assembles a microservices style server assembly from the Maven dependencies in the project POM. In a Fuse on OpenShift project, it is recommended that you bind the karaf:assembly goal to the Maven install phase. The project uses bundle packaging and the project itself gets installed into the Karaf container by listing it inside the startupBundles element. The following example displays the typical Maven configuration in a quickstart:
B.2.1.2. Parameters
The karaf:assembly goal supports the following parameters:
startupFeature-
This will result in the feature bundles being listed in
startup.propertiesat the appropriate start level and the bundles being copied into thesystem/internal repository. You can use<feature-name>or<feature-name>/<feature-version>formats. bootFeature-
This will result in the feature name being added to
boot-featuresin the features service configuration file and all the bundles in the feature copied into thesystem/internal repository. You can use<feature-name>or<feature-name>/<feature-version>formats. installedFeature-
This will result in all the bundles in the feature being installed in the
system/internal repository. Therefore, at run time the feature may be installed without access to external repositories. You can use<feature-name>or<feature-name>/<feature-version>formats. librariesThe plugin accepts the
librarieselement, which can have one or morelibrarychild elements that specify a library URL. For example:<libraries> <library>mvn:org.postgresql/postgresql/9.3-1102-jdbc41;type:=endorsed</library> </libraries><libraries> <library>mvn:org.postgresql/postgresql/9.3-1102-jdbc41;type:=endorsed</library> </libraries>Copy to Clipboard Copied! Toggle word wrap Toggle overflow
Appendix C. Fabric8 Maven Plug-In
C.1. Overview
With the help of fabric8-maven-plugin, you can deploy your Java applications to OpenShift. It provides tight integration with Maven and benefits from the build configuration already provided. This plug-in focuses on the following tasks:
- Building Docker-formatted images and,
- Creating OpenShift resource descriptors
It can be configured very flexibly and supports multiple configuration models for creating:
- A Zero-Config setup, which allows for a quick ramp-up with some opinionated defaults. Or for more advanced requirements,
-
An XML configuration, which provides additional configuration options that can be added to the
pom.xmlfile.
C.1.1. Building Images
The fabric8:build goal is for creating Docker-formatted images containing an application. It is easy to include build artifacts and their dependencies in these images. This plugin uses the assembly descriptor format from the maven-assembly-plugin to specify the content which will be added to the image.
Fuse on OpenShift supports only the OpenShift s2i build strategy, not the docker build strategy.
C.1.2. Kubernetes and OpenShift Resources
Kubernetes and OpenShift resource descriptors can be created with fabric8:resource. These files are packaged within the Maven artifacts and can be deployed to a running orchestration platform with fabric8:apply.
C.1.3. Configuration
There are three levels of configuration:
-
Zero-Config mode helps to make some very useful decisions based on what is present in the
pom.xmlfile like, what base image to use or which ports to expose. It is used for starting up things and for keeping quickstart applications small and tidy. - XML plugin configuration mode is similar to what docker-maven-plugin provides. It allows for type safe configuration with IDE support, but only a subset of possible resource descriptor features is provided.
- Kubernetes and OpenShift resource fragments are user provided YAML files that can be enriched by the plugin. This allows expert users to use plain configuration file with all their capabilities, but also to add project specific build information and avoid boilerplate code.
For more information about the Configuration, see https://maven.fabric8.io/#configuration.
C.2. Installing the Plugin
The Fabric8 Maven plugin is available under the Maven central repository and can be connected to pre- and post-integration phases as shown below.
C.3. Understanding the Goals
The Fabric8 Maven Plugin supports a rich set of goals for providing a smooth Java developer experience. You can categorize these goals as follows:
- Build goals are used to create and manage the Kubernetes and OpenShift build artifacts like Docker-formatted images or S2I builds.
- Development goals are used in deploying resource descriptors to the development cluster. Also, helps you to manage the lifecycle of the development cluster.
The following are the goals supported by the Fabric8 Maven plugin in the Red Hat Fabric Integration Services product:
| Goal | Description |
|---|---|
| fabric8:build |
Build images. Note that Fuse on OpenShift supports only the OpenShift |
| fabric8:resource | Create Kubernetes or OpenShift resource descriptors |
| fabric8:apply | Apply resources to a running cluster |
| fabric8:resource-apply |
Run |
| Goal | Description |
|---|---|
| fabric8:run |
Run a complete development workflow cycle |
| fabric8:deploy |
Deploy resources descriptors to a cluster after creating them and building the app. Same as |
| fabric8:undeploy | Undeploy and remove resources descriptors from a cluster. |
| fabric8:start | Start the application which has been deployed previously |
| fabric8:stop | Stop the application which has been deployed previously |
| fabric8:log | Show the logs of the running application |
| fabric8:debug | Enable remote debugging |
| fabric8:watch | Monitor the project workspace for changes and automatically trigger redeployment of application. |
For more information about the Fabric8 Maven plugin goals, see https://maven.fabric8.io/#goals.
C.4. Generators
The Fabric8 Maven plug-in provides generator components, which have the capability to build images automatically for specific kinds of application. In the case of Fuse on OpenShift, the following generator types are supported:
Depending on certain characteristics of the application project, the generator framework auto-detects what type of build is required and invokes the appropriate generator component.
The open source community version of the Fabric8 Maven plug-in provides additional generator types, but these are not supported in the Fuse on OpenShift product.
C.4.1. Zero-Configuration
Generators do not require any configuration. They are enabled by default and run automatically with default settings when the Fabric8 Maven plug-in is invoked. But you can easily customize the configuration of the generators, if you need to.
C.4.2. Modes for Specifying the Base Image
In Fuse on OpenShift, the base image for an application build can either be a Java image (for Spring Boot applications) or a Karaf image (for Karaf applications) The Fabric8 Maven plug-in supports the following modes for specifying the base image:
istag(Default) The image stream mode works by selecting a tagged image from an OpenShift image stream. In this case, the base image is specified in the following format:
<namespace>/<image-stream-name>:<tag>
<namespace>/<image-stream-name>:<tag>Copy to Clipboard Copied! Toggle word wrap Toggle overflow Where
<namespace>is the name of the OpenShift project where the image streams are defined (normally,openshift),<image-stream-name>is the name of the image stream, and<tag>identifies a particular image in the stream (or tracks the latest image in the stream).dockerThe docker mode works by selecting a particular Docker-formatted image directly from an image registry. Because the base image is obtained directly from a remote registry, an image stream is not required. In this case, the base image is specified in the following format:
[<registry-location-url>/]<image-namespace>/<image-name>:<tag>
[<registry-location-url>/]<image-namespace>/<image-name>:<tag>Copy to Clipboard Copied! Toggle word wrap Toggle overflow Where the image specifier optionally begins with the URL location of the remote image registry
<registry-location-url>, followed by the image namespace<image-namespace>, the image name<image-name>, and the tag,<tag>.
The default behaviour of the open source community version of fabric8-maven-plugin is different from the Red Hat productized version (for example, in the community version, the default mode is docker).
C.4.2.1. Default Values for istag Mode
When istag mode is selected (which is the default), the Fabric8 Maven plug-in uses the following default image specifiers to select the Fuse images (formatted as <namespace>/<image-stream-name>:<tag>):
openshift/fuse-eap-openshift:1.0 openshift/fuse-java-openshift:1.0 openshift/fuse-karaf-openshift:1.0
openshift/fuse-eap-openshift:1.0
openshift/fuse-java-openshift:1.0
openshift/fuse-karaf-openshift:1.0
In the Fuse image streams, the individual images are tagged with build numbers — for example, 2.0-1, 2.0-2, and so on. The 2.0 tag is configured to always track the latest image.
C.4.2.2. Default Values for docker Mode
When docker mode is selected, and assuming that the OpenShift environment is configured to access registry.access.redhat.com, the Fabric8 Maven plug-in uses the following default image specifiers to select the Fuse images (formatted as <image-namespace>/<image-name>:<tag>):
fuse7/fuse-eap-openshift:1.0 fuse7/fuse-java-openshift:1.0 fuse7/fuse-karaf-openshift:1.0
fuse7/fuse-eap-openshift:1.0
fuse7/fuse-java-openshift:1.0
fuse7/fuse-karaf-openshift:1.0C.4.2.3. Mode Configuration for Spring Boot Applications
To customize the mode configuration and base image location used for building Spring Boot applications, add a configuration element to the fabric8-maven-plugin configuration in your application’s pom.xml file, in the following format:
C.4.2.4. Mode Configuration for Karaf Applications
To customize the mode configuration and base image location used for building Karaf applications, add a configuration element to the fabric8-maven-plugin configuration in your application’s pom.xml file, in the following format:
C.4.2.5. Specifying the Mode on the Command Line
As an alternative to customizing the mode configuration directly in the pom.xml file, you can pass the mode settings directly to the mvn command, by adding the following property settings to the command line invocation:
C.4.3. Spring Boot
The Spring Boot generator gets activated when it finds a spring-boot-maven-plugin plug-in in the pom.xml file. The generated container port is read from the server.port property application.properties, defaulting to 8080 if it is not found.
In addition to the common generator options, this generator can be configured with the following options:
| Element | Description | Default |
|---|---|---|
| assemblyRef | If a reference to an assembly is given, then this is used without trying to detect the artifacts to include. | |
| targetDir | Directory within the generated image where the detected artefacts are put. Change this only if the base image is changed too. |
|
| jolokiaPort | Port of the Jolokia agent exposed by the base image. Set this to 0 if you don’t want to expose the Jolokia port. | 8778 |
| mainClass |
Main class to call. If not specified, the generator searches for the main class as follows. First, a check is performed to detect a fat-jar. Next, the | |
| webPort | Port to expose as service, which is supposed to be the port of a web application. Set this to 0 if you don’t want to expose a port. | 8080 |
| color | If set, force the use of color in the Spring Boot console output. |
The generator adds Kubernetes liveness and readiness probes pointing to either the management or server port as read from the application.properties. If the server.ssl.key-store property is set in application.properties then the probes are automatically set to use https.
C.4.4. Karaf
The Karaf generator gets activated when it finds a karaf-maven-plugin plug-in in the pom.xml file.
In addition to the common generator options, this generator can be configured with the following options:
| Element | Description | Default |
|---|---|---|
| baseDir | Directory within the generated image where the detected artifacts are put. Change this only if the base image is changed too. |
|
| jolokiaPort | Port of the Jolokia agent exposed by the base image. Set this to 0 if you don’t want to expose the Jolokia port. | 8778 |
| mainClass |
Main class to call. If not specified, the generator searches for the main class as follows. First, a check is performed to detect a fat-jar. Next, the | |
| user |
User and/or group under which the files should be added. The user must already exist in the base image. It has the general format |
|
| webPort | Port to expose as service, which is supposed to be the port of a web application. Set this to 0 if you don’t want to expose a port. | 8080 |
Appendix D. Fabric8 Camel Maven Plug-In
D.1. Goals
For validating Camel endpoints in the source code:
-
fabric8-camel:validatevalidates the Maven project source code to identify invalid camel endpoint uris
D.2. Adding the plugin to your project
To enable the Plugin, add the following to the pom.xml file:
<plugin> <groupId>io.fabric8.forge</groupId> <artifactId>fabric8-camel-maven-plugin</artifactId> <version>2.3.80</version> </plugin>
<plugin>
<groupId>io.fabric8.forge</groupId>
<artifactId>fabric8-camel-maven-plugin</artifactId>
<version>2.3.80</version>
</plugin>
Note: Check the current version number of the fabric8-forge release. You can find the latest release at the following location: https://github.com/fabric8io/fabric8-forge/releases.
However, you can run the validate goal from the command line or from your Java editor such as IDEA or Eclipse.
mvn fabric8-camel:validate
mvn fabric8-camel:validateYou can also enable the Plugin to run automatically as a part of the build to catch the errors.
The phase determines when the Plugin runs. In the above example, the phase is process-classes which runs after the compilation of the main source code.
You can also configure the maven plugin to validate the test source code. Change the phase as per the process-test-classes as shown below:
D.3. Running the Goal on any Maven Project
You can also run the validate goal on any Maven project, without adding the Plugin to the pom.xml file. You need to specify the Plugin, using its fully qualified name. For example, to run the goal on the camel-example-cdi plugin from Apache Camel, execute the following:
$cd camel-example-cdi
$mvn io.fabric8.forge:fabric8-camel-maven-plugin:2.3.80:validate
$cd camel-example-cdi
$mvn io.fabric8.forge:fabric8-camel-maven-plugin:2.3.80:validatewhich then runs and displays the following output:
After passing the validation successfully, you can validate the four endpoints. Let us assume that you made a typo in one of the Camel endpoint uris in the source code, such as:
@Uri("timer:foo?period=5000")
@Uri("timer:foo?period=5000")
You can make changes to include a typo error in the period option, such as:
@Uri("timer:foo?perid=5000")
@Uri("timer:foo?perid=5000")And when running the validate goal again, reports the following:
D.4. Options
The maven plugin supports the following options which you can configure from the command line (use -D syntax), or defined in the pom.xml file in the <configuration> tag.
D.4.1. Table
| Parameter | Default Value | Description |
|---|---|---|
| downloadVersion | true | Whether to allow downloading Camel catalog version from the internet. This is needed, if the project uses a different Camel version than this plugin is using by default. |
| failOnError | false |
Whether to fail if invalid Camel endpoints was found. By default the plugin logs the errors at |
| logUnparseable | false | Whether to log endpoint URIs which was un-parsable and therefore not possible to validate |
| includeJava | true | Whether to include Java files to be validated for invalid Camel endpoints |
| includeXML | true | Whether to include XML files to be validated for invalid Camel endpoints |
| includeTest | false | Whether to include test source code |
| includes | - | To filter the names of java and xml files to only include files matching any of the given list of patterns (wildcard and regular expression). Multiple values can be separated by comma. |
| excludes | - | To filter the names of java and xml files to exclude files matching any of the given list of patterns (wildcard and regular expression). Multiple values can be separated by comma. |
| ignoreUnknownComponent | true | Whether to ignore unknown components |
| ignoreIncapable | true | Whether to ignore incapable of parsing the endpoint uri |
| ignoreLenientProperties | true | Whether to ignore components that uses lenient properties. When this is true, then the uri validation is stricter but would fail on properties that are not part of the component but in the uri because of using lenient properties. For example using the HTTP components to provide query parameters in the endpoint uri. |
| showAll | false | Whether to show all endpoints and simple expressions (both invalid and valid). |
D.5. Validating include test
If you have a Maven project, then you can run the plugin to validate the endpoints in the unit test source code as well. You can pass in the options using -D style as shown:
$cd myproject
$mvn io.fabric8.forge:fabric8-camel-maven-plugin:2.3.80:validate -DincludeTest=true
$cd myproject
$mvn io.fabric8.forge:fabric8-camel-maven-plugin:2.3.80:validate -DincludeTest=trueAppendix E. JVM Environment Variables
E.1. S2I Java Builder Image with OpenJDK 8
In this S2I builder image for Java builds, you can run results directly without using any other application server. It is suitable for microservices with a flat classpath (including fat jars).
You can configure Java options when using the Fuse on OpenShift images. All the options for the Fuse on OpenShift images are set by using environment variables as given below. For the JVM options, you can use the environment variable JAVA_OPTIONS. Also, provide JAVA_ARGS for the arguments which are given through to the application.
E.2. S2I Karaf Builder Image with OpenJDK 8
This image can be used with OpenShift’s Source To Image in order to build Karaf4 custom assembly based maven projects.
Following is the command to use S2I:
s2i build <git repo url> registry.access.redhat.com/fuse7/fuse-karaf-openshift:1.0 <target image name> docker run <target image name>
s2i build <git repo url> registry.access.redhat.com/fuse7/fuse-karaf-openshift:1.0 <target image name>
docker run <target image name>E.2.1. Configuring the Karaf4 Assembly
The location of the Karaf4 assembly built by the maven project can be provided in multiple ways.
-
Default assembly file
*.tar.gzin output directory -
By using the
-e flagin sti or oc command -
By setting
FUSE_ASSEMBLYproperty in.sti/environmentunder the project source
E.2.2. Customizing the Build
It is possible to customize the maven build. The MAVEN_ARGS environment variable can be set to change the behaviour.
By default, the MAVEN_ARGS is set as follows:
Karaf4: install karaf:assembly karaf:archive -DskipTests -e
E.3. Environment Variables
Following are the environment variables that are used to influence the behaviour of S2I Java and Karaf builder images:
E.3.1. Build Time
During the build time, you can use the following environment variables:
-
MAVEN_ARGS: Arguments to use when calling maven, replacing the default package. -
MAVEN_ARGS_APPEND: Additional Maven arguments, useful for adding temporary arguments like-Xor-am-pl. -
ARTIFACT_DIR: Path totarget/where the jar files are created for multi-module builds. These are added to${MAVEN_ARGS}. -
ARTIFACT_COPY_ARGS: Arguments to use when copying artifacts from the output directory to the application directory. Useful to specify which artifacts will be part of the image. -
MAVEN_CLEAR_REPO: If set, remove the Maven repository after you build the artifact. This is useful for keeping the application image small, however, It prevents the incremental builds. The default value is false.
E.3.2. Run Time
You can use the following environment variables to influence the run script:
-
JAVA_APP_DIR: the directory where the application resides. All paths in your application are relative to the directory. -
JAVA_LIB_DIR: this directory contains the Java jar files as well an optional classpath file, which holds the classpath. Either as a single line classpath (colon separated) or with jar files listed line-by-line. However, If not set, thenJAVA_LIB_DIRis the same asJAVA_APP_DIRdirectory. -
JAVA_OPTIONS: options to add when calling java. -
JAVA_MAX_MEM_RATIO: It is used when no-Xmxoption is given in JAVA_OPTIONS. This is used to calculate a default maximal heap Memory based on a containers restriction. If used in a Docker container without any memory constraints for the container, then this option has no effect. -
JAVA_MAX_CORE: It restricts manually the number of cores available, which is used for calculating certain defaults like the number of garbage collector threads. If set to 0, you cannot perform the base JVM tuning based on the number of cores. -
JAVA_DIAGNOSTICS: Set this to fetch some diagnostics information, to standard out when things are happening. -
JAVA_MAIN_CLASS: A main class to use as an argument for java. When you give this environment variable, all jar files in$JAVA_APP_DIRdirectory are added to the classpath and in the$JAVA_LIB_DIRdirectory. -
JAVA_APP_JAR: A jar file with an appropriate manifest, so that you can start withjava -jar. However, if it is not provided, then$JAVA_MAIN_CLASSis set. In all cases, this jar file is added to the classpath. -
JAVA_APP_NAME: Name to use for the process. -
JAVA_CLASSPATH: the classpath to use. If not given, the startup script checks for a file${JAVA_APP_DIR}/classpathand use its content as classpath. If this file doesn’t exists, then all jars in the application directory are added under(classes:${JAVA_APP_DIR}/*). -
JAVA_DEBUG: If set, remote debugging will be switched on. -
JAVA_DEBUG_PORT: Port used for remote debugging. The default value is 5005.
E.3.3. Jolokia Configuration
You can use the following environment variables in Jolokia:
-
AB_JOLOKIA_OFF: If set, disables the activation of Jolokia (echos an empty value). By default, Jolokia is enabled. -
AB_JOLOKIA_CONFIG: If set, uses the file (including path) as Jolokia JVM agent properties. However, If not set, the/opt/jolokia/etc/jolokia.propertieswill be created using the settings. -
AB_JOLOKIA_HOST: Host address to bind (Default value is 0.0.0.0) -
AB_JOLOKIA_PORT: Port to use (Default value is 8778) -
AB_JOLOKIA_USER: User for basic authentication. By default, it isjolokia -
AB_JOLOKIA_PASSWORD: Password for basic authentication. By default, authentication is switched off -
AB_JOLOKIA_PASSWORD_RANDOM: Generates a value and is written in/opt/jolokia/etc/jolokia.pwfile -
AB_JOLOKIA_HTTPS: Switch on secure communication withHTTPS. By default, self-signed server certificates are generated, if no serverCert configuration is given inAB_JOLOKIA_OPTS -
AB_JOLOKIA_ID: Agent ID to use -
AB_JOLOKIA_DISCOVERY_ENABLED: Enables the Jolokia discovery. The default value is false. -
AB_JOLOKIA_OPTS: Additional options to be appended to the agent configuration. Options are given in the formatkey=value
Here is an option for integration with various environments:
-
AB_JOLOKIA_AUTH_OPENSHIFT: Switch on client authentication for OpenShift TSL communication. Ensure that the value of this parameter must be present in a client certificate. If you enable this parameter, it will automatically switch Jolokia intoHTTPScommunication mode. The default CA cert is set to/var/run/secrets/kubernetes.io/serviceaccount/ca.crt
Application arguments can be provided by setting the variable JAVA_ARGS to the corresponding value.
Appendix F. Tuning JVMs to Run in Linux Containers
F.1. Overview
Java processes running inside the Linux container do not behave as expected when you allow JVM ergonomics to set the default values for the garbage collector, heap size, and runtime compiler. When you execute a Java application without any tuning parameters — for example, java -jar mypplication-fat.jar — the JVM automatically sets several parameters based on the host limits, not the container limits.
This section provides information about the packaging of Java applications inside a Linux container so that the container’s limits are taken into consideration for calculating default values.
F.2. Tuning the JVM
The current generation of Java JVMs are not container-aware, so they allocate resources based on the size of the physical host, not on the size of the container. For example, a JVM normally sets the maximum heap size to be 1/4 of the physical memory on a host. On a large host machine, this value can easily exceed the memory limit defined for a container and, if the container limit is exceeded at run time, OpenShift will kill the application.
To solve this issue, you can use the Fuse on OpenShift base image that is capable of understanding that a Java JVM runs inside a restricted container and automatically adjusts the maximum heap size, if not done manually. It provides a solution of setting the maximum memory limit and the core limit on the JVM that runs your application.
F.3. Default Behaviour of Fuse On OpenShift Images
In Fuse on OpenShift, the base image for an application build can either be a Java image (for Spring Boot applications) or a Karaf image (for Karaf applications). Fuse on OpenShift images execute a script that reads the container limits and uses these limits as the basis for allocating resources. By default, the script allocates the following resources to the JVM:
- 50% of the container memory limit,
- 50% of the container core limit.
There are some exceptions to this. For Karaf and Java images, when the physical memory is below 300MB threshold, heap size is restored to one-fourth default heap size instead of the one-half.
F.4. Custom Tuning of Fuse on OpenShift images
The script sets the CONTAINER_MAX_MEMORY and CONTAINER_CORE_LIMIT environment variables, which can be read by a custom application to tune its internal resources. Additionally, you can specify the following runtime environment variables that enable you to customize the settings on the JVM that runs your application:
-
JAVA_OPTIONS -
JAVA_MAX_MEM_RATIO
To customize the limits explicitly, you can set the JAVA_MAX_MEM_RATIO environment variable by editing the deployment.yml file, in your Maven project. For example:
F.5. Tuning Third-Party Libraries
Red Hat recommends you to customize limits for any third-party Java libraries such as Jetty. These libraries would use the given default limits, if you fail to customize limits manually.
The startup script exposes some environment variables describing container limits which can be used by applications:
CONTAINER_CORE_LIMIT- A calculated core limit
CONTAINER_MAX_MEMORY- Memory limit given to the container