Installation Guide
Installing Red Hat Gluster Storage 3.2
Abstract
Chapter 1. Planning Red Hat Gluster Storage Installation
1.1. About Red Hat Gluster Storage
Red Hat Gluster Storage Server for On-Premise enables enterprises to treat physical storage as a virtualized, scalable, and centrally managed pool of storage by using commodity server and storage hardware.
Red Hat Gluster Storage Server for Public Cloud packages GlusterFS as an Amazon Machine Image (AMI) for deploying scalable NAS in the AWS public cloud. This powerful storage server provides a highly available, scalable, virtualized, and centrally managed pool of storage for Amazon users.
1.2. Prerequisites
XFS - Format the back-end file system using XFS for glusterFS bricks. XFS can journal metadata, resulting in faster crash recovery. The XFS file system can also be defragmented and expanded while mounted and active.
Note
ext3 or ext4 to upgrade to a supported version of Red Hat Gluster Storage using the XFS back-end file system.
Format glusterFS bricks using XFS on the Logical Volume Manager to prepare for the installation.
- Synchronize time across all Red Hat Gluster Storage servers using the Network Time Protocol (NTP) daemon.
1.2.1. Network Time Protocol Setup
ntpd daemon to automatically synchronize the time during the boot process as follows:
- Edit the NTP configuration file
/etc/ntp.confusing a text editor such as vim or nano.nano /etc/ntp.conf
# nano /etc/ntp.confCopy to Clipboard Copied! Toggle word wrap Toggle overflow - Add or edit the list of public NTP servers in the
ntp.conffile as follows:The Red Hat Enterprise Linux 6 version of this file already contains the required information. Edit the contents of this file if customization is required.server 0.rhel.pool.ntp.org server 1.rhel.pool.ntp.org server 2.rhel.pool.ntp.org
server 0.rhel.pool.ntp.org server 1.rhel.pool.ntp.org server 2.rhel.pool.ntp.orgCopy to Clipboard Copied! Toggle word wrap Toggle overflow - Optionally, increase the initial synchronization speed by appending the
iburstdirective to each line:server 0.rhel.pool.ntp.org iburst server 1.rhel.pool.ntp.org iburst server 2.rhel.pool.ntp.org iburst
server 0.rhel.pool.ntp.org iburst server 1.rhel.pool.ntp.org iburst server 2.rhel.pool.ntp.org iburstCopy to Clipboard Copied! Toggle word wrap Toggle overflow - After the list of servers is complete, set the required permissions in the same file. Ensure that only
localhosthas unrestricted access:restrict default kod nomodify notrap nopeer noquery restrict -6 default kod nomodify notrap nopeer noquery restrict 127.0.0.1 restrict -6 ::1
restrict default kod nomodify notrap nopeer noquery restrict -6 default kod nomodify notrap nopeer noquery restrict 127.0.0.1 restrict -6 ::1Copy to Clipboard Copied! Toggle word wrap Toggle overflow - Save all changes, exit the editor, and restart the NTP daemon:
service ntpd restart
# service ntpd restartCopy to Clipboard Copied! Toggle word wrap Toggle overflow - Ensure that the
ntpddaemon starts at boot time:chkconfig ntpd on
# chkconfig ntpd onCopy to Clipboard Copied! Toggle word wrap Toggle overflow
ntpdate command for a one-time synchronization of NTP. For more information about this feature, see the Red Hat Enterprise Linux Deployment Guide.
1.3. Hardware Compatibility
1.4. Port Information
| Port Number | Usage |
|---|---|
| 22 | For sshd used by geo-replication. |
| 111 | For rpc port mapper. |
| 139 | For netbios service. |
| 445 | For CIFS protocol. |
| 965 | For NFS's Lock Manager (NLM). |
| 2049 | For glusterFS's NFS exports (nfsd process). |
| 24007 | For glusterd (for management). |
| 24009 - 24108 | For client communication with Red Hat Gluster Storage 2.0. |
| 38465 | For NFS mount protocol. |
| 38466 | For NFS mount protocol. |
| 38468 | For NFS's Lock Manager (NLM). |
| 38469 | For NFS's ACL support. |
| 39543 | For oVirt (Red Hat Gluster Storage-Console). |
| 49152 - 49251 | For client communication with Red Hat Gluster Storage 2.1 and for brick processes depending on the availability of the ports. The total number of ports required to be open depends on the total number of bricks exported on the machine. |
| 54321 | For VDSM (Red Hat Gluster Storage Console). |
| 55863 | For oVirt (Red Hat Gluster Storage-Console). |
| Port Number | Usage |
|---|---|
| 443 | For HTTPS request. |
| 6010 | For Object Server. |
| 6011 | For Container Server. |
| 6012 | For Account Server. |
| 8080 | For Proxy Server. |
| Port Number | Usage |
|---|---|
| 80 | For HTTP protocol (required only if Nagios server is running on a Red Hat Gluster Storage node). |
| 443 | For HTTPS protocol (required only for Nagios server). |
| 5667 | For NSCA service (required only if Nagios server is running on a Red Hat Gluster Storage node). |
| 5666 | For NRPE service (required in all Red Hat Gluster Storage nodes). |
| Port Number | Usage |
|---|---|
| 111 | For RPC Bind. |
| 963 | For NFS's Lock Manager (NLM). |
1.5. Supported Versions of Red Hat Gluster Storage
| RHGS version | glusterfs and glusterfs-fuse | RHGS op-version | SMB | NFS | gDeploy |
|---|---|---|---|---|---|
| 3.0 | 3.6.0.28-1 | 30000 | SMB 1, 2.0 | NFSv3 | - |
| 3.0 Update 1 | 3.6.0.29-1 | 30000 | SMB 1, 2.0 | NFSv3 | gdeploy-1.0-12 |
| 3.0 Update 2 | 3.6.0.29-3 | 30000 | SMB 1, 2.0 | NFSv3 | gdeploy-1.0-12 |
| 3.0 Update 3 | 3.6.0.42-1 | 30000 | SMB 1, 2.0 | NFSv3 | gdeploy-1.0-12 |
| 3.0 Update 4 | 3.6.0.53-1 | 30004 | SMB 1, 2.0, 2.1, 3.0 | NFSv3, NFSv4 | gdeploy-1.0-12 |
| 3.1 | 3.7.1-11 | 30703 | SMB 1, 2.0, 2.1, 3.0 | NFSv3, NFSv4 | gdeploy-1.0-12 |
| 3.1 Update 1 | 3.7.1-16 | 30703 | SMB 1, 2.0, 2.1, 3.0 | NFSv3, NFSv4 | gdeploy-1.0-12 |
| 3.1 Update 2 | 3.7.5-19 | 30707 | SMB 1, 2.0, 2.1, 3.0 | NFSv3, NFSv4 | gdeploy-1.0-12 |
| 3.1 Update 3 | 3.7.9-12 | 30712 | SMB 1, 2.0, 2.1, 3.0, 3.1.1 | NFSv3, NFSv4 | gdeploy-2.0-16 |
| 3.1 Update 3 (Async Security Fix) | 3.7.9-12 | 30712 | SMB 1, 2.0, 2.1, 3.0, 3.1.1 | NFSv3, NFSv4 | gdeploy-2.0.1-8 |
| 3.2 | 3.8.4-18.6 | 31001 | SMB 1, 2.0, 2.1, 3.0, 3.1.1 | NFSv3, NFSv4 | gdeploy-2.0.1-13 |
| 3.2 (Async Bug Fix) | 3.8.4-18.7 | 31001 | SMB 1, 2.0, 2.1, 3.0, 3.1.1 | NFSv3, NFSv4 | gdeploy-2.0.1-13 |
rhel-x86_64-server-rhsclient-6).
Chapter 2. Installing Red Hat Gluster Storage
Important
- Technology preview packages will also be installed with this installation of Red Hat Gluster Storage Server. For more information about the list of technology preview features, see chapter Technology Previews in the Red Hat Gluster Storage 3.2 Release Notes.
- When you clone a virtual machine that has Red Hat Gluster Storage Server installed, you need to remove the
/var/lib/glusterd/glusterd.infofile (if present) before you clone. If you do not remove this file, all cloned machines will have the same UUID. The file will be automatically recreated with a UUID on initial start-up of the glusterd daemon on the cloned virtual machines.
2.1. Obtaining Red Hat Gluster Storage
2.1.1. Obtaining Red Hat Gluster Storage Server for On-Premise
- Visit the Red Hat Customer Service Portal at https://access.redhat.com/login and enter your user name and password to log in.
- Click Downloads to visit the Software & Download Center.
- In the Red Hat Gluster Storage Server area, click to download the latest version of the software.
2.1.2. Obtaining Red Hat Gluster Storage Server for Public Cloud
2.2. Installing from an ISO Image
2.2.1. Installing Red Hat Gluster Storage 3.2 on Red Hat Enterprise Linux 6.7 and later
- Download an ISO image file for Red Hat Gluster Storage Server as described in Section 2.1, “Obtaining Red Hat Gluster Storage”The installation process launches automatically when you boot the system using the ISO image file.Press Enter to begin the installation process.
Note
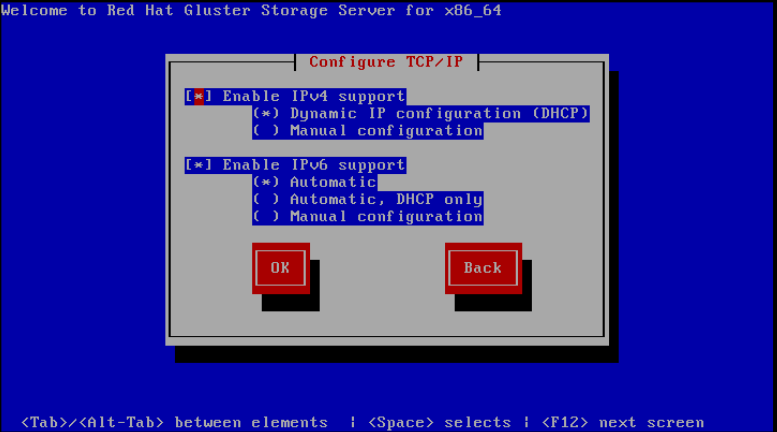
For some hypervisors, while installing Red Hat Gluster Storage on a virtual machine, you must select theInstall System with basic video driveroption. - The Configure TCP/IP screen displays.To configure your computer to support TCP/IP, accept the default values for Internet Protocol Version 4 (IPv4) and Internet Protocol Version 6 (IPv6) and click OK. Alternatively, you can manually configure network settings for both Internet Protocol Version 4 (IPv4) and Internet Protocol Version 6 (IPv6).
Important
NLM Locking protocol implementation in Red Hat Gluster Storage does not support clients over IPv6.Figure 2.1. Configure TCP/IP
- The Welcome screen displays.Click Next.
- The Language Selection screen displays. Select the preferred language for the installation and the system default and click Next.
- The Keyboard Configuration screen displays. Select the preferred keyboard layout for the installation and the system default and click Next.
- The Storage Devices screen displays. Select Basic Storage Devices.Click Next.
- The Hostname configuration screen displays.Enter the hostname for the computer. You can also configure network interfaces if required. Click Next.
- The Time Zone Configuration screen displays. Set your time zone by selecting the city closest to your computer's physical location.
- The Set Root Password screen displays.The root account's credentials will be used to install packages, upgrade RPMs, and perform most system maintenance. As such, setting up a root account and password is one of the most important steps in the installation process.
Note
The root user (also known as the superuser) has complete access to the entire system. For this reason, you should only log in as the root user to perform system maintenance or administration.The Set Root Password screen prompts you to set a root password for your system. You cannot proceed to the next stage of the installation process without entering a root password.Enter the root password into the Root Password field. The characters you enter will be masked for security reasons. Then, type the same password into the Confirm field to ensure the password is set correctly. After you set the root password, click Next. - The Partitioning Type screen displays.Partitioning allows you to divide your hard drive into isolated sections that each behave as their own hard drive. Partitioning is particularly useful if you run multiple operating systems. If you are unsure how to partition your system, see An Introduction to Disk Partitions in Red Hat Enterprise Linux 6 Installation Guide for more information.In this screen you can choose to create the default partition layout in one of four different ways, or choose to partition storage devices manually to create a custom layout.If you are not comfortable partitioning your system, choose one of the first four options. These options allow you to perform an automated installation without having to partition your storage devices yourself. Depending on the option you choose, you can still control what data, if any, is removed from the system. Your options are:
- Use All Space
- Replace Existing Linux System(s)
- Shrink Current System
- Use Free Space
- Create Custom Layout
Choose the preferred partitioning method by clicking the radio button to the left of its description in the dialog box.Click Next once you have made your selection. For more information on disk partitioning, see Disk Partitioning Setup in the Red Hat Enterprise Linux 6 Installation Guide.Important
- It is recommended to create a separate
/varpartition that is large enough (50GB - 100GB) for log files, geo-replication related miscellaneous files, and other files. - If a user does not select Create Custom Layout, all the connected/detected disks will be used in the Volume Group for the
/and/homefilesystems.
- The Boot Loader screen displays with the default settings.Click Next.
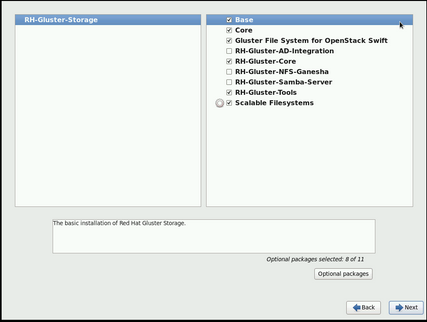
- The Minimal Selection screen displays.Click Next to retain the default selections and proceed with the installation.
- To customize your package set further, select the Customize now option and click Next. This will take you to the Customizing the Software Selection screen.Click Next to retain the default selections and proceed with the installation.
- For Red Hat Gluster Storage 3.0.4 or later, if you require the Samba packages, ensure you select the RH-Gluster-Samba-Server component, in the Customizing the Software Selection screen. If you require samba active directory integration with gluster, ensure you select RH-Gluster-AD-Integration component. For NFS-Ganesha select RH-Gluster-NFS-Ganesha.
Figure 2.2. Customize Packages
- The Package Installation screen displays.Red Hat Gluster Storage Server reports the progress on the screen as it installs the selected packages in the system.
- On successful completion, the Installation Complete screen displays.
- Click Reboot to reboot the system and complete the installation of Red Hat Gluster Storage Server.Ensure that you remove any installation media if it is not automatically ejected upon reboot.Congratulations! Your Red Hat Gluster Storage Server installation is now complete.
2.2.2. Installing Red Hat Gluster Storage 3.2 on Red Hat Enterprise Linux 7.3
- Download an ISO image file for Red Hat Gluster Storage Server as described in Section 2.1, “Obtaining Red Hat Gluster Storage”
- In the Welcome to Red Hat Gluster Storage 3.2 screen, select the language that will be used for the rest of the installation and click Continue. This selection will also become the default for the installed system, unless changed later.
Note
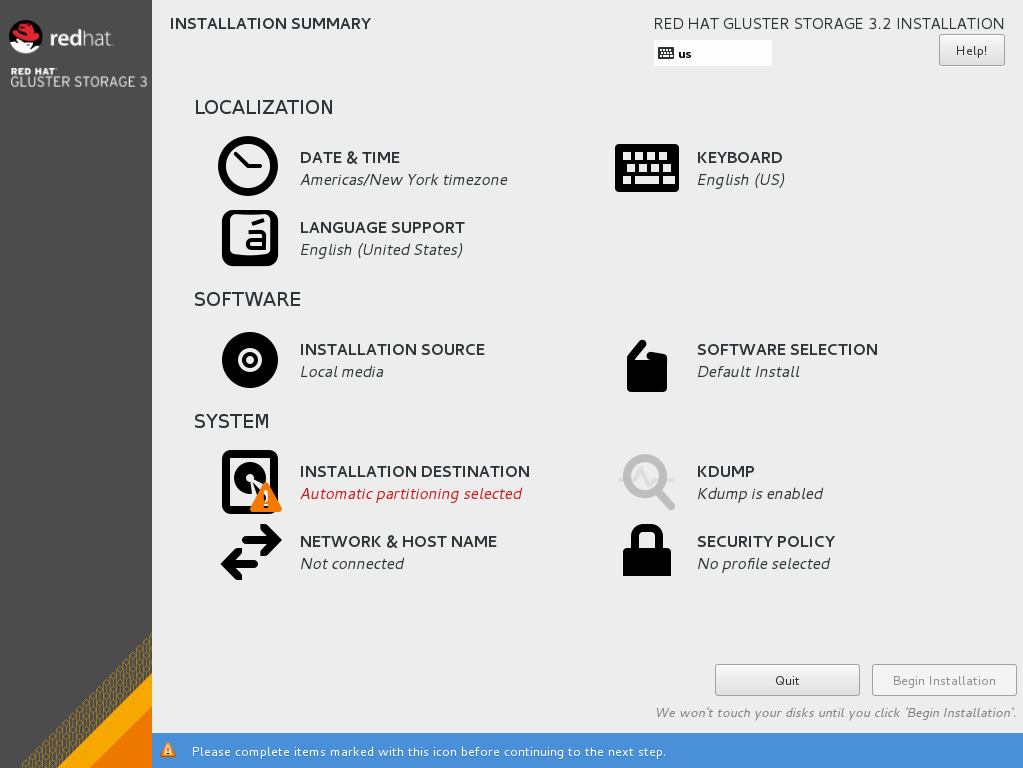
One language is pre-selected by default on top of the list. If network access is configured at this point (for example, if you booted from a network server instead of local media), the pre-selected language will be determined based on automatic location detection using the GeoIP module. - The Installation Summary screen is the central location for setting up an installation.
Figure 2.3. Installation Summary
Instead of directing you through consecutive screens, the Red Hat Gluster Storage 3.2 installation program on Red Hat Enterprise Linux 7.3 allows you to configure the installation in the order you choose.Select a menu item to configure a section of the installation. When you have completed configuring a section, or if you would like to complete that section later, click the Done button located in the upper left corner of the screen.Only sections marked with a warning symbol are mandatory. A note at the bottom of the screen warns you that these sections must be completed before the installation can begin. The remaining sections are optional. Beneath each section's title, the current configuration is summarized. Using this you can determine whether you need to visit the section to configure it further.The following list provides a brief information of each of the menu item on the Installation Summary screen:- Date & Time
To configure time zone, date, and optional settings for network time, select Date & Time.
- Language Support
To install support for additional locales and language dialects, select Language Support.
- Keyboard Configuration
To add multiple keyboard layouts to your system, select Keyboard.
- Installation Source
To specify a file or a location to install Red Hat Enterprise Linux from, select Installation Source. On this screen, you can choose between locally available installation media, such as a DVD or an ISO file, or a network location.
- Network & Hostname
To configure essential networking features for your system, select Network & Hostname.
Important
When the Red Hat Gluster Storage 3.2 on Red Hat Enterprise Linux 7.3 installation finishes and the system boots for the first time, any network interfaces which you configured during the installation will be activated. However, the installation does not prompt you to configure network interfaces on some common installation paths - for example, when you install Red Hat Gluster Storage 3.2 on Red Hat Enterprise Linux 7.3 from a DVD to a local hard drive.When you install Red Hat Gluster Storage 3.2 on Red Hat Enterprise Linux 7.3 from a local installation source to a local storage device, be sure to configure at least one network interface manually if you require network access when the system boots for the first time. You will also need to set the connection to connect automatically after boot when editing the configuration. - Software Selection
To specify which packages will be installed, select Software Selection. If you require the following optional Add-Ons, then select the required Add-Ons and click Done:
- RH-Gluster-AD-Integration
- RH-Gluster-NFS-Ganesha
- RH-Gluster-Samba-Server
- Installation Destination
To select the disks and partition the storage space on which you will install Red Hat Gluster Storage, select Installation Destination. For more information on Installation Destination, see Red Hat Enterprise Linux 7 Installation Guide.
- Kdump
Kdump is a kernel crash dumping mechanism which, in the event of a system crash, captures information that can be invaluable in determining the cause of the crash. Use this option to select whether or not to use Kdump on the system
- After making the necessary configurations, click Begin Installation on the Installation Summary screen.
Warning
Up to this point in the installation process, no lasting changes have been made on your computer. When you click Begin Installation, the installation program will allocate space on your hard drive and start to transfer Red Hat Gluster Storage into this space. Depending on the partitioning option that you chose, this process might include erasing data that already exists on your computer.To revise any of the choices that you made up to this point, return to the relevant section of the Installation Summary screen. To cancel installation completely, click Quit or switch off your computer.If you have finished customizing the installation and are certain that you want to proceed, click Begin Installation.After you click Begin Installation, allow the installation process to complete. If the process is interrupted, for example, by you switching off or resetting the computer, or by a power outage, you will probably not be able to use your computer until you restart and complete the Red Hat Gluster Storage installation process - Once you click Begin Installation, the progress screen appears. Red Hat Gluster Storage reports the installation progress on the screen as it writes the selected packages to your system. Following is a brief description of the options on this screen:
- Root Password
The Root Password menu item is used to set the password for the root account. The root account is used to perform critical system management and administration tasks. The password can be configured either while the packages are being installed or afterwards, but you will not be able to complete the installation process until it has been configured.
- User Creation
Creating a user account is optional and can be done after installation, but it is recommended to do it on this screen. A user account is used for normal work and to access the system. Best practice suggests that you always access the system via a user account and not the root account.
- After the installation is completed, click Reboot to reboot your system and begin using Red Hat Gluster Storage.
2.3. Installing Red Hat Gluster Storage Server on Red Hat Enterprise Linux (Layered Install)
Important
- Layered Installation is not available to all customers. Contact your Red Hat representative for more details on whether you can use it.
- It is recommended to create a separate
/varpartition that is large enough (50GB - 100GB) for log files, geo-replication related miscellaneous files, and other files.
Perform a base install of Red Hat Enterprise Linux Server
Red Hat Gluster Storage requires a kernel version of 2.6.32-431.17.1 or higher. This is available in Red Hat Enterprise Linux 6.5 and higher, and in Red Hat Enterprise Linux 7.Register the System with Subscription Manager
Run the following command and enter your Red Hat Network user name and password to register the system with the Red Hat Network:subscription-manager register
# subscription-manager registerCopy to Clipboard Copied! Toggle word wrap Toggle overflow Identify Available Entitlement Pools
Run the following commands to find entitlement pools containing the repositories required to install Red Hat Gluster Storage:subscription-manager list --available
# subscription-manager list --availableCopy to Clipboard Copied! Toggle word wrap Toggle overflow Attach Entitlement Pools to the System
Use the pool identifiers located in the previous step to attach theRed Hat Enterprise Linux ServerandRed Hat Gluster Storageentitlements to the system. Run the following command to attach the entitlements:subscription-manager attach --pool=[POOLID]
# subscription-manager attach --pool=[POOLID]Copy to Clipboard Copied! Toggle word wrap Toggle overflow For example:subscription-manager attach --pool=8a85f9814999f69101499c05aa706e47
# subscription-manager attach --pool=8a85f9814999f69101499c05aa706e47Copy to Clipboard Copied! Toggle word wrap Toggle overflow Enable the Required Channels
For Red Hat Gluster Storage 3.2 on Red Hat Enterprise Linux 6.7 and later- Run the following commands to enable the repositories required to install Red Hat Gluster Storage:
subscription-manager repos --enable=rhel-6-server-rpms
subscription-manager repos --enable=rhel-scalefs-for-rhel-6-server-rpms
subscription-manager repos --enable=rhs-3-for-rhel-6-server-rpms
# subscription-manager repos --enable=rhel-6-server-rpms
# subscription-manager repos --enable=rhel-scalefs-for-rhel-6-server-rpms
# subscription-manager repos --enable=rhs-3-for-rhel-6-server-rpms
Copy to Clipboard Copied! Toggle word wrap Toggle overflow - For Red Hat Gluster Storage 3.0.4 and later, if you require Samba, then enable the following repository:
subscription-manager repos --enable=rh-gluster-3-samba-for-rhel-6-server-rpms
# subscription-manager repos --enable=rh-gluster-3-samba-for-rhel-6-server-rpmsCopy to Clipboard Copied! Toggle word wrap Toggle overflow For more information about installing Samba, see Chapter 3, Deploying Samba on Red Hat Gluster Storage - If you require NFS-Ganesha then enable the following repository:
subscription-manager repos
# subscription-manager repos
--enable=rh-gluster-3-nfs-for-rhel-6-server-rpms
Copy to Clipboard Copied! Toggle word wrap Toggle overflow For more information about installing NFS-Ganesha, see Chapter 4, Deploying NFS-Ganesha on Red Hat Gluster Storage.
For Red Hat Gluster Storage 3.2 on Red Hat Enterprise Linux 7.x- Run the following commands to enable the repositories required to install Red Hat Gluster Storage
subscription-manager repos --enable=rhel-7-server-rpms
subscription-manager repos --enable=rh-gluster-3-for-rhel-7-server-rpms
# subscription-manager repos --enable=rhel-7-server-rpms
# subscription-manager repos --enable=rh-gluster-3-for-rhel-7-server-rpms
Copy to Clipboard Copied! Toggle word wrap Toggle overflow - For Red Hat Gluster Storage 3.0.4 and later, if you require Samba, then enable the following repository:
subscription-manager repos --enable=rh-gluster-3-samba-for-rhel-7-server-rpms
# subscription-manager repos --enable=rh-gluster-3-samba-for-rhel-7-server-rpmsCopy to Clipboard Copied! Toggle word wrap Toggle overflow For more information about installing Samba, see Chapter 3, Deploying Samba on Red Hat Gluster Storage - If you require NFS-Ganesha then enable the following repository:
subscription-manager repos
# subscription-manager repos
--enable=rh-gluster-3-nfs-for-rhel-7-server-rpms
Copy to Clipboard Copied! Toggle word wrap Toggle overflow For more information about installing NFS-Ganesha, see Chapter 4, Deploying NFS-Ganesha on Red Hat Gluster Storage.
Verify if the Channels are Enabled
Run the following command to verify if the channels are enabled:yum repolist
# yum repolistCopy to Clipboard Copied! Toggle word wrap Toggle overflow Kernel Version Requirement
Red Hat Gluster Storage requires the kernel-2.6.32-431.17.1.el6 version or higher to be used on the system. Verify the installed and running kernel versions by running the following command:rpm -q kernel
# rpm -q kernel
kernel-2.6.32-431.el6.x86_64
kernel-2.6.32-431.17.1.el6.x86_64
Copy to Clipboard Copied! Toggle word wrap Toggle overflow uname -r
# uname -r
2.6.32-431.17.1.el6.x86_64
Copy to Clipboard Copied! Toggle word wrap Toggle overflow Update all packages
Ensure that all packages are up to date by running the following command.yum update
# yum updateCopy to Clipboard Copied! Toggle word wrap Toggle overflow Important
If any kernel packages are updated, reboot the system with the following command.shutdown -r now
# shutdown -r nowCopy to Clipboard Copied! Toggle word wrap Toggle overflow Install Red Hat Gluster Storage
Run the following command to install Red Hat Gluster Storage:yum install redhat-storage-server
# yum install redhat-storage-serverCopy to Clipboard Copied! Toggle word wrap Toggle overflow - For Red Hat Gluster Storage 3.0.4 and later, if you require Samba, then execute the following command to install Samba:
yum groupinstall RH-Gluster-Samba-Server
# yum groupinstall RH-Gluster-Samba-ServerCopy to Clipboard Copied! Toggle word wrap Toggle overflow - If you require Samba Active Directory integration with gluster, execute the following command:
yum groupinstall RH-Gluster-AD-Integration
# yum groupinstall RH-Gluster-AD-IntegrationCopy to Clipboard Copied! Toggle word wrap Toggle overflow - To install NFS-Ganesha, see Chapter 4, Deploying NFS-Ganesha on Red Hat Gluster Storage
Reboot
Reboot the system.
2.4. Installing from a PXE Server
Network Boot or Boot Services. Once you properly configure PXE booting, the computer can boot the Red Hat Gluster Storage Server installation system without any other media.
- Ensure that the network cable is attached. The link indicator light on the network socket should be lit, even if the computer is not switched on.
- Switch on the computer.
- A menu screen appears. Press the number key that corresponds to the preferred option.
2.5. Installing from Red Hat Satellite Server
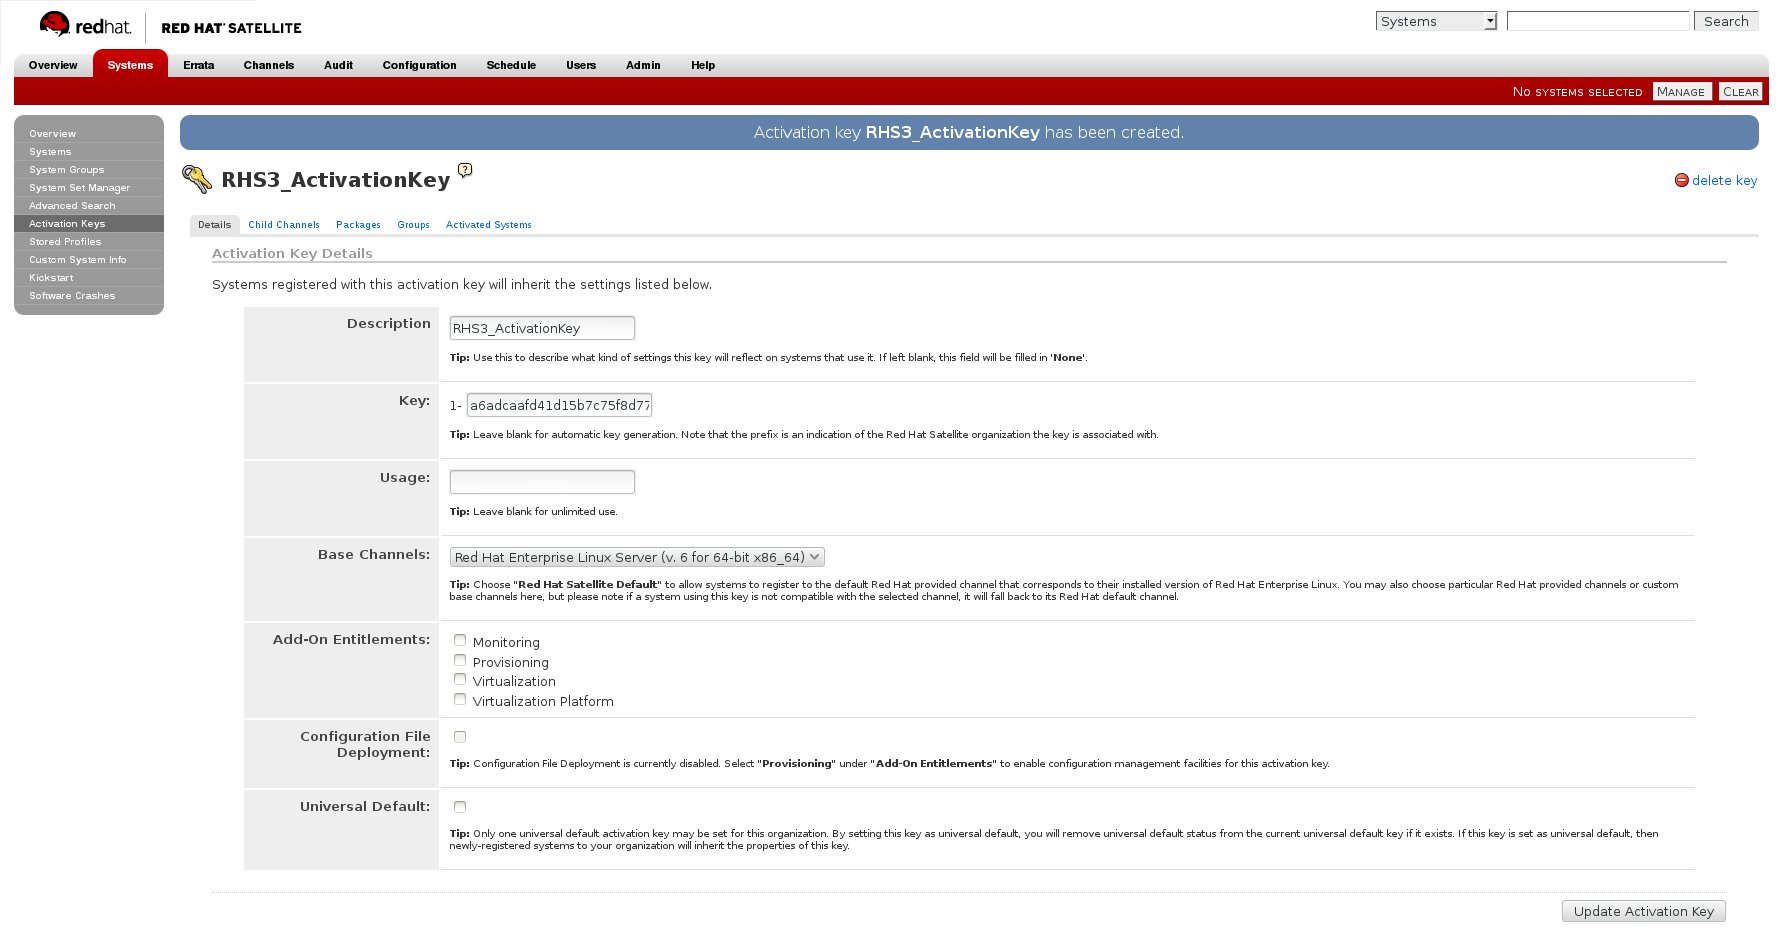
For more information on how to create an activation key, see Activation Keys in the Red Hat Network Satellite Reference Guide.
- In the Details tab of the Activation Keys screen, select
Red Hat Enterprise Linux Server (v.6 for 64-bit x86_64)from the Base Channels drop-down list.Figure 2.4. Base Channels
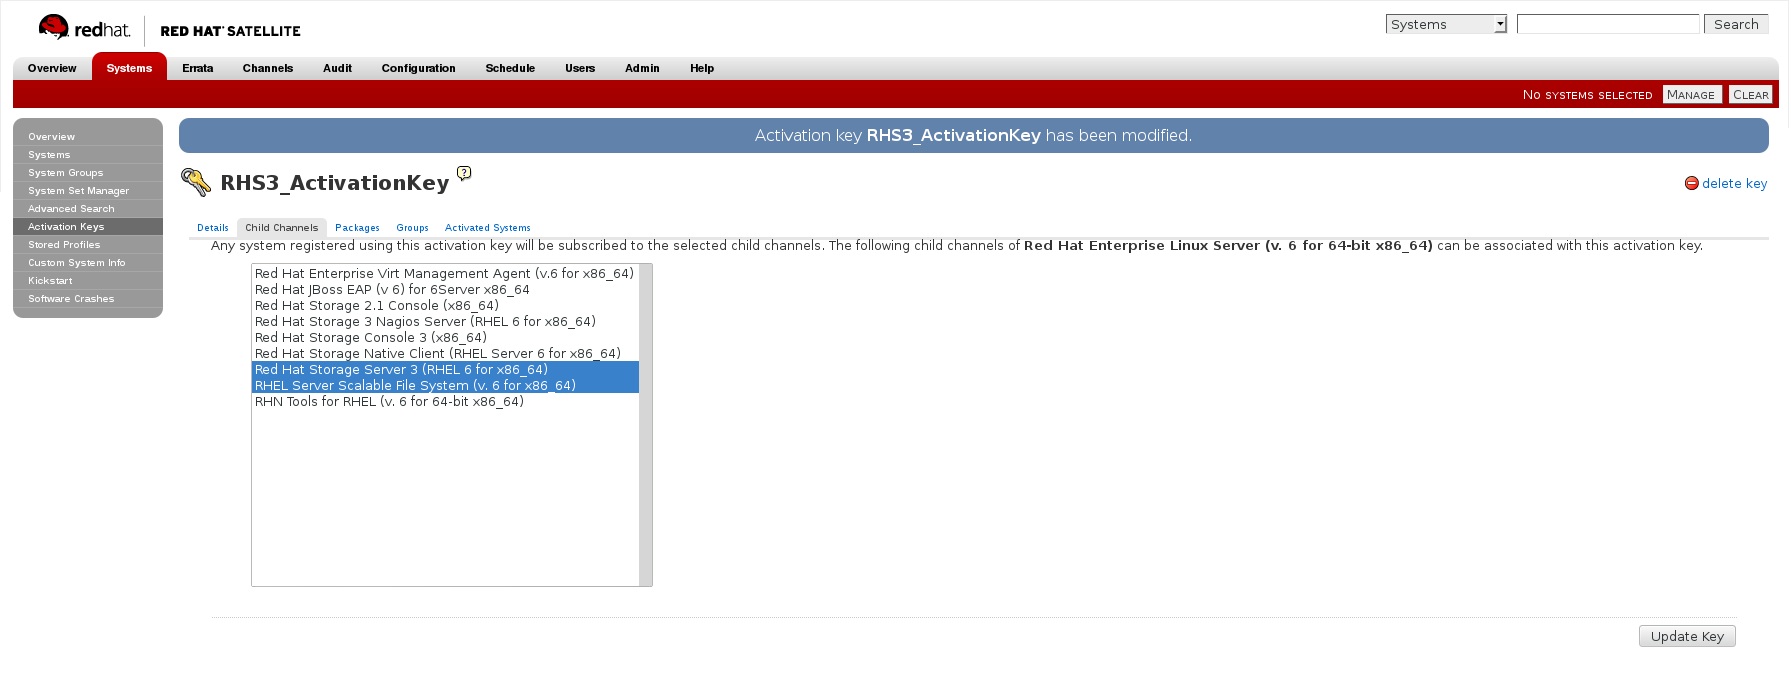
- In the Child Channels tab of the Activation Keys screen, select the following child channels:
RHEL Server Scalable File System (v. 6 for x86_64)
Red Hat Gluster Storage Server 3 (RHEL 6 for x86_64)
RHEL Server Scalable File System (v. 6 for x86_64)
Red Hat Gluster Storage Server 3 (RHEL 6 for x86_64)
Copy to Clipboard Copied! Toggle word wrap Toggle overflow For Red Hat Gluster Storage 3.0.4 or later, if you require the Samba package, then select the following child channel:Red Hat Gluster 3 Samba (RHEL 6 for x86_64)
Red Hat Gluster 3 Samba (RHEL 6 for x86_64)Copy to Clipboard Copied! Toggle word wrap Toggle overflow Figure 2.5. Child Channels
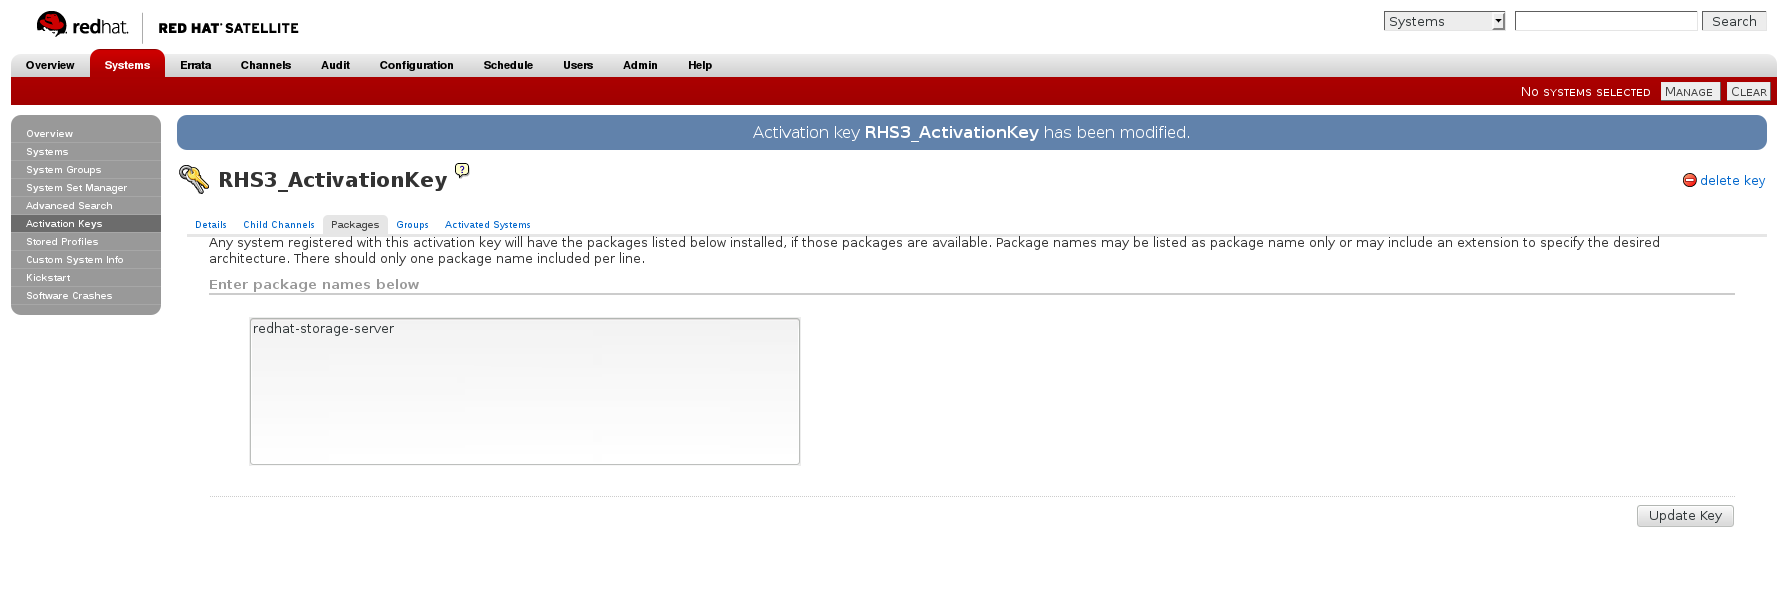
- In the Packages tab of the Activation Keys screen, enter the following package name:
redhat-storage-server
redhat-storage-serverCopy to Clipboard Copied! Toggle word wrap Toggle overflow Figure 2.6. Package
- For Red Hat Gluster Storage 3.0.4 or later, if you require the Samba package, then enter the following package name:
samba
sambaCopy to Clipboard Copied! Toggle word wrap Toggle overflow
For more information on creating a kickstart profile, see Kickstart in the Red Hat Network Satellite Reference Guide.
- When creating a kickstart profile, the following
Base ChannelandTreemust be selected.Base Channel: Red Hat Enterprise Linux Server (v.6 for 64-bit x86_64)Tree: ks-rhel-x86_64-server-6-6.5 - Do not associate any child channels with the kickstart profile.
- Associate the previously created activation key with the kickstart profile.
Important
- By default, the kickstart profile chooses
md5as the hash algorithm for user passwords.You must change this algorithm tosha512by providing the following settings in theauthfield of theKickstart Details,Advanced Optionspage of the kickstart profile:--enableshadow --passalgo=sha512
--enableshadow --passalgo=sha512Copy to Clipboard Copied! Toggle word wrap Toggle overflow - After creating the kickstart profile, you must change the root password in the Kickstart Details, Advanced Options page of the kickstart profile and add a root password based on the prepared sha512 hash algorithm.
For more information on installing Red Hat Gluster Storage Server using a kickstart profile, see Kickstart in Red Hat Network Satellite Reference Guide.
2.6. Subscribing to the Red Hat Gluster Storage Server Channels
Note
Register the System with Subscription Manager
Run the following command and enter your Red Hat Network user name and password to register the system with Subscription Manager:subscription-manager register
# subscription-manager registerCopy to Clipboard Copied! Toggle word wrap Toggle overflow Identify Available Entitlement Pools
Run the following commands to find entitlement pools containing the repositories required to install Red Hat Gluster Storage:subscription-manager list --available | grep -A8 "Red Hat Enterprise Linux Server" subscription-manager list --available | grep -A8 "Red Hat Storage"
# subscription-manager list --available | grep -A8 "Red Hat Enterprise Linux Server"
# subscription-manager list --available | grep -A8 "Red Hat Storage"
Copy to Clipboard Copied! Toggle word wrap Toggle overflow Attach Entitlement Pools to the System
Use the pool identifiers located in the previous step to attach theRed Hat Enterprise Linux ServerandRed Hat Gluster Storageentitlements to the system. Run the following command to attach the entitlements:subscription-manager attach --pool=[POOLID]
# subscription-manager attach --pool=[POOLID]Copy to Clipboard Copied! Toggle word wrap Toggle overflow For example:subscription-manager attach --pool=8a85f9814999f69101499c05aa706e47
# subscription-manager attach --pool=8a85f9814999f69101499c05aa706e47Copy to Clipboard Copied! Toggle word wrap Toggle overflow Enable the Required Channels for Red Hat Gluster Storage on Red Hat Enterprise Linux
For Red Hat Gluster Storage 3.2 on Red Hat Enterprise Linux 6.7 and later- Run the following commands to enable the repositories required to install Red Hat Gluster Storage:
subscription-manager repos --enable=rhel-6-server-rpms
subscription-manager repos --enable=rhel-scalefs-for-rhel-6-server-rpms
subscription-manager repos --enable=rhs-3-for-rhel-6-server-rpms
# subscription-manager repos --enable=rhel-6-server-rpms
# subscription-manager repos --enable=rhel-scalefs-for-rhel-6-server-rpms
# subscription-manager repos --enable=rhs-3-for-rhel-6-server-rpms
Copy to Clipboard Copied! Toggle word wrap Toggle overflow - For Red Hat Gluster Storage 3.0.4 or later, if you require Samba, then enable the following repository:
subscription-manager repos --enable=rh-gluster-3-samba-for-rhel-6-server-rpms
# subscription-manager repos --enable=rh-gluster-3-samba-for-rhel-6-server-rpmsCopy to Clipboard Copied! Toggle word wrap Toggle overflow - For Red Hat Gluster Storage 3.2, if NFS-Ganesha is required, then enable the following repository:
subscription-manager repos
# subscription-manager repos
--enable=rh-gluster-3-nfs-for-rhel-6-server-rpms
Copy to Clipboard Copied! Toggle word wrap Toggle overflow
For Red Hat Gluster Storage 3.2 on Red Hat Enterprise Linux 7.3- Run the following commands to enable the repositories required to install Red Hat Gluster Storage
subscription-manager repos --enable=rhel-7-server-rpms
subscription-manager repos --enable=rh-gluster-3-for-rhel-7-server-rpms
# subscription-manager repos --enable=rhel-7-server-rpms
# subscription-manager repos --enable=rh-gluster-3-for-rhel-7-server-rpms
Copy to Clipboard Copied! Toggle word wrap Toggle overflow - For Red Hat Gluster Storage 3.0.4 or later, if you require Samba, then enable the following repository:
subscription-manager repos --enable=rh-gluster-3-samba-for-rhel-7-server-rpms
# subscription-manager repos --enable=rh-gluster-3-samba-for-rhel-7-server-rpmsCopy to Clipboard Copied! Toggle word wrap Toggle overflow - For Red Hat Gluster Storage 3.2, if NFS-Ganesha is required, then enable the following repository:
subscription-manager repos
# subscription-manager repos
--enable=rh-gluster-3-nfs-for-rhel-7-server-rpms
Copy to Clipboard Copied! Toggle word wrap Toggle overflow - For Red Hat Gluster Storage 3.2, if you require CTDB, then enable the following repository:
subscription-manager repos --enable=rh-gluster-3-samba-for-rhel-7-server-rpms
# subscription-manager repos --enable=rh-gluster-3-samba-for-rhel-7-server-rpmsCopy to Clipboard Copied! Toggle word wrap Toggle overflow
Verify if the Channels are Enabled
Run the following command to verify if the channels are enabled:yum repolist
# yum repolistCopy to Clipboard Copied! Toggle word wrap Toggle overflow
Configure the Client System to Access Red Hat Satellite
Configure the client system to access Red Hat Satellite. Refer section Registering Clients with Red Hat Satellite Server in Red Hat Satellite 5.6 Client Configuration Guide.Register to the Red Hat Satellite Server
Run the following command to register the system to the Red Hat Satellite Server:rhn_register
# rhn_registerCopy to Clipboard Copied! Toggle word wrap Toggle overflow Register to the Standard Base Channel
In the select operating system release page, selectAll available updatesand follow the prompts to register the system to the standard base channel for RHEL6 - rhel-x86_64-server-6. The standard base channel for RHEL 7 is RHEL7-rhel-x86_64-server-7Subscribe to the Required Red Hat Gluster Storage Server Channels
For Red Hat Gluster Storage 3.2 on Red Hat Enterprise Linux 6.7 and later- Run the following command to subscribe the system to the required Red Hat Gluster Storage server channel:
rhn-channel --add --channel rhel-x86_64-server-6-rhs-3 --channel rhel-x86_64-server-sfs-6
# rhn-channel --add --channel rhel-x86_64-server-6-rhs-3 --channel rhel-x86_64-server-sfs-6Copy to Clipboard Copied! Toggle word wrap Toggle overflow - For Red Hat Gluster Storage 3.0.4 or later, if you require Samba, then execute the following command to enable the required channel:
rhn-channel --add --channel rhel-x86_64-server-6-rh-gluster-3-samba
# rhn-channel --add --channel rhel-x86_64-server-6-rh-gluster-3-sambaCopy to Clipboard Copied! Toggle word wrap Toggle overflow - For Red Hat Gluster Storage 3.2, for NFS-Ganesha enable the following channel:
rhn-channel --add --channel
# rhn-channel --add --channel
rhel-x86_64-server-6-rh-gluster-3-nfs
Copy to Clipboard Copied! Toggle word wrap Toggle overflow
For Red Hat Gluster Storage 3.2 on Red Hat Enterprise Linux 7.3- Run the following command to subscribe the system to the required Red Hat Gluster Storage server channels for RHEL 7:
rhn-channel --add --channel rhel-x86_64-server-7-rh-gluster-3
# rhn-channel --add --channel rhel-x86_64-server-7-rh-gluster-3Copy to Clipboard Copied! Toggle word wrap Toggle overflow - For Red Hat Gluster Storage 3.0.4 or later, if you require Samba, then execute the following command to enable the required channel:
rhn-channel --add --channel rhel-x86_64-server-7-rh-gluster-3-samba
# rhn-channel --add --channel rhel-x86_64-server-7-rh-gluster-3-sambaCopy to Clipboard Copied! Toggle word wrap Toggle overflow - For Red Hat Gluster Storage 3.2, for NFS-Ganesha enable the following channel:
rhn-channel --add --channel
# rhn-channel --add --channel
rhel-x86_64-server-7-rh-gluster-3-nfs
Copy to Clipboard Copied! Toggle word wrap Toggle overflow - For Red Hat Gluster Storage 3.2, if CTDB is required, then enable the following channel:
rhn-channel --add --channel rhel-x86_64-server-7-rh-gluster-3-samba
# rhn-channel --add --channel rhel-x86_64-server-7-rh-gluster-3-sambaCopy to Clipboard Copied! Toggle word wrap Toggle overflow
Verify if the System is Registered Successfully
Run the following command to verify if the system is registered successfully:rhn-channel --list
# rhn-channel --list
rhel-x86_64-server-7
rhel-x86_64-server-7-rh-gluster-3
Copy to Clipboard Copied! Toggle word wrap Toggle overflow
2.7. Managing the glusterd Service
glusterd service automatically starts on all the servers in the trusted storage pool. The service can be manually started and stopped using the glusterd service commands.
glusterd also offers elastic volume management.
gluster CLI commands to decouple logical storage volumes from physical hardware. This allows the user to grow, shrink, and migrate storage volumes without any application downtime. As storage is added to the cluster, the volumes are distributed across the cluster. This distribution ensures that the cluster is always available despite changes to the underlying hardware.
2.7.1. Manually Starting and Stopping glusterd
glusterd service.
- Manually start
glusterdas follows:/etc/init.d/glusterd start
# /etc/init.d/glusterd startCopy to Clipboard Copied! Toggle word wrap Toggle overflow orservice glusterd start
# service glusterd startCopy to Clipboard Copied! Toggle word wrap Toggle overflow - Manually stop
glusterdas follows:/etc/init.d/glusterd stop
# /etc/init.d/glusterd stopCopy to Clipboard Copied! Toggle word wrap Toggle overflow orservice glusterd stop
# service glusterd stopCopy to Clipboard Copied! Toggle word wrap Toggle overflow
2.8. Installing Ansible to Support Gdeploy
Note
Chapter 3. Deploying Samba on Red Hat Gluster Storage
3.1. Prerequisites
- You must install Red Hat Gluster Storage Server 3.0.4 on the target server.
Warning
- For layered installation of Red Hat Gluster Storage, ensure to have only the default Red Hat Enterprise Linux server installation, without the Samba or CTDB packages installed from Red Hat Enterprise Linux.
- The Samba version 3 is being deprecated from Red Hat Gluster Storage 3.0 Update 4. Further updates will not be provided for samba-3.x. It is recommended that you upgrade to Samba-4.x, which is provided in a separate channel or repository, for all updates including the security updates.
- CTDB version 2.5 is not supported from Red Hat Gluster Storage 3.1 Update 2. To use CTDB in Red Hat Gluster Storage 3.1.2 and later, you must upgrade the system to CTDB 4.x, which is provided in the Samba channel of Red Hat Gluster Storage.
- Downgrade of Samba from Samba 4.x to Samba 3.x is not supported.
- Ensure that Samba is upgraded on all the nodes simultaneously, as running different versions of Samba in the same cluster will lead to data corruption.
- Enable the channel where the Samba packages are available:For Red Hat Gluster Storage 3.2 on Red Hat Enterprise Linux 6.x
- If you have registered your machine using Red Hat Subscription Manager, enable the repository by running the following command:
subscription-manager repos --enable=rh-gluster-3-samba-for-rhel-6-server-rpms
# subscription-manager repos --enable=rh-gluster-3-samba-for-rhel-6-server-rpmsCopy to Clipboard Copied! Toggle word wrap Toggle overflow - If you have registered your machine using Satellite server, enable the channel by running the following command:
rhn-channel --add --channel rhel-x86_64-server-6-rh-gluster-3-samba
# rhn-channel --add --channel rhel-x86_64-server-6-rh-gluster-3-sambaCopy to Clipboard Copied! Toggle word wrap Toggle overflow
For Red Hat Gluster Storage 3.2 on Red Hat Enterprise Linux 7.x- If you have registered your machine using Red Hat Subscription Manager, enable the repository by running the following command:
subscription-manager repos --enable=rh-gluster-3-samba-for-rhel-7-server-rpms
# subscription-manager repos --enable=rh-gluster-3-samba-for-rhel-7-server-rpmsCopy to Clipboard Copied! Toggle word wrap Toggle overflow - If you have registered your machine using Satellite server, enable the channel by running the following command:
rhn-channel --add --channel rhel-x86_64-server-7-rh-gluster-3-samba
# rhn-channel --add --channel rhel-x86_64-server-7-rh-gluster-3-sambaCopy to Clipboard Copied! Toggle word wrap Toggle overflow
3.2. Installing Samba Using ISO

Figure 3.1. Customize Packages
3.3. Installing Samba Using yum
yum groupinstall RH-Gluster-Samba-Server
# yum groupinstall RH-Gluster-Samba-Serveryum groupinstall RH-Gluster-AD-Integration
# yum groupinstall RH-Gluster-AD-Integration
- To install the basic Samba packages, execute the following command:
yum install samba
# yum install sambaCopy to Clipboard Copied! Toggle word wrap Toggle overflow - If you require the
smbclienton the server, then execute the following command:yum install samba-client
# yum install samba-clientCopy to Clipboard Copied! Toggle word wrap Toggle overflow - If you require an Active directory setup, then execute the following commands:
yum install samba-winbind
yum install samba-winbind-clients
yum install samba-winbind-krb5-locator
# yum install samba-winbind
# yum install samba-winbind-clients
# yum install samba-winbind-krb5-locator
Copy to Clipboard Copied! Toggle word wrap Toggle overflow - Verify if the following packages are installed.
Copy to Clipboard Copied! Toggle word wrap Toggle overflow
Chapter 4. Deploying NFS-Ganesha on Red Hat Gluster Storage
- Installing NFS-Ganesha using yum
- Installing NFS-Ganesha during an ISO Installation
4.1. Prerequisites
Note
Enable the channel where the NFS-Ganesha packages are available:
- If you have registered your machine using Red Hat Subscription Manager, enable the repository by running the following command:
subscription-manager repos
# subscription-manager repos
--enable=rh-gluster-3-nfs-for-rhel-6-server-rpms
Copy to Clipboard Copied! Toggle word wrap Toggle overflow - If you have registered your machine using Satellite server, enable the channel by running the following command:
rhn-channel --add --channel
# rhn-channel --add --channel
rhel-x86_64-server-6-rh-gluster-3-nfs
Copy to Clipboard Copied! Toggle word wrap Toggle overflow - To subscribe to the HA channel, execute the following command:
rhn-channel --add --channel rhel-x86_64-server-ha-6
# rhn-channel --add --channel rhel-x86_64-server-ha-6Copy to Clipboard Copied! Toggle word wrap Toggle overflow - To add the HA repository, execute the following command:
subscription-manager repos --enable=rhel-6-server-rpms --enable=rhel-ha-for-rhel-6-server-rpms
# subscription-manager repos --enable=rhel-6-server-rpms --enable=rhel-ha-for-rhel-6-server-rpmsCopy to Clipboard Copied! Toggle word wrap Toggle overflow
Enable the channel where the NFS-Ganesha packages are available:
- If you have registered your machine using Red Hat Subscription Manager, enable the repository by running the following command:
subscription-manager repos
# subscription-manager repos
--enable=rh-gluster-3-nfs-for-rhel-7-server-rpms
Copy to Clipboard Copied! Toggle word wrap Toggle overflow - If you have registered your machine using Satellite server, enable the channel by running the following command:
rhn-channel --add --channel
# rhn-channel --add --channel
rhel-x86_64-server-7-rh-gluster-3-nfs
Copy to Clipboard Copied! Toggle word wrap Toggle overflow - To subscribe to the HA channel, execute the following command:
rhn-channel --add --channel rhel-x86_64-server-ha-7
# rhn-channel --add --channel rhel-x86_64-server-ha-7Copy to Clipboard Copied! Toggle word wrap Toggle overflow - To add the HA repository, execute the following command:
subscription-manager repos --enable=rhel-7-server-rpms --enable=rhel-ha-for-rhel-7-server-rpms
# subscription-manager repos --enable=rhel-7-server-rpms --enable=rhel-ha-for-rhel-7-server-rpmsCopy to Clipboard Copied! Toggle word wrap Toggle overflow
4.2. Installing NFS-Ganesha during an ISO Installation
- While installing Red Hat Storage using an ISO, in the Customizing the Software Selection screen, select RH-Gluster-NFS-Ganesha and click Next.
- Proceed with the remaining installation steps for installing Red Hat Gluster Storage. For more information on how to install Red Hat Storage using an ISO, see Installing from an ISO Image.
4.3. Installing NFS-Ganesha using yum
- The glusterfs-ganesha package can be installed using the following command:
yum install glusterfs-ganesha
# yum install glusterfs-ganeshaCopy to Clipboard Copied! Toggle word wrap Toggle overflow NFS-Ganesha is installed along with the above package. nfs-ganesha-gluster and HA packages are also installed.
Chapter 5. Deploying gstatus on Red Hat Gluster Storage
- Installing gstatus during an ISO Installation
- Installing using yum or the Red Hat Satellite Server or Red Hat Network
5.1. Installing gstatus during an ISO Installation
- While installing Red Hat Storage using an ISO, in the Customizing the Software Selection screen, select Red Hat Storage Tools Group and click Optional Packages.
- From the list of packages, select gstatus and click Close.
- Proceed with the remaining installation steps for installing Red Hat Storage. For more information on how to install Red Hat Storage using an ISO, see Installing from an ISO Image.
5.2. Installing using yum or the Red Hat Satellite Server or Red Hat Network
yum install gstatus
# yum install gstatusNote
yum list gstatus
# yum list gstatus

Installed Packages
gstatus.x86_640.65-1@rhs-3-for-rhel-6-server-rpmsChapter 6. Deploying Containerized Red Hat Gluster Storage with Atomic Host
6.1. Supported Deployment Configuration
6.2. Supported Versions
| Red Hat Gluster Storage Server | Docker | Red Hat Enterprsie Linux Atomic Host |
|---|---|---|
| 3.2 | 1.13 | 7.3 |
6.3. Downloading the Red Hat Gluster Storage Image from the Red Hat Registry
- You can verify the docker service is running with the following command:
Copy to Clipboard Copied! Toggle word wrap Toggle overflow - Download the Red Hat Gluster Storage Container images from the Red Hat Docker Registry using the following command:
docker pull registry.access.redhat.com/rhgs3/rhgs-server-rhel7
# docker pull registry.access.redhat.com/rhgs3/rhgs-server-rhel7Copy to Clipboard Copied! Toggle word wrap Toggle overflow - Verify that you have a Red Hat Gluster Storage image on a Red Hat Enterprise Linux Atomic Host 7.2 by checking the contents of the /etc/redhat-release file. First, on the host system:
cat /etc/redhat-release
Red Hat Enterprise Linux Atomic Host 7.3
# cat /etc/redhat-release
Red Hat Enterprise Linux Atomic Host 7.3
Copy to Clipboard Copied! Toggle word wrap Toggle overflow - And next, you can check the Red Hat Gluster Storage Container Image, again from the host system (no need to log into the container image):
docker run rhgs3/rhgs-server-rhel7 cat /etc/redhat-storage-release
Red Hat Gluster Storage Server 3.1 Update 2 (Container)
# docker run rhgs3/rhgs-server-rhel7 cat /etc/redhat-storage-release
Red Hat Gluster Storage Server 3.1 Update 2 (Container)
Copy to Clipboard Copied! Toggle word wrap Toggle overflow
Chapter 7. Updating Red Hat Gluster Storage from 3.2.x to 3.2.y
- Updating from Red Hat Enterprise Linux 6 based Red Hat Gluster Storage to Red Hat Enterprise Linux 7 based Red Hat Gluster Storage is not supported.
- Asynchronous errata update releases of Red Hat Gluster Storage include all fixes that were released asynchronously since the last release as a cumulative update.
- When there are large number of snapshots, ensure to deactivate the snapshots before performing an update. The snapshots can be activated after the update is complete. For more information, see Chapter 4.1 Starting and Stopping the glusterd service in the Red Hat Gluster Storage 3 Administration Guide.
7.1. Updating Red Hat Gluster Storage in the Offline Mode
Warning
- Offline updates result in server downtime, as volumes are offline during upgrade.
- You must update all Red Hat Gluster Storage servers before updating any clients.
- This process assumes that you are updating to a thinly provisioned volume.
Updating Red Hat Gluster Storage 3.2 in the offline mode
- Make a complete backup using a reliable backup solution. This Knowledge Base solution covers one possible approach: https://access.redhat.com/solutions/1484053.If you use an alternative backup solution:
- Ensure that you have sufficient space available for a complete backup.
- Copy the
.glusterfsdirectory before copying any data files. - Ensure that no new files are created on Red Hat Gluster Storage file systems during the backup.
- Ensure that all extended attributes, ACLs, owners, groups, and symbolic and hard links are backed up.
- Check that the backup restores correctly before you continue with the migration.
- Delete the existing Logical Volume (LV) and recreate a new thinly provisioned LV. For more information, see https://access.redhat.com/site/documentation/en-US/Red_Hat_Enterprise_Linux/6/html/Logical_Volume_Manager_Administration/thinprovisioned_volumes.html
- Restore backed up content to the newly created thinly provisioned LV.
- When you are certain that your backup works, stop all volumes.
gluster volume stop volname
# gluster volume stop volnameCopy to Clipboard Copied! Toggle word wrap Toggle overflow - Run the following commands to stop gluster services and update Red Hat Gluster Storage in the offline mode:On Red Hat Enterprise Linux 6:
service glusterd stop
pkill glusterfs
pkill glusterfsd
yum update
# service glusterd stop
# pkill glusterfs
# pkill glusterfsd
# yum update
Copy to Clipboard Copied! Toggle word wrap Toggle overflow On Red Hat Enterprise Linux 7:systemctl stop glusterd pkill glusterfs pkill glusterfsd yum update
# systemctl stop glusterd
# pkill glusterfs
# pkill glusterfsd
# yum update
Copy to Clipboard Copied! Toggle word wrap Toggle overflow Wait for the update to complete. - Start glusterd.On Red Hat Enterprise Linux 6:
service glusterd start
# service glusterd startCopy to Clipboard Copied! Toggle word wrap Toggle overflow On Red Hat Enterprise Linux 7:systemctl start glusterd
# systemctl start glusterdCopy to Clipboard Copied! Toggle word wrap Toggle overflow - When all nodes have been updated, run the following command to update the
op-versionof the cluster. This helps to prevent any compatibility issues within the cluster.gluster volume set all cluster.op-version 31001
# gluster volume set all cluster.op-version 31001Copy to Clipboard Copied! Toggle word wrap Toggle overflow Note
31001is thecluster.op-versionvalue for Red Hat Gluster Storage 3.2.0. Refer to Section 1.5, “Supported Versions of Red Hat Gluster Storage” for the correctcluster.op-versionvalue for other versions. - Start your volumes with the following command:
gluster volume start volname
# gluster volume start volnameCopy to Clipboard Copied! Toggle word wrap Toggle overflow - If you had a meta volume configured prior to this upgrade, and you did not reboot as part of the upgrade process, mount the meta volume:
mount /var/run/gluster/shared_storage/
# mount /var/run/gluster/shared_storage/Copy to Clipboard Copied! Toggle word wrap Toggle overflow If this command does not work, review the content of/etc/fstaband ensure that the entry for the shared storage is configured correctly and re-run themountcommand. The line for the meta volume in the/etc/fstabfile should look like the following:hostname:/gluster_shared_storage /var/run/gluster/shared_storage/ glusterfs defaults 0 0
hostname:/gluster_shared_storage /var/run/gluster/shared_storage/ glusterfs defaults 0 0Copy to Clipboard Copied! Toggle word wrap Toggle overflow - If using NFS to access volumes, enable gluster-NFS using the following command:
gluster volume set volname nfs.disable off
# gluster volume set volname nfs.disable offCopy to Clipboard Copied! Toggle word wrap Toggle overflow For example:gluster volume set testvol nfs.disable off
# gluster volume set testvol nfs.disable off
volume set: success
Copy to Clipboard Copied! Toggle word wrap Toggle overflow - If you use geo-replication, restart geo-replication sessions when upgrade is complete.
Important
In Red Hat Gluster Storage 3.1 and higher, a meta volume is recommended when geo-replication is configured. However, when upgrading geo-replicated Red Hat Gluster Storage from version 3.0.x to 3.1.y, the older geo-replicated configuration that did not use shared volumes was persisted to the upgraded installation. Red Hat recommends reconfiguring geo-replication following upgrade to Red Hat Gluster Storage 3.2 to ensure that shared volumes are used and a meta volume is configured.To enable shared volumes, set thecluster.enable-shared-storageparameter toenablefrom the master node:gluster volume set all cluster.enable-shared-storage enable
# gluster volume set all cluster.enable-shared-storage enableCopy to Clipboard Copied! Toggle word wrap Toggle overflow Then configure geo-replication to use shared volumes as a meta volume by settinguse_meta_volumetotrue.gluster volume geo-replication MASTER_VOL SLAVE_HOST::SLAVE_VOL config use_meta_volume true
# gluster volume geo-replication MASTER_VOL SLAVE_HOST::SLAVE_VOL config use_meta_volume trueCopy to Clipboard Copied! Toggle word wrap Toggle overflow For further information see the following sections in the Red Hat Gluster Storage 3.2 Administration Guide:gluster volume geo-replication MASTER_VOL SLAVE_HOST::SLAVE_VOL start
# gluster volume geo-replication MASTER_VOL SLAVE_HOST::SLAVE_VOL startCopy to Clipboard Copied! Toggle word wrap Toggle overflow Note
As a result of BZ#1347625, you may need to use theforceparameter to successfully restart in some circumstances.gluster volume geo-replication MASTER_VOL SLAVE_HOST::SLAVE_VOL start force
# gluster volume geo-replication MASTER_VOL SLAVE_HOST::SLAVE_VOL start forceCopy to Clipboard Copied! Toggle word wrap Toggle overflow
7.2. Updating the NFS Server
- Updating Gluster NFS
- Updating NFS-Ganesha in the Offline Mode
- Migrating from Gluster NFS to NFS Ganesha in Offline mode
7.2.1. Updating Gluster NFS
7.2.2. Updating NFS-Ganesha in the Offline Mode
Note
- Back up all the volume export files under
/etc/ganesha/exportsandganesha.confunder/etc/ganesha, in a backup directory on all the nodes:From Red Hat Gluster Storage 3.1.x to Red Hat Gluster Storage 3.2For example:
Copy to Clipboard Copied! Toggle word wrap Toggle overflow From Red Hat Gluster Storage 3.2 to Red Hat Gluster Storage 3.2 AsyncFor example:
Copy to Clipboard Copied! Toggle word wrap Toggle overflow - Disable nfs-ganesha on the cluster by executing the following command:
gluster nfs-ganesha disable
# gluster nfs-ganesha disableCopy to Clipboard Copied! Toggle word wrap Toggle overflow For example:gluster nfs-ganesha disable
# gluster nfs-ganesha disable
This will take a few minutes to complete. Please wait ..
nfs-ganesha : success
Copy to Clipboard Copied! Toggle word wrap Toggle overflow - Disable the shared volume in cluster by executing the following command:
gluster volume set all cluster.enable-shared-storage disable
# gluster volume set all cluster.enable-shared-storage disableCopy to Clipboard Copied! Toggle word wrap Toggle overflow For example:gluster volume set all cluster.enable-shared-storage disable
# gluster volume set all cluster.enable-shared-storage disable
Disabling cluster.enable-shared-storage will delete the shared storage volumec(gluster_shared_storage), which is used by snapshot scheduler, geo-replication and NFS-Ganesha.
Do you still want to continue? (y/n) y
volume set: success
Copy to Clipboard Copied! Toggle word wrap Toggle overflow - Stop the glusterd service and kill any running gluster process on all the nodes.On Red Hat Enterprise Linux 7:
systemctl stop glusterd
pkill glusterfs
pkill glusterfsd
# systemctl stop glusterd
# pkill glusterfs
# pkill glusterfsd
Copy to Clipboard Copied! Toggle word wrap Toggle overflow On Red Hat Enterprise Linux 6:service glusterd stop pkill glusterfs pkill glusterfsd
# service glusterd stop # pkill glusterfs # pkill glusterfsdCopy to Clipboard Copied! Toggle word wrap Toggle overflow - Ensure all gluster processes are stopped and if there are any gluster processes still running, terminate the process using kill, on all the nodes by executing the following command:
pgrep gluster
# pgrep glusterCopy to Clipboard Copied! Toggle word wrap Toggle overflow - Stop the pcsd service on all nodes of the cluster.On Red Hat Enterprise Linux 7:
systemctl stop pcsd
# systemctl stop pcsdCopy to Clipboard Copied! Toggle word wrap Toggle overflow On Red Hat Enterprise Linux 6:service pcsd stop
# service pcsd stopCopy to Clipboard Copied! Toggle word wrap Toggle overflow - Update the packages on all the nodes by executing the following command:
yum update
# yum updateCopy to Clipboard Copied! Toggle word wrap Toggle overflow This updates the required packages and any dependencies of those packages.Important
- From Red Hat Gluster Storage 3.2, NFS-Ganesha packages must be installed on all the nodes of the trusted storage pool.
- Verify on all the nodes that the required packages are updated, the nodes are fully functional and are using the correct versions. If anything does not seem correct, then do not proceed until the situation is resolved. Contact the Red Hat Global Support Services for assistance if needed.
- Start the glusterd and pcsd service on all the nodes by executing the following commands.On Red Hat Enterprise Linux 7:
systemctl start glusterd systemctl start pcsd
# systemctl start glusterd # systemctl start pcsdCopy to Clipboard Copied! Toggle word wrap Toggle overflow On Red Hat Enterprise Linux 6:service glusterd start service pcsd start
# service glusterd start # service pcsd startCopy to Clipboard Copied! Toggle word wrap Toggle overflow - When all nodes have been upgraded, run the following command to update the op-version of the cluster. This helps to prevent any compatibility issues within the cluster.
gluster volume set all cluster.op-version 31001
# gluster volume set all cluster.op-version 31001Copy to Clipboard Copied! Toggle word wrap Toggle overflow - Copy the volume's export information from backup copy of
ganesha.confto the newly renamedganesha.confunder/etc/ganesha.Export entries will look like as below in backup copy ofganesha.conf:Copy to Clipboard Copied! Toggle word wrap Toggle overflow - Copy the backup volume export files from backup directory to
/etc/ganesha/exportscp export.* /etc/ganesha/exports/
# cp export.* /etc/ganesha/exports/Copy to Clipboard Copied! Toggle word wrap Toggle overflow
- Enable the firewall settings for the new services and ports. Information on how to enable the services is available in the Red Hat Gluster Storage Administration Guide.
- Enable the shared volume in the cluster:
gluster volume set all cluster.enable-shared-storage enable
# gluster volume set all cluster.enable-shared-storage enableCopy to Clipboard Copied! Toggle word wrap Toggle overflow For example:gluster volume set all cluster.enable-shared-storage enable
# gluster volume set all cluster.enable-shared-storage enable volume set: successCopy to Clipboard Copied! Toggle word wrap Toggle overflow - Ensure that the shared storage volume mount exists on the server after node reboot/shutdown. If it does not, then mount the shared storage volume manually using the following command:
mount -t glusterfs <local_node's_hostname>:gluster_shared_storage /var/run/gluster/shared_storage
# mount -t glusterfs <local_node's_hostname>:gluster_shared_storage /var/run/gluster/shared_storageCopy to Clipboard Copied! Toggle word wrap Toggle overflow - Once the shared volume is created, create a folder named “nfs-ganesha” inside /var/run/gluster/shared_storage:
cd /var/run/gluster/shared_storage/ mkdir nfs-ganesha
# cd /var/run/gluster/shared_storage/ # mkdir nfs-ganeshaCopy to Clipboard Copied! Toggle word wrap Toggle overflow - Copy the ganesha.conf, ganesha-ha.conf, and the exports folder from
/etc/ganeshato/var/run/gluster/shared_storage/nfs-ganeshacd /etc/ganesha/ cp ganesha.conf ganesha-ha.conf /var/run/gluster/shared_storage/nfs-ganesha/ cp -r exports/ /var/run/gluster/shared_storage/nfs-ganesha/
# cd /etc/ganesha/ # cp ganesha.conf ganesha-ha.conf /var/run/gluster/shared_storage/nfs-ganesha/ # cp -r exports/ /var/run/gluster/shared_storage/nfs-ganesha/Copy to Clipboard Copied! Toggle word wrap Toggle overflow - If there are any export entries in the ganesha.conf file, then update the path in the file using the following command:
sed -i 's/\/etc\/ganesha/\/var\/run\/gluster\/shared_storage\/nfs-ganesha/' /var/run/gluster/shared_storage/nfs-ganesha/ganesha.conf
# sed -i 's/\/etc\/ganesha/\/var\/run\/gluster\/shared_storage\/nfs-ganesha/' /var/run/gluster/shared_storage/nfs-ganesha/ganesha.confCopy to Clipboard Copied! Toggle word wrap Toggle overflow - Execute the following command to cleanup any already existing cluster related configuration:
/usr/libexec/ganesha/ganesha-ha.sh --cleanup /var/run/gluster/shared_storage/nfs-ganesha
/usr/libexec/ganesha/ganesha-ha.sh --cleanup /var/run/gluster/shared_storage/nfs-ganeshaCopy to Clipboard Copied! Toggle word wrap Toggle overflow - If you have upgraded to Red Hat Enterprise Linux 7.4, enable the
ganesha_use_fusefsand thegluster_use_execmemboolean before enabling NFS-Ganesha by executing the following commands:setsebool -P ganesha_use_fusefs on setsebool -P gluster_use_execmem on
# setsebool -P ganesha_use_fusefs on # setsebool -P gluster_use_execmem onCopy to Clipboard Copied! Toggle word wrap Toggle overflow - Enable nfs-ganesha on the cluster:
gluster nfs-ganesha enable
# gluster nfs-ganesha enableCopy to Clipboard Copied! Toggle word wrap Toggle overflow For example:gluster nfs-ganesha enable
# gluster nfs-ganesha enable Enabling NFS-Ganesha requires Gluster-NFS to be disabled across the trusted pool. Do you still want to continue? (y/n) y This will take a few minutes to complete. Please wait .. nfs-ganesha : successCopy to Clipboard Copied! Toggle word wrap Toggle overflow
Important
7.2.3. Migrating from Gluster NFS to NFS Ganesha in Offline mode
- To ensure that CTDB does not start automatically after a reboot run the following command on each node of the CTDB cluster:
chkconfig ctdb off
# chkconfig ctdb offCopy to Clipboard Copied! Toggle word wrap Toggle overflow - Stop the CTDB service on the Red Hat Gluster Storage node using the following command on each node of the CTDB cluster:
service ctdb stop
# service ctdb stopCopy to Clipboard Copied! Toggle word wrap Toggle overflow - To verify if the CTDB and NFS services are stopped, execute the following command:
ps axf | grep -E '(ctdb|nfs)[d]'
ps axf | grep -E '(ctdb|nfs)[d]'Copy to Clipboard Copied! Toggle word wrap Toggle overflow - Stop the gluster services on the storage server using the following commands:
service glusterd stop
pkill glusterfs
pkill glusterfsd
# service glusterd stop
# pkill glusterfs
# pkill glusterfsd
Copy to Clipboard Copied! Toggle word wrap Toggle overflow - Delete the CTDB volume by executing the following command:
gluster vol delete <ctdb_vol_name>
# gluster vol delete <ctdb_vol_name>Copy to Clipboard Copied! Toggle word wrap Toggle overflow - Update the server using the following command:
yum update
# yum updateCopy to Clipboard Copied! Toggle word wrap Toggle overflow - Reboot the server
- Start the glusterd service using the following command:
service glusterd start
# service glusterd startCopy to Clipboard Copied! Toggle word wrap Toggle overflow On Red Hat Enterprise Linux 7, execute the following command:systemctl start glusterd
# systemctl start glusterdCopy to Clipboard Copied! Toggle word wrap Toggle overflow - When all nodes have been upgraded, run the following command to update the op-version of the cluster. This helps to prevent any compatibility issues within the cluster.
gluster volume set all cluster.op-version 31001
# gluster volume set all cluster.op-version 31001Copy to Clipboard Copied! Toggle word wrap Toggle overflow - To install nfs-ganesha packages, refer Chapter 4, Deploying NFS-Ganesha on Red Hat Gluster Storage
- To configure nfs-ganesha cluster, refer section NFS-Ganesha in the Red Hat Gluster Storage Administration Guide.
7.3. In-service Software Update from Red Hat Gluster Storage
Warning
Important
- You must update all Red Hat Gluster Storage servers before updating any clients.
- If geo-replication is in use, slave nodes must be updated before master nodes.
- NFS-Ganesha does not support in-service updates. All the running services and I/O operations must be stopped before starting the update process. For more information see, Section 7.2.2, “Updating NFS-Ganesha in the Offline Mode”.
- Dispersed volumes (volumes that use erasure coding) do not support in-service updates and cannot be updated in a non-disruptive manner.
- The SMB and CTDB services do not support in-service updates. The procedure outlined in this section involves service interruptions to the SMB and CTDB services.
- If updating Samba, ensure that Samba is upgraded on all nodes simultaneously, as running different versions of Samba in the same cluster results in data corruption.
- Your system must be registered to Red Hat Network. For more information refer to Section 2.6, “Subscribing to the Red Hat Gluster Storage Server Channels”
- Do not perform any volume operations while the cluster is being updated.
Updating Red Hat Gluster Storage 3.2 in in-service mode
- If you have a replicated configuration, perform these steps on all nodes of a replica set.If you have a distributed-replicated setup, perform these steps on one replica set at a time, for all replica sets.
- Stop any geo-replication sessions.
gluster volume geo-replication MASTER_VOL SLAVE_HOST::SLAVE_VOL stop
# gluster volume geo-replication MASTER_VOL SLAVE_HOST::SLAVE_VOL stopCopy to Clipboard Copied! Toggle word wrap Toggle overflow - Verify that there are no pending self-heals:
gluster volume heal volname info
# gluster volume heal volname infoCopy to Clipboard Copied! Toggle word wrap Toggle overflow Wait for any self-heal operations to complete before continuing. - Stop the gluster services on the storage server using the following commands:
service glusterd stop
pkill glusterfs
pkill glusterfsd
# service glusterd stop
# pkill glusterfs
# pkill glusterfsd
Copy to Clipboard Copied! Toggle word wrap Toggle overflow - If you use Samba:
- Enable the required repository.On Red Hat Enterprise Linux 6.7 or later:
subscription-manager repos --enable=rh-gluster-3-samba-for-rhel-6-server-rpms
# subscription-manager repos --enable=rh-gluster-3-samba-for-rhel-6-server-rpmsCopy to Clipboard Copied! Toggle word wrap Toggle overflow On Red Hat Enterprise Linux 7:subscription-manager repos --enable=rh-gluster-3-samba-for-rhel-7-server-rpms
# subscription-manager repos --enable=rh-gluster-3-samba-for-rhel-7-server-rpmsCopy to Clipboard Copied! Toggle word wrap Toggle overflow - Stop the CTDB and SMB services across all nodes in the Samba cluster using the following command. Stopping the CTDB service also stops the SMB service.
service ctdb stop
# service ctdb stopCopy to Clipboard Copied! Toggle word wrap Toggle overflow This ensures different versions of Samba do not run in the same Samba cluster. - Verify that the CTDB and SMB services are stopped by running the following command:
ps axf | grep -E '(ctdb|smb|winbind|nmb)[d]'
ps axf | grep -E '(ctdb|smb|winbind|nmb)[d]'Copy to Clipboard Copied! Toggle word wrap Toggle overflow
- Update the server using the following command:
yum update
# yum updateCopy to Clipboard Copied! Toggle word wrap Toggle overflow Wait for the update to complete. - If a kernel update was included as part of the update process in the previous step, reboot the server.
- If a reboot of the server was not required, then start the gluster services on the storage server using the following command:
service glusterd start
# service glusterd startCopy to Clipboard Copied! Toggle word wrap Toggle overflow Additionally, if you use Samba:- Mount
/gluster/lockbefore starting CTDB by executing the following command:mount -a
# mount -aCopy to Clipboard Copied! Toggle word wrap Toggle overflow - If the CTDB and SMB services were stopped earlier, then start the services by executing the following command.
service ctdb start
# service ctdb startCopy to Clipboard Copied! Toggle word wrap Toggle overflow - To verify if the CTDB and SMB services have started, execute the following command:
ps axf | grep -E '(ctdb|smb|winbind|nmb)[d]'
ps axf | grep -E '(ctdb|smb|winbind|nmb)[d]'Copy to Clipboard Copied! Toggle word wrap Toggle overflow
- To verify that you have updated to the latest version of the Red Hat Gluster Storage server execute the following command and compare output with the desired version in Section 1.5, “Supported Versions of Red Hat Gluster Storage”.
gluster --version
# gluster --versionCopy to Clipboard Copied! Toggle word wrap Toggle overflow - Ensure that all bricks are online. To check the status, execute the following command:
gluster volume status
# gluster volume statusCopy to Clipboard Copied! Toggle word wrap Toggle overflow - Start self-heal on the volume.
gluster volume heal volname
# gluster volume heal volnameCopy to Clipboard Copied! Toggle word wrap Toggle overflow - Ensure self-heal is complete on the replica using the following command:
gluster volume heal volname info
# gluster volume heal volname infoCopy to Clipboard Copied! Toggle word wrap Toggle overflow - When all nodes in the volume have been upgraded, run the following command to update the
op-versionof the cluster. This helps to prevent any compatibility issues within the cluster.gluster volume set all cluster.op-version 31001
# gluster volume set all cluster.op-version 31001Copy to Clipboard Copied! Toggle word wrap Toggle overflow Note
31001is thecluster.op-versionvalue for Red Hat Gluster Storage 3.2.0. Refer to Section 1.5, “Supported Versions of Red Hat Gluster Storage” for the correctcluster.op-versionvalue for other versions. - If you had a meta volume configured prior to this upgrade, and you did not reboot as part of the upgrade process, mount the meta volume:
mount /var/run/gluster/shared_storage/
# mount /var/run/gluster/shared_storage/Copy to Clipboard Copied! Toggle word wrap Toggle overflow If this command does not work, review the content of/etc/fstaband ensure that the entry for the shared storage is configured correctly and re-run themountcommand. The line for the meta volume in the/etc/fstabfile should look like the following:hostname:/gluster_shared_storage /var/run/gluster/shared_storage/ glusterfs defaults 0 0
hostname:/gluster_shared_storage /var/run/gluster/shared_storage/ glusterfs defaults 0 0Copy to Clipboard Copied! Toggle word wrap Toggle overflow - If you use geo-replication, restart geo-replication sessions when upgrade is complete.
gluster volume geo-replication MASTER_VOL SLAVE_HOST::SLAVE_VOL start
# gluster volume geo-replication MASTER_VOL SLAVE_HOST::SLAVE_VOL startCopy to Clipboard Copied! Toggle word wrap Toggle overflow Note
As a result of BZ#1347625, you may need to use theforceparameter to successfully restart in some circumstances.gluster volume geo-replication MASTER_VOL SLAVE_HOST::SLAVE_VOL start force
# gluster volume geo-replication MASTER_VOL SLAVE_HOST::SLAVE_VOL start forceCopy to Clipboard Copied! Toggle word wrap Toggle overflow
Chapter 8. Upgrading to Red Hat Gluster Storage 3.2
Upgrade support limitations
- Upgrading from Red Hat Enterprise Linux 6 based Red Hat Gluster Storage to Red Hat Enterprise Linux 7 based Red Hat Gluster Storage is not supported.
- Servers must be upgraded prior to upgrading clients.
8.1. Offline Upgrade from Red Hat Gluster Storage 3.1 to 3.2
Warning
Important
8.1.1. Upgrading from Red Hat Gluster Storage 3.1 to Red Hat Gluster Storage 3.2 for Systems Subscribed to Red Hat Network
Procedure 8.1. Before you upgrade
- Unmount gluster volumes from all clients. On a client, use the following command to unmount a volume from a mount point.
umount mount-point
# umount mount-pointCopy to Clipboard Copied! Toggle word wrap Toggle overflow - On a gluster server, stop all volumes by running the following command for each volume.
gluster volume stop volname
# gluster volume stop volnameCopy to Clipboard Copied! Toggle word wrap Toggle overflow - Unmount the data partition(s) from the servers using the following command.
umount mount-point
# umount mount-pointCopy to Clipboard Copied! Toggle word wrap Toggle overflow - Verify that all volumes are stopped.
gluster volume info
# gluster volume infoCopy to Clipboard Copied! Toggle word wrap Toggle overflow - Stop the
glusterdservices on all servers using the following command:service glusterd stop
# service glusterd stopCopy to Clipboard Copied! Toggle word wrap Toggle overflow
Procedure 8.2. Upgrade using yum
- Execute the following command to kill all gluster processes:
pkill gluster
# pkill glusterCopy to Clipboard Copied! Toggle word wrap Toggle overflow - Verify that your system is not on the legacy Red Hat Network Classic update system.
migrate-rhs-classic-to-rhsm --status
# migrate-rhs-classic-to-rhsm --statusCopy to Clipboard Copied! Toggle word wrap Toggle overflow If you are still on Red Hat Network Classic, run the following command to migrate to Red Hat Subscription Manager.migrate-rhs-classic-to-rhsm --rhn-to-rhsm
# migrate-rhs-classic-to-rhsm --rhn-to-rhsmCopy to Clipboard Copied! Toggle word wrap Toggle overflow Then verify that your status has changed.migrate-rhs-classic-to-rhsm --status
# migrate-rhs-classic-to-rhsm --statusCopy to Clipboard Copied! Toggle word wrap Toggle overflow - If you use Samba:
- For Red Hat Enterprise Linux 6.7 or higher, enable the following repository:
subscription-manager repos --enable=rh-gluster-3-samba-for-rhel-6-server-rpms
# subscription-manager repos --enable=rh-gluster-3-samba-for-rhel-6-server-rpmsCopy to Clipboard Copied! Toggle word wrap Toggle overflow For Red Hat Enterprise Linux 7, enable the following repository:subscription-manager repos --enable=rh-gluster-3-samba-for-rhel-7-server-rpms
# subscription-manager repos --enable=rh-gluster-3-samba-for-rhel-7-server-rpmsCopy to Clipboard Copied! Toggle word wrap Toggle overflow - Ensure that Samba is upgraded on all the nodes simultaneously, as running different versions of Samba in the same cluster will lead to data corruption.Stop the CTDB and SMB services and verify that they are stopped.
service ctdb stop
# service ctdb stopCopy to Clipboard Copied! Toggle word wrap Toggle overflow ps axf | grep -E '(ctdb|smb|winbind|nmb)[d]'
# ps axf | grep -E '(ctdb|smb|winbind|nmb)[d]'Copy to Clipboard Copied! Toggle word wrap Toggle overflow
- Upgrade the server to Red Hat Gluster Storage 3.2.
yum update
# yum updateCopy to Clipboard Copied! Toggle word wrap Toggle overflow Wait for the update to complete. - Reboot the server to ensure that kernel updates are applied.
- When all nodes have been upgraded, run the following command to update the
op-versionof the cluster. This helps to prevent any compatibility issues within the cluster.gluster volume set all cluster.op-version 31001
# gluster volume set all cluster.op-version 31001Copy to Clipboard Copied! Toggle word wrap Toggle overflow Note
31001is thecluster.op-versionvalue for Red Hat Gluster Storage 3.2.0. Refer to Section 1.5, “Supported Versions of Red Hat Gluster Storage” for the correctcluster.op-versionvalue for other versions.
8.1.2. Upgrading from Red Hat Gluster Storage 3.1 to Red Hat Gluster Storage 3.2 for Systems Subscribed to Red Hat Satellite Server
- Unmount all volumes. On a client, use the following command to unmount a volume from the mount point.
umount mount-name
# umount mount-nameCopy to Clipboard Copied! Toggle word wrap Toggle overflow - On a gluster server, stop all volumes using the following command:
gluster volume stop volname
# gluster volume stop volnameCopy to Clipboard Copied! Toggle word wrap Toggle overflow - Unmount the data partition(s) on the servers using the following command:
umount mount-point
umount mount-pointCopy to Clipboard Copied! Toggle word wrap Toggle overflow - Create an Activation Key at the Red Hat Satellite Server, and associate it with the following channels. For more information, refer to Section 2.5, “Installing from Red Hat Satellite Server”
- For Red Hat Enterprise Linux 6.7 or higher:
Base Channel: Red Hat Enterprise Linux Server (v.6 for 64-bit x86_64) Child channels: RHEL Server Scalable File System (v. 6 for x86_64) Red Hat Gluster Storage Server 3 (RHEL 6 for x86_64)
Base Channel: Red Hat Enterprise Linux Server (v.6 for 64-bit x86_64) Child channels: RHEL Server Scalable File System (v. 6 for x86_64) Red Hat Gluster Storage Server 3 (RHEL 6 for x86_64)Copy to Clipboard Copied! Toggle word wrap Toggle overflow If you use Samba, add the following channel:Red Hat Gluster 3 Samba (RHEL 6 for x86_64)
Red Hat Gluster 3 Samba (RHEL 6 for x86_64)Copy to Clipboard Copied! Toggle word wrap Toggle overflow - For Red Hat Enterprise Linux 7:
Base Channel: Red Hat Enterprise Linux Server (v.7 for 64-bit x86_64) Child channels: RHEL Server Scalable File System (v. 7 for x86_64) Red Hat Gluster Storage Server 3 (RHEL 7 for x86_64)
Base Channel: Red Hat Enterprise Linux Server (v.7 for 64-bit x86_64) Child channels: RHEL Server Scalable File System (v. 7 for x86_64) Red Hat Gluster Storage Server 3 (RHEL 7 for x86_64)Copy to Clipboard Copied! Toggle word wrap Toggle overflow If you use Samba, add the following channel:Red Hat Gluster 3 Samba (RHEL 6 for x86_64)
Red Hat Gluster 3 Samba (RHEL 6 for x86_64)Copy to Clipboard Copied! Toggle word wrap Toggle overflow
- Unregister your system from Red Hat Satellite by following these steps:
- Log in to the Red Hat Satellite server.
- Click on the Systems tab in the top navigation bar and then the name of the old or duplicated system in the System List.
- Click the delete system link in the top-right corner of the page.
- To confirm the system profile deletion by clicking the Delete System button.
- Run the following command on your Red Hat Gluster Storage server, using your credentials and the Activation Key you prepared earlier. This re-registers the system to the Red Hat Gluster Storage 3.2 channels on the Red Hat Satellite Server.
rhnreg_ks --username username --password password --force --activationkey Activation Key ID
# rhnreg_ks --username username --password password --force --activationkey Activation Key IDCopy to Clipboard Copied! Toggle word wrap Toggle overflow - Verify that the channel subscriptions have been updated.On Red Hat Enterprise Linux 6.7 and higher, look for the following channels, as well as the
rhel-x86_64-server-6-rh-gluster-3-sambachannel if you use Samba.rhn-channel --list
# rhn-channel --list rhel-x86_64-server-6 rhel-x86_64-server-6-rhs-3 rhel-x86_64-server-sfs-6Copy to Clipboard Copied! Toggle word wrap Toggle overflow On Red Hat Enterprise Linux 7, look for the following channels, as well as therhel-x86_64-server-7-rh-gluster-3-sambachannel if you use Samba.rhn-channel --list
# rhn-channel --list rhel-x86_64-server-7 rhel-x86_64-server-7-rhs-3 rhel-x86_64-server-sfs-7Copy to Clipboard Copied! Toggle word wrap Toggle overflow - Upgrade to Red Hat Gluster Storage 3.2.
yum update
# yum updateCopy to Clipboard Copied! Toggle word wrap Toggle overflow - Reboot the server and run volume and data integrity checks.
- When all nodes have been upgraded, run the following command to update the
op-versionof the cluster. This helps to prevent any compatibility issues within the cluster.gluster volume set all cluster.op-version 31001
# gluster volume set all cluster.op-version 31001Copy to Clipboard Copied! Toggle word wrap Toggle overflow Note
31001is thecluster.op-versionvalue for Red Hat Gluster Storage 3.2.0. Refer to Section 1.5, “Supported Versions of Red Hat Gluster Storage” for the correctcluster.op-versionvalue for other versions.
8.2. In-Service Software Upgrade from Red Hat Gluster Storage 3.1 to Red Hat Gluster Storage 3.2
Important
8.2.1. Pre-upgrade Tasks
8.2.1.1. Upgrade Requirements for Red Hat Gluster Storage 3.2
- In-service software upgrade is supported only for nodes with replicate and distributed replicate volumes.
- If you want to use snapshots for your existing environment, each brick must be an independent thinly provisioned logical volume (LV). If you do not plan to use snapshots, thickly provisioned volumes remain supported.
- A Logical Volume that contains a brick must not be used for any other purpose.
- Only linear LVM is supported with Red Hat Gluster Storage 3.2. For more information, see https://access.redhat.com/site/documentation/en-US/Red_Hat_Enterprise_Linux/4/html-single/Cluster_Logical_Volume_Manager/#lv_overview
- When server-side quorum is enabled, ensure that bringing one node down does not violate server-side quorum. Add dummy peers to ensure the server-side quorum will not be violated until the completion of rolling upgrade using the following command:
gluster peer probe dummynode
# gluster peer probe dummynodeCopy to Clipboard Copied! Toggle word wrap Toggle overflow Note
If you have a geo-replication session, then to add a node follow the steps mentioned in the sectionStarting Geo-replication for a New Brick or New Node in the Red Hat Gluster Storage Administration Guide.For example, when the server-side quorum percentage is set to the default value (>50%), for a plain replicate volume with two nodes and one brick on each machine, a dummy node that does not contain any bricks must be added to the trusted storage pool to provide high availability of the volume using the command mentioned above.In a three node cluster, if the server-side quorum percentage is set to 77%, bringing down one node would violate the server-side quorum. In this scenario, you have to add two dummy nodes to meet server-side quorum. - For replica 2 volumes, disable client-side quorum. This is not recommended for replica 3 volumes, as it increases the risk of split brain conditions developing.
gluster volume reset <vol-name> cluster.quorum-type
# gluster volume reset <vol-name> cluster.quorum-typeCopy to Clipboard Copied! Toggle word wrap Toggle overflow - Stop any geo-replication sessions running between the master and slave.
gluster volume geo-replication MASTER_VOL SLAVE_HOST::SLAVE_VOL stop
# gluster volume geo-replication MASTER_VOL SLAVE_HOST::SLAVE_VOL stopCopy to Clipboard Copied! Toggle word wrap Toggle overflow - Ensure that there are no pending self-heals before proceeding with in-service software upgrade using the following command:
gluster volume heal volname info
# gluster volume heal volname infoCopy to Clipboard Copied! Toggle word wrap Toggle overflow - Ensure the Red Hat Gluster Storage server is registered to the required channels.On Red Hat Enterprise Linux 6:
rhel-x86_64-server-6 rhel-x86_64-server-6-rhs-3 rhel-x86_64-server-sfs-6
rhel-x86_64-server-6 rhel-x86_64-server-6-rhs-3 rhel-x86_64-server-sfs-6Copy to Clipboard Copied! Toggle word wrap Toggle overflow On Red Hat Enterprise Linux 7:rhel-x86_64-server-7 rhel-x86_64-server-7-rhs-3 rhel-x86_64-server-sfs-7
rhel-x86_64-server-7 rhel-x86_64-server-7-rhs-3 rhel-x86_64-server-sfs-7Copy to Clipboard Copied! Toggle word wrap Toggle overflow To subscribe to the channels, run the following command:rhn-channel --add --channel=<channel>
# rhn-channel --add --channel=<channel>Copy to Clipboard Copied! Toggle word wrap Toggle overflow
8.2.1.2. Restrictions for In-Service Software Upgrade
- Do not perform in-service software upgrade when the I/O or load is high on the Red Hat Gluster Storage server.
- Do not perform any volume operations on the Red Hat Gluster Storage server.
- Do not change hardware configurations.
- Do not run mixed versions of Red Hat Gluster Storage for an extended period of time. For example, do not have a mixed environment of Red Hat Gluster Storage 3.1 and Red Hat Gluster Storage 3.2 for a prolonged time.
- Do not combine different upgrade methods.
- It is not recommended to use in-service software upgrade for migrating to thinly provisioned volumes, but to use offline upgrade scenario instead. For more information see, Section 8.1, “Offline Upgrade from Red Hat Gluster Storage 3.1 to 3.2 ”
8.2.1.3. Configuring repo for Upgrading using ISO
Note
- Mount the ISO image file under any directory using the following command:
mount -o loop <ISO image file> <mount-point>
mount -o loop <ISO image file> <mount-point>Copy to Clipboard Copied! Toggle word wrap Toggle overflow For example:mount -o loop RHGS-3.2-20170209.0-RHS-x86_64-dvd1.iso /mnt
mount -o loop RHGS-3.2-20170209.0-RHS-x86_64-dvd1.iso /mntCopy to Clipboard Copied! Toggle word wrap Toggle overflow - Set the repo options in a file in the following location:
/etc/yum.repos.d/<file_name.repo>
/etc/yum.repos.d/<file_name.repo>Copy to Clipboard Copied! Toggle word wrap Toggle overflow - Add the following information to the repo file:
[local] name=local baseurl=file:///mnt enabled=1 gpgcheck=0
[local] name=local baseurl=file:///mnt enabled=1 gpgcheck=0Copy to Clipboard Copied! Toggle word wrap Toggle overflow
8.2.1.4. Preparing and Monitoring the Upgrade Activity
- Check the peer and volume status to ensure that all peers are connected and there are no active volume tasks.
gluster peer status
# gluster peer statusCopy to Clipboard Copied! Toggle word wrap Toggle overflow gluster volume status
# gluster volume statusCopy to Clipboard Copied! Toggle word wrap Toggle overflow - Check the rebalance status using the following command:
gluster volume rebalance r2 status
# gluster volume rebalance r2 status Node Rebalanced-files size scanned failures skipped status run time in secs --------- ----------- --------- -------- --------- ------ -------- -------------- 10.70.43.198 0 0Bytes 99 0 0 completed 1.00 10.70.43.148 49 196Bytes 100 0 0 completed 3.00Copy to Clipboard Copied! Toggle word wrap Toggle overflow - Ensure that there are no pending self-heals before proceeding with in-service software upgrade using the following command:
gluster volume heal volname info
# gluster volume heal volname infoCopy to Clipboard Copied! Toggle word wrap Toggle overflow The following example shows no pending self-heals.Copy to Clipboard Copied! Toggle word wrap Toggle overflow
8.2.2. Service Impact of In-Service Upgrade
ReST requests that are in transition will fail during in-service software upgrade. Hence it is recommended to stop all swift services before in-service software upgrade using the following commands:
service openstack-swift-proxy stop service openstack-swift-account stop service openstack-swift-container stop service openstack-swift-object stop
# service openstack-swift-proxy stop
# service openstack-swift-account stop
# service openstack-swift-container stop
# service openstack-swift-object stopWhen you NFS mount a volume, any new or outstanding file operations on that file system will hang uninterruptedly during in-service software upgrade until the server is upgraded.
Ongoing I/O on Samba shares will fail as the Samba shares will be temporarily unavailable during the in-service software upgrade, hence it is recommended to stop the Samba service using the following command:
service ctdb stop ;Stopping CTDB will also stop the SMB service.
# service ctdb stop ;Stopping CTDB will also stop the SMB service.In-service software upgrade is not supported for distributed volume. If you have a distributed volume in the cluster, stop that volume for the duration of the upgrade.
gluster volume stop <VOLNAME>
# gluster volume stop <VOLNAME>The virtual machine images are likely to be modified constantly. The virtual machine listed in the output of the volume heal command does not imply that the self-heal of the virtual machine is incomplete. It could mean that the modifications on the virtual machine are happening constantly.
8.2.3. In-Service Software Upgrade
- Back up the following configuration directory and files in a location that is not on the operating system partition.
/var/lib/glusterd, /etc/swift, /etc/samba, /etc/ctdb, /etc/glusterfs, /var/lib/samba, /var/lib/ctdbCopy to Clipboard Copied! Toggle word wrap Toggle overflow Note
- If you have a CTDB environment, see Section 8.2.4.1, “In-Service Software Upgrade for a CTDB Setup”.
- Ensure that there are no pending self-heals before proceeding with in-service software upgrade using the following command:
gluster volume heal volname info
# gluster volume heal volname infoCopy to Clipboard Copied! Toggle word wrap Toggle overflow - Stop the gluster services on the storage server using the following commands:
service glusterd stop
pkill glusterfs
pkill glusterfsd
# service glusterd stop
# pkill glusterfs
# pkill glusterfsd
Copy to Clipboard Copied! Toggle word wrap Toggle overflow - Verify that your system is not using the legacy Red Hat Classic update software.
migrate-rhs-classic-to-rhsm --status
# migrate-rhs-classic-to-rhsm --statusCopy to Clipboard Copied! Toggle word wrap Toggle overflow If your system uses this legacy software, migrate to Red Hat Subscription Manager and verify that your status has changed when migration is complete.migrate-rhs-classic-to-rhsm --rhn-to-rhsm
# migrate-rhs-classic-to-rhsm --rhn-to-rhsmCopy to Clipboard Copied! Toggle word wrap Toggle overflow migrate-rhs-classic-to-rhsm --status
# migrate-rhs-classic-to-rhsm --statusCopy to Clipboard Copied! Toggle word wrap Toggle overflow - Update the server using the following command:
yum update
# yum updateCopy to Clipboard Copied! Toggle word wrap Toggle overflow - If the volumes are thickly provisioned, and you plan to use snapshots, perform the following steps to migrate to thinly provisioned volumes:
Note
Migrating from thickly provisioned volume to thinly provisioned volume during in-service software upgrade takes a significant amount of time based on the data you have in the bricks. If you do not plan to use snapshots, you can skip this step. However, if you plan to use snapshots on your existing environment, the offline method to upgrade is recommended. For more information regarding offline upgrade, see Section 8.1, “Offline Upgrade from Red Hat Gluster Storage 3.1 to 3.2 ”Contact a Red Hat Support representative before migrating from thickly provisioned volumes to thinly provisioned volumes using in-service software upgrade.- Unmount all the bricks associated with the volume by executing the following command:
umount mount_point
# umount mount_pointCopy to Clipboard Copied! Toggle word wrap Toggle overflow - Remove the LVM associated with the brick by executing the following command:
lvremove logical_volume_name
# lvremove logical_volume_nameCopy to Clipboard Copied! Toggle word wrap Toggle overflow For example:lvremove /dev/RHS_vg/brick1
# lvremove /dev/RHS_vg/brick1Copy to Clipboard Copied! Toggle word wrap Toggle overflow - Remove the volume group by executing the following command:
vgremove -ff volume_group_name
# vgremove -ff volume_group_nameCopy to Clipboard Copied! Toggle word wrap Toggle overflow For example:vgremove -ff RHS_vg
vgremove -ff RHS_vgCopy to Clipboard Copied! Toggle word wrap Toggle overflow - Remove the physical volume by executing the following command:
pvremove -ff physical_volume
# pvremove -ff physical_volumeCopy to Clipboard Copied! Toggle word wrap Toggle overflow - If the physical volume (PV) not created then create the PV for a RAID 6 volume by executing the following command, else proceed with the next step:
pvcreate --dataalignment 2560K /dev/vdb
# pvcreate --dataalignment 2560K /dev/vdbCopy to Clipboard Copied! Toggle word wrap Toggle overflow For more information, see the Red Hat Gluster Storage 3.2 Administration Guide: https://access.redhat.com/documentation/en-us/red_hat_gluster_storage/3.2/html-single/administration_guide/#Formatting_and_Mounting_Bricks. - Create a single volume group from the PV by executing the following command:
vgcreate volume_group_name disk
# vgcreate volume_group_name diskCopy to Clipboard Copied! Toggle word wrap Toggle overflow For example:vgcreate RHS_vg /dev/vdb
vgcreate RHS_vg /dev/vdbCopy to Clipboard Copied! Toggle word wrap Toggle overflow - Create a thinpool using the following command:
lvcreate -L size --poolmetadatasize md size --chunksize chunk size -T pool device
# lvcreate -L size --poolmetadatasize md size --chunksize chunk size -T pool deviceCopy to Clipboard Copied! Toggle word wrap Toggle overflow For example:lvcreate -L 2T --poolmetadatasize 16G --chunksize 256 -T /dev/RHS_vg/thin_pool
lvcreate -L 2T --poolmetadatasize 16G --chunksize 256 -T /dev/RHS_vg/thin_poolCopy to Clipboard Copied! Toggle word wrap Toggle overflow - Create a thin volume from the pool by executing the following command:
lvcreate -V size -T pool device -n thinp
# lvcreate -V size -T pool device -n thinpCopy to Clipboard Copied! Toggle word wrap Toggle overflow For example:lvcreate -V 1.5T -T /dev/RHS_vg/thin_pool -n thin_vol
lvcreate -V 1.5T -T /dev/RHS_vg/thin_pool -n thin_volCopy to Clipboard Copied! Toggle word wrap Toggle overflow - Create filesystem in the new volume by executing the following command:
mkfs.xfs -i size=512 thin pool device
mkfs.xfs -i size=512 thin pool deviceCopy to Clipboard Copied! Toggle word wrap Toggle overflow For example:mkfs.xfs -i size=512 /dev/RHS_vg/thin_vol
mkfs.xfs -i size=512 /dev/RHS_vg/thin_volCopy to Clipboard Copied! Toggle word wrap Toggle overflow The back-end is now converted to a thinly provisioned volume. - Mount the thinly provisioned volume to the brick directory and setup the extended attributes on the bricks. For example:
setfattr -n trusted.glusterfs.volume-id \ -v 0x$(grep volume-id /var/lib/glusterd/vols/volname/info \ | cut -d= -f2 | sed 's/-//g') $brick
# setfattr -n trusted.glusterfs.volume-id \ -v 0x$(grep volume-id /var/lib/glusterd/vols/volname/info \ | cut -d= -f2 | sed 's/-//g') $brickCopy to Clipboard Copied! Toggle word wrap Toggle overflow
- To ensure Red Hat Gluster Storage Server node is healthy after reboot and so that it can then be joined back to the cluster, it is recommended that you disable glusterd during boot using the following command:
chkconfig glusterd off
# chkconfig glusterd offCopy to Clipboard Copied! Toggle word wrap Toggle overflow - Reboot the server.
- Perform the following operations to change the Automatic File Replication extended attributes so that the heal process happens from a brick in the replica subvolume to the thin provisioned brick.
- Create a FUSE mount point from any server to edit the extended attributes. Using the NFS and CIFS mount points, you will not be able to edit the extended attributes.Note that /mnt/r2 is the FUSE mount path.
- Create a new directory on the mount point and ensure that a directory with such a name is not already present.
mkdir /mnt/r2/name-of-nonexistent-dir
# mkdir /mnt/r2/name-of-nonexistent-dirCopy to Clipboard Copied! Toggle word wrap Toggle overflow - Delete the directory and set the extended attributes.
rmdir /mnt/r2/name-of-nonexistent-dir
# rmdir /mnt/r2/name-of-nonexistent-dirCopy to Clipboard Copied! Toggle word wrap Toggle overflow setfattr -n trusted.non-existent-key -v abc /mnt/r2 setfattr -x trusted.non-existent-key /mnt/r2
# setfattr -n trusted.non-existent-key -v abc /mnt/r2 # setfattr -x trusted.non-existent-key /mnt/r2Copy to Clipboard Copied! Toggle word wrap Toggle overflow - Ensure that the extended attributes of the brick in the replica subvolume(In this example,
brick: /dev/RHS_vg/brick2, extended attribute: trusted.afr.r2-client-1), is not set to zero.Copy to Clipboard Copied! Toggle word wrap Toggle overflow
- Start the
glusterdservice using the following command:service glusterd start
# service glusterd startCopy to Clipboard Copied! Toggle word wrap Toggle overflow - To automatically start the
glusterddaemon every time the system boots, run the following command:chkconfig glusterd on
# chkconfig glusterd onCopy to Clipboard Copied! Toggle word wrap Toggle overflow - To verify if you have upgraded to the latest version of the Red Hat Gluster Storage server execute the following command:
gluster --version
# gluster --versionCopy to Clipboard Copied! Toggle word wrap Toggle overflow - Ensure that all the bricks are online. To check the status execute the following command:
gluster volume status
# gluster volume statusCopy to Clipboard Copied! Toggle word wrap Toggle overflow For example:Copy to Clipboard Copied! Toggle word wrap Toggle overflow - Start self-heal on the volume.
gluster volume heal vol-name
# gluster volume heal vol-nameCopy to Clipboard Copied! Toggle word wrap Toggle overflow - Ensure self-heal is complete on the replica using the following command:
gluster volume heal volname info
# gluster volume heal volname infoCopy to Clipboard Copied! Toggle word wrap Toggle overflow The following example shows self heal completion:Copy to Clipboard Copied! Toggle word wrap Toggle overflow - Repeat the above steps on the other node of the replica pair.
Note
In the case of a distributed-replicate setup, repeat the above steps on all the replica pairs. - When all nodes have been upgraded, run the following command to update the
op-versionof the cluster. This helps to prevent any compatibility issues within the cluster.gluster volume set all cluster.op-version 31001
# gluster volume set all cluster.op-version 31001Copy to Clipboard Copied! Toggle word wrap Toggle overflow Note
31001is thecluster.op-versionvalue for Red Hat Gluster Storage 3.2.0. Refer to Section 1.5, “Supported Versions of Red Hat Gluster Storage” for the correctcluster.op-versionvalue for other versions.Note
If you want to enable snapshots, see the Red Hat Gluster Storage 3.2 Administration Guide: https://access.redhat.com/documentation/en-us/red_hat_gluster_storage/3.2/html-single/administration_guide/#Troubleshooting1. - If the client-side quorum was disabled before upgrade, then upgrade it by executing the following command:
gluster volume set volname cluster.quorum-type auto
# gluster volume set volname cluster.quorum-type autoCopy to Clipboard Copied! Toggle word wrap Toggle overflow - If a dummy node was created earlier, then detatch it by executing the following command:
gluster peer detatch <dummy_node name>
# gluster peer detatch <dummy_node name>Copy to Clipboard Copied! Toggle word wrap Toggle overflow - If the geo-replication session between master and slave was disabled before upgrade, then configure the meta volume and restart the session:
gluster volume set all cluster.enable-shared-storage enable
# gluster volume set all cluster.enable-shared-storage enableCopy to Clipboard Copied! Toggle word wrap Toggle overflow gluster volume geo-replication Volume1 example.com::slave-vol config use_meta_volume true
# gluster volume geo-replication Volume1 example.com::slave-vol config use_meta_volume trueCopy to Clipboard Copied! Toggle word wrap Toggle overflow gluster volume geo-replication MASTER_VOL SLAVE_HOST::SLAVE_VOL start
# gluster volume geo-replication MASTER_VOL SLAVE_HOST::SLAVE_VOL startCopy to Clipboard Copied! Toggle word wrap Toggle overflow
8.2.4. Special Consideration for In-Service Software Upgrade
8.2.4.1. In-Service Software Upgrade for a CTDB Setup
- To ensure that the CTDB does not start automatically after a reboot run the following command on each node of the CTDB cluster:
chkconfig ctdb off
# chkconfig ctdb offCopy to Clipboard Copied! Toggle word wrap Toggle overflow - Stop the CTDB service on the Red Hat Gluster Storage node using the following command on each node of the CTDB cluster:
service ctdb stop
# service ctdb stopCopy to Clipboard Copied! Toggle word wrap Toggle overflow - To verify if the CTDB and SMB services are stopped, execute the following command:
ps axf | grep -E '(ctdb|smb|winbind|nmb)[d]'
ps axf | grep -E '(ctdb|smb|winbind|nmb)[d]'Copy to Clipboard Copied! Toggle word wrap Toggle overflow
- Stop the gluster services on the storage server using the following commands:
service glusterd stop
pkill glusterfs
pkill glusterfsd
# service glusterd stop
# pkill glusterfs
# pkill glusterfsd
Copy to Clipboard Copied! Toggle word wrap Toggle overflow - In
/etc/fstab, comment out the line containing the volume used for CTDB service as shown in the following example:HostName:/volname /gluster/lock glusterfs defaults,transport=tcp 0 0
# HostName:/volname /gluster/lock glusterfs defaults,transport=tcp 0 0Copy to Clipboard Copied! Toggle word wrap Toggle overflow - Update the server using the following command:
yum update
# yum updateCopy to Clipboard Copied! Toggle word wrap Toggle overflow - If SELinux support is required, then enable SELinux by following the steps mentioned in, Chapter 10, Enabling SELinux
- After SELinux is enabled, set the following boolean:For Samba
setsebool -P samba_load_libgfapi 1For CTDBsetsebool -P use_fusefs_home_dirs 1 - To ensure the
glusterdservice does not start automatically after reboot, execute the following command:chkconfig glusterd off
# chkconfig glusterd offCopy to Clipboard Copied! Toggle word wrap Toggle overflow - Reboot the server.
- Update the META=all with the gluster volume information in the following scripts:
/var/lib/glusterd/hooks/1/start/post/S29CTDBsetup.sh /var/lib/glusterd/hooks/1/stop/pre/S29CTDB-teardown.sh
/var/lib/glusterd/hooks/1/start/post/S29CTDBsetup.sh /var/lib/glusterd/hooks/1/stop/pre/S29CTDB-teardown.shCopy to Clipboard Copied! Toggle word wrap Toggle overflow - In
/etc/fstab, uncomment the line containing the volume used for CTDB service as shown in the following example:HostName:/volname /gluster/lock glusterfs defaults,transport=tcp 0 0
HostName:/volname /gluster/lock glusterfs defaults,transport=tcp 0 0Copy to Clipboard Copied! Toggle word wrap Toggle overflow - To automatically start the
glusterddaemon every time the system boots, run the following command:chkconfig glusterd on
# chkconfig glusterd onCopy to Clipboard Copied! Toggle word wrap Toggle overflow - To automatically start the ctdb daemon every time the system boots, run the following command:
chkconfig ctdb on
# chkconfig ctdb onCopy to Clipboard Copied! Toggle word wrap Toggle overflow - Start the
glusterdservice using the following command:service glusterd start
# service glusterd startCopy to Clipboard Copied! Toggle word wrap Toggle overflow - If using NFS to access volumes, enable gluster-NFS using below command:
gluster volume set <volname> nfs.disable off
# gluster volume set <volname> nfs.disable offCopy to Clipboard Copied! Toggle word wrap Toggle overflow For example:gluster volume set testvol nfs.disable off
# gluster volume set testvol nfs.disable off
volume set: success
Copy to Clipboard Copied! Toggle word wrap Toggle overflow - Mount the CTDB volume by running the following command:
mount -a
# mount -aCopy to Clipboard Copied! Toggle word wrap Toggle overflow - Start the CTDB service using the following command:
service ctdb start
# service ctdb startCopy to Clipboard Copied! Toggle word wrap Toggle overflow - To verify if CTDB is running successfully, execute the following commands:
ctdb status
ctdb ip
ctdb ping -n all
# ctdb status
# ctdb ip
# ctdb ping -n all
Copy to Clipboard Copied! Toggle word wrap Toggle overflow
After upgrading the Red Hat Gluster Storage server, upgrade the CTDB package by executing the following steps:
Note
- Upgrading CTDB on all the nodes must be done simultaneously to avoid any data corruption.
- The following steps have to performed only when upgrading CTDB from CTDB 1.x to CTDB 4.x.
- Stop the CTDB service on all the nodes of the CTDB cluster by executing the following command. Ensure it is performed on all the nodes simultaneously as two different versions of CTDB cannot run at the same time in the CTDB cluster:
service ctdb stop
# service ctdb stopCopy to Clipboard Copied! Toggle word wrap Toggle overflow - Perform the following operations on all the nodes used as samba servers:
- Remove the following soft links:
/etc/sysconfig/ctdb
/etc/ctdb/nodes
/etc/ctdb/public_addresses
/etc/sysconfig/ctdb
/etc/ctdb/nodes
/etc/ctdb/public_addresses
Copy to Clipboard Copied! Toggle word wrap Toggle overflow - Copy the following files from the CTDB volume to the corresponding location by executing the following command on each node of the CTDB cluster:
cp /gluster/lock/nodes /etc/ctdb/nodes
cp /gluster/lock/public_addresses /etc/ctdb/public_addresses
cp /gluster/lock/nodes /etc/ctdb/nodes
cp /gluster/lock/public_addresses /etc/ctdb/public_addresses
Copy to Clipboard Copied! Toggle word wrap Toggle overflow
- Stop and delete the CTDB volume by executing the following commands on one of the nodes of the CTDB cluster:
gluster volume stop volname
# gluster volume stop volnameCopy to Clipboard Copied! Toggle word wrap Toggle overflow gluster volume delete volname
# gluster volume delete volnameCopy to Clipboard Copied! Toggle word wrap Toggle overflow - To update CTDB, execute the following command:
yum update
# yum updateCopy to Clipboard Copied! Toggle word wrap Toggle overflow
8.2.4.2. Verifying In-Service Software Upgrade
gluster --version
# gluster --version8.2.4.3. Upgrading the Native Client
yum.
Warning
Important
9.1. Upgrading using an ISO
- Using Red Hat Enterprise Virtualization Manager, stop all the virtual machine instances.The Red Hat Gluster Storage volume on the instances will be stopped during the upgrade.
- Using Red Hat Enterprise Virtualization Manager, move the data domain of the data center to Maintenance mode.
- Using Red Hat Enterprise Virtualization Manager, stop the volume (the volume used for data domain) containing Red Hat Gluster Storage nodes in the data center.
- Using Red Hat Enterprise Virtualization Manager, move all Red Hat Gluster Storage nodes to Maintenance mode.
- Perform the ISO Upgrade as mentioned in section Section 8.2.1.3, “Configuring repo for Upgrading using ISO”.
- Re-install the Red Hat Gluster Storage nodes from Red Hat Enterprise Virtualization Manager.
Note
- Re-installation for the Red Hat Gluster Storage nodes should be done from Red Hat Enterprise Virtualization Manager. The newly upgraded Red Hat Gluster Storage 3.2 nodes lose their network configuration and other configuration details, such as firewall configuration, which was done while adding the nodes to Red Hat Enterprise Virtualization Manager. Re-install the Red Hat Gluster Storage nodes to have the bootstrapping done.
- You can re-configure the Red Hat Gluster Storage nodes using the option provided under Action Items, as shown in Figure 9.1, “Red Hat Gluster Storage Node before Upgrade ”, and perform bootstrapping.
Figure 9.1. Red Hat Gluster Storage Node before Upgrade
- Perform the steps above in all Red Hat Gluster Storage nodes.
- Start the volume once all the nodes are shown in Up status in Red Hat Enterprise Virtualization Manager.
- Upgrade the native client bits for Red Hat Enterprise Linux 6 or Red Hat Enterprise Linux 7, depending on the hypervisor you are using.
Note
If Red Hat Enterprise Virtualization Hypervisor is used as hypervisor, then install a suitable build of Red Hat Enterprise Virtualization Hypervisor containing the latest native client.Figure 9.2. Red Hat Gluster Storage Node after Upgrade
- Using Red Hat Enterprise Virtualization Manager, activate the data domain and start all the virtual machine instances in the data center.

9.2. Upgrading using yum
- Using Red Hat Enterprise Virtualization Manager, stop all virtual machine instances in the data center.
- Using Red Hat Enterprise Virtualization Manager, move the data domain backed by gluster volume to Maintenance mode.
- Using Red Hat Enterprise Virtualization Manager, move all Red Hat Gluster Storage nodes to Maintenance mode.
- Perform
yumupdate as mentioned in Section 8.1.1, “Upgrading from Red Hat Gluster Storage 3.1 to Red Hat Gluster Storage 3.2 for Systems Subscribed to Red Hat Network”. - Once the Red Hat Gluster Storage nodes are rebooted and up, them using Red Hat Enterprise Virtualization Manager.
Note
Re-installation of Red Hat Gluster Storage nodes is required, as the network configurations and bootstrapping configurations done prior to upgrade are preserved, unlike ISO upgrade. - Using Red Hat Enterprise Virtualization Manager, start the volume.
- Upgrade the native client bits for Red Hat Enterprise Linux 6 or Red Hat Enterprise Linux 7, based on the Red Hat Enterprise Linux server hypervisor used.
Note
If Red Hat Enterprise Virtualization Hypervisor is used as hypervisor, reinstall Red Hat Enterprise Virtualization Hypervisor containing the latest version of Red Hat Gluster Storage native client. - Activate the data domain and start all the virtual machine instances.
Chapter 10. Enabling SELinux
rpm -q package_name
# rpm -q package_nameImportant
dracut utility has to be run to put SELinux awareness into the initramfs file system. Failing to do so causes SELinux to not start during system startup.
- Before SELinux is enabled, each file on the file system must be labeled with an SELinux context. Before this happens, confined domains may be denied access, preventing your system from booting correctly. To prevent this, configure
SELINUX=permissivein/etc/selinux/config:Copy to Clipboard Copied! Toggle word wrap Toggle overflow - As the Linux root user, reboot the system. During the next boot, file systems are labeled. The label process labels each file with an SELinux context:
*** Warning -- SELinux targeted policy relabel is required.
*** Relabeling could take a very long time, depending on file
*** system size and speed of hard drives.
****
*** Warning -- SELinux targeted policy relabel is required.
*** Relabeling could take a very long time, depending on file
*** system size and speed of hard drives.
****
Copy to Clipboard Copied! Toggle word wrap Toggle overflow Each * (asterisk) character on the bottom line represents 1000 files that have been labeled. In the above example, four * characters represent 4000 files have been labeled. The time it takes to label all files depends on the number of files on the system and the speed of hard drives. On modern systems, this process can take as short as 10 minutes. - In permissive mode, the SELinux policy is not enforced, but denial messages are still logged for actions that would have been denied in enforcing mode. Before changing to enforcing mode, as the Linux root user, run the following command to confirm that SELinux did not deny actions during the last boot:
grep "SELinux is preventing" /var/log/messages
# grep "SELinux is preventing" /var/log/messagesCopy to Clipboard Copied! Toggle word wrap Toggle overflow If SELinux did not deny any actions during the last boot, this command returns no output. - If there were no denial messages in /var/log/messages, configure SELINUX=enforcing in /etc/selinux/config:
Copy to Clipboard Copied! Toggle word wrap Toggle overflow - Reboot your system. After reboot, confirm that getenforce returns Enforcing
getenforce
~]$ getenforce
Enforcing
Copy to Clipboard Copied! Toggle word wrap Toggle overflow
Chapter 11. Using the Gluster Command Line Interface
Note
--mode=script to any CLI command ensures that the command executes without confirmation prompts.
Run the Gluster CLI on any Red Hat Gluster Storage Server by either invoking the commands or running the Gluster CLI in interactive mode. The gluster command can be remotely used via SSH.
gluster peer COMMAND
# gluster peer COMMANDstatus command:
gluster peer status
# gluster peer statusAlternatively, run the Gluster CLI in interactive mode using the following command:
gluster
# glustergluster>
gluster>gluster> COMMAND
gluster> COMMANDstatus to view the status of the peer server:
- Start Gluster CLI's interactive mode:
gluster
# glusterCopy to Clipboard Copied! Toggle word wrap Toggle overflow - Request the peer server status:
gluster> status
gluster> statusCopy to Clipboard Copied! Toggle word wrap Toggle overflow - The peer server status displays.
help to view the gluster help options.
- Start Gluster CLI's interactive mode:
gluster
# glusterCopy to Clipboard Copied! Toggle word wrap Toggle overflow - Request the help options:
gluster> help
gluster> helpCopy to Clipboard Copied! Toggle word wrap Toggle overflow - A list of gluster commands and options displays.
Appendix A. Revision History
| Revision History | |||||||||||||
|---|---|---|---|---|---|---|---|---|---|---|---|---|---|
| Revision 3.2-2 | Fri Mar 17 2017 | ||||||||||||
| |||||||||||||
| Revision 3.2-1 | Fri Mar 17 2017 | ||||||||||||
| |||||||||||||