Administration Guide
Configuring and Managing Red Hat Gluster Storage
Abstract
Part I. Preface
Chapter 1. Preface
1.1. About Red Hat Gluster Storage
1.2. About glusterFS
1.3. About On-premises Installation
Part II. Overview
Chapter 2. Architecture and Concepts
2.1. Architecture
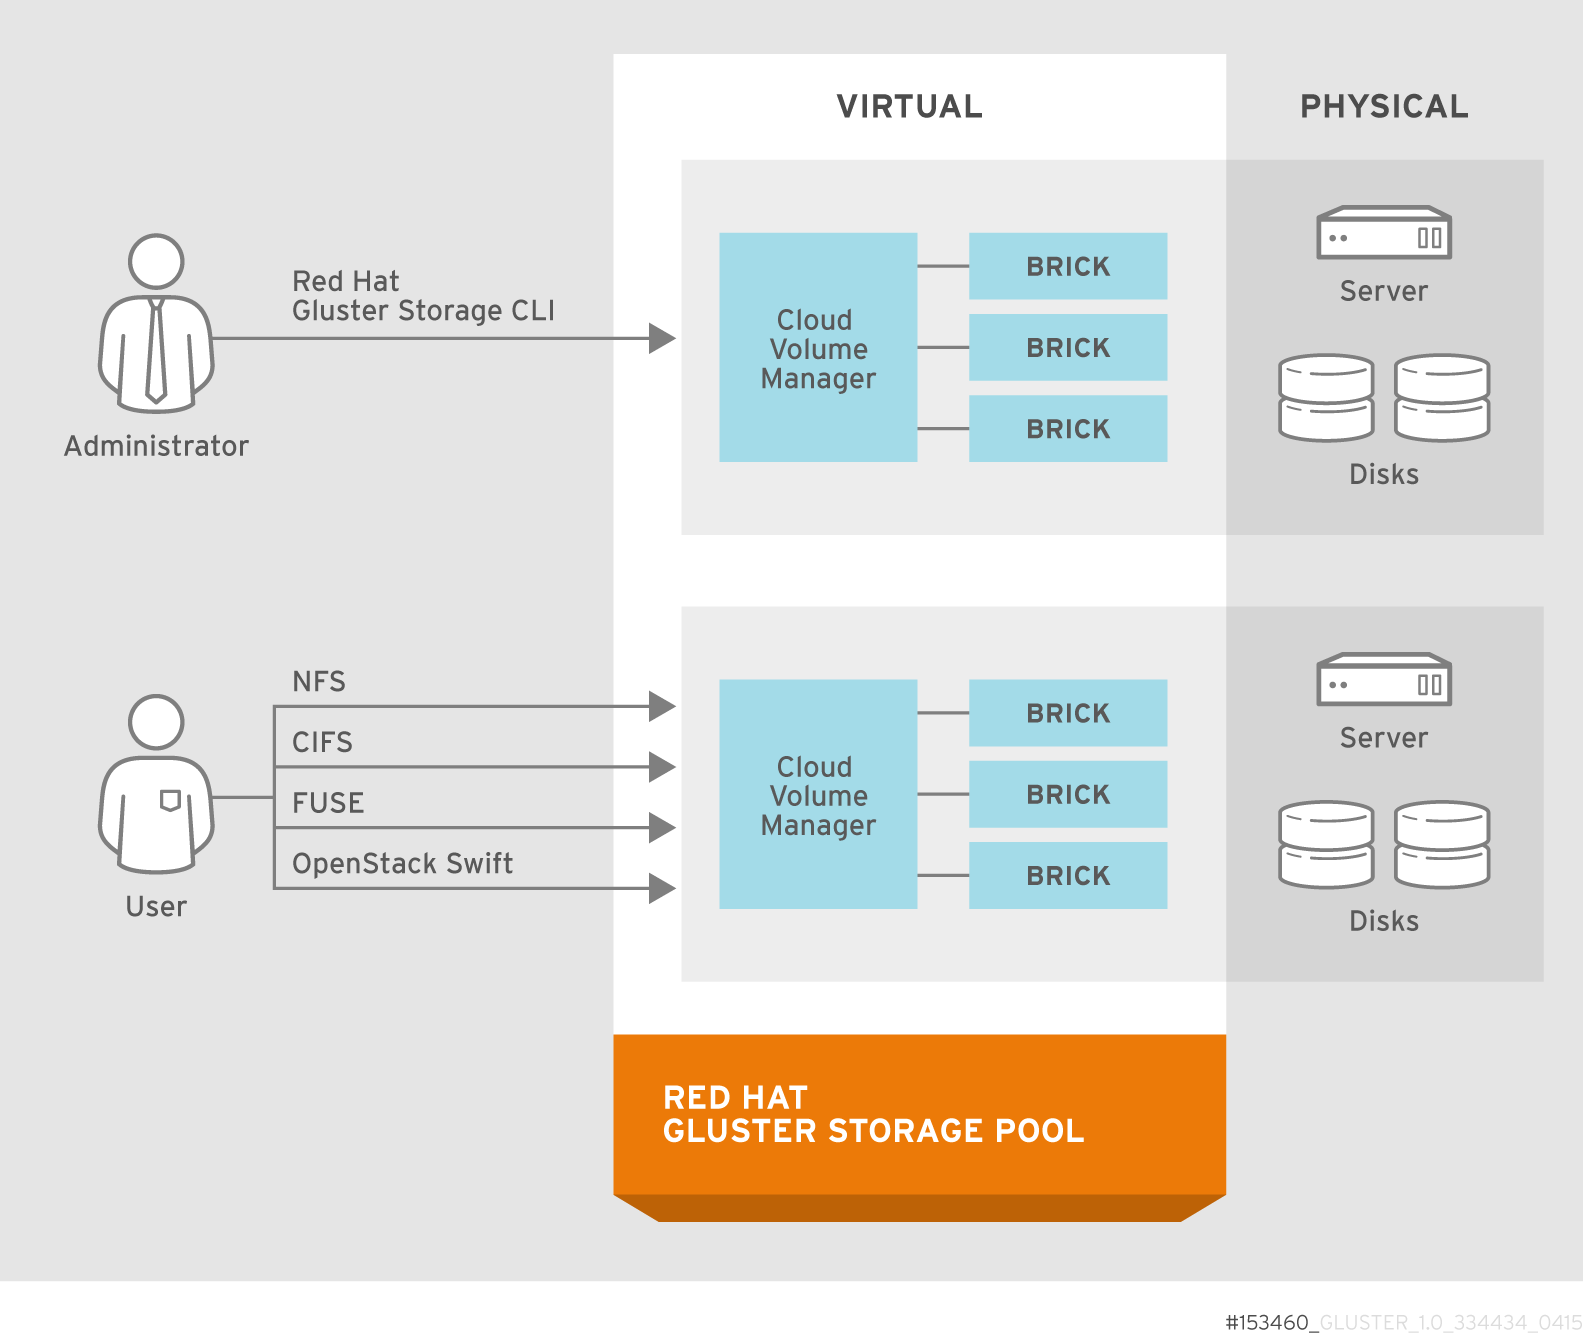
Figure 2.1. Red Hat Gluster Storage Architecture
2.2. On-premises Architecture
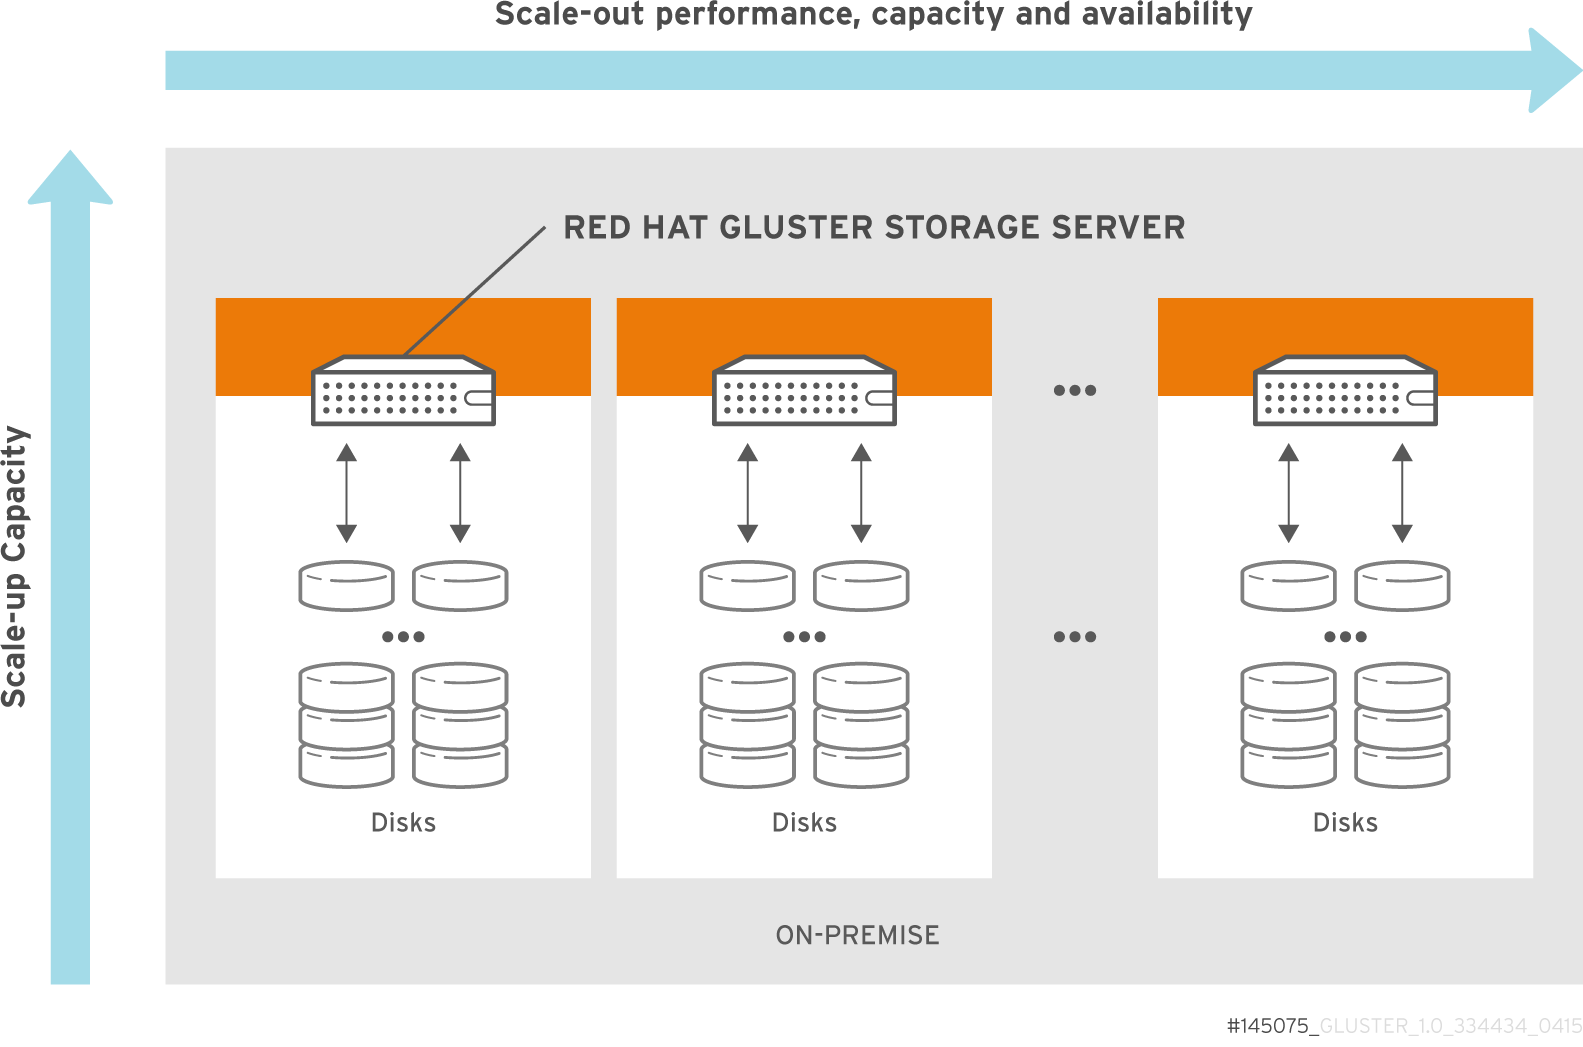
Figure 2.2. Red Hat Gluster Storage for On-premises Architecture
2.3. Storage Concepts
- Brick
- The glusterFS basic unit of storage, represented by an export directory on a server in the trusted storage pool. A brick is expressed by combining a server with an export directory in the following format:
SERVER:EXPORTFor example:myhostname:/exports/myexportdir/ - Volume
- A volume is a logical collection of bricks. Most of the Red Hat Gluster Storage management operations happen on the volume.
- Translator
- A translator connects to one or more subvolumes, does something with them, and offers a subvolume connection.
- Subvolume
- A brick after being processed by at least one translator.
- Volfile
- Volume (vol) files are configuration files that determine the behavior of your Red Hat Gluster Storage trusted storage pool. At a high level, GlusterFS has three entities, that is, Server, Client and Management daemon. Each of these entities have their own volume files. Volume files for servers and clients are generated by the management daemon upon creation of a volume.Server and Client Vol files are located in
/var/lib/glusterd/vols/VOLNAMEdirectory. The management daemon vol file is named asglusterd.voland is located in/etc/glusterfs/directory.Warning
You must not modify any vol file in/var/lib/glusterdmanually as Red Hat does not support vol files that are not generated by the management daemon. - glusterd
- glusterd is the glusterFS Management Service that must run on all servers in the trusted storage pool.
- Cluster
- A trusted pool of linked computers working together, resembling a single computing resource. In Red Hat Gluster Storage, a cluster is also referred to as a trusted storage pool.
- Client
- The machine that mounts a volume (this may also be a server).
- File System
- A method of storing and organizing computer files. A file system organizes files into a database for the storage, manipulation, and retrieval by the computer's operating system.Source: Wikipedia
- Distributed File System
- A file system that allows multiple clients to concurrently access data which is spread across servers/bricks in a trusted storage pool. Data sharing among multiple locations is fundamental to all distributed file systems.
- Virtual File System (VFS)
- VFS is a kernel software layer that handles all system calls related to the standard Linux file system. It provides a common interface to several kinds of file systems.
- POSIX
- Portable Operating System Interface (for Unix) (POSIX) is the name of a family of related standards specified by the IEEE to define the application programming interface (API), as well as shell and utilities interfaces, for software that is compatible with variants of the UNIX operating system. Red Hat Gluster Storage exports a fully POSIX compatible file system.
- Metadata
- Metadata is data providing information about other pieces of data.
- FUSE
- Filesystem in User space (FUSE) is a loadable kernel module for Unix-like operating systems that lets non-privileged users create their own file systems without editing kernel code. This is achieved by running file system code in user space while the FUSE module provides only a "bridge" to the kernel interfaces.Source: Wikipedia
- Geo-Replication
- Geo-replication provides a continuous, asynchronous, and incremental replication service from one site to another over Local Area Networks (LAN), Wide Area Networks (WAN), and the Internet.
- N-way Replication
- Local synchronous data replication that is typically deployed across campus or Amazon Web Services Availability Zones.
- Petabyte
- A petabyte is a unit of information equal to one quadrillion bytes, or 1000 terabytes. The unit symbol for the petabyte is PB. The prefix peta- (P) indicates a power of 1000:1 PB = 1,000,000,000,000,000 B = 1000^5 B = 10^15 B.The term "pebibyte" (PiB), using a binary prefix, is used for the corresponding power of 1024.Source: Wikipedia
- RAID
- Redundant Array of Independent Disks (RAID) is a technology that provides increased storage reliability through redundancy. It combines multiple low-cost, less-reliable disk drives components into a logical unit where all drives in the array are interdependent.
- RRDNS
- Round Robin Domain Name Service (RRDNS) is a method to distribute load across application servers. RRDNS is implemented by creating multiple records with the same name and different IP addresses in the zone file of a DNS server.
- Server
- The machine (virtual or bare metal) that hosts the file system in which data is stored.
- Block Storage
- Block special files, or block devices, correspond to devices through which the system moves data in the form of blocks. These device nodes often represent addressable devices such as hard disks, CD-ROM drives, or memory regions. As of Red Hat Gluster Storage 3.4 and later, block storage supports only OpenShift Container Storage converged and independent mode use cases. Block storage can be created and configured for this use case by using the
gluster-blockcommand line tool. For more information, see Container-Native Storage for OpenShift Container Platform. - Scale-Up Storage
- Increases the capacity of the storage device in a single dimension. For example, adding additional disk capacity in a trusted storage pool.
- Scale-Out Storage
- Increases the capability of a storage device in single dimension. For example, adding more systems of the same size, or adding servers to a trusted storage pool that increases CPU, disk capacity, and throughput for the trusted storage pool.
- Trusted Storage Pool
- A storage pool is a trusted network of storage servers. When you start the first server, the storage pool consists of only that server.
- Namespace
- An abstract container or environment that is created to hold a logical grouping of unique identifiers or symbols. Each Red Hat Gluster Storage trusted storage pool exposes a single namespace as a POSIX mount point which contains every file in the trusted storage pool.
- User Space
- Applications running in user space do not directly interact with hardware, instead using the kernel to moderate access. User space applications are generally more portable than applications in kernel space. glusterFS is a user space application.
- Hashed subvolume
- A Distributed Hash Table Translator subvolume to which the file or directory name is hashed to.
- Cached subvolume
- A Distributed Hash Table Translator subvolume where the file content is actually present. For directories, the concept of cached-subvolume is not relevant. It is loosely used to mean subvolumes which are not hashed-subvolume.
- Linkto-file
- For a newly created file, the hashed and cached subvolumes are the same. When directory entry operations like rename (which can change the name and hence hashed subvolume of the file) are performed on the file, instead of moving the entire data in the file to a new hashed subvolume, a file is created with the same name on the newly hashed subvolume. The purpose of this file is only to act as a pointer to the node where the data is present. In the extended attributes of this file, the name of the cached subvolume is stored. This file on the newly hashed-subvolume is called a linkto-file. The linkto file is relevant only for non-directory entities.
- Directory Layout
- The directory layout helps determine where files in a gluster volume are stored.When a client creates or requests a file, the DHT translator hashes the file's path to create an integer. Each directory in a gluster subvolume holds files that have integers in a specific range, so the hash of any given file maps to a specific subvolume in the gluster volume. The directory layout determines which integer ranges are assigned to a given directory across all subvolumes.Directory layouts are assigned when a directory is first created, and can be reassigned by running a rebalance operation on the volume. If a brick or subvolume is offline when a directory is created, it will not be part of the layout until after a rebalance is run.You should rebalance a volume to recalculate its directory layout after bricks are added to the volume. See Section 11.11, “Rebalancing Volumes” for more information.
- Fix Layout
- A command that is executed during the rebalance process.The rebalance process itself comprises of two stages:
- Fixes the layouts of directories to accommodate any subvolumes that are added or removed. It also heals the directories, checks whether the layout is non-contiguous, and persists the layout in extended attributes, if needed. It also ensures that the directories have the same attributes across all the subvolumes.
- Migrates the data from the cached-subvolume to the hashed-subvolume.
Part III. Configure and Verify
Chapter 3. Considerations for Red Hat Gluster Storage
3.1. Firewall and Port Access
3.1.1. Configuring the Firewall
iptables command to open a port:
# iptables -A INPUT -m state --state NEW -m tcp -p tcp --dport 5667 -j ACCEPT
# service iptables saveImportant
# firewall-cmd --zone=zone_name --add-service=glusterfs
# firewall-cmd --zone=zone_name --add-service=glusterfs --permanent# firewall-cmd --zone=zone_name --add-port=port/protocol
# firewall-cmd --zone=zone_name --add-port=port/protocol --permanent# firewall-cmd --zone=public --add-port=5667/tcp
# firewall-cmd --zone=public --add-port=5667/tcp --permanent3.1.2. Port Access Requirements
| Connection source | TCP Ports | UDP Ports | Recommended for | Used for |
|---|---|---|---|---|
| Any authorized network entity with a valid SSH key | 22 | - | All configurations | Remote backup using geo-replication |
| Any authorized network entity; be cautious not to clash with other RPC services. | 111 | 111 | All configurations | RPC port mapper and RPC bind |
| Any authorized SMB/CIFS client | 139 and 445 | 137 and 138 | Sharing storage using SMB/CIFS | SMB/CIFS protocol |
| Any authorized NFS clients | 2049 | 2049 | Sharing storage using Gluster NFS or NFS-Ganesha | Exports using NFS protocol |
| All servers in the Samba-CTDB cluster | 4379 | - | Sharing storage using SMB and Gluster NFS | CTDB |
| Any authorized network entity | 24007 | - | All configurations | Management processes using glusterd |
| Any authorized network entity | 55555 | - | All configurations |
Gluster events daemon
If you are upgrading from a previous version of Red Hat Gluster Storage to the latest version 3.5.4, the port used for glusterevents daemon should be modified to be in the ephemral range.
|
| NFSv3 clients | 662 | 662 | Sharing storage using NFS-Ganesha and Gluster NFS | statd |
| NFSv3 clients | 32803 | 32803 | Sharing storage using NFS-Ganesha and Gluster NFS | NLM protocol |
| NFSv3 clients sending mount requests | - | 32769 | Sharing storage using Gluster NFS | Gluster NFS MOUNT protocol |
| NFSv3 clients sending mount requests | 20048 | 20048 | Sharing storage using NFS-Ganesha | NFS-Ganesha MOUNT protocol |
| NFS clients | 875 | 875 | Sharing storage using NFS-Ganesha | NFS-Ganesha RQUOTA protocol (fetching quota information) |
| Servers in pacemaker/corosync cluster | 2224 | - | Sharing storage using NFS-Ganesha | pcsd |
| Servers in pacemaker/corosync cluster | 3121 | - | Sharing storage using NFS-Ganesha | pacemaker_remote |
| Servers in pacemaker/corosync cluster | - | 5404 and 5405 | Sharing storage using NFS-Ganesha | corosync |
| Servers in pacemaker/corosync cluster | 21064 | - | Sharing storage using NFS-Ganesha | dlm |
| Any authorized network entity | 49152 - 49664 | - | All configurations | Brick communication ports. The total number of ports required depends on the number of bricks on the node. One port is required for each brick on the machine. |
| Gluster Clients | 1023 or 49152 | - | Applicable when system ports are already being used in the machines. | Communication between brick and client processes. |
| Connection source | TCP Ports | UDP Ports | Recommended for | Used for |
|---|---|---|---|---|
| NFSv3 servers | 662 | 662 | Sharing storage using NFS-Ganesha and Gluster NFS | statd |
| NFSv3 servers | 32803 | 32803 | Sharing storage using NFS-Ganesha and Gluster NFS | NLM protocol |
3.2. Feature Compatibility Support
Note
| Feature | Version |
|---|---|
| Arbiter bricks | 3.2 |
| Bitrot detection | 3.1 |
| Erasure coding | 3.1 |
| Google Compute Engine | 3.1.3 |
| Metadata caching | 3.2 |
| Microsoft Azure | 3.1.3 |
| NFS version 4 | 3.1 |
| SELinux | 3.1 |
| Sharding | 3.2.0 |
| Snapshots | 3.0 |
| Snapshots, cloning | 3.1.3 |
| Snapshots, user-serviceable | 3.0.3 |
| Tiering (Deprecated) | 3.1.2 |
| Volume Shadow Copy (VSS) | 3.1.3 |
| Volume Type | Sharding | Tiering (Deprecated) | Quota | Snapshots | Geo-Rep | Bitrot |
|---|---|---|---|---|---|---|
| Arbitrated-Replicated | Yes | No | Yes | Yes | Yes | Yes |
| Distributed | No | Yes | Yes | Yes | Yes | Yes |
| Distributed-Dispersed | No | Yes | Yes | Yes | Yes | Yes |
| Distributed-Replicated | Yes | Yes | Yes | Yes | Yes | Yes |
| Replicated | Yes | Yes | Yes | Yes | Yes | Yes |
| Sharded | N/A | No | No | No | Yes | No |
| Tiered (Deprecated) | No | N/A | Limited[a] | Limited[a] | Limited[a] | Limited[a] |
| Feature | FUSE | Gluster-NFS | NFS-Ganesha | SMB |
|---|---|---|---|---|
| Arbiter | Yes | Yes | Yes | Yes |
| Bitrot detection | Yes | Yes | No | Yes |
| dm-cache | Yes | Yes | Yes | Yes |
| Encryption (TLS-SSL) | Yes | Yes | Yes | Yes |
| Erasure coding | Yes | Yes | Yes | Yes |
| Export subdirectory | Yes | Yes | Yes | N/A |
| Geo-replication | Yes | Yes | Yes | Yes |
| Quota (Deprecated)
Warning
Using QUOTA feature is considered to be deprecated in Red Hat Gluster Storage 3.5.3. Red Hat no longer recommends to use this feature and does not support it on new deployments and existing deployments that upgrade to Red Hat Gluster Storage 3.5.3.
See Chapter 9, Managing Directory Quotas for more details.
| Yes | Yes | Yes | Yes |
| RDMA (Deprecated)
Warning
Using RDMA as a transport protocol is considered deprecated in Red Hat Gluster Storage 3.5. Red Hat no longer recommends its use, and does not support it on new deployments and existing deployments that upgrade to Red Hat Gluster Storage 3.5.3.
| Yes | No | No | No |
| Snapshots | Yes | Yes | Yes | Yes |
| Snapshot cloning | Yes | Yes | Yes | Yes |
| Tiering (Deprecated)
Warning
Tiering is considered deprecated as of Red Hat Gluster Storage 3.5. Red Hat no longer recommends its use, and does not support tiering in new deployments and existing deployments that upgrade to Red Hat Gluster Storage 3.5.3.
| Yes | Yes | N/A | N/A |
Chapter 4. Adding Servers to the Trusted Storage Pool
Important
# firewall-cmd --get-active-zones# firewall-cmd --zone=zone_name --add-service=glusterfs
# firewall-cmd --zone=zone_name --add-service=glusterfs --permanentNote
gluster volume status VOLNAME command is executed from two of the nodes simultaneously.
4.1. Adding Servers to the Trusted Storage Pool
gluster peer probe [server] command is used to add servers to the trusted server pool.
Note
Adding Three Servers to a Trusted Storage Pool
Prerequisites
- The
glusterdservice must be running on all storage servers requiring addition to the trusted storage pool. See Chapter 22, Starting and Stopping the glusterd service for service start and stop commands. Server1, the trusted storage server, is started.- The host names of the target servers must be resolvable by DNS.
- Run
gluster peer probe [server]from Server 1 to add additional servers to the trusted storage pool.Note
- Self-probing
Server1will result in an error because it is part of the trusted storage pool by default. - All the servers in the Trusted Storage Pool must have RDMA devices if either RDMA or RDMA,TCP volumes are created in the storage pool. The peer probe must be performed using IP/hostname assigned to the RDMA device.
# gluster peer probe server2 Probe successful # gluster peer probe server3 Probe successful # gluster peer probe server4 Probe successful - Verify the peer status from all servers using the following command:
# gluster peer status Number of Peers: 3 Hostname: server2 Uuid: 5e987bda-16dd-43c2-835b-08b7d55e94e5 State: Peer in Cluster (Connected) Hostname: server3 Uuid: 1e0ca3aa-9ef7-4f66-8f15-cbc348f29ff7 State: Peer in Cluster (Connected) Hostname: server4 Uuid: 3e0caba-9df7-4f66-8e5d-cbc348f29ff7 State: Peer in Cluster (Connected)
Important
Note
# for peer in `gluster peer status | grep Hostname | awk -F':' '{print $2}' | awk '{print $1}'`; do clockdiff $peer; done4.2. Removing Servers from the Trusted Storage Pool
Warning
gluster peer detach server to remove a server from the storage pool.
Removing One Server from the Trusted Storage Pool
Prerequisites
- The
glusterdservice must be running on the server targeted for removal from the storage pool. See Chapter 22, Starting and Stopping the glusterd service for service start and stop commands. - The host names of the target servers must be resolvable by DNS.
- Run
gluster peer detach [server]to remove the server from the trusted storage pool.# gluster peer detach (server) All clients mounted through the peer which is getting detached needs to be remounted, using one of the other active peers in the trusted storage pool, this ensures that the client gets notification on any changes done on the gluster configuration and if the same has been done do you want to proceed? (y/n) y peer detach: success - Verify the peer status from all servers using the following command:
# gluster peer status Number of Peers: 2 Hostname: server2 Uuid: 5e987bda-16dd-43c2-835b-08b7d55e94e5 State: Peer in Cluster (Connected) Hostname: server3 Uuid: 1e0ca3aa-9ef7-4f66-8f15-cbc348f29ff7
Chapter 5. Setting Up Storage Volumes
Warning
Note
yum groupinstall "Infiniband Support" to install Infiniband packages.
Volume Types
- Distributed
- Distributes files across bricks in the volume.Use this volume type where scaling and redundancy requirements are not important, or provided by other hardware or software layers.See Section 5.4, “Creating Distributed Volumes” for additional information about this volume type.
- Replicated
- Replicates files across bricks in the volume.Use this volume type in environments where high-availability and high-reliability are critical.See Section 5.5, “Creating Replicated Volumes” for additional information about this volume type.
- Distributed Replicated
- Distributes files across replicated bricks in the volume.Use this volume type in environments where high-reliability and scalability are critical. This volume type offers improved read performance in most environments.See Section 5.6, “Creating Distributed Replicated Volumes” for additional information about this volume type.
- Arbitrated Replicated
- Replicates files across two bricks in a replica set, and replicates only metadata to the third brick.Use this volume type in environments where consistency is critical, but underlying storage space is at a premium.See Section 5.7, “Creating Arbitrated Replicated Volumes” for additional information about this volume type.
- Dispersed
- Disperses the file's data across the bricks in the volume.Use this volume type where you need a configurable level of reliability with a minimum space waste.See Section 5.8, “Creating Dispersed Volumes” for additional information about this volume type.
- Distributed Dispersed
- Distributes file's data across the dispersed sub-volume.Use this volume type where you need a configurable level of reliability with a minimum space waste.See Section 5.9, “Creating Distributed Dispersed Volumes” for additional information about this volume type.
5.1. Setting up Gluster Storage Volumes using gdeploy
- Setting-up the backend on several machines can be done from one's laptop/desktop. This saves time and scales up well when the number of nodes in the trusted storage pool increase.
- Flexibility in choosing the drives to configure. (sd, vd, ...).
- Flexibility in naming the logical volumes (LV) and volume groups (VG).
5.1.1. Getting Started
- Generate the passphrase-less SSH keys for the nodes which are going to be part of the trusted storage pool by running the following command:
# ssh-keygen -t rsa -N '' - Set up key-based SSH authentication access between the gdeploy controller and servers by running the following command:
# ssh-copy-id -i root@serverNote
If you are using a Red Hat Gluster Storage node as the deployment node and not an external node, then the key-based SSH authentication must be set up for the Red Hat Gluster Storage node from where the installation is performed. - Enable the repository required to install Ansible by running the following command:For Red Hat Enterprise Linux 8
# subscription-manager repos --enable=ansible-2-for-rhel-8-x86_64-rpmsFor Red Hat Enterprise Linux 7# subscription-manager repos --enable=rhel-7-server-ansible-2-rpms - Install
ansibleby executing the following command:# yum install ansible - You must also ensure the following:
- Devices should be raw and unused
- Default system locale must be set to
en_USFor information on system locale, refer to the Setting the System Locale of the Red Hat Enterprise Linux 7 System Administrator's Guide. - For multiple devices, use multiple volume groups, thinpool, and thinvol in the
gdeployconfiguration file
- Using a node in a trusted storage pool
- Using a machine outside the trusted storage pool
The gdeploy package is bundled as part of the initial installation of Red Hat Gluster Storage.
You must ensure that the Red Hat Gluster Storage is subscribed to the required channels. For more information see, Subscribing to the Red Hat Gluster Storage Server Channels in the Red Hat Gluster Storage 3.5 Installation Guide.
# yum install gdeploygdeploy see, Installing Ansible to Support Gdeploy section in the Red Hat Gluster Storage 3.5 Installation Guide.
5.1.2. Setting up a Trusted Storage Pool
/usr/share/doc/gdeploy/examples/gluster.conf.sampleNote
#
# Usage:
# gdeploy -c 3x3-volume-create.conf
#
# This does backend setup first and then create the volume using the
# setup bricks.
#
#
[hosts]
10.70.46.13
10.70.46.17
10.70.46.21
# Common backend setup for 2 of the hosts.
[backend-setup]
devices=sdb,sdc,sdd
vgs=vg1,vg2,vg3
pools=pool1,pool2,pool3
lvs=lv1,lv2,lv3
mountpoints=/rhgs/brick1,/rhgs/brick2,/rhgs/brick3
brick_dirs=/rhgs/brick1/b1,/rhgs/brick2/b2,/rhgs/brick3/b3
# If backend-setup is different for each host
# [backend-setup:10.70.46.13]
# devices=sdb
# brick_dirs=/rhgs/brick1
#
# [backend-setup:10.70.46.17]
# devices=sda,sdb,sdc
# brick_dirs=/rhgs/brick{1,2,3}
#
[volume]
action=create
volname=sample_volname
replica=yes
replica_count=3
force=yes
[clients]
action=mount
volname=sample_volname
hosts=10.70.46.15
fstype=glusterfs
client_mount_points=/mnt/gluster
/dev/sdb, /dev/sdc, /dev/sdd with the volume name as sample_volname will be created.
# gdeploy -c txt.confNote
/usr/share/doc/gdeploy/examples/gluster.conf.sample. To invoke the new configuration file, run gdeploy -c /path_to_file/config.txt command.
only setup the backend see, Section 5.1.3, “Setting up the Backend ”
only create a volume see, Section 5.1.4, “Creating Volumes”
only mount clients see, Section 5.1.5, “Mounting Clients”
5.1.3. Setting up the Backend
/usr/share/doc/gdeploy/examples/gluster.conf.sample- Using the [backend-setup] module
- Creating Physical Volume (PV), Volume Group (VG), and Logical Volume (LV) individually
Note
xfsprogs package must be installed before setting up the backend bricks using gdeploy.
Important
5.1.3.1. Using the [backend-setup] Module
- Generic
- Specific
If the disk names are uniform across the machines then backend setup can be written as below. The backend is setup for all the hosts in the `hosts’ section.
#
# Usage:
# gdeploy -c backend-setup-generic.conf
#
# This configuration creates backend for GlusterFS clusters
#
[hosts]
10.70.46.130
10.70.46.32
10.70.46.110
10.70.46.77
# Backend setup for all the nodes in the `hosts' section. This will create
# PV, VG, and LV with gdeploy generated names.
[backend-setup]
devices=vdbIf the disks names vary across the machines in the cluster then backend setup can be written for specific machines with specific disk names. gdeploy is quite flexible in allowing to do host specific setup in a single configuration file.
#
# Usage:
# gdeploy -c backend-setup-hostwise.conf
#
# This configuration creates backend for GlusterFS clusters
#
[hosts]
10.70.46.130
10.70.46.32
10.70.46.110
10.70.46.77
# Backend setup for 10.70.46.77 with default gdeploy generated names for
# Volume Groups and Logical Volumes. Volume names will be GLUSTER_vg1,
# GLUSTER_vg2...
[backend-setup:10.70.46.77]
devices=vda,vdb
# Backend setup for remaining 3 hosts in the `hosts' section with custom names
# for Volumes Groups and Logical Volumes.
[backend-setup:10.70.46.{130,32,110}]
devices=vdb,vdc,vdd
vgs=vg1,vg2,vg3
pools=pool1,pool2,pool3
lvs=lv1,lv2,lv3
mountpoints=/rhgs/brick1,/rhgs/brick2,/rhgs/brick3
brick_dirs=/rhgs/brick1/b1,/rhgs/brick2/b2,/rhgs/brick3/b3
5.1.3.2. Creating Backend by Setting up PV, VG, and LV
[hosts]
10.70.46.130
10.70.46.32
[pv]
action=create
devices=vdb
[vg1]
action=create
vgname=RHS_vg1
pvname=vdb
[lv1]
action=create
vgname=RHS_vg1
lvname=engine_lv
lvtype=thick
size=10GB
mount=/rhgs/brick1
[lv2]
action=create
vgname=RHS_vg1
poolname=lvthinpool
lvtype=thinpool
poolmetadatasize=200MB
chunksize=1024k
size=30GB
[lv3]
action=create
lvname=lv_vmaddldisks
poolname=lvthinpool
vgname=RHS_vg1
lvtype=thinlv
mount=/rhgs/brick2
virtualsize=9GB
[lv4]
action=create
lvname=lv_vmrootdisks
poolname=lvthinpool
vgname=RHS_vg1
size=19GB
lvtype=thinlv
mount=/rhgs/brick3
virtualsize=19GB
#
# Extends a given given VG. pvname and vgname is mandatory, in this example the
# vg `RHS_vg1' is extended by adding pv, vdd. If the pv is not alreay present, it
# is created by gdeploy.
#
[hosts]
10.70.46.130
10.70.46.32
[vg2]
action=extend
vgname=RHS_vg1
pvname=vdd
5.1.4. Creating Volumes
/usr/share/doc/gdeploy/examples/gluster.conf.sample[hosts]
10.0.0.1
10.0.0.2
10.0.0.3
10.0.0.4
[volume]
action=create
volname=glustervol
transport=tcp,rdma
replica=yes
replica_count=3
brick_dirs=/glus/brick1/b1,/glus/brick1/b1,/glus/brick1/b1
force=yes# gdeploy -c txt.conf
Note
[hosts]
10.70.46.130
10.70.46.32
10.70.46.16
[backend-setup]
devices=vdb,vdc,vdd,vde
mountpoints=/mnt/data{1-6}
brick_dirs=/mnt/data1/1,/mnt/data2/2,/mnt/data3/3,/mnt/data4/4,/mnt/data5/5,/mnt/data6/6
[volume1]
action=create
volname=vol-one
transport=tcp
replica=yes
replica_count=3
brick_dirs=/mnt/data1/1,/mnt/data2/2,/mnt/data5/5
[volume2]
action=create
volname=vol-two
transport=tcp
replica=yes
replica_count=3
brick_dirs=/mnt/data3/3,/mnt/data4/4,/mnt/data6/6[hosts]
10.70.46.130
10.70.46.32
10.70.46.16
[backend-setup]
devices=vdb,vdc
mountpoints=/mnt/data{1-6}
[volume1]
action=create
volname=vol-one
transport=tcp
replica=yes
replica_count=3
key=group,storage.owner-uid,storage.owner-gid,features.shard,features.shard-block-size,performance.low-prio-threads,cluster.data-self-heal-algorithm
value=virt,36,36,on,512MB,32,full
brick_dirs=/mnt/data1/1,/mnt/data3/3,/mnt/data5/5
[volume2]
action=create
volname=vol-two
transport=tcp
replica=yes
key=group,storage.owner-uid,storage.owner-gid,features.shard,features.shard-block-size,performance.low-prio-threads,cluster.data-self-heal-algorithm
value=virt,36,36,on,512MB,32,full
replica_count=3
brick_dirs=/mnt/data2/2,/mnt/data4/4,/mnt/data6/6
5.1.5. Mounting Clients
/usr/share/doc/gdeploy/examples/gluster.conf.sample[clients]
action=mount
hosts=10.70.46.159
fstype=glusterfs
client_mount_points=/mnt/gluster
volname=10.0.0.1:glustervolNote
fstype) is NFS, then mention it as nfs-version. The default version is 3.
# gdeploy -c txt.conf5.1.6. Configuring a Volume
5.1.6.1. Adding and Removing a Brick
Modify the [volume] section in the configuration file to add a brick. For example:
[volume]
action=add-brick
volname=10.0.0.1:glustervol
bricks=10.0.0.1:/rhgs/new_brick# gdeploy -c txt.confModify the [volume] section in the configuration file to remove a brick. For example:
[volume]
action=remove-brick
volname=10.0.0.1:glustervol
bricks=10.0.0.2:/rhgs/brick
state=commitstate are stop, start, and force.
# gdeploy -c txt.conf5.1.6.2. Rebalancing a Volume
[volume]
action=rebalance
volname=10.70.46.13:glustervol
state=startstate are stop, and fix-layout.
# gdeploy -c txt.conf5.1.6.3. Starting, Stopping, or Deleting a Volume
Modify the [volume] section in the configuration file to start a volume. For example:
[volume]
action=start
volname=10.0.0.1:glustervol# gdeploy -c txt.confModify the [volume] section in the configuration file to start a volume. For example:
[volume]
action=stop
volname=10.0.0.1:glustervol# gdeploy -c txt.confModify the [volume] section in the configuration file to start a volume. For example:
[volume]
action=delete
volname=10.70.46.13:glustervol# gdeploy -c txt.conf5.1.7. Configuration File
- [hosts]
- [devices]
- [disktype]
- [diskcount]
- [stripesize]
- [vgs]
- [pools]
- [lvs]
- [mountpoints]
- [peer]
- [clients]
- [volume]
- [backend-setup]
- [pv]
- [vg]
- [lv]
- [RH-subscription]
- [yum]
- [shell]
- [update-file]
- [service]
- [script]
- [firewalld]
- [geo-replication]
- hosts
This is a mandatory section which contains the IP address or hostname of the machines in the trusted storage pool. Each hostname or IP address should be listed in a separate line.
For example:[hosts] 10.0.0.1 10.0.0.2 - devices
This is a generic section and is applicable to all the hosts listed in the [hosts] section. However, if sections of hosts such as the [hostname] or [IP-address] is present, then the data in the generic sections like [devices] is ignored. Host specific data take precedence. This is an optional section.
For example:[devices] /dev/sda /dev/sdbNote
When configuring the backend setup, the devices should be either listed in this section or in the host specific section. - disktype
This section specifies the disk configuration that is used while setting up the backend. gdeploy supports RAID 10, RAID 6, RAID 5, and JBOD configurations. This is an optional section and if the field is left empty, JBOD is taken as the default configuration. Valid values for this field are
raid10,raid6,raid5, andjbod.For example:[disktype] raid6 - diskcount
This section specifies the number of data disks in the setup. This is a mandatory field if a RAID disk type is specified under
[disktype]. If the [disktype] is JBOD the [diskcount] value is ignored. This parameter is host specific.For example:[diskcount] 10 - stripesize
This section specifies the stripe_unit size in KB.
Case 1: This field is not necessary if the [disktype] is JBOD, and any given value will be ignored.Case 2: This is a mandatory field if [disktype] is specified as RAID 5 or RAID 6.For [disktype] RAID 10, the default value is taken as 256KB. Red Hat does not recommend changing this value. If you specify any other value the following warning is displayed:"Warning: We recommend a stripe unit size of 256KB for RAID 10"Note
Do not add any suffixes like K, KB, M, etc. This parameter is host specific and can be added in the hosts section.For example:[stripesize] 128 - vgs
This section is deprecated in gdeploy 2.0. Please see [backend-setup] for more details for gdeploy 2.0. This section specifies the volume group names for the devices listed in [devices]. The number of volume groups in the [vgs] section should match the one in [devices]. If the volume group names are missing, the volume groups will be named as GLUSTER_vg{1, 2, 3, ...} as default.
For example:[vgs] CUSTOM_vg1 CUSTOM_vg2 - pools
This section is deprecated in gdeploy 2.0. Please see [backend-setup] for more details for gdeploy 2.0. This section specifies the pool names for the volume groups specified in the [vgs] section. The number of pools listed in the [pools] section should match the number of volume groups in the [vgs] section. If the pool names are missing, the pools will be named as GLUSTER_pool{1, 2, 3, ...}.
For example:[pools] CUSTOM_pool1 CUSTOM_pool2 - lvs
This section is deprecated in gdeploy 2.0. Please see [backend-setup] for more details for gdeploy 2.0. This section provides the logical volume names for the volume groups specified in [vgs]. The number of logical volumes listed in the [lvs] section should match the number of volume groups listed in [vgs]. If the logical volume names are missing, it is named as GLUSTER_lv{1, 2, 3, ...}.
For example:[lvs] CUSTOM_lv1 CUSTOM_lv2 - mountpoints
This section is deprecated in gdeploy 2.0. Please see [backend-setup] for more details for gdeploy 2.0. This section specifies the brick mount points for the logical volumes. The number of mount points should match the number of logical volumes specified in [lvs] If the mount points are missing, the mount points will be names as /gluster/brick{1, 2, 3…}.
For example:[mountpoints] /rhgs/brick1 /rhgs/brick2 - peer
This section specifies the configurations for the Trusted Storage Pool management (TSP). This section helps in making all the hosts specified in the [hosts] section to either probe each other to create the trusted storage pool or detach all of them from the trusted storage pool. The only option in this section is the option names 'action' which can have it's values to be either probe or detach.
For example:[peer] action=probe - clients
This section specifies the client hosts and client_mount_points to mount the gluster storage volume created. The 'action' option is to be specified for the framework to determine the action that has to be performed. The options are 'mount' and 'unmount'. The Client hosts field is mandatory. If the mount points are not specified, default will be taken as /mnt/gluster for all the hosts.
The option fstype specifies how the gluster volume is to be mounted. Default is glusterfs (FUSE mount). The volume can also be mounted as NFS. Each client can have different types of volume mount, which has to be specified with a comma separated. The following fields are included:* action * hosts * fstype * client_mount_pointsFor example:[clients] action=mount hosts=10.0.0.10 fstype=nfs options=vers=3 client_mount_points=/mnt/rhs - volume
The section specifies the configuration options for the volume. The following fields are included in this section:
* action * volname * transport * replica * replica_count * disperse * disperse_count * redundancy_count * force- action
This option specifies what action must be performed in the volume. The choices can be [create, delete, add-brick, remove-brick].
create: This choice is used to create a volume.delete: If the delete choice is used, all the options other than 'volname' will be ignored.add-brick or remove-brick: If the add-brick or remove-brick is chosen, extra option bricks with a comma separated list of brick names(in the format <hostname>:<brick path> should be provided. In case of remove-brick, state option should also be provided specifying the state of the volume after brick removal. - volname
This option specifies the volume name. Default name is glustervol
Note
- In case of a volume operation, the 'hosts' section can be omitted, provided volname is in the format <hostname>:<volname>, where hostname is the hostname / IP of one of the nodes in the cluster
- Only single volume creation/deletion/configuration is supported.
- transport
This option specifies the transport type. Default is tcp. Options are tcp or rdma (Deprecated) or tcp,rdma.
- replica
This option will specify if the volume should be of type replica. options are yes and no. Default is no. If 'replica' is provided as yes, the 'replica_count' should be provided.
- disperse
This option specifies if the volume should be of type disperse. Options are yes and no. Default is no.
- disperse_count
This field is optional even if 'disperse' is yes. If not specified, the number of bricks specified in the command line is taken as the disperse_count value.
- redundancy_count
If this value is not specified, and if 'disperse' is yes, it's default value is computed so that it generates an optimal configuration.
- force
This is an optional field and can be used during volume creation to forcefully create the volume.
For example:[volname] action=create volname=glustervol transport=tcp,rdma replica=yes replica_count=3 force=yes - backend-setup
Available in gdeploy 2.0. This section sets up the backend for using with GlusterFS volume. If more than one backend-setup has to be done, they can be done by numbering the section like [backend-setup1], [backend-setup2], ...
backend-setup section supports the following variables:- devices: This replaces the [pvs] section in gdeploy 1.x. devices variable lists the raw disks which should be used for backend setup. For example:
[backend-setup] devices=sda,sdb,sdcThis is a mandatory field. - dalign:The Logical Volume Manager can use a portion of the physical volume for storing its metadata while the rest is used as the data portion. Align the I/O at the Logical Volume Manager (LVM) layer using the dalign option while creating the physical volume. For example:
[backend-setup] devices=sdb,sdc,sdd,sde dalign=256kFor JBOD, use an alignment value of 256K. For hardware RAID, the alignment value should be obtained by multiplying the RAID stripe unit size with the number of data disks. If 12 disks are used in a RAID 6 configuration, the number of data disks is 10; on the other hand, if 12 disks are used in a RAID 10 configuration, the number of data disks is 6.The following example is appropriate for 12 disks in a RAID 6 configuration with a stripe unit size of 128 KiB:[backend-setup] devices=sdb,sdc,sdd,sde dalign=1280kThe following example is appropriate for 12 disks in a RAID 10 configuration with a stripe unit size of 256 KiB:[backend-setup] devices=sdb,sdc,sdd,sde dalign=1536kTo view the previously configured physical volume settings for the dalign option, run thepvs -o +pe_start devicecommand. For example:# pvs -o +pe_start /dev/sdb PV VG Fmt Attr PSize PFree 1st PE /dev/sdb lvm2 a-- 9.09t 9.09t 1.25mYou can also set the dalign option in the PV section. - vgs: This is an optional variable. This variable replaces the [vgs] section in gdeploy 1.x. vgs variable lists the names to be used while creating volume groups. The number of VG names should match the number of devices or should be left blank. gdeploy will generate names for the VGs. For example:
[backend-setup] devices=sda,sdb,sdc vgs=custom_vg1,custom_vg2,custom_vg3A pattern can be provided for the vgs like custom_vg{1..3}, this will create three vgs.[backend-setup] devices=sda,sdb,sdc vgs=custom_vg{1..3} - pools: This is an optional variable. The variable replaces the [pools] section in gdeploy 1.x. pools lists the thin pool names for the volume.
[backend-setup] devices=sda,sdb,sdc vgs=custom_vg1,custom_vg2,custom_vg3 pools=custom_pool1,custom_pool2,custom_pool3Similar to vg, pattern can be provided for thin pool names. For example custom_pool{1..3} - lvs: This is an optional variable. This variable replaces the [lvs] section in gdeploy 1.x. lvs lists the logical volume name for the volume.
[backend-setup] devices=sda,sdb,sdc vgs=custom_vg1,custom_vg2,custom_vg3 pools=custom_pool1,custom_pool2,custom_pool3 lvs=custom_lv1,custom_lv2,custom_lv3Patterns for LV can be provided similar to vg. For example custom_lv{1..3}. - mountpoints: This variable deprecates the [mountpoints] section in gdeploy 1.x. Mountpoints lists the mount points where the logical volumes should be mounted. Number of mount points should be equal to the number of logical volumes. For example:
[backend-setup] devices=sda,sdb,sdc vgs=custom_vg1,custom_vg2,custom_vg3 pools=custom_pool1,custom_pool2,custom_pool3 lvs=custom_lv1,custom_lv2,custom_lv3 mountpoints=/gluster/data1,/gluster/data2,/gluster/data3 - ssd - This variable is set if caching has to be added. For example, the backed setup with ssd for caching should be:
[backend-setup] ssd=sdc vgs=RHS_vg1 datalv=lv_data cachedatalv=lv_cachedata:1G cachemetalv=lv_cachemeta:230GNote
Specifying the name of the data LV is necessary while adding SSD. Make sure the datalv is created already. Otherwise ensure to create it in one of the earlier `backend-setup’ sections.
- PV
Available in gdeploy 2.0. If the user needs to have more control over setting up the backend, and does not want to use backend-setup section, then pv, vg, and lv modules are to be used. The pv module supports the following variables.
- action: Mandatory. Supports two values, 'create' and 'resize'Example: Creating physical volumes
[pv] action=create devices=vdb,vdc,vddExample: Creating physical volumes on a specific host[pv:10.0.5.2] action=create devices=vdb,vdc,vdd - devices: Mandatory. The list of devices to use for pv creation.
- expand: Used when
action=resize.Example: Expanding an already created pv[pv] action=resize devices=vdb expand=yes - shrink: Used when
action=resize.Example: Shrinking an already created pv[pv] action=resize devices=vdb shrink=100G - dalign:The Logical Volume Manager can use a portion of the physical volume for storing its metadata while the rest is used as the data portion. Align the I/O at the Logical Volume Manager (LVM) layer using the dalign option while creating the physical volume. For example:
[pv] action=create devices=sdb,sdc,sdd,sde dalign=256kFor JBOD, use an alignment value of 256K. For hardware RAID, the alignment value should be obtained by multiplying the RAID stripe unit size with the number of data disks. If 12 disks are used in a RAID 6 configuration, the number of data disks is 10; on the other hand, if 12 disks are used in a RAID 10 configuration, the number of data disks is 6.The following example is appropriate for 12 disks in a RAID 6 configuration with a stripe unit size of 128 KiB:[pv] action=create devices=sdb,sdc,sdd,sde dalign=1280kThe following example is appropriate for 12 disks in a RAID 10 configuration with a stripe unit size of 256 KiB:[pv] action=create devices=sdb,sdc,sdd,sde dalign=1536kTo view the previously configured physical volume settings for the dalign option, run thepvs -o +pe_start devicecommand. For example:# pvs -o +pe_start /dev/sdb PV VG Fmt Attr PSize PFree 1st PE /dev/sdb lvm2 a-- 9.09t 9.09t 1.25mYou can also set the dalign option in the backend-setup section.
- VG
Available in gdeploy 2.0. This module is used to create and extend volume groups. The vg module supports the following variables.
- action - Action can be one of create or extend.
- pvname - PVs to use to create the volume. For more than one PV use comma separated values.
- vgname - The name of the vg. If no name is provided GLUSTER_vg will be used as default name.
- one-to-one - If set to yes, one-to-one mapping will be done between pv and vg.
If action is set to extend, the vg will be extended to include pv provided.Example1: Create a vg named images_vg with two PVs[vg] action=create vgname=images_vg pvname=sdb,sdcExample2: Create two vgs named rhgs_vg1 and rhgs_vg2 with two PVs[vg] action=create vgname=rhgs_vg pvname=sdb,sdc one-to-one=yesExample3: Extend an existing vg with the given disk.[vg] action=extend vgname=rhgs_images pvname=sdc - LV
Available in gdeploy 2.0. This module is used to create, setup-cache, and convert logical volumes. The lv module supports the following variables:
action - The action variable allows three values `create’, `setup-cache’, `convert’, and `change’. If the action is 'create', the following options are supported:- lvname: The name of the logical volume, this is an optional field. Default is GLUSTER_lv
- poolname - Name of the thinpool volume name, this is an optional field. Default is GLUSTER_pool
- lvtype - Type of the logical volume to be created, allowed values are `thin’ and `thick’. This is an optional field, default is thick.
- size - Size of the logical volume volume. Default is to take all available space on the vg.
- extent - Extent size, default is 100%FREE
- force - Force lv create, do not ask any questions. Allowed values `yes’, `no’. This is an optional field, default is yes.
- vgname - Name of the volume group to use.
- pvname - Name of the physical volume to use.
- chunksize - The size of the chunk unit used for snapshots, cache pools, and thin pools. By default this is specified in kilobytes. For RAID 5 and 6 volumes, gdeploy calculates the default chunksize by multiplying the stripe size and the disk count. For RAID 10, the default chunksize is 256 KB. See Section 19.2, “Brick Configuration” for details.
Warning
Red Hat recommends using at least the default chunksize. If the chunksize is too small and your volume runs out of space for metadata, the volume is unable to create data. This includes the data required to increase the size of the metadata pool or to migrate data away from a volume that has run out of metadata space. Red Hat recommends monitoring your logical volumes to ensure that they are expanded or more storage created before metadata volumes become completely full. - poolmetadatasize - Sets the size of pool's metadata logical volume. Allocate the maximum chunk size (16 GiB) if possible. If you allocate less than the maximum, allocate at least 0.5% of the pool size to ensure that you do not run out of metadata space.
Warning
If your metadata pool runs out of space, you cannot create data. This includes the data required to increase the size of the metadata pool or to migrate data away from a volume that has run out of metadata space. Monitor your metadata pool using thelvs -o+metadata_percentcommand and ensure that it does not run out of space. - virtualsize - Creates a thinly provisioned device or a sparse device of the given size
- mkfs - Creates a filesystem of the given type. Default is to use xfs.
- mkfs-opts - mkfs options.
- mount - Mount the logical volume.
If the action is setup-cache, the below options are supported:- ssd - Name of the ssd device. For example sda/vda/ … to setup cache.
- vgname - Name of the volume group.
- poolname - Name of the pool.
- cache_meta_lv - Due to requirements from dm-cache (the kernel driver), LVM further splits the cache pool LV into two devices - the cache data LV and cache metadata LV. Provide the cache_meta_lv name here.
- cache_meta_lvsize - Size of the cache meta lv.
- cache_lv - Name of the cache data lv.
- cache_lvsize - Size of the cache data.
- force - Force
If the action is convert, the below options are supported:- lvtype - type of the lv, available options are thin and thick
- force - Force the lvconvert, default is yes.
- vgname - Name of the volume group.
- poolmetadata - Specifies cache or thin pool metadata logical volume.
- cachemode - Allowed values writeback, writethrough. Default is writethrough.
- cachepool - This argument is necessary when converting a logical volume to a cache LV. Name of the cachepool.
- lvname - Name of the logical volume.
- chunksize - The size of the chunk unit used for snapshots, cache pools, and thin pools. By default this is specified in kilobytes. For RAID 5 and 6 volumes, gdeploy calculates the default chunksize by multiplying the stripe size and the disk count. For RAID 10, the default chunksize is 256 KB. See Section 19.2, “Brick Configuration” for details.
Warning
Red Hat recommends using at least the default chunksize. If the chunksize is too small and your volume runs out of space for metadata, the volume is unable to create data. Red Hat recommends monitoring your logical volumes to ensure that they are expanded or more storage created before metadata volumes become completely full. - poolmetadataspare - Controls creation and maintanence of pool metadata spare logical volume that will be used for automated pool recovery.
- thinpool - Specifies or converts logical volume into a thin pool's data volume. Volume’s name or path has to be given.
If the action is change, the below options are supported:- lvname - Name of the logical volume.
- vgname - Name of the volume group.
- zero - Set zeroing mode for thin pool.
Example 1: Create a thin LV[lv] action=create vgname=RHGS_vg1 poolname=lvthinpool lvtype=thinpool poolmetadatasize=200MB chunksize=1024k size=30GBExample 2: Create a thick LV[lv] action=create vgname=RHGS_vg1 lvname=engine_lv lvtype=thick size=10GB mount=/rhgs/brick1If there are more than one LVs, then the LVs can be created by numbering the LV sections, like [lv1], [lv2] … - RH-subscription
Available in gdeploy 2.0. This module is used to subscribe, unsubscribe, attach, enable repos etc. The RH-subscription module allows the following variables:
This module is used to subscribe, unsubscribe, attach, enable repos etc. The RH-subscription module allows the following variables:If the action is register, the following options are supported:- username/activationkey: Username or activationkey.
- password/activationkey: Password or activation key
- auto-attach: true/false
- pool: Name of the pool.
- repos: Repos to subscribe to.
- disable-repos: Repo names to disable. Leaving this option blank will disable all the repos.
- ignore_register_errors: If set to no, gdeploy will exit if system registration fails.
- If the action is attach-pool the following options are supported:pool - Pool name to be attached.ignore_attach_pool_errors - If set to no, gdeploy fails if attach-pool fails.
- If the action is enable-repos the following options are supported:repos - List of comma separated repos that are to be subscribed to.ignore_enable_errors - If set to no, gdeploy fails if enable-repos fail.
- If the action is disable-repos the following options are supported:repos - List of comma separated repos that are to be subscribed to.ignore_disable_errors - If set to no, gdeploy fails if disable-repos fail
- If the action is unregister the systems will be unregistered.ignore_unregister_errors - If set to no, gdeploy fails if unregistering fails.
Example 1: Subscribe to Red Hat Subscription network:[RH-subscription1] action=register username=qa@redhat.com password=<passwd> pool=<pool> ignore_register_errors=noExample 2: Disable all the repos:[RH-subscription2] action=disable-repos repos=*Example 3: Enable a few repos[RH-subscription3] action=enable-repos repos=rhel-7-server-rpms,rh-gluster-3-for-rhel-7-server-rpms,rhel-7-server-rhev-mgmt-agent-rpms ignore_enable_errors=no - yum
Available in gdeploy 2.0. This module is used to install or remove rpm packages, with the yum module we can add repos as well during the install time.
The action variable allows two values `install’ and `remove’.If the action is install the following options are supported:- packages - Comma separated list of packages that are to be installed.
- repos - The repositories to be added.
- gpgcheck - yes/no values have to be provided.
- update - Whether yum update has to be initiated.
If the action is remove then only one option has to be provided:- remove - The comma separated list of packages to be removed.
For example[yum1] action=install gpgcheck=no # Repos should be an url; eg: http://repo-pointing-glusterfs-builds repos=<glusterfs.repo>,<vdsm.repo> packages=vdsm,vdsm-gluster,ovirt-hosted-engine-setup,screen,xauth update=yesInstall a package on a particular host.[yum2:host1] action=install gpgcheck=no packages=rhevm-appliance - shell
Available in gdeploy 2.0. This module allows user to run shell commands on the remote nodes.
Currently shell provides a single action variable with value execute. And a command variable with any valid shell command as value.The below command will execute vdsm-tool on all the nodes.[shell] action=execute command=vdsm-tool configure --force - update-file
Available in gdeploy 2.0. update-file module allows users to copy a file, edit a line in a file, or add new lines to a file. action variable can be any of copy, edit, or add.
When the action variable is set to copy, the following variables are supported.- src - The source path of the file to be copied from.
- dest - The destination path on the remote machine to where the file is to be copied to.
When the action variable is set to edit, the following variables are supported.- dest - The destination file name which has to be edited.
- replace - A regular expression, which will match a line that will be replaced.
- line - Text that has to be replaced.
When the action variable is set to add, the following variables are supported.- dest - File on the remote machine to which a line has to be added.
- line - Line which has to be added to the file. Line will be added towards the end of the file.
Example 1: Copy a file to a remote machine.[update-file] action=copy src=/tmp/foo.cfgExample 2: Edit a line in the remote machine, in the below example lines that have allowed_hosts will be replaced with allowed_hosts=host.redhat.com[update-file] action=edit replace=allowed_hosts line=allowed_hosts=host.redhat.comExample 3: Add a line to the end of a fileFor Red Hat Enterprise Linux 7:[update-file] action=add dest=/etc/ntp.conf line=server clock.redhat.com iburstFor Red Hat Enterprise Linux 8:[update-file] action=add dest=/etc/chrony.conf line=server 0.rhel.pool.ntp.org iburst - service
Available in gdeploy 2.0. The service module allows user to start, stop, restart, reload, enable, or disable a service. The action variable specifies these values.
When action variable is set to any of start, stop, restart, reload, enable, disable the variable servicename specifies which service to start, stop etc.- service - Name of the service to start, stop etc.
For Red Hat Enterprise Linux 7:Example: enable and start ntp daemon.[service1] action=enable service=ntpd[service2] action=restart service=ntpdFor Red Hat Enterprise Linux 8:Example: enable and start chrony daemon.[service1] action=enable service=chrony[service2] action=restart service=chrony - script
Available in gdeploy 2.0. script module enables user to execute a script/binary on the remote machine. action variable is set to execute. Allows user to specify two variables file and args.
- file - An executable on the local machine.
- args - Arguments to the above program.
Example: Execute script disable-multipath.sh on all the remote nodes listed in `hosts’ section.[script] action=execute file=/usr/share/ansible/gdeploy/scripts/disable-multipath.sh - firewalld
Available in gdeploy 2.0. firewalld module allows the user to manipulate firewall rules. action variable supports two values `add’ and `delete’. Both add and delete support the following variables:
- ports/services - The ports or services to add to firewall.
- permanent - Whether to make the entry permanent. Allowed values are true/false
- zone - Default zone is public
For example:[firewalld] action=add ports=111/tcp,2049/tcp,54321/tcp,5900/tcp,5900-6923/tcp,5666/tcp,16514/tcp services=glusterfs - geo-replication
Available in gdeploy 2.0.2, geo-replication module allows the user to configure geo-replication, control and verify geo-replication sessions. The following are the supported variables:
action- The action to be performed for the geo-replication session.- create - To create a geo-replication session.
- start - To start a created geo-replication session.
- stop - To stop a started geo-replication session.
- pause - To pause a geo-replication session.
- resume - To resume a paused geo-replication session.
- delete - To delete a geo-replication session.
georepuser- Username to be used for the action being performedImportant
Ifgeorepuservariable is omitted, the user is assumed to be root user.mastervol- Master volume details in the following format:Master_HostName:Master_VolNameslavevol- Slave volume details in the following format:Slave_HostName:Slave_VolNameslavenodes- Slave node IP addresses in the following format:Slave1_IPAddress,Slave2_IPAddressImportant
Slave IP addresses must be comma (,) separated.force- Force the system to perform the action. Allowed values areyesorno.start- Start the action specified in the configuration file. Allowed values areyesorno. Default value isyes.
For example:[geo-replication] action=create georepuser=testgeorep mastervol=10.1.1.29:mastervolume slavevol=10.1.1.25:slavevolume slavenodes=10.1.1.28,10.1.1.86 force=yes start=yes
5.1.8. Deploying NFS Ganesha using gdeploy
5.1.8.1. Prerequisites
You must subscribe to subscription manager and obtain the NFS Ganesha packages before continuing further.
[RH-subscription1]
action=register
username=<user>@redhat.com
password=<password>
pool=<pool-id># gdeploy -c txt.confTo enable the required repos, add the following details in the configuration file:
[RH-subscription2]
action=enable-repos
repos=rhel-7-server-rpms,rh-gluster-3-for-rhel-7-server-rpms,rh-gluster-3-nfs-for-rhel-7-server-rpms,rhel-ha-for-rhel-7-server-rpms,rhel-7-server-ansible-2-rpms# gdeploy -c txt.confTo enable the firewall ports, add the following details in the configuration file:
[firewalld]
action=add
ports=111/tcp,2049/tcp,54321/tcp,5900/tcp,5900-6923/tcp,5666/tcp,16514/tcp
services=glusterfs,nlm,nfs,rpc-bind,high-availability,mountd,rquotaNote
# gdeploy -c txt.confTo install the required package, add the following details in the configuration file
[yum]
action=install
repolist=
gpgcheck=no
update=no
packages=glusterfs-ganesha# gdeploy -c txt.conf5.1.8.2. Supported Actions
- Creating a Cluster
- Destroying a Cluster
- Adding a Node
- Deleting a Node
- Exporting a Volume
- Unexporting a Volume
- Refreshing NFS Ganesha Configuration
This action creates a fresh NFS-Ganesha setup on a given volume. For this action the nfs-ganesha in the configuration file section supports the following variables:
- ha-name: This is an optional variable. By default it is ganesha-ha-360.
- cluster-nodes: This is a required argument. This variable expects comma separated values of cluster node names, which is used to form the cluster.
- vip: This is a required argument. This variable expects comma separated list of ip addresses. These will be the virtual ip addresses.
- volname: This is an optional variable if the configuration contains the [volume] section
[hosts]
host-1.example.com
host-2.example.com
host-3.example.com
host-4.example.com
[backend-setup]
devices=/dev/vdb
vgs=vg1
pools=pool1
lvs=lv1
mountpoints=/mnt/brick
[firewalld]
action=add
ports=111/tcp,2049/tcp,54321/tcp,5900/tcp,5900-6923/tcp,5666/tcp,16514/tcp,662/tcp,662/udp
services=glusterfs,nlm,nfs,rpc-bind,high-availability,mountd,rquota
[volume]
action=create
volname=ganesha
transport=tcp
replica_count=3
force=yes
#Creating a high availability cluster and exporting the volume
[nfs-ganesha]
action=create-cluster
ha-name=ganesha-ha-360
cluster-nodes=host-1.example.com,host-2.example.com,host-3.example.com,host-4 .example.com
vip=10.70.44.121,10.70.44.122
volname=ganesha
ignore_ganesha_errors=no# gdeploy -c txt.conf
The action, destroy-cluster cluster disables NFS Ganesha. It allows one variable, cluster-nodes.
[hosts]
host-1.example.com
host-2.example.com
# To destroy the high availability cluster
[nfs-ganesha]
action=destroy-cluster
cluster-nodes=host-1.example.com,host-2.example.com# gdeploy -c txt.confThe add-node action allows three variables:
nodes: Accepts a list of comma separated hostnames that have to be added to the clustervip: Accepts a list of comma separated ip addresses.cluster_nodes: Accepts a list of comma separated nodes of the NFS Ganesha cluster.
[hosts]
host-1.example.com
host-2.example.com
host-3.example.com
[peer]
action=probe
[clients]
action=mount
volname=host-3.example.com:gluster_shared_storage
hosts=host-3.example.com
fstype=glusterfs
client_mount_points=/var/run/gluster/shared_storage/
[nfs-ganesha]
action=add-node
nodes=host-3.example.com
cluster_nodes=host-1.example.com,host-2.example.com
vip=10.0.0.33Note
# gdeploy -c txt.conf
The delete-node action takes one variable, nodes, which specifies the node or nodes to delete from the NFS Ganesha cluster in a comma delimited list.
[hosts]
host-1.example.com
host-2.example.com
host-3.example.com
host-4.example.com
[nfs-ganesha]
action=delete-node
nodes=host-2.example.com
This action exports a volume. export-volume action supports one variable, volname.
[hosts]
host-1.example.com
host-2.example.com
[nfs-ganesha]
action=export-volume
volname=ganesha# gdeploy -c txt.conf
This action unexports a volume. unexport-volume action supports one variable, volname.
[hosts]
host-1.example.com
host-2.example.com
[nfs-ganesha]
action=unexport-volume
volname=ganesha# gdeploy -c txt.conf
This action will add/delete or add a config block to the configuration file and runs refresh-config on the cluster.
refresh-config supports the following variables:
- del-config-lines
- block-name
- volname
- ha-conf-dir
- update_config_lines
Note
refresh-config with client block has few limitations:
- Works for only one client
- User cannot delete a line from a config block
[hosts]
host1-example.com
host2-example.com
[nfs-ganesha]
action=refresh-config
# Default block name is `client'
block-name=client
config-block=clients = 10.0.0.1;|allow_root_access = true;|access_type = "RO";|Protocols = "2", "3";|anonymous_uid = 1440;|anonymous_gid = 72;
volname=ganesha
# gdeploy -c txt.conf[hosts]
host1-example.com
host2-example.com
[nfs-ganesha]
action=refresh-config
del-config-lines=client
volname=ganesha# gdeploy -c txt.conf[hosts]
host1-example.com
host2-example.com
[nfs-ganesha]
action=refresh-config
volname=ganesha# gdeploy -c txt.conf[hosts]
host1-example.com
host2-example.com
[nfs-ganesha]
action=refresh-config
update_config_lines=Access_type = "RO";
#update_config_lines=Protocols = "4";
#update_config_lines=clients = 10.0.0.1;
volname=ganesha# gdeploy -c txt.conf5.1.9. Deploying Samba / CTDB using gdeploy
5.1.9.1. Prerequisites
You must subscribe to subscription manager and obtain the Samba packages before continuing further.
[RH-subscription1]
action=register
username=<user>@redhat.com
password=<password>
pool=<pool-id># gdeploy -c txt.confTo enable the required repos, add the following details in the configuration file:
[RH-subscription2]
action=enable-repos
repos=rhel-7-server-rpms,rh-gluster-3-for-rhel-7-server-rpms,rh-gluster-3-samba-for-rhel-7-server-rpms,rhel-7-server-ansible-2-rpms[RH-subscription2]
action=enable-repos
rh-gluster-3-for-rhel-8-x86_64-rpms,ansible-2-for-rhel-8-x86_64-rpms,rhel-8-for-x86_64-baseos-rpms,rhel-8-for-x86_64-appstream-rpms,rhel-8-for-x86_64-highavailability-rpms,rh-gluster-3-samba-for-rhel-8-x86_64-rpms
# gdeploy -c txt.confTo enable the firewall ports, add the following details in the configuration file:
[firewalld]
action=add
ports=54321/tcp,5900/tcp,5900-6923/tcp,5666/tcp,4379/tcp
services=glusterfs,samba,high-availability# gdeploy -c txt.confTo install the required package, add the following details in the configuration file
[yum]
action=install
repolist=
gpgcheck=no
update=no
packages=samba,samba-client,glusterfs-server,ctdb# gdeploy -c txt.conf5.1.9.2. Setting up Samba
- Enabling Samba on an existing volume
- Enabling Samba while creating a volume
If a Red Hat Gluster Storage volume is already present, then the user has to mention the action as smb-setup in the volume section. It is necessary to mention all the hosts that are in the cluster, as gdeploy updates the glusterd configuration files on each of the hosts.
[hosts]
10.70.37.192
10.70.37.88
[volume]
action=smb-setup
volname=samba1
force=yes
smb_username=smbuser
smb_mountpoint=/mnt/smbNote
# gdeploy -c txt.conf
If Samba has be set up while creating a volume, the a variable smb has to be set to yes in the configuration file.
[hosts]
10.70.37.192
10.70.37.88
10.70.37.65
[backend-setup]
devices=/dev/vdb
vgs=vg1
pools=pool1
lvs=lv1
mountpoints=/mnt/brick
[volume]
action=create
volname=samba1
smb=yes
force=yes
smb_username=smbuser
smb_mountpoint=/mnt/smb# gdeploy -c txt.confNote
smb_username and smb_mountpoint are necessary if samba has to be setup with the acls set correctly.
5.1.9.3. Setting up CTDB
[hosts]
10.70.37.192
10.70.37.88
10.70.37.65
[volume]
action=create
volname=ctdb
transport=tcp
replica_count=3
force=yes
[ctdb]
action=setup
public_address=10.70.37.6/24 eth0,10.70.37.8/24 eth0
volname=ctdbctdb_nodes parameter, as shown in the following example.
[hosts]
10.70.37.192
10.70.37.88
10.70.37.65
[volume]
action=create
volname=ctdb
transport=tcp
replica_count=3
force=yes
[ctdb]
action=setup
public_address=10.70.37.6/24 eth0,10.70.37.8/24 eth0
ctdb_nodes=192.168.1.1,192.168.2.5
volname=ctdb# gdeploy -c txt.conf5.1.10. Enabling SSL on a Volume
5.1.10.1. Creating a Volume and Enabling SSL
[hosts]
10.70.37.147
10.70.37.47
10.70.37.13
[backend-setup]
devices=/dev/vdb
vgs=vg1
pools=pool1
lvs=lv1
mountpoints=/mnt/brick
[volume]
action=create
volname=vol1
transport=tcp
replica_count=3
force=yes
enable_ssl=yes
ssl_clients=10.70.37.107,10.70.37.173
brick_dirs=/data/1
[clients]
action=mount
hosts=10.70.37.173,10.70.37.107
volname=vol1
fstype=glusterfs
client_mount_points=/mnt/data# gdeploy -c txt.conf5.1.10.2. Enabling SSL on an Existing Volume:
[hosts]
10.70.37.147
10.70.37.47
# It is important for the clients to be unmounted before setting up SSL
[clients1]
action=unmount
hosts=10.70.37.173,10.70.37.107
client_mount_points=/mnt/data
[volume]
action=enable-ssl
volname=vol2
ssl_clients=10.70.37.107,10.70.37.173
[clients2]
action=mount
hosts=10.70.37.173,10.70.37.107
volname=vol2
fstype=glusterfs
client_mount_points=/mnt/data# gdeploy -c txt.conf5.1.11. Gdeploy log files
/home/username/.gdeploy/logs/gdeploy.log instead of the /var/log directory.
GDEPLOY_LOGFILE environment variable. For example, to set the gdeploy log location to /var/log/gdeploy/gdeploy.log for this session, run the following command:
$ export GDEPLOY_LOGFILE=/var/log/gdeploy/gdeploy.log/home/username/.bash_profile file for that user.
5.2. About Encrypted Disk
- For RHEL 6, refer to Disk Encryption Appendix of the Red Hat Enterprise Linux 6 Installation Guide.
Important
Red Hat Gluster Storage is not supported on Red Hat Enterprise Linux 6 (RHEL 6) from 3.5 Batch Update 1 onwards. See Version Details table in section Red Hat Gluster Storage Software Components and Versions of the Installation Guide - For RHEL 7, refer to Encryption of the Red Hat Enterprise Linux 7 Security Guide.
- Starting in RHEL 7.5, Red Hat has implemented an additional component that can be used to enable LUKS disks remotely during startup called as Network Bound Disk Encryption (NBDE). For more information on NBDE, refer to Configuring Automated Unlocking of Encrypted Volumes using Policy-Based Decryption of the Red Hat Enterprise Linux 7 Security Guide.
- For RHEL 8, refer to Encrypting Block Devices Using LUKS of the Red Hat Enterprise Linux 8 Security Guide.
5.3. Formatting and Mounting Bricks
5.3.1. Creating Bricks Manually
Important
- Red Hat supports formatting a Logical Volume using the XFS file system on the bricks.
- Red Hat supports heterogeneous subvolume sizes for distributed volumes (either pure distributed, distributed-replicated or distributed-dispersed). Red Hat does not support heterogeneous brick sizes for bricks of the same subvolume.For example, you can have a distributed-replicated 3x3 volume with 3 bricks of 10GiB, 3 bricks of 50GiB and 3 bricks of 100GiB as long as the 3 10GiB bricks belong to the same replicate and similarly the 3 50GiB and 100GiB bricks belong to the same replicate set. In this way you will have 1 subvolume of 10GiB, another of 50GiB and 100GiB. The distributed hash table balances the number of assigned files to each subvolume so that the subvolumes get filled proportionally to their size.
5.3.1.1. Creating a Thinly Provisioned Logical Volume
- Create a physical volume(PV) by using the
pvcreatecommand.# pvcreate --dataalignment alignment_value deviceFor example:# pvcreate --dataalignment 1280K /dev/sdbHere,/dev/sdbis a storage device.Use the correctdataalignmentoption based on your device. For more information, see Section 19.2, “Brick Configuration”Note
The device name and the alignment value will vary based on the device you are using. - Create a Volume Group (VG) from the PV using the
vgcreatecommand:# vgcreate --physicalextentsize alignment_value volgroup deviceFor example:# vgcreate --physicalextentsize 1280K rhs_vg /dev/sdb - Create a thin-pool using the following commands:
# lvcreate --thin volgroup/poolname --size pool_sz --chunksize chunk_sz --poolmetadatasize metadev_sz --zero nFor example:# lvcreate --thin rhs_vg/rhs_pool --size 2T --chunksize 1280K --poolmetadatasize 16G --zero nEnsure you read Chapter 19, Tuning for Performance to select appropriate values forchunksizeandpoolmetadatasize. - Create a thinly provisioned volume that uses the previously created pool by running the
lvcreatecommand with the--virtualsizeand--thinoptions:# lvcreate --virtualsize size --thin volgroup/poolname --name volnameFor example:# lvcreate --virtualsize 1G --thin rhs_vg/rhs_pool --name rhs_lvIt is recommended that only one LV should be created in a thin pool. - Format bricks using the supported XFS configuration, mount the bricks, and verify the bricks are mounted correctly. To enhance the performance of Red Hat Gluster Storage, ensure you read Chapter 19, Tuning for Performance before formatting the bricks.
Important
Snapshots are not supported on bricks formatted with external log devices. Do not use-l logdev=deviceoption withmkfs.xfscommand for formatting the Red Hat Gluster Storage bricks.# mkfs.xfs -f -i size=512 -n size=8192 -d su=128k,sw=10 deviceDEVICE is the created thin LV. The inode size is set to 512 bytes to accommodate for the extended attributes used by Red Hat Gluster Storage. - Run
# mkdir /mountpointto create a directory to link the brick to.# mkdir /rhgs - Add an entry in
/etc/fstab:/dev/volgroup/volname /mountpoint xfs rw,inode64,noatime,nouuid,x-systemd.device-timeout=10min 1 2For example:/dev/rhs_vg/rhs_lv /rhgs xfs rw,inode64,noatime,nouuid,x-systemd.device-timeout=10min 1 2 - Run
mount /mountpointto mount the brick. - Run the
df -hcommand to verify the brick is successfully mounted:# df -h /dev/rhs_vg/rhs_lv 16G 1.2G 15G 7% /rhgs - If SElinux is enabled, then the SELinux labels that has to be set manually for the bricks created using the following commands:
# semanage fcontext -a -t glusterd_brick_t /rhgs/brick1 # restorecon -Rv /rhgs/brick1
5.3.2. Using Subdirectory as the Brick for Volume
/rhgs directory is the mounted file system and is used as the brick for volume creation. However, for some reason, if the mount point is unavailable, any write continues to happen in the /rhgs directory, but now this is under root file system.
/bricks. After the file system is available, create a directory called /rhgs/brick1 and use it for volume creation. Ensure that no more than one brick is created from a single mount. This approach has the following advantages:
- When the
/rhgsfile system is unavailable, there is no longer/rhgs/brick1directory available in the system. Hence, there will be no data loss by writing to a different location. - This does not require any additional file system for nesting.
- Create the
brick1subdirectory in the mounted file system.# mkdir /rhgs/brick1Repeat the above steps on all nodes. - Create the Red Hat Gluster Storage volume using the subdirectories as bricks.
# gluster volume create distdata01 ad-rhs-srv1:/rhgs/brick1 ad-rhs-srv2:/rhgs/brick2 - Start the Red Hat Gluster Storage volume.
# gluster volume start distdata01 - Verify the status of the volume.
# gluster volume status distdata01
Note
# df -h
/dev/rhs_vg/rhs_lv1 16G 1.2G 15G 7% /rhgs1
/dev/rhs_vg/rhs_lv2 16G 1.2G 15G 7% /rhgs2# gluster volume create test-volume server1:/rhgs1/brick1 server2:/rhgs1/brick1 server1:/rhgs2/brick2 server2:/rhgs2/brick25.3.3. Reusing a Brick from a Deleted Volume
# mkfs.xfs -f -i size=512 device to reformat the brick to supported requirements, and make it available for immediate reuse in a new volume.
Note
5.3.4. Cleaning An Unusable Brick
- Delete all previously existing data in the brick, including the
.glusterfssubdirectory. - Run
# setfattr -x trusted.glusterfs.volume-id brickand# setfattr -x trusted.gfid brickto remove the attributes from the root of the brick. - Run
# getfattr -d -m . brickto examine the attributes set on the volume. Take note of the attributes. - Run
# setfattr -x attribute brickto remove the attributes relating to the glusterFS file system.Thetrusted.glusterfs.dhtattribute for a distributed volume is one such example of attributes that need to be removed.
5.4. Creating Distributed Volumes
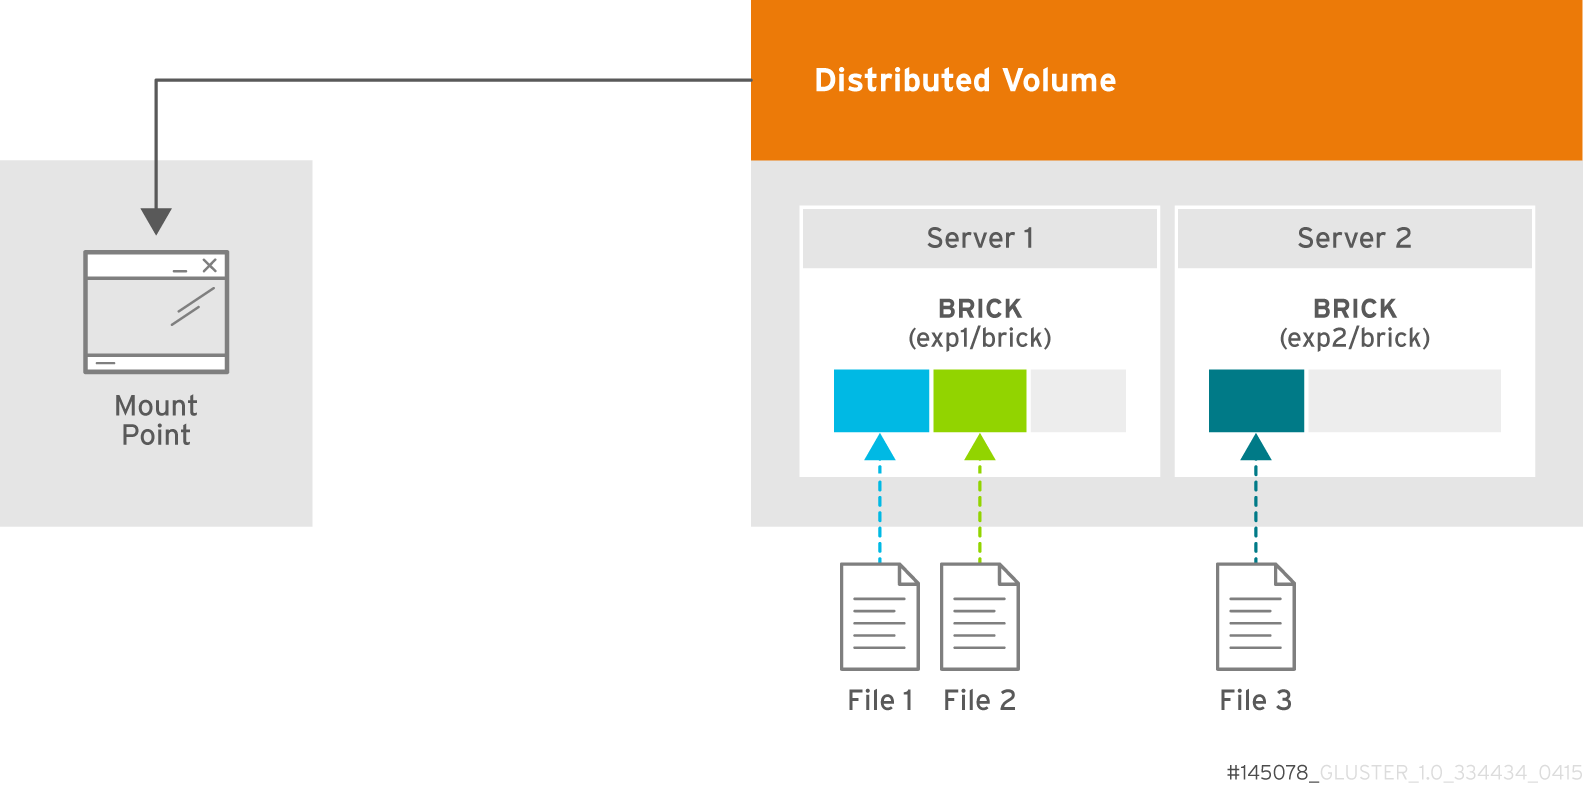
Figure 5.1. Illustration of a Distributed Volume
Warning
- No in-service upgrades - distributed only volumes need to be taken offline during upgrades.
- Temporary inconsistencies of directory entries and inodes during eventual node failures.
- I/O operations will block or fail due to node unavailability or eventual node failures.
- Permanent loss of data.
Create a Distributed Volume
gluster volume create command to create different types of volumes, and gluster volume info command to verify successful volume creation.
Prerequisites
- A trusted storage pool has been created, as described in Section 4.1, “Adding Servers to the Trusted Storage Pool”.
- Understand how to start and stop volumes, as described in Section 5.10, “Starting Volumes”.
- Run the
gluster volume createcommand to create the distributed volume.The syntax isgluster volume create NEW-VOLNAME [transport tcp | rdma (Deprecated) | tcp,rdma] NEW-BRICK...The default value for transport istcp. Other options can be passed such asauth.alloworauth.reject. See Section 11.1, “Configuring Volume Options” for a full list of parameters.Red Hat recommends disabling theperformance.client-io-threadsoption on distributed volumes, as this option tends to worsen performance. Run the following command to disableperformance.client-io-threads:# gluster volume set VOLNAME performance.client-io-threads offExample 5.1. Distributed Volume with Two Storage Servers
# gluster v create glustervol server1:/rhgs/brick1 server2:/rhgs/brick1 volume create: glutervol: success: please start the volume to access dataExample 5.2. Distributed Volume over InfiniBand with Four Servers
# gluster v create glustervol transport rdma server1:/rhgs/brick1 server2:/rhgs/brick1 server3:/rhgs/brick1 server4:/rhgs/brick1 volume create: glutervol: success: please start the volume to access data - Run
# gluster volume start VOLNAMEto start the volume.# gluster v start glustervol volume start: glustervol: success - Run
gluster volume infocommand to optionally display the volume information.The following output is the result of Example 5.1, “Distributed Volume with Two Storage Servers”.# gluster volume info Volume Name: test-volume Type: Distribute Status: Created Number of Bricks: 2 Transport-type: tcp Bricks: Brick1: server1:/rhgs/brick Brick2: server2:/rhgs/brick
5.5. Creating Replicated Volumes
gluster volume create to create different types of volumes, and gluster volume info to verify successful volume creation.
- A trusted storage pool has been created, as described in Section 4.1, “Adding Servers to the Trusted Storage Pool”.
- Understand how to start and stop volumes, as described in Section 5.10, “Starting Volumes”.
Warning
5.5.1. Creating Three-way Replicated Volumes
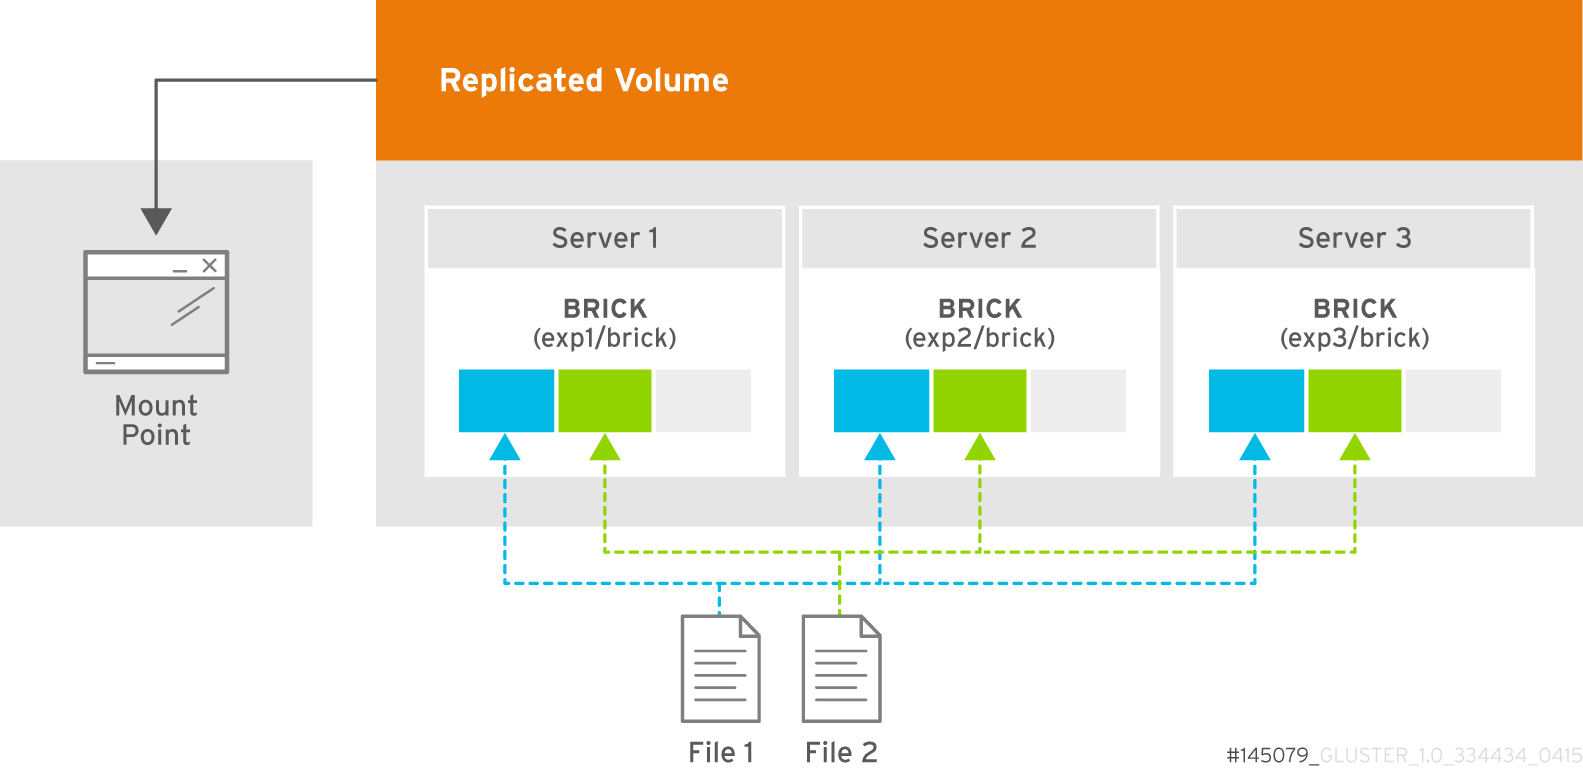
Figure 5.2. Illustration of a Three-way Replicated Volume
- Run the
gluster volume createcommand to create the replicated volume.The syntax is# gluster volume create NEW-VOLNAME [replica COUNT] [transport tcp | rdma (Deprecated) | tcp,rdma] NEW-BRICK...The default value for transport istcp. Other options can be passed such asauth.alloworauth.reject. See Section 11.1, “Configuring Volume Options” for a full list of parameters.Example 5.3. Replicated Volume with Three Storage Servers
The order in which bricks are specified determines how bricks are replicated with each other. For example, everynbricks, where3is the replica count forms a replica set. This is illustrated in Figure 5.2, “Illustration of a Three-way Replicated Volume”.# gluster v create glutervol data replica 3 transport tcp server1:/rhgs/brick1 server2:/rhgs/brick2 server3:/rhgs/brick3 volume create: glutervol: success: please start the volume to access - Run
# gluster volume start VOLNAMEto start the volume.# gluster v start glustervol volume start: glustervol: success - Run
gluster volume infocommand to optionally display the volume information.
Important
5.5.2. Creating Sharded Replicated Volumes
.shard directory, and are named with the GFID and a number indicating the order of the pieces. For example, if a file is split into four pieces, the first piece is named GFID and stored normally. The other three pieces are named GFID.1, GFID.2, and GFID.3 respectively. They are placed in the .shard directory and distributed evenly between the various bricks in the volume.
5.5.2.1. Supported use cases
Important
Important
Example 5.4. Example: Three-way replicated sharded volume
- Set up a three-way replicated volume, as described in the Red Hat Gluster Storage Administration Guide: https://access.redhat.com/documentation/en-US/red_hat_gluster_storage/3.5/html/Administration_Guide/sect-Creating_Replicated_Volumes.html#Creating_Three-way_Replicated_Volumes.
- Before you start your volume, enable sharding on the volume.
# gluster volume set test-volume features.shard enable - Start the volume and ensure it is working as expected.
# gluster volume test-volume start # gluster volume info test-volume
5.5.2.2. Configuration Options
-
features.shard - Enables or disables sharding on a specified volume. Valid values are
enableanddisable. The default value isdisable.# gluster volume set volname features.shard enableNote that this only affects files created after this command is run; files created before this command is run retain their old behaviour. -
features.shard-block-size - Specifies the maximum size of the file pieces when sharding is enabled. The supported value for this parameter is 512MB.
# gluster volume set volname features.shard-block-size 32MBNote that this only affects files created after this command is run; files created before this command is run retain their old behaviour.
5.5.2.3. Finding the pieces of a sharded file
# getfattr -d -m. -e hex path_to_file# ls /rhgs/*/.shard -lh | grep GFID5.6. Creating Distributed Replicated Volumes
Note
- A trusted storage pool has been created, as described in Section 4.1, “Adding Servers to the Trusted Storage Pool”.
- Understand how to start and stop volumes, as described in Section 5.10, “Starting Volumes”.
5.6.1. Creating Three-way Distributed Replicated Volumes

Figure 5.3. Illustration of a Three-way Distributed Replicated Volume
- Run the
gluster volume createcommand to create the distributed replicated volume.The syntax is# gluster volume create NEW-VOLNAME [replica COUNT] [transport tcp | rdma (Deprecated) | tcp,rdma] NEW-BRICK...The default value for transport istcp. Other options can be passed such asauth.alloworauth.reject. See Section 11.1, “Configuring Volume Options” for a full list of parameters.Example 5.5. Six Node Distributed Replicated Volume with a Three-way Replication
The order in which bricks are specified determines how bricks are replicated with each other. For example, first 3 bricks, where 3 is the replica count forms a replicate set.# gluster v create glustervol replica 3 transport tcp server1:/rhgs/brick1 server2:/rhgs/brick1 server3:/rhgs/brick1 server4:/rhgs/brick1 server5:/rhgs/brick1 server6:/rhgs/brick1 volume create: glutervol: success: please start the volume to access data - Run
# gluster volume start VOLNAMEto start the volume.# gluster v start glustervol volume start: glustervol: success - Run
gluster volume infocommand to optionally display the volume information.
Important
5.7. Creating Arbitrated Replicated Volumes
Advantages of arbitrated replicated volumes
- Better consistency
- When an arbiter is configured, arbitration logic uses client-side quorum in auto mode to prevent file operations that would lead to split-brain conditions.
- Less disk space required
- Because an arbiter brick only stores file names and metadata, an arbiter brick can be much smaller than the other bricks in the volume.
- Fewer nodes required
- The node that contains the arbiter brick of one volume can be configured with the data brick of another volume. This "chaining" configuration allows you to use fewer nodes to fulfill your overall storage requirements.
- Easy migration from deprecated two-way replicated volumes
- Red Hat Gluster Storage can convert a two-way replicated volume without arbiter bricks into an arbitrated replicated volume. See Section 5.7.5, “Converting to an arbitrated volume” for details.
Limitations of arbitrated replicated volumes
- Arbitrated replicated volumes provide better data consistency than a two-way replicated volume that does not have arbiter bricks. However, because arbitrated replicated volumes store only metadata, they provide the same level of availability as a two-way replicated volume that does not have arbiter bricks. To achieve high-availability, you need to use a three-way replicated volume instead of an arbitrated replicated volume.
- Tiering is not compatible with arbitrated replicated volumes.
- Arbitrated volumes can only be configured in sets of three bricks at a time. Red Hat Gluster Storage can convert an existing two-way replicated volume without arbiter bricks into an arbitrated replicated volume by adding an arbiter brick to that volume. See Section 5.7.5, “Converting to an arbitrated volume” for details.
5.7.1. Arbitrated volume requirements
5.7.1.1. System requirements for nodes hosting arbiter bricks
| Configuration type | Min CPU | Min RAM | NIC | Arbiter Brick Size | Max Latency |
|---|---|---|---|---|---|
| Dedicated arbiter | 64-bit quad-core processor with 2 sockets | 8 GB[a] | Match to other nodes in the storage pool | 1 TB to 4 TB[b] | 5 ms[c] |
| Chained arbiter | Match to other nodes in the storage pool | 1 TB to 4 TB[d] | 5 ms[e] | ||
[a]
More RAM may be necessary depending on the combined capacity of the number of arbiter bricks on the node.
[b]
Arbiter and data bricks can be configured on the same device provided that the data and arbiter bricks belong to different replica sets. See Section 5.7.1.2, “Arbiter capacity requirements” for further details on sizing arbiter volumes.
[c]
This is the maximum round trip latency requirement between all nodes irrespective of Aribiter node. See KCS#413623 to know how to determine latency between nodes.
[d]
Multiple bricks can be created on a single RAIDed physical device. Please refer the following product documentation: Section 19.2, “Brick Configuration”
[e]
This is the maximum round trip latency requirement between all nodes irrespective of Aribiter node. See KCS#413623 to know how to determine latency between nodes.
| |||||
- minimum 4 vCPUs
- minimum 16 GB RAM
- 1 TB to 4 TB of virtual disk space
- maximum 5 ms latency
5.7.1.2. Arbiter capacity requirements
minimum arbiter brick size = 4 KB * ( size in KB of largest data brick in volume or replica set / average file size in KB)minimum arbiter brick size = 4 KB * ( 1 TB / 2 GB )
= 4 KB * ( 1000000000 KB / 2000000 KB )
= 4 KB * 500 KB
= 2000 KB
= 2 MBminimum arbiter brick size = 4 KB * ( size in KB of largest data brick in volume or replica set / shard block size in KB )5.7.2. Arbitration logic
| Volume state | Arbitration behavior |
|---|---|
| All bricks available | All file operations permitted. |
| Arbiter and 1 data brick available |
If the arbiter does not agree with the available data node, write operations fail with ENOTCONN (since the brick that is correct is not available). Other file operations are permitted.
If the arbiter's metadata agrees with the available data node, all file operations are permitted.
|
| Arbiter down, data bricks available | All file operations are permitted. The arbiter's records are healed when it becomes available. |
| Only one brick available |
All file operations fail with ENOTCONN.
|
5.7.3. Creating an arbitrated replicated volume
# gluster volume create VOLNAME replica 3 arbiter 1 HOST1:DATA_BRICK1 HOST2:DATA_BRICK2 HOST3:ARBITER_BRICK3Note
# gluster volume create testvol replica 3 arbiter 1 \
server1:/bricks/brick server2:/bricks/brick server3:/bricks/arbiter_brick \
server4:/bricks/brick server5:/bricks/brick server6:/bricks/arbiter_brick# gluster volume info testvol
Volume Name: testvol
Type: Distributed-Replicate
Volume ID: ed9fa4d5-37f1-49bb-83c3-925e90fab1bc
Status: Created
Snapshot Count: 0
Number of Bricks: 2 x (2 + 1) = 6
Transport-type: tcp
Bricks:
Brick1: server1:/bricks/brick
Brick2: server2:/bricks/brick
Brick3: server3:/bricks/arbiter_brick (arbiter)
Brick1: server4:/bricks/brick
Brick2: server5:/bricks/brick
Brick3: server6:/bricks/arbiter_brick (arbiter)
Options Reconfigured:
cluster.granular-entry-heal: on
transport.address-family: inet
performance.readdir-ahead: on
nfs.disable: on
5.7.4. Creating multiple arbitrated replicated volumes across fewer total nodes
- Chain multiple arbitrated replicated volumes together, by placing the arbiter brick for one volume on the same node as a data brick for another volume. Chaining is useful for write-heavy workloads when file size is closer to metadata file size (that is, from 32–128 KiB). This avoids all metadata I/O going through a single disk.In arbitrated distributed-replicated volumes, you can also place an arbiter brick on the same node as another replica sub-volume's data brick, since these do not share the same data.
- Place the arbiter bricks from multiple volumes on a single dedicated node. A dedicated arbiter node is suited to write-heavy workloads with larger files, and read-heavy workloads.
Example 5.6. Example of a dedicated configuration
# gluster volume create firstvol replica 3 arbiter 1 server1:/bricks/brick server2:/bricks/brick server3:/bricks/arbiter_brick
# gluster volume create secondvol replica 3 arbiter 1 server4:/bricks/data_brick server5:/bricks/brick server3:/bricks/brick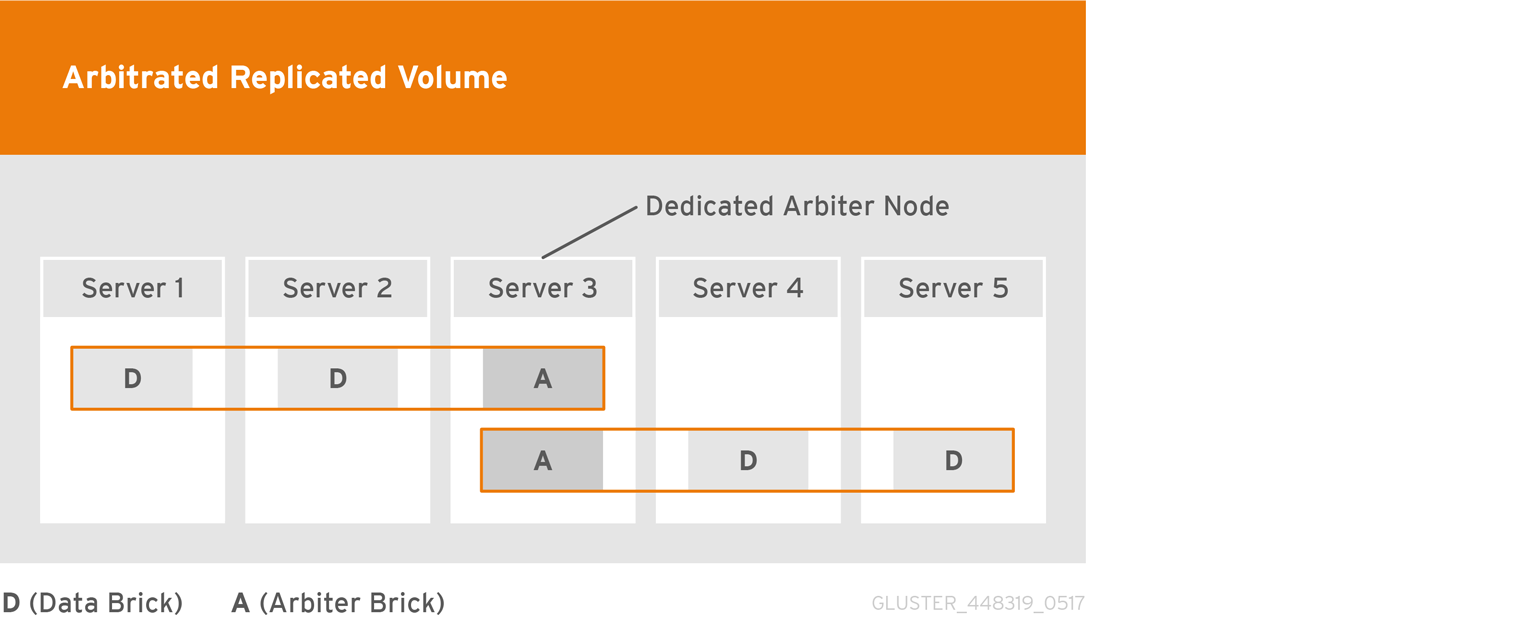
Example 5.7. Example of a chained configuration
# gluster volume create arbrepvol replica 3 arbiter 1 server1:/bricks/brick1 server2:/bricks/brick1 server3:/bricks/arbiter_brick1 server2:/bricks/brick2 server3:/bricks/brick2 server4:/bricks/arbiter_brick2 server3:/bricks/brick3 server4:/bricks/brick3 server5:/bricks/arbiter_brick3 server4:/bricks/brick4 server5:/bricks/brick4 server6:/bricks/arbiter_brick4 server5:/bricks/brick5 server6:/bricks/brick5 server1:/bricks/arbiter_brick5 server6:/bricks/brick6 server1:/bricks/brick6 server2:/bricks/arbiter_brick6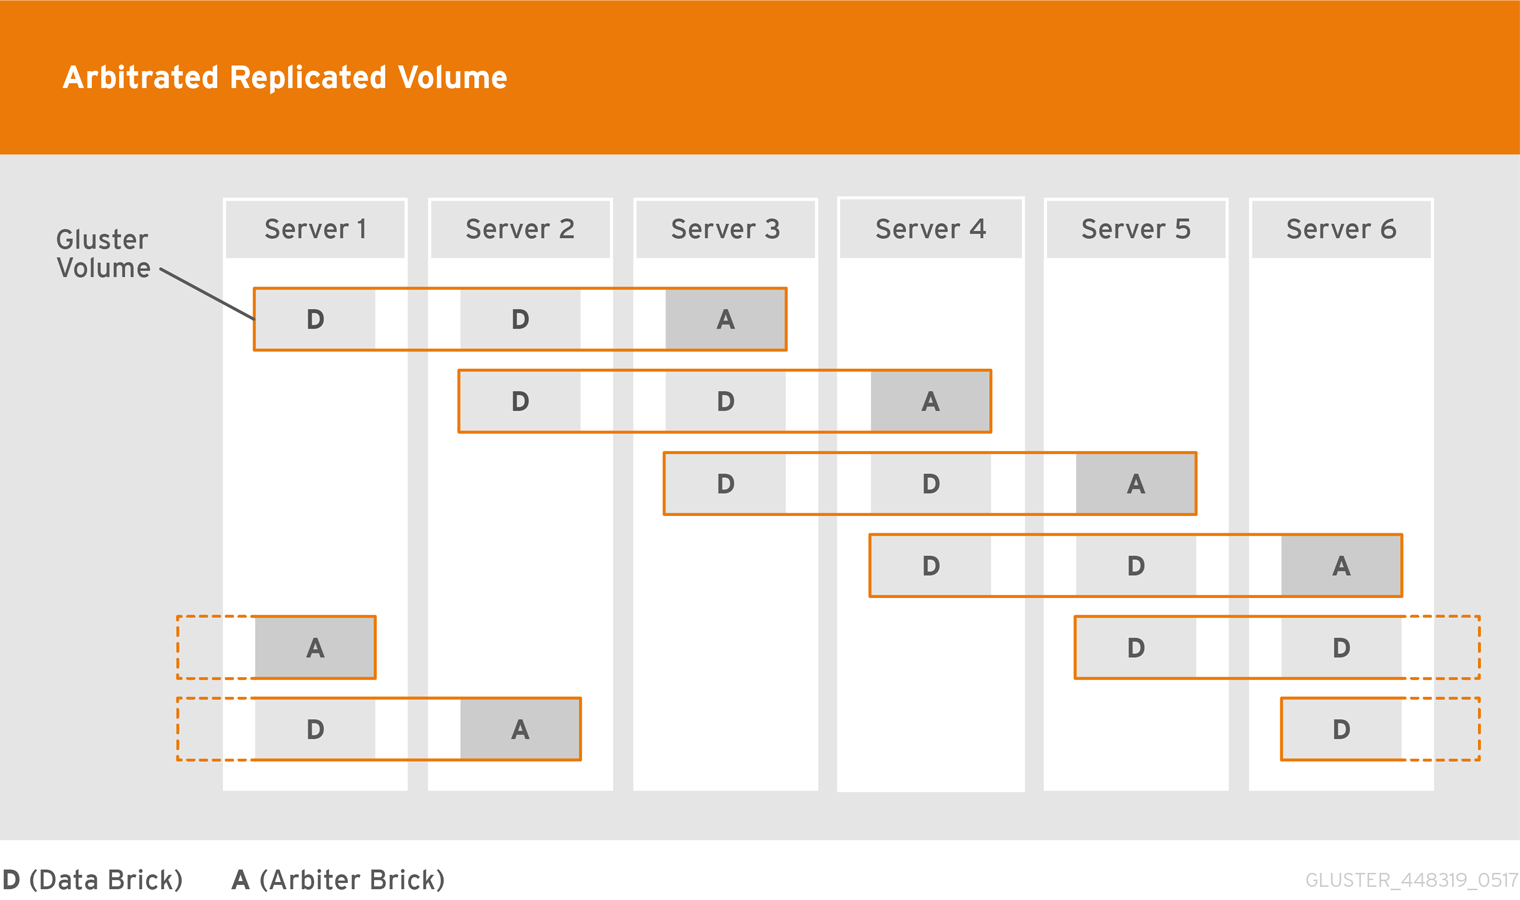
5.7.5. Converting to an arbitrated volume
Procedure 5.1. Converting a replica 2 volume to an arbitrated volume
Warning
Verify that healing is not in progress
# gluster volume heal VOLNAME infoWait until pending heal entries is0before proceeding.Disable and stop self-healing
Run the following commands to disable data, metadata, and entry self-heal, and the self-heal daemon.# gluster volume set VOLNAME cluster.data-self-heal off # gluster volume set VOLNAME cluster.metadata-self-heal off # gluster volume set VOLNAME cluster.entry-self-heal off # gluster volume set VOLNAME self-heal-daemon offAdd arbiter bricks to the volume
Convert the volume by adding an arbiter brick for each replicated sub-volume.# gluster volume add-brick VOLNAME replica 3 arbiter 1 HOST:arbiter-brick-pathFor example, if you have an existing two-way replicated volume called testvol, and a new brick for the arbiter to use, you can add a brick as an arbiter with the following command:# gluster volume add-brick testvol replica 3 arbiter 1 server:/bricks/arbiter_brickIf you have an existing two-way distributed-replicated volume, you need a new brick for each sub-volume in order to convert it to an arbitrated distributed-replicated volume, for example:# gluster volume add-brick testvol replica 3 arbiter 1 server1:/bricks/arbiter_brick1 server2:/bricks/arbiter_brick2Wait for client volfiles to update
This takes about 5 minutes.Verify that bricks added successfully
# gluster volume info VOLNAME # gluster volume status VOLNAMERe-enable self-healing
Run the following commands to re-enable self-healing on the servers.# gluster volume set VOLNAME cluster.data-self-heal on # gluster volume set VOLNAME cluster.metadata-self-heal on # gluster volume set VOLNAME cluster.entry-self-heal on # gluster volume set VOLNAME self-heal-daemon onVerify all entries are healed
# gluster volume heal VOLNAME infoWait until pending heal entries is0to ensure that all heals completed successfully.
Procedure 5.2. Converting a replica 3 volume to an arbitrated volume
Warning
Verify that healing is not in progress
# gluster volume heal VOLNAME infoWait until pending heal entries is0before proceeding.Reduce the replica count of the volume to 2
Remove one brick from every sub-volume in the volume so that the replica count is reduced to 2. For example, in a replica 3 volume that distributes data across 2 sub-volumes, run the following command:# gluster volume remove-brick VOLNAME replica 2 HOST:subvol1-brick-path HOST:subvol2-brick-path forceNote
In a distributed replicated volume, data is distributed across sub-volumes, and replicated across bricks in a sub-volume. This means that to reduce the replica count of a volume, you need to remove a brick from every sub-volume.Bricks are grouped by sub-volume in thegluster volume infooutput. If the replica count is 3, the first 3 bricks form the first sub-volume, the next 3 bricks form the second sub-volume, and so on.# gluster volume info VOLNAME [...] Number of Bricks: 2 x 3 = 6 Transport-type: tcp Bricks: Brick1: node1:/test1/brick Brick2: node2:/test2/brick Brick3: node3:/test3/brick Brick4: node1:/test4/brick Brick5: node2:/test5/brick Brick6: node3:/test6/brick [...]In this volume, data is distributed across two sub-volumes, which each consist of three bricks. The first sub-volume consists of bricks 1, 2, and 3. The second sub-volume consists of bricks 4, 5, and 6. Removing any one brick from each subvolume using the following command reduces the replica count to 2 as required.# gluster volume remove-brick VOLNAME replica 2 HOST:subvol1-brick-path HOST:subvol2-brick-path forceDisable and stop self-healing
Run the following commands to disable data, metadata, and entry self-heal, and the self-heal daemon.# gluster volume set VOLNAME cluster.data-self-heal off # gluster volume set VOLNAME cluster.metadata-self-heal off # gluster volume set VOLNAME cluster.entry-self-heal off # gluster volume set VOLNAME self-heal-daemon offAdd arbiter bricks to the volume
Convert the volume by adding an arbiter brick for each replicated sub-volume.# gluster volume add-brick VOLNAME replica 3 arbiter 1 HOST:arbiter-brick-pathFor example, if you have an existing replicated volume:# gluster volume add-brick testvol replica 3 arbiter 1 server:/bricks/brickIf you have an existing distributed-replicated volume:# gluster volume add-brick testvol replica 3 arbiter 1 server1:/bricks/arbiter_brick1 server2:/bricks/arbiter_brick2Wait for client volfiles to update
This takes about 5 minutes. Verify that this is complete by running the following command on each client.# grep -ir connected mount-path/.meta/graphs/active/volname-client-*/privateThe number of timesconnected=1appears in the output is the number of bricks connected to the client.Verify that bricks added successfully
# gluster volume info VOLNAME # gluster volume status VOLNAMERe-enable self-healing
Run the following commands to re-enable self-healing on the servers.# gluster volume set VOLNAME cluster.data-self-heal on # gluster volume set VOLNAME cluster.metadata-self-heal on # gluster volume set VOLNAME cluster.entry-self-heal on # gluster volume set VOLNAME self-heal-daemon onVerify all entries are healed
# gluster volume heal VOLNAME infoWait until pending heal entries is0to ensure that all heals completed successfully.
5.7.6. Converting an arbitrated volume to a three-way replicated volume
Warning
Procedure 5.3. Converting an arbitrated volume to a replica 3 volume
Verify that healing is not in progress
# gluster volume heal VOLNAME infoWait until pending heal entries is0before proceeding.Remove arbiter bricks from the volume
Check which bricks are listed as(arbiter), and then remove those bricks from the volume.# gluster volume info VOLNAME# gluster volume remove-brick VOLNAME replica 2 HOST:arbiter-brick-path forceDisable and stop self-healing
Run the following commands to disable data, metadata, and entry self-heal, and the self-heal daemon.# gluster volume set VOLNAME cluster.data-self-heal off # gluster volume set VOLNAME cluster.metadata-self-heal off # gluster volume set VOLNAME cluster.entry-self-heal off # gluster volume set VOLNAME self-heal-daemon offAdd full bricks to the volume
Convert the volume by adding a brick for each replicated sub-volume.# gluster volume add-brick VOLNAME replica 3 HOST:brick-pathFor example, if you have an existing arbitrated replicated volume:# gluster volume add-brick testvol replica 3 server:/bricks/brickIf you have an existing arbitrated distributed-replicated volume:# gluster volume add-brick testvol replica 3 server1:/bricks/brick1 server2:/bricks/brick2Wait for client volfiles to update
This takes about 5 minutes.Verify that bricks added successfully
# gluster volume info VOLNAME # gluster volume status VOLNAMERe-enable self-healing
Run the following commands to re-enable self-healing on the servers.# gluster volume set VOLNAME cluster.data-self-heal on # gluster volume set VOLNAME cluster.metadata-self-heal on # gluster volume set VOLNAME cluster.entry-self-heal on # gluster volume set VOLNAME self-heal-daemon onVerify all entries are healed
# gluster volume heal VOLNAME infoWait until pending heal entries is0to ensure that all heals completed successfully.
5.7.7. Tuning recommendations for arbitrated volumes
- For dedicated arbiter nodes, use JBOD for arbiter bricks, and RAID6 for data bricks.
- For chained arbiter volumes, use the same RAID6 drive for both data and arbiter bricks.
5.8. Creating Dispersed Volumes
Important
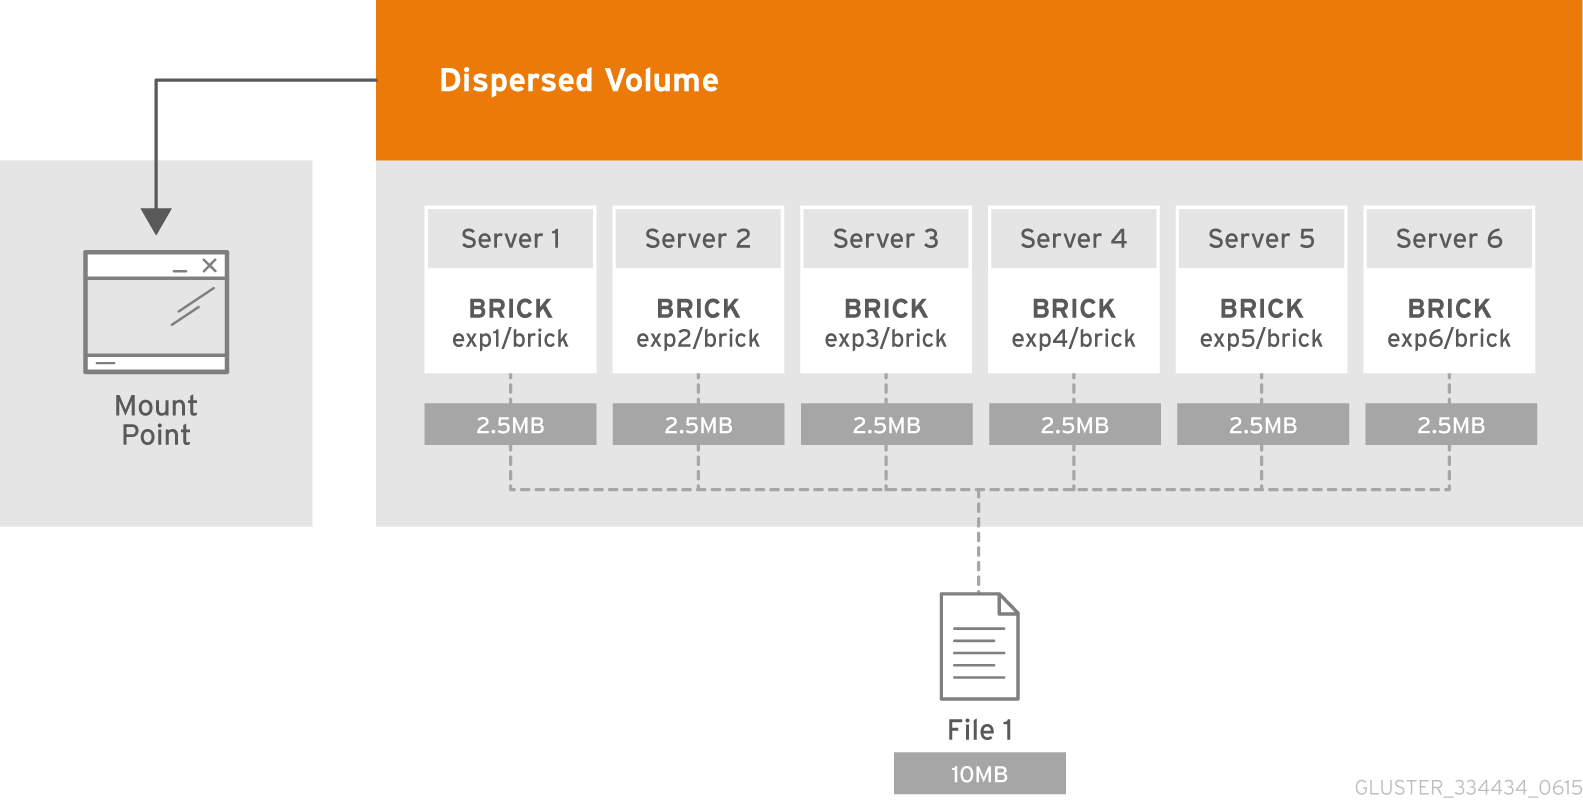
Figure 5.4. Illustration of a Dispersed Volume
n = k + m. Here n is the total number of bricks, we would require any k bricks out of n bricks for recovery. In other words, we can tolerate failure up to any m bricks. With this release, the following configurations are supported:
- 6 bricks with redundancy level 2 (4 + 2)
- 10 bricks with redundancy level 2 (8 + 2)
- 11 bricks with redundancy level 3 (8 + 3)
- 12 bricks with redundancy level 4 (8 + 4)
- 20 bricks with redundancy level 4 (16 + 4)
gluster volume create to create different types of volumes, and gluster volume info to verify successful volume creation.
- Create a trusted storage pool as described in Section 4.1, “Adding Servers to the Trusted Storage Pool”.
- Understand how to start and stop volumes, as described in Section 5.10, “Starting Volumes”.
Important
- Run the
gluster volume createcommand to create the dispersed volume.The syntax is# gluster volume create NEW-VOLNAME [disperse-data COUNT] [redundancy COUNT] [transport tcp | rdma (Deprecated) | tcp,rdma] NEW-BRICK...The number of bricks required to create a disperse volume is the sum ofdisperse-data countandredundancy count.Thedisperse-datacountoption specifies the number of bricks that is part of the dispersed volume, excluding the count of the redundant bricks. For example, if the total number of bricks is 6 andredundancy-countis specified as 2, then the disperse-data count is 4 (6 - 2 = 4). If thedisperse-data countoption is not specified, and only theredundancy countoption is specified, then thedisperse-data countis computed automatically by deducting the redundancy count from the specified total number of bricks.Redundancy determines how many bricks can be lost without interrupting the operation of the volume. Ifredundancy countis not specified, based on the configuration it is computed automatically to the optimal value and a warning message is displayed.The default value for transport istcp. Other options can be passed such asauth.alloworauth.reject. See Section 5.2, “About Encrypted Disk” for a full list of parameters.Example 5.8. Dispersed Volume with Six Storage Servers
# gluster v create glustervol disperse-data 4 redundancy 2 transport tcp server1:/rhgs1/brick1 server2:/rhgs2/brick2 server3:/rhgs3/brick3 server4:/rhgs4/brick4 server5:/rhgs5/brick5 server6:/rhgs6/brick6 volume create: glutervol: success: please start the volume to access data - Run
# gluster volume start VOLNAMEto start the volume.# gluster v start glustervol volume start: glustervol: successImportant
Theopen-behindvolume option is enabled by default. If you are accessing the dispersed volume using the SMB protocol, you must disable theopen-behindvolume option to avoid performance bottleneck on large file workload. Run the following command to disableopen-behindvolume option:# gluster volume set VOLNAME open-behind offFor information onopen-behindvolume option, see Section 11.1, “Configuring Volume Options” - Run
gluster volume infocommand to optionally display the volume information.
5.9. Creating Distributed Dispersed Volumes
- Multiple disperse sets containing 6 bricks with redundancy level 2
- Multiple disperse sets containing 10 bricks with redundancy level 2
- Multiple disperse sets containing 11 bricks with redundancy level 3
- Multiple disperse sets containing 12 bricks with redundancy level 4
- Multiple disperse sets containing 20 bricks with redundancy level 4
Important
gluster volume create to create different types of volumes, and gluster volume info to verify successful volume creation.
- A trusted storage pool has been created, as described in Section 4.1, “Adding Servers to the Trusted Storage Pool”.
- Understand how to start and stop volumes, as described in Section 5.10, “Starting Volumes”.
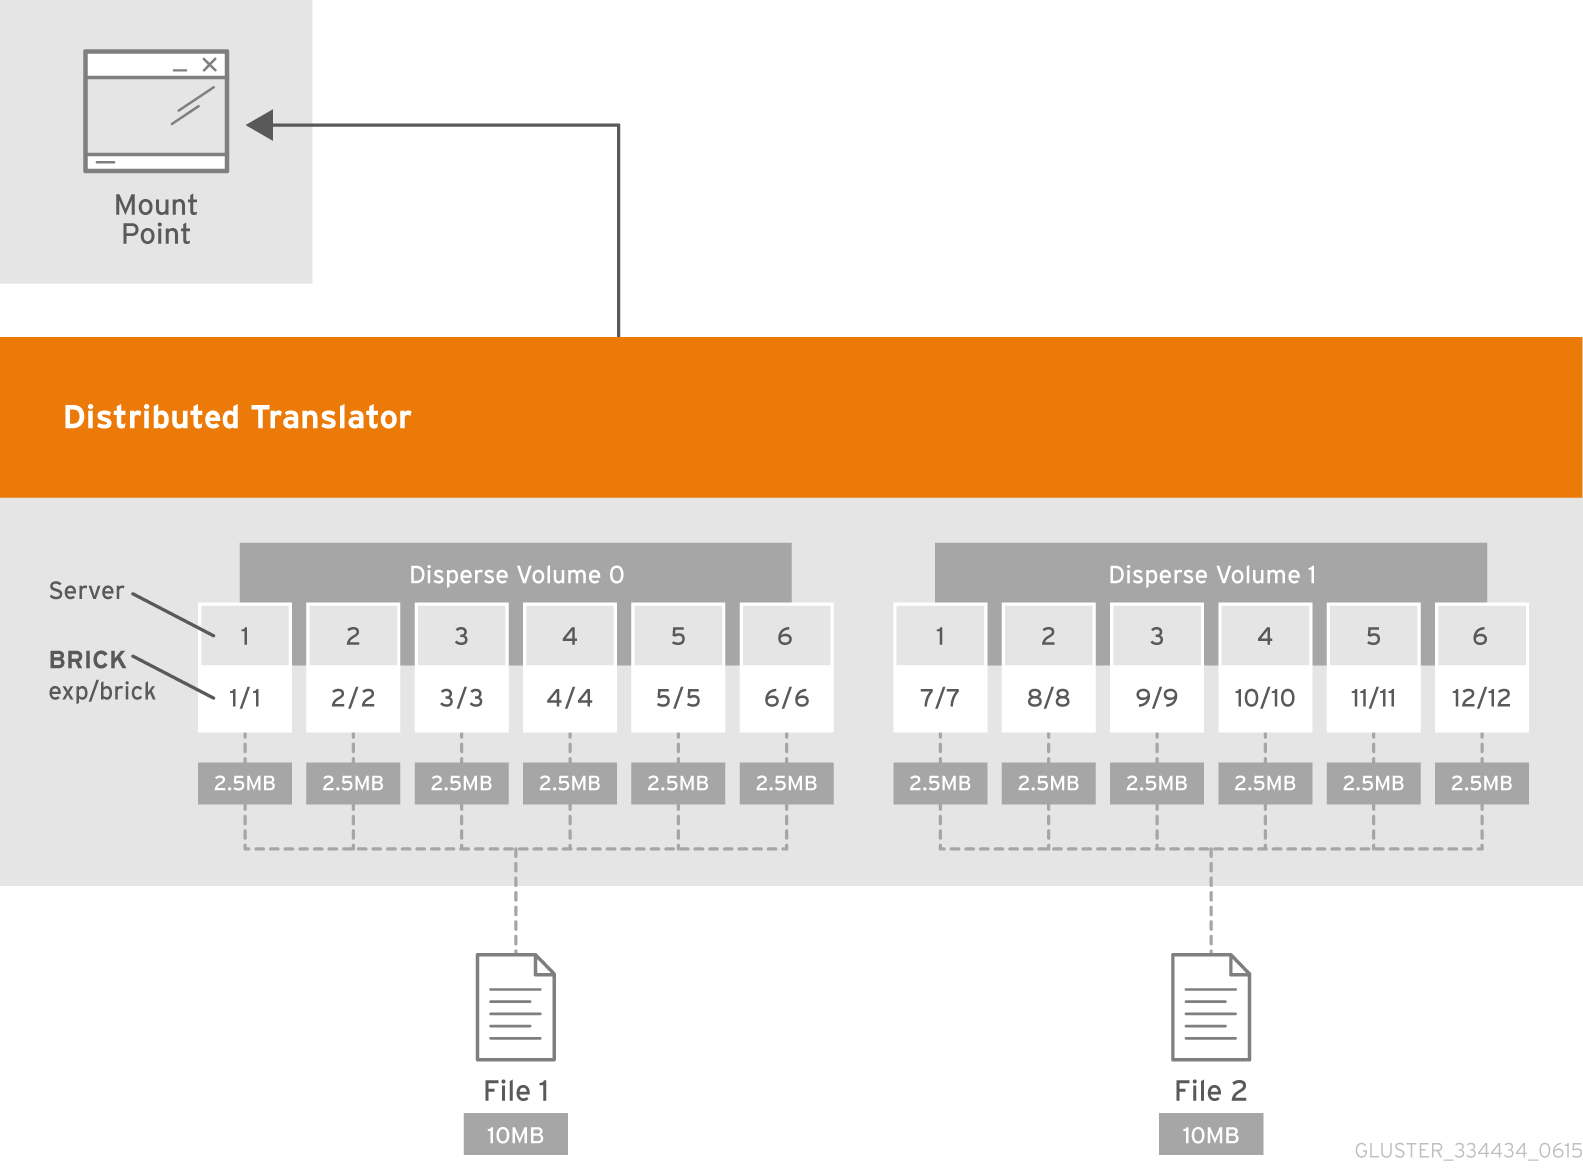
Figure 5.5. Illustration of a Distributed Dispersed Volume
Important
- Run the
gluster volume createcommand to create the dispersed volume.The syntax is# gluster volume create NEW-VOLNAME disperse-data COUNT [redundancy COUNT] [transport tcp | rdma (Deprecated) | tcp,rdma] NEW-BRICK...The default value for transport istcp. Other options can be passed such asauth.alloworauth.reject. See Section 11.1, “Configuring Volume Options” for a full list of parameters.Example 5.9. Distributed Dispersed Volume with Six Storage Servers
# gluster v create glustervol disperse-data 4 redundancy 2 transport tcp server1:/rhgs1/brick1 server2:/rhgs2/brick2 server3:/rhgs3/brick3 server4:/rhgs4/brick4 server5:/rhgs5/brick5 server6:/rhgs6/brick6 server1:/rhgs7/brick7 server2:/rhgs8/brick8 server3:/rhgs9/brick9 server4:/rhgs10/brick10 server5:/rhgs11/brick11 server6:/rhgs12/brick12 volume create: glutervol: success: please start the volume to access data.The above example is illustrated in Figure 5.4, “Illustration of a Dispersed Volume” . In the illustration and example, you are creating 12 bricks from 6 servers. - Run
# gluster volume start VOLNAMEto start the volume.# gluster v start glustervol volume start: glustervol: successImportant
Theopen-behindvolume option is enabled by default. If you are accessing the distributed dispersed volume using the SMB protocol, you must disable theopen-behindvolume option to avoid performance bottleneck on large file workload. Run the following command to disableopen-behindvolume option:# gluster volume set VOLNAME open-behind offFor information onopen-behindvolume option, see Section 11.1, “Configuring Volume Options” - Run
gluster volume infocommand to optionally display the volume information.
5.10. Starting Volumes
# gluster volume start VOLNAME
# gluster v start glustervol
volume start: glustervol: successChapter 6. Creating Access to Volumes
Warning
storage.fips-mode-rchecksum volume option on volumes with clients that use Red Hat Gluster Storage 3.4 or earlier.
- Native Client (see Section 6.2, “Native Client”)
- Network File System (NFS) v3 (see Section 6.3, “NFS”)
- Server Message Block (SMB) (see Section 6.4, “SMB”)
6.1. Client Support Information
6.1.1. Cross Protocol Data Access
| SMB | Gluster NFS | NFS-Ganesha | Native FUSE | Object | |
|---|---|---|---|---|---|
| SMB | Yes | No | No | No | No |
| Gluster NFS (Deprecated) | No | Yes | No | No | No |
| NFS-Ganesha | No | No | Yes | No | No |
| Native FUSE | No | No | No | Yes | Yes [a] |
6.1.2. Client Operating System Protocol Support
| Client OS | FUSE | Gluster NFS | NFS-Ganesha | SMB |
|---|---|---|---|---|
| RHEL 5 | Unsupported | Unsupported | Unsupported | Unsupported |
| RHEL 6 | Supported | Deprecated | Unsupported | Supported |
| RHEL 7 | Supported | Deprecated | Supported | Supported |
| RHEL 8 | Supported | Unsupported | Supported | Supported |
| Windows Server 2008, 2012, 2016 | Unsupported | Unsupported | Unsupported | Supported |
| Windows 7, 8, 10 | Unsupported | Unsupported | Unsupported | Supported |
| Mac OS 10.15 | Unsupported | Unsupported | Unsupported | Supported |
6.1.3. Transport Protocol Support
| Access Protocols | TCP | RDMA (Deprecated) |
|---|---|---|
| FUSE | Yes | Yes |
| SMB | Yes | No |
| NFS | Yes | Yes |
Warning
Important
6.2. Native Client
- Install Native Client packages
- Mount Red Hat Gluster Storage volumes (manually and automatically)
- Verify that the Gluster Storage volume has mounted successfully
Note
- Red Hat Gluster Storage server supports the Native Client version which is the same as the server version and the preceding version of Native Client . For list of releases see: https://access.redhat.com/solutions/543123.
- From Red Hat Gluster Storage 3.5 batch update 7 onwards,
glusterfs-6.0-62and higher version of glusterFS Native Client is only available viarh-gluster-3-client-for-rhel-8-x86_64-rpmsfor Red Hat Gluster Storage based on Red Hat Enterprise Enterprise Linux (RHEL 8) andrh-gluster-3-client-for-rhel-7-server-rpmsfor Red Hat Gluster Storage based on RHEL 7.
| Red Hat Enterprise Linux version | Red Hat Gluster Storage version | Native client version |
|---|---|---|
| 6.5 | 3.0 | 3.0, 2.1* |
| 6.6 | 3.0.2, 3.0.3, 3.0.4 | 3.0, 2.1* |
| 6.7 | 3.1, 3.1.1, 3.1.2 | 3.1, 3.0, 2.1* |
| 6.8 | 3.1.3 | 3.1.3 |
| 6.9 | 3.2 | 3.2, 3.1.3* |
| 6.9 | 3.3 | 3.3, 3.2 |
| 6.9 | 3.3.1 | 3.3.1, 3.3, 3.2 |
| 6.10 | 3.4 | 3.5*, 3.4, 3.3.z |
| 7.1 | 3.1, 3.1.1 | 3.1.1, 3.1, 3.0 |
| 7.2 | 3.1.2 | 3.1.2, 3.1, 3.0 |
| 7.2 | 3.1.3 | 3.1.3 |
| 7.3 | 3.2 | 3.2, 3.1.3 |
| 7.4 | 3.2 | 3.2, 3.1.3 |
| 7.4 | 3.3 | 3.3, 3.2 |
| 7.4 | 3.3.1 | 3.3.1, 3.3, 3.2 |
| 7.5 | 3.3.1, 3.4 | 3.3.z, 3.4.z |
| 7.6 | 3.3.1, 3.4 | 3.3.z, 3.4.z |
| 7.7 | 3.5.1 | 3.4.z, 3.5.z |
| 7.8 | 3.5.2 | 3.4.z, 3.5.z |
| 7.9 | 3.5.3, 3.5.4, 3.5.5, 3.5.6, 3.5.7 | 3.4.z, 3.5.z |
| 8.1 | NA | 3.5 |
| 8.2 | 3.5.2 | 3.5.z |
| 8.3 | 3.5.3 | 3.5.z |
| 8.4 | 3.5.4 | 3.5.z |
| 8.5 | 3.5.5, 3.5.6 | 3.5.z |
| 8.6 | 3.5.7 | 3.5.z |
Warning
Warning
- For Red Hat Gluster Storage 3.5, Red Hat supports only Red Hat Gluster Storage 3.4 and 3.5 clients.
6.2.1. Installing Native Client
- Use the Command Line to Register and Subscribe a System to Red Hat Subscription Management
- Use the Web Interface to Register and Subscribe a System to Red Hat Subscription Management
Important
Use the Command Line to Register and Subscribe a System to Red Hat Subscription Management
Prerequisites
- Know the user name and password of the Red Hat Subscription Manager account with Red Hat Gluster Storage entitlements.
- Run the
subscription-manager registercommand to list the available pools. Select the appropriate pool and enter your Red Hat Subscription Manager user name and password to register the system with Red Hat Subscription Manager.# subscription-manager register - Depending on your client, run one of the following commands to subscribe to the correct repositories.
- For Red Hat Enterprise Linux 8 clients:
# subscription-manager repos --enable=rh-gluster-3-client-for-rhel-8-x86_64-rpms - For Red Hat Enterprise Linux 7.x clients:
# subscription-manager repos --enable=rhel-7-server-rpms --enable=rh-gluster-3-client-for-rhel-7-server-rpmsNote
The following command can also be used, but Red Hat Gluster Storage may deprecate support for this repository in future releases.# subscription-manager repos --enable=rhel-7-server-rh-common-rpms - For Red Hat Enterprise Linux 6.1 and later clients:
# subscription-manager repos --enable=rhel-6-server-rpms --enable=rhel-6-server-rhs-client-1-rpms
For more information on subscriptions, refer to Section 3.1 Registering and attaching a system from the Command Line in Using and Configuring Red Hat Subscription Management. - Verify that the system is subscribed to the required repositories.
# yum repolist
Use the Web Interface to Register and Subscribe a System to Red Hat Subscription Management
Prerequisites
- Know the user name and password of the Red Hat Subsrciption Management (RHSM) account with Red Hat Gluster Storage entitlements.
- Log on to Red Hat Subscription Management (https://access.redhat.com/management).
- Click the Systems link at the top of the screen.
- Click the name of the system to which the Red Hat Gluster Storage Native Client channel must be appended.
- Click in the Subscribed Channels section of the screen.
- Expand the node for Additional Services Channels for
Red Hat Enterprise Linux 7 for x86_64orfor x86_64or forRed Hat Enterprise Linux 5 for x86_64depending on the client platform. - Click the button to finalize the changes.When the page refreshes, select the Details tab to verify the system is subscribed to the appropriate channels.
Install Native Client Packages
Prerequisites
- Run the
yum installcommand to install the native client RPM packages.# yum install glusterfs glusterfs-fuse - For Red Hat Enterprise 5.x client systems, run the
modprobecommand to load FUSE modules before mounting Red Hat Gluster Storage volumes.# modprobe fuseFor more information on loading modules at boot time, see https://access.redhat.com/knowledge/solutions/47028 .
6.2.2. Upgrading Native Client
Unmount gluster volumes
Unmount any gluster volumes prior to upgrading the native client.# umount /mnt/glusterfsUpgrade the client
Run theyum updatecommand to upgrade the native client:# yum update glusterfs glusterfs-fuseRemount gluster volumes
Remount volumes as discussed in Section 6.2.3, “Mounting Red Hat Gluster Storage Volumes”.
6.2.3. Mounting Red Hat Gluster Storage Volumes
Note
- Clients should be on the same version as the server, and at least on the version immediately previous to the server version. For Red Hat Gluster Storage 3.5, the recommended native client version should either be 3.4.z, and 3.5. For other versions, see Section 6.2, “Native Client”.
- Server names selected during volume creation should be resolvable in the client machine. Use appropriate
/etc/hostsentries, or a DNS server to resolve server names to IP addresses. - Internet Protocol Version 6 (IPv6) support is available only for Red Hat Hyperconverged Infrastructure for Virtualization environments and not for Red Hat Gluster Storage standalone environments.
6.2.3.1. Mount Commands and Options
mount -t glusterfs command. All options must be separated with commas.
# mount -t glusterfs -o backup-volfile-servers=volfile_server2:volfile_server3:.... ..:volfile_serverN,transport-type tcp,log-level=WARNING,reader-thread-count=2,log-file=/var/log/gluster.log server1:/test-volume /mnt/glusterfs- backup-volfile-servers=<volfile_server2>:<volfile_server3>:...:<volfile_serverN>
- List of the backup volfile servers to mount the client. If this option is specified while mounting the fuse client, when the first volfile server fails, the servers specified in
backup-volfile-serversoption are used as volfile servers to mount the client until the mount is successful.Note
This option was earlier specified asbackupvolfile-serverwhich is no longer valid. - log-level
- Logs only specified level or higher severity messages in the
log-file. - log-file
- Logs the messages in the specified file.
- transport-type
- Specifies the transport type that FUSE client must use to communicate with bricks. If the volume was created with only one transport type, then that becomes the default when no value is specified. In case of
tcp,rdmavolume, tcp is the default. - dump-fuse
- This mount option creates dump of fuse traffic between the glusterfs client (fuse userspace server) and the kernel. The interface to mount a glusterfs volume is the standard mount(8) command from the CLI. This feature enables the same in the mount option.
# mount -t glusterfs -odump-fuse=filename hostname:/volname mount-pathFor example,# mount -t glusterfs -odump-fuse=/dumpfile 10.70.43.18:/arbiter /mnt/arbiterThe above command generates a binary file with the namedumpfile.Note
The fusedump grows large with time and notably if the client gets a heavy load. So this is not an intended use case to do fusedump during normal usage. It is advised to use this to get a dump from a particular scenario, for diagnostic purposes.You need to unmount and remount the volume without the fusedump option to stop dumping. - ro
- Mounts the file system with read-only permissions.
- acl
- Enables POSIX Access Control List on mount. See Section 6.5.4, “Checking ACL enablement on a mounted volume” for further information.
- background-qlen=n
- Enables FUSE to handle n number of requests to be queued before subsequent requests are denied. Default value of n is 64.
- enable-ino32
- Enables file system to present 32-bit inodes instead of 64-bit inodes.
- reader-thread-count=n
- Enables FUSE to add n number of reader threads that can give better I/O performance. Default value of n is
1. - lru-limit
- This
mountcommand option clears the inodes from the least recently used (lru) list (which keeps non-referenced inodes) after the inode limit has reached.For example,# mount -olru-limit=NNNN -t glusterfs hostname:/volname /mnt/mountdirWhere NNNN is a positive integer. The default value of NNNN is 128k (131072) and the recommended value is 20000 and above. If0is specified as thelru-limitthen it means that no invalidation of inodes from the lru-list.
6.2.3.2. Mounting Volumes Manually
Manually Mount a Red Hat Gluster Storage Volume or Subdirectory
- For a Red Hat Gluster Storage Volume
mount -t glusterfs HOSTNAME|IPADDRESS:/VOLNAME /MOUNTDIR- For a Red Hat Gluster Storage Volume's Subdirectory
mount -t glusterfs HOSTNAME|IPADDRESS:/VOLNAME/SUBDIRECTORY /MOUNTDIR
Note
- If a mount point has not yet been created for the volume, run the
mkdircommand to create a mount point.# mkdir /mnt/glusterfs - Run the
mount -t glusterfscommand, using the key in the task summary as a guide.- For a Red Hat Gluster Storage Volume:
# mount -t glusterfs server1:/test-volume /mnt/glusterfs - For a Red Hat Gluster Storage Volume's Subdirectory
# mount -t glusterfs server1:/test-volume/sub-dir /mnt/glusterfs
6.2.3.3. Mounting Volumes Automatically
- Open the
/etc/fstabfile in a text editor. - Append the following configuration to the
fstabfile:- For a Red Hat Gluster Storage Volume
HOSTNAME|IPADDRESS:/VOLNAME /MOUNTDIR glusterfs defaults,_netdev 0 0- For a Red Hat Gluster Storage Volume's Subdirectory
HOSTNAME|IPADDRESS:/VOLNAME/SUBDIRECTORY /MOUNTDIR glusterfs defaults,_netdev 0 0
Using the example server names, the entry contains the following replaced values.server1:/test-volume /mnt/glusterfs glusterfs defaults,_netdev 0 0ORserver1:/test-volume/subdir /mnt/glusterfs glusterfs defaults,_netdev 0 0If you want to specify the transport type then check the following example:server1:/test-volume /mnt/glusterfs glusterfs defaults,_netdev,transport=tcp 0 0ORserver1:/test-volume/sub-dir /mnt/glusterfs glusterfs defaults,_netdev,transport=tcp 0 0
6.2.3.4. Manually Mounting Sub-directories Using Native Client
- Provides namespace isolation so that multiple users can access the storage without risking namespace collision with other users.
- Prevents the root file system from becoming full in the event of a mount failure.
# mount -t glusterfs hostname:/volname/subdir /mount-point# mount -t glusterfs hostname:/volname -osubdir-mount=subdir /mount-point# gluster volume set test-vol auth.allow "/(192.168.10.*|192.168.11.*),/subdir1(192.168.1.*),/subdir2(192.168.8.*)”- The
auth.allowoption allows only the directories specified as the value of theauth.allowoption to be mounted. - Each group of auth-allow is separated by a comma (
,). - Each group has a directory separated by parentheses,
(), which contains the valid IP addresses. - All subdirectories start with
/, that is, no relative path to a volume, but everything is an absolute path, taking/as the root directory of the volume.
Note
*, where any given subdirectory in a volume can be mounted by all clients.
6.2.3.5. Testing Mounted Volumes
Testing Mounted Red Hat Gluster Storage Volumes
Prerequisites
- Run the
mountcommand to check whether the volume was successfully mounted.# mount server1:/test-volume on /mnt/glusterfs type fuse.glusterfs(rw,allow_other,default_permissions,max_read=131072OR# mount server1:/test-volume/sub-dir on /mnt/glusterfs type fuse.glusterfs(rw,allow_other,default_permissions,max_read=131072If transport option is used while mounting a volume, mount status will have the transport type appended to the volume name. For example, for transport=tcp:# mount server1:/test-volume.tcp on /mnt/glusterfs type fuse.glusterfs(rw,allow_other,default_permissions,max_read=131072OR# mount server1:/test-volume/sub-dir.tcp on /mnt/glusterfs type fuse.glusterfs(rw,allow_other,default_permissions,max_read=131072 - Run the
dfcommand to display the aggregated storage space from all the bricks in a volume.# df -h /mnt/glusterfs Filesystem Size Used Avail Use% Mounted on server1:/test-volume 28T 22T 5.4T 82% /mnt/glusterfs - Move to the mount directory using the
cdcommand, and list the contents.# cd /mnt/glusterfs # ls
6.3. NFS
6.3.1. Support Matrix
| Features | glusterFS NFS (NFSv3) | NFS-Ganesha (NFSv3) | NFS-Ganesha (NFSv4) |
|---|---|---|---|
| Root-squash | Yes | Yes | Yes |
| All-squash | No | Yes | Yes |
| Sub-directory exports | Yes | Yes | Yes |
| Locking | Yes | Yes | Yes |
| Client based export permissions | Yes | Yes | Yes |
| Netgroups | Yes | Yes | Yes |
| Mount protocols | UDP, TCP | UDP, TCP | Only TCP |
| NFS transport protocols | TCP | UDP, TCP | TCP |
| AUTH_UNIX | Yes | Yes | Yes |
| AUTH_NONE | Yes | Yes | Yes |
| AUTH_KRB | No | Yes | Yes |
| ACLs | Yes | No | Yes |
| Delegations | N/A | N/A | No |
| High availability | Yes (but with certain limitations. For more information see, "Setting up CTDB for NFS") | Yes | Yes |
| Multi-head | Yes | Yes | Yes |
| Gluster RDMA volumes | Yes | Not supported | Not supported |
| DRC | Not supported | Yes | Yes |
| Dynamic exports | No | Yes | Yes |
| pseudofs | N/A | N/A | Yes |
| NFSv4.1 | N/A | N/A | Yes |
Note
- Red Hat does not recommend running NFS-Ganesha with any other NFS servers, such as, kernel-NFS and Gluster NFS servers.
- Only one of NFS-Ganesha, gluster-NFS or kernel-NFS servers can be enabled on a given machine/host as all NFS implementations use the port 2049 and only one can be active at a given time. Hence you must disable kernel-NFS before NFS-Ganesha is started.
6.3.2. Gluster NFS (Deprecated)
Warning
Note
mount -t nfs” command on the client as below:
# mount -t nfs HOSTNAME:VOLNAME MOUNTPATH# gluster volume set VOLNAME nfs.disable off- To set nfs.acl ON, run the following command:
# gluster volume set VOLNAME nfs.acl on - To set nfs.acl OFF, run the following command:
# gluster volume set VOLNAME nfs.acl off
Note
Important
# firewall-cmd --get-active-zones# firewall-cmd --zone=zone_name --add-service=nfs --add-service=rpc-bind
# firewall-cmd --zone=zone_name --add-service=nfs --add-service=rpc-bind --permanent6.3.2.1. Setting up CTDB for Gluster NFS (Deprecated)
Important
# firewall-cmd --get-active-zones# firewall-cmd --zone=zone_name --add-port=4379/tcp
# firewall-cmd --zone=zone_name --add-port=4379/tcp --permanentNote
6.3.2.1.1. Prerequisites
- If you already have an older version of CTDB (version <= ctdb1.x), then remove CTDB by executing the following command:
# yum remove ctdbAfter removing the older version, proceed with installing the latest CTDB.Note
Ensure that the system is subscribed to the samba channel to get the latest CTDB packages. - Install CTDB on all the nodes that are used as NFS servers to the latest version using the following command:
# yum install ctdb - CTDB uses TCP port 4379 by default. Ensure that this port is accessible between the Red Hat Gluster Storage servers.
6.3.2.1.2. Port and Firewall Information for Gluster NFS
# firewall-cmd --zone=public --add-port=662/tcp --add-port=662/udp \
--add-port=32803/tcp --add-port=32769/udp \
--add-port=111/tcp --add-port=111/udp# firewall-cmd --zone=public --add-port=662/tcp --add-port=662/udp \
--add-port=32803/tcp --add-port=32769/udp \
--add-port=111/tcp --add-port=111/udp --permanent- On Red Hat Enterprise Linux 7, edit
/etc/sysconfig/nfsfile as mentioned below:# sed -i '/STATD_PORT/s/^#//' /etc/sysconfig/nfsNote
This step is not applicable for Red Hat Enterprise Linux 8. - Restart the services:
- For Red Hat Enterprise Linux 6:
# service nfslock restart # service nfs restartImportant
Red Hat Gluster Storage is not supported on Red Hat Enterprise Linux 6 (RHEL 6) from 3.5 Batch Update 1 onwards. See Version Details table in section Red Hat Gluster Storage Software Components and Versions of the Installation Guide - For Red Hat Enterprise Linux 7:
# systemctl restart nfs-config # systemctl restart rpc-statd # systemctl restart nfs-mountd # systemctl restart nfslockNote
This step is not applicable for Red Hat Enterprise Linux 8.
6.3.2.1.3. Configuring CTDB on Red Hat Gluster Storage Server
- Create a replicate volume. This volume will host only a zero byte lock file, hence choose minimal sized bricks. To create a replicate volume run the following command:
# gluster volume create volname replica n ipaddress:/brick path.......N timeswhere,N: The number of nodes that are used as Gluster NFS servers. Each node must host one brick.For example:# gluster volume create ctdb replica 3 10.16.157.75:/rhgs/brick1/ctdb/b1 10.16.157.78:/rhgs/brick1/ctdb/b2 10.16.157.81:/rhgs/brick1/ctdb/b3 - In the following files, replace "all" in the statement META="all" to the newly created volume name
/var/lib/glusterd/hooks/1/start/post/S29CTDBsetup.sh /var/lib/glusterd/hooks/1/stop/pre/S29CTDB-teardown.shFor example:META="all" to META="ctdb" - Start the volume.
# gluster volume start ctdbAs part of the start process, theS29CTDBsetup.shscript runs on all Red Hat Gluster Storage servers, adds an entry in/etc/fstabfor the mount, and mounts the volume at/gluster/lockon all the nodes with Gluster NFS server. It also enables automatic start of CTDB service on reboot.Note
When you stop the special CTDB volume, the S29CTDB-teardown.sh script runs on all Red Hat Gluster Storage servers and removes an entry in /etc/fstab for the mount and unmounts the volume at /gluster/lock. - Verify if the file /etc/sysconfig/ctdb exists on all the nodes that is used as Gluster NFS server. This file contains Red Hat Gluster Storage recommended CTDB configurations.
- Create /etc/ctdb/nodes file on all the nodes that is used as Gluster NFS servers and add the IPs of these nodes to the file.
10.16.157.0 10.16.157.3 10.16.157.6The IPs listed here are the private IPs of NFS servers. - On all the nodes that are used as Gluster NFS server which require IP failover, create /etc/ctdb/public_addresses file and add the virtual IPs that CTDB should create to this file. Add these IP address in the following format:
<Virtual IP>/<routing prefix><node interface>For example:192.168.1.20/24 eth0 192.168.1.21/24 eth0 - Start the CTDB service on all the nodes by executing the following command:
# service ctdb start
Note
6.3.2.2. Using Gluster NFS to Mount Red Hat Gluster Storage Volumes (Deprecated)
Note
nfsmount.conf file at /etc/nfsmount.conf by adding the following text in the file:
Defaultvers=3vers=3 manually in all the mount commands.
# mount nfsserver:export -o vers=3 /MOUNTPOINTtcp,rdma volume it could be changed using the volume set option nfs.transport-type.
6.3.2.2.1. Manually Mounting Volumes Using Gluster NFS (Deprecated)
mount command to manually mount a Red Hat Gluster Storage volume using Gluster NFS.
- If a mount point has not yet been created for the volume, run the
mkdircommand to create a mount point.# mkdir /mnt/glusterfs - Run the correct
mountcommand for the system.- For Linux
# mount -t nfs -o vers=3 server1:/test-volume /mnt/glusterfs- For Solaris
# mount -o vers=3 nfs://server1:38467/test-volume /mnt/glusterfs
mount command to manually mount a Red Hat Gluster Storage volume using Gluster NFS over TCP.
Note
requested NFS version or transport protocol is not supported
nfs.mount-udp is supported for mounting a volume, by default it is disabled. The following are the limitations:
- If
nfs.mount-udpis enabled, the MOUNT protocol needed for NFSv3 can handle requests from NFS-clients that require MOUNT over UDP. This is useful for at least some versions of Solaris, IBM AIX and HP-UX. - Currently, MOUNT over UDP does not have support for mounting subdirectories on a volume. Mounting
server:/volume/subdirexports is only functional when MOUNT over TCP is used. - MOUNT over UDP does not currently have support for different authentication options that MOUNT over TCP honors. Enabling
nfs.mount-udpmay give more permissions to NFS clients than intended via various authentication options likenfs.rpc-auth-allow,nfs.rpc-auth-rejectandnfs.export-dir.
- If a mount point has not yet been created for the volume, run the
mkdircommand to create a mount point.# mkdir /mnt/glusterfs - Run the correct
mountcommand for the system, specifying the TCP protocol option for the system.- For Linux
# mount -t nfs -o vers=3,mountproto=tcp server1:/test-volume /mnt/glusterfs- For Solaris
# mount -o proto=tcp, nfs://server1:38467/test-volume /mnt/glusterfs
6.3.2.2.2. Automatically Mounting Volumes Using Gluster NFS (Deprecated)
Note
/etc/auto.master and /etc/auto.misc files, and restart the autofs service. Whenever a user or process attempts to access the directory it will be mounted in the background on-demand.
- Open the
/etc/fstabfile in a text editor. - Append the following configuration to the
fstabfile.HOSTNAME|IPADDRESS:/VOLNAME /MOUNTDIR nfs defaults,_netdev, 0 0Using the example server names, the entry contains the following replaced values.server1:/test-volume /mnt/glusterfs nfs defaults,_netdev, 0 0
- Open the
/etc/fstabfile in a text editor. - Append the following configuration to the
fstabfile.HOSTNAME|IPADDRESS:/VOLNAME /MOUNTDIR nfs defaults,_netdev,mountproto=tcp 0 0Using the example server names, the entry contains the following replaced values.server1:/test-volume /mnt/glusterfs nfs defaults,_netdev,mountproto=tcp 0 0
6.3.2.2.3. Automatically Mounting Subdirectories Using NFS (Deprecated)
nfs.export-dir and nfs.export-dirs options provide granular control to restrict or allow specific clients to mount a sub-directory. These clients can be authenticated during sub-directory mount with either an IP, host name or a Classless Inter-Domain Routing (CIDR) range.
- nfs.export-dirs
- This option is enabled by default. It allows the sub-directories of exported volumes to be mounted by clients without needing to export individual sub-directories. When enabled, all sub-directories of all volumes are exported. When disabled, sub-directories must be exported individually in order to mount them on clients.To disable this option for all volumes, run the following command:
# gluster volume set VOLNAME nfs.export-dirs off - nfs.export-dir
- When
nfs.export-dirsis set toon, thenfs.export-diroption allows you to specify one or more sub-directories to export, rather than exporting all subdirectories (nfs.export-dirs on), or only exporting individually exported subdirectories (nfs.export-dirs off).To export certain subdirectories, run the following command:# gluster volume set VOLNAME nfs.export-dir subdirectoryThe subdirectory path should be the path from the root of the volume. For example, in a volume with six subdirectories, to export the first three subdirectories, the command would be the following:# gluster volume set myvolume nfs.export-dir /dir1,/dir2,/dir3Subdirectories can also be exported based on the IP address, hostname, or a Classless Inter-Domain Routing (CIDR) range by adding these details in parentheses after the directory path:# gluster volume set VOLNAME nfs.export-dir subdirectory(IPADDRESS),subdirectory(HOSTNAME),subdirectory(CIDR)# gluster volume set myvolume nfs.export-dir /dir1(192.168.10.101),/dir2(storage.example.com),/dir3(192.168.98.0/24)
6.3.2.2.4. Testing Volumes Mounted Using Gluster NFS (Deprecated)
Testing Mounted Red Hat Gluster Storage Volumes
Prerequisites
- Run the
mountcommand to check whether the volume was successfully mounted.# mount server1:/test-volume on /mnt/glusterfs type nfs (rw,addr=server1) - Run the
dfcommand to display the aggregated storage space from all the bricks in a volume.# df -h /mnt/glusterfs Filesystem Size Used Avail Use% Mounted on server1:/test-volume 28T 22T 5.4T 82% /mnt/glusterfs - Move to the mount directory using the
cdcommand, and list the contents.# cd /mnt/glusterfs # lsNote
The LOCK functionality in NFS protocol is advisory, it is recommended to use locks if the same volume is accessed by multiple clients.
6.3.2.3. Troubleshooting Gluster NFS (Deprecated)
- Q: The mount command on the NFS client fails with RPC Error: Program not registered. This error is encountered due to one of the following reasons:
- Q: The rpcbind service is not running on the NFS client. This could be due to the following reasons:
- Q: The NFS server glusterfsd starts but the initialization fails with nfsrpc- service: portmap registration of program failed error message in the log.
- Q: The NFS server start-up fails with the message Port is already in use in the log file.
- Q: The mount command fails with NFS server failed error:
- Q: The showmount command fails with clnt_create: RPC: Unable to receive error. This error is encountered due to the following reasons:
- Q: The application fails with Invalid argument or Value too large for defined data type
- Q: After the machine that is running NFS server is restarted the client fails to reclaim the locks held earlier.
- Q: The rpc actor failed to complete successfully error is displayed in the nfs.log, even after the volume is mounted successfully.
- Q: The mount command fails with No such file or directory.
RPC Error: Program not registered. This error is encountered due to one of the following reasons:
- The NFS server is not running. You can check the status using the following command:
# gluster volume status - The volume is not started. You can check the status using the following command:
# gluster volume info - rpcbind is restarted. To check if rpcbind is running, execute the following command:
# ps ax| grep rpcbind
- If the NFS server is not running, then restart the NFS server using the following command:
# gluster volume start VOLNAME - If the volume is not started, then start the volume using the following command:
# gluster volume start VOLNAME - If both rpcbind and NFS server is running then restart the NFS server using the following commands:
# gluster volume stop VOLNAME# gluster volume start VOLNAME
rpcbind service is not running on the NFS client. This could be due to the following reasons:
- The portmap is not running.
- Another instance of kernel NFS server or glusterNFS server is running.
rpcbind service by running the following command:
# service rpcbind start[2010-05-26 23:33:47] E [rpcsvc.c:2598:rpcsvc_program_register_portmap] rpc-service: Could notregister with portmap
[2010-05-26 23:33:47] E [rpcsvc.c:2682:rpcsvc_program_register] rpc-service: portmap registration of program failed
[2010-05-26 23:33:47] E [rpcsvc.c:2695:rpcsvc_program_register] rpc-service: Program registration failed: MOUNT3, Num: 100005, Ver: 3, Port: 38465
[2010-05-26 23:33:47] E [nfs.c:125:nfs_init_versions] nfs: Program init failed
[2010-05-26 23:33:47] C [nfs.c:531:notify] nfs: Failed to initialize protocols
[2010-05-26 23:33:49] E [rpcsvc.c:2614:rpcsvc_program_unregister_portmap] rpc-service: Could not unregister with portmap
[2010-05-26 23:33:49] E [rpcsvc.c:2731:rpcsvc_program_unregister] rpc-service: portmap unregistration of program failed
[2010-05-26 23:33:49] E [rpcsvc.c:2744:rpcsvc_program_unregister] rpc-service: Program unregistration failed: MOUNT3, Num: 100005, Ver: 3, Port: 38465- Start the rpcbind service on the NFS server by running the following command:
# service rpcbind startAfter starting rpcbind service, glusterFS NFS server needs to be restarted. - Stop another NFS server running on the same machine.Such an error is also seen when there is another NFS server running on the same machine but it is not the glusterFS NFS server. On Linux systems, this could be the kernel NFS server. Resolution involves stopping the other NFS server or not running the glusterFS NFS server on the machine. Before stopping the kernel NFS server, ensure that no critical service depends on access to that NFS server's exports.On Linux, kernel NFS servers can be stopped by using either of the following commands depending on the distribution in use:
# service nfs-kernel-server stop # service nfs stop - Restart glusterFS NFS server.
[2010-05-26 23:40:49] E [rpc-socket.c:126:rpcsvc_socket_listen] rpc-socket: binding socket failed:Address already in use
[2010-05-26 23:40:49] E [rpc-socket.c:129:rpcsvc_socket_listen] rpc-socket: Port is already in use
[2010-05-26 23:40:49] E [rpcsvc.c:2636:rpcsvc_stage_program_register] rpc-service: could not create listening connection
[2010-05-26 23:40:49] E [rpcsvc.c:2675:rpcsvc_program_register] rpc-service: stage registration of program failed
[2010-05-26 23:40:49] E [rpcsvc.c:2695:rpcsvc_program_register] rpc-service: Program registration failed: MOUNT3, Num: 100005, Ver: 3, Port: 38465
[2010-05-26 23:40:49] E [nfs.c:125:nfs_init_versions] nfs: Program init failed
[2010-05-26 23:40:49] C [nfs.c:531:notify] nfs: Failed to initialize protocolsmount command fails with NFS server failed error:
mount: mount to NFS server '10.1.10.11' failed: timed out (retrying).- Disable name lookup requests from NFS server to a DNS server.The NFS server attempts to authenticate NFS clients by performing a reverse DNS lookup to match host names in the volume file with the client IP addresses. There can be a situation where the NFS server either is not able to connect to the DNS server or the DNS server is taking too long to respond to DNS request. These delays can result in delayed replies from the NFS server to the NFS client resulting in the timeout error.NFS server provides a work-around that disables DNS requests, instead relying only on the client IP addresses for authentication. The following option can be added for successful mounting in such situations:
option nfs.addr.namelookup offNote
Remember that disabling the NFS server forces authentication of clients to use only IP addresses. If the authentication rules in the volume file use host names, those authentication rules will fail and client mounting will fail. - NFS version used by the NFS client is other than version 3 by default.glusterFS NFS server supports version 3 of NFS protocol by default. In recent Linux kernels, the default NFS version has been changed from 3 to 4. It is possible that the client machine is unable to connect to the glusterFS NFS server because it is using version 4 messages which are not understood by glusterFS NFS server. The timeout can be resolved by forcing the NFS client to use version 3. The vers option to mount command is used for this purpose:
# mount nfsserver:export -o vers=3 /MOUNTPOINT
- The firewall might have blocked the port.
- rpcbind might not be running.
NFS.enable-ino32 <on | off>off by default, which permits NFS to return 64-bit inode numbers by default.
- built and run on 32-bit machines, which do not support large files by default,
- built to 32-bit standards on 64-bit systems.
-D_FILE_OFFSET_BITS=64chkconfig --list nfslock to check if NSM is configured during OS boot.
on,run chkconfig nfslock off to disable NSM clients during boot, which resolves the issue.
rpc actor failed to complete successfully error is displayed in the nfs.log, even after the volume is mounted successfully.
nfs.log file.
[2013-06-25 00:03:38.160547] W [rpcsvc.c:180:rpcsvc_program_actor] 0-rpc-service: RPC program version not available (req 100003 4)
[2013-06-25 00:03:38.160669] E [rpcsvc.c:448:rpcsvc_check_and_reply_error] 0-rpcsvc: rpc actor failed to complete successfullynoacl option in the mount command as follows:
# mount -t nfs -o vers=3,noacl server1:/test-volume /mnt/glusterfsNo such file or directory.
6.3.3. NFS Ganesha
Note
6.3.3.1. Supported Features of NFS-Ganesha
In a highly available active-active environment, if a NFS-Ganesha server that is connected to a NFS client running a particular application goes down, the application/NFS client is seamlessly connected to another NFS-Ganesha server without any administrative intervention.
NFS-Ganesha supports addition and removal of exports dynamically. Dynamic exports is managed by the DBus interface. DBus is a system local IPC mechanism for system management and peer-to-peer application communication.
In NFS-Ganesha, multiple Red Hat Gluster Storage volumes or sub-directories can be exported simultaneously.
NFS-Ganesha creates and maintains a NFSv4 pseudo-file system, which provides clients with seamless access to all exported objects on the server.
NFS-Ganesha NFSv4 protocol includes integrated support for Access Control List (ACL)s, which are similar to those used by Windows. These ACLs can be used to identify a trustee and specify the access rights allowed, or denied for that trustee.This feature is disabled by default.
Note
6.3.3.2. Setting up NFS Ganesha
Note
6.3.3.2.1. Port and Firewall Information for NFS-Ganesha
| Service | Port Number | Protocol |
| sshd | 22 | TCP |
| rpcbind/portmapper | 111 | TCP/UDP |
| NFS | 2049 | TCP/UDP |
| mountd | 20048 | TCP/UDP |
| NLM | 32803 | TCP/UDP |
| RQuota | 875 | TCP/UDP |
| statd | 662 | TCP/UDP |
| pcsd | 2224 | TCP |
| pacemaker_remote | 3121 | TCP |
| corosync | 5404 and 5405 | UDP |
| dlm | 21064 | TCP |
Note
Ensure the statd service is configured to use the ports mentioned above by executing the following commands on every node in the nfs-ganesha cluster:
- On Red Hat Enterprise Linux 7, edit /etc/sysconfig/nfs file as mentioned below:
# sed -i '/STATD_PORT/s/^#//' /etc/sysconfig/nfsNote
This step is not applicable for Red Hat Enterprise Linux 8. - Restart the statd service:For Red Hat Enterprise Linux 7:
# systemctl restart nfs-config # systemctl restart rpc-statdNote
This step is not applicable for Red Hat Enterprise Linux 8.
Note
- Edit '/etc/sysconfig/nfs' using following commands:
# sed -i '/STATD_PORT/s/^#//' /etc/sysconfig/nfs # sed -i '/LOCKD_TCPPORT/s/^#//' /etc/sysconfig/nfs # sed -i '/LOCKD_UDPPORT/s/^#//' /etc/sysconfig/nfs - Restart the services:For Red Hat Enterprise Linux 7:
# systemctl restart nfs-config # systemctl restart rpc-statd # systemctl restart nfslock - Open the ports that are configured in the first step using the following command:
# firewall-cmd --zone=public --add-port=662/tcp --add-port=662/udp \ --add-port=32803/tcp --add-port=32769/udp \ --add-port=111/tcp --add-port=111/udp# firewall-cmd --zone=public --add-port=662/tcp --add-port=662/udp \ --add-port=32803/tcp --add-port=32769/udp \ --add-port=111/tcp --add-port=111/udp --permanent - To ensure NFS client UDP mount does not fail, ensure to open port 2049 by executing the following command:
# firewall-cmd --zone=zone_name --add-port=2049/udp # firewall-cmd --zone=zone_name --add-port=2049/udp --permanent
- Firewall SettingsOn Red Hat Enterprise Linux 7, enable the firewall services mentioned below.
- Get a list of active zones using the following command:
# firewall-cmd --get-active-zones - Allow the firewall service in the active zones, run the following commands:
# firewall-cmd --zone=zone_name --add-service=nlm --add-service=nfs --add-service=rpc-bind --add-service=high-availability --add-service=mountd --add-service=rquota # firewall-cmd --zone=zone_name --add-service=nlm --add-service=nfs --add-service=rpc-bind --add-service=high-availability --add-service=mountd --add-service=rquota --permanent # firewall-cmd --zone=zone_name --add-port=662/tcp --add-port=662/udp # firewall-cmd --zone=zone_name --add-port=662/tcp --add-port=662/udp --permanent
6.3.3.2.2. Prerequisites to run NFS-Ganesha
- A Red Hat Gluster Storage volume must be available for export and NFS-Ganesha rpms are installed.
- Ensure that the fencing agents are configured. For more information on configuring fencing agents, refer to the following documentation:
- Fencing Configuration section in the High Availability Add-On Administration guide: https://access.redhat.com/documentation/en-us/red_hat_enterprise_linux/7/html/high_availability_add-on_administration/s1-fenceconfig-haaa
- Fence Devices section in the High Availability Add-On Reference guide: https://access.redhat.com/documentation/en-us/red_hat_enterprise_linux/7/html/high_availability_add-on_reference/s1-guiclustcomponents-haar#s2-guifencedevices-HAAR
Note
The required minimum number of nodes for a highly available installation/configuration of NFS Ganesha is 3 and a maximum number of supported nodes is 8. - Only one of NFS-Ganesha, gluster-NFS or kernel-NFS servers can be enabled on a given machine/host as all NFS implementations use the port 2049 and only one can be active at a given time. Hence you must disable kernel-NFS before NFS-Ganesha is started.Disable the kernel-nfs using the following command:For Red Hat Enterprise Linux 7
# systemctl stop nfs-server # systemctl disable nfs-serverTo verify if kernel-nfs is disabled, execute the following command:# systemctl status nfs-serverThe service should be in stopped state.Note
Gluster NFS will be stopped automatically when NFS-Ganesha is enabled.Ensure that none of the volumes have the variablenfs.disableset to 'off'. - Ensure to configure the ports as mentioned in Port/Firewall Information for NFS-Ganesha.
- Edit the ganesha-ha.conf file based on your environment.
- Reserve virtual IPs on the network for each of the servers configured in the ganesha.conf file. Ensure that these IPs are different than the hosts' static IPs and are not used anywhere else in the trusted storage pool or in the subnet.
- Ensure that all the nodes in the cluster are DNS resolvable. For example, you can populate the /etc/hosts with the details of all the nodes in the cluster.
- Make sure the SELinux is in Enforcing mode.
- Start network service on all machines using the following command:For Red Hat Enterprise Linux 7:
# systemctl start network - Create and mount a gluster shared volume by executing the following command:
# gluster volume set all cluster.enable-shared-storage enable volume set: successFor more information, see Section 11.12, “Setting up Shared Storage Volume” - Create a directory named
nfs-ganeshaunder/var/run/gluster/shared_storageNote
With the release of 3.5 Batch Update 3, the mount point of shared storage is changed from /var/run/gluster/ to /run/gluster/ . - Copy the
ganesha.confandganesha-ha.conffiles from/etc/ganeshato/var/run/gluster/shared_storage/nfs-ganesha. - Enable the glusterfssharedstorage.service service using the following command:
systemctl enable glusterfssharedstorage.service - Enable the nfs-ganesha service using the following command:
systemctl enable nfs-ganesha
6.3.3.2.3. Configuring the Cluster Services
Note
- Enable the pacemaker service using the following command:For Red Hat Enterprise Linux 7:
# systemctl enable pacemaker.service - Start the pcsd service using the following command.For Red Hat Enterprise Linux 7:
# systemctl start pcsdNote
- To start pcsd by default after the system is rebooted, execute the following command:For Red Hat Enterprise Linux 7:
# systemctl enable pcsd
- Set a password for the user ‘hacluster’ on all the nodes using the following command. Use the same password for all the nodes:
# echo <password> | passwd --stdin hacluster - Perform cluster authentication between the nodes, where, username is ‘hacluster’, and password is the one you used in the previous step. Ensure to execute the following command on every node:For Red Hat Enterprise Linux 7:
# pcs cluster auth <hostname1> <hostname2> ...For Red Hat Enterprise Linux 8:# pcs host auth <hostname1> <hostname2> ...Note
The hostname of all the nodes in the Ganesha-HA cluster must be included in the command when executing it on every node.For example, in a four node cluster; nfs1, nfs2, nfs3, and nfs4, execute the following command on every node:For Red Hat Enterprise Linux 7:# pcs cluster auth nfs1 nfs2 nfs3 nfs4 Username: hacluster Password: nfs1: Authorized nfs2: Authorized nfs3: Authorized nfs4: AuthorizedFor Red Hat Enterprise Linux 8:# pcs host auth nfs1 nfs2 nfs3 nfs4 Username: hacluster Password: nfs1: Authorized nfs2: Authorized nfs3: Authorized nfs4: Authorized - Key-based SSH authentication without password for the root user has to be enabled on all the HA nodes. Follow these steps:
- On one of the nodes (node1) in the cluster, run:
# ssh-keygen -f /var/lib/glusterd/nfs/secret.pem -t rsa -N '' - Deploy the generated public key from node1 to all the nodes (including node1) by executing the following command for every node:
# ssh-copy-id -i /var/lib/glusterd/nfs/secret.pem.pub root@<node-ip/hostname> - Copy the ssh keypair from node1 to all the nodes in the Ganesha-HA cluster by executing the following command for every node:
# scp -i /var/lib/glusterd/nfs/secret.pem /var/lib/glusterd/nfs/secret.* root@<node-ip/hostname>:/var/lib/glusterd/nfs/
- As part of cluster setup, port 875 is used to bind to the Rquota service. If this port is already in use, assign a different port to this service by modifying following line in ‘/etc/ganesha/ganesha.conf’ file on all the nodes.
# Use a non-privileged port for RQuota Rquota_Port = 875;
6.3.3.2.4. Creating the ganesha-ha.conf file
- Create a directory named nfs-ganesha under /var/run/gluster/shared_storage
Note
With the release of 3.5 Batch Update 3, the mount point of shared storage is changed from /var/run/gluster/ to /run/gluster/ . - Copy the ganesha.conf and ganesha-ha.conf files from /etc/ganesha to /var/run/gluster/shared_storage/nfs-ganesha.
# Name of the HA cluster created.
# must be unique within the subnet
HA_NAME="ganesha-ha-360"
#
#
# You may use short names or long names; you may not use IP addresses.
# Once you select one, stay with it as it will be mildly unpleasant to clean
# up if you switch later on. Ensure that all names - short and/or long - are in
# DNS or /etc/hosts on all machines in the cluster.
#
# The subset of nodes of the Gluster Trusted Pool that form the ganesha HA
# cluster. Hostname is specified.
HA_CLUSTER_NODES="server1.lab.redhat.com,server2.lab.redhat.com,..."
#
# Virtual IPs for each of the nodes specified above.
VIP_server1="10.0.2.1"
VIP_server2="10.0.2.2"
#VIP_server1_lab_redhat_com="10.0.2.1"
#VIP_server2_lab_redhat_com="10.0.2.2"
....
....Note
- Pacemaker handles the creation of the VIP and assigning an interface.
- Ensure that the VIP is in the same network range.
- Ensure that the HA_CLUSTER_NODES are specified as hostnames. Using IP addresses will cause clustering to fail.
6.3.3.2.5. Configuring NFS-Ganesha using Gluster CLI
To setup the HA cluster, enable NFS-Ganesha by executing the following command:
- Enable NFS-Ganesha by executing the following command
# gluster nfs-ganesha enableNote
Before enabling or disabling NFS-Ganesha, ensure that all the nodes that are part of the NFS-Ganesha cluster are up.For example,# gluster nfs-ganesha enable Enabling NFS-Ganesha requires Gluster-NFS to be disabled across the trusted pool. Do you still want to continue? (y/n) y This will take a few minutes to complete. Please wait .. nfs-ganesha : successNote
After enabling NFS-Ganesha, ifrpcinfo -pshows the statd port different from 662, then, restart the statd service:For Red Hat Enterprise Linux 7:# systemctl restart rpc-statdTearing down the HA clusterTo tear down the HA cluster, execute the following command:
# gluster nfs-ganesha disableFor example,# gluster nfs-ganesha disable Disabling NFS-Ganesha will tear down entire ganesha cluster across the trusted pool. Do you still want to continue? (y/n) y This will take a few minutes to complete. Please wait .. nfs-ganesha : successVerifying the status of the HA clusterTo verify the status of the HA cluster, execute the following script:
# /usr/libexec/ganesha/ganesha-ha.sh --status /var/run/gluster/shared_storage/nfs-ganeshaNote
With the release of 3.5 Batch Update 3, the mount point of shared storage is changed from /var/run/gluster/ to /run/gluster/ .For example:# /usr/libexec/ganesha/ganesha-ha.sh --status /var/run/gluster/shared_storage/nfs-ganeshaOnline: [ server1 server2 server3 server4 ] server1-cluster_ip-1 server1 server2-cluster_ip-1 server2 server3-cluster_ip-1 server3 server4-cluster_ip-1 server4 Cluster HA Status: HEALTHYNote
- It is recommended to manually restart the
ganesha.nfsdservice after the node is rebooted, to fail back the VIPs. - Disabling NFS Ganesha does not enable Gluster NFS by default. If required, Gluster NFS must be enabled manually.
Note
- NFS-Ganesha fails to start.
- NFS-Ganesha port 875 is unavailable.
- The ganesha.conf file is available at /etc/ganesha/ganesha.conf.
- Uncomment the line #Enable_RQUOTA = false; to disable RQUOTA.
- Restart the nfs-ganesha service on all nodes.
# systemctl restart nfs-ganesha
6.3.3.2.6. Exporting and Unexporting Volumes through NFS-Ganesha
Note
To export a Red Hat Gluster Storage volume, execute the following command:
# gluster volume set <volname> ganesha.enable on# gluster vol set testvol ganesha.enable on
volume set: successTo unexport a Red Hat Gluster Storage volume, execute the following command:
# gluster volume set <volname> ganesha.enable off# gluster vol set testvol ganesha.enable off
volume set: success6.3.3.2.7. Verifying the NFS-Ganesha Status
- Check if NFS-Ganesha is started by executing the following commands:On Red Hat Enterprise Linux-7
# systemctl status nfs-ganeshaFor example:# systemctl status nfs-ganesha nfs-ganesha.service - NFS-Ganesha file server Loaded: loaded (/usr/lib/systemd/system/nfs-ganesha.service; disabled) Active: active (running) since Tue 2015-07-21 05:08:22 IST; 19h ago Docs: http://github.com/nfs-ganesha/nfs-ganesha/wiki Main PID: 15440 (ganesha.nfsd) CGroup: /system.slice/nfs-ganesha.service └─15440 /usr/bin/ganesha.nfsd -L /var/log/ganesha/ganesha.log -f /etc/ganesha/ganesha.conf -N NIV_EVENT Jul 21 05:08:22 server1 systemd[1]: Started NFS-Ganesha file server.] - Check if the volume is exported.
# showmount -e localhostFor example:# showmount -e localhost Export list for localhost: /volname (everyone) - The logs of ganesha.nfsd daemon are written to /var/log/ganesha/ganesha.log. Check the log file on noticing any unexpected behavior.
6.3.3.3. Accessing NFS-Ganesha Exports
- Execute the following commands to set the tunable:
# sysctl -w sunrpc.tcp_slot_table_entries=128 # echo 128 > /proc/sys/sunrpc/tcp_slot_table_entries # echo 128 > /proc/sys/sunrpc/tcp_max_slot_table_entries - To make the tunable persistent on reboot, execute the following commands:
# echo "options sunrpc tcp_slot_table_entries=128" >> /etc/modprobe.d/sunrpc.conf # echo "options sunrpc tcp_max_slot_table_entries=128" >> /etc/modprobe.d/sunrpc.conf
Note
6.3.3.3.1. Mounting exports in NFSv3 Mode
# mount -t nfs -o vers=3 virtual_ip:/volname /mountpointmount -t nfs -o vers=3 10.70.0.0:/testvol /mnt6.3.3.3.2. Mounting exports in NFSv4 Mode
# mount -t nfs -o vers=4 virtual_ip:/volname /mountpoint# mount -t nfs -o vers=4 10.70.0.0:/testvol /mntImportant
# mount -t nfs -o vers=4.0 or 4.1 virtual_ip:/volname /mountpoint# mount -t nfs -o vers=4.1 10.70.0.0:/testvol /mnt6.3.3.3.3. Finding clients of an NFS server using dbus
# dbus-send --type=method_call --print-reply --system --dest=org.ganesha.nfsd /org/ganesha/nfsd/ClientMgr org.ganesha.nfsd.clientmgr.ShowClientsNote
6.3.3.3.4. Finding authorized client list and other information from an NFS server using dbus
# dbus-send --type=method_call --print-reply --system --dest=org.ganesha.nfsd /org/ganesha/nfsd/ExportMgr org.ganesha.nfsd.exportmgr.DisplayExport uint16:Export_Iduint16 export_id
string fullpath
string pseudopath
string tag
array[
struct {
string client_type
int32 CIDR_version
byte CIDR_address
byte CIDR_mask
int32 CIDR_proto
uint32 anonymous_uid
uint32 anonymous_gid
uint32 expire_time_attr
uint32 options
uint32 set
}
struct {
.
.
.
}
.
.
.
]
client_type is the client’s IP address, CIDR_version, CIDR_address, CIDR_mask and CIDR_proto are the CIDR representation details of the client and uint32 anonymous_uid, uint32 anonymous_gid, uint32 expire_time_attr, uint32 options and uint32 set are the Client Permissions.
#dbus-send --type=method_call --print-reply --system --dest=org.ganesha.nfsd /org/ganesha/nfsd/ExportMgr org.ganesha.nfsd.exportmgr.DisplayExport uint16:2
method return time=1559209192.642525 sender=:1.5491 -> destination=:1.5510 serial=370 reply_serial=2
uint16 2
string "/mani1"
string "/mani1"
string ""
array [
struct {
string "10.70.46.107/32"
int32 0
byte 0
byte 255
int32 1
uint32 1440
uint32 72
uint32 0
uint32 52441250
uint32 7340536
}
struct {
string "10.70.47.152/32"
int32 0
byte 0
byte 255
int32 1
uint32 1440
uint32 72
uint32 0
uint32 51392994
uint32 7340536
}
]
6.3.3.4. Modifying the NFS-Ganesha HA Setup
6.3.3.4.1. Adding a Node to the Cluster
Note
/var/lib/glusterd/nfs/secret.pem SSH key are already generated, those steps should not be repeated.
# /usr/libexec/ganesha/ganesha-ha.sh --add <HA_CONF_DIR> <HOSTNAME> <NODE-VIP>/run/gluster/shared_storage/nfs-ganesha.
# /usr/libexec/ganesha/ganesha-ha.sh --add /var/run/gluster/shared_storage/nfs-ganesha server16 10.00.00.01
Note
6.3.3.4.2. Deleting a Node in the Cluster
# /usr/libexec/ganesha/ganesha-ha.sh --delete <HA_CONF_DIR> <HOSTNAME>/run/gluster/shared_storage/nfs-ganesha.
# /usr/libexec/ganesha/ganesha-ha.sh --delete /var/run/gluster/shared_storage/nfs-ganesha server16Note
6.3.3.4.3. Replacing a Node in the Cluster
- Delete the node from the cluster. Refer Section 6.3.3.4.2, “Deleting a Node in the Cluster”
- Create a node with the same hostname.Refer Section 11.10.2, “Replacing a Host Machine with the Same Hostname”
Note
It is not required for the new node to have the same name as that of the old node. - Add the node to the cluster. Refer Section 6.3.3.4.1, “Adding a Node to the Cluster”
Note
Ensure that firewall services are enabled as mentioned in Section 6.3.3.2.1, “Port and Firewall Information for NFS-Ganesha” and also the Section 6.3.3.2.2, “Prerequisites to run NFS-Ganesha” are met.
6.3.3.5. Modifying the Default Export Configurations
ganesha-export-config 8 man page.
- Edit/add the required fields in the corresponding export file located at
/run/gluster/shared_storage/nfs-ganesha/exports/. - Execute the following command
# /usr/libexec/ganesha/ganesha-ha.sh --refresh-config <HA_CONF_DIR> <volname>
- HA_CONF_DIR: The directory path containing the ganesha-ha.conf file. By default it is located at
/run/gluster/shared_storage/nfs-ganesha. - volname: The name of the volume whose export configuration has to be changed.
# cat export.conf
EXPORT{
Export_Id = 1 ; # Export ID unique to each export
Path = "volume_path"; # Path of the volume to be exported. Eg: "/test_volume"
FSAL {
name = GLUSTER;
hostname = "10.xx.xx.xx"; # IP of one of the nodes in the trusted pool
volume = "volume_name"; # Volume name. Eg: "test_volume"
}
Access_type = RW; # Access permissions
Squash = No_root_squash; # To enable/disable root squashing
Disable_ACL = true; # To enable/disable ACL
Pseudo = "pseudo_path"; # NFSv4 pseudo path for this export. Eg: "/test_volume_pseudo"
Protocols = "3”, “4" ; # NFS protocols supported
Transports = "UDP”, “TCP" ; # Transport protocols supported
SecType = "sys"; # Security flavors supported
}
export.conf file to see the expected behavior.
- Providing Permissions for Specific Clients
- Enabling and Disabling NFSv4 ACLs
- Providing Pseudo Path for NFSv4 Mount
- Exporting Subdirectories
6.3.3.5.1. Providing Permissions for Specific Clients
EXPORT block applies to any client that mounts the exported volume. To provide specific permissions to specific clients , introduce a client block inside the EXPORT block.
EXPORT block.
client {
clients = 10.00.00.01; # IP of the client.
access_type = "RO"; # Read-only permissions
Protocols = "3"; # Allow only NFSv3 protocol.
anonymous_uid = 1440;
anonymous_gid = 72;
}client block.
6.3.3.5.2. Enabling and Disabling NFSv4 ACLs
Disable_ACL = false;Note
6.3.3.5.3. Providing Pseudo Path for NFSv4 Mount
Pseudo = "pseudo_path"; # NFSv4 pseudo path for this export. Eg: "/test_volume_pseudo"6.3.3.5.4. Exporting Subdirectories
- Create a separate export file for the sub-directory.
# cat export.ganesha-dir.conf # WARNING : Using Gluster CLI will overwrite manual # changes made to this file. To avoid it, edit the # file and run ganesha-ha.sh --refresh-config. EXPORT{ Export_Id = 3; Path = "/ganesha/dir"; FSAL { name = GLUSTER; hostname="localhost"; volume="ganesha"; volpath="/dir"; } Access_type = RW; Disable_ACL = true; Squash="No_root_squash"; Pseudo="/ganesha/dir"; Protocols = "3", "4"; Transports = "UDP","TCP"; SecType = "sys"; } - Change the
Export_IDto any unique unused ID.Edit thePathandPseudoparameters and add the volpath entry to the export file. - If a new export file is created for the sub-directory, you must add it's entry in
ganesha.conffile.%include "/var/run/gluster/shared_storage/nfs-ganesha/exports/export.<share-name>.conf"Note
With the release of 3.5 Batch Update 3, the mount point of shared storage is changed from /var/run/gluster/ to /run/gluster/ .For example:%include "/var/run/gluster/shared_storage/nfs-ganesha/exports/export.ganesha.conf" --> Volume entry %include >/var/run/gluster/shared_storage/nfs-ganesha/exports/export.ganesha-dir.conf" --> Subdir entry - Execute the following script to export the sub-directory shares without disrupting existing clients connected to other shares :
# /usr/libexec/ganesha/ganesha-ha.sh --refresh-config <HA_CONF_DIR> <share-name>For example:/usr/libexec/ganesha/ganesha-ha.sh --refresh-config /run/gluster/shared_storage/nfs-ganesha/ ganesha-dir
- Edit the volume export file with subdir entry.For Example:
# cat export.ganesha.conf # WARNING : Using Gluster CLI will overwrite manual # changes made to this file. To avoid it, edit the # file and run ganesha-ha.sh --refresh-config. EXPORT{ Export_Id = 4; Path = "/ganesha/dir1"; FSAL { name = GLUSTER; hostname="localhost"; volume="ganesha"; volpath="/dir1"; } Access_type = RW; Disable_ACL = true; Squash="No_root_squash"; Pseudo="/ganesha/dir1"; Protocols = "3", "4"; Transports = "UDP","TCP"; SecType = "sys"; } - Change the
Export_IDto any unique unused ID.Edit thePathandPseudoparameters and add the volpath entry to the export file. - Execute the following script to export the sub-directory shares without disrupting existing clients connected to other shares:
# /usr/libexec/ganesha/ganesha-ha.sh --refresh-config <HA_CONF_DIR> <share-name>For example:/usr/libexec/ganesha/ganesha-ha.sh --refresh-config /run/gluster/shared_storage/nfs-ganesha/ ganeshaNote
If the same export file contains multiple EXPORT{} entries, then a volume restart or nfs-ganesha service restart is required.
6.3.3.5.4.1. Enabling all_squash option
all_squash, edit the following parameter:
Squash = all_squash ; # To enable/disable root squashing6.3.3.5.5. Unexporting Subdirectories
- Note the export id of the share which you want to unexport from configuration file
(/var/run/gluster/shared_storage/nfs-ganesha/exports/file-name.conf) - Deleting the configuration:
- Delete the configuration file (if there is a seperate configraution file):
# rm -rf /var/run/gluster/shared_storage/nfs-ganesha/exports/file-name.conf - Delete the entry of the conf file from /etc/ganesha/ganesha.confRemove the line:
%include "/var/run/gluster/shared_storage/nfs-ganesha/export/export.conf - Run the below command:
# dbus-send --print-reply --system --dest=org.ganesha.nfsd /org/ganesha/nfsd/ExportMgr org.ganesha.nfsd.exportmgr.RemoveExport uint16:export_idExport_id in above command should be of export entry obtained from step 1.
6.3.3.6. Configuring Kerberized NFS-Ganesha
Note
- Install the krb5-workstation and the ntpdate (RHEL 7) or the chrony (RHEL 8) packages on all the machines:
# yum install krb5-workstationFor Red Hat Enterprise Linux 7:# yum install ntpdateFor Red Hat Enterprise Linux 8:# dnf install chronyNote
- The krb5-libs package will be updated as a dependent package.
- For RHEL 7, configure the ntpdate based on the valid time server according to the environment:
# echo <valid_time_server> >> /etc/ntp/step-tickers # systemctl enable ntpdate # systemctl start ntpdateFor RHEL 8, configure chrony based on the valid time server accroding to the environment:# vi /etc/chrony.conf # systemctl enable chrony # systemctl start chronyFor RHEL 7 and RHEL 8 both, perform the following steps: - Ensure that all systems can resolve each other by FQDN in DNS.
- Configure the
/etc/krb5.conffile and add relevant changes accordingly. For example:[logging] default = FILE:/var/log/krb5libs.log kdc = FILE:/var/log/krb5kdc.log admin_server = FILE:/var/log/kadmind.log [libdefaults] dns_lookup_realm = false ticket_lifetime = 24h renew_lifetime = 7d forwardable = true rdns = false default_realm = EXAMPLE.COM default_ccache_name = KEYRING:persistent:%{uid} [realms] EXAMPLE.COM = { kdc = kerberos.example.com admin_server = kerberos.example.com } [domain_realm] .example.com = EXAMPLE.COM example.com = EXAMPLE.COMNote
For further details regarding the file configuration, refer toman krb5.conf. - On the NFS-server and client, update the /etc/idmapd.conf file by making the required change. For example:
Domain = example.com
6.3.3.6.1. Setting up the NFS-Ganesha Server
Note
- Install the following packages:
# yum install nfs-utils # yum install rpcbind - Install the relevant gluster and NFS-Ganesha rpms. For more information see, Red Hat Gluster Storage 3.5 Installation Guide.
- Create a Kerberos principle and add it to krb5.keytab on the NFS-Ganesha server
$ kadmin $ kadmin: addprinc -randkey nfs/<host_name>@EXAMPLE.COM $ kadmin: ktadd nfs/<host_name>@EXAMPLE.COMFor example:# kadmin Authenticating as principal root/admin@EXAMPLE.COM with password. Password for root/admin@EXAMPLE.COM: kadmin: addprinc -randkey nfs/<host_name>@EXAMPLE.COM WARNING: no policy specified for nfs/<host_name>@EXAMPLE.COM; defaulting to no policy Principal "nfs/<host_name>@EXAMPLE.COM" created. kadmin: ktadd nfs/<host_name>@EXAMPLE.COM Entry for principal nfs/<host_name>@EXAMPLE.COM with kvno2, encryption type aes256-cts-hmac-sha1-96 added to keytab FILE:/etc/krb5.keytab. Entry for principal nfs/<host_name>@EXAMPLE.COM with kvno 2, encryption type aes128-cts-hmac-sha1-96 added to keytab FILE:/etc/krb5.keytab. Entry for principal nfs/<host_name>@EXAMPLE.COM with kvno 2, encryption type des3-cbc-sha1 added to keytab FILE:/etc/krb5.keytab. Entry for principal nfs/<host_name>@EXAMPLE.COM with kvno 2, encryption type arcfour-hmac added to keytab FILE:/etc/krb5.keytab. Entry for principal nfs/<host_name>@EXAMPLE.COM with kvno 2, encryption type camellia256-cts-cmac added to keytab FILE:/etc/krb5.keytab. Entry for principal nfs/<host_name>@EXAMPLE.COM with kvno 2, encryption type camellia128-cts-cmac added to keytab FILE:/etc/krb5.keytab. Entry for principal nfs/<host_name>@EXAMPLE.COM with kvno 2, encryption type des-hmac-sha1 added to keytab FILE:/etc/krb5.keytab. Entry for principal nfs/<host_name>@EXAMPLE.COM with kvno 2, encryption type des-cbc-md5 added to keytab FILE:/etc/krb5.keytab. - Update
/etc/ganesha/ganesha.conffile as mentioned below:NFS_KRB5 { PrincipalName = nfs ; KeytabPath = /etc/krb5.keytab ; Active_krb5 = true ; } - Based on the different kerberos security flavours (krb5, krb5i and krb5p) supported by nfs-ganesha, configure the 'SecType' parameter in the volume export file (/var/run/gluster/shared_storage/nfs-ganesha/exports) with appropriate security flavour.
Note
With the release of 3.5 Batch Update 3, the mount point of shared storage is changed from /var/run/gluster/ to /run/gluster/ . - Create an unprivileged user and ensure that the users that are created are resolvable to the UIDs through the central user database. For example:
# useradd guestNote
The username of this user has to be the same as the one on the NFS-client.
6.3.3.6.2. Setting up the NFS Client
Note
- Install the following packages:
# yum install nfs-utils # yum install rpcbind - Create a kerberos principle and add it to krb5.keytab on the client side. For example:
# kadmin # kadmin: addprinc -randkey host/<host_name>@EXAMPLE.COM # kadmin: ktadd host/<host_name>@EXAMPLE.COM# kadmin Authenticating as principal root/admin@EXAMPLE.COM with password. Password for root/admin@EXAMPLE.COM: kadmin: addprinc -randkey host/<host_name>@EXAMPLE.COM WARNING: no policy specified for host/<host_name>@EXAMPLE.COM; defaulting to no policy Principal "host/<host_name>@EXAMPLE.COM" created. kadmin: ktadd host/<host_name>@EXAMPLE.COM Entry for principal host/<host_name>@EXAMPLE.COM with kvno 2, encryption type aes256-cts-hmac-sha1-96 added to keytab FILE:/etc/krb5.keytab. Entry for principal host/<host_name>@EXAMPLE.COM with kvno 2, encryption type aes128-cts-hmac-sha1-96 added to keytab FILE:/etc/krb5.keytab. Entry for principal host/<host_name>@EXAMPLE.COM with kvno 2, encryption type des3-cbc-sha1 added to keytab FILE:/etc/krb5.keytab. Entry for principal host/<host_name>@EXAMPLE.COM with kvno 2, encryption type arcfour-hmac added to keytab FILE:/etc/krb5.keytab. Entry for principal host/<host_name>@EXAMPLE.COM with kvno 2, encryption type camellia256-cts-cmac added to keytab FILE:/etc/krb5.keytab. Entry for principal host/<host_name>@EXAMPLE.COM with kvno 2, encryption type camellia128-cts-cmac added to keytab FILE:/etc/krb5.keytab. Entry for principal host/<host_name>@EXAMPLE.COM with kvno 2, encryption type des-hmac-sha1 added to keytab FILE:/etc/krb5.keytab. Entry for principal host/<host_name>@EXAMPLE.COM with kvno 2, encryption type des-cbc-md5 added to keytab FILE:/etc/krb5.keytab. - Check the status of nfs-client.target service and start it, if not already started:
# systemctl status nfs-client.target # systemctl start nfs-client.target # systemctl enable nfs-client.target - Create an unprivileged user and ensure that the users that are created are resolvable to the UIDs through the central user database. For example:
# useradd guestNote
The username of this user has to be the same as the one on the NFS-server. - Mount the volume specifying kerberos security type:
# mount -t nfs -o sec=krb5 <host_name>:/testvolume /mntAs root, all access should be granted.For example:Creation of a directory on the mount point and all other operations as root should be successful.# mkdir <directory name> - Login as a guest user:
# su - guestWithout a kerberos ticket, all access to /mnt should be denied. For example:# su guest # ls ls: cannot open directory .: Permission denied - Get the kerberos ticket for the guest and access /mnt:
# kinit Password for guest@EXAMPLE.COM: # ls <directory created>Important
With this ticket, some access must be allowed to /mnt. If there are directories on the NFS-server where "guest" does not have access to, it should work correctly.
6.3.3.7. NFS-Ganesha Service Downtime
- If the ganesha.nfsd dies (crashes, oomkill, admin kill), the maximum time to detect it and put the ganesha cluster into grace is 20sec, plus whatever time pacemaker needs to effect the fail-over.
Note
This time taken to detect if the service is down, can be edited using the following command on all the nodes:# pcs resource op remove nfs-mon monitor # pcs resource op add nfs-mon monitor interval=<interval_period_value> - If the whole node dies (including network failure) then this down time is the total of whatever time pacemaker needs to detect that the node is gone, the time to put the cluster into grace, and the time to effect the fail-over. This is ~20 seconds.
- So the max-fail-over time is approximately 20-22 seconds, and the average time is typically less. In other words, the time taken for NFS clients to detect server reboot or resume I/O is 20 - 22 seconds.
6.3.3.7.1. Modifying the Fail-over Time
| Protocols | File Operations |
| NFSV3 |
|
| NLM |
|
| NFSV4 |
|
Note
/etc/ganesha/ganesha.conf file.
NFSv4 {
Grace_Period=<grace_period_value_in_sec>;
}/etc/ganesha/ganesha.conf file, restart the NFS-Ganesha service using the following command on all the nodes :
# systemctl restart nfs-ganesha6.3.3.8. Tuning Readdir Performance for NFS-Ganesha
Dir_Chunk parameter enables the directory content to be read in chunks at an instance. This parameter is enabled by default. The default value of this parameter is 128. The range for this parameter is 1 to UINT32_MAX. To disable this parameter, set the value to 0
Procedure 6.1. Configuring readdir perform for NFS-Ganesha
- Edit the
/etc/ganesha/ganesha.conffile. - Locate the
CACHEINODEblock. - Add the
Dir_Chunkparameter inside the block:CACHEINODE { Entries_HWMark = 125000; Chunks_HWMark = 1000; Dir_Chunk = 128; # Range: 1 to UINT32_MAX, 0 to disable } - Save the
ganesha.conffile and restart the NFS-Ganesha service on all nodes:# systemctl restart nfs-ganesha
6.3.3.9. Troubleshooting NFS Ganesha
Ensure you execute the following commands for all the issues/failures that is encountered:
- Make sure all the prerequisites are met.
- Execute the following commands to check the status of the services:
# service nfs-ganesha status # service pcsd status # service pacemaker status # pcs status - Review the followings logs to understand the cause of failure.
/var/log/ganesha/ganesha.log /var/log/ganesha/ganesha-gfapi.log /var/log/messages /var/log/pcsd.log
- Situation
NFS-Ganesha fails to start.
SolutionEnsure you execute all the mandatory checks to understand the root cause before proceeding with the following steps. Follow the listed steps to fix the issue:
- Ensure the kernel and gluster nfs services are inactive.
- Ensure that the port 875 is free to connect to the RQUOTA service.
- Ensure that the shared storage volume mount exists on the server after node reboot/shutdown. If it does not, then mount the shared storage volume manually using the following command:
# mount -t glusterfs <local_node's_hostname>:gluster_shared_storage /var/run/gluster/shared_storageNote
With the release of 3.5 Batch Update 3, the mount point of shared storage is changed from /var/run/gluster/ to /run/gluster/ .
For more information see, section Exporting and Unexporting Volumes through NFS-Ganesha. - Situation
NFS-Ganesha port 875 is unavailable.
SolutionEnsure you execute all the mandatory checks to understand the root cause before proceeding with the following steps. Follow the listed steps to fix the issue:
- Run the following command to extract the PID of the process using port 875:
netstat -anlp | grep 875 - Determine if the process using port 875 is an important system or user process.
- Perform one of the following depending upon the importance of the process:
- If the process using port 875 is an important system or user process:
- Assign a different port to this service by modifying following line in ‘/etc/ganesha/ganesha.conf’ file on all the nodes:
# Use a non-privileged port for RQuota Rquota_Port = port_number; - Run the following commands after modifying the port number:
# semanage port -a -t mountd_port_t -p tcp port_number # semanage port -a -t mountd_port_t -p udp port_number - Run the following command to restart NFS-Ganesha:
systemctl restart nfs-ganesha
- If the process using port 875 is not an important system or user process:
- Run the following command to kill the process using port 875:
# kill pid;Use the process ID extracted from the previous step. - Run the following command to ensure that the process is killed and port 875 is free to use:
# ps aux | grep pid; - Run the following command to restart NFS-Ganesha:
systemctl restart nfs-ganesha - If required, restart the killed process.
- Situation
NFS-Ganesha Cluster setup fails.
SolutionEnsure you execute all the mandatory checks to understand the root cause before proceeding with the following steps.
- Ensure the kernel and gluster nfs services are inactive.
- Ensure that
pcs cluster authcommand is executed on all the nodes with same password for the userhacluster - Ensure that shared volume storage is mounted on all the nodes.
- Ensure that the name of the HA Cluster does not exceed 15 characters.
- Ensure UDP multicast packets are pingable using
OMPING. - Ensure that Virtual IPs are not assigned to any NIC.
- Situation
NFS-Ganesha has started and fails to export a volume.
SolutionEnsure you execute all the mandatory checks to understand the root cause before proceeding with the following steps. Follow the listed steps to fix the issue:
- Ensure that volume is in
Startedstate using the following command:# gluster volume status <volname> - Execute the following commands to check the status of the services:
# service nfs-ganesha status # showmount -e localhost - Review the followings logs to understand the cause of failure.
/var/log/ganesha/ganesha.log /var/log/ganesha/ganesha-gfapi.log /var/log/messages - Ensure that dbus service is running using the following command
# service messagebus status - If the volume is not in a started state, run the following command to start the volume.
# gluster volume start <volname>If the volume is not exported as part of volume start, run the following command to re-export the volume:# /usr/libexec/ganesha/dbus-send.sh /var/run/gluster/shared_storage on <volname>Note
With the release of 3.5 Batch Update 3, the mount point of shared storage is changed from /var/run/gluster/ to /run/gluster/ .
- Situation
Adding a new node to the HA cluster fails.
SolutionEnsure you execute all the mandatory checks to understand the root cause before proceeding with the following steps. Follow the listed steps to fix the issue:
- Ensure to run the following command from one of the nodes that is already part of the cluster:
# ganesha-ha.sh --add <HA_CONF_DIR> <NODE-HOSTNAME> <NODE-VIP> - Ensure that gluster_shared_storage volume is mounted on the node that needs to be added.
- Make sure that all the nodes of the cluster is DNS resolvable from the node that needs to be added.
- Execute the following command for each of the hosts in the HA cluster on the node that needs to be added:For Red Hat Enterprize Linux 7:
# pcs cluster auth <hostname>For Red Hat Enterprize Linux 8:# pcs host auth <hostname>
- Situation
Cleanup required when nfs-ganesha HA cluster setup fails.
SolutionTo restore back the machines to the original state, execute the following commands on each node forming the cluster:
# /usr/libexec/ganesha/ganesha-ha.sh --teardown /var/run/gluster/shared_storage/nfs-ganesha # /usr/libexec/ganesha/ganesha-ha.sh --cleanup /var/run/gluster/shared_storage/nfs-ganesha # systemctl stop nfs-ganeshaNote
With the release of 3.5 Batch Update 3, the mount point of shared storage is changed from /var/run/gluster/ to /run/gluster/ . - Situation
Permission issues.
SolutionBy default, the
root squashoption is disabled when you start NFS-Ganesha using the CLI. In case, you encounter any permission issues, check the unix permissions of the exported entry.
6.4. SMB
Warning
Overview of configuring SMB shares
- Verify that your system fulfils the requirements outlined in Section 6.4.1, “Requirements for using SMB with Red Hat Gluster Storage”.
- If you want to share volumes that use replication, set up CTDB: Section 6.4.2, “Setting up CTDB for Samba”.
- Configure your volumes to be shared using SMB: Section 6.4.3, “Sharing Volumes over SMB”.
- If you want to mount volumes on macOS clients: Section 6.4.4.1, “Configuring the Apple Create Context for macOS users”.
- Set up permissions for user access: Section 6.4.4.2, “Configuring read/write access for a non-privileged user”.
- Mount the shared volume on a client:
- Verify that your shared volume is working properly: Section 6.4.6, “Starting and Verifying your Configuration”
6.4.1. Requirements for using SMB with Red Hat Gluster Storage
- Samba is required to provide support and interoperability for the SMB protocol on Red Hat Gluster Storage. Additionally, CTDB is required when you want to share replicated volumes using SMB. See Subscribing to the Red Hat Gluster Storage server channels in the Red Hat Gluster Storage 3.5 Installation Guide for information on subscribing to the correct channels for SMB support.
- Enable the Samba firewall service in the active zones for runtime and permanent mode. The following commands are for systems based on Red Hat Enterprise Linux 7.To get a list of active zones, run the following command:
# firewall-cmd --get-active-zonesTo allow the firewall services in the active zones, run the following commands# firewall-cmd --zone=zone_name --add-service=samba # firewall-cmd --zone=zone_name --add-service=samba --permanent
6.4.2. Setting up CTDB for Samba
Important
Prerequisites
- If you already have an older version of CTDB (version <= ctdb1.x), then remove CTDB by executing the following command:
# yum remove ctdbAfter removing the older version, proceed with installing the latest CTDB.Note
Ensure that the system is subscribed to the samba channel to get the latest CTDB packages. - Install CTDB on all the nodes that are used as Samba servers to the latest version using the following command:
# yum install ctdb - In a CTDB based high availability environment of Samba , the locks will not be migrated on failover.
- Enable the CTDB firewall service in the active zones for runtime and permanent mode. The following commands are for systems based on Red Hat Enterprise Linux 7.To get a list of active zones, run the following command:
# firewall-cmd --get-active-zonesTo add ports to the active zones, run the following commands:# firewall-cmd --zone=zone_name --add-port=4379/tcp # firewall-cmd --zone=zone_name --add-port=4379/tcp --permanent
Best Practices
- CTDB requires a different broadcast domain from the Gluster internal network. The network used by the Windows clients to access the Gluster volumes exported by Samba, must be different from the internal Gluster network. Failing to do so can lead to an excessive time when there is a failover of CTDB between the nodes, and a degraded performance accessing the shares in Windows.For example an incorrect setup where CTDB is running in Network 192.168.10.X:
Status of volume: ctdb Gluster process TCP Port RDMA Port Online Pid Brick node1:/rhgs/ctdb/b1 49157 0 Y 30439 Brick node2:/rhgs/ctdb/b1 49157 0 Y 3827 Brick node3:/rhgs/ctdb/b1 49157 0 Y 89421 Self-heal Daemon on localhost N/A N/A Y 183026 Self-heal Daemon on sesdel0207 N/A N/A Y 44245 Self-heal Daemon on segotl4158 N/A N/A Y 110627 cat ctdb_listnodes 192.168.10.1 192.168.10.2 cat ctdb_ip Public IPs on node 0 192.168.10.3 0Note
The host names, node1, node2, and node3 are used to setup the bricks and resolve the IPs in the same network 192.168.10.X. The Windows clients are accessing the shares using the internal Gluster network and this should not be the case. - Additionally, the CTDB network and the Gluster internal network must run in separate physical interfaces. Red Hat recommends 10GbE interfaces for better performance.
- It is recommended to use the same network bandwidth for Gluster and CTDB networks. Using different network speeds can lead to performance bottlenecks.The same amount of network traffic is expected in both internal and external networks.
Configuring CTDB on Red Hat Gluster Storage Server
- Create a new replicated volume to house the CTDB lock file. The lock file has a size of zero bytes, so use small bricks.To create a replicated volume run the following command, replacing N with the number of nodes to replicate across:
# gluster volume create volname replica N ip_address_1:brick_path ... ip_address_N:brick_pathFor example:# gluster volume create ctdb replica 3 10.16.157.75:/rhgs/brick1/ctdb/b1 10.16.157.78:/rhgs/brick1/ctdb/b2 10.16.157.81:/rhgs/brick1/ctdb/b3 - In the following files, replace
allin the statementMETA="all"with the newly created volume name, for example,META="ctdb"./var/lib/glusterd/hooks/1/start/post/S29CTDBsetup.sh /var/lib/glusterd/hooks/1/stop/pre/S29CTDB-teardown.sh - In the
/etc/samba/smb.conffile, add the following line in the global section on all the nodes:clustering=yes - Start the volume.
# gluster volume start ctdbThe S29CTDBsetup.sh script runs on all Red Hat Gluster Storage servers, adds an entry in/etc/fstabfor the mount, and mounts the volume at/gluster/lockon all the nodes with Samba server. It also enables automatic start of CTDB service on reboot.Note
When you stop the special CTDB volume, the S29CTDB-teardown.sh script runs on all Red Hat Gluster Storage servers and removes an entry in/etc/fstabfor the mount and unmounts the volume at/gluster/lock. - Verify that the
/etc/ctdbdirectory exists on all nodes that are used as a Samba server. This file contains CTDB configuration details recommended for Red Hat Gluster Storage. - Create the
/etc/ctdb/nodesfile on all the nodes that are used as Samba servers and add the IP addresses of these nodes to the file.10.16.157.0 10.16.157.3 10.16.157.6The IP addresses listed here are the private IP addresses of Samba servers. - On nodes that are used as Samba servers and require IP failover, create the
/etc/ctdb/public_addressesfile. Add any virtual IP addresses that CTDB should create to the file in the following format:VIP/routing_prefix network_interfaceFor example:192.168.1.20/24 eth0 192.168.1.21/24 eth0 - Start the CTDB service on all the nodes.On RHEL 7 and RHEL 8, runOn RHEL 6, run
# systemctl start ctdb# service ctdb start
6.4.3. Sharing Volumes over SMB
/etc/samba/smb.conf:
[gluster-VOLNAME]
comment = For samba share of volume VOLNAME
vfs objects = glusterfs
glusterfs:volume = VOLNAME
glusterfs:logfile = /var/log/samba/VOLNAME.log
glusterfs:loglevel = 7
path = /
read only = no
guest ok = yes| Configuration Options | Required? | Default Value | Description |
|---|---|---|---|
| Path | Yes | n/a | It represents the path that is relative to the root of the gluster volume that is being shared. Hence / represents the root of the gluster volume. Exporting a subdirectory of a volume is supported and /subdir in path exports only that subdirectory of the volume. |
glusterfs:volume | Yes | n/a | The volume name that is shared. |
glusterfs:logfile | No | NULL | Path to the log file that will be used by the gluster modules that are loaded by the vfs plugin. Standard Samba variable substitutions as mentioned in smb.conf are supported. |
glusterfs:loglevel | No | 7 | This option is equivalent to the client-log-level option of gluster. 7 is the default value and corresponds to the INFO level. |
glusterfs:volfile_server | No | localhost | The gluster server to be contacted to fetch the volfile for the volume. It takes the value, which is a list of white space separated elements, where each element is unix+/path/to/socket/file or [tcp+]IP|hostname|\[IPv6\][:port] |
If you are using an older version of Samba:
- Enable SMB specific caching:
# gluster volume set VOLNAME performance.cache-samba-metadata onYou can also enable generic metadata caching to improve performance. See Section 19.7, “Directory Operations” for details. - Restart the
glusterdservice on each Red Hat Gluster Storage node. - Verify proper lock and I/O coherence:
# gluster volume set VOLNAME storage.batch-fsync-delay-usec 0
Note
# gluster volume set <volname> performance.write-behind offIf you are using Samba-4.8.5-104 or later:
- To export gluster volume as SMB share via Samba, one of the following volume options,
user.cifsoruser.smbis required.To enable user.cifs volume option, run:# gluster volume set VOLNAME user.cifs enableAnd to enable user.smb, run:# gluster volume set VOLNAME user.smb enableRed Hat Gluster Storage 3.4 introduces a group commandsambafor configuring the necessary volume options for Samba-CTDB setup. - Execute the following command to configure the volume options for the Samba-CTDB:
# gluster volume set VOLNAME group sambaThis command will enable the following option for Samba-CTDB setup:- performance.readdir-ahead: on
- performance.parallel-readdir: on
- performance.nl-cache-timeout: 600
- performance.nl-cache: on
- performance.cache-samba-metadata: on
- network.inode-lru-limit: 200000
- performance.md-cache-timeout: 600
- performance.cache-invalidation: on
- features.cache-invalidation-timeout: 600
- features.cache-invalidation: on
- performance.stat-prefetch: on
If you are using Samba-4.9.8-109 or later:
- Have a local mount using native Gluster protocol Fuse on every Gluster node that shares the Gluster volume via Samba. Mount GlusterFS volume via FUSE and record the FUSE mountpoint for further steps:Add an entry in
/etc/fstab:localhost:/myvol /mylocal glusterfs defaults,_netdev,acl 0 0For example:localhost:/myvol 4117504 1818292 2299212 45% /mylocalWhere gluster volume ismyvolthat will be mounted on/mylocal - Edit the samba share configuration file located at
/etc/samba/smb.conf[gluster-VOLNAME] comment = For samba share of volume VOLNAME vfs objects = glusterfs glusterfs:volume = VOLNAME glusterfs:logfile = /var/log/samba/VOLNAME.log glusterfs:loglevel = 7 path = / read only = no guest ok = yes- Edit the
vfs objectsparameter value toglusterfs_fusevfs objects = glusterfs_fuse - Edit the
pathparameter value to the FUSE mountpoint recorded previously. For example:path = /MOUNTDIR
- With SELinux in Enforcing mode, turn on the SELinux boolean
samba_share_fusefs:# setsebool -P samba_share_fusefs on
Note
- New volumes being created will be automatically configured with the use of default
vfs objectsparameter. - Modifications to samba share configuration file are retained over restart of volumes until these volumes are deleted using Gluster CLI.
- The Samba hook scripts invoked as part of Gluster CLI operations on a volume
VOLNAMEwill only operate on a Samba share named[gluster-VOLNAME]. In other words, hook scripts will never delete or change the samba share configuration file for a samba share called[VOLNAME].
Then, for all Samba versions:
- Verify that the volume can be accessed from the SMB/CIFS share:
# smbclient -L <hostname> -U%For example:# smbclient -L rhs-vm1 -U% Domain=[MYGROUP] OS=[Unix] Server=[Samba 4.1.17] Sharename Type Comment --------- ---- ------- IPC$ IPC IPC Service (Samba Server Version 4.1.17) gluster-vol1 Disk For samba share of volume vol1 Domain=[MYGROUP] OS=[Unix] Server=[Samba 4.1.17] Server Comment --------- ------- Workgroup Master --------- ------- - Verify that the SMB/CIFS share can be accessed by the user, run the following command:
# smbclient //<hostname>/gluster-<volname> -U <username>%<password>For example:# smbclient //10.0.0.1/gluster-vol1 -U root%redhat Domain=[MYGROUP] OS=[Unix] Server=[Samba 4.1.17] smb: \> mkdir test smb: \> cd test\ smb: \test\> pwd Current directory is \\10.0.0.1\gluster-vol1\test\ smb: \test\>
6.4.4. Configuring User Access to Shared Volumes
6.4.4.1. Configuring the Apple Create Context for macOS users
- Add the following lines to the
[global]section of thesmb.conffile. Note that the indentation level shown is required.fruit:aapl = yes ea support = yes - Load the
vfs_fruitmodule and its dependencies by adding the following line to your volume's export configuration block in thesmb.conffile.vfs objects = fruit streams_xattr glusterfsFor example:[gluster-volname] comment = For samba share of volume smbshare vfs objects = fruit streams_xattr glusterfs glusterfs:volume = volname glusterfs:logfile = /var/log/samba/glusterfs-volname-fruit.%M.log glusterfs:loglevel = 7 path = / read only = no guest ok = yes fruit:encoding = native
6.4.4.2. Configuring read/write access for a non-privileged user
- Add the user on all the Samba servers based on your configuration:
# adduser username - Add the user to the list of Samba users on all Samba servers and assign password by executing the following command:
# smbpasswd -a username - From any other Samba server, mount the volume using the FUSE protocol.
# mount -t glusterfs -o acl ip-address:/volname /mountpointFor example:# mount -t glusterfs -o acl rhs-a:/repvol /mnt - Use the
setfaclcommand to provide the required permissions for directory access to the user.# setfacl -m user:username:rwx mountpointFor example:# setfacl -m user:cifsuser:rwx /mnt
6.4.5. Mounting Volumes using SMB
6.4.5.1. Manually mounting volumes exported with SMB on Red Hat Enterprise Linux
- Install the
cifs-utilspackage on the client.# yum install cifs-utils - Run
mount -t cifsto mount the exported SMB share, using the syntax example as guidance.# mount -t cifs -o user=username,pass=password //hostname/gluster-volname /mountpointThesec=ntlmsspparameter is also required when mounting a volume on Red Hat Enterprise Linux 6.# mount -t cifs -o user=username,pass=password,sec=ntlmssp //hostname/gluster-volname /mountpointFor example:# mount -t cifs -o user=cifsuser,pass=redhat,sec=ntlmssp //server1/gluster-repvol /cifsImportant
Red Hat Gluster Storage is not supported on Red Hat Enterprise Linux 6 (RHEL 6) from 3.5 Batch Update 1 onwards. See Version Details table in section Red Hat Gluster Storage Software Components and Versions of the Installation Guide - Run
# smbstatus -Son the server to display the status of the volume:Service pid machine Connected at ------------------------------------------------------------------- gluster-VOLNAME 11967 __ffff_192.168.1.60 Mon Aug 6 02:23:25 2012
6.4.5.2. Manually mounting volumes exported with SMB on Microsoft Windows
6.4.5.2.1. Using Microsoft Windows Explorer to manually mount a volume
- In Windows Explorer, click → . to open the Map Network Drive screen.
- Choose the drive letter using the drop-down list.
- In the Folder text box, specify the path of the server and the shared resource in the following format: \\SERVER_NAME\VOLNAME.
- Click to complete the process, and display the network drive in Windows Explorer.
- Navigate to the network drive to verify it has mounted correctly.
6.4.5.2.2. Using Microsoft Windows command line interface to manually mount a volume
- Click → , and then type
cmd. - Enter
net use z: \\SERVER_NAME\VOLNAME, where z: is the drive letter to assign to the shared volume.For example,net use y: \\server1\test-volume - Navigate to the network drive to verify it has mounted correctly.
6.4.5.3. Manually mounting volumes exported with SMB on macOS
Prerequisites
- Ensure that your Samba configuration allows the use the SMB Apple Create Context.
- Ensure that the username you're using is on the list of allowed users for the volume.
Manual mounting process
- In the Finder, click Go > Connect to Server.
- In the Server Address field, type the IP address or hostname of a Red Hat Gluster Storage server that hosts the volume you want to mount.
- Click .
- When prompted, select Registered User to connect to the volume using a valid username and password.If required, enter your user name and password, then select the server volumes or shared folders that you want to mount.To make it easier to connect to the computer in the future, select Remember this password in my keychain to add your user name and password for the computer to your keychain.
6.4.5.4. Configuring automatic mounting for volumes exported with SMB on Red Hat Enterprise Linux
- Open the
/etc/fstabfile in a text editor and add a line containing the following details:\\HOSTNAME|IPADDRESS\SHARE_NAME MOUNTDIR cifs OPTIONS DUMP FSCKIn the OPTIONS column, ensure that you specify thecredentialsoption, with a value of the path to the file that contains the username and/or password.Using the example server names, the entry contains the following replaced values.\\server1\test-volume /mnt/glusterfs cifs credentials=/etc/samba/passwd,_netdev 0 0Thesec=ntlmsspparameter is also required when mounting a volume on Red Hat Enterprise Linux 6, for example:\\server1\test-volume /mnt/glusterfs cifs credentials=/etc/samba/passwd,_netdev,sec=ntlmssp 0 0See themount.cifsman page for more information about these options.Important
Red Hat Gluster Storage is not supported on Red Hat Enterprise Linux 6 (RHEL 6) from 3.5 Batch Update 1 onwards. See Version Details table in section Red Hat Gluster Storage Software Components and Versions of the Installation Guide - Run
# smbstatus -Son the client to display the status of the volume:Service pid machine Connected at ------------------------------------------------------------------- gluster-VOLNAME 11967 __ffff_192.168.1.60 Mon Aug 6 02:23:25 2012
6.4.5.5. Configuring automatic mounting for volumes exported with SMB on Microsoft Windows
- In Windows Explorer, click → . to open the Map Network Drive screen.
- Choose the drive letter using the drop-down list.
- In the Folder text box, specify the path of the server and the shared resource in the following format: \\SERVER_NAME\VOLNAME.
- Click the Reconnect at logon check box.
- Click to complete the process, and display the network drive in Windows Explorer.
- If the Windows Security screen pops up, enter the username and password and click OK.
- Navigate to the network drive to verify it has mounted correctly.
6.4.5.6. Configuring automatic mounting for volumes exported with SMB on macOS
- Manually mount the volume using the process outlined in Section 6.4.5.3, “Manually mounting volumes exported with SMB on macOS”.
- In the Finder, click System Preferences > Users & Groups > Username > Login Items.
- Drag and drop the mounted volume into the login items list.Check Hide if you want to prevent the drive's window from opening every time you boot or log in.
6.4.6. Starting and Verifying your Configuration
Verify the Configuration
- Verify that CTDB is running using the following commands:
# ctdb status # ctdb ip # ctdb ping -n all - Mount a Red Hat Gluster Storage volume using any one of the VIPs.
- Run
# ctdb ipto locate the physical server serving the VIP. - Shut down the CTDB VIP server to verify successful configuration.When the Red Hat Gluster Storage server serving the VIP is shut down there will be a pause for a few seconds, then I/O will resume.
6.4.8. Accessing Snapshots in Windows
Note
6.4.8.1. Configuring Shadow Copy
Note
vfs objects = shadow_copy2 glusterfs| Configuration Options | Required? | Default Value | Description |
|---|---|---|---|
| shadow:snapdir | Yes | n/a | Path to the directory where snapshots are kept. The snapdir name should be .snaps. |
| shadow:basedir | Yes | n/a | Path to the base directory that snapshots are from. The basedir value should be /. |
| shadow:sort | Optional | unsorted | The supported values are asc/desc. By this parameter one can specify that the shadow copy directories should be sorted before they are sent to the client. This can be beneficial as unix filesystems are usually not listed alphabetically sorted. If enabled, it is specified in descending order. |
| shadow:localtime | Optional | UTC | This is an optional parameter that indicates whether the snapshot names are in UTC/GMT or in local time. |
| shadow:format | Yes | n/a | This parameter specifies the format specification for the naming of snapshots. The format must be compatible with the conversion specifications recognized by str[fp]time. The default value is _GMT-%Y.%m.%d-%H.%M.%S. |
| shadow:fixinodes | Optional | No | If you enable shadow:fixinodes then this module will modify the apparent inode number of files in the snapshot directories using a hash of the files path. This is needed for snapshot systems where the snapshots have the same device:inode number as the original files (such as happens with GPFS snapshots). If you don't set this option then the 'restore' button in the shadow copy UI will fail with a sharing violation. |
| shadow:snapprefix | Optional | n/a | Regular expression to match prefix of snapshot name. Red Hat Gluster Storage only supports Basic Regular Expression (BRE) |
| shadow:delimiter | Optional | _GMT | delimiter is used to separate shadow:snapprefix and shadow:format. |
[gluster-vol0]
comment = For samba share of volume vol0
vfs objects = shadow_copy2 glusterfs
glusterfs:volume = vol0
glusterfs:logfile = /var/log/samba/glusterfs-vol0.%M.log
glusterfs:loglevel = 3
path = /
read only = no
guest ok = yes
shadow:snapdir = /.snaps
shadow:basedir = /
shadow:sort = desc
shadow:snapprefix= ^S[A-Za-z0-9]*p$
shadow:format = _GMT-%Y.%m.%d-%H.%M.%SNote
vfs objects = shadow_copy2 glusterfs_fuse[gluster-vol0]
comment = For samba share of volume vol0
vfs objects = shadow_copy2 glusterfs_fuse
path = /MOUNTDIR
read only = no
guest ok = yes
shadow:snapdir = /MOUNTDIR/.snaps
shadow:basedir = /MOUNTDIR
shadow:sort = desc
shadow:snapprefix= ^S[A-Za-z0-9]*p$
shadow:format = _GMT-%Y.%m.%d-%H.%M.%SSnap_GMT-2016.06.06-06.06.06
Sl123p_GMT-2016.07.07-07.07.07
xyz_GMT-2016.08.08-08.08.08- Start or restart the
smbservice.On RHEL 7 and RHEL 8, runsystemctl [re]start smbOn RHEL 6, runservice smb [re]start - Enable User Serviceable Snapshot (USS) for Samba. For more information see Section 8.13, “User Serviceable Snapshots”
6.4.8.2. Accessing Snapshot
- Right Click on the file or directory for which the previous version is required.
- Click on .
- In the dialog box, select the Date/Time of the previous version of the file, and select either , , or .where,Open: Lets you open the required version of the file in read-only mode.Restore: Restores the file back to the selected version.Copy: Lets you copy the file to a different location.
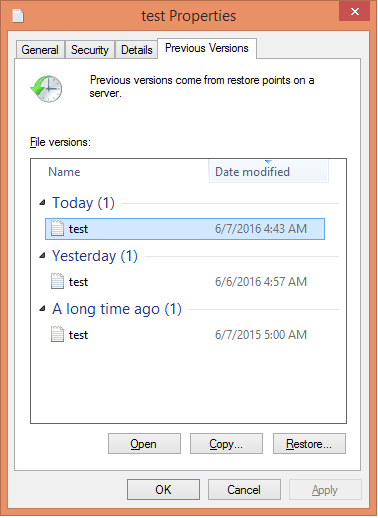
Figure 6.1. Accessing Snapshot
6.4.9. Tuning Performance
- Enabling Metadata Caching to improve the performance of SMB access of Red Hat Gluster Storage volumes.
- Enhancing Directory Listing Performance
- Enhancing File/Directory Create Performance
6.4.9.1. Enabling Metadata Caching
Note
- Execute the following command to enable metadata caching and cache invalidation:
# gluster volume set <volname> group metadata-cacheThis is group set option which sets multiple volume options in a single command. - To increase the number of files that can be cached, execute the following command:
# gluster volume set <VOLNAME> network.inode-lru-limit <n>n, is set to 50000. It can be increased if the number of active files in the volume is very high. Increasing this number increases the memory footprint of the brick processes.
6.4.9.2. Enhancing Directory Listing Performance
Note
- Verify if the
performance.readdir-aheadoption is enabled by executing the following command:# gluster volume get <VOLNAME> performance.readdir-aheadIf theperformance.readdir-aheadis not enabled then execute the following command:# gluster volume set <VOLNAME> performance.readdir-ahead on - Execute the following command to enable
parallel-readdiroption:# gluster volume set <VOLNAME> performance.parallel-readdir onNote
If there are more than 50 bricks in the volume it is recommended to increase the cache size to be more than 10Mb (default value):# gluster volume set <VOLNAME> performance.rda-cache-limit <CACHE SIZE>
6.4.9.3. Enhancing File/Directory Create Performance
- Execute the following command to enable negative-lookup cache:
# gluster volume set <volname> group nl-cache volume set successNote
The above command also enables cache-invalidation and increases the timeout to 10 minutes.
6.5. POSIX Access Control Lists
6.5.1. Setting ACLs with setfacl
setfacl command lets you modify the ACLs of a specified file or directory. You can add access rules for a file with the -m subcommand, or remove access rules for a file with the -x subcommand. The basic syntax is as follows:
# setfacl subcommand access_rule file_path- Rules for users start with
u: # setfacl -m u:user:perms file_pathFor example,setfacl -m u:fred:rw /mnt/datagives the userfredread and write access to the/mnt/datadirectory.setfacl -x u::w /works_in_progress/my_presentation.txtprevents all users from writing to the/works_in_progress/my_presentation.txtfile (except the owning user and members of the owning group, as these are controlled by POSIX).- Rules for groups start with
g: # setfacl -m g:group:perms file_pathFor example,setfacl -m g:admins:rwx /etc/fstabgives users in theadminsgroup read, write, and execute permissions to the/etc/fstabfile.setfacl -x g:newbies:x /mnt/harmful_script.shprevents users in thenewbiesgroup from executing/mnt/harmful_script.sh.- Rules for other users start with
o: # setfacl -m o:perms file_pathFor example,setfacl -m o:r /mnt/data/publicgives users without any specific rules about their username or group permission to read files in the/mnt/data/public directory.- Rules for setting a maximum access level using an effective rights mask start with
m: # setfacl -m m:mask file_pathFor example,setfacl -m m:r-x /mount/harmless_script.shgives all users a maximum of read and execute access to the/mount/harmless_script.shfile.
d: to the beginning of any rule, or make a rule recursive with the -R option. For example, setfacl -Rm d:g:admins:rwx /etc gives all members of the admins group read, write, and execute access to any file created under the /etc directory after the point when setfacl is run.
6.5.2. Checking current ACLs with getfacl
getfacl command lets you check the current ACLs of a file or directory. The syntax for this command is as follows:
# getfacl file_path# getfacl /mnt/gluster/data/test/sample.jpg
# owner: antony
# group: antony
user::rw-
group::rw-
other::r--default:, like so:
# getfacl /mnt/gluster/data/doc
# owner: antony
# group: antony
user::rw-
user:john:r--
group::r--
mask::r--
other::r--
default:user::rwx
default:user:antony:rwx
default:group::r-x
default:mask::rwx
default:other::r-x6.5.3. Mounting volumes with ACLs enabled
acl mount option. For further information, see Section 6.2.3, “Mounting Red Hat Gluster Storage Volumes”.
6.5.4. Checking ACL enablement on a mounted volume
| Client type | How to check | Further info |
|---|---|---|
| Native FUSE |
Check the output of the
mount command for the default_permissions option:
If
default_permissions appears in the output for a mounted volume, ACLs are not enabled on that volume.
Check the output of the
ps aux command for the gluster FUSE mount process (glusterfs):
If
--acl appears in the output for a mounted volume, ACLs are enabled on that volume.
| See Section 6.2, “Native Client” for more information. |
| Gluster Native NFS |
On the server side, check the output of the
gluster volume info volname command. If nfs.acl appears in the output, that volume has ACLs disabled. If nfs.acl does not appear, ACLs are enabled (the default state).
On the client side, check the output of the
mount command for the volume. If noacl appears in the output, ACLs are disabled on the mount point. If this does not appear in the output, the client checks that the server uses ACLs, and uses ACLs if server support is enabled.
|
Refer to the output of
gluster volume set help pertaining to NFS, or see the Red Hat Enterprise Linux Storage Administration Guide for more information: https://access.redhat.com/documentation/en-US/Red_Hat_Enterprise_Linux/7/html/Storage_Administration_Guide/ch-nfs.html
|
| NFS Ganesha |
On the server side, check the volume's export configuration file,
/run/gluster/shared_storage/nfs-ganesha/exports/export.volname.conf. If the Disable_ACL option is set to true, ACLs are disabled. Otherwise, ACLs are enabled for that volume.
Note
NFS-Ganesha supports NFSv4 protocol standardized ACLs but not NFSACL protocol used for NFSv3 mounts. Only NFSv4 mounts can set ACLs.
There is no option to disable NFSv4 ACLs on the client side, so as long as the server supports ACLs, clients can set ACLs on the mount point.
|
See Section 6.3.3, “NFS Ganesha” for more information. For client side settings, refer to the Red Hat Enterprise Linux Storage Administration Guide: https://access.redhat.com/documentation/en-US/Red_Hat_Enterprise_Linux/7/html/Storage_Administration_Guide/ch-nfs.html
|
| samba |
POSIX ACLs are enabled by default when using Samba to access a Red Hat Gluster Storage volume.
| See Section 6.4, “SMB” for more information. |
6.6. Checking Client Operating Versions
op-version. The cluster.op-version parameter sets the required operating version for all volumes in a cluster on the server side. Each client supports a range of operating versions that are identified by a minimum (min-op-version) and maximum (max-op-version) supported operating version.
- For Red Hat Gluster 3.2 and later
# gluster volume status volname clientsUseallin place of the name of your volume if you want to see the operating versions of clients connected to all volumes in the cluster.
Before Red Hat Gluster Storage 3.2:
- Perform a state dump for the volume whose clients you want to check.
# gluster volume statedump volname - Locate the state dump directory
# gluster --print-statedumpdir - Locate the state dump file and grep for client information.
# grep -A4 "identifier=client_ip" statedumpfile
Chapter 7. Integrating Red Hat Gluster Storage with Windows Active Directory
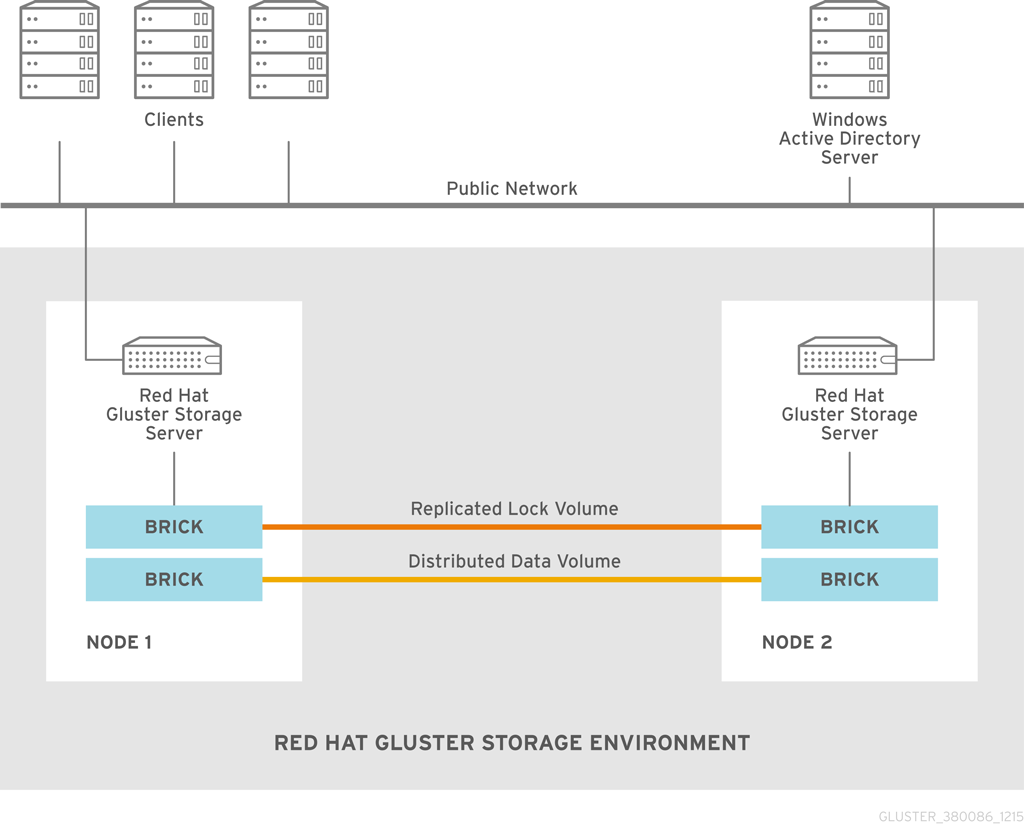
Figure 7.1. Active Directory Integration
| Information | Example Value |
|---|---|
| DNS domain name / realm | addom.example.com |
| NetBIOS domain name | ADDOM |
| Name of administrative account | administrator |
| Red Hat Gluster Storage nodes | rhs-srv1.addom.example.com, 192.168.56.10 rhs-srv2.addom.example.com, 192.168.56.11 rhs-srv3.addom.example.com, 192.168.56.12 |
| Netbios name of the cluster | RHS-SMB |
7.1. Prerequisites
- Name Resolution
The Red Hat Gluster Storage nodes must be able to resolve names from the AD domain via DNS. To verify the same you can use the following command:
host dc1.addom.example.comwhere,addom.example.comis the AD domain and dc1 is the name of a domain controller.For example, the/etc/resolv.conffile in a static network configuration could look like this:domain addom.example.com search addom.example.com nameserver 10.11.12.1 # dc1.addom.example.com nameserver 10.11.12.2 # dc2.addom.example.comThis example assumes that both the domain controllers are also the DNS servers of the domain. - Kerberos Packages
If you want to use the kerberos client utilities, like kinit and klist, then manually install the krb5-workstation using the following command:
# yum -y install krb5-workstation - Synchronize Time Service
It is essential that the time service on each Red Hat Gluster Storage node and the Windows Active Directory server are synchronized, else the Kerberos authentication may fail due to clock skew. In environments where time services are not reliable, the best practice is to configure the Red Hat Gluster Storage nodes to synchronize time from the Windows Server.
On each Red Hat Storage node, edit the file/etc/ntp.conffor RHEL 7 or/etc/chrony.conffor RHEL 8 so the time is synchronized from a known, reliable time service:# Enable writing of statistics records. #statistics clockstats cryptostats loopstats peerstats server 0.rhel.pool.ntp.org iburst server 1.rhel.pool.ntp.org iburst driftfile /var/lib/chrony/drift makestep 1.0 3 rtcsync logdir /var/log/chronyActivate the change on each Red Hat Gluster Storage node by stopping the NTP or chrony daemon, updating the time, then starting the chrony daemon. Verify the change on both servers using the following commands:For RHEL 7 and RHEL 8, run:# systemctl stop ntpd # systemctl start ntpd # systemctl stop chrony # systemctl start chronyFor RHEL 6, run:# service ntpd stop # service ntpd start # service chrony stop # service chrony stopFor more information on using chrony with RHEL 8, see https://access.redhat.com/documentation/en-us/red_hat_enterprise_linux/8/html/configuring_basic_system_settings/using-chrony-to-configure-ntp - Samba Packages
Ensure to install the following Samba packages along with its dependencies:
- CTDB
- samba
- samba-client
- samba-winbind
- samba-winbind-modules
7.2. Integration
- Configure Authentication
- Join Active Directory Domain
- Verify/Test Active Directory and Services
7.2.1. Configure Authentication
Note
- Ensure that CTDB is configured before the active directory join. For more information see, Section 6.3.1 Setting up CTDB for Samba in the Red Hat Gluster Storage Administration Guide.
- It is recommended to take backups of the configuration and of Samba’s databases (local and ctdb) before making any changes.
7.2.1.1. Basic Samba Configuration
autorid. Red Hat recommends autorid because in addition to automatically calculating user and group identifiers like tdb, it performs fewer database transactions and read operations, and is a prerequisite for supporting secure ID history (SID history).
Warning
/etc/samba/smb.conf must be identical on all nodes, and must contain the relevant parameters for AD. Along with that, a few other settings are required in order to activate mapping of user and group IDs.
[global]
netbios name = RHS-SMB
workgroup = ADDOM
realm = addom.example.com
security = ads
clustering = yes
idmap config * : backend = autorid
idmap config * : range = 1000000-19999999
idmap config * : rangesize = 1000000
# -----------------RHS Options -------------------------
#
# The following line includes RHS-specific configuration options. Be careful with this line.
include = /etc/samba/rhs-samba.conf
#=================Share Definitions =====================Warning
global section required in the smb.conf file. Ensure that nothing else appears in this section in order to prevent gluster mechanisms from changing settings when starting or stopping the ctdb lock volume.
netbios name consists of only one name which has to be the same name on all cluster nodes. Windows clients will only access the cluster via that name (either in this short form or as an FQDN). The individual node hostname (rhs-srv1, rhs-srv2, …) must not be used for the netbios name parameter.
Note
- The idmap
rangedefines the lowerst and hightest identifier numbers that can be used. Specify a range large enough to cover the number of objects specified inrangesize. - The idmap
rangesizespecifies the number of identifiers available for each domain range. In this case there are one million identifiers per domain range, and therangeparameter indicates that there are nearly 19 million identifiers total, meaning that there are a total of 19 possible domain ranges. - If you want to be able to use the individual host names to also access specific nodes, you can add them to the
netbios aliasesparameter ofsmb.conf. - In an AD environment, it is usually not required to run
nmbd. However, if you have to runnmbd, then make sure to set thecluster addressessmb.confoption to the list of public IP addresses of the cluster.
7.2.1.2. Alternative Configuration using ad backend
idmap_ad module in addition to autorid. The idmap_ad module reads the unix IDs from the AD's special unix attributes. This has to be configured by the AD domain's administrator before it can be used by Samba and winbind.
idmap_ad, the AD domain admin has to prepare the AD domain for using the so called unix extensions and assign unix IDs to all users and groups that should be able to access the Samba server.
idmap_ad backend for the ADDOM domain. The default autorid backend catches all objects from domains other than the ADDOM domain.
[global]
netbios name = RHS-SMB
workgroup = ADDOM
realm = addom.example.com
security = ads
clustering = yes
idmap config * : backend = autorid
idmap config * : range = 1000000-1999999
idmap config ADDOM : backend = ad
idmap config ADDOM : range = 3000000-3999999
idmap config ADDOM : schema mode = rfc2307
winbind nss info = rfc2307
# -------------------RHS Options -------------------------------
#
# The following line includes RHS-specific configuration options. Be careful with this line.
include = /etc/samba/rhs-samba.conf
#===================Share Definitions =========================Note
- The range for the idmap_ad configuration is prescribed by the AD configuration. This has to be obtained by AD administrator.
- Ranges for different idmap configurations must not overlap.
- The schema mode and the winbind nss info setting should have the same value. If the domain is at level 2003R2 or newer, then rfc2307 is the correct value. For older domains, additional values sfu and sfu20 are available. See the manual pages of idmap_ad and smb.conf for further details.
7.2.1.3. Verifying the Samba Configuration
# testparm -s
Load smb config files from /etc/samba/smb.conf
rlimit_max: increasing rlimit_max (1024) to minimum Windows limit (16384)
Loaded services file OK.
Server role: ROLE_DOMAIN_MEMBER
# Global parameters
[global]
workgroup = ADDOM
realm = addom.example.com
netbios name = RHS-SMB
security = ADS
clustering = Yes
winbind nss info = rfc2307
idmap config addom : schema mode = rfc2307
idmap config addom : range = 3000000-3999999
idmap config addom : backend = ad
idmap config * : range = 1000000-1999999
idmap config * : backend = autorid7.2.1.4. nsswitch Configuration
/etc/nsswitch.conf file. Make sure the file contains the winbind entries for the passwd and group databases. For example:
...
passwd: files winbind
group: files winbind
...visible on the individual cluster node once Samba is joined to AD and winbind is started.
7.2.2. Join Active Directory Domain
# onnode all systemctl start ctdb
# onnode all systemctl stop winbind
# onnode all systemctl stop smb# onnode all service ctdb start
# onnode all service winbind stop
# onnode all service smb stopNote
- If your configuration has CTDB managing Winbind and Samba, they can be temporarily disabled with the following commands (to be executed prior to the above stop commands) so as to prevent CTDB going into an unhealthy state when they are shut down:
# onnode all ctdb event script disable legacy 49.winbind # onnode all ctdb event script disable legacy 50.samba - For some versions of Red Hat Gluster Storage, a bug in the selinux policy prevents 'ctdb disablescript SCRIPT' from succeeding. If this is the case, 'chmod -x /etc/ctdb/events.d/SCRIPT' can be executed as a workaround from a root shell.
- Shutting down winbind and smb is primarily to prevent access to SMB services during this AD integration. These services may be left running but access to them should be prevented through some other means.
net utility from a single node:
Warning
# net ads join -U Administrator
Enter Administrator's password:
Using short domain name -- ADDOM
Joined 'RHS-SMB' to dns domain addom.example.com'
Not doing automatic DNS update in a clustered setup.net utility can be used again:
# net ads dns register rhs-smb <PUBLIC IP 1> <PUBLIC IP 2> ...rhs-smb will resolve to the given public IP addresses. The DNS registrations use the cluster machine account for authentication in AD, which means this operation only can be done after the join has succeeded.
7.2.3. Verify/Test Active Directory and Services
# onnode all systemctl start nmb
# onnode all systemctl start winbind
# onnode all systemctl start smb# onnode all service nmb start
# onnode all service winbind start
# onnode all service smb startNote
- If you previously disabled CTDB’s ability to manage Winbind and Samba they can be re-enabled with the following commands:
# onnode all ctdb event script enable legacy 50.samba # onnode all ctdb event script enable legacy 49.winbind - With the latest ctdb-4.9.8-105.el7rhgs.x86_64 package, the paths of ctdb managed service scripts have changed. The script files are now available under /etc/ctdb/events/legacy/ after enabling them from /usr/share/ctdb/events/legacy.
- To enable ctdb event script, execute the following command:
ctdb event script enable legacy 49.winbind - To enable ctbd event script on all nodes, execute the following command:
# onnode all ctdb event script enable legacy 49.winbind
- Verify the join by executing the following stepsVerify the join to check if the created machine account can be used to authenticate to the AD LDAP server using the following command:
# net ads testjoin Join is OK - Execute the following command to display the machine account’s LDAP object
# net ads status -P objectClass: top objectClass: person objectClass: organizationalPerson objectClass: user objectClass: computer cn: rhs-smb distinguishedName: CN=rhs-smb,CN=Computers,DC=addom,DC=example,DC=com instanceType: 4 whenCreated: 20150922013713.0Z whenChanged: 20151126111120.0Z displayName: RHS-SMB$ uSNCreated: 221763 uSNChanged: 324438 name: rhs-smb objectGUID: a178177e-4aa4-4abc-9079-d1577e137723 userAccountControl: 69632 badPwdCount: 0 codePage: 0 countryCode: 0 badPasswordTime: 130880426605312806 lastLogoff: 0 lastLogon: 130930100623392945 localPolicyFlags: 0 pwdLastSet: 130930098809021309 primaryGroupID: 515 objectSid: S-1-5-21-2562125317-1564930587-1029132327-1196 accountExpires: 9223372036854775807 logonCount: 1821 sAMAccountName: rhs-smb$ sAMAccountType: 805306369 dNSHostName: rhs-smb.addom.example.com servicePrincipalName: HOST/rhs-smb.addom.example.com servicePrincipalName: HOST/RHS-SMB objectCategory: CN=Computer,CN=Schema,CN=Configuration,DC=addom,DC=example,DC=com isCriticalSystemObject: FALSE dSCorePropagationData: 16010101000000.0Z lastLogonTimestamp: 130929563322279307 msDS-SupportedEncryptionTypes: 31 - Execute the following command to display general information about the AD server:
# net ads info LDAP server: 10.11.12.1 LDAP server name: dc1.addom.example.com Realm: ADDOM.EXAMPLE.COM Bind Path: dc=ADDOM,dc=EXAMPLE,dc=COM LDAP port: 389 Server time: Thu, 26 Nov 2015 11:15:04 UTC KDC server: 10.11.12.1 Server time offset: -26 - Verify if winbind is operating correctly by executing the following stepsExecute the following command to verify if winbindd can use the machine account for authentication to AD
# wbinfo -t checking the trust secret for domain ADDOM via RPC calls succeeded - Execute the following command to resolve the given name to a Windows SID
# wbinfo --name-to-sid 'ADDOM\Administrator' S-1-5-21-2562125317-1564930587-1029132327-500 SID_USER (1) - Execute the following command to verify authentication:
# wbinfo -a 'ADDOM\user' Enter ADDOM\user's password: plaintext password authentication succeeded Enter ADDOM\user's password: challenge/response password authentication succeededor,# wbinfo -a 'ADDOM\user%password' plaintext password authentication succeeded challenge/response password authentication succeeded - Execute the following command to verify if the id-mapping is working properly:
# wbinfo --sid-to-uid <SID-OF-ADMIN> 1000000 - Execute the following command to verify if the winbind Name Service Switch module works correctly:
# getent passwd 'ADDOM\Administrator' ADDOM\administrator:*:1000000:1000004::/home/ADDOM/administrator:/bin/false - Execute the following command to verify if samba can use winbind and the NSS module correctly:
# smbclient -L rhs-smb -U 'ADDOM\Administrator' Domain=[ADDOM] OS=[Windows 6.1] Server=[Samba 4.2.4] Sharename Type Comment --------- ---- ------- IPC$ IPC IPC Service (Samba 4.2.4) Domain=[ADDOM] OS=[Windows 6.1] Server=[Samba 4.2.4] Server Comment --------- ------- RHS-SMB Samba 4.2.4 Workgroup Master --------- ------- ADDOM RHS-SMB
Part IV. Manage
Chapter 8. Managing Snapshots
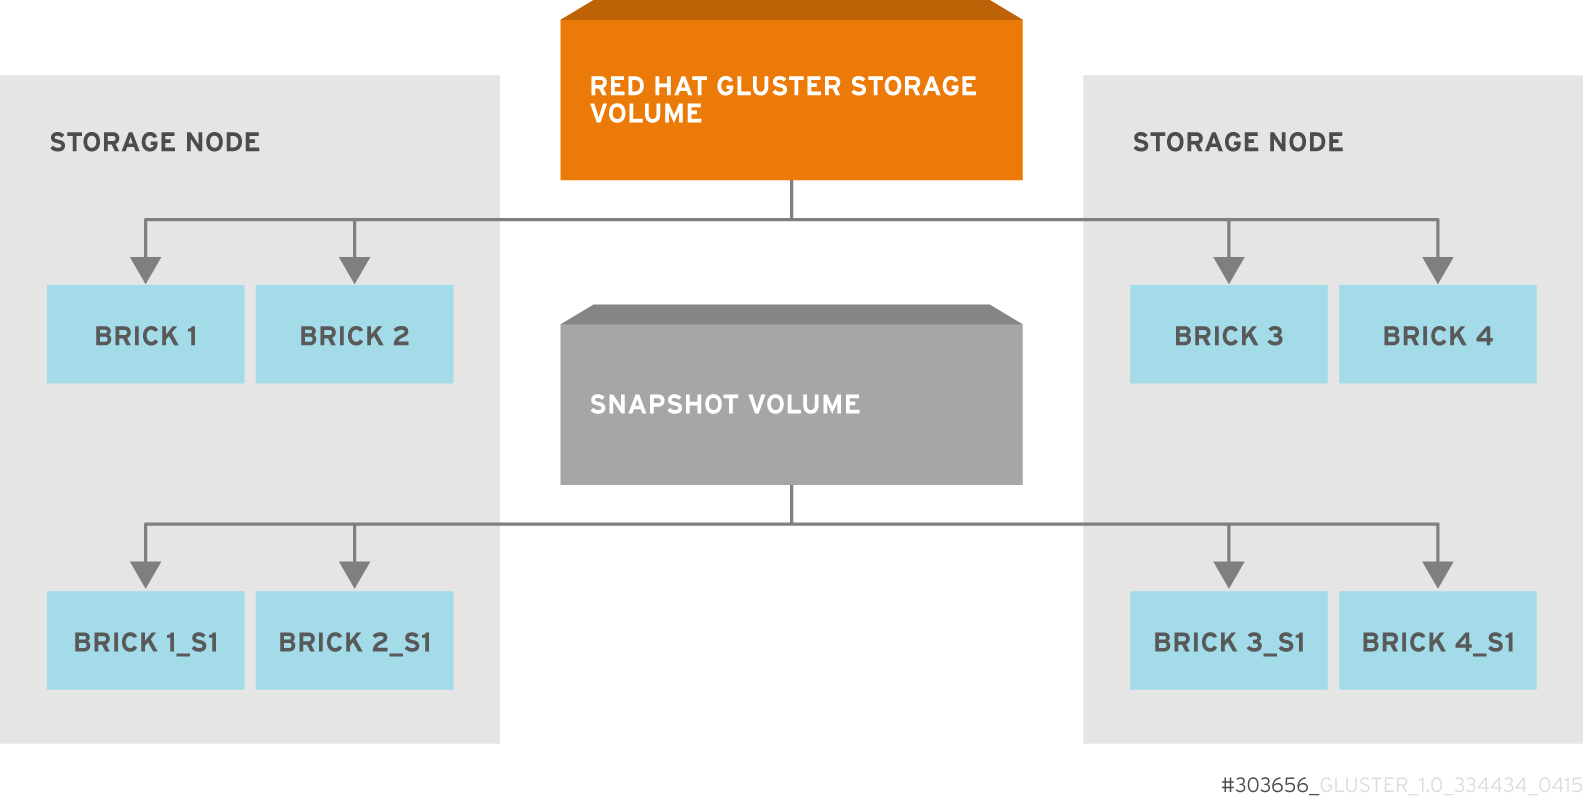
Figure 8.1. Snapshot Architecture
- Crash Consistency
A crash consistent snapshot is captured at a particular point-in-time. When a crash consistent snapshot is restored, the data is identical as it was at the time of taking a snapshot.
Note
Currently, application level consistency is not supported. - Online Snapshot
Snapshot is an online snapshot hence the file system and its associated data continue to be available for the clients even while the snapshot is being taken.
- Barrier
To guarantee crash consistency some of the file operations are blocked during a snapshot operation.
These file operations are blocked till the snapshot is complete. All other file operations are passed through. There is a default time-out of 2 minutes, within that time if snapshot is not complete then these file operations are unbarriered. If the barrier is unbarriered before the snapshot is complete then the snapshot operation fails. This is to ensure that the snapshot is in a consistent state.
Note
8.1. Prerequisites
- Snapshot is based on thinly provisioned LVM. Ensure the volume is based on LVM2. Red Hat Gluster Storage is supported on Red Hat Enterprise Linux 6.7 and later, Red Hat Enterprise Linux 7.1 and later, and on Red Hat Enterprise Linux 8.2 and later versions. All these versions of Red Hat Enterprise Linux is based on LVM2 by default. For more information, see https://access.redhat.com/site/documentation/en-US/Red_Hat_Enterprise_Linux/6/html/Logical_Volume_Manager_Administration/thinprovisioned_volumes.html
Important
Red Hat Gluster Storage is not supported on Red Hat Enterprise Linux 6 (RHEL 6) from 3.5 Batch Update 1 onwards. See Version Details table in section Red Hat Gluster Storage Software Components and Versions of the Installation Guide - Each brick must be independent thinly provisioned logical volume(LV).
- All bricks must be online for snapshot creation.
- The logical volume which contains the brick must not contain any data other than the brick.
- Linear LVM and thin LV are supported with Red Hat Gluster Storage 3.4 and later. For more information, see https://access.redhat.com/documentation/en-us/red_hat_enterprise_linux/7/html-single/logical_volume_manager_administration/index#LVM_components
- For each volume brick, create a dedicated thin pool that contains the brick of the volume and its (thin) brick snapshots. With the current thin-p design, avoid placing the bricks of different Red Hat Gluster Storage volumes in the same thin pool, as this reduces the performance of snapshot operations, such as snapshot delete, on other unrelated volumes.
- The recommended thin pool chunk size is 256KB. There might be exceptions to this in cases where we have a detailed information of the customer's workload.
- The recommended pool metadata size is 0.1% of the thin pool size for a chunk size of 256KB or larger. In special cases, where we recommend a chunk size less than 256KB, use a pool metadata size of 0.5% of thin pool size.
- Create a physical volume(PV) by using the
pvcreatecommand.pvcreate /dev/sda1Use the correctdataalignmentoption based on your device. For more information, Section 19.2, “Brick Configuration” - Create a Volume Group (VG) from the PV using the following command:
vgcreate dummyvg /dev/sda1 - Create a thin-pool using the following command:
# lvcreate --size 1T --thin dummyvg/dummypool --chunksize 256k --poolmetadatasize 16G --zero nA thin pool of size 1 TB is created, using a chunksize of 256 KB. Maximum pool metadata size of 16 G is used. - Create a thinly provisioned volume from the previously created pool using the following command:
# lvcreate --virtualsize 1G --thin dummyvg/dummypool --name dummylv - Create a file system (XFS) on this. Use the recommended options to create the XFS file system on the thin LV.For example,
mkfs.xfs -f -i size=512 -n size=8192 /dev/dummyvg/dummylv - Mount this logical volume and use the mount path as the brick.
mount /dev/dummyvg/dummylv /mnt/brick1
8.2. Creating Snapshots
- Red Hat Gluster Storage volume has to be present and the volume has to be in the
Startedstate. - All the bricks of the volume have to be on an independent thin logical volume(LV).
- Snapshot names must be unique in the cluster.
- All the bricks of the volume should be up and running, unless it is a n-way replication where n >= 3. In such case quorum must be met. For more information see Chapter 8, Managing Snapshots
- No other volume operation, like
rebalance,add-brick, etc, should be running on the volume. - Total number of snapshots in the volume should not be equal to Effective snap-max-hard-limit. For more information see Configuring Snapshot Behavior.
- If you have a geo-replication setup, then pause the geo-replication session if it is running, by executing the following command:
# gluster volume geo-replication MASTER_VOL SLAVE_HOST::SLAVE_VOL pauseFor example,# gluster volume geo-replication master-vol example.com::slave-vol pause Pausing geo-replication session between master-vol example.com::slave-vol has been successfulEnsure that you take the snapshot of the master volume and then take snapshot of the slave volume.
# gluster snapshot create <snapname> <volname> [no-timestamp] [description <description>] [force]- snapname - Name of the snapshot that will be created.
- VOLNAME(S) - Name of the volume for which the snapshot will be created. We only support creating snapshot of single volume.
- description - This is an optional field that can be used to provide a description of the snap that will be saved along with the snap.
force- The behavior of snapshot creation command remains the same with and without the force option.- no-timestamp: By default a timestamp is appended to the snapshot name. If you do not want to append timestamp then pass no-timestamp as an argument.
Note
activate-on-create parameter to enabled.
# gluster snapshot create snap1 vol1 no-timestamp
snapshot create: success: Snap snap1 created successfully# gluster snapshot create snap1 vol1
snapshot create: success: Snap snap1_GMT-2015.07.20-10.02.33 created successfully/var/run/gluster/snaps/<snap-volume-name>/brick<bricknumber>.
0888649a92ea45db8c00a615dfc5ea35 and having two bricks will have the following two mount points:
/var/run/gluster/snaps/0888649a92ea45db8c00a615dfc5ea35/brick1
/var/run/gluster/snaps/0888649a92ea45db8c00a615dfc5ea35/brick2df or mount command.
Note
# gluster volume geo-replication MASTER_VOL SLAVE_HOST::SLAVE_VOL resume# gluster volume geo-replication master-vol example.com::slave-vol resume
Resuming geo-replication session between master-vol example.com::slave-vol has been successful8.3. Cloning a Snapshot
# gluster snapshot clone <clonename> <snapname>Note
- Unlike restoring a snapshot, the original snapshot is still retained, after it has been cloned.
- The snapshot should be in activated state and all the snapshot bricks should be in running state before taking clone. Also the server nodes should be in quorum.
- This is a space efficient clone therefore both the Clone (new volume) and the snapshot LVM share the same LVM backend. The space consumption of the LVM grow as the new volume (clone) diverge from the snapshot.
# gluster snapshot clone clone_vol snap1
snapshot clone: success: Clone clone_vol created successfully# gluster vol info <clonename># gluster vol info clone_vol
Volume Name: clone_vol
Type: Distribute
Volume ID: cdd59995-9811-4348-8e8d-988720db3ab9
Status: Created
Number of Bricks: 1
Transport-type: tcp
Bricks:
Brick1: 10.00.00.01:/var/run/gluster/snaps/clone_vol/brick1/brick3
Options Reconfigured:
performance.readdir-ahead: onCreated state, similar to a newly created volume. This volume should be explicitly started to use this volume.
8.4. Listing of Available Snapshots
# gluster snapshot list [VOLNAME]- VOLNAME - This is an optional field and if provided lists the snapshot names of all snapshots present in the volume.
# gluster snapshot list
snap3
# gluster snapshot list test_vol
No snapshots present8.5. Getting Information of all the Available Snapshots
# gluster snapshot info [(<snapname> | volume VOLNAME)]- snapname - This is an optional field. If the snapname is provided then the information about the specified snap is displayed.
- VOLNAME - This is an optional field. If the VOLNAME is provided the information about all the snaps in the specified volume is displayed.
# gluster snapshot info snap3
Snapshot : snap3
Snap UUID : b2a391ce-f511-478f-83b7-1f6ae80612c8
Created : 2014-06-13 09:40:57
Snap Volumes:
Snap Volume Name : e4a8f4b70a0b44e6a8bff5da7df48a4d
Origin Volume name : test_vol1
Snaps taken for test_vol1 : 1
Snaps available for test_vol1 : 255
Status : Started8.6. Getting the Status of Available Snapshots
# gluster snapshot status [(<snapname> | volume VOLNAME)]- snapname - This is an optional field. If the snapname is provided then the status about the specified snap is displayed.
- VOLNAME - This is an optional field. If the VOLNAME is provided the status about all the snaps in the specified volume is displayed.
# gluster snapshot status snap3
Snap Name : snap3
Snap UUID : b2a391ce-f511-478f-83b7-1f6ae80612c8
Brick Path :
10.70.42.248:/var/run/gluster/snaps/e4a8f4b70a0b44e6a8bff5da7df48a4d/brick1/brick1
Volume Group : snap_lvgrp1
Brick Running : Yes
Brick PID : 1640
Data Percentage : 1.54
LV Size : 616.00m
Brick Path :
10.70.43.139:/var/run/gluster/snaps/e4a8f4b70a0b44e6a8bff5da7df48a4d/brick2/brick3
Volume Group : snap_lvgrp1
Brick Running : Yes
Brick PID : 3900
Data Percentage : 1.80
LV Size : 616.00m
Brick Path :
10.70.43.34:/var/run/gluster/snaps/e4a8f4b70a0b44e6a8bff5da7df48a4d/brick3/brick4
Volume Group : snap_lvgrp1
Brick Running : Yes
Brick PID : 3507
Data Percentage : 1.80
LV Size : 616.00mNote
8.7. Configuring Snapshot Behavior
snap-max-hard-limit: If the snapshot count in a volume reaches this limit then no further snapshot creation is allowed. The range is from 1 to 256. Once this limit is reached you have to remove the snapshots to create further snapshots. This limit can be set for the system or per volume. If both system limit and volume limit is configured then the effective max limit would be the lowest of the two value.snap-max-soft-limit: This is a percentage value. The default value is 90%. This configuration works along with auto-delete feature. If auto-delete is enabled then it will delete the oldest snapshot when snapshot count in a volume crosses this limit. When auto-delete is disabled it will not delete any snapshot, but it will display a warning message to the user.auto-delete: This will enable or disable auto-delete feature. By default auto-delete is disabled. When enabled it will delete the oldest snapshot when snapshot count in a volume crosses the snap-max-soft-limit. When disabled it will not delete any snapshot, but it will display a warning message to the useractivate-on-create: Snapshots are not activated at creation time by default. If you want created snapshots to immediately be activated after creation, set theactivate-on-createparameter toenabled. Note that all volumes are affected by this setting.
- Displaying the Configuration Values
To display the existing configuration values for a volume or the entire cluster, run the following command:
# gluster snapshot config [VOLNAME]where:- VOLNAME: This is an optional field. The name of the volume for which the configuration values are to be displayed.
If the volume name is not provided then the configuration values of all the volume is displayed. System configuration details are displayed irrespective of whether the volume name is specified or not.For Example:# gluster snapshot config Snapshot System Configuration: snap-max-hard-limit : 256 snap-max-soft-limit : 90% auto-delete : disable activate-on-create : disable Snapshot Volume Configuration: Volume : test_vol snap-max-hard-limit : 256 Effective snap-max-hard-limit : 256 Effective snap-max-soft-limit : 230 (90%) Volume : test_vol1 snap-max-hard-limit : 256 Effective snap-max-hard-limit : 256 Effective snap-max-soft-limit : 230 (90%) - Changing the Configuration Values
To change the existing configuration values, run the following command:
# gluster snapshot config [VOLNAME] ([snap-max-hard-limit <count>] [snap-max-soft-limit <percent>]) | ([auto-delete <enable|disable>]) | ([activate-on-create <enable|disable>])where:- VOLNAME: This is an optional field. The name of the volume for which the configuration values are to be changed. If the volume name is not provided, then running the command will set or change the system limit.
- snap-max-hard-limit: Maximum hard limit for the system or the specified volume.
- snap-max-soft-limit: Soft limit mark for the system.
- auto-delete: This enables or disables the auto-delete feature. By default auto-delete is disabled.
- activate-on-create: This enables or disables the activate-on-create feature for all volumes. By default activate-on-create is disabled.
For Example:# gluster snapshot config test_vol snap-max-hard-limit 100 Changing snapshot-max-hard-limit will lead to deletion of snapshots if they exceed the new limit. Do you want to continue? (y/n) y snapshot config: snap-max-hard-limit for test_vol set successfully
8.8. Activating and Deactivating a Snapshot
# gluster snapshot activate <snapname> [force]- snapname: Name of the snap to be activated.
force: If some of the bricks of the snapshot volume are down then use theforcecommand to start them.
# gluster snapshot activate snap1# gluster snapshot deactivate <snapname>- snapname: Name of the snap to be deactivated.
# gluster snapshot deactivate snap18.9. Deleting Snapshot
- Snapshot with the specified name should be present.
- Red Hat Gluster Storage nodes should be in quorum.
- No volume operation (e.g. add-brick, rebalance, etc) should be running on the original / parent volume of the snapshot.
# gluster snapshot delete <snapname>- snapname - The name of the snapshot to be deleted.
# gluster snapshot delete snap2
Deleting snap will erase all the information about the snap. Do you still want to continue? (y/n) y
snapshot delete: snap2: snap removed successfullyNote
8.9.1. Deleting Multiple Snapshots
# gluster snapshot delete all# gluster snapshot delete volume <volname>8.10. Restoring Snapshot
- The specified snapshot has to be present
- The original / parent volume of the snapshot has to be in a stopped state.
- Red Hat Gluster Storage nodes have to be in quorum.
- No volume operation (e.g. add-brick, rebalance, etc) should be running on the origin or parent volume of the snapshot.
# gluster snapshot restore <snapname>where,- snapname - The name of the snapshot to be restored.
For Example:# gluster snapshot restore snap1 Snapshot restore: snap1: Snap restored successfullyAfter snapshot is restored and the volume is started, trigger a self-heal by running the following command:# gluster volume heal VOLNAME fullNote
- The snapshot will be deleted once it is restored. To restore to the same point again take a snapshot explicitly after restoring the snapshot.
- After restore the brick path of the original volume will change. If you are using
fstabto mount the bricks of the origin volume then you have to fixfstabentries after restore. For more information see, https://access.redhat.com/site/documentation/en-US/Red_Hat_Enterprise_Linux/6/html/Installation_Guide/apcs04s07.html
- In the cluster, identify the nodes participating in the snapshot with the snapshot status command. For example:
# gluster snapshot status snapname Snap Name : snapname Snap UUID : bded7c02-8119-491b-a7e1-cc8177a5a1cd Brick Path : 10.70.43.46:/var/run/gluster/snaps/816e8403874f43a78296decd7c127205/brick2/brick2 Volume Group : snap_lvgrp Brick Running : Yes Brick PID : 8303 Data Percentage : 0.43 LV Size : 2.60g Brick Path : 10.70.42.33:/var/run/gluster/snaps/816e8403874f43a78296decd7c127205/brick3/brick3 Volume Group : snap_lvgrp Brick Running : Yes Brick PID : 4594 Data Percentage : 42.63 LV Size : 2.60g Brick Path : 10.70.42.34:/var/run/gluster/snaps/816e8403874f43a78296decd7c127205/brick4/brick4 Volume Group : snap_lvgrp Brick Running : Yes Brick PID : 23557 Data Percentage : 12.41 LV Size : 2.60g- In the nodes identified above, check if the
geo-replicationrepository is present in/var/lib/glusterd/snaps/snapname. If the repository is present in any of the nodes, ensure that the same is present in/var/lib/glusterd/snaps/snapnamethroughout the cluster. If thegeo-replicationrepository is missing in any of the nodes in the cluster, copy it to/var/lib/glusterd/snaps/snapnamein that node. - Restore snapshot of the volume using the following command:
# gluster snapshot restore snapname
If you have a geo-replication setup, then perform the following steps to restore snapshot:
- Stop the geo-replication session.
# gluster volume geo-replication MASTER_VOL SLAVE_HOST::SLAVE_VOL stop - Stop the slave volume and then the master volume.
# gluster volume stop VOLNAME - Restore snapshot of the slave volume and the master volume.
# gluster snapshot restore snapname - Start the slave volume first and then the master volume.
# gluster volume start VOLNAME - Start the geo-replication session.
# gluster volume geo-replication MASTER_VOL SLAVE_HOST::SLAVE_VOL start - Resume the geo-replication session.
# gluster volume geo-replication MASTER_VOL SLAVE_HOST::SLAVE_VOL resume
8.11. Accessing Snapshots
mount -t glusterfs <hostname>:/snaps/<snapname>/parent-VOLNAME /mount_point- parent-VOLNAME - Volume name for which we have created the snapshot.For example,
# mount -t glusterfs myhostname:/snaps/snap1/test_vol /mnt
Note
Warning
8.12. Scheduling of Snapshots
8.12.1. Prerequisites
- To initialize snapshot scheduler on all the nodes of the cluster, execute the following command:
snap_scheduler.py initThis command initializes the snap_scheduler and interfaces it with the crond running on the local node. This is the first step, before executing any scheduling related commands from a node.Note
This command has to be run on all the nodes participating in the scheduling. Other options can be run independently from any node, where initialization has been successfully completed. - A shared storage named
gluster_shared_storageis used across nodes to co-ordinate the scheduling operations. This shared storage is mounted at /var/run/gluster/shared_storage on all the nodes. For more information see, Section 11.12, “Setting up Shared Storage Volume”Note
With the release of 3.5 Batch Update 3, the mount point of shared storage is changed from /var/run/gluster/ to /run/gluster/ . - All nodes in the cluster have their times synced using NTP or any other mechanism. This is a hard requirement for this feature to work.
- If you are on Red Hat Enterprise Linux 7.1 or later, set the
cron_system_cronjob_use_sharesboolean toonby running the following command:# setsebool -P cron_system_cronjob_use_shares on
8.12.2. Snapshot Scheduler Options
Note
To enable snap scheduler, execute the following command:
snap_scheduler.py enableNote
# snap_scheduler.py enable
snap_scheduler: Snapshot scheduling is enabledTo enable snap scheduler, execute the following command:
snap_scheduler.py disable
# snap_scheduler.py disable
snap_scheduler: Snapshot scheduling is disabledTo display the the current status(Enabled/Disabled) of the snap scheduler, execute the following command:
snap_scheduler.py status# snap_scheduler.py status
snap_scheduler: Snapshot scheduling status: DisabledTo add a snapshot schedule, execute the following command:
snap_scheduler.py add "Job Name" "Schedule" "Volume Name"Example of job definition:
.---------------- minute (0 - 59)
| .------------- hour (0 - 23)
| | .---------- day of month (1 - 31)
| | | .------- month (1 - 12) OR jan,feb,mar,apr ...
| | | | .---- day of week (0 - 6) (Sunday=0 or 7) OR sun,mon,tue,wed,thu,fri,sat
| | | | |
* * * * * user-name command to be executed
# snap_scheduler.py add "Job1" "* * * * *" test_vol
snap_scheduler: Successfully added snapshot scheduleNote
Scheduled-Job1-test_vol_GMT-2015.06.19-09.47.01To edit an existing snapshot schedule, execute the following command:
snap_scheduler.py edit "Job Name" "Schedule" "Volume Name"
Example of job definition:
.---------------- minute (0 - 59)
| .------------- hour (0 - 23)
| | .---------- day of month (1 - 31)
| | | .------- month (1 - 12) OR jan,feb,mar,apr ...
| | | | .---- day of week (0 - 6) (Sunday=0 or 7) OR sun,mon,tue,wed,thu,fri,sat
| | | | |
* * * * * user-name command to be executed
# snap_scheduler.py edit "Job1" "*/5 * * * *" gluster_shared_storage
snap_scheduler: Successfully edited snapshot scheduleTo list the existing snapshot schedule, execute the following command:
snap_scheduler.py list
# snap_scheduler.py list
JOB_NAME SCHEDULE OPERATION VOLUME NAME
--------------------------------------------------------------------
Job0 * * * * * Snapshot Create test_vol
To delete an existing snapshot schedule, execute the following command:
snap_scheduler.py delete "Job Name"# snap_scheduler.py delete Job1
snap_scheduler: Successfully deleted snapshot schedule8.13. User Serviceable Snapshots
test.txt which was in the Home directory a couple of months earlier and was deleted accidentally. You can now easily go to the virtual .snaps directory that is inside the home directory and recover the test.txt file using the cp command.
Note
- User Serviceable Snapshot is not the recommended option for bulk data access from an earlier snapshot volume. For such scenarios it is recommended to mount the Snapshot volume and then access the data. For more information see, Chapter 8, Managing Snapshots
- Each activated snapshot volume when initialized by User Serviceable Snapshots, consumes some memory. Most of the memory is consumed by various house keeping structures of gfapi and xlators like DHT, AFR, etc. Therefore, the total memory consumption by snapshot depends on the number of bricks as well. Each brick consumes approximately 10MB of space, for example, in a 4x3 replica setup the total memory consumed by snapshot is around 50MB and for a 6x3 setup it is roughly 90MB.Therefore, as the number of active snapshots grow, the total memory footprint of the snapshot daemon (snapd) also grows. Therefore, in a low memory system, the snapshot daemon can get
OOMkilled if there are too many active snapshots
8.13.1. Enabling and Disabling User Serviceable Snapshot
# gluster volume set VOLNAME features.uss enable# gluster volume set test_vol features.uss enable
volume set: success# gluster snapshot activate <snapshot-name># gluster volume set VOLNAME features.uss disable# gluster volume set test_vol features.uss disable
volume set: success8.13.2. Viewing and Retrieving Snapshots using NFS / FUSE
.snaps directory of every directory of the mounted volume.
Note
# mount -t nfs -o vers=3 server1:/test-vol /mnt/glusterfs# mount -t glusterfs server1:/test-vol /mnt/glusterfs.snaps directory is a virtual directory which will not be listed by either the ls command, or the ls -a option. The .snaps directory will contain every snapshot taken for that given volume as individual directories. Each of these snapshot entries will in turn contain the data of the particular directory the user is accessing from when the snapshot was taken.
- Go to the folder where the file was present when the snapshot was taken. For example, if you had a test.txt file in the root directory of the mount that has to be recovered, then go to that directory.
# cd /mnt/glusterfsNote
Since every directory has a virtual.snapsdirectory, you can enter the.snapsdirectory from here. Since.snapsis a virtual directory,lsandls -acommand will not list the.snapsdirectory. For example:# ls -a ....Bob John test1.txt test2.txt - Go to the
.snapsfolder# cd .snaps - Run the
lscommand to list all the snapsFor example:# ls -p snapshot_Dec2014/ snapshot_Nov2014/ snapshot_Oct2014/ snapshot_Sept2014/ - Go to the snapshot directory from where the file has to be retrieved.For example:
cd snapshot_Nov2014# ls -p John/ test1.txt test2.txt - Copy the file/directory to the desired location.
# cp -p test2.txt $HOME
8.13.3. Viewing and Retrieving Snapshots using CIFS for Windows Client
.snaps folder of every folder in the root of the CIFS share. The .snaps folder is a hidden folder which will be displayed only when the following option is set to ON on the volume using the following command:
# gluster volume set volname features.show-snapshot-directory onON, every Windows client can access the .snaps folder by following these steps:
- In the
Folderoptions, enable theShow hidden files, folders, and drivesoption. - Go to the root of the CIFS share to view the
.snapsfolder.Note
The.snapsfolder is accessible only in the root of the CIFS share and not in any sub folders. - The list of snapshots are available in the
.snapsfolder. You can now access the required file and retrieve it.
8.14. Troubleshooting Snapshots
- Situation
Snapshot creation fails.
Step 1Check if the bricks are thinly provisioned by following these steps:
- Execute the
mountcommand and check the device name mounted on the brick path. For example:# mount /dev/mapper/snap_lvgrp-snap_lgvol on /rhgs/brick1 type xfs (rw) /dev/mapper/snap_lvgrp1-snap_lgvol1 on /rhgs/brick2 type xfs (rw) - Run the following command to check if the device has a LV pool name.
lvs device-nameFor example:# lvs -o pool_lv /dev/mapper/snap_lvgrp-snap_lgvol Pool snap_thnpoolIf thePoolfield is empty, then the brick is not thinly provisioned. - Ensure that the brick is thinly provisioned, and retry the snapshot create command.
Step 2Check if the bricks are down by following these steps:
- Execute the following command to check the status of the volume:
# gluster volume status VOLNAME - If any bricks are down, then start the bricks by executing the following command:
# gluster volume start VOLNAME force - To verify if the bricks are up, execute the following command:
# gluster volume status VOLNAME - Retry the snapshot create command.
Step 3Check if the node is down by following these steps:
- Execute the following command to check the status of the nodes:
# gluster volume status VOLNAME - If a brick is not listed in the status, then execute the following command:
# gluster pool list - If the status of the node hosting the missing brick is
Disconnected, then power-up the node. - Retry the snapshot create command.
Step 4Check if rebalance is in progress by following these steps:
- Execute the following command to check the rebalance status:
gluster volume rebalance VOLNAME status - If rebalance is in progress, wait for it to finish.
- Retry the snapshot create command.
- Situation
Snapshot delete fails.
Step 1Check if the server quorum is met by following these steps:
- Execute the following command to check the peer status:
# gluster pool list - If nodes are down, and the cluster is not in quorum, then power up the nodes.
- To verify if the cluster is in quorum, execute the following command:
# gluster pool list - Retry the snapshot delete command.
- Situation
Snapshot delete command fails on some node(s) during commit phase, leaving the system inconsistent.
Solution- Identify the node(s) where the delete command failed. This information is available in the delete command's error output. For example:
# gluster snapshot delete snapshot1 Deleting snap will erase all the information about the snap. Do you still want to continue? (y/n) y snapshot delete: failed: Commit failed on 10.00.00.02. Please check log file for details. Snapshot command failed - On the node where the delete command failed, bring down glusterd using the following command:On RHEL 7 and RHEL 8, runOn RHEL 6, run
# systemctl stop glusterd# service glusterd stopImportant
Red Hat Gluster Storage is not supported on Red Hat Enterprise Linux 6 (RHEL 6) from 3.5 Batch Update 1 onwards. See Version Details table in section Red Hat Gluster Storage Software Components and Versions of the Installation Guide - Delete that particular snaps repository in
/var/lib/glusterd/snaps/from that node. For example:# rm -rf /var/lib/glusterd/snaps/snapshot1 - Start glusterd on that node using the following command:On RHEL 7 and RHEL 8, runOn RHEL 6, run
# systemctl start glusterd# service glusterd start.Important
Red Hat Gluster Storage is not supported on Red Hat Enterprise Linux 6 (RHEL 6) from 3.5 Batch Update 1 onwards. See Version Details table in section Red Hat Gluster Storage Software Components and Versions of the Installation Guide - Repeat the 2nd, 3rd, and 4th steps on all the nodes where the commit failed as identified in the 1st step.
- Retry deleting the snapshot. For example:
# gluster snapshot delete snapshot1
- Situation
Snapshot restore fails.
Step 1Check if the server quorum is met by following these steps:
- Execute the following command to check the peer status:
# gluster pool list - If nodes are down, and the cluster is not in quorum, then power up the nodes.
- To verify if the cluster is in quorum, execute the following command:
# gluster pool list - Retry the snapshot restore command.
Step 2Check if the volume is in
Stopstate by following these steps:- Execute the following command to check the volume info:
# gluster volume info VOLNAME - If the volume is in
Startedstate, then stop the volume using the following command:gluster volume stop VOLNAME - Retry the snapshot restore command.
- Situation
Snapshot commands fail.
Step 1Check if there is a mismatch in the operating versions by following these steps:
- Open the following file and check for the operating version:
/var/lib/glusterd/glusterd.infoIf theoperating-versionis lesser than 30000, then the snapshot commands are not supported in the version the cluster is operating on. - Upgrade all nodes in the cluster to Red Hat Gluster Storage 3.2 or higher.
- Retry the snapshot command.
- Situation
After rolling upgrade, snapshot feature does not work.
SolutionYou must ensure to make the following changes on the cluster to enable snapshot:
- Restart the volume using the following commands.
# gluster volume stop VOLNAME # gluster volume start VOLNAME - Restart glusterd services on all nodes.On RHEL 7 and RHEL 8, runOn RHEL 6, run
# systemctl restart glusterd# service glusterd restartImportant
Red Hat Gluster Storage is not supported on Red Hat Enterprise Linux 6 (RHEL 6) from 3.5 Batch Update 1 onwards. See Version Details table in section Red Hat Gluster Storage Software Components and Versions of the Installation Guide
Chapter 9. Managing Directory Quotas
Warning
9.1. Enabling and Disabling Quotas
# gluster volume quota VOLNAME enableNote
# gluster volume quota VOLNAME disableImportant
quota-remove-xattr.sh. If you re-enable quotas while the cleanup process is still running, the extended attributes that enable quotas may be removed by the cleanup process. This has negative effects on quota accounting.
9.2. Before Setting a Quota on a Directory
- When specifying a directory to limit with the
gluster volume quotacommand, the directory's path is relative to the Red Hat Gluster Storage volume mount point, not the root directory of the server or client on which the volume is mounted. That is, if the Red Hat Gluster Storage volume is mounted at/mnt/glusterfsand you want to place a limit on the/mnt/glusterfs/dirdirectory, use/diras the path when you run thegluster volume quotacommand, like so:# gluster volume quota VOLNAME limit-usage /dir hard_limit - Ensure that at least one brick is available per replica set when you run the
gluster volume quotacommand. A brick is available if aYappears in theOnlinecolumn ofgluster volume statuscommand output, like so:# gluster volume status VOLNAME Status of volume: VOLNAME Gluster process Port Online Pid ------------------------------------------------------------ Brick arch:/export/rep1 24010 Y 18474 Brick arch:/export/rep2 24011 Y 18479 NFS Server on localhost 38467 Y 18486 Self-heal Daemon on localhost N/A Y 18491
9.3. Limiting Disk Usage
9.3.1. Setting Disk Usage Limits
# gluster volume quota VOLNAME limit-usage path hard_limit/dir directory on the data volume to 100 GB, run the following command:
# gluster volume quota data limit-usage /dir 100GB/dir directory and all files and directories underneath it from containing more than 100 GB of data cumulatively.
data volume to 1 TB, set a 1 TB limit on the root directory of the volume, like so:
# gluster volume quota data limit-usage / 1TB# gluster volume quota data limit-usage / 1TB 75/var/log/glusterfs/bricks/BRICKPATH.log.
default-soft-limit subcommand. For example, to set a default soft limit of 90% on the data volume, run the following command:
# gluster volume quota data default-soft-limit 90# gluster volume quota VOLNAME listlimit-usage subcommand.
9.3.2. Viewing Current Disk Usage Limits
# gluster volume quota VOLNAME list# gluster volume quota test-volume list
Path Hard-limit Soft-limit Used Available
--------------------------------------------------------
/ 50GB 75% 0Bytes 50.0GB
/dir 10GB 75% 0Bytes 10.0GB
/dir/dir2 20GB 90% 0Bytes 20.0GB# gluster volume quota VOLNAME list /<directory_name># gluster volume quota test-volume list /dir
Path Hard-limit Soft-limit Used Available
-------------------------------------------------
/dir 10.0GB 75% 0Bytes 10.0GB# gluster volume quota VOLNAME list DIR1 DIR29.3.2.1. Viewing Quota Limit Information Using the df Utility
df utility does not take quota limits into account when reporting disk usage. This means that clients accessing directories see the total space available to the volume, rather than the total space allotted to their directory by quotas. You can configure a volume to display the hard quota limit as the total disk space instead by setting quota-deem-statfs parameter to on.
quota-deem-statfs parameter to on, run the following command:
# gluster volume set VOLNAME quota-deem-statfs ondf to to display the hard quota limit as the total disk space for a client.
quota-deem-statfs is set to off:
# df -hT /home
Filesystem Type Size Used Avail Use% Mounted on
server1:/test-volume fuse.glusterfs 400G 12G 389G 3% /homequota-deem-statfs is set to on:
# df -hT /home
Filesystem Type Size Used Avail Use% Mounted on
server1:/test-volume fuse.glusterfs 300G 12G 289G 4% /home9.3.3. Setting Quota Check Frequency (Timeouts)
soft-timeout parameter specifies how often Red Hat Gluster Storage checks space usage when usage has, so far, been below the soft limit set on the directory or volume. The default soft timeout frequency is every 60 seconds.
# gluster volume quota VOLNAME soft-timeout secondshard-timeout parameter specifies how often Red Hat Gluster Storage checks space usage when usage is greater than the soft limit set on the directory or volume. The default hard timeout frequency is every 5 seconds.
# gluster volume quota VOLNAME hard-timeout secondsImportant
9.3.4. Setting Logging Frequency (Alert Time)
alert-time parameter configures how frequently usage information is logged after the soft limit has been reached. You can configure alert-time with the following command:
# gluster volume quota VOLNAME alert-time time1w).
| Unit of time | Format 1 | Format 2 |
|---|---|---|
| Second(s) | [integer]s | [integer]sec |
| Minute(s) | [integer]m | [integer]min |
| Hour(s) | [integer]h | [integer]hr |
| Day(s) | [integer]d | [integer]days |
| Week(s) | [integer]w | [integer]wk |
# gluster volume quota test-vol alert-time 10m# gluster volume quota test-vol alert-time 10days9.3.5. Removing Disk Usage Limits
# gluster volume quota VOLNAME remove DIR# gluster volume quota test-volume remove /data
volume quota : success# gluster vol quota VOLNAME remove /Chapter 10. Managing Geo-replication
10.1. About Geo-replication
- Master – the primary Red Hat Gluster Storage volume.
- Slave – a secondary Red Hat Gluster Storage volume. A slave volume can be a volume on a remote host, such as
remote-host::volname.
10.2. Replicated Volumes vs Geo-replication
| Replicated Volumes | Geo-replication |
|---|---|
| Works between all bricks in a replica set, so that changes are synced in both directions. | Works only from the primary (master) volume to the secondary (slave) volume. |
| Mirrors data across bricks within one trusted storage pool. | Mirrors data across geographically distributed trusted storage pools. |
| Provides high-availability. | Provides data back-up for disaster recovery. |
| Synchronous replication: each and every file operation is applied to all the bricks. | Asynchronous replication: checks for changes in files periodically, and syncs them on detecting differences. |
10.3. Preparing to Deploy Geo-replication
10.3.1. Exploring Geo-replication Deployment Scenarios
- Geo-replication over LAN
- Geo-replication over WAN
- Geo-replication over the Internet
- Multi-site cascading geo-replication
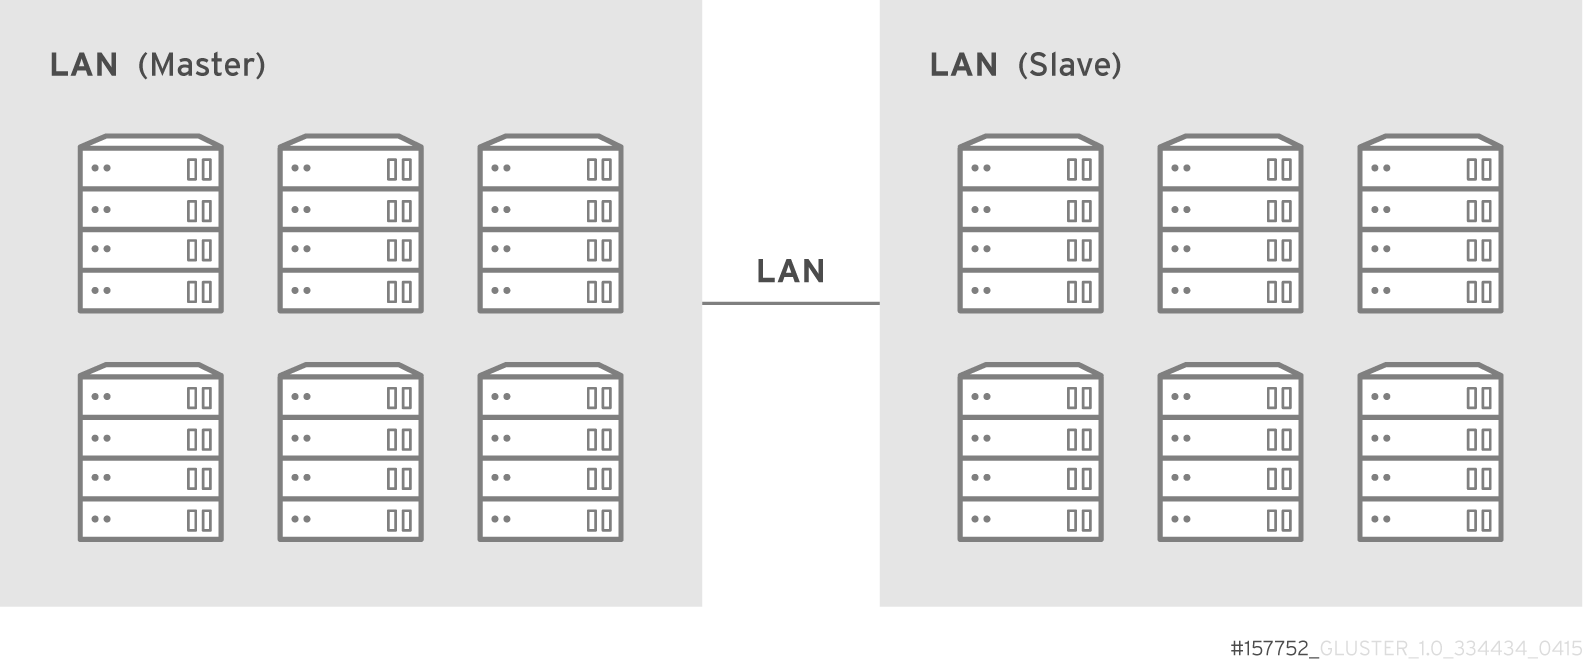
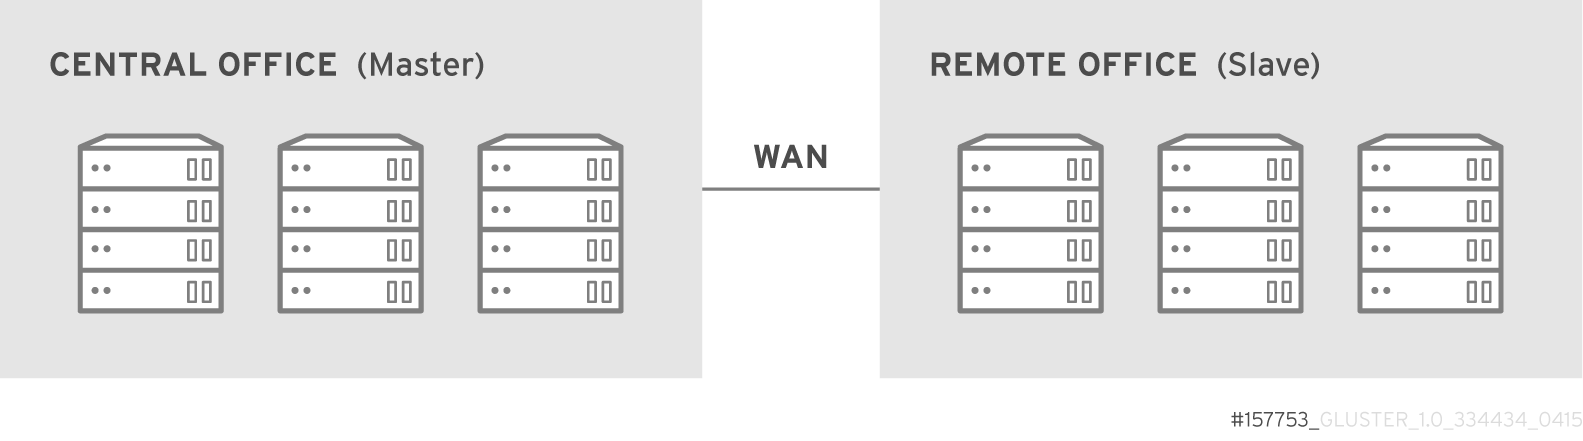
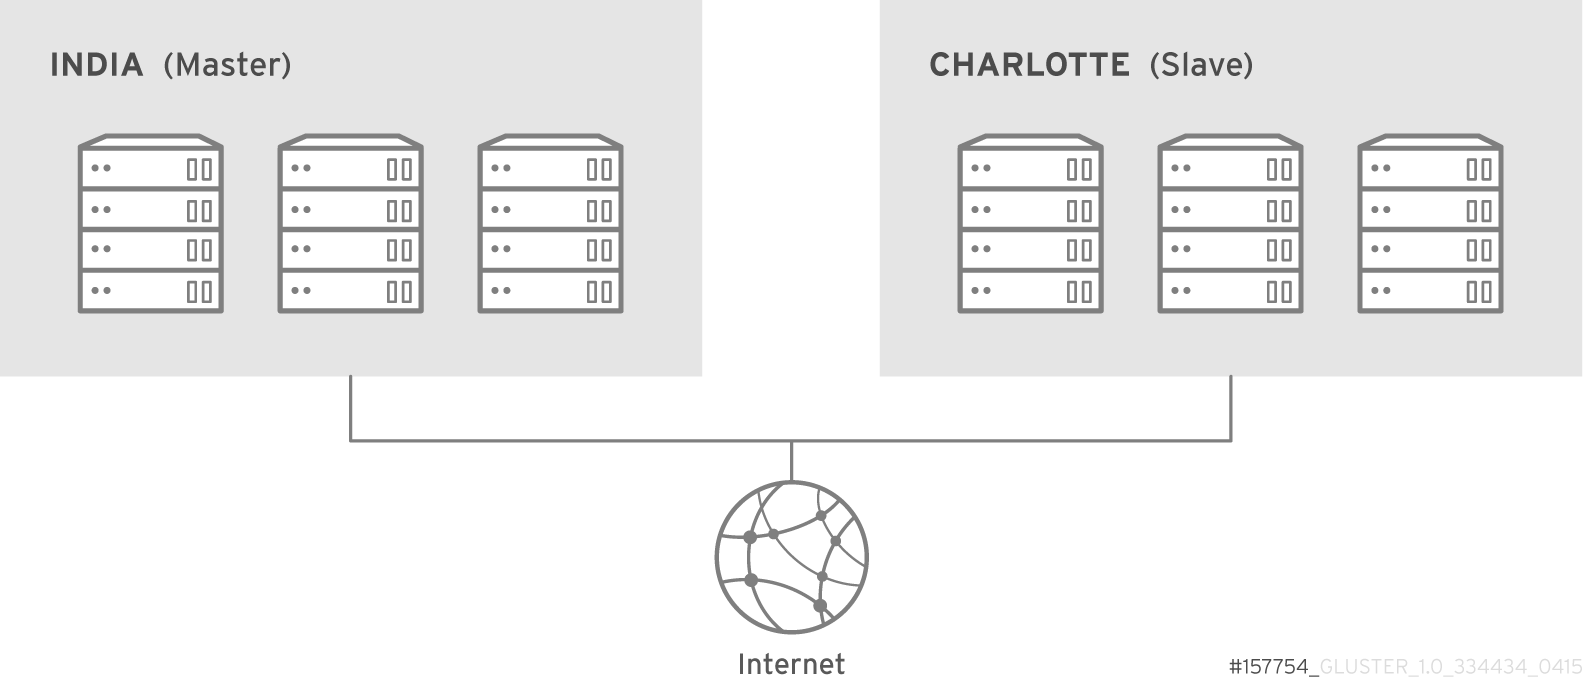

10.3.2. Geo-replication Deployment Overview
- Verify that your environment matches the minimum system requirements. See Section 10.3.3, “Prerequisites”.
- Determine the appropriate deployment scenario. See Section 10.3.1, “Exploring Geo-replication Deployment Scenarios”.
- Start geo-replication on the master and slave systems.
- For manual method, see Section 10.4, “Starting Geo-replication”.
- For gdeploy method, see Starting a geo-replication session in Section 10.5.3, “Controlling geo-replication sessions using gdeploy”.
10.3.3. Prerequisites
- The master and slave volumes must use the same version of Red Hat Gluster Storage.
- Nodes in the slave volume must not be part of the master volume. Two separate trusted storage pools are required.
- Disable the
performance.quick-readoption in the slave volume using the following command:[slave ~]# gluster volume set slavevol performance.quick-read off - Time must be synchronized between all master and slave nodes before geo-replication is configured. Red Hat recommends setting up a network time protocol service to keep time synchronized between bricks and servers, and avoid out-of-time synchronization errors.See Network Time Protocol Setup for more information.
- Add the required port for geo-replication from the ports listed in the Section 3.1.2, “Port Access Requirements”.
- Key-based SSH authentication without a password is required between one node of the master volume (the node from which the
geo-replication createcommand will be executed), and one node of the slave volume (the node whose IP/hostname will be mentioned in the slave name when running thegeo-replication createcommand).Create the public and private keys usingssh-keygen(without passphrase) on the master node:# ssh-keygenCopy the public key to the slave node using the following command:# ssh-copy-id -i identity_file root@slave_node_IPaddress/HostnameIf you are setting up a non-root geo-replicaton session, then copy the public key to the respectiveuserlocation.Note
- Key-based SSH authentication without a password is only required from the master node to the slave node; the slave node does not need this level of access. - ssh-copy-idcommand does not work ifssh authorized_keysfile is configured in the custom location. You must copy the contents of.ssh/id_rsa.pubfile from the Master and paste it to authorized_keys file in the custom location on the Slave node.Gsyncd also requires key-based SSH authentication without a password between every node in the master cluster to every node in the slave cluster. Thegluster system:: execute gsec_createcommand createssecret-pemfiles on all the nodes in the master, and is used to implement the SSH authentication connection. Thepush-pemoption in thegeo-replication createcommand pushes these keys to all slave nodes.For more information on thegluster system::execute gsec_createandpush-pemcommands, see Section 10.3.4.1, “Setting Up your Environment for Geo-replication Session”.
10.3.4. Setting Up your Environment
- Section 10.3.4.1, “Setting Up your Environment for Geo-replication Session” - In this method, the slave mount is owned by the root user.
- Section 10.3.4.2, “Setting Up your Environment for a Secure Geo-replication Slave” - This method is more secure as the slave mount is owned by a normal user.
10.3.4.1. Setting Up your Environment for Geo-replication Session
Creating Geo-replication Sessions
- To create a common
pem pubfile, run the following command on the master node where the key-based SSH authentication connection is configured:# gluster system:: execute gsec_createAlternatively, you can create the pem pub file by running the following command on the master node where the key-based SSH authentication connection is configured. This alternate command generates Geo-rep session specific ssh-keys in all the master nodes and collects public keys from all peer nodes. It also provides a detailed view of the command status.# gluster-georep-sshkey generate +--------------+-------------+---------------+ | NODE | NODE STATUS | KEYGEN STATUS | +--------------+-------------+---------------+ | node1 | UP | OK | | node2 | UP | OK | | node3 | UP | OK | | node4 | UP | OK | | node5 | UP | OK | | localhost | UP | OK | +--------------+-------------+---------------+ - Create the geo-replication session using the following command. The
push-pemoption is needed to perform the necessarypem-filesetup on the slave nodes.# gluster volume geo-replication MASTER_VOL SLAVE_HOST::SLAVE_VOL create push-pem [force]For example:# gluster volume geo-replication Volume1 storage.backup.com::slave-vol create push-pemNote
- There must be key-based SSH authentication access between the node from which this command is run, and the slave host specified in the above command. This command performs the slave verification, which includes checking for a valid slave URL, valid slave volume, and available space on the slave. If the verification fails, you can use the
forceoption which will ignore the failed verification and create a geo-replication session. - The slave volume is in read-only mode by default. However, in case of a failover-failback situation, the original master is made read-only by default as the session is from the original slave to the original master.
- Enable shared storage for master and slave volumes:
# gluster volume set all cluster.enable-shared-storage enableFor more information on shared storage, see Section 11.12, “Setting up Shared Storage Volume”. - Configure the meta-volume for geo-replication:
# gluster volume geo-replication MASTER_VOL SLAVE_HOST::SLAVE_VOL config use_meta_volume trueFor example:# gluster volume geo-replication Volume1 storage.backup.com::slave-vol config use_meta_volume trueFor more information on configuring meta-volume, see Section 10.3.5, “Configuring a Meta-Volume”. - Start the geo-replication by running the following command on the master node:For example,
# gluster volume geo-replication MASTER_VOL SLAVE_HOST::SLAVE_VOL start [force] - Verify the status of the created session by running the following command:
# gluster volume geo-replication MASTER_VOL SLAVE_HOST::SLAVE_VOL status
10.3.4.2. Setting Up your Environment for a Secure Geo-replication Slave
mountbroker, an internal service of glusterd which manages the mounts for unprivileged slave accounts. You must perform additional steps to configure glusterd with the appropriate mountbroker's access control directives. The following example demonstrates this process:
- In all the slave nodes, create a new group. For example,
geogroup.Note
You must not use multiple groups for themountbrokersetup. You can create multiple user accounts but the group should be same for all the non-root users. - In all the slave nodes, create a unprivileged account. For example,
geoaccount. Addgeoaccountas a member ofgeogroupgroup. - On any one of the Slave nodes, run the following command to set up mountbroker root directory and group.
# gluster-mountbroker setup <MOUNT ROOT> <GROUP>For example,# gluster-mountbroker setup /var/mountbroker-root geogroup - On any one of the Slave nodes, run the following commands to add volume and user to the mountbroker service.
# gluster-mountbroker add <VOLUME> <USER>For example,# gluster-mountbroker add slavevol geoaccount - Check the status of the setup by running the following command:
# gluster-mountbroker status NODE NODE STATUS MOUNT ROOT GROUP USERS --------------------------------------------------------------------------------------- localhost UP /var/mountbroker-root(OK) geogroup(OK) geoaccount(slavevol) node2 UP /var/mountbroker-root(OK) geogroup(OK) geoaccount(slavevol)The output displays the mountbroker status for every peer node in the slave cluster. - Restart
glusterdservice on all the Slave nodes.# service glusterd restartAfter you setup an auxiliary glusterFS mount for the unprivileged account on all the Slave nodes, perform the following steps to setup a non-root geo-replication session.: - Setup key-based SSH authentication from one of the master nodes to the
useron one of the slave nodes.For example, to setup key-based SSH authentication to the user geoaccount.# ssh-keygen # ssh-copy-id -i identity_file geoaccount@slave_node_IPaddress/Hostname - Create a common pem pub file by running the following command on the master nodes, where the key-based SSH authentication connection is configured to the
useron the slave nodes:# gluster system:: execute gsec_create - Create a geo-replication relationship between the master and the slave to the
userby running the following command on the master node:For example,# gluster volume geo-replication MASTERVOL geoaccount@SLAVENODE::slavevol create push-pemIf you have multiple slave volumes and/or multiple accounts, create a geo-replication session with that particular user and volume.For example,# gluster volume geo-replication MASTERVOL geoaccount2@SLAVENODE::slavevol2 create push-pem - Enable shared storage for master and slave volumes:
# gluster volume set all cluster.enable-shared-storage enableFor more information on shared storage, see Section 11.12, “Setting up Shared Storage Volume”. - On the slave node, which is used to create relationship, run
/usr/libexec/glusterfs/set_geo_rep_pem_keys.shas a root with user name, master volume name, and slave volume names as the arguments.For example,# /usr/libexec/glusterfs/set_geo_rep_pem_keys.sh geoaccount MASTERVOL SLAVEVOL_NAME - Configure the meta-volume for geo-replication:
# gluster volume geo-replication MASTER_VOL SLAVE_HOST::SLAVE_VOL config use_meta_volume trueFor example:# gluster volume geo-replication Volume1 storage.backup.com::slave-vol config use_meta_volume trueFor more information on configuring meta-volume, see Section 10.3.5, “Configuring a Meta-Volume”. - Start the geo-replication with slave user by running the following command on the master node:For example,
# gluster volume geo-replication MASTERVOL geoaccount@SLAVENODE::slavevol start - Verify the status of geo-replication session by running the following command on the master node:
# gluster volume geo-replication MASTERVOL geoaccount@SLAVENODE::slavevol status
After mountbroker geo-replicaton session is deleted, you must remove the volumes per mountbroker user.
Important
# gluster-mountbroker remove [--volume volume] [--user user]# gluster-mountbroker remove --volume slavevol --user geoaccount
# gluster-mountbroker remove --user geoaccount
# gluster-mountbroker remove --volume slavevol
Important
# gluster volume geo-replication MASTERVOL geoaccount@SLAVENODE::slavevol statusgeoaccount is the name of the unprivileged user account.
10.3.5. Configuring a Meta-Volume
gluster_shared_storage is the gluster volume used for internal purposes. Setting use_meta_volume to true enables geo-replication to use shared volume in order to store lock file(s) which helps in handling worker fail-overs. For effective handling of node fail-overs in Master volume, geo-replication requires this shared storage to be available across all nodes of the cluster. Hence, ensure that a gluster volume named gluster_shared_storage is created in the cluster, and is mounted at /var/run/gluster/shared_storage on all the nodes in the cluster. For more information on setting up shared storage volume, see Section 11.12, “Setting up Shared Storage Volume”.
Note
- Configure the meta-volume for geo-replication:
# gluster volume geo-replication MASTER_VOL SLAVE_HOST::SLAVE_VOL config use_meta_volume trueFor example:# gluster volume geo-replication Volume1 storage.backup.com::slave-vol config use_meta_volume true
Important
rsync_full_access on and rsync_client on booleans are set to ON to prevent file permission issues during rsync required by geo-replication.
10.4. Starting Geo-replication
10.4.1. Starting a Geo-replication Session
Important
- To start the geo-replication session between the hosts:
# gluster volume geo-replication MASTER_VOL SLAVE_HOST::SLAVE_VOL startFor example:# gluster volume geo-replication Volume1 storage.backup.com::slave-vol start Starting geo-replication session between Volume1 & storage.backup.com::slave-vol has been successfulThis command will start distributed geo-replication on all the nodes that are part of the master volume. If a node that is part of the master volume is down, the command will still be successful. In a replica pair, the geo-replication session will be active on any of the replica nodes, but remain passive on the others.After executing the command, it may take a few minutes for the session to initialize and become stable.Note
If you attempt to create a geo-replication session and the slave already has data, the following error message will be displayed:slave-node::slave is not empty. Please delete existing files in slave-node::slave and retry, or use force to continue without deleting the existing files. geo-replication command failed
- To start the geo-replication session forcefully between the hosts:
# gluster volume geo-replication MASTER_VOL SLAVE_HOST::SLAVE_VOL start forceFor example:# gluster volume geo-replication Volume1 storage.backup.com::slave-vol start force Starting geo-replication session between Volume1 & storage.backup.com::slave-vol has been successfulThis command will force start geo-replication sessions on the nodes that are part of the master volume. If it is unable to successfully start the geo-replication session on any node which is online and part of the master volume, the command will still start the geo-replication sessions on as many nodes as it can. This command can also be used to re-start geo-replication sessions on the nodes where the session has died, or has not started.
10.4.2. Verifying a Successful Geo-replication Deployment
status command to verify the status of geo-replication in your environment:
# gluster volume geo-replication MASTER_VOL SLAVE_HOST::SLAVE_VOL status# gluster volume geo-replication Volume1 storage.backup.com::slave-vol status10.4.3. Displaying Geo-replication Status Information
status command can be used to display information about a specific geo-replication master session, master-slave session, or all geo-replication sessions. The status output provides both node and brick level information.
- To display information about all geo-replication sessions, use the following command:
# gluster volume geo-replication status [detail] - To display information on all geo-replication sessions from a particular master volume, use the following command:
# gluster volume geo-replication MASTER_VOL status [detail]
- To display information of a particular master-slave session, use the following command:
# gluster volume geo-replication MASTER_VOL SLAVE_HOST::SLAVE_VOL status [detail]Important
There will be a mismatch between the outputs of thedfcommand (including-hand-k) and inode of the master and slave volumes when the data is in full sync. This is due to the extra inode and size consumption by thechangelogjournaling data, which keeps track of the changes done on the file system on themastervolume. Instead of running thedfcommand to verify the status of synchronization, use# gluster volume geo-replication MASTER_VOL SLAVE_HOST::SLAVE_VOL status detailinstead. - The geo-replication status command output provides the following information:
- Master Node: Master node and Hostname as listed in the
gluster volume infocommand output - Master Vol: Master volume name
- Master Brick: The path of the brick
- Slave User: Slave user name
- Slave: Slave volume name
- Slave Node: IP address/hostname of the slave node to which master worker is connected to.
- Status: The status of the geo-replication worker can be one of the following:
- Initializing: This is the initial phase of the Geo-replication session; it remains in this state for a minute in order to make sure no abnormalities are present.
- Created: The geo-replication session is created, but not started.
- Active: The
gsyncdaemon in this node is active and syncing the data. - Passive: A replica pair of the active node. The data synchronization is handled by the active node. Hence, this node does not sync any data.
- Faulty: The geo-replication session has experienced a problem, and the issue needs to be investigated further. For more information, see Section 10.12, “Troubleshooting Geo-replication” section.
- Stopped: The geo-replication session has stopped, but has not been deleted.
- Crawl Status: Crawl status can be one of the following:
- Changelog Crawl: The
changelogtranslator has produced the changelog and that is being consumed bygsyncddaemon to sync data. - Hybrid Crawl: The
gsyncddaemon is crawling the glusterFS file system and generating pseudo changelog to sync data. - History Crawl: The
gsyncddaemon consumes the history changelogs produced by the changelog translator to sync data.
- Last Synced: The last synced time.
- Entry: The number of pending entry (CREATE, MKDIR, RENAME, UNLINK etc) operations per session.
- Data: The number of
Dataoperations pending per session. - Meta: The number of
Metaoperations pending per session. - Failures: The number of failures. If the failure count is more than zero, view the log files for errors in the Master bricks.
- Checkpoint Time: Displays the date and time of the checkpoint, if set. Otherwise, it displays as N/A.
- Checkpoint Completed: Displays the status of the checkpoint.
- Checkpoint Completion Time: Displays the completion time if Checkpoint is completed. Otherwise, it displays as N/A.
10.4.4. Configuring a Geo-replication Session
# gluster volume geo-replication MASTER_VOL SLAVE_HOST::SLAVE_VOL config [Name] [Value]# gluster volume geo-replication Volume1 storage.backup.com::slave-vol config sync_method rsync# gluster volume geo-replication Volume1 storage.backup.com::slave-vol config! (exclamation mark). For example, to reset log-level to the default value:
# gluster volume geo-replication Volume1 storage.backup.com::slave-vol config '!log-level'Warning
Connected (online) state. If you change the configuration when any of the peer is down, the geo-replication cluster would be in inconsistent state when the node comes back online.
The following table provides an overview of the configurable options for a geo-replication setting:
| Option | Description |
|---|---|
| gluster_log_file LOGFILE | The path to the geo-replication glusterfs log file. |
| gluster_log_level LOGFILELEVEL | The log level for glusterfs processes. |
| log_file LOGFILE | The path to the geo-replication log file. |
| log_level LOGFILELEVEL | The log level for geo-replication. |
| changelog_log_level LOGFILELEVEL | The log level for the changelog. The default log level is set to INFO. |
| changelog_batch_size SIZEINBYTES | The total size for the changelog in a batch. The default size is set to 727040 bytes. |
| ssh_command COMMAND | The SSH command to connect to the remote machine (the default is SSH). |
| sync_method NAME | The command to use for setting synchronizing method for the files. The available options are rsync or tarssh. The default is rsync. The tarssh allows tar over Secure Shell protocol. Use tarssh option to handle workloads of files that have not undergone edits.
Note
On a RHEL 8.3 or above, before configuring the sync_method as _tarssh_, make sure to install _tar_ package.
|
| volume_id=UID | The command to delete the existing master UID for the intermediate/slave node. |
| timeout SECONDS | The timeout period in seconds. |
| sync_jobs N |
The number of sync-jobs represents the maximum number of syncer threads (rsync processes or tar over ssh processes for syncing) inside each worker. The number of workers is always equal to the number of bricks in the Master volume. For example, a distributed-replicated volume of (3 x 2) with sync-jobs configured at 3 results in 9 total sync-jobs (aka threads) across all nodes/servers.
Active and Passive Workers: The number of active workers is based on the volume configuration. In case of a distribute volume, all bricks (workers) will be active and participate in syncing. In case of replicate or dispersed volume, one worker from each replicate/disperse group (subvolume) will be active and participate in syncing. This is to avoid duplicate syncing from other bricks. The remaining workers in each replicate/disperse group (subvolume) will be passive. In case the active worker goes down, one of the passive worker from the same replicate/disperse group will become an active worker.
|
| ignore_deletes | If this option is set to true, a file deleted on the master will not trigger a delete operation on the slave. As a result, the slave will remain as a superset of the master and can be used to recover the master in the event of a crash and/or accidental delete. If this option is set to false, which is the default config option for ignore-deletes, a file deleted on the master will trigger a delete operation on the slave. |
| checkpoint [LABEL|now] | Sets a checkpoint with the given option LABEL. If the option is set as now, then the current time will be used as the label. |
| sync_acls [true | false] | Syncs acls to the Slave cluster. By default, this option is enabled.
Note
Geo-replication can sync acls only with rsync as the sync engine and not with tarssh as the sync engine.
|
| sync_xattrs [true | false] | Syncs extended attributes to the Slave cluster. By default, this option is enabled.
Note
Geo-replication can sync extended attributes only with rsync as the sync engine and not with tarssh as the sync engine.
|
| log_rsync_performance [true | false] | If this option is set to enable, geo-replication starts recording the rsync performance in log files. By default, this option is disabled. |
| rsync_options | Additional options to rsync. For example, you can limit the rsync bandwidth usage "--bwlimit=<value>". |
| use_meta_volume [true | false] | Set this option to enable, to use meta volume in Geo-replication. By default, this option is disabled.
Note
For more information on meta-volume, see Section 10.3.5, “Configuring a Meta-Volume”.
|
| meta_volume_mnt PATH | The path of the meta volume mount point. |
| gfid_conflict_resolution [true | false] | Auto GFID conflict resolution feature provides an ability to automatically detect and fix the GFID conflicts between master and slave. This configuration option provides an ability to enable or disable this feature. By default, this option is true. |
| special_sync_mode |
Speeds up the recovery of data from slave. Adds capability to geo-replication to ignore the files created before enabling indexing option.
Tunables for failover or failback mechanism:
None: gsyncd behaves as normal.
blind: gsyncd works with xtime pairs to identify candidates for synchronization.
wrapup: same as normal mode but does not assign xtimes to orphaned files.
recover: files are only transferred if they are identified as changed on the slave.
Note
Use this mode after ensuring that the number of files in the slave is equal to that of master. Geo-replication will synchronize only those files which are created after making Slave volume as Master volume.
|
10.4.4.1. Geo-replication Checkpoints
10.4.4.1.1. About Geo-replication Checkpoints
10.4.4.1.2. Configuring and Viewing Geo-replication Checkpoint Information
- To set a checkpoint on a geo-replication session, use the following command:
# gluster volume geo-replication MASTER_VOL SLAVE_HOST::SLAVE_VOL config checkpoint [now|LABEL]For example, to set checkpoint betweenVolume1andstorage.backup.com:/data/remote_dir:# gluster volume geo-replication Volume1 storage.backup.com::slave-vol config checkpoint now geo-replication config updated successfullyThe label for a checkpoint can be set as the current time usingnow, or a particular label can be specified, as shown below:# gluster volume geo-replication Volume1 storage.backup.com::slave-vol config checkpoint NEW_ACCOUNTS_CREATED geo-replication config updated successfully. - To display the status of a checkpoint for a geo-replication session, use the following command:
# gluster volume geo-replication MASTER_VOL SLAVE_HOST::SLAVE_VOL status detail - To delete checkpoints for a geo-replication session, use the following command:
# gluster volume geo-replication MASTER_VOL SLAVE_HOST::SLAVE_VOL config '!checkpoint'For example, to delete the checkpoint set betweenVolume1andstorage.backup.com::slave-vol:# gluster volume geo-replication Volume1 storage.backup.com::slave-vol config '!checkpoint' geo-replication config updated successfully
10.4.5. Stopping a Geo-replication Session
- To stop a geo-replication session between the hosts:
# gluster volume geo-replication MASTER_VOL SLAVE_HOST::SLAVE_VOL stopFor example:# gluster volume geo-replication Volume1 storage.backup.com::slave-vol stop Stopping geo-replication session between Volume1 & storage.backup.com::slave-vol has been successfulNote
Thestopcommand will fail if:- any node that is a part of the volume is offline.
- if it is unable to stop the geo-replication session on any particular node.
- if the geo-replication session between the master and slave is not active.
- To stop a geo-replication session forcefully between the hosts:
# gluster volume geo-replication MASTER_VOL SLAVE_HOST::SLAVE_VOL stop forceFor example:# gluster volume geo-replication Volume1 storage.backup.com::slave-vol stop force Stopping geo-replication session between Volume1 & storage.backup.com::slave-vol has been successfulUsingforcewill stop the geo-replication session between the master and slave even if any node that is a part of the volume is offline. If it is unable to stop the geo-replication session on any particular node, the command will still stop the geo-replication sessions on as many nodes as it can. Usingforcewill also stop inactive geo-replication sessions.
# gluster volume geo-replication MASTER_VOL geoaccount@SLAVE_HOST::SLAVE_VOL stop10.4.6. Deleting a Geo-replication Session
Important
# gluster volume geo-replication MASTER_VOL SLAVE_HOST::SLAVE_VOL delete reset-sync-timereset-sync-time: The geo-replication delete command retains the information about the last synchronized time. Due to this, if the same geo-replication session is recreated, then the synchronization will continue from the time where it was left before deleting the session. For the geo-replication session to not maintain any details about the deleted session, use the reset-sync-time option with the delete command. Now, when the session is recreated, it starts synchronization from the beginning just like a new session.
# gluster volume geo-replication Volume1 storage.backup.com::slave-vol delete
geo-replication command executed successfullyNote
delete command will fail if:
- any node that is a part of the volume is offline.
- if it is unable to delete the geo-replication session on any particular node.
- if the geo-replication session between the master and slave is still active.
Important
pem files which contain the SSH keys from the /var/lib/glusterd/geo-replication/ directory.
# gluster volume geo-replication MASTER_VOL geoaccount@SLAVE_HOST::SLAVE_VOL delete reset-sync-time10.5. Setting up Geo-replication using gdeploy
10.5.1. Setting up geo-replication as root user using gdeploy
- Creating a common pem pub file
- Creating a geo-replication session
- Configuring the meta-volume
- Starting the geo-replication session
/usr/share/doc/gdeploy/examples/geo-replication.confProcedure 10.1. Setting up geo-replication as root user using gdeploy
Important
- Create a copy of the sample gdeploy configuration file present in the following location:
/usr/share/doc/gdeploy/examples/geo-replication.conf - Add the required details in the geo-replication section of the configuration file using the following template:
[geo-replication] action=create mastervol=Master_IP:Master_Volname slavevol=Slave_IP:Slave_Volname slavenodes=Slave_IP_1,Slave_IP_2 [Add all slave IP addresses. Each address followed by a comma (,)] force=yes [yes or no] start=yes [yes or no] - After modifying the configuration file, invoke the configuration using the command:
# gdeploy -c txt.conf
[geo-replication]
action=create
mastervol=10.1.1.29:mastervolume
slavevol=10.1.1.25:slavesvolume
slavenodes=10.1.1.28,10.1.1.86
force=yes
start=yes
10.5.2. Setting up a secure geo-replication session using gdeploy
- Creating a new group with a unprivileged account for all slave nodes
- Setting up the mountbroker
- Creating a common pem pub file
- Creating a geo-replication session
- Configuring the meta-volume
- Starting the geo-replication session
/usr/share/doc/gdeploy/examples/georep-secure.confProcedure 10.2. Setting up a secure geo-replication session using gdeploy
Important
- Create a copy of the sample gdeploy configuration file present in the following location:
/usr/share/doc/gdeploy/examples/georep-secure.conf - Add the required details in the geo-replication section of the configuration file using the following template:
[geo-replication] action=create georepuser=User_Name [If the user is not present, gdeploy creates the geo-replication user.] mastervol=Master_IP:Master_Volname slavevol=Slave_IP:Slave_Volname slavenodes=Slave_IP_1,Slave_IP_2 [Add all slave IP addresses. Each address followed by a comma (,)] force=yes [yes or no] start=yes [yes or no] - After modifying the configuration file, invoke the configuration using the command:
# gdeploy -c txt.conf
[geo-replication]
action=create
georepuser=testgeorep
mastervol=10.1.1.29:mastervolume
slavevol=10.1.1.25:slavesvolume
slavenodes=10.1.1.28,10.1.1.86
force=yes
start=yes
10.5.3. Controlling geo-replication sessions using gdeploy
/usr/share/doc/gdeploy/examples. The sample configuration file names for each action are as follows:
| Geo-replication Session Control | Configuration File Name |
|---|---|
| Starting a session | georep-start.conf |
| Stopping a session | georep-stop.conf |
| Pausing a session | georep-pause.conf |
| Resuming a session | georep-resume.conf |
| Deleting a session | georep-delete.conf |
Procedure 10.3. Controlling geo-replication sessions using gdeploy
Warning
Important
- Create a copy of the required gdeploy sample configuration file present in the following location:
/usr/share/doc/gdeploy/examples - Add the required information in the geo-replication section of the configuration file using the following template:
[geo-replication] action=Action_Name georepuser=User_Name If georepuser variable is omitted, the user is assumed to be root user. mastervol=Master_IP:Master_Volname slavevol=Slave_IP:Slave_Volname slavenodes=Slave_IP_1,Slave_IP_2 [Add all slave IP addresses. Each address followed by a comma (,)] force=yes [yes or no] start=yes [yes or no]Important
Ifgeorepuservariable is omitted, the user is assumed to be root user. - After modifying the configuration file, invoke the configuration using the command:
# gdeploy -c txt.conf
[geo-replication]
action=start
mastervol=10.1.1.29:mastervolume
slavevol=10.1.1.25:slavevolume
[geo-replication]
action=stop
mastervol=10.1.1.29:mastervolume
slavevol=10.1.1.25:slavevolume
force=yes
[geo-replication]
action=pause
mastervol=10.1.1.29:mastervolume
slavevol=10.1.1.25:slavevolume
force=yes
[geo-replication]
action=resume
mastervol=10.1.1.29:mastervolume
slavevol=10.1.1.25:slavevolume
force=yes
[geo-replication]
action=delete
mastervol=10.1.1.29:mastervolume
slavevol=10.1.1.25:slavevolume
force=yes
10.6. Starting Geo-replication on a Newly Added Brick, Node, or Volume
10.6.1. Starting Geo-replication for a New Brick or New Node
- Run the following command on the master node where key-based SSH authentication connection is configured, in order to create a common
pem pubfile.# gluster system:: execute gsec_create - Create the geo-replication session using the following command. The
push-pemandforceoptions are required to perform the necessarypem-filesetup on the slave nodes.# gluster volume geo-replication MASTER_VOL SLAVE_HOST::SLAVE_VOL create push-pem forceFor example:# gluster volume geo-replication Volume1 storage.backup.com::slave-vol create push-pem forceNote
There must be key-based SSH authentication access between the node from which this command is run, and the slave host specified in the above command. This command performs the slave verification, which includes checking for a valid slave URL, valid slave volume, and available space on the slave. - After successfully setting up the shared storage volume, when a new node is added to the cluster, the shared storage is not mounted automatically on this node. Neither is the
/etc/fstabentry added for the shared storage on this node. To make use of shared storage on this node, execute the following commands:# mount -t glusterfs <local node's ip>:gluster_shared_storage /var/run/gluster/shared_storage # cp /etc/fstab /var/run/gluster/fstab.tmp # echo "<local node's ip>:/gluster_shared_storage /var/run/gluster/shared_storage/ glusterfs defaults 0 0" >> /etc/fstabNote
With the release of 3.5 Batch Update 3, the mount point of shared storage is changed from /var/run/gluster/ to /run/gluster/ .For more information on setting up shared storage volume, see Section 11.12, “Setting up Shared Storage Volume”. - Configure the meta-volume for geo-replication:
# gluster volume geo-replication MASTER_VOL SLAVE_HOST::SLAVE_VOL config use_meta_volume trueFor example:# gluster volume geo-replication Volume1 storage.backup.com::slave-vol config use_meta_volume trueFor more information on configuring meta-volume, see Section 10.3.5, “Configuring a Meta-Volume”. - If a node is added at slave, stop the geo-replication session using the following command:
# gluster volume geo-replication MASTER_VOL SLAVE_HOST::SLAVE_VOL stop - Start the geo-replication session between the slave and master forcefully, using the following command:
# gluster volume geo-replication MASTER_VOL SLAVE_HOST::SLAVE_VOL start force - Verify the status of the created session, using the following command:
# gluster volume geo-replication MASTER_VOL SLAVE_HOST::SLAVE_VOL statusWarning
The following scenarios can lead to a checksum mismatch:- Adding bricks to expand a geo-replicated volume.
- Expanding the volume while the geo-replication synchronization is in progress.
- Newly added brick becomes `ACTIVE` to sync the data.
- Self healing on the new brick is not completed.
10.6.2. Starting Geo-replication for a New Brick on an Existing Node
10.6.3. Starting Geo-replication for a New Volume
Prerequisites
- There must be key-based SSH authentication without a password access between the master volume node and the slave volume node.
- Create the geo-replication session using the following command:
# gluster volume geo-replication MASTER_VOL SLAVE_HOST::SLAVE_VOL createFor example:# gluster volume geo-replication Volume1 storage.backup.com::slave-vol createNote
This command performs the slave verification, which includes checking for a valid slave URL, valid slave volume, and available space on the slave. - Configure the meta-volume for geo-replication:
# gluster volume geo-replication MASTER_VOL SLAVE_HOST::SLAVE_VOL config use_meta_volume trueFor example:# gluster volume geo-replication Volume1 storage.backup.com::slave-vol config use_meta_volume trueFor more information on configuring meta-volume, see Section 10.3.5, “Configuring a Meta-Volume”. - Start the geo-replication session between the slave and master, using the following command:
# gluster volume geo-replication MASTER_VOL SLAVE_HOST::SLAVE_VOL start - Verify the status of the created session, using the following command:
# gluster volume geo-replication MASTER_VOL SLAVE_HOST::SLAVE_VOL status
10.7. Scheduling Geo-replication as a Cron Job
- Stops the geo-replication session, if started
- Starts the geo-replication session
- Sets the Checkpoint
- Checks the status of checkpoint until it is complete
- After the checkpoint is complete, stops the geo-replication session
To run a geo-reolication session only when required, run the following script:
# python /usr/share/glusterfs/scripts/schedule_georep.py MASTERVOL SLAVEHOST SLAVEVOL# python /usr/share/glusterfs/scripts/schedule_georep.py Volume1 storage.backup.com slave-vol# python /usr/share/glusterfs/scripts/schedule_georep.py --helpTo schedule geo-replication to run automatically using Cron:
minute hour day month day-of-week directory_and_script-to-execute MASTERVOL SLAVEHOST SLAVEVOL >> log_file_for_script_output30 20 * * * root python /usr/share/glusterfs/scripts/schedule_georep.py --no-color Volume1 storage.backup.com slave-vol >> /var/log/glusterfs/schedule_georep.log 2>&110.8. Disaster Recovery
failover procedure so that a slave can replace the master. When this happens, all the I/O operations, including reads and writes, are done on the slave which is now acting as the master. When the original master is back online, you can perform a failback procedure on the original slave so that it synchronizes the differences back to the original master.
10.8.1. Failover: Promoting a Slave to Master
- Disable read-only on the slave volume by running the following command:
# gluster volume set VOLNAME features.read-only off - Run the following commands on the slave machine to promote it to be the master:
# gluster volume set VOLNAME geo-replication.indexing on # gluster volume set VOLNAME changelog onFor example# gluster volume set slave-vol geo-replication.indexing on volume set: success # gluster volume set slave-vol changelog on volume set: success
10.8.2. Failback: Resuming Master and Slave back to their Original State
- Stop the existing geo-rep session from original master to orginal slave using the following command:
# gluster volume geo-replication ORIGINAL_MASTER_VOL ORIGINAL_SLAVE_HOST::ORIGINAL_SLAVE_VOL stop forceFor example,# gluster volume geo-replication Volume1 storage.backup.com::slave-vol stop force Stopping geo-replication session between Volume1 and storage.backup.com::slave-vol has been successful - Create a new geo-replication session with the original slave as the new master, and the original master as the new slave with
forceoption. Detailed information on creating geo-replication session is available at: . - Start the special synchronization mode to speed up the recovery of data from slave. This option adds capability to geo-replication to ignore the files created before enabling
indexingoption. With this option, geo-replication will synchronize only those files which are created after making Slave volume as Master volume.# gluster volume geo-replication ORIGINAL_SLAVE_VOL ORIGINAL_MASTER_HOST::ORIGINAL_MASTER_VOL config special-sync-mode recoverFor example,# gluster volume geo-replication slave-vol master.com::Volume1 config special-sync-mode recover geo-replication config updated successfully - Disable the gfid-conflict-resolution option:
# gluster volume geo-replication ORIGINAL_SLAVE_VOL ORIGINAL_MASTER_HOST::ORIGINAL_MASTER_VOL config gfid-conflict-resolution falseFor example,# gluster volume geo-replication slave-vol master.com::Volume1 config gfid-conflict-resolution false geo-replication config updated successfully - Start the new geo-replication session using the following command:
# gluster volume geo-replication ORIGINAL_SLAVE_VOL ORIGINAL_MASTER_HOST::ORIGINAL_MASTER_VOL startFor example,# gluster volume geo-replication slave-vol master.com::Volume1 start Starting geo-replication session between slave-vol and master.com::Volume1 has been successful - Stop the I/O operations on the original slave and set the checkpoint. By setting a checkpoint, synchronization information is available on whether the data that was on the master at that point in time has been replicated to the slaves.
# gluster volume geo-replication ORIGINAL_SLAVE_VOL ORIGINAL_MASTER_HOST::ORIGINAL_MASTER_VOL config checkpoint nowFor example,# gluster volume geo-replication slave-vol master.com::Volume1 config checkpoint now geo-replication config updated successfully - Checkpoint completion ensures that the data from the original slave is restored back to the original master. But since the IOs were stopped at slave before checkpoint was set, we need to touch the slave mount for checkpoint to be completed
# touch orginial_slave_mount# gluster volume geo-replication ORIGINAL_SLAVE_VOL ORIGINAL_MASTER_HOST::ORIGINAL_MASTER_VOL status detailFor example,# touch /mnt/gluster/slavevol # gluster volume geo-replication slave-vol master.com::Volume1 status detail - After the checkpoint is complete, stop and delete the current geo-replication session between the original slave and original master
# gluster volume geo-replication ORIGINAL_SLAVE_VOL ORIGINAL_MASTER_HOST::ORIGINAL_MASTER_VOL stop# gluster volume geo-replication ORIGINAL_SLAVE_VOL ORIGINAL_MASTER_HOST::ORIGINAL_MASTER_VOL deleteFor example,# gluster volume geo-replication slave-vol master.com::Volume1 stop Stopping geo-replication session between slave-vol and master.com::Volume1 has been successful # gluster volume geo-replication slave-vol master.com::Volume1 delete geo-replication command executed successfully - Disable read-only on the master volume by running the following command:
# gluster volume set VOLNAME features.read-only off - Reset the options that were set for promoting the slave volume as the master volume by running the following commands:
# gluster volume reset ORIGINAL_SLAVE_VOL geo-replication.indexing force # gluster volume reset ORIGINAL_SLAVE_VOL changelogFor example,# gluster volume reset slave-vol geo-replication.indexing force volume set: success # gluster volume reset slave-vol changelog volume set: success - Resume the original roles by starting the geo-rep session from the original master using the following command:
# gluster volume geo-replication ORIGINAL_MASTER_VOL ORIGINAL_SLAVE_HOST::ORIGINAL_SLAVE_VOL start# gluster volume geo-replication Volume1 storage.backup.com::slave-vol start Starting geo-replication session between slave-vol and master.com::Volume1 been successful
10.9. Creating a Snapshot of Geo-replicated Volume
# gluster snapshot create snap1 master
snapshot create: failed: geo-replication session is running for the volume master. Session needs to be stopped before taking a snapshot.
Snapshot command failed10.10. Example - Setting up Cascading Geo-replication
- Verify that your environment matches the minimum system requirements listed in Section 10.3.3, “Prerequisites”.
- Determine the appropriate deployment scenario. For more information on deployment scenarios, see Section 10.3.1, “Exploring Geo-replication Deployment Scenarios”.
- Configure the environment and create a geo-replication session between master-vol and interimmaster-vol.
- Create a common pem pub file, run the following command on the master node where the key-based SSH authentication connection is configured:
# gluster system:: execute gsec_create - Create the geo-replication session using the following command. The push-pem option is needed to perform the necessary pem-file setup on the interimmaster nodes.
# gluster volume geo-replication master-vol interimhost.com::interimmaster-vol create push-pem - Verify the status of the created session by running the following command:
# gluster volume geo-replication master-vol interimhost::interimmaster-vol status
- Configure the meta-volume for geo-replication:
# gluster volume geo-replication master-vol interimhost.com::interimmaster-vol config use_meta_volume trueFor more information on configuring meta-volume, see Section 10.3.5, “Configuring a Meta-Volume”. - Start a Geo-replication session between the hosts:
# gluster volume geo-replication master-vol interimhost.com::interimmaster-vol startThis command will start distributed geo-replication on all the nodes that are part of the master volume. If a node that is part of the master volume is down, the command will still be successful. In a replica pair, the geo-replication session will be active on any of the replica nodes, but remain passive on the others. After executing the command, it may take a few minutes for the session to initialize and become stable. - Verifying the status of geo-replication session by running the following command:
# gluster volume geo-replication master-vol interimhost.com::interimmaster-vol status - Create a geo-replication session between interimmaster-vol and slave-vol.
- Create a common pem pub file by running the following command on the interimmaster master node where the key-based SSH authentication connection is configured:
# gluster system:: execute gsec_create - On interimmaster node, create the geo-replication session using the following command. The push-pem option is needed to perform the necessary pem-file setup on the slave nodes.
# gluster volume geo-replication interimmaster-vol slave_host.com::slave-vol create push-pem - Verify the status of the created session by running the following command:
# gluster volume geo-replication interrimmaster-vol slave_host::slave-vol status
- Configure the meta-volume for geo-replication:
# gluster volume geo-replication interrimmaster-vol slave_host::slave-vol config use_meta_volume trueFor more information on configuring meta-volume, see Section 10.3.5, “Configuring a Meta-Volume”. - Start a geo-replication session between interrimaster-vol and slave-vol by running the following command:
# gluster volume geo-replication interrimmaster-vol slave_host.com::slave-vol start - Verify the status of geo-replication session by running the following:
# gluster volume geo-replication interrimmaster-vol slave_host.com::slave-vol status
10.11. Recommended Practices
If you have to change the time on the bricks manually, then the geo-replication session and indexing must be disabled when setting the time on all the bricks. All bricks in a geo-replication environment must be set to the same time, as this avoids the out-of-time sync issue described in Section 10.3.4.1, “Setting Up your Environment for Geo-replication Session”. Bricks not operating on the same time setting, or changing the time while the geo-replication is running, will corrupt the geo-replication index. The recommended way to set the time manually is using the following procedure.
Manually Setting the Time on Bricks in a Geo-replication Environment
- Stop geo-replication between the master and slave, using the following command:
# gluster volume geo-replication MASTER_VOL SLAVE_HOST::SLAVE_VOL stop - Stop geo-replication indexing, using the following command:
# gluster volume set MASTER_VOL geo-replication.indexing off - Set a uniform time on all the bricks.
- Restart the geo-replication sessions, using the following command:
# gluster volume geo-replication MASTER_VOL SLAVE_HOST::SLAVE_VOL start
When the following option is set, it has been observed that there is an increase in geo-replication performance. On the slave volume, run the following command:
# gluster volume set SLAVE_VOL batch-fsync-delay-usec 0For replicating large volumes to a slave in a remote location, it may be useful to do the initial replication to disks locally on a local area network (LAN), and then physically transport the disks to the remote location. This eliminates the need of doing the initial replication of the whole volume over a slower and more expensive wide area network (WAN) connection. The following procedure provides instructions for setting up a local geo-replication session, physically transporting the disks to the remote location, and then setting up geo-replication over a WAN.
Initially Replicating to a Remote Slave Locally using a LAN
- Create a geo-replication session locally within the LAN. For information on creating a geo-replication session, see Section 10.3.4.1, “Setting Up your Environment for Geo-replication Session”.
Important
You must remember the order in which the bricks/disks are specified when creating the slave volume. This information is required later for configuring the remote geo-replication session over the WAN. - Ensure that the initial data on the master is synced to the slave volume. You can verify the status of the synchronization by using the
statuscommand, as shown in Section 10.4.3, “Displaying Geo-replication Status Information”. - Stop and delete the geo-replication session.For information on stopping and deleting the the geo-replication session, see Section 10.4.5, “Stopping a Geo-replication Session” and Section 10.4.6, “Deleting a Geo-replication Session”.
Important
You must ensure that there are no stale files in/var/lib/glusterd/geo-replication/. - Stop and delete the slave volume.For information on stopping and deleting the volume, see Section 11.13, “Stopping Volumes” and Section 11.14, “Deleting Volumes”.
- Remove the disks from the slave nodes, and physically transport them to the remote location. Make sure to remember the order in which the disks were specified in the volume.
- At the remote location, attach the disks and mount them on the slave nodes. Make sure that the file system or logical volume manager is recognized, and that the data is accessible after mounting it.
- Configure a trusted storage pool for the slave using the
peer probecommand.For information on configuring a trusted storage pool, see Chapter 4, Adding Servers to the Trusted Storage Pool. - Delete the glusterFS-related attributes on the bricks. This should be done before creating the volume. You can remove the glusterFS-related attributes by running the following command:
# for i in `getfattr -d -m . ABSOLUTE_PATH_TO_BRICK 2>/dev/null | grep trusted | awk -F = '{print $1}'`; do setfattr -x $i ABSOLUTE_PATH_TO_BRICK; doneRun the following command to ensure that there are noxattrsstill set on the brick:# getfattr -d -m . ABSOLUTE_PATH_TO_BRICK - After creating the trusted storage pool, create the Red Hat Gluster Storage volume with the same configuration that it had when it was on the LAN. For information on creating volumes, see Chapter 5, Setting Up Storage Volumes.
Important
Make sure to specify the bricks in same order as they were previously when on the LAN. A mismatch in the specification of the brick order may lead to data loss or corruption. - Start and mount the volume, and check if the data is intact and accessible.For information on starting and mounting volumes, see Section 5.10, “Starting Volumes” and Chapter 6, Creating Access to Volumes.
- Configure the environment and create a geo-replication session from the master to this remote slave.For information on configuring the environment and creating a geo-replication session, see Section 10.3.4.1, “Setting Up your Environment for Geo-replication Session”.
- Start the geo-replication session between the master and the remote slave.For information on starting the geo-replication session, see Section 10.4, “Starting Geo-replication”.
- Use the
statuscommand to verify the status of the session, and check if all the nodes in the session are stable.For information on thestatus, see Section 10.4.3, “Displaying Geo-replication Status Information”.
10.12. Troubleshooting Geo-replication
10.12.1. Tuning Geo-replication performance with Change Log
rollover-time option sets the rate at which the change log is consumed. The default rollover time is 15 seconds, but it can be configured to a faster rate. A recommended rollover-time for geo-replication is 10-15 seconds. To change the rollover-time option, use following the command:
# gluster volume set VOLNAME rollover-time 15fsync-interval option determines the frequency that updates to the change log are written to disk. The default interval is 5, which means that updates to the change log are written synchronously as they occur, and this may negatively impact performance in a geo-replication environment. Configuring fsync-interval to a non-zero value will write updates to disk asynchronously at the specified interval. To change the fsync-interval option, use following the command:
# gluster volume set VOLNAME fsync-interval 510.12.2. Triggering Explicit Sync on Entries
glusterfs.geo-rep.trigger-sync is provided to accomplish the same.
# setfattr -n glusterfs.geo-rep.trigger-sync -v "1" <file-path>10.12.3. Synchronization Is Not Complete
The geo-replication status is displayed as Stable, but the data has not been completely synchronized.
A full synchronization of the data can be performed by erasing the index and restarting geo-replication. After restarting geo-replication, it will begin a synchronization of the data using checksums. This may be a long and resource intensive process on large data sets. If the issue persists, contact Red Hat Support.
10.12.4. Issues with File Synchronization
The geo-replication status is displayed as Stable, but only directories and symlinks are synchronized. Error messages similar to the following are in the logs:
[2011-05-02 13:42:13.467644] E [master:288:regjob] GMaster: failed to sync ./some_file`
Geo-replication requires rsync v3.0.0 or higher on the host and the remote machines. Verify if you have installed the required version of rsync.
10.12.5. Geo-replication Status is Often Faulty
The geo-replication status is often displayed as Faulty, with a backtrace similar to the following:
012-09-28 14:06:18.378859] E [syncdutils:131:log_raise_exception] <top>: FAIL: Traceback (most recent call last): File "/usr/local/libexec/glusterfs/python/syncdaemon/syncdutils.py", line 152, in twraptf(*aa) File "/usr/local/libexec/glusterfs/python/syncdaemon/repce.py", line 118, in listen rid, exc, res = recv(self.inf) File "/usr/local/libexec/glusterfs/python/syncdaemon/repce.py", line 42, in recv return pickle.load(inf) EOFErrorThis usually indicates that RPC communication between the master gsyncd module and slave gsyncd module is broken. Make sure that the following prerequisites are met:
- Key-based SSH authentication is set up properly between the host and remote machines.
- FUSE is installed on the machines. The geo-replication module mounts Red Hat Gluster Storage volumes using FUSE to sync data.
10.12.6. Intermediate Master is in a Faulty State
In a cascading environment, the intermediate master is in a faulty state, and messages similar to the following are in the log:
raise RuntimeError ("aborting on uuid change from %s to %s" % \ RuntimeError: aborting on uuid change from af07e07c-427f-4586-ab9f- 4bf7d299be81 to de6b5040-8f4e-4575-8831-c4f55bd41154
In a cascading configuration, an intermediate master is loyal to its original primary master. The above log message indicates that the geo-replication module has detected that the primary master has changed. If this change was deliberate, delete the volume-id configuration option in the session that was initiated from the intermediate master.
10.12.7. Remote gsyncd Not Found
The master is in a faulty state, and messages similar to the following are in the log:
[2012-04-04 03:41:40.324496] E [resource:169:errfail] Popen: ssh> bash: /usr/local/libexec/glusterfs/gsyncd: No such file or directoryThe steps to configure a SSH connection for geo-replication have been updated. Use the steps as described in Section 10.3.4.1, “Setting Up your Environment for Geo-replication Session”
Chapter 11. Managing Red Hat Gluster Storage Volumes
11.1. Configuring Volume Options
Note
# gluster volume info VOLNAME# gluster volume set VOLNAME OPTION PARAMETERtest-volume:
# gluster volume set test-volume performance.cache-size 256MB
volume set: success# gluster volume reset VOLNAME OPTION_NAMEchangelog option for test-volume:
# gluster volume reset test-volume changelog
volume set: success11.2. Setting Multiple Volume Option
Creating a group configuration file
- Create a new file in the
/var/lib/glusterd/groups/directory.# touch /var/lib/glusterd/groups/filename - Add the parameters and values that you want to set on the volume to the created file as key-value pairs, placing each parameter on a new line:
domain1.key1=value1 domain1.key2=value2 domain2.key3=value3For example,changelog.changelog=on client.event-threads=6 cluster.brick-multiplex=on
Adding configurations to volumes
# gluster volume set volname group filename# gluster volume set volume1 group virt
# gluster volume set volume2 group virt
# gluster volume set volume3 group dbgroupNote
11.3. Supported Volume Options
Important
| Option | Value Description | Allowed Values | Default Value |
|---|---|---|---|
| auth.allow | IP addresses or hostnames of the clients which are allowed to access the volume. | Valid hostnames or IP addresses, which includes wild card patterns including *. For example, 192.168.1.*. A list of comma separated addresses is acceptable, but a single hostname must not exceed 256 characters. | * (allow all) |
| auth.reject |
IP addresses or hostnames of FUSE clients that are denied access to a volume. For NFS access control, use
nfs.rpc-auth-* options instead.
Auth.reject takes precedence and overrides auth.allow. If auth.allow and auth.reject contain the same IP address then auth.reject is considered.
| Valid hostnames or IP addresses, which includes wild card patterns including *. For example, 192.168.1.*. A list of comma separated addresses is acceptable, but a single hostname must not exceed 256 characters. | none (reject none) |
| changelog | Enables the changelog translator to record all the file operations. | on | off | off |
| client.event-threads | Specifies the number of network connections to be handled simultaneously by the client processes accessing a Red Hat Gluster Storage node. | 1 - 32 | 2 |
| client.strict-locks | With this option enabled, it do not reopen the saved fds after reconnect if POSIX locks are held on them. Hence, subsequent operations on these fds are failed. This is necessary for stricter lock compliance as bricks cleanup any granted locks when a client disconnects. | on | off | off |
| Important
Before enabling client.strict-locks option, upgrade all the servers and clients to RHGS-3.5.5.
| |||
| cluster.background-self-heal-count | The maximum number of heal operations that can occur simultaneously. Requests in excess of this number are stored in a queue whose length is defined by cluster.heal-wait-queue-leng. | 0–256 | 8 |
| cluster.brick-multiplex |
Available as of Red Hat Gluster Storage 3.3 and later. Controls whether to use brick multiplexing on all volumes. Red Hat recommends restarting volumes after enabling or disabling brick multiplexing. When set to
off (the default), each brick has its own process and uses its own port. When set to on, bricks that are compatible with each other use the same process and the same port. This reduces per-brick memory usage and port consumption.
Brick compatibility is determined at volume start, and depends on volume options shared between bricks. When multiplexing is enabled, restart volumes whenever volume configuration is changed in order to maintain the compatibility of the bricks grouped under a single process.
| on | off | off |
| cluster.consistent-metadata |
If set to
on, the readdirp function in Automatic File Replication feature will always fetch metadata from their respective read children as long as it holds the good copy (the copy that does not need healing) of the file/directory. However, this could cause a reduction in performance where readdirps are involved.
This option requires that the volume is remounted on the client to take effect.
| on | off | off |
| cluster.granular-entry-heal |
If set to enable, stores more granular information about the entries which were created or deleted from a directory while a brick in a replica was down. This helps in faster self-heal of directories, especially in use cases where directories with large number of entries are modified by creating or deleting entries. If set to disable, it only stores that the directory needs heal without information about what entries within the directories need to be healed, and thereby requires entire directory crawl to identify the changes.
| enable | disable | enable |
| Important
Execute the gluster volume set VOLNAME cluster.granular-entry-heal [enable | disable] command only if the volume is in Created state. If the volume is in any other state other than Created, for example, Started, Stopped, and so on, execute gluster volume heal VOLNAME granular-entry-heal [enable | disable] command to enable or disable granular-entry-heal option.
Important
For new deployments and existing deployments that upgrade to Red Hat Gluster Storage 3.5.4, the cluster.granular-entry-heal option is enabled by default for the replicate volumes.
| |||
| cluster.heal-wait-queue-leng | The maximum number of requests for heal operations that can be queued when heal operations equal to cluster.background-self-heal-count are already in progress. If more heal requests are made when this queue is full, those heal requests are ignored. | 0-10000 | 128 |
| cluster.lookup-optimize |
If this option is set to
on, when a hashed sub-volume does not return a lookup result, negative lookups are optimized by not continuing to look on non-hashed subvolumes.
For existing volumes, any directories created after the upgrade will have lookup-optimize behavior enabled. Rebalance operation has to be performed on all existing directories before they can use the lookup optimization.
For new volumes, the lookup-optimize behavior is enabled by default, except for the root of the volume. Run a rebalance operation in order to enable lookup-optimize for the root of the volume.
| on|off | on (Red Hat Gluster Storage 3.4 onwards) |
| cluster.max-bricks-per-process |
The maximum number of bricks that can run on a single instance of glusterfsd process.
As of Red Hat Gluster Storage 3.4 Batch 2 Update, the default value of this option is set to
250. This provides better control of resource usage for container-based workloads. In earlier versions, the default value was 0, which used a single process for all bricks on the node.
Updating the value of this option does not affect currently running bricks. Restart the volume to change this setting for existing bricks.
| 0 to system maximum (any positive integer greater than 1) | 250 |
| cluster.min-free-disk | Specifies the percentage of disk space that must be kept free. This may be useful for non-uniform bricks. | Percentage of required minimum free disk space. | 10% |
| cluster.op-version | Allows you to set the operating version of the cluster. The op-version number cannot be downgraded and is set for all volumes in the cluster. The op-version is not listed as part of gluster volume info command output. | 30708 | 30712 | 31001 | 31101 | 31302 | 31303 | 31304 | 31305 | 31306 | 70200 | Default value depends on Red Hat Gluster Storage version first installed. For Red Hat Gluster Storage 3.5 the value is set to 70200 for a new deployment. |
| cluster.read-freq-threshold | Specifies the number of reads, in a promotion/demotion cycle, that would mark a file HOT for promotion. Any file that has read hits less than this value will be considered as COLD and will be demoted. | 0-20 | 0 |
| cluster.self-heal-daemon | Specifies whether proactive self-healing on replicated volumes is activated. | on | off | on |
| cluster.server-quorum-ratio | Sets the quorum percentage for the trusted storage pool. | 0 - 100 | >50% |
| cluster.server-quorum-type | If set to server, this option enables the specified volume to participate in the server-side quorum. For more information on configuring the server-side quorum, see Section 11.15.1.1, “Configuring Server-Side Quorum” | none | server | none |
| cluster.quorum-count | Specifies the minimum number of bricks that must be available in order for writes to be allowed. This is set on a per-volume basis. This option is used by the cluster.quorum-type option to determine write behavior. | Valid values are between 1 and the number of bricks in a replica set. | null |
| cluster.quorum-type | Determines when the client is allowed to write to a volume. For more information on configuring the client-side quorum, see Section 11.15.1.2, “Configuring Client-Side Quorum” | none | fixed | auto | auto |
| cluster.shd-max-threads | Specifies the number of entries that can be self healed in parallel on each replica by self-heal daemon. | 1 - 64 | 1 |
| cluster.shd-max-threads | Specifies the number of entries that can be self healed in parallel on each replica by self-heal daemon. | 1 - 64 | 1 |
| cluster.shd-wait-qlength | Specifies the number of entries that must be kept in the queue for self-heal daemon threads to take up as soon as any of the threads are free to heal. This value should be changed based on how much memory self-heal daemon process can use for keeping the next set of entries that need to be healed. | 1 - 655536 | 1024 |
| cluster.shd-wait-qlength | Specifies the number of entries that must be kept in the dispersed subvolume's queue for self-heal daemon threads to take up as soon as any of the threads are free to heal. This value should be changed based on how much memory self-heal daemon process can use for keeping the next set of entries that need to be healed. | 1 - 655536 | 1024 |
| cluster.tier-demote-frequency | Specifies how frequently the tier daemon must check for files to demote. | 1 - 172800 seconds | 3600 seconds |
| cluster.tier-max-files | Specifies the maximum number of files that may be migrated in any direction from each node in a given cycle. | 1-100000 files | 10000 |
| cluster.tier-max-mb | Specifies the maximum number of MB that may be migrated in any direction from each node in a given cycle. | 1 -100000 (100 GB) | 4000 MB |
| cluster.tier-mode | If set to cache mode, promotes or demotes files based on whether the cache is full or not, as specified with watermarks. If set to test mode, periodically demotes or promotes files automatically based on access. | test | cache | cache |
| cluster.tier-promote-frequency | Specifies how frequently the tier daemon must check for files to promote. | 1- 172800 seconds | 120 seconds |
| cluster.use-anonymous-inode | When enabled, handles entry heal related issues and heals the directory renames efficiently. | on|off | on (Red Hat Gluster Storage 3.5.4 onwards) |
| cluster.use-compound-fops | When enabled, write transactions that occur as part of Automatic File Replication are modified so that network round trips are reduced, improving performance. | on | off | off |
| cluster.watermark-hi | Upper percentage watermark for promotion. If hot tier fills above this percentage, no promotion will happen and demotion will happen with high probability. | 1- 99 % | 90% |
| cluster.watermark-low | Lower percentage watermark. If hot tier is less full than this, promotion will happen and demotion will not happen. If greater than this, promotion/demotion will happen at a probability relative to how full the hot tier is. | 1- 99 % | 75% |
| cluster.write-freq-threshold | Specifies the number of writes, in a promotion/demotion cycle, that would mark a file HOT for promotion. Any file that has write hits less than this value will be considered as COLD and will be demoted. | 0-20 | 0 |
| config.transport | Specifies the type of transport(s) volume would support communicating over. | tcp OR rdma OR tcp,rdma | tcp |
| diagnostics.brick-log-buf-size | The maximum number of unique log messages that can be suppressed until the timeout or buffer overflow, whichever occurs first on the bricks. | 0 and 20 (0 and 20 included) | 5 |
| diagnostics.brick-log-flush-timeout | The length of time for which the log messages are buffered, before being flushed to the logging infrastructure (gluster or syslog files) on the bricks. | 30 - 300 seconds (30 and 300 included) | 120 seconds |
| diagnostics.brick-log-format | Allows you to configure the log format to log either with a message id or without one on the brick. | no-msg-id | with-msg-id | with-msg-id |
| diagnostics.brick-log-level | Changes the log-level of the bricks. | INFO | DEBUG | WARNING | ERROR | CRITICAL | NONE | TRACE | info |
| diagnostics.brick-sys-log-level | Depending on the value defined for this option, log messages at and above the defined level are generated in the syslog and the brick log files. | INFO | WARNING | ERROR | CRITICAL | CRITICAL |
| diagnostics.client-log-buf-size | The maximum number of unique log messages that can be suppressed until the timeout or buffer overflow, whichever occurs first on the clients. | 0 and 20 (0 and 20 included) | 5 |
| diagnostics.client-log-flush-timeout | The length of time for which the log messages are buffered, before being flushed to the logging infrastructure (gluster or syslog files) on the clients. | 30 - 300 seconds (30 and 300 included) | 120 seconds |
| diagnostics.client-log-format | Allows you to configure the log format to log either with a message ID or without one on the client. | no-msg-id | with-msg-id | with-msg-id |
| diagnostics.client-log-level | Changes the log-level of the clients. | INFO | DEBUG | WARNING | ERROR | CRITICAL | NONE | TRACE | info |
| diagnostics.client-sys-log-level | Depending on the value defined for this option, log messages at and above the defined level are generated in the syslog and the client log files. | INFO | WARNING | ERROR | CRITICAL | CRITICAL |
| disperse.eager-lock | Before a file operation starts, a lock is placed on the file. The lock remains in place until the file operation is complete. After the file operation completes, if eager-lock is on, the lock remains in place either until lock contention is detected, or for 1 second in order to check if there is another request for that file from the same client. If eager-lock is off, locks release immediately after file operations complete, improving performance for some operations, but reducing access efficiency. | on | off | on |
| disperse.other-eager-lock | This option is equivalent to the disperse.eager-lock option but applicable only for non regular files. When multiple clients access a particular directory, disabling disperse.other-eager-lockoption for the volume can improve performance for directory access without compromising performance of I/O's for regular files. | on | off | on |
| disperse.other-eager-lock-timeout | Maximum time (in seconds) that a lock on a non regular entry is held if no new operations on the entry are received. | 0-60 | 1 |
| disperse.shd-max-threads | Specifies the number of entries that can be self healed in parallel on each disperse subvolume by self-heal daemon. | 1 - 64 | 1 |
| disperse.shd-wait-qlength | Specifies the number of entries that must be kept in the dispersed subvolume's queue for self-heal daemon threads to take up as soon as any of the threads are free to heal. This value should be changed based on how much memory self-heal daemon process can use for keeping the next set of entries that need to be healed. | 1 - 655536 | 1024 |
| features.ctr_link_consistency | Enables a crash consistent way of recording hardlink updates by Change Time Recorder translator. When recording in a crash consistent way the data operations will experience more latency. | on | off | off |
| features.ctr-enabled | Enables Change Time Recorder (CTR) translator for a tiered volume. This option is used in conjunction with features.record-counters option to enable recording write and read heat counters. | on | off | on |
| features.locks-notify-contention | When this option is enabled and a lock request conflicts with a currently granted lock, an upcall notification will be sent to the current owner of the lock to request it to be released as soon as possible. | yes | no | yes |
| features.locks-notify-contention-delay | This value determines the minimum amount of time (in seconds) between upcall contention notifications on the same inode. If multiple lock requests are received during this period, only one upcall will be sent. | 0-60 | 5 |
| features.quota-deem-statfs (Deprecated)
See Chapter 9, Managing Directory Quotas for more details.
| When this option is set to on, it takes the quota limits into consideration while estimating the filesystem size. The limit will be treated as the total size instead of the actual size of filesystem. | on | off | on |
| features.read-only | Specifies whether to mount the entire volume as read-only for all the clients accessing it. | on | off | off |
| features.record-counters | If set to enabled, cluster.write-freq-thresholdand cluster.read-freq-thresholdoptions defines the number of writes and reads to a given file that are needed before triggering migration. | on | off | on |
| features.shard | Enables or disables sharding on the volume. Affects files created after volume configuration. | enable | disable | disable |
| features.shard-block-size | Specifies the maximum size of file pieces when sharding is enabled. Affects files created after volume configuration. | 512MB | 512MB |
| geo-replication.indexing | Enables the marker translator to track the changes in the volume. | on | off | off |
| network.ping-timeout | The time the client waits for a response from the server. If a timeout occurs, all resources held by the server on behalf of the client are cleaned up. When the connection is reestablished, all resources need to be reacquired before the client can resume operations on the server. Additionally, locks are acquired and the lock tables are updated. A reconnect is a very expensive operation and must be avoided. | 42 seconds | 42 seconds |
| nfs.acl | Disabling nfs.acl will remove support for the NFSACL sideband protocol. This is enabled by default. | enable | disable | enable |
| nfs.addr-namelookup | Specifies whether to lookup names for incoming client connections. In some configurations, the name server can take too long to reply to DNS queries, resulting in timeouts of mount requests. This option can be used to disable name lookups during address authentication. Note that disabling name lookups will prevent you from using hostnames in nfs.rpc-auth-*options. | on | off | off |
| nfs.disable | Specifies whether to disable NFS exports of individual volumes. | on | off | off |
| nfs.enable-ino32 | For nfs clients or applciatons that do not support 64-bit inode numbers, use this option to make NFS return 32-bit inode numbers instead. Disabled by default, so NFS returns 64-bit inode numbers. This value is global and applies to all the volumes in the trusted storage pool. | enable | disable | disable |
| nfs.export-volumes | Enables or disables exporting entire volumes. If this option is disabled and the nfs.export-diroption is enabled, you can set subdirectories as the only exports. | on | off | on |
| nfs.mount-rmtab | Path to the cache file that contains a list of NFS-clients and the volumes they have mounted. Change the location of this file to a mounted (with glusterfs-fuse, on all storage servers) volume to gain a trusted pool wide view of all NFS-clients that use the volumes. The contents of this file provide the information that can get obtained with the showmount command. | Path to a directory | /var/lib/glusterd/nfs/rmtab |
| nfs.mount-udp | Enable UDP transport for the MOUNT sideband protocol. By default, UDP is not enabled, and MOUNT can only be used over TCP. Some NFS-clients (certain Solaris, HP-UX and others) do not support MOUNT over TCP and enabling nfs.mount-udpmakes it possible to use NFS exports provided by Red Hat Gluster Storage. | disable | enable | disable |
| nfs.nlm | By default, the Network Lock Manager (NLMv4) is enabled. Use this option to disable NLM. Red Hat does not recommend disabling this option. | on|off | on |
| nfs.port | Associates glusterFS NFS with a non-default port. | 1025-60999 | 38465- 38467 |
| nfs.ports-insecure | Allows client connections from unprivileged ports. By default only privileged ports are allowed. This is a global setting for allowing insecure ports for all exports using a single option. | on | off | off |
| nfs.rdirplus | The default value is on. When this option is turned off, NFS falls back to standard readdir instead of readdirp. Turning this off would result in more lookup and stat requests being sent from the client which may impact performance. | on|off | on |
| nfs.rpc-auth-allow IP_ADRESSES | A comma separated list of IP addresses allowed to connect to the server. By default, all clients are allowed. | Comma separated list of IP addresses | accept all |
| nfs.rpc-auth-reject IP_ADRESSES | A comma separated list of addresses not allowed to connect to the server. By default, all connections are allowed. | Comma separated list of IP addresses | reject none |
| nfs.server-aux-gids | When enabled, the NFS-server will resolve the groups of the user accessing the volume. NFSv3 is restricted by the RPC protocol (AUTH_UNIX/AUTH_SYS header) to 16 groups. By resolving the groups on the NFS-server, this limits can get by-passed. | on|off | off |
| nfs.transport-type | Specifies the transport used by GlusterFS NFS server to communicate with bricks. | tcp OR rdma | tcp |
| open-behind | It improves the application's ability to read data from a file by sending success notifications to the application whenever it receives an open call. | on | off | on |
| performance.cache-max-file-size | Sets the maximum file size cached by the io-cache translator. Can be specified using the normal size descriptors of KB, MB, GB, TB, or PB (for example, 6 GB). | Size in bytes, or specified using size descriptors. | 2 ^ 64-1 bytes |
| performance.cache-min-file-size | Sets the minimum file size cached by the io-cache translator. Can be specified using the normal size descriptors of KB, MB, GB, TB, or PB (for example, 6 GB). | Size in bytes, or specified using size descriptors. | 0 |
| performance.cache-refresh-timeout | The number of seconds cached data for a file will be retained. After this timeout, data re-validation will be performed. | 0 - 61 seconds | 1 second |
| performance.cache-size | Size of the read cache. | Size in bytes, or specified using size descriptors. | 32 MB |
| performance.client-io-threads | Improves performance for parallel I/O from a single mount point for dispersed (erasure-coded) volumes by allowing up to 16 threads to be used in parallel. When enabled, 1 thread is used by default, and further threads up to the maximum of 16 are created as required by client workload. This is useful for dispersed and distributed dispersed volumes. This feature is not recommended for distributed, replicated or distributed-replicated volumes. It is disabled by default on replicated and distributed-replicated volume types. | on | off | on, except for replicated and distributed-replicated volumes |
| performance.flush-behind | Specifies whether the write-behind translator performs flush operations in the background by returning (false) success to the application before flush file operations are sent to the backend file system. | on | off | on |
| performance.io-thread-count | The number of threads in the I/O threads translator. | 1 - 64 | 16 |
| performance.lazy-open | This option requires open-behind to be on. Perform an open in the backend only when a necessary file operation arrives (for example, write on the file descriptor, unlink of the file). When this option is disabled, perform backend open immediately after an unwinding open. | Yes/No | Yes |
| performance.md-cache-timeout | The time period in seconds which controls when metadata cache has to be refreshed. If the age of cache is greater than this time-period, it is refreshed. Every time cache is refreshed, its age is reset to 0. | 0-600 seconds | 1 second |
| performance.nfs-strict-write-ordering | Specifies whether to prevent later writes from overtaking earlier writes for NFS, even if the writes do not relate to the same files or locations. | on | off | off |
| performance.nfs.flush-behind | Specifies whether the write-behind translator performs flush operations in the background for NFS by returning (false) success to the application before flush file operations are sent to the backend file system. | on | off | on |
| performance.nfs.strict-o-direct | Specifies whether to attempt to minimize the cache effects of I/O for a file on NFS. When this option is enabled and a file descriptor is opened using the O_DIRECT flag, write-back caching is disabled for writes that affect that file descriptor. When this option is disabled, O_DIRECT has no effect on caching. This option is ignored if performance.write-behind is disabled. | on | off | off |
| performance.nfs.write-behind-trickling-writes | Enables and disables trickling-write strategy for the write-behind translator for NFS clients. | on | off | on |
| performance.nfs.write-behind-window-size | Specifies the size of the write-behind buffer for a single file or inode for NFS. | 512 KB - 1 GB | 1 MB |
| performance.quick-read | To enable/disable quick-read translator in the volume. | on | off | on |
| performance.rda-cache-limit | The value specified for this option is the maximum size of cache consumed by the readdir-ahead translator. This value is global and the total memory consumption by readdir-ahead is capped by this value, irrespective of the number/size of directories cached. | 0-1GB | 10MB |
| performance.rda-request-size | The value specified for this option will be the size of buffer holding directory entries in readdirp response. | 4KB-128KB | 128KB |
| performance.resync-failed-syncs-after-fsync | If syncing cached writes that were issued before an fsync operation fails, this option configures whether to reattempt the failed sync operations. | on | off | off |
| performance.strict-o-direct | Specifies whether to attempt to minimize the cache effects of I/O for a file. When this option is enabled and a file descriptor is opened using the O_DIRECT flag, write-back caching is disabled for writes that affect that file descriptor. When this option is disabled, O_DIRECT has no effect on caching. This option is ignored if performance.write-behind is disabled. | on | off | off |
| performance.strict-write-ordering | Specifies whether to prevent later writes from overtaking earlier writes, even if the writes do not relate to the same files or locations. | on | off | off |
| performance.use-anonymous-fd | This option requires open-behind to be on. For read operations, use anonymous file descriptor when the original file descriptor is open-behind and not yet opened in the backend. | Yes | No | Yes |
| performance.write-behind | Enables and disables write-behind translator. | on | off | on |
| performance.write-behind-trickling-writes | Enables and disables trickling-write strategy for the write-behind translator for FUSE clients. | on | off | on |
| performance.write-behind-window-size | Specifies the size of the write-behind buffer for a single file or inode. | 512 KB - 1 GB | 1 MB |
| rebal-throttle | Rebalance process is made multithreaded to handle multiple files migration for enhancing the performance. During multiple file migration, there can be a severe impact on storage system performance. The throttling mechanism is provided to manage it. | lazy, normal, aggressive | normal |
| server.allow-insecure | Allows FUSE-based client connections from unprivileged ports. By default, this is enabled, meaning that ports can accept and reject messages from insecure ports. When disabled, only privileged ports are allowed. This is a global setting for allowing insecure ports to be enabled for all FUSE-based exports using a single option. Use nfs.rpc-auth-* options for NFS access control. | on | off | on |
| server.anongid | Value of the GID used for the anonymous user when root-squash is enabled. When root-squash is enabled, all the requests received from the root GID (that is 0) are changed to have the GID of the anonymous user. | 0 - 4294967295 | 65534 (this UID is also known as nfsnobody) |
| server.anonuid | Value of the UID used for the anonymous user when root-squash is enabled. When root-squash is enabled, all the requests received from the root UID (that is 0) are changed to have the UID of the anonymous user. | 0 - 4294967295 | 65534 (this UID is also known as nfsnobody) |
| server.event-threads | Specifies the number of network connections to be handled simultaneously by the server processes hosting a Red Hat Gluster Storage node. | 1 - 32 | 1 |
| server.gid-timeout | The time period in seconds which controls when cached groups has to expire. This is the cache that contains the groups (GIDs) where a specified user (UID) belongs to. This option is used only when server.manage-gids is enabled. | 0-4294967295 seconds | 2 seconds |
| server.manage-gids | Resolve groups on the server-side. By enabling this option, the groups (GIDs) a user (UID) belongs to gets resolved on the server, instead of using the groups that were send in the RPC Call by the client. This option makes it possible to apply permission checks for users that belong to bigger group lists than the protocol supports (approximately 93). | on|off | off |
| server.root-squash | Prevents root users from having root privileges, and instead assigns them the privileges of nfsnobody. This squashes the power of the root users, preventing unauthorized modification of files on the Red Hat Gluster Storage servers. This option is used only for glusterFS NFS protocol. | on | off | off |
| server.statedump-path | Specifies the directory in which the statedumpfiles must be stored. | /var/run/gluster (for a default installation) | Path to a directory |
| ssl.crl-path | Specifies the path to a directory containing SSL certificate revocation list (CRL). This list helps the server nodes to stop the nodes with revoked certificates from accessing the cluster. | Absolute path of the directory hosting the CRL files. | null (No default value. Hence, it is blank until the volume option is set.) |
| storage.fips-mode-rchecksum | If enabled, posix_rchecksum uses the FIPS compliant SHA256 checksum, else it uses MD5. | on | off | on |
| Warning
Do not enable the storage.fips-mode-rchecksum option on volumes with clients that use Red Hat Gluster Storage 3.4 or earlier.
| |||
| storage.create-mask | Maximum set (upper limit) of permission for the files that will be created. | 0000 - 0777 | 0777 |
| storage. create-directory-mask | Maximum set (upper limit) of permission for the directories that will be created. | 0000 - 0777 | 0777 |
| storage.force-create-mode | Minimum set (lower limit) of permission for the files that will be created. | 0000 - 0777 | 0000 |
| storage.force-directory-mode | Minimum set (lower limit) of permission for the directories that will be created. | 0000 - 0777 | 0000 |
| Important
Behavior is undefined in terms of calculated file access mode when both a mask and a matching forced mode are set simultaneously, create-directory-mask and force-directory-mode or create-mask and force-create-mode.
| |||
| storage.health-check-interval | Sets the time interval in seconds for a filesystem health check. You can set it to 0 to disable. The POSIX translator on the bricks performs a periodic health check. If this check fails, the file system exported by the brick is not usable anymore and the brick process (glusterfsd) logs a warning and exits. | 0-4294967295 seconds | 30 seconds |
| storage.health-check-timeout | Sets the time interval in seconds to wait for aio_write to finish for health check. Set to 0 to disable. | 0-4294967295 seconds | 20 seconds |
| storage.owner-gid | Sets the GID for the bricks of the volume. This option may be required when some of the applications need the brick to have a specific GID to function correctly. Example: For QEMU integration the UID/GID must be qemu:qemu, that is, 107:107 (107 is the UID and GID of qemu). | Any integer greater than or equal to -1. | The GID of the bricks are not changed. This is denoted by -1. |
| storage.owner-uid | Sets the UID for the bricks of the volume. This option may be required when some of the applications need the brick to have a specific UID to function correctly. Example: For QEMU integration the UID/GID must be qemu:qemu, that is, 107:107 (107 is the UID and GID of qemu). | Any integer greater than or equal to -1. | The UID of the bricks are not changed. This is denoted by -1. |
| storage.reserve |
The POSIX translator includes an option that allow users to reserve disk space on the bricks. This option ensures that enough space is retained to allow users to expand disks or cluster when the bricks are nearly full. The option does this by preventing new file creation when the disk has the
storage.reserve percentage/size or less free space.
Storage.reserve accepts value either in form of percentage or in form of MB/GB. To reconfigure this volume option from MB/GB to percentage or percentage to MB/GB, make use of the same volume option. Also, the newest set value is considered.
If set to 0
storage.reserve is disabled
|
0-100% (applicable if parameter is percentage)
or
nKB/MB/GB (applicable when size is used as parameter), where 'n' is the positive integer that needs to be reserved.
Respective examples:
gluster volume set <vol-name> storage.reserve 15%
or
gluster volume set <vol-name> storage.reserve 100GB
| 1% (1% of the brick size) |
| Note
Be mindful of the brick size while setting the storage.reserve option in MB/GB. For example, in a case where the value for the volume option is >= brick size, the entire brick will be reserved.
The option works at sub-volume level.
| |||
| transport.listen-backlog | The maximum number of established TCP socket requests queued and waiting to be accepted at any one time. | 0 to system maximum | 1024 |
11.4. Configuring a volume to be mounted read-only
# gluster volume set volname read-only enable11.5. Configuring Transport Types for a Volume
- Unmount the volume on all the clients using the following command:
# umount mount-point - Stop the volumes using the following command:
# gluster volume stop volname Warning
Using RDMA as a transport protocol is considered deprecated in Red Hat Gluster Storage 3.5. Red Hat no longer recommends its use, and does not support it on new deployments and existing deployments that upgrade to Red Hat Gluster Storage 3.5.3.Change the transport type. For example, to enable both tcp and rdma execute the followimg command:# gluster volume set volname config.transport tcp,rdma OR tcp OR rdma- Mount the volume on all the clients. For example, to mount using rdma transport, use the following command:
# mount -t glusterfs -o transport=rdma server1:/test-volume /mnt/glusterfs
11.6. Reserving Storage on a Volume
# gluster volume set volname storage.reserve percentagestorage.reserve option either takes a percentage(%) suffixed value or an unsigned integer value suffixed with absolute units(KB, MB, GB etc). The default value for the option is 1%(1% of the brick size). If set to 0 this option is disabled.
Note
11.7. Expanding Volumes
Warning
Important
Expanding a Volume
- From any server in the trusted storage pool, use the following command to probe the server on which you want to add a new brick:
# gluster peer probe HOSTNAMEFor example:# gluster peer probe server5 Probe successful # gluster peer probe server6 Probe successful - Add the bricks using the following command:
# gluster volume add-brick VOLNAME NEW_BRICKFor example:# gluster volume add-brick test-volume server5:/rhgs/brick5/ server6:/rhgs/brick6/ Add Brick successful - Check the volume information using the following command:
# gluster volume infoThe command output displays information similar to the following:Volume Name: test-volume Type: Distribute-Replicate Status: Started Number of Bricks: 6 Bricks: Brick1: server1:/rhgs/brick1 Brick2: server2:/rhgs/brick2 Brick3: server3:/rhgs/brick3 Brick4: server4:/rhgs/brick4 Brick5: server5:/rhgs/brick5 Brick6: server6:/rhgs/brick6 - Rebalance the volume to ensure that files will be distributed to the new brick. Use the rebalance command as described in Section 11.11, “Rebalancing Volumes”.The
add-brickcommand should be followed by arebalanceoperation to ensure better utilization of the added bricks.
11.7.1. Expanding a Tiered Volume
Warning
11.7.1.1. Expanding a Cold Tier Volume
- Detach the tier by performing the steps listed in Section 16.7, “Detaching a Tier from a Volume (Deprecated)”
- From any server in the trusted storage pool, use the following command to probe the server on which you want to add a new brick :
# gluster peer probe HOSTNAMEFor example:# gluster peer probe server5 Probe successful # gluster peer probe server6 Probe successful - Add the bricks using the following command:
# gluster volume add-brick VOLNAME NEW_BRICKFor example:# gluster volume add-brick test-volume server5:/rhgs/brick5/ server6:/rhgs/brick6/ - Rebalance the volume to ensure that files will be distributed to the new brick. Use the rebalance command as described in Section 11.11, “Rebalancing Volumes”.The
add-brickcommand should be followed by arebalanceoperation to ensure better utilization of the added bricks. - Reattach the tier to the volume with both old and new (expanded) bricks:
# gluster volume tier VOLNAME attach [replica COUNT] NEW-BRICK...Important
When you reattach a tier, an internal process called fix-layout commences internally to prepare the hot tier for use. This process takes time and there will a delay in starting the tiering activities.If you are reusing the brick, be sure to clearly wipe the existing data before attaching it to the tiered volume.
11.7.1.2. Expanding a Hot Tier Volume
- Detach the tier by performing the steps listed in Section 16.7, “Detaching a Tier from a Volume (Deprecated)”
- Reattach the tier to the volume with both old and new (expanded) bricks:
# gluster volume tier VOLNAME attach [replica COUNT] NEW-BRICK...For example,# gluster volume tier test-volume attach replica 3 server1:/rhgs/tier5 server2:/rhgs/tier6 server1:/rhgs/tier7 server2:/rhgs/tier8Important
When you reattach a tier, an internal process called fix-layout commences internally to prepare the hot tier for use. This process takes time and there will a delay in starting the tiering activities.If you are reusing the brick, be sure to clearly wipe the existing data before attaching it to the tiered volume.
11.7.2. Expanding a Dispersed or Distributed-dispersed Volume
Note
Dispersed volume, it will be converted to a Distributed-Dispersed volume, and the existing dispersed volume will be treated as dispersed subvolume.
- From any server in the trusted storage pool, use the following command to probe the server on which you want to add new bricks:
# gluster peer probe HOSTNAMEFor example:# gluster peer probe server4 Probe successful # gluster peer probe server5 Probe successful # gluster peer probe server6 Probe successful - Add the bricks using the following command:
# gluster volume add-brick VOLNAME NEW_BRICKFor example:# gluster volume add-brick test-volume server4:/rhgs/brick7 server4:/rhgs/brick8 server5:/rhgs/brick9 server5:/rhgs/brick10 server6:/rhgs/brick11 server6:/rhgs/brick12 - (Optional) View the volume information after adding the bricks:
# gluster volume info VOLNAMEFor example:# gluster volume info test-volume Volume Name: test-volume Type: Distributed-Disperse Volume ID: 2be607f2-f961-4c4b-aa26-51dcb48b97df Status: Started Snapshot Count: 0 Number of Bricks: 2 x (4 + 2) = 12 Transport-type: tcp Bricks: Brick1: server1:/rhgs/brick1 Brick2: server1:/rhgs/brick2 Brick3: server2:/rhgs/brick3 Brick4: server2:/rhgs/brick4 Brick5: server3:/rhgs/brick5 Brick6: server3:/rhgs/brick6 Brick7: server4:/rhgs/brick7 Brick8: server4:/rhgs/brick8 Brick9: server5:/rhgs/brick9 Brick10: server5:/rhgs/brick10 Brick11: server6:/rhgs/brick11 Brick12: server6:/rhgs/brick12 Options Reconfigured: transport.address-family: inet performance.readdir-ahead: on nfs.disable: on - Rebalance the volume to ensure that the files will be distributed to the new brick. Use the rebalance command as described in Section 11.11, “Rebalancing Volumes”.The
add-brickcommand should be followed by arebalanceoperation to ensure better utilization of the added bricks.
11.7.3. Expanding Underlying Logical Volume
lvextend command.
Warning
# gluster volume status
# kill -9 brick-process-id- Stop all volumes using the brick with the following command:
# gluster volume stop VOLNAME - Check if new disk is visible using
lsblkcommand:# lsblk - Create new physical volume using following command:
# pvcreate /dev/PHYSICAL_VOLUME_NAME - Use the following command to verify if the physical volume is created:
# pvs - Extend the existing volume group:
# vgextend VOLUME_GROUP_NAME /dev/PHYSICAL_VOLUME_NAME - Use the following commands to check the size of volume group, and verify if it reflects the new addition:
# vgscan - Ensure the volume group created has enough space to extend the logical volume:
vgdisplay VOLUME_GROUP_NAMERetrieve the file system name using the following command:# df -h - Extend the logical volume using the following command:
# lvextend -L+nG /dev/mapper/ LOGICAL_VOLUME_NAME-VOLUME_GROUP_NAMEIn case of thin pool, extend the pool using the following command:# lvextend -L+nG VOLUME_GROUP_NAME/POOL_NAMEIn the above commands, n is the additional size in GB to be extended.Execute the#lvdisplaycommand to fetch the pool name.Use the following command to check if the logical volume is extended:# lvdisplay VOLUME_GROUP_NAME - Execute the following command to expand the filesystem to accommodate the extended logical volume:
# xfs_growfs /dev/VOLUME_GROUP_NAME/LOGICAL_VOLUME_NAME - Remount the file system using the following command:
# mount -o remount /dev/VOLUME_GROUP_NAME/LOGICAL_VOLUME_NAME /bricks/path_to_brick - Start all the volumes with
forceoption:# gluster volume start VOLNAME force
11.8. Shrinking Volumes
Shrinking a Volume
- Remove a brick using the following command:
# gluster volume remove-brick VOLNAME BRICK startFor example:# gluster volume remove-brick test-volume server2:/rhgs/brick2 start Remove Brick start successfulNote
If theremove-brickcommand is run withforceor without any option, the data on the brick that you are removing will no longer be accessible at the glusterFS mount point. When using thestartoption, the data is migrated to other bricks, and on a successful commit the removed brick's information is deleted from the volume configuration. Data can still be accessed directly on the brick. - You can view the status of the remove brick operation using the following command:
# gluster volume remove-brick VOLNAME BRICK statusFor example:# gluster volume remove-brick test-volume server2:/rhgs/brick2 status Node Rebalanced size scanned failures skipped status run time -files in h:m:s ---------- --------- ------ ------ -------- ------ --------- -------- localhost 5032 43.4MB 27715 0 5604 completed 0:15:05 10.70.43.41 0 0Bytes 0 0 0 completed 0:08:18 volume rebalance: test-volume: success - When the data migration shown in the previous
statuscommand is complete, run the following command to commit the brick removal:# gluster volume remove-brick VOLNAME BRICK commitFor example,# gluster volume remove-brick test-volume server2:/rhgs/brick2 commit - After the brick removal, you can check the volume information using the following command:
# gluster volume infoThe command displays information similar to the following:# gluster volume info Volume Name: test-volume Type: Distribute Status: Started Number of Bricks: 3 Bricks: Brick1: server1:/rhgs/brick1 Brick3: server3:/rhgs/brick3 Brick4: server4:/rhgs/brick4
11.8.1. Shrinking a Geo-replicated Volume
- Remove a brick using the following command:
# gluster volume remove-brick VOLNAME BRICK startFor example:# gluster volume remove-brick MASTER_VOL MASTER_HOST:/rhgs/brick2 start Remove Brick start successfulNote
If theremove-brickcommand is run withforceor without any option, the data on the brick that you are removing will no longer be accessible at the glusterFS mount point. When using thestartoption, the data is migrated to other bricks, and on a successful commit the removed brick's information is deleted from the volume configuration. Data can still be accessed directly on the brick. - Use geo-replication
config checkpointto ensure that all the data in that brick is synced to the slave.- Set a checkpoint to help verify the status of the data synchronization.
# gluster volume geo-replication MASTER_VOL SLAVE_HOST::SLAVE_VOL config checkpoint now - Verify the checkpoint completion for the geo-replication session using the following command:
# gluster volume geo-replication MASTER_VOL SLAVE_HOST::SLAVE_VOL status detail
- You can view the status of the remove brick operation using the following command:
# gluster volume remove-brick VOLNAME BRICK statusFor example:# gluster volume remove-brick MASTER_VOL MASTER_HOST:/rhgs/brick2 status - Stop the geo-replication session between the master and the slave:
# gluster volume geo-replication MASTER_VOL SLAVE_HOST::SLAVE_VOL stop - When the data migration shown in the previous
statuscommand is complete, run the following command to commit the brick removal:# gluster volume remove-brick VOLNAME BRICK commitFor example,# gluster volume remove-brick MASTER_VOL MASTER_HOST:/rhgs/brick2 commit - After the brick removal, you can check the volume information using the following command:
# gluster volume info - Start the geo-replication session between the hosts:
# gluster volume geo-replication MASTER_VOL SLAVE_HOST::SLAVE_VOL start
11.8.2. Shrinking a Tiered Volume
Warning
11.8.2.1. Shrinking a Cold Tier Volume
- Detach the tier by performing the steps listed in Section 16.7, “Detaching a Tier from a Volume (Deprecated)”
- Remove a brick using the following command:
# gluster volume remove-brick VOLNAME BRICK startFor example:# gluster volume remove-brick test-volume server2:/rhgs/brick2 start Remove Brick start successfulNote
If theremove-brickcommand is run withforceor without any option, the data on the brick that you are removing will no longer be accessible at the glusterFS mount point. When using thestartoption, the data is migrated to other bricks, and on a successful commit the removed brick's information is deleted from the volume configuration. Data can still be accessed directly on the brick. - You can view the status of the remove brick operation using the following command:
# gluster volume remove-brick VOLNAME BRICK statusFor example:# gluster volume remove-brick test-volume server2:/rhgs/brick2 status Node Rebalanced-files size scanned failures status --------- ----------- ----------- ----------- ----------- ------------ localhost 16 16777216 52 0 in progress 192.168.1.1 13 16723211 47 0 in progress - When the data migration shown in the previous
statuscommand is complete, run the following command to commit the brick removal:# gluster volume remove-brick VOLNAME BRICK commitFor example,# gluster volume remove-brick test-volume server2:/rhgs/brick2 commit - Rerun the attach-tier command only with the required set of bricks:
# gluster volume tier VOLNAME attach [replica COUNT] BRICK...For example,# gluster volume tier test-volume attach replica 3 server1:/rhgs/tier1 server2:/rhgs/tier2 server1:/rhgs/tier3 server2:/rhgs/tier4Important
When you attach a tier, an internal process called fix-layout commences internally to prepare the hot tier for use. This process takes time and there will a delay in starting the tiering activities.
11.8.2.2. Shrinking a Hot Tier Volume
- Detach the tier by performing the steps listed in Section 16.7, “Detaching a Tier from a Volume (Deprecated)”
- Rerun the attach-tier command only with the required set of bricks:
# gluster volume tier VOLNAME attach [replica COUNT] brick...Important
When you reattach a tier, an internal process called fix-layout commences internally to prepare the hot tier for use. This process takes time and there will a delay in starting the tiering activities.
11.8.3. Stopping a remove-brick Operation
remove-brick operation that is in progress can be stopped by using the stop command.
Note
remove-brick operation will not be migrated back to the same brick when the operation is stopped.
# gluster volume remove-brick VOLNAME BRICK stopgluster volume remove-brick test-volume server1:/rhgs/brick1/ server2:/brick2/ stop
Node Rebalanced-files size scanned failures skipped status run-time in secs
---- ------- ---- ---- ------ ----- ----- ------
localhost 23 376Bytes 34 0 0 stopped 2.00
rhs1 0 0Bytes 88 0 0 stopped 2.00
rhs2 0 0Bytes 0 0 0 not started 0.00
'remove-brick' process may be in the middle of a file migration.
The process will be fully stopped once the migration of the file is complete.
Please check remove-brick process for completion before doing any further brick related tasks on the volume.11.9. Migrating Volumes
Note
replace-brick operation, review the known issues related to replace-brick operation in the Red Hat Gluster Storage Release Notes.
11.9.1. Replacing a Subvolume on a Distribute or Distribute-replicate Volume
- Add the new bricks to the volume.
# gluster volume add-brick VOLNAME [replica <COUNT>] NEW-BRICKExample 11.1. Adding a Brick to a Distribute Volume
# gluster volume add-brick test-volume server5:/rhgs/brick5 Add Brick successful - Verify the volume information using the command:
# gluster volume info Volume Name: test-volume Type: Distribute Status: Started Number of Bricks: 5 Bricks: Brick1: server1:/rhgs/brick1 Brick2: server2:/rhgs/brick2 Brick3: server3:/rhgs/brick3 Brick4: server4:/rhgs/brick4 Brick5: server5:/rhgs/brick5Note
In case of a Distribute-replicate volume, you must specify the replica count in theadd-brickcommand and provide the same number of bricks as the replica count to theadd-brickcommand. - Remove the bricks to be replaced from the subvolume.
- Start the
remove-brickoperation using the command:# gluster volume remove-brick VOLNAME [replica <COUNT>] <BRICK> startExample 11.2. Start a remove-brick operation on a distribute volume
# gluster volume remove-brick test-volume server2:/rhgs/brick2 start Remove Brick start successful - View the status of the
remove-brickoperation using the command:# gluster volume remove-brick VOLNAME [replica <COUNT>] BRICK statusExample 11.3. View the Status of remove-brick Operation
# gluster volume remove-brick test-volume server2:/rhgs/brick2 status Node Rebalanced-files size scanned failures skipped status run-time in h:m:s ---- ------- ---- ---- ------ ----- ----- ------ server2 10045 204.9MB 73522 0 0 in progress 0:10:34 Estimated time left for rebalance to complete: 0:10:23Keep monitoring theremove-brickoperation status by executing the above command. In the above example, the estimated time for rebalance to complete is 10 minutes. When the value of the status field is set tocompletein the output ofremove-brickstatus command, proceed further. - Commit the
remove-brickoperation using the command:# gluster volume remove-brick VOLNAME [replica <COUNT>] <BRICK> commitExample 11.4. Commit the remove-brick Operation on a Distribute Volume
# gluster volume remove-brick test-volume server2:/rhgs/brick2 commit - Verify the volume information using the command:
# gluster volume info Volume Name: test-volume Type: Distribute Status: Started Number of Bricks: 4 Bricks: Brick1: server1:/rhgs/brick1 Brick3: server3:/rhgs/brick3 Brick4: server4:/rhgs/brick4 Brick5: server5:/rhgs/brick5 - Verify the content on the brick after committing the
remove-brickoperation on the volume. If there are any files leftover, copy it through FUSE or NFS mount.- Verify if there are any pending files on the bricks of the subvolume.Along with files, all the application-specific extended attributes must be copied. glusterFS also uses extended attributes to store its internal data. The extended attributes used by glusterFS are of the form
trusted.glusterfs.*,trusted.afr.*, andtrusted.gfid. Any extended attributes other than ones listed above must also be copied.To copy the application-specific extended attributes and to achieve a an effect similar to the one that is described above, use the following shell script:Syntax:# copy.sh <glusterfs-mount-point> <brick>Example 11.5. Code Snippet Usage
If the mount point is/mnt/glusterfsand brick path is/rhgs/brick1, then the script must be run as:# copy.sh /mnt/glusterfs /rhgs/brick1#!/bin/bash MOUNT=$1 BRICK=$2 for file in `find $BRICK ! -type d`; do rpath=`echo $file | sed -e "s#$BRICK\(.*\)#\1#g"` rdir=`dirname $rpath` cp -fv $file $MOUNT/$rdir; for xattr in `getfattr -e hex -m. -d $file 2>/dev/null | sed -e '/^#/d' | grep -v -E "trusted.glusterfs.*" | grep -v -E "trusted.afr.*" | grep -v "trusted.gfid"`; do key=`echo $xattr | cut -d"=" -f 1` value=`echo $xattr | cut -d"=" -f 2` setfattr $MOUNT/$rpath -n $key -v $value done done - To identify a list of files that are in a split-brain state, execute the command:
# gluster volume heal test-volume info split-brain - If there are any files listed in the output of the above command, compare the files across the bricks in a replica set, delete the bad files from the brick and retain the correct copy of the file. Manual intervention by the System Administrator would be required to choose the correct copy of file.
11.9.2. Replacing an Old Brick with a New Brick on a Replicate or Distribute-replicate Volume
- Ensure that the new brick (
server5:/rhgs/brick1) that replaces the old brick (server0:/rhgs/brick1) is empty. Ensure that all the bricks are online. The brick that must be replaced can be in an offline state. - Execute the
replace-brickcommand with theforceoption:# gluster volume replace-brick test-volume server0:/rhgs/brick1 server5:/rhgs/brick1 commit force volume replace-brick: success: replace-brick commit successful - Check if the new brick is online.
# gluster volume status Status of volume: test-volume Gluster process Port Online Pid --------------------------------------------------------- Brick server5:/rhgs/brick1 49156 Y 5731 Brick server1:/rhgs/brick1 49153 Y 5354 Brick server2:/rhgs/brick1 49154 Y 5365 Brick server3:/rhgs/brick1 49155 Y 5376 - Data on the newly added brick would automatically be healed. It might take time depending upon the amount of data to be healed. It is recommended to check heal information after replacing a brick to make sure all the data has been healed before replacing/removing any other brick.
# gluster volume heal VOL_NAME infoFor example:# gluster volume heal test-volume info Brick server5:/rhgs/brick1 Status: Connected Number of entries: 0 Brick server1:/rhgs/brick1 Status: Connected Number of entries: 0 Brick server2:/rhgs/brick1 Status: Connected Number of entries: 0 Brick server3:/rhgs/brick1 Status: Connected Number of entries: 0The value ofNumber of entriesfield will be displayed as zero if the heal is complete.
11.9.3. Replacing an Old Brick with a New Brick on a Distribute Volume
- Before making any changes, check the contents of the brick that you want to remove from the volume.
# ls /mount/point/OLDBRICK file1 file2 ... file5 - Add the new brick to the volume.
# gluster volume add-brick VOLNAME NEWSERVER:NEWBRICK - Start removing the old brick.
# gluster volume remove-brick VOLNAME OLDSERVER:OLDBRICK start - Wait until the remove-brick status command shows that the removal is complete.
# gluster volume remove-brick VOLNAME BRICK status Rebalanced run time Node files size scanned failures skipped status in secs -------------------------------------------------------------------------------- localhost 5 20Bytes 15 0 0 completed 0.00 - Finish removing the old brick.
# gluster volume remove-brick VOLNAME OLDSERVER:OLDBRICK commit - Verify that all files that were on the removed brick are still present on the volume.
11.9.4. Replacing an Old Brick with a New Brick on a Dispersed or Distributed-dispersed Volume
- Ensure that the new brick that replaces the old brick is empty. The brick that must be replaced can be in an offline state but all other bricks must be online.
- Execute the replace-brick command with the
forceoption:# gluster volume replace-brick VOL_NAME old_brick_path new_brick_path commit forceFor example:# gluster volume replace-brick test-volume server1:/rhgs/brick2 server1:/rhgs/brick2new commit force volume replace-brick: success: replace-brick commit successfulThe new brick you are adding could be from the same server or you can add a new server and then a new brick. - Check if the new brick is online.
# gluster volume status Status of volume: test-volume Gluster process TCP Port RDMA Port Online Pid ------------------------------------------------------------------------------ Brick server1:/rhgs/brick1 49187 0 Y 19927 Brick server1:/rhgs/brick2new 49188 0 Y 19946 Brick server2:/rhgs/brick3 49189 0 Y 19965 Brick server2:/rhgs/brick4 49190 0 Y 19984 Brick server3:/rhgs/brick5 49191 0 Y 20003 Brick server3:/rhgs/brick6 49192 0 Y 20022 NFS Server on localhost N/A N/A N N/A Self-heal Daemon on localhost N/A N/A Y 20043 Task Status of Volume test-volume ------------------------------------------------------------------------------ There are no active volume tasks - Data on the newly added brick would automatically be healed. It might take time depending upon the amount of data to be healed. It is recommended to check heal information after replacing a brick to make sure all the data has been healed before replacing/removing any other brick.
# gluster volume heal VOL_NAME infoFor example:# gluster volume heal test-volume info Brick server1:/rhgs/brick1 Status: Connected Number of entries: 0 Brick server1:/rhgs/brick2new Status: Connected Number of entries: 0 Brick server2:/rhgs/brick3 Status: Connected Number of entries: 0 Brick server2:/rhgs/brick4 Status: Connected Number of entries: 0 Brick server3:/rhgs/brick5 Status: Connected Number of entries: 0 Brick server3:/rhgs/brick6 Status: Connected Number of entries: 0The value ofNumber of entriesfield will be displayed as zero if the heal is complete. - Red Hat Gluster Storage 3.4 introduces the
summaryoption ofheal infocommand. This command displays the statistics of entries pending heal in split-brain and the entries undergoing healing. This command prints only the entry count and not the actual file-names or gfids.To get the summary of a volume, run the following command:# gluster volume heal VOLNAME info summaryFor example:# gluster volume heal test-volume info summary Command output: Brick 192.168.2.8:/brick/1 Status: Connected Total Number of entries: 363 Number of entries in heal pending: 362 Number of entries in split-brain: 0 Number of entries possibly healing: 1Note
The ‘summary’ option provides a detailed information about the brick unlike the ‘info’ command. The summary information is obtained in a similar way as the ‘info’ command.The --xml parameter provides the output of the summary option in XML format# gluster volume heal test-volume info summary --xml <?xml version="1.0" encoding="UTF-8" standalone="yes"?> <cliOutput> <healInfo< <bricks> <brick hostUuid="9105dd4b-eca8-4fdb-85b2-b81cdf77eda3"> <name>192.168.2.8:/brick/1</name> <status>Connected</status> <totalNumberOfEntries>363</totalNumberOfEntries> <numberOfEntriesInHealPending>362</numberOfEntriesInHealPending> <numberOfEntriesInSplitBrain>0</numberOfEntriesInSplitBrain> <numberOfEntriesPossiblyHealing>1</numberOfEntriesPossiblyHealing> </brick> </bricks> </healInfo> <opRet>0</opRet> <opErrno>0</opErrno> <opErrstr/> </cliOutput>
11.9.5. Reconfiguring a Brick in a Volume
reset-brick subcommand is useful when you want to reconfigure a brick rather than replace it. reset-brick lets you replace a brick with another brick of the same location and UUID. For example, if you initially configured bricks so that they were identified with a hostname, but you want to use that hostname somewhere else, you can use reset-brick to stop the brick, reconfigure it so that it is identified by an IP address instead of the hostname, and return the reconfigured brick to the cluster.
- Ensure that the quorum minimum will still be met when the brick that you want to reset is taken offline.
- If possible, Red Hat recommends stopping I/O, and verifying that no heal operations are pending on the volume.
- Run the following command to kill the brick that you want to reset.
# gluster volume reset-brick VOLNAME HOSTNAME:BRICKPATH start - Configure the offline brick according to your needs.
- Check that the volume's
Volume IDdisplayed bygluster volume infomatches thevolume-id(if any) of the offline brick.# gluster volume info VOLNAME # cat /var/lib/glusterd/vols/VOLNAME/VOLNAME.HOSTNAME.BRICKPATH.vol | grep volume-idFor example, in the following dispersed volume, theVolume IDand thevolume-idare bothab8a981a-a6d9-42f2-b8a5-0b28fe2c4548.# gluster volume info vol Volume Name: vol Type: Disperse Volume ID: ab8a981a-a6d9-42f2-b8a5-0b28fe2c4548 Status: Started Snapshot Count: 0 Number of Bricks: 1 x (4 + 2) = 6 Transport-type: tcp Bricks: Brick1: myhost:/brick/gluster/vol-1# cat /var/lib/glusterd/vols/vol/vol.myhost.brick-gluster-vol-1.vol | grep volume-id option volume-id ab8a981a-a6d9-42f2-b8a5-0b28fe2c4548 - Bring the reconfigured brick back online. There are two options for this:
- If your brick did not have a
volume-idin the previous step, run:# gluster volume reset-brick VOLNAME HOSTNAME:BRICKPATH HOSTNAME:BRICKPATH commit - If your brick's
volume-idmatches your volume's identifier, Red Hat recommends adding theforcekeyword to ensure that the operation succeeds.# gluster volume reset-brick VOLNAME HOSTNAME:BRICKPATH HOSTNAME:BRICKPATH commit force
11.10. Replacing Hosts
11.10.1. Replacing a Host Machine with a Different Hostname
server0.example.com and the replacement machine is server5.example.com. The brick with an unrecoverable failure is server0.example.com:/rhgs/brick1 and the replacement brick is server5.example.com:/rhgs/brick1.
- Stop the geo-replication session if configured by executing the following command.
# gluster volume geo-replication MASTER_VOL SLAVE_HOST::SLAVE_VOL stop force - Probe the new peer from one of the existing peers to bring it into the cluster.
# gluster peer probe server5.example.com - Ensure that the new brick
(server5.example.com:/rhgs/brick1)that is replacing the old brick(server0.example.com:/rhgs/brick1)is empty. - If the geo-replication session is configured, perform the following steps:
- Setup the geo-replication session by generating the ssh keys:
# gluster system:: execute gsec_create - Create geo-replication session again with
forceoption to distribute the keys from new nodes to Slave nodes.# gluster volume geo-replication MASTER_VOL SLAVE_HOST::SLAVE_VOL create push-pem force - After successfully setting up the shared storage volume, when a new node is replaced in the cluster, the shared storage is not mounted automatically on this node. Neither is the
/etc/fstabentry added for the shared storage on this node. To make use of shared storage on this node, execute the following commands:# mount -t glusterfs local node's ip:gluster_shared_storage /var/run/gluster/shared_storage # cp /etc/fstab /var/run/gluster/fstab.tmp # echo local node's ip:/gluster_shared_storage /var/run/gluster/shared_storage/ glusterfs defaults 0 0" >> /etc/fstabNote
With the release of 3.5 Batch Update 3, the mount point of shared storage is changed from /var/run/gluster/ to /run/gluster/ .For more information on setting up shared storage volume, see Section 11.12, “Setting up Shared Storage Volume”. - Configure the meta-volume for geo-replication:
# gluster volume geo-replication MASTER_VOL SLAVE_HOST::SLAVE_VOL config use_meta_volume trueFor more information on configuring meta-volume, see Section 10.3.5, “Configuring a Meta-Volume”.
- Retrieve the brick paths in
server0.example.comusing the following command:# gluster volume info <VOLNAME>Volume Name: vol Type: Replicate Volume ID: 0xde822e25ebd049ea83bfaa3c4be2b440 Status: Started Snap Volume: no Number of Bricks: 1 x 2 = 2 Transport-type: tcp Bricks: Brick1: server0.example.com:/rhgs/brick1 Brick2: server1.example.com:/rhgs/brick1 Options Reconfigured: cluster.granular-entry-heal: on performance.readdir-ahead: on snap-max-hard-limit: 256 snap-max-soft-limit: 90 auto-delete: disableBrick path inserver0.example.comis/rhgs/brick1. This has to be replaced with the brick in the newly added host,server5.example.com. - Create the required brick path in server5.example.com.For example, if /rhs/brick is the XFS mount point in server5.example.com, then create a brick directory in that path.
# mkdir /rhgs/brick1 - Execute the
replace-brickcommand with the force option:# gluster volume replace-brick vol server0.example.com:/rhgs/brick1 server5.example.com:/rhgs/brick1 commit force volume replace-brick: success: replace-brick commit successful - Verify that the new brick is online.
# gluster volume status Status of volume: vol Gluster process Port Online Pid Brick server5.example.com:/rhgs/brick1 49156 Y 5731 Brick server1.example.com:/rhgs/brick1 49153 Y 5354 - Initiate self-heal on the volume. The status of the heal process can be seen by executing the command:
# gluster volume heal VOLNAME - The status of the heal process can be seen by executing the command:
# gluster volume heal VOLNAME info - Detach the original machine from the trusted pool.
# gluster peer detach (server) All clients mounted through the peer which is getting detached need to be remounted, using one of the other active peers in the trusted storage pool, this ensures that the client gets notification on any changes done on the gluster configuration and if the same has been done do you want to proceed? (y/n) y peer detach: success - Ensure that after the self-heal completes, the extended attributes are set to zero on the other bricks in the replica.
# getfattr -d -m. -e hex /rhgs/brick1 getfattr: Removing leading '/' from absolute path names #file: rhgs/brick1 security.selinux=0x756e636f6e66696e65645f753a6f626a6563745f723a66696c655f743a733000 trusted.afr.vol-client-0=0x000000000000000000000000 trusted.afr.vol-client-1=0x000000000000000000000000 trusted.gfid=0x00000000000000000000000000000001 trusted.glusterfs.dht=0x0000000100000000000000007ffffffe trusted.glusterfs.volume-id=0xde822e25ebd049ea83bfaa3c4be2b440In this example, the extended attributestrusted.afr.vol-client-0andtrusted.afr.vol-client-1have zero values. This means that the data on the two bricks is identical. If these attributes are not zero after self-heal is completed, the data has not been synchronised correctly. - Start the geo-replication session using
forceoption:# gluster volume geo-replication MASTER_VOL SLAVE_HOST::SLAVE_VOL start force
11.10.2. Replacing a Host Machine with the Same Hostname
/var/lib/glusterd/glusterd.info file.
- Stop the geo-replication session if configured by executing the following command.
# gluster volume geo-replication MASTER_VOL SLAVE_HOST::SLAVE_VOL stop force - Stop the
glusterdservice on the server0.example.com.On RHEL 7 and RHEL 8, runOn RHEL 6, run# systemctl stop glusterd# service glusterd stopImportant
Red Hat Gluster Storage is not supported on Red Hat Enterprise Linux 6 (RHEL 6) from 3.5 Batch Update 1 onwards. See Version Details table in section Red Hat Gluster Storage Software Components and Versions of the Installation Guide - Retrieve the UUID of the failed host (server0.example.com) from another of the Red Hat Gluster Storage Trusted Storage Pool by executing the following command:
# gluster peer status Number of Peers: 2 Hostname: server1.example.com Uuid: 1d9677dc-6159-405e-9319-ad85ec030880 State: Peer in Cluster (Connected) Hostname: server0.example.com Uuid: b5ab2ec3-5411-45fa-a30f-43bd04caf96b State: Peer Rejected (Connected)Note that the UUID of the failed host isb5ab2ec3-5411-45fa-a30f-43bd04caf96b - Edit the
glusterd.infofile in the new host and include the UUID of the host you retrieved in the previous step.# cat /var/lib/glusterd/glusterd.info UUID=b5ab2ec3-5411-45fa-a30f-43bd04caf96b operating-version=30703Note
The operating version of this node must be same as in other nodes of the trusted storage pool. - Select any host (say for example, server1.example.com) in the Red Hat Gluster Storage Trusted Storage Pool and retrieve its UUID from the
glusterd.infofile.# grep -i uuid /var/lib/glusterd/glusterd.info UUID=8cc6377d-0153-4540-b965-a4015494461c - Gather the peer information files from the host (server1.example.com) in the previous step. Execute the following command in that host (server1.example.com) of the cluster.
# cp -a /var/lib/glusterd/peers /tmp/ - Remove the peer file corresponding to the failed host (server0.example.com) from the
/tmp/peersdirectory.# rm /tmp/peers/b5ab2ec3-5411-45fa-a30f-43bd04caf96bNote that the UUID corresponds to the UUID of the failed host (server0.example.com) retrieved in Step 3. - Archive all the files and copy those to the failed host(server0.example.com).
# cd /tmp; tar -cvf peers.tar peers - Copy the above created file to the new peer.
# scp /tmp/peers.tar root@server0.example.com:/tmp - Copy the extracted content to the
/var/lib/glusterd/peersdirectory. Execute the following command in the newly added host with the same name (server0.example.com) and IP Address.# tar -xvf /tmp/peers.tar # cp peers/* /var/lib/glusterd/peers/ - Select any other host in the cluster other than the node (server1.example.com) selected in step 5. Copy the peer file corresponding to the UUID of the host retrieved in Step 5 to the new host (server0.example.com) by executing the following command:
# scp /var/lib/glusterd/peers/<UUID-retrieved-from-step5> root@Example1:/var/lib/glusterd/peers/ - Start the
glusterdservice.# systemctl start glusterd - If new brick has same hostname and same path, refer to Section 11.9.5, “Reconfiguring a Brick in a Volume”, and if it has different hostname and different brick path for replicated volumes then, refer to Section 11.9.2, “Replacing an Old Brick with a New Brick on a Replicate or Distribute-replicate Volume”.
- In case of disperse volumes, when a new brick has different hostname and different brick path then, refer to Section 11.9.4, “Replacing an Old Brick with a New Brick on a Dispersed or Distributed-dispersed Volume”.
- Perform the self-heal operation on the restored volume.
# gluster volume heal VOLNAME - You can view the gluster volume self-heal status by executing the following command:
# gluster volume heal VOLNAME info - If the geo-replication session is configured, perform the following steps:
- Setup the geo-replication session by generating the ssh keys:
# gluster system:: execute gsec_create - Create geo-replication session again with
forceoption to distribute the keys from new nodes to Slave nodes.# gluster volume geo-replication MASTER_VOL SLAVE_HOST::SLAVE_VOL create push-pem force - After successfully setting up the shared storage volume, when a new node is replaced in the cluster, the shared storage is not mounted automatically on this node. Neither is the
/etc/fstabentry added for the shared storage on this node. To make use of shared storage on this node, execute the following commands:# mount -t glusterfs <local node's ip>:gluster_shared_storage /var/run/gluster/shared_storage # cp /etc/fstab /var/run/gluster/fstab.tmp # echo "<local node's ip>:/gluster_shared_storage /var/run/gluster/shared_storage/ glusterfs defaults 0 0" >> /etc/fstabNote
With the release of 3.5 Batch Update 3, the mount point of shared storage is changed from /var/run/gluster/ to /run/gluster/ .For more information on setting up shared storage volume, see Section 11.12, “Setting up Shared Storage Volume”. - Configure the meta-volume for geo-replication:
# gluster volume geo-replication MASTER_VOL SLAVE_HOST::SLAVE_VOL config use_meta_volume true - Start the geo-replication session using
forceoption:# gluster volume geo-replication MASTER_VOL SLAVE_HOST::SLAVE_VOL start force
If there are only 2 hosts in the Red Hat Gluster Storage Trusted Storage Pool where the host server0.example.com must be replaced, perform the following steps:
- Stop the geo-replication session if configured by executing the following command:
# gluster volume geo-replication MASTER_VOL SLAVE_HOST::SLAVE_VOL stop force - Stop the
glusterdservice on server0.example.com.On RHEL 7 and RHEL 8, runOn RHEL 6, run# systemctl stop glusterd# service glusterd stopImportant
Red Hat Gluster Storage is not supported on Red Hat Enterprise Linux 6 (RHEL 6) from 3.5 Batch Update 1 onwards. See Version Details table in section Red Hat Gluster Storage Software Components and Versions of the Installation Guide - Retrieve the UUID of the failed host (server0.example.com) from another peer in the Red Hat Gluster Storage Trusted Storage Pool by executing the following command:
# gluster peer status Number of Peers: 1 Hostname: server0.example.com Uuid: b5ab2ec3-5411-45fa-a30f-43bd04caf96b State: Peer Rejected (Connected)Note that the UUID of the failed host isb5ab2ec3-5411-45fa-a30f-43bd04caf96b - Edit the
glusterd.infofile in the new host (server0.example.com) and include the UUID of the host you retrieved in the previous step.# cat /var/lib/glusterd/glusterd.info UUID=b5ab2ec3-5411-45fa-a30f-43bd04caf96b operating-version=30703Note
The operating version of this node must be same as in other nodes of the trusted storage pool. - Create the peer file in the newly created host (server0.example.com) in /var/lib/glusterd/peers/<uuid-of-other-peer> with the name of the UUID of the other host (server1.example.com).UUID of the host can be obtained with the following:
# gluster system:: uuid getExample 11.6. Example to obtain the UUID of a host
For example, # gluster system:: uuid get UUID: 1d9677dc-6159-405e-9319-ad85ec030880In this case the UUID of other peer is1d9677dc-6159-405e-9319-ad85ec030880 - Create a file
/var/lib/glusterd/peers/1d9677dc-6159-405e-9319-ad85ec030880in server0.example.com, with the following command:# touch /var/lib/glusterd/peers/1d9677dc-6159-405e-9319-ad85ec030880The file you create must contain the following information:UUID=<uuid-of-other-node> state=3 hostname=<hostname> - Continue to perform steps 12 to 18 as documented in the previous procedure.
11.11. Rebalancing Volumes
add-brick or remove-brick commands, the data on the volume needs to be rebalanced among the servers.
Note
rebalance operation using the start option. In a replicated volume, at least one of the bricks in the replica should be online.
# gluster volume rebalance VOLNAME start# gluster volume rebalance test-volume start
Starting rebalancing on volume test-volume has been successfulforce option, the rebalance command attempts to balance the space utilized across nodes. Files whose migration would cause the target node to have less available space than the source node are skipped. This results in linkto files being retained, which may cause slower access when a large number of linkto files are present.
Warning
Rebalance command can be executed with the force option even when the older clients are connected to the cluster. However, this could lead to a data loss situation.
rebalance operation with force, balances the data based on the layout, and hence optimizes or does away with the link files, but may lead to an imbalanced storage space used across bricks. This option is to be used only when there are a large number of link files in the system.
# gluster volume rebalance VOLNAME start force# gluster volume rebalance test-volume start force
Starting rebalancing on volume test-volume has been successful11.11.1. Rebalance Throttling
normal mode. Configure the throttling modes to adjust the rate at which the files must be migrated
# gluster volume set VOLNAME rebal-throttle lazy|normal|aggressive# gluster volume set test-volume rebal-throttle lazy11.11.2. Displaying Rebalance Progress
# gluster volume rebalance VOLNAME status# gluster volume rebalance test-volume status
Node Rebalanced size scanned failures skipped status run time
-files in h:m:s
------------- ---------- ------ ------- -------- ------- ----------- --------
localhost 71962 70.3GB 380852 0 0 in progress 2:02:20
server1 70489 68.8GB 502185 0 0 in progress 2:02:20
server2 70704 69.0GB 507728 0 0 in progress 2:02:20
server3 71819 70.1GB 435611 0 0 in progress 2:02:20
Estimated time left for rebalance to complete : 2:50:24
Important
| Property Name | Description |
|---|---|
| Node | The name of the node. |
| Rebalanced-files | The number of files that were successfully migrated. |
| size | The total size of the files that were migrated. |
| scanned | The number of files scanned on the node. This includes the files that were migrated. |
| failures | The number of files that could not be migrated because of errors. |
| skipped | The number of files which were skipped because of various errors or reasons. |
| status | The status of the rebalance operation on the node is in progress, completed, or failed. |
| run time in h:m:s | The amount of time for which the process has been running on the node. |
>2 months and the user is advised to check again later.
completed. For example:
# gluster volume rebalance test-volume status
Node Rebalanced size scanned failures skipped status run time
-files in h:m:s
---------- ---------- ----- ------- -------- ------- ----------- --------
node2 0 0Bytes 0 0 0 completed 0:02:23
node3 234 737.8KB 3350 0 257 completed 0:02:25
node4 3 14.6K 71 0 6 completed 0:00:02
localhost 317 1.1MB 3484 0 155 completed 0:02:38
volume rebalance: test-volume: successrebalance log with the message ID 109126. You can search for the message ID from the log file and get the list of all the skipped files:
# grep -i 109126 /var/log/glusterfs/test-volume-rebalance.log
[2018-03-15 09:14:30.203393] I [MSGID: 109126] [dht-rebalance.c:2715:gf_defrag_migrate_single_file] 0-test-volume-dht: File migration skipped for /linux-4.9.27/Documentation/ABI/stable/sysfs-fs-orangefs.
[2018-03-15 09:14:31.262969] I [MSGID: 109126] [dht-rebalance.c:2715:gf_defrag_migrate_single_file] 0-test-volume-dht: File migration skipped for /linux-4.9.27/Documentation/ABI/stable/sysfs-devices.
[2018-03-15 09:14:31.842631] I [MSGID: 109126] [dht-rebalance.c:2715:gf_defrag_migrate_single_file] 0-test-volume-dht: File migration skipped for /linux-4.9.27/Documentation/ABI/stable/sysfs-devices-system-cpu.
[2018-03-15 09:14:33.733728] I [MSGID: 109126] [dht-rebalance.c:2715:gf_defrag_migrate_single_file] 0-test-volume-dht: File migration skipped for /linux-4.9.27/Documentation/ABI/testing/sysfs-bus-fcoe.
[2018-03-15 09:14:35.576404] I [MSGID: 109126] [dht-rebalance.c:2715:gf_defrag_migrate_single_file] 0-test-volume-dht: File migration skipped for /linux-4.9.27/Documentation/ABI/testing/sysfs-bus-iio-frequency-ad9523.
[2018-03-15 09:14:43.378480] I [MSGID: 109126] [dht-rebalance.c:2715:gf_defrag_migrate_single_file] 0-test-volume-dht: File migration skipped for /linux-4.9.27/Documentation/DocBook/kgdb.tmpl.
11.11.3. Stopping a Rebalance Operation
# gluster volume rebalance VOLNAME stop# gluster volume rebalance test-volume stop
Node Rebalanced size scanned failures skipped status run time
-files in h:m:s
------------- ---------- ------- ------- -------- ------- ----------- --------
localhost 106504 104.0GB 558111 0 0 stopped 3:02:24
server1 102299 99.9GB 725239 0 0 stopped 3:02:24
server2 102264 99.9GB 737364 0 0 stopped 3:02:24
server3 106813 104.3GB 646581 0 0 stopped 3:02:24
Estimated time left for rebalance to complete : 2:06:3811.13. Stopping Volumes
# gluster volume stop VOLNAME# gluster volume stop test-volume
Stopping volume will make its data inaccessible. Do you want to continue? (y/n) y
Stopping volume test-volume has been successful11.14. Deleting Volumes
Important
/etc/fstab file after the volume has been deleted.
# gluster volume delete VOLNAME# gluster volume delete test-volume
Deleting volume will erase all information about the volume. Do you want to continue? (y/n) y
Deleting volume test-volume has been successful11.15. Managing Split-brain
- Data split-brain: Contents of the file under split-brain are different in different replica pairs and automatic healing is not possible.Red Hat allows the user to resolve Data split-brain from the mount point and from the CLI.For information on how to recover from data split-brain from the mount point, see Section 11.15.2.1, “ Recovering File Split-brain from the Mount Point”.For information on how to recover from data split-brain using CLIS, see Section 11.15.2.2, “Recovering File Split-brain from the gluster CLI”.
- Metadata split-brain: The metadata of the files like user defined extended attribute are different and automatic healing is not possible.Like Data split-brain, Metadata split-brain can also be resolved from both mount point and CLI.For information on how to recover from metadata split-brain from the mount point, see Section 11.15.2.1, “ Recovering File Split-brain from the Mount Point”.para>For information on how to recover from metadata split-brain using CLI, see Section 11.15.2.2, “Recovering File Split-brain from the gluster CLI”.
- Entry split-brain: Entry split-brain can be of two types:
- GlusterFS Internal File Identifier or GFID split-Brain: This happen when files or directories in different replica pairs have different GFIDs.
- Type Mismatch Split-Brain: This happen when the files/directories stored in replica pairs are of different types but with the same names.
Red Hat Gluster Storage 3.4 and later allows you to resolve GFID split-brain from gluster CLI. For more information, see Section 11.15.3, “Recovering GFID Split-brain from the gluster CLI”.You can resolve split-brain manually by inspecting the file contents from the backend and deciding which is the true copy (source) and modifying the appropriate extended attributes such that healing can happen automatically.
11.15.1. Preventing Split-brain
11.15.1.1. Configuring Server-Side Quorum
cluster.server-quorum-type volume option as server. For more information on this volume option, see Section 11.1, “Configuring Volume Options”.
glusterd service. Whenever the glusterd service on a machine observes that the quorum is not met, it brings down the bricks to prevent data split-brain. When the network connections are brought back up and the quorum is restored, the bricks in the volume are brought back up. When the quorum is not met for a volume, any commands that update the volume configuration or peer addition or detach are not allowed. It is to be noted that both, the glusterd service not running and the network connection between two machines being down are treated equally.
# gluster volume set all cluster.server-quorum-ratio PERCENTAGE# gluster volume set all cluster.server-quorum-ratio 51%# gluster volume set VOLNAME cluster.server-quorum-type serverImportant
11.15.1.2. Configuring Client-Side Quorum
Client-Side Quorum Options
- cluster.quorum-count
- The minimum number of bricks that must be available in order for writes to be allowed. This is set on a per-volume basis. Valid values are between
1and the number of bricks in a replica set. This option is used by thecluster.quorum-typeoption to determine write behavior.This option is used in conjunction withcluster.quorum-type =fixedoption to specify the number of bricks to be active to participate in quorum. If the quorum-type isautothen this option has no significance. - cluster.quorum-type
- Determines when the client is allowed to write to a volume. Valid values are
fixedandauto.Ifcluster.quorum-typeisfixed, writes are allowed as long as the number of bricks available in the replica set is greater than or equal to the value of thecluster.quorum-countoption.Ifcluster.quorum-typeisauto, writes are allowed when at least 50% of the bricks in a replica set are be available. In a replica set with an even number of bricks, if exactly 50% of the bricks are available, the first brick in the replica set must be available in order for writes to continue.In a three-way replication setup, it is recommended to setcluster.quorum-typetoautoto avoid split-brains. If the quorum is not met, the replica pair becomes read-only.
Example 11.7. Client-Side Quorum

A, only replica group A becomes read-only. Replica groups B and C continue to allow data modifications.
cluster.quorum-type and cluster.quorum-count options.
Important
gluster volume set VOLNAME group virt command. If on a two replica set up, if the first brick in the replica pair is offline, virtual machines will be paused because quorum is not met and writes are disallowed.
# gluster volume reset VOLNAME quorum-typeThis example provides information on how to set server-side and client-side quorum on a Distribute Replicate volume to avoid split-brain scenario. The configuration of this example has 3 X 3 ( 9 bricks) Distribute Replicate setup.
# gluster volume info testvol
Volume Name: testvol
Type: Distributed-Replicate
Volume ID: 0df52d58-bded-4e5d-ac37-4c82f7c89cfh
Status: Created
Number of Bricks: 3 x 3 = 9
Transport-type: tcp
Bricks:
Brick1: server1:/rhgs/brick1
Brick2: server2:/rhgs/brick2
Brick3: server3:/rhgs/brick3
Brick4: server4:/rhgs/brick4
Brick5: server5:/rhgs/brick5
Brick6: server6:/rhgs/brick6
Brick7: server7:/rhgs/brick7
Brick8: server8:/rhgs/brick8
Brick9: server9:/rhgs/brick9
# gluster volume set VOLNAME cluster.server-quorum-type server# gluster volume set all cluster.server-quorum-ratio 51%quorum-typeoption to auto to allow writes to the file only if the percentage of active replicate bricks is more than 50% of the total number of bricks that constitute that replica.
# gluster volume set VOLNAME quorum-type autoImportant
n) in a replica set is an even number, it is mandatory that the n/2 count must consist of the primary brick and it must be up and running. If n is an odd number, the n/2 count can have any brick up and running, that is, the primary brick need not be up and running to allow writes.
11.15.2. Recovering from File Split-brain
- See Section 11.15.2.1, “ Recovering File Split-brain from the Mount Point” for information on how to recover from data and meta-data split-brain from the mount point.
- See Section 11.15.2.2, “Recovering File Split-brain from the gluster CLI” for information on how to recover from data and meta-data split-brain using CLI
11.15.2.1. Recovering File Split-brain from the Mount Point
Steps to recover from a split-brain from the mount point
- You can use a set of
getfattrandsetfattrcommands to detect the data and meta-data split-brain status of a file and resolve split-brain from the mount point.Important
This process for split-brain resolution from mount will not work on NFS mounts as it does not provide extended attributes support.In this example, thetest-volumevolume has bricksbrick0,brick1,brick2andbrick3.# gluster volume info test-volume Volume Name: test-volume Type: Distributed-Replicate Status: Started Number of Bricks: 2 x 2 = 4 Transport-type: tcp Bricks: Brick1: test-host:/rhgs/brick0 Brick2: test-host:/rhgs/brick1 Brick3: test-host:/rhgs/brick2 Brick4: test-host:/rhgs/brick3Directory structure of the bricks is as follows:# tree -R /test/b? /rhgs/brick0 ├── dir │ └── a └── file100 /rhgs/brick1 ├── dir │ └── a └── file100 /rhgs/brick2 ├── dir ├── file1 ├── file2 └── file99 /rhgs/brick3 ├── dir ├── file1 ├── file2 └── file99In the following output, some of the files in the volume are in split-brain.# gluster volume heal test-volume info split-brain Brick test-host:/rhgs/brick0/ /file100 /dir Number of entries in split-brain: 2 Brick test-host:/rhgs/brick1/ /file100 /dir Number of entries in split-brain: 2 Brick test-host:/rhgs/brick2/ /file99 <gfid:5399a8d1-aee9-4653-bb7f-606df02b3696> Number of entries in split-brain: 2 Brick test-host:/rhgs/brick3/ <gfid:05c4b283-af58-48ed-999e-4d706c7b97d5> <gfid:5399a8d1-aee9-4653-bb7f-606df02b3696> Number of entries in split-brain: 2To know data or meta-data split-brain status of a file:# getfattr -n replica.split-brain-status <path-to-file>The above command executed from mount provides information if a file is in data or meta-data split-brain. This command is not applicable to entry/type-mismatch split-brain.For example,file100is in meta-data split-brain. Executing the above mentioned command forfile100gives :# getfattr -n replica.split-brain-status file100 # file: file100 replica.split-brain-status="data-split-brain:no metadata-split-brain:yes Choices:test-client-0,test-client-1"file1is in data split-brain.# getfattr -n replica.split-brain-status file1 # file: file1 replica.split-brain-status="data-split-brain:yes metadata-split-brain:no Choices:test-client-2,test-client-3"file99is in both data and meta-data split-brain.# getfattr -n replica.split-brain-status file99 # file: file99 replica.split-brain-status="data-split-brain:yes metadata-split-brain:yes Choices:test-client-2,test-client-3"diris inentry/type-mismatchsplit-brain but as mentioned earlier, the above command is does not display if the file is inentry/type-mismatchsplit-brain. Hence, the command displaysThe file is not under data or metadata split-brain. For information on resolving entry/type-mismatch split-brain, see Chapter 23, Manually Recovering File Split-brain .# getfattr -n replica.split-brain-status dir # file: dir replica.split-brain-status="The file is not under data or metadata split-brain"file2is not in any kind of split-brain.# getfattr -n replica.split-brain-status file2 # file: file2 replica.split-brain-status="The file is not under data or metadata split-brain"
- Analyze the files in data and meta-data split-brain and resolve the issue
When you perform operations like
cat,getfattr, and more from the mount on files in split-brain, it throws an input/output error. For further analyzing such files, you can usesetfattrcommand.# setfattr -n replica.split-brain-choice -v "choiceX" <path-to-file>Using this command, a particular brick can be chosen to access the file in split-brain.For example,file1is in data-split-brain and when you try to read from the file, it throws input/output error.# cat file1 cat: file1: Input/output errorSplit-brain choices provided for file1 weretest-client-2andtest-client-3.Settingtest-client-2as split-brain choice for file1 serves reads fromb2for the file.# setfattr -n replica.split-brain-choice -v test-client-2 file1Now, you can perform operations on the file. For example, read operations on the file:# cat file1 xyzSimilarly, to inspect the file from other choice,replica.split-brain-choiceis to be set totest-client-3.Trying to inspect the file from a wrong choice errors out. You can undo the split-brain-choice that has been set, the above mentionedsetfattrcommand can be used withnoneas the value for extended attribute.For example,# setfattr -n replica.split-brain-choice -v none file1Now performingcatoperation on the file will again result in input/output error, as before.# cat file cat: file1: Input/output errorAfter you decide which brick to use as a source for resolving the split-brain, it must be set for the healing to be done.# setfattr -n replica.split-brain-heal-finalize -v <heal-choice> <path-to-file>Example# setfattr -n replica.split-brain-heal-finalize -v test-client-2 file1The above process can be used to resolve data and/or meta-data split-brain on all the files.Setting the split-brain-choice on the fileAfter setting the split-brain-choice on the file, the file can be analyzed only for five minutes. If the duration of analyzing the file needs to be increased, use the following command and set the required time intimeout-in-minuteargument.# setfattr -n replica.split-brain-choice-timeout -v <timeout-in-minutes> <mount_point/file>This is a global timeout and is applicable to all files as long as the mount exists. The timeout need not be set each time a file needs to be inspected but for a new mount it will have to be set again for the first time. This option becomes invalid if the operations like add-brick or remove-brick are performed.Note
Iffopen-keep-cacheFUSE mount option is disabled, then inode must be invalidated each time before selecting a newreplica.split-brain-choiceto inspect a file using the following command:# setfattr -n inode-invalidate -v 0 <path-to-file>
11.15.2.2. Recovering File Split-brain from the gluster CLI
- Use bigger-file as source
- Use the file with latest mtime as source
- Use one replica as source for a particular file
- Use one replica as source for all files
Note
Theentry/type-mismatchsplit-brain resolution is not supported using CLI. For information on resolvingentry/type-mismatchsplit-brain, see Chapter 23, Manually Recovering File Split-brain .
This method is useful for per file healing and where you can decided that the file with bigger size is to be considered as source.
- Run the following command to obtain the list of files that are in split-brain:
# gluster volume heal VOLNAME info split-brainBrick <hostname:brickpath-b1> <gfid:aaca219f-0e25-4576-8689-3bfd93ca70c2> <gfid:39f301ae-4038-48c2-a889-7dac143e82dd> <gfid:c3c94de2-232d-4083-b534-5da17fc476ac> Number of entries in split-brain: 3 Brick <hostname:brickpath-b2> /dir/file1 /dir /file4 Number of entries in split-brain: 3From the command output, identify the files that are in split-brain.You can find the differences in the file size and md5 checksums by performing a stat and md5 checksums on the file from the bricks. The following is the stat and md5 checksum output of a file:On brick b1: # stat b1/dir/file1 File: ‘b1/dir/file1’ Size: 17 Blocks: 16 IO Block: 4096 regular file Device: fd03h/64771d Inode: 919362 Links: 2 Access: (0644/-rw-r--r--) Uid: ( 0/ root) Gid: ( 0/ root) Access: 2015-03-06 13:55:40.149897333 +0530 Modify: 2015-03-06 13:55:37.206880347 +0530 Change: 2015-03-06 13:55:37.206880347 +0530 Birth: - # md5sum b1/dir/file1 040751929ceabf77c3c0b3b662f341a8 b1/dir/file1 On brick b2: # stat b2/dir/file1 File: ‘b2/dir/file1’ Size: 13 Blocks: 16 IO Block: 4096 regular file Device: fd03h/64771d Inode: 919365 Links: 2 Access: (0644/-rw-r--r--) Uid: ( 0/ root) Gid: ( 0/ root) Access: 2015-03-06 13:54:22.974451898 +0530 Modify: 2015-03-06 13:52:22.910758923 +0530 Change: 2015-03-06 13:52:22.910758923 +0530 Birth: - # md5sum b2/dir/file1 cb11635a45d45668a403145059c2a0d5 b2/dir/file1You can notice the differences in the file size and md5 checksums. - Execute the following command along with the full file name as seen from the root of the volume (or) the gfid-string representation of the file, which is displayed in the heal info command's output.
# gluster volume heal <VOLNAME> split-brain bigger-file <FILE>For example,# gluster volume heal test-volume split-brain bigger-file /dir/file1 Healed /dir/file1.
On brick b1:
# stat b1/dir/file1
File: ‘b1/dir/file1’
Size: 17 Blocks: 16 IO Block: 4096 regular file
Device: fd03h/64771d Inode: 919362 Links: 2
Access: (0644/-rw-r--r--) Uid: ( 0/ root) Gid: ( 0/ root)
Access: 2015-03-06 14:17:27.752429505 +0530
Modify: 2015-03-06 13:55:37.206880347 +0530
Change: 2015-03-06 14:17:12.880343950 +0530
Birth: -
# md5sum b1/dir/file1
040751929ceabf77c3c0b3b662f341a8 b1/dir/file1
On brick b2:
# stat b2/dir/file1
File: ‘b2/dir/file1’
Size: 17 Blocks: 16 IO Block: 4096 regular file
Device: fd03h/64771d Inode: 919365 Links: 2
Access: (0644/-rw-r--r--) Uid: ( 0/ root) Gid: ( 0/ root)
Access: 2015-03-06 14:17:23.249403600 +0530
Modify: 2015-03-06 13:55:37.206880000 +0530
Change: 2015-03-06 14:17:12.881343955 +0530
Birth: -
# md5sum b2/dir/file1
040751929ceabf77c3c0b3b662f341a8 b2/dir/file1This method is useful for per file healing and if you want the file with latest mtime has to be considered as source.
- Run the following command to obtain the list of files that are in split-brain:
# gluster volume heal VOLNAME info split-brainBrick <hostname:brickpath-b1> <gfid:aaca219f-0e25-4576-8689-3bfd93ca70c2> <gfid:39f301ae-4038-48c2-a889-7dac143e82dd> <gfid:c3c94de2-232d-4083-b534-5da17fc476ac> Number of entries in split-brain: 3 Brick <hostname:brickpath-b2> /dir/file1 /dir /file4 Number of entries in split-brain: 3From the command output, identify the files that are in split-brain.You can find the differences in the file size and md5 checksums by performing a stat and md5 checksums on the file from the bricks. The following is the stat and md5 checksum output of a file:On brick b1: stat b1/file4 File: ‘b1/file4’ Size: 4 Blocks: 16 IO Block: 4096 regular file Device: fd03h/64771d Inode: 919356 Links: 2 Access: (0644/-rw-r--r--) Uid: ( 0/ root) Gid: ( 0/ root) Access: 2015-03-06 13:53:19.417085062 +0530 Modify: 2015-03-06 13:53:19.426085114 +0530 Change: 2015-03-06 13:53:19.426085114 +0530 Birth: - # md5sum b1/file4 b6273b589df2dfdbd8fe35b1011e3183 b1/file4 On brick b2: # stat b2/file4 File: ‘b2/file4’ Size: 4 Blocks: 16 IO Block: 4096 regular file Device: fd03h/64771d Inode: 919358 Links: 2 Access: (0644/-rw-r--r--) Uid: ( 0/ root) Gid: ( 0/ root) Access: 2015-03-06 13:52:35.761833096 +0530 Modify: 2015-03-06 13:52:35.769833142 +0530 Change: 2015-03-06 13:52:35.769833142 +0530 Birth: - # md5sum b2/file4 0bee89b07a248e27c83fc3d5951213c1 b2/file4You can notice the differences in the md5 checksums, and the modify time. - Execute the following command
# gluster volume heal <VOLNAME> split-brain latest-mtime <FILE>In this command, FILE can be either the full file name as seen from the root of the volume or the gfid-string representation of the file.For example,# gluster volume heal test-volume split-brain latest-mtime /file4 Healed /file4After the healing is complete, the md5 checksum, file size, and modify time on both bricks must be same. The following is a sample output of the stat and md5 checksums command after completion of healing the file. You can notice that the file has been healed using the brick having the latest mtime (brick b1, in this example) as the source.On brick b1: # stat b1/file4 File: ‘b1/file4’ Size: 4 Blocks: 16 IO Block: 4096 regular file Device: fd03h/64771d Inode: 919356 Links: 2 Access: (0644/-rw-r--r--) Uid: ( 0/ root) Gid: ( 0/ root) Access: 2015-03-06 14:23:38.944609863 +0530 Modify: 2015-03-06 13:53:19.426085114 +0530 Change: 2015-03-06 14:27:15.058927962 +0530 Birth: - # md5sum b1/file4 b6273b589df2dfdbd8fe35b1011e3183 b1/file4 On brick b2: # stat b2/file4 File: ‘b2/file4’ Size: 4 Blocks: 16 IO Block: 4096 regular file Device: fd03h/64771d Inode: 919358 Links: 2 Access: (0644/-rw-r--r--) Uid: ( 0/ root) Gid: ( 0/ root) Access: 2015-03-06 14:23:38.944609000 +0530 Modify: 2015-03-06 13:53:19.426085000 +0530 Change: 2015-03-06 14:27:15.059927968 +0530 Birth: # md5sum b2/file4 b6273b589df2dfdbd8fe35b1011e3183 b2/file4
This method is useful if you know which file is to be considered as source.
- Run the following command to obtain the list of files that are in split-brain:
# gluster volume heal VOLNAME info split-brainBrick <hostname:brickpath-b1> <gfid:aaca219f-0e25-4576-8689-3bfd93ca70c2> <gfid:39f301ae-4038-48c2-a889-7dac143e82dd> <gfid:c3c94de2-232d-4083-b534-5da17fc476ac> Number of entries in split-brain: 3 Brick <hostname:brickpath-b2> /dir/file1 /dir /file4 Number of entries in split-brain: 3From the command output, identify the files that are in split-brain.You can find the differences in the file size and md5 checksums by performing a stat and md5 checksums on the file from the bricks. The following is the stat and md5 checksum output of a file:On brick b1: stat b1/file4 File: ‘b1/file4’ Size: 4 Blocks: 16 IO Block: 4096 regular file Device: fd03h/64771d Inode: 919356 Links: 2 Access: (0644/-rw-r--r--) Uid: ( 0/ root) Gid: ( 0/ root) Access: 2015-03-06 13:53:19.417085062 +0530 Modify: 2015-03-06 13:53:19.426085114 +0530 Change: 2015-03-06 13:53:19.426085114 +0530 Birth: - # md5sum b1/file4 b6273b589df2dfdbd8fe35b1011e3183 b1/file4 On brick b2: # stat b2/file4 File: ‘b2/file4’ Size: 4 Blocks: 16 IO Block: 4096 regular file Device: fd03h/64771d Inode: 919358 Links: 2 Access: (0644/-rw-r--r--) Uid: ( 0/ root) Gid: ( 0/ root) Access: 2015-03-06 13:52:35.761833096 +0530 Modify: 2015-03-06 13:52:35.769833142 +0530 Change: 2015-03-06 13:52:35.769833142 +0530 Birth: - # md5sum b2/file4 0bee89b07a248e27c83fc3d5951213c1 b2/file4You can notice the differences in the file size and md5 checksums. - Execute the following command
# gluster volume heal <VOLNAME> split-brain source-brick <HOSTNAME:BRICKNAME> <FILE>In this command, FILE present in <HOSTNAME:BRICKNAME> is taken as source for healing.For example,# gluster volume heal test-volume split-brain source-brick test-host:b1 /file4 Healed /file4After the healing is complete, the md5 checksum and file size on both bricks must be same. The following is a sample output of the stat and md5 checksums command after completion of healing the file.On brick b1: # stat b1/file4 File: ‘b1/file4’ Size: 4 Blocks: 16 IO Block: 4096 regular file Device: fd03h/64771d Inode: 919356 Links: 2 Access: (0644/-rw-r--r--) Uid: ( 0/ root) Gid: ( 0/ root) Access: 2015-03-06 14:23:38.944609863 +0530 Modify: 2015-03-06 13:53:19.426085114 +0530 Change: 2015-03-06 14:27:15.058927962 +0530 Birth: - # md5sum b1/file4 b6273b589df2dfdbd8fe35b1011e3183 b1/file4 On brick b2: # stat b2/file4 File: ‘b2/file4’ Size: 4 Blocks: 16 IO Block: 4096 regular file Device: fd03h/64771d Inode: 919358 Links: 2 Access: (0644/-rw-r--r--) Uid: ( 0/ root) Gid: ( 0/ root) Access: 2015-03-06 14:23:38.944609000 +0530 Modify: 2015-03-06 13:53:19.426085000 +0530 Change: 2015-03-06 14:27:15.059927968 +0530 Birth: - # md5sum b2/file4 b6273b589df2dfdbd8fe35b1011e3183 b2/file4
This method is useful if you know want to use a particular brick as a source for the split-brain files in that replica pair.
- Run the following command to obtain the list of files that are in split-brain:
# gluster volume heal VOLNAME info split-brainFrom the command output, identify the files that are in split-brain. - Execute the following command
# gluster volume heal <VOLNAME> split-brain source-brick <HOSTNAME:BRICKNAME>In this command, for all the files that are in split-brain in this replica, <HOSTNAME:BRICKNAME> is taken as source for healing.For example,# gluster volume heal test-volume split-brain source-brick test-host:b1
11.15.3. Recovering GFID Split-brain from the gluster CLI
- Use bigger-file as source
- Use the file with latest mtime as source
- Use one replica as source for a particular file
Note
This method is useful for per file healing and where you can decided that the file with bigger size is to be considered as source.
- Run the following command to obtain the path of the file that is in split-brain:
# gluster volume heal VOLNAME info split-brainFrom the output, identify the files for which file operations performed from the client failed with input/output error.For example,# gluster volume heal 12 info split-brainBrick 10.70.47.45:/bricks/brick2/b0 /f5 / - Is in split-brain Status: Connected Number of entries: 2 Brick 10.70.47.144:/bricks/brick2/b1 /f5 / - Is in split-brain Status: Connected Number of entries: 2In the above command, 12 is the volume name, b0 and b1 are the bricks. - Execute the below command on the brick to fetch information if a file is in GFID split-brain. The
getfattrcommand is used to obtain and verify the AFR changelog extended attributes of the files.# getfattr -d -e hex -m. <path-to-file>For example,On brick /b0 # getfattr -d -m . -e hex /bricks/brick2/b0/f5 getfattr: Removing leading '/' from absolute path names # file: bricks/brick2/b0/f5 security.selinux=0x73797374656d5f753a6f626a6563745f723a676c7573746572645f627269636b5f743a733000 trusted.afr.12-client-1=0x000000020000000100000000 trusted.afr.dirty=0x000000000000000000000000 trusted.gfid=0xce0a9956928e40afb78e95f78defd64f trusted.gfid2path.9cde09916eabc845=0x30303030303030302d303030302d303030302d303030302d3030303030303030303030312f6635 On brick /b1 # getfattr -d -m . -e hex /bricks/brick2/b1/f5 getfattr: Removing leading '/' from absolute path names # file: bricks/brick2/b1/f5 security.selinux=0x73797374656d5f753a6f626a6563745f723a676c7573746572645f627269636b5f743a733000 trusted.afr.12-client-0=0x000000020000000100000000 trusted.afr.dirty=0x000000000000000000000000 trusted.gfid=0x9563544118653550e888ab38c232e0c trusted.gfid2path.9cde09916eabc845=0x30303030303030302d303030302d303030302d303030302d3030303030303030303030312f6635You can notice the difference in GFID for the file f5 in both the bricks.You can find the differences in the file size by executingstatcommand on the file from the bricks. The following is the output of the file f5 in bricks b0 and b1:On brick /b0 # stat /bricks/brick2/b0/f5 File: ‘/bricks/brick2/b0/f5’ Size: 15 Blocks: 8 IO Block: 4096 regular file Device: fd15h/64789d Inode: 67113350 Links: 2 Access: (0644/-rw-r--r--) Uid: ( 0/ root) Gid: ( 0/ root) Context: system_u:object_r:glusterd_brick_t:s0 Access: 2018-08-29 20:46:26.353751073 +0530 Modify: 2018-08-29 20:46:26.361751203 +0530 Change: 2018-08-29 20:47:16.363751236 +0530 Birth: - On brick /b1 # stat /bricks/brick2/b1/f5 File: ‘/bricks/brick2/b1/f5’ Size: 2 Blocks: 8 IO Block: 4096 regular file Device: fd15h/64789d Inode: 67111750 Links: 2 Access: (0644/-rw-r--r--) Uid: ( 0/ root) Gid: ( 0/ root) Context: system_u:object_r:glusterd_brick_t:s0 Access: 2018-08-29 20:44:56.153301616 +0530 Modify: 2018-08-29 20:44:56.161301745 +0530 Change: 2018-08-29 20:44:56.162301761 +0530 Birth: - - Execute the following command along with the full filename as seen from the root of the volume which is displayed in the
heal infocommand's output:# gluster volume heal VOLNAME split-brain bigger-file FILEFor example,# gluster volume heal12 split-brain bigger-file /f5 GFID split-brain resolved for file /f5After the healing is complete, the file size on both bricks must be the same as that of the file which had the bigger size. The following is a sample output of thegetfattrcommand after completion of healing the file.On brick /b0 # getfattr -d -m . -e hex /bricks/brick2/b0/f5 getfattr: Removing leading '/' from absolute path names # file: bricks/brick2/b0/f5 security.selinux=0x73797374656d5f753a6f626a6563745f723a676c7573746572645f627269636b5f743a733000 trusted.gfid=0xce0a9956928e40afb78e95f78defd64f trusted.gfid2path.9cde09916eabc845=0x30303030303030302d303030302d303030302d303030302d3030303030303030303030312f6635 On brick /b1 # getfattr -d -m . -e hex /bricks/brick2/b1/f5 getfattr: Removing leading '/' from absolute path names # file: bricks/brick2/b1/f5 security.selinux=0x73797374656d5f753a6f626a6563745f723a676c7573746572645f627269636b5f743a733000 trusted.gfid=0xce0a9956928e40afb78e95f78defd64f trusted.gfid2path.9cde09916eabc845=0x30303030303030302d303030302d303030302d303030302d3030303030303030303030312f6635
This method is useful for per file healing and if you want the file with latest mtime has to be considered as source.
- Run the following command to obtain the list of files that are in split-brain:
# gluster volume heal VOLNAME info split-brainFrom the output, identify the files for which file operations performed from the client failed with input/output error.For example,# gluster volume heal 12 info split-brainBrick 10.70.47.45:/bricks/brick2/b0 /f4 / - Is in split-brain Status: Connected Number of entries: 2 Brick 10.70.47.144:/bricks/brick2/b1 /f4 / - Is in split-brain Status: Connected Number of entries: 2In the above command, 12 is the volume name, b0 and b1 are the bricks. - The below command executed from backend provides information if a file is in GFID split-brain.
# getfattr -d -e hex -m. <path-to-file>For example,On brick /b0 # getfattr -d -m . -e hex /bricks/brick2/b0/f4 getfattr: Removing leading '/' from absolute path names # file: bricks/brick2/b0/f4 security.selinux=0x73797374656d5f753a6f626a6563745f723a676c7573746572645f627269636b5f743a733000 trusted.afr.12-client-1=0x000000020000000100000000 trusted.afr.dirty=0x000000000000000000000000 trusted.gfid=0xb66b66d07b315f3c9cffac2fb6422a28 trusted.gfid2path.364f55367c7bd6f4=0x30303030303030302d303030302d303030302d303030302d3030303030303030303030312f6634 On brick /b1 # getfattr -d -m . -e hex /bricks/brick2/b1/f4 getfattr: Removing leading '/' from absolute path names # file: bricks/brick2/b1/f4 security.selinux=0x73797374656d5f753a6f626a6563745f723a676c7573746572645f627269636b5f743a733000 trusted.afr.12-client-0=0x000000020000000100000000 trusted.afr.dirty=0x000000000000000000000000 trusted.gfid=0x87242f808c6e56a007ef7d49d197acff trusted.gfid2path.364f55367c7bd6f4=0x30303030303030302d303030302d303030302d303030302d3030303030303030303030312f6634You can notice the difference in GFID for the file f4 in both the bricks.You can find the difference in the modify time by executingstatcommand on the file from the bricks. The following is the output of the file f4 in bricks b0 and b1:On brick /b0 # stat /bricks/brick2/b0/f4 File: ‘/bricks/brick2/b0/f4’ Size: 14 Blocks: 8 IO Block: 4096 regular file Device: fd15h/64789d Inode: 67113349 Links: 2 Access: (0644/-rw-r--r--) Uid: ( 0/ root) Gid: ( 0/ root) Context: system_u:object_r:glusterd_brick_t:s0 Access: 2018-08-29 20:57:38.913629991 +0530 Modify: 2018-08-29 20:57:38.921630122 +0530 Change: 2018-08-29 20:57:38.923630154 +0530 Birth: - On brick /b1 # stat /bricks/brick2/b1/f4 File: ‘/bricks/brick2/b1/f4’ Size: 2 Blocks: 8 IO Block: 4096 regular file Device: fd15h/64789d Inode: 67111749 Links: 2 Access: (0644/-rw-r--r--) Uid: ( 0/ root) Gid: ( 0/ root) Context: system_u:object_r:glusterd_brick_t:s0 Access: 2018-08-24 20:54:50.953217256 +0530 Modify: 2018-08-24 20:54:50.961217385 +0530 Change: 2018-08-24 20:54:50.962217402 +0530 Birth: - - Execute the following command:
# gluster volume healVOLNAME split-brain latest-mtime FILEFor example,# gluster volume heal 12 split-brain latest-mtime /f4 GFID split-brain resolved for file /f4After the healing is complete, the GFID of the files on both bricks must be same. The following is a sample output of thegetfattrcommand after completion of healing the file. You can notice that the file has been healed using the brick having the latest mtime as the source.On brick /b0 # getfattr -d -m . -e hex /bricks/brick2/b0/f4 getfattr: Removing leading '/' from absolute path names # file: bricks/brick2/b0/f4 security.selinux=0x73797374656d5f753a6f626a6563745f723a676c7573746572645f627269636b5f743a733000 trusted.gfid=0xb66b66d07b315f3c9cffac2fb6422a28 trusted.gfid2path.364f55367c7bd6f4=0x30303030303030302d303030302d303030302d303030302d3030303030303030303030312f6634 On brick /b1 # getfattr -d -m . -e hex /bricks/brick2/b1/f4 getfattr: Removing leading '/' from absolute path names # file: bricks/brick2/b1/f4 security.selinux=0x73797374656d5f753a6f626a6563745f723a676c7573746572645f627269636b5f743a733000 trusted.gfid=0xb66b66d07b315f3c9cffac2fb6422a28 trusted.gfid2path.364f55367c7bd6f4=0x30303030303030302d303030302d303030302d303030302d3030303030303030303030312f6634
This method is useful if you know which file is to be considered as source.
- Run the following command to obtain the list of files that are in split-brain:
# gluster volume heal VOLNAME info split-brainFrom the output, identify the files for which file operations performed from the client failed with input/output error.For example,# gluster volume heal 12 info split-brainBrick 10.70.47.45:/bricks/brick2/b0 /f3 / - Is in split-brain Status: Connected Number of entries: 2 Brick 10.70.47.144:/bricks/brick2/b1 /f3 / - Is in split-brain Status: Connected Number of entries: 2In the above command, 12 is the volume name, b0 and b1 are the bricks.Note
With one replica as source option, there is no way to resolve all the GFID split-brain in one shot by not specifying any file-path in the CLI as done for data/metadata split-brain resolutions.For each file in GFID split-brain, you have to run thehealcommand separately. - The below command executed from backend provides information if a file is in GFID split-brain.
# getfattr -d -e hex -m. <path-to-file>For example,# getfattr -d -m . -e hex /bricks/brick2/b0/f3 On brick /b0 getfattr: Removing leading '/' from absolute path names # file: bricks/brick2/b0/f3 security.selinux=0x73797374656d5f753a6f626a6563745f723a676c7573746572645f627269636b5f743a733000 trusted.afr.12-client-1=0x000000020000000100000000 trusted.afr.dirty=0x000000000000000000000000 trusted.gfid=0x9d542fb1b3b15837a2f7f9dcdf5d6ee8 trusted.gfid2path.364f55367c7bd6f4=0x30303030303030302d303030302d303030302d303030302d3030303030303030303030312f6634 On brick /b1 # getfattr -d -m . -e hex /bricks/brick2/b1/f3 getfattr: Removing leading '/' from absolute path names # file: bricks/brick2/b0/f3 security.selinux=0x73797374656d5f753a6f626a6563745f723a676c7573746572645f627269636b5f743a733000 trusted.afr.12-client-1=0x000000020000000100000000 trusted.afr.dirty=0x000000000000000000000000 trusted.gfid=0xc90d9b0f65f6530b95b9f3f8334033df trusted.gfid2path.364f55367c7bd6f4=0x30303030303030302d303030302d303030302d303030302d3030303030303030303030312f6634You can notice the difference in GFID for the file f3 in both the bricks. - Execute the following command:
# gluster volume heal VOLNAME split-brain source-brick HOSTNAME : export-directory-absolute-path FILEIn this command, FILE present in HOSTNAME : export-directory-absolute-path is taken as source for healing.For example,# gluster volume heal 12 split-brain source-brick 10.70.47.144:/bricks/brick2/b1 /f3 GFID split-brain resolved for file /f3After the healing is complete, the GFID of the file on both the bricks should be same as that of the file which had bigger size. The following is a sample output of thegetfattrcommand after the file is healed.On brick /b0 # getfattr -d -m . -e hex /bricks/brick2/b0/f3 getfattr: Removing leading '/' from absolute path names # file: bricks/brick2/b0/f3 security.selinux=0x73797374656d5f753a6f626a6563745f723a676c7573746572645f627269636b5f743a733000 trusted.gfid=0x90d9b0f65f6530b95b9f3f8334033df trusted.gfid2path.364f55367c7bd6f4=0x30303030303030302d303030302d303030302d303030302d3030303030303030303030312f6634 On brick /b1 # getfattr -d -m . -e hex /bricks/brick2/b1/f3 getfattr: Removing leading '/' from absolute path names # file: bricks/brick2/b1/f3 security.selinux=0x73797374656d5f753a6f626a6563745f723a676c7573746572645f627269636b5f743a733000 trusted.gfid=0x90d9b0f65f6530b95b9f3f8334033df trusted.gfid2path.364f55367c7bd6f4=0x30303030303030302d303030302d303030302d303030302d3030303030303030303030312f6634Note
You can not use the GFID of the file as an argument with any of the CLI options to resolve GFID split-brain. It should be the absolute path as seen from the mount point to the file considered as source.With source-brick option there is no way to resolve all the GFID split-brain in one shot by not specifying any file-path in the CLI as done while resolving data or metadata split-brain. For each file in GFID split-brain, run the CLI with the policy you want to use.Resolving directory GFID split-brain using CLI with the "source-brick" option in a "distributed-replicated" volume needs to be done on all the volumes explicitly. Since directories get created on all the subvolumes, using one particular brick as source for directory GFID split-brain, heal the directories for that subvolume. In this case, other subvolumes must be healed using the brick which has same GFID as that of the previous brick which was used as source for healing other subvolume. For information on resolvingentry/type-mismatchsplit-brain, see Chapter 23, Manually Recovering File Split-brain .
11.15.4. Triggering Self-Healing on Replicated Volumes
Self-heal daemon has the capability to handle multiple heals in parallel and is supported on Replicate and Distribute-replicate volumes. However, increasing the number of heals has impact on I/O performance so the following options have been provided. The cluster.shd-max-threads volume option controls the number of entries that can be self healed in parallel on each replica by self-heal daemon using. Using cluster.shd-wait-qlength volume option, you can configure the number of entries that must be kept in the queue for self-heal daemon threads to take up as soon as any of the threads are free to heal.
cluster.shd-max-threads and cluster.shd-wait-qlength volume set options, see Section 11.1, “Configuring Volume Options”.
- To view the list of files that need healing:
# gluster volume heal VOLNAME infoFor example, to view the list of files on test-volume that need healing:# gluster volume heal test-volume info Brick server1:/gfs/test-volume_0 Number of entries: 0 Brick server2:/gfs/test-volume_1 /95.txt /32.txt /66.txt /35.txt /18.txt /26.txt - Possibly undergoing heal /47.txt /55.txt /85.txt - Possibly undergoing heal ... Number of entries: 101 - To trigger self-healing only on the files which require healing:
# gluster volume heal VOLNAMEFor example, to trigger self-healing on files which require healing on test-volume:# gluster volume heal test-volume Heal operation on volume test-volume has been successful - To trigger self-healing on all the files on a volume:
# gluster volume heal VOLNAME fullFor example, to trigger self-heal on all the files on test-volume:# gluster volume heal test-volume full Heal operation on volume test-volume has been successful - To view the list of files on a volume that are in a split-brain state:
# gluster volume heal VOLNAME info split-brainFor example, to view the list of files on test-volume that are in a split-brain state:# gluster volume heal test-volume info split-brain Brick server1:/gfs/test-volume_2 Number of entries: 12 at path on brick ---------------------------------- 2012-06-13 04:02:05 /dir/file.83 2012-06-13 04:02:05 /dir/file.28 2012-06-13 04:02:05 /dir/file.69 Brick server2:/gfs/test-volume_2 Number of entries: 12 at path on brick ---------------------------------- 2012-06-13 04:02:05 /dir/file.83 2012-06-13 04:02:05 /dir/file.28 2012-06-13 04:02:05 /dir/file.69 ...
11.16. Recommended Configurations - Dispersed Volume
The following table lists the brick layout details of multiple server/disk configurations for dispersed and distributed dispersed volumes.
| Redundancy Level | Supported Configurations | Bricks per Server per Subvolume | Node Loss | Max brick failure count within a subvolume | Compatible Server Node count | Increment Size (no. of nodes) | Min number of sub-volumes | Total Spindles | Tolerated HDD Failure Percentage |
|---|---|---|---|---|---|---|---|---|---|
| 12 HDD Chassis | |||||||||
| 2 | 4 + 2 | 2 | 1 | 2 | 3 | 3 | 6 | 36 | 33.33% |
| 1 | 2 | 2 | 6 | 6 | 12 | 72 | 33.33% | ||
| 2 | 8+2 | 2 | 1 | 2 | 5 | 5 | 6 | 60 | 20.00% |
| 1 | 2 | 2 | 10 | 10 | 12 | 120 | 20.00% | ||
| 3 | 8 + 3 | 1-2 | 1 | 3 | 6 | 6 | 6 | 72 | 25.00% |
| 4 | 8 + 4 | 4 | 1 | 4 | 3 | 3 | 3 | 36 | 33.33% |
| 2 | 2 | 4 | 6 | 6 | 6 | 72 | 33.33% | ||
| 1 | 4 | 4 | 12 | 12 | 12 | 144 | 33.33% | ||
| 4 | 16 + 4 | 4 | 1 | 4 | 5 | 5 | 3 | 60 | 20.00% |
| 2 | 2 | 4 | 10 | 10 | 6 | 120 | 20.00% | ||
| 1 | 4 | 4 | 20 | 20 | 12 | 240 | 20.00% | ||
| 24 HDD Chassis | |||||||||
| 2 | 4 + 2 | 2 | 1 | 2 | 3 | 3 | 12 | 72 | 33.33% |
| 1 | 2 | 2 | 6 | 6 | 24 | 144 | 33.33% | ||
| 2 | 8+ 2 | 2 | 1 | 2 | 5 | 5 | 12 | 120 | 20.00% |
| 1 | 2 | 2 | 10 | 10 | 24 | 240 | 20.00% | ||
| 4 | 8 + 4 | 4 | 1 | 4 | 3 | 3 | 6 | 72 | 33.33% |
| 2 | 2 | 4 | 6 | 6 | 12 | 144 | 33.33% | ||
| 1 | 4 | 4 | 12 | 12 | 24 | 288 | 33.33% | ||
| 4 | 16 + 4 | 4 | 1 | 4 | 5 | 5 | 6 | 120 | 20.00% |
| 2 | 2 | 4 | 10 | 10 | 12 | 240 | 20.00% | ||
| 1 | 4 | 4 | 20 | 20 | 24 | 480 | 20.00% | ||
| 36 HDD Chassis | |||||||||
| 2 | 4 + 2 | 2 | 1 | 2 | 3 | 3 | 18 | 108 | 33.33% |
| 1 | 2 | 2 | 6 | 6 | 36 | 216 | 33.33% | ||
| 2 | 8 + 2 | 2 | 1 | 1 | 5 | 5 | 18 | 180 | 20.00% |
| 1 | 2 | 2 | 10 | 10 | 36 | 360 | 20.00% | ||
| 3 | 8 + 3 | 1-2 | 1 | 3 | 6 | 6 | 19 | 216 | 26.39% |
| 4 | 8 + 4 | 4 | 1 | 4 | 3 | 3 | 9 | 108 | 33.33% |
| 2 | 2 | 4 | 6 | 6 | 18 | 216 | 33.33% | ||
| 1 | 4 | 4 | 12 | 12 | 36 | 432 | 33.33% | ||
| 4 | 16 + 4 | 4 | 1 | 4 | 5 | 5 | 9 | 180 | 20.00% |
| 2 | 2 | 4 | 10 | 10 | 18 | 360 | 20.00% | ||
| 1 | 4 | 4 | 20 | 20 | 36 | 720 | 20.00% | ||
| 60 HDD Chassis | |||||||||
| 2 | 4 + 2 | 2 | 1 | 2 | 3 | 3 | 30 | 180 | 33.33% |
| 1 | 2 | 2 | 6 | 6 | 60 | 360 | 33.33% | ||
| 2 | 8 + 2 | 2 | 1 | 2 | 5 | 5 | 30 | 300 | 20.00% |
| 1 | 2 | 2 | 10 | 10 | 60 | 600 | 20.00% | ||
| 3 | 8 + 3 | 1-2 | 1 | 3 | 6 | 6 | 32 | 360 | 26.67% |
| 4 | 8 + 4 | 4 | 1 | 4 | 3 | 3 | 15 | 180 | 33.33% |
| 2 | 2 | 4 | 6 | 6 | 30 | 360 | 33.33% | ||
| 1 | 4 | 4 | 12 | 12 | 60 | 720 | 33.33% | ||
| 4 | 16 + 4 | 4 | 1 | 4 | 5 | 5 | 15 | 300 | 20.00% |
| 2 | 2 | 4 | 10 | 10 | 30 | 600 | 20.00% | ||
| 1 | 4 | 4 | 20 | 20 | 60 | 1200 | 20.00% | ||
This example describes a compact configuration of three servers, with each server attached to a 12 HDD chassis to create a dispersed volume. In this example, each HDD is assumed to contain a single brick.
# gluster volume create test_vol disperse-data 4 redundancy 2 transport tcp server1:/rhgs/brick1 server1:/rhgs/brick2 server2:/rhgs/brick3 server2:/rhgs/brick4 server3:/rhgs/brick5 server3:/rhgs/brick6 --force--force parameter is required because this configuration is not optimal in terms of fault tolerance. Since each server provides two bricks, this configuration has a greater risk to data availability if a server goes offline than it would if each brick was provided by a separate server.
gluster volume info command to view the volume information.
# gluster volume info test-volume
Volume Name: test-volume
Type: Disperse
Status: Started
Number of Bricks: 1 x (4 + 2) = 6
Transport-type: tcp
Bricks:
Brick1: server1:/rhgs/brick1
Brick2: server1:/rhgs/brick2
Brick3: server2:/rhgs/brick3
Brick4: server2:/rhgs/brick4
Brick5: server3:/rhgs/brick5
Brick6: server3:/rhgs/brick6# gluster volume add-brick test_vol server1:/rhgs/brick7 server1:/rhgs/brick8 server2:/rhgs/brick9 server2:/rhgs/brick10 server3:/rhgs/brick11 server3:/rhgs/brick12gluster volume info command to view distributed dispersed volume information.
# gluster volume info test-volume
Volume Name: test-volume
Type: Distributed-Disperse
Status: Started
Number of Bricks: 2 x (4 + 2) = 12
Transport-type: tcp
Bricks:
Brick1: server1:/rhgs/brick1
Brick2: server1:/rhgs/brick2
Brick3: server2:/rhgs/brick3
Brick4: server2:/rhgs/brick4
Brick5: server3:/rhgs/brick5
Brick6: server3:/rhgs/brick6
Brick7: server1:/rhgs/brick7
Brick8: server1:/rhgs/brick8
Brick9: server2:/rhgs/brick9
Brick10: server2:/rhgs/brick10
Brick11: server3:/rhgs/brick11
Brick12: server3:/rhgs/brick12The following diagram illustrates a dispersed 8+4 configuration on three servers as explained in the row 3 of Table 11.3, “Brick Configurations for Dispersed and Distributed Dispersed Volumes” The command to create the disperse volume for this configuration:
# gluster volume create test_vol disperse-data 8 redundancy 4 transport tcp server1:/rhgs/brick1 server1:/rhgs/brick2 server1:/rhgs/brick3 server1:/rhgs/brick4 server2:/rhgs/brick1 server2:/rhgs/brick2 server2:/rhgs/brick3 server2:/rhgs/brick4 server3:/rhgs/brick1 server3:/rhgs/brick2 server3:/rhgs/brick3 server3:/rhgs/brick4 server1:/rhgs/brick5 server1:/rhgs/brick6 server1:/rhgs/brick7 server1:/rhgs/brick8 server2:/rhgs/brick5 server2:/rhgs/brick6 server2:/rhgs/brick7 server2:/rhgs/brick8 server3:/rhgs/brick5 server3:/rhgs/brick6 server3:/rhgs/brick7 server3:/rhgs/brick8 server1:/rhgs/brick9 server1:/rhgs/brick10 server1:/rhgs/brick11 server1:/rhgs/brick12 server2:/rhgs/brick9 server2:/rhgs/brick10 server2:/rhgs/brick11 server2:/rhgs/brick12 server3:/rhgs/brick9 server3:/rhgs/brick10 server3:/rhgs/brick11 server3:/rhgs/brick12 --force--force parameter is required because this configuration is not optimal in terms of fault tolerance. Since each server provides more than one brick, this configuration has a greater risk to data availability if a server goes offline than it would if each brick was provided by a separate server.
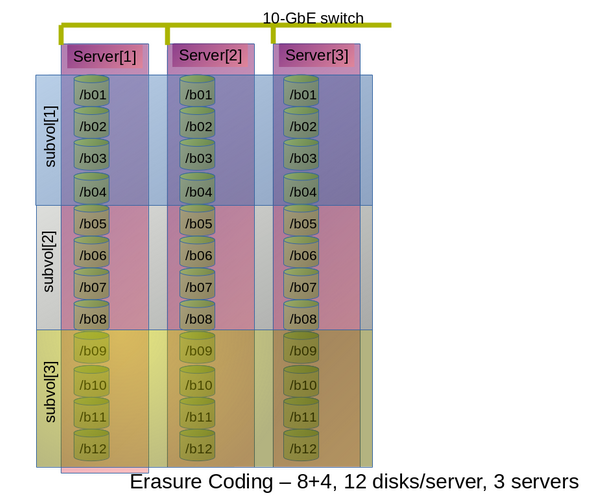
Figure 11.1. Example Configuration of 8+4 Dispersed Volume Configuration
m bricks (refer to section Section 5.8, “Creating Dispersed Volumes” for information on n = k+m equation) from a dispersed subvolume on each server. If you add more than m bricks from a dispersed subvolume on server S, and if the server S goes down, data will be unavailable.
S (a single column in the above diagram) goes down, there is no data loss, but if there is any additional hardware failure, either another node going down or a storage device failure, there would be immediate data loss.
The following diagram illustrates dispersed 4+2 configuration on six servers and each server with 12-disk-per-server configuration as explained in the row 2 of Table 11.3, “Brick Configurations for Dispersed and Distributed Dispersed Volumes”. The command to create the disperse volume for this configuration:
# gluster volume create test_vol disperse-data 4 redundancy 2 transport tcp server1:/rhgs/brick1 server2:/rhgs/brick1 server3:/rhgs/brick1 server4:/rhgs/brick1 server5:/rhgs/brick1 server6:/rhgs/brick1server1:/rhgs/brick2 server2:/rhgs/brick2 server3:/rhgs/brick2 server4:/rhgs/brick2 server5:/rhgs/brick2 server6:/rhgs/brick2 server1:/rhgs/brick3 server2:/rhgs/brick3 server3:/rhgs/brick3 server4:/rhgs/brick3 server5:/rhgs/brick3 server6:/rhgs/brick3 server1:/rhgs/brick4 server2:/rhgs/brick4 server3:/rhgs/brick4 server4:/rhgs/brick4 server5:/rhgs/brick4 server6:/rhgs/brick4 server1:/rhgs/brick5 server2:/rhgs/brick5 server3:/rhgs/brick5 server4:/rhgs/brick5 server5:/rhgs/brick5 server6:/rhgs/brick5 server1:/rhgs/brick6 server2:/rhgs/brick6 server3:/rhgs/brick6 server4:/rhgs/brick6 server5:/rhgs/brick6 server6:/rhgs/brick6 server1:/rhgs/brick7 server2:/rhgs/brick7 server3:/rhgs/brick7 server4:/rhgs/brick7 server5:/rhgs/brick7 server6:/rhgs/brick7 server1:/rhgs/brick8 server2:/rhgs/brick8 server3:/rhgs/brick8 server4:/rhgs/brick8 server5:/rhgs/brick8 server6:/rhgs/brick8 server1:/rhgs/brick9 server2:/rhgs/brick9 server3:/rhgs/brick9 server4:/rhgs/brick9 server5:/rhgs/brick9 server6:/rhgs/brick9 server1:/rhgs/brick10 server2:/rhgs/brick10 server3:/rhgs/brick10 server4:/rhgs/brick10 server5:/rhgs/brick10 server6:/rhgs/brick10 server1:/rhgs/brick11 server2:/rhgs/brick11 server3:/rhgs/brick11 server4:/rhgs/brick11 server5:/rhgs/brick11 server6:/rhgs/brick11 server1:/rhgs/brick12 server2:/rhgs/brick12 server3:/rhgs/brick12 server4:/rhgs/brick12 server5:/rhgs/brick12 server6:/rhgs/brick12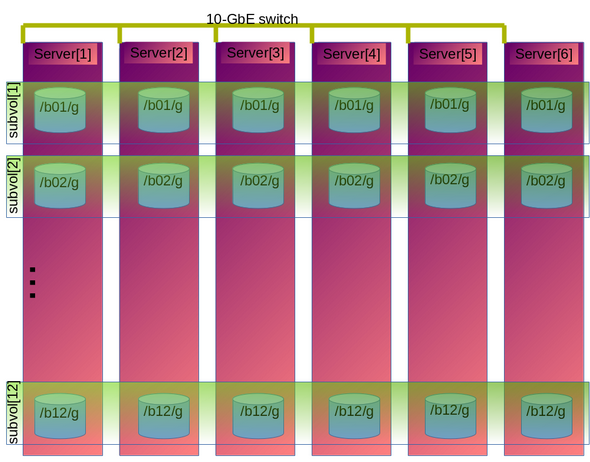
Figure 11.2. Example Configuration of 4+2 Dispersed Volume Configuration
The following chart illustrates the redundancy comparison of all supported dispersed volume configurations.

Figure 11.3. Illustration of the redundancy comparison
11.17. Consistent time attributes within Replica and Disperse subvolumes
11.17.1. Pre-requisites
11.17.2. Enabling and disabling the Consistent Time Feature
# gluster volume set VOLNAME ctime on# gluster volume set VOLNAME ctime off11.17.3. Advantages of Consistent Time Feature
11.17.4. Extended Attribute Format
glusterfs.mdata = “<version – 8bits> <flags – 64bits> <ctime sec – 64bits> <ctime nsec – 64bits> <mtime sec - 64 bits> <mtime nsec-64 bits> <atime sec - 64 bits> <atime nsec - 64 bits>”trusted.glusterfs.mdata=0x010000000000000000000000005cefab7b000000002bcb2587000000005cefab7b000000002bcb2587000000005cefab7b000000002b73964d11.17.5. Upgrade
11.17.6. Limitations
- The access time (atime) updates are not supported. The support can be enabled by setting the “ctime.noatime” option to “off”. But enabling it would cause significant performance drop. The replicated and dispersed volume reads data from one subvolume resulting in the xattr update on that subvolume and triggering self heal for other subvolumes of replica set for each atime update.
- Mounting gluster volume with time attribute options (noatime, realatime) is not supported with this feature.
- This feature does not guarantee consistent time for directories if the hashed sub-volume for the directory is down.
- Directory listing may report inconsistent time information, hence this feature is not supported for workloads relying too much on directory listing or metadata.
Chapter 12. Managing Red Hat Gluster Storage Logs
log-file-name.epoch-time-stamp.The components for which the log messages are generated with message-ids are glusterFS Management Service, Distributed Hash Table (DHT), and Automatic File Replication (AFR).
12.1. Log Rotation
12.2. Red Hat Gluster Storage Component Logs and Location
/var/log directory.
| Component/Service Name | Location of the Log File | Remarks |
|---|---|---|
| glusterd | /var/log/glusterfs/glusterd.log | One glusterd log file per server. This log file also contains the snapshot and user logs. |
| gluster commands | /var/log/glusterfs/cmd_history.log | Gluster commands executed on a node in a Red Hat Gluster Storage Trusted Storage Pool is logged in this file. |
| bricks | /var/log/glusterfs/bricks/<path extraction of brick path>.log | One log file per brick on the server |
| rebalance | /var/log/glusterfs/VOLNAME-rebalance.log | One log file per volume on the server |
| self heal deamon | /var/log/glusterfs/glustershd.log | One log file per server |
| quota (Deprecated)
See Chapter 9, Managing Directory Quotas for more details.
|
| One log file per server (and per volume from quota-mount. |
| Gluster NFS (Deprecated) | /var/log/glusterfs/nfs.log | One log file per server |
| SAMBA Gluster | /var/log/samba/glusterfs-VOLNAME-<ClientIP>.log | If the client mounts this on a glusterFS server node, the actual log file or the mount point may not be found. In such a case, the mount outputs of all the glusterFS type mount operations need to be considered. |
| NFS - Ganesha | /var/log/ganesha/ganesha.log, /var/log/ganesha/ganesha-gfapi.log | One log file per server |
| FUSE Mount | /var/log/ glusterfs/<mountpoint path extraction>.log | |
| Geo-replication | /var/log/glusterfs/geo-replication/<master> /var/log/glusterfs/geo-replication-slaves | |
gluster volume heal VOLNAME info command | /var/log/glusterfs/glfsheal-VOLNAME.log | One log file per server on which the command is executed. |
| SwiftKrbAuth (Deprecated) | /var/log/httpd/error_log | |
| Command Line Interface logs | /var/log/glusterfs/cli.log | This file captures log entries for every command that is executed on the Command Line Interface(CLI). |
12.3. Configuring the Log Format
# gluster volume set VOLNAME diagnostics.brick-log-format <value>Example 12.1. Generate log files with with-msg-id:
# gluster volume set testvol diagnostics.brick-log-format with-msg-idExample 12.2. Generate log files with no-msg-id:
# gluster volume set testvol diagnostics.brick-log-format no-msg-idgluster volume set VOLNAME diagnostics.client-log-format <value>Example 12.3. Generate log files with with-msg-id:
# gluster volume set testvol diagnostics.client-log-format with-msg-idExample 12.4. Generate log files with no-msg-id:
# gluster volume set testvol diagnostics.client-log-format no-msg-idglusterd:
# glusterd --log-format=<value>Example 12.5. Generate log files with with-msg-id:
# glusterd --log-format=with-msg-idExample 12.6. Generate log files with no-msg-id:
# glusterd --log-format=no-msg-id12.4. Configuring the Log Level
INFO, only CRITICAL, ERROR, WARNING, and INFO messages are logged.
- CRITICAL
- ERROR
- WARNING
- INFO
- DEBUG
- TRACE
Important
# gluster volume set VOLNAME diagnostics.brick-log-level <value>Example 12.7. Set the log level to warning on a brick
# gluster volume set testvol diagnostics.brick-log-level WARNING# gluster volume set VOLNAME diagnostics.brick-sys-log-level <value>Example 12.8. Set the syslog level to warning on a brick
# gluster volume set testvol diagnostics.brick-sys-log-level WARNING# gluster volume set VOLNAME diagnostics.client-log-level <value>Example 12.9. Set the log level to error on a client
# gluster volume set testvol diagnostics.client-log-level ERROR# gluster volume set VOLNAME diagnostics.client-sys-log-level <value>Example 12.10. Set the syslog level to error on a client
# gluster volume set testvol diagnostics.client-sys-log-level ERRORglusterd persistently
/etc/sysconfig/glusterd file, and set the value of the LOG_LEVEL parameter to the log level that you want glusterd to use.
## Set custom log file and log level (below are defaults)
#LOG_FILE='/var/log/glusterfs/glusterd.log'
LOG_LEVEL='VALUE'service or systemctl command.
Example 12.11. Set the log level to WARNING on glusterd
- Edit the
glusterdservice file:On Red Hat Enterprise 7(RHEL 7) and RHEL 8, theglusterdservice file is available at/usr/lib/systemd/system/glusterd.serviceOn RHEL 6, theglusterdservice file is available at/etc/sysconfig/glusterdImportant
Red Hat Gluster Storage is not supported on Red Hat Enterprise Linux 6 (RHEL 6) from 3.5 Batch Update 1 onwards. See Version Details table in section Red Hat Gluster Storage Software Components and Versions of the Installation Guide - Change the
LOG_LEVELvariable to the required debug level.## Set custom log file and log level (below are defaults) #LOG_FILE='/var/log/glusterfs/glusterd.log' LOG_LEVEL='WARNING' - Reload the daemon:On RHEL 7 and RHEL 8, runOn RHEL 6, run
systemctl daemon-reloadservice glusterd reloadImportant
Red Hat Gluster Storage is not supported on Red Hat Enterprise Linux 6 (RHEL 6) from 3.5 Batch Update 1 onwards. See Version Details table in section Red Hat Gluster Storage Software Components and Versions of the Installation Guide - Restart the
glusterdservice.On RHEL 7 and RHEL 8, runOn RHEL 6, runsystemctl restart glusterdservice glusterd restartImportant
Red Hat Gluster Storage is not supported on Red Hat Enterprise Linux 6 (RHEL 6) from 3.5 Batch Update 1 onwards. See Version Details table in section Red Hat Gluster Storage Software Components and Versions of the Installation Guide
Example 12.12. Run volume status with a log level of ERROR
# gluster --log-level=ERROR volume status12.5. Suppressing Repetitive Log Messages
log-flush-timeout period and by defining a log-buf-size buffer size options with the gluster volume set command.
# gluster volume set VOLNAME diagnostics.brick-log-flush-timeout <value in seconds>Example 12.13. Set a timeout period on the bricks
# gluster volume set testvol diagnostics.brick-log-flush-timeout 200sec
volume set: success# gluster volume set VOLNAME diagnostics.client-log-flush-timeout <value in seconds>Example 12.14. Set a timeout period on the clients
# gluster volume set testvol diagnostics.client-log-flush-timeout 180sec
volume set: successglusterd:
# glusterd --log-flush-timeout=<value in seconds>Example 12.15. Set a timeout period on the glusterd
# glusterd --log-flush-timeout=60secThe maximum number of unique log messages that can be suppressed until the timeout or buffer overflow, whichever occurs first on the bricks.
# gluster volume set VOLNAME diagnostics.brick-log-buf-size <value>Example 12.16. Set a buffer size on the bricks
# gluster volume set testvol diagnostics.brick-log-buf-size 10
volume set: success# gluster volume set VOLNAME diagnostics.client-log-buf-size <value>Example 12.17. Set a buffer size on the clients
# gluster volume set testvol diagnostics.client-log-buf-size 15
volume set: successglusterd:
# glusterd --log-buf-size=<value>Example 12.18. Set a log buffer size on the glusterd
# glusterd --log-buf-size=10Note
12.6. Geo-replication Logs
Master-log-file- log file for the process that monitors the master volume.Slave-log-file- log file for process that initiates changes on a slave.Master-gluster-log-file- log file for the maintenance mount point that the geo-replication module uses to monitor the master volume.Slave-gluster-log-file- If the slave is a Red Hat Gluster Storage Volume, this log file is the slave's counterpart ofMaster-gluster-log-file.
12.6.1. Viewing the Geo-replication Master Log Files
# gluster volume geo-replication MASTER_VOL SLAVE_HOST::SLAVE_VOL config log-file# gluster volume geo-replication Volume1 example.com::slave-vol config log-file12.6.2. Viewing the Geo-replication Slave Log Files
glusterd must be running on slave machine.
- On the master, run the following command to display the session-owner details:
# gluster volume geo-replication MASTER_VOL SLAVE_HOST::SLAVE_VOL config session-ownerFor example:# gluster volume geo-replication Volume1 example.com::slave-vol config session-owner 5f6e5200-756f-11e0-a1f0-0800200c9a66 - On the slave, run the following command with the session-owner value from the previous step:
# gluster volume geo-replication SLAVE_VOL config log-file /var/log/gluster/SESSION_OWNER:remote-mirror.logFor example:# gluster volume geo-replication slave-vol config log-file /var/log/gluster/5f6e5200-756f-11e0-a1f0-0800200c9a66:remote-mirror.log
Chapter 13. Managing Red Hat Gluster Storage Volume Life-Cycle Extensions
- Creating a volume
- Starting a volume
- Adding a brick
- Removing a brick
- Tuning volume options
- Stopping a volume
- Deleting a volume
Note
13.1. Location of Scripts
- /var/lib/glusterd/hooks/1/create/
- /var/lib/glusterd/hooks/1/delete/
- /var/lib/glusterd/hooks/1/start/
- /var/lib/glusterd/hooks/1/stop/
- /var/lib/glusterd/hooks/1/set/
- /var/lib/glusterd/hooks/1/add-brick/
- /var/lib/glusterd/hooks/1/remove-brick/
--volname=VOLNAME to specify the volume. Command-specific additional arguments are provided for the following volume operations:
- Start volume
--first=yes, if the volume is the first to be started--first=no, for otherwise
- Stop volume
--last=yes, if the volume is to be stopped last.--last=no, for otherwise
- Set volume
-o key=valueFor every key, value is specified in volume set command.
13.2. Prepackaged Scripts
/var/lib/glusterd/hooks/1/start/post and /var/lib/glusterd/hooks/1/stop/pre. By default, the scripts are enabled.
# gluster volume start VOLNAME
S30samba-start.sh script performs the following:
- Adds Samba share configuration details of the volume to the
smb.conffile - Mounts the volume through FUSE and adds an entry in
/etc/fstabfor the same. - Restarts Samba to run with updated configuration
# gluster volume stop VOLNAME
S30samba-stop.sh script performs the following:
- Removes the Samba share details of the volume from the
smb.conffile - Unmounts the FUSE mount point and removes the corresponding entry in
/etc/fstab - Restarts Samba to run with updated configuration
Chapter 14. Detecting BitRot
gluster volume bitrot command scans all the bricks in a volume for BitRot issues in a process known as scrubbing. The process calculates the checksum for each file or object, and compares that checksum against the actual data of the file. When BitRot is detected in a file, that file is marked as corrupted, and the detected errors are logged in the following files:
- /var/log/glusterfs/bitd.log
- /var/log/glusterfs/scrub.log
14.1. Enabling and Disabling the BitRot daemon
gluster volume bitrot VOLNAME enable- Enable the BitRot daemon for the specified volume.
gluster volume bitrot VOLNAME disable- Disable the BitRot daemon for the specified volume.
14.2. Modifying BitRot Detection Behavior
gluster volume bitrot VOLNAME scrub ondemand- Starts the scrubbing process and the scrubber will start crawling the file system immediately. Ensure to keep the scrubber in 'Active (Idle)' state, where the scrubber is waiting for it's next frequency cycle to start scrubbing, for on demand scrubbing to be successful. On demand scrubbing does not work when the scrubber is in 'Paused' state or already running.
gluster volume bitrot VOLNAME scrub pause- Pauses the scrubbing process on the specified volume. Note that this does not stop the BitRot daemon; it stops the process that cycles through the volume checking files.
gluster volume bitrot VOLNAME scrub resume- Resumes the scrubbing process on the specified volume. Note that this does not start the BitRot daemon; it restarts the process that cycles through the volume checking files.
gluster volume bitrot VOLNAME scrub status- This command prints a summary of scrub status on the specified volume, including various configuration details and the location of the bitrot and scrubber error logs for this volume. It also prints details each node scanned for errors, along with identifiers for any corrupted objects located.
gluster volume bitrot VOLNAME scrub-throttle rate- Because the BitRot daemon scrubs the entire file system, scrubbing can have a severe performance impact. This command changes the rate at which files and objects are verified. Valid rates are
lazy,normal, andaggressive. By default, the scrubber process is started inlazymode. gluster volume bitrot VOLNAME scrub-frequency frequency- This command changes how often the scrub operation runs when the BitRot daemon is enabled. Valid options are
daily,weekly,biweekly, andmonthly.By default, the scrubber process is set to runbiweekly.
14.3. Restoring a bad file
Important
-oaux-gfid-mount mount option, and enable GFID-to-path translation on each volume by running the following command.
# gluster volume set VOLNAME build-pgfid onfind command.
Procedure 14.1. Restoring a bad file from a replicate volume
Note the identifiers of bad files
Check the output of thescrub statuscommand to determine the identifiers of corrupted files.# gluster volume bitrot VOLNAME scrub status Volume name: VOLNAME ... Node name: NODENAME ... Error count: 3 Corrupted objects: 5f61ade8-49fb-4c37-af84-c95041ff4bf5 e8561c6b-f881-499b-808b-7fa2bce190f7 eff2433f-eae9-48ba-bdef-839603c9434cDetermine the path of each corrupted object
For files created after GFID-to-path translation was enabled, use thegetfattrcommand to determine the path of the corrupted files.# getfattr -n glusterfs.ancestry.path -e text /mnt/VOLNAME/.gfid/GFID ... glusterfs.ancestry.path="/path/to/corrupted_file"For files created before GFID-to-path translation was enabled, use thefindcommand to determine the path of the corrupted file and the index file that match the identifying GFID.# find /rhgs/brick*/.glusterfs -name GFID /rhgs/brick1/.glusterfs/path/to/GFID# find /rhgs -samefile /rhgs/brick1/.glusterfs/path/to/GFID /rhgs/brick1/.glusterfs/path/to/GFID /rhgs/brick1/path/to/corrupted_fileDelete the corrupted files
Delete the corrupted files from the path output by thegetfattrorfindcommand.Delete the GFID file
Delete the GFID file from the/rhgs/brickN/.glusterfsdirectory.Restore the file
Follow these steps to safely restore corrupt files.Disable metadata caching
If the metadata cache is enabled, disable it by running the following command:# gluster volume set VOLNAME stat-prefetch offCreate a recovery mount point
Create a mount point to use for the recovery process. For example,/mnt/recovery.# mkdir /mnt/recoveryMount the volume with timeouts disabled
# mount -t glusterfs -o attribute-timeout=0,entry-timeout=0 hostname:volume-path /mnt/recoveryHeal files and hard links
Access files and hard links to heal them. For example, run thestatcommand on the files and hard links you need to heal.$ stat /mnt/recovery/corrupt-fileIf you do not have client self-heal enabled, you must manually heal the volume with the following command.# gluster volume heal VOLNAMEUnmount and optionally remove the recovery mount point
# umount /mnt/recovery # rmdir /mnt/recoveryOptional: Re-enable metadata caching
If the metadata cache was enabled previously, re-enable it by running the following command:# gluster volume set VOLNAME stat-prefetch on
Chapter 15. Incremental Backup Assistance using Glusterfind
15.1. Glusterfind Configuration Options
- Glusterfind Create
- Glusterfind Pre
- Glusterfind Post
- Glusterfind Query
- Glusterfind List
- Glusterfind Delete
Note
To create a session for a particular instance in the volume, execute the following command:
# glusterfind create [-h] [--debug] [--force] <SessionName> <volname> [--reset-session-time]create command is executed.
# glusterfind create sess_vol1 vol1
Session sess_vol1 created with volume vol1
Ensure that all nodes are online before glusterfind Pre operation. To retrieve the list of modified files and directories and store it in the outfile, execute the following command:
# glusterfind pre [-h] [--debug] [--no-encode] [--full] [--disable-partial] [--output-prefix OUTPUT_PREFIX] [--regenerate-outfile] [-N] [--tag-for-full-find TAG_FOR_FULL_FIND] [--type {f,d,both}] [--field-separator FIELD_SEPARATOR] <session> <volname> <outfile>--help OR -h: Displays help for the command
--debug: Enables the debug mode
--no-encode: The file paths are encoded by default in the output file. This option disables encoding of file paths.
--full: Performs a full search.
--disable-partial: Disables the partial-find feature that is enabled by default.
--output-prefix OUTPUT_PREFIX: Prefix to the path/name that is specified in the outfile.
--regenerate-outfile: Regenerates a new outfile and discards the outfile generated from the last pre command.
-N OR --only-namespace-changes: List only namespace changes
--tag-for-full-find TAG_FOR_FULL_FIND: Tag prefix for file names emitted during a full find operation. Default value is NEW
--type {f,d,both}: type: f, f-files only ; d, d-directories only ; by default = both
--field-separator: Specifies the character/s that glusterfind output uses to separate fields. By default this is a single space, but if your file names contain spaces, you may want to change the delimiter so you can parse the output of glusterfind automatically.
pre command is executed.
# glusterfind pre sess_vol1 vol1 /tmp/outfile.txt
Generated output file /tmp/outfile.txt
Note
NEW file1
NEW dir1%2Ffile2
MODIFY dir3%2Fdir4%2Ftest3
RENAME test1 dir1%2F%2Ftest1new
DELETE test2--no-encode option
NEW file1
NEW dir1/file2
MODIFY dir3/dir4/test3
RENAME test1 dir1/test1new
DELETE test2
The following command is run to update the session time:
# glusterfind post [-h] [--debug] <SessionName> <volname>
post command is executed.
# glusterfind post sess_vol1 vol1
Session sess_vol1 with volume vol1 updatedTo list all the active sessions and the corresponding volumes present in the cluster, execute the following command:
# glusterfind list [-h] [--session SESSION] [--volume VOLUME] [--debug]
# glusterfind list
SESSION VOLUME SESSION TIME
--------------------------------------------------
sess_vol1 vol1 2015-06-22 22:22:53
The glusterfind query subcommand provides a list of changed files based on a specified time stamp. These commands do not check any change log information. Use the glusterfind query subcommand when your backup software maintains its own checkpoints and time stamps outside glusterfind. The glusterfind query subcommand can be used as follows:
# glusterfind query [-h] [--since-time SINCE_TIME] [--end-time END_TIME] [--no-encode] [--full] [--debug] [--disable-partial] [--output-prefix OUTPUT_PREFIX] [-N] [--tag-for-full-find TAG_FOR_FULL_FIND] [--type {f,d,both}] [--field-separator FIELD_SEPARATOR] volname outfile--help OR -h: Displays help for the command
--since-time SINCE_TIME: Start time stamp expected in seconds, since the Linux epoch date (1970-01-01 00:00:00 UTC). Current Linux epoch time can be determined by executing echo $(date +'%s') command.
--end-time END_TIME: End time stamp expected in seconds, since the Linux epoch date (1970-01-01 00:00:00 UTC). Current Linux epoch time can be determined by executing echo $(date +'%s') command.
--no-encode: The file paths are encoded by default in the output file. This option disables encoding of file paths.
--full: Performs a full search. This cannot be used with --since-time and --end-time.
--debug: Enables the debug mode.
--disable-partial: Disables the partial-find feature that is enabled by default.
--output-prefix OUTPUT_PREFIX: Prefix to the path/name that is specified in the outfile.
-N OR --only-namespace-changes: List only namespace changes
--tag-for-full-find TAG_FOR_FULL_FIND: Tag prefix for file names emitted during a full find operation. Default value is NEW
--type {f,d,both}: type: f, f-files only ; d, d-directories only ; by default = both
--field-separator: Specifies the character/s that glusterfind output uses to separate fields. By default this is a single space, but if your file names contain spaces, you may want to change the delimiter so you can parse the output of glusterfind automatically.
pre command is executed.
# glusterfind query volname --since-time timestamp1 --end-time timestamp2 output_file.txtecho $(date +'%s') on the command line.
# glusterfind query volname --full output_file.txt# glusterfind query volname --full --tag-for-full-find NEW output_file.txt--field-separator option. The following command sets the field separator to ==.
# gluster query volname --full output_file.txt --field-separator "=="To clear out all the session information associated with that particular session, execute the following command:
# glusterfind delete [-h] [--debug] <SessionName> <volname>delete command is executed.
# glusterfind delete sess_vol1 vol1
Session sess_vol1 with volume vol1 deleted15.1.1. Adding or Replacing a Brick from an Existing Glusterfind Session
glusterfind create command with force for the existing session to work. For example:
# glusterfind create existing-session volname --forceChapter 16. Managing Tiering (Deprecated)
Warning
Important
The hot tier is the tiering volume created using better performing subvolumes, an example of which could be SSDs. Frequently accessed data is placed in the highest performance and most expensive hot tier. Hot tier volume could be a distributed volume or distributed-replicated volume.
Warning
The cold tier is the existing Red Hat Gluster Storage volume created using slower storage such as Spinning disks. Inactive or infrequently accessed data is placed in the lowest-cost cold tier.
Tiering automatically migrates files between hot tier and cold tier to improve the storage performance and resource use.
16.1. Tiering Architecture (Deprecated)
Warning
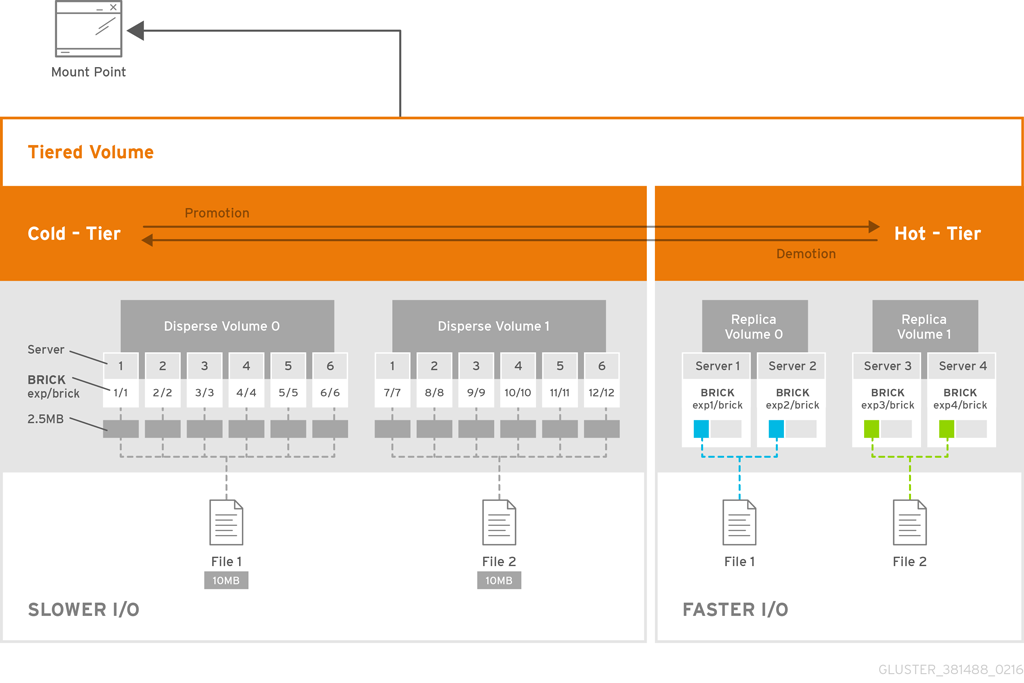
Figure 16.1. Tiering Architecture
16.2. Key Benefits of Tiering (Deprecated)
Warning
- Automatic classification and movement of files based on the access patterns
- Faster response time and reduced latency
- Better I/O performance
- Improved data-storage efficiency
- Reduced deployment and operating costs
16.3. Tiering Limitations (Deprecated)
Warning
- Native client support for tiering is limited to Red Hat Enterprise Linux version 6.7, 6.8 and 7.x clients. Tiered volumes cannot be mounted by Red Hat Enterprise Linux 5.x clients.
- Tiering works only with
cache friendlyworkloads. Attaching a tier volume to a cache unfriendly workload will lead to slow performance. In acache friendlyworkload, most of the reads and writes are accessing a subset of the total amount of data. And, this subset fits on the hot tier. This subset should change only infrequently. - Tiering feature is supported only on Red Hat Enterprise Linux 7 based Red Hat Gluster Storage. Tiering feature is not supported on Red Hat Enterprise Linux 6 based Red Hat Gluster Storage.
- Only Fuse and gluster-nfs access is supported. Server Message Block (SMB) and nfs-ganesha access to tiered volume is not supported.
- Creating snapshot of a tiered volume is supported. Snapshot clones are not supported with the tiered volumes.
- When you run
tier detach commitortier detach force, ongoing I/O operations may fail with a Transport endpoint is not connected error. - Files with hardlinks and softlinks are not migrated.
- Files on which POSIX locks has been taken are not migrated until all locks are released.
- Add brick, remove brick, and rebalance operations are not supported on the tiered volume. For information on expanding a tiered volume, see Section 11.7.1, “Expanding a Tiered Volume” and for information on shrinking a tiered volume, see Section 11.8.2, “Shrinking a Tiered Volume ”
16.4. Attaching a Tier to a Volume (Deprecated)
Warning
attach command will declare an existing volume as cold tier and creates a new hot tier volume which is appended to it. Together, the combination is a single tiered volume.
- Attach the tier to the volume by executing the following command:
# gluster volume tier VOLNAME attach [replica COUNT] NEW-BRICK...For example,# gluster volume tier test-volume attach replica 3 server1:/rhgs/brick5/b1 server2:/rhgs/brick6/b2 server1:/rhgs/brick7/b3 server2:/rhgs/brick8/b4 - Run
gluster volume infocommand to optionally display the volume information.The command output displays information similar to the following:# gluster volume info test-volume Volume Name: test-volume Type: Tier Status: Started Number of Bricks: 8 Transport-type: tcp Hot Tier : Hot Tier Type : Distributed-Replicate Number of Bricks: 2 x 2 = 4 Brick1: server1:/rhgs/brick5/b1 Brick2: server2:/rhgs/brick6/b2 Brick3: server1:/rhgs/brick7/b3 Brick4: server2:/rhgs/brick8/b4 Cold Tier: Cold Tier Type : Distributed-Replicate Number of Bricks: 2 x 2 = 4 Brick5: server1:/rhgs/brick1/b5 Brick6: server2:/rhgs/brick2/b6 Brick7: server1:/rhgs/brick3/b7 Brick8: server2:/rhgs/brick4/b8 Options Reconfigured: cluster.watermark-low: 70 cluster.watermark-hi: 90 cluster.tier-demote-frequency: 45 cluster.tier-mode: cache features.ctr-enabled: on performance.readdir-ahead: on
gluster volume tier VOLNAME start force command.
16.4.1. Attaching a Tier to a Geo-replicated Volume (Deprecated)
Warning
Important
performance.quick-read option is enabled and geo-replicated from a tiered master volume. If the master volume is a tiered volume, you must disable the performance.quick-read option in the Slave Volume using the following command:
# gluster volume set Slavevol performance.quick-read off- Stop geo-replication between the master and slave, using the following command:
# gluster volume geo-replication MASTER_VOL SLAVE_HOST::SLAVE_VOL stopFor example:# gluster volume geo-replication Volume1 example.com::slave-vol stop - Attach the tier to the volume using the following command:
# gluster volume tier VOLNAME attach [replica COUNT] NEW-BRICK...For example, to create a distributed-replicated tier volume with replica count two:# gluster volume tier test-volume attach replica 3 server1:/rhgs/brick1/b1 server2:/rhgs/brick2/b2 server1:/rhgs/brick3/b3 server2:/rhgs/brick4/b4 - Restart the geo-replication sessions, using the following command:
# gluster volume geo-replication MASTER_VOL SLAVE_HOST::SLAVE_VOL startFor example# gluster volume geo-replication Volume1 example.com::slave-vol start - Verify whether geo-replication session has started with tier's bricks, using the following command:
# gluster volume geo-replication MASTER_VOL SLAVE_HOST::SLAVE_VOL statusFor example,# gluster volume geo-replication Volume1 example.com::slave-vol status
16.5. Configuring a Tiering Volume (Deprecated)
Warning
# gluster volume set VOLNAME key value
16.5.1. Configuring Watermarks (Deprecated)
Warning
cache mode, the configured watermark values and the percentage of the hot tier that is full determine whether a file will be promoted or demoted. The cluster.watermark-low and cluster.watermark-hi volume options set the lower and upper watermark values respectively for a tier volume.
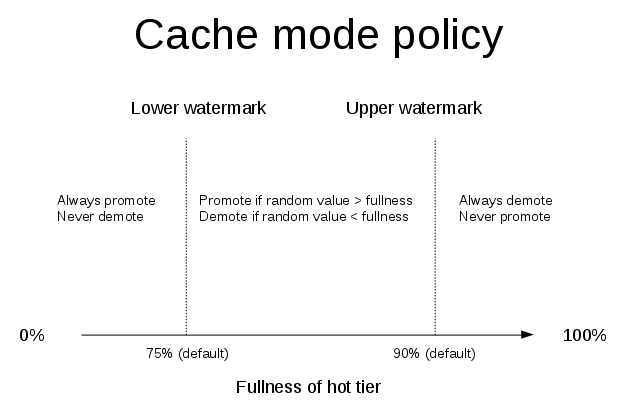
Figure 16.2. Tiering Watermarks
# gluster volume set VOLNAME cluster.watermark-hi value
# gluster volume set VOLNAME cluster.watermark-low value
16.5.2. Configuring Promote and Demote Frequency (Deprecated)
Warning
# gluster volume set VOLNAME cluster.tier-demote-frequency value_in_seconds
# gluster volume set VOLNAME cluster.tier-promote-frequency value_in_seconds
16.5.3. Configuring Read and Write Frequency (Deprecated)
Warning
HOT for promotion. Any file that has read or write hits less than this value will be considered as COLD and will be demoted. If the read/write access count is not set, then the default count is set to 0.
# gluster volume set VOLNAME cluster.write-freq-threshold value
Note
# gluster volume set VOLNAME cluster.read-freq-threshold value
Note
16.5.4. Configuring Target Data Size (Deprecated)
Warning
# gluster volume set VOLNAME cluster.tier-max-mb value_in_mb
cluster.tier-max-mb count is not set, then the default data size is set to 4000 MB.
16.5.5. Configuring the File Count per Cycle (Deprecated)
Warning
# gluster volume set VOLNAME cluster.tier-max-files count
cluster.tier-max-files count is not set, then the default count is set to 10000.
16.6. Displaying Tiering Status Information (Deprecated)
Warning
# gluster volume tier VOLNAME status
# gluster volume tier test-volume status
Node Promoted files Demoted files Status
--------- --------- --------- ---------
localhost 1 5 in progress
server1 0 2 in progress
Tiering Migration Functionality: test-volume: success16.7. Detaching a Tier from a Volume (Deprecated)
Warning
- Start the detach tier by executing the following command:
# gluster volume tier VOLNAME detach startFor example,# gluster volume tier test-volume detach start - Monitor the status of detach tier until the status displays the status as complete.
# gluster volume tier VOLNAME detach statusFor example,# gluster volume tier test-volume detach status Node Rebalanced-files size scanned failures skipped status run time in secs -------- ----------- ----------- ----------- ----------- ----------- ------------ -------------- localhost 0 0Bytes 0 0 0 completed 0.00 server1 0 0Bytes 0 0 0 completed 1.00 server2 0 0Bytes 0 0 0 completed 0.00 server1 0 0Bytes 0 0 0 completed server2 0 0Bytes 0 0 0 completedNote
It is possible that some files are not migrated to the cold tier on a detach operation for various reasons like POSIX locks being held on them. Check for files on the hot tier bricks and you can either manually move the files, or turn off applications (which would presumably unlock the files) and stop/start detach tier, to retry. - When the tier is detached successfully as shown in the previous status command, run the following command to commit the tier detach:
# gluster volume tier VOLNAME detach commitFor example,# gluster volume tier test-volume detach commit Removing tier can result in data loss. Do you want to Continue? (y/n) y volume detach-tier commit: success Check the detached bricks to ensure all files are migrated. If files with data are found on the brick path, copy them via a gluster mount point before re-purposing the removed brick.
Note
tier detach commit or tier detach force, ongoing I/O operations may fail with a Transport endpoint is not connected error.
gluster volume info command.
16.7.1. Detaching a Tier of a Geo-replicated Volume (Deprecated)
Warning
- Start the detach tier by executing the following command:
# gluster volume tier VOLNAME detach startFor example,# gluster volume tier test-volume detach start - Monitor the status of detach tier until the status displays the status as complete.
# gluster volume tier VOLNAME detach statusFor example,# gluster volume tier test-volume detach status Node Rebalanced-files size scanned failures skipped status run time in secs -------- ----------- ----------- ----------- ----------- ----------- ------------ -------------- localhost 0 0Bytes 0 0 0 completed 0.00 server1 0 0Bytes 0 0 0 completed 1.00 server2 0 0Bytes 0 0 0 completed 0.00 server1 0 0Bytes 0 0 0 completed server2 0 0Bytes 0 0 0 completedNote
There could be some number of files that were not moved. Such files may have been locked by the user, and that prevented them from moving to the cold tier on the detach operation. You must check for such files. If you find any such files, you can either manually move the files, or turn off applications (which would presumably unlock the files) and stop/start detach tier, to retry. - Set a checkpoint on a geo-replication session to ensure that all the data in that cold-tier is synced to the slave. For more information on geo-replication checkpoints, see Section 10.4.4.1, “Geo-replication Checkpoints”.
# gluster volume geo-replication MASTER_VOL SLAVE_HOST::SLAVE_VOL config checkpoint nowFor example,# gluster volume geo-replication Volume1 example.com::slave-vol config checkpoint now - Use the following command to verify the checkpoint completion for the geo-replication session
# gluster volume geo-replication MASTER_VOL SLAVE_HOST::SLAVE_VOL status detail - Stop geo-replication between the master and slave, using the following command:
# gluster volume geo-replication MASTER_VOL SLAVE_HOST::SLAVE_VOL stopFor example:# gluster volume geo-replication Volume1 example.com::slave-vol stop - Commit the detach tier operation using the following command:
# gluster volume tier VOLNAME detach commitFor example,# gluster volume tier test-volume detach commit Removing tier can result in data loss. Do you want to Continue? (y/n) y volume detach-tier commit: success Check the detached bricks to ensure all files are migrated. If files with data are found on the brick path, copy them via a gluster mount point before re-purposing the removed brick.After the detach tier commit is completed, you can verify that the volume is no longer a tier volume by runninggluster volume infocommand. - Restart the geo-replication sessions, using the following command:
# gluster volume geo-replication MASTER_VOL SLAVE_HOST::SLAVE_VOL startFor example,# gluster volume geo-replication Volume1 example.com::slave-vol start
Part V. Monitor and Tune
Chapter 17. Monitoring Red Hat Gluster Storage Gluster Workload
volume top and volume profile commands to view vital performance information and identify bottlenecks on each brick of a volume.
Note
profile and top information will be reset.
17.1. Profiling volumes
17.1.1. Server-side volume profiling using volume profile
volume profile command provides an interface to get the per-brick or NFS server I/O information for each file operation of a volume. This information helps in identifying the bottlenecks in the storage system.
volume profile command.
17.1.1.1. Start Profiling
# gluster volume profile VOLNAME start
# gluster volume profile test-volume start
Starting volume profile on test has been successfulImportant
profile command can affect system performance while the profile information is being collected. Red Hat recommends that profiling should only be used for debugging.
volume info command:
diagnostics.count-fop-hits: on
diagnostics.latency-measurement: on17.1.1.2. Displaying the I/O Information
# gluster volume profile VOLNAME info
# gluster v profile glustervol info
Brick: rhsqaci-vm33.lab.eng.blr.redhat.com:/bricks/brick0/1
-----------------------------------------------------------
Cumulative Stats:
%-latency Avg-latency Min-Latency Max-Latency No. of calls Fop
--------- ----------- ----------- ----------- ------------ ----
0.00 0.00 us 0.00 us 0.00 us 11 RELEASE
0.00 0.00 us 0.00 us 0.00 us 238 RELEASEDIR
0.35 380.05 us 380.05 us 380.05 us 1 SETXATTR
0.40 107.73 us 5.50 us 413.31 us 4 OPENDIR
0.62 167.65 us 91.33 us 339.28 us 4 STATFS
0.86 187.42 us 28.50 us 534.96 us 5 GETXATTR
2.16 106.54 us 32.16 us 383.58 us 22 ENTRYLK
2.17 106.97 us 39.01 us 251.65 us 22 FLUSH
2.92 263.57 us 189.06 us 495.05 us 12 SETATTR
3.22 124.60 us 43.08 us 311.69 us 28 INODELK
3.41 616.76 us 319.27 us 1028.72 us 6 READDIR
10.11 997.03 us 413.73 us 3507.02 us 11 CREATE
73.79 256.58 us 50.02 us 924.61 us 312 LOOKUP
Duration: 46537 seconds
Data Read: 0 bytes
Data Written: 0 bytes
Interval 1 Stats:
%-latency Avg-latency Min-Latency Max-Latency No. of calls Fop
--------- ----------- ----------- ----------- ------------ ----
0.00 0.00 us 0.00 us 0.00 us 11 RELEASE
0.00 0.00 us 0.00 us 0.00 us 4 RELEASEDIR
0.35 380.05 us 380.05 us 380.05 us 1 SETXATTR
0.40 107.73 us 5.50 us 413.31 us 4 OPENDIR
0.62 167.65 us 91.33 us 339.28 us 4 STATFS
0.86 187.42 us 28.50 us 534.96 us 5 GETXATTR
2.16 106.54 us 32.16 us 383.58 us 22 ENTRYLK
2.17 106.97 us 39.01 us 251.65 us 22 FLUSH
2.92 263.57 us 189.06 us 495.05 us 12 SETATTR
3.22 124.60 us 43.08 us 311.69 us 28 INODELK
3.41 616.76 us 319.27 us 1028.72 us 6 READDIR
10.11 997.03 us 413.73 us 3507.02 us 11 CREATE
73.79 256.58 us 50.02 us 924.61 us 312 LOOKUP
Duration: 347 seconds
Data Read: 0 bytes
Data Written: 0 bytes
Brick: rhsqaci-vm33.lab.eng.blr.redhat.com:/bricks/brick1/1
-----------------------------------------------------------
Cumulative Stats:
%-latency Avg-latency Min-Latency Max-Latency No. of calls Fop
--------- ----------- ----------- ----------- ------------ ----
0.00 0.00 us 0.00 us 0.00 us 12 RELEASE
0.00 0.00 us 0.00 us 0.00 us 238 RELEASEDIR
0.14 146.24 us 146.24 us 146.24 us 1 OPEN
0.26 266.64 us 266.64 us 266.64 us 1 SETXATTR
0.26 67.88 us 2.50 us 243.52 us 4 OPENDIR
0.42 108.83 us 81.87 us 139.11 us 4 STATFS
0.98 201.26 us 82.36 us 306.38 us 5 GETXATTR
2.49 116.34 us 23.53 us 304.10 us 22 ENTRYLK
2.75 236.13 us 124.73 us 358.80 us 12 SETATTR
3.12 114.82 us 44.34 us 550.01 us 28 INODELK
3.17 142.00 us 23.16 us 388.56 us 23 FLUSH
4.37 748.73 us 324.70 us 1115.96 us 6 READDIR
6.57 614.44 us 364.94 us 807.17 us 11 CREATE
75.46 248.88 us 66.43 us 599.31 us 312 LOOKUP
Duration: 46537 seconds
Data Read: 0 bytes
Data Written: 0 bytes# gluster volume profile VOLNAME info nfs
# gluster volume profile test-volume info nfs
NFS Server : localhost
----------------------
Cumulative Stats:
Block Size: 32768b+ 65536b+
No. of Reads: 0 0
No. of Writes: 1000 1000
%-latency Avg-latency Min-Latency Max-Latency No. of calls Fop
--------- ----------- ----------- ----------- ------------ ----
0.01 410.33 us 194.00 us 641.00 us 3 STATFS
0.60 465.44 us 346.00 us 867.00 us 147 FSTAT
1.63 187.21 us 67.00 us 6081.00 us 1000 SETATTR
1.94 221.40 us 58.00 us 55399.00 us 1002 ACCESS
2.55 301.39 us 52.00 us 75922.00 us 968 STAT
2.85 326.18 us 88.00 us 66184.00 us 1000 TRUNCATE
4.47 511.89 us 60.00 us 101282.00 us 1000 FLUSH
5.02 3907.40 us 1723.00 us 19508.00 us 147 READDIRP
25.42 2876.37 us 101.00 us 843209.00 us 1012 LOOKUP
55.52 3179.16 us 124.00 us 121158.00 us 2000 WRITE
Duration: 7074 seconds
Data Read: 0 bytes
Data Written: 102400000 bytes
Interval 1 Stats:
Block Size: 32768b+ 65536b+
No. of Reads: 0 0
No. of Writes: 1000 1000
%-latency Avg-latency Min-Latency Max-Latency No. of calls Fop
--------- ----------- ----------- ----------- ------------ ----
0.01 410.33 us 194.00 us 641.00 us 3 STATFS
0.60 465.44 us 346.00 us 867.00 us 147 FSTAT
1.63 187.21 us 67.00 us 6081.00 us 1000 SETATTR
1.94 221.40 us 58.00 us 55399.00 us 1002 ACCESS
2.55 301.39 us 52.00 us 75922.00 us 968 STAT
2.85 326.18 us 88.00 us 66184.00 us 1000 TRUNCATE
4.47 511.89 us 60.00 us 101282.00 us 1000 FLUSH
5.02 3907.40 us 1723.00 us 19508.00 us 147 READDIRP
25.41 2878.07 us 101.00 us 843209.00 us 1011 LOOKUP
55.53 3179.16 us 124.00 us 121158.00 us 2000 WRITE
Duration: 330 seconds
Data Read: 0 bytes
Data Written: 102400000 bytes17.1.1.3. Stop Profiling
# gluster volume profile VOLNAME stop
# gluster volume profile test-volume stop
Stopping volume profile on test has been successful17.1.2. Client-side volume profiling (FUSE only)
# setfattr -n trusted.io-stats-dump -v output_file_id mount_point/var/run/gluster directory. The output_file_id is not the whole file name, but is used as part of the name of the generated files.
17.2. Running the Volume Top Command
volume top command allows you to view the glusterFS bricks’ performance metrics, including read, write, file open calls, file read calls, file write calls, directory open calls, and directory real calls. The volume top command displays up to 100 results.
volume top command.
17.2.1. Viewing Open File Descriptor Count and Maximum File Descriptor Count
volume top command. The volume top command also displays the maximum open file descriptor count of files that are currently open, and the maximum number of files opened at any given point of time since the servers are up and running. If the brick name is not specified, then the open file descriptor metrics of all the bricks belonging to the volume displays.
# gluster volume top VOLNAME open [nfs | brick BRICK-NAME] [list-cnt cnt]
# gluster volume top test open brick server:/bricks/brick1/test list-cnt 10
Brick: server/bricks/brick1/test
Current open fds: 2, Max open fds: 4, Max openfd time: 2020-10-09 05:57:20.171038
Count filename
=======================
2 /file222
1 /file117.2.2. Viewing Highest File Read Calls
volume top command. If the brick name is not specified, a list of 100 files are displayed by default.
# gluster volume top VOLNAME read [nfs | brick BRICK-NAME] [list-cnt cnt]
# gluster volume top testvol_distributed-dispersed read brick `hostname`:/bricks/brick1/testvol_distributed-dispersed_brick1/ list-cnt 10
Brick: server/bricks/brick1/testvol_distributed-dispersed_brick1
Count filename
=======================
9 /user11/dir1/dir4/testfile2.txt
9 /user11/dir1/dir1/testfile0.txt
9 /user11/dir0/dir4/testfile4.txt
9 /user11/dir0/dir3/testfile4.txt
9 /user11/dir0/dir1/testfile0.txt
9 /user11/testfile4.txt
9 /user11/testfile3.txt
5 /user11/dir2/dir1/testfile4.txt
5 /user11/dir2/dir1/testfile0.txt
5 /user11/dir2/testfile2.txt17.2.3. Viewing Highest File Write Calls
volume top command. If the brick name is not specified, a list of 100 files displays by default.
# gluster volume top VOLNAME write [nfs | brick BRICK-NAME] [list-cnt cnt]
# gluster volume top testvol_distributed-dispersed write brick `hostname`:/bricks/brick1/testvol_distributed-dispersed_brick1/ list-cnt 10
Brick: server/bricks/brick1/testvol_distributed-dispersed_brick1
Count filename
=======================
8 /user12/dir4/dir4/testfile3.txt
8 /user12/dir4/dir3/testfile3.txt
8 /user2/dir4/dir3/testfile4.txt
8 /user3/dir4/dir4/testfile1.txt
8 /user12/dir4/dir2/testfile3.txt
8 /user2/dir4/dir1/testfile0.txt
8 /user11/dir4/dir3/testfile4.txt
8 /user3/dir4/dir2/testfile2.txt
8 /user12/dir4/dir0/testfile0.txt
8 /user11/dir4/dir3/testfile3.txt17.2.4. Viewing Highest Open Calls on a Directory
volume top command. If the brick name is not specified, the metrics of all bricks belonging to that volume displays.
# gluster volume top VOLNAME opendir [brick BRICK-NAME] [list-cnt cnt]
# gluster volume top testvol_distributed-dispersed opendir brick `hostname`:/bricks/brick1/testvol_distributed-dispersed_brick1/ list-cnt 10
Brick: server/bricks/brick1/testvol_distributed-dispersed_brick1
Count filename
=======================
3 /user2/dir3/dir2
3 /user2/dir3/dir1
3 /user2/dir3/dir0
3 /user2/dir3
3 /user2/dir2/dir4
3 /user2/dir2/dir3
3 /user2/dir2/dir2
3 /user2/dir2/dir1
3 /user2/dir2/dir0
3 /user2/dir217.2.5. Viewing Highest Read Calls on a Directory
volume top command. If the brick name is not specified, the metrics of all bricks belonging to that volume displays.
# gluster volume top VOLNAME readdir [nfs | brick BRICK-NAME] [list-cnt cnt]
# gluster volume top testvol_distributed-dispersed readdir brick `hostname`:/bricks/brick1/testvol_distributed-dispersed_brick1/ list-cnt 10
Brick: server/bricks/brick1/testvol_distributed-dispersed_brick1
Count filename
=======================
4 /user6/dir2/dir3
4 /user6/dir1/dir4
4 /user6/dir1/dir2
4 /user6/dir1
4 /user6/dir0
4 /user13/dir1/dir1
4 /user3/dir4/dir4
4 /user3/dir3/dir4
4 /user3/dir3/dir3
4 /user3/dir3/dir117.2.6. Viewing Read Performance
volume top command. If the brick name is not specified, the metrics of all the bricks belonging to that volume is displayed. The output is the read throughput.
# gluster volume top VOLNAME read-perf [bs blk-size count count] [nfs | brick BRICK-NAME] [list-cnt cnt]
server:/export/ of test-volume, specifying a 256 block size, and list the top 10 results:
# gluster volume top testvol_distributed-dispersed read-perf bs 256 count 1 brick `hostname`:/bricks/brick1/testvol_distributed-dispersed_brick1/ list-cnt 10
Brick: server/bricks/brick1/testvol_distributed-dispersed_brick1
Throughput 10.67 MBps time 0.0000 secs
MBps Filename Time
==== ======== ====
0 /user2/dir3/dir2/testfile3.txt 2021-02-01 15:47:35.391234
0 /user2/dir3/dir2/testfile0.txt 2021-02-01 15:47:35.371018
0 /user2/dir3/dir1/testfile4.txt 2021-02-01 15:47:33.375333
0 /user2/dir3/dir1/testfile0.txt 2021-02-01 15:47:31.859194
0 /user2/dir3/dir0/testfile2.txt 2021-02-01 15:47:31.749105
0 /user2/dir3/dir0/testfile1.txt 2021-02-01 15:47:31.728151
0 /user2/dir3/testfile4.txt 2021-02-01 15:47:31.296924
0 /user2/dir3/testfile3.txt 2021-02-01 15:47:30.988683
0 /user2/dir3/testfile0.txt 2021-02-01 15:47:30.557743
0 /user2/dir2/dir4/testfile4.txt 2021-02-01 15:47:30.46401717.2.7. Viewing Write Performance
volume top command. If brick name is not specified, then the metrics of all the bricks belonging to that volume will be displayed. The output will be the write throughput.
# gluster volume top VOLNAME write-perf [bs blk-size count count] [nfs | brick BRICK-NAME] [list-cnt cnt]
server:/export/ of test-volume, specifying a 256 block size, and list the top 10 results:
# gluster volume top testvol_distributed-dispersed write-perf bs 256 count 1 brick `hostname`:/bricks/brick1/testvol_distributed-dispersed_brick1/ list-cnt 10
Brick: server/bricks/brick1/testvol_distributed-dispersed_brick1
Throughput 3.88 MBps time 0.0001 secs
MBps Filename Time
==== ======== ====
0 /user12/dir4/dir4/testfile4.txt 2021-02-01 13:30:32.225628
0 /user12/dir4/dir4/testfile3.txt 2021-02-01 13:30:31.771095
0 /user12/dir4/dir4/testfile0.txt 2021-02-01 13:30:29.655447
0 /user12/dir4/dir3/testfile4.txt 2021-02-01 13:30:29.62920
0 /user12/dir4/dir3/testfile3.txt 2021-02-01 13:30:28.995407
0 /user2/dir4/dir4/testfile2.txt 2021-02-01 13:30:28.489318
0 /user2/dir4/dir4/testfile1.txt 2021-02-01 13:30:27.956523
0 /user2/dir4/dir3/testfile4.txt 2021-02-01 13:30:27.34337
0 /user12/dir4/dir3/testfile0.txt 2021-02-01 13:30:26.699984
0 /user3/dir4/dir4/testfile2.txt 2021-02-01 13:30:26.602165
17.3. Listing Volumes
# gluster volume list
# gluster volume list
test-volume
volume1
volume2
volume317.4. Displaying Volume Information
# gluster volume info VOLNAME
# gluster volume info test-volume
Volume Name: test-volume
Type: Distribute
Status: Created
Number of Bricks: 4
Bricks:
Brick1: server1:/rhgs/brick1
Brick2: server2:/rhgs/brick2
Brick3: server3:/rhgs/brick3
Brick4: server4:/rhgs/brick417.5. Obtaining Node Information
get-state command outputs information about a node to a specified file.
The get-state command outputs information about a node to a specified file and can be invoked in different ways. The table below shows the options that can be used with the get-state command.
# gluster get-state [odir path_to_output_dir] [file filename] [detail|volumeoptions]
Usage: get-state [options]
| Command | Description |
|---|---|
gluster get-state | glusterd state information is saved in the /var/run/gluster/glusterd_state_timestamp file. |
gluster get-state file filename | glusterd state information is saved in the /var/run/gluster/ directory with the filename as specified in the command. |
gluster get-state odir directory file filename | glusterd state information is saved in the directory and in the file name as specified in the command. |
gluster get-state detail | glusterd state information is saved in the /var/run/gluster/glusterd_state_timestamp file, and all clients connected per brick are included in the output. |
gluster get-state volumeoptions | glusterd state information is saved in the /var/run/gluster/glusterd_state_timestamp file, and all values for all the volume options are included in the output. |
Invocation of the get-state command saves the information that reflects the node level status of the trusted storage pool as maintained in glusterd (no other daemons are supported as of now) to a file specified in the command. By default, the output will be dumped to /var/run/gluster/glusterd_state_timestamp file .
| Section | Description |
|---|---|
| Global | Displays the UUID and the op-version of the glusterd. |
| Global options | Displays cluster specific options that have been set explicitly through the volume set command. |
| Peers | Displays the peer node information including its hostname and connection status. |
| Volumes | Displays the list of volumes created on this node along with the detailed information on each volume. |
| Services | Displays the list of the services configured on this node along with its status. |
| Misc | Displays miscellaneous information about the node. For example, configured ports. |
gluster get-state:
# gluster get-state
glusterd state dumped to /var/run/gluster/glusterd_state_timestampcat state_dump_file_path command:
[Global]
MYUUID: 5392df4c-aeb9-4e8c-9001-58e984897bf6
op-version: 70200
[Global options]
[Peers]
Peer1.primary_hostname: output omitted
Peer1.uuid: 19700669-dff6-4d9f-bf73-ca370c7dc462
Peer1.state: Peer in Cluster
Peer1.connected: Connected
Peer1.othernames:
Peer2.primary_hostname: output omitted
Peer2.uuid: 179d4a5d-0539-4c4e-91a4-2e5bebad25a9
Peer2.state: Peer in Cluster
Peer2.connected: Connected
Peer2.othernames:
Peer3.primary_hostname: output omitted
Peer3.uuid: 80c715a0-5b67-4e7d-8e6e-0449955d1f66
Peer3.state: Peer in Cluster
Peer3.connected: Connected
Peer3.othernames:
Peer4.primary_hostname: output omitted
Peer4.uuid: bed027c6-596f-43a1-b250-11e252a1c524
Peer4.state: Peer in Cluster
Peer4.connected: Connected
Peer4.othernames:
Peer5.primary_hostname: output omitted
Peer5.uuid: d7084399-d47c-4f36-991b-9bd2e9e52dd4
Peer5.state: Peer in Cluster
Peer5.connected: Connected
Peer5.othernames:
[Volumes]
Volume1.name: ecv6012
Volume1.id: e33fbc3e-9240-4024-975d-5f3ed8ce2540
Volume1.type: Distributed-Disperse
Volume1.transport_type: tcp
Volume1.status: Started
Volume1.profile_enabled: 0
Volume1.brickcount: 18
Volume1.Brick1.path: output omitted:/gluster/brick1/ecv6012
Volume1.Brick1.hostname: output omitted
Volume1.Brick2.path: output omitted:/gluster/brick1/ecv6012
Volume1.Brick2.hostname: output omitted
Volume1.Brick3.path: output omitted:/gluster/brick1/ecv6012
Volume1.Brick3.hostname: output omitted
Volume1.Brick3.port: 49152
Volume1.Brick3.rdma_port: 0
Volume1.Brick3.port_registered: 1
Volume1.Brick3.status: Started
Volume1.Brick3.spacefree: 423360098304Bytes
Volume1.Brick3.spacetotal: 427132190720Bytes
Volume1.Brick4.path: output omitted:/gluster/brick1/ecv6012
Volume1.Brick4.hostname: output omitted
Volume1.Brick5.path: output omitted:/gluster/brick1/ecv6012
Volume1.Brick5.hostname: output omitted
Volume1.Brick6.path: output omitted:/gluster/brick1/ecv6012
Volume1.Brick6.hostname: output omitted
Volume1.Brick7.path: output omitted:/gluster/brick2/ecv6012
Volume1.Brick7.hostname: output omitted
Volume1.Brick8.path: output omitted:/gluster/brick2/ecv6012
Volume1.Brick8.hostname: output omitted
Volume1.Brick9.path: output omitted:/gluster/brick2/ecv6012
Volume1.Brick9.hostname: output omitted
Volume1.Brick9.port: 49153
Volume1.Brick9.rdma_port: 0
Volume1.Brick9.port_registered: 1
Volume1.Brick9.status: Started
Volume1.Brick9.spacefree: 423832850432Bytes
Volume1.Brick9.spacetotal: 427132190720Bytes
Volume1.Brick10.path: output omitted:/gluster/brick2/ecv6012
Volume1.Brick10.hostname: output omitted
Volume1.Brick11.path: output omitted:/gluster/brick2/ecv6012
Volume1.Brick11.hostname: output omitted
Volume1.Brick12.path: output omitted:/gluster/brick2/ecv6012
Volume1.Brick12.hostname: output omitted
Volume1.Brick13.path: output omitted:/gluster/brick3/ecv6012
Volume1.Brick13.hostname: output omitted
Volume1.Brick14.path: output omitted:/gluster/brick3/ecv6012
Volume1.Brick14.hostname: output omitted
Volume1.Brick15.path: output omitted:/gluster/brick3/ecv6012
Volume1.Brick15.hostname: output omitted
Volume1.Brick15.port: 49154
Volume1.Brick15.rdma_port: 0
Volume1.Brick15.port_registered: 1
Volume1.Brick15.status: Started
Volume1.Brick15.spacefree: 423877419008Bytes
Volume1.Brick15.spacetotal: 427132190720Bytes
Volume1.Brick16.path: output omitted:/gluster/brick3/ecv6012
Volume1.Brick16.hostname: output omitted
Volume1.Brick17.path: output omitted:/gluster/brick3/ecv6012
Volume1.Brick17.hostname: output omitted
Volume1.Brick18.path: output omitted:/gluster/brick3/ecv6012
Volume1.Brick18.hostname: output omitted
Volume1.snap_count: 0
Volume1.stripe_count: 1
Volume1.replica_count: 1
Volume1.subvol_count: 3
Volume1.arbiter_count: 0
Volume1.disperse_count: 6
Volume1.redundancy_count: 2
Volume1.quorum_status: not_applicable
Volume1.snapd_svc.online_status: Offline
Volume1.snapd_svc.inited: true
Volume1.rebalance.id: 00000000-0000-0000-0000-000000000000
Volume1.rebalance.status: not_started
Volume1.rebalance.failures: 0
Volume1.rebalance.skipped: 0
Volume1.rebalance.lookedup: 0
Volume1.rebalance.files: 0
Volume1.rebalance.data: 0Bytes
Volume1.time_left: 0
Volume1.gsync_count: 0
Volume1.options.server.event-threads: 8
Volume1.options.client.event-threads: 8
Volume1.options.disperse.shd-max-threads: 24
Volume1.options.transport.address-family: inet
Volume1.options.storage.fips-mode-rchecksum: on
Volume1.options.nfs.disable: on
[Services]
svc1.name: glustershd
svc1.online_status: Online
svc2.name: nfs
svc2.online_status: Offline
svc3.name: bitd
svc3.online_status: Offline
svc4.name: scrub
svc4.online_status: Offline
svc5.name: quotad
svc5.online_status: Offline
[Misc]
Base port: 49152
Last allocated port: 49154gluster get-state volumeoptions lists all volume options irrespective of whether the volume option has been explicitly set or not.
gluster get-state volumeoptions:
# gluster get-state volumeoptions
glusterd state dumped to /var/run/gluster/glusterd_state_timestampcat state_dump_file_path command:
[Volume Options]
Volume1.name: ecv6012
Volume1.options.count: 374
Volume1.options.value374: (null)
Volume1.options.key374: features.cloudsync-product-id
Volume1.options.value373: (null)
Volume1.options.key373: features.cloudsync-store-id
Volume1.options.value372: off
Volume1.options.key372: features.cloudsync-remote-read
Volume1.options.value371: off
Volume1.options.key371: features.enforce-mandatory-lock
Volume1.options.value370: (null)
Volume1.options.key370: features.cloudsync-storetype
Volume1.options.value369: on
Volume1.options.key369: ctime.noatime
Volume1.options.value368: off
Volume1.options.key368: features.ctime
Volume1.options.value367: off
Volume1.options.key367: features.cloudsync
Volume1.options.value366: off
Volume1.options.key366: features.sdfs
Volume1.options.value365: on
Volume1.options.key365: disperse.parallel-writes
Volume1.options.value364:
Volume1.options.key364: delay-gen.enable
Volume1.options.value363: 100000
Volume1.options.key363: delay-gen.delay-duration
Volume1.options.value362: 10%
Volume1.options.key362: delay-gen.delay-percentage
Volume1.options.value361: off
Volume1.options.key361: debug.delay-gen
Volume1.options.value360: INFO
Volume1.options.key360: cluster.daemon-log-level
Volume1.options.value359: off
Volume1.options.key359: features.selinux
Volume1.options.value358: 2
Volume1.options.key358: cluster.halo-min-replicas
Volume1.options.value357: 99999
Volume1.options.key357: cluster.halo-max-replicas
Volume1.options.value356: 5
Volume1.options.key356: cluster.halo-max-latency
Volume1.options.value355: 5
Volume1.options.key355: cluster.halo-nfsd-max-latency
Volume1.options.value354: 99999
Volume1.options.key354: cluster.halo-shd-max-latency
Volume1.options.value353: False
Volume1.options.key353: cluster.halo-enabled
Volume1.options.value352: 4
Volume1.options.key352: disperse.stripe-cache
Volume1.options.value351: on
Volume1.options.key351: disperse.optimistic-change-log
Volume1.options.value350: 250
Volume1.options.key350: cluster.max-bricks-per-process
Volume1.options.value349: 100
Volume1.options.key349: glusterd.vol_count_per_thread
Volume1.options.value348: disable
Volume1.options.key348: cluster.brick-multiplex
Volume1.options.value347: 60
Volume1.options.key347: performance.nl-cache-timeout
Volume1.options.value346: 10MB
Volume1.options.key346: performance.nl-cache-limit
Volume1.options.value345: false
Volume1.options.key345: performance.nl-cache-positive-entry
Volume1.options.value344: 10MB
Volume1.options.key344: performance.rda-cache-limit
Volume1.options.value343: 128KB
Volume1.options.key343: performance.rda-high-wmark
Volume1.options.value342: 4096
Volume1.options.key342: performance.rda-low-wmark
Volume1.options.value341: 131072
Volume1.options.key341: performance.rda-request-size
Volume1.options.value340: off
Volume1.options.key340: performance.parallel-readdir
Volume1.options.value339: off
Volume1.options.key339: cluster.use-compound-fops
Volume1.options.value338: 1
Volume1.options.key338: disperse.self-heal-window-size
Volume1.options.value337: auto
Volume1.options.key337: disperse.cpu-extensions
Volume1.options.value336: 1024
Volume1.options.key336: disperse.shd-wait-qlength
Volume1.options.value335: 1
Volume1.options.key335: disperse.shd-max-threads
Volume1.options.value334: 5
Volume1.options.key334: features.locks-notify-contention-delay
Volume1.options.value333: yes
Volume1.options.key333: features.locks-notify-contention
Volume1.options.value332: false
Volume1.options.key332: features.locks-monkey-unlocking
Volume1.options.value331: 0
Volume1.options.key331: features.locks-revocation-max-blocked
Volume1.options.value330: false
Volume1.options.key330: features.locks-revocation-clear-all
Volume1.options.value329: 0
Volume1.options.key329: features.locks-revocation-secs
Volume1.options.value328: on
Volume1.options.key328: cluster.granular-entry-heal
Volume1.options.value327: full
Volume1.options.key327: cluster.locking-scheme
Volume1.options.value326: 1024
Volume1.options.key326: cluster.shd-wait-qlength
Volume1.options.value325: 1
Volume1.options.key325: cluster.shd-max-threads
Volume1.options.value324: gfid-hash
Volume1.options.key324: disperse.read-policy
Volume1.options.value323: on
Volume1.options.key323: dht.force-readdirp
Volume1.options.value322: 600
Volume1.options.key322: cluster.heal-timeout
Volume1.options.value321: 128
Volume1.options.key321: disperse.heal-wait-qlength
Volume1.options.value320: 8
Volume1.options.key320: disperse.background-heals
Volume1.options.value319: 60
Volume1.options.key319: features.lease-lock-recall-timeout
Volume1.options.value318: off
Volume1.options.key318: features.leases
Volume1.options.value317: off
Volume1.options.key317: ganesha.enable
Volume1.options.value316: 60
Volume1.options.key316: features.cache-invalidation-timeout
Volume1.options.value315: off
Volume1.options.key315: features.cache-invalidation
Volume1.options.value314: 120
Volume1.options.key314: features.expiry-time
Volume1.options.value313: false
Volume1.options.key313: features.scrub
Volume1.options.value312: biweekly
Volume1.options.key312: features.scrub-freq
Volume1.options.value311: lazy
Volume1.options.key311: features.scrub-throttle
Volume1.options.value310: 100
Volume1.options.key310: features.shard-deletion-rate
Volume1.options.value309: 16384
Volume1.options.key309: features.shard-lru-limit
Volume1.options.value308: 64MB
Volume1.options.key308: features.shard-block-size
Volume1.options.value307: off
Volume1.options.key307: features.shard
Volume1.options.value306: (null)
Volume1.options.key306: client.bind-insecure
Volume1.options.value305: no
Volume1.options.key305: cluster.quorum-reads
Volume1.options.value304: enable
Volume1.options.key304: cluster.disperse-self-heal-daemon
Volume1.options.value303: off
Volume1.options.key303: locks.mandatory-locking
Volume1.options.value302: off
Volume1.options.key302: locks.trace
Volume1.options.value301: 25000
Volume1.options.key301: features.ctr-sql-db-wal-autocheckpoint
Volume1.options.value300: 12500
Volume1.options.key300: features.ctr-sql-db-cachesize
Volume1.options.value299: 300
Volume1.options.key299: features.ctr_lookupheal_inode_timeout
Volume1.options.value298: 300
Volume1.options.key298: features.ctr_lookupheal_link_timeout
Volume1.options.value297: off
Volume1.options.key297: features.ctr_link_consistency
Volume1.options.value296: off
Volume1.options.key296: features.ctr-record-metadata-heat
Volume1.options.value295: off
Volume1.options.key295: features.record-counters
Volume1.options.value294: off
Volume1.options.key294: features.ctr-enabled
Volume1.options.value293: 604800
Volume1.options.key293: cluster.tier-cold-compact-frequency
Volume1.options.value292: 604800
Volume1.options.key292: cluster.tier-hot-compact-frequency
Volume1.options.value291: on
Volume1.options.key291: cluster.tier-compact
Volume1.options.value290: 100
Volume1.options.key290: cluster.tier-query-limit
Volume1.options.value289: 10000
Volume1.options.key289: cluster.tier-max-files
Volume1.options.value288: 4000
Volume1.options.key288: cluster.tier-max-mb
Volume1.options.value287: 0
Volume1.options.key287: cluster.tier-max-promote-file-size
Volume1.options.value286: cache
Volume1.options.key286: cluster.tier-mode
Volume1.options.value285: 75
Volume1.options.key285: cluster.watermark-low
Volume1.options.value284: 90
Volume1.options.key284: cluster.watermark-hi
Volume1.options.value283: 3600
Volume1.options.key283: cluster.tier-demote-frequency
Volume1.options.value282: 120
Volume1.options.key282: cluster.tier-promote-frequency
Volume1.options.value281: off
Volume1.options.key281: cluster.tier-pause
Volume1.options.value280: 0
Volume1.options.key280: cluster.read-freq-threshold
Volume1.options.value279: 0
Volume1.options.key279: cluster.write-freq-threshold
Volume1.options.value278: disable
Volume1.options.key278: cluster.enable-shared-storage
Volume1.options.value277: off
Volume1.options.key277: features.trash-internal-op
Volume1.options.value276: 5MB
Volume1.options.key276: features.trash-max-filesize
Volume1.options.value275: (null)
Volume1.options.key275: features.trash-eliminate-path
Volume1.options.value274: .trashcan
Volume1.options.key274: features.trash-dir
Volume1.options.value273: off
Volume1.options.key273: features.trash
Volume1.options.value272: 120
Volume1.options.key272: features.barrier-timeout
Volume1.options.value271: disable
Volume1.options.key271: features.barrier
Volume1.options.value270: off
Volume1.options.key270: changelog.capture-del-path
Volume1.options.value269: 120
Volume1.options.key269: changelog.changelog-barrier-timeout
Volume1.options.value268: 5
Volume1.options.key268: changelog.fsync-interval
Volume1.options.value267: 15
Volume1.options.key267: changelog.rollover-time
Volume1.options.value266: ascii
Volume1.options.key266: changelog.encoding
Volume1.options.value265: {{ brick.path }}/.glusterfs/changelogs
Volume1.options.key265: changelog.changelog-dir
Volume1.options.value264: off
Volume1.options.key264: changelog.changelog
Volume1.options.value263: 51
Volume1.options.key263: cluster.server-quorum-ratio
Volume1.options.value262: off
Volume1.options.key262: cluster.server-quorum-type
Volume1.options.value261: off
Volume1.options.key261: config.gfproxyd
Volume1.options.value260: off
Volume1.options.key260: features.ctime
Volume1.options.value259: 100
Volume1.options.key259: storage.max-hardlinks
Volume1.options.value258: 0777
Volume1.options.key258: storage.create-directory-mask
Volume1.options.value257: 0777
Volume1.options.key257: storage.create-mask
Volume1.options.value256: 0000
Volume1.options.key256: storage.force-directory-mode
Volume1.options.value255: 0000
Volume1.options.key255: storage.force-create-mode
Volume1.options.value254: on
Volume1.options.key254: storage.fips-mode-rchecksum
Volume1.options.value253: 20
Volume1.options.key253: storage.health-check-timeout
Volume1.options.value252: 1
Volume1.options.key252: storage.reserve
Volume1.options.value251: :
Volume1.options.key251: storage.gfid2path-separator
Volume1.options.value250: on
Volume1.options.key250: storage.gfid2path
Volume1.options.value249: off
Volume1.options.key249: storage.build-pgfid
Volume1.options.value248: 30
Volume1.options.key248: storage.health-check-interval
Volume1.options.value247: off
Volume1.options.key247: storage.node-uuid-pathinfo
Volume1.options.value246: -1
Volume1.options.key246: storage.owner-gid
Volume1.options.value245: -1
Volume1.options.key245: storage.owner-uid
Volume1.options.value244: 0
Volume1.options.key244: storage.batch-fsync-delay-usec
Volume1.options.value243: reverse-fsync
Volume1.options.key243: storage.batch-fsync-mode
Volume1.options.value242: off
Volume1.options.key242: storage.linux-aio
Volume1.options.value241: 180
Volume1.options.key241: features.auto-commit-period
Volume1.options.value240: relax
Volume1.options.key240: features.retention-mode
Volume1.options.value239: 120
Volume1.options.key239: features.default-retention-period
Volume1.options.value238: on
Volume1.options.key238: features.worm-files-deletable
Volume1.options.value237: off
Volume1.options.key237: features.worm-file-level
Volume1.options.value236: off
Volume1.options.key236: features.worm
Volume1.options.value235: off
Volume1.options.key235: features.read-only
Volume1.options.value234: (null)
Volume1.options.key234: nfs.auth-cache-ttl-sec
Volume1.options.value233: (null)
Volume1.options.key233: nfs.auth-refresh-interval-sec
Volume1.options.value232: (null)
Volume1.options.key232: nfs.exports-auth-enable
Volume1.options.value231: 2
Volume1.options.key231: nfs.event-threads
Volume1.options.value230: on
Volume1.options.key230: nfs.rdirplus
Volume1.options.value229: (1 * 1048576ULL)
Volume1.options.key229: nfs.readdir-size
Volume1.options.value228: (1 * 1048576ULL)
Volume1.options.key228: nfs.write-size
Volume1.options.value227: (1 * 1048576ULL)
Volume1.options.key227: nfs.read-size
Volume1.options.value226: 0x20000
Volume1.options.key226: nfs.drc-size
Volume1.options.value225: off
Volume1.options.key225: nfs.drc
Volume1.options.value224: off
Volume1.options.key224: nfs.server-aux-gids
Volume1.options.value223: /sbin/rpc.statd
Volume1.options.key223: nfs.rpc-statd
Volume1.options.value222: /var/lib/glusterd/nfs/rmtab
Volume1.options.key222: nfs.mount-rmtab
Volume1.options.value221: off
Volume1.options.key221: nfs.mount-udp
Volume1.options.value220: on
Volume1.options.key220: nfs.acl
Volume1.options.value219: on
Volume1.options.key219: nfs.nlm
Volume1.options.value218: on
Volume1.options.key218: nfs.disable
Volume1.options.value217:
Volume1.options.key217: nfs.export-dir
Volume1.options.value216: read-write
Volume1.options.key216: nfs.volume-access
Volume1.options.value215: off
Volume1.options.key215: nfs.trusted-write
Volume1.options.value214: off
Volume1.options.key214: nfs.trusted-sync
Volume1.options.value213: off
Volume1.options.key213: nfs.ports-insecure
Volume1.options.value212: none
Volume1.options.key212: nfs.rpc-auth-reject
Volume1.options.value211: all
Volume1.options.key211: nfs.rpc-auth-allow
Volume1.options.value210: on
Volume1.options.key210: nfs.rpc-auth-null
Volume1.options.value209: on
Volume1.options.key209: nfs.rpc-auth-unix
Volume1.options.value208: 2049
Volume1.options.key208: nfs.port
Volume1.options.value207: 16
Volume1.options.key207: nfs.outstanding-rpc-limit
Volume1.options.value206: on
Volume1.options.key206: nfs.register-with-portmap
Volume1.options.value205: off
Volume1.options.key205: nfs.dynamic-volumes
Volume1.options.value204: off
Volume1.options.key204: nfs.addr-namelookup
Volume1.options.value203: on
Volume1.options.key203: nfs.export-volumes
Volume1.options.value202: on
Volume1.options.key202: nfs.export-dirs
Volume1.options.value201: 15
Volume1.options.key201: nfs.mem-factor
Volume1.options.value200: no
Volume1.options.key200: nfs.enable-ino32
Volume1.options.value199: (null)
Volume1.options.key199: debug.error-fops
Volume1.options.value198: off
Volume1.options.key198: debug.random-failure
Volume1.options.value197: (null)
Volume1.options.key197: debug.error-number
Volume1.options.value196: (null)
Volume1.options.key196: debug.error-failure
Volume1.options.value195: off
Volume1.options.key195: debug.error-gen
Volume1.options.value194: (null)
Volume1.options.key194: debug.include-ops
Volume1.options.value193: (null)
Volume1.options.key193: debug.exclude-ops
Volume1.options.value192: no
Volume1.options.key192: debug.log-file
Volume1.options.value191: no
Volume1.options.key191: debug.log-history
Volume1.options.value190: off
Volume1.options.key190: debug.trace
Volume1.options.value189: disable
Volume1.options.key189: features.bitrot
Volume1.options.value188: off
Volume1.options.key188: features.inode-quota
Volume1.options.value187: off
Volume1.options.key187: features.quota
Volume1.options.value186: off
Volume1.options.key186: geo-replication.ignore-pid-check
Volume1.options.value185: off
Volume1.options.key185: geo-replication.ignore-pid-check
Volume1.options.value184: off
Volume1.options.key184: geo-replication.indexing
Volume1.options.value183: off
Volume1.options.key183: geo-replication.indexing
Volume1.options.value182: off
Volume1.options.key182: features.quota-deem-statfs
Volume1.options.value181: 86400
Volume1.options.key181: features.alert-time
Volume1.options.value180: 5
Volume1.options.key180: features.hard-timeout
Volume1.options.value179: 60
Volume1.options.key179: features.soft-timeout
Volume1.options.value178: 80%
Volume1.options.key178: features.default-soft-limit
Volume1.options.value171: off
Volume1.options.key171: features.tag-namespaces
Volume1.options.value170: off
Volume1.options.key170: features.show-snapshot-directory
Volume1.options.value169: .snaps
Volume1.options.key169: features.snapshot-directory
Volume1.options.value168: off
Volume1.options.key168: features.uss
Volume1.options.value167: true
Volume1.options.key167: performance.global-cache-invalidation
Volume1.options.value166: false
Volume1.options.key166: performance.cache-invalidation
Volume1.options.value165: true
Volume1.options.key165: performance.force-readdirp
Volume1.options.value164: off
Volume1.options.key164: performance.nfs.io-threads
Volume1.options.value163: off
Volume1.options.key163: performance.nfs.stat-prefetch
Volume1.options.value162: off
Volume1.options.key162: performance.nfs.quick-read
Volume1.options.value161: off
Volume1.options.key161: performance.nfs.io-cache
Volume1.options.value160: off
Volume1.options.key160: performance.nfs.read-ahead
Volume1.options.value159: on
Volume1.options.key159: performance.nfs.write-behind
Volume1.options.value158: off
Volume1.options.key158: performance.client-io-threads
Volume1.options.value157: on
Volume1.options.key157: performance.stat-prefetch
Volume1.options.value156: off
Volume1.options.key156: performance.nl-cache
Volume1.options.value155: on
Volume1.options.key155: performance.quick-read
Volume1.options.value154: on
Volume1.options.key154: performance.open-behind
Volume1.options.value153: on
Volume1.options.key153: performance.io-cache
Volume1.options.value152: off
Volume1.options.key152: performance.readdir-ahead
Volume1.options.value151: on
Volume1.options.key151: performance.read-ahead
Volume1.options.value150: on
Volume1.options.key150: performance.write-behind
Volume1.options.value149: inet
Volume1.options.key149: transport.address-family
Volume1.options.value148: 1024
Volume1.options.key148: transport.listen-backlog
Volume1.options.value147: 9
Volume1.options.key147: server.keepalive-count
Volume1.options.value146: 2
Volume1.options.key146: server.keepalive-interval
Volume1.options.value145: 20
Volume1.options.key145: server.keepalive-time
Volume1.options.value144: 42
Volume1.options.key144: server.tcp-user-timeout
Volume1.options.value143: 2
Volume1.options.key143: server.event-threads
Volume1.options.value142: (null)
Volume1.options.key142: server.own-thread
Volume1.options.value141: 300
Volume1.options.key141: server.gid-timeout
Volume1.options.value140: on
Volume1.options.key140: client.send-gids
Volume1.options.value139: on
Volume1.options.key139: server.dynamic-auth
Volume1.options.value138: off
Volume1.options.key138: server.manage-gids
Volume1.options.value137: *
Volume1.options.key137: auth.ssl-allow
Volume1.options.value136: off
Volume1.options.key136: server.ssl
Volume1.options.value135: 64
Volume1.options.key135: server.outstanding-rpc-limit
Volume1.options.value134: /var/run/gluster
Volume1.options.key134: server.statedump-path
Volume1.options.value133: 65534
Volume1.options.key133: server.anongid
Volume1.options.value132: 65534
Volume1.options.key132: server.anonuid
Volume1.options.value131: off
Volume1.options.key131: server.all-squash
Volume1.options.value130: off
Volume1.options.key130: server.root-squash
Volume1.options.value129: on
Volume1.options.key129: server.allow-insecure
Volume1.options.value128: 1
Volume1.options.key128: transport.keepalive
Volume1.options.value127: (null)
Volume1.options.key127: auth.reject
Volume1.options.value126: *
Volume1.options.key126: auth.allow
Volume1.options.value125: 16384
Volume1.options.key125: network.inode-lru-limit
Volume1.options.value124: (null)
Volume1.options.key124: network.tcp-window-size
Volume1.options.value123: 9
Volume1.options.key123: client.keepalive-count
Volume1.options.value122: 2
Volume1.options.key122: client.keepalive-interval
Volume1.options.value121: 20
Volume1.options.key121: client.keepalive-time
Volume1.options.value120: 0
Volume1.options.key120: client.tcp-user-timeout
Volume1.options.value119: 2
Volume1.options.key119: client.event-threads
Volume1.options.value118: disable
Volume1.options.key118: network.remote-dio
Volume1.options.value117: off
Volume1.options.key117: client.ssl
Volume1.options.value116: (null)
Volume1.options.key116: network.tcp-window-size
Volume1.options.value115: 42
Volume1.options.key115: network.ping-timeout
Volume1.options.value114: 1800
Volume1.options.key114: network.frame-timeout
Volume1.options.value113: off
Volume1.options.key113: features.encryption
Volume1.options.value112: false
Volume1.options.key112: performance.nl-cache-pass-through
Volume1.options.value111:
Volume1.options.key111: performance.xattr-cache-list
Volume1.options.value110: off
Volume1.options.key110: performance.md-cache-statfs
Volume1.options.value109: true
Volume1.options.key109: performance.cache-ima-xattrs
Volume1.options.value108: true
Volume1.options.key108: performance.cache-capability-xattrs
Volume1.options.value107: false
Volume1.options.key107: performance.cache-samba-metadata
Volume1.options.value106: true
Volume1.options.key106: performance.cache-swift-metadata
Volume1.options.value105: 1
Volume1.options.key105: performance.md-cache-timeout
Volume1.options.value104: false
Volume1.options.key104: performance.md-cache-pass-through
Volume1.options.value103: false
Volume1.options.key103: performance.readdir-ahead-pass-through
Volume1.options.value102: false
Volume1.options.key102: performance.read-ahead-pass-through
Volume1.options.value101: 4
Volume1.options.key101: performance.read-ahead-page-count
Volume1.options.value100: false
Volume1.options.key100: performance.open-behind-pass-through
Volume1.options.value99: yes
Volume1.options.key99: performance.read-after-open
Volume1.options.value98: yes
Volume1.options.key98: performance.lazy-open
Volume1.options.value97: on
Volume1.options.key97: performance.nfs.write-behind-trickling-writes
Volume1.options.value96: 128KB
Volume1.options.key96: performance.aggregate-size
Volume1.options.value95: on
Volume1.options.key95: performance.write-behind-trickling-writes
Volume1.options.value94: off
Volume1.options.key94: performance.nfs.strict-write-ordering
Volume1.options.value93: off
Volume1.options.key93: performance.strict-write-ordering
Volume1.options.value92: off
Volume1.options.key92: performance.nfs.strict-o-direct
Volume1.options.value91: off
Volume1.options.key91: performance.strict-o-direct
Volume1.options.value90: 1MB
Volume1.options.key90: performance.nfs.write-behind-window-size
Volume1.options.value89: off
Volume1.options.key89: performance.resync-failed-syncs-after-fsync
Volume1.options.value88: 1MB
Volume1.options.key88: performance.write-behind-window-size
Volume1.options.value87: on
Volume1.options.key87: performance.nfs.flush-behind
Volume1.options.value86: on
Volume1.options.key86: performance.flush-behind
Volume1.options.value85: false
Volume1.options.key85: performance.ctime-invalidation
Volume1.options.value84: false
Volume1.options.key84: performance.quick-read-cache-invalidation
Volume1.options.value83: 1
Volume1.options.key83: performance.qr-cache-timeout
Volume1.options.value82: 128MB
Volume1.options.key82: performance.cache-size
Volume1.options.value81: false
Volume1.options.key81: performance.io-cache-pass-through
Volume1.options.value80: false
Volume1.options.key80: performance.iot-pass-through
Volume1.options.value79: off
Volume1.options.key79: performance.iot-cleanup-disconnected-reqs
Volume1.options.value78: (null)
Volume1.options.key78: performance.iot-watchdog-secs
Volume1.options.value77: on
Volume1.options.key77: performance.enable-least-priority
Volume1.options.value76: 1
Volume1.options.key76: performance.least-prio-threads
Volume1.options.value75: 16
Volume1.options.key75: performance.low-prio-threads
Volume1.options.value74: 16
Volume1.options.key74: performance.normal-prio-threads
Volume1.options.value73: 16
Volume1.options.key73: performance.high-prio-threads
Volume1.options.value72: 16
Volume1.options.key72: performance.io-thread-count
Volume1.options.value71: 32MB
Volume1.options.key71: performance.cache-size
Volume1.options.value70:
Volume1.options.key70: performance.cache-priority
Volume1.options.value69: 1
Volume1.options.key69: performance.cache-refresh-timeout
Volume1.options.value68: 0
Volume1.options.key68: performance.cache-min-file-size
Volume1.options.value67: 0
Volume1.options.key67: performance.cache-max-file-size
Volume1.options.value66: 86400
Volume1.options.key66: diagnostics.stats-dnscache-ttl-sec
Volume1.options.value65: 65535
Volume1.options.key65: diagnostics.fop-sample-buf-size
Volume1.options.value64: json
Volume1.options.key64: diagnostics.stats-dump-format
Volume1.options.value63: 0
Volume1.options.key63: diagnostics.fop-sample-interval
Volume1.options.value62: 0
Volume1.options.key62: diagnostics.stats-dump-interval
Volume1.options.value61: 120
Volume1.options.key61: diagnostics.client-log-flush-timeout
Volume1.options.value60: 120
Volume1.options.key60: diagnostics.brick-log-flush-timeout
Volume1.options.value59: 5
Volume1.options.key59: diagnostics.client-log-buf-size
Volume1.options.value58: 5
Volume1.options.key58: diagnostics.brick-log-buf-size
Volume1.options.value57: (null)
Volume1.options.key57: diagnostics.client-log-format
Volume1.options.value56: (null)
Volume1.options.key56: diagnostics.brick-log-format
Volume1.options.value55: (null)
Volume1.options.key55: diagnostics.client-logger
Volume1.options.value54: (null)
Volume1.options.key54: diagnostics.brick-logger
Volume1.options.value53: CRITICAL
Volume1.options.key53: diagnostics.client-sys-log-level
Volume1.options.value52: CRITICAL
Volume1.options.key52: diagnostics.brick-sys-log-level
Volume1.options.value51: INFO
Volume1.options.key51: diagnostics.client-log-level
Volume1.options.value50: INFO
Volume1.options.key50: diagnostics.brick-log-level
Volume1.options.value49: off
Volume1.options.key49: diagnostics.count-fop-hits
Volume1.options.value48: off
Volume1.options.key48: diagnostics.dump-fd-stats
Volume1.options.value47: off
Volume1.options.key47: diagnostics.latency-measurement
Volume1.options.value46: yes
Volume1.options.key46: cluster.full-lock
Volume1.options.value45: none
Volume1.options.key45: cluster.favorite-child-policy
Volume1.options.value44: 128
Volume1.options.key44: cluster.heal-wait-queue-length
Volume1.options.value43: no
Volume1.options.key43: cluster.consistent-metadata
Volume1.options.value42: on
Volume1.options.key42: cluster.ensure-durability
Volume1.options.value41: 1
Volume1.options.key41: cluster.post-op-delay-secs
Volume1.options.value40: 1KB
Volume1.options.key40: cluster.self-heal-readdir-size
Volume1.options.value39: true
Volume1.options.key39: cluster.choose-local
Volume1.options.value38: (null)
Volume1.options.key38: cluster.quorum-count
Volume1.options.value37: auto
Volume1.options.key37: cluster.quorum-type
Volume1.options.value36: 1
Volume1.options.key36: disperse.other-eager-lock-timeout
Volume1.options.value35: 1
Volume1.options.key35: disperse.eager-lock-timeout
Volume1.options.value34: on
Volume1.options.key34: disperse.other-eager-lock
Volume1.options.value33: on
Volume1.options.key33: disperse.eager-lock
Volume1.options.value32: on
Volume1.options.key32: cluster.eager-lock
Volume1.options.value31: (null)
Volume1.options.key31: cluster.data-self-heal-algorithm
Volume1.options.value30: on
Volume1.options.key30: cluster.metadata-change-log
Volume1.options.value29: on
Volume1.options.key29: cluster.data-change-log
Volume1.options.value28: 1
Volume1.options.key28: cluster.self-heal-window-size
Volume1.options.value27: 600
Volume1.options.key27: cluster.heal-timeout
Volume1.options.value26: on
Volume1.options.key26: cluster.self-heal-daemon
Volume1.options.value25: off
Volume1.options.key25: cluster.entry-self-heal
Volume1.options.value24: off
Volume1.options.key24: cluster.data-self-heal
Volume1.options.value23: off
Volume1.options.key23: cluster.metadata-self-heal
Volume1.options.value22: 8
Volume1.options.key22: cluster.background-self-heal-count
Volume1.options.value21: 1
Volume1.options.key21: cluster.read-hash-mode
Volume1.options.value20: -1
Volume1.options.key20: cluster.read-subvolume-index
Volume1.options.value19: (null)
Volume1.options.key19: cluster.read-subvolume
Volume1.options.value18: on
Volume1.options.key18: cluster.entry-change-log
Volume1.options.value17: (null)
Volume1.options.key17: cluster.switch-pattern
Volume1.options.value16: on
Volume1.options.key16: cluster.weighted-rebalance
Volume1.options.value15: (null)
Volume1.options.key15: cluster.local-volume-name
Volume1.options.value14: off
Volume1.options.key14: cluster.force-migration
Volume1.options.value13: off
Volume1.options.key13: cluster.lock-migration
Volume1.options.value12: normal
Volume1.options.key12: cluster.rebal-throttle
Volume1.options.value11: off
Volume1.options.key11: cluster.randomize-hash-range-by-gfid
Volume1.options.value10: trusted.glusterfs.dht
Volume1.options.key10: cluster.dht-xattr-name
Volume1.options.value9: (null)
Volume1.options.key9: cluster.extra-hash-regex
Volume1.options.value8: (null)
Volume1.options.key8: cluster.rsync-hash-regex
Volume1.options.value7: off
Volume1.options.key7: cluster.readdir-optimize
Volume1.options.value6: (null)
Volume1.options.key6: cluster.subvols-per-directory
Volume1.options.value5: off
Volume1.options.key5: cluster.rebalance-stats
Volume1.options.value4: 5%
Volume1.options.key4: cluster.min-free-inodes
Volume1.options.value3: 10%
Volume1.options.key3: cluster.min-free-disk
Volume1.options.value2: on
Volume1.options.key2: cluster.lookup-optimize
Volume1.options.value1: on
Volume1.options.key1: cluster.lookup-unhashed
17.6. Retrieving Current Volume Option Settings
gluster volume get command. If a volume option is reconfigured for a volume, then the same value is displayed. If the volume option is not reconfigured, the default value is displayed.
# gluster volume get <VOLNAME|all> <key|all>
17.6.1. Retrieving Value of a Specific Volume Option
# gluster volume get <VOLNAME> <key># gluster volume get test-vol nfs.disable
Option Value
------ -----
nfs.disable on17.6.2. Retrieving all Options of a Volume
# gluster volume get <VOLNAME> all# gluster volume get test-vol all
Option Value
------ -----
cluster.lookup-unhashed on
cluster.lookup-optimize on
cluster.min-free-disk 10%
cluster.min-free-inodes 5%
cluster.rebalance-stats off
cluster.subvols-per-directory (null)
....
17.6.3. Retrieving all Global Options
# gluster volume get all all# gluster volume get all all
Option Value
------ -----
cluster.server-quorum-ratio 51
cluster.enable-shared-storage disable
cluster.op-version 70200
cluster.max-op-version 70200
cluster.brick-multiplex disable
cluster.max-bricks-per-process 250
cluster.daemon-log-level INFO
17.7. Viewing complete volume state with statedump
statedump subcommand writes out details of the current state of a specified process, including internal variables and other information that is useful for troubleshooting.
# gluster volume statedump VOLNAME [[nfs|quotad] [all|mem|iobuf|callpool|priv|fd|inode|history] | [client hostname:pid]]17.7.1. Gathering information from the server
- all
- Dumps all available state information.
- mem
- Dumps the memory usage and memory pool details of the bricks.
- iobuf
- Dumps iobuf details of the bricks.
- priv
- Dumps private information of loaded translators.
- callpool
- Dumps the pending calls of the volume.
- fd
- Dumps the open file descriptor tables of the volume.
- inode
- Dumps the inode tables of the volume.
- history
- Dumps the event history of the volume
data volume, run the following command on the server:
# gluster volume statedump data all# gluster volume statedump data historynfs parameter is required to gather details about volumes shared via NFS. It can be combined with any of the above parameters to filter output.
# gluster volume statedump VOLNAME nfs allquotad parameter is required to gather details about the quota daemon. The following command writes out the state of the quota daemon across all nodes.
# gluster volume statedump VOLNAME quotad# kill -SIGUSR1 pid17.7.2. Gathering information from the client
statedump subcommand writes out details of the current state of a specified process, including internal variables and other information that is useful for troubleshooting.
# gluster volume statedump VOLNAME client hostname:pidImportant
# gluster volume statedump VOLNAME client localhost:pid# kill -SIGUSR1 pidImportant
gluster group. For example, if your gfapi application is run by user qemu, ensure that qemu is added to the gluster group by running the following command:
# usermod -a -G gluster qemu17.7.3. Controlling statedump output location
/var/run/gluster directory by default. Output files are named according to the following conventions:
- For brick processes,
brick_path.brick_pid.dump - For volume processes and
killcommand results,glusterdump-glusterd_pid.dump.timestamp
server.statedump-path parameter, like so:
# gluster volume set VOLNAME server.statedump-path PATH17.8. Displaying Volume Status
- detail - Displays additional information about the bricks.
- clients - Displays the list of clients connected to the volume.
- mem - Displays the memory usage and memory pool details of the bricks.
- inode - Displays the inode tables of the volume.
- fd - Displays the open file descriptor tables of the volume.
- callpool - Displays the pending calls of the volume.
When you try to obtain information of a specific volume, the command may get timed out from the CLI if the originator glusterd takes longer than 120 seconds, the default time out, to aggregate the results from all the other glusterds and report back to CLI.
--timeout option to ensure that the commands do not get timed out by 120 seconds.
# gluster volume status --timeout=500 VOLNAME inode--timeout option when obtaining information about the inodes or clients or details as they frequently get timed out.
# gluster volume status --timeout=value_in_seconds [all|VOLNAME [nfs | shd | BRICKNAME]] [detail |clients | mem | inode | fd |callpool]
# gluster volume status test-volume
Status of volume: test-volume
Gluster process Port Online Pid
------------------------------------------------------------
Brick Server1:/rhgs/brick0/rep1 24010 Y 18474
Brick Server1:/rhgs/brick0/rep2 24011 Y 18479
NFS Server on localhost 38467 Y 18486
Self-heal Daemon on localhost N/A Y 18491# gluster volume status all
# gluster volume status all
Status of volume: test
Gluster process Port Online Pid
-----------------------------------------------------------
Brick Server1:/rhgs/brick0/test 24009 Y 29197
NFS Server on localhost 38467 Y 18486
Status of volume: test-volume
Gluster process Port Online Pid
------------------------------------------------------------
Brick Server1:/rhgs/brick0/rep1 24010 Y 18474
Brick Server1:/rhgs/brick0/rep2 24011 Y 18479
NFS Server on localhost 38467 Y 18486
Self-heal Daemon on localhost N/A Y 18491# gluster volume status VOLNAME detail
# gluster volume status test-volume detail
Status of volume: test-vol
------------------------------------------------------------------------------
Brick : Brick Server1:/rhgs/test
Port : 24012
Online : Y
Pid : 18649
File System : xfs
Device : /dev/sda1
Mount Options : rw,relatime,user_xattr,acl,commit=600,barrier=1,data=ordered
Inode Size : 256
Disk Space Free : 22.1GB
Total Disk Space : 46.5GB
Inode Count : 3055616
Free Inodes : 2577164# gluster volume status VOLNAME clients
# gluster volume status test-volume clients
Brick : Server1:/rhgs/brick0/1
Clients connected : 2
Hostname Bytes Read BytesWritten OpVersion
-------- --------- ------------ ---------
127.0.0.1:1013 776 676 70200
127.0.0.1:1012 50440 51200 70200
# gluster volume status VOLNAME mem
# gluster volume status glustervol mem
Memory status for volume : glustervol
----------------------------------------------
Brick : rhsqaci-vm33.lab.eng.blr.redhat.com:/bricks/brick0/1
Mallinfo
--------
Arena : 11509760
Ordblks : 278
Smblks : 16
Hblks : 17
Hblkhd : 17350656
Usmblks : 0
Fsmblks : 1376
Uordblks : 3850640
Fordblks : 7659120
Keepcost : 121632
----------------------------------------------
Brick : rhsqaci-vm44.lab.eng.blr.redhat.com:/bricks/brick0/1
Mallinfo
--------
Arena : 11595776
Ordblks : 329
Smblks : 44
Hblks : 17
Hblkhd : 17350656
Usmblks : 0
Fsmblks : 4240
Uordblks : 3888928
Fordblks : 7706848
Keepcost : 121632
----------------------------------------------
Brick : rhsqaci-vm32.lab.eng.blr.redhat.com:/bricks/brick0/1
Mallinfo
--------
Arena : 9695232
Ordblks : 306
Smblks : 67
Hblks : 17
Hblkhd : 17350656
Usmblks : 0
Fsmblks : 5616
Uordblks : 3890736
Fordblks : 5804496
Keepcost : 121632# gluster volume status VOLNAME inode
# gluster volume status test inode
inode tables for volume test
----------------------------------------------
Brick : rhsqaci-vm35.lab.eng.blr.redhat.com:/bricks/brick1/test
Connection 1:
LRU limit : 16384
Active Inodes : 1000
LRU Inodes : 1
Purge Inodes : 0# gluster volume status VOLNAME fd
# gluster volume status test-volume fd
FD tables for volume test-volume
----------------------------------------------
Brick : Server1:/rhgs/brick0/1
Connection 1:
RefCount = 0 MaxFDs = 128 FirstFree = 4
FD Entry PID RefCount Flags
-------- --- -------- -----
0 26311 1 2
1 26310 3 2
2 26310 1 2
3 26311 3 2
Connection 2:
RefCount = 0 MaxFDs = 128 FirstFree = 0
No open fds
Connection 3:
RefCount = 0 MaxFDs = 128 FirstFree = 0
No open fds# gluster volume status VOLNAME callpool
# gluster volume status test-volume callpool
Pending calls for volume test-volume
----------------------------------------------
Brick : Server1:/rhgs/brick0/1
Pending calls: 2
Call Stack1
UID : 0
GID : 0
PID : 26338
Unique : 192138
Frames : 7
Frame 1
Ref Count = 1
Translator = test-volume-server
Completed = No
Frame 2
Ref Count = 0
Translator = test-volume-posix
Completed = No
Parent = test-volume-access-control
Wind From = default_fsync
Wind To = FIRST_CHILD(this)->fops->fsync
Frame 3
Ref Count = 1
Translator = test-volume-access-control
Completed = No
Parent = repl-locks
Wind From = default_fsync
Wind To = FIRST_CHILD(this)->fops->fsync
Frame 4
Ref Count = 1
Translator = test-volume-locks
Completed = No
Parent = test-volume-io-threads
Wind From = iot_fsync_wrapper
Wind To = FIRST_CHILD (this)->fops->fsync
Frame 5
Ref Count = 1
Translator = test-volume-io-threads
Completed = No
Parent = test-volume-marker
Wind From = default_fsync
Wind To = FIRST_CHILD(this)->fops->fsync
Frame 6
Ref Count = 1
Translator = test-volume-marker
Completed = No
Parent = /export/1
Wind From = io_stats_fsync
Wind To = FIRST_CHILD(this)->fops->fsync
Frame 7
Ref Count = 1
Translator = /export/1
Completed = No
Parent = test-volume-server
Wind From = server_fsync_resume
Wind To = bound_xl->fops->fsync17.9. Troubleshooting issues in the Red Hat Gluster Storage Trusted Storage Pool
17.9.1. Troubleshooting a network issue in the Red Hat Gluster Storage Trusted Storage Pool
ping from one Red Hat Gluster Storage node to another.
ping command times out and displays the following error:
# ping -s 1600 '-Mdo'IP_ADDRESS
local error: Message too long, mtu=1500Chapter 18. Managing Resource Usage
Important
Procedure 18.1. Controlling CPU Usage for a Gluster Daemon
control-cpu-load script provides a utility to control CPU utilization for any Gluster daemon by using the cgroup framework to configure CPU quota for a process.
- Navigate to the scripts folder by using the following command:
# cd /usr/share/glusterfs/scripts - Determine the PID of the required gluster daemon by using the following command:
# ps -aef | grep daemon_nameThe output will be in the following format:root 1565...output omitted...grep --color=auto daemon_nameIn this output, 1565 represents the PID of the daemon service. PIDs are unlikely to be the same on different systems, or for different instances of the daemon, so ensure that you check for the relevant PID every time you perform this process. - Execute the
control-cpu-loadscript by using the following command:# sh control-cpu-load.sh - When the system prompts you with the following input, type the PID of the daemon acquired from the previous step and press
Enter:[root@XX-XX scripts]# sh control-cpu-load.sh Enter gluster daemon pid for which you want to control CPU. 1565 - When the system prompts you with the following input, type
yand pressEnter:If you want to continue the script to attach 1565 with new cgroup_gluster_1565 cgroup Press (y/n)? - When the system prompts the following notification, enter the required quota value to be assigned to the daemon and press
Enter:Creating child cgroup directory 'cgroup_gluster_1565 cgroup' for daemon_name.service. Enter quota value in range [10,100]: 25In this example, quota value for the daemon service is set to25.The system displays the following message once the quota value has been successfully set:Entered quota value is 25 Setting 25000 to cpu.cfs_quota_us for gluster_cgroup. Tasks are attached successfully specific to 1565 to cgroup_gluster_1565.
Important
Procedure 18.2. Controlling memory usage for a Gluster daemon
control-mem script provides a utility to control memory utilization for any Gluster daemon by using the cgroup framework to configure memory limit for a process.
- Navigate to the scripts folder by using the following command:
# cd /usr/share/glusterfs/scripts - Determine the PID of the required gluster daemon by using the following command:
# ps -aef | grep daemon_nameThe output will be in the following format:root 1565 1 0 Feb05 ? 00:09:17 /usr/sbin/glusterfs -s localhost --volfile-id gluster/daemon_name -p /var/run/gluster/daemon_name/daemon_name.pid -l /var/log/glusterfs/daemon_name.log -S /var/run/gluster/ed49b959a0dc9b2185913084e3b2b339.socket --xlator-option *replicate*.node-uuid=13dbfa1e-ebbf-4cee-a1ac-ca6763903c55 root 16766 14420 0 19:00 pts/0 00:00:00 grep --color=auto daemon_nameIn this output, 1565 represents the PID of the daemon service. - Execute the
control-memscript by using the following command:# sh control-mem.sh - When the system prompts for the following input, type the PID of the daemon acquired from the previous step and press
Enter:[root@XX-XX scripts]# sh control-mem.sh Enter gluster daemon pid for which you want to control CPU. 1565In this example, 1565 represents the PID of the daemon service. The PID of the daemon services can vary from system to system. - When the system prompts for the following input, type
yand pressEnter:If you want to continue the script to attach daeomon with new cgroup. Press (y/n)?The system prompts the following notification:Creating child cgroup directory 'cgroup_gluster_1565 cgroup' for daemon_name.service. - When the system prompts for the following input, enter the required memory value to be assigned to the daemon and press
Enter:Enter Memory value in Mega bytes [100,8000000000000]:In this example, the memory value is set to5000. The system prompts the following message once the memory value has been successfully set:Entered memory limit value is 5000. Setting 5242880000 to memory.limit_in_bytes for /sys/fs/cgroup/memory/system.slice/daemon_name.service/cgroup_gluster_1565. Tasks are attached successfully specific to 1565 to cgroup_gluster_1565.
Important
Chapter 19. Tuning for Performance
19.1. Disk Configuration
19.1.1. Hardware RAID
19.1.2. JBOD
raw drives to the operating system using a pass-through mode.
19.2. Brick Configuration
Procedure 19.1. Brick Configuration
LVM layer
The steps for creating a brick from a physical device is listed below. An outline of steps for creating multiple bricks on a physical device is listed as Example - Creating multiple bricks on a physical device below.- Creating the Physical VolumeThe
pvcreatecommand is used to create the physical volume. The Logical Volume Manager can use a portion of the physical volume for storing its metadata while the rest is used as the data portion.Align the I/O at the Logical Volume Manager (LVM) layer using--dataalignmentoption while creating the physical volume.The command is used in the following format:# pvcreate --dataalignment alignment_value diskFor JBOD, use an alignment value of256K.In case of hardware RAID, the alignment_value should be obtained by multiplying the RAID stripe unit size with the number of data disks. If 12 disks are used in a RAID 6 configuration, the number of data disks is 10; on the other hand, if 12 disks are used in a RAID 10 configuration, the number of data disks is 6.For example, the following command is appropriate for 12 disks in a RAID 6 configuration with a stripe unit size of 128 KiB:# pvcreate --dataalignment 1280k diskThe following command is appropriate for 12 disks in a RAID 10 configuration with a stripe unit size of 256 KiB:# pvcreate --dataalignment 1536k diskTo view the previously configured physical volume settings for--dataalignment, run the following command:# pvs -o +pe_start /dev/sdb PV VG Fmt Attr PSize PFree 1st PE /dev/sdb lvm2 a-- 9.09t 9.09t 1.25m - Creating the Volume GroupThe volume group is created using the
vgcreatecommand.For hardware RAID, in order to ensure that logical volumes created in the volume group are aligned with the underlying RAID geometry, it is important to use the-- physicalextentsizeoption. Execute thevgcreatecommand in the following format:# vgcreate --physicalextentsize extent_size VOLGROUP physical_volumeThe extent_size should be obtained by multiplying the RAID stripe unit size with the number of data disks. If 12 disks are used in a RAID 6 configuration, the number of data disks is 10; on the other hand, if 12 disks are used in a RAID 10 configuration, the number of data disks is 6.For example, run the following command for RAID-6 storage with a stripe unit size of 128 KB, and 12 disks (10 data disks):# vgcreate --physicalextentsize 1280k VOLGROUP physical_volumeIn the case of JBOD, use thevgcreatecommand in the following format:# vgcreate VOLGROUP physical_volume - Creating the Thin PoolA thin pool provides a common pool of storage for thin logical volumes (LVs) and their snapshot volumes, if any.Execute the following commands to create a thin pool of a specific size:
# lvcreate --thin VOLGROUP/POOLNAME --size POOLSIZE --chunksize CHUNKSIZE --poolmetadatasize METASIZE --zero nYou can also create a thin pool of the maximum possible size for your device by executing the following command:# lvcreate --thin VOLGROUP/POOLNAME --extents 100%FREE --chunksize CHUNKSIZE --poolmetadatasize METASIZE --zero nRecommended parameter values for thin pool creation
- poolmetadatasize
- Internally, a thin pool contains a separate metadata device that is used to track the (dynamically) allocated regions of the thin LVs and snapshots. The
poolmetadatasizeoption in the above command refers to the size of the pool metadata device.The maximum possible size for a metadata LV is 16 GiB. Red Hat Gluster Storage recommends creating the metadata device of the maximum supported size. You can allocate less than the maximum if space is a concern, but in this case you should allocate a minimum of 0.5% of the pool size.Warning
If your metadata pool runs out of space, you cannot create data. This includes the data required to increase the size of the metadata pool or to migrate data away from a volume that has run out of metadata space. Monitor your metadata pool using thelvs -o+metadata_percentcommand and ensure that it does not run out of space. - chunksize
- An important parameter to be specified while creating a thin pool is the chunk size,which is the unit of allocation. For good performance, the chunk size for the thin pool and the parameters of the underlying hardware RAID storage should be chosen so that they work well together.For JBOD, use a thin pool chunk size of 256 KiB.For RAID 6 storage, the striping parameters should be chosen so that the full stripe size (stripe_unit size * number of data disks) is between 1 MiB and 2 MiB, preferably in the low end of the range. The thin pool chunk size should be chosen to match the RAID 6 full stripe size. Matching the chunk size to the full stripe size aligns thin pool allocations with RAID 6 stripes, which can lead to better performance. Limiting the chunk size to below 2 MiB helps reduce performance problems due to excessive copy-on-write when snapshots are used.For example, for RAID 6 with 12 disks (10 data disks), stripe unit size should be chosen as 128 KiB. This leads to a full stripe size of 1280 KiB (1.25 MiB). The thin pool should then be created with the chunk size of 1280 KiB.For RAID 10 storage, the preferred stripe unit size is 256 KiB. This can also serve as the thin pool chunk size. Note that RAID 10 is recommended when the workload has a large proportion of small file writes or random writes. In this case, a small thin pool chunk size is more appropriate, as it reduces copy-on-write overhead with snapshots.If the addressable storage on the device is smaller than the device itself, you need to adjust the recommended chunk size. Calculate the adjustment factor using the following formula:
adjustment_factor = device_size_in_tb / (preferred_chunk_size_in_kb * 4 / 64 )Round the adjustment factor up. Then calculate the new chunk size using the following:chunk_size = preferred_chunk_size * rounded_adjustment_factor - block zeroing
- By default, the newly provisioned chunks in a thin pool are zeroed to prevent data leaking between different block devices. In the case of Red Hat Gluster Storage, where data is accessed via a file system, this option can be turned off for better performance with the
--zero noption. Note thatndoes not need to be replaced.The following example shows how to create the thin pool:# lvcreate --thin VOLGROUP/thin_pool --size 2T --chunksize 1280k --poolmetadatasize 16G --zero nYou can also use--extents 100%FREEto ensure the thin pool takes up all available space once the metadata pool is created.# lvcreate --thin VOLGROUP/thin_pool --extents 100%FREE --chunksize 1280k --poolmetadatasize 16G --zero n
The following example shows how to create a 2 TB thin pool:# lvcreate --thin VOLGROUP/thin_pool --size 2T --chunksize 1280k --poolmetadatasize 16G --zero nThe following example creates a thin pool that takes up all remaining space once the metadata pool has been created.# lvcreate --thin VOLGROUP/thin_pool --extents 100%FREE --chunksize 1280k --poolmetadatasize 16G --zero n - Creating a Thin Logical VolumeAfter the thin pool has been created as mentioned above, a thinly provisioned logical volume can be created in the thin pool to serve as storage for a brick of a Red Hat Gluster Storage volume.
# lvcreate --thin --name LV_name --virtualsize LV_size VOLGROUP/thin_pool - Example - Creating multiple bricks on a physical deviceThe steps above (LVM Layer) cover the case where a single brick is being created on a physical device. This example shows how to adapt these steps when multiple bricks need to be created on a physical device.
Note
In this following steps, we are assuming the following:- Two bricks must be created on the same physical device
- One brick must be of size 4 TiB and the other is 2 TiB
- The device is
/dev/sdb, and is a RAID-6 device with 12 disks - The 12-disk RAID-6 device has been created according to the recommendations in this chapter, that is, with a stripe unit size of 128 KiB
- Create a single physical volume using pvcreate
# pvcreate --dataalignment 1280k /dev/sdb - Create a single volume group on the device
# vgcreate --physicalextentsize 1280k vg1 /dev/sdb - Create a separate thin pool for each brick using the following commands:
# lvcreate --thin vg1/thin_pool_1 --size 4T --chunksize 1280K --poolmetadatasize 16G --zero n# lvcreate --thin vg1/thin_pool_2 --size 2T --chunksize 1280K --poolmetadatasize 16G --zero nIn the examples above, the size of each thin pool is chosen to be the same as the size of the brick that will be created in it. With thin provisioning, there are many possible ways of managing space, and these options are not discussed in this chapter. - Create a thin logical volume for each brick
# lvcreate --thin --name lv1 --virtualsize 4T vg1/thin_pool_1# lvcreate --thin --name lv2 --virtualsize 2T vg1/thin_pool_2 - Follow the XFS Recommendations (next step) in this chapter for creating and mounting filesystems for each of the thin logical volumes
# mkfs.xfs options /dev/vg1/lv1# mkfs.xfs options /dev/vg1/lv2# mount options /dev/vg1/lv1 mount_point_1# mount options /dev/vg1/lv2 mount_point_2
XFS Recommendataions
- XFS Inode SizeAs Red Hat Gluster Storage makes extensive use of extended attributes, an XFS inode size of 512 bytes works better with Red Hat Gluster Storage than the default XFS inode size of 256 bytes. So, inode size for XFS must be set to 512 bytes while formatting the Red Hat Gluster Storage bricks. To set the inode size, you have to use -i size option with the
mkfs.xfscommand as shown in the following Logical Block Size for the Directory section. - XFS RAID AlignmentWhen creating an XFS file system, you can explicitly specify the striping parameters of the underlying storage in the following format:
# mkfs.xfs other_options -d su=stripe_unit_size,sw=stripe_width_in_number_of_disks deviceFor RAID 6, ensure that I/O is aligned at the file system layer by providing the striping parameters. For RAID 6 storage with 12 disks, if the recommendations above have been followed, the values must be as following:# mkfs.xfs other_options -d su=128k,sw=10 deviceFor RAID 10 and JBOD, the-d su=<>,sw=<>option can be omitted. By default, XFS will use the thin-p chunk size and other parameters to make layout decisions. - Logical Block Size for the DirectoryAn XFS file system allows to select a logical block size for the file system directory that is greater than the logical block size of the file system. Increasing the logical block size for the directories from the default 4 K, decreases the directory I/O, which in turn improves the performance of directory operations. To set the block size, you need to use
-n sizeoption with themkfs.xfscommand as shown in the following example output.Following is the example output of RAID 6 configuration along with inode and block size options:# mkfs.xfs -f -i size=512 -n size=8192 -d su=128k,sw=10 logical volume meta-data=/dev/mapper/gluster-brick1 isize=512 agcount=32, agsize=37748736 blks = sectsz=512 attr=2, projid32bit=0 data = bsize=4096 blocks=1207959552, imaxpct=5 = sunit=32 swidth=320 blks naming = version 2 bsize=8192 ascii-ci=0 log =internal log bsize=4096 blocks=521728, version=2 = sectsz=512 sunit=32 blks, lazy-count=1 realtime =none extsz=4096 blocks=0, rtextents=0 - Allocation Strategyinode32 and inode64 are two most common allocation strategies for XFS. With inode32 allocation strategy, XFS places all the inodes in the first 1 TiB of disk. With larger disk, all the inodes would be stuck in first 1 TiB. inode32 allocation strategy is used by default.With inode64 mount option inodes would be replaced near to the data which would be minimize the disk seeks.To set the allocation strategy to inode64 when file system is being mounted, you need to use
-o inode64option with themountcommand as shown in the following Access Time section. - Access TimeIf the application does not require to update the access time on files, than file system must always be mounted with
noatimemount option. For example:# mount -t xfs -o inode64,noatime <logical volume> <mount point>This optimization improves performance of small-file reads by avoiding updates to the XFS inodes when files are read./etc/fstab entry for option E + F <logical volume> <mount point>xfs inode64,noatime 0 0 - Allocation groupsEach XFS file system is partitioned into regions called allocation groups. Allocation groups are similar to the block groups in ext3, but allocation groups are much larger than block groups and are used for scalability and parallelism rather than disk locality. The default allocation for an allocation group is 1 TiB.Allocation group count must be large enough to sustain the concurrent allocation workload. In most of the cases allocation group count chosen by
mkfs.xfscommand would give the optimal performance. Do not change the allocation group count chosen bymkfs.xfs, while formatting the file system. - Percentage of space allocation to inodesIf the workload is very small files (average file size is less than 10 KB ), then it is recommended to set
maxpctvalue to10, while formatting the file system. Also, maxpct value can be set upto 100 if needed for arbiter brick.
Performance tuning option in Red Hat Gluster Storage
A tuned profile is designed to improve performance for a specific use case by tuning system parameters appropriately. Red Hat Gluster Storage includes tuned profiles tailored for its workloads. These profiles are available in both Red Hat Enterprise Linux 6 and Red Hat Enterprise Linux 7.Expand Table 19.1. Recommended Profiles for Different Workloads Workload Profile Name Large-file, sequential I/O workloads rhgs-sequential-ioSmall-file workloads rhgs-random-ioRandom I/O workloads rhgs-random-ioEarlier versions of Red Hat Gluster Storage on Red Hat Enterprise Linux 6 recommended tuned profilesrhs-high-throughputandrhs-virtualization. These profiles are still available on Red Hat Enterprise Linux 6. However, switching to the new profiles is recommended.Important
Red Hat Gluster Storage is not supported on Red Hat Enterprise Linux 6 (RHEL 6) from 3.5 Batch Update 1 onwards. See Version Details table in section Red Hat Gluster Storage Software Components and Versions of the Installation GuideTo apply tunings contained in the tuned profile, run the following command after creating a Red Hat Gluster Storage volume.# tuned-adm profile profile-nameFor example:# tuned-adm profile rhgs-sequential-ioWriteback Caching
For small-file and random write performance, we strongly recommend writeback cache, that is, non-volatile random-access memory (NVRAM) in your storage controller. For example, normal Dell and HP storage controllers have it. Ensure that NVRAM is enabled, that is, the battery is working. Refer your hardware documentation for details on enabling NVRAM.Do not enable writeback caching in the disk drives, this is a policy where the disk drive considers the write is complete before the write actually made it to the magnetic media (platter). As a result, the disk write cache might lose its data during a power failure or even loss of metadata leading to file system corruption.
19.2.1. Many Bricks per Node
Configuring Brick Multiplexing
- Set
cluster.brick-multiplextoon. This option affects all volumes.# gluster volume set all cluster.brick-multiplex on - Restart all volumes for brick multiplexing to take effect.
# gluster volume stop VOLNAME # gluster volume start VOLNAME
Important
19.2.2. Port Range Configuration
glusterd.vol file. The base-port and max-port options can be used to set the port range. By default, base-port is set to 49152, and max-port is set to 60999.
Important
base-port and max-port, newer bricks and volumes fail to start.
Configuring Port Range
- Edit the
glusterd.volfile on all the nodes.# vi /etc/glusterfs/glusterd.vol - Remove the comment marker
#corresponding to thebase-portandmax-portoptions.volume management type mgmt/glusterd option working-directory /var/lib/glusterd option transport-type socket,rdma option transport.socket.keepalive-time 10 option transport.socket.keepalive-interval 2 option transport.socket.read-fail-log off option ping-timeout 0 option event-threads 1 # option lock-timer 180 # option transport.address-family inet6 option base-port 49152 option max-port 60999 end-volume - Define the port number in the
base-port, andmax-portoptions.option base-port 49152 option max-port 60999 - Save the
glusterd.volfile and restart theglusterdservice on each Red Hat Gluster Storage node.
19.3. Network
19.4. Memory
19.4.1. Virtual Memory Parameters
- vm.dirty_ratio
- vm.dirty_background_ratio
- Large-file sequential I/O workloads benefit from higher values for these parameters.
- For small-file and random I/O workloads it is recommended to keep these parameter values low.
19.5. Small File Performance Enhancements
Metadata-intensive workload is the term used to identify such workloads. A few performance enhancements can be made to optimize the network and storage performance and minimize the effect of slow throughput and response time for small files in a Red Hat Gluster Storage trusted storage pool.
Note
rhgs-random-io tuned profile.
You can set the client.event-thread and server.event-thread values for the client and server components. Setting the value to 4, for example, would enable handling four network connections simultaneously.
# gluster volume set VOLNAME client.event-threads <value>Example 19.1. Tuning the event threads for a client accessing a volume
# gluster volume set test-vol client.event-threads 4# gluster volume set VOLNAME server.event-threads <value>Example 19.2. Tuning the event threads for a server accessing a volume
# gluster volume set test-vol server.event-threads 4# gluster volume info VOLNAMEIt is possible to see performance gains with the Red Hat Gluster Storage stack by tuning the number of threads processing events from network connections. The following are the recommended best practices to tune the event thread values.
- As each thread processes a connection at a time, having more threads than connections to either the brick processes (
glusterfsd) or the client processes (glusterfsorgfapi) is not recommended. Due to this reason, monitor the connection counts (using thenetstatcommand) on the clients and on the bricks to arrive at an appropriate number for the event thread count. - Configuring a higher event threads value than the available processing units could again cause context switches on these threads. As a result reducing the number deduced from the previous step to a number that is less that the available processing units is recommended.
- If a Red Hat Gluster Storage volume has a high number of brick processes running on a single node, then reducing the event threads number deduced in the previous step would help the competing processes to gain enough concurrency and avoid context switches across the threads.
- If a specific thread consumes more number of CPU cycles than needed, increasing the event thread count would enhance the performance of the Red Hat Gluster Storage Server.
- In addition to the deducing the appropriate event-thread count, increasing the
server.outstanding-rpc-limiton the storage nodes can also help to queue the requests for the brick processes and not let the requests idle on the network queue. - Another parameter that could improve the performance when tuning the event-threads value is to set the
performance.io-thread-count(and its related thread-counts) to higher values, as these threads perform the actual IO operations on the underlying file system.
19.5.1. Enabling Lookup Optimization
cluster.lookup-optimize configuration option enables DHT lookup optimization. To enable this option run the following command:
# gluster volume set VOLNAME cluster.lookup-optimize <on/off>\Note
19.6. Replication
19.7. Directory Operations
- Listing of directories (recursive)
- Creating files
- Deleting files
- Renaming files
19.7.1. Enabling Metadata Caching
Note
- Execute the following command to enable metadata caching and cache invalidation:
# gluster volume set <volname> group metadata-cacheThis is group set option which sets multiple volume options in a single command. - To increase the number of files that can be cached, execute the following command:
# gluster volume set <VOLNAME> network.inode-lru-limit <n>n, is set to 50000. It can be increased if the number of active files in the volume is very high. Increasing this number increases the memory footprint of the brick processes.
19.8. LVM Cache for Red Hat Gluster Storage
Important
19.8.1. About LVM Cache
19.8.1.1. LVM Cache vs. DM-Cache
dm-cache refers to the Linux kernel-level device-mapper subsystem that is responsible for all I/O transactions. For most usual operations, the administrator interfaces with the logical volume manager (LVM) as a much simpler abstraction layer above device-mapper. As such, lvmcache is simply part of the LVM system acting as an abstraction layer for the dm-cache subsystem.
19.8.1.2. LVM Cache vs. Gluster Tiered Volumes
19.8.1.3. Arbiter Bricks
19.8.1.4. Writethrough vs. Writeback
Note
19.8.1.5. Cache-Friendly Workloads
19.8.2. Choosing the Size and Speed of Your Cache Devices
19.8.3. Configuring LVM Cache
Warning
/dev/nvme0n1. A SATA/SAS device will likely present with a device path such as /dev/sdb. The following example naming has been used:
- Physical Volume (PV) Name:
/dev/nvme0n1 - Volume Group (VG) Name:
GVG - Thin pool name:
GTP - Logical Volume (LV) name:
GLV
Note
lvmcache(7).
- Create a PV for your fast data device.
# pvcreate /dev/nvme0n1 - Add the fast data PV to the VG that hosts the LV you intend to cache.
# vgextend GVG /dev/nvme0n1 - Create the cache pool from your fast data device, reserving space required for metadata during the cache conversion process of your LV.
# lvcreate --type cache-pool -l 100%FREE -n cpool GVG /dev/nvme0n1 - Convert your existing data thin pool LV into a cache LV.
# lvconvert --type cache --cachepool GVG/cpool GVG/GTP
19.8.4. Managing LVM Cache
19.8.4.1. Changing the Mode of an Existing Cache Pool
lvchange command. For thin LVs, the command must be run against the tdata subvolume.
# lvchange --cachemode writeback GVG/GTP_tdata19.8.4.2. Checking Your Configuration
lsblk command to view the new virtual block device layout.
# lsblk /dev/{sdb,nvme0n1}
NAME MAJ:MIN RM SIZE RO TYPE MOUNTPOINT
sdb 8:16 0 9.1T 0 disk
└─GVG-GTP_tdata_corig 253:9 0 9.1T 0 lvm
└─GVG-GTP_tdata 253:3 0 9.1T 0 lvm
└─GVG-GTP-tpool 253:4 0 9.1T 0 lvm
├─GVG-GTP 253:5 0 9.1T 0 lvm
└─GVG-GLV 253:6 0 9.1T 0 lvm /mnt
nvme0n1 259:0 0 745.2G 0 disk
├─GVG-GTP_tmeta 253:2 0 76M 0 lvm
│ └─GVG-GTP-tpool 253:4 0 9.1T 0 lvm
│ ├─GVG-GTP 253:5 0 9.1T 0 lvm
│ └─GVG-GLV 253:6 0 9.1T 0 lvm /mnt
├─GVG-cpool_cdata 253:7 0 701.1G 0 lvm
│ └─GVG-GTP_tdata 253:3 0 9.1T 0 lvm
│ └─GVG-GTP-tpool 253:4 0 9.1T 0 lvm
│ ├─GVG-GTP 253:5 0 9.1T 0 lvm
│ └─GVG-GLV 253:6 0 9.1T 0 lvm /mnt
├─GVG-cpool_cmeta 253:8 0 48M 0 lvm
│ └─GVG-GTP_tdata 253:3 0 9.1T 0 lvm
│ └─GVG-GTP-tpool 253:4 0 9.1T 0 lvm
│ ├─GVG-GTP 253:5 0 9.1T 0 lvm
│ └─GVG-GLV 253:6 0 9.1T 0 lvm /mnt
└─GVG-GTP_tdata_corig 253:9 0 9.1T 0 lvm
└─GVG-GTP_tdata 253:3 0 9.1T 0 lvm
└─GVG-GTP-tpool 253:4 0 9.1T 0 lvm
├─GVG-GTP 253:5 0 9.1T 0 lvm
└─GVG-GLV 253:6 0 9.1T 0 lvm /mntlvs command displays a number of valuable columns to show the status of your cache pool and volume. For more details, see lvs(8).
# lvs -a -o name,vg_name,size,pool_lv,devices,cachemode,chunksize
LV VG LSize Pool Devices CacheMode Chunk
GLV GVG 9.10t GTP 0
GTP GVG <9.12t GTP_tdata(0) 8.00m
[GTP_tdata] GVG <9.12t [cpool] GTP_tdata_corig(0) writethrough 736.00k
[GTP_tdata_corig] GVG <9.12t /dev/sdb(0) 0
[GTP_tdata_corig] GVG <9.12t /dev/nvme0n1(185076) 0
[GTP_tmeta] GVG 76.00m /dev/nvme0n1(185057) 0
[cpool] GVG <701.10g cpool_cdata(0) writethrough 736.00k
[cpool_cdata] GVG <701.10g /dev/nvme0n1(24) 0
[cpool_cmeta] GVG 48.00m /dev/nvme0n1(12) 0
[lvol0_pmspare] GVG 76.00m /dev/nvme0n1(0) 0
[lvol0_pmspare] GVG 76.00m /dev/nvme0n1(185050) 0
root vg_root 50.00g /dev/sda3(4095) 0
swap vg_root <16.00g /dev/sda3(0) 0lvs command that can be used to monitor the effectiveness of the cache and to aid in sizing decisions are:
- CacheTotalBlocks
- CacheUsedBlocks
- CacheDirtyBlocks
- CacheReadHits
- CacheReadMisses
- CacheWriteHits
- CacheWriteMisses
# lvs -a -o devices,cachetotalblocks,cacheusedblocks, \
cachereadhits,cachereadmisses | egrep 'Devices|cdata'
Devices CacheTotalBlocks CacheUsedBlocks CacheReadHits CacheReadMisses
cpool_cdata(0) 998850 2581 1 19219.8.4.3. Detaching a Cache Pool
# lvconvert --splitcache GVG/cpoolPart VI. Security
Chapter 20. Configuring Network Encryption in Red Hat Gluster Storage
- I/O encryption
- Encryption of the I/O connections between the Red Hat Gluster Storage clients and servers.
- Management encryption
- Encryption of management (
glusterd) connections within a trusted storage pool, and betweenglusterdand NFS Ganesha or SMB clients.
/etc/ssl/glusterfs.pem- Certificate file containing the system's uniquely signed TLS certificate. This file is unique for each system and must not be shared with others.
/etc/ssl/glusterfs.key- This file contains the system's unique private key. This file must not be shared with others.
/etc/ssl/glusterfs.ca- This file contains the certificates of the Certificate Authorities (CA) who have signed the certificates. The
glusterfs.cafile must be identical on all servers in the trusted pool, and must contain the certificates of the signing CA for all servers and all clients. All clients should also have a.cafile that contains the certificates of the signing CA for all the servers.Red Hat Gluster Storage does not use the global CA certificates that come with the system, so you need to either create your own self-signed certificates, or create certificates and have them signed by a Certificate Authority. If you are using self-signed certificates, the CA file for the servers is a concatenation of the relevant.pemfiles of every server and every client. The client CA file is a concatenation of the certificate files of every server. /var/lib/glusterd/secure-access- This file is required for management encryption. It enables encryption on the management (
glusterd) connections betweenglusterdof all servers and the connection between clients, and contains any configuration required by the Certificate Authority. Theglusterdservice of all servers uses this file to fetch volfiles and notify the clients with the volfile changes. This file must be present on all servers and all clients for management encryption to work correctly. It can be empty, but most configurations require at least one line to set the certificate depth (transport.socket.ssl-cert-depth) required by the Certificate Authority.
20.1. Preparing Certificates
- Self-signed certificate
- Generating and signing the certificate yourself.
- Certificate Authority (CA) signed certificate
- Generating the certificate and then requesting that a Certificate Authority sign it.
Procedure 20.1. Preparing a self-signed certificate
Generate and sign certificates for each server and client
Perform the following steps on each server and client.Generate a private key for this machine
# openssl genrsa -out /etc/ssl/glusterfs.key 2048Generate a self-signed certificate for this machine
The following command generates a signed certificate that expires in 365 days, instead of the default 30 days. Provide a short name for this machine in place of COMMONNAME. This is generally a hostname, FQDN, or IP address.# openssl req -new -x509 -key /etc/ssl/glusterfs.key -subj "/CN=COMMONNAME" -days 365 -out /etc/ssl/glusterfs.pem
Generate client-side certificate authority lists
From the first server, concatenate the/etc/ssl/glusterfs.pemfiles from all servers into a single file calledglusterfs.ca, and place this file in the/etc/ssldirectory on all clients.For example, running the following commands fromserver1creates a certificate authority list (.cafile) that contains the certificates (.pemfiles) of two servers, and copies the certificate authority list (.cafile) to three clients.# cat /etc/ssl/glusterfs.pem > /etc/ssl/glusterfs.ca # ssh user@server2 cat /etc/ssl/glusterfs.pem >> /etc/ssl/glusterfs.ca # scp /etc/ssl/glusterfs.ca client1:/etc/ssl/glusterfs.ca # scp /etc/ssl/glusterfs.ca client2:/etc/ssl/glusterfs.ca # scp /etc/ssl/glusterfs.ca client3:/etc/ssl/glusterfs.caGenerate server-side
glusterfs.cafilesFrom the first server, append the certificates (/etc/ssl/glusterfs.pemfiles) from all clients to the end of the certificate authority list (/etc/ssl/glusterfs.cafile) generated in the previous step.For example, running the following commands fromserver1appends the certificates (.pemfiles) of three clients to the certificate authority list (.cafile) onserver1, and then copies that certificate authority list (.cafile) to one other server.# ssh user@client1 cat /etc/ssl/glusterfs.pem >> /etc/ssl/glusterfs.ca # ssh user@client2 cat /etc/ssl/glusterfs.pem >> /etc/ssl/glusterfs.ca # ssh user@client3 cat /etc/ssl/glusterfs.pem >> /etc/ssl/glusterfs.ca # scp /etc/ssl/glusterfs.ca server2:/etc/ssl/glusterfs.caVerify server certificates
Run the following command in the/etc/ssldirectory on the servers to verify the certificate on that machine against the Certificate Authority list.# openssl verify -verbose -CAfile glusterfs.ca glusterfs.pemYour certificate is correct if the output of this command isglusterfs.pem: OK.Note
This process does not work for self-signed client certificates.
Procedure 20.2. Preparing a Common Certificate Authority certificate
Generate a private key
# openssl genrsa -out /etc/ssl/glusterfs.key 2048Generate a certificate signing request
The following command generates a certificate signing request for a certificate that expires in 365 days, instead of the default 30 days. Provide a short name for this machine in place of COMMONNAME. This is generally a hostname, FQDN, or IP address.# openssl req -new -sha256 -key /etc/ssl/glusterfs.key -subj '/CN=<COMMONNAME>' -days 365 -out glusterfs.csrSend the generated glusterfs.csr file to your Certificate Authority
Your Certificate Authority provides a signed certificate for this machine in the form of a.pemfile, and the certificates of the Certificate Authority in the form of a.cafile.Place the
.pemfile provided by the Certificate AuthorityEnsure that the.pemfile is calledglusterfs.pem. Place this file in the/etc/ssldirectory of this server only.Place the
.cafile provided by the Certificate AuthorityEnsure that the.cafile is calledglusterfs.ca. Place the.cafile in the/etc/ssldirectory of all servers.Verify your certificates
Run the following command in the/etc/ssldirectory on all clients and servers to verify the certificate on that machine against the Certificate Authority list.# openssl verify -verbose -CAfile glusterfs.ca glusterfs.pemYour certificate is correct if the output of this command isglusterfs.pem: OK.
20.2. Configuring Network Encryption for a New Trusted Storage Pool
20.2.1. Enabling Management Encryption
Procedure 20.3. Enabling management encryption on servers
Create and edit the secure-access file
Create a new/var/lib/glusterd/secure-accessfile. This file can be empty if you are using the default settings.# touch /var/lib/glusterd/secure-accessYour Certificate Authority may require changes to the SSL certificate depth setting,transport.socket.ssl-cert-depth, in order to work correctly. To edit this setting, add the following line to thesecure-accessfile, replacing n with the certificate depth required by your Certificate Authority.echo "option transport.socket.ssl-cert-depth n" > /var/lib/glusterd/secure-accessStart
glusterdOn Red Hat Enterprise Linux 7 based servers, run:# systemctl start glusterdOn Red Hat Enterprise Linux 6 based servers, run:# service glusterd startImportant
Red Hat Gluster Storage is not supported on Red Hat Enterprise Linux 6 (RHEL 6) from 3.5 Batch Update 1 onwards. See Version Details table in section Red Hat Gluster Storage Software Components and Versions of the Installation GuideContinue storage configuration
Proceed with the normal configuration process by setting up the trusted storage pool, formatting bricks, and creating volumes. For more information, see Chapter 4, Adding Servers to the Trusted Storage Pool and Chapter 5, Setting Up Storage Volumes.
Procedure 20.4. Enabling management encryption on clients
Prerequisites
- You must have configured a trusted storage pool, bricks, and volumes before following this process. For more information, see Chapter 4, Adding Servers to the Trusted Storage Pool and Chapter 5, Setting Up Storage Volumes.
Create and edit the secure-access file
Create the/var/lib/glusterddirectory, and create a new/var/lib/glusterd/secure-accessfile. This file can be empty if you are using the default settings.# touch /var/lib/glusterd/secure-accessYour Certificate Authority may require changes to the SSL certificate depth setting,transport.socket.ssl-cert-depth, in order to work correctly. To edit this setting, add the following line to thesecure-accessfile, replacing n with the certificate depth required by your Certificate Authority.echo "option transport.socket.ssl-cert-depth n" > /var/lib/glusterd/secure-accessStart the volume
On the server, start the volume.# gluster volume start volnameMount the volume
The process for mounting a volume depends on the protocol your client is using. The following command mounts a volume calledtestvolusing the native FUSE protocol.# mount -t glusterfs server1:testvol /mnt/glusterfs
20.2.2. Enabling I/O Encryption
Procedure 20.5. Enabling I/O encryption
Prerequisites
- You must have volumes configured, but not started, to perform this process. See Chapter 5, Setting Up Storage Volumes for information on creating volumes. To stop a volume, run the following command:
# gluster volume stop volname
Specify servers and clients to allow
Provide a list of the common names of servers and clients that are allowed to access the volume. The common names provided must be exactly the same as the common name specified when you created theglusterfs.pemfile for that server or client.# gluster volume set volname auth.ssl-allow 'server1,server2,client1,client2,client3'This provides an additional check in case you want to leave keys in place, but temporarily restrict a client or server by removing it from this list, as shown in Section 20.7, “Deauthorizing a Client”.You can also use the default value of*, which indicates that any TLS authenticated machine can mount and access the volume.Enable TLS/SSL on the volume
# gluster volume set volname client.ssl on # gluster volume set volname server.ssl onStart the volume
# gluster volume start volnameVerify
Verify that the volume can be mounted on authorized clients, and that the volume cannot be mounted by unauthorized clients. The process for mounting a volume depends on the protocol your client is using.The process for mounting a volume depends on the protocol your client is using. The following command mounts a volume calledtestvolusing the native FUSE protocol.# mount -t glusterfs server1:testvol /mnt/glusterfs
20.3. Configuring Network Encryption for an existing Trusted Storage Pool
20.3.1. Enabling I/O Encryption
Procedure 20.6. Enabling I/O encryption
Unmount the volume from all clients
Unmount the volume by running the following command on all clients.# umount mountpointStop the volume
Stop the volume by running the following command from any server.# gluster volume stop VOLNAMESpecify servers and clients to allow
Provide a list of the common names of servers and clients that are allowed to access the volume. The common names provided must be exactly the same as the common name specified when you created theglusterfs.pemfile for that server or client.# gluster volume set volname auth.ssl-allow 'server1,server2,client1,client2,client3'This provides an additional check in case you want to leave keys in place, but temporarily restrict a client or server by removing it from this list, as shown in Section 20.7, “Deauthorizing a Client”.You can also use the default value of*, which indicates that any TLS authenticated machine can mount and access the volume.Enable TLS/SSL encryption on the volume
Run the following command from any server to enable TLS/SSL encryption.# gluster volume set volname client.ssl on # gluster volume set volname server.ssl onStart the volume
# gluster volume start volnameVerify
Verify that the volume can be mounted only on authorized clients. The process for mounting a volume depends on the protocol your client is using.The following command mounts a volume using the native FUSE protocol. Ensure that this command works on authorized clients, and does not work on unauthorized clients.# mount -t glusterfs server1:/testvolume /mnt/glusterfs
20.4. Enabling Management Encryption
Prerequisites
- Enabling management encryption requires that storage servers are offline. Schedule an outage window for volumes, applications, clients, and other end users before beginning this process. Be aware that features such as snapshots and geo-replication may also be affected by this outage.
Procedure 20.7. Enabling management encryption
Prepare to enable encryption
Unmount all volumes from all clients
Run the following command on each client, for each volume mounted on that client.# umount mount-pointStop NFS Ganesha or SMB services, if used
Run the following command on any gluster server to disable NFS-Ganesha.# systemctl stop nfs-ganeshaRun the following command on any gluster server to stop SMB.# systemctl stop ctdbUnmount shared storage, if used
Run the following command on all servers to unmount shared storage.# umount /var/run/gluster/shared_storageNote
With the release of 3.5 Batch Update 3, the mount point of shared storage is changed from /var/run/gluster/ to /run/gluster/ .Important
Features that require shared storage, such as snapshots and geo-replication, may not work until after this process is complete.Stop all volumes
Run the following command on any server to stop all volumes, including the shared storage volume.# for vol in `gluster volume list`; do gluster --mode=script volume stop $vol; sleep 2s; doneStop gluster services on all servers
For Red Hat Enterprise Linux 7 based installations:# systemctl stop glusterd # pkill glusterfsFor Red Hat Enterprise Linux 6 based installations:# service glusterd stop # pkill glusterfsImportant
Red Hat Gluster Storage is not supported on Red Hat Enterprise Linux 6 (RHEL 6) from 3.5 Batch Update 1 onwards. See Version Details table in section Red Hat Gluster Storage Software Components and Versions of the Installation Guide
Create and edit the secure-access file on all servers and clients
Create a new/var/lib/glusterd/secure-accessfile. This file can be empty if you are using the default settings.# touch /var/lib/glusterd/secure-accessYour Certificate Authority may require changes to the SSL certificate depth setting,transport.socket.ssl-cert-depth, in order to work correctly. To edit this setting, add the following line to thesecure-accessfile, replacing n with the certificate depth required by your Certificate Authority.echo "option transport.socket.ssl-cert-depth n" > /var/lib/glusterd/secure-accessClean up after configuring management encryption
Start the glusterd service on all servers
For Red Hat Enterprise Linux 7 based installations:# systemctl start glusterdFor Red Hat Enterprise Linux 6 based installations:# service glusterd startImportant
Red Hat Gluster Storage is not supported on Red Hat Enterprise Linux 6 (RHEL 6) from 3.5 Batch Update 1 onwards. See Version Details table in section Red Hat Gluster Storage Software Components and Versions of the Installation GuideStart all volumes
Run the following command on any host to start all volumes including shared storage.# for vol in `gluster volume list`; do gluster --mode=script volume start $vol; sleep 2s; doneMount shared storage, if used
Run the following command on all servers to mount shared storage.# mount -t glusterfs hostname:/gluster_shared_storage /run/gluster/shared_storageRestart NFS Ganesha or SMB services, if used
Run the following command on any gluster server to start NFS-Ganesha.# systemctl start nfs-ganeshaRun the following command on any gluster server to start SMB.# systemctl start ctdbMount volumes on clients
The process for mounting a volume depends on the protocol your client is using. The following command mounts a volume using the native FUSE protocol.# mount -t glusterfs server1:/testvolume /mnt/glusterfs
20.5. Expanding Volumes
20.5.1. Certificate signed by a Common Certificate Authority
Prerequisites
- Ensure that you have followed the steps in Section 20.1, “Preparing Certificates” before following this section.
Procedure 20.8. Expanding a pool that uses common Certificate Authority signed certificates
Import the common Certificate Authority list
Copy the/etc/ssl/glusterfs.cafile from an existing server into the/etc/ssldirectory of the new server.For management encryption, create and edit the secure-access file
Create a new/var/lib/glusterd/secure-accessfile. This file can be empty if you are using the default settings.# touch /var/lib/glusterd/secure-accessYour Certificate Authority may require changes to the SSL certificate depth setting,transport.socket.ssl-cert-depth, in order to work correctly. To edit this setting, add the following line to thesecure-accessfile, replacing n with the certificate depth required by your Certificate Authority.echo "option transport.socket.ssl-cert-depth n" > /var/lib/glusterd/secure-accessStart glusterd on the new server
# systemctl start glusterdSpecify servers and clients to allow
Provide a list of the common names of servers and clients that are allowed to access the volume. The common names provided must be exactly the same as the common name specified when you created theglusterfs.pemfile for that server or client.# gluster volume set volname auth.ssl-allow 'server1,server2,client1,client2,client3'This provides an additional check in case you want to leave keys in place, but temporarily restrict a client or server by removing it from this list, as shown in Section 20.7, “Deauthorizing a Client”.Note
Thegluster volume setcommand does not append to existing values of the options. To append the new name to the list, get the existing list usinggluster volume infocommand, append the new name to the list and set the option again usinggluster volume setcommand.You can also use the default value of*, which indicates that any TLS authenticated machine can mount and access the volume.Expand volumes to the new server
Follow the instructions in Section 11.7, “Expanding Volumes” to expand existing volumes using the newly trusted server.
20.5.2. Self-signed Certificates
Prerequisites
- Because self-signed certificates are not automatically generated and updated, the trusted storage pool must be offline for this process. Schedule an outage window for volumes, applications, clients, and other end users before beginning this process.
Procedure 20.9. Expanding a pool that uses self-signed certificates
Generate the key and self-signed certificate for the new server
Follow the steps in Section 20.1, “Preparing Certificates” to generate a private key and a self-signed certificate for the new server.Update server Certificate Authority list files
Append the contents of the new server's/etc/ssl/glusterfs.pemfile to the/etc/ssl/glusterfs.cafile on all existing servers in the trusted storage pool.Update client Certificate Authority list files
Append the contents of the new server's/etc/ssl/glusterfs.pemfile to the/etc/ssl/glusterfs.cafile on all authorized clients in the trusted storage pool.Stop all gluster processes
Run the following commands on all servers.# systemctl stop glusterd # pkill glusterfs(Optional) Enable management encryption on the new server
Copy the/var/lib/glusterd/secure-accessfile from an existing server to the new server.Start glusterd on the new server
# systemctl start glusterdUpdate servers and clients to allow
Run the following command from any server to specify the common names of servers and clients that are allowed to access the volume. The common names provided must be exactly the same as the common name specified when you created theglusterfs.pemfile for that server or client.# gluster volume set volname auth.ssl-allow 'server1,server2,client1,client2,client3'Note
Thegluster volume setcommand does not append to existing values of the options. To append the new name to the list, get the existing list usinggluster volume infocommand, append the new name to the list and set the option again usinggluster volume setcommand.You can also use the default value of*, which indicates that any TLS authenticated machine can mount and access the volume.Restart the glusterfs processes on existing servers and clients
On all clients, unmount all volumes
# umount mountpointOn any server, stop all volumes
# for vol in `gluster volume list`; do gluster --mode=script volume stop $vol; sleep 2s; doneOn all servers, restart glusterd
For Red Hat Enterprise Linux 7 based installations:# systemctl start glusterdFor Red Hat Enterprise Linux 6 based installations:# service glusterd startImportant
Red Hat Gluster Storage is not supported on Red Hat Enterprise Linux 6 (RHEL 6) from 3.5 Batch Update 1 onwards. See Version Details table in section Red Hat Gluster Storage Software Components and Versions of the Installation GuideOn any server, start all volumes
# gluster volume start volname
Mount the volume on all clients
The process for mounting a volume depends on the protocol your client is using. The following command mounts a volume using the native FUSE protocol.# mount -t glusterfs server1:/test-volume /mnt/glusterfsExpand volumes to the new server
Follow the instructions in Section 11.7, “Expanding Volumes” to expand existing volumes using the newly trusted server.
20.6. Authorizing a New Client
20.6.1. Certificate Signed by a Common Certificate Authority
Procedure 20.10. Authorizing a new client using a CA-signed certificate
Generate a key for the client
Run the following command on the client.# openssl genrsa -out /etc/ssl/glusterfs.key 2048Generate a certificate signing request
The following command generates a certificate signing request for a certificate that expires in 365 days, instead of the default 30 days. Provide a short name for this machine in place of COMMONNAME. This is generally a hostname, FQDN, or IP address.# openssl req -new -sha256 -key /etc/ssl/glusterfs.key -subj '/CN=<COMMONNAME>' -days 365 -out glusterfs.csrSend the generated glusterfs.csr file to your Certificate Authority
Your Certificate Authority provides a signed certificate for this machine in the form of a.pemfile, and the Certificate Authority list in the form of a.cafile.Add provided certificate file on the client
Place the.pemfile provided by the Certificate Authority in the/etc/ssldirectory on the client. Ensure that the.pemfile is calledglusterfs.pem.Add the Certificate Authority list to the client
Copy the/etc/ssl/glusterfs.cafile from an existing client to your new client.# scp existingclient/etc/ssl/glusterfs.ca newclient:/etc/ssl/glusterfs.caVerify your certificate
Run the following command in the/etc/ssldirectory to verify the certificate on that machine against the Certificate Authority list.# openssl verify -verbose -CAfile glusterfs.ca glusterfs.pemYour certificate is correct if the output of this command isglusterfs.pem: OK.Configure management encryption, if used
On the client, create the/var/lib/glusterddirectory, and create a new/var/lib/glusterd/secure-accessfile. This file can be empty if you are using the default settings.# touch /var/lib/glusterd/secure-accessYour Certificate Authority may require changes to the SSL certificate depth setting,transport.socket.ssl-cert-depth, in order to work correctly. To edit this setting, add the following line to thesecure-accessfile, replacing n with the certificate depth required by your Certificate Authority.echo "option transport.socket.ssl-cert-depth n" > /var/lib/glusterd/secure-accessUpdate the list of servers and clients to allow
Run the following command from any server to specify the common names of servers and clients that are allowed to access the volume. The common names provided must be exactly the same as the common name specified when you created theglusterfs.pemfile for that server or client.# gluster volume set volname auth.ssl-allow 'server1,server2,client1,client2,client3'Note
Thegluster volume setcommand does not append to existing values of the options. To append the new name to the list, get the existing list usinggluster volume infocommand, append the new name to the list and set the option again usinggluster volume setcommand.You can also use the default value of*, which indicates that any TLS authenticated machine can mount and access the volume.Start the volume
# gluster volume start volnameVerify
Verify that the volume can be mounted from the new client. The process for mounting a volume depends on the protocol your client is using.The following command mounts a volume using the native FUSE protocol. Ensure that this command works on authorized clients, and does not work on unauthorized clients.# mount -t glusterfs server1:testvolume /mnt/glusterfs
20.6.2. Self-signed Certificates
Prerequisites
- Because self-signed certificates are not automatically generated and updated, the trusted storage pool must be offline for this process. Schedule an outage window for volumes, applications, clients, and other end users before beginning this process.
Procedure 20.11. Authorizing a new client using a self-signed certificate
Generate a key for the client
Run the following command on the client.# openssl genrsa -out /etc/ssl/glusterfs.key 2048Generate a self-signed certificate for the client
The following command generates a signed certificate that expires in 365 days, instead of the default 30 days. Provide a short name for this machine in place of COMMONNAME. This is generally a hostname, FQDN, or IP address.# openssl req -new -x509 -key /etc/ssl/glusterfs.key -subj "/CN=COMMONNAME" -days 365 -out /etc/ssl/glusterfs.pemAdd the Certificate Authority list to the client
Copy the/etc/ssl/glusterfs.cafile from an existing client to your new client. Run the following command from the new client.# scp existingclient:/etc/ssl/glusterfs.ca /etc/ssl/glusterfs.caGenerate new server
glusterfs.cafilesOn any server, append the value of the new client's/etc/ssl/glusterfs.pemfile to the end of the server's/etc/ssl/glusterfs.cafile.Place the updated/etc/ssl/glusterfs.cafile in the/etc/ssldirectory of all servers in the trusted storage pool.For example, running the following commands on any server updates theglusterfs.cafile with the.pemfile from the new client, and then copies thatglusterfs.cafile to all servers.# ssh user@newclient cat /etc/ssl/glusterfs.pem >> /etc/ssl/glusterfs.ca # scp /etc/ssl/glusterfs.ca server1:/etc/ssl/glusterfs.ca # scp /etc/ssl/glusterfs.ca server2:/etc/ssl/glusterfs.caConfigure management encryption on the new client, if used
On the client, create the/var/lib/glusterddirectory, and create a new/var/lib/glusterd/secure-accessfile. This file can be empty if you are using the default settings.# touch /var/lib/glusterd/secure-accessYour Certificate Authority may require changes to the SSL certificate depth setting,transport.socket.ssl-cert-depth, in order to work correctly. To edit this setting, add the following line to thesecure-accessfile, replacing n with the certificate depth required by your Certificate Authority.echo "option transport.socket.ssl-cert-depth n" > /var/lib/glusterd/secure-accessUpdate the list of servers and clients to allow
Run the following command from any server to specify the common names of servers and clients that are allowed to access the volume. The common names provided must be exactly the same as the common name specified when you created theglusterfs.pemfile for that server or client.# gluster volume set volname auth.ssl-allow 'server1,server2,client1,client2,client3'Note
Thegluster volume setcommand does not append to existing values of the options. To append the new name to the list, get the existing list usinggluster volume infocommand, append the new name to the list and set the option again usinggluster volume setcommand.You can also use the default value of*, which indicates that any TLS authenticated machine can mount and access the volume.Start the volume
Run the following command from any server to start the volume.# gluster volume start volnameIf management encryption is used, restart glusterd on all servers
For Red Hat Enterprise Linux 7 based installations:# systemctl start glusterdFor Red Hat Enterprise Linux 6 based installations:# service glusterd startImportant
Red Hat Gluster Storage is not supported on Red Hat Enterprise Linux 6 (RHEL 6) from 3.5 Batch Update 1 onwards. See Version Details table in section Red Hat Gluster Storage Software Components and Versions of the Installation GuideVerify
Verify that the volume can be mounted from the new client. The process for mounting a volume depends on the protocol your client is using.The following command mounts a volume using the native FUSE protocol. Ensure that this command works on authorized clients, and does not work on unauthorized clients.# mount -t glusterfs server1:testvolume /mnt/glusterfs
20.7. Deauthorizing a Client
- Remove an authorized client from the allowed list
- Revoke SSL/TLS certificate authorization through a certificate revocation list (CRL)
20.7.1. To Remove an Authorized Client From the Allowed List
Procedure 20.12. Removing an authorized client from the allowed list
List currently authorized clients and servers
$ gluster volume get VOLNAME auth.ssl-allowFor example, the following command shows that there are three authorized servers and five authorized clients.$ gluster volume get sample_volname auth.ssl-allow server1,server2,server3,client1,client2,client3,client4,client5Remove clients to deauthorize from the output
For example, if you want to deauthorize client2 and client4, copy the string and remove those clients from the list.server1,server2,server3,client1,client3,client5Set the new list of authorized clients and servers
Set the value ofauth.ssl-allowto your updated string.$ gluster volume set VOLNAME auth.ssl-allow <list_of_systems>For example, the updated list shows three servers and three clients.$ gluster volume set sample_volname auth.ssl-allow server1,server2,server3,client1,client3,client5
20.7.2. To Revoke SSL/TLS Certificate Authorization Using a SSL Certificate Revocation List
ssl.crl-path option. The path containing the list of revoked certificates enables server nodes to stop the nodes with revoked certificates from accessing the cluster.
volume set command as follows:
$ gluster volume set vm-images ssl.crl-path /etc/ssl/Note
- Copy the CRL files to a directory.
- Change directory to the directory containing CRL files.
- Compute hashes to the CRL files using the
c_rehashutility.$ c_rehash .The hash and symbolic linking can be done using thec_rehashutility, which is available through theopenssl-perlRPM. The name of the symbolic link must be the hash of the Common Name. For more information, see thecrlman page. - Set the
ssl.crl-pathvolume option.$ gluster volume set VOLNAME ssl.crl-path path-to-directorywhere, path-to-directory has to be an absolute name of the directory that hosts the CRL files.
20.8. Disabling Network Encryption
Procedure 20.13. Disabling I/O encryption
Unmount volumes from all clients
Run the following command on each client for any volume that should have encryption disabled.# umount /mountpointStop encrypted volumes
Run the following command on any server to stop volumes that should have encryption disabled.# gluster volume stop volnameDisable server and client SSL usage
Run the following commands for each volume that should have encryption disabled.# gluster volume set volname server.ssl off # gluster volume set volname client.ssl offStart volumes
# gluster volume start volnameMount volumes on clients
The process for mounting a volume depends on the protocol your client is using. The following command mounts a volume using the native FUSE protocol.# mount -t glusterfs server1:/testvolume /mnt/glusterfs
Procedure 20.14. Disabling management encryption
Unmount volumes from all clients
Run the following command on each client for any volume that should have encryption disabled.# umount /mountpointStop glusterd on all nodes
For Red Hat Enterprise Linux 7 based installations:# systemctl stop glusterdFor Red Hat Enterprise Linux 6 based installations:# service glusterd stopImportant
Red Hat Gluster Storage is not supported on Red Hat Enterprise Linux 6 (RHEL 6) from 3.5 Batch Update 1 onwards. See Version Details table in section Red Hat Gluster Storage Software Components and Versions of the Installation GuideRemove the secure-access file
Run the following command on all servers and clients to remove the secure-access file. You can just rename the file if you are only disabling encryption temporarily.# rm -f /var/lib/glusterd/secure-accessStart glusterd on all nodes
For Red Hat Enterprise Linux 7 based installations:# systemctl start glusterdFor Red Hat Enterprise Linux 6 based installations:# service glusterd startImportant
Red Hat Gluster Storage is not supported on Red Hat Enterprise Linux 6 (RHEL 6) from 3.5 Batch Update 1 onwards. See Version Details table in section Red Hat Gluster Storage Software Components and Versions of the Installation GuideMount volumes on clients
The process for mounting a volume depends on the protocol your client is using. The following command mounts a volume using the native FUSE protocol.# mount -t glusterfs server1:/testvolume /mnt/glusterfs
Important
Part VII. Troubleshoot
Chapter 21. Resolving Common Issues
21.1. Identifying locked file and clear locks
statedump command to list the locks held on files. The statedump output also provides information on each lock with its range, basename, and PID of the application holding the lock, and so on. You can analyze the output to find the locks whose owner/application is no longer running or interested in that lock. After ensuring that no application is using the file, you can clear the lock using the following clear-locks command:
# gluster volume clear-locks VOLNAME path kind {blocked | granted | all}{inode range | entry basename | posix range}
statedump, see Section 17.7, “Viewing complete volume state with statedump”
- Perform
statedumpon the volume to view the files that are locked using the following command:# gluster volume statedump VOLNAMEFor example, to displaystatedumpof test-volume:# gluster volume statedump test-volume Volume statedump successfulThestatedumpfiles are created on the brick servers in the/tmpdirectory or in the directory set using theserver.statedump-pathvolume option. The naming convention of the dump file isbrick-path.brick-pid.dump. - Clear the entry lock using the following command:
# gluster volume clear-locks VOLNAME path kind granted entry basenameThe following are the sample contents of thestatedumpfile indicating entry lock (entrylk). Ensure that those are stale locks and no resources own them.[xlator.features.locks.vol-locks.inode] path=/ mandatory=0 entrylk-count=1 lock-dump.domain.domain=vol-replicate-0 xlator.feature.locks.lock-dump.domain.entrylk.entrylk[0](ACTIVE)=type=ENTRYLK_WRLCK on basename=file1, pid = 714782904, owner=ffffff2a3c7f0000, transport=0x20e0670, , granted at Mon Feb 27 16:01:01 2012 conn.2.bound_xl./rhgs/brick1.hashsize=14057 conn.2.bound_xl./rhgs/brick1.name=/gfs/brick1/inode conn.2.bound_xl./rhgs/brick1.lru_limit=16384 conn.2.bound_xl./rhgs/brick1.active_size=2 conn.2.bound_xl./rhgs/brick1.lru_size=0 conn.2.bound_xl./rhgs/brick1.purge_size=0For example, to clear the entry lock onfile1of test-volume:# gluster volume clear-locks test-volume / kind granted entry file1 Volume clear-locks successful test-volume-locks: entry blocked locks=0 granted locks=1 - Clear the inode lock using the following command:
# gluster volume clear-locks VOLNAME path kind granted inode rangeThe following are the sample contents of thestatedumpfile indicating there is an inode lock (inodelk). Ensure that those are stale locks and no resources own them.[conn.2.bound_xl./rhgs/brick1.active.1] gfid=538a3d4a-01b0-4d03-9dc9-843cd8704d07 nlookup=1 ref=2 ia_type=1 [xlator.features.locks.vol-locks.inode] path=/file1 mandatory=0 inodelk-count=1 lock-dump.domain.domain=vol-replicate-0 inodelk.inodelk[0](ACTIVE)=type=WRITE, whence=0, start=0, len=0, pid = 714787072, owner=00ffff2a3c7f0000, transport=0x20e0670, , granted at Mon Feb 27 16:01:01 2012For example, to clear the inode lock onfile1of test-volume:# gluster volume clear-locks test-volume /file1 kind granted inode 0,0-0 Volume clear-locks successful test-volume-locks: inode blocked locks=0 granted locks=1 - Clear the granted POSIX lock using the following command:
# gluster volume clear-locks VOLNAME path kind granted posix rangeThe following are the sample contents of thestatedumpfile indicating there is a granted POSIX lock. Ensure that those are stale locks and no resources own them.xlator.features.locks.vol1-locks.inode] path=/file1 mandatory=0 posixlk-count=15 posixlk.posixlk[0](ACTIVE)=type=WRITE, whence=0, start=8, len=1, pid = 23848, owner=d824f04c60c3c73c, transport=0x120b370, , blocked at Mon Feb 27 16:01:01 2012 , granted at Mon Feb 27 16:01:01 2012 posixlk.posixlk[1](ACTIVE)=type=WRITE, whence=0, start=7, len=1, pid = 1, owner=30404152462d436c-69656e7431, transport=0x11eb4f0, , granted at Mon Feb 27 16:01:01 2012 posixlk.posixlk[2](BLOCKED)=type=WRITE, whence=0, start=8, len=1, pid = 1, owner=30404152462d436c-69656e7431, transport=0x11eb4f0, , blocked at Mon Feb 27 16:01:01 2012 posixlk.posixlk[3](ACTIVE)=type=WRITE, whence=0, start=6, len=1, pid = 12776, owner=a36bb0aea0258969, transport=0x120a4e0, , granted at Mon Feb 27 16:01:01 2012 ...For example, to clear the granted POSIX lock onfile1of test-volume:# gluster volume clear-locks test-volume /file1 kind granted posix 0,8-1 Volume clear-locks successful test-volume-locks: posix blocked locks=0 granted locks=1 test-volume-locks: posix blocked locks=0 granted locks=1 test-volume-locks: posix blocked locks=0 granted locks=1 - Clear the blocked POSIX lock using the following command:
# gluster volume clear-locks VOLNAME path kind blocked posix rangeThe following are the sample contents of thestatedumpfile indicating there is a blocked POSIX lock. Ensure that those are stale locks and no resources own them.[xlator.features.locks.vol1-locks.inode] path=/file1 mandatory=0 posixlk-count=30 posixlk.posixlk[0](ACTIVE)=type=WRITE, whence=0, start=0, len=1, pid = 23848, owner=d824f04c60c3c73c, transport=0x120b370, , blocked at Mon Feb 27 16:01:01 2012 , granted at Mon Feb 27 16:01:01 posixlk.posixlk[1](BLOCKED)=type=WRITE, whence=0, start=0, len=1, pid = 1, owner=30404146522d436c-69656e7432, transport=0x1206980, , blocked at Mon Feb 27 16:01:01 2012 posixlk.posixlk[2](BLOCKED)=type=WRITE, whence=0, start=0, len=1, pid = 1, owner=30404146522d436c-69656e7432, transport=0x1206980, , blocked at Mon Feb 27 16:01:01 2012 posixlk.posixlk[3](BLOCKED)=type=WRITE, whence=0, start=0, len=1, pid = 1, owner=30404146522d436c-69656e7432, transport=0x1206980, , blocked at Mon Feb 27 16:01:01 2012 posixlk.posixlk[4](BLOCKED)=type=WRITE, whence=0, start=0, len=1, pid = 1, owner=30404146522d436c-69656e7432, transport=0x1206980, , blocked at Mon Feb 27 16:01:01 2012 ...For example, to clear the blocked POSIX lock onfile1of test-volume:# gluster volume clear-locks test-volume /file1 kind blocked posix 0,0-1 Volume clear-locks successful test-volume-locks: posix blocked locks=28 granted locks=0 test-volume-locks: posix blocked locks=1 granted locks=0 No locks cleared. - Clear all POSIX locks using the following command:
# gluster volume clear-locks VOLNAME path kind all posix rangeThe following are the sample contents of thestatedumpfile indicating that there are POSIX locks. Ensure that those are stale locks and no resources own them.[xlator.features.locks.vol1-locks.inode] path=/file1 mandatory=0 posixlk-count=11 posixlk.posixlk[0](ACTIVE)=type=WRITE, whence=0, start=8, len=1, pid = 12776, owner=a36bb0aea0258969, transport=0x120a4e0, , blocked at Mon Feb 27 16:01:01 2012 , granted at Mon Feb 27 16:01:01 2012 posixlk.posixlk[1](ACTIVE)=type=WRITE, whence=0, start=0, len=1, pid = 12776, owner=a36bb0aea0258969, transport=0x120a4e0, , granted at Mon Feb 27 16:01:01 2012 posixlk.posixlk[2](ACTIVE)=type=WRITE, whence=0, start=7, len=1, pid = 23848, owner=d824f04c60c3c73c, transport=0x120b370, , granted at Mon Feb 27 16:01:01 2012 posixlk.posixlk[3](ACTIVE)=type=WRITE, whence=0, start=6, len=1, pid = 1, owner=30404152462d436c-69656e7431, transport=0x11eb4f0, , granted at Mon Feb 27 16:01:01 2012 posixlk.posixlk[4](BLOCKED)=type=WRITE, whence=0, start=8, len=1, pid = 23848, owner=d824f04c60c3c73c, transport=0x120b370, , blocked at Mon Feb 27 16:01:01 2012 ...For example, to clear all POSIX locks onfile1of test-volume:# gluster volume clear-locks test-volume /file1 kind all posix 0,0-1 Volume clear-locks successful test-volume-locks: posix blocked locks=1 granted locks=0 No locks cleared. test-volume-locks: posix blocked locks=4 granted locks=1
statedump on test-volume again to verify that all the above locks are cleared.
21.2. Retrieving File Path from the Gluster Volume
getfattr utility. The getfattr utility enables you to locate a file residing on a gluster volume brick. You can retrieve the path of a file even if the filename is unknown.
21.2.1. Retrieving Known File Name
# getfattr -n trusted.glusterfs.pathinfo -e text <path_to_fuse_mount/filename># getfattr -n trusted.glusterfs.pathinfo -e text /mnt/fuse_mnt/File1
getfattr: Removing leading '/' from absolute path names
# file: mnt/fuse_mnt/File1
trusted.glusterfs.pathinfo="(<DISTRIBUTE:testvol-dht> (<REPLICATE:testvol-replicate-0>
<POSIX(/rhgs/brick1):tuxpad:/rhgs/brick1/File1>
<POSIX(/rhgs/brick2):tuxpad:/rhgs/brick2/File1>))"21.2.2. Retrieving Unknown File Name
Note
# getfattr -d -m. -e hex /path/to/file/on/the/brick21.2.3. Retrieving File Path using gfid String
- Fuse mount the volume with the aux-gfid option enabled.
# mount -t glusterfs -o aux-gfid-mount hostname:volume-name <path_to_fuse_mnt>Where,path_to_fuse_mount: The fuse mount where the gluster volume is mounted.For example:# mount -t glusterfs -o aux-gfid-mount 127.0.0.2:testvol /mnt/aux_mount - After mounting the volume, execute the following command
# getfattr -n trusted.glusterfs.pathinfo -e text <path-to-fuse-mnt>/.gfid/<GFID string>Where,path_to_fuse_mount: The fuse mount where the gluster volume is mounted.GFID string: The GFID string.For example:# getfattr -n trusted.glusterfs.pathinfo -e text /mnt/aux_mount/.gfid/80b0b164-2ea4-478b-a4cd-a9f76c1e6efd getfattr: Removing leading '/' from absolute path names # file: mnt/aux_mount/.gfid/80b0b164-2ea4-478b-a4cd-a9f76c1e6efd trusted.glusterfs.pathinfo="(<DISTRIBUTE:testvol-dht> (<REPLICATE:testvol-replicate-0> <POSIX(/rhgs/brick2):tuxpad:/rhgs/brick2/File1> <POSIX(/rhgs/brick1):tuxpad:/rhgs/brick1/File1>))The command output displays the brick pathinfo under the <POSIX> tag. In this example output, two paths are displayed as the file is replicated twice.
21.2.4. Controlling Self-heal for Dispersed Volumes
- Navigate to the scripts folder using the following command:
# cd /usr/share/glusterfs/scripts - Determine the PID of the self-heal daemon using the following command:
# ps -aef | grep glustershdThe output will be in the following format:root 1565 1 0 Feb05 ? 00:09:17 /usr/sbin/glusterfs -s localhost --volfile-id gluster/glustershd -p /var/run/gluster/glustershd/glustershd.pid -l /var/log/glusterfs/glustershd.log -S /var/run/gluster/ed49b959a0dc9b2185913084e3b2b339.socket --xlator-option *replicate*.node-uuid=13dbfa1e-ebbf-4cee-a1ac-ca6763903c55 root 16766 14420 0 19:00 pts/0 00:00:00 grep --color=auto glustershdIn this output, 1565 represents the PID of the selfheald service. - Execute the
control-cpu-loadscript using the following command:# sh control-cpu-load.sh - When the system prompts for the following input, type the PID of the self-heal daemon acquired from the previous step and press
Enter:[root@XX-XX scripts]# sh control-cpu-load.sh Enter gluster daemon pid for which you want to control CPU. 1565 - When the system prompts for the following input, type
yand pressEnter:If you want to continue the script to attach 1565 with new cgroup_gluster_1565 cgroup Press (y/n)?In this example, 1565 represents the PID of the selfheald service. The PID of the selfheald service can vary from system to system. - When the system prompts for the following input, enter the required quota value to be assigned to the self-heal daemon and press
Enter:Creating child cgroup directory 'cgroup_gluster_1565 cgroup' for glustershd.service. Enter quota value in range [10,100]: 25In this example, the quota value for the self-heal daemon is set as25.Note
The recommended quota value for a self-heal daemon is 25. However, the quota value can be set by the user on a run-time basis.The system prompts the following notification once the quota value is successfully set:Entered quota value is 25 Setting 25000 to cpu.cfs_quota_us for gluster_cgroup. Tasks are attached successfully specific to 1565 to cgroup_gluster_1565.
top command.
Important
21.3. Resolving glusterd Crash
glusterd crash is observed in the following scenarios:
glusterdrecieves a Termination Signal orSIGTERM.Segmentation faulterror message when upgrading Red Hat Gluster Storage.glusterdservice is being stopped.
Important
glusterd.
glusterd crash is persistent in any other scenarios, contact Red Hat Support
21.4. Restarting a dead/failed brick
Note
# gluster volume start VOLNAME force21.5. Deactivating a group configuration
metadata-cache, nl-cache, or samba. Use this procedure to reset volume options set up by a group configuration in order to deactivate the group.
- Navigate to the
groupsfolder:# cd /var/lib/glusterd/groups - View the contents of the group profile:
# cat PROFILE_NAME - Reset each volume option present in the group profile:
# gluster volume reset VOLNAME OPTION_NAME
Part VIII. Appendices
Chapter 22. Starting and Stopping the glusterd service
glusterd command line, logical storage volumes can be decoupled from physical hardware. Decoupling allows storage volumes to be grown, resized, and shrunk, without application or server downtime.
glusterd service is started automatically on all servers in the trusted storage pool. The service can also be manually started and stopped as required.
- Run the following command to start glusterd manually.On RHEL 7 and RHEL 8, runOn RHEL 6, run
# systemctl start glusterd# service glusterd startImportant
Red Hat Gluster Storage is not supported on Red Hat Enterprise Linux 6 (RHEL 6) from 3.5 Batch Update 1 onwards. See Version Details table in section Red Hat Gluster Storage Software Components and Versions of the Installation Guide - Run the following command to stop glusterd manually.On RHEL 7 and RHEL 8, runOn RHEL 6, run
# systemctl stop glusterd# service glusterd stop
Chapter 23. Manually Recovering File Split-brain
- Run the following command to obtain the path of the file that is in split-brain:
# gluster volume heal VOLNAME info split-brainFrom the command output, identify the files for which file operations performed from the client keep failing with Input/Output error. - Close the applications that opened split-brain file from the mount point. If you are using a virtual machine, you must power off the machine.
- Obtain and verify the AFR changelog extended attributes of the file using the
getfattrcommand. Then identify the type of split-brain to determine which of the bricks contains the 'good copy' of the file.getfattr -d -m . -e hex <file-path-on-brick>For example,# getfattr -d -e hex -m. brick-a/file.txt #file: brick-a/file.txt security.selinux=0x726f6f743a6f626a6563745f723a66696c655f743a733000 trusted.afr.vol-client-2=0x000000000000000000000000 trusted.afr.vol-client-3=0x000000000200000000000000 trusted.gfid=0x307a5c9efddd4e7c96e94fd4bcdcbd1bThe extended attributes withtrusted.afr.VOLNAMEvolname-client-<subvolume-index>are used by AFR to maintain changelog of the file. The values of thetrusted.afr.VOLNAMEvolname-client-<subvolume-index>are calculated by the glusterFS client (FUSE or NFS-server) processes. When the glusterFS client modifies a file or directory, the client contacts each brick and updates the changelog extended attribute according to the response of the brick.subvolume-indexis thebrick number - 1ofgluster volume info VOLNAMEoutput.For example,# gluster volume info vol Volume Name: vol Type: Distributed-Replicate Volume ID: 4f2d7849-fbd6-40a2-b346-d13420978a01 Status: Created Number of Bricks: 4 x 2 = 8 Transport-type: tcp Bricks: brick1: server1:/rhgs/brick1 brick2: server1:/rhgs/brick2 brick3: server1:/rhgs/brick3 brick4: server1:/rhgs/brick4 brick5: server1:/rhgs/brick5 brick6: server1:/rhgs/brick6 brick7: server1:/rhgs/brick7 brick8: server1:/rhgs/brick8In the example above:Brick | Replica set | Brick subvolume index ---------------------------------------------------------------------------- /rhgs/brick1 | 0 | 0 /rhgs/brick2 | 0 | 1 /rhgs/brick3 | 1 | 2 /rhgs/brick4 | 1 | 3 /rhgs/brick5 | 2 | 4 /rhgs/brick6 | 2 | 5 /rhgs/brick7 | 3 | 6 /rhgs/brick8 | 3 | 7 ```Each file in a brick maintains the changelog of itself and that of the files present in all the other bricks in it's replica set as seen by that brick.In the example volume given above, all files in brick-a will have 2 entries, one for itself and the other for the file present in it's replica pair. The following is the changelog for brick2,- trusted.afr.vol-client-0=0x000000000000000000000000 - is the changelog for itself (brick1)
- trusted.afr.vol-client-1=0x000000000000000000000000 - changelog for brick2 as seen by brick1
Likewise, all files in brick2 will have the following:- trusted.afr.vol-client-0=0x000000000000000000000000 - changelog for brick1 as seen by brick2
- trusted.afr.vol-client-1=0x000000000000000000000000 - changelog for itself (brick2)
Note
These files do not have entries for themselves, only for the other bricks in the replica. For example,brick1will only havetrusted.afr.vol-client-1set andbrick2will only havetrusted.afr.vol-client-0set. Interpreting the changelog remains same as explained below.The same can be extended for other replica pairs.Interpreting changelog (approximate pending operation count) valueEach extended attribute has a value which is 24 hexa decimal digits. First 8 digits represent changelog of data. Second 8 digits represent changelog of metadata. Last 8 digits represent Changelog of directory entries.
Pictorially representing the same is as follows:0x 000003d7 00000001 00000000110 | | | | | \_ changelog of directory entries | \_ changelog of metadata \ _ changelog of dataFor directories, metadata and entry changelogs are valid. For regular files, data and metadata changelogs are valid. For special files like device files and so on, metadata changelog is valid. When a file split-brain happens it could be either be data split-brain or meta-data split-brain or both.The following is an example of both data, metadata split-brain on the same file:# getfattr -d -m . -e hex /rhgs/brick?/a getfattr: Removing leading '/' from absolute path names #file: rhgs/brick1/a trusted.afr.vol-client-0=0x000000000000000000000000 trusted.afr.vol-client-1=0x000003d70000000100000000 trusted.gfid=0x80acdbd886524f6fbefa21fc356fed57 #file: rhgs/brick2/a trusted.afr.vol-client-0=0x000003b00000000100000000 trusted.afr.vol-client-1=0x000000000000000000000000 trusted.gfid=0x80acdbd886524f6fbefa21fc356fed57Scrutinize the changelogsThe changelog extended attributes on file/rhgs/brick1/aare as follows:- The first 8 digits of
trusted.afr.vol-client-0 are all zeros (0x00000000................),The first 8 digits oftrusted.afr.vol-client-1are not all zeros (0x000003d7................).So the changelog on/rhgs/brick-a/aimplies that some data operations succeeded on itself but failed on/rhgs/brick2/a. - The second 8 digits of
trusted.afr.vol-client-0 are all zeros (0x........00000000........), and the second 8 digits oftrusted.afr.vol-client-1are not all zeros (0x........00000001........).So the changelog on/rhgs/brick1/aimplies that some metadata operations succeeded on itself but failed on/rhgs/brick2/a.
The changelog extended attributes on file/rhgs/brick2/aare as follows:- The first 8 digits of
trusted.afr.vol-client-0are not all zeros (0x000003b0................).The first 8 digits oftrusted.afr.vol-client-1are all zeros (0x00000000................).So the changelog on/rhgs/brick2/aimplies that some data operations succeeded on itself but failed on/rhgs/brick1/a. - The second 8 digits of
trusted.afr.vol-client-0are not all zeros (0x........00000001........)The second 8 digits oftrusted.afr.vol-client-1are all zeros (0x........00000000........).So the changelog on/rhgs/brick2/aimplies that some metadata operations succeeded on itself but failed on/rhgs/brick1/a.
Here, both the copies have data, metadata changes that are not on the other file. Hence, it is both data and metadata split-brain.Deciding on the correct copyYou must inspect
statandgetfattroutput of the files to decide which metadata to retain and contents of the file to decide which data to retain. To continue with the example above, here, we are retaining the data of/rhgs/brick1/aand metadata of/rhgs/brick2/a.Resetting the relevant changelogs to resolve the split-brainResolving data split-brainYou must change the changelog extended attributes on the files as if some data operations succeeded on
/rhgs/brick1/abut failed on /rhgs/brick-b/a. But/rhgs/brick2/ashouldnothave any changelog showing data operations succeeded on/rhgs/brick2/abut failed on/rhgs/brick1/a. You must reset the data part of the changelog ontrusted.afr.vol-client-0of/rhgs/brick2/a.Resolving metadata split-brainYou must change the changelog extended attributes on the files as if some metadata operations succeeded on/rhgs/brick2/abut failed on/rhgs/brick1/a. But/rhgs/brick1/ashouldnothave any changelog which says some metadata operations succeeded on/rhgs/brick1/abut failed on/rhgs/brick2/a. You must reset metadata part of the changelog ontrusted.afr.vol-client-1of/rhgs/brick1/aRun the following commands to reset the extended attributes.- On
/rhgs/brick2/a, fortrusted.afr.vol-client-0 0x000003b00000000100000000to0x000000000000000100000000, execute the following command:# setfattr -n trusted.afr.vol-client-0 -v 0x000000000000000100000000 /rhgs/brick2/a - On
/rhgs/brick1/a, fortrusted.afr.vol-client-1 0x0000000000000000ffffffffto0x000003d70000000000000000, execute the following command:# setfattr -n trusted.afr.vol-client-1 -v 0x000003d70000000000000000 /rhgs/brick1/a
After you reset the extended attributes, the changelogs would look similar to the following:# getfattr -d -m . -e hex /rhgs/brick?/a getfattr: Removing leading '/' from absolute path names #file: rhgs/brick1/a trusted.afr.vol-client-0=0x000000000000000000000000 trusted.afr.vol-client-1=0x000003d70000000000000000 trusted.gfid=0x80acdbd886524f6fbefa21fc356fed57 #file: rhgs/brick2/a trusted.afr.vol-client-0=0x000000000000000100000000 trusted.afr.vol-client-1=0x000000000000000000000000 trusted.gfid=0x80acdbd886524f6fbefa21fc356fed57Resolving Directory entry split-brainAFR has the ability to conservatively merge different entries in the directories when there is a split-brain on directory. If on one brick directory
storagehas entries1,2and has entries3,4on the other brick then AFR will merge all of the entries in the directory to have1, 2, 3, 4entries in the same directory. But this may result in deleted files to re-appear in case the split-brain happens because of deletion of files on the directory. Split-brain resolution needs human intervention when there is at least one entry which has same file name but differentgfidin that directory.For example:Onbrick-athe directory has 2 entriesfile1withgfid_xandfile2. Onbrick-bdirectory has 2 entriesfile1withgfid_yandfile3. Here the gfid's offile1on the bricks are different. These kinds of directory split-brain needs human intervention to resolve the issue. You must remove eitherfile1onbrick-aor thefile1onbrick-bto resolve the split-brain.In addition, the correspondinggfid-linkfile must be removed. Thegfid-linkfiles are present in the .glusterfsdirectory in the top-level directory of the brick. If the gfid of the file is0x307a5c9efddd4e7c96e94fd4bcdcbd1b(the trusted.gfid extended attribute received from thegetfattrcommand earlier), the gfid-link file can be found at/rhgs/brick1/.glusterfs/30/7a/307a5c9efddd4e7c96e94fd4bcdcbd1b.Warning
Before deleting thegfid-link, you must ensure that there are no hard links to the file present on that brick. If hard-links exist, you must delete them. - Trigger self-heal by running the following command:
# ls -l <file-path-on-gluster-mount>or# gluster volume heal VOLNAME
Appendix A. Revision History
| Revision History | |||
|---|---|---|---|
| Revision 3.5-0 | Wed Oct 30 2019 | ||
| |||