Quick Start Guide
Getting Started with Web Administration
Abstract
Chapter 1. Overview
Red Hat Gluster Storage Web Administration provides monitoring and metrics infrastructure for Red Hat Gluster Storage 3.5 and is the primary method to monitor your Red Hat Gluster Storage environment. The Red Hat Gluster Storage Web Administration environment is based on the Tendrl upstream project and utilizes Ansible automation for installation. The key goal of Red Hat Gluster Storage Web Administration is to provide deep metrics and visualization of Red Hat Storage Gluster clusters and the associated storage elements such as storage nodes, volumes, and bricks.
Key Features
- Monitoring dashboards for Clusters, Hosts, Volumes, and Bricks
- Top-level list views of Clusters, Hosts, and Volumes
- SNMPv3 Configuration and Alerting
- User Management
- Importing Gluster cluster
1.1. Web Administration System Concepts
The Red Hat Gluster Storage Web Administration environment consists of the following system components.
Web Administration Server
The Web Administration server system hosts the Web Administration user interface, the API and etcd. The Web Administration server is the system on which the Ansible installation process is run.
Red Hat Gluster Storage Node
The system on which Red Hat Gluster Storage is installed. Web Administration node agents are installed on the storage nodes.
Client System
Any external system that accesses the Web Administration user interface on a compatible web browser.
1.2. Web Administration Architecture
Figure 1.1. Web Administration Architecture
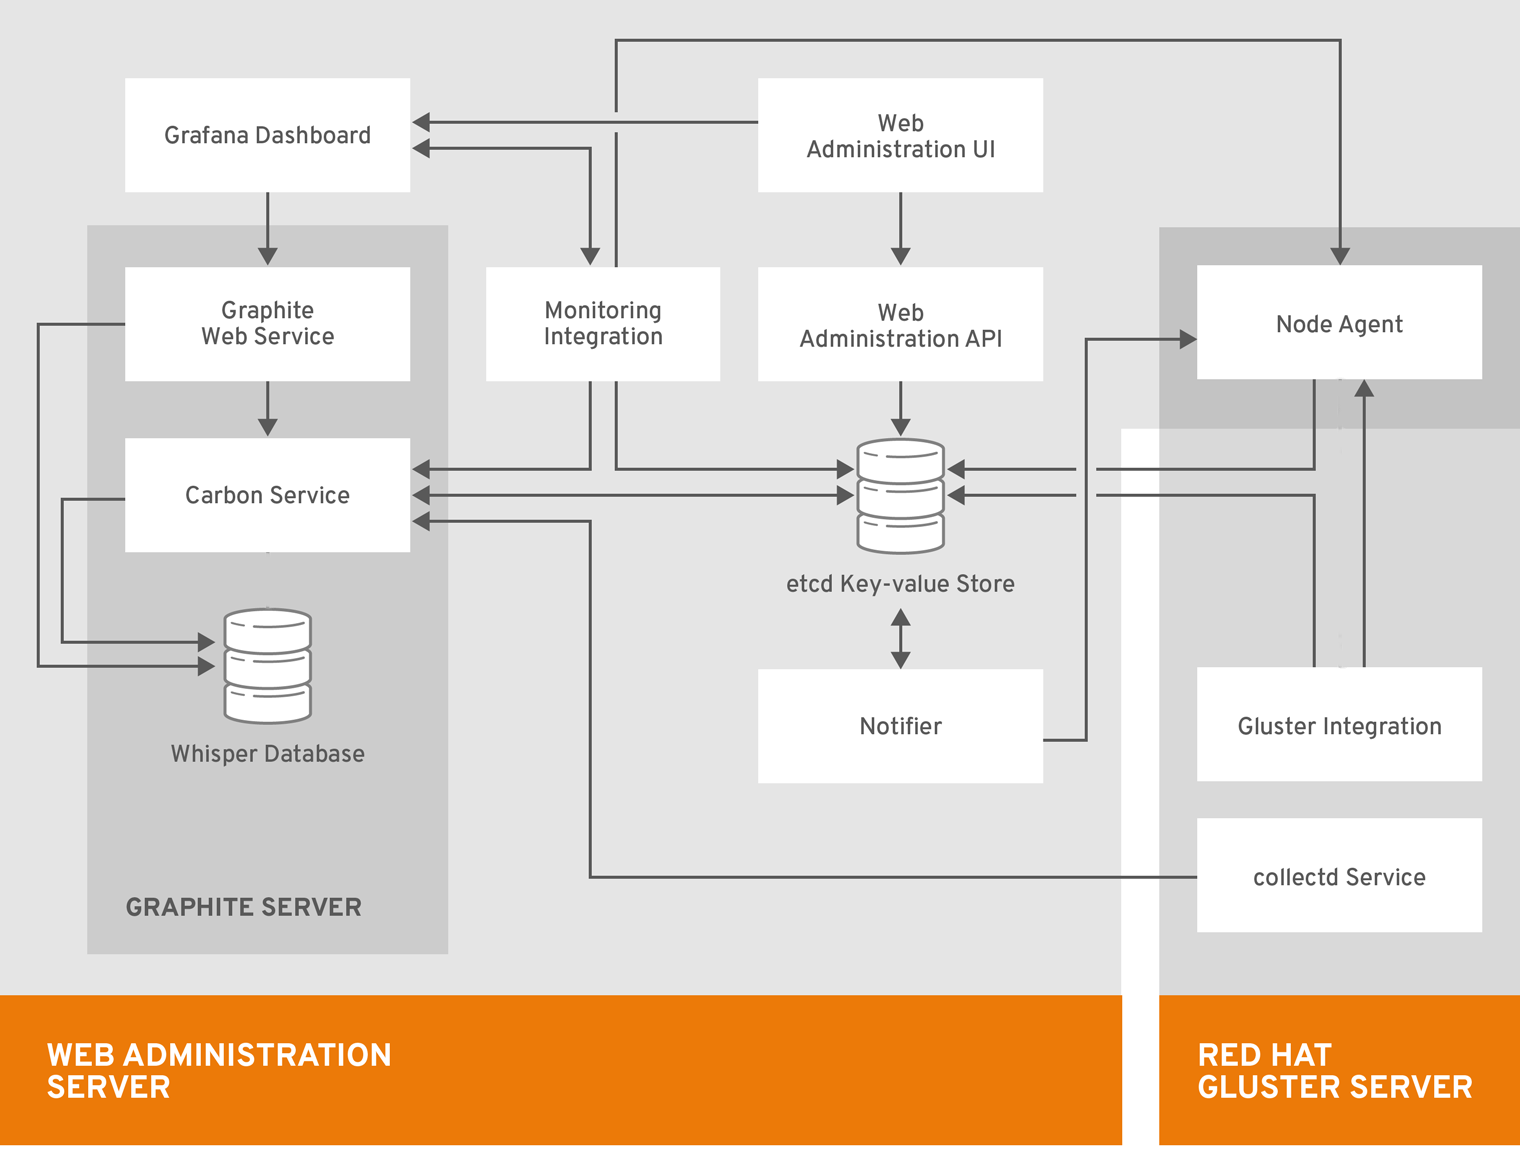
The components of the Web Administration architecture are described below:
Web Administration Server Components
- Web Administration UI: the primary user interface for monitoring Red Hat Gluster Storage clusters.
- Grafana Dashboard: a third party integrated dashboard that displays real-time metrics and monitoring data.
- Monitoring Integration: service that enables monitoring and alerting via integration with external systems such as Graphite and Grafana.
- Graphite Web Service: repository of (Gluster) telemetry data collected using collectd.
- Carbon Service: set of services dealing with receiving data from collectors (collectd), replication and sharding, and interfacing with Grafana.
- Whisper Database: database for storing time-series numeric metrics.
- Web Administration API: the Web Administration northbound API.
- etcd Key-value Store: central store that contains all the configuration state information for storage subsystems managed by Web Administration
- Notifier: notification service that enables various types of notifications and alerts including SMTP and SNMP
Red Hat Gluster Storage Server Components
Red Hat Gluster Storage server is a system with Red Hat Gluster Storage installed. Multiple Red Hat Gluster Storage servers form a Red Hat Gluster Storage cluster. The components are as follows:
- collectd Service: host-based system statistics collection daemon that gathers metrics from various sources such as the operating system, applications, log files and devices, Red Hat Gluster Storage clusters, etc.
- Gluster Integration: component that fetches data from Red Hat Gluster Storage cluster to be sent to the Web Administration server.
- Node Agent: takes care of node-specific flows and tasks to be performed.
Chapter 2. System Requirements
This chapter outlines the minimum hardware and software requirements to install Red Hat Gluster Storage Web Administration.
Ensure that all the requirements are met before the installation starts. Missing requirements can result in Red Hat Gluster Storage Web Administration environment not functioning as expected.
The Red Hat Gluster Storage Web Administration environment requires:
- One machine to act as the management server
- One or more machines to act as storage servers. At least three machines are required to support replicated volumes
- One or more machines to be used as clients to access the Web Administration interface
2.1. Requirements for Web Administration Server System
On the system to be designated as the Web Administration server, verify that these recommended hardware and software requirements are met.
2.1.1. Hardware Requirements
The following are the different hardware requirements based on different cluster configurations:
2.1.1.1. Small Cluster Configuration
- Number of nodes: upto 8 nodes
- Number of volumes: upto 6-8 volumes per cluster
- Number of bricks per node for replicated volumes: upto 2-3 bricks
- Number of bricks per node for Erasure Coded volumes: upto 12-36 bricks
Recommended Requirements
- 4 vCPUs
- 4 GB of available system RAM
- One Network Interface Card (NIC) with bandwidth of at least 1 Gbps
Additional Storage Devices
For hosting etcd data directory:
- Storage disk size: 20 GB per cluster
- Filesystem format: XFS
-
Mounting directory:
/var/lib/etcd
For hosting time-series data from Graphite, Carbon, and Whisper applications:
- Storage disk size: 200 GB per cluster
- Filesystem format: XFS
-
Mounting directory:
/var/lib/carbon
For more information on how to prepare and mount the additional disks, see the Creating a Partition and Mounting a File System sections in the Red Hat Enterprise Linux Storage Administration Guide.
2.1.1.2. Medium Cluster Configuration
- Number of nodes: 9-16 nodes
- Number of volumes: upto 6-8 volumes per cluster
- Number of bricks per node for replicated volumes: upto 2-3 bricks
- Number of bricks per node for Erasure Coded volumes: upto 12-36 bricks
Recommended Requirements
- 4 vCPUs
- 6 GB of available system RAM
- One Network Interface Card (NIC) with bandwidth of at least 1 Gbps
Additional Storage Devices
For hosting etcd data directory:
- Storage disk size: 20 GB per cluster
- Filesystem format: XFS
-
Mounting directory:
/var/lib/etcd
For hosting time-series data from Graphite, Carbon, and Whisper applications:
- Storage disk size: 350 GB per cluster
- Filesystem format: XFS
-
Mounting directory:
/var/lib/carbon
2.1.1.3. Large Cluster Configuration
- Number of nodes: 17-24 nodes
- Number of volumes: upto 6-8 volumes per cluster
- Number of bricks per node for replicated volumes: upto 2-3 bricks
- Number of bricks per node for Erasure Coded volumes: upto 12-36 bricks
Recommended Requirements
- 6 vCPUs
- 6 GB of available system RAM
- One Network Interface Card (NIC) with bandwidth of at least 1 Gbps
Additional Storage Devices
For hosting etcd data directory:
- Storage disk size: 20 GB per cluster
- Filesystem format: XFS
-
Mounting directory:
/var/lib/etcd
For hosting time-series data from Graphite, Carbon, and Whisper applications:
- Storage disk size: 500 GB per cluster
- Filesystem format: XFS
-
Mounting directory:
/var/lib/carbon
2.1.2. Software Requirements
Red Hat Gluster Storage Web Administration is supported on Red Hat Enterprise Linux 7.5 or later 64-bit version.
| Software | Name and Version |
|---|---|
| Operating System | Red Hat Enterprise Linux 7.5 or later |
2.2. Requirements for Red Hat Gluster Storage Nodes
Ensure the following requirements are met on the Red Hat Gluster Storage nodes:
Red Hat Gluster Storage Web Administration is not supported on new installations of Red Hat Gluster Storage 3.5.2 on Red Hat Enterprise Linux 8. Red Hat Gluster Storage server on Red Hat Enterprise Linux 8 and Red Hat Gluster Storage Web Administration on Red Hat Enterprise Linux 7 is not supported.
- Red Hat Enterprise Linux 7.5 or later.
- Red Hat Gluster Storage servers updated to the latest Red Hat Gluster Storage version 3.5 or greater. For detailed instructions on the upgrade process, see the Upgrading Red Hat Storage section in the Red Hat Gluster Storage Installation Guide.
Minimum hardware requirements
NoteFor more information, see the knowledge base article on Red Hat Gluster Storage Hardware Compatibility.
- Network Time Protocol (NTP) setup
- Firewall access to ports
For detailed information on prerequisites and setting up Red Hat Gluster Storage server, see the Red Hat Gluster Storage 3.5 Installation Guide.
2.3. Requirements for the Client System
The Red Hat Gluster Storage Web Administration environment can be accessed by a client machine with the following web browser compatibility:
| Software | Name and Version |
|---|---|
| Web Browser | Mozilla Firefox 38.7.0 or later |
| Web Browser | Google Chrome 46 or later |
2.4. Firewall Configuration
Automated Firewall Setup
In this version of Red Hat Gluster Web Administration, firewall configuration is automated by Ansible automation. The tendrl-ansible installer configures the firewall during Web Administration installation as the variable *configure_firewalld_for_tendrl* is set to True by default. This automation opens all the required ports for the Web Administration environment.
To automatically configure the firewall, follow the Web Administration installation process. See the Web Administration installation section in the Quick Start Guide for details.
For tendrl-ansible to automate firewall setup, ensure the firewalld service is configured and enabled. For instructions, see Using firewalls in the Red Hat Enterprise Linux 7 Security Guide.
Manual Firewall Setup
To manually configure firewall for Web Administration services:
- Open the required ports before continuing the installation process
Set the variable
configure_firewalld_for_tendrlto False in the [all:vars] section of the inventory file which will be applied to both the groups: tendrl_server and gluster_servers. See sample variables described in Sample Inventory Variables at the end of 3.5 Web Administration Installation procedure of this guide.NoteThe inventory file is created as part of the Web Administration Ansible installation process.
- Follow Web Administration Installation procedure of this guide.
The list of the ports and the port numbers are given in the table below:
| TCP Port Numbers | Usage |
|---|---|
| 2379 | For etcd |
| 2003 | For Graphite |
| 80 or 443 | For tendrl http or https |
| 8789 | For tendrl-monitoring-integration |
NOTE:
- If you are updating to Web Administration 3.5 Update 2 or higher from previous versions, you no longer need to open TCP port 3000 on the Web Administration server.
-
If you are updating to Web Administration 3.5 Update 3 or higher from previous versions, you no longer need to open TCP port 10080 on the Web Administration server. Access to
Graphite-webTCP port 10080 is unencrypted, you can open it if required.
To use Firewalld to open a particular port, run:
# firewall-cmd --zone=zone_name --add-port=5667/tcp
# firewall-cmd --zone=zone_name --add-port=5667/tcp --permanent
To use iptables to open a particular port, run:
# iptables -A INPUT -m state --state NEW -m tcp -p tcp --dport 5667 -j ACCEPT
# service iptables save
To be able to execute the iptables commands successfully, ensure the iptables-services package is installed. To install the iptables-services package, run yum install iptables-services.
Chapter 3. Installing Web Administration
This chapter covers installing Red Hat Gluster Web Administration using Ansible automation.
3.1. Prerequisites
Before installing Red Hat Gluster Web Administration, ensure the following prerequisites are met:
Enable the following repositories on the Web Administration server and all the Gluster storage servers:
# subscription-manager repos --enable=rhel-7-server-rpms

# subscription-manager repos --enable=rhel-7-server-ansible-2-rpms
Enable the following repository on the Web Administration server:
# subscription-manager repos --enable=rh-gluster-3-web-admin-server-for-rhel-7-server-rpms
Enable the following repositories on all the Gluster storage servers:
# subscription-manager repos --enable=rh-gluster-3-for-rhel-7-server-rpms
# subscription-manager repos --enable=rh-gluster-3-web-admin-agent-for-rhel-7-server-rpms
Set up SSH password-less connection from the Web Administration server system to the remote Gluster servers in addition to localhost (SSH to localhost).
NoteFor information on how to set up SSH key-based authentication, see the Using Key-based Authentication section in the Red Hat Enterprise Linux System Administrator’s Guide.
If the
httpdpackage is already installed on the Web Administration server, stop thehttpdservice before continuing with the installation:# systemctl stop httpd
3.2. Installation Workflow
To install Web Administration, follow the sequence outlined below. For detailed instructions to execute the following sequence, see the next section entitled Web Administration Installation of this Guide.
- Installing the latest version of Ansible and tendrl-ansible on the Web Administration server.
- Creating inventory file with required groups: tendrl_server and gluster_servers with mandatory and optional ansible variables.
-
Executing the
site.ymlplaybook and accessing the Web Administration environment.
See also the README file from tendrl-ansible package available at the following path: /usr/share/doc/tendrl-ansible-1.6.3/README.md
Ansible Groups
The site.yml playbook from tendrl-ansible package expects the hosts to be divided into two groups according to its functionality:
- tendrl_server: contains one machine acting as Web Administration server.
- gluster_servers: contains all the Red Hat Gluster Storage nodes.
Ansible Roles
The tendrl-ansible package contains two Ansible roles with tasks intended for a particular component:
tendrl-ansible.tendrl-server: contains tasks for Web Administration server belonging to the tendrl_server group in the inventory file.
NoteFor more information about this role and the variables, see the README file from tendrl-ansible package available at the following path:
/usr/share/ansible/roles/tendrl-ansible.tendrl-server/README.md- tendrl-ansible.tendrl-storage-node: contains tasks for Red Hat Gluster Storage nodes belonging to the gluster_servers group in the inventory file.
For more information on this role and the variables, see the README file from tendrl-ansible package available on the following path: /usr/share/ansible/roles/tendrl-ansible.tendrl-storage-node/README.md
3.3. Web Administration Installation
The following procedure outlines the steps to install Web Administration the Ansible way.
Procedure. Installing Web Administration
Install the latest version of Ansible and tendrl-ansible on the Web Administration server:
# yum install tendrl-ansible
NoteVerify that the latest Ansible package is obtained from the
rhel-7-server-ansible-2-rpmschannel before executing the following steps. Additionally, ensure that the Ansible version is the same on the Web Administration server as available on the storage nodes.NoteLatest version of Web Administration is compatible with the latest version of Ansible. Web Administration is not compatible with versions below Ansible 2.5.
Create an Ansible inventory file with two Ansible groups: tendrl_server and gluster_servers. Ensure to use FQDNs for all the hosts in the inventory file as shown in the following example:
Sample Inventory groups
[tendrl_server]
tendrl.example.com

[gluster_servers]

gl1.example.com
gl2.example.com
gl3.example.com
gl4.example.com
NoteFor instructions on setting up an inventory file, see Ansible Inventory file setup in Ansible documentation.
Add the following required Ansible variables with their corresponding values in the inventory file:
- etcd_ip_address: configures where etcd instance is listening
- etcd_fqdn: configures Web Administration components to be able to connect to the etcd
graphite_fqdn: configures Web Administration components to be able to connect to graphite
Sample Inventory variables
[all:vars]

etcd_ip_address=192.0.2.1
etcd_fqdn=tendrl.example.com
graphite_fqdn=tendrl.example.com
NoteFor more detail, see the Sample Inventory variables at the end of this installation workflow.
Add any other optional variables in the inventory file as required. The other variables are listed in the Ansible roles README files at the following paths. Enable or disable features by specifying values to the variables such as etcd-tls client authentication. For detailed TLS configuration instructions, see Chapter 5. TLS Encryption Configuration of this Guide.
# /usr/share/ansible/roles/tendrl-ansible.tendrl-server/README.md
# /usr/share/ansible/roles/tendrl-ansible.tendrl-storage-node/README.md
NoteThe firewall configuration variable is enabled by default.
NoteFor detailed inventory file configuration, see the README.md file provided with the installation at the following path:
# less /usr/share/doc/tendrl-ansible-1.6.3/README.md
Copy the
site.ymlplaybook into the working directory where the inventory file is stored.# cp /usr/share/doc/tendrl-ansible-1.6.3/site.yml .
Copy the
prechecks.ymlfile into the inventory file directory:# cp /usr/share/doc/tendrl-ansible-1.6.3/prechecks.yml .
Set up SSH password-less connection from the Web Administration server system to the remote Gluster servers.
NoteFor information about how to set up SSH key-based authentication, see the Using Key-based Authentication section in the Red Hat Enterprise Linux System Administrator’s Guide.
Verify SSH connection to all the nodes from the inventory file without asking for password or validation of public key by running:
# ansible -i <inventory_file> -m ping all
Example
# ansible -i <inventory_file> -m ping all gl3.example.com | SUCCESS => { "changed": false, "failed": false, "ping": "pong" }NoteAnsible should return
SUCCESSandpongmessage for all the nodes as shown in the example above. Do not proceed until the SSH connection is successfully established.To check if Web Administration minimal requirements and setup are met, run the prechecks playbook:
# ansible-playbook -i <inventory_file> prechecks.yml
NoteIf there are any missing requirements, the prechecks playbook will detect it immediately, and direct your attention to the specific problem before running the installation.
Run the prepared
site.ymlplaybook using the following command to set up the Web Administration server and the Storage nodes:# ansible-playbook -i <inventory_file> site.yml
- Log in to the Web Administration environment. For login instructions, see the Web Administration Login chapter of this guide.
The tendrl-ansible.tendrl-server role creates the default user as admin and default password as adminuser. The default password is stored in the /root/password file of the Web Administration server.
Sample Inventory Variables
If there is a single network interface on all machines, the example inventory variables would be as follows:
[all:vars]

etcd_ip_address=192.0.2.1
etcd_fqdn=tendrl.example.com
graphite_fqdn=tendrl.example.com
In the above example:
- 192.0.2.1 is the IP address of the Web Administration server
- tendrl.example.com is the hostname of the Web Administration server
- tendrl.example.com hostname is translated to IP address 192.0.2.1.
See the full description in the README file of tendrl-ansible.tendrl-server role and pay attention to the values you specify there when you use multiple network interfaces on the machines.
You can define these variables in variable files or from the command line directly, but including them into the inventory file provides you with a single file with a full description of tendrl-ansible setup for future reference.
The consolidated variables in the inventory file can be used for the cluster expansion process and also to ensure the installation configuration is intact. The inventory file does not contain the grafana admin password which is stored in the grafana_admin_passwd file generated during tendrl-ansible execution.
Chapter 4. Upgrading Red Hat Gluster Storage Web Administration
4.1. Red Hat Gluster Storage Web Administration 3.4 to 3.5
This chapter describes the procedure to upgrade Web Administration to version 3.5 from previous versions.
To upgrade your Web Administration environment to version 3.5, execute the following actions on the Gluster nodes and the Web Administration server:
On Gluster storage nodes
- Stop and disable all Web Administration services on storage nodes.
- Enable the Ansible repository and ensure the other required repositories are enabled.
- Upgrade Red Hat Gluster Storage to version 3.5.
On Web Administration Server
- Upgrade Red Hat Enterprise Linux on the Web Administration Server.
- Import the Gluster 3.5 cluster.
On Gluster storage nodes
Stopping and disabling Web Administration Services
Stop and disable the following services on the storage nodes by executing the commands given below.
To stop and disable the tendrl-node-agent service:
# systemctl stop tendrl-node-agent
# systemctl disable tendrl-node-agent
To stop and disable the collectd service:
# systemctl stop collectd
# systemctl disable collectd
To stop and disable the tendrl-gluster-integration service:
# systemctl stop tendrl-gluster-integration
# systemctl disable tendrl-gluster-integration
The tendrl-node-agent service is enabled and started during execution of the tendrl-ansible site.yml playbook. The collectd and tendrl-gluster-integration services are enabled and started after importing a cluster into the Web Administration environment.
Enabling Web Administration Repositories
Enable the Ansible repository by running the following command:
# subscription-manager repos --enable=rhel-7-server-ansible-2-rpms
Additionally, ensure that the other required Web Administration repositories are enabled. Run the following command to check if all the required repositories are enabled:
# yum repolist
To check the required repositories, see the Prerequisites section of the Quick Start Guide.
After the repositories are enabled, clear yum cache:
# yum clean all
Upgrading Red Hat Gluster Storage
After enabling the required repositories, upgrade your Red Hat Gluster Storage environment to 3.5. For detailed upgrade instructions, see the Upgrading to Red Hat Gluster Storage 3.5 chapter in the Red Hat Gluster Storage 3.5 Installation Guide. After a successful upgrade, resume the following steps.
On Web Administration server
Stop all Web Administration services:
To stop the tendrl-monitoring-integration service:
# systemctl stop tendrl-monitoring-integration
To stop the tendrl-node-agent service:
# systemctl stop tendrl-node-agent
To stop the tendrl-notifier service:
# systemctl stop tendrl-notifier
To stop the tendrl-api service:
# systemctl stop tendrl-api
To stop the etcd service:
# systemctl stop etcd
To stop the carbon-cache service:
# systemctl stop carbon-cache
Update all packages on the Web Administration server:
# yum update
Run the tendrl-upgrade script:
# tendrl-upgrade
- Run the tendrl-ansible playbooks with the same initial installation configuration. For instructions, see section Web Administration Installation, steps 2 to 9.
If updates to the kernel package occurred, reboot the server system. If not, restart the Web Administration services:
# systemctl restart httpd
# systemctl restart etcd
# systemctl restart carbon-cache
# systemctl restart tendrl-node-agent
# systemctl restart tendrl-monitoring-integration
# systemctl restart tendrl-notifier
# systemctl restart tendrl-api
After upgrading, import the Gluster 3.5 cluster in the Web Administration environment. For detailed import procedure, see the Import Cluster chapter of the Web Administration 3.5 Monitoring Guide.
Chapter 5. TLS Encryption Configuration
Red Hat Gluster Storage Web Administration supports Transport Layer Security (TLS) based security model. This model is used for the following purposes:
-
Authentication and encryption of
etcdcommunication between storage nodes and Web Administration server - HTTPS encryption between Web Administration server and web browser
5.1. General Prerequisites
You need to have Certificate Authority (CA) to be able to generate and sign certificates. The CA can be either self-signed or a trusted CA. For instructions about generating a CA certificate, see the Creating Your Own Certificates section of the Red Hat AMQ Security Guide.
CA is used to sign certificates for the storage nodes and Web Administration server for TLS-based client server etcd authentication. CA is also used to sign the certificate that is used for the https setup on Web Administration server. However, CA for TLS etcd setup can be different from CA for https setup.
Red Hat Gluster Storage Web Administration or tendrl-ansible neither generates nor deploys certificate files or keys.
5.2. Enabling TLS for etcd
Red Hat Gluster Storage Web Administration supports etcd’s TLS-based security model. This model supports authentication and encryption of traffic between etcd and Web Administration system components.
By default, etcd functions without authentication and encryption but it is recommended to use TLS authentication for client-server encryption.
5.2.1. Prerequisites for TLS Encryption
Before setting up the TLS encryption, ensure that the general prerequisites are met. See Section 5.1, “General Prerequisites”.
-
Generate a private key and a client certificate for each storage node and the Web Administration server. For more information, see the Creating and Managing Encryption Keys section of the Red Hat Enterprise Linux Security Guide. On each Web Administration managed storage node, and on the Web Administration server, place the PEM-encoded private key and the client/CA certificates in a secure place that is only accessible by the Web Administration server’s
rootuser. -
Configuration of TLS encryption for
etcdis automated using tendrl-ansible. Hence, you need to have tendrl-ansible installed and the inventory file created. See Chapter 3, Installing Web Administration chapter.
Configuration of TLS encryption for etcd is performed either during the installation of Web Administration (when tendrl-ansible is run for the first time) or later by rerunning tendrl-ansible.
5.2.2. Configuring TLS Encryption for etcd
After generating and placing the TLS certificate files in the preferred directory, update the value of the Ansible variables in the inventory file with the respective file paths of the certificate files.
Add and modify the following etcd TLS variables in the [all:vars] section of the inventory file.
| Variable | Description |
|---|---|
|
| Variable used to enable or disable TLS authentication. |
|
|
Certificate used for SSL/TLS connections to |
|
| Key for the certificate that has to be unencrypted. |
|
| Trusted Certificate Authority. |
- Open the inventory file.
-
Set the value for
etcd_tls_client_authvariable toTrue. By default, the value of this variable isFalse. -
Edit the file path for the
etcd_cert_filevariable as required. The default value is/etc/pki/tls/certs/etcd.crt. -
Edit the file path for
etcd_key_filevariable as required. The default value is/etc/pki/tls/private/etcd.key. -
Edit the file path for the
etcd_trusted_ca_filevariable. The default value is/etc/pki/tls/certs/ca-etcd.crt. - Continue the Web Administration installation process by following the Web Administration Installation chapter.
5.3. Enabling HTTPS for Web Administration Components
This section describes how to set up SSL access for Web Aadministration UI, REST API, and Grafana based dashboard.
Overview of Enabling HTTPS
- Web Administration UI, API and Grafana dashboard, which are provided by the apache server, are secured with SSL by reconfiguration of apache.
-
Access to unencrypted
httpport is redirected to encryptedhttpsport. - Web Administration contains sample configuration files for the apache to simplify the SSL setup.
5.3.1. Prerequisites for Enabling HTTPS
-
mod_sslpackage must be installed and the default configuration in/etc/httpd/conf.d/ssl.confmust be left unmodified. - SSL key and certificate files need to be deployed on the Web Administration server. See Section 5.1, “General Prerequisites”.
Enabling HTTPS for Web Administration components must be done after the Web Administration installation.
5.3.2. Limitations
- Access to Grafana dashboard is not authenticated, which means that anyone who has access to Web Administration login page can access and read all panels in the dashboard without any password. They also can learn about the cluster structure, current workload, and historic trends. This is because Web Administration uses anonymous access to Grafana dashboard.
- Web Administration server listens on a few ports that are not secured but needed for internal communication. For example, Web Administration server receives metrics data from storage machines.
- Nothing else is secured or restricted compared to the default setup without HTTPS enabled.
5.3.3. Configuring HTTPS for Web Administration Components
On a machine where Web Administration server is installed, perform the following steps.
Create a new
00_tendrl-ssl.conffile using the sample configuration file:# cp /etc/httpd/conf.d/00_tendrl-ssl.conf.sample /etc/httpd/conf.d/00_tendrl-ssl.conf
Make the following changes to the
/etc/httpd/conf.d/00_tendrl-ssl.conffile:-
Set
ServerNameto host name (fqdn) of Web Administration server. -
Edit the file path for the
SSLCertificateFilevariable if you want to use your own certificate instead of default self-signed/etc/pki/tls/certs/localhost.crtgenerated by themod_sslpackage. -
Edit the file path for the
SSLCertificateKeyFilevariable if you have changed certificate file in the previous step. The default value is/etc/pki/tls/private/localhost.key.
-
Set
Make the following changes to the
/etc/httpd/conf.d/tendrl.conffile:-
Uncomment the line which has the Redirect rule and replace
%ssl_virtualhost_fqdn%with the fully qualified domain name of Web Administration server. -
Comment the lines (put a # at the beginning of each line) that have the
DocumentRoot,ProxyPass, andProxyPassReversedirectives.
-
Uncomment the line which has the Redirect rule and replace
Check if the configuration is valid.
# apachectl -t
Reload the
httpddaemon.# systemctl reload httpd.service
Ensure that the
httpsport is open.# firewall-cmd --add-service=https # firewall-cmd --add-service=https --permanent
Reload the web browser if you have the browser open with the Web Administration UI or Grafana dashboard.
Chapter 6. Web Administration Login
The Web Administration interface is accessed on a client system using a compatible web browser.
Procedure. Logging in the Web Administration interface
Open the following URL in a web browser.
http://web-admin-server.example.com
NoteReplace web-admin-server.example.com with the hostname or FQDN of the Web Administration server.
The login page is displayed. Enter the default username admin and the default password adminuser, and click Log in.
Figure 6.1. Login Page

The Clusters interface is displayed after logging in to the Web Administration interface. This interface is the starting point to initiate a cluster import.
Figure 6.2. Landing Page
 Note
NoteFor instructions on how to import a Gluster cluster, see the import cluster chapter in the Red Hat Gluster Storage Web Administration Monitoring Guide.


