Administration Guide
Configuring and Managing Red Hat Storage Server
Abstract
Part I. Overview
Chapter 1. Platform Introduction
1.1. About Red Hat Storage
1.2. About glusterFS
1.3. About On-premise Installation
1.4. About Public Cloud Installation
Chapter 2. Red Hat Storage Architecture and Concepts
2.1. Red Hat Storage Architecture
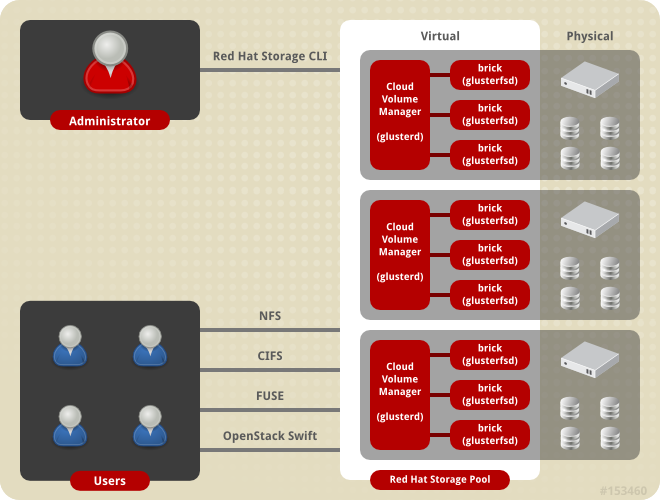
Figure 2.1. Red Hat Storage Architecture
2.2. Red Hat Storage Server for On-premise Architecture

Figure 2.2. Red Hat Storage Server for On-premise Architecture
2.3. Red Hat Storage Server for Public Cloud Architecture
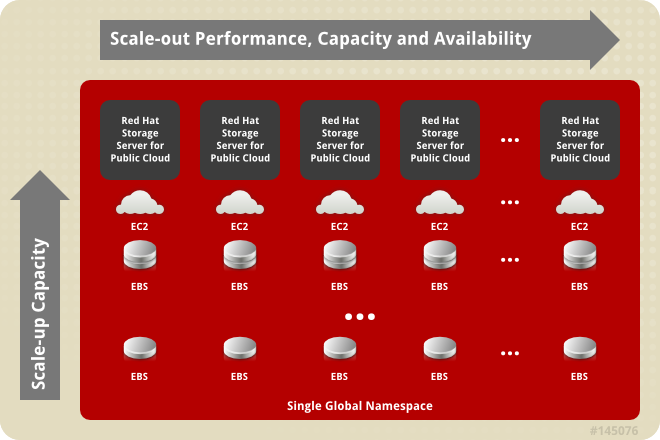
Figure 2.3. Red Hat Storage Server for Public Cloud Architecture
2.4. Storage Concepts
- Brick
- The glusterFS basic unit of storage, represented by an export directory on a server in the trusted storage pool. A brick is expressed by combining a server with an export directory in the following format:
SERVER:EXPORTFor example:myhostname:/exports/myexportdir/ - Volume
- A volume is a logical collection of bricks. Most of the Red Hat Storage management operations happen on the volume.
- Translator
- A translator connects to one or more subvolumes, does something with them, and offers a subvolume connection.
- Subvolume
- A brick after being processed by at least one translator.
- Volfile
- Volume (vol) files are configuration files that determine the behavior of your Red Hat Storage trusted storage pool. At a high level, GlusterFS has three entities, that is, Server, Client and Management daemon. Each of these entities have their own volume files. Volume files for servers and clients are generated by the management daemon upon creation of a volume.Server and Client Vol files are located in
/var/lib/glusterd/vols/VOLNAMEdirectory. The management daemon vol file is named asglusterd.voland is located in/etc/glusterfs/directory.Warning
You must not modify any vol file in/var/lib/glusterdmanually as Red Hat does not support vol files that are not generated by the management daemon. - glusterd
- glusterd is the glusterFS Management Service that must run on all servers in the trusted storage pool.
- Cluster
- A trusted pool of linked computers working together, resembling a single computing resource. In Red Hat Storage, a cluster is also referred to as a trusted storage pool.
- Client
- The machine that mounts a volume (this may also be a server).
- File System
- A method of storing and organizing computer files. A file system organizes files into a database for the storage, manipulation, and retrieval by the computer's operating system.Source: Wikipedia
- Distributed File System
- A file system that allows multiple clients to concurrently access data which is spread across servers/bricks in a trusted storage pool. Data sharing among multiple locations is fundamental to all distributed file systems.
- Virtual File System (VFS)
- VFS is a kernel software layer that handles all system calls related to the standard Linux file system. It provides a common interface to several kinds of file systems.
- POSIX
- Portable Operating System Interface (for Unix) (POSIX) is the name of a family of related standards specified by the IEEE to define the application programming interface (API), as well as shell and utilities interfaces, for software that is compatible with variants of the UNIX operating system. Red Hat Storage exports a fully POSIX compatible file system.
- Metadata
- Metadata is data providing information about other pieces of data.
- FUSE
- Filesystem in User space (FUSE) is a loadable kernel module for Unix-like operating systems that lets non-privileged users create their own file systems without editing kernel code. This is achieved by running file system code in user space while the FUSE module provides only a "bridge" to the kernel interfaces.Source: Wikipedia
- Geo-Replication
- Geo-replication provides a continuous, asynchronous, and incremental replication service from one site to another over Local Area Networks (LAN), Wide Area Networks (WAN), and the Internet.
- N-way Replication
- Local synchronous data replication that is typically deployed across campus or Amazon Web Services Availability Zones.
- Petabyte
- A petabyte is a unit of information equal to one quadrillion bytes, or 1000 terabytes. The unit symbol for the petabyte is PB. The prefix peta- (P) indicates a power of 1000:1 PB = 1,000,000,000,000,000 B = 1000^5 B = 10^15 B.The term "pebibyte" (PiB), using a binary prefix, is used for the corresponding power of 1024.Source: Wikipedia
- RAID
- Redundant Array of Independent Disks (RAID) is a technology that provides increased storage reliability through redundancy. It combines multiple low-cost, less-reliable disk drives components into a logical unit where all drives in the array are interdependent.
- RRDNS
- Round Robin Domain Name Service (RRDNS) is a method to distribute load across application servers. RRDNS is implemented by creating multiple records with the same name and different IP addresses in the zone file of a DNS server.
- Server
- The machine (virtual or bare metal) that hosts the file system in which data is stored.
- Block Storage
- Block special files, or block devices, correspond to devices through which the system moves data in the form of blocks. These device nodes often represent addressable devices such as hard disks, CD-ROM drives, or memory regions. Red Hat Storage supports the XFS file system with extended attributes.
- Scale-Up Storage
- Increases the capacity of the storage device in a single dimension. For example, adding additional disk capacity in a trusted storage pool.
- Scale-Out Storage
- Increases the capability of a storage device in single dimension. For example, adding more systems of the same size, or adding servers to a trusted storage pool that increases CPU, disk capacity, and throughput for the trusted storage pool.
- Trusted Storage Pool
- A storage pool is a trusted network of storage servers. When you start the first server, the storage pool consists of only that server.
- Namespace
- An abstract container or environment that is created to hold a logical grouping of unique identifiers or symbols. Each Red Hat Storage trusted storage pool exposes a single namespace as a POSIX mount point which contains every file in the trusted storage pool.
- User Space
- Applications running in user space do not directly interact with hardware, instead using the kernel to moderate access. User space applications are generally more portable than applications in kernel space. glusterFS is a user space application.
- Hashed subvolume
- A Distributed Hash Table Translator subvolume to which the file or directory name is hashed to.
- Cached subvolume
- A Distributed Hash Table Translator subvolume where the file content is actually present. For directories, the concept of cached-subvolume is not relevant. It is loosely used to mean subvolumes which are not hashed-subvolume.
- Linkto-file
- For a newly created file, the hashed and cached subvolumes are the same. When directory entry operations like rename (which can change the name and hence hashed subvolume of the file) are performed on the file, instead of moving the entire data in the file to a new hashed subvolume, a file is created with the same name on the newly hashed subvolume. The purpose of this file is only to act as a pointer to the node where the data is present. In the extended attributes of this file, the name of the cached subvolume is stored. This file on the newly hashed-subvolume is called a linkto-file. The linkto file is relevant only for non-directory entities.
- Directory Layout
- The directory layout specifies the hash-ranges of the subdirectories of a directory to which subvolumes they correspond to.Properties of directory layouts:
- The layouts are created at the time of directory creation and are persisted as extended attributes of the directory.
- A subvolume is not included in the layout if it remained offline at the time of directory creation and no directory entries ( such as files and directories) of that directory are created on that subvolume. The subvolume is not part of the layout until the fix-layout is complete as part of running the rebalance command. If a subvolume is down during access (after directory creation), access to any files that hash to that subvolume fails.
- Fix Layout
- A command that is executed during the rebalance process.The rebalance process itself comprises of two stages:
- Fixes the layouts of directories to accommodate any subvolumes that are added or removed. It also heals the directories, checks whether the layout is non-contiguous, and persists the layout in extended attributes, if needed. It also ensures that the directories have the same attributes across all the subvolumes.
- Migrates the data from the cached-subvolume to the hashed-subvolume.
Chapter 3. Key Features
3.1. Elasticity
3.2. No Metadata with the Elastic Hashing Algorithm
3.3. Scalability
3.4. High Availability and Flexibility
3.5. Flexibility
3.6. No Application Rewrites
3.7. Simple Management
Top and Profile. Top provides visibility into workload patterns, while Profile provides performance statistics over a user-defined time period for metrics including latency and amount of data read or written.
3.8. Modular, Stackable Design
Part II. Red Hat Storage Administration On-Premise
Chapter 4. The glusterd Service
glusterd enables dynamic configuration changes to Red Hat Storage volumes, without needing to restart servers or remount storage volumes on clients.
glusterd command line, logical storage volumes can be decoupled from physical hardware. Decoupling allows storage volumes to be grown, resized, and shrunk, without application or server downtime.
4.1. Starting and Stopping the glusterd service
glusterd service is started automatically on all servers in the trusted storage pool. The service can also be manually started and stopped as required.
- Run the following command to start glusterd manually.
# service glusterd start - Run the following command to stop glusterd manually.
# service glusterd stop
Chapter 5. Trusted Storage Pools
Note
gluster volume status VOLNAME command is executed from two of the nodes simultaneously.
5.1. Adding Servers to the Trusted Storage Pool
gluster peer probe [server] command is used to add servers to the trusted server pool.
Adding Three Servers to a Trusted Storage Pool
Prerequisites
- The
glusterdservice must be running on all storage servers requiring addition to the trusted storage pool. See Chapter 4, The glusterd Service for service start and stop commands. Server1, the trusted storage server, is started.- The host names of the target servers must be resolvable by DNS.
- Run
gluster peer probe [server]from Server 1 to add additional servers to the trusted storage pool.Note
- Self-probing
Server1will result in an error because it is part of the trusted storage pool by default. - All the servers in the Trusted Storage Pool must have RDMA devices if either
RDMAorRDMA,TCPvolumes are created in the storage pool. The peer probe must be performed using IP/hostname assigned to the RDMA device.
# gluster peer probe server2 Probe successful # gluster peer probe server3 Probe successful # gluster peer probe server4 Probe successful - Verify the peer status from all servers using the following command:
# gluster peer status
Number of Peers: 3

Hostname: server2
Uuid: 5e987bda-16dd-43c2-835b-08b7d55e94e5
State: Peer in Cluster (Connected)

Hostname: server3
Uuid: 1e0ca3aa-9ef7-4f66-8f15-cbc348f29ff7
State: Peer in Cluster (Connected)

Hostname: server4
Uuid: 3e0caba-9df7-4f66-8e5d-cbc348f29ff7
State: Peer in Cluster (Connected)
5.2. Removing Servers from the Trusted Storage Pool
gluster peer detach server to remove a server from the storage pool.
Removing One Server from the Trusted Storage Pool
Prerequisites
- The
glusterdservice must be running on the server targeted for removal from the storage pool. See Chapter 4, The glusterd Service for service start and stop commands. - The host names of the target servers must be resolvable by DNS.
- Run
gluster peer detach [server]to remove the server from the trusted storage pool.# gluster peer detach server4 Detach successful - Verify the peer status from all servers using the following command:
# gluster peer status
Number of Peers: 2

Hostname: server2
Uuid: 5e987bda-16dd-43c2-835b-08b7d55e94e5
State: Peer in Cluster (Connected)

Hostname: server3
Uuid: 1e0ca3aa-9ef7-4f66-8f15-cbc348f29ff7
Chapter 6. Red Hat Storage Volumes
Warning
Note
yum groupinstall "Infiniband Support" to install Infiniband packages.
Volume Types
- Distributed
- Distributes files across bricks in the volume.Use this volume type where scaling and redundancy requirements are not important, or provided by other hardware or software layers.See Section 6.3, “Creating Distributed Volumes” for additional information about this volume type.
- Replicated
- Replicates files across bricks in the volume.Use this volume type in environments where high-availability and high-reliability are critical.See Section 6.4, “Creating Replicated Volumes” for additional information about this volume type.
- Distributed Replicated
- Distributes files across replicated bricks in the volume.Use this volume type in environments where high-reliability and scalability are critical. This volume type offers improved read performance in most environments.See Section 6.5, “Creating Distributed Replicated Volumes” for additional information about this volume type.
Important
- Striped
- Stripes data across bricks in the volume.Use this volume type only in high-concurrency environments where accessing very large files is required.See Section 6.6, “Creating Striped Volumes” for additional information about this volume type.
- Striped Replicated
- Stripes data across replicated bricks in the trusted storage pool.Use this volume type only in highly-concurrent environments, where there is parallel access to very large files, and performance is critical.This volume type is supported for
Map Reduceworkloads only. See Section 6.8, “Creating Striped Replicated Volumes” for additional information about this volume type, and restriction. - Distributed Striped
- Stripes data across two or more nodes in the trusted storage pool.Use this volume type where storage must be scalable, and in high-concurrency environments where accessing very large files is critical.See Section 6.7, “Creating Distributed Striped Volumes” for additional information about this volume type.
- Distributed Striped Replicated
- Distributes striped data across replicated bricks in the trusted storage pool.Use this volume type only in highly-concurrent environments where performance, and parallel access to very large files is critical.This volume type is supported for
Map Reduceworkloads only. See Section 6.9, “Creating Distributed Striped Replicated Volumes” for additional information about this volume type.
6.1. About Encrypted Disk
6.2. Formatting and Mounting Bricks
Important
- Red Hat supports formatting a Logical Volume using the XFS file system on the bricks.
- Create a physical volume(PV) by using the
pvcreatecommand.For example:pvcreate --dataalignment 1280K /dev/sdbHere,/dev/sdbis a storage device.Use the correctdataalignmentoption based on your device. For more information, see Section 9.2, “Brick Configuration”Note
The device name and the alignment value will vary based on the device you are using. - Create a Volume Group (VG) from the PV using the
vgcreatecommand:For example:vgcreate --physicalextentsize 128K rhs_vg /dev/sdb - Create a thin-pool using the following commands:
- Create an LV to serve as the metadata device using the following command:
lvcreate -L metadev_sz --name metadata_device_name VOLGROUPFor example:lvcreate -L 16776960K --name rhs_pool_meta rhs_vg - Create an LV to serve as the data device using the following command:
lvcreate -L datadev_sz --name thin_pool VOLGROUPFor example:lvcreate -L 536870400K --name rhs_pool rhs_vg - Create a thin pool from the data LV and the metadata LV using the following command:
lvconvert --chunksize STRIPE_WIDTH --thinpool VOLGROUP/thin_pool --poolmetadata VOLGROUP/metadata_device_nameFor example:lvconvert --chunksize 1280K --thinpool rhs_vg/rhs_pool --poolmetadata rhs_vg/rhs_pool_metaNote
By default, the newly provisioned chunks in a thin pool are zeroed to prevent data leaking between different block devices. In the case of Red Hat Storage, where data is accessed via a file system, this option can be turned off for better performance.lvchange --zero n VOLGROUP/thin_poolFor example:lvchange --zero n rhs_vg/rhs_pool
- Create a thinly provisioned volume from the previously created pool using the
lvcreatecommand:For example:lvcreate -V 1G -T rhs_vg/rhs_pool -n rhs_lvIt is recommended that only one LV should be created in a thin pool.
- Run
# mkfs.xfs -f -i size=512 -n size=8192 -d su=128K,sw=10 DEVICEto format the bricks to the supported XFS file system format. Here, DEVICE is the created thin LV. The inode size is set to 512 bytes to accommodate for the extended attributes used by Red Hat Storage. - Run
# mkdir /mountpointto create a directory to link the brick to. - Add an entry in
/etc/fstab:/dev/rhs_vg/rhs_lv /mountpoint xfs rw,inode64,noatime,nouuid 1 2 - Run
# mount /mountpointto mount the brick. - Run the
df -hcommand to verify the brick is successfully mounted:# df -h /dev/rhs_vg/rhs_lv 16G 1.2G 15G 7% /exp1
/exp directory is the mounted file system and is used as the brick for volume creation. However, for some reason, if the mount point is unavailable, any write continues to happen in the /exp directory, but now this is under root file system.
/bricks. After the file system is available, create a directory called /bricks/bricksrv1 and use it for volume creation. Ensure that no more than one brick is created from a single mount. This approach has the following advantages:
- When the
/bricksfile system is unavailable, there is no longer/bricks/bricksrv1directory available in the system. Hence, there will be no data loss by writing to a different location. - This does not require any additional file system for nesting.
- Create the
bricksrv1subdirectory in the mounted file system.# mkdir /bricks/bricksrv1Repeat the above steps on all nodes. - Create the Red Hat Storage volume using the subdirectories as bricks.
# gluster volume create distdata01 ad-rhs-srv1:/bricks/bricksrv1 ad-rhs-srv2:/bricks/bricksrv2 - Start the Red Hat Storage volume.
# gluster volume start distdata01 - Verify the status of the volume.
# gluster volume status distdata01
Reusing a Brick from a Deleted Volume
- Brick with a File System Suitable for Reformatting (Optimal Method)
- Run
# mkfs.xfs -f -i size=512 deviceto reformat the brick to supported requirements, and make it available for immediate reuse in a new volume.Note
All data will be erased when the brick is reformatted. - File System on a Parent of a Brick Directory
- If the file system cannot be reformatted, remove the whole brick directory and create it again.
- Delete all previously existing data in the brick, including the
.glusterfssubdirectory. - Run
# setfattr -x trusted.glusterfs.volume-id brickand# setfattr -x trusted.gfid brickto remove the attributes from the root of the brick. - Run
# getfattr -d -m . brickto examine the attributes set on the volume. Take note of the attributes. - Run
# setfattr -x attribute brickto remove the attributes relating to the glusterFS file system.Thetrusted.glusterfs.dhtattribute for a distributed volume is one such example of attributes that need to be removed.
6.3. Creating Distributed Volumes
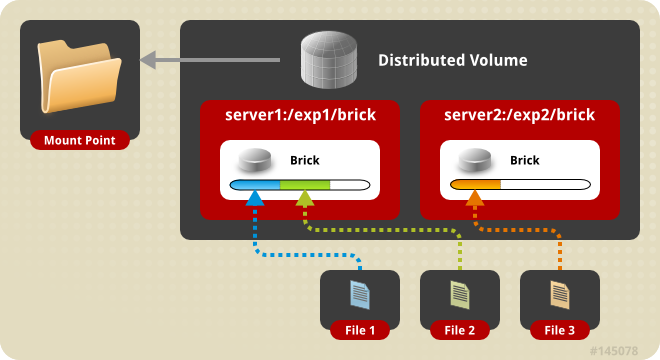
Figure 6.1. Illustration of a Distributed Volume
Warning
Create a Distributed Volume
gluster volume create command to create different types of volumes, and gluster volume info command to verify successful volume creation.
Pre-requisites
- A trusted storage pool has been created, as described in Section 5.1, “Adding Servers to the Trusted Storage Pool”.
- Understand how to start and stop volumes, as described in Section 6.10, “Starting Volumes”.
- Run the
gluster volume createcommand to create the distributed volume.The syntax isgluster volume create NEW-VOLNAME [transport tcp | rdma | tcp,rdma] NEW-BRICK...The default value for transport istcp. Other options can be passed such asauth.alloworauth.reject. See Section 8.1, “Configuring Volume Options” for a full list of parameters.Example 6.1. Distributed Volume with Two Storage Servers
# gluster volume create test-volume server1:/exp1/brick server2:/exp2/brick
Creation of test-volume has been successful
Please start the volume to access data.
Example 6.2. Distributed Volume over InfiniBand with Four Servers
# gluster volume create test-volume transport rdma server1:/exp1/brick server2:/exp2/brick server3:/exp3/brick server4:/exp4/brick Creation of test-volume has been successful Please start the volume to access data. - Run
# gluster volume start VOLNAMEto start the volume.# gluster volume start test-volume Starting test-volume has been successful - Run
gluster volume infocommand to optionally display the volume information.The following output is the result of Example 6.1, “Distributed Volume with Two Storage Servers”.# gluster volume info Volume Name: test-volume Type: Distribute Status: Created Number of Bricks: 2 Transport-type: tcp Bricks: Brick1: server1:/exp1/brick Brick2: server2:/exp2/brick
6.4. Creating Replicated Volumes
Important
gluster volume create to create different types of volumes, and gluster volume info to verify successful volume creation.
A trusted storage pool has been created, as described in Section 5.1, “Adding Servers to the Trusted Storage Pool”. Understand how to start and stop volumes, as described in Section 6.10, “Starting Volumes”.
6.4.1. Creating Two-way Replicated Volumes
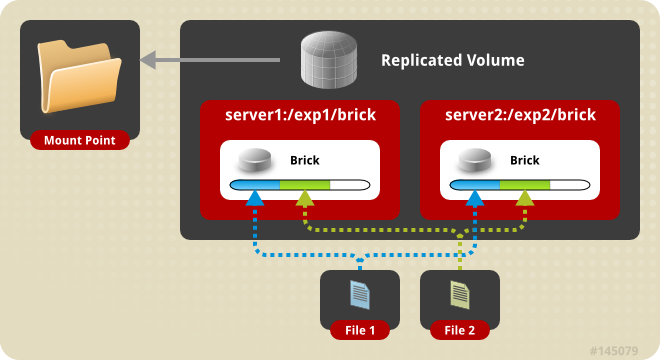
Figure 6.2. Illustration of a Two-way Replicated Volume
- Run the
gluster volume createcommand to create the replicated volume.The syntax is# gluster volume create NEW-VOLNAME [replica COUNT] [transport tcp | rdma | tcp,rdma] NEW-BRICK...The default value for transport istcp. Other options can be passed such asauth.alloworauth.reject. See Section 8.1, “Configuring Volume Options” for a full list of parameters.Example 6.3. Replicated Volume with Two Storage Servers
The order in which bricks are specified determines how bricks are replicated with each other. For example, every2bricks, where2is the replica count forms a replica set. If more bricks were specified, the next two bricks in sequence would replicate each other. The same is illustrated in Figure 6.2. Illustration of a Replicated Volume.# gluster volume create test-volume replica 2 transport tcp server1:/exp1/brick server2:/exp2/brick Creation of test-volume has been successful Please start the volume to access data. - Run
# gluster volume start VOLNAMEto start the volume.# gluster volume start test-volume Starting test-volume has been successful - Run
gluster volume infocommand to optionally display the volume information.
Important
6.4.2. Creating Three-way Replicated Volumes
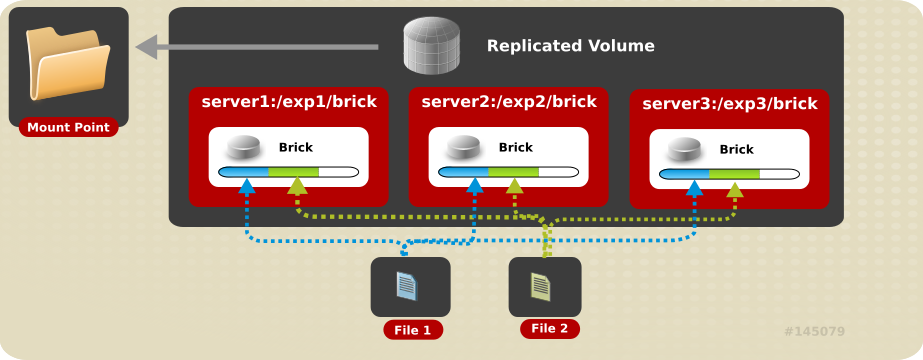
Figure 6.3. Illustration of a Three-way Replicated Volume
The recommended configuration for three-way replication is to have a minimum of three nodes, as only a single brick out of the replica set is involved in syncing the files to the slave. It is expected that, all the bricks of a replica set are in different nodes. It is recommended not to have a brick along with its replica set from the same volume residing in the same node.
# gluster volume info master
Volume Name: master
Type: Replicate
Volume ID: 6e2e447d-550d-44e4-85be-33b35933de3c
Status: Started
Snap Volume: no
Number of Bricks: 1 x 3 = 3
Transport-type: tcp
Bricks:
Brick1: fedora1:/bricks/brick0/b0
Brick2: fedora2:/bricks/brick0/b0
Brick3: fedora3:/bricks/brick0/b0
- Run the
gluster volume createcommand to create the replicated volume.The syntax is# gluster volume create NEW-VOLNAME [replica COUNT] [transport tcp | rdma | tcp,rdma] NEW-BRICK...The default value for transport istcp. Other options can be passed such asauth.alloworauth.reject. See Section 8.1, “Configuring Volume Options” for a full list of parameters.Example 6.4. Replicated Volume with Three Storage Servers
The order in which bricks are specified determines how bricks are replicated with each other. For example, everynbricks, wherenis the replica count forms a replica set. If more bricks were specified, the next three bricks in sequence would replicate each other. The same is illustrated in Figure 6.2. Illustration of a Replicated Volume.# gluster volume create test-volume replica 3 transport tcp server1:/exp1/brick server2:/exp2/brick server3:/exp3/brick Creation of test-volume has been successful Please start the volume to access data. - Run
# gluster volume start VOLNAMEto start the volume.# gluster volume start test-volume Starting test-volume has been successful - Run
gluster volume infocommand to optionally display the volume information.
Important
6.5. Creating Distributed Replicated Volumes
Important
Note
A trusted storage pool has been created, as described in Section 5.1, “Adding Servers to the Trusted Storage Pool”.Understand how to start and stop volumes, as described in Section 6.10, “Starting Volumes”.
6.5.1. Creating Two-way Distributed Replicated Volumes
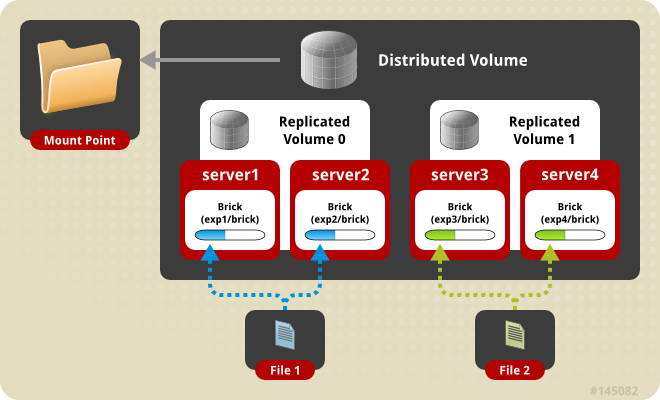
Figure 6.4. Illustration of a Two-way Distributed Replicated Volume
- Run the
gluster volume createcommand to create the distributed replicated volume.The syntax is# gluster volume create NEW-VOLNAME [replica COUNT] [transport tcp | rdma | tcp,rdma] NEW-BRICK...The default value for transport istcp. Other options can be passed such asauth.alloworauth.reject. See Section 8.1, “Configuring Volume Options” for a full list of parameters.Example 6.5. Four Node Distributed Replicated Volume with a Two-way Replication
The order in which bricks are specified determines how bricks are replicated with each other. For example, first 2 bricks, where 2 is the replica count. In this scenario, the first two bricks specified replicate each other. If more bricks were specified, the next two bricks in sequence would replicate each other.# gluster volume create test-volume replica 2 transport tcp server1:/exp1/brick server2:/exp2/brick server3:/exp3/brick server4:/exp4/brick Creation of test-volume has been successful Please start the volume to access data.Example 6.6. Six Node Distributed Replicated Volume with a Two-way Replication
# gluster volume create test-volume replica 2 transport tcp server1:/exp1/brick server2:/exp2/brick server3:/exp3/brick server4:/exp4/brick server5:/exp5/brick server6:/exp6/brick Creation of test-volume has been successful Please start the volume to access data. - Run
# gluster volume start VOLNAMEto start the volume.# gluster volume start test-volume Starting test-volume has been successful - Run
gluster volume infocommand to optionally display the volume information.
Important
6.5.2. Creating Three-way Distributed Replicated Volumes

Figure 6.5. Illustration of a Three-way Distributed Replicated Volume
The recommended configuration for three-way replication is to have a minimum of three nodes or a multiples of three, as only a single brick out of the replica set is involved in syncing the files to the slave. It is expected that, all the bricks of a replica set are in different nodes. For each replica set, select the nodes for the bricks as per the first replica set. It is recommended not to have a brick along with its replica set from the same volume residing in the same node.
# gluster volume info master
Volume Name: master
Type: Distributed-Replicate
Volume ID: 6e2e447d-550d-44e4-85be-33b35933de3c
Status: Started
Snap Volume: no
Number of Bricks: 2 x 3 = 6
Transport-type: tcp
Bricks:
Brick1: fedora1:/bricks/brick0/b0
Brick2: fedora2:/bricks/brick0/b0
Brick3: fedora3:/bricks/brick0/b0
Brick4: fedora1:/bricks/brick1/b1
Brick5: fedora2:/bricks/brick1/b1
Brick6: fedora3:/bricks/brick1/b1
- Run the
gluster volume createcommand to create the distributed replicated volume.The syntax is# gluster volume create NEW-VOLNAME [replica COUNT] [transport tcp | rdma | tcp,rdma] NEW-BRICK...The default value for transport istcp. Other options can be passed such asauth.alloworauth.reject. See Section 8.1, “Configuring Volume Options” for a full list of parameters.Example 6.7. Six Node Distributed Replicated Volume with a Three-way Replication
The order in which bricks are specified determines how bricks are replicated with each other. For example, first 3 bricks, where 3 is the replica count. In this scenario, the first three bricks specified replicate each other. If more bricks were specified, the next three bricks in sequence would replicate each other.# gluster volume create test-volume replica 3 transport tcp server1:/exp1/brick server2:/exp2/brick server3:/exp3/brick server4:/exp4/brick server5:/exp5/brick server6:/exp6/brick Creation of test-volume has been successful Please start the volume to access data. - Run
# gluster volume start VOLNAMEto start the volume.# gluster volume start test-volume Starting test-volume has been successful - Run
gluster volume infocommand to optionally display the volume information.
Important
6.6. Creating Striped Volumes
Important
Note
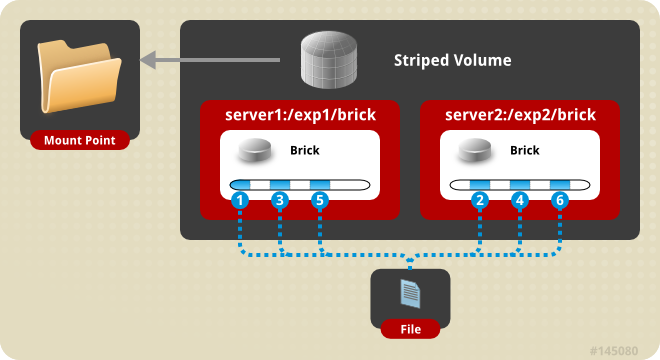
Figure 6.6. Illustration of a Striped Volume
Create a Striped Volume
gluster volume create to create a striped volume, and gluster volume info to verify successful volume creation.
Pre-requisites
- A trusted storage pool has been created, as described in Section 5.1, “Adding Servers to the Trusted Storage Pool”.
- Understand how to start and stop volumes, as described in Section 6.10, “Starting Volumes”.
- Run the
gluster volume createcommand to create the striped volume.The syntax is# gluster volume create NEW-VOLNAME [stripe COUNT] [transport tcp | rdma | tcp,rdma] NEW-BRICK...The default value for transport istcp. Other options can be passed such asauth.alloworauth.reject. See Section 8.1, “Configuring Volume Options” for a full list of parameters.Example 6.8. Striped Volume Across Two Servers
# gluster volume create test-volume stripe 2 transport tcp server1:/exp1/brick server2:/exp2/brick Creation of test-volume has been successful Please start the volume to access data. - Run
# gluster volume start VOLNAMEto start the volume.# gluster volume start test-volume Starting test-volume has been successful - Run
gluster volume infocommand to optionally display the volume information.
6.7. Creating Distributed Striped Volumes
Important
Note
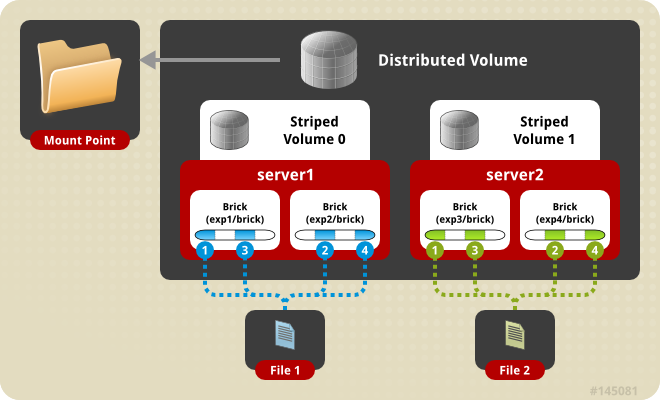
Figure 6.7. Illustration of a Distributed Striped Volume
Create a Distributed Striped Volume
gluster volume create to create a distributed striped volume, and gluster volume info to verify successful volume creation.
Pre-requisites
- A trusted storage pool has been created, as described in Section 5.1, “Adding Servers to the Trusted Storage Pool”.
- Understand how to start and stop volumes, as described in Section 6.10, “Starting Volumes”.
- Run the
gluster volume createcommand to create the distributed striped volume.The syntax is# gluster volume create NEW-VOLNAME [stripe COUNT] [transport tcp | rdma | tcp,rdma] NEW-BRICK...The default value for transport istcp. Other options can be passed such asauth.alloworauth.reject. See Section 8.1, “Configuring Volume Options” for a full list of parameters.Example 6.9. Distributed Striped Volume Across Two Storage Servers
# gluster volume create test-volume stripe 2 transport tcp server1:/exp1/brick server1:/exp2/brick server2:/exp3/brick server2:/exp4/brick Creation of test-volume has been successful Please start the volume to access data. - Run
# gluster volume start VOLNAMEto start the volume.# gluster volume start test-volume Starting test-volume has been successful - Run
gluster volume infocommand to optionally display the volume information.
6.8. Creating Striped Replicated Volumes
Important
Note
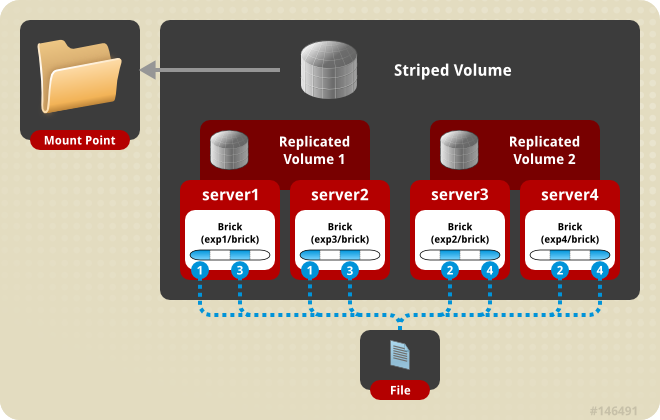
Figure 6.8. Illustration of a Striped Replicated Volume
Create a Striped Replicated Volume
gluster volume create to create a striped replicated volume, and gluster volume info to verify successful volume creation.
Pre-requisites
- A trusted storage pool has been created, as described in Section 5.1, “Adding Servers to the Trusted Storage Pool”.
- Understand how to start and stop volumes, as described in Section 6.10, “Starting Volumes”.
- Run the
gluster volume createcommand to create the striped replicated volume.The syntax is# gluster volume create NEW-VOLNAME [stripe COUNT] [replica COUNT] [transport tcp | rdma | tcp,rdma] NEW-BRICK...The default value for transport istcp. Other options can be passed such asauth.alloworauth.reject. See Section 8.1, “Configuring Volume Options” for a full list of parameters.Example 6.10. Striped Replicated Volume Across Four Servers
The order in which bricks are specified determines how bricks are mirrored with each other. For example, first n bricks, where n is the replica count. In this scenario, the first two bricks specified mirror each other. If more bricks were specified, the next two bricks in sequence would mirror each other. .# gluster volume create test-volume stripe 2 replica 2 transport tcp server1:/exp1/brick server2:/exp3/brick server3:/exp2/brick server4:/exp4/brick Creation of test-volume has been successful Please start the volume to access data.Example 6.11. Striped Replicated Volume Across Six Servers
The order in which bricks are specified determines how bricks are mirrored with each other. For example, first n bricks, where n is the replica count. In this scenario, the first two bricks specified mirror each other. If more bricks were specified, the next two bricks in sequence would mirror each other.# gluster volume create test-volume stripe 3 replica 2 transport tcp server1:/exp1/brick server2:/exp2/brick server3:/exp3/brick server4:/exp4/brick server5:/exp5/brick server6:/exp6/brick Creation of test-volume has been successful Please start the volume to access data. - Run
# gluster volume start VOLNAMEto start the volume.# gluster volume start test-volume Starting test-volume has been successful - Run
gluster volume infocommand to optionally display the volume information.
6.9. Creating Distributed Striped Replicated Volumes
Important
Note
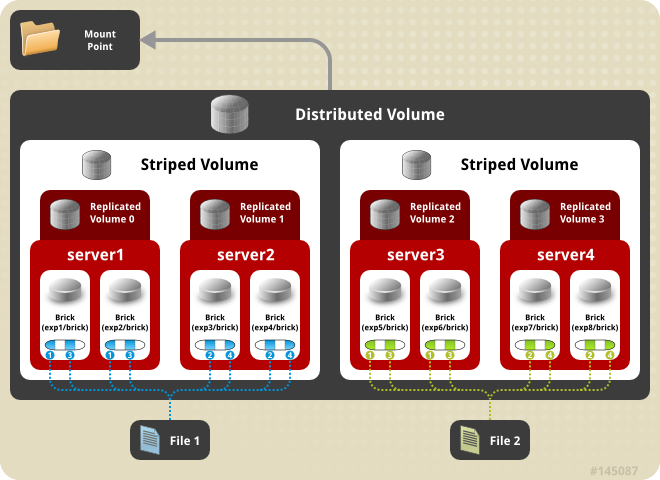
Figure 6.9. Illustration of a Distributed Striped Replicated Volume
Create a Distributed Striped Replicated Volume
gluster volume create to create a distributed striped replicated volume, and gluster volume info to verify successful volume creation.
Prerequisites
- A trusted storage pool has been created, as described in Section 5.1, “Adding Servers to the Trusted Storage Pool”.
- Understand how to start and stop volumes, as described in Section 6.10, “Starting Volumes”.
- Run the
gluster volume createcommand to create the distributed striped replicated volume.The syntax is# gluster volume create NEW-VOLNAME [stripe COUNT] [replica COUNT] [transport tcp | rdma | tcp,rdma] NEW-BRICK...The default value for transport istcp. Other options can be passed such asauth.alloworauth.reject. See Section 8.1, “Configuring Volume Options” for a full list of parameters.Example 6.12. Distributed Replicated Striped Volume Across Four Servers
The order in which bricks are specified determines how bricks are mirrored with each other. For example, first n bricks, where n is the replica count. In this scenario, the first two bricks specified mirror each other. If more bricks were specified, the next two bricks in sequence would mirror each other.# gluster volume create test-volume stripe 2 replica 2 transport tcp server1:/exp1/brick server1:/exp2/brick server2:/exp3/brick server2:/exp4/brick server3:/exp5/brick server3:/exp6/brick server4:/exp7/brick server4:/exp8/brick Creation of test-volume has been successful Please start the volume to access data. - Run
# gluster volume start VOLNAMEto start the volume.# gluster volume start test-volume Starting test-volume has been successful - Run
gluster volume infocommand to optionally display the volume information.
6.10. Starting Volumes
# gluster volume start VOLNAME
# gluster volume start test-volume
Starting test-volume has been successfulChapter 7. Accessing Data - Setting Up Clients
- Native Client (see Section 7.2, “Native Client”)
- Network File System (NFS) v3 (see Section 7.3, “NFS”)
- Server Message Block (SMB) (see Section 7.4, “SMB”)
Although a Red Hat Storage trusted pool can be configured to support multiple protocols simultaneously, a single volume cannot be freely accessed by different protocols due to differences in locking semantics. The table below defines which protocols can safely access the same volume concurrently.
| SMB | NFS | Native Client | Object | |
|---|---|---|---|---|
SMB | Yes | No | No | No |
NFS | No | Yes | Yes | Yes |
Native Client | No | Yes | Yes | Yes |
Object | No | Yes | Yes | Yes |
7.1. Securing Red Hat Storage Client Access
| Port Number | Usage |
|---|---|
| 22 | For sshd used by geo-replication. |
| 111 | For rpc port mapper. |
| 139 | For netbios service. |
| 445 | For CIFS protocol. |
| 965 | For NLM. |
| 2049 | For glusterFS's NFS exports (nfsd process). |
| 24007 | For glusterd (for management). |
| 24008 | For glusterd (RDMA port for management) |
| 24009 - 24108 | For client communication with Red Hat Storage 2.0. |
| 38465 | For NFS mount protocol. |
| 38466 | For NFS mount protocol. |
| 38468 | For NFS's Lock Manager (NLM). |
| 38469 | For NFS's ACL support. |
| 39543 | For oVirt (Red Hat Storage-Console). |
| 49152 - 49251 | For client communication with Red Hat Storage 2.1 and for brick processes depending on the availability of the ports. The total number of ports required to be open depends on the total number of bricks exported on the machine. |
| 55863 | For oVirt (Red Hat Storage-Console). |
| Port Number | Usage |
|---|---|
| 443 | For HTTPS request. |
| 6010 | For Object Server. |
| 6011 | For Container Server. |
| 6012 | For Account Server. |
| 8080 | For Proxy Server. |
| Port Number | Usage |
|---|---|
| 80 | For HTTP protocol (required only if Nagios server is running on a Red Hat Storage node). |
| 443 | For HTTPS protocol (required only for Nagios server). |
| 5667 | For NSCA service (required only if Nagios server is running on a Red Hat Storage node). |
| 5666 | For NRPE service (required in all Red Hat Storage nodes). |
| Port Number | Usage |
|---|---|
| 111 | For RPC Bind. |
| 963 | For NFS's Lock Manager (NLM). |
7.2. Native Client
| Red Hat Enterprise Linux version | Red Hat Storage Server version | Native client version |
|---|---|---|
| 6.5 | 3.0 | 3.0, 2.1* |
| 6.6 | 3.0.2, 3.0.3, 3.0.4 | 3.0, 2.1* |
Note
7.2.1. Installing Native Client
Important
Use the Command Line to Register, and Subscribe a System.
Prerequisites
- Know the user name and password of the Red Hat Network (RHN) account with Red Hat Storage entitlements.
- Run the
rhn_registercommand to register the system with Red Hat Network.# rhn_register - In the Operating System Release Version screen, select All available updates and follow the prompts to register the system to the standard base channel of the respective Red Hat Enterprise Linux Server version.
- Run the
rhn-channel --add --channelcommand to subscribe the system to the correct Red Hat Storage Native Client channel:- For Red Hat Enterprise Linux 7.x clients using Red Hat Satellite Server:
# rhn-channel --add --channel= rhel-x86_64-server-rh-common-7 - For Red Hat Enterprise Linux 6.x clients:
# rhn-channel --add --channel=rhel-x86_64-server-rhsclient-6 - For Red Hat Enterprise Linux 5.x clients:
# rhn-channel --add --channel=rhel-x86_64-server-rhsclient-5
- Execute the following commands, for Red Hat Enterprise Linux clients using Subscription Manager.
- Run the following command and enter your Red Hat Network user name and password to register the system with the Red Hat Network.
# subscription-manager register --auto-attach - Run the following command to enable the channels required to install Red Hat Storage Native Client:
- For Red Hat Enterprise Linux 7.x clients:
# subscription-manager repos --enable=rhel-7-server-rpms --enable=rhel-7-server-rh-common-rpms - For Red Hat Enterprise Linux 6.1 and later clients:
# subscription-manager repos --enable=rhel-6-server-rpms --enable=rhel-6-server-rhs-client-1-rpms - For Red Hat Enterprise Linux 5.7 and later clients:
# subscription-manager repos --enable=rhel-5-server-rpms --enable=rhel-5-server-rhs-client-1-rpms
For more information, see Section 3.2 Registering from the Command Line in the Red Hat Subscription Management guide.
- Run the following command to verify if the system is subscribed to the required channels.
# # yum repolist
Use the Web Interface to Register, and Subscribe a System.
Prerequisites
- Know the user name and password of the Red Hat Network (RHN) account with Red Hat Storage entitlements.
- Log on to Red Hat Network (http://rhn.redhat.com).
- Move the mouse cursor over the
Subscriptionslink at the top of the screen, and then click theRegistered Systemslink. - Click the name of the system to which the Red Hat Storage Native Client channel must be appended.
- Click in the Subscribed Channels section of the screen.
- Expand the node for Additional Services Channels for
Red Hat Enterprise Linux 6 for x86_64or forRed Hat Enterprise Linux 5 for x86_64depending on the client platform. - Click the button to finalize the changes.When the page refreshes, select the Details tab to verify the system is subscribed to the appropriate channels.
Install Native Client Packages
Prerequisites
- Run the
yum installcommand to install the native client RPM packages.# yum install glusterfs glusterfs-fuse - For Red Hat Enterprise 5.x client systems, run the
modprobecommand to load FUSE modules before mounting Red Hat Storage volumes.# modprobe fuseFor more information on loading modules at boot time, see https://access.redhat.com/knowledge/solutions/47028 .
7.2.2. Upgrading Native Client
yum update command to upgrade the native client:
# yum update glusterfs glusterfs-fuse7.2.3. Mounting Red Hat Storage Volumes
Note
- When a new volume is created in Red Hat Storage 3.0, it cannot be accessed by an older (Red Hat Storage 2.1.x) clients, because the
readdir-aheadtranslator is enabled by default for the newly created Red Hat Storage 3.0 volumes. This makes it incompatible with older clients. In order to resolve this issue, disablereaddir-aheadin the newly created volume using the following command:# gluster volume set VOLNAME readdir-ahead off - Server names selected during volume creation should be resolvable in the client machine. Use appropriate
/etc/hostsentries, or a DNS server to resolve server names to IP addresses.
7.2.3.1. Mount Commands and Options
mount -t glusterfs command. All options must be separated with commas.
# mount -t glusterfs -o backup-volfile-servers=volfile_server2:volfile_server3:.... ..:volfile_serverN,transport-type tcp,log-level=WARNING,log-file=/var/log/gluster.log server1:/test-volume /mnt/glusterfs- backup-volfile-servers=<volfile_server2>:<volfile_server3>:...:<volfile_serverN>
- List of the backup volfile servers to mount the client. If this option is specified while mounting the fuse client, when the first volfile server fails, the servers specified in
backup-volfile-serversoption are used as volfile servers to mount the client until the mount is successful.Note
This option was earlier specified asbackupvolfile-serverwhich is no longer valid. - log-level
- Logs only specified level or higher severity messages in the log-file.
- log-file
- Logs the messages in the specified file.
- transport-type
- Specifies the transport type that FUSE client must use to communicate with bricks. If the volume was created with only one transport type, then that becomes the default when no value is specified. In case of
tcp,rdmavolume, tcp is the default. - ro
- Mounts the file system as read only.
- acl
- Enables POSIX Access Control List on mount.
- background-qlen=n
- Enables FUSE to handle n number of requests to be queued before subsequent requests are denied. Default value of n is 64.
- enable-ino32
- this option enables file system to present 32-bit inodes instead of 64- bit inodes.
7.2.3.2. Mounting Volumes Manually
Manually Mount a Red Hat Storage Volume
mount -t glusterfs HOSTNAME|IPADDRESS:/VOLNAME /MOUNTDIR command to manually mount a Red Hat Storage volume.
Note
- If a mount point has not yet been created for the volume, run the
mkdircommand to create a mount point.# mkdir /mnt/glusterfs - Run the
mount -t glusterfscommand, using the key in the task summary as a guide.# mount -t glusterfs server1:/test-volume /mnt/glusterfs
7.2.3.3. Mounting Volumes Automatically
- Open the
/etc/fstabfile in a text editor. - Append the following configuration to the
fstabfile.HOSTNAME|IPADDRESS:/VOLNAME /MOUNTDIR glusterfs defaults,_netdev 0 0Using the example server names, the entry contains the following replaced values.server1:/test-volume /mnt/glusterfs glusterfs defaults,_netdev 0 0If you want to specify the transport type then check the following example:server1:/test-volume /mnt/glusterfs glusterfs defaults,_netdev,transport=tcp 0 0
7.2.3.4. Testing Mounted Volumes
Testing Mounted Red Hat Storage Volumes
Prerequisites
- Run the
mountcommand to check whether the volume was successfully mounted.# mount server1:/test-volume on /mnt/glusterfs type fuse.glusterfs(rw,allow_other,default_permissions,max_read=131072If transport option is used while mounting a volume, mount status will have the transport type appended to the volume name. For example, for transport=tcp:# mount server1:/test-volume.tcp on /mnt/glusterfs type fuse.glusterfs(rw,allow_other,default_permissions,max_read=131072 - Run the
dfcommand to display the aggregated storage space from all the bricks in a volume.# df -h /mnt/glusterfs Filesystem Size Used Avail Use% Mounted on server1:/test-volume 28T 22T 5.4T 82% /mnt/glusterfs - Move to the mount directory using the
cdcommand, and list the contents.# cd /mnt/glusterfs # ls
7.3. NFS
getfacl and setfacl operations on NFS clients. The following options are provided to configure the Access Control Lists (ACL) in the glusterFS NFS server with the nfs.acl option. For example:
- To set nfs.acl
ON, run the following command:# gluster volume set VOLNAME nfs.acl on - To set nfs.acl
OFF, run the following command:# gluster volume set VOLNAME nfs.acl off
Note
ON by default.
7.3.1. Using NFS to Mount Red Hat Storage Volumes
Note
nfsmount.conf file at /etc/nfsmount.conf by adding the following text in the file:
Defaultvers=3
vers=3 manually in all the mount commands.
# mount nfsserver:export -o vers=3 /MOUNTPOINT
tcp,rdma volume it could be changed using the volume set option nfs.transport-type.
7.3.1.1. Manually Mounting Volumes Using NFS
mount command to manually mount a Red Hat Storage volume using NFS.
- If a mount point has not yet been created for the volume, run the
mkdircommand to create a mount point.# mkdir /mnt/glusterfs - Run the correct
mountcommand for the system.- For Linux
# mount -t nfs -o vers=3 server1:/test-volume /mnt/glusterfs- For Solaris
# mount -o vers=3 nfs://server1:38467/test-volume /mnt/glusterfs
mount command to manually mount a Red Hat Storage volume using NFS over TCP.
Note
requested NFS version or transport protocol is not supported
nfs.mount-udp is supported for mounting a volume, by default it is disabled. The following are the limitations:
- If
nfs.mount-udpis enabled, the MOUNT protocol needed for NFSv3 can handle requests from NFS-clients that require MOUNT over UDP. This is useful for at least some versions of Solaris, IBM AIX and HP-UX. - Currently, MOUNT over UDP does not have support for mounting subdirectories on a volume. Mounting
server:/volume/subdirexports is only functional when MOUNT over TCP is used. - MOUNT over UDP does not currently have support for different authentication options that MOUNT over TCP honors. Enabling
nfs.mount-udpmay give more permissions to NFS clients than intended via various authentication options likenfs.rpc-auth-allow,nfs.rpc-auth-rejectandnfs.export-dir.
- If a mount point has not yet been created for the volume, run the
mkdircommand to create a mount point.# mkdir /mnt/glusterfs - Run the correct
mountcommand for the system, specifying the TCP protocol option for the system.- For Linux
# mount -t nfs -o vers=3,mountproto=tcp server1:/test-volume /mnt/glusterfs- For Solaris
# mount -o proto=tcp, nfs://server1:38467/test-volume /mnt/glusterfs
7.3.1.2. Automatically Mounting Volumes Using NFS
Note
/etc/auto.master and /etc/auto.misc files, and restart the autofs service. Whenever a user or process attempts to access the directory it will be mounted in the background on-demand.
- Open the
/etc/fstabfile in a text editor. - Append the following configuration to the
fstabfile.HOSTNAME|IPADDRESS:/VOLNAME /MOUNTDIR glusterfs mountdir nfs defaults,_netdev, 0 0Using the example server names, the entry contains the following replaced values.server1:/test-volume /mnt/glusterfs nfs defaults,_netdev, 0 0
- Open the
/etc/fstabfile in a text editor. - Append the following configuration to the
fstabfile.HOSTNAME|IPADDRESS:/VOLNAME /MOUNTDIR glusterfs nfs defaults,_netdev,mountproto=tcp 0 0Using the example server names, the entry contains the following replaced values.server1:/test-volume /mnt/glusterfs nfs defaults,_netdev,mountproto=tcp 0 0
7.3.1.3. Authentication Support for Subdirectory Mount
nfs.export-dir option to provide client authentication during sub-directory mount. The nfs.export-dir and nfs.export-dirs options provide granular control to restrict or allow specific clients to mount a sub-directory. These clients can be authenticated with either an IP, host name or a Classless Inter-Domain Routing (CIDR) range.
- nfs.export-dirs: By default, all NFS sub-volumes are exported as individual exports. This option allows you to manage this behavior. When this option is turned off, none of the sub-volumes are exported and hence the sub-directories cannot be mounted. This option is on by default.To set this option to off, run the following command:
# gluster volume set VOLNAME nfs.export-dirs offTo set this option to on, run the following command:# gluster volume set VOLNAME nfs.export-dirs on - nfs.export-dir: This option allows you to export specified subdirectories on the volume. You can export a particular subdirectory, for example:
# gluster volume set VOLNAME nfs.export-dir /d1,/d2/d3/d4,/d6where d1, d2, d3, d4, d6 are the sub-directories.You can also control the access to mount these subdirectories based on the IP address, host name or a CIDR. For example:# gluster volume set VOLNAME nfs.export-dir "/d1(<ip address>),/d2/d3/d4(<host name>|<ip address>),/d6(<CIDR>)"The directory /d1, /d2 and /d6 are directories inside the volume. Volume name must not be added to the path. For example if the volume vol1 has directories d1 and d2, then to export these directories use the following command:#gluster volume set vol1 nfs.export-dir "/d1(192.0.2.2),d2(192.0.2.34)"
7.3.1.4. Testing Volumes Mounted Using NFS
Testing Mounted Red Hat Storage Volumes
Prerequisites
- Run the
mountcommand to check whether the volume was successfully mounted.# mount server1:/test-volume on /mnt/glusterfs type nfs (rw,addr=server1) - Run the
dfcommand to display the aggregated storage space from all the bricks in a volume.# df -h /mnt/glusterfs Filesystem Size Used Avail Use% Mounted on server1:/test-volume 28T 22T 5.4T 82% /mnt/glusterfs - Move to the mount directory using the
cdcommand, and list the contents.# cd /mnt/glusterfs # ls
7.3.2. Troubleshooting NFS
- Q: The mount command on the NFS client fails with RPC Error: Program not registered. This error is encountered due to one of the following reasons:
- Q: The rpcbind service is not running on the NFS client. This could be due to the following reasons:
- Q: The NFS server glusterfsd starts but the initialization fails with nfsrpc- service: portmap registration of program failed error message in the log.
- Q: The NFS server start-up fails with the message Port is already in use in the log file.
- Q: The mount command fails with NFS server failed error:
- Q: The showmount command fails with clnt_create: RPC: Unable to receive error. This error is encountered due to the following reasons:
- Q: The application fails with Invalid argument or Value too large for defined data type
- Q: After the machine that is running NFS server is restarted the client fails to reclaim the locks held earlier.
- Q: The rpc actor failed to complete successfully error is displayed in the nfs.log, even after the volume is mounted successfully.
- Q: The mount command fails with No such file or directory.
RPC Error: Program not registered. This error is encountered due to one of the following reasons:
- The NFS server is not running. You can check the status using the following command:
# gluster volume status - The volume is not started. You can check the status using the following command:
# gluster volume info - rpcbind is restarted. To check if rpcbind is running, execute the following command:
# ps ax| grep rpcbind
- If the NFS server is not running, then restart the NFS server using the following command:
# gluster volume start VOLNAME - If the volume is not started, then start the volume using the following command:
# gluster volume start VOLNAME - If both rpcbind and NFS server is running then restart the NFS server using the following commands:
# gluster volume stop VOLNAME# gluster volume start VOLNAME
rpcbind service is not running on the NFS client. This could be due to the following reasons:
- The portmap is not running.
- Another instance of kernel NFS server or glusterNFS server is running.
rpcbind service by running the following command:
# service rpcbind start[2010-05-26 23:33:47] E [rpcsvc.c:2598:rpcsvc_program_register_portmap] rpc-service: Could notregister with portmap
[2010-05-26 23:33:47] E [rpcsvc.c:2682:rpcsvc_program_register] rpc-service: portmap registration of program failed
[2010-05-26 23:33:47] E [rpcsvc.c:2695:rpcsvc_program_register] rpc-service: Program registration failed: MOUNT3, Num: 100005, Ver: 3, Port: 38465
[2010-05-26 23:33:47] E [nfs.c:125:nfs_init_versions] nfs: Program init failed
[2010-05-26 23:33:47] C [nfs.c:531:notify] nfs: Failed to initialize protocols
[2010-05-26 23:33:49] E [rpcsvc.c:2614:rpcsvc_program_unregister_portmap] rpc-service: Could not unregister with portmap
[2010-05-26 23:33:49] E [rpcsvc.c:2731:rpcsvc_program_unregister] rpc-service: portmap unregistration of program failed
[2010-05-26 23:33:49] E [rpcsvc.c:2744:rpcsvc_program_unregister] rpc-service: Program unregistration failed: MOUNT3, Num: 100005, Ver: 3, Port: 38465- Start the rpcbind service on the NFS server by running the following command:
# service rpcbind startAfter starting rpcbind service, glusterFS NFS server needs to be restarted. - Stop another NFS server running on the same machine.Such an error is also seen when there is another NFS server running on the same machine but it is not the glusterFS NFS server. On Linux systems, this could be the kernel NFS server. Resolution involves stopping the other NFS server or not running the glusterFS NFS server on the machine. Before stopping the kernel NFS server, ensure that no critical service depends on access to that NFS server's exports.On Linux, kernel NFS servers can be stopped by using either of the following commands depending on the distribution in use:
# service nfs-kernel-server stop # service nfs stop - Restart glusterFS NFS server.
[2010-05-26 23:40:49] E [rpc-socket.c:126:rpcsvc_socket_listen] rpc-socket: binding socket failed:Address already in use
[2010-05-26 23:40:49] E [rpc-socket.c:129:rpcsvc_socket_listen] rpc-socket: Port is already in use
[2010-05-26 23:40:49] E [rpcsvc.c:2636:rpcsvc_stage_program_register] rpc-service: could not create listening connection
[2010-05-26 23:40:49] E [rpcsvc.c:2675:rpcsvc_program_register] rpc-service: stage registration of program failed
[2010-05-26 23:40:49] E [rpcsvc.c:2695:rpcsvc_program_register] rpc-service: Program registration failed: MOUNT3, Num: 100005, Ver: 3, Port: 38465
[2010-05-26 23:40:49] E [nfs.c:125:nfs_init_versions] nfs: Program init failed
[2010-05-26 23:40:49] C [nfs.c:531:notify] nfs: Failed to initialize protocolsmount command fails with NFS server failed error:
mount: mount to NFS server '10.1.10.11' failed: timed out (retrying).- Disable name lookup requests from NFS server to a DNS server.The NFS server attempts to authenticate NFS clients by performing a reverse DNS lookup to match host names in the volume file with the client IP addresses. There can be a situation where the NFS server either is not able to connect to the DNS server or the DNS server is taking too long to respond to DNS request. These delays can result in delayed replies from the NFS server to the NFS client resulting in the timeout error.NFS server provides a work-around that disables DNS requests, instead relying only on the client IP addresses for authentication. The following option can be added for successful mounting in such situations:
option nfs.addr.namelookup offNote
Remember that disabling the NFS server forces authentication of clients to use only IP addresses. If the authentication rules in the volume file use host names, those authentication rules will fail and client mounting will fail. - NFS version used by the NFS client is other than version 3 by default.glusterFS NFS server supports version 3 of NFS protocol by default. In recent Linux kernels, the default NFS version has been changed from 3 to 4. It is possible that the client machine is unable to connect to the glusterFS NFS server because it is using version 4 messages which are not understood by glusterFS NFS server. The timeout can be resolved by forcing the NFS client to use version 3. The vers option to mount command is used for this purpose:
# mount nfsserver:export -o vers=3 /MOUNTPOINT
- The firewall might have blocked the port.
- rpcbind might not be running.
NFS.enable-ino32 <on | off>off by default, which permits NFS to return 64-bit inode numbers by default.
- built and run on 32-bit machines, which do not support large files by default,
- built to 32-bit standards on 64-bit systems.
-D_FILE_OFFSET_BITS=64chkconfig --list nfslock to check if NSM is configured during OS boot.
on,run chkconfig nfslock off to disable NSM clients during boot, which resolves the issue.
rpc actor failed to complete successfully error is displayed in the nfs.log, even after the volume is mounted successfully.
nfs.log file.
[2013-06-25 00:03:38.160547] W [rpcsvc.c:180:rpcsvc_program_actor] 0-rpc-service: RPC program version not available (req 100003 4)
[2013-06-25 00:03:38.160669] E [rpcsvc.c:448:rpcsvc_check_and_reply_error] 0-rpcsvc: rpc actor failed to complete successfullynoacl option in the mount command as follows:
mount -t nfs -o vers=3,noacl server1:/test-volume /mnt/glusterfsNo such file or directory.
7.3.3. NFS Ganesha
Important
- nfs-ganesha is a technology preview feature. Technology preview features are not fully supported under Red Hat subscription level agreements (SLAs), may not be functionally complete, and are not intended for production use. However, these features provide early access to upcoming product innovations, enabling customers to test functionality and provide feedback during the development process. As Red Hat considers making future iterations of technology preview features generally available, we will provide commercially reasonable support to resolve any reported issues that customers experience when using these features.
- Red Hat Storage currently does not support NFSv4 delegations, Multi-head NFS and High Availability. These will be added in the upcoming releases of Red Hat Storage nfs-ganesha. It is not a feature recommended for production deployment in its current form. However, Red Hat Storage volumes can be exported via nfs-ganesha for consumption by both NFSv3 and NFSv4 clients.
7.3.3.1. Installing nfs-ganesha
- Installing nfs-ganesha using yum
- Installing nfs-ganesha during an ISO Installation
- Installing nfs-ganesha using RHN / Red Hat Satellite
7.3.3.1.1. Installing using yum
# yum install nfs-ganesha# rpm -qlp nfs-ganesha-2.1.0.2-4.el6rhs.x86_64.rpm
/etc/glusterfs-ganesha/README
/etc/glusterfs-ganesha/nfs-ganesha.conf
/etc/glusterfs-ganesha/org.ganesha.nfsd.conf
/usr/bin/ganesha.nfsd
/usr/lib64/ganesha
/usr/lib64/ganesha/libfsalgluster.so
/usr/lib64/ganesha/libfsalgluster.so.4
/usr/lib64/ganesha/libfsalgluster.so.4.2.0
/usr/lib64/ganesha/libfsalgpfs.so
/usr/lib64/ganesha/libfsalgpfs.so.4
/usr/lib64/ganesha/libfsalgpfs.so.4.2.0
/usr/lib64/ganesha/libfsalnull.so
/usr/lib64/ganesha/libfsalnull.so.4
/usr/lib64/ganesha/libfsalnull.so.4.2.0
/usr/lib64/ganesha/libfsalproxy.so
/usr/lib64/ganesha/libfsalproxy.so.4
/usr/lib64/ganesha/libfsalproxy.so.4.2.0
/usr/lib64/ganesha/libfsalvfs.so
/usr/lib64/ganesha/libfsalvfs.so.4
/usr/lib64/ganesha/libfsalvfs.so.4.2.0
/usr/share/doc/nfs-ganesha
/usr/share/doc/nfs-ganesha/ChangeLog
/usr/share/doc/nfs-ganesha/LICENSE.txt/usr/bin/ganesha.nfsd is the nfs-ganesha daemon.
7.3.3.1.2. Installing nfs-ganesha during an ISO Installation
- While installing Red Hat Storage using an ISO, in the Customizing the Software Selection screen, select Red Hat Storage Tools Group and click Optional Packages.
- From the list of packages, select
nfs-ganeshaand click Close.
Figure 7.1. Installing nfs-ganesha
- Proceed with the remaining installation steps for installing Red Hat Storage. For more information on how to install Red Hat Storage using an ISO, see Installing from an ISO Image section of the Red Hat Storage 3 Installation Guide.
7.3.3.1.3. Installing from Red Hat Satellite Server or Red Hat Network
- Install nfs-ganesha by executing the following command:
# yum install nfs-ganesha - Verify the installation by running the following command:
# yum list nfs-ganesha

Installed Packages
nfs-ganesha.x86_64      2.1.0.2-4.el6rhs      rhs-3-for-rhel-6-server-rpms
7.3.3.2. Pre-requisites to run nfs-ganesha
Note
- Red Hat does not recommend running nfs-ganesha in mixed-mode and/or hybrid environments. This includes multi-protocol environments where NFS and CIFS shares are used simultaneously, or running nfs-ganesha together with gluster-nfs, kernel-nfs or gluster-fuse clients.
- Only one of nfs-ganesha, gluster-nfs server or kernel-nfs can be enabled on a given machine/host as all NFS implementations use the port 2049 and only one can be active at a given time. Hence you must disable gluster-nfs (it is enabled by default on a volume) and kernel-nfs before nfs-ganesha is started.
- A Red Hat Storage volume must be available for export and nfs-ganesha rpms are installed.
- IPv6 must be enabled on the host interface which is used by the nfs-ganesha daemon. To enable IPv6 support, perform the following steps:
- Comment or remove the line
options ipv6 disable=1in the/etc/modprobe.d/ipv6.conffile. - Reboot the system.
7.3.3.3. Exporting and Unexporting Volumes through nfs-ganesha
- Copy the
org.ganesha.nfsd.conffile into the/etc/dbus-1/system.d/directory. Theorg.ganesha.nfsd.conffile can be found in/etc/glusterfs-ganesha/on installation of nfs-ganesha rpms. - Execute the following command:
service messagebus restart
Note
Volume set options can be used to export or unexport a Red Hat Storage volume via nfs-ganesha. Use these volume options to export a Red Hat Storage volume.
- Disable gluster-nfs on all Red Hat Storage volumes.
# gluster volume set volname nfs.disable ongluster-nfs and nfs-ganesha cannot run simultaneously. Hence, gluster-nfs must be disabled on all Red Hat Storage volumes before exporting them via nfs-ganesha. - To set the host IP, execute the following command:
# gluster vol set volname nfs-ganesha.host IPThis command sets the host IP to start nfs-ganesha.In a multi-node volume environment, it is recommended that all the nfs-ganesha related commands/operations must be run on one of the nodes only. Hence, the IP address provided must be the IP of that node. If a Red Hat Storage volume is already exported, setting a different host IP will take immediate effect. - To start nfs-ganesha, execute the following command:
# gluster volume set volname nfs-ganesha.enable on
To unexport a Red Hat Storage volume, execute the following command:
# gluster vol set volname nfs-ganesha.enable offBefore restarting nfs-ganesha, unexport all Red Hat Storage volumes by executing the following command:
# gluster vol set volname nfs-ganesha.enable off- To set the host IP, execute the following command:
# gluster vol set volname nfs-ganesha.host IP - To restart nfs-ganesha, execute the following command:
# gluster volume set volname nfs-ganesha.enable on
To verify the status of the volume set options, follow the guidelines mentioned below:
- Check if nfs-ganesha is started by executing the following command:
ps aux | grep ganesha - Check if the volume is exported.
showmount -e localhost - The logs of ganesha.nfsd daemon are written to
/tmp/ganesha.log. Check the log file on noticing any unexpected behavior. This file will be lost in case of a system reboot.
7.3.3.4. Supported Features of nfs-ganesha
Previous versions of nfs-ganesha required a restart of the server whenever the administrator had to add or remove exports. nfs-ganesha now supports addition and removal of exports dynamically. Dynamic exports is managed by the DBus interface. DBus is a system local IPC mechanism for system management and peer-to-peer application communication.
Note
With this version of nfs-ganesha, multiple Red Hat Storage volumes or sub-directories can now be exported simultaneously.
This version of nfs-ganesha now creates and maintains a NFSv4 pseudo-file system, which provides clients with seamless access to all exported objects on the server.
nfs-ganesha NFSv4 protocol includes integrated support for Access Control List (ACL)s, which are similar to those used by Windows. These ACLs can be used to identify a trustee and specify the access rights allowed, or denied for that trustee.This feature is disabled by default.
Note
7.3.3.5. Manually Configuring nfs-ganesha Exports
# /usr/bin/ganesha.nfsd -f location of nfs-ganesha.conf file -L location of log file -N log level -d/usr/bin/ganesha.nfsd -f nfs-ganesha.conf -L nfs-ganesha.log -N NIV_DEBUG -dnfs-ganesha.confis the configuration file that is available by default on installation of nfs-ganesha rpms. This file is located at/etc/glusterfs-ganesha.nfs-ganesha.logis the log file for the ganesha.nfsd process.- NIV_DEBUG is the log level.
EXPORT block into a .conf file, for example export.conf. Edit the parameters appropriately and include the export.conf file in nfs-ganesha.conf. This can be done by adding the line below at the end of nfs-ganesha.conf.
%include "export.conf"# cat export.conf
EXPORT{
Export_Id = 1 ; # Export ID unique to each export
Path = "volume_path"; # Path of the volume to be exported. Eg: "/test_volume"
FSAL {
name = GLUSTER;
hostname = "10.xx.xx.xx"; # IP of one of the nodes in the trusted pool
volume = "volume_name"; # Volume name. Eg: "test_volume"
}
Access_type = RW; # Access permissions
Squash = No_root_squash; # To enable/disable root squashing
Disable_ACL = TRUE; # To enable/disable ACL
Pseudo = "pseudo_path"; # NFSv4 pseudo path for this export. Eg: "/test_volume_pseudo"
Protocols = "3,4" ; # NFS protocols supported
Transports = "UDP,TCP" ; # Transport protocols supported
SecType = "sys"; # Security flavors supported
}export.conf file to see the expected behavior.
To export subdirectories within a volume, edit the following parameters in the export.conf file.
Path = "path_to_subdirectory";  # Path of the volume to be exported. Eg: "/test_volume/test_subdir"

	FSAL {
		name = GLUSTER;
		hostname = "10.xx.xx.xx";  # IP of one of the nodes in the trusted pool
		volume = "volume_name";	 # Volume name. Eg: "test_volume"
		volpath = "path_to_subdirectory_with_respect_to_volume"; #Subdirectory path from the root of the volume. Eg: "/test_subdir"
}To export multiple export entries, define separate export block in the export.conf file for each of the entires, with unique export ID.
# cat export.conf
EXPORT{
	Export_Id = 1 ;   # Export ID unique to each export
	Path = "test_volume";  # Path of the volume to be exported. Eg: "/test_volume"

	FSAL {
		name = GLUSTER;
		hostname = "10.xx.xx.xx";  # IP of one of the nodes in the trusted pool
		volume = "test_volume";	 # Volume name. Eg: "test_volume"
	}

	Access_type = RW;	 # Access permissions
	Squash = No_root_squash; # To enable/disable root squashing
	Disable_ACL = TRUE;	 # To enable/disable ACL
	Pseudo = "/test_volume";	 # NFSv4 pseudo path for this export. Eg: "/test_volume_pseudo"
	Protocols = "3,4" ;	 # NFS protocols supported
	Transports = "UDP,TCP" ; # Transport protocols supported
	SecType = "sys";	 # Security flavors supported
}

EXPORT{
	Export_Id = 2 ;   # Export ID unique to each export
	Path = "test_volume/test_subdir";  # Path of the volume to be exported. Eg: "/test_volume"

	FSAL {
		name = GLUSTER;
		hostname = "10.xx.xx.xx";  # IP of one of the nodes in the trusted pool
		volume = "test_volume";	 # Volume name. Eg: "test_volume"
		volpath = "/test_subdir"
	}

	Access_type = RW;	 # Access permissions
	Squash = No_root_squash; # To enable/disable root squashing
	Disable_ACL = "FALSE;	 # To enable/disable ACL
	Pseudo = "/test_subdir";	 # NFSv4 pseudo path for this export. Eg: "/test_volume_pseudo"
	Protocols = "3,4" ;	 # NFS protocols supported
	Transports = "UDP,TCP" ; # Transport protocols supported
	SecType = "sys";	 # Security flavors supported
}


#showmount -e localhost
Export list for localhost:
/test_volume (everyone)
/test_volume/test_subdir (everyone)
/        (everyone)
The parameter values and permission values given in the EXPORT block applies to any client that mounts the exported volume. To provide specific permissions to specific clients , introduce a client block inside the EXPORT block.
EXPORT block.
client {
        clients = "10.xx.xx.xx";  # IP of the client.
        allow_root_access = true;
        access_type = "RO"; # Read-only permissions
        Protocols = "3"; # Allow only NFSv3 protocol.
        anonymous_uid = 1440;
        anonymous_gid = 72;
}client block.
To enable NFSv4 ACLs , edit the following parameter:
Disable_ACL = FALSE;To set NFSv4 pseudo path , edit the below parameter:
Pseudo = "pseudo_path"; # NFSv4 pseudo path for this export. Eg: "/test_volume_pseudo"
File org.ganesha.nfsd.conf is installed in /etc/glusterfs-ganesha/ as part of the nfs-ganesha rpms. To export entries dynamically without restarting nfs-ganesha, execute the following steps:
- Copy the file
org.ganesha.nfsd.confinto the directory/etc/dbus-1/system.d/. - Execute the following command:
service messagebus restart
- Adding an export dynamically
To add an export dynamically, add an export block as explained in section Exporting Multiple Entries, and execute the following command:
dbus-send --print-reply --system --dest=org.ganesha.nfsd /org/ganesha/nfsd/ExportMgr org.ganesha.nfsd.exportmgr.AddExport string:/path-to-export.conf string:'EXPORT(Path=/path-in-export-block)'For example, to add testvol1 dynamically:dbus-send --print-reply --system --dest=org.ganesha.nfsd /org/ganesha/nfsd/ExportMgr org.ganesha.nfsd.exportmgr.AddExport string:/home/nfs-ganesha/export.conf string:'EXPORT(Path=/testvol1)') method return sender=:1.35 -> dest=:1.37 reply_serial=2 - Removing an export dynamically
To remove an export dynamically, execute the following command:
dbus-send --print-reply --system --dest=org.ganesha.nfsd /org/ganesha/nfsd/ExportMgr org.ganesha.nfsd.exportmgr.RemoveExport int32:export-id-in-the-export-blockFor example:dbus-send --print-reply --system --dest=org.ganesha.nfsd /org/ganesha/nfsd/ExportMgr org.ganesha.nfsd.exportmgr.RemoveExport int32:79 method return sender=:1.35 -> dest=:1.37 reply_serial=2
7.3.3.6. Accessing nfs-ganesha Exports
To mount an export in NFSv3 mode, execute the following command:
mount -t nfs -o vers=3 ip:/volname /mountpointmount -t nfs -o vers=3 10.70.0.0:/testvol /mntTo mount an export in NFSv4 mode, execute the following command:
mount -t nfs -o vers=4 ip:/volname /mountpointmount -t nfs -o vers=4 10.70.0.0:/testvol /mnt7.3.3.7. Troubleshooting
- Situation
nfs-ganesha fails to start.
SolutionFollow the listed steps to fix the issue:
- Review the
/tmp/ganesha.logto understand the cause of failure. - Ensure the kernel and gluster nfs services are inactive.
- Ensure you execute both the
nfs-ganesha.hostandnfs-ganesha.enablevolume set options.
For more information see, Section 7.3.3.5 Manually Configuring nfs-ganesha Exports. - Situation
nfs-ganesha has started and fails to export a volume.
SolutionFollow the listed steps to fix the issue:
- Ensure the file
org.ganesha.nfsd.confis copied into/etc/dbus-1/systemd/before starting nfs-ganesha. - In case you had not copied the file, restart nfs-ganesha. For more information see, Section 7.3.3.3 Exporting and Unexporting Volumes through nfs-ganesha
- Situation
nfs-ganesha fails to stop
SolutionExecute the following steps
- Check for the status of the nfs-ganesha process.
- If it is still running, issue a kill -9 signal on its PID.
- Run the following command to check if nfs, mountd, rquotad, nlockmgr and rquotad services are unregistered cleanly.
rpcinfo -p- If the services are not unregistered, then delete these entries using the following command:
rpcinfo -dNote
You can also restart the rpcbind service instead of using rpcinfo -d on individual entries.
- Force start the volume by using the following command:
# gluster volume start volname force
- Situation
Permission issues.
SolutionBy default, the
root squashoption is disabled when you start nfs-ganesha using the CLI. In case, you encounter any permission issues, check the unix permissions of the exported entry.
7.4. SMB
Note
Warning
7.4.1. Sharing Volumes over SMB
- Run
gluster volume set VOLNAME stat-prefetch offto disable stat-prefetch for the volume. - Run
gluster volume set VOLNAME server.allow-insecure onto permit insecure ports.Note
This allows Samba to communicate with brick processes even with untrusted ports. - Edit the
/etc/glusterfs/glusterd.volin each Red Hat Storage node, and add the following setting:option rpc-auth-allow-insecure onNote
This allows Samba to communicate with glusterd even with untrusted ports. - Restart
glusterdservice on each Red Hat Server node. - Run the following command to verify proper lock and I/O coherency.
gluster volume set VOLNAME storage.batch-fsync-delay-usec 0Note
To enable Samba to start on boot, run the following command:# chkconfig smb on
gluster volume start VOLNAME command, the volume is automatically exported through Samba on all Red Hat Storage servers running Samba.
- With elevated privileges, navigate to
/var/lib/glusterd/hooks/1/start/post - Rename the
S30samba-start.shtoK30samba-start.sh.For more information about these scripts, see Section 16.2, “Prepackaged Scripts”. - Run
# smbstatus -Son the client to display the status of the volume:Service pid machine Connected at ------------------------------------------------------------------- gluster-VOLNAME 11967 __ffff_192.168.1.60 Mon Aug 6 02:23:25 2012
- Either disable sharing over SMB for the whole cluster as detailed in Section 7.4.1, “Sharing Volumes over SMB” or run the following command to disable automatic SMB sharing per-volume:
# gluster volume set user.smb disable - Open the
/etc/samba/smb.conffile in a text editor and add the following lines for a simple configuration:[gluster-VOLNAME] comment = For samba share of volume VOLNAME vfs objects = glusterfs glusterfs:volume = VOLNAME glusterfs:logfile = /var/log/samba/VOLNAME.log glusterfs:loglevel = 7 path = / read only = no guest ok = yesThe configuration options are described in the following table:Expand Table 7.7. Configuration Options Configuration Options Required? Default Value Description Path Yes n/a It represents the path that is relative to the root of the gluster volume that is being shared. Hence /represents the root of the gluster volume. Exporting a subdirectory of a volume is supported and /subdir in path exports only that subdirectory of the volume.glusterfs:volumeYes n/a The volume name that is shared. glusterfs:logfileNo NULL Path to the log file that will be used by the gluster modules that are loaded by the vfs plugin. Standard Samba variable substitutions as mentioned in smb.confare supported.glusterfs:loglevelNo 7 This option is equivalent to the client-log-leveloption of gluster. 7 is the default value and corresponds to the INFO level.glusterfs:volfile_serverNo localhost The gluster server to be contacted to fetch the volfile for the volume. - Run
service smb [re]startto start or restart thesmbservice. - Run
smbpasswdto set the SMB password.# smbpasswd -a usernameSpecify the SMB password. This password is used during the SMB mount.
7.4.2. Mounting Volumes using SMB
- Add the user on all the Samba servers based on your configuration:
# adduser username - Add the user to the list of Samba users on all Samba servers and assign password by executing the following command:
# smbpasswd -a username - Perform a FUSE mount of the gluster volume on any one of the Samba servers and provide required permissions to the user by executing the following commands:
# mount -t glusterfs -oacl ip address volname mountpoint# setfacl -muser:<username>:rwx <mountpoint> - Provide required permissions to the user by executing appropriate
setfaclcommand. For example:# setfacl -m user:username:rwx mountpoint
7.4.2.1. Manually Mounting Volumes Using SMB on Red Hat Enterprise Linux and Windows
Mounting a Volume Manually using SMB on Red Hat Enterprise Linux
- Install the
cifs-utilspackage on the client.# yum install cifs-utils - Run
mount -t cifsto mount the exported SMB share, using the syntax example as guidance.Example 7.1. mount -t cifs Command Syntax
# mount -t cifs \\\\Samba_Server_IP_Address\\Share_Name Mount_Point-o user=<username>,pass=<password>Run# mount -t cifs \\\\SAMBA_SERVER_IP\\gluster-VOLNAME /mnt/smb -o user=<username>,pass=<password>for a Red Hat Storage volume exported through SMB, which uses the/etc/samba/smb.conffile with the following configuration.[gluster-VOLNAME] comment = For samba share of volume VOLNAME vfs objects = glusterfs glusterfs:volume = VOLNAME glusterfs:logfile = /var/log/samba/VOLNAME.log glusterfs:loglevel = 7 path = / read only = no guest ok = yes - Run
# smbstatus -Son the server to display the status of the volume:Service pid machine Connected at ------------------------------------------------------------------- gluster-VOLNAME 11967 __ffff_192.168.1.60 Mon Aug 6 02:23:25 2012
Mounting a Volume Manually using SMB through Microsoft Windows Explorer
- In Windows Explorer, click → . to open the Map Network Drive screen.
- Choose the drive letter using the drop-down list.
- In the Folder text box, specify the path of the server and the shared resource in the following format: \\SERVER_NAME\VOLNAME.
- Click to complete the process, and display the network drive in Windows Explorer.
- Navigate to the network drive to verify it has mounted correctly.
Mounting a Volume Manually using SMB on Microsoft Windows Command-line.
- Click → , and then type
cmd. - Enter
net use z: \\SERVER_NAME\VOLNAME, where z: is the drive letter to assign to the shared volume.For example,net use y: \\server1\test-volume - Navigate to the network drive to verify it has mounted correctly.
7.4.2.2. Automatically Mounting Volumes Using SMB on Red Hat Enterprise Linux and Windows
Mounting a Volume Automatically using SMB on Red Hat Enterprise Linux
- Open the
/etc/fstabfile in a text editor. - Append the following configuration to the
fstabfile.You must specify the filename and its path that contains the user name and/or password in thecredentialsoption in/etc/fstabfile. See themount.cifsman page for more information.\\HOSTNAME|IPADDRESS\SHARE_NAME MOUNTDIRUsing the example server names, the entry contains the following replaced values.\\server1\test-volume /mnt/glusterfs cifs credentials=/etc/samba/passwd,_netdev 0 0 - Run
# smbstatus -Son the client to display the status of the volume:Service pid machine Connected at ------------------------------------------------------------------- gluster-VOLNAME 11967 __ffff_192.168.1.60 Mon Aug 6 02:23:25 2012
Mounting a Volume Automatically on Server Start using SMB through Microsoft Windows Explorer
- In Windows Explorer, click → . to open the Map Network Drive screen.
- Choose the drive letter using the drop-down list.
- In the Folder text box, specify the path of the server and the shared resource in the following format: \\SERVER_NAME\VOLNAME.
- Click the Reconnect at logon check box.
- Click to complete the process, and display the network drive in Windows Explorer.
- If the Windows Security screen pops up, enter the username and password and click OK.
- Navigate to the network drive to verify it has mounted correctly.
7.5. Configuring Automated IP Failover for NFS and SMB
Note
- Amazon Elastic Compute Cloud (EC2) does not support VIPs and hence not compatible with this solution.
7.5.1. Setting Up CTDB
Configuring CTDB on Red Hat Storage Server
Note
- If you already have an older version of CTDB, then remove CTDB by executing the following command:
# yum remove ctdbAfter removing the older version, proceed with installing the latest CTDB. - Install CTDB on all the nodes that are used as Samba servers to the latest version using the following command:
# yum install ctdb2.5 - In a CTDB based high availability environment of NFS and SMB, the locks will not be migrated on failover.
- You must ensure to open Port 4379 between the Red Hat Storage servers.
- Create a replicate volume. This volume will host only a zero byte lock file, hence choose minimal sized bricks. To create a replicate volume run the following command:
# gluster volume create volname replica n ipaddress:/brick path.......N timeswhere,N: The number of nodes that are used as Samba servers. Each node must host one brick.For example:# gluster volume create ctdb replica 4 10.16.157.75:/rhs/brick1/ctdb/b1 10.16.157.78:/rhs/brick1/ctdb/b2 10.16.157.81:/rhs/brick1/ctdb/b3 10.16.157.84:/rhs/brick1/ctdb/b4 - In the following files, replace all in the statement META=all to the newly created volume name
/var/lib/glusterd/hooks/1/start/post/S29CTDBsetup.sh
/var/lib/glusterd/hooks/1/stop/pre/S29CTDB-teardown.sh.
For example:META=all to META=ctdb - Start the volume.The
S29CTDBsetup.shscript runs on all Red Hat Storage servers and adds the following lines to the[global]section of your Samba configuration file at/etc/samba/smb.conf.clustering = yes idmap backend = tdb2The script stops Samba server, modifies Samba configuration, adds an entry in/etc/fstab/for the mount, and mounts the volume at/gluster/lockon all the nodes with Samba server. It also enables automatic start of CTDB service on reboot.Note
When you stop a volume,S29CTDB-teardown.shscript runs on all Red Hat Storage servers and removes the following lines from[global]section of your Samba configuration file at/etc/samba/smb.conf.clustering = yes idmap backend = tdb2It also removes an entry in/etc/fstab/for the mount and unmount the volume at/gluster/lock. - Verify if the file
/etc/sysconfig/ctdbexists on all the nodes that is used as Samba server. This file contains Red Hat Storage recommended CTDB configurations. - Create
/etc/ctdb/nodesfile on all the nodes that is used as Samba servers and add the IPs of these nodes to the file.10.16.157.0 10.16.157.3 10.16.157.6 10.16.157.9The IPs listed here are the private IPs of Samba servers. - On all the nodes that are used as Samba server which require IP failover, create
/etc/ctdb/public_addressesfile and add the virtual IPs that CTDB should create to this file. Add these IP address in the following format:<Virtual IP>/<routing prefix><node interface>For example:192.168.1.20/24 eth0 192.168.1.21/24 eth0
7.5.2. Starting and Verifying your Configuration
Start CTDB and Verify the Configuration
- Run
# service ctdb startto start the CTDB service. - Run
# chkconfig smb offto prevent CTDB starting Samba automatically when the server is restarted. - Verify that CTDB is running using the following commands:
# ctdb status # ctdb ip # ctdb ping -n all - Mount a Red Hat Storage volume using any one of the VIPs.
- Run
# ctdb ipto locate the physical server serving the VIP. - Shut down the CTDB VIP server to verify successful configuration.When the Red Hat Storage Server serving the VIP is shut down there will be a pause for a few seconds, then I/O will resume.
7.6. POSIX Access Control Lists
John creates a file. He does not allow anyone in the group to access the file, except for another user, Antony (even if there are other users who belong to the group john).
7.6.1. Setting POSIX ACLs
- Per user
- Per group
- Through the effective rights mask
- For users not in the user group for the file
7.6.1.1. Setting Access ACLs
# setfacl –m entry_typefile_name command sets and modifies access ACLs
setfaclentry_type Options
r (read), w (write), and x (execute). Specify the ACL entry_type as described below, separating multiple entry types with commas.
- u:user_name:permissons
- Sets the access ACLs for a user. Specify the user name, or the UID.
- g:group_name:permissions
- Sets the access ACLs for a group. Specify the group name, or the GID.
- m:permission
- Sets the effective rights mask. The mask is the combination of all access permissions of the owning group, and all user and group entries.
- o:permissions
- Sets the access ACLs for users other than the ones in the group for the file.
setfacl command is used, the additional permissions are added to the existing POSIX ACLs or the existing rule is modified.
# setfacl -m u:antony:rw /mnt/gluster/data/testfile7.6.1.2. Setting Default ACLs
# setfacl -d --set entry_type directory command sets default ACLs for files and directories.
setfaclentry_type Options
r (read), w (write), and x (execute). Specify the ACL entry_type as described below, separating multiple entry types with commas.
- u:user_name:permissons
- Sets the access ACLs for a user. Specify the user name, or the UID.
- g:group_name:permissions
- Sets the access ACLs for a group. Specify the group name, or the GID.
- m:permission
- Sets the effective rights mask. The mask is the combination of all access permissions of the owning group, and all user and group entries.
- o:permissions
- Sets the access ACLs for users other than the ones in the group for the file.
# setfacl -d --set o::r /mnt/gluster/data to set the default ACLs for the /data directory to read-only for users not in the user group,
Note
- A subdirectory inherits the default ACLs of the parent directory both as its default ACLs and as an access ACLs.
- A file inherits the default ACLs as its access ACLs.
7.6.2. Retrieving POSIX ACLs
# getfacl command to view the existing POSIX ACLs for a file or directory.
-
# getfacl path/filename - View the existing access ACLs of the
sample.jpgfile using the following command.# getfacl /mnt/gluster/data/test/sample.jpg # owner: antony # group: antony user::rw- group::rw- other::r-- -
# getfacl directory name - View the default ACLs of the
/docdirectory using the following command.# getfacl /mnt/gluster/data/doc # owner: antony # group: antony user::rw- user:john:r-- group::r-- mask::r-- other::r-- default:user::rwx default:user:antony:rwx default:group::r-x default:mask::rwx default:other::r-x
7.6.3. Removing POSIX ACLs
# setfacl -x ACL entry_type file to remove all permissions for a user, groups, or others.
setfaclentry_type Options
r (read), w (write), and x (execute). Specify the ACL entry_type as described below, separating multiple entry types with commas.
- u:user_name
- Sets the access ACLs for a user. Specify the user name, or the UID.
- g:group_name
- Sets the access ACLs for a group. Specify the group name, or the GID.
- m:permission
- Sets the effective rights mask. The mask is the combination of all access permissions of the owning group, and all user and group entries.
- o:permissions
- Sets the access ACLs for users other than the ones in the group for the file.
antony:
# setfacl -x u:antony /mnt/gluster/data/test-file7.6.4. Samba and ACLs
--with-acl-support option, so no special flags are required when accessing or mounting a Samba share.
Chapter 8. Managing Red Hat Storage Volumes
8.1. Configuring Volume Options
Note
# gluster volume info VOLNAME# gluster volume set VOLNAME OPTION PARAMETERtest-volume:
# gluster volume set test-volume performance.cache-size 256MB
Set volume successfulNote
| Option | Value Description | Allowed Values | Default Value |
|---|---|---|---|
| auth.allow | IP addresses or hostnames of the clients which are allowed to access the volume. | Valid hostnames or IP addresses, which includes wild card patterns including *. For example, 192.168.1.*. A list of comma separated addresses is acceptable, but a single hostname must not exceed 256 characters. | * (allow all) |
| auth.reject | IP addresses or hostnames of the clients which are denied access to the volume. | Valid hostnames or IP addresses, which includes wild card patterns including *. For example, 192.168.1.*. A list of comma separated addresses is acceptable, but a single hostname must not exceed 256 characters. | none (reject none) |
| Note
Using auth.allow and auth.reject options, you can control access of only glusterFS FUSE-based clients. Use nfs.rpc-auth-* options for NFS access control.
| |||
| client.event-threads | Specifies the number of network connections to be handled simultaneously by the client processes accessing a Red Hat storage node. | 1 - 32 | 2 |
| server.event-threads | Specifies the number of network connections to be handled simultaneously by the server processes hosting a Red Hat Storage node. | 1 - 32 | 2 |
| cluster.consistent-metadata | If set to On, the readdirp function in Automatic File Replication feature will always fetch metadata from their respective read children as long as it holds the good copy (the copy that does not need healing) of the file/directory. However, this could cause a reduction in performance where readdirps are involved. | on | off | off |
| Note
After cluster.consistent-metadata option is set to On, you must ensure to unmount and mount the volume at the clients for this option to take effect.
| |||
| cluster.min-free-disk | Specifies the percentage of disk space that must be kept free. This may be useful for non-uniform bricks. | Percentage of required minimum free disk space. | 10% |
| cluster.op-version | Allows you to set the operating version of the cluster. The op-version number cannot be downgraded and is set for all the volumes. Also the op-version does not appear when you execute the gluster volume info command. | 2 | 30000 | Default value is 2 after an upgrade from RHS 2.1. Value is set to 30000 for a new cluster deployment. |
| cluster.self-heal-daemon | Specifies whether proactive self-healing on replicated volumes is activated. | on | off | on |
| cluster.server-quorum-type | If set to server, this option enables the specified volume to participate in the server-side quorum. For more information on configuring the server-side quorum, see Section 8.10.1.1, “Configuring Server-Side Quorum” | none | server | none |
| cluster.server-quorum-ratio | Sets the quorum percentage for the trusted storage pool. | 0 - 100 | >50% |
| cluster.quorum-type | If set to fixed, this option allows writes to a file only if the number of active bricks in that replica set (to which the file belongs) is greater than or equal to the count specified in the cluster.quorum-count option. If set to auto, this option allows writes to the file only if the percentage of active replicate bricks is more than 50% of the total number of bricks that constitute that replica. If there are only two bricks in the replica group, the first brick must be up and running to allow modifications. | fixed | auto | none |
| cluster.quorum-count | The minimum number of bricks that must be active in a replica-set to allow writes. This option is used in conjunction with cluster.quorum-type =fixed option to specify the number of bricks to be active to participate in quorum. The cluster.quorum-type = auto option will override this value. | 1 - replica-count | 0 |
| config.transport | Specifies the type of transport(s) volume would support communicating over. | tcp OR rdma OR tcp,rdma | tcp |
| diagnostics.brick-log-level | Changes the log-level of the bricks. | INFO | DEBUG | WARNING | ERROR | CRITICAL | NONE | TRACE | info |
| diagnostics.client-log-level | Changes the log-level of the clients. | INFO | DEBUG | WARNING | ERROR | CRITICAL | NONE | TRACE | info |
| diagnostics.brick-sys-log-level | Depending on the value defined for this option, log messages at and above the defined level are generated in the syslog and the brick log files. | INFO | WARNING | ERROR | CRITICAL | CRITICAL |
| diagnostics.client-sys-log-level | Depending on the value defined for this option, log messages at and above the defined level are generated in the syslog and the client log files. | INFO | WARNING | ERROR | CRITICAL | CRITICAL |
| diagnostics.client-log-format | Allows you to configure the log format to log either with a message id or without one on the client. | no-msg-id | with-msg-id | with-msg-id |
| diagnostics.brick-log-format | Allows you to configure the log format to log either with a message id or without one on the brick. | no-msg-id | with-msg-id | with-msg-id |
| diagnostics.brick-log-flush-timeout | The length of time for which the log messages are buffered, before being flushed to the logging infrastructure (gluster or syslog files) on the bricks. | 30 - 300 seconds (30 and 300 included) | 120 seconds |
| diagnostics.brick-log-buf-size | The maximum number of unique log messages that can be suppressed until the timeout or buffer overflow, whichever occurs first on the bricks. | 0 and 20 (0 and 20 included) | 5 |
| diagnostics.client-log-flush-timeout | The length of time for which the log messages are buffered, before being flushed to the logging infrastructure (gluster or syslog files) on the clients. | 30 - 300 seconds (30 and 300 included) | 120 seconds |
| diagnostics.client-log-buf-size | The maximum number of unique log messages that can be suppressed until the timeout or buffer overflow, whichever occurs first on the clients. | 0 and 20 (0 and 20 included) | 5 |
| features.quota-deem-statfs | When this option is set to on, it takes the quota limits into consideration while estimating the filesystem size. The limit will be treated as the total size instead of the actual size of filesystem. | on | off | off |
| features.read-only | Specifies whether to mount the entire volume as read-only for all the clients accessing it. | on | off | off |
| group small-file-perf | This option enables the open-behind and quick-read translators on the volume, and can be done only if all the clients of the volume are using Red Hat Storage 2.1. | NA | - |
| network.ping-timeout | The time the client waits for a response from the server. If a timeout occurs, all resources held by the server on behalf of the client are cleaned up. When the connection is reestablished, all resources need to be reacquired before the client can resume operations on the server. Additionally, locks are acquired and the lock tables are updated. A reconnect is a very expensive operation and must be avoided. | 42 seconds | 42 seconds |
| nfs.acl | Disabling nfs.acl will remove support for the NFSACL sideband protocol. This is enabled by default. | enable | disable | enable |
| nfs.enable-ino32 | For nfs clients or applciatons that do not support 64-bit inode numbers, use this option to make NFS return 32-bit inode numbers instead. Disabled by default, so NFS returns 64-bit inode numbers. | enable | disable | disable |
| nfs.export-dir | By default, all NFS volumes are exported as individual exports. This option allows you to export specified subdirectories on the volume. | The path must be an absolute path. Along with the path allowed, list of IP address or hostname can be associated with each subdirectory. | None |
| nfs.export-dirs | By default, all NFS sub-volumes are exported as individual exports. This option allows any directory on a volume to be exported separately. | on | off | on |
| Note
The value set for nfs.export-dirs and nfs.export-volumes options are global and applies to all the volumes in the Red Hat Storage trusted storage pool.
| |||
| nfs.export-volumes | Enables or disables exporting entire volumes. If disabled and used in conjunction with nfs.export-dir, you can set subdirectories as the only exports. | on | off | on |
| nfs.mount-rmtab | Path to the cache file that contains a list of NFS-clients and the volumes they have mounted. Change the location of this file to a mounted (with glusterfs-fuse, on all storage servers) volume to gain a trusted pool wide view of all NFS-clients that use the volumes. The contents of this file provide the information that can get obtained with the showmount command. | Path to a directory | /var/lib/glusterd/nfs/rmtab |
| nfs.mount-udp | Enable UDP transport for the MOUNT sideband protocol. By default, UDP is not enabled, and MOUNT can only be used over TCP. Some NFS-clients (certain Solaris, HP-UX and others) do not support MOUNT over TCP and enabling nfs.mount-udp makes it possible to use NFS exports provided by Red Hat Storage. | disable | enable | disable |
| nfs.nlm | By default, the Network Lock Manager (NLMv4) is enabled. Use this option to disable NLM. Red Hat does not recommend disabling this option. | on | on|off |
| nfs.rpc-auth-allow IP_ADRESSES | A comma separated list of IP addresses allowed to connect to the server. By default, all clients are allowed. | Comma separated list of IP addresses | accept all |
| nfs.rpc-auth-reject IP_ADRESSES | A comma separated list of addresses not allowed to connect to the server. By default, all connections are allowed. | Comma separated list of IP addresses | reject none |
| nfs.ports-insecure | Allows client connections from unprivileged ports. By default only privileged ports are allowed. This is a global setting for allowing insecure ports for all exports using a single option. | on | off | off |
| nfs.addr-namelookup | Specifies whether to lookup names for incoming client connections. In some configurations, the name server can take too long to reply to DNS queries, resulting in timeouts of mount requests. This option can be used to disable name lookups during address authentication. Note that disabling name lookups will prevent you from using hostnames in nfs.rpc-auth-* options. | on | off | on |
| nfs.port | Associates glusterFS NFS with a non-default port. | 1025-65535 | 38465- 38467 |
| nfs.disable | Specifies whether to disable NFS exports of individual volumes. | on | off | off |
| nfs.server-aux-gids | When enabled, the NFS-server will resolve the groups of the user accessing the volume. NFSv3 is restricted by the RPC protocol (AUTH_UNIX/AUTH_SYS header) to 16 groups. By resolving the groups on the NFS-server, this limits can get by-passed. | on|off | off |
| nfs.transport-type | Specifies the transport used by GlusterFS NFS server to communicate with bricks. | tcp OR rdma | tcp |
| open-behind | It improves the application's ability to read data from a file by sending success notifications to the application whenever it receives a open call. | on | off | off |
| performance.io-thread-count | The number of threads in the IO threads translator. | 0 - 65 | 16 |
| performance.cache-max-file-size | Sets the maximum file size cached by the io-cache translator. Can be specified using the normal size descriptors of KB, MB, GB, TB, or PB (for example, 6GB). | Size in bytes, or specified using size descriptors. | 2 ^ 64-1 bytes |
| performance.cache-min-file-size | Sets the minimum file size cached by the io-cache translator. Can be specified using the normal size descriptors of KB, MB, GB, TB, or PB (for example, 6GB). | Size in bytes, or specified using size descriptors. | 0 |
| performance.cache-refresh-timeout | The number of seconds cached data for a file will be retained. After this timeout, data re-validation will be performed. | 0 - 61 seconds | 1 second |
| performance.cache-size | Size of the read cache. | Size in bytes, or specified using size descriptors. | 32 MB |
| performance.md-cache-timeout | The time period in seconds which controls when metadata cache has to be refreshed. If the age of cache is greater than this time-period, it is refreshed. Every time cache is refreshed, its age is reset to 0. | 0-60 seconds | 1 second |
| performance.use-anonymous-fd | This option requires open-behind to be on. For read operations, use anonymous FD when the original FD is open-behind and not yet opened in the backend. | Yes | No | Yes |
| performance.lazy-open | This option requires open-behind to be on. Perform an open in the backend only when a necessary FOP arrives (for example, write on the FD, unlink of the file). When this option is disabled, perform backend open immediately after an unwinding open. | Yes/No | Yes |
| server.allow-insecure | Allows client connections from unprivileged ports. By default, only privileged ports are allowed. This is a global setting for allowing insecure ports to be enabled for all exports using a single option. | on | off | off |
| Important
Turning server.allow-insecure to on allows ports to accept/reject messages from insecure ports. Enable this option only if your deployment requires it, for example if there are too many bricks in each volume, or if there are too many services which have already utilized all the privileged ports in the system. You can control access of only glusterFS FUSE-based clients. Use nfs.rpc-auth-* options for NFS access control.
| |||
| server.root-squash | Prevents root users from having root privileges, and instead assigns them the privileges of nfsnobody. This squashes the power of the root users, preventing unauthorized modification of files on the Red Hat Storage Servers. | on | off | off |
| server.anonuid | Value of the UID used for the anonymous user when root-squash is enabled. When root-squash is enabled, all the requests received from the root UID (that is 0) are changed to have the UID of the anonymous user. | 0 - 4294967295 | 65534 (this UID is also known as nfsnobody) |
| server.anongid | Value of the GID used for the anonymous user when root-squash is enabled. When root-squash is enabled, all the requests received from the root GID (that is 0) are changed to have the GID of the anonymous user. | 0 - 4294967295 | 65534 (this UID is also known as nfsnobody) |
| server.gid-timeout | The time period in seconds which controls when cached groups has to expire. This is the cache that contains the groups (GIDs) where a specified user (UID) belongs to. This option is used only when server.manage-gids is enabled. | 0-4294967295 seconds | 2 seconds |
| server.manage-gids | Resolve groups on the server-side. By enabling this option, the groups (GIDs) a user (UID) belongs to gets resolved on the server, instead of using the groups that were send in the RPC Call by the client. This option makes it possible to apply permission checks for users that belong to bigger group lists than the protocol supports (approximately 93). | on|off | off |
| server.statedump-path | Specifies the directory in which the statedump files must be stored. | /var/run/gluster (for a default installation) | Path to a directory |
| storage.health-check-interval | Sets the time interval in seconds for a filesystem health check. You can set it to 0 to disable. The POSIX translator on the bricks performs a periodic health check. If this check fails, the filesystem exported by the brick is not usable anymore and the brick process (glusterfsd) logs a warning and exits. | 0-4294967295 seconds | 30 seconds |
| storage.owner-uid | Sets the UID for the bricks of the volume. This option may be required when some of the applications need the brick to have a specific UID to function correctly. Example: For QEMU integration the UID/GID must be qemu:qemu, that is, 107:107 (107 is the UID and GID of qemu). | Any integer greater than or equal to -1. | The UID of the bricks are not changed. This is denoted by -1. |
| storage.owner-gid | Sets the GID for the bricks of the volume. This option may be required when some of the applications need the brick to have a specific GID to function correctly. Example: For QEMU integration the UID/GID must be qemu:qemu, that is, 107:107 (107 is the UID and GID of qemu). | Any integer greater than or equal to -1. | The GID of the bricks are not changed. This is denoted by -1. |
8.2. Configuring Transport Types for a Volume
- Unmount the volume on all the clients using the following command:
# umount mount-point - Stop the volumes using the following command:
# gluster volume stop volname - Change the transport type. For example, to enable both tcp and rdma execute the followimg command:
# gluster volume set volname config.transport tcp,rdma OR tcp OR rdma - Mount the volume on all the clients. For example, to mount using rdma transport, use the following command:
# mount -t glusterfs -o transport=rdma server1:/test-volume /mnt/glusterfs
8.3. Expanding Volumes
Note
Expanding a Volume
- From any server in the trusted storage pool, use the following command to probe the server on which you want to add a new brick :
# gluster peer probe HOSTNAMEFor example:# gluster peer probe server4 Probe successful - Add the brick using the following command:
# gluster volume add-brick VOLNAME NEW_BRICKFor example:# gluster volume add-brick test-volume server4:/exp4 Add Brick successfulIf you want to change the replica/stripe count, you must add the replica/stripe count to theadd-brickcommand.For example,# gluster volume add-brick replica 2 test-volume server4:/exp4When increasing the replica/stripe count of a distribute replicate/stripe volume, the number of replica/stripe bricks to be added must be equal to the number of distribute subvolumes. - Check the volume information using the following command:
# gluster volume infoThe command output displays information similar to the following:Volume Name: test-volume Type: Distribute-Replicate Status: Started Number of Bricks: 4 Bricks: Brick1: server1:/exp1 Brick2: server2:/exp2 Brick3: server3:/exp3 Brick4: server4:/exp4 - Rebalance the volume to ensure that files are distributed to the new brick. Use the rebalance command as described in Section 8.7, “Rebalancing Volumes”.
Important
add-brick command should be followed by a rebalance operation to ensure better utilization of the added bricks.
8.4. Shrinking Volumes
Note
Shrinking a Volume
- Remove a brick using the following command:
# gluster volume remove-brick VOLNAME BRICK startFor example:# gluster volume remove-brick test-volume server2:/exp2 start Remove Brick start successfulNote
If theremove-brickcommand is run withforceor without any option, the data on the brick that you are removing will no longer be accessible at the glusterFS mount point. When using thestartoption, the data is migrated to other bricks, and on a successful commit the removed brick's information is deleted from the volume configuration. Data can still be accessed directly on the brick. - You can view the status of the remove brick operation using the following command:
# gluster volume remove-brick VOLNAME BRICK statusFor example:# gluster volume remove-brick test-volume server2:/exp2 status Node Rebalanced-files size scanned failures status --------- ----------- ----------- ----------- ----------- ------------ localhost 16 16777216 52 0 in progress 192.168.1.1 13 16723211 47 0 in progress - When the data migration shown in the previous
statuscommand is complete, run the following command to commit the brick removal:# gluster volume remove-brick VOLNAME BRICK commitFor example,# gluster volume remove-brick test-volume server2:/exp2 commit - After the brick removal, you can check the volume information using the following command:
# gluster volume infoThe command displays information similar to the following:# gluster volume info Volume Name: test-volume Type: Distribute Status: Started Number of Bricks: 3 Bricks: Brick1: server1:/exp1 Brick3: server3:/exp3 Brick4: server4:/exp4
Shrinking a Geo-replicated Volume
- Remove a brick using the following command:
# gluster volume remove-brick VOLNAME BRICK startFor example:# gluster volume remove-brick MASTER_VOL MASTER_HOST:/exp2 start Remove Brick start successfulNote
If theremove-brickcommand is run withforceor without any option, the data on the brick that you are removing will no longer be accessible at the glusterFS mount point. When using thestartoption, the data is migrated to other bricks, and on a successful commit the removed brick's information is deleted from the volume configuration. Data can still be accessed directly on the brick. - Use geo-replication
config checkpointto ensure that all the data in that brick is synced to the slave.- Set a checkpoint to help verify the status of the data synchronization.
# gluster volume geo-replication MASTER_VOL SLAVE_HOST::SLAVE_VOL config checkpoint now - Monitor the checkpoint output using the following command, until the status displays: checkpoint as of
checkpoint as of <time of checkpoint creation> is completed at <time of completion>.# gluster volume geo-replication MASTER_VOL SLAVE_HOST::SLAVE_VOL status
- You can view the status of the remove brick operation using the following command:
# gluster volume remove-brick VOLNAME BRICK statusFor example:# gluster volume remove-brick MASTER_VOL MASTER_HOST:/exp2 status - Stop the geo-replication session between the master and the slave:
# gluster volume geo-replication MASTER_VOL SLAVE_HOST::SLAVE_VOL stop - When the data migration shown in the previous
statuscommand is complete, run the following command to commit the brick removal:# gluster volume remove-brick VOLNAME BRICK commitFor example,# gluster volume remove-brick MASTER_VOL MASTER_HOST:/exp2 commit - After the brick removal, you can check the volume information using the following command:
# gluster volume info - Start the geo-replication session between the hosts:
# gluster volume geo-replication MASTER_VOL SLAVE_HOST::SLAVE_VOL start
8.4.1. Stopping a remove-brick Operation
Important
remove-brick operation is a technology preview feature. Technology Preview features are not fully supported under Red Hat subscription level agreements (SLAs), may not be functionally complete, and are not intended for production use. However, these features provide early access to upcoming product innovations, enabling customers to test functionality and provide feedback during the development process. As Red Hat considers making future iterations of Technology Preview features generally available, we will provide commercially reasonable efforts to resolve any reported issues that customers experience when using these features.
remove-brick operation that is in progress can be stopped by using the stop command.
Note
remove-brick operation will not be migrated back to the same brick when the operation is stopped.
# gluster volume remove-brick VOLNAME BRICK stopgluster volume remove-brick di rhs1:/brick1/di21 rhs1:/brick1/di21 stop
Node Rebalanced-files size scanned failures skipped status run-time in secs
---- ------- ---- ---- ------ ----- ----- ------
localhost 23 376Bytes 34 0 0 stopped 2.00
rhs1 0 0Bytes 88 0 0 stopped 2.00
rhs2 0 0Bytes 0 0 0 not started 0.00
'remove-brick' process may be in the middle of a file migration.
The process will be fully stopped once the migration of the file is complete.
Please check remove-brick process for completion before doing any further brick related tasks on the volume.8.5. Migrating Volumes
Note
replace-brick operation, review the known issues related to replace-brick operation in the Red Hat Storage 3.0 Release Notes.
8.5.1. Replacing a Subvolume on a Distribute or Distribute-replicate Volume
- Add the new bricks to the volume.
# gluster volume add-brick VOLNAME [<stripe|replica> <COUNT>] NEW-BRICKExample 8.1. Adding a Brick to a Distribute Volume
# gluster volume add-brick test-volume server5:/exp5 Add Brick successful - Verify the volume information using the command:
# gluster volume info
 Volume Name: test-volume
    Type: Distribute
    Status: Started
    Number of Bricks: 5
    Bricks:
    Brick1: server1:/exp1
    Brick2: server2:/exp2
    Brick3: server3:/exp3
    Brick4: server4:/exp4
    Brick5: server5:/exp5
Note
In case of a Distribute-replicate or stripe volume, you must specify the replica or stripe count in theadd-brickcommand and provide the same number of bricks as the replica or stripe count to theadd-brickcommand. - Remove the bricks to be replaced from the subvolume.
- Start the
remove-brickoperation using the command:# gluster volume remove-brick VOLNAME [replica <COUNT>] <BRICK> startExample 8.2. Start a remove-brick operation on a distribute volume
#gluster volume remove-brick test-volume server2:/exp2 start Remove Brick start successful - View the status of the
remove-brickoperation using the command:# gluster volume remove-brick VOLNAME [replica <COUNT>] BRICK statusExample 8.3. View the Status of remove-brick Operation
# gluster volume remove-brick test-volume server2:/exp2 status
Node     Rebalanced-files size        scanned failures status
------------------------------------------------------------------
server2  16               16777216    52      0        in progress
Keep monitoring theremove-brickoperation status by executing the above command. When the value of the status field is set tocompletein the output ofremove-brickstatus command, proceed further. - Commit the
remove-brickoperation using the command:#gluster volume remove-brick VOLNAME [replica <COUNT>] <BRICK> commitExample 8.4. Commit the remove-brick Operation on a Distribute Volume
#gluster volume remove-brick test-volume server2:/exp2 commit - Verify the volume information using the command:
# gluster volume info Volume Name: test-volume Type: Distribute Status: Started Number of Bricks: 4 Bricks: Brick1: server1:/exp1 Brick3: server3:/exp3 Brick4: server4:/exp4 Brick5: server5:/exp5 - Verify the content on the brick after committing the
remove-brickoperation on the volume. If there are any files leftover, copy it through FUSE or NFS mount.- Verify if there are any pending files on the bricks of the subvolume.Along with files, all the application-specific extended attributes must be copied. glusterFS also uses extended attributes to store its internal data. The extended attributes used by glusterFS are of the form
trusted.glusterfs.*,trusted.afr.*, andtrusted.gfid. Any extended attributes other than ones listed above must also be copied.To copy the application-specific extended attributes and to achieve a an effect similar to the one that is described above, use the following shell script:Syntax:# copy.sh <glusterfs-mount-point> <brick>Example 8.5. Code Snippet Usage
If the mount point is/mnt/glusterfsand brick path is/export/brick1, then the script must be run as:# copy.sh /mnt/glusterfs /export/brick#!/bin/bash MOUNT=$1 BRICK=$2 for file in `find $BRICK ! -type d`; do rpath=`echo $file | sed -e "s#$BRICK\(.*\)#\1#g"` rdir=`dirname $rpath` cp -fv $file $MOUNT/$rdir; for xattr in `getfattr -e hex -m. -d $file 2>/dev/null | sed -e '/^#/d' | grep -v -E "trusted.glusterfs.*" | grep -v -E "trusted.afr.*" | grep -v "trusted.gfid"`; do key=`echo $xattr | cut -d"=" -f 1` value=`echo $xattr | cut -d"=" -f 2` setfattr $MOUNT/$rpath -n $key -v $value done done - To identify a list of files that are in a split-brain state, execute the command:
#gluster volume heal test-volume info - If there are any files listed in the output of the above command, delete those files from the mount point and manually retain the correct copy of the file after comparing the files across the bricks in a replica set. Selecting the correct copy of the file needs manual intervention by the System Administrator.
8.5.2. Replacing an Old Brick with a New Brick on a Replicate or Distribute-replicate Volume
- Ensure that the new brick (
sys5:/home/gfs/r2_5) that replaces the old brick (sys0:/home/gfs/r2_0) is empty. Ensure that all the bricks are online. The brick that must be replaced can be in an offline state. - Bring the brick that must be replaced to an offline state, if it is not already offline.
- Identify the PID of the brick to be replaced, by executing the command:
# gluster volume status Status of volume: r2 Gluster process Port Online Pid ------------------------------------------------------- Brick sys0:/home/gfs/r2_0 49152 Y 5342 Brick sys1:/home/gfs/r2_1 49153 Y 5354 Brick sys2:/home/gfs/r2_2 49154 Y 5365 Brick sys3:/home/gfs/r2_3 49155 Y 5376 - Log in to the host on which the brick to be replaced has its process running and kill the brick.
#kill -9 <PID> - Ensure that the brick to be replaced is offline and the other bricks are online by executing the command:
# gluster volume status
Status of volume: r2
Gluster process                  Port    Online  Pid
------------------------------------------------------
Brick sys0:/home/gfs/r2_0         N/A      N    5342

Brick sys1:/home/gfs/r2_1         49153    Y    5354

Brick sys2:/home/gfs/r2_2         49154    Y    5365

Brick sys3:/home/gfs/r2_3         49155    Y    5376
- Create a FUSE mount point from any server to edit the extended attributes. Using the NFS and CIFS mount points, you will not be able to edit the extended attributes.
- Perform the following operations to change the Automatic File Replication extended attributes so that the heal process happens from the other brick (
sys1:/home/gfs/r2_1) in the replica pair to the new brick (sys5:/home/gfs/r2_5).Note that/mnt/r2is the FUSE mount path.- Create a new directory on the mount point and ensure that a directory with such a name is not already present.
#mkdir /mnt/r2/<name-of-nonexistent-dir> - Delete the directory and set the extended attributes.
#rmdir /mnt/r2/<name-of-nonexistent-dir>#setfattr -n trusted.non-existent-key -v abc /mnt/r2 #setfattr -x trusted.non-existent-key /mnt/r2 - Ensure that the extended attributes on the other bricks in the replica (in this example,
trusted.afr.r2-client-0) is not set to zero.#getfattr -d -m. -e hex /home/gfs/r2_1 # file: home/gfs/r2_1 security.selinux=0x756e636f6e66696e65645f753a6f626a6563745f723a66696c655f743a733000 trusted.afr.r2-client-0=0x000000000000000300000002 trusted.afr.r2-client-1=0x000000000000000000000000 trusted.gfid=0x00000000000000000000000000000001 trusted.glusterfs.dht=0x0000000100000000000000007ffffffe trusted.glusterfs.volume-id=0xde822e25ebd049ea83bfaa3c4be2b440
- Execute the
replace-brickcommand with theforceoption:# gluster volume replace-brick r2 sys0:/home/gfs/r2_0 sys5:/home/gfs/r2_5 commit force volume replace-brick: success: replace-brick commit successful - Check if the new brick is online.
# gluster volume status Status of volume: r2 Gluster process Port Online Pid --------------------------------------------------------- Brick sys5:/home/gfs/r2_5 49156 Y 5731 Brick sys1:/home/gfs/r2_1 49153 Y 5354 Brick sys2:/home/gfs/r2_2 49154 Y 5365 Brick sys3:/home/gfs/r2_3 49155 Y 5376 - Ensure that after the self-heal completes, the extended attributes are set to zero on the other bricks in the replica.
# getfattr -d -m. -e hex /home/gfs/r2_1 getfattr: Removing leading '/' from absolute path names # file: home/gfs/r2_1 security.selinux=0x756e636f6e66696e65645f753a6f626a6563745f723a66696c655f743a733000 trusted.afr.r2-client-0=0x000000000000000000000000 trusted.afr.r2-client-1=0x000000000000000000000000 trusted.gfid=0x00000000000000000000000000000001 trusted.glusterfs.dht=0x0000000100000000000000007ffffffe trusted.glusterfs.volume-id=0xde822e25ebd049ea83bfaa3c4be2b440Note that in this example, the extended attributestrusted.afr.r2-client-0andtrusted.afr.r2-client-1are set to zero.
8.5.3. Replacing an Old Brick with a New Brick on a Distribute Volume
Important
- Replace a brick with a commit
forceoption:# gluster volume replace-brick VOLNAME <BRICK> <NEW-BRICK> commit forceExample 8.6. Replace a brick on a Distribute Volume
# gluster volume replace-brick r2 sys0:/home/gfs/r2_0 sys5:/home/gfs/r2_5 commit force volume replace-brick: success: replace-brick commit successful - Verify if the new brick is online.
# gluster volume status
Status of volume: r2
Gluster process                    Port    Online    Pid
---------------------------------------------------------
Brick sys5:/home/gfs/r2_5            49156    Y    5731

Brick sys1:/home/gfs/r2_1            49153    Y    5354

Brick sys2:/home/gfs/r2_2            49154    Y    5365

Brick sys3:/home/gfs/r2_3            49155    Y    5376
Note
replace-brick command options except the commit force option are deprecated.
8.6. Replacing Hosts
8.6.1. Replacing a Host Machine with a Different Hostname
Important
sys0.example.com and the replacement machine is sys5.example.com. The brick with an unrecoverable failure is sys0.example.com:/rhs/brick1/b1 and the replacement brick is sys5.example.com:/rhs/brick1/b1.
- Probe the new peer from one of the existing peers to bring it into the cluster.
# gluster peer probe sys5.example.com - Ensure that the new brick
(sys5.example.com:/rhs/brick1/b1)that replaces the old brick(sys0.example.com:/rhs/brick1/b1)is empty. - Create a FUSE mount point from any server to edit the extended attributes.
#mount -t glusterfs server-ip:/VOLNAME mount-point - Perform the following operations to change the Automatic File Replication extended attributes so that the heal process happens from the other brick (sys1.example.com:/rhs/brick1/b1) in the replica pair to the new brick (sys5.example.com:/rhs/brick1/b1). Note that /mnt/r2 is the FUSE mount path.
- Create a new directory on the mount point and ensure that a directory with such a name is not already present.
#mkdir /mnt/r2/<name-of-nonexistent-dir> - Delete the directory and set and delete the extended attributes.
#rmdir /mnt/r2/<name-of-nonexistent-dir> #setfattr -n trusted.non-existent-key -v abc /mnt/r2 #setfattr -x trusted.non-existent-key /mnt/r2 - Ensure that the extended attributes on the other bricks in the replica (in this example,
trusted.afr.vol-client-0) is not set to zero.#getfattr -d -m. -e hex /rhs/brick1/b1 # file: rhs/brick1/b1 security.selinux=0x756e636f6e66696e65645f753a6f626a6563745f723a66696c655f743a733000 trusted.afr.vol-client-0=0x000000000000000300000002 trusted.afr.vol-client-1=0x000000000000000000000000 trusted.gfid=0x00000000000000000000000000000001 trusted.glusterfs.dht=0x0000000100000000000000007ffffffe trusted.glusterfs.volume-id=0xde822e25ebd049ea83bfaa3c4be2b440
- Retrieve the brick paths in sys0.example.com using the following command:
#gluster volume info <VOLNAME>Volume Name: vol Type: Replicate Volume ID: 0xde822e25ebd049ea83bfaa3c4be2b440 Status: Started Snap Volume: no Number of Bricks: 1 x 2 = 2 Transport-type: tcp Bricks: Brick1: sys0.example.com:/rhs/brick1/b1 Brick2: sys1.example.com:/rhs/brick1/b1 Options Reconfigured: performance.readdir-ahead: on snap-max-hard-limit: 256 snap-max-soft-limit: 90 auto-delete: disableBrick path in sys0.example.com is /rhs/brick1/b1. This has to be replaced with the brick in the newly added host, sys5.example.com - Create the required brick path in sys5.example.com.For example, if /rhs/brick is the XFS mount point in sys5.example.com, then create a brick directory in that path.
# mkdir /rhs/brick1/b1 - Execute the
replace-brickcommand with the force option:# gluster volume replace-brick vol sys0.example.com:/rhs/brick1/b1 sys5.example.com:/rhs/brick1/b1 commit force volume replace-brick: success: replace-brick commit successful - Verify if the new brick is online.
# gluster volume status Status of volume: vol Gluster process Port Online Pid Brick sys5.example.com:/rhs/brick1/b1 49156 Y 5731 Brick sys1.example.com:/rhs/brick1/b1 49153 Y 5354 - Initiate self-heal on the volume. The status of the heal process can be seen by executing the command:
#gluster volume heal VOLNAME full - The status of the heal process can be seen by executing the command:
# gluster volume heal VOLNAME info - Detach the original machine from the trusted pool.
#gluster peer detach sys0.example.com - Ensure that after the self-heal completes, the extended attributes are set to zero on the other bricks in the replica.
#getfattr -d -m. -e hex /rhs/brick1/b1
getfattr: Removing leading '/' from absolute path names
#file: rhs/brick1/b1
security.selinux=0x756e636f6e66696e65645f753a6f626a6563745f723a66696c655f743a733000
trusted.afr.vol-client-0=0x000000000000000000000000
trusted.afr.vol-client-1=0x000000000000000000000000
trusted.gfid=0x00000000000000000000000000000001
trusted.glusterfs.dht=0x0000000100000000000000007ffffffe
trusted.glusterfs.volume-id=0xde822e25ebd049ea83bfaa3c4be2b440
Note
Note that in this example, the extended attributestrusted.afr.vol-client-0andtrusted.afr.vol-client-1are set to zero.
8.6.2. Replacing a Host Machine with the Same Hostname
/var/lib/glusterd/glusterd/info file.
Warning
- Stop the
glusterdservice on the sys0.example.com.# service glusterd stop - Retrieve the UUID of the failed host (sys0.example.com) from another of the Red Hat Storage Trusted Storage Pool by executing the following command:
# gluster peer status
Number of Peers: 2

Hostname: sys1.example.com
Uuid: 1d9677dc-6159-405e-9319-ad85ec030880
State: Peer in Cluster (Connected)

Hostname: sys0.example.com
Uuid: b5ab2ec3-5411-45fa-a30f-43bd04caf96b
State: Peer Rejected (Connected)
Note that the UUID of the failed host isb5ab2ec3-5411-45fa-a30f-43bd04caf96b - Edit the
glusterd.infofile in the new host and include the UUID of the host you retrieved in the previous step.# cat /var/lib/glusterd/glusterd.info UUID=b5ab2ec3-5411-45fa-a30f-43bd04caf96b operating-version=30000 - Select any host (say for example, sys1.example.com) in the Red Hat Storage Trusted Storage Pool and retrieve its UUID from the
glusterd.infofile.# grep -i uuid /var/lib/glusterd/glusterd.info UUID=8cc6377d-0153-4540-b965-a4015494461c - Gather the peer information files from the host (sys1.example.com) in the previous step. Execute the following command in that host (sys1.example.com) of the cluster.
# cp -a /var/lib/glusterd/peers /tmp/ - Remove the peer file corresponding to the failed host (sys0.example.com) from the
/tmp/peersdirectory.# rm /tmp/peers/b5ab2ec3-5411-45fa-a30f-43bd04caf96bNote that the UUID corresponds to the UUID of the failed host (sys0.example.com) retrieved in Step 2. - Archive all the files and copy those to the failed host(sys0.example.com).
# cd /tmp; tar -cvf peers.tar peers - Copy the above created file to the new peer.
# scp /tmp/peers.tar root@sys0.example.com:/tmp - Copy the extracted content to the
/var/lib/glusterd/peersdirectory. Execute the following command in the newly added host with the same name (sys0.example.com) and IP Address.# tar -xvf /tmp/peers.tar # cp peers/* /var/lib/glusterd/peers/ - Select any other host in the cluster other than the node (sys1.example.com) selected in step 4. Copy the peer file corresponding to the UUID of the host retrieved in Step 4 to the new host (sys0.example.com) by executing the following command:
# scp /var/lib/glusterd/peers/<UUID-retrieved-from-step4> root@Example1:/var/lib/glusterd/peers/ - Retrieve the brick directory information, by executing the following command in any host in the cluster.
# gluster volume infoVolume Name: vol Type: Replicate Volume ID: 0x8f16258c88a0498fbd53368706af7496 Status: Started Snap Volume: no Number of Bricks: 1 x 2 = 2 Transport-type: tcp Bricks: Brick1: sys0.example.com:/rhs/brick1/b1 Brick2: sys1.example.com:/rhs/brick1/b1 Options Reconfigured: performance.readdir-ahead: on snap-max-hard-limit: 256 snap-max-soft-limit: 90 auto-delete: disableIn the above example, the brick path in sys0.example.com is,/rhs/brick1/b1. If the brick path does not exist in sys0.example.com, perform steps a, b, and c.- Create a brick path in the host, sys0.example.com.
mkdir /rhs/brick1/b1 - Retrieve the volume ID from the existing brick of another host by executing the following command on any host that contains the bricks for the volume.
# getfattr -d -m. -ehex <brick-path>Copy the volume-id.# getfattr -d -m. -ehex /rhs/brick1/b1 getfattr: Removing leading '/' from absolute path names # file: rhs/brick1/b1 trusted.afr.vol-client-0=0x000000000000000000000000 trusted.afr.vol-client-1=0x000000000000000000000000 trusted.gfid=0x00000000000000000000000000000001 trusted.glusterfs.dht=0x0000000100000000000000007ffffffe trusted.glusterfs.volume-id=0x8f16258c88a0498fbd53368706af7496In the above example, the volume id is 0x8f16258c88a0498fbd53368706af7496 - Set this volume ID on the brick created in the newly added host and execute the following command on the newly added host (sys0.example.com).
# setfattr -n trusted.glusterfs.volume-id -v <volume-id> <brick-path>For Example:# setfattr -n trusted.glusterfs.volume-id -v 0x8f16258c88a0498fbd53368706af7496 /rhs/brick2/drv2
Data recovery is possible only if the volume type is replicate or distribute-replicate. If the volume type is plain distribute, you can skip steps 12 and 13. - Create a FUSE mount point to mount the glusterFS volume.
# mount -t glusterfs <server-name>:/VOLNAME <mount> - Perform the following operations to change the Automatic File Replication extended attributes so that the heal process happens from the other brick (sys1.example.com:/rhs/brick1/b1) in the replica pair to the new brick (sys0.example.com:/rhs/brick1/b1). Note that /mnt/r2 is the FUSE mount path.
- Create a new directory on the mount point and ensure that a directory with such a name is not already present.
#mkdir /mnt/r2/<name-of-nonexistent-dir> - Delete the directory and set the extended attributes.
#rmdir /mnt/r2/<name-of-nonexistent-dir> #setfattr -n trusted.non-existent-key -v abc /mnt/r2 #setfattr -x trusted.non-existent-key /mnt/r2 - Ensure that the extended attributes on the other bricks in the replica (in this example,
trusted.afr.vol-client-0) is not set to zero.#getfattr -d -m. -e hex /rhs/brick1/b1 # file: rhs/brick1/b1 security.selinux=0x756e636f6e66696e65645f753a6f626a6563745f723a66696c655f743a733000 trusted.afr.vol-client-0=0x000000000000000300000002 trusted.afr.vol-client-1=0x000000000000000000000000 trusted.gfid=0x00000000000000000000000000000001 trusted.glusterfs.dht=0x0000000100000000000000007ffffffe trusted.glusterfs.volume-id=0x8f16258c88a0498fbd53368706af7496
- Start the
glusterdservice.# service glusterd start - Perform the self-heal operation on the restored volume.
# gluster volume heal VOLNAME full - You can view the gluster volume self-heal status by executing the following command:
# gluster volume heal VOLNAME info
If there are only 2 hosts in the Red Hat Storage Trusted Storage Pool where the host sys0.example.com must be replaced, perform the following steps:
- Stop the
glusterdservice on sys0.example.com.# service glusterd stop - Retrieve the UUID of the failed host (sys0.example.com) from another peer in the Red Hat Storage Trusted Storage Pool by executing the following command:
# gluster peer status
Number of Peers: 1

Hostname: sys0.example.com
Uuid: b5ab2ec3-5411-45fa-a30f-43bd04caf96b
State: Peer Rejected (Connected)
Note that the UUID of the failed host isb5ab2ec3-5411-45fa-a30f-43bd04caf96b - Edit the
glusterd.infofile in the new host (sys0.example.com) and include the UUID of the host you retrieved in the previous step.# cat /var/lib/glusterd/glusterd.info UUID=b5ab2ec3-5411-45fa-a30f-43bd04caf96b operating-version=30000 - Create the peer file in the newly created host (sys0.example.com) in /var/lib/glusterd/peers/<uuid-of-other-peer> with the name of the UUID of the other host (sys1.example.com).UUID of the host can be obtained with the following:
# gluster system:: uuid getExample 8.7. Example to obtain the UUID of a host
For example,
# gluster system:: uuid get
UUID: 1d9677dc-6159-405e-9319-ad85ec030880
In this case the UUID of other peer is1d9677dc-6159-405e-9319-ad85ec030880 - Create a file
/var/lib/glusterd/peers/1d9677dc-6159-405e-9319-ad85ec030880in sys0.example.com, with the following command:# touch /var/lib/glusterd/peers/1d9677dc-6159-405e-9319-ad85ec030880The file you create must contain the following information:UUID=<uuid-of-other-node> state=3 hostname=<hostname> - Continue to perform steps 11 to 16 as documented in the previous procedure.
8.7. Rebalancing Volumes
add-brick or remove-brick commands, the data on the volume needs to be rebalanced among the servers.
Note
rebalance operation using the start option. In a replicated volume, at least one of the bricks in the replica should be online.
# gluster volume rebalance VOLNAME start# gluster volume rebalance test-volume start
Starting rebalancing on volume test-volume has been successfulrebalance operation, without force option, will attempt to balance the space utilized across nodes, thereby skipping files to rebalance in case this would cause the target node of migration to have lesser available space than the source of migration. This leads to link files that are still left behind in the system and hence may cause performance issues in access when a large number of such link files are present.
volume rebalance: VOLNAME: failed: Volume VOLNAME has one or more connected clients of a version lower than Red Hat Storage-2.1 update 5. Starting rebalance in this state could lead to data loss.
Please disconnect those clients before attempting this command again.
Warning
Rebalance command can be executed with the force option even when the older clients are connected to the cluster. However, this could lead to a data loss situation.
rebalance operation with force, balances the data based on the layout, and hence optimizes or does away with the link files, but may lead to an imbalanced storage space used across bricks. This option is to be used only when there are a large number of link files in the system.
# gluster volume rebalance VOLNAME start force# gluster volume rebalance test-volume start force
Starting rebalancing on volume test-volume has been successful8.7.1. Displaying Status of a Rebalance Operation
# gluster volume rebalance VOLNAME status# gluster volume rebalance test-volume status
Node Rebalanced-files size scanned failures status
--------- ----------- ----------- ----------- ----------- ------------
localhost 112 14567 150 0 in progress
10.16.156.72 140 2134 201 2 in progress# gluster volume rebalance test-volume status
Node Rebalanced-files size scanned failures status
--------- ----------- ----------- ----------- ----------- ------------
localhost 112 14567 150 0 in progress
10.16.156.72 140 2134 201 2 in progresscompleted the following when the rebalance is complete:
# gluster volume rebalance test-volume status
     Node    Rebalanced-files          size       scanned      failures         status
---------         -----------   -----------   -----------   -----------   ------------
localhost                 112         15674           170            0       completed
10.16.156.72              140          3423           321            2       completed
8.7.2. Stopping a Rebalance Operation
# gluster volume rebalance VOLNAME stop# gluster volume rebalance test-volume stop
Node Rebalanced-files size scanned failures status
--------- ----------- ----------- ----------- ----------- ------------
localhost 102 12134 130 0 stopped
10.16.156.72 110 2123 121 2 stopped
Stopped rebalance process on volume test-volume8.8. Stopping Volumes
# gluster volume stop VOLNAME# gluster volume stop test-volume
Stopping volume will make its data inaccessible. Do you want to continue? (y/n) y
Stopping volume test-volume has been successful8.9. Deleting Volumes
# gluster volume delete VOLNAME# gluster volume delete test-volume
Deleting volume will erase all information about the volume. Do you want to continue? (y/n) y
Deleting volume test-volume has been successful8.10. Managing Split-brain
- Data split-brain: Contents of the file under split-brain are different in different replica pairs and automatic healing is not possible.
- Metadata split-brain : The metadata of the files (example, user defined extended attribute) are different and automatic healing is not possible.
- Entry split-brain: This happens when a file have different gfids on each of the replica pair.
8.10.1. Preventing Split-brain
8.10.1.1. Configuring Server-Side Quorum
cluster.server-quorum-type volume option as server. For more information on this volume option, see Section 8.1, “Configuring Volume Options”.
glusterd service. Whenever the glusterd service on a machine observes that the quorum is not met, it brings down the bricks to prevent data split-brain. When the network connections are brought back up and the quorum is restored, the bricks in the volume are brought back up. When the quorum is not met for a volume, any commands that update the volume configuration or peer addition or detach are not allowed. It is to be noted that both, the glusterd service not running and the network connection between two machines being down are treated equally.
# gluster volume set all cluster.server-quorum-ratio PERCENTAGE# gluster volume set all cluster.server-quorum-ratio 51%# gluster volume set VOLNAME cluster.server-quorum-type serverImportant
8.10.1.2. Configuring Client-Side Quorum
m of n replica groups only m replica groups becomes read-only and the rest of the replica groups continue to allow data modifications.
Example 8.8. Client-Side Quorum

A, only replica group A becomes read-only. Replica groups B and C continue to allow data modifications.
Important
- If
cluster.quorum-typeisfixed, writes will continue till number of bricks up and running in replica pair is equal to the count specified incluster.quorum-countoption. This is irrespective of first or second or third brick. All the bricks are equivalent here. - If
cluster.quorum-typeisauto, then at least ceil (n/2) number of bricks need to be up to allow writes, wherenis the replica count. For example,In addition, forfor replica 2, ceil(2/2)= 1 brick for replica 3, ceil(3/2)= 2 bricks for replica 4, ceil(4/2)= 2 bricks for replica 5, ceil(5/2)= 3 bricks for replica 6, ceil(6/2)= 3 bricks and so onauto, if the number of bricks that are up is exactly ceil (n/2), andnis an even number, then the first brick of the replica must also be up to allow writes. For replica 6, if more than 3 bricks are up, then it can be any of the bricks. But if exactly 3 bricks are up, then the first brick has to be up and running. - In a three-way replication setup, it is recommended to set
cluster.quorum-typetoautoto avoid split brains. If the quorum is not met, the replica pair becomes read-only.
cluster.quorum-type and cluster.quorum-count options. For more information on these options, see Section 8.1, “Configuring Volume Options”.
Important
gluster volume set VOLNAME group virt command. If on a two replica set up, if the first brick in the replica pair is offline, virtual machines will be paused because quorum is not met and writes are disallowed.
# gluster volume reset VOLNAME quorum-typeThis example provides information on how to set server-side and client-side quorum on a Distribute Replicate volume to avoid split-brain scenario. The configuration of this example has 2 X 2 ( 4 bricks) Distribute Replicate setup.
# gluster volume info testvol
Volume Name: testvol
Type: Distributed-Replicate
Volume ID: 0df52d58-bded-4e5d-ac37-4c82f7c89cfh
Status: Created
Number of Bricks: 2 x 2 = 4
Transport-type: tcp
Bricks:
Brick1: server1:/bricks/brick1
Brick2: server2:/bricks/brick2
Brick3: server3:/bricks/brick3
Brick4: server4:/bricks/brick4
# gluster volume set VOLNAME cluster.server-quorum-type server# gluster volume set all cluster.server-quorum-ratio 51%quorum-typeoption to auto to allow writes to the file only if the percentage of active replicate bricks is more than 50% of the total number of bricks that constitute that replica.
# gluster volume set VOLNAME quorum-type autoImportant
n) in a replica set is an even number, it is mandatory that the n/2 count must consist of the primary brick and it must be up and running. If n is an odd number, the n/2 count can have any brick up and running, that is, the primary brick need not be up and running to allow writes.
8.10.2. Recovering from File Split-brain
Steps to recover from a file split-brain
- Run the following command to obtain the path of the file that is in split-brain:
# gluster volume heal VOLNAME info split-brainFrom the command output, identify the files for which file operations performed from the client keep failing with Input/Output error. - Close the applications that opened split-brain file from the mount point. If you are using a virtual machine, you must power off the machine.
- Obtain and verify the AFR changelog extended attributes of the file using the
getfattrcommand. Then identify the type of split-brain to determine which of the bricks contains the 'good copy' of the file.getfattr -d -m . -e hex <file-path-on-brick>For example,# getfattr -d -e hex -m. brick-a/file.txt \#file: brick-a/file.txt security.selinux=0x726f6f743a6f626a6563745f723a66696c655f743a733000 trusted.afr.vol-client-2=0x000000000000000000000000 trusted.afr.vol-client-3=0x000000000200000000000000 trusted.gfid=0x307a5c9efddd4e7c96e94fd4bcdcbd1bThe extended attributes withtrusted.afr.VOLNAMEvolname-client-<subvolume-index>are used by AFR to maintain changelog of the file. The values of thetrusted.afr.VOLNAMEvolname-client-<subvolume-index>are calculated by the glusterFS client (FUSE or NFS-server) processes. When the glusterFS client modifies a file or directory, the client contacts each brick and updates the changelog extended attribute according to the response of the brick.subvolume-indexis thebrick number - 1ofgluster volume info VOLNAMEoutput.For example,# gluster volume info vol Volume Name: vol Type: Distributed-Replicate Volume ID: 4f2d7849-fbd6-40a2-b346-d13420978a01 Status: Created Number of Bricks: 4 x 2 = 8 Transport-type: tcp Bricks: brick-a: server1:/gfs/brick-a brick-b: server1:/gfs/brick-b brick-c: server1:/gfs/brick-c brick-d: server1:/gfs/brick-d brick-e: server1:/gfs/brick-e brick-f: server1:/gfs/brick-f brick-g: server1:/gfs/brick-g brick-h: server1:/gfs/brick-hIn the example above:Brick | Replica set | Brick subvolume index ---------------------------------------------------------------------------- -/gfs/brick-a | 0 | 0 -/gfs/brick-b | 0 | 1 -/gfs/brick-c | 1 | 2 -/gfs/brick-d | 1 | 3 -/gfs/brick-e | 2 | 4 -/gfs/brick-f | 2 | 5 -/gfs/brick-g | 3 | 6 -/gfs/brick-h | 3 | 7 ```Each file in a brick maintains the changelog of itself and that of the files present in all the other bricks in it's replica set as seen by that brick.In the example volume given above, all files in brick-a will have 2 entries, one for itself and the other for the file present in it's replica pair. The following is the changelog for brick-b,- trusted.afr.vol-client-0=0x000000000000000000000000 - is the changelog for itself (brick-a)
- trusted.afr.vol-client-1=0x000000000000000000000000 - changelog for brick-b as seen by brick-a
Likewise, all files in brick-b will have the following:- trusted.afr.vol-client-0=0x000000000000000000000000 - changelog for brick-a as seen by brick-b
- trusted.afr.vol-client-1=0x000000000000000000000000 - changelog for itself (brick-b)
The same can be extended for other replica pairs.Interpreting changelog (approximate pending operation count) valueEach extended attribute has a value which is 24 hexa decimal digits. First 8 digits represent changelog of data. Second 8 digits represent changelog of metadata. Last 8 digits represent Changelog of directory entries.
Pictorially representing the same is as follows:0x 000003d7 00000001 00000000110 | | | | | \_ changelog of directory entries | \_ changelog of metadata \ _ changelog of dataFor directories, metadata and entry changelogs are valid. For regular files, data and metadata changelogs are valid. For special files like device files and so on, metadata changelog is valid. When a file split-brain happens it could be either be data split-brain or meta-data split-brain or both.The following is an example of both data, metadata split-brain on the same file:# getfattr -d -m . -e hex /gfs/brick-?/a getfattr: Removing leading '/' from absolute path names \#file: gfs/brick-a/a trusted.afr.vol-client-0=0x000000000000000000000000 trusted.afr.vol-client-1=0x000003d70000000100000000 trusted.gfid=0x80acdbd886524f6fbefa21fc356fed57 \#file: gfs/brick-b/a trusted.afr.vol-client-0=0x000003b00000000100000000 trusted.afr.vol-client-1=0x000000000000000000000000 trusted.gfid=0x80acdbd886524f6fbefa21fc356fed57Scrutinize the changelogsThe changelog extended attributes on file/gfs/brick-a/aare as follows:- The first 8 digits of
trusted.afr.vol-client-0 are all zeros (0x00000000................),The first 8 digits oftrusted.afr.vol-client-1are not all zeros (0x000003d7................).So the changelog on/gfs/brick-a/aimplies that some data operations succeeded on itself but failed on/gfs/brick-b/a. - The second 8 digits of
trusted.afr.vol-client-0 are all zeros (0x........00000000........), and the second 8 digits oftrusted.afr.vol-client-1are not all zeros (0x........00000001........).So the changelog on/gfs/brick-a/aimplies that some metadata operations succeeded on itself but failed on/gfs/brick-b/a.
The changelog extended attributes on file/gfs/brick-b/aare as follows:- The first 8 digits of
trusted.afr.vol-client-0are not all zeros (0x000003b0................).The first 8 digits oftrusted.afr.vol-client-1are all zeros (0x00000000................).So the changelog on/gfs/brick-b/aimplies that some data operations succeeded on itself but failed on/gfs/brick-a/a. - The second 8 digits of
trusted.afr.vol-client-0are not all zeros (0x........00000001........)The second 8 digits oftrusted.afr.vol-client-1are all zeros (0x........00000000........).So the changelog on/gfs/brick-b/aimplies that some metadata operations succeeded on itself but failed on/gfs/brick-a/a.
Here, both the copies have data, metadata changes that are not on the other file. Hence, it is both data and metadata split-brain.Deciding on the correct copyYou must inspect
statandgetfattroutput of the files to decide which metadata to retain and contents of the file to decide which data to retain. To continue with the example above, here, we are retaining the data of/gfs/brick-a/aand metadata of/gfs/brick-b/a.Resetting the relevant changelogs to resolve the split-brainResolving data split-brainYou must change the changelog extended attributes on the files as if some data operations succeeded on
/gfs/brick-a/abut failed on /gfs/brick-b/a. But/gfs/brick-b/ashouldnothave any changelog showing data operations succeeded on/gfs/brick-b/abut failed on/gfs/brick-a/a. You must reset the data part of the changelog ontrusted.afr.vol-client-0of/gfs/brick-b/a.Resolving metadata split-brainYou must change the changelog extended attributes on the files as if some metadata operations succeeded on/gfs/brick-b/abut failed on/gfs/brick-a/a. But/gfs/brick-a/ashouldnothave any changelog which says some metadata operations succeeded on/gfs/brick-a/abut failed on/gfs/brick-b/a. You must reset metadata part of the changelog ontrusted.afr.vol-client-1of/gfs/brick-a/aRun the following commands to reset the extended attributes.- On
/gfs/brick-b/a, fortrusted.afr.vol-client-0 0x000003b00000000100000000to0x000000000000000100000000, execute the following command:# setfattr -n trusted.afr.vol-client-0 -v 0x000000000000000100000000 /gfs/brick-b/a - On
/gfs/brick-a/a, fortrusted.afr.vol-client-1 0x0000000000000000ffffffffto0x000003d70000000000000000, execute the following command:# setfattr -n trusted.afr.vol-client-1 -v 0x000003d70000000000000000 /gfs/brick-a/a
After you reset the extended attributes, the changelogs would look similar to the following:# getfattr -d -m . -e hex /gfs/brick-?/a getfattr: Removing leading '/' from absolute path names \#file: gfs/brick-a/a trusted.afr.vol-client-0=0x000000000000000000000000 trusted.afr.vol-client-1=0x000003d70000000000000000 trusted.gfid=0x80acdbd886524f6fbefa21fc356fed57 \#file: gfs/brick-b/a trusted.afr.vol-client-0=0x000000000000000100000000 trusted.afr.vol-client-1=0x000000000000000000000000 trusted.gfid=0x80acdbd886524f6fbefa21fc356fed57Resolving Directory entry split-brainAFR has the ability to conservatively merge different entries in the directories when there is a split-brain on directory. If on one brick directory
storagehas entries1,2and has entries3,4on the other brick then AFR will merge all of the entries in the directory to have1, 2, 3, 4entries in the same directory. But this may result in deleted files to re-appear in case the split-brain happens because of deletion of files on the directory. Split-brain resolution needs human intervention when there is at least one entry which has same file name but differentgfidin that directory.For example:Onbrick-athe directory has 2 entriesfile1withgfid_xandfile2. Onbrick-bdirectory has 2 entriesfile1withgfid_yandfile3. Here the gfid's offile1on the bricks are different. These kinds of directory split-brain needs human intervention to resolve the issue. You must remove eitherfile1onbrick-aor thefile1onbrick-bto resolve the split-brain.In addition, the correspondinggfid-linkfile must be removed. Thegfid-linkfiles are present in the .glusterfsdirectory in the top-level directory of the brick. If the gfid of the file is0x307a5c9efddd4e7c96e94fd4bcdcbd1b(the trusted.gfid extended attribute received from thegetfattrcommand earlier), the gfid-link file can be found at/gfs/brick-a/.glusterfs/30/7a/307a5c9efddd4e7c96e94fd4bcdcbd1b.Warning
Before deleting thegfid-link, you must ensure that there are no hard links to the file present on that brick. If hard-links exist, you must delete them. - Trigger self-heal by running the following command:
# ls -l <file-path-on-gluster-mount>or# gluster volume heal VOLNAME
8.10.3. Triggering Self-Healing on Replicated Volumes
- To view the list of files that need healing:
# gluster volume heal VOLNAME infoFor example, to view the list of files on test-volume that need healing:# gluster volume heal test-volume info Brick server1:/gfs/test-volume_0 Number of entries: 0 Brick server2:/gfs/test-volume_1 /95.txt /32.txt /66.txt /35.txt /18.txt /26.txt - Possibly undergoing heal /47.txt /55.txt /85.txt - Possibly undergoing heal ... Number of entries: 101 - To trigger self-healing only on the files which require healing:
# gluster volume heal VOLNAMEFor example, to trigger self-healing on files which require healing on test-volume:# gluster volume heal test-volume Heal operation on volume test-volume has been successful - To trigger self-healing on all the files on a volume:
# gluster volume heal VOLNAME fullFor example, to trigger self-heal on all the files on test-volume:# gluster volume heal test-volume full Heal operation on volume test-volume has been successful - To view the list of files on a volume that are in a split-brain state:
# gluster volume heal VOLNAME info split-brainFor example, to view the list of files on test-volume that are in a split-brain state:# gluster volume heal test-volume info split-brain Brick server1:/gfs/test-volume_2 Number of entries: 12 at path on brick ---------------------------------- 2012-06-13 04:02:05 /dir/file.83 2012-06-13 04:02:05 /dir/file.28 2012-06-13 04:02:05 /dir/file.69 Brick server2:/gfs/test-volume_2 Number of entries: 12 at path on brick ---------------------------------- 2012-06-13 04:02:05 /dir/file.83 2012-06-13 04:02:05 /dir/file.28 2012-06-13 04:02:05 /dir/file.69 ...
8.11. Non Uniform File Allocation (NUFA)
Important
gluster volume set VOLNAME cluster.nufa enable on.
Important
- Volumes with only with one brick per server.
- For use with a FUSE client. NUFA is not supported with NFS or SMB.
- A client that is mounting a NUFA-enabled volume must be present within the trusted storage pool.
Chapter 9. Configuring Red Hat Storage for Enhancing Performance
/usr/lib/glusterfs/.unsupported/rhs-system-init.sh. You can refer the same for more information.
9.1. Disk Configuration
9.1.1. Hardware RAID
9.1.2. JBOD
Important
- The number of disks supported per server in the JBOD configuration is limited to 24.
- JBOD is supported with three-way replication.
raw drives to the operating system using a pass-through mode.
9.2. Brick Configuration
Procedure 9.1. Brick Configuration
LVM layer
- Creating the Physical VolumeThe
pvcreatecommand is used to create the physical volume. The Logical Volume Manager can use a portion of the physical volume for storing its metadata while the rest is used as the data portion.Align the I/O at the Logical Volume Manager (LVM) layer using-- dataalignmentoption while creating the physical volume.The command is used in the following formatpvcreate --dataalignment alignment_value diskFor JBOD, use an alignment value of 256K.In case of hardware RAID, the alignment_value should be obtained by multiplying the RAID stripe unit size with the number of data disks. If 12 disks are used in a RAID 6 configuration, the number of data disks is 10; on the other hand, if 12 disks are used in a RAID 10 configuration, the number of data disks is 6.For example:- Run the following command for RAID 6 storage with 12 disks and a stripe unit size of 128KiB:
# pvcreate --dataalignment 1280K disk - Run the following command for RAID 10 storage with 12 disks and a stripe unit size of 256KiB:
# pvcreate --dataalignment 1536K disk - To view the previously configured physical volume settings for --
dataalignment, run the following command :# pvs -o +pe_start disk PV VG Fmt Attr PSize PFree 1st PE /dev/sdb lvm2 a-- 9.09t 9.09t 1.25m
- Creating the Volume GroupThe volume group is created using the
vgcreatecommand. In order to ensure that logical volumes created in the volume group are aligned with the underlying hardware RAID, it is important to use the-- physicalextentsizeoption.For JBOD, use thephysical extent sizeof 256 K.LVM currently supports only physical extent sizes that are a power of 2, whereas RAID full stripes are in general not a power of 2. Hence, getting proper alignment requires some extra work as outlined in this sub-section and in the sub-section on thin pool creation.Since a RAID full stripe may not be a power of 2, use the RAID stripe unit size, which is a power of 2, as the physical extent size when creating the volume group.Use thevgcreatecommand in the following format# vgcreate --physicalextentsize RAID_stripe_unit_size VOLGROUP physical_volumeFor example, run the following command for RAID-6 storage with a stripe unit size of 128K, and 12 disks (10 data disks):# vgcreate --physicalextentsize 128K VOLGROUP physical_volume - Creating the Thin PoolA thin pool provides a common pool of storage for thin logical volumes (LVs) and their snapshot volumes, if any. It also maintains the metadata required to track the (dynamically) allocated regions of the thin LVs and snapshots. Internally, a thin pool consists of a separate data device and a metadata device.To create a thin pool you must first create an LV to serve as the metadata device, then create a logical volume to serve as the data device and finally create a thin pool from the data LV and the metadata LVCreating an LV to serve as the metadata deviceThe maximum possible size for a metadata LV is 16 GiB. Red Hat Storage recommends creating the metadata device of the maximum supported size. You can allocate less than the maximum if space is a concern, but in this case you should allocate a minimum of 0.5% of the data device size.After choosing the size of the metadata device, adjust it to be a multiple of the RAID full stripe size to allow the LV to be aligned with the hardware RAID stripe. For JBOD, this adjustment is not necessary.For example in the case where a 16GiB device is created with RAID 6 with 128K stripe unit size, and 12 disks (RAID full stripe is 1280KiB):
KB_PER_GB=1048576
(( metadev_sz = 16 * $KB_PER_GB / 1280 ))
(( metadev_sz = $metadev_sz * 1280 ))
lvcreate -L ${metadev_sz}K --name metadata_device_name VOLGROUP
Creating an LV to serve as the data deviceAs in the case of the metadata device, adjust the data device size to be a multiple of the RAID full stripe size. For JBOD, this adjustment is not necessary.For example, in the case where a 512GiB device is created with RAID 6 with 128KiB stripe unit size, and 12 disks (RAID full stripe is 1280KiB).KB_PER_GB=1048576 (( datadev_sz = 512 * $KB_PER_GB / 1280 )) (( datadev_sz = $datadev_sz * 1280 )) lvcreate -L ${datadev_sz}K --name thin_pool VOLGROUPCreating a thin pool from the data LV and the metadata LVAn important parameter to be specified while creating a thin pool is the chunk size. For good performance, the chunk size for the thin pool and the parameters of the underlying hardware RAID storage should be chosen so that they work well together.For RAID-6 storage, the striping parameters should be chosen so that the full stripe size (stripe_unit size * number of data disks) is between 1MiB and 2MiB, preferably in the low end of the range. The thin pool chunk size should be chosen to match the RAID 6 full stripe size. Matching the chunk size to the full stripe size aligns thin pool allocations with RAID 6 stripes, which can lead to better performance. Limiting the chunk size to below 2MiB helps reduce performance problems due to excessive copy-on-write when snapshots are used.For example, for RAID 6 with 12 disks (10 data disks), stripe unit size should be chosen as 128KiB. This leads to a full stripe size of 1280KiB (1.25MiB). The thin pool should then be created with the chunk size of 1280KiB.For RAID 10 storage, the preferred stripe unit size is 256KiB. This can also serve as the thin pool chunk size. Note that RAID 10 is recommended when the workload has a large proportion of small file writes or random writes. In this case, a small thin pool chunk size is more appropriate, as it reduces copy-on-write overhead with snapshots.For JBOD, use a thin pool chunk size of 256 K.The following example shows how to create the thin pool from the data LV and metadata LV, created earlier:lvconvert --chunksize 1280K --thinpool VOLGROUP/thin_pool --poolmetadata VOLGROUP/metadata_device_nameBy default, the newly provisioned chunks in a thin pool are zeroed to prevent data leaking between different block devices. In the case of Red Hat Storage, where data is accessed via a file system, this option can be turned off for better performance.lvchange --zero n VOLGROUP/thin_pool - Creating a Thin Logical VolumeAfter the thin pool has been created as mentioned above, a thinly provisioned logical volume can be created in the thin pool to serve as storage for a brick of a Red Hat Storage volume.LVM allows multiple thinly-provisioned LVs to share a thin pool; this allows a common pool of physical storage to be used for multiple Red Hat Storage bricks and simplifies provisioning. However, such sharing of the thin pool metadata and data devices can impact performance in a number of ways.
Note
To avoid performance problems resulting from the sharing of the same thin pool, Red Hat Storage recommends that the LV for each Red Hat Storage brick have a dedicated thin pool of its own. As Red Hat Storage volume snapshots are created, snapshot LVs will get created and share the thin pool with the brick LVlvcreate --thin --name LV_name --virtualsize LV_size VOLGROUP/thin_pool
XFS Inode Size
As Red Hat Storage makes extensive use of extended attributes, an XFS inode size of 512 bytes works better with Red Hat Storage than the default XFS inode size of 256 bytes. So, inode size for XFS must be set to 512 bytes while formatting the Red Hat Storage bricks. To set the inode size, you have to use -i size option with themkfs.xfscommand as shown in the following Logical Block Size for the Directory section.XFS RAID Alignment
When creating an XFS file system, you can explicitly specify the striping parameters of the underlying storage in the following format:.mkfs.xfs other_options -d su=stripe_unit_size,sw=stripe_width_in_number_of_disks deviceFor RAID 6, ensure that I/O is aligned at the file system layer by providing the striping parameters. For RAID 6 storage with 12 disks, if the recommendations above have been followed, the values must be as following:# mkfs.xfs other_options -d su=128K,sw=10 deviceFor RAID 10 and JBOD, the-d su=<>,sw=<>option can be omitted. By default, XFS will use the thin-p chunk size and other parameters to make layout decisions.Logical Block Size for the Directory
An XFS file system allows to select a logical block size for the file system directory that is greater than the logical block size of the file system. Increasing the logical block size for the directories from the default 4 K, decreases the directory I/O, which in turn improves the performance of directory operations. To set the block size, you need to use-n sizeoption with themkfs.xfscommand as shown in the following example output.Following is the example output of RAID 6 configuration along with inode and block size options:# mkfs.xfs -f -i size=512 -n size=8192 -d su=128K,sw=10 logical volume meta-data=/dev/mapper/gluster-brick1 isize=512 agcount=32, agsize=37748736 blks = sectsz=512 attr=2, projid32bit=0 data = bsize=4096 blocks=1207959552, imaxpct=5 = sunit=32 swidth=320 blks naming = version 2 bsize=8192 ascii-ci=0 log =internal log bsize=4096 blocks=521728, version=2 = sectsz=512 sunit=32 blks, lazy-count=1 realtime =none extsz=4096 blocks=0, rtextents=0Allocation Strategy
inode32 and inode64 are two most common allocation strategies for XFS. With inode32 allocation strategy, XFS places all the inodes in the first 1 TiB of disk. With larger disk, all the inodes would be stuck in first 1 TiB. inode32 allocation strategy is used by default.With inode64 mount option inodes would be replaced near to the data which would be minimize the disk seeks.To set the allocation strategy to inode64 when file system is being mounted, you need to use-o inode64option with themkfs.xfscommand as shown in the following Access Time section.Access Time
If the application does not require to update the access time on files, than file system must always be mounted withnoatimemount option. For example:# mount -t xfs -o inode64,noatime <logical volume> <mount point>This optimization improves performance of small-file reads by avoiding updates to the XFS inodes when files are read./etc/fstab entry for option E + F <logical volume> <mount point>xfs inode64,noatime 0 0Performance tuning option in Red Hat Storage
Run the following command after creating the volume:# tuned-adm profile default ; tuned-adm profile rhs-high-throughput Switching to profile 'default' Applying ktune sysctl settings: /etc/ktune.d/tunedadm.conf: [ OK ] Applying sysctl settings from /etc/sysctl.conf Starting tuned: [ OK ] Stopping tuned: [ OK ] Switching to profile 'rhs-high-throughput'This profile performs the following:- Increases read ahead to 64 MB
- Changes I/O scheduler to
deadline - Disables power-saving mode
Writeback caching
For small-file and random write performance, we strongly recommend writeback cache, that is, non-volatile random-access memory (NVRAM) in your storage controller. For example, normal Dell and HP storage controllers have it. Ensure that NVRAM is enabled, that is, the battery is working. Refer your hardware documentation for details on enabling NVRAM.Do not enable writeback caching in the disk drives, this is a policy where the disk drive considers the write is complete before the write actually made it to the magnetic media (platter). As a result, the disk write cache might lose its data during a power failure or even loss of metadata leading to file system corruption.Allocation groups
Each XFS file system is partitioned into regions called allocation groups. Allocation groups are similar to the block groups in ext3, but allocation groups are much larger than block groups and are used for scalability and parallelism rather than disk locality. The default allocation for an allocation group is 1 TiB.Allocation group count must be large enough to sustain the concurrent allocation workload. In most of the cases allocation group count chosen bymkfs.xfscommand would give the optimal performance. Do not change the allocation group count chosen bymkfs.xfs, while formatting the file system.Percentage of space allocation to inodes
If the workload is very small files (average file size is less than 10 KB ), then it is recommended to setmaxpctvalue to10, while formatting the file system.
9.3. Network
9.4. Memory
9.4.1. Virtual Memory Parameters
- vm.dirty_ratio
- vm.dirty_background_ratio
| I/O Type | Recommended Value | Remarks |
|---|---|---|
| Large file sequential I/O workloads | dirty_ratio = 20, dirty_background_ratio = 10 (default setting) | The writeback operations to disk are efficient for this workload therefore the Virtual Memory parameters can have higher values. Higher values for these parameters help reduce fragmentation of large files with thin-provisioned storage.. |
| Random and small file workloads | dirty_ratio = 5, dirty_background_ratio = 2 | The write operations to disk are less efficient for this workload. Lower values of the Virtual Memory parameters prevent excessive delays during write-back. |
The Red Hat Storage tuned profiles, rhs-high-throughput and rhs-virtualization, permit custom settings for system parameters in the file /etc/sysctl.conf.
- Edit the file
/etc/sysctl.confto update the parameters with the desired values in the file.Example 9.1. Update the Virtual Memory Parameters
vm.dirty_ratio = 5 vm.dirty_background_ratio = 2 - Execute the
tuned-admcommand to apply these values:# tuned-adm profile PROFILE-NAMEExample 9.2. Applying Virtual Memory Parameters
In this example,rhs-high-throughputis the profile which is being activated.# tuned-adm profile rhs-high-throughput - Verify the changes made to the virtual Memory parameters.
# cat /proc/sys/vm/dirty_ratio
5
# cat /proc/sys/vm/dirty_background_ratio
2
9.5. Small File Performance Enhancements
Metadata-intensive workload is the term used to identify such workloads. A few performance enhancements can be made to optimize the network and storage performance and minimize the effect of slow throughput and response time for small files in a Red Hat Storage trusted storage pool.
Note
dirty-ratio = 5, dirty-background-ration = 2. See section Memory in the chapter Configuring Red Hat Storage for Enhancing Performance for instructions on configuring these values.
You can set the client.event-thread and server.event-thread values for the client and server components. Setting the value to 3, for example, would enable handling three network connections simultaneously.
# gluster volume set VOLNAME client.event-threads <value>Example 9.3. Tuning the event threads for a client accessing a volume
# gluster volume set test-vol client.event-threads 3# gluster volume set VOLNAME server.event-threads <value>Example 9.4. Tuning the event threads for a server accessing a volume
# gluster volume set test-vol server.event-threads 3# gluster volume info VOLNAMEIt is possible to see performance gains with the Red Hat Storage stack by tuning the number of threads processing events from network connections.The following are the recommended best practices to tune the event thread values.
- As each thread processes a connection at a time, having more threads than connections to either the brick processes (
glusterfsd) or the client processes (glusterfsorgfapi) is not recommended. Due to this reason, monitor the connection counts (using thenetstatcommand) on the clients and on the bricks to arrive at an appropriate number for the event thread count. - Configuring a higher event threads value than the available processing units could again cause context switches on these threads. As a result reducing the number deduced from the previous step to a number that is less that the available processing units is recommended.
- If a Red Hat Storage volume has a high number of brick processes running on a single node, then reducing the event threads number deduced in the previous step would help the competing processes to gain enough concurrency and avoid context switches across the threads.
- If a specific thread consumes more number of CPU cycles than needed, increasing the event thread count would enhance the performance of the Red Hat Storage Server.
- In addition to the deducing the appropriate event-thread count, increasing the
server.outstanding-rpc-limiton the storage nodes can also help to queue the requests for the brick processes and not let the requests idle on the network queue. - Another parameter that could improve the performance when tuning the event-threads value is to set the
performance.io-thread-count(and its related thread-counts) to higher values, as these threads perform the actual IO operations on the underlying file system.
9.6. Number of Clients
rhs-virtualization tuned profile, which increases ARP (Address Resolution Protocol) table size, but has less aggressive read ahead setting of 4 MB. This is 32 times the Linux default but small enough to avoid fairness issues with large numbers of files being concurrently read.
# tuned-adm profile rhs-virtualization9.7. Replication
Chapter 10. Managing Geo-replication
10.1. About Geo-replication
- Master – a Red Hat Storage volume.
- Slave – a Red Hat Storage volume. A slave volume can be either a local volume, such as
localhost::volname, or a volume on a remote host, such asremote-host::volname.
10.2. Replicated Volumes vs Geo-replication
| Replicated Volumes | Geo-replication |
|---|---|
| Mirrors data across bricks within one trusted storage pool. | Mirrors data across geographically distributed trusted storage pools. |
| Provides high-availability. | Provides back-ups of data for disaster recovery. |
| Synchronous replication: each and every file operation is applied to all the bricks. | Asynchronous replication: checks for changes in files periodically, and syncs them on detecting differences. |
10.3. Preparing to Deploy Geo-replication
10.3.1. Exploring Geo-replication Deployment Scenarios
- Geo-replication over LAN
- Geo-replication over WAN
- Geo-replication over the Internet
- Multi-site cascading geo-replication

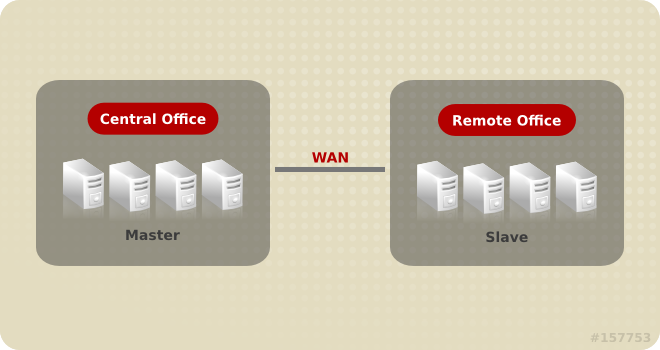
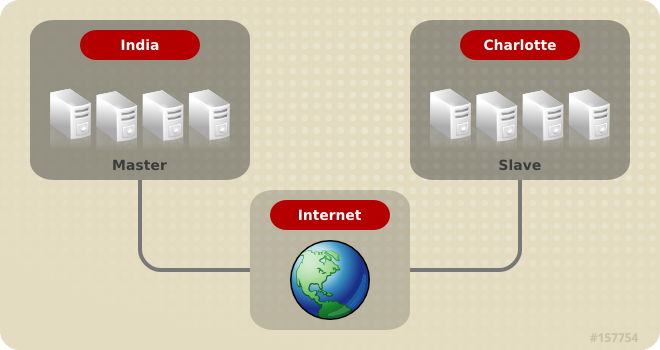
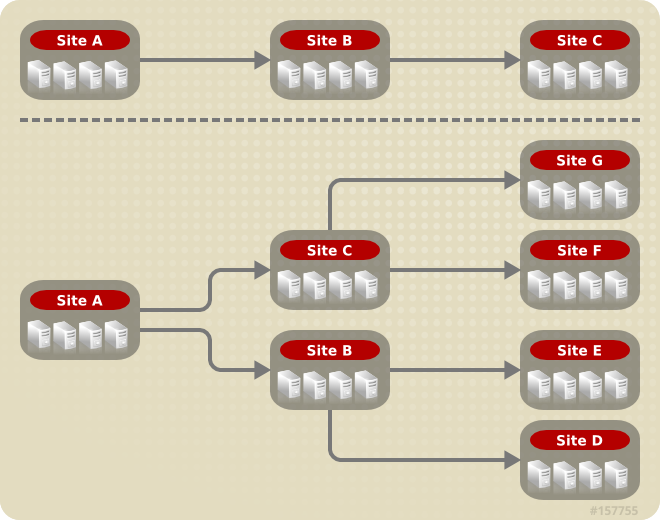
10.3.2. Geo-replication Deployment Overview
- Verify that your environment matches the minimum system requirements. See Section 10.3.3, “Prerequisites”.
- Determine the appropriate deployment scenario. See Section 10.3.1, “Exploring Geo-replication Deployment Scenarios”.
- Start geo-replication on the master and slave systems. See Section 10.4, “Starting Geo-replication”.
10.3.3. Prerequisites
- The master and slave volumes must be Red Hat Storage instances.
- Slave node must not be a peer of the any of the nodes of the Master trusted storage pool.
- Password-less SSH access is required between one node of the master volume (the node from which the
geo-replication createcommand will be executed), and one node of the slave volume (the node whose IP/hostname will be mentioned in the slave name when running thegeo-replication createcommand).Create the public and private keys usingssh-keygen(without passphrase) on the master node:# ssh-keygenCopy the public key to the slave node using the following command:# ssh-copy-id root@slave_node_IPaddress/HostnameIf you are setting up a non-root geo-replicaton session, then copy the public key to the respectiveuserlocation.Note
- Password-less SSH access is required from the master node to slave node, whereas password-less SSH access is not required from the slave node to master node. - ssh-copy-idcommand does not work ifssh authorized_keysfile is configured in the custom location. You must copy the contents of.ssh/id_rsa.pubfile from the Master and paste it to authorized_keys file in the custom location on the Slave node.A password-less SSH connection is also required forgsyncdbetween every node in the master to every node in the slave. Thegluster system:: execute gsec_createcommand createssecret-pemfiles on all the nodes in the master, and is used to implement the password-less SSH connection. Thepush-pemoption in thegeo-replication createcommand pushes these keys to all the nodes in the slave.For more information on thegluster system::execute gsec_createandpush-pemcommands, see Section 10.3.4, “Setting Up your Environment for Geo-replication Session”.
10.3.4. Setting Up your Environment for Geo-replication Session
- All the servers' time must be uniform on bricks of a geo-replicated master volume. It is recommended to set up a NTP (Network Time Protocol) service to keep the bricks' time synchronized, and avoid out-of-time sync effects.For example: In a replicated volume where brick1 of the master has the time 12:20, and brick2 of the master has the time 12:10 with a 10 minute time lag, all the changes on brick2 between in this period may go unnoticed during synchronization of files with a Slave.For more information on configuring NTP, see https://access.redhat.com/site/documentation/en-US/Red_Hat_Enterprise_Linux/6/html/Migration_Planning_Guide/sect-Migration_Guide-Networking-NTP.html.
Creating Geo-replication Sessions
- To create a common
pem pubfile, run the following command on the master node where the password-less SSH connection is configured:# gluster system:: execute gsec_create - Create the geo-replication session using the following command. The
push-pemoption is needed to perform the necessarypem-filesetup on the slave nodes.# gluster volume geo-replication MASTER_VOL SLAVE_HOST::SLAVE_VOL create push-pem [force]For example:# gluster volume geo-replication master-vol example.com::slave-vol create push-pemNote
There must be password-less SSH access between the node from which this command is run, and the slave host specified in the above command. This command performs the slave verification, which includes checking for a valid slave URL, valid slave volume, and available space on the slave. If the verification fails, you can use theforceoption which will ignore the failed verification and create a geo-replication session. - Verify the status of the created session by running the following command:
# gluster volume geo-replication MASTER_VOL SLAVE_HOST::SLAVE_VOL status
10.3.5. Setting Up your Environment for a Secure Geo-replication Slave
mountbroker, an internal service of glusterd which manages the mounts for unprivileged slave accounts. You must perform additional steps to configure glusterd with the appropriate mountbroker's access control directives. The following example demonstrates this process:
- Create a new group. For example,
geogroup. - Create a unprivileged account. For example,
geoaccount. Addgeoaccountas a member ofgeogroupgroup. - As a root, create a new directory with permissions 0711. Ensure that the location where this directory is created is writeable only by root but
geoaccountis able to access it. For example, create amountbroker-rootdirectory at/var/mountbroker-root. - Add the following options to the glusterd.vol file, assuming the name of the slave Red Hat Storage volume as
slavevol:option mountbroker-root /var/mountbroker-root option mountbroker-geo-replication.geoaccount slavevol option geo-replication-log-group geogroup option rpc-auth-allow-insecure onSee Section 2.4, “Storage Concepts” for information on volume file of a Red Hat Storage volume.If you are unable to locate theglusterd.volfile at/etc/glusterfs/directory, create a vol file containing both the default configuration and the above options and save it at/etc/glusterfs/.The following is the sampleglusterd.volfile along with default options:volume management type mgmt/glusterd option working-directory /var/lib/glusterd option transport-type socket,rdma option transport.socket.keepalive-time 10 option transport.socket.keepalive-interval 2 option transport.socket.read-fail-log off option rpc-auth-allow-insecure on option mountbroker-root /var/mountbroker-root option mountbroker-geo-replication.geoaccount slavevol option geo-replication-log-group geogroup end-volume- If you have multiple slave volumes on Slave, repeat Step 2 for each of them and add the following options to the vol file:
option mountbroker-geo-replication.geoaccount2 slavevol2 option mountbroker-geo-replication.geoaccount3 slavevol3 - You can add multiple slave volumes within the same account (geoaccount) by providing comma-separated list (without spaces) as the argument of
mountbroker-geo-replication.geogroup. You can also have multiple options of the formmountbroker-geo-replication.*. It is recommended to use one service account per Master machine. For example, if there are multiple slave volumes on Slave for the master machines Master1, Master2, and Master3, then create a dedicated service user on Slave for them by repeating Step 2. for each (like geogroup1, geogroup2, and geogroup3), and then add the following corresponding options to the volfile:option mountbroker-geo-replication.geoaccount1 slavevol11,slavevol12,slavevol13 option mountbroker-geo-replication.geoaccount2 slavevol21,slavevol22 option mountbroker-geo-replication.geoaccount3 slavevol31
- Restart
glusterdservice on all the Slave nodes.After you setup an auxiliary glusterFS mount for the unprivileged account on all the Slave nodes, perform the following steps to setup a non-root geo-replication session.: - Setup a passwdless SSH from one of the master node to the
useron one of the slave node. For example, to geoaccount. - Create a common pem pub file by running the following command on the master node where the password-less SSH connection is configured to the
useron the slave node:# gluster system:: execute gsec_create - Create a geo-replication relationship between master and slave to the
userby running the following command on the master node:For example,# gluster volume geo-replication MASTERVOL geoaccount@SLAVENODE::slavevol create push-pemIf you have multiple slave volumes and/or multiple accounts, create a geo-replication session with that particular user and volume.For example,# gluster volume geo-replication MASTERVOL geoaccount2@SLAVENODE::slavevol2 create push-pem - In the slavenode, which is used to create relationship, run
/usr/libexec/glusterfs/set_geo_rep_pem_keys.shas a root with user name, master volume name, and slave volume names as the arguments.For example,# /usr/libexec/glusterfs/set_geo_rep_pem_keys.sh geoaccount MASTERVOL SLAVEVOL_NAME - Start the geo-replication with slave user by running the following command on the master node:For example,
# gluster volume geo-replication MASTERVOL geoaccount@SLAVENODE::slavevol start - Verify the status of geo-replication session by running the following command on the master node:
# gluster volume geo-replication MASTERVOL geoaccount@SLAVENODE::slavevol status
10.4. Starting Geo-replication
10.4.1. Starting a Geo-replication Session
Important
- To start the geo-replication session between the hosts:
# gluster volume geo-replication MASTER_VOL SLAVE_HOST::SLAVE_VOL startFor example:# gluster volume geo-replication master-vol example.com::slave-vol start Starting geo-replication session between master-vol & example.com::slave-vol has been successfulThis command will start distributed geo-replication on all the nodes that are part of the master volume. If a node that is part of the master volume is down, the command will still be successful. In a replica pair, the geo-replication session will be active on any of the replica nodes, but remain passive on the others.After executing the command, it may take a few minutes for the session to initialize and become stable.Note
If you attempt to create a geo-replication session and the slave already has data, the following error message will be displayed:slave-node::slave is not empty. Please delete existing files in slave-node::slave and retry, or use force to continue without deleting the existing files. geo-replication command failed
- To start the geo-replication session forcefully between the hosts:
# gluster volume geo-replication MASTER_VOL SLAVE_HOST::SLAVE_VOL start forceFor example:# gluster volume geo-replication master-vol example.com::slave-vol start force Starting geo-replication session between master-vol & example.com::slave-vol has been successfulThis command will force start geo-replication sessions on the nodes that are part of the master volume. If it is unable to successfully start the geo-replication session on any node which is online and part of the master volume, the command will still start the geo-replication sessions on as many nodes as it can. This command can also be used to re-start geo-replication sessions on the nodes where the session has died, or has not started.
10.4.2. Verifying a Successful Geo-replication Deployment
status command to verify the status of geo-replication in your environment:
# gluster volume geo-replication MASTER_VOL SLAVE_HOST::SLAVE_VOL status# gluster volume geo-replication master-vol example.com::slave-vol status10.4.3. Displaying Geo-replication Status Information
status command can be used to display information about a specific geo-replication master session, master-slave session, or all geo-replication sessions. The status output provides both node and brick level information.
- To display information on all geo-replication sessions from a particular master volume, use the following command:
# gluster volume geo-replication MASTER_VOL status
- To display information of a particular master-slave session, use the following command:
# gluster volume geo-replication MASTER_VOL SLAVE_HOST::SLAVE_VOL status - To display the details of a master-slave session, use the following command:
# gluster volume geo-replication MASTER_VOL SLAVE_HOST::SLAVE_VOL status detailImportant
There will be a mismatch between the outputs of thedfcommand (including-hand-k) and inode of the master and slave volumes when the data is in full sync. This is due to the extra inode and size consumption by thechangelogjournaling data, which keeps track of the changes done on the file system on themastervolume. Instead of running thedfcommand to verify the status of synchronization, use# gluster volume geo-replication MASTER_VOL SLAVE_HOST::SLAVE_VOL status detailinstead.The status of a session can be one of the following:- Initializing: This is the initial phase of the Geo-replication session; it remains in this state for a minute in order to make sure no abnormalities are present.
- Not Started: The geo-replication session is created, but not started.
- Active: The
gsyncdaemon in this node is active and syncing the data. - Passive: A replica pair of the active node. The data synchronization is handled by active node. Hence, this node does not sync any data.
- Faulty: The geo-replication session has experienced a problem, and the issue needs to be investigated further. For more information, see Section 10.10, “Troubleshooting Geo-replication” section.
- Stopped: The geo-replication session has stopped, but has not been deleted.
- Crawl Status
- Changelog Crawl: The
changelogtranslator has produced the changelog and that is being consumed bygsyncddaemon to sync data. - Hybrid Crawl: The
gsyncddaemon is crawling the glusterFS file system and generating pseudo changelog to sync data.
- Checkpoint Status: Displays the status of the checkpoint, if set. Otherwise, it displays as N/A.
10.4.4. Configuring a Geo-replication Session
# gluster volume geo-replication MASTER_VOL SLAVE_HOST::SLAVE_VOL config [options]# gluster volume geo-replication Volume1 example.com::slave-vol config! (exclamation mark). For example, to reset log-level to the default value:
# gluster volume geo-replication Volume1 example.com::slave-vol config '!log-level'The following table provides an overview of the configurable options for a geo-replication setting:
| Option | Description |
|---|---|
| gluster-log-file LOGFILE | The path to the geo-replication glusterfs log file. |
| gluster-log-level LOGFILELEVEL | The log level for glusterfs processes. |
| log-file LOGFILE | The path to the geo-replication log file. |
| log-level LOGFILELEVEL | The log level for geo-replication. |
| ssh-command COMMAND | The SSH command to connect to the remote machine (the default is SSH). |
| rsync-command COMMAND | The rsync command to use for synchronizing the files (the default is rsync). |
| use-tarssh true | The use-tarssh command allows tar over Secure Shell protocol. Use this option to handle workloads of files that have not undergone edits. |
| volume_id=UID | The command to delete the existing master UID for the intermediate/slave node. |
| timeout SECONDS | The timeout period in seconds. |
| sync-jobs N | The number of simultaneous files/directories that can be synchronized. |
| ignore-deletes | If this option is set to 1, a file deleted on the master will not trigger a delete operation on the slave. As a result, the slave will remain as a superset of the master and can be used to recover the master in the event of a crash and/or accidental delete. |
| checkpoint [LABEL|now] | Sets a checkpoint with the given option LABEL. If the option is set as now, then the current time will be used as the label. |
10.4.4.1. Geo-replication Checkpoints
10.4.4.1.1. About Geo-replication Checkpoints
10.4.4.1.2. Configuring and Viewing Geo-replication Checkpoint Information
- To set a checkpoint on a geo-replication session, use the following command:
# gluster volume geo-replication MASTER_VOL SLAVE_HOST::SLAVE_VOL config checkpoint [now|LABEL]For example, to set checkpoint betweenVolume1andexample.com:/data/remote_dir:# gluster volume geo-replication Volume1 example.com::slave-vol config checkpoint now geo-replication config updated successfullyThe label for a checkpoint can be set as the current time usingnow, or a particular label can be specified, as shown below:# gluster volume geo-replication Volume1 example.com::slave-vol config checkpoint NEW_ACCOUNTS_CREATED geo-replication config updated successfully. - To display the status of a checkpoint for a geo-replication session, use the following command:
# gluster volume geo-replication MASTER_VOL SLAVE_HOST::SLAVE_VOL status - To delete checkpoints for a geo-replication session, use the following command:
# gluster volume geo-replication MASTER_VOL SLAVE_HOST::SLAVE_VOL config '!checkpoint'For example, to delete the checkpoint set betweenVolume1andexample.com::slave-vol:# gluster volume geo-replication Volume1 example.com::slave-vol config '!checkpoint' geo-replication config updated successfully - To view the history of checkpoints for a geo-replication session (including set, delete, and completion events), use the following command:
# gluster volume geo-replication MASTER_VOL SLAVE_HOST::SLAVE_VOL config log-file | xargs grep checkpointFor example, to display the checkpoint history betweenVolume1andexample.com::slave-vol:# gluster volume geo-replication Volume1 example.com::slave-vol config log-file | xargs grep checkpoint [2013-11-12 12:40:03.436563] I [gsyncd(conf):359:main_i] <top>: checkpoint as of 2012-06-04 12:40:02 set [2013-11-15 12:41:03.617508] I master:448:checkpt_service] _GMaster: checkpoint as of 2013-11-12 12:40:02 completed [2013-11-12 03:01:17.488917] I [gsyncd(conf):359:main_i] <top>: checkpoint as of 2013-06-22 03:01:12 set [2013-11-15 03:02:29.10240] I master:448:checkpt_service] _GMaster: checkpoint as of 2013-06-22 03:01:12 completed
10.4.5. Stopping a Geo-replication Session
- To stop a geo-replication session between the hosts:
# gluster volume geo-replication MASTER_VOL SLAVE_HOST::SLAVE_VOL stopFor example:#gluster volume geo-replication master-vol example.com::slave-vol stop Stopping geo-replication session between master-vol & example.com::slave-vol has been successfulNote
Thestopcommand will fail if:- any node that is a part of the volume is offline.
- if it is unable to stop the geo-replication session on any particular node.
- if the geo-replication session between the master and slave is not active.
- To stop a geo-replication session forcefully between the hosts:
# gluster volume geo-replication MASTER_VOL SLAVE_HOST::SLAVE_VOL stop forceFor example:# gluster volume geo-replication master-vol example.com::slave-vol stop force Stopping geo-replication session between master-vol & example.com::slave-vol has been successfulUsingforcewill stop the geo-replication session between the master and slave even if any node that is a part of the volume is offline. If it is unable to stop the geo-replication session on any particular node, the command will still stop the geo-replication sessions on as many nodes as it can. Usingforcewill also stop inactive geo-replication sessions.
10.4.6. Deleting a Geo-replication Session
Important
# gluster volume geo-replication MASTER_VOL SLAVE_HOST::SLAVE_VOL delete# gluster volume geo-replication master-vol example.com::slave-vol delete
geo-replication command executed successfullyNote
delete command will fail if:
- any node that is a part of the volume is offline.
- if it is unable to delete the geo-replication session on any particular node.
- if the geo-replication session between the master and slave is still active.
Important
pem files which contain the SSH keys from the /var/lib/glusterd/geo-replication/ directory.
10.5. Starting Geo-replication on a Newly Added Brick
10.5.1. Starting Geo-replication for a New Brick on a New Node
Starting Geo-replication for a New Brick on a New Node
- Run the following command on the master node where password-less SSH connection is configured, in order to create a common
pem pubfile.# gluster system:: execute gsec_create - Create the geo-replication session using the following command. The
push-pemandforceoptions are required to perform the necessarypem-filesetup on the slave nodes.# gluster volume geo-replication MASTER_VOL SLAVE_HOST::SLAVE_VOL create push-pem forceFor example:# gluster volume geo-replication master-vol example.com::slave-vol create push-pem forceNote
There must be password-less SSH access between the node from which this command is run, and the slave host specified in the above command. This command performs the slave verification, which includes checking for a valid slave URL, valid slave volume, and available space on the slave. - Start the geo-replication session between the slave and master forcefully, using the following command:
# gluster volume geo-replication MASTER_VOL SLAVE_HOST::SLAVE_VOL start force - Verify the status of the created session, using the following command:
# gluster volume geo-replication MASTER_VOL SLAVE_HOST::SLAVE_VOL status
10.5.2. Starting Geo-replication for a New Brick on an Existing Node
10.6. Disaster Recovery
10.6.1. Promoting a Slave to Master
# gluster volume set VOLNAME geo-replication.indexing on
# gluster volume set VOLNAME changelog on10.6.2. Failover and Failback
Performing a Failover and Failback
- Create a new geo-replication session with the original slave as the new master, and the original master as the new slave. For more information on setting and creating geo-replication session, see Section 10.3.4, “Setting Up your Environment for Geo-replication Session”.
- Start the special synchronization mode to speed up the recovery of data from slave.
# gluster volume geo-replication ORIGINAL_SLAVE_VOL ORIGINAL_MASTER_HOST::ORIGINAL_MASTER_VOL config special-sync-mode recover - Set a checkpoint to help verify the status of the data synchronization.
# gluster volume geo-replication ORIGINAL_SLAVE_VOL ORIGINAL_MASTER_HOST::ORIGINAL_MASTER_VOL config checkpoint now - Start the new geo-replication session using the following command:
# gluster volume geo-replication ORIGINAL_SLAVE_VOL ORIGINAL_MASTER_HOST::ORIGINAL_MASTER_VOL start - Monitor the checkpoint output using the following command, until the status displays:
checkpoint as of <time of checkpoint creation> is completed at <time of completion>.# gluster volume geo-replication ORIGINAL_SLAVE_VOL ORIGINAL_MASTER_HOST::ORIGINAL_MASTER_VOL status - To resume the original master and original slave back to their previous roles, stop the I/O operations on the original slave, and using steps 3 and 5, ensure that all the data from the original slave is restored back to the original master. After the data from the original slave is restored back to the original master, stop the current geo-replication session (the failover session) between the original slave and original master, and resume the previous roles.
- Reset the options that were set for promoting the slave volume as the master volume by running the following commands:
# gluster volume reset ORIGINAL_SLAVE_VOL geo-replication.indexing # gluster volume reset ORIGINAL_SLAVE_VOL changelogFor more information on promoting slave volume to be the master volume, see Section 10.6.1, “Promoting a Slave to Master”.
10.7. Creating a Snapshot of Geo-replicated Volume
# gluster snapshot create snap1 master
snapshot create: failed: geo-replication session is running for the volume master. Session needs to be stopped before taking a snapshot.
Snapshot command failed10.8. Example - Setting up Cascading Geo-replication
- Verify that your environment matches the minimum system requirements listed in Section 10.3.3, “Prerequisites”.
- Determine the appropriate deployment scenario. For more information on deployment scenarios, see Section 10.3.1, “Exploring Geo-replication Deployment Scenarios”.
- Configure the environment and create a geo-replication session between master-vol and interimmaster-vol.
- Create a common pem pub file, run the following command on the master node where the password-less SSH connection is configured:
# gluster system:: execute gsec_create - Create the geo-replication session using the following command. The push-pem option is needed to perform the necessary pem-file setup on the interimmaster nodes.
# gluster volume geo-replication master-vol interimhost.com::interimmaster-vol create push-pem - Verify the status of the created session by running the following command:
# gluster volume geo-replication master-vol interimhost::interimmaster-vol status
- Start a Geo-replication session between the hosts:
# gluster volume geo-replication master-vol interimhost.com::interimmaster-vol startThis command will start distributed geo-replication on all the nodes that are part of the master volume. If a node that is part of the master volume is down, the command will still be successful. In a replica pair, the geo-replication session will be active on any of the replica nodes, but remain passive on the others. After executing the command, it may take a few minutes for the session to initialize and become stable. - Verifying the status of geo-replication session by running the following command:
# gluster volume geo-replication master-vol interimhost.com::interimmaster-vol status - Create a geo-replication session between interimmaster-vol and slave-vol.
- Create a common pem pub file by running the following command on the interimmaster master node where the password-less SSH connection is configured:
# gluster system:: execute gsec_create - On interimmaster node, create the geo-replication session using the following command. The push-pem option is needed to perform the necessary pem-file setup on the slave nodes.
# gluster volume geo-replication interimmaster-vol slave_host.com::slave-vol create push-pem - Verify the status of the created session by running the following command:
# gluster volume geo-replication interrimmaster-vol slave_host::slave-vol status
- Start a geo-replication session between interrimaster-vol and slave-vol by running the following command:
# gluster volume geo-replication interrimmaster-vol slave_host.com::slave-vol start - Verify the status of geo-replication session by running the following:
# gluster volume geo-replication interrimmaster-vol slave_host.com::slave-vol status
10.9. Recommended Practices
If you have to change the time on the bricks manually, then the geo-replication session and indexing must be disabled when setting the time on all the bricks. All bricks in a geo-replication environment must be set to the same time, as this avoids the out-of-time sync issue described in Section 10.3.4, “Setting Up your Environment for Geo-replication Session”. Bricks not operating on the same time setting, or changing the time while the geo-replication is running, will corrupt the geo-replication index. The recommended way to set the time manually is using the following procedure.
Manually Setting the Time on Bricks in a Geo-replication Environment
- Stop geo-replication between the master and slave, using the following command:
# gluster volume geo-replication MASTER_VOL SLAVE_HOST::SLAVE_VOL stop - Stop geo-replication indexing, using the following command:
# gluster volume set MASTER_VOL geo-replication.indexing off - Set a uniform time on all the bricks.
- Restart the geo-replication sessions, using the following command:
# gluster volume geo-replication MASTER_VOL SLAVE_HOST::SLAVE_VOL start
When the following option is set, it has been observed that there is an increase in geo-replication performance. On the slave volume, run the following command:
# gluster volume set SLAVE_VOL batch-fsync-delay-usec 0For replicating large volumes to a slave in a remote location, it may be useful to do the initial replication to disks locally on a local area network (LAN), and then physically transport the disks to the remote location. This eliminates the need of doing the initial replication of the whole volume over a slower and more expensive wide area network (WAN) connection. The following procedure provides instructions for setting up a local geo-replication session, physically transporting the disks to the remote location, and then setting up geo-replication over a WAN.
Initially Replicating to a Remote Slave Locally using a LAN
- Create a geo-replication session locally within the LAN. For information on creating a geo-replication session, see Section 10.3.4, “Setting Up your Environment for Geo-replication Session”.
Important
You must remember the order in which the bricks/disks are specified when creating the slave volume. This information is required later for configuring the remote geo-replication session over the WAN. - Ensure that the initial data on the master is synced to the slave volume. You can verify the status of the synchronization by using the
statuscommand, as shown in Section 10.4.3, “Displaying Geo-replication Status Information”. - Stop and delete the geo-replication session.For information on stopping and deleting the the geo-replication session, see Section 10.4.5, “Stopping a Geo-replication Session” and Section 10.4.6, “Deleting a Geo-replication Session”.
Important
You must ensure that there are no stale files in/var/lib/glusterd/geo-replication/. - Stop and delete the slave volume.For information on stopping and deleting the volume, see Section 8.8, “Stopping Volumes” and Section 8.9, “Deleting Volumes”.
- Remove the disks from the slave nodes, and physically transport them to the remote location. Make sure to remember the order in which the disks were specified in the volume.
- At the remote location, attach the disks and mount them on the slave nodes. Make sure that the file system or logical volume manager is recognized, and that the data is accessible after mounting it.
- Configure a trusted storage pool for the slave using the
peer probecommand.For information on configuring a trusted storage pool, see Chapter 5, Trusted Storage Pools. - Delete the glusterFS-related attributes on the bricks. This should be done before creating the volume. You can remove the glusterFS-related attributes by running the following command:
# for i in `getfattr -d -m . ABSOLUTE_PATH_TO_BRICK 2>/dev/null | grep trusted | awk -F = '{print $1}'`; do setfattr -x $i ABSOLUTE_PATH_TO_BRICK; doneRun the following command to ensure that there are noxattrsstill set on the brick:# getfattr -d -m . ABSOLUTE_PATH_TO_BRICK - After creating the trusted storage pool, create the Red Hat Storage volume with the same configuration that it had when it was on the LAN. For information on creating volumes, see Chapter 6, Red Hat Storage Volumes.
Important
Make sure to specify the bricks in same order as they were previously when on the LAN. A mismatch in the specification of the brick order may lead to data loss or corruption. - Start and mount the volume, and check if the data is intact and accessible.For information on starting and mounting volumes, see Section 6.10, “Starting Volumes” and Chapter 7, Accessing Data - Setting Up Clients.
- Configure the environment and create a geo-replication session from the master to this remote slave.For information on configuring the environment and creating a geo-replication session, see Section 10.3.4, “Setting Up your Environment for Geo-replication Session”.
- Start the geo-replication session between the master and the remote slave.For information on starting the geo-replication session, see Section 10.4, “Starting Geo-replication”.
- Use the
statuscommand to verify the status of the session, and check if all the nodes in the session are stable.For information on thestatus, see Section 10.4.3, “Displaying Geo-replication Status Information”.
10.10. Troubleshooting Geo-replication
10.10.1. Tuning Geo-replication performance with Change Log
rollover-time option sets the rate at which the change log is consumed. The default rollover time is 60 seconds, but it can be configured to a faster rate. A recommended rollover-time for geo-replication is 10-15 seconds. To change the rollover-time option, use following the command:
# gluster volume set VOLNAME rollover-time 15fsync-interval option determines the frequency that updates to the change log are written to disk. The default interval is 0, which means that updates to the change log are written synchronously as they occur, and this may negatively impact performance in a geo-replication environment. Configuring fsync-interval to a non-zero value will write updates to disk asynchronously at the specified interval. To change the fsync-interval option, use following the command:
# gluster volume set VOLNAME fsync-interval 310.10.2. Synchronization Is Not Complete
The geo-replication status is displayed as Stable, but the data has not been completely synchronized.
A full synchronization of the data can be performed by erasing the index and restarting geo-replication. After restarting geo-replication, it will begin a synchronization of the data using checksums. This may be a long and resource intensive process on large data sets. If the issue persists, contact Red Hat Support.
10.10.3. Issues with File Synchronization
The geo-replication status is displayed as Stable, but only directories and symlinks are synchronized. Error messages similar to the following are in the logs:
[2011-05-02 13:42:13.467644] E [master:288:regjob] GMaster: failed to sync ./some_file`
Geo-replication requires rsync v3.0.0 or higher on the host and the remote machines. Verify if you have installed the required version of rsync.
10.10.4. Geo-replication Status is Often Faulty
The geo-replication status is often displayed as Faulty, with a backtrace similar to the following:
012-09-28 14:06:18.378859] E [syncdutils:131:log_raise_exception] <top>: FAIL: Traceback (most recent call last): File "/usr/local/libexec/glusterfs/python/syncdaemon/syncdutils.py", line 152, in twraptf(*aa) File "/usr/local/libexec/glusterfs/python/syncdaemon/repce.py", line 118, in listen rid, exc, res = recv(self.inf) File "/usr/local/libexec/glusterfs/python/syncdaemon/repce.py", line 42, in recv return pickle.load(inf) EOFErrorThis usually indicates that RPC communication between the master gsyncd module and slave gsyncd module is broken. Make sure that the following pre-requisites are met:
- Password-less SSH is set up properly between the host and remote machines.
- FUSE is installed on the machines. The geo-replication module mounts Red Hat Storage volumes using FUSE to sync data.
10.10.5. Intermediate Master is in a Faulty State
In a cascading environment, the intermediate master is in a faulty state, and messages similar to the following are in the log:
raise RuntimeError ("aborting on uuid change from %s to %s" % \ RuntimeError: aborting on uuid change from af07e07c-427f-4586-ab9f- 4bf7d299be81 to de6b5040-8f4e-4575-8831-c4f55bd41154
In a cascading configuration, an intermediate master is loyal to its original primary master. The above log message indicates that the geo-replication module has detected that the primary master has changed. If this change was deliberate, delete the volume-id configuration option in the session that was initiated from the intermediate master.
10.10.6. Remote gsyncd Not Found
The master is in a faulty state, and messages similar to the following are in the log:
[2012-04-04 03:41:40.324496] E [resource:169:errfail] Popen: ssh> bash: /usr/local/libexec/glusterfs/gsyncd: No such file or directoryThe steps to configure a SSH connection for geo-replication have been updated. Use the steps as described in Section 10.3.4, “Setting Up your Environment for Geo-replication Session”
Chapter 11. Managing Directory Quotas
11.1. Enabling Quotas
# gluster volume quota VOLNAME enable
# gluster volume quota test-volume enable
volume quota : success
Important
- Do not enable quota using the
volume-setcommand. This option is no longer supported. - Do not enable quota while
quota-remove-xattr.shis still running.
11.2. Setting Limits
Note
- Before setting quota limits on any directory, ensure that there is at least one brick available per replica set.To see the current status of bricks of a volume, run the following command:
# gluster volume status VOLNAME status - If the Red Hat Storage volume is mounted at
/mntglusterfsand you want to perform a certain function pertaining to Quota on/mntglusterfs/dir, then the path to be provided in any corresponding command should be/dir, where/diris the absolute path relative to the Red Hat Storage volume mount point.
# gluster volume quota VOLNAME limit-usage path hard_limit
- To set a hard limit of 100GB on
/dir:# gluster volume quota VOLNAME limit-usage /dir 100GB - To set a hard limit of 1TB for the volume:
# gluster volume quota VOLNAME limit-usage / 1TB
/var/log/glusterfs/bricks/<path-to-brick.log># gluster volume quota VOLNAME limit-usage path hard_limit soft_limit
- To set the soft limit to 76% of the hard limit on
/dir:# gluster volume quota VOLNAME limit-usage /dir 100GB 76% - To set the soft limit to 68% of the hard limit on the volume:
# gluster volume quota VOLNAME limit-usage / 1TB 68%
Note
11.3. Setting the Default Soft Limit
# gluster volume quota VOLNAME default-soft-limit soft_limit
# gluster volume quota test-volume default-soft-limit 90%
volume quota : success# gluster volume quota test-volume listNote
11.4. Displaying Quota Limit Information
# gluster volume quota VOLNAME list
# gluster volume quota test-volume list
Path       Hard-limit  Soft-limit   Used    Available
------------------------------------------------------
/           50GB        75%       0Bytes    50.0GB
/dir        10GB        75%       0Bytes    10.0GB
/dir/dir2 20GB 90% 0Bytes 20.0GB# gluster volume quota VOLNAME list /<directory_name>
# gluster volume quota test-volume list /dir
Path  Hard-limit   Soft-limit   Used   Available
-------------------------------------------------
/dir 10.0GB 75% 0Bytes 10.0GB# gluster volume quota VOLNAME list /<directory_name1> /<directory_name2>
# gluster volume quota test-volume list /dir /dir/dir2
Path    Hard-limit   Soft-limit   Used     Available
------------------------------------------------------
/dir       10.0GB        75%        0Bytes     10.0GB
/dir/dir2  20.0GB        90%        0Bytes     20.0GB
11.4.1. Displaying Quota Limit Information Using the df Utility
df utility, taking quota limits into consideration, run the following command:
# gluster volume set VOLNAME quota-deem-statfs onNote
quota-deem-statfs is off. However, it is recommended to set quota-deem-statfs to on.
quota-deem-statfs is off:
# gluster volume set test-volume features.quota-deem-statfs off
volume set: success
# gluster volume quota test-volume list
Path        Hard-limit    Soft-limit     Used     Available
-----------------------------------------------------------
/              300.0GB        90%        11.5GB     288.5GB
/John/Downloads 77.0GB 75% 11.5GB 65.5GB# df -hT /home
Filesystem Type Size Used Avail Use% Mounted on
server1:/test-volume fuse.glusterfs 400G 12G 389G 3% /homequota-deem-statfs is on:
# gluster volume set test-volume features.quota-deem-statfs on
volume set: success
# gluster vol quota test-volume list
Path        Hard-limit    Soft-limit     Used     Available
-----------------------------------------------------------
/              300.0GB        90%        11.5GB     288.5GB
/John/Downloads 77.0GB 75% 11.5GB 65.5GB# df -hT /home
Filesystem Type Size Used Avail Use% Mounted on
server1:/test-volume fuse.glusterfs 300G 12G 289G 4% /homequota-deem-statfs option when set to on, allows the administrator to make the user view the total disk space available on the directory as the hard limit set on it.
11.5. Setting Timeout
- Soft timeout is the frequency at which the quota server-side translator checks the volume usage when the usage is below the soft limit. The soft timeout is in effect when the disk usage is less than the soft limit.To set the soft timeout, use the following command:
#gluster volume quota VOLNAME soft-timeout timeNote
The default soft timeout is 60 seconds.For example, to set the soft timeout on test-volume to 1 minute:# gluster volume quota test-volume soft-timeout 1min volume quota : success - Hard timeout is the frequency at which the quota server-side translator checks the volume usage when the usage is above the soft limit. The hard timeout is in effect when the disk usage is between the soft limit and the hard limit.To set the hard timeout, use the following command:
# gluster volume quota VOLNAME hard-timeout timeNote
The default hard timeout is 5 seconds.For example, to set the hard timeout for 30 seconds:# gluster volume quota test-volume hard-timeout 30s volume quota : successNote
As the margin of error for disk usage is proportional to the workload of the applications running on the volume, ensure that you set the hard-timeout and soft-timeout taking the workload into account.
11.6. Setting Alert Time
# gluster volume quota VOLNAME alert-time time
Note
# gluster volume quota test-volume alert-time 1d
volume quota : success
11.7. Removing Disk Limits
# gluster volume quota VOLNAME remove /<directory-name>
# gluster volume quota test-volume remove /data
volume quota : success# gluster vol quota test-volume remove /
volume quota : successNote
11.8. Disabling Quotas
# gluster volume quota VOLNAME disable
# gluster volume quota test-volume disable
Disabling quota will delete all the quota configuration. Do you want to continue? (y/n) y
volume quota : success
Note
- When you disable quotas, all previously configured limits are removed from the volume.
Chapter 12. Managing Snapshots
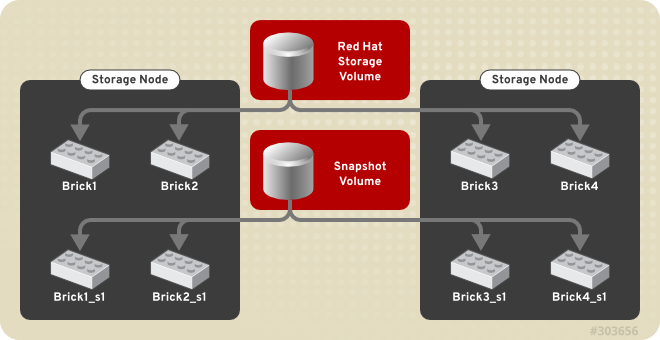
Figure 12.1. Snapshot Architecture
- Crash Consistency
A crash consistent snapshot is captured at a particular point-in-time. When a crash consistent snapshot is restored, the data is identical as it was at the time of taking a snapshot.
Note
Currently, application level consistency is not supported. - Online Snapshot
Snapshot is an online snapshot hence the file system and its associated data continue to be available for the clients even while the snapshot is being taken.
- Quorum Based
The quorum feature ensures that the volume is in a good condition while the bricks are down. If any brick that is down for a n way replication, where n <= 2 , quorum is not met. In a n-way replication where n >= 3, quorum is met when m bricks are up, where m >= (n/2 +1) where n is odd and m >= n/2 and the first brick is up where n is even. If quorum is not met snapshot creation fails.
Note
The quorum check feature in snapshot is in technology preview. Snapshot delete and restore feature checks node level quorum instead of brick level quorum. Snapshot delete and restore is successful only when m number of nodes of a n node cluster is up, where m >= (n/2+1). - Barrier
To guarantee crash consistency some of the fops are blocked during a snapshot operation.
These fops are blocked till the snapshot is complete. All other fops is passed through. There is a default time-out of 2 minutes, within that time if snapshot is not complete then these fops are unbarriered. If the barrier is unbarriered before the snapshot is complete then the snapshot operation fails. This is to ensure that the snapshot is in a consistent state.
Note
12.1. Prerequisites
- Snapshot is supported in Red Hat Storage 3.0 and above. If you have previous versions of Red Hat Storage, then you must upgrade to Red Hat Storage 3.0. For more information, see Chapter 8 - Setting Up Software Updates in the Red Hat Storage 3 Installation Guide.
- Snapshot is based on thinly provisioned LVM. Ensure the volume is based on LVM2. Red Hat Storage 3.0 is supported on Red Hat Enterprise Linux 6.5 and Red Hat Enterprise Linux 6.6. Both these versions of Red Hat Enterprise Linux is based on LVM2 by default. For more information, see https://access.redhat.com/site/documentation/en-US/Red_Hat_Enterprise_Linux/6/html/Logical_Volume_Manager_Administration/thinprovisioned_volumes.html
- Each brick must be independent thinly provisioned logical volume(LV).
- The logical volume which contains the brick must not contain any data other than the brick.
- Only linear LVM is supported with Red Hat Storage 3.0. For more information, see https://access.redhat.com/site/documentation/en-US/Red_Hat_Enterprise_Linux/4/html-single/Cluster_Logical_Volume_Manager/#lv_overview
- Each snapshot creates as many bricks as in the original Red Hat Storage volume. Bricks, by default, use privileged ports to communicate. The total number of privileged ports in a system is restricted to 1024. Hence, for supporting 256 snapshots per volume, the following options must be set on Gluster volume. These changes will allow bricks and glusterd to communicate using non-privileged ports.
- Run the following command to permit insecure ports:
# gluster volume set VOLNAME server.allow-insecure on - Edit the
/etc/glusterfs/glusterd.volin each Red Hat Storage node, and add the following setting:option rpc-auth-allow-insecure on - Restart glusterd service on each Red Hat Server node using the following command:
# service glusterd restart
- For each volume brick, create a dedicated thin pool that contains the brick of the volume and its (thin) brick snapshots. With the current thin-p design, avoid placing the bricks of different Red Hat Storage volumes in the same thin pool, as this reduces the performance of snapshot operations, such as snapshot delete, on other unrelated volumes.
- The recommended thin pool chunk size is 256KB. There might be exceptions to this in cases where we have a detailed information of the customer's workload.
- The recommended pool metadata size is 0.1% of the thin pool size for a chunk size of 256KB or larger. In special cases, where we recommend a chunk size less than 256KB, use a pool metadata size of 0.5% of thin pool size.
- Create a physical volume(PV) by using the
pvcreatecommand.pvcreate /dev/sda1Use the correctdataalignmentoption based on your device. For more information, Section 9.2, “Brick Configuration” - Create a Volume Group (VG) from the PV using the following command:
vgcreate dummyvg /dev/sda1 - Create a thin-pool using the following command:
lvcreate -L 1T -T dummyvg/dummypool -c 256k --poolmetadatasize 16GA thin pool of size 1 TB is created, using a chunksize of 256 KB. Maximum pool metadata size of 16 G is used. - Create a thinly provisioned volume from the previously created pool using the following command:
lvcreate -V 1G -T dummyvg/dummypool -n dummylv - Create a file system (XFS) on this. Use the recommended options to create the XFS file system on the thin LV.For example,
mkfs.xfs -f -i size=512 -n size=8192 /dev/dummyvg/dummylv - Mount this logical volume and use the mount path as the brick.
mount/dev/dummyvg/dummylv /mnt/brick1
12.2. Snapshot Commands
- Creating Snapshot
Before creating a snapshot ensure that the following prerequisites are met:
- Red Hat Storage volume has to be present and the volume has to be in the
Startedstate. - All the bricks of the volume have to be on an independent thin logical volume(LV).
- Snapshot names must be unique in the cluster.
- All the bricks of the volume should be up and running, unless it is a n-way replication where n >= 3. In such case quorum must be met. For more information see Chapter 12, Managing Snapshots
- No other volume operation, like
rebalance,add-brick, etc, should be running on the volume. - Total number of snapshots in the volume should not be equal to Effective snap-max-hard-limit. For more information see Configuring Snapshot Behavior.
- If you have a geo-replication setup, then pause the geo-replication session if it is running, by executing the following command:
# gluster volume geo-replication MASTER_VOL SLAVE_HOST::SLAVE_VOL pauseFor example,# gluster volume geo-replication master-vol example.com::slave-vol pause Pausing geo-replication session between master-vol example.com::slave-vol has been successfulEnsure that you take the snapshot of the master volume and then take snapshot of the slave volume. - If you have a Hadoop enabled Red Hat Storage volume, you must ensure to stop all the Hadoop Services in Ambari.
To create a snapshot of the volume, run the following command:# gluster snapshot create <snapname> VOLNAME(S) [description <description>] [force]where,- snapname - Name of the snapshot that will be created. It should be a unique name in the entire cluster.
- VOLNAME(S) - Name of the volume for which the snapshot will be created. We only support creating snapshot of single volume.
- description - This is an optional field that can be used to provide a description of the snap that will be saved along with the snap.
force- Snapshot creation will fail if any brick is down. In a n-way replicated Red Hat Storage volume where n >= 3 snapshot is allowed even if some of the bricks are down. In such case quorum is checked. Quorum is checked only when theforceoption is provided, else by-default the snapshot create will fail if any brick is down. Refer the Overview section for more details on quorum.
For Example:# gluster snapshot create snap1 vol1 snapshot create: success: Snap snap1 created successfullySnapshot of a Red Hat Storage volume creates a read-only Red Hat Storage volume. This volume will have identical configuration as of the original / parent volume. Bricks of this newly created snapshot is mounted as/var/run/gluster/snaps/<snap-volume-name>/brick<bricknumber>.For example, a snapshot with snap volume name0888649a92ea45db8c00a615dfc5ea35and having two bricks will have the following two mount points:/var/run/gluster/snaps/0888649a92ea45db8c00a615dfc5ea35/brick1 /var/run/gluster/snaps/0888649a92ea45db8c00a615dfc5ea35/brick2These mounts can also be viewed using thedformountcommand.Note
If you have a geo-replication setup, after creating the snapshot, resume the geo-replication session by running the following command:# gluster volume geo-replication MASTER_VOL SLAVE_HOST::SLAVE_VOL resumeFor example,# gluster volume geo-replication master-vol example.com::slave-vol resume Resuming geo-replication session between master-vol example.com::slave-vol has been successful
- Listing of Available Snapshots
To list all the snapshots that are taken for a specific volume, run the following command:
# gluster snapshot list [VOLNAME]where,- VOLNAME - This is an optional field and if provided lists the snapshot names of all snapshots present in the volume.
For Example:# gluster snapshot list snap3 # gluster snapshot list test_vol No snapshots present
- Getting Information of all the Available Snapshots
The following command provides the basic information of all the snapshots taken. By default the information of all the snapshots in the cluster is displayed:
# gluster snapshot info [(<snapname> | volume VOLNAME)]where,- snapname - This is an optional field. If the snapname is provided then the information about the specified snap is displayed.
- VOLNAME - This is an optional field. If the VOLNAME is provided the information about all the snaps in the specified volume is displayed.
For Example:# gluster snapshot info snap3 Snapshot : snap3 Snap UUID : b2a391ce-f511-478f-83b7-1f6ae80612c8 Created : 2014-06-13 09:40:57 Snap Volumes: Snap Volume Name : e4a8f4b70a0b44e6a8bff5da7df48a4d Origin Volume name : test_vol1 Snaps taken for test_vol1 : 1 Snaps available for test_vol1 : 255 Status : Started
- Getting the Status of Available Snapshots
This command displays the running status of the snapshot. By default the status of all the snapshots in the cluster is displayed. To check the status of all the snapshots that are taken for a particular volume, specify a volume name:
# gluster snapshot status [(<snapname> | volume VOLNAME)]where,- snapname - This is an optional field. If the snapname is provided then the status about the specified snap is displayed.
- VOLNAME - This is an optional field. If the VOLNAME is provided the status about all the snaps in the specified volume is displayed.
For Example:# gluster snapshot status snap3 Snap Name : snap3 Snap UUID : b2a391ce-f511-478f-83b7-1f6ae80612c8 Brick Path : 10.70.42.248:/var/run/gluster/snaps/e4a8f4b70a0b44e6a8bff5da7df48a4d/brick1/brick1 Volume Group : snap_lvgrp1 Brick Running : Yes Brick PID : 1640 Data Percentage : 1.54 LV Size : 616.00m Brick Path : 10.70.43.139:/var/run/gluster/snaps/e4a8f4b70a0b44e6a8bff5da7df48a4d/brick2/brick3 Volume Group : snap_lvgrp1 Brick Running : Yes Brick PID : 3900 Data Percentage : 1.80 LV Size : 616.00m Brick Path : 10.70.43.34:/var/run/gluster/snaps/e4a8f4b70a0b44e6a8bff5da7df48a4d/brick3/brick4 Volume Group : snap_lvgrp1 Brick Running : Yes Brick PID : 3507 Data Percentage : 1.80 LV Size : 616.00m
- Configuring Snapshot Behavior
The configurable parameters for snapshot are:
- snap-max-hard-limit: If the snapshot count in a volume reaches this limit then no further snapshot creation is allowed. The range is from 1 to 256. Once this limit is reached you have to remove the snapshots to create further snapshots. This limit can be set for the system or per volume. If both system limit and volume limit is configured then the effective max limit would be the lowest of the two value.
- snap-max-soft-limit: This is a percentage value. The default value is 90%. This configuration works along with auto-delete feature. If auto-delete is enabled then it will delete the oldest snapshot when snapshot count in a volume crosses this limit. When auto-delete is disabled it will not delete any snapshot, but it will display a warning message to the user.
- auto-delete: This will enable or disable auto-delete feature. By default auto-delete is disabled. When enabled it will delete the oldest snapshot when snapshot count in a volume crosses the snap-max-soft-limit. When disabled it will not delete any snapshot, but it will display a warning message to the user
- Displaying the Configuration Values
To display the existing configuration values for a volume or the entire cluster, run the following command:
# gluster snapshot config [VOLNAME]where:- VOLNAME: This is an optional field. The name of the volume for which the configuration values are to be displayed.
If the volume name is not provided then the configuration values of all the volume is displayed. System configuration details are displayed irrespective of whether the volume name is specified or not.For Example:# gluster snapshot config Snapshot System Configuration: snap-max-hard-limit : 256 snap-max-soft-limit : 90% auto-delete : disable Snapshot Volume Configuration: Volume : test_vol snap-max-hard-limit : 256 Effective snap-max-hard-limit : 256 Effective snap-max-soft-limit : 230 (90%) Volume : test_vol1 snap-max-hard-limit : 256 Effective snap-max-hard-limit : 256 Effective snap-max-soft-limit : 230 (90%) - Changing the Configuration Values
To change the existing configuration values, run the following command:
# gluster snapshot config [VOLNAME] ([snap-max-hard-limit <count>] [snap-max-soft-limit <percent>]) | ([auto-delete <enable|disable>])where:- VOLNAME: This is an optional field. The name of the volume for which the configuration values are to be changed. If the volume name is not provided, then running the command will set or change the system limit.
- snap-max-hard-limit: Maximum hard limit for the system or the specified volume.
- snap-max-soft-limit: Soft limit mark for the system.
- auto-delete: This will enable or disable auto-delete feature. By default auto-delete is disabled.
For Example:# gluster snapshot config test_vol snap-max-hard-limit 100 Changing snapshot-max-hard-limit will lead to deletion of snapshots if they exceed the new limit. Do you want to continue? (y/n) y snapshot config: snap-max-hard-limit for test_vol set successfully
- Activating and Deactivating a Snapshot
Only activated snapshots are accessible. Check the Accessing Snapshot section for more details. Since each snapshot is a Red Hat Storage volume it consumes some resources hence if the snapshots are not needed it would be good to deactivate them and activate them when required. To activate a snapshot run the following command:
# gluster snapshot activate <snapname> [force]where:- snapname: Name of the snap to be activated.
force: If some of the bricks of the snapshot volume are down then use theforcecommand to start them.
For Example:# gluster snapshot activate snap1To deactivate a snapshot, run the following command:# gluster snapshot deactivate <snapname>where:- snapname: Name of the snap to be deactivated.
For example:# gluster snapshot deactivate snap1
- Deleting Snapshot
Before deleting a snapshot ensure that the following prerequisites are met:
- Snapshot with the specified name should be present.
- Red Hat Storage nodes should be in quorum.
- No volume operation (e.g. add-brick, rebalance, etc) should be running on the original / parent volume of the snapshot.
To delete a snapshot run the following command:# gluster snapshot delete <snapname>where,- snapname - The name of the snapshot to be deleted.
For Example:# gluster snapshot delete snap2 Deleting snap will erase all the information about the snap. Do you still want to continue? (y/n) y snapshot delete: snap2: snap removed successfullyNote
Red Hat Storage volume cannot be deleted if any snapshot is associated with the volume. You must delete all the snapshots before issuing a volume delete.
- Restoring Snapshot
Before restoring a snapshot ensure that the following prerequisites are met
- The specified snapshot has to be present
- The original / parent volume of the snapshot has to be in a stopped state.
- Red Hat Storage nodes have to be in quorum.
- If you have a Hadoop enabled Red Hat Storage volume, you must ensure to stop all the Hadoop Services in Ambari.
- No volume operation (e.g. add-brick, rebalance, etc) should be running on the origin or parent volume of the snapshot.
# gluster snapshot restore <snapname>where,- snapname - The name of the snapshot to be restored.
For Example:# gluster snapshot restore snap1 Snapshot restore: snap1: Snap restored successfullyAfter snapshot is restored and the volume is started, trigger a self-heal by running the following command:# gluster volume heal VOLNAME fullIf you have a Hadoop enabled Red Hat Storage volume, you must start all the Hadoop Services in Ambari.Note
- The snapshot will be deleted once it is restored. To restore to the same point again take a snapshot explicitly after restoring the snapshot.
- After restore the brick path of the original volume will change. If you are using
fstabto mount the bricks of the origin volume then you have to fixfstabentries after restore. For more information see, https://access.redhat.com/site/documentation/en-US/Red_Hat_Enterprise_Linux/6/html/Installation_Guide/apcs04s07.html
- In the cluster, identify the nodes participating in the snapshot with the snapshot status command. For example:
# gluster snapshot status snapname Snap Name : snapname Snap UUID : bded7c02-8119-491b-a7e1-cc8177a5a1cd Brick Path : 10.70.43.46:/var/run/gluster/snaps/816e8403874f43a78296decd7c127205/brick2/brick2 Volume Group : snap_lvgrp Brick Running : Yes Brick PID : 8303 Data Percentage : 0.43 LV Size : 2.60g Brick Path : 10.70.42.33:/var/run/gluster/snaps/816e8403874f43a78296decd7c127205/brick3/brick3 Volume Group : snap_lvgrp Brick Running : Yes Brick PID : 4594 Data Percentage : 42.63 LV Size : 2.60g Brick Path : 10.70.42.34:/var/run/gluster/snaps/816e8403874f43a78296decd7c127205/brick4/brick4 Volume Group : snap_lvgrp Brick Running : Yes Brick PID : 23557 Data Percentage : 12.41 LV Size : 2.60g- In the nodes identified above, check if the
geo-replicationrepository is present in/var/lib/glusterd/snaps/snapname. If the repository is present in any of the nodes, ensure that the same is present in/var/lib/glusterd/snaps/snapnamethroughout the cluster. If thegeo-replicationrepository is missing in any of the nodes in the cluster, copy it to/var/lib/glusterd/snaps/snapnamein that node. - Restore snapshot of the volume using the following command:
# gluster snapshot restore snapname
Restoring Snapshot of a Geo-replication VolumeIf you have a geo-replication setup, then perform the following steps to restore snapshot:
- Stop the geo-replication session.
# gluster volume geo-replication MASTER_VOL SLAVE_HOST::SLAVE_VOL stop - Stop the slave volume and then the master volume.
# gluster volume stop VOLNAME - Restore snapshot of the slave volume and the master volume.
# gluster snapshot restore snapname - Start the slave volume first and then the master volume.
# gluster volume start VOLNAME - Start the geo-replication session.
# gluster volume geo-replication MASTER_VOL SLAVE_HOST::SLAVE_VOL start - Resume the geo-replication session.
# gluster volume geo-replication MASTER_VOL SLAVE_HOST::SLAVE_VOL resume
- Accessing Snapshots
Snapshot of a Red Hat Storage volume can be accessed only via FUSE mount. Use the following command to mount the snapshot.
mount -t glusterfs <hostname>:/snaps/<snapname>/parent-VOLNAME /mount_point- parent-VOLNAME - Volume name for which we have created the snapshot.For example,
# mount -t glusterfs myhostname:/snaps/snap1/test_vol /mnt
Since the Red Hat Storage snapshot volume is read-only, no write operations are allowed on this mount. After mounting the snapshot the entire snapshot content can then be accessed in a read-only mode.Note
NFS and CIFS mount of snapshot volume is not supported.Snapshots can also be accessed via User Serviceable Snapshots. For more information see, Section 12.3, “User Serviceable Snapshots”
Warning
12.3. User Serviceable Snapshots
test.txt which was in the Home directory a couple of months earlier and was deleted accidentally. You can now easily go to the virtual .snaps directory that is inside the home directory and recover the test.txt file using the cp command.
Note
- User Serviceable Snapshot is not the recommended option for bulk data access from an earlier snapshot volume. For such scenarios it is recommended to mount the Snapshot volume and then access the data. For more information see, Chapter 12, Managing Snapshots
- Each activated snapshot volume when initialized by User Serviceable Snapshots, consumes some memory. Most of the memory is consumed by various house keeping structures of gfapi and xlators like DHT, AFR, etc. Therefore, the total memory consumption by snapshot depends on the number of bricks as well. Each brick consumes approximately 10MB of space, for example, in a 4x2 replica setup the total memory consumed by snapshot is around 50MB and for a 6x2 setup it is roughly 90MB.Therefore, as the number of active snapshots grow, the total memory footprint of the snapshot daemon (snapd) also grows. Therefore, in a low memory system, the snapshot daemon can get
OOMkilled if there are too many active snapshots
12.3.1. Enabling and Disabling User Serviceable Snapshot
# gluster volume set VOLNAME features.uss enable# gluster volume set test_vol features.uss enable
volume set: success# gluster volume set VOLNAME features.uss disable# gluster volume set test_vol features.uss disable
volume set: success12.3.2. Viewing and Retrieving Snapshots using NFS / FUSE
.snaps directory of every directory of the mounted volume. The .snaps directory is a virtual directory which will not be listed by either the ls command, or the ls -a option.
- Go to the folder where the file was present when the snapshot was taken. For example, if you had a test.txt file in the Home directory that has to be recovered, then go to the home directory.
# cd $HOMENote
Since every directory has a virtual.snapsdirectory, you can enter the.snapsdirectory from here. Since.snapsis a virtual directory,lsandls -acommand will not list the.snapsdirectory. For example:# ls -a ....Bob John test1.txt test2.txt - Go to the
.snapsfolder# cd .snaps - Run the
lscommand to list all the snapsFor example:# ls -p snapshot_Dec2014/ snapshot_Nov2014/ snapshot_Oct2014/ snapshot_Sept2014/ - Go to the snapshot directory from where the file has to be retrieved.For example:
cd snapshot_Nov2014# ls -p John/ test1.txt test2.txt - Copy the file/directory to the desired location.
# cp -p test2.txt $HOME
12.3.3. Viewing and Retrieving Snapshots using CIFS for Windows Client
.snaps folder of every folder in the root of the CIFS share. The .snaps folder is a hidden folder which will be displayed only when the following option is set to ON on the volume using the following command:
# gluster volume set volname features.show-snapshot-directory onON, every Windows client can access the .snaps folder by following these steps:
- In the
Folderoptions, enable theShow hidden files, folders, and drivesoption. - Go to the root of the CIFS share to view the
.snapsfolder.Note
The.snapsfolder is accessible only in the root of the CIFS share and not in any sub folders. - The list of snapshots are available in the
.snapsfolder. You can now access the required file and retrieve it.
12.4. Troubleshooting
- Situation
Snapshot creation fails.
Step 1Check if the bricks are thinly provisioned by following these steps:
- Execute the
mountcommand and check the device name mounted on the brick path. For example:# mount /dev/mapper/snap_lvgrp-snap_lgvol on /brick/brick-dirs type xfs (rw) /dev/mapper/snap_lvgrp1-snap_lgvol1 on /brick/brick-dirs1 type xfs (rw) - Run the following command to check if the device has a LV pool name.
lvs device-nameFor example:# lvs -o pool_lv /dev/mapper/snap_lvgrp-snap_lgvol Pool snap_thnpoolIf thePoolfield is empty, then the brick is not thinly provisioned. - Ensure that the brick is thinly provisioned, and retry the snapshot create command.
Step 2Check if the bricks are down by following these steps:
- Execute the following command to check the status of the volume:
# gluster volume status VOLNAME - If any bricks are down, then start the bricks by executing the following command:
# gluster volume start VOLNAME force - To verify if the bricks are up, execute the following command:
# gluster volume status VOLNAME - Retry the snapshot create command.
Step 3Check if the node is down by following these steps:
- Execute the following command to check the status of the nodes:
# gluster volume status VOLNAME - If a brick is not listed in the status, then execute the following command:
# gluster pool list - If the status of the node hosting the missing brick is
Disconnected, then power-up the node. - Retry the snapshot create command.
Step 4Check if rebalance is in progress by following these steps:
- Execute the following command to check the rebalance status:
gluster volume rebalance VOLNAME status - If rebalance is in progress, wait for it to finish.
- Retry the snapshot create command.
- Situation
Snapshot delete fails.
Step 1Check if the server quorum is met by following these steps:
- Execute the following command to check the peer status:
# gluster pool list - If nodes are down, and the cluster is not in quorum, then power up the nodes.
- To verify if the cluster is in quorum, execute the following command:
# gluster pool list - Retry the snapshot delete command.
- Situation
Snapshot delete command fails on some node(s) during commit phase, leaving the system inconsistent.
Solution- Identify the node(s) where the delete command failed. This information is available in the delete command's error output. For example:
# gluster snapshot delete snapshot1 Deleting snap will erase all the information about the snap. Do you still want to continue? (y/n) y snapshot delete: failed: Commit failed on 10.00.00.02. Please check log file for details. Snapshot command failed - On the node where the delete command failed, bring down glusterd using the following command:
#service glusterd stop - Delete that particular snaps repository in
/var/lib/glusterd/snaps/from that node. For example:#rm -rf /var/lib/glusterd/snaps/snapshot1 - Start glusterd on that node using the following command:
#service glusterd start. - Repeat the 2nd, 3rd, and 4th steps on all the nodes where the commit failed as identified in the 1st step.
- Retry deleting the snapshot. For example:
#gluster snapshot delete snapshot1
- Situation
Snapshot restore fails.
Step 1Check if the server quorum is met by following these steps:
- Execute the following command to check the peer status:
# gluster pool list - If nodes are down, and the cluster is not in quorum, then power up the nodes.
- To verify if the cluster is in quorum, execute the following command:
# gluster pool list - Retry the snapshot restore command.
Step 2Check if the volume is in
Stopstate by following these steps:- Execute the following command to check the volume info:
# gluster volume info VOLNAME - If the volume is in
Startedstate, then stop the volume using the following command:gluster volume stop VOLNAME - Retry the snapshot restore command.
- Situation
The brick process is hung.
SolutionCheck if the LVM data / metadata utilization had reached 100% by following these steps:
- Execute the mount command and check the device name mounted on the brick path. For example:
# mount /dev/mapper/snap_lvgrp-snap_lgvol on /brick/brick-dirs type xfs (rw) /dev/mapper/snap_lvgrp1-snap_lgvol1 on /brick/brick-dirs1 type xfs (rw) - Execute the following command to check if the data/metadatautilization has reached 100%:
lvs -v device-nameFor example:# lvs -o data_percent,metadata_percent -v /dev/mapper/snap_lvgrp-snap_lgvol Using logical volume(s) on command line Data% Meta% 0.40
Note
Ensure that the data and metadata does not reach the maximum limit. Usage of monitoring tools like Nagios, will ensure you do not come across such situations. For more information about Nagios, see Chapter 13, Monitoring Red Hat Storage - Situation
Snapshot commands fail.
Step 1Check if there is a mismatch in the operating versions by following these steps:
- Open the following file and check for the operating version:
/var/lib/glusterd/glusterd.infoIf theoperating-versionis lesser than 30000, then the snapshot commands are not supported in the version the cluster is operating on. - Upgrade all nodes in the cluster to Red Hat Storage 3.0.
- Retry the snapshot command.
- Situation
After rolling upgrade, snapshot feature does not work.
SolutionYou must ensure to make the following changes on the cluster to enable snapshot:
- Restart the volume using the following commands.
# gluster volume stop VOLNAME # gluster volume start VOLNAME - Restart glusterd services on all nodes.
# service glusterd restart
Chapter 13. Monitoring Red Hat Storage
- Nagios deployed on Red Hat Storage node.
- Nagios deployed on Red Hat Storage Console node.
- Nagios deployed on Red Hat Enterprise Linux node.
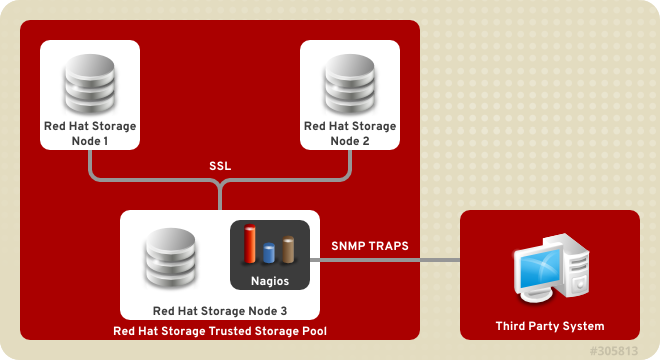
Figure 13.1. Nagios deployed on Red Hat Storage node

Figure 13.2. Nagios deployed on Red Hat Enterprise Linux node
13.1. Prerequisites
Note
- Registering using Subscription Manager and enabling Nagios repositories
- To install Nagios on Red Hat Storage node, subscribe to
rhs-nagios-3-for-rhel-6-server-rpmsrepository. - To install Nagios on Red Hat Enterprise Linux node, subscribe to
rhel-6-server-rpms,rhs-nagios-3-for-rhel-6-server-rpmsrepositories.
- Registering using Red Hat Network (RHN) Classic and subscribing to Nagios channels
- To install Nagios on Red Hat Storage node, subscribe to
rhel-x86_64-server-6-rhs-nagios-3channel. - To install Nagios on Red Hat Enterprise Linux node, subscribe to
rhel-x86_64-server-6,rhel-x86_64-server-6-rhs-nagios-3channels.
Important
13.2. Installing Nagios
- nagios
- Core program, web interface and configuration files for Nagios server.
- python-cpopen
- Python package for creating sub-process in simple and safe manner.
- python-argparse
- Command line parser for python.
- libmcrypt
- Encryptions algorithm library.
- rrdtool
- Round Robin Database Tool to store and display time-series data.
- pynag
- Python modules and utilities for Nagios plugins and configuration.
- check-mk
- General purpose Nagios-plugin for retrieving data.
- mod_python
- An embedded Python interpreter for the Apache HTTP Server.
- nrpe
- Monitoring agent for Nagios.
- nsca
- Nagios service check acceptor.
- nagios-plugins
- Common monitoring plug-ins for nagios.
- gluster-nagios-common
- Common libraries, tools, configurations for Gluster node and Nagios server add-ons.
- nagios-server-addons
- Gluster node management add-ons for Nagios.
13.2.1. Installing Nagios Server
# yum install nagios-server-addons13.2.2. Configuring Red Hat Storage Nodes for Nagios
- In
/etc/nagios/nrpe.cfgfile, add the central Nagios server IP address as shown below:allowed_hosts=127.0.0.1, NagiosServer-HostName-or-IPaddress - Restart the
NRPEservice using the following command:# service nrpe restartNote
- The host name of the node is used while configuring Nagios server using auto-discovery. To view the host name, run
hostnamecommand. - Ensure that the host names are unique.
- Start the
glusterpmdservice using the following command:# service glusterpmd startTo startglusterpmdservice automatically when the system reboots, runchkconfig --add glusterpmdcommand.You can start theglusterpmdservice usingservice glusterpmd startcommand and stop the service usingservice glusterpmd stopcommand.Theglusterpmdservice is a Red Hat Storage process monitoring service running in every Red Hat Storage node to monitor glusterd, self heal, smb, quotad, ctdbd and brick services and to alert the user when the services go down. Theglusterpmdservice sends its managing services detailed status to the Nagios server whenever there is a state change on any of its managing services.This service uses/etc/nagios/nagios_server.conffile to get the Nagios server name and the local host name given in the Nagios server. Thenagios_server.confis configured by auto-discovery.
13.3. Monitoring Red Hat Storage Trusted Storage Pool
13.3.1. Configuring Nagios
Note
configure-gluster-nagios command, ensure that all the Red Hat Storage nodes are configured as mentioned in Section 13.2.2, “Configuring Red Hat Storage Nodes for Nagios”.
- Execute the
configure-gluster-nagioscommand manually on the Nagios server using the following command. The cluster name and host address must be included only the first time the script is executed:# configure-gluster-nagios -c cluster-name -H HostName-or-IP-addressFor-c, provide a cluster name (a logical name for the cluster) and for-H, provide the host name or ip address of a node in the Red Hat Storage trusted storage pool. - Perform the steps given below when
configure-gluster-nagioscommand runs:- Confirm the configuration when prompted.
- Enter the current Nagios server host name or IP address to be configured all the nodes.
- Confirm restarting Nagios server when prompted.
# configure-gluster-nagios -c demo-cluster -H HostName-or-IP-address
Cluster configurations changed
Changes :
Hostgroup demo-cluster - ADD
Host demo-cluster - ADD
	 Service - Volume Utilization - vol-1 -ADD
	 Service - Volume Self-Heal - vol-1 -ADD
	 Service - Volume Status - vol-1 -ADD
	 Service - Volume Utilization - vol-2 -ADD
	 Service - Volume Status - vol-2 -ADD
	 Service - Cluster Utilization -ADD
	 Service - Cluster - Quorum -ADD
	 Service - Cluster Auto Config -ADD
Host Host_Name - ADD
	 Service - Brick Utilization - /bricks/vol-1-5 -ADD
	 Service - Brick - /bricks/vol-1-5 -ADD
	 Service - Brick Utilization - /bricks/vol-1-6 -ADD
	 Service - Brick - /bricks/vol-1-6 -ADD
	 Service - Brick Utilization - /bricks/vol-2-3 -ADD
	 Service - Brick - /bricks/vol-2-3 -ADD
Are you sure, you want to commit the changes? (Yes, No) [Yes]:
Enter Nagios server address [Nagios_Server_Address]:
Cluster configurations synced successfully from host ip-address
Do you want to restart Nagios to start monitoring newly discovered entities? (Yes, No) [Yes]:
Nagios re-started successfully
All the hosts, volumes and bricks are added and displayed.
- Login to the Nagios server GUI using the following URL.
https://NagiosServer-HostName-or-IPaddress/nagiosNote
- The default Nagios user name and password is nagiosadmin / nagiosadmin.
- You can manually update/discover the services by executing the
configure-gluster-nagioscommand or by runningCluster Auto Configservice through Nagios Server GUI. - If the node with which auto-discovery was performed is down or removed from the cluster, run the
configure-gluster-nagioscommand with a different node address to continue discovering or monitoring the nodes and services. - If new nodes or services are added, removed, or if snapshot restore was performed on Red Hat Storage node, run
configure-gluster-nagioscommand.
13.3.2. Verifying the Configuration
- Verify the updated configurations using the following command:
# nagios -v /etc/nagios/nagios.cfgIf error occurs, verify the parameters set in/etc/nagios/nagios.cfgand update the configuration files. - Restart Nagios server using the following command:
# service nagios restart - Log into the Nagios server GUI using the following URL with the Nagios Administrator user name and password.
https://NagiosServer-HostName-or-IPaddress/nagiosNote
To change the default password, see Changing Nagios Password section in Red Hat Storage Administration Guide. - Click Services in the left pane of the Nagios server GUI and verify the list of hosts and services displayed.
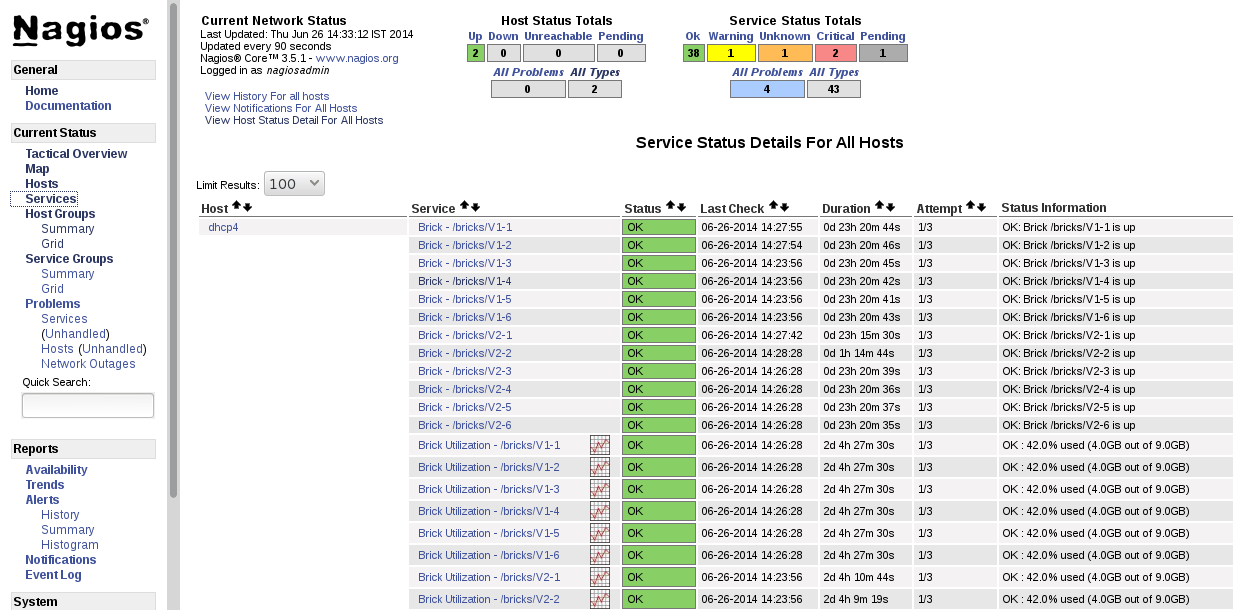
Figure 13.3. Nagios Services
13.3.3. Using Nagios Server GUI
https://NagiosServer-HostName-or-IPaddress/nagios
Figure 13.4. Nagios Login
To view the overview of the hosts and services being monitored, click Tactical Overview in the left pane. The overview of Network Outages, Hosts, Services, and Monitoring Features are displayed.
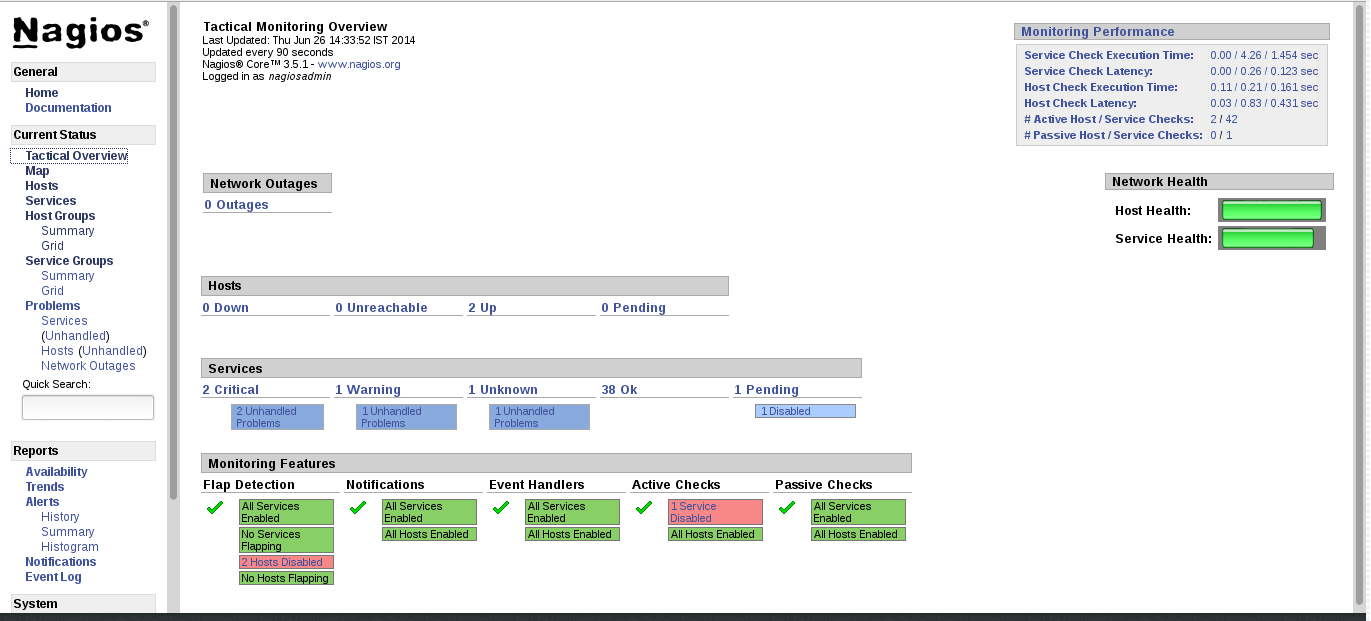
Figure 13.5. Tactical Overview
To view the status summary of all the hosts, click Summary under Host Groups in the left pane.
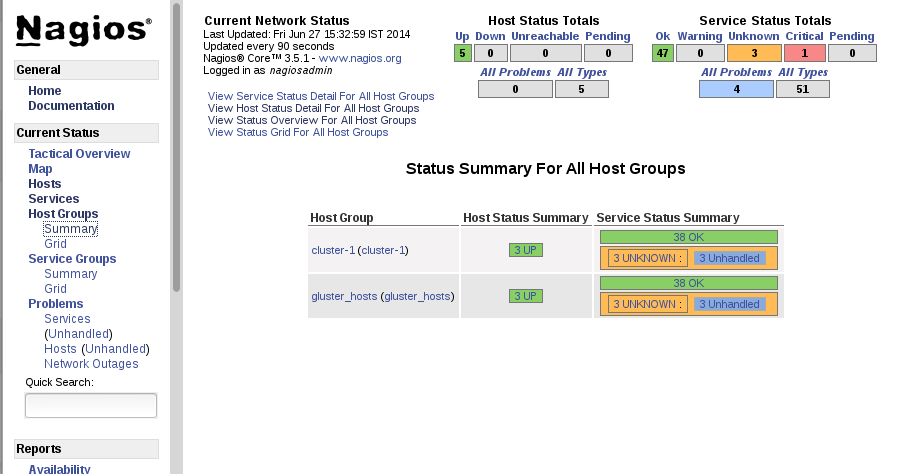
Figure 13.6. Host Groups Summary
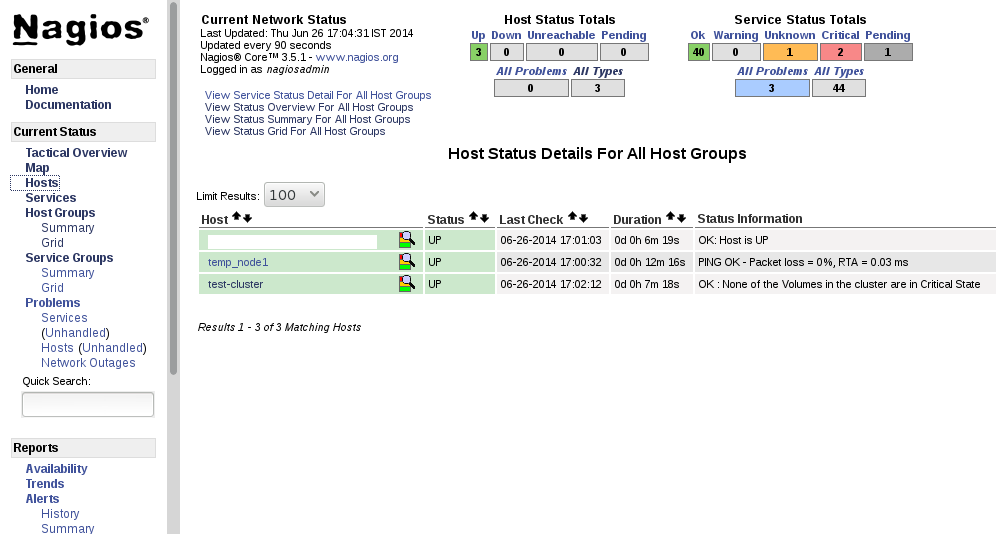
Figure 13.7. Host Status
To view the list of all hosts and their service status click Services in the left pane.
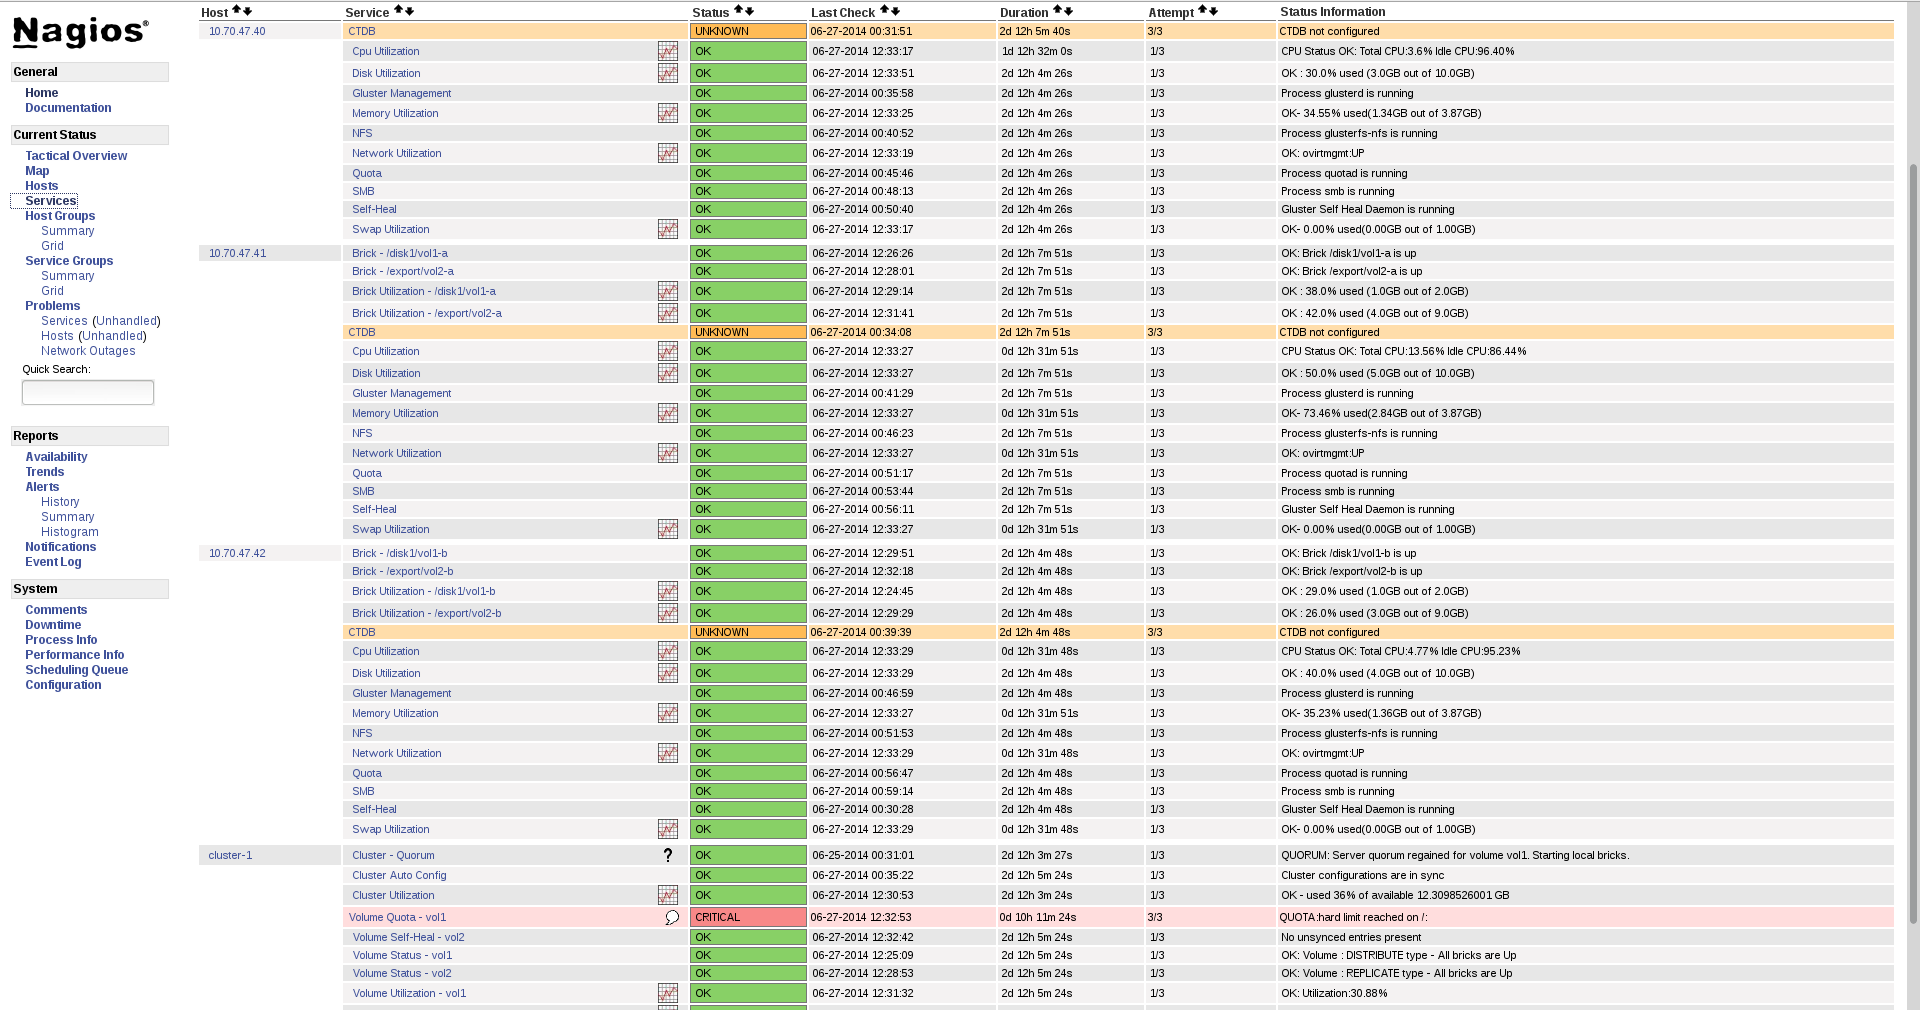
Figure 13.8. Service Status
Note
- Click
Hostsin the left pane. The list of hosts are displayed. - Click
 corresponding to the host name to view the host details.
- Select the service name to view the Service State Information. You can view the utilization of the following services:
- Memory
- Swap
- CPU
- Network
- Brick
- DiskThe Brick/Disk Utilization Performance data has four sets of information for every mount point which are brick/disk space detail, inode detail of a brick/disk, thin pool utilization and thin pool metadata utilization if brick/disk is made up of thin LV.The Performance data for services is displayed in the following format: value[UnitOfMeasurement];warningthreshold;criticalthreshold;min;max.For Example,Performance Data: /bricks/brick2=31.596%;80;90;0;0.990 /bricks/brick2.inode=0.003%;80;90;0;1048064 /bricks/brick2.thinpool=19.500%;80;90;0;1.500 /bricks/brick2.thinpool-metadata=4.100%;80;90;0;0.004As part of disk utilization service, the following mount points will be monitored:
/ , /boot, /home, /var and /usrif available.
- To view the utilization graph, click
 corresponding to the service name. The utilization graph is displayed.
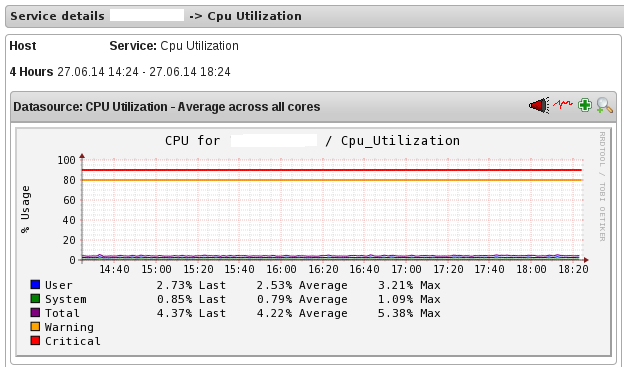
Figure 13.9. CPU Utilization
- To monitor status, click on the service name. You can monitor the status for the following resources:
- Disk
- Network
- To monitor process, click on the process name. You can monitor the following processes:
- NFS(NetworkFileSystem)
- Self-Heal(SelfHeal)
- GlusterManagement(glusterd)
- Quota(Quota daemon)
- CTDB
- SMB
Note
Monitoring Openstack Swift operations is not supported.
- Click
Hostsin the left pane. The list of hosts and clusters are displayed. - Click
corresponding to the cluster name to view the cluster details.
- To view utilization graph, click
corresponding to the service name. You can monitor the following utilizations:
- Cluster
- Volume

Figure 13.10. Cluster Utilization
- To monitor status, click on the service name. You can monitor the status for the following resources:
- Host
- Volume
- Brick
- To monitor cluster services, click on the service name. You can monitor the following:
- Volume Quota
- Volume Geo-replication
- Volume Self Heal
- Cluster Quorum (A cluster quorum service would be present only when there are volumes in the cluster.)
If new nodes or services are added or removed, or if snapshot restore is performed on Red Hat Storage node, reschedule the Cluster Auto config service using Nagios Server GUI or execute the configure-gluster-nagios command. To synchronize the configurations using Nagios Server GUI, perform the steps given below:
- Login to the Nagios Server GUI using the following URL in your browser with nagiosadmin user name and password.
https://NagiosServer-HostName-or-IPaddress/nagios - Click Services in left pane of Nagios server GUI and click Cluster Auto Config.
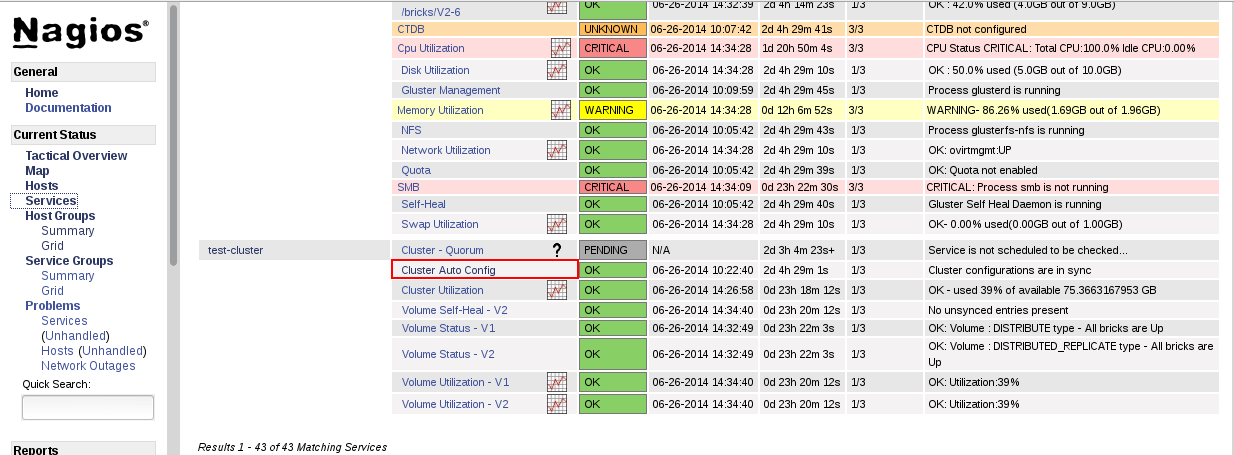
Figure 13.11. Nagios Services
- In Service Commands, click Re-schedule the next check of this service. The Command Options window is displayed.
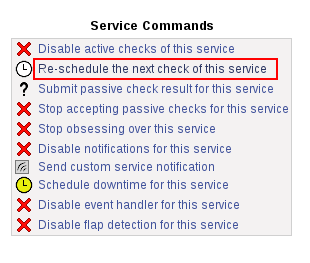
Figure 13.12. Service Commands
- In Command Options window, click .
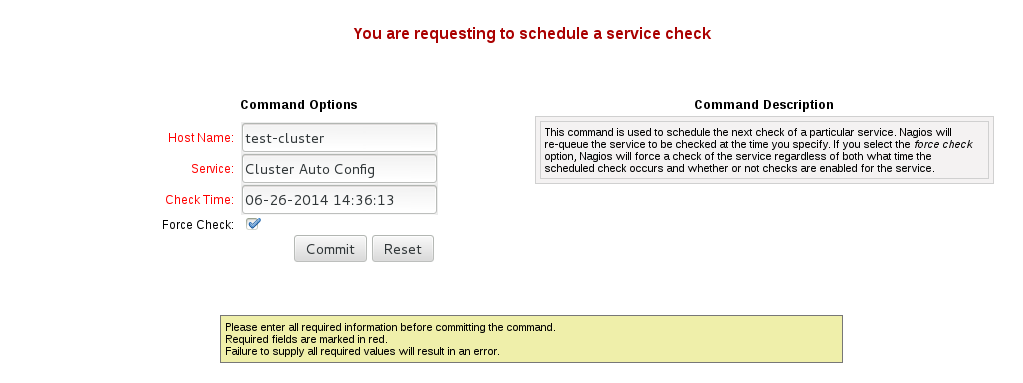
Figure 13.13. Command Options
You can enable or disable Host and Service notifications through Nagios GUI.
- To enable and disable Host Notifcations:
- Login to the Nagios Server GUI using the following URL in your browser with nagiosadmin user name and password.
https://NagiosServer-HostName-or-IPaddress/nagios - Click Hosts in left pane of Nagios server GUI and select the host.
- Click Enable notifications for this host or Disable notifications for this host in Host Commands section.
- Click Commit to enable or disable notification for the selected host.
- To enable and disable Service Notification:
- Login to the Nagios Server GUI.
- Click Services in left pane of Nagios server GUI and select the service to enable or disable.
- Click Enable notifications for this service or Disable notifications for this service from the Service Commands section.
- Click Commit to enable or disable the selected service notification.
- To enable and disable all Service Notifications for a host:
- Login to the Nagios Server GUI.
- Click Hosts in left pane of Nagios server GUI and select the host to enable or disable all services notifications.
- Click Enable notifications for all services on this host or Disable notifications for all services on this host from the Service Commands section.
- Click Commit to enable or disable all service notifications for the selected host.
- To enable or disable all Notifications:
- Login to the Nagios Server GUI.
- Click Process Info under Systems section from left pane of Nagios server GUI.
- Click Enable notifications or Disable notifications in Process Commands section.
- Click Commit.
You can enable a service to monitor or disable a service you have been monitoring using the Nagios GUI.
- To enable Service Monitoring:
- Login to the Nagios Server GUI using the following URL in your browser with nagiosadmin user name and password.
https://NagiosServer-HostName-or-IPaddress/nagios - Click Services in left pane of Nagios server GUI and select the service to enable monitoring.
- Click Enable active checks of this service from the Service Commands and click Commit.
- Click Start accepting passive checks for this service from the Service Commands and click Commit.Monitoring is enabled for the selected service.
- To disable Service Monitoring:
- Login to the Nagios Server GUI using the following URL in your browser with nagiosadmin user name and password.
https://NagiosServer-HostName-or-IPaddress/nagios - Click Services in left pane of Nagios server GUI and select the service to disable monitoring.
- Click Disable active checks of this service from the Service Commands and click Commit.
- Click Stop accepting passive checks for this service from the Service Commands and click Commit.Monitoring is disabled for the selected service.
Note
| Service Name | Status | Messsage | Description |
|---|---|---|---|
| SMB | OK | OK: No gluster volume uses smb | When no volumes are exported through smb. |
| OK | Process smb is running | When SMB service is running and when volumes are exported using SMB. | |
| CRITICAL | CRITICAL: Process smb is not running | When SMB service is down and one or more volumes are exported through SMB. | |
| CTDB | UNKNOWN | CTDB not configured | When CTDB service is not running, and smb or nfs service is running. |
| CRITICAL | Node status: BANNED/STOPPED | When CTDB service is running but Node status is BANNED/STOPPED. | |
| WARNING | Node status: UNHEALTHY/DISABLED/PARTIALLY_ONLINE | When CTDB service is running but Node status is UNHEALTHY/DISABLED/PARTIALLY_ONLINE. | |
| OK | Node status: OK | When CTDB service is running and healthy. | |
| Gluster Management | OK | Process glusterd is running | When glusterd is running as unique. |
| WARNING | PROCS WARNING: 3 processes | When there are more then one glusterd is running. | |
| CRITICAL | CRITICAL: Process glusterd is not running | When there is no glusterd process running. | |
| UNKNOWN | NRPE: Unable to read output | When unable to communicate or read output | |
| NFS | OK | OK: No gluster volume uses nfs | When no volumes are configured to be exported through NFS. |
| OK | Process glusterfs-nfs is running | When glusterfs-nfs process is running. | |
| CRITICAL | CRITICAL: Process glusterfs-nfs is not running | When glusterfs-nfs process is down and there are volumes which requires NFS export. | |
| Self-Heal | OK | Gluster Self Heal Daemon is running | When self-heal process is running. |
| OK | OK: Process Gluster Self Heal Daemon | ||
| CRITICAL | CRITICAL: Gluster Self Heal Daemon not running | When gluster self heal process is not running. | |
| Auto-Config | OK | Cluster configurations are in sync | When auto-config has not detected any change in Gluster configuration. This shows that Nagios configuration is already in synchronization with the Gluster configuration and auto-config service has not made any change in Nagios configuration. |
| OK | Cluster configurations synchronized successfully from host host-address | When auto-config has detected change in the Gluster configuration and has successfully updated the Nagios configuration to reflect the change Gluster configuration. | |
| CRITICAL | Can't remove all hosts except sync host in 'auto' mode. Run auto discovery manually. | When the host used for auto-config itself is removed from the Gluster peer list. Auto-config will detect this as all host except the synchronized host is removed from the cluster. This will not change the Nagios configuration and the user need to manually run the auto-config. | |
| QUOTA | OK | OK: Quota not enabled | When quota is not enabled in any volumes. |
| OK | Process quotad is running | When glusterfs-quota service is running. | |
| CRITICAL | CRITICAL: Process quotad is not running | When glusterfs-quota service is down and quota is enabled for one or more volumes. | |
| CPU Utilization | OK | CPU Status OK: Total CPU:4.6% Idle CPU:95.40% | When CPU usage is less than 80%. |
| WARNING | CPU Status WARNING: Total CPU:82.40% Idle CPU:17.60% | When CPU usage is more than 80%. | |
| CRITICAL | CPU Status CRITICAL: Total CPU:97.40% Idle CPU:2.6% | When CPU usage is more than 90%. | |
| Memory Utilization | OK | OK- 65.49% used(1.28GB out of 1.96GB) | When used memory is below warning threshold. (Default warning threshold is 80%) |
| WARNING | WARNING- 85% used(1.78GB out of 2.10GB) | When used memory is below critical threshold (Default critical threshold is 90%) and greater than or equal to warning threshold (Default warning threshold is 80%). | |
| CRITICAL | CRITICAL- 92% used(1.93GB out of 2.10GB) | When used memory is greater than or equal to critical threshold (Default critical threshold is 90% ) | |
| Brick Utilization | OK | OK | When used space of any of the four parameters, space detail, inode detail, thin pool, and thin pool-metadata utilizations, are below threshold of 80%. |
| WARNING | WARNING:mount point /brick/brk1 Space used (0.857 / 1.000) GB | If any of the four parameters, space detail, inode detail, thin pool utilization, and thinpool-metadata utilization, crosses warning threshold of 80% (Default is 80%). | |
| CRITICAL | CRITICAL : mount point /brick/brk1 (inode used 9980/1000) | If any of the four parameters, space detail, inode detail, thin pool utilization, and thinpool-metadata utilizations, crosses critical threshold 90% (Default is 90%). | |
| Disk Utilization | OK | OK | When used space of any of the four parameters, space detail, inode detail, thin pool utilization, and thinpool-metadata utilizations, are below threshold of 80%. |
| WARNING | WARNING:mount point /boot Space used (0.857 / 1.000) GB | When used space of any of the four parameters, space detail, inode detail, thin pool utilization, and thinpool-metadata utilizations, are above warning threshold of 80%. | |
| CRITICAL | CRITICAL : mount point /home (inode used 9980/1000) | If any of the four parameters, space detail, inode detail, thin pool utilization, and thinpool-metadata utilizations, crosses critical threshold 90% (Default is 90%). | |
| Network Utilization | OK | OK: tun0:UP,wlp3s0:UP,virbr0:UP | When all the interfaces are UP. |
| WARNING | WARNING: tun0:UP,wlp3s0:UP,virbr0:DOWN | When any of the interfaces is down. | |
| UNKNOWN | UNKNOWN | When network utilization/status is unknown. | |
| Swap Utilization | OK | OK- 0.00% used(0.00GB out of 1.00GB) | When used memory is below warning threshold (Default warning threshold is 80%). |
| WARNING | WARNING- 83% used(1.24GB out of 1.50GB) | When used memory is below critical threshold (Default critical threshold is 90%) and greater than or equal to warning threshold (Default warning threshold is 80%). | |
| CRITICAL | CRITICAL- 83% used(1.42GB out of 1.50GB) | When used memory is greater than or equal to critical threshold (Default critical threshold is 90%). | |
| Cluster- Quorum | PENDING | When cluster.quorum-type is not set to server; or when there are no problems in the cluster identified. | |
| OK | Quorum regained for volume | When quorum is regained for volume. | |
| CRITICAL | Quorum lost for volume | When quorum is lost for volume. | |
| Volume Geo-replication | OK | "Session Status: slave_vol1-OK .....slave_voln-OK. | When all sessions are active. |
| Session status :No active sessions found | When Geo-replication sessions are deleted. | ||
| CRITICAL | Session Status: slave_vol1-FAULTY slave_vol2-OK | If one or more nodes are Faulty and there's no replica pair that's active. | |
| WARNING | Session Status: slave_vol1-NOT_STARTED slave_vol2-STOPPED slave_vol3- PARTIAL_FAULTY |
| |
| WARNING | Geo replication status could not be determined. | When there's an error in getting Geo replication status. This error occurs when volfile is locked as another transaction is in progress. | |
| UNKNOWN | Geo replication status could not be determined. | When glusterd is down. | |
| Volume Quota | OK | QUOTA: not enabled or configured | When quota is not set |
| OK | QUOTA:OK | When quota is set and usage is below quota limits. | |
| WARNING | QUOTA:Soft limit exceeded on path of directory | When quota exceeds soft limit. | |
| CRITICAL | QUOTA:hard limit reached on path of directory | When quota reaches hard limit. | |
| UNKNOWN | QUOTA: Quota status could not be determined as command execution failed | When there's an error in getting Quota status. This occurs when
| |
| Volume Status | OK | Volume : volume type - All bricks are Up | When all volumes are up. |
| WARNING | Volume :volume type Brick(s) - list of bricks is|are down, but replica pair(s) are up | When bricks in the volume are down but replica pairs are up. | |
| UNKNOWN | Command execution failed Failure message | When command execution fails. | |
| CRITICAL | Volume not found. | When volumes are not found. | |
| CRITICAL | Volume: volume-type is stopped. | When volumes are stopped. | |
| CRITICAL | Volume : volume type - All bricks are down. | When all bricks are down. | |
| CRITICAL | Volume : volume type Bricks - brick list are down, along with one or more replica pairs | When bricks are down along with one or more replica pairs. | |
| Volume Self-Heal | OK | When volume is not a replicated volume, there is no self-heal to be done. | |
| OK | No unsynced entries present | When there are no unsynched entries in a replicated volume. | |
| WARNING | Unsynched entries present : There are unsynched entries present. | If self-heal process is turned on, these entries may be auto healed. If not, self-heal will need to be run manually. If unsynchronized entries persist over time, this could indicate a split brain scenario. | |
| WARNING | Self heal status could not be determined as the volume was deleted | When self-heal status can not be determined as the volume is deleted. | |
| UNKNOWN | When there's an error in getting self heal status. This error occurs when:
| ||
| Cluster Utilization | OK | OK : 28.0% used (1.68GB out of 6.0GB) | When used % is below the warning threshold (Default warning threshold is 80%). |
| WARNING | WARNING: 82.0% used (4.92GB out of 6.0GB) | Used% is above the warning limit. (Default warning threshold is 80%) | |
| CRITICAL | CRITICAL : 92.0% used (5.52GB out of 6.0GB) | Used% is above the warning limit. (Default critical threshold is 90%) | |
| UNKNOWN | Volume utilization data could not be read | When volume services are present, but the volume utilization data is not available as it's either not populated yet or there is error in fetching volume utilization data. | |
| Volume Utilization | OK | OK: Utilization: 40 % | When used % is below the warning threshold (Default warning threshold is 80%). |
| WARNING | WARNING - used 84% of available 200 GB | When used % is above the warning threshold (Default warning threshold is 80%). | |
| CRITICAL | CRITICAL - used 96% of available 200 GB | When used % is above the critical threshold (Default critical threshold is 90%). | |
| UNKNOWN | UNKNOWN - Volume utilization data could not be read | When all the bricks in the volume are killed or if glusterd is stopped in all the nodes in a cluster. |
13.4. Monitoring Notifications
13.4.1. Configuring Nagios Server to Send Mail Notifications
- In the
/etc/nagios/gluster/gluster-contacts.cfgfile, add contacts to send mail in the format shown below:Modifycontact_name,alias, andemail.define contact { contact_name Contact1 alias ContactNameAlias email email-address service_notification_period 24x7 service_notification_options w,u,c,r,f,s service_notification_commands notify-service-by-email host_notification_period 24x7 host_notification_options d,u,r,f,s host_notification_commands notify-host-by-email } define contact { contact_name Contact2 alias ContactNameAlias2 email email-address service_notification_period 24x7 service_notification_options w,u,c,r,f,s service_notification_commands notify-service-by-email host_notification_period 24x7 host_notification_options d,u,r,f,s host_notification_commands notify-host-by-email }Theservice_notification_optionsdirective is used to define the service states for which notifications can be sent out to this contact. Valid options are a combination of one or more of the following:w: Notify on WARNING service statesu: Notify on UNKNOWN service statesc: Notify on CRITICAL service statesr: Notify on service RECOVERY (OK states)f: Notify when the service starts and stops FLAPPINGn (none): Do not notify the contact on any type of service notifications
Thehost_notification_optionsdirective is used to define the host states for which notifications can be sent out to this contact. Valid options are a combination of one or more of the following:d: Notify on DOWN host statesu: Notify on UNREACHABLE host statesr: Notify on host RECOVERY (UP states)f: Notify when the host starts and stops FLAPPINGs: Send notifications when host or service scheduled downtime starts and endsn (none): Do not notify the contact on any type of host notifications.
Note
By default, a contact and a contact group are defined for administrators incontacts.cfgand all the services and hosts will notify the administrators. Add suitable email id for administrator incontacts.cfgfile. - To add a group to which the mail need to be sent, add the details as given below:
define contactgroup{ contactgroup_name Group1 alias GroupAlias members Contact1,Contact2 } - In the
/etc/nagios/gluster/gluster-templates.cfgfile specify the contact name and contact group name for the services for which the notification need to be sent, as shown below:Addcontact_groupsname andcontactsname.define host{ name gluster-generic-host use linux-server notifications_enabled 1 notification_period 24x7 notification_interval 120 notification_options d,u,r,f,s register 0 contact_groups Group1 contacts Contact1,Contact2 } define service { name gluster-service use generic-service notifications_enabled 1 notification_period 24x7 notification_options w,u,c,r,f,s notification_interval 120 register 0 _gluster_entity Service contact_groups Group1 contacts Contact1,Contact2 }You can configure notification for individual services by editing the corresponding node configuration file. For example, to configure notification for brick service, edit the corresponding node configuration file as shown below:define service { use brick-service _VOL_NAME VolumeName __GENERATED_BY_AUTOCONFIG 1 notes Volume : VolumeName host_name RedHatStorageNodeName _BRICK_DIR brickpath service_description Brick Utilization - brickpath contact_groups Group1 contacts Contact1,Contact2 } - To receive detailed information on every update when Cluster Auto-Config is run, edit
/etc/nagios/objects/commands.cfgfile add$NOTIFICATIONCOMMENT$\nafter$SERVICEOUTPUT$\noption innotify-service-by-emailandnotify-host-by-emailcommand definition as shown below:# 'notify-service-by-email' command definition define command{ command_name notify-service-by-email command_line /usr/bin/printf "%b" "***** Nagios *****\n\nNotification Type: $NOTIFICATIONTYPE$\n\nService: $SERVICEDESC$\nHost: $HOSTALIAS$\nAddress: $HOSTADDRESS$\nState: $SERVICESTATE$\n\nDate/Time: $LONGDATETIME$\n\nAdditional Info:\n\n$SERVICEOUTPUT$\n $NOTIFICATIONCOMMENT$\n" | /bin/mail -s "** $NOTIFICATIONTYPE$ Service Alert: $HOSTALIAS$/$SERVICEDESC$ is $SERVICESTATE$ **" $CONTACTEMAIL$ } - Restart the Nagios server using the following command:
# service nagios restart
Note
- By default, the system ensures three occurences of the event before sending mail notifications.
- By default, Nagios Mail notification is sent using
/bin/mailcommand. To change this, modify the definition fornotify-host-by-emailcommand andnotify-service-by-emailcommand in/etc/nagios/objects/commands.cfgfile and configure the mail server accordingly.
13.4.2. Configuring Simple Network Management Protocol (SNMP) Notification
- Log in as root user.
- In the
/etc/nagios/gluster/snmpmanagers.conffile, specify the Host Name or IP address and community name of the SNMP managers to whom the SNMP traps need to be sent as shown below:HostName-or-IP-address publicIn the/etc/nagios/gluster/gluster-contacts.cfgfile specify the contacts name as +snmp as shown below:define contact { contact_name snmp alias Snmp Traps email admin@ovirt.com service_notification_period 24x7 service_notification_options w,u,c,r,f,s service_notification_commands gluster-notify-service-by-snmp host_notification_period 24x7 host_notification_options d,u,r,f,s host_notification_commands gluster-notify-host-by-snmp }You can download the required Management Information Base (MIB) files from the URLs given below: - Restart Nagios using the following command:
# service nagios restart
13.5. Nagios Advanced Configuration
13.5.1. Creating Nagios User
- Login as
rootuser. - Run the command given below with the new user name and type the password when prompted.
# htpasswd /etc/nagios/passwd newUserName - Add permissions for the new user in
/etc/nagios/cgi.cfgfile as shown below:authorized_for_system_information=nagiosadmin,newUserName authorized_for_configuration_information=nagiosadmin,newUserName authorized_for_system_commands=nagiosadmin,newUserName authorized_for_all_services=nagiosadmin,newUserName authorized_for_all_hosts=nagiosadmin,newUserName authorized_for_all_service_commands=nagiosadmin,newUserName authorized_for_all_host_commands=nagiosadmin,newUserNameNote
To setread onlypermission for users, addauthorized_for_read_only=usernamein the/etc/nagios/cgi.cfgfile. - Start Nagios and httpd services using the following commands:
# service httpd restart # service nagios restart - Verify Nagios access by using the following URL in your browser, and using the user name and password.
https://NagiosServer-HostName-or-IPaddress/nagios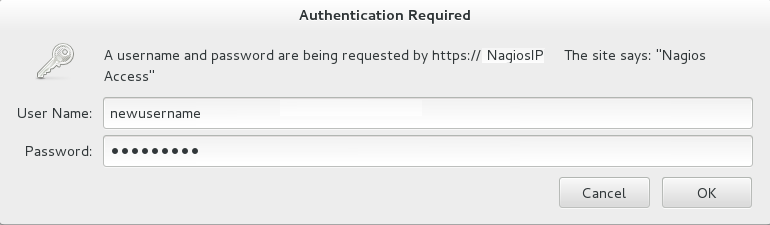
Figure 13.14. Nagios Login
13.5.2. Changing Nagios Password
nagiosadmin and nagiosadmin. This value is available in the /etc/nagios/cgi.cfg file.
- Login as
rootuser. - To change the default password for the Nagios Administrator user, run the following command with the new password:
# htpasswd -c /etc/nagios/passwd nagiosadmin - Start Nagios and httpd services using the following commands:
# service httpd restart # service nagios restart - Verify Nagios access by using the following URL in your browser, and using the user name and password that was set in Step 2:
https://NagiosServer-HostName-or-IPaddress/nagios
Figure 13.15. Nagios Login
13.5.3. Configuring SSL
- Create a 1024 bit RSA key using the following command:
openssl genrsa -out /etc/ssl/private/{cert-file-name.key} 1024 - Create an SSL certificate for the server using the following command:
openssl req -key nagios-ssl.key -new | openssl x509 -out nagios-ssl.crt -days 365 -signkey nagios-ssl.key -reqEnter the server's host name which is used to access the Nagios Server GUI as Common Name. - Edit the
/etc/httpd/conf.d/ssl.conffile and add path to SSL Certificate and key files correspondingly forSSLCertificateFileandSSLCertificateKeyFilefields as shown below:SSLCertificateFile /etc/pki/tls/certs/nagios-ssl.crt SSLCertificateKeyFile /etc/pki/tls/private/nagios-ssl.key - Edit the
/etc/httpd/conf/httpd.conffile and comment the port 80 listener as shown below:# Listen 80 - In
/etc/httpd/conf/httpd.conffile, ensure that the following line is not commented:<Directory "/var/www/html"> - Restart the httpd service on the Nagios server using the following command:
# service httpd restart
13.5.4. Integrating LDAP Authentication with Nagios
- In apache configuration file
/etc/httpd/conf/httpd.conf, ensure that LDAP is installed and LDAP apache module is enabled.The configurations are displayed as given below if the LDAP apache module is enabled.You can enable the LDAP apache module by deleting the # symbol.LoadModule ldap_module modules/mod_ldap.so LoadModule authnz_ldap_module modules/mod_authnz_ldap.so - Edit the
nagios.conffile in /etc/httpd/conf.d/nagios.conf with the corresponding values for the following:- AuthBasicProvider
- AuthLDAPURL
- AuthLDAPBindDN
- AuthLDAPBindPassword
- Edit the CGI authentication file
/etc/nagios/cgi.cfgas given below with the path where Nagios is installed.nagiosinstallationdir = /usr/local/nagios/ or /etc/nagios/ - Uncomment the lines shown below by deleting # and set permissions for specific users:
Note
Replace nagiosadmin and user names with * to give any LDAP user full functionality of Nagiosauthorized_for_system_information=user1,user2,user3 authorized_for_configuration_information=nagiosadmin,user1,user2,user3 authorized_for_system_commands=nagiosadmin,user1,user2,user3 authorized_for_all_services=nagiosadmin,user1,user2,user3 authorized_for_all_hosts=nagiosadmin,user1,user2,user3 authorized_for_all_service_commands=nagiosadmin,user1,user2,user3 authorized_for_all_host_commands=nagiosadmin,user1,user2,user3 - Restart
httpdservice andNagiosserver using the following commands:# service httpd restart # service nagios restart
13.6. Configuring Nagios Manually
Note
- In the
/etc/nagios/glusterdirectory, create a directory with the cluster name. All configurations for the cluster are added in this directory. - In the
/etc/nagios/gluster/cluster-namedirectory, create a file with nameclustername.cfgto specify thehostandhostgroupconfigurations. The service configurations for all the cluster and volume level services are added in this file.Note
Cluster is configured as host and host group in Nagios.In theclustername.cfgfile, add the following definitions:- Define a host group with cluster name as shown below:
define hostgroup{ hostgroup_name cluster-name alias cluster-name } - Define a host with cluster name as shown below:
define host{ host_name cluster-name alias cluster-name use gluster-cluster address cluster-name } - Define Cluster-Quorum service to monitor cluster quorum status as shown below:
define service { service_description Cluster - Quorum use gluster-passive-service host_name cluster-name } - Define the Cluster Utilization service to monitor cluster utilization as shown below:
define service { service_description Cluster Utilization use gluster-service-with-graph check_command check_cluster_vol_usage!warning-threshold!critcal-threshold; host_name cluster-name } - Add the following service definitions for each volume in the cluster:
- Volume Status service to monitor the status of the volume as shown below:
define service { service_description Volume Status - volume-name host_name cluster-name use gluster-service-without-graph _VOL_NAME volume-name notes Volume type : Volume-Type check_command check_vol_status!cluster-name!volume-name } - Volume Utilization service to monitor the volume utilization as shown below:
define service { service_description Volume Utilization - volume-name host_name cluster-name use gluster-service-with-graph _VOL_NAME volume-name notes Volume type : Volume-Type check_command check_vol_utilization!cluster-name!volume-name!warning-threshold!critcal-threshold } - Volume Self-Heal service to monitor the volume self-heal status as shown below:
define service { service_description Volume Self-Heal - volume-name host_name cluster-name use gluster-service-without-graph _VOL_NAME volume-name check_command check_vol_heal_status!cluster-name!volume-name } - Volume Quota service to monitor the volume quota status as shown below:
define service { service_description Volume Quota - volume-name host_name cluster-name use gluster-service-without-graph _VOL_NAME volume-name check_command check_vol_quota_status!cluster-name!volume-name notes Volume type : Volume-Type } - Volume Geo-Replication service to monitor Geo Replication status as shown below:
define service { service_description Volume Geo Replication - volume-name host_name cluster-name use gluster-service-without-graph _VOL_NAME volume-name check_command check_vol_georep_status!cluster-name!volume-name }
- In the
/etc/nagios/gluster/cluster-namedirectory, create a file with namehost-name.cfg. The host configuration for the node and service configuration for all the brick from the node are added in this file.Inhost-name.cfgfile, add following definitions:- Define Host for the node as shown below:
define host { use gluster-host hostgroups gluster_hosts,cluster-name alias host-name host_name host-name #Name given by user to identify the node in Nagios _HOST_UUID host-uuid #Host UUID returned by gluster peer status address host-address # This can be FQDN or IP address of the host } - Create the following services for each brick in the node:
- Add Brick Utilization service as shown below:
define service { service_description Brick Utilization - brick-path host_name host-name # Host name given in host definition use brick-service _VOL_NAME Volume-Name notes Volume : Volume-Name _BRICK_DIR brick-path } - Add Brick Status service as shown below:
define service { service_description Brick - brick-path host_name host-name # Host name given in host definition use gluster-brick-status-service _VOL_NAME Volume-Name notes Volume : Volume-Name _BRICK_DIR brick-path }
- Add host configurations and service configurations for all nodes in the cluster as shown in Step 3.
- In
/etc/nagiosdirectory of each Red Hat Storage node, editnagios_server.conffile by setting the configurations as shown below:# NAGIOS SERVER # The nagios server IP address or FQDN to which the NSCA command # needs to be sent [NAGIOS-SERVER] nagios_server=NagiosServerIPAddress # CLUSTER NAME # The host name of the logical cluster configured in Nagios under which # the gluster volume services reside [NAGIOS-DEFINTIONS] cluster_name=cluster_auto # LOCAL HOST NAME # Host name given in the nagios server [HOST-NAME] hostname_in_nagios=NameOfTheHostInNagios # LOCAL HOST CONFIGURATION # Process monitoring sleeping intevel [HOST-CONF] proc-mon-sleep-time=TimeInSecondsThenagios_server.conffile is used byglusterpmdservice to get server name, host name, and the process monitoring interval time. - Start the
glusterpmdservice using the following command:# service glusterpmd start
By default, the active Red Hat Storage services are monitored every 10 minutes. You can change the time interval for monitoring by editing the gluster-templates.cfg file.
- In
/etc/nagios/gluster/gluster-templates.cfgfile, edit the service withgluster-servicename. - Add
normal_check_intervaland set the time interval to 1 to check all Red Hat Storage services every 1 minute as shown below:define service { name gluster-service use generic-service notifications_enabled 1 notification_period 24x7 notification_options w,u,c,r,f,s notification_interval 120 register 0 contacts +ovirt,snmp _GLUSTER_ENTITY HOST_SERVICE normal_check_interval 1 } - To change this on individual service, add this property to the required service definition as shown below:
define service { name gluster-brick-status-service use gluster-service register 0 event_handler brick_status_event_handler check_command check_brick_status normal_check_interval 1 }Thecheck_intervalis controlled by the global directiveinterval_length. This defaults to 60 seconds. This can be changed in/etc/nagios/nagios.cfgas shown below:# INTERVAL LENGTH # This is the seconds per unit interval as used in the # host/contact/service configuration files. Setting this to 60 means # that each interval is one minute long (60 seconds). Other settings # have not been tested much, so your mileage is likely to vary... interval_length=TimeInSeconds
13.7. Troubleshooting Nagios
13.7.1. Troubleshooting NSCA and NRPE Configuration Issues
- Check Firewall and Port Settings on Nagios ServerIf port 5667 is not opened on the server host's firewall, a timeout error is displayed. Ensure that port 5667 is opened.
- Run the following command on the Red Hat Storage node as root to get the list of current iptables rules:
# iptables -L - The output is displayed as shown below:
ACCEPT tcp -- anywhere anywhere tcp dpt:5667 - If the port is not opened, add an iptables rule by adding the following lines in
/etc/sysconfig/iptablesfile:-A INPUT -m state --state NEW -m tcp -p tcp --dport 5667 -j ACCEPT - Restart the iptables service using the following command:
# service iptables restart - Restart the NSCA service using the following command:
# service nsca restart
- Check the Configuration File on Red Hat Storage NodeMessages cannot be sent to the NSCA server, if Nagios server IP or FQDN, cluster name and hostname (as configured in Nagios server) are not configured correctly.Open the Nagios server configuration file /etc/nagios/nagios_server.conf and verify if the correct configurations are set as shown below:
# NAGIOS SERVER # The nagios server IP address or FQDN to which the NSCA command # needs to be sent [NAGIOS-SERVER] nagios_server=NagiosServerIPAddress # CLUSTER NAME # The host name of the logical cluster configured in Nagios under which # the gluster volume services reside [NAGIOS-DEFINTIONS] cluster_name=cluster_auto # LOCAL HOST NAME # Host name given in the nagios server [HOST-NAME] hostname_in_nagios=NagiosServerHostNameIf Host name is updated, restart the NSCA service using the following command:# service nsca restart
- CHECK_NRPE: Error - Could Not Complete SSL HandshakeThis error occurs if the IP address of the Nagios server is not defined in the
nrpe.cfgfile of the Red Hat Storage node. To fix this issue, follow the steps given below:- Add the Nagios server IP address in
/etc/nagios/nrpe.cfgfile in theallowed_hostsline as shown below:allowed_hosts=127.0.0.1, NagiosServerIPTheallowed_hostsis the list of IP addresses which can execute NRPE commands. - Save the
nrpe.cfgfile and restart NRPE service using the following command:# service nrpe restart
- CHECK_NRPE: Socket Timeout After n SecondsTo resolve this issue perform the steps given below:On Nagios Server:The default timeout value for the NRPE calls is 10 seconds and if the server does not respond within 10 seconds, Nagios Server GUI displays an error that the NRPE call has timed out in 10 seconds. To fix this issue, change the timeout value for NRPE calls by modifying the command definition configuration files.
- Changing the NRPE timeout for services which directly invoke check_nrpe.For the services which directly invoke check_nrpe (check_disk_and_inode, check_cpu_multicore, and check_memory), modify the command definition configuration file
/etc/nagios/gluster/gluster-commands.cfgby adding -t Time in Seconds as shown below:define command { command_name check_disk_and_inode command_line $USER1$/check_nrpe -H $HOSTADDRESS$ -c check_disk_and_inode -t TimeInSeconds } - Changing the NRPE timeout for the services in
nagios-server-addonspackage which invoke NRPE call through code.The services which invoke/usr/lib64/nagios/plugins/gluster/check_vol_server.py(check_vol_utilization, check_vol_status, check_vol_quota_status, check_vol_heal_status, and check_vol_georep_status) make NRPE call to the Red Hat Storage nodes for the details through code. To change the timeout for the NRPE calls, modify the command definition configuration file/etc/nagios/gluster/gluster-commands.cfgby adding -t No of seconds as shown below:define command { command_name check_vol_utilization command_line $USER1$/gluster/check_vol_server.py $ARG1$ $ARG2$ -w $ARG3$ -c $ARG4$ -o utilization -t TimeInSeconds }The auto configuration servicegluster_auto_discoverymakes NRPE calls for the configuration details from the Red Hat Storage nodes. To change the NRPE timeout value for the auto configuration service, modify the command definition configuration file/etc/nagios/gluster/gluster-commands.cfgby adding -t TimeInSeconds as shown below:define command{ command_name gluster_auto_discovery command_line sudo $USER1$/gluster/configure-gluster-nagios.py -H $ARG1$ -c $HOSTNAME$ -m auto -n $ARG2$ -t TimeInSeconds } - Restart Nagios service using the following command:
# service nagios restart
On Red Hat Storage node:- Add the Nagios server IP address as described in CHECK_NRPE: Error - Could Not Complete SSL Handshake section in Troubleshooting NRPE Configuration Issues section.
- Edit the
nrpe.cfgfile using the following command:# vi /etc/nagios/nrpe.cfg - Search for the
command_timeoutandconnection_timeoutsettings and change the value. Thecommand_timeoutvalue must be greater than or equal to the timeout value set in Nagios server.The timeout on checks can be set as connection_timeout=300 and the command_timeout=60 seconds. - Restart the NRPE service using the following command:
# service nrpe restart
- Check the NRPE Service StatusThis error occurs if the NRPE service is not running. To resolve this issue perform the steps given below:
- Log in as root to the Red Hat Storage node and run the following command to verify the status of NRPE service:
# service nrpe status - If NRPE is not running, start the service using the following command:
# service nrpe start
- Check Firewall and Port SettingsThis error is associated with firewalls and ports. The timeout error is displayed if the NRPE traffic is not traversing a firewall, or if port 5666 is not open on the Red Hat Storage node.Enure that port 5666 is opened on the Red Hat Storage node.
- Run
check_nrpecommand from the Nagios server to verify if the port is opened and if NRPE is running on the Red Hat Storage Node. - Log into the Nagios server as root and run the following command:
/usr/lib64/nagios/plugins/check_nrpe -H RedHatStorageNodeIP - The output is displayed as given below:
NRPE v2.14
If not, ensure the that port 5666 is opened on the Red Hat Storage node.- Run the following command on the Red Hat Storage node as root to get a list of the current iptables rules:
# iptables -L - The output is displayed as shown below:
ACCEPT - tcp -- 0.0.0.0/0 0.0.0.0/0 tcp dpt:5666
- If the port is not open, add iptables rule for it.
- To add iptables rule, edit the
iptablesfile as shown below:vi /etc/sysconfig/iptables - Add the following line in the file:
-A INPUT -m state --state NEW -m tcp -p tcp --dport 5666 -j ACCEPT - Restart the iptables service using the following command:
# service iptables restart - Save the file and restart NRPE service:
# service nrpe restart
- Checking Port 5666 From the Nagios Server with TelnetUse telnet to verify the Red Hat Storage node's ports. To verify the ports of the Red Hat Storage node, perform the steps given below:
- Log in as root on Nagios server.
- Test the connection on port 5666 from the Nagios server to the Red Hat Storage node using the following command:
# telnet RedHatStorageNodeIP 5666 - The output displayed is similar to:
telnet 10.70.36.49 5666 Trying 10.70.36.49... Connected to 10.70.36.49. Escape character is '^]'.
- Connection Refused By HostThis error is due to port/firewall issues or incorrectly configured allowed_hosts directives. See the sections CHECK_NRPE: Error - Could Not Complete SSL Handshake and CHECK_NRPE: Socket Timeout After n Seconds for troubleshooting steps.
13.7.2. Troubleshooting General Issues
Set SELinux to permissive and restart the Nagios server.
Chapter 14. Monitoring Red Hat Storage Workload
volume top and volume profile commands to view vital performance information and identify bottlenecks on each brick of a volume.
Note
profile and top information will be reset.
14.1. Running the Volume Profile Command
volume profile command provides an interface to get the per-brick or NFS server I/O information for each File Operation (FOP) of a volume. This information helps in identifying the bottlenecks in the storage system.
volume profile command.
14.1.1. Start Profiling
# gluster volume profile VOLNAME start
# gluster volume profile test-volume start
Profiling started on test-volumeImportant
profile command can affect system performance while the profile information is being collected. Red Hat recommends that profiling should only be used for debugging.
volume info command:
diagnostics.count-fop-hits: on
diagnostics.latency-measurement: on14.1.2. Displaying the I/O Information
# gluster volume profile VOLNAME info
# gluster volume profile test-volume info
Brick: Test:/export/2
Cumulative Stats:
Block 1b+ 32b+ 64b+
Size:
Read: 0 0 0
Write: 908 28 8
Block 128b+ 256b+ 512b+
Size:
Read: 0 6 4
Write: 5 23 16
Block 1024b+ 2048b+ 4096b+
Size:
Read: 0 52 17
Write: 15 120 846
Block 8192b+ 16384b+ 32768b+
Size:
Read: 52 8 34
Write: 234 134 286
Block 65536b+ 131072b+
Size:
Read: 118 622
Write: 1341 594
%-latency Avg- Min- Max- calls Fop
latency Latency Latency
___________________________________________________________
4.82 1132.28 21.00 800970.00 4575 WRITE
5.70 156.47 9.00 665085.00 39163 READDIRP
11.35 315.02 9.00 1433947.00 38698 LOOKUP
11.88 1729.34 21.00 2569638.00 7382 FXATTROP
47.35 104235.02 2485.00 7789367.00 488 FSYNC
------------------
------------------
Duration : 335
BytesRead : 94505058
BytesWritten : 195571980# gluster volume profile VOLNAME info nfs
# gluster volume profile test-volume info nfs
NFS Server : localhost
----------------------
Cumulative Stats:
Block Size: 32768b+ 65536b+
No. of Reads: 0 0
No. of Writes: 1000 1000
%-latency Avg-latency Min-Latency Max-Latency No. of calls Fop
--------- ----------- ----------- ----------- ------------ ----
0.01 410.33 us 194.00 us 641.00 us 3 STATFS
0.60 465.44 us 346.00 us 867.00 us 147 FSTAT
1.63 187.21 us 67.00 us 6081.00 us 1000 SETATTR
1.94 221.40 us 58.00 us 55399.00 us 1002 ACCESS
2.55 301.39 us 52.00 us 75922.00 us 968 STAT
2.85 326.18 us 88.00 us 66184.00 us 1000 TRUNCATE
4.47 511.89 us 60.00 us 101282.00 us 1000 FLUSH
5.02 3907.40 us 1723.00 us 19508.00 us 147 READDIRP
25.42 2876.37 us 101.00 us 843209.00 us 1012 LOOKUP
55.52 3179.16 us 124.00 us 121158.00 us 2000 WRITE
Duration: 7074 seconds
Data Read: 0 bytes
Data Written: 102400000 bytes
Interval 1 Stats:
Block Size: 32768b+ 65536b+
No. of Reads: 0 0
No. of Writes: 1000 1000
%-latency Avg-latency Min-Latency Max-Latency No. of calls Fop
--------- ----------- ----------- ----------- ------------ ----
0.01 410.33 us 194.00 us 641.00 us 3 STATFS
0.60 465.44 us 346.00 us 867.00 us 147 FSTAT
1.63 187.21 us 67.00 us 6081.00 us 1000 SETATTR
1.94 221.40 us 58.00 us 55399.00 us 1002 ACCESS
2.55 301.39 us 52.00 us 75922.00 us 968 STAT
2.85 326.18 us 88.00 us 66184.00 us 1000 TRUNCATE
4.47 511.89 us 60.00 us 101282.00 us 1000 FLUSH
5.02 3907.40 us 1723.00 us 19508.00 us 147 READDIRP
25.41 2878.07 us 101.00 us 843209.00 us 1011 LOOKUP
55.53 3179.16 us 124.00 us 121158.00 us 2000 WRITE
Duration: 330 seconds
Data Read: 0 bytes
Data Written: 102400000 bytes14.1.3. Stop Profiling
# gluster volume profile VOLNAME stop
# gluster volume profile test-volume stop
Profiling stopped on test-volume14.2. Running the Volume Top Command
volume top command allows you to view the glusterFS bricks’ performance metrics, including read, write, file open calls, file read calls, file write calls, directory open calls, and directory real calls. The volume top command displays up to 100 results.
volume top command.
14.2.1. Viewing Open File Descriptor Count and Maximum File Descriptor Count
volume top command. The volume top command also displays the maximum open file descriptor count of files that are currently open, and the maximum number of files opened at any given point of time since the servers are up and running. If the brick name is not specified, then the open file descriptor metrics of all the bricks belonging to the volume displays.
# gluster volume top VOLNAME open [nfs | brick BRICK-NAME] [list-cnt cnt]
# gluster volume top test-volume open brick server:/export list-cnt 10
Brick: server:/export/dir1
Current open fd's: 34 Max open fd's: 209
==========Open file stats========
open file name
call count
2 /clients/client0/~dmtmp/PARADOX/
COURSES.DB
11 /clients/client0/~dmtmp/PARADOX/
ENROLL.DB
11 /clients/client0/~dmtmp/PARADOX/
STUDENTS.DB
10 /clients/client0/~dmtmp/PWRPNT/
TIPS.PPT
10 /clients/client0/~dmtmp/PWRPNT/
PCBENCHM.PPT
9 /clients/client7/~dmtmp/PARADOX/
STUDENTS.DB
9 /clients/client1/~dmtmp/PARADOX/
STUDENTS.DB
9 /clients/client2/~dmtmp/PARADOX/
STUDENTS.DB
9 /clients/client0/~dmtmp/PARADOX/
STUDENTS.DB
9 /clients/client8/~dmtmp/PARADOX/
STUDENTS.DB14.2.2. Viewing Highest File Read Calls
volume top command. If the brick name is not specified, a list of 100 files are displayed by default.
# gluster volume top VOLNAME read [nfs | brick BRICK-NAME] [list-cnt cnt]
# gluster volume top test-volume read brick server:/export list-cnt 10
Brick: server:/export/dir1
==========Read file stats========
read filename
call count
116 /clients/client0/~dmtmp/SEED/LARGE.FIL
64 /clients/client0/~dmtmp/SEED/MEDIUM.FIL
54 /clients/client2/~dmtmp/SEED/LARGE.FIL
54 /clients/client6/~dmtmp/SEED/LARGE.FIL
54 /clients/client5/~dmtmp/SEED/LARGE.FIL
54 /clients/client0/~dmtmp/SEED/LARGE.FIL
54 /clients/client3/~dmtmp/SEED/LARGE.FIL
54 /clients/client4/~dmtmp/SEED/LARGE.FIL
54 /clients/client9/~dmtmp/SEED/LARGE.FIL
54 /clients/client8/~dmtmp/SEED/LARGE.FIL14.2.3. Viewing Highest File Write Calls
volume top command. If the brick name is not specified, a list of 100 files displays by default.
# gluster volume top VOLNAME write [nfs | brick BRICK-NAME] [list-cnt cnt]
# gluster volume top test-volume write brick server:/export/ list-cnt 10
Brick: server:/export/dir1
==========Write file stats========
write call count filename
83 /clients/client0/~dmtmp/SEED/LARGE.FIL
59 /clients/client7/~dmtmp/SEED/LARGE.FIL
59 /clients/client1/~dmtmp/SEED/LARGE.FIL
59 /clients/client2/~dmtmp/SEED/LARGE.FIL
59 /clients/client0/~dmtmp/SEED/LARGE.FIL
59 /clients/client8/~dmtmp/SEED/LARGE.FIL
59 /clients/client5/~dmtmp/SEED/LARGE.FIL
59 /clients/client4/~dmtmp/SEED/LARGE.FIL
59 /clients/client6/~dmtmp/SEED/LARGE.FIL
59 /clients/client3/~dmtmp/SEED/LARGE.FIL14.2.4. Viewing Highest Open Calls on a Directory
volume top command. If the brick name is not specified, the metrics of all bricks belonging to that volume displays.
# gluster volume top VOLNAME opendir [brick BRICK-NAME] [list-cnt cnt]
# gluster volume top test-volume opendir brick server:/export/ list-cnt 10
Brick: server:/export/dir1
==========Directory open stats========
Opendir count directory name
1001 /clients/client0/~dmtmp
454 /clients/client8/~dmtmp
454 /clients/client2/~dmtmp
454 /clients/client6/~dmtmp
454 /clients/client5/~dmtmp
454 /clients/client9/~dmtmp
443 /clients/client0/~dmtmp/PARADOX
408 /clients/client1/~dmtmp
408 /clients/client7/~dmtmp
402 /clients/client4/~dmtmp14.2.5. Viewing Highest Read Calls on a Directory
volume top command. If the brick name is not specified, the metrics of all bricks belonging to that volume displays.
# gluster volume top VOLNAME readdir [nfs | brick BRICK-NAME] [list-cnt cnt]
# gluster volume top test-volume readdir brick server:/export/ list-cnt 10
Brick: server:/export/dir1
==========Directory readdirp stats========
readdirp count directory name
1996 /clients/client0/~dmtmp
1083 /clients/client0/~dmtmp/PARADOX
904 /clients/client8/~dmtmp
904 /clients/client2/~dmtmp
904 /clients/client6/~dmtmp
904 /clients/client5/~dmtmp
904 /clients/client9/~dmtmp
812 /clients/client1/~dmtmp
812 /clients/client7/~dmtmp
800 /clients/client4/~dmtmp14.2.6. Viewing Read Performance
volume top command. If the brick name is not specified, the metrics of all the bricks belonging to that volume is displayed. The output is the read throughput.
# gluster volume top VOLNAME read-perf [bs blk-size count count] [nfs | brick BRICK-NAME] [list-cnt cnt]
server:/export/ of test-volume, specifying a 256 block size, and list the top 10 results:
# gluster volume top test-volume read-perf bs 256 count 1 brick server:/export/ list-cnt 10
Brick: server:/export/dir1 256 bytes (256 B) copied, Throughput: 4.1 MB/s
==========Read throughput file stats========
read filename Time
through
put(MBp
s)
2912.00 /clients/client0/~dmtmp/PWRPNT/ -2012-05-09
TRIDOTS.POT 15:38:36.896486
2570.00 /clients/client0/~dmtmp/PWRPNT/ -2012-05-09
PCBENCHM.PPT 15:38:39.815310
2383.00 /clients/client2/~dmtmp/SEED/ -2012-05-09
MEDIUM.FIL 15:52:53.631499
2340.00 /clients/client0/~dmtmp/SEED/ -2012-05-09
MEDIUM.FIL 15:38:36.926198
2299.00 /clients/client0/~dmtmp/SEED/ -2012-05-09
LARGE.FIL 15:38:36.930445
2259.00 /clients/client0/~dmtmp/PARADOX/ -2012-05-09
COURSES.X04 15:38:40.549919
2221.00 /clients/client9/~dmtmp/PARADOX/ -2012-05-09
STUDENTS.VAL 15:52:53.298766
2221.00 /clients/client8/~dmtmp/PARADOX/ -2012-05-09
COURSES.DB 15:39:11.776780
2184.00 /clients/client3/~dmtmp/SEED/ -2012-05-09
MEDIUM.FIL 15:39:10.251764
2184.00 /clients/client5/~dmtmp/WORD/ -2012-05-09
BASEMACH.DOC 15:39:09.336572
14.2.7. Viewing Write Performance
volume top command. If brick name is not specified, then the metrics of all the bricks belonging to that volume will be displayed. The output will be the write throughput.
# gluster volume top VOLNAME write-perf [bs blk-size count count] [nfs | brick BRICK-NAME] [list-cnt cnt]
server:/export/ of test-volume, specifying a 256 block size, and list the top 10 results:
# gluster volume top test-volume write-perf bs 256 count 1 brick server:/export/ list-cnt 10
Brick: server:/export/dir1 256 bytes (256 B) copied, Throughput: 2.8 MB/s
==========Write throughput file stats========
write filename Time
throughput
(MBps)
1170.00 /clients/client0/~dmtmp/SEED/ -2012-05-09
SMALL.FIL 15:39:09.171494
1008.00 /clients/client6/~dmtmp/SEED/ -2012-05-09
LARGE.FIL 15:39:09.73189
949.00 /clients/client0/~dmtmp/SEED/ -2012-05-09
MEDIUM.FIL 15:38:36.927426
936.00 /clients/client0/~dmtmp/SEED/ -2012-05-09
LARGE.FIL 15:38:36.933177
897.00 /clients/client5/~dmtmp/SEED/ -2012-05-09
MEDIUM.FIL 15:39:09.33628
897.00 /clients/client6/~dmtmp/SEED/ -2012-05-09
MEDIUM.FIL 15:39:09.27713
885.00 /clients/client0/~dmtmp/SEED/ -2012-05-09
SMALL.FIL 15:38:36.924271
528.00 /clients/client5/~dmtmp/SEED/ -2012-05-09
LARGE.FIL 15:39:09.81893
516.00 /clients/client6/~dmtmp/ACCESS/ -2012-05-09
FASTENER.MDB 15:39:01.797317
14.3. gstatus Command
14.3.1. gstatus Command
Important
gstatus provides an overview of the health of a Red Hat Storage trusted storage pool for distributed, replicated and distributed-replicated volumes.
gstatus command provides an easy-to-use, high-level view of the health of a trusted storage pool with a single command. It gathers information by executing the GlusterFS commands, to gather information about the statuses of the Red Hat Storage nodes, volumes, and bricks. The checks are performed across the trusted storage pool and the status is displayed. This data can be analyzed to add further checks and incorporate deployment best-practices and free-space triggers.
- Gstatus works with Red Hat Storage version 3.0.3 and above
- GlusterFS CLI
- Python 2.6 or above
14.3.2. Installing gstatus during an ISO Installation
- While installing Red Hat Storage using an ISO, in the Customizing the Software Selection screen, select Red Hat Storage Tools Group and click Optional Packages.
- From the list of packages, select
gstatusand click Close.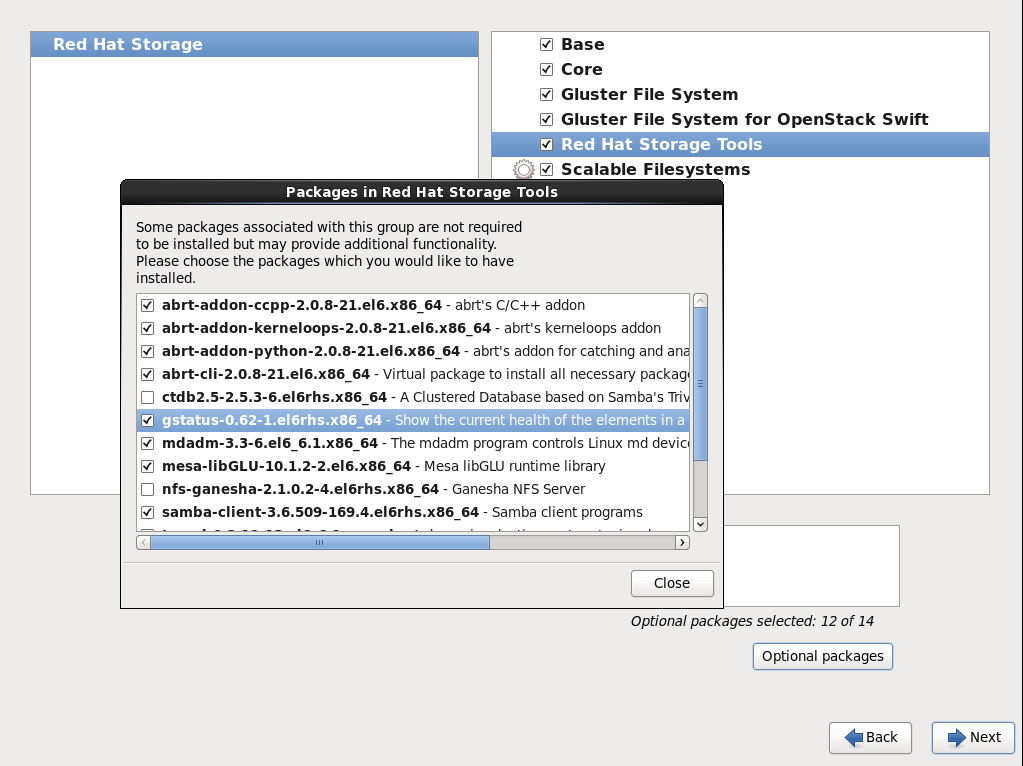
Figure 14.1. Installing gstatus
- Proceed with the remaining installation steps for installing Red Hat Storage. For more information on how to install Red Hat Storage using an ISO, see Installing from an ISO Image section of the Red Hat Storage 3 Installation Guide.
The gstatus package can be installed using the following command:
# yum install gstatusNote
# yum list gstatus
Installed Packages
gstatus.x86_64 0.62-1.el6rhs @rhs-3-for-rhel-6-server-rpms14.3.3. Executing the gstatus command
gstatus command can be invoked in several different ways. The table below shows the optional switches that can be used with gstatus.
# gstatus -h
Usage: gstatus [options]| Option | Description |
|---|---|
| --version | Displays the program's version number and exits. |
| -h, --help | Displays the help message and exits. |
| -s, --state | Displays the high level health of the Red Hat Storage Trusted Storage Pool. |
| -v, --volume | Displays volume information (default is ALL, or supply a volume name). |
| -b, --backlog | Probes the self heal state. |
| -a, --all | Displays capacity units in decimal or binary format(GB vs GiB) |
| -l, --layout | Displays the brick layout when used in combination with -v, or -a |
| -o OUTPUT_MODE, --output-mode=OUTPUT_MODE | Produces outputs in various formats such as - json, keyvalue, or console(default) |
| -D, --debug | Enables the debug mode. |
| -w, --without-progress | Disables progress updates during data gathering. |
| Description | Command |
|---|---|
| An overview of the trusted storage pool | gstatus -s |
| View component information | gstatus -a |
| View the volume details, including the brick layout | gstatus -vl VOLNAME |
| View the summary output for Nagios and Logstash | gstatus -o <keyvalue> |
gstatus provides a header section, which provides a high level view of the state of the Red Hat Storage trusted storage pool. The Status field within the header offers two states; Healthy and Unhealthy. When problems are detected, the status field changes to Unhealthy(n), where n denotes the total number of issues that have been detected.
gstatus command output for both healthy and unhealthy Red Hat Storage environments.
Example 14.1. Example 1: Trusted Storage Pool is in a healthy state; all nodes, volumes and bricks are online
# gstatus -a
Product: RHSS v3.0 u 2 Capacity: 36.00 GiB(raw bricks)
Status: HEALTHY 7.00 GiB(raw used)
Glusterfs: 3.6.0.29 18.00 GiB(usable from volumes)
OverCommit: No Snapshots: 0
Nodes : 4/ 4 Volumes: 1 Up
Self Heal: 4/ 4 0 Up(Degraded)
Bricks : 4/ 4 0 Up(Partial)
Clients : 1 0 Down
Volume Information
splunk UP - 4/4 bricks up - Distributed-Replicate
Capacity: (18% used) 3.00 GiB/18.00 GiB (used/total)
Snapshots: 0
Self Heal: 4/ 4
Tasks Active: None
Protocols: glusterfs:on NFS:on SMB:off
Gluster Clients : 1
Status Messages
- Cluster is HEALTHY, all checks successful
Example 14.2. Example 2: A node is down within the trusted pool
# gstatus -al
Product: RHSS v3.0 u 2 Capacity: 27.00 GiB(raw bricks)
Status: UNHEALTHY(4) 5.00 GiB(raw used)
Glusterfs: 3.6.0.29 18.00 GiB(usable from volumes)
OverCommit: No Snapshots: 0
Nodes : 3/ 4 Volumes: 0 Up
Self Heal: 3/ 4 1 Up(Degraded)
Bricks : 3/ 4 0 Up(Partial)
Clients : 1 0 Down
Volume Information
splunk UP(DEGRADED) - 3/4 bricks up - Distributed-Replicate
Capacity: (18% used) 3.00 GiB/18.00 GiB (used/total)
Snapshots: 0
Self Heal: 3/ 4
Tasks Active: None
Protocols: glusterfs:on NFS:on SMB:off
Gluster Clients : 1
splunk---------- +
|
Distribute (dht)
|
+-- Repl Set 0 (afr)
| |
| +--splunk-rhs1:/rhs/brick1/splunk(UP) 2.00 GiB/9.00 GiB
| |
| +--splunk-rhs2:/rhs/brick1/splunk(UP) 2.00 GiB/9.00 GiB
|
+-- Repl Set 1 (afr)
|
+--splunk-rhs3:/rhs/brick1/splunk(DOWN) 0.00 KiB/0.00 KiB
|
+--splunk-rhs4:/rhs/brick1/splunk(UP) 2.00 GiB/9.00 GiB
Status Messages
- Cluster is UNHEALTHY
- Cluster node 'splunk-rhs3' is down
- Self heal daemon is down on splunk-rhs3
- Brick splunk-rhs3:/rhs/brick1/splunk in volume 'splunk' is down/unavailable
- INFO -> Not all bricks are online, so capacity provided is NOT accurate-l switch is used. The brick layout mode shows the brick and node relationships. This provides a simple means of checking replication relationships for bricks across nodes is as intended.
| Field | Description |
|---|---|
| Capacity Information | This information is derived from the brick information taken from the vol status detail command. The accuracy of this number hence depends on the nodes and bricks all being online - elements missing from the configuration are not considered in the calculation. |
| Over-commit Status | The physical file system used by a brick could be re-used by multiple volumes, this field indicates whether a brick is used by multiple volumes. Although technically valid, this exposes the system to capacity conflicts across different volumes when the quota feature is not in use. |
| Clients | Displays a count of the unique clients connected against the trusted pool and each of the volumes. Multiple mounts from the same client are hence ignored in this calculation. |
| Nodes / Self Heal / Bricks X/Y | This indicates that X components of Y total/expected components within the trusted pool are online. In Example 2, note that 3/4 is displayed against all of these fields – indicating that the node, brick and the self heal daemon are unavailable. |
| Tasks Active | Active background tasks such as rebalance are displayed here against individual volumes. |
| Protocols | Displays which protocols have been enabled for the volume. In the case of SMB, this does not denote that Samba is configured and is active. |
| Snapshots | Displays a count of the number of snapshots taken for the volume. The snapshot count for each volume is rolled up to the trusted storage pool to provide a high level view of the number of snapshots in the environment. |
| Status Messages | After the information is gathered, any errors detected are reported in the Status Messages section. These descriptions provide a view of the problem and the potential impact of the condition. |
14.4. Listing Volumes
# gluster volume list
# gluster volume list
test-volume
volume1
volume2
volume314.5. Displaying Volume Information
# gluster volume info VOLNAME
# gluster volume info test-volume
Volume Name: test-volume
Type: Distribute
Status: Created
Number of Bricks: 4
Bricks:
Brick1: server1:/exp1
Brick2: server2:/exp2
Brick3: server3:/exp3
Brick4: server4:/exp414.6. Performing Statedump on a Volume
- mem - Dumps the memory usage and memory pool details of the bricks.
- iobuf - Dumps iobuf details of the bricks.
- priv - Dumps private information of loaded translators.
- callpool - Dumps the pending calls of the volume.
- fd - Dumps the open file descriptor tables of the volume.
- inode - Dumps the inode tables of the volume.
- history - Dumps the event history of the volume
# gluster volume statedump VOLNAME [nfs] [all|mem|iobuf|callpool|priv|fd|inode|history]
# gluster volume statedump test-volume
Volume statedump successful /var/run/gluster/ directory or in the directory set using server.statedump-path volume option. The naming convention of the dump file is brick-path.brick-pid.dump.
# gluster volume set VOLNAME server.statedump-path path
# gluster volume set test-volume server.statedump-path /usr/local/var/log/glusterfs/dumps/
Set volume successful# gluster volume info VOLNAME
kill -USR1 process_ID
kill -USR1 4120# kill -SIGUSR1 PID_of_the_glusterd_process
/var/run/gluster/ directory with the name in the format:
glusterdump-<PID_of_the_glusterd_process>.dump.<timestamp>
14.7. Displaying Volume Status
- detail - Displays additional information about the bricks.
- clients - Displays the list of clients connected to the volume.
- mem - Displays the memory usage and memory pool details of the bricks.
- inode - Displays the inode tables of the volume.
- fd - Displays the open file descriptor tables of the volume.
- callpool - Displays the pending calls of the volume.
# gluster volume status [all|VOLNAME [nfs | shd | BRICKNAME]] [detail |clients | mem | inode | fd |callpool]
# gluster volume status test-volume
Status of volume: test-volume
Gluster process Port Online Pid
------------------------------------------------------------
Brick arch:/export/rep1 24010 Y 18474
Brick arch:/export/rep2 24011 Y 18479
NFS Server on localhost 38467 Y 18486
Self-heal Daemon on localhost N/A Y 18491# gluster volume status all
# gluster volume status all
Status of volume: test
Gluster process Port Online Pid
-----------------------------------------------------------
Brick 192.168.56.1:/export/test 24009 Y 29197
NFS Server on localhost 38467 Y 18486
Status of volume: test-volume
Gluster process Port Online Pid
------------------------------------------------------------
Brick arch:/export/rep1 24010 Y 18474
Brick arch:/export/rep2 24011 Y 18479
NFS Server on localhost 38467 Y 18486
Self-heal Daemon on localhost N/A Y 18491# gluster volume status VOLNAME detail
# gluster volume status test-volume detail
Status of volume: test-vol
------------------------------------------------------------------------------
Brick : Brick arch:/exp
Port : 24012
Online : Y
Pid : 18649
File System : ext4
Device : /dev/sda1
Mount Options : rw,relatime,user_xattr,acl,commit=600,barrier=1,data=ordered
Inode Size : 256
Disk Space Free : 22.1GB
Total Disk Space : 46.5GB
Inode Count : 3055616
Free Inodes : 2577164# gluster volume status VOLNAME clients
# gluster volume status test-volume clients
Brick : arch:/export/1
Clients connected : 2
Hostname Bytes Read BytesWritten
-------- --------- ------------
127.0.0.1:1013 776 676
127.0.0.1:1012 50440 51200# gluster volume status VOLNAME mem
# gluster volume status test-volume mem
Memory status for volume : test-volume
----------------------------------------------
Brick : arch:/export/1
Mallinfo
--------
Arena : 434176
Ordblks : 2
Smblks : 0
Hblks : 12
Hblkhd : 40861696
Usmblks : 0
Fsmblks : 0
Uordblks : 332416
Fordblks : 101760
Keepcost : 100400
Mempool Stats
-------------
Name HotCount ColdCount PaddedSizeof AllocCount MaxAlloc
---- -------- --------- ------------ ---------- --------
test-volume-server:fd_t 0 16384 92 57 5
test-volume-server:dentry_t 59 965 84 59 59
test-volume-server:inode_t 60 964 148 60 60
test-volume-server:rpcsvc_request_t 0 525 6372 351 2
glusterfs:struct saved_frame 0 4096 124 2 2
glusterfs:struct rpc_req 0 4096 2236 2 2
glusterfs:rpcsvc_request_t 1 524 6372 2 1
glusterfs:call_stub_t 0 1024 1220 288 1
glusterfs:call_stack_t 0 8192 2084 290 2
glusterfs:call_frame_t 0 16384 172 1728 6# gluster volume status VOLNAME inode
# gluster volume status test-volume inode
inode tables for volume test-volume
----------------------------------------------
Brick : arch:/export/1
Active inodes:
GFID Lookups Ref IA type
---- ------- --- -------
6f3fe173-e07a-4209-abb6-484091d75499 1 9 2
370d35d7-657e-44dc-bac4-d6dd800ec3d3 1 1 2
LRU inodes:
GFID Lookups Ref IA type
---- ------- --- -------
80f98abe-cdcf-4c1d-b917-ae564cf55763 1 0 1
3a58973d-d549-4ea6-9977-9aa218f233de 1 0 1
2ce0197d-87a9-451b-9094-9baa38121155 1 0 2# gluster volume status VOLNAME fd
# gluster volume status test-volume fd
FD tables for volume test-volume
----------------------------------------------
Brick : arch:/export/1
Connection 1:
RefCount = 0 MaxFDs = 128 FirstFree = 4
FD Entry PID RefCount Flags
-------- --- -------- -----
0 26311 1 2
1 26310 3 2
2 26310 1 2
3 26311 3 2
Connection 2:
RefCount = 0 MaxFDs = 128 FirstFree = 0
No open fds
Connection 3:
RefCount = 0 MaxFDs = 128 FirstFree = 0
No open fds# gluster volume status VOLNAME callpool
# gluster volume status test-volume callpool
Pending calls for volume test-volume
----------------------------------------------
Brick : arch:/export/1
Pending calls: 2
Call Stack1
UID : 0
GID : 0
PID : 26338
Unique : 192138
Frames : 7
Frame 1
Ref Count = 1
Translator = test-volume-server
Completed = No
Frame 2
Ref Count = 0
Translator = test-volume-posix
Completed = No
Parent = test-volume-access-control
Wind From = default_fsync
Wind To = FIRST_CHILD(this)->fops->fsync
Frame 3
Ref Count = 1
Translator = test-volume-access-control
Completed = No
Parent = repl-locks
Wind From = default_fsync
Wind To = FIRST_CHILD(this)->fops->fsync
Frame 4
Ref Count = 1
Translator = test-volume-locks
Completed = No
Parent = test-volume-io-threads
Wind From = iot_fsync_wrapper
Wind To = FIRST_CHILD (this)->fops->fsync
Frame 5
Ref Count = 1
Translator = test-volume-io-threads
Completed = No
Parent = test-volume-marker
Wind From = default_fsync
Wind To = FIRST_CHILD(this)->fops->fsync
Frame 6
Ref Count = 1
Translator = test-volume-marker
Completed = No
Parent = /export/1
Wind From = io_stats_fsync
Wind To = FIRST_CHILD(this)->fops->fsync
Frame 7
Ref Count = 1
Translator = /export/1
Completed = No
Parent = test-volume-server
Wind From = server_fsync_resume
Wind To = bound_xl->fops->fsync14.8. Troubleshooting issues in the Red Hat Storage Trusted Storage Pool
14.8.1. Troubleshooting a network issue in the Red Hat Storage Trusted Storage Pool
ping from one Red Hat Storage node to another.
ping command times out and displays the following error:
ping: local error: Message too long, mtu=1500Chapter 15. Managing Red Hat Storage Logs
log-file-name.epoch-time-stamp.The components for which the log messages are generated with message-ids are glusterFS Management Service, Distributed Hash Table (DHT), and Automatic File Replication (AFR).
15.1. Log Rotation
15.2. Red Hat Storage Component Logs and Location
/var/log directory.
| Component/Service Name | Location of the Log File | Remarks |
|---|---|---|
| glusterd | /var/log/glusterfs/etc-glusterfs-glusterd.vol.log | One glusterd log file per server. This log file also contains the snapshot and user logs. |
| gluster commands | /var/log/glusterfs/cmd_history.log | Gluster commands executed on a node in a Red Hat Storage Trusted Storage Pool is logged in this file. |
| bricks | /var/log/glusterfs/bricks/<path extraction of brick path>.log | One log file per brick on the server |
| rebalance | /var/log/glusterfs/ VOLNAME- rebalance.log | One log file per volume on the server |
| self heal deamon | /var/log/glusterfs/ glustershd.log | One log file per server |
| quota |
| One log file per server (and per volume from quota-mount. |
| Gluster NFS | /var/log/glusterfs/ nfs.log | One log file per server |
| SAMBA Gluster | /var/log/samba/glusterfs-VOLNAME-<ClientIP>.log | If the client mounts this on a glusterFS server node, the actual log file or the mount point may not be found. In such a case, the mount outputs of all the glusterFS type mount operations need to be considered. |
| Ganesha NFS | /var/log/nfs-ganesha.log | |
| FUSE Mount | /var/log/ glusterfs/<mountpoint path extraction>.log | |
| Geo-replication | /var/log/glusterfs/geo-replication/<master> /var/log/glusterfs/geo-replication-slaves | |
gluster volume heal VOLNAME info command | /var/log/glusterfs/glfsheal-VOLNAME.log | One log file per server on which the command is executed. |
| gluster-swift | /var/log/messages | |
| SwiftKrbAuth | /var/log/httpd/error_log | |
| Command Line Interface logs | /var/log/glusterfs/cli.log | This file captures log entries for every command that is executed on the Command Line Interface(CLI). |
15.3. Configuring the Log Format
gluster volume set VOLNAME diagnostics.brick-log-format <value>Example 15.1. Generate log files with with-msg-id:
#gluster volume set testvol diagnostics.brick-log-format with-msg-id
Example 15.2. Generate log files with no-msg-id:
#gluster volume set testvol diagnostics.brick-log-format no-msg-id
gluster volume set VOLNAME diagnostics.client-log-format <value>Example 15.3. Generate log files with with-msg-id:
#gluster volume set testvol diagnostics.client-log-format with-msg-id
Example 15.4. Generate log files with no-msg-id:
#gluster volume set testvol diagnostics.client-log-format no-msg-id
glusterd:
# glusterd --log-format=<value>Example 15.5. Generate log files with with-msg-id:
#glusterd --log-format=with-msg-id
Example 15.6. Generate log files with no-msg-id:
#glusterd --log-format=no-msg-id
15.4. Configuring the Log Level
critical, error, warning, and info messages are logged.
- CRITICAL
- ERROR
- WARNING
- INFO
- DEBUG
- TRACE
Important
#gluster volume set VOLNAME diagnostics.brick-log-level <value>Example 15.7. Set the log level to warning on a brick
#gluster volume set testvol diagnostics.brick-log-level WARNING
#gluster volume set VOLNAME diagnostics.brick-sys-log-level <value>Example 15.8. Set the syslog level to warning on a brick
#gluster volume set testvol diagnostics.brick-sys-log-level WARNING
#gluster volume set VOLNAME diagnostics.client-log-level <value>Example 15.9. Set the log level to error on a client
#gluster volume set testvol diagnostics.client-log-level ERROR
#gluster volume set VOLNAME diagnostics.client-sys-log-level <value>Example 15.10. Set the syslog level to error on a client
#gluster volume set testvol diagnostics.client-sys-log-level ERROR
glusterd
#glusterd --log-level <value>Example 15.11. Set the log level to warning on glusterd
#glusterd --log-level WARNING
gluster --log-level=ERROR VOLNAME peer probe HOSTNAMEExample 15.12. Set the CLI log level to ERROR for the volume statuscommand
# gluster --log-level=ERROR volume status
#gluster --log-level ERROR volume status
15.5. Suppressing Repetitive Log Messages
log-flush-timeout period and by defining a log-buf-size buffer size options with the gluster volume set command.
# gluster volume set VOLNAME diagnostics.brick-log-flush-timeout <value>
Example 15.13. Set a timeout period on the bricks
# gluster volume set testvol diagnostics.brick-log-flush-timeout 200
volume set: success
# gluster volume set VOLNAME diagnostics.client-log-flush-timeout <value>
Example 15.14. Set a timeout period on the clients
# gluster volume set testvol diagnostics.client-log-flush-timeout 180
volume set: success
glusterd:
# glusterd --log-flush-timeout=<value>Example 15.15. Set a timeout period on the glusterd
# glusterd --log-flush-timeout=60
The maximum number of unique log messages that can be suppressed until the timeout or buffer overflow, whichever occurs first on the bricks.
# gluster volume set VOLNAME diagnostics.brick-log-buf-size <value>
Example 15.16. Set a buffer size on the bricks
# gluster volume set testvol diagnostics.brick-log-buf-size 10
volume set: success
# gluster volume set VOLNAME diagnostics.client-log-buf-size <value>
Example 15.17. Set a buffer size on the clients
# gluster volume set testvol diagnostics.client-log-buf-size 15
volume set: success
glusterd:
# glusterd --log-buf-size=<value>Example 15.18. Set a log buffer size on the glusterd
# glusterd --log-buf-size=10
Note
15.6. Geo-replication Logs
Master-log-file- log file for the process that monitors the master volume.Slave-log-file- log file for process that initiates changes on a slave.Master-gluster-log-file- log file for the maintenance mount point that the geo-replication module uses to monitor the master volume.Slave-gluster-log-file- If the slave is a Red Hat Storage Volume, this log file is the slave's counterpart ofMaster-gluster-log-file.
15.6.1. Viewing the Geo-replication Master Log Files
# gluster volume geo-replication MASTER_VOL SLAVE_HOST::SLAVE_VOL config log-file# gluster volume geo-replication Volume1 example.com::slave-vol config log-file15.6.2. Viewing the Geo-replication Slave Log Files
glusterd must be running on slave machine.
- On the master, run the following command to display the session-owner details:
# gluster volume geo-replication MASTER_VOL SLAVE_HOST::SLAVE_VOL config session-ownerFor example:# gluster volume geo-replication Volume1 example.com::slave-vol config session-owner 5f6e5200-756f-11e0-a1f0-0800200c9a66 - On the slave, run the following command with the session-owner value from the previous step:
# ls -l /var/log/glusterfs/geo-replication-slaves/ | grep SESSION_OWNERFor example:# ls -l /var/log/glusterfs/geo-replication-slaves/ | grep 5f6e5200-756f-11e0-a1f0-0800200c9a66
Chapter 16. Managing Red Hat Storage Volume Life-Cycle Extensions
- Creating a volume
- Starting a volume
- Adding a brick
- Removing a brick
- Tuning volume options
- Stopping a volume
- Deleting a volume
Note
16.1. Location of Scripts
- /var/lib/glusterd/hooks/1/create/
- /var/lib/glusterd/hooks/1/delete/
- /var/lib/glusterd/hooks/1/start/
- /var/lib/glusterd/hooks/1/stop/
- /var/lib/glusterd/hooks/1/set/
- /var/lib/glusterd/hooks/1/add-brick/
- /var/lib/glusterd/hooks/1/remove-brick/
--volname=VOLNAME to specify the volume. Command-specific additional arguments are provided for the following volume operations:
- Start volume
--first=yes, if the volume is the first to be started--first=no, for otherwise
- Stop volume
--last=yes, if the volume is to be stopped last.--last=no, for otherwise
- Set volume
-o key=valueFor every key, value is specified in volume set command.
16.2. Prepackaged Scripts
/var/lib/glusterd/hooks/1/start/post and /var/lib/glusterd/hooks/1/stop/pre. By default, the scripts are enabled.
# gluster volume start VOLNAME
S30samba-start.sh script performs the following:
- Adds Samba share configuration details of the volume to the
smb.conffile - Mounts the volume through FUSE and adds an entry in
/etc/fstabfor the same. - Restarts Samba to run with updated configuration
# gluster volume stop VOLNAME
S30samba-stop.sh script performs the following:
- Removes the Samba share details of the volume from the
smb.conffile - Unmounts the FUSE mount point and removes the corresponding entry in
/etc/fstab - Restarts Samba to run with updated configuration
Part III. Red Hat Storage Administration on Public Cloud
Chapter 17. Launching Red Hat Storage Server for Public Cloud
Important
Note
17.1. Launching Red Hat Storage Instances
- Navigate to the Amazon Web Services home page at http://aws.amazon.com. The Amazon Web Services home page appears.
- Login to Amazon Web Services. The Amazon Web Services main screen is displayed.
- Click the Amazon EC2 tab. The Amazon EC2 Console Dashboard is displayed.
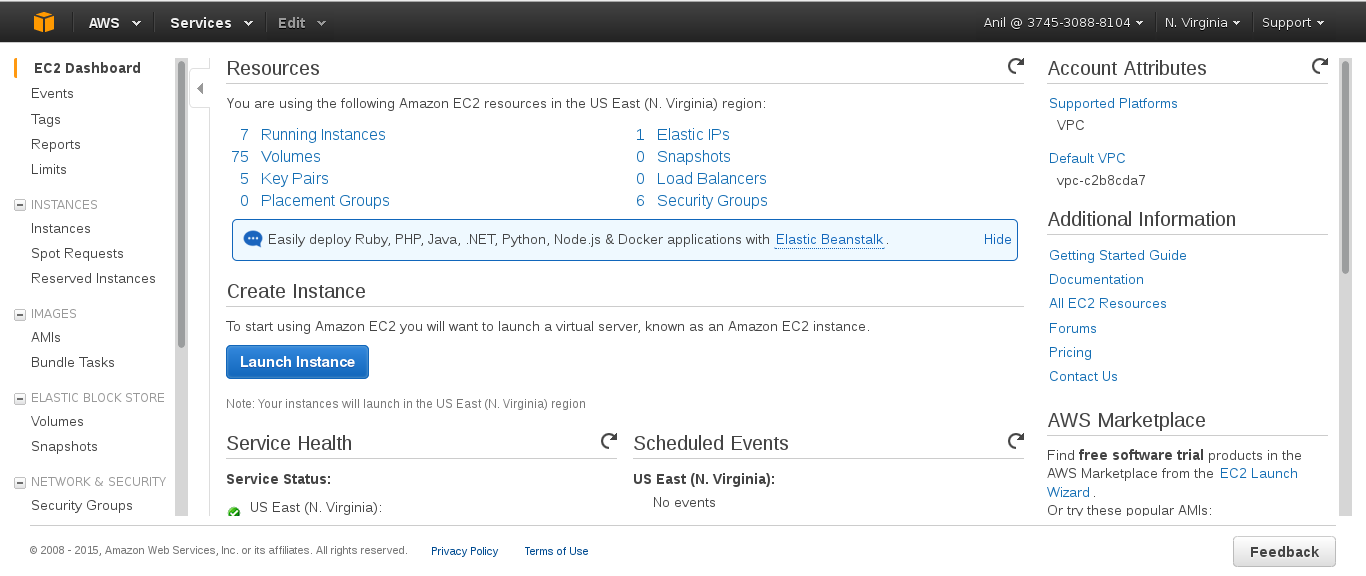
- Click Launch Instance.The Step 1: Choose an AMI screen is displayed.
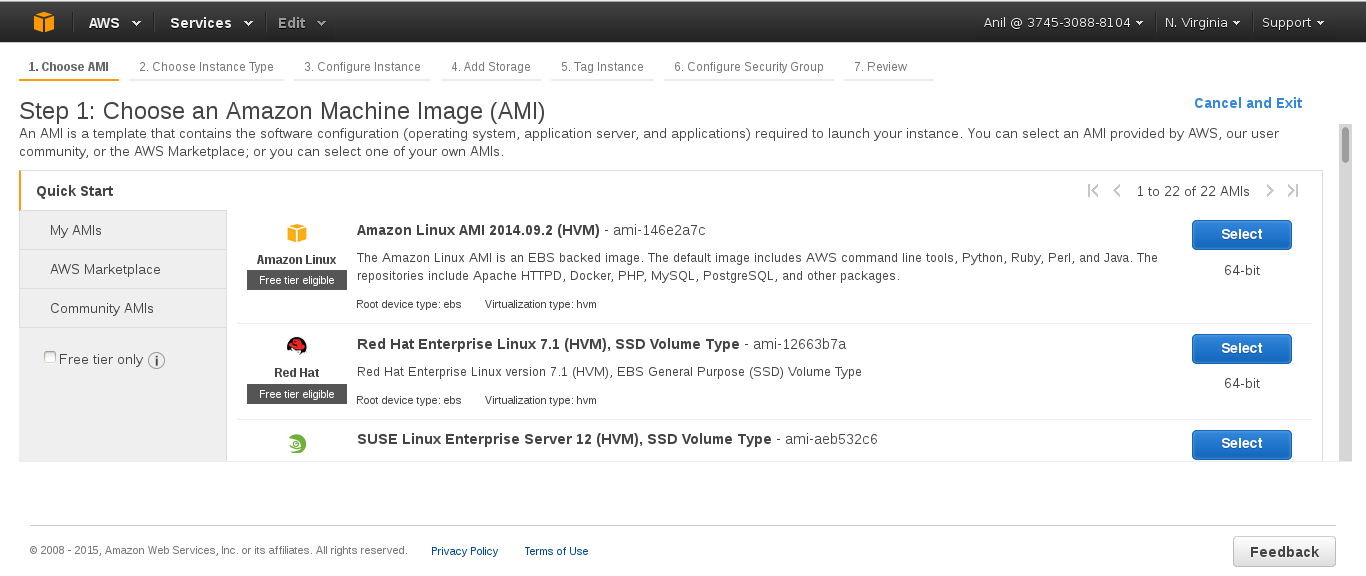
- Click Select for the corresponding AMI and click Next: Choose an Instance Type. The Step 2: Choose an Instance Type screen is displayed.

- Select Large as the instance type, and click Next: Configure Instance Details . The Step 3: Configure Instance Details screen displays.
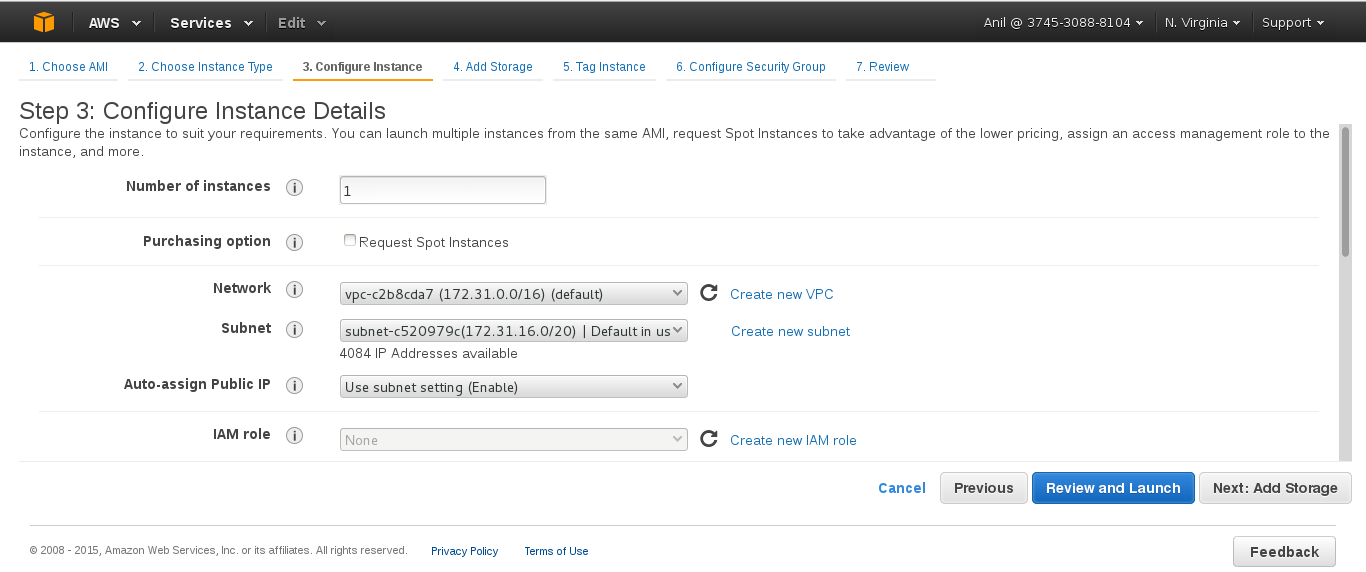
- Specify the configuration for your instance or continue with the default settings, and click Next: Add Storage The Step 4: Add Storage screen displays.

- In the Add Storage screen, specify the storage details and click Next: Tag Instance. The Step 5: Tag Instance screen is displayed.

- Enter a name for the instance in the Value field for Name, and click Next: Configure Security Group. You can use this name later to verify that the instance is operating correctly. The Step 6: Configure Security Group screen is displayed.

- Select an existing security group or create a new security group and click Review and Launch.You must ensure to open the following TCP port numbers in the selected security group:
- 22
- 6000, 6001, 6002, 443, and 8080 ports if Red Hat Storage for OpenStack Swift is enabled
- Choose an existing key pair or create a new key pair, and click Launch Instance.

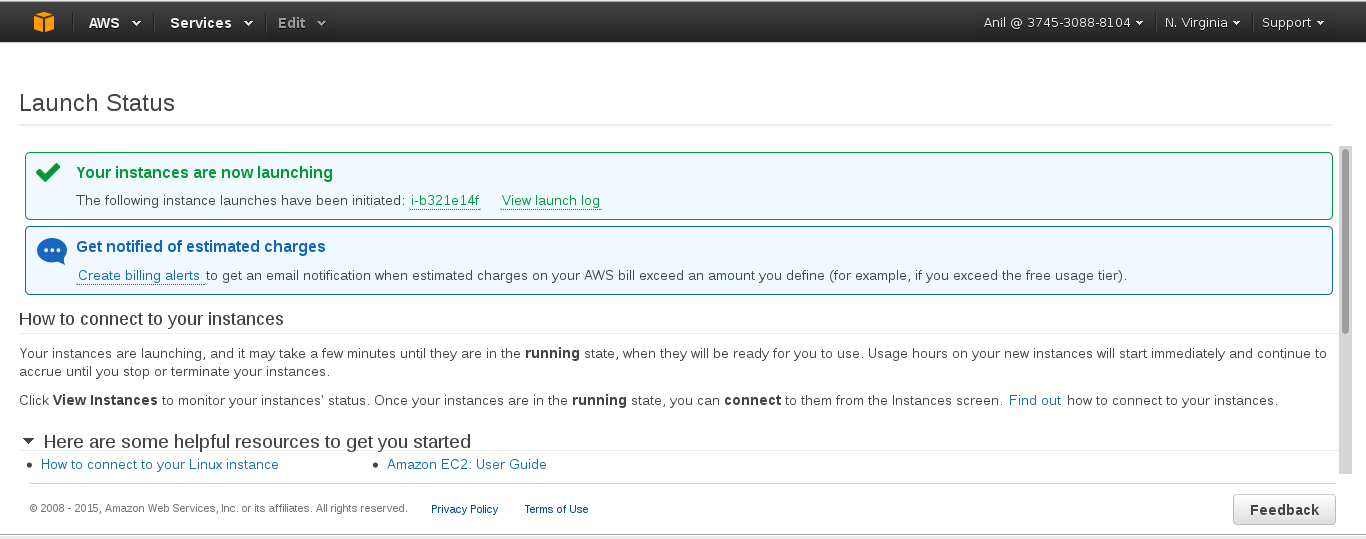
17.2. Verifying that Red Hat Storage Instance is Running
- On the Amazon Web Services home page, click the Amazon EC2 tab. The Amazon EC2 Console Dashboard is displayed.
- Click the Instances link in the Instances section on the left. The screen displays your current instances.
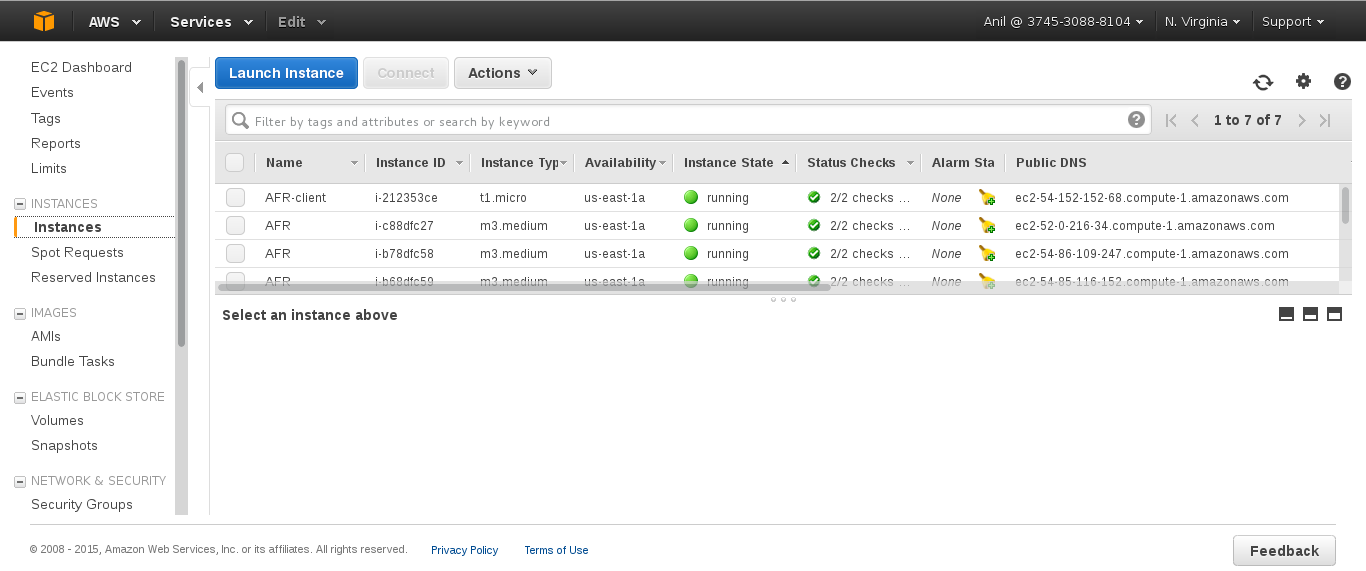
- Check the Status column and verify that the instance is running. A yellow circle indicates a status of pending while a green circle indicates that the instance is running.Click the instance and verify the details displayed in the Description tab.

- Note the domain name in the Public DNS field. You can use this domain to perform a remote login to the instance.
- Using SSH and the domain from the previous step, login to the Red Hat Amazon Machine Image instance. You must use the key pair that was selected or created when launching the instance.Example:Enter the following in command line:
# ssh -i rhs-aws.pem ec2-user@ec2-23-20-52-123.compute-1.amazonaws.com # sudo su - At the command line, enter the following command:
# service glusterd statusVerify that the command indicates that the glusterd daemon is running on the instance.
Chapter 18. Provisioning Storage
Important
18.1. Provisioning Storage for Two-way Replication Volumes
- Login to Amazon Web Services at http://aws.amazon.com and select the tab.
- In the select the option to add the Amazon Elastic Block Storage Volumes
- In order to support configuration as a brick, assemble the eight Amazon EBS volumes into a RAID 0 (stripe) array using the following command:
# mdadm --create ARRAYNAME --level=0 --raid-devices=8 list of all devicesFor example, to create a software RAID 0 of eight volumes:# mdadm --create /dev/md0 --level=0 --raid-devices=8 /dev/xvdf1 /dev/xvdf2 /dev/xvdf3 /dev/xvdf4 /dev/xvdf5 /dev/xvdf6 /dev/xvdf7 /dev/xvdf8 # mdadm --examine --scan > /etc/mdadm.conf - Create a Logical Volume (LV) using the following commands:
# pvcreate /dev/md0 # vgcreate glustervg /dev/md0 # vgchange -a y glustervg # lvcreate -a y -l 100%VG -n glusterlv glustervgIn these commands,glustervgis the name of the volume group andglusterlvis the name of the logical volume. Red Hat Storage uses the logical volume created over EBS RAID as a brick. For more information about logical volumes, see the Red Hat Enterprise Linux Logical Volume Manager Administration Guide. - Format the logical volume using the following command:
# mkfs.xfs -i size=512 DEVICEFor example, to format/dev/glustervg/glusterlv:# mkfs.xfs -i size=512 /dev/glustervg/glusterlv - Mount the device using the following commands:
# mkdir -p /export/glusterlv # mount /dev/glustervg/glusterlv /export/glusterlv - Using the following command, add the device to
/etc/fstabso that it mounts automatically when the system reboots:# echo "/dev/glustervg/glusterlv /export/glusterlv xfs defaults 0 2" >> /etc/fstab
18.2. Provisioning Storage for Three-way Replication Volumes
- Login to Amazon Web Services at http://aws.amazon.com and select the tab.
- Create six AWS instances in three different availability zones. All the bricks of a replica pair must be from different availability zones. For each replica set, select the instances for the bricks from three different availability zones. A replica pair must not have a brick along with its replica from the same availability zone.
- Add single EBS volume to each AWS instances
- Create a Logical Volume (LV) on each EBS volume using the following commands:
# pvcreate /dev/xvdf1 # vgcreate glustervg /dev/xvdf1 # vgchange -a y glustervg # lvcreate -a y -l 100%VG -n glusterlv glustervgIn these commands, /dev/xvdf1 is a EBS volume, glustervg is the name of the volume group and glusterlv is the name of the logical volume. Red Hat Storage uses the logical volume created over EBS as a brick. For more information about logical volumes, see the Red Hat Enterprise Linux Logical Volume Manager Administration Guide. - Format the logical volume using the following command:
# mkfs.xfs -i size=512 DEVICEFor example, to format/dev/glustervg/glusterlv:# mkfs.xfs -i size=512 /dev/glustervg/glusterlv - Mount the device using the following commands:
# mkdir -p /export/glusterlv # mount /dev/glustervg/glusterlv /export/glusterlv - Using the following command, add the device to
/etc/fstabso that it mounts automatically when the system reboots:# echo "/dev/glustervg/glusterlv /export/glusterlv xfs defaults 0 2" >> /etc/fstab
client-side quorum to avoid split-brain scenarios, unavailability of two zones would make the access read-only.
Chapter 19. Stopping and Restarting Red Hat Storage Instance
Part IV. Data Access with Other Interfaces
Chapter 20. Managing Object Store
20.1. Architecture Overview
- OpenStack Object Storage environment.For detailed information on Object Storage, see OpenStack Object Storage Administration Guide available at: http://docs.openstack.org/admin-guide-cloud/content/ch_admin-openstack-object-storage.html.
- Red Hat Storage environment.Red Hat Storage environment consists of bricks that are used to build volumes. For more information on bricks and volumes, see Section 6.2, “Formatting and Mounting Bricks”.
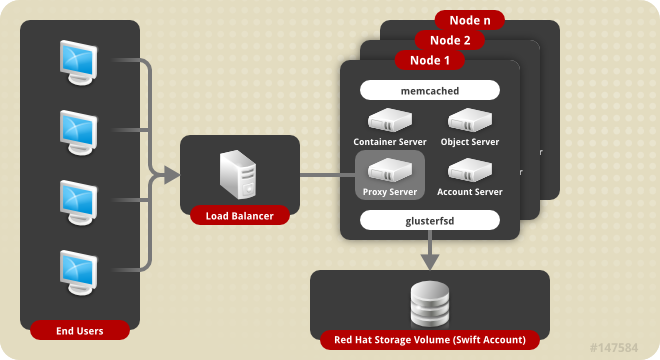
Figure 20.1. Object Store Architecture
20.2. Components of Object Storage
- Authenticate Object Store against an external OpenStack Keystone server.Each Red Hat Storage volume is mapped to a single account. Each account can have multiple users with different privileges based on the group and role they are assigned to. After authenticating using accountname:username and password, user is issued a token which will be used for all subsequent REST requests.Integration with Keystone
When you integrate Red Hat Storage Object Store with Keystone authentication, you must ensure that the Swift account name and Red Hat Storage volume name are the same. It is common that Red Hat Storage volumes are created before exposing them through the Red Hat Storage Object Store.
When working with Keystone, account names are defined by Keystone as thetenant id. You must create the Red Hat Storage volume using the Keystonetenant idas the name of the volume. This means, you must create the Keystone tenant before creating a Red Hat Storage Volume.Important
Red Hat Storage does not contain any Keystone server components. It only acts as a Keystone client. After you create a volume for Keystone, ensure to export this volume for accessing it using the object storage interface. For more information on exporting volume, see Section 20.6.8, “Exporting the Red Hat Storage Volumes”.Integration with GSwauthGSwauth is a Web Server Gateway Interface (WGSI) middleware that uses a Red Hat Storage Volume itself as its backing store to maintain its metadata. The benefit in this authentication service is to have the metadata available to all proxy servers and saving the data to a Red Hat Storage volume.
To protect the metadata, the Red Hat Storage volume should only be able to be mounted by the systems running the proxy servers. For more information on mounting volumes, see Chapter 7, Accessing Data - Setting Up Clients.Integration with TempAuthYou can also use the
TempAuthauthentication service to test Red Hat Storage Object Store in the data center.
20.3. Advantages of using Object Store
- Default object size limit of 1 TiB
- Unified view of data across NAS and Object Storage technologies
- High availability
- Scalability
- Replication
- Elastic Volume Management
20.4. Limitations
- Object NameObject Store imposes the following constraints on the object name to maintain the compatibility with network file access:
- Object names must not be prefixed or suffixed by a '/' character. For example,
a/b/ - Object names must not have contiguous multiple '/' characters. For example,
a//b
- Account Management
- Object Store does not allow account management even though OpenStack Swift allows the management of accounts. This limitation is because Object Store treats
accountsequivalent to the Red Hat Storage volumes. - Object Store does not support account names (i.e. Red Hat Storage volume names) having an underscore.
- In Object Store, every account must map to a Red Hat Storage volume.
- Subdirectory ListingHeaders
X-Content-Type: application/directoryandX-Content-Length: 0can be used to create subdirectory objects under a container, but GET request on a subdirectory would not list all the objects under it.
20.5. Prerequisites
memcached service using the following command:
# service memcached start- 6010 - Object Server
- 6011 - Container Server
- 6012 - Account Server
- Proxy server
- 443 - for HTTPS request
- 8080 - for HTTP request
- You must create and mount a Red Hat Storage volume to use it as a Swift Account. For information on creating Red Hat Storage volumes, see Chapter 6, Red Hat Storage Volumes . For information on mounting Red Hat Storage volumes, see Chapter 7, Accessing Data - Setting Up Clients .
20.6. Configuring the Object Store
Warning
/etc/swift directory would contain both *.conf extension and *.conf-gluster files. You must delete the *.conf files and create new configuration files based on *.conf-gluster template. Otherwise, inappropriate python packages will be loaded and the component may not work as expected.
.rpmnew extension. You must ensure to delete .conf files and folders (account-server, container-server, and object-server) for better understanding of the loaded configuration."
20.6.1. Configuring a Proxy Server
etc/swift/proxy-server.conf by referencing the template file available at /etc/swift/proxy-server.conf-gluster.
20.6.1.1. Configuring a Proxy Server for HTTPS
- Create self-signed cert for SSL using the following commands:
# cd /etc/swift # openssl req -new -x509 -nodes -out cert.crt -keyout cert.key - Add the following lines to
/etc/swift/proxy-server.confunder [DEFAULT]bind_port = 443 cert_file = /etc/swift/cert.crt key_file = /etc/swift/cert.key
Important
memcache_servers configuration option in the proxy-server.conf and list all memcached servers.
proxy-server.conf file.
[filter:cache]
use = egg:swift#memcache
memcache_servers = 192.168.1.20:11211,192.168.1.21:11211,192.168.1.22:1121120.6.2. Configuring the Authentication Service
Keystone, GSwauth, and TempAuth authentication services.
20.6.2.1. Integrating with the Keystone Authentication Service
- To configure Keystone, add
authtokenandkeystoneauthto/etc/swift/proxy-server.confpipeline as shown below:[pipeline:main] pipeline = catch_errors healthcheck proxy-logging cache authtoken keystoneauth proxy-logging proxy-server - Add the following sections to
/etc/swift/proxy-server.conffile by referencing the example below as a guideline. You must substitute the values according to your setup:[filter:authtoken] paste.filter_factory = keystoneclient.middleware.auth_token:filter_factory signing_dir = /etc/swift auth_host = keystone.server.com auth_port = 35357 auth_protocol = http auth_uri = http://keystone.server.com:5000 # if its defined admin_tenant_name = services admin_user = swift admin_password = adminpassword delay_auth_decision = 1 [filter:keystoneauth] use = egg:swift#keystoneauth operator_roles = admin, SwiftOperator is_admin = true cache = swift.cache
Verify that the Red Hat Storage Object Store has been configured successfully by running the following command:
$ swift -V 2 -A http://keystone.server.com:5000/v2.0 -U tenant_name:user -K password stat20.6.2.2. Integrating with the GSwauth Authentication Service
Perform the following steps to integrate GSwauth:
- Create and start a Red Hat Storage volume to store metadata.
# gluster volume create NEW-VOLNAME NEW-BRICK # gluster volume start NEW-VOLNAMEFor example:# gluster volume create gsmetadata server1:/exp1 # gluster volume start gsmetadata - Run
gluster-swift-gen-builderstool with all the volumes to be accessed using the Swift client includinggsmetadatavolume:# gluster-swift-gen-builders gsmetadata other volumes - Edit the
/etc/swift/proxy-server.confpipeline as shown below:[pipeline:main] pipeline = catch_errors cache gswauth proxy-server - Add the following section to
/etc/swift/proxy-server.conffile by referencing the example below as a guideline. You must substitute the values according to your setup.[filter:gswauth] use = egg:gluster_swift#gswauth set log_name = gswauth super_admin_key = gswauthkey metadata_volume = gsmetadata auth_type = sha1 auth_type_salt = swauthsaltImportant
You must ensure to secure theproxy-server.conffile and thesuper_admin_keyoption to prevent unprivileged access. - Restart the proxy server by running the following command:
# swift-init proxy restart
You can set the following advanced options for GSwauth WSGI filter:
- default-swift-cluster: The default storage-URL for the newly created accounts. When you attempt to authenticate for the first time, the access token and the storage-URL where data for the given account is stored will be returned.
- token_life: The set default token life. The default value is 86400 (24 hours).
- max_token_life: The maximum token life. You can set a token lifetime when requesting a new token with header
x-auth-token-lifetime. If the passed in value is greater than themax_token_life, then themax_token_lifevalue will be used.
GSwauth provides CLI tools to facilitate managing accounts and users. All tools have some options in common:
- -A, --admin-url: The URL to the auth. The default URL is
http://127.0.0.1:8080/auth/. - -U, --admin-user: The user with administrator rights to perform action. The default user role is
.super_admin. - -K, --admin-key: The key for the user with administrator rights to perform the action. There is no default value.
Prepare the Red Hat Storage volume for gswauth to save its metadata by running the following command:
# gswauth-prep [option]# gswauth-prep -A http://10.20.30.40:8080/auth/ -K gswauthkey20.6.2.2.1. Managing Account Services in GSwauth
Create an account for GSwauth. This account is mapped to a Red Hat Storage volume.
# gswauth-add-account [option] <account_name># gswauth-add-account -K gswauthkey <account_name>You must ensure that all users pertaining to this account must be deleted before deleting the account. To delete an account:
# gswauth-delete-account [option] <account_name># gswauth-delete-account -K gswauthkey test
Sets a service URL for an account. User with reseller admin role only can set the service URL. This command can be used to change the default storage URL for a given account. All accounts will have the same storage-URL as default value, which is set using default-swift-cluster option.
# gswauth-set-account-service [options] <account> <service> <name> <value># gswauth-set-account-service -K gswauthkey test storage local http://newhost:8080/v1/AUTH_test20.6.2.2.2. Managing User Services in GSwauth
The following user roles are supported in GSwauth:
- A regular user has no rights. Users must be given both read and write privileges using Swift ACLs.
- The
adminuser is a super-user at the account level. This user can create and delete users for that account. These members will have both write and read privileges to all stored objects in that account. - The
reseller adminuser is a super-user at the cluster level. This user can create and delete accounts and users and has read and write privileges to all accounts under that cluster. - GSwauth maintains its own swift account to store all of its metadata on accounts and users. The
.super_adminrole provides access to GSwauth own swift account and has all privileges to act on any other account or user.
The following table provides user access right information.
| Role/Group | get list of accounts | get Acccount Details | Create Account | Delete Account | Get User Details | Create admin user | Create reseller_admin user | Create regular user | Delete admin user |
|---|---|---|---|---|---|---|---|---|---|
| .super_admin (username) | X | X | X | X | X | X | X | X | X |
| .reseller_admin (group) | X | X | X | X | X | X | X | X | |
| .admin (group) | X | X | X | X | X | ||||
| regular user (type) |
You can create an user for an account that does not exist. The account will be created before creating the user.
-r flag to create a reseller admin user and -a flag to create an admin user. To change the password or role of the user, you can run the same command with the new option.
# gswauth-add-user [option] <account_name> <user> <password># gswauth-add-user -K gswauthkey -a test ana anapwdDelete a user by running the following command:
gswauth-delete-user [option] <account_name> <user>gwauth-delete-user -K gswauthkey test anaThere are two methods to access data using the Swift client. The first and simple method is by providing the user name and password everytime. The swift client will acquire the token from gswauth.
$ swift -A http://127.0.0.1:8080/auth/v1.0 -U test:ana -K anapwd upload container1 README.mdcurl -v -H 'X-Storage-User: test:ana' -H 'X-Storage-Pass: anapwd' -k http://localhost:8080/auth/v1.0
...
< X-Auth-Token: AUTH_tk7e68ef4698f14c7f95af07ab7b298610
< X-Storage-Url: http://127.0.0.1:8080/v1/AUTH_test
...$ swift --os-auth-token=AUTH_tk7e68ef4698f14c7f95af07ab7b298610 --os-storage-url=http://127.0.0.1:8080/v1/AUTH_test upload container1 README.md
README.md
bash-4.2$
bash-4.2$ swift --os-auth-token=AUTH_tk7e68ef4698f14c7f95af07ab7b298610 --os-storage-url=http://127.0.0.1:8080/v1/AUTH_test list container1
README.mdImportant
Reseller admins must always use the second method to acquire a token to get access to other accounts other than his own. The first method of using the username and password will give them access only to their own accounts.
20.6.2.2.3. Managing Accounts and Users Information
You can obtain the accounts and users information including stored password.
# gswauth-list [options] [account] [user]# gswauth-list -K gswauthkey test ana
+----------+
| Groups |
+----------+
| test:ana |
| test |
| .admin |
+----------+- If [account] and [user] are omitted, all the accounts will be listed.
- If [account] is included but not [user], a list of users within that account will be listed.
- If [account] and [user] are included, a list of groups that the user belongs to will be listed.
- If the [user] is .groups, the active groups for that account will be listed.
-p option provides the output in plain text format, -j provides the output in JSON format.
You can change the password of the user, account administrator, and reseller_admin roles.
- Change the password of a regular user by running the following command:
# gswauth-add-user -U account1:user1 -K old_passwd account1 user1 new_passwd - Change the password of an
account administratorby running the following command:# gswauth-add-user -U account1:admin -K old_passwd -a account1 admin new_passwd - Change the password of the
reseller_adminby running the following command:# gswauth-add-user -U account1:radmin -K old_passwd -r account1 radmin new_passwd
Users with .super_admin role can delete the expired tokens.
# gswauth-cleanup-tokens [options]# gswauth-cleanup-tokens -K gswauthkey --purge test- -t, --token-life: The expected life of tokens. The token objects modified before the give number of seconds will be checked for expiration (default: 86400).
- --purge: Purges all the tokens for a given account whether the tokens have expired or not.
- --purge-all: Purges all the tokens for all the accounts and users whether the tokens have expired or not.
20.6.2.3. Integrating with the TempAuth Authentication Service
Warning
cleartext in a single proxy-server.conf file. In your /etc/swift/proxy-server.conf file, enable TempAuth in pipeline and add user information in TempAuth section by referencing the below example.
[pipeline:main]
pipeline = catch_errors healthcheck proxy-logging cache tempauth proxy-logging proxy-server
[filter:tempauth]
use = egg:swift#tempauth
user_admin_admin = admin.admin.reseller_admin
user_test_tester = testing .admin
user_test_tester2 = testing2user_accountname_username = password [.admin]accountname is the Red Hat Storage volume used to store objects.
20.6.3. Configuring Object Servers
etc/swift/object.server.conf by referencing the template file available at /etc/swift/object-server.conf-gluster.
20.6.4. Configuring Container Servers
etc/swift/container-server.conf by referencing the template file available at /etc/swift/container-server.conf-gluster.
20.6.5. Configuring Account Servers
etc/swift/account-server.conf by referencing the template file available at /etc/swift/account-server.conf-gluster.
20.6.6. Configuring Swift Object and Container Constraints
/etc/swift/swift.conf by referencing the template file available at /etc/swift/swift.conf-gluster.
20.6.7. Configuring Object Expiration
Note
object-expirer daemon. This is an expected behavior.
20.6.7.1. Setting Up Object Expiration
gsexpiring for managing object expiration. Hence, you must create a Red Hat Storage volume and name it as gsexpiring.
/etc/swift/object.expirer.conf by referencing the template file available at /etc/swift/object-expirer.conf-gluster.
20.6.7.2. Using Object Expiration
The X-Delete-At header requires a UNIX epoch timestamp, in integer form. For example, 1418884120 represents Thu, 18 Dec 2014 06:27:31 GMT. By setting the header to a specific epoch time, you indicate when you want the object to expire, not be served, and be deleted completely from the Red Hat Storage volume. The current time in Epoch notation can be found by running this command:
$ date +%s- Set the object expiry time during an object PUT with X-Delete-At header using cURL:
curl -v -X PUT -H 'X-Delete-At: 1392013619' http://127.0.0.1:8080/v1/AUTH_test/container1/object1 -T ./localfileSet the object expiry time during an object PUT with X-Delete-At header using swift client:swift --os-auth-token=AUTH_tk99a39aecc3dd4f80b2b1e801d00df846 --os-storage-url=http://127.0.0.1:8080/v1/AUTH_test upload container1 ./localfile --header 'X-Delete-At: 1392013619'
The X-Delete-After header takes an integer number of seconds that represents the amount of time from now when you want the object to be deleted.
- Set the object expiry time with an object PUT with X-Delete-After header using cURL:
curl -v -X PUT -H 'X-Delete-After: 3600' http://127.0.0.1:8080/v1/AUTH_test/container1/object1 -T ./localfileSet the object expiry time with an object PUT with X-Delete-At header using swift client:swift --os-auth-token=AUTH_tk99a39aecc3dd4f80b2b1e801d00df846 --os-storage-url=http://127.0.0.1:8080/v1/AUTH_test upload container1 ./localfile --header 'X-Delete-After: 3600'
20.6.7.3. Running Object Expirer Service
interval option in /etc/swift/object-expirer.conf file. For every pass it makes, it queries the gsexpiring account for tracker objects. Based on the timestamp and path present in the name of tracker objects, object-expirer deletes the actual object and the corresponding tracker object.
# swift-init object-expirer start# swift-object-expirer -o -v /etc/swift/object-expirer.conf20.6.8. Exporting the Red Hat Storage Volumes
Swift on File component.
# cd /etc/swift
# gluster-swift-gen-builders VOLUME [VOLUME...]# cd /etc/swift
# gluster-swift-gen-builders testvol1 testvol2 testvol3/mnt/gluster-object). The default value can be changed to a different path by changing the devices configurable option across all account, container, and object configuration files. The path must contain Red Hat Storage volumes mounted under directories having the same names as volume names. For example, if devices option is set to /home, it is expected that the volume named testvol1 be mounted at /home/testvol1.
gluster-swift-gen-builders tool even if it was previously added. The gluster-swift-gen-builders tool creates new ring files every time it runs successfully.
gluster-swift-gen-builders only with the volumes which are required to be accessed using the Swift interface.
testvol2 volume, run the following command:
# gluster-swift-gen-builders testvol1 testvol320.6.9. Starting and Stopping Server
- To start the server, enter the following command:
# swift-init main start - To stop the server, enter the following command:
# swift-init main stop
20.7. Starting the Services Automatically
# chkconfig memcached on
# chkconfig openstack-swift-proxy on
# chkconfig openstack-swift-account on
# chkconfig openstack-swift-container on
# chkconfig openstack-swift-object on
# chkconfig openstack-swift-object-expirer onImportant
20.8. Working with the Object Store
20.8.1. Creating Containers and Objects
20.8.2. Creating Subdirectory under Containers
Content-Type: application/directory and Content-Length: 0. However, the current behavior of Object Store returns 200 OK on a GET request on subdirectory but this does not list all the objects under that subdirectory.
20.8.3. Working with Swift ACLs
Chapter 21. Administering the Hortonworks Data Platform on Red Hat Storage
The following are the advantages of Hadoop Compatible Storage with Red Hat Storage:
- Provides file-based access to Red Hat Storage volumes by Hadoop while simultaneously supporting POSIX features for the volumes such as NFS Mounts, Fuse Mounts, Snapshotting and Geo-Replication.
- Eliminates the need for a centralized metadata server (HDFS Primary and Redundant Namenodes) by replacing HDFS with Red Hat Storage.
- Provides compatibility with MapReduce and Hadoop Ecosystem applications with no code rewrite required.
- Provides a fault tolerant file system.
- Allows co-location of compute and data and the ability to run Hadoop jobs across multiple namespaces using multiple Red Hat Storage volumes.
21.1. Deployment Scenarios
| Component Overview | Component Description |
|---|---|
| Ambari | Management Console for the Hortonworks Data Platform |
| Red Hat Storage Console | (Optional) Management Console for Red Hat Storage |
| YARN Resource Manager | Scheduler for the YARN Cluster |
| YARN Node Manager | Worker for the YARN Cluster on a specific server |
| Job History Server | This logs the history of submitted YARN Jobs |
| glusterd | This is the Red Hat Storage process on a given server |
21.1.1. Red Hat Storage Trusted Storage Pool with Two Additional Servers
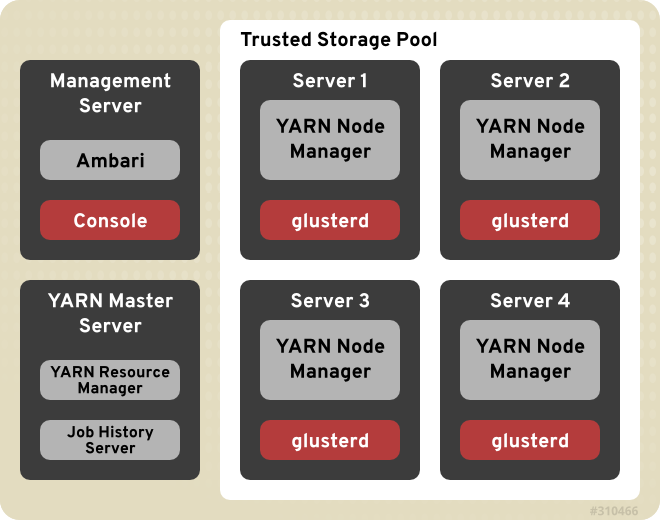
Figure 21.1. Recommended Deployment Topology for Large Clusters
21.1.2. Red Hat Storage Trusted Storage Pool with One Additional Server

Figure 21.2. Recommended Deployment Topology for Smaller Clusters
21.1.3. Red Hat Storage Trusted Storage Pool only
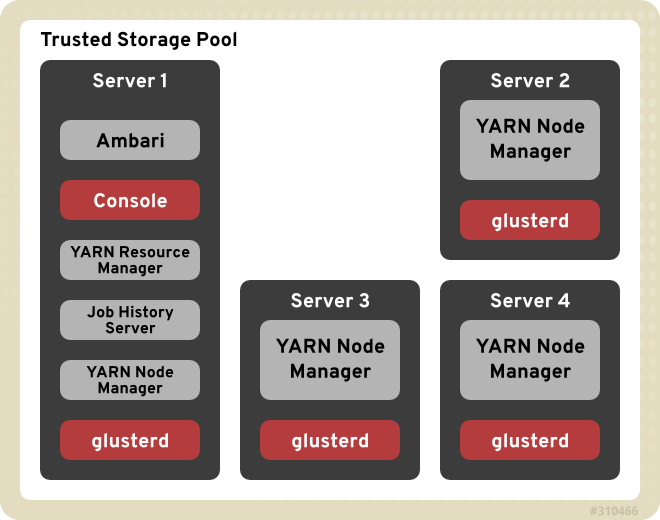
Figure 21.3. Evaluation deployment topology using the minimum amount of servers
21.1.4. Deploying Hadoop on an existing Red Hat Storage Trusted Storage Pool
21.1.5. Deploying Hadoop on a New Red Hat Storage Trusted Storage Pool
setup_cluster.sh script can build the storage pool for you. The rest of the installation instructions will articulate how to create and enable volumes for use with Hadoop.
21.2. Administration of HDP Services with Ambari on Red Hat Storage
21.3. Managing Users of the System
21.4. Running Hadoop Jobs Across Multiple Red Hat Storage Volumes
When you specify paths in a Hadoop Job, the full URI of the path is required. For example, if you have a volume named VolumeOne and that must pass in a file called myinput.txt in a directory named input, then you would specify it as glusterfs://VolumeOne/input/myinput.txt, the same formatting goes for the output. The example below shows data read from a path on VolumeOne and written to a path on VolumeTwo.
# bin/hadoop jar /opt/HadoopJobs.jar ProcessLogs glusterfs://VolumeOne/input/myinput.txt glusterfs://VolumeTwo/output/
Note
glusterfs://HadoopVol/input/myinput.txt and /input/myinput.txt are processed the same when providing input to a Hadoop Job or using the Hadoop CLI.
21.5. Scaling Up and Scaling Down
21.5.1. Scaling Up
- Ensure that the new servers meet all the prerequisites and have the appropriate channels and components installed. For information on prerequisites, see section Prerequisites in the chapter Deploying the Hortonworks Data Platform on Red Hat Storage of Red Hat Storage 3.0 Installation Guide. For information on adding servers to the trusted storage pool, see Chapter 5, Trusted Storage Pools
- In the Ambari Console, click in the navigation panel. You must wait until all the services are completely stopped.
- Open the terminal window of the server designated to be the Ambari Management Server and navigate to the
/usr/share/rhs-hadoop-install/directory. - Run the following command by replacing the examples with the necessary values. This command below assumes the LVM partitions on the server are
/dev/vg1/lv1and you wish them to be mounted as/mnt/brick1:# ./setup_cluster.sh --yarn-master <the-existing-yarn-master-node> [--hadoop-mgmt-node <the-existing-mgmt-node>] new-node1.hdp:/mnt/brick1:/dev/vg1/lv1 new-node2.hdp - Open the terminal of any Red Hat Storage server in the trusted storage pool and run the following command. This command assumes that you want to add the servers to a volume called
HadoopVol:# gluster volume add-brick HadoopVol replica 2 new-node1:/mnt/brick1/HadoopVol new-node2:/mnt/brick1/HadoopVolFor more information on expanding volumes, see Section 8.3, “Expanding Volumes”. - Open the terminal of any Red Hat Storage Server in the cluster and rebalance the volume using the following command:
# gluster volume rebalance HadoopVol startRebalancing the volume will distribute the data on the volume among the servers. To view the status of the rebalancing operation, run# gluster volume rebalance HadoopVol statuscommand. The rebalance status will be shown ascompletedwhen the rebalance is complete. For more information on rebalancing a volume, see Section 8.7, “Rebalancing Volumes”. - Open the terminal of both of the new storage nodes and navigate to the
/usr/share/rhs-hadoop-install/directory and run the command given below:# ./setup_container_executor.sh - Access the Ambari Management Interface via the browser (http://ambari-server-hostname:8080) and add the new nodes by selecting the HOSTS tab and selecting add new host. Select the services you wish to install on the new host and deploy the service to the hosts.
- Follow the instructions in Configuring the Linux Container Executor section in the Red Hat Storage 3.0 Installation Guide.
21.5.2. Scaling Down
- In the Ambari Console, click in the navigation panel. You must wait until all the services are completely stopped.
- Open the terminal of any Red Hat Storage server in the trusted storage pool and run the following command. This procedure assumes that you want to remove 2 servers, that is
old-node1andold-node2from a volume calledHadoopVol:# gluster volume remove-brick HadoopVol [replica count] old-node1:/mnt/brick2/HadoopVol old-node2:/mnt/brick2/HadoopVol startTo view the status of the remove brick operation, run# gluster volume remove-brick HadoopVol old-node1:/mnt/brick2/HadoopVol old-node2:/mnt/brick2/HadoopVol statuscommand. - When the data migration shown in the status command is
Complete, run the following command to commit the brick removal:# gluster volume remove-brick HadoopVol old-node1:/mnt/brick2/HadoopVol old-node2:/mnt/brick2/HadoopVol commitAfter the bricks removal, you can check the volume information using# gluster volume info HadoopVolcommand. For detailed information on removing volumes, see Section 8.4, “Shrinking Volumes” - Open the terminal of any Red Hat Storage server in the trusted storage pool and run the following command to detach the removed server:
# gluster peer detach old-node1 # gluster peer detach old-node2 - Open the terminal of any Red Hat Storage Server in the cluster and rebalance the volume using the following command:
# gluster volume rebalance HadoopVol startRebalancing the volume will distribute the data on the volume among the servers. To view the status of the rebalancing operation, run# gluster volume rebalance HadoopVol statuscommand. The rebalance status will be shown ascompletedwhen the rebalance is complete. For more information on rebalancing a volume, see Section 8.7, “Rebalancing Volumes”. - Remove the nodes from Ambari by accessing the Ambari Management Interface via the browser (http://ambari-server-hostname:8080) and selecting the HOSTS tab. Click on the host(node) that you would like to delete and select Host Actions on the right hand side. Select Delete Host from the drop down.
21.6. Creating a Snapshot of Hadoop enabled Red Hat Storage Volumes
You have an existing Red Hat Storage volume and you created a snapshot of that volume but you are not yet using the volume with Hadoop. You then add more data to the volume and decide later that you want to rollback the volume's contents. You rollback the contents by restoring the snapshot. The volume can then be enabled later to support Hadoop workloads the same way that a newly created volume does.
You are running Hadoop workloads on the volume prior to the snapshot being created. You then create a snapshot of the volume and later restore from the snapshot. Hadoop continues to work on the volume once it is restored.
In this scenario, instead of restoring the full volume, only a subset of the files are restored that may have been lost or corrupted. This means that certain files that existed when the volume was originally snapped have subsequently been deleted. You want to restore just those files back from the Snapshot and add them to the current volume state. This means that the files will be copied from the snapshot into the volume. Once the copy has occurred, Hadoop workloads will run on the volume as normal.
21.7. Creating Quotas on Hadoop enabled Red Hat Storage Volume
Part V. Appendices
Chapter 22. Troubleshooting
statedump command to list the locks held on files. The statedump output also provides information on each lock with its range, basename, and PID of the application holding the lock, and so on. You can analyze the output to find the locks whose owner/application is no longer running or interested in that lock. After ensuring that no application is using the file, you can clear the lock using the following clear-locks command:
# gluster volume clear-locks VOLNAME path kind {blocked | granted | all}{inode range | entry basename | posix range}
statedump, see Section 14.6, “Performing Statedump on a Volume”
- Perform
statedumpon the volume to view the files that are locked using the following command:# gluster volume statedump VOLNAMEFor example, to displaystatedumpof test-volume:# gluster volume statedump test-volume Volume statedump successfulThestatedumpfiles are created on the brick servers in the/tmpdirectory or in the directory set using theserver.statedump-pathvolume option. The naming convention of the dump file isbrick-path.brick-pid.dump. - Clear the entry lock using the following command:
# gluster volume clear-locks VOLNAME path kind granted entry basenameThe following are the sample contents of thestatedumpfile indicating entry lock (entrylk). Ensure that those are stale locks and no resources own them.[xlator.features.locks.vol-locks.inode] path=/ mandatory=0 entrylk-count=1 lock-dump.domain.domain=vol-replicate-0 xlator.feature.locks.lock-dump.domain.entrylk.entrylk[0](ACTIVE)=type=ENTRYLK_WRLCK on basename=file1, pid = 714782904, owner=ffffff2a3c7f0000, transport=0x20e0670, , granted at Mon Feb 27 16:01:01 2012 conn.2.bound_xl./gfs/brick1.hashsize=14057 conn.2.bound_xl./gfs/brick1.name=/gfs/brick1/inode conn.2.bound_xl./gfs/brick1.lru_limit=16384 conn.2.bound_xl./gfs/brick1.active_size=2 conn.2.bound_xl./gfs/brick1.lru_size=0 conn.2.bound_xl./gfs/brick1.purge_size=0For example, to clear the entry lock onfile1of test-volume:# gluster volume clear-locks test-volume / kind granted entry file1 Volume clear-locks successful test-volume-locks: entry blocked locks=0 granted locks=1 - Clear the inode lock using the following command:
# gluster volume clear-locks VOLNAME path kind granted inode rangeThe following are the sample contents of thestatedumpfile indicating there is an inode lock (inodelk). Ensure that those are stale locks and no resources own them.[conn.2.bound_xl./gfs/brick1.active.1] gfid=538a3d4a-01b0-4d03-9dc9-843cd8704d07 nlookup=1 ref=2 ia_type=1 [xlator.features.locks.vol-locks.inode] path=/file1 mandatory=0 inodelk-count=1 lock-dump.domain.domain=vol-replicate-0 inodelk.inodelk[0](ACTIVE)=type=WRITE, whence=0, start=0, len=0, pid = 714787072, owner=00ffff2a3c7f0000, transport=0x20e0670, , granted at Mon Feb 27 16:01:01 2012For example, to clear the inode lock onfile1of test-volume:# gluster volume clear-locks test-volume /file1 kind granted inode 0,0-0 Volume clear-locks successful test-volume-locks: inode blocked locks=0 granted locks=1 - Clear the granted POSIX lock using the following command:
# gluster volume clear-locks VOLNAME path kind granted posix rangeThe following are the sample contents of thestatedumpfile indicating there is a granted POSIX lock. Ensure that those are stale locks and no resources own them.xlator.features.locks.vol1-locks.inode] path=/file1 mandatory=0 posixlk-count=15 posixlk.posixlk[0](ACTIVE)=type=WRITE, whence=0, start=8, len=1, pid = 23848, owner=d824f04c60c3c73c, transport=0x120b370, , blocked at Mon Feb 27 16:01:01 2012 , granted at Mon Feb 27 16:01:01 2012 posixlk.posixlk[1](ACTIVE)=type=WRITE, whence=0, start=7, len=1, pid = 1, owner=30404152462d436c-69656e7431, transport=0x11eb4f0, , granted at Mon Feb 27 16:01:01 2012 posixlk.posixlk[2](BLOCKED)=type=WRITE, whence=0, start=8, len=1, pid = 1, owner=30404152462d436c-69656e7431, transport=0x11eb4f0, , blocked at Mon Feb 27 16:01:01 2012 posixlk.posixlk[3](ACTIVE)=type=WRITE, whence=0, start=6, len=1, pid = 12776, owner=a36bb0aea0258969, transport=0x120a4e0, , granted at Mon Feb 27 16:01:01 2012 ...For example, to clear the granted POSIX lock onfile1of test-volume:# gluster volume clear-locks test-volume /file1 kind granted posix 0,8-1 Volume clear-locks successful test-volume-locks: posix blocked locks=0 granted locks=1 test-volume-locks: posix blocked locks=0 granted locks=1 test-volume-locks: posix blocked locks=0 granted locks=1 - Clear the blocked POSIX lock using the following command:
# gluster volume clear-locks VOLNAME path kind blocked posix rangeThe following are the sample contents of thestatedumpfile indicating there is a blocked POSIX lock. Ensure that those are stale locks and no resources own them.[xlator.features.locks.vol1-locks.inode] path=/file1 mandatory=0 posixlk-count=30 posixlk.posixlk[0](ACTIVE)=type=WRITE, whence=0, start=0, len=1, pid = 23848, owner=d824f04c60c3c73c, transport=0x120b370, , blocked at Mon Feb 27 16:01:01 2012 , granted at Mon Feb 27 16:01:01 posixlk.posixlk[1](BLOCKED)=type=WRITE, whence=0, start=0, len=1, pid = 1, owner=30404146522d436c-69656e7432, transport=0x1206980, , blocked at Mon Feb 27 16:01:01 2012 posixlk.posixlk[2](BLOCKED)=type=WRITE, whence=0, start=0, len=1, pid = 1, owner=30404146522d436c-69656e7432, transport=0x1206980, , blocked at Mon Feb 27 16:01:01 2012 posixlk.posixlk[3](BLOCKED)=type=WRITE, whence=0, start=0, len=1, pid = 1, owner=30404146522d436c-69656e7432, transport=0x1206980, , blocked at Mon Feb 27 16:01:01 2012 posixlk.posixlk[4](BLOCKED)=type=WRITE, whence=0, start=0, len=1, pid = 1, owner=30404146522d436c-69656e7432, transport=0x1206980, , blocked at Mon Feb 27 16:01:01 2012 ...For example, to clear the blocked POSIX lock onfile1of test-volume:# gluster volume clear-locks test-volume /file1 kind blocked posix 0,0-1 Volume clear-locks successful test-volume-locks: posix blocked locks=28 granted locks=0 test-volume-locks: posix blocked locks=1 granted locks=0 No locks cleared. - Clear all POSIX locks using the following command:
# gluster volume clear-locks VOLNAME path kind all posix rangeThe following are the sample contents of thestatedumpfile indicating that there are POSIX locks. Ensure that those are stale locks and no resources own them.[xlator.features.locks.vol1-locks.inode] path=/file1 mandatory=0 posixlk-count=11 posixlk.posixlk[0](ACTIVE)=type=WRITE, whence=0, start=8, len=1, pid = 12776, owner=a36bb0aea0258969, transport=0x120a4e0, , blocked at Mon Feb 27 16:01:01 2012 , granted at Mon Feb 27 16:01:01 2012 posixlk.posixlk[1](ACTIVE)=type=WRITE, whence=0, start=0, len=1, pid = 12776, owner=a36bb0aea0258969, transport=0x120a4e0, , granted at Mon Feb 27 16:01:01 2012 posixlk.posixlk[2](ACTIVE)=type=WRITE, whence=0, start=7, len=1, pid = 23848, owner=d824f04c60c3c73c, transport=0x120b370, , granted at Mon Feb 27 16:01:01 2012 posixlk.posixlk[3](ACTIVE)=type=WRITE, whence=0, start=6, len=1, pid = 1, owner=30404152462d436c-69656e7431, transport=0x11eb4f0, , granted at Mon Feb 27 16:01:01 2012 posixlk.posixlk[4](BLOCKED)=type=WRITE, whence=0, start=8, len=1, pid = 23848, owner=d824f04c60c3c73c, transport=0x120b370, , blocked at Mon Feb 27 16:01:01 2012 ...For example, to clear all POSIX locks onfile1of test-volume:# gluster volume clear-locks test-volume /file1 kind all posix 0,0-1 Volume clear-locks successful test-volume-locks: posix blocked locks=1 granted locks=0 No locks cleared. test-volume-locks: posix blocked locks=4 granted locks=1
statedump on test-volume again to verify that all the above locks are cleared.
Chapter 23. Nagios Configuration Files
- In
/etc/nagios/gluster/directory, a new directoryCluster-Nameis created with the name provided asCluster-Namewhile executingconfigure-gluster-nagioscommand for auto-discovery. All configurations created by auto-discovery for the cluster are added in this folder. - In
/etc/nagios/gluster/Cluster-Namedirectory, a configuration file,Cluster-Name.cfgis generated. This file has the host and hostgroup configurations for the cluster. This also contains service configuration for all the cluster/volume level services.The following Nagios object definitions are generated inCluster-Name.cfgfile:- A hostgroup configuration with
hostgroup_nameas cluster name. - A host configuration with
host_nameas cluster name. - The following service configurations are generated for cluster monitoring:
- A Cluster - Quorum service to monitor the cluster quorum.
- A Cluster Utilization service to monitor overall utilization of volumes in the cluster. This is created only if there is any volume present in the cluster.
- A Cluster Auto Config service to periodically synchronize the configurations in Nagios with Red Hat Storage trusted storage pool.
- The following service configurations are generated for each volume in the trusted storage pool:
- A Volume Status- Volume-Name service to monitor the status of the volume.
- A Volume Utilization - Volume-Name service to monitor the utilization statistics of the volume.
- A Volume Quota - Volume-Name service to monitor the Quota status of the volume, if Quota is enabled for the volume.
- A Volume Self-Heal - Volume-Name service to monitor the Self-Heal status of the volume, if the volume is of type replicate or distributed-replicate.
- A Volume Geo-Replication - Volume-Name service to monitor the Geo Replication status of the volume, if Geo-replication is configured for the volume.
- In
/etc/nagios/gluster/Cluster-Namedirectory, a configuration file with nameHost-Name.cfgis generated for each node in the cluster. This file has the host configuration for the node and service configuration for bricks from the particular node. The following Nagios object definitions are generated inHost-name.cfg.- A host configuration which has Cluster-Name in the
hostgroupsfield. - The following services are created for each brick in the node:
- A Brick Utilization - brick-path service to monitor the utilization of the brick.
- A Brick - brick-path service to monitor the brick status.
| File Name | Description |
|---|---|
/etc/nagios/nagios.cfg
|
Main Nagios configuration file.
|
/etc/nagios/cgi.cfg
|
CGI configuration file.
|
/etc/httpd/conf.d/nagios.conf
|
Nagios configuration for httpd.
|
/etc/nagios/passwd
|
Password file for Nagios users.
|
/etc/nagios/nrpe.cfg
|
NRPE configuration file.
|
/etc/nagios/gluster/gluster-contacts.cfg
|
Email notification configuration file.
|
/etc/nagios/gluster/gluster-host-services.cfg
|
Services configuration file that's applied to every Red Hat Storage node.
|
/etc/nagios/gluster/gluster-host-groups.cfg
|
Host group templates for a Red Hat Storage trusted storage pool.
|
/etc/nagios/gluster/gluster-commands.cfg
|
Command definitions file for Red Hat Storage Monitoring related commands.
|
/etc/nagios/gluster/gluster-templates.cfg
|
Template definitions for Red Hat Storage hosts and services.
|
/etc/nagios/gluster/snmpmanagers.conf
|
SNMP notification configuration file with the IP address and community name of SNMP managers where traps need to be sent.
|
Appendix A. Revision History
| Revision History | |||
|---|---|---|---|
| Revision 3-129 | Fri Oct 9 2015 | ||
| |||
| Revision 3-127 | Wed May 13 2015 | ||
| |||
| Revision 3-126 | Wed Apr 29 2015 | ||
| |||
| Revision 3-123 | Mon Apr 27 2015 | ||
| |||
| Revision 3-116 | Wed Apr 15 2015 | ||
| |||
| Revision 3-114 | Thu Apr 9 2015 | ||
| |||
| Revision 3-107 | Thu Apr 2 2015 | ||
| |||
| Revision 3-106 | Mon Mar 30 2015 | ||
| |||
| Revision 3-104 | Wed Mar 25 2015 | ||
| |||
| Revision 3-103 | Mon Mar 23 2015 | ||
| |||
| Revision 3-100 | Fri Mar 20 2015 | ||
| |||
| Revision 3-93 | Wed Mar 18 2015 | ||
| |||
| Revision 3-92 | Wed Mar 18 2015 | ||
| |||
| Revision 3-88 | Thu Mar 12 2015 | ||
| |||
| Revision 3-85 | Thu Mar 12 2015 | ||
| |||
| Revision 3-85 | Thu Mar 12 2015 | ||
| |||
| Revision 3-80 | Mon Mar 09 2015 | ||
| |||
| Revision 3-77 | Mon Mar 09 2015 | ||
| |||
| Revision 3-76 | Wed Feb 18 2015 | ||
| |||
| Revision 3-74 | Tue Feb 17 2015 | ||
| |||
| Revision 3-73 | Tue Feb 10 2015 | ||
| |||
| Revision 3-72 | Tue Jan 13 2015 | ||
| |||
| Revision 3-69 | Wed Dec 24 2014 | ||
| |||
| Revision 3-62 | Thu Nov 27 2014 | ||
| |||
| Revision 3-60 | Mon Nov 24 2014 | ||
| |||
| Revision 3-59 | Fri Nov 21 2014 | ||
| |||
| Revision 3-57 | Wed Nov 12 2014 | ||
| |||
| Revision 3-56 | Thu Nov 06 2014 | ||
| |||
| Revision 3-55 | Thu Sep 25 2014 | ||
| |||
| Revision 3-51 | Mon Sep 22 2014 | ||
| |||