Deployment Guide
Deploying a Red Hat Hyperconverged Infrastructure for Cloud Solution
Abstract
Chapter 1. Introducing the Red Hat Hyperconverged Infrastructure for Cloud solution
The Red Hat Hyperconverged Infrastructure (RHHI) for Cloud solution is part of the broader software-defined RHHI solutions. The RHHI Cloud solution unifies Red Hat OpenStack Platform (RHOSP) 13 and Red Hat Ceph Storage (RHCS) 3 technologies into a single product to accomplish three goals:
- Simplify the deployment of RHOSP and RHCS.
- Provide a more predictable performance experience.
- Achieve a lower cost of entry for RHOSP and RHCS by colocating their respective services on the same node.
The RHHI Cloud colocating scenarios are:
- The RHOSP Controller and the RHCS Monitor services on the same node.
- The RHOSP Nova Compute and the RHCS Object Storage Daemon (OSD) services on the same node.
Choosing a Deployment Workflow
You can choose to deploy the Red Hat Hyperconverged Infrastructure for Cloud by using either, the Red Hat OpenStack Platform Director web interface, or the command-line interface. This is the basic deployment workflow:

Additional Resources
- See the Deploying Red Hat Hyperconverged Infrastructure for Cloud using the Red Hat OpenStack Director section for more details.
- See the Deploying Red Hat Hyperconverged Infrastructure for Cloud using the command-line interface section for more details.
Chapter 2. Verifying the Red Hat Hyperconverged Infrastructure for Cloud requirements
As a technician, you need to verify three core requirements before deploying the Red Hat Hyperconverged Infrastructure for Cloud solution.
2.1. Prerequisites
2.2. The Red Hat Hyperconverged Infrastructure for Cloud hardware requirements
Implementors of hyper-converged infrastructures will reflect a wide variety of hardware configurations. Red Hat recommends the following minimums when considering hardware:
- CPU
- For Controller/Monitor nodes, use dual-socket, 8-core CPUs. For Compute/OSD nodes, use dual-socket, 14-core CPUs for nodes with NVMe storage media, or dual-socket, 10-core CPUs for nodes with SAS/SATA SSDs.
- RAM
- Configure twice the RAM needed by the resident Nova virtual machine workloads.
- OSD Disks
- Use 7,200 RPM enterprise HDDs for general-purpose workloads or NVMe SSDs for IOPS-intensive workloads.
- Journal Disks
- Use SAS/SATA SSDs for general-purpose workloads or NVMe SSDs for IOPS-intensive workloads.
- Network
- Use two 10GbE NICs for Red Hat Ceph Storage (RHCS) nodes. Additionally, use dedicated NICs to meet the Nova virtual machine workload requirements. See the network requirements for more details.
| Qty. | Role | Physical / Virtual |
|---|---|---|
| 1 | Red Hat OpenStack Platform director (RHOSP-d) | Either* |
| 3 | RHOSP Controller & RHCS Monitor | Physical |
| 3 | RHOSP Compute & RHCS OSD | Physical |
The RHOSP-d node can be virtualized for small deployments, that is less than 20TB in total capacity. If the solution deployment is larger than 20TB in capacity, then Red Hat recommends the RHOSP-d node be a physical node. Additional hyper-converged compute/storage nodes can be initially deployed or added at a later time.
Red Hat recommends using standalone compute and storage nodes for deployments spanning more than one datacenter rack, which is 30 nodes.
2.3. The Red Hat Hyperconverged Infrastructure for Cloud network requirements
Red Hat recommends using a minimum of five networks to serve various traffic roles:
- Red Hat Ceph Storage
- Ceph Monitor nodes use the public network. Ceph OSDs use the public network, if no private storage cluster network exists. Optionally, OSDs may use a private storage cluster network to handle traffic associated with replication, heartbeating and backfilling, leaving the public network exclusively for I/O. Red Hat recommends using a cluster network for larger deployments. The compute role needs access to this network.
- External
- Red Hat OpenStack Platform director (RHOSP-d) uses the External network to download software updates for the overcloud, and the overcloud operator uses it to access RHOSP-d to manage the overcloud. When tenant services establish connections via reserved floating IP addresses, the Controllers use the External network to route their traffic to the Internet. Overcloud users use the external network to access the overcloud.
- OpenStack Internal API
- OpenStack provides both public facing and private API endpoints. This is an isolated network for the private endpoints.
- OpenStack Tenant Network
- OpenStack tenants create private networks implemented by VLAN or VXLAN on this network.
- Red Hat OpenStack Platform Director Provisioning
- Red Hat OpenStack Platform director serves DHCP and PXE services from this network to install the operating system and other software on the overcloud nodes from bare metal. Red Hat OpenStack Platform director uses this network to manage the overcloud nodes, and the cloud operator uses it to access the overcloud nodes directly by ssh if necessary. The overcloud nodes must be configured to PXE boot from this network provisioning.
Figure 2.1. Network Separation Diagram
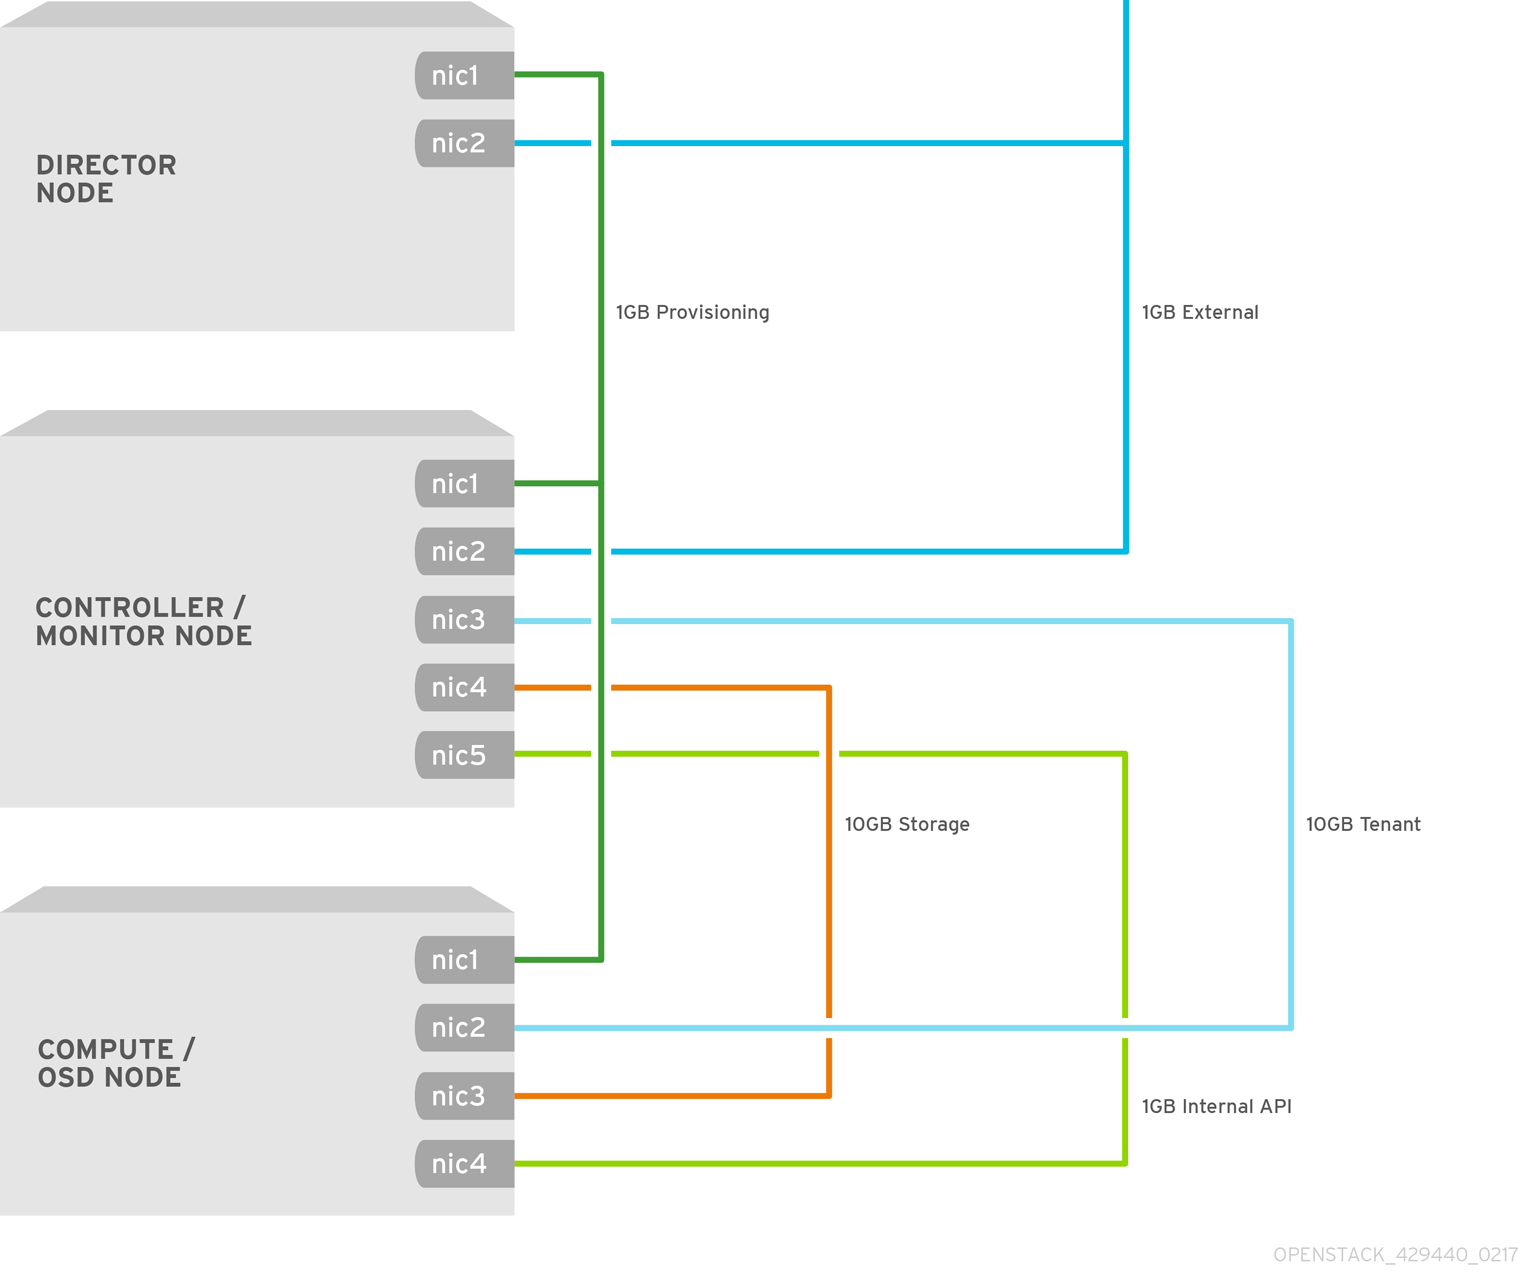
The NICs can be a logical bond of two physical NICs. It is not required to trunk each network to the same interface.
2.4. Verifying the Red Hat Hyperconverged Infrastructure for Cloud software requirements
Verify that the nodes have access to the necessary software repositories. The Red Hat Hyperconverged Infrastructure (RHHI) for Cloud solution requires specific software packages to be installed to function properly.
Prerequisites
- Have a valid Red Hat Hyperconverged Infrastructure for Cloud subscription.
- Root-level access to the nodes.
Procedure
On any node, verify the available subscriptions:
subscription-manager list --available --all --matches="*OpenStack*"
# subscription-manager list --available --all --matches="*OpenStack*"Copy to Clipboard Copied! Toggle word wrap Toggle overflow
Additional Resources
- See the Red Hat Hyperconverged Infrastructure for Cloud required repositories section for the required software repositories.
2.5. Additional Resources
- For more information, see the Red Hat Ceph Storage Hardware Guide.
Chapter 3. Deploying the Undercloud
As a technician, you can deploy an undercloud, which provides users with the ability to deploy and manage overclouds with the Red Hat OpenStack Platform Director interface.
3.1. Prerequisites
- Have a valid Red Hat Hyperconverged Infrastructure for Cloud subscription.
- Have access to Red Hat’s software repositories through Red Hat’s Content Delivery Network (CDN).
3.2. Understanding Ironic’s disk cleaning between deployments
Enabling Ironic’s disk cleaning feature will permanently delete all data from all the disks on a node before that node becomes available again for deployment.
There are two facts that you should consider before enabling Ironic’s disk cleaning feature:
- When director deploys Ceph it uses the ceph-disk command to prepare each OSD. Before ceph-disk prepares an OSD, it checks if the disk which will host the new OSD has data from an older OSD and if it does, then it will fail the disk preparation in order to not overwrite that data. It does this as a safety feature so that data is not lost.
- If a deployment attempt with director fails and is then repeated after the overcloud is deleted, then by default the data from the previous deployment will still be on the server disks. This data may cause the repeated deployment to fail because of how the ceph-disk command behaves.
If an overcloud node is accidentally deleted and disk cleaning is enabled, then the data will be removed and can only be put back into the environment by rebuilding the node with Red Hat OpenStack Platform Director.
3.3. Installing the undercloud
Several steps must be completed to install the undercloud. This procedure is installing the Red Hat OpenStack Platform director (RHOSP-d) as the undercloud. Here is a summary of the installation steps:
- Create an installation user.
- Create directories for templates and images.
- Verify/Set the RHOSP-d node name.
- Register the RHOSP-d node.
- Install the RHOSP-d software.
- Configure the RHOSP-d software.
- Obtain and import disk images for the overcloud.
- Set a DNS server on the undercloud’s subnet.
Prerequisites
- Have access to Red Hat’s software repositories through Red Hat’s Content Delivery Network (CDN).
-
Having
rootaccess to the Red Hat OpenStack Platform director (RHOSP-d) node.
Procedure
The RHOSP-d installation requires a non-root user with
sudoprivileges to do the installation.Create a user named
stack:useradd stack
[root@director ~]# useradd stackCopy to Clipboard Copied! Toggle word wrap Toggle overflow Set a password for
stack. When prompted, enter the new password:passwd stack
[root@director ~]# passwd stackCopy to Clipboard Copied! Toggle word wrap Toggle overflow Configure
sudoaccess for thestackuser:echo "stack ALL=(root) NOPASSWD:ALL" | tee -a /etc/sudoers.d/stack chmod 0440 /etc/sudoers.d/stack
[root@director ~]# echo "stack ALL=(root) NOPASSWD:ALL" | tee -a /etc/sudoers.d/stack
[root@director ~]# chmod 0440 /etc/sudoers.d/stack
Copy to Clipboard Copied! Toggle word wrap Toggle overflow Switch to the
stackuser:su - stack
[root@director ~]# su - stackCopy to Clipboard Copied! Toggle word wrap Toggle overflow The RHOSP-d installation will be done as the
stackuser.
Create two new directories in the
stackuser’s home directory, one namedtemplatesand the other namedimages:mkdir ~/images mkdir ~/templates
[stack@director ~]$ mkdir ~/images
[stack@director ~]$ mkdir ~/templates
Copy to Clipboard Copied! Toggle word wrap Toggle overflow These directories will organize the system image files and Heat template files used to create the overcloud environment later.
The installing and configuring process requires a fully qualified domain name (FQDN), along with an entry in the
/etc/hostsfile.Verify the RHOSP-d node’s host name:
hostname -f
[stack@director ~]$ hostname -fCopy to Clipboard Copied! Toggle word wrap Toggle overflow If needed, set the host name:
sudo hostnamectl set-hostname FQDN_HOST_NAME
sudo hostnamectl set-hostname --transient FQDN_HOST_NAME
sudo hostnamectl set-hostname FQDN_HOST_NAME
sudo hostnamectl set-hostname --transient FQDN_HOST_NAME
Copy to Clipboard Copied! Toggle word wrap Toggle overflow - Replace…
FQDN_HOST_NAME with the fully qualified domain name (FQDN) of the RHOSP-d node.
Example
sudo hostnamectl set-hostname director.example.com
sudo hostnamectl set-hostname --transient director.example.com
[stack@director ~]$ sudo hostnamectl set-hostname director.example.com
[stack@director ~]$ sudo hostnamectl set-hostname --transient director.example.com
Copy to Clipboard Copied! Toggle word wrap Toggle overflow
Add an entry for the RHOSP-d node name to the
/etc/hostsfile. Add the following line to the/etc/hostsfile:sudo echo "127.0.0.1 FQDN_HOST_NAME SHORT_HOST_NAME localhost localhost.localdomain localhost4 localhost4.localdomain4" >> /etc/hosts
sudo echo "127.0.0.1 FQDN_HOST_NAME SHORT_HOST_NAME localhost localhost.localdomain localhost4 localhost4.localdomain4" >> /etc/hostsCopy to Clipboard Copied! Toggle word wrap Toggle overflow - Replace…
- FQDN_HOST_NAME with the full qualified domain name of the RHOSP-d node.
SHORT_HOST_NAME with the short domain name of the RHOSP-d node.
Example
sudo echo "127.0.0.1 director.example.com director localhost localhost.localdomain localhost4 localhost4.localdomain4" >> /etc/hosts
[stack@director ~]$ sudo echo "127.0.0.1 director.example.com director localhost localhost.localdomain localhost4 localhost4.localdomain4" >> /etc/hostsCopy to Clipboard Copied! Toggle word wrap Toggle overflow
Register the RHOSP-d node on the Red Hat Content Delivery Network (CDN), and enable the required Red Hat software repositories using the Red Hat Subscription Manager.
Register the RHOSP-d node:
sudo subscription-manager register
[stack@director ~]$ sudo subscription-manager registerCopy to Clipboard Copied! Toggle word wrap Toggle overflow When prompted, enter an authorized Customer Portal user name and password.
Lookup the valid
Pool IDfor the RHOSP entitlement:sudo subscription-manager list --available --all --matches="*Hyperconverged*"
[stack@director ~]$ sudo subscription-manager list --available --all --matches="*Hyperconverged*"Copy to Clipboard Copied! Toggle word wrap Toggle overflow Example Output
Copy to Clipboard Copied! Toggle word wrap Toggle overflow Using the
Pool IDfrom the previous step, attach the RHOSP entitlement:sudo subscription-manager attach --pool=POOL_ID
[stack@director ~]$ sudo subscription-manager attach --pool=POOL_IDCopy to Clipboard Copied! Toggle word wrap Toggle overflow - Replace…
POOL_ID with the valid pool id from the previous step.
Example
sudo subscription-manager attach --pool=a1b2c3d4e5f6g7h8i9
[stack@director ~]$ sudo subscription-manager attach --pool=a1b2c3d4e5f6g7h8i9Copy to Clipboard Copied! Toggle word wrap Toggle overflow
Disable the default software repositories, and enable the required software repositories:
sudo subscription-manager repos --disable=*
sudo subscription-manager repos --enable=rhel-7-server-rpms --enable=rhel-7-server-extras-rpms --enable=rhel-7-server-rh-common-rpms --enable=rhel-ha-for-rhel-7-server-rpms --enable=rhel-7-server-openstack-13-rpms
[stack@director ~]$ sudo subscription-manager repos --disable=*
[stack@director ~]$ sudo subscription-manager repos --enable=rhel-7-server-rpms --enable=rhel-7-server-extras-rpms --enable=rhel-7-server-rh-common-rpms --enable=rhel-ha-for-rhel-7-server-rpms --enable=rhel-7-server-openstack-13-rpms
Copy to Clipboard Copied! Toggle word wrap Toggle overflow If needed, update the base system software to the latest package versions, and reboot the RHOSP-d node:
sudo yum update
sudo reboot
[stack@director ~]$ sudo yum update
[stack@director ~]$ sudo reboot
Copy to Clipboard Copied! Toggle word wrap Toggle overflow Wait for the node to be completely up and running before continuing to the next step.
Install all the RHOSP-d software packages:
sudo yum install python-tripleoclient ceph-ansible
[stack@director ~]$ sudo yum install python-tripleoclient ceph-ansibleCopy to Clipboard Copied! Toggle word wrap Toggle overflow Configure the RHOSP-d software.
Red Hat provides a basic undercloud configuration template to use. Copy the
undercloud.conf.samplefile to thestackuser’s home directory, namedundercloud.conf:cp /usr/share/instack-undercloud/undercloud.conf.sample ~/undercloud.conf
[stack@director ~]$ cp /usr/share/instack-undercloud/undercloud.conf.sample ~/undercloud.confCopy to Clipboard Copied! Toggle word wrap Toggle overflow The undercloud configuration template contains two sections:
[DEFAULT]and[auth]. Open theundercloud.conffile for editing. Edit theundercloud_hostnamewith the RHOSP-d node name. Uncomment the following parameters under the[DEFAULT]section in theundercloud.conffile by deleting the#before the parameter. Edit the parameter values with the appropriate values as required for this solution’s network configuration:Expand Parameter
Network
Edit Value?
Example Value
local_ipProvisioning
Yes
192.0.2.1/24network_gatewayProvisioning
Yes
192.0.2.1undercloud_public_vipProvisioning
Yes
192.0.2.2undercloud_admin_vipProvisioning
Yes
192.0.2.3local_interfaceProvisioning
Yes
eth1network_cidrProvisioning
Yes
192.0.2.0/24masquerade_networkProvisioning
Yes
192.0.2.0/24dhcp_startProvisioning
Yes
192.0.2.5dhcp_endProvisioning
Yes
192.0.2.24inspection_interfaceProvisioning
No
br-ctlplaneinspection_iprangeProvisioning
Yes
192.0.2.100,192.0.2.120inspection_extrasN/A
Yes
trueinspection_runbenchN/A
Yes
falseinspection_enable_uefiN/A
Yes
trueSave the changes after editing the
undercloud.conffile. See the Undercloud configuration parameters for detailed descriptions of these configuration parameters.NoteConsider enabling Ironic’s disk cleaning feature, if overcloud nodes are going to be repurposed again. See the Understanding Ironic disk cleaning between deployments section for more details.
Run the RHOSP-d configuration script:
openstack undercloud install
[stack@director ~]$ openstack undercloud installCopy to Clipboard Copied! Toggle word wrap Toggle overflow NoteThis script will take several minutes to complete. This script will install additional software packages and generates two files:
undercloud-passwords.conf- A list of all passwords for the director’s services.
stackrc- A set of initialization variables to help you access the director’s command line tools.
Verify that the configuration script started and enabled all of the RHOSP services:
sudo systemctl list-units openstack-*
[stack@director ~]$ sudo systemctl list-units openstack-*Copy to Clipboard Copied! Toggle word wrap Toggle overflow The configuration script gives the
stackuser access to all the container management commands. Refresh thestackuser’s permissions:exec su -l stack
[stack@director ~]$ exec su -l stackCopy to Clipboard Copied! Toggle word wrap Toggle overflow Initialize the
stackuser’s environment to use the RHOSP-d command-line tools:source ~/stackrc
[stack@director ~]$ source ~/stackrcCopy to Clipboard Copied! Toggle word wrap Toggle overflow The command-line prompt will change, which indicates that OpenStack commands will authenticate and execute against the undercloud:
Example
(undercloud) [stack@director ~]$Copy to Clipboard Copied! Toggle word wrap Toggle overflow
The RHOSP-d requires several disk images for provisioning the overcloud nodes.
Obtain these disk images by installing
rhosp-director-imagesandrhosp-director-images-ipasoftware packages:sudo yum install rhosp-director-images rhosp-director-images-ipa
(undercloud) [stack@director ~]$ sudo yum install rhosp-director-images rhosp-director-images-ipaCopy to Clipboard Copied! Toggle word wrap Toggle overflow Extract the archive files to the
imagesdirectory in thestackuser’s home directory:cd ~/images for x in /usr/share/rhosp-director-images/overcloud-full-latest-13.0.tar /usr/share/rhosp-director-images/ironic-python-agent-latest-13.0.tar ; do tar -xvf $x ; done
(undercloud) [stack@director ~]$ cd ~/images
(undercloud) [stack@director ~]$ for x in /usr/share/rhosp-director-images/overcloud-full-latest-13.0.tar /usr/share/rhosp-director-images/ironic-python-agent-latest-13.0.tar ; do tar -xvf $x ; done
Copy to Clipboard Copied! Toggle word wrap Toggle overflow Import the disk images into the RHOSP-d:
openstack overcloud image upload --image-path /home/stack/images/
(undercloud) [stack@director ~]$ openstack overcloud image upload --image-path /home/stack/images/Copy to Clipboard Copied! Toggle word wrap Toggle overflow To view a list of imported disk images, execute the following command:
openstack image list
(undercloud) [stack@director ~]$ openstack image listCopy to Clipboard Copied! Toggle word wrap Toggle overflow Expand Image Name
Image Type
Image Description
bm-deploy-kernelDeployment
Kernel file used for provisioning and deploying systems.
bm-deploy-ramdiskDeployment
RAMdisk file used for provisioning and deploying systems.
overcloud-full-vmlinuzOvercloud
Kernel file used for the base system, which is written to the node’s disk.
overcloud-full-initrdOvercloud
RAMdisk file used for the base system, which is written to the node’s disk.
overcloud-fullOvercloud
The rest of the software needed for the base system, which is written to the node’s disk.
NoteThe
openstack image listcommand will not display the introspection PXE disk images. The introspection PXE disk images are copied to the/httpboot/directory.ls -l /httpboot total 341460 -rwxr-xr-x. 1 root root 5153184 Mar 31 06:58 agent.kernel -rw-r--r--. 1 root root 344491465 Mar 31 06:59 agent.ramdisk -rw-r--r--. 1 ironic-inspector ironic-inspector 337 Mar 31 06:23 inspector.ipxe
(undercloud) [stack@director images]$ ls -l /httpboot
total 341460
-rwxr-xr-x. 1 root              root                5153184 Mar 31 06:58 agent.kernel
-rw-r--r--. 1 root              root              344491465 Mar 31 06:59 agent.ramdisk
-rw-r--r--. 1 ironic-inspector  ironic-inspector        337 Mar 31 06:23 inspector.ipxe
Copy to Clipboard Copied! Toggle word wrap Toggle overflow
Set the DNS server so that it resolves the overcloud node host names.
List the subnets:
openstack subnet list
(undercloud) [stack@director ~]$ openstack subnet listCopy to Clipboard Copied! Toggle word wrap Toggle overflow Define the name server using the undercloud’s
neutronsubnet:openstack subnet set --dns-nameserver DNS_NAMESERVER_IP SUBNET_NAME_or_ID
openstack subnet set --dns-nameserver DNS_NAMESERVER_IP SUBNET_NAME_or_IDCopy to Clipboard Copied! Toggle word wrap Toggle overflow - Replace…
- DNS_NAMESERVER_IP with the IP address of the DNS server.
SUBNET_NAME_or_ID with the
neutronsubnet name or id.Example
openstack subnet set --dns-nameserver 192.0.2.4 local-subnet
(undercloud) [stack@director ~]$ openstack subnet set --dns-nameserver 192.0.2.4 local-subnetCopy to Clipboard Copied! Toggle word wrap Toggle overflow NoteReuse the
--dns-nameserver DNS_NAMESERVER_IPoption for each name server.
Verify the DNS server by viewing the subnet details:
openstack subnet show SUBNET_NAME_or_ID
(undercloud) [stack@director ~]$ openstack subnet show SUBNET_NAME_or_IDCopy to Clipboard Copied! Toggle word wrap Toggle overflow - Replace…
SUBNET_NAME_or_ID with the
neutronsubnet name or id.Example
Copy to Clipboard Copied! Toggle word wrap Toggle overflow
Additional Resources
-
For more information on all the undercloud configuration parameters located in the
undercloud.conffile, see the Configuring the Director section in the RHOSP Director Installation and Usage Guide.
3.4. Configuring the undercloud to clean the disks before deploying the overcloud
Updating the undercloud configuration file to clean disks before deploying the overcloud.
Enabling this feature will destroy all data on all disks before they are provisioned in the overcloud deployment.
Prerequisites
Procedure
There are two options, an automatic or manual way to cleaning the disks before deploying the overcloud:
First option is automatically cleaning the disks by editing the
undercloud.conffile, and add the following line:clean_nodes = True
clean_nodes = TrueCopy to Clipboard Copied! Toggle word wrap Toggle overflow NoteThe bare metal provisioning service runs a
wipefs --force --allcommand to accomplish the cleaning.
WarningEnabling this feature will destroy all data on all disks before they are provisioned in the overcloud deployment. Also, this will do an additional power cycle after the first introspection and before each deployment.
The second option is to keep automatic cleaning off and run the following commands for each Ceph node:
openstack baremetal node manage NODE
openstack baremetal node clean NODE --clean-steps '[{"interface": "deploy", "step": "erase_devices_metadata"}]'
openstack baremetal node provide NODE
[stack@director ~]$ openstack baremetal node manage NODE [stack@director ~]$ openstack baremetal node clean NODE --clean-steps '[{"interface": "deploy", "step": "erase_devices_metadata"}]' [stack@director ~]$ openstack baremetal node provide NODECopy to Clipboard Copied! Toggle word wrap Toggle overflow - Replace…
- NODE with the Ceph host name.
Chapter 4. Deploying Red Hat Hyperconverged Infrastructure for Cloud using the Red Hat OpenStack Platform Director
As a technician, you can deploy and manage the Red Hat Hyperconverged Infrastructure for Cloud solution using the Red Hat OpenStack Platform Director interface. Also, you should have a basic understanding of resource isolation, so there is not resource contention between Red Hat OpenStack Platform and Red Hat Ceph Storage.
4.1. Prerequisites
- Verify that all the requirements are met.
- Installing the undercloud
4.2. Exporting an overcloud plan using the Red Hat OpenStack Platform Director
This procedure is for exporting a deployment plan using the OpenStack Platform Director. The default deployment plan contains a common, and exportable overcloud configuration.
Prerequisites
- Verify that all the requirements are met.
- Installation of the undercloud.
Procedure
Enter the IP address or host name of the undercloud into a web browser.
NoteIf not using SSL, then the undercloud URL will need to use port 3000. For example:
http://192.168.0.4:3000Login to the Red Hat OpenStack Platform Director user interface using the correct credentials.
NoteThe default user name is
admin. You can obtain the admin password by running the following command:sudo hiera admin_password
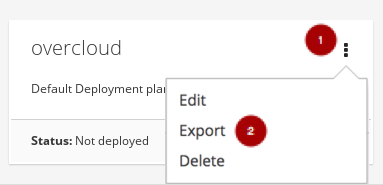
[stack@director ~]$ sudo hiera admin_passwordCopy to Clipboard Copied! Toggle word wrap Toggle overflow On the Plans tab, select the drop-down menu
 from the Overcloud plan, and select Export
  .
.
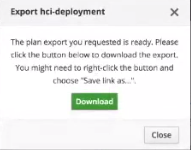
Click on the Download button.
This will download a compressed tarball file to the local hard drive, which includes all the plan files.
ImportantIf you need to add or modify the files contained within the tarball file, then before importing the tarball file you must recreate the tarball file, as follows:
Example
tar -czf my-deployment-plan.tar.gz -C my-deployment-plan-local-files/ .
tar -czf my-deployment-plan.tar.gz -C my-deployment-plan-local-files/ .Copy to Clipboard Copied! Toggle word wrap Toggle overflow NoteCurrently, the OpenStack Platform Director interface does not support advance configuration of the plan, such as a custom network configuration. Advance configuration must be done manually by editing the files directly.
4.3. Importing an overcloud plan using the Red Hat OpenStack Platform Director
This procedure is for importing a deployment plan using the OpenStack Platform Director that has previously been exported.
Prerequisites
- Verify that all the requirements are met.
- Installation of the undercloud.
Procedure
Enter the IP address or host name of the undercloud into a web browser.
NoteIf not using SSL, then the undercloud URL will need to use port 3000. For example:
http://192.168.0.4:3000Login to the Red Hat OpenStack Platform Director user interface using the correct credentials.
NoteThe default user name is
admin. You can obtain the admin password by running the following command:sudo hiera admin_password
[stack@director ~]$ sudo hiera admin_passwordCopy to Clipboard Copied! Toggle word wrap Toggle overflow On the Plans tab, select the Import Plan button.

Enter Plan Name
and click on the Choose File button
. Browse to the location of the tarball file, and select it for import. Once the file is selected, click on the Upload Files and Create Plan button
 .
.

4.4. Deploying the overcloud using the Red Hat OpenStack Platform Director
This procedure deploys the overcloud using the Red Hat OpenStack Platform Director.
Prerequisites
- Verify that all the requirements are met.
- Installation of the undercloud.
Procedure
Enter the IP address or host name of the undercloud into a web browser.
NoteIf not using SSL, then the undercloud URL will need to include port 3000. For example:
http://192.168.0.4:3000Login to the Red Hat OpenStack Platform Director user interface using the correct credentials.
NoteThe default user name is
admin. You can obtain the admin password by running the following command:sudo hiera admin_password
[stack@director ~]$ sudo hiera admin_passwordCopy to Clipboard Copied! Toggle word wrap Toggle overflow Select the default overcloud plan
or select the Import Plan
.
For more information on importing a plan, see Section 4.3, “Importing an overcloud plan using the Red Hat OpenStack Platform Director”
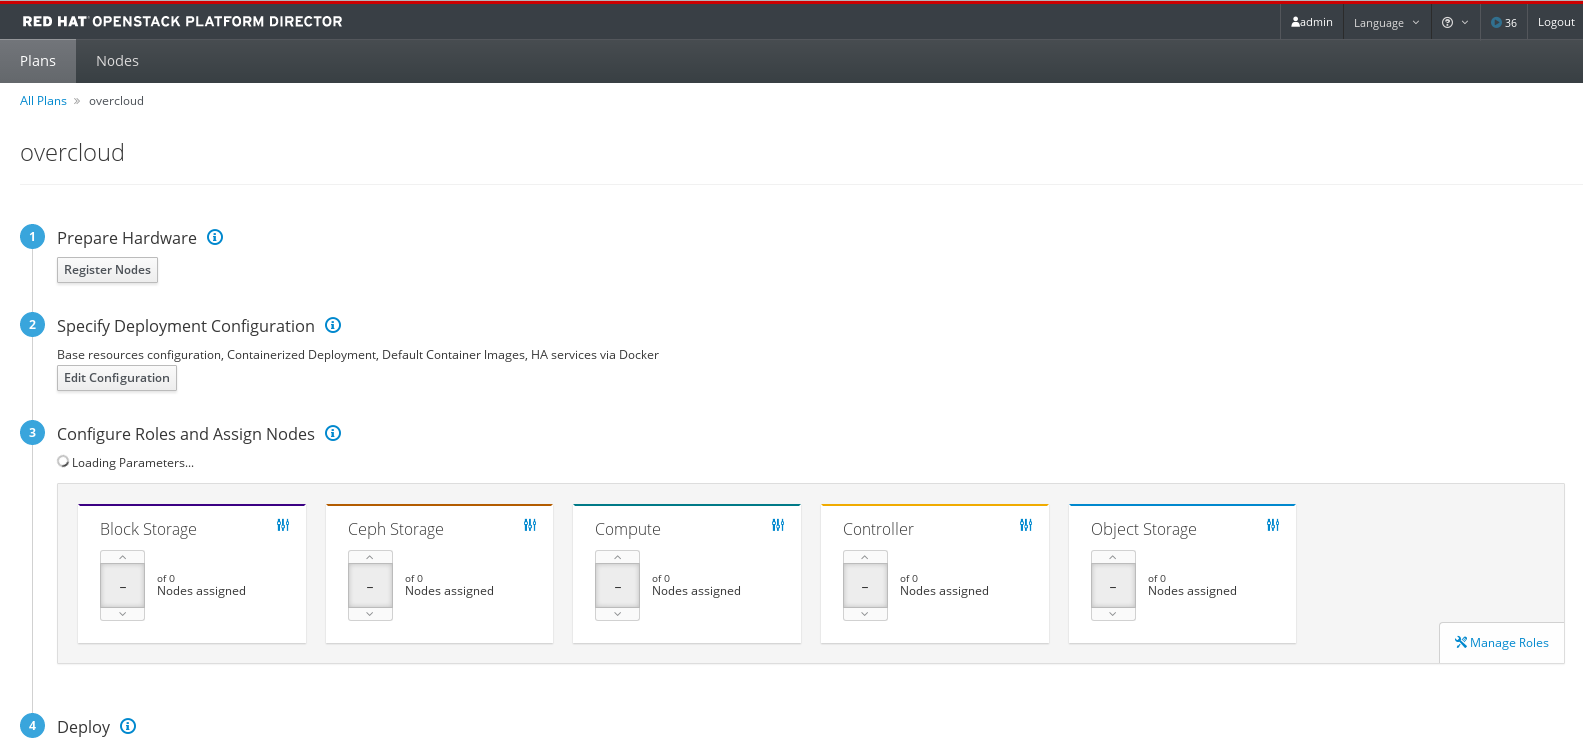
From the plan configuration page, prepare the hardware by adding registered nodes.
Figure 4.1. Example Plan Configuration Page
Click on the Register Nodes button
to registered the nodes.
Click on the Add New Node button
.
Alternatively, you can prepare the nodes by customizing the
instackenv.jsonhost definition file and uploading it. To create a custominstackenv.jsonhost definition file, see Section 5.2.2, “Registering and introspecting the hardware” and Section 5.2.3, “Setting the root device” to prepare the nodes.- Fill out all the required fields, denoted by a small red asterisks, on the register node page.
After all the required field are filled out, click on the Register Node button
.

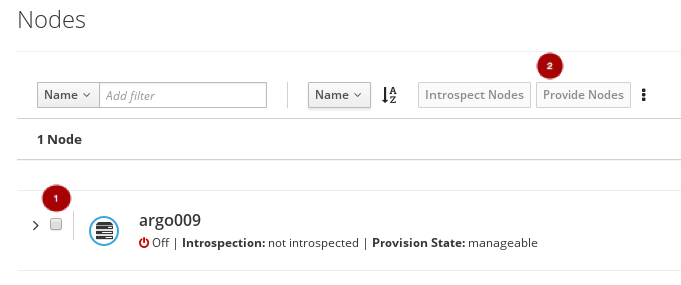
Once the node is registered, select the node
, and click on the Introspect Nodes
button.
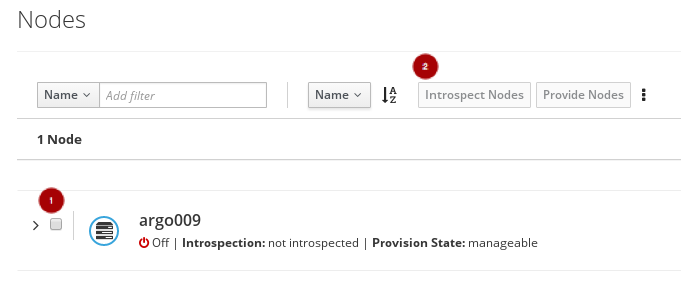
Once the introspection is done, select the node
, and click on the Provide Nodes
button.
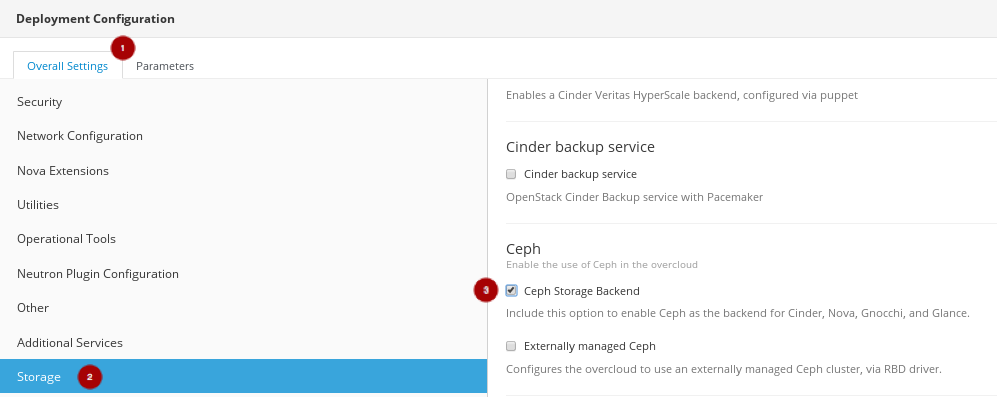
From the plan configuration page, edit the deployment configuration.
Click on the Edit Configuration button
.
On the Overall Settings tab
, click on the General Deployment Options section
, and enable the HA services via Docker, Containerized Deployment, and Default Container Images.
On the Overall Settings tab
, click on the Storage section
, and enable the Ceph Storage Backend
.
Click on the Save Changes button.
Click on the Parameters tab
, then click on the Ceph Storage Backend section
to edit additional Ceph parameters.
Update the CephAnsibleExtraConfig field with the following values:
{"ceph_osd_docker_memory_limit": "5g", "ceph_osd_docker_cpu_limit": 1, "ceph_mds_docker_memory_limit": "4g", "ceph_mds_docker_cpu_limit": 1}{"ceph_osd_docker_memory_limit": "5g", "ceph_osd_docker_cpu_limit": 1, "ceph_mds_docker_memory_limit": "4g", "ceph_mds_docker_cpu_limit": 1}Copy to Clipboard Copied! Toggle word wrap Toggle overflow Update the CephConfigOverrides field with the following values.
{"osd_recovery_op_priority": 3, "osd_recovery_max_active": 3, "osd_max_backfills": 1}{"osd_recovery_op_priority": 3, "osd_recovery_max_active": 3, "osd_max_backfills": 1}Copy to Clipboard Copied! Toggle word wrap Toggle overflow Update the CephConfigOverrides field with the following values.
{"osd_recovery_op_priority": 3, "osd_recovery_max_active": 3, "osd_max_backfills": 1}{"osd_recovery_op_priority": 3, "osd_recovery_max_active": 3, "osd_max_backfills": 1}Copy to Clipboard Copied! Toggle word wrap Toggle overflow Set the CephPoolDefaultSize value to
3.Update the CephAnsibleDisksConfig field with a disk list.
Example
{"devices":["/dev/sda","/dev/sdb","/dev/sdc","/dev/sdd","/dev/sde","/dev/sdf","/dev/sdg","/dev/sdh","/dev/sdi","/dev/sdj","/dev/sdk","/dev/sdl"],"dedicated_devices":["/dev/sdm","/dev/sdm","/dev/sdm","/dev/sdm","/dev/sdn","/dev/sdn","/dev/sdn","/dev/sdn","/dev/sdo","/dev/sdo","/dev/sdo","/dev/sdo"],"journal_size":5120}{"devices":["/dev/sda","/dev/sdb","/dev/sdc","/dev/sdd","/dev/sde","/dev/sdf","/dev/sdg","/dev/sdh","/dev/sdi","/dev/sdj","/dev/sdk","/dev/sdl"],"dedicated_devices":["/dev/sdm","/dev/sdm","/dev/sdm","/dev/sdm","/dev/sdn","/dev/sdn","/dev/sdn","/dev/sdn","/dev/sdo","/dev/sdo","/dev/sdo","/dev/sdo"],"journal_size":5120}Copy to Clipboard Copied! Toggle word wrap Toggle overflow NoteThis disk listing is for block devices (
devices) being used as OSDs, and the block devices dedicated (dedicated_devices) as OSD journals. See Section 5.5.5, “Setting the Red Hat Ceph Storage parameters” for more information.Click on the Save And Close button.
Back on the plan configuration page, the saved configuration changes will appear under the Specify Deployment Configuration step.
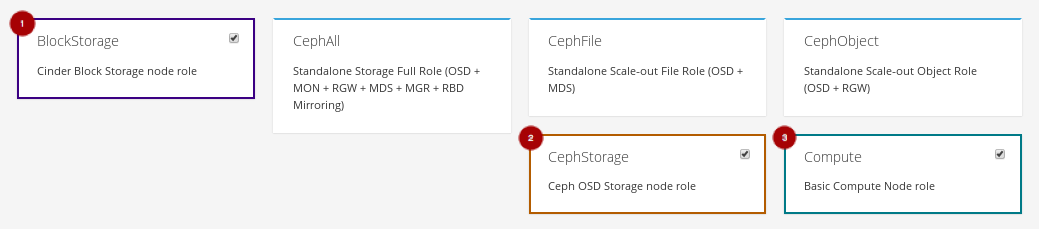
Configure the roles for the hyperconverged nodes by clicking on the Manage Roles link
.
Unselect the BlockStorage
, CephStorage
, and Compute
roles by clicking on them.
Select the ComputeHCI
role by clicking on it.
Back on the plan configuration page, configure the Compute HCI role by clicking on the levers icon
.
On the Parameters tab, update the following parameters:
The ExtraConfig field with the calculated resource allocation values.
See Appendix E, Tuning the Nova reserved memory and CPU allocation manually for how to calculate the appropriate values.
The ComputeHCIIPs field with all the relevant IP addresses for the environment.
Example
{"storage_mgmt":["172.16.2.203","172.16.2.204","172.16.2.205"],"storage":["172.16.1.203","172.16.1.204","172.16.1.205"],"tenant":["192.168.3.203","192.168.3.204","192.168.3.205"],"internal_api":["192.168.2.203","192.168.2.204","192.168.2.205"]}{"storage_mgmt":["172.16.2.203","172.16.2.204","172.16.2.205"],"storage":["172.16.1.203","172.16.1.204","172.16.1.205"],"tenant":["192.168.3.203","192.168.3.204","192.168.3.205"],"internal_api":["192.168.2.203","192.168.2.204","192.168.2.205"]}Copy to Clipboard Copied! Toggle word wrap Toggle overflow The OvercloudComputeHCIFlavor field with the following value:
osd-compute
osd-computeCopy to Clipboard Copied! Toggle word wrap Toggle overflow The ComputeHCISchedulerHints field with the following value:
{"capabilities:node":"hci-%index%"}{"capabilities:node":"hci-%index%"}Copy to Clipboard Copied! Toggle word wrap Toggle overflow
Click on the Save And Close button.
Back on the plan configuration page, configure the Controller role by clicking on the levers icon
.
On the Parameters tab
, update the ControllerIPs field with the relevant IP addresses.
Example
{"storage_mgmt":["172.16.2.200","172.16.2.201","172.16.2.202"],"storage":["172.16.1.200","172.16.1.201","172.16.1.202"],"tenant":["192.168.3.200","192.168.3.201","192.168.3.202"],"internal_api":["192.168.2.200","192.168.2.201","192.168.2.202"]}{"storage_mgmt":["172.16.2.200","172.16.2.201","172.16.2.202"],"storage":["172.16.1.200","172.16.1.201","172.16.1.202"],"tenant":["192.168.3.200","192.168.3.201","192.168.3.202"],"internal_api":["192.168.2.200","192.168.2.201","192.168.2.202"]}Copy to Clipboard Copied! Toggle word wrap Toggle overflow On the Services tab
, in the Ntp section
, update the NtpServer field
with the relevant NTP server name.
Click on the Save And Close button.
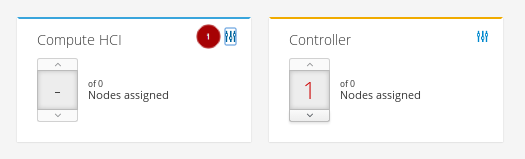
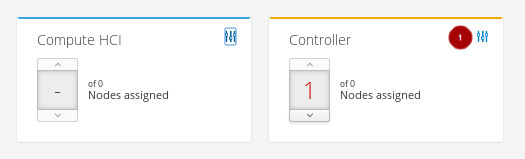
Assign the number of nodes needed in the environment for each role.
Figure 4.2. Example
From the plan configuration page, click on the Edit Configuration button
.
Edit the network configuration by clicking on the Network Configuration section
, and select Network Isolation
.

Select one of the NIC configuration templates or use a custom plan.

To customize the NICs in the environment, first you need to export the plan.
See Section 4.2, “Exporting an overcloud plan using the Red Hat OpenStack Platform Director” on how to export a plan.
Download the plan tarball file and make the necessary additions or modifications locally.
Example
After updating the plan tarball file, click the drop down menu and select Edit.

Import the plan. Enter Plan Name
and click on the Choose File button
. Browse to the location of the tarball file, and select it for import. Once the file is selected, click on the Upload Files and Create Plan button
.
Click on the Edit Configuration button.

-
On the Overall Settings tab
, click on the Other section
.
- Select the Others section and include the custom templates.
Select any new or modified files from the file list.
Example

- Click on the Parameters tab and update any of the values accordingly.
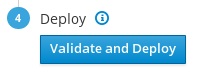
Now, it is time to deploy the plan. From the plan configuration page, click on the Validate and Deploy button to deploy the overcloud plan.
- Wait for the overcloud deployment to finish.


4.5. Additional Resources
- For more details on resource isolation, see Appendix E, Tuning the Nova reserved memory and CPU allocation manually.
Chapter 5. Deploying Red Hat Hyperconverged Infrastructure for Cloud using the command-line interface
As a technician, you can deploy and manage the Red Hat Hyperconverged Infrastructure for Cloud solution using the command-line interface.
5.1. Prerequisites
- Verify that all the requirements are met.
- Installing the undercloud
5.2. Preparing the nodes before deploying the overcloud using the command-line interface
As a technician, before you can deploy the overcloud, the undercloud needs to understand the hardware being used in the environment.
The Red Hat OpenStack Platform director (RHOSP-d) is also known as the undercloud.
5.2.1. Prerequisites
- Verify that all the requirements are met.
- Installing the undercloud
5.2.2. Registering and introspecting the hardware
The Red Hat OpenStack Platform director (RHOSP-d) runs an introspection process on each node and collects data about the node’s hardware. This introspection data is stored on the RHOSP-d node, and is used for various purposes, such as benchmarking and root disk assignments.
Prerequisites
- Complete the software installation of the RHOSP-d node.
- The MAC addresses for the network interface cards (NICs).
- IPMI User name and password
Procedure
Do the following steps on the RHOSP-d node, as the stack user:
Create the
osd-computeflavor:openstack flavor create --id auto --ram 2048 --disk 40 --vcpus 2 osd-compute openstack flavor set --property "capabilities:boot_option"="local" --property "capabilities:profile"="osd-compute" osd-compute
[stack@director ~]$ openstack flavor create --id auto --ram 2048 --disk 40 --vcpus 2 osd-compute
[stack@director ~]$ openstack flavor set --property "capabilities:boot_option"="local" --property "capabilities:profile"="osd-compute" osd-compute
Copy to Clipboard Copied! Toggle word wrap Toggle overflow Create and populate a host definition file for the Ironic service to manage the nodes.
Create the
instackenv.jsonhost definition file:touch ~/instackenv.json
[stack@director ~]$ touch ~/instackenv.jsonCopy to Clipboard Copied! Toggle word wrap Toggle overflow Add a definition block for each node between the
nodesstanza square brackets ({"nodes": []}), using this template:Copy to Clipboard Copied! Toggle word wrap Toggle overflow - Replace…
- IPMI_USER_PASSWORD with the IPMI password.
- NODE_NAME with a descriptive name of the node. This is an optional parameter.
- IPMI_USER_NAME with the IPMI user name that has access to power the node on or off.
- IPMI_IP_ADDR with the IPMI IP address.
- NIC_MAC_ADDR with the network card MAC address handling the PXE boot.
NODE_ROLE-INSTANCE_NUM with the node’s role, along with a node number. This solution uses two roles:
controlandosd-compute.Example
Copy to Clipboard Copied! Toggle word wrap Toggle overflow NoteThe
osd-computerole is a custom role that is created in a later step. To predictably control node placement, add these nodes in order. For example:Copy to Clipboard Copied! Toggle word wrap Toggle overflow
Import the nodes into the Ironic database:
openstack baremetal import ~/instackenv.json
[stack@director ~]$ openstack baremetal import ~/instackenv.jsonCopy to Clipboard Copied! Toggle word wrap Toggle overflow Verify that the
openstack baremetal importcommand populated the Ironic database with all the nodes:openstack baremetal node list
[stack@director ~]$ openstack baremetal node listCopy to Clipboard Copied! Toggle word wrap Toggle overflow
Assign the bare metal boot kernel and RAMdisk images to all the nodes:
openstack baremetal configure boot
[stack@director ~]$ openstack baremetal configure bootCopy to Clipboard Copied! Toggle word wrap Toggle overflow To start the nodes, collect their hardware data and store the information in the Ironic database, execute the following:
openstack baremetal introspection bulk start
[stack@director ~]$ openstack baremetal introspection bulk startCopy to Clipboard Copied! Toggle word wrap Toggle overflow NoteBulk introspection can take a long time to complete based on the number of nodes imported. Setting the
inspection_runbenchvalue tofalsein~/undercloud.conffile will speed up the bulk introspection process, but it will not collect thesysbenchandfiobenchmark data will not be collected, which can be useful data for the RHOSP-d.Verify that the introspection process completes without errors for all the nodes:
openstack baremetal introspection bulk status
[stack@director ~]$ openstack baremetal introspection bulk statusCopy to Clipboard Copied! Toggle word wrap Toggle overflow
Additional Resources
- For more information on assigning node identification parameters, see the Controlling Node Placement chapter of the RHOSP Advanced Overcloud Customization Guide.
5.2.3. Setting the root device
The Red Hat OpenStack Platform director (RHOSP-d) must identify the root disk to provision the nodes. By default Ironic will image the first block device, typically this block device is /dev/sda. Follow this procedure to change the root disk device according to the disk configuration of the Compute/OSD nodes.
This procedure will use the following Compute/OSD node disk configuration as an example:
-
OSD : 12 x 1TB SAS disks presented as
/dev/[sda, sdb, …, sdl]block devices -
OSD Journal : 3 x 400GB SATA SSD disks presented as
/dev/[sdm, sdn, sdo]block devices -
Operating System : 2 x 250GB SAS disks configured in RAID1 presented as
/dev/sdpblock device
Since an OSD will use /dev/sda, Ironic will use /dev/sdp, the RAID 1 disk, as the root disk instead. During the hardware introspection process, Ironic stores the world-wide number (WWN) and size of each block device.
Prerequisites
- Complete the hardware introspection procedure.
Procedure
Run one of the following commands on the RHOSP-d node.
Configure the root disk device to use the
smallestroot device:openstack baremetal configure boot --root-device=smallest
[stack@director ~]$ openstack baremetal configure boot --root-device=smallestCopy to Clipboard Copied! Toggle word wrap Toggle overflow
or
Configure the root disk device to use the disk’s
by-pathname:openstack baremetal configure boot --root-device=disk/by-path/pci-0000:00:1f.1-scsi-0:0:0:0
[stack@director ~]$ openstack baremetal configure boot --root-device=disk/by-path/pci-0000:00:1f.1-scsi-0:0:0:0Copy to Clipboard Copied! Toggle word wrap Toggle overflow
Ironic will apply this root device directive to all nodes within Ironic’s database.
Verify the correct root disk device was set:
openstack baremetal introspection data save NODE_NAME_or_UUID | jq .
openstack baremetal introspection data save NODE_NAME_or_UUID | jq .Copy to Clipboard Copied! Toggle word wrap Toggle overflow - Replace…
- NODE_NAME_or_UUID with the host name or UUID of the node.
Additional Resources
- For more information on Defining the Root Disk for Nodes section in the RHOSP Director Installation and Usage Guide.
5.2.4. Verifying that Ironic’s disk cleaning is working
To verify if Ironic’s disk cleaning feature is working, you can toggle the node’s state, then observe if the node’s state goes into a cleaning state.
Prerequisites
- Installing the undercloud.
Procedure
Set the node’s state to manage:
openstack baremetal node manage $NODE_NAME
openstack baremetal node manage $NODE_NAMECopy to Clipboard Copied! Toggle word wrap Toggle overflow Example
openstack baremetal node manage osdcompute-0
[stack@director ~]$ openstack baremetal node manage osdcompute-0Copy to Clipboard Copied! Toggle word wrap Toggle overflow Set the node’s state to provide:
openstack baremetal node provide NODE_NAME
openstack baremetal node provide NODE_NAMECopy to Clipboard Copied! Toggle word wrap Toggle overflow Example
openstack baremetal node provide osdcompute-0
[stack@director ~]$ openstack baremetal node provide osdcompute-0Copy to Clipboard Copied! Toggle word wrap Toggle overflow Check the node status:
openstack node list
openstack node listCopy to Clipboard Copied! Toggle word wrap Toggle overflow
5.2.5. Additional Resources
- For more information, see the RHOSP-d Installation and Usage Guide.
5.3. Configuring a container image source
As a technician, you can containerize the overcloud, but this first requires access to a registry with the required container images. Here you can find information on how to prepare the registry and the overcloud configuration to use container images for Red Hat OpenStack Platform.
There are several methods for configuring the overcloud to use a registry, based on the use case.
5.3.1. Registry methods
Red Hat Hyperconverged Infrastructure for Cloud supports the following registry types, choose one of the following methods:
- Remote Registry
-
The overcloud pulls container images directly from
registry.access.redhat.com. This method is the easiest for generating the initial configuration. However, each overcloud node pulls each image directly from the Red Hat Container Catalog, which can cause network congestion and slower deployment. In addition, all overcloud nodes require internet access to the Red Hat Container Catalog. - Local Registry
-
Create a local registry on the undercloud, synchronize the images from
registry.access.redhat.com, and the overcloud pulls the container images from the undercloud. This method allows you to store a registry internally, which can speed up the deployment and decrease network congestion. However, the undercloud only acts as a basic registry and provides limited life cycle management for container images.
5.3.2. Including additional container images for Red Hat OpenStack Platform services
The Red Hat Hyperconverged Infrastructure for Cloud uses additional services besides the core Red Hat OpenStack Platform services. These additional services require additional container images, and you enable these services with their corresponding environment file. These environment files enable the composable containerized services in the overcloud and the director needs to know these services are enabled to prepare their images.
Prerequisites
- A running undercloud.
Procedure
As the
stackuser, on the undercloud node, using theopenstack overcloud container image preparecommand to include the additional services.Include the following environment file using the
-eoption:-
Ceph Storage Cluster :
/usr/share/openstack-tripleo-heat-templates/environments/ceph-ansible/ceph-ansible.yaml
-
Ceph Storage Cluster :
Include the following
--setoptions for Red Hat Ceph Storage:--set ceph_namespace- Defines the namespace for the Red Hat Ceph Storage container image.
--set ceph_image-
Defines the name of the Red Hat Ceph Storage container image. Use image name:
rhceph-3-rhel7. --set ceph_tag-
Defines the tag to use for the Red Hat Ceph Storage container image. When
--tag-from-labelis specified, the versioned tag is discovered starting from this tag.
Run the image prepare command:
Example
Copy to Clipboard Copied! Toggle word wrap Toggle overflow NoteThese options are passed in addition to any other options (
…) that need to be passed to theopenstack overcloud container image preparecommand.
5.3.3. Using the Red Hat registry as a remote registry source
Red Hat hosts the overcloud container images on registry.access.redhat.com. Pulling the images from a remote registry is the simplest method because the registry is already setup and all you require is the URL and namespace of the image you aim to pull.
Prerequisites
- A running Red Hat Hyperconverged Infrastructure for Cloud 10 environment.
- Access to the Internet.
Procedure
To pull the images directly from
registry.access.redhat.comin the overcloud deployment, an environment file is required to specify the image parameters. The following command automatically creates this environment file:openstack overcloud container image prepare \ --namespace=registry.access.redhat.com/rhosp13 \ --prefix=openstack- \ --tag-from-label {version}-{release} \ --output-env-file=/home/stack/templates/overcloud_images.yaml(undercloud) [stack@director ~]$ openstack overcloud container image prepare \ --namespace=registry.access.redhat.com/rhosp13 \ --prefix=openstack- \ --tag-from-label {version}-{release} \ --output-env-file=/home/stack/templates/overcloud_images.yamlCopy to Clipboard Copied! Toggle word wrap Toggle overflow NoteUse the
-eoption to include any environment files for optional services.-
This creates an
overcloud_images.yamlenvironment file, which contains image locations, on the undercloud. Include this file with all future upgrade and deployment operations.
Additional Resources
- For more details, see the Including additional container images for Red Hat OpenStack Platform services section in the Red Hat Hyperconverged Infrastructure for Cloud Deployment Guide.
5.3.4. Using the undercloud as a local registry
You can configure a local registry on the undercloud to store overcloud container images. This method involves the following:
-
The director pulls each image from the
registry.access.redhat.com. The director creates the overcloud.
- During the overcloud creation, the nodes pull the relevant images from the undercloud.
Prerequisites
- A running Red Hat Hyperconverged Infrastructure for Cloud environment.
- Access to the Internet.
Procedure
Create a template to pull the images to the local registry:
openstack overcloud container image prepare \
  --namespace=registry.access.redhat.com/rhosp13 \
  --prefix=openstack- \
  --tag-from-label {version}-{release} \
  --output-images-file /home/stack/local_registry_images.yaml
(undercloud) [stack@director ~]$ openstack overcloud container image prepare \ --namespace=registry.access.redhat.com/rhosp13 \ --prefix=openstack- \ --tag-from-label {version}-{release} \ --output-images-file /home/stack/local_registry_images.yamlCopy to Clipboard Copied! Toggle word wrap Toggle overflow Use the
-eoption to include any environment files for optional services.NoteThis version of the
openstack overcloud container image preparecommand targets the registry on theregistry.access.redhat.comto generate an image list. It uses different values than theopenstack overcloud container image preparecommand used in a later step.
This creates a file called
local_registry_images.yamlwith the container image information. Pull the images using thelocal_registry_images.yamlfile:sudo openstack overcloud container image upload \ --config-file /home/stack/local_registry_images.yaml \ --verbose
(undercloud) [stack@director ~]$ sudo openstack overcloud container image upload \
  --config-file  /home/stack/local_registry_images.yaml \
  --verbose
Copy to Clipboard Copied! Toggle word wrap Toggle overflow NoteThe container images consume approximately 10 GB of disk space.
Find the namespace of the local images. The namespace uses the following pattern:
<REGISTRY_IP_ADDRESS>:8787/rhosp13
<REGISTRY_IP_ADDRESS>:8787/rhosp13Copy to Clipboard Copied! Toggle word wrap Toggle overflow Use the IP address of the undercloud, which you previously set with the
local_ipparameter in theundercloud.conffile. Alternatively, you can also obtain the full namespace with the following command:docker images | grep -v redhat.com | grep -o '^.*rhosp13' | sort -u
(undercloud) [stack@director ~]$ docker images | grep -v redhat.com | grep -o '^.*rhosp13' | sort -uCopy to Clipboard Copied! Toggle word wrap Toggle overflow Create a template for using the images in our local registry on the undercloud. For example:
openstack overcloud container image prepare \
  --namespace=192.168.24.1:8787/rhosp13 \
  --prefix=openstack- \
  --tag-from-label {version}-{release} \
  --output-env-file=/home/stack/templates/overcloud_images.yaml
(undercloud) [stack@director ~]$ openstack overcloud container image prepare \ --namespace=192.168.24.1:8787/rhosp13 \ --prefix=openstack- \ --tag-from-label {version}-{release} \ --output-env-file=/home/stack/templates/overcloud_images.yamlCopy to Clipboard Copied! Toggle word wrap Toggle overflow -
Use the
-eoption to include any environment files for optional services. -
If using Ceph Storage, include the additional parameters to define the Ceph Storage container image location:
--set ceph_namespace,--set ceph_image,--set ceph_tag.
NoteThis version of the
openstack overcloud container image preparecommand targets a Red Hat Satellite server. It uses different values than theopenstack overcloud container image preparecommand used in a previous step.-
Use the
-
This creates an
overcloud_images.yamlenvironment file, which contains image locations on the undercloud. Include this file with all future upgrade and deployment operations.
Additional Resources
- See the Including additional container images for Red Hat OpenStack Platform services section in the Red Hat Hyperconverged Infrastructure for Cloud Deployment Guide for more information.
Next Steps
- Prepare the overcloud for an upgrade.
5.3.5. Additional Resources
- See Section 4.2 in the Red Hat OpenStack Platform Fast Forward Upgrades Guide for more information.
5.4. Isolating resources and tuning the overcloud using the command-line interface
Resource contention between Red Hat OpenStack Platform (RHOSP) and Red Hat Ceph Storage (RHCS) might cause a degradation of either service. Therefore, isolating system resources is important with the Red Hat Hyperconverged Infrastructure Cloud solution.
Likewise, tuning the overcloud is equally important for a more predictable performance outcome for a given workload.
To isolate resources and tune the overcloud, you will continue to refine the custom templates created previously.
5.4.1. Prerequisites
- Build the overcloud foundation by defining the overcloud.
5.4.2. Reserving CPU and memory resources for hyperconverged nodes
By default, the Nova Compute service parameters do not take into account the colocation of Ceph OSD services on the same node. Hyperconverged nodes need to be tuned in order to maintain stability and maximize the number of possible instances. Using a plan environment file allows you to set resource constraints for the Nova Compute service on hyperconverged nodes. Plan environment files define workflows, and the Red Hat OpenStack Platform director (RHOSP-d) executes the plan file with the OpenStack Workflow (Mistral) service.
The RHOSP-d also provides a default plan environment file specifically for configuring resource constraints on hyperconverged nodes:
/usr/share/openstack-tripleo-heat-templates/plan-samples/plan-environment-derived-params.yaml
/usr/share/openstack-tripleo-heat-templates/plan-samples/plan-environment-derived-params.yaml
Using the -p parameter invokes a plan environment file during the overcloud deployment.
This plan environment file will direct the OpenStack Workflow to:
- Retrieve hardware introspection data.
- Calculate optimal CPU and memory constraints for Compute on hyper-converged nodes based on that data.
- Autogenerate the necessary parameters to configure those constraints.
In the plan-environment-derived-params.yaml plan environment file, the hci_profile_config option defines several CPU and memory allocation workload profiles. The hci_profile parameter sets which workload profile is enabled.
Here is the default hci_profile:
Default Example
In the above example, assumes that the average guest will use 2 GB of memory and 50% of their CPUs.
You can create a custom workload profile for the environment by adding a new profile to the hci_profile_config section. You can enable this custom workload profile by setting the hci_profile parameter to the profile’s name.
Custom Example
The my_workload profile assumes that the average guest will use 128 GB of RAM and 100% of the CPUs allocated to the guest.
Additional Resources
- See the Red Hat OpenStack Platform Hyper-converged Infrastructure Guide for more information.
5.4.3. Reserving CPU resources for Ceph
With hyperconverged deployments there can be contention between the Nova compute and Ceph processes for CPU resources. By default ceph-ansible will limit each OSD to one vCPU by using the --cpu-quota option on the docker run command. The ceph_osd_docker_cpu_limit option overrides this default limit, allowing you to use more vCPUs for each Ceph OSD process, for example:
CephAnsibleExtraConfig:
  ceph_osd_docker_cpu_limit: 2
CephAnsibleExtraConfig:
  ceph_osd_docker_cpu_limit: 2
Red Hat recommends setting the ceph_osd_docker_cpu_limit value to 2 as a starting point, and then adjust this value based on the hardware being used and workload being ran on this hyperconverged environment. This configuration option can be set in the ~/templates/ceph.yaml file.
Always test the workload before running it in a production environment.
Additional Resources
-
See the Setting the Red Hat Ceph Storage parameters section for more details on the
~/templates/ceph.yamlfile. - See the Recommended minimum hardware for containerized Ceph clusters secton in the Red Hat Ceph Storage Hardware Selection Guide for more information.
- See the Setting Dedicated Resources for Collocated Daemons in the Red Hat Ceph Storage Container Guide for more information.
5.4.4. Reserving memory resources for Ceph
With hyperconverged deployments there can be contention between the Nova compute and Ceph processes for memory resources. Deployments of the Red Hat Hyperconverged Infrastructure for Cloud solution will use ceph-ansible to automatically tune Ceph’s memory settings to reduce memory contention between collocated processes. The BlueStore object store is the recommended backend for hyperconverged deployments because of its better memory-handling features.
The ceph_osd_docker_memory_limit option is automatically set to the maximum memory size of the node as discovered by Ansible, regardless of the Ceph object store backend used, either FileStore or BlueStore.
Red Hat recommends not overriding the ceph_osd_docker_memory_limit option.
The osd_memory_target option is the preferred way to reduce memory growth by the Ceph OSD processes. The osd_memory_target option is automatically set if the is_hci option is set to true, for example:
CephAnsibleExtraConfig:
  is_hci: true
CephAnsibleExtraConfig:
  is_hci: true
These configuration options can be set in the ~/templates/ceph.yaml file.
The osd_memory_target option was introduced with the BlueStore object store feature starting with Red Hat Ceph Storage 3.2.
Additional Resources
-
See the Setting the Red Hat Ceph Storage parameters section for more details on the
~/templates/ceph.yamlfile. - See the Recommended minimum hardware for containerized Ceph clusters secton in the Red Hat Ceph Storage Hardware Selection Guide for more information.
- See the Setting Dedicated Resources for Collocated Daemons in the Red Hat Ceph Storage Container Guide for more information.
5.4.5. Tuning the backfilling and recovery operations for Ceph
Ceph uses a backfilling and recovery process to rebalance the storage cluster, whenever an OSD is removed. This is done to keep multiple copies of the data, according to the placement group policy. These two operations use system resources, so when a Ceph storage cluster is under load, then Ceph’s performance will drop as Ceph diverts resources to the backfill and recovery process. To maintain acceptable performance of the Ceph storage when an OSD is removed, then reduce the priority of backfill and recovery operations. The trade off for reducing the priority is that there are less data replicas for a longer period of time, and putting the data at a slightly greater risk.
The three variables to modify are:
osd_recovery_max_active- The number of active recovery requests per OSD at one time. More requests will accelerate recovery, but the requests place an increased load on the cluster.
osd_max_backfills- The maximum number of backfills allowed to or from a single OSD.
osd_recovery_op_priority- The priority set for recovery operations. It is relative to osd client op priority.
Since the osd_recovery_max_active and osd_max_backfills parameters are set to the correct values already, there is no need to add them to the ceph.yaml file. If you want to overwrite the default values of 3 and 1 respectively, then add them to the ceph.yaml file.
Additional Resources
- For more information on the OSD configurable parameters, see the Red Hat Ceph Storage Configuration Guide.
5.4.6. Additional Resources
- See Table 5.2 Deployment Parameters in the Red Hat OpenStack Platform 10 Director Installation and Usage Guide for more information on the overcloud parameters.
- See Customizing Virtual Machine Settings for more information.
-
See Section 5.6.4, “Running the deploy command” for details on running the
openstack overcloud deploycommand. - For mapping Ceph OSDs to a disk layout on non-homogeneous nodes, see Mapping the Disk Layout to Non-Homogeneous Ceph Storage Nodes in the Deploying an Overcloud with Containerized Red Hat Ceph guide.
5.5. Defining the overcloud using the command-line interface
As a technician, you can create a customizable set of TripleO Heat templates which defines the overcloud.
5.5.1. Prerequisites
- Verify that all the requirements are met.
- Deploy the Red Hat OpenStack Platform director, also known as the undercloud.
The high-level steps for defining the Red Hat Hyperconverged Infrastructure for Cloud overcloud:
- Creating a Directory for Custom Templates
- Configuring the Overcloud Networks
- Creating the Controller and ComputeHCI Roles
- Configuring Red Hat Ceph Storage for the overcloud
- Configuring the Overcloud Node Profile Layouts
5.5.2. Creating a directory for the custom templates
The installation of the Red Hat OpenStack Platform director (RHOSP-d) creates a set of TripleO Heat templates. These TripleO Heat templates are located in the /usr/share/openstack-tripleo-heat-templates/ directory. Red Hat recommends copying these templates before customizing them.
Prerequisites
- Deploy the undercloud.
Procedure
Do the following step on the command-line interface of the RHOSP-d node.
Create new directories for the custom templates:
mkdir -p ~/templates/nic-configs
[stack@director ~]$ mkdir -p ~/templates/nic-configsCopy to Clipboard Copied! Toggle word wrap Toggle overflow
5.5.3. Configuring the overcloud networks
This procedure will customize the network configuration files for isolated networks and assigning them to the Red Hat OpenStack Platform (RHOSP) services.
Prerequisites
- Verify that all the network requirements are met.
Procedure
Do the following steps on the RHOSP director node, as the stack user.
Choose the Compute NIC configuration template applicable to the environment:
-
/usr/share/openstack-tripleo-heat-templates/network/config/single-nic-vlans/compute.yaml -
/usr/share/openstack-tripleo-heat-templates/network/config/single-nic-linux-bridge-vlans/compute.yaml -
/usr/share/openstack-tripleo-heat-templates/network/config/multiple-nics/compute.yaml /usr/share/openstack-tripleo-heat-templates/network/config/bond-with-vlans/compute.yamlNoteSee the
README.mdin each template’s respective directory for details about the NIC configuration.
-
Create a new directory within the ~/templates/ directory:
touch ~/templates/nic-configs
[stack@director ~]$ touch ~/templates/nic-configsCopy to Clipboard Copied! Toggle word wrap Toggle overflow Copy the chosen template to the
~/templates/nic-configs/directory and rename it tocompute-hci.yaml:Example
cp /usr/share/openstack-tripleo-heat-templates/network/config/bond-with-vlans/compute.yaml ~/templates/nic-configs/compute-hci.yaml
[stack@director ~]$ cp /usr/share/openstack-tripleo-heat-templates/network/config/bond-with-vlans/compute.yaml ~/templates/nic-configs/compute-hci.yamlCopy to Clipboard Copied! Toggle word wrap Toggle overflow Add following definition, if it does note already exist, in the
parameters:section of the~/templates/nic-configs/compute-hci.yamlfile:StorageMgmtNetworkVlanID: default: 40 description: Vlan ID for the storage mgmt network traffic. type: numberStorageMgmtNetworkVlanID: default: 40 description: Vlan ID for the storage mgmt network traffic. type: numberCopy to Clipboard Copied! Toggle word wrap Toggle overflow Map
StorageMgmtNetworkVlanIDto a specific NIC on each node. For example, if you chose to trunk VLANs to a single NIC (single-nic-vlans/compute.yaml), then add the following entry to thenetwork_config:section of~/templates/nic-configs/compute-hci.yaml:Copy to Clipboard Copied! Toggle word wrap Toggle overflow ImportantRed Hat recommends setting the
mtuto9000, when mapping a NIC toStorageMgmtNetworkVlanID. This MTU setting provides measurable performance improvement to the performance of Red Hat Ceph Storage. For more details, see Configuring Jumbo Frames in the Red Hat OpenStack Platform Advanced Overcloud Customization guide.Create a new file in the custom templates directory:
touch ~/templates/network.yaml
[stack@director ~]$ touch ~/templates/network.yamlCopy to Clipboard Copied! Toggle word wrap Toggle overflow Open and edit the
network.yamlfile.Add the
resource_registrysection:resource_registry:
resource_registry:Copy to Clipboard Copied! Toggle word wrap Toggle overflow Add the following two lines under the
resource_registry:section:OS::TripleO::Controller::Net::SoftwareConfig: /home/stack/templates/nic-configs/controller-nics.yaml OS::TripleO::Compute::Net::SoftwareConfig: /home/stack/templates/nic-configs/compute-nics.yaml
OS::TripleO::Controller::Net::SoftwareConfig: /home/stack/templates/nic-configs/controller-nics.yaml OS::TripleO::Compute::Net::SoftwareConfig: /home/stack/templates/nic-configs/compute-nics.yamlCopy to Clipboard Copied! Toggle word wrap Toggle overflow These two lines point the RHOSP services to the network configurations of the Controller/Monitor and Compute/OSD nodes respectively.
Add the
parameter_defaultssection:parameter_defaults:
parameter_defaults:Copy to Clipboard Copied! Toggle word wrap Toggle overflow Add the following default parameters for the Neutron bridge mappings for the tenant network:
NeutronBridgeMappings: 'datacentre:br-ex,tenant:br-tenant'
NeutronNetworkType: 'vxlan'
NeutronTunnelType: 'vxlan'
NeutronExternalNetworkBridge: "''"
NeutronBridgeMappings: 'datacentre:br-ex,tenant:br-tenant'
NeutronNetworkType: 'vxlan'
NeutronTunnelType: 'vxlan'
NeutronExternalNetworkBridge: "''"
Copy to Clipboard Copied! Toggle word wrap Toggle overflow This defines the bridge mappings assigned to the logical networks and enables the tenants to use
vxlan.The two TripleO Heat templates referenced in step 2b requires parameters to define each network. Under the
parameter_defaultssection add the following lines:Copy to Clipboard Copied! Toggle word wrap Toggle overflow - Replace…
- IP_ADDR_CIDR with the appropriate IP address and net mask (CIDR).
- IP_ADDR_START with the appropriate starting IP address.
- IP_ADDR_END with the appropriate ending IP address.
- IP_ADDRESS with the appropriate IP address.
- VLAN_ID with the appropriate VLAN identification number for the corresponding network.
DNS_SERVER_IP with the appropriate IP address for defining two DNS servers, separated by a comma (
,).See the appendix for an example
network.yamlfile.
Additional Resources
- For more information on Isolating Networks, see the Red Hat OpenStack Platform Advance Overcloud Customization Guide.
5.5.4. Creating the Controller and ComputeHCI roles
The overcloud has five default roles: Controller, Compute, BlockStorage, ObjectStorage, and CephStorage. These roles contains a list of services. You can mix these services to create a custom deployable role.
Prerequisites
- Deploy the Red Hat OpenStack Platform director, also known as the undercloud.
- Create a Directory for Custom Templates.
Procedure
Do the following step on the Red Hat OpenStack Platform director node, as the stack user.
Generate a custom
roles_data_custom.yamlfile that includes theControllerand theComputeHCI:openstack overcloud roles generate -o ~/custom-templates/roles_data_custom.yaml Controller ComputeHCI
[stack@director ~]$ openstack overcloud roles generate -o ~/custom-templates/roles_data_custom.yaml Controller ComputeHCICopy to Clipboard Copied! Toggle word wrap Toggle overflow
Additional Resources
- See the Deploying the overcloud using the command line in the Red Hat Hyperconverged Infrastructure for Cloud Deployment Guide for more information on using these custom roles.
5.5.5. Setting the Red Hat Ceph Storage parameters
This procedure defines what Red Hat Ceph Storage (RHCS) OSD parameters to use.
Prerequisites
- Deploy the Red Hat OpenStack Platform director, also known as the undercloud.
- Create a Directory for Custom Templates.
Procedure
Do the following steps on the Red Hat OpenStack Platform director node, as the stack user.
Open for editing the
~/templates/ceph.yamlfile.To use the BlueStore object store backend, update the following lines under the
CephAnsibleExtraConfigsection:Example
CephAnsibleExtraConfig:
  osd_scenario: lvm
  osd_objectstore: bluestore
CephAnsibleExtraConfig:
  osd_scenario: lvm
  osd_objectstore: bluestore
Copy to Clipboard Copied! Toggle word wrap Toggle overflow Update the following options under the
parameter_defaultssection:Example
Copy to Clipboard Copied! Toggle word wrap Toggle overflow - Replace…
NUM with the calculated values from the Ceph PG calculator.
For this example, the following Compute/OSD node disk configuration is being used:
-
OSD : 12 x 1TB SAS disks presented as
/dev/[sda, sdb, …, sdg]block devices -
OSD WAL and DB devices : 2 x 400GB NVMe SSD disks presented as
/dev/[nvme0n1, nvme1n1]block devices
-
OSD : 12 x 1TB SAS disks presented as
Additional Resources
- For more details on tuning Ceph OSD parameters, see the Red Hat Ceph Storage Storage Strategies Guide.
- For more details on using the BlueStore object store, see the Red Hat Ceph Storage Administration Guide.
- For examples of the LVM scenario, see the LVM simple and LVM advance sections in the Red Hat Ceph Storage Installation Guide.
5.5.6. Configuring the overcloud nodes layout
The overcloud layout for the nodes defines, how many of these nodes to deploy based on the type, which pool of IP addresses to assign, and other parameters.
Prerequisites
- Deploy the Red Hat OpenStack Platform director, also known as the undercloud.
- Create a Directory for Custom Templates.
Procedure
Do the following steps on the Red Hat OpenStack Platform director node, as the stack user.
Create the
layout.yamlfile in the custom templates directory:touch ~/templates/layout.yaml
[stack@director ~]$ touch ~/templates/layout.yamlCopy to Clipboard Copied! Toggle word wrap Toggle overflow Open the
layout.yamlfile for editing.Add the resource registry section by adding the following line:
resource_registry:
resource_registry:Copy to Clipboard Copied! Toggle word wrap Toggle overflow Add the following lines under the
resource_registrysection for configuring theControllerandComputeHCIroles to use a pool of IP addresses:Copy to Clipboard Copied! Toggle word wrap Toggle overflow Add a new section for the parameter defaults called
parameter_defaultsand include the following parameters underneath this section:Copy to Clipboard Copied! Toggle word wrap Toggle overflow - Replace…
NTP_IP_ADDR with the IP address of the NTP source. Time synchronization is very important!
Example
Copy to Clipboard Copied! Toggle word wrap Toggle overflow The value of
3for theControllerCountandComputeHCICountparameters means three Controller/Monitor nodes and three Compute/OSD nodes will be deployed.
Under the
parameter_defaultssection, add a two scheduler hints, one calledControllerSchedulerHintsand the other calledComputeHCISchedulerHints. Under each scheduler hint, add the node name format for predictable node placement, as follows:ControllerSchedulerHints: 'capabilities:node': 'control-%index%' ComputeHCISchedulerHints: 'capabilities:node': 'osd-compute-%index%'ControllerSchedulerHints: 'capabilities:node': 'control-%index%' ComputeHCISchedulerHints: 'capabilities:node': 'osd-compute-%index%'Copy to Clipboard Copied! Toggle word wrap Toggle overflow Under the
parameter_defaultssection, add the required IP addresses for each node profile, for example:Example
Copy to Clipboard Copied! Toggle word wrap Toggle overflow From this example, node
control-0would have the following IP addresses:192.168.2.200,192.168.3.200,172.16.1.200, and172.16.2.200.
5.5.7. Additional Resources
- The Red Hat OpenStack Platform Advanced Overcloud Customization Guide for more information.
5.6. Deploying the overcloud using the command-line interface
As a technician, you can deploy the overcloud nodes so the Nova Compute and the Ceph OSD services are colocated on the same node.
5.6.1. Prerequisites
5.6.2. Verifying the available nodes for Ironic
Before deploying the overcloud nodes, verify that the nodes are powered off and available.
The nodes can not be in maintenance mode.
Prerequisites
-
Having the
stackuser available on the Red Hat OpenStack Platform director node.
Procedure
Run the following command to verify all nodes are powered off, and available:
openstack baremetal node list
[stack@director ~]$ openstack baremetal node listCopy to Clipboard Copied! Toggle word wrap Toggle overflow
5.6.3. Configuring the controller for Pacemaker fencing
Isolating a node in a cluster so data corruption doesn’t happen is called fencing. Fencing protects the integrity of cluster and cluster resources.
Prerequisites
- An IPMI user and password.
-
Having the
stackuser available on the Red Hat OpenStack Platform director node.
Procedure
Generate the fencing Heat environment file:
openstack overcloud generate fencing --ipmi-lanplus instackenv.json --output fencing.yaml
[stack@director ~]$ openstack overcloud generate fencing --ipmi-lanplus instackenv.json --output fencing.yamlCopy to Clipboard Copied! Toggle word wrap Toggle overflow -
Include the
fencing.yamlfile with theopenstack overcloud deploycommand.
Additional Resources
- For more information, see the Deploying Red Hat Enterprise Linux OpenStack Platform 7 with Red Hat OpenStack Platform director.
5.6.4. Running the deploy command
After all the customization and tuning, it is time to deploy the overcloud.
The deployment of the overcloud can take a long time to finish based on the sized of the deployment.
Prerequisites
- Preparing the nodes
- Configure a container image source
- Define the overcloud
- Isolating Resources and tuning
-
Having the
stackuser available on the Red Hat OpenStack Platform director node.
Procedure
Run the following command:
Copy to Clipboard Copied! Toggle word wrap Toggle overflow - Command Details
-
The
timecommand is used to tell you how long the deployment takes. -
The
openstack overcloud deploycommand does the actual deployment. -
Replace
$NTP_IP_ADDRwith the IP address of the NTP source. Time synchronization is very important! -
The
--templatesargument uses the default directory (/usr/share/openstack-tripleo-heat-templates/) containing the TripleO Heat templates to deploy. -
The
-pargument points to the plan environment file for HCI deployments. See the Reserving CPU and memory resources for hyperconverged nodes section for more details. -
The
-rargument points to the roles file and overrides the defaultrole_data.yamlfile. -
The
-eargument points to an explicit template file to use during the deployment. -
The
puppet-pacemaker.yamlfile configures the controller node services in a highly available pacemaker cluster. -
The
storage-environment.yamlfile configures Ceph as a storage backend, whoseparameter_defaultsare passed by the custom template,ceph.yaml. -
The
network-isolation.yamlfile configures network isolation for different services, whose parameters are passed by the custom template,network.yaml. This file will be created automatically when the deployment starts. -
The
network.yamlfile is explained in Configuring the overcloud networks section for more details. -
The
ceph.yamlfile is explained in Setting the Red Hat Ceph Storage parameters section for more details. -
The
compute.yamlfile is explained in Changing Nova reserved memory and CPU allocations section for more details. -
The
layout.yamlfile is explained in Configuring the overcloud node profile layouts section for more details. The
fencing.yamlfile is explained in Configuring the controller for Pacemaker fencing section for more details.ImportantThe order of the arguments matters. The custom template files will override the default template files.
NoteOptionally, add the
--rhel-reg,--reg-method,--reg-orgoptions, if you want to use the Red Hat OpenStack Platform director (RHOSP-d) node as a software repository for package installations.
-
The
- Wait for the overcloud deployment to finish.
Additional Resources
- See Table 5.2 Deployment Parameters in the Red Hat OpenStack Platform 13 Director Installation and Usage Guide for more information on the overcloud parameters.
5.6.5. Verifying a successful overcloud deployment
It is important to verify if the overcloud deployment was successful.
Prerequisites
-
Having the
stackuser available on the Red Hat OpenStack Platform director node.
Procedure
Watch the deployment process and look for failures:
heat resource-list -n5 overcloud | egrep -i 'fail|progress'
[stack@director ~]$ heat resource-list -n5 overcloud | egrep -i 'fail|progress'Copy to Clipboard Copied! Toggle word wrap Toggle overflow Example output from a successful overcloud deployment:
Copy to Clipboard Copied! Toggle word wrap Toggle overflow After the deployment finishes, view the IP addresses for the overcloud nodes:
openstack server list
[stack@director ~]$ openstack server listCopy to Clipboard Copied! Toggle word wrap Toggle overflow
Chapter 6. Updating the Red Hat Hyperconverged Infrastructure for Cloud solution to the latest versions
As a technician, you can update the Red Hat Hyperconverged Infrastructure for Cloud solution to the latest versions of Red Hat OpenStack Platform 13, and Red Hat Ceph Storage 3. To update the Red Hat Hyperconverged Infrastructure for Cloud software sets to the latest versions, follow the instructions in the Red Hat OpenStack Platform 13 documentation:
Appendix A. Red Hat Hyperconverged Infrastructure for Cloud required repositories
| Name | Repository | Description of Requirement |
| Red Hat Enterprise Linux 7 Server (RPMs) |
| Base operating system repository. |
| Red Hat Enterprise Linux 7 Server - Extras (RPMs) |
| Contains Red Hat OpenStack Platform dependencies. |
| Red Hat Enterprise Linux 7 Server - RH Common (RPMs) |
| Contains tools for deploying and configuring Red Hat OpenStack Platform. |
| Red Hat Enterprise Linux High Availability (for RHEL 7 Server) (RPMs) |
| High availability tools for Red Hat Enterprise Linux. Used for Controller node high availability. |
| Red Hat Enterprise Linux OpenStack Platform 13 for RHEL 7 (RPMs) |
| Core Red Hat OpenStack Platform repository. Also contains packages for Red Hat OpenStack Platform director. |
| Red Hat Ceph Storage 3 OSD for Red Hat Enterprise Linux 7 Server (RPMs) |
| Repository for RHCS Object Storage Daemons (OSDs). Enabled on Compute nodes. |
| Red Hat Ceph Storage 3 MON for Red Hat Enterprise Linux 7 Server (RPMs) |
| Repository for RHCS Monitor daemon. Enabled on Controller nodes. |
| Red Hat Ceph Storage 3 Tools for Red Hat Enterprise Linux 7 Workstation (RPMs) |
| Repository for RHCS tools and clients, such as the Ceph Object Gateway. |
Appendix B. Red Hat Hyper-converaged Infrastructure for Cloud undercloud configuration parameters
local_ip- The IP address defined for the director’s provisioning network. This is also the IP address the director uses for its DHCP and PXE boot services.
network_gateway- The gateway for the overcloud instances. This is the undercloud node, which forwards traffic to the external network.
undercloud_public_vip- The IP address defined for the director’s Public API. Use an IP address on the provisioning network that does not conflict with any other IP addresses or address ranges. The director configuration attaches this IP address to its software bridge as a routed IP address, which uses the /32 netmask.
undercloud_admin_vip- The IP address defined for the director’s Admin API. Use an IP address on the provisioning network that does not conflict with any other IP addresses or address ranges. The director configuration attaches this IP address to its software bridge as a routed IP address, which uses the /32 netmask.
local_interface-
The chosen interface for the director’s provisioning NIC. This is also the device the director uses for its DHCP and PXE boot services. The configuration script attaches this interface to a custom bridge defined with the
inspection_interfaceparameter. network_cidr- The network that the director uses to manage overcloud instances. This is the provisioning network, which the undercloud’s neutron service manages.
masquerade_network- Defines the network that will masquerade for external access. This provides the provisioning network with a degree of network address translation (NAT), so that it has external access through the director.
dhcp_start- The start of the DHCP allocation range for overcloud nodes. Ensure this range contains enough IP addresses to allocate to all nodes.
dhcp_end- The end of the DHCP allocation range for overcloud nodes. Ensure this range contains enough IP addresses to allocate to all nodes.
inspection_interface-
The bridge the director uses for node introspection. This is custom bridge that the director configuration creates. The
local_interfaceattaches to this bridge. Leave this as the default,br-ctlplane. inspection_iprange-
A range of IP address that the director’s introspection service uses during the PXE boot and provisioning process. Use comma-separated values to define the start and end of this range. Verify this range contains enough IP addresses for the nodes and does not conflict with the range for
dhcp_startanddhcp_end. inspection_extras-
Defines whether to enable extra hardware collection during the inspection process. Requires
python-hardwareorpython-hardware-detectpackage on the introspection image. inspection_runbench-
Runs a set of benchmarks during node introspection. Set to
trueto enable. This option is necessary if you intend to perform benchmark analysis when inspecting the hardware of registered nodes. inspection_enable_uefi- Defines whether to support introspection of nodes with UEFI-only firmware.
Appendix C. Red Hat Hyperconverged Infrastructure for Cloud - Nova memory and CPU calculator script source
This is the Python source code for the nova_mem_cpu_calc.py script.
Appendix D. Red Hat Hyperconverged Infrastructure for Cloud - example network.yaml file
Example
Appendix E. Tuning the Nova reserved memory and CPU allocation manually
Tuning the Nova environment for the planned workload can be a trial and error process. Red Hat recommends starting will a calculated base set of defaults and tune from there.
By tuning the reserved_host_memory_mb and cpu_allocation_ratio parameters, you can maximize the number of possible guests for the workload. Also, by fine tuning these values you can find the desired trade off between determinism and guest-hosting capacity for the workload.
Tuning Nova reserved memory
Nova’s reserved_host_memory_mb parameter is the amount of memory, in megabytes (MB), to reserve for the node. Keep in mind, that on a hyper-converged Compute/OSD nodes, the memory must be shared between the two services, as not to starve either service of their required resources.
The following is an example of how to determine the reserved_host_memory_mb value for a hyper-converged node. Given a node with 256GB of RAM and 10 OSDs, assuming that each OSD consumes 3GB of RAM, that is 30GB of RAM for Ceph, and leaving 226GB of RAM for Nova Compute. If the average guest each uses 2GB of RAM, then the overall system could host 113 guest machines. However, there is the additional overhead for each guest machine running on the hypervisor that you must account for. Assuming this overhead is 500MB, the maximum number of 2GB guest machines that could be ran would be approximately 90.
Here is the mathematical formulas:
Approximate Number of Guest Machines = ( Memory Available for Nova in GB / ( Memory per Guest Machine in GB + Hypervisor Memory Overhead in GB ) )
Example
90.4 = ( 226 / ( 2 + .5 ) )
Given the approximate number of guest machines and the number of OSDs, the amount of memory to reserve for Nova can be calculated.
Nova Reserved Memory in MB = 1000 * ( ( OSD Memory Size in GB * Number of OSDs ) + ( Approximate Number of Guest Machines * Hypervisor Memory Overhead in GB ) )
Example
75000 = 1000 * ( ( 3 * 10 ) + ( 90 * .5 ) )
Thus, reserved_host_memory_mb would equal 75000. The parameter value must be in megabytes (MB).
Tuning CPU allocation ratio
Nova’s cpu_allocation_ratio parameter is used by the Nova scheduler when choosing which compute nodes to run the guest machines. If the ratio of guest machines to compute nodes is 16:1, and the number of cores (vCPUs) on a node is 56, then the Nova scheduler may schedule enough guests to consume 896 cores, before it considers the node is unable to handle any more guest machines. The reason is because, the Nova scheduler does not take into account the CPU needs of the Ceph OSD services running on the same node as the Nova scheduler. Modifying the cpu_allocation_ratio parameter allows Ceph to have the CPU resources it needs to operate effectively without those CPU resources being given to Nova Compute.
The following is an example of how to determine the cpu_allocation_ratio value for a hyper-converged node. Given a node has 56 cores and 10 OSDs, and assuming that one core is used by each OSD, that leaves 46 cores for Nova. If each guest machine utilizes 100% of its core, then the number of available cores for guest machines is divided by the total number of cores on the node. In this scenario, the cpu_allocation_ratio value is 0.821429.
However, because guest machines do not typically utilize 100% of their cores, the ratio must take into account an anticipated utilization percentage when determining the number of cores per guest machine. In a scenario, where you only anticipate on average, 10% core utilization per guest machine, the cpu_allocation_ratio value must be 8.214286.
Here is the mathematical formulas:
- Number of Non Ceph Cores = Total Number of Cores on the Node - ( Number of Cores per OSD * Number of OSDs)
- Number of Guest Machine vCPUs = Number of Non Ceph Cores / Average Guest Machine CPU Utilization
- CPU Allocation Ratio = Number of Guest Machine vCPUs / Total Number of Cores on the Node
Example
- 46 = 56 - ( 1 * 10 )
- 460 = 46 / .1
- 8.214286 = 460 / 56
Nova memory and CPU calculator
Red Hat provides a calculator script to do all these calculations for you. The script name is nova_mem_cpu_calc.py, and takes 5 input parameters:
nova_mem_cpu_calc.py TOTAL_NODE_RAM_GB TOTAL_NODE_CORES NUM_OSDs_PER_NODE AVG_GUEST_MEM_SIZE_GB AVG_GUEST_CPU_UTIL
nova_mem_cpu_calc.py TOTAL_NODE_RAM_GB TOTAL_NODE_CORES NUM_OSDs_PER_NODE AVG_GUEST_MEM_SIZE_GB AVG_GUEST_CPU_UTIL- Replace…
- TOTAL_NODE_RAM_GB with the total size of RAM in GB on the node.
- TOTAL_NODE_CORES with the total number of cores on the node.
- NUM_OSDs_PER_NODE with the number of Ceph OSDs per node.
- AVG_GUEST_MEM_SIZE_GB with the average memory size in GB for the guest machine.
- AVG_GUEST_CPU_UTIL with the average CPU utilization, expressed as a decimal, for the guest machine.
Example
./nova_mem_cpu_calc.py 256 56 10 2 0.1
[stack@director ~]$ ./nova_mem_cpu_calc.py 256 56 10 2 0.1Additional Resources
-
See the appendix for the full source code of the
nova_mem_cpu_calc.pyscript.
Appendix F. Changing Nova reserved memory and CPU allocation manually
Creating a custom template to overwrite the reserved_host_memory_mb and cpu_allocation_ratio default values.
Prerequisites
- Deploy the Red Hat OpenStack Platform director (RHOSP-d), also known as the undercloud.
- Create a Directory for Custom Templates.
Procedure
Do the following steps on the RHOSP-d node, as the stack user.
Create the
compute.yamlfile in the custom templates directory:touch ~/templates/compute.yaml
[stack@director ~]$ touch ~/templates/compute.yamlCopy to Clipboard Copied! Toggle word wrap Toggle overflow Open the
compute.yamlfile for editing.Add the
reserved_host_memoryandcpu_allocation_ratioconfiguration parameters to theExtraConfigsection, under the parameter defaults section:parameter_defaults: ExtraConfig: nova::compute::reserved_host_memory: MEMORY_SIZE_IN_MB nova::cpu_allocation_ratio: CPU_RATIOparameter_defaults: ExtraConfig: nova::compute::reserved_host_memory: MEMORY_SIZE_IN_MB nova::cpu_allocation_ratio: CPU_RATIOCopy to Clipboard Copied! Toggle word wrap Toggle overflow - Replace…
- MEMORY_SIZE_IN_MB with the memory size in megabytes (MB).
CPU_RATIO with the ratio decimal value.
Example
    nova::compute::reserved_host_memory: 75000
    nova::cpu_allocation_ratio: 8.2
nova::compute::reserved_host_memory: 75000 nova::cpu_allocation_ratio: 8.2Copy to Clipboard Copied! Toggle word wrap Toggle overflow NoteRed Hat OpenStack Platform director refers to the
reserved_host_memory_mbparameter used by Nova as thereserved_host_memoryparameter.