Getting Started Guide
The Getting Started Guide for Red Hat JBoss BPM Suite
Abstract
Chapter 1. Introduction
1.1. About Red Hat JBoss BPM Suite
1.2. Red Hat JBoss BPM Suite components
- Execution Engine
- The runtime environment for business assets (Processes, Tasks, Rules, etc.). For further details, refer to the Red Hat JBoss BPM Suite Administration and Configuration Guide.
- Artifact Repository (Knowledge Store)
- A storage for business assets that provide revision control capabilities (connects GIT repositories with business assets).
- Business Central
- A web-based application for asset creation, management, and monitoring of business assets providing an integrated environment with the respective tools, such as, rule and process authoring tools, business asset management tool for work with Artifact Repository, runtime data management tools, resource editors, BAM (Business Activity Monitoring) tools, Task management tools, and BRMS tools. For further details, refer to the Red Hat JBoss BPM Suite User Guide.
1.3. Use Case: Process-based solutions in the loan industry
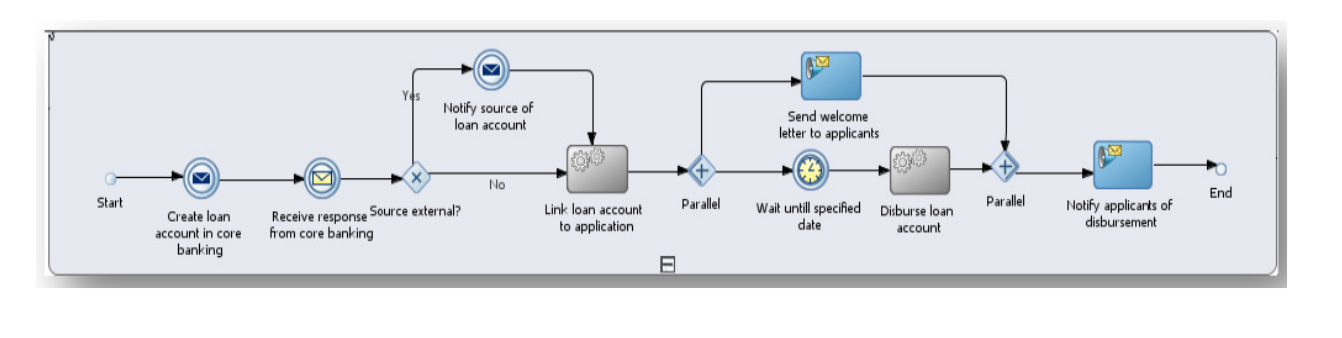
Figure 1.1. High-level loan application process flow
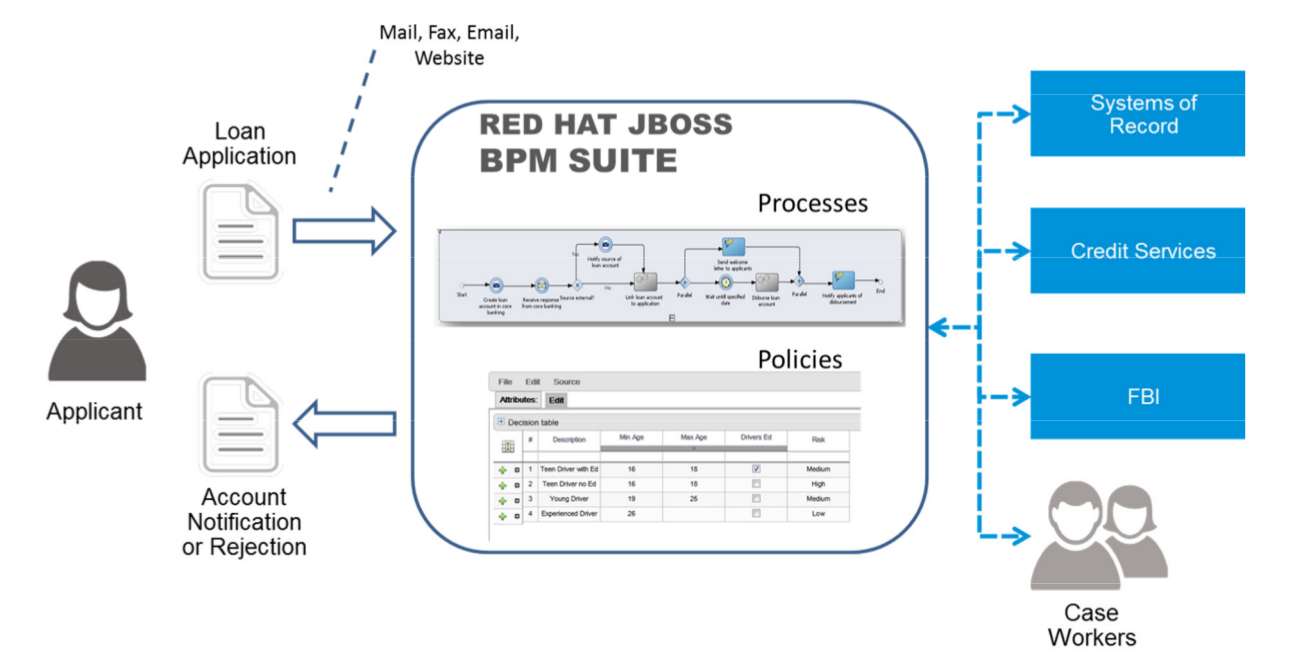
Figure 1.2. Loan Application Process Automation
Chapter 2. Quick start with Red Hat JBoss BPM Suite
Procedure 2.1. BPM Suite Quick Start
- Download BPM Suite installer from access.redhat.com.
- Run installer by executing the following command:
java -jar jboss-bpms-installer-VERSION.GA-redhat-MINOR.jar - Step through the GUI installer steps making note of the username/password for accessing the BPM Suite application after installation.
- After successful installation, in a command prompt, navigate to the EAP home folder where you have installed BPM Suite.
- Start the BPM Suite server by issuing the following command.
bin/standalone.sh - Open a web browser and login to Business Central by navigating to
http://localhost:8080/business-central/. Login using the username/password combination for accessing the BPM Suite application that you created at installation time.
| Learn more about roles: Section 3.1.3, “Defining Roles” |
| Create additional users: Section 3.1.4, “Creating users” |
| Create a Hello World Project: Chapter 5, Hello World project |
| Work through the BPM Example App Guide Working with the BPM Suite Example App |
| Look up detailed installation instructions for using the installer: Installation Guide |
Chapter 3. Installation options
- Executable jar installer for installation on Red Hat JBoss Enterprise Application Platform (EAP) 6.1.1.
- Zip file install which itself comes in two versions:
jboss-bpms-6.MINOR_VERSION-redhat-x-deployable-eap6.x.zip: version adapted for deployment on Red Hat JBoss Enterprise Application Platform (EAP 6.1.1).jboss-bpms-6.MINOR_VERSION-redhat-x-deployable-generic.zip: the deployable version with additional libraries adapted for deployment on Red Hat JBoss Web Server (WS), Apache Tomcat 6, and Apache Tomcat 7.
Note
"-Dfile.encoding=UTF-8".
3.1. The EAP6 bundle installation
Note
3.1.1. Downloading the EAP6 package
- Go to the Red Hat Customer Portal and log in.
- Click → .
- In the Product Downloads page that opens, click Red Hat JBoss BPM Suite.
- From the Version drop-down menu, select version 6.0.3.
- On the Software Downloads page that opens, navigate to the Red Hat JBoss BPM Suite 6.0.3 Deployable for EAP 6.1.1 row and click Download.
3.1.2. Installing the EAP6 package
Installation on a fresh EAP instance
- Extract the zip package deployable for EAP you downloaded from the Red Hat Customer Portal.
- Merge the extracted zip package deployable for EAP into the EAP SERVER_HOME directory.
Warning
This step must be performed by the same user account that was used to install EAP. This account must not be a superuser account. - In this process, multiple files in the EAP SERVER_HOME directory will be overwritten and you must let the unzip process overwrite these files. An example of a file that is overwritten is the
SERVER_HOME/bin/product.conffile. After a successful merge, this file must contain the stringslot=bpms. You can open this file to verify that the files have been overwritten successfully.
unzip -u jboss-bpms-VERSION-TYPE.zip -d SERVER_HOME_PARENT_DIR
unzip -u jboss-bpms-VERSION-TYPE.zip -d SERVER_HOME_PARENT_DIRExample 3.1. The unzip command
unzip -u jboss-bpms-6.0.3-redhat-7-deployable-eap6.x.zip -d /home/john/myServers/
unzip -u jboss-bpms-6.0.3-redhat-7-deployable-eap6.x.zip -d /home/john/myServers/Installation on an existing EAP configuration
Warning
- Extract the zip package deployable for EAP you downloaded from the Red Hat Customer Portal.
- Unzip the downloaded zip archive; however, do not overwrite all of the files. Manually merge the following files into the SERVER_HOME directory.
jboss-eap-6.1/domain/configuration/*- (please be aware that BPMS requires JMS, so JMS is added by default into all profiles indomain.xmlprovided by BPMS distribution.)jboss-eap-6.1/standalone/configuration/*- (please be aware that BPMS requires JMS, so JMS is added by default into all profiles config files (especially intostandalone.xmlandstandalone-ha.xml) provided by BPMS distribution.)jboss-eap-6.1/modules/layers.confjboss-eap-6.1/bin/product.conf
- Ensure the target EAP does not include a deployment with a colliding name. Copy the folder
jboss-eap-6.1/standalone/deploymentsinto the EAP_HOME directory from the BPMS distribution. - Make sure no EAP module layer is already called BPMS and copy the folder
jboss-eap-6.1/modules/system/layers/bpmsinto the EAP 6.1.1 folder.
3.1.3. Defining Roles
- admin: The users with admin role are the administrators of the application. Administrators can manage users, manage the repositories (create and clone) and have full access to make the required changes in the application. Admins have access to all areas within the system.
- developer: A developer has access to almost all features and can manage rules, models, process flows, forms and dashboards. They can manage the asset repository, they can create, build and deploy projects and they can even use Red Hat JBoss Developer Studio to view processes. Only certain administrative functions like creating and cloning a new repository are hidden for the developer role.
- analyst: An analyst role has access to all high-level features to model and execute their projects. However, → access is unavailable to users with the analyst role. Certain lower-level features targeted towards developers, like the → view are not accessible for this role. However, the Build & Deploy button is available for the analyst role while using the Project Editor.
- user: User or a business user work on the business task lists that are used to operate a certain process. A user with this role can access the dashboard and manage processes.
- manager: A manager is a viewer of the system and is interested in statistics around the business processes and their performance, business indicators, and other reporting of the system. A user with this role has access to the BAM only.
Note
3.1.4. Creating users
- Run ./add-user.sh on a Unix system or add-user.bat on a Windows system from the bin directory.
- Enter b to select an Application User at the type of user prompt and press Enter.
- Accept the default Realm (ApplicationRealm): by pressing Enter.
- At the username prompt, enter a user name and confirm. For example:
helloworlduser. - Create the user's password at the password prompt and reenter the password. For example:
Helloworld@123.Note
The password should be at least 8 characters in length and should contain upper and lower case alphabetic characters (e.g. A-Z, a-z), at least one numerical character (e.g. 0-9) and at least one special character (e.g. ~ ! @ # $ % ^ * ( ) - _ + =). - Enter a comma separate list of roles the user will need at the roles prompt (refer to Section 3.1.3, “Defining Roles”).Business Central users need to have at least the
analystrole, and dashbuilder users need to have theadminrole. Roles should be entered as a comma-separated list. - Confirm you want to add the user.
- Enter yes at the next prompt (this is to enable clustering in the future if required).
3.2. The generic deployable bundle installation
jboss-bpms-engine.zip: supported execution engine libraries needed if you are embedding the engine into your applicationjboss-bpms-manager.zip: thebusiness-central.waranddashbuilder.warweb applications
3.2.1. Downloading the generic deployable package
- Go to the Red Hat Customer Portal and log in.
- Select → .
- From the list of products click on Red Hat JBoss BPM Suite.
- From the Version drop-down menu, select version 6.0.3.
- In the Software Downloads section that comes up, navigate to the Red Hat JBoss BPM Suite 6.0.3 Deployable for all supported containers row and then click Download.
3.2.2. Installing the generic deployable package
- Set up the database driver and the transaction manager (Bitronix) (refer to Section 3.2.2.1, “Setting up transaction manager for Red Hat JBoss Web Server 2.0 (Tomcat 7)”).
- Set up the Business Central application: set up users and roles and set up persistence (refer to Section 3.2.2.2, “Setting up Business Central for Red Hat JBoss Web Server 2.0 (Tomcat 7)”).
- Set up the Dashbuilder application: set up users and roles and set up persistence (refer to Section 3.2.2.3, “Setting up Dashbuilder for Red Hat JBoss Web Server 2.0 (Tomcat 7)”).
3.2.2.1. Setting up transaction manager for Red Hat JBoss Web Server 2.0 (Tomcat 7)
- Extract the generic deployable zip package you downloaded from Red Hat Customer Portal. This zip package contains two more zip files:
jboss-bpms-engine.zipandjboss-bpms-manager.zip. - Extract the contents of the
jboss-bpms-manager.zipfile to a temporary location. This zip file contains two web application archive folders:business-central.waranddashbuilder.warin exploded formats and these are now in your temporary location. Rename these folders to remove the.warextension.Copy both these folders directly under the$TOMCAT_DIR/webappsfolder.You should end up with two folders in exploded format:$TOMCAT_DIR/webapps/business-centraland$TOMCAT_DIR/webapps/dashbuilder.Note
$TOMCAT_DIR stands for the home directory where your web server is located. Replace it with the actual path to your web server home directory, for example:/home/john/jboss-ews-2.0/tomcat7/ - Extract the
jboss-bpms-enginefolder from thejboss-bpms-engine.ziparchive to a temporary location from where you can copy the required libraries. This folder now contains all the core BPMS libraries under the extracted folder and alibfolder. Install the transaction manager.
Warning
Please note that the following section describes the setup of a transaction manager, Bitronix that is not officially supported by Red Hat.Copy the following transaction manager jar libraries from thelibfolder where you just extracted thejboss-bpms-enginelibraries to$TOMCAT_DIR/lib/directory:- btm-VERSION.jar
- btm-tomcat55-lifecycle-VERSION.jar
- jta-VERSION.jar
- slf4j-api-VERSION.jar
- slf4j-ext-VERSION.jar
In addition, download the following library and copy it into the$TOMCAT_DIR/lib/folder as well:- Install the driver to your database: copy the jar file with the relevant database driver to
$TOMCAT_DIR/lib/.Note
If using the embedded H2 database, the driver is available inbusiness-central/WEB-INF/lib/. - Create the transaction manager configuration files in
$TOMCAT_DIR/conf/:- btm-config.properties
bitronix.tm.serverId=tomcat-btm-node0
bitronix.tm.journal.disk.logPart1Filename=${btm.root}/work/btm1.tlog
bitronix.tm.journal.disk.logPart2Filename=${btm.root}/work/btm2.tlog
bitronix.tm.resource.configuration=${btm.root}/conf/resources.properties
bitronix.tm.serverId=tomcat-btm-node0 bitronix.tm.journal.disk.logPart1Filename=${btm.root}/work/btm1.tlog bitronix.tm.journal.disk.logPart2Filename=${btm.root}/work/btm2.tlog bitronix.tm.resource.configuration=${btm.root}/conf/resources.propertiesCopy to Clipboard Copied! Toggle word wrap Toggle overflow - resources.properties (the resource.ds1.uniqueName defines the datasource name used in tomcat resource definition later - make a note of this value).Make sure to change the values in the following definitions to match your environment.
Example 3.2. H2 datasource definition
Copy to Clipboard Copied! Toggle word wrap Toggle overflow Example 3.3. MySQL 5.5 datasource definition
Copy to Clipboard Copied! Toggle word wrap Toggle overflow Example 3.4. DB2 Type 4 datasource definition
Copy to Clipboard Copied! Toggle word wrap Toggle overflow Example 3.5. Oracle datasource definition
Copy to Clipboard Copied! Toggle word wrap Toggle overflow Example 3.6. Microsoft SQL Server datasource definition
Copy to Clipboard Copied! Toggle word wrap Toggle overflow
- Set up the transaction manager listener in
$TOMCAT_DIR/conf/server.xmlto start and stop Bitronix on container startup and shutdown:Add the following element as the last <Listener> element into the <Server> element:<Listener className="bitronix.tm.integration.tomcat55.BTMLifecycleListener" />
<Listener className="bitronix.tm.integration.tomcat55.BTMLifecycleListener" />Copy to Clipboard Copied! Toggle word wrap Toggle overflow - Define the btm.root system property and location where bitronix config file is placed:In
$TOMCAT_DIR/bin/, create thesetenv.shfile with the following content:CATALINA_OPTS="-Xmx512M -XX:MaxPermSize=512m -Dbtm.root=$CATALINA_HOME -Dbitronix.tm.configuration=$CATALINA_HOME/conf/btm-config.properties -Dorg.jbpm.designer.perspective=RuleFlow -Djbpm.tsr.jndi.lookup=java:comp/env/TransactionSynchronizationRegistry"
CATALINA_OPTS="-Xmx512M -XX:MaxPermSize=512m -Dbtm.root=$CATALINA_HOME -Dbitronix.tm.configuration=$CATALINA_HOME/conf/btm-config.properties -Dorg.jbpm.designer.perspective=RuleFlow -Djbpm.tsr.jndi.lookup=java:comp/env/TransactionSynchronizationRegistry"Copy to Clipboard Copied! Toggle word wrap Toggle overflow The propertyorg.jbpm.designer.perspectiveis set toRuleFlowto allow the default perspective for the designer to beRuleFlowrather thanFull. Grant the file execute permissions if applicable.Important
On Microsoft Windows systems, replace the$CATALINA_HOMEvalue in the content of the file with the equivalent environment variable name or use the absolute path and add the values insetenv.batfile as shown here in the following example:set "CATALINA_OPTS=-Xmx512M -XX:MaxPermSize=512m -Dbtm.root=C:/Tomcat -Dbitronix.tm.configuration=C:/Tomcat/conf/btm-config.properties -Dorg.jbpm.designer.perspective=RuleFlow"
set "CATALINA_OPTS=-Xmx512M -XX:MaxPermSize=512m -Dbtm.root=C:/Tomcat -Dbitronix.tm.configuration=C:/Tomcat/conf/btm-config.properties -Dorg.jbpm.designer.perspective=RuleFlow"Copy to Clipboard Copied! Toggle word wrap Toggle overflow
3.2.2.2. Setting up Business Central for Red Hat JBoss Web Server 2.0 (Tomcat 7)
- Set up a
Valveso that the Business Central web application can load the users set up in Tomcat:- Define users and roles in
$TOMCAT_DIR/conf/tomcat-users.xml. Note that Business Central requires users to have the roles specified asadminand/oranalyst(for more information about user and role definitions, refer to the Tomcat 7 documentation).The program listing below shows an example of how these two roles would be added and how a user namedbpmsadminwill be assigned these roles.<role rolename="admin"/> <role rolename="analyst" /> <user username="bpmsadmin" password="P@ssw0rd" roles="admin,analyst"/>
<role rolename="admin"/> <role rolename="analyst" /> <user username="bpmsadmin" password="P@ssw0rd" roles="admin,analyst"/>Copy to Clipboard Copied! Toggle word wrap Toggle overflow - Copy
kie-tomcat-integration-VERSION.jarfrom$TOMCAT_DIR/webapps/business-central/WEB-INF/lib/to$TOMCAT_DIR/lib/. - Copy
jaxb-api-VERSION.jarfrom$TOMCAT_DIR/webapps/business-central/WEB-INF/lib/to$TOMCAT_DIR/lib/. - In
$TOMCAT_DIR/conf/server.xml, add the Tomcat Valve declaration in the relevant <host> element:<Valve className="org.kie.integration.tomcat.JACCValve" />
<Valve className="org.kie.integration.tomcat.JACCValve" />Copy to Clipboard Copied! Toggle word wrap Toggle overflow - In
$TOMCAT_DIR/webapps/business-central/WEB-INF/web.xml, uncomment entries marked with theTOMCAT-JEE-SECURITYcomments. - Set up the tomcat authentication source: in the
$TOMCAT_DIR/webapps/business-central/WEB-INF/classes/META-INF/services/directory, rename the following files:org.uberfire.security.auth.AuthenticationSourcetoorg.uberfire.security.auth.AuthenticationSource-ORIGINandorg.uberfire.security.auth.AuthenticationSource-TOMCAT-JEE-SECURITYtoorg.uberfire.security.auth.AuthenticationSource:# Example command if you run this from $TOMCAT_DIR/webapps directory mv business-central/WEB-INF/classes/META-INF/services/org.uberfire.security.auth.AuthenticationSource business-central/WEB-INF/classes/META-INF/services/org.uberfire.security.auth.AuthenticationSource-ORIGIN mv business-central/WEB-INF/classes/META-INF/services/org.uberfire.security.auth.AuthenticationSource-TOMCAT-JEE-SECURITY business-central/WEB-INF/classes/META-INF/services/org.uberfire.security.auth.AuthenticationSource
# Example command if you run this from $TOMCAT_DIR/webapps directory
$ mv business-central/WEB-INF/classes/META-INF/services/org.uberfire.security.auth.AuthenticationSource business-central/WEB-INF/classes/META-INF/services/org.uberfire.security.auth.AuthenticationSource-ORIGIN
$ mv business-central/WEB-INF/classes/META-INF/services/org.uberfire.security.auth.AuthenticationSource-TOMCAT-JEE-SECURITY business-central/WEB-INF/classes/META-INF/services/org.uberfire.security.auth.AuthenticationSource
Copy to Clipboard Copied! Toggle word wrap Toggle overflow - In
$TOMCAT_DIR/webapps/business-central/WEB-INF/beans.xml, uncommentJAASUserGroupInfoProducerand commentorg.jbpm.kie.services.cdi.producer.DefaultUserGroupInfoProducer(optional). Thealternativespart of this file should now look like this:Copy to Clipboard Copied! Toggle word wrap Toggle overflow
- If you are using a datasource other than the default provided by the underlying H2 database, you will need to setup persistence. If you are using the default H2 database, then you can ignore the rest of the steps in this procedure.In this procedure, you configure a datasource with the JNDI name
jdbc/myDatasourceas defined in uniqueName=jdbc/jbpm in the bitronixresources.propertiesfile earlier (for the MySQL option).- In
business-central/META-INF/context.xml, replace the datasource JNDI name in the <Resource> element. The uniqueName attribute refers to the resource.ds1.uniqueName property set inresources.properties:<Resource name="jdbc/myDatasource" uniqueName="jdbc/jbpm" auth="Container" removeAbandoned="true" factory="bitronix.tm.resource.ResourceObjectFactory" type="javax.sql.DataSource"/>
<Resource name="jdbc/myDatasource" uniqueName="jdbc/jbpm" auth="Container" removeAbandoned="true" factory="bitronix.tm.resource.ResourceObjectFactory" type="javax.sql.DataSource"/>Copy to Clipboard Copied! Toggle word wrap Toggle overflow - In
business-central/WEB-INF/web.xml, replace the datasource JNDI name in the <res-ref-name> element with your datasource name:Copy to Clipboard Copied! Toggle word wrap Toggle overflow - Change
business-central/WEB-INF/classes/META-INF/persistence.xml.In this file, change the name of the hibernate dialect used for your database, if using a different database other than H2. The code below demonstrates the original database information forpersistence.xml:<property name="hibernate.dialect" value="org.hibernate.dialect.H2Dialect"/>
<property name="hibernate.dialect" value="org.hibernate.dialect.H2Dialect"/>Copy to Clipboard Copied! Toggle word wrap Toggle overflow This information can be updated in the following manner (as demonstrated with MySQL database below):<property name="hibernate.dialect" value="org.hibernate.dialect.MySQLDialect"/>
<property name="hibernate.dialect" value="org.hibernate.dialect.MySQLDialect"/>Copy to Clipboard Copied! Toggle word wrap Toggle overflow Note
The dialect for DB2 isorg.hibernate.dialect.DB2Dialect, for DB2 on AS/400 isorg.hibernate.dialect.DB2400Dialect, for Oracle isorg.hibernate.dialect.Oracle10gDialectand for Microsoft SQL Server isorg.hibernate.dialect.SQLServerDialect - Change
business-central/WEB-INF/classes/META-INF/persistence.xmlfile so that BPMS process engine can use the new database.The code below demonstrates the original datasource information forpersistence.xml:<jta-data-source>java:comp/env/jdbc/jbpm</jta-data-source>
<jta-data-source>java:comp/env/jdbc/jbpm</jta-data-source>Copy to Clipboard Copied! Toggle word wrap Toggle overflow Change this value to the datasource defined earlier:<jta-data-source>java:comp/env/jdbc/myDatasource</jta-data-source>
<jta-data-source>java:comp/env/jdbc/myDatasource</jta-data-source>Copy to Clipboard Copied! Toggle word wrap Toggle overflow
- You can now start the JBoss Web Server to login to Business Central.
- Run
startup.shin the $TOMCAT_HOME/bindirectory../startup.sh
./startup.shCopy to Clipboard Copied! Toggle word wrap Toggle overflow - Navigate to http://localhost:8080/business-central in a web browser.
- Login with the correct username/password as given in the
tomcat-users.xmlfile where you defined user roles.
3.2.2.3. Setting up Dashbuilder for Red Hat JBoss Web Server 2.0 (Tomcat 7)
- Define users and roles in
$TOMCAT_DIR/conf/tomcat-users.xml. Note that Dashbuilder requires users to have the role specified asadminand/oranalyst. If you have already defined these users earlier for Business-Central, you don't need to define them again. - Enable single sign-on between Dashbuilder and Business Central by uncommenting the following lines in
$TOMCAT_DIR/conf/server.xmlfile:<Valve className="org.apache.catalina.authenticator.SingleSignOn" />
<Valve className="org.apache.catalina.authenticator.SingleSignOn" />Copy to Clipboard Copied! Toggle word wrap Toggle overflow - As with Business Central setup, if you are using a database other than the default and integrated H2 database, you will need to setup persistence.In this procedure, you configure a datasource with the JNDI name
jdbc/dashbuilderDSas defined in uniqueName=jdbc/jbpm in the bitronixresources.propertiesfile:- In
dashbuilder/META-INF/context.xml, replace the datasource JNDI name in the <Resource> element. The uniqueName attribute refers to the resource.ds1.uniqueName property set inresources.properties:<Resource name="jdbc/dashbuilderDS" uniqueName="jdbc/jbpm" auth="Container" removeAbandoned="true" factory="bitronix.tm.resource.ResourceObjectFactory" type="javax.sql.DataSource"/>
<Resource name="jdbc/dashbuilderDS" uniqueName="jdbc/jbpm" auth="Container" removeAbandoned="true" factory="bitronix.tm.resource.ResourceObjectFactory" type="javax.sql.DataSource"/>Copy to Clipboard Copied! Toggle word wrap Toggle overflow Note
Depending upon your database, you may need to define some other properties here as well. For example, in an Oracle environment, this entry may look like the following listing.<Resource name="jdbc/jbpm" uniqueName="jdbc/jbpm" auth="Container" removeAbandoned="true" factory="bitronix.tm.resource.ResourceObjectFactory" type="javax.sql.DataSource" username="username" password="password" driverClassName="oracle.jdbc.xa.client.OracleXADataSource" url="jdbc:oracle:thin:YOUR-URL:1521:YOUR-DB" maxActive="8" />
<Resource name="jdbc/jbpm" uniqueName="jdbc/jbpm" auth="Container" removeAbandoned="true" factory="bitronix.tm.resource.ResourceObjectFactory" type="javax.sql.DataSource" username="username" password="password" driverClassName="oracle.jdbc.xa.client.OracleXADataSource" url="jdbc:oracle:thin:YOUR-URL:1521:YOUR-DB" maxActive="8" />Copy to Clipboard Copied! Toggle word wrap Toggle overflow - In
dashbuilder/WEB-INF/web.xml, add the datasource JNDI name in the <res-ref-name> element with your datasource name:Copy to Clipboard Copied! Toggle word wrap Toggle overflow - In
dashbuilder/META-INF/context.xml, define the transaction factory:<Transaction factory="bitronix.tm.BitronixUserTransactionObjectFactory"/>
<Transaction factory="bitronix.tm.BitronixUserTransactionObjectFactory"/>Copy to Clipboard Copied! Toggle word wrap Toggle overflow - Update the datasource JNDI name in
dashbuilder/WEB-INF/etc/hibernate.cfg.xmlin the <session-factory> element:<property name="connection.datasource">java:/comp/env/jdbc/dashbuilderDS</property>
<property name="connection.datasource">java:/comp/env/jdbc/dashbuilderDS</property>Copy to Clipboard Copied! Toggle word wrap Toggle overflow
- Restart Java Web server for these changes to take effect. Once restarted, you can navigate to Dashbuilder from within Business Central or directly via:
http://localhost:8080/dashbuilder.
3.3. Starting the server
Note
standalone.sh that Red Hat JBoss BPM Suite ships with is optimized for performance. To run your server in the performance mode, do the following:
- On the command line, move into the
$SERVER_HOME/bin/directory. - In a Unix environment run:
./standalone.sh
./standalone.shCopy to Clipboard Copied! Toggle word wrap Toggle overflow In a Windows environment run:./standalone.bat
./standalone.batCopy to Clipboard Copied! Toggle word wrap Toggle overflow
standalone-secure.sh that is optimized for security. This script applies a security policy by default that protects against a known security vulnerability.
Note
standalone-secure.sh script.
Warning
- On the command line, move into the
$SERVER_HOME/bin/directory. - In a Unix environment run:
./standalone-secure.sh
./standalone-secure.shCopy to Clipboard Copied! Toggle word wrap Toggle overflow In a Windows environment run:./standalone-secure.bat
./standalone-secure.batCopy to Clipboard Copied! Toggle word wrap Toggle overflow
3.4. Java Security Manager and performance management
- In high load environments where performance is critical it is recommended to only deploy applications that have been developed on other systems and properly reviewed. It is also recommended not to create any users with Analyst role on such systems. If these safeguards are followed, it is safe to leave JSM disabled on these systems so it does not introduce any performance degradation.
- In testing and development environments without high loads, or in environments where rule and process authoring is exposed to external networks, it is recommended to have JSM enabled in order to achieve security benefits of properly sandboxed evaluation of MVEL.
Chapter 4. Logging on to Business Central
- Navigate to http://localhost:8080/business-central in a web browser. If the user interface has been configured to run from a domain name, substitute
localhostfor the domain name. For example http://www.example.com:8080/business-central. - Log in with the user credentials that were created during installation. For example: User =
helloworlduserand password =Helloworld@123.
Chapter 5. Hello World project
Hello World project with a Hello World business process. All that this business process will do, is display the Hello World! message and finish execution.
- Create a Hello World repository in the Artifact repository.
- Create the Hello World Project with the
HelloWorldbusiness process definition. - Model the Hello World process logic in the business process using the graphical Process Designer tool.
- Build and deploy the project on the locally running Execution Engine.
- Run the Hello World process.
- Monitor the Process execution.
5.1. Creating repository structure
- Open Business Central in your web browser (if running locally http://localhost:8080/business-central) and log in as a user with the
adminrole (helloworlduser). - Create an organizational unit in the Artifact repository:
- Go to → .
- On the perspective menu, click → .
- In the displayed Organizational Unit Manager view, click .In the displayed Add New Organizational Unit dialog box, define the unit properties and click :
- Name:
helloworld - Owner:
helloworlduser
- Create a new repository in the helloworld organizational unit:
- Go to → .
- On the perspective menu, click → .
- In the displayed Create Repository dialog box, define the repository properties:
- Repository Name:
helloworldrepo - Organizational Unit:
helloworld
- Go to → .
- In the Project Explorer in the organizational unit drop-down box, select
helloworld, and in the repository drop-down box selecthelloworldrepo.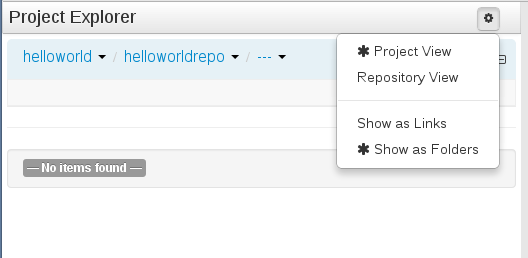
Figure 5.1. Selecting the
helloworldreporepository in thehelloworldorganizational group in Project Explorer - Create a project in the
helloworldrepository:- On the perspective menu, go to →
- In the displayed Create new dialog box, define your Project properties:
- Resource Name (project name):
HelloWorld - Path:
default://master@helloworldrepo/
- In the New Project Wizard dialog, define the maven properties of the Project. Press Enter after making each entry:
- Group ID:
org.bpms - Artifact ID:
HelloWorld - Version ID:
1.0
- Click .
Chapter 6. Hello World process
6.1. Creating business process
- Display the Project Authoring perspective ( →
- In the Project Explorer view on the left, select the
helloworldorganizational unit, thehelloworldreporepository, theHelloWorldproject, and the org.bpms package: this defines the location in the Artifact repository, where you will create your Business Process definition.Note
Make sure to select the package org.bpms. Selection of an incorrect package causes the deployment to fail. - On the perspective menu, click → and define the Process definition details:
- Enter the resource name as
HelloWorld.
- Click .
6.2. Modeling business process
HelloWorld under Business Processes to re-open the Business Process designer. Make sure you select the correct package (org.bpms.helloworld). To design the Process content, do the following:
- Expand the Object Library palette with Process Elements: click the double-arrow button (
 ) in the upper left hand corner of the Business Process designer tab.
- A Start Event element appears on the canvas.
- Click the Start Event element: the quick linker items appear around the node. Click the Task (
 ) icon to create an outgoing Sequence Flow and a Task element connected to the Start Event.
- Create a Timer Event: from the palette, drag-and-drop the Timer (under Catching Intermediate Events) and connect the Task to the Timer Element using the quick linker menu.
- Create the End Event element connected to the Timer Event element (either using the quick linker feature or dragging it from the palette).
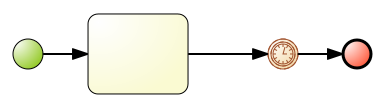
Figure 6.1. Draft of the HelloWorld Process
6.3. Defining element properties
- Click the double-arrow (
 ) in the upper right hand corner to expand the Properties tab.
- Click anywhere on the canvas. The Properties tab displays the properties of the
HelloWorldProcess. The required properties are pre-defined; however, you can change their values if necessary. - The Start Element and End Element have only optional properties. However, Task Elements need their type and then type-specific properties defined: click the Task element and define the required properties:
- Name:
ScriptTask - Task Type:
Script - Script Language:
java - Script:
System.out.println("Hello World!");Click .
You have defined a Task that will perform a script on execution. The script is defined in Java and executes the methodSystem.out.println("Hello World!");, that means it will writeHello World!to the standard output of the server (by default, the standard output of the server is the console the server was started in). - You still need to define properties of the Timer Event to make the process wait on runtime, so you can inspect its execution: click the Timer Element and define the time it will wait for execution:
- Edit Time Duration:
1mand press Enter.The Process will therefore wait for 1 minute on the Timer Event after it executes the Script Task.
- Give the Timer Event a name via the properties, and then save your Process: open the menu (
 ) and click .
- Click the (
 ) button on the toolbar of the Process Designer with the Process to make sure the defined Process is valid. The outline of any element with one or multiple validation mistakes turns orange (refer to the Red Hat JBoss BPM Suite User Guide for information on the validation feature).
6.4. Building and deploying
Hello World Process, you need to build the entire Project and deploy it to the Execution Server:
- On the main menu of Business Central, go to → .
- In the Project Explorer, locate the Hello World project.
- Open the Project in the Project editor: on the perspective menu, click → .
- Check that the correct Project details are displayed on the Project Screen and click the button in the upper right hand corner of the Project Screen view.
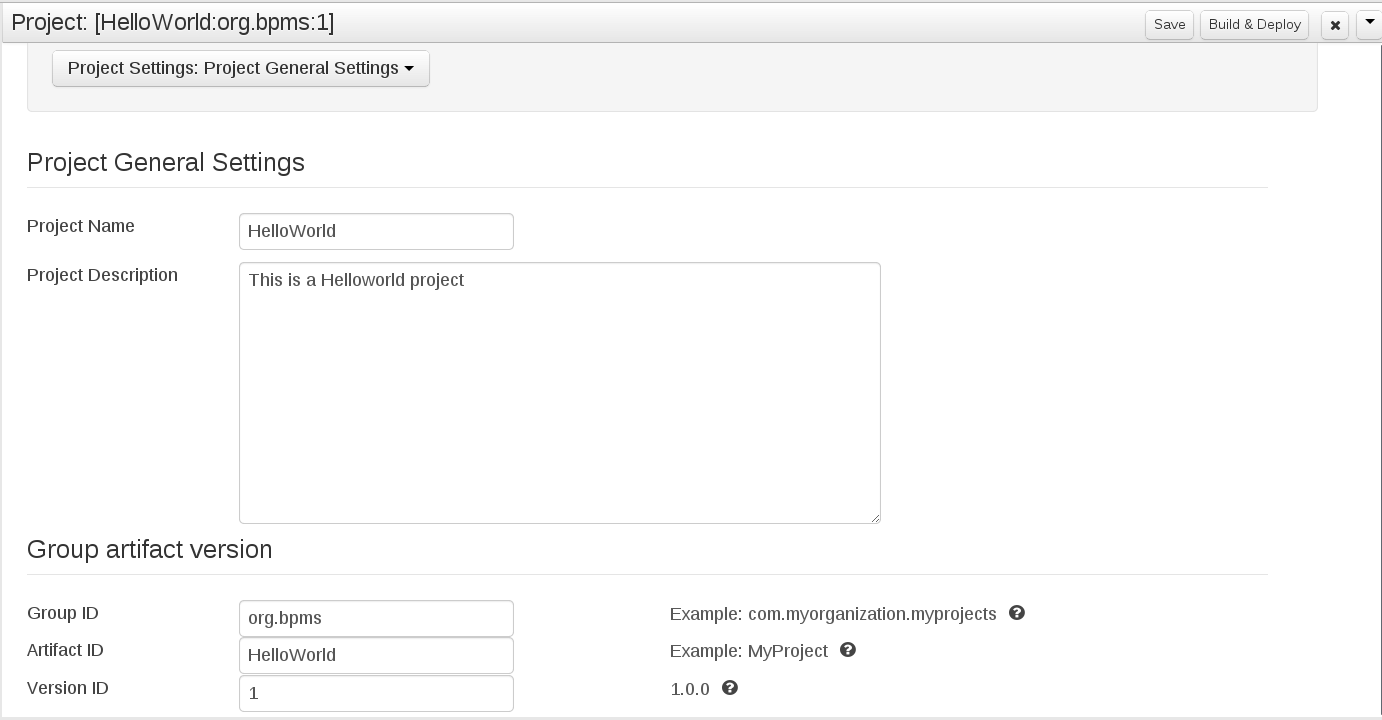
Figure 6.2. Project editor with the helloWorld project properties
6.5. Instantiating business process
Hello World process, that is, to run the business process, do the following:
- Click → on the main menu.
- On the displayed Process Definitions tab, locate the
Hello Worldprocess. You might need to click the button to have the deployment displayed on the list. - Click the (
 ) button next to the Process definition entry and in the Form dialog box, click the button again to confirm that you want to instantiate the process.
The Process is instantiated with the currently logged-in user as the process owner and the process form is displayed (the form can serve to request input from a user on Process instantiation if defined; refer to the Red Hat JBoss BPM Suite User Guide).
) button next to the Process definition entry and in the Form dialog box, click the button again to confirm that you want to instantiate the process.
The Process is instantiated with the currently logged-in user as the process owner and the process form is displayed (the form can serve to request input from a user on Process instantiation if defined; refer to the Red Hat JBoss BPM Suite User Guide).
Hello World! message appears in standard output, typically the terminal emulator in which the server was started. Then the Process instance waits on the Timer Event. Click on to see the current execution status.
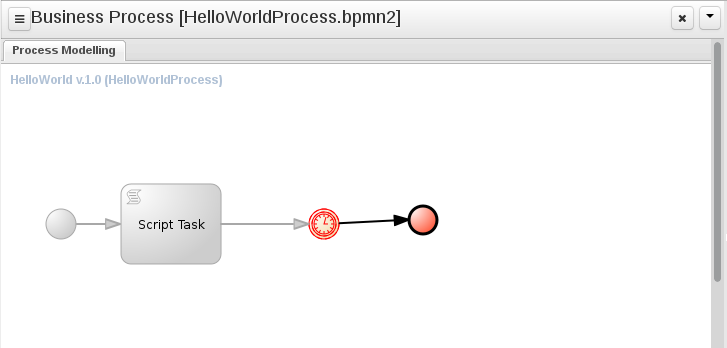
Figure 6.3. HelloWorld realtime execution diagram: the Timer Event being executed
6.6. Aborting business process
HelloWorld Process is running on the Execution Server (being executed). You can check in the Process Instances view: to display the view, go to → .
 ) button and perform basic administration actions, such as, send a Signal to a Process instance (
 ) and abort it (
 ).
).
HelloWorld Process instance is waiting on the Timer Event, abort it: click the (
) on the line with the information on the HelloWorld Process instance: the instance will disappear from the list of active Process instances and appear in the list of Aborted instances.

Figure 6.4. Aborted Process instances including the HelloWorld Process instance
Chapter 7. Hello World business rule
7.1. Creating the business rule
helloworldrule business rule in the HelloWorld project, do the following:
- In Project Explorer, select the
helloworldorganizational unit, thehelloworldreporepository, theHelloWorldproject, and the default package.Note
Make sure to select the default package. Selection of an incorrect package causes the deployment to fail. - Create the DRL file:
- On the perspective menu, click → .
- In the Create new dialog box, define the resource name as
helloworldruleand check that the destination path isdefault://master@helloworldrepo/HelloWorld/src/main/resources. - Click .
- In the displayed DRL editor with the
helloworldrule.drlfile, define the rule:Copy to Clipboard Copied! Toggle word wrap Toggle overflow This rule does not define any when condition, that is, it will always be true when fired (called to execute) and theHello World!phrase will be printed. - Click .
- A Save this item prompt is displayed. Enter the Check-in comment and click Save.
Note
The check-in comment would be a short description of the kind of change you made and has to be entered every time an asset is saved.
7.2. Adding the Business Rule Task
- Open your Business Process in Process Designer: in Project Explorer, select the
HelloWorldproject, the org.bpms package, click on BUSINESS PROCESSES and click theHelloWorldprocess.Note
Make sure to select the org.bpms package. Selection of an incorrect package causes the deployment to fail. - In the displayed Business Process designer with the helloworld process, expand the Object Library palette with Process Elements: click the double-arrow button (
) in the upper left hand corner of the Business Process designer tab.
- Expand the Tasks menu and drag-and-drop the Business Rule task to the canvas on the right.Adjust flow connections so as to integrate the task into the workflow.
- Select the Business Rule Task and define its properties in the Properties panel:
- Name:
BusinessRule - Ruleflow Group:
helloworldgroupThe Ruleflow Group property defines the group of rules that should be fired when the Task is being executed. In this example, only one rule, thehelloworldrulerule defined in thehelloworldrule.drlfile, is present in thehelloworldgroupgroup.
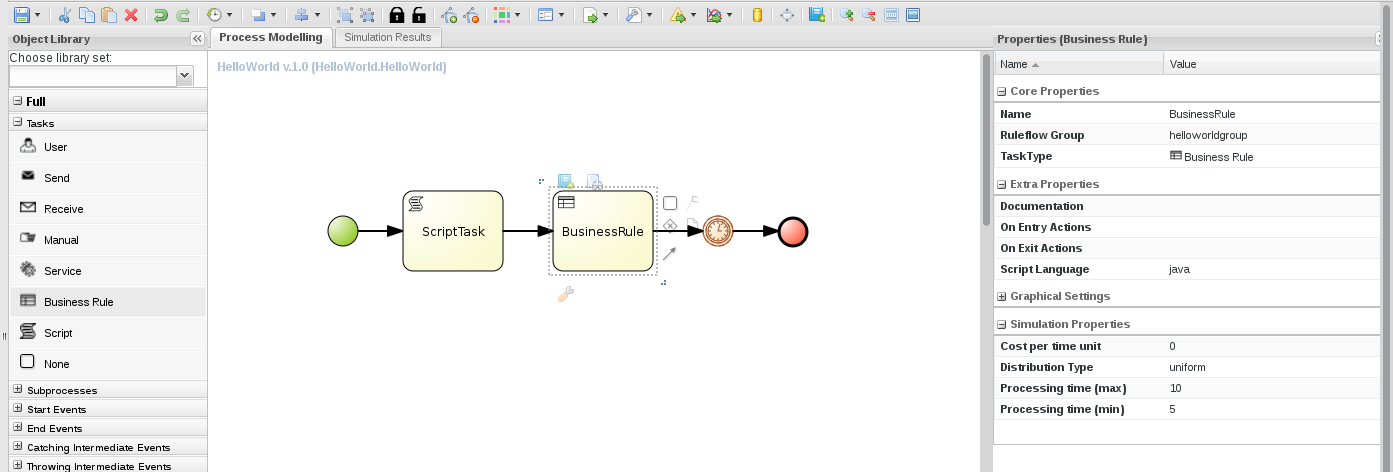
Figure 7.1. The helloworld process with the Business Rule Task and its properties
- Click the save button to save the changes.
7.3. Building and deploying
- On the main menu of Business Central, go to → .
- In the Project Explorer, locate the Hello World project.
- Open the Project in the Project editor: on the perspective menu, click → .
- Check that the correct Project details are displayed on the Project Screen and click the button in the upper right hand corner of the Project Screen view.
Figure 7.2. Project editor with the helloWorld project properties
helloWorld deployment is substituted with the new version with the Business Rule Task. To keep both deployments, change the version number of the Project in the Project editor.
7.4. Instantiating business process
Hello World process, that is, to run the business process, do the following:
- Click → on the main menu.
- On the displayed Process Definitions tab, locate the
Hello World. You might need to click to have the deployment displayed on the list. - Click the (
) button next to the Process definition entry and in the Form dialog box, click the play (
 ) button to confirm that you want to instantiate the process.
The Process is instantiated with the currently logged-in user as the process owner and the process form is displayed (the form can serve to request input from a user on Process instantiation if defined; refer to the Red Hat JBoss BPMS User Guide).
) button to confirm that you want to instantiate the process.
The Process is instantiated with the currently logged-in user as the process owner and the process form is displayed (the form can serve to request input from a user on Process instantiation if defined; refer to the Red Hat JBoss BPMS User Guide).
Hello World! message appears in standard output twice, typically the terminal emulator in which the server was started. Then the Process instance waits on the Timer Event. Click on the to see the current execution status.
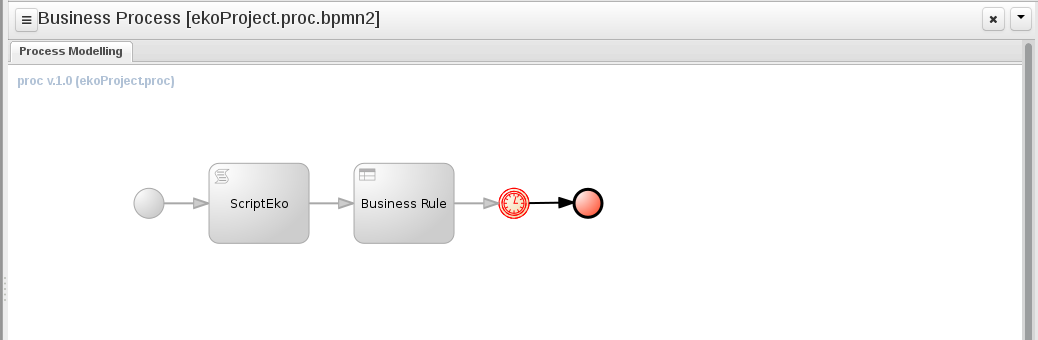
Figure 7.3. HelloWorld realtime execution diagram: the Timer Event being executed
Chapter 8. BAM
8.1. Accessing Red Hat JBoss BPM Suite Dashbuilder
8.2. Monitoring instances
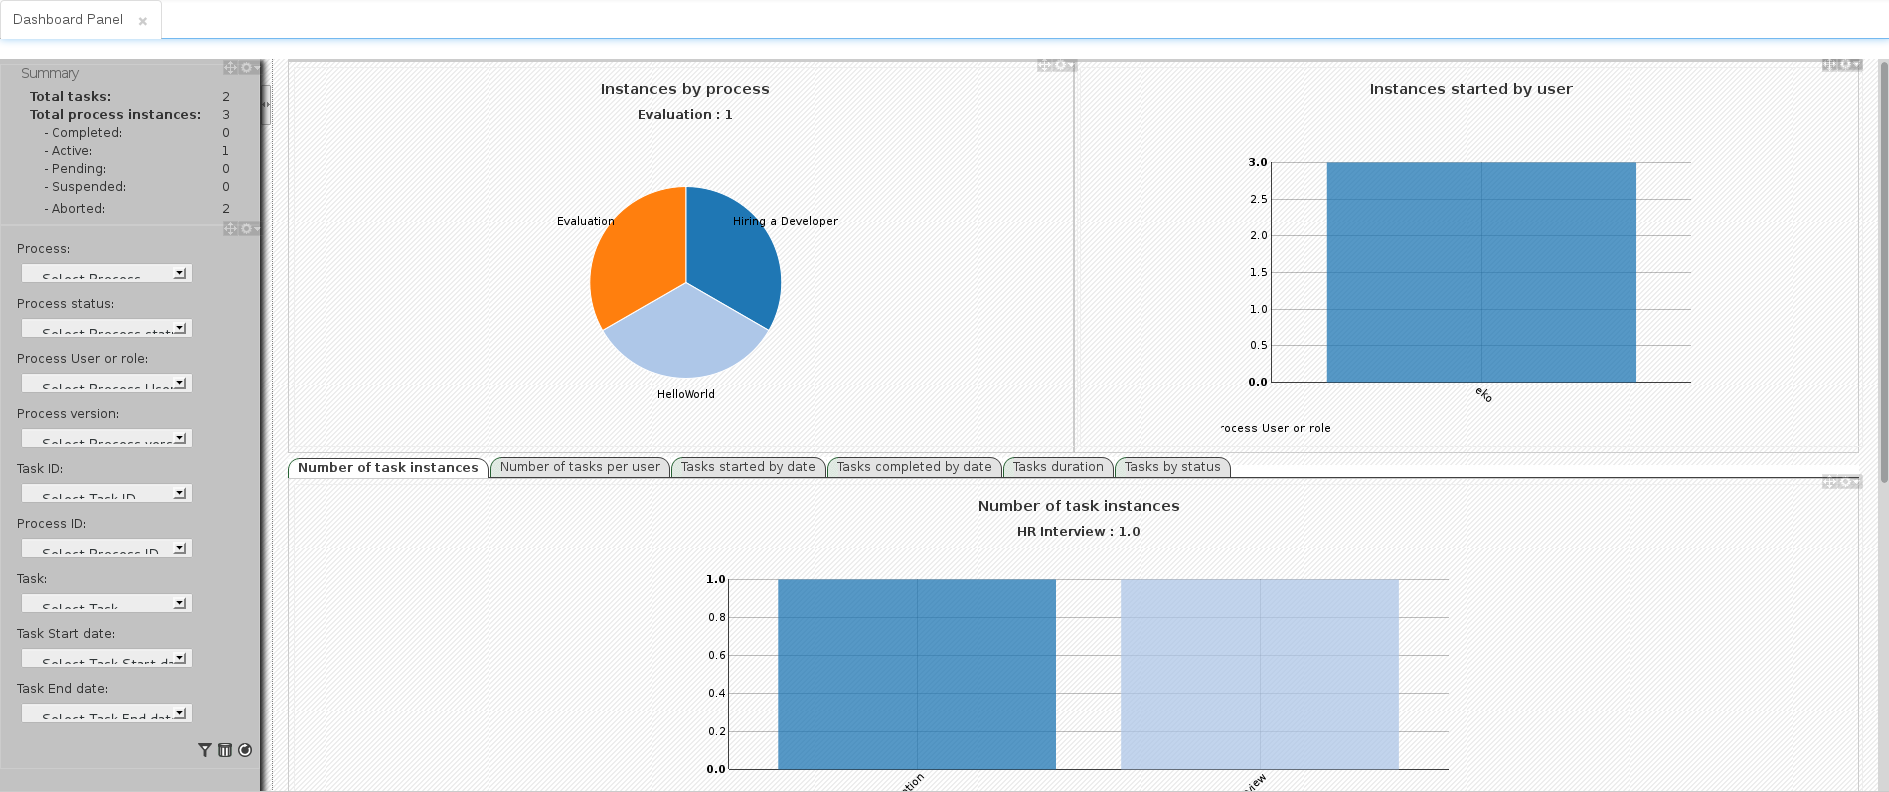
Figure 8.1. Process and Task dashboard
Chapter 9. Red Hat JBoss Developer Studio
9.1. JBoss Central
Note
# Don't use GTK 3
export SWT_GTK3=0
# Don't use GTK 3
export SWT_GTK3=0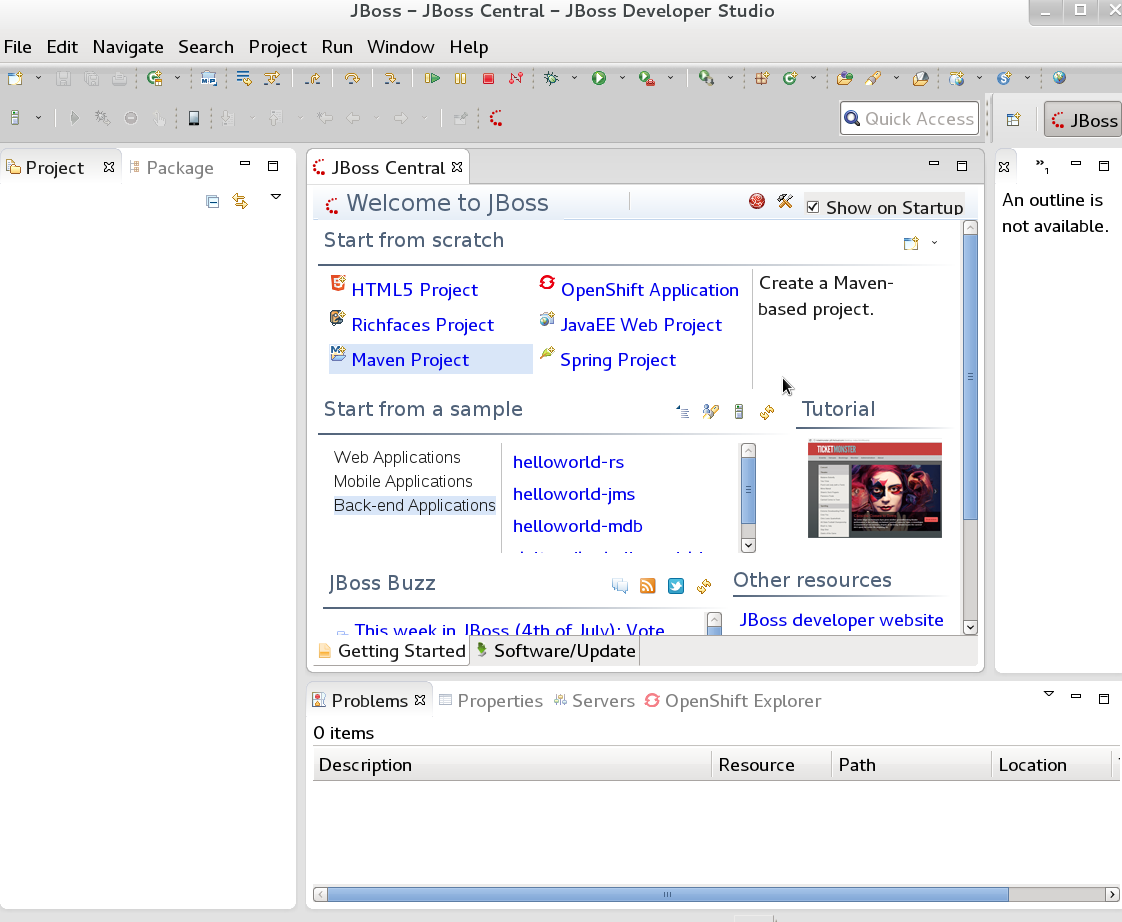
Figure 9.1. JBoss Central
9.2. Installing the JBoss Developer Studio Plug-ins
Procedure 9.1. Install the Drools and jBPM JBoss Developer Studio Plug-in
- Start JBoss Developer Studio.
- Select → .
- Click Add to enter the Add Repository menu.
- Give the software site a name next to Name field and add the following url in the Location field: https://devstudio.jboss.com/updates/7.0/integration-stack/
- Click OK
- Select the JBoss Business Process and Rule Development feature from the available options and click Next and then Next again.
- Read the license and accept it by selecting the appropriate radio button, and click Finish.
- After installation of the plug-ins has completed, restart JBoss Developer Studio.
9.3. Setting the Drools runtime
Procedure 9.2. Configure BRMS Runtime
- Extract the runtime jar files located in the
jboss-brms-engine.ziparchive of the JBoss BRMS Generic Deployable zip archive (not the EAP6 deployable zip archive) available from Red Hat Customer Portal. - From the JBoss Developer Studio menu, select Window and click Preferences.
- Select → .
- Click Add...; provide a name for the new runtime, and click Browse to navigate to the directory where you extracted the runtime files in step 1. Click OK to register the selected runtime in JBDS.
- Mark the runtime you have created as the default Drools runtime by clicking on the check box next to it.
- Click OK. If you have existing projects, a dialog box will indicate that you have to restart JBoss Developer Studio to update the Runtime.
9.4. Setting the jBPM runtime
jboss-bpms-engine.zip archive.
Procedure 9.3. Configure jBPM Runtime
- From the JBoss Developer Studio menu, select Window and click Preferences.
- Select → .
- Click Add...; provide a name for the new runtime, and click Browse to navigate to the directory where the runtime is located.
- Click OK, select the new runtime and click OK again. If you have existing projects, a dialog box will indicate that you have to restart JBoss Developer Studio to update the Runtime.
9.5. Configuring the JBoss BPM Suite Server
Procedure 9.4. Configure the Server
- Open the jBPM view by selecting → → and select jBPM and click OK.
- Add the server view by selecting → → and select → .
- Open the server menu by right clicking the Servers panel and select → .
- Define the server by selecting → and clicking Next.
- Set the home directory by clicking the Browse button. Navigate to and select the installation directory for JBoss EAP 6.1.1 which has JBoss BPM Suite installed.
- Provide a name for the server in the Name field, make sure that the configuration file is set, and click Finish.
9.6. Importing Projects from a Git Repository into JBoss Developer Studio
Procedure 9.5. Cloning a Remote Git Repository
- Start the Red Hat JBoss BPM Suite server (if not already running) by selecting the server from the server tab and click the start icon.
- Simultaneously, start the Secure Shell server, if not running already, by using the following command. The command is Linux and Mac specific only. On these platforms, if sshd has already been started, this command will fail and you may safely ignore this step.
/sbin/service sshd start
/sbin/service sshd startCopy to Clipboard Copied! Toggle word wrap Toggle overflow - In JBoss Developer Studio, select → and navigate to the Git folder. Open the Git folder to select and click .
- Select the repository source as and click .
- Enter the details of the Git repository in the next window and click .
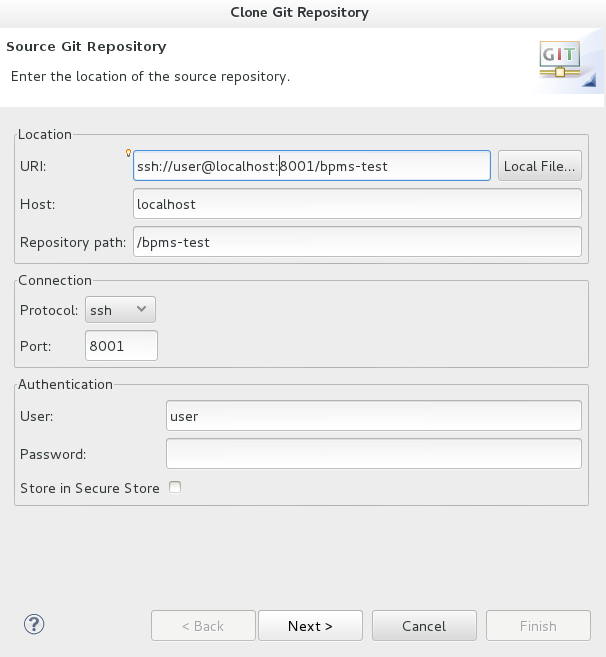
Figure 9.2. Git Repository Details
- Select which branch you want to import in the following window and click .
- You will be presented with the option to define the local storage for this project. Enter (or select) a non-empty directory, make any configuration changes and click .
- Import the project as a general project in the following window and click . Name the project and click .
Procedure 9.6. Importing a Local Git Repository
- Start the Red Hat JBoss BPM Suite server (if not already running) by selecting the server from the server tab and click the start icon.
- In JBoss Developer Studio, select → and navigate to the Git folder. Open the Git folder to select and click .
- Select the repository source as and click .
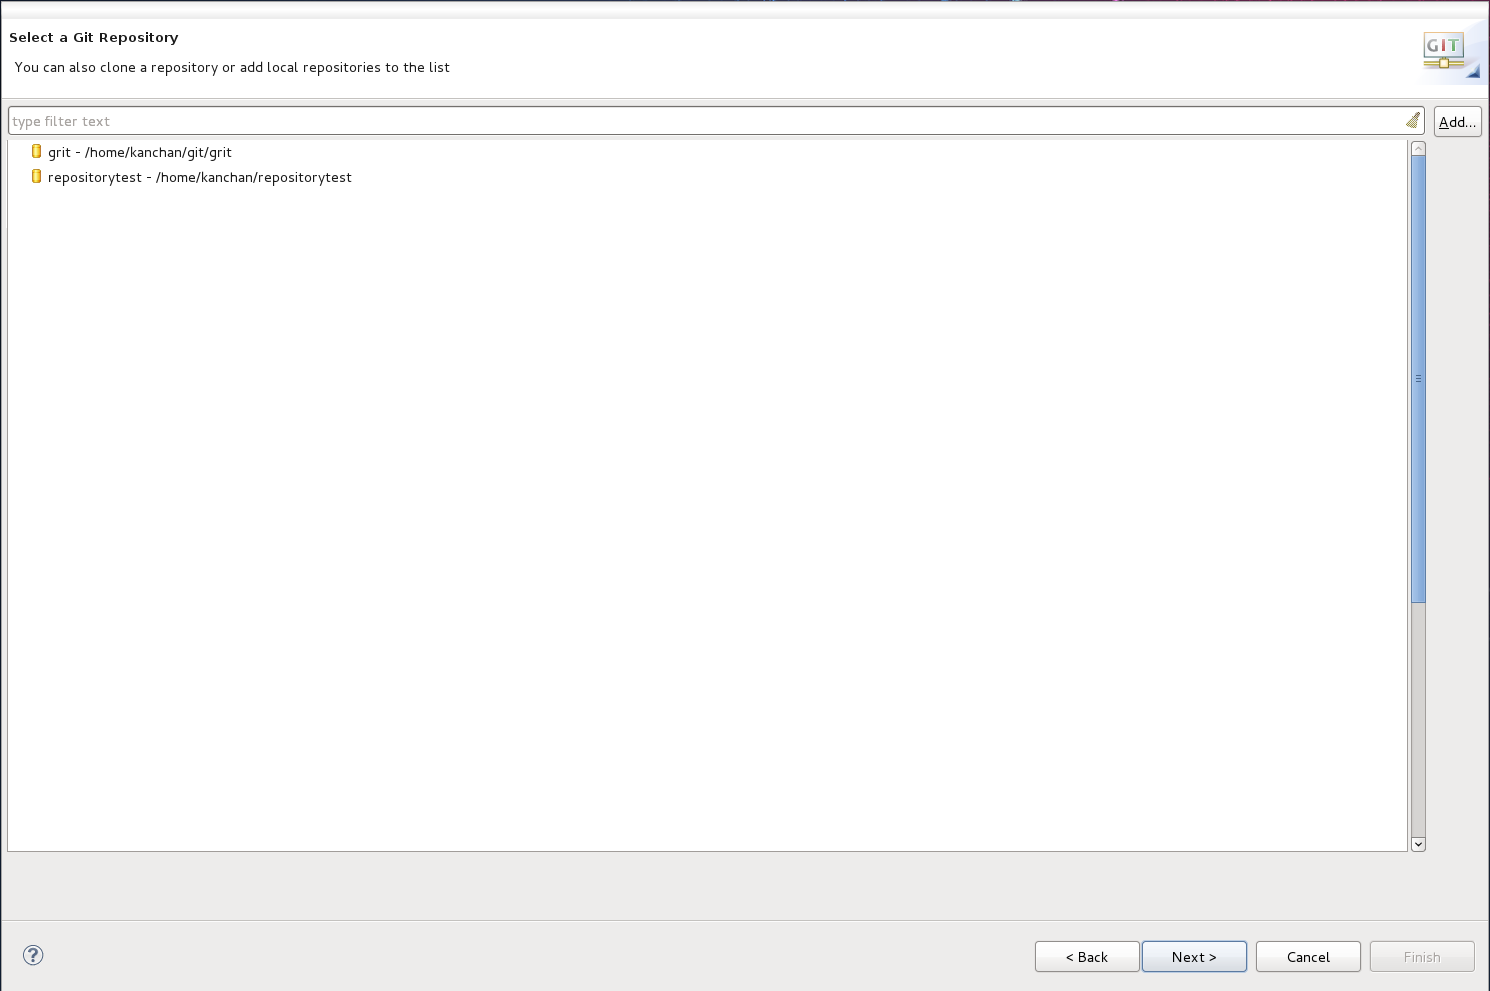
Figure 9.3. Git Repository Details
- Select the repository that is to be configured from the list of available repositories and click .
- In the dialog that opens, select the radio button from the and click . Name the project and click .
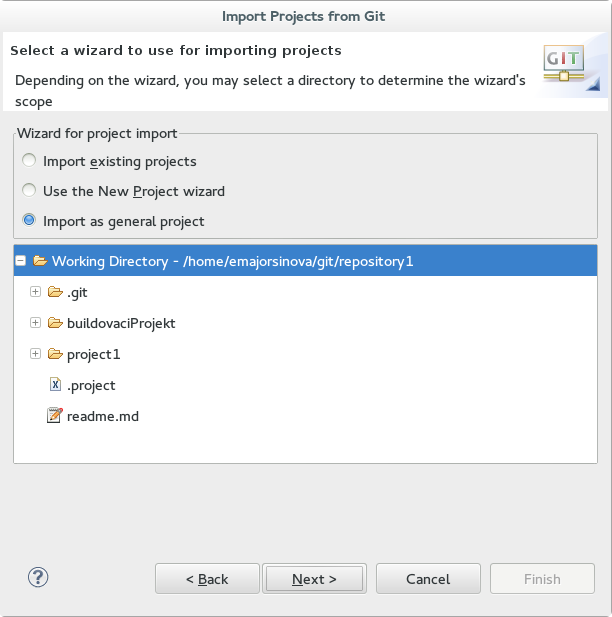
Figure 9.4. Wizard for Project Import
9.7. Creating a Drools Project
Procedure 9.7. Creating a New Red Hat JBoss Developer Studio Project
- From the main menu, select → → .Select → and click Next.
- Enter a name for the project into the Project name: text box and click Next.
Note
JBoss Developer Studio provides the option to add a sample HelloWorld Rule file to the project. Accept this default by clicking Next to test the sample project in the following steps. - Select the Drools runtime (or use the default).
- Select code compatible with Drools 6.0.x. Enter a GroupID, an ArtifactID, and Version, and click Finish.
- To test the project, right click the Java file that contains the main method and select → → .The output will be displayed on the console tab.
9.8. Creating a jBPM project
Procedure 9.8. Creating a New Red Hat JBoss Developer Studio Project
- From the main menu, select → → .Select → and click Next.
- Enter a name for the project into the Project name: text box and click Next.
Note
JBoss Developer Studio provides the option to add a sample HelloWorld Rule file to the project. Accept this default by clicking Next to test the sample project in the following steps. - Select the jBPM runtime (or use the default).
- Select generate code compatible with jBPM 6 or above, and click Finish.
- To test the project, right click the Java file that contains the main method and select → → .The output will be displayed in the console tab.
Chapter 10. Business Resource Planner
- Employee/Patient Rosters. Planner helps create timetables for nurses and keeps track of patient bed management.
- Educational Timetables. Planner helps schedule lessons, courses, exams, and conference presentations.
- Shop Schedules: Planner tracks car assembly lines, machine queue planning, and workforce task planning.
- Cutting Stock: Planner minimizes waste by reducing the consumption of resources such as paper and steel.
10.1. Installing Business Resource Planner
- Navigate to the Red Hat Customer Portal and log in with your user credentials.
- Select → .
- In the Product Downloads page that opens, click Red Hat JBoss BPM Suite.
- From the Version drop-down menu, select version 6.0.3.
- Select Red Hat JBoss BPM Suite 6.0.3 Business Resource Planner and then click Download.
10.2. Running the Business Resource Planner Examples
- On the command line, move into the
examples/directory. - In a Unix environment, run the following command:
./runExamples.sh
./runExamples.shCopy to Clipboard Copied! Toggle word wrap Toggle overflow In a Windows environment, run the following command:./runExamples.bat
./runExamples.batCopy to Clipboard Copied! Toggle word wrap Toggle overflow - Pick an example from the Examples GUI application that opens and run it in your favorite IDE.
Appendix A. Revision History
| Revision History | |||
|---|---|---|---|
| Revision 1.0.0-35 | Mon Dec 01 2014 | ||
| |||