Administration and Configuration Guide
The Administration and Configuration Guide for Red Hat JBoss BPM Suite
Abstract
Part I. Introduction
Chapter 1. Business Process Model and Notation
Business Process Model and Notation (BPMN) is a standard notation for business process modeling. It aspires to link the gap between business analysts and programmers by providing a workflow language that can be clearly understood by both.
1.1. Components
Red Hat JBoss BPM Suite integrates multiple components to support business processes throughout their entire life cycle and to provide process management features and tools for business analysts, developers, and business users. The product can be deployed on various JEE-compliant servers; the recommended option is Red Hat JBoss Enterprise Application Platform 6.
Red Hat JBoss BPM Suite consists of the following main components:
Execution Engine: Provides the runtime environment for Processes and Business Rules. It encompasses a workflow library that can be embedded into a user web application. Runtime manager is the root object and contains the following components:
Runtime Engine: Implements the core behavior of the computer language and it is provided by the runtime manager.
- Process Engine: The environment for business process model execution.
- Task Service: Handles human task lifecycles.
Rule Engine: Can be used with the process engine or on its own.
- Rules Evaluation: Executes business rules on the provided set of facts.
- Complex Event Processing: Applies business rules on incoming stream of events.
Business Central: A web-based application that accommodates tooling for asset creation, management, and monitoring by providing an integrated web environment.
- Asset Repository: The central sharing location (Knowledge Store) for business assets, processes, rules, forms, etc. Users access this repository through the Project Explorer view of Business Central via Authoring → Project Authoring. By default, the product initializes a local GIT repository as its Asset Repository. However, other repositories may be added or removed as necessary.
- Artifact Repository: A Maven based repository for storage of project jar artifacts.
- Execution Server: Provides an execution environment for business process instances and tasks.
- Business Activity Monitor: Provides customizable view on business performance.
Red Hat JBoss BRMS comes with its own Business Central application that is a subset of the Business Central application in Red Hat JBoss BPM Suite.
1.2. Project
A project is a container for asset packages (business processes, rules, work definitions, decision tables, fact models, data models, and DSLs) that lives in the Knowledge Repository. It is this container that defines the properties of the KIE Base and KIE Session that are applied to its content. In the GUI, you can edit these entities in the Project Editor.
As a project is a Maven project, it contains the Project Object Model file (pom.xml) with information on how to build the output artifact. It also contains the Module Descriptor file, kmodule.xml, that contains the KIE Base and KIE Session configuration for the assets in the project.
1.3. Creating a Project
It is possible to create a project either in the Project Authoring perspective of Business Central or using the REST API calls.
Creating a Project in Business Central
Note that only users with the admin role in Business Central can create projects.
Procedure: Using Business Central to Create a Project
- In Business Central, go to Authoring → Project Authoring.
- In the Project Explorer, select the organizational unit and the repository in which you want to create the project.
On the perspective menu, click New Item → Project.
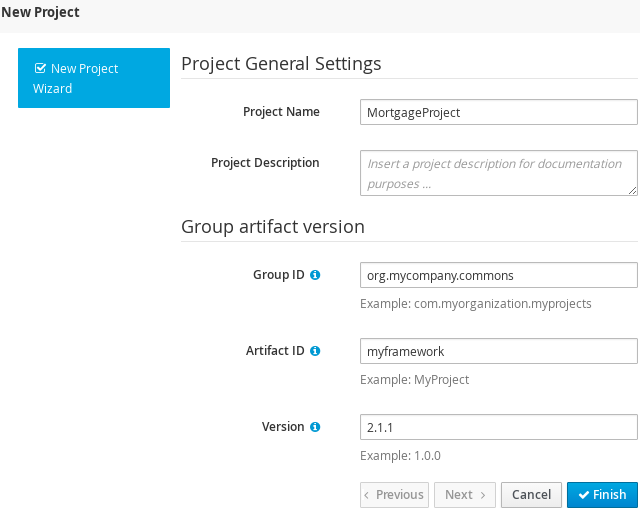
The New Project dialog window opens.
Define the Project General Settings and Group artifact version details of the new project. These parameters are stored in the
pom.xmlMaven configuration file.See the detailed description of the parameters:
-
Project Name: name of the project (for example
MortgageProject). - Project Description: description of the project, which may be useful for the project documentation purposes.
-
Group ID: group ID of the project (for example
org.mycompany.commons). -
Artifact ID: artifact ID unique in the group (for example
myframework). Avoid using a space or any other special character that might lead to an invalid name. -
Version: version of the project (for example
2.1.1).
-
Project Name: name of the project (for example
Click Finish.
The project screen view is updated with the new project details as defined in the
pom.xmlfile. You can switch between project descriptor files and edit their content by clicking the Project Settings: Project General Settings button at the top of the project screen view.
Creating a Project Using the REST API
Note that only users with the rest-all or rest-project role can create projects.
To create a project in the repository, issue the POST REST API call. Details of the project are defined by the corresponding JSON entity.
Input parameter of the call is an Entity instance. The call returns a CreateProjectRequest instance.
Example 1.1. Creating a Project Using the Curl Utility
Example JSON entity containing details of a project to be created:
Execute the following command:
curl -X POST 'localhost:8080/business-central/rest/repositories/REPOSITORY_NAME/projects/' -u USERNAME:PASSWORD -H 'Accept: application/json' -H 'Content-Type: application/json' -d '{"name":"MortgageProject","description":null,"groupId":"org.mycompany.commons","version":"2.1.1"}'
curl -X POST 'localhost:8080/business-central/rest/repositories/REPOSITORY_NAME/projects/' -u USERNAME:PASSWORD -H 'Accept: application/json' -H 'Content-Type: application/json' -d '{"name":"MortgageProject","description":null,"groupId":"org.mycompany.commons","version":"2.1.1"}'For further information, refer to chapter Knowledge Store REST API, section Repository Calls of the Red Hat JBoss BPM Suite Development Guide.
1.4. Adding Dependencies
To add dependencies to your project, do the following:
Open the Project Editor for the given project:
- In the Project Explorer view of the Project Authoring perspective, open the project directory.
- Click Open Project Editor to open the project view.
- In the Project Screen view, select in the Project Settings drop-down box the Dependencies item.
On the updated Project Screen, click the Add button to add a maven dependency or click the Add from repository button to add a dependency from the Knowledge Store (Artifact repository):
-
When adding a maven dependency, a user has to define the
Group ID,Artifact IDand theVersion IDin the Dependency dialogue window. - When adding a dependency from the Knowledge Store, select the dependency in the displayed dialog box: the dependency will be added to the dependency table.
-
When adding a maven dependency, a user has to define the
- To apply the various changes, the dependencies must be saved.
Additionally, you can use the Package white list when working with dependencies. When you add a repository, you can click the gear icon and select Add all or Add none, which results in including all or none of the packages from the added dependency.
If working with modified artifacts, do not re-upload modified non-snapshot artifacts as Maven will not know these artifacts have been updated, and it will not work if it is deployed in this manner.
Part II. Configuration
Chapter 2. Business Central Configuration
As Business Central is a web application, any configuration settings are loaded from DEPLOY_DIRECTORY/business-central.war/WEB-INF/web.xml and the referenced files, and if deployed on Red Hat JBoss EAP 6, also in jboss-web.xml and jboss-deployment-structure.xml.
Note that the entire application can be run in different profiles (refer to the Red Hat JBoss BPM Suite Installation Guide).
2.1. Access Control
The access control mechanism includes authorization and authentication. In the unified environment of Red Hat JBoss BPM Suite, users are able to update the default user roles located within JBOSS_HOME/standalone/deployments/business-central.war/WEB-INF/classes/userinfo.properties.
To grant a user access to JBoss BPM Suite, the user needs to have the respective role assigned:
-
admin: Administrates JBoss BPM Suite system and has full access rights to make any changes necessary including the ability to add and remove users from the system. -
developer: Implements code required for processes to work and has access to everything except administration tasks. -
analyst: Creates and designs processes and forms, instantiates the processes and deploys artifacts. This role is the similar to a developer, without access to asset repository and deployments. -
user: Claims, performs, and invokes other actions (such as, escalation, rejection, etc.) on the assigned Tasks and has no access to authoring functions. -
manager: Monitors the system and its statistics and only has access to the dashboard. -
business user: Takes action on business tasks that are required for processes to continue forward. Works primarily with the task list.
If using Red Hat JBoss EAP, to create a user with particular roles, run the JBOSS_HOME/add-user.sh script and create an Application User in the ApplicationRealm with the respectives roles.
Workbench Configuration
Within Red Hat JBoss BPM Suite, users may set up roles using LDAP to modify existing roles. Users may modify the roles in the workbench configuration to ensure the unique LDAP based roles conform to enterprise standards by editing the deployments directory located at JBOSS_HOME/standalone/deployments/business-central.war/WEB-INF/classes/workbench-policy.propeties.
If authenticating user via LDAP over Git, administrators must set system property org.uberfire.domain to the name of login module it should use to authenticate users via the Git service. This must be set in the standalone.xmlfile in EAP.
You can further customize Business Central with parameters no_build or no_search. The parameters disable the build and search functionality. Include one or both parameters in the Business Central URL, for example http://SERVER:PORT/business-central/kie-wb.html?no_build&no_search.
Authentication in Human Tasks
Every Task that needs to be executed is assigned to one or multiple roles or groups, so that any user with the given role or the given group assigned can claim the Task instance and execute it. Tasks can also be assigned to one or multiple users directly. JBoss BPM Suite uses the UserGroupCallback interface to assign tasks to user.
A group for a Human Task must not be named after an existing user of the system. Doing so causes intermittent issues.
LDAP Configuration
You can configure LDAP domain during the installation of Red Hat JBoss BPM Suite. See the Red Hat JBoss BPM Suite Installation Guide for further information. When already installed, Business Central uses JBoss Security Domains defined in EAP_HOME/standalone/configuration/standalone/configuration/standalone.xml by default. The security domain is referenced in business-central.war/WEB-INF/jboss-web.xml.
To configure LDAP on your existing Red Hat JBoss BPM Suite installation:
Define an LDAP security domain.
-
In
standalone.xml, locate<security-domains>. Add your login module:
Copy to Clipboard Copied! Toggle word wrap Toggle overflow For more information about the LDAP login module, see Ldap Login Module from the Red Hat JBoss EAP Login Module Reference.
Locate
<hornetq-server>and add the following lines:<security-domain>ldap</security-domain> <security-enabled>true</security-enabled>
<security-domain>ldap</security-domain> <security-enabled>true</security-enabled>Copy to Clipboard Copied! Toggle word wrap Toggle overflow Refer to your LDAP security domain in
jboss-web.xml:<jboss-web> <security-domain>ldap</security-domain> </jboss-web><jboss-web> <security-domain>ldap</security-domain> </jboss-web>Copy to Clipboard Copied! Toggle word wrap Toggle overflow
-
In
If you require LDAP integration in task services, provide the task service configuration.
-
Open
EAP_HOME/standalone/deployments/business-central.war/WEB-INF/beans.xml. -
Change
<class>org.jbpm.services.cdi.producer.JAASUserGroupInfoProducer</class>to<class>org.jbpm.services.cdi.producer.LDAPUserGroupInfoProducer</class>. Create a
jbpm.usergroup.callback.propertiesfile inEAP_HOME/standalone/deployments/business-central.war/WEB-INF/classes/jbpm.usergroup.callback.propertiesand provide your usergroup callback properties, for example:Copy to Clipboard Copied! Toggle word wrap Toggle overflow Create a
jbpm.user.info.propertiesfile inEAP_HOME/standalone/deployments/business-central.war/WEB-INF/classes/jbpm.user.info.propertiesand provide your user info properties, for example:Copy to Clipboard Copied! Toggle word wrap Toggle overflow
-
Open
-
Ensure correct roles assigned to the users in your LDAP server, for example
admin,analyst, and others.
You can define your own roles in EAP_HOME/standalone/deployments/business-central.war/WEB-INF/classes/workbench-policy.properties.
2.2. Business Central Profile Configuration
Red Hat JBoss BPM Suite 6 (or better) server is capable of starting the Business Central application in three different modes:
- Full profile: Default profile that is active without additional configuration required (UI and remote services e.g. REST).
- Execution server profile: Disables completely UI components of the application and allows only remote access e.g. via REST interface.
- UI server profile: Disables remote services e.g REST and allows only UI access to the application.
To change the profile use the following configuration steps.
Procedure: Configuring Business Central Profiles
Select the desired
web.xmlinsideBPMS_HOME/standalone/deployments/business-central.war/WEB-INF/. The following files are provided:-
web.xml(default) for full profile -
web-exec-server.xmlfor execution server profile -
web-ui-server.xmlfor UI server profile
-
To activate a profile other than the default full profile, the web-<PROFILE>.xml file must be renamed to
web.xml. The following steps demonstrate one way to enable the execution server profile:Backup the
web.xmlfile from the full profilemv web.xml web-full.xml
$ mv web.xml web-full.xmlCopy to Clipboard Copied! Toggle word wrap Toggle overflow Rename the
web-exec-server.xmlfile:mv web-exec-server.xml web.xml
$ mv web-exec-server.xml web.xmlCopy to Clipboard Copied! Toggle word wrap Toggle overflow
Start application server with additional system property to instruct the profile manager to activate given profile.
-
Dorg.kie.active.profile=full- To activate full profile or skip the property completely -
Dorg.kie.active.profile=exec-server- To activate execution server profile -
Dorg.kie.active.profile=ui-server- To activate UI server profile
-
2.3. Branding the Business Central Application
The Business Central web application enables you to customize its look and feel by allowing you to override some of its default styles. The ability to customize the Business Central branding allows you to get a consistent appearance across all your applications thereby improving the user experience. It also helps in cases when multiple teams are using the application. Each team can develop their own customized user interface. The customizable elements are built using cascading style sheets (CSS), images, and HTML files, providing an easy and flexible approach to customize without having to recompile the code.
You can modify the following elements in the Business Central application to make it inline with your company’s brand:
- Login screen
You can customize the following attributes of the Business Central login screen:
- The background image
- The company logo
- The application logo
- Application header
You can customize the following attributes of the Business Central application header:
- The Business Central header containing the title and banner logo
- Help pop-up windows
You can customize the following attributes of the splash help pop-up windows:
- The splash help images
- The label text
2.3.1. Customizing Business Central Login Page
Procedure: Changing the Business Central Login Page Background Image
- Start the EAP server and open http://localhost:8080/business-central in a web browser.
-
Copy the new background image to the
EAP_HOME/standalone/deployments/business-central.war/imagesdirectory in your Red Hat JBoss BPM Suite installation. -
Navigate to
EAP_HOME/standalone/deployments/business-central.war/stylesdirectory and open thelogin-screen.cssfile in a text editor. In the
login-screen.cssfile, provide the location of your new background image in the followingbackground-imageattribute:background-image: url("../images/login-screen-background.jpg");background-image: url("../images/login-screen-background.jpg");Copy to Clipboard Copied! Toggle word wrap Toggle overflow The
background-imageattribute points to the defaultlogin-screen-background.jpgimage.In addition to the background image, you can modify other attributes such as image size, position, and background color in the
login-screen.cssfile.
Refresh the Business Central login page to view your changes.
Procedure: Changing the Business Central Login Page Company Logo and Project Logo
- Start the EAP server and open http://localhost:8080/business-central in a web browser.
-
Navigate to the
EAP_HOME/standalone/deployments/business-central.war/imagesdirectory in your Red Hat JBoss BPM Suite installation. -
Replace the default image
login-screen-logo.pngwith a new one. This is the company logo that appears on the top right hand corner of the login page. Replace the default image
RH_JBoss_BPMS_Logo.pngwith a new one.This is the project logo that appears on the center left hand side of the login page.
Refresh the Business Central login page to view your changes.
2.3.2. Customizing Business Central Application Header
Procedure: Changing the Business Central Application Header (Banner)
- Start the EAP server and open http://localhost:8080/business-central in a web browser.
- Log in to the Business Central application with your user credentials.
-
Copy your new application header image to the
EAP_HOME/standalone/deployments/business-central.war/bannerdirectory in your Red Hat JBoss BPM Suite installation. -
Open
EAP_HOME/standalone/deployments/business-central.war/banner/banner.htmlfile in a text editor. In the
banner.htmlfile, edit the following<img>tag to provide the name of your new header image:<img src="banner/logo.png"/>
<img src="banner/logo.png"/>Copy to Clipboard Copied! Toggle word wrap Toggle overflow The default image is
logo.png.
Refresh the Business Central Home page to view your changes.
2.3.3. Customizing Business Central Splash Help Windows
The EAP_HOME/standalone/deployments/business-central.war/plugins directory contains the splash pages and the corresponding html files. Each splash page holds the name of the html file, which contains information about the image(s) and the text to be displayed. For example, the authoring_perspective.splash.js splash page points to the authoring_perspective.splash.html file. The authoring_perspective.splash.html contains the names and location of all the image files that appear on the Authoring Perspective splash help and also their captions. You can customize the images and the corresponding captions of the existing splash help pop-up windows.
Procedure: Changing the Business Central Splash Help Pop-Up Images and Captions
- Start the EAP server and open http://localhost:8080/business-central in a web browser.
- Log in to the Business Central application with your user credentials.
-
Copy your new splash help image(s) to the
EAP_HOME/standalone/deployments/business-central.war/imagesdirectory in your Red Hat JBoss BPM Suite installation. -
Open the corresponding html file from
EAP_HOME/standalone/deployments/business-central.war/pluginsdirectory in a text editor. Edit the html file to point to your new splash help image. For example, to change the first image that appears in the Authoring Perspective splash help, edit the following
<img>tag in theauthoring_perspective.splash.htmlfile to add your new image:<img src="images/authoring_perspective1.png" alt="">
<img src="images/authoring_perspective1.png" alt="">Copy to Clipboard Copied! Toggle word wrap Toggle overflow The default image is
authoring_perspective1.png, which appears on the first page of the Authoring Perspective splash help.To change the image caption that appears on the splash help, edit the
<h4>and<p>tag contents below the<img>tag:<h4>Authoring</h4> <p>Modularized and customizable workbench</p>
<h4>Authoring</h4> <p>Modularized and customizable workbench</p>Copy to Clipboard Copied! Toggle word wrap Toggle overflow
Refresh the Business Central Home page and access the splash help pop-up windows to view your changes.
2.4. Deployment Descriptors
Processes and rules within Red Hat JBoss BPM Suite 6 onwards are stored in Apache Maven based packaging, and are known as knowledge archives or KJAR. The rules, processes, assets, etc. are part of a jar file built and managed by Maven. A file kept inside the META-INF directory of the KJAR called kmodule.xml can be used to define the knowledge bases and sessions. This kmodule.xml file, by default, is empty.
Whenever a runtime component such as Business Central is about to process the KJAR, it looks up kmodule.xml to build the runtime representation.
Deployment Descriptors, a new feature introduced in the 6.1 branch of Red Hat JBoss BPM Suite, allows you fine grained control over your deployment and supplements the kmodule.xml file. The presence of these descriptors is optional and your deployment will proceed successfully without them. The properties that you can set using these descriptors are purely technical in nature and include meta values like persistence, auditing and runtime strategy.
These descriptors allow you to configure the execution server on multiple levels (server level default, different deployment descriptor per KJAR and so on). This allows you to make simple customizations to the execution server’s out-of-the-box configuration (possibly per KJAR).
You define these descriptors in a file called kie-deployment-descriptor.xml and place this file next to your kmodule.xml file in the META-INF folder. You can change this default location (and the filename) by specifying it as a system parameter:
-Dorg.kie.deployment.desc.location=file:/path/to/file/company-deployment-descriptor.xml
-Dorg.kie.deployment.desc.location=file:/path/to/file/company-deployment-descriptor.xml2.4.1. Deployment Descriptor Configuration
Deployment descriptors allow the user to configure the execution server on multiple levels:
- Server level: The main level and the one that applies to all KJARs deployed on the server.
- Kjar level: This allows you to configure descriptors on a per KJAR basis.
- Deploy time level: Descriptors that apply while a KJAR is being deployed.
The granular configuration items specified by the deployment descriptors take precedence over the server level ones, except in case of configuration items that are collection based, which are merged. The hierarchy works like this: deploy time configuration > KJAR configuration > server configuration.
The deploy time configuration applies to deployments done via the REST API.
For example, if the persistence mode (one of the items you can configure) defined at the server level is NONE but the same mode is specified as JPA at the KJAR level, the actual mode will be JPA for that KJAR. If nothing is specified for the persistence mode in the deployment descriptor for that KJAR (or if there is no deployment descriptor), it will fall back to the server level configuration, which in this case is NONE (or to JPA if there is no server level deployment descriptor).
Can You Override this Hierarchal Merge Mode Behavior?
Yes. In the default way, if there are deployment descriptors present at multiple levels, the configuration properties are merged with the granular ones overriding the coarse values, and with missing configuration items at the granular level being supplied with those values from the higher levels. The end result is a merged Deployment Descriptor configuration. This default merge mode is called the MERGE_COLLECTIONS mode. However, you can change it (see Section 2.4.2, “Managing Deployment Descriptors”) if it does not suit your environment to one of the following modes:
-
KEEP_ALL: In this mode, all higher level values override all lower level values (server level values replace KJAR level values) -
OVERRIDE_ALL: In this mode, all lower level values override all higher level values (KJAR values replace server level values) -
OVERRIDE_EMPTY: In this mode, all non empty configuration items from lower levels replace those at higher levels, including items that are represented as collections. -
MERGE_COLLECTIONS (DEFAULT): In this mode, all non empty configuration items from lower level replace those from higher levels (like inOVERRIDE_EMPTY), but collection properties are merged (combined).
Deployment Descriptors from dependent KJARs are placed lower than the actual KJAR being deployed, but they still have higher hierarchy than the server level.
Do I Need to Provide a Full Deployment Descriptor for All Kjars?
No, and this is where the beauty of the merge between different files can help you. Providing partial Deployment Descriptors is possible and recommended. For example, if you want to only override the audit mode in a KJAR, then you just need to provide that and the rest of the values will be merged from server level or higher level KJARs.
It is worth noting that when using OVERRIDE_ALL merge mode, all configuration items should be specified since the relevant KJAR will always use them and will not merge with any other deployment descriptor in the hierarchy.
What Can You Configure?
High level technical configuration details can be configured via deployment descriptors. The following table lists these along with the permissible and default values for each.
| Configuration | XML Entry | Permissible Values | Default Value |
|---|---|---|---|
| Persistence unit name for runtime data | persistence-unit | Any valid persistence package name | org.jbpm.domain |
| Persistence unit name for audit data | audit-persistence-unit | Any valid persistence package name | org.jbpm.domain |
| Persistence mode | persistence-mode | JPA, NONE | JPA |
| Audit mode | audit-mode | JPA, JMS or NONE | JPA |
| Runtime Strategy | runtime-strategy | SINGLETON, PER_REQUEST or PER_PROCESS_INSTANCE | SINGLETON |
| List of Event Listeners to be registered | event-listeners |
Valid listener class names as | No default value |
| List of Task Event Listeners to be registered | task-event-listeners |
Valid listener class names as | No default value |
| List of Work Item Handlers to be registered | work-item-handlers |
Valid Work Item Handler classes given as | No default value |
| List of Globals to be registered | globals |
Valid Global variables given as | No default value |
| Marshalling strategies to be registered (for pluggable variable persistence) | marshalling-strategies |
Valid | No default value |
| Required Roles to be granted access to the resources of the KJAR | required-roles | String role names | No default value |
| Additional Environment Entries for Knowledge Session | environment-entries |
Valid | No default value |
| Additional configuration options of Knowledge Session | configurations |
Valid | No default value |
How Do You Provide Values For Collections-Based Configuration Items?
In the table of valid configuration items earlier, you would have noticed that the valid values for the collection based items are either ObjectModel or NamedObjectModel. Both are similar and provide a definition of the object to be built or created at runtime, with the exception that the NamedObjectModel object details name the object to be looked. Both these types are defined using an identifier, optional parameters and resolver (to resolve the object).
- Identifier
- Defines all the information about the object, such as fully qualified class name, Spring bean id or an MVEL expression.
- Parameters
- Optional parameters that should be used while creating instances of objects from this model.
- Resolver
- Identifier of the resolver that will be used to create object instances from the model, that is reflection, mvel, or Spring.
As an example, if you have built a custom marshaling strategy and want your deployments to use that strategy instead of the default, you will need to provide that strategy as an ObjectModel, with the identifier being com.mycompany.MyStrategy, resolver being reflection (the easiest and the default) and any parameters that are required for your strategy to work. Reflection will then be used to create an instance of this strategy using the fully qualified class name that you have provided as the identifier.
In the case that reflection based on resolver is not enough (as demonstrated in the previous example), you can use a resolver based on MVEL expression as the identifier of the object model. While evaluating expressions, you can substitute out-of-the-box parameters. For example:
<marshalling-strategy>
  <resolver>mvel</resolver>
  <identifier>new com.myCompany.CustomStrategy(runtimeManager)</identifier>
</marshalling-strategy>
<marshalling-strategy>
  <resolver>mvel</resolver>
  <identifier>new com.myCompany.CustomStrategy(runtimeManager)</identifier>
</marshalling-strategy>The Spring based resolver allows you to look up a bean by its identifier from a Spring application context. Whenever JBoss BPM Suite is used with Spring, this resolver helps in deploying KJARs into the runtime. As an example (note that the identifier in this case is a named bean in the Spring context):
<marshalling-strategy>
 <resolver>spring</resolver>
 <identifier>customStrategy</identifier>
</marshalling-strategy>
<marshalling-strategy>
 <resolver>spring</resolver>
 <identifier>customStrategy</identifier>
</marshalling-strategy>2.4.2. Managing Deployment Descriptors
Deployment Descriptors can be edited via the Business Central in one of two ways. Either graphically (by clicking on Authoring → Project Authoring → Deployment Descriptor or by clicking on Authoring → Administration menu and then clicking through to the META-INF folder in the File Explorer. Click on the kie-deployment-descriptor.xml file to edit it manually.
Every time a project is created, a stock kie-deployment-descriptor.xml file is generated with default values as described earlier.
Overriding Hierarchical Merge Mode Behavior
To change the default mode of MERGE_COLLECTIONS to one of KEEP_ALL, OVERRIDE_ALL, or OVERRIDE_EMPTY, you can use the following methods, depending on the requirement.
-
Set the system property
org.kie.dd.mergemodeto one of these values. This merge mode will become default for all KJARs deployed in the system, unless you override it at a KJAR level via the next method. - When deploying a new deployment unit via Business Central (Deploy → Deployments) you can select what merge mode should be used for that particular KJAR.
-
When deploying via the REST API, you can add
mergemodequery parameter to the command URL to one of these modes to set the merge mode for that deployment.
Restricting Access to the Runtime Engine
One of the configuration items discussed earlier, required-roles, can be edited via the Deployment Descriptors. This property restricts access to the runtime engine on a per KJAR or per server level by ensuring that access to certain processes is only granted to users that belong to groups defined by this property.
The security role can be used to restrict access to process definitions or restrict access at runtime.
The default behavior is to add required roles to this property based on repository restrictions. You can of course, edit these properties manually if required, as described above by providing roles that match actual roles defined in the security realm.
2.5. Managing Deployment Override Policy
If a user tries to deploy an artifact with a GAV (Group-Id, Artifact-Id and Version) that already exists in the system, the deployment will fail and an error message will be displayed in the Messages panel.
This feature prevents the user from overwriting an existing deployment by mistake.
By default this feature is enabled, that is, by default the system will prevent the user from overwriting an existing installation with the same GAV.
However, there may be cases when the user may want to overwrite existing deployments with the same GAV. Although you cannot enable overwriting on a per-deployment basis, you can set this up for the system as a whole by using the system setting org.kie.override.deploy.enabled. This setting, is false by default. Change it to true to enable overwriting of deployments with the same GAV by providing it at startup time of your server (-Dorg.kie.override.deploy.enabled=true).
2.6. Extending Business Central
Starting with version 6.1 of Red Hat JBoss BPM Suite, Business Central can be configured to add new screens, menus, editors, splashscreens and perspectives by the Administrator. These elements can extend functionality of Business Central and can be accessed through the Extensions → Plugin Management.
You can now define your own Javascript and HTML based plugins to extend Business Central and add them without having to worry about copying files in the underlying filesystem. Let us add a new screen in the system to show you the basics of this functionality.
2.6.1. Plugin Management
You access the Plugin Management screen by clicking on Extensions → Plugin Management. This brings up the Plugin Explorer screen that lists all the existing plugins under their respective categories:
- Perspective Plugin
- Screen Plugin
- Editor Plugin
- Splashscreen Plugin
- and Dynamic Menu
Open any of these, and you will see the existing plugins in each category, including the uneditable system generated ones.
Let us create a new plugin that echoes "Hello World" when users visit the screen for that plugin. In general, the steps to creating a new plugin are:
- Create a new screen
- Create a new perspective (and add the new screen to it)
- Create a new menu (and add the new perspective to it)
- Apps (optional)
Adding a New Screen
Click the
 button and select New Screen. You will be prompted to enter the name of this new screen. Enter "HelloWorldJS" and press the OK button. The Screen plugin editor will open, divided into 4 sections: Template, CSS, JavaScript and Media.
All manually created elements go into their respective categories in case you want to edit them later. In this case, to open the Screen plugin editor again if you close it, open the Screen Plugin category and scroll past the system generated screens to your manually created plugin and click on it to open the Screen plugin editor again.
Template is where your HTML goes, CSS is for styling, JavaScript is for your functions and Media is for uploading and managing images.
Since we are making a simple Hello World plugin, enter the following code in the Template section: <div>My Hello World Screen</div>. This can be any HTML code, and you can use the supplied Angular and Knockout frameworks. For the purposes of this example, we are not using any of those frameworks, but you can choose to by selecting them from the drop down in the Template section.
Enter your JavaScript code in the JavaScript section. Some common methods and properties are defined for you, including main, on_close and on_open. For this demo, select the on_open and enter the following: function () { alert('Hello World'); }
Click the Save button to finish creating the screen. After you save the screen, refresh business central so that the Screen Plugin is listed in the Screen Component of Perspective plugin.
Adding New Perspective
Once a screen has been created, you need to create a perspective on which this screen will reside. Perspectives can also be created similar to the way a screen is created by clicking on the New button and then selecting New Perspective. You can now provide a name for this perspective, say HelloWorldPerspective. This will open the Perspective plugin editor, similar to the Screen plugin editor.
The Perspective Editor is like a drag and drop grid builder for screens and HTML components. Remove any existing grids and then drag a 6×6 grid on the right hand side to the left hand side.
Next, open the Components category and drag a Screen Component on the right hand side to the left hand side (in any grid). This will open the Edit Component dialog box that allows you to select the screen created in the previous step (HelloWorldJS). Click the OK button and then click Save to save this perspective. To tag your perspective, enter Home in the tag name field and click Tags. Click OK and save the changes.
You can open this perspective again from the Perspective plugins listed on the left hand side.
Adding New Menu
The final step in creating our plugin is to add a dynamic menu from where the new screen/perspective can be called up. To do so, go to Extensions → Plugin Management and then click on the New button to select New Dynamic Menu. Give this dynamic menu a name (HelloWorldMenu) and then click the OK button. The dynamic menu editor opens up.
Enter the perspective name (HelloWorldPerspective) as the Activity Id and the name for the drop down menu (HelloWorldMenuDropDown). Click OK and then Save.
This new menu will be added to your workbench the next time you refresh Business Central. Refresh it now to see HelloWorldMenu added to your top level menu. Click on it to reveal HelloWorldMenuDropDown, which when clicked will open your perspective/screen with the message Hello World.
You have created your first Plugin!
Working with Apps (Optional)
If you create multiple plugins, you can use the Apps directory feature to organize your own components and plugins, instead of having to rely on just the top menu entries.
When you save a new perspective, you can add labels (tags) for them and these labels (tags) are used to associate a perspective with an App directory. You can open the App directories by clicking on Extensions → Apps.
The Apps directory provides an alternate way to open your perspective. When you created your HelloWorldPerspective, you entered the tag Home. The Apps directory by default contains a single directory called Home with which you associated your perspective. This is where you will find it when you open the Apps directory. You can click on it to run the perspective now.
You can create multiple directories and associate perspectives with those directories depending on functional and vertical business requirements. For example, you could create an HR directory and then associate all HR related perspectives with that directory to better manage Apps.
You can create a new directory by clicking the
 button.
2.6.2. The JavaScript (JS) API for Extensions
The extensibility of Business Central is achieved by an underlying JavaScript (JS) API which is automatically loaded if it is placed in the plugins folder of the Business Central webapp (typically: INSTALL_DIR/business-central.war/plugins/), or it can be loaded via regular JavaScript calls.
This API is divided into multiple sets depending on the functionality it performs.
- Register Perspective API
Allows for the dynamic creation of perspectives. The example below creates a panel using the
registerPerspectivemethod:Copy to Clipboard Copied! Toggle word wrap Toggle overflow - Editor API
Allows you to dynamically create editors and associate them with a file type. The example below creates a sample editor and associates it with
filenamefile type.Copy to Clipboard Copied! Toggle word wrap Toggle overflow In addition to
on_startupandon_openmethods seen in the previous example, the API exposes the following callback events for managing the editor’s lifecycle:-
on_concurrent_update; -
on_concurrent_delete; -
on_concurrent_rename; -
on_concurrent_copy; -
on_rename; -
on_delete; -
on_copy; -
on_update; -
on_open; -
on_close; -
on_focus; -
on_lost_focus; -
on_may_close; -
on_startup; -
on_shutdown;
You can display this editor via an HTML template:
Copy to Clipboard Copied! Toggle word wrap Toggle overflow -
- PlaceManager API
-
The methods of this API allow you to request that the Business Central display a particular component associated with a target:
$goToPlace("componentIdentifier"); - Register plugin API
The methods of this API allow you to create dynamic plugins (that will be transformed in Business Central screens) via the JS API.
Copy to Clipboard Copied! Toggle word wrap Toggle overflow The plugin references the
angular.sample.htmltemplate:Copy to Clipboard Copied! Toggle word wrap Toggle overflow A plugin can be hooked to Business Central events via a series of JavaScript callbacks:
-
on_concurrent_update; -
on_concurrent_delete; -
on_concurrent_rename; -
on_concurrent_copy; -
on_rename; -
on_delete; -
on_copy; -
on_update; -
on_open; -
on_close; -
on_focus; -
on_lost_focus; -
on_may_close; -
on_startup; -
on_shutdown;
-
- Register splash screens API
use the methods in this API to create splash screens.
Copy to Clipboard Copied! Toggle word wrap Toggle overflow - Virtual File System (VFS) API
with this API, you can read and write a file saved in the file system using an asynchronous call.
Copy to Clipboard Copied! Toggle word wrap Toggle overflow
2.7. Configuring Table Columns
Business Central allows you to configure views that contain lists of items in the form of tables. You can resize columns, move columns, add or remove the default list of columns and sort the columns. This functionality is provided for all views that contain tables.
Once you make changes to the columns of a table view, these changes are persisted for the current logged in user.
Adding and Removing Columns
Tables that allow columns to be configured have the
 button in the top right corner. Clicking on this button opens up the list of columns that can added or removed to the current table with a check box next to each column:

Resizing Columns
To resize columns, place your cursor between the edges of the column header and move in the direction that you want:

Moving Columns
To re-order and drag and drop a column in a different position, hover your mouse over the rightmost area of the column header:

You can now grab the column and move it:

Drop it over the column header that you want to move it to.
Sorting Columns
To sort columns, click on the desired column’s header. To reverse-sort, click on the header again.
Chapter 3. Repository Hooks
In Business Central, it is possible to trigger a chosen action every time a particular event happens. For this purpose, you can configure the repository to use scripts called hooks.
3.1. Configuring Git Hooks
Business Central can automatically push changes to a remote repository using the Git hooks. Git hooks support has been introduced with the release of Red Hat JBoss BPM Suite 6.2.0.
Please note that currently only the post-commit hook is supported. Post-commit hooks are triggered after finishing the entire commit process.
The following procedure shows how to configure the post-commit hook to automatically push your changes to the remote repository.
- In Business Central, go to Authoring → Administration.
- Below the main menu, click Repositories → Clone repository.
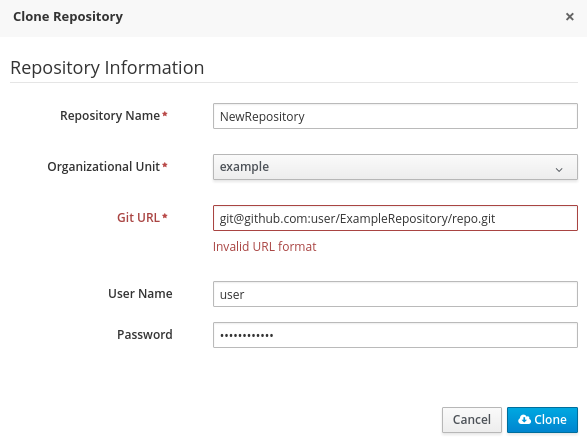
In the displayed Clone repository dialog box, fill in the repository information:
- Repository Name
- Organizational Unit
Git URL: For example
https://github.com/USERNAME/REPOSITORY_NAME.gitImportantIt is important to use the HTTPS or Git protocol instead of a SCP-style SSH URL. Business Central does not support the basic SSH URL and fails with Invalid URL format.
Figure 3.1. An invalid SCP-style SSH URL.
- User Name: your Git user name
- Password: your Git password
Change to the created repository:
cd JBOSS_HOME/bin/.niogit/REPOSITORY_NAME.git
cd JBOSS_HOME/bin/.niogit/REPOSITORY_NAME.gitCopy to Clipboard Copied! Toggle word wrap Toggle overflow Change the remote URL:
git remote set-url origin git@github.com:USERNAME/REPOSITORY_NAME.git
git remote set-url origin git@github.com:USERNAME/REPOSITORY_NAME.gitCopy to Clipboard Copied! Toggle word wrap Toggle overflow Make sure that you can access the remote repository through command line using SSH. For example, the private SSH key for the repository should exist under the
~/.ssh/directory.If you created a new repository, you may encounter the following error:
fatal: No such remote 'origin'
fatal: No such remote 'origin'Copy to Clipboard Copied! Toggle word wrap Toggle overflow To resolve it, add the remote origin URL:
git remote add origin git@github.com:USERNAME/REPOSITORY_NAME.git
git remote add origin git@github.com:USERNAME/REPOSITORY_NAME.gitCopy to Clipboard Copied! Toggle word wrap Toggle overflow Verify that the remote repository was successfully added:
git remote -v
git remote -vCopy to Clipboard Copied! Toggle word wrap Toggle overflow The command should list the following:
origin  git@github.com:USERNAME/REPOSITORY_NAME.git (fetch)
origin  git@github.com:USERNAME/REPOSITORY_NAME.git (push)
origin  git@github.com:USERNAME/REPOSITORY_NAME.git (fetch)
origin  git@github.com:USERNAME/REPOSITORY_NAME.git (push)
Copy to Clipboard Copied! Toggle word wrap Toggle overflow Create a file named
post-commitwith the permissions set torwxr--r--underJBOSS_HOME/bin/.niogit/REPOSITORY_NAME.git/hookswith the following content:#!/bin/sh git push origin master
#!/bin/sh git push origin masterCopy to Clipboard Copied! Toggle word wrap Toggle overflow Make sure that the configuration was successful by creating a new guided rule in Business Central:
- Go to Authoring → Project Authoring → New Item → Guided Rule.
- Fill in the required information in the displayed Create new Guided Rule window.
- Click Ok.
All of the changes should be pushed automatically.
For further information about remote Git repositories, see How to configure the BxMS 6 server to use a remote Git repository for storing assets?.
It is also possible to specify the system property org.uberfire.nio.git.hooks. Its value determines a directory with default hook files, which will be copied to the newly created Git repositories. See the example of a standalone.xml file with this setting below:
<system-properties>
  <property name="org.uberfire.nio.git.hooks" value="/opt/jboss-as/git-hooks">
  </property>
  ...
</system-properties>
<system-properties>
  <property name="org.uberfire.nio.git.hooks" value="/opt/jboss-as/git-hooks">
  </property>
  ...
</system-properties>Chapter 4. Command Line Configuration
The kie-config-cli tool is a command line configuration tool that provides capabilities to manage the system repository from the command line and can be used in an online or offline mode.
- Online mode (default and recommended)
-
On startup, the tool connects to a Git repository using a Git server provided by
kie-wb. All changes are made locally and published to upstream only after explicitly executing the push-changes command. Use the exit command to publish local changes. To discard local changes on exit, use the discard command. - Offline mode (installer style)
- Creates and manipulates the system repository directly on the server (there is no discard option).
The tool is available on the Red Hat Customer Portal. To download the kie-config-cli tool, do the following:
- Go to the Red Hat Customer Portal and log in.
- Click DOWNLOADS at the top of the page.
In the Product Downloads page that opens, click Red Hat JBoss BPM Suite.
- From the Version drop-down menu, select 6.3.0.
- In the displayed table, navigate to the Supplementary Tools row and then click Download.
Extract the zip package for supplementary tools you downloaded from the Red Hat Customer Portal. It contains the directory kie-config-cli-6.MINOR_VERSION-redhat-x-dist with file kie-config-cli.sh.
4.1. Starting the kie-config-cli Tool in Online Mode
-
To start the
kie-config-clitool in online mode, navigate to thekie-config-cli-6.MINOR_VERSION-redhat-x-distdirectory where you installed the tool and then execute the following command. In a Unix environment run:
./kie-config-cli.sh
./kie-config-cli.shCopy to Clipboard Copied! Toggle word wrap Toggle overflow In a Windows environment run:
./kie-config-cli.bat
./kie-config-cli.batCopy to Clipboard Copied! Toggle word wrap Toggle overflow
By default, the tool starts in online mode and asks for user credentials and a Git URL to connect to (the default value is git://localhost/system). To connect to a remote server, replace the host and port with appropriate values.
Example: git://kie-wb-host:9148/system
4.2. Starting the kie-config-cli Tool in Offline Mode
To operate in offline mode, append the offline parameter to the command as below.
-
Navigate to the
kie-config-cli-6.MINOR_VERSION-redhat-x-distdirectory where you installed the tool. In a Unix environment, run:
./kie-config-cli.sh offline
./kie-config-cli.sh offlineCopy to Clipboard Copied! Toggle word wrap Toggle overflow In a Windows environment, run:
./kie-config-cli.bat offline
./kie-config-cli.bat offlineCopy to Clipboard Copied! Toggle word wrap Toggle overflow
Executing this command changes the tool’s behaviour and displays a request to specify the folder where the system repository (.niogit) is located. If .niogit does not yet exist, the folder value can be left empty and a brand new setup is created.
4.3. Commands Available for the kie-config-cli Tool
The following commands are available for managing the Git repository using the kie-config-cli tool:
-
add-deployment: Adds a new deployment unit -
add-repo-org-unit: Adds a repository to the organizational unit -
add-role-org-unit: Adds role(s) to an organizational unit -
add-role-project: Adds role(s) to a project -
add-role-repo: Adds role(s) to a repository -
create-org-unit: Creates new organizational unit -
create-repo: Creates a new git repository -
discard: Does not publish local changes, cleans up temporary directories and closes the tool -
exit: Publishes work, cleans up temporary directories and closes the tool -
fetch-changes: Fetches changes from upstream repository -
help: Prints available commands with descriptions -
list-deployment: Lists available deployments -
list-org-units: Lists available organizational units -
list-repo: Lists available repositories -
push-changes: Pushes changes to upstream repository (in online mode only) -
remove-deployment: Removes existing deployment -
remove-org-unit: Removes existing organizational unit -
remove-repo: Removes an existing repository from config only -
remove-repo-org-unit: Removes a repository from the organizational unit -
remove-role-org-unit: Removes role(s) from an organizational unit -
remove-role-project: Removes role(s) from a project -
remove-role-repo: Removes role(s) from a repository
Chapter 5. Migration
Migrating your projects from Red Hat JBoss BPM Suite 5 to Red Hat JBoss BPM Suite 6 requires careful planning and step by step evaluation of the various issues. You can plan for migration either manually, or by using automatic processes. Most real world migration will require a combination of these two processes.
Because Red Hat JBoss BPM Suite 6 uses Git for storing assets, artifacts and code repositories including processes and rules, you should start by creating an empty project in Red Hat JBoss BPM Suite 6 as the basis for your migration with dummy files as placeholders for the various assets and artifacts. Running a Git clone of this empty project into your favorite IDE will initiate the migration process.
Based on the placeholder files in your cloned project, you can start adding assets at the correct locations. The Red Hat JBoss BPM Suite 6 system is smart enough to pick these changes and apply them correctly. Ensure that when you are importing old rule files that they are imported with the right package name structure.
Since Maven is used for building projects, the projects assets like the rules, processes and models are accessible as a simple JAR file.
This section lists the generally accepted step by step ways to migrate your project. These are just guidelines though, and actual migration may vary a lot from this.
In general, you should:
- Migrate the data first: These are your business assets.
- Next, migrate your runtime processes.
- Finally, convert old API calls to new ones one by one.
Let us look at these steps in more detail in the next few sections:
5.1. Data Migration
To migrate data from Red Hat JBoss BPM Suite 5, do the following:
- Download the migration tool by logging in at the Red Hat Customer Portal and then navigating to Red Hat JBoss BPM Suite Software Downloads section. Click on Red Hat JBoss BPM Suite Migration Tool to download the zip archive.
Unzip the downloaded zip archive in a directory of your choice and navigate to this directory in a command prompt. This directory contains four folders:
-
bin- contains the launch scripts. -
jcr-exporter-libs- contains the libs specific to theexport-from-JCRpart of the migration. -
vfs-importer-libs- contains the libs specific to theimport-into-Gitpart of the migration. -
conf- contains global migration tool configuration.
-
-
For production databases, copy the JDBC driver for the database that is used by the JCR repository into the
jcr-exporter-libsdirectory of the migration tool. Execute the following command:
./bin/runMigration.sh -i <source-path> -o <destination-path> -r <repository-name>
./bin/runMigration.sh -i <source-path> -o <destination-path> -r <repository-name>Copy to Clipboard Copied! Toggle word wrap Toggle overflow Where:
-
<source-path>is a path to a source JCR repository. -
<desintation-path>is a path to a destination Git VFS. This folder must not exist already. -
<repository-name>an arbitrary name for the new repository.
-
The repository is migrated at the specified destination.
Besides the -i command, you can also use -h to print out a help message and -f which forces an overwrite of the output directory, thus eliminating the need for manual deletion of this directory.
Importing the Repository in Business Central
The repository can be imported in business central by cloning it. In the Administration perspective, click on the Repositories → Clone Repository menu to start the process.
Assets can also be migrated manually as they are all just text files. The BPMN2 specification and the DRL syntax did not change between the different versions.
Importing the Repository in JBDS
To import the repository in JBoss Developer Studio, do the following
- Start JBoss Developer Studio.
- Start the Red Hat JBoss BPM Suite server (if not already running) by selecting the server from the server tab and click the start icon.
- Select File → Import… and navigate to the Git folder. Open the Git folder to select Projects from Git and click next.
- Select the repository source as Existing local repository and click next.
- Select the repository that is to be configured from the list of available repositories.
- Import the project as a general project in the next window and click next. Name this project and click Finish.
5.2. Runtime Migration
To run Red Hat JBoss BPM Suite 5 processes in Red Hat JBoss BPM Suite 6, do the following:
Set the system property
jbpm.v5.id.strategyto true in the JBoss BPM Suitestandalone.xmlfile:<property name="jbpm.v5.id.strategy" value="true"/>
<property name="jbpm.v5.id.strategy" value="true"/>Copy to Clipboard Copied! Toggle word wrap Toggle overflow Load the KieSession as shown here:
KieSession ksession = JPAKnowledgeService.loadStatefulKnowledgeSession(sessionID, kbase, sessionConf, env);
KieSession ksession = JPAKnowledgeService.loadStatefulKnowledgeSession(sessionID, kbase, sessionConf, env);Copy to Clipboard Copied! Toggle word wrap Toggle overflow Continue the normal execution of the process using KieSession methods:
ksession.signalEvent("SomeEvent", null);ksession.signalEvent("SomeEvent", null);Copy to Clipboard Copied! Toggle word wrap Toggle overflow
5.3. API and Backwards Compatibility
Migrating to Version 6.1
In version 6.1, 5.X APIs are no longer officially supported.
Red Hat JBoss BPM Suite no longer provides backward compatibility with the rule, event, and process application programming interface (API) from Red Hat JBoss BRMS 5. The content of the knowledge-api JAR file is no longer supported in version 6.1 and is replaced by APIs contained in the kie-api JAR file that were introduced in Red Hat JBoss BPM Suite 6.0.
If you used the legacy 5.x API (located in knowledge-api.jar), please migrate (rewrite) the API calls to the new KIE API. Please be aware that several other APIs have changed between Red Hat JBoss BRMS 5.x and Red Hat JBoss BPM Suite 6.x, namely the task service API and the REST API.
Migrating to Version 6.0
The Red Hat JBoss BPM Suite 6 system provides backward compatibility with the rule, event and process interactions from JBoss BRMS 5. You should eventually migrate (rewrite) these interactions to the all new revamped core API because this backward compatibility is likely to be deprecated.
If you cannot migrate your code to use the new API, then you can use the API provided by the purpose built knowledge-api JAR for backwards compatible code. This API is the public interface for working with JBoss BPM Suite and JBoss BRMS and is backwards compatible.
If you are instead using the REST API in Red Hat JBoss BPM Suite 5, note that this has changed as well and there is no mechanism in it for backwards compatibility.
5.4. Migrating task service
Red Hat JBoss BPM Suite 6 provides support for a locally running task server only. This means that you do not need to setup any messaging service in your project. This differs from Red Hat JBoss BPM Suite 5 because it provided a task server that was bridged from the core engine by using, most commonly, the messaging system provided by HornetQ.
To help you bridge the gap until you can migrate this in your current architecture, there is a helper or utility method, LocalHTWorkItemHandler.
Since the TaskService API is part of the public API you will now need to refactor your imports because of package changes and refactor your methods due to API changes themselves.
Chapter 6. Data Management
6.1. Data Backups
When applying a backup mechanism to Red Hat JBoss BPM Suite, make sure you back up the following resources:
-
Any customized deployment descriptors (such as,
web.xml,jboss-web.xml,jboss.xml) Any customized properties files
NoteConsider backing up the entire
business-central.waranddashbuilder.warfiles.
6.2. Setup Indexes
Setup Foreign Key Indexes
Some databases, for instance Oracle and PostgreSQL, do not automatically create an index for each foreign key. This can result in deadlocks occurring. To avoid this situation, it is necessary to create an index on all foreign keys, especially in the Oracle database.
Setup Indexes for Process and Task Dashboard
Process and Task Dashboard in 6.1 has been refactored in order to cope with high volume of task and process instances. In order to get good response times while querying the database the following JBoss BPM Suite tables need to be indexed: processinstancelog and bamtasksummary.
Note that ALL the columns in these two tables need to be indexed and not just the primary and foreign keys.
6.3. Setting up and Editing the Database
For information on how to change the database for Red Hat JBoss BPM Suite, see Special Setups of the Red Hat JBoss BPM Suite Installation Guide.
6.4. DDL Scripts
DDL scripts for database tables for Red Hat JBoss BPM Suite are available for download on the Customer Portal. These scripts allow you to study the tables and use them to create the tables and indexes manually or in databases that are not directly supported.
To download these scripts:
- Login to the Customer Portal.
- Click on Red Hat JBoss BPM Suite and select the version of the product for your requirements.
- Click on Download in the row Red Hat JBoss BPM Suite 6.3.0 Supplementary Tools to download the supplementary tools.
Unzip the file on your machine. The DDL scripts are located in the ddl-scripts directory. Database scripts are provided for DB2, H2, MySQL5, Oracle, PostgreSQL, and SQLServer.
The complete Entity Relationship diagram can be viewed in this Red Hat Solution.
Chapter 7. Asset Repository
Business Rules, Process definition files and other assets and resources created in Business Central are stored in Asset repository, which is otherwise known as the Knowledge Store.
Knowledge Store is a centralized repository for your business knowledge. It connects with the Git repository that allows you to store different kinds of knowledge assets and artifacts at a single location. Business Central provides a web front-end that allows you to view and update the stored content. You can access it using the Project Explorer from the unified environment of Red Hat JBoss BPM Suite.
All business assets are stored in repositories. These repositories are then saved in directories called organizational units. By default, the Artifact repository does not contain any organizational unit. Therefore, to be able to create your own business assets, you need to create an organizational unit and a repository first.
7.1. Creating an Organizational Unit
It is possible to create an organizational unit either in the Administration perspective of Business Central, using the kie-config-cli tool or the REST API calls.
Creating an Organizational Unit in Business Central
Note that only users with the admin role in Business Central can create organizational units.
Procedure: Using Business Central to Create an Organizational Unit
- In Business Central, go to Authoring → Administration.
- On the perspective menu, click Organizational Units → Manage Organizational Units.
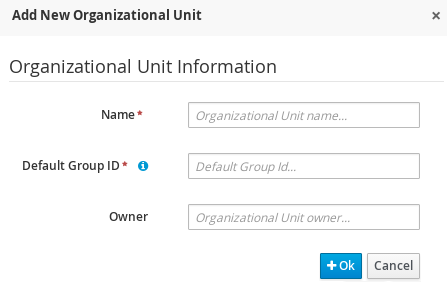
In the Organization Unit Manager view, click Add.
The Add New Organizational Unit dialog window opens.
Figure 7.1. Add New Organizational Unit_Dialog Window
- Enter the two mandatory parameters (name and default group ID) and click Ok.
Creating an Organizational Unit Using the kie-config-cli Tool
Organizational units can be created using the kie-config-cli tool as well. To do so, run the create-org-unit command. The tool then guides you through the entire process of creating an organizational unit by asking for other required parameters. Type help for a list of all commands.
For more information about the kie-config-cli tool, see Chapter 4, Command Line Configuration.
Creating an Organizational Unit Using the REST API
Note that only users with the rest-all role can create organizational units.
To create an organizational unit in Knowledge Store, issue the POST REST API call. Details of the organizational unit are defined by the JSON entity.
Input parameter of the call is a OrganizationalUnit instance. Call returns a CreateOrganizationalUnitRequest instance.
Example 7.1. Creating an Organizational Unit Using the Curl Utility
Example JSON entity containing details of an organizational unit to be created:
Execute the following command:
curl -X POST 'localhost:8080/business-central/rest/organizationalunits/' -u USERNAME:PASSWORD -H 'Accept: application/json' -H 'Content-Type: application/json' -d '{"name":"helloWorldUnit","owner":"tester","description":null,"repositories":[]}'
curl -X POST 'localhost:8080/business-central/rest/organizationalunits/' -u USERNAME:PASSWORD -H 'Accept: application/json' -H 'Content-Type: application/json' -d '{"name":"helloWorldUnit","owner":"tester","description":null,"repositories":[]}'For further information, refer to chapter Knowledge Store REST API, section Organizational Unit Calls of Red Hat JBoss BPM Suite Development Guide.
7.2. Creating a Repository
There are three ways to create a repository: through the Administration perspective of Business Central, the kie-config-cli tool, or using the REST API calls.
Creating a Repository in Business Central
Note that only users with the admin role in Business Central can create repositories.
Procedure: Using Business Central to Create a Repository
- In Business Central, go to Authoring → Administration.
On the perspective menu, click Repositories → New repository.
The New Repository pop-up window is displayed.
Figure 7.2. New Repository Dialog Window
Specify the two mandatory parameters:
- Repository name
NoteMake sure that the repository name is a valid file name. Avoid using a space or any special character that might lead to an invalid name.
- Organizational unit: Specifies the location of the newly created repository.
- Click Finish.

You can view the newly created repository either in the File Explorer or the Project Explorer.
Creating Repository Using kie-config-cli Tool
To create a new Git repository using the kie-config-cli tool, run the create-repo command. The tool then guides you through the entire process of creating a repository by asking for other required parameters. Type help for a list of all commands.
For more information about the kie-config-cli tool, see Chapter 4, Command Line Configuration.
Creating Repository Using REST API
Note that only users with the rest-all role can create repositories.
To create a repository in the Knowledge Store, issue the POST REST API call. Details of the repository are defined by the JSON entity. Make sure you established an authenticated HTTP session before executing this call.
Input parameter of the call is a RepositoryRequest instance. Call returns a CreateOrCloneRepositoryRequest instance.
Example 7.2. Creating Repository Using Curl Utility
Example JSON entity containing details of a repository to be created:
Execute the following command:
curl -X POST 'localhost:8080/business-central/rest/repositories/' -u USERNAME:PASSWORD -H 'Accept: application/json' -H 'Content-Type: application/json' -d '{"name":"newRepository","description":null,"requestType":"new","gitURL":null,"organizationalUnitName":"helloWorldUnit"}'
curl -X POST 'localhost:8080/business-central/rest/repositories/' -u USERNAME:PASSWORD -H 'Accept: application/json' -H 'Content-Type: application/json' -d '{"name":"newRepository","description":null,"requestType":"new","gitURL":null,"organizationalUnitName":"helloWorldUnit"}'For further information, refer to chapter Knowledge Store REST API, section Repository Calls of Red Hat JBoss BPM Suite Development Guide.
7.3. Cloning a Repository
It is possible to clone a repository either in Business Central or using the REST API calls. The kie-config-cli tool cannot be used to clone arbitrary repositories. Run git clone, or use one of the following options instead:
Cloning a Repository in Business Central
Note that only users with the admin role in Business Central can clone repositories.
Procedure: Using Business Central to Clone a Repository
- In Business Central, go to Authoring → Administration.
On the perspective menu, choose Repositories → Clone repository.
The Clone Repository pop-up window is displayed.
Figure 7.3. Clone Repository Dialog Window
In the Clone Repository dialog window, enter the repository details:
- Enter the Repository Name to be used as the repository identifier in the Asset repository and select the Organizational Unit it should be added to.
Enter the URL of the Git repository:
-
For a local repository, use
file:///PATH_TO_REPOSITORY/REPOSITORY_NAME. For a remote or preexisting repository, use
https://github.com/USERNAME/REPOSITORY_NAME.gitorgit://HOST_NAME/REPOSITORY_NAME.ImportantIt is important to use the HTTPS or Git protocol instead of a SCP-style SSH URL. Business Central does not support the basic SSH URL and fails with
Invalid URL format.
NoteThe file protocol is only supported for READ operations. WRITE operations are not supported.
-
For a local repository, use
- If applicable, enter the User Name and Password of your Git account to be used for authentication.
Click Clone.
A confirmation prompt with the notification that the repository was created successfully is displayed.
Click Ok.
The repository is now being indexed. Some workbench features may be unavailable until the indexing has completed.

You can view the cloned repository either in the File Explorer or the Project Explorer.
If you are deploying Business Central on WebLogic server, set the following Java system property in the setDomainEnv.sh file (for Linux) or setDomainEnv.cmd file (for Windows):
JAVA_OPTIONS="%JAVA_OPTIONS% -DUseSunHttpHandler=true"
JAVA_OPTIONS="%JAVA_OPTIONS% -DUseSunHttpHandler=true"This enables the WebLogic server to use the HTTP handlers.
Cloning a Repository Using the REST API
To clone a repository, issue the POST REST API call. This call creates or clones (according to the value of the requestType parameter) the repository defined by the JSON entity.
The input parameter of the call is a RepositoryRequest instance. The Call returns a CreateOrCloneRepositoryRequest instance.
Note that, only users with the rest-all role can clone repositories.
Example 7.3. Cloning a Repository Using the Curl Utility
Example JSON entity containing details of a repository to be cloned:
Execute the following command:
curl -X POST 'localhost:8080/business-central/rest/repositories/' -u USERNAME:PASSWORD -H 'Accept: application/json' -H 'Content-Type: application/json' -d '{"name":"clonedRepository","description":null,"requestType":"clone","gitURL":"git://localhost:9418/newRepository","organizationalUnitName":"helloWorldUnit"}'
curl -X POST 'localhost:8080/business-central/rest/repositories/' -u USERNAME:PASSWORD -H 'Accept: application/json' -H 'Content-Type: application/json' -d '{"name":"clonedRepository","description":null,"requestType":"clone","gitURL":"git://localhost:9418/newRepository","organizationalUnitName":"helloWorldUnit"}'For further information, refer to chapter Knowledge Store REST API, section Repository Calls of Red Hat JBoss BPM Suite Development Guide.
7.4. Removing a Repository
Repositories can be removed using any of the following procedures.
Removing a Repository in Business Central
The simplest way to remove a repository is using the RepositoryEditor in Business Central.
Procedure: Using Business Central to Remove a Repository
- In Business Central, go to Authoring → Administration.
- Select Repositories from the tree menu on the left.
- In the RepositoryEditor on the right side of the page, locate the repository you want to delete from the list of available repositories.
From the drop-down menu, select master → Delete.
The following message will appear:
Are you sure you want to remove Repository "REPOSITORY_NAME"? Some editors may become inoperable if their content is inaccessible.
Are you sure you want to remove Repository "REPOSITORY_NAME"? Some editors may become inoperable if their content is inaccessible.Copy to Clipboard Copied! Toggle word wrap Toggle overflow - Press OK to delete the repository.
Removing a Repository Using the kie-config-cli Tool
Repositories can be removed using the kie-config-cli tool as well. To do so, run the remove-repo command.
For further information about the kie-config-cli tool, see Chapter 4, Command Line Configuration.
Removing a Repository Using the REST API
Note that only users with the rest-all role can remove repositories.
To remove a repository from the Knowledge Store, issue the DELETE REST API call. Make sure you established an authenticated HTTP session before executing this call.
The call returns a RemoveRepositoryRequest instance.
Example 7.4. Removing a Repository Using the Curl Utility
Execute the following command:
curl -X DELETE 'localhost:8080/business-central/rest/repositories/REPOSITORY_NAME' -u USERNAME:PASSWORD -H 'Accept: application/json' -H 'Content-Type: application/json'
curl -X DELETE 'localhost:8080/business-central/rest/repositories/REPOSITORY_NAME' -u USERNAME:PASSWORD -H 'Accept: application/json' -H 'Content-Type: application/json'For further information, refer to chapter Knowledge Store REST API, section Repository Calls of Red Hat JBoss BPM Suite Development Guide.
7.5. Managing Assets
To activate and use the feature described below, login to Business Central with a user that has the kiemgmt role assigned.
To make management of projects easier, Red Hat JBoss BPM Suite now provides a way to manage multiple projects based on standards. This allows you to create repository structures using industry standard best practices for maintenance, versioning and distribution of your projects.
To start with, repositories can now be managed or unmanaged.
Managed and Unmanaged Repositories
Unmanaged Repositories are the repository structures that you are used to. They can contain multiple unrelated projects.
Managed Repositories, on the other hand, provide version control at the project level and project branches for managing the release cycle. Further, Managed Repositories can be restricted to just a single project or encompass multiple projects. When you create a Managed Repository, the asset management configuration process is automatically launched in order to create the repository branches. Corresponding project structure is created as well.
Procedure: Creating an Unmanaged Repository
- In Business Central, go to Authoring → Administration.
Click Repositories → New Repository.
The New Repository window is displayed.
- Enter the repository name and select an organizational unit the repository belongs to.
- Click Finish.
Procedure: Creating a Managed Repository
- In Business Central, go to Authoring → Administration.
Click Repositories → New Repository.
The New Repository window is displayed.
- Enter the repository name and select an organizational unit the repository belongs to.
Select the Managed Repository check box and click Next to enter additional details of the Managed Repository.
Choose either the Single-project Repository or the Multi-project Repository radio button.
If the project you are creating is simple and self-contained, select the Single-project Repository radio button. Note that you will not be able to add more projects to this repository later.
For more complex projects, where there is likely to be a parent project that encompasses smaller ones, select the Multi-project Repository radio button.
Enter the details of the managed project along with the GAV (Group, Artifact, Version) details.
Note that all projects created in a Multi-project Repository will be managed together, with their version numbers being incremented together as well. Details of the parent project will be inherited by all future projects that you create in this Managed Repository.
- Click Finish .


Managed Branches
With Managed Repositories comes the added advantage of Managed Branches. As in Git, you can choose to work on different branches of your project (for example: master, dev and release). This process of branching can also be automated for you, by selecting the checkbox while creating a new Managed Repository (for both single and multi-projects).
You can switch between branches by selecting the desired branch while working in the Project Explorer.
Repository Structure
If you do not select automatic branch management while creating a repository, you can create branches manually afterwards. For Managed Repositories, you can do so by using the Configure button. This button, along with Promote and Release buttons, is provided in the Repository Structure view. You can access this view, by clicking on Repository → Repository Structure in the Project Explorer perspective menu.
Clicking on the Configure button allows you to create branches or edit automatically created ones.
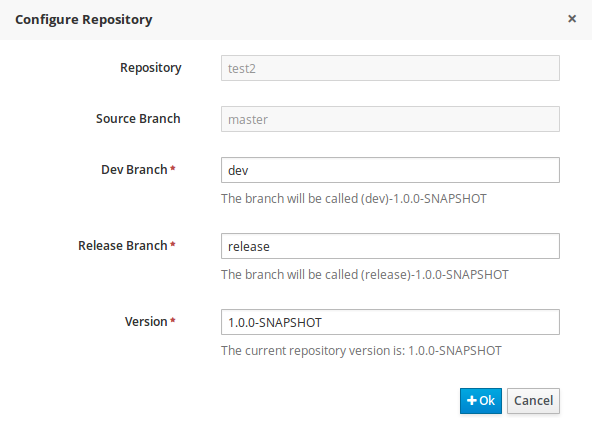
You can promote assets from the master branch to other branches using the Promote button. Similarly, you can Release branches and deploy them on the server using the Release button.
Both these functions are controlled internally by the use of pre-defined processes that are deployed on your instance. For example, when you click on Promote button after having done work on your development branch, a Promote Changes process is started in the background. A user, with the role of kiemgmt will have a user task appear in this task list to review the assets being promoted. This user can claim this task, and decide to promote all, some or none of the assets. The underlying process will cherry-pick the commits selected by the user to a release branch. This user can also request another review of these assets and this process can be repeated multiple times till all the assets are ready for release. The flow for this process is shown below:

Similarly, when you click on the Release button, a release process flow is initiated. This process flow builds the project and updates all the Maven artifacts to the next version, and deploys the project to the runtime, if runtime deployment details are supplied.
Project branches to be released must start with the keyword release.

7.6. Maven Repository
Maven is a software project management tool which uses a project object model (POM) file to manage:
- Builds
- Documentation
- Reporting
- Dependencies
- Releases
- SCMs
- Distribution
A Maven repository is used to hold or store the build artifacts and project dependencies and is generally of two types:
- Local
- Refers to a local repository where all the project dependencies are stored and is located with the current installation in the default folder as "m2". It is a cache of the remote downloads, and also contains the temporary build artifacts which have not yet been released.
- Remote
-
Refers to any other type of repository that can be accessed by a variety of protocols such as
file://orhttp://. These repositories can be at a remote location set up by a third-party for downloading of artifacts or an internal repository set up on a file or HTTP server, used to share private artifacts between the development teams for managing internal releases.
7.7. Configuring Deployment to a Remote Nexus Repository
Nexus is a repository manager frequently used in organizations to centralize storage and management of software development artifacts. It is possible to configure your project so that artifacts produced by every build are automatically deployed to a repository on a remote Nexus server.
To configure your project to deploy artifacts to a remote Nexus repository, add a distributionManagement element to your project’s pom.xml file as demonstrated in the code example below.
Replace the URLs in the example with real URLs of your Nexus repositories. The repository specified in the snapshotRepository element is used when the -SNAPSHOT qualifier is appended to the project’s current version number. In other cases the repository specified in the repository element is used.
If your Nexus server requires authentication, you will also need to modify your projects Maven settings to add your credentials in the settings-security.xml file, using a master password. By default, this file is in the $M2_HOME/conf folder, unless you have changed its location by modifying the kie.maven.settings.custom system property. It is also possible to create new user-specific settings.xml and settings-security.xml files in the ~/.m2 folder. In that case, these files will override the original ones.
See the following example of the settings-security.xml:
Note that keeping your server authentication credentials (for example the passwords) as a plain text in the settings.xml file is not recommended. All the information should be hashed with a master password in the settings-security.xml file.
For further information about password encryption and creating a master password, see the Apache Maven documentation, article Password Encryption.
With this configuration in place, clicking the Build & Deploy button in Business Central executes a Maven build and deploys the built artifacts both to the local repository and to one of the Nexus repositories specified in the pom.xml file.
Chapter 8. Process Export and Import
8.1. Creating a Process Definition
Make sure you have logged in to JBoss BPM Suite or you are in JBoss Developer Studio with the repository connected.
To create a Process, do the following:
- Open the Project Authoring perspective (Authoring → Project Authoring).
In Project Explorer (Project Authoring → Project Explorer), navigate to the project where you want to create the Process definition (in the Project view, select the respective repository and project in the drop-down lists; in the Repository view, navigate to
REPOSITORY/PROJECT/src/main/resources/directory).Creating packagesIt is recommended to create your resources, including your Process definitions, in a package of a Project to allow importing of resources and their referencing. To create a package, do the following:
-
In the Repository view of the Project Explorer, navigate to the
REPOSITORY/PROJECT/src/main/resources/directory. - Go to New Item → Package.
- In the New resource dialog, define the package name and check the location of the package in the repository.
-
In the Repository view of the Project Explorer, navigate to the
- From the perspective menu, go to New Item → Business Process.
- In the New Processes dialog box, enter the Process name and click OK. Wait until the Process Editor with the Process diagram appears.
8.2. Importing a Process Definition
To import an existing BPMN2 or JSON definition, do the following:
- In the Project Explorer, select a Project and the respective package to which you want to import the Process definition.
- Create a new Business Process to work in by going to New Item → Business Process.
-
In the Process Designer toolbar, click the Import
 icon in the editor toolbar and pick the format of the imported process definition. Note that you have to choose to overwrite the existing process definition in order to import.
From the Import window, locate the Process file and click Import.
Figure 8.1. Import Window
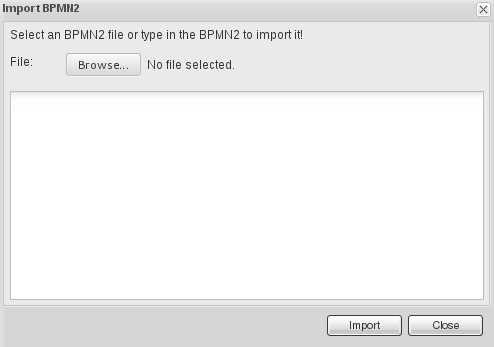
Whenever a process definition is imported, the existing imported definition is overwritten. Make sure you are not overwriting a process definition you have edited so as not to lose any changes.
A process can also be imported to the git repository in the filesystem by cloning the repository, adding the process files, and pushing the changes back to git. In addition to alternative import methods, you can copy and paste a process or just open a file in the import dialog.
When importing processes, the Process Designer provides visual support for Process elements and therefore requires information on element positions on the canvas. If the information is not provided in the imported Process, you need to add it manually.
8.3. Importing jPDL 3.2 to BPMN2
To migrate and import a jPDL definition to BPMN2, in the Process Designer, click on the import button then scroll down and select Migrate jPDL 3.2 to BPMN2.
Figure 8.2. Migrate jPDL 3.2 to BPMN2

In the Migrate to BPMN2 dialog box, select the process definition file and the name of the gpd file. Confirm by clicking the Migrate button.
Figure 8.3. Migrate to BPMN2 dialog box

The migration tool for jPDL 3.2 to BPMN2 is a technical preview feature, and therefore not currently supported in Red Hat JBoss BPM Suite.
8.4. Exporting a Process
Procedure: Exporting a business process
To export a business process, do the following:
- Open the Project Authoring perspective: on the main menu, click Authoring → Project Authoring.
- Select the business process which is to be exported, to view it in the Process Designer.
Click on the
 button of the process designer toolbar and select View Process Sources from the drop-down options.
The Process Sources window is displayed.
- Click on the Download BPMN2 button and save the business process at the desired location.
Part III. Integration
Chapter 9. Deploying Red Hat JBoss BPM Suite to Amazon EC2 Web Service
Amazon Elastic Compute Cloud (hereinafter referred to as Amazon EC2) is a web service providing a computing environment in the Amazon Web Services (AWS) cloud. Deploying Red Hat JBoss BPM Suite to Amazon EC2 has been supported since version 6.2.
Amazon EC2 can be used to create a virtual machine and its computing environments called instances. Templates for this instances are then known as Amazon Machine Images or AMIs. The service allows you to modify the instance to use a required configuration of CPU, memory, storage, and other properties. The cost of the service is calculated based on the used compute capacity.
For more information about Amazon EC2 and all the provided features, see the official AWS Documentation.
9.1. Getting Started with Amazon EC2
Logging into AWS
- Go to the Amazon Web Services main page, click Sign in to the Console and enter your user credentials.
On the AWS home page that opens, choose EC2 Virtual Servers in the Cloud in the left hand corner.
You are redirected to the EC2 Dashboard.
Figure 9.1. Amazon EC2 Dashboard

EC2 Dashboard provides an overview of your AWS account as well as the information about the overall service health and scheduled events. The Resources section of the dashboard contains links to all running instances, created key pairs, security groups, and more. To launch a virtual server, click the Launch Instance quick link in the Create Instance section. The main menu on the left side of the page contains links necessary for configuring instances and images, setting up networks and controlling security issues.
Note that login information in Amazon EC2 is encrypted. Before creating or starting an instance, you need to import your public key to AWS in order to be able to connect to the instance.
Importing Public Key
- In the main menu on the left, click Key Pairs under the NETWORK & SECURITY drop-down menu.
Click Import Key Pair at the top of the page.
The Import Key Pair dialog window opens.
- Define the name of the key pair and either upload the public key from file, or copy and paste the content of your public key into the Public key contents text field.
Click Import.
The imported key pair appears in the displayed list of key pairs.
Alternatively, you can create your own key pair using Amazon EC2. For more information, see the Amazon EC2 Key Pairs chapter in the AWS Documentation.
9.2. Creating and Starting Virtual Machine Instances
To deploy Red Hat JBoss BPM Suite to Amazon EC2, you must have a valid membership in the JBoss Cloud Access program. The program provides a number of supported AMIs created by Red Hat, while each of them has Red Hat Enterprise Linux 6 and Red Hat JBoss EAP 6 (together with other required software) pre-installed.
For further information about supported Amazon EC2 instance types, see the Deploy JBoss EAP 6 on Amazon EC2 chapter of Red Hat JBoss Enterprise Application Platform 6.4 Administration and Configuration Guide.
To create a virtual machine instance, do the following:
Creating Virtual Machine Instance
- In the main menu, click AMIs under the IMAGES drop-down menu.
Choose one of the supported AMIs.
For example
RHEL-6.7_HVM_GA-JBEAP-6.4.7-20160421-x86_64-1-Access2-GP2 (ami-50bba23a).Click Launch.
The Choose an Instance Type window opens. An instance type is a custom configuration of CPU, memory, storage, and networking capacity of your virtual machine instance.
Choose one of the listed instance types.
Instance type depends on the needs of your application. KIE Server and Business Central are usually two separated instances in AWS and each of them requires different settings. However, at least 2 vCPUs (the number of virtual CPUs) and 7.5 GiB of memory is recommended.
It is possible to launch the instance directly from here by clicking Review and Launch. If you want to change additional settings, see the following steps.
Click Next: Configure Instance Details.
In this step, you can choose a number of launched instances, network (either EC2-Classic or VPC, the Amazon Virtual Private Cloud), or enable detailed monitoring. If you want to keep the default settings, continue to the next tab.
Click Next: Add Storage.
This screen allows you to add more Amazon Elastic Block Store (Amazon EBS) volumes and modify the settings of the root volume. The minimum recommended size of the root volume is
30 GiB.ImportantMake sure that the set volume size is greater than the size of the used snapshot.
-
Click Next: Tag Instance and specify the tags for the instance that can help you search and filter the instances later. For example, the key
Namecan indicate a logical name of the instance in the instance list. Click Next: Configure Security Group.
A security group is a virtual firewall containing a number of firewall rules that control the traffic for your instance. Each instance can have one or more security groups assigned and these groups can be modified at any time.
You need to create a new security group in order to be able to deploy Red Hat JBoss BPM Suite:
Creating New Security Group
- If not already selected, select the Create a new security group check box.
- Fill in the Security group name and Description.
- Keep the default SSH type TCP protocol rule.
Define three new firewall rules by clicking Add Rule:
Default SSH access to Business Central:
- Type: Custom TCP Rule
- Protocol: TCP
- Port Range: 8001
Default HTTP port of Red Hat JBoss EAP:
- Type: Custom TCP Rule
- Protocol: TCP
- Port Range: 8080
Default Git port:
- Type: Custom TCP Rule
- Protocol: TCP
- Port Range: 9418
WarningAll the configured ports must be allowed in the
PORTS_ALLOWEDproperty of user data. For more information, see Configuring User Data.- Click Review and Launch.
- Review your instance details and if you want to launch the instance, click Launch.
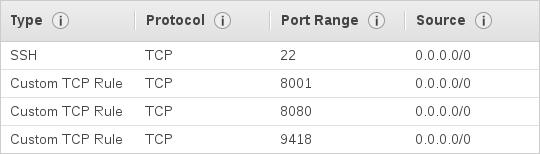
A list of all created instances can be found under the Instances option in the main menu on the left. You can filter, search and launch the instances as well as view the instance description and edit the settings.
Figure 9.2. List of Instances Searched by Name

In case you created a custom security group and defined new firewall rules with specific ports, you have to allow these ports in user data for the new virtual machine instance.
Configuring User Data
- In the main menu, go to INSTANCES → Instances.
- In the list of instances, find and select the instance you want to configure.
Click Actions → Instance Settings → View/Change User Data.
In the View/Change User Data dialog window that opens, define the
PORTS_ALLOWEDproperty. For example:PORTS_ALLOWED="8001 8080 9418"
PORTS_ALLOWED="8001 8080 9418"Copy to Clipboard Copied! Toggle word wrap Toggle overflow - Click Save.

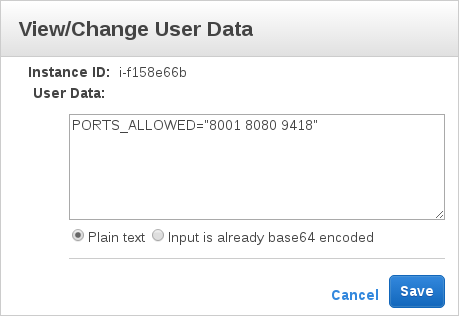
To start the created instance, do the following:
Starting Virtual Machine Instance
- In the main menu, go to INSTANCES → Instances.
Select the instance from the list and click Actions → Instance State → Start.
- In the Start Instances dialog window that opens, click Yes, Start to confirm that you want to start the instance.
-
Wait until the result of a status check changes to
2/2 checks passed.
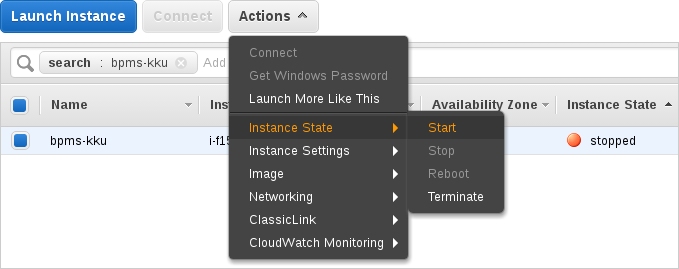
Do not forget to stop your instance after you no longer need it.
9.3. Installing Red Hat JBoss BPM Suite on Virtual Machine Instance
First, follow the steps below to connect to your instance:
Connecting to Instance
- Start the instance.
Click Connect to view details required for accessing your instance.
The Connect To Your Instance pop-up window opens.
- Copy the public DNS address.
Execute the following command:
ssh ec2-user@PUBLIC_DNS_ADDRESS
~]$ ssh ec2-user@PUBLIC_DNS_ADDRESSCopy to Clipboard Copied! Toggle word wrap Toggle overflow -
Enter
yesto confirm that you want to connect to your instance.
Installing Red Hat JBoss BPM Suite on VM Instance
- Connect to the instance on which you want to install Red Hat JBoss BPM Suite.
Update your instance in order to get the latest version of Red Hat JBoss EAP 6.x by executing the following command:
sudo yum -y update
~]$ sudo yum -y updateCopy to Clipboard Copied! Toggle word wrap Toggle overflow Switch to root:
sudo su
~]$ sudo suCopy to Clipboard Copied! Toggle word wrap Toggle overflow Copy the following configuration files to
/etc/jbossas/standalone/and/etc/jbossas/domain/:-
standalone.xml -
standalone-full.xml -
standalone-full-ha.xml -
standalone-ha.xml -
standalone-osgi.xml
Follow the instructions:
- Download Red Hat JBoss BPM Suite 6.3.0 Deployable for EAP 6 from Customer Portal.
- Change directory to the location of the downloaded zip file.
Copy the zip file into the
/tmp/directory of your virtual machine instance:scp jboss-bpmsuite-6.3.0.GA-deployable-eap6.x.zip ec2-user@PUBLIC_DNS_ADDRESS:/tmp
~]$ scp jboss-bpmsuite-6.3.0.GA-deployable-eap6.x.zip ec2-user@PUBLIC_DNS_ADDRESS:/tmpCopy to Clipboard Copied! Toggle word wrap Toggle overflow Go to the
/tmp/directory of your VM instance and unzip the file:unzip jboss-bpmsuite-6.3.0.GA-deployable-eap6.x.zip
~]# unzip jboss-bpmsuite-6.3.0.GA-deployable-eap6.x.zipCopy to Clipboard Copied! Toggle word wrap Toggle overflow Change directory to
jboss-eap-6.4/standalone/configuration/and copy all the configuration files listed above into/etc/jbossas/standalone/and/etc/jbossas/domain/, for example:cp standalone.xml /etc/jbossas/standalone/
~]# cp standalone.xml /etc/jbossas/standalone/Copy to Clipboard Copied! Toggle word wrap Toggle overflow Enter
yto overwrite the file.Make sure that the files were overwritten:
standalone.xmlshould contain the following:<system-properties> <property name="org.kie.example" value="true"/> <property name="org.jbpm.designer.perspective" value="full"/> <property name="designerdataobjects" value="false"/> </system-properties>
<system-properties> <property name="org.kie.example" value="true"/> <property name="org.jbpm.designer.perspective" value="full"/> <property name="designerdataobjects" value="false"/> </system-properties>Copy to Clipboard Copied! Toggle word wrap Toggle overflow
-
Copy the required applications (for example Business Central) to
/usr/share/jbossas/standalone/deployments/:-
Change directory to
/tmp/jboss-eap-6.4/standalone/deployments/. Copy Business Central:
cp -r business-central.war /usr/share/jbossas/standalone/deployments/
~]# cp -r business-central.war /usr/share/jbossas/standalone/deployments/Copy to Clipboard Copied! Toggle word wrap Toggle overflow cp -r business-central.war.dodeploy /usr/share/jbossas/standalone/deployments/
~]# cp -r business-central.war.dodeploy /usr/share/jbossas/standalone/deployments/Copy to Clipboard Copied! Toggle word wrap Toggle overflow
-
Change directory to
Set the proper Red Hat JBoss EAP binding address.
Each virtual machine has private and public IP addresses. The public IP address can be accessed outside the AWS, while the private IP address is accessible only inside the virtual network of your Amazon EC2 account.
ImportantEvery time you start the instance, the addresses change. Refer to the Red Hat JBoss Enterprise Application Platform 6.4 Administration and Configuration Guide for more information.
One way to set the address is by doing the following:
-
Run
ifconfigand copy theinet addraddress (for example10.233.159.148). Open
/etc/jbossas/standalone/standalone.xmland set the proper binding address:Copy to Clipboard Copied! Toggle word wrap Toggle overflow
-
Run
Enable Git and SSH access to Business Central: add the following system properties (with your private IP address) into
/etc/jbossas/standalone/standalone.xml.<property name="org.uberfire.nio.git.daemon.host" value="10.233.159.148"/> <property name="org.uberfire.nio.git.ssh.host" value="10.233.159.148"/>
<property name="org.uberfire.nio.git.daemon.host" value="10.233.159.148"/> <property name="org.uberfire.nio.git.ssh.host" value="10.233.159.148"/>Copy to Clipboard Copied! Toggle word wrap Toggle overflow
Once the setup has been done, you can create a new AMI from your instance.
Creating new AMI from Configured Instance
- In the main menu, go to INSTANCES → Instances.
Locate your configured instance and click Actions → Image → Create Image.
- In the Create Image dialog window, specify the image details and click Create Image.

9.4. Running Red Hat JBoss BPM Suite on Virtual Machine Instance
Running Red Hat JBoss BPM Suite on VM Instance
Start Red Hat JBoss EAP by executing the command:
/etc/init.d/jbossas start
~]# /etc/init.d/jbossas startCopy to Clipboard Copied! Toggle word wrap Toggle overflow Alternatively, you can use the command with option
stop(orrestart) to stop (or restart) the Red Hat JBoss EAP.The following message appears:
Starting jbossas: [ OK ]
Starting jbossas: [ OK ]Copy to Clipboard Copied! Toggle word wrap Toggle overflow If the deployment finished successfully, the
business-central.war.dodeployfile in/usr/share/jbossas/standalone/deployments/changes tobusiness-central.war.deployed.-
To log in to Business Central, navigate to
http://PUBLIC_DNS_ADDRESS:8080/business-centralin a web browser.
Chapter 10. Deploying Red Hat JBoss BPM Suite artifacts to SOA Repository Artifact Model and Protocol (S-RAMP) repository
While Red Hat JBoss BPM Suite and S-RAMP are two independent products, it is possible to move artifacts between them. You can move artifacts from JBoss BPM Suite to S-RAMP using Maven or via a user interface.
This section provides information about these two processes.
10.1. Deploying Red Hat JBoss BPM Suite artifacts to SOA Repository Artifact Model and Protocol (S-RAMP) using Maven
Before you can deploy Red Hat JBoss BPM Suite artifacts to S-RAMP using Maven, you will need to enable the S-RAMP Maven Wagon. The Maven Wagon is a key feature that supports the S-RAMP Atom based REST API protocol. By enabling the S-RAMP Maven Wagon, users will be able to access artifacts from the S-RAMP repository as dependencies in a Maven project.
Enable the S-RAMP Maven Wagon by making an edit in the pom.xml file as shown below:
Once the S-RAMP Maven Wagon is enabled, you can deploy the JBoss BPM Suite artifacts to that S-RAMP repository. To do this, follow the steps below:
Clone the git repository where you have saved the BPM Suite project by running this command:
git clone http://localhost:8001/REPOSITORY_NAME
git clone http://localhost:8001/REPOSITORY_NAMECopy to Clipboard Copied! Toggle word wrap Toggle overflow - On the command line, move into the folder that contains the project.
Follow the instructions in Red Hat JBoss Fuse Service Works 6 Development Guide, Volume 3: Governance, section Deploying to S-RAMP. Use the URL from the example below:
Copy to Clipboard Copied! Toggle word wrap Toggle overflow With these settings, Maven deployments are sent directly to the S-RAMP repository using the S-RAMP API. Note that artifacts are added to the S-RAMP repository with an artifact type based on the Maven type of the project. You can override this behavior by adding a query parameter to the repository URL in the
pom.xmlfile. For example:Copy to Clipboard Copied! Toggle word wrap Toggle overflow The above example causes the Maven artifact to be uploaded with an S-RAMP artifact type of KieJarArchive.
Amend the maven plug-in in file
pom.xmland add a dependency to it as follows in case the project does not contain decision tables:Copy to Clipboard Copied! Toggle word wrap Toggle overflow If the project contains decision tables, use this dependency for the kie-maven-plugin instead:
Copy to Clipboard Copied! Toggle word wrap Toggle overflow Run a clean Maven deployment using the following command:
mvn -s sramp-settings.xml deploy
mvn -s sramp-settings.xml deployCopy to Clipboard Copied! Toggle word wrap Toggle overflow
For the Maven deployment to the S-RAMP repository, it is necessary to have credentials set in the settings.xml file. For further details on the credentials, refer to Red Hat JBoss Fuse Service Works (FSW) documentation on Authentication.
To deploy Red Hat JBoss BPM Suite artifacts to an S-RAMP repository using the user interface, do the following:
-
In a web browser, navigate to http://localhost:8080/s-ramp-ui/. If the user interface has been configured to run from a domain name, substitute
localhostfor the domain name. For example http://www.example.com:8080/s-ramp-ui/. - Click on Artifacts.
- In the Manage Artifacts section, select Import.
-
Locate the kie archive you want to deploy. In the dialog that opens, fill out
KieJarArchiveas the type, and select Import. The deployment then creates these entries in the S-RAMP repository:
KieJarArchive, from which it derives:-
KieXmlDocument(if the archive containskmodule.xml) -
BpmnDocument(if the archive containsbpmndefinitions) -
DroolsDocument(if the archive containsdrldefinitions)
-
Chapter 11. Integrating Red Hat JBoss BPM Suite with Red Hat JBoss Fuse
Red Hat JBoss Fuse integration allows users of Red Hat JBoss Fuse to complement their integration solution with additional features provided by Red Hat JBoss BPM Suite and Red Hat JBoss BRMS.
Red Hat JBoss BPM Suite integration is provided by two features.xml files:
drools-karaf-features-VERSION-features.xmlThis file provides core Red Hat JBoss BPM Suite and Red Hat JBoss BRMS features, which defines the OSGi features that can be deployed into Red Hat JBoss Fuse. This file is a part of the Red Hat JBoss BPM Suite and Red Hat JBoss BRMS product. OSGi users can install features from this file in order to install Red Hat JBoss BRMS engine or Red Hat JBoss BPM Suite engine into Red Hat JBoss Fuse and use it in their applications.
karaf-features-VERSION-features.xmlThis file provides additional features used for integrating Red Hat JBoss BPM Suite and Red Hat JBoss BRMS with Apache Camel, primarily in Red Hat JBoss Fuse. This file is part of the Integration Pack and it defines OSGi features that enable integration with Apache Camel and SwitchYard. In addition to the
karaf-featuresXML file, the Integration Pack also contains afeatures.xmlfile for quick starts.
For further information about integration of Red Hat JBoss BPM Suite with Red Hat JBoss Fuse, see the Install Integration Pack chapter of the Red Hat JBoss Fuse Integration Guide.
11.1. Core Red Hat JBoss BPM Suite and Red Hat JBoss BRMS Features
Core Red Hat JBoss BPM Suite and Red Hat JBoss BRMS features are provided by the drools-karaf-features-VERSION-features.xml file present in your product Maven repository or the jboss-brms-bpmsuite-VERSION-redhat-VERSION-fuse-features.zip file. It provides the following features:
-
drools-common -
drools-module -
drools-templates -
drools-decisiontable -
drools-jpa -
kie -
kie-ci -
kie-spring -
kie-aries-blueprint -
jbpm-commons -
jbpm-human-task -
jbpm -
droolsjbpm-hibernate -
h2
The following table provides example of use cases for some of the features listed above.
| Feature | Use Case |
|---|---|
|
| Use the Red Hat JBoss BRMS engine for rules evaluation, without requiring persistence, processes, or decision tables. |
|
|
Use the Red Hat JBoss BRMS engine for rules evaluation with persistence and transactions, but without requiring processes or decision tables. The |
|
| Use the Red Hat JBoss BRMS engine with decision tables. |
|
|
Use the Red Hat JBoss BPM Suite (or Red Hat JBoss BRMS engine with processes). The |
|
| Use the Red Hat JBoss BPM Suite (or Red Hat JBoss BRMS engine with processes) with Human Task. |
|
core engine JARs and |
Use Red Hat JBoss BRMS or Red Hat JBoss BPM Suite with |
|
| Use KIE-Spring integration. See the section called “kie-spring Feature Further Information” for more information. |
|
| Use KIE-Aries-Blueprint integration. |
kie-spring Feature Further Information
-
Use
org.drools.osgi.spring.OsgiKModuleBeanFactoryPostProcessorinstead oforg.kie.spring.KModuleBeanFactoryPostProcessorto postprocess KIE elements in an OSGi environment. Do not install the
drools-modulefeature before thekie-springfeature. Otherwise, thedrools-compilerbundle does not detect packages exported bykie-spring.Run
osgi:refresh drools-compiler_bundle_IDif you have installed the features in the incorrect order to forcedrools-compilerto rebuild its Import-Package metadata.
11.2. Additional Features for SwitchYard and Apache Camel Integration
The following additional features for integration with SwitchYard and Apache Camel on Red Hat JBoss Fuse are provided by the integration pack:
-
fuse-bxms-switchyard-common-knowledge -
fuse-bxms-switchyard-rules -
fuse-bxms-switchyard-bpm -
kie-camel -
jbpm-workitems-camel
The integration pack features are defined in the karaf-features-VERSION-features.xml file. This file (and supporting repositories) is located in http://repository.jboss.org/nexus/content/repositories/public, which is already configured for use on Red Hat JBoss Fuse 6.2 out of the box in INSTALLATION_DIRECTORY/etc/org.ops4j.pax.url.mvn.cfg.
The file can also be downloaded from either the Red Hat JBoss Fuse 6.2 or Red Hat JBoss BPM Suite product page in the Red Hat Customer Portal.
11.3. Installing and Updating Core Integration Features
This section refers to features in the drools-karaf-features-VERSION-features.xml file. For additional integration features, see Section 11.4, “Installing Additional Integration Features”.
If you have already installed an older version of the core Red Hat JBoss BPM Suite and Red Hat JBoss BRMS features (for example, drools-karaf-features-6.2.0.Final-redhat-6-features.xml), you need to remove them and all associated files before installing the most recent features.xml file.
Procedure: Removing Existing drools-karaf-features Installation
Start the Red Hat JBoss Fuse console using:
./INSTALLATION_DIRECTORY/bin/fuse
$ ./INSTALLATION_DIRECTORY/bin/fuseCopy to Clipboard Copied! Toggle word wrap Toggle overflow Unistall old features or applications that used the previous
features.xmlfile. For example:JBossFuse:karaf@root> features:uninstall drools-module JBossFuse:karaf@root> features:uninstall jbpm JBossFuse:karaf@root> features:uninstall kie-ci
JBossFuse:karaf@root> features:uninstall drools-module JBossFuse:karaf@root> features:uninstall jbpm JBossFuse:karaf@root> features:uninstall kie-ciCopy to Clipboard Copied! Toggle word wrap Toggle overflow Search for references of bundles using
drools,kie, orjbpm, and remove them:karaf@root> list -t 0 -s | grep drools karaf@root> list -t 0 -s | grep kie karaf@root> list -t 0 -s | grep jbpm
karaf@root> list -t 0 -s | grep drools karaf@root> list -t 0 -s | grep kie karaf@root> list -t 0 -s | grep jbpmCopy to Clipboard Copied! Toggle word wrap Toggle overflow To remove the bundles:
karaf@root> osgi:uninstall BUNDLE_ID
karaf@root> osgi:uninstall BUNDLE_IDCopy to Clipboard Copied! Toggle word wrap Toggle overflow Remove the old
drools-karaf-featuresURL:karaf@root> features:removeurl mvn:org.drools/drools-karaf-features/6.2.0.Final-redhat-VERSION/xml/features
karaf@root> features:removeurl mvn:org.drools/drools-karaf-features/6.2.0.Final-redhat-VERSION/xml/featuresCopy to Clipboard Copied! Toggle word wrap Toggle overflow - Restart Red Hat JBoss Fuse.
To install the drools-karaf-features:
Procedure: Installing Core Red Hat JBoss BPM Suite and Red Hat JBoss BRMS Features
Configure required repositories:
Edit the
INSTALLATION_DIRECTORY/etc/org.ops4j.pax.url.mvn.cfgfile in your Red Hat JBoss Fuse installation and add the following entry to theorg.ops4j.pax.url.mvn.repositoriesvariable (note that entries are separated by, \):
Start Red Hat JBoss Fuse:
./INSTALLATION_DIRECTORY/bin/fuse
$ ./INSTALLATION_DIRECTORY/bin/fuseCopy to Clipboard Copied! Toggle word wrap Toggle overflow Add a reference to the core features file by running the following console command:
For Red Hat JBoss Fuse 6.2.1, use:
JBossFuse:karaf@root> features:addurl mvn:org.drools/drools-karaf-features/VERSION/xml/features
JBossFuse:karaf@root> features:addurl mvn:org.drools/drools-karaf-features/VERSION/xml/featuresCopy to Clipboard Copied! Toggle word wrap Toggle overflow For Red Hat JBoss Fuse 6.3.0, use:
JBossFuse:karaf@root> features:addurl mvn:org.drools/drools-karaf-features/VERSION/xml/features-fuse-6_3
JBossFuse:karaf@root> features:addurl mvn:org.drools/drools-karaf-features/VERSION/xml/features-fuse-6_3Copy to Clipboard Copied! Toggle word wrap Toggle overflow For example:
features:addurl mvn:org.drools/drools-karaf-features/6.4.0.Final-redhat-10/xml/features-fuse-6_3
features:addurl mvn:org.drools/drools-karaf-features/6.4.0.Final-redhat-10/xml/features-fuse-6_3Copy to Clipboard Copied! Toggle word wrap Toggle overflow To see the current
drools-karaf-featuresversion, see Supported Component Versions of the Red Hat JBoss BPM Suite Installation Guide.You can now install the features provided by this file by running, for example, the following console command:
JBossFuse:karaf@root> features:install jbpm
JBossFuse:karaf@root> features:install jbpmCopy to Clipboard Copied! Toggle word wrap Toggle overflow
11.4. Installing Additional Integration Features
Use the following procedure for additional integration with SwitchYard and Apache Camel.
Procedure: SwitchYard and Apache Camel Integration
Download the
fuse-integrationpackage that is aligned with your version of Red Hat JBoss Fuse.NoteFor instance, if you want to use the
6.2.0.redhat-117version of Red Hat JBoss Fuse, you need to install thefuse-6.2.0.redhat-117Red Hat JBoss Fuse integration features.Add the remote Maven repository that contains the fuse dependencies to your
karafinstance:-
Edit
FUSE_HOME/etc/org.ops4j.pax.url.mvn.cfg
-
Edit
Update the Drools features URL:
JBossFuse:karaf@root> features:addurl mvn:org.switchyard.karaf/mvn:org.switchyard.karaf/switchyard/SWITCHYARD_VERSION/xml/core-features
JBossFuse:karaf@root> features:addurl mvn:org.jboss.integration.fuse/karaf-features/1.0.0.redhat-VERSION/xml/features
JBossFuse:karaf@root> features:addurl mvn:org.switchyard.karaf/mvn:org.switchyard.karaf/switchyard/SWITCHYARD_VERSION/xml/core-features
JBossFuse:karaf@root> features:addurl mvn:org.jboss.integration.fuse/karaf-features/1.0.0.redhat-VERSION/xml/features
Copy to Clipboard Copied! Toggle word wrap Toggle overflow Additionally, update the
drools-karaf-featuresURL. For Red Hat JBoss Fuse 6.2.1, use:JBossFuse:karaf@root> features:addurl mvn:org.drools/drools-karaf-features/VERSION/xml/features
JBossFuse:karaf@root> features:addurl mvn:org.drools/drools-karaf-features/VERSION/xml/featuresCopy to Clipboard Copied! Toggle word wrap Toggle overflow For Red Hat JBoss Fuse 6.3.0, use:
JBossFuse:karaf@root> features:addurl mvn:org.drools/drools-karaf-features/VERSION/xml/features-fuse-6_3
JBossFuse:karaf@root> features:addurl mvn:org.drools/drools-karaf-features/VERSION/xml/features-fuse-6_3Copy to Clipboard Copied! Toggle word wrap Toggle overflow To see the current
drools-karaf-featuresversion, see Supported Component Versions of the Red Hat JBoss BPM Suite Installation Guide.You can now install the features provided for SwitchYard and Apache Camel integration by running, for example, the following console command:
JBossFuse:karaf@root> features:install fuse-bxms-switchyard-rules
JBossFuse:karaf@root> features:install kie-camel
JBossFuse:karaf@root> features:install jbpm-workitems-camel
JBossFuse:karaf@root> features:install fuse-bxms-switchyard-rules
JBossFuse:karaf@root> features:install kie-camel
JBossFuse:karaf@root> features:install jbpm-workitems-camel
Copy to Clipboard Copied! Toggle word wrap Toggle overflow
11.5. Configuring Dependencies
When you configure KIE, Red Hat JBoss BRMS, or Red Hat Jboss BPM Suite in your application, you can follow one of the following approaches to build your OSGi application bundles:
-
Bundle required dependencies into your application bundle. In this approach, you declare all required artifacts as runtime dependencies in your
pom.xml. Hence, you need not import the packages that provide these artifacts that you have already added as dependencies. -
Import the required dependencies into the application bundle. This is a preferred approach for building OSGi bundles as it adheres to the principles of OSGi framework. In this approach, you declare only the API JARs (such as
org.kie:kie-api) as dependencies in your application bundle. You will need to install the required Red Hat JBoss BRMS and Red Hat JBoss BPM Suite bundles and then import them in your application.
The MVELUserGroupCallback class fails to initialize in an OSGi environment. Do not use or include MVELUserGroupCallback as it is not designed for production purposes.
11.6. Installing Red Hat JBoss Fuse Integration Quick Start Applications
The following features for Red Hat JBoss Fuse integration quick start applications are provided by org/jboss/integration/fuse/quickstarts/karaf-features/1.0.0.redhat-VERSION/karaf-features-1.0.0.redhat-VERSION-features.xml:
-
fuse-bxms-switchyard-quickstart-bpm-service -
fuse-bxms-switchyard-quickstart-rules-camel-cbr -
fuse-bxms-switchyard-quickstart-rules-interview -
fuse-bxms-switchyard-quickstart-rules-interview-container -
fuse-bxms-switchyard-quickstart-rules-interview-dtable -
fuse-bxms-switchyard-demo-library -
fuse-bxms-switchyard-demo-helpdesk -
fuse-bxms-camel-blueprint-drools-decision-table -
fuse-bxms-camel-spring-drools-decision-table -
fuse-bxms-jbpm-workitems-camel-quickstart -
fuse-bxms-spring-jbpm-osgi-example
This file (and supporting repositories) is located in http://repository.jboss.org/nexus/content/repositories/public, which is already configured for use on Red Hat JBoss Fuse 6.2 out of the box in INSTALLATION_DIRECTORY/etc/org.ops4j.pax.url.mvn.cfg.
Procedure: Installing Quick Start Applications
Add a reference to the features file by running the following console command:
JBossFuse:karaf@root> features:addurl mvn:org.jboss.integration.fuse.quickstarts/karaf-features/1.0.0.redhat-VERSION/xml/features
JBossFuse:karaf@root> features:addurl mvn:org.jboss.integration.fuse.quickstarts/karaf-features/1.0.0.redhat-VERSION/xml/featuresCopy to Clipboard Copied! Toggle word wrap Toggle overflow You can now install the quick start applications provided by this features file by running, for example, the following console command:
JBossFuse:karaf@root> features:install fuse-bxms-switchyard-quickstart-bpm-service
JBossFuse:karaf@root> features:install fuse-bxms-switchyard-quickstart-bpm-serviceCopy to Clipboard Copied! Toggle word wrap Toggle overflow
Procedure: Downloading and Installing Quick Start ZIP Files
- Download the quick start application ZIP file.
-
Unpack the contents of the quick starts directory into your existing
INSTALLATION_DIRECTORY/quickstartsdirectory. -
Unpack the contents of the system directory into your existing
INSTALLATION_DIRECTORY/systemdirectory.
11.6.1. Testing Your First Quick Start Application
Procedure: Testing Quick Start Application
Start Red Hat JBoss Fuse:
./INSTALLATION_DIRECTORY/bin/fuse
$ ./INSTALLATION_DIRECTORY/bin/fuseCopy to Clipboard Copied! Toggle word wrap Toggle overflow Install and start the
switchyard-bpm-serviceby running the following console command:JBossFuse:karaf@root> features:install fuse-bxms-switchyard-quickstart-bpm-service
JBossFuse:karaf@root> features:install fuse-bxms-switchyard-quickstart-bpm-serviceCopy to Clipboard Copied! Toggle word wrap Toggle overflow NoteAny dependent features specified by the application’s features file will be installed automatically.
Submit a web service request to invoke the SOAP gateway.
-
Open a terminal window and navigate to the associated quick start directory that was unpacked from the quick start application ZIP file (in this case,
switchyard-bpm-service). Run the following command:
mvn clean install
$ mvn clean installCopy to Clipboard Copied! Toggle word wrap Toggle overflow NoteYou will need the following repositories configured in your
settings.xmlfile:Run the following command:
mvn exec:java -Pkaraf
$ mvn exec:java -PkarafCopy to Clipboard Copied! Toggle word wrap Toggle overflow
-
Open a terminal window and navigate to the associated quick start directory that was unpacked from the quick start application ZIP file (in this case,
You will receive the following response:
Copy to Clipboard Copied! Toggle word wrap Toggle overflow
Chapter 12. Integrating Red Hat JBoss BPM Suite with Red Hat Single Sign-On
Red Hat Single Sign-On (RH-SSO) is a Single Sign-On solution that you can use for securing your browser applications and your REST web services. This chapter describes how you can integrate RH-SSO with Red Hat JBoss BPM Suite and leverage its features.
Integrating with RH-SSO brings an integrated SSO and IDM (Identity Management) environment for Red Hat JBoss BPM Suite. The session management feature of RH-SSO allows you to use different Red Hat JBoss BPM Suite environments on the web by authenticating only once.
For more information on RH-SSO, see the RH-SSO documentation.
Red Hat Single Sign On Integration Points
You can integrate RH-SSO with Intelligent Process Servers using the following integration points:
Business Central authentication through an RH-SSO server
Authenticating Red Hat JBoss BPM Suite Business Central through RH-SSO involves securing both the Business Central web client and remote services through RH-SSO. This integration enables you to connect to Business Central using either web interface or a remote service consumer through RH-SSO.
Intelligent Process Server authentication through an RH-SSO server
Authenticating Red Hat JBoss BPM Suite Intelligent Process Server through RH-SSO involves securing the remote services provided by the Intelligent Process Server as it does not provide a web interface for server authentication. This enables any remote Red Hat JBoss BPM Suite service consumer (user or a service) to authenticate through RH-SSO.
Third-party client authentication through an RH-SSO server
Authenticating a third-party client through an RH-SSO server involves third-party clients to authenticate themselves using RH-SSO to consume the remote service endpoints provided by Business Central and Intelligent Process Server.
The following sections describe how to achieve RH-SSO integration through these integration points:
12.1. Business Central Authentication through RH-SSO
To authenticate Business Central through RH-SSO:
- Set up and run an RH-SSO server with a realm client for Business Central.
- Install and set up the RH-SSO client adapter for EAP.
- Secure Business Central Remote Service using RH-SSO.
- Create an RH-SSO client and configure the RH-SSO client adapter for Dashbuilder (BAM).
12.1.1. Setting Up RH-SSO with Realm Client for Business Central
Security realms are used to restrict access for the different applications resources. It is advised to create a new realm whether your RH-SSO instance is private or shared amongst other products. You can keep the master realm as a place for super administrators to create and manage the realms in your system. If you are integrating with an RH-SSO instance that is shared with other product installations to achieve Single Sign-On with those applications, all those applications must use the same realm.
Here is how you can install an RH-SSO server and create a security realm for Business Central:
Procedure: Setting Up RH-SSO with Realm Client
Install and configure a basic RH-SSO standalone server. To do this, follow the instructions in the RH-SSO Installation Guide.
NoteIf you want to run both RH-SSO and Red Hat JBoss BPM Suite servers on the same machine, ensure that you avoid port conflicts. To do so, do one of the following:
Update the
RHSSO_HOME/standalone/configuration/standalone.xmlfile and set a port offset to 100. For example:<socket-binding-group name="standard-sockets" default-interface="public" port-offset="${jboss.socket.binding.port-offset:100}"><socket-binding-group name="standard-sockets" default-interface="public" port-offset="${jboss.socket.binding.port-offset:100}">Copy to Clipboard Copied! Toggle word wrap Toggle overflow Use an environment variable to run the server:
bin/standalone.sh -Djboss.socket.binding.port-offset=100
bin/standalone.sh -Djboss.socket.binding.port-offset=100Copy to Clipboard Copied! Toggle word wrap Toggle overflow
Start the RH-SSO server using the following command from
RHSSO_HOME/bin:./standalone.sh
./standalone.shCopy to Clipboard Copied! Toggle word wrap Toggle overflow Once the RH-SSO server starts, open http://localhost:8180/auth/admin in a web browser and log in using your admin credentials that you created while installing RH-SSO. When you login for the first time, you can set up the initial user using the new user registration form.
- On the RH-SSO admin console, click Realm Settings tab.
On the Realm Settings page, click Add Realm.
The Add realm page opens.
- On the Add realm page, provide a name for the realm and click Create.
Click Client tab from the main admin console menu and click Create.
The Add Client page opens.
On the Add Client page, provide the required information to create a new client for your realm. For example:
- Client ID: kie
- Client protocol: openid-connect
- Root URL: http://localhost:8080/business-central
Click Save to save your changes.
At this point, the RH-SSO server is configured with a realm with a client for Red Hat JBoss BPM Suite applications (Business Central, in this example) and running and listening for HTTP connections at
localhost:8180. This realm provides different users, roles, and sessions for the Red Hat JBoss BPM Suite applications.
12.1.2. Setting Up RH-SSO Client Adapter for EAP
To set up the RH-SSO client adapter for EAP:
- Install the RH-SSO adapter for EAP.
- Configure the Red Hat JBoss BPM Suite application and the RH-SSO client adapter.
Procedure: Installing the RH-SSO Adapter for EAP
- Install EAP 6.4.X. See Chapter 2. Installation Instructions from the Red Hat JBoss Enterprise Application Platform Installation Guide.
-
Install Red Hat JBoss BPM Suite in the freshly installed JBoss EAP. This step is important because if you configure RH-SSO adapter by making changes in
standalone.xml, and then unzip Red Hat JBoss BPM Suite, you may overwrite and lose the RH-SSO adapter configuration. - Download the EAP adapter from the Red Hat Customer Portal.
- Unzip and install the adapter. For installation instructions, see Installing Adapters for Red Hat Single Sign-On in the RH-SSO Installation Guide.
Procedure: Configuring the RH-SSO Adapter
Navigate to
EAP_HOME/standalone/configurationin your EAP installation and editstandalone.xmlto add the RH-SSO subsystem configuration. For example:Copy to Clipboard Copied! Toggle word wrap Toggle overflow Here,
-
secure-deployment name: Name of your application’s WAR file. -
realm: Name of the realm that you created for the applications to use. -
realm-public-key: The public key of the realm you created. You can find it in the Keys tab in the Realm settings page of the realm you created in the RH-SSO admin console. If you do not provide a value for realm-public-key, the server retrieves it automatically. -
auth-server-url: The URL for the RH-SSO authentication server. -
enable-basic-auth: The setting to enable basic authentication mechanism, so that the clients can use both token-based and basic authentication approaches to perform the requests. -
resource: The name for the client that you created. -
credential name: The secret key for the client you created. You can find it in the Credentials tab on the Clients page of the RH-SSO admin console. principal-attribute: The login name of the user. If you do not provide this value, your User Id is displayed in the application instead of your user name.NoteThe RH-SSO server converts the user names to lowercase. Therefore, after integration with RH-SSO, your user name will appear in lowercase in Business Central. If you have user names in upper-case letters hard coded in business processes, the application may not be able to identify the upper-case user.
-
Add the following sub element under the
<extensions>section ofstandalone.xml:<extension module="org.keycloak.keycloak-adapter-subsystem"/>
<extension module="org.keycloak.keycloak-adapter-subsystem"/>Copy to Clipboard Copied! Toggle word wrap Toggle overflow This secures the application using the urn:jboss:domain:keycloak subsystem in
standalone.xmlas opposed to securing it throughweb.xmlfile inside each WAR.Navigate to
EAP_HOME/bin/and start the EAP server using the following command:./standalone.sh
./standalone.shCopy to Clipboard Copied! Toggle word wrap Toggle overflow You can now login to your Red Hat JBoss BPM Suite application (in this example, Business Central) once the server is running using the RH-SSO admin user credentials.
You can also configure RH-SSO adapter for EAP by updating your applications WAR file to use the RH-SSO security subsystem. However, the recommended approach is configuring the adapter through the RH-SSO subsystem. This means that you are updating EAP configuration instead of applying the configuration on each WAR file.
12.1.3. Adding a New User
To add new users and assign them a role to access Business Central:
- Login to the RH-SSO Admin console and open the realm you wish to add a user to.
Click Users under Manage section in the left menu bar.
An empty user list page called Users opens.
Click the Add User button on the empty user list to start creating your new user.
An Add user page opens.
- Provide user information on the Add user page and click Save.
- Set new password under the Credentials tab.
Assign the new user one of the roles that allow access to Business Central (For example,
adminoranalystrole for Red Hat JBoss BRMS andadminordeveloperrole for Red Hat JBoss BPM Suite).Define the roles as realm roles in the Roles page under the Configure section.
- Click Role Mappings tab on the Users page to assign roles.
12.1.4. Securing Business Central Remote Service using RH-SSO
Business Central provides different remote service endpoints that can be consumed by third-party clients using remote API. To authenticate those services through RH-SSO, you must disable a security filter called BasicAuthSecurityFilter. To do this, follow these steps:
Procedure: Disabling BasicAuthSecurityFilter
Open your application deployment descriptor file (
WEB-INF/web.xml) and apply the following changes to it:Remove the following lines to remove the servlet filter and its mapping for class
org.uberfire.ext.security.server.BasicAuthSecurityFilter:Copy to Clipboard Copied! Toggle word wrap Toggle overflow Add the following lines to add the
security-constraintfor the url-patterns that you have removed from the filter mapping:Copy to Clipboard Copied! Toggle word wrap Toggle overflow
- Save your changes.
12.1.5. Creating and Configuring RH-SSO Client Adapter for BAM
Once you have created a realm client for Business Central and set up the RH-SSO client adapter for EAP, you can repeat the same steps to integrate BAM with RH-SSO. After successful integration of RH-SSO with BAM, you can navigate within Business Central and BAM without having to re-login.
Procedure: Integrating RH-SSO with BAM
- On the RH-SSO admin console, open the security realm that you created.
Click Client tab from the main admin console menu and click Create.
The Add Client page opens.
On the Add Client page, provide the required information to create a new BAM client for your realm. For example:
- Client ID: dashbuilder
- Root URL: http://localhost:8080/dashbuilder
- Client protocol: openid-connect
Configure the RH-SSO client adapter for BAM. To do so, navigate to
EAP_HOME/standalone/configurationin your EAP installation and editstandalone.xmlto add the RH-SSO subsystem configuration. For example:Copy to Clipboard Copied! Toggle word wrap Toggle overflow Here,
-
secure-deployment name: The name of the BAM war file being deployed. -
realm-public-key: The public key of the realm you created. -
resource: The name of the client that you created for BAM (dashbuilder). -
enable-basic-auth: The setting to enable basic authentication mechanism, so that the clients can use both token-based and basic authentication approaches to perform the requests. -
credential name: The secret key for the client you created for BAM. You can find it in the Credentials tab on the Clients page of the RH-SSO admin console. -
principal-attribute: The login name of the user. If you do not provide this value, your User Id is displayed in the application instead of your user name.
-
Restart the EAP server and open http://localhost:8080/dashbuilder in a web browser to access BAM. Login to BAM using your RH-SSO admin user credentials.
You can now access both the applications (Business Central and BAM) without having to re-login.
12.2. Intelligent Process Server Authentication through RH-SSO
The Red Hat JBoss BPM Suite Intelligent Process Server provides a REST API for third-party clients. You can integrate the Intelligent Process Server with RH-SSO to delegate the third-party clients identity management to the RH-SSO server.
Once you have created a realm client for Business Central and set up the RH-SSO client adapter for EAP, you can repeat the same steps to integrate the Intelligent Process Server with RH-SSO.
12.2.1. Creating Client for Intelligent Process Server on RH-SSO
To create a new client on your already created realm on RH-SSO admin console:
Procedure: Creating a Client for the Intelligent Process Server
- On the RH-SSO admin console, open the security realm that you created.
Click Client tab from the main menu and click Create.
The Add Client page opens.
On the Add Client page, provide the required information to create a new client for your realm. For example:
- Client ID: kie-execution-server
- Root URL: http://localhost:8080/kie-server
- Client protocol: openid-connect
- Navigate to the Credentials tab and copy the secret key and and paste it on the kie-execution-server client configuration screen.
Click Save to save your changes.
Once you create a new client, its access value is
publicby default. Change it toconfidential.
12.2.2. Installing and Setting Up Intelligent Process Server with Client Adapter
To consume the Intelligent Process Server remote service endpoints, you must first create and assign the kie-server role in the RH-SSO admin console.
Procedure: Setting Up the Intelligent Process Server
Navigate to
EAP_HOME/standalone/configurationin your EAP installation and editstandalone.xmlto add the RH-SSO subsystem configuration. For example:Copy to Clipboard Copied! Toggle word wrap Toggle overflow Here,
-
secure-deployment name: Name of your application WAR file. -
realm: Name of the realm that you created for the applications to use. -
realm-public-key: The public key of the realm you created. You can - find it in the Keys tab in the Realm settings page of the realm you created in the RH-SSO admin console. If you do not provide a value for this public key, the server retrieves it automatically.
-
auth-server-url: The URL for the RH-SSO authentication server. -
resource: The name for the server client that you created. -
enable-basic-auth: The setting to enable basic authentication mechanism, so that the clients can use both token-based and basic authentication approaches to perform the requests. -
credential name: The secret key of the server client you created. You can find it in the Credentials tab on the Clients page of the RH-SSO admin console. -
principal-attribute: The login name of the user. If you do not provide this value, your User Id is displayed in the application instead of your user name.
-
-
Save your configuration changes in
standalone.xml. Use the following command to restart the EAP server and run the Intelligent Process Server.
EXEC_SERVER_HOME/bin/standalone.sh -Dorg.kie.server.id=<ID> -Dorg.kie.server.user=<USER> -Dorg.kie.server.pwd=<PWD> -Dorg.kie.server.location=<LOCATION_URL> -Dorg.kie.server.controller=<CONTROLLER_URL> -Dorg.kie.server.controller.user=<CONTROLLER_USER> -Dorg.kie.server.controller.pwd=<CONTOLLER_PASSWORD>
EXEC_SERVER_HOME/bin/standalone.sh -Dorg.kie.server.id=<ID> -Dorg.kie.server.user=<USER> -Dorg.kie.server.pwd=<PWD> -Dorg.kie.server.location=<LOCATION_URL> -Dorg.kie.server.controller=<CONTROLLER_URL> -Dorg.kie.server.controller.user=<CONTROLLER_USER> -Dorg.kie.server.controller.pwd=<CONTOLLER_PASSWORD>Copy to Clipboard Copied! Toggle word wrap Toggle overflow Here is an example:
EXEC_SERVER_HOME/bin/standalone.sh -Dorg.kie.server.id=kieserver1 -Dorg.kie.server.user=kieserver -Dorg.kie.server.pwd=password -Dorg.kie.server.location=http://localhost:8080/kie-server/services/rest/server -Dorg.kie.server.controller=http://localhost:8080/business-central/rest/controller -Dorg.kie.server.controller.user=kiecontroller -Dorg.kie.server.controller.pwd=password
EXEC_SERVER_HOME/bin/standalone.sh -Dorg.kie.server.id=kieserver1 -Dorg.kie.server.user=kieserver -Dorg.kie.server.pwd=password -Dorg.kie.server.location=http://localhost:8080/kie-server/services/rest/server -Dorg.kie.server.controller=http://localhost:8080/business-central/rest/controller -Dorg.kie.server.controller.user=kiecontroller -Dorg.kie.server.controller.pwd=passwordCopy to Clipboard Copied! Toggle word wrap Toggle overflow Once the Intelligent Process Server is running, you can check the server status using the following command:
curl http://kieserver:password@localhost:8080/kie-server/services/rest/server/
curl http://kieserver:password@localhost:8080/kie-server/services/rest/server/Copy to Clipboard Copied! Toggle word wrap Toggle overflow
Token-based authorization is also supported for communication between Business Central and the Intelligent Process Server. Additionally, you can use the complete token as system property (instead of username and password) for your applications. However, you must ensure that the token does not expire for the period of interaction between the applications, as it is not automatically refreshed.
12.3. Third-Party Client Authentication through RH-SSO
To use the different remote services provided by the Red Hat JBoss BPM Suite or by an Intelligent Process Server, your client must be authenticated on the RH-SSO server and have a valid token to perform the requests. To use the remote services, the authenticated user must have assigned the following roles:
rest-all: For using the Business Central remote servicesNoteThe rest-all role must have user specified in
org.kie.server.controller.userproperty.-
kie-server: For using the Intelligent Process Server remote services
Use the RH-SSO Administrator Console to create these roles and assign them to the users that will consume the remote services.
To achieve third-party client authentication through RH-SSO, you can choose between one of these options:
- Basic authentication (if the application’s client supports it)
- Token-based authentication
12.3.1. Basic Authentication
If you have enabled the basic authentication in the RH-SSO client adapter configuration for both Business Central and Intelligent Process Server, you can avoid the token grant/refresh calls and call the services as shown in the examples below:
For web based remote repositories endpoint:
curl http://admin:password@localhost:8080/business-central/rest/repositories
curl http://admin:password@localhost:8080/business-central/rest/repositoriesCopy to Clipboard Copied! Toggle word wrap Toggle overflow For the Intelligent Process Server:
curl http://admin:password@localhost:8080/kie-server/services/rest/server/
curl http://admin:password@localhost:8080/kie-server/services/rest/server/Copy to Clipboard Copied! Toggle word wrap Toggle overflow
12.3.2. Token-Based Authentication
If you want to opt for a more secure option of authentication, you can consume the remote services from both Business Central and Intelligent Process Server using a granted token provided by a new RH-SSO client.
Procedure: Obtaining and Using Token for Authorizing Remote Calls
Click Client tab from the main admin console menu and click Create to create a new client.
The Add Client page opens.
On the Add Client page, provide the required information to create a new client for your realm. For example:
- Client ID: kie-remote
- Client protocol: openid-connect
Click Save to save your changes.
Once you create a new client, its access value
publicby default. Change it toconfidential.Obtain a token from Realm Settings:
- On the RH-SSO admin console, click Realm Settings tab.
- Click Tokens tab.
Change the value for Access Token Lifespan to
15minutes.This gives you enough time to obtain a token and invoke the service before it expires.
- Click Save to save your changes.
Once a public client for your remote clients is created, you can now obtain the token by making an HTTP request to the RH-SSO server’s token endpoint using:
RESULT=`curl --data "grant_type=password&client_id=kie-remote&username=admin&password=password" http://localhost:8180/auth/realms/demo/protocol/openid-connect/token`
RESULT=`curl --data "grant_type=password&client_id=kie-remote&username=admin&password=password" http://localhost:8180/auth/realms/demo/protocol/openid-connect/token`Copy to Clipboard Copied! Toggle word wrap Toggle overflow To view the token obtained from the RH-SSO server, use the following command:
TOKEN=`echo RESULT | sed 's/.*access_token":"//g' | sed 's/".*//g'`
TOKEN=`echo RESULT | sed 's/.*access_token":"//g' | sed 's/".*//g'`Copy to Clipboard Copied! Toggle word wrap Toggle overflow
You can now use this token to authorize the remote calls. For example, if you want to check the internal Red Hat JBoss BPM Suite repositories, use the token as shown below:
curl -H "Authorization: bearer TOKEN" http://localhost:8080/business-central/rest/repositories
curl -H "Authorization: bearer TOKEN" http://localhost:8080/business-central/rest/repositoriesChapter 13. Integration with Spring
13.1. Configuring Red Hat JBoss BPM Suite with Spring
The jboss-bpms-engine.zip file contains the Spring module, which is called kie-spring-VERSION-redhat-MINOR_VERSION.jar.
You can configure the Spring modules:
- As a Self Managed Process Engine
-
If you require a single runtime manager instance, use the
RuntimeManagerAPI. TheRuntimeManagerAPI synchronizes the process engine and task service internally. - As a Shared Task Service
- If you require multiple runtime manager instances, use the jBPM services.
13.1.1. Integrating Spring with Runtime Manager API
To integrate Spring with the Runtime Manager API, include the following factory beans:
-
org.kie.spring.factorybeans.RuntimeEnvironmentFactoryBean -
org.kie.spring.factorybeans.RuntimeManagerFactoryBean -
org.kie.spring.factorybeans.TaskServiceFactoryBean
TaskServiceFactoryBean is required only for shared task service.
RuntimeEnvironmentFactoryBean
RuntimeEnvironmentFactoryBean produces RuntimeEnvironment instances consumed by RuntimeManager.
You can create the following types of RuntimeEnvironment instances:
-
DEFAULT: The default type. -
EMPTY: An empty environment. -
DEFAULT_IN_MEMORY: Same asDEFAULTwith no persistence of the runtime engine. -
DEFAULT_KJAR: Same asDEFAULTwith knowledge assets taken from kJAR and identified byreleaseIDor GAV (Group, Artifact, Version). -
DEFAULT_KJAR_CL: Built from class path that consists of akmodule.xmldescriptor.
Knowledge information is required for all the RuntimeEnvironment types. Provide one or more of the following:
-
knowledgeBase -
assets -
releaseId -
groupId,artifactId,version
For the DEFAULT, DEFAULT_KJAR, DEFAULT_KJAR_CL types, configure persistence using entity manager factory or transaction manager.
RuntimeManagerFactoryBean
RuntimeManagerFactoryBean creates RuntimeManager instances based on runtimeEnvironment. You can create the following runtimeEnvironment instances:
-
SINGLETON(default) -
PER_REQUEST -
PER_PROCESS_INSTANCE
Every RuntimeManager instance must have a unique ID. You can dispose of any RuntimeManager instance created by RuntimeManagerFactoryBean by calling the close() method.
TaskServiceFactoryBean
TaskServiceFactoryBean creates TaskService instance based on the given properties. Creates a single instance only.
Properties required:
-
entity manager factory -
transaction manager
When using the TaskServiceFactoryBean, provide the Spring transaction manager. When using a shared entity manager from Spring, you can also provide EntityManager instance instead of entity manager factory.
Optional properties:
-
userGroupCallback:MVELUserGroupCallbackImplby default. -
userInfo:DefaultUserInfoby default. -
listener: List ofTaskLifeCycleEventListenerinstances.
Sample RuntimeManager Configuration with Spring
To create a single runtime manager Spring configuration:
Configure the entity manager factory and the transaction manager, for example:
Copy to Clipboard Copied! Toggle word wrap Toggle overflow This configuration provides:
- JTA transaction manager, backed by Bitronix for unit tests or servlet containers.
-
The
org.jbpm.persistence.spring.jtaentity manager factory for persistence unit.
Configure resources you use, for example a business process:
<bean id="process" factory-method="newclass pathResource" class="org.kie.internal.io.ResourceFactory">
  <constructor-arg>
    <value>jbpm/processes/sample.bpmn</value>
  </constructor-arg>
</bean>
<bean id="process" factory-method="newclass pathResource" class="org.kie.internal.io.ResourceFactory"> <constructor-arg> <value>jbpm/processes/sample.bpmn</value> </constructor-arg> </bean>Copy to Clipboard Copied! Toggle word wrap Toggle overflow The
sample.bpmnprocess is included from the class path.Configure
RuntimeEnvironmentusing your entity manager, transaction manager, and resources:Copy to Clipboard Copied! Toggle word wrap Toggle overflow Create
RuntimeManager:<bean id="runtimeManager" class="org.kie.spring.factorybeans.RuntimeManagerFactoryBean" destroy-method="close"> <property name="identifier" value="spring-rm"/> <property name="runtimeEnvironment" ref="runtimeEnvironment"/> </bean>
<bean id="runtimeManager" class="org.kie.spring.factorybeans.RuntimeManagerFactoryBean" destroy-method="close"> <property name="identifier" value="spring-rm"/> <property name="runtimeEnvironment" ref="runtimeEnvironment"/> </bean>Copy to Clipboard Copied! Toggle word wrap Toggle overflow
An example of complete configuration:
13.1.2. Spring and jBPM Services
If you require multiple runtime managers, you can use jBPM services directly in your application. Due to the dynamic nature of jBPM services, processes and other assets can be added and removed without restarting your application.
To configure jBPM services, implement the IdentityProvider interface:
To configure jBPM services in a Spring application:
Configure the transaction manager:
<context:annotation-config />
<tx:annotation-driven />
<tx:jta-transaction-manager />

<bean id="transactionManager" class="org.springframework.transaction.jta.JtaTransactionManager" />
<context:annotation-config />
<tx:annotation-driven />
<tx:jta-transaction-manager />

<bean id="transactionManager" class="org.springframework.transaction.jta.JtaTransactionManager" />
Copy to Clipboard Copied! Toggle word wrap Toggle overflow Configure JPA and persistence:
<bean id="entityManagerFactory" class="org.springframework.orm.jpa.LocalContainerEntityManagerFactoryBean" depends-on="transactionManager">
   <property name="persistenceXmlLocation" value="classpath:/META-INF/jbpm-persistence.xml" />
</bean>
<bean id="entityManagerFactory" class="org.springframework.orm.jpa.LocalContainerEntityManagerFactoryBean" depends-on="transactionManager">
   <property name="persistenceXmlLocation" value="classpath:/META-INF/jbpm-persistence.xml" />
</bean>
Copy to Clipboard Copied! Toggle word wrap Toggle overflow Configure security providers:
Copy to Clipboard Copied! Toggle word wrap Toggle overflow Configure the runtime manager factory:
Copy to Clipboard Copied! Toggle word wrap Toggle overflow The runtime manager factory is Spring context aware and can interact with Spring containers.
Configure jBPM services as Spring beans:
Copy to Clipboard Copied! Toggle word wrap Toggle overflow
Chapter 14. CDI Integration
14.1. CDI Integration
To make use of jbpm-kie-services in your system, you will need to provide some mbeans to satisfy all dependencies of the services. There are several mbeans that depend on actual scenarios.
- Entity manager and entity manager factory
- User group callback for human tasks
- Identity provider to pass authenticated user information to the services
When running in JEE environment, like JBoss Application Server, the mbean should satisfy all requirements of the jbpm-kie-services:
Then the deployments/business-central.war/WEB-INF/beans.xml file may be configured to change the current settings of the new usergroupcallback implementation:
org.jbpm.services.task.identity.JAASUserGroupCallbackImpl is just an example here to demonstrate the settings of the application server regardless of what it actually is (LDAP, DB, etc).
Chapter 15. Persistence
The runtime data of the Process Engine can be persisted in data stores. The persistence mechanism saves the data using marshalling: the runtime data is converted into a binary dataset and the dataset is saved in the data storage.
Note that persistence is not configured by default and the engine runs without persistence.
The runtime data is saved using marshalling (binary persistence). The marshalling mechanism is a custom serialization mechanism.
Red Hat JBoss BPM Suite will persist the following when persistence is configured:
- Session state: This includes the session ID, date of last modification, the session data that business rules would need for evaluation, state of timer jobs.
- Process instance state: This includes the process instance ID, process ID, date of last modification, date of last read access, process instance start date, runtime data (the execution status including the node being executed, variable values, etc.)and the eventtypes.
- Work item runtime state: This includes the work item ID, creation date, name, process instance ID, and the work item state itself.
Based on the persisted data, it is possible to restore the state of execution of all running process instances in case of failure or to temporarily remove running instances from memory and restore them later. By default, no persistence is configured.
To allow persistence, you need to add the jbpm-persistence jar files to the classpath of your application and configure the engine to use persistence. The engine automatically stores the runtime state in the storage when the engine reaches a safe point. Safe points are points where the process instance has paused. When a process instance invocation reaches a safe point in the engine, the engine stores any changes to the process instance as a snapshot of the process runtime data. However, when a process instance is completed, the persisted snapshot of process instance runtime data is automatically deleted.
If a failure occurs and you need to restore the engine runtime from the storage, the process instances are automatically restored and their execution resumes so there is no need to reload and trigger the process instances manually.
The runtime persistence data is to be considered internal to the engine. You should not access persisted runtime data or modify them directly as this might have unexpected side effects.
To obtain information about the current execution state, refer to the history log. Query the database for runtime data only if absolutely necessary.
15.1. Session
Sessions are persisted as SessionInfo entities. These persist the state of the runtime KIE session, and store the following data:
| Field | Description | Nullable |
|---|---|---|
| id | primary key | false |
| lastmodificationdate | last saved to data store | N/A |
| rulesbytearray | binary dataset with session state (binary blob | false |
| startdate | session start | |
| optlock | version number used to lock value for optimistic locking |
15.2. Process Instance
Process instances are persisted as ProcessInstanceInfo entities, which persist the state of a process instance on runtime and store the following data:
| Field | Description | Nullable |
|---|---|---|
| instanceid | primary key | false |
| lastmodificationdate | last saved to data store | N/A |
| lastreaddate | last read from data store | N/A |
| processid | ID of the process the instance is based on | false |
| processinstancebytearray | binary dataset with process instance state (binary blob) | false |
| startdate | Process instance start date | |
| optlock | version number used lock value for optimistic locking | |
| state | Process instance state | false |
ProcessInstanceInfo has a 1:N relationship to the EventTypes entity.
The EventTypes entity contains the following data:
| Field | Description | Nullable |
|---|---|---|
| instanceid |
reference to the Process instance (foreign key to the | false |
| element | text field related to an event the Process instance has undergone |
Pessimistic Locking Support
The default locking mechanism for persistence of processes is optimistic. With multi-thread high concurrency to the same process instance, this locking strategy can result in bad performance.
With the release of the 6.1 version of Red Hat JBoss BPM Suite, this can be changed at runtime to allow the user to set locking on a per process basis and to allow it to be pessimistic (the change can be made at a per KIE Session level or Runtime Manager level as well and not just at the process level).
To set a process to use pessimistic locking, do this in the runtime environment:
15.3. Work Item
Work Items are persisted as workiteminfo entities, which persist the state of the particular work item instance on runtime and store the following data:
| Field | Description | Nullable |
|---|---|---|
| workitemid | primary key | false |
| name | work item name | |
| processinstanceid | parent Process instance id | false |
| state | integer representing work item state | false |
| optlock | version number used lock value for optimistic locking | |
| workitembytearray | binary dataset with work item state (binary blob) | false |
| creationDate | timestampe on which the work item was created | false |
15.4. Persistence configuration
15.4.1. Persistence configuration
Although persistence is not used by default, the dependencies needed are available in the runtime directory as jar files.
Persistence is defined per session and you can define it either using the JBPMHelper class after you create a session or using the JPAKnowledgeService to create your session. The latter option provides more flexibility, while JBPMHelper has a method to create a session, and uses a configuration file to configure this session.
15.4.2. Configuring persistence using JBPMHelper
To configure persistence of your session using JBPMHelper, do the following:
Define your application to use an appropriate JBPMHelper session constructor:
-
KieSession ksession = JBPMHelper.newKieSession(kbase); -
KieSession ksession = JBPMHelper.loadKieSession(kbase, sessionId);
-
Configure the persistence in the
jBPM.propertiesfile.Example 15.1. A sample jBPM.properties file with persistence for the in-memory H2 database
Copy to Clipboard Copied! Toggle word wrap Toggle overflow
Any invocations on the session will now trigger the persistence process.
Make sure the datasource is up and running on engine start. If you are running the in-memory H2 database, you can start the database from your application using the JBPMHelper.startH2Server(); method call and register it with the engine using JBPMHelper.setupDataSource(); method call.
15.4.3. Configuring persistence using JPAKnowledgeService
To create your knowledge session and configure its persistence using JPAKnowledgeService, do the following:
Define your application to use the knowledge session created by JPAKnowledgeService:
Define the session based on a knowledge base, a knowledge session configuration, and an environment. The environment must contain a reference to your Entity Manager Factory:
Copy to Clipboard Copied! Toggle word wrap Toggle overflow Define the session based on a specific session id.
// recreate the session from database using the sessionId
ksession = JPAKnowledgeService.loadKieSession(sessionId, kbase, null, env );
// recreate the session from database using the sessionId
ksession = JPAKnowledgeService.loadKieSession(sessionId, kbase, null, env );
Copy to Clipboard Copied! Toggle word wrap Toggle overflow
Configure the persistence in the
META-INF/persistence.xmlfile: configure JPA to use Hibernate and the respective database.Information on how to configure data source on your application server should be available in the documentation delivered with the application server. For this information for JBoss Enterprise Application Platform, see the Administration and Configuration Guide for this product.
Example 15.2. A sample persistence.xml file with persistence for an H2 data source jdbc/jbpm-ds
Copy to Clipboard Copied! Toggle word wrap Toggle overflow
Any invocations on the session will now trigger the persistence process.
Make sure the datasource is up and running on engine start. If you are running the in-memory H2 database, you can start the database from your application using the JBPMHelper.startH2Server(); method call and register it with the engine using JBPMHelper.setupDataSource(); method call.
If you are running JBoss BPM Suite in a simple Java environment, your data source configuration will be similar to the following:
Chapter 16. Transactions
16.1. Transactions
The Process Engine supports JTA transactions: local transactions are only supported when using Spring. Pure local transactions are not supported.
By default, each method invocation is considered a transaction. To change this behavior, for example, to combine multiple commands into one transaction, you will need to specify transaction boundaries.
16.2. Defining transactions
To define a transaction, do the following:
Register the transaction manager in your environment:
Example 16.1. Code with transaction manager registration
Copy to Clipboard Copied! Toggle word wrap Toggle overflow Initialize the KieSession:
// get the KieSession
RuntimeManager manager = RuntimeManagerFactory.Factory.get().newPerProcessInstanceRuntimeManager(environment);
RuntimeEngine runtime = manager.getRuntimeEngine(ProcessInstanceIdContext.get());
KieSession ksession = runtime.getKieSession();
// get the KieSession
RuntimeManager manager = RuntimeManagerFactory.Factory.get().newPerProcessInstanceRuntimeManager(environment);
RuntimeEngine runtime = manager.getRuntimeEngine(ProcessInstanceIdContext.get());
KieSession ksession = runtime.getKieSession();
Copy to Clipboard Copied! Toggle word wrap Toggle overflow Define the transaction manager in
jndi.properties:Example 16.2. Definition of Bitronix transaction manager in jndi.properties
java.naming.factory.initial=bitronix.tm.jndi.BitronixInitialContextFactory
java.naming.factory.initial=bitronix.tm.jndi.BitronixInitialContextFactoryCopy to Clipboard Copied! Toggle word wrap Toggle overflow Using another transaction managerTo use a different JTA transaction manager, edit the
hibernate.transaction.manager_lookup_class, the transaction manager property, in thepersistence.xmlfile to load your transaction manager.For example, if choosing JBoss Transaction Manager:
<property name="hibernate.transaction.manager_lookup_class" value="org.hibernate.transaction.JBossTransactionManagerLookup"/>
<property name="hibernate.transaction.manager_lookup_class" value="org.hibernate.transaction.JBossTransactionManagerLookup"/>Copy to Clipboard Copied! Toggle word wrap Toggle overflow Define the start and the end of the transaction.
Copy to Clipboard Copied! Toggle word wrap Toggle overflow
16.3. Container Managed Transactions
In cases where JBoss BPM Suite is embedded inside an application that is in a container that can manage transactions by itself (Container Managed Transactions - CMT), a special dedicated transaction manager is provided using the org.jbpm.persistence.jta.ContainerManagerTransactionManager class. This is because the default implementation of the transaction manager in JBoss BPM Suite is based on the UserTransaction class getting the transaction status. However, some application servers in a CMT mode do not allow accessing the UserTransaction instance from JNDI.
Operations executed on this manager are all no-op because they cannot affect the underlying CMT. The ContainerManagedTransactionManager class expects that the transaction is always active (returning ACTIVE to the getStatus() method).
Even though the container manages transactions, the container should be made aware of any exceptions that happen during process instance execution. Exceptions thrown by the engine should be propagated up to the container to properly rollback transactions.
Configuring the Transaction Manager
To configure and use the ContainerManagedTransactionManager, it needs to be inserted into the environment before you create or load a session:
Environment env = EnvironmentFactory.newEnvironment();
env.set(EnvironmentName.ENTITY_MANAGER_FACTORY, emf);
env.set(EnvironmentName.TRANSACTION_MANAGER, new ContainerManagedTransactionManager());
env.set(EnvironmentName.PERSISTENCE_CONTEXT_MANAGER, new JpaProcessPersistenceContextManager(env));
Environment env = EnvironmentFactory.newEnvironment();
env.set(EnvironmentName.ENTITY_MANAGER_FACTORY, emf);
env.set(EnvironmentName.TRANSACTION_MANAGER, new ContainerManagedTransactionManager());
env.set(EnvironmentName.PERSISTENCE_CONTEXT_MANAGER, new JpaProcessPersistenceContextManager(env));
Next, setup the JPA Provider in your persistence.xml file. For example, if using IBM WebSphere:
<property name="hibernate.transaction.factory_class" value="org.hibernate.transaction.CMTTransactionFactory"/>
<property name="hibernate.transaction.manager_lookup_class" value="org.hibernate.transaction.WebSphereExtendedJTATransactionLookup"/>
<property name="hibernate.transaction.factory_class" value="org.hibernate.transaction.CMTTransactionFactory"/>
<property name="hibernate.transaction.manager_lookup_class" value="org.hibernate.transaction.WebSphereExtendedJTATransactionLookup"/>Disposing the KSession in a CMT
In a CMT, you should not dispose the ksession directly (by using the dispose() method). Doing so will cause exceptions on transaction completion as the Process Engine needs to clean up the state after the invocation has finished.
Instead, use the specialized class org.jbpm.persistence.jta.ContainerManagedTransactionDisposeCommand's execute() method. Using this command ensures that the ksession will be disposed when the transaction is actually complete.
This method checks to see if the transaction is active. If it is, it delegates the actual disposal to the afterDisposal phase of the transaction instead of executing it directly. If there is no active transaction or if there is no active transaction, the ksession is disposed immediately.
Chapter 17. Logging
The logging mechanism allows you to store information about the execution of a process instance. It is provided by a special event listener that listens to the Process Engine for any relevant events to be logged, so that the information can be stored separately from other non-log information stored either in the server built-in database (H2) or a connected data source using JPA or Hibernate.
The jbpm-audit module provides the event listener and also allows you to store process-related information directly in a database using JPA or Hibernate. The data of the following entities is stored as follows:
-
Process instance as
processinstancelog -
Element instance as
nodeinstancelog -
Variable instance as
variableinstancelog
| Field | Description | Nullable |
|---|---|---|
| id | The primary key of the log entity | No |
| end_date | The end date of the process instance | Yes |
| processid | The name (id) of the underlying process | Yes |
| processinstanceid | The id of the process instance | No |
| start_date | The start date of the process instance | Yes |
| status | The status of the process instance | Yes |
| parentProcessInstanceId | The process instance id of the parent process instance if applicable | Yes |
| outcome | The outcome of the process instance (details on the process finish, such as error code) | Yes |
| Field | Description | Nullable |
|---|---|---|
| id | The primary key of the log entity | No |
| log_date | The date of the event | Yes |
| nodeid | The node id of the underlying Process Element | Yes |
| nodeinstanceid | The id of the node instance | Yes |
| nodename | The name of the underlying node | Yes |
| processid | The id of the underlying process | Yes |
| processinstanceid | The id of the parent process instance | No |
| type |
The type of the event ( | No |
| Field | Description | Nullable |
|---|---|---|
| id | The primary key of the log entity | No |
| log_date | The date of the event | Yes |
| processid | The name (id) of the underlying process | Yes |
| processinstanceid | The id of the process instance | No |
| value | The value of the variable at log time | Yes |
| variableid | The variable id as defined in the process definition | Yes |
| variableinstanceid | The id of the variable instance | Yes |
| outcome | The outcome of the process instance (details on the process finish, such as error code) | Yes |
If necessary, define your own data model of custom information and use the process event listeners to extract the information.
17.1. Logging events to database
To log an event that occurs on runtime in a Process instance, an Element instance, or a variable instance, you need to do the following:
Map the Log classes to the data source, so that the given data source accepts the log entries. On Red Hat JBoss EAP, edit the data source properties in the
persistence.xmlfile.Example 17.1. The ProcessInstanceLog, NodeInstanceLog and VariableInstanceLog classes enabled for processInstanceDS
Copy to Clipboard Copied! Toggle word wrap Toggle overflow Register a logger on your Kie Session.
Example 17.2. Import the Loggers
import org.jbpm.process.audit.AuditLogService;
import org.jbpm.process.audit.AuditLoggerFactory;
import org.jbpm.process.audit.AuditLoggerFactory.Type;
import org.jbpm.process.audit.JPAAuditLogService;
...
import org.jbpm.process.audit.AuditLogService;
import org.jbpm.process.audit.AuditLoggerFactory;
import org.jbpm.process.audit.AuditLoggerFactory.Type;
import org.jbpm.process.audit.JPAAuditLogService;
...
Copy to Clipboard Copied! Toggle word wrap Toggle overflow Example 17.3. Registering a Logger to a Kie Session
Copy to Clipboard Copied! Toggle word wrap Toggle overflow -
Optionally, call the method
addFilteron the logger to filter out irrelevant information. Only information accepted by all filters appears in the database. Logger classes can be viewed in the Audit View:
<dependency>
	<groupId>org.jbpm</groupId>
	<artifactId>jbpm-audit</artifactId>
	<version>6.0.1.Final</version>
</dependency>
<dependency>
	<groupId>org.jbpm</groupId>
	<artifactId>jbpm-audit</artifactId>
	<version>6.0.1.Final</version>
</dependency>
Copy to Clipboard Copied! Toggle word wrap Toggle overflow
17.2. Logback Functionality
Red Hat JBoss BPM Suite provides logback functionality for logging configuration.
Accordingly, everything configured is logged to the Simple Logging Facade for Java SLF4J, which delegates any log to Logback, Apache Commons Logging, Log4j or java.util.logging. Add a dependency to the logging adaptor for your logging framework of choice. If you are not using any logging framework yet, you can use Logback by adding this Maven dependency:
<dependency>
   <groupId>ch.qos.logback</groupId>
   <artifactId>logback-classic</artifactId>
   <version>1.x</version>
</dependency>
<dependency>
   <groupId>ch.qos.logback</groupId>
   <artifactId>logback-classic</artifactId>
   <version>1.x</version>
</dependency>
slf4j-nop and slf4j-simple are ideal for a light environment.
17.3. Configuring Logging
To configure the logging level of the packages, create a logback.xml file in business-central.war/WEB-INF/classes/logback.xml. To set the logging level of the org.drools package to "debug" for verbose logging, you would need to add the following line to the file:
<configuration>
  <logger name="org.drools" level="debug"/>

  ...
<configuration>
<configuration>
  <logger name="org.drools" level="debug"/>

  ...
<configuration>Similarly, you can configure logging for packages such as the following:
-
org.guvnor -
org.jbpm -
org.kie -
org.slf4j -
org.dashbuilder -
org.uberfire -
org.errai - etc…
If configuring with log4j, the log4j.xml can be located at business-central.war/WEB-INF/classes/log4j.xml and can be configured in the following way:
Additional logging can be configured in the individual container. To configure logging for JBoss Enterprise Application Platform, please refer to the Red Hat JBoss Enterprise Application Platform Administration and Configuration Guide.
17.4. Managing log files
Red Hat JBoss BPM Suite manages most of the required maintenance. Automatically cleaned runtime data includes:
- Process instances data, which is removed upon process instance completion.
- Work items data, which is removed upon work item completion.
- Task instances data, which is removed upon completion of a process to which given task belongs.
Runtime data, which may not be automatically cleaned, includes session information data. This depends on the selected runtime strategy:
- Singleton strategy ensures that session information runtime data will not be automatically removed.
- Per request strategy allows automatic removal when a given request terminates.
- Per process instances will be automatically removed when process instance mapped to a given session completes or is aborted.
Red Hat JBoss BPM Suite does not remove executor request and error information.
In order not to lose track of process instances, Red Hat JBoss BPM Suite offers audit data tables. These are used by default and keep track of the BPM Suite environment. JBoss BPM Suite offers two ways of how to manage and maintain the audit data tables:
- Automatic clean-up
- Manual clean-up
17.4.1. Automatic Clean-Up
Automatic clean-up uses the LogCleanupCommand executor command, which consists of logic to clean up all or selected data automatically. An advantage of the automatic clean-up method is the ability to schedule repeated clean-ups by using reoccurring job feature of the JBoss BPM Suite executor. This means that when one job completes, it provides information to the JBoss BPM Suite executor if and when the next instance of this job should be executed. By default, LogCleanupCommand is executed once a day but can be reconfigured to run on different intervals.
There are several important configuration options that can be used with the LogCleanupCommand command:
| Name | Description | Is Exclusive |
|---|---|---|
| SkipProcessLog | Indicates if the clean-up of process instances, node instances and variables log cleanup should be omitted (default: false) | No, can be used with other parameters |
| SkipTaskLog | Indicates if the task audit and the task event log clean-up should be omitted (default: false) | No, can be used with other parameters |
| SkipExecutorLog | Indicates if the JBoss BPM Suite executor entries clean-up should be omitted (default: false) | No, can be used with other parameters |
| SingleRun | Indicates if the job routine should run only once (default: false) | No, can be used with other parameters |
| NextRun | Sets a date for the next run. For example, 12h is set for jobs to be executed every 12 hours. If the option is not given, the next job will run 24 hours after the completion of the current job | Yes, cannot be used when the OlderThanPeriod parameter is used |
| OlderThan |
Causes logs older than the given date to be removed. The date format is | Yes, cannot be used when the NextRun parameter is used |
| OlderThanPeriod | Causes logs older than the given timer expression should be removed. For example, set 30d to remove logs older than 30 day from current time | No, can be used with other parameters |
| ForProcess | Specifies process definition ID for which logs should be removed | No, can be used with other parameters |
| ForDeployment | Specifies deployment ID for which logs should be removed | No, can be used with other parameters |
| EmfName | Persistence unit name that shall be used to perform operation deletion | N/A |
LogCleanupCommand does not remove any active instances, such as running process instances, task instances, or executor jobs.
While all audit tables have a time stamp, some may be missing other parameters, such as process id, or deployment id. For that reason, it is recommended to use the date parameter when managing the clean-up job routine.
17.4.2. Setting up Automatic Clean-up Job
To set up automatic clean-up job, do the following:
-
Open Business Central in your web browser (if running locally http://localhost:8080/business-central) and log in as a user with the
adminrole. - Go to Deploy → Jobs.
-
Click
 in the top right hand corner of the page.
Enter a name, due date and time. Enter the following into the Type text field:
org.jbpm.executor.commands.LogCleanupCommand
org.jbpm.executor.commands.LogCleanupCommandCopy to Clipboard Copied! Toggle word wrap Toggle overflow - Click on if you wish to use parameters listed above. In the key section, enter a parameter name. In the value section, enter true or false, depending on the desired outcome.
- Click Create to finalize the job creation wizard. You have successfully created an automatic clean-up job.
17.4.3. Manual Clean-Up
You may make use of audit API to do the clean-up manually with more control over parameters and thus more control over what will be removed. Audit API is divided into following areas:
-
Process audit, which is used to clean up process, node and variables logs, accessible in the
jbpm-auditmodule -
Task audit, which is used to clean up tasks and task events, accessible in the
jbpm-human-task-auditmodule -
Executor jobs, which is used to clean up executor jobs and errors, accessible in the
jbpm-executormodule
Modules are sorted hierarchically and can be accessed as follows:
-
org.jbpm.process.audit.JPAAuditLogService -
org.jbpm.services.task.audit.service.TaskJPAAuditService -
org.jbpm.executor.impl.jpa.ExecutorJPAAuditService
Several examples of manual clean-up follow:
Example 17.4. Removal of completed process instance logs
Example 17.5. Task audit logs removal for the org.jbpm:HR:1.0 deployment
Example 17.6. Executor error and requests removal
When removing executor entries, ensure that the error information is removed before the request information because of constraints setup on database.
Parts of the code utilize internal API. While this does not have any direct impact on the functionality of our product, internal API is subject to change and Red Hat cannot guarantee backward compatibility.
Chapter 18. Localization and Customization
18.1. Available Languages
The Red Hat JBoss BPM Suite web user interface can be viewed in multiple languages:
-
United States English (
en_US) -
Spanish (
es_ES) -
Japanese (
ja_JP) -
Simplified Chinese (
zh_CN) -
Traditional Chinese (
zh_TW) -
Portuguese (
pt_BR) -
French (
fr_CA) -
German (
de_DE)
If a language is not specified, US English is used by default.
Dashbuilder does not support Traditional Chinese (zh_TW).
18.2. Changing Language Settings
Changing the User Interface Language in Business Central
By default, Business Central uses the system locale. If you need to change it, then append the required locale code at the end of the Business Central URL. For example, the following URL will set the locale to Portuguese (pt_BR).
http://localhost:8080/business-central/?locale=pt_BR
Changing the User Interface Language in Dashbuilder
To change the user interface language in dashbuilder, do the following:
- Log into the dashbuilder after the server has been successfully started by navigating to http://localhost:8080/dashbuilder in a web browser.
- Select the language of your choice by clicking on the available locales on the top center of the dashbuilder user interface to change the language.
Setting a Default User Interface Language in Dashbuilder
Following is an example to set the default user interface language in dashbuilder:
Procedure: Setting the Default Language as French
Navigate to
jboss-eap-6.4/standalone/configurationand define the following in thestandalone.xmlfile.<system-properties> <property name="org.jboss.dashboard.LocaleManager.installedLocaleIds" value="en,es,de,fr,ja,pt,zh"/> <property name="org.jboss.dashboard.LocaleManager.defaultLocaleId" value="fr"/> </system-properties>
<system-properties> <property name="org.jboss.dashboard.LocaleManager.installedLocaleIds" value="en,es,de,fr,ja,pt,zh"/> <property name="org.jboss.dashboard.LocaleManager.defaultLocaleId" value="fr"/> </system-properties>Copy to Clipboard Copied! Toggle word wrap Toggle overflow - The default user interface language of the dashbuilder is now set to French.
Defining the Installed Locales in Dashbuilder
Following is an example to define the installed locales in dashbuilder:
Procedure: Defining the Installed Locale
Navigate to
jboss-eap-6.4/standalone/configurationand define the following in thestandalone.xmlfile:<system-properties> <property name="org.jboss.dashboard.LocaleManager.installedLocaleIds" value="en,es,de,fr,ja,pt"/> <property name="org.jboss.dashboard.LocaleManager.defaultLocaleId" value="fr"/> </system-properties>
<system-properties> <property name="org.jboss.dashboard.LocaleManager.installedLocaleIds" value="en,es,de,fr,ja,pt"/> <property name="org.jboss.dashboard.LocaleManager.defaultLocaleId" value="fr"/> </system-properties>Copy to Clipboard Copied! Toggle word wrap Toggle overflow
In this example, the Chinese language (zh) has been removed from the list of installed locales so users will not be able to switch the dashbuilder to Chinese. Dashbuilder will show content in French, which is the default locale. Users will be able to select other languages that are defined (en, es, de, ja, pt) in this file.
Within Business Central, the application server does not need to be restarted after changing locale if you append the "locale" parameter to the URL of Business Central. However, with Dashbuilder, the application server should be restarted after the configuration files have been changed.
18.3. Running the JVM with UTF-8 Encoding
Red Hat JBoss BPM Suite is designed to work with UTF-8 encoding. If a different encoding system is being used by the JVM, unexpected errors might occur.
To ensure UTF-8 is used by the JVM, use the JVM option -Dfile.encoding=UTF-8.
Part IV. Execution
Chapter 19. Process Execution Server Configuration
19.1. Assignment Rules
Assignment rules are rules executed automatically when a Human Task is created or completed. This mechanism can be used, for example, to assign a Human Task automatically to a particular user of a group or prevent a user from completing a Task if data is missing.
19.1.1. Defining Assignment Rules
To define assignment rules, do the following:
Create a file that will contain the rule definition on the Business Central classpath (the recommended location is
DEPLOY_DIR/standalone/deployments/business-central.war/WEB-INF/classes/):-
default-add-task.drlwith the rules to be checked when the Human Task is created -
default-complete-task.drlwith the rules to be checked when the Human Task is completed
-
- Define the rules in the file.
Example 19.1. The default-add-task.drl Content
If the potential owners of a Human Task will contain the user Mary, the task will be automatically assigned to the user mary.
Example 19.2. The default-complete-task.drl Content
If the potential owners of a Human Task will contain the user Mary, the task will be automatically assigned to the user mary.
19.2. Mail Session
Mail session defines the mail server properties that are used for sending emails if required by the application, such as, escalation or notification mechanisms (refer to the Red Hat JBoss BPM Suite User Guide).
19.2.1. Setting up Mail Session
To set up the mail session for your execution engine, do the following:
-
Open the respective profile configuration file (
standalone.xmlorhost.xml) for editing. Add the mail session to the
urn:jboss:domain:mail:1.1subsystem.Example 19.3. New Mail Session on localhost
Copy to Clipboard Copied! Toggle word wrap Toggle overflow Define the session outbound socket in the profile configuration file.
Example 19.4. Outbound Socket Definition
<outbound-socket-binding name="bpmsMail">
  <remote-destination host="localhost" port="12345"/>
</outbound-socket-binding>
<outbound-socket-binding name="bpmsMail">
  <remote-destination host="localhost" port="12345"/>
</outbound-socket-binding>
Copy to Clipboard Copied! Toggle word wrap Toggle overflow
Part V. Monitoring
Chapter 20. Process monitoring
20.1. JBoss Operations Network
A JBoss Operations Network plug-in can be used to monitor rules sessions for Red Hat JBoss BPM Suite.
Due to a limitation of passing the JVM monitoring arguments via the Maven command line, all com.sun.management.jmxremote.* parameters must be passed to the Red Hat JBoss BPM Suite application via the pom.xml configuration file.
Please refer to the JBoss Operations NetworkInstallation Guide for installation instructions for the JBoss ON server.
20.2. Installing the JBoss BRMS Plug-in into JBoss ON
Red Hat JBoss BRMS plug-in for JBoss Operations Network can be installed by either copying the plug-in JAR files to the JBoss Operations Network plug-in directory or through the JBoss Operations Network GUI.
The following procedure guides the user to copy the plug-in JAR files to the JBoss Operations Network plug-in directory:
Procedure: Copying the JBoss BRMS plug-in JAR files
Extract the JBoss BRMS plug-in pack archive to a temporary location. This creates a subdirectory with the name
jon-plugin-pack-brms-bpms-3.3.0.GA. For example:unzip jon-plugin-pack-brms-bpms-3.3.0.GA.zip -d /tmp
[root@server rhq-agent]# unzip jon-plugin-pack-brms-bpms-3.3.0.GA.zip -d /tmpCopy to Clipboard Copied! Toggle word wrap Toggle overflow Copy the extracted JBoss BRMS plug-in JAR files from the
jon-plugin-pack-brms-bpms-3.2.0.GA/directory to the JBoss ON server plug-in directory. For example:cp /tmp/jon-plugin-pack-brms-bpms-3.3.0.GA/*.jar /opt/jon/jon-server-3.3.0.GA1/plugins
[root@server rhq-agent]# cp /tmp/jon-plugin-pack-brms-bpms-3.3.0.GA/*.jar /opt/jon/jon-server-3.3.0.GA1/pluginsCopy to Clipboard Copied! Toggle word wrap Toggle overflow - Start the JBoss Operations Network server to update the JBoss BRMS plug-in.
To upload the JBoss BRMS plug-in through the JBoss Operations Network GUI, follow this procedure:
Procedure: Uploading the JBoss BRMS plug-in through GUI
- Start the JBoss Operations Network Server and Log in to access the GUI.
- In the top navigation of the GUI, open the Administration menu.
- In the Configuration area on the left, select the Server Plugins link.
- At the bottom of the list of loaded server plug-ins, click the Upload a plugin button and choose the BRMS plugin.
- The JBoss BRMS plug-in for JBoss Operations Network is now uploaded.
20.3. Monitoring Kie Bases and Kie Sessions
In order for JBoss Operations Network to monitor KieBases and KieSessions, MBeans must be enabled.
MBeans can be enabled either by passing the parameter: -kie.mbeans = enabled or via the API:
KieBaseConfiguration kbconf = KieServices.Factory.get().newKieBaseConfiguration();
kbconf.setOption(MBeansOption.ENABLED);
KieBaseConfiguration kbconf = KieServices.Factory.get().newKieBaseConfiguration();
kbconf.setOption(MBeansOption.ENABLED);
Kie Services have been implemented for JBoss BRMS 6; for JBoss BRMS 5, Drools Services was the naming convention used and it had different measurements on sessions. For example, activation → match renaming occurred in the updated version.
Please refer to the JBoss Operations Network Resource Monitoring and Operations Reference guide for information on importing Kie Sessions into the Inventory View for monitoring purposes.
Chapter 21. Managing Security for Red Hat JBoss BPM Suite Dashbuilder
21.1. Accessing Red Hat JBoss BPM Suite Dashbuilder
Dashbuilder is the Red Hat JBoss BPM Suite web-based user interface for Business Activity Monitoring. To access the Dashbuilder from Business Central, go to Dashboards → Process & Task Dashboards.
The displayed dashboard provides statistics on runtime data selected on the left. You can create your own dashboard in the Dashbuilder. To do so, display the Dashbuilder by clicking Dashboards → Business Dashboards.
21.2. Managing security
To manage security, you can define custom authorization policies to grant or deny access to workspace, page, or panel instances per role.
Defined below is a list of the available roles for Dashbuilder:
-
admin: Administrates the Red Hat JBoss BPM Suite system. Has full access rights to make any changes necessary. Also has the ability to add and remove users from the system. -
developer: Implements code required for process to work. Mostly uses the JBDS connection to view processes, but may use the web tool occasionally.: -
analyst: Responsible for creating and designing processes into the system. Creates process flows and handles process change requests. Needs to test processes that they create. Also creates forms and dashboards. -
user: Daily user of the system to take actions on business tasks that are required for the processes to continue forward. Works primarily with the task lists. -
manager: Viewer of the system that is interested in statistics around the business processes and their performance, business indicators, and other reporting of the system and people who interact with the system.
Thanks to the permissions system, you can build a workspace structure with several pages, menus, and panels and define what pages and panels within a page will be visible for each role. You can also define special types of users and give them restricted access to certain tooling features, or even restricted access to a page subset.
21.3. Workspace permissions
Procedure: Accessing Workspace Permissions
- Log into Business Dashboards from Business Central (as described in the Accessing Red Hat JBoss BPM Suite Dashbuilder topic).
Select the appropriate Dashboard from the Wokspace drop-down:
Figure 21.1. Dashbuilder Workspace
-
Click the
 button to access the Workspace Dashboard.
Click the Permissions label to view the permission management screen.
Figure 21.2. Permissions Screen

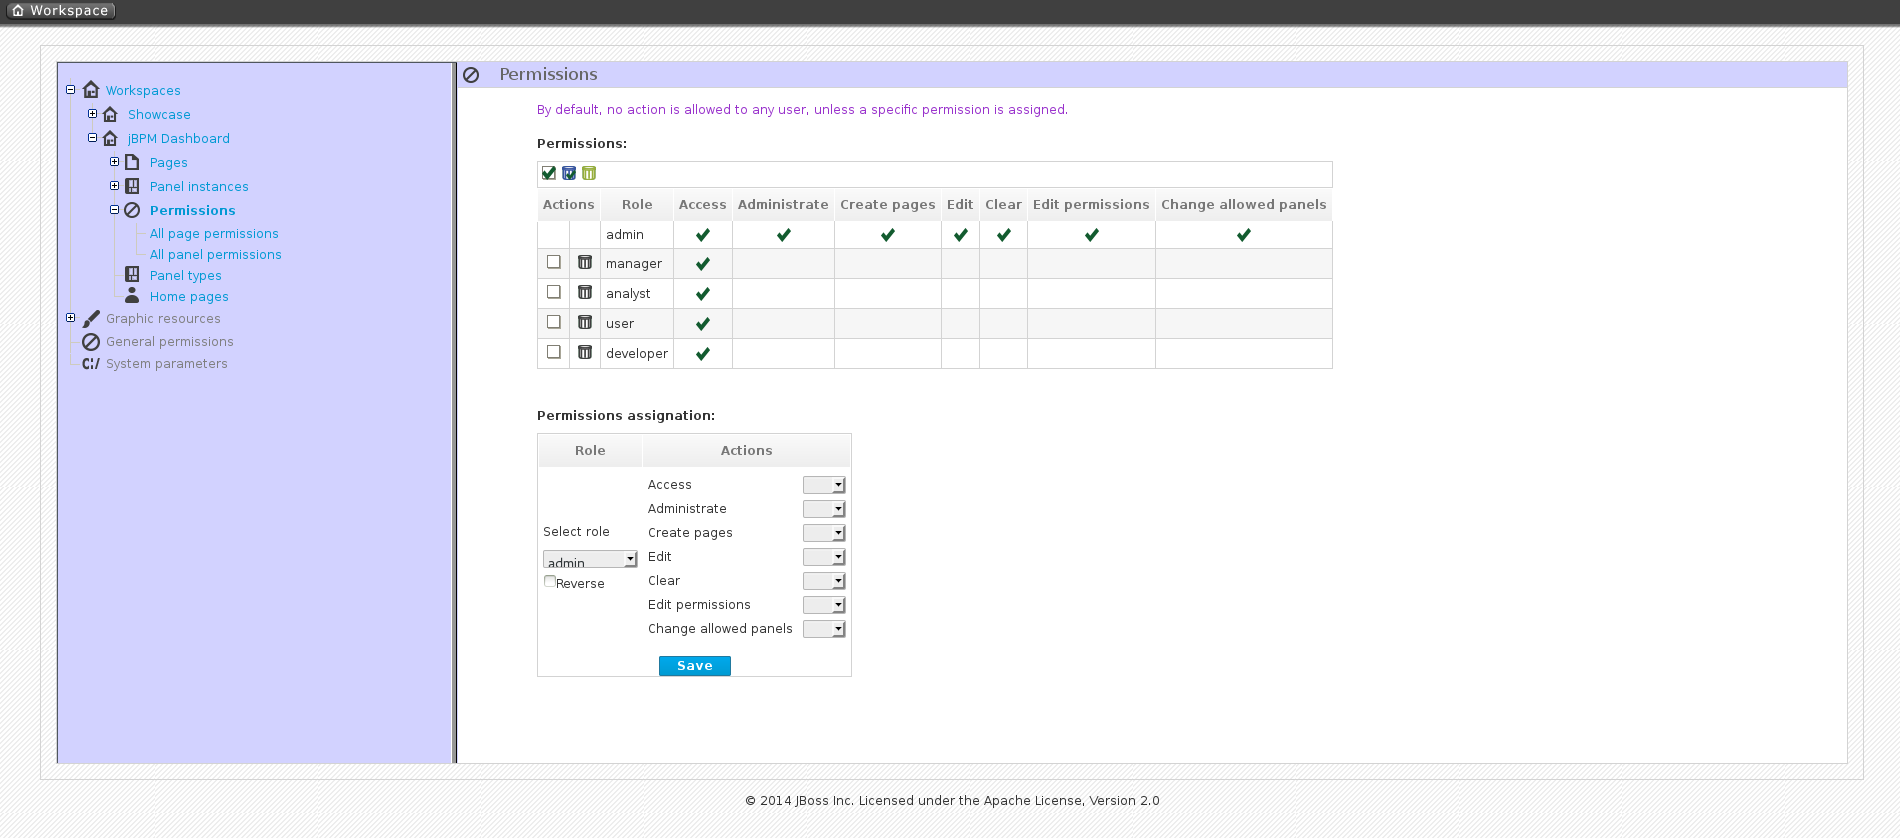
Under the Permissions section is a list of allowed actions that are applied to the selected role:
- Access: Permission to login into the application.
- Administrate: Permission to access the toolbar and system configuration features.
- Create pages: Ability to create new project pages.
- Edit: Permission to change the workspace properties.
- Clear: Ability to delete the workspace.
- Edit permissions: Ability to grant/deny permissions.
- Change allowed panels: Permission to restrict the type of panels that can be used in this workspace.
To assign a permission, you must select the target role and the list of actions allowed over the selected resource:
Figure 21.3. Permissions assignment
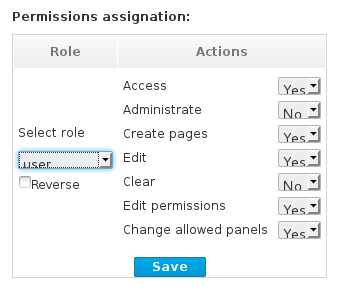
- Target roles (who): What user will be granted/denied with the permissions defined.
- Allowed actions: Depending on the type of the resource we can enable/disable what the user can do on this resource.
- Reverse (optional): When we have a set of roles and we want to grant/deny a permission to all the roles but one.
By default, the full set of permissions go to the role admin. This makes it easy to create a user that can do everything as long as the role admin is assigned.
21.4. Page permissions
- To access Page permissions, locate the Pages drop-down under the jBPM Dashboard (or whatever Dashboard you selected).
- After expanding Pages, expand the Process dashboard option.
- Select the Page permissions option.
Figure 21.4. Page Permissions

Under the Permissions section is a list of allowed actions that are applied to the selected role:
- Visualize: Permission to make the page visible.
- Edit: Ability to change the page properties.
- Clear: Ability to delete the page.
- Edit permissions: Ability to grant/deny permissions for the page.
21.5. Panel permissions
- To access the Panel permissions page, expand the Panel instances option under the jBPM Dashboard (or whatever Dashboard you are using).
- Expand the Dashboard option and then expand the Process dashboard.
- Expand the Panels choice and select the appropriate process.
- Open the Panel permissions page.
Below is a screenshot of the permission management screen for a given panel (in this example, the Process dashboard):
Figure 21.5. Panel permissions configuration screen

Allowed actions are the following:
- Visualize: Make the panel visible.
- Edit: Change the panel properties.
- Edit permissions: Ability to grant/deny permissions for the panel.
Appendix A. Configuration Properties
This chapter contains all public system properties and KIE environment entries that you can use to configure your deployment of Red Hat JBoss BPM Suite.
A.1. System Properties
System properties configure the entire JVM Red Hat JBoss BPM Suite runs on. You can either provide them at runtime, or set them in the configuration XML file for your deployment.
A.1.1. Runtime Configuration
To set a particular property at runtime, add a flag -D with the property’s name and value when starting the server. You can list multiple such properties at the same time.
Configuring System Properties at Runtime (Standalone deployments)
-
Navigate to
SERVER_HOME/bin. Run the server with the desired flags:
./standalone.sh -Dorg.kie.custom.property=value -Dorg.uberfire.switch=false
./standalone.sh -Dorg.kie.custom.property=value -Dorg.uberfire.switch=falseCopy to Clipboard Copied! Toggle word wrap Toggle overflow NoteOn Windows, run
standalone.batinstead ofstandalone.sh.
A.1.2. XML Configuration
To set a property in Red Hat JBoss BPM Suite configuration, add an entry under the <system-properties> section in the standalone.xml file:
<system-properties>
  <property name="org.kie.custom.property" value="random_value"/>
  <property name="org.uberfire.switch" value="false"/>
  ...
</system-properties>
<system-properties>
  <property name="org.kie.custom.property" value="random_value"/>
  <property name="org.uberfire.switch" value="false"/>
  ...
</system-properties>
When running Red Hat JBoss BPM Suite in domain mode, add the entries in the <system-properties> element of the appropriate node in the host.xml file.
A.1.3. List of System Properties
This section contains the alphabetically sorted list of all recognized system properties in Red Hat JBoss BPM Suite 6.3.
Red Hat JBoss BPM Suite System Properties
- btm.root
Root directory for Bitronix Transaction Manager. The discovery of configuration and other files starts in this location.
Expand Values Default String
N/A
- drools.propertySpecific
Sets property reactivity behavior of the Red Hat JBoss BPM Suite engine. Options are following:
-
DISABLED: Property reactivity turned off. -
ALLOWED: Property reactivity allowed. -
ALWAYS: Property reactivity always on.
Expand Values Default DISABLED,ALLOWED, orALWAYSALLOWED-
- drools.ruleEngine
Specifies which algorithm the Red Hat JBoss BPM Suite rule engine should use.
Expand Values Default phreakorreteoophreak- drools.sequential
Enables sequential mode for stateless sessions.
Expand Values Default trueorfalsefalse- drools.sequential.agenda
Selects static or dynamic agenda with sequential mode.
Expand Values Default staticordynamicstaticfor standard mode,dynamicfor sequential mode- jboss.node.name
A node name unique in a Red Hat JBoss BPM Suite cluster.
Expand Values Default String
N/A
- jbpm.audit.jms.connection.factory
A link to a JMS connection factory instance.
Expand Values Default A
javax.jms.ConnectionFactoryinstanceN/A
- jbpm.audit.jms.connection.factory.jndi
The JNDI name of the connection factory to look up.
Expand Values Default String
N/A
- jbpm.audit.jms.enabled
Indicates if audit mode is set to JMS.
Expand Values Default trueif Audit mode is set to JMS, otherwisefalseN/A
- jbpm.audit.jms.queue
A JMS Queue instance to be used when creating JMS AuditLogger.
Expand Values Default A
javax.jms.QueueinstanceN/A
- jbpm.audit.jms.queue.jndi
The JNDI name of the JMS queue to look up.
Expand Values Default String
N/A
- jbpm.audit.jms.transacted
Determines if the JMS session is transacted.
Expand Values Default trueorfalsetrue- jbpm.business.calendar.properties
The location of the configuration file with Business Calendar properties.
Expand Values Default Path
/jbpm.business.calendar.properties- jbpm.data.dir
The location where data files produced by Red Hat JBoss BPM Suite must be stored.
Expand Values Default ${jboss.server.data.dir}if available, otherwise${java.io.tmpdir}${java.io.tmpdir}- jbpm.enable.multi.con
Allows Web Designer to use multiple incoming or outgoing connections for tasks. If not enabled, the tasks are marked as invalid.
Expand Values Default trueorfalsefalse- jbpm.loop.level.disabled
Enables or disables loop iteration tracking to allow advanced loop support when using XOR gateways.
Expand Values Default trueorfalsetrue- jbpm.overdue.timer.delay
Specifies the delay for overdue timers to allow proper initialization, in milliseconds.
Expand Values Default Number (
Long)2000
- jbpm.process.name.comparator
An alternative comparator class to empower the Start Process by Name feature.
Expand Values Default Fully qualified name
org.jbpm.process.instance.StartProcessHelper.NumberVersionComparator- jbpm.tm.jndi.lookup
Allows setting a specific
TransactionManagerJNDI lookup name as a fallback in case a standard JNDI name is not used. Ifjava:comp/UserTransactiondoes not implement theorg.drools.persistence.TransactionManagerinterface, these names are used, in this order:-
java:comp/TransactionManager -
java:appserver/TransactionManager -
java:pm/TransactionManager -
java:TransactionManager - Value of this property
Expand Values Default JNDI name
N/A
-
- jbpm.usergroup.callback.properties
The location of the usegroup callback property file when
org.jbpm.ht.callbackis set tojaasordb.Expand Values Default Path
classpath:/jbpm.usergroup.callback.properties- jbpm.user.group.mapping
An alternative classpath location of user info configuration (used by
LDAPUserInfoImpl).Expand Values Default Path
${jboss.server.config.dir}/roles.properties
- jbpm.user.info.properties
An alternative classpath location for user group callback implementation (LDAP, DB). For more information, see
org.jbpm.ht.userinfo.Expand Values Default Path
classpath:/userinfo.properties- jbpm.ut.jndi.lookup
An alternative JNDI name to be used when there is no access to the default one for user transactions (
java:comp/UserTransaction).Expand Values Default JNDI name
N/A
- jbpm.v5.id.strategy
When enabled, Red Hat JBoss BPM Suite will use the process ID generation strategy from version 5 when migrating to version 6 and newer.
Expand Values Default trueorfalsefalse- kie.maven.settings.custom
The location of a custom
settings.xmlfile for Maven configuration.Expand Values Default Path
N/A
- kie.server.jms.queues.response
The JNDI name of response queue for JMS.
Expand Values Default String
queue/KIE.SERVER.RESPONSE- org.drools.server.ext.disabled
When set to
true, disables the BRM support (for example rules support).Expand Values Default trueorfalsefalse- org.drools.server.filter.classes
When set to
true, the Drools Intelligent Process Server extension accepts custom classes annotated byXmlRootElementorRemotableannotations only.Expand Values Default trueorfalsefalse- org.guvnor.m2repo.dir
The location where Maven artifacts are stored. When you build and deploy a project, it is stored in this directory. Change the setting, for example, to allow easier backup of your maven repository.
Expand Values Default Path
EAP_HOME/repositories/kie- org.guvnor.project.gav.check.disabled
Disables a duplicate
GroupId,ArtifactId, andVersion(GAV) detection. When you build and deploy a project, Business Central scans the Maven repository for an artifact with the same GAV values. If set totrue, Business Central silently overrides any previous project. If set tofalse, the user is required to confirm overriding the old project.Expand Values Default trueorfalsefalse- org.jbpm.deploy.sync.enabled
When enabled, Red Hat JBoss BPM Suite synchronizes KJAR deployments across Business Central nodes in a cluster, and automatically loads previous deployments.
Expand Values Default trueorfalsetrue- org.jbpm.deploy.sync.int
Interval of KJAR deployment synchronization, in seconds.
Expand Values Default Number (
Integer)3
- org.jbpm.ht.callback
Specifies the implementation of user group callback to be used:
-
mvel: Default; mostly used for testing. -
ldap: LDAP; requires additional configuration in thejbpm.usergroup.callback.propertiesfile. -
db: Database; requires additional configuration in thejbpm.usergroup.callback.propertiesfile. -
jaas: JAAS; delegates to the container to fetch information about user data. -
props: A simple property file; requires additional file that will keep all information (users and groups). -
custom: A custom implementation; you must specify the fully qualified name of the class in theorg.jbpm.ht.custom.callback.
Expand Values Default mvel,ldap,db,jaas,props, orcustommvel-
- org.jbpm.ht.custom.callback
A custom implementation of the
UserGroupCallbackinterface in case theorg.jbpm.ht.callbackproperty is set tocustom.Expand Values Default Fully qualified name
N/A
- org.jbpm.ht.custom.userinfo
A custom implementation of the
UserInfointerface in case theorg.jbpm.ht.userinfoproperty is set tocustom.Expand Values Default Fully qualified name
N/A
- org.jbpm.ht.userinfo
Specifies what implementation of the UserInfo interface to use for user or group information providers.
-
ldap: LDAP; needs to be configured in the file specified injbpm-user.info.properties. -
db: Database; needs to be configured in the file specified injbpm-user.info.properties. -
props: A simple property file; set the propertyjbpm.user.info.propertiesto specify the path to the file. -
custom: A custom implementation; you must specify the fully qualified name of the class in theorg.jbpm.ht.custom.userinfoproperty.
Expand Values Default ldap,db,props, orcustomN/A
-
- org.jbpm.ht.user.separator
An alternative separator when loading actors and groups for user tasks from a
String.Expand Values Default String
,(comma)- org.jbpm.rule.task.waitstate
When set to
false, a business rule task automatically fires off all rules instead of waiting to be triggered from the outside. This prevents errors during heavy multithreaded usage.Expand Values Default trueorfalsetrue- org.jbpm.runtime.manager.class
A custom implementation of the
org.kie.api.runtime.manager.RuntimeManagerFactoryinterface.Expand Values Default Fully qualified name
org.jbpm.runtime.manager.impl.RuntimeManagerFactoryImpl- org.jbpm.server.ext.disabled
When set to
true, disables the BPM support (for example, processes support).Expand Values Default trueorfalsefalse- org.jbpm.ui.server.ext.disabled
When set to
true, disables the Intelligent Process Server UI extension.Expand Values Default trueorfalsefalse- org.kie.auto.deploy.enabled
When enabled, issuing a Build & Deploy operation in Business Central always deploys to runtime.
Expand Values Default trueorfalsetrue- org.kie.build.disable-project-explorer
Disables automatic build of the selected project in Project Explorer.
Expand Values Default trueorfalsefalse- org.kie.dd.mergemode
Selects the method for overriding hierarchical merge mode behavior when managing deployment descriptors.
Expand Values Default MERGE_COLLECTIONS,KEEP_ALL,OVERRIDE_ALL, orOVERRIDE_EMPTYMERGE_COLLECTIONS- org.kie.demo
Enables external cloning of a demo application from GitHub. This System Property takes precedence over
org.kie.example.Expand Values Default trueorfalsetrue- org.kie.example
When set to
true, creates an example organization unit and repository. This system property allows you to create projects and assets without creating your custom organization unit and repository. It is useful, for example, to simplify the getting started experience.Expand Values Default trueorfalsefalse- org.kie.example.repositories
Sets the path to the directory containing example repositories. If you set this system property, repositories in the specified directory are automatically cloned into Business Central during startup. This property overrides
org.kie.exampleandorg.kie.demo.WarningYou must download the example repositories from the Customer Portal and extract them to this directory before setting this system property.
Expand Values Default Path
N/A
- org.kie.executor.disabled
Disables the Red Hat JBoss BPM Suite executor.
Expand Values Default trueorfalsefalse- org.kie.executor.initial.delay
The initial delay before the Red Hat JBoss BPM Suite executor starts a job, in milliseconds.
Expand Values Default Number (
Integer)100
- org.kie.executor.interval
The time between the moment the Red Hat JBoss BPM Suite executor finishes a job and the moment it starts a new one, in a time unit specified in
org.kie.executor.timeunit.Expand Values Default Number (
Integer)3
- org.kie.executor.pool.size
The number of threads used by the Red Hat JBoss BPM Suite executor.
Expand Values Default Number (
Integer)1
- org.kie.executor.retry.count
The number of retries the Red Hat JBoss BPM Suite executor attempts on a failed job.
Expand Values Default Number (
Integer)3
- org.kie.executor.timeunit
The time unit in which the
org.kie.executor.intervalis specified.Expand Values Default A
java.util.concurrent.TimeUnitconstantSECONDS- org.kie.git.deployments.enabled
When enabled, Red Hat JBoss BPM Suite uses a Git repository for storing deployments instead of a database.
Expand Values Default trueorfalsefalse- org.kie.mail.debug
When enabled,
EmailWorkItemHandlerproduces debug logging forjavax.mail.Session.Expand Values Default trueorfalsefalse- org.kie.mail.session
The JNDI name of the mail session as registered in the application server, for use by
EmailWorkItemHandler.Expand Values Default String
mail/jbpmMailSession- org.kie.override.deploy.enabled
Allows overwriting deployments with the same GAV (not allowed by default).
Expand Values Default trueorfalsefalse- org.kie.server.bypass.auth.user
Allows to bypass the authenticated user for task-related operations, for example queries.
Expand Values Default trueorfalsefalse- org.kie.server.controller
A comma-separated list of URLs to controller REST endpoints, for example
http://localhost:8080/business-central/rest/controller. This property is required when using a controller.Expand Values Default Comma-separated list
N/A
- org.kie.server.controller.connect
The waiting time between repeated attempts to connect Intelligent Process Server to the controller when Intelligent Process Server starts up, in milliseconds.
Expand Values Default Number (
Long)10000- org.kie.server.controller.pwd
The password to connect to the controller REST API. This property is required when using a controller.
Expand Values Default String
kieserver1!- org.kie.server.controller.token
This property allows you to use a token-based authentication between the KIE server and the controller instead of the basic user name/password authentication. The KIE server sends the token as a parameter in the request header. Note that long-lived access tokens are required as the tokens are not refreshed.
Expand Values Default String
N/A
- org.kie.server.controller.user
The user name to connect to the controller REST API. This property is required when using a controller.
Expand Values Default String
kieserver- org.kie.server.domain
The JAAS
LoginContextdomain used to authenticate users when using JMS.Expand Values Default String
N/A
- org.kie.server.id
An arbitrary ID to be assigned to this server. If a remote controller is configured, this is the ID under which the server will connect to the controller to fetch the KIE container configurations. If not provided, the ID is automatically generated.
Expand Values Default String
N/A
- org.kie.server.location
The URL of the Intelligent Process Server instance used by the controller to call back on this server, for example:
http://localhost:8230/kie-server/services/rest/server. This property is required when using a controller.Expand Values Default URL
N/A
- org.kie.server.persistence.dialect
The Hibernate dialect to be used. You must set this property when enabling BPM support.
Expand Values Default String
N/A
- org.kie.server.persistence.ds
A data source JNDI name. You must set this property when enabling BPM support.
Expand Values Default String
N/A
- org.kie.server.persistence.schema
The database schema to be used.
Expand Values Default String
N/A
- org.kie.server.persistence.tm
A transaction manager platform for Hibernate properties set. You must set this property when enabling BPM support.
Expand Values Default String
N/A
- org.kie.server.pwd
The password used to connect with the KIE server from the controller, required when running in managed mode. You must set this property in Business Central system properties, and it is required when using a controller.
Expand Values Default String
kieserver1!- org.kie.server.repo
The location where Intelligent Process Server state files will be stored.
Expand Values Default Path
.- org.kie.server.sync.deploy
Instructs the KIE server to hold the deployment until the controller provides the containers deployment configuration. This property affects only the KIE servers running in managed mode. The options are as follows:
-
false; the connection to the controller is asynchronous. The application starts, connects to the controller and once successful, deploys the containers. The application accepts requests even before the containers are available. true; the deployment of the KIE server application joins the controller connection thread with the main deployment and awaits its completion.This option can lead to a potential deadlock in case more applications are on the same server instance. It is strongly recommended to use only one application (the KIE server) on one server instance.
Expand Values Default trueorfalsefalse-
- org.kie.server.token
This property allows you to use a token-based authentication between the controller and the KIE server instead of the basic user name/password authentication. The controller sends the token as a parameter in the request header. Note that long-lived access tokens are required as the tokens are not refreshed.
Expand Values Default String
N/A
- org.kie.server.user
The user name used to connect with the KIE server from the controller, required when running in managed mode. This property need to be set in Business Central system properties and is required when using a controller.
Expand Values Default String
kieserver- org.kie.task.insecure
Allows an authenticated user to work on tasks on behalf of other users through the Business Central runtime remote API.
Expand Values Default trueorfalsefalse- org.kie.timer.ejb.disabled
If you select the Singleton runtime strategy and use the EJB executor of your application server to handle timer events, a race condition may occur since the EJB executor completes a transaction outside the
KieSession. Set this property totrueto use the EJB executor bundled with Red Hat JBoss BPM Suite, which prevents this situation from happening.Expand Values Default trueorfalsefalse- org.kie.tx.lock.enabled
When enabled, Red Hat JBoss BPM Suite uses an interceptor that locks the
KieSessionto a single thread for the duration of a transaction, which prevents concurrency errors in Container Managed Transaction (CMT) environments.Expand Values Default trueorfalsefalse- org.kie.verification.disable-dtable-realtime-verification
Disables Business Central’s decision table verification and validation feature.
Expand Values Default trueorfalsefalse- org.optaplanner.server.ext.disabled
When set to
true, disables the BRP support (for example planner support).Expand Values Default trueorfalsefalse- org.quartz.properties
The location of the Quartz configuration file to activate the Quartz timer service.
Expand Values Default Path
N/A
- org.uberfire.cluster.autostart
Delays VFS clustering until the application is fully initialized to avoid conflicts when all cluster members create local clones.
Expand Values Default trueorfalsefalse- org.uberfire.cluster.id
The name of the Helix cluster, for example:
kie-cluster. You must set this property to the same value as defined in the Helix Controller.Expand Values Default String
N/A
- org.uberfire.cluster.local.id
The unique ID of the Helix cluster node. Note that ':' is replaced with '_', for example
node1_12345.Expand Values Default String
N/A
- org.uberfire.cluster.vfs.lock
The name of the resource defined on the Helix cluster, for example:
kie-vfs.Expand Values Default String
N/A
- org.uberfire.cluster.zk
The location of the Zookeeper servers.
Expand Values Default String of the form
host1:port1,host2:port2,host3:port3,…N/A
- org.uberfire.domain
The security domain name for Business Central. For more information about security domains, see chapter Use a Security Domain in Your Application of the Red Hat JBoss EAP Security Guide.
Expand Values Default String
ApplicationRealm- org.uberfire.metadata.index.dir
The location of the
.indexdirectory, which Apache Lucene uses when indexing and searching.Expand Values Default Path
Current working directory
- org.uberfire.nio.git.daemon.enabled
Enables the Git daemon.
Expand Values Default trueorfalsetrue- org.uberfire.nio.git.daemon.host
If the Git daemon is enabled, it uses this property as the localhost identifier.
Expand Values Default URL
localhost- org.uberfire.nio.git.daemon.hostport
When running in a virtualized environment, the host’s outside port number for the Git daemon.
Expand Values Default Port number
9418
- org.uberfire.nio.git.daemon.port
If the Git daemon is enabled, it uses this property as the port number.
Expand Values Default Port number
9418
- org.uberfire.nio.git.dir
The location of the directory
.niogit. Change the value for example for backup purposes.Expand Values Default Path
Current working directory
- org.uberfire.nio.git.hooks
The location where default Git hook files are stored. These files will be copied to newly created Git repositories.
Expand Values Default Path
N/A
- org.uberfire.nio.git.ssh.cert.dir
The location of the directory
.security. Local certificates are stored here.Expand Values Default Path
Current working directory
- org.uberfire.nio.git.ssh.enabled
Enables the SSH daemon.
Expand Values Default trueorfalsetrue- org.uberfire.nio.git.ssh.host
If the SSH daemon is enabled, it uses this property as the localhost identifier.
Expand Values Default URL
localhost- org.uberfire.nio.git.ssh.hostport
When running in a virtualized environment, the host’s outside port number for the SSH daemon.
Expand Values Default Port number
8003
- org.uberfire.nio.git.ssh.passphrase
The passphrase to access your operating system’s public keystore when cloning Git repositories with scp-style URLs, for example
git@github.com:user/repository.git.Expand Values Default String
N/A
- org.uberfire.nio.git.ssh.port
If the SSH daemon is enabled, it uses this property as the port number.
Expand Values Default Port number
8001- org.uberfire.secure.alg
The crypto algorithm used by password encryption.
Expand Values Default String
PBEWithMD5AndDES- org.uberfire.secure.key
A secret password used by password encryption.
Expand Values Default String
org.uberfire.admin- org.uberfire.sys.repo.monitor.disabled
Disables the configuration monitor.
WarningDo not use unless you are certain what you are doing.
Expand Values Default trueorfalsefalse
A.2. Environment Properties
As opposed to system properties, environment properties are passed to an individual KieSession, allowing you to control its behaviour independently on the rest of the deployment.
The properties available to you are the constants of the class org.kie.api.runtime.EnvironmentName.
A.2.1. Configuration
To set the environment properties on a KieSession, you can create a new session with an instance of the Environment or RuntimeEnvironment interface:
Setting Environment Property using Environment interface
Environment env = EnvironmentFactory.newEnvironment();
env.set(EnvironmentName.SAMPLE_PROPERTY, true);
kbase.newKieSession(null, env);
Environment env = EnvironmentFactory.newEnvironment();
env.set(EnvironmentName.SAMPLE_PROPERTY, true);
kbase.newKieSession(null, env);Setting Environment Property using RuntimeEnvironment interface
A.2.2. List of Environment Properties
This section contains the alphabetically sorted list of all recognized environment properties in Red Hat JBoss BPM Suite 6.3.
Red Hat JBoss BPM Suite Environment Properties
- APP_SCOPED_ENTITY_MANAGER
The entity manager used for persistence of
SessionInfo. You can specify it when using Spring with local transactions and a shared entity manager.Expand Values Default An instance of
EntityManagerAutomatically created from the provided
EntityManagerFactory- CALENDARS
- This property is not used.
- CMD_SCOPED_ENTITY_MANAGER
The entity manager used for persistence of entities (process instances, tasks, work items). You can specify it when using Spring with local transactions and a shared entity manager.
Expand Values Default An instance of
EntityManagerAutomatically created from the provided
EntityManagerFactory- DATE_FORMATS
- This property is not used.
- ENTITY_MANAGER_FACTORY
The
EntityManagerFactoryused in the Red Hat JBoss BPM Suite engine.Expand Values Default An instance of
EntityManagerFactoryN/A
- GLOBALS
Expand Values Default Any object declared in DRL or BPMN
N/A
- OBJECT_MARSHALLING_STRATEGIES
Enable use of pluggable variable persistence strategies. Allows storing variables in different data stores.
Expand Values Default An instance of
org.kie.api.marshalling.ObjectMarshallingStrategyDependent on the engine configuration. If no other strategy is available,
org.drools.core.marshalling.impl.SerializablePlaceholderResolvingStrategyis used.- PERSISTENCE_CONTEXT_MANAGER
The
ProcessPersistenceContextManagerinstance used for process persistence.Expand Values Default An instance of
org.jbpm.persistence.ProcessPersistenceContextManagerAn instance of
org.jbpm.persistence.JpaProcessPersistenceContextManager- TASK_PERSISTENCE_CONTEXT_MANAGER
The
TaskPersistenceContextManagerinstance used for task persistence.Expand Values Default An instance of
org.kie.internal.task.api.TaskPersistenceContextManagerAn instance of
org.jbpm.services.task.persistence.JPATaskPersistenceContextManager- TASK_USER_GROUP_CALLBACK
Get the
UserGroupCallbackinstance from the environment or context. For example:callback = context.get(EnvironmentName.TASK_USER_GROUP_CALLBACK)
callback = context.get(EnvironmentName.TASK_USER_GROUP_CALLBACK)Copy to Clipboard Copied! Toggle word wrap Toggle overflow Expand Values Default Configured by Red Hat JBoss BPM Suite
An instance of
org.kie.internal.task.api.UserGroupCallback- TASK_USER_INFO
Get the
UserInfoinstance from the environment or context. For example:info = context.get(EnvironmentName.TASK_USER_INFO)
info = context.get(EnvironmentName.TASK_USER_INFO)Copy to Clipboard Copied! Toggle word wrap Toggle overflow Expand Values Default Configured by Red Hat JBoss BPM Suite
An instance of
org.kie.internal.task.api.UserInfo- TRANSACTION
Optional property if
UserTransactioncan not be obtained using JNDI lookup.Expand Values Default An instance of
UserTransactionnull- TRANSACTION_MANAGER
Get the
TransactionManagerinstance from the environment or context. For example:info = context.get(EnvironmentName.TRANSACTION_MANAGER)
info = context.get(EnvironmentName.TRANSACTION_MANAGER)Copy to Clipboard Copied! Toggle word wrap Toggle overflow Expand Values Default An instance of
TransactionManagerDepends on your configuration
- TRANSACTION_SYNCHRONIZATION_REGISTRY
Allows access to and control of the active transaction. Used by Red Hat JBoss BPM Suite to efficiently manage persistence.
Expand Values Default An instance of
TransactionSynchronizationRegistryTaken from the environment—usually JNDI lookup in JTA environments
- USE_LOCAL_TRANSACTIONS
When enabled, Red Hat JBoss BPM Suite uses local transactions as opposed to JTA.
Expand Values Default trueorfalsefalse- USE_PESSIMISTIC_LOCKING
When enabled, a database resource can only be accessed by one transaction at a time.
Expand Values Default trueorfalsefalse
Appendix B. Revision History
| Revision History | |||
|---|---|---|---|
| Revision 6.3.0-17 | Mon Mar 20 2017 | ||
| |||
| Revision 6.3.0-16 | Wed Feb 22 2017 | ||
| |||
| Revision 6.3.0-15 | Fri Dec 23 2016 | ||
| |||
| Revision 6.3.0-14 | Mon Nov 28 2016 | ||
| |||
| Revision 6.3.0-13 | Wed Oct 5 2016 | ||
| |||
| Revision 6.3.0-12 | Mon Oct 3 2016 | ||
| |||
| Revision 6.3.0-11 | Thu Sep 15 2016 | ||
| |||
| Revision 6.3.0-10 | Thu Sep 15 2016 | ||
| |||
| Revision 6.3.0-8 | Thu Jul 14 2016 | ||
| |||
| Revision 6.3.0-7 | Thu Jun 2 2016 | ||
| |||
| Revision 6.3.0-6 | Thu May 5 2016 | ||
| |||
| Revision 6.3.0-5 | Thu May 5 2016 | ||
| |||
| Revision 6.3.0-4 | Thu May 5 2016 | ||
| |||
| Revision 6.3.0-3 | Thu Apr 28 2016 | ||
| |||
| Revision 6.3.0-2 | Thu Apr 28 2016 | ||
| |||
| Revision 6.3.0-1 | Thu Apr 28 2016 | ||
| |||