Development Guide
Red Hat JBoss BPM Suite Development Guide for Red Hat JBoss Developers
Abstract
Part I. Overview
Chapter 1. About This Guide
This guide is intended for users who are implementing a standalone Red Hat JBoss BRMS solution or the complete Red Hat JBoss BPM Suite solution. It discusses the following topics:
- Detailed Architecture of Red Hat JBoss BRMS and Red Hat JBoss BPM Suite.
- Detailed description of how to author, test, debug, and package simple and complex business rules and processes using Integrated Development environment (IDE).
- Red Hat JBoss BRMS runtime environment.
- Domain specific languages (DSLs) and how to use them in a rule.
- Complex event processing.
This guide comprises the following sections:
Overview
This section provides detailed information on Red Hat JBoss BRMS and Red Hat JBoss BPM suite, their architecture, key components. It also discusses the role of Maven in project building and deploying.
All About Rules
This section provides details on all you have to know to author rules with Red Hat JBoss Developer Studio. It describes the rule algorithms, rule structure, components, advanced conditions, constraints, commands, Domain Specific Languages and Complex Event Processing. It provides details on how to use the various views, editors, and perspectives that Red Hat JBoss Developer Studio offers.
All About Processes
This section describes what comprises a business process and how you can author and test them using Red Hat JBoss Developer Studio.
KIE
This section highlights the KIE API with detailed description of how to create, build, deploy, and run KIE projects.
Appendix
This section comprises important reference material such as key knowledge terms, and examples.
1.1. Audience
This book has been designed to be understood by:
- Author of rules and processes who are responsible for authoring and testing business rules and processes using Red Hat JBoss Developer Studio.
- Java application developers responsible for developing and integrating business rules and processes into Java and Java EE enterprise applications.
1.2. Prerequisites
Users of this guide must meet one or more of the following prerequisites:
- Basic Java/Java EE programming experience
- Knowledge of the Eclipse IDE, Maven, and GIT
Chapter 2. Red Hat JBoss BRMS and Red Hat JBoss BPM Suite Architecture
2.1. Red Hat JBoss Business Rules Management System
Red Hat JBoss BRMS is an open source business rule management system that provides rules development, access, change, and management capabilities. In today’s world, when IT organizations consistently face changes in terms of policies, new products, government imposed regulations, a system like JBoss BRMS makes it easy by separating business logic from the underlying code. It includes a rule engine, a rules development environment, a management system, and a repository. It allows both developers and business analysts to view, manage, and verify business rules as they are executed within an IT application infrastructure.
Red Hat JBoss BRMS can be executed in any Java EE-compliant container. It supports an open choice of authoring and management consoles and language and decision table inputs.
2.1.1. Red Hat JBoss BRMS Key Components
Red Hat JBoss BRMS comprises the following components:
Drools Expert
Drools Expert is a pattern matching based rule engine that runs on Java EE application servers, Red Hat JBoss BRMS platform, or bundled with Java applications. It comprises an inference engine, a production memory, and a working memory. Rules are stored in the production memory and the facts that the inference engine matches the rules against, are stored in the working memory.
Business Central
Business Central is a web-based application intended for business analysts for creation and maintenance of business rules and rule artifacts. It is designed to ease creation, testing, and packaging of rules for business users.
Drools Flow
Drools flow provides business process capabilities to the Red Hat JBoss BRMS platform. This framework can be embedded into any Java application or can even run standalone on a server. A business process provides stepwise tasks using a flow chart, for the Rule Engine to execute.
Drools Fusion
Drools Fusion provides event processing capabilities to the Red Hat JBoss BRMS platform. Drools Fusion defines a set of goals to be achieved such as:
- Support events as first class citizens.
- Support detection, correlation, aggregation and composition of events.
- Support processing streams of events.
- Support temporal constraints in order to model the temporal relationships between events.
Drools Integrated Development Environment (IDE)
We encourage you to use Red Hat JBoss Developer Studio (JBDS) with Red Hat JBoss BRMS plug-ins to develop and test business rules. The Red Hat JBoss Developer Studio builds upon an extensible, open source Java-based IDE Eclipse providing platform and framework capabilities, making it ideal for Red Hat JBoss BRMS rules development.
2.1.2. Red Hat JBoss BRMS Features
The Red Hat JBoss BRMS provides the following key features:
- Centralized repository of business assets (JBoss BRMS artifacts).
- IDE tools to define and govern decision logic.
- Building, deploying, and testing the decision logic.
- Packages of business assets.
- Categorization of business assets.
- Integration with development tools.
- Business logic and data separation.
- Business logic open to reuse and changes.
- Easy to maintain business logic.
- Enables several stakeholders (business analysts, developer, administrators) to contribute in defining the business logic.
2.2. Red Hat JBoss Business Process Management Suite
Red Hat JBoss BPM Suite is an open source business process management system that combines business process management and business rules management. Red Hat JBoss BRMS offers tools to author rules and business processes, but does not provide tools to start or manage the business processes. Red Hat JBoss BPM Suite includes all the Red Hat JBoss BRMS functionality, with additional capabilities of business activity monitoring, starting business processes, and managing tasks using Business Central. Red Hat JBoss BPM Suite also provides a central repository to store rules and processes.
2.2.1. Red Hat JBoss BPM Suite Key Components
The Red Hat JBoss BPM Suite comprises the following components:
JBoss BPM Central (Business Central)
Business Central is a web-based application for creating, editing, building, managing, and monitoring Red Hat JBoss BPM Suite business assets. It also allows execution of business processes and management of tasks created by those processes.
Business Activity Monitoring Dashboards
The Business Activity Monitor (BAM) dashboard provides report generation capabilities. It enables you to use a pre-defined dashboard and even create your own customized dashboard.
Maven Artifact Repository
Red Hat JBoss BPM Suite projects are built as Apache Maven projects and the default location of the Maven repository is
WORKING_DIRECTORY/repositories/kie. You can specify an alternate repository location by changing theorg.guvnor.m2repo.dirproperty.Each project builds a JAR artifact file called a KJAR. You can store your project artifacts and dependent JAR files in this repository.
Execution Engine
The Red Hat JBoss BPM Suite execution engine is responsible for executing business processes and managing the tasks, which result from these processes. Business Central provides a user interface for executing processes and managing tasks.
NoteTo execute your business processes, you can use Business Central web application that bundles the execution engine, enabling a ready-to-use process execution environment. Alternatively, you can create your own execution server and embed the Red Hat JBoss BPM Suite and Red Hat JBoss BRMS libraries with your application using Java EE.
For example, if you are developing a web application, include the Red Hat JBoss BPM Suite or Red Hat JBoss BRMS libraries in the
WEB-INF/libfolder of your application.Business Central Repository
The business artifacts of a Red Hat JBoss BPM Suite project, such as process models, rules, and forms, are stored in Git repositories managed through the Business Central. You can also access these repositories outside of Business Central through the Git or SSH protocols.
2.2.2. Red Hat JBoss BPM Suite Features
Red Hat JBoss BPM Suite provides the following features:
- Pluggable human task service for including tasks that need to be performed by human actors (based on the WS-HumanTask specification).
- Pluggable persistence and transactions (based on JPA/JTA).
- Web-based process designer to support the graphical creation and simulation of your business processes (drag and drop).
- Web-based data modeler and form modeler to support the creation of data models and process and task forms.
- Web-based, customizable dashboards and reporting.
A web-based workbench called Business Central, supporting the complete BPM life cycle:
- Modeling and deployment: to author your processes, rules, data models, forms and other assets.
- Execution: to execute processes, tasks, rules and events on the core runtime engine.
- Runtime Management: to work on assigned task, manage process instances.
- Reporting: to monitor the execution using Business Activity Monitoring capabilities.
- Eclipse-based developer tools to support the modeling, testing and debugging of processes.
- Remote API to process engine as a service (REST, JMS, Remote Java API).
- Integration with Maven, Spring, and OSGi.
2.3. Supported Platforms and APIs
For a list of supported containers and configurations, see section Supported Platforms of Red Hat JBoss BPM Suite Installation Guide.
The kie-api is a fully supported API and it is the recommended way to interact with your project. For further information about API supportability, see Knowledgebase article What Are the Public and Internal APIs for BPM Suite and BRMS 6?.
2.4. Use Cases
2.4.1. Use Case: Business Decision Management in Insurance Industry with Red Hat JBoss BRMS
Red Hat JBoss BRMS comprises a high performance rule engine, a rule repository, easy to use rule authoring tools, and complex event processing rule engine extensions. The following use case describes how these features of Red Hat JBoss BRMS are implemented in insurance industry.
The consumer insurance market is extremely competitive, and it is imperative that customers receive efficient, competitive, and comprehensive services when visiting an online insurance quotation solution. An insurance provider increased revenue from their online quotation solution by upselling relevant, additional products during the quotation process to the visitors of the solution.
The diagram below shows integration of Red Hat JBoss BRMS with the insurance provider’s infrastructure. This integration is fruitful in such a way that when a request for insurance is processed, Red Hat JBoss BRMS is consulted and appropriate additional products are presented with the insurance quotation.
Figure 2.1. JBoss BRMS Use Case: Insurance Industry Decision Making
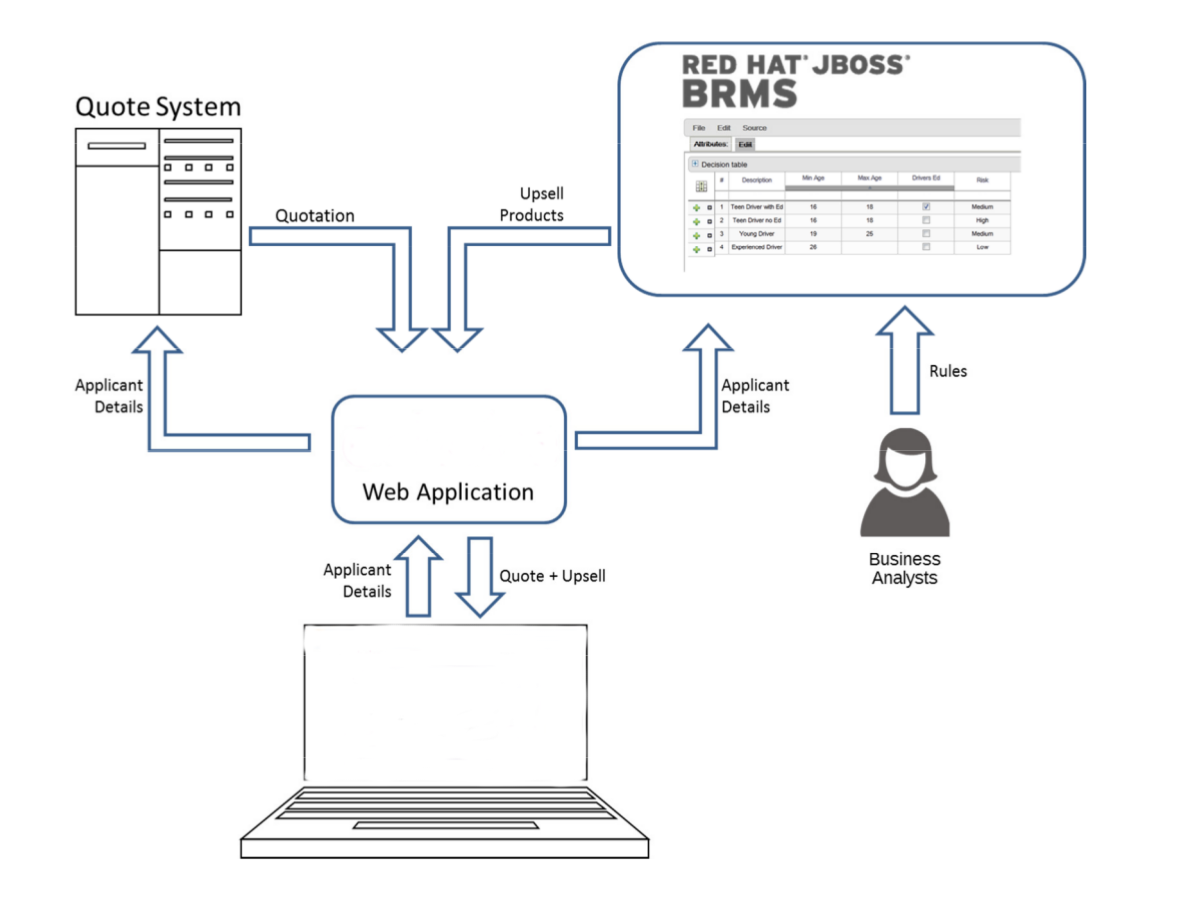
Red Hat JBoss BRMS provides the decision management functionality, that automatically determines the products to present to the applicant based on the rules defined by the business analysts. The rules are implemented as decision tables, so they can be easily understood and modified without requiring additional support from IT.
2.4.2. Use Case: Process-Based Solution in Loan Industry
This section describes a use case of deploying Red Hat JBoss BPM Suite to automate business processes (such as loan approval process) at a retail bank. This use case is a typical process-based specific deployment that might be the first step in a wider adoption of Red Hat JBoss BPM Suite throughout an enterprise. It leverages features of both business rules and processes of Red Hat JBoss BPM Suite.
A retail bank offers several types of loan products each with varying terms and eligibility requirements. Customers requiring a loan must file a loan application with the bank. The bank then processes the application in several steps, such as verifying eligibility, determining terms, checking for fraudulent activity, and determining the most appropriate loan product. Once approved, the bank creates and funds a loan account for the applicant, who can then access funds. The bank must be sure to comply with all relevant banking regulations at each step of the process, and has to manage its loan portfolio to maximize profitability. Policies are in place to aid in decision making at each step, and those policies are actively managed to optimize outcomes for the bank.
Business analysts at the bank model the loan application processes using the BPMN2 authoring tools (Process Designer) in Red Hat JBoss BPM Suite. Here is the process flow:
High-Level Loan Application Process Flow
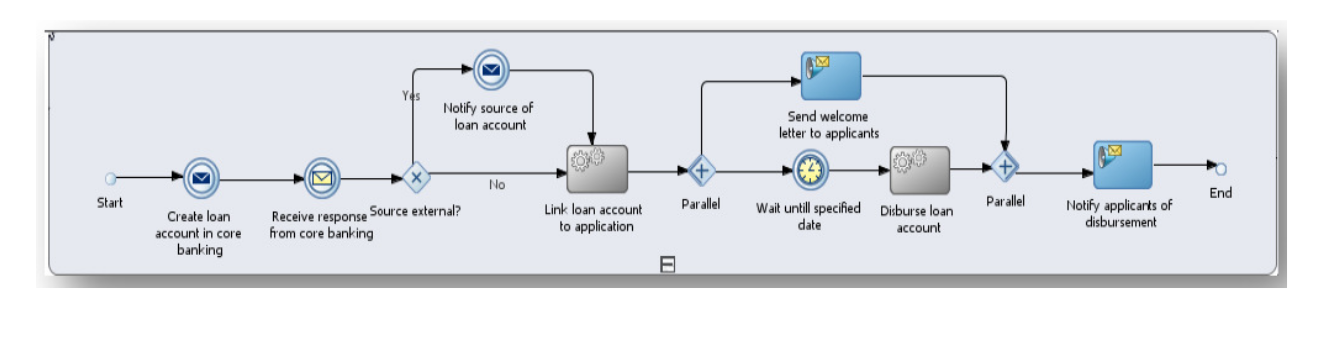
Business rules are developed with the rule authoring tools in Red Hat JBoss BPM Suite to enforce policies and make decisions. Rules are linked with the process models to enforce the correct policies at each process step.
The bank’s IT organization deploys the Red Hat JBoss BPM Suite so that the entire loan application process can be automated.
Figure 2.2. Loan Application Process Automation
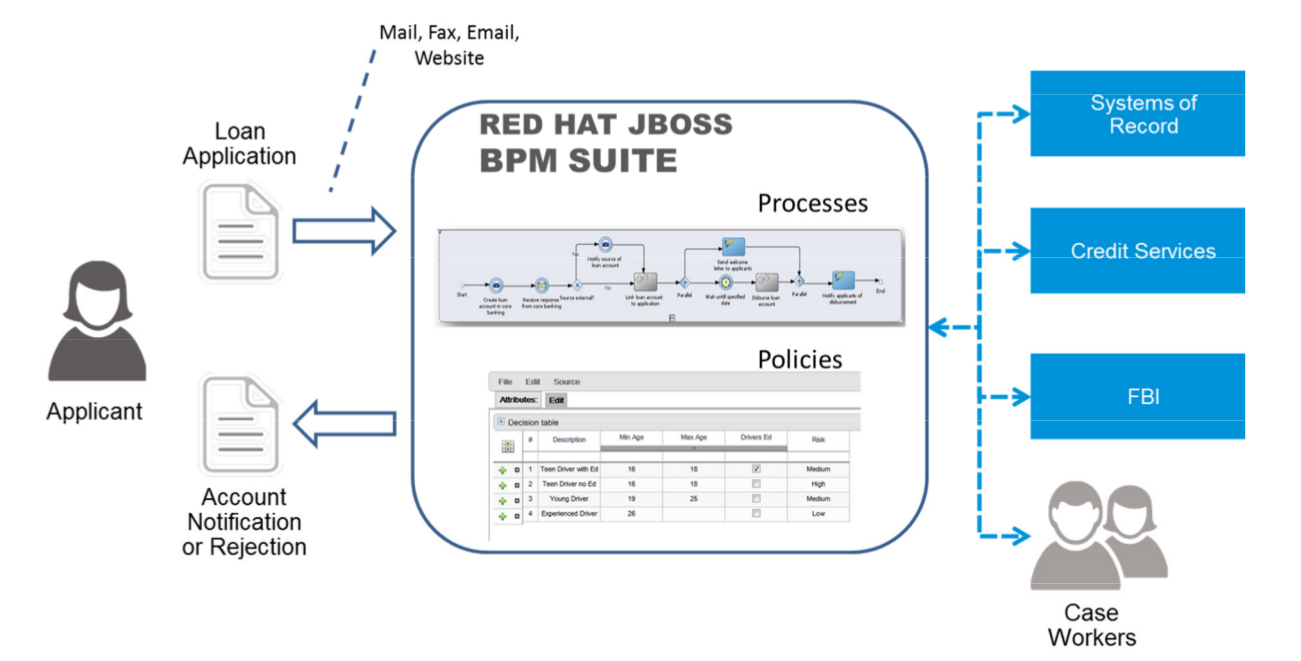
The entire loan process and rules can be modified at any time by the bank’s business analysts. The bank is able to maintain constant compliance with changing regulations, and is able to quickly introduce new loan products and improve loan policies in order to compete effectively and drive profitability.
Chapter 3. Apache Maven
Apache Maven is a distributed build automation tool used in Java application development to build and manage software projects. Apart from building, publishing, and deploying capabilities, using Maven for your Red Hat JBoss BRMS and Red Hat JBoss BPM suite projects ensures the following:
- The build process is easy and a uniform build system is implemented across projects.
- All of the required JAR files for a project are made available at compile time.
- A proper project structure is configured.
- Dependencies and versions are well managed.
- No need for additional build processing, as Maven builds output into a number of predefined types, such as JAR and WAR.
3.1. Maven Repositories
Maven uses repositories to store Java libraries, plug-ins, and other build artifacts. These repositories can be local or remote. Red Hat JBoss BRMS and Red Hat JBoss BPM Suite products maintain local and remote maven repositories that you can add to your project for accessing the rules, processes, events, and other project dependencies. You must configure Maven to use these repositories and the Maven Central Repository to provide correct build functionality.
When building projects and archetypes, Maven dynamically retrieves Java libraries and Maven plug-ins from local or remote repositories. Doing so promotes sharing and reuse of dependencies across projects.
3.2. Using the Maven Repository in Your Project
You can direct Maven to use the Red Hat JBoss Enterprise Application Platform Maven repository in your project in one of the following ways:
-
Configure the Project Object Model (POM) file (
pom.xml). -
Modify the Maven settings file (
settings.xml).
The recommended approach is to direct Maven to use the Red Hat JBoss Enterprise Application Platform Maven repository across all projects by using the Maven global or user settings.
From version 6.1.0 onwards, Red Hat JBoss BPM Suite and Red Hat JBoss BRMS are designed to be used in combination with Red Hat JBoss Middleware Maven Repository and Maven Central repository as dependency sources. Ensure that both repositories are available for project builds.
3.3. Maven Project Configuration File
To use Maven for building and managing your Red Hat JBoss BRMS and Red Hat JBoss BPM Suite projects, you must configure your projects to be built with Maven. To do so, Maven provides the POM file (pom.xml) that holds configuration details for your project.
pom.xml is an XML file that contains information about the project (such as project name, version, description, developers, mailing list, and license), and build details (such as dependencies, location of the source, test, target directories, repositories, and plug-ins).
When you generate a Maven project, a pom.xml file is automatically generated. You can edit pom.xml to add more dependencies and new repositories. Maven downloads all of the JAR files and the dependent JAR files from the Maven repository when you compile and package your project.
Find the schema for the pom.xml file at http://maven.apache.org/maven-v4_0_0.xsd.
For more information about POM files, see Apache Maven Project POM Reference.
3.4. Maven Settings File
The Maven settings file (settings.xml) is used to configure Maven execution. You can locate this file in the following locations:
-
In the Maven install directory at
$M2_HOME/conf/settings.xml. These settings are called global settings. -
In the user’s install directory at
$USER_HOME/.m2/settings.xml. These settings are called user settings. -
A custom location specified by the system property
kie.maven.settings.custom.
The settings used is a merge of the files located in these locations.
The following is an example of a Maven settings.xml file. Note the activeByDefault tag, which specifies the default profile. In the following example, it is a profile with a remote Maven repository.
<settings>
<profiles>
<profile>
<id>my-profile</id>
<activation>
<activeByDefault>true</activeByDefault>
</activation>
<repositories>
<repository>
<id>fusesource</id>
<url>http://repo.fusesource.com/nexus/content/groups/public/</url>
<snapshots>
<enabled>false</enabled>
</snapshots>
<releases>
<enabled>true</enabled>
</releases>
</repository>
...
</repositories>
</profile>
</profiles>
...
</settings>3.5. Dependency Management
In order to use the correct Maven dependencies in your Red Hat JBoss BPM Suite project, you must add relevant Bill Of Materials (BOM) files to the project’s pom.xml file. Adding the BOM files ensures that the correct versions of transitive dependencies from the provided Maven repositories are included in the project.
See the Supported Component Versions chapter of Red Hat JBoss BPM Suite Installation Guide to view the supported BOM components.
Declare the BOM in pom.xml. For example:
Example 3.1. BOM for Red Hat JBoss BPM Suite 6.4.0
<dependencyManagement>
<dependencies>
<dependency>
<groupId>org.jboss.bom.brms</groupId>
<artifactId>jboss-brms-bpmsuite-platform-bom</artifactId>
<version>6.4.2.GA-redhat-2</version>
<type>pom</type>
<scope>import</scope>
</dependency>
</dependencies>
</dependencyManagement>
<dependencies>
<!-- Your dependencies -->
</dependencies>To check the current BOM version, see the Supported Component Versions chapter of Red Hat JBoss BPM Suite Installation Guide.
Furthermore, declare dependencies needed for your project in the dependencies tag.
For a basic Red Hat JBoss BPM Suite project, declare the following dependencies:
Embedded jBPM Engine Dependencies
<dependency> <groupId>org.jbpm</groupId> <artifactId>jbpm-kie-services</artifactId> </dependency> <!-- Dependency needed for default WorkItemHandler implementations. --> <dependency> <groupId>org.jbpm</groupId> <artifactId>jbpm-workitems</artifactId> </dependency> <!-- Logging dependency. You can use any logging framework compatible with slf4j. --> <dependency> <groupId>ch.qos.logback</groupId> <artifactId>logback-classic</artifactId> <version>${logback.version}</version> </dependency> <dependency> <groupId>org.kie</groupId> <artifactId>kie-api</artifactId> </dependency>For a Red Hat JBoss BPM Suite project that uses CDI, declare the following dependencies:
CDI-Enabled jBPM Engine dependencies
<dependency> <groupId>org.kie</groupId> <artifactId>kie-api</artifactId> </dependency> <dependency> <groupId>org.jbpm</groupId> <artifactId>jbpm-kie-services</artifactId> </dependency> <dependency> <groupId>org.jbpm</groupId> <artifactId>jbpm-services-cdi</artifactId> </dependency>For a basic Red Hat JBoss BRMS project, declare the following dependencies:
Embedded Drools Engine Dependencies
<dependency> <groupId>org.drools</groupId> <artifactId>drools-compiler</artifactId> </dependency> <!-- Dependency for persistence support. --> <dependency> <groupId>org.drools</groupId> <artifactId>drools-persistence-jpa</artifactId> </dependency> <!-- Dependencies for decision tables, templates, and scorecards. For other assets, declare org.drools:drools-workbench-models-* dependencies. --> <dependency> <groupId>org.drools</groupId> <artifactId>drools-decisiontables</artifactId> </dependency> <dependency> <groupId>org.drools</groupId> <artifactId>drools-templates</artifactId> </dependency> <dependency> <groupId>org.drools</groupId> <artifactId>drools-scorecards</artifactId> </dependency> <!-- Dependency for loading KJARs from a Maven repository using KieScanner. --> <dependency> <groupId>org.kie</groupId> <artifactId>kie-ci</artifactId> </dependency> <!-- Dependency for loading KJARs from a Maven repository using KieScanner in an OSGi environment. --> <dependency> <groupId>org.kie</groupId> <artifactId>kie-ci-osgi</artifactId> </dependency> <dependency> <groupId>org.kie</groupId> <artifactId>kie-api</artifactId> </dependency>Do not use both
kie-ciandkie-ci-osgiin onepom.xmlfile.To use the Intelligent Process Server, declare the following dependencies:
Client Application Intelligent Process Server Dependencies
<dependency> <groupId>org.kie.server</groupId> <artifactId>kie-server-client</artifactId> </dependency> <dependency> <groupId>org.kie.server</groupId> <artifactId>kie-server-api</artifactId> </dependency> <!-- Dependency for Red Hat JBoss BRMS functionality. --> <dependency> <groupId>org.drools</groupId> <artifactId>drools-core</artifactId> </dependency> <dependency> <groupId>org.kie</groupId> <artifactId>kie-api</artifactId> </dependency>To create a remote client for Red Hat JBoss BPM Suite or Red Hat JBoss BRMS, declare the following dependencies:
Client Dependencies
<dependency> <groupId>org.kie.remote</groupId> <artifactId>kie-remote-client</artifactId> </dependency>To use assets in
KJARpackaging, the preferred way is to includekie-maven-plugin:Kie Maven Plugin
<!-- BOM does not resolve plugin versioning. Consult section Supported Components of Red Hat JBoss BPM Suite Installation Guide for newest version number. --> <packaging>kjar</packaging> <build> <plugins> <plugin> <groupId>org.kie</groupId> <artifactId>kie-maven-plugin</artifactId> <version>6.5.0.Final-redhat-7</version> <extensions>true</extensions> </plugin> </plugins> </build>For testing purposes, declare the following dependencies:
Testing Dependencies
<!-- JUnit dependency --> <dependency> <groupId>junit</groupId> <artifactId>junit</artifactId> <version>${junit.version}</version> <scope>test</scope> </dependency> <!-- Red Hat JBoss BPM Suite integration services dependency --> <dependency> <groupId>org.jbpm</groupId> <artifactId>jbpm-shared-services</artifactId> <classifier>btm</classifier> <scope>test</scope> </dependency> <!-- Logging dependency --> <dependency> <groupId>ch.qos.logback</groupId> <artifactId>logback-classic</artifactId> <version>${logback.version}</version> <scope>test</scope> </dependency> <!-- Persistence tests dependencies --> <dependency> <groupId>org.hibernate</groupId> <artifactId>hibernate-entitymanager</artifactId> <version>${hibernate.version}</version> <scope>test</scope> </dependency> <dependency> <groupId>org.hibernate</groupId> <artifactId>hibernate-core</artifactId> <version>${hibernate.core.version}</version> <scope>test</scope> </dependency> <dependency> <groupId>com.h2database</groupId> <artifactId>h2</artifactId> <version>${h2.version}</version> <scope>test</scope> </dependency> <dependency> <groupId>org.codehaus.btm</groupId> <artifactId>btm</artifactId> <version>${btm.version}</version> <scope>test</scope> </dependency> <dependency> <groupId>org.kie</groupId> <artifactId>kie-api</artifactId> </dependency>Alternatively, for extensive testing of Red Hat JBoss BPM Suite, include the
jbpm-testdependency. Note thatjbpm-testincludes some of the previous dependencies, for example thejunitdependency, dependencies required for persistence tests, and others.Declaring jbpm-test Dependency
<dependency> <groupId>org.jbpm</groupId> <artifactId>jbpm-test</artifactId> </dependency>To include the
jbpm-testdependency as part of your KJAR, set the dependency scope toprovided. Doing so ensures that the dependency is available at runtime, thereby avoiding unresolved dependency errors. The recommended practice is to use only business resources in your KJAR and not includejbpm-testdependency in it. It is a best practice to keep the test suite for the KJAR in a separate project.NoteIf you are deploying Red Hat JBoss BRMS or Red Hat JBoss BPM Suite on Red Hat JBoss EAP 7, you must make changes to the project BOM files. For more information on the BOM changes, see the Red Hat JBoss EAP Migration chapter in the Red Hat JBoss BPM Suite Migration Guide.
For more information on BOM usage in Red Hat JBoss EAP 7, see the Using Maven with JBoss EAP chapter in the Red Hat JBoss EAP Development Guide.
3.6. Integrated Maven Dependencies
Throughout the Red Hat JBoss BRMS and BPM Suite documentation, various code samples are presented with KIE API for the 6.1.x releases. These code samples will require Maven dependencies in the various pom.xml file and should be included like the following example:
<dependency>
<groupId>commons-logging</groupId>
<artifactId>commons-logging</artifactId>
<version>1.1.1-redhat-2</version>
<scope>compile</scope>
</dependency>All the Red Hat JBoss related product dependencies can be found at the following location: Red Hat Maven Repository.
3.7. Uploading Artifacts to Maven Repository
There may be scenarios when your project may fail to fetch dependencies from a remote repository configured in its pom.xml. In such cases, you can programmatically upload dependencies to Red Hat JBoss BPM Suite by uploading artifacts to the embedded maven repository through Business Central. Red Hat JBoss BPM Suite uses a servlet for the maven repository interactions. This servlet processes a GET request to download an artifact and a POST request to upload one. You can leverage the servlet’s POST request to upload an artifact to the repository using REST. To do this, implement the Http basic authentication and issue an HTTP POST request in the following format:
PROTOCOL://HOST_NAME:PORT/CONTEXT_ROOT/maven2/[GROUP_ID replacing '.' with '/']/ARTIFACT_ID/VERSION/ARTIFACT_ID-VERSION.jar
For example, to upload the org.slf4j:slf4j-api:1.7.7.jar, where ARTIFACT_ID is slf4j-api, GROUP_ID is slf4j, and VERSION is 1.7.7, the URI must be:
http://localhost:8080/business-central/maven2/org/slf4j/slf4j-api/1.7.7/slf4j-api-1.7.7.jar
The following example illustrates uploading a JAR located at /tmp directory as a user bpmsAdmin with the password abcd1234!, to an instance of Red Hat JBoss BPM Suite running locally:
package com.rhc.example;
import java.io.File;
import java.io.IOException;
import org.apache.http.HttpEntity;
import org.apache.http.HttpHost;
import org.apache.http.auth.AuthScope;
import org.apache.http.auth.UsernamePasswordCredentials;
import org.apache.http.client.AuthCache;
import org.apache.http.client.ClientProtocolException;
import org.apache.http.client.CredentialsProvider;
import org.apache.http.client.methods.CloseableHttpResponse;
import org.apache.http.client.methods.HttpPost;
import org.apache.http.client.protocol.HttpClientContext;
import org.apache.http.entity.mime.HttpMultipartMode;
import org.apache.http.entity.mime.MultipartEntityBuilder;
import org.apache.http.entity.mime.content.FileBody;
import org.apache.http.impl.auth.BasicScheme;
import org.apache.http.impl.client.BasicAuthCache;
import org.apache.http.impl.client.BasicCredentialsProvider;
import org.apache.http.impl.client.CloseableHttpClient;
import org.apache.http.impl.client.HttpClients;
import org.slf4j.Logger;
import org.slf4j.LoggerFactory;
public class UploadMavenArtifact {
private static final Logger LOG = LoggerFactory.getLogger(UploadMavenArtifact.class);
public static void main(String[] args) {
// Maven coordinates:
String groupId = "com.rhc.example";
String artifactId = "bpms-upload-jar";
String version = "1.0.0-SNAPSHOT";
// File to upload:
File file = new File("/tmp/" + artifactId + "-" + version + ".jar");
// Server properties:
String protocol = "http";
String hostname = "localhost";
Integer port = 8080;
String username = "bpmsAdmin";
String password = "abcd1234!";
// Create the HttpEntity (body of our POST):
FileBody fileBody = new FileBody(file);
MultipartEntityBuilder builder = MultipartEntityBuilder.create();
builder.setMode(HttpMultipartMode.BROWSER_COMPATIBLE);
builder.addPart("upfile", fileBody);
HttpEntity entity = builder.build();
// Calculate the endpoint from the Maven coordinates:
String resource = "/business-central/maven2/" + groupId.replace('.', '/') + "/" + artifactId +"/" + version + "/" + artifactId + "-" + version + ".jar";
LOG.info("POST " + hostname + ":" + port + resource);
// Set up HttpClient to use Basic pre-emptive authentication with the provided credentials:
HttpHost target = new HttpHost(hostname, port, protocol);
CredentialsProvider credsProvider = new BasicCredentialsProvider();
credsProvider.setCredentials(
new AuthScope(target.getHostName(), target.getPort()),
new UsernamePasswordCredentials(username,password));
CloseableHttpClient httpclient = HttpClients.custom().setDefaultCredentialsProvider(credsProvider).build();
HttpPost httpPost = new HttpPost(resource);
httpPost.setEntity(entity);
AuthCache authCache = new BasicAuthCache();
BasicScheme basicAuth = new BasicScheme();
authCache.put(target, basicAuth);
HttpClientContext localContext = HttpClientContext.create();
localContext.setAuthCache(authCache);
try {
// Perform the HTTP POST:
CloseableHttpResponse response = httpclient.execute(target, httpPost, localContext);
LOG.info(response.toString());
// Now check your artifact repository!
} catch (ClientProtocolException e) {
LOG.error("Protocol Error", e);
throw new RuntimeException(e);
} catch (IOException e) {
LOG.error("IOException while getting response", e);
throw new RuntimeException(e);
}
}
}Alternative Maven Approach
An alternative Maven approach is to configure your projects pom.xml by adding the repository as shown below:
<distributionManagement>
<repository>
<id>guvnor-m2-repo</id>
<name>maven repo</name>
<url>http://localhost:8080/business-central/maven2/</url>
<layout>default</layout>
</repository>
</distributionManagement>
Once you specify the repository information in the pom.xml, add the corresponding configuration in settings.xml as shown below:
<server>
<id>guvnor-m2-repo</id>
<username>bpmsAdmin</username>
<password>abcd1234!</password>
<configuration>
<wagonProvider>httpclient</wagonProvider>
<httpConfiguration>
<all>
<usePreemptive>true</usePreemptive>
</all>
</httpConfiguration>
</configuration>
</server>
Now when you run the mvn deploy command, the JAR file gets uploaded.
3.8. Deploying Red Hat JBoss BPM Suite Artifacts to Red Hat JBoss Fuse
Red Hat JBoss Fuse is an open source Enterprise Service Bus (ESB) with an elastic footprint and is based on Apache Karaf. The 6.4 version of Red Hat JBoss BPM Suite supports deployment of runtime artifacts to Fuse.
With the 6.1 release, Red Hat JBoss BPM Suite runtime components (in the form of JARs) are OSGi enabled. The runtime engines JARs MANIFEST.MF files describe their dependencies, amongst other things. You can plug these JARs directly into an OSGi environment, like Fuse.
Red Hat JBoss BPM Suite uses a scanner to enable continuous integration, resolution, and fetching of artifacts from remote Maven repositories. This scanner, called KIE-CI, uses a native Maven parser called Plexus to parse Maven POMs. However, this parser is not OSGi compatible and fails to instantiate in an OSGi environment. KIE-CI automatically switches to a simpler POM parser called MinimalPomParser.
The MinimalPomParser is a very simple POM parser implementation provided by Drools and is limited in what it can parse. It ignores some POM file parts, such as the parent POM of a KJAR. This means that users must not rely on those POM features (such as dependencies declared in the parent POM in their KJARs) when using KIE-CI in an OSGi environment.
Separating Assets and Code
One of the main advantage of deploying Red Hat JBoss BPM Suite artifacts on Red Hat JBoss Fuse is that each bundle is isolated, running in its own classloader. This allows you to separate the logic (code) from the assets. Business users can produce and change the rules and processes (assets) and package them in their own bundle, keeping them separate from the project bundle (code), created by the developer team. Assets can be updated without needing to change the project code.
Chapter 4. Install and Set up Red Hat JBoss Developer Studio
Red Hat JBoss Developer Studio is the JBoss Integrated Development Environment (IDE) based on Eclipse. Get the latest Red Hat JBoss Developer Studio from the Red Hat Customer Portal. Red Hat JBoss Developer Studio provides plug-ins with tools and interfaces for Red Hat JBoss BRMS and Red Hat JBoss BPM Suite. These plugins are based on the community version of these products. So, the Red Hat JBoss BRMS plug-in is called the Drools plug-in and the Red Hat JBoss BPM Suite plug-in is called the jBPM plug-in.
See the Red Hat JBoss Developer Studio documentation for installation and setup instructions.
Due to an issue in the way multi-byte rule names are handled, you must ensure that the instance of Red Hat JBoss Developer Studio is started with the file encoding set to UTF-8. You can do this by editing the $JBDS_HOME/studio/jbdevstudio.ini file and adding the following property: "-Dfile.encoding=UTF-8".
4.1. Installing Red Hat JBoss Developer Studio Plug-ins
Get the latest Red Hat JBoss Developer Studio from the Red Hat Customer Portal. The Red Hat JBoss BRMS and Red Hat JBoss BPM Suite plug-ins for Red Hat JBoss Developer Studio are available using the update site.
Installing Red Hat JBoss BRMS and Red Hat JBoss BPM Suite Plug-ins in Red Hat JBoss Developer Studio
- Start Red Hat JBoss Developer Studio.
- Click Help → Install New Software.
- Click Add to enter the Add Repository menu.
-
Provide a name next to the Name field and add the following URL in the Location field:
https://devstudio.jboss.com/10.0/stable/updates/integration-stack/. - Click OK.
- Select the JBoss Business Process and Rule Development feature from the available options, click Next and then Next again.
- Read the license and accept it by selecting the appropriate radio button, and click Finish.
- Restart Red Hat JBoss Developer Studio after the installation process finishes.
4.2. Configuring Red Hat JBoss BRMS/BPM Suite Server
Red Hat JBoss Developer Studio can be configured to run the Red Hat JBoss BRMS and Red Hat JBoss BPM Suite server.
Configuring Red Hat JBoss BRMS and Red Hat JBoss BPM Suite Server
Open the Drools view: click Window → Open Perspective → Other, select Drools and click OK.
To open the Red Hat JBoss BPM Suite view, go to Window → Open Perspective → Other, select jBPM and click OK.
- Click Window → Show View → Other… and select Server → Servers to add the server view.
- Right click the Servers panel and select New → Server to open the server menu.
- Click JBoss Enterprise Middleware → JBoss Enterprise Application Platform 6.1+ and click Next to define the server.
Set the home directory by clicking Browse button. Navigate to the Red Hat JBoss EAP directory which has Red Hat JBoss BRMS installed.
For configuring Red Hat JBoss BPM Suite server, select the Red Hat JBoss EAP directory which has Red Hat JBoss BPM Suite installed.
- Provide a name for the server in the Name field, ensure that the configuration file is set, and click Finish.
4.3. Importing Projects from Git Repository into Red Hat JBoss Developer Studio
You can configure Red Hat JBoss Developer Studio to connect to a central Git asset repository. The repository stores rules, models, functions, and processes.
You can either clone a remote Git repository or import a local Git repository.
Cloning Remote Git Repository
- Select the server from the Server tab and click the start icon to start your server.
Start the Secure Shell server, if not running already, by using the following command. The command is Linux and Mac specific only. On these platforms, if
sshdhas already been started, this command fails. In that case, you may safely ignore this step./sbin/service sshd start- In Red Hat JBoss Developer Studio , select File → Import… and navigate to the Git folder. Open the Git folder to select Projects from Git and click Next.
- Select the repository source as Clone URI and click Next.
- Enter the details of the Git repository in the next window and click Next.
- Select the branch you wish to import in the following window and click Next.
- To define the local storage for this project, enter (or select) a non-empty directory, make any configuration changes and click Next.
- Import the project as a general project in the following window and click Next.
- Name the project and click Finish.
Importing Local Git Repository
- Select your server from the Server tab and click the start icon to start the server.
- In Red Hat JBoss Developer Studio, select File → Import… and navigate to the Git folder. Open the Git folder to select Projects from Git and click Next.
- Select the repository source as Existing local repository and click Next.
- Select the repository that is to be configured from the list of available repositories and click Next.
- In the dialog window that opens, select the Import as general project radio button from the Wizard for project import group and click Next.
- Name the project and click Finish.
Part II. All About Rules
Chapter 5. Rule Algorithms
5.1. PHREAK Algorithm
The new PHREAK algorithm is evolved from the RETE algorithm. While RETE is considered eager and data oriented, PHREAK on the other hand follows lazy and goal oriented approach. The RETE algorithm does a lot of work during the insert, update and delete actions in order to find partial matches for all rules. In case of PHREAK, this partial matching of rule is delayed deliberately.
The eagerness of RETE algorithm during rule matching wastes a lot of time in case of large systems as it does result in a rule firing eventually. PHREAK algorithm addresses this issue and therefore is able to handle large data more efficiently.
PHREAK is derived from a number of algorithms including the following LEAPS, RETE/UL and Collection-Oriented Match algorithms.
In addition to the enhancements listed in the Rete00 algorithm, PHREAK algorithm adds the following set of enhancements:
- Three layers of contextual memory: Node, Segment, and Rule memories.
- Rule, segment, and node based linking.
- Lazy (delayed) rule evaluation.
- Stack-based evaluations with pause and resume.
- Isolated rule evaluation.
- Set-oriented propagations.
5.2. Rule Evaluation With PHREAK Algorithm
When the rule engine starts, all the rules are unlinked. At this stage, there is no rule evaluation. The insert, update, and delete actions are queued before entering the beta network. The rule engine uses a simple heuristic—based on the rule most likely to result in firings—to calculate and select the next rule for evaluation. This delays the evaluation and firing of the other rules. When a rule has all the right input values populated, it gets linked in—a goal representing this rule is created and placed into a priority queue, which is ordered by salience. Each queue is associated with an AgendaGroup. The engine only evaluates rules for the active AgendaGroup by inspecting the queue and popping the goal for the rule with the highest salience. This means the work done shifts from the insert, update, delete phase to the fireAllRules phase. Only the rule for which the goal was created is evaluated, and other potential rule evaluations are delayed. While individual rules are evaluated, node sharing is still achieved through the process of segmentation.
Unlike the tuple-oriented RETE, the PHREAK propagation is collection-oriented. For the rule that is being evaluated, the engine accesses the first node and processes all queued insert, update, and delete actions. The results are added to a set, and the set is propagated to the child node. In the child node, all queued insert, update, and delete actions are processed, adding the results to the same set. Once finished, this set is propagated to the next child node and the same process repeats until it reaches the terminal node. This creates a batch process effect, which can provide performance advantages for certain rule constructs.
This linking and unlinking of rules happens through a layered bit mask system, based on network segmentation. When the rule network is built, segments are created for nodes that are shared by the same set of rules. A rule itself is made up from a path of segments. In case a rule does not share any node with any other rule, it becomes a single segment.
A bit-mask offset is assigned to each node in the segment. Furthermore, another bit mask is assigned to each segment in the rule’s path according to these rules:
- If there is at least one input, the node’s bit is set to the on state.
- If each node in a segment has its bit set to the on state, the segment’s bit is also set to the on state.
- If any node’s bit is set to the off state, the segment is also set to the off state.
- If each segment in the rule’s path is set to the on state, the rule is said to be linked in, and a goal is created to schedule the rule for evaluation.
The same bit-mask technique is used to also track dirty nodes, segments, and rules. This allows for an already linked rule to be scheduled for evaluation if it has been considered dirty since it was last evaluated. This ensures that no rule will ever evaluate partial matches.
As opposed to a single unit of memory in RETE, PHREAK has three levels of memory. This allows for much more contextual understanding during the evaluation of a rule.
PHREAK and Sequential Mode
The sequential mode is supported for the PHREAK algorithm: the modify and update rule statements are now allowed. Any rule that has not yet been evaluated will have access to data modified by the previous rules that used modify or update. This results in a more intuitive behavior of the sequential mode.
For example, consider the following rule:
rule "Rule1"
salience 100
when
$fact : MyFact( field1 == false )
then
System.out.println("Rule1 : " + $fact);
$fact.setField1(true);
update($fact);
end
rule "Rule2"
salience 95
when
$fact : MyFact( field1 == true )
then
System.out.println("Rule2 : " + $fact);
update($fact);
end
When you insert a MyFact with the value field1==false:
-
The ReteOO algorithm executes only
Rule1. -
The PHREAK algorithm executes both
Rule1andRule2.
For more information about the sequential mode, see Section 20.1.11.2.1, “Sequential Mode”.
5.3. Rete Algorithm
5.3.1. ReteOO
The Rete implementation used in BRMS is called ReteOO. It is an enhanced and optimized implementation of the Rete algorithm specifically for object-oriented systems. The Rete Algorithm has now been deprecated, and PHREAK is an enhancement of Rete. However, Rete can still be used by developers. This section describes how the Rete Algorithm functions.
Rete Root Node
When using ReteOO, the root node is where all objects enter the network. From there, it immediately goes to the ObjectTypeNode.
Figure 5.1. ReteNode

ObjectTypeNode
The ObjectTypeNode helps to reduce the workload of the rules engine. If there are several objects, the rule engine wastes a lot of cycles trying to evaluate every node against every object. To make things efficient, the ObjectTypeNode is used so that the engine only passes objects to the nodes that match the object’s type. This way, if an application asserts a new Account, it does not propagate to the nodes for the Order object.
In Red Hat JBoss BRMS, an inserted object retrieves a list of valid ObjectTypesNodes through a lookup in a HashMap from the object’s class. If this list does not exist, it scans all the ObjectTypeNodes to find valid matches. It then caches these matched nodes in the list. This enables Red Hat JBoss BRMS to match against any class type that matches with an instanceof check.
AlphaNodes
AlphaNodes are used to evaluate literal conditions. When a rule has multiple literal conditions for a single object type, they are linked together. This means that if an application asserts an Account object, it must first satisfy the first literal condition before it can proceed to the next AlphaNode.
AlphaNodes are propagated using ObjectTypeNodes.
Hashing
Red Hat JBoss BRMS uses hashing to extend Rete by optimizing the propagation from ObjectTypeNode to AlphaNode. Each time an AlphaNode is added to an ObjectTypeNode, it adds the literal value as a key to the HashMap with the AlphaNode as the value. When a new instance enters the ObjectType node, rather than propagating to each AlphaNode, it retrieves the correct AlphaNode from the HashMap. This avoids unnecessary literal checks.
When facts enter from one side, you may do a hash lookup returning potentially valid candidates (referred to as indexing). At any point a valid join is found, the Tuple joins with the Object (referred to as a partial match) and then propagates to the next node.
BetaNodes
BetaNodes are used to compare two objects and their fields. The objects may be of the same or different types.
Alpha Memory and Beta Memory
Alpha memory refers to the left input on a BetaNode. In Red Hat JBoss BRMS, this input remembers all incoming objects.
Beta memory is the term used to refer to the right input of a BetaNode. It remembers all incoming tuples.
Lookups with BetaNodes
When facts enter from one side, you can do a hash lookup returning potentially valid candidates (referred to as indexing). If a valid join is found, the Tuple joins with the Object (referred to as a partial match) and then propagates to the next node.
LeftInputNodeAdapters
A LeftInputNodeAdapter takes an Object as an input and propagates a single Object Tuple.
Terminal Nodes
Terminal nodes are used to indicate when a single rule matches all its conditions (that is, the rule has a full match). A rule with an OR conditional disjunctive connective results in a sub-rule generation for each possible logical branch. Because of this, one rule can have multiple terminal nodes.
Node Sharing
Node sharing is used to prevent redundancy. As many rules repeat the same patterns, node sharing allows users to collapse those patterns so that the patterns need not be reevaluated for every single instance.
The following rules share the first pattern but not the last:
rule
when
Cheese($cheddar : name == "cheddar")
$person: Person(favouriteCheese == $cheddar)
then
System.out.println($person.getName() + "likes cheddar");
endrule
when
Cheese($cheddar : name == "cheddar")
$person : Person(favouriteCheese != $cheddar)
then
System.out.println($person.getName() + " does not like cheddar");
end
The Rete network displayed below denotes that the alpha node is shared but the beta nodes are not. Each beta node has its own TerminalNode.
Figure 5.2. Node Sharing

5.4. Switching Between PHREAK and ReteOO
It is possible to switch between PHREAK and ReteOO either by setting system properties, or in KieBase configuration. PHREAK is the default algorithm in both cases.
Switching to ReteOO requires the drools-reteoo-VERSION.jar file to be available on the class path. To include the file, add the following ReteOO Maven dependency to the pom.xml file in your project:
<dependency>
<groupId>org.drools</groupId>
<artifactId>drools-reteoo</artifactId>
<version>DROOLS_VERSION</version>
</dependency>For the supported Maven artifact version, see the Supported Component Versions section of the Red Hat JBoss BPM Suite Installation Guide.
If the ReteOO Maven dependency is not specified in the pom.xml file in your project, the BRMS engine uses PHREAK instead and issues a warning.
Switching Between PHREAK and ReteOO in System Properties
To switch between the PHREAK and ReteOO algorithms, edit the drools.ruleEngine system property to contain one the following values:
drools.ruleEngine=phreakdrools.ruleEngine=reteoo
The default value is phreak.
Switching Between PHREAK and ReteOO in KieBaseConfiguration
When creating a KieBase, specify the rule engine algorithm in KieBaseConfiguration. See the following example:
import org.kie.api.KieBase;
import org.kie.api.KieBaseConfiguration;
import org.kie.api.KieServices;
import org.kie.api.runtime.KieContainer;
import org.kie.internal.builder.conf.RuleEngineOption;
...KieServices kservices = KieServices.Factory.get();
KieBaseConfiguration kconfig = kieServices.Factory.get().newKieBaseConfiguration();
// You can either specify PHREAK (default):
kconfig.setOption(RuleEngineOption.PHREAK);
// or legacy ReteOO:
kconfig.setOption(RuleEngineOption.RETEOO);
// ... and then create a KieBase for the selected algorithm
// (getKieClasspathContainer() is just an example):
KieContainer container = kservices.getKieClasspathContainer();
KieBase kbase = container.newKieBase(kieBaseName, kconfig);For a list of Maven dependencies, see example Embedded jBPM Engine Dependencies. If you use Red Hat JBoss BRMS, see example Embedded Drools Engine Dependencies.
Additionally, if you want to switch to ReteOO, use the drools-reteoo dependency:
<dependency>
<groupId>org.drools</groupId>
<artifactId>drools-reteoo</artifactId>
<version>6.5.0.Final-redhat-2</version>
</dependency>For the current Maven artifact version, see chapter Supported Component Versions of the Red Hat JBoss BPM Suite Installation Guide.
Switching to ReteOO requires drools-reteoo-(version).jar to exist on the classpath. If not present, the BRMS Engine reverts back to PHREAK and issues a warning. This applies for switching with KieBaseConfiguration and system properties.
Chapter 6. Getting Started with Rules and Facts
To create business rules, an appropriate fact model on which the business rules operate must be present. A fact is an instance of an application object represented as POJO. Rules that contain the business logic can then be authored by using either the Business Central web user interface or Red Hat JBoss Developer Studio.
The structure of a rule is as follows:
rule "NAME"
when
RULE CONDITIONS
then
RULE CONSEQUENCES
end
Conditions inside the when clause of a rule query for fact combinations that match the criteria. If such a fact combination is found, consequences specified in the then clause are executed. These actions can assert a fact, retract a fact, or update a fact within the rule engine. As a result, other rules can be fired as well.
Rules Processing Steps
-
BRMS parses all
.drlrule files into the knowledge base. - Each fact is asserted into the working memory. As the facts are being asserted, BRMS uses the PHREAK or ReteOO algorithm to infer how the facts relate to the rules. After that, the working memory contains copies of the parsed rules and a reference to the facts.
-
The
fireAllRules()method is called. All rules and facts are evaluated by the rule engine and rule-facts pairs are created, based on which rules match against which set of facts. - All the rule-facts combinations are queued within a data construct called an agenda.
- Finally, activations are processed one by one from the agenda, calling the rule consequences on the facts. Note that executing an activation can modify the contents of the agenda before the next activation is performed. The PHREAK and ReteOO algorithms handle such situations efficiently.
6.1. Creating and Executing Rules
In this section, procedures describing how to create and execute rules using plain Java, Maven, Red Hat JBoss Developer Studio, and Business Central in Red Hat JBoss BPM Suite are provided.
6.1.1. Creating and Executing Rules Using Plain Java
Create a fact model.
Create a Plain old Java object (POJO) on which a rule will operate. In this example, a
Person.javafile in a directorymy-projectis created. ThePersonclass contains getter and setter methods to set and retrieve the first name, last name, hourly rate, and the wage of a person:import org.kie.api.KieServices; import org.kie.api.runtime.KieContainer; import org.kie.api.runtime.KieSession; public class Person { private String firstName; private String lastName; private Integer hourlyRate; private Integer wage; public String getFirstName() { return firstName; } public void setFirstName(String firstName) { this.firstName = firstName; } public String getLastName() { return lastName; } public void setLastName(String lastName) { this.lastName = lastName; } public Integer getHourlyRate() { return hourlyRate; } public void setHourlyRate(Integer hourlyRate) { this.hourlyRate = hourlyRate; } public Integer getWage(){ return wage; } public void setWage(Integer wage){ this.wage = wage; } }Create a rule.
Create a rule file in the
.drlformat under themy-projectdirectory. The followingPerson.drlrule calculates the wage and hourly rate values and displays a message based on the result afterwards.dialect "java" rule "Wage" when Person(hourlyRate * wage > 100) Person(name : firstName, surname : lastName) then System.out.println("Hello" + " " + name + " " + surname + "!"); System.out.println("You are rich!"); endCreate a main class.
Create a main class and save it to the same directory as the POJO created earlier. The main class will load the knowledge base and fire rules. In the following example, a main class
DroolsTest.javais created.In the main class:
Add the following
importstatements to import KIE services, a KIE container, and a KIE session:import org.kie.api.KieServices; import org.kie.api.runtime.KieContainer; import org.kie.api.runtime.KieSession;Load the knowledge base, insert facts, and fire the rule from the
main()method which passes the fact model to the rule:public class DroolsTest { public static final void main(String[] args) { try { // Load the knowledge base: KieServices ks = KieServices.Factory.get(); KieContainer kContainer = ks.getKieClasspathContainer(); KieSession kSession = kContainer.newKieSession(); // Go! Person p = new Person(); p.setWage(12); p.setFirstName("Tom"); p.setLastName("Summers"); p.setHourlyRate(10); kSession.insert(p); kSession.fireAllRules(); } catch (Throwable t) { t.printStackTrace(); } } }
-
Download the Red Hat JBoss BRMS 6.4 Core Engine ZIP file from the Red Hat Customer Portal and extract it under
my-project/BRMS-engine-jars/. In the
my-project/META-INFdirectory, create akmodule.xmlmetadata file with the following content:<?xml version="1.0" encoding="UTF-8"?> <kmodule xmlns="http://www.drools.org/xsd/kmodule"> </kmodule>Build the example.
To compile and build your Java files, navigate to the
my-projectdirectory on the command line and run the following command:javac -classpath "./BRMS-engine-jars/*:." DroolsTest.javaRun the example.
If there are no compilation errors, run the following command to execute the rule:
java -classpath "./BRMS-engine-jars/*:." DroolsTestThe expected output looks similar to the following:
Hello Tom Summers! You are rich!
6.1.2. Creating and Executing Rules Using Maven
Create a basic Maven archetype.
Navigate to a directory where you want to create a Maven archetype and run the following command:
mvn archetype:generate -DgroupId=com.sample.app -DartifactId=my-app -DarchetypeArtifactId=maven-archetype-quickstart -DinteractiveMode=falseThis creates a directory
my-appwith the following structure:my-app |-- pom.xml `-- src |-- main | `-- java | `-- com | `-- mycompany | `-- app | `-- App.java `-- test `-- java `-- com `-- mycompany `-- app `-- AppTest.javaThe
my-appdirectory contains:-
A
src/maindirectory for storing the application’s sources. -
A
src/testdirectory for storing the test sources. -
A
pom.xmlfile with the project’s configuration.
-
A
Create a fact model.
A fact model is a POJO, based on which a rule will operate. Create a
Person.javafile under themy-app/src/main/java/com/mycompany/appdirectory. ThePersonclass contains getter and setter methods to set and retrieve the first name, last name, hourly rate, and the wage of a person.package com.mycompany.app; public class Person { private String firstName; private String lastName; private Integer hourlyRate; private Integer wage; public String getFirstName() { return firstName; } public void setFirstName(String firstName) { this.firstName = firstName; } public String getLastName() { return lastName; } public void setLastName(String lastName) { this.lastName = lastName; } public Integer getHourlyRate() { return hourlyRate; } public void setHourlyRate(Integer hourlyRate) { this.hourlyRate = hourlyRate; } public Integer getWage(){ return wage; } public void setWage(Integer wage){ this.wage = wage; } }Create a rule.
Create a rule file in the
.drlformat under themy-app/src/main/resources/rulesdirectory. See the following example with a simple rulePerson.drlwhich imports thePersonclass:package com.mycompany.app; import com.mycompany.app.Person; dialect "java" rule "Wage" when Person(hourlyRate * wage > 100) Person(name : firstName, surname : lastName) then System.out.println("Hello " + name + " " + surname + "!"); System.out.println("You are rich!"); endThe rule above calculates the wage and hourly rate values and displays a message based on the result afterwards.
In the
my-app/src/main/resources/META-INFdirectory, create a metadata filekmodule.xmlwith the following content:<?xml version="1.0" encoding="UTF-8"?> <kmodule xmlns="http://www.drools.org/xsd/kmodule"> </kmodule>Set project dependencies.
Specify the libraries your application requires in the
my-app/pom.xmlconfiguration file. Provide the Red Hat JBoss BRMS dependencies as well as the group ID, artifact ID, and version (GAV) of your application as shown below:<?xml version="1.0" encoding="UTF-8"?> <project xmlns="http://maven.apache.org/POM/4.0.0" xmlns:xsi="http://www.w3.org/2001/XMLSchema-instance" xsi:schemaLocation="http://maven.apache.org/POM/4.0.0 http://maven.apache.org/xsd/maven-4.0.0.xsd"> <modelVersion>4.0.0</modelVersion> <groupId>com.mycompany.app</groupId> <artifactId>my-app</artifactId> <version>1.0.0</version> <repositories> <repository> <id>jboss-ga-repository</id> <url>http://maven.repository.redhat.com/ga/</url> </repository> </repositories> <dependencies> <dependency> <groupId>org.drools</groupId> <artifactId>drools-compiler</artifactId> <version>VERSION</version> </dependency> <dependency> <groupId>org.kie</groupId> <artifactId>kie-api</artifactId> <version>VERSION</version> </dependency> <dependency> <groupId>junit</groupId> <artifactId>junit</artifactId> <version>4.11</version> <scope>test</scope> </dependency> </dependencies> </project>For the supported Maven artifact version, see section Supported Component Versions of the Red Hat JBoss BPM Suite Installation Guide.
Test the example.
Use the
testAppmethod inmy-app/src/test/java/com/mycompany/app/AppTest.javato test the rule. TheAppTest.javafile is created by Maven by default.In the
AppTest.javafile:Add the following
importstatements to import KIE services, a KIE container, and a KIE session:import org.kie.api.KieServices; import org.kie.api.runtime.KieContainer; import org.kie.api.runtime.KieSession;Load the knowledge base, insert facts, and fire the rule from the
testApp()method which passes the fact model to the rule:public void testApp() { // Load the knowledge base: KieServices ks = KieServices.Factory.get(); KieContainer kContainer = ks.getKieClasspathContainer(); KieSession kSession = kContainer.newKieSession(); // Set up the fact model: Person p = new Person(); p.setWage(12); p.setFirstName("Tom"); p.setLastName("Summers"); p.setHourlyRate(10); // Insert the person into the session: kSession.insert(p); // Fire all rules: kSession.fireAllRules(); }
Build the example.
On the command line, navigate to the
my-appdirectory and run the following command:mvn clean installNote that executing this command for the first time may take a while.
The expected output looks similar to the following:
Hello Tom Summers! You are rich! Tests run: 1, Failures: 0, Errors: 0, Skipped: 0, Time elapsed: 1.194 sec Results : Tests run: 1, Failures: 0, Errors: 0, Skipped: 0 [INFO] ... [INFO] -------------------------------------------------------------- [INFO] BUILD SUCCESS [INFO] -------------------------------------------------------------- [INFO] Total time: 6.393 s ... [INFO] --------------------------------------------------------------
6.1.3. Creating and Executing Rules Using Red Hat JBoss Developer Studio
Make sure you have Red Hat JBoss Developer Studio properly set before proceeding further. See chapter Red Hat JBoss Developer Studio of Red Hat JBoss BPM Suite Installation Guide for more information.
Create a BRMS project.
To create a BRMS project in Red Hat JBoss Developer Studio:
- Start Red Hat JBoss Developer Studio and click File → New → Project.
- In the New Project dialog window that opens, select Drools → Drools Project and click Next.
- Click on the second icon to create a project and populate it with some example files to help you get started quickly. Click Next.
Enter a name of the project a select the Maven radio button as the project building option. Specify the GAV values which form the project’s fully qualified name, for example:
-
Group ID:
com.mycompany.app -
Artifact ID:
my-app -
Version:
1.0.0
-
Group ID:
- Click Finish.
This configuration sets up a basic project structure, class path, and sample rules. The project structure is as follows:
My-Project `-- src/main/java | `-- com.sample | `-- DecisionTable.java | `-- DroolsTest.java | `-- ProcessTest.java | `-- src/main/resources | `-- dtables | `-- Sample.xls | `-- process | `-- sample.bpmn | `-- rules | `-- Sample.drl | `-- META-INF | `-- JRE System Library | `-- Maven Dependencies | `-- Drools Library | `-- src | `-- target | `-- pom.xmlNotice the following:
-
A
Sample.drlrule file in thesrc/main/resourcesdirectory, containing an exampleHello WorldandGoodByerules. -
A
DroolsTest.javafile under thesrc/main/javadirectory in thecom.samplepackage. TheDroolsTestclass can be used to execute rules. -
The
Drools Librarydirectory which acts as a custom class path containing JAR files necessary for execution.
Create a fact model.
The
DroolsTest.javafile contains a sample POJOMessagewith getter and setter methods. You can edit this class or create a different POJO. In this example, a classPersoncontaining methods to set and retrieve the first name, last name, hourly rate, and wage of a person is used.public static class Person { private String firstName; private String lastName; private Integer hourlyRate; private Integer wage; public String getFirstName() { return firstName; } public void setFirstName(String firstName) { this.firstName = firstName; } public String getLastName() { return lastName; } public void setLastName(String lastName) { this.lastName = lastName; } public Integer getHourlyRate() { return hourlyRate; } public void setHourlyRate(Integer hourlyRate) { this.hourlyRate = hourlyRate; } public Integer getWage(){ return wage; } public void setWage(Integer wage){ this.wage = wage; } }Update the
main()method.The
DroolsTest.javafile contains amain()method that loads the knowledge base, inserts facts, and fires rules. Update the method to pass the objectPersonto a rule:public static final void main(String[] args) { try { // Load the knowledge base: KieServices ks = KieServices.Factory.get(); KieContainer kContainer = ks.getKieClasspathContainer(); KieSession kSession = kContainer.newKieSession("ksession-rules"); // Go! Person p = new Person(); p.setWage(12); p.setFirstName("Tom"); p.setLastName("Summers"); p.setHourlyRate(10); kSession.insert(p); kSession.fireAllRules(); } catch (Throwable t) { t.printStackTrace(); } }To load the knowledge base, get a
KieServicesinstance and a class-path-basedKieContainerand build theKieSessionwith theKieContainer. In the example above, a sessionksession-rulesmatching the one defined inkmodule.xmlfile is passed.Create a rule.
The rule file
Sample.drlcontains an example of two rules. Edit this file or create a new one. In your rule file:Specify the package name:
package com.sampleImport facts:
import com.sample.DroolsTest.Person;Write the rule:
dialect "java" rule "Wage" when Person(hourlyRate * wage > 100) Person(name : firstName, surname : lastName) then System.out.println("Hello" + " " + name + " " + surname + "!"); System.out.println("You are rich!"); end
Test the rule.
Right-click the
DroolsTest.javafile and select Run As → Java Application.The expected output looks similar to the following:
Hello Tom Summers! You are rich!
6.1.4. Creating and Executing Rules Using Business Central
Make sure you have Red Hat JBoss BPM Suite successfully installed before proceeding further.
- Start the server and log in to Business Central. For more information how to do so, see sections Starting Server and Logging into Business Central of Red Hat JBoss BPM Suite Installation Guide.
Create a repository structure and a project.
- In Business Central, click Authoring → Administration.
- Click Organizational Units → Manage Organizational Units.
- In the displayed Organizational Unit Manager, click Add.
In the Add New Organizational Unit dialog window, define the unit properties. For example:
-
Name:
EmployeeWage -
Owner:
Employee
-
Name:
- Click Ok.
- Click Repositories → New repository.
In the New Repository dialog window, define the repository properties. For example:
-
Repository Name:
EmployeeRepo -
In Organizational Unit:
EmployeeWage
-
Repository Name:
- Click Finish.
- In the main menu, click Authoring → Project Authoring.
-
In Project Explorer, navigate to the
EmployeeWageorganizational unit and theEmployeeReporepository. - Click New Item → Project.
In the New Project dialog window, enter a name of the project, for example
MyProject, and specify project’s Maven properties. For example:-
Group ID:
org.bpms -
Artifact ID:
MyProject -
Version:
1.0.0
-
Group ID:
- Click Finish.
Create a fact model.
- Click New Item → Data Object.
In the Create new Data Object dialog window, enter the object’s name and specify a package. For example:
-
Data Object:
Person -
Package:
org.bpms.myproject
-
Data Object:
- Click Ok.
In the Editor than opens, click Add field and create four fields with the following values by clicking Create and continue:
-
Id:
firstName, Type: String -
Id:
lastName, Type: String -
Id:
hourlyRate, Type: Integer -
Id:
wage, Type: Integer
-
Id:
- Save the project.
Create a rule.
- Click New Item → DRL file.
In the Create new DRL file dialog window, enter a name of the rule and specify a package. For example:
-
DRL file:
MyRule -
Package:
org.bpms.myproject
-
DRL file:
- Click Ok.
Paste the definition of a rule shown below into the DRL Editor or create your own rule.
package org.bpms.myproject; rule "MyRule" ruleflow-group "MyProjectGroup" when Person(hourlyRate * wage > 100) Person(name : firstName, surname : lastName) then System.out.println("Hello" + " " + name + " " + surname + "!"); System.out.println("You are rich!"); end- Click Save.
Create a business process with a business rule task.
- Click New Item → Business Process.
In the Create new Business Process dialog window, enter a name of the business process and specify a package. For example:
-
Business Process:
MyProcess -
Package:
org.bpms.myproject
-
Business Process:
- Click Ok. The Business Process Editor opens with a Start Event element on the canvas.
- Expand the Object Library palette on the left and drag and drop a Business Rule task (Tasks → Business Rule) on the canvas.
- Click on an empty space on the canvas and open the Properties panel on the right. Click on the Value text field of the Variable Definitions property. Click on the arrow that appears on the right to open the Editor for Variable Definitions dialog window.
Click Add Variable and define the following variable:
-
Name:
person -
Defined Types:
Person [org.bpms.myproject]
-
Name:
- Click Ok.
-
Click on the Business Rule task on the canvas and in the Properties panel on the right, set the Name of the task, for example
My_Rule. -
Click on the Value text field of the Ruleflow Group property. Click on the arrow that appears on the right to open the Editor for RuleFlow Groups dialog window. Select
MyProjectGroupand click Save. Click on the Value text field of the Assignments property. Click on the arrow that appears on the right to open the My_Rule Data I/O dialog window and click Add next to the Data Inputs and Assignments option to add the following:
-
Name:
Person -
Data Type:
Person [org.bpms.myproject] -
Source:
person
-
Name:
Click Save.
You have now successfully created an object that maps to the variables you set before in your fact model. Your business process passes this object as an input to the rule.
- Add an End Event and connect all events on the canvas to complete the process.
-
Click
 and select Generate all Forms.
- Save the process.
Build and deploy the rule.
Click Open Project Editor on the left, change the version of the project and click Build → Build & Deploy.
A notification appears in the upper part of the screen informing you that the project has been built successfully.
- Click Process Management → Process Definitions.
- Click Start next to the newly built process.
In the opened MyProcess dialog window, provide the following values of the variables defined in your fact model and click Submit:
-
firstName:
Tom -
lastName:
Summers -
hourlyRate:
12 -
wage:
10
As these values satisfy the rule condition, the expected output looks similar to the following:
16:19:58,479 INFO [org.jbpm.kie.services.impl.store.DeploymentSynchronizer] (http-/127.0.0.1:8080-1) Deployment unit org.bpms:MyProject:1.0 stored successfully 16:26:56,119 INFO [stdout] (http-/127.0.0.1:8080-5) Hello Tom Summers! 16:26:56,119 INFO [stdout] (http-/127.0.0.1:8080-5) You are rich!-
firstName:
6.2. Execution of Rules
6.2.1. Agenda
The Agenda is a Rete feature. During actions on the WorkingMemory, rules may become fully matched and eligible for execution. A single Working Memory Action can result in multiple eligible rules. When a rule is fully matched an Activation is created, referencing the rule and the matched facts, and placed onto the Agenda. The Agenda controls the execution order of these Activations using a Conflict Resolution strategy.
6.2.2. Agenda Processing
The engine cycles repeatedly through two phases:
-
Working Memory Actions. This is where most of the work takes place, either in the Consequence (the RHS itself) or the main Java application process. Once the Consequence has finished or the main Java application process calls
fireAllRules()the engine switches to the Agenda Evaluation phase. - Agenda Evaluation. This attempts to select a rule to fire. If no rule is found it exits, otherwise it fires the found rule, switching the phase back to Working Memory Actions.
The process repeats until the agenda is clear, in which case control returns to the calling application. When Working Memory Actions are taking place, no rules are being fired.
6.2.3. Conflict Resolution
Conflict resolution is required when there are multiple rules on the agenda. As firing a rule may have side effects on the working memory, the rule engine needs to know in what order the rules should fire (for instance, firing ruleA may cause ruleB to be removed from the agenda).
6.2.4. AgendaGroup
Agenda groups are a way to partition rules on the agenda. At any one time, only one group has "focus" which means that activations for rules in that group only will take effect. You can also have rules with "auto focus" which means that the focus is taken for its agenda group when that rule’s conditions are true.
Agenda groups are known as "modules" in CLIPS terminology. Agenda groups provide a way to create a "flow" between grouped rules. You can switch the group which has focus either from within the rule engine, or via the API. If your rules have a clear need for multiple "phases" or "sequences" of processing, consider using agenda-groups for this purpose.
6.2.5. setFocus()
Each time setFocus() is called it pushes the specified Agenda Group onto a stack. When the focus group is empty it is popped from the stack and the focus group that is now on top evaluates. An Agenda Group can appear in multiple locations on the stack. The default Agenda Group is "MAIN", with all rules which do not specify an Agenda Group being in this group. It is also always the first group on the stack, given focus initially, by default.
The setFocus() method call looks like follows:
ksession.getAgenda().getAgendaGroup("Group A").setFocus();6.2.6. ActivationGroup
An activation group is a set of rules bound together by the same activation-group rule attribute. In this group only one rule can fire, and after that rule has fired all the other rules are cancelled from the agenda. The clear() method can be called at any time, which cancels all of the activations before one has had a chance to fire.
An activation group looks like follows:
ksession.getAgenda().getActivationGroup("Group B").clear();6.3. Inference
6.3.1. The Inference Engine
The inference engine is the part of the Red Hat JBoss BRMS engine which matches production facts and data to rules. It is often called the brain of a Production Rules System as it is able to scale to a large number of rules and facts. It makes inferences based on its existing knowledge and performs the actions based on what it infers from the information.
The rules are stored in the production memory and the facts that the inference engine matches against, are stored in the working memory. Facts are asserted into the working memory where they may get modified or retracted. A system with a large number of rules and facts may result in many rules being true for the same fact assertion. Such conflicting rules are managed using a conflict resolution strategy. This strategy determines the order of execution of the rules by assigning a priority level to each rule.
Inferences can be forward chaining or backward chaining. In a forward chaining inference mechanism, when some data gets inserted into the working memory, the related rules are triggered and if the data satisfies the rule conditions, corresponding actions are taken. These actions may insert new data into the working memory and therefore trigger more rules and so on. Thus, the forward chaining inference is data driven. On the contrary, the backward chaining inference is goal driven. In this case, the system looks for a particular goal, which the engine tries to satisfy. If it cannot do so it searches for sub-goals, that is, conclusions that will complete part of the current goal. It continues this process until either the initial conclusion is satisfied or there are no more unsatisfied sub-goals. Correct use of inference can create agile and less error prone business rules, which are easier to maintain.
6.3.2. Inference Example
The following example illustrates how an inference is made about whether a person is eligible to have a bus pass based on the rule conditions. Here is a rule that provides the age policy for a person to hold a bus pass:
rule "Infer Adult"
when
$p : Person(age >= 18)
then
insert(new IsAdult($p))
endBased on this rule, a rule engine infers whether a person is an adult or a child and act on it. Every person who is 18 years or above will have an instance of IsAdult inserted for them in the working memory. This inferred relation of age and bus pass can be inferred in any rule, such as:
$p : Person()
IsAdult(person == $p)6.4. Truth Maintenance
The inference engine is responsible for logical decisions on assertions and retractions of facts. After regular insertions, facts are generally retracted explicitly. However, in case of logical assertions, the facts that were asserted are automatically retracted when the conditions that asserted the facts in the first place are no longer true. In other words, the facts are retracted when there is no single condition that supports the logical assertion.
The inference engine uses a mechanism of truth maintenance to efficiently handle the inferred information from rules. A Truth Maintenance System (TMS) refers to an inference engine’s ability to enforce truthfulness when applying rules. It provides justified reasoning for each and every action taken by the inference engine and validates the conclusions of the engine. If the inference engine asserts data as a result of firing a rule, the engine uses the truth maintenance to justify the assertion.
A Truth Maintenance System also helps to identify inconsistencies and handle contradictions. For example, if there are two rules to be fired, each resulting in a contradictory action, the Truth Maintenance System enables the inference engine to decide its actions based on assumptions and derivations of previously calculated conclusions.
The usual insertion of facts, referred to as stated insertions, are straightforward and do not need a reasoning. However, the logical assertions need to be justified. If the inference engine tries to logically insert an object when there is an equal stated object, it fails as it cannot justify a stated fact. If the inference engine tries for a stated insertion of an existing equal object that is justified, then it overrides the justified insertion, and removes the justifications.
The following flowcharts illustrate the lifecycle of stated and logical insertions:
Figure 6.1. Stated Assertion
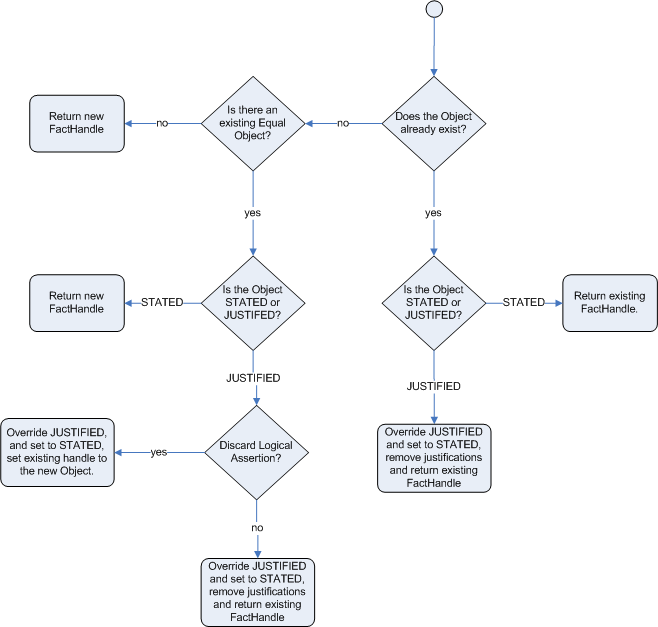
Figure 6.2. Logical Assertion
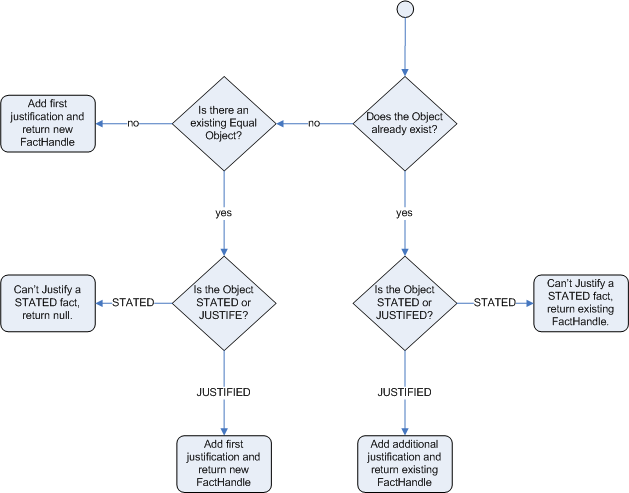
For the Truth Maintenance System and logical assertions to work, your fact objects (POJOs) must override the equals and hashCode methods from java.lang.Object as per the Java standard. Two objects are equal if and only if their equals methods return true for each other and if their hashCode methods return the same values. For more information, see the Java API documentation.
The following example illustrates how the Truth Maintenance System helps in the inference mechanism. The rules in the example provide information on basic policies on issuing child and adult bus passes.
rule "Issue Child Bus Pass"
when
$p : Person(age < 16)
then
insert(new ChildBusPass($p));
end
rule "Issue Adult Bus Pass"
when
$p : Person(age >= 16)
then
insert(new AdultBusPass($p));
end
These rules are monolithic and provide poor separation of concerns. The truth maintenance mechanism in an inference engine makes the system become more robust and have a clear separation of concerns. For example, the following rule uses logical insertion of facts, which makes the fact dependent on the truth of the when clause:
rule "Infer Child"
when
$p : Person(age < 16)
then
insertLogical(new IsChild($p))
end
rule "Infer Adult"
when
$p : Person(age >= 16)
then
insertLogical(new IsAdult($p))
end
When the condition in the rule is false, the fact is automatically retracted. This works particularly well as the two rules are mutually exclusive. In the above rules, if the person is under 16 years, it inserts an IsChild fact. Once the person is 16 years or above, the IsChild fact is automatically retracted and the IsAdult fact inserted.
Now the two rules for issuing child and adult bus pass can logically insert the ChildBusPass and AdultBusPass facts, as the Truth Maintenance System supports chaining of logical insertions for a cascading set of retracts.
rule "Issue Child Bus Pass"
when
$p : Person()
IsChild(person == $p)
then
insertLogical(new ChildBusPass($p));
end
rule "Issue Adult Bus Pass"
when
$p : Person(age >= 16)
IsAdult(person =$p)
then
insertLogical(new AdultBusPass($p));
end
When a person turns 16 years old, the IsChild fact as well as the person’s ChildBusPass fact is retracted. To these set of conditions, you can relate another rule which states that a person must return the child pass after turning 16 years old. When the Truth Maintenance System automatically retracts the ChildBusPass object, this rule triggers and sends a request to the person:
rule "Return ChildBusPass Request"
when
$p : Person()
not(ChildBusPass(person == $p))
then
requestChildBusPass($p);
end6.5. Using Decision Tables in Spreadsheets
Decision tables are a way of representing conditional logic in a precise manner, and are well suited to business-level rules.
Red Hat JBoss BRMS supports managing rules in a spreadsheet format. Since two formats are currently supported, XLS and CSV, a variety of spreadsheet programs, such as Microsoft Excel, Apache OpenOffice Calc, and LibreOffice Calc, can be utilized.
Use the XLS format if you are building and uploading decision tables using Business Central. Business Central does not support decision tables in the CSV format.
6.5.1. OpenOffice Example
Figure 6.3. OpenOffice Screenshot

In the above examples, the technical aspects of the decision table have been collapsed away (using a standard spreadsheet feature).
The rules start from row 17, with each row resulting in a rule. The conditions are in columns C, D, E, and the actions are off-screen. The values' meanings are indicated by the headers in Row 16. Column B is just a description.
Although the decision tables look like they process top down, this is not necessarily the case. Ideally, rules are authored without regard for the order of rows. This makes maintenance easier, as rows will not need to be shifted around all the time.
6.5.2. Rules and Spreadsheets
- Rules Inserted into Rows
- As each row is a rule, the same principles apply as with written code. As the rule engine processes the facts, any rules that match may fire.
- Agendas
- It is possible to clear the agenda when a rule fires and simulate a very simple decision table where only the first match effects an action.
- Multiple Tables
- You can have multiple tables on one spreadsheet. This way, rules can be grouped where they share common templates, but are still all combined into one rule package.
6.5.3. The RuleTable Keyword
When using decision tables, the spreadsheet searches for the RuleTable keyword to indicate the start of a rule table (both the starting row and column).
Keywords should all be in the same column.
6.5.4. The RuleSet Keyword
The RuleSet keyword indicates the name to be used in the rule package that will encompass all the rules. This name is optional, using a default, but it must have the RuleSet keyword in the cell immediately to the right.
6.5.5. Data-Defining Cells
There are two types of rectangular areas defining data that is used for generating a DRL file. One, marked by a cell labelled RuleSet, defines all DRL items except rules. The other one may occur repeatedly and is to the right and below a cell whose contents begin with RuleTable. These areas represent the actual decision tables, each area resulting in a set of rules of similar structure.
A Rule Set area may contain cell pairs, one below the RuleSet cell and containing a keyword designating the kind of value contained in the other one that follows in the same row.
6.5.6. Rule Table Columns
The columns of a Rule Table area define patterns and constraints for the left hand sides of the rules derived from it, actions for the consequences of the rules, and the values of individual rule attributes. A Rule Table area should contain one or more columns, both for conditions and actions, and an arbitrary selection of columns for rule attributes, at most one column for each of these. The first four rows following the row with the cell marked with RuleTable are earmarked as header area, mostly used for the definition of code to construct the rules. It is any additional row below these four header rows that spawns another rule, with its data providing for variations in the code defined in the Rule Table header.
All keywords are case insensitive.
Only the first worksheet is examined for decision tables.
6.5.7. Rule Set Entries
Entries in a Rule Set area may define DRL constructs (except rules), and specify rule attributes. While entries for constructs may be used repeatedly, each rule attribute may be given at most once, and it applies to all rules unless it is overruled by the same attribute being defined within the Rule Table area.
Entries must be given in a vertically stacked sequence of cell pairs. The first one contains a keyword and the one to its right the value. This sequence of cell pairs may be interrupted by blank rows or even a Rule Table, as long as the column marked by RuleSet is upheld as the one containing the keyword.
| Keyword | Value | Usage |
|---|---|---|
|
|
The package name for the generated DRL file. Optional, the default is | Must be the first entry. |
|
|
| Optional, at most once. If omitted, no firing order is imposed. |
|
|
| Optional, at most once. If omitted, quotation marks are escaped. |
|
| A comma-separated list of Java classes to import. | Optional, may be used repeatedly. |
|
| Declarations of DRL globals, for example a type followed by a variable name. Multiple global definitions must be separated with a comma. | Optional, may be used repeatedly. |
|
| One or more function definitions, according to DRL syntax. | Optional, may be used repeatedly. |
|
| One or more query definitions, according to DRL syntax. | Optional, may be used repeatedly. |
|
| One or more declarative types, according to DRL syntax. | Optional, may be used repeatedly. |
6.5.8. Rule Attribute Entries in Rule Set Area
Rule attributes specified in a Rule Set area will affect all rule assets in the same package (not only in the spreadsheet). Unless you are sure that the spreadsheet is the only one rule asset in the package, the recommendation is to specify rule attributes not in a Rule Set area but in a Rule Table columns for each rule instead.
| Keyword | Initial | Value |
|---|---|---|
|
| P | An integer defining the "salience" value for the rule. Overridden by the "Sequential" flag. |
|
| D | A long integer value defining the "duration" value for the rule. |
|
| T | A timer definition. See Section 8.10.2, “Timers”. |
|
| E | A calendars definition. See Section 8.10.4, “Calendars”. |
|
| U |
A Boolean value. |
|
| L |
A Boolean value. |
|
| F |
A Boolean value. |
|
| X | A string identifying an activation (or XOR) group. Only one rule within an activation group will fire, for example the first one to fire cancels any existing activations of other rules within the same group. |
|
| G | A string identifying an agenda group, which has to be activated by giving it the "focus", which is one way of controlling the flow between groups of rules. |
|
| R | A string identifying a rule-flow group. |
|
| V |
A string containing a date and time definition. A rule can only activate if the current date and time is after |
|
| Z |
A string containing a date and time definition. A rule cannot activate if the current date and time is after the |
6.5.9. The RuleTable Cell
All Rule Tables begin with a cell containing RuleTable, optionally followed by a string within the same cell. The string is used as the initial part of the name for all rules derived from this Rule Table, with the row number appended for distinction. This automatic naming can be overridden by using a NAME column. All other cells defining rules of this Rule Table are below and to the right of this cell.
6.5.10. Column Types
The next row after the RuleTable cell defines the column type. Each column results in a part of the condition or the consequence, or provides some rule attribute, the rule name or a comment. Each attribute column may be used at most once.
| Keyword | Initial | Value | Usage |
|---|---|---|---|
|
| N | Provides the name for the rule generated from that row. The default is constructed from the text following the RuleTable tag and the row number. | At most one column. |
|
| I | A text, resulting in a comment within the generated rule. | At most one column. |
|
| C | Code snippet and interpolated values for constructing a constraint within a pattern in a condition. | At least one per rule table. |
|
| A | Code snippet and interpolated values for constructing an action for the consequence of the rule. | At least one per rule table. |
|
| @ | Code snippet and interpolated values for constructing a metadata entry for the rule. | Optional, any number of columns. |
6.5.11. Conditional Elements
Given a column headed CONDITION, the cells in successive lines result in a conditional element.
Text in the first cell below
CONDITIONdevelops into a pattern for the rule condition, with the snippet in the next line becoming a constraint. If the cell is merged with one or more neighbours, a single pattern with multiple constraints is formed: all constraints are combined into a parenthesized list and appended to the text in this cell. The cell may be left blank, which means that the code snippet in the next row must result in a valid conditional element on its own.To include a pattern without constraints, you can write the pattern in front of the text for another pattern.
The pattern may be written with or without an empty pair of parentheses. A "from" clause may be appended to the pattern.
If the pattern ends with "eval", code snippets are supposed to produce boolean expressions for inclusion into a pair of parentheses after "eval".
Text in the second cell below
CONDITIONis processed in two steps.The code snippet in this cell is modified by interpolating values from cells farther down in the column. If you want to create a constraint consisting of a comparison using "==" with the value from the cells below, the field selector alone is sufficient. Any other comparison operator must be specified as the last item within the snippet, and the value from the cells below is appended. For all other constraint forms, you must mark the position for including the contents of a cell with the symbol
$param. Multiple insertions are possible by using the symbols$1,$2, etc., and a comma-separated list of values in the cells below.A text according to the pattern
forall(DELIMITER){SNIPPET}is expanded by repeating theSNIPPETonce for each of the values of the comma-separated list of values in each of the cells below, inserting the value in place of the symbol$and by joining these expansions by the givenDELIMITER. Note that the forall construct may be surrounded by other text.If the cell in the preceding row is not empty, the completed code snippet is added to the conditional element from that cell. A pair of parentheses is provided automatically, as well as a separating comma if multiple constraints are added to a pattern in a merged cell.
If the cell above is empty, the interpolated result is used as is.
-
Text in the third cell below
CONDITIONis for documentation only. It should be used to indicate the column’s purpose to a human reader. - From the fourth row on, non-blank entries provide data for interpolation as described above. A blank cell results in the omission of the conditional element or constraint for this rule.
6.5.12. Action Statements
Given a column headed ACTION, the cells in successive lines result in an action statement:
-
Text in the first cell below
ACTIONis optional. If present, it is interpreted as an object reference. Text in the second cell below
ACTIONis processed in two steps.The code snippet in this cell is modified by interpolating values from cells farther down in the column. For a singular insertion, mark the position for including the contents of a cell with the symbol
$param. Multiple insertions are possible by using the symbols$1,$2, etc., and a comma-separated list of values in the cells below.A method call without interpolation can be achieved by a text without any marker symbols. In this case, use any non-blank entry in a row below to include the statement.
The
forallconstruct is available here, too.If the first cell is not empty, its text, followed by a period, the text in the second cell and a terminating semicolon are stringed together, resulting in a method call which is added as an action statement for the consequence.
If the cell above is empty, the interpolated result is used as is.
-
Text in the third cell below
ACTIONis for documentation only. It should be used to indicate the column’s purpose to a human reader. - From the fourth row on, non-blank entries provide data for interpolation as described above. A blank cell results in the omission of the action statement for this rule.
Using $1 instead of $param will fail if the replacement text contains a comma.
6.5.13. Metadata Statements
Given a column headed METADATA, the cells in successive lines result in a metadata annotation for the generated rules:
-
Text in the first cell below
METADATAis ignored. -
Text in the second cell below
METADATAis subject to interpolation, as described above, using values from the cells in the rule rows. The metadata marker character@is prefixed automatically, and should not be included in the text for this cell. -
Text in the third cell below
METADATAis for documentation only. It should be used to indicate the column’s purpose to a human reader. - From the fourth row on, non-blank entries provide data for interpolation as described above. A blank cell results in the omission of the metadata annotation for this rule.
6.5.14. Interpolating Cell Data Example
-
If the template is
Foo(bar == $param)and the cell is42, then the result isFoo(bar == 42). -
If the template is
Foo(bar < $1, baz == $2)and the cell contains42,43, the result will beFoo(bar < 42, baz ==43). -
The template
forall(&&){bar != $}with a cell containing42,43results inbar != 42 && bar != 43.
6.5.15. Tips for Working Within Cells
- Multiple package names within the same cell must be comma-separated.
- Pairs of type and variable names must be comma-separated.
-
Functions must be written as they appear in a DRL file. This should appear in the same column as the
RuleSetkeyword. It can be above, between or below all the rule rows. - You can use Import, Variables, Functions and Queries repeatedly instead of packing several definitions into a single cell.
- Trailing insertion markers can be omitted.
- You can provide the definition of a binding variable.
- Anything can be placed in the object type row. Apart from the definition of a binding variable, it could also be an additional pattern that is to be inserted literally.
-
The cell below the
ACTIONheader can be left blank. Using this style, anything can be placed in the consequence, not just a single method call. The same technique is applicable within aCONDITIONcolumn.
6.5.16. The SpreadsheetCompiler Class
The SpreadsheetCompiler class is the main class used with API spreadsheet-based decision tables in the drools-decisiontables module. This class takes spreadsheets in various formats and generates rules in DRL.
The SpreadsheetCompiler can be used to generate partial rule files and assemble them into a complete rule package after the fact. This allows the separation of technical and non-technical aspects of the rules if needed.
6.5.17. Using Spreadsheet-Based Decision Tables
Procedure: Task
- Generate a sample spreadsheet that you can use as the base.
- If the Red Hat JBoss BRMS plug-in is being used, use the wizard to generate a spreadsheet from a template.
- Use an XSL-compatible spreadsheet editor to modify the XSL.
6.5.18. Lists
In Excel, you can create lists of values. These can be stored in other worksheets to provide valid lists of values for cells.
6.5.19. Revision Control
When changes are being made to rules over time, older versions are archived. Some applications in Red Hat JBoss BRMS provide a limited ability to keep a history of changes, but it is recommended to use an alternative means of revision control.
6.5.20. Tabular Data Sources
A tabular data source can be used as a source of rule data. It can populate a template to generate many rules. This can allow both for more flexible spreadsheets, but also rules in existing databases for instance (at the cost of developing the template up front to generate the rules).
6.6. Dependency Management for Guided Decision Tables, Scorecards, and Rule Templates
When you build your own application with the embedded Drools or jBPM engine, that uses guided decision tables, guided scorecards, or guided templates, you need to add the drools-workbench-models-guided-dtable, drools-workbench-models-guided-scorecard, and drools-workbench-models-guided-template dependencies respectively, on the class path.
If you want to use a kJAR in the Intelligent Process server, you do not need to add these dependencies, as the server already has them.
When using Maven, declare the dependencies in the pom.xml file as shown below:
<dependency>
<groupId>org.drools</groupId>
<artifactId>drools-workbench-models-guided-dtable</artifactId>
</dependency>
<dependency>
<groupId>org.drools</groupId>
<artifactId>drools-workbench-models-guided-scorecard</artifactId>
</dependency>
<dependency>
<groupId>org.drools</groupId>
<artifactId>drools-workbench-models-guided-template</artifactId>
</dependency>6.7. Logging
The logging feature enables you to investigate what the Rule Engine does at the back-end. The rule engine uses Java logging API SLF4J for logging. The underlying logging back-end can be Logback, Apache Commons Logging, Log4j, or java.util.logging. You can add a dependency to the logging adaptor for your logging framework of choice.
Here is an example of how to use Logback by adding a Maven dependency:
<dependency>
<groupId>ch.qos.logback</groupId>
<artifactId>logback-classic</artifactId>
<version>1.x</version>
</dependency>
If you are developing for an ultra light environment, use slf4j-nop or slf4j-simple.
6.7.1. Configuring Logging Level
Here is an example of how you can configure the logging level on the package org.drools in your logback.xml file when you are using Logback:
<configuration>
<logger name="org.drools" level="debug"/>
...
...
<configuration>
Here is an example of how you can configure the logging level in your log4j.xml file when you are using Log4J:
<log4j:configuration xmlns:log4j="http://jakarta.apache.org/log4j/">
<category name="org.drools">
<priority value="debug" />
</category>
...
</log4j:configuration>Chapter 7. Complex Event Processing
7.1. Introduction to Complex Event Processing
JBoss BRMS Complex Event Processing provides the JBoss Enterprise BRMS Platform with complex event processing capabilities.
For the purpose of this guide, Complex Event Processing, or CEP, refers to the ability to process multiple events and detect interesting events from within a collection of events, uncover relationships that exist between events, and infer new data from the events and their relationships.
An event can best be described as a record of a significant change of state in the application domain. Depending on how the domain is modeled, the change of state may be represented by a single event, multiple atomic events, or even hierarchies of correlated events. Using a stock broker application as an example, a change in security prices, a change in ownership from seller to buyer, or a change in an account holder’s balance are all considered to be events as a change has occurred in the state of the application domain.
Event processing use cases, in general, share several requirements and goals with business rules use cases.
From a business perspective, business rule definitions are often defined based on the occurrence of scenarios triggered by events. For example:
On an algorithmic trading application: Take an action if the security price increases X% above the day’s opening price.
The price increases are denoted by events on a stock trade application.
On a monitoring application: Take an action if the temperature in the server room increases X degrees in Y minutes.
The sensor readings are denoted by events.
Both business rules and event processing queries change frequently and require an immediate response for the business to adapt to new market conditions, regulations, and corporate policies.
From a technical perspective:
- Both business rules and event processing require seamless integration with the enterprise infrastructure and applications. This is particularly important with regard to life-cycle management, auditing, and security.
- Both business rules and event processing have functional requirements like pattern matching and non-functional requirements like response time limits and query/rule explanations.
JBoss BRMS Complex Event Processing provides the complex event processing capabilities of JBoss Business Rules Management System. The Business Rules Management and Business Process Management capabilities are provided by other modules.
Complex event processing scenarios share these distinguishing characteristics:
- They usually process large numbers of events, but only a small percentage of the events are of interest.
- The events are usually immutable, as they represent a record of change in state.
- The rules and queries run against events and must react to detected event patterns.
- There are usually strong temporal relationships between related events.
- Individual events are not important. The system is concerned with patterns of related events and the relationships between them.
- It is often necessary to perform composition and aggregation of events.
As such, JBoss BRMS Complex Event Processing supports the following behaviors:
- Support events, with their proper semantics, as first class citizens.
- Allow detection, correlation, aggregation, and composition of events.
- Support processing streams of events.
- Support temporal constraints in order to model the temporal relationships between events.
- Support sliding windows of interesting events.
- Support a session-scoped unified clock.
- Support the required volumes of events for complex event processing use cases.
- Support reactive rules.
- Support adapters for event input into the engine (pipeline).
7.2. Events
Events are a record of significant change of state in the application domain. From a complex event processing perspective, an event is a special type of fact or object. A fact is a known piece of data. For instance, a fact could be a stock’s opening price. A rule is a definition of how to react to the data. For instance, if a stock price reaches $X, sell the stock.
The defining characteristics of events are the following:
- Events are immutable
An event is a record of change which has occurred at some time in the past, and as such it cannot be changed.
NoteThe rules engine does not enforce immutability on the Java objects representing events; this makes event data enrichment possible.
The application should be able to populate un-populated event attributes, which can be used to enrich the event with inferred data; however, event attributes that have already been populated should not be changed.
- Events have strong temporal constraints
- Rules involving events usually require the correlation of multiple events that occur at different points in time relative to each other.
- Events have managed life-cycles
- Because events are immutable and have temporal constraints, they are usually only of interest for a specified period of time. This means the engine can automatically manage the life-cycle of events.
- Events can use sliding windows
- It is possible to define and use sliding windows with events since all events have timestamps associated with them. Therefore, sliding windows allow the creation of rules on aggregations of values over a time period.
Events can be declared as either interval-based events or point-in-time events. Interval-based events have a duration time and persist in working memory until their duration time has lapsed. Point-in-time events have no duration and can be thought of as interval-based events with a duration of zero.
7.2.1. Event Declaration
To declare a fact type as an event, assign the @role metadata tag to the fact with the event parameter. The @role metadata tag can accept two possible values:
-
fact: assigning the fact role declares the type is to be handled as a regular fact. Fact is the default role. -
event: assigning the event role declares the type is to be handled as an event.
This example declares that a stock broker application’s StockTick fact type will be handled as an event:
Example 7.1. Declaring Fact Type as Event
import some.package.StockTick
declare StockTick
@role( event )
end
Facts can also be declared inline. If StockTick was a fact type declared in the DRL instead of in a pre-existing class, the code would be as follows:
Example 7.2. Declaring Fact Type and Assigning it to Event Role
declare StockTick
@role(event)
datetime : java.util.Date
symbol : String
price : double
endFor more information about type declarations, see Section 8.9, “Type Declaration”.
7.2.2. Event Metadata
Every event has associated metadata. Typically, the metadata is automatically added as each event is inserted into working memory. The metadata defaults can be changed on an event-type basis using the metadata tags:
-
@role -
@timestamp -
@duration -
@expires
The following examples assume the application domain model includes the following class:
Example 7.3. The VoiceCall Fact Class
/**
* A class that represents a voice call in a Telecom domain model.
*/
public class VoiceCall {
private String originNumber;
private String destinationNumber;
private Date callDateTime;
private long callDuration; // in milliseconds
// Constructors, getters, and setters.
}- @role
The
@rolemetadata tag indicates whether a given fact type is either a regular fact or an event. It accepts eitherfactoreventas a parameter. The default isfact.@role(<fact|event>)Example 7.4. Declaring VoiceCall as Event Type
declare VoiceCall @role(event) end- @timestamp
A timestamp is automatically assigned to every event. By default, the time is provided by the session clock and assigned to the event at insertion into the working memory. Events can have their own timestamp attribute, which can be included by telling the engine to use the attribute’s timestamp instead of the session clock.
To use the attribute’s timestamp, use the attribute name as the parameter for the
@timestamptag.@timestamp(<attributeName>)Example 7.5. Declaring VoiceCall Timestamp Attribute
declare VoiceCall @role(event) @timestamp(callDateTime) end- @duration
JBoss BRMS Complex Event Processing supports both point-in-time and interval-based events. A point-in-time event is represented as an interval-based event with a duration of zero time units. By default, every event has a duration of zero. To assign a different duration to an event, use the attribute name as the parameter for the
@durationtag.@duration(<attributeName>)Example 7.6. Declaring VoiceCall Duration Attribute
declare VoiceCall @role(event) @timestamp(callDateTime) @duration(callDuration) end- @expires
Events may be set to expire automatically after a specific duration in the working memory. By default, this happens when the event can no longer match and activate any of the current rules. You can also explicitly define when an event should expire. The
@expirestag is only used when the engine is running in stream mode.@expires(<timeOffset>)The value of
timeOffsetis a temporal interval that sets the relative duration of the event.[#d][#h][#m][#s][#[ms]]All parameters are optional and the
#parameter should be replaced by the appropriate value.To declare that the
VoiceCallfacts should expire one hour and thirty-five minutes after insertion into the working memory, use the following:Example 7.7. Declaring Expiration Offset for VoiceCall Events
declare VoiceCall @role(event) @timestamp(callDateTime) @duration(callDuration) @expires(1h35m) end
7.3. Clock Implementation in Complex Event Processing
7.3.1. Session Clock
Events have strong temporal constraints making it is necessary to use a reference clock. If a rule needs to determine the average price of a given stock over the last sixty minutes, it is necessary to compare the stock price event’s timestamp with the current time. The reference clock provides the current time.
Because the rules engine can simultaneously run an array of different scenarios that require different clocks, multiple clock implementations can be used by the engine.
Scenarios that require different clocks include the following:
- Rules testing: Testing always requires a controlled environment, and when the tests include rules with temporal constraints, it is necessary to control the input rules, facts, and the flow of time.
- Regular execution: A rules engine that reacts to events in real time needs a real-time clock.
- Special environments: Specific environments may have specific time control requirements. For instance, clustered environments may require clock synchronization or JEE environments may require you to use an application server-provided clock.
- Rules replay or simulation: In order to replay or simulate scenarios, it is necessary that the application controls the flow of time.
7.3.2. Available Clock Implementations
JBoss BRMS Complex Event Processing comes equipped with two clock implementations:
- Real-Time Clock
The real-time clock is the default implementation based on the system clock. The real-time clock uses the system clock to determine the current time for timestamps.
To explicitly configure the engine to use the real-time clock, set the session configuration parameter to
realtime:import org.kie.api.KieServices.Factory; import org.kie.api.runtime.conf.ClockTypeOption; import org.kie.api.runtime.KieSessionConfiguration; KieSessionConfiguration config = KieServices.Factory.get().newKieSessionConfiguration(); config.setOption(ClockTypeOption.get("realtime"));- Pseudo-Clock
The pseudo-clock is useful for testing temporal rules since it can be controlled by the application.
To explicitly configure the engine to use the pseudo-clock, set the session configuration parameter to
pseudo:import org.kie.api.runtime.conf.ClockTypeOption; import org.kie.api.runtime.KieSessionConfiguration; import org.kie.api.KieServices.Factory; KieSessionConfiguration config = KieServices.Factory.get().newKieSessionConfiguration(); config.setOption(ClockTypeOption.get("pseudo"));This example shows how to control the pseudo-clock:
import java.util.concurrent.TimeUnit; import org.kie.api.runtime.KieSessionConfiguration; import org.kie.api.KieServices.Factory; import org.kie.api.runtime.KieSession; import org.drools.core.time.SessionPseudoClock; import org.kie.api.runtime.rule.FactHandle; import org.kie.api.runtime.conf.ClockTypeOption; KieSessionConfiguration conf = KieServices.Factory.get().newKieSessionConfiguration(); conf.setOption( ClockTypeOption.get("pseudo")); KieSession session = kbase.newKieSession(conf, null); SessionPseudoClock clock = session.getSessionClock(); // Then, while inserting facts, advance the clock as necessary: FactHandle handle1 = session.insert(tick1); clock.advanceTime(10, TimeUnit.SECONDS); FactHandle handle2 = session.insert(tick2); clock.advanceTime(30, TimeUnit.SECONDS); FactHandle handle3 = session.insert(tick3);
For a list of Maven dependencies, see example Embedded jBPM Engine Dependencies. If you use Red Hat JBoss BRMS, see Embedded Drools Engine Dependencies.
7.4. Event Processing Modes
Rules engines process facts and rules to provide applications with results. Regular facts (facts with no temporal constraints) are processed independent of time and in no particular order. Red Hat JBoss BRMS processes facts of this type in cloud mode. Events (facts which have strong temporal constraints) must be processed in real-time or near real-time. Red Hat JBoss BRMS processes these events in stream mode. Stream mode deals with synchronization and makes it possible for Red Hat JBoss BRMS to process events.
7.4.1. Cloud Mode
Cloud mode is the default operating mode of Red Hat JBoss Business Rules Management System.
Running in Cloud mode, the engine applies a many-to-many pattern matching algorithm, which treats the events as an unordered cloud. Events still have timestamps, but there is no way for the rules engine running in Cloud mode to draw relevance from the timestamp because Cloud mode is unaware of the present time.
This mode uses the rules constraints to find the matching tuples, activate, and fire rules.
Cloud mode does not impose any kind of additional requirements on facts; however, because it has no concept of time, it cannot take advantage of temporal features such as sliding windows or automatic life-cycle management. In Cloud mode, it is necessary to explicitly retract events when they are no longer needed.
Certain requirements that are not imposed include the following:
- No need for clock synchronization since there is no notion of time.
- No requirement on ordering events since the engine looks at the events as an unordered cloud against which the engine tries to match rules.
Cloud mode can be specified either by setting a system property, using configuration property files, or using the API.
The API call follows:
import org.kie.api.conf.EventProcessingOption;
import org.kie.api.KieBaseConfiguration;
import org.kie.api.KieServices.Factory;
KieBaseConfiguration config = KieServices.Factory.get().newKieBaseConfiguration();
config.setOption(EventProcessingOption.CLOUD);The equivalent property follows:
drools.eventProcessingMode = cloudFor a list of Maven dependencies, see example Embedded jBPM Engine Dependencies. If you use Red Hat JBoss BRMS, see Embedded Drools Engine Dependencies.
7.4.2. Stream Mode
Stream mode processes events chronologically as they are inserted into the rules engine. Stream mode uses a session clock that enables the rules engine to process events as they occur in time. The session clock enables processing events as they occur based on the age of the events. Stream mode also synchronizes streams of events (so events in different streams can be processed in chronological order), implements sliding windows of interest, and enables automatic life-cycle management.
The requirements for using stream mode are the following:
- Events in each stream must be ordered chronologically.
- A session clock must be present to synchronize event streams.
The application does not need to enforce ordering events between streams, but the use of event streams that have not been synchronized may cause unexpected results.
Stream mode can be enabled by setting a system property, using configuration property files, or using the API.
The API call follows:
import org.kie.api.conf.EventProcessingOption;
import org.kie.api.KieBaseConfiguration;
import org.kie.api.KieServices.Factory;
KieBaseConfiguration config = KieServices.Factory.get().newKieBaseConfiguration();
config.setOption(EventProcessingOption.STREAM);The equivalent property follows:
drools.eventProcessingMode = streamFor a list of Maven dependencies, see example Embedded jBPM Engine Dependencies. If you use Red Hat JBoss BRMS, see Embedded Drools Engine Dependencies.
7.5. Event Streams
Complex event processing use cases deal with streams of events. The streams can be provided to the application using JMS queues, flat text files, database tables, raw sockets, or even web service calls.
Streams share a common set of characteristics:
- Events in the stream are ordered by timestamp. The timestamps may have different semantics for different streams, but they are always ordered internally.
- There is usually a high volume of events in the stream.
- Atomic events contained in the streams are rarely useful by themselves.
- Streams are either homogeneous (they contain a single type of event) or heterogeneous (they contain events of different types).
A stream is also known as an entry point.
Facts from one entry point, or stream, may join with facts from any other entry point in addition to facts already in working memory. Facts always remain associated with the entry point through which they entered the engine. Facts of the same type may enter the engine through several entry points, but facts that enter the engine through entry point A will never match a pattern from entry point B.
7.5.1. Declaring and Using Entry Points
Entry points are declared implicitly by making direct use of them in rules. Referencing an entry point in a rule will make the engine, at compile time, identify and create the proper internal structures to support that entry point.
For example, a banking application that has transactions fed into the engine using streams could have one stream for all of the transactions executed at ATMs. A rule for this scenario could state, "A withdrawal is only allowed if the account balance is greater than the withdrawal amount the customer has requested."
Example 7.8. ATM Rule
rule "Authorize Withdraw"
when
WithdrawRequest($ai : accountId, $am : amount) from entry-point "ATM Stream"
CheckingAccount(accountId == $ai, balance > $am)
then
// authorize withdraw
end
When the engine compiles this rule, it will identify that the pattern is tied to the entry point ATM Stream. The engine will create all the necessary structures for the rule-base to support the ATM Stream, and this rule will only match WithdrawRequest events coming from the ATM Stream.
Note the ATM example rule joins the event (WithdrawalRequest) from the stream with a fact from the main working memory (CheckingAccount).
The banking application may have a second rule that states, "A fee of $2 must be applied to a withdraw request made using a branch teller."
Example 7.9. Using Multiple Streams
rule "Apply Fee on Withdraws on Branches"
when
WithdrawRequest($ai : accountId, processed == true) from entry-point "Branch Stream"
CheckingAccount(accountId == $ai)
then
// apply a $2 fee on the account
end
This rule matches events of the same type (WithdrawRequest) as the example ATM rule but from a different stream. Events inserted into the ATM Stream will never match the pattern on the second rule, which is tied to the Branch Stream; accordingly, events inserted into the Branch Stream will never match the pattern on the example ATM rule, which is tied to the ATM Stream.
Declaring the stream in a rule states that the rule is only interested in events coming from that stream.
Events can be inserted manually into an entry point instead of directly into the working memory.
Example 7.10. Inserting Facts into Entry Point
import org.kie.api.runtime.KieSession;
import org.kie.api.runtime.rule.EntryPoint;
// Create your rulebase and your session as usual:
KieSession session = ...
// Get a reference to the entry point:
EntryPoint atmStream = session.getEntryPoint("ATM Stream");
// ...and start inserting your facts into the entry point:
atmStream.insert(aWithdrawRequest);For a list of Maven dependencies, see example Embedded jBPM Engine Dependencies. If you use Red Hat JBoss BRMS, see Embedded Drools Engine Dependencies.
7.5.2. Negative Pattern in Stream Mode
A negative pattern is concerned with conditions that are not met. Negative patterns make reasoning in the absence of events possible. For instance, a safety system could have a rule that states "If a fire is detected and the sprinkler is not activated, sound the alarm."
In Cloud mode, the engine assumes all facts (regular facts and events) are known in advance and evaluates negative patterns immediately.
Example 7.11. Rule with Negative Pattern
rule "Sound the Alarm"
when
$f : FireDetected()
not(SprinklerActivated())
then
// sound the alarm
endAn example in stream mode is displayed below. This rule keeps consistency when dealing with negative patterns and temporal constraints at the same time interval.
Example 7.12. Rule with Negative Pattern, Temporal Constraints, and Explicit Duration Parameter
rule "Sound the Alarm"
duration(10s)
when
$f : FireDetected()
not(SprinklerActivated(this after[0s,10s] $f))
then
// sound the alarm
endIn stream mode, negative patterns with temporal constraints may force the engine to wait for a set time before activating a rule. A rule may be written for an alarm system that states, "If a fire is detected and the sprinkler is not activated after 10 seconds, sound the alarm." Unlike the previous stream mode example, this one does not require the user to calculate and write the duration parameter.
Example 7.13. Rule with Negative Pattern with Temporal Constraints
rule "Sound the Alarm"
when
$f : FireDetected()
not(SprinklerActivated(this after[0s,10s] $f))
then
// sound the alarm
endThe rule depicted below expects one "Heartbeat" event to occur every 10 seconds; if not, the rule fires. What is special about this rule is that it uses the same type of object in the first pattern and in the negative pattern. The negative pattern has the temporal constraint to wait between 0 to 10 seconds before firing, and it excludes the Heartbeat bound to $h. Excluding the bound Heartbeat is important since the temporal constraint [0s, …] does not exclude by itself the bound event $h from being matched again, thus preventing the rule to fire.
Example 7.14. Excluding Bound Events in Negative Patterns
rule "Sound the Alarm"
when
$h: Heartbeat() from entry-point "MonitoringStream"
not(Heartbeat(this != $h, this after[0s,10s] $h) from entry-point "MonitoringStream")
then
// sound the alarm
end7.6. Temporal Operations
7.6.1. Temporal Reasoning
Complex Event Processing requires the rules engine to engage in temporal reasoning. Events have strong temporal constraints so it is vital the rules engine can determine and interpret an event’s temporal attributes, both as they relate to other events and the 'flow of time' as it appears to the rules engine. This makes it possible for rules to take time into account; for instance, a rule could state "Calculate the average price of a stock over the last 60 minutes."
JBoss BRMS Complex Event Processing implements interval-based time events, which have a duration attribute that is used to indicate how long an event is of interest. Point-in-time events are also supported and treated as interval-based events with a duration of 0 (zero).
7.6.2. Temporal Operations
JBoss BRMS Complex Event Processing implements the following temporal operators and their logical complements (negation):
-
after -
before -
coincides -
during -
finishes -
finishes by -
includes -
meets -
met by -
overlaps -
overlapped by -
starts -
started by
7.6.3. After
The after operator correlates two events and matches when the temporal distance (the time between the two events) from the current event to the event being correlated falls into the distance range declared for the operator.
For example:
$eventA : EventA(this after[3m30s, 4m] $eventB)
This pattern only matches if the temporal distance between the time when $eventB finished and the time when $eventA started is between the lower limit of three minutes and thirty seconds and the upper limit of four minutes.
This can also be represented as follows:
3m30s <= $eventA.startTimestamp - $eventB.endTimeStamp <= 4m
The after operator accepts one or two optional parameters:
- If two values are defined, the interval starts on the first value (3 minutes and 30 seconds in the example) and ends on the second value (4 minutes in the example).
- If only one value is defined, the interval starts on the provided value and runs indefinitely with no end time.
- If no value is defined, the interval starts at one millisecond and runs indefinitely with no end time.
The after operator also accepts negative temporal distances.
For example:
$eventA : EventA(this after[-3m30s, -2m] $eventB)If the first value is greater than the second value, the engine will automatically reverse them.
The following two patterns are equivalent to each other:
$eventA : EventA(this after[-3m30s, -2m] $eventB)
$eventA : EventA(this after[-2m, -3m30s] $eventB)7.6.4. Before
The before operator correlates two events and matches when the temporal distance (time between the two events) from the event being correlated to the current event falls within the distance range declared for the operator.
For example:
$eventA : EventA(this before[3m30s, 4m] $eventB)
This pattern only matches if the temporal distance between the time when $eventA finished and the time when $eventB started is between the lower limit of three minutes and thirty seconds and the upper limit of four minutes.
This can also be represented as follows:
3m30s <= $eventB.startTimestamp - $eventA.endTimeStamp <= 4m
The before operator accepts one or two optional parameters:
- If two values are defined, the interval starts on the first value (3 minutes and 30 seconds in the example) and ends on the second value (4 minutes in the example).
- If only one value is defined, the interval starts on the provided value and runs indefinitely with no end time.
- If no value is defined, the interval starts at one millisecond and runs indefinitely with no end time.
The before operator also accepts negative temporal distances.
For example:
$eventA : EventA(this before[-3m30s, -2m] $eventB)If the first value is greater than the second value, the engine will automatically reverse them.
The following two patterns are equivalent to each other:
$eventA : EventA(this before[-3m30s, -2m] $eventB)
$eventA : EventA(this before[-2m, -3m30s] $eventB)7.6.5. Coincides
The coincides operator correlates two events and matches when both events happen at the same time.
For example:
$eventA : EventA(this coincides $eventB)
This pattern only matches if both the start timestamps of $eventA and $eventB are identical and the end timestamps of both $eventA and $eventB are also identical.
The coincides operator accepts optional thresholds for the distance between the events' start times and the events' end times, so the events do not have to start at exactly the same time or end at exactly the same time, but they need to be within the provided thresholds.
The following rules apply when defining thresholds for the coincides operator:
- If only one parameter is given, it is used to set the threshold for both the start and end times of both events.
- If two parameters are given, the first is used as a threshold for the start time and the second one is used as a threshold for the end time.
For example:
$eventA : EventA(this coincides[15s, 10s] $eventB)This pattern will only match if the following conditions are met:
abs($eventA.startTimestamp - $eventB.startTimestamp) <= 15s
&&
abs($eventA.endTimestamp - $eventB.endTimestamp) <= 10s
The coincides operator does not accept negative intervals, and the rules engine will throw an exception if an attempt is made to use negative distance internals.
7.6.6. During
The during operator correlates two events and matches when the current event happens during the event being correlated.
For example:
$eventA : EventA(this during $eventB)
This pattern only matches if $eventA starts after $eventB and ends before $eventB ends.
This can also be represented as follows:
$eventB.startTimestamp < $eventA.startTimestamp <= $eventA.endTimestamp < $eventB.endTimestamp
The during operator accepts one, two, or four optional parameters:
The following rules apply when providing parameters for the during operator:
- If one value is defined, this value will represent the maximum distance between the start times of the two events and the maximum distance between the end times of the two events.
If two values are defined, these values represent a threshold that the current event’s start time and end time must occur between in relation to the correlated event’s start and end times.
If the values
5sand10sare provided, the current event must start between 5 and 10 seconds after the correlated event, and similarly the current event must end between 5 and 10 seconds before the correlated event.- If four values are defined, the first and second values will be used as the minimum and maximum distances between the starting times of the events, and the third and fourth values will be used as the minimum and maximum distances between the end times of the two events.
7.6.7. Finishes
The finishes operator correlates two events and matches when the current event’s start timestamp post-dates the correlated event’s start timestamp and both events end simultaneously.
For example:
$eventA : EventA(this finishes $eventB)
This pattern only matches if $eventA starts after $eventB starts and ends at the same time as $eventB ends.
This can be represented as follows:
$eventB.startTimestamp < $eventA.startTimestamp
&&
$eventA.endTimestamp == $eventB.endTimestamp
The finishes operator accepts one optional parameter. If defined, the optional parameter sets the maximum time allowed between the end times of the two events.
For example:
$eventA : EventA(this finishes[5s] $eventB)This pattern matches if these conditions are met:
$eventB.startTimestamp < $eventA.startTimestamp
&&
abs($eventA.endTimestamp - $eventB.endTimestamp) <= 5s
The finishes operator does not accept negative intervals, and the rules engine will throw an exception if an attempt is made to use negative distance intervals.
7.6.8. Finishes By
The finishedby operator correlates two events and matches when the current event’s start time predates the correlated event’s start time but both events end simultaneously. finishedby is the symmetrical opposite of the finishes operator.
For example:
$eventA : EventA(this finishedby $eventB)
This pattern only matches if $eventA starts before $eventB starts and ends at the same time as $eventB ends.
This can be represented as follows:
$eventA.startTimestamp < $eventB.startTimestamp
&&
$eventA.endTimestamp == $eventB.endTimestamp
The finishedby operator accepts one optional parameter. If defined, the optional parameter sets the maximum time allowed between the end times of the two events.
$eventA : EventA(this finishedby[5s] $eventB)This pattern matches if these conditions are met:
$eventA.startTimestamp < $eventB.startTimestamp
&&
abs($eventA.endTimestamp - $eventB.endTimestamp) <= 5s
The finishedby operator does not accept negative intervals, and the rules engine will throw an exception if an attempt is made to use negative distance intervals.
7.6.9. Includes
The includes operator examines two events and matches when the event being correlated happens during the current event. It is the symmetrical opposite of the during operator.
For example:
$eventA : EventA(this includes $eventB)
This pattern only matches if $eventB starts after $eventA and ends before $eventA ends.
This can be represented as follows:
$eventA.startTimestamp < $eventB.startTimestamp <= $eventB.endTimestamp < $eventA.endTimestamp
The includes operator accepts 1, 2 or 4 optional parameters:
- If one value is defined, this value will represent the maximum distance between the start times of the two events and the maximum distance between the end times of the two events.
If two values are defined, these values represent a threshold that the current event’s start time and end time must occur between in relation to the correlated event’s start and end times.
If the values
5sand10sare provided, the current event must start between 5 and 10 seconds after the correlated event, and similarly the current event must end between 5 and 10 seconds before the correlated event.- If four values are defined, the first and second values will be used as the minimum and maximum distances between the starting times of the events, and the third and fourth values will be used as the minimum and maximum distances between the end times of the two events.
7.6.10. Meets
The meets operator correlates two events and matches when the current event ends at the same time as the correlated event starts.
For example:
$eventA : EventA(this meets $eventB)
This pattern matches if $eventA ends at the same time as $eventB starts.
This can be represented as follows:
abs($eventB.startTimestamp - $eventA.endTimestamp) == 0
The meets operator accepts one optional parameter. If defined, it determines the maximum time allowed between the end time of the current event and the start time of the correlated event.
For example:
$eventA : EventA(this meets[5s] $eventB)This pattern matches if these conditions are met:
abs($eventB.startTimestamp - $eventA.endTimestamp) <= 5s
The meets operator does not accept negative intervals, and the rules engine will throw an exception if an attempt is made to use negative distance intervals.
7.6.11. Met By
The metby operator correlates two events and matches when the current event starts at the same time as the correlated event ends.
For example:
$eventA : EventA(this metby $eventB)
This pattern matches if $eventA starts at the same time as $eventB ends.
This can be represented as follows:
abs($eventA.startTimestamp - $eventB.endTimestamp) == 0
The metby operator accepts one optional parameter. If defined, it sets the maximum distance between the end time of the correlated event and the start time of the current event.
For example:
$eventA : EventA(this metby[5s] $eventB)This pattern matches if these conditions are met:
abs($eventA.startTimestamp - $eventB.endTimestamp) <= 5s
The metby operator does not accept negative intervals, and the rules engine will throw an exception if an attempt is made to use negative distance intervals.
7.6.12. Overlaps
The overlaps operator correlates two events and matches when the current event starts before the correlated event starts and ends after the correlated event starts, but it ends before the correlated event ends.
For example:
$eventA : EventA(this overlaps $eventB)This pattern matches if these conditions are met:
$eventA.startTimestamp < $eventB.startTimestamp < $eventA.endTimestamp < $eventB.endTimestamp
The overlaps operator accepts one or two optional parameters:
- If one parameter is defined, it will define the maximum distance between the start time of the correlated event and the end time of the current event.
- If two values are defined, the first value will be the minimum distance, and the second value will be the maximum distance between the start time of the correlated event and the end time of the current event.
7.6.13. Overlapped By
The overlappedby operator correlates two events and matches when the correlated event starts before the current event, and the correlated event ends after the current event starts but before the current event ends.
For example:
$eventA : EventA(this overlappedby $eventB)This pattern matches if these conditions are met:
$eventB.startTimestamp < $eventA.startTimestamp < $eventB.endTimestamp < $eventA.endTimestamp
The overlappedby operator accepts one or two optional parameters:
- If one parameter is defined, it sets the maximum distance between the start time of the correlated event and the end time of the current event.
- If two values are defined, the first value will be the minimum distance, and the second value will be the maximum distance between the start time of the correlated event and the end time of the current event.
7.6.14. Starts
The starts operator correlates two events and matches when they start at the same time, but the current event ends before the correlated event ends.
For example:
$eventA : EventA(this starts $eventB)
This pattern matches if $eventA and $eventB start at the same time, and $eventA ends before $eventB ends.
This can be represented as follows:
$eventA.startTimestamp == $eventB.startTimestamp
&&
$eventA.endTimestamp < $eventB.endTimestamp
The starts operator accepts one optional parameter. If defined, it determines the maximum distance between the start times of events in order for the operator to still match:
$eventA : EventA(this starts[5s] $eventB)This pattern matches if these conditions are met:
abs($eventA.startTimestamp - $eventB.startTimestamp) <= 5s
&&
$eventA.endTimestamp < $eventB.endTimestamp
The starts operator does not accept negative intervals, and the rules engine will throw an exception if an attempt is made to use negative distance intervals.
7.6.15. Started By
The startedby operator correlates two events. It matches when both events start at the same time and the correlating event ends before the current event.
For example:
$eventA : EventA(this startedby $eventB)
This pattern matches if $eventA and $eventB start at the same time, and $eventB ends before $eventA ends.
This can be represented as follows:
$eventA.startTimestamp == $eventB.startTimestamp
&&
$eventA.endTimestamp > $eventB.endTimestamp
The startedby operator accepts one optional parameter. If defined, it sets the maximum distance between the start time of the two events in order for the operator to still match:
$eventA : EventA( this starts[5s] $eventB)This pattern matches if these conditions are met:
abs( $eventA.startTimestamp - $eventB.startTimestamp ) <= 5s
&&
$eventA.endTimestamp > $eventB.endTimestamp
The startedby operator does not accept negative intervals, and the rules engine will throw an exception if an attempt is made to use negative distance intervals.
7.7. Sliding Windows
7.7.1. Sliding Time Windows
Stream mode allows events to be matched over a sliding time window. A sliding window is a time period that stretches back in time from the present. For instance, a sliding window of two minutes includes any events that have occurred in the past two minutes. As events fall out of the sliding time window (in this case because they occurred more than two minutes ago), they will no longer match against rules using this particular sliding window.
For example:
StockTick() over window:time(2m)
JBoss BRMS Complex Event Processing uses the over keyword to associate windows with patterns.
Sliding time windows can also be used to calculate averages and over time. For instance, a rule could be written that states "If the average temperature reading for the last ten minutes goes above a certain point, sound the alarm."
Example 7.15. Average Value over Time
rule "Sound the Alarm in Case Temperature Rises Above Threshold"
when
TemperatureThreshold($max : max)
Number(doubleValue > $max) from accumulate(
SensorReading($temp : temperature) over window:time(10m),
average($temp))
then
// sound the alarm
end
The engine will automatically discard any SensorReading more than ten minutes old and keep re-calculating the average.
7.7.2. Sliding Length Windows
Similar to Time Windows, Sliding Length Windows work in the same manner; however, they consider events based on order of their insertion into the session instead of flow of time.
The pattern below demonstrates this order by only considering the last 10 RHT Stock Ticks independent of how old they are. Unlike the previous StockTick from the Sliding Time Windows pattern, this pattern uses window:length.
StockTick(company == "RHT") over window:length(10)The example below portrays window length instead of window time; that is, it allows the user to sound an alarm in case the average temperature over the last 100 readings from a sensor is above the threshold value.
Example 7.16. Average Value over Length
rule "Sound the Alarm in Case Temperature Rises Above Threshold"
when
TemperatureThreshold($max : max)
Number(doubleValue > $max) from accumulate(
SensorReading($temp : temperature) over window:length(100),
average($temp))
then
// sound the alarm
endThe engine disregards events that fall off a window when calculating that window, but it does not remove the event from the session based on that condition alone as there might be other rules that depend on that event.
Length based windows do not define temporal constraints for event expiration from the session, and the engine will not consider them. If events have no other rules defining temporal constraints and no explicit expiration policy, the engine will keep them in the session indefinitely.
7.8. Memory Management for Events
Automatic memory management for events is available when running the rules engine in Stream mode. Events that no longer match any rule due to their temporal constraints can be safely retracted from the session by the rules engine without any side effects, releasing any resources held by the retracted events.
The rules engine has two ways of determining if an event is still of interest:
- Explicitly
-
Event expiration can be explicitly set with the
@expires. - Implicitly
- The rules engine can analyze the temporal constraints in rules to determine the window of interest for events.
7.8.1. Explicit Expiration
Explicit expiration is set with a declare statement and the metadata @expires tag.
For example:
Example 7.17. Declaring Explicit Expiration
declare StockTick
@expires(30m)
end
Declaring expiration against an event-type will, in the above example StockTick events, remove any StockTick events from the session automatically after the defined expiration time if no rules still need the events.
7.8.2. Inferred Expiration
The rules engine can calculate the expiration offset for a given event implicitly by analyzing the temporal constraints in the rules.
For example:
Example 7.18. Rule with Temporal Constraints
rule "correlate orders"
when
$bo : BuyOrder($id : id)
$ae : AckOrder(id == $id, this after[0,10s] $bo)
then
// do something
end
For the example rule, the rules engine automatically calculates that whenever a BuyOrder event occurs it needs to store the event for up to ten seconds to wait for the matching AckOrder event, making the implicit expiration offset for BuyOrder events ten seconds. An AckOrder event can only match an existing BuyOrder event making its implicit expiration offset zero seconds.
The engine analyzes the entire rule-base to find the offset for every event-type. Whenever an implicit expiration clashes with an explicit expiration the engine uses the greater value of the two.
Chapter 8. Working With Rules
8.1. About Rule Files
8.1.1. Rule File
A rule file is typically a file with a .drl extension. In a DRL file you can have multiple rules, queries and functions, as well as some resource declarations like imports, globals, and attributes that are assigned and used by your rules and queries. However, you are also able to spread your rules across multiple rule files (in that case, the extension .rule is suggested, but not required) - spreading rules across files can help with managing large numbers of rules. A DRL file is simply a text file.
8.1.2. Structure of Rule Files
The overall structure of a rule file is the following:
Example 8.1. Rule File
package package-name
imports
globals
functions
queries
rulesThe order in which the elements are declared is not important, except for the package name that, if declared, must be the first element in the rules file. All elements are optional, so you will use only those you need.
8.2. Operating on Facts
Facts are domain model objects that BRMS uses to evaluate conditions and execute consequences. A rule specifies that when a particular set of conditions occur, then the specified list of actions must be executed. The inference engine matches facts against rules, and when matches are found, rule actions are placed on the agenda. The agenda is the place where rules are queued ready to have their actions fired. The rule engine then determines which eligible rules on the agenda must fire.
8.2.1. Accessing Working Memory
The working memory is a stateful object that provides temporary storage and enables manipulation of facts. The working memory includes an API that contains methods which enable access to the working memory from rule files. The available methods are:
update(OBJECT, HANDLE)Used to inform the engine that an object has changed and rules can need to be reconsidered.
update(OBJECT)This method causes
KieSessionto search for a fact handle of the passed object using an identity check. You do not have to call this method when the object changes if property change listeners are provided. For more infomartion, see Section 8.12.15, “Fine Grained Property Change Listeners”.If field values of a fact have changed, call this method or use the
modifykeyword before changing another fact to avoid issues with indexing within the engine.insert(OBJECT)Used to place a new object into the working memory.
insertLogical(OBJECT)This method is similar to the
insertmethod. The newly inserted object is automatically retracted from the working memory if there are no more facts supporting the truth of the rule that inserted the fact.retract(HANDLE)Used to remove an object from the working memory. This method is mapped to the
deletemethod inKieSession.halt()Used to terminate a rule execution immediately. Calling
fireUntilHalt()causes continuous firing of the rules. To stop the firing, callhalt().getKieRuntime()The whole KIE API is exposed through a predefined
kcontextvariable of typeRuleContext. The inheritedgetKieRuntime()method returns aKieRuntimeobject that provides access to various methods, many of which are useful for coding the rule logic.For example, calling
kcontext.getKieRuntime().halt()terminates a rule execution immediately.
8.3. Using Rule Keywords
8.3.1. Hard Keywords
Hard keywords are words which you cannot use when naming your domain objects, properties, methods, functions, and other elements that are used in the rule text. The hard keywords are true, false, and null.
8.3.2. Soft Keywords
Soft keywords can be used for naming domain objects, properties, methods, functions, and other elements. The rules engine recognizes their context and processes them accordingly.
8.3.3. List of Soft Keywords
Rule attributes can be both simple and complex properties that provide a way to influence the behavior of the rule. They are usually written as one attribute per line and can be optional to the rule. Listed below are various rule attributes:
Figure 8.1. Rule Attributes
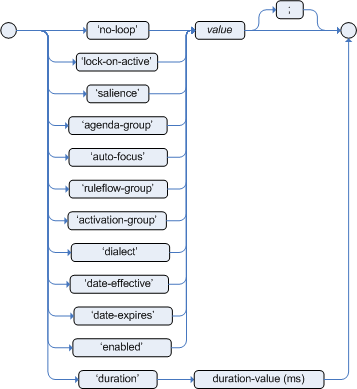
- no-loop BOOLEAN
When a rule’s consequence modifies a fact, it may cause the rule to activate again, causing an infinite loop. Setting
no-looptotruewill skip the creation of another activation for the rule with the current set of facts.Default value:
false.- lock-on-active BOOLEAN
Whenever a
ruleflow-groupbecomes active or anagenda-groupreceives the focus, any rule within that group that haslock-on-activeset totruewill not be activated any more. Regardless of the origin of the update, the activation of a matching rule is discarded. This is a stronger version ofno-loopbecause the change is not only caused by the rule itself. It is ideal for calculation rules where you have a number of rules that modify a fact, and you do not want any rule re-matching and firing again. Only when theruleflow-groupis no longer active or theagenda-grouploses the focus, those rules withlock-on-activeset totruebecome eligible again for their activations to be placed onto the agenda.Default value:
false.- salience INTEGER
Each rule has an integer salience attribute which defaults to zero and can be negative or positive. Salience is a form of priority where rules with higher salience values are given higher priority when ordered in the activation queue.
Default value:
0.Red Hat JBoss BRMS also supports dynamic salience where you can use an expression involving bound variables like the following:
rule "Fire in rank order 1,2,.." salience(-$rank) when Element($rank : rank,...) then ... end- ruleflow-group STRING
-
Ruleflow is a BRMS feature that lets you exercise control over the firing of rules. Rules that are assembled by the same
ruleflow-groupidentifier fire only when their group is active. This attribute has been merged withagenda-groupand the behaviours are basically the same. - agenda-group STRING
Agenda groups enable you to partition the agenda, which provides more execution control. Only rules in the agenda group that have acquired the focus are allowed to fire. This attribute has been merged with
ruleflow-groupand the behaviours are basically the same.Default value:
MAIN.- auto-focus BOOLEAN
When a rule is activated where the
auto-focusvalue istrueand the rule’s agenda group does not have focus yet, it is automatically given focus, allowing the rule to potentially fire.Default value:
false.- activation-group STRING
-
Rules that belong to the same
activation-groupidentified by this attribute’s String value, will only fire exclusively. More precisely, the first rule in anactivation-groupto fire will cancel all pending activations of all rules in the group, for example stop them from firing. - dialect STRING
Java and MVEL are the possible values of the
dialectattribute. This attribute specifies the language to be used for any code expressions in the LHS or the RHS code block. While thedialectcan be specified at the package level, this attribute allows the package definition to be overridden for a rule.Default value: specified by the package.
- date-effective STRING
A rule can only activate if the current date and time is after the
date-effectiveattribute. Note that STRING is a date and time definition. An exampledate-effectiveattribute is displayed below:rule "Start Exercising" date-effective "4-Sep-2014" when $m : org.drools.compiler.Message() then $m.setFired(true); end- date-expires STRING
A rule cannot activate if the current date and time is after the
date-expiresattribute. Note that STRING is a date and time definition. An exampledate-expiresattribute is displayed below:rule "Run 4km" date-effective "4-Sep-2014" date-expires "9-Sep-2014" when $m : org.drools.compiler.Message() then $m.setFired(true); end- duration LONG
-
If a rule is still
true, thedurationattribute will dictate that the rule will fire after a specified duration.
The attributes ruleflow-group and agenda-group have been merged and now behave the same. The GET methods have been left the same, for deprecations reasons, but both attributes return the same underlying data.
8.4. Adding Comments to Rule File
Comments are sections of text that are ignored by the rule engine. They are stripped out when they are encountered, except inside semantic code blocks (like a rule’s RHS).
8.4.1. Single Line Comment Example
This is what a single line comment looks like. To create single line comments, you can use //. The parser will ignore anything in the line after the comment symbol:
rule "Testing Comments"
when
// this is a single line comment
eval(true) // this is a comment in the same line of a pattern
then
// this is a comment inside a semantic code block
end8.4.2. Multi-Line Comment Example
This is what a multi-line comment looks like. This configuration comments out blocks of text, both in and outside semantic code blocks:
rule "Test Multi-Line Comments"
when
/* this is a multi-line comment
in the left hand side of a rule */
eval( true )
then
/* and this is a multi-line comment
in the right hand side of a rule */
end8.5. Error Messages in Rules
Red Hat JBoss BRMS provides standardized error messages. This standardization aims to help users to find and resolve problems in a easier and faster way.
8.5.1. Error Message Format
This is the standard error message format.
Figure 8.2. Error Message Format Example

1st Block: This area identifies the error code.
2nd Block: Line and column information.
3rd Block: Some text describing the problem.
4th Block: This is the first context. Usually indicates the rule, function, template, or query where the error occurred. This block is not mandatory.
5th Block: Identifies the pattern where the error occurred. This block is not mandatory.
8.5.2. Error Message Description
- [ERR 101] Line 4:4 no viable alternative at input 'exits' in rule one
Indicates when the parser came to a decision point but couldn’t identify an alternative. For example:
1: rule one 2: when 3: exists Foo() 4: exits Bar() 5: then 6: end- [ERR 101] Line 3:2 no viable alternative at input 'WHEN
This message means the parser has encountered the token
WHEN(a hard keyword) which is in the wrong place, since the rule name is missing. For example:1: package org.drools; 2: rule 3: when 4: Object() 5: then 6: System.out.println("A RHS"); 7: end- [ERR 101] Line 0:-1 no viable alternative at input '<eof>' in rule simple_rule in pattern [name]
Indicates an open quote, apostrophe or parentheses. For example:
1: rule simple_rule 2: when 3: Student(name == "Andy) 4: then 5: end- [ERR 102] Line 0:-1 mismatched input '<eof>' expecting ')' in rule simple_rule in pattern Bar
Indicates that the parser was looking for a particular symbol that it didn’t end at the current input position.
1: rule simple_rule 2: when 3: foo3 : Bar(- [ERR 102] Line 0:-1 mismatched input '<eof>' expecting ')' in rule simple_rule in pattern [name]
This error is the result of an incomplete rule statement. Usually when you get a 0:-1 position, it means that parser reached the end of source. To fix this problem, it is necessary to complete the rule statement.
1: package org.drools; 2: 3: rule "Avoid NPE on wrong syntax" 4: when 5: not(Cheese((type == "stilton", price == 10) \|\| (type == "brie", price == 15)) from $cheeseList) 6: then 7: System.out.println("OK"); 8: end- [ERR 103] Line 7:0 rule 'rule_key' failed predicate: {(validateIdentifierKey( DroolsSoftKeywords.RULE ))}? in rule
A validating semantic predicate evaluated to false. Usually these semantic predicates are used to identify soft keywords.
1: package nesting; 2: dialect "mvel" 3: 4: import org.drools.Person 5: import org.drools.Address 6: 7: fdsfdsfds 8: 9: rule "test something" 10: when 11: p: Person(name=="Michael") 12: then 13: p.name = "other"; 14: System.out.println(p.name); 15: end- [ERR 104] Line 3:4 trailing semi-colon not allowed in rule simple_rule
This error is associated with the
evalclause, where its expression may not be terminated with a semicolon. This problem is simple to fix: just remove the semi-colon.1: rule simple_rule 2: when 3: eval(abc();) 4: then 5: end- [ERR 105] Line 2:2 required (…)+ loop did not match anything at input 'aa' in template test_error
The recognizer came to a subrule in the grammar that must match an alternative at least once, but the subrule did not match anything. To fix this problem it is necessary to remove the numeric value as it is neither a valid data type which might begin a new template slot nor a possible start for any other rule file construct.
1: template test_error 2: aa s 11; 3: end
8.6. Packaging
A package is a collection of rules and other related constructs, such as imports and globals. The package members are typically related to each other, such as HR rules. A package represents a namespace, which ideally is kept unique for a given grouping of rules. The package name itself is the namespace, and is not related to files or folders in any way.
It is possible to assemble rules from multiple rule sources, and have one top-level package configuration that all the rules are kept under (when the rules are assembled). It is not possible to merge into the same package resources declared under different names. A single Rulebase may, however, contain multiple packages built on it. A common structure is to have all the rules for a package in the same file as the package declaration (so that is it entirely self-contained).
8.6.1. Import Statements
Import statements work like import statements in Java. You need to specify the fully qualified paths and type names for any objects you want to use in the rules. Red Hat JBoss BRMS automatically imports classes from the Java package of the same name, and also from the package java.lang.
8.6.2. Using Globals
In DRL files, globals represent global variables. To use globals in rules:
Declare the global variable:
global java.util.List myGlobalList; rule "Using a Global" when eval(true) then myGlobalList.add("Hello World"); endSet the global value in the working memory. The best practice is to set all global values before asserting any fact into the working memory. For example:
List list = new ArrayList(); KieSession kieSession = kieBase.newKieSession(); kieSession.setGlobal("myGlobalList", list);
8.6.3. From Element
The from element allows you to pass a Hibernate session as a global. It also lets you pull data from a named Hibernate query.
8.6.4. Using Globals with E-Mail Service
Procedure: Task
- Open the integration code that is calling the rule engine.
- Obtain your emailService object and then set it in the working memory.
-
In the DRL, declare that you have a global of type emailService and give it the name
email. In your rule consequences, you can use things like
email.sendSMS(number, message).WarningGlobals are not designed to share data between rules and they should never be used for that purpose. Rules always reason and react to the working memory state, so if you want to pass data from rule to rule, assert the data as facts into the working memory.
ImportantDo not set or change a global value from inside the rules. We recommend to you always set the value from your application using the working memory interface.
8.7. Functions in Rules
Functions are a way to put semantic code in a rule source file, as opposed to in normal Java classes. The main advantage of using functions in a rule is that you can keep the logic all in one place. You can change the functions as needed.
Functions are most useful for invoking actions on the consequence (then) part of a rule, especially if that particular action is used repeatedly.
A typical function declaration looks like the following:
function String hello(String name) {
return "Hello " + name + "!";
}
Note that the function keyword is used, even though it is not technically part of Java. Parameters to the function are defined as for a method. You do not have to have parameters if they are not needed. The return type is defined just like in a regular method.
8.7.1. Importing Static Method Example
In the following example, a static method Foo.hello() from a helper class is imported as a function. To import a method, enter the following into your DRL file:
import function my.package.Foo.hello8.7.2. Calling Function Declaration Example
Irrespective of the way the function is defined or imported, you use a function by calling it by its name, in the consequence or inside a semantic code block. This is shown below:
rule "Using a Static Function"
when
eval(true)
then
System.out.println(hello("Bob"));
end8.7.3. Type Declarations
Type declarations have two main goals in the rules engine: to allow the declaration of new types, and to allow the declaration of metadata for types.
| Role | Description |
|---|---|
| Declaring new types | Red Hat JBoss BRMS uses plain Java objects as facts out of the box. However, if you wish to define the model directly to the rules engine, you can do so by declaring a new type. You can also declare a new type when there is a domain model already built and you want to complement this model with additional entities that are used mainly during the reasoning process. |
| Declaring metadata | Facts may have meta information associated to them. Examples of meta information include any kind of data that is not represented by the fact attributes and is consistent among all instances of that fact type. This meta information may be queried at runtime by the engine and used in the reasoning process. |
8.7.4. Declaring New Types
To declare a new type, the keyword declare is used, followed by the list of fields and the keyword end. A new fact must have a list of fields, otherwise the engine will look for an existing fact class in the classpath and raise an error if not found.
8.7.5. Declaring New Fact Type Example
In this example, a new fact type called Address is used. This fact type will have three attributes: number, streetName and city. Each attribute has a type that can be any valid Java type, including any other class created by the user or other fact types previously declared:
declare Address
number : int
streetName : String
city : String
end8.7.6. Declaring New Fact Type Additional Example
This fact type declaration uses a Person example. dateOfBirth is of the type java.util.Date (from the Java API) and address is of the fact type Address.
declare Person
name : String
dateOfBirth : java.util.Date
address : Address
end8.7.7. Using Import Example
To avoid using fully qualified class names, use the import statement:
import java.util.Date
declare Person
name : String
dateOfBirth : Date
address : Address
end8.7.8. Generated Java Classes
When you declare a new fact type, Red Hat JBoss BRMS generates bytecode that implements a Java class representing the fact type. The generated Java class is a one-to-one Java Bean mapping of the type definition.
8.7.9. Generated Java Class Example
This is an example of a generated Java class using the Person fact type:
public class Person implements Serializable {
private String name;
private java.util.Date dateOfBirth;
private Address address;
// empty constructor
public Person() {...}
// constructor with all fields
public Person(String name, Date dateOfBirth, Address address) {...}
// if keys are defined, constructor with keys
public Person( ...keys... ) {...}
// getters and setters
// equals/hashCode
// toString
}8.7.10. Using Declared Types in Rules Example
Since the generated class is a simple Java class, it can be used transparently in the rules like any other fact:
rule "Using a declared Type"
when
$p : Person(name == "Bob")
then
// Insert Mark, who is Bob's manager.
Person mark = new Person();
mark.setName("Mark");
insert(mark);
end8.7.11. Declaring Metadata
Metadata may be assigned to several different constructions in Red Hat JBoss BRMS, such as fact types, fact attributes and rules. Red Hat JBoss BRMS uses the at sign (@) to introduce metadata and it always uses the form:
@metadata_key(metadata_value)
The parenthesized metadata_value is optional.
8.7.12. Working with Metadata Attributes
Red Hat JBoss BRMS allows the declaration of any arbitrary metadata attribute. Some have special meaning to the engine, while others are available for querying at runtime. Red Hat JBoss BRMS allows the declaration of metadata both for fact types and for fact attributes. Any metadata that is declared before the attributes of a fact type are assigned to the fact type, while metadata declared after an attribute are assigned to that particular attribute.
8.7.13. Declaring Metadata Attribute with Fact Types Example
This is an example of declaring metadata attributes for fact types and attributes. There are two metadata items declared for the fact type (@author and @dateOfCreation) and two more defined for the name attribute (@key and @maxLength). The @key metadata has no required value, and so the parentheses and the value were omitted:
import java.util.Date
declare Person
@author(Bob)
@dateOfCreation(01-Feb-2009)
name : String @key @maxLength(30)
dateOfBirth : Date
address : Address
end8.7.14. @position Attribute
The @position attribute can be used to declare the position of a field, overriding the default declared order. This is used for positional constraints in patterns.
8.7.15. @position Example
This is what the @position attribute looks like in use:
declare Cheese
name : String @position(1)
shop : String @position(2)
price : int @position(0)
end8.7.16. Predefined Class Level Annotations
- @role( <fact\|event>)
- This attribute can be used to assign roles to facts and events.
- @typesafe(<boolean>)
-
By default, all type declarations are compiled with type safety enabled.
@typesafe(false)provides a means to override this behavior by permitting a fall-back, to type unsafe evaluation where all constraints are generated as MVEL constraints and executed dynamically. This is useful when dealing with collections that do not have any generics or mixed type collections. - @timestamp(<attribute name>)
- Creates a timestamp.
- @duration(<attribute name>)
- Sets a duration for the implementation of an attribute.
- @expires(<time interval>)
- Allows you to define when the attribute should expire.
- @propertyChangeSupport
- Facts that implement support for property changes as defined in the Javabean spec can now be annotated so that the engine register itself to listen for changes on fact properties.
- @propertyReactive
- Makes the type property reactive.
8.7.17. @key Attribute Functions
Declaring an attribute as a key attribute has two major effects on generated types:
-
The attribute is used as a key identifier for the type, and thus the generated class implements the
equals()andhashCode()methods taking the attribute into account when comparing instances of this type. - Red Hat JBoss BRMS generates a constructor using all the key attributes as parameters.
8.7.18. @key Declaration Example
This is an example of @key declarations for a type. Red Hat JBoss BRMS generates equals() and hashCode() methods that checks the firstName and lastName attributes to determine if two instances of Person are equal to each other. It does not check the age attribute. It also generates a constructor taking firstName and lastName as parameters:
declare Person
firstName : String @key
lastName : String @key
age : int
end8.7.19. Creating Instance with Key Constructor Example
This is what creating an instance using the key constructor looks like:
Person person = new Person("John", "Doe");8.7.20. Positional Arguments
Patterns support positional arguments on type declarations and are defined by the @position attribute.
Positional arguments are when you do not need to specify the field name, as the position maps to a known named field. That is, Person(name == "mark") can be rewritten as Person("mark";). The semicolon ; is important so that the engine knows that everything before it is a positional argument. You can mix positional and named arguments on a pattern by using the semicolon ; to separate them. Any variables used in a positional that have not yet been bound will be bound to the field that maps to that position.
8.7.21. Positional Argument Example
Observe the example below:
declare Cheese
name : String
shop : String
price : int
end
The default order is the declared order, but this can be overridden using @position.
declare Cheese
name : String @position(1)
shop : String @position(2)
price : int @position(0)
end8.7.22. @position Annotation
The @position annotation can be used to annotate original pojos on the classpath. Currently only fields on classes can be annotated. Inheritance of classes is supported, but not interfaces of methods.
8.7.23. Example Patterns
These example patterns have two constraints and a binding. The semicolon ; is used to differentiate the positional section from the named argument section. Variables and literals and expressions using just literals are supported in positional arguments, but not variables:
Cheese("stilton", "Cheese Shop", p;)
Cheese("stilton", "Cheese Shop"; p : price)
Cheese("stilton"; shop == "Cheese Shop", p : price)
Cheese(name == "stilton"; shop == "Cheese Shop", p : price)8.8. Backward-Chaining
8.8.1. Backward-Chaining Systems
Backward-Chaining is a feature recently added to the BRMS Engine. This process is often referred to as derivation queries, and it is not as common compared to reactive systems since BRMS is primarily reactive forward chaining. That is, it responds to changes in your data. The backward-chaining added to the engine is for product-like derivations.
8.8.2. Cloning Transitive Closures
Figure 8.3. Reasoning Graph
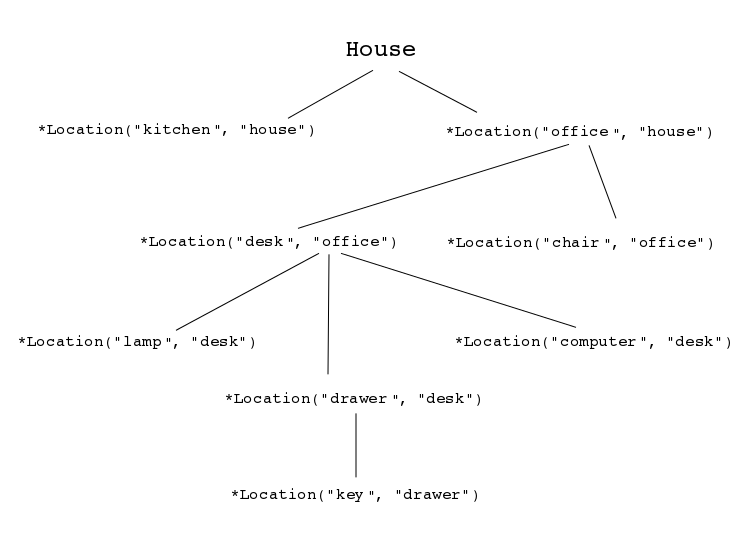
The previous chart demonstrates a House example of transitive items. A similar reasoning chart can be created by implementing the following rules:
Configuring Transitive Closures
- First, create some java rules to develop reasoning for transitive items. It inserts each of the locations.
-
Next, create the
Locationclass; it has the item and where it is located. Type the rules for the House example as depicted below:
ksession.insert(new Location("office", "house")); ksession.insert(new Location("kitchen", "house")); ksession.insert(new Location("knife", "kitchen")); ksession.insert(new Location("cheese", "kitchen")); ksession.insert(new Location("desk", "office")); ksession.insert(new Location("chair", "office")); ksession.insert(new Location("computer", "desk")); ksession.insert(new Location("drawer", "desk"));A transitive design is created in which the item is in its designated location such as a "desk" located in an "office."
Figure 8.4. Transitive Reasoning Graph of House
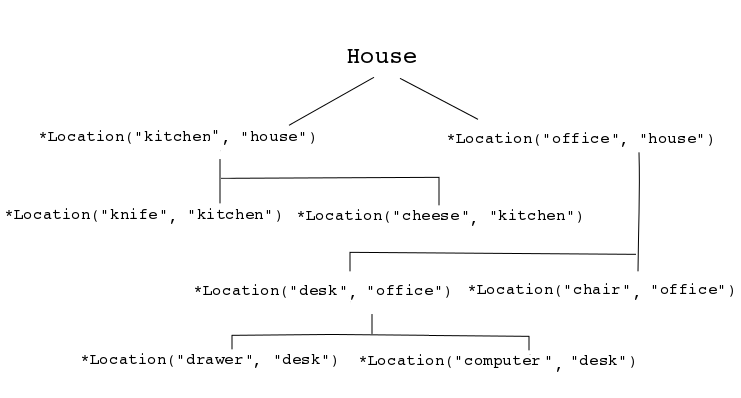
Notice compared to the previous graph, there is no "key" item in a "drawer" location. This will become evident in a later topic.
8.8.3. Defining Query
Create a query to search for data inserted into the rule engine:
query isContainedIn(String x, String y) Location(x, y;) or (Location(z, y;) and isContainedIn(x, z;)) endNote that the query in the example above is recursive, calling
isContainedIn.To see implementation details, create a rule similar to the following for printing each string inserted into the system:
rule "go" salience 10 when $s : String() then System.out.println($s); endCreate a rule that uses the
isContainedInquery from the first step.rule "go1" when String(this == "go1") isContainedIn("office", "house";) then System.out.println("office is in the house"); endThe rule checks whether the item
officeis in the locationhouse. The query created in the first step is triggered when the stringgo1is inserted.Insert a fact into the engine and call
fireAllRules().ksession.insert("go1"); ksession.fireAllRules();The output of the engine should look like the following:
go1 office is in the houseThe following holds:
-
The salience ensures that the
gorule is fired first and the message output is printed. -
The
go1rule matches the query andoffice is in the houseis printed.
-
The salience ensures that the
8.8.4. Transitive Closure Example
Creating Transitive Closure
Create a transitive closure by implementing the following rule:
rule "go2" when String(this == "go2") isContainedIn("drawer", "house";) then System.out.println("Drawer in the House"); endRecall from the cloning transitive closure topic, there was no instance of "drawer" in "house." "Drawer" was located in "desk."
Figure 8.5. Transitive Reasoning Graph of a Drawer.
Use the previous query for this recursive information.
query isContainedIn(String x, String y) Location(x, y;) or (Location(z, y;) and isContainedIn(x, z;)) endCreate the
go2, insert it into the engine, and call thefireAllRules.ksession.insert( "go2" ); ksession.fireAllRules(); --- go2 Drawer in the HouseWhen the rule is fired, it correctly tells you
go2has been inserted and that the "drawer" is in the "house."Check how the engine determined this outcome.
- The query has to recurse down several levels to determine this.
-
Instead of using
Location(x, y;), the query uses the value of(z, y;)since "drawer" is not in "house." -
The
zis currently unbound which means it has no value and will return everything that is in the argument. -
yis currently bound to "house," sozwill return "office" and "kitchen." Information is gathered from "office" and checks recursively if the "drawer" is in the "office." The following query line is being called for these parameters:
isContainedIn(x ,z;)There is no instance of "drawer" in "office"; therefore, it does not match. With
zbeing unbound, it will return data that is within the "office", and it will gather thatz == desk.isContainedIn(x==drawer, z==desk)isContainedInrecurses three times. On the final recurse, an instance triggers of "drawer" in the "desk".Location(x==drawer, y==desk)This matches on the first location and recurses back up, so we know that "drawer" is in the "desk", the "desk" is in the "office", and the "office" is in the "house"; therefore, the "drawer" is in the "house" and returns
true.
8.8.5. Reactive Transitive Queries
Creating a Reactive Transitive Query
Create a reactive transitive query by implementing the following rule:
rule "go3" when String( this == "go3" ) isContainedIn("key", "office"; ) then System.out.println( "Key in the Office" ); endReactive transitive queries can ask a question even if the answer can not be satisfied. Later, if it is satisfied, it will return an answer.
NoteRecall from the cloning transitive closures example that there was no
keyitem in the system.Use the same query for this reactive information.
query isContainedIn(String x, String y) Location(x, y;) or (Location(z, y;) and isContainedIn(x, z;)) endCreate the
go3, insert it into the engine, and call thefireAllRules.ksession.insert("go3"); ksession.fireAllRules(); --- go3-
go3is inserted -
fireAllRules();is called
The first rule that matches any String returns
go3but nothing else is returned because there is no answer; however, whilego3is inserted in the system, it will continuously wait until it is satisfied.-
Insert a new location of "key" in the "drawer":
ksession.insert( new Location("key", "drawer")); ksession.fireAllRules(); --- Key in the OfficeThis new location satisfies the transitive closure because it is monitoring the entire graph. In addition, this process now has four recursive levels in which it goes through to match and fire the rule.
8.8.6. Queries with Unbound Arguments
Creating Unbound Argument Query
Create a query with unbound arguments by implementing the following rule:
rule "go4" when String(this == "go4") isContainedIn(thing, "office";) then System.out.println("thing" + thing + "is in the office"); endThis rule is asking for everything in the "office", and it will tell everything in all the rows below. The unbound argument (out variable
thing) in this example will return every possible value; accordingly, it is very similar to thezvalue used in the reactive transitive query example.Use the query for the unbound arguments.
query isContainedIn(String x, String y) Location(x, y;) or (Location(z, y;) and isContainedIn(x, z;)) endCreate the
go4, insert it into the engine, and call thefireAllRules.ksession.insert( "go4" ); ksession.fireAllRules(); --- go4 thing Key is in the Office thing Computer is in the Office thing Drawer is in the Office thing Desk is in the Office thing Chair is in the OfficeWhen
go4is inserted, it returns all the previous information that is transitively below "office."
8.8.7. Multiple Unbound Arguments
Creating Multiple Unbound Arguments
Create a query with multiple unbound arguments by implementing the following rule:
rule "go5" when String(this == "go5") isContainedIn(thing, location;) then System.out.println("thing" + thing + "is in" + location); endBoth
thingandlocationare unbound out variables, and without bound arguments, everything is called upon.Use the query for multiple unbound arguments.
query isContainedIn(String x, String y) Location(x, y;) or (Location(z, y;) and isContainedIn(x, z;)) endCreate the
go5, insert it into the engine, and call thefireAllRules.ksession.insert("go5"); ksession.fireAllRules(); --- go5 thing Knife is in House thing Cheese is in House thing Key is in House thing Computer is in House thing Drawer is in House thing Desk is in House thing Chair is in House thing Key is in Office thing Computer is in Office thing Drawer is in Office thing Key is in Desk thing Office is in House thing Computer is in Desk thing Knife is in Kitchen thing Cheese is in Kitchen thing Kitchen is in House thing Key is in Drawer thing Drawer is in Desk thing Desk is in Office thing Chair is in OfficeWhen
go5is called, it returns everything within everything.
8.9. Type Declaration
8.9.1. Declaring Metadata for Existing Types
Red Hat JBoss BRMS allows the declaration of metadata attributes for existing types in the same way as when declaring metadata attributes for new fact types. The only difference is that there are no fields in that declaration.
8.9.2. Declaring Metadata for Existing Types Example
This example shows how to declare metadata for an existing type:
import org.drools.examples.Person
declare Person
@author(Bob)
@dateOfCreation(01-Feb-2009)
end8.9.3. Declaring Metadata Using Fully Qualified Class Name Example
This example shows how you can declare metadata using the fully qualified class name instead of using the import annotation:
declare org.drools.examples.Person
@author(Bob)
@dateOfCreation(01-Feb-2009)
end8.9.4. Parametrized Constructors for Declared Types Example
For a declared type like the following:
declare Person
firstName : String @key
lastName : String @key
age : int
end
The compiler will implicitly generate 3 constructors: one without parameters, one with the @key fields and one with all fields.
Person() // parameterless constructor
Person(String firstName, String lastName)
Person(String firstName, String lastName, int age)8.9.5. Non-Typesafe Classes
The @typesafe(BOOLEAN) annotation has been added to type declarations. By default all type declarations are compiled with type safety enabled. @typesafe(false) provides a means to override this behaviour by permitting a fall-back, to type unsafe evaluation where all constraints are generated as MVEL constraints and executed dynamically. This is useful when dealing with collections that do not have any generics or mixed type collections.
8.9.6. Accessing Declared Types from Application Code
Sometimes applications need to access and handle facts from the declared types. In such cases, Red Hat JBoss BRMS provides a simplified API for the most common fact handling the application wishes to do. A declared fact belongs to the package where it is declared.
8.9.7. Declaring Type
This illustrates the process of declaring a type:
package org.drools.examples
import java.util.Date
declare Address
street : String
city : String
code : String
end
declare Person
name : String
dateOfBirth : Date
address : Address
end8.9.8. Handling Declared Fact Types Through API Example
This example illustrates the handling of declared fact types through the API:
import java.util.Date;
import org.kie.api.definition.type.FactType;
import org.kie.api.KieBase;
import org.kie.api.runtime.KieSession;
...
// Get a reference to a knowledge base with a declared type:
KieBase kbase = ...
// Get the declared FactType:
FactType personType = kbase.getFactType("org.drools.examples", "Person");
// Handle the type as necessary:
// Create instances:
Object bob = personType.newInstance();
// Set attributes values:
personType.set(bob, "name", "Bob" );
personType.set(bob, "dateOfBirth", new Date());
personType.set(bob, "address", new Address("King's Road","London","404"));
// Insert fact into a session:
KieSession ksession = ...
ksession.insert(bob);
ksession.fireAllRules();
// Read attributes:
String name = (String) personType.get(bob, "name");
Date date = (Date) personType.get(bob, "dateOfBirth");For a list of Maven dependencies, see example Embedded jBPM Engine Dependencies. If you use Red Hat JBoss BRMS, see Embedded Drools Engine Dependencies.
The API also includes other helpful methods, like setting all the attributes at once, reading values from a Map, or reading all attributes at once, into a Map.
8.9.9. Type Declaration Extends
Type declarations support the extends keyword for inheritance. To extend a type declared in Java by a DRL declared subtype, repeat the supertype in a declare statement without any fields.
8.9.10. Type Declaration Extends Example
This illustrates the use of the extends annotation:
import org.people.Person
declare Person
end
declare Student extends Person
school : String
end
declare LongTermStudent extends Student
years : int
course : String
end8.9.11. Traits
Traits allow you to model multiple dynamic types which do not fit naturally in a class hierarchy. A trait is an interface that can be applied (and eventually removed) to an individual object at runtime. To create a trait out of an interface, a @format(trait) annotation is added to its declaration in DRL.
8.9.12. Traits Example
declare GoldenCustomer
@format(trait)
// fields will map to getters/setters
code : String
balance : long
discount : int
maxExpense : long
end
In order to apply a trait to an object, the new don keyword is added:
when
$c : Customer()
then
GoldenCustomer gc = don($c, Customer.class);
end8.9.13. Core Objects and Traits
When a core object dons a trait, a proxy class is created on the fly (one such class will be generated lazily for each core/trait class combination). The proxy instance, which wraps the core object and implements the trait interface, is inserted automatically and will possibly activate other rules. An immediate advantage of declaring and using interfaces, getting the implementation proxy for free from the engine, is that multiple inheritance hierarchies can be exploited when writing rules. The core classes, however, need not implement any of those interfaces statically, also facilitating the use of legacy classes as cores. Any object can don a trait. For efficiency reasons, however, you can add the @traitable annotation to a declared bean class to reduce the amount of glue code that the compiler will have to generate. This is optional and will not change the behavior of the engine.
8.9.14. @traitable Example
This illustrates the use of the @traitable annotation:
declare Customer
@traitable
code : String
balance : long
end8.9.15. Writing Rules with Traits
The only connection between core classes and trait interfaces is at the proxy level. (That is, a trait is not specifically tied to a core class.) This means that the same trait can be applied to totally different objects. For this reason, the trait does not transparently expose the fields of its core object. When writing a rule using a trait interface, only the fields of the interface will be available, as usual. However, any field in the interface that corresponds to a core object field, will be mapped by the proxy class.
8.9.16. Rules with Traits Example
This example illustrates the trait interface being mapped to a field:
when
$o: OrderItem($p : price, $code : custCode)
$c: GoldenCustomer(code == $code, $a : balance, $d: discount)
then
$c.setBalance( $a - $p*$d );
end8.9.18. Two-Part Proxy
The two-part proxy has been developed to deal with soft and hidden fields which are not processed intuitively. Internally, proxies are formed by a proper proxy and a wrapper. The former implements the interface, while the latter manages the core object fields, implementing a name/value map to supports soft fields. The proxy uses both the core object and the map wrapper to implement the interface, as needed.
8.9.19. Wrappers
The wrapper provides a looser form of typing when writing rules. However, it has also other uses. The wrapper is specific to the object it wraps, regardless of how many traits have been attached to an object. All the proxies on the same object will share the same wrapper. Additionally, the wrapper contains a back-reference to all proxies attached to the wrapped object, effectively allowing traits to see each other.
8.9.20. Wrapper Example
This is an example of using the wrapper:
when
$sc : GoldenCustomer($c : code, // hard getter
$maxExpense : maxExpense > 1000 // soft getter)
then
$sc.setDiscount( ... ); // soft setter
end8.9.21. Wrapper with isA Annotation Example
This illustrates a wrapper in use with the isA annotation:
$sc : GoldenCustomer($maxExpense : maxExpense > 1000, this isA "SeniorCustomer")8.9.22. Removing Traits
The business logic may require that a trait is removed from a wrapped object. There are two ways to do so:
- Logical don
Results in a logical insertion of the proxy resulting from the traiting operation.
then don($x, // core object Customer.class, // trait class true // optional flag for logical insertion)- The shed keyword
The shed keyword causes the retraction of the proxy corresponding to the given argument type.
then Thing t = shed($x, GoldenCustomer.class)This operation returns another proxy implementing the
org.drools.factmodel.traits.Thinginterface, where thegetFields()andgetCore()methods are defined. Internally, all declared traits are generated to extend this interface (in addition to any others specified). This allows to preserve the wrapper with the soft fields which would otherwise be lost.
8.10. Rule Attributes
For the list of all rule attributes and their description, see Section 8.3.2, “Soft Keywords”.
See an example of rule attributes below:
rule "my rule"
salience 42
agenda-group "number-1"
when
...8.10.1. Timer Attribute Example
This is what the timer attribute looks like:
timer(int: INITIAL_DELAY REPEAT_INTERVAL?)
timer(int: 30s)
timer(int: 30s 5m)
timer(cron: CRON_EXPRESSION)
timer(cron:* 0/15 * * * ?)8.10.2. Timers
The following timers are available in Red Hat JBoss BRMS:
- Interval
-
Interval (indicated by
int:) timers follow the semantics ofjava.util.Timerobjects, with an initial delay and an optional repeat interval. - Cron
-
Cron (indicated by
cron:) timers follow standard Unix cron expressions.
A rule controlled by a timer becomes active when it matches, and once for each individual match. Its consequence is executed repeatedly, according to the timer’s settings. This stops as soon as the condition doesn’t match any more.
Consequences are executed even after control returns from a call to fireUntilHalt. Moreover, the Engine remains reactive to any changes made to the Working Memory. For instance, removing a fact that was involved in triggering the timer rule’s execution causes the repeated execution to terminate, or inserting a fact so that some rule matches will cause that rule to fire. But the Engine is not continually active, only after a rule fires, for whatever reason. Thus, reactions to an insertion done asynchronously will not happen until the next execution of a timer-controlled rule.
Disposing a session puts an end to all timer activity.
8.10.3. Cron Timer Example
This is what the Cron timer looks like:
rule "Send SMS every 15 minutes"
timer (cron:* 0/15 * * * ?)
when
$a : Alarm(on == true)
then
channels["sms"].insert(new Sms($a.mobileNumber, "The alarm is still on");
end8.10.4. Calendars
Calendars are used to control when rules can fire. Red Hat JBoss BRMS uses the Quartz calendar.
8.10.5. Quartz Calendar Example
This is what the Quartz calendar looks like:
Calendar weekDayCal = QuartzHelper.quartzCalendarAdapter(org.quartz.Calendar quartzCal)8.10.6. Registering Calendar
Procedure: Task
-
Start a
StatefulKnowledgeSession. Use the following code to register the calendar:
ksession.getCalendars().set("weekday", weekDayCal);If you wish to utilize the calendar and a timer together, use the following code:
rule "Weekdays are high priority" calendars "weekday" timer (int:0 1h) when Alarm() then send("priority high - we have an alarm”); end rule "Weekend are low priority" calendars "weekend" timer (int:0 4h) when Alarm() then send("priority low - we have an alarm”); end
8.10.7. Left Hand Side
The Left Hand Side (LHS) is a common name for the conditional part of the rule. It consists of zero or more conditional elements. If the LHS is empty, it will be considered as a condition element that is always true and it will be activated once, when a new WorkingMemory session is created.
8.10.8. Conditional Elements
Conditional elements work on one or more patterns. The most common conditional element is and. It is implicit when you have multiple patterns in the LHS of a rule that is not connected in any way.
8.10.9. Rule Without Conditional Element Example
This is what a rule without a conditional element looks like:
rule "no CEs"
when
// empty
then
... // actions (executed once)
end
// The above rule is internally rewritten as:
rule "eval(true)"
when
eval( true )
then
... // actions (executed once)
end8.11. Patterns
A pattern element is the most important conditional element. It can potentially match on each fact that is inserted in the working memory. A pattern contains constraints and has an optional pattern binding.
8.11.1. Pattern Example
This is what a pattern looks like:
rule "Two unconnected patterns"
when
Pattern1()
Pattern2()
then
... // actions
end
// The above rule is internally rewritten as:
rule "Two and connected patterns"
when
Pattern1()
and Pattern2()
then
... // actions
end
An and cannot have a leading declaration binding. This is because a declaration can only reference a single fact at a time, and when the and is satisfied it matches both facts.
8.11.2. Pattern Matching
A pattern matches against a fact of the given type. The type need not be the actual class of some fact object. Patterns may refer to superclasses or even interfaces, thereby potentially matching facts from many different classes. The constraints are defined inside parentheses.
8.11.3. Pattern Binding
Patterns can be bound to a matching object. This is accomplished using a pattern binding variable such as $p.
8.11.4. Pattern Binding with Variable Example
This is what pattern binding using a variable looks like:
rule ...
when
$p : Person()
then
System.out.println("Person " + $p);
end
The prefixed dollar symbol ($) is not mandatory.
8.11.5. Constraints
A constraint is an expression that returns true or false. For example, you can have a constraint that states "five is smaller than six".
8.12. Elements and Variables
8.12.1. Property Access on Java Beans (POJOs)
Any bean property can be used directly. A bean property is exposed using a standard Java bean getter: a method getMyProperty() (or isMyProperty() for a primitive boolean) which takes no arguments and return something.
Red Hat JBoss BRMS uses the standard JDK Introspector class to do this mapping, so it follows the standard Java bean specification.
Property accessors must not change the state of the object in a way that may effect the rules. The rule engine effectively caches the results of its matching in between invocations to make it faster.
8.12.2. POJO Example
This is what the bean property looks like:
Person(age == 50)
// this is the same as:
Person(getAge() == 50)- The age property
-
The age property is written as
agein DRL instead of the gettergetAge(). - Property accessors
-
You can use property access (
age) instead of getters explicitly (getAge()) because of performance enhancements through field indexing.
8.12.3. Working with POJOs
Procedure: Task
Observe the example below:
public int getAge() { Date now = DateUtil.now(); // Do NOT do this. return DateUtil.differenceInYears(now, birthday); }-
To solve this, insert a fact that wraps the current date into working memory and update that fact between
fireAllRulesas needed.
8.12.4. POJO Fallbacks
When working with POJOs, a fallback method is applied. If the getter of a property cannot be found, the compiler will resort to using the property name as a method name and without arguments. Nested properties are also indexed.
8.12.5. Fallback Example
This is what happens when a fallback is implemented:
Person(age == 50)
// If Person.getAge() does not exists, this falls back to:
Person(age() == 50)This is what it looks like as a nested property:
Person(address.houseNumber == 50)
// this is the same as:
Person(getAddress().getHouseNumber() == 50)
In a stateful session, care should be taken when using nested accessors as the Working Memory is not aware of any of the nested values and does not know when they change. Consider them immutable while any of their parent references are inserted into the Working Memory. If you wish to modify a nested value you should mark all of the outer facts as updated. In the above example, when the houseNumber changes, any Person with that Address must be marked as updated.
8.12.6. Java Expressions
| Capability | Example |
|---|---|
|
You can use any Java expression that returns a |
|
| You can change the evaluation priority by using parentheses, as in any logic or mathematical expression. |
|
| You can reuse Java methods. |
|
| Type coercion is always attempted if the field and the value are of different types; exceptions will be thrown if a bad coercion is attempted. |
|
Methods must not change the state of the object in a way that may affect the rules. Any method executed on a fact in the LHS should be a read only method.
The state of a fact should not change between rule invocations (unless those facts are marked as updated to the working memory on every change):
Person(System.currentTimeMillis() % 1000 == 0) // Do NOT do this.
All operators have normal Java semantics except for == and !=.
The == operator has null-safe equals() semantics:
// Similar to: java.util.Objects.equals(person.getFirstName(), "John")
// so (because "John" is not null) similar to:
// "John".equals(person.getFirstName())
Person(firstName == "John")
The != operator has null-safe !equals() semantics:
// Similar to: !java.util.Objects.equals(person.getFirstName(), "John")
Person(firstName != "John")8.12.7. Comma-Separated Operators
The comma character (,) is used to separate constraint groups. It has implicit and connective semantics.
The comma operator is used at the top-level constraint as it makes them easier to read and the engine will be able to optimize them.
8.12.8. Comma-Separated Operator Example
The following illustrates comma-separated scenarios in implicit and connective semantics:
// Person is at least 50 and weighs at least 80 kg.
Person(age > 50, weight > 80)// Person is at least 50, weighs at least 80 kg and is taller than 2 meter.
Person(age > 50, weight > 80, height > 2)
The comma (,) operator cannot be embedded in a composite constraint expression, such as parentheses.
8.12.9. Binding Variables
You can bind properties to variables in Red Hat JBoss BRMS. It allows for faster execution and performance.
8.12.10. Binding Variable Examples
This is an example of a property bound to a variable:
// Two people of the same age:
Person($firstAge : age) // binding
Person(age == $firstAge) // constraint expressionFor backwards compatibility reasons, it’s allowed (but not recommended) to mix a constraint binding and constraint expressions as such:
// Not recommended:
Person($age : age * 2 < 100)// Recommended (separates bindings and constraint expressions):
Person(age * 2 < 100, $age : age)8.12.11. Unification
You can unify arguments across several properties. While positional arguments are always processed with unification, the unification symbol, :=, exists for named arguments.
8.12.12. Unification Example
This is what unifying two arguments looks like:
Person($age := age)
Person($age := age)8.12.13. Options and Operators in Red Hat JBoss BRMS
- Date literal
The date format
dd-mmm-yyyyis supported by default. You can customize this by providing an alternative date format mask as the System property nameddrools.dateformat. If more control is required, use a restriction.Cheese(bestBefore < "27-Oct-2009")- List and Map access
You can directly access a List value by index.
// Same as childList(0).getAge() == 18 Person(childList[0].age == 18)- Value key
You can directly access a Map value by key.
// Same as credentialMap.get("jsmith").isValid() Person(credentialMap["jsmith"].valid)- Abbreviated combined relation condition
This allows you to place more than one restriction on a field using the restriction connectives
&&or\|\|. Grouping via parentheses is permitted, resulting in a recursive syntax pattern.// Simple abbreviated combined relation condition using a single && Person(age > 30 && < 40)// Complex abbreviated combined relation using groupings Person(age ((> 30 && < 40) \|\| (> 20 && < 25)))// Mixing abbreviated combined relation with constraint connectives Person(age > 30 && < 40 \|\| location == "london")- Operators
Operators can be used on properties with natural ordering. For example, for Date fields,
<means before, for String fields, it means alphabetically lower.Person(firstName < $otherFirstName)Person(birthDate < $otherBirthDate)- Operator matches
Matches a field against any valid Java regular expression. Typically that regexp is a string literal, but variables that resolve to a valid regexp are also allowed. It only applies on String properties. Using
matchesagainst anullvalue always evaluates to false.Cheese(type matches "(Buffalo)?\\S*Mozarella")- Operator not matches
The operator returns true if the String does not match the regular expression. The same rules apply as for the
matchesoperator. It only applies on String properties.Cheese(type not matches "(Buffulo)?\\S*Mozarella")- The operator contains
The operator
containsis used to check whether a field that is a Collection or array and contains the specified value. It only applies on Collection properties.CheeseCounter(cheeses contains "stilton") // contains with a String literal CheeseCounter(cheeses contains $var) // contains with a variable- The operator not contains
The operator
not containsis used to check whether a field that is a Collection or array and does not contain the specified value. It only applies on Collection properties.CheeseCounter(cheeses not contains "cheddar") // not contains with a String literal CheeseCounter(cheeses not contains $var) // not contains with a variable- The operator memberOf
The operator
memberOfis used to check whether a field is a member of a collection or array; that collection must be a variable.CheeseCounter(cheese memberOf $matureCheeses)- The operator not memberOf
The operator
not memberOfis used to check whether a field is not a member of a collection or array. That collection must be a variable.CheeseCounter(cheese not memberOf $matureCheeses)- The operator soundslike
This operator is similar to
matches, but it checks whether a word has almost the same sound (using English pronunciation) as the given value.// match cheese "fubar" or "foobar" Cheese(name soundslike 'foobar')- The operator str
The operator
stris used to check whether a field that is a String starts with or ends with a certain value. It can also be used to check the length of the String.Message(routingValue str[startsWith] "R1")Message(routingValue str[endsWith] "R2")Message(routingValue str[length] 17)- Compound Value Restriction
Compound value restriction is used where there is more than one possible value to match. Currently only the
inandnot inevaluators support this. The second operand of this operator must be a comma-separated list of values, enclosed in parentheses. Values may be given as variables, literals, return values or qualified identifiers. Both evaluators are actually syntactic sugar, internally rewritten as a list of multiple restrictions using the operators!=and==.Person($cheese : favouriteCheese) Cheese(type in ("stilton", "cheddar", $cheese))- Inline Eval Operator (deprecated)
An inline eval constraint can use any valid dialect expression as long as it results to a primitive boolean. The expression must be constant over time. Any previously bound variable, from the current or previous pattern, can be used; autovivification is also used to auto-create field binding variables. When an identifier is found that is not a current variable, the builder looks to see if the identifier is a field on the current object type, if it is, the field binding is auto-created as a variable of the same name. This is called autovivification of field variables inside of inline eval’s.
Person(girlAge : age, sex = "F") Person(eval(age == girlAge + 2), sex = 'M') // eval() is actually obsolete in this example
8.12.14. Operator Precedence
| Operator Type | Operators | Notes |
|---|---|---|
| (nested) property access |
| Not normal Java semantics. |
| List/Map access |
| Not normal Java semantics. |
| constraint binding |
| Not normal Java semantics. |
| multiplicative |
| |
| additive |
| |
| shift |
| |
| relational |
| |
| equality |
| Does not use normal Java (not) same semantics: uses (not) equals semantics instead. |
| non-short circuiting AND |
| |
| non-short circuiting exclusive OR |
| |
| non-short circuiting inclusive OR |
| |
| logical AND |
| |
| logical OR |
| |
| ternary |
| |
| comma-separated AND |
| Not normal Java semantics. |
8.12.15. Fine Grained Property Change Listeners
This feature allows the pattern matching to only react to modification of properties actually constrained or bound inside of a given pattern. This helps with performance and recursion and avoid artificial object splitting.
By default this feature is off in order to make the behavior of the rule engine backward compatible with the former releases. When you want to activate it on a specific bean you have to annotate it with @propertyReactive.
8.12.16. Fine Grained Property Change Listener Example
- DRL example
declare Person @propertyReactive firstName : String lastName : String end- Java class example
@PropertyReactive public static class Person { private String firstName; private String lastName; }
8.12.17. Working with Fine Grained Property Change Listeners
Using these listeners means you do not need to implement the no-loop attribute to avoid an infinite recursion. The engine recognizes that the pattern matching is done on the property while the RHS of the rule modifies other the properties. On Java classes, you can also annotate any method to say that its invocation actually modifies other properties.
8.12.18. Using Patterns with @watch
Annotating a pattern with @watch allows you to modify the inferred set of properties for which that pattern will react. The properties named in the @watch annotation are added to the ones automatically inferred. You can explicitly exclude one or more of them by beginning their name with a ! and to make the pattern to listen for all or none of the properties of the type used in the pattern respectively with the wildcards * and !*.
8.12.19. @watch Example
This is the @watch annotation in a rule’s LHS:
// Listens for changes on both firstName (inferred) and lastName:
Person(firstName == $expectedFirstName) @watch(lastName)
// Listens for all the properties of the Person bean:
Person(firstName == $expectedFirstName) @watch(*)
// Listens for changes on lastName and explicitly exclude firstName:
Person(firstName == $expectedFirstName) @watch(lastName, !firstName)
// Listens for changes on all the properties except the age one:
Person(firstName == $expectedFirstName) @watch(*, !age)
Since it does not make sense to use this annotation on a pattern using a type not annotated with @PropertyReactive the rule compiler will raise a compilation error if you try to do so. Also the duplicated usage of the same property in @watch (for example like in: @watch(firstName, ! firstName)) will end up in a compilation error.
8.12.20. Using @PropertySpecificOption
You can enable @watch by default or completely disallow it using the on option of the KnowledgeBuilderConfiguration. This new PropertySpecificOption can have one of the following 3 values:
-
DISABLED: the feature is turned off and all the other related annotations are just ignored. -
ALLOWED: this is the default behavior: types are not property reactive unless they are not annotated with@PropertySpecific. -
ALWAYS: all types are property reactive by default.
Alternatively, you can use the drools.propertySpecific system property. For example, if you use Red Hat JBoss EAP, add the property into EAP_HOME/standalone/configuration/standalone.xml:
<system-properties>
...
<property name="drools.propertySpecific" value="DISABLED"/>
...
</system-properties>8.12.21. Basic Conditional Elements
- and
The conditional element
andis used to group other conditional elements into a logical conjunction. Red Hat JBoss BRMS supports both prefixandand infixand. It supports explicit grouping with parentheses. You can also use traditional infix and prefixand.//infixAnd Cheese(cheeseType : type) and Person(favouriteCheese == cheeseType)//infixAnd with grouping (Cheese(cheeseType : type) and (Person(favouriteCheese == cheeseType) or Person(favouriteCheese == cheeseType))Prefix
andis also supported:(and Cheese(cheeseType : type) Person(favouriteCheese == cheeseType))The root element of the LHS is an implicit prefix
andand does not need to be specified:when Cheese(cheeseType : type) Person(favouriteCheese == cheeseType) then ...- or
This is a shortcut for generating two or more similar rules. Red Hat JBoss BRMS supports both prefix
orand infixor. You can use traditional infix, prefix and explicit grouping parentheses.//infixOr Cheese(cheeseType : type) or Person(favouriteCheese == cheeseType)//infixOr with grouping (Cheese(cheeseType : type) or (Person(favouriteCheese == cheeseType) and Person(favouriteCheese == cheeseType))(or Person(sex == "f", age > 60) Person(sex == "m", age > 65)Allows for optional pattern binding. Each pattern must be bound separately.
pensioner : (Person(sex == "f", age > 60) or Person(sex == "m", age > 65))(or pensioner : Person(sex == "f", age > 60) pensioner : Person(sex == "m", age > 65))- not
This checks to ensure an object specified as absent is not included in the Working Memory. It may be followed by parentheses around the condition elements it applies to. In a single pattern you can omit the parentheses.
// Brackets are optional: not Bus(color == "red") // Brackets are optional: not (Bus(color == "red", number == 42)) // "not" with nested infix and - two patterns, // brackets are requires: not (Bus(color == "red") and Bus(color == "blue"))- exists
This checks the working memory to see if a specified item exists. The keyword
existsmust be followed by parentheses around the CEs that it applies to. In a single pattern you can omit the parentheses.exists Bus(color == "red") // brackets are optional: exists (Bus(color == "red", number == 42)) // "exists" with nested infix and, // brackets are required: exists (Bus(color == "red") and Bus(color == "blue"))
The behavior of the Conditional Element or is different from the connective || for constraints and restrictions in field constraints. The engine cannot interpret the Conditional Element or. Instead, a rule with or is rewritten as a number of subrules. This process ultimately results in a rule that has a single or as the root node and one subrule for each of its CEs. Each subrule can activate and fire like any normal rule; there is no special behavior or interaction between these subrules.
8.12.22. Conditional Element forall
This element evaluates to true when all facts that match the first pattern match all the remaining patterns. It is a scope delimiter. Therefore, it can use any previously bound variable, but no variable bound inside it will be available for use outside of it.
forall can be nested inside other CEs. For instance, forall can be used inside a not CE. Only single patterns have optional parentheses, so with a nested forall parentheses must be used.
8.12.23. forall Examples
- Evaluating to true
rule "All English buses are red" when forall($bus : Bus(type == 'english') Bus(this == $bus, color = 'red')) then // all English buses are red end- Single pattern forall
rule "All buses are red" when forall(Bus(color == 'red')) then // all Bus facts are red end- Multi-pattern forall
rule "All employees have health and dental care programs" when forall($emp : Employee() HealthCare(employee == $emp) DentalCare(employee == $emp)) then // all employees have health and dental care end- Nested forall
rule "Not all employees have health and dental care" when not (forall($emp : Employee() HealthCare(employee == $emp) DentalCare(employee == $emp))) then // not all employees have health and dental care end
8.12.24. Conditional Element from
The conditional element from enables users to specify an arbitrary source for data to be matched by LHS patterns. This allows the engine to reason over data not in the Working Memory. The data source could be a sub-field on a bound variable or the results of a method call. It is a powerful construction that allows out of the box integration with other application components and frameworks. One common example is the integration with data retrieved on-demand from databases using hibernate named queries.
The expression used to define the object source is any expression that follows regular MVEL syntax. Therefore, it allows you to easily use object property navigation, execute method calls and access maps and collections elements.
Using from with lock-on-active rule attribute can result in rules not being fired.
There are several ways to address this issue:
-
Avoid the use of
fromwhen you can assert all facts into working memory or use nested object references in your constraint expressions (shown below). - Place the variable assigned used in the modify block as the last sentence in your condition (LHS).
-
Avoid the use of
lock-on-activewhen you can explicitly manage how rules within the same rule-flow group place activations on one another.
8.12.25. from Examples
- Reasoning and binding on patterns
rule "Validate zipcode" when Person($personAddress : address) Address(zipcode == "23920W") from $personAddress then // zip code is ok end- Using a graph notation
rule "Validate zipcode" when $p : Person() $a : Address(zipcode == "23920W") from $p.address then // zip code is ok end- Iterating over all objects
rule "Apply 10% discount to all items over US$ 100,00 in an order" when $order : Order() $item : OrderItem( value > 100) from $order.items then // apply discount to $item end- Use with lock-on-active
rule "Assign people in North Carolina (NC) to sales region 1" ruleflow-group "test" lock-on-active true when $p : Person(address.state == "NC") then modify ($p) {} // Assign person to sales region 1 in a modify block end rule "Apply a discount to people in the city of Raleigh" ruleflow-group "test" lock-on-active true when $p : Person(address.city == "Raleigh") then modify ($p) {} //Apply discount to person in a modify block end
8.12.26. Conditional Element collect
The conditional element collect allows rules to reason over a collection of objects obtained from the given source or from the working memory. In First Oder Logic terms this is the cardinality quantifier.
The result pattern of collect can be any concrete class that implements the java.util.Collection interface and provides a default no-arg public constructor. You can use Java collections like ArrayList, LinkedList and HashSet or your own class, as long as it implements the java.util.Collection interface and provide a default no-arg public constructor.
Variables bound before the collect CE are in the scope of both source and result patterns and therefore you can use them to constrain both your source and result patterns. Any binding made inside collect is not available for use outside of it.
8.12.27. Conditional Element accumulate
The conditional element accumulate is a more flexible and powerful form of the collect element and allows a rule to iterate over a collection of objects while executing custom actions for each of the elements. The accumulate element returns a result object.
The element accumulate supports the use of predefined accumulate functions, as well as the use of inline custom code. However, using inline custom code is not recommended, as it is harder to maintain and might lead to code duplication. On the other hand, accumulate functions are easier to test and reuse.
The conditional element accumulate supports multiple different syntaxes. The preferred is the top-level syntax (as noted below), but all other syntaxes are supported as well for backward compatibility.
Top-Level accumulate Syntax
The top-level accumulate syntax is the most compact and flexible. The simplified syntax is as follows:
accumulate(SOURCE_PATTERN ; FUNCTIONS [;CONSTRAINTS])Example 8.2. Top-Level accumulate Syntax Example
rule "Raise Alarm"
when
$s : Sensor()
accumulate(Reading(sensor == $s, $temp : temperature);
$min : min($temp),
$max : max($temp),
$avg : average($temp);
$min < 20, $avg > 70)
then
// raise the alarm
end
In the example above, min, max, and average are accumulate functions that calculate the minimum, maximum, and average temperature values over all the readings for each sensor.
Built-in accumulate Functions
Only user-defined custom accumulate functions have to be explicitly imported. The following accumulate functions are imported automatically by the engine:
-
average -
min -
max -
count -
sum -
collectList -
collectSet
These common functions accept any expression as an input. For instance, if you want to calculate an average profit on all items of an order, you can write a rule using the average function as follows:
rule "Average Profit"
when
$order : Order()
accumulate(
OrderItem(order == $order, $cost : cost, $price : price);
$avgProfit : average(1 - $cost / $price))
then
// average profit for $order is $avgProfit
endAccumulate Functions Pluggability
Accumulate functions are all pluggable; if needed, custom and domain-specific functions can be easily added to the engine and rules can start to use them without any restrictions.
To implement a new accumulate function, create a Java class that implements the org.kie.api.runtime.rule.AccumulateFunction interface. To use the function in the rules, import it using the import accumulate statement:
import accumulate CLASS_NAME FUNCTION_NAMEExample 8.3. Importing and Using Custom Accumulate Function
import accumulate some.package.VarianceFunction variance
rule "Calculate Variance"
when
accumulate(Test($s : score), $v : variance($s))
then
// variance of the test scores is $v
endExample 8.4. Implementation of average Function
As an example of an accumulate function, see the following implementation of the average function:
import java.io.Externalizable;
import java.io.IOException;
import java.io.ObjectInput;
import java.io.ObjectOutput;
import java.io.Serializable;
import org.kie.api.runtime.rule.AccumulateFunction;
/**
* Implementation of an accumulator capable of calculating average values.
*/
public class AverageAccumulateFunction implements AccumulateFunction {
public void readExternal(ObjectInput in) throws IOException, ClassNotFoundException {}
public void writeExternal(ObjectOutput out) throws IOException {}
public static class AverageData implements Externalizable {
public int count = 0;
public double total = 0;
public AverageData() {}
public void readExternal(ObjectInput in) throws IOException, ClassNotFoundException {
count = in.readInt();
total = in.readDouble();
}
public void writeExternal(ObjectOutput out) throws IOException {
out.writeInt(count);
out.writeDouble(total);
}
}
/* (non-Javadoc)
* @see org.kie.base.accumulators.AccumulateFunction#createContext()
*/
public Serializable createContext() {
return new AverageData();
}
/* (non-Javadoc)
* @see org.kie.base.accumulators.AccumulateFunction#init(java.lang.Object)
*/
public void init(Serializable context) throws Exception {
AverageData data = (AverageData) context;
data.count = 0;
data.total = 0;
}
/* (non-Javadoc)
* @see org.kie.base.accumulators.AccumulateFunction#accumulate(java.lang.Object,
* java.lang.Object)
*/
public void accumulate(Serializable context, Object value) {
AverageData data = (AverageData) context;
data.count++;
data.total += ((Number) value).doubleValue();
}
/* (non-Javadoc)
* @see org.kie.base.accumulators.AccumulateFunction#reverse(java.lang.Object,
* java.lang.Object)
*/
public void reverse(Serializable context, Object value) throws Exception {
AverageData data = (AverageData) context;
data.count--;
data.total -= ((Number) value).doubleValue();
}
/* (non-Javadoc)
* @see org.kie.base.accumulators.AccumulateFunction#getResult(java.lang.Object)
*/
public Object getResult(Serializable context) throws Exception {
AverageData data = (AverageData) context;
return new Double(data.count == 0 ? 0 : data.total / data.count);
}
/* (non-Javadoc)
* @see org.kie.base.accumulators.AccumulateFunction#supportsReverse()
*/
public boolean supportsReverse() {
return true;
}
/**
* {@inheritDoc}
*/
public Class< ? > getResultType() {
return Number.class;
}
}For a list of Maven dependencies, see example Embedded jBPM Engine Dependencies. If you use Red Hat JBoss BRMS, see Embedded Drools Engine Dependencies.
Alternative Syntax
Previous accumulate syntaxes are still supported for backward compatibility.
In case the rule uses a single accumulate function on a given accumulate element, you can add a pattern for the result object and use the from keyword to link it to the accumulate result. See the following example:
Example 8.5. Rule with Alternative Syntax
rule "Apply 10% Discount on Orders over US $100.00"
when
$order : Order()
$total : Number(doubleValue > 100)
from accumulate(OrderItem(order == $order, $value : value), sum($value))
then
# apply discount on $order
end
In this example, the element accumulate uses only one function – sum. In this case, it is possible to write a pattern for the result type of the accumulate function with the constraints inside.
Note that it is not possible to use both the return type and the function binding in the same accumulate statement.
accumulate with Inline Custom Code
Instead of using the accumulate functions, you can define inline custom code.
The use of accumulate with inline custom code is not recommended. It is difficult to maintain and test the rules, as well as reuse the code. Implementing your own accumulate functions allows you to test and use them easily.
The general syntax of the accumulate with inline custom code is as follows:
RESULT_PATTERN from accumulate(
SOURCE_PATTERN,
init(INIT_CODE),
action(ACTION_CODE),
reverse(REVERSE_CODE),
result(RESULT_EXPRESSION))RESULT_PATTERNA regular pattern that the engine tries to match against the object returned from the
RESULT_EXPRESSION.If the attempt succeeds, the
accumulateconditional element returnstrueand the engine proceeds with an evaluation of the next conditional element in the rule. In the second case,accumulatereturnsfalseand the engine stops evaluating conditional elements for this rule.SOURCE_PATTERN- A regular pattern that the engine tries to match against each of the source objects.
INIT_CODE- A semantic block of code in the selected dialect that is executed once for each tuple before iterating over the source objects.
ACTION_CODE- A semantic block of code in the selected dialect that is executed for each of the source objects.
REVERSE_CODEAn optional semantic block of code in the selected dialect that is executed for each source object that no longer matches the source pattern.
The objective of this code block is to undo any calculation done in the
ACTION_CODEblock, so that the engine can do decremental calculation when a source object is modified or retracted. This significantly improves the performance of these operations.RESULT_EXPRESSION- A semantic expression in the selected dialect that is executed after all source objects are iterated.
Example 8.6. Example of Inline Custom Code
rule "Apply 10% Discount on Orders over US $100.00"
when
$order : Order()
$total : Number(doubleValue > 100)
from accumulate(OrderItem(order == $order, $value : value),
init(double total = 0;),
action(total += $value;),
reverse(total -= $value;),
result(total))
then
# apply discount on $order
end
In this example, the engine executes the INIT_CODE for each Order in the working memory, initializing the total variable to zero. The engine then iterates over all OrderItem objects for that Order, executing the action for each one. After the iteration, the engine returns the value corresponding to the RESULT_EXPRESSION (in this case, a value of the total variable). Finally, the engine tries to match the result with the Number pattern. If the doubleValue is greater than 100, the rule fires.
The example is using Java programming language as a semantic dialect. In this case, a semicolon as a statement delimiter is mandatory in the init, action, and reverse code blocks. However, since the result is an expression, it does not require a semicolon. If you want to use any other dialect, note that you have to observe the principles of its specific syntax.
Custom Objects
The accumulate conditional element can be used to execute any action on source objects. The following example instantiates and populates a custom object:
Example 8.7. Instantiating Custom Objects
rule "accumulate Using Custom Objects"
when
$person : Person($likes : likes)
$cheesery : Cheesery(totalAmount > 100)
from accumulate($cheese : Cheese(type == $likes),
init(Cheesery cheesery = new Cheesery();),
action(cheesery.addCheese($cheese);),
reverse(cheesery.removeCheese($cheese);),
result(cheesery));
then
// do something
end8.12.28. Conditional Element eval
The conditional element eval is essentially a catch-all which allows any semantic code (that returns a primitive boolean) to be executed. This code can refer to variables that were bound in the LHS of the rule, and functions in the rule package. Overuse of eval reduces the declarativeness of your rules and can result in a poorly performing engine. While eval can be used anywhere in the patterns, the best practice is to add it as the last conditional element in the LHS of a rule.
Evals cannot be indexed and thus are not as efficient as field constraints. However this makes them ideal for being used when functions return values that change over time, which is not allowed within field constraints.
8.12.29. eval Conditional Element Examples
This is what eval looks like in use:
p1 : Parameter()
p2 : Parameter()
eval(p1.getList().containsKey( p2.getItem()))p1 : Parameter()
p2 : Parameter()
// call function isValid in the LHS
eval(isValid( p1, p2))8.12.30. Right Hand Side
The Right Hand Side (RHS) is a common name for the consequence part of a rule. The main purpose of the RHS is to insert, retract (delete), or modify working memory data. The RHS usually contains a list of actions to be executed and should be kept small, thus keeping it declarative and readable.
In case you need imperative or conditional code in the RHS, divide the rule into more rules.
8.12.31. RHS Convenience Methods
See the following list of the RHS convenience methods:
-
update(OBJECT, HANDLE); -
update(OBJECT); -
insert(OBJECT); -
insertLogical(OBJECT); -
retract(HANDLE);
For more information, see Section 8.2.1, “Accessing Working Memory”.
8.12.32. Convenience Methods Using Drools Variable
-
The call
drools.halt()terminates rule execution immediately. This is required for returning control to the point whence the current session was put to work withfireUntilHalt(). -
Methods
insert(Object o),update(Object o)andretract(Object o)can be called ondroolsas well, but due to their frequent use they can be called without the object reference. -
drools.getWorkingMemory()returns theWorkingMemoryobject. -
drools.setFocus(String s)sets the focus to the specified agenda group. -
drools.getRule().getName(), called from a rule’s RHS, returns the name of the rule. -
drools.getTuple()returns the Tuple that matches the currently executing rule, anddrools.getActivation()delivers the corresponding Activation. (These calls are useful for logging and debugging purposes.)
8.12.33. Convenience Methods Using kcontext Variable
-
The call
kcontext.getKieRuntime().halt()terminates rule execution immediately. The accessor
getAgenda()returns a reference to the session’sAgenda, which in turn provides access to the various rule groups: activation groups, agenda groups, and rule flow groups. A fairly common paradigm is the activation of some agenda group, which could be done with the lengthy call:// Give focus to the agenda group CleanUp: kcontext.getKieRuntime().getAgenda().getAgendaGroup("CleanUp").setFocus();You can achieve the same using
drools.setFocus("CleanUp").-
To run a query, you call
getQueryResults(String query), whereupon you may process the results. - A set of methods dealing with event management lets you add and remove event listeners for the Working Memory and the Agenda.
-
Method
getKieBase()returns theKieBaseobject, the backbone of all the Knowledge in your system, and the originator of the current session. -
You can manage globals with
setGlobal(…),getGlobal(…)andgetGlobals(). -
Method
getEnvironment()returns the runtime’sEnvironment.
8.12.34. Modify Statement
- modify
This provides a structured approach to fact updates. It combines the update operation with a number of setter calls to change the object’s fields.
modify (FACT_EXPRESSION) { EXPRESSION [, EXPRESSION]* }The parenthesized FACT_EXPRESSION must yield a fact object reference. The expression list in the block should consist of setter calls for the given object, to be written without the usual object reference, which is automatically prepended by the compiler.
rule "Modify stilton" when $stilton : Cheese(type == "stilton") then modify($stilton){ setPrice(20), setAge("overripe") } end
8.12.35. Query Examples
To return the results use ksession.getQueryResults("name"), where "name" is the query’s name. This returns a list of query results, which allow you to retrieve the objects that matched the query.
- Query for people over the age of 30
query "People over the age of 30" person : Person(age > 30) end- Query for people over the age of X, and who live in Y
query "People over the age of x" (int x, String y) person : Person(age > x, location == y) end
8.12.36. QueryResults Example
We iterate over the returned QueryResults using a standard for loop. Each element is a QueryResultsRow which we can use to access each of the columns in the tuple. These columns can be accessed by bound declaration name or index position:
QueryResults results = ksession.getQueryResults("people over the age of 30");
System.out.println("we have " + results.size() + " people over the age of 30");
System.out.println("These people are are over 30:");
for (QueryResultsRow row : results) {
Person person = (Person) row.get("person");
System.out.println(person.getName() + "\n");
}8.12.37. Queries Calling Other Queries
Queries can call other queries. This combined with optional query arguments provides derivation query style backward chaining. Positional and named syntax is supported for arguments. It is also possible to mix both positional and named, but positional must come first, separated by a semi colon. Literal expressions can be passed as query arguments, but you cannot mix expressions with variables.
Using the ? symbol in this process means the query is pull only and once the results are returned you will not receive further results as the underlying data changes.
8.12.38. Queries Calling Other Queries Example
- Query calling another query
declare Location thing : String location : String end query isContainedIn(String x, String y) Location(x, y;) or (Location(z, y;) and ?isContainedIn(x, z;)) end- Using live queries to reactively receive changes over time from query results
query isContainedIn(String x, String y) Location(x, y;) or (Location(z, y;) and isContainedIn(x, z;)) end rule look when Person($l : likes) isContainedIn($l, 'office';) then insertLogical($l 'is in the office'); end
8.12.39. Unification for Derivation Queries
Red Hat JBoss BRMS supports unification for derivation queries. This means that arguments are optional. It is possible to call queries from Java leaving arguments unspecified using the static field org.drools.runtime.rule.Variable.v. You must use v and not an alternative instance of Variable. These are referred to as out arguments.
The query itself does not declare at compile time whether an argument is in or an out. This can be defined purely at runtime on each use.
8.13. Searching Working Memory Using Query
8.13.1. Queries
Queries are used to retrieve fact sets based on patterns, as they are used in rules. Patterns may make use of optional parameters. Queries can be defined in the Knowledge Base, from where they are called up to return the matching results. While iterating over the result collection, any identifier bound in the query can be used to access the corresponding fact or fact field by calling the get method with the binding variable’s name as its argument. If the binding refers to a fact object, its FactHandle can be retrieved by calling getFactHandle, again with the variable’s name as the parameter. Illustrated below is a query example:
QueryResults results = ksession.getQueryResults("my query", new Object[] {"string"});
for (QueryResultsRow row : results) {
System.out.println(row.get("varName"));
}8.13.2. Live Queries
Invoking queries and processing the results by iterating over the returned set is not a good way to monitor changes over time.
To alleviate this, Red Hat JBoss BRMS provides live queries, which have a listener attached instead of returning an iterable result set. These live queries stay open by creating a view and publishing change events for the contents of this view. To activate, start your query with parameters and listen to changes in the resulting view. The dispose method terminates the query and discontinues this reactive scenario.
8.13.3. ViewChangedEventListener Implementation Example
final List updated = new ArrayList();
final List removed = new ArrayList();
final List added = new ArrayList();
ViewChangedEventListener listener = new ViewChangedEventListener() {
public void rowUpdated(Row row) {
updated.add(row.get("$price"));
}
public void rowRemoved(Row row) {
removed.add(row.get("$price"));
}
public void rowAdded(Row row) {
added.add(row.get("$price"));
}
}
// Open the LiveQuery:
LiveQuery query = ksession.openLiveQuery("cars", new Object[] {"sedan", "hatchback"}, listener);
...
query.dispose() // calling dispose to terminate the live queryFor an example of Glazed Lists integration for live queries, read the Glazed Lists examples for Drools Live Querries article.
8.14. Domain Specific Languages (DSLs)
Domain Specific Languages (or DSLs) are a way of creating a rule language that is dedicated to your problem domain. A set of DSL definitions consists of transformations from DSL "sentences" to DRL constructs, which lets you use of all the underlying rule language and engine features. You can write rules in DSL rule (or DSLR) files, which will be translated into DRL files.
DSL and DSLR files are plain text files and you can use any text editor to create and modify them. There are also DSL and DSLR editors you can use, both in the IDE as well as in the web based BRMS, although they may not provide you with the full DSL functionality.
8.14.1. DSL Editor
The DSL editor provides a tabular view of the mapping of Language to Rule Expressions. The Language Expression feeds the content assistance for the rule editor so that it can suggest Language Expressions from the DSL configuration. The rule editor loads the DSL configuration when the rule resource is loaded for editing.
DSL feature is useful for simple use cases for non technical users to easily define rules based on sentence snippets. For more complex use cases, we recommend you to use other advanced features like decision tables and DRL rules, that are more expressive and flexible.
8.14.2. Using DSLs
DSLs can serve as a layer of separation between rule authoring (and rule authors) and the technical intricacies resulting from the modeling of domain object and the rule engine’s native language and methods. A DSL hides implementation details and focuses on the rule logic proper. DSL sentences can also act as "templates" for conditional elements and consequence actions that are used repeatedly in your rules, possibly with minor variations. You may define DSL sentences as being mapped to these repeated phrases, with parameters providing a means for accommodating those variations.
8.14.3. DSL Example
[when]Something is {colour}=Something(colour=="{colour}")
[when] indicates the scope of the expression (that is, whether it is valid for the LHS or the RHS of a rule).
The part after the bracketed keyword is the expression that you use in the rule.
The part to the right of the equal sign (=) is the mapping of the expression into the rule language. The form of this string depends on its destination, RHS or LHS. If it is for the LHS, then it ought to be a term according to the regular LHS syntax; if it is for the RHS then it might be a Java statement.
8.14.4. About DSL Parser
Whenever the DSL parser matches a line from the rule file written in the DSL with an expression in the DSL definition, it performs three steps of string manipulation:
- The DSL extracts the string values appearing where the expression contains variable names in brackets.
- The values obtained from these captures are interpolated wherever that name occurs on the right hand side of the mapping.
- The interpolated string replaces whatever was matched by the entire expression in the line of the DSL rule file.
You can use (for instance) a ? to indicate that the preceding character is optional. One good reason to use this is to overcome variations in natural language phrases of your DSL. But, given that these expressions are regular expression patterns, this means that all wildcard characters in Java’s pattern syntax have to be escaped with a preceding backslash (\).
8.14.5. About DSL Compiler
The DSL compiler transforms DSL rule files line by line. If you do not wish for this to occur, ensure that the captures are surrounded by characteristic text (words or single characters). As a result, the matching operation done by the parser plucks out a substring from somewhere within the line. In the example below, quotes are used as distinctive characters. The characters that surround the capture are not included during interpolation, just the contents between them.
8.14.6. DSL Syntax Examples
- Quotes
Use quotes for textual data that a rule editor may want to enter. You can also enclose the capture with words to ensure that the text is correctly matched.
[when]something is "{color}"=Something(color=="{color}") [when]another {state} thing=OtherThing(state=="{state}"- Braces
In a DSL mapping, the braces "{" and "}" should only be used to enclose a variable definition or reference, resulting in a capture. If they should occur literally, either in the expression or within the replacement text on the right hand side, they must be escaped with a preceding backslash (
\).[then]do something= if (foo) \{ doSomething(); \}- Mapping with correct syntax example
# This is a comment to be ignored. [when]There is a person with name of "{name}"=Person(name=="{name}") [when]Person is at least {age} years old and lives in "{location}"=Person(age >= {age}, location=="{location}") [then]Log "{message}"=System.out.println("{message}"); [when]And = and- Expanded DSL example
There is a person with name of "Kitty" ==> Person(name="Kitty") Person is at least 42 years old and lives in "Atlanta" ==> Person(age >= 42, location="Atlanta") Log "boo" ==> System.out.println("boo"); There is a person with name of "Bob" and Person is at least 30 years old and lives in "Utah" ==> Person(name="Bob") and Person(age >= 30, location="Utah")
If you are capturing plain text from a DSL rule line and want to use it as a string literal in the expansion, you must provide the quotes on the right hand side of the mapping.
8.14.7. Chaining DSL Expressions
DSL expressions can be chained together one one line to be used at once. It must be clear where one ends and the next one begins and where the text representing a parameter ends. Otherwise you risk getting all the text until the end of the line as a parameter value. The DSL expressions are tried, one after the other, according to their order in the DSL definition file. After any match, all remaining DSL expressions are investigated, too.
8.14.8. Adding Constraints to Facts
- Expressing LHS conditions
The DSL facility allows you to add constraints to a pattern by a simple convention: if your DSL expression starts with a hyphen (minus character,
-) it is assumed to be a field constraint and, consequently, is is added to the last pattern line preceding it.In the example, the class
Cheese, has these fields: type, price, age, and country. You can express some LHS condition in normal DRL.Cheese(age < 5, price == 20, type=="stilton", country=="ch")- DSL definitions
The DSL definitions given in this example result in three DSL phrases which may be used to create any combination of constraint involving these fields.
[when]There is a Cheese with=Cheese() [when]- age is less than {age}=age<{age} [when]- type is '{type}'=type=='{type}' [when]- country equal to '{country}'=country=='{country}'- -
The parser will pick up a line beginning with
-and add it as a constraint to the preceding pattern, inserting a comma when it is required.There is a Cheese with - age is less than 42 - type is 'stilton'Cheese(age<42, type=='stilton')- Defining DSL phrases
Defining DSL phrases for various operators and even a generic expression that handles any field constraint reduces the amount of DSL entries.
[when][]is less than or equal to=<= [when][]is less than=< [when][]is greater than or equal to=>= [when][]is greater than=> [when][]is equal to=== [when][]equals=== [when][]There is a Cheese with=Cheese()- DSL definition rule
There is a Cheese with - age is less than 42 - rating is greater than 50 - type equals 'stilton'In this specific case, a phrase such as "is less than" is replaced by
<, and then the line matches the last DSL entry. This removes the hyphen, but the final result is still added as a constraint to the preceding pattern. After processing all of the lines, the resulting DRL text is:Cheese(age<42, rating > 50, type=='stilton')
The order of the entries in the DSL is important if separate DSL expressions are intended to match the same line, one after the other.
8.14.9. Tips for Developing DSLs
- Write representative samples of the rules your application requires and test them as you develop.
- Rules, both in DRL and in DSLR, refer to entities according to the data model representing the application data that should be subject to the reasoning process defined in rules.
- Writing rules is easier if most of the data model’s types are facts.
- Mark variable parts as parameters. This provides reliable leads for useful DSL entries.
- You may postpone implementation decisions concerning conditions and actions during this first design phase by leaving certain conditional elements and actions in their DRL form by prefixing a line with a greater sign (">"). (This is also handy for inserting debugging statements.)
- New rules can be written by reusing the existing DSL definitions, or by adding a parameter to an existing condition or consequence entry.
- Keep the number of DSL entries small. Using parameters lets you apply the same DSL sentence for similar rule patterns or constraints.
8.14.10. DSL and DSLR Reference
A DSL file is a text file in a line-oriented format. Its entries are used for transforming a DSLR file into a file according to DRL syntax:
-
A line starting with
#or//(with or without preceding white space) is treated as a comment. A comment line starting with#/is scanned for words requesting a debug option, see below. -
Any line starting with an opening bracket (
[) is assumed to be the first line of a DSL entry definition. - Any other line is appended to the preceding DSL entry definition, with the line end replaced by a space.
8.14.11. DSL Entry Description
A DSL entry consists of the following four parts:
-
A scope definition, written as one of the keywords
whenorcondition,thenorconsequence,*andkeyword, enclosed in brackets ([and]). This indicates whether the DSL entry is valid for the condition or the consequence of a rule, or both. A scope indication ofkeywordmeans that the entry has global significance, that is, it is recognized anywhere in a DSLR file. - A type definition, written as a Java class name, enclosed in brackets. This part is optional unless the next part begins with an opening bracket. An empty pair of brackets is valid, too.
A DSL expression consists of a (Java) regular expression, with any number of embedded variable definitions, terminated by an equal sign (
=). A variable definition is enclosed in braces ({and}). It consists of a variable name and two optional attachments, separated by colons (:). If there is one attachment, it is a regular expression for matching text that is to be assigned to the variable. If there are two attachments, the first one is a hint for the GUI editor and the second one the regular expression.Note that all characters that are "magic" in regular expressions must be escaped with a preceding backslash (
\) if they should occur literally within the expression.The remaining part of the line after the delimiting equal sign is the replacement text for any DSLR text matching the regular expression. It may contain variable references, for example a variable name enclosed in braces. Optionally, the variable name may be followed by an exclamation mark (
!) and a transformation function, see below.Note that braces (
{and}) must be escaped with a preceding backslash (\) if they should occur literally within the replacement string.
8.14.12. Debug Options for DSL Expansion
| Word | Description |
|---|---|
|
| Prints the resulting DRL text, with line numbers. |
|
| Prints each expansion step of condition and consequence lines. |
|
|
Dumps the internal representation of all DSL entries with scope |
|
|
Dumps the internal representation of all DSL entries with scope |
|
|
Dumps the internal representation of all DSL entries with scope |
|
| Displays a usage statistic of all DSL entries. |
8.14.13. DSL Definition Example
This is what a DSL definition looks like:
# Comment: DSL examples
#/ debug: display result and usage
# keyword definition: replaces "regula" by "rule"
[keyword][]regula=rule
# conditional element: "T" or "t", "a" or "an", convert matched word
[when][][Tt]here is an? {entity:\w+}=${entity!lc}: {entity!ucfirst} ()
# consequence statement: convert matched word, literal braces
[then][]update {entity:\w+}=modify(${entity!lc})\{ \}8.14.14. Transformation of DSLR File
The transformation of a DSLR file proceeds as follows:
- The text is read into memory.
-
Each of the
keywordentries is applied to the entire text. The regular expression from the keyword definition is modified by replacing white space sequences with a pattern matching any number of white space characters, and by replacing variable definitions with a capture made from the regular expression provided with the definition, or with the default (.*?). Then, the DSLR text is searched exhaustively for occurrences of strings matching the modified regular expression. Substrings of a matching string corresponding to variable captures are extracted and replace variable references in the corresponding replacement text, and this text replaces the matching string in the DSLR text. Sections of the DSLR text between
whenandthen, andthenandend, respectively, are located and processed in a uniform manner, line by line, as described below.For a line, each DSL entry pertaining to the line’s section is taken in turn, in the order it appears in the DSL file. Its regular expression part is modified: white space is replaced by a pattern matching any number of white space characters; variable definitions with a regular expression are replaced by a capture with this regular expression, its default being
.*?. If the resulting regular expression matches all or part of the line, the matched part is replaced by the suitably modified replacement text.Modification of the replacement text is done by replacing variable references with the text corresponding to the regular expression capture. This text may be modified according to the string transformation function given in the variable reference; see below for details.
If there is a variable reference naming a variable that is not defined in the same entry, the expander substitutes a value bound to a variable of that name, provided it was defined in one of the preceding lines of the current rule.
If a DSLR line in a condition is written with a leading hyphen, the expanded result is inserted into the last line, which should contain a pattern CE, that is, a type name followed by a pair of parentheses. if this pair is empty, the expanded line (which should contain a valid constraint) is simply inserted, otherwise a comma (
,) is inserted beforehand.If a DSLR line in a consequence is written with a leading hyphen, the expanded result is inserted into the last line, which should contain a
modifystatement, ending in a pair of braces ({and}). If this pair is empty, the expanded line (which should contain a valid method call) is simply inserted, otherwise a comma (,) is inserted beforehand.
It is currently not possible to use a line with a leading hyphen to insert text into other conditional element forms (for example accumulate) or it may only work for the first insertion (for example eval).
8.14.15. String Transformation Functions
| Name | Description |
|---|---|
|
| Converts all letters to upper case. |
|
| Converts all letters to lower case. |
|
| Converts the first letter to upper case, and all other letters to lower case. |
|
|
Extracts all digits and |
|
|
Compares the string with string |
8.14.16. Stringing DSL Transformation Functions
- .dsl
A file containing a DSL definition is customarily given the extension
.dsl. It is passed to the Knowledge Builder withResourceType.DSL. For a file using DSL definition, the extension.dslrshould be used. The Knowledge Builder expectsResourceType.DSLR. The IDE, however, relies on file extensions to correctly recognize and work with your rules file.# definitions for conditions [when][]There is an? {entity}=${entity!lc}: {entity!ucfirst}() [when][]- with an? {attr} greater than {amount}={attr} <= {amount!num} [when][]- with a {what} {attr}={attr} {what!positive?>0/negative?%lt;0/zero?==0/ERROR}- DSL passing
The DSL must be passed to the Knowledge Builder ahead of any rules file using the DSL.
For parsing and expanding a DSLR file the DSL configuration is read and supplied to the parser. Thus, the parser can "recognize" the DSL expressions and transform them into native rule language expressions.
KnowledgeBuilder kBuilder = new KnowledgeBuilder(); Resource dsl = ResourceFactory.newClassPathResource(dslPath, getClass()); kBuilder.add(dsl, ResourceType.DSL); Resource dslr = ResourceFactory.newClassPathResource(dslrPath, getClass()); kBuilder.add(dslr, ResourceType.DSLR);
Chapter 9. Using Red Hat JBoss Developer Studio to Create and Test Rules
There are many ways to author rules in BRMS, however as a developer you would prefer an Integrated Development Environment (IDE) such as Red Hat JBoss Developer Studio that offers you advanced tooling and content assistance. Red Hat JBoss BRMS and Red Hat JBoss BPM Suite tooling are compatible with Red Hat JBoss Developer Studio version 7 and above. The Red Hat JBoss Developer Studio with Red Hat JBoss BPM Suite/BRMS plug-ins simplify your development tasks. These plug-ins provide the following features:
- Simple wizards for rule and project creation.
-
Content assistance for generating the basic rule structure. For example, If you open a
.drlfile in the Red Hat JBoss Developer Studio editor and typeru, and press Ctrl+Space , the template rule structure is created. - Syntax coloring.
- Error highlighting.
- IntelliSense code completion.
- Outline view to display an outline of your structured rule project.
- Debug perspective for rules and process debugging.
- Rete tree view to display Rete network.
- Editor for modifying business process diagram.
- Support for unit testing using JUnit and TestNG.
9.1. Red Hat JBoss Developer Studio Drools Perspective
Red Hat JBoss Developer Studio comes with all the BRMS and BPM Suite plug-in requirements pre-packaged with it. It offers the following perspectives:
- Drools: allows you to work with Red Hat JBoss BRMS specific resources.
- Business Central Repository Exploring.
- jBPM: allows you to work with Red Hat JBoss BPM Suite resources.
9.2. Red Hat JBoss BRMS Runtimes
A Drools runtime is a collection of JAR files on your file system that represent one specific release of the Drools project JARs. While creating a new runtime, you must either point to the release of your choice or create a new runtime on your file system from the jars included in the Drools plug-in. For creating a new runtime, you need to specify a default Drools runtime for your Eclipse workspace, but each individual project can override the default and select the appropriate runtime for that project specifically. You can add as many Drools runtimes as you need. In order to use the Red Hat JBoss BRMS plug-in with Red Hat JBoss Developer Studio, it is necessary to set up the runtime.
9.2.1. Defining a Red Hat JBoss BRMS Runtime
-
Extract the runtime JAR files located in the
jboss-brms-engine.ziparchive of the Red Hat JBoss BRMS 6.4.0 Core Engine ZIP archive available on the Red Hat Customer Portal. - From the Red Hat JBoss Developer Studio menu, click Window → Preferences.
- Select Drools → Installed Drools Runtimes.
- Click Add…, provide a name for the new runtime, and click Browse to navigate to the directory where you extracted the runtime files in the first step. Click OK to register the selected runtime in Red Hat JBoss Developer Studio.
- Mark the runtime you have created as the default Drools runtime by clicking on the check box next to it.
- Click OK. If you already have projects in Red Hat JBoss Developer Studio, a dialog box will indicate that you have to restart Red Hat JBoss Developer Studio to update the runtime.
9.2.2. Selecting a Runtime for Your Red Hat JBoss BRMS Project
Whenever you create a Drools project either by using the New Drools Project wizard or by converting an existing Java project to a Drools project, the Drools plug-in automatically adds all the required JAR files to the classpath of your project.
If you are creating a new Drools project, the plug-in uses the default Drools runtime for that project, unless you specify a project-specific one.
To define a project-specific runtime, create a new Drools project and choose the desired runtime in the final step of the New Drools Project wizard. Alternatively, you can create a new runtime by clicking Manage Runtime Definitions.
9.2.3. Changing the Runtime of Your Red Hat JBoss BRMS Project
To change the runtime of a Drools project:
In the Drools perspective, right-click the project and select Properties.
The project properties dialog opens.
- Navigate and select the Drools category.
Check the Enable project specific settings checkbox and select the appropriate runtime from the drop-down box.
If you click the Configure workspace settings… link, the workspace preferences showing the currently installed Drools runtimes opens. You can add new runtimes there if required. If you uncheck the Enable project specific settings checkbox, it uses the default runtime as defined in your global preferences.
- Click OK.
9.2.4. Configuring the Red Hat JBoss BRMS Server
Red Hat JBoss Developer Studio can be configured to run the Red Hat JBoss BRMS\BPM Suite Server.
Configuring the Server
- Open the Drools view by clicking Window → Open Perspective → Other and then Drools. Click OK.
- Add the Server view by clicking Window → Show View → Other… and then Server → Servers.
- Open the server menu by right clicking the Servers panel. Click New → Server to add a new server.
- Define the server by selecting JBoss Enterprise Middleware → JBoss Enterprise Application Platform 6.1+, and click Next.
- Click JBoss EAP 6.4 Runtime and select Create new runtime (next page). Click Next.
- Set the home directory by clicking Browse. Navigate to and select the installation directory for Red Hat JBoss EAP 6.4 that has Red Hat JBoss BPM Suite installed.
- Provide a name for the server in the Name field, make sure that the configuration file is set, and click Finish.
9.3. Exploring Red Hat JBoss BRMS Application
A BRMS project typically comprises the following:
- Facts, which are a set of java class files, often POJOs.
- Rules, which operate on the facts.
- Drools library (JAR files) for executing the rules.
Red Hat JBoss Developer Studio helps you generate the getter and setter methods for attributes automatically. When you create a BRMS or a BPM Suite project, the following directories are generated:
-
src/main/javathat stores the class files (facts). -
src/main/resources/rulesthat stores the.drlfiles (rules). -
src/main/resources/processthat stores the.bpmnfiles (processes).
9.4. Creating a Red Hat JBoss BRMS Project
To create a new Red Hat JBoss BRMS project in the Drools perspective, do the following:
Procedure: Creating New Red Hat JBoss Developer Studio Project
- In the main menu, click File → New → Project.
- Click Drools → Drools Project and click Next.
- For now, choose the second option. Red Hat JBoss Developer Studio will create a project with a Red Hat JBoss BPM Suite example. Click Next.
- Enter a name for the project into the Project name: text box and click Finish.
To test the project:
-
Navigate to the
src/main/javadirectory and expand thecom.samplepackage. Right click the desired Java class and click Run As → Java Application.
The output will be displayed on the console tab.
If you checked the default artifacts checkboxes in the Drools Project wizard, you can see the newly created Drools project in the Package Explorer accordingly containing:
-
A sample rule
Sample.drlin thesrc/main/resources/rulesdirectory. -
A sample process
Sample.bpmnin thesrc/main/resources/processdirectory. -
A sample decision table
Sample.xlsin thesrc/main/resources/dtablesdirectory. -
An example
DroolsTest.javaJava class in thesrc/main/javadirectory to execute the rules in the Drools engine in thecom.samplepackage. -
An example
ProcessTest.javaJava class in thesrc/main/javadirectory to execute the rules in the Drools engine in thecom.samplepackage. -
An example
DecisionTableTest.javaJava class in thesrc/main/javadirectory to execute the rules in the Drools engine in thecom.samplepackage.
9.5. Using Textual Rule Editor
In the Package Explorer, you can double-click your existing rule file to open it on a textual rule editor or choose File → New → Rule Resource to create a new rule on the textual editor. The textual rule editor has a pattern of a normal text editor and this is where you modify and manage your rules.
The textual rule editor works on files that have a .drl (or .rule) extension. Usually these contain related rules, but it is also possible to have rules in individual files, grouped by being in the same package namespace. These DRL files are plain text files. Even if your rule group is using a domain specific language (DSL), the rules are still stored as plain text. This allows easy management of rules and versions.
Textual editor provides features like:
- Content assistance: The pop-up content assistance helps you quickly create rule attributes such as functions, import statements, and package declarations. You can invoke pop-up content assistance by pressing Ctrl+Space.
- Code folding: Code Folding allows you to hide and show sections of a file use the icons with minus and plus on the left vertical line of the editor.
- Sysnchronization with outline view: The text editor is in sync with the structure of the rules in the outline view as soon as you save your rules. The outline view provides a quick way of navigating around rules by name, or even in a file containing hundreds of rules. The items are sorted alphabetically by default.
9.6. Red Hat JBoss BRMS Views
You can alternate between these views when modifying rules:
- Working Memory View
- Shows all elements in the Red Hat JBoss BRMS working memory.
- Agenda View
- Shows all elements on the agenda. For each rule on the agenda, the rule name and bound variables are shown.
- Global Data View
- Shows all global data currently defined in the Red Hat JBoss BRMS working memory.
- Audit View
- Can be used to display audit logs containing events that were logged during the execution of a rules engine, in tree form.
- Rete View
This shows you the current Rete Network for your DRL file. You display it by clicking on the tab "Rete Tree" at the bottom of the DRL Editor window. With the Rete Network visualization being open, you can use drag-and-drop on individual nodes to arrange optimal network overview. You may also select multiple nodes by dragging a rectangle over them so the entire group can be moved around.
NoteThe Rete view works only in projects where the rule builder is set in the project´s properties. For other projects, you can use a workaround. Set up a Red Hat JBoss BRMS project next to your current project and transfer the libraries and the DRLs you want to inspect with the Rete view. Click on the right tab below in the DRL Editor, then click Generate Rete View.
- Kie Navigator View
- Shows you the contents of your Red Hat JBoss BPM Suite projects on your container. See chapter Kie Navigator of the Red Hat JBoss BPM Suite Getting Started Guide for more information.
9.7. Debugging Rules
Drools breakpoints are only enabled if you debug your application as a Drools Application. To do this you should perform one of two actions:
- Select the main class of your application. Right-click on it and select Debug As → Drools Application.
Alternatively, select Debug As → Debug Configuration to open a new dialog window for creating, managing and running debug configurations.
Select the Drools Application item in the left tree and click New launch configuration (leftmost icon in the toolbar above the tree). This will create a new configuration with a number of the properties already filled in based on main class you selected in the beginning. All properties shown here are the same as any standard Java program.
NoteRemember to change the name of your debug configuration to something meaningful.
- Click the Debug button on the bottom to start debugging your application.
-
After enabling the debugging, the application starts executing and will halt if any breakpoint is encountered. This can be a Drools rule breakpoint, or any other standard Java breakpoint. Whenever a Drools rule breakpoint is encountered, the corresponding
.drlfile is opened and the active line is highlighted. The Variables view also contains all rule parameters and their value. You can then use the default Java debug actions to decide what to do next (resume, terminate, step over, and others). The debug views can also be used to determine the contents of the working memory and agenda at that time as well (the current executing working memory is automatically shown).
9.7.1. Creating Breakpoints
Create breakpoints to help monitor rules that have been executed. Instead of waiting for the result to appear at the end of the process, you can inspect the details of the execution at each breakpoint you set. This is useful for debugging and ensuring rules are executed as expected.
-
To create breakpoints in the Package Explorer view or Navigator view of the Red Hat JBoss BRMS perspective, double-click the selected
.drlfile to open it in the editor. You can add and remove rule breakpoints in the
.drlfiles in two ways:Double-click the rule in the Rule editor at the line where you want to add a breakpoint. A breakpoint can be removed by double-clicking the rule once more.
NoteRule breakpoints can only be created in the consequence of a rule. Double-clicking on a line where no breakpoint is allowed does nothing.
- Right-click the ruler. Select the Toggle Breakpoint action in the context menu. Choosing this action adds a breakpoint at the selected line or remove it if there is one already.
- The Debug perspective contains a Breakpoints view which can be used to see all defined breakpoints, get their properties, enable/disable and remove them. You can switch to it by clicking Window → Perspective → Others → Debug.
Part III. All About Processes
Chapter 10. Getting Started with Processes
JBoss Business Process Management System is a light-weight, open-source, flexible Business Process Management (BPM) Suite that allows you to create, execute, and monitor business processes throughout their life cycle. The business processes allow you to model your business goals. They describe the steps that need to be executed to achieve those goals. It depicts the order of these goals in a flow chart. The business processes greatly improve the visibility and agility of your business logic.
Red Hat JBoss BPM Suite creates the bridge between business analysts, developers and end users by offering process management features and tools in a way that both business users and developers like. The life cycle of Business processes includes authoring, deployment, process management and task lists, and dashboards and reporting.
10.1. The Red Hat JBoss BPM Suite Engine
The core of Red Hat JBoss BPM Suite is a light-weight, extensible workflow engine called the BPM Suite engine in BPMN 2.0 format, written in pure Java that allows you to execute business processes. It can run in any Java environment, embedded in your application or as a service. It has the following features:
- Solid, stable core engine for executing your process instances.
- Native support for the latest BPMN 2.0 specification for modeling and executing business processes.
- Strong focus on performance and scalability.
- Light-weight. You can deploy it on almost any device that supports a simple Java Runtime Environment. It does not require any web container at all.
- Pluggable persistence with a default JPA implementation (Optional).
- Pluggable transaction support with a default JTA implementation.
- Implemented as a generic process engine, so it can be extended to support new node types or other process languages.
- Listeners to be notified of various events.
- Ability to migrate running process instances to a new version of their process definition.
10.2. Integrating BPM Suite Engine With Other Services
The Red Hat JBoss BPM Suite engine can be integrated with a few independent core services such as:
- The human task service
- The human task service helps manage human tasks when human actors need to participate in the process. It is fully pluggable and the default implementation is based on the WS-HumanTask specification and manages the life cycle of the tasks, task lists, task forms, and some more advanced features like escalation, delegation, and rule-based assignments.
- The history log
- The history log stores all information about the execution of all the processes in the engine. This is necessary if you need access to historic information as runtime persistence only stores the current state of all active process instances. The history log can be used to store all current and historic states of active and completed process instances. It can be used to query for any information related to the execution of process instances, for monitoring, and analysis.
Chapter 11. Working with Processes
11.1. BPMN 2.0 Notation
11.1.1. Business Process Model and Notation (BPMN) 2.0 Specification
The Business Process Model and Notation (BPMN) 2.0 specification defines a standard for graphically representing a business process; it includes execution semantics for the defined elements and an XML format to store and share process definitions.
The table below shows the supported elements of the BPMN 2.0 specification and includes some additional elements and attributes.
- definitions
Expand Supported attributes Supported elements Extension attributes Extension elements BPMNDiagram, itemDefinition, signal, process, relationship*
- process
Expand Supported attributes Supported elements Extension attributes Extension elements processType, isExecutable, name, id
property, laneSet, flowElement
packageName, adHoc, version
import, global
- sequenceFlow
Expand Supported attributes Supported elements Extension attributes Extension elements sourceRef, targetRef, isImmediate, name, id
conditionExpression
priority
- interface
Expand Supported attributes Supported elements Extension attributes Extension elements name, id
operation
- operation
Expand Supported attributes Supported elements Extension attributes Extension elements name, id
inMessageRef
- laneSet
Expand Supported attributes Supported elements Extension attributes Extension elements lane
- lane
Expand Supported attributes Supported elements Extension attributes Extension elements name, id
flowNodeRef
- import
Expand Supported attributes Supported elements Extension attributes Extension elements name
- global
Expand Supported attributes Supported elements Extension attributes Extension elements identifier, type
* Used for extension elements for BPMN2, such as simulation data.
BPMN 2.0 Supported Elements and Attributes (Events)
- startEvent
Expand Supported attributes Supported elements Extension attributes Extension elements name, id
dataOutput, dataOutputAssociation, outputSet, eventDefinition
x, y, width, height
- endEvent
Expand Supported attributes Supported elements Extension attributes Extension elements name, id
dataInput, dataInputAssociation, inputSet, eventDefinition
x, y, width, height
- intermediateCatchEvent
Expand Supported attributes Supported elements Extension attributes Extension elements name, id
dataOutput, dataOutputAssociation, outputSet, eventDefinition
x, y, width, height
- intermediateThrowEvent
Expand Supported attributes Supported elements Extension attributes Extension elements name, id
dataInput, dataInputAssociation, inputSet, eventDefinition
x, y, width, height
- boundaryEvent
Expand Supported attributes Supported elements Extension attributes Extension elements cancelActivity, attachedToRef, name, id
eventDefinition
x, y, width, height
- terminateEventDefinition
Expand Supported attributes Supported elements Extension attributes Extension elements - compensateEventDefinition
Expand Supported attributes Supported elements Extension attributes Extension elements activityRef
documentation, extensionElements
- conditionalEventDefinition
Expand Supported attributes Supported elements Extension attributes Extension elements condition
- errorEventDefinition
Expand Supported attributes Supported elements Extension attributes Extension elements errorRef
- error
Expand Supported attributes Supported elements Extension attributes Extension elements errorCode, id
- escalationEventDefinition
Expand Supported attributes Supported elements Extension attributes Extension elements escalationRef
- escalation
Expand Supported attributes Supported elements Extension attributes Extension elements escalationCode, id
- messageEventDefinition
Expand Supported attributes Supported elements Extension attributes Extension elements messageRef
- message
Expand Supported attributes Supported elements Extension attributes Extension elements itemRef, id
- signalEventDefinition
Expand Supported attributes Supported elements Extension attributes Extension elements signalRef
- timerEventDefinition
Expand Supported attributes Supported elements Extension attributes Extension elements timeCycle, timeDuration
BPMN 2.0 Supported Elements and Attributes (Activities)
- task
Expand Supported attributes Supported elements Extension attributes Extension elements name, id
ioSpecification, dataInputAssociation, dataOutputAssociation
taskName, x, y, width, height
- scriptTask
Expand Supported attributes Supported elements Extension attributes Extension elements scriptFormat, name, id
script
x, y, width, height
- script
Expand Supported attributes Supported elements Extension attributes Extension elements text[mixed content]
- userTask
Expand Supported attributes Supported elements Extension attributes Extension elements name, id
ioSpecification, dataInputAssociation, dataOutputAssociation, resourceRole
x, y, width, height
onEntry-script, onExit-script
- potentialOwner
Expand Supported attributes Supported elements Extension attributes Extension elements resourceAssignmentExpression
- resourceAssignmentExpression
Expand Supported attributes Supported elements Extension attributes Extension elements expression
- businessRuleTask
Expand Supported attributes Supported elements Extension attributes Extension elements name, id
x, y, width, height, ruleFlowGroup
onEntry-script, onExit-script
- manualTask
Expand Supported attributes Supported elements Extension attributes Extension elements name, id
x, y, width, height
onEntry-script, onExit-script
- sendTask
Expand Supported attributes Supported elements Extension attributes Extension elements messageRef, name, id
ioSpecification, dataInputAssociation
x, y, width, height
onEntry-script, onExit-script
- receiveTask
Expand Supported attributes Supported elements Extension attributes Extension elements messageRef, name, id
ioSpecification, dataOutputAssociation
x, y, width, height
onEntry-script, onExit-script
- serviceTask
Expand Supported attributes Supported elements Extension attributes Extension elements operationRef, name, id
ioSpecification, dataInputAssociation, dataOutputAssociation
x, y, width, height
onEntry-script, onExit-script
- subProcess
Expand Supported attributes Supported elements Extension attributes Extension elements name, id
flowElement, property, loopCharacteristics
x, y, width, height
- adHocSubProcess
Expand Supported attributes Supported elements Extension attributes Extension elements cancelRemainingInstances, name, id
completionCondition, flowElement, property
x, y, width, height
- callActivity
Expand Supported attributes Supported elements Extension attributes Extension elements calledElement, name, id
ioSpecification, dataInputAssociation, dataOutputAssociation
x, y, width, height, waitForCompletion, independent
onEntry-script, onExit-script
- multiInstanceLoopCharacteristics
Expand Supported attributes Supported elements Extension attributes Extension elements loopDataInputRef, inputDataItem
- onEntry-script
Expand Supported attributes Supported elements Extension attributes Extension elements scriptFormat
script
- onExit-script
Expand Supported attributes Supported elements Extension attributes Extension elements scriptFormat
script
BPMN 2.0 Supported Elements and Attributes (Gateways)
- parallelGateway
Expand Supported attributes Supported elements Extension attributes Extension elements gatewayDirection, name, id
x, y, width, height
- eventBasedGateway
Expand Supported attributes Supported elements Extension attributes Extension elements gatewayDirection, name, id
x, y, width, height
- exclusiveGateway
Expand Supported attributes Supported elements Extension attributes Extension elements default, gatewayDirection, name, id
x, y, width, height
- inclusiveGateway
Expand Supported attributes Supported elements Extension attributes Extension elements default, gatewayDirection, name, id
x, y, width, height
BPMN 2.0 Supported Elements and Attributes (Data)
- property
Expand Supported attributes Supported elements Extension attributes Extension elements itemSubjectRef, id
- dataObject
Expand Supported attributes Supported elements Extension attributes Extension elements itemSubjectRef, id
- itemDefinition
Expand Supported attributes Supported elements Extension attributes Extension elements structureRef, id
- signal
Expand Supported attributes Supported elements Extension attributes Extension elements name, id
- ioSpecification
Expand Supported attributes Supported elements Extension attributes Extension elements dataInput, dataOutput, inputSet, outputSet
- dataInput
Expand Supported attributes Supported elements Extension attributes Extension elements name, id
- dataInputAssociation
Expand Supported attributes Supported elements Extension attributes Extension elements sourceRef, targetRef, assignment
- dataOutput
Expand Supported attributes Supported elements Extension attributes Extension elements name, id
- dataOutputAssociation
Expand Supported attributes Supported elements Extension attributes Extension elements sourceRef, targetRef, assignment
- inputSet
Expand Supported attributes Supported elements Extension attributes Extension elements dataInputRefs
- outputSet
Expand Supported attributes Supported elements Extension attributes Extension elements dataOutputRefs
- assignment
Expand Supported attributes Supported elements Extension attributes Extension elements from, to
- formalExpression
Expand Supported attributes Supported elements Extension attributes Extension elements language
text[mixed content]
BPMN 2.0 Supported Elements and Attributes (BPMNDI)
- BPMNDiagram
Expand Supported attributes Supported elements Extension attributes Extension elements BPMNPlane
- BPMNPlane
Expand Supported attributes Supported elements Extension attributes Extension elements bpmnElement
BPMNEdge, BPMNShape
- BPMNShape
Expand Supported attributes Supported elements Extension attributes Extension elements bpmnElement
Bounds
- BPMNEdge
Expand Supported attributes Supported elements Extension attributes Extension elements bpmnElement
waypoint
- Bounds
Expand Supported attributes Supported elements Extension attributes Extension elements x, y, width, height
- waypoint
Expand Supported attributes Supported elements Extension attributes Extension elements x, y
11.1.2. BPMN 2.0 Process Example
Here is a BPMN 2.0 process that prints out a "Hello World" statement when the process is started:
<?xml version="1.0" encoding="UTF-8"?>
<definitions id="Definition"
targetNamespace="http://www.jboss.org/drools"
typeLanguage="http://www.java.com/javaTypes"
expressionLanguage="http://www.mvel.org/2.0"
xmlns="http://www.omg.org/spec/BPMN/20100524/MODEL"
xmlns:xsi="http://www.w3.org/2001/XMLSchema-instance"
xsi:schemaLocation="http://www.omg.org/spec/BPMN/20100524/MODEL BPMN20.xsd"
xmlns:bpmndi="http://www.omg.org/spec/BPMN/20100524/DI"
xmlns:dc="http://www.omg.org/spec/DD/20100524/DC"
xmlns:di="http://www.omg.org/spec/DD/20100524/DI"
xmlns:tns="http://www.jboss.org/drools">
<process processType="Private" isExecutable="true" id="com.sample.bpmn.hello" name="Hello World" >
<!-- nodes -->
<scriptTask id="_2" name="Hello" >
<script>System.out.println("Hello World");</script>
</scriptTask>
<startEvent id="_1" />
<endEvent id="_3" >
<terminateEventDefinition/>
</endEvent>
<!-- connections -->
<sequenceFlow id="_1-_2" sourceRef="_1" targetRef="_2" />
<sequenceFlow id="_2-_3" sourceRef="_2" targetRef="_3" />
</process>
<bpmndi:BPMNDiagram>
<bpmndi:BPMNPlane bpmnElement="com.sample.bpmn.hello" >
<bpmndi:BPMNShape bpmnElement="_2" >
<dc:Bounds x="96" y="16" width="80" height="48" />
</bpmndi:BPMNShape>
<bpmndi:BPMNShape bpmnElement="_1" >
<dc:Bounds x="30" y="22" width="36" height="36" />
</bpmndi:BPMNShape>
<bpmndi:BPMNShape bpmnElement="_3" >
<dc:Bounds x="210" y="22" width="36" height="36" />
</bpmndi:BPMNShape>
<bpmndi:BPMNEdge bpmnElement="_1-_2" >
<di:waypoint x="66" y="40" />
<di:waypoint x="96" y="40" />
</bpmndi:BPMNEdge>
<bpmndi:BPMNEdge bpmnElement="_2-_3" >
<di:waypoint x="176" y="40" />
<di:waypoint x="210" y="40" />
</bpmndi:BPMNEdge>
</bpmndi:BPMNPlane>
</bpmndi:BPMNDiagram>
</definitions>11.1.3. Supported Elements and Attributes in BPMN 2.0 Specification
Red Hat JBoss BPM Suite 6 does not implement all elements and attributes as defined in the BPMN 2.0 specification. However, we do support significant node types that you can use inside executable processes. This includes almost all elements and attributes as defined in the Common Executable subclass of the BPMN 2.0 specification, extended with some additional elements and attributes we believe are valuable in that context as well. The full set of elements and attributes that are supported can be found below, but it includes elements like:
Flow Objects
Events
- Start Event (None, Conditional, Signal, Message, Timer)
- End Event (None, Terminate, Error, Escalation, Signal, Message, Compensation)
- Intermediate Catch Event (Signal, Timer, Conditional, Message)
- Intermediate Throw Event (None, Signal, Escalation, Message, Compensation)
- Non-interrupting Boundary Event (Escalation, Signal, Timer, Conditional, Message)
- Interrupting Boundary Event (Escalation, Error, Signal, Timer, Conditional, Message, Compensation)
Activities
- Script Task
- Task
- Service Task
- User Task
- Business Rule Task
- Manual Task
- Send Task
- Receive Task
- Reusable Sub-Process (Call Activity)
- Embedded Sub-Process
- Event Sub-Process
- Ad-Hoc Sub-Process
- Data-Object
Gateways
Diverging
- Exclusive
- Inclusive
- Parallel
- Event-Based
Converging
- Exclusive
- Inclusive
- Parallel
- Lanes
Data
- Java type language
- Process properties
- Embedded Sub-Process properties
- Activity properties
Connecting Objects
- Sequence flow
11.1.4. Loading and Executing a BPMN2 Process Into Repository
The following example shows how you can load a BPMN2 process into your knowledge base:
import org.kie.api.KieServices;
import org.kie.api.builder.KieRepository;
import org.kie.api.builder.KieFileSystem;
import org.kie.api.builder.KieBuilder;
import org.kie.internal.io.ResourceFactory;
import org.kie.api.runtime.KieContainer;
import org.kie.api.KieBase;
...
KieServices kServices = KieServices.Factory.get();
KieRepository kRepository = kServices.getRepository();
KieFileSystem kFileSystem = kServices.newKieFileSystem();
kFileSystem.write(ResourceFactory.newClassPathResource("MyProcess.bpmn"));
KieBuilder kBuilder = kServices.newKieBuilder(kFileSystem);
kBuilder.buildAll();
KieContainer kContainer = kServices.newKieContainer(kRepository.getDefaultReleaseId());
KieBase kBase = kContainer.getKieBase();For a list of Maven dependencies, see example Embedded jBPM Engine Dependencies.
11.2. What Comprises a Business Process
A business process is a graph that describes the order in which a series of steps need to be executed using a flow chart. A process consists of a collection of nodes that are linked to each other using connections. Each of the nodes represents one step in the overall process, while the connections specify how to transition from one node to the other. A large selection of predefined node types have been defined.
A typical process consists of the following parts:
- The header part that comprises global elements such as the name of the process, imports, and variables.
- The nodes section that contains all the different nodes that are part of the process.
- The connections section that links these nodes to each other to create a flow chart.
Figure 11.1. A Business Process

Processes can be created with the following methods:
- Using the Business Central or Red Hat JBoss Developer Studio with BPMN2 modeler.
- As an XML file, according to the XML process format as defined in the XML Schema Definition in the BPMN 2.0 specification.
- By directly creating a process using the Process API.
The Red Hat JBoss Developer Studio Process editor has been deprecated in favor of BPMN2 Modeler for process modeling as it is not being developed any more. However, you can still use it for limited number of supported elements.
11.2.1. Process Nodes
Executable processes consist of different types of nodes which are connected to each other. The BPMN 2.0 specification defines three main types of nodes:
- Events
- Event elements represent a particular event that occurs or can occur during process runtime.
- Activities
- Activities represent relatively atomic pieces of work that need to be performed as part of the process execution.
- Gateways
- Gateways represent forking or merging of workflows during process execution.
11.2.2. Process Properties
Every process has the following properties:
- ID: The unique ID of the process.
- Name: The display name of the process.
- Version: The version number of the process.
- Package: The package (namespace) the process is defined in.
- Variables (optional): Variables to store data during the execution of your process.
- Swimlanes: Swimlanes used in the process for assigning human tasks.
11.2.3. Defining Processes Using XML
You can create processes directly in XML format using the BPMN 2.0 specifications. The syntax of these XML processes is defined using the BPMN 2.0 XML Schema Definition.
The process XML file consists of:
- The process element
-
This is the top part of the process XML that contains the definition of the different nodes and their properties. The process XML consist of exactly one
<process>element. This element contains parameters related to the process (its type, name, ID, and package name), and consists of three subsections: a header section (where process-level information like variables, globals, imports, and lanes can be defined), a nodes section that defines each of the nodes in the process, and a connections section that contains the connections between all the nodes in the process. - The BPMNDiagram element
- This is the lower part of the process XML that contains all graphical information, like the location of the nodes. In the nodes section, there is a specific element for each node, defining the various parameters and, possibly, sub-elements for that node type.
The following XML fragment shows a simple process that contains a sequence of a Start Event, a Script Task that prints "Hello World" to the console, and an End Event:
<?xml version="1.0" encoding="UTF-8"?>
<definitions
id="Definition"
targetNamespace="http://www.jboss.org/drools"
typeLanguage="http://www.java.com/javaTypes"
expressionLanguage="http://www.mvel.org/2.0"
xmlns="http://www.omg.org/spec/BPMN/20100524/MODEL"
xmlns:xsi="http://www.w3.org/2001/XMLSchema-instance"
xsi:schemaLocation="http://www.omg.org/spec/BPMN/20100524/MODEL BPMN20.xsd"
xmlns:g="http://www.jboss.org/drools/flow/gpd"
xmlns:bpmndi="http://www.omg.org/spec/BPMN/20100524/DI"
xmlns:dc="http://www.omg.org/spec/DD/20100524/DC"
xmlns:di="http://www.omg.org/spec/DD/20100524/DI"
xmlns:tns="http://www.jboss.org/drools">
<process processType="Private" isExecutable="true" id="com.sample.hello" name="Hello Process">
<!-- nodes -->
<startEvent id="_1" name="Start" />
<scriptTask id="_2" name="Hello">
<script>System.out.println("Hello World");</script>
</scriptTask>
<endEvent id="_3" name="End" >
<terminateEventDefinition/>
</endEvent>
<!-- connections -->
<sequenceFlow id="_1-_2" sourceRef="_1" targetRef="_2" />
<sequenceFlow id="_2-_3" sourceRef="_2" targetRef="_3" />
</process>
<bpmndi:BPMNDiagram>
<bpmndi:BPMNPlane bpmnElement="com.sample.hello" >
<bpmndi:BPMNShape bpmnElement="_1" >
<dc:Bounds x="16" y="16" width="48" height="48" />
</bpmndi:BPMNShape>
<bpmndi:BPMNShape bpmnElement="_2" >
<dc:Bounds x="96" y="16" width="80" height="48" />
</bpmndi:BPMNShape>
<bpmndi:BPMNShape bpmnElement="_3" >
<dc:Bounds x="208" y="16" width="48" height="48" />
</bpmndi:BPMNShape>
<bpmndi:BPMNEdge bpmnElement="_1-_2" >
<di:waypoint x="40" y="40" />
<di:waypoint x="136" y="40" />
</bpmndi:BPMNEdge>
<bpmndi:BPMNEdge bpmnElement="_2-_3" >
<di:waypoint x="136" y="40" />
<di:waypoint x="232" y="40" />
</bpmndi:BPMNEdge>
</bpmndi:BPMNPlane>
</bpmndi:BPMNDiagram>
</definitions>11.3. Activities
An activity is an action performed inside a business process. Activities are classified based on the type of tasks they do:
- Task
- Use this activity type in your business process to implement a single task which can not be further broken into subtasks.
- Subprocess
- Use this activity type in your business process when you have a group of tasks to be processed in a sequential order in order to achieve a single result.
Each activity has one incoming and one outgoing connection.
11.3.1. Tasks
A task is an action that is executed inside a business process. Tasks can be of the following types:
| Task | Icon | Description |
|---|---|---|
| User |
|
Use the
|
| Send |
|
Use the
|
| Receive |
|
Use the
|
| Manual |
|
Use the
|
| Service |
|
Use the
|
| Business Rule |
|
Use the
|
| Script |
|
Use the
|
| None |
|
A |


11.3.2. Subprocesses
A subprocess is a process within another process. When a parent process calls a child process (subprocess), the child process executes in a sequential manner and once complete, the execution control then transfers to the main parent process. Subprocess can be of the following types:
| Subprocess | Icon | Description |
|---|---|---|
| Reusable |
|
Use the
The |
| Multiple Instances |
|
Use the
When the engine reaches a
A |
| Embedded |
|
Use the
When you expand an
An |
| Ad-Hoc |
|
Use the You can define a set of activities for this subprocess, but the sequence and number of performances for the activities is determined by the performers of the activities.
Use an |
| Event |
|
Use the
The
An |


Only the Reusable subprocess can contain Swimlanes.
11.4. Data
Throughout the execution of a process, data can be retrieved, stored, passed on, and used. To store runtime data during the execution of the process, process variables are used. A variable is defined with a name and a data type. A basic data type could include the following: boolean, int, String, or any kind of object subclass.
Variables can be defined inside a variable scope. The top-level scope is the variable scope of the process itself. Sub-scopes can be defined using a sub-process. Variables that are defined in a sub-scope are only accessible for nodes within that scope.
Whenever a variable is accessed, the process will search for the appropriate variable scope that defines the variable. Nesting variable scopes are allowed. A node will always search for a variable in its parent container; if the variable cannot be found, the node will look in the parent’s parent container, and so on, until the process instance itself is reached. If the variable cannot be found, a read access yields null, and a write access produces an error message. All of this occurs with the process continuing execution.
Variables can be used in the following ways:
- Process-level variables can be set when starting a process by providing a map of parameters to the invocation of the startProcess method. These parameters will be set as variables on the process scope.
Script actions can access variables directly simply by using the name of the variable as a local parameter in their script. For example, if the process defines a variable of type "org.jbpm.Person" in the process, a script in the process could access this directly:
// call method on the process variable "person" person.setAge(10);Changing the value of a variable in a script can be done through the knowledge context:
kcontext.setVariable(variableName, value);WarningDo not create a script variable with the same name as a process variable. Otherwise, an error similar to the following error is thrown during the deployment of your application. In the following case, the variable
personhas been declared both in a script task and as a process variable.ERROR [org.drools.compiler.kie.builder.impl.AbstractKieModule] (default task-16) Unable to build KieBaseModel:defaultKieBase Process Compilation error : Process com.myteam.scripttask.ScriptTaskBP(ScriptTask.ScriptTaskBP) com/myteam/scripttask/Process_com$u46$myteam$u46$scripttask$u46$ScriptTaskBP95786628.java (9:437) : Duplicate local variable personService tasks (and reusable sub-processes) can pass the value of process variables to the outside world (or another process instance) by mapping the variable to an outgoing parameter. For example, the parameter mapping of a service task could define that the value of the process variable
xshould be mapped to a task parameteryjust before the service is invoked. You can also inject the value of the process variable into a hard-coded parameter String using#{expression}. For example, the description of a human task could be defined as the following:You need to contact person #{person.getName()}Where
personis a process variable. This will replace this expression with the actual name of the person when the service needs to be invoked. Similar results of a service (or reusable sub-process) can also be copied back to a variable using result mapping.- Various other nodes can also access data. Event nodes, for example, can store the data associated to the event in a variable. Check the properties of the different node types for more information.
Finally, processes (and rules) have access to globals, for example, globally defined variables and data in the Knowledge Session. Globals are directly accessible in actions like variables. Globals need to be defined as part of the process before they can be used. Globals can be set using the following:
ksession.setGlobal(name, value)Globals can also be set from inside process scripts using:
kcontext.getKieRuntime().setGlobal(name,value);.11.5. Events
Events are triggers, which when occur, impact a business process. Events are classified as start events, end events, and intermediate events. A start event indicates the beginning of a business process. An end event indicates the completion of a business process. And intermediate events drive the flow of a business process. Every event has an event ID and a name. You can implement triggers for each of these event types to identify the conditions under which an event is triggered. If the conditions of the triggers are not met, the events are not initialized, and hence the process flow does not complete.
11.5.1. Start Events
A start event is a flow element in a business process that indicates the beginning of a business process flow. The execution of a business process starts at this node, so a process flow can only have one start event. A start event can have only one outgoing connection which connects to another node to take the process flow ahead. Start events are of the following types:
| Event | Icon | Description |
|---|---|---|
| None |
|
Use the
|
| Message |
|
Use the
|
| Timer |
|
Use the
|
| Escalation |
|
Use the
|
| Conditional |
|
Use the
|
| Error |
|
Use the
|
| Compensation |
|
Use the
|
| Signal |
|
Use the
|


11.5.2. End Events
An end event marks the end of a business process. Your business process may have more than one end event. An end event has one incoming connection and no outgoing connections. End events are of the following types:
| Event | Icon | Description |
|---|---|---|
| None |
|
Use the |
| Message |
|
Use the |
| Escalation |
|
Use the |
| Error |
| Use the Error end event in your process or subprocess to end the process in an error state and throw a named error, which can be caught by a Catching Intermediate event. |
| Cancel |
|
Use the |
| Compensation |
|
Use the |
| Signal |
|
Use the |
| Terminate |
|
Use the |


11.5.3. Intermediate Events
Intermediate events occur during the execution of a process flow, and they drive the flow of the process. Some specific situations in a process may trigger these intermediate events. Intermediate events can occur in a process with one or no incoming flow and an outgoing flow. Intermediate events can further be classified as:
- Catching Intermediate Events;
- Throwing Intermediate Events.
11.5.3.1. Catching Intermediate Events
Catching intermediate events comprises intermediate events which implement a response to specific indication of a situation from the main process workflow. Catching intermediate events are of the following types:
-
Message: Use theMessagecatching intermediate events in your process to implement a reaction to an arriving message. The message that this event is expected to react to, is specified in its properties. It executes the flow only when it receives the specific message. -
Timer: Use theTimerintermediate event to delay the workflow execution until a specified point or duration. ATimerintermediate event has one incoming flow and one outgoing flow and its execution starts when the incoming flow transfers to the event. When placed on an activity boundary, the execution is triggered at the same time as the activity execution. -
Escalation: Use theEscalationcatching intermediate event in your process to consume an Escalation object. AnEscalationcatching intermediate event awaits a specific escalation object defined in its properties. Once it receives the object, it triggers execution of its outgoing flow. -
Conditional: Use theConditionalintermediate event to execute a workflow when a specific business Boolean condition that it defines, evaluates to true. When placed in the process workflow, aConditionalintermediate event has one incoming flow and one outgoing flow and its execution starts when the incoming flow transfers to the event. When placed on an activity boundary, the execution is triggered at the same time as the activity execution. Note that if the event is non-interrupting, it triggers continuously while the condition is true. -
Error: Use the Error catching intermediate event in your process to execute a workflow when it received a specific error object defined in its properties. -
Compensation: Use theCompensationintermediate event to handle compensation in case of partially failed operations. ACompensationintermediate event is a boundary event that is attached to an activity in a transaction subprocess that may finish with aCompensationend event or aCancelend event. TheCompensationintermediate event must have one outgoing flow that connects to an activity that defines the compensation action needed to compensate for the action performed by the activity. -
Signal: Use theSignalcatching intermediate event to execute a workflow once a specified signal object defined in its properties is received from the main process or any other process.
11.5.3.2. Throwing Intermediate Events
Throwing intermediate events comprises events which produce a specified trigger in the form of a message, escalation, or signal, to drive the flow of a process. Throwing intermediate events are of the following types:
-
Message: Use theMessagethrow intermediate event to produce and send a message to a communication partner (such as an element in another process). Once it sends a message, the process execution continues. -
Escalation: Use theEscalationthrow intermediate event to produce an escalation object. Once it creates an escalation object, the process execution continues. The escalation object can be consumed by anEscalationstart event or anEscalationintermediate catch event, which is looking for this specific escalation object. -
Signal: Use theSignalthrowing intermediate events to produces a signal object. Once it creates a signal object, the process execution continues. The signal object is consumed by aSignalstart event or a Signal catching intermediate event, which is looking for this specific signal object.
11.6. Gateways
"Gateways are used to control how Sequence Flows interact as they converge and diverge within a Process."[1]
Gateways are used to create or synchronize branches in the workflow using a set of conditions which is called the gating mechanism. Gateways are either converging (multiple flows into one flow) or diverging (one flow into multiple flows).
One Gateway cannot have multiple incoming and multiple outgoing flows.
Depending on the gating mechanism you want to apply, you can use the following types of gateways:
- Parallel (AND): in a converging gateway, waits for all incoming flows. In a diverging gateway, takes all outgoing flows simultaneously.
-
Inclusive (OR): in a converging gateway, waits for all incoming flows whose condition evaluates to true. In a diverging gateway takes all outgoing flows whose condition evaluates to
true. - Exclusive (XOR): in a converging gateway, only the first incoming flow whose condition evaluates to true is chosen. In a diverging gateway only one outgoing flow is chosen.
- Event-based: used only in diverging gateways for reacting to events. See Section 11.6.1.1, “Event-Based Gateway”.
- Data-based Exclusive: used in both diverging and converging gateways to make decisions based on available data. See Section 11.6.1.4, “Data-Based Exclusive Gateway”.
11.6.1. Gateway Types
11.6.1.1. Event-Based Gateway
"The Event-Based Gateway has pass-through semantics for a set of incoming branches (merging behavior). Exactly one of the outgoing branches is activated afterwards (branching behavior), depending on which of events of the Gateway configuration is first triggered."[2]
The Gateway is only diverging and allows you to react to possible events as opposed to the Data-based Exclusive Gateway, which reacts to the process data. It is the event that actually occurs that decides which outgoing flow is taken. As it provides the mechanism to react to exactly one of the possible events, it is exclusive, that is, only one outgoing flow is taken.
The Gateway might act as a start event, where the process is instantiated only if one the Intermediate Events connected to the Event-Based Gateway occurs.
11.6.1.2. Parallel Gateway
"A Parallel Gateway is used to synchronize (combine) parallel flows and to create parallel flows."[3]
- Diverging
- Once the incoming flow is taken, all outgoing flows are taken simultaneously.
- Converging
- The Gateway waits until all incoming flows have entered and only then triggers the outgoing flow.
11.6.1.3. Inclusive Gateway
- Diverging
Once the incoming flow is taken, all outgoing flows whose condition evaluates to true are taken. Connections with lower priority numbers are triggered before triggering higher priority ones; priorities are evaluated but the BPMN2 specification doesn’t guarantee this. So for portability reasons it is recommended that you do not depend on this.
ImportantMake sure that at least one of the outgoing flow evaluates to true at runtime; otherwise, the process instance terminates with a runtime exception.
- Converging
- The Gateway merges all incoming flows previously created by a diverging Inclusive Gateway; that is, it serves as a synchronizing entry point for the Inclusive Gateway branches.
Attributes
- Default gate
- The outgoing flow taken by default if no other flow can be taken.
11.6.1.4. Data-Based Exclusive Gateway
- Diverging
The Gateway triggers exactly one outgoing flow: the flow with the constraint evaluated to true and the lowest priority is taken. After evaluating the constraints that are linked to the outgoing flows: the constraint with the lowest priority number that evaluates to true is selected.
Possible Runtime ExceptionMake sure that at least one of the outgoing Flows evaluates to true at runtime: if no Flow can be taken, the execution returns a runtime exception.
- Converging
- The Gateway allows a workflow branch to continue to its outgoing flow as soon as it reaches the Gateway; that is, whenever one of the incoming flows triggers the Gateway, the workflow is sent to the outgoing flow of the Gateway; if it is triggered from more than one incoming connection, it triggers the next node for each trigger.
Attributes
- Default gate
- The outgoing flow taken by default if no other flow can be taken.
11.7. Variables
Variables are elements that serve for storing a particular type of data during runtime. The type of data a variable contains is defined by its data type.
Just like any context data, every variable has its scope that defines its "visibility". An element, such as a process, subprocess, or task can only access variables in its own and parent contexts: variables defined in the element’s child elements cannot be accessed. Therefore, when an elements requires access to a variable on runtime, its own context is searched first. If the variable cannot be found directly in the element’s context, the immediate parent context is searched. The search continues to "level up" until the Process context is reached; in case of globals, the search is performed directly on the session container. If the variable cannot be found, a read access request returns null and a write access produces an error message, and the process continues its execution. Variables are searched for based on their ID.
In Red Hat JBoss BPM Suite, variables can live in the following contexts:
-
Session context:
Globalsare visible to all process instances and assets in the given session and are intended to be used primarily by business rules and by constrains. The are created dynamically by the rules or constrains. -
Process context:
Process variablesare defined as properties in the BPMN2 definition file and are visible within the process instance. They are initialized at process creation and destroyed on process finish. Element context:
Local variablesare available within their process element, such as an activity. They are initialized when the element context is initialized, that is, when the execution workflow enters the node and execution of theOnEntryaction finished if applicable. They are destroyed when the element context is destroyed, that is, when the execution workflow leaves the element.Values of local variables can be mapped to global or process variables using the assignment mechanism (see Section 11.8, “Assignment”). This allows you to maintain relative independence of the parent element that accommodates the local variable. Such isolation may help prevent technical exceptions.
11.8. Assignment
The assignment mechanism allows you to assign a value to an object, such as a variable, before or after the particular element is executed.
When defining assignment on an activity element, the value assignment is performed either before or after activity execution. If the assignment defines mapping to a local variable, the time when the assignment is performed depends on whether the local variable is defined as an DataInput or DataOutput item.
For example, if you need to assign a task to a user whose ID is a process variable, use the assignment to map the variable to the parameter ActorId.
Assignment is defined in the Assignments property in case of activity elements and in the DataInputAssocations or DataOutputAssociations property in case of non-activity elements.
As parameters of the type String can make use of the assignment mechanism by applying the respective syntax directly in their value, #{userVariable}, assignment is rather intended for mapping of properties that are not of type String.
11.9. Action Scripts
Action scripts are pieces of code that define the Script property or an element’s interceptor action. Action scripts have access to global variables, process variables, and the predefined variable kcontext. Accordingly, kcontext is an instance of the ProcessContext interface. See the ProcessContext Javadoc for more information.
Currently, Java and MVEL are supported as dialects for action scripts definitions. MVEL accepts any valid Java code and additionally provides support for nested access to parameters. For example, the MVEL equivalent of Java call person.getName() is person.name.
Example 11.1. Sample Action Script
The following action script prints out the name of the person:
// Java dialect
System.out.println(person.getName());// MVEL dialect
System.out.println(person.name);Process Instance Action Scripts
Additionally, you can use action scripts to view information about process instances.
Use the following commands to:
Return the ID of a process instance:
System.out.println(kcontext.getProcessInstance().getId());Return the parent process instance ID if a process instance has a parent:
System.out.println(kcontext.getProcessInstance().getParentProcessInstanceId());Return the ID of a process definition that is related to a process instance:
System.out.println(kcontext.getProcessInstance().getProcessId());Return the name of a process definition that is related to a process instance:
System.out.println(kcontext.getProcessInstance().getProcessName());Return the state of a process instance:
System.out.println(kcontext.getProcessInstance().getState());
To set a process variable in an action script, use kcontext.setVariable("VARIABLE_NAME", "VALUE").
11.10. Constraints
There are two types of constraints in business processes: code constraints and rule constraints.
Code constraints are boolean expressions evaluated directly whenever they are reached; these constraints are written in either Java or MVEL. Both Java and MVEL code constraints have direct access to the globals and variables defined in the process.
Here is an example of a valid Java code constraint, person being a variable in the process:
return person.getAge() > 20;Here is an example of a valid MVEL code constraint, person being a variable in the process:
return person.age > 20;Rule constraints are equal to normal Drools rule conditions. They use the Drools Rule Language syntax to express complex constraints. These rules can, like any other rule, refer to data in the working memory. They can also refer to globals directly. Here is an example of a valid rule constraint:
Person(age > 20)This tests for a person older than 20 in the working memory.
Rule constraints do not have direct access to variables defined inside the process. However, it is possible to refer to the current process instance inside a rule constraint by adding the process instance to the working memory and matching for the process instance in your rule constraint. Logic is included to make sure that a variable processInstance of type WorkflowProcessInstance will only match the current process instance and not other process instances in the working memory. Note, it is necessary to insert the process instance into the session. If it is necessary to update the process instance, use Java code or an on-entry, on-exit, or explicit action in the process. The following example of a rule constraint will search for a person with the same name as the value stored in the variable name of the process:
processInstance : WorkflowProcessInstance()
Person(name == (processInstance.getVariable("name")))
# add more constraints here ...11.11. Timers
Timers wait for a predefined amount of time before triggering, once, or repeatedly. You can use timers to trigger certain logic after a certain period, or to repeat some action at regular intervals.
Configuring Timer with Delay and Period
A Timer node is set up with a delay and a period. The delay specifies the amount of time to wait after node activation before triggering the timer for the first time. The period defines the time between subsequent trigger activations. A period of 0 results in a one-shot timer. The (period and delay) expression must be of the form [#d][#h][#m][#s][#[ms]]. You can specify the amount of days, hours, minutes, seconds, and milliseconds. Milliseconds is the default value. For example, the expression 1h waits one hour before triggering the timer again.
Configuring Timer ISO-8601 Date Format
Since version 6, you can configure timers with valid ISO8601 date format that supports both one shot timers and repeatable timers. You can define timers as date and time representation, time duration or repeating intervals. For example:
Date - 2013-12-24T20:00:00.000+02:00 - fires exactly at Christmas Eve at 8PM
Duration - PT1S - fires once after 1 second
Repeatable intervals - R/PT1S - fires every second, no limit.
Alternatively R5/PT1S fires 5 times every secondConfiguring Timer with Process Variables
In addition to the above mentioned configuration options, you can specify timers using process variable that consists of string representation of either delay and period or ISO8601 date format. By specifying #{variable}, the engine dynamically extracts process variable and uses it as timer expression. The timer service is responsible for making sure that timers get triggered at the appropriate times. You can cancel timers so that they are no longer triggered. You can use timers in the following ways inside a process:
- You can add a timer event to a process flow. The process activation starts the timer, and when it triggers, once or repeatedly, it activates the timer node’s successor. Subsequently, the outgoing connection of a timer with a positive period is triggered multiple times. Canceling a Timer node also cancels the associated timer, after which no more triggers occur.
- You can associate timer with a sub-process or tasks as a boundary event.
Updating Timer Within a Running Process Instance
Sometimes a process requires the possibility to dynamically alter the timer period or delay without the need to restart the entire process workflow. In that case, an already scheduled timer can be rescheduled to meet the new requirements: for example to prolong or shorten the timer expiration time or change the delay, period, and repeat limit.
For this reason, jBPM offers a corresponding UpdateTimerCommand class which allows you to perform these several steps as an atomic operation. All of them are then done within the same transaction.
org.jbpm.process.instance.command.UpdateTimerCommandIt is supported to update the boundary timer events as well as the intermediate timer events.
You can reschedule the timer by specifying the two mandatory parameters and one of the three optional parameter sets of the UpdateTimerCommand class.
Both of the following two parameters are mandatory:
-
process instance ID (
long); -
timer node name (
String).
Next, choose and configure one of the three following parameter sets:
-
delay (
long); -
period (
long) and repeat limit (int); - delay, period, and repeat limit.
Example 11.2. Rescheduling Timer Event
// Start the process instance and record its ID:
long id = kieSession.startProcess(BOUNDARY_PROCESS_NAME).getId();
// Set the timer delay to 3 seconds:
kieSession.execute(new UpdateTimerCommand(id, BOUNDARY_TIMER_ATTACHED_TO_NAME, 3));
As you can notice, the rescheduling is performed using the kieSession executor to ensure execution within the same transaction.
Troubleshooting
- Getting IllegalStateException Exception
The Intelligent Process Server uses EJB timer service by default for implementation of timer-based nodes. Consequently, the limitations described in the warning message here about Singleton strategy and CMT are valid for the out-of-the-box Intelligent Process Server setup. To resolve the issue:
-
Change the
RuntimeManagerstrategy. -
Disable the default EJB timer service for timer nodes by setting the system property
org.kie.timer.ejb.disabledtotrue.
- The Intelligent Process Server Throws InactiveTransactionException When Using Timers
When you deploy the Intelligent Process Server on Red Hat JBoss EAP 7 and configure a database for the EJB timer service, processes that require timers end in the InactiveTransactionException exception similar to the following:
WFLYEJB0018: Ignoring exception during setRollbackOnly: com.arjuna.ats.jta.exceptions.InactiveTransactionException: ARJUNA016102: The transaction is not active! Uid is ...To resolve this issue:
- Update your Red Hat JBoss BPM Suite to version 6.4.2.
Set the property
org.jbpm.ejb.timer.txtotrue.Note that the property is not available in previous versions of Red Hat JBoss BPM Suite. See chapter System Properties of Red Hat JBoss BPM Suite Administration and Configuration Guide for further information.
11.12. Multi-Threading
11.12.1. Multi-Threading
In the following text, we will refer to two types of "multi-threading": logical and technical. Technical multi-threading is what happens when multiple threads or processes are started on a computer, for example by a Java or C program. Logical multi-threading is what we see in a BPM process after the process reaches a parallel gateway. From a functional standpoint, the original process will then split into two processes that are executed in a parallel fashion.
The BPM engine supports logical multi-threading; for example, processes that include a parallel gateway are supported. We’ve chosen to implement logical multi-threading using one thread; accordingly, a BPM process that includes logical multi-threading will only be executed in one technical thread. The main reason for doing this is that multiple (technical) threads need to be be able to communicate state information with each other if they are working on the same process. This requirement brings with it a number of complications. While it might seem that multi-threading would bring performance benefits with it, the extra logic needed to make sure the different threads work together well means that this is not guaranteed. There is also the extra overhead incurred because we need to avoid race conditions and deadlocks.
11.12.2. Engine Execution
In general, the BPM engine executes actions in serial. For example, when the engine encounters a script task in a process, it will synchronously execute that script and wait for it to complete before continuing execution. Similarly, if a process encounters a parallel gateway, it will sequentially trigger each of the outgoing branches, one after the other. This is possible since execution is almost always instantaneous, meaning that it is extremely fast and produces almost no overhead. As a result, the user will usually not even notice this. Similarly, action scripts in a process are also synchronously executed, and the engine will wait for them to finish before continuing the process. For example, doing a Thread.sleep(…) as part of a script will not make the engine continue execution elsewhere but will block the engine thread during that period.
The same principle applies to service tasks. When a service task is reached in a process, the engine will also invoke the handler of this service synchronously. The engine will wait for the completeWorkItem(…) method to return before continuing execution. It is important that your service handler executes your service asynchronously if its execution is not instantaneous.
To implement an asynchronous service handler, implement the service in a new thread using the executeWorkItem() method in the work item handler that allows the process instance to continue its execution.
package documentation.wih.async;
import java.util.concurrent.TimeUnit;
import org.kie.api.runtime.process.WorkItem;
import org.kie.api.runtime.process.WorkItemHandler;
import org.kie.api.runtime.process.WorkItemManager;
public class MyServiceTaskHandler implements WorkItemHandler {
private Thread asyncThread;
public void executeWorkItem(final WorkItem workItem, final WorkItemManager manager) {
asyncThread = new Thread(new Runnable() {
public void run() {
for (int i = 0; i < 10; i++) {
System.out.println("Hello number + " + i + " from async!");
waitASecond();
}
}
});
asyncThread.start();
manager.completeWorkItem(workItem.getId(), null);
}
public void abortWorkItem(WorkItem workItem, WorkItemManager manager) {
//asyncThread can't be aborted
}
private static void waitASecond() {
try {
TimeUnit.SECONDS.sleep(1);
} catch (InterruptedException ignored) {}
}
}An example of this would be a service task that invokes an external service. Since the delay in invoking this service remotely and waiting for the results might be too long, it might be a good idea to invoke this service asynchronously. This means that the handler will only invoke the service and will notify the engine later when the results are available. In the mean time, the process engine then continues execution of the process.
Human tasks are a typical example of a service that needs to be invoked asynchronously, as we don’t want the engine to wait until a human actor has responded to the request. The human task handler will only create a new task (on the task list of the assigned actor) when the human task node is triggered. The engine will then be able to continue execution on the rest of the process (if necessary), and the handler will notify the engine asynchronously when the user has completed the task.
11.12.3. Job Executor for Asynchronous Execution
In Red Hat JBoss BPM Suite, the Job Executor component integrates with the runtime engine for processing asynchronous tasks. You can delegate asynchronous execution operations, such as error handling, retry, cancellation, and history logging in a new thread (using custom implementation of WorkItemHandler) and use the Job Executor to handle these operations for you. The Job Executor provides an environment for background execution of commands, which are nothing but business logic encapsulated within a simple interface.
The custom tasks that the process engine delegates to the Job Executor runs as asynchronous WorkItemHandler. Red Hat JBoss BPM Suite provides AsyncWorkItemHandler that is backed by the Red Hat JBoss BPM Suite Job Executor. During the execution, the AsyncWorkItemHandler sets contextual data available inside the command. You can configure the AsyncWorkItemHandler class in two ways:
-
As a generic handler where you provide the command name as part of the work item parameters. In Business Central while modeling a process, if you need to execute some work item asynchronously: specify
asyncas the value for theTaskNameproperty, create a data input calledCommandClassand assign the fully-qualified class name of thisCommandClassas the data input. -
As a specific handler which is created to handle a given type of work item, thus allowing you to register different instances of
AsyncWorkItemHandlerfor different work items. Commands are most likely to be dedicated to a particular work item, which allows you to specify theCommandClassat registration time instead of requiring it at design time, as with the first approach. But this means that an additional CDI bean that implementsWorkItemHandlerProducerinterface needs to be provided and placed on the application classpath so that the CDI container can find it. When you are ready to model your process, set the value of theTaskNameproperty to the one provided at registration time.
11.12.4. Using Job Executor in Embedded Mode
The Job Executor API is a public API and is available within kie-api (org.kie.api.executor). You can run your background processes asynchronously using the Job Executor from Business Central or outside the Business Central in embedded mode. To use the Job Executor in Business Central, see Section 11.12.6, “Using Job Executor in Business Central”. Perform the following steps to use the Job Executor in the embedded mode:
-
Implement the
Commandinterface. -
Transfer business data from the process engine to your
Commandimplementation. - Configure the Job Executor.
-
Register the
AsyncWorkItemHandlerhandler, which uses the Job Executor. - Provide the execution results to the process engine.
Wrapping Business Logic with the Command Interface
The Job Executor contains the business logic to be executed and does not have any process runtime related information. The Job Executor works on instances of the Command interface. It receives data through the CommandContext object and returns results of the execution with ExecutionResults class:
package org.kie.api.executor;
import org.kie.api.executor.ExecutionResults;
public interface Command {
public ExecutionResults execute(CommandContext ctx) throws Exception;
}
Here, ctx is the contextual data given by the executor service.
Since the Job Executor is decoupled from the runtime process engine and provides only the logic that is to be executed as a part of that command, it promotes reuse of already existing logic by wrapping it with Command implementation.
Transferring Business Data from the Process Engine to the Command Interface
The input data is transferred from the process engine to the command using the data transfer object CommandContext. It is important that the data CommandContext holds is serializable.
package org.kie.api.executor;
import java.io.Serializable;
public class CommandContext implements Serializable {
private static final long serialVersionUID = -1440017934399413860L;
private Map<String, Object> data;
public CommandContext() {
data = new HashMap<String, Object>();
}
public CommandContext(Map<String, Object> data) {
this.data = data;
}
public void setData(Map<String, Object> data) {
this.data = data;
}
public Map<String, Object> getData() {
return data;
}
public Object getData(String key) {
return data.get(key);
}
public void setData(String key, Object value) {
data.put(key, value);
}
public Set<String> keySet() {
return data.keySet();
}
@Override
public String toString() {
return "CommandContext{" + "data=" + data + '}';
}
}
CommandContext should provide the following:
-
businessKey: a unique identifier of the caller. -
callbacks: the fully qualified classname (FQCN) of theCommandCallbackinstance to be called on command completion.
Configuring the Executor
The Job Executor API usage scenarios are identical when used from Business Central and when used outside of Business Central. See example Job Executor configuration options:
In-memory Job Executor with optional configuration:
import org.jbpm.executor.ExecutorServiceFactory; .. // Configuration of in-memory executor service. executorService = ExecutorServiceFactory.newExecutorService(); // Set number of threads which will be used by executor - default is 1. executorService.setThreadPoolSize(1); // Sets interval at which executor threads are running in seconds - default is 3. executorService.setInterval(1); // Sets time unit of interval - default is SECONDS. executorService.setTimeunit(TimeUnit.SECONDS); // Number of retries in case of excepting during execution of command - default is 3. executorService.setRetries(1); executorService.init();Executor configuration using
EntityManagerFactoryto store jobs into a database:emf = Persistence.createEntityManagerFactory("org.jbpm.executor"); // Configuration of database executor service. executorService = ExecutorServiceFactory.newExecutorService(emf); // Optional configuration is skipped. executorService.init();
Registering the AsyncWorkItemHandler Handler
The AsyncWorkItemHandler handler uses Job Executor for scheduling tasks. See the following code sample to register the AsyncWorkItemHandler handler:
import java.util.List;
import java.util.Map;
import org.kie.api.event.process.ProcessEventListener;
import org.kie.api.io.ResourceType;
import org.kie.api.runtime.KieSession;
import org.kie.api.runtime.manager.RuntimeEngine;
import org.kie.api.runtime.manager.RuntimeEnvironment;
import org.kie.api.runtime.manager.RuntimeEnvironmentBuilder;
import org.kie.api.runtime.manager.RuntimeManagerFactory;
import org.kie.api.runtime.process.ProcessInstance;
import org.kie.api.runtime.process.WorkItemHandler;
import org.kie.internal.io.ResourceFactory;
import org.kie.internal.runtime.manager.context.EmptyContext;
import org.jbpm.runtime.manager.impl.DefaultRegisterableItemsFactory;
...
RuntimeEnvironment environment = RuntimeEnvironmentBuilder
.Factory.get().newDefaultBuilder()
.userGroupCallback(userGroupCallback)
.addAsset(ResourceFactory.newClassPathResource
("BPMN2-ScriptTask.bpmn2"), ResourceType.BPMN2)
.registerableItemsFactory(new DefaultRegisterableItemsFactory() {
@Override
public Map<String, WorkItemHandler> getWorkItemHandlers(RuntimeEngine runtime) {
Map<String, WorkItemHandler> handlers = super.getWorkItemHandlers(runtime);
handlers.put("async", new AsyncWorkItemHandler
(executorService, "org.jbpm.executor.commands.PrintOutCommand"));
return handlers;
}
@Override
public List<ProcessEventListener> getProcessEventListeners( RuntimeEngine runtime) {
List<ProcessEventListener> listeners = super.getProcessEventListeners(runtime);
listeners.add(countDownListener);
return listeners;
}
})
.get();
manager = RuntimeManagerFactory.Factory.get().newSingletonRuntimeManager(environment);
assertNotNull(manager);
RuntimeEngine runtime = manager.getRuntimeEngine(EmptyContext.get());
KieSession ksession = runtime.getKieSession();
assertNotNull(ksession);
ProcessInstance processInstance = ksession.startProcess("ScriptTask");
assertEquals(ProcessInstance.STATE_ACTIVE, processInstance.getState());
Thread.sleep(3000);
processInstance = runtime.getKieSession().getProcessInstance(processInstance.getId());
assertNull(processInstance);Providing Execution Results to the Process Engine
The outcome of the command is provided to process engine using the ExecutionResults class. ExecutionResults is a data transfer object. The data provided by this class must be serializable.
package org.kie.api.executor;
import org.kie.api.executor.ExecutorService;
import java.io.Serializable;
public class ExecutionResults implements Serializable {
private static final long serialVersionUID = -1738336024526084091L;
private Map<String, Object> data = new HashMap<String, Object>();
public ExecutionResults() {}
public void setData(Map<String, Object> data) {
this.data = data;
}
public Map<String, Object> getData() {
return data;
}
public Object getData(String key) {
return data.get(key);
}
public void setData(String key, Object value) {
data.put(key, value);
}
public Set<String> keySet() {
return data.keySet();
}
@Override
public String toString() {
return "ExecutionResults{" + "data=" + data + '}';
}
}For a list of Maven dependencies, see example Embedded jBPM Engine Dependencies.
11.12.5. Hello World Example with Embedded Job Executor
The following example uses the Job Executor in embedded mode. If you are using Maven, see example Embedded jBPM Engine Dependencies for a list of Maven dependencies. The following example uses Red Hat JBoss Developer Studio to model and execute the project. To use the Job Executor in embedded mode:
In your jBPM project, add the
src/main/resources/META-INF/drools.rulebase.conffile with the following content:drools.workDefinitions = WorkDefinitions.widAdd the
src/main/resources/META-INF/WorkDefinitions.widfile with the following content:import org.drools.core.process.core.datatype.impl.type.ObjectDataType; import java.lang.Long; import java.lang.Integer; import java.lang.Boolean; import java.lang.String; [ [ "name" : "AsyncWIH", "results" : [ "Result" : new ObjectDataType(), ], "displayName" : "AsyncWIH", "icon" : "async-16x15.png" ], ]Add the following BPMN diagram in the
src/main/resourcesdirectory: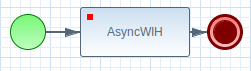
In your diagram, create an
org.kie.api.executor.ExecutionResultsvariable and map it to the Output variable of the asynchronous work item.Create a
Commandimplementation insrc/main/java:package com.sample; import org.kie.api.executor.Command; import org.kie.api.executor.CommandContext; import org.kie.api.executor.ExecutionResults; public class HelloWorldCommand implements Command { @Override public ExecutionResults execute(CommandContext arg0) throws Exception { System.out.println("Hello World from Business Command!"); return new ExecutionResults(); } }Create the main class that will register the work item handler and execute the process:
package com.sample; import java.util.Properties; import javax.persistence.EntityManagerFactory; import javax.persistence.Persistence; import org.jbpm.test.JBPMHelper; import org.kie.api.KieBase; import org.kie.api.KieServices; import org.kie.api.runtime.KieContainer; import org.kie.api.runtime.KieSession; import org.kie.api.runtime.manager.RuntimeEngine; import org.kie.api.runtime.manager.RuntimeEnvironmentBuilder; import org.kie.api.runtime.manager.RuntimeManager; import org.kie.api.runtime.manager.RuntimeManagerFactory; import bitronix.tm.resource.jdbc.PoolingDataSource; import org.kie.api.executor.ExecutorService; import org.jbpm.executor.ExecutorServiceFactory; import org.jbpm.executor.impl.wih.AsyncWorkItemHandler; public class ProcessMain { static EntityManagerFactory emf; public static void main(String[] args) throws InterruptedException { KieServices ks = KieServices.Factory.get(); KieContainer kContainer = ks.getKieClasspathContainer(); KieBase kbase = kContainer.getKieBase("kbase"); RuntimeManager manager = createRuntimeManager(kbase); RuntimeEngine engine = manager.getRuntimeEngine(null); KieSession ksession = engine.getKieSession(); //Register the work item handler and point it to the FQCN of the command implementation. ExecutorService executorService = ExecutorServiceFactory.newExecutorService(ProcessMain.emf); ksession.getWorkItemManager().registerWorkItemHandler("AsyncWIH", new AsyncWorkItemHandler(executorService,"com.sample.HelloWorldCommand")); executorService.init(); ksession.startProcess("com.sample.bpmn.hello"); manager.disposeRuntimeEngine(engine); //Wait for the executor to finish. Otherwise, the process finishes before the job executor is checked. Thread.sleep(5000); System.exit(0); } private static RuntimeManager createRuntimeManager(KieBase kbase) { JBPMHelper.startH2Server(); // Create a data source if no custom datasource is available Properties properties = JBPMHelper.getProperties(); PoolingDataSource pds = new PoolingDataSource(); //Note the JNDI name pds.setUniqueName("jndi:/example"); pds.setClassName("bitronix.tm.resource.jdbc.lrc.LrcXADataSource"); pds.setMaxPoolSize(5); pds.setAllowLocalTransactions(true); pds.getDriverProperties().put("user", properties.getProperty("persistence.datasource.user", "sa")); pds.getDriverProperties().put("password", properties.getProperty("persistence.datasource.password", "")); pds.getDriverProperties().put("url", properties.getProperty("persistence.datasource.url", "jdbc:h2:tcp://localhost/~/jbpm-db;MVCC=TRUE")); pds.getDriverProperties().put("driverClassName", properties.getProperty("persistence.datasource.driverClassName", "org.h2.Driver")); pds.init(); //Note the persistence unit name ProcessMain.emf = Persistence.createEntityManagerFactory("org.jbpm.example"); RuntimeEnvironmentBuilder builder = RuntimeEnvironmentBuilder.Factory.get() .newDefaultBuilder().entityManagerFactory(emf) .knowledgeBase(kbase); return RuntimeManagerFactory.Factory.get() .newSingletonRuntimeManager(builder.get(), "com.sample:example:1.0"); } }Add the
src/main/resource/persistence.xmlfile with the following content. If you have a custom datasource, configure your custom persistence unit.<?xml version="1.0" encoding="UTF-8"?> <persistence version="2.0" xmlns="http://java.sun.com/xml/ns/persistence" xmlns:orm="http://java.sun.com/xml/ns/persistence/orm" xmlns:xsi="http://www.w3.org/2001/XMLSchema-instance" xsi:schemaLocation="http://java.sun.com/xml/ns/persistence http://java.sun.com/xml/ns/persistence/persistence_2_0.xsd http://java.sun.com/xml/ns/persistence/orm http://java.sun.com/xml/ns/persistence/orm_2_0.xsd"> <persistence-unit name="org.jbpm.example" transaction-type="JTA"> <provider>org.hibernate.ejb.HibernatePersistence</provider> <jta-data-source>jndi:/example</jta-data-source> <mapping-file>META-INF/Executor-orm.xml</mapping-file> <properties> <property name="hibernate.dialect" value="org.hibernate.dialect.H2Dialect" /> <property name="hibernate.max_fetch_depth" value="3" /> <property name="hibernate.hbm2ddl.auto" value="update" /> <property name="hibernate.show_sql" value="false" /> <!-- BZ 841786: AS7/EAP 6/Hib 4 uses new (sequence) generators which seem to cause problems --> <property name="hibernate.id.new_generator_mappings" value="false" /> <property name="hibernate.transaction.jta.platform" value="org.hibernate.service.jta.platform.internal.BitronixJtaPlatform" /> </properties> </persistence-unit> </persistence>When you execute the main class, the expected output is:
[main] INFO org.jbpm.executor.impl.ExecutorImpl - Starting Executor Component ... - Thread Pool Size: 1 - Interval: 3 SECONDS - Retries per Request: 3 [main] WARN org.jbpm.executor.impl.ExecutorImpl - Disabling JMS support in executor because: unable to initialize JMS configuration for executor due to unable to find a bound object at name 'java:/JmsXA' Hello World from Business Command!
11.12.6. Using Job Executor in Business Central
AsyncWorkItemHandler accepts the following input parameters:
-
CommandClass: A fully-qualified class name (FQCN) of the command to be executed. Mandatory unless the handler is configured with a default command class. -
Retries: The number of retries for the command execution. This parameter is optional. RetryDelay: A single value or a comma separated list of time expressions used in case of multiple retries. For example:5s, 2m, 4h. This parameter is optional.If you provide a comma separated list of time expressions and if the number of retry delays is smaller than number of retries, the executor uses the last available value from the list.
If you provide a single time expression for retry delay, the retries will be equally spaced.
-
Delay: A start delay for jobs. The value is a time expression:5s,2m, or4h. The delay is calculated from the current time. This parameter is optional. -
AutoComplete: Allows to use the fire and forget execution style. Thus, the handler does not wait for job completion. The default value isfalse. -
Priority: Priority for the job execution. The value is a range from 0 (the lowest) to 9 (the highest).
The following data are available inside of the command during execution:
-
businessKey: A String generated from the process instance ID and the work item ID in the following format: [processInstanceId]:[workItemId]. -
workItem: A work item instance that is being executed, including all its parameters. -
processInstanceId: The process instance ID that triggered this work item execution.
To register the Asynchronous Work Item handler in Business Central:
Implement the
Commandinterface, for example:package docs.command; import org.kie.api.executor.Command; import org.kie.api.executor.CommandContext; import org.kie.api.executor.ExecutionResults; public class HelloWorldCommand implements Command { public ExecutionResults execute(CommandContext commandContext) throws Exception { System.out.println("Hello World from Business Command!"); return new ExecutionResults(); } }Use the following
pom.xml:<project xmlns="http://maven.apache.org/POM/4.0.0" xmlns:xsi="http://www.w3.org/2001/XMLSchema-instance" xsi:schemaLocation="http://maven.apache.org/POM/4.0.0 http://maven.apache.org/xsd/maven-4.0.0.xsd"> <modelVersion>4.0.0</modelVersion> <groupId>org.docs</groupId> <artifactId>hello-commandimpl</artifactId> <version>1.0</version> <name>commandImpl</name> <description>Hello world command implementation</description> <dependencies> <dependency> <groupId>org.kie</groupId> <artifactId>kie-api</artifactId> <version>6.4.0.Final-redhat-8</version> <scope>provided</scope> </dependency> </dependencies> </project>See the Supported Component Versions of the Red Hat JBoss BPM Suite Installation Guide for the current version number. Also note that you must configure Maven to work with the Red Hat middleware repository. See Chapter 3, Apache Maven for further information.
- Build your Maven project, upload the JAR file to the Business Central, and add into your project dependencies. See the Registering Work Item handler in Business Central chapter for further information.
In your project, define a custom Work Item Definition that will trigger your
Commandimplementation:- Click Work Item Definitions → Work Definitions. The Work Item Definitions editor opens.
Add your definition, specifying all parameters you want to use, for example:
[ "name" : "async", "displayName" : "Async Hello World!", "icon" : "defaultemailicon.gif", "parameters" : [ "CommandClass" : new StringDataType() ] ]- Click Save and Validate to ensure correctness of your Work Item Definition file.
- Click New Item → Business Process to create a new Business Process.
-
On your canvas, click
 to open the Object Library pallet, expand Service Tasks and drag and drop the Work Item you created on the canvas, for example the
 Async Hello World!Service Task. - Connect the Work Item with the start and end event.
-
Click on the Work Item and click
 to open the Properties tab. Click the 1 data inputs, 0 data outputs value and click
 to open the Data I/O window.
-
Set the
CommandClassattribute todocs.command.HelloWorldCommand. Alternatively, if you used a different package, enter the fully-qualified class name of your implementation. - Click Save to save the data input mappings.
- Click Save to save your process.
Register
AsyncWorkItemHandlerin Business Central:- Click Open Project Editor and navigate to the Deployment Descriptor for your project.
- Click Add under the Work Item handlers category.
-
Set the first
Valuefield toasync. Set the second
Valuefield to:new org.jbpm.executor.impl.wih.AsyncWorkItemHandler(org.jbpm.executor.ExecutorServiceFactory.newExecutorService(null))-
Set the resolver to
mvel. - Click Save and Validate to ensure correctness of your deployment descriptor.
You can now build, deploy, and start your process. If you followed the example above, you will see similar output in the in the command line:
09:46:03,473 INFO [stdout] (Thread-637 (HornetQ-client-global-threads-1573025029)) Hello World from Business Command!Executor Configuration
When you are not running the Executor Service in the embedded mode, you can use the following properties:
-
org.kie.executor.disabled:trueorfalseto enable or disable the executor. -
org.kie.executor.pool.size: an Integer that specifies the thread pool size for the executor. The default value is 1. -
org.kie.executor.retry.count: an Integer that specifies the default number of retries in case of an error executing a job. The default value is 3. -
org.kie.executor.interval: an Integer that specifies the time to wait between checking for waiting jobs. The default value is 3 seconds. -
org.kie.executor.timeunit:NANOSECONDS,MICROSECONDS,MILLISECONDS,SECONDS,MINUTES,HOURS, orDAYS. Specifies the unit for the interval property. The default isSECONDS.
11.12.7. Multiple Sessions and persistence
The simplest way to run multiple process instances is to run them in one knowledge session. However, it is possible to run multiple process instances in different knowledge sessions or in different technical threads.
When using multiple knowledge session with multiple processes and adding persistence, use a database that allows row-level as well as table-level locks: There could be a situation when there are 2 or more threads running, each within its own knowledge session instance. On each thread, a process is being started using the local knowledge session instance. In this use case, a race condition exists in which both thread A and thread B have coincidentally simultaneously finished a process instance. At this point, both thread A and B are committing changes to the database. If row-level locks are not possible, then the following situation can occur:
- Thread A has a lock on the ProcessInstanceInfo table, having just committed a change to that table.
- Thread A wants a lock on the SessionInfo table in order to commit a change.
- Thread B has the opposite situation: It has a lock on the SessionInfo table, having just committed a change.
- Thread B wants a lock on the ProcessInstanceInfo table, even though Thread A already has a lock on it.
This is a deadlock situation which the database and application are not be able to solve, unless row-level locks are possible and enabled in the database and tables used.
11.12.8. Asynchronous Events
In cases where several process instances from different process definitions are waiting for the same signal, they are generally executed sequentially in the same single thread. However, if one of those process instances throws a runtime exception, all the other process instances are affected, usually resulting in a rolled back transaction. To avoid this, Red Hat JBoss BPM Suite supports using asynchronous signals events for:
- Throwing Intermediate Signal Events
- End Events
From the Business Central, set the Data Input value of the throw event to async to automatically set the Executor Service on each ksession. This ensures that each process instance is signaled in a different transaction.
11.12.9. Technical exceptions
Technical exceptions occur when a technical component of a Process acts in an unexpected way. When using Java-based systems, this often results in a Java Exception. As these exceptions cannot be handled using BPMN2, it is important to handle them in expected ways.
The following types of code might throw exceptions:
- Code present directly in the process definition
- Code that is not part of the product executed during a Process
- Code that interacts with a technical component outside of the Process Engine
This includes the following:
-
Code in Element properties, such as the
Scriptproperty of a Script Task element or in the definitions of the interception actions, that is, theonEntryandonExitproperties -
Code in
WorkItemHandlersassociated withtaskand task-type nodes
Code in Element properties
Exceptions thrown by code defined in Element properties can cause the Process instance to fail in an unrecoverable way. Often, it is the code that starts the Process that will end up throwing the exception generated by a Process without returning a reference to the Process instance. Such code includes for example the onEntry and onExit properties, Script defined for the Script Task, etc.
Therefore, it is important to limit the scope of the code in these Elements so that is operates only over Process variables. Using a scriptTask to interact with a different technical component, such as a database or web service has significant risks because any exceptions thrown will corrupt or abort the Process instance.
To interact with other systems, use task Elements, serviceTask Elements and other task-type Elements. Do not use the scriptTask nodes for these purposes.
If the script defined in a scriptTask causes the problem, the Process Engine usually throws the WorkflowRuntimeException with information on the Process (see Section 11.12.9.1.5, “Extracting information from WorkflowRuntimeException”).
Code in WorkItemHandlers
WorkItemHandlers are used when your Process interacts with other technical systems.
You can either build exception handling into your own WorkItemhandler implementations or wrap your implementation into the handler decorator classes (for examples and detailed information see Section 11.12.9.1.2, “Exception handling classes”). These classes include the logic that is executed when an exception is thrown during the execution or abortion of a work item:
- SignallingTaskHandlerDecorator
-
catches the exception and signals it to the Process instance using a configurable event type when the
executeWorkItem()orabortWorkItemmethods of the originalWorkItemHandlerinstance throw an exception. The exception thrown is passed as part of the event. This functionality can be also used to signal to an Event SubProcess defined in the Process definition. - LoggingTaskHandlerDecorator
-
logs error about any exceptions thrown by the
executeWorkItem()andabortWorkItem()methods. It also saves any exceptions thrown to an internal list so that they can be retrieved later for inspection or further logging. The content and format of the message logged are configurable.
While the classes described above covers most cases involving exception handling as it catches any throwable objects, you might still want to write a custom WorkItemHandler that includes exception handling logic. In such a case, consider the following:
- Does the implementation catch all exceptions the code could return?
- Does the implementation complete or abort the work item after an exception has been caught or uses a mechanisms to retry the process later (in some cases, incomplete process instances might be acceptable)?
- Does the implementation define any other actions that need to be taken when an exception is caught? Would it be beneficial to interact with other technical systems? Should a Sub-Process be triggered to handle the exception?
If WorkItemManager signals that the work item has been completed or aborted, make sure the signal is sent after any signals to the Process instance were sent. Depending on how your Process definition, calling WorkItemManager.completeWorkItem() or WorkItemManager.abortWorkItem() triggers the completion of the Process instance as these methods trigger further execution of the Process execution flow.
11.12.9.1. Technical exception examples
11.12.9.1.1. Service Task handlers
The following example uses a Throwing Error Intermediate Event to throw an error. An Error Event Sub-Process then catches and handles the error.
When the Throwing Error Intermediate Event throws an error, the process instance is interrupted:
- Execution of the process instance stops: no other parts of the process are executed.
- The process instance finishes as ABORTED.
The process starts with a start event and continues to the Throw Exception service task. The task produces an exception, which is propagated as a signal object through the process instance and caught by the sub-process start event in the Exception Handler event sub-process. The workflow continues to the Handle Exception task and the process instance finishes with the sub-process end event.
Figure 11.2. Process with an exception handling Event Sub-Process
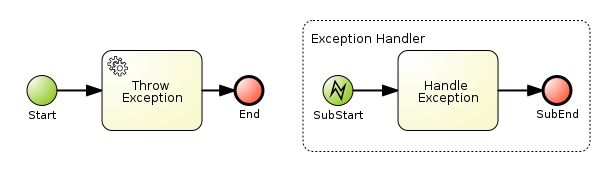
The following XML is a representation of the process. It contains elements and IDs that are referenced in Section 11.12.9.1.2, “Exception handling classes”.
<itemDefinition id="_stringItem" structureRef="java.lang.String" /> (1)
<message id="_message" itemRef="_stringItem"/> # (2)
<interface id="_serviceInterface" name="org.jbpm.examples.exceptions.service.ExceptionService">
<operation id="_serviceOperation" name="throwException">
<inMessageRef>_message</inMessageRef> (2)
</operation>
</interface>
<error id="_exception" errorCode="code" structureRef="_exceptionItem"/> (3)
<itemDefinition id="_exceptionItem" structureRef="org.kie.api.runtime.process.WorkItem"/> (4)
<message id="_exceptionMessage" itemRef="_exceptionItem"/> (4)
<interface id="_handlingServiceInterface" name="org.jbpm.examples.exceptions.service.ExceptionService">
<operation id="_handlingServiceOperation" name="handleException">
<inMessageRef>_exceptionMessage</inMessageRef> (4)
</operation>
</interface>
<process id="ProcessWithExceptionHandlingError" name="Service Process" isExecutable="true" processType="Private">
<!-- properties -->
<property id="serviceInputItem" itemSubjectRef="_stringItem"/> (1)
<property id="exceptionInputItem" itemSubjectRef="_exceptionItem"/> (4)
<!-- main process -->
<startEvent id="_1" name="Start" />
<serviceTask id="_2" name="Throw Exception" implementation="Other" operationRef="_serviceOperation">
<!-- rest of the serviceTask element and process definition... -->
<subProcess id="_X" name="Exception Handler" triggeredByEvent="true" >
<startEvent id="_X-1" name="subStart">
<dataOutput id="_X-1_Output" name="event"/>
<dataOutputAssociation>
<sourceRef>_X-1_Output</sourceRef>
<targetRef>exceptionInputItem</targetRef> (4)
</dataOutputAssociation>
<errorEventDefinition id="_X-1_ED_1" errorRef="_exception" /> (3)
</startEvent>
<!-- rest of the subprocess definition... -->
</subProcess>
</process>-
This
<itemDefinition>element defines a data structure that is used in theserviceInputItemproperty in the process. -
This
<message>element (first reference) defines a message that has a String as its content, as defined by the<itemDefintion>element on line above. The<interface>element below it refers to it (second reference) in order to define what type of content the service (defined by the<interface>) expects. -
This
<error>element (first reference) defines an error for use later in the process: an Event SubProcess is defined that is triggered by this error (second reference). The content of the error is defined by the<itemDefintion>element defined below the<error>element. This
<itemDefintion>element (first reference) defines an item that contains a WorkItem instance. The<message>element (second reference) then defines a message that uses this item definition to define its content. The<interface>element below that refers to the<message>definition (third reference) in order to define the type of content that the service expects.In the process itself, a
<property>element (fourth reference) is defined as having the content defined by the initial<itemDefintion>. This is helpful because it means that the Event SubProcess can then store the error it receives in that property (5th reference).
11.12.9.1.2. Exception handling classes
The BPMN process defined in Section 11.12.9.1.1, “Service Task handlers” contains two <serviceTask> activities. The org.jbpm.bpmn2.handler.ServiceTaskHandler class is the default task handler class used for <serviceTask> tasks. If you do not specify a Work Item Handler implementation for a <serviceTask> activity, the ServiceTaskHandler class is used.
The example below decorates the ServiceTaskHandler class with a SignallingTaskHandlerDecorator instance in order to define behavior when the ServiceTaskHandler class throws an exception.
In the example, the ServiceTaskHandler throws an exception because it calls the ExceptionService.throwException method, which throws an exception. (See the _handlingServiceInterface <interface> element in the BPMN2 XML schema.)
The example also configures which (error) event is sent to the process instance by the SignallingTaskHandlerDecorator instance. The SignallingTaskHandlerDecorator object does this when an exception is thrown in a task. In this example, because of the <error> definition with the error code code in the BPMN2 process, the signal is set to Error-code.
When sending a signal of an event to the Process Engine, consider the rules for signaling process events:
-
Error events are signaled by sending an
Error-ERRORCODE ATTRIBUTE VALUEvalue to the session. - Signal events are signaled by sending the name of the signal to the session.
If you wanted to send an error event to a Boundary Catch Error Event, the error type should be of the format:
"Error-" + $AttachedNodeID + "-" + $ERROR_CODE. For example,Error-SubProcess_1-888would be a valid error type.However, this is NOT a recommended practice because sending the signal this way bypasses parts of the boundary error event functionality and it relies on internal implementation details that might be changed in the future. For a way to programmatically trigger a boundary error event when an Exception is thrown in
WorkItemHandlersee this KnowledgeBase article.
Example 11.3. Using SignallingTaskHandlerDecorator
The ServiceTaskHandler calls the ExceptionService.throwException() method to throw an exception (refer to the _handlingServiceInterface interface element in the BPMN2).
The SignallingTaskHandlerDecorator that wraps the ServiceTaskHandler sends to the Process instance the error with the set error code.
import java.util.HashMap;
import java.util.Map;
import org.jbpm.bpmn2.handler.ServiceTaskHandler;
import org.jbpm.bpmn2.handler.SignallingTaskHandlerDecorator;
import org.jbpm.examples.exceptions.service.ExceptionService;
import org.kie.api.KieBase;
import org.kie.api.io.ResourceType;
import org.kie.api.runtime.KieSession;
import org.kie.api.runtime.process.ProcessInstance;
import org.kie.internal.builder.KnowledgeBuilder;
import org.kie.internal.builder.KnowledgeBuilderFactory;
import org.kie.internal.io.ResourceFactory;
public class ExceptionHandlingErrorExample {
public static final void main(String[] args) {
runExample();
}
public static ProcessInstance runExample() {
KieSession ksession = createKieSession();
String eventType = "Error-code";
SignallingTaskHandlerDecorator signallingTaskWrapper
= new SignallingTaskHandlerDecorator(ServiceTaskHandler.class, eventType);
signallingTaskWrapper.setWorkItemExceptionParameterName(ExceptionService.exceptionParameterName);
ksession.getWorkItemManager().registerWorkItemHandler("Service Task", signallingTaskWrapper);
Map<String, Object> params = new HashMap<String, Object>();
params.put("serviceInputItem", "Input to Original Service");
ProcessInstance processInstance = ksession.startProcess("ProcessWithExceptionHandlingError", params);
return processInstance;
}
private static KieSession createKieSession() {
KnowledgeBuilder kbuilder = KnowledgeBuilderFactory.newKnowledgeBuilder();
kbuilder.add(ResourceFactory.newClassPathResource("exceptions/ExceptionHandlingWithError.bpmn2"), ResourceType.BPMN2);
KieBase kbase = kbuilder.newKnowledgeBase();
return kbase.newKieSession();
}- 1
- Definition of the
Error-codeevent to be sent to the process instance when the wrappedWorkItemHandlerimplementation throws an exception. - 2
- Construction of the
SignallingTaskHandlerDecoratorclass instance with theWorkItemHandlerimplementation andeventTypeas parameters: Note that aSignallingTaskHandlerDecoratorclass constructor that takes an instance of aWorkItemHandlerimplementation as its parameter is also available. This constructor is useful if theWorkItemHandlerimplementation does not allow a no-argument constructor. - 3
- Registering the
WorkItemHandlerwith the session: When an exception is thrown by the wrappedWorkItemHandler, theSignallingTaskHandlerDecoratorsaves it as a parameter in theWorkIteminstance with a parameter name configured in theSignallingTaskHandlerDecorator(see the code below for theExceptionService).
For a list of Maven dependencies, see example Embedded jBPM Engine Dependencies in chapter Dependency Management of the Red Hat JBoss BPM Suite Development Guide.
11.12.9.1.3. Exception service
In Section 11.12.9.1.1, “Service Task handlers”, the BPMN2 process definition defines the exception service using the ExceptionService class as follows:
<interface id="_handlingServiceInterface" name="org.jbpm.examples.exceptions.service.ExceptionService">
<operation id="_handlingServiceOperation" name="handleException">
The exception service uses the ExceptionService class to provide the exception handling abilities. The class is implemented as follows:
import org.kie.api.runtime.process.WorkItem;
...
public class ExceptionService {
public static String exceptionParameterName = "my.exception.parameter.name";
public void handleException(WorkItem workItem) {
System.out.println( "Handling exception caused by work item '" + workItem.getName() + "' (id: " + workItem.getId() + ")");
Map<String, Object> params = workItem.getParameters();
Throwable throwable = (Throwable) params.get(exceptionParameterName);
throwable.printStackTrace();
}
public String throwException(String message) {
throw new RuntimeException("Service failed with input: " + message );
}
public static void setExceptionParameterName(String exceptionParam) {
exceptionParameterName = exceptionParam;
}
}For a list of Maven dependencies, see example Embedded jBPM Engine Dependencies in chapter Dependency Management of the Red Hat JBoss BPM Suite Development Guide.
You can specify any Java class with the default or another no-argument constructor as the class to provide the exception service so that it is executed as part of a serviceTask.
11.12.9.1.4. Handling errors with Signals
In the example in Section 11.12.9.1.1, “Service Task handlers”, an Error event occurs during Process execution and the execution is interrupted immediately: no other Flows or Activities are executed.
However, you might want to complete the execution. In such case you can use a Signal event as the Process execution continues after the Signal is processed (that is, after the Signal Event SubProcess or another Activities that the Signal triggered, finish their execution). Also, the Process execution finished successfully, not in an aborted state, which is the case if an Error is used.
In the example process, we define the error element which is then used to throw the Error:
<error id="_exception" errorCode="code" structureRef="_exceptionItem"/>To use a Signal instead, do the following:
Remove the line defining the
errorelement and define a<signal>element:<signal id="exception-signal" structureRef="_exceptionItem"/>Change all references from the
_exceptionvalue in the<error>XML tag to theexception-signalvalue of the<signal>XML tag.Change the
<errorEventDefinition>element in the<startEvent>,<errorEventDefinition id="_X-1_ED_1" errorRef="_exception" />to a
<signalEventDefinition>:<signalEventDefinition id="_X-1_ED_1" signalRef="exception-signal"/>
11.12.9.1.5. Extracting information from WorkflowRuntimeException
If a scripts in your Process definition may throw or threw an exception, you need to retrieve more information about the exception and related information.
If it is a scriptTask element that causes an exception, you can extract the information from the WorkflowRuntimeException as it is the wrapper of the scriptTask.
The WorkflowRuntimeException instance stores the information outlined in Table 11.5, “Information in WorkflowRuntimeException instances”. Values of all fields listed can be obtained using the standard get* methods.
| Field name | Type | Description |
|---|---|---|
|
|
|
The id of the
Note that the |
|
|
| The id of the process definition that was used to start the process (that is, "ExceptionScriptTask" in ) |
|
|
| The value of the (BPMN2) id attribute of the node that threw the exception |
|
|
| The value of the (BPMN2) name attribute of the node that threw the exception |
|
|
| The map containing the variables in the process instance (experimental) |
|
|
| The short message with information on the exception |
|
|
| The original exception that was thrown |
The following code illustrates how to extract extra information from a process instance that throws a WorkflowRuntimeException exception instance.
import org.jbpm.workflow.instance.WorkflowRuntimeException;
import org.kie.api.KieBase;
import org.kie.api.io.ResourceType;
import org.kie.api.runtime.KieSession;
import org.kie.api.runtime.process.ProcessInstance;
import org.kie.internal.builder.KnowledgeBuilder;
import org.kie.internal.builder.KnowledgeBuilderFactory;
import org.kie.internal.io.ResourceFactory;
public class ScriptTaskExceptionExample {
public static final void main(String[] args) {
runExample();
}
public static void runExample() {
KieSession ksession = createKieSession();
Map < String, Object > params = new HashMap < String, Object > ();
String varName = "var1";
params.put(varName, "valueOne");
try {
ProcessInstance processInstance = ksession.startProcess("ExceptionScriptTask", params);
} catch (WorkflowRuntimeException wfre) {
String msg = "An exception happened in " + "process instance [" + wfre.getProcessInstanceId() + "] of process [" + wfre.getProcessId() + "] in node [id: " + wfre.getNodeId() + ", name: " + wfre.getNodeName() + "] and variable " + varName + " had the value [" + wfre.getVariables().get(varName) + "]";
System.out.println(msg);
}
}
private static KieSession createKieSession() {
KnowledgeBuilder kbuilder = KnowledgeBuilderFactory.newKnowledgeBuilder();
kbuilder.add(ResourceFactory.newClassPathResource("exceptions/ScriptTaskException.bpmn2"), ResourceType.BPMN2);
KieBase kbase = kbuilder.newKnowledgeBase();
return kbase.newKieSession();
}
}Use the following Maven dependencies:
<dependencies>
...
<dependency>
<groupId>org.kie</groupId>
<artifactId>kie-api</artifactId>
<version>6.5.0.Final-redhat-2</version>
</dependency>
<dependency>
<groupId>org.jbpm</groupId>
<artifactId>jbpm-flow</artifactId>
<version>6.5.0.Final-redhat-2</version>
</dependency>
<dependency>
<groupId>org.kie</groupId>
<artifactId>kie-internal</artifactId>
<version>6.5.0.Final-redhat-2</version>
</dependency>
...
</dependencies>For the current Maven artifact version, see chapter Supported Component Versions of the Red Hat JBoss BPM Suite Installation Guide.
11.13. Process Fluent API
11.13.1. Using the Process Fluent API to Create Business Process
While it is recommended to define processes using the graphical editor or the underlying XML, you can also create a business process using the Process API directly. The most important process model elements are defined in the packages org.jbpm.workflow.core and org.jbpm.workflow.core.node.
Red Hat JBoss BPM Suite provides you a fluent API that allows you to easily construct processes in a readable manner using factories. You can then validate the process that you were constructing manually.
11.13.2. Process Fluent API Example
Here is an example of a basic process with only a script task:
import org.kie.api.KieServices;
import org.kie.api.builder.KieFileSystem;
import org.kie.api.builder.ReleaseId;
import org.kie.api.io.Resource;
import org.jbpm.ruleflow.core.RuleFlowProcessFactory;
import org.jbpm.ruleflow.core.RuleFlowProcess;
import org.jbpm.bpmn2.xml.XmlBPMNProcessDumper;
...
RuleFlowProcessFactory factory = RuleFlowProcessFactory.createProcess("org.jbpm.HelloWorld");
factory
// Header
.name("HelloWorldProcess")
.version("1.0")
.packageName("org.jbpm")
// Nodes
.startNode(1).name("Start").done()
.actionNode(2).name("Action")
.action("java", "System.out.println(\"Hello World\");").done()
.endNode(3).name("End").done()
// Connections
.connection(1, 2)
.connection(2, 3);
RuleFlowProcess process = factory.validate().getProcess();
KieServices ks = KieServices.Factory.get();
KieFileSystem kfs = ks.newKieFileSystem();
Resource resource = ks.getResources().newByteArrayResource(
XmlBPMNProcessDumper.INSTANCE.dump(process).getBytes());
resource.setSourcePath("helloworld.bpmn2");
kfs.write(resource);
ReleaseId releaseId = ks.newReleaseId("org.jbpm", "helloworld", "1.0");
kfs.generateAndWritePomXML(releaseId);
ks.newKieBuilder(kfs).buildAll();
ks.newKieContainer(releaseId).newKieSession().startProcess("org.jbpm.HelloWorld");For a list of Maven dependencies, see example Embedded jBPM Engine Dependencies.
In this example, we first call the static createProcess() method from the RuleFlowProcessFactory class. This method creates a new process and returns the RuleFlowProcessFactory that can be used to create the process.
A process consists of three parts:
Header: The header section comprises global elements such as the name of the process, imports, and variables.
In the above example, the header contains the name and version of the process and the package name.
Nodes: The nodes section comprises all the different nodes that are part of the process.
In the above example, nodes are added to the current process by calling the
startNode(),actionNode()andendNode()methods. These methods return a specificNodeFactorythat allows you to set the properties of that node. Once you have finished configuring that specific node, thedone()method returns you to the currentRuleFlowProcessFactoryso you can add more nodes, if necessary.Connections: The connections section links the nodes to create a flow chart.
In the above example, once you add all the nodes, you must connect them by creating connections between them. This can be done by calling the method
connection, which links the nodes.Finally, you can validate the generated process by calling the
validate()method and retrieve the createdRuleFlowProcessobject.
11.14. Testing Business Processes
Although business processes should not contain any implementation details and should be as high-level as possible, they have a life cycle similar to other development artefacts. Because business processes can be updated dynamically and modifying them can cause errors, testing a process definition is a part of creating business processes.
Process unit tests ensure that the process behaves as expected in specific use cases. For example, an output can be tested based on a particular input. To simplify unit testing, Red Hat JBoss BPM Suite includes the org.jbpm.test.JbpmJUnitBaseTestCase class. The class provides the following:
- Helper methods for creating a new knowledge base and a session for one or more given processes, with the possibility of using persistence. For more information, see Section 11.14.2, “Configuring Persistence”.
Assert statements to check:
- The state of a process instance. A process instance can be active, completed, or aborted.
- The node instances that are currently active.
- Which nodes have been triggered. This enables to inspect the followed path.
- The value of different variables.
Example 11.4. JUnit Test of hello.bpmn Process
The process below contains a start event, a script task, and an end event. The example JUnit test creates a new session, starts the hello.bpmn process, verifies whether the process instance has completed successfully, and whether the StartProcess, Hello, and EndProcess nodes were executed.
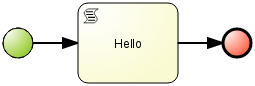
import org.jbpm.test.JbpmJUnitBaseTestCase;
import org.kie.api.runtime.KieSession;
import org.kie.api.runtime.manager.RuntimeEngine;
import org.kie.api.runtime.process.ProcessInstance;
public class ProcessPersistenceTest extends JbpmJUnitBaseTestCase {
public ProcessPersistenceTest() {
// Set up a data source and enable persistence:
super(true, true);
}
@Test
public void testProcess() {
// Create a runtime manager with the hello.bpmn process:
createRuntimeManager("hello.bpmn");
// Get a runtime engine:
RuntimeEngine runtimeEngine = getRuntimeEngine();
// Get an access to an instance of a session:
KieSession ksession = runtimeEngine.getKieSession();
// Start the process:
ProcessInstance processInstance = ksession.startProcess("com.sample.bpmn.hello");
// Check whether the process instance has completed successfully:
assertProcessInstanceCompleted(processInstance.getId());
// Check whether the given nodes were executed:
assertNodeTriggered(processInstance.getId(), "StartProcess", "Hello", "EndProcess");
}
}For a list of Maven dependencies, see section Testing Dependencies.
11.14.1. JbpmJUnitBaseTestCase
The JbpmJUnitBaseTestCase class acts as a base test case class that you can use for Red Hat JBoss BPM Suite-related tests. It provides four usage areas:
- JUnit life cycle methods
- Knowledge base and knowledge session management methods
- Assertions
- Helper methods
For the complete list of all methods, see the JbpmJUnitBaseTestCase Javadoc.
| Method | Description |
|---|---|
|
|
This method is annotated as |
|
|
This method is annotated as |
To create a session, create RuntimeManager and RuntimeEngine first. Use the following methods to create and dispose of RuntimeManager:
| Method | Description |
|---|---|
|
|
Creates one |
|
|
Creates |
|
|
Creates |
|
|
Creates |
|
|
Creates one |
|
|
Creates one |
|
|
Creates the lowest level of
|
|
|
Disposes of the currently active |
| Method | Description |
|---|---|
|
|
Returns a new |
|
|
Returns a new |
To test the current state of various assets, the following methods are available:
| Assertion | Description |
|---|---|
|
| Checks whether a process instance with the given ID is active. |
|
|
Checks whether a process instance with the given ID has completed successfully. Use this method in case session persistence is enabled. Otherwise, use |
|
|
Checks whether a process instance with the given ID was aborted. Use this method in case session persistence is enabled. Otherwise, use |
|
| Checks whether the given nodes exist within the specified process. |
|
| Checks whether a process instance with the given ID contains at least one active node with the specified node names. |
|
| For each given node name, checks whether a node instance was triggered during the execution of the specified process instance. |
|
| Retrieves the value of the given variable from the specified process instance. |
|
| Checks whether the given process contains the specified process variables. |
|
| Checks whether the given name matches the name of the specified process. |
|
| Checks whether the given process version matches the version of the specified process. |
| Method | Description |
|---|---|
|
| Configures a data source. |
|
| Returns the currently configured data source. |
|
|
Returns the currently configured |
|
| Returns a test work item handler that can be registered in addition to what is registered by default. |
|
| Clears a history log. |
JbpmJUnitBaseTestCase supports all the predefined RuntimeManager strategies as part of the unit testing. Specify which strategy should be used whenever creating a runtime manager as part of a single test. The following example uses the PerProcessInstance strategy:
import java.util.List;
import org.jbpm.test.JbpmJUnitBaseTestCase;
import org.junit.Test;
import org.kie.api.runtime.KieSession;
import org.kie.api.runtime.manager.RuntimeEngine;
import org.kie.api.runtime.manager.RuntimeManager;
import org.kie.api.runtime.process.ProcessInstance;
import org.kie.api.task.TaskService;
import org.kie.api.task.model.TaskSummary;
import org.kie.internal.runtime.manager.context.ProcessInstanceIdContext;
import org.slf4j.Logger;
import org.slf4j.LoggerFactory;
public class ProcessHumanTaskTest extends JbpmJUnitBaseTestCase {
private static final Logger logger = LoggerFactory.getLogger(ProcessHumanTaskTest.class);
public ProcessHumanTaskTest() {
super(true, false);
}
@Test
public void testProcessProcessInstanceStrategy() {
RuntimeManager manager = createRuntimeManager
(Strategy.PROCESS_INSTANCE, "manager", "humantask.bpmn");
RuntimeEngine runtimeEngine = getRuntimeEngine(ProcessInstanceIdContext.get());
KieSession ksession = runtimeEngine.getKieSession();
TaskService taskService = runtimeEngine.getTaskService();
int ksessionID = ksession.getId();
ProcessInstance processInstance = ksession.startProcess("com.sample.bpmn.hello");
assertProcessInstanceActive(processInstance.getId(), ksession);
assertNodeTriggered(processInstance.getId(), "Start", "Task 1");
manager.disposeRuntimeEngine(runtimeEngine);
runtimeEngine = getRuntimeEngine(ProcessInstanceIdContext.get(processInstance.getId()));
ksession = runtimeEngine.getKieSession();
taskService = runtimeEngine.getTaskService();
assertEquals(ksessionID, ksession.getId());
// Let John execute Task 1:
List<TaskSummary> list = taskService.getTasksAssignedAsPotentialOwner("john", "en-UK");
TaskSummary task = list.get(0);
logger.info("John is executing task {}", task.getName());
taskService.start(task.getId(), "john");
taskService.complete(task.getId(), "john", null);
assertNodeTriggered(processInstance.getId(), "Task 2");
// Let Mary execute Task 2:
list = taskService.getTasksAssignedAsPotentialOwner("mary", "en-UK");
task = list.get(0);
logger.info("Mary is executing task {}", task.getName());
taskService.start(task.getId(), "mary");
taskService.complete(task.getId(), "mary", null);
assertNodeTriggered(processInstance.getId(), "End");
assertProcessInstanceCompleted(processInstance.getId());
}
}For a list of Maven dependencies, see section Testing Dependencies.
11.14.2. Configuring Persistence
Persistence allows to store states of all process instances in a database and uses a history log to check assertions related to the execution history. When persistence is not used, process instances are stored in the memory and an in-memory logger is used for history transactions.
By default, the performed JUnit tests do not use persistence. To change this behavior, invoke a constructor of the superclass in one of the following ways:
-
default: This option uses a no-argument constructor; it does not initialize a data source and does not configure session persistence. This option is usually used for in-memory process management without any human task interaction. super(boolean, boolean): This option allows to explicitly configure persistence and a data source. This is the most common way of bootstrapping test cases for Red Hat JBoss BPM Suite. Use-
super(true, false)for execution with in-memory process management and human tasks persistence. -
super(true, true)for execution with persistent process management and human tasks persistence.
-
-
super(boolean, boolean, string): This option is very similar to the last one, however, it enables you to use a different persistence unit name than the default one, which isorg.jbpm.persistence.jpa.
import org.jbpm.test.JbpmJUnitBaseTestCase;
import org.slf4j.Logger;
import org.slf4j.LoggerFactory;
public class ProcessHumanTaskTest extends JbpmJUnitBaseTestCase {
private static final Logger logger = LoggerFactory
.getLogger(ProcessHumanTaskTest.class);
public ProcessHumanTaskTest() {
// Persistence will not be used for the
// process engine but will be used for human tasks:
super(true, false);
}
}11.14.3. Testing Integration with External Services
Business processes often include the invocation of external services. Unit testing of a business process allows you to register test handlers that verify whether the specific services are requested correctly, and provide test responses for those services as well.
To test the interactions with external services, use the TestWorkItemHandler handler, which is provided by default. TestWorkItemHandler can be registered to collect all the work items of a given type and contains data related to a task. A work item represents one unit of work, such as sending one specific email or invoking one specific service. This test handler then checks whether a specific work item was actually requested during an execution of a process, and whether the data associcated with the work item are correct.
Example 11.5. Testing Email Task
This example shows how to test a process that sends an email and whether an exception is raised if the email cannot be sent. This is accomplished by notifying the engine about the email delivery failure.
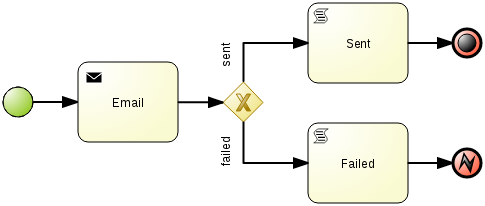
Further notes describing the following source code are below.
// Not used in the snippet below but your class must extend JbpmJUnitBaseTestCase.
import org.jbpm.test.JbpmJUnitBaseTestCase;
import org.kie.api.runtime.KieSession;
import org.kie.api.runtime.manager.RuntimeEngine;
import org.kie.api.runtime.process.ProcessInstance;
import org.kie.api.runtime.process.WorkItem;
...
public void testProcess2() {
// Create a runtime manager with a single process:
createRuntimeManager("sample-process.bpmn");
// Get a runtime engine:
RuntimeEngine runtimeEngine = getRuntimeEngine();
// Get an access to an instance of a session:
KieSession ksession = runtimeEngine.getKieSession();
// Register a test handler for "Email":
TestWorkItemHandler testHandler = getTestWorkItemHandler();
ksession.getWorkItemManager().registerWorkItemHandler("Email", testHandler);
// Start the process:
ProcessInstance processInstance = ksession.startProcess("com.sample.bpmn.hello2");
assertProcessInstanceActive(processInstance.getId(), ksession);
assertNodeTriggered(processInstance.getId(), "StartProcess", "Email");
// Check whether the email has been requested:
WorkItem workItem = testHandler.getWorkItem();
assertNotNull(workItem);
assertEquals("Email", workItem.getName());
assertEquals("me@mail.com", workItem.getParameter("From"));
assertEquals("you@mail.com", workItem.getParameter("To"));
// Simulate a failure of sending the email:
ksession.getWorkItemManager().abortWorkItem(workItem.getId());
assertProcessInstanceAborted(processInstance.getId());
assertNodeTriggered(processInstance.getId(), "Gateway", "Failed", "Error");
}
The unit test uses a test handler that is executed when an email is requested and allows you to test the data related to the email, such as its sender and recipient. Once the abortWorkItem() method notifies the engine about the email delivery failure, the unit test verifies that the process handles such case by generating an error and logging the action. In this case, the process instance is eventually aborted.
Chapter 12. Human Tasks Management
12.1. Human Tasks
Human Tasks are tasks within a process that must be carried out by human actors. BRMS Business Process Management supports a human task node inside processes for modeling the interaction with human actors. The human task node allows process designers to define the properties related to the task that the human actor needs to execute; for example, the type of task, the actor, and the data associated with the task can be defined by the human task node. A back-end human task service manages the lifecycle of the tasks at runtime. The implementation of the human task service is based on the WS-HumanTask specification, and the implementation is fully pluggable; this means users can integrate their own human task solution if necessary. Human tasks nodes must be included inside the process model and the end users must interact with a human task client to request their tasks, claim and complete tasks.
12.2. Using User Tasks in Processes
Red Hat JBoss BPM Suite supports the use of human tasks inside processes using a special User Task node defined by the BPMN2 Specification. A User Task node represents an atomic task that is executed by a human actor.
Although Red Hat JBoss BPM Suite has a special user task node for including human tasks inside a process, human tasks are considered the same as any other kind of external service that is invoked and are therefore implemented as a domain-specific service.
You can edit the values of User Tasks variables in the Properties view of JBoss Developer Studio after selecting the User Task node.
A User Task node contains the following core properties:
-
Actors: The actors that are responsible for executing the human task. A list of actor id’s can be specified using a comma (,) as separator. -
Group: The group id that is responsible for executing the human task. A list of group id’s can be specified using a comma (,) as separator. -
Name: The display name of the node. -
TaskName: The name of the human task. This name is used to link the task to a Form. It also represent the internal name of the Task that can be used for other purposes. -
DataInputSet: all the input variables that the task will receive to work on. Usually you will be interested in copying variables from the scope of the process to the scope of the task. -
DataOutputSet: all the output variables that will be generated by the execution of the task. Here you specify all the name of the variables in the context of the task that you are interested to copy to the context of the process. -
Assignments: here you specify which process variable will be linked to each Data Input and Data Output mapping.
A User Task node contains the following extra properties:
-
Comment: A comment associated with the human task. Here you can use expressions. -
Content: The data associated with this task. -
Priority: An integer indicating the priority of the human task. -
Skippable: Specifies whether the human task can be skipped, that is, whether the actor may decide not to execute the task. -
On entry and on exit actions: Action scripts that are executed upon entry and exit of this node, respectively.
Apart from the above mentioned core and extra properties of user tasks, there are some additional generic user properties that are not exposed through the user interface. These properties are:
-
ActorId: The performer of the task to whom the task is assigned. -
GroupId: The group to which the task performer belongs. -
BusinessAdministratorId: The default business administrator responsible for the progress and the outcome of a task at the task definition level. -
BusinessAdministratorGroupId: The group to which the administrator belongs. -
ExcludedOwnerId: Anybody who has been excluded to perform the task and become an actual or potential owner. -
RecipientId: A person who is the recipient of notifications related to the task. A notification may have more than one recipients.
To override the default values of these generic user properties, you must define a data input with the name of the property, and then set the desired value in the assignment section.
12.3. Data Mapping
Human tasks typically present some data related to the task that needs to be performed to the actor that is executing the task. Human tasks usually also request the actor to provide some result data related to the execution of the task. Task forms are typically used to present this data to the actor and request results.
You must specify the data that is used by the task when you define the user task in our process. In order to do that, you need to define which data must be copied from the process context to the task context. Notice that the data is copied, so it can be modified inside the task context but it will not affect the process variables unless we decide to copy back the value from the task to the process context.
Most of the times forms are used to display data to the end user. This allows them to generate or create new data to propagate to the process context to be used by future activities. In order to decide how the information flow from the process to a particular task and from the task to the process, you need to define which pieces of information must be automatically copied by the process engine.
12.4. Task Lifecycle
A human task is created when a user task node is encountered during the execution. The process leaves the user task node only when the associated human task is completed or aborted. The human task itself has a complete life cycle as well. The following diagram describes the human task life cycle.
Figure 12.1. Human Task Life Cycle
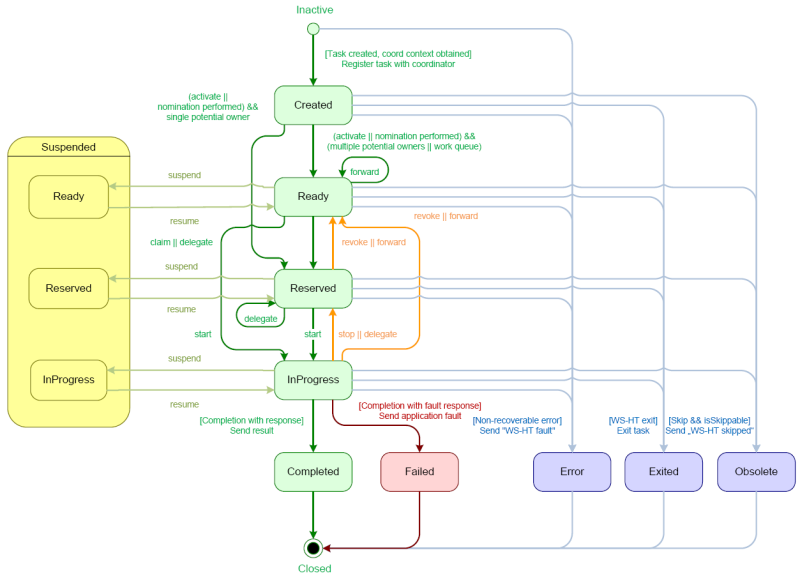
A newly created task starts in the Created stage. It then automatically comes into the Ready stage. The task then shows up on the task list of all the actors that are allowed to execute the task. The task stays in the Ready stage until one of these actors claims the task. When a user then eventually claims the task, the status changes to Reserved. Note that a task that only has one potential (specific) actor is automatically assigned to that actor upon creation of the task. When the user who has claimed the task starts executing it, the task status changes from Reserved to InProgress.
Once the user has performed and completed the task, the task status changes to Completed. In this step, the user can optionally specify the result data related to the task. If the task could not be completed, the user may indicate this by using a fault response, possibly including fault data, in which case the status changes to Failed.
While this life cycle explained above is the normal life cycle, the specification also describes a number of other life cycle methods, including:
- Delegating or forwarding a task, so that the task is assigned to another actor.
- Revoking a task, so that it is no longer claimed by one specific actor but is (re)available to all actors allowed to take it.
- Temporarily suspending and resuming a task.
- Stopping a task in progress.
- Skipping a task (if the task has been marked as skippable), in which case the task will not be executed.
12.5. Task Permissions
Only users associated with a specific task are allowed to modify or retrieve information about the task. This allows users to create a Red Hat JBoss BPM Suite workflow with multiple tasks and yet still be assured of both the confidentiality and integrity of the task status and information associated with a task.
Some task operations end up throwing a org.jbpm.services.task.exception.PermissionDeniedException when used with information about an unauthorized user. For example, when a user is trying to directly modify the task (for example, by trying to claim or complete the task), the PermissionDeniedException is thrown if that user does not have the correct role for that operation. Also, users are not able to view or retrieve tasks in Business Central that they are not involved with.
It is possible to allow an authenticated user to execute task operations on behalf of an unauthenticated user by setting the -Dorg.kie.task.insecure=true system property on the server side. For example, if you have a bot that executes task operations on behalf of other users, the bot can use a system account and does not need any credentials of the real users.
If you are using a remote Java client, you need to turn on insecure task operations on the client side as well. To do so, set the mentioned system property in your client or call the disableTaskSecurity method of the client builder.
12.5.1. Task Permissions Matrix
The task permissions matrix below summarizes the actions that specific user roles are allowed to do. The cells of the permissions matrix contain one of three possible characters, each of which indicate the user role permissions for that operation:
-
+indicates that the user role can do the specified operation. -
-indicates that the user role may not do the specified operation, or it is not an operation that matches the user’s role ("not applicable").
| Role | Description |
|---|---|
| Potential Owner | The user who can claim the task before it has been claimed, or after it has been released or forwarded. Only tasks that have the status Ready may be claimed. A potential owner becomes the actual owner of a task by claiming the task. |
| Actual Owner | The user who has claimed the task and will progress the task to completion or failure. |
| Business Administrator | A super user who may modify the status or progress of a task at any point in a task’s lifecycle. |
User roles are assigned to users by the definition of the task in the JBoss BPM Suite (BPMN2) process definition.
Permissions Matrices
The following matrix describes the authorizations for all operations which modify a task:
| Operation/Role | Potential Owner | Actual Owner | Business Administrator |
|---|---|---|---|
| activate | - | - | + |
| claim | + | - | + |
| complete | - | + | + |
| delegate | + | + | + |
| fail | - | + | + |
| forward | + | + | + |
| nominate | - | - | + |
| release | - | + | + |
| remove | - | - | + |
| resume | + | + | + |
| skip | + | + | + |
| start | + | + | + |
| stop | - | + | + |
| suspend | + | + | + |
12.6. Task Service
12.6.1. Task Service and Process Engine
Human tasks are similar to any other external service that are invoked and implemented as a domain-specific service. As a human task is an example of such a domain-specific service, the process itself only contains a high-level, abstract description of the human task to be executed and a work item handler that is responsible for binding this (abstract) task to a specific implementation.
You can plug in any human task service implementation, such as the one that is provided by JBoss BPM Suite, or may register your own implementation. The Red Hat JBoss BPM Suite provides a default implementation of a human task service based on the WS-HumanTask specification. If you do not need to integrate JBoss BPM Suite with another existing implementation of a human task service, you can use this service. The Red Hat JBoss BPM Suite implementation manages the life cycle of the tasks (such as creation, claiming, completion) and stores the state of all the tasks, task lists, and other associated information. It also supports features like internationalization, calendar integration, different types of assignments, delegation, escalation and deadlines. You can find the code for the implementation in the jbpm-human-task module. The Red Hat JBoss BPM Suite task service implementation is based on the WS-HumanTask (WS-HT) specification. This specification defines (in detail) the model of the tasks, the life cycle, and many other features.
12.6.2. Task Service API
The human task service exposes a Java API for managing the life cycle of tasks. This allows clients to integrate (at a low level) with the human task service. Note that, the end users should probably not interact with this low-level API directly, but use one of the more user-friendly task clients instead. These clients offer a graphical user interface to request task lists, claim and complete tasks, and manage tasks in general. The task clients listed below use the Java API to internally interact with the human task service. Of course, the low-level API is also available so that developers can use it in their code to interact with the human task service directly.
A task service (interface org.kie.api.task.TaskService) offers the following methods for managing the life cycle of human tasks:
...
void start( long taskId, String userId );
void stop( long taskId, String userId );
void release( long taskId, String userId );
void suspend( long taskId, String userId );
void resume( long taskId, String userId );
void skip( long taskId, String userId );
void delegate(long taskId, String userId, String targetUserId);
void complete( long taskId, String userId, Map<String, Object> results );
...The common arguments passed to these methods are:
-
taskId: The ID of the task that we are working with. This is usually extracted from the currently selected task in the user task list in the user interface. -
userId: The ID of the user that is executing the action. This is usually the id of the user that is logged in into the application.
To make use of the methods provided by the internal interface InternalTaskService, you need to manually cast to InternalTaskService. One method that can be useful from this interface is getTaskContent():
Map<String, Object> getTaskContent( long taskId );
This method saves you from the complexity of getting the ContentMarshallerContext to unmarshall the serialized version of the task content. If you only want to use the stable or public API’s, you can use the following method:
import java.util.Map;
import org.jbpm.services.task.utils.ContentMarshallerHelper;
import org.kie.api.task.model.Content;
import org.kie.api.task.model.Task;
import org.kie.internal.task.api.ContentMarshallerContext;
import org.kie.internal.task.api.TaskContentService;
import org.kie.internal.task.api.TaskQueryService;
...
Task taskById = taskQueryService.getTaskInstanceById(taskId);
Content contentById = taskContentService.getContentById
(taskById.getTaskData().getDocumentContentId());
ContentMarshallerContext context = getMarshallerContext(taskById);
Object unmarshalledObject = ContentMarshallerHelper.unmarshall
(contentById.getContent(), context.getEnvironment(), context.getClassloader());
if (!(unmarshalledObject instanceof Map)) {
throw new IllegalStateException
(" The Task Content Needs to be a Map in order to use this method and it was: "
+ unmarshalledObject.getClass());
}
Map<String, Object> content = (Map<String, Object>) unmarshalledObject;
return content;For a list of Maven dependencies, see example Embedded jBPM Engine Dependencies.
12.6.3. Interacting with the Task Service
In order to get access to the Task Service API, it is recommended to let the Runtime Manager ensure that everything is setup correctly. From the API perspective, if you use the following approach, there is no need to register the Task Service with the Process Engine:
import java.util.List;
import org.kie.api.runtime.KieSession;
import org.kie.api.runtime.manager.RuntimeEngine;
import org.kie.api.task.TaskService;
import org.kie.api.task.model.TaskSummary;
import org.kie.internal.runtime.manager.context.EmptyContext;
...
RuntimeEngine engine = runtimeManager.getRuntimeEngine(EmptyContext.get());
KieSession kieSession = engine.getKieSession();
// Start a process:
kieSession.startProcess("CustomersRelationship.customers", params);
// Do task operations:
TaskService taskService = engine.getTaskService();
List<TaskSummary> tasksAssignedAsPotentialOwner = taskService
.getTasksAssignedAsPotentialOwner("mary", "en-UK");
// Claim task:
taskService.claim(taskSummary.getId(), "mary");
// Start task:
taskService.start(taskSummary.getId(), "mary");
...For a list of Maven dependencies, see example Embedded jBPM Engine Dependencies.
The Runtime Manager registers the Task Service with the Process Engine automatically. If you do not use the Runtime Manager, you have to set the LocalHTWorkItemHandler in the session to get the Task Service notify the Process Engine once the task completes. In Red Hat JBoss BPM Suite, the Task Service runs locally to the Process and Rule Engine. This enables you to create multiple light clients for different Process and Rule Engine’s instances. All the clients can share the same database.
12.6.4. Accessing Task Variables Using TaskEventListener
Task variables can be accessed in the TaskEventListener for process instances.
Creating a CustomTaskEventListener
Create a
CustomTaskEventListenerclass using your preferred IDE, such as Red Hat JBoss Developer Studio.import org.jboss.logging.Logger; import org.jbpm.services.task.events.DefaultTaskEventListener; import org.kie.api.task.TaskEvent; public class CustomTaskEventListener extends DefaultTaskEventListener { private static final Logger LOGGER = Logger.getLogger(CustomTaskEventListener.class.getName()); @Override public void beforeTaskStartedEvent(TaskEvent event) { LOGGER.info("Starting task " + event.getTask().getId()); } }Registering the CustomTaskEventListener
The listener can be registered at
RuntimeManagerlevel:import java.util.List; import org.kie.internal.io.ResourceFactory; import org.kie.api.io.ResourceType; import org.kie.api.runtime.manager.RuntimeEnvironment; import org.kie.api.runtime.manager.RuntimeManagerFactory; import org.kie.api.task.TaskEvent; import org.kie.api.task.TaskLifeCycleEventListener; import org.jbpm.runtime.manager.impl.DefaultRegisterableItemsFactory; import org.jbpm.runtime.manager.impl.RuntimeEnvironmentBuilder; import org.jbpm.services.task.events.DefaultTaskEventListener; ... RuntimeEnvironment environment = RuntimeEnvironmentBuilder.getDefault() .persistence(true) .entityManagerFactory(emf) .userGroupCallback(userGroupCallback) .addAsset(ResourceFactory.newClassPathResource(process), ResourceType.BPMN2) .registerableItemsFactory(new DefaultRegisterableItemsFactory() { @Override public List<TaskLifeCycleEventListener> getTaskListeners() { List<TaskLifeCycleEventListener> listeners = super.getTaskListeners(); listeners.add(new DefaultTaskEventListener() { @Override public void afterTaskAddedEvent(TaskEvent event) { System.out.println("taskId = " + event.getTask().getId()); } }); return listeners; } }) .get(); return RuntimeManagerFactory.Factory.get().newPerProcessInstanceRuntimeManager(environment);Alternatively, it can be registered at
Task Servicelevel:import org.jbpm.services.task.events.DefaultTaskEventListener; import org.kie.api.task.TaskEvent; import org.kie.api.task.TaskLifeCycleEventListener; import org.kie.api.task.TaskService; import org.kie.internal.task.api.EventService; ... TaskService taskService = runtime.getTaskService(); ((EventService<TaskLifeCycleEventListener>)taskService).registerTaskEventListener(new DefaultTaskEventListener() { @Override public void afterTaskAddedEvent(TaskEvent event) { System.out.println("taskId = " + event.getTask().getId()); } });Loading Task Variables
The
TaskEventListenercan now obtain task variables using theloadTaskVariablesmethod to populate both input and output variables of a given task.event.getTaskContext().loadTaskVariables(event.getTask())This populates both Input and Output tasks, which can be retrieved using the following:
Input
task.getTaskData().getTaskInputVariables()Output
task.getTaskData().getTaskOutputVariables()To improve performance, task variables are automatically set when they are available, and are usually given by the caller on
Task Service. TheloadTaskVariablesmethod is "no op" where task variables are already set on a task. For example:-
When created, a task usually has input variables, which are then set on
Taskinstance. This applies tobeforeTaskAddedandafterTaskAddedevents handling. When
Taskis completed, it usually has output variables, which are set on a task.The
loadTaskVariablesmethod should be used to populate task variables in all other circumstances.NoteCalling the
loadTaskVariablesmethod of the listener once (such as inbeforeTask) makes it available to bothbeforeTaskandafterTaskmethods.
-
When created, a task usually has input variables, which are then set on
Configuring the TaskEventListener
At the project level,
TaskEventListenercan be configured using thekie-deployment-descriptor.xmlfile. To configureTaskEventListenerin Business Central, go to Deployment Descriptor Editor and add an entry underTask event listenerswith the classnameCustomProcessEventListener. TheTaskEventListenerappears inkie-deployment-descriptor.xmlas:<task-event-listeners> <task-event-listener> <resolver>reflection</resolver> <identifier>com.redhat.gss.sample.CustomTaskEventListener</identifier> </task-event-listener> </task-event-listeners>The
TaskEventListenercan also be registered inbusiness-central.war/WEB-INF/classes/META-INF/kie-wb-deployment-descriptor.xml. ThisTaskEventListeneris available for all projects that are deployed in Business Central.Adding Maven Dependencies
If you are using a Maven project, see example Embedded jBPM Engine Dependencies for a list of Maven dependencies.
12.6.5. Task Service Data Model
The task service data model is illustrated in the following image. In this section, each entity of the database model is described in detail.
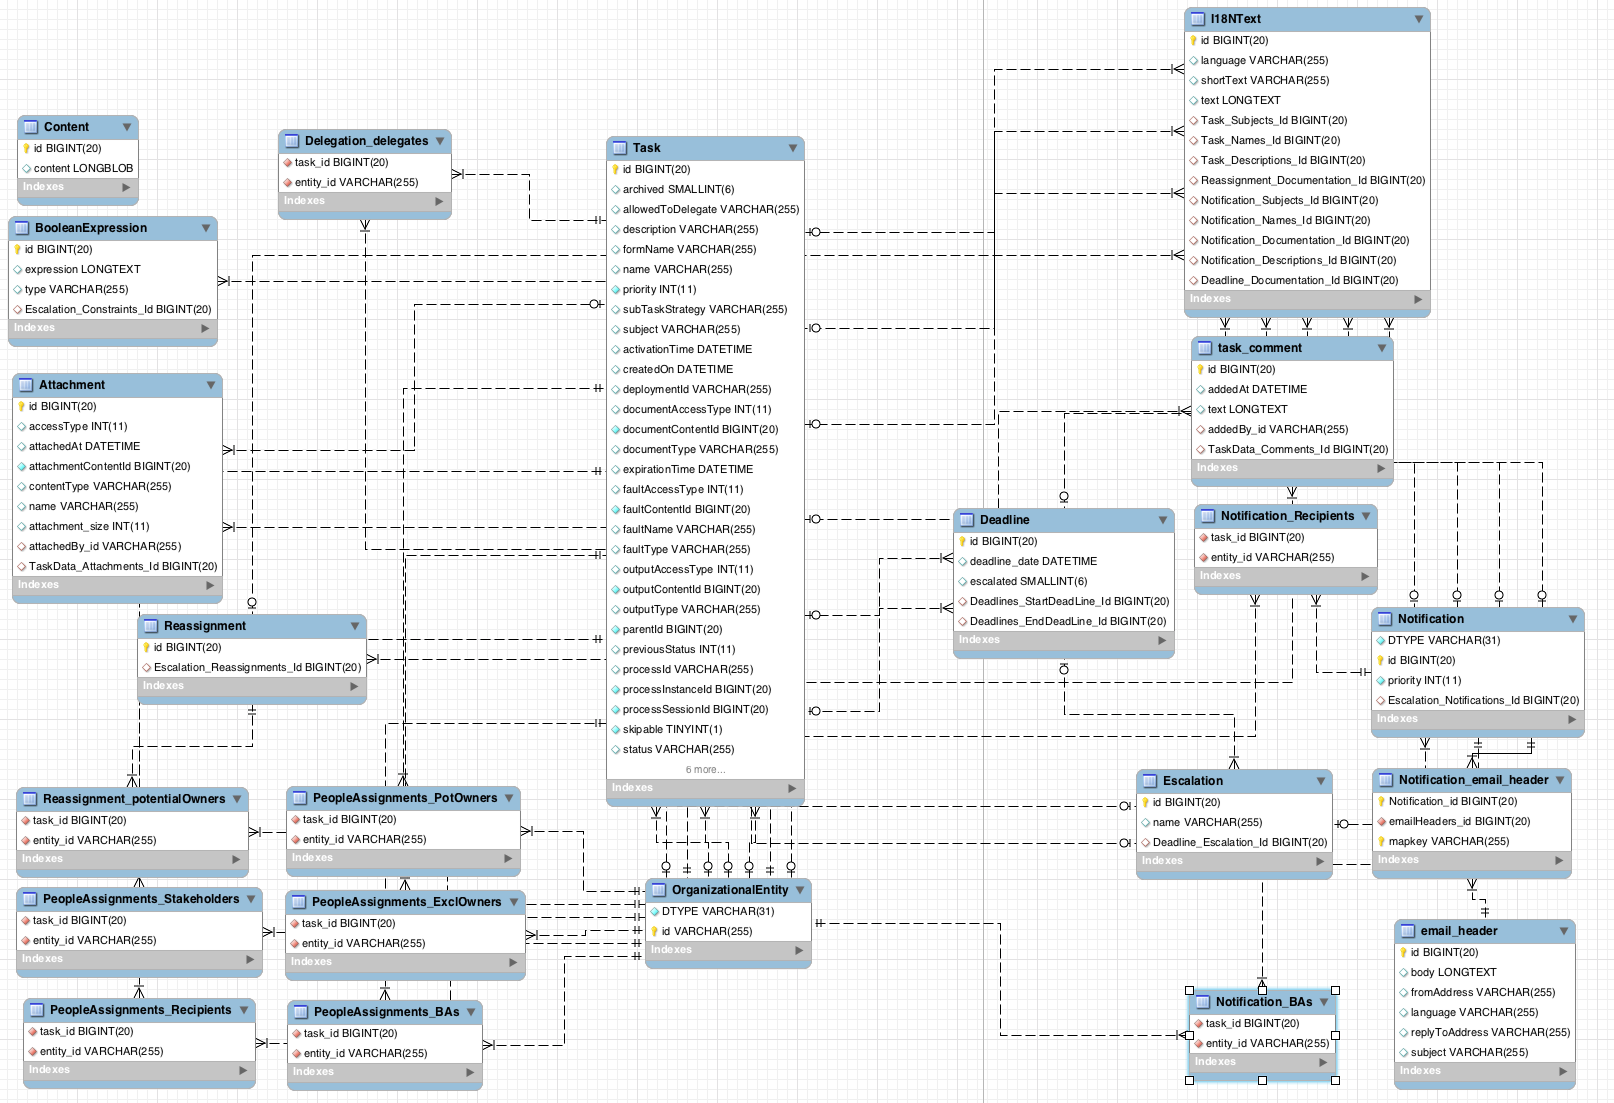
The I18NText table represents a text in a particular language. The language is stored in the language attribute, the unique ID of a text in the id attribute, the short attribute contains an abbreviated content and the text attribute contains the text itself.
Tasks
The Task table stores information about a particular task.
| Attribute | Description |
|---|---|
|
| The unique ID of a task. |
|
|
Determines whether a task is archived. The value can be |
|
| Determines whether a task can be delegated (assigned to another user). For more information about delegations, see the section called “Delegations”. |
|
| The description of a task. The maximum number of characters is 255. |
|
| The name of a form attached to a task. |
|
| The name of a task. |
|
|
The priority of a task. The value ranges from |
|
|
The default subtask strategy is
|
|
| The subject of a task. |
|
| The time when a task is assigned to a user or when a user claims a task. |
|
| The time when a process reaches a task and an instance of the task is created. The claim operation is either performed automatically or the task waits until it is assigned to a particular user. |
|
| The ID of a kJAR deployment in which a task was created. |
|
| The time until when a task is expected to be completed. |
|
|
The ID of a parent task. If a task does not have any parent (and at the same time can be a parent of other tasks), the value is |
|
|
The status of a task. Possible values are (in this order): |
|
|
The previous status of a task. The value is a number from |
|
| The ID of a process in which the task was created. |
|
| The ID of a process instance in which the task was created. |
|
| The ID of a process session in which the task was created. |
|
|
Determines whether a task can be skipped. Possible values are |
|
| The ID of a task work item. Each task can be a certain type of a work item. |
|
| The unique ID of the user who claimed a task. |
|
| The unique ID of the user who created a task. |
The Task table stores also the information about an input and output task content in the following attributes:
| INPUT | OUTPUT | Description |
|---|---|---|
|
|
|
The content access type: can be either inline (then the value of the attribute is |
|
|
|
A content ID is the unique ID of a content stored in the |
|
|
|
The type of a task content. If the access type is inline, then the content type is |
The faultAccessType, faultContentId, faultName, and faultType attributes follow the same logic as the attributes described in the previous table, with the difference that they are used by failed tasks. While the completed tasks have an output document assigned (which can be for example a HashMap), the failed tasks return a fail document.
Task comments are stored in the task_comment table. See a list of task_comment attributes below:
| Attribute | Description |
|---|---|
|
| The unique ID of a comment. |
|
| The time when a comment was added to a task. |
|
| The content of a comment. |
|
|
The unique ID of a user who created a comment. Based on the ID, you can find the user in the |
|
| The unique ID of a task to which a comment was added. |
For more information about task data model, see Section 13.2, “Audit Log”.
Entities and People Assignments
Information about particular users and groups are stored in the OrganizationalEntity table. The attribute DTYPE determines whether it is a user or a group and id is the name of a user (for example bpmsAdmin) or a group (for example Administrators).
See a list of different types of people assignments below. All the assignments have the following attributes: task_id, entity_id.
- PeopleAssignments_PotOwners
-
Potential owners are users or groups who can claim a task and start the task. The attribute
task_idis a unique ID of an assigned task andentity_iddetermines the unique ID of a user or a group. - PeopleAssignments_ExclOwners
-
Excluded owners are users excluded from a group that has a specific task assigned. You can assign a task to a group and specify excluded owners. These users then cannot claim the assigned task. The attribute
task_idis a unique ID of a task andentity_iddetermines the unique ID of an excluded user. - PeopleAssignments_BAs
-
Business administrators have the rights to manage tasks, delegate tasks and perform similar operations. The attribute
task_idis a unique ID of an assigned task andentity_iddetermines the unique ID of a user or a group. - PeopleAssignments_Stakeholders
- Not fully supported.
- PeopleAssignments_Recipients
- Not fully supported.
Reassignments
It is possible to set a reassignment time for each task. If the task has not started or has not been completed before the set time, it is reassigned to a particular user or a group.
The reassignments are stored in the Reassignment_potentialOwners table, where task_id is a unique ID of a task and entity_id is a user or a group to which a task is assigned after the deadline.
The Escalation table contains the unique ID of an escalation (id), the ID of a deadline (Deadline_Escalation_Id), and the deadline name (name) which is generated by default and cannot be changed.
The Deadline table stores deadline information: the unique ID of a deadline (id) and the time and date of a deadline (deadline_date). The escalated attribute determines whether the reassignment have been performed (the value can be either 1 or 0). If a task is reassigned after it has not started until the set deadline, the Deadlines_StartDeadLine_Id attribute will be nonempty. If a task is reassigned after it has not been completed until the set deadline, Deadlines_EndDeadLine_Id attribute will be nonempty.
The Reassignment table refers to the Escalation table: the Escalation_Reassignments_Id attribute in Reassignments is equivalent to the id attribute in Escalation.
Notifications
If a task has not started or has not been completed before the deadline, a notification is sent to a subscribed user or a group of users (recipients). These notification are stored in the Notification table: id is the unique ID of a notification, DTYPE is the type of a notification (currently only an email notifications are supported), priority is set to 0 by default, and Escalation_Notifications_Id refers to the Escalation table, which then refers to the Deadline table. For example, if a task has not been completed before the deadline, then the Deadlines_EndDeadLine_Id attribute is nonempty and a notification is sent.
Recipients of a notification are stored in the Notification_Recipients table, where task_id is the unique ID of a task and entity_id is the ID of a subscribed user or a group.
The Notification_email_header stores the ID of a notification in the Notification_id attribute and the ID of an email that is sent in the emailHeader_id attribute. The email_header table contains the unique ID of an email (id), content of an email (body), the name of a user who is sending an email (fromAddress), the language of an email (language), the email address to which it is possible to reply (replyToAddress), and the subject of an email (subject).
Attachments
You can attach an attachment with an arbitrary type and content to each task. These attachments are stored in the Attachment table.
| Attribute | Description |
|---|---|
|
| The unique ID of an attachment. |
|
| The way you can access an attachment. Can be either inline or a URL. |
|
| The time when an attachment was added to a task. |
|
|
Refers to the |
|
| The type of an attachment (MIME). |
|
| The name of an attachment. Different attachments can have the same name. |
|
| The size of an attachment. |
|
| The unique ID of a user who attached an attachment to a task. |
|
| The unique ID of a task that contains the attachment. |
The Content table stores the actual binary content of an attachment. The content type is defined in the Attachment table. The maximum size of an attachment is 2 GB.
Delegations
Each task defines whether it can be escalated to another user or a group in the allowedToDelegate attribute of the Task table. The Delegation_delegates table stores the tasks that can be escalated (in the task_id attribute) and the users to which the tasks are escalated (entity_id).
12.6.6. Connecting to Custom Directory Information Services
It is often necessary to establish a connection and transfer data from existing systems and services, such as LDAP, to get data on actors and groups for User Tasks. To do so, implement the UserGroupInfoProducer interface. This enables you to create your own implementation for user and group management, and then configure it using CDI for Business Central.
To implement and activate the interface:
Implement the
UserGroupInfoProducerinterface and provide a custom callback (see chapter Connecting to LDAP of the Red Hat JBoss BPM Suite User Guide) and user information implementations according to the needs from the producer.To enable Business Central to find the implementation, Annotate your implementation with the
@Selectablequalifier. See an example LDAP implementation:import javax.enterprise.context.ApplicationScoped; import javax.enterprise.inject.Alternative; import javax.enterprise.inject.Produces; import org.jbpm.services.task.identity.LDAPUserGroupCallbackImpl; import org.jbpm.services.task.identity.LDAPUserInfoImpl; import org.jbpm.shared.services.cdi.Selectable; import org.kie.api.task.UserGroupCallback; import org.kie.internal.task.api.UserInfo; @ApplicationScoped @Alternative @Selectable public class LDAPUserGroupInfoProducer implements UserGroupInfoProducer { private UserGroupCallback callback = new LDAPUserGroupCallbackImpl(true); private UserInfo userInfo = new LDAPUserInfoImpl(true); @Override @Produces public UserGroupCallback produceCallback() { return callback; } @Override @Produces public UserInfo produceUserInfo() { return userInfo; } }-
Package your custom implementations, that is the
LDAPUserGroupInfoProducer, theLDAPUserGroupCallbackImpland theLDAPUserInfoImplclasses from the example above, into a JAR archive. Create theMETA-INFdirectory and in it, create thebeans.xmlfile. This makes your implementation CDI enabled. Add the resulting JAR file tobusiness-central.war/WEB-INF/lib/. Modify
business-central.war/WEB-INF/beans.xmland add the implementation,LDAPUserGroupInfoProducerfrom the example above, as an alternative to be used by Business Central.<beans xmlns="http://java.sun.com/xml/ns/javaee" xmlns:xsi="http://www.w3.org/2001/XMLSchema-instance" xsi:schemaLocation="http://java.sun.com/xml/ns/javaee http://docs.jboss.org/cdi/beans_1_0.xsd"> <alternatives> <class>com.test.services.producer.LDAPUserGroupInfoProducer</class> </alternatives> </beans>WarningThe use of a custom
UserGroupInfoProducerrequires internal APIs, which may change in future releases. Using a customUserGroupInfoProduceris not recommended or supported by Red Hat.- Restart your server. Your custom callback implementation should now be used by Business Central.
12.6.7. LDAP Connection
A dedicated UserGroupCallback implementation for LDAP servers is provided with the product to enable the User Task service to retrieve information about users, groups, and roles directly from an LDAP service. See LDAP Callback Connection Example for example configuration.
The LDAP UserGroupCallback implementation takes the following properties:
-
ldap.bind.user: a username used to connect to the LDAP server. The property is optional if LDAP server accepts anonymous access. -
ldap.bind.pwd: a password used to connect to the LDAP server. The property is optional if LDAP server accepts anonymous access. -
ldap.user.ctx: an LDAP context with user information. The property is mandatory. -
ldap.role.ctx: an LDAP context with group and role information. The property is mandatory. -
ldap.user.roles.ctx: an LDAP context with user group and role membership information. The property is optional; if not specified,ldap.role.ctxis used. -
ldap.user.filter: a search filter used for user information; usually contains substitution keys {0}, which are replaced with parameters. The property is mandatory. -
ldap.role.filter: a search filter used for group and role information; usually contains substitution keys {0}, which are replaced with parameters. The property is mandatory. -
ldap.user.roles.filter: a search filter used for user group and role membership information; usually contains substitution keys {0}, which are replaced with parameters. The property is mandatory. -
ldap.user.attr.id: an attribute name of the user ID in LDAP. This property is optional; if not specified,uidis used. -
ldap.roles.attr.id: an attribute name of the group and role ID in LDAP. This property is optional; if not specified,cnis used. -
ldap.user.id.dn: a user ID in a DN, instructs the callback to query for user DN before searching for roles. This property is optional, by defaultfalse. -
java.naming.factory.initial: initial context factory class name (by defaultcom.sun.jndi.ldap.LdapCtxFactory) -
java.naming.security.authentication: authentication type (possible values arenone,simple,strong; by defaultsimple) -
java.naming.security.protocol: security protocol to be used; for instancessl -
java.naming.provider.url: LDAP url (by defaultldap://localhost:389; if the protocol is set tosslthenldap://localhost:636)
12.6.7.1. Connecting to LDAP
To use the LDAP UserGroupCallback implementation, configure the respective LDAP properties as shown below. For more information, see Section 12.6.7, “LDAP Connection”.
Programatically: build a
Propertiesobject with the respective LDAPUserGroupCallbackImplproperties and createLDAPUserGroupCallbackImplwith thePropertiesobject as its parameter.import org.kie.api.PropertiesConfiguration; import org.kie.api.task.UserGroupCallback; ... Properties properties = new Properties(); properties.setProperty(LDAPUserGroupCallbackImpl.USER_CTX, "ou=People,dc=my-domain,dc=com"); properties.setProperty(LDAPUserGroupCallbackImpl.ROLE_CTX, "ou=Roles,dc=my-domain,dc=com"); properties.setProperty(LDAPUserGroupCallbackImpl.USER_ROLES_CTX, "ou=Roles,dc=my-domain,dc=com"); properties.setProperty(LDAPUserGroupCallbackImpl.USER_FILTER, "(uid={0})"); properties.setProperty(LDAPUserGroupCallbackImpl.ROLE_FILTER, "(cn={0})"); properties.setProperty(LDAPUserGroupCallbackImpl.USER_ROLES_FILTER, "(member={0})"); UserGroupCallback ldapUserGroupCallback = new LDAPUserGroupCallbackImpl(properties); UserGroupCallbackManager.getInstance().setCallback(ldapUserGroupCallback);Declaratively: create the
jbpm.usergroup.callback.propertiesfile in the root of your application or specify the file location as a system property:-Djbpm.usergroup.callback.properties=FILE_LOCATION_ON_CLASSPATH.Make sure to register the LDAP callback when starting the User Task server.
LDAP Callback Connection Example
#ldap.bind.user= #ldap.bind.pwd= ldap.user.ctx=ou\=People,dc\=my-domain,dc\=com ldap.role.ctx=ou\=Roles,dc\=my-domain,dc\=com ldap.user.roles.ctx=ou\=Roles,dc\=my-domain,dc\=com ldap.user.filter=(uid\={0}) ldap.role.filter=(cn\={0}) ldap.user.roles.filter=(member\={0}) #ldap.user.attr.id= #ldap.roles.attr.id=
12.7. Task Escalation and Notifications
For human tasks in business processes, you can define automatic task escalation and notification behavior if the tasks remain incomplete for a defined period of time. For example, if a user assigned to a task is unable to complete that task within the defined period of time, the engine can automatically reassign the task to another actor or group for completion and send an email notification to the relevant users.
You can set up automatic escalations and notifications for tasks that are in the following states:
-
not-started(tasks inREADYorRESERVEDstate) -
not-completed(tasks inIN_PROGRESSstate)
When an escalation occurs, users and groups defined in the task are assigned to the task as potential owners, replacing those who were previously assigned. If an actual owner is assigned to the task, the escalation is reset and the task is set to the READY state.
To define automatic task reassignment, follow these steps:
- Select the human task in the process designer.
In the Properties panel on the right side of the window, select the Reassignment property and add or edit the following reassignment details as needed:
-
Users: A comma-separated list of user IDs to which the task will be assigned after the Expires At period lapses. This attribute supports string values and the variable expression
#{user-id}. -
Groups: A comma-separated list of group IDs to which the task will be assigned after the Expires At period lapses. This attribute supports string values and the variable expression
#{group-id}. -
Expires At: The amount of time after which the task is reassigned to the defined users or groups (in the format
2m,4h,6d, and so on). This attribute supports string values and the variable expression#{expiresAt}. -
Type: The task state in which the task reassignment can occur (
not-startedornot-completed).
-
Users: A comma-separated list of user IDs to which the task will be assigned after the Expires At period lapses. This attribute supports string values and the variable expression
Figure 12.2. Defining automatic task reassignment
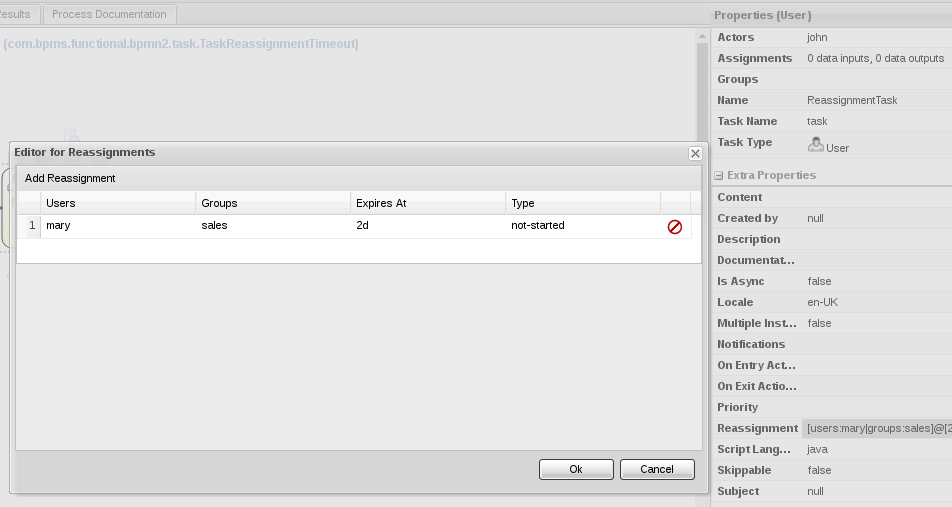
In this example, this task that is assigned to John will be reassigned to Mary in Sales if the task is still in a not-started state after two days.
To define automatic email notifications for a task escalation, follow these steps:
- Select the human task in the process designer.
In the Properties panel on the right side of the window, select the Notifications property and add or edit the following notification details as needed:
-
Type: The task state in which the notification can occur (
not-startedornot-completed). -
Expires At: The amount of time after which the email notification is sent (in the format
2m,4h,6d, and so on). Set this value to a period of time equal to or greater than the period you defined for the task Reassignment property. This attribute supports string values and the variable expression#{expiresAt}. -
From: An optional user or group ID that is used in the From field of the email notification. This attribute supports string values and the variable expressions
#{user-id}and#{group-id}. -
To Users: A comma-separated list of user IDs to which the email notification will be sent after the Expires At period lapses. This attribute supports string values and the variable expression
#{user-id}. -
To Groups: A comma-separated list of group IDs to which the email notification will be sent after the Expires At period lapses. This attribute supports string values and the variable expression
#{group-id}. -
Reply To: An optional user or group ID to which the recipients of the notification can reply. This attribute supports string values and the variable expressions
#{user-id}and#{group-id}. - Subject: The subject of the email notification. The subject supports string values and the variable expressions described in this list.
- Body: The message body of the email notification. The body supports string values and the variable expressions described in this list.
-
Type: The task state in which the notification can occur (
Figure 12.3. Defining automatic email notifications
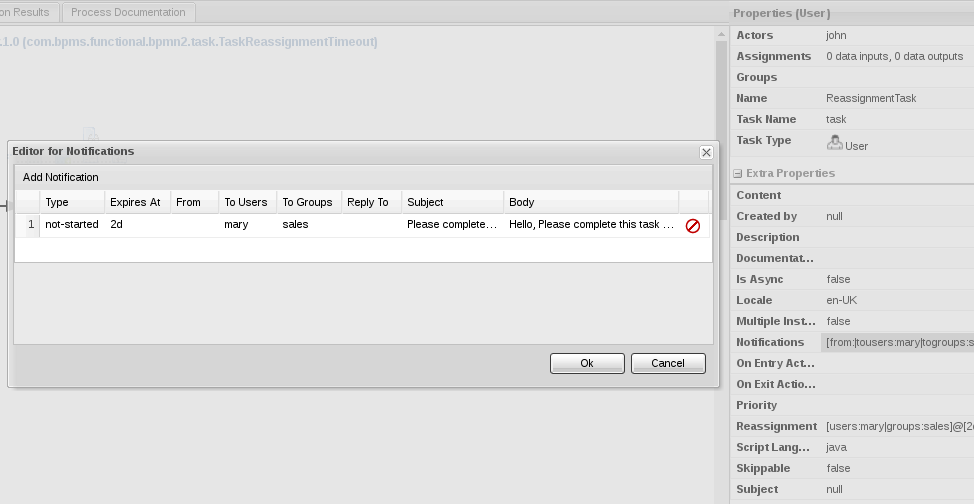
In this example, Mary in Sales will receive an email notification along with the reassigned task if the task is still in a not-started state after two days.
Notification messages also support process and task variables in the format ${variable}. Process variables resolve when the task is created and task variables resolve when the task notification is sent.
The following list contains several process and task variables that you can use in task notifications:
-
taskId: An internal ID of a task instance -
processInstanceId: An internal ID of a process instance that the task belongs to -
workItemId: An internal ID of a work item that created the task -
processSessionId: An internal ID of a runtime engine -
owners: A list of users or groups that are potential owners of the task -
doc: A map that contains regular task variables
The following example notification message illustrates how you can use process and task variables:
<html>
<body>
<b>${owners[0].id} you have been assigned to a task (task-id ${taskId})</b><br>
You can access it in your task
<a href="http://localhost:8080/jbpm-console/app.html#errai_ToolSet_Tasks;Group_Tasks.3">inbox</a><br/>
Important technical information that can be of use when working on it<br/>
- process instance id - ${processInstanceId}<br/>
- work item id - ${workItemId}<br/>
<hr/>
Here are some task variables available:
<ul>
<li>ActorId = ${doc['ActorId']}</li>
<li>GroupId = ${doc['GroupId']}</li>
<li>Comment = ${doc['Comment']}</li>
</ul>
<hr/>
Here are all potential owners for this task:
<ul>
$foreach{orgEntity : owners}
<li>Potential owner = ${orgEntity.id}</li>
$end{}
</ul>
<i>Regards</i>
</body>
</html>12.7.1. Configuring a Custom Implementation of Email Notification Events
You can use the NotificationListener interface to configure a custom implementation of the Email Notification Events in the Task Escalation service. A custom notification implementation provides greater flexibility for your existing task escalation configurations.
To configure a custom implementation of Email Notification Events, follow these steps:
-
Implement the
NotificationListenerinterface. -
Create an
org.jbpm.services.task.deadlines.NotificationListenertext file in theMETA-INF/services/directory. -
Add a Fully Qualified Name (FQN) for your custom listener implementation to the
org.jbpm.services.task.deadlines.NotificationListenertext file. -
Package all classes and files from the
META-INF/services/org.jbpm.services.task.deadlines.NotificationListenertext file into a JAR file. -
Deploy your JAR package by copying it and any required external dependencies into the
$SERVER_HOME/standalone/kie-server.war/WEB-INF/libor$SERVER_HOME/standalone/business-central.war/WEB-INF/libdirectory. - Restart your server.
After you restart your server, the Task Escalation Service triggers your custom Email Notification Event. This feature is based on notification broadcasting, which enables all the notification handlers to handle the event. You can specify the following identifying information in any calls that your application makes to the desired handlers:
- Task information, such as task ID, name, and description
- Process information, such as process instance ID, process ID, and deployment ID
12.8. Retrieving Process and Task Information
There are two services which can be used when building list-based user interfaces: the RuntimeDataService and TaskQueryService.
The RuntimeDataService interface can be used as the main source of information, as it provides an interface for retrieving data associated with the runtime. It can list process definitions, process instances, tasks for given users, node instance information and other. The service should provide all required information and still be as efficient as possible.
See the following examples:
Example 12.1. Get All Process Definitions
Returns every available process definition.
import java.util.Collection;
import org.kie.api.runtime.query.QueryContext;
import org.jbpm.services.api.RuntimeDataService;
...
Collection definitions = runtimeDataService.getProcesses(new QueryContext());Example 12.2. Get Active Process Instances
Returns a list of all active process instance descriptions.
import java.util.Collection;
import org.kie.api.runtime.query.QueryContext;
import org.jbpm.services.api.RuntimeDataService;
...
Collection<processInstanceDesc> activeInstances = runtimeDataService
.getProcessInstances(new QueryContext());Example 12.3. Get Active Nodes for Given Process Instance
Returns a trace of all active nodes for given process instance ID.
import java.util.Collection;
import org.kie.api.runtime.query.QueryContext;
import org.jbpm.services.api.RuntimeDataService;
...
Collection<nodeInstanceDesc> activeNodes = runtimeDataService
.getProcessInstanceHistoryActive(processInstanceId, new QueryContext());Example 12.4. Get Tasks Assigned to Given User
Returns a list of tasks the given user is eligible for.
import java.util.List;
import org.jbpm.services.api.RuntimeDataService;
import org.kie.api.task.model.TaskSummary;
import org.kie.internal.query.QueryFilter;
...
List<TaskSummary> TaskSummaries = runtimeDataService
.getTasksAssignedAsPotentialOwner("john", new QueryFilter(0, 10));Example 12.5. Get Tasks Assigned to Business Administrator
Returns a list of tasks assigned to the given business administrator user.
import java.util.List;
import org.jbpm.services.api.RuntimeDataService;
import org.kie.internal.query.QueryFilter;
List<TaskSummary> taskSummaries = runtimeDataService
.getTasksAssignedAsBusinessAdministrator("john", new QueryFilter(0, 10));For a list of Maven dependencies, see example Embedded jBPM Engine Dependencies.
The RuntimeDataService is mentioned also in Section 20.4, “CDI Integration”.
As you can notice, operations of the RuntimeDataService then support two important arguments:
-
QueryContext -
QueryFilter(which is an extension ofQueryContext)
These two classes provide capabilities for an efficient management and search results. The QueryContext allows you to set an offset (by using the offset argument), number of results (count), their order (orderBy) and ascending order (asc) as well.
Since the QueryFilter inherits all of the mentioned attributes, it provides the same features, as well as some others: for example, it is possible to set the language, single result, maximum number of results, or paging.
Moreover, additional filtering can be applied to the queries to provide more advanced options when searching for user tasks and processes.
12.9. Advanced Queries with QueryService
QueryService provides advanced search capabilities based on JBoss BPM Suite Dashbuilder datasets. You can retrieve data from the underlying data store by means of, for example, JPA entity tables, or custom database tables.
QueryService consists of two main parts:
Management operations, such as:
- Register query definition.
- Replace query definition.
- Remove query definition.
- Get query definition.
- Get all registered query definitions.
Runtime operations:
-
Simple, with
QueryParamas the filter provider. -
Advanced, with
QueryParamBuilderas the filter provider.
-
Simple, with
Following services are a part of QueryService:
-
QueryDefinition: represents dataset which consists of a unique name, SQL expression (the query), and source. QueryParam: represents theconditionquery parameter that consists of:- Column name
- Operator
- Expected value(s)
-
QueryResultMapper: responsible for mapping raw datasets (rows and columns) to objects. -
QueryParamBuilder: responsible for building query filters for the query invocation of the given query definition.
12.9.1. QueryResultMapper
QueryResultMapper maps data to an object. It is similar to other object-relational mapping (ORM) providers, such as hibernate, which maps tables to entities. Red Hat JBoss BPM Suite provides a number of mappers for various object types:
org.jbpm.kie.services.impl.query.mapper.ProcessInstanceQueryMapper-
Registered with name
ProcessInstances.
-
Registered with name
org.jbpm.kie.services.impl.query.mapper.ProcessInstanceWithVarsQueryMapper-
Registered with name
ProcessInstancesWithVariables.
-
Registered with name
org.jbpm.kie.services.impl.query.mapper.ProcessInstanceWithCustomVarsQueryMapper-
Registered with name
ProcessInstancesWithCustomVariables.
-
Registered with name
org.jbpm.kie.services.impl.query.mapper.UserTaskInstanceQueryMapper-
Registered with name
UserTasks.
-
Registered with name
org.jbpm.kie.services.impl.query.mapper.UserTaskInstanceWithVarsQueryMapper-
Registered with name
UserTasksWithVariables.
-
Registered with name
org.jbpm.kie.services.impl.query.mapper.UserTaskInstanceWithCustomVarsQueryMapper-
Registered with name
UserTasksWithCustomVariables.
-
Registered with name
org.jbpm.kie.services.impl.query.mapper.TaskSummaryQueryMapper-
Registered with name
TaskSummaries.
-
Registered with name
org.jbpm.kie.services.impl.query.mapper.RawListQueryMapper-
Registered with name
RawList.
-
Registered with name
Alternatively, you can build custom mappers. The name for each mapper serves as a reference that you can use instead of the class name. It is useful, for example, when you want to reduce the number of dependencies and you do not want to rely on implementation on the client side. To reference QueryResultMapper, use the mapper’s name, which is a part of jbpm-services-api. It acts as a (lazy) delegate as it will search for the mapper when the query is performed.
Following example references ProcessInstanceQueryMapper by name:
queryService.query("my query def", new NamedQueryMapper<Collection<ProcessInstanceDesc>>("ProcessInstances"), new QueryContext());12.9.2. QueryParamBuilder
When you use the QueryService query method which accepts QueryParam instances, all of the parameters are joined by logical conjunction (AND) by default. Alternatively, use QueryParamBuilder to create custom builder which provides filters when the query is issued.
You can use a predefined builder, which includes a number of QueryParam methods based on core functions. Core functions are SQL-based conditions and include following conditions:
-
IS_NULL -
NOT_NULL -
EQUALS_TO -
NOT_EQUALS_TO -
LIKE_TO -
GREATER_THAN -
GREATER_OR_EQUALS_TO -
LOWER_THAN -
LOWER_OR_EQUALS_TO -
BETWEEN -
IN -
NOT_IN
12.9.3. Implementing QueryParamBuilder
QueryParamBuilder is an interface that is invoked when its build method returns a non-null value before the query is performed. It allows you to build complex filter options that a QueryParam list cannot express.
Example 12.6. QueryParamBuilder Implementation Using DashBuilder Dataset API
import java.util.Map;
import org.dashbuilder.dataset.filter.ColumnFilter;
import org.dashbuilder.dataset.filter.FilterFactory;
import org.jbpm.services.api.query.QueryParamBuilder;
public class TestQueryParamBuilder implements QueryParamBuilder<ColumnFilter> {
private Map<String, Object> parameters;
private boolean built = false;
public TestQueryParamBuilder(Map<String, Object> parameters) {
this.parameters = parameters;
}
@Override
public ColumnFilter build() {
// Return NULL if it was already invoked:
if (built) {
return null;
}
String columnName = "processInstanceId";
ColumnFilter filter = FilterFactory.OR(
FilterFactory.greaterOrEqualsTo((Long)parameters.get("min")),
FilterFactory.lowerOrEqualsTo((Long)parameters.get("max")));
filter.setColumnId(columnName);
built = true;
return filter;
}
}For a list of Maven dependencies, see Embedded jBPM Engine Dependencies.
When you implement QueryParamBuilder, use its instance through QueryService:
import org.jbpm.services.api.query.QueryService;
...
queryService.query("my query def", ProcessInstanceQueryMapper.get(), new QueryContext(), paramBuilder);12.9.4. QueryService in Embedded Mode
QueryService is a part of the jBPM Services API, a cross-framework API built to simplify embedding Red Hat JBoss BPM Suite. You can also use advanced querying through the Intelligent Process Server, described in Section 12.9.5, “Advanced Queries Through Intelligent Process Server”. When you use QueryService in embedded mode, follow these steps:
Define the dataset you want to work with:
import org.jbpm.kie.services.impl.query.SqlQueryDefinition; ... SqlQueryDefinition query = new SqlQueryDefinition ("getAllProcessInstances", "java:jboss/datasources/ExampleDS"); query.setExpression("select * from processinstancelog");The constructor of this query definition requires:
- A unique name that serves as ID during runtime.
- JDNI name of a data source for the query.
The expression is an SQL statement that creates a view that will be filtered when performing queries.
Register the query definition:
import org.jbpm.services.api.query.QueryService; ... queryService.registerQuery(query);
You can now use the query definition. The following example does not use filtering:
import java.util.Collection;
import org.jbpm.services.api.model.ProcessInstanceDesc;
import org.kie.api.runtime.query.QueryContext;
import org.jbpm.services.api.query.QueryService;
import org.jbpm.kie.services.impl.query.mapper.ProcessInstanceQueryMapper;
...
Collection<ProcessInstanceDesc> instances = queryService.query("getAllProcessInstances", ProcessInstanceQueryMapper.get(), new QueryContext());You can change the query context, that is paging and sorting of the query:
import java.util.Collection;
import org.kie.api.runtime.query.QueryContext;
import org.jbpm.services.api.model.ProcessInstanceDesc;
import org.jbpm.services.api.query.QueryService;
import org.jbpm.kie.services.impl.query.mapper.ProcessInstanceQueryMapper;
...
QueryContext ctx = new QueryContext(0, 100, "start_date", true);
Collection<ProcessInstanceDesc> instances = queryService.query
("getAllProcessInstances", ProcessInstanceQueryMapper.get(), ctx);You can also use filtering:
import java.util.Collection;
import org.jbpm.kie.services.impl.model.ProcessInstanceDesc;
import org.jbpm.services.api.query.QueryService;
import org.jbpm.kie.services.impl.query.mapper.ProcessInstanceQueryMapper;
import org.kie.api.runtime.query.QueryContext;
import org.jbpm.services.api.query.model.QueryParam;
...
// Single filter parameter:
Collection<ProcessInstanceDesc> instances = queryService.query
("getAllProcessInstances", ProcessInstanceQueryMapper.get(), new QueryContext(),
QueryParam.likeTo(COLUMN_PROCESSID, true, "org.jbpm%"));
// Multiple filter parameters (AND):
Collection<ProcessInstanceDesc> instances = queryService.query
("getAllProcessInstances", ProcessInstanceQueryMapper.get(), new QueryContext(),
QueryParam.likeTo(COLUMN_PROCESSID, true, "org.jbpm%"),
QueryParam.in(COLUMN_STATUS, 1, 3));For a list of Maven dependencies, see Embedded jBPM Engine Dependencies.
12.9.5. Advanced Queries Through Intelligent Process Server
To use advanced queries, you need to deploy the Intelligent Process Server. See chapter The Intelligent Process Server from Red Hat JBoss BPM Suite User Guide to learn more about the Intelligent Process Server. Also, for a list of endpoints you can use, view chapter Advanced Queries for the Intelligent Process Server from the Red Hat JBoss BPM Suite User Guide.
Through the Intelligent Process Server, users can:
- Register query definitions.
- Replace query definitions.
- Remove query definitions.
- Get a query or a list of queries.
Execute queries with:
- Paging and sorting.
- Filter parameters.
- Custom parameter builders and mappers.
To use advanced queries through the Intelligent Process Server, you need to build your Intelligent Process Server to use query services. For Maven projects, see Embedded jBPM Engine Dependencies. To build your Intelligent Process Server:
import java.util.Date;
import java.util.HashSet;
import java.util.Set;
import org.kie.server.api.marshalling.MarshallingFormat;
import org.kie.server.client.KieServicesClient;
import org.kie.server.client.KieServicesConfiguration;
import org.kie.server.client.KieServicesFactory;
import org.kie.server.client.QueryServicesClient;
...
KieServicesConfiguration configuration = KieServicesFactory
.newRestConfiguration(serverUrl, user, password);
Set<Class<?>> extraClasses = new HashSet<Class<?>>();
extraClasses.add(Date.class); // for JSON only to properly map dates
configuration.setMarshallingFormat(MarshallingFormat.JSON);
configuration.addJaxbClasses(extraClasses);
KieServicesClient kieServicesClient = KieServicesFactory
.newKieServicesClient(configuration);
QueryServicesClient queryClient = kieServicesClient
.getServicesClient(QueryServicesClient.class);
// Maven dependency list shown aboveYou can now list available queries on your system:
List<QueryDefinition> queryDefs = queryClient.getQueries(0, 10);
System.out.println(queryDefs);To use advanced queries, register a new query definition:
import org.jbpm.services.api.query.model.QueryDefinition;
...
QueryDefinition query = new QueryDefinition();
query.setName("getAllTaskInstancesWithCustomVariables");
query.setSource("java:jboss/datasources/ExampleDS");
query.setExpression("select ti.*,c.country,c.productCode,c.quantity,c.price,c.saleDate " +
"from AuditTaskImpl ti " +
"inner join (select mv.map_var_id, mv.taskid from MappedVariable mv) mv " +
"on (mv.taskid = ti.taskId) " +
"inner join ProductSale c " +
"on (c.id = mv.map_var_id)");
query.setTarget("Task");
queryClient.registerQuery(query);
// Maven dependency list shown above
Note that Target instructs QueryService to apply default filters. Alternatively, you can set filter parameters manually. Target has the following values:
public enum Target {
PROCESS,
TASK,
BA_TASK,
PO_TASK,
JOBS,
CUSTOM;
}Once registered, you can start with queries:
import java.util.List;
import org.kie.server.api.model.instance.TaskInstance;
//necessary for the queryClient object
import org.kie.server.client.QueryServicesClient;
List<TaskInstance> tasks = queryClient.query
("getAllTaskInstancesWithCustomVariables", "UserTasks", 0, 10, TaskInstance.class);
System.out.println(tasks);
// Maven dependency list shown above
This query returns task instances from the defined dataset, and does not use filtering or UserTasks mapper.
Following example uses advanced querying:
import java.text.SimpleDateFormat;
import java.util.Arrays;
import java.util.Date;
import java.util.List;
import org.kie.server.api.model.definition.QueryFilterSpec;
import org.kie.server.api.model.instance.TaskInstance;
import org.kie.server.api.util.QueryFilterSpecBuilder;
//necessary for the queryClient object
import org.kie.server.client.QueryServicesClient;
...
SimpleDateFormat sdf = new SimpleDateFormat("yyyy-MM-dd");
Date from = sdf.parse("2016-02-01");
Date to = sdf.parse("2016-03-01");
QueryFilterSpec spec = new QueryFilterSpecBuilder()
.between("processInstanceId", 1000, 2000)
.greaterThan("price", 800)
.between("saleDate", from, to)
.in("productCode", Arrays.asList("EAP", "WILDFLY"))
.oderBy("saleDate, country", false)
.addColumnMapping("COUNTRY", "string")
.addColumnMapping("PRODUCTCODE", "string")
.addColumnMapping("QUANTITY", "integer")
.addColumnMapping("PRICE", "double")
.addColumnMapping("SALEDATE", "date")
.get();
List<TaskInstance> tasks = queryClient.query
("getAllTaskInstancesWithCustomVariables", "UserTasksWithCustomVariables",
spec, 0, 10, TaskInstance.class);
System.out.println(tasks);
// Maven dependency list shown aboveIt searches for tasks which have following attributes:
-
The
processInstanceIdis between 1000 and 2000. - Price is greater than 800.
- Sale date is between 2016-02-01 and 2016-03-01.
- Sold product is in groups EAP or Wildfly.
- The results will be ordered by sale date and country in descending order.
The query example uses QueryFilterSpec to specify query parameters and sorting options. It also allows to specify column mapping for custom elements to be set as variables, and combine it with default column mapping for task details. In the example, the UserTasksWithCustomVariables mapper was used.
When you use QueryFilterSpec, all the conditions are connected by logical conjunction (AND). You can build custom advanced filters with different behavior by implementing QueryParamBuilder. You need to include it in one of the following:
-
The Intelligent Process Server (for example, in
WEB-INF/lib). - Inside a project, that is in a project kJAR.
- As a project dependency.
To use QueryParamBuilder, you need to:
Implement
QueryParamBuilderby an object that produces a new instance every time you request it with a map of parameters:import java.util.Map; import org.dashbuilder.dataset.filter.ColumnFilter; import org.dashbuilder.dataset.filter.FilterFactory; import org.jbpm.services.api.query.QueryParamBuilder; ... public class TestQueryParamBuilder implements QueryParamBuilder<ColumnFilter> { private Map<String, Object> parameters; private boolean built = false; public TestQueryParamBuilder(Map<String, Object> parameters) { this.parameters = parameters; } @Override public ColumnFilter build() { // Return NULL if it was already invoked: if (built) { return null; } String columnName = "processInstanceId"; ColumnFilter filter = FilterFactory.OR( FilterFactory.greaterOrEqualsTo(((Number)parameters.get("min")).longValue()), FilterFactory.lowerOrEqualsTo(((Number)parameters.get("max")).longValue())); filter.setColumnId(columnName); built = true; return filter; } } // Maven dependency list shown aboveThis example will accept processInstanceId values that are either grater than
minvalue or lower thanmaxvalue.Implement
QueryParamBuilderFactory:import java.util.Map; import org.jbpm.services.api.query.QueryParamBuilder; import org.jbpm.services.api.query.QueryParamBuilderFactory; import org.jbpm.kie.services.test.objects.TestQueryParamBuilder; ... public class TestQueryParamBuilderFactory implements QueryParamBuilderFactory { @Override public boolean accept(String identifier) { if ("test".equalsIgnoreCase(identifier)) { return true; } return false; } @Override public QueryParamBuilder newInstance(Map<String, Object> parameters) { return new TestQueryParamBuilder(parameters); } } // Maven dependency list shown aboveThe factory interface returns new instances of the
QueryParamBuilderonly if the given identifier is accepted by the factory. The Identifier is a part of the query request. Only one query builder factory can be selected based on the identifier. In the example, usetestidentifier to use this factory, and theQueryParamBuilder.Add a service file into
META-INF/services/of the JAR that will package these implementations. In the service file, specify fully qualified class name of the factory, for example:org.jbpm.services.api.query.QueryParamBuilderFactory
You can now request your query builder:
import java.util.HashMap;
import java.util.List;
import java.util.Map;
import org.kie.server.api.model.instance.TaskInstance;
...
Map<String, Object> params = new HashMap<String, Object>();
params.put("min", 10);
params.put("max", 20);
List<TaskInstance> instances = queryClient.query
("getAllTaskInstancesWithCustomVariables", "UserTasksWithCustomVariables", "test",
params, 0, 10, TaskInstance.class);
// Maven dependencies shown aboveSimilarly, to create a custom mapper, follow these steps:
Implement the mapper interface:
public class ProductSaleQueryMapper extends UserTaskInstanceWithCustomVarsQueryMapper { private static final long serialVersionUID = 3299692663640707607L; public ProductSaleQueryMapper() { super(getVariableMapping()); } protected static Map<String, String> getVariableMapping() { Map<String, String> variablesMap = new HashMap<String, String>(); variablesMap.put("COUNTRY", "string"); variablesMap.put("PRODUCTCODE", "string"); variablesMap.put("QUANTITY", "integer"); variablesMap.put("PRICE", "double"); variablesMap.put("SALEDATE", "date"); return variablesMap; } @Override public String getName() { return "ProductSale"; } }Add appropriate service file into
META-INF/services/:org.jbpm.services.api.query.QueryResultMapperReference it by the name, for example:
List<TaskInstance> tasks = queryClient.query ("getAllTaskInstancesWithCustomVariables", "ProductSale", 0, 10, TaskInstance.class); System.out.println(tasks);
12.10. Process Instance Migration
Process instance migration is available only with Red Hat JBoss BPM Suite 6.4 and higher.
The ProcessInstanceMigrationService service is a utility used to migrate given process instances from one deployment to another. Process or task variables are not affected by the migration. The ProcessInstanceMigrationService service enables you to change the process definition for the process engine.
For process instance migrations, let active process instances finish and start new process instances in the new deployment. If this approach is not suitable to your needs, consider the following before starting process instance migration:
- Backward compatibility
- Data change
- Need for node mapping
You should create backward compatible processes whenever possible, such as extending process definitions. For example, removing specific nodes from the process definition breaks compatibility. In such case, you must provide new node mapping in case an active process instance is in a node that has been removed.
A node map contains source node IDs from the old process definition mapped to target node IDs in the new process definition. You can map nodes of the same type only, such as a user task to a user task.
Red Hat JBoss BPM Suite offers several implementations of the migration service:
public interface ProcessInstanceMigrationService {
/**
* Migrates given process instance that belongs to source deployment, into target process id that belongs to target deployment.
* Following rules are enforced:
* <ul>
* <li>source deployment id must be there</li>
* <li>process instance id must point to existing and active process instance</li>
* <li>target deployment must exist</li>
* <li>target process id must exist in target deployment</li>
* </ul>
* Migration returns migration report regardless of migration being successful or not that needs to be examined for migration outcome.
* @param sourceDeploymentId deployment that process instance to be migrated belongs to
* @param processInstanceId id of the process instance to be migrated
* @param targetDeploymentId id of deployment that target process belongs to
* @param targetProcessId id of the process process instance should be migrated to
* @return returns complete migration report
*/
MigrationReport migrate(String sourceDeploymentId, Long processInstanceId, String targetDeploymentId, String targetProcessId);
/**
* Migrates given process instance (with node mapping) that belongs to source deployment, into target process id that belongs to target deployment.
* Following rules are enforced:
* <ul>
* <li>source deployment id must be there</li>
* <li>process instance id must point to existing and active process instance</li>
* <li>target deployment must exist</li>
* <li>target process id must exist in target deployment</li>
* </ul>
* Migration returns migration report regardless of migration being successful or not that needs to be examined for migration outcome.
* @param sourceDeploymentId deployment that process instance to be migrated belongs to
* @param processInstanceId id of the process instance to be migrated
* @param targetDeploymentId id of deployment that target process belongs to
* @param targetProcessId id of the process process instance should be migrated to
* @param nodeMapping node mapping - source and target unique ids of nodes to be mapped - from process instance active nodes to new process nodes
* @return returns complete migration report
*/
MigrationReport migrate(String sourceDeploymentId, Long processInstanceId, String targetDeploymentId, String targetProcessId, Map<String, String> nodeMapping);
/**
* Migrates given process instances that belong to source deployment, into target process id that belongs to target deployment.
* Following rules are enforced:
* <ul>
* <li>source deployment id must be there</li>
* <li>process instance id must point to existing and active process instance</li>
* <li>target deployment must exist</li>
* <li>target process id must exist in target deployment</li>
* </ul>
* Migration returns list of migration report - one per process instance, regardless of migration being successful or not that needs to be examined for migration outcome.
* @param sourceDeploymentId deployment that process instance to be migrated belongs to
* @param processInstanceIds list of process instance id to be migrated
* @param targetDeploymentId id of deployment that target process belongs to
* @param targetProcessId id of the process process instance should be migrated to
* @return returns complete migration report
*/
List<MigrationReport> migrate(String sourceDeploymentId, List<Long> processInstanceIds, String targetDeploymentId, String targetProcessId);
/**
* Migrates given process instances (with node mapping) that belong to source deployment, into target process id that belongs to target deployment.
* Following rules are enforced:
* <ul>
* <li>source deployment id must be there</li>
* <li>process instance id must point to existing and active process instance</li>
* <li>target deployment must exist</li>
* <li>target process id must exist in target deployment</li>
* </ul>
* Migration returns list of migration report - one per process instance, regardless of migration being successful or not that needs to be examined for migration outcome.
* @param sourceDeploymentId deployment that process instance to be migrated belongs to
* @param processInstanceIds list of process instance id to be migrated
* @param targetDeploymentId id of deployment that target process belongs to
* @param targetProcessId id of the process process instance should be migrated to
* @param nodeMapping node mapping - source and target unique ids of nodes to be mapped - from process instance active nodes to new process nodes
* @return returns list of migration reports one per each process instance
*/
List<MigrationReport> migrate(String sourceDeploymentId, List<Long> processInstanceIds, String targetDeploymentId, String targetProcessId, Map<String, String> nodeMapping);
}To migrate process instances on the KIE Server, use the following implementations. These correspond with the implementations described in the previous code sample.
public interface ProcessAdminServicesClient {
MigrationReportInstance migrateProcessInstance(String containerId, Long processInstanceId, String targetContainerId, String targetProcessId);
MigrationReportInstance migrateProcessInstance(String containerId, Long processInstanceId, String targetContainerId, String targetProcessId, Map<String, String> nodeMapping);
List<MigrationReportInstance> migrateProcessInstances(String containerId, List<Long> processInstancesId, String targetContainerId, String targetProcessId);
List<MigrationReportInstance> migrateProcessInstances(String containerId, List<Long> processInstancesId, String targetContainerId, String targetProcessId, Map<String, String> nodeMapping);
}You can migrate a single process instance, or multiple process instances at once. If you migrate multiple process instances, each instance will be migrated in a separate transaction to ensure that the migrations do not affect each other.
After migration is done, the migrate method returns a MigrationReport object that contains the following information:
- Start and end dates of the migration.
- Migration outcome (success or failure).
-
Log entry as
INFO,WARN, orERRORtype. TheERRORmessage terminates the migration.
The following is an example process instance migration:
Example Process Instance Migration
import org.kie.server.api.model.admin.MigrationReportInstance;
import org.kie.server.api.marshalling.MarshallingFormat;
import org.kie.server.client.KieServicesClient;
import org.kie.server.client.KieServicesConfiguration;
public class ProcessInstanceMigrationTest{
private static final String SOURCE_CONTAINER = "com.redhat:MigrateMe:1.0";
private static final String SOURCE_PROCESS_ID = "MigrateMe.MigrateMev1";
private static final String TARGET_CONTAINER = "com.redhat:MigrateMe:2";
private static final String TARGET_PROCESS_ID = "MigrateMe.MigrateMeV2";
public static void main(String[] args) {
KieServicesConfiguration config = KieServicesFactory.newRestConfiguration("http://HOST:PORT/kie-server/services/rest/server", "USERNAME", "PASSWORD");
config.setMarshallingFormat(MarshallingFormat.JSON);
KieServicesClient client = KieServicesFactory.newKieServicesClient(config);
long sourcePid = client.getProcessClient().startProcess(SOURCE_CONTAINER, SOURCE_PROCESS_ID);
// Use the 'report' object to return migration results.
MigrationReportInstance report = client.getAdminClient().migrateProcessInstance(SOURCE_CONTAINER, sourcePid,TARGET_CONTAINER, TARGET_PROCESS_ID);
System.out.println("Was migration successful:" + report.isSuccessful());
client.getProcessClient().abortProcessInstance(TARGET_CONTAINER, sourcePid);
}
}Known Limitations
There are several limitations to the migration service:
- You can migrate process instances only, not their data.
- If you modify a task that is preceding the active task, the active task will not be affected by the change.
- You cannot remove a currently active human task. You can replace a human task by mapping it onto a different human task.
- You cannot add new branches parallel to the current active task. In such case, the new branch will not be activated and the workflow will not pass the AND gateway.
- Changes in the active recurring timer events will not be persisted in the database.
- You cannot update task inputs and outputs.
- Node mapping updates task node name and description only. Other task fields will not be mapped and migrated.
Chapter 13. Persistence and Transactions
13.1. Process Instance State
Red Hat JBoss BPM Suite allows persistent storage of information. For example, you can persistently store process runtime state to ensure that you will be able to resume your process instance in case of failure. While logs of current and previous process states are stored by default, you can store process definitions and logging information as well.
13.1.1. Runtime State
When you start a process, Red Hat JBoss BPM Suite creates a process instance, which represents the execution of the process in the specific context. For example, when you start a process that specifies how to process a sales order, Red Hat JBoss BPM Suite creates a process instance for each order. Process instances contain all the related information and minimal runtime state required to continue the execution at any time. However, it does not include process instance logs unless needed for execution of the process instance.
You can make the runtime state of an executing process persistent, for example, in a database. This allows you to restore the state of execution of all running processes in case of failure, or to temporarily remove running instances from memory and restore them later. Red Hat JBoss BPM Suite allows you to plug in different persistence strategies. Note that process instances are not persistent by default.
When you configure the Red Hat JBoss BPM Suite engine to use persistence, it automatically stores the runtime state in a database without further prompting. When you invoke the engine, it ensures that all changes are stored at the end of that invocation. If you encounter a failure and restore the engine from the database, do not manually resume the execution. Process instances automatically resume execution if they are triggered.
Inexperienced users should not directly access and modify database tables containing runtime persistence data. Changes in the runtime state of process instances which are not done by the engine may have unexpected results. If you require information about the current execution state of a process instance, use the history log.
13.1.2. Binary Persistence
Binary persistence, or marshaling, converts the state of the process instance into a binary dataset. Binary persistence is a mechanism used to store and retrieve information persistently. The same mechanism is also applied to the session state and work item states.
When you enable persistence of a process instance:
- Red Hat JBoss BPM Suite transforms the process instance information into binary data. Custom serialization is used instead of Java serialization for performance reasons.
- The binary data is stored together with other process instance metadata, such as process instance ID, process ID, and the process start date.
The session can also store other forms of state, such as the state of timer jobs, or data required for business rules evaluation. Session state is stored separately as a binary dataset along with the ID of the session and metadata. You can restore the session state by reloading a session with given ID. Use ksession.getId() to get the session ID.
13.1.3. Data Model Description
Each entity of the data model is described below.
Figure 13.1. Data Model
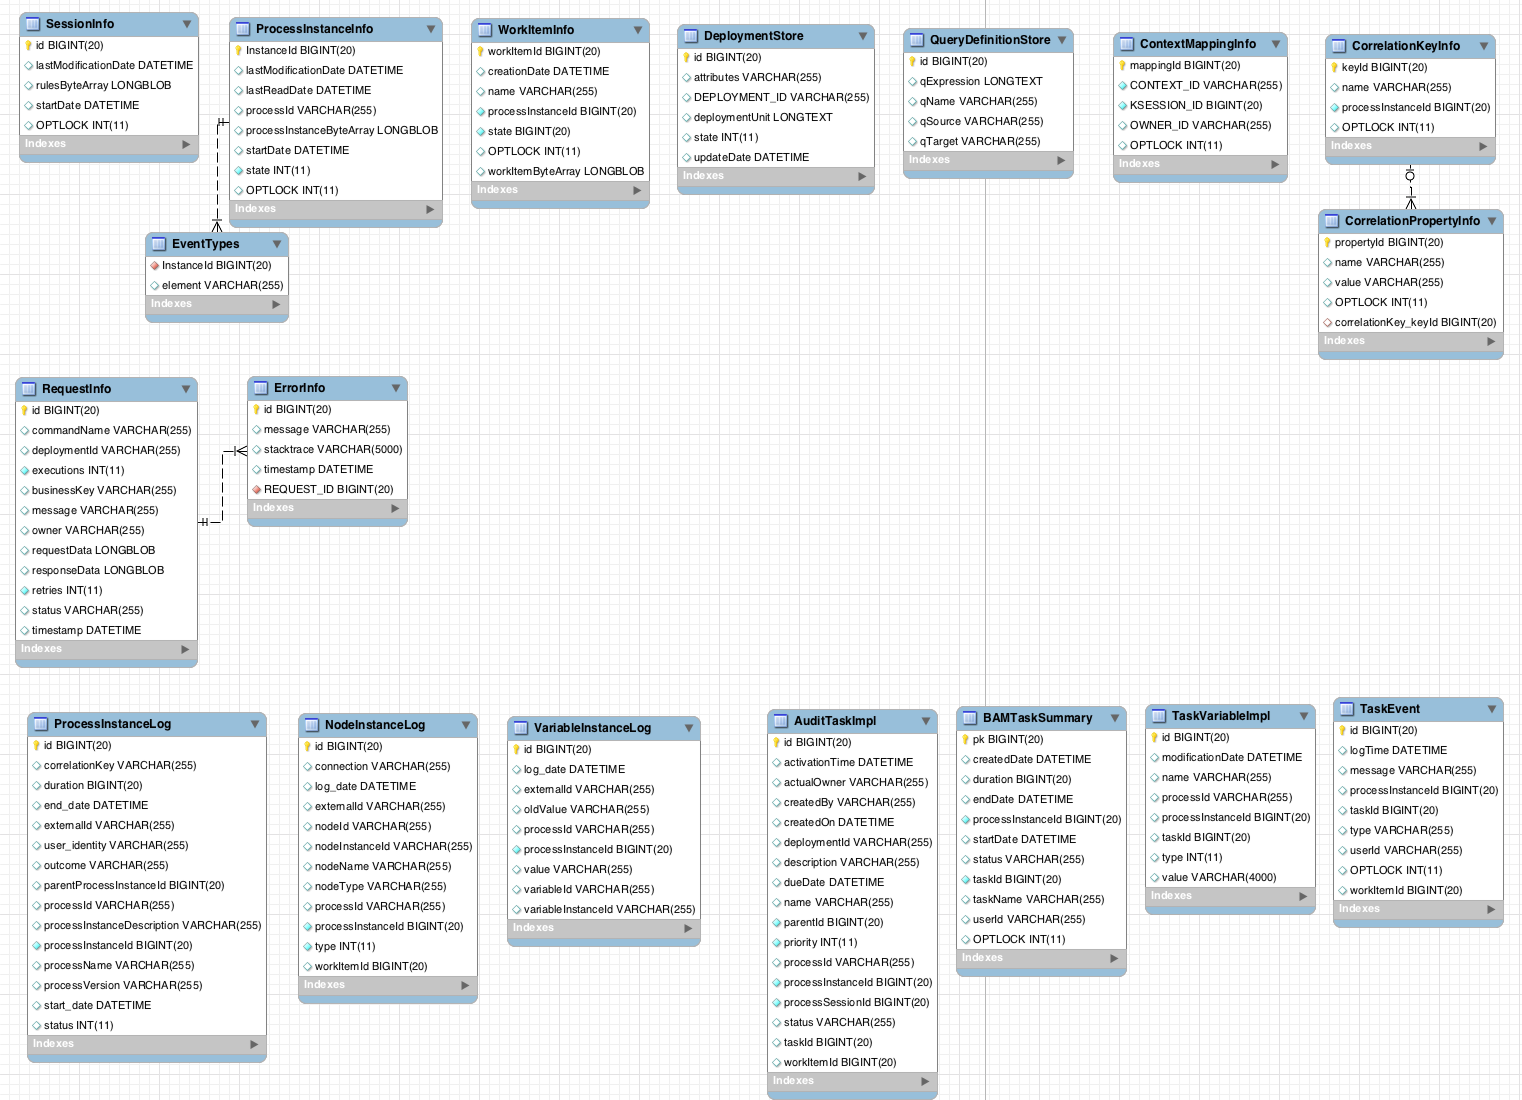
The SessionInfo entity contains the state of the (knowledge) session in which the process instance is running.
| Field | Description | Nullable |
|---|---|---|
|
| The primary key. | NOT NULL |
|
| The last time that entity was saved to a database. | |
|
| The state of a session. | NOT NULL |
|
| The session start time. | |
|
| A version field containing a lock value. |
The ProcessInstanceInfo entity contains the state of the process instance.
| Field | Description | Nullable |
|---|---|---|
|
| The primary key. | NOT NULL |
|
| The last time that the entity was saved to a database. | |
|
| The last time that the entity was retrieved from the database. | |
|
| The ID of the process. | |
|
| The state of a process instance in form of a binary dataset. | NOT NULL |
|
| The start time of the process. | |
|
| An integer representing the state of a process instance. | NOT NULL |
|
| A version field containing a lock value. |
The EventTypes entity contains information about events that a process instance will undergo or has undergone.
| Field | Description | Nullable |
|---|---|---|
|
|
A reference to the | NOT NULL |
|
| A finished event in the process. |
The WorkItemInfo entity contains the state of a work item.
| Field | Description | Nullable |
|---|---|---|
|
| The primary key. | NOT NULL |
|
| The name of the work item. | |
|
| The (primary key) ID of the process. There is no foreign key constraint on this field. | NOT NULL |
|
| The state of a work item. | NOT NULL |
|
| A version field containing a lock value. | |
|
| The work item state in as a binary dataset. | NOT NULL |
The CorrelationKeyInfo entity contains information about correlation keys assigned to the given process instance. This table is optional. Use it only when you require correlation capabilities.
| Field | Description | Nullable |
|---|---|---|
|
| The primary key. | NOT NULL |
|
| The assigned name of the correlation key. | |
|
| The ID of the process instance which is assigned to the correlation key. | NOT NULL |
|
| A version field containing a lock value. |
The CorrelationPropertyInfo entity contains information about correlation properties for a correlation key assigned the process instance.
| Field | Description | Nullable |
|---|---|---|
|
| The primary key. | NOT NULL |
|
| The name of the property. | |
|
| The value of the property. | NOT NULL |
|
| A version field containing a lock value. | |
|
| A foreign key mapped to the correlation key. | NOT NULL |
The ContextMappingInfo entity contains information about the contextual information mapped to a KieSession. This is an internal part of RuntimeManager and can be considered optional when RuntimeManager is not used.
| Field | Description | Nullable |
|---|---|---|
|
| The primary key. | NOT NULL |
|
| The context identifier. | NOT NULL |
|
|
The | NOT NULL |
|
| A version field containing a lock value. |
13.1.4. Safe Points
During the process engine execution, the state of a process instance is stored in safe points. When you execute a process instance, the engine continues the execution until there are no more actions to be performed. That is, the process instance has been completed, aborted, or is in the wait state in all of its paths. At that point, the engine has reached the next safe state, and the state of the process instance (and all other process instances that it affected) is stored persistently.
13.2. Audit Log
Storing information about the execution of process instances can be useful when you need to, for example:
- Verify which actions have been executed in a particular process instance.
- Monitor and analyze the efficiency of a particular process.
However, storing history information in the runtime database can result in the database rapidly increasing in size. Additionally, monitoring and analysis queries might influence the performance of your runtime engine. This is why process execution history logs are stored separately.
13.2.1. Audit Data Model
The jbpm-audit module contains an event listener that stores process-related information in a database using Java Persistence API (JPA). The data model contains the following entities:
- The ProcessInstanceLog table contains the basic log information about a process instance.
- The NodeInstanceLog table contains information about which nodes were actually executed inside each process instance. Whenever a node instance is entered from one of its incoming connections or is exited through one of its outgoing connections, that information is stored in this table.
- The VariableInstanceLog table contains information about changes in variable instances. The execution engine generates log entries after a variable changes, by default. Alternatively, you can log entries before the variable value changes.
- The AuditTaskImpl table contains information about tasks that can be used for queries.
- The BAMTaskSummary table collects information about tasks. The Business Activity Monitor engine then uses the information to build charts and dashboards.
- The TaskVariableImpl table contains information about task variable instances.
- The TaskEvent table contains information about changes in task instances. It contains a timeline view of events (for example claim, start, or stop) for the given task.
13.2.2. Audit Data Model Description
All audit data model entities contain following elements:
| Field | Description |
|---|---|
|
| The primary key and ID of the log entity. Cannot have the null value. |
|
| The duration of a process instance since its start date. |
|
| The end date of a process instance when applicable. |
|
| An optional external identifier used to correlate various elements, for example deployment ID. |
|
| An optional identifier of the user who started the process instance. |
|
| The outcome of a process instance, for example the error code. |
|
| The process instance ID of the parent process instance. |
|
| The ID of the executed process. |
|
| The process instance ID. Cannot have the NULL value. |
|
| The name of the process. |
|
| The version of the process. |
|
| The start date of the process instance. |
|
| The status of process instance that maps to process instance state. |
| Field | Description |
|---|---|
|
| The primary key and ID of the log entity. Cannot have the NULL value. |
|
| The identifier of the sequence flow that led to this node instance. |
|
| The event date. |
|
| An optional external identifier used to correlate various elements, for example deployment ID. |
|
| The node ID of the corresponding node in the process definition. |
|
| The instance ID of the node. |
|
| The name of the node. |
|
| The type of the node. |
|
| The ID of the executed process. |
|
| The process instance ID. |
|
| The type of the event (0 = enter, 1 = exit). Cannot have the NULL value. |
|
| An optional identifier of work items available only for certain node types. |
| Field | Description |
|---|---|
|
| The primary key and ID of the log entity. Cannot have the NULL value. |
|
| An optional external identifier used to correlate various elements, for example deployment ID. |
|
| The date of the event. |
|
| The ID of the executed process. |
|
| The process instance ID. |
|
| The previous value of the variable at the time of recording of the log. |
|
| The value of the variable at the time of recording of the log. |
|
| The variable ID in the process definition. |
|
| The ID of the variable instance. |
| Field | Description |
|---|---|
|
| The primary key and ID of the log entity. |
|
| The time of the task activation. |
|
| The actual owner assigned to this task. This field is set only when a user claims the task. |
|
| The user who created the task. |
|
| The date of the task creation. |
|
| The deployment ID to which this task belongs. |
|
| The task description. |
|
| The due date set on this task. |
|
| The name of the task. |
|
| The parent task ID. |
|
| The priority of the task. |
|
| The process definition ID to which this task belongs. |
|
| The process instance ID with which this task is associated. |
|
|
The |
|
| The current status of the task. |
|
| The identifier of task. |
|
| The work item ID assigned to this task ID (on process side). |
| Field | Description |
|---|---|
|
| The primary key and ID of the log entity. Cannot have the null value. |
|
| The date of the task creation. |
|
| Duration since the task was created. |
|
| The date when the task reached an end state (that is: complete, exit, fail, or skip). |
|
| The process instance ID. |
|
| The date when the task was started. |
|
| The current status of the task. |
|
| The identifier of the task. |
|
| The name of the task. |
|
| The user ID assigned to the task. |
| Field | Description |
|---|---|
|
| The primary key and ID of the log entity. Cannot have the null value. |
|
| The last time when the variable was modified. |
|
| The name of the task. |
|
| The ID of the process that the process instance is executing. |
|
| The process instance ID. |
|
| The identifier of the task. |
|
| The type of the variable, that is input or output of the task. |
|
| The value of a variable. |
| Field | Description |
|---|---|
|
| The primary key and ID of the log entity. Cannot have the null value. |
|
| The date when this event was saved. |
|
| The log event message. |
|
| The process instance ID. |
|
| The identifier of the task. |
|
| The type of the event, which corresponds to the life cycle phases of the task. |
|
| The user ID assigned to the task. |
|
| The identifier of the work item to which the task is assigned. |
13.2.3. Storing Process Events in a Database
To log process history in a database, register a logger in your session:
EntityManagerFactory emf = ...;
StatefulKnowledgeSession ksession = ...;
AbstractAuditLogger auditLogger = AuditLoggerFactory.newJPAInstance(emf);
ksession.addProcessEventListener(auditLogger);
// Invoke methods on your session here.
Modify persistence.xml to specify a database. You need to include audit log classes as well (ProcessInstanceLog, NodeInstanceLog, and VariableInstanceLog). See the example:
<?xml version="1.0" encoding="UTF-8" standalone="yes"?>
<persistence
version="2.0"
xsi:schemaLocation="
http://java.sun.com/xml/ns/persistence
http://java.sun.com/xml/ns/persistence/persistence_2_0.xsd
http://java.sun.com/xml/ns/persistence/orm
http://java.sun.com/xml/ns/persistence/orm_2_0.xsd"
xmlns="http://java.sun.com/xml/ns/persistence"
xmlns:orm="http://java.sun.com/xml/ns/persistence/orm"
xmlns:xsi="http://www.w3.org/2001/XMLSchema-instance">
<persistence-unit name="org.jbpm.persistence.jpa" transaction-type="JTA">
<provider>org.hibernate.ejb.HibernatePersistence</provider>
<jta-data-source>jdbc/jbpm-ds</jta-data-source>
<mapping-file>META-INF/JBPMorm.xml</mapping-file>
<class>org.drools.persistence.info.SessionInfo</class>
<class>org.jbpm.persistence.processinstance.ProcessInstanceInfo</class>
<class>org.drools.persistence.info.WorkItemInfo</class>
<class>org.jbpm.persistence.correlation.CorrelationKeyInfo</class>
<class>org.jbpm.persistence.correlation.CorrelationPropertyInfo</class>
<class>org.jbpm.runtime.manager.impl.jpa.ContextMappingInfo</class>
<class>org.jbpm.process.audit.ProcessInstanceLog</class>
<class>org.jbpm.process.audit.NodeInstanceLog</class>
<class>org.jbpm.process.audit.VariableInstanceLog</class>
<properties>
<property name="hibernate.dialect" value="org.hibernate.dialect.H2Dialect"/>
<property name="hibernate.max_fetch_depth" value="3"/>
<property name="hibernate.hbm2ddl.auto" value="update"/>
<property name="hibernate.show_sql" value="true"/>
<property name="hibernate.transaction.jta.platform"
value="org.hibernate.service.jta.platform.internal.BitronixJtaPlatform"/>
</properties>
</persistence-unit>
</persistence>13.2.4. Storing Process Events in a JMS Queue
Synchronous storing of history logs and runtime data in one database may be undesirable due to performance reasons. In that case, you can use JMS logger to send data into a JMS queue instead of directly storing it in a database. You can also configure it to be transactional in order to avoid issues with inconsistent data, for example when the process engine transaction is reversed.
Example configuration of JMS queue:
ConnectionFactory factory = ...;
Queue queue = ...;
StatefulKnowledgeSession ksession = ...;
Map<String, Object> jmsProps = new HashMap<String, Object>();
jmsProps.put("jbpm.audit.jms.transacted", true);
jmsProps.put("jbpm.audit.jms.connection.factory", factory);
jmsProps.put("jbpm.audit.jms.queue", queue);
AbstractAuditLogger auditLogger =
AuditLoggerFactory.newInstance(Type.JMS, session, jmsProps);
ksession.addProcessEventListener(auditLogger);
// Invoke methods of your session here.13.2.5. Auditing Variables
Process and task variables are stored as string (similar to variable.toString()) in audit tables by default. This is not always efficient, for example, when you need to query by the process or task instance variables:
public class Person implements Serializable {
private static final long serialVersionUID = -5172443495317321032L;
private String name;
private int age;
public Person(String name, int age) {
this.name = name;
this.age = age;
}
public String getName() {
return name;
}
public void setName(String name) {
this.name = name;
}
public int getAge() {
return age;
}
public void setAge(int age) {
this.age = age;
}
@Override
public String toString() {
return "Person [name=" + name + ", age=" + age + "]";
}
}In this example, when you want to query all the people with certain age, querying becomes inefficient.
Thus, variable audit is based on VariableIndexer, which extracts relevant parts of the variables that will be stored in audit log:
/**
* Variable indexer that allows to transform variable instance
* into other representation (usually String) to be able to use it for queries.
*
* @param <V> type of the object that will represent indexed variable
*/
public interface VariableIndexer<V> {
/**
* Tests if given variable shall be indexed by this indexer.
*
* NOTE: Only one indexer can be used for given variable.
*
* @param variable variable to be indexed
* @return true if variable should be indexed with this indexer
*/
boolean accept(Object variable);
/**
* Performs index/transform operation of the variable.
* Result of this operation can be either single value
* or list of values to support complex type separation.
* For example, when variable is of type Person that has name,
* address, and phone, indexer could build three entries
* out of it to represent individual fields:
*
* person = person.name
* address = person.address.street
* phone = person.phone
*
* That will allow more advanced queries to be used to find
* relevant entries.
*
* @param name name of the variable
* @param variable actual variable value
* @return
*/
List<V> index(String name, Object variable);
}
The default indexer (that is indexer accepting toString()) produces a single audit entry for a single variable. However, you can create a custom indexer which indexes variables into separate audit entries:
public class PersonTaskVariablesIndexer implements TaskVariableIndexer {
@Override
public boolean accept(Object variable) {
if (variable instanceof Person) {
return true;
}
return false;
}
@Override
public List<TaskVariable> index(String name, Object variable) {
Person person = (Person) variable;
List<TaskVariable> indexed = new ArrayList<TaskVariable>();
TaskVariableImpl personNameVar = new TaskVariableImpl();
personNameVar.setName("person.name");
personNameVar.setValue(person.getName());
indexed.add(personNameVar);
TaskVariableImpl personAgeVar = new TaskVariableImpl();
personAgeVar.setName("person.age");
personAgeVar.setValue(person.getAge()+"");
indexed.add(personAgeVar);
return indexed;
}
}This allows you to search all the process instances or tasks that contain the person instance of age 34 by querying for:
- Variable name: person.age
- Variable value: 34
13.2.6. Building and Registering Custom Indexers
You can build indexers for both process and task variables. They are supported by different interfaces because they produce different type of objects representing audit view of the variable. To create a custom indexer, follow these steps:
Implement following interfaces to build custom indexers:
-
Process variables:
org.kie.internal.process.ProcessVariableIndexer. -
Task variables:
org.kie.internal.task.api.TaskVariableIndexer.
-
Process variables:
Implement the following methods:
-
accept: indicates what types are handled by given indexer. Only one indexer can index any given variable. The first that accepts the variable will index it. -
index: the method for indexing the variable.
-
Package the implementation into a jar file, including following files:
-
For process variables:
META-INF/services/org.kie.internal.process.ProcessVariableIndexerwith list of fully qualified class names that represent the process variable indexers (single class name per line). -
For task variables:
META-INF/services/org.kie.internal.task.api.TaskVariableIndexerwith list of fully qualified class names that represent the task variable indexers (single class name per line).
-
For process variables:
The ServiceLoader service registers indexers. When you start indexing, all the registered indexers are examined. If no applicable indexer is found, the default indexer (toString() based) is used.
13.3. Transactions
Red Hat JBoss BPM Suite engine supports Java Transaction API (JTA). The engine executes any method you invoke in a separate transaction unless you set transaction boundaries. Transaction boundaries allow you to combine multiple commands into one transaction.
Register a transaction manager before using user-defined transactions. The following sample code uses Bitronix transaction manager. It also uses JTA to specify transaction boundaries:
// Create the entity manager factory and register it in the environment:
EntityManagerFactory emf =
Persistence.createEntityManagerFactory("org.jbpm.persistence.jpa");
Environment env = KnowledgeBaseFactory.newEnvironment();
env.set(EnvironmentName.ENTITY_MANAGER_FACTORY, emf);
env.set(EnvironmentName.TRANSACTION_MANAGER,
TransactionManagerServices.getTransactionManager());
// Create a new knowledge session that uses JPA to store the runtime state:
StatefulKnowledgeSession ksession =
JPAKnowledgeService.newStatefulKnowledgeSession(kbase, null, env);
// Start the transaction:
UserTransaction ut =
(UserTransaction) new InitialContext().lookup("java:comp/UserTransaction");
ut.begin();
// Perform multiple commands inside one transaction:
ksession.insert(new Person("John Doe"));
ksession.startProcess("MyProcess");
// Commit the transaction:
ut.commit();
If you use Bitronix as the transaction manager, you must provide jndi.properties in your root classpath to register the Bitronix transaction manager in JNDI.
-
If you use the
jbpm-testmodule,jndi.propertiesis included by default. If you are not using
jbpm-testmodule, createjndi.propertiesmanually with the following content:java.naming.factory.initial=bitronix.tm.jndi.BitronixInitialContextFactory
If you use a different JTA transaction manager, modify the transaction manager property in persistence.xml:
<property
name = "hibernate.transaction.jta.platform"
value = "org.hibernate.transaction.JBossTransactionManagerLookup"
/>
Using the (runtime manager) Singleton strategy with JTA transactions (UserTransaction or CMT) is not recommended because of a race condition. It can result in an IllegalStateException with a message similar to "Process instance X is disconnected".
Avoid this condition by explicitly synchronizing around the KieSession instance when invoking the transaction in the user application code:
synchronized (ksession) {
try {
tx.begin();
// use ksession application logic
tx.commit();
} catch (Exception e) {
...
}
}13.4. Implementing Container Managed Transaction
You can embed Red Hat JBoss BPM Suite inside an application that executes in Container Managed Transaction (CMT) mode, such as Enterprise Java Beans (EJB).
To configure the transaction manager, follow these steps:
Implement the dedicated transaction manager:
org.jbpm.persistence.jta.ContainerManagedTransactionManagerInsert the transaction manager and persistence context manager into the environment before you create or load your session:
Environment env = EnvironmentFactory.newEnvironment(); env.set(EnvironmentName.ENTITY_MANAGER_FACTORY, emf); env.set(EnvironmentName.TRANSACTION_MANAGER, new ContainerManagedTransactionManager()); env.set(EnvironmentName.PERSISTENCE_CONTEXT_MANAGER, new JpaProcessPersistenceContextManager(env)); env.set(EnvironmentName.TASK_PERSISTENCE_CONTEXT_MANAGER, new JPATaskPersistenceContextManager(env));Configure JPA provider (example Hibernate and WebSphere):
<property name="hibernate.transaction.factory_class" value="org.hibernate.transaction.CMTTransactionFactory"/> <property name="hibernate.transaction.jta.platform" value="org.hibernate.service.jta.platform.internal.WebSphereJtaPlatform"/>
To ensure that the container is aware of process instance execution exceptions, make sure that exceptions thrown by the engine are sent to the container to properly reverse the transaction.
Using the CMT Dispose KieSession Command
If you dispose of your KieSession directly when running in the CMT mode, you may generate exceptions, because Red Hat JBoss BPM Suite requires transaction synchronization. Use org.jbpm.persistence.jta.ContainerManagedTransactionDisposeCommand to dispose of your session.
13.5. Using Persistence
Red Hat JBoss BPM Suite engine does not save runtime data persistently by default. To use persistence, you need to:
- Add necessary dependencies.
- Configure a datasource.
- Configure the Red Hat JBoss BPM Suite engine.
13.5.1. Adding Dependencies
To use persistence, add necessary dependencies to the classpath of your application. If you are using Red Hat JBoss Development Studio with Red Hat JBoss BPM Suite runtime default configuration, all necessary dependencies are already present for the default persistence configuration. Otherwise, ensure that the necessary JAR files are added to your Red Hat JBoss BPM Suite runtime directory.
Following is a list of dependencies for the default combination with Hibernate as the JPA persistence provider, an H2 in-memory database, and Bitronix for JTA-based transaction management. Dependencies needed for your project will vary depending on your solution configuration.
jbpm-persistence-jpa.jar file is necessary for saving the runtime state. Therefore, always make sure it is available in your project.
-
jbpm-persistence-jpa(org.jbpm) -
drools-persistence-jpa(org.drools) -
persistence-api(javax.persistence) -
hibernate-entitymanager(org.hibernate) -
hibernate-annotations(org.hibernate) -
hibernate-commons-annotations(org.hibernate) -
hibernate-core(org.hibernate) -
commons-collections(commons-collections) -
dom4j(dom4j) -
jta(javax.transaction) -
btm(org.codehaus.btm) -
javassist(javassist) -
slf4j-api(org.slf4j) -
slf4j-jdk14(org.slf4j) -
h2(com.h2database)
13.5.2. Manually Configuring Red Hat JBoss BPM Suite Engine to Use Persistence
Use JPAKnowledgeService to create a knowledge session based on a knowledge base, a knowledge session configuration (if necessary), and the environment. Ensure that the environment contains a reference to your Entity Manager Factory. For example:
// Create the entity manager factory and register it in the environment:
EntityManagerFactory emf =
Persistence.createEntityManagerFactory("org.jbpm.persistence.jpa");
Environment env = KnowledgeBaseFactory.newEnvironment();
env.set(EnvironmentName.ENTITY_MANAGER_FACTORY, emf);
// Create a new knowledge session that uses JPA to store the runtime state:
StatefulKnowledgeSession ksession =
JPAKnowledgeService.newStatefulKnowledgeSession(kbase, null, env);
int sessionId = ksession.getId();
// Invoke methods on your session here:
ksession.startProcess("MyProcess");
ksession.dispose();
Additionally, you can use JPAKnowledgeService to recreate a session based on a specific session ID. For example:
// Recreate the session from database using the sessionId:
ksession = JPAKnowledgeService.loadStatefulKnowledgeSession(sessionId, kbase, null, env);Note that only the minimal state that is required to continue execution of the process instance is saved. You cannot retrieve information related to already executed nodes if that information is no longer necessary. To search for history-related information, use the history log.
Add persistence.xml to META-INF to configure JPA. Following example uses Hibernate and H2 database:
<?xml version="1.0" encoding="UTF-8" standalone="yes"?>
<persistence
version="2.0"
xsi:schemaLocation="
http://java.sun.com/xml/ns/persistence
http://java.sun.com/xml/ns/persistence/persistence_2_0.xsd
http://java.sun.com/xml/ns/persistence/orm
http://java.sun.com/xml/ns/persistence/orm_2_0.xsd"
xmlns="http://java.sun.com/xml/ns/persistence"
xmlns:orm="http://java.sun.com/xml/ns/persistence/orm"
xmlns:xsi="http://www.w3.org/2001/XMLSchema-instance">
<persistence-unit name="org.jbpm.persistence.jpa" transaction-type="JTA">
<provider>org.hibernate.ejb.HibernatePersistence</provider>
<jta-data-source>jdbc/jbpm-ds</jta-data-source>
<mapping-file>META-INF/JBPMorm.xml</mapping-file>
<class>org.drools.persistence.info.SessionInfo</class>
<class>org.jbpm.persistence.processinstance.ProcessInstanceInfo</class>
<class>org.drools.persistence.info.WorkItemInfo</class>
<class>org.jbpm.persistence.correlation.CorrelationKeyInfo</class>
<class>org.jbpm.persistence.correlation.CorrelationPropertyInfo</class>
<class>org.jbpm.runtime.manager.impl.jpa.ContextMappingInfo</class>
<properties>
<property name="hibernate.dialect" value="org.hibernate.dialect.H2Dialect"/>
<property name="hibernate.max_fetch_depth" value="3"/>
<property name="hibernate.hbm2ddl.auto" value="update"/>
<property name="hibernate.show_sql" value="true"/>
<property name="hibernate.transaction.jta.platform"
value="org.hibernate.service.jta.platform.internal.BitronixJtaPlatform"/>
</properties>
</persistence-unit>
</persistence>
In this example, persistence.xml refers to a data source called jdbc/jbpm-ds. If you run your application in an application server, these containers typically allow you to use custom configure file for the data sources. See your application server documentation for further details.
Following example shows you how to set up a data source:
PoolingDataSource ds = new PoolingDataSource();
ds.setUniqueName("jdbc/jbpm-ds");
ds.setClassName("bitronix.tm.resource.jdbc.lrc.LrcXADataSource");
ds.setMaxPoolSize(3);
ds.setAllowLocalTransactions(true);
ds.getDriverProperties().put("user", "sa");
ds.getDriverProperties().put("password", "sasa");
ds.getDriverProperties().put("URL", "jdbc:h2:mem:jbpm-db");
ds.getDriverProperties().put("driverClassName", "org.h2.Driver");
ds.init();Chapter 14. Using Red Hat JBoss Developer Studio to Create and Test Processes
The Red Hat JBoss BPM Suite plug-in provides an environment for editing and testing processes, and enables integration with your application. The following features are provided:
- Wizards for creating Red Hat JBoss BPM Suite projects and BPMN2 processes.
- A Red Hat JBoss BPM Suite perspective showing the most commonly used views in a predefined layout.
14.1. Red Hat JBoss BPM Suite Runtime
14.1.1. Red Hat JBoss BPM Suite Runtime
A Red Hat JBoss BPM Suite runtime is a collection of JAR files that represent one specific release of the Red Hat JBoss BPM Suite project. Follow the steps described in the next section to create and configure a runtime. It is required to specify a default runtime for your Red Hat JBoss Developer Studio workspace, however, each project can override the default setting and therefore can have a specific runtime.
14.1.2. Setting the Red Hat JBoss BPM Suite Runtime
To use the Red Hat JBoss BPM Suite plug-in with Red Hat JBoss Developer Studio, it is necessary to set up the runtime.
Download the Red Hat JBoss BPM Suite 6.4.0 Core Engine archive from the Red Hat Customer Portal. The JAR files that form the runtime are located in the jboss-bpmsuite-VERSION-engine.zip archive.
Make sure you have the JBoss Business Process and Rule Development feature installed before configuring the Red Hat JBoss BPM Suite runtime. See chapter Red Hat JBoss Developer Studio of Red Hat JBoss BPM Suite Getting Started Guide for more information.
Procedure: Configuring jBPM Runtime
- In the Red Hat JBoss Developer Studio, click Window → Preferences.
- Click jBPM → Installed jBPM Runtimes.
- Click Add….
- Provide a name for the new runtime and click Browse to navigate to the directory where the runtime is located. Click OK.
Select the new runtime and click OK.
Red Hat JBoss Developer Studio prompts you to update the runtime if you have any existing projects.
14.1.3. Configuring Red Hat JBoss BPM Suite Server
Red Hat JBoss Developer Studio can be configured to run the Red Hat JBoss BPM Suite server.
Procedure: Configuring Red Hat JBoss BPM Suite Server
- Click Window → Perspective → Open Perspective → Other… and select jBPM.
- To add the Servers view, click Window → Show View → Other… and select Server → Servers.
- Right click the empty space in the Servers view at the bottom of the Red Hat JBoss Developer Studio and choose New → Server.
Select the server type. Find Red Hat JBoss Middleware → Red Hat JBoss Enterprise Application Platform 7 and provide a name for the server and a server’s host name. Click Next.
Figure 14.1. Setting Server Type
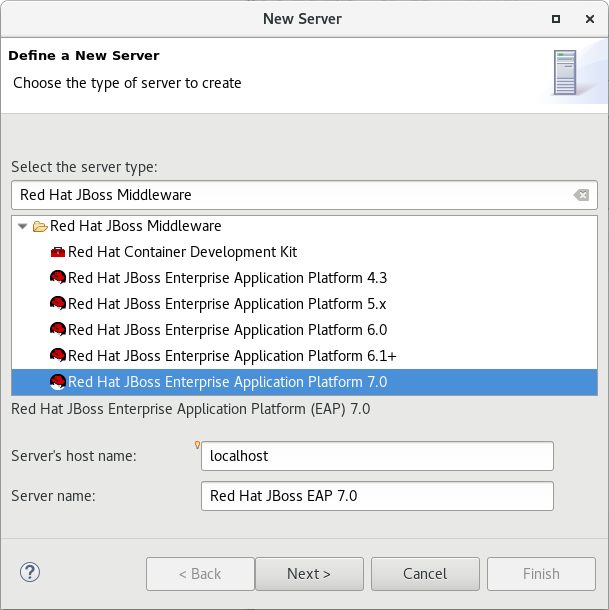
In the Create a new Server Adapter step, choose Create new runtime (next page) and click Next.
Figure 14.2. Creating New Server Adapter
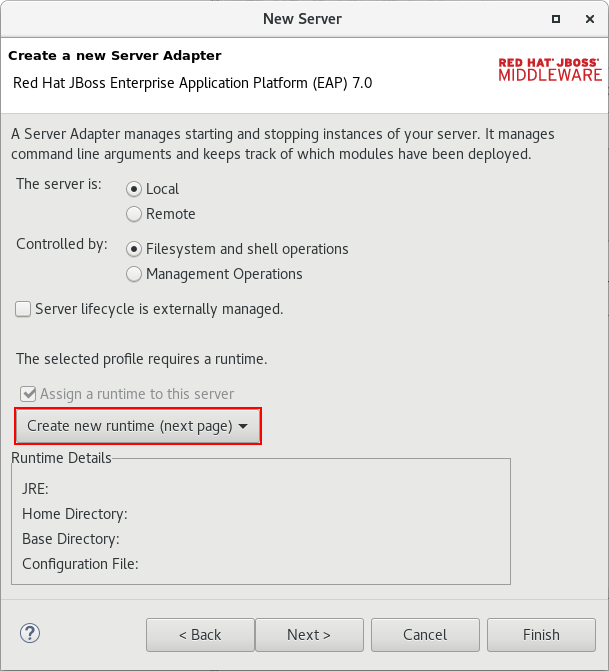
In the next step, set the Home Directory: click Browse… and select the Red Hat JBoss EAP directory which has Red Hat JBoss BPM Suite installed. Also, make sure that correct JRE is set. Red Hat JBoss EAP 7 requires Java 8, while earlier versions can use Java 7. Click Next.
Figure 14.3. Referencing JBoss Installation Directory
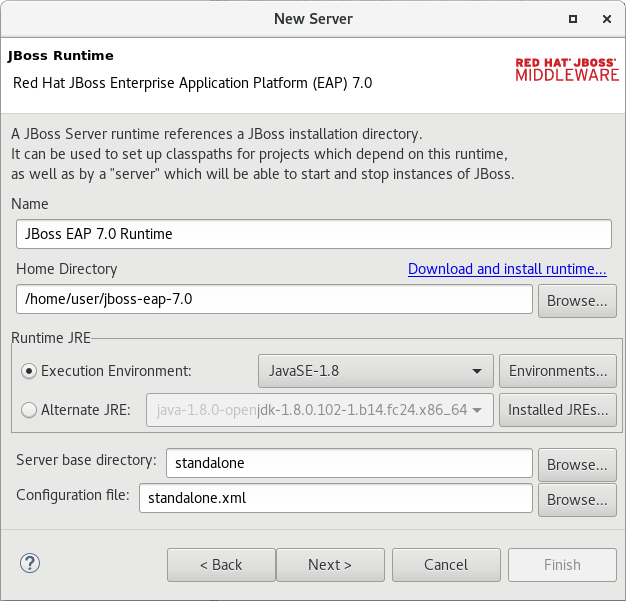
- Click Finish.
14.2. Importing And Cloning Projects from Git Repository into Red Hat JBoss Developer Studio
Red Hat JBoss Developer Studio can be configured to connect to a central Git repository, which stores rules, models, functions, and processes.
You can either clone a remote Git repository or import a local Git repository.
Procedure: Cloning Remote Git Repository
- In Red Hat JBoss Developer Studio, click File → Import… and select Git → Projects from Git. Click Next.
- Select Clone URI to connect to a remote repository. Click Next.
- Enter the details of the Git repository. You can use both the HTTPS or SSH protocol. Click Next.
- In the Branch Selection step, select the branch you want to import and click Next.
- To define a local storage for this project, enter an empty directory, make any configuration changes necessary, and click Next.
- Select Import as general project and click Next.
- Name the project and click Finish.
Procedure: Importing Local Git Repository
- In Red Hat JBoss Developer Studio, click File → Import… and select Git → Projects from Git. Click Next.
- Select the repository source as Existing local repository and click Next.
- From the list of available repositories, select the repository you want to import and click Next.
- In the Select a wizard to use for importing projects step, select Import as general project and click Next.
- Name the project and click Finish.
14.3. Components of Red Hat JBoss BPM Suite Application
A Red Hat JBoss BPM Suite application consists of the following components:
- A set of Java classes that become process variables or facts in rules.
- A set of services accessed from service tasks in a business process model.
- A business process model definition file in BPMN2 format.
- Rules assets (optional).
- A Java class that drives the application, including creation of a knowledge session, starting processes, and firing rules.
When you create a BPM Suite project in Red Hat JBoss Developer Studio, the following directories are generated:
-
src/main/java: stores class files (facts). -
src/main/resources: stores.drlfiles (rules) and.bpmn2files (processes).
14.4. Creating Red Hat JBoss BPM Suite Project
To create a Red Hat JBoss BPM Suite project in Red Hat JBoss Developer Studio:
- Click File → New → Project and select jBPM → jBPM Project. Click Next.
- Select the initial project contents: an empty project, a project populated with examples to help you get started quickly, or an example project from an online repository. Click Next.
Specify the name of the project and select one of the two building options, Java and jBPM Runtime classes or Maven.
Furthermore, if you decided in the second step to create a project populated with examples, Red Hat JBoss Developer Studio enables you to add either a sample Hello World process, or a more advanced process including Human Tasks and persistence. Select the corresponding radio button to choose between these two options.
- Click Finish.
To test a non-empty project:
-
Right-click the file that contains the main method: by default the
ProcessMain.javafile located atPROJECT_NAME/src/main/java/in thecom.samplepackage. Select Run As → Java Application.
The output is displayed in the Console tab.
The project contains the kmodule.xml configuration file under the src/main/resources/META-INF directory. The file defines which resources, such as processes and rules, will be loaded as a part of your project. By default, the file defines a knowledge base, called kbase, that loads resources located in the com.sample package. The default kmodule.xml file looks like follows:
<kmodule xmlns="http://jboss.org/kie/6.0.0/kmodule">
<kbase name="kbase" packages="com.sample"/>
</kmodule>
If you selected Maven as a building option, the project contains the pom.xml file. By default, two dependencies are specified: kie-api and jbpm-test. Add more dependencies as required by your project.
14.5. Converting Existing Java Project to Red Hat JBoss BPM Suite Project
To convert an existing Java project to a BPM Suite project:
- Open the Java project in Red Hat JBoss Developer Studio.
- Right-click the project and under the Configure category, select Convert to jBPM Project.
This converts your Java project to BPM Suite project and adds the jBPM Library to your project’s classpath.
14.6. Creating Processes in Red Hat JBoss Developer Studio
To create a new process:
- Click File → New → Other and select jBPM → jBPM Process Diagram. Click Next.
- Specify the name and the package of the process, the file name, and the container. The container is the parent folder of the process.
Click Finish.
Process Editor with the newly created process opens and a start node appears on the canvas. Add more nodes and connections to further model the process.
14.7. Modeling and Validating Processes in Red Hat JBoss Developer Studio
To model a process:
- Follow the steps described in Section 14.6, “Creating Processes in Red Hat JBoss Developer Studio” to create a process.
-
In the Project Explorer panel on the left, double-click the corresponding
.bpmn2file to open the process in the BPMN2 Diagram Editor. To open the process in a different editor, right-click the.bpmn2file, click Open With, and select an editor. - By default, a newly created process contains a start node. To add more nodes to the process, drag and drop them on the canvas from the Palette panel on the right. Add an end node to finish the process.
- Connect the nodes: in the Palette panel, select Connections → Sequence Flow and then click the nodes you want to connect.
To edit properties of a node, click the node to open the corresponding Properties tab at the lower right corner of Red Hat JBoss Developer Studio. In case the Properties tab does not open, click Window → Show View → Properties.
Alternatively, double-click a node to open the Edit Task dialog window.
- Save the process.
To validate a process, right-click the process .bpmn2 file and select Validate.
If the validation completes successfully, a dialogue window that states The validation completed with no errors or warnings opens. If the validation is unsuccessful, the found errors display in the Problems tab. Fix the errors and rerun the validation.
14.8. Audit View
The audit view in Red Hat JBoss Developer Studio shows the audit log, which is a log of all events that were logged from a session. To open the audit view, click Window → Show View → Other and select Drools → Audit.
To open an audit tree in the audit view, click
 and select the log file from the file system, or drag the file into the audit view. A tree-based view is generated based on the audit log. An event is shown as a subnode of another event if the child event is directly caused by the parent event.
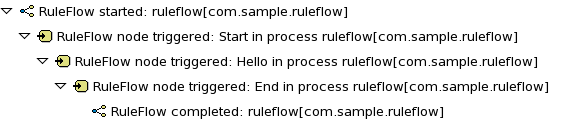
For more information about log files, see the following Section 14.8.1, “File Logger”.
14.8.1. File Logger
A file logger logs events from a session into a file. To create a logger, use KnowledgeRuntimeLoggerFactory and add it to a session.
Using a threaded file logger causes the audit log to be saved to the file system in regular intervals. The audit viewer is then able to show the latest state.
See the following example of a threaded file logger with a specified audit log file and interval in milliseconds:
Example 14.1. Threaded File Logger
KnowledgeRuntimeLogger logger = KnowledgeRuntimeLoggerFactory
.newThreadedFileLogger(ksession, "logdir/mylogfile", 1000);
// Work with the session here.
logger.close();14.9. Synchronizing Red Hat JBoss Developer Studio Workspace with Business Central Repositories
Red Hat JBoss BPM Suite allows you to synchronize your local workspace with one or more repositories that are managed inside Business Central with the help of Eclipse tooling for Git. Git is a popular distributed source code version control system. You can use any Git tool of your choice.
When you create and execute processes inside Red Hat JBoss Developer Studio, they get created on your local file system. Alternatively, you can import an existing repository from Business Central, apply changes and push these changes back into the Business Central repositories. This synchronization enables collaboration between developers using Red Hat JBoss Developer Studio and business analysts or end users using Business Central.
14.9.1. Importing Business Central Repository
- In Red Hat JBoss Developer Studio, click File → Import and select Git → Projects from Git. Click Next.
- Select Clone URI to connect to a repository managed by Business Central. Click Next.
In the URI field, provide the URI of the repository to be imported in the following format:
ssh://HOST_NAME:8001/REPOSITORY_NAMEFor example, if you are running Business Central on localhost, use the following URI to import the
jbpm-playgroundrepository:ssh://localhost:8001/jbpm-playgroundYou can change the port used by the server to provide SSH access to the Git repository if necessary, using the system property
org.uberfire.nio.git.ssh.port.- Enter the user name and the password used for logging in to Business Central. Click Next.
- Select branches to be cloned from the remote repository and click Next.
- To define a local storage for this project, enter a path to an empty directory, make any configuration changes necessary, and click Next.
- Select Import as general project and click Next.
- Provide a name for the repository and click Finish.
14.9.2. Committing Changes to Business Central
To commit and push your local changes back to the Business Central repositories:
- Open your repository project in Red Hat JBoss Developer Studio.
Right-click on your repository project and select Team → Commit ….
A new dialog box open showing all the changes you have on your local file system.
Select the files you want to commit, provide an appropriate commit message, and click Commit.
You can double-click each file to get an overview of the changes you did for that file.
- Right-click your project again, and select Team → Push to Upstream.
14.9.3. Retrieving Changes from Business Central Repository
To retrieve the latest changes from the Business Central repository:
- Open your repository project in Red Hat JBoss Developer Studio.
Right-click your repository project and select Team → Fetch from Upstream.
This action fetches all the changes from the Business Central repository.
Right-click your project again and select Team → Merge.
A Merge 'master' dialog appears.
-
In the Merge 'master' dialog box, select
origin/masterbranch under Remote Tracking. - Click Merge.
This merges all the changes from the original repository in Business Central.
It is possible that you have committed and/or conflicting changes in your local version, you might have to resolve these conflicts and commit the merge results before you will be able to complete the merge successfully. It is recommended to update regularly, before you start updating a file locally, to avoid merge conflicts being detected when trying to commit changes.
14.9.4. Importing Individual Projects from Repository
When you import a repository, all the projects inside that repository are downloaded. It is however useful to mount one specific project as a separate Java project. Red Hat JBoss Developer Studio is then able to:
-
Interpret the information in the project’s
pom.xmlfile. - Download and include any specified dependencies.
- Compile any Java class located in the project.
To import a project as a separate Java project:
- In the Package Explorer on the right side of Red Hat JBoss Developer Studio, right-click on one of the projects and click Import….
Select Maven → Existing Maven Projects and click Next.
The Import Maven Projects dialog window opens with the project’s
pom.xmlfile displayed.- Click Finish.
14.9.5. Adding Red Hat JBoss BPM Suite Libraries to Project Class Path
To ensure your project compiles and executes correctly, add the Red Hat JBoss BPM Suite libraries to the project’s class path. To do so, right-click the project and select Configure → Convert to jBPM Project.
This converts the project into a Red Hat JBoss BPM Suite project and adds the Red Hat JBoss BPM Suite library to the project’s class path.
Chapter 15. Case Management
In Red Hat JBoss BPM Suite 7.0, the Case Management API will be completely redesigned.
15.1. Introduction
Business Process Management (BPM) is a management practice for automating tasks that are repeatable and have a common pattern. However, many applications in the real world cannot be described completely from start to finish and include multiple paths, deviations, and exceptions. Moreover, using a process focused approach in certain cases can lead to complex solutions that are hard to maintain. Sometimes business users need more flexible and adaptive business processes without the overly complex solutions. In such cases, human actors play an important role in solving complex problems. Case management is for collaborative and dynamic tasks that require human actions. Case management focuses on problem resolution for unpredictable process instances as opposed to the efficiency-oriented approach of Business Process Management for routine predictable tasks.
Instead of trying to model a process from start to finish, the case management approach supports giving the end user the flexibility to decide what must happen at runtime. In its most extreme form for example, case management does not require any process definition at all. Whenever a new case comes in, the end user can decide what to do next based on all of the case data.
This does not necessarily mean that there is no role for BPM in case management. Even at its most extreme form, where no process is modeled up front, you may still need a lot of the other features that the BPM system provides. For example, BPM features like audit logs, monitoring, coordinating various services, human interaction (such as using task forms), and analysis play a crucial role in case management as well. There can also be cases where a more structured business process evolves from case management. Thus, a flexible BPM system enables you to decide how and where you can apply it.
15.2. Use Cases
Here are some common use cases of case management:
- Clinical decision support is a great use case for case management approach. Care plans are used to describe how patients must be treated in specific circumstances, but people like general practitioners still need to have the flexibility to add additional steps and deviate from the proposed plan, as each case is unique. A care plan with tasks to be performed when a patient who has high blood pressure can be designed with this approach. While a large part of the process is still well-structured, the general practitioner can decide which tasks must be performed as part of the sub-process. The practitioner also has the ability to add new tasks during that period, tasks that were not defined as part of the process, or repeat tasks multiple times. The process uses an ad hoc sub-process to model this kind of flexibility, possibly augmented with rules or event processing to help in deciding which fragments to execute.
- An internet provider can use this approach to handle internet connectivity cases. Instead of having a set process from start to end, the case worker can choose from a number of actions based on the problem at hand. The case worker is responsible for selecting what to do next and can even add new tasks dynamically.
15.3. case management in Red Hat JBoss BPM Suite
Red Hat JBoss BPM Suite provides a wrapper API called casemgmt that focuses on exposing the case management concepts. The core process engine has always contained the flexibility to model adaptive and flexible processes. These features are typically also required in the context of case management. To simplify picking up some of these more advanced features, the wrapper API exposes some of these features in a simple API. Note that this API simply relies on other existing features and APIs, and can easily be extended. The API and implementation is added as part of the jbpm-case-mgmt module.
- Process instance description
- Each case can have a unique name, specific to that case.
- Case roles
A case can keep track of who is participating by using case roles. These roles can be defined as part of the case definition by giving them a name and (optionally) a cardinality. Case roles can also be defined dynamically at runtime. For active case instances, specific users can be assigned to roles.
You can define roles for a case definition and keep track of which users participate with the case in which role at runtime. Case roles are defined in the case definitions as below:
<extensionElements> <tns:metaData name="customCaseRoles"> <tns:metaValue> responsible:1,accountable,consulted,informed </tns:metaValue> </tns:metaData> <tns:metaData name="customDescription"> <tns:metaValue> #{name} </tns:metaValue> </tns:metaData> </extensionElements>The number represents the maximum of users in this role. In the example above, only one user is assigned to role responsible.
The case roles cannot be used as groups for Human Tasks. The Human Task has to be assigned to a user with the case role, hence a user is selected in the case role based on random heuristics:
public String getRandomUserInTheRole(long pid, String role) {
String[] users = caseMgmtService.getCaseRoleInstanceNames(pid).get(role);
Random rand = new Random();
int n = 0;
if (users.length > 1) {
n = rand.nextInt(users.length - 1);
}
return users[n];
}- Ad hoc cases
- One can start a new case without even having a case definition. Whatever happens inside this case is completely determined at runtime.
- Case file
- A case can contain any kind of data, from simple key-value pairs to custom data objects or documents. A case file contains all the information required for managing a case, and comprises several case file items each representing a piece of information.
- Ad hoc tasks
A case definition is a very flexible high level process synonymous to the ad hoc process in Red Hat JBoss BPM Suite. You can define a default empty ad hoc process for maximum flexibility to use when loaded in
RuntimeManager. For a more complex case definition, you can define an ad hoc process that may include milestones, predefined tasks to be accomplished, and case roles to specify the roles of case participantsUsing the ad hoc constructs available in BPMN2, you can model optional process fragments that can be executed during runtime.
This could occur in the following ways:
- End users selecting optional fragments for execution.
Automatically, for example:
- Rules that trigger certain fragments under certain conditions.
- Whenever triggered by external services.
- Dynamic tasks
- It is possible to add new tasks dynamically, even if they were not defined initially in the case definition. This includes human tasks, service tasks and other processes.
- Miliestones
-
You can define milestones as part of the case definition or dynamically, and keep track of which milestones were reached for specific case instances. You can define milestones in a case definition and track a cases progress at runtime. A number of events can be captured from processes and tasks executions. Based on these events, you can define milestones in a case definition and track the progress of a case at runtime. The
getAchievedMilestones()is used to get all achieved milestones. The task names of milestones must beMilestone.
15.4. Starting a Case
In an ad hoc process definition, a case instance is created that allows the involved roles to create new tasks. You can create a new case instance for an empty case as below:
ProcessInstance processInstance = caseMgmtService.startNewCase("CaseName");
During the start of a new case, the parameter Case Name is set as a process variable name.
Alternatively, you can create a case instance the same way as new process instance:
ProcessInstance processInstance =
runtimeEngine.getKieSession().startProcess("CaseUserTask", params);15.5. Example Case Model
The following example of a user task demonstrates the ad hoc capabilities of case management in Red Hat JBoss BPM Suite6.4.
Figure 15.1. User Task Case Management Example

The provided case instance example can have the following work flow:
Start a case instance:
ProcessInstance processInstance = runtimeEngine.getKieSession().startProcess("CaseUserTask", params);Set roles for users.
caseMgmtService.addUserToRole(processInstance.getId(), "contactPerson", "myuserid1"); caseMgmtService.addUserToRole(processInstance.getId(), "contactPerson", "myuserid2");Assign
Hello1to someone with the rolecontactPerson.String userid = getRandomUserInTheRole(processInstanceId, "contactPerson"); taskService.claim(taskId, userid);-
Complete the task
Hello1. Trigger and complete
Hello2.Ad hoc tasks, such as
Hello2, can be triggered and completed afterwards using the following:caseMgmtService.triggerAdHocFragment(processInstance.getId(), "Hello2");Trigger the milestone called
Milestone1with a signal sent to the case instance:runtimeEngine.getKieSession().signalEvent("Milestone1", null, processInstance.getId());Create a dynamic human task called
Hello3and complete it afterwards:caseMgmtService.createDynamicHumanTask(processInstance.getId(), "Hello3", "user1", null, "Make XY done", null);Add a case file summary document.
caseMgmtService.setCaseData(processInstanceId, "summary", mySummaryDocument);Trigger
Milestone2:runtimeEngine.getKieSession().signalEvent("Milestone2", null, processInstance.getId());
Part IV. Intelligent Process Server and Realtime Decision Server
For Red Hat JBoss BPM Suite, the server is called Intelligent Process Server. For Red Hat JBoss BRMS, the server is called Realtime Decision Server. In the following text, only Intelligent Process Server is used.
The Intelligent Process Server is a standalone, out-of-the-box component that can be used to instantiate and execute rules and processes. The Realtime Decision Server and the Intelligent Process Server are created as a WAR file that can be deployed on any web container. The current version of these servers are shipped with default extensions for both JBoss BRMS and Business Resource Planner, with Intelligent Process Server adding extensions for Red Hat JBoss BPM Suite.
This server has a low footprint with minimal memory consumption; therefore, it can be deployed easily on a cloud instance. Each instance of this server can open and instantiate multiple KIE containers, which allows you to execute multiple rules and processes in parallel.
Red Hat JBoss BPM Suite supports two execution servers for processes: Intelligent Process Server (kie-server) and Business Central (business-central), and has Remote APIs for both. The process engine in Business Central and its Remote API are supported for Red Hat JBoss BPMS 6.x releases only. However, the Intelligent Process Server is being enhanced over releases. Hence, Intelligent Process Server is recommended to instantiate and execute your processes.
This chapter describes the Intelligent Process Server APIs and extensions.
Chapter 16. The REST API for Intelligent Process Server Execution
You can communicate with the Intelligent Process Server through the REST API.
-
The base URL for sending requests is the endpoint defined earlier, for example
http://SERVER:PORT/kie-server/services/rest/server/. -
All requests require basic HTTP Authentication or token-based authentication for the role
kie-server.
Following methods support three formats of the requests: JSON, JAXB, and XSTREAM. You must provide following HTTP headers:
Accept: set toapplication/jsonorapplication/xml.When specifying more than one accepted content type in the Accept header, be sure to include the qualifiers of preference (qvalues as defined in the HTML 1.1 standard). If you do not, unexpected behaviour may occur. This is an example of a well-formed header with multiple accepted content types:
Accept: application/xml; q=0.5, application/json; q=0.9-
X-KIE-ContentTypeis required when using the XSTREAM marshaller. In such case, set the header toXSTREAM. ValuesJSONandJAXBare allowed, but not required. When you set theContent-typetoapplication/xml, theJAXBvalue is used by default. -
Content-type: set toapplication/jsonorapplication/xml. This header corresponds with the format of your payload. --data: your payload. If the payload is in a file, start the name with an ampersand@. For example:--data @commandsRequest.json
To ensure both the request and the response are in the same format, always specify both the Content-Type and Accept HTTP headers in your application’s requests. Otherwise, you can receive a marshalling-related error from the server.
The examples use the Curl utility. You can use any REST client. Curl commands use the following parameters:
-
-u: specifies username:password for the Intelligent Process Server authentication. -
-H: specifies HTTP headers. -
-X: specifies the HTTP method of the request, that is [GET], [POST], [PUT], or [DELETE].
BRMS Commands endpoints will work only if your Intelligent Process Server has BRM capability. The rest of the endpoints will work only if your Intelligent Process Server has BPM capabilities. Check the following URI for capabilities of your Intelligent Process Server : http://SERVER:PORT/kie-server/services/rest/server.
16.1. BRMS Commands
- [POST] /containers/instances/CONTAINER_ID
- Request Type
-
A single
org.kie.api.command.Commandcommand or multiples commands inBatchExecutionCommandwrapper. - Response Type
-
org.kie.server.api.model.ServiceResponse<String> - Description
-
Executes the commands sent to the specified
CONTAINER_IDand returns the commands execution results. For more information, See the supported commands below.
List of supported commands:
-
AgendaGroupSetFocusCommand -
ClearActivationGroupCommand -
ClearAgendaCommand -
ClearAgendaGroupCommand -
ClearRuleFlowGroupCommand -
DeleteCommand -
InsertObjectCommand -
ModifyCommand -
GetObjectCommand -
InsertElementsCommand -
FireAllRulesCommand -
QueryCommand -
SetGlobalCommand -
GetGlobalCommand -
GetObjectsCommand -
BatchExecutionCommand -
DisposeCommand
For more information about the commands, see the org.drools.core.command.runtime package. Alternatively, see Supported Red Hat JBoss BRMS Commands from the Red Hat JBoss Development Guide.
Example 16.1. [POST] Drools Commands Execution
Change into a directory of your choice and create
commandsRequest.json:{ "lookup" : "ksession1", "commands" : [ { "insert" : { "object" : "testing", "disconnected" : false, "out-identifier" : null, "return-object" : true, "entry-point" : "DEFAULT" } }, { "fire-all-rules" : { } } ] }Execute the following command:
$ curl -X POST -H 'X-KIE-ContentType: JSON' -H 'Content-type: application/json' -u 'kieserver:kieserver1!' --data @commandsRequest.json http://localhost:8080/kie-server/services/rest/server/containers/instances/myContainerThe command generates a request that sends the
InsertObjectandFireAllRulescommands to the server. Thelookupattribute sets the KIE session ID on which the commands will be executed. For stateless KIE sessions, this attribute is required. For stateful KIE sessions, this attribute is optional and if not specified, the default KIE session is used.
An example response:
{
"type" : "SUCCESS",
"msg" : "Container hello successfully called.",
"result" : "{\n \"results\" : [ ],\n \"facts\" : [ ]\n}"
}16.2. Managing Processes
Use the following entry point: http://SERVER:PORT/kie-server/services/rest/server/containers/CONTAINER_ID/processes. See the list of endpoints:
- [DELETE] /instances
- Description
-
Aborts multiple process instances specified by the query parameter
instanceId.
- [GET] /instances/PROCESS_INSTANCE_ID/signals
- Response Type
- A list of Strings.
- Description
-
Returns all the available signal names for
PROCESS_INSTANCE_IDas a list of Strings.
- [PUT] /instances/PROCESS_INSTANCE_ID/variable/VARIABLE_NAME
- Request Type
- The variable marshalled value.
- Description
-
Sets the value of the
VARIABLE_NAMEvariable for thePROCESS_INSTANCE_IDprocess instance. If successful, the return value is HTTP code 201.
- [GET] /instances/PROCESS_INSTANCE_ID/variable/VARIABLE_NAME
- Response Type
- The variable value.
- Description
-
Returns the marshalled value of the
VARIABLE_NAMEvariable for thePROCESS_INSTANCE_IDprocess instance.
- [POST] /instances/PROCESS_INSTANCE_ID/variables
- Request Type
- A map with variable names and values.
- Description
-
Sets multiple variables that belong to a
PROCESS_INSTANCE_IDprocess instance. The request is a map, in which the key is the name of the variable and the value is the new value of the variable.
- [GET] /instances/PROCESS_INSTANCE_ID/variables
- Response Type
- A map with the variable names and values.
- Description
-
Gets all variables for the
PROCESS_INSTANCE_IDprocess instance as a map, in which the key is the name of the variable and the value is the value of the variable.
- [GET] /instances/PROCESS_INSTANCE_ID/workitems
- Response Type
- A list of WorkItemInstance objects.
- Description
-
Gets all the work items of the given
PROCESS_INSTANCE_IDprocess instance.
- [GET] /instances/PROCESS_INSTANCE_ID/workitems/WORK_ITEM_ID
- Response Type
- A WorkItemInstance object.
- Description
-
Gets the
WORK_ITEM_IDwork item of the givenPROCESS_INSTANCE_IDprocess instance.
- [PUT] /instances/PROCESS_INSTANCE_ID/workitems/WORK_ITEM_ID/aborted
- Description
-
Aborts the
WORK_ITEM_IDwork item of the givenPROCESS_INSTANCE_IDprocess instance. If successful, the return value is HTTP code 201.
- [PUT] /instances/PROCESS_INSTANCE_ID/workitems/WORK_ITEM_ID/completed
- Description
-
Completes the
WORK_ITEM_IDwork item of the givenPROCESS_INSTANCE_IDprocess instance. If successful, the return value is HTTP code 201.
- [POST] /PROCESS_ID/instances
- Request Type
- A map with variables used to start the process.
- Response Type
- Plain text with the process instance id.
- Description
-
Creates a
PROCESS_IDbusiness process instance. Accepted input is a map with the process variables and its values.
- [POST] /instances/signal/SIGNAL_NAME
- Request Type
- A marshalled object.
- Description
-
Signals multiple process instances of a query parameter
instanceIdwith theSIGNAL_NAMEsignal. You can provide the signal payload marshalled in the request body.
- [DELETE] /instances/PROCESS_INSTANCE_ID
- Description
-
Aborts the
PROCESS_INSTANCE_IDprocess instance. If successful, the return value is HTTP code 204.
- [GET] /instances/PROCESS_INSTANCE_ID
- Response Type
- A Process Instance object.
- Description
-
Returns the details of the
PROCESS_INSTANCE_IDprocess instance. You can request variable information by setting thewithVarsparameter as true.
- [POST] /instances/PROCESS_INSTANCE_ID/signal/SIGNAL_NAME
- Request Type
- A marshalled object.
- Description
-
Signals the
PROCESS_INSTANCE_IDprocess instance withSIGNAL_NAMEsignal. You can provide the signal payload marshalled in the request body.
- [POST] /PROCESS_ID/instances/correlation/CORRELATION_KEY
- Request Type
- A map with variables used to start the process.
- Response Type
- Plain text with the process instance id.
- Description
-
Creates the
PROCESS_IDbusiness process instance with theCORRELATION_KEYcorrelation key. Accepted input is a map with the process variables and its values.
Example 16.2. Managing Processes
Create
person.json:{ "p" : { "org.kieserver.test.Person": { "id" : 13, "name": "William" } } }Start a process using a custom object (Person) as a parameter:
$ curl -X POST -u 'kieserver:kieserver1!' -H 'Content-type: application/json' -H 'X-KIE-ContentType: JSON' --data @person.json 'http://localhost:8080/kie-server/services/rest/server/containers/person/processes/proc-with-pojo.p-proc/instances'Create a new process instance of process definition
com.sample.rewards-basicwith parameters:$ curl -X POST -u 'kieserver:kieserver1!' -H 'Content-type: application/json' -H 'X-KIE-ContentType: JSON' --data '{"employeeName": "William"}' 'http://localhost:8080/kie-server/services/rest/server/containers/rewards/processes/com.sample.rewards-basic/instances'Returns process instance ID.
Get the variables of process instance
3$ curl -u 'kieserver:kieserver1!' -H 'Accept: application/json' 'http://localhost:8080/kie-server/services/rest/server/containers/rewards/processes/instances/3/variables'Example response:
{ "employeeName" : "William" }Send a TEST signal to the process instance with ID
5$ curl -X POST -u 'kieserver:kieserver1!' -H 'Content-type: application/json' -H 'X-KIE-ContentType: JSON' --data '"SIGNAL DATA"' 'http://localhost:8080/kie-server/services/rest/server/containers/test/processes/instances/signal/TEST?instanceId=5'
16.3. Managing Process Definitions
Use the following entry point: http://SERVER:PORT/kie-server/services/rest/server/containers/CONTAINER_ID/processes/definitions. See table Process Queries Endpoints for a list of endpoints. To use pagination, use the page and pageSize parameters.
- [GET] /PROCESS_ID/variables
- Response Type
- A VariablesDefinition object.
- Description
-
Returns a map of the variable definitions for the
PROCESS_IDprocess. The map contains the variable name and its type.
- [GET] /PROCESS_ID/tasks/service
- Response Type
- A ServiceTaskDefinition object.
- Description
-
Returns all service tasks for the
PROCESS_IDprocess. The return value is a map with the names and types of the service tasks. If no tasks are found, the return value is an empty list.
- [GET] /PROCESS_ID/tasks/users
- Response Type
- A list of UserTaskDefinition objects.
- Description
-
Returns all the user tasks for the
PROCESS_IDprocess. The response also contains maps of the input and output parameters. The key is the name and the value is the type of a parameter.
- [GET] /PROCESS_ID/subprocesses
- Response Type
- A SubProcessDefinition object.
- Description
-
Returns a list of reusable sub-process IDs for the
PROCESS_IDprocess.
- [GET] /PROCESS_ID/entities
- Response Type
- An AssociatedEntitiesDefinition object.
- Description
-
Returns a map with the entities associated with the
PROCESS_IDprocess.
- [GET] /PROCESS_ID/tasks/users/TASK_NAME/inputs
- Response Type
- A TaskInputsDefinition object.
- Description
- Returns a map with all the task input parameter definitions for the TASK_NAME task of the PROCESS_ID process. The key is the name of the input and the value is its type.
- [GET] /PROCESS_ID/tasks/users/TASK_NAME/outputs
- Response Type
- A TaskOutputsDefinition object.
- Description
- Returns a map with all the task output parameter definitions for the TASK_NAME task of the PROCESS_ID process. The key is the name of the input and the value is its type.
Example 16.3. [GET] User Tasks for a Specified Process
The following command displays user tasks for the the com.sample.rewards-basic process in the rewards container:
$ curl -u 'kieserver:kieserver1!' -H 'accept: application/json' 'http://localhost:8080/kie-server/services/rest/server/containers/rewards/processes/definitions/com.sample.rewards-basic/tasks/users'An example response:
{
"task" : [ {
"task-name" : "Approval by PM",
"task-priority" : 0,
"task-skippable" : false,
"associated-entities" : [ "PM" ],
"task-inputs" : {
"Skippable" : "Object",
"TaskName" : "java.lang.String",
"GroupId" : "Object"
},
"task-outputs" : {
"_approval" : "Boolean"
}
}, {
"task-name" : "Approval by HR",
"task-priority" : 0,
"task-skippable" : false,
"associated-entities" : [ "HR" ],
"task-inputs" : {
"Skippable" : "Object",
"TaskName" : "java.lang.String",
"GroupId" : "Object"
},
"task-outputs" : {
"_approval" : "Boolean"
}
} ]
}Example 16.4. [GET] Variable Definitions for Specified Process
The following command displays the variable definitions of the com.sample.rewards-basic process in the rewards container:
$ curl -u 'kieserver:kieserver1!' -H 'accept: application/json' 'http://localhost:8080/kie-server/services/rest/server/containers/rewards/processes/definitions/com.sample.rewards-basic/variables'An example response:
{
"variables" : {
"result" : "String",
"hrApproval" : "Boolean",
"pmApproval" : "Boolean",
"employeeName" : "String"
}
}16.4. Managing User Tasks
16.4.1. Managing Task Instances
Use this base URI: http://SERVER:PORT/kie-server/services/rest/server/containers/CONTAINER_ID/tasks/TASK_ID/states. If successful, the return value is HTTP code 201. See the list of endpoints:
- [PUT] /activated
- Description
-
Activates the
TASK_IDtask.
- [PUT] /claimed
- Description
-
Claims the
TASK_IDtask.
- [PUT] /started
- Description
-
Starts the
TASK_IDtask.
- [PUT] /stopped
- Description
-
Stops the
TASK_IDtask.
- [PUT] /completed
- Request Type
- A map with the output parameters name and value.
- Description
-
Completes the
TASK_IDtask. You can provide the output parameters as a map, where the key is the parameter name and the value is the value of the output parameter. You can also use theauto-progressparameter. If set to true, it will claim, start, and complete a task at once.
- [PUT] /delegated
- Description
-
Delegates the
TASK_IDtask to a user provided by thetargetUserquery parameter.
- [PUT] /exited
- Description
-
Exits the
TASK_IDtask.
- [PUT] /failed
- Description
-
Fails the
TASK_IDtask.
- [PUT] /forwarded
- Description
-
Forwards the
TASK_IDtask to the user provided by thetargetUserquery parameter.
- [PUT] /released
- Description
-
Releases the
TASK_IDtask.
- [PUT] /resumed
- Description
-
Resumes the
TASK_IDtask.
- [PUT] /skipped
- Description
-
Skips the
TASK_IDtask.
- [PUT] /suspended
- Description
-
Suspends the
TASK_IDtask.
- [PUT] /nominated
- Description
-
Nominates the
TASK_IDtask to the potential owners by thepotOwnerquery parameter. You can use the parameter multiple times, for example:potOwner=usr1&potOwner=usr2.
Example 16.5. Task Instances
Start task with
taskId4 in the containertest:$ curl -X PUT -u 'kieserver:kieserver1!' http://localhost:8080/kie-server/services/rest/server/containers/test/tasks/4/states/startedComplete the task 1 by passing an output parameter:
$ curl -X PUT -u 'kieserver:kieserver1!' -H 'Content-type: application/json' -H 'X-KIE-ContentType: JSON' --data '{ "_approval" : true }' 'http://localhost:8080/kie-server/services/rest/server/containers/test/tasks/1/states/completed'
Some operations are illegal, such as starting a completed task, or disallowed for security reasons, such as claiming a task for another user. Having different sets of users for authentication and task management can be a security concern. Making such requests will result in one of the following exceptions:
Unexpected error during processing User '[UserImpl:'{USER ID}']' does not have permissions to execute operation OPERATION on task id {$TASK_ID}Unexpected error during processing: User '[UserImpl:'{USER ID}']' was unable to execute operation OPERATION on task id {$TASK_ID} due to a no 'current status' match
Ensure the operation you are executing is allowed for the current task status. You can disable the security settings by using the org.kie.server.bypass.auth.user property.
For example, on Red Hat JBoss EAP, open EAP_HOME/standalone/configuration/standalone.xml and enter the following:
<system-properties>
...
<property name="org.kie.server.bypass.auth.user" value="true"/>
...
</system-properties>
Alternatively, use -Dorg.kie.server.bypass.auth.user=true to set the property. If you use the Intelligent Process Server Java client API, set the property on your client as well:
System.setProperty("org.kie.server.bypass.auth.user", "true");
When you turn on the security settings, you can provide a user with sufficient permissions to execute the operation using the query parameter ?user=$USER_NAME. If you do not use the parameter, the authenticated user will be used to perform the action.
If you disabled the security settings and still experience authentication issues, configure the Intelligent Process Server callback:
Configuring UserGroupCallback
Override the default JAAS UserGroupCallback on the server side:
<property name="org.jbpm.ht.callback" value="props"/> <!-- If necessary, override the userinfo configuration as well. --> <property name="org.jbpm.ht.userinfo" value="props"/>See the source code for other possible values.
For the
propsvalue, specify the location of theapplication-roles.propertiesfile:<property name="jbpm.user.group.mapping" value="file:///EAP_HOME/standalone/configuration/application-roles.properties"/> <!-- If no other file is specified, the business-central.war/WEB-INF/classes/userinfo.properties file is used. You can specify a file with the following property: <property name="jbpm.user.info.properties" value="file:///path" /> -->
You can also use a different callback object. The Human Task callback is instantiated by a CDI producer configured in EAP_HOME/standalone/business-central.war/WEB-INF/beans.xml:
<beans xmlns="http://java.sun.com/xml/ns/javaee" xmlns:xsi="http://www.w3.org/2001/XMLSchema-instance"
xsi:schemaLocation="http://java.sun.com/xml/ns/javaee http://docs.jboss.org/cdi/beans_1_0.xsd">
<alternatives>
<class>org.jbpm.services.cdi.producer.JAASUserGroupInfoProducer</class>
</alternatives>
</beans>Red Hat JBoss BPM Suite provides out-of-the-box producer and callback objects you can use. See the source code for a list of additional setting required for each callback implementation:
DBUserGroupCallback:
LDAPUserGroupCallback:
MvelUserGroupCallbackImpl:
16.4.2. Managing Task Instance Data
Use this base URI: http://SERVER:PORT/kie-server/services/rest/server/containers/CONTAINER_ID/tasks/TASK_ID. See table Task Instance Data Management Endpoints for a list of endpoints.
- [GET] /
- Response Type
- A TaskInstance object.
- Description
-
Gets the
TASK_IDtask instance details.
- [POST] /attachments
- Request Type
- The content of the attachment.
- Response Type, Description
-
Adds a new attachment for the
TASK_IDtask. The ID of the created content is returned in the response, which is HTTP code 201. The name of the attachment is set using the query parametername. If you make multiples request, you create multiple attachments.
- [GET] /attachments
- Response Type
- A list of TaskAttachment objects.
- Description
-
Gets all task attachments for the
TASK_IDtask.
- [GET] /attachments/ATTACHMENT_ID
- Response Type
- A TaskAttachment object.
- Description
-
Gets the
ATTACHMENT_IDtask attachment.
- [DELETE] /attachments/ATTACHMENT_ID
- Description
-
Removes the
ATTACHMENT_IDtask attachment.
- [GET] /attachments/ATTACHMENT_ID/content
- Response Type
- An attachment-type object.
- Description
-
Gets the
ATTACHMENT_IDtask attachment content.
- [POST] /comments
- Request Type
- A TaskComment object.
- Response Type
- Long.
- Description
-
Adds a new comment for the
TASK_IDtask. The ID of the created content is returned in the response, which HTTP code is 201. If you make multiples request, you create multiple comments.
- [GET] /comments
- Response Type
- A list of TaskComment objects.
- Description
-
Gets all task comments for the
TASK_IDtask.
- [GET] /comments/COMMENT_ID
- Response Type
- A TaskComment object.
- Description
-
Gets the
COMMENT_IDtask comment of theTASK_IDtask.
- [DELETE] /comments/COMMENT_ID
- Description
-
Deletes the
COMMENT_IDtask comment of theTASK_IDtask.
- [GET] /contents/input
- Response Type
- A map with the input parameters name and value.
- Description
-
Gets the
TASK_IDtask input content in form of a map, where the key is the parameter name and the value is the value of the output parameter.
- [PUT] /contents/output
- Request Type
- A map with the output parameters name and value.
- Description
-
Updates the
TASK_IDtask output parameters and returns HTTP 201 if successful. Provide the output parameters as a map, where the key is the parameter name and the value is the value of the output parameter.
- [GET] /contents/output
- Response Type
- A map with the output parameters name and value.
- Description
-
Gets the
TASK_IDtask output content in form of a map, where the key is the parameter name and the value is the value of the output parameter.
- [DELETE] /contents/CONTENT_ID
- Description
-
Deletes the
CONTENT_IDcontent and returns HTTP code 204.
- [PUT] /description
- Request Type
- Marshalled String value.
- Description
-
Updates the
TASK_IDtask description and returns HTTP code 201 if successful. Provide the new value for description in the request body.
- [PUT] /expiration
- Request Type
- Marshalled Date value.
- Description
-
Updates the
TASK_IDtask expiration date and returns HTTP 201 if successful. Provide the new value for the expiration date in the request body.
- [PUT] /name
- Request Type
- Marshalled String value.
- Description
-
Updates the
TASK_IDtask name and returns HTTP code 201 if successful. Provide the new value for name in the request body.
- [PUT] /priority
- Request Type
- Marshalled int value.
- Description
-
Updates the
TASK_IDtask priority and returns HTTP code 201 if successful. Provide the new value for priority in the request body.
- [PUT] /skipable
- Request Type
- Marshalled Boolean value.
- Description
-
Updates the
TASK_IDtask propertyskipableand returns HTTP code 201 if successful. Provide the new value for priority in the request body.
Example 16.6. User Task Instance Data
Get a user task instance for container
test:$ curl -X GET -u 'kieserver:kieserver1!' 'http://localhost:8080/kie-server/services/rest/server/containers/test/tasks/1'Example response:
<?xml version="1.0" encoding="UTF-8" standalone="yes"?> <task-instance> <task-id>1</task-id> <task-priority>0</task-priority> <task-name>Approval by PM</task-name> <task-subject></task-subject> <task-description></task-description> <task-form>ApprovalbyPM</task-form> <task-status>Ready</task-status> <task-actual-owner></task-actual-owner> <task-created-by></task-created-by> <task-created-on>2016-02-15T13:31:10.624-02:00</task-created-on> <task-activation-time>2016-02-15T13:31:10.624-02:00</task-activation-time> <task-skippable>false</task-skippable> <task-workitem-id>1</task-workitem-id> <task-process-instance-id>1</task-process-instance-id> <task-parent-id>-1</task-parent-id> <task-process-id>com.sample.rewards-basic</task-process-id> <task-container-id>rewards</task-container-id> </task-instance>Set priority to 3 for task 1:
$ curl -X PUT -u 'kieserver:kieserver1!' -H 'Content-type: application/json' -H 'X-KIE-ContentType: JSON' --data '3' 'http://localhost:8080/kie-server/services/rest/server/containers/test/tasks/1/priority'Add a comment to a task 2:
$ curl -X POST -u 'kieserver:kieserver1!' -H 'Content-type: application/json' -H 'X-KIE-ContentType: JSON' --data '{ "comment" : "One last comment", "comment-added-by": "kieserver"}' 'http://localhost:8080/kie-server/services/rest/server/containers/test/tasks/2/comments'Get all task comments:
$ curl -u 'kieserver:kieserver1!' -H 'Accept: application/json' 'http://localhost:8080/kie-server/services/rest/server/containers/test/tasks/2/comments'Example response:
{ "task-comment" : [ { "comment-id" : 1, "comment" : "Some task comment", "comment-added-by" : "kieserver" }, { "comment-id" : 3, "comment" : "One last comment", "comment-added-by" : "kieserver" } ] }
16.5. Querying Process Instances
Use the following entry point: http://SERVER:PORT/kie-server/services/rest/server/queries/. To use pagination, use the page and pageSize parameters.
- [GET] processes/instances
Returns a list of process instances.
Additional parameters you can use:
status,initiator,processName.Server Response
<process-instance-list> <process-instance> <process-instance-id>4</process-instance-id> <process-id>evaluation</process-id> <process-name>Evaluation</process-name> <process-version>1</process-version> <process-instance-state>1</process-instance-state> <container-id>myContainer</container-id> <initiator>kiesu</initiator> <start-date>2016-04-05T09:23:29.428+02:00</start-date> <process-instance-desc>Evaluation</process-instance-desc> <correlation-key/> <parent-instance-id>-1</parent-instance-id> </process-instance> <process-instance> <process-instance-id>5</process-instance-id> <process-id>evaluation</process-id> <process-name>Evaluation</process-name> <process-version>1</process-version> <process-instance-state>1</process-instance-state> <container-id>myContainer</container-id> <initiator>kiesu</initiator> <start-date>2016-04-05T09:40:39.772+02:00</start-date> <process-instance-desc>Evaluation</process-instance-desc> <correlation-key/> <parent-instance-id>-1</parent-instance-id> </process-instance> </process-instance-list>- [GET] processes/PROCESS_ID/instances
Returns a list of process instances for the specified process.
Additional parameters you can use:
status,initiator.Server Response
<process-instance-list> <process-instance> <process-instance-id>4</process-instance-id> <process-id>evaluation</process-id> <process-name>Evaluation</process-name> <process-version>1</process-version> <process-instance-state>1</process-instance-state> <container-id>myContainer</container-id> <initiator>kiesu</initiator> <start-date>2016-04-05T09:23:29.428+02:00</start-date> <process-instance-desc>Evaluation</process-instance-desc> <correlation-key/> <parent-instance-id>-1</parent-instance-id> </process-instance> </process-instance-list>- [GET] containers/CONTAINER_ID/process/instances
Returns a list of process instances for the specified container.
Additional parameters you can use:
status.Server Response
<process-instance-list> <process-instance> <process-instance-id>4</process-instance-id> <process-id>evaluation</process-id> <process-name>Evaluation</process-name> <process-version>1</process-version> <process-instance-state>1</process-instance-state> <container-id>myContainer</container-id> <initiator>kiesu</initiator> <start-date>2016-04-05T09:23:29.428+02:00</start-date> <process-instance-desc>Evaluation</process-instance-desc> <correlation-key/> <parent-instance-id>-1</parent-instance-id> </process-instance> <process-instance> <process-instance-id>5</process-instance-id> <process-id>evaluation</process-id> <process-name>Evaluation</process-name> <process-version>1</process-version> <process-instance-state>1</process-instance-state> <container-id>myContainer</container-id> <initiator>kiesu</initiator> <start-date>2016-04-05T09:40:39.772+02:00</start-date> <process-instance-desc>Evaluation</process-instance-desc> <correlation-key/> <parent-instance-id>-1</parent-instance-id> </process-instance> </process-instance-list>- [GET] processes/instance/correlation/CORRELATION_KEY
- Returns an instance with the specified correlation key.
- [GET] processes/instances/correlation/CORRELATION_KEY
- Returns a list of instances with the specified correlation key.
- [GET] processes/instances/PROCESS_INSTANCE_ID
Returns information about the specified process instance.
Additional parameters you can use:
withVars.Server Response
<?xml version="1.0" encoding="UTF-8" standalone="yes"?> <process-instance> <process-instance-id>5</process-instance-id> <process-id>evaluation</process-id> <process-name>Evaluation</process-name> <process-version>1</process-version> <process-instance-state>1</process-instance-state> <container-id>myContainer</container-id> <initiator>kiesu</initiator> <start-date>2016-04-05T09:40:39.772+02:00</start-date> <process-instance-desc>Evaluation</process-instance-desc> <correlation-key></correlation-key> <parent-instance-id>-1</parent-instance-id> <active-user-tasks> <task-summary> <task-id>5</task-id> <task-name>Self Evaluation</task-name> <task-description>Please perform a self-evalutation.</task-description> <task-priority>0</task-priority> <task-actual-owner>Kartik</task-actual-owner> <task-created-by>Kartik</task-created-by> <task-created-on>2016-04-05T09:40:39.778+02:00</task-created-on> <task-activation-time>2016-04-05T09:40:39.778+02:00</task-activation-time> <task-proc-inst-id>5</task-proc-inst-id> <task-proc-def-id>evaluation</task-proc-def-id> <task-container-id>myContainer</task-container-id> </task-summary> </active-user-tasks> </process-instance>- [GET] processes/instances/variables/VARIABLE_NAME
Returns process instance with the specified variable.
Additional parameters you can use:
status,varValue.Note that you can use wildcard characters with
varValue, for examplevarValue=waiting%to list all the values that start withwaiting.Example Response
<?xml version="1.0" encoding="UTF-8" standalone="yes"?> <process-instance-list> <process-instance> <process-instance-id>4</process-instance-id> <process-id>evaluation</process-id> <process-name>Evaluation</process-name> <process-version>1</process-version> <process-instance-state>1</process-instance-state> <container-id>myContainer</container-id> <initiator>kiesu</initiator> <start-date>2016-04-05T09:23:29.428+02:00</start-date> <process-instance-desc>Evaluation</process-instance-desc> <correlation-key></correlation-key> <parent-instance-id>-1</parent-instance-id> </process-instance> <process-instance> <process-instance-id>5</process-instance-id> <process-id>evaluation</process-id> <process-name>Evaluation</process-name> <process-version>1</process-version> <process-instance-state>1</process-instance-state> <container-id>myContainer</container-id> <initiator>kiesu</initiator> <start-date>2016-04-05T09:40:39.772+02:00</start-date> <process-instance-desc>Evaluation</process-instance-desc> <correlation-key></correlation-key> <parent-instance-id>-1</parent-instance-id> </process-instance> </process-instance-list>- [GET] containers/CONTAINER_ID/processes/definitions
Returns a list of process definitions available for the container.
Server Response
<?xml version="1.0" encoding="UTF-8" standalone="yes"?> <process-definitions> <processes> <process-id>evaluation</process-id> <process-name>Evaluation</process-name> <process-version>1</process-version> <package>Evaluation.src.main.resources</package> <container-id>myContainer</container-id> </processes> </process-definitions>- [GET] processes/definitions
Returns list of process definitions.
Additional parameters you can use:
filter.Note that the
filterparameter filters all the process definitions that contain the given substring.Server Response
<?xml version="1.0" encoding="UTF-8" standalone="yes"?> <process-definitions> <processes> <process-id>evaluation</process-id> <process-name>Evaluation</process-name> <process-version>1</process-version> <package>Evaluation.src.main.resources</package> <container-id>myContainer</container-id> </processes> </process-definitions>- [GET] containers/CONTAINER_ID/processes/definitions/PROCESS_ID
Returns process definition of the specified process instance in the specified container.
Server Response
<?xml version="1.0" encoding="UTF-8" standalone="yes"?> <process-definitions> <processes> <process-id>evaluation</process-id> <process-name>Evaluation</process-name> <process-version>1</process-version> <package>Evaluation.src.main.resources</package> <container-id>myContainer</container-id> </processes> </process-definitions>- [GET] processes/definitions/PROCESS_ID
Returns a list of process definitions of the specified process.
Server Response
<?xml version="1.0" encoding="UTF-8" standalone="yes"?> <process-definitions> <processes> <process-id>evaluation</process-id> <process-name>Evaluation</process-name> <process-version>1</process-version> <package>Evaluation.src.main.resources</package> <container-id>myContainer</container-id> </processes> </process-definitions>- [GET] processes/instances/PROCESS_INSTANCE_ID/nodes/instances
Returns node instances for the specified process instance.
Additional parameters you can use:
activeOnly,completedOnly.Server Response
<?xml version="1.0" encoding="UTF-8" standalone="yes"?> <node-instance-list> <node-instance> <node-instance-id>0</node-instance-id> <node-name> </node-name> <process-instance-id>5</process-instance-id> <container-id>myContainer</container-id> <start-date>2016-04-05T09:40:39.797+02:00</start-date> <node-id>_ED165B85-E65D-42A6-B0EF-8A160356271E</node-id> <node-type>StartNode</node-type> <node-connection>_B8F3E49D-2C7A-4056-BF49-C61987044DB4</node-connection> <node-completed>true</node-completed> </node-instance> <node-instance> <node-instance-id>1</node-instance-id> <node-name>Self Evaluation</node-name> <process-instance-id>5</process-instance-id> <work-item-id>5</work-item-id> <container-id>myContainer</container-id> <start-date>2016-04-05T09:40:39.773+02:00</start-date> <node-id>_D3E17247-1D94-47D8-93AD-D645E317B736</node-id> <node-type>HumanTaskNode</node-type> <node-connection>_B8F3E49D-2C7A-4056-BF49-C61987044DB4</node-connection> <node-completed>false</node-completed> </node-instance> <node-instance> <node-instance-id>0</node-instance-id> <node-name> </node-name> <process-instance-id>5</process-instance-id> <container-id>myContainer</container-id> <start-date>2016-04-05T09:40:39.772+02:00</start-date> <node-id>_ED165B85-E65D-42A6-B0EF-8A160356271E</node-id> <node-type>StartNode</node-type> <node-completed>false</node-completed> </node-instance> </node-instance-list>- [GET] processes/instances/PROCESS_INSTANCE_ID/wi-nodes/instances/WORK_ITEM_ID
- Returns node instances for the specified work item in the specified process instance.
- [GET] processes/instances/PROCESS_INSTANCE_ID/variables/instances
Returns current variable values of the specified process instance.
Server Response
<?xml version="1.0" encoding="UTF-8" standalone="yes"?> <variable-instance-list> <variable-instance> <name>employee</name> <old-value></old-value> <value>Kartik</value> <process-instance-id>5</process-instance-id> <modification-date>2016-04-05T09:40:39.771+02:00</modification-date> </variable-instance> <variable-instance> <name>reason</name> <old-value></old-value> <value>Job Opening</value> <process-instance-id>5</process-instance-id> <modification-date>2016-04-05T09:40:39.771+02:00</modification-date> </variable-instance> </variable-instance-list>- [GET] processes/instances/PROCESS_INSTANCE_ID/variables/instances/VARIABLE_NAME
Returns the value of the given variable in the specified process instance.
Server Response
<?xml version="1.0" encoding="UTF-8" standalone="yes"?> <variable-instance-list> <variable-instance> <name>employee</name> <old-value></old-value> <value>Kartik</value> <process-instance-id>5</process-instance-id> <modification-date>2016-04-05T09:40:39.771+02:00</modification-date> </variable-instance> </variable-instance-list>
16.6. Querying Tasks
Use the following entry point: http://SERVER:PORT/kie-server/services/rest/server/queries/. To use pagination, use the page and pageSize parameters. The following list of endpoints contains additional parameters, if applicable:
- [GET] tasks/instances/pot-owners
Returns a list of tasks where the actual user is defined as a potential owner.
Additional parameters you can use:
status,groups,user.Note that the
userfilter is applicable only when the request is sent without authentication.Server Response
<?xml version="1.0" encoding="UTF-8" standalone="yes"?> <task-summary-list> <task-summary> <task-id>2</task-id> <task-name>Self Evaluation</task-name> <task-subject></task-subject> <task-description>Please perform a self-evalutation.</task-description> <task-status>Ready</task-status> <task-priority>0</task-priority> <task-is-skipable>false</task-is-skipable> <task-created-by>Kartik</task-created-by> <task-created-on>2016-04-05T15:09:14.206+02:00</task-created-on> <task-activation-time>2016-04-05T15:09:14.206+02:00</task-activation-time> <task-proc-inst-id>2</task-proc-inst-id> <task-proc-def-id>evaluation</task-proc-def-id> <task-container-id>myContainer</task-container-id> <task-parent-id>-1</task-parent-id> </task-summary> <task-summary> <task-id>1</task-id> <task-name>Self Evaluation</task-name> <task-subject></task-subject> <task-description>Please perform a self-evalutation.</task-description> <task-status>InProgress</task-status> <task-priority>0</task-priority> <task-is-skipable>false</task-is-skipable> <task-actual-owner>kiesu</task-actual-owner> <task-created-by>Kartik</task-created-by> <task-created-on>2016-04-05T15:05:06.508+02:00</task-created-on> <task-activation-time>2016-04-05T15:05:06.508+02:00</task-activation-time> <task-proc-inst-id>1</task-proc-inst-id> <task-proc-def-id>evaluation</task-proc-def-id> <task-container-id>myContainer</task-container-id> <task-parent-id>-1</task-parent-id> </task-summary> </task-summary-list>- [GET] tasks/instances/admins
Returns a list of tasks assigned to the Business Administrator.
Additional parameters you can use:
status,user.- [GET] tasks/instances/owners
Returns a list of tasks that the querying user owns.
Additional parameters you can use:
status,user.Server Response
<?xml version="1.0" encoding="UTF-8" standalone="yes"?> <task-summary-list> <task-summary> <task-id>1</task-id> <task-name>Self Evaluation</task-name> <task-subject></task-subject> <task-description>Please perform a self-evalutation.</task-description> <task-status>InProgress</task-status> <task-priority>0</task-priority> <task-is-skipable>false</task-is-skipable> <task-actual-owner>kiesu</task-actual-owner> <task-created-by>Kartik</task-created-by> <task-created-on>2016-04-05T15:05:06.508+02:00</task-created-on> <task-activation-time>2016-04-05T15:05:06.508+02:00</task-activation-time> <task-proc-inst-id>1</task-proc-inst-id> <task-proc-def-id>evaluation</task-proc-def-id> <task-container-id>myContainer</task-container-id> <task-parent-id>-1</task-parent-id> </task-summary> </task-summary-list>- [GET] tasks/instances
Returns a list of instances available for the querying user.
Additional parameters you can use:
user.- [GET] tasks/instances/TASK_INSTANCE_ID/events
Returns a list of events for the specified task instance.
Server Response
<?xml version="1.0" encoding="UTF-8" standalone="yes"?> <task-event-instance-list> <task-event-instance> <task-event-id>1</task-event-id> <task-id>1</task-id> <task-event-type>ADDED</task-event-type> <task-event-user>evaluation</task-event-user> <task-event-date>2016-04-05T15:05:06.655+02:00</task-event-date> <task-process-instance-id>1</task-process-instance-id> <task-work-item-id>1</task-work-item-id> </task-event-instance> <task-event-instance> <task-event-id>1</task-event-id> <task-id>1</task-id> <task-event-type>STARTED</task-event-type> <task-event-user>kiesu</task-event-user> <task-event-date>2016-04-05T15:13:35.062+02:00</task-event-date> <task-process-instance-id>1</task-process-instance-id> <task-work-item-id>1</task-work-item-id> </task-event-instance> </task-event-instance-list>- [GET] tasks/instances/TASK_INSTANCE_ID
Returns information about the specified task instance.
Server Response
<?xml version="1.0" encoding="UTF-8" standalone="yes"?> <task-instance> <task-id>1</task-id> <task-priority>0</task-priority> <task-name>Self Evaluation</task-name> <task-description>Please perform a self-evalutation.</task-description> <task-status>InProgress</task-status> <task-actual-owner>kiesu</task-actual-owner> <task-created-by>Kartik</task-created-by> <task-created-on>2016-04-05T15:05:06.508+02:00</task-created-on> <task-activation-time>2016-04-05T15:05:06.508+02:00</task-activation-time> <task-process-instance-id>1</task-process-instance-id> <task-process-id>evaluation</task-process-id> <task-container-id>myContainer</task-container-id> </task-instance>- [GET] tasks/instances/workitem/WORK_ITEM_ID
- Returns a list of task instances that use the specified work item.
- [GET] tasks/instances/process/PROCESS_INSTANCE_ID
Returns a list of tasks attached to the specified process instance.
Additional parameters you can use:
status.Server Response
<?xml version="1.0" encoding="UTF-8" standalone="yes"?> <task-summary-list> <task-summary> <task-id>1</task-id> <task-name>Self Evaluation</task-name> <task-subject></task-subject> <task-description>Please perform a self-evalutation.</task-description> <task-status>InProgress</task-status> <task-priority>0</task-priority> <task-is-skipable>false</task-is-skipable> <task-actual-owner>kiesu</task-actual-owner> <task-created-by>Kartik</task-created-by> <task-created-on>2016-04-05T15:05:06.508+02:00</task-created-on> <task-activation-time>2016-04-05T15:05:06.508+02:00</task-activation-time> <task-proc-inst-id>1</task-proc-inst-id> <task-proc-def-id>evaluation</task-proc-def-id> <task-container-id>myContainer</task-container-id> <task-parent-id>-1</task-parent-id> </task-summary> </task-summary-list>- [GET] tasks/instances/variables/VARIABLE_NAME
Returns a list of tasks that use the specified variable.
Aditional parameters you can use:
varValue,status,user.<?xml version="1.0" encoding="UTF-8" standalone="yes"?> <task-summary-list> <task-summary> <task-id>1</task-id> <task-name>Self Evaluation</task-name> <task-subject>Please perform a self-evalutation.</task-subject> <task-description>Please perform a self-evalutation.</task-description> <task-status>Ready</task-status> <task-priority>0</task-priority> <task-is-skipable>false</task-is-skipable> <task-created-by>Kartik</task-created-by> <task-created-on>2016-04-07T13:40:32.181+02:00</task-created-on> <task-activation-time>2016-04-07T13:40:32.181+02:00</task-activation-time> <task-proc-inst-id>1</task-proc-inst-id> <task-proc-def-id>evaluation</task-proc-def-id> <task-container-id>myContainer</task-container-id> <task-parent-id>-1</task-parent-id> </task-summary> </task-summary-list>
16.7. Advanced Queries for the Intelligent Process Server
The Intelligent Process Server supports the following commands through the REST API. For more information about advanced queries for the Intelligent Process Server, see Section 12.9, “Advanced Queries with QueryService”. For more information about using advanced queries in the Java Client API, see Section 19.10, “QueryDefinition for Intelligent Process Server Using Java Client API”.
Use the following entry point: http://SERVER:PORT/kie-server/services/rest/server/queries/definitions.
For endpoints that include MAPPER_ID, you can use following default mappers:
org.jbpm.kie.services.impl.query.mapper.ProcessInstanceQueryMapper-
registered with name -
ProcessInstances
-
registered with name -
org.jbpm.kie.services.impl.query.mapper.ProcessInstanceWithVarsQueryMapper-
registered with name -
ProcessInstancesWithVariables
-
registered with name -
org.jbpm.kie.services.impl.query.mapper.ProcessInstanceWithCustomVarsQueryMapper-
registered with name -
ProcessInstancesWithCustomVariables
-
registered with name -
org.jbpm.kie.services.impl.query.mapper.UserTaskInstanceQueryMapper-
registered with name -
UserTasks
-
registered with name -
org.jbpm.kie.services.impl.query.mapper.UserTaskInstanceWithVarsQueryMapper-
registered with name -
UserTasksWithVariables
-
registered with name -
org.jbpm.kie.services.impl.query.mapper.UserTaskInstanceWithCustomVarsQueryMapper-
registered with name -
UserTasksWithCustomVariables
-
registered with name -
org.jbpm.kie.services.impl.query.mapper.TaskSummaryQueryMapper-
registered with name -
TaskSummaries
-
registered with name -
org.jbpm.kie.services.impl.query.mapper.RawListQueryMapper-
registered with name -
RawList
-
registered with name -
Advanced Queries Endpoints
- [GET] /
- Returns query definitions.
- [GET] /QUERY_NAME
- Returns information about the specified query.
- [POST] /QUERY_NAME
- Registers a query definition.
Request Body
{
"query-name" : "getAllTaskInstancesWithCustomVariables1",
"query-source" : "java:jboss/datasources/ExampleDS",
"query-expression" : "select ti.*, c.country, c.productCode, c.quantity, c.price, c.saleDate from AuditTaskImpl ti inner join (select mv.map_var_id, mv.taskid from MappedVariable mv) mv on (mv.taskid = ti.taskId) inner join ProductSale c on (c.id = mv.map_var_id)",
"query-target" : "CUSTOM"
}- [PUT] /QUERY_NAME
- This endpoint updates a query definition.
Request Body
{
"query-name" : "getAllTaskInstancesWithCustomVariables1",
"query-source" : "java:jboss/datasources/ExampleDS",
"query-expression" : "select ti.*, c.country, c.productCode, c.quantity, c.price, c.saleDate from AuditTaskImpl ti inner join (select mv.map_var_id, mv.taskid from MappedVariable mv) mv on (mv.taskid = ti.taskId) inner join ProductSale c on (c.id = mv.map_var_id)",
"query-target" : "CUSTOM"
}- [DELETE] /QUERY_NAME
- This endpoint deletes a query.
- [GET] /QUERY_NAME/data?mapper=MAPPER_ID
- This endpoint queries tasks with no filtering. You can use either default or custom mappers.
- [POST] /QUERY_NAME/filtered-data?mapper=MAPPER_ID
This endpoint queries tasks with filters specified in the request body.
Request Body
{ "order-by" : "saleDate, country", "order-asc" : false, "query-params" : [ { "cond-column" : "processInstanceId", "cond-operator" : "BETWEEN", "cond-values" : [ 1000, 2000 ] }, { "cond-column" : "price", "cond-operator" : "GREATER_THAN", "cond-values" : [ 800 ] }, { "cond-column" : "saleDate", "cond-operator" : "BETWEEN", "cond-values" : [ {"java.util.Date":1454281200000}, {"java.util.Date":1456786800000} ] }, { "cond-column" : "productCode", "cond-operator" : "IN", "cond-values" : [ "EAP", "WILDFLY" ] } ], "result-column-mapping" : { "PRICE" : "double", "PRODUCTCODE" : "string", "COUNTRY" : "string", "SALEDATE" : "date", "QUANTITY" : "integer" } }- [POST] /QUERY_NAME/filtered-data?mapper=MAPPER_ID&builder=BUILDER_ID
This endpoint queries tasks with QueryParamBuilder. Pass the QueryParamBuilder variables in the request body.
Request Body
{ "min" : 10, "max" : 20 }
To use advanced queries through the REST API:
Change into a directory of your choice and create an XML file with your query definition. For example:
<query-definition> <query-name>getAllTasks</query-name> <query-source>java:jboss/datasources/ExampleDS</query-source> <query-expression>select * from Task t</query-expression> <query-target>TASK</query-target> </query-definition>Send a POST request to register your query definition. For example:
$ curl -X POST -u 'kieserver:kieserver1!' -H 'Content-type: application/xml' --data @queryDefinition.xml 'http://localhost:8080/kie-server/services/rest/server/queries/definitions/getAllTasks'To get the results of the query execution, send a GET request to queries/definitions/getAllTasks/data. For example:
curl -u 'kieserver:kieserver1!' -H 'Accept: application/xml' 'http://localhost:8080/kie-server/services/rest/server/queries/definitions/getAllTasks/data?mapper=UserTasks&orderBy=&page=0&pageSize=100'Server Response
<?xml version="1.0" encoding="UTF-8" standalone="yes"?> <task-instance-list> <task-instance> <task-priority>0</task-priority> <task-name>TEST_HT</task-name> <task-description></task-description> <task-status>Reserved</task-status> <task-created-on>2016-05-14T01:47:42.684-03:00</task-created-on> <task-activation-time>2016-05-14T01:47:42.684-03:00</task-activation-time> <task-process-instance-id>1</task-process-instance-id> <task-process-id>project1.proc_ht</task-process-id> <task-container-id>project1</task-container-id> </task-instance> </task-instance-list>
16.8. Managing Job Execution
REST API allows you to access information about asynchronous jobs without using the Business Central directly. The Intelligent Process Server exposes a component for executing asynchronous tasks through REST and JMS. The exposed API then offers you an access to:
- Schedule a new job.
- Cancel an already scheduled job.
-
Add a failed job to the queue again by giving the relevant
JOB_ID. -
Get a particular job by its
JOB_ID. - Query jobs scheduled to execute the same command (given as a parameter).
-
Query jobs scheduled with the same given
BUSINESS_KEY. - Query jobs with the given status as a parameter.
To control job execution, use the URI http://SERVER_ADDRESS:PORT/kie-server/services/rest/server/jobs.
For example http://localhost:8080/kie-server/services/rest/server/jobs.
Job Execution Endpoints
See the list of available endpoints:
- [GET] /
Response type: list of
RequestInfoInstanceobjectsDescription: Use this endpoint to query jobs in the server. Moreover, you can specify the parameters
page,pageSize, andstatus; possible values for status are QUEUED, DONE, CANCELLED, ERROR, RETRYING, and RUNNING. Note that these values must be capitalized.- [POST] /
Request type:
RequestInfoInstanceobjectResponse type: created
JOB_IDDescription: Creates a new job request and returns its ID. It is possible to assign the job to a container by setting
CONTAINER_ID.- [GET] /commands/JOB_COMMAND_NAME
Response type: list of
RequestInfoInstanceobjectsDescription: Returns a list of jobs configured to run with the
JOB_COMMAND_NAMEcommand class.- [GET] /JOB_ID
Response type:
RequestInfoInstanceobjectDescription: Returns details of a job request with the provided
JOB_ID. You can specify the parameterswithErrors(boolean) to include errors of an execution andwithDatato include the data associated with the job.- [DELETE] /JOB_ID
-
Description: Cancels a job with the given
JOB_ID. If successful, returns HTTP code 204, otherwise HTTP code 500. - [PUT] /JOB_ID
Request type:
RequestInfoInstanceobjectDescription: Requests unfinished or failed job request with the given
JOB_IDand reassigns it into the job queue.- [GET] /keys/BUSINESS_KEY
Response type: list of
RequestInfoInstanceobjectsDescription: Returns a list of jobs that match the given
BUSINESS_KEY.
Example 16.7. [POST] New Job
Change into a directory of your choice and create a
jobRequest.xmlfile with the following content:<?xml version="1.0" encoding="UTF-8" standalone="yes"?> <job-request-instance> <job-command>org.jbpm.executor.commands.PrintOutCommand</job-command> <scheduled-date>2016-02-11T00:00:00-02:00</scheduled-date> <data /> </job-request-instance>Execute the following command:
$ curl -X POST --data @jobRequest.xml -u 'kieserver:kieserver1!' -H 'content-type: application/xml' 'http://localhost:8080/kie-server/services/rest/server/jobs/'An example response:
<?xml version="1.0" encoding="UTF-8" standalone="yes"?> <long-type> <value>4</value> </long-type>
Example 16.8. [GET] List All Jobs
To list all jobs in the JSON format, execute the following command:
$ curl -u 'kieserver:kieserver1!' -H 'Accept: application/json' 'http://localhost:8080/kie-server/services/rest/server/jobs?status=QUEUED&status=DONE&status=CANCELLED&status=ERROR&status=RETRYING&status=RUNNING'An example response:
{
"request-info-instance" : [ {
"request-instance-id" : 3,
"request-status" : "CANCELLED",
"request-message" : "Ready to execute",
"request-retries" : 3,
"request-executions" : 0,
"request-command" : "org.jbpm.executor.commands.PrintOutCommand",
"request-scheduled-date" : 1455156000000
}, {
"request-instance-id" : 2,
"request-status" : "QUEUED",
"request-message" : "Ready to execute",
"request-retries" : 3,
"request-executions" : 0,
"request-command" : "org.jbpm.executor.commands.PrintOutCommand",
"request-scheduled-date" : 1454983200000
}, {
"request-instance-id" : 1,
"request-status" : "DONE",
"request-message" : "Ready to execute",
"request-retries" : 3,
"request-executions" : 0,
"request-command" : "org.jbpm.executor.commands.PrintOutCommand",
"request-scheduled-date" : 1454918401190
} ]
}Chapter 17. The REST API for Intelligent Process Server Administration
This section provides information about the Rest API for both managed and unmanaged Intelligent Process Server environments. You must set correct HTTP headers for the servers. See REST API for Intelligent Process Server Execution section for further information about HTTP headers.
17.1. Managed Intelligent Process Server Environment
When you have a managed Intelligent Process Server setup, you need to manage Intelligent Process Server and containers through a controller. Usually, it is done through Business Central, but you may also use Controller REST API.
-
The controller base URL is provided by business-central war deployment, which is the same as
org.kie.server.controllerproperty (for example http://localhost:8080/business-central/rest/controller). All requests require basic HTTP Authentication or token-based authentication for the role
kie-server.- [GET] /management/servers
Returns a list of Intelligent Process Server templates.
Example Server Response
<?xml version="1.0" encoding="UTF-8" standalone="yes"?> <server-template-list> <server-template> <server-id>local-server-123</server-id> <server-name>local-server-123</server-name> <container-specs> <container-id>hr</container-id> <container-name>hr</container-name> <server-template-key> <server-id>local-server-123</server-id> <server-name>local-server-123</server-name> </server-template-key> <release-id> <artifact-id>EmailProject</artifact-id> <group-id>org.redhat.gss</group-id> <version>1.0</version> </release-id> <configs> <entry> <key>RULE</key> <value xsi:type="ruleConfig" xmlns:xsi="http://www.w3.org/2001/XMLSchema-instance"> <pollInterval>500</pollInterval> <scannerStatus>STOPPED</scannerStatus> </value> </entry> <entry> <key>PROCESS</key> <value xsi:type="processConfig" xmlns:xsi="http://www.w3.org/2001/XMLSchema-instance"> <runtimeStrategy>SINGLETON</runtimeStrategy> <mergeMode>MERGE_COLLECTIONS</mergeMode> </value> </entry> </configs> <status>STARTED</status> </container-specs> <configs/> <server-instances> <server-instance-id>local-server-123@localhost:8080</server-instance-id> <server-name>local-server-123@localhost:8080</server-name> <server-template-id>local-server-123</server-template-id> <server-url>http://localhost:8080/kie-server/services/rest/server</server-url> </server-instances> <capabilities>RULE</capabilities> <capabilities>PROCESS</capabilities> <capabilities>PLANNING</capabilities> </server-template> </server-template-list>- [GET] /management/servers/ID
Returns an Intelligent Process Server template.
Server Response
<?xml version="1.0" encoding="UTF-8" standalone="yes"?> <server-template-list> <server-template> <server-id>local-server-123</server-id> <server-name>local-server-123</server-name> <container-specs> <container-id>hr</container-id> <container-name>hr</container-name> <server-template-key> <server-id>local-server-123</server-id> <server-name>local-server-123</server-name> </server-template-key> <release-id> <artifact-id>EmailProject</artifact-id> <group-id>org.redhat.gss</group-id> <version>1.0</version> </release-id> <configs> <entry> <key>RULE</key> <value xsi:type="ruleConfig" xmlns:xsi="http://www.w3.org/2001/XMLSchema-instance"> <pollInterval>500</pollInterval> <scannerStatus>STOPPED</scannerStatus> </value> </entry> <entry> <key>PROCESS</key> <value xsi:type="processConfig" xmlns:xsi="http://www.w3.org/2001/XMLSchema-instance"> <runtimeStrategy>SINGLETON</runtimeStrategy> <mergeMode>MERGE_COLLECTIONS</mergeMode> </value> </entry> </configs> <status>STARTED</status> </container-specs> <configs/> <server-instances> <server-instance-id>local-server-123@localhost:8080</server-instance-id> <server-name>local-server-123@localhost:8080</server-name> <server-template-id>local-server-123</server-template-id> <server-url>http://localhost:8080/kie-server/services/rest/server</server-url> </server-instances> <capabilities>RULE</capabilities> <capabilities>PROCESS</capabilities> <capabilities>PLANNING</capabilities> </server-template> </server-template-list>- [PUT] /management/servers/ID
Creates a new Intelligent Process Server template with the specified id.
Example Request to Create a New Intelligent Process Server Instance
<?xml version="1.0" encoding="UTF-8" standalone="yes"?> <server-template-details> <server-id>test-demo</server-id> <server-name>test-demo</server-name> <configs/> <capabilities>RULE</capabilities> <capabilities>PROCESS</capabilities> <capabilities>PLANNING</capabilities> </server-template-details>- [DELETE] /management/servers/ID
- Deletes an Intelligent Process Server template with the specified id.
- [GET] /management/servers/ID/containers
Returns all containers on given server.
Server Response
<?xml version="1.0" encoding="UTF-8" standalone="yes"?> <container-spec-list> <container-spec> <container-id>hr</container-id> <container-name>hr</container-name> <server-template-key> <server-id>local-server-123</server-id> <server-name>local-server-123</server-name> </server-template-key> <release-id> <artifact-id>EmailProject</artifact-id> <group-id>org.redhat.gss</group-id> <version>1.0</version> </release-id> <configs> <entry> <key>RULE</key> <value xsi:type="ruleConfig" xmlns:xsi="http://www.w3.org/2001/XMLSchema-instance"> <pollInterval>500</pollInterval> <scannerStatus>STOPPED</scannerStatus> </value> </entry> <entry> <key>PROCESS</key> <value xsi:type="processConfig" xmlns:xsi="http://www.w3.org/2001/XMLSchema-instance"> <runtimeStrategy>SINGLETON</runtimeStrategy> <mergeMode>MERGE_COLLECTIONS</mergeMode> </value> </entry> </configs> <status>STARTED</status> </container-spec> </container-spec-list>- [GET] /management/servers/ID/containers/CONTAINER_ID
Returns the container information including its release id and configuration.
Server Response
<?xml version="1.0" encoding="UTF-8" standalone="yes"?> <container-spec-details> <container-id>hr</container-id> <container-name>hr</container-name> <server-template-key> <server-id>local-server-123</server-id> <server-name>local-server-123</server-name> </server-template-key> <release-id> <artifact-id>EmailProject</artifact-id> <group-id>org.redhat.gss</group-id> <version>1.0</version> </release-id> <configs> <entry> <key>RULE</key> <value xsi:type="ruleConfig" xmlns:xsi="http://www.w3.org/2001/XMLSchema-instance"> <pollInterval>500</pollInterval> <scannerStatus>STOPPED</scannerStatus> </value> </entry> <entry> <key>PROCESS</key> <value xsi:type="processConfig" xmlns:xsi="http://www.w3.org/2001/XMLSchema-instance"> <runtimeStrategy>SINGLETON</runtimeStrategy> <mergeMode>MERGE_COLLECTIONS</mergeMode> </value> </entry> </configs> <status>STARTED</status> </container-spec-details>- [PUT] /management/servers/ID/containers/CONTAINER_ID
Creates a new container with the specified container ID, release ID, and the following configuration:
-
Runtime strategy:
SINGLETON. -
KIE Base:
default. -
KIE Session:
default. -
Deployment descriptor merge mode:
MERGE_COLLECTIONS. -
KIE Scanner:
Stopped.
Server Request
<?xml version="1.0" encoding="UTF-8" standalone="yes"?> <container-spec-details> <container-id>hr</container-id> <container-name>hr</container-name> <server-template-key xsi:type="serverTemplate" xmlns:xsi="http://www.w3.org/2001/XMLSchema-instance"> <server-id>demo</server-id> <server-name>local-server-123</server-name> <configs/> <server-instances> <server-instance-id>local-server-123@localhost:8080</server-instance-id> <server-name>local-server-123@localhost:8080</server-name> <server-template-id>local-server-123</server-template-id> <server-url>http://localhost:8080/kie-server/services/rest/server</server-url> </server-instances> </server-template-key> <release-id> <artifact-id>HR</artifact-id> <group-id>org.jbpm</group-id> <version>1.0</version> </release-id> <configs> <entry> <key>PROCESS</key> <value xsi:type="processConfig" xmlns:xsi="http://www.w3.org/2001/XMLSchema-instance"> <runtimeStrategy>SINGLETON</runtimeStrategy> <kbase></kbase> <ksession></ksession> <mergeMode>MERGE_COLLECTIONS</mergeMode> </value> </entry> <entry> <key>RULE</key> <value xsi:type="ruleConfig" xmlns:xsi="http://www.w3.org/2001/XMLSchema-instance"> <scannerStatus>STOPPED</scannerStatus> </value> </entry> </configs> <status>STARTED</status> </container-spec-details>-
Runtime strategy:
- [POST] /management/servers/ID/containers/CONTAINER_ID/config/CAPABILITY
Updates the capability (
RULE,PROCESS, orPLANNING, case sensitive) for a specified KIE container. Also requires a map containing the configurations for the specified KIE container capability, such as the following configurations:-
Runtime strategy:
SINGLETON. -
KIE Base:
default. -
KIE Session:
default. -
Deployment descriptor merge mode:
MERGE_COLLECTIONS.
POST Endpoint with Parameters
http://localhost:8080/business-central/rest/controller/management/servers/default-kieserver/containers/employeerostering_1.0.0-SNAPSHOT/config/PROCESSServer Request
<process-config> <runtimeStrategy>SINGLETON</runtimeStrategy> <kbase></kbase> <ksession></ksession> <mergeMode>MERGE_COLLECTIONS</mergeMode> </process-config>-
Runtime strategy:
- [DELETE] /management/servers/ID/containers/CONTAINER_ID
-
Disposes a container with the specified
CONTAINER_ID. - [POST] /management/servers/ID/containers/CONTAINER_ID/status/started
- Starts the container. No request body required.
- [POST] /management/servers/ID/containers/CONTAINER_ID/status/stopped
- Stops the Container. No request body required.
17.2. Unmanaged Intelligent Process Server Environment
The unmanaged Intelligent Process Server supports endpoints described in this section through the REST API. Note that:
-
The base URL for these remains as the endpoint defined earlier:
http://SERVER:PORT/kie-server/services/rest/server/. -
All requests require basic HTTP authentication for the
kie-serverrole.
For information about how to access the endpoints, see Chapter 16, The REST API for Intelligent Process Server Execution.
The commands are as follows:
- [GET] /
Returns the execution server information.
Server Response
<response type="SUCCESS" msg="Kie Server info"> <kie-server-info> <capabilities>KieServer</capabilities> <capabilities>BRM</capabilities> <capabilities>BPM</capabilities> <capabilities>BPM-UI</capabilities> <capabilities>BRP</capabilities> <location> http://localhost:8230/kie-server/services/rest/server </location> <messages> <content> Server KieServerInfo{serverId='15ad5bfa-7532-3eea-940a-abbbbc89f1e8', version='6.5.0.Final-redhat-2', location='http://localhost:8230/kie-server/services/rest/server'}started successfully at Tue Apr 18 08:00:45 CEST 2017 </content> <severity>INFO</severity> <timestamp>2017-04-18T08:00:45.953+02:00</timestamp> </messages> <name>KieServer@/kie-server</name> <id>15ad5bfa-7532-3eea-940a-abbbbc89f1e8</id> <version>6.5.0.Final-redhat-2</version> </kie-server-info> </response>Note that the
<capabilities>tags provide information about your execution server:-
KieServer: This is the execution server core functionality. It is always present because it provides deployment capabilities, such as deploy and undeploy containers on your server instance. -
BRM: Rule execution capability. Corresponds to Red Hat JBoss BRMS. -
BPM: Process, task, and job execution capability. Corresponds to Red Hat JBoss BPM Suite. -
BPM-UI: The UI extension functionality. See Chapter 18, Intelligent Process Server UI Extension for further information. -
BRP: The Business Resource Planner functionality.
-
- [GET] /state
Returns information about the current state and configurations of the execution server.
Server Response
<response type="SUCCESS" msg="Successfully loaded server state for server id default-kieserver"> <result> <kie-server-state-info> <controller>http://localhost:8080/business-central/rest/controller</controller> <config> <config-items> <itemName>org.kie.server.location</itemName> <itemValue>http://localhost:8080/kie-server/services/rest/server</itemValue> <itemType>java.lang.String</itemType> </config-items> <config-items> <itemName>org.kie.server.controller.user</itemName> <itemValue>controllerUser</itemValue> <itemType>java.lang.String</itemType> </config-items> <config-items> <itemName>org.kie.server.controller</itemName> <itemValue>http://localhost:8080/business-central/rest/controller</itemValue> <itemType>java.lang.String</itemType> </config-items> </config> <containers> <container-id>employee-rostering</container-id> <release-id> <group-id>employeerostering</group-id> <artifact-id>employeerostering</artifact-id> <version>1.0.0-SNAPSHOT</version> </release-id> <resolved-release-id/> <status>STARTED</status> <scanner> <status>STOPPED</status> <poll-interval/> </scanner> <config-items> <itemName>KBase</itemName> <itemValue> </itemValue> <itemType>BPM</itemType> </config-items> <config-items> <itemName>KSession</itemName> <itemValue> </itemValue> <itemType>BPM</itemType> </config-items> <config-items> <itemName>MergeMode</itemName> <itemValue>MERGE_COLLECTIONS</itemValue> <itemType>BPM</itemType> </config-items> <config-items> <itemName>RuntimeStrategy</itemName> <itemValue>SINGLETON</itemValue> <itemType>BPM</itemType> </config-items> <messages/> <container-alias>employeerostering</container-alias> </containers> </kie-server-state-info> </result> </response>- [POST] /config
Use this endpoint to execute commands on the execution server, for example
create-container,list-containers,dispose-container, andcall-container.An example call for the JAXB marshaller:
curl -X POST -u 'kiesu:kiesu123!' -H 'Content-type: application/xml' -H 'X-KIE-ContentType: JAXB' --data @request.xml 'http://localhost:8080/kie-server/services/rest/server/config'An example call for the XSTREAM marshaller:
curl -X POST -u 'kiesu:kiesu123!' -H 'Content-type: application/xml' -H 'X-KIE-ContentType: XSTREAM' --data @request.xml 'http://localhost:8080/kie-server/services/rest/server/config'An example call for the JSON marshaller:
curl -X POST -u 'kiesu:kiesu123!' -H 'Content-type: application/json' -H 'X-KIE-ContentType: JSON' --data @request.json 'http://localhost:8080/kie-server/services/rest/server/config'Supported commands are:
- GetServerInfoCommand
XML body request using the JAXB marshaller:
<?xml version="1.0" encoding="UTF-8" standalone="yes"?> <script> <get-server-info/> </script>XML body request using the XSTREAM marshaller:
<script> <commands> <get-server-info/> </commands> </script>JSON body request:
{ "commands" : [ { "get-server-info" : { } } ] }An example response:
<?xml version="1.0" encoding="UTF-8" standalone="yes"?> <responses> <response type="SUCCESS" msg="Kie Server info"> <kie-server-info> <capabilities>KieServer</capabilities> <capabilities>BRM</capabilities> <capabilities>BPM</capabilities> <capabilities>BPM-UI</capabilities> <capabilities>BRP</capabilities> <location>http://localhost:8230/kie-server/services/rest/server</location> <messages> <content>Server KieServerInfo{serverId='15ad5bfa-7532-3eea-940a-abbbbc89f1e8', version='6.5.0.Final-redhat-2', location='http://localhost:8230/kie-server/services/rest/server'}started successfully at Fri Mar 31 14:14:52 CEST 2017</content> <severity>INFO</severity> <timestamp>2017-03-31T14:14:52.710+02:00</timestamp> </messages> <name>KieServer@/kie-server</name> <id>15ad5bfa-7532-3eea-940a-abbbbc89f1e8</id> <version>6.5.0.Final-redhat-2</version> </kie-server-info> </response> </responses>
- CreateContainerCommand
XML body request using the JAXB marshaller:
<?xml version="1.0" encoding="UTF-8" standalone="yes"?> <script> <create-container> <container container-id="command-script-container"> <release-id> <artifact-id>evaluation</artifact-id> <group-id>org.jbpm</group-id> <version>1.0</version> </release-id> </container> </create-container> </script>XML body request using the XSTREAM marshaller:
<script> <commands> <create-container> <kie-container> <container-id>command-script-container</container-id> <release-id> <group-id>org.jbpm</group-id> <artifact-id>evaluation</artifact-id> <version>1.0</version> </release-id> </kie-container> </create-container> </commands> </script>JSON body request:
{ "commands" : [ { "create-container" : { "container" : { "status" : null, "messages" : [ ], "container-id" : "command-script-container", "release-id" : { "version" : "1.0", "group-id" : "org.jbpm", "artifact-id" : "evaluation" }, "config-items" : [ ] } } } ] }An example response:
<?xml version="1.0" encoding="UTF-8" standalone="yes"?> <responses> <response type="SUCCESS" msg="Container command-script-container successfully deployed with module org.jbpm:evaluation:1.0."> <kie-container container-id="command-script-container" status="STARTED"> <release-id> <artifact-id>evaluation</artifact-id> <group-id>org.jbpm</group-id> <version>1.0</version> </release-id> <resolved-release-id> <artifact-id>evaluation</artifact-id> <group-id>org.jbpm</group-id> <version>1.0</version> </resolved-release-id> <scanner status="DISPOSED"/> </kie-container> </response> </responses>
- GetContainerInfoCommand
XML body request using the JAXB marshaller:
<?xml version="1.0" encoding="UTF-8" standalone="yes"?> <script> <get-container-info container-id="command-script-container"/> </script>XML body request using the XSTREAM marshaller:
<script> <commands> <get-container-info> <container-id>command-script-container</container-id> </get-container-info> </commands> </script>JSON body request:
{ "commands" : [ { "get-container-info" : { "container-id" : "command-script-container" } } ] }An example response:
<?xml version="1.0" encoding="UTF-8" standalone="yes"?> <responses> <response type="SUCCESS" msg="Info for container command-script-container"> <kie-container container-id="command-script-container" status="STARTED"> <messages> <content>Container command-script-container successfully created with module org.jbpm:evaluation:1.0.</content> <severity>INFO</severity> <timestamp>2017-03-31T15:29:21.056+02:00</timestamp> </messages> <release-id> <artifact-id>evaluation</artifact-id> <group-id>org.jbpm</group-id> <version>1.0</version> </release-id> <resolved-release-id> <artifact-id>evaluation</artifact-id> <group-id>org.jbpm</group-id> <version>1.0</version> </resolved-release-id> <scanner status="DISPOSED"/> </kie-container> </response> </responses>
- ListContainersCommand
XML body request using the JAXB marshaller:
<?xml version="1.0" encoding="UTF-8" standalone="yes"?> <script> <list-containers> <kie-container-filter> <release-id-filter/> <container-status-filter> <accepted-status>CREATING</accepted-status> <accepted-status>STARTED</accepted-status> <accepted-status>FAILED</accepted-status> <accepted-status>DISPOSING</accepted-status> <accepted-status>STOPPED</accepted-status> </container-status-filter> </kie-container-filter> </list-containers> </script>XML body request using the XSTREAM marshaller:
<script> <commands> <list-containers> <kie-container-filter> <release-id-filter/> <container-status-filter> <accepted-status> <org.kie.server.api.model.KieContainerStatus>CREATING</org.kie.server.api.model.KieContainerStatus> <org.kie.server.api.model.KieContainerStatus>STARTED</org.kie.server.api.model.KieContainerStatus> <org.kie.server.api.model.KieContainerStatus>FAILED</org.kie.server.api.model.KieContainerStatus> <org.kie.server.api.model.KieContainerStatus>DISPOSING</org.kie.server.api.model.KieContainerStatus> <org.kie.server.api.model.KieContainerStatus>STOPPED</org.kie.server.api.model.KieContainerStatus> </accepted-status> </container-status-filter> </kie-container-filter> </list-containers> </commands> </script>JSON body request:
{ "commands" : [ { "list-containers" : { "kie-container-filter" : { "release-id-filter" : { }, "container-status-filter" : { "accepted-status" : [ "CREATING", "STARTED", "FAILED", "DISPOSING", "STOPPED" ] } } } } ] }An example response:
<?xml version="1.0" encoding="UTF-8" standalone="yes"?> <responses> <response type="SUCCESS" msg="List of created containers"> <kie-containers> <kie-container container-id="command-script-container" status="STARTED"> <messages> <content>Container command-script-container successfully created with module org.jbpm:evaluation:1.0.</content> <severity>INFO</severity> <timestamp>2017-04-10T10:05:22.866+02:00</timestamp> </messages> <release-id> <artifact-id>evaluation</artifact-id> <group-id>org.jbpm</group-id> <version>1.0</version> </release-id> <resolved-release-id> <artifact-id>evaluation</artifact-id> <group-id>org.jbpm</group-id> <version>1.0</version> </resolved-release-id> <scanner status="DISPOSED"/> </kie-container> </kie-containers> </response> </responses>
- DisposeContainerCommand
XML body request using the JAXB marshaller:
<?xml version="1.0" encoding="UTF-8" standalone="yes"?> <script> <dispose-container container-id="mycontainer"/> </scriptXML body request using the XSTREAM marshaller:
<script> <commands> <dispose-container> <container-id>mycontainer</container-id> </dispose-container> </commands> </script>JSON body request:
{ "commands" : [ { "dispose-container" : { "container-id" : "mycontainer" } } ] }An example response:
<?xml version="1.0" encoding="UTF-8" standalone="yes"?> <responses> <response type="SUCCESS" msg="Container mycontainer successfully disposed."/> </responses>
- GetScannerInfoCommand
XML body request using the JAXB marshaller:
<?xml version="1.0" encoding="UTF-8" standalone="yes"?> <script> <get-scanner-info container-id="command-script-container"/> </script>XML body request using the XSTREAM marshaller:
<script> <commands> <get-scanner-info> <container-id>command-script-container</container-id> </get-scanner-info> </commands> </script>JSON body request:
{ "commands" : [ { "get-scanner-info" : { "container-id" : "command-script-container" } } ] }An example response:
<?xml version="1.0" encoding="UTF-8" standalone="yes"?> <responses> <response type="SUCCESS" msg="Scanner info successfully retrieved"> <kie-scanner status="DISPOSED"/> </response> </responses>
- UpdateScannerCommand
XML body request using the JAXB marshaller:
<?xml version="1.0" encoding="UTF-8" standalone="yes"?> <script> <update-scanner container-id="command-script-container"> <scanner poll-interval="10000" status="STARTED"/> </update-scanner> </script>XML body request using the XSTREAM marshaller:
<script> <commands> <update-scanner> <container-id>command-script-container</container-id> <scanner> <status>STARTED</status> <poll-interval>10000</poll-interval> </scanner> </update-scanner> </commands> </script>JSON body request:
{ "commands" : [ { "update-scanner" : { "scanner" : { "status" : "STARTED", "poll-interval" : 10000 }, "container-id" : "command-script-container" } } ] }An example response:
<?xml version="1.0" encoding="UTF-8" standalone="yes"?> <responses> <response type="SUCCESS" msg="Kie scanner successfully created."> <kie-scanner poll-interval="10000" status="STARTED"/> </response> </responses>
- UpdateReleaseIdCommand
XML body request using the JAXB marshaller:
<?xml version="1.0" encoding="UTF-8" standalone="yes"?> <script> <update-release-id container-id="command-script-container"> <releaseId> <artifact-id>evaluation</artifact-id> <group-id>org.jbpm</group-id> <version>1.1</version> </releaseId> </update-release-id> </script>XML body request using the XSTREAM marshaller:
<script> <commands> <update-release-id> <container-id>command-script-container</container-id> <release-id> <group-id>org.jbpm</group-id> <artifact-id>evaluation</artifact-id> <version>1.1</version> </release-id> </update-release-id> </commands> </script>JSON body request:
{ "commands" : [ { "update-release-id" : { "releaseId" : { "version" : "1.1", "group-id" : "org.jbpm", "artifact-id" : "evaluation" }, "container-id" : "command-script-container" } } ] }An example response:
<?xml version="1.0" encoding="UTF-8" standalone="yes"?> <responses> <response type="SUCCESS" msg="Release id successfully updated."> <release-id> <artifact-id>evaluation</artifact-id> <group-id>org.jbpm</group-id> <version>1.1</version> </release-id> </response> </responses>
- CallContainerCommand
The
CallContainerCommandcommand requires thepayloadattribute. The following payload is used in the examples:import org.kie.server.api.marshalling.Marshaller; import org.kie.server.api.marshalling.MarshallerFactory; import org.kie.server.api.marshalling.MarshallingFormat; ... Marshaller marshaller = MarshallerFactory.getMarshaller(MarshallingFormat.JSON,myclass.class.getClassLoader()); //Marshalling format is changed based on the method of marshalling for the CallContainerCommand. Also note myclass.class classloader is called. If replicating this code, change the name to the name of your class. Command<?> fire = KieServices.Factory.get().getCommands().newFireAllRules(); BatchExecutionCommand batch = KieServices.Factory.get().getCommands().newBatchExecution(Arrays.<Command<?>>asList(fire), "defaultKieSession"); String payload = marshaller.marshall(batch);XML body request using the JAXB marshaller:
<?xml version="1.0" encoding="UTF-8" standalone="yes"?> <script> <call-container container-id="command-script-container"> <payload><?xml version="1.0" encoding="UTF-8" standalone="yes"?> <batch-execution lookup="defaultKieSession"> <fire-all-rules max="-1"/> </batch-execution> </payload> </call-container> </script>XML body request using the XSTREAM marshaller:
<script> <commands> <call-container> <container-id>command-script-container</container-id> <payload><batch-execution lookup="defaultKieSession"> <fire-all-rules/> </batch-execution></payload> </call-container> </commands> </script>JSON body request:
{ "commands" : [ { "call-container" : { "payload" : "{\n \"lookup\" : \"defaultKieSession\",\n \"commands\" : [ {\n \"fire-all-rules\" : {\n \"max\" : -1,\n \"out-identifier\" : null\n }\n } ]\n}", "container-id" : "command-script-container" } } ] }An example response:
<?xml version="1.0" encoding="UTF-8" standalone="yes"?> <responses> <response type="SUCCESS" msg="Container command-script-container successfully called."> <results><?xml version="1.0" encoding="UTF-8" standalone="yes"?> <execution-results> <results/> <facts/> </execution-results> </results> </response> </responses>
- GetServerStateCommand
XML body request using the JAXB marshaller:
<?xml version="1.0" encoding="UTF-8" standalone="yes"?> <script> <get-server-state/> </script>XML body request using the XSTREAM marshaller:
<script> <commands> <org.kie.server.api.commands.GetServerStateCommand/> </commands> </script>JSON body request:
{ "commands" : [ { "get-server-state" : { } } ] }An example response:
<?xml version="1.0" encoding="UTF-8" standalone="yes"?> <responses> <response type="SUCCESS" msg="Successfully loaded server state for server id 15ad5bfa-7532-3eea-940a-abbbbc89f1e8"> <kie-server-state-info> <config> <config-items> <itemName>org.kie.server.repo</itemName> <itemValue>/BPMS6.4/standalone/data</itemValue> <itemType>java.lang.String</itemType> </config-items> </config> <containers container-id="command-script-container" status="STARTED"> <release-id> <artifact-id>evaluation</artifact-id> <group-id>org.jbpm</group-id> <version>1.1</version> </release-id> <resolved-release-id> <artifact-id>evaluation</artifact-id> <group-id>org.jbpm</group-id> <version>1.1</version> </resolved-release-id> <scanner poll-interval="1000" status="STARTED"/> </containers> </kie-server-state-info> </response> </responses>The following example request contains the
create-container,call-container, anddispose-containercommands:Sample Request to Create a Container
<?xml version="1.0" encoding="UTF-8" standalone="yes"?> <script> <create-container> <container container-id="command-script-container"> <release-id> <artifact-id>baz</artifact-id> <group-id>foo.bar</group-id> <version>2.1.0.GA</version> </release-id> </container> </create-container> <call-container container-id="command-script-container"> <payload><?xml version="1.0" encoding="UTF-8" standalone="yes"?> <batch-execution lookup="defaultKieSession"> <insert out-identifier="message" return-object="true" entry-point="DEFAULT" disconnected="false"> <object xsi:type="message" xmlns:xsi="http://www.w3.org/2001/XMLSchema-instance"> <text>HelloWorld</text> </object> </insert> <fire-all-rules max="-1"/> </batch-execution> </payload> </call-container> <dispose-container container-id="command-script-container"/> </script>
- [GET] /containers
Returns a list of containers on the server.
Server Response
<response type="SUCCESS" msg="List of created containers"> <kie-containers> <kie-container container-id="MyProjectContainer" status="STARTED"> <release-id> <artifact-id>Project1</artifact-id> <group-id>com.redhat</group-id> <version>1.0</version> </release-id> <resolved-release-id> <artifact-id>Project1</artifact-id> <group-id>com.redhat</group-id> <version>1.0</version> </resolved-release-id> </kie-container> </kie-containers> </response>Starting with Red Hat JBoss BPM Suite version 6.4, you can filter the containers by adding any of the following Maven artifact coordinates to the query:
-
groupId -
artifactId -
version
Example 17.1. Filtering Containers by Maven Properties
Issuing the following call lists containers with Group ID
org.example, Artifact IDartifact, and version1.0.0.Final:curl -u 'kieserver:kieserver1!' -H 'Accept: application/json' 'http://localhost:8080/kie-server/services/rest/server/containers?groupId=org.example&artifactId=artifact&version=1.0.0.Final'To filter by container status, specify the
statusattribute. Multiple values are separated with a comma.Example 17.2. Example Filtering Containers by Status
Issuing the following call lists only failed and stopped containers:
curl -u 'kieserver:kieserver1!' -H 'Accept: application/json' 'http://localhost:8080/kie-server/services/rest/server/containers?status=FAILED,STOPPED'-
- [GET] /containers/ID
Returns the status and information about a specified container.
Server Response
<response type="SUCCESS" msg="Info for container MyProjectContainer"> <kie-container container-id="MyProjectContainer" status="STARTED"> <release-id> <artifact-id>Project1</artifact-id> <group-id>com.redhat</group-id> <version>1.0</version> </release-id> <resolved-release-id> <artifact-id>Project1</artifact-id> <group-id>com.redhat</group-id> <version>1.0</version> </resolved-release-id> </kie-container> </response>- [PUT] /containers/CONTAINER_ID
Creates a new container in the Intelligent Process Server with a container ID specified in the URI and configuration specified in the request body. The configuration, in addition to the project release ID, provides the following settings:
-
Runtime strategy:
SINGLETON. -
KIE Base:
default. -
KIE Session:
default. -
Deployment descriptor merge mode:
MERGE_COLLECTIONS. KIE Scanner:
-
Status:
STARTED. -
Interval:
5000.
-
Status:
Request to Create a Container
<?xml version="1.0" encoding="UTF-8" standalone="yes"?> <kie-container> <config-items> <itemName>RuntimeStrategy</itemName> <itemValue>SINGLETON</itemValue> <itemType>java.lang.String</itemType> </config-items> <config-items> <itemName>MergeMode</itemName> <itemValue>MERGE_COLLECTIONS</itemValue> <itemType>java.lang.String</itemType> </config-items> <config-items> <itemName>KBase</itemName> <itemValue></itemValue> <itemType>java.lang.String</itemType> </config-items> <config-items> <itemName>KSession</itemName> <itemValue></itemValue> <itemType>java.lang.String</itemType> </config-items> <release-id> <artifact-id>EmailProject</artifact-id> <group-id>org.redhat.gss</group-id> <version>1.0</version> </release-id> <scanner poll-interval="5000" status="STARTED"/> </kie-container>Example Server Response When Creating a Container
<?xml version="1.0" encoding="UTF-8" standalone="yes"?> <response type="SUCCESS" msg="Container Example successfully deployed with module org.redhat.gss:EmailProject:1.0."> <kie-container container-id="Example" status="STARTED"> <config-items> <itemName>RuntimeStrategy</itemName> <itemValue>SINGLETON</itemValue> <itemType>java.lang.String</itemType> </config-items> <config-items> <itemName>MergeMode</itemName> <itemValue>MERGE_COLLECTIONS</itemValue> <itemType>java.lang.String</itemType> </config-items> <config-items> <itemName>KBase</itemName> <itemValue></itemValue> <itemType>java.lang.String</itemType> </config-items> <config-items> <itemName>KSession</itemName> <itemValue></itemValue> <itemType>java.lang.String</itemType> </config-items> <release-id> <artifact-id>EmailProject</artifact-id> <group-id>org.redhat.gss</group-id> <version>1.0</version> </release-id> <resolved-release-id> <artifact-id>EmailProject</artifact-id> <group-id>org.redhat.gss</group-id> <version>1.0</version> </resolved-release-id> <scanner poll-interval="5000" status="STARTED"/> </kie-container> </response>-
Runtime strategy:
- [DELETE] /containers/ID
Disposes of a container specified by the ID.
Server Response Disposing a Container
<response type="SUCCESS" msg="Container MyProjectContainer successfully disposed."/>- [GET] /containers/ID/release-id
Returns a full release ID for a specified container.
Server Response
<response type="SUCCESS" msg="ReleaseId for container MyProjectContainer"> <release-id> <artifact-id>Project1</artifact-id> <group-id>com.redhat</group-id> <version>1.0</version> </release-id> </response>- [POST] /containers/ID/release-id
Allows you to update the release ID of a container.
Sample Server Request
<release-id> <artifact-id>Project1</artifact-id> <group-id>com.redhat</group-id> <version>1.1</version> </release-id>The server responds with a success or error message, such as:
Sample Server Response
<response type="SUCCESS" msg="Release id successfully updated."> <release-id> <artifact-id>Project1</artifact-id> <group-id>com.redhat</group-id> <version>1.0</version> </release-id> </response>- [GET] /containers/ID/scanner
Returns information about the scanner for container’s automatic updates.
Server Response
<response type="SUCCESS" msg="Scanner info successfully retrieved"> <kie-scanner status="DISPOSED"/> </response>- [POST] /containers/ID/scanner
Allows you to start or stop a scanner that controls polling for updated container deployments.
Example Server Request to Start the Scanner
<kie-scanner status="STARTED" poll-interval="20"/>Server Response
<response type="SUCCESS" msg="Kie scanner successfully created."> <kie-scanner status="STARTED"/> </response>To stop the scanner, replace the status with
DISPOSEDand remove thepoll-intervalattribute.
Chapter 18. Intelligent Process Server UI Extension
The Intelligent Process Server is focused on execution and contains no UI for interaction. To simplify creating custom UI, Intelligent Process Server is capable of providing:
- Process form structures.
- Task form structures.
- SVG image of the process definition diagram.
- Annotated SVG image of the process definition diagram.
Business Central, the authoring environment, allows users to build assets, such as rules, decision tables, forms, and others. In Business Central, Form Modeler generates forms that are well integrated with process and task variables, and provides binding between the inputs and outputs.
The Intelligent Process Server expects data to be mapped onto correct process and task variables. By generating form structures, you are able to create custom UI that will properly map the input data onto process and task variables.
18.1. Using the Intelligent Process Server UI Extension
The Intelligent Process Server UI Extension supports the following commands through the REST API. Note the following before using these commands:
- The base URL for these will remain as the endpoint defined earlier (http://_SERVER:PORT/kie-server/services/rest/server/_).
-
All requests require basic HTTP Authentication for the role
kie-server. You need to enable SVG image storing in order to be able to retrieve it through REST API. To do that, follow these steps:
-
Change into
$SERVER_HOME/standalone/deployments/business-central.war/org.kie.workbench.KIEWebapp/profiles/. -
In
jbpm.xml, find<storesvgonsave enabled="false"/>. -
Change it to
<storesvgonsave enabled="true"/> - Restart your server.
- Modify your business process and save it. This step is necessary, otherwise you will receive an empty SVG image.
- Build and deploy your project.
-
Change into
If you set the package attribute of your business process, ensure that it matches the package structure of your project. That means if you set the package attribute to com.example.myproject, place your business process into the com/example/myproject directory of your JAR file.
If you set the package attribute to a structure different from the directory structure of your business process, you will receive an error similar to the following:
16:35:52,155 WARN [org.kie.server.services.jbpm.ui.ImageServiceBase] (http-127.0.0.1:8180-1) Could not find SVG image file for process 'sampleproject1.sampleprocess' within container TestKieUIContainer-
The default form structure of the Intelligent Process Server is XML. You can change the format to JSON by providing HTTP header
Accept: application/json.
Start the process through Intelligent Process Server (for example, through the REST API) to ensure the following endpoints work.
- [GET] /containers/CONTAINER_ID/forms/processes/PROCESS_ID
Server Response
<form id="1634631252"> <property name="subject" value=""/> <property name="name" value="com.sample.evaluation-taskform"/> <property name="displayMode" value="default"/> <property name="labelMode" value="undefined"/> <property name="status" value="0"/> <field id="301394101" name="301394101" position="0" type="InputText"> <property name="fieldRequired" value="true"/> <property name="groupWithPrevious" value="false"/> <property name="labelCSSClass" value=""/> <property name="labelCSSStyle" value=""/> <property name="label" value=""/> <property name="errorMessage" value=""/> <property name="title" value=""/> <property name="disabled" value="false"/> <property name="readonly" value="false"/> <property name="size" value=""/> <property name="formula" value=""/> <property name="rangeFormula" value=""/> <property name="pattern" value=""/> <property name="styleclass" value=""/> <property name="cssStyle" value=""/> <property name="isHTML" value="false"/> <property name="hideContent" value="false"/> <property name="defaultValueFormula" value=""/> <property name="inputBinding" value=""/> <property name="outputBinding" value="employee"/> </field> <field id="1698224711" name="1698224711" position="1" type="InputTextArea"> <property name="fieldRequired" value="true"/> <property name="groupWithPrevious" value="false"/> <property name="height" value="3"/> <property name="labelCSSClass" value=""/> <property name="labelCSSStyle" value=""/> <property name="label" value=""/> <property name="errorMessage" value=""/> <property name="title" value=""/> <property name="disabled" value="false"/> <property name="readonly" value="false"/> <property name="size" value=""/> <property name="formula" value=""/> <property name="rangeFormula" value=""/> <property name="pattern" value=""/> <property name="styleclass" value=""/> <property name="cssStyle" value=""/> <property name="defaultValueFormula" value=""/> <property name="inputBinding" value=""/> <property name="outputBinding" value="reason"/> </field> </form>The XML response maps the following form:
Figure 18.1. Form Mapped to XML
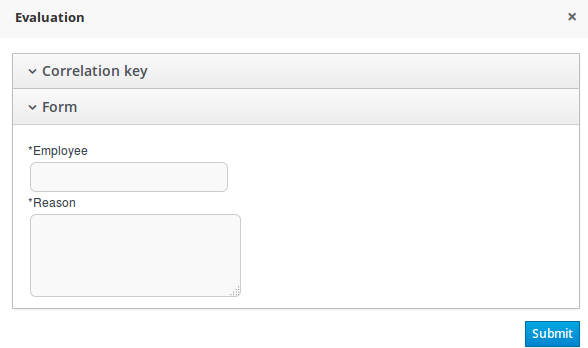
- [GET] /containers/CONTAINER_ID/forms/tasks/TASK_ID
Server Response
<form id="1635016860"> <property name="name" value="PerformanceEvaluation-taskform"/> <property name="displayMode" value="default"/> <property name="status" value="0"/> <field id="822358072" name="822358072" position="0" type="InputTextArea"> <property name="fieldRequired" value="false"/> <property name="groupWithPrevious" value="false"/> <property name="label" value="Reason"/> <property name="errorMessage" value=""/> <property name="title" value=""/> <property name="readonly" value="true"/> <property name="inputBinding" value="reason"/> <property name="fieldClass" value="java.lang.String"/> </field> <field id="348604726" name="348604726" position="1" type="InputText"> <property name="fieldRequired" value="true"/> <property name="groupWithPrevious" value="false"/> <property name="label" value="Performance"/> <property name="errorMessage" value=""/> <property name="title" value=""/> <property name="readonly" value="false"/> <property name="isHTML" value="false"/> <property name="hideContent" value="false"/> <property name="inputBinding" value="performance"/> <property name="outputBinding" value="performance"/> <property name="fieldClass" value="java.lang.String"/> </field> <field id="1048590899" name="initiator" position="2" type="InputText"> <property name="fieldRequired" value="false"/> <property name="label" value="BusinessAdministratorId (initiator)"/> <property name="readonly" value="false"/> <property name="inputBinding" value="BusinessAdministratorId"/> <property name="fieldClass" value="java.lang.String"/> </field> <dataHolder id="initiator" inputId="BusinessAdministratorId" name="#9BCAFA" outId="" type="basicType" value="java.lang.String"/> <dataHolder id="performance" inputId="" name="#BBBBBB" outId="performance" type="basicType" value="java.lang.String"/> <dataHolder id="reason" inputId="reason" name="#FF54A7" outId="" type="basicType" value="java.lang.String"/> </form>The XML response maps the following form:
Figure 18.2. Form Mapped to XML
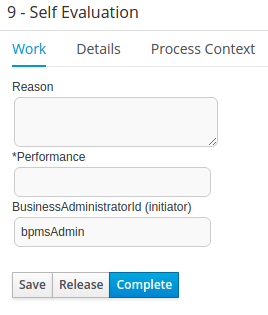
- [GET] /containers/CONTAINER_ID/images/processes/PROCESS_ID
Returns an SVG image of the process definition diagram.
Example 18.1. Server Response
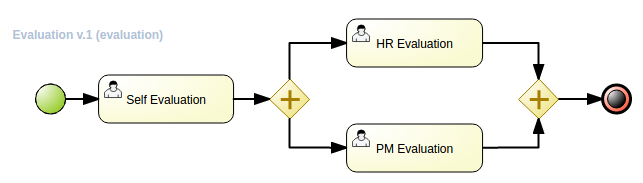
- [GET] /containers/CONTAINER_ID/images/processes/instances/PROCESS_INSTANCE_ID
Returns an annotated SVG image of the process definition diagram.
Example 18.2. Server Response
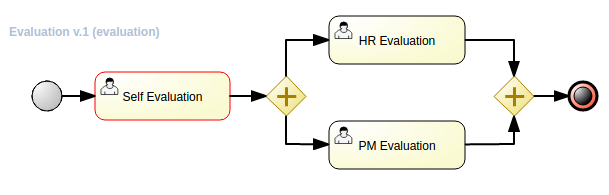
Chapter 19. Intelligent Process Server Java Client API Overview
19.1. Client Configuration
You need to declare a configuration object and set server communication aspects, such as the protocol (REST or JMS), credentials and the payload format (XStream, JAXB or JSON). For additional example, follow the Hello World project.
Client Configuration
import org.kie.server.api.marshalling.MarshallingFormat;
import org.kie.server.client.KieServicesClient;
import org.kie.server.client.KieServicesConfiguration;
import org.kie.server.client.KieServicesFactory;
public class DecisionServerTest {
private static final String URL = "http://localhost:8080/kie-server/services/rest/server";
private static final String USER = "kieserver";
private static final String PASSWORD = "kieserver1!";
private static final MarshallingFormat FORMAT = MarshallingFormat.JSON;
private KieServicesConfiguration conf;
private KieServicesClient kieServicesClient;
@Before
public void initialize() {
conf = KieServicesFactory.newRestConfiguration(URL, USER, PASSWORD);
//If you use custom classes, such as Obj.class, add them to the configuration
Set<Class<?>> extraClassList = new HashSet<Class<?>>();
extraClassList.add(Obj.class);
conf.addExtraClasses(extraClassList);
conf.setMarshallingFormat(FORMAT);
kieServicesClient = KieServicesFactory.newKieServicesClient(conf);
}
}JMS Client Configuration
import java.util.Properties;
import javax.jms.ConnectionFactory;
import javax.jms.Queue;
import javax.naming.Context;
import javax.naming.InitialContext;
import org.junit.Test;
import org.kie.server.client.KieServicesClient;
import org.kie.server.client.KieServicesConfiguration;
import org.kie.server.client.KieServicesFactory;
public class DecisionServerTest {
private static final String REMOTING_URL = new String("remote://localhost:4447");
private static final String USER = "kieserver";
private static final String PASSWORD = "kieserver1!";
private static final String INITIAL_CONTEXT_FACTORY = new String("org.jboss.naming.remote.client.InitialContextFactory");
private static final String CONNECTION_FACTORY = new String("jms/RemoteConnectionFactory");
private static final String REQUEST_QUEUE_JNDI = new String("jms/queue/KIE.SERVER.REQUEST");
private static final String RESPONSE_QUEUE_JNDI = new String("jms/queue/KIE.SERVER.RESPONSE");
private KieServicesConfiguration conf;
private KieServicesClient kieServicesClient;
@Test
public void testJms() throws Exception {
final Properties env = new Properties();
env.put(Context.INITIAL_CONTEXT_FACTORY, INITIAL_CONTEXT_FACTORY);
env.put(Context.PROVIDER_URL, REMOTING_URL);
env.put(Context.SECURITY_PRINCIPAL, USER);
env.put(Context.SECURITY_CREDENTIALS, PASSWORD);
InitialContext context = new InitialContext(env);
Queue requestQueue = (Queue) context.lookup(REQUEST_QUEUE_JNDI);
Queue responseQueue = (Queue) context.lookup(RESPONSE_QUEUE_JNDI);
ConnectionFactory connectionFactory = (ConnectionFactory) context.lookup(CONNECTION_FACTORY);
conf = KieServicesFactory.newJMSConfiguration(connectionFactory, requestQueue, responseQueue, USER, PASSWORD);
//If you use custom classes, such as Obj.class, add them to the configuration
Set<Class<?>> extraClassList = new HashSet<Class<?>>();
extraClassList.add(Obj.class);
conf.addExtraClasses(extraClassList);
kieServicesClient = KieServicesFactory.newKieServicesClient(conf);
}
}
Note that you must assign the the guest role to the user kieserver. Additionally, you must declare JMS dependency:
<dependency>
<groupId>org.jboss.as</groupId>
<artifactId>jboss-as-jms-client-bom</artifactId>
<version>7.5.7.Final-redhat-3</version>
<type>pom</type>
</dependency>19.1.1. JMS Interaction Patterns
Since version 6.4 of Red Hat JBoss BPM Suite, Intelligent Process Server Client integration with JMS has been enhanced by several interaction patterns. Available interaction patterns are:
- Request reply: the default option that blocks the client until a response is received, making the JMS integration synchronous. Request reply is not suitable for a JMS transactional delivery.
- Fire and forget: an option for one-way integration. Suitable, for example, for notifications invoked by integration with the Intelligent Process Server. Fire and forget is convenient for a transactional JMS delivery. Messages are delivered to the server only if the transaction that invoked the server client was committed successfully.
- Asynchronous with callback: with this option, the client is not blocked after sending a message to Intelligent Process Server. Responses can be received asynchronously. This option can be used for the transactional JMS delivery.
You can set the response handlers either globally (when a KieServicesConfiguration is created) or individually on different client instances (such as RuleServiceClient, ProcessServicesClient, and others) during runtime.
Whereas fire and forget and request reply patterns do not require any additional configuration, you need to configure the callback if you use the asynchronous pattern. The Intelligent Process Server client includes a built-in callback (BlockingResponseCallback) that provides support using a blocking queue. The callback is configured to receive a single message at a time by default. Therefore, each client interaction contains a single message (request) and a single response. You can change the size of the queue to make it possible to receive multiple messages.
To create a custom callback, implement the org.kie.server.client.jms.ResponseCallback interface.
Intelligent Process Server client is not thread-safe when switching response handlers. Change of a handler can affect all the threads which are using the same client instance. It is recommended to use separate client instances in case of dynamic changes of the handler. You can maintain a set of clients where each client uses a dedicated response handler. Depending on which handler is required, choose a respective client.
For example, having two clients, the first client (with the fire and forget pattern) can be used for starting processes and the second client (with the request reply pattern) can be used for querying user tasks.
Example 19.1. Global JMS Configuration
InitialContext context = ...;
Queue requestQueue = (Queue) context.lookup("jms/queue/KIE.SERVER.REQUEST");
Queue responseQueue = (Queue) context.lookup("jms/queue/KIE.SERVER.RESPONSE");
ConnectionFactory connectionFactory = (ConnectionFactory) context.lookup("jms/RemoteConnectionFactory");
KieServicesConfiguration jmsConfiguration = KieServicesFactory.newJMSConfiguration(connectionFactory, requestQueue, responseQueue, "user", "password");
// Set your response handler globally here.
jmsConfiguration.setResponseHandler(new FireAndForgetResponseHandler());Example 19.2. Per Client JMS Configuration
ProcessServiceClient processClient = client.getServicesClient(ProcessServicesClient.class);
// Change response handler for processClient. The other clients are not affected.
processClient.setResponseHandler(new FireAndForgetResponseHandler());
In case you are using asynchronous or fire and forget response handlers, you can turn on JMS transactions in KieServicesConfiguration. If you do so, use a transaction-aware connection factory: XAConnectionFactory.
JMS transactions are supported only on Red Hat JBoss Enterprise Application Platform. JMS transactions are not tested on Oracle WebLogic Server and IBM WebSphere Application Server.
19.2. Server Response
Service responses are represented by the org.kie.server.api.model.ServiceResponse<T> object, where T represents the payload type. It has the following attributes:
-
String message: returns the response message. -
ResponseType type: returns eitherSUCCESSorFAILURE. -
T result: returns the requested object.
Example 19.3. Hello World Server Response
import org.kie.server.api.model.ServiceResponse;
import org.kie.server.client.RuleServicesClient;
RuleServicesClient ruleClient = client.getServicesClient(RuleServicesClient.class);
ServiceResponse<ExecutionResults> response = ruleClient.executeCommandsWithResults(container, batchCommand);
// Retrieve result with identifier output-object
Object result = response.getResult().getValue("output-object");
A service response is retrieved only if you are using the request reply response handler. In case of asynchronous or fire and forget response handlers, all remote calls always return null.
19.3. Inserting and Executing Commands
To insert commands, use the org.kie.api.command.KieCommands class. To instantiate the KieCommands class, use org.kie.api.KieServices.get().getCommands(). If you want to add multiple commands, use the BatchExecutionCommand wrapper.
Example 19.4. Inserting and Executing Commands
import org.kie.api.command.Command;
import org.kie.api.command.KieCommands;
import org.kie.server.api.model.ServiceResponse;
import org.kie.server.client.RuleServicesClient;
import org.kie.server.client.KieServicesClient;
import org.kie.api.KieServices;
import java.util.Arrays;
...
public void executeCommands() {
String containerId = "hello";
System.out.println("== Sending commands to the server ==");
RuleServicesClient rulesClient =
kieServicesClient.getServicesClient(RuleServicesClient.class);
KieCommands commandsFactory = KieServices.Factory.get().getCommands();
Command<?> insert = commandsFactory.newInsert("Some String OBJ");
Command<?> fireAllRules = commandsFactory.newFireAllRules();
Command<?> batchCommand =
commandsFactory.newBatchExecution(Arrays.asList(insert, fireAllRules));
ServiceResponse<ExecutionResults> executeResponse =
rulesClient.executeCommandsWithResults(containerId, batchCommand);
if(executeResponse.getType() == ResponseType.SUCCESS) {
System.out.println("Commands executed with success!");
// Retrieve result with identifier output-object
Object result = executeResponse.getResult().getValue("output-object");
} else {
System.out.println("Error executing rules. Message: ");
System.out.println(executeResponse.getMsg());
}
}
Add the org.drools:drools-compiler dependency into your pom.xml file. See the Supported Components Versions section of Red Hat JBoss BPM Suite Installation Guide to add a correct version.
<dependency>
<groupId>org.drools-redhat</groupId>
<artifactId>drools-compiler</artifactId>
<version>6.5.0.Final-redhat-2</version>
</dependency>See Embedded jBPM Engine Dependencies for a list of further Maven dependencies.
19.4. Listing Server Capabilities
From version 6.2, Intelligent Process Server supports the business process execution. To find out server capabilities, use the org.kie.server.api.model.KieServerInfo object.
KieServicesClient requires the server capability information to correctly produce service clients (see Section 19.7, “Available Intelligent Process Server Clients”). You can specify the capabilities globally in KieServicesConfiguration, otherwise they are automatically retrieved from the server.
Regardless of which response handler is globally specified, KieServicesClient uses synchronous request response handler to retrieve the server capabilities. However, you cannot make synchronous calls when JMS transactions are enabled. To do so, you need to set the server capabilities in KieServicesConfiguration.
Example 19.5. Server Capabilities
public void listCapabilities() {
KieServerInfo serverInfo = kieServicesClient.getServerInfo().getResult();
System.out.print("Server capabilities:");
for (String capability : serverInfo.getCapabilities()) {
System.out.print(" " + capability);
}
System.out.println();
}19.5. Listing Containers
Containers are represented by the org.kie.server.api.model.KieContainerResource object. The list of resources is represented by the org.kie.server.api.model.KieContainerResourceList object.
Example 19.6. Print a List of Containers
public void listContainers() {
KieContainerResourceList containersList = kieServicesClient.listContainers().getResult();
List<KieContainerResource> kieContainers = containersList.getContainers();
System.out.println("Available containers: ");
for (KieContainerResource container : kieContainers) {
System.out.println("\t" + container.getContainerId() + " (" + container.getReleaseId() + ")");
}
}
When obtaining the list of containers, you can optionally filter the result using an instance of the org.kie.server.api.model.KieContainerResourceFilter class, which is passed to the org.kie.server.client.KieServicesClient.listContainers() method.
Example 19.7. Filter Containers in Java Client API
public void listContainersWithFilter() {
// The following filter will match only containers with the ReleaseId
// "org.example:container:1.0.0.Final" and status FAILED
KieContainerResourceFilter filter = new KieContainerResourceFilter.Builder()
.releaseId("org.example", "container", "1.0.0.Final")
.status(KieContainerStatus.FAILED)
.build();
// using previously created KieServicesClient....
KieContainerResourceList containersList = kieServicesClient.listContainers(filter).getResult();
List<KieContainerResource> kieContainers = containersList.getContainers();
System.out.println("Available containers: ");
for (KieContainerResource container : kieContainers) {
System.out.println("\t" + container.getContainerId() + " (" + container.getReleaseId() + ")");
}
}19.6. Handling Containers
You can use the Intelligent Process Server Java client to create and dispose containers. If you dispose a container, ServiceResponse will be returned with void payload. If you create a container, KieContainerResource object will be returned.
Disposing and Creating a Container
public void disposeAndCreateContainer() {
System.out.println("== Disposing and creating containers ==");
List<KieContainerResource> kieContainers = kieServicesClient.listContainers().getResult().getContainers();
if (kieContainers.size() == 0) {
System.out.println("No containers available...");
return;
}
KieContainerResource container = kieContainers.get(0);
String containerId = container.getContainerId();
ServiceResponse<Void> responseDispose = kieServicesClient.disposeContainer(containerId);
if (responseDispose.getType() == ResponseType.FAILURE) {
System.out.println("Error disposing " + containerId + ". Message: ");
System.out.println(responseDispose.getMsg());
return;
}
System.out.println("Success Disposing container " + containerId);
System.out.println("Trying to recreate the container...");
ServiceResponse<KieContainerResource> createResponse = kieServicesClient.createContainer(containerId, container);
if(createResponse.getType() == ResponseType.FAILURE) {
System.out.println("Error creating " + containerId + ". Message: ");
System.out.println(responseDispose.getMsg());
return;
}
System.out.println("Container recreated with success!");
}
A conversation between a client and a specific Intelligent Process Server container in a clustered environment is secured by a unique conversationID. The conversationID is transferred using the X-KIE-ConversationId REST header. If you update the container, unset the previous conversationID. Use KieServiesClient.completeConversation() to unset the conversationID for Java API.
19.7. Available Intelligent Process Server Clients
KieServicesClient serves also as an entry point for other clients with the ability to perform various operations, such as Red Hat JBoss BRMS commands and manage processes. Following services are available in the org.kie.server.client package:
- JobServicesClient is used to schedule, cancel, requeue, and get job requests.
- ProcessServicesClient is used to start, signal, and abort processes or work items.
- QueryServicesClient is used to query processes, process nodes, and process variables.
- RuleServicesClient is used to send commands to the server to perform rule-related operations (for example insert objects into the working memory, fire rules, …).
The org.kie.server.client.RuleServicesClient.executeCommands() API call was deprecated in version 6.3. The new org.kie.server.client.RuleServicesClient.executeCommandsWithResults() API returns execution results for objects that have been unmarshalled.
- UserTaskServicesClient is used to perform all user-task operations (start, claim, cancel a task) and query tasks by specified field (process instances id, user, …)
- UIServicesClient is used to get String representation of forms (XML or JSON) and of the process image (SVG).
- SolverServicesClient is used to perform all Business Resource Planner operations, such as getting the solver state and the best solution, or disposing of a solver.
The getServicesClient method provides access to any of these clients:
RuleServicesClient rulesClient = kieServicesClient.getServicesClient(RuleServicesClient.class);19.8. Listing Available Business Processes
Use QueryClient to list available process definitions. QueryClient methods use pagination, therefore in addition to the query you make, you must provide the current page and the number of results per page. In the provided example, the query starts on page 0 and lists the first 1000 results.
List Processes
public void listProcesses() {
System.out.println("== Listing Business Processes ==");
QueryServicesClient queryClient = kieServicesClient.getServicesClient(QueryServicesClient.class);
List<ProcessDefinition> findProcessesByContainerId = queryClient.findProcessesByContainerId("rewards", 0, 1000);
for (ProcessDefinition def : findProcessesByContainerId) {
System.out.println(def.getName() + " - " + def.getId() + " v" + def.getVersion());
}
}19.9. Starting a Business Processes
Use the ProcessServicesClient client to start your process. Ensure that any custom classes you require for your process are added into the KieServicesConfiguration object, using the addExtraClasses() method. To start a process using the Java Client API, see the following example:
import java.util.HashMap;
import java.util.HashSet;
import java.util.Map;
import java.util.Set;
import javax.xml.bind.JAXBContext;
import javax.xml.bind.JAXBException;
import javax.xml.bind.Marshaller;
import org.kie.server.api.marshalling.MarshallingFormat;
import org.kie.server.client.KieServicesClient;
import org.kie.server.client.KieServicesConfiguration;
import org.kie.server.client.KieServicesFactory;
import org.kie.server.client.ProcessServicesClient;
...
public static void startProcess() {
//Client configuration setup
KieServicesConfiguration config = KieServicesFactory.newRestConfiguration(SERVER_URL, LOGIN, PASSWORD);
//Add custom classes, such as Obj.class, to the configuration
Set<Class<?>> extraClassList = new HashSet<Class<?>>();
extraClassList.add(Obj.class);
config.addExtraClasses(extraClassList);
config.setMarshallingFormat(MarshallingFormat.JSON);
// ProcessServicesClient setup
KieServicesClient client = KieServicesFactory.newKieServicesClient(config);
ProcessServicesClient processServicesClient = client.getServicesClient(ProcessServicesClient.class);
// Create an instance of the custom class
Obj obj = new Obj();
obj.setOk("ok");
Map<String, Object> variables = new HashMap<String, Object>();
variables.put("test", obj);
// Start the process with custom class
processServicesClient.startProcess(CONTAINER, processId, variables);
}19.10. QueryDefinition for Intelligent Process Server Using Java Client API
QueryDefinition is a feature used to execute advanced queries. For more information about advanced queries, see Section 16.7, “Advanced Queries for the Intelligent Process Server”. To register and execute query definitions using the Java Client API, see the following example:
Registering and Executing Query Definitions with QueryServicesClient
// client setup
KieServicesConfiguration conf = KieServicesFactory.newRestConfiguration(SERVER_URL, LOGIN, PASSWORD);
KieServicesClient client = KieServicesFactory.newKieServicesClient(conf);
// get the query services client
QueryServicesClient queryClient = client.getServicesClient(QueryServicesClient.class);
// building the query
QueryDefinition queryDefinition = QueryDefinition.builder().name(QUERY_NAME)
.expression("select * from Task t")
.source("java:jboss/datasources/ExampleDS")
.target("TASK").build();
// two queries cannot have the same name
queryClient.unregisterQuery(QUERY_NAME);
// register the query
queryClient.registerQuery(queryDefinition);
// execute the query with parameters: query name, mapping type (to map the fields to an object), page number, page size and return type
List<TaskInstance> query = queryClient.query(QUERY_NAME, QueryServicesClient.QUERY_MAP_TASK, 0, 100, TaskInstance.class);
// read the result
for (TaskInstance taskInstance : query) {
System.out.println(taskInstance);
}
Note that target instructs QueryService to apply default filters. Alternatively, you can set filter parameters manually. Target has the following values:
public enum Target {
PROCESS,
TASK,
BA_TASK,
PO_TASK,
JOBS,
CUSTOM;
}Part V. KIE
Chapter 20. Java APIs
Red Hat JBoss BRMS and Red Hat JBoss BPM Suite provide various Java APIs which enable you to embed runtime engines into your application.
It is recommended to use the services described in Section 20.3, “KIE Services”. These high-level APIs deal with low-level details and enable you to focus solely on business logic.
20.1. KIE API
The KIE (Knowledge Is Everything) API is used to load and execute business processes. To interact with the process engine—for example to start a process—you need to set up a session, which is used to communicate with the process engine. A session must have a reference to a knowledge base, which contains references to all the relevant process definitions and searches the definitions whenever necessary.
To create a session:
- First, create a knowledge base and load all the necessary process definitions. Process definitions can be loaded from various sources, such as the class path, file system, or a process repository.
- Instantiate a session.
Once a session is set, you can use the session to execute processes. Every time a process is started, a new process instance of that particular process defition is created. The process instance maintains its state throughout the process life cycle.
For example, to write an application that processes sales orders, define one or more process definitions that specify how the orders must be processed. When starting the application, create a knowledge base that contains the specified process definitions. Based on the knowledge base, instantiate a session such that each time a new sales order comes in, a new process instance is started for that sales order. The process instance then contains the state of the process for that specific sales request.
A knowledge base can be shared across sessions and is usually created once, at the start of the application. Knowledge bases can be dynamically changed, which allows you to add or remove processes at runtime.
It is possible to create more independent sessions or multiple sessions; for example, to separate all processes for one customer from processes for another customer, create an independent session for each one. For scalability reasons, multiple sessions can be used.
The Red Hat JBoss BPM Suite projects have a clear separation between the APIs users interact with and the actual implementation classes. The public API exposes most of the features that users can safely use, however, experienced users can still access internal classes. Keep in mind that the internal APIs may change in the future.
20.1.1. KIE Framework
In the Red Hat JBoss BPM Suite environment, the life cycle of KIE systems is divided into the following labels:
| Author | Knowledge authoring: creating DRLs, BPMN2 sources, decision tables, and class models. |
| Build | Building the authored knowledge into deployable units; kJARs. |
| Test | Testing the knowledge artifacts before they are deployed to the application. |
| Deploy | Deploying the artifacts to be used to a Maven repository. |
| Utilize | Loading of a kJAR exposed at runtime using a KIE container. A session, which the application can interact with, is created from the KIE Container. |
| Run | Interacting with a session using the KIE API. |
| Work | Interacting with a session using the user interface. |
| Manage | Managing any session or a KIE container. |
20.1.2. KIE Base
The KIE API enables you to create a knowledge base that includes all the process definitions that may need to be executed. To create a knowledge base, use KieHelper to load processes from various resources (for example, from the class path or from the file system), and then create a new knowledge base from that helper. The following code snippet shows how to manually create a simple knowledge base consisting of only one process definition, using a resource from the class path:
KieBase kBase = new KieHelper()
.addResource(ResourceFactory.newClassPathResource("MyProcess.bpmn"))
.build();
The code snippet above uses org.kie.internal.utils.KieHelper and org.kie.internal.io.ResourceFactory that are a part of the internal API. Using RuntimeManager is the recommended way of creating a knowledge base and a knowledge session.
KieBase or KiePackage serialization is not supported in Red Hat JBoss BPM Suite 6.4. For more information, see Is serialization of kbase/package supported in BRMS 6/BPM Suite 6/RHDM 7?.
The classes belonging to the internal API (org.kie.internal) are not supported because they are subject to change.
KieBase is a repository that contains all knowledge definitions of the application—rules, processes, forms, and data models—but does not contain any runtime data. Knowledge sessions are created based on a particular KieBase. While creating knowledge bases can be onerous, creating knowledge sessions is very light. Therefore, it is recommended to cache knowledge bases as much as possible to allow repeated session creation. The caching mechanism is automatically provided by KieContainer.
See the following KieBase attributes:
- name
The name which retrieves
KieBasefromKieContainer. This attribute is mandatory.Expand Default Value Admitted Values None
Any
- includes
A comma-separated list of other
KieBaseobjects contained in thiskmodule. TheKieBaseartifacts are included as well. A knowledge base can be contained in multiple KIE modules, assuming that it is declared as a dependency in thepom.xmlfile of the modules.Expand Default Value Admitted Values None
A comma-separated list
- packages
|By default, all artifacts (such as rules and processes) in the
resourcesdirectory are included into a knowledge base. This attribute enables you to limit the number of compiled artifacts. Only the packages belonging to the list specified in this attribute are compiled.Expand Default Value Admitted Values All
A comma-separated list
- default
|Defines whether a knowledge base is the default knowledge base for a module, and therefore it can be created from the KIE container without passing any name. Each module can have at most one default knowledge base.
Expand Default Value Admitted Values falsetrueorfalse- scope
The CDI bean scope that is set for the CDI bean representing the
KieBase, for exampleApplicationScoped,SessionScoped, orRequestScoped. See the CDI specification for more information about the CDI scope definition.The scope can be specified in two ways;
-
As
javax.enterprise.context.INTERFACE, for example. - As INTERFACE.
The
javax.enterprise.contextpackage is added automatically if no package is specified.Expand Default Value Admitted Values javax.enterprise.context.ApplicationScopedA name of an interface in the javax.enterprise.context package representing a valid CDI bean scope.
-
As
- equalsBehavior
Defines the behavior of Red Hat JBoss BRMS when a new fact is inserted into the working memory.
If set to
identity, a newFactHandleis always created unless the same object is already present in the working memory.If set to
equality, a newFactHandleis created only if the newly inserted object is not equal, according to itsequals()method, to an existing fact.Expand Default Value Admitted Values identityidentityorequality- eventProcessingMode
If set to
cloud,KieBasetreats events as normal facts.If set to
stream, temporal reasoning on events is allowed.See Section 7.6, “Temporal Operations” for more information.
Expand Default Value Admitted Values cloudcloudorstream
The following example shows how to update assets using the KieBase object:
import org.kie.api.KieBase;
import org.kie.api.KieServices;
import org.kie.api.runtime.KieSession;
import org.kie.api.runtime.KieSessionConfiguration;
// build kbase with the replace-version-1.bpmn process
KieBase kbase = KieServices.Factory.get().newKieClasspathContainer().getKieBase();
kbase.addKnowledgePackages(getProcessPackages("replace-version-1.bpmn"));
KieSession ksession = kbase.newStatefulKnowledgeSession();
try {
// start a replace-version-1.bpmn process instance
ksession.startProcess("com.sample.process", Collections.<String, Object>singletonMap("name", "process1"));
// add the replace-version-2.bpmn process and start its instance
kbase.addKnowledgePackages(getProcessPackages("replace-version-2.bpmn"));
ksession.startProcess("com.sample.process", Collections.<String, Object>singletonMap("name", "process2"));
// signal all processes in the session to continue (both instances finish)
ksession.signalEvent("continue", null);
} finally {
ksession.dispose();
}20.1.3. KIE Session
Once the knowledge base is loaded, create a session to interact with the engine. The session can then be used to start new processes and signal events. The following code snippet shows how to create a session and start a new process instance:
KieSession ksession = kbase.newKieSession();
ProcessInstance processInstance = ksession.startProcess("com.sample.MyProcess");
KieSession stores and executes runtime data. It is created from a knowledge base, or, more easily, directly from KieContainer if it is defined in the kmodule.xml file.
- name
A unique name of the
KieSessionused to fetchKieSessionfromKieContainer. This attribute is mandatory.Expand Default Value Admitted Values None
Any
- type
A session set to
statefulenables you to iteratively work with the working memory, while a session set tostatelessis used for a one-off execution of rules only.A stateless session stores a knowledge state. Therefore, a state is changed every time a new fact is added, updated, or deleted, as well as every time a rule is fired. An execution in a stateless session has no information about previous actions, for example rule fires.
Expand Default Value Admitted Values statefulstatefulorstateless- default
Defines whether the
KieSessionis the default one for a module, and therefore it can be created from KieContainer without passing any name to it. There can be at most one defaultKieSessionof each type in a module.Expand Default Value Admitted Values falsetrueorfalse- clockType
Defines whether event time stamps are determined by the system clock or by a pseudo clock controlled by the application. This clock is especially useful for unit testing temporal rules.
Expand Default Value Admitted Values realtimerealtimeorpseudo- beliefSystem
Defines a type of a belief system used by
KieSession. A belief system is a truth maintenance system. For more information, see Section 6.4, “Truth Maintenance”.A belief system tries to deduce the truth from knowledge (facts). For example, if a new fact is inserted based on another fact which is later removed from the engine, the system can determine that the newly inserted fact should be removed as well.
Expand Default Value Admitted Values simplesimple,jtms, ordefeasible
Alternatively, you can get a KIE session from the Runtime Manager:
import org.kie.api.runtime.KieSession;
import org.kie.api.runtime.manager.RuntimeEngine;
import org.kie.api.runtime.manager.RuntimeManager;
import org.kie.api.runtime.manager.RuntimeManagerFactory;
import org.kie.internal.runtime.manager.context.ProcessInstanceIdContext;
...
RuntimeManager manager =
RuntimeManagerFactory.Factory.get()
.newPerProcessInstanceRuntimeManager(environment);
RuntimeEngine runtime =
manager.getRuntimeEngine(
ProcessInstanceIdContext.get());
KieSession ksession = runtime.getKieSession();
// do something here, for example:
ksession.startProcess(“org.jbpm.hello”);
manager.disposeRuntimeEngine(engine);
manager.close();For Maven dependencies, see Embedded jBPM Engine Dependencies. For further information about the Runtime Manager, see Section 20.2, “Runtime Manager”.
20.1.3.1. Process Runtime Interface
The ProcessRuntime interface, which is extended by KieSession, defines methods for interacting with processes. See the interface below:
package org.kie.api.runtime.process;
interface ProcessRuntime {
/**
* Start a new process instance. The process (definition) that should
* be used is referenced by the given process ID.
*
* @param processId The ID of the process that should be started
* @return the ProcessInstance that represents the instance
* of the process that was started
*/
ProcessInstance startProcess(String processId);
/**
* Start a new process instance. The process (definition) that should
* be used is referenced by the given process id. Parameters can be passed
* to the process instance (as name-value pairs), and these will be set
* as variables of the process instance.
*
* @param processId the ID of the process that should be started
* @param parameters the process variables that should be set when
* starting the process instance
* @return the ProcessInstance that represents the instance
* of the process that was started
*/
ProcessInstance startProcess(String processId, Map<String, Object> parameters);
/**
* Signals the engine that an event has occurred. The type parameter defines
* which type of event and the event parameter can contain additional information
* related to the event. All process instances that are listening to this type
* of (external) event will be notified. For performance reasons, this type of event
* signaling should only be used if one process instance should be able to notify
* other process instances. For internal event within one process instance, use the
* signalEvent method that also include the processInstanceId of the process instance
* in question.
*
* @param type the type of event
* @param event the data associated with this event
*/
void signalEvent(String type, Object event);
/**
* Signals the process instance that an event has occurred. The type parameter defines
* which type of event and the event parameter can contain additional information
* related to the event. All node instances inside the given process instance that
* are listening to this type of (internal) event will be notified. Note that the event
* will only be processed inside the given process instance. All other process instances
* waiting for this type of event will not be notified.
*
* @param type the type of event
* @param event the data associated with this event
* @param processInstanceId the id of the process instance that should be signaled
*/
void signalEvent(String type, Object event, long processInstanceId);
/**
* Returns a collection of currently active process instances. Note that only process
* instances that are currently loaded and active inside the engine will be returned.
* When using persistence, it is likely not all running process instances will be loaded
* as their state will be stored persistently. It is recommended not to use this
* method to collect information about the state of your process instances but to use
* a history log for that purpose.
*
* @return a collection of process instances currently active in the session
*/
Collection<ProcessInstance> getProcessInstances();
/**
* Returns the process instance with the given id. Note that only active process instances
* will be returned. If a process instance has been completed already,
* this method will return null.
*
* @param id the id of the process instance
* @return the process instance with the given id or null if it cannot be found
*/
ProcessInstance getProcessInstance(long processInstanceId);
/**
* Aborts the process instance with the given id. If the process instance has been completed
* (or aborted), or the process instance cannot be found, this method will throw an
* IllegalArgumentException.
*
* @param id the id of the process instance
*/
void abortProcessInstance(long processInstanceId);
/**
* Returns the WorkItemManager related to this session. This can be used to
* register new WorkItemHandlers or to complete (or abort) WorkItems.
*
* @return the WorkItemManager related to this session
*/
WorkItemManager getWorkItemManager();
}20.1.3.2. Event Listeners
A knowledge session provides methods for registering and removing listeners.
The KieRuntimeEventManager interface is implemented by KieRuntime. KieRuntime provides two interfaces: RuleRuntimeEventManager and ProcessEventManager.
20.1.3.2.1. Process Event Listeners
Use the ProcessEventListener class to listen to process-related events, such as starting and completing processes, entering and leaving nodes, or changing values of process variables. An event object provides an access to related information, for example, what is the process and node instances linked to the event.
Use this API to register your own event listeners. See the methods of the ProcessEventListener interface:
package org.kie.api.event.process;
public interface ProcessEventListener {
void beforeProcessStarted(ProcessStartedEvent event);
void afterProcessStarted(ProcessStartedEvent event);
void beforeProcessCompleted(ProcessCompletedEvent event);
void afterProcessCompleted(ProcessCompletedEvent event);
void beforeNodeTriggered(ProcessNodeTriggeredEvent event);
void afterNodeTriggered(ProcessNodeTriggeredEvent event);
void beforeNodeLeft(ProcessNodeLeftEvent event);
void afterNodeLeft(ProcessNodeLeftEvent event);
void beforeVariableChanged(ProcessVariableChangedEvent event);
void afterVariableChanged(ProcessVariableChangedEvent event);
}
The before and after events follow the structure of a stack. For example, if a node is triggered as result of leaving a different node, ProcessNodeTriggeredEvent occurs in between the BeforeNodeLeftEvent and AfterNodeLeftEvent of the first node. Similarly, all the NodeTriggered and NodeLeft events that are a direct result of starting a process occur in between the beforeProcessStarted and afterProcessStarted events. This feature enables you to derive cause relationships between events more easily.
In general, to be notified when a particular event happens, consider only the before events, as they occur immediately before the event actually occurs. If you are considering only the after events, it may appear that the events arise in the wrong order. As the after events are executed in the same order as any items in a stack, these events are triggered only after all the events executed as a result of this event have already triggered. Use the after events to ensure that any process-related action has ended. For example, use the after event to be notified when starting of a particular process instance has ended.
Not all nodes always generate the NodeTriggered or NodeLeft events; depending on the type of a node, some nodes might only generate the NodeLeft events, or the NodeTriggered events.
Catching intermediate events is similar to generating the NodeLeft events, as they are not triggered by another node, but activated from outside. Similarly, throwing intermediate events is similar to generating the NodeTriggered events, as they have no outgoing connection.
20.1.3.2.2. Rule Event Listeners
The RuleRuntimeEventManager interface enables you to add and remove listeners to listen to the events for the working memory and the agenda.
The following code snippet shows how to declare a simple agenda listener and attach the listener to a session. The code prints the events after they fire.
Example 20.1. Adding AgendaEventListener
import org.kie.api.runtime.process.EventListener;
ksession.addEventListener(new DefaultAgendaEventListener() {
public void afterMatchFired(AfterMatchFiredEvent event) {
super.afterMatchFired(event);
System.out.println(event);
}
});
Red Hat JBoss BRMS also provides the DebugRuleRuntimeEventListener and DebugAgendaEventListener classes which implement each method of the RuleRuntimeEventListener interface with a debug print statement. To print all the working memory events, add a listener as shown below:
Example 20.2. Adding DebugRuleRuntimeEventListener
ksession.addEventListener(new DebugRuleRuntimeEventListener());
Each event implements the KieRuntimeEvent interface which can be used to retrieve KnowlegeRuntime, from which the event originated.
The supported events are as follows:
-
MatchCreatedEvent -
MatchCancelledEvent -
BeforeMatchFiredEvent -
AfterMatchFiredEvent -
AgendaGroupPushedEvent -
AgendaGroupPoppedEvent -
ObjectInsertEvent -
ObjectDeletedEvent -
ObjectUpdatedEvent -
ProcessCompletedEvent -
ProcessNodeLeftEvent -
ProcessNodeTriggeredEvent -
ProcessStartEvent
20.1.3.3. Loggers
Red Hat JBoss BPM Suite provides a listener for creating an audit log to the console or a file on the file system. You can use these logs for debugging purposes as it contains all the events occurring at runtime. Red Hat JBoss BPM Suite provides the following logger implementations:
- Console logger
-
This logger prints all the events to the console. The
KieServicesobject provides aKieRuntimeLoggerlogger that you can add to your session. When you create a console logger, pass the knowledge session as an argument. - File logger
- This logger writes all events to a file using an XML representation. You can use this log file in your IDE to generate a tree-based visualization of the events that occurs during execution. For the file logger, you need to provide a name.
- Threaded file logger
- As a file logger writes the events to disk only when closing the logger or when the number of events in the logger reaches a predefined level. You cannot use it when debugging processes at runtime. A threaded file logger writes the events to a file after a specified time interval, making it possible to use the logger to visualize the progress in real-time, while debugging processes. For the threaded file logger, you need to provide the interval (in milliseconds) after which the events must be saved. You must always close the logger at the end of your application.
See an example of using FileLogger logger:
Example 20.3. FileLogger
import org.kie.api.KieServices;
import org.kie.api.logger.KieRuntimeLogger;
...
KieRuntimeLogger logger = KieServices.Factory
.get().getLoggers().newFileLogger(ksession, "test");
// Add invocations to the process engine here,
// for example ksession.startProcess(processId);
...
logger.close();
KieRuntimeLogger uses the comprehensive event system in Red Hat JBoss BRMS to create an audit log that can be used to log the execution of an application for later inspection, using tools such as the Red Hat JBoss Developer Studio audit viewer.
20.1.3.4. Correlation Keys
When working with processes, you may require to assign a given process instance a business identifier for later reference without knowing the generated process instance ID. To provide such capabilities, Red Hat JBoss BPM Suite enables you to use the CorrelationKey interface that is composed of CorrelationProperties. CorrelationKey can have a single property describing it. Alternatively, CorrelationKey can be represented as multi-valued property set. Note that CorrelationKey is a unique identifier for an active process instance, and is not passed on to the subprocesses.
Correlation is usually used with long running processes and thus require persistence to be enabled in order to permanently store correlation information. Correlation capabilities are provided as part of the CorrelationAwareProcessRuntime interface.
The CorrelationAwareProcessRuntime interface exposes following methods:
package org.kie.internal.process;
interface CorrelationAwareProcessRuntime {
/**
* Start a new process instance. The process (definition) that should
* be used is referenced by the given process id. Parameters can be passed
* to the process instance (as name-value pairs), and these will be set
* as variables of the process instance.
*
* @param processId the id of the process that should be started
* @param correlationKey custom correlation key that can be used to identify process instance
* @param parameters the process variables that should be set
* when starting the process instance
* @return the ProcessInstance that represents the instance of the process that was started
*/
ProcessInstance startProcess(String processId, CorrelationKey correlationKey, Map<String, Object> parameters);
/**
* Creates a new process instance (but does not yet start it). The process
* (definition) that should be used is referenced by the given process id.
* Parameters can be passed to the process instance (as name-value pairs),
* and these will be set as variables of the process instance. You should only
* use this method if you need a reference to the process instance before actually
* starting it. Otherwise, use startProcess.
*
* @param processId the id of the process that should be started
* @param correlationKey custom correlation key that can be used to identify process instance
* @param parameters the process variables that should be set
* when creating the process instance
* @return the ProcessInstance that represents the instance of the process
* that was created (but not yet started)
*/
ProcessInstance createProcessInstance(String processId, CorrelationKey correlationKey, Map<String, Object> parameters);
/**
* Returns the process instance with the given correlationKey.
* Note that only active process instances will be returned.
* If a process instance has been completed already, this method will return null.
*
* @param correlationKey the custom correlation key assigned
* when process instance was created
* @return the process instance with the given id or null if it cannot be found
*/
ProcessInstance getProcessInstance(CorrelationKey correlationKey);
}You can create and use a correlation key with single or multiple properties. In case of correlation keys with multiple properties, it is not necessary that you know all parts of the correlation key in order to search for a process instance. Red Hat JBoss BPM Suite enables you to set a part of the correlation key properties and get a list of entities that match the properties. That is, you can search for process instances even with partial correlation keys.
For example, consider a scenario when you have a unique identifier customerId per customer. Each customer can have many applications (process instances) running simultaneously. To retrieve a list of all the currently running applications and choose to continue any one of them, use a correlation key with multiple properties (such as customerId and applicationId) and use only customerId to retrieve the entire list.
Red Hat JBoss BPM Suite runtime provides the operations to find single process instance by complete correlation key and many process instances by partial correlation key. The following methods of RuntimeDataService can be used (see Section 20.3.4, “Runtime Data Service”):
/**
* Returns active process instance description found for given correlation key
* if found otherwise null. At the same time it will
* fetch all active tasks (in status: Ready, Reserved, InProgress) to provide
* information what user task is keeping instance and who owns them
* (if were already claimed).
*
* @param correlationKey correlation key assigned to process instance
* @return Process instance information, in the form of
* a {@link ProcessInstanceDesc} instance.
*/
ProcessInstanceDesc getProcessInstanceByCorrelationKey(CorrelationKey correlationKey);
/**
* Returns process instances descriptions (regardless of their states)
* found for given correlation key if found otherwise empty list.
* This query uses 'like' to match correlation key so it allows to pass only partial keys,
* though matching is done based on 'starts with'.
*
* @param correlationKey correlation key assigned to process instance
* @return A list of {@link ProcessInstanceDesc} instances representing the process
* instances that match the given correlation key
*/
Collection<ProcessInstanceDesc> getProcessInstancesByCorrelationKey
(CorrelationKey correlationKey);20.1.3.5. Threads
Multi-threading is divided into technical and logical multi-threading.
- Technical multi-threading
- Occurs when multiple threads or processes are started on a computer.
- Logical multi-threading
- Occurs in a BPM process, for example after a process reaches a parallel gateway. The original process then splits into two processes that are executed in parallel.
The Red Hat JBoss BPM Suite engine supports logical multi-threading which is implemented using only one technical thread. The logical implementation was chosen because multiple technical threads need to communicate state information with each other, if they are working on the same process. While multi-threading provides performance benefits, the extra logic used to ensure the different threads work together well, means that this is not guaranteed. There is additional overhead of avoiding race conditions and deadlocks.
The Red Hat JBoss BPM Suite engine executes actions serially. For example, if a process encounters a parallel gateway, it sequentially triggers each of the outgoing branches, one after the other. This is possible since execution is usually instantaneous. As a result, you may not even notice this behaivor. Similarly, when the engine encounters a script task in a process, it synchronously executes that script and waits for it to complete before continuing execution.
For example, calling a Thread.sleep(…) method as a part of a script does not make the engine continue execution elsewhere, but blocks the engine thread during that period. The same principle applies to service tasks.
When a service task is reached in a process, the engine invokes the handler of the service synchronously. The engine waits for the completeWorkItem(…) method to return before continuing execution. It is important that your service handler executes your service asynchronously if its execution is not instantaneous. For example, a service task that invokes an external service. Since the delay in invoking the service remotely and waiting for the results can take too long, invoking this service asynchronously is advised. Asynchronous call invokes the service and notifies the engine later when the results are available. After invoking the service, the process engine continues execution of the process.
Human tasks are a typical example of a service that needs to be invoked asynchronously, as the engine does not have to wait until a human actor responds to the request. The human task handler only creates a new task when the human task node is triggered. The engine then is able to continue the execution of the process (if necessary) and the handler notifies the engine asynchronously when the user completes the task.
20.1.3.6. Globals
Globals are named objects that are visible to the engine differently from facts; changes in a global do not trigger reevaluation of rules. Globals are useful for providing static information, as an object offering services that are used in the RHS of a rule, or as a means to return objects from the rule engine. When you use a global on the LHS of a rule, make sure it is immutable, or, at least, do not expect changes to have any effect on the behavior of your rules.
A global must be declared as a Java object in a rules file:
global java.util.List list
With the Knowledge Base now aware of the global identifier and its type, it is now possible to call the ksession.setGlobal() method with the global’s name and an object, for any session, to associate the object with the global. Failure to declare the global type and identifier in DRL code will result in an exception being thrown from this call.
List list = new ArrayList();
ksession.setGlobal("list", list);
Set any global before it is used in the evaluation of a rule. Failure to do so results in a NullPointerException exception.
You can also initialize global variables while instantiating a process:
-
Define the variables as a
MapofStringandObjectvalues. Provide the map as a parameter to the
startProcess()method.Map<String, Object> params = new HashMap<String, Object>(); params.put("VARIABLE_NAME", "variable value"); ksession.startProcess("my.process.id", params);
To access your global variable, use the getVariable() method:
processInstance.getContextInstance().getVariable("globalStatus");20.1.4. KIE File System
You can define the a KIE base and a KIE session that belong to a KIE module programmatically instead of using definitions in the kmodule.xml file. The API also enables you to add the file that contains the KIE artifacts instead of automatically reading the files from the resources folder of your project. To add KIE artifacts manually, create a KieFileSystem object, which is a sort of virtual file system, and add all the resources contained in your project to it.
To use the KIE file system:
-
Create a
KieModuleModelinstance fromKieServices. -
Configure your
KieModuleModelinstance with the desired KIE base and KIE session. -
Convert your
KieModuleModelinstance into XML and add the XML toKieFileSystem.
This process is shown by the following example:
Example 20.4. Creating kmodule.xml Programmatically and Adding It to KieFileSystem
import org.kie.api.KieServices;
import org.kie.api.builder.model.KieModuleModel;
import org.kie.api.builder.model.KieBaseModel;
import org.kie.api.builder.model.KieSessionModel;
import org.kie.api.builder.KieFileSystem;
KieServices kieServices = KieServices.Factory.get();
KieModuleModel kieModuleModel = kieServices.newKieModuleModel();
KieBaseModel kieBaseModel1 = kieModuleModel.newKieBaseModel("KBase1")
.setDefault(true)
.setEqualsBehavior(EqualityBehaviorOption.EQUALITY)
.setEventProcessingMode(EventProcessingOption.STREAM);
KieSessionModel ksessionModel1 = kieBaseModel1.newKieSessionModel("KSession1")
.setDefault(true)
.setType(KieSessionModel.KieSessionType.STATEFUL)
.setClockType(ClockTypeOption.get("realtime"));
KieFileSystem kfs = kieServices.newKieFileSystem();
kfs.writeKModuleXML(kieModuleModel.toXML());
Add remaining KIE artifacts that you use in your project to your KieFileSystem instance. The artifacts must be in a Maven project file structure.
Example 20.5. Adding Kie Artifacts to KieFileSystem
import org.kie.api.builder.KieFileSystem;
KieFileSystem kfs = ...
kfs.write("src/main/resources/KBase1/ruleSet1.drl", stringContainingAValidDRL)
.write("src/main/resources/dtable.xls",
kieServices.getResources().newInputStreamResource(dtableFileStream));
The example above shows that it is possible to add the KIE artifacts both as a String variable and as Resource instance. The Resource instance can be created by the KieResources factory, also provided by the KieServices instance. The KieResources class provides factory methods to convert an InputStream, URL, and File objects, or a String representing a path of your file system to a Resource instance that can be managed by the KieFileSystem.
The type of Resource can be inferred from the extension of the name used to add it to the KieFileSystem instance. However, it is also possible not to follow the KIE conventions about file extensions and explicitly assign a ResourceType property to a Resource object as shown below:
Example 20.6. Creating and Adding Resource with Explicit Type
import org.kie.api.builder.KieFileSystem;
KieFileSystem kfs = ...
kfs.write("src/main/resources/myDrl.txt",
kieServices.getResources().newInputStreamResource(drlStream)
.setResourceType(ResourceType.DRL));
Add all the resources to your KieFileSystem instance and build it by passing the KieFileSystem instance to KieBuilder.
When you build KieFileSystem, the resulting KieModule is automatically added to the KieRepository singleton. KieRepository is a singleton acting as a repository for all the available KieModule instances.
20.1.5. KIE Module
Red Hat JBoss BRMS and Red Hat JBoss BPM Suite use Maven and align with Maven practices. A KIE project or a KIE module is a Maven project or a module with an additional metadata file META-INF/kmodule.xml. This file is a descriptor that selects resources to knowledge bases and configures sessions. There is also alternative XML support through Spring and OSGi BluePrints.
While Maven can build and package KIE resources, it does not provide validation at build time by default. A Maven plug-in, kie-maven-plugin, is recommended to get build time validation. The plug-in also generates many classes, making the runtime loading faster. See Section 20.1.7, “KIE Maven Plug-in” for more information about the kie-maven-plugin plug-in.
KIE uses default values to minimize the amount of required configuration; an empty kmodule.xml file is the simplest configuration. The kmodule.xml file is required, even if it is empty, as it is used for discovery of the JAR and its contents.
Maven can use the following commands:
-
mvn installto deploy a KIE module to the local machine, where all other applications on the local machine use it. -
mvn deployto push the KIE module to a remote Maven repository. Building the application will pull in the KIE module and populate the local Maven repository in the process.
JAR files and libraries can be deployed in one of two ways:
- Added to the class path, similar to a standard JAR in a Maven dependency listing
- Dynamically loaded at runtime.
KIE scans the class path to find all the JAR files with a kmodule.xml file in it. Each found JAR is represented by the KieModule interface. The terms class path KIE module and dynamic KIE module are used to refer to the two loading approaches. While dynamic modules support side by side versioning, class path modules do not. Once a module is on the class path, no other version may be loaded dynamically.
The kmodule.xml file enables you to define and configure one or more KIE bases. Additionally, you can create one or more KIE sessions from each KIE base, as shown in the following example. For more information about KieBase attributes, see Section 20.1.2, “KIE Base”. For more information about KieSession attributes, see Section 20.1.3, “KIE Session”.
Example 20.7. Sample kmodule.xml File
<kmodule xmlns:xsi="http://www.w3.org/2001/XMLSchema-instance" xmlns="http://www.drools.org/xsd/kmodule">
<kbase name="KBase1" default="true" eventProcessingMode="cloud" equalsBehavior="equality" declarativeAgenda="enabled" packages="org.domain.pkg1">
<ksession name="KSession1_1" type="stateful" default="true" />
<ksession name="KSession1_2" type="stateless" default="false" beliefSystem="jtms" />
</kbase>
<kbase name="KBase2" default="false" eventProcessingMode="stream" equalsBehavior="equality" declarativeAgenda="enabled" packages="org.domain.pkg2, org.domain.pkg3" includes="KBase1">
<ksession name="KSession2_1" type="stateful" default="false" clockType="realtime">
<fileLogger file="debugInfo" threaded="true" interval="10" />
<workItemHandlers>
<workItemHandler name="name" type="new org.domain.WorkItemHandler()" />
</workItemHandlers>
<listeners>
<ruleRuntimeEventListener type="org.domain.RuleRuntimeListener" />
<agendaEventListener type="org.domain.FirstAgendaListener" />
<agendaEventListener type="org.domain.SecondAgendaListener" />
<processEventListener type="org.domain.ProcessListener" />
</listeners>
</ksession>
</kbase>
</kmodule>
The example above defines two KIE bases. It is possible to instantiate a different number of KIE sessions from each KIE base. In this example, two KIE sessions are instantiated from the KBase1 KIE base, while only one KIE session from the second KIE base.
You can specify properties in the <configuration> element of the kmodule.xml file:
<kmodule>
...
<configuration>
<property key="drools.dialect.default" value="java"/>
...
</configuration>
...
</kmodule>See the list of supported properties:
- drools.dialect.default
-
Sets the default Drools dialect. Possible values are
javaandmvel. - drools.accumulate.function.FUNCTION
Links a class that implements an accumulate function to a specified function name, which allows to add custom accumulate functions into the engine. For example:
<property key="drools.accumulate.function.hyperMax" value="org.drools.custom.HyperMaxAccumulate"/>- drools.evaluator.EVALUATION
Links a class that implements an evaluator definition to a specified evaluator name, which allows to add custom evaluators into the engine. Evaluator is similar to a custom operator. For example:
<property key="drools.evaluator.soundslike" value="org.drools.core.base.evaluators.SoundslikeEvaluatorsDefinition"/>- drools.dump.dir
-
Sets a path to the Drools
dump/logdirectory. - drools.defaultPackageName
- Sets the default package.
- drools.parser.processStringEscapes
-
Sets the String escape function. Possible values are
trueandfalse. If set tofalse, the\ncharacter will not be interpreted as the newline character. The default value istrue. - drools.kbuilder.severity.SEVERITY
Sets the severity of problems in a knowledge definition. Possible severities are
duplicateRule,duplicateProcess, andduplicateFunction. Possible values are for exampleERRORandWARNING. The default value isINFO.When you build a KIE base, it uses this setting for reporting found problems. For example, if there are two function definitions in a DRL file with the same name and the property is set to the following, then building KIE base throws an error.
<property key="drools.kbuilder.severity.duplicateFunction" value="ERROR"/>- drools.propertySpecific
-
Sets the property reactivity of the engine. Possible values are
DISABLED,ALLOWED, andALWAYS. - drools.lang.level
-
Sets the DRL language level. Possible values are
DRL5,DRL6, andDRL6_STRICT. The default value isDRL6_STRICT.
For more information about the kmodule.xml file, download the Red Hat JBoss BPM Suite 6.4.0 Source Distribution ZIP file from the Red Hat Customer Portal and see the kmodule.xsd XML schema located at FILE_HOME/jboss-bpmsuite-6.4.0.GA-sources/kie-api-parent-6.5.0.Final-redhat-2/kie-api/src/main/resources/org/kie/api/.
Since default values have been provided for all configuration aspects, the simplest kmodule.xml file can contain just an empty kmodule tag, such as:
Example 20.8. Empty kmodule.xml File
<?xml version="1.0" encoding="UTF-8"?>
<kmodule xmlns="http://www.drools.org/xsd/kmodule"/>In this way the KIE module will contain a single default KIE base. All KIE assets stored in the resources directory, or any directory in it, will be compiled and added to the default KIE base. To build the artifacts, it is sufficient to create a KIE container for them.
20.1.6. KIE Container
The following example shows how to build a KieContainer object that reads resources built from the class path:
Example 20.9. Creating KieContainer From Classpath
import org.kie.api.KieServices;
import org.kie.api.runtime.KieContainer;
KieServices kieServices = KieServices.Factory.get();
KieContainer kContainer = kieServices.getKieClasspathContainer();
After defining named KIE bases and sessions in the kmodule.xml file, you can retrieve KieBase and KieSession objects from KieContainer using their names. For example:
Example 20.10. Retrieving KieBases and KieSessions from KieContainer
import org.kie.api.KieServices;
import org.kie.api.runtime.KieContainer;
import org.kie.api.KieBase;
import org.kie.api.runtime.KieSession;
import org.kie.api.runtime.StatelessKieSession;
KieServices kieServices = KieServices.Factory.get();
KieContainer kContainer = kieServices.getKieClasspathContainer();
KieBase kBase1 = kContainer.getKieBase("KBase1");
KieSession kieSession1 = kContainer.newKieSession("KSession2_1");
StatelessKieSession kieSession2 = kContainer.newStatelessKieSession("KSession2_2");
Because KSession2_1 is stateful and KSession2_2 is stateless, the example uses different methods to create the two objects. Use method corresponding to the session type when creating a KIE session. Otherwise, KieContainer will throw a RuntimeException exception. Additionally, because kmodule.xml has default KieBase and KieSession definitions, you can instantiate them from KieContainer without invoking their name:
Example 20.11. Retrieving Default KieBases and KieSessions from KieContainer
import org.kie.api.runtime.KieContainer;
import org.kie.api.KieBase;
import org.kie.api.runtime.KieSession;
KieContainer kContainer = ...
KieBase kBase1 = kContainer.getKieBase(); // returns KBase1
KieSession kieSession1 = kContainer.newKieSession(); // returns KSession2_1
Because a KIE project is also a Maven project, the groupId, artifactId and version values declared in the pom.xml file are used to generate a ReleaseId object that uniquely identifies your project inside your application. You can create a new KieContainer from the project by passing its ReleaseId to the KieServices.
Example 20.12. Creating KieContainer of Existing Project by ReleaseId
import org.kie.api.KieServices;
import org.kie.api.builder.ReleaseId;
import org.kie.api.runtime.KieContainer;
KieServices kieServices = KieServices.Factory.get();
ReleaseId releaseId = kieServices.newReleaseId("org.acme", "myartifact", "1.0");
KieContainer kieContainer = kieServices.newKieContainer( releaseId );
Use the KieServices interface to access KIE building and runtime facilities.
The example shows how to compile all the Java sources and the KIE resources and deploy them into your KIE container, which makes its content available for use at runtime.
20.1.6.1. KIE Base Configuration
Sometimes, for instance in an OSGi environment, the KieBase object needs to resolve types that are not in the default class loader. To do so, create a KieBaseConfiguration instance with an additional class loader and pass it to KieContainer when creating a new KieBase object. For example:
Example 20.13. Creating a New KieBase with Custom Class Loader
import org.kie.api.KieServices;
import org.kie.api.KieServices.Factory;
import org.kie.api.KieBaseConfiguration;
import org.kie.api.KieBase;
import org.kie.api.runtime.KieContainer;
KieServices kieServices = KieServices.Factory.get();
KieBaseConfiguration kbaseConf = kieServices
.newKieBaseConfiguration( null, MyType.class.getClassLoader());
KieBase kbase = kieContainer.newKieBase(kbaseConf);
The KieBase object can create, and optionally keep references to, KieSession objects. When you modify KieBase, the modifications are applied against the data in the sessions. This reference is a weak reference and it is also optional, which is controlled by a boolean flag.
If you are using Oracle WebLogic Server, note how it finds and loads application class files at runtime. When using a non-exploded WAR deployment, Oracle WebLogic Server packs the contents of WEB-INF/classes into WEB-INF/lib/_wl_cls_gen.jar. Consequently, when you use KIE-Spring to create KieBase and KieSession from resources stored in WEB-INF/classes, KIE-Spring fails to locate these resources. For this reason, the recommended deployment method on Oracle WebLogic Server is to use the exploded archives contained within the product ZIP file.
20.1.7. KIE Maven Plug-in
The KIE Maven Plug-in validates and pre-compiles artifact resources. It is recommended that the plug-in is used at all times. To use the plug-in, add it to the build section of your Maven pom.xml file:
Example 20.14. Adding KIE Plug-in to Maven pom.xml
<build>
<plugins>
<plugin>
<groupId>org.kie</groupId>
<artifactId>kie-maven-plugin</artifactId>
<version>${project.version}</version>
<extensions>true</extensions>
</plugin>
</plugins>
</build>For the supported Maven artifact version, see Supported Component Versions of the Red Hat JBoss BPM Suite Installation Guide.
The kie-maven-plugin artifact requires Maven version 3.1.1 or above due to the migration of sonatype-aether to eclipse-aether. Aether implementation on Sonatype is no longer maintained and supported. As the eclipse-aether requires Maven version 3.1.1 or above, the kie-maven-plugin requires it too.
Building a KIE module without the Maven plugin copies all the resources into the resulting JAR file. When the JAR file is loaded at runtime, all the resources are built. In case of compilation issues, it returns a null KieContainer. It also pushes the compilation overhead to the runtime. To prevent these issues, it is recommended that you use the Maven plugin.
For compiling decision tables and processes, add their dependencies to project dependencies (as compile scope) or as plugin dependencies. For decision tables the dependency is org.drools:drools-decisiontables and for processes org.jbpm:jbpm-bpmn2.
20.1.8. KIE Repository
When you build the content of KieFileSystem, the resulting KieModule is automatically added to KieRepository. KieRepository is a singleton acting as a repository for all the available KIE modules.
After this, you can create a new KieContainer for the KieModule using its ReleaseId identifier. However, because KieFileSystem does not contain pom.xml file (it is possible to add pom.xml using the KieFileSystem.writePomXML method), KIE cannot determine the ReleaseId of the KieModule. Consequently, it assigns a default ReleaseId to the module. The default ReleaseId can be obtained from the KieRepository and used to identify the KieModule inside the KieRepository itself.
The following example shows this process.
Example 20.15. Building Content of KieFileSystem and Creating KieContainer
import org.kie.api.KieServices;
import org.kie.api.KieServices.Factory;
import org.kie.api.builder.KieFileSystem;
import org.kie.api.builder.KieBuilder;
import org.kie.api.runtime.KieContainer;
KieServices kieServices = KieServices.Factory.get();
KieFileSystem kfs = ...
kieServices.newKieBuilder( kfs ).buildAll();
KieContainer kieContainer = kieServices
.newKieContainer(kieServices.getRepository().getDefaultReleaseId());
At this point, you can get KIE bases and create new KIE sessions from this KieContainer in the same way as in the case of a KieContainer created directly from the class path.
It is a best practice to check the compilation results. The KieBuilder reports compilation results of three different severities:
- ERROR
- WARNING
- INFO
An ERROR indicates that the compilation of the project failed, no KieModule is produced, and nothing is added to the KieRepository singleton. WARNING and INFO results can be ignored, but are available for inspection.
Example 20.16. Checking that Compilation Did Not Produce Any Error
import org.kie.api.builder.KieBuilder;
import org.kie.api.KieServices;
KieBuilder kieBuilder = kieServices.newKieBuilder( kfs ).buildAll();
assertEquals(0, kieBuilder.getResults().getMessages(Message.Level.ERROR).size());20.1.9. KIE Scanner
The KIE Scanner continuously monitors your Maven repository to check for a new release of your KIE project. A new release is deployed in the KieContainer wrapping that project. The use of the KieScanner requires kie-ci.jar to be on the class path.
Avoid using a KIE scanner with business processes. Using a KIE scanner with processes can lead to unforeseen updates that can then cause errors in long-running processes when changes are not compatible with running process instances.
A KieScanner can be registered on a KieContainer as in the following example.
Example 20.17. Registering and Starting KieScanner on KieContainer
import org.kie.api.KieServices;
import org.kie.api.builder.ReleaseId;
import org.kie.api.runtime.KieContainer;
import org.kie.api.builder.KieScanner;
...
KieServices kieServices = KieServices.Factory.get();
ReleaseId releaseId = kieServices
.newReleaseId("org.acme", "myartifact", "1.0-SNAPSHOT");
KieContainer kContainer = kieServices.newKieContainer(releaseId);
KieScanner kScanner = kieServices.newKieScanner(kContainer);
// Start the KieScanner polling the Maven repository every 10 seconds:
kScanner.start(10000L);
In this example the KieScanner is configured to run with a fixed time interval, but it is also possible to run it on demand by invoking the scanNow() method on it. If the KieScanner finds in the Maven repository an updated version of the KIE project used by KieContainer for which it is configured, the KieScanner automatically downloads the new version and triggers an incremental build of the new project. From this moment all the new KieBase and KieSession objects created from the KieContainer will use the new project version.
Since KieScanner relies on Maven, Maven should be configured with the correct updatePolicy of always as shown in the following example:
<profile>
<id>guvnor-m2-repo</id>
<repositories>
<repository>
<id>guvnor-m2-repo</id>
<name>BRMS Repository</name>
<url>http://10.10.10.10:8080/business-central/maven2/</url>
<layout>default</layout>
<releases>
<enabled>true</enabled>
<updatePolicy>always</updatePolicy>
</releases>
<snapshots>
<enabled>true</enabled>
<updatePolicy>always</updatePolicy>
</snapshots>
</repository>
</repositories>
</profile>20.1.10. Command Executor
The CommandExecutor interface enables commands to be executed on both stateful and stateless KIE sessions. The stateless KIE session executes fireAllRules() at the end before disposing the session.
SetGlobalCommand and GetGlobalCommand are two commands relevant to Red Hat JBoss BRMS. SetGlobalCommand calls setGlobal method on a KIE session.
The optional Boolean indicates whether the command should return the value of the global as a part of the ExecutionResults. If true it uses the same name as the global name. A String can be used instead of the Boolean, if an alternative name is desired.
Example 20.18. Set Global Command
import org.kie.api.runtime.StatelessKieSession;
import org.kie.api.runtime.ExecutionResults;
StatelessKieSession ksession = kbase.newStatelessKieSession();
ExecutionResults results = ksession.execute
(CommandFactory.newSetGlobal("stilton", new Cheese("stilton"), true));
Cheese stilton = results.getValue("stilton");Example 20.19. Get Global Command
import org.kie.api.runtime.StatelessKieSession;
import org.kie.api.runtime.ExecutionResults;
StatelessKieSession ksession = kbase.newStatelessKieSession();
ExecutionResults results =
ksession.execute(CommandFactory.getGlobal("stilton"));
Cheese stilton = results.getValue("stilton");
All the above examples execute single commands. The BatchExecution represents a composite command, created from a list of commands. The execution engine will iterate over the list and execute each command in turn. This means you can insert objects, start a process, call fireAllRules, and execute a query in a single execute(…) call.
The StatelessKieSession session will execute fireAllRules() automatically at the end. The FireAllRules command is allowed even for the stateless session, because using it disables the automatic execution at the end. It is similar to manually overriding the function.
Any command in the batch that has an out identifier set will add its results to the returned ExecutionResults instance.
Example 20.20. BatchExecution Command
import org.kie.api.runtime.StatelessKieSession;
import org.kie.api.runtime.ExecutionResults;
StatelessKieSession ksession = kbase.newStatelessKieSession();
List cmds = new ArrayList();
cmds.add(CommandFactory.newInsertObject(new Cheese("stilton", 1), "stilton"));
cmds.add(CommandFactory.newStartProcess("process cheeses"));
cmds.add(CommandFactory.newQuery("cheeses"));
ExecutionResults results = ksession.execute(CommandFactory.newBatchExecution(cmds));
Cheese stilton = (Cheese) results.getValue("stilton");
QueryResults qresults = (QueryResults) results.getValue("cheeses");
In the example above, multiple commands are executed, two of which populate the ExecutionResults. The query command uses the same identifier as the query name by default, but you can map it to a different identifier.
All commands support XML (using XStream or JAXB marshallers) and JSON marshalling. For more information, see Section 20.1.10.1, “Marshalling”.
20.1.10.1. Marshalling
XML marshalling and unmarshalling of the JBoss BRMS Commands requires the use of special classes. This section describes these classes.
20.1.10.1.1. XStream
To use the XStream commands marshaller, you need to use the DroolsHelperProvider to obtain an XStream instance. It is required because it has the commands converters registered. Also ensure that the drools-compiler library is present on the classpath.
BatchExecutionHelper.newXStreamMarshaller().toXML(command);BatchExecutionHelper.newXStreamMarshaller().fromXML(xml);
The fully-qualified class name of the BatchExecutionHelper class is org.kie.internal.runtime.helper.BatchExecutionHelper.
JSON
JSON API to marshalling/unmarshalling is similar to XStream API:
BatchExecutionHelper.newJSonMarshaller().toXML(command);BatchExecutionHelper.newJSonMarshaller().fromXML(xml);JAXB
There are two options for using JAXB. You can define your model in an XSD file or have a POJO model. In both cases you have to declare your model inside JAXBContext. In order to do this, you need to use Drools Helper classes. Once you have the JAXBContext, you need to create the Unmarshaller/Marshaller as needed.
XSD File
With your model defined in a XSD file, you need to have a KBase that has your XSD model added as a resource.
To do this, add the XSD file as a XSD ResourceType into the KBase. Finally you can create the JAXBContext using the KBase (created with the KnowledgeBuilder). Ensure that the drools-compiler and jaxb-xjc libraries are present on the classpath.
import org.kie.api.conf.Option;
import org.kie.api.KieBase;
Options xjcOpts = new Options();
xjcOpts.setSchemaLanguage(Language.XMLSCHEMA);
JaxbConfiguration jaxbConfiguration =
KnowledgeBuilderFactory.newJaxbConfiguration( xjcOpts, "xsd");
kbuilder.add
(ResourceFactory.newClassPathResource
("person.xsd", getClass()), ResourceType.XSD, jaxbConfiguration);
KieBase kbase = kbuilder.newKnowledgeBase();
List<String> classesName = new ArrayList<String>();
classesName.add("org.drools.compiler.test.Person");
JAXBContext jaxbContext = KnowledgeBuilderHelper
.newJAXBContext(classesName.toArray(new String[classesName.size()]), kbase);Using POJO Model
Use DroolsJaxbHelperProviderImpl to create the JAXBContext. DroolsJaxbHelperProviderImpl.createDroolsJaxbContext() has two parameters:
- classNames
- A list with the canonical name of the classes that you want to use in the marshalling/unmarshalling process.
- properties
- JAXB custom properties.
List<String> classNames = new ArrayList<String>();
classNames.add("org.drools.compiler.test.Person");
JAXBContext jaxbContext = DroolsJaxbHelperProviderImpl
.createDroolsJaxbContext(classNames, null);
Marshaller marshaller = jaxbContext.createMarshaller();
Ensure that the drools-compiler and jaxb-xjc libraries are present on the classpath. The fully-qualified class name of the DroolsJaxbHelperProviderImpl class is org.drools.compiler.runtime.pipeline.impl.DroolsJaxbHelperProviderImpl.
20.1.10.2. Supported Commands
Red Hat JBoss BRMS supports the following list of commands:
-
BatchExecutionCommand -
InsertObjectCommand -
RetractCommand -
ModifyCommand -
GetObjectCommand -
InsertElementsCommand -
FireAllRulesCommand -
StartProcessCommand -
SignalEventCommand -
CompleteWorkItemCommand -
AbortWorkItemCommand -
QueryCommand -
SetGlobalCommand -
GetGlobalCommand -
GetObjectsCommand
The code snippets provided in the examples for these commands use a POJO org.drools.compiler.test.Person with the following fields:
-
name: String -
age: Integer
20.1.10.2.1. BatchExecutionCommand
The BatchExecutionCommand command wraps multiple commands to be executed together. It has the following attributes:
| Name | Description | Required |
|---|---|---|
|
| Sets the knowledge session ID on which the commands are going to be executed. |
|
|
| List of commands to be executed. |
|
Creating BatchExecutionCommand
BatchExecutionCommand command = new BatchExecutionCommand();
command.setLookup("ksession1");
InsertObjectCommand insertObjectCommand = new InsertObjectCommand(new Person("john", 25));
FireAllRulesCommand fireAllRulesCommand = new FireAllRulesCommand();
command.getCommands().add(insertObjectCommand);
command.getCommands().add(fireAllRulesCommand);
ksession.execute(command);XML Output
XStream:
<batch-execution lookup="ksession1">
<insert>
<org.drools.compiler.test.Person>
<name>john</name>
<age>25</age>
</org.drools.compiler.test.Person>
</insert>
<fire-all-rules/>
</batch-execution>JSON:
{"batch-execution":{"lookup":"ksession1","commands":[{"insert":{"object":{"org.drools.compiler.test.Person":{"name":"john","age":25}}}},{"fire-all-rules":""}]}}JAXB:
<?xml version="1.0" encoding="UTF-8" standalone="yes"?>
<batch-execution lookup="ksession1">
<insert>
<object xsi:type="person" xmlns:xsi="http://www.w3.org/2001/XMLSchema-instance">
<age>25</age>
<name>john</name>
</object>
</insert>
<fire-all-rules max="-1"/>
</batch-execution>20.1.10.2.2. InsertObjectCommand
The InsertObjectCommand command is used to insert an object in the knowledge session. It has the following attributes:
| Name | Description | Required |
|---|---|---|
|
| The object to be inserted. |
|
|
| ID to identify the FactHandle created in the object insertion and added to the execution results. |
|
|
|
Boolean to establish if the object must be returned in the execution results. Default value is |
|
|
| Entrypoint for the insertion. |
|
Creating InsertObjectCommand
Command insertObjectCommand =
CommandFactory.newInsert(new Person("john", 25), "john", false, null);
ksession.execute(insertObjectCommand);XML Output
XStream:
<insert out-identifier="john" entry-point="my stream" return-object="false">
<org.drools.compiler.test.Person>
<name>john</name>
<age>25</age>
</org.drools.compiler.test.Person>
</insert>JSON:
{
"insert": {
"entry-point": "my stream",
"object": {
"org.drools.compiler.test.Person": {
"age": 25,
"name": "john"
}
},
"out-identifier": "john",
"return-object": false
}
}JAXB:
<?xml version="1.0" encoding="UTF-8" standalone="yes"?>
<insert out-identifier="john" entry-point="my stream" >
<object xsi:type="person" xmlns:xsi="http://www.w3.org/2001/XMLSchema-instance">
<age>25</age>
<name>john</name>
</object>
</insert>20.1.10.2.3. RetractCommand
The RetractCommand command is used to retract an object from the knowledge session. It has the following attributes:
| Name | Description | Required |
|---|---|---|
|
| The FactHandle associated to the object to be retracted. |
|
Creating RetractCommand
There are two ways to create RetractCommand. You can either create the Fact Handle from a string, with the same output result as shown below:
RetractCommand retractCommand = new RetractCommand();
retractCommand.setFactHandleFromString("123:234:345:456:567");Or set the Fact Handle that you received when the object was inserted, as shown below:
RetractCommand retractCommand = new RetractCommand(factHandle);XML Output
XStream:
<retract fact-handle="0:234:345:456:567"/>JSON:
{
"retract": {
"fact-handle": "0:234:345:456:567"
}
}JAXB:
<?xml version="1.0" encoding="UTF-8" standalone="yes"?>
<retract fact-handle="0:234:345:456:567"/>20.1.10.2.4. ModifyCommand
The ModifyCommand command allows you to modify a previously inserted object in the knowledge session. It has the following attributes:
| Name | Description | Required |
|---|---|---|
|
|
The |
|
|
| List of setters object’s modifications. |
|
Creating ModifyCommand
ModifyCommand modifyCommand = new ModifyCommand();
modifyCommand.setFactHandleFromString("123:234:345:456:567");
List<Setter> setters = new ArrayList<Setter>();
setters.add(new SetterImpl("age", "30"));
modifyCommand.setSetters(setters);XML Output
XStream:
<modify fact-handle="0:234:345:456:567">
<set accessor="age" value="30"/>
</modify>JSON:
{
"modify": {
"fact-handle": "0:234:345:456:567",
"setters": {
"accessor": "age",
"value": 30
}
}
}JAXB:
<?xml version="1.0" encoding="UTF-8" standalone="yes"?>
<modify fact-handle="0:234:345:456:567">
<set value="30" accessor="age"/>
</modify>20.1.10.2.5. GetObjectCommand
The GetObjectCommand command is used to get an object from a knowledge session. It has the following attributes:
| Name | Description | Required |
|---|---|---|
|
|
The |
|
|
|
ID to identify the |
|
Creating GetObjectCommand
GetObjectCommand getObjectCommand = new GetObjectCommand();
getObjectCommand.setFactHandleFromString("123:234:345:456:567");
getObjectCommand.setOutIdentifier("john");XML Output
XStream:
<get-object fact-handle="0:234:345:456:567" out-identifier="john"/>JSON:
{
"get-object": {
"fact-handle": "0:234:345:456:567",
"out-identifier": "john"
}
}JAXB:
<?xml version="1.0" encoding="UTF-8" standalone="yes"?>
<get-object out-identifier="john" fact-handle="0:234:345:456:567"/>20.1.10.2.6. InsertElementsCommand
The InsertElementsCommand command is used to insert a list of objects. It has the following attributes:
| Name | Description | Required |
|---|---|---|
|
| The list of objects to be inserted on the knowledge session. |
|
|
|
ID to identify the |
|
|
|
Boolean to establish if the object must be returned in the execution results. Default value: |
|
|
| Entrypoint for the insertion. |
|
Creating InsertElementsCommand
List<Object> objects = new ArrayList<Object>();
objects.add(new Person("john", 25));
objects.add(new Person("sarah", 35));
Command insertElementsCommand = CommandFactory.newInsertElements(objects);XML Output
XStream:
<insert-elements>
<org.drools.compiler.test.Person>
<name>john</name>
<age>25</age>
</org.drools.compiler.test.Person>
<org.drools.compiler.test.Person>
<name>sarah</name>
<age>35</age>
</org.drools.compiler.test.Person>
</insert-elements>JSON:
{
"insert-elements": {
"objects": [
{
"containedObject": {
"@class": "org.drools.compiler.test.Person",
"age": 25,
"name": "john"
}
},
{
"containedObject": {
"@class": "Person",
"age": 35,
"name": "sarah"
}
}
]
}
}JAXB:
<?xml version="1.0" encoding="UTF-8" standalone="yes"?>
<insert-elements return-objects="true">
<list>
<element xsi:type="person" xmlns:xsi="http://www.w3.org/2001/XMLSchema-instance">
<age>25</age>
<name>john</name>
</element>
<element xsi:type="person" xmlns:xsi="http://www.w3.org/2001/XMLSchema-instance">
<age>35</age>
<name>sarah</name>
</element>
<list>
</insert-elements>20.1.10.2.7. FireAllRulesCommand
The FireAllRulesCommand command is used to allow execution of the rules activations created. It has the following attributes:
| Name | Description | Required |
|---|---|---|
|
|
The maximum number of rules activations to be executed. default is |
|
|
| Add the number of rules activations fired on the execution results. |
|
|
| Allow the rules execution using an Agenda Filter. |
|
Creating FireAllRulesCommand
FireAllRulesCommand fireAllRulesCommand = new FireAllRulesCommand();
fireAllRulesCommand.setMax(10);
fireAllRulesCommand.setOutIdentifier("firedActivations");XML Output
XStream:
<fire-all-rules max="10" out-identifier="firedActivations"/>JSON:
{
"fire-all-rules": {
"max": 10,
"out-identifier": "firedActivations"
}
}JAXB:
<?xml version="1.0" encoding="UTF-8" standalone="yes"?>
<fire-all-rules out-identifier="firedActivations" max="10"/>20.1.10.2.8. StartProcessCommand
The StartProcessCommand command allows you to start a process using the ID. Additionally, you can pass parameters and initial data to be inserted. It has the following attributes:
| Name | Description | Required |
|---|---|---|
|
| The ID of the process to be started. |
|
|
| A Map <String>, <Object> to pass parameters in the process startup. |
|
|
| A list of objects to be inserted in the knowledge session before the process startup. |
|
Creating StartProcessCommand
StartProcessCommand startProcessCommand = new StartProcessCommand();
startProcessCommand.setProcessId("org.drools.task.processOne");XML Output
XStream:
<start-process processId="org.drools.task.processOne"/>JSON:
{
"start-process": {
"process-id": "org.drools.task.processOne"
}
}JAXB:
<?xml version="1.0" encoding="UTF-8" standalone="yes"?>
<start-process processId="org.drools.task.processOne">
<parameter/>
</start-process>20.1.10.2.9. SignalEventCommand
The SignalEventCommand command is used to send a signal event. It has the following attributes:
| Name | Description | Required |
|---|---|---|
|
| The type of the incoming event. |
|
|
| The ID of the process instance to be signalled. |
|
|
| The data of the incoming event. |
|
Creating SignalEventCommand
SignalEventCommand signalEventCommand = new SignalEventCommand();
signalEventCommand.setProcessInstanceId(1001);
signalEventCommand.setEventType("start");
signalEventCommand.setEvent(new Person("john", 25));XML Output
XStream:
<signal-event process-instance-id="1001" event-type="start">
<org.drools.pipeline.camel.Person>
<name>john</name>
<age>25</age>
</org.drools.pipeline.camel.Person>
</signal-event>JSON:
{
"signal-event": {
"@event-type": "start",
"event-type": "start",
"object": {
"org.drools.pipeline.camel.Person": {
"age": 25,
"name": "john"
}
},
"process-instance-id": 1001
}
}JAXB:
<?xml version="1.0" encoding="UTF-8" standalone="yes"?>
<signal-event event-type="start" process-instance-id="1001">
<event xsi:type="person" xmlns:xsi="http://www.w3.org/2001/XMLSchema-instance">
<age>25</age>
<name>john</name>
</event>
</signal-event>20.1.10.2.10. CompleteWorkItemCommand
The CompleteWorkItemCommand command allows you to complete a WorkItem. It has the following attributes:
| Name | Description | Required |
|---|---|---|
|
| The ID of the WorkItem to be completed. |
|
|
| The result of the WorkItem. |
|
Creating CompleteWorkItemCommand
CompleteWorkItemCommand completeWorkItemCommand = new CompleteWorkItemCommand();
completeWorkItemCommand.setWorkItemId(1001);XML Output
XStream:
<complete-work-item id="1001"/>JSON:
{
"complete-work-item": {
"id": 1001
}
}JAXB:
<?xml version="1.0" encoding="UTF-8" standalone="yes"?>
<complete-work-item id="1001"/>20.1.10.2.11. AbortWorkItemCommand
The AbortWorkItemCommand command enables you to abort a work item the same way as ksession.getWorkItemManager().abortWorkItem(workItemId). It has the following attributes:
| Name | Description | Required |
|---|---|---|
|
| The ID of the WorkItem to be aborted. |
|
Creating AbortWorkItemCommand
AbortWorkItemCommand abortWorkItemCommand = new AbortWorkItemCommand();
abortWorkItemCommand.setWorkItemId(1001);XML Output
XStream:
<abort-work-item id="1001"/>JSON:
{
"abort-work-item": {
"id": 1001
}
}JAXB:
<?xml version="1.0" encoding="UTF-8" standalone="yes"?>
<abort-work-item id="1001"/>20.1.10.2.12. QueryCommand
The QueryCommand command executes a query defined in the knowledge base. It has the following attributes:
| Name | Description | Required |
|---|---|---|
|
| The query name. |
|
|
| The identifier of the query results. The query results are going to be added in the execution results with this identifier. |
|
|
| A list of objects to be passed as a query parameter. |
|
Creating QueryCommand
QueryCommand queryCommand = new QueryCommand();
queryCommand.setName("persons");
queryCommand.setOutIdentifier("persons");XML Output
XStream:
<query out-identifier="persons" name="persons"/>JSON:
{
"query": {
"name": "persons",
"out-identifier": "persons"
}
}JAXB:
<?xml version="1.0" encoding="UTF-8" standalone="yes"?>
<query name="persons" out-identifier="persons"/>20.1.10.2.13. SetGlobalCommand
The SetGlobalCommand command enables you to set an object to global state. It has the following attributes:
| Name | Description | Required |
|---|---|---|
|
| The identifier of the global defined in the knowledge base. |
|
|
| The object to be set into the global. |
|
|
| A boolean to exclude the global you set from the execution results. |
|
|
| The identifier of the global execution result. |
|
Creating SetGlobalCommand
SetGlobalCommand setGlobalCommand = new SetGlobalCommand();
setGlobalCommand.setIdentifier("helper");
setGlobalCommand.setObject(new Person("kyle", 30));
setGlobalCommand.setOut(true);
setGlobalCommand.setOutIdentifier("output");XML Output
XStream:
<set-global identifier="helper" out-identifier="output">
<org.drools.compiler.test.Person>
<name>kyle</name>
<age>30</age>
</org.drools.compiler.test.Person>
</set-global>JSON:
{
"set-global": {
"identifier": "helper",
"object": {
"org.drools.compiler.test.Person": {
"age": 30,
"name": "kyle"
}
},
"out-identifier": "output"
}
}JAXB:
<?xml version="1.0" encoding="UTF-8" standalone="yes"?>
<set-global out="true" out-identifier="output" identifier="helper">
<object xsi:type="person" xmlns:xsi="http://www.w3.org/2001/XMLSchema-instance">
<age>30</age>
<name>kyle</name>
</object>
</set-global>20.1.10.2.14. GetGlobalCommand
The GetGlobalCommand command allows you to get a previously defined global object. It has the following attributes:
| Name | Description | Required |
|---|---|---|
|
| The identifier of the global defined in the knowledge base. |
|
|
| The identifier to be used in the execution results. |
|
Creating GetGlobalCommand
GetGlobalCommand getGlobalCommand = new GetGlobalCommand();
getGlobalCommand.setIdentifier("helper");
getGlobalCommand.setOutIdentifier("helperOutput");XML Output
XStream:
<get-global identifier="helper" out-identifier="helperOutput"/>JSON:
{
"get-global": {
"identifier": "helper",
"out-identifier": "helperOutput"
}
}JAXB:
<?xml version="1.0" encoding="UTF-8" standalone="yes"?>
<get-global out-identifier="helperOutput" identifier="helper"/>20.1.10.2.15. GetObjectsCommand
The GetObjectsCommand command returns all the objects from the current session as a Collection. It has the following attributes:
| Name | Description | Required |
|---|---|---|
|
| An ObjectFilter to filter the objects returned from the current session. |
|
|
| The identifier to be used in the execution results. |
|
Creating GetObjectsCommand
GetObjectsCommand getObjectsCommand = new GetObjectsCommand();
getObjectsCommand.setOutIdentifier("objects");XML Output
XStream:
<get-objects out-identifier="objects"/>JSON:
{
"get-objects": {
"out-identifier": "objects"
}
}JAXB:
<?xml version="1.0" encoding="UTF-8" standalone="yes"?>
<get-objects out-identifier="objects"/>20.1.11. KIE Configuration
20.1.11.1. Build Result Severity
In some cases, it is possible to change the default severity of a type of build result. For instance, when a new rule with the same name of an existing rule is added to a package, the default behavior is to replace the old rule by the new rule and report it as an INFO. This is probably ideal for most use cases, but in some deployments the user might want to prevent the rule update and report it as an error.
Changing the default severity for a result type, configured like any other option in BRMS, can be done by API calls, system properties or configuration files. As of this version, BRMS supports configurable result severity for rule updates and function updates. To configure it using system properties or configuration files, the user has to use the following properties:
Example 20.21. Setting the severity using properties
// Sets the severity of rule updates:
drools.kbuilder.severity.duplicateRule = <INFO|WARNING|ERROR>
// Sets the severity of function updates:
drools.kbuilder.severity.duplicateFunction = <INFO|WARNING|ERROR>20.1.11.2. StatelessKieSession
The StatelessKieSession wraps the KieSession, instead of extending it. Its main focus is on the decision service type scenarios. It avoids the need to call dispose(). Stateless sessions do not support iterative insertions and the method call fireAllRules() from Java code; the act of calling execute() is a single-shot method that will internally instantiate a KieSession, add all the user data and execute user commands, call fireAllRules(), and then call dispose(). While the main way to work with this class is via the BatchExecution (a subinterface of Command) as supported by the CommandExecutor interface, two convenience methods are provided for when simple object insertion is all that’s required. The CommandExecutor and BatchExecution are talked about in detail in their own section.
Our simple example shows a stateless session executing a given collection of Java objects using the convenience API. It will iterate the collection, inserting each element in turn.
Example 20.22. Simple StatelessKieSession Execution with Collection
import org.kie.api.runtime.StatelessKieSession;
StatelessKieSession ksession = kbase.newStatelessKieSession();
ksession.execute(collection);If this was done as a single command it would be as follows:
Example 20.23. Simple StatelessKieSession Execution with InsertElements Command
ksession.execute(CommandFactory.newInsertElements(collection));
If you wanted to insert the collection itself, and the collection’s individual elements, then CommandFactory.newInsert(collection) would do the job.
Methods of the CommandFactory create the supported commands, all of which can be marshalled using XStream and the BatchExecutionHelper. BatchExecutionHelper provides details on the XML format as well as how to use BRMS Pipeline to automate the marshalling of BatchExecution and ExecutionResults.
StatelessKieSession supports globals, scoped in a number of ways. We cover the non-command way first, as commands are scoped to a specific execution call. Globals can be resolved in three ways.
The
StatelessKieSessionmethodgetGlobals()returns a Globals instance which provides access to the session’s globals. These are shared for all execution calls. Exercise caution regarding mutable globals because execution calls can be executing simultaneously in different threads.Example 20.24. Session Scoped Global
import org.kie.api.runtime.StatelessKieSession; StatelessKieSession ksession = kbase.newStatelessKieSession(); // Set a global hbnSession, that can be used for DB interactions in the rules. ksession.setGlobal("hbnSession", hibernateSession); // Execute while being able to resolve the "hbnSession" identifier. ksession.execute(collection);-
Using a delegate is another way of global resolution. Assigning a value to a global (with
setGlobal(String, Object)) results in the value being stored in an internal collection mapping identifiers to values. Identifiers in this internal collection will have priority over any supplied delegate. Only if an identifier cannot be found in this internal collection, the delegate global (if any) will be used. -
The third way of resolving globals is to have execution scoped globals. Here, a
Commandto set a global is passed to theCommandExecutor.
The CommandExecutor interface also offers the ability to export data through "out" parameters. Inserted facts, globals and query results can all be returned.
Example 20.25. Out Identifiers
import org.kie.api.runtime.ExecutionResults;
// Set up a list of commands:
List cmds = new ArrayList();
cmds.add(CommandFactory.newSetGlobal("list1", new ArrayList(), true));
cmds.add(CommandFactory.newInsert(new Person("jon", 102), "person"));
cmds.add(CommandFactory.newQuery("Get People" "getPeople"));
// Execute the list:
ExecutionResults results = ksession.execute(CommandFactory.newBatchExecution(cmds));
// Retrieve the ArrayList:
results.getValue("list1");
// Retrieve the inserted Person fact:
results.getValue("person");
// Retrieve the query as a QueryResults instance:
results.getValue("Get People");20.1.11.2.1. Sequential Mode
In a stateless session, the initial data set cannot be modified, and rules cannot be added or removed with the ReteOO algorithm. See the section called “PHREAK and Sequential Mode” for more information about PHREAK and sequential mode. Sequential mode can be used with stateless sessions only.
- Sequential Mode Workflow
If you enable sequential mode, the rule engine executes the following:
- Rules are ordered by salience and position in the ruleset.
- An element for each possible rule match is created. The element position indicates the firing order.
- Node memory is disabled, with the exception of the right-input object memory.
-
The left-input adapter node propagation is disconnected, and the object with the node are referenced in a
Commandobject. TheCommandobject is put into a list in the working memory for later execution. -
All objects are asserted. Afterwards, the list of
Commandobjects is checked and executed. - All matches resulting from executing the list are placed into elements based on the sequence number of the rule.
- The elements containing matches are executed in a sequence.
- If you set the maximum number of rule executions, the evaluation network may exit too early.
In sequential mode, the
LeftInputAdapterNodenode creates aCommandobject and adds it to a list in the working memory. ThisCommandobject holds a reference to theLeftInputAdapterNodenode and the propagated object. This stops any left-input propagations at insertion time, so the right-input propagation will never need to attempt a join with the left-inputs. This removes the need for the left-input memory.All nodes have their memory turned off, including the left-input tuple memory, but excluding the right-input object memory. Once all the assertions are finished and the right-input memory of all the objects is populated, the list of
LeftInputAdatperNodeCommandobjects is iterated over. The objects will propagate down the network attempting to join with the right-input objects, but they will not be remembered in the left input.The agenda with a priority queue to schedule the tuples is replaced by an element for each rule. The sequence number of the
RuleTerminalNodenode indicates the element where to place the match. Once allCommandobjects have finished, the elements are checked and existing matches are fired. To improve performance, the first and the last populated cell in the elements are remembered.When the network is constructed, each
RuleTerminalNodenode receives a sequence number based on its salience number and the order in which it was added to the network.The right-input node memories are typically hash maps for fast object deletion. Because object deletions is not supported, a list is used when the values of the object are not indexed. For a large number of objects, indexed hash maps provide a performance increase. In case an object only has a few instances, indexing may not be advantageous, and a list can be used.
- Advantages of Sequential Mode
- The rule execution is faster because the data does not change after the initial data set insertion.
- Limitations of Sequential Mode
-
The
insert,update,delete, ormodifyoperations in the right-hand side (RHS) of the rules are not supported for the ReteOO algorithm. For the PHREAK algorithm, themodifyandupdateoperations are supported. - How to Enable Sequential Mode
Sequential mode is disabled by default. To enable it, do one of the following:
-
Set the system property
drools.sequentialtotrue. Enable sequential mode while creating the KIE Base in the client code.
For example:
KieServices services = KieServices.Factory.get(); KieContainer container = services.newKieContainer(releaseId); KieBaseConfiguration conf = KieServices.Factory.get().newKieBaseConfiguration(); conf.setOption(SequentialOption.YES); KieBase kieBase = kc.newKieBase(conf);
For sequential mode to use a dynamic agenda, do one of the following:
-
Set the system property
drools.sequential.agendatodynamic. Set the sequential agenda option while creating the KIE Base in the client code.
For example:
KieServices services = KieServices.Factory.get(); KieContainer container = services.newKieContainer(releaseId); KieBaseConfiguration conf = KieServices.Factory.get().newKieBaseConfiguration(); conf.setOption(SequentialAgendaOption.DYNAMIC); KieBase kieBase = kc.newKieBase(conf);
-
Set the system property
20.1.11.3. Marshalling
The KieMarshallers are used to marshal and unmarshal KieSessions.
An instance of the KieMarshallers can be retrieved from the KieServices. A simple example is shown below:
Example 20.26. Simple Marshaller Example
import org.kie.api.runtime.KieSession;
import org.kie.api.KieBase;
import org.kie.api.marshalling.Marshaller;
// ksession is the KieSession
// kbase is the KieBase
ByteArrayOutputStream baos = new ByteArrayOutputStream();
Marshaller marshaller = KieServices.Factory.get().getMarshallers().newMarshaller(kbase);
marshaller.marshall( baos, ksession );
baos.close();
However, with marshalling, you will need more flexibility when dealing with referenced user data. To achieve this use the ObjectMarshallingStrategy interface. Two implementations are provided, but users can implement their own. The two supplied strategies are IdentityMarshallingStrategy and SerializeMarshallingStrategy. SerializeMarshallingStrategy is the default, as shown in the example above, and it just calls the Serializable or Externalizable methods on a user instance. IdentityMarshallingStrategy creates an integer id for each user object and stores them in a Map, while the id is written to the stream. When unmarshalling it accesses the IdentityMarshallingStrategy map to retrieve the instance. This means that if you use the IdentityMarshallingStrategy, it is stateful for the life of the Marshaller instance and will create ids and keep references to all objects that it attempts to marshal. Below is the code to use an Identity Marshalling Strategy.
Example 20.27. IdentityMarshallingStrategy
import org.kie.api.marshalling.KieMarshallers;
import org.kie.api.marshalling.ObjectMarshallingStrategy;
import org.kie.api.marshalling.Marshaller;
ByteArrayOutputStream baos = new ByteArrayOutputStream();
KieMarshallers kMarshallers = KieServices.Factory.get().getMarshallers()
ObjectMarshallingStrategy oms = kMarshallers.newIdentityMarshallingStrategy()
Marshaller marshaller =
kMarshallers.newMarshaller(kbase, new ObjectMarshallingStrategy[]{ oms });
marshaller.marshall(baos, ksession);
baos.close();
In most cases, a single strategy is insufficient. For added flexibility, the ObjectMarshallingStrategyAcceptor interface can be used. This Marshaller has a chain of strategies, and while reading or writing a user object it iterates the strategies asking if they accept responsibility for marshalling the user object. One of the provided implementations is ClassFilterAcceptor. This allows strings and wild cards to be used to match class names. The default is ., so in the above example the Identity Marshalling Strategy is used which has a default . acceptor.
Assuming that we want to serialize all classes except for one given package, where we will use identity lookup, we could do the following:
Example 20.28. IdentityMarshallingStrategy with Acceptor
import org.kie.api.marshalling.KieMarshallers;
import org.kie.api.marshalling.ObjectMarshallingStrategy;
import org.kie.api.marshalling.Marshaller;
ByteArrayOutputStream baos = new ByteArrayOutputStream();
KieMarshallers kMarshallers = KieServices.Factory.get().getMarshallers()
ObjectMarshallingStrategyAcceptor identityAcceptor =
kMarshallers.newClassFilterAcceptor(new String[] { "org.domain.pkg1.*" });
ObjectMarshallingStrategy identityStrategy =
kMarshallers.newIdentityMarshallingStrategy(identityAcceptor);
ObjectMarshallingStrategy sms = kMarshallers.newSerializeMarshallingStrategy();
Marshaller marshaller =
kMarshallers.newMarshaller
(kbase, new ObjectMarshallingStrategy[]{ identityStrategy, sms });
marshaller.marshall( baos, ksession );
baos.close();Note that the acceptance checking order is in the natural order of the supplied elements.
Also note that if you are using scheduled matches (for example some of your rules use timers or calendars) they are marshallable only if, before you use it, you configure your KieSession to use a trackable timer job factory manager as follows:
Example 20.29. Configuring a trackable timer job factory manager
import org.kie.api.runtime.KieSessionConfiguration;
import org.kie.api.KieServices.Factory;
import org.kie.api.runtime.conf.TimerJobFactoryOption;
KieSessionConfiguration ksconf = KieServices.Factory.get().newKieSessionConfiguration();
ksconf.setOption(TimerJobFactoryOption.get("trackable"));
KSession ksession = kbase.newKieSession(ksconf, null);20.1.11.4. KIE Persistence
Longterm out of the box persistence with Java Persistence API (JPA) is possible with BRMS. It is necessary to have some implementation of the Java Transaction API (JTA) installed. For development purposes the Bitronix Transaction Manager is suggested, as it’s simple to set up and works embedded, but for production use JBoss Transactions is recommended.
Example 20.30. Simple example using transactions
import org.kie.api.KieServices;
import org.kie.api.runtime.Environment;
import org.kie.api.runtime.EnvironmentName;
import org.kie.api.runtime.KieSessionConfiguration;
KieServices kieServices = KieServices.Factory.get();
Environment env = kieServices.newEnvironment();
env.set(EnvironmentName.ENTITY_MANAGER_FACTORY,
Persistence.createEntityManagerFactory("emf-name"));
env.set(EnvironmentName.TRANSACTION_MANAGER,
TransactionManagerServices.getTransactionManager());
// KieSessionConfiguration may be null, and a default will be used:
KieSession ksession =
kieServices.getStoreServices().newKieSession(kbase, null, env);
int sessionId = ksession.getId();
UserTransaction ut =
(UserTransaction) new InitialContext().lookup("java:comp/UserTransaction");
ut.begin();
ksession.insert(data1);
ksession.insert(data2);
ksession.startProcess("process1");
ut.commit();
To use a JPA, the Environment must be set with both the EntityManagerFactory and the TransactionManager. If rollback occurs the ksession state is also rolled back, hence it is possible to continue to use it after a rollback. To load a previously persisted KieSession you’ll need the id, as shown below:
Example 20.31. Loading a KieSession
import org.kie.api.runtime.KieSession;
KieSession ksession =
kieServices.getStoreServices().loadKieSession(sessionId, kbase, null, env);
To enable persistence several classes must be added to your persistence.xml, as in the example below:
Example 20.32. Configuring JPA
<persistence-unit name="org.drools.persistence.jpa" transaction-type="JTA">
<provider>org.hibernate.ejb.HibernatePersistence</provider>
<jta-data-source>jdbc/BitronixJTADataSource</jta-data-source>
<class>org.drools.persistence.info.SessionInfo</class>
<class>org.drools.persistence.info.WorkItemInfo</class>
<properties>
<property name="hibernate.dialect" value="org.hibernate.dialect.H2Dialect"/>
<property name="hibernate.max_fetch_depth" value="3"/>
<property name="hibernate.hbm2ddl.auto" value="update" />
<property name="hibernate.show_sql" value="true" />
<property name="hibernate.transaction.manager_lookup_class"
value="org.hibernate.transaction.BTMTransactionManagerLookup" />
</properties>
</persistence-unit>The JDBC JTA data source would have to be configured first. Bitronix provides a number of ways of doing this, and its documentation should be consulted for details. For a quick start, here is the programmatic approach:
Example 20.33. Configuring JTA DataSource
PoolingDataSource ds = new PoolingDataSource();
ds.setUniqueName("jdbc/BitronixJTADataSource");
ds.setClassName("org.h2.jdbcx.JdbcDataSource");
ds.setMaxPoolSize(3);
ds.setAllowLocalTransactions(true);
ds.getDriverProperties().put("user", "sa");
ds.getDriverProperties().put("password", "sasa");
ds.getDriverProperties().put("URL", "jdbc:h2:mem:mydb");
ds.init();
Bitronix also provides a simple embedded JNDI service, ideal for testing. To use it, add a jndi.properties file to your META-INF folder and add the following line to it:
Example 20.34. JNDI Properties
java.naming.factory.initial=bitronix.tm.jndi.BitronixInitialContextFactory20.1.12. KIE Sessions
20.1.12.1. Stateless KIE Sessions
A stateless KIE session is a session without inference. A stateless session can be called like a function in that you can use it to pass data and then receive the result back.
Stateless KIE sessions are useful in situations requiring validation, calculation, routing, and filtering.
20.1.12.1.1. Configuring Rules in Stateless Session
Create a data model like the driver’s license example below:
public class Applicant { private String name; private int age; private boolean valid; // getter and setter methods here }Write the first rule. In this example, a rule is added to disqualify any applicant younger than 18:
package com.company.license rule "Is of valid age" when $a : Applicant(age < 18) then $a.setValid(false); endWhen the
Applicantobject is inserted into the rule engine, each rule’s constraints evaluate it and search for a match. There is always an implied constraint of "object type" after which there can be any number of explicit field constraints.$ais a binding variable. It exists to make possible a reference to the matched object in the rule’s consequence (from which place the object’s properties can be updated).NoteUse of the dollar sign (
$) is optional. It helps to differentiate between variable names and field names.In the
Is of valid agerule there are two constraints:-
The fact being matched must be of type
Applicant. -
The value of
agemust be less than eighteen.
-
The fact being matched must be of type
-
To use this rule, save it in a file with
.drlextension (for example,licenseApplication.drl), and store it in a KIE Project. A KIE Project has the structure of a normal Maven project with an additionalkmodule.xmlfile defining the KieBases and KieSessions. Place this file in theresources/META-INFfolder of the Maven project. Store all the other artifacts, such as thelicenseApplication.drlcontaining any former rule, in the resources folder or in any other subfolder under it. Create a
KieContainerthat reads the files to be built, from the classpath:KieServices kieServices = KieServices.Factory.get(); KieContainer kContainer = kieServices.getKieClasspathContainer();This compiles all the rule files found on the classpath and put the result of this compilation, a
KieModule, in theKieContainer.If there are no errors, you can go ahead and create your session from the
KieContainerand execute against some data:StatelessKieSession kSession = kContainer.newStatelessKieSession(); Applicant applicant = new Applicant("Mr John Smith", 16); assertTrue(applicant.isValid()); ksession.execute(applicant); assertFalse(applicant.isValid());Here, since the applicant is under the age of eighteen, their application will be marked as invalid.
Result
The preceding code executes the data against the rules. Since the applicant is under the age of 18, the application is marked as invalid.
20.1.12.1.2. Configuring Rules with Multiple Objects
To execute rules against any object-implementing
iterable(such as a collection), add another class as shown in the example code below:public class Applicant { private String name; private int age; // getter and setter methods here } public class Application { private Date dateApplied; private boolean valid; // getter and setter methods here }In order to check that the application was made within a legitimate time-frame, add this rule:
package com.company.license rule "Is of valid age" when Applicant(age < 18) $a : Application() then $a.setValid(false); end rule "Application was made this year" when $a : Application(dateApplied > "01-jan-2009") then $a.setValid(false); endUse the JDK converter to implement the iterable interface. This method commences with the line
Arrays.asList(…). The code shown below executes rules against an iterable list. Every collection element is inserted before any matched rules are fired:StatelessKieSession ksession = kbase.newStatelessKnowledgeSession(); Applicant applicant = new Applicant("Mr John Smith", 16); Application application = new Application(); assertTrue(application.isValid()); ksession.execute(Arrays.asList(new Object[] { application, applicant })); assertFalse(application.isValid());NoteThe
execute(Object object)andexecute(Iterable objects)methods are actually "wrappers" around a further method calledexecute(Command command)which comes from theBatchExecutorinterface.Use the
CommandFactoryto create instructions, so that the following is equivalent toexecute(Iterable it):ksession.execute (CommandFactory.newInsertIterable(new Object[] { application, applicant }));Use the
BatchExecutorandCommandFactorywhen working with many different commands or result output identifiers:List<Command> cmds = new ArrayList<Command>(); cmds.add(CommandFactory.newInsert(new Person("Mr John Smith"), "mrSmith")); cmds.add(CommandFactory.newInsert(new Person("Mr John Doe"), "mrDoe")); BatchExecutionResults results = ksession.execute(CommandFactory.newBatchExecution(cmds)); assertEquals(new Person("Mr John Smith"), results.getValue("mrSmith"));NoteCommandFactorysupports many other commands that can be used in theBatchExecutor. Some of these areStartProcess,QueryandSetGlobal.
20.1.12.2. Stateful KIE Sessions
A stateful session allow you to make iterative changes to facts over time. As with the StatelessKnowledgeSession, the StatefulKnowledgeSession supports the BatchExecutor interface. The only difference is the FireAllRules command is not automatically called at the end.
Ensure that the dispose() method is called after running a stateful session. This is to ensure that there are no memory leaks. This is due to the fact that knowledge bases will obtain references to stateful knowledge sessions when they are created.
20.1.12.2.1. Common Use Cases for Stateful Sessions
- Monitoring
- For example, you can monitor a stock market and automate the buying process.
- Diagnostics
- Stateful sessions can be used to run fault-finding processes. They could also be used for medical diagnostic processes.
- Logistical
- For example, they could be applied to problems involving parcel tracking and delivery provisioning.
- Ensuring compliance
- For example, to validate the legality of market trades.
20.1.12.2.2. Stateful Session Monitoring Example
Create a model of what you want to monitor. In this example involving fire alarms, the rooms in a house have been listed. Each has one sprinkler. A fire can start in any of the rooms:
public class Room { private String name; // getter and setter methods here } public class Sprinkler { private Room room; private boolean on; // getter and setter methods here } public class Fire { private Room room; // getter and setter methods here } public class Alarm { }- The rules must express the relationships between multiple objects (to define things such as the presence of a sprinkler in a certain room). To do this, use a binding variable as a constraint in a pattern. This results in a cross-product.
Create an instance of the
Fireclass and insert it into the session.The rule below adds a binding to
Fireobject’s room field to constrain matches. This so that only the sprinkler for that room is checked. When this rule fires and the consequence executes, the sprinkler activates:rule "When there is a fire turn on the sprinkler" when Fire($room : room) $sprinkler : Sprinkler(room == $room, on == false) then modify($sprinkler) { setOn(true) }; System.out.println("Turn on the sprinkler for room "+$room.getName()); endWhereas the stateless session employed standard Java syntax to modify a field, the rule above uses the
modifystatement. It acts much like awithstatement.
20.2. Runtime Manager
The RuntimeManager interface enables and simplifies the usage of KIE API. The interface provides configurable strategies that control actual runtime execution. The strategies are as follows:
- Singleton
-
The runtime manager maintains a single
KieSessionregardless of the number of processes available. - Per Process Instance
-
The runtime manager maintains mapping between a process instance and a
KieSessionand always provides the sameKieSessionwhen working with the original process instance. - Per Request
-
The runtime manager delivers a new
KieSessionfor every request.
See the fragment of RuntimeManager interface with further comments below:
package org.kie.api.runtime.manager;
public interface RuntimeManager {
/**
* Returns a fully initialized RuntimeEngine instance:
* KieSession is created or loaded depending on the strategy.
* TaskService is initialized and attached to a ksession
* (using a listener).
* WorkItemHandlers are initialized and registered on the ksession.
* EventListeners (Process, Agenda, WorkingMemory) are initialized
* and added to the ksession.
*
* @param context: a concrete implementation of a context
* supported by the given RuntimeManager
* @return an instance of the RuntimeEngine
*/
RuntimeEngine getRuntimeEngine(Context<?> context);
...
}
The runtime manager is responsible for managing and delivering instances of RuntimeEngine to the caller. The RuntimeEngine interface contains two important parts of the process engine, KieSession and TaskService:
public interface RuntimeEngine {
/**
* Returns KieSession configured for this RuntimeEngine.
* @return
*/
KieSession getKieSession();
/**
* Returns TaskService configured for this RuntimeEngine.
* @return
*/
TaskService getTaskService();
}
Both these components are configured to work with each other without any additional changes from an end user, and it is therefore not required to register a human task handler and keep track of its connection to the service. Regardless of a strategy, the runtime manager provides the same capabilities when initializing and configuring RuntimeEngine:
-
KieSessionis loaded with the same factories, either in memory or JPA-based. -
Work item handlers as well as event listeners are registered on each
KieSession. TaskServiceis configured with:- The JTA transaction manager.
-
The same entity manager factory as a
KieSession. -
UserGroupCallbackfrom the environment.
Additionally, the runtime manager provides dedicated methods to dispose RuntimeEngine when it is no longer required to release any resources it might have acquired.
20.2.1. Usage
20.2.1.1. Usage Scenario
Regular usage scenario for RuntimeManager is:
At application startup:
-
Build the
RuntimeManagerand keep it for the entire life time of the application. It is thread safe and you can access it concurrently.
-
Build the
At request:
-
Get
RuntimeEnginefromRuntimeManagerusing proper context instance dedicated to strategy ofRuntimeManager. -
Get
KieSessionorTaskServicefromRuntimeEngine. -
Perform operations on
KieSessionorTaskServicesuch asstartProcessandcompleteTask. -
Once done with processing, dispose
RuntimeEngineusing theRuntimeManager.disposeRuntimeEnginemethod.
-
Get
At application shutdown:
-
Close
RuntimeManager.
-
Close
When the RuntimeEngine is obtained from RuntimeManager within an active JTA transaction, then there is no need to dispose RuntimeEngine at the end, as it automatically disposes the RuntimeEngine on transaction completion (regardless of the completion status commit or rollback).
20.2.1.2. Building Runtime Manager
Here is how you can build RuntimeManager (with RuntimeEnvironment) and get RuntimeEngine (that encapsulates KieSession and TaskService) from it:
// First, configure environment that will be used by RuntimeManager:
RuntimeEnvironment environment = RuntimeEnvironmentBuilder.Factory.get()
.newDefaultInMemoryBuilder()
.addAsset(ResourceFactory.newClassPathResource
("BPMN2-ScriptTask.bpmn2"), ResourceType.BPMN2)
.get();
// Next, create RuntimeManager - in this case singleton strategy is chosen:
RuntimeManager manager = RuntimeManagerFactory
.Factory.get().newSingletonRuntimeManager(environment);
// Then, get RuntimeEngine out of manager - using empty context as singleton
// does not keep track of runtime engine as there is only one:
RuntimeEngine runtime = manager.getRuntimeEngine(EmptyContext.get());
// Get KieSession from runtime runtimeEngine - already initialized with all handlers,
// listeners, and others, that were configured on the environment:
KieSession ksession = runtimeEngine.getKieSession();
// Add invocations to the process engine here,
// for example ksession.startProcess(processId);
// and last dispose the runtime engine:
manager.disposeRuntimeEngine(runtimeEngine);Runtime Manager Identifier
During runtime execution, the identifier of the runtime manager is deploymentId. If a task is persisted, the identifier of the task is persisted as deploymentId as well. The deploymentId of the task is then used to identify the runtime manager after the task is completed and its process instance is resumed. The deploymentId is also persisted as externalId in a history log.
If the identifier is not specified during the creation of the runtime manager, a default value is used. Therefore, the same deployment is used during the application’s lifecycle. It is possible to maintain multiple runtime managers in one application. However, it is required to specify their identifiers. For example, Deployment Service (see Section 20.3.1, “Deployment Service”) maintains more runtime managers with identifiers based on the kJAR’s GAV. The Business Central web application depends on Deployment Service, so it has multiple runtime managers as well.
20.2.2. Runtime Environment
The complexity of knowing when to create, dispose, and register handlers is taken away from the end user and moved to the runtime manager that knows when and how to perform such operations. But it still allows to have a fine grained control over this process by providing comprehensive configuration of the RuntimeEnvironment.
The RuntimeEnvironment interface provides access to the data kept as part of the environment. You can use RuntimeEnvironmentBuilder that provides fluent API to configure RuntimeEnvironment with predefined settings. You can obtain instances of the RuntimeEnvironmentBuilder through RuntimeEnvironmentBuilderFactory that provides preconfigured sets of builder to simplify and help you build the environment for the RuntimeManager.
Besides KieSession, Runtime Manager also provides access to TaskService. The default builder comes with predefined set of elements that consists of:
- Persistence unit name
-
It is set to
org.jbpm.persistence.jpa(for both process engine and task service). - Human task handler
-
This is automatically registered on the
KieSession. - JPA based history log event listener
-
This is automatically registered on the
KieSession. - Event listener to trigger rule task evaluation (fireAllRules)
-
This is automatically registered on the
KieSession.
The MVELUserGroupCallback class fails to initialize in an OSGi environment. Do not use or include MVELUserGroupCallback as it is not designed for production purposes.
20.2.3. Strategies
There are multiple strategies of managing KIE sessions that can be used when working with the Runtime Manager.
20.2.3.1. Singleton Strategy
This instructs the RuntimeManager to maintain single instance of RuntimeEngine and in turn single instance of KieSession and TaskService. Access to the RuntimeEngine is synchronized and the thread is safe although it comes with a performance penalty due to synchronization. This strategy is considered to be the easiest one and recommended to start with. It has the following characteristics:
- Small memory footprint, that is a single instance of runtime engine and task service.
- Simple and compact in design and usage.
- Good fit for low to medium load on process engine due to synchronized access.
-
Due to single
KieSessioninstance, all state objects (such as facts) are directly visible to all process instances and vice versa. -
Not contextual, that is when retrieving instances of
RuntimeEnginefrom singletonRuntimeManager, Context instance is not important and usually theEmptyContext.get()method is used, although null argument is acceptable as well. -
Keeps track of the ID of the
KieSessionused betweenRuntimeManagerrestarts, to ensure it uses the same session. This ID is stored as serialized file on disc in a temporary location that depends on the environment.
Consider the following warnings when using the Singleton strategy:
- Do not use the Singleton runtime strategy with the EJB Timer Scheduler (the default scheduler in Process Server) in a production environment. This combination can result in Hibernate problems under load. For more information about this limitation, see Hibernate issues with Singleton strategy and EJBTimerScheduler.
Do not use the Singleton runtime strategy with JTA transactions (
UserTransactionor CMT). This combination can result in anIllegalStateExceptionerror with a message similar to "Process instance X is disconnected". For more information about this limitation, see Hibernate errors with Singleton RuntimeManager and outer transaction.To avoid this problem, put the transaction invocations into synchronized blocks, as shown in the following example:
synchronized (ksession) { try { tx.begin(); // use ksession application logic tx.commit(); } catch (Exception e) { ... } }
20.2.3.2. Per Request Strategy
This instructs the RuntimeManager to provide new instance of RuntimeEngine for every request. As the RuntimeManager request considers one or more invocations within single transaction. It must return same instance of RuntimeEngine within single transaction to ensure correctness of state as otherwise the operation in one call would not be visible in the other. This a kind of stateless strategy that provides only request scope state. Once the request is completed, the RuntimeEngine is permanently destroyed. The KieSession information is then removed from the database in case you used persistence. It has following characteristics:
- Completely isolated process engine and task service operations for every request.
- Completely stateless, storing facts makes sense only for the duration of the request.
- A good fit for high load, stateless processes (no facts or timers involved that shall be preserved between requests).
-
KieSessionis only available during life time of request and at the end is destroyed. -
Not contextual, that is when retrieving instances of
RuntimeEnginefrom per requestRuntimeManager, Context instance is not important and usually theEmptyContext.get()method is used, althoughnullargument is also acceptable.
20.2.3.3. Per Process Instance Strategy
This instructs the RuntimeManager to maintain a strict relationship between KieSession and ProcessInstance. That means that the KieSession will be available as long as the ProcessInstance that it belongs to is active. This strategy provides the most flexible approach to use advanced capabilities of the engine like rule evaluation in isolation (for given process instance only). It provides maximum performance and reduction of potential bottlenecks introduced by synchronization. Additionally, it reduces number of KieSessions to the actual number of process instances, rather than number of requests (in contrast to per request strategy). It has the following characteristics:
- Most advanced strategy to provide isolation to given process instance only.
-
Maintains strict relationship between
KieSessionandProcessInstanceto ensure it will always deliver sameKieSessionfor givenProcessInstance. -
Merges life cycle of
KieSessionwithProcessInstancemaking both to be disposed on process instance completion (complete or abort). - Allows to maintain data (such as facts, timers) in scope of process instance, that is, only process instance will have access to that data.
-
Introduces a bit of overhead due to need to look up and load
KieSessionfor process instance. -
Validates usage of
KieSession, so it can not be used for other process instances. In such cases, an exception is thrown. -
Is contextual. It accepts
EmptyContext,ProcessInstanceIdContext, andCorrelationKeyContextcontext instances.
20.2.4. Handlers and Listeners
Runtime Manager provides various ways how to register work item handlers and process event listeners.
20.2.4.1. Registering Through Registerable Items Factory
The implementation of RegisterableItemsFactory provides a dedicated mechanism to create your own handlers or listeners.
/**
* Returns new instances of WorkItemHandler that will be registered on RuntimeEngine.
*
* @param runtime provides RuntimeEngine in case handler need to make use of it internally
* @return map of handlers to be registered - in case of no handlers
* empty map shall be returned
*/
Map<String, WorkItemHandler> getWorkItemHandlers(RuntimeEngine runtime);
/**
* Returns new instances of ProcessEventListener that will be registered on RuntimeEngine.
*
* @param runtime provides RuntimeEngine in case listeners need to make use of it internally
* @return list of listeners to be registered - in case of no listeners
* empty list shall be returned
*/
List<ProcessEventListener> getProcessEventListeners(RuntimeEngine runtime);
/**
* Returns new instances of AgendaEventListener that will be registered on RuntimeEngine.
*
* @param runtime provides RuntimeEngine in case listeners need to make use of it internally
* @return list of listeners to be registered - in case of no listeners
* empty list shall be returned
*/
List<AgendaEventListener> getAgendaEventListeners(RuntimeEngine runtime);
/**
* Returns new instances of WorkingMemoryEventListener that will be registered
* on RuntimeEngine.
*
* @param runtime provides RuntimeEngine in case listeners need to make use of it internally
* @return list of listeners to be registered - in case of no listeners
* empty list shall be returned
*/
List<WorkingMemoryEventListener> getWorkingMemoryEventListeners(RuntimeEngine runtime);
Extending out-of-the-box implementation and adding your own is a good practice. You may not always need extensions, as the default implementations of RegisterableItemsFactory provides a mechanism to define custom handlers and listeners. Following is a list of available implementations ordered in the hierarchy of inheritance:
- org.jbpm.runtime.manager.impl.SimpleRegisterableItemsFactory
- This is the simplest possible implementation that comes empty and is based on a reflection to produce instances of handlers and listeners based on given class names.
- org.jbpm.runtime.manager.impl.DefaultRegisterableItemsFactory
-
This is an extension of the simple implementation that introduces defaults described above and still provides same capabilities as the
SimpleRegisterableItemsFactoryimplementation. - org.jbpm.runtime.manager.impl.KModuleRegisterableItemsFactory
-
This is an extension of the default implementation (
DefaultRegisterableItemsFactory) that provides specific capabilities for KIE module and still provides the same capabilities as the simple implementation (SimpleRegisterableItemsFactory). - org.jbpm.runtime.manager.impl.cdi.InjectableRegisterableItemsFactory
-
This is an extension of the default implementation (
DefaultRegisterableItemsFactory) that is tailored for CDI environments and provides CDI style approach to finding handlers and listeners through producers.
20.2.4.2. Registering Through Configuration Files
Alternatively, you may also register simple (stateless or requiring only KieSession) work item handlers by defining them as part of CustomWorkItem.conf file and update the class path. To use this approach do the following:
-
Create a file called
drools.session.confinsideMETA-INFof the root of the class path (WEB-INF/classes/META-INFfor web applications). Add the following line to the
drools.session.conf file:drools.workItemHandlers = CustomWorkItemHandlers.conf-
Create a file called
CustomWorkItemHandlers.confinsideMETA-INFof the root of the class path (WEB-INF/classes/META-INFfor web applications). Define custom work item handlers in MVEL format inside the
CustomWorkItemHandlers.conffile:[ "Log": new org.jbpm.process.instance.impl.demo.SystemOutWorkItemHandler(), "WebService": new org.jbpm.process.workitem.webservice.WebServiceWorkItemHandler(ksession), "Rest": new org.jbpm.process.workitem.rest.RESTWorkItemHandler(), "Service Task" : new org.jbpm.process.workitem.bpmn2.ServiceTaskHandler(ksession) ]
These steps register the work item handlers for any KieSession created by the application, regardless of it using the RuntimeManager or not.
20.2.4.3. Registering in CDI Environment
When you are using RuntimeManager in CDI environment, you can use the dedicated interfaces to provide custom WorkItemHandlers and EventListeners to the RuntimeEngine.
public interface WorkItemHandlerProducer {
/**
* Returns map of (key = work item name, value work item handler instance)
* of work items to be registered on KieSession.
* Parameters that might be given are as follows:
* ksessiontaskService
* runtimeManager
*
* @param identifier - identifier of the owner - usually RuntimeManager that allows
* the producer to filter out and provide valid instances
* for given owner
* @param params - owner might provide some parameters, usually KieSession,
* TaskService, RuntimeManager instances
* @return map of work item handler instances (recommendation is to always
* return new instances when this method is invoked)
*/
Map<String, WorkItemHandler> getWorkItemHandlers(String identifier,
Map<String, Object> params);
}The event listener producer is annotated with proper qualifier to indicate what type of listeners they provide. You can select one of the following to indicate the type:
- @Process
-
for
ProcessEventListener - @Agenda
-
for
AgendaEventListener - @WorkingMemory
-
for
WorkingMemoryEventListener
public interface EventListenerProducer<T> {
/**
* Returns list of instances for given (T) type of listeners.
* Parameters that might be given are as follows:
* ksession
* taskServiceruntimeManager
*
* @param identifier - identifier of the owner - usually RuntimeManager that allows
* the producer to filter out and provide valid instances
* for given owner
* @param params - owner might provide some parameters, usually KieSession,
* TaskService, RuntimeManager instances
* @return list of listener instances (recommendation is to always return new
* instances when this method is invoked)
*/
List<T> getEventListeners(String identifier, Map<String, Object> params);
}
Package these interface implementations as bean archive that includes beans.xml inside META-INF folder and update the application classpath (for example, WEB-INF/lib for web application). This enables the CDI based RuntimeManager to discover them and register on every KieSession that is created or loaded from the data store.
All the components (KieSession, TaskService, and RuntimeManager) are provided to the producers to allow handlers or listeners to be more stateful and be able to do more advanced things with the engine. You can also apply filtering based on the identifier (that is given as argument to the methods) to decide if the given RuntimeManager can receive handlers or listeners or not.
Whenever there is a need to interact with the process engine or task service from within handler or listener, recommended approach is to use RuntimeManager and retrieve RuntimeEngine (and then KieSession or TaskService) from it as that ensures a proper state.
20.2.5. Control Parameters
The following control parameters are available to alter engine default behavior:
Engine Behavior Bootstrap Switches
- jbpm.business.calendar.properties
The location of the configuration file with Business Calendar properties.
Expand Default Value Admitted Values /jbpm.business.calendar.propertiesPath
- jbpm.data.dir
The location where data files produced by Red Hat JBoss BPM Suite must be stored.
Expand Default Value Admitted Values ${java.io.tmpdir}${jboss.server.data.dir}if available, otherwise${java.io.tmpdir}- jbpm.enable.multi.con
Allows Web Designer to use multiple incoming or outgoing connections for tasks. If not enabled, the tasks are marked as invalid.
Expand Default Value Admitted Values falsetrueorfalse- jbpm.loop.level.disabled
Enables or disables loop iteration tracking to allow advanced loop support when using XOR gateways.
Expand Default Value Admitted Values truetrueorfalse- jbpm.overdue.timer.delay
Specifies the delay for overdue timers to allow proper initialization, in milliseconds.
Expand Default Value Admitted Values 2000
Number (
Long)- jbpm.process.name.comparator
An alternative comparator class to empower the Start Process by Name feature.
Expand Default Value Admitted Values org.jbpm.process.instance.StartProcessHelper.NumberVersionComparatorFully qualified name
- jbpm.usergroup.callback.properties
The location of the usergroup callback property file when
org.jbpm.ht.callbackis set tojaasordb.Expand Default Value Admitted Values classpath:/jbpm.usergroup.callback.propertiesPath
- jbpm.user.group.mapping
An alternative classpath location of user information configuration (used by
LDAPUserInfoImpl).Expand Default Value Admitted Values ${jboss.server.config.dir}/roles.propertiesPath
- jbpm.user.info.properties
An alternative classpath location for user group callback implementation (LDAP, DB). For more information, see
org.jbpm.ht.userinfo.Expand Default Value Admitted Values classpath:/userinfo.propertiesPath
- jbpm.ut.jndi.lookup
An alternative JNDI name to be used when there is no access to the default one for user transactions (
java:comp/UserTransaction).Expand Default Value Admitted Values N/A
JNDI name
- org.jbpm.ht.callback
Specifies the implementation of user group callback to be used:
-
mvel: Default; mostly used for testing. -
ldap: LDAP; requires additional configuration in thejbpm.usergroup.callback.propertiesfile. -
db: Database; requires additional configuration in thejbpm.usergroup.callback.propertiesfile. -
jaas: JAAS; delegates to the container to fetch information about user data. -
props: A simple property file; requires additional file that will keep all information (users and groups). -
custom: A custom implementation; you must specify the fully qualified name of the class in theorg.jbpm.ht.custom.callback.
Expand Default Value Admitted Values jaasmvel,ldap,db,jaas,props, orcustom-
- org.jbpm.ht.custom.callback
A custom implementation of the
UserGroupCallbackinterface in case theorg.jbpm.ht.callbackproperty is set tocustom.Expand Default Value Admitted Values N/A
Fully qualified name
- org.jbpm.ht.custom.userinfo
A custom implementation of the
UserInfointerface in case theorg.jbpm.ht.userinfoproperty is set tocustom.Expand Default Value Admitted Values N/A
Fully qualified name
- org.jbpm.ht.userinfo
Specifies what implementation of the
UserInfointerface to use for user or group information providers.-
ldap: LDAP; needs to be configured in the file specified injbpm-user.info.properties. -
db: Database; needs to be configured in the file specified injbpm-user.info.properties. -
props: A simple property file; set the propertyjbpm.user.info.propertiesto specify the path to the file. -
custom: A custom implementation; you must specify the fully qualified name of the class in theorg.jbpm.ht.custom.userinfoproperty.
Expand Default Value Admitted Values N/A
ldap,db,props, orcustom-
- org.jbpm.ht.user.separator
An alternative separator when loading actors and groups for user tasks from a
String.Expand Default Value Admitted Values ,(comma)String
- org.kie.executor.disabled
Disables the async job executor.
Expand Default Value Admitted Values falsetrueorfalse- org.kie.executor.jms
Enables or disables the JMS support of the executor. Set to
falseto disable JMS support.Expand Default Value Admitted Values truetrueorfalse
- org.kie.executor.interval
The time between the moment the async job executor finishes a job and the moment it starts a new one, in a time unit specified in
org.kie.executor.timeunit.Expand Default Value Admitted Values 3
Number (
Integer)- org.kie.executor.pool.size
The number of threads used by the async job executor.
Expand Default Value Admitted Values 1
Number (
Integer)- org.kie.executor.retry.count
The number of retries the async job executor attempts on a failed job.
Expand Default Value Admitted Values 3
Number (
Integer)
- org.kie.executor.timeunit
The time unit in which the
org.kie.executor.intervalis specified.Expand Default Value Admitted Values SECONDSA
java.util.concurrent.TimeUnitconstant- org.kie.mail.session
The JNDI name of the mail session as registered in the application server, for use by
EmailWorkItemHandler.Expand Default Value Admitted Values mail/jbpmMailSessionString
- org.quartz.properties
The location of the Quartz configuration file to activate the Quartz timer service.
Expand Default Value Admitted Values N/A
Path
These allow you to fine tune the execution for the environment needs and actual requirements. All of these parameters are set as JVM system properties, usually with -D when starting a program such as an application server.
20.2.6. Variable Persistence Strategy
Objects in Red Hat JBoss BPM Suite that are used as process variables must be serializable. That is, they must implement the java.io.Serializable interface. Objects that are not serializable can be used as process variables but for these you must implement and use a marshaling strategy and register it. The default strategy will not convert these variables into bytes. By default all objects need to be serializable.
For internal objects, which are modified only by the engine, it is sufficient if java.io.Serializable is implemented. The variable will be transformed into a byte stream and stored in a database.
For external data that can be modified by external systems and people (like documents from a CMS, or other database entities), other strategies need to be implemented.
Red Hat JBoss BPM Suite uses what is known as the pluggable Variable Persistence Strategy — that is, it uses serialization for objects that do implement the java.io.Serializable interface but uses the JPA-based JPAPlaceholderResolverStrategy class to work on objects that are entities (not implementing the java.io.Serializable interface).
JPA Placeholder Resolver Strategy
To use this strategy, configure it by placing it in your Runtime Environment used for creating your Knowledge Sessions. This strategy should be set as the first one and the serialization based strategy as the last, default one. An example on how to set this is shown here:
// Create entity manager factory:
EntityManagerFactory emf = Persistence.createEntityManagerFactory("com.redhat.sample");
RuntimeEnvironment environment = RuntimeEnvironmentBuilder.Factory.get().newDefaultBuilder()
.entityManagerFactory(emf)
.addEnvironmentEntry(EnvironmentName.OBJECT_MARSHALLING_STRATEGIES,
new ObjectMarshallingStrategy[] {
// Set the entity manager factory to JPA strategy so it knows how to store and read entities:
new JPAPlaceholderResolverStrategy(emf),
// Set the serialization-based strategy as last one to deal with non entity classes:
new SerializablePlaceholderResolverStrategy(ClassObjectMarshallingStrategyAcceptor.DEFAULT)})
.addAsset(ResourceFactory.newClassPathResource("example.bpmn"), ResourceType.BPMN2)
.get();
// Now create the runtime manager and start using entities as part of your process:
RuntimeManager manager = RuntimeManagerFactory.Factory
.get().newSingletonRuntimeManager(environment);
Make sure to add your entity classes into persistence.xml configuration file that will be used by the JPA strategy.
At runtime, process variables that need persisting are evaluated using the available strategy. It is up to the strategy to accept or reject the variable. If the variable is rejected by the first strategy, it is passed on till it reaches the default strategy.
A JPA based strategy will only accept classes that declare a field with the @Id annotation (javax.persistence.Id) This is the unique id that is used to retrieve the variable. On the other hand, a serialization based strategy simply accepts all variables by default.
Once the variable has been accepted, a JPA marshalling operation to store the variable is performed by the marshal() method, while the unmarshal() method will retrieve the variable from the storage.
Creating Custom Strategy
The previous section alluded to the two methods that are used to marshal() and unmarshal() objects. These methods are part of the org.kie.api.marshalling.ObjectMarshallingStrategy interface and you can implement this interface to create a custom persistence strategy.
public interface ObjectMarshallingStrategy {
public boolean accept(Object object);
public void write(ObjectOutputStream os, Object object) throws IOException;
public Object read(ObjectInputStream os) throws IOException, ClassNotFoundException;
public byte[] marshal(Context context, ObjectOutputStream os, Object object)
throws IOException;
public Object unmarshal(Context context, ObjectInputStream is, byte[] object,
ClassLoader classloader) throws IOException, ClassNotFoundException;
public Context createContext();
}
The methods read() and write() are for backwards compatibility. Use the methods accept(), marshal() and unmarshal() to create your strategy.
20.3. KIE Services
Red Hat JBoss BPM Suite provides a set of high level services on top of the Runtime Manager API. These services are the easiest way to embed BPM capabilities into a custom application. These services are split into several modules to ease their adoption in various environments:
- jbpm-services-api
- Service interfaces and other common classes
- jbpm-kie-services
- Core implementation of the services API in pure Java (without any framework-specific dependencies)
- jbpm-services-cdi
- CDI wrappers of the core services implementation
- jbpm-services-ejb
- EJB wrappers of the core services implementation including EJB remote client implementation
- jbpm-executor
- Executor Service core implementation
- jbpm-executor-cdi
- CDI wrapper of the Executor Service core implementation
When working with KIE Services, you do not have to create your own wrappers around Runtime Manager, Runtime Engine, and KIE Session. KIE Services make use of Runtime Manager API best practices and thus, eliminate various risks when working with that API.
20.3.1. Deployment Service
The Deployment Service is responsible for managing deployment units which include resources such as rules, processes, and forms. It can be used to:
- Deploy and undeploy deployment units
- Activate and deactivate deployments
- List all deployed units
- Get deployment unit for a given deployment and check its status
- Retrieve Runtime Manager instance dedicated to a given deployment
There are some restrictions on EJB remote client to do not expose Runtime Manager as it will not make any sense on the client side (after it was serialized).
Typical use case for this service is to provide dynamic behavior into your system so that multiple kjars can be active at the same time and executed simultaneously.
// create deployment unit by giving GAV
DeploymentUnit deploymentUnit = new KModuleDeploymentUnit(GROUP_ID, ARTIFACT_ID, VERSION);
// deploy
deploymentService.deploy(deploymentUnit);
// retrieve deployed unit
DeployedUnit deployedUnit = deploymentService.getDeployedUnit(deploymentUnit.getIdentifier());
// get runtime manager
RuntimeManager manager = deployedUnit.getRuntimeManager();20.3.2. Definition Service
The Definition Service provides details about processes extracted from their BPMN2 definitions. Before using any method to get some information, you must invoke the buildProcessDefinition method to populate the repository with process information taken from the BPMN2 content.
The Definition Service provides access to the following BPMN2 data :
- Process definitions, reusable subprocesses, and process variables
- Java classes and rules referred in a given process
- All organizational entities involved in a given process
- Service tasks defined in a given process
- User task definitions, task input and output mappings
Depending on the actual process definition, the returned values for users and groups can contain actual user or group name or process variable that is used to get actual user or group name on runtime.
20.3.3. Process Service
The Process Service provides access to the execution environment. Before using this service, a deployment unit containing process definitions needs to be created (see section Section 20.3.1, “Deployment Service”). Process Service can be used to:
- Start new process instances and abort the existing ones
- Get process instance information
- Get and modify process variables
- Signal a single process instance or all instances in a given deployment
- List all available signals in the current state of a given process instance
- List, complete, and abort work items
- Execute commands on the underlying command executor
The Process Service is mostly focused on runtime operations that affect process execution and not on read operations for which there is dedicated Runtime Data Service (see section Section 20.3.4, “Runtime Data Service”).
An example on how to deploy and run a process can be done as follows:
KModuleDeploymentUnit deploymentUnit = new KModuleDeploymentUnit(groupId, artifactId, version);
deploymentService.deploy(deploymentUnit);
long processInstanceId = processService.startProcess(deploymentUnit.getIdentifier(), "HiringProcess");
ProcessInstance pi = processService.getProcessInstance(processInstanceId);20.3.4. Runtime Data Service
The Runtime Data Service provides access to actual data that is available on runtime such as:
- Process definitions by various query parameters
- Active process instances by various query parameters
- Current and previous values of process variables
- List of active tasks by various parameters
- Active and completed nodes of given process instance
Use this service as the main source of information whenever building list based user interface to show process definitions, process instances, and tasks for a given user.
The Runtime Data Service provides only basic querying capabilities. Use Query Service to create and execute more advanced queries (see section Section 20.3.6, “Query Service”).
There are two important arguments that most of the Runtime Data Service operations support:
- QueryContext
- This provides capabilities for efficient management result set like pagination, sorting, and ordering.
- QueryFilter
- This applies additional filtering to task queries in order to provide more advanced capabilities when searching for user tasks.
20.3.5. User Task Service
The User Task Service covers a complete life cycle of a task so it can be managed from start to end. It also provides a way to manipulate task content and other task properties.
The User Task Service allows you to:
- Execute task operations (such as claim, start, and complete)
- Change various task properties (such as priority and expiration date)
- Manipulate task content, comments, and attachments
- Execute various task commands
The User Task Service focuses on executing task operations and manipulating task content rather than task querying. Use the Runtime Data Service to get task details or list tasks based on some parameter (see section Section 20.3.4, “Runtime Data Service”).
Example of how to start a process and complete a user task:
long processInstanceId = processService.startProcess(deploymentUnit.getIdentifier(), "HiringProcess");
List<Long> taskIds = runtimeDataService.getTasksByProcessInstanceId(processInstanceId);
Long taskId = taskIds.get(0);
userTaskService.start(taskId, "john");
UserTaskInstanceDesc task = runtimeDataService.getTaskById(taskId);
// do something with task data
Map<String, Object> results = new HashMap<String, Object>();
results.put("Result", "some document data");
userTaskService.complete(taskId, "john", results);20.3.6. Query Service
The Query Service provides advanced search capabilities that are based on DashBuilder Data Sets. As a user, you have a control over how to retrieve data from the underlying data store. This includes complex joins with external tables such as JPA entities tables and custom systems database tables.
Query Service is build around two parts:
- Management operations
- Registering, unregistering, replacing, and getting query definitions
- Runtime operations
- Executing simple and advanced queries
The DashBuilder Data Sets provide support for multiple data sources (such as CSV, SQL, ElasticSearch) while the process engine focuses on SQL based data sets as its backend is RDBMS based. So the Query Service is a subset of DashBuilder Data Sets capabilities and allows efficient queries with simple API.
20.3.6.1. Terminology
The Query Service uses the following four classes describing queries and their results:
- QueryDefinition
- Represents definition of the data set which consists of unique name, SQL expression (the query) and source - JNDI name of the data source to use when performing the query.
- QueryParam
- Basic structure that represents individual query parameter - condition - that consists of column name, operator, expected value(s).
- QueryResultMapper
- Responsible for mapping raw data set data (rows and columns) into object representation.
- QueryParamBuilder
- Responsible for building query filters that are applied on the query definition for given query invocation.
While using the QueryDefinition and QueryParam classes is straightforward, the QueryResultMapper and QueryParamBuilder classes are more advanced and require more attention to make use of their capabilities.
20.3.6.2. Query Result Mapper
The Query Result Mapper maps data taken out from database (from data set) into object representation (like ORM providers such as Hibernate map tables to entities). As there can be many object types that you can use for representing data set results, it is almost impossible to provide them out of the box. Mappers are powerful and thus are pluggable. You can implement your own mapper to transform the result into any type. Red Hat JBoss BPM Suite comes with the following mappers out of the box:
- org.jbpm.kie.services.impl.query.mapper.ProcessInstanceQueryMapper
-
Registered with name
ProcessInstances - org.jbpm.kie.services.impl.query.mapper.ProcessInstanceWithVarsQueryMapper
-
Registered with name
ProcessInstancesWithVariables - org.jbpm.kie.services.impl.query.mapper.ProcessInstanceWithCustomVarsQueryMapper
-
Registered with name
ProcessInstancesWithCustomVariables - org.jbpm.kie.services.impl.query.mapper.UserTaskInstanceQueryMapper
-
Registered with name
UserTasks - org.jbpm.kie.services.impl.query.mapper.UserTaskInstanceWithVarsQueryMapper
-
Registered with name
UserTasksWithVariables - org.jbpm.kie.services.impl.query.mapper.UserTaskInstanceWithCustomVarsQueryMapper
-
Registered with name
UserTasksWithCustomVariables - org.jbpm.kie.services.impl.query.mapper.TaskSummaryQueryMapper
-
Registered with name
TaskSummaries - org.jbpm.kie.services.impl.query.mapper.RawListQueryMapper
-
Registered with name
RawList
Each mapper is registered under the given name to allow simple lookup by name instead of referencing its class name. This is especially important when using EJB remote flavor of services where it is important to reduce the number of dependencies and thus not relying on implementation on client side. Hence, to be able to reference the QueryResultMapper class by name, use the NamedQueryMapper class, which is a part of the KIE Services API. It acts as a delegate (lazy delegate) as it looks up the actual mapper when the query is performed.
queryService.query("my query def", new NamedQueryMapper<Collection<ProcessInstanceDesc>>("ProcessInstances"), new QueryContext());20.3.6.3. Query Parameter Builder
The QueryParamBuilder class provides an advanced way of building filters for data sets. By default when using a query method of the Query Service (that accepts zero or more QueryParam instances), all of these parameters will be joined with an AND operator. Therefore, all of them must match. However, that is not always the case, hence you can use QueryParamBuilder to provide filters at the time the query is issued.
The QueryParamBuilder available out of the box is used to cover default QueryParams. The default QueryParams are based on core functions, which are SQL based conditions and includes following:
- IS_NULL
- NOT_NULL
- EQUALS_TO
- NOT_EQUALS_TO
- LIKE_TO
- GREATER_THAN
- GREATER_OR_EQUALS_TO
- LOWER_THAN
- LOWER_OR_EQUALS_TO
- BETWEEN
- IN
- NOT_IN
The QueryParamBuilder is a simple interface that is invoked as long as its build method returns a non-null value before the query is performed. So you can build up a complex filter options that could not be simply expressed by list of QueryParams. Here is a basic implementation of QueryParamBuilder to give you a jump start to implement your own (note that, it relies on the DashBuilder Data Set API):
public class TestQueryParamBuilder implements QueryParamBuilder<ColumnFilter> {
private Map<String, Object> parameters;
private boolean built = false;
public TestQueryParamBuilder(Map<String, Object> parameters) {
this.parameters = parameters;
}
@Override
public ColumnFilter build() {
// return null if it was already invoked
if (built) {
return null;
}
String columnName = "processInstanceId";
ColumnFilter filter = FilterFactory.OR(
FilterFactory.greaterOrEqualsTo((Long)parameters.get("min")),
FilterFactory.lowerOrEqualsTo((Long)parameters.get("max")));
filter.setColumnId(columnName);
built = true;
return filter;
}
}
Once you have a QueryParamBuilder implemented, you can use its instance when performing query via QueryService:
queryService.query("my query def", ProcessInstanceQueryMapper.get(), new QueryContext(), paramBuilder);20.3.6.4. Typical usage scenario
First thing you need to do is to define a data set (the view of the data you want to work with), using QueryDefinition in the KIE Services API:
SqlQueryDefinition query = new SqlQueryDefinition("getAllProcessInstances", "java:jboss/datasources/ExampleDS");
query.setExpression("select * from processinstancelog");This is the simplest possible query definition. The constructor takes a unique name that identifies it on runtime and data source JNDI name used when performing queries on this definition. The expression is the SQL statement that builds up the view to be filtered when performing queries.
Once you create the SQL query definition, you can register it to be used later for actual queries:
queryService.registerQuery(query);From now on, you can use this query definition to perform actual queries (or data look-ups to use terminology from data sets). Following is the basic one that collects data as is, without any filtering:
Collection<ProcessInstanceDesc> instances = queryService.query("getAllProcessInstances", ProcessInstanceQueryMapper.get(), new QueryContext());
The above query uses defaults from QueryContext(paging and sorting). However, you can change these defaults:
QueryContext ctx = new QueryContext(0, 100, "start_date", true);
Collection<ProcessInstanceDesc> instances = queryService.query("getAllProcessInstances", ProcessInstanceQueryMapper.get(), ctx);You can perform the data filtering in the following way:
// single filter parameter
Collection<ProcessInstanceDesc> instances = queryService.query("getAllProcessInstances", ProcessInstanceQueryMapper.get(), new QueryContext(), QueryParam.likeTo(COLUMN_PROCESSID, true, "org.jboss%"));
// multiple filter parameters (AND)
Collection<ProcessInstanceDesc> instances = queryService.query("getAllProcessInstances", ProcessInstanceQueryMapper.get(), new QueryContext(),
QueryParam.likeTo(COLUMN_PROCESSID, true, "org.jboss%"),
QueryParam.in(COLUMN_STATUS, 1, 3));With this mechanism, you can define what data are retrieved and how they should be fetched, without being limited by JPA provider. This also promotes the use of tailored queries for a given environment, as in most of the cases, there may be a single database used. Thus, specific features of that database can be utilized to increase performance.
20.3.7. Process Instance Migration Service
Process instance migration is available only with Red Hat JBoss BPM Suite 6.4 and higher.
The Process Instance Migration Service provides administrative utility to move given process instance(s) from one deployment to another or from one process definition to another. Its main responsibility is to allow basic upgrade of process definition behind a given process instance. This may include mapping of currently active nodes to other nodes in a new definition.
Processes or task variables are not affected by migration. Process instance migration means a change of underlying process definition that the process engine uses to move on with a process instance.
Even though process instance migration is available, it is recommended to let active process instances finish and then start new instances with new version whenever possible. In case you can not use this approach, carefully plan the migration of active process instances before its execution, as it might lead to unexpected issues.
Ensure to take into account the following points:
- Is the new process definition backward compatible?
- Are there any data changes (variables that could affect process instance decisions after migration)?
- Is there a need for node mapping?
Answers to these questions might save a lot of production problems after migration. Opt for the backward compatible processes, like extending process definition rather than removing nodes. However, that may not always be possible and in some cases there is a need to remove certain nodes from a process definition. In that situation, migration needs to be instructed how to map nodes that were removed in new definition if the active process instance is at the moment in such a node.
Node mapping is given as a map of node IDs (unique IDs that are set in the definition) where key is the source node ID (from the process definition used by the process instance) to target node ID (in the new process definition).
Node mapping can only be used to map the same type of nodes, for example user task to user task.
Migration can either be performed for a single process instance or multiple process instances at the same time. Multiple process instances migration is a utility method on top of a single instance. Instead of calling it multiple times, you can call it once and then the service will take care of the migration of individual process instances.
Multi instance migration migrates each instance separately to ensure that one will not affect the other and then produces dedicated migration reports for each process instance.
20.3.7.1. Migration report
Migration is always concluded with a migration report for each process instance. The migration report provides the following information:
- start and end date of the migration
outcome of the migration
- success or failure
complete log entry
- all steps performed during migration
- entry can be INFO, WARN or ERROR (in case of ERROR there will be at most one as they are causing migration to be immediately terminated)
20.3.7.2. Known limitations
There are some process instance migration scenarios which are not supported at the moment:
- When a new or modified task requires inputs, which are not available in the new process instance.
- Modifying the tasks prior to the active task where the changes have an impact on further processing.
- Removing a human task, which is currently active (can only be replaced and requires to be mapped to another human task)
- Adding a new task parallel to the single active task (all branches in parallel gateway are not activated - process will stuck)
- Changing or removing the active recurring timer events (will not be changed in database)
- Fixing or updating inputs and outputs in an active task (task data are not migrated)
-
Node mapping updates only the task node name and description (other task fields will not be mapped including the
TaskNamevariable)
20.3.7.3. Example
Following is an example of how to invoke the migration:
// first deploy both versions
deploymentUnitV1 = new KModuleDeploymentUnit(MIGRATION_GROUP_ID, MIGRATION_ARTIFACT_ID, MIGRATION_VERSION_V1);
deploymentService.deploy(deploymentUnitV1);
// ... version 2
deploymentUnitV2 = new KModuleDeploymentUnit(MIGRATION_GROUP_ID, MIGRATION_ARTIFACT_ID, MIGRATION_VERSION_V2);
deploymentService.deploy(deploymentUnitV2);
// next start process instance in version 1
long processInstanceId = processService.startProcess(deploymentUnitV1.getIdentifier(), "processID-V1");
// and once the instance is active it can be migrated
MigrationReport report = migrationService.migrate(deploymentUnitV1.getIdentifier(), processInstanceId, deploymentUnitV2.getIdentifier(), "processID-V2");
// as last step check if the migration finished successfully
if (report.isSuccessful()) {
// do something
}20.3.8. Form Provider Service
The Form Provider Service provides access to the process and task forms. It is built on the concept of isolated form providers.
Implementations of the FormProvider interface must define a priority, as this is the main driver for the Form Provider Service to ask for the content of the form from a given provider. The Form Provider Service collects all available providers and iterates over them asking for the form content in the order of the specified priority. The lower the priority number, the higher priority it gets during evaluation. For example, a provider with priority 5 is evaluated before a provider with priority 10. FormProviderService iterates over available providers as long as one delivers the content. In a worse case scenario, it returns simple text-based forms.
The FormProvider interface shown below describes contract for the implementations:
public interface FormProvider {
int getPriority();
String render(String name, ProcessDesc process,
Map<String, Object> renderContext);
String render(String name, ProcessDesc process,
Task task, Map<String, Object> renderContext);
}
Red Hat JBoss BPM Suite comes with the following FormProvider implementations out of the box:
- Additional form provider available with the form modeler. The priority number of this form provider is 2.
- Freemarker based implementation to support process and task forms. The priority number of this form provider is 3.
- Default form provider that provides simplest possible forms. It has the lowest priority and is the last option if none of the other providers delivers content.
20.3.9. Executor Service
The Executor Service gives you access to the Job Executor, which provides advanced features for asynchronous execution (see Section 11.12.3, “Job Executor for Asynchronous Execution” for more details).
Executor Service provides:
- Scheduling and cancelling requests (execution of commands)
- Executor configuration (interval, number of retries, thread pool size)
- Administration operations (clearing requests and errors)
- Queries to access runtime data by various parameters (requests and errors)
20.4. CDI Integration
Apart from the API based approach, Red Hat JBoss BPM Suite 6 also provides the Context and Dependency Injection (CDI) to build your custom applications.
The jbpm-services-cdi module provides CDI wrappers of Section 20.3, “KIE Services” that enable these services to be injected in any CDI bean.
A workaround is needed on the Oracle WebLogic Server for CDI to work. For more information, see Additional Notes in the Red Hat JBoss BPM Suite Oracle WebLogic Installation and Configuration Guide.
20.4.1. Configuring CDI Integration
To use the KIE Services in your CDI container, you must provide several CDI beans for these services to satisfy their dependencies. For example:
- Entity manager and entity manager factory.
- User group callback for human tasks.
- Identity provider to pass authenticated user information to the services.
Here is an example of a producer bean that satisfies all the requirements of KIE Services in a Java EE environment, such as the Red Hat JBoss Enterprise Application Server (EAP):
public class EnvironmentProducer {
@PersistenceUnit(unitName = "org.jbpm.domain")
private EntityManagerFactory emf;
@Inject
@Selectable
private UserGroupInfoProducer userGroupInfoProducer;
@Inject
@Kjar
private DeploymentService deploymentService;
@Produces
public EntityManagerFactory getEntityManagerFactory() {
return this.emf;
}
@Produces
public org.kie.api.task.UserGroupCallback produceSelectedUserGroupCalback() {
return userGroupInfoProducer.produceCallback();
}
@Produces
public UserInfo produceUserInfo() {
return userGroupInfoProducer.produceUserInfo();
}
@Produces
@Named("Logs")
public TaskLifeCycleEventListener produceTaskAuditListener() {
return new JPATaskLifeCycleEventListener(true);
}
@Produces
public DeploymentService getDeploymentService() {
return this.deploymentService;
}
@Produces
public IdentityProvider produceIdentityProvider {
return new IdentityProvider() {
// implement identity provider
}
}
}
Provide an alternative for user group callback in the beans.xml configuration file. For example, the org.jbpm.kie.services.cdi.producer.JAASUserGroupInfoProducer class allows Red Hat JBoss EAP to reuse security settings on application server regardless of the settings (such as LDAP or DB):
<beans xmlns="http://java.sun.com/xml/ns/javaee"
xmlns:xsi="http://www.w3.org/2001/XMLSchema-instance"
xsi:schemaLocation="http://java.sun.com/xml/ns/javaee
http://docs.jboss.org/cdi/beans_1_0.xsd">
<alternatives>
<class>org.jbpm.kie.services.cdi.producer.JAASUserGroupInfoProducer</class>
</alternatives>
</beans>
Optionally, you can use several other producers provided to deliver components like process, agenda, WorkingMemory event listeners, and WorkItemHandlers. To provide these components, implement the following interfaces:
-
org.kie.internal.runtime.manager.WorkItemHandlerProducer -
org.kie.internal.runtime.manager.EventListenerProducer
CDI beans that implement the above-mentioned interfaces are collected at runtime and used when building a KieSession by the RuntimeManager.
20.4.2. Deployment Service as CDI Bean
Deployment Service fires CDI events when deployment units are deployed or undeployed. This allows application components to react real time to the CDI events and store or remove deployment details from the memory. An event with the @Deploy qualifier is fired on deployment; an event with the @Undeploy qualifier is fired on undeployment. You can use CDI observer mechanism to get a notification on these events.
20.4.2.1. Saving and Removing Deployments from Database
The deployment service stores the deployed units in memory by default. To save deployments in the data store of your choice:
public void saveDeployment(@Observes @Deploy DeploymentEvent event) {
DeployedUnit deployedUnit = event.getDeployedUnit();
// store deployed unit info for further needs
}To remove a saved deployment when undeployed:
public void removeDeployment(@Observes @Undeploy DeploymentEvent event) {
// remove deployment with ID event.getDeploymentId()
}The deployment service contains deployment synchronization mechanisms that enable you to persist deployed units into a database.
20.4.2.2. Available Deployment Services
You can use qualifiers to instruct the CDI container which deployment service to use. Red Hat JBoss BPM Suite contains the following Deployment Services:
-
@Kjar: A KIE module deployment service configured to work withKModuleDeploymentUnit; a small descriptor on top of a KJAR. -
@Vfs: A VFS deployment service that enables you to deploy assets from VFS (Virtual File System).
Note that every implementation of deployment service must have a dedicated implementation of deployment unit as the services mentioned above.
20.4.3. Runtime Manager as CDI Bean
You can inject RuntimeManager as CDI bean into any other CDI bean within your application. RuntimeManager comes with the following predefined strategies and each of them have CDI qualifiers:
-
@Singleton -
@PerRequest -
@PerProcessInstance
Though you can directly inject RuntimeManager as a CDI bean, it is recommended to utilize KIE services when frameworks like CDI, EJB or Spring are used. KIE services provide significant amount of features that encapsulate best practices when using RuntimeManager.
Here is an example of a producer method implementation that provides RuntimeEnvironment:
public class EnvironmentProducer {
// add the same producers as mentioned above in the configuration section
@Produces
@Singleton
@PerRequest
@PerProcessInstance
public RuntimeEnvironment produceEnvironment(EntityManagerFactory emf) {
RuntimeEnvironment environment = RuntimeEnvironmentBuilder.Factory.get()
.newDefaultBuilder()
.entityManagerFactory(emf)
.userGroupCallback(getUserGroupCallback())
.registerableItemsFactory(InjectableRegisterableItemsFactory
.getFactory(beanManager, null))
.addAsset(ResourceFactory.newClassPathResource("HiringProcess.bpmn2"),
ResourceType.BPMN2)
.addAsset(ResourceFactory.newClassPathResource("FiringProcess.bpmn2"),
ResourceType.BPMN2)
.get();
return environment;
}
}
In the example above, a single producer method is capable of providing RuntimeEnvironment for all strategies of RuntimeManager by specifying all qualifiers on the method level. Once a complete producer is available, you can inject RuntimeManager into the application CDI bean as shown below:
public class ProcessEngine {
@Inject
@Singleton
private RuntimeManager singletonManager;
public void startProcess() {
RuntimeEngine runtime = singletonManager.getRuntimeEngine(EmptyContext.get());
KieSession ksession = runtime.getKieSession();
ProcessInstance processInstance = ksession.startProcess("HiringProcess");
singletonManager.disposeRuntimeEngine(runtime);
}
}
It is recommended to use DeploymentService when you need multiple RuntimeManager instances active in your application instead of a single RuntimeManager.
As an alternative to DeploymentService, the application can inject RuntimeManagerFactory and then create RuntimeManager instance manually. In such cases, EnvironmentProducer remains the same as the DeploymentService. Here is an example of a simple ProcessEngine bean:
public class ProcessEngine {
@Inject
private RuntimeManagerFactory managerFactory;
@Inject
private EntityManagerFactory emf;
@Inject
private BeanManager beanManager;
public void startProcess() {
RuntimeEnvironment environment = RuntimeEnvironmentBuilder.Factory.get()
.newDefaultBuilder()
.entityManagerFactory(emf)
.addAsset(ResourceFactory.newClassPathResource("HiringProcess.bpmn2"),
ResourceType.BPMN2)
.addAsset(ResourceFactory.newClassPathResource("FiringProcess.bpmn2"),
ResourceType.BPMN2)
.registerableItemsFactory(InjectableRegisterableItemsFactory
.getFactory(beanManager, null))
.get();
RuntimeManager manager = managerFactory.newSingletonRuntimeManager(environment);
RuntimeEngine runtime = manager.getRuntimeEngine(EmptyContext.get());
KieSession ksession = runtime.getKieSession();
ProcessInstance processInstance = ksession.startProcess("HiringProcess");
manager.disposeRuntimeEngine(runtime);
manager.close();
}
}Chapter 21. Remote API
Red Hat JBoss BPM Suite provides various ways how to access the execution server in Business Central remotely including REST, JMS, SOAP, and EJB interfaces. Moreover, it provides remote Java API which allows developers to work with the RuntimeEngine interface while remote calls are executed in the background, using either REST or JMS.
It is not recommended to use Business Central remote APIs to any further extent, with the exception of the Knowledge Store REST API. Instead, Intelligent Process Server should be used. Both execution servers can be configured to use the same data source, thus processes and tasks started on one server are accessible from the other server. See section Unified Execution Servers of Red Hat JBoss BPM Suite Administration and Configuration Guide for more details.
21.1. REST API
Representational State Transfer (hereinafter referred to as REST) is a style of software architecture of distributed systems. It enables a highly abstract client-server communication: clients initiate requests to servers to a particular URL with parameters if needed and servers process the requests and return appropriate responses based on the requested URL. The requests and responses are built around the transfer of representations of resources. A resource can be any coherent and meaningful concept that may be addressed, such as a repository, a process, a rule, and so on.
Red Hat JBoss BPM Suite and Red Hat JBoss BRMS provide a REST API for individual application components. The REST API implementations differ slightly:
- Knowledge Store REST API calls interact with the artifact repository and are mostly asynchronous, which means that they continue running after the call as a job. The calls return a job ID which can be used after the REST API call was performed to request the job status and verify whether the job finished successfully. Parameters of these calls are provided in the form of JSON entities. See Section 21.1.1, “Knowledge Store REST API”.
The following APIs are only available in Red Hat JBoss BPM Suite.
- Deployment REST API calls perform actions on deployments or retrieve information about one ore more deployments. See Section 21.1.2, “Deployment REST API”.
- The Process Image REST API allows you to get a diagram of your process in Business Central through the remote REST API. See Section 21.1.3, “Process Image REST API”.
- Runtime REST API calls interact with the process engine, task service, and business rule engine in Business Central. See Section 21.1.4, “Runtime REST API”.
- The REST Query API allows developers to query tasks, process instances, and their variables. The operations results are grouped by the given process instance. See Section 21.1.5, “REST Query API”.
All REST API calls use the following URL with the request body: http://SERVER:PORT/business-central/rest/REQUEST_BODY.
It is not possible to issue REST API calls on project resources, such as rule files, work item definitions, process definition files, and so on. Operations on such files should be performed using Git and its REST API directly.
21.1.1. Knowledge Store REST API
REST API calls to the Knowledge Store REST API allow you to manage the organization units, repositories, and projects.
All POST and DELETE calls return details about the request as well as a job ID that can be used to request the job status and verify whether the job finished successfully. The GET calls return information about repositories, projects, and organizational units.
Parameters and results of these calls are provided in the form of JSON entities. Java classes for different entities are available in the org.guvnor.rest.client package and are referenced in the following text.
21.1.1.1. Job Calls
Most Knowledge Store REST calls return a job ID after they are issued. This is necessary as the calls are asynchronous and it is required to be able to reference the job later to check its status as it goes through a job lifecycle.
During its lifecycle, a job can have the following statuses:
| Status | Description |
|---|---|
|
| The job was accepted and is being processed. |
|
| The request was not accepted as it contained incorrect content. |
|
| The requested resource (path) does not exist. |
|
| The resource already exists. |
|
| An error on the server side occurred. |
|
| The job finished successfully. |
|
| The job failed. |
|
| The job was approved. |
|
| The job was denied. |
|
|
The job ID could not be found. A job can be
|
The following job calls are provided:
- [GET] /jobs/JOB_ID
Returns a status of the given
JOB_ID.Example 21.1. Formatted Response to GET Job Call on Repository Clone Request
{ "status" : "SUCCESS", "jobId" : "1377770574783-27", "result" : "Alias: testInstallAndDeployProject, Scheme: git, Uri: git://testInstallAndDeployProject", "lastModified" : 1377770578194, "detailedResult" : null }- [DELETE] /jobs/JOB_ID
-
Removes a job with the given
JOB_ID. If the job is not being processed yet, the call will remove the job from the job queue. However, this call will not cancel or stop an ongoing job.
Both of these job calls return a JobResult instance.
21.1.1.2. Organizational Unit Calls
Organizational unit calls are calls to the Knowledge Store that allow you to manage its organizational units which are useful to model departments and divisions. An organization unit can hold multiple repositories.
The following organizational unit calls are provided:
- [GET] /organizationalunits/
Returns a list of all organizational units.
Example 21.2. Organizational Unit List in JSON Format
[ { "name" : "EmployeeWage", "description" : null, "owner" : "Employee", "defaultGroupId" : "org.bpms", "repositories" : [ "EmployeeRepo", "OtherRepo" ] }, { "name" : "OrgUnitName", "description" : null, "owner" : "OrgUnitOwner", "defaultGroupId" : "org.group.id", "repositories" : [ "repository-name-1", "repository-name-2" ] } ]- [GET] /organizationalunits/ORGANIZATIONAL_UNIT_NAME
- Returns information about a specific organizational unit.
- [POST] /organizationalunits/
Creates an organizational unit in the Knowledge Store. The organizational unit is defined as a JSON entity. The call requires an
OrganizationalUnitinstance and returns aCreateOrganizationalUnitRequestinstance.Example 21.3. Organizational Unit in JSON Format
{ "name" : "testgroup", "description" : "", "owner" : "tester", "repositories" : ["testGroupRepository"] }- [POST] /organizationalunits/ORGANIZATIONAL_UNIT_NAME
Updates the details of an existing organizational unit.
Both the
nameandownerfields in the requiredUpdateOrganizationalUnitinstance can be left empty. Neither thedescriptionfield nor the repository association can be updated using this operation.Example 21.4. Update Organizational Unit Input in JSON Format
{ "owner" : "NewOwner", "defaultGroupId" : "org.new.default.group.id" }- [DELETE] /organizationalunits/ORGANIZATIONAL_UNIT_NAME
- Removes a specified organizational unit.
- [POST] /organizationalunits/ORGANIZATIONAL_UNIT_NAME/repositories/REPOSITORY_NAME
- Adds a repository to an organizational unit.
- [DELETE] /organizationalunits/ORGANIZATIONAL_UNIT_NAME/repositories/REPOSITORY_NAME
- Removes a repository from an organizational unit.
21.1.1.3. Repository Calls
Repository calls are calls to the Knowledge Store that allow you to manage its Git repositories and their projects.
The following repository calls are provided:
- [GET] /repositories
Returns a list of repositories in the Knowledge Store.
Example 21.5. Response of Repository Call
[ { "name": "bpms-assets", "description": "generic assets", "userName": null, "password": null, "requestType": null, "gitURL": "git://bpms-assets" }, { "name": "loanProject", "description": "Loan processes and rules", "userName": null, "password": null, "requestType": null, "gitURL": "git://loansProject" } ]- [GET] /repositories/REPOSITORY_NAME
- Returns information about a specific repository.
- [DELETE] /repositories/REPOSITORY_NAME
- Removes a repository.
- [POST] /repositories/
Creates or clones a repository defined by a JSON entity.
Example 21.6. JSON Entity with Details about Repository to Be Cloned
{ "name": "myClonedRepository", "organizationalUnitName": "example", "description": "", "userName": "", "password": "", "requestType": "clone", "gitURL": "git://localhost/example-repository" }Example 21.7. JSON Entity with Details about Repository to Be Created
{ "name": "myCreatedRepository", "organizationalUnitName": "example", "description": "", "userName": "", "password": "", "requestType": "create", "gitURL": "git://localhost/example-repository" }ImportantMake sure you always include the
organizationalUnitNamekey-value pair in your query and that the specified organization unit exists before you create or clone the repository.- [GET] /repositories/REPOSITORY_NAME/projects/
Returns a list of projects in a specific repository as a JSON entity.
Example 21.8. JSON Entity with Details about Existing Projects
[ { "name" : "my-project-name", "description" : "A project to illustrate a REST output.", "groupId" : "com.acme", "version" : "1.0" }, { "name" : "yet-another-project-name", "description" : "Yet another project to illustrate a REST output.", "groupId" : "com.acme", "version" : "2.2.1" } ]- [POST] /repositories/REPOSITORY_NAME/projects/
Creates a project in a repository.
Example 21.9. Request Body That Defines Project to Be Created
{ "name" : "NewProject", "description" : "Description of the new project.", "groupId" : "org.redhat.test", "version" : "1.0.0" }- [DELETE] /repositories/REPOSITORY_NAME/projects/PROJECT_NAME
- Removes a project in a repository.
21.1.1.4. Maven Calls
Maven calls are calls to a project in the Knowledge Store that allow you to compile and deploy the project resources.
The following Maven calls are provided:
- [POST] /repositories/REPOSITORY_NAME/projects/PROJECT_NAME/maven/compile/
-
Compiles the project. Equivalent to
mvn compile. Returns aCompileProjectRequestinstance. - [POST] /repositories/REPOSITORY_NAME/projects/PROJECT_NAME/maven/install/
-
Installs the project. Equivalent to
mvn install. Returns aInstallProjectRequestinstance. - [POST] /repositories/REPOSITORY_NAME/projects/PROJECT_NAME/maven/test/
-
Compiles and runs the tests. Equivalent to
mvn test. Returns aTestProjectRequestinstance. - [POST] /repositories/REPOSITORY_NAME/projects/PROJECT_NAME/maven/deploy/
-
Deploys the project. Equivalent to
mvn deploy. Returns aDeployProjectRequestinstance.
21.1.2. Deployment REST API
The KIE module JAR files can be deployed or undeployed using the Business Central UI or the REST API calls.
Deployment units are represented by a unique deployment ID consisting of the following elements separated by colons:
- Group ID
- Artifact ID
- Version
- KIE base ID (optional)
- KIE session ID (optional)
21.1.2.1. Deployment Calls
The following deployment calls are provided:
- [GET] /deployment/
-
Returns a list of all available deployed instances in a
JaxbDeploymentUnitListinstance. - [GET] /deployment/processes
-
Returns a list of all available deployed process definitions in a
JaxbProcessDefinitionListinstance. - [GET] /deployment/DEPLOYMENT_ID
-
Returns an instance of
JaxbDeploymentUnitcontaining the information about a deployment unit, including its configuration. - [POST] /deployment/DEPLOYMENT_ID/deploy
Deploys a deployment unit referenced by
DEPLOYMENT_ID. The call returns aJaxbDeploymentJobResultinstance with a status of the request.The deploy operation is asynchronous. Use the described GET calls to get a status of the deployment.
When a project is deployed, it is activated by default: new process instances can be started using the process definitions and other information in the deployment. However, at later point in time, users may want to make sure that the deployment is no longer used without necessarily aborting or stopping the existing (running) process instances. To do so, the deployment can first be deactivated before it will be removed at a later date.
NoteConfiguration options such as the runtime strategy should be defined before deploying the JAR files and cannot be changed post deployment.
To override the session strategy specified in the deployment descriptor, use the
strategyquery parameter. The following not case-sensitive values are supported:-
SINGLETON -
PER_REQUEST -
PER_PROCESS_INSTANCE
For example:
[POST] /deployment/DEPLOYMENT_ID/deploy?strategy=PER_REQUESTTo use a specific merge mode in the deployment request, specify the
mergemodequery parameter. The following not case-sensitive values are supported:-
KEEP_ALL -
OVERRIDE_ALL -
OVERRIDE_EMPTY -
MERGE_COLLECTIONS
It is possible to post a deployment descriptor or its fragment with the deployment request, which allows to override other deployment descriptors. To do so, set a content type of the request to
application/xmland make sure the request body is a valid deployment descriptor content, for example:<deployment-descriptor xsi:schemaLocation="http://www.jboss.org/jbpm deployment-descriptor.xsd" xmlns:xsi="http://www.w3.org/2001/XMLSchema-instance"> <audit-mode>JMS</audit-mode> </deployment-descriptor>WarningTo avoid the Unsupported Media Type error on Oracle WebLogic Server, make sure the
deployment-descriptoris always provided, even as an empty-element tag, and the header is specified asContent-Type. See the example call:curl -v -H 'Content-Type: application/xml' -u bpmsAdmin --data "<deployment-descriptor/>" -X POST 'localhost:7001/business-central/rest/deployment/com.sample:bpm-processes:1.1/deploy'-
- [POST] /deployment/DEPLOYMENT_ID/undeploy
Undeploys a deployment unit with a specified
DEPLOYMENT_IDand returns aJaxbDeploymentJobResultinstance with a status of the request.The undeploy operation is asynchronous. Use the described GET calls to get the status of the deployment.
The deploy and undeploy operations can fail if one of the following is true:
- An identical job has already been submitted to the queue and has not yet completed.
-
The amount of
deployandundeployjobs submitted but not yet processed exceeds the job cache size.
- [POST] /deployment/DEPLOYMENT_ID/activate
Activates a deployment. Returns a
JaxbDeploymentJobResultinstance with a status of the request.The
activateoperation is asynchronous.- [POST] /deployment/DEPLOYMENT_ID/deactivate
Deactivates a deployment. Returns a
JaxbDeploymentJobResultinstance with a status of the request.The
deactivateoperation is asynchronous.
-
The
deactivateoperation ensures that no new process instances can be started with the existing deployment. -
If it is decided that a deactivated deployment should be reactivated instead of deleted, the
activateoperation should be used to reactivate the deployment. A deployment is always activated by default when it is initially deployed.
In version 6.4 of the product, start timer events keep starting new process instances after a deployment is deactivated. This is a known issue.
- [GET] /deployment/DEPLOYMENT_ID/processes
-
Lists all available process definitions in a given deployment unit. Returns an instance of
JaxbProcessDefinitionList.
21.1.2.2. Asynchronous Calls
The following deployment calls described in the previous section are asynchronous REST operations:
-
/deployment/DEPLOYMENT_ID/deploy -
/deployment/DEPLOYMENT_ID/undeploy -
/deployment/DEPLOYMENT_ID/activate -
/deployment/DEPLOYMENT_ID/deactivate
Asynchronous calls allow a user to issue a request and continue to the next task before the previous task in the queue is finished. Therefore, the information received after posting a call does not reflect the actual state or eventual status of the operation. It returns a status 202 upon the completion of the request: "The request has been accepted for processing, but the processing has not been completed."
This means that:
-
The POST request has been successfully queued, but the result of the actual operation (deploying or undeploying the deployment unit) cannot be determined from this code. Interrogate the
JaxbDeploymentUnitobject returned by the GET/deployment/DEPLOYMENT_IDcall to obtain that state. -
The
JaxbDeploymentUnitobject returned using the GET request is only valid for the point in time which it was checked. Its status may change after the GET request has completed.
21.1.3. Process Image REST API
Red Hat JBoss BPM Suite allows you to get a diagram of your process in Business Central through the remote REST API. To get the diagram, you need to generate the image based on the SVG source first, which is done automatically by the process designer when you save a process definition.
To ensure that the process is saved in the process designer as SVG and is added to the kJAR, set <storesvgonsave enabled="true"/> in the /org.kie.workbench.KIEWebapp/profiles/jbpm.xml file in business-central.war. SVGImageProcessor adds further annotations based on the audit log data. You can extend SVGImageProcessor further for more advanced visualizations.
It is recommended to use Intelligent Process Server instead of Business Central. Chapter 18, Intelligent Process Server UI Extension provides a richer set of REST endpoints, including process diagram images as well as process and task forms.
The following process image REST operations are provided by Business Central:
- [GET] /runtime/DEPLOYMENT_ID/process/PROCESS_DEFINITION_ID/image
- Returns an SVG image of the process definition diagram.
- [GET] /runtime/DEPLOYMENT_ID/process/PROCESS_DEFINITION_ID/image/PROCESS_INSTANCE_ID
- Returns an SVG image of the process instance diagram, with highlighted currently active nodes.
21.1.4. Runtime REST API
Runtime REST API provided by Business Central allows you to work with its underlying execution server, including process engine, task service, and business rule engine, and manipulate runtime data.
It is recommended to use Intelligent Process Server instead of Business Central for all remote calls. See Chapter 16, The REST API for Intelligent Process Server Execution for more information about equivalent REST endpoints.
With the exception of execute operations (see Section 21.1.6, “Execute Operations”), all the other REST calls can use JAXB or JSON. The calls are synchronous and return the requested data as JAXB objects by default. When using JSON, the JSON media type (application/json) should be added to the ACCEPT header of the REST call.
21.1.4.1. Query Parameters
The Runtime REST API calls can have various query parameters. To add a parameter to a call, add the ? symbol to the URL and a parameter name with its value. For example, http://localhost:8080/business-central/rest/task/query?workItemId=393 returns a list of all tasks (TaskSummary instances) based on the work item with ID 393. Note that parameters and their values are case sensitive.
21.1.4.1.1. Map Parameters
Some runtime REST API calls can use the Map parameter. That means it is possible to submit key-value pairs to the operation using a query parameter prefixed with the map_ keyword. For example,
map_age=5000is translated as
{ "age" => Long.parseLong("5000") }Example 21.10. GET Call That Returns All Tasks to Locally Running Application Using curl
curl -v -H 'Accept: application/json' -u eko 'localhost:8080/business-central/rest/tasks/'To perform the runtime REST calls from your Java application, see Section 21.5, “Remote Java API”.
While interacting with the Remote API, some classes are to be included in the deployment. This enables users to pass instances of their own classes as parameters to certain operations. The REST calls that start with /task often do not contain any information about the associated deployment. In this case, an extra query parameter deploymentId is added to the REST call allowing the server to find the appropriate deployment class and deserialize the information passed with the call.
21.1.4.1.2. Pagination
The pagination parameters allow you to define pagination of REST call results. The following pagination parameters are available:
pageorp-
A number of the page to be returned. The default value is
1, which means that page number1is returned. pageSizeors-
A number of items per page. The default value is
10.
If both the long option and the short option are included in a URL, the longer version of the parameter takes precedence. When no pagination parameters are included, the returned results are not paginated.
Pagination parameters can be applied to the following REST requests:
-
/task/query -
/history/instances -
/history/instance/* -
/task/query
Example 21.11. REST Request Body with Pagination Parameter
/history/instances?page=3&pageSize=20
/history/instances?p=3&s=2021.1.4.1.3. Object Data Type Parameters
By default, any object parameters provided in a REST call are considered to be strings. If you need to explicitly define the data type of a parameter in a call, you can do so by adding one of the following values to the parameter:
-
\d+i: Integer -
\d+l: Long
Example 21.12. REST Request Body with Integer Parameter
/rest/runtime/business-central/process/org.jbpm.test/start?map_var1=1234i
Note that the intended use of these object parameters is to define data types of send signal and process variable values. For example, consider the use in the startProcess command in the execute operation. See Section 21.1.6, “Execute Operations”.
21.1.4.2. Runtime Calls
Runtime REST calls allow you to work with runtime data such as process instances, signals, and work items.
If you want to use other features of the execution engine that are not available as direct REST calls, look at generic execute operations. See Section 21.1.6, “Execute Operations”.
21.1.4.2.1. Process Calls
Process calls allow you to start new process instances, abort the existing ones, and get details about running process instances and their variables.
The following runtime process calls are provided:
- [POST] /runtime/DEPLOYMENT_ID/process/PROCESS_DEFINITION_ID/start
Starts a new instance of
PROCESS_DEFINITION_IDprocess and returnsJaxbProcessInstanceResponsewith information about the process instance.This operation accepts map parameters. For more information, see Section 21.1.4.1.1, “Map Parameters”. If you want to pass custom classes, use Remove Java API. See Section 21.5, “Remote Java API”.
- [POST] /runtime/DEPLOYMENT_ID/withvars/process/PROCESS_DEFINITION_ID/start
-
Starts a new instance of
PROCESS_DEFINITION_IDprocess and returnsJaxbProcessInstanceWithVariablesResponsewith information about the process instance including process variables. - [GET] /runtime/DEPLOYMENT_ID/process/PROCESS_DEFINITION_ID/startform
-
If the
PROCESS_DEFINITION_IDprocess exists, returnsJaxbProcessInstanceFormResponsecontaining a URL where the process form can be found. - [POST] /runtime/DEPLOYMENT_ID/process/instance/PROCESS_INSTANCE_ID/abort
-
Aborts the process instance and returns
JaxbGenericResponseindicating success or failure of the operation. - [GET] /runtime/DEPLOYMENT_ID/process/instance/PROCESS_INSTANCE_ID
-
Returns
JaxbProcessInstanceResponsewith details about the active process instance. - [GET] /runtime/DEPLOYMENT_ID/withvars/process/instance/PROCESS_INSTANCE_ID
-
Returns
JaxbProcessInstanceWithVariablesResponsewith details about the active process instance including process variables. - [GET] /runtime/DEPLOYMENT_ID/process/instance/PROCESS_INSTANCE_ID/variable/VARIABLE_NAME
-
Returns the
VARIABLE_NAMEvariable in thePROCESS_INSTANCE_IDprocess instance. If the variable is primitive, the variable value is returned.
21.1.4.2.2. Signal Calls
Signal calls allow you to send a signal to a deployment or a particular process instance.
All signal calls accept the following query parameters:
-
signal: the name of the signal event (required). -
event: the data associated with this event.
The following signal calls are provided:
- [POST] /runtime/DEPLOYMENT_ID/signal
Sends a signal event to all active process instances as well as process definitions with a
Signalstart event (see Section 11.5.1, “Start Events”) in the given deployment unit. ReturnsJaxbGenericResponsewith the status of the operation.Example 21.13. Signal Call Example
/runtime/DEPLOYMENT_ID/signal?signal=SIGNAL_CODEWarningThere is a known issue preventing this operation to work with deployment units using the Per Process Instance runtime strategy.
- [POST] /runtime/DEPLOYMENT_ID/process/instance/PROCESS_INSTANCE_ID/signal
Sends a signal event to the given process instance and returns
JaxbGenericResponsewith a status of the operation.Example 21.14. Local Signal Invocation and Its REST Version
ksession.signalEvent("MySignal", "value", 23l);curl -v -u admin 'localhost:8080/business-central/rest/runtime/myDeployment/process/instance/23/signal?signal=MySignal&event=value'- [POST] /runtime/DEPLOYMENT_ID/withvars/process/instance/PROCESS_INSTANCE_ID/signal
-
Sends a signal event to the given process instance and returns
JaxbProcessInstanceWithVariablesResponse.
21.1.4.2.3. Work Item Calls
Work item calls allow you to complete or abort a particular work item as well as get details about a work item instance.
The parameters of work item calls must match the following regular expressions:
-
DEPLOYMENT_ID:(:[\\w\\.-]){2,2}(:[\\w\\.-]*){0,2}} -
WORK_ITEM_ID:[0-9]+
The following work item calls are provided:
- [GET] /runtime/DEPLOYMENT_ID/workitem/WORK_ITEM_ID
-
Returns
JaxbWorkItemResponsewith details about a work item with the givenWORK_ITEM_ID. - [POST] /runtime/DEPLOYMENT_ID/workitem/WORK_ITEM_ID/complete
Completes the given work item.
The call accepts map parameters containing information about the results. See Section 21.1.4.1.1, “Map Parameters”.
Example 21.15. Local Invocation and Its REST Version
Map<String, Object> results = new HashMap<String, Object>(); results.put("one", "done"); results.put("two", 2); kieSession.getWorkItemManager().completeWorkItem(23l, results);curl -v -u admin 'localhost:8080/business-central/rest/runtime/myDeployment/workitem/23/complete?map_one=done&map_two=2i'- [POST] /runtime/DEPLOYMENT_ID/workitem/WORK_ITEM_ID/abort
- Aborts the given work item.
21.1.4.2.4. History Calls
The history calls allow you to access audit log information about process instances.
The following history calls are provided:
- [GET] /history/instances
- Returns logs of all process instances.
- [GET] /history/instance/PROCESS_INSTANCE_ID
- Returns all logs of the given process instance, including subprocesses.
- [GET] /history/instance/PROCESS_INSTANCE_ID/child
- Returns logs of subprocesses of the given process instance.
- [GET] /history/instance/PROCESS_INSTANCE_ID/node
- Returns logs of all nodes of the given process instance.
- [GET] /history/instance/PROCESS_INSTANCE_ID/node/NODE_ID
- Returns logs of the specified node of the given process instance.
- [GET] /history/instance/PROCESS_INSTANCE_ID/variable
- Returns variable logs of the given process instance.
- [GET] /history/instance/PROCESS_INSTANCE_ID/variable/VARIABLE_ID
- Returns a variable log of the specified variable of the given process instance.
- [GET] /history/process/PROCESS_INSTANCE_ID
- Returns logs of the given process instance, excluding logs of its nodes and variables.
- [POST] /history/clear
- Clears all process, variable, and node logs.
History Variable Calls
In the following REST calls, variables are used to search process instances, variables, and their values.
The calls below accept an optional boolean query parameter:
-
activeProcesses: if set to true, only the information from active process instances is returned.
The following history variable calls are provided:
- [GET] /history/variable/VARIABLE_ID
- Returns variable logs of the given process variable.
- [GET] /history/variable/VARIABLE_ID/value/VALUE
Returns variable logs of the given process variable with the specified value.
Example 21.16. Local Invocation and Its REST Version
auditLogService.findVariableInstancesByNameAndValue("countVar", "three", true);curl -v -u admin 'localhost:8080/business-central/rest/history/variable/countVar/value/three?activeProcesses=true'- [GET] /history/variable/VARIABLE_ID/instances
- Returns process instance logs for the processes that contain the given process variable.
- [GET] /history/variable/VARIABLE_ID/value/VALUE/instances
- Returns process instance logs for the processes that contain the given process variable with the specified value.
21.1.4.3. Task Calls
The task calls allow you to execute task operations as well as query the tasks and get task details.
The following task calls are provided:
- [GET] /task/TASK_ID
-
Returns
JaxbTaskwith details about the given task. - [POST] /task/TASK_ID/TASK_OPERATION
- Executes the given task operation. For more information, see Section 21.1.4.3.1, “Task Operations”.
- [GET] /task/TASK_ID/content
-
Returns
JaxbContentwith a content of the given task. For more information, see Section 21.1.4.3.2, “Content Operations”. - [GET] /task/content/CONTENT_ID
-
Returns
JaxbContentwith a task content. For more information, see Section 21.1.4.3.2, “Content Operations”. - [GET] /task/query
-
Another entry point for the
/query/runtime/taskcalls of the REST Query API. See Section 21.1.5, “REST Query API”.
21.1.4.3.1. Task Operations
The following operations can be executed on a task:
| Task | Action |
|---|---|
|
| Activate the task. |
|
| Claim the task. |
|
| Claim the next available task assigned to the user. |
|
| Complete the task with the specified map parameters. See Section 21.1.4.1.1, “Map Parameters”. |
|
|
Delegate the task to the user specified by the |
|
| Exit the task.
This operation can be performed by any user or a group specified as the administrator of a human task. If the task does not specify any values, the system automatically adds user |
|
| Fail the task. |
|
| Forward the task. |
|
| Release the task. |
|
| Resume the task. |
|
| Skip the task. |
|
| Start the task. |
|
| Stop the task. |
|
| Suspend the task. |
|
|
Nominate either a user or a group, specified by the |
21.1.4.3.2. Content Operations
Both task and content operations return the serialized content associated with the given task.
The content associated with a task is stored in a database in a serialized form either as a string with XML data or a map with several different key-value pairs. The content is serialized using the algorithm based on Protocol Buffers: protobuf. This serialization process is usually executed by the static methods in the org.jbpm.services.task.utils.ContentMarshallerHelper class.
If the client that calls the task content operation do not have access to the org.jbpm.services.task.utils.ContentMarshallerHelper class, the task content cannot be deserialized. When using the REST call to obtain task content, the content is first deserialized using the ContentMarshallerHelper class and then serialized with the common Java serialization mechanism.
Due to restrictions of REST operations, only the objects for which the following is true can be returned by the task content operations:
-
The requested objects are instances of a class that implements the
Serializableinterface. In the case ofMapobjects, they only contain values that implement theSerializableinterface. - The objects are not instances of a local class, an anonymous class, or arrays of a local or an anonymous class.
- The object classes are present on the class path of the server application.
21.1.5. REST Query API
The REST Query API allows developers to query tasks, process instances, and their variables. The operations results are grouped by the process instance they belong to.
21.1.5.1. URL Layout
The rich query operations can be performed using the following URLs:
http://SERVER:PORT/business-central/rest/query/runtime/taskRich query for task summaries and process variables.
http://SERVER:PORT/business-central/rest/query/runtime/processRich query for process instances and process variables.
You can specify a number of different query parameters. For more information, see Section 21.1.5.2, “Query Parameters”.
21.1.5.2. Query Parameters
In the text below, query parameters are strings such as processInstanceId, taskId, or tid. These query parameters are not case sensitive, with the exception of those also specifying the name of a user-defined variable. Parameters are the values passed with query parameters, for example org.process.frombulator, 29, or harry.
When you submit a REST call to the query operation, the URL could be similar to the following:
http://localhost:8080/business-central/rest/query/runtime/process?processId=org.process.frombulator&piid=29A query containing multiple query parameters searches for their intersection. However, many of the query parameters described later can be entered multiple times. In such case, the query searches for any results that match one or more of the entered values.
Example 21.17. Repeated Query Parameters
processId=org.example.process&processInstanceId=27&processInstanceId=29
This process instance query returns a result that contains information about process instances with the org.example.process process definition and ID 27 or 29.
When running Business Central on WebSphere application server, the server ignores the parameters of REST Query API calls without a value (for example http://localhost:9080/business-central/rest/query/runtime/process?vv=john&all). However, the server accepts the call if you specify an empty value for these parameters. For example http://localhost:9080/business-central/rest/query/runtime/process?vv=john&all=.
21.1.5.2.1. Range and Regular Expression Parameters
There are two ways to define a value of a query parameter: using ranges or a simple regular expression.
21.1.5.2.2. Range Query Parameters
To define the start of a range, add _min to the parameter’s name. To define the end of a range, add _max to the parameter’s name. Range ends are inclusive.
Defining only one end of the range results in querying on an open ended range.
Example 21.18. Range Parameters
processId=org.example.process&taskId_min=50&taskId_max=53
This task query returns a result that contains only the information about tasks associated with the org.example.process process definition and the tasks that have an ID between 50 and 53, inclusive.
The following tak query differs:
processId=org.example.process&taskId_min=52
This task query returns a result that contains only the information about tasks associated with the org.example.process process definition and the tasks that have an ID larger than or equal to 52.
21.1.5.2.3. Regular Expression Query Parameters
To use regular expressions in a query parameter, add _re to the parameter’s name. The regular expression language contains two special characters:
-
*means 0 or more characters -
.means 1 character
The slash character (\) is not interpreted.
Example 21.19. Regular Expression Parameters
processId_re=org.example.*&processVersion=2.0This process instance query returns a result that fulfills the following:
Contains only the information about process instances associated with a process definition whose name matches the regular expression
org.example.*. This includes:-
org.example.process -
org.example.process.definition.example.long.name -
orgXexampleX
-
-
Contains only the information about process instances that have process version
2.0.
21.1.5.3. List of Query Parameters
Query parameters that can be defined in ranges have an X in the MIN/MAX column. Query parameters that use regular expressions have an X in the Regex column. The last column describes whether a query parameter can be used in task queries, process instance queries, or both.
- processinstanceid
The process instance ID.
Expand Short Form Regex MIN/MAX Task, Process piidX
T, P
- processid
The process definition ID.
Expand Short Form Regex MIN/MAX Task, Process pidX
T, P
- deploymentid
The deployment ID.
Expand Short Form Regex MIN/MAX Task, Process didX
T, P
- taskid
The task ID.
Expand Short Form Regex MIN/MAX Task, Process tidX
T
- initiator
The task initiator or creator.
Expand Short Form Regex MIN/MAX Task, Process initX
T
- potentialowner
The task potential owner.
Expand Short Form Regex MIN/MAX Task, Process poX
T
- taskowner
The task owner.
Expand Short Form Regex MIN/MAX Task, Process toX
T
- businessadmin
The task business administrator.
Expand Short Form Regex MIN/MAX Task, Process baX
T
- taskstatus
The task status.
Expand Short Form Regex MIN/MAX Task, Process tstT
- processinstancestatus
The process instance status.
Expand Short Form Regex MIN/MAX Task, Process pistT, P
- processversion
The process version.
Expand Short Form Regex MIN/MAX Task, Process pvX
T, P
- startdate
The process instance start date.1
Expand Short Form Regex MIN/MAX Task, Process stdtX
T, P
- enddate
The process instance end date.1
Expand Short Form Regex MIN/MAX Task, Process edtX
T, P
- varid
The variable ID.
Expand Short Form Regex MIN/MAX Task, Process vidX
T, P
- varvalue
The variable value.
Expand Short Form Regex MIN/MAX Task, Process vvX
T, P
- var
The variable ID and value.2
Expand Short Form Regex MIN/MAX Task, Process varT, P
- varregex
The variable ID and value.3
Expand Short Form Regex MIN/MAX Task, Process vrX
T, P
- all
Retrieves all variable instance logs.4
Expand Short Form Regex MIN/MAX Task, Process allT, P
[1] The date operations require strings with the yy-MM-dd_HH:mm:ss date format as their values. However, you can submit only a part of the date:
-
Submitting only the date (
yy-MM-dd) means that a time of 00:00:00 is used (the beginning of the day). -
Submitting only the time (
HH:mm:ss) means that the current date is used.
| Date String | Actual Meaning |
|---|---|
|
| May 29th, 2015, 13:40:12 (1:40:12 PM) |
|
| November 20th, 2014, 00:00:00 |
|
| Today, 9:30:00 (AM) |
For more information about the used format, see the Class SimpleDateFormat documentation.
[2] The var query parameter is used differently than other parameters. If you want to specify both the variable ID and the value of a variable, as opposed to just the variable ID, do so by using the var query parameter. The syntax is var_{VARIABLE_ID}={VARIABLE_VALUE}.
For example, the query parameter and parameter pair var_myVar=foo3 queries for process instances with a variable called myVar that have value foo3.
[3] The varreggex (or just vr) parameter works similarly as the var query parameter. The value part of the query parameter can be a regular expression.
[4] By default, only the information from the latest variable instance logs is retrieved. Using this parameters, you can retrieve all the variable instance logs that match the given criteria.
| Parameter | Short Form | Example |
|---|---|---|
|
|
|
|
|
|
|
|
|
|
|
|
|
|
|
|
|
|
|
|
|
|
|
|
|
|
|
|
|
|
|
|
|
|
|
|
|
|
|
|
|
|
|
|
|
|
|
|
|
|
|
|
|
|
|
|
|
|
|
|
|
|
|
|
|
|
|
|
|
|
|
|
|
|
|
|
|
|
|
|
21.1.5.4. Query Output Format
The REST Query API calls return the following results:
-
JaxbQueryProcessInstanceResultfor all process instance queries. -
JaxbQueryTaskResultfor all task queries.
21.1.6. Execute Operations
For remote communication, it is recommended to use the Remote Java API. See Section 21.5, “Remote Java API”.
For performing runtime operations that involves passing a custom Java object used in the process (such as starting a process instance with process variables, or completing a task with task variables), you can use the approach mentioned in Section 21.5.2.3, “Custom Model Objects and Remote API”.
If it is not possible to use the Remote Java API or if your requirement is to use the REST API directly, you may consider using the execute operations. While the REST API accepts only string or integer values as parameters, the execute operation allows you to send complex Java objects to perform Red Hat JBoss BPM Suite runtime operations.
The execute operations are created to support the Remote Java API. Use the operations only in exceptional circumstances, such as:
- When you need to pass complex objects as parameters.
-
When it is not possible to use
/runtimeor/taskendpoints.
Additionally, you can consider using the execute operations in cases when you are running any other client besides Java.
In the following example, a complex object org.MyPOJO is passed as a parameter to start a process:
package com.redhat.gss.jbpm;
import java.io.StringReader;
import java.io.StringWriter;
import java.net.URL;
import java.nio.charset.Charset;
import java.util.ArrayList;
import java.util.List;
import javax.ws.rs.core.MediaType;
import javax.xml.bind.JAXBContext;
import javax.xml.bind.JAXBException;
import javax.xml.bind.Marshaller;
import javax.xml.bind.Unmarshaller;
import org.MyPOJO;
import org.apache.commons.codec.binary.Base64;
import org.jboss.resteasy.client.ClientRequest;
import org.jboss.resteasy.client.ClientRequestFactory;
import org.jboss.resteasy.client.ClientResponse;
import org.kie.api.command.Command;
import org.kie.remote.client.jaxb.JaxbCommandsRequest;
import org.kie.remote.client.jaxb.JaxbCommandsResponse;
import org.kie.remote.jaxb.gen.JaxbStringObjectPairArray;
import org.kie.remote.jaxb.gen.StartProcessCommand;
import org.kie.remote.jaxb.gen.util.JaxbStringObjectPair;
import org.kie.services.client.serialization.JaxbSerializationProvider;
import org.kie.services.client.serialization.jaxb.impl.JaxbCommandResponse;
public class StartProcessWithPOJO {
/*
* Set the parameters according your installation:
*/
private static final String DEPLOYMENT_ID = "org.kie.example:project1:3.0";
private static final String PROCESS_ID = "project1.proc_start";
private static final String PROCESS_PARAM_NAME = "myPOJO";
private static final String APP_URL = "http://localhost:8080/business-central/rest";
private static final String USER = "jesuino";
private static final String PASSWORD = "redhat2014!";
public static void main(String[] args) throws Exception {
// List of commands to be executed:
List<Command> commands = new ArrayList<>();
// A sample command to start a process:
StartProcessCommand startProcessCommand = new StartProcessCommand();
JaxbStringObjectPairArray params = new JaxbStringObjectPairArray();
params.getItems().add(new JaxbStringObjectPair(PROCESS_PARAM_NAME, new MyPOJO("My POJO TESTING")));
startProcessCommand.setProcessId(PROCESS_ID);
startProcessCommand.setParameter(params);
commands.add(startProcessCommand);
List<JaxbCommandResponse<?>> response = executeCommand(DEPLOYMENT_ID, commands);
System.out.printf("Command %s executed.\n", response.toString());
System.out.println("commands1" + commands);
}
private static List<JaxbCommandResponse<?>> executeCommand(String deploymentId, List<Command> commands) throws Exception {
URL address = new URL(APP_URL + "/execute");
ClientRequest request = createRequest(address);
request.header(JaxbSerializationProvider.EXECUTE_DEPLOYMENT_ID_HEADER, DEPLOYMENT_ID);
JaxbCommandsRequest commandMessage = new JaxbCommandsRequest();
commandMessage.setCommands(commands);
commandMessage.setDeploymentId(DEPLOYMENT_ID);
String body = convertJaxbObjectToString(commandMessage);
request.body(MediaType.APPLICATION_XML, body);
ClientResponse<String> responseObj = request.post(String.class);
String strResponse = responseObj.getEntity();
System.out.println("RESPONSE FROM THE SERVER: \n" + strResponse);
JaxbCommandsResponse cmdsResp = convertStringToJaxbObject(strResponse);
return cmdsResp.getResponses();
}
private static ClientRequest createRequest(URL address) {
return new ClientRequestFactory()
.createRequest(address.toExternalForm())
.header("Authorization", getAuthHeader());
}
private static String getAuthHeader() {
String auth = USER + ":" + PASSWORD;
byte[] encodedAuth = Base64.encodeBase64(auth.getBytes(Charset.forName("US-ASCII")));
return "Basic " + new String(encodedAuth);
}
private static String convertJaxbObjectToString(Object object) throws JAXBException {
// Add your classes here.
Class<?>[] classesToBeBound = { JaxbCommandsRequest.class, MyPOJO.class };
Marshaller marshaller = JAXBContext
.newInstance(classesToBeBound)
.createMarshaller();
marshaller.setProperty(Marshaller.JAXB_FORMATTED_OUTPUT, Boolean.TRUE);
StringWriter stringWriter = new StringWriter();
marshaller.marshal(object, stringWriter);
String output = stringWriter.toString();
System.out.println("REQUEST CONTENT: \n" + output);
return output;
}
private static JaxbCommandsResponse convertStringToJaxbObject(String str)
throws JAXBException {
Unmarshaller unmarshaller = JAXBContext
.newInstance(JaxbCommandsResponse.class)
.createUnmarshaller();
return (JaxbCommandsResponse) unmarshaller.unmarshal(new StringReader(str));
}
}
In this example, the org.kie.remote.jaxb.gen package classes are used for the client, which are in the org.kie.remote:kie-remote-client artifact. The deployment ID is set using a new HTTP header Kie-Deployment-Id that is also available as the JaxbSerializationProvider.EXECUTE_DEPLOYMENT_ID_HEADER Java constant.
The /execute call takes the JaxbCommandsRequest object as its parameter. The JaxbCommandsRequest object contains a list of org.kie.api.command.Command objects. The commands are stored in the JaxbCommandsRequest object, which are converted to a string representation and sent to the execute REST call. The JaxbCommandsRequest parameters are deploymentId and a Command object.
When you send a command to the /execute endpoint, a Java code is used to convert the Command object to String in an XML format. Once you generate the XML, you can use any Java or non-Java client to send it to the REST endpoint exposed by Business Central.
Note that the org.MyPOJO class must be the same in your client code as well as on the server side. To achieve this, share it through a Maven dependency: create the org.MyPOJO class using the Data Modeler in Business Central and in your REST client, add the dependency of the project which includes the org.MyPOJO class. An example of the pom.xml file with the dependency of the project created in Business Central that contains the org.MyPOJO class and other required dependencies follows.
<project xmlns="http://maven.apache.org/POM/4.0.0"
xmlns:xsi="http://www.w3.org/2001/XMLSchema-instance"
xsi:schemaLocation="http://maven.apache.org/POM/4.0.0
http://maven.apache.org/xsd/maven-4.0.0.xsd">
<modelVersion>4.0.0</modelVersion>
<groupId>com.redhat.gss.jbpm</groupId>
<artifactId>bpms-start-process</artifactId>
<version>1.0</version>
<name>Start process using execute</name>
<properties>
<version.org.jboss.bom.eap>6.4.7.GA</version.org.jboss.bom.eap>
<version.org.jboss.bom.brms>6.4.0.GA-redhat-2</version.org.jboss.bom.brms>
<maven.compiler.target>1.7</maven.compiler.target>
<maven.compiler.source>1.7</maven.compiler.source>
</properties>
<dependencyManagement>
<dependencies>
<dependency>
<groupId>org.jboss.bom.brms</groupId>
<artifactId>jboss-brms-bpmsuite-platform-bom</artifactId>
<type>pom</type>
<version>${version.org.jboss.bom.brms}</version>
<scope>import</scope>
</dependency>
<dependency>
<groupId>org.jboss.bom.eap</groupId>
<artifactId>jboss-javaee-6.0-with-tools</artifactId>
<version>${version.org.jboss.bom.eap}</version>
<type>pom</type>
<scope>import</scope>
</dependency>
<dependency>
<groupId>org.jboss.bom.brms</groupId>
<artifactId>jboss-javaee-6.0-with-brms-bpmsuite</artifactId>
<version>${version.org.jboss.bom.brms}</version>
<type>pom</type>
<scope>import</scope>
</dependency>
</dependencies>
</dependencyManagement>
<dependencies>
<dependency>
<groupId>org.kie.remote</groupId>
<artifactId>kie-remote-client</artifactId>
</dependency>
<dependency>
<groupId>org.drools</groupId>
<artifactId>drools-core</artifactId>
</dependency>
<dependency>
<groupId>org.jboss.resteasy</groupId>
<artifactId>resteasy-jaxrs</artifactId>
</dependency>
<dependency>
<groupId>org.slf4j</groupId>
<artifactId>slf4j-api</artifactId>
</dependency>
<dependency>
<groupId>commons-codec</groupId>
<artifactId>commons-codec</artifactId>
</dependency>
<!-- A Business Central project dependency which contains the POJO. -->
<dependency>
<artifactId>remote-process-start-with-bean</artifactId>
<groupId>com.redhat.gss</groupId>
<version>1.0</version>
</dependency>
</dependencies>
</project>- 1
- See the supported Red Hat JBoss EAP version in the Supported Platforms chapter of the Red Hat JBoss BPM Suite Installation Guide.
- 2
- See the current version in the Supported Component Versions chapter of the Red Hat JBoss BPM Suite Installation Guide.
In the example, com.redhat.gss:remote-process-start-with-bean:1.0 is the kJAR created by Business Central. The kJAR includes the org.MyPOJO class. By sharing the dependency, you ensure that your org.MyPOJO class on the server matches with the one on the client.
Another way to achieve this is to create a data model using Red Hat JBoss Developer Studio, export the JAR file, and add it as a dependency of both the Business Central kJAR and your REST client.
21.1.6.1. Execute Operation Commands
In this section, a list of commands accepted by the execute REST endpoint is provided.
See the constructor and set methods on the actual command classes for more information about which parameters the commands accept.
The following commands are used for interacting with the process engine:
-
AbortWorkItemCommand -
CompleteWorkItemCommand -
GetWorkItemCommand -
AbortProcessInstanceCommand -
GetProcessIdsCommand -
GetProcessInstanceByCorrelationKeyCommand -
GetProcessInstanceCommand -
GetProcessInstancesCommand -
SetProcessInstanceVariablesCommand -
SignalEventCommand -
StartCorrelatedProcessCommand -
StartProcessCommand -
GetVariableCommand -
GetFactCountCommand -
GetGlobalCommand -
GetIdCommand -
FireAllRulesCommand
The following commands are used for interacting with a Task service:
-
ActivateTaskCommand -
AddTaskCommand -
CancelDeadlineCommand -
ClaimNextAvailableTaskCommand -
ClaimTaskCommand -
CompleteTaskCommand -
CompositeCommand -
DelegateTaskCommand -
ExecuteTaskRulesCommand -
ExitTaskCommand -
FailTaskCommand -
ForwardTaskCommand -
GetAttachmentCommand -
GetContentCommand -
GetTaskAssignedAsBusinessAdminCommand -
GetTaskAssignedAsPotentialOwnerCommand -
GetTaskByWorkItemIdCommand -
GetTaskCommand -
GetTasksByProcessInstanceIdCommand -
GetTasksByStatusByProcessInstanceIdCommand -
GetTasksOwnedCommand -
NominateTaskCommand -
ProcessSubTaskCommand -
ReleaseTaskCommand -
ResumeTaskCommand -
SkipTaskCommand -
StartTaskCommand -
StopTaskCommand -
SuspendTaskCommand
The following commands are used for managing and retrieving historical (audit log) information:
-
ClearHistoryLogsCommand -
FindActiveProcessInstancesCommand -
FindNodeInstancesCommand -
FindProcessInstanceCommand -
FindProcessInstancesCommand -
FindSubProcessInstancesCommand -
FindSubProcessInstancesCommand -
FindVariableInstancesByNameCommand -
FindVariableInstancesCommand
Simple Call Example
An example of /rest/execute operation for:
-
processID:evaluation -
deploymentID:org.jbpm:Evaluation:1.0
Parameters to start the process are employee and reason.
<?xml version="1.0" encoding="UTF-8" standalone="yes"?>
<command-request>
<deployment-id>org.jbpm:Evaluation:1.0</deployment-id>
<ver>6.2.0.1</ver>
<user>krisv</user>
<start-process processId="evaluation">
<parameter>
<item key="reason">
<value xsi:type="xs:string" xmlns:xs="http://www.w3.org/2001/XMLSchema" xmlns:xsi="http://www.w3.org/2001/XMLSchema-instance">Yearly performance evaluation</value>
</item>
<item key="employee">
<value xsi:type="xs:string" xmlns:xs="http://www.w3.org/2001/XMLSchema" xmlns:xsi="http://www.w3.org/2001/XMLSchema-instance">krisv</value>
</item>
</parameter>
</start-process>
</command-request>Include the following HTTP headers in your request:
-
The Content-Type header:
application/xml. - The Authorization header with basic authentication information, as specificed by RFC2616.
An example response:
<?xml version="1.0" encoding="UTF-8" standalone="yes"?>
<command-response>
<deployment-id>org.jbpm:Evaluation:1.0</deployment-id>
<ver>6.2.0.1</ver>
<process-instance index="0">
<process-id>evaluation</process-id>
<id>15</id>
<state>1</state>
<parentProcessInstanceId>0</parentProcessInstanceId>
<command-name>StartProcessCommand</command-name>
</process-instance>
</command-response>Custom Data Type Call Example
The execute operations support sending user-defined class instances as parameters in the command, which requires JAXB for serialization and deserialization. To be able to deserialize the custom class on the server side, include the Kie-Deployment-Id header.
The following request starts a process which contains a custom TestObject class as a parameter:
<?xml version="1.0" encoding="UTF-8" standalone="yes"?>
<command-request>
<deployment-id>demo:testproject:1.0</deployment-id>
<ver>6.2.0.1</ver>
<user>krisv</user>
<start-process processId="testproject.testprocess">
<parameter>
<item key="testobject">
<value xsi:type="testObject" xmlns:xsi="http://www.w3.org/2001/XMLSchema-instance">
<field1>1</field1>
<field2>2</field2>
</value>
</item>
</parameter>
</start-process>
</command-request>Include the following HTTP headers in your request:
-
The Content-Type header:
application/xml. - The Authorization header with basic authentication information, as specificed by RFC2616.
-
The
Kie-Deployment-Idheader withdeploymentIDthat contains a definition of the custom class.
21.1.7. REST API Summary
The URL templates in the table below are relative to the following URL:
http://SERVER:PORT/business-central/rest
| URL Template | HTTP Method | Description |
|---|---|---|
|
| GET | Returns a job status. |
|
| DELETE | Removes a job. |
|
| GET | Returns a list of organizational units. |
|
| GET | Returns a single organizational unit. |
|
| POST | Creates an organizational unit. |
|
| POST | Updates an organizational unit. |
|
| DELETE | Removes an organizational unit. |
|
| POST | Adds a repository to an organizational unit. |
|
| DELETE | Removes a repository from an organizational unit. |
|
| GET | Returns a list of repositories. |
|
| GET | Returns a single repository. |
|
| POST | Creates or clones a repository. |
|
| DELETE | Removes a repository. |
|
| GET | Returns a list of projects in a repository. |
|
| POST | Creates a project in a repository. |
|
| DELETE | Removes a project in a repository. |
|
| POST | Compiles a project. |
|
| POST | Tests a project. |
|
| POST | Installs a project. |
|
| POST | Deploys a project. |
| URL Template | HTTP Method | Description |
|---|---|---|
|
| GET | Returns a list of (deployed) deployments. |
|
| GET | Returns a status and information about a deployment. |
|
| POST | Submits a request to deploy a deployment. |
|
| POST | Submits a request to undeploy a deployment. |
|
| POST | Deactivates a deployment. |
|
| POST | Activates a deployment. |
| URL Template | HTTP Method | Description |
|---|---|---|
|
| GET | Returns an SVG image with a process definition diagram. |
|
| GET | Returns an SVG image with a process instance diagram. |
| URL Template | HTTP Method | Description |
|---|---|---|
|
| POST | Starts a new process instance. Accepts query map parameters. |
|
| GET | Returns a URL where the process form can be found. |
|
| GET | Returns process instance details. |
|
| POST | Aborts a process instance. |
|
| POST | Sends a signal event to a process instance. Accepts query map parameters. |
|
| GET | Returns a variable from a process instance. |
|
| POST | Sends a signal event to a deployment unit. |
|
| POST | Starts a new process instance and return a process instance details with its variables. Note that even if a passed variable is not defined in the underlying process definition, it is created and initialized with the passed value. |
|
| GET | Returns process instance details with its variables. |
|
| POST | Sends a signal event to a process instance. Accepts query map parameters. The following query parameters are accepted:
|
|
| POST | Completes a work item. Accepts query map parameters. |
|
| POST | Aborts a work item. |
| URL Template | HTTP Method | Description |
|---|---|---|
|
| GET |
Returns a |
|
| GET | Returns a content of a task. |
|
| GET | Returns a content of a task. |
|
| GET | Returns a task. |
|
| POST | Activates a task. |
|
| POST | Claims a task. |
|
| POST | Claim the next available task. |
|
| POST | Complete a task. Accepts query map parameters. |
|
| POST | Delegates a task. |
|
| POST | Exits a task. |
|
| POST | Fails a task. |
|
| POST | Forwards a task. |
|
| POST | Nominates a task. |
|
| POST | Releases a task. |
|
| POST | Resumes a task after suspending. |
|
| POST | Skips a task. |
|
| POST | Starts a task. |
|
| POST | Stops a task. |
|
| POST | Suspends a task. |
|
| GET |
Generates a URL to show a task form on a remote application as a |
| URL Template | HTTP Method | Description |
|---|---|---|
|
| GET | Returns a list of all process instance history records. |
|
| GET | Returns a list of process instance history records for a process instance. |
|
| GET | Returns a list of process instance history records for subprocesses of a process instance. |
|
| GET | Returns a list of node history records for a process instance. |
|
| GET | Returns a list of node history records for a node in a process instance. |
|
| GET | Returns a list of variable history records for a process instance. |
|
| GET | Returns a list of variable history records for a variable in a process instance. |
|
| GET | Returns a list of process instance history records for process instances using the given process definition. |
|
| GET | Returns a list of variable history records for a variable. |
|
| GET | Returns a list of process instance history records for process instances that contain a variable with the given variable ID. |
|
| GET | Returns a list of variable history records for variable(s) with the given variable ID and the given value. |
|
| GET | Returns a list of process instance history records for process instances with the specified variable that contains the specified variable value. |
|
| POST | Removes all process, node, and history records. |
| URL Template | HTTP Method | Description |
|---|---|---|
|
| GET |
Query for process instances and process variables. Returns a |
|
| GET |
Query for task summaries and process variables. Returns a |
|
| GET |
Query for tasks. Returns a
Supported query parameters are |
None of these REST endpoints has an equivalent Java client. Return values are examples of classes that can be used when you retrieve responses of calls made from your Java application. Each response is either in an XML or JSON format.
21.1.8. Control of REST API
You can use the following roles:
| Name | Type | Scope of access |
|---|---|---|
|
| GET, POST, DELETE | All direct REST calls, excluding a remote client. |
|
| GET, POST, DELETE | Knowledge store REST calls. |
|
| GET, POST | Deployment unit REST calls. |
|
| GET, POST | Runtime and history REST calls. |
|
| GET | Runtime and history REST calls. |
|
| GET, POST | Task REST calls. |
|
| GET | Task REST calls. |
|
| GET | REST query API calls. |
|
| POST | Remote client calls. |
21.2. JMS
The Java Message Service (JMS) is an API that allows Java Enterprise components to communicate with each other asynchronously and reliably.
Operations on the runtime engine and tasks can be done through the JMS API exposed by Business Central. However, it is not possible to manage deployments or the knowledge base using this JMS API.
Unlike the REST API, it is possible to send a batch of commands to the JMS API that will all be processed in one request after which the responses to the commands will be collected and returned in one response message.
It is not recommended to use JMS directly. Use the Remote Java API when you want to communicate with Business Central. The better way is to use the Intelligent Process Server Java Client API. See Chapter 19, Intelligent Process Server Java Client API Overview.
21.2.1. JMS Queue Setup
When you deploy Business Central on the Java EE application server, it automatically creates the following JMS queues:
-
KIE.SESSION -
KIE.TASK -
KIE.RESPONSE -
KIE.AUDIT -
KIE.EXECUTOR -
KIE.SIGNAL
The KIE.SESSION and KIE.TASK queues are used to send request messages to the JMS API. Command response messages will be then placed on the KIE.RESPONSE queues. Command request messages that involve starting and managing business processes should be sent to the KIE.SESSION queue and command request messages that involve managing human tasks should be sent to the KIE.TASK queue.
Although there are two different input queues, KIE.SESSION and KIE.TASK, it is to provide multiple input queues to optimize processing: command request messages will be processed in the same manner regardless of which queue they are sent to. However, in some cases, users may send more requests involving human tasks than requests involving business processes, but then not want the processing of business process-related request messages to be delayed by the human task messages. By sending the appropriate command request messages to the appropriate queues, this problem can be avoided.
The term command request message used above refers to a JMS byte message that contains a serialized JaxbCommandsRequest object. At the moment, only XML serialization is supported as opposed to, for example, JSON or protobuf.
JMS queue KIE.EXECUTOR is used in the Job Executor component to speed up processing of asynchronous tasks and defined jobs. See Section 11.12.3, “Job Executor for Asynchronous Execution” for more information about Job Executor. Note that the executor can work without JMS. You can disable JMS, for example, when you deploy Red Hat JBoss BPM Suite on container without full JMS support out of the box, such as Tomcat. To disable JMS, set the following property: org.kie.executor.jms=false.
21.2.2. Example JMS Usage
The following example shows the usage of the JMS API. The numbers (callouts) in the example refer to notes below that explain particular parts of the example. It is provided for the advanced users that do not wish to use the Red Hat JBoss BPM Suite Remote Java API which otherwise incorporates the logic shown below.
// Usual Java imports skipped.
import org.drools.core.command.runtime.process.StartProcessCommand;
import org.jbpm.services.task.commands.GetTaskAssignedAsPotentialOwnerCommand;
import org.kie.api.command.Command;
import org.kie.api.runtime.process.ProcessInstance;
import org.kie.api.task.model.TaskSummary;
// 1
import org.kie.services.client.api.command.exception.RemoteCommunicationException;
import org.kie.services.client.serialization.JaxbSerializationProvider;
import org.kie.services.client.serialization.SerializationConstants;
import org.kie.services.client.serialization.SerializationException;
import org.kie.services.client.serialization.jaxb.impl.JaxbCommandResponse;
import org.kie.services.client.serialization.jaxb.impl.JaxbCommandsRequest;
import org.kie.services.client.serialization.jaxb.impl.JaxbCommandsResponse;
import org.kie.services.client.serialization.jaxb.rest.JaxbExceptionResponse;
import org.slf4j.Logger;
import org.slf4j.LoggerFactory;
public class DocumentationJmsExamples {
protected static final Logger logger = LoggerFactory.getLogger(DocumentationJmsExamples.class);
public void sendAndReceiveJmsMessage() {
String USER = "charlie";
String PASSWORD = "ch0c0licious";
String DEPLOYMENT_ID = "test-project";
String PROCESS_ID_1 = "oompa-processing";
URL serverUrl;
try {
serverUrl = new URL("http://localhost:8080/business-central/");
} catch (MalformedURLException murle) {
logger.error("Malformed URL for the server instance!", murle);
return;
}
// Create JaxbCommandsRequest instance and add commands:
Command<?> cmd = new StartProcessCommand(PROCESS_ID_1);
int oompaProcessingResultIndex = 0;
// 5
JaxbCommandsRequest req = new JaxbCommandsRequest(DEPLOYMENT_ID, cmd);
// 2
req.getCommands().add(new GetTaskAssignedAsPotentialOwnerCommand(USER, "en-UK"));
int loompaMonitoringResultIndex = 1;
// 5
// Get JNDI context from server:
InitialContext context = getRemoteJbossInitialContext(serverUrl, USER, PASSWORD);
// Create JMS connection:
ConnectionFactory connectionFactory;
try {
connectionFactory = (ConnectionFactory) context.lookup("jms/RemoteConnectionFactory");
} catch (NamingException ne) {
throw new RuntimeException("Unable to lookup JMS connection factory.", ne);
}
// Set up queues:
Queue sendQueue, responseQueue;
try {
sendQueue = (Queue) context.lookup("jms/queue/KIE.SESSION");
responseQueue = (Queue) context.lookup("jms/queue/KIE.RESPONSE");
} catch (NamingException ne) {
throw new RuntimeException("Unable to lookup send or response queue", ne);
}
// Send command request:
Long processInstanceId = null; // needed if you are doing an operation on a PER_PROCESS_INSTANCE deployment
String humanTaskUser = USER;
JaxbCommandsResponse cmdResponse = sendJmsCommands(DEPLOYMENT_ID, processInstanceId, humanTaskUser, req, connectionFactory, sendQueue, responseQueue, USER, PASSWORD, 5);
// Retrieve results:
ProcessInstance oompaProcInst = null;
List<TaskSummary> charliesTasks = null;
// 6
for (JaxbCommandResponse<?> response : cmdResponse.getResponses()) {
if (response instanceof JaxbExceptionResponse) {
// Something went wrong on the server side:
JaxbExceptionResponse exceptionResponse = (JaxbExceptionResponse) response;
throw new RuntimeException(exceptionResponse.getMessage());
}
// 5
if (response.getIndex() == oompaProcessingResultIndex) {
oompaProcInst = (ProcessInstance) response.getResult();
// 6
} else if (response.getIndex() == loompaMonitoringResultIndex) {
// 5
charliesTasks = (List<TaskSummary>) response.getResult();
// 6
}
}
}
private JaxbCommandsResponse sendJmsCommands(String deploymentId, Long processInstanceId, String user, JaxbCommandsRequest req, ConnectionFactory factory, Queue sendQueue, Queue responseQueue, String jmsUser, String jmsPassword, int timeout) {
req.setProcessInstanceId(processInstanceId);
req.setUser(user);
Connection connection = null;
Session session = null;
String corrId = UUID.randomUUID().toString();
String selector = "JMSCorrelationID = '" + corrId + "'";
JaxbCommandsResponse cmdResponses = null;
try {
// Setup:
MessageProducer producer;
MessageConsumer consumer;
try {
if (jmsPassword != null) {
connection = factory.createConnection(jmsUser, jmsPassword);
} else {
connection = factory.createConnection();
}
session = connection.createSession(false,Session.AUTO_ACKNOWLEDGE);
producer = session.createProducer(sendQueue);
consumer = session.createConsumer(responseQueue, selector);
connection.start();
} catch (JMSException jmse) {
throw new RemoteCommunicationException("Unable to setup a JMS connection.", jmse);
}
// 7
JaxbSerializationProvider serializationProvider = new JaxbSerializationProvider();
// If necessary, add user-created classes here:
// xmlSerializer.addJaxbClasses(MyType.class, AnotherJaxbAnnotatedType.class);
// Create msg:
BytesMessage msg;
try {
msg = session.createBytesMessage();
// 3
// Set properties:
msg.setJMSCorrelationID(corrId);
// 3
msg.setIntProperty(SerializationConstants.SERIALIZATION_TYPE_PROPERTY_NAME, JaxbSerializationProvider.JMS_SERIALIZATION_TYPE);
// 3
Collection<Class<?>> extraJaxbClasses = serializationProvider.getExtraJaxbClasses();
if (!extraJaxbClasses.isEmpty()) {
String extraJaxbClassesPropertyValue = JaxbSerializationProvider.classSetToCommaSeperatedString(extraJaxbClasses);
msg.setStringProperty(SerializationConstants.EXTRA_JAXB_CLASSES_PROPERTY_NAME, extraJaxbClassesPropertyValue);
msg.setStringProperty(SerializationConstants.DEPLOYMENT_ID_PROPERTY_NAME, deploymentId);
}
// Serialize request:
String xmlStr = serializationProvider.serialize(req);
msg.writeUTF(xmlStr);
// 3
} catch (JMSException jmse) {
throw new RemoteCommunicationException("Unable to create and fill a JMS message.", jmse);
} catch (SerializationException se) {
throw new RemoteCommunicationException("Unable to deserialze JMS message.", se.getCause());
}
// Send:
try {
producer.send(msg);
} catch (JMSException jmse) {
throw new RemoteCommunicationException("Unable to send a JMS message.", jmse);
}
// Receive:
Message response;
// 4
try {
response = consumer.receive(timeout);
} catch (JMSException jmse) {
throw new RemoteCommunicationException("Unable to receive or retrieve the JMS response.", jmse);
}
if (response == null) {
logger.warn("Response is empty, leaving");
return null;
}
// Extract response:
assert response != null : "Response is empty.";
try {
String xmlStr = ((BytesMessage) response).readUTF();
cmdResponses = (JaxbCommandsResponse) serializationProvider.deserialize(xmlStr);
} catch (JMSException jmse) {
throw new RemoteCommunicationException("Unable to extract "
+ JaxbCommandsResponse.class.getSimpleName()
+ " instance from JMS response.", jmse);
} catch (SerializationException se) {
throw new RemoteCommunicationException("Unable to extract "
+ JaxbCommandsResponse.class.getSimpleName()
+ " instance from JMS response.", se.getCause());
}
assert cmdResponses != null : "Jaxb Cmd Response was null!";
} finally {
if (connection != null) {
try {
connection.close();
session.close();
} catch (JMSException jmse) {
logger.warn("Unable to close connection or session!", jmse);
}
}
}
return cmdResponses;
}
private InitialContext getRemoteJbossInitialContext(URL url, String user, String password) {
Properties initialProps = new Properties();
initialProps.setProperty(InitialContext.INITIAL_CONTEXT_FACTORY, "org.jboss.naming.remote.client.InitialContextFactory");
String jbossServerHostName = url.getHost();
initialProps.setProperty(InitialContext.PROVIDER_URL, "remote://"+ jbossServerHostName + ":4447");
initialProps.setProperty(InitialContext.SECURITY_PRINCIPAL, user);
initialProps.setProperty(InitialContext.SECURITY_CREDENTIALS, password);
for (Object keyObj : initialProps.keySet()) {
String key = (String) keyObj;
System.setProperty(key, (String) initialProps.get(key));
}
try {
return new InitialContext(initialProps);
} catch (NamingException e) {
throw new RemoteCommunicationException("Unable to create " + InitialContext.class.getSimpleName(), e);
}
}
}-
These classes can all be found in the
kie-services-clientand thekie-services-jaxbJARs. The
JaxbCommandsRequestinstance is the "holder" object in which you can place all of the commands you want to execute in a particular request. By using theJaxbCommandsRequest.getCommands()method, you can retrieve the list of commands to add more commands to the request.A deployment ID is required for command request messages that deal with business processes. Command request messages that only contain human task-related commands do not require a deployment ID.
Note that the JMS message sent to the remote JMS API must be constructed as follows:
- It must be a JMS byte message.
- It must have a filled JMS Correlation ID property.
-
It must have an
intproperty called serialization set to an acceptable value: only0at the moment. -
It must contain a serialized instance of a
JaxbCommandsRequest, added to the message as a UTF string.
- The same serialization mechanism used to serialize the request message will be used to serialize the response message.
-
To match the response, use the
indexfield of the returnedJaxbCommandResponseinstances. Thisindexfield will match the index of the initial command. Because not all commands will return a result, it is possible to send three commands with a command request message, and then receive a command response message that only includes oneJaxbCommandResponsemessage with anindexvalue1. This value then identifies it as the response to the second command. Since many of the results returned by various commands are not serializable, the JMS API of Business Central converts these results into JAXB equivalents, all of which implement the
JaxbCommandResponseinterface. TheJaxbCommandResponse.getResult()method then returns the JAXB equivalent to the actual result, which will conform to the interface of the result.For example, in the code above, the
StartProcessCommandreturnsProcessInstance. To return this object to the requester, theProcessInstanceis converted toJaxbProcessInstanceResponseand then added asJaxbCommandResponseto the command response message. The same applies toList<TaskSummary>that is returned byGetTaskAssignedAsPotentialOwnerCommand.However, not all methods that can be called on
ProcessInstancecan be called on theJaxbProcessInstanceResponsebecauseJaxbProcessInstanceResponseis simply a representation of aProcessInstanceobject. This applies to various other command response as well. In particular, methods which require an active (backing)KieSession, such asProcessInstance.getProcess()orProcessInstance.signalEvent(String type, Object event), will throwUnsupportedOperationException.By default, a session is created in
kieServerMDBwith the acknowledge mode set toSession.AUTO_ACKNOWLEDGEand the transacted value set tofalse, resulting in the following response as shown in the example:session = connection.createSession(false,Session.AUTO_ACKNOWLEDGE);If a generic resource adapter is used with JMS, this session setting can generate a null pointer error. You can either temporarily work around this issue or resolve it going forward:
To work around this issue when a generic resource adapter is used, set the transacted value to
trueand set the session type toSESSION_TRANSACTED:session = connection.createSession(true, Session.SESSION_TRANSACTED);To resolve this issue when a generic resource adapter is used, add the following under
<system properties>in thestandalone.xmlfile of Red Hat JBoss EAP:org.kie.server.jms.session.tx=true // If not set, defaults to `false`. org.kie.server.jms.session.ack=$INTEGER // Integer value matching one of the javax.jms.Session constants that represent `ack` mode.
21.3. SOAP API
Simple Object Access Protocol (SOAP) is a type of distribution architecture used for exchanging information. SOAP requires a minimal amount of overhead on the system and is used as a protocol for communication, while it is versatile enough to allow the use of different transport protocols.
Like REST, SOAP allows client-server communication. Clients can initiate requests to servers using URLs with parameters. The servers then process the requests and return responses based on the particular URL.
21.3.1. CommandWebService
Business Central in Red Hat JBoss BPM Suite provides a SOAP interface in the form of CommandWebService. A Java client is provided as a generated CommandWebService class and can be used as follows.
Classes generated by the kie-remote-client module function as a client-side interface for SOAP. The CommandWebServiceClient class referenced in the test code below is generated by the Web Service Description Language (WSDL) in the kie-remote-client JAR.
import org.kie.remote.client.api.RemoteRuntimeEngineFactory;
import org.kie.remote.client.jaxb.JaxbCommandsRequest;
import org.kie.remote.client.jaxb.JaxbCommandsResponse;
import org.kie.remote.jaxb.gen.StartProcessCommand;
import org.kie.remote.services.ws.command.generated.CommandWebService;
import org.kie.services.client.serialization.jaxb.impl.JaxbCommandResponse;
public JaxbProcessInstanceResponse startProcessInstance(String user, String password, String processId, String deploymentId, String applicationUrl) throws Exception {
CommandWebService client = RemoteRuntimeEngineFactory
.newCommandWebServiceClientBuilder()
.addDeploymentId(deploymentId)
.addUserName(user)
.addPassword(password)
.addServerUrl(applicationUrl)
.buildBasicAuthClient();
// Get a response from the WebService:
StartProcessCommand cmd = new StartProcessCommand();
cmd.setProcessId(processId);
JaxbCommandsRequest req = new JaxbCommandsRequest(deploymentId, cmd);
final JaxbCommandsResponse response = client.execute(req);
JaxbCommandResponse<?> cmdResp = response.getResponses().get(0);
return (JaxbProcessInstanceResponse) cmdResp;
}The SOAP interface of Business Central in Red Hat JBoss BPM Suite is currently available for Red Hat JBoss EAP, IBM WebSphere, and Oracle WebLogic servers.
21.4. EJB Interface
Starting with version 6.1, the Red Hat JBoss BPM Suite execution engine supports an EJB interface for accessing KieSession and TaskService remotely. This enables close transaction integration between the execution engine and remote customer applications.
The implementation of the EJB interface is a single framework-independent and container-agnostic API that can be used with framework-specific code. The services are exposed using the org.jbpm.services.api and org.jbpm.services.ejb packages. CDI is supported as well through the org.jbpm.services.cdi package.
The implementation does not support RuleService at the moment, however, the ProcessService class exposes an execute method that enables you to use various rule-related commands, such as InsertCommand and FireAllRulesCommand.
Deployment of EJB Client
The EJB interface is supported on Red Hat JBoss EAP only.
Download the Red Hat JBoss BPM Suite 6.4 Maven Repository ZIP file from the Red Hat Customer Portal. The EJB client is available as a JAR file jbpm-services-ejb-client-VERSION-redhat-MINOR_VERSION in the maven-repository/org/jbpm/jbpm-services-ejb-client directory of the downloaded file.
The inclusion of EJB does not mean that CDI-based services are replaced. CDI and EJB can be used together, however, it is not recommended. Since EJBs are not available by default in Business Central, the kie-services package must be present on the class path. The EJB services are suitable for embedded use cases.
21.4.1. EJB Interface Artifacts
The artifacts that provide the EJB interface to the jBPM services are contained in the following packages:
-
org.jbpm.services.ejb.api: the extension of the Services API for the needs of the EJB interface. -
org.jbpm.services.ejb.impl: EJB wrappers on top of the core service implementation. -
org.jbpm.services.ejb.client: the EJB remote client implementation. The implementation is supported on Red Hat JBoss EAP only.
The org.jbpm.services.ejb.api package mentioned above contains the following service interfaces that can be used by remote EJB clients:
-
DefinitionServiceEJBRemote: use this interface to gather information about processes (ID, name, and version), process variables (name and type), defined reusable subprocesses, domain-specific services, user tasks, and user tasks inputs and outputs. DeploymentServiceEJBRemote: use this interface to initiate deployments and undeployments. Methods includedeploy,undeploy,getRuntimeManager,getDeployedUnits,isDeployed,activate,deactivate, andgetDeployedUnit. Calling thedeploymethod with an instance ofDeploymentUnitdeploys the unit into the runtime engine by building aRuntimeManagerinstance. After a successful deployment, an instance ofDeployedUnitis created and cached for further usage.To use the methods mentioned above, the artifacts of the project must be installed in a Maven repository.
-
ProcessServiceEJBRemote: use this interface to control a lifecycle of one or more processes and work items. -
RuntimeDataServiceEJBRemote: use this interface to retrieve data related to the runtime: process instances, process definitions, node instance information, and variable information. The interface includes several convenience methods for gathering task information based on owner, status, and time. -
UserTaskServiceEJBRemote: use this interface to control a lifecycle of a user task. The included methods are for exampleactivate,start,stop, andexecute. -
QueryServiceEJBRemote: provides advanced query capabilities. -
ProcessInstanceMigrationServiceEJBRemote: provides a migration service for process instances. If a new version of a process definition is deployed and the active process instances should be migrated, use this interface to do so.
Process instance migration is available only with Red Hat JBoss BPM Suite 6.4 and higher.
A synchronization service that synchronizes the information between Business Central and EJBs is available as well. The synchronization interval can be set using the org.jbpm.deploy.sync.int system property. However, note that you have to wait for the service to finish the synchronization before trying to access the updated information using REST.
When you deploy the jBPM services EJB API, the executor is registered during the deployment of a kJAR. Hence the JNDI name used is only visible for the module where the EJB is deployed. If you want to use the executor service from a different module, use the org.jbpm.executor.service.ejb-jndi system property that enables you to configure the executor service JNDI name. For more information, see the List of System Properties section of the Red Hat JBoss BPM Suite Administration and Configuration Guide.
21.4.2. Generating EJB Services WAR File
Follow the procedure below to create an EJB Services WAR file using the EJB interface.
Register a Human Task callback using a startup class:
@Singleton @Startup public class StartupBean { @PostConstruct public void init() { System.setProperty("org.jbpm.ht.callback", "jaas"); } }Run the following command to generate the WAR file:
mvn assembly:assemblyDeploy the generated WAR file
sample-war-ejb-app.waron the Red Hat JBoss EAP instance where Red Hat JBoss BPM Suite is running.WarningIf you are deploying the EJB WAR file on the same Red Hat JBoss EAP instance, avoid using the
Singletonstrategy for your runtime sessions. TheSingletonstrategy causes both applications to load the sameksessioninstance from the underlying file system and causes optimistic lock exceptions.If you want to deploy the file on a Red Hat JBoss EAP instance separate from the one where Red Hat JBoss BPM Suite is running:
- Configure your application or the application server to invoke a remote EJB.
- Configure your application or the application server to propagate the security context.
If you are using Hibernate to create a database schema for jBPM, update the
persistence.xmlfile in Business Central. Edit thehibernate.hbm2ddl.autoproperty and set its value toupdateinstead ofcreate.To test it, create a simple web application and inject the EJB Services:
@EJB(lookup = "ejb:/sample-war-ejb-app/ProcessServiceEJBImpl!org.jbpm.services.ejb.api.ProcessServiceEJBRemote") private ProcessServiceEJBRemote processService; @EJB(lookup = "ejb:/sample-war-ejb-app/UserTaskServiceEJBImpl!org.jbpm.services.ejb.api.UserTaskServiceEJBRemote") private UserTaskServiceEJBRemote userTaskService; @EJB(lookup = "ejb:/sample-war-ejb-app/RuntimeDataServiceEJBImpl!org.jbpm.services.ejb.api.RuntimeDataServiceEJBRemote") private RuntimeDataServiceEJBRemote runtimeDataService;
For more information about invoking remote EJBs, see the Invoking Session Beans chapter of the Red Hat JBoss EAP Development Guide.
21.5. Remote Java API
The Remote Java API provides KieSession, TaskService, and AuditService interfaces to the JMS and REST APIs.
The interface implementations provided by the Remote Java API incorporate the underlying logic needed to communicate with the JMS or REST APIs. In other words, these implementations allow you to interact with Business Central through the known interfaces such as the KieSession or TaskService interface, without having to deal with the underlying transport and serialization details.
While the KieSession, TaskService, and AuditService instances provided by the Remote Java API may "look" and "feel" like local instances of the same interfaces, make sure to remember that these instances are only wrappers around a REST or JMS client that interacts with a remote REST or JMS API.
This means that if a requested operation fails on the server, the Remote Java API client instance on the client side will throw RuntimeException indicating that the REST call failed. This is different from the behavior of a "real" (or local) instance of a KieSession, TaskService, and AuditService instance: the exception the local instances will throw will relate to how the operation failed. Also, while local instances require different handling, such as having to dispose of KieSession, client instances provided by the Remote Java API hold no state and thus do not require any special handling.
Lastly, operations on a Remote Java API client instance that would normally throw other exceptions, such as the TaskService.claim(taskId, userId) operation when called by a user who is not a potential owner, will now throw RuntimeException instead when the requested operation fails on the server.
It is recommended to use Intelligent Process Server instead of Business Central. Intelligent Process Server provides more intuitive and easier way to use the Java Client API. See Chapter 19, Intelligent Process Server Java Client API Overview.
The very first step in interacting with the remote runtime is to create the RemoteRuntimeEngine instance. The recommended way is to use RemoteRestRuntimeEngineBuilder or RemoteJmsRuntimeEngineBuilder. There is a number of different methods for both the JMS and REST client builders that allow the configuration of parameters such as the base URL of the REST API, JMS queue location, or timeout while waiting for responses.
Procedure: Creating RemoteRuntimeEngine Instance
-
Instantiate the
RemoteRestRuntimeEngineBuilderorRemoteJmsRuntimeEngineBuilderby calling eitherRemoteRuntimeEngineFactory.newRestBuilder()orRemoteRuntimeEngineFactory.newJmsBuilder(). - Set the required parameters.
-
Finally, call the
build()method.
Detailed examples can be found in Section 21.5.2, “REST Client”, Section 21.5.2.2, “Calling Tasks Without Deployment ID”, and Section 21.5.2.3, “Custom Model Objects and Remote API”.
Once the RemoteRuntimeEngine instance has been created, there are a couple of methods that can be used to instantiate the client classes you want to use:
Remote Java API Methods
KieSession RemoteRuntimeEngine.getKieSession()-
This method instantiates a new (client)
KieSessioninstance. TaskService RemoteRuntimeEngine.getTaskService()-
This method instantiates a new (client)
TaskServiceinstance. - A`uditService RemoteRuntimeEngine.getAuditService()`
-
This method instantiates a new (client)
AuditServiceinstance.
Starting Project: Adding Dependencies
To start your own project, specify the Red Hat JBoss BPM Suite BOM in the project’s pom.xml file. Also, make sure you add the kie-remote-client dependency. See the following example:
<dependencyManagement>
<dependencies>
<dependency>
<groupId>org.jboss.bom.brms</groupId>
<artifactId>jboss-brms-bpmsuite-bom</artifactId>
<version>6.4.2.GA-redhat-2</version>
<type>pom</type>
<scope>import</scope>
</dependency>
</dependencies>
</dependencyManagement>
<dependencies>
<dependency>
<groupId>org.kie.remote</groupId>
<artifactId>kie-remote-client</artifactId>
</dependency>
</dependencies>For the supported Maven BOM version, see Supported Component Versions of the Red Hat JBoss BPM Suite Installation Guide.
21.5.1. Common Configuration
The following common methods can be called on both RemoteRestRuntimeEngineBuilder and RemoteJmsRuntimeEngineBuilder when creating a new instance of RemoteRuntimeEngine:
- addUrl(java.net.URL param)
-
URL of the deployed Business Central. For example
http://localhost:8080/business-central/. - addUserName(String param)
- The password to access the REST API.
- addPassword(String param)
- The password to access the REST API.
- addDeploymentId(String param)
-
The name (ID) of the deployment the
RuntimeEnginemust interact with. This can be an emptyStringin case you are only interested in task operations. - addTimeout(int param)
- The maximum number of seconds the engine must wait for a response from the server.
- addProcessInstanceId(long param)
- The method that adds the process instance ID, which may be necessary when interacting with deployments that employ the per process instance runtime strategy.
- addExtraJaxbClasses(MyClass.class)
- The method that adds extra classes to the class path available to the serialization mechanisms. When passing instances of user-defined classes in a Remote Java API call, it is important to have added the classes using this method first so that the class instances can be serialized correctly.
- clearJaxbClasses()
-
If
RemoteRuntimeEngineBuilderis being reused to build multiple instances ofRemoteRuntimeEngineFactory, this method can be called betweenbuild()methods to reset the list of user-defined classes being used by the builder. - addCorrelationProperties(String[] params)
-
Adds the correlation key properties which are necessary when interacting with a correlation-key identitied
KieSession. - clearCorrelationProperties()
-
Clears all the correlation key properties added by the
addCorrelationPropertiesmethod.
21.5.2. REST Client
The RemoteRuntimeEngineFactory class is the starting point for building and configuring a new RemoteRuntimeEngine instance that can interact with the Remote API. This class creates an instance of a REST client builder using the newRestBuilder() method. This builder is then used to create a RemoteRuntimeEngine instance that acts as a client to the remote REST API.
In addition to the methods mentioned in Section 21.5.1, “Common Configuration”, the following configuration methods can be called on RemoteRestRuntimeEngineBuilder:
- addUrl(java.net.URL param)
-
Configures a URL of the deployed Business Central. For example
http://localhost:8080/business-central/. - disableTaskSecurity()
Allows an authenticated user to work on tasks on behalf of other users.
This requires the
org.kie.task.insecureproperty to be set totrueon the server side as well.- addHeader(String param1, String param2)
Adds a custom HTTP header field that will be sent with each request.
Multiple calls to this method with the same header field name will not replace existing header fields with the same header field name.
- clearHeaderFields()
- Clears all custom header fields for this builder.
Once you have configured all the necessary properties, call build() to get access to RemoteRuntimeEngine.
If the REST API access control is turned on, which is done by default, the given user who wants to use RemoteRuntimeEngine calls has to have the rest-client and rest-all roles assigned.
The following example illustrates how the Remote Java API can be used with the REST API.
package org.kie.remote.client.documentation;
import java.net.URL;
import java.util.List;
import org.kie.api.runtime.KieSession;
import org.kie.api.runtime.manager.RuntimeEngine;
import org.kie.api.runtime.process.ProcessInstance;
import org.kie.api.task.TaskService;
import org.kie.api.task.model.TaskSummary;
import org.kie.remote.client.api.RemoteRuntimeEngineFactory;
public class RemoteJavaApiRestClientExample {
public void startProcessAndStartTask(URL baseUrl, String deploymentId, String user, String password) {
// The baseUrl should contain a URL similar to
// "http://localhost:8080/business-central/".
// RuntimeEngine instance with the necessary information to communicate
// with the REST services.
// Select a user with the rest-all role.
RuntimeEngine engine = RemoteRuntimeEngineFactory
.newRestBuilder()
.addDeploymentId(deploymentId)
.addUrl(baseUrl)
.addUserName(user)
.addPassword(password)
.build();
// Create KieSession and TaskService instances and use them:
KieSession ksession = engine.getKieSession();
TaskService taskService = engine.getTaskService();
// Each operation on a KieSession, TaskService, or AuditLogService (client) instance
// sends a request for the operation to the server side and waits for the response.
// If something goes wrong on the server side, the client will throw an exception.
ProcessInstance processInstance = ksession.startProcess("com.burns.reactor.maintenance.cycle");
long procId = processInstance.getId();
String taskUserId = user;
taskService = engine.getTaskService();
List<TaskSummary> tasks = taskService.getTasksAssignedAsPotentialOwner(user, "en-UK");
long taskId = -1;
for (TaskSummary task : tasks) {
if (task.getProcessInstanceId() == procId) {
taskId = task.getId();
}
}
if (taskId == -1) {
throw new IllegalStateException("Unable to find task for " + user + " in process instance " + procId);
}
taskService.start(taskId, taskUserId);
}
}
}21.5.2.1. Retrieving Potential Owners of Human Task
To guarantee high performance, the getPotentialOwners() method of the TaskSummary class does not return the list of potential owners of a task.
Instead, you should retrieve information about owners on an individual task basis. In the following example, the mentioned Task is from the org.kie.api.task.model.Task package. Also notice that the method getTaskById() uses the task ID as a parameter.
import org.kie.api.task.model.OrganizationalEntity;
import org.kie.api.task.model.Task;
public List<OrganizationalEntity> getPotentialOwnersByTaskId(long taskId) {
Task task = taskService.getTaskById(taskId);
return task.getPeopleAssignments().getPotentialOwners();
}
In addition, actual owners and users created by them can be retrieved using the getActualOwnerId() and getCreatedById() methods.
For a list of Maven dependencies, see Embedded jBPM Engine Dependencies.
21.5.2.2. Calling Tasks Without Deployment ID
The addDeploymentId() method called on the instance of RemoteRuntimeEngineBuilder requires the calling application to pass the deploymentId parameter to connect to Business Central. The deploymentId is the ID of the deployment with which the RuntimeEngine interacts. However, there may be applications that require working with human tasks and dealing with processes across multiple deployments. In such cases, where providing deploymentId parameters for multiple deployments to connect to Business Central is not feasible, it is possible to skip the parameter when using the fluent API of RemoteRestRuntimeEngineBuilder.
This API does not require the calling application to pass the deploymentId parameter. If a request requires the deploymentId parameter, but does not have it configured, an exception is thrown.
import org.kie.api.runtime.manager.RuntimeEngine;
import org.kie.remote.client.api.RemoteRestRuntimeEngineBuilder;
import org.kie.remote.client.api.RemoteRestRuntimeEngineFactory;
import org.kie.remote.client.api.RemoteRuntimeEngineFactory;
import java.net.URL;
...
RuntimeEngine engine = RemoteRuntimeEngineFactory
.newRestBuilder()
.addUrl(instanceUrl)
.addUserName(user)
.addPassword(password)
.build();
// This call does not require the deployment ID and ends successfully:
engine.getTaskService().claim(23l, "user");
// This code throws a "MissingRequiredInfoException" because the
// deployment ID is required:
engine.getKieSession().startProcess("org.test.process");For a list of Maven dependencies, see Embedded jBPM Engine Dependencies.
21.5.2.3. Custom Model Objects and Remote API
Working with custom model objects from a client application using the Remote API is supported in Red Hat JBoss BPM Suite. Custom model objects can be created using the Data Modeler in Business Central. Once built and deployed successfully into a project, these objects are part of the project in the local Maven repository.
Reuse model objects instead of recreating them locally in the client application.
The process to access and manipulate these objects from a client application follows.
Procedure: Accessing Custom Model Objects Using Remote API
- Ensure that the custom model objects have been installed into the local Maven repository of the project that they are a part of. To achieve that, the project has to be built successfully.
If your client application is a Maven-based project, include project the custom model objects as a Maven dependency in the
pom.xmlconfiguration file of the client application.To find the Maven GAV of the project: in Business Central, go to Authoring → Project Authoring and Tools → Project Editor.
If the client application is not a Maven-based project, download the Red Hat JBoss BPM Suite project which includes the model classes: in Business Central, go to Authoring → Artifact Repository. Add this JAR file of the project on the build path of your client application.
You can now use the custom model objects in your client application and invoke methods on them using the Remote API. See the following example with a
Personcustom model object.import java.net.URL; import java.util.HashMap; import java.util.Map; import org.kie.api.runtime.KieSession; import org.kie.api.runtime.manager.RuntimeEngine; import org.kie.api.runtime.process.ProcessInstance; import org.kie.remote.client.api.RemoteRestRuntimeEngineBuilder; import org.kie.remote.client.api.RemoteRestRuntimeEngineFactory; import org.kie.remote.client.api.RemoteRuntimeEngineFactory; ... RuntimeEngine engine = RemoteRuntimeEngineFactory .newRestBuilder() .addUrl(instanceUrl) .addUserName(user) .addPassword(password) .addExtraJaxbClasses(Person.class) .addDeploymentId(deploymentId) .build(); KieSession kSession = engine.getKieSession(); Map<String, Object> params = new HashMap<>(); Person person = new Person(); person.setName("anton"); params.put("pVar", person); ProcessInstance pi = kSession.startProcess(PROCESS2_ID, params); System.out.println("Process Started: " + pi.getId());For a list of Maven dependencies, see Embedded jBPM Engine Dependencies.
Ensure that your client application has imported the correct Red Hat JBoss BPM Suite libraries for the example to work.
If you are creating a data object, make sure that the class has the @org.kie.api.remote.Remotable annotation. The @org.kie.api.remote.Remotable annotation makes the entity available for use with JBoss BPM Suite remote services such as REST, JMS, and WS.
There are two ways to add the annotation:
On the Drools & jBPM screen of the data object in Business Central, select the Remotable check box.
You can also add the annotation manually. On the right side of the Data Object editor screen in Business Central, choose the Advanced tab and click add annotation. In the Add new annotation dialog window, define the annotation class name as
org.kie.api.remote.Remotableand click the search button.It is also possible to edit the source of the class directly. See the following example:
package org.bpms.helloworld; @org.kie.api.remote.Remotable public class Person implements java.io.Serializable { ... }
If you are creating a data object, make sure that the class has the @org.kie.api.remote.Remotable annotation. The @org.kie.api.remote.Remotable annotation makes the entity available for use with the Red Hat JBoss BPM Suite remote services such as REST, JMS, and WS.
21.5.3. JMS Client
RemoteRuntimeEngineFactory works similarly as the REST variation: it is a starting point for building and configuring a new RemoteRuntimeEngine instance that can interact with the remote JMS API. The main use for this class is to create a builder instance of JMS using the newJmsBuilder() method. The builder is then used to create a RemoteRuntimeEngine instance that will act as a client to the remote JMS API.
In addition to methods mentioned in Section 21.5.1, “Common Configuration”, the following configuration methods can be called on RemoteJmsRuntimeEngineBuilder:
- addRemoteInitialContext(javax.jms.InitialContext param)
-
A remote
InitialContextinstance from the server, created using JNDI. - addConnectionFactory(javax.jms.ConnectionFactory param)
-
A
ConnectionFactoryinstance used to connect toKieSessionQueueorTaskServiceQueue. - addKieSessionQueue(javax.jms.Queue param)
- Sets the JMS queue for requests related to a process instance.
- addTaskServiceQueue(javax.jms.Queue param)
- Sets the JMS queue for requests related to the task service usage.
- addResponseQueue(javax.jms.Queue param)
- Sets a JMS queue used for receiving responses.
- addJbossServerHostName(String param)
-
Sets a host name to look up and retrieve a remote instance of
InitialContext. - addHostName(String param)
- Sets a host name of JMS queues.
- addJmsConnectorPort(int param)
- Sets a port for the JMS Connector.
- addKeystorePassword(String param)
- Sets a JMS Keystore password.
- addKeystoreLocation(String param)
- Specifies a JMS Keystore location.
- addTruststorePassword(String param)
- Sets a JMS Truststore password.
- addTruststoreLocation(String param)
- Specifies a JMS Truststore location.
- useKeystoreAsTruststore()
- Configures the client to use the same file for both Keystore and Truststore.
- useSsl(boolean param)
- Sets whether this client instance uses secured connection.
- disableTaskSecurity()
Turns off SSL usage when communicating with Business Central.
Note that disabling task security exposes users to a man-in-the-middle attack, since no encryption will be used when sending a message containing a password.
The following example illustrates how the Remote Java API can be used with the JMS API.
import java.net.URL;
import java.util.HashMap;
import java.util.List;
import java.util.Map;
import org.kie.api.runtime.KieSession;
import org.kie.api.runtime.manager.RuntimeEngine;
import org.kie.api.runtime.process.ProcessInstance;
import org.kie.api.task.TaskService;
import org.kie.api.task.model.TaskSummary;
import org.kie.remote.client.api.RemoteRuntimeEngineFactory;
import org.kie.services.client.builder.objects.MyType;
public class RemoteJavaApiJmsClientExample {
public void startProcessAndTaskViaJmsRemoteJavaAPI (URL serverUrl, String deploymentId, String user, String password) {
// The serverURL should contain a URL similar to "http://localhost:8080/business-central".
// Select a user with the rest-all role.
// Set up remote JMS runtime engine factory:
RuntimeEngine engine = RemoteRuntimeEngineFactory
.newJmsBuilder()
.addDeploymentId(deploymentId)
.addJbossServerHostName(serverUrl.getHost())
.addUserName(user)
.addPassword(password)
.build();
// Interface with JMS API
KieSession ksession = engine.getKieSession();
Map<String, Object> params = new HashMap<String, Object>();
params.put("paramName", new MyType("name", 23));
ProcessInstance processInstance = ksession.startProcess("com.burns.reactor.maintenance.cycle", params);
long procId = processInstance.getId();
TaskService taskService = engine.getTaskService();
List<Long> tasks = taskService.getTasksByProcessInstanceId(procId);
taskService.start(tasks.get(0), user);
}
}Configuration Using InitialContext Instance
When configuring the RemoteJmsRuntimeEngineBuilder with an InitialContext instance as a parameter, it is necessary to retrieve the (remote) instance of InitialContext first from the server. See the following example:
private InitialContext getRemoteJbossInitialContext(URL url, String user, String password) {
Properties initialProps = new Properties();
initialProps.setProperty(InitialContext.INITIAL_CONTEXT_FACTORY, "org.jboss.naming.remote.client.InitialContextFactory");
String jbossServerHostName = url.getHost();
initialProps.setProperty(InitialContext.PROVIDER_URL, "remote://"+ jbossServerHostName + ":4447");
initialProps.setProperty(InitialContext.SECURITY_PRINCIPAL, user);
initialProps.setProperty(InitialContext.SECURITY_CREDENTIALS, password);
for (Object keyObj : initialProps.keySet()) {
String key = (String) keyObj;
System.setProperty(key, (String) initialProps.get(key));
}
try {
return new InitialContext(initialProps);
} catch (NamingException e) {
throw new RemoteCommunicationException("Unable to create "
+ InitialContext.class.getSimpleName(), e);
}
}
You can work with JMS queues directly without using RemoteRuntimeEngine. For more information, see the How to Use JMS Queues Without the RemoteRuntimeEngine in Red Hat JBoss BPMS article. However, this approach is not a recommended way to use the provided JMS interface.
21.5.4. Supported Methods
The Remote Java API provides client-like instances of the RuntimeEngine, KieSession, TaskService, and AuditService interfaces. This means that while many of the methods in those interfaces are available, some are not. The following tables list the available methods. Methods not listed in the tables below throw UnsupportedOperationException explaining that the called method is not available.
Available Process-Related KieSession Methods
- abortProcessInstance(long processInstanceId)
-
Aborts a process instance. Return value:
void. - getProcessInstance(long processInstanceId)
-
Returns a process instance. Return value:
ProcessInstance. - getProcessInstance(long processInstanceId, boolean readonly)
-
Returns a process instance. Return value:
ProcessInstance. - getProcessInstances()
-
Returns all (active) process instances. Return value:
Collection<ProcessInstance>. - signalEvent(String type, Object event)
-
Signals all (active) process instances. Return value:
void. - signalEvent(String type, Object event, long processInstanceId)
-
Signals a process instance. Return value:
void. - startProcess(String processId)
-
Starts a new process and returns a process instance if the process instance has not immediately completed. Return value:
ProcessInstance. - startProcess(String processId, Map<String, Object> parameters)
-
Starts a new process and returns a process instance if the process instance has not immediately completed. Return value:
ProcessInstance.
Available Rules-Related KieSession Methods
- getFactCount()
-
Returns the total fact count. Return value:
Long. - getGlobal(String identifier)
-
Returns a global fact. Return value:
Object. - setGlobal(String identifier, Object value)
-
Sets a global fact. Return value:
void.
Available WorkItemManager Methods
- abortWorkItem(long id)
-
Aborts a work item. Return value:
void. - completeWorkItem(long id, Map<String, Object> results)
-
Completes a work item. Return value:
void. - getWorkItem(long workItemId)
-
Returns a work item. Return value:
WorkItem.
Available Task Operation TaskService Methods
- addTask(Task task, Map<String, Object> params)
-
Adds a new task. Return value:
Long. - activate(long taskId, String userId)
-
Activates a task. Return value:
void. - claim(long taskId, String userId)
-
Claims a task. Return value:
void. - claimNextAvailable(String userId, String language)
-
Claims the next available task for a user. Return value:
void. - complete(long taskId, String userId, Map<String, Object> data)
-
Completes a task. Return value:
void. - delegate(long taskId, String userId, String targetUserId)
-
Delegates a task. Return value:
void. - exit(long taskId, String userId)
-
Exits a task. Return value:
void. - fail(long taskId, String userId, Map<String, Object> faultData)
-
Fails a task. Return value:
void. - forward(long taskId, String userId, String targetEntityId)
-
Forwards a task. Return value:
void. - nominate(long taskId, String userId, List<OrganizationalEntity> potentialOwners)
-
Nominates a task. Return value:
void. - release(long taskId, String userId)
-
Releases a task. Return value:
void. - resume(long taskId, String userId)
-
Resumes a task. Return value:
void. - skip(long taskId, String userId)
-
Skips a task. Return value:
void. - start(long taskId, String userId)
-
Starts a task. Return value:
void. - stop(long taskId, String userId)
-
Stops a task. Return value:
void. - suspend(long taskId, String userId)
-
Suspends a task. Return value:
void. - addOutputContent(long taskId, Map<String, Object> params)[4]
-
Adds output parameters to a task. Return value:
RemoteApiResponse<Long>. - getOutputContentMap(long taskId) [4]
-
Retrieves the output parameters of a task. Return value:
RemoteApiResponse<Map<String, Object>>.
Available Task Retrieval and Query TaskService Methods
- getTaskByWorkItemId(long workItemId)
-
Return value:
Task. - getTaskById(long taskId)
-
Return value:
Task. - getTasksAssignedAsBusinessAdministrator(String userId, String language)
-
Return value:
List<TaskSummary>. - getTasksAssignedAsPotentialOwner(String userId, String language)
-
Return value:
List<TaskSummary>. - getTasksAssignedAsPotentialOwnerByStatus(String userId, List<Status> status, String language)
-
Return value:
List<TaskSummary>. - getTasksOwned(String userId, String language)
-
Return value:
List<TaskSummary>. - getTasksOwnedByStatus(String userId, List<Status> status, String language)
-
Return value:
List<TaskSummary>. - getTasksByStatusByProcessInstanceId(long processInstanceId, List<Status> status, String language)
-
Return value:
List<TaskSummary>. - getTasksByProcessInstanceId(long processInstanceId)
-
Return value:
List<TaskSummary>. - getTasksAssignedAsPotentialOwnerByProcessId(String userId, String processId)
-
Return value:
List<TaskSummary>. - getContentById(long contentId)
-
Return value:
Content. - getAttachmentById(long attachId)
-
Return value:
Attachment.
The language parameter is not used for task retrieval and query TaskService methods anymore. However, the method signatures still contain it to support backward compatibility. This parameter will be removed in future releases.
Available AuditService Methods
- findProcessInstances()
-
Return value:
List<ProcessInstanceLog>. - findProcessInstances(String processId)
-
Return value:
List<ProcessInstanceLog>. - findActiveProcessInstances(String processId)
-
Return value:
List<ProcessInstanceLog>. - findProcessInstance(long processInstanceId)
-
Return value:
ProcessInstanceLog. - findSubProcessInstances(long processInstanceId)
-
Return value:
List<ProcessInstanceLog>. - findNodeInstances(long processInstanceId)
-
Return value:
List<NodeInstanceLog>. - findNodeInstances(long processInstanceId, String nodeId)
-
Return value:
List<NodeInstanceLog>. - findVariableInstances(long processInstanceId)
-
Return value:
List<VariableInstanceLog>. - findVariableInstances(long processInstanceId, String variableId)
-
Return value:
List<VariableInstanceLog>. - findVariableInstancesByName(String variableId, boolean onlyActiveProcesses)
-
Return value:
List<VariableInstanceLog>. - findVariableInstancesByNameAndValue(String variableId, String value, boolean onlyActiveProcesses)
-
Return value:
List<VariableInstanceLog>. - clear()
-
Return value:
void.
org.kie.remote.client.api.RemoteTaskService class instead of the TaskService class.
21.6. Troubleshooting
21.6.1. Serialization Issues
Sometimes, users may wish to pass instances of their own classes as parameters to commands sent in a REST request or JMS message. In order to do this, there are a number of requirements.
The user-defined class satisfy the following in order to be property serialized and deserialized by the JMS or REST API:
The user-defined class must be correctly annotated with JAXB annotations, including the following:
-
The user-defined class must be annotated with a
javax.xml.bind.annotation.XmlRootElementannotation with a non-emptynamevalue All fields or getter/setter methods must be annotated with a
javax.xml.bind.annotation.XmlElementorjavax.xml.bind.annotation.XmlAttributeannotations.Furthermore, the following usage of JAXB annotations is recommended:
-
Annotate the user-defined class with a
javax.xml.bind.annotation.XmlAccessorTypeannotation specifying that fields should be used, (javax.xml.bind.annotation.XmlAccessType.FIELD). This also means that you should annotate the fields (instead of the getter or setter methods) with@XmlElementor@XmlAttributeannotations. -
Fields annotated with
@XmlElementor@XmlAttributeannotations should also be annotated withjavax.xml.bind.annotation.XmlSchemaTypeannotations specifying the type of the field, even if the fields contain primitive values. -
Use objects to store primitive values. For example, use the
java.lang.Integerclass for storing an integer value, and not theintclass. This way it will always be obvious if the field is storing a value.
-
The user-defined class must be annotated with a
- The user-defined class definition must implement a no-arg constructor.
-
Any fields in the user-defined class must either be object primitives (such as a
LongorString) or otherwise be objects that satisfy the first 2 requirements in this list (correct usage of JAXB annotations and a no-arg constructor).
The class definition must be included in the deployment JAR of the deployment that the JMS message content is meant for.
NoteIf you create your class definitions from an XSD schema, you may end up creating classes that inconsistently (among classes) refer to a namespace. This inconsistent use of a namespace can end up preventing a these class instance from being correctly deserialized when received as a parameter in a command on the server side.
For example, you may create a class that is used in a BPMN2 process, and add an instance of this class as a parameter when starting the process. While sending the command/operation request (via the Remote (client) Java API) will succeed, the parameter will not be correctly deserialized on the server side, leading the process to eventually throw an exception about an unexpected type for the class.
-
The sender must set a
deploymentIdstring property on the JMS bytes message to the name of thedeploymentId. This property is necessary in order to be able to load the proper classes from the deployment itself before deserializing the message on the server side.
While submitting an instance of a user-defined class is possible using both the JMS and REST API, retrieving an instance of the process variable is only possible through the REST API.
21.6.2. Insecure Task Operations
By default, you may only work with tasks as the authenticated user. If you try to claim tasks on behalf of another user, you may get an exception similar to:
PermissionDeniedException thrown with message 'User '[UserImpl:'john']' does not have permissions to execute operation 'Claim' on task id 14'This is caused by the security settings. To bypass the security settings:
Set the
org.kie.task.insecure=trueproperty on your server. For example, on Red Hat JBoss EAP, add the following intoEAP_HOME/standalone/configuration/standalone.xml:<system-properties> ... <property name="org.kie.task.insecure" value="true"/> ... </system-properties>On the client side, do one of the following:
Use the
disableTaskSecurity()method when building theRuntimeEngineobject:RuntimeEngine engine = RemoteRuntimeEngineFactory .newRestBuilder() .addDeploymentId(deploymentId) .addUrl(baseUrl) .addUserName(user) .addPassword(password) .disableTaskSecurity() .build();-
Set the
org.kie.task.insecuresystem property totrue.
If you are still experiencing the exception in your application, configure the UserGroupCallback settings. See Configuring UserGroupCallback for further information.
Appendix A. Versioning information
Documentation last updated on: Monday, May 13, 2019.