IBM WebSphere Installation and Configuration Guide
For Red Hat JBoss BPM Suite
Abstract
Chapter 1. Introduction
1.1. About Red Hat JBoss BPM Suite
Red Hat JBoss BPM Suite is an open source business process management suite that combines Business Process Management and Business Rules Management and enables business and IT users to create, manage, validate, and deploy business processes and rules.
Red Hat JBoss BRMS and Red Hat JBoss BPM Suite use a centralized repository where all resources are stored. This ensures consistency, transparency, and the ability to audit across the business. Business users can modify business logic and business processes without requiring assistance from IT personnel.
To accommodate Business Rules component, Red Hat JBoss BPM Suite includes integrated Red Hat JBoss BRMS.
Business Resource Planner is included with this release.
Red Hat JBoss BPM Suite is supported for use with Red Hat Enterprise Linux 7 (RHEL7).
1.2. Supported Platforms
Red Hat JBoss BPM Suite and Red Hat JBoss BRMS are fully supported and tested on the following platforms:
- Red Hat JBoss Enterprise Application Platform 6.4.7
- Red Hat JBoss Web Server 2.1, 3.0
- IBM WebSphere Application Server 8.5.5
- Oracle WebLogic Server 12.1.3 (12c)
- Red Hat JBoss Fuse 6.2.x
1.3. Use Case: Process-Based Solutions in Loan Industry
This section describes a use case of deploying Red Hat JBoss BPM Suite to automate business processes (such as loan approval process) at a retail bank. This use case is a typical process-based specific deployment that might be the first step in a wider adoption of Red Hat JBoss BPM Suite throughout an enterprise. It leverages features of both business rules and processes of Red Hat JBoss BPM Suite.
A retail bank offers several types of loan products each with varying terms and eligibility requirements. Customers requiring a loan must file a loan application with the bank. The bank then processes the application in several steps, such as verifying eligibility, determining terms, checking for fraudulent activity, and determining the most appropriate loan product. Once approved, the bank creates and funds a loan account for the applicant, who can then access funds. The bank must be sure to comply with all relevant banking regulations at each step of the process, and has to manage its loan portfolio to maximize profitability. Policies are in place to aid in decision making at each step, and those policies are actively managed to optimize outcomes for the bank.
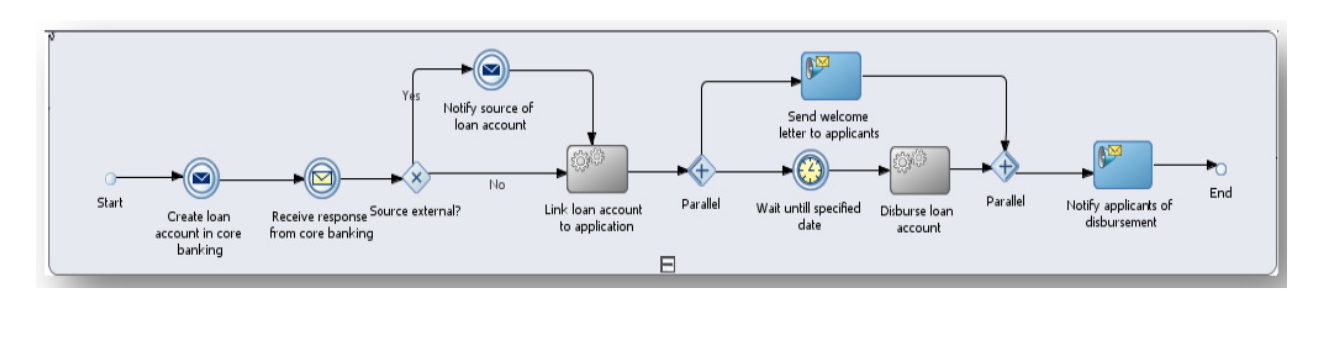
Business analysts at the bank model the loan application processes using the BPMN2 authoring tools (Process Designer) in Red Hat JBoss BPM Suite. Here is the process flow:
Figure 1.1. High-Level Loan Application Process Flow
Business rules are developed with the rule authoring tools in Red Hat JBoss BPM Suite to enforce policies and make decisions. Rules are linked with the process models to enforce the correct policies at each process step.
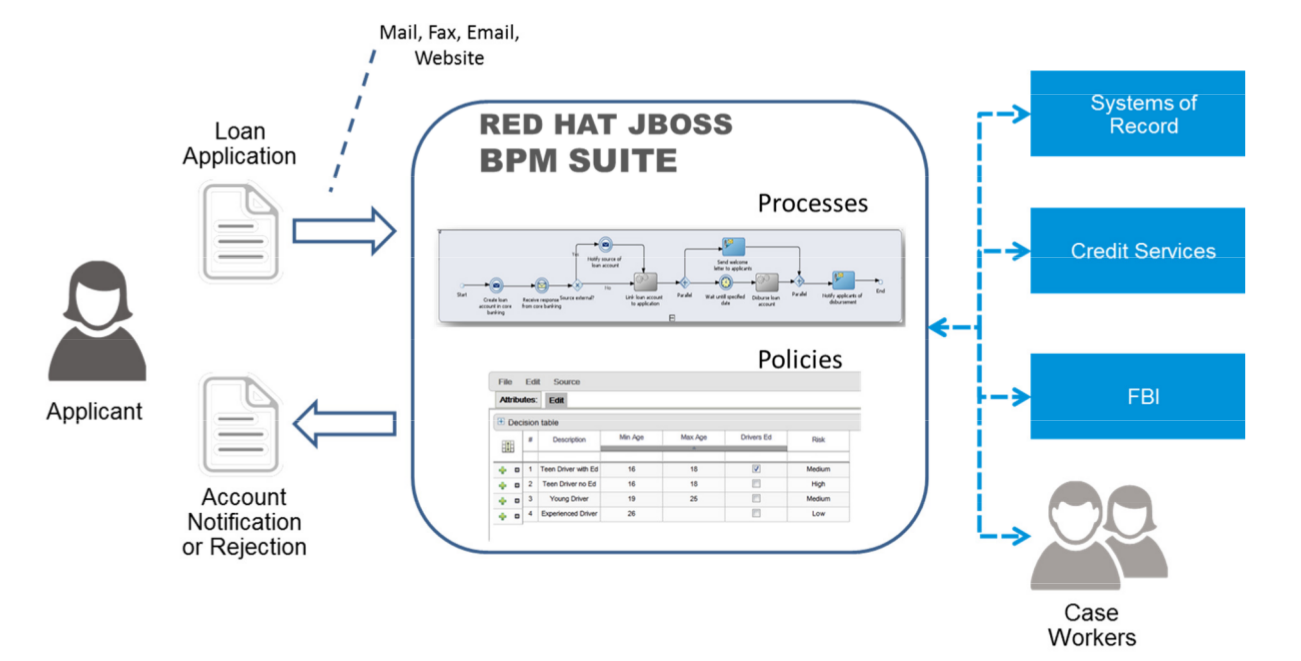
The bank’s IT organization deploys the Red Hat JBoss BPM Suite so that the entire loan application process can be automated.
Figure 1.2. Loan Application Process Automation
The entire loan process and rules can be modified at any time by the bank’s business analysts. The bank is able to maintain constant compliance with changing regulations, and is able to quickly introduce new loan products and improve loan policies in order to compete effectively and drive profitability.
1.4. About IBM WebSphere Application Server
IBM WebSphere Application Server (hereinafter referred to as WAS) is a flexible and secure web application server that hosts Java-based web applications and provides Java EE-certified runtime environments. WAS 8.5.5 supports Java SE 8 and is fully compliant with Java EE 7 since version 8.5.5.6.
1.4.1. Getting Started with IBM WebSphere Application Server
Downloading and Installing WAS
In order to install IBM WebSphere Application Server, you need to download and install IBM Installation Manager first.
- Download IBM Installation Manager version 1.8.5 or later from the IBM Installation Manager and Packaging Utility download links page.
Extract the downloaded archive, change to root, and run the following command in the new directory:
./install
./installCopy to Clipboard Copied! Toggle word wrap Toggle overflow IBM Installation Manager opens. The installer will guide you through the entire process of installing the manager.
Open the installed manager, go to File → Preferences and click Add Repository.
The Add Repository dialog window opens.
Enter the repository URL for IBM WebSphere Application Server 8.5. You can find all the repository URLs in the Online product repositories for WebSphere Application Server offerings page of the IBM Knowledge Center. For example:
http://www.ibm.com/software/repositorymanager/com.ibm.websphere.APPCLIENT.v85
http://www.ibm.com/software/repositorymanager/com.ibm.websphere.APPCLIENT.v85Copy to Clipboard Copied! Toggle word wrap Toggle overflow - Enter your IBM id credentials when prompted and after the Connection status turns green, click OK.
- Click Install.
- Choose the packages you want to install and click Next. If asked, install all the recommended fixes as well.
Creating Users and Installation Verification
- In the WebSphere Customization Toolbox 8.5, open the Profile Management Tool.
- Click Create… and create a user for the Application Server environment.
- In the WebSphere Application Server - First Steps window that opens, click Installation Verification and verify that your server was installed properly.
Starting Server
-
Change into the
bindirectory of the installed application server (by default at/opt/IBM/WebSphere/AppServer). Change to root and run
./startServer.sh APPLICATION_SERVER_NAME, for example:./startServer.sh server1
./startServer.sh server1Copy to Clipboard Copied! Toggle word wrap Toggle overflow Navigate to
http://TARGET_SERVER:9060/ibm/consolein your web browser and log in with the user credentials created in the previous procedure.The Integrated Solutions Console opens.
Do not forget to stop the server after you are no longer using it. Log out of the console and run ./stopServer.sh APPLICATION_SERVER_NAME as root. For example:
./stopServer.sh server1
./stopServer.sh server1For further information, see WebSphere Application Server, version 8.5.5 documentation.
1.5. About Red Hat JBoss BPM Suite for IBM WebSphere Application Server
Red Hat JBoss BPM Suite for IBM WebSphere Application Server is provided as three deployable web application archives: business-central.war, kie-server.war, and dashbuilder.war. It is then deployed and configured as any other web application.
Red Hat JBoss BPM Suite 6.4 is supported on the version 8.5.5 of IBM WebSphere Application Server.
Installation of Red Hat JBoss BPM Suite on IBM WebSphere Application Server is supported since version 6.0.2 of Red Hat JBoss BPM Suite. This guide covers the installation and configuration of Red Hat JBoss BPM Suite on a full profile version of IBM WebSphere Application Server 8.5.5.
Before installation, several configuration steps need to be performed to enable a successful setup. Follow the procedures in this guide to configure the server.
Before you proceed, ensure you have root access to IBM WebSphere Application Server and that you are able to successfully access the IBM WebSphere’s administrative console using a web browser (usually at http://TARGET_SERVER:9060/ibm/console).
Chapter 2. Download and Extract
Follow the steps outlined in this chapter to download and extract Red Hat JBoss BPM Suite for IBM WebSphere Application Server.
2.1. Downloading Red Hat JBoss BPM Suite for IBM WebSphere Application Server
To download the deployable Red Hat JBoss BPM Suite package file for IBM WebSphere Application Server from the Red Hat Customer Portal:
- Go to the Red Hat Customer Portal and log in.
- Click DOWNLOADS at the top of the page.
- In the Product Downloads page that opens, click Red Hat JBoss BPM Suite.
- From the Version drop-down menu, select 6.4.
- Navigate to Red Hat JBoss BPM Suite 6.4.0 Deployable for WebSphere 8.5 and click Download.
2.2. Extracting Red Hat JBoss BPM Suite for IBM WebSphere Application Server
The downloaded installation ZIP file for Red Hat JBoss BPM Suite (jboss-bpmsuite-6.4.0.GA-deployable-was8.zip) contains the Business Central WAR deployable archive (business-central.war), the Intelligent Process Server WAR deployable archive (kie-server.war), and the Dashbuilder WAR deployable archive (dashbuilder.war) in an unextracted format.
Extract the downloaded ZIP file so that you have access to the deployable WAR files:
unzip jboss-bpmsuite-VERSION-deployable-was8.zip
unzip jboss-bpmsuite-VERSION-deployable-was8.zipChapter 3. Configure
Before you can deploy Red Hat JBoss BPM Suite as a web archive on IBM WebSphere Application Server, configure the server to accept the deployable WAR files. Follow the steps outlined in this section to deploy Red Hat JBoss BPM Suite on IBM WebSphere Application Server.
Log in to your IBM WebSphere console using an administrative login before performing any of these steps. The usual login URL is http://TARGET_SERVER:9060/ibm/console (for example http://localhost:9060/ibm/console).
The IBM Integrated Solutions Console with the welcome screen opens. The main menu on the left side of the console contains all the links necessary for setting the application server.
Figure 3.1. IBM Integrated Solutions Console

3.1. Increasing JVM Heap Size
With the default JVM heap size, the IBM WebSphere Application Server freezes or causes deployment errors when deploying Business Central. To increase the heap size:
- In the Integrated Solutions Console, go to Servers → Server Types → WebSphere Application Servers.
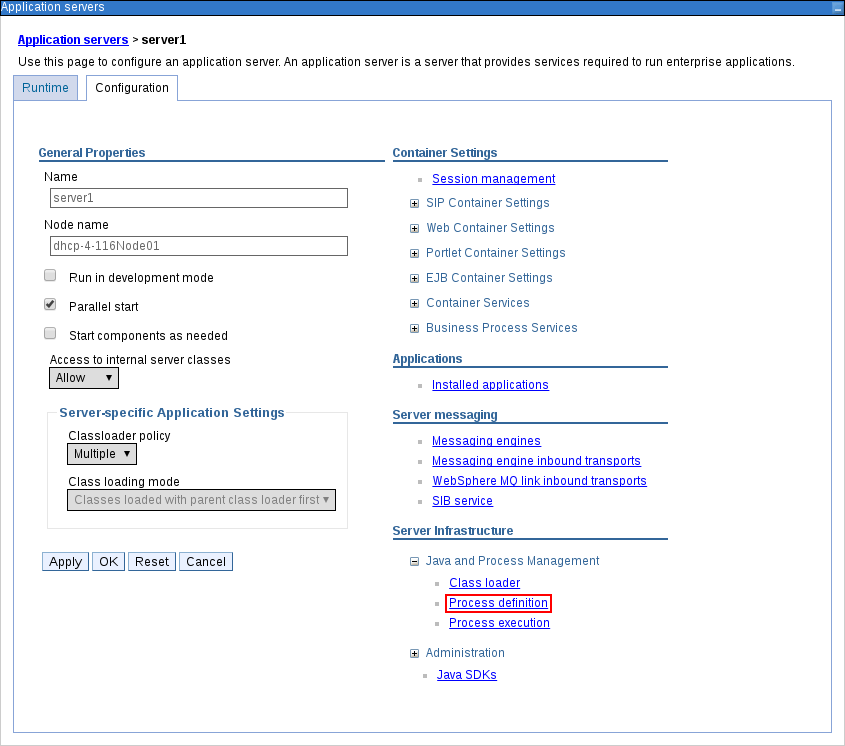
In the list of application servers, click on the server on which you are going to deploy Business Central. For example
server1.The configuration page for that server opens.
Under Server Infrastructure heading on the right side, click Java and Process Management → Process Definition.
Figure 3.2. Application Server Configuration Page
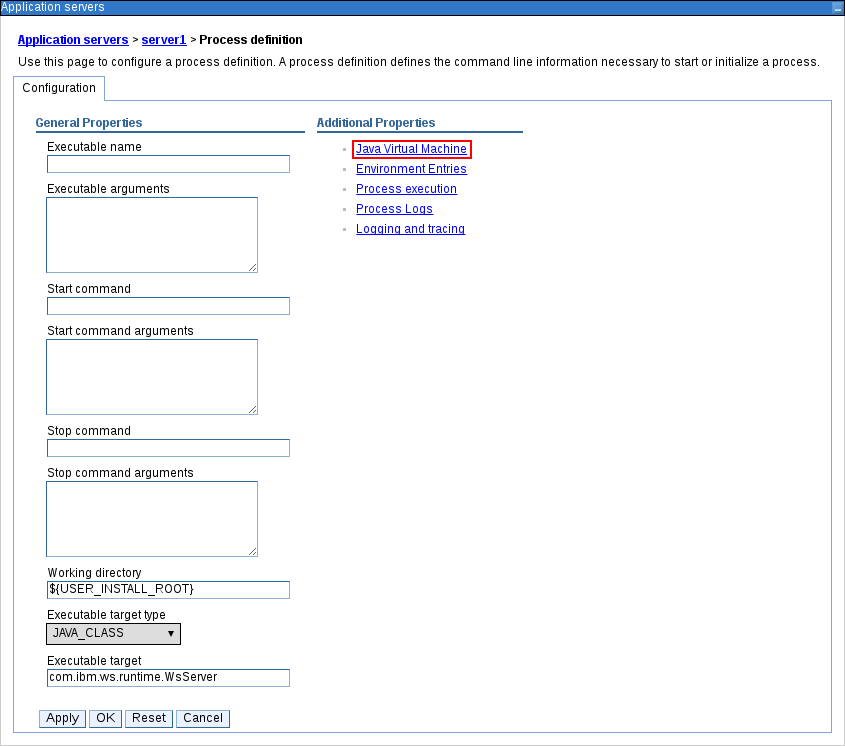
Click Java Virtual Machine under the Additional Properties heading on the right.
Figure 3.3. Process Definition Configuration Page
This will open up the configuration properties for the JVM that is used to start the server.
Change both the Initial Heap Size and Maximum Heap Size to
2048. This is the configuration Red Hat JBoss BPM Suite is tested with.Figure 3.4. JVM Configuration Page
Click Apply at the bottom.
Messages pop-up window appears at the top of the Application Servers configuration page. You can choose to save these configuration settings to the master configuration at this stage.
Figure 3.5. Messages Pop-up
- Restart the server at this point or wait till other configuration changes have been made.


3.2. Modifying Security Settings
For the Business Central application to work, you need to modify several security settings on IBM WebSphere Application Server. To enable the container-managed authentication mechanisms provided by the server:
In the main menu, click Security → Global Security. Ensure that the option Enable Application Security is checked. This may already be checked and overridden at the server level.
Figure 3.6. Global Security Configuration Page
Click Custom Properties on the right side and then New… to enter a new custom property with the following details:
-
Name:
com.ibm.ws.security.web.logoutOnHTTPSessionExpire -
Value:
true
This property instructs the server to invalidate LTPA tokens on session invalidation, which makes the logout process consistent across multiple users using the same browser.
-
Name:
- Click Apply and then OK.

3.3. Creating Users and Groups
- In the main menu on the left, click Users and Groups → Manage Groups.
Create five new groups:
admin,analyst,developer,manager, anduserby clicking Create….Figure 3.7. Created Groups
NoteAdd the
kie-servergroup as well if you are going to install the Intelligent Process Server. Also add therest-alland other REST API groups if you are going to use the API. For further information about API roles, see chapter Remote API of Red Hat JBoss BPM Suite Development Guide.- In the main menu on the left, click Users and Groups → Manage Users.
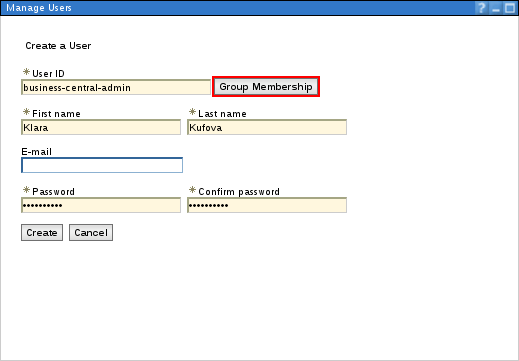
Click Create… and fill in the user credentials.
ImportantMake sure that the selected User ID does not conflict with any known title of a role or a group.
For example, if there is a role called
admin, you should not create a user with the user nameadmin.Figure 3.8. Create User Dialog Window
Click Group Membership and assign the user to the
admingroup that you created previously.NoteYou may assign this user to any of the groups you have just created. In the production systems, you are likely to create separate users for separate groups that align with business roles. The
admingroup is all encompassing and is therefore useful for the purposes of this setup.- Click Create.

3.4. Session Management Custom Settings
- In the main menu on the left, go to Servers → Server Types → WebSphere Application Servers and select the server on which you are deploying Business Central.
- Click Session Management under the Container Settings heading on the right.
- In the Additional Properties section on the right, click Custom Properties and then New….
Fill in the required information:
-
Name:
InvalidateOnUnauthorizedSessionRequestException -
Value:
true
-
Name:
- Click Apply and then OK.
3.5. Setting up Data Source
The Business Central application requires a data source which must be created prior to the deployment of the actual WAR file. This means that you must have access to an underlying database to which the data source connects. Whatever your underlying database, make sure you have the data source ready. Follow the steps below to set the data source.
In the following procedure, the data source setup is demonstrated on the Oracle Database 12c.
Creating JDBC Providers
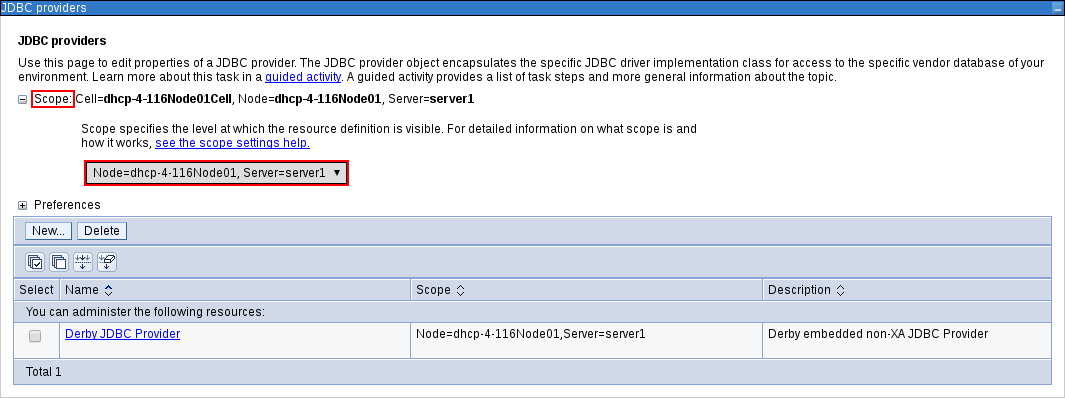
- Open up the JDBC Providers page by clicking Resources → JDBC → JDBC Providers.
At the top of the JDBC Providers page, click Scope. Select the scope of this JDBC provider to include your server and node. Note that it cannot be
All scopes.Figure 3.9. Selecting Scope of JDBC Provider
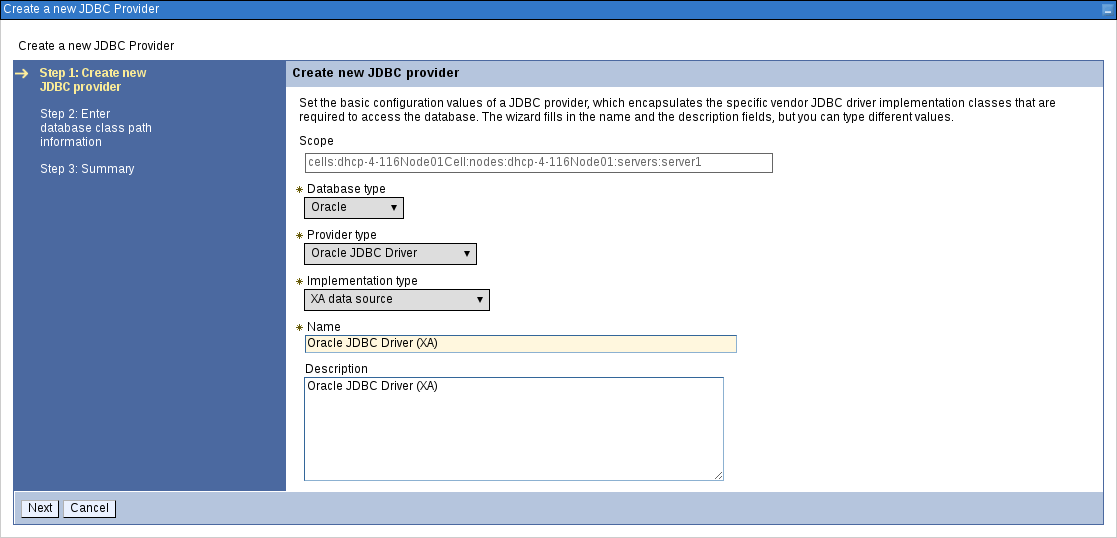
Click New….
The Create a New JDBC Provider page opens.
Fill in the form based on the database driver that you have available.
Figure 3.10. First Step of Creating New JDBC Provider
If your database is not listed, select the User-Defined option from the Database Type selection box and provide the implementation class name.
For example, for H2, PostgreSQL, or MySQL, the implementation class name will be
org.h2.jdbcx.JdbcDataSource,org.postgresql.xa.PGXADataSource, andcom.mysql.jdbc.jdbc2.optional.MysqlXADataSourcerespectively.- Give the JDBC Provider a descriptive name and click Next.
Provide the class path information for the JDBC driver class files you defined. Click Apply.
Figure 3.11. Defining Database Class Path
- Click Next.
Click Finish to accept and add this new JDBC provider.
Figure 3.12. JDBC Provider Summary Page


Using this new JDBC provider, you will now need to set up the actual data source for Business Central.
Before you create the data source, open the persistence.xml file located in the WEB-INF/classes/META-INF directory of the Business Central WAR file (business-central.war) that you have downloaded. You will need to know the JNDI name of the data source defined within the <jta-data-source> tag. For Business Central, it is jdbc/jbpm.
Also change the hibernate.dialect property to suit your database. For example, if your underlying database is Oracle Database 12c, change the property value to org.hibernate.dialect.Oracle10gDialect.
Setting up Data Source
- Open the Data Sources page by clicking Resources → JDBC → Data Sources in the main menu on the left and make sure that the appropriate scope has been selected.
- Click New….
Enter a unique Data Source Name by which you will refer to this data source and the JNDI name that you found in the
persistence.xmlfile.Figure 3.13. First Step of Creating New Data Source
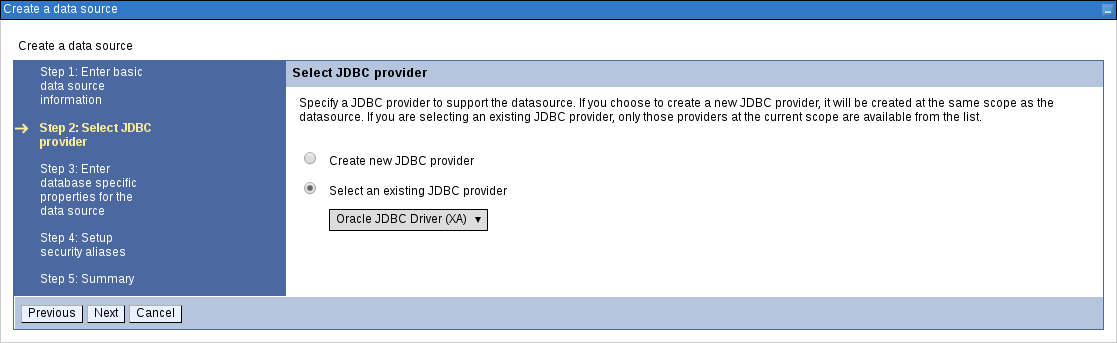
Click Next.
From the Select an Existing JDBC Provider drop-down menu, select the JDBC provider created earlier and click Next.
Figure 3.14. Selecting JDBC Provider
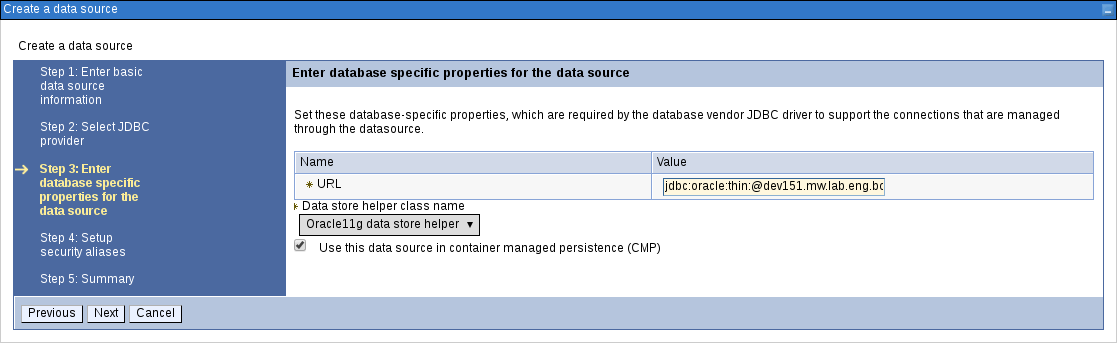
In the Enter Database Specific Properties for the Data Source step, enter the database JDBC URL and click Next.
Figure 3.15. Enter Database Specific Properties for Data Source Screen
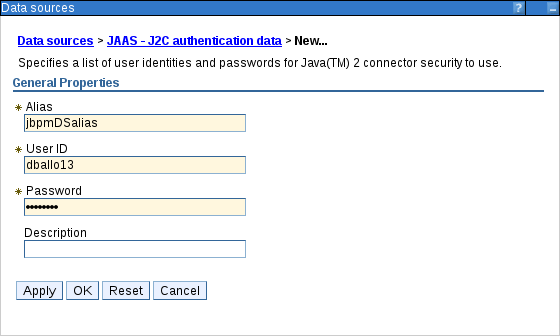
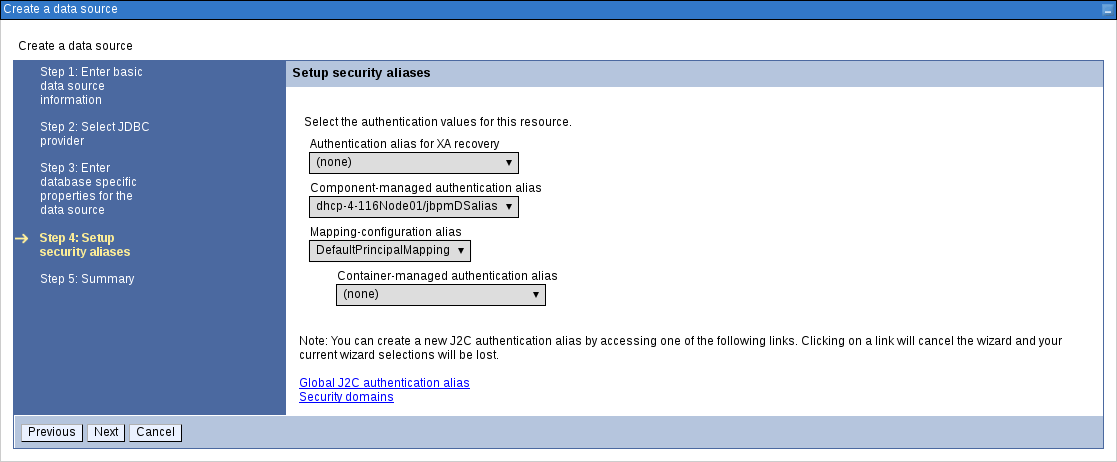
In the Setup Security Aliases screen, set the authentication values for connecting to this data source. If the aliases are not yet created, click Global J2C Authentication Alias at the bottom. Note that in this case, the Create a Data Source wizard will be canceled.
- Click New….
Fill in the Alias, User ID, and Password.
Figure 3.16. Creating New Security Alias
- Click OK.
Go back to the Setup Security Aliases screen and set the Component-Managed Authentication Alias to the newly created alias and the Mapping-Configuration Alias to
DefaultPrincipalMapping.You can also create and set a different alias for XA recovery. If the Authentication Alias for XA Recovery is set to
(none), the component-managed authentication alias is used by default.Figure 3.17. Setting Security Aliases
Click Next.
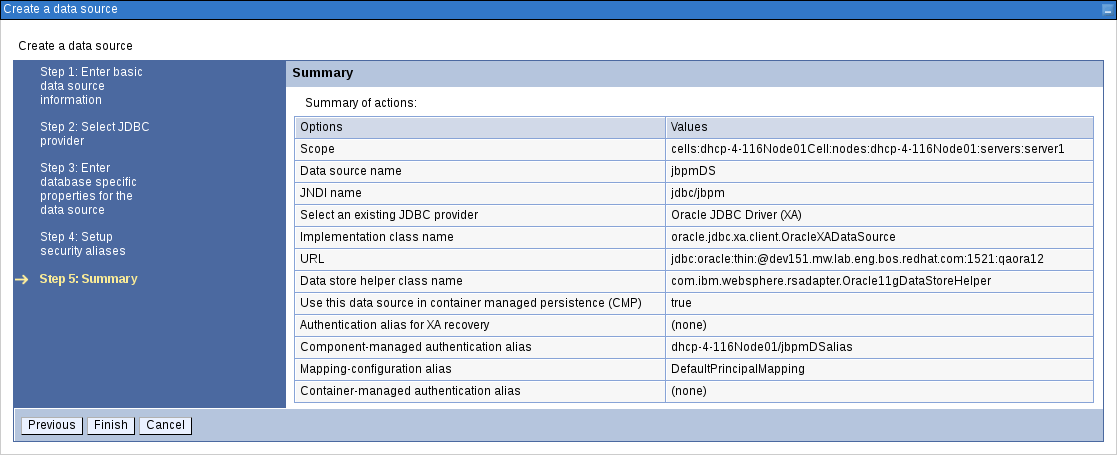
In the Summary screen, check the values and click Finish. Choose to save the changes to the master configuration as well.
Figure 3.18. Creating Data Source Summary Screen
- Choose the created data source from a list of all data sources to provide the basic meta properties.
Click Custom Properties under the Additional Properties section on the right.
Properties like
serverName,databaseName,userName, andpasswordmust now be defined and vary for different databases. Some example database properties are shown below.Expand Table 3.1. Custom Properties for Different Databases Database Properties H2
URL,user,passwordMySQL
serverName,databaseName,port,user,passwordPostgreSQL
serverName,databaseName,portNumber,user,passwordOracle
jdbcURL

Once all the connection properties have been defined, click Test Connection to ensure the validity of the data source. If the connection was successful, the following message appears at the top of the screen:
The test connection operation for data source DATA_SOURCE_NAME on server SERVER_NAME at node NODE_NAME was successful.
The test connection operation for data source DATA_SOURCE_NAME on server SERVER_NAME at node NODE_NAME was successful.3.6. Setting up JMS Resources
IBM WebSphere Application Server must be configured to send and receive JMS messages through Red Hat JBoss BPM Suite. However, before you do this, a service bus must be present. Follow the steps below to create a service bus if one does not already exist.
Setting up Buses
Creating Service Bus
- In the main menu on the left, click Service Integration → Buses.
- Click New….
- Enter the name and make sure that the Bus Security option is unchecked.
- Click Next and then Finish to create the service bus.
Adding Bus Member
Before you continue, add a new bus member. A bus member is a server or a cluster that has been added to this service bus.
- Go to Service Integration → Buses and click on the service bus that you have created.
- Under the Topology heading on the right, click Bus Members.
- Click Add.
- In the Add a New Bus Member wizard, choose the server and the type of message store for the persistence in the first two steps. Depending on the previous selection, you can also specify the properties of the message store.
- Click Finish in the last step to add a new bus member.
Creating JMS Connection Factories
To send and receive messages from Red Hat JBoss BPM Suite, you have to create the JMS connection factories, which are needed for establishing connections used for sending messages into queues.
For Business Central, create the following connection factories: KIE.SIGNAL, KIE.INPUT (for queries), KIE.RESPONSE.ALL (for responses), and KIE.EXECUTOR (for the executor).
If you will be installing the Intelligent Process Server as well, you need to create KIE.SERVER.REQUEST, KIE.SERVER.RESPONSE, and KIE.SERVER.EXECUTOR connection factories.
The factory names shown above are suggestions only and you can change them to suit your needs and company guidelines.
- In the main menu on the left, go to Resources → JMS → Connection Factories.
- Make sure the correct scope is selected and click New.
- Select the Default Messaging Provider option and click OK.
Enter the name and JNDI name of the factory. For example:
-
Name:
KIE.SIGNAL -
JNDI name:
jms/conn/KIE.SIGNAL
NoteThe JNDI names for
KIE.INPUT,KIE.RESPONSE.ALL, andKIE.EXECUTORarejms/conn/KIE.INPUT,jms/conn/KIE.RESPONSE.ALL, andjms/conn/KIE.EXECUTORrespectively.-
Name:
From the Bus Name drop-down list, select the service bus created earlier.
The rest of the options are not mandatory and can be left with default values.
- Click Apply and choose to save the changes to the master configuration.
Creating JMS Queues
The next step is to create the JMS queues. These queues are the destination end points for point-to-point messaging.
For Business Central, create the following queues: KIE.RESPONSE.ALL (for responses), KIE.AUDIT (for asynchronous audit logs), KIE.SESSION (for ksession-based operations), KIE.TASK (for task-based operations), KIE.EXECUTOR (for Business Central executor services), and KIE.SIGNAL (for sending external global signals to processes).
For Intelligent Process Server, create the following: KIE.SERVER.REQUEST (for requests), KIE.SERVER.RESPONSE (for responses), and KIE.SERVER.EXECUTOR (for executor services).
To create these queues:
- In the main menu, go to Resources → JMS → Queues.
- Make sure the correct scope is selected and click New.
- Select the Default Messaging Provider radio button and click OK.
Enter the name and the JNDI name of the queue, for example:
-
Name:
KIE.RESPONSE.ALL -
JNDI name:
jms/KIE.RESPONSE.ALL
NoteAll of the JNDI names of other queues follow the same convention as the example above.
-
Name:
- From the Bus Name drop-down list, select the service bus created earlier.
From the Queue Name drop-down list, make sure to select the Create Service Integration Bus Destination.
This will open up the Create New Queue form for creating a new service integration bus. In this form, enter a unique identifier and select the bus member created earlier in this section.
- Click Apply at the bottom and choose to save the changes to the master configuration.
Creating JMS Activation Specifications
A JMS activation specification is required to be the bridge between the queue and the message-driven bean.
For Business Central, create the following activation specifications: KIE.RESPONSE.ALL (for responses), KIE.AUDIT (for asynchronous audit logs), KIE.SESSION (for ksession-based operations), KIE.TASK (for task-based operations), KIE.EXECUTOR (for Business Central executor services), and KIE.SIGNAL (for sending external global signals to processes).
For Intelligent Process Server, create the following: KIE.SERVER.REQUEST (for requests), KIE.SERVER.RESPONSE (for responses), and KIE.SERVER.EXECUTOR (for executor services).
- In the main menu, go to Resources → JMS → Activation Specifications.
- Make sure the correct scope is selected and click New.
- Check the Default Messaging Provider radio button and click OK.
Enter the name and the JNDI name of the activation specification, for example:
-
Name:
KIE.RESPONSE.ALL -
JNDI name:
jms/activation/KIE.RESPONSE.ALL
NoteAll of the JNDI names of other activation specifications follow the same convention as the example above.
-
Name:
- From the Destination Type drop-down list, make sure to select Queue.
-
Enter the Destination JNDI Name (as created in the previous procedure), for example
jms/KIE.RESPONSE.ALL. - From the Bus Name drop-down list, choose the service bus created earlier.
- Click OK at the bottom with the rest of the field values as default and choose to save the changes to the master configuration.
You have now successfully completed the JMS configurations required for setting up Red Hat JBoss BPM Suite on IBM WebSphere Application Server.
3.7. Adding Custom JVM Properties
You must add custom properties to the JVM that is used to start IBM WebSphere Application Server. These custom properties take into consideration the configuration changes that have been outlined in previous sections of this guide.
- In the main menu, go to Servers → Server Types → WebSphere Application Servers.
- In the list of application servers, choose the server on which you are going to deploy Business Central.
- Under the Server Infrastructure heading on the right, click Java and Process Management → Process Definition.
Click Java Virtual Machine under the Additional Properties heading.
This opens up the configuration properties for the JVM that is used to start WebSphere Application Server.
- Click Custom Properties under Additional Properties.
Create the following properties by clicking New….
Custom JVM Properties
Expand Table 3.2. Properties Required for Business Central and Intelligent Process Server Name Value Description org.kie.executor.jms.queuejms/KIE.EXECUTORorjms/KIE.SERVER.EXECUTORThe JNDI name of the JMS queue for scheduling asynchronous job execution by Business Central (
jms/KIE.EXECUTOR) or Intelligent Process Server (jms/KIE.SERVER.EXECUTOR). Choose the right value based on the application being used for execution.org.kie.executor.jms.cfjms/conn/KIE.EXECUTORThe JNDI name of connection factory to be used for sending messages.
org.jboss.logging.providerjdkThis property is only required where a
CA SiteMinder TAI (SMTAI)is installed in the environment. Using this property forces Hibernate to useJDKinstead oflog4jfor logging within Dashbuilder.CA SiteMinder TAI (SMTAI)contains an old version oflog4j, which causes conflicts.org.apache.wink.jaxbcontextcacheoffThis property ensures that the IBM WebSphere Apache Wink framework does not cache
JAXBContexts, which negatively impacts the performance and interferes with the custom-type serialization for the REST API.Expand Table 3.3. Properties Required for Business Central Name Value Description jbpm.ut.jndi.lookupjta/usertransactionUsed to look up user transactions from within non-managed threads, such as timers.
kie.services.jms.queues.responsejms/KIE.RESPONSE.ALLThe JNDI name of the response queue for the JMS remote API created earlier. You may have given this a different name from
KIE.RESPONSE.ALL. Change if required.org.uberfire.start.methodejbDefines startable beans for Uberfire.
Set this property if following warning message appears in the logs during the deployment of
business-central.war:WARNING: Unable to instantiate EJB Asynchronous Bean. Falling back to Executors' CachedThreadPool
WARNING: Unable to instantiate EJB Asynchronous Bean. Falling back to Executors' CachedThreadPoolCopy to Clipboard Copied! Toggle word wrap Toggle overflow NoteRed Hat JBoss BPM Suite uses an embedded version of Git for its artifact versioning. This version of Git uses ports
9418and8001for standard and SSH access (org.uberfire.nio.git.ssh.port) respectively.Ensure that these embedded Git ports are not already in use in your version of IBM WebSphere Application Server.
If these ports are being used and you need to change the default Git ports, they can be changed by setting the
org.uberfire.nio.git.daemon.portandorg.uberfire.nio.git.ssh.portproperties using the steps described above.For more information, see section Configuring LDAP Principal and Role Names Matching Criteria below.
Expand Table 3.4. Properties Required for Intelligent Process Server Name Value Description kie.server.jms.queues.responsejms/conn/KIE.SERVER.RESPONSEThe JNDI name of connection factory for responses used by the Intelligent Process Server .
org.kie.server.domainWSLoginJAAS
LoginContextdomain used to authenticate users when using JMS.org.kie.server.persistence.dsSet according to database type and configuration.
Datasource JNDI name.
org.kie.server.persistence.tmorg.hibernate.service.jta.platform.internal.WebSphereExtendedJtaPlatformTransaction manager platform for setting Hibernate properties.
org.kie.server.persistence.dialectSet according to database type and configuration.
Specifies the Hibernate dialect to be used.
- Save these configuration settings to the master configuration.
- Restart IBM WebSphere Application Server for these changes to take effect.
3.8. Configuring LDAP Principal and Role Names Matching Criteria
The client applications using ssh to interact with the Git server bundled with Business Central are authenticated and authorised to perform git operations using the security API offered by the Uberfire server. If your Red Hat JBoss BPM Suite application is deployed on WebSphere Application Server (WAS) using an LDAP security realm, the git clients may not be authorized as expected. This is because the distinguished name (DN) for the principal (user or group name) assigned by WAS is the more complex DN associated with that principal by LDAP, which leads to a mismatch of names when the Uberfire server tries to map the roles. To ensure that the role mapping does not fail, use the system property org.uberfire.ldap.regex.role_mapper to control the matching criteria of LDAP principal to role names.
The system property org.uberfire.ldap.regex.role_mapper is a regex pattern used to map LDAP principal names to application role names. Ensure that this pattern contains the variable role as it is substited by the application role name when matching a principal value to the role name. Only after the pattern is matched, the role is added to the user.
For example, if the distinguished name (DN) for the admin group in LDAP is cn=admin,ou=groups,dc=example,dc=com and the intended role is admin, then setting the following value for property org.uberfire.ldap.regex.role_mapper finds a match on admin role:
cn[\\ ]*=[\\ ]*role
cn[\\ ]*=[\\ ]*role3.9. Configuring Unified Execution Servers
To configure Business Central to manage the Intelligent Process Server and use the same data source, follow the instructions in the Unified Execution Servers section of the Red Hat JBoss BPM Suite Administration and Configuration Guide.
Chapter 4. Install
Now that the basic configuration is done and IBM WebSphere Application Server is set to deploy Red Hat JBoss BPM Suite, you can upload the WAR deployables that were extracted earlier.
As noted previously, the Red Hat JBoss BPM Suite ZIP file for IBM WebSphere Application Server contains the deployable WAR files for Business Central, Intelligent Process Server, and Dashbuilder.
4.1. Installing Business Central
Business Central is uploaded as a web archive and can then be accessed at http://TARGET_SERVER:PORT/business-central. Start the deployment by installing the Business Central WAR as a WebSphere application.
In the main menu, go to Applications → Application Types → WebSphere Enterprise Applications.
This will show you all the existing applications in the system and allow you to install a new one.
- Click Install to start the installation process.
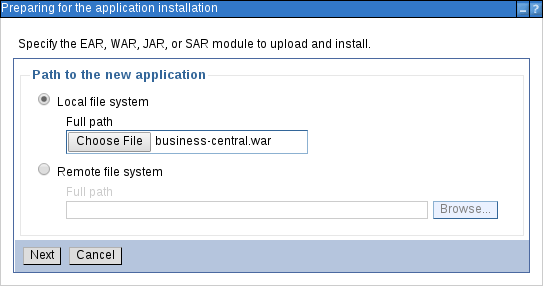
Upload the Business Central WAR file (
business-central.war) from the local file system. See Section 2.2, “Extracting Red Hat JBoss BPM Suite for IBM WebSphere Application Server” for more information.Figure 4.1. Preparing for Application Installation Wizard
Click Next. This process may take some time.
ImportantYou may encounter an error message similar to the following:
The EAR file could be corrupt and/or incomplete. Make sure that the application is at a compatible Java(TM) Platform, Enterprise Edition (Java EE) level for the current version of WebSphere(R) Application Server.
java.lang.NullPointerException
The EAR file could be corrupt and/or incomplete. Make sure that the application is at a compatible Java(TM) Platform, Enterprise Edition (Java EE) level for the current version of WebSphere(R) Application Server.
java.lang.NullPointerException
Copy to Clipboard Copied! Toggle word wrap Toggle overflow In that case, run
ulimit -nin the command line. If the result is1024, increase the number of open file descriptors. The recommended value is 100 000.- Select the Fast Path radio button and click Next.
Change the Application Name to
business-centralin the Select Installation Options step and click Next.Figure 4.2. Selecting Installation Options
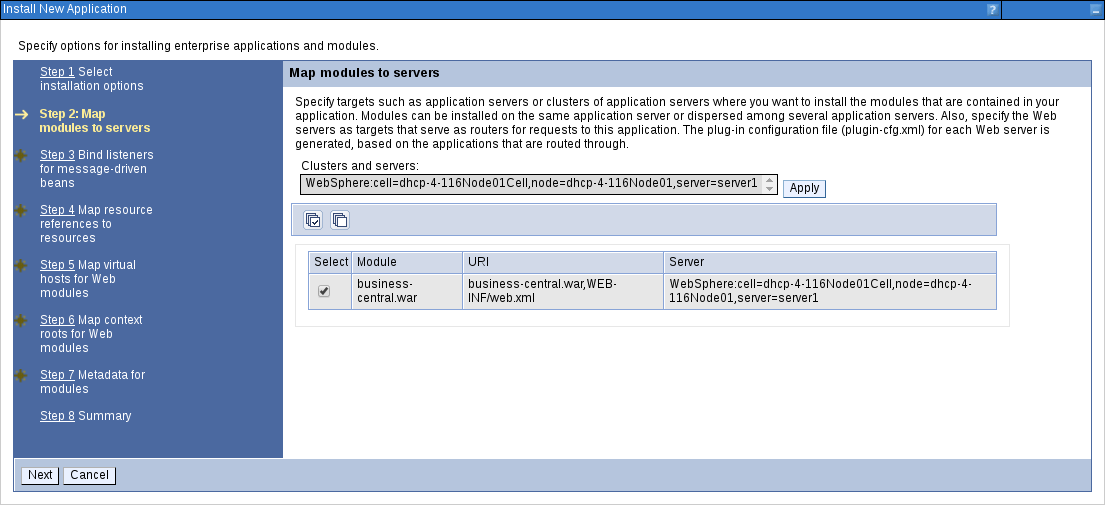
In the Map Modules to Servers step, map the Business Central modules to servers according to your requirements.
Figure 4.3. Mapping Modules to Servers
Next, for each bean, select the Activation Specification radio button and enter the JMS Activation JNDI names created earlier into the Target Resource JNDI Name field:
-
For
KieSessionRequesMessageBean, enterjms/activation/KIE.SESSION. -
For
TaskServiceRequesMessageBean, enterjms/activation/KIE.TASK. -
For
JMSAuditProcessor, enterjms/activation/KIE.AUDIT. -
For
JmsAvailableJobsExecutor, enterjms/activation/KIE.EXECUTOR. -
For
JMSSignalReceiver, enterjms/activation/KIE.SIGNAL.
-
For
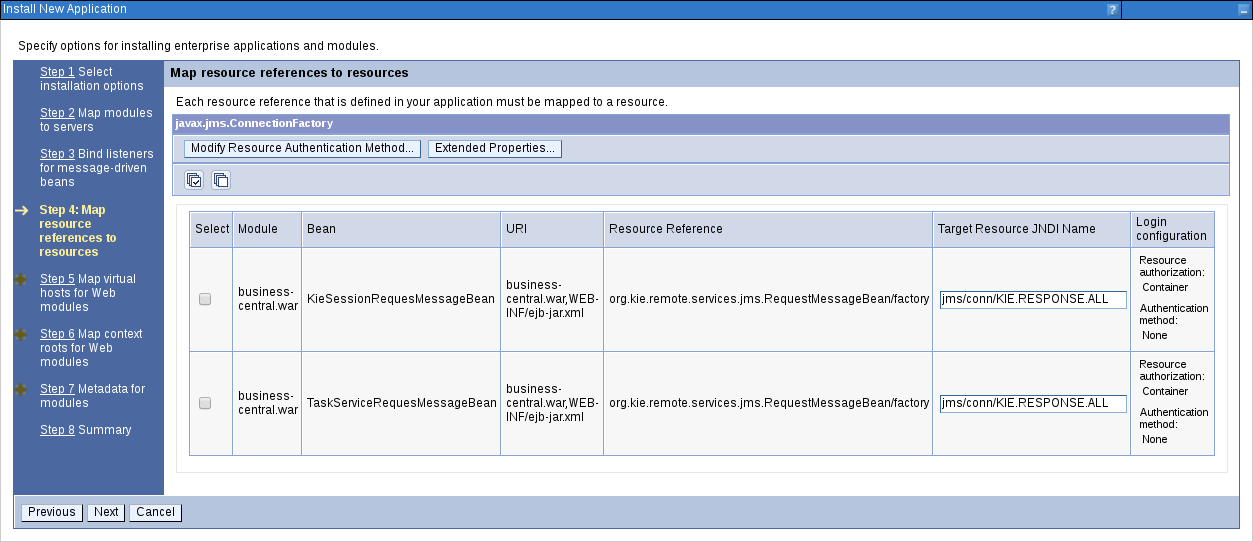
In the next step, where you have to map resource references to actual resources, you will be asked to fill the Target Resource JNDI Name field for two beans:
KieSessionRequesMessageBeanandTaskServiceRequesMessageBean. Enter the JNDI name for theKIE.RESPONSE.ALLconnection factory that you created earlier:jms/conn/KIE.RESPONSE.ALL.Figure 4.4. Mapping Resource References to Resources
- In the Map Virtual Hosts for Web Modules step, leave the default values and click Next.
-
In the next step, set the context root to
business-central. - In the Metadata for Modules step, leave the default values and click Next.
- In the Summary page, click Finish to install Business Central. This process can take a while. Save the changes to the master configuration at the end of this process.

You will be returned to the WebSphere Enterprise Applications page where business-central will be listed as a new application. However, it will be stopped at this stage. Before you start the application, you need to map groups to roles, configure class loading, and enable the Bouncy Castle Crypto API.
Mapping Groups to Roles
-
Click on the
business-centralapplication to open the application configuration page. - Click Security Role to User/Group Mapping under the Detail Properties heading on the left.
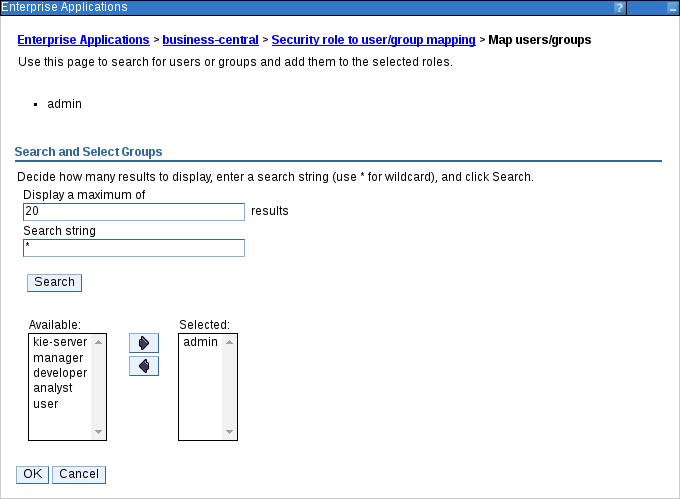
-
Select the
adminrole and click Map Groups… at the top. Search for the
admingroup (or just click the Search button) and move it from the Available list to the Selected list. Click OK.This mapping gives the previously created administrator user access to the Business Central application.
Figure 4.5. Mapping Groups
-
Follow the same procedure for the
analystrole as well and save the configuration.
If you have other groups or users that should have access to Business Central, use the same steps to map them to the admin or analyst roles, or any other roles that you have, such as developer, manager, or user.
If you are also installing the Intelligent Process Server, give this user access to the kie-server role. Additionally, map appropriate REST API roles if you are going to use the REST API. For further information about API roles, see chapter Remote API of Red Hat JBoss BPM Suite Development Guide.
Class-Loading Configuration
Ensure correct class-loading configuration by following the steps below.
- In the main menu, go to Applications → Application Types → WebSphere Enterprise Applications.
-
Click
business-central. - Click Class Loading and Update Detection under the Detail Properties heading on the left.
Check the following options:
- Class Loader Order: Classes loaded with local class loader first (parent last)
- WAR Class Loader Policy: Single class loader for application
Figure 4.6. Configuring Class Loading
- Click OK, save the changes to the master configuration and restart the IBM WebSphere Application Server.
Enabling Bouncy Castle Crypto API
To enable Git SSH repository cloning and kie-config-cli from within Business Central, the Bouncy Castle Crypto API must be set up. Enable the API by following the steps below.
-
Set the
org.apache.sshd.registerBouncyCastleproperty totrueandorg.uberfire.domainproperty toWSLogin. See Section 3.7, “Adding Custom JVM Properties” for detailed instructions on how to set custom properties. Set up the Bouncy Castle API as a shared library referenced from Business Central using the appropriate version of Bouncy Castle:
- In the main menu on the left, navigate to Environment → Shared Libraries, select the appropriate scope and click New… to create a new library.
Give this library a name and set the class path to the Bouncy Castle library (
bcprov-jdk16-1.46.jar). Click OK and save the configuration.NoteFor more information about the
bcprov-jdk16-1.46.jarpackage, see the Maven Repository — Bouncy Castle Provider page.-
Go to Applications → Application Types → WebSphere Enterprise Applications and click
business-central. Click Shared Library References under the References heading on the left, select the web module, click on Reference Shared Libraries and move the Bouncy Castle library created in the previous step from the Available to the Selected list.
Figure 4.7. Mapping Shared Libraries
- Click OK and save the configuration.

You have now successfully installed Business Central on IBM WebSphere Application Server.
To start the application, go back to Applications → Application Types → WebSphere Enterprise Applications page and select the business-central checkbox before clicking Start.
To access the application, navigate to http://TARGET_SERVER:PORT/business-central in your web browser.
4.2. Installing Dashbuilder
Dashbuilder for IBM WebSphere Application Server is distributed as a deployable WAR file (dashbuilder.war) as a part of the Red Hat JBoss BPM Suite download.
Before installing Dashbuilder, set up a data source for Dashbuilder by following the steps outlined in Section 3.5, “Setting up Data Source”.
Dashbuilder needs an access to the same database schema as Business Central. In the first step of creating a data source, specify the data source JNDI name as jdbc/jbpm.
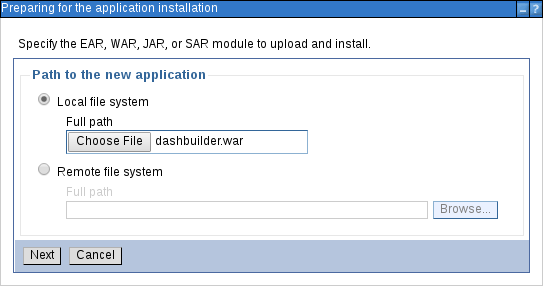
- In the main menu of the IBM Integrated Solutions Console, go to Applications → Application Types → WebSphere Enterprise Applications and click Install.
Upload the Dashbuilder WAR file (
dashbuilder.war) from the local file system and click Next. This process may take some time.Figure 4.8. Preparing for Application Installation Wizard
Select Fast Path radio button and click Next.
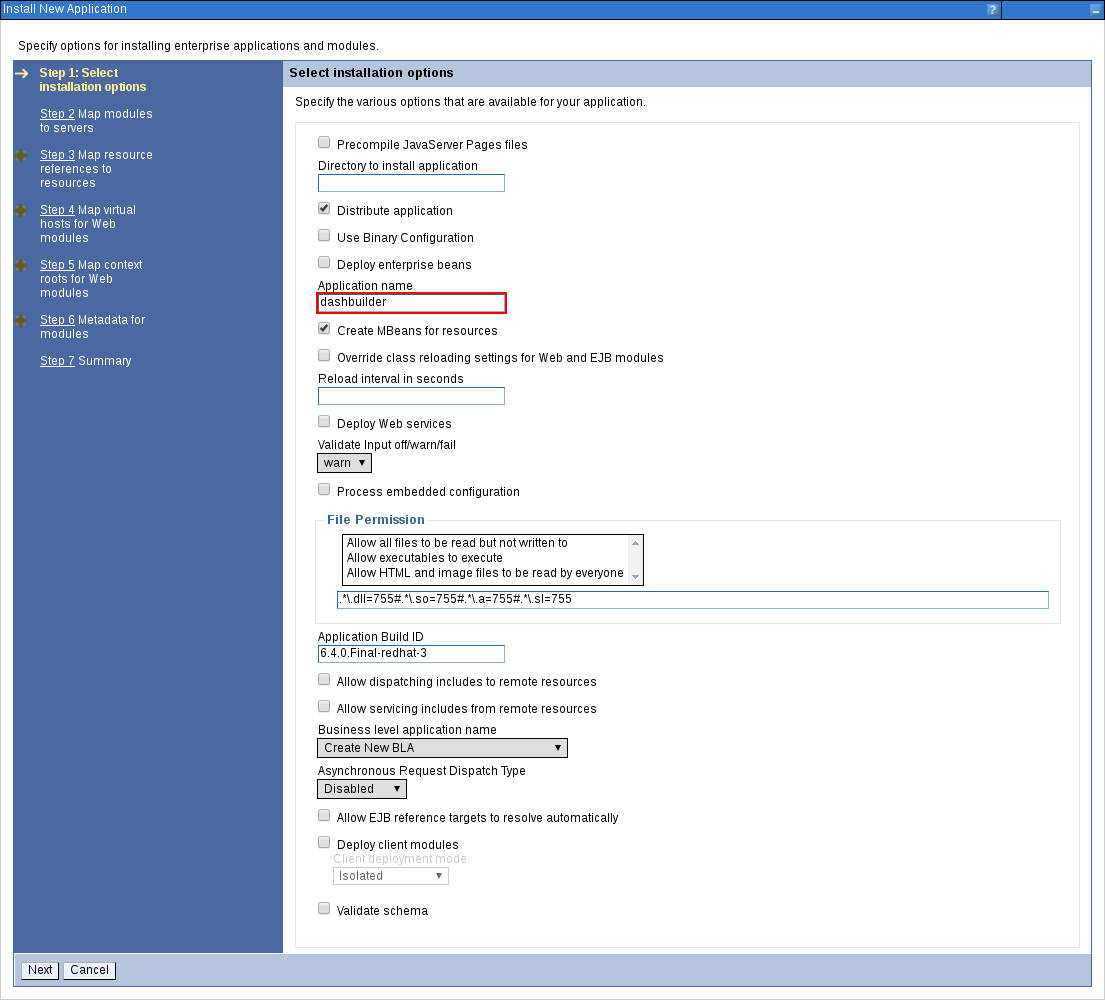
The Install New Application window opens.
In the Select Installation Options step, change the Application Name to
dashbuilderand click Next.Figure 4.9. Selecting Installation Options
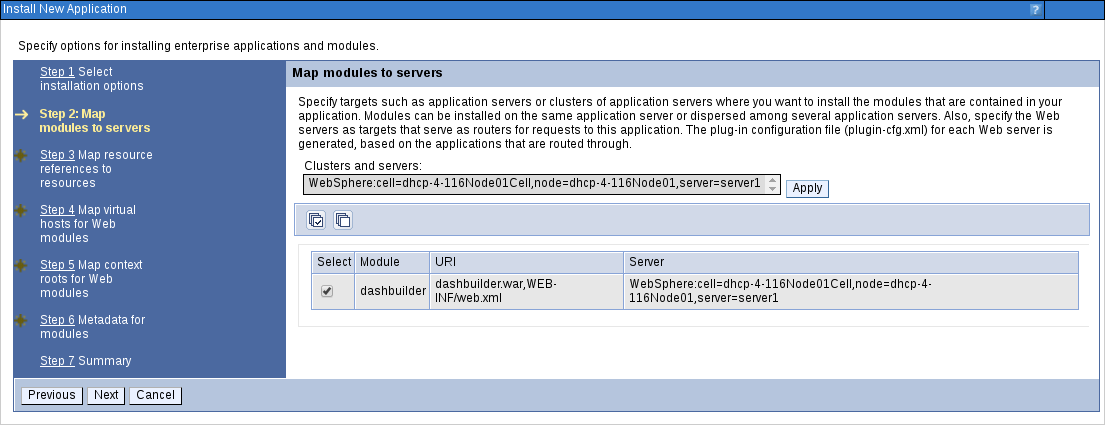
In the Map Modules to Servers step, map the Dashbuilder modules to servers according to your requirements and click Next.
Figure 4.10. Mapping Modules to Servers
In the Map Resource References to Resources step, set the Target Resource JNDI Name of the
dashbuildermodule tojdbc/jbpm. Click Next.Figure 4.11. Mapping Resource References to Resources
- In the Map Virtual Hosts for Web Modules step, leave the default values and click Next.
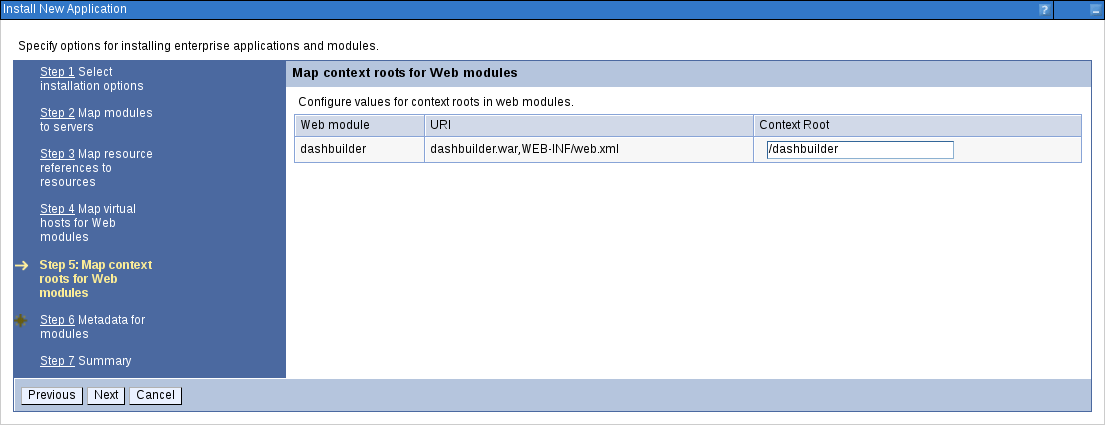
In the next step, set the context root to
/dashbuilderand click Next.Figure 4.12. Mapping Context Roots for Web Modules
- In the Metadata for Modules step, leave the default values and click Next.
- In the Summary page, click Finish to install Dashbuilder. This process may take a while. Save the changes to the master configuration at the end of this process.

You will be returned to the Enterprise Applications page where dashbuilder will be listed as a new application. However, it will be stopped at this stage. Before you start the application, you need to map groups to roles and configure correct class loading.
Mapping Groups to Roles
-
Click on the
dashbuilderapplication to open the application configuration page. - Click Security Role to User/Group Mapping under the Detail Properties heading on the left.
-
Select the
adminrole and click Map Groups… at the top. Search for the
admingroup (or just click the Search button) and move it from the Available list to the Selected list. Click OK.This mapping gives the previously created administrator user access to the Dashbuilder application.
-
Follow the same procedure for the
analyst,developer,user, andmanagerroles.
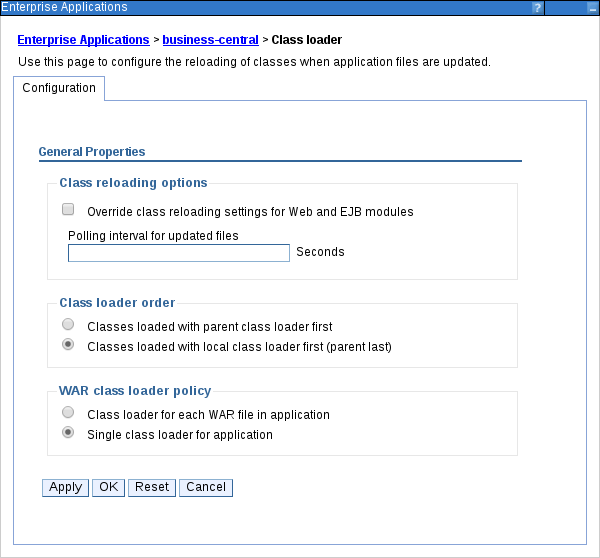
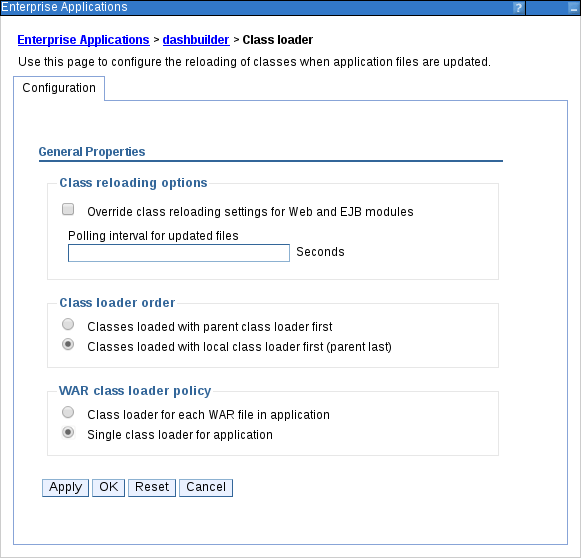
Class-Loading Configuration
Ensure correct class-loading configuration by following the steps below.
- In the main menu, go to Applications → Application Types → WebSphere Enterprise Applications.
-
Click
dashbuilder. - Click Class Loading and Update Detection under the Detail Properties heading on the left.
Check the following options:
- Class Loader Order: Classes loaded with local class loader first (parent last)
- WAR Class Loader Policy: Single class loader for application
Figure 4.13. Configuring Class Loading
- Click OK, save the changes to the master configuration and restart the IBM WebSphere Application Server.
You have now successfully installed Dashbuilder on IBM WebSphere Application Server.
To start the application, go back to Applications → Application Types → WebSphere Enterprise Applications page and select the dashbuilder checkbox before clicking Start.
You can now log in to Dashbuilder at http://TARGET_SERVER:PORT/dashbuilder using the user that you have created in the previous steps.
4.3. Installing Intelligent Process Server
The Intelligent Process Server is distributed as a web application archive file (kie-server.war) and is present in your Red Hat JBoss BPM Suite 6.4.0 Deployable for WebSphere 8.5 download.
It is assumed that you followed the steps described in Section 3.3, “Creating Users and Groups” to create the role kie-server required by the Intelligent Process Server. Similarly, the JMS connection factories, queues, and activation specifications required by the Intelligent Process Server need to be created. If you have not done so, revisit the respective sections in this guide.
In the main menu on the left, go to Applications → Application Types → WebSphere Enterprise Applications.
This will show you all the existing applications in the system and allow you to install a new one.
- Click Install to start the installation process.
-
Upload the Intelligent Process Server WAR file (
kie-server.war) from the local file system. Select the Fast Path radio button and click Next.
The Install New Application wizard opens.
-
Change the Application Name to
kie-serverin the first step and click Next. - In the next step, map the Intelligent Process Server modules to servers according to your requirements and click Next.
-
In the Bind Listeners for Message-Driven Beans step, select the Activation Specification radio button for both the beans. Enter
jms/activation/KIE.SERVER.EXECUTORas Target Resource JNDI Name for the KieExecutorMDB bean, andjms/activation/KIE.SERVER.REQUESTfor the KieServerMDB bean. -
In the next step, map resource references to actual resources. Enter the JNDI name for the
KIE.SERVER.REQUESTconnection factory that you created earlier:jms/conn/KIE.SERVER.REQUEST. - In the Map Virtual Hosts for Web Modules step, leave the default values and click Next.
-
In the next screen, set the context root to
kie-server. - In the Metadata for Modules step, leave the default values and click Next.
- Click Finish to install the Intelligent Process Server. Save the changes to the master configuration at the end of this process.
Class-Loading Configuration
Ensure correct class-loading configuration by following the steps below.
-
Navigate to Applications → Application Types → WebSphere Enterprise Applications and click
kie-server. - Click Class Loading and Update Detection under the Detail Properties heading on the left.
- In the properties, change Class Loader Order to Classes loaded with local class loader first (parent last) and WAR Class Loader Policy to Single class loader for application.
- Save the changes to the master configuration.
Mapping Groups to Roles
If you have already mapped the kie-server role to a user or a group, you can ignore this procedure. Otherwise, do the following:
-
Go back to the main configuration page for the newly installed
kie-serverapplication (Applications → Application Types → WebSphere Enterprise Applications). Click Security Role to User/Group Mapping under the Detail Properties heading on the left. -
Select the
kie-serverrole, click Map Groups… and search for thekie-servergroup in the next screen (or just click the Search button). - Move it from the Available list to the Selected list. Click OK.
This mapping gives the previously created administrator user access to the Intelligent Process Server.
You can now save the changes and start the kie-server application.
Check whether the Intelligent Process Server REST API works by sending a GET request at http://TARGET_SERVER:PORT/kie-server/services/rest/server.
Appendix A. Versioning information
Documentation last updated on: Monday, May 13, 2019.