User Guide
The User Guide for Red Hat JBoss BRMS
Abstract
Chapter 1. Introduction
1.1. About Red Hat JBoss BRMS
Red Hat JBoss BRMS is an open source decision management platform that combines Business Rules Management and Complex Event Processing. It automates business decisions and makes that logic available to the entire business.
Red Hat JBoss BRMS uses a centralized repository where all resources are stored. This ensures consistency, transparency, and the ability to audit across the business. Business users can modify business logic without requiring assistance from IT personnel.
Business Resource Planner is included with this release.
Red Hat JBoss BRMS is supported for use with Red Hat Enterprise Linux 7 (RHEL7).
1.2. Use Case: Business Decision Management in the Insurance Industry with Red Hat JBoss BRMS
Red Hat JBoss BRMS comprises a high performance rule engine, a rule repository, easy to use rule authoring tools, and complex event processing rule engine extensions. The following use case describes how these features of JBoss BRMS are implemented in insurance industry.
The consumer insurance market is extremely competitive, and it is imperative that customers receive efficient, competitive, and comprehensive services when visiting an online insurance quotation solution. An insurance provider increased revenue from their online quotation solution by upselling relevant, additional products during the quotation process to the visitors of the solution.
The diagram below shows integration of JBoss BRMS with the insurance provider’s infrastructure. This integration is fruitful in such a way that when a request for insurance is processed, JBoss BRMS is consulted and appropriate additional products are presented with the insurance quotation.
Figure 1.1. JBoss BRMS Use Case: Insurance Industry Decision Making
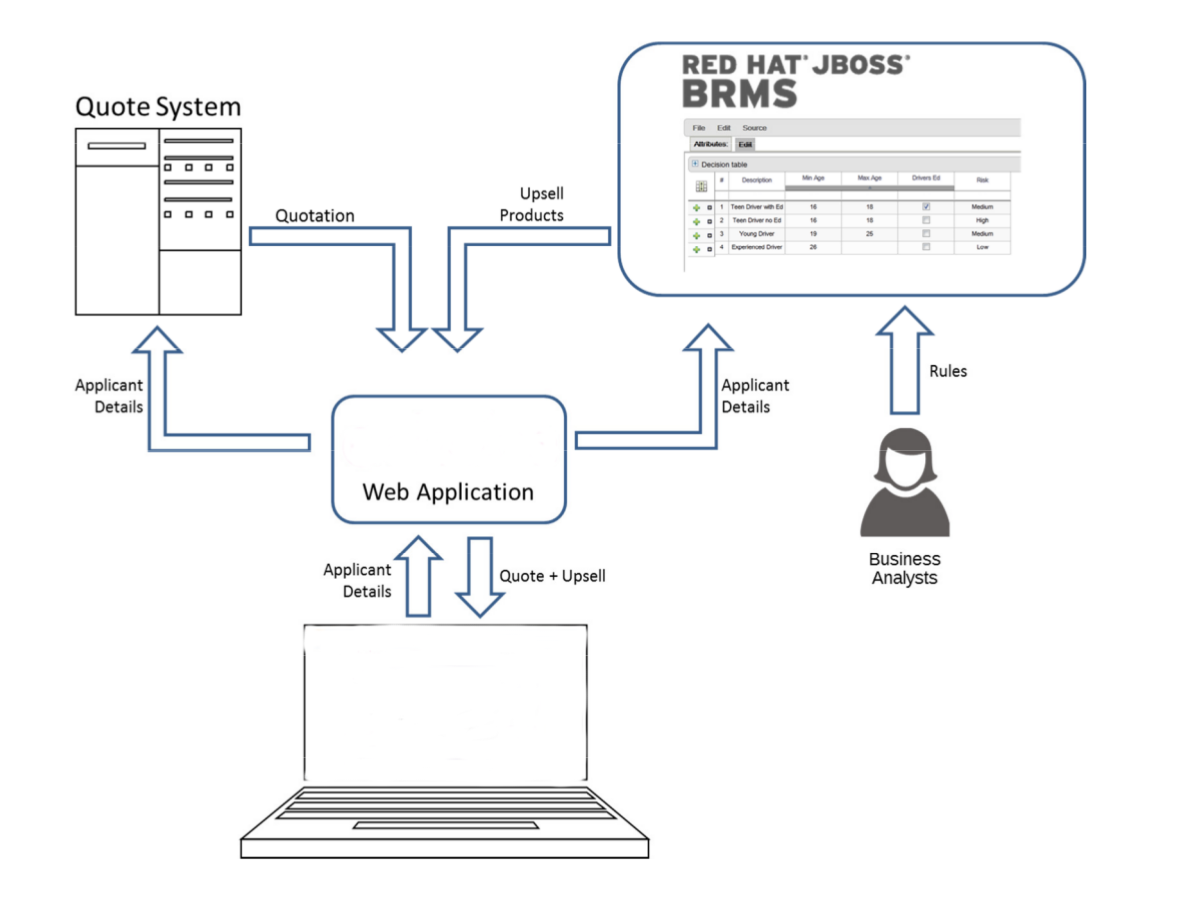
JBoss BRMS provides the decision management functionality, that automatically determines the products to present to the applicant based on the rules defined by the business analysts. The rules are implemented as decision tables, so they can be easily understood and modified without requiring additional support from IT.
1.3. Assets
Anything that can be stored as a version in the artifact repository is an asset. This includes rules, packages, business processes, decision tables, fact models, and DSLs.
Rules
Rules provide the logic for the rule engine to execute against. A rule includes a name, attributes, a 'when' statement on the left hand side of the rule, and a 'then' statement on the right hand side of the rule.
Business Rules
Business Rules define a particular aspect of a business that is intended to assert business structure or influence the behaviour of a business. Business Rules often focus on access control issues, pertain to business calculations and policies of an organization.
Business Processes
Business Processes are flow charts that describe the steps necessary to achieve business goals (see the Red Hat JBoss BRMS Business Process Management Guide for more details).
Projects
A project is a container for packages of assets (business processes, rules, work definitions, decision tables, fact models, data models, and DSLs) that lives in the Knowledge Repository. It is this container that defines the properties of the KIE Base and KIE Session that are applied to its content. In the GUI, you can edit these entities in the Project Editor.
If an asset, such as a Process or Rule definition, is not placed in a package with a Project, it cannot be deployed. Therefore, make sure to organize your assets in packages. Also note, that the name of the package must be identical with the KIE Session name.
As a project is a Maven project, it contains the Project Object Model file (pom.xml) with information on how to build the output artifact. It also contains the Module Descriptor file, kmodule.xml, that contains the KIE Base and KIE Session configuration for the assets in the project.
Packages
Packages are deployable collections of assets. Rules and other assets must be collected into a package before they can be deployed. When a package is built, the assets contained in the package are validated and compiled into a deployable package.
Domain Specific Languages
A domain specific languages, or DSL, is a rule language that is dedicated to the problem domain.
Decision Tables
Decision Tables are collections of rules stored in either a spreadsheet or in the JBoss BRMS user interface as guided decision tables.
Data Model
Data models are a collection of facts about the business domain. The rules interact with the data model in rules-based applications.
Chapter 2. Business Central
Business Central is the web based user interface used for both Red Hat JBoss BRMS 6 and Red Hat JBoss BPM Suite 6.
It is the user interface for the business rules manager and has been combined with the core drools engine and other tools. It allows a business user to manage rules in a multi user environment and implement changes in a controlled fashion.
The Business Central is used when:
- Users need to manage versions/deployment of rules.
- Multiple users of different skill levels need to access and edit rules.
- You need an infrastructure to manage rules.
Business Central is managed by the Business Analysts, Rule experts, Developers and Administrators (rule administrators).
The main features of the Business Central are:
Multiple types of rule editors (GUI, text) including:-
- Guided Rule Editor
- Rule Templates
- Decision Tables
- Store multiple rule "assets" together as a package
- Domain Specific Language support
- Complex Event Processing support
- Version control (historical assets)
- Testing of rules
- Validation and verification of rules
- Categorization
Build and deploy including:-
- Assembly of assets into a binary package for use with a ChangeSet or KnowledgeBuilder.
- REST API to manipulate assets.
2.1. Logging on to Business Central
Log into Business Central after the server has successfully started.
-
Navigate to http://localhost:8080/business-central in a web browser. If the user interface has been configured to run from a domain name, substitute
localhostfor the domain name. For example http://www.example.com:8080/business-central. -
Log in with the user credentials that were created during installation. For example: User =
helloworlduserand password =Helloworld@123.
2.2. The Home Screen
The Home view or the "landing page" is the default view for the application. There are two menu items available in this view: Authoring and Deployment, besides the Home menu option.
The following screen shows what the Home view looks like:
Figure 2.1. Business central home screen
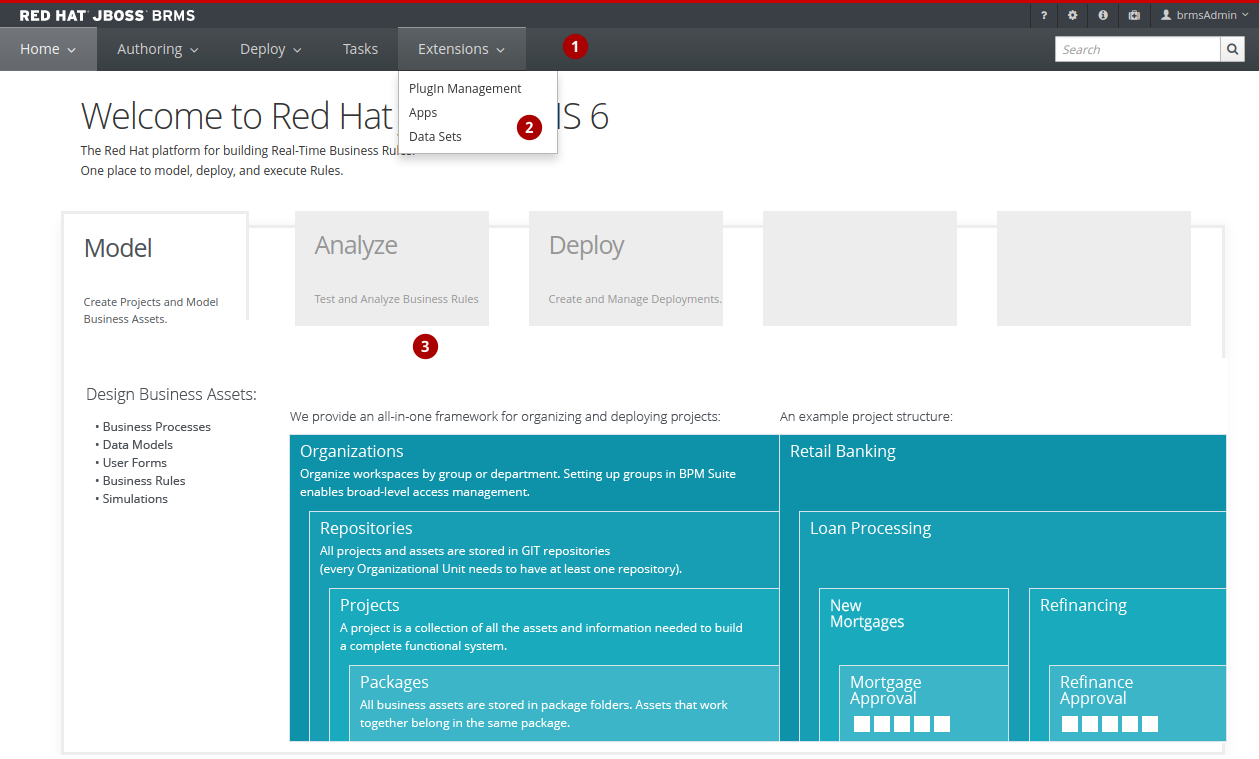
- The main menu contains the links to the
Homepage and all available perspectives. - The perspective menu contains menus for the selected perspective.
- The perspective area contains the perspective tools (here the home page with links to individual perspectives and their views), such as views and editors.
2.2.1. Perspectives
Business Central provides the following groups of perspectives accessible from the main menu:
Authoring group:
Project Authoring perspective contains:
- The Project Explorer view with the overview of available repository structure, and information on available resources, such as, business process definitions, form definitions, and others.
- The editor area on the right of the Project Explorer view, where the respective editor appears when a resource is opened.
- The Messages view with validation messages.
- Contributors perspective enables you to view the number of commits sorted by the organizational unit, repository, author, and other criteria.
Artifact Repository perspective contains a list of jars which can be added as dependencies. The available operations in this perspective are upload/download artifact and open (view) the
pom.xmlfile.The view is available for users with the
adminrole only.Administration perspective contains:
- The File Explorer view with available asset repositories
The editor area on the right of the File Explorer view, where the respective editor appears when a resource is opened.
The Administration perspective allows an administrator to connect a Knowledge Store to a repository with assets and to create a new repository. For more information, see the Red Hat JBoss BRMS Administration and Configuration Guide.
The view is available for users with the
adminrole only.
Deploy group:
- Execution Servers perspective contains a list of the deployed Realtime Decision Server templates and containers associated with the templates.
Tasks group:
- Task List perspective contains a list of Tasks produced by Human Task of the Process instances or produced manually. Only Tasks assigned to the logged-in user are visible. It allows you to claim Tasks assigned to a group you are a member of.
Extensions
- PlugIn Management perspective enables you to customize and create new Business Central perspectives and plugins.
- Apps perspective enables you to browse, categorize and open custom perspective plugins.
- Data Sets perspective enables you to define and connect to external data sets.
2.3. Embedding Business Central
Business Central provides a set of editors to author assets in different formats. A specialized editor is used according to the asset format.
Business Central provides the ability to embed it in your own (Web) Applications using standalone mode. This allows you to edit rules, processes, decision tables, and other assets in your own applications without switching to Business Central.
In order to embed Business Central in your application, you will need the Business Central application deployed and running in a web/application server and, from within your own web applications, an iframe with proper HTTP query parameters as described in the following table.
| Parameter Name | Explanation | Allow Multiple Values | Example |
|---|---|---|---|
| standalone | This parameter switches Business Central to standalone mode. | no | (none) |
| path | Path to the asset to be edited. Note that asset should already exists. | no | git://master@uf-playground/todo.md |
| perspective | Reference to an existing perspective name. | no | org.guvnor.m2repo.client.perspectives.GuvnorM2RepoPerspective |
| header | Defines the name of the header that should be displayed (useful for context menu headers). | yes | ComplementNavArea |
The following example demonstrates how to set up an embedded Author Perspective for Business Central.
X-frame options can be set in web.xml of business-central. The default value for x-frame-options is as follows:
<param-name>x-frame-options</param-name>
  <param-value>SAMEORIGIN</param-value>
<param-name>x-frame-options</param-name>
<param-value>SAMEORIGIN</param-value>2.4. Project Authoring
Projects and the associated assets can be authored from the Project Explorer. The Project Explorer can be accessed from the Home screen by clicking on Authoring → Project Authoring.
Figure 2.2. The Project Explorer screen
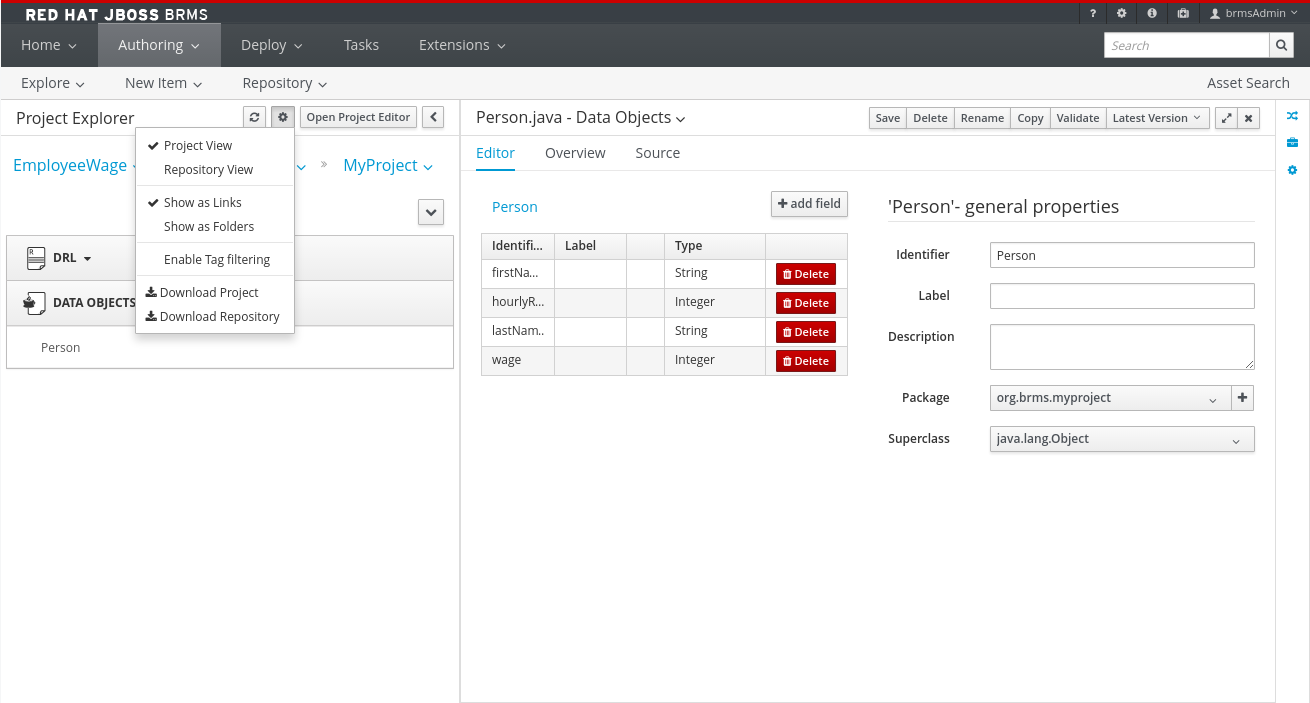
The project authoring screen is divided into 3 sections:
-
Project Explorer: The left pane of the project authoring screen is the project explorer that allows you to navigate through projects and create the required packages and assets. Clicking on the (
 ) button allows you to set the view to Project view or Repository view. The contents of the project can be navigated in a tree view by clicking on the Show as Folders or in a single-line path by clicking on the Show as Links.
- Content area: The content area shows the assets which are opened for editing. It has a toolbar with buttons like Save, Delete, Rename, Copy, and Validate that can be used to perform the required actions on the assets that are being worked upon.
- Problems: The problems area shows the validation errors of the project that occur while saving or validating a particular asset.
2.4.1. Changing the Layout
The layout of any panel can be changed by the user. Each panel can be resized and repositioned, except for the Project Explorer panel, which can only be resized and not repositioned.
Resizing the layout
The layout can be resized in the following ways:
To resize the width of the screen:
-
Move the mouse pointer over the vertical panel splitter. The pointer changes to
 .
.
- Adjust the width of the screen by dragging the splitter and setting it at the required position.
-
Move the mouse pointer over the vertical panel splitter. The pointer changes to
To resize the height of the screen:
-
Hover the cursor over the horizontal panel splitter. The pointer changes to
 .
.
- Adjust the height of the screen by dragging the splitter and setting the required position.
-
Hover the cursor over the horizontal panel splitter. The pointer changes to
Repositioning the layout
To reposition the layout, do the following:
-
Move the mouse pointer on the title of the panel. The pointer changes to
 .
.
-
Press and hold the left click of the mouse and drag the screen to the required location. A
 symbol indicating the target position is displayed to set the position of the screen.
2.4.2. Creating new assets
Assets can be created using the New Item perspective menu option.
Figure 2.3. Creating new Asset screen
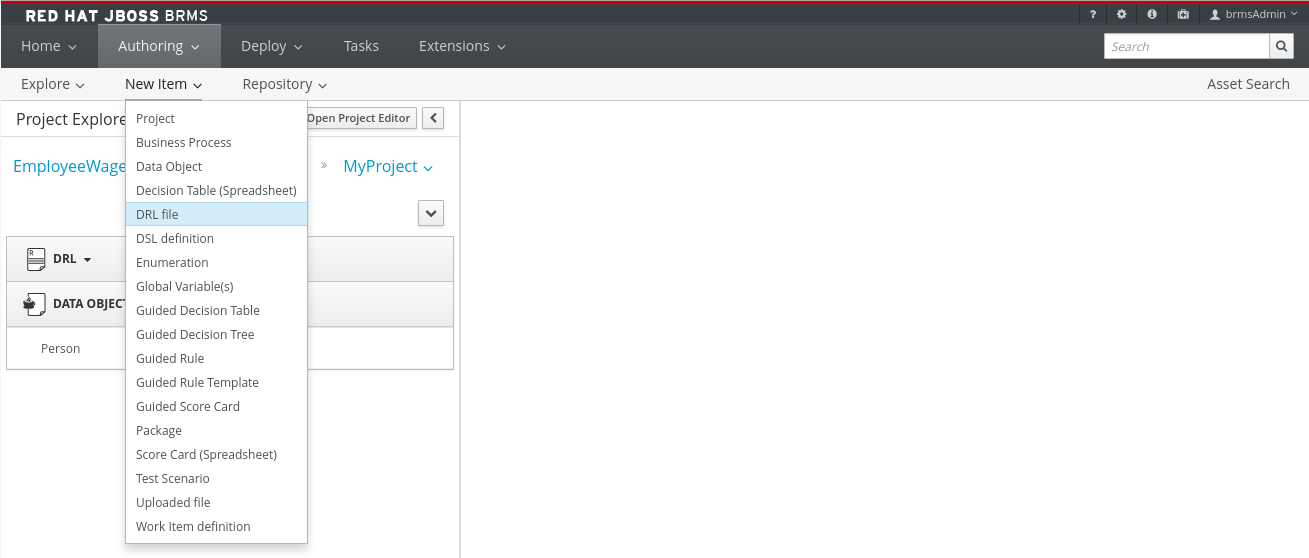
Clicking on an Asset from the New Item menu will open a Create new (Asset-type) pop-up dialog where a user can enter the name of the Asset.
Figure 2.4. Create new pop-up dialog
2.4.3. Asset Metadata and Versioning
Most assets within Business Central have some metadata and versioning information associated with them. In this section, we will go through the metadata screens and version management for one such asset (a DRL asset). Similar steps can be used to view and edit metadata and versions for other assets.
Metadata Management
To open up the metadata screen for a DRL asset, click on the Overview tab. If an asset doesn’t have an Overview tab, it means that there is no metadata associated with that asset.
The Overview section opens up in the Version history tab, and you can switch to the actual metadata by clicking on the Metadata tab.
The metadata section allows you to view or edit the Tags, Subject, Type, External Link and Source metadata for that asset. However, the most interesting metadata is the description of the asset that you can view/edit in the description field and the comments that you and other people with access to this asset can enter and view.
Comments can be entered in the text box provided in the comments section. Once you have finished entering a comment, press enter for it to appear in the comments section.
You must hit the Save button for all metadata changes to be persisted, including the comments.
Version Management
Every time you make a change in an asset and save it, a new version of the asset is created. You can switch between different versions of an asset in one of two ways:
Click the Latest Version button in the asset toolbar and select the version that you are interested in. Business Central will load this version of the asset.
- Alternatively, open up the Overview section. The Version history section shows you all the available versions. Select the version that you want to restore.

In both cases, the Save button will change to Restore. Click this button to persist changes.
2.5. Asset Locking Support
The default locking mechanism for locking a BPM and BRMS asset while updating it in Business Central is pessimistic. Whenever you open and modify an asset in Business Central, it automatically locks the asset for your exclusive use, in order to avoid conflicts in a multi-user setup. The pessimistic lock is automatically released when your session ends or when you save or close the asset.
The pessimistic lock feature is provided in order to help prevent users from overwriting each other’s changes. However, there may be cases when you may want to edit a file locked by another user. Business Central allows you to force unlock a locked asset. To do this:
Procedure: Unlocking assets
- Open the asset.
Click on the Overview tab and open up the Metadata screen.
If the asset is already being edited by another user, the following will be displayed in the Lock status field:
Locked by <user_name>To edit the asset locked by another user, click Force unclock asset button.
The following confirmation popup message is displayed:
Are you sure you want to release the lock of this asset? This might cause <user_name> to lose unsaved changes!Click Yes to confirm.
The asset goes back to unlocked state.
2.6. Project Editor
2.6.1. The Project Editor
The Project Editor helps a user to build and deploy projects. This view provides access to the various properties of a Red Hat JBoss BRMS Project that can be edited through the Web interface. Properties like Group artifact version, Dependencies, Metadata, Knowledge Base Settings and Imports can be managed from this view. The editor shows the configuration options for the current active project and the content changes when you move around in your code repository.
To access the Project Editor:
- Click Authoring → Project Authoring.
- Select your project.
- Click Open Project Editor.
2.6.2. Project Settings
Project General Settings
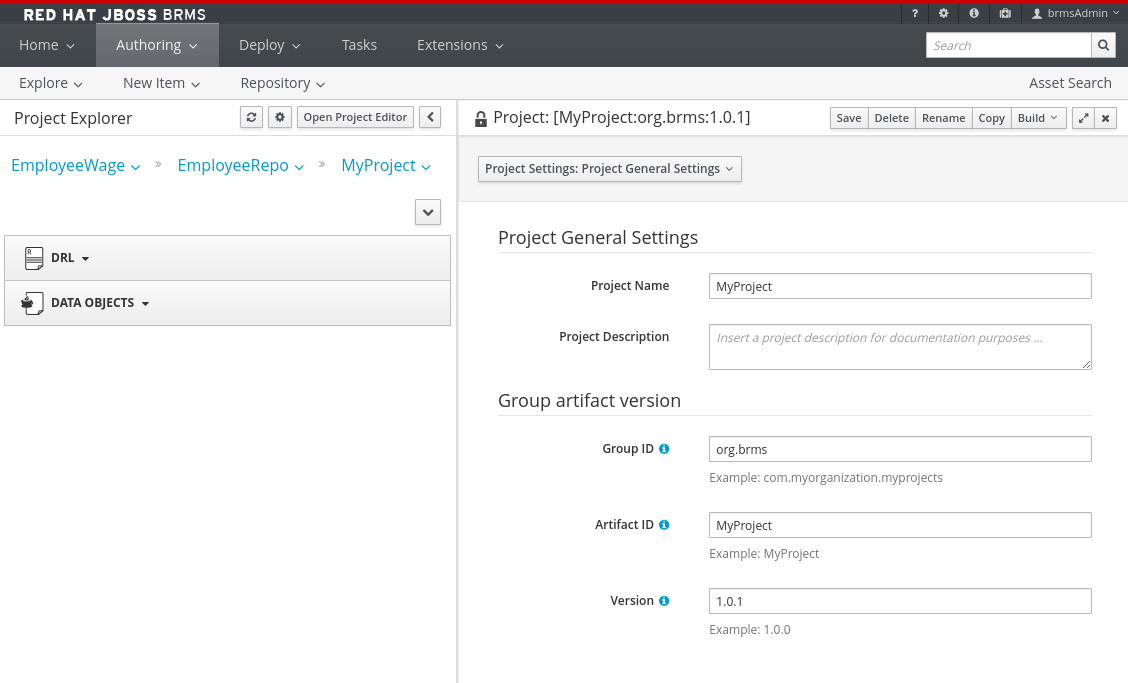
The Project settings screen allows a user to set the Group, Artifact, and Version ID’s for a project. It edits the pom.xml setting file since we use Maven to build our projects.
Figure 2.5. Project Editor - Project Settings
Dependencies
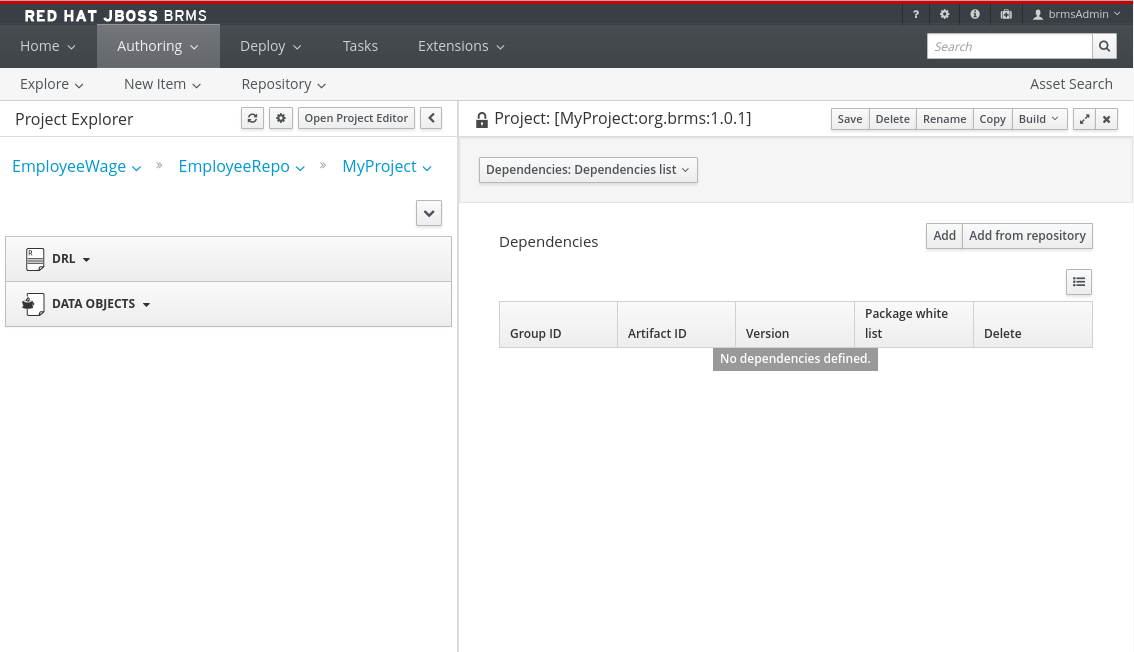
The Dependencies option allows you to set the dependencies for the current project.You access the dependencies by using Project Settings → Dependencies option. You can add dependencies from the Artifact repository by clicking the Add from repository button or by entering the Group ID, Artifact ID and Version ID of a project directly by clicking on the Add button.
Figure 2.6. Project Editor - Project Dependencies
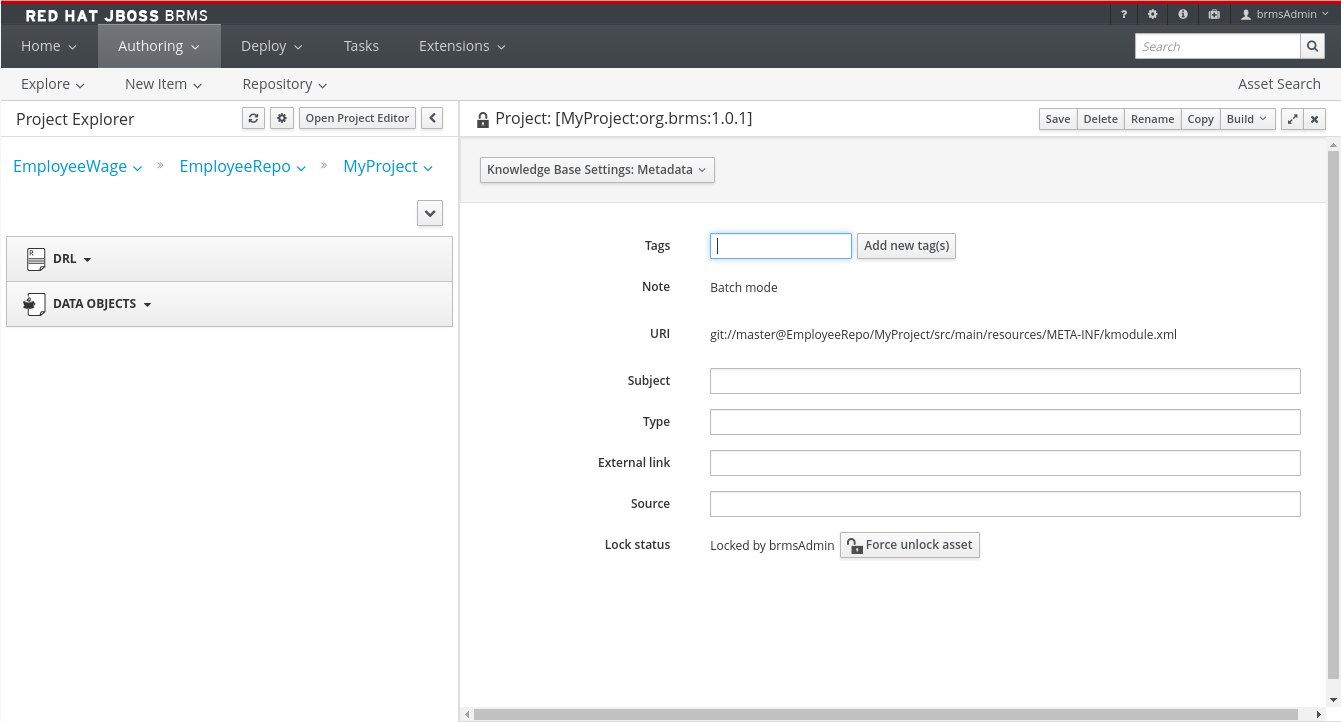
Metadata
The Metadata screen displays various data and version history of a project. It enables you to edit metadata details, add descriptions, and participate in discussions which are specific to a selected asset. You can add metadata to a project, a knowledge base (kmodule) and project imports. Each metadata tab provides the following fields:
-
Tags: A tagging system for grouping the assets. -
Note: A comment from the last asset update. -
URI: A unique identifier of the asset inside of the Git repository. -
Subject,Type,External link,Source: Miscellaneous asset meta data. -
Lock status- Lock status of an asset.
Figure 2.7. Knowledge Base Settings - Metadata
2.6.3. Knowledge Base Settings
Knowledge Bases and Sessions
The Knowledge Base Settings allows the user to create the KIE bases and sessions using the kmodule.xml project descriptor file of your project. Accordingly, it edits the kmodule.xml project setting file.
The Knowledge bases and sessions page lists all the knowledge bases by name. It contains the Add, Rename, Delete, and Make Default options above the list. Only one knowledge base can be set as default at a time.
Figure 2.8. Project Editor - Knowledge Base Settings
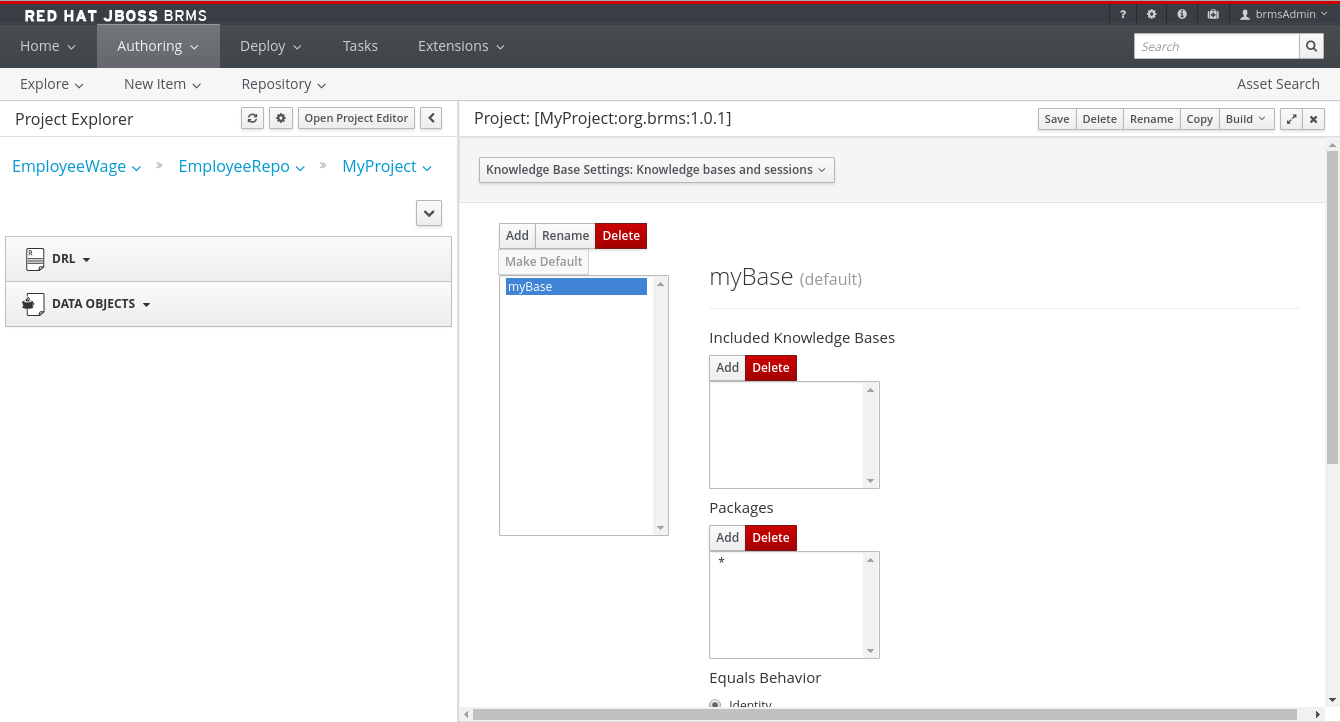
The Included Knowledge Bases section displays the models, rules, and any other content in the included knowledge base. It will only be visible and usable by selecting the knowledge base from the Knowledge Base list to the left. You can Add and Delete content from this list.
The Packages section allows users to Add and Delete packages which are specified to the knowledge base.
The Equals Behavior section allows the user to choose between Identity or Equality assertion modes.
-
Identityuses anIdentityHashMapto store all asserted objects. -
Equalityuses aHashMapto store all asserted objects.
See the kbase attributes section of the Red Hat JBoss BRMS Development Guide for further details about Identity and Equality assertion modes.
The Event Processing Mode section allows the user to choose between Cloud and Stream processing modes.
-
Cloudprocessing mode is the default processing mode. It behaves in the same manner as any pure forward-chaining rules engine. -
Streamprocessing mode is ideal when the application needs to process streams of events.
See the kbase attributes section of the Red Hat JBoss BRMS Development Guide for further details about Cloud and Stream processing modes.
The Knowledge Sessions table lists all the knowledge sessions in the selected knowledge base. By clicking the
 button, you are able to add a new knowledge session to the table.
-
The
Namefield displays the name of the session. -
The
Defaultoption can only be allocated to one of each type of session. -
The
Statedrop-down allows either Stateless or Stateful types. -
The
Clockdrop-down allows either Realtime or Pseudo choices. -
Clicking the
 opens a pop-up that displays more properties for the knowledge session.
Metadata
See Section 2.6.2, “Project Settings” for more information about metadata.
2.6.4. Imports
External Data Objects
The External Data Objects specify a set of imports, or external data objects, used in the project. Each asset in a project has its own imports. The imports are used as suggestions when using the guided editors the workbench offers; accordingly, this makes it easier to work with the workbench as there is no need to type each import in every file that uses it. By changing the Import settings, the project.imports setting files are edited. Data Objects are usually provided by the Java runtime. For example java.util.List.
Figure 2.9. Project Editor - Imports
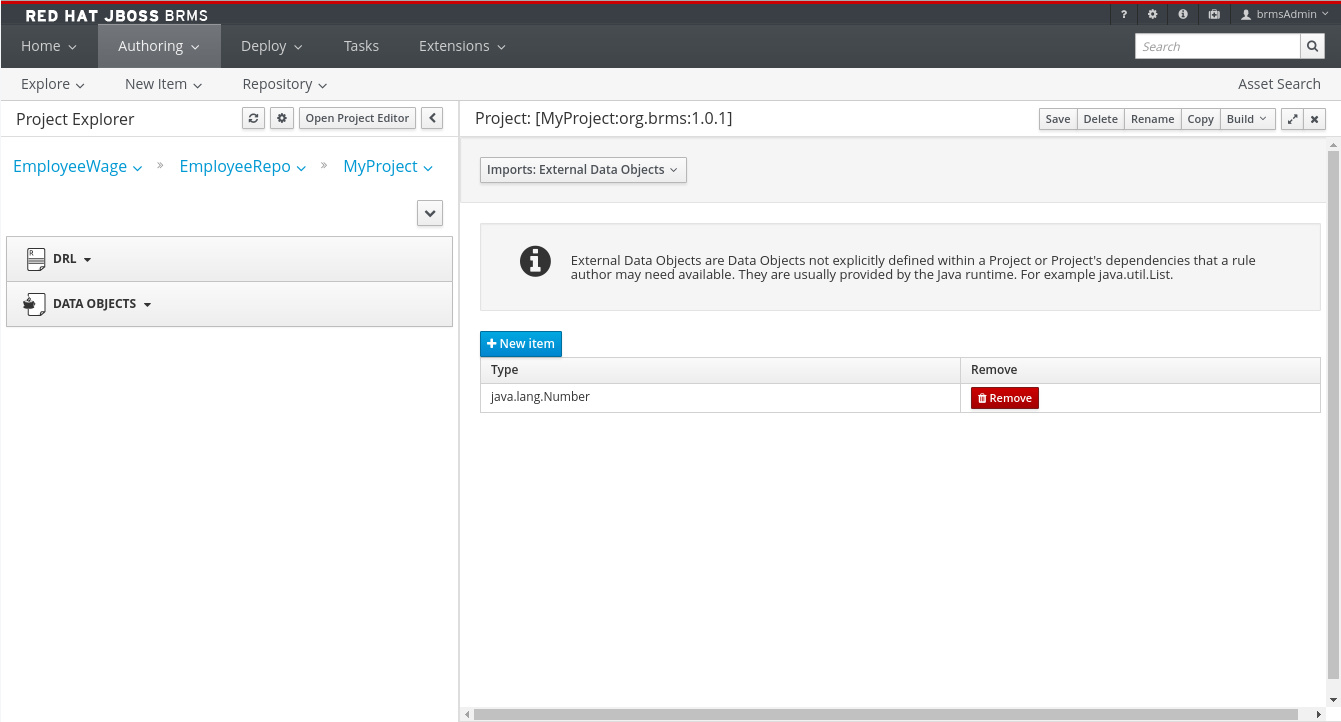
To add a fact model to the imports section, click New Item. This displays a pop-up dialog to Add Import information.Once the Import Type has been entered, click OK.
To remove a fact model from the imports section, click Remove.
The imports listed in the import suggestions are not automatically added into the knowledge base or into the packages of the workbench. Each import needs to be added into each file.
Metadata
See Section 2.6.2, “Project Settings” for more information about Metadata.
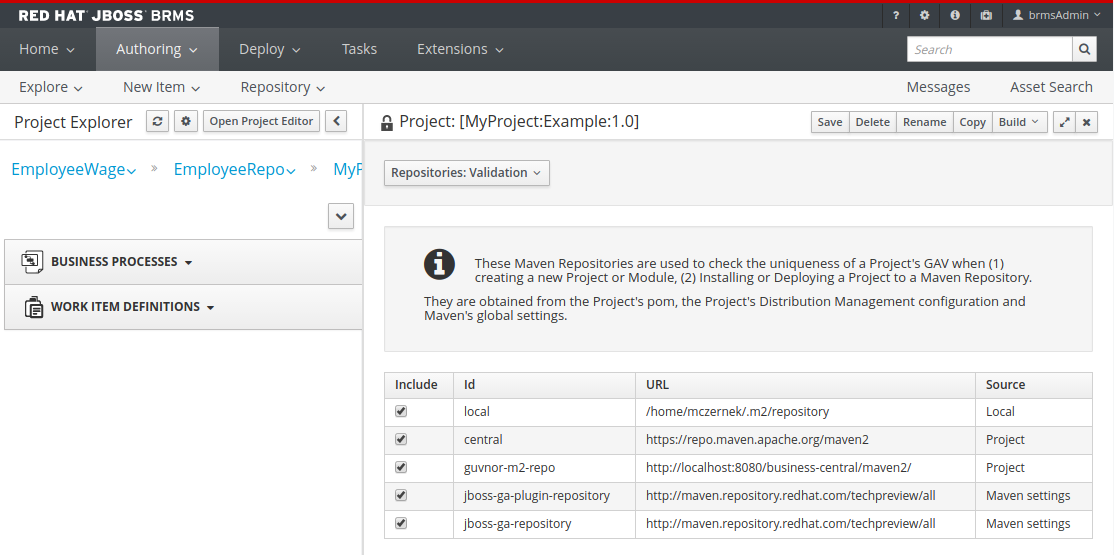
2.6.5. Repositories
Validation
The Validation section enables you to select which maven repositories are used to check the uniqueness of your project’s GAV (group ID, artifact ID, and version).
Figure 2.10. Project Editor - Validation
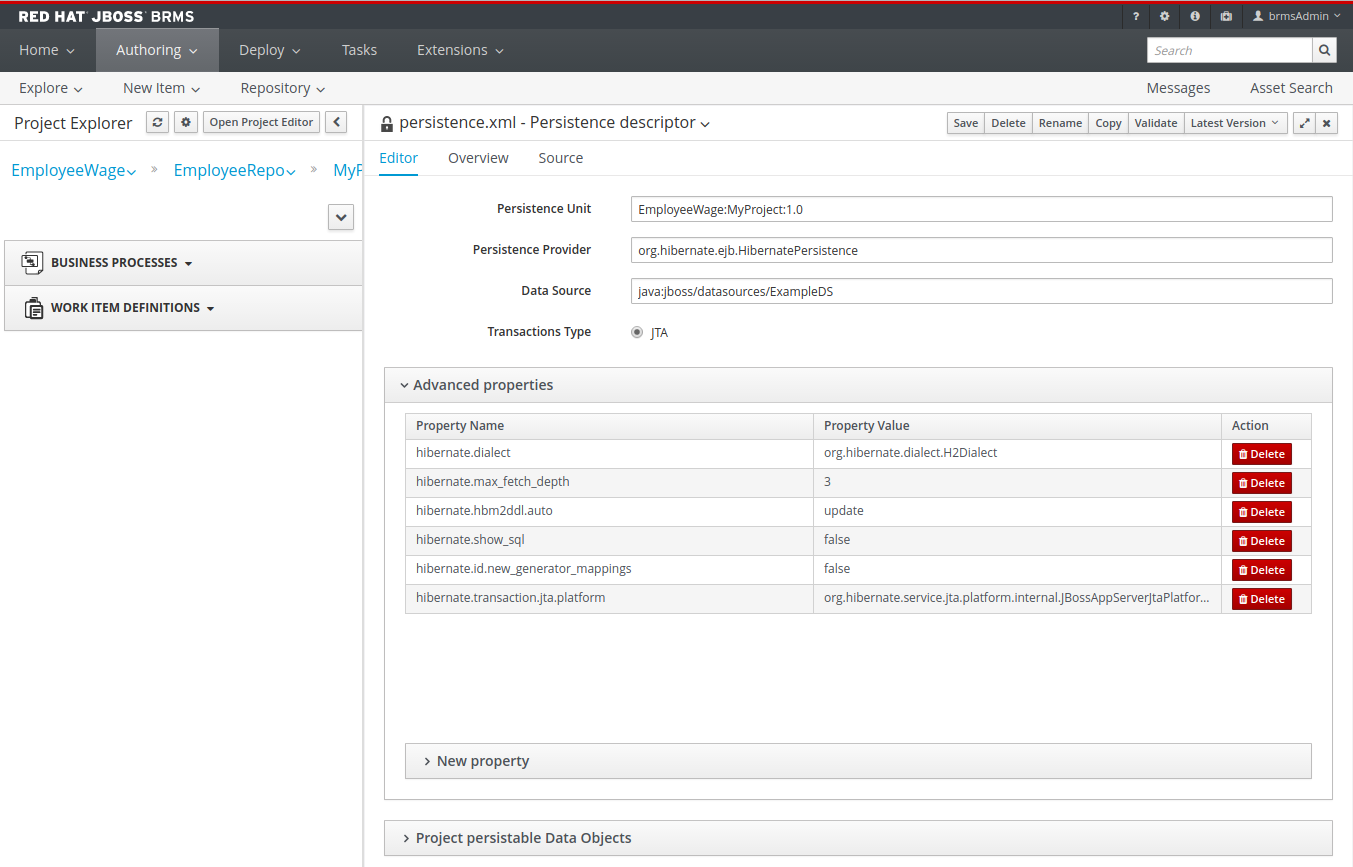
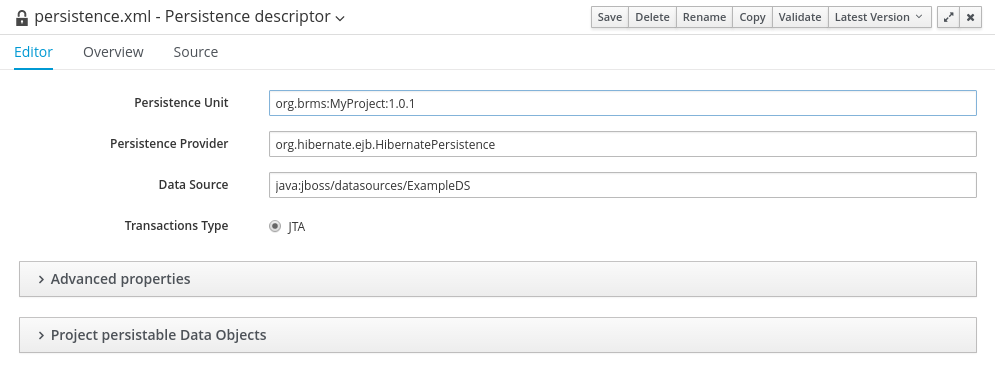
2.6.6. Persistence
Persistence descriptor
The Persistence descriptor section enables you to modify persistence.xml through GUI. You can:
- Define a persistence unit provider.
- Define a data source.
- Change predefined properties for your persistence unit.
- Add new properties to your persistence unit.
Manage persistable data objects.
The persistable data objects are based on the JPA specification and all the underlying metadata are automatically generated.
Alternatively, click Source tab to edit the persistence.xml directly.
Figure 2.11. Persistence descriptor
2.7. Administration menu
You can manage Organizational Units and Repositories from the Administration view. Click Authoring → Administration to get to this view. For more details on creating and managing these assets, see Chapter 3, Setting up a New Project.
Figure 2.12. The Administration Screen
2.8. Rename, Copy, Delete assets
2.8.1. Renaming a file or folder
Users can rename a file or a folder directly in Project Explorer.
- To rename a file or a folder, open Project Explorer by selecting Authoring → Project Authoring.
-
Click the Gear
 icon in the upper right hand corner of the Project Explorer view and in the menu that opens, select Repository View. Click the gear icon again to select the option Show as Links (if not already selected).
-
Click the Rename
 icon to the right of the file or folder you want to rename. In the displayed Rename this item dialog box, enter the new name and click the Rename item button.
2.8.2. Deleting a file or folder
Users can delete a file or a folder directly in Project Explorer.
- To delete a file or a folder, open Project Explorer by selecting Authoring → Project Authoring.
-
Click the Gear icon (
) in the upper right hand corner of the Project Explorer view and in the menu that opens, select Repository View. Click the gear icon again to select the option Show as Links (if not already selected).
-
Click the Delete icon (
 ) to the right of the file or folder you want to rename. In the displayed Delete this item dialog box, click the Delete item button.
2.8.3. Copying a file or folder
Users can copy a file or a folder directly in Project Explorer.
- To copy a file or a folder, open Project Explorer by selecting Authoring → Project Authoring.
-
Click the Gear
icon in the upper right hand corner of the Project Explorer view and in the menu that opens, select Repository View. Click the gear icon again to select the option Show as Links (if not already selected).
-
Click the Copy
 icon to the right of the file or folder you want to copy. In the displayed Copy this item dialog box, enter the new name and click the Create copy button.
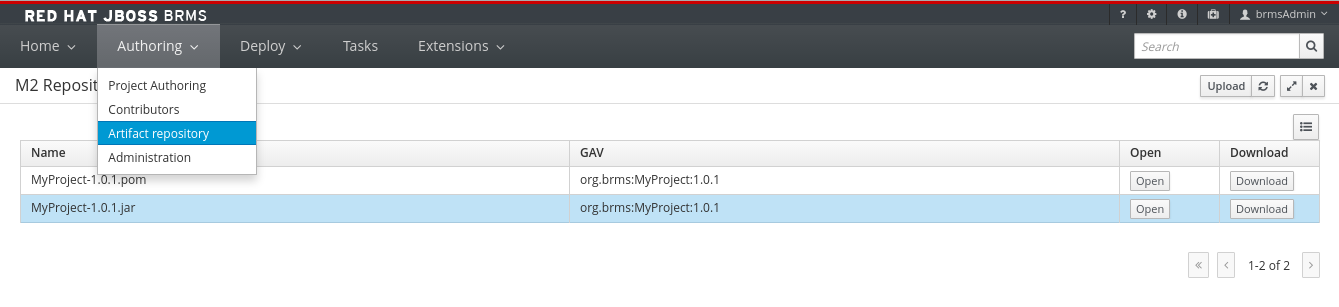
2.9. Deployment Menu: The Artifact Repository
The Artifact Repository explores the Guvnor M2 repository. It shows the list of available kjar files used by the existing projects and allows a user to upload, download and manage the kjar files. It can be accessed by clicking on the Authoring → Artifact Repository menu on the toolbar.
Figure 2.13. The Artifact Repository Screen
Chapter 3. Setting up a New Project
To create a project a business user has to create an organizational unit. An organizational unit is based on any domain in a particular business sector. It holds the repositories, where projects and packages can be created. Packages are deployable collections of assets like rules, fact models, decision tables and so on, that can be validated and compiled for deployment.
3.1. Creating an Organizational Unit
It is possible to create an organizational unit in the Administration perspective of Business Central, using the kie-config-cli tool, or the REST API calls.
Creating an Organizational Unit in Business Central
Note that only users with the admin role in Business Central can create organizational units.
Procedure: Using Business Central to Create an Organizational Unit
- In Business Central, go to Authoring → Administration.
- On the perspective menu, click Organizational Units → Manage Organizational Units.
In the Organization Unit Manager view, click Add.
The Add New Organizational Unit dialog window opens.
Figure 3.1. *Add New Organizational Unit*Dialog Window
-
Enter the two mandatory parameters (
nameanddefault group ID) and click Ok.

Creating an Organizational Unit Using the kie-config-cli Tool
Organizational units can be created using the kie-config-cli tool as well. To do so, run the create-org-unit command. The tool then guides you through the entire process of creating an organizational unit by asking for other required parameters. Type help for a list of all commands.
For more information about the kie-config-cli tool, see Red Hat JBoss BRMS Administration and Configuration Guide, chapter Command Line Configuration.
Creating an Organizational Unit Using the REST API
Note that only users with the rest-all role can create organizational units.
To create an organizational unit in Knowledge Store, issue the POST REST API call. Details of the organizational unit are defined by the JSON entity.
Input parameter of the call is an OrganizationalUnit instance. The call returns a CreateOrganizationalUnitRequest instance.
Example 3.1. Creating an Organizational Unit Using the Curl Utility
Example JSON entity containing details of an organizational unit to be created:
Execute the following command:
curl -X POST 'localhost:8080/business-central/rest/organizationalunits/' -u USERNAME:PASSWORD -H 'Accept: application/json' -H 'Content-Type: application/json' -d '{"name":"helloWorldUnit","owner":"tester","description":null,"repositories":[]}'
curl -X POST 'localhost:8080/business-central/rest/organizationalunits/' -u USERNAME:PASSWORD -H 'Accept: application/json' -H 'Content-Type: application/json' -d '{"name":"helloWorldUnit","owner":"tester","description":null,"repositories":[]}'For further information, see the Red Hat JBoss BPM Suite Development Guide, chapter Knowledge Store REST API, section Organizational Unit Calls.
3.2. Creating a Repository
There are three ways to create a repository: using the Administration perspective of Business Central, the kie-config-cli tool, or the REST API calls.
Creating a Repository in Business Central
Note that only users with the admin role in Business Central can create repositories.
Procedure: Using Business Central to Create a Repository
- In Business Central, go to Authoring → Administration.
On the perspective menu, click Repositories → New repository.
The New Repository pop-up window is displayed.
Figure 3.2. *New Repository*Dialog Window
Specify the two mandatory parameters:
repository name
NoteMake sure that the repository name is a valid file name. Avoid using a space or any special character that might lead to an invalid name.
- organizational unit: specifies the location of the newly created repository.
- Click Finish.

You can view the newly created repository either in the File Explorer or the Project Explorer.
Creating a Repository Using the kie-config-cli Tool
To create a new Git repository using the kie-config-cli tool, run the create-repo command. The tool then guides you through the entire process of creating a repository by asking for other required parameters. Type help for a list of all commands.
For more information about the kie-config-cli tool, see Red Hat JBoss BRMS Administration and Configuration Guide .
Creating a Repository Using the REST API
Note that only users with the rest-all role can create repositories.
To create a repository in the Knowledge Store, issue the POST REST API call. Details of the repository are defined by the JSON entity. Make sure you established an authenticated HTTP session before executing this call.
Input parameter of the call is a RepositoryRequest instance. The call returns a CreateOrCloneRepositoryRequest instance.
Example 3.2. Creating a Repository Using the Curl Utility
Example JSON entity containing details of a repository to be created:
Execute the following command:
curl -X POST 'localhost:8080/business-central/rest/repositories/' -u USERNAME:PASSWORD -H 'Accept: application/json' -H 'Content-Type: application/json' -d '{"name":"newRepository","description":null,"requestType":"new","gitURL":null,"organizationalUnitName":"helloWorldUnit"}'
curl -X POST 'localhost:8080/business-central/rest/repositories/' -u USERNAME:PASSWORD -H 'Accept: application/json' -H 'Content-Type: application/json' -d '{"name":"newRepository","description":null,"requestType":"new","gitURL":null,"organizationalUnitName":"helloWorldUnit"}'For further information, see the Red Hat JBoss BPM Suite Development Guide, chapter Knowledge Store REST API, section Repository Calls.
3.3. Cloning a Repository
It is possible to clone a repository either in Business Central or using the REST API calls. The kie-config-cli tool cannot be used to clone arbitrary repositories - run git clone or use one of the following options instead.
Cloning a Repository in Business Central
Note that only users with the admin role in Business Central can clone repositories.
Procedure: Using Business Central to Clone a Repository
- In Business Central, go to Authoring → Administration.
On the perspective menu, choose Repositories → Clone repository.
The Clone Repository pop-up window is displayed.
Figure 3.3. *Clone Repository*Dialog Window
In the Clone Repository dialog window, enter the repository details:
- Enter the Repository Name to be used as the repository identifier in the Asset repository and select the Organizational Unit it should be added to.
Enter the URL of the Git repository:
for a local repository, use
file:///PATH_TO_REPOSITORY/REPOSITORY_NAME;NoteThe file protocol is only supported for READ operations. WRITE operations are not supported.
for a remote or preexisting repository, use
https://github.com/USERNAME/REPOSITORY_NAME.gitorgit://HOST_NAME/REPOSITORY_NAME.ImportantIt is important to use the HTTPS or Git protocol instead of a SCP-style SSH URL. Business Central does not support the basic SSH URL and fails with Invalid URL format.
- If applicable, enter the User Name and Password of your Git account to be used for authentication.
Click Clone.
A confirmation prompt with the notification that the repository was created successfully is displayed.
Click Ok.
The repository is now being indexed. Some workbench features may be unavailable until the indexing has completed.

You can view the cloned repository either in the File Explorer or the Project Explorer.
Cloning a Repository Using the REST API
Note that only users with the rest-all role can clone repositories.
To clone a repository, issue the POST REST API call. This call creates or clones (according to the value of the requestType parameter) the repository defined by the JSON entity.
Input parameter of the call is a RepositoryRequest instance. The call returns a CreateOrCloneRepositoryRequest instance.
Example 3.3. Cloning a Repository Using the Curl Utility
Example JSON entity containing details of a repository to be cloned:
Execute the following command:
curl -X POST 'localhost:8080/business-central/rest/repositories/' -u USERNAME:PASSWORD -H 'Accept: application/json' -H 'Content-Type: application/json' -d '{"name":"clonedRepository","description":null,"requestType":"clone","gitURL":"git://localhost:9418/newRepository","organizationalUnitName":"helloWorldUnit"}'
curl -X POST 'localhost:8080/business-central/rest/repositories/' -u USERNAME:PASSWORD -H 'Accept: application/json' -H 'Content-Type: application/json' -d '{"name":"clonedRepository","description":null,"requestType":"clone","gitURL":"git://localhost:9418/newRepository","organizationalUnitName":"helloWorldUnit"}'For further information, see the Red Hat JBoss BPM Suite Development Guide, chapter Knowledge Store REST API, section Repository Calls.
3.4. Creating a Project
It is possible to create a project either in the Project Authoring perspective of Business Central or using the REST API calls.
Creating a Project in Business Central
Note that only users with the admin role in Business Central can create projects.
Procedure: Using Business Central to Create a Project
- In Business Central, go to Authoring → Project Authoring.
- In the Project Explorer, select the organizational unit and the repository in which you want to create the project.
On the perspective menu, click New Item → Project.
The New Project dialog window opens.
Define the Project General Settings and Group artifact version details of the new project. These parameters are stored in the
pom.xmlMaven configuration file.See the detailed description of the parameters:
-
Project Name: name of the project (for exampleMortgageProject). -
Project Description: description of the project, which may be useful for the project documentation purposes. -
Group ID: group ID of the project (for exampleorg.mycompany.commons). -
Artifact ID: artifact ID unique in the group (for examplemyframework). Avoid using a space or any other special character that might lead to an invalid name. -
Version: version of the project (for example2.1.1).
-
Click Finish.
The project screen view is updated with the new project details as defined in the
pom.xmlfile. You can switch between project descriptor files and edit their content by clicking the Project Settings: Project General Settings button at the top of the project screen view.

Creating a Project Using the REST API
Note that only users with the rest-all or rest-project role can create projects.
To create a project in the repository, issue the POST REST API call. Details of the project are defined by the corresponding JSON entity.
Input parameter of the call is an Entity instance. The call returns a CreateProjectRequest instance.
Example 3.4. Creating a Project Using the Curl Utility
Example JSON entity containing details of a project to be created:
Execute the following command:
curl -X POST 'localhost:8080/business-central/rest/repositories/REPOSITORY_NAME/projects/' -u USERNAME:PASSWORD -H 'Accept: application/json' -H 'Content-Type: application/json' -d '{"name":"MortgageProject","description":null,"groupId":"org.mycompany.commons","version":"2.1.1"}'
curl -X POST 'localhost:8080/business-central/rest/repositories/REPOSITORY_NAME/projects/' -u USERNAME:PASSWORD -H 'Accept: application/json' -H 'Content-Type: application/json' -d '{"name":"MortgageProject","description":null,"groupId":"org.mycompany.commons","version":"2.1.1"}'For further information, see the Red Hat JBoss BPM Suite Development Guide, chapter Knowledge Store REST API, section Repository Calls.
3.5. Creating a New Package
It is possible to create a new package in the Project Authoring perspective of Business Central.
Procedure: Creating a New Package in Business Central
- In Business Central, go to Authoring → Project Authoring.
- In the Project Explorer view, select the organizational unit, repository and the project where you want to create the package.
On the perspective menu, click New Item → Package.
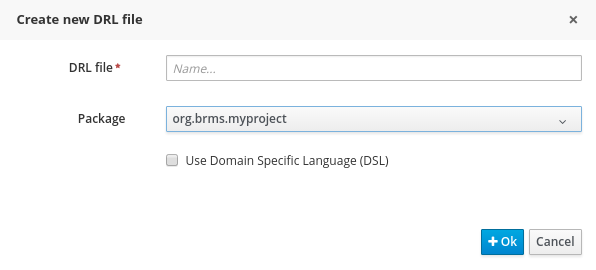
The Create new Package dialog window opens.
- Define the package details: enter the package name a specify the package.
Click Ok.
A new package is now created under the selected project.

3.6. Adding Dependencies
To add dependencies to your project, do the following:
Open the Project Editor for the given project:
- In the Project Explorer view of the Project Authoring perspective, open the project directory.
- Click Open Project Editor to open the project view.
- In the Project Screen view, select in the Project Settings drop-down box the Dependencies item.
On the updated Project Screen, click the Add button to add a maven dependency or click the Add from repository button to add a dependency from the Knowledge Store (Artifact repository):
- When adding a maven dependency, a user has to define the Group ID, Artifact ID and the Version ID in the Dependency dialogue window.
- When adding a dependency from the Knowledge Store, select the dependency in the displayed dialog box: the dependency will be added to the dependency table.
- To apply the various changes, the dependencies must be saved.
Additionally, you can use the Package white list when working with dependencies. When you add a repository, you can click the gear icon and select Add all or Add none, which results in including all or none of the packages from the added dependency.
If working with modified artifacts, do not re-upload modified non-snapshot artifacts as Maven will not know these artifacts have been updated, and it will not work if it is deployed in this manner.
3.7. Defining KIE Bases and Sessions
A KIE base is a repository of the application’s knowledge definitions. It contains rules, processes, functions, and type models. A KIE base does not contain runtime data, instead sessions are created from the KIE base into which data can be inserted and process instances started.
A KIE session stores runtime data created from a KIE base. See the KIE Sessions chapter of the Red Hat JBoss BPM Suite Development Guide for more information.
You can create KIE bases and sessions by editing the kmodule.xml project descriptor file of your project.You can do so through Business Central or by editing kmodule.xml in the src/main/resources/META-INF/ folder by navigating through the Repository view.
Defining KIE Bases and Sessions in the Project Editor
To define a KIE base or session in Business Central, do the following:
- Click Authoring → Project Authoring and navigate to your project.
- In the Project Explorer window, click Open Project Editor.
-
Click Project Settings: Project General Settings → Knowledge bases and sessions. This view provides a user interface for changing
kmodule.xml. Click Add to define and add your bases.
-
After you enter a name for your Knowledge Base, add Packages. For including all packages, click Add below Packages and enter asterisk
*.
-
After you enter a name for your Knowledge Base, add Packages. For including all packages, click Add below Packages and enter asterisk
- Below Knowledge Sessions, click Add and enter the name of your session.
Mark it
Defaultand select appropriate state.For Red Hat JBoss BRMS, you can choose between
statefulandstatelesssessions. Usestatelessif you do not need iterative invocations of the facts. Otherwise, usestatefulsession.- Click Save in the top right corner once you are done.
Defining KIE Bases and Sessions in kmodule.xml
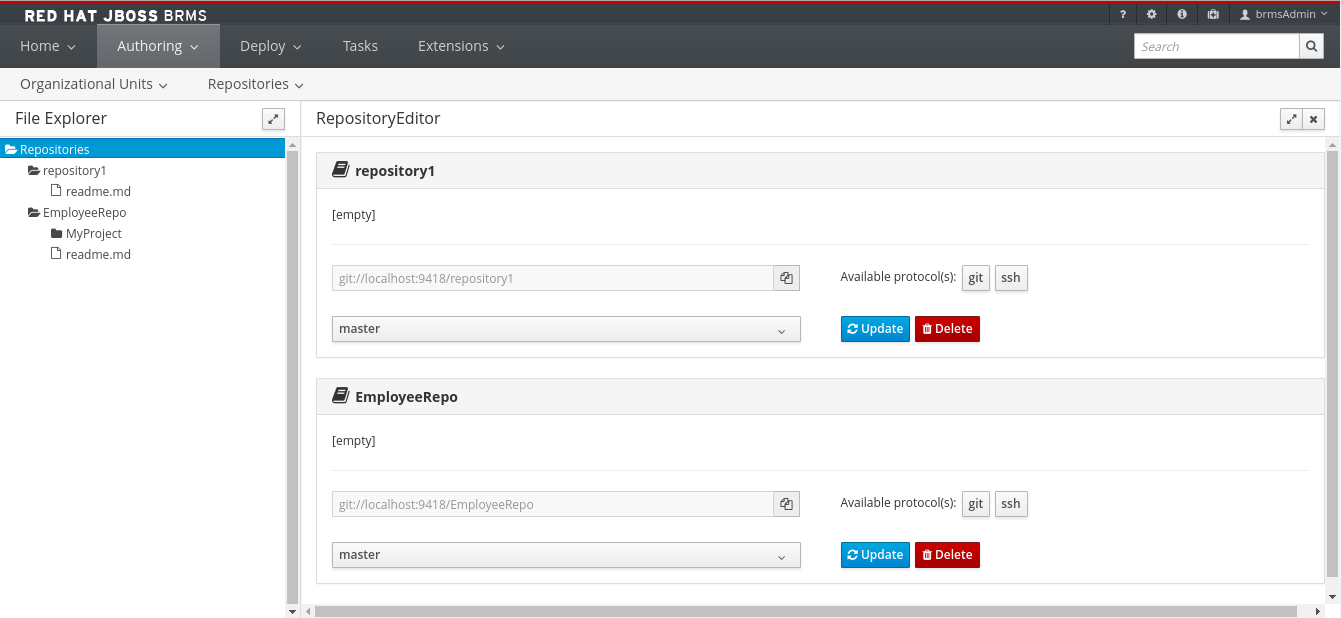
To define a KIE base or session by editing kmodule.xml, do the following:
Open the repository view for your project.
Figure 3.4. Changing to Repository View
-
Navigate to
/src/main/resources/META-INF. Click onkmodule.xmlto edit the file directly. Define your
kbasesandksessions. For example:<kmodule xmlns="http://www.drools.org/xsd/kmodule" xmlns:xsi="http://www.w3.org/2001/XMLSchema-instance"> <kbase name="myBase" default="true" eventProcessingMode="stream" equalsBehavior="identity" packages="*"> <ksession name="mySession" type="stateless" default="true" clockType="realtime"/> </kbase> </kmodule><kmodule xmlns="http://www.drools.org/xsd/kmodule" xmlns:xsi="http://www.w3.org/2001/XMLSchema-instance"> <kbase name="myBase" default="true" eventProcessingMode="stream" equalsBehavior="identity" packages="*"> <ksession name="mySession" type="stateless" default="true" clockType="realtime"/> </kbase> </kmodule>Copy to Clipboard Copied! Toggle word wrap Toggle overflow - Click save in the top right corner.

You can switch between the Project Editor view and the Repository view to look at the changes you make in each view. To do so, close and reopen the view each time a change is made.
3.8. Creating a Resource
A Project may contain an arbitrary number of packages, which contain files with resources, such as Process definition, Work Item definition, Form definition, Business Rule definition, etc.
To create a resource, select the Project and the package in the Project Explorer and click on the perspective menu and select the resource you want to create.
It is recommended to create your resources, such as Process definitions, Work Item definitions, Data Models, etc., inside a package of a Project to allow importing of resources and referencing their content.
To create a package, do the following:
-
In the Repository view of the Project Explorer, navigate to the
REPOSITORY/PROJECT/src/main/resources/directory. - Go to New Item → Package.
- In the New resource dialog, define the package name and check the location of the package in the repository.
Chapter 4. Data Sets
The data set functionality in Business Central defines how to access and parse data. Data sets serve as a source of data that can be displayed by the Dashbuilder displayer. You can add the Dashbuilder displayers to a custom perspective in the Plugin Management perspective. Note that the data set perspective is visible only to users of the Administrator group.
4.1. Managing Data Sets
To add a data set definition:
- Log into Business Central and click Extensions → Data Sets.
- Click New Data Set.
Select the provider type and click Next. Currently, the following provider types are supported:
- Java Class – generate a data set from a Java class.
- SQL – generate a data set from an ANSI-SQL compliant database.
- CSV – generate a data set from a remote or local CSV file.
- Elasticsearch – generate a data set from Elasticsearch nodes.
Elasticsearch data set integration support is limited to commercially reasonable efforts. For details, see What is commercially reasonable support?.
- Complete the Data Set Creation Wizard and click Test.
- Depending on what provider you chose, the configuration steps will differ. Once you complete the steps, click Save to create a data set definition.
To edit a data set:
- Log into Business Central and click Extensions → Data Sets.
- In Data Set Explorer, click on an existing data set and click Edit.
Data Set Editor opens. You can edit your data set in three tabs. Note that some of the tabs differ based on the provider type you chose. The following applies to the CSV data provider.
- CSV Configuration – allows you to change the name of your data set definition, the source file, the separator, and other properties.
Preview – after you click Test in the CSV Configuration tab, the system executes the data set lookup call and if the data is available, you will see a preview. Notice two subtabs:
- Data columns – allows you to customize what columns are part of your data set definition.
- Filter – allows you to add a new filter.
Advanced – allows you to manage:
- Caching – see Section 4.2, “Caching” for more information.
- Cache life-cycle – see Section 4.3, “Data Refresh” for more information.
4.2. Caching
Red Hat JBoss BRMS data set functionality provides two cache levels:
- Client level
- Back end level
Client Cache
When turned on, the data set is cached in a web browser during the look-up operation. Consequently, further look-up operations do not perform any request to the backend.
Backend Cache
When turned on, the data set is cached by the Red Hat JBoss BRMS engine. This reduces the number of requests to the remote storage system.
The Java and CSV data providers rely on back-end caching. As a result, back-end cache settings are not always visible in the Advanced tab of the Data Set Explorer.
4.3. Data Refresh
The refresh features allow you to invalidate cached data set data after a specified interval of time. The Refresh on stale data feature invalidates cached data when the back-end data changes.
Chapter 5. Social Events
In Red Hat JBoss BRMS, users can follow other users and gain an insight into what activities are being performed by those users. They can also listen for and follow timelines of regular events. This capability comes via the implementation of a Social Activities framework. This framework ensures that event notifications are generated by different activities within the system and that these notifications are broadcast for registered actors to view.
Multiple activities trigger events. These include: new repository creation, adding and updating resources and adding and updating processes. With the right credentials, a user can view these notifications once they are logged into Business Central.
Follow User
To follow a user, search for the user by entering his name in the search box in the People perspective. You get to this perspective by navigating to it from Home → People.
You must know the login name of the other user that you want to follow. As you enter the name in the search box, the system will try and auto-complete the name for you and display matches based on your partial entry. Select the user that you want to follow from these matches and the perspective will update to display more details about this user.
You can choose to follow the user by clicking on the Follow button. The perspective refreshes to showcase the user details and their recent activities.
Activity Timeline
Click on Home → Timeline to see a list of recent assets that have been modified (in the left hand window) and a list of changes made in the selected repository in the right hand side. You can click on the assets to directly open the editor for the assets (if you have the right permissions).
Chapter 6. Data Models
Data models are models of data objects. A data object is a custom complex data type (for example, a Person object with data fields Name, Address, and Date of Birth).
Data models are saved in data models definitions stored in your Project. Red Hat JBoss BRMS provides the Data modeler, a custom graphical editor, for defining data objects.
6.1. Data Modeler
The Data Modeler is the built-in editor for creating facts or data objects as part of a Project data model from the Business Central. Data objects are custom data types implemented as POJOs. These custom data types can be then used in any resource (such as a Guided Decision Table) after they have been imported.
To open the editor, open the Project Authoring perspective, click New Item → Data Object on the perspective menu. If you want to edit an existing model, these files are located under Data Objects in Project Explorer.
You will be prompted to enter the name of this model object when creating a new model, and asked to select a location for it (in terms of the package). On successful addition, it will bring up the editor where you can create fields for your model object.
The Data Modeler supports roundtrips between the Editor and Source tabs, along with source code preservation. This allows you to make changes to your model in external tools, like JBDS, and the Data Modeler updates the necessary code blocks automatically.
In the main editor window the user can
- Add/delete fields
- Select a given field. When a field is selected then the field information will be loaded in all the domain editors.
Select the data object class. For example, by clicking on the data object name (on the main window) instead of loading the field properties, the domain editors will load the class properties.
6.2. Available Field Types
Data object fields can be assigned to any of the following types:
Java Object Primitive Types:
BigDecimal,BigInteger,Boolean,Byte,Character,Date,Double,Float,Integer,Long,Short, andString.Java Primitive Types:
boolean,byte,char,double,float,int,long, andshort.Java Enum Types:
Java enum types defined in current project or imported as a dependency. See Adding Dependencies.
Current project Data Objects:
Any user defined data object automatically becomes available to be assigned as a field type.
Project Dependencies:
Other Java classes imported as a Java dependency in current project. See Adding Dependencies.
6.3. Annotations in Data Modeler
Red Hat JBoss BRMS supports all Drools annotations by default, and can be customized using the Drools & jBPM domain screen. For further information about available domain screens, see Section 6.6, “Data Object Domain Screens”.
To add or edit custom or pre-defined annotations, switch to the Source tab and modify the source code directly. You can edit the source code directly in both Red Hat JBoss Developer Studio and Business Central. Use the Advanced screen to manage arbitrary annotations.
When creating or adding fields to a persistable data object, the JPA annotations that are added by default will generate a model that can be used by Red Hat JBoss BRMS at runtime. In general, modifying the default configurations where the model will be used by processes is not recommended.
Red Hat JBoss BRMS 6.2 onwards supports the use of JPA specific annotations, with Hibernate available as the default JPA implementation. Other JPA annotations are also supported where the JPA provider is loaded on the classpath.
When adding an annotation in the Data Modeler, the annotation class should be on the workbench classpath, or a project dependency can be added to a .jar file that has the annotation. The Data Modeler will run a validation check to confirm that the annotation is on the classpath, and the project will not build if the annotation is not present.
6.4. Creating a Data Object
- In the Project Authoring perspective, click New Item → Data Object on the perspective menu.
- Enter the name and select the package. The name must be unique across the package, but it is possible to have two data objects with the same name in two different packages.
- To make your Data Object persistable, check the Persistable checkbox.
- Click Ok.
Create fields of the data object:
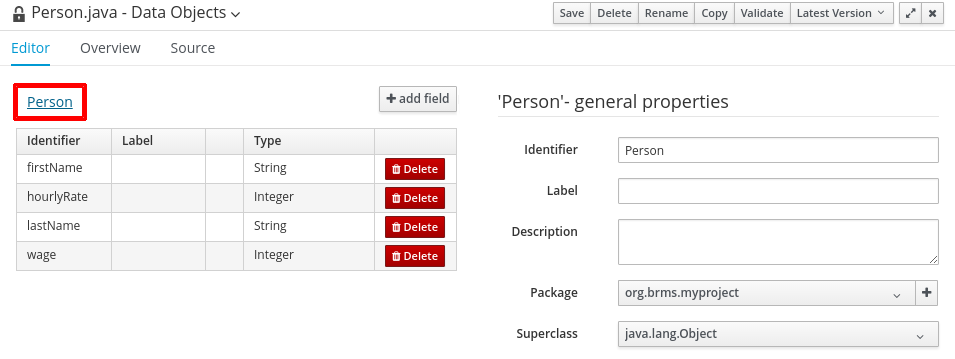
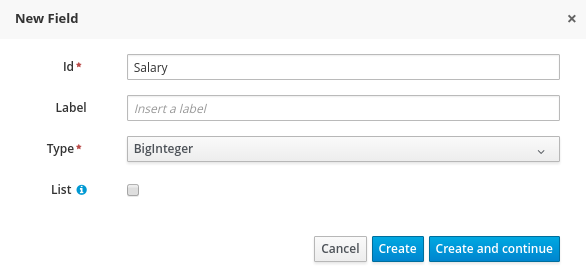
Click add field in the main editor window to add a field to the object with the attributes Id, Label and Type. Required attributes are marked with *.
- Id: The ID of the field unique within the data object.
- Label: The label to be used in the Fields panel. This field is optional.
Type: The data type of the field.
- Click Create to create the new field and close the New field window. Alternatively, click Create and continue to keep the New field window open.
To edit an attribute, select the attribute and use the general properties screen.
To use a data object, make sure you import the data model into your resource. Unless both the data model and your resource, for example a guided rule editor, are in the same package, this is necessary even if both are in the same project.
6.5. Persistable Data Objects
From Red Hat JBoss BRMS 6.2 onwards, the Data Modeler supports the generation of persistable data objects. Persistable data objects are based on the JPA specification. When you check the Persistable checkbox, the platform will use default persistence settings. You can make a data object persistable in two ways:
When creating a new data object.
When creating a new object, follow the procedure in Section 6.4, “Creating a Data Object”.
- When a data object has already been created.
To make an already created data object persistable:
- Open your data object in Business Central.
- Click the Editor tab.
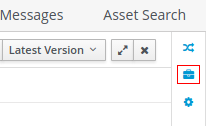
Select the Persistence icon from the menu on the right:
- Check Persistable.
- Click Save to save your changes.
6.6. Data Object Domain Screens
The following domain screen tabs can be selected from the right side of the data object editor screen.
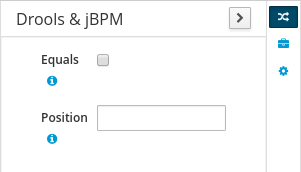
Drools & jBPM
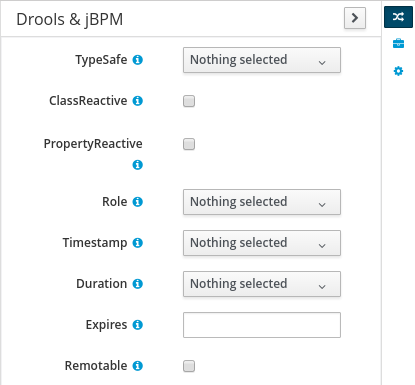
The Drools & jBPM screen allows configuration of Drools-specific attributes.
The Data Modeler in Business Central supports editing of the pre-defined annotations of fact model classes and attributes. The following Drools annotations are supported, and can be customized using the Drools & jBPM interface:
-
TypeSafe -
ClassReactive -
PropertyReactive -
Role -
Timestamp -
Duration -
Expires -
Remotable
Figure 6.1. The Drools & jBPM Class View
For the fields within the fact model, the position and Equals annotations are supported. The Drools & jBPM screen when a specific field is selected looks as follows:
Figure 6.2. The Drools & jBPM Field View
Persistence
The Persistence screen can be used to configure attributes on basic JPA annotations for persistence. For fine tuning of annotations, or to add specific annotations, use the Advanced screen.
Figure 6.3. The Class Persistence View
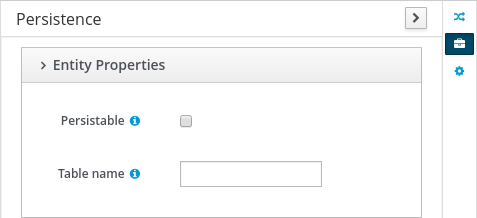
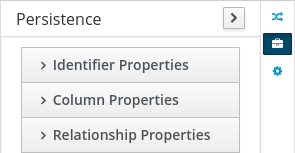
The Persistence screen when a specific field is selected looks as follows:
Figure 6.4. The Field Persistence View
The following annotations can be managed via the Persistence screen.
| Annotation | Automatically Generated when the Data Object is Persistable |
|---|---|
| javax.persistence.Entity | Yes |
| javax.persistence.Table | No |
| Annotation | Automatically Generated when the Data Object is Persistable | Responsible UI Element |
|---|---|---|
| javax.persistence.Id | Yes | Is Identifier |
| javax.persistence.GeneratedValue | Yes | Generation strategy |
| javax.persistence.SequenceGenerator | Yes | Sequence Generator |
| javax.persistence.Column | No | Column Properties attributes |
| javax.persistence.OneToOne | No | Relationship Type |
| javax.persistence.OneToMany | Yes - when a field has one or multiple values | Relationship Type |
| javax.persistence.ManyToOne | Yes - when a field has multiple values | Relationship Type |
| javax.persistence.ManyToMany | No | Relationship Type |
| javax.persistence.ElementCollection | Yes - generated by the UI when a new field has one or multiple of a base java type, such as Integer, Boolean, String. This annotation cannot be edited with the Persistence screen tool (use the Advanced screen tool instead). |
Created by a field marked as |
All other JPA annotations can be added using the Advanced screen.
Advanced
The Advanced screen is used for fine-tuning of annotations. Annotations can be configured, added and removed using the Advanced Domain screen. These can be any annotation that is on the classpath.
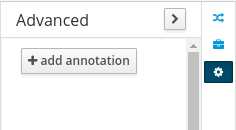
After you click on the add annotation option, the Add new Annotation window is displayed. It is required to enter a fully qualified class name of an annotation and by pressing the search icon, the annotation definition is loaded into the wizard. Then it is possible to set different annotation parameters (required parameters are marked with *).
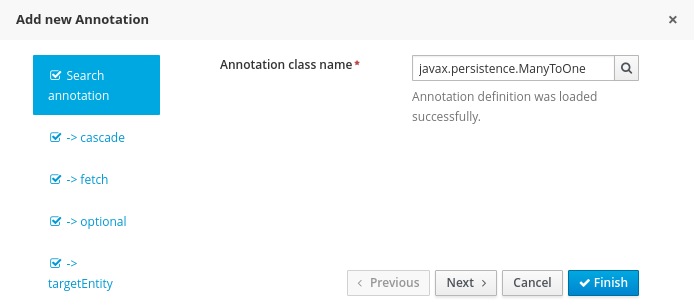
If possible, the wizard will provide a suitable editor for the given parameters.
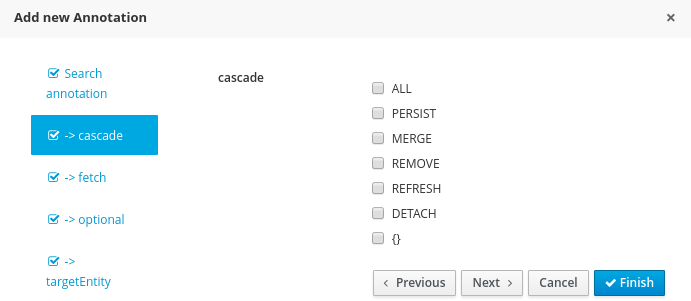
If it is not possible to provide a customized editor, the wizard will provide a generic parameter editor.
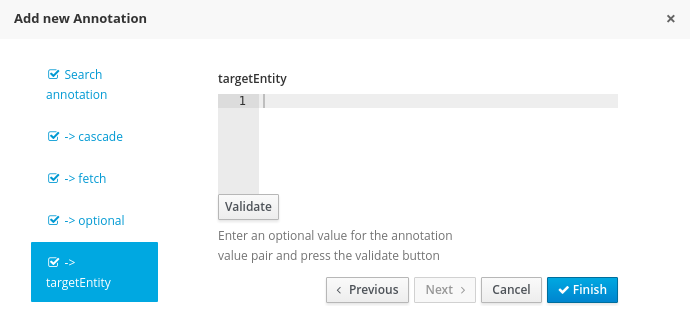
After you enter all the required parameters, the Finish button is enabled and the annotation can be added to the given field or data object.
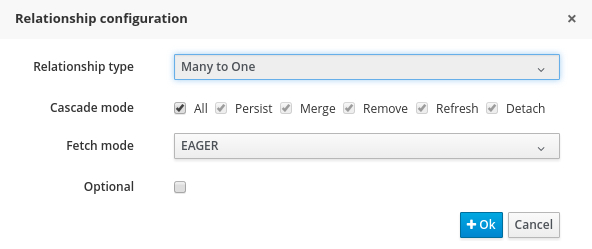
6.7. Configuring Relationships Between Data Objects
When an attribute type is defined as another data object, the relationship is identified and defined by the
![]() symbol in the object attribute list. You can jump to the data object definition to view and edit by clicking on the icon.
symbol in the object attribute list. You can jump to the data object definition to view and edit by clicking on the icon.
Relationship customization is only relevant where the data object is persistable.
Relationships can be configured by selecting an attribute with a relationship and choosing the Persistence button on the right. Under Relationship Properties, click the Relationship Type property editing option.
Attempting to delete a data object that is used by a different data object will show the Usage Detected screen. It is still possible to delete the object from here, however this will stop your project from building successfully until the resulting errors are resolved.
6.8. Persistence Descriptor
Business central contains a persistence.xml file with default persistence settings. To configure persistence settings, click Project Settings: Project General Settings → Persistence descriptor.
Use the Advanced properties section to change or delete or add properties.
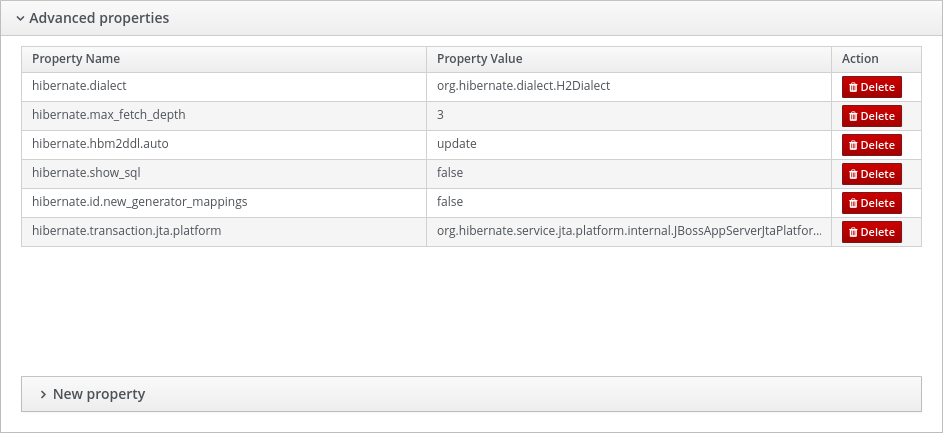
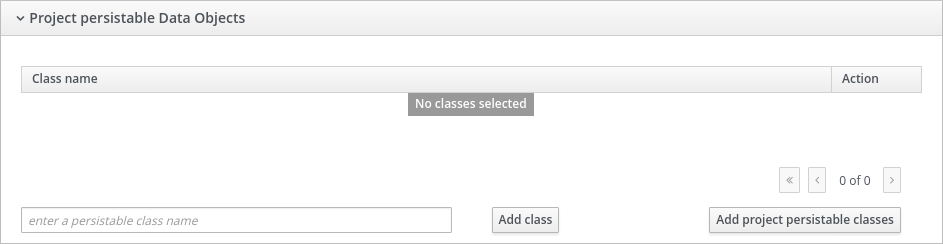
If you open the Project persistable Data Objects section in the Persistence Descriptor, you will see two buttons:
-
Add class enables the user to add arbitrary classes to the
persistence.xmlfile to be declared as entities. - Add project persistable classes will automatically load all the persistable data objects in the current project.
Chapter 7. Writing rules
7.1. Creating a rule
Procedure: Creating a new rule
In the Project Explorer view, do the following:
- If in the Project view of Project Explorer, select the organizational unit, repository and the project where you want to create the rule.
-
If in the Repository view of Project Explorer, navigate to
src/main/resources/and theSUBFOLDER/PACKAGEwhere you want to create the project folder for the rule template.
- In the perspective menu, go to New Item → Guided Rule.
In the Create new Guided Rule dialog window, define the package details:
- In the Guided Rule text box, enter the name of the rule, and click OK. You can check Use Domain Specific Language (DSL) to use DSL. For more information, see Section 7.6, “The Domain Specific Language Editor”.
- The new Guided Rule is now created under the selected project.
7.2. Editing Rules
7.2.1. Editing Rules Using the Asset Editor
The asset editor provides access to information about assets and gives users the ability to edit assets.
The editor contains Editor, Overview, Source, and Data Objects tabs.
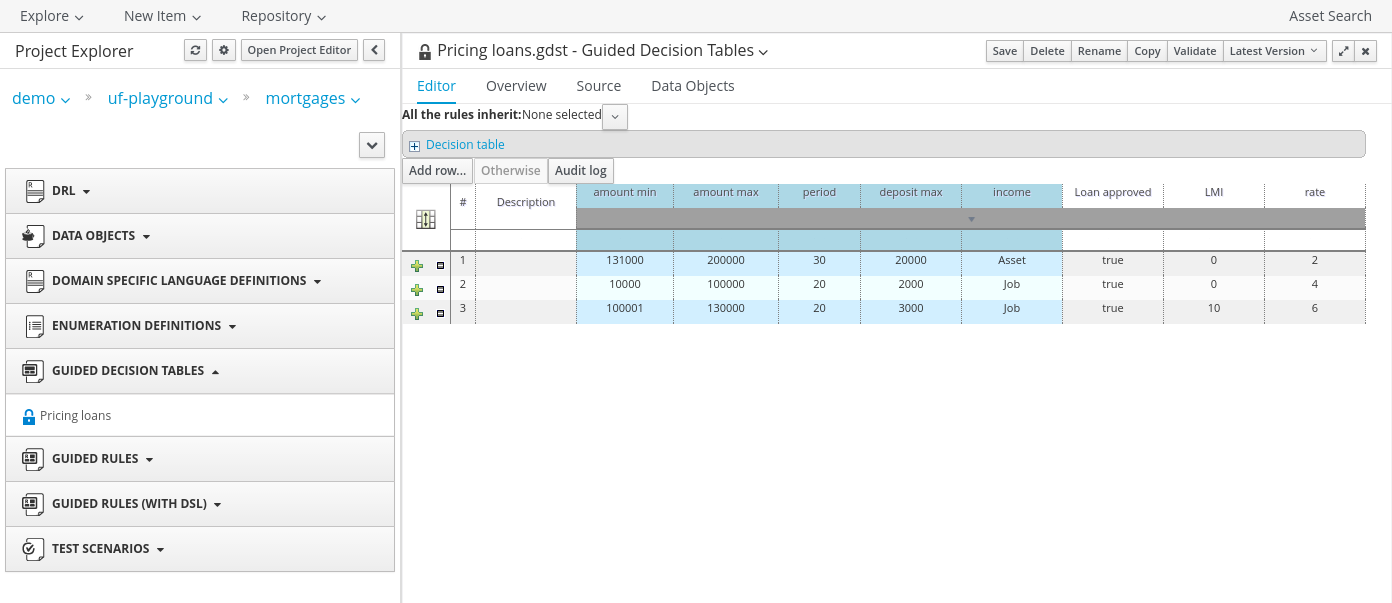
Editor Tab
The Editor tab is where assets can be edited. The available options in the edit tab will depend on the type of asset being edited.
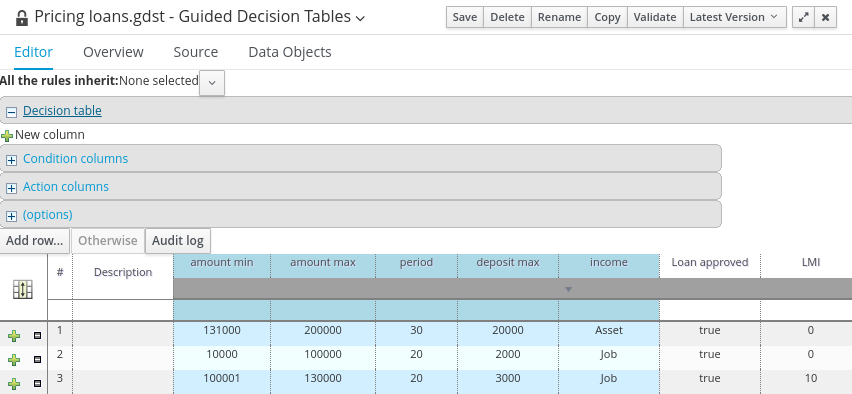
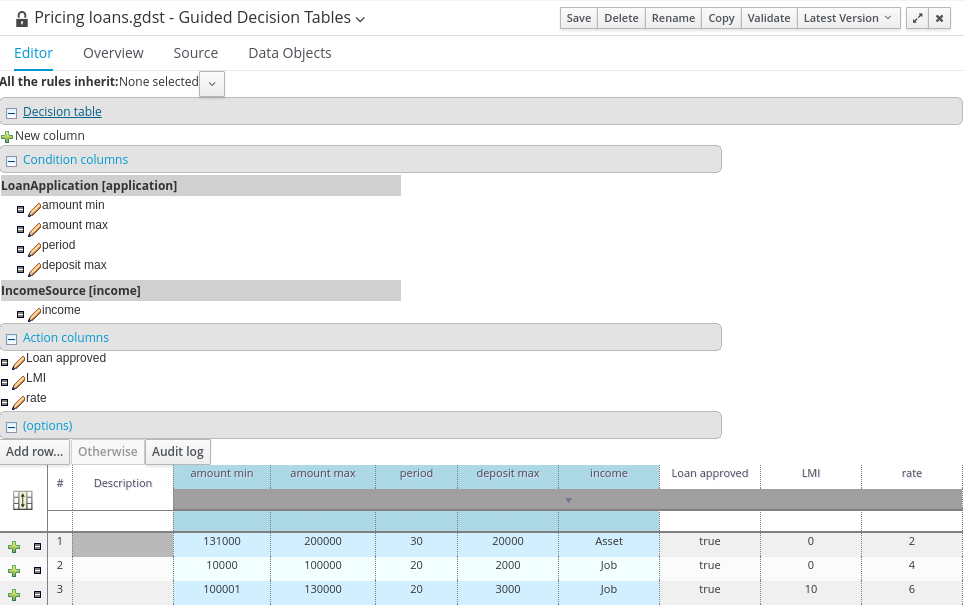
Figure 7.1. The Guided Decision Table - Editor Tab
Overview Tab
The Overview screen displays the generic data and version history of an asset. It allows a user to edit other metadata details, add descriptions and discussions which are specific to a selected asset.
Figure 7.2. The Guided Decision Table - Overview Tab

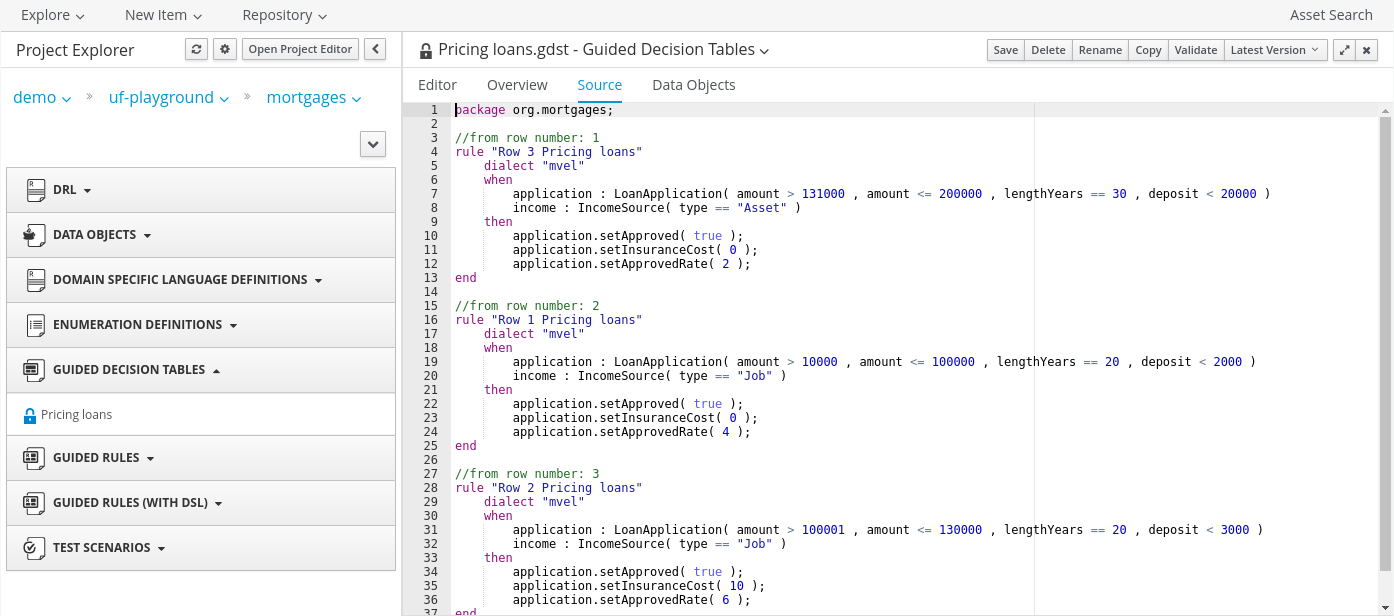
Source Tab
Source tab shows the DRL source for a selected asset.
Figure 7.3. The Guided Decision Table - Source Tab
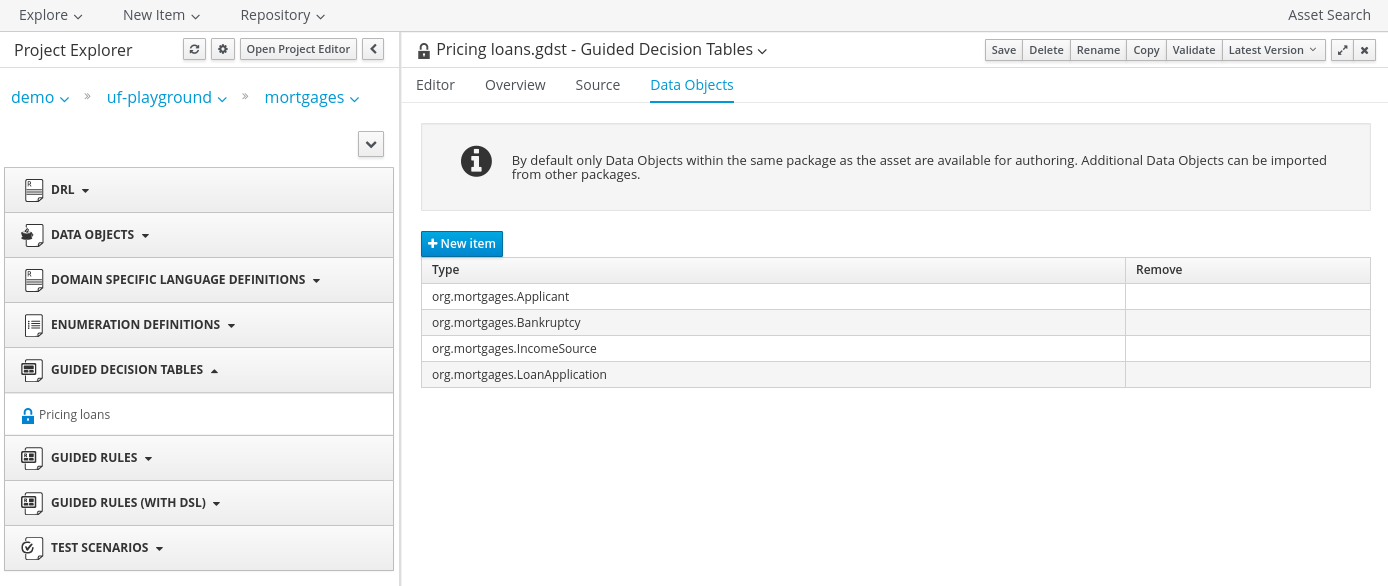
Data Objects Tab
The Data Objects tab suggests the set of imports used in the project. Each asset has its own imports and suggested fact types (that means data objects) that the user might want to use. See Section 6.4, “Creating a Data Object” for more information about data objects.
Figure 7.4. The Guided Decision Table - Data Objects Tab
7.2.2. Business Rules with the Guided Rule Editor
Business rules are edited in the Guided Rule Editor. The Guided Rule Editor prompts users for input based on the object model of the rule being edited.
Assets used in a rule that belong to a different package must be imported into the rule. Assets in the same package are imported by default. Define your imports in the Data Objects tab.
Example 7.1. The Guided Rule Editor
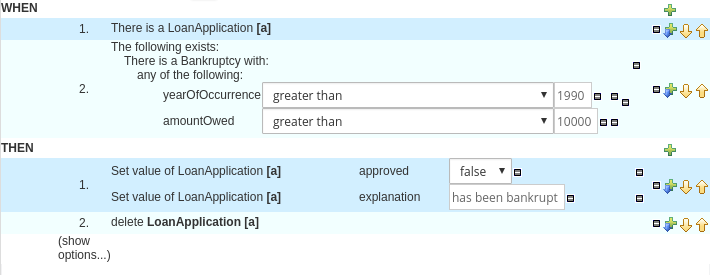
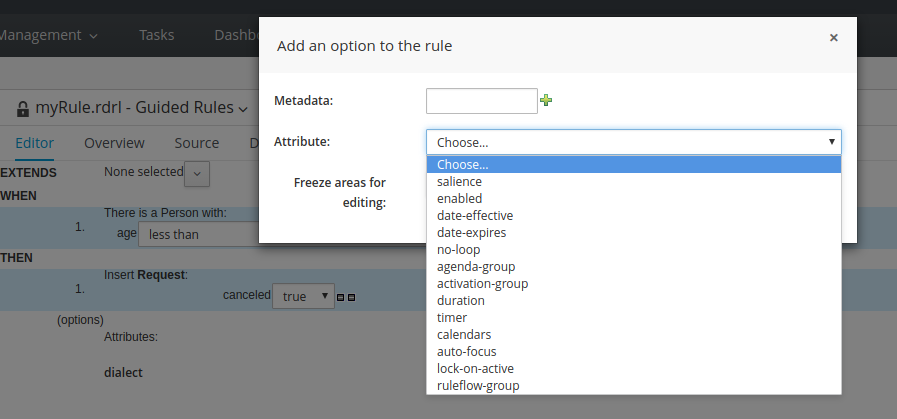
The Guided Rule Editor consists of the When and Then parts. Under the Then part is a (show options…) link that enables you to set additional rule attributes, such as ruleflow-group, salience, and similar. For more information about the Guided Rule Editor, see Section 7.5.1, “The Guided Rule Template”.
Figure 7.5. Rule Attributes
7.2.3. Narrowing Facts Using Package White List
You can narrow down the facts available during rule creation and modification by using a file called package-names-white-list. Use this file to narrow down a group of facts that are loaded and are visible. This helps to speed up the loading of these facts while creating new rules.
When you create a new project in the root directory, an empty package-names-white-list file is automatically created along with the pom.xml and project.imports project files. For existing projects, create the package-names-white-list file manually. In Business Central, you can view the file through the repository view of a project in the Project Explorer.
By default (when the file is empty), all the facts within the project itself are visible while those from the project’s dependencies are restricted.
Rules for Defining Packages
The package-names-white-list file is a text file that accepts single package names on each line. Packages can contain wildcards, for example:
-
com.redhat.finance: allows facts from only the com.redhat.finance package. Thus,
com.redhat.finance.Personandcom.redhat.finance.Salaryare allowed, butcom.redhat.finance.senior.Managementare not allowed. -
com.redhat.finance.*: allows facts from the sub-packages of the com.redhat.finance package only. Thus,
com.redhat.finance.senior.Managementandcom.redhat.finance.junior.Managementare allowed, but notcom.redhat.finance.Person. -
com.redhat.finance.**: this is a combination of the above two rules. Allows
com.redhat.finance.Personandcom.redhat.finance.senior.Managementand even,com.redhat.finance.really.senior.Managementclasses.
You can include specific packages from a dependency by adding appropriate entries into the package-names-white-list file. You can also include or remove all packages from specific dependencies. For more information, see Adding Dependencies.
7.2.4. The Anatomy of a Rule
A rule consists of multiple parts:
- When
- The when part of the rule is the condition that must be met. For instance, a bank providing credit in the form of a loan may specify that customers must be over twenty-one years of age. This would be represented by using when to determine if the customer is over twenty-one years of age.
- Then
- The then part of the rule is the action to be performed when the conditional part of the rule has been met. For instance, when the customer is under twenty-one years of age, then decline the loan because the applicant is under age.
- Optional
- Optional attributes such as salience can be defined on rules.
With the Guided Rule Editor, it is possible to add more conditions to the when (conditional) part of the rule and more actions to the then (action) part of the rule. For instance, if an applicant under the age of 21 had a guarantor for a loan application, the bank may decide to approve the loan application.
7.2.5. Salience
Each rule has a salience value which is an integer value that defaults to zero. The salience value represents the priority of the rule with higher salience values representing higher priority. Salience values can be positive or negative.
7.2.6. Adding Conditions or Actions to Rules
Procedure: Adding Conditions or Actions to Rules
- Click the plus icon in the When section of the Guided Rule Editor to add a condition, or click the plus icon in the Then section of the Guided Rule Editor to add an action.
- Select the condition or action from the menu and click Ok. If the package the rule belongs to has been configured to include DSL (Domain Specific Language) sentences, DSL sentences can be chosen from the menu.
- If the condition or action requires input, i.e., a date, true or false, am integer, or other input type, enter the required value.
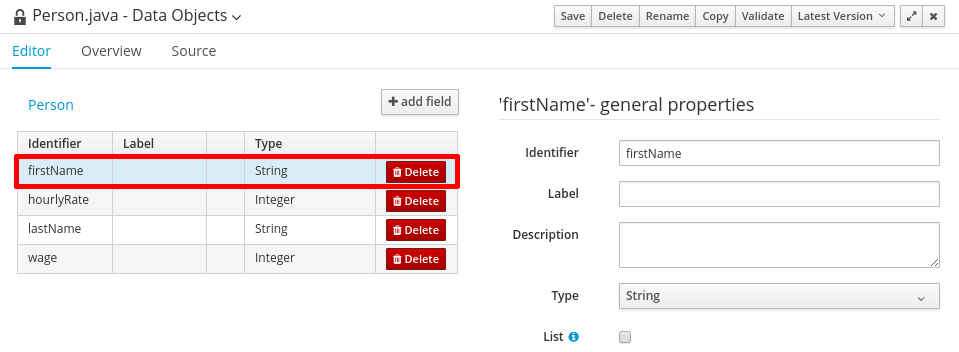
7.2.7. Adding a Field to a Fact Type
With the Guided Rule Editor, it is possible to add more conditions to the when (conditional) part of the rule and more actions to the then (action) part of the rule. For instance, if a loan applicant under the age of 21 had a guarantor for a loan application, the bank may decide to approve the loan application.
To add the guarantor to the condition, first add the guarantor field to the application fact type (Data Object in Business Central) of the mortgage model. For further information about how to add a field to a fact type, see Section 6.1, “Data Modeler”.
With the guarantor field now added to the applicant fact type, you can modify the rule to include a guarantor as a condition.
7.2.8. Technical Rules (DRL)
Technical (DRL) rules are stored as text and can be managed in the Red Hat JBoss BRMS user interface. A DRL file can contain one or more rules. The condition and the action of the rule are the when and then parts of the rule respectively.
Red Hat JBoss Developer Studio provides tools for creating, editing, and debugging DRL files, and it should be used for these purposes. However, DRL rules can be managed within the Red Hat JBoss BRMS user interface. The DRL editor provides syntax highlighting for Java, DRL, and XML.
An Example Technical Rule (DRL)
7.3. Decision Tables
7.3.1. Spreadsheet Decision Tables
Rules can be stored in spreadsheet decision tables. Each row in the spreadsheet is a rule, and each column is either a condition, an action, or an option. The Red Hat JBoss BPM Suite Development Guide provides details for using decision tables.
7.3.2. Uploading Spreadsheet Decision Tables
Procedure: Uploading a Spreadsheet Decision Table
- To upload an existing spreadsheet, select New Item → Decision Table (Spreadsheet).
-
Enter a name for the spreadsheet, click Choose file…, and select the spreadsheet. You can select
.xlsor.xlsxfiles. Click Ok when done.
To convert the uploaded spreadsheet to a Guided Decision table:
- Validate the uploaded spreadsheet by clicking on the Validate button located on the project screen menu bar.
- Click Convert.
7.3.3. Spreadsheet Decision Table Examples
We are here considering a simple example for an online shopping site which lists out the shipping charges for the ordered items. The site agrees for a FREE shipping with the following conditions:
- If the number of items ordered is 4 or more and totaling $300 or over and
- If delivered at the standard shipping day from the day they were purchased which would be 4 to 5 working days.
The listed shipping rates are as follows:
| Number of items | Delivery Day | Shipping Charge, N = Number of Items |
|---|---|---|
| 3 or fewer | Next Day
2nd Day
Standard | $35 $15 $10 |
| 4 or more | Next Day
2nd Day
Standard | N*7.50 N*3.50 N*2.50 |
| Number of items | Delivery Day | Shipping Charge, N = Number of Items |
|---|---|---|
| 3 or fewer | Next Day 2nd Day Standard | $25 $10 N*1.50 |
| 4 or more | Next Day 2nd Day Standard | N*5 N*2 FREE |
The above conditions can be presented in a spreadsheet as:

7.4. Web Based Guided Decision Tables
7.4.1. Web Based Guided Decision Tables
The (web based) Guided Decision Table feature works similar to the Guided Editor by introspecting what facts and fields are available to guide the creation of a decision table.
Rule attributes, meta-data, conditions and actions can be defined in a tabular format thus facilitating rapid entry of large sets of related rules. Web based decision table rules are compiled into DRL like all other rule assets.
To create a new decision table, click on New Item → Guided Decision Table. Enter the name of the table and select whether you want the extended entry or limited entry table (Section 7.4.2, “Types of decision tables”). Optionally select to use the Guided Decision Table Wizard.
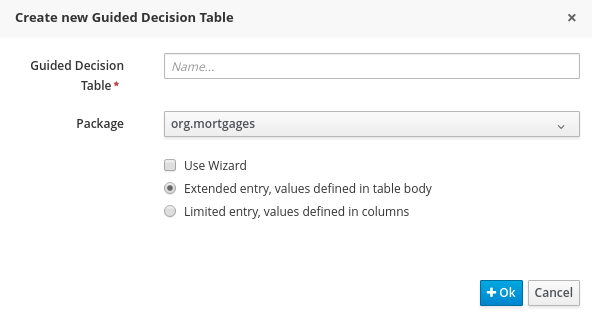
Click OK when done. If you didn’t select the wizard, you will be presented with the editor for Guided Decision Tables. If you selected the wizard, you will be presented with the first screen of the wizard.
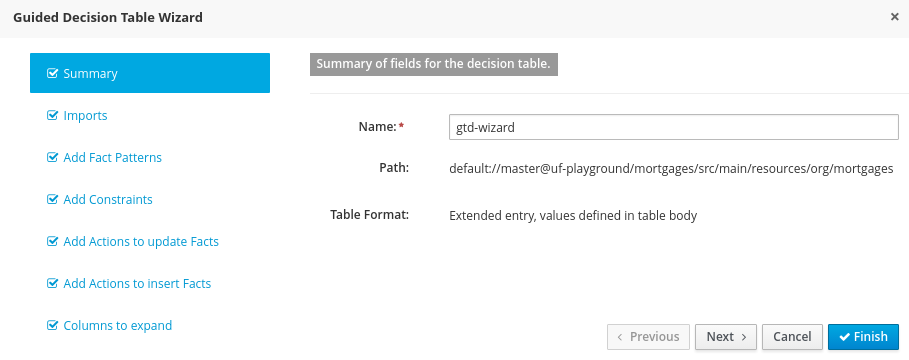
The wizard helps you define your imports, facts, patterns and columns, but not the rows. Rows are added in the Guided Decision Table Editor, which is what you are presented with at the end of the wizard (or directly if you didn’t use the wizard).
When you build your own application comprising guided decision tables, ensure that you have the necessary dependencies added to your class path. For more information about dependencies for guided decision tables, see the Dependency Management for Guided Decision Tables, Scorecards, and Rule Templates section of the Red Hat JBoss BPM Suite Development Guide.
7.4.2. Types of decision tables
There are broadly two types of decision tables, both of which are supported:
- Extended Entry
- Limited Entry
Extended entry
An Extended Entry decision table is one for which the column definitions specify Pattern, Field and operator but not value. The values, or states, are themselves held in the body of the decision table. It is normal, but not essential, for the range of possible values to be restricted by limiting entry to values from a list. Business central supports use of Java enumerations or decision table "optional value lists" to restrict value entry.
Limited entry
A Limited Entry decision table is one for which the column definitions specify value in addition to Pattern, Field and operator. The decision table states, held in the body of the table, are boolean where a positive value (a checked tick-box) has the effect of meaning the column should apply, or be matched. A negative value (a cleared tick-box) means the column does not apply.
7.4.3. Column Configuration
For a description of column constraint types, see Section 7.4.5.3, “Condition Columns”.
You can set a default value, but normally if there is no value in the cell, that constraint will not apply.
Figure 7.6. Column Configuration
7.4.4. Adding Columns
To add a column within the Guided Decision Table Editor, click on the
 icon.
icon.
The following column type selection dialog appears:
Figure 7.7. Advanced Column Options
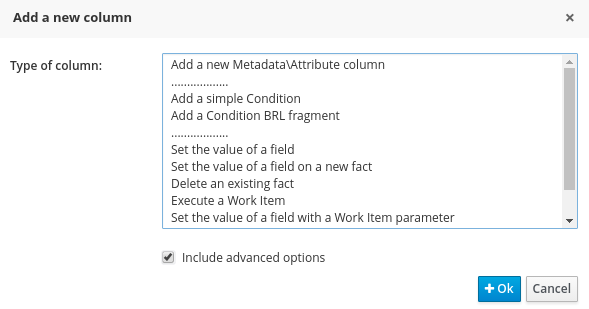
By default, the column type dialog shows the following types:
- Add a new Metadata\Attribute column
- Add a simple Condition
- Set the value of a field
- Set the value of a field on a new fact
- Delete an existing fact
Clicking on "Include advanced options" adds the following options:
- Add a Condition BRL fragment
- Execute a Work Item
- Set the value of a field with a Work Item parameter
- Set the value of a field on a new Fact with a Work Item parameter
- Add an action BRL fragment
7.4.5. Column Types
7.4.5.1. Attribute Columns
You can have zero or more attribute columns representing any of the DRL rule attributes. For example:
For a list of attributes, see the Rule Set Entries chapter of the Red Hat JBoss BPM Suite Development Guide.
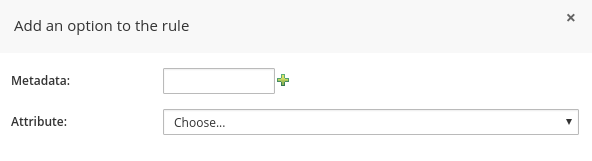
7.4.5.2. Metadata Columns
Zero or more meta-data columns can be defined, each represents the normal meta-data annotation on DRL rules. To add meta-data:
- Click New column, then select Add a new Metadata\Attribute column.
-
Fill the Metadata field, then click the plus button (
 ) to add the meta-data.
Figure 7.8. Attribute and Meta-Data Option
7.4.5.3. Condition Columns
Conditions represent fact patterns defined in the left-hand side, or when portion, of a rule. To define a condition column, you must define a binding to a model class or select one that has previously been defined. You can also choose to negate the pattern:
when
  $c : Cheese( name == "Cheddar" ) //Binds the Cheese object to the $c variable
then
  ...
end
when
  $c : Cheese( name == "Cheddar" ) //Binds the Cheese object to the $c variable
then
  ...
endwhen not Cheese( name == "Cheddar" ) //Negates matching pattern then ... end
when
  not Cheese( name == "Cheddar" ) //Negates matching pattern
then
  ...
endOnce this has been completed, you can define field constraints. If two or more columns are defined using the same fact pattern binding, the field constraints become composite field constraints on the same pattern. If you define multiple bindings for a single model class, each binding becomes a separate model class in the left-hand side of the rule.
When you edit or create a new column, you will be given a choice of the type of constraint:
- Literal: The value in the cell will be compared with the field using the operator.
- Formula: The expression in the cell will be evaluated and then compared with the field.
- Predicate: No field is needed, the expression will be evaluated to true or false.
Figure 7.9. Simple Condition Column

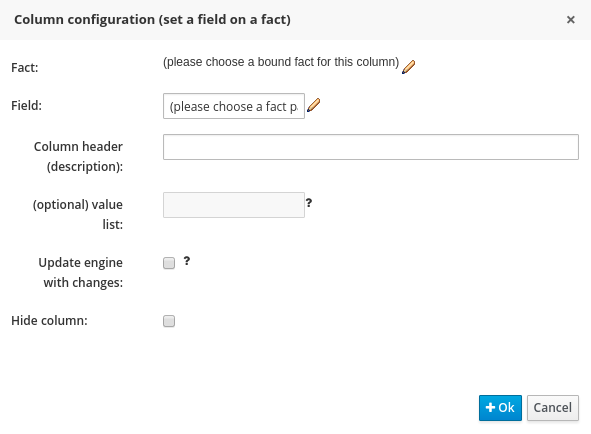
7.4.5.4. Field Value Columns
This column creates an action to set the value of a field on a previously bound fact. You have the option to notify the rule engine of the modified values which could lead to other rules being re-activated.
Figure 7.10. Set the value of a field
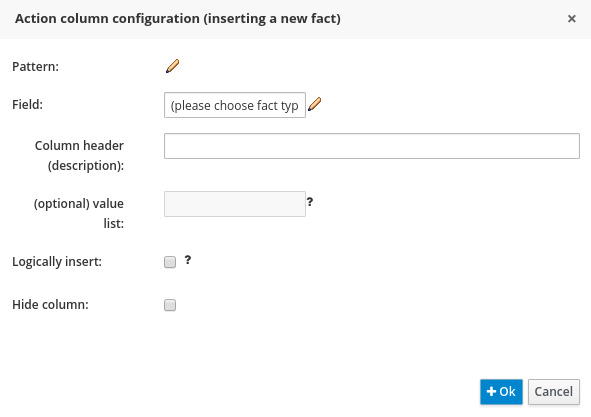
7.4.5.5. New Fact Field Value Columns
This column enables an action to insert a new fact (object) into the working memory of the rule engine. You can also define the value of one or more of the fields of the new fact. You can logically insert the new fact. When you logically insert a fact, the inserted fact will be retracted as soon as the condition of rule that inserted the fact is no longer true. See the Red Hat JBoss Development Guide for information about truth maintenance and logical insertions.
Figure 7.11. Set the Value of a Field on a New Fact
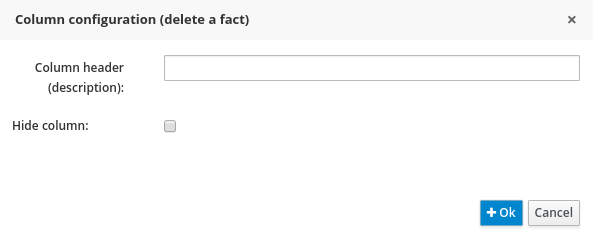
7.4.5.6. Delete Existing Fact Columns
The implementation of an action to delete a bound fact.
Figure 7.12. Delete an existing fact
7.4.6. Advanced Column Types
7.4.6.1. Condition BRL Fragment Columns
A construct that allows a BRL fragment to be used in the left-hand side of a rule. A BRL fragment is authored using the Guided Rule Editor and hence all features available in that editor can be used to define a decision table column such as the following: "from", "collect", and "accumulate". When using the embedded Guided Rule Editor, field values defined as "Template Keys" will form columns in the decision table. Facts and Fact’s fields bound in the BRL fragment can be referenced by the simpler column types and vice-versa.
The following example displays a BRL Condition for a shopping tier.
Figure 7.13. Add a Condition BRL fragment
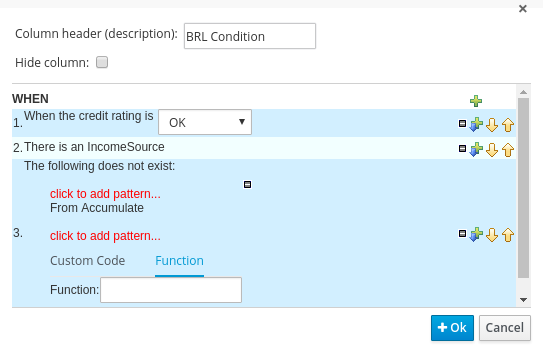
7.4.6.2. Execute Work Item Columns
This implements an action to invoke a Red Hat JBoss Business Process Management Suite work item handler. It sets its input parameters to bound Facts/Facts' fields values. This works for any work item definition.
Figure 7.14. Execute a Work Item
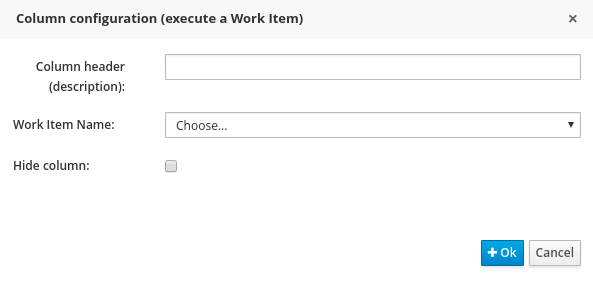
Figure 7.15. WS Work Item
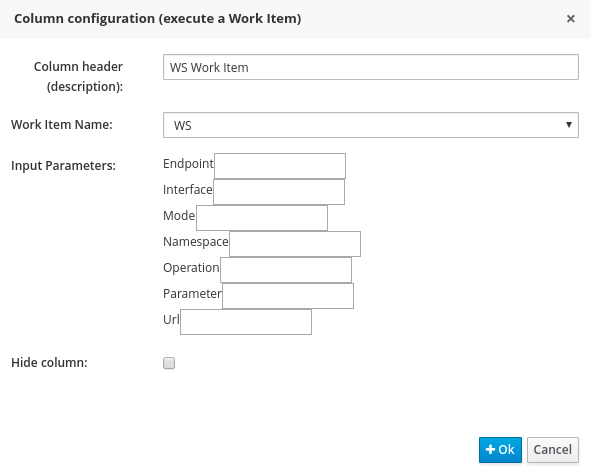
Figure 7.16. REST Work Item
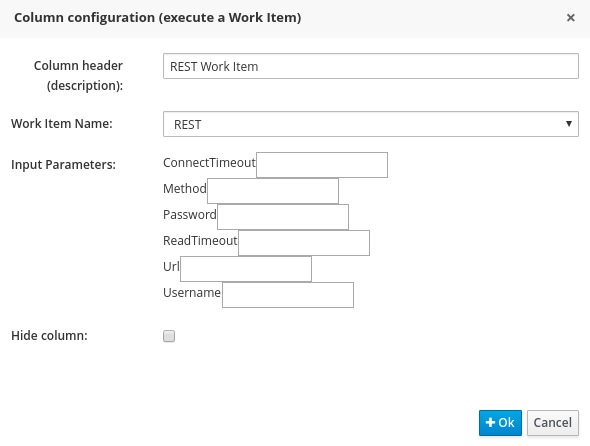
Figure 7.17. Log Work Item
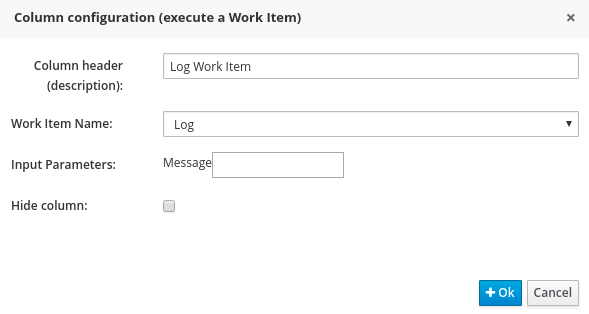
Figure 7.18. Email Work Item
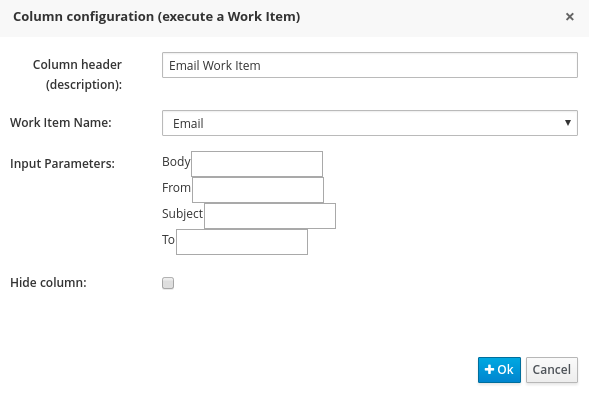
7.4.6.3. Field Value with Work Item Parameter Columns
This implements an action that sets the value of a fact field to the value of a result parameter of a Red Hat JBoss BPM Suite work item handler. The work item must define a result parameter of the same data type as a field on a bound fact; this will allow you to set the field to the return parameter.
Figure 7.19. Set the Value of a Field with a Work Item Parameter
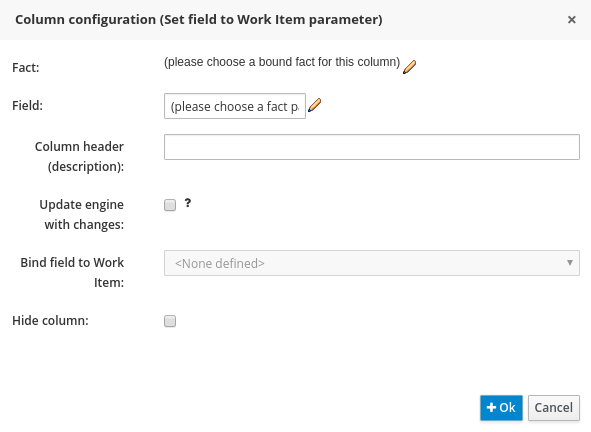
To set the Bind field to Work Item option, you first must have an action that executes a work item. This will allow you to set the field of an existing Fact based on a work item’s results.
7.4.6.4. New Fact Field Value with Work Item Parameter Columns
This implements an action that sets the value of a fact field to the value of a result parameter of a Red Hat JBoss BPM Suite work item handler. The work item must define a result parameter of the same data type as a field on a bound fact type. In such case, you can set the field to the return parameter.
Figure 7.20. Set the value of a field on a new Fact with a Work Item parameter.
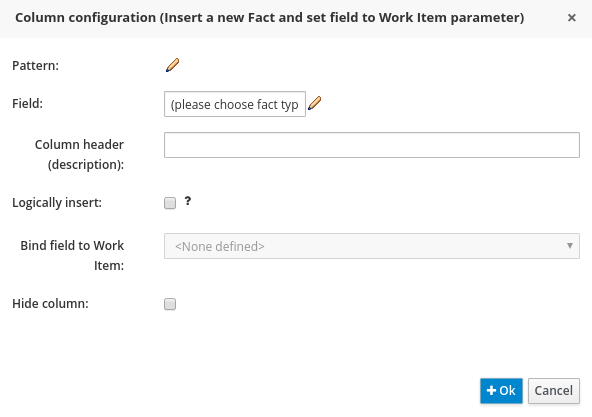
To set the Bind field to Work Item option, you first need to have an action executing a work item. This will allow you to insert a new Fact with a field value from a work item’s Results.
7.4.6.5. Action BRL Fragment Columns
A construct that allows a BRL fragment to be used in the right-hand side of a rule. A BRL fragment is authored using the Guided Rule Editor and hence all features available in that editor can be used to define a decision table column. When using the embedded Guided Rule Editor, field values defined as "Template Keys" will form columns in the decision table. Facts bound in the BRL fragment can be referenced by the simpler column types and vice-versa.
Figure 7.21. Simple layout for Adding an Action BRL fragment
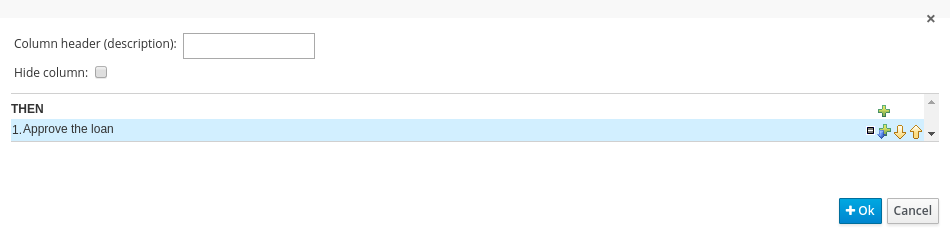
7.4.7. Rule Definition
Rules are created in the main body of the decision table using the columns that have already been defined.
Rows of rules can be added or deleted by clicking the plus or minus symbols respectively.
Figure 7.22. Rule Definition
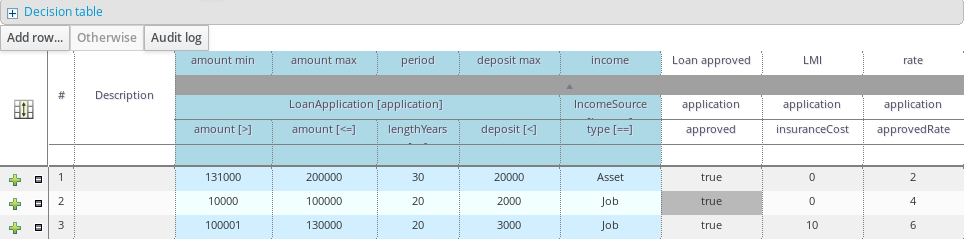
7.4.8. Cell Merging
The icon in the top left of the decision table toggles cell merging on and off. When cells are merged, those in the same column with identical values are merged into a single cell. This simplifies changing the value of multiple cells that shared the same original value. When cells are merged, they also gain an icon in the top-left of the cell that allows rows spanning the merged cell to be grouped.
Figure 7.23. Cell Merging
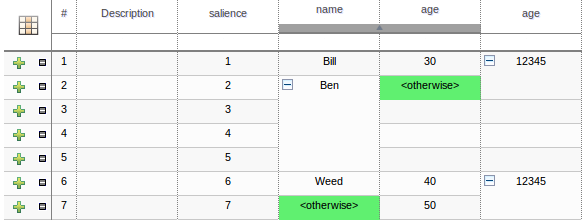
7.4.9. Cell Grouping
Cells that have been merged can be further collapsed into a single row. Clicking the [+\-] icon in the top left of a merged cell collapses the corresponding rows into a single entry. Cells in other columns spanning the collapsed rows that have identical values are shown unchanged. Cells in other columns spanning the collapsed rows that have different values are highlighted and the first value displayed.
Figure 7.24. Cell Grouping
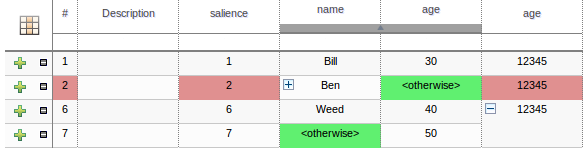
When the value of a grouped cell is altered, all cells that have been collapsed also have their values updated.
7.4.10. Otherwise Operations
Condition columns defined with literal values that use either the equality == or inequality != operators can take advantage of a special decision table cell value of otherwise. This special value allows a rule to be defined that matches on all values not explicitly defined in all other rules defined in the table. This is best illustrated with an example:
To use the otherwise keyword:
-
Select a cell of a condition column that uses the
==or!=operator. - Click Otherwise.
7.5. Rule Templates
7.5.1. The Guided Rule Template
Rule Templates enable you to define a rule structure. They provide a place-holder for values and data, and they populate templates to generate many rules. From the user’s perspective, Guided Rule Templates are parametrized guided rules that contain a data table which provides parameter values. The templates enable more flexible decision tables and can enhance the flexibility of rules in existing databases. For information about managing dependencies of Rule Templates, see the Dependency Management for Guided Decision Tables, Scorecards, and Rule Templates section of the Red Hat JBoss BPM Suite Development Guide.
Procedure: Creating a new Guided Rule Template
In the Project Explorer view, do one of the following:
- If you are in the Project view, select the organizational unit, repository, and the project where you want to create the template.
-
If you are in the Repository view, navigate to
src/main/resources/and theSUBFOLDER/PACKAGEwhere you want to create the project folder for the rule template.
- In the perspective menu, go to New Item → Guided Rule Template.
In the Create new Guided Rule Template dialog window, specify the rule template name:
- In the Guided Rule Template text box, enter a name of the asset, select the package from the Package selector, then click OK.
- The new Guided Rule Template is now created and from the selected project.
Figure 7.25. Guided Template Editor
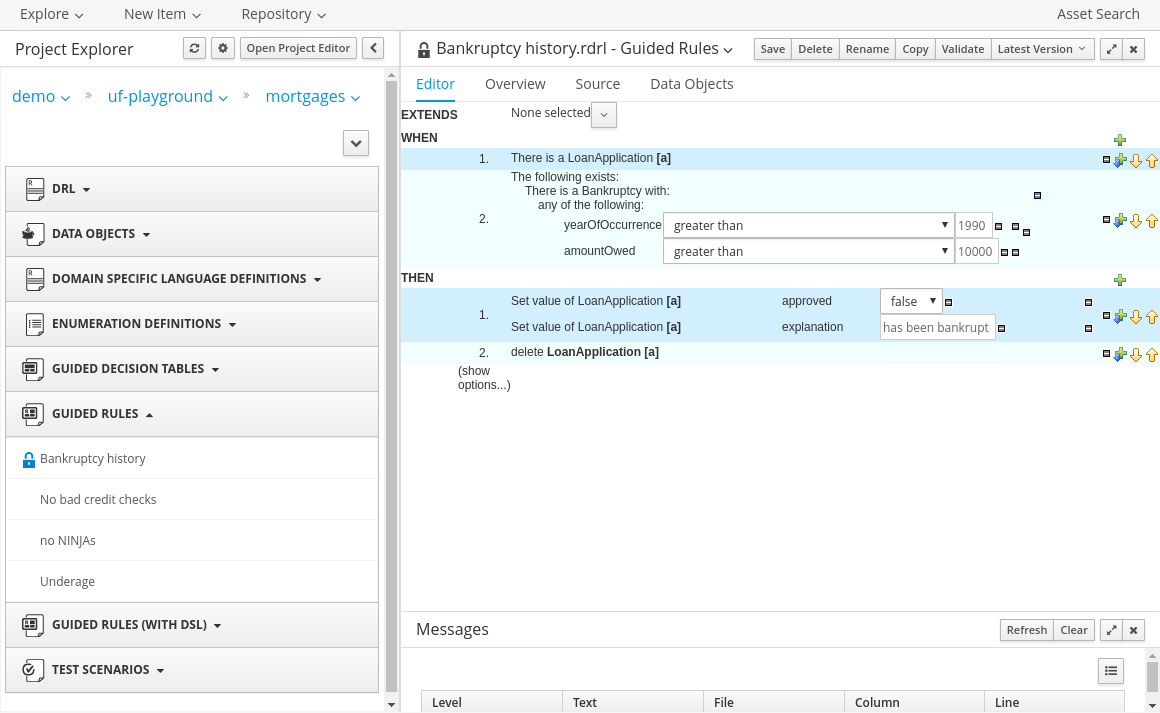
Using a plain rule template and manipulating rules and spreadsheets directly from Business Central is not supported by Red Hat. It is recommended that you create and use Guided Rule Template using Business Central.
7.5.2. WHEN Conditions in Guided Rule Templates
The Guided Rule Template Editor in Business Central allows you to set rule templates where the data is kept separate from the rules.
Make sure you have already set a data model for your project as described in Section 6.4, “Creating a Data Object”.
Procedure: Creating Simple Condition with Restriction and Multiple Field Constraint
In the Guided Rule Template Editor, click the plus icon (
) on the right side of the WHENsection.The Add a condition to the rule… dialog window with the available condition templates opens.
Figure 7.26. Add a Condition to the Rule Dialog Window
Choose a condition (for example LoanApplication …) and click Ok.
A new condition is displayed in the Guided Rule Template Editor.
Click on the condition.
The Modify constraints for LoanApplication dialog window opens. From here you can add a restriction on a field, apply multiple field constraints, add a new formula style expression, apply an expression editor, or set a variable name.
Modify the condition to suit your needs. For example, set a variable name that can help define the condition, or add a restriction.
Once you select a restriction, the dialog window closes automatically.
Figure 7.27. Modifying a Condition
-
Choose an operator for the restriction (for example
greater than) from the drop-down menu next to the added restriction. -
Click Edit (
 ) to define the field value. The field value can be a literal value, a template key, a formula, or an expression editor.
To apply multiple field constraint, click on the condition and in the Modify constraints for LoanApplication dialog window, select All of(And) or Any of(Or) from the Multiple field constraint drop-down menu.
Figure 7.28. Adding Multiple Field Constraint
The constraint is displayed in the Guided Rule Template Editor.
Click on the constraint.
The Add fields to this constraint dialog window opens.
Specify the fields and their values. For example, by clicking New Formula, you can add a new formula expression that is later evaluated to be true or false.
Figure 7.29. Multiple Field Constraint on Formula Expression
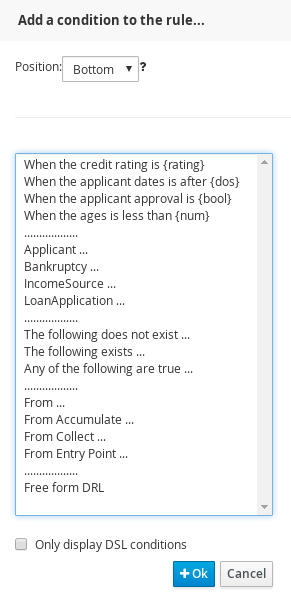
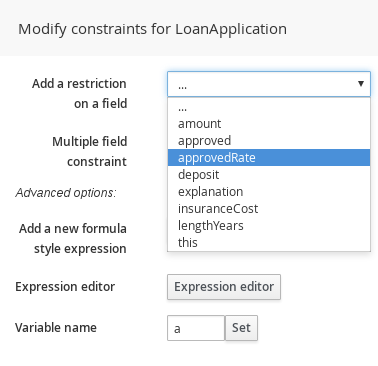
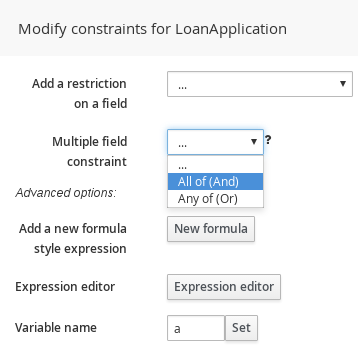
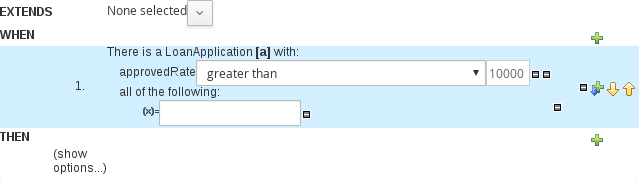
7.5.3. THEN Actions in Guided Rule Templates
The THEN section of a rule holds the actions to be executed when it matches the WHEN section.
Procedure: Using the Guided Template Editor with THEN Actions
-
Select the plus icon
to the right of the
THENsection of the Guided Template Editor to inputTHENactions. A dialog window will appear with available action templates to choose from. In the example below, we select the Modify a… action from the list.
Figure 7.30. Nurse Roster THEN Dialog Window
-
Click OK and the Guided Template Editor will display your
THENaction. Click the newly added
THENaction. An Add a field dialog appears. In the following example, it is the "Modify value of LoanApplication [a]"
action.
Figure 7.31. Add a Field Dialog
- Within this dialog, you can choose a field from the Add field drop-down menu.
- Once selected, the dialog window closes automatically.
-
Select the Edit icon (
) within the item field to define the field value with a literal value, template key, or a formula.
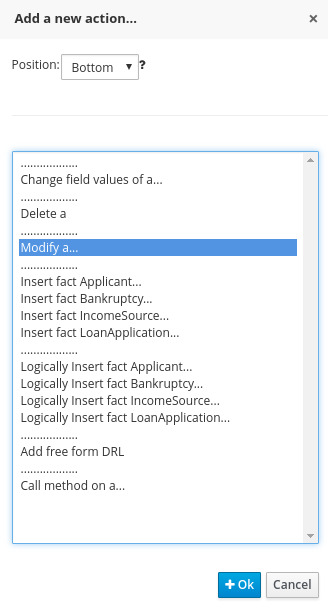
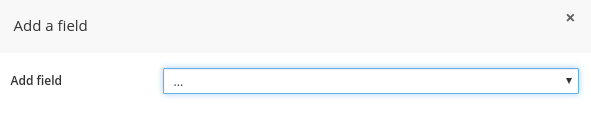
7.5.4. Data Tables in the Guided Rule Template
Data tables provide variables for guided rule templates that you define. This generates a number of rules, based on your settings. Data tables can be altered within the Guided Template Editor by clicking on the Data tab. Consider the following example:
A company offers phone service, internet service, and TV service. The monthly payment differs based on the active services that a customer has. The template for our example looks as follows:
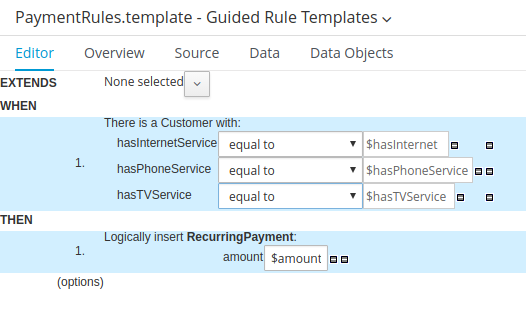
To populate the rules:
Procedure: Using the Guided Template Editor with Data Tables
Click the Data tab to access the newly created data table. The table is empty at first, containing only a header with variables defined in the template:
- Click Add row…. Each new row results in one new rule.
Input additional data into the table. For example:
Figure 7.32. Data Table for Guided Template Editor
To view the DRL code, click the Source tab.
Copy to Clipboard Copied! Toggle word wrap Toggle overflow - Click Save to save the template when you are finished working in the Guided Template Editor.
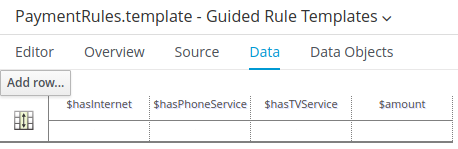
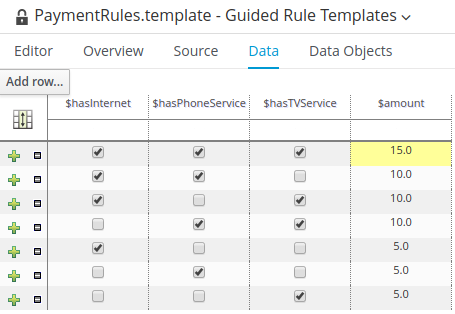
7.6. The Domain Specific Language Editor
The domain specific language feature enables you to define language that is specific to your problem domain. You, or business analyst users, can then create rules using only the predefined language. This simplifies the process of rule creation for users without deep knowledge of rules and the rule language. Sentence constructed from domain specific languages (or DSL sentences) can be edited in the DSL editor. See the Red Hat JBoss BPM Suite Development Guide for more information about domain specific languages. The DSL syntax is extended to provide hints to control how the DSL variables are rendered. The following hints are supported:
{<varName>:<regular expression>}
This will render a text field in place of the DSL variable when the DSL sentence is used in the guided editor. The content of the text field will be validated against the regular expression.
{<varName>:ENUM:<factType.fieldName>}
This will render an enumeration in place of the DSL variable when the DSL sentence is used in the guided editor. <factType.fieldName> binds the enumeration to the model fact and field enumeration definition. This could be either a Knowledge Base enumeration or a Java enumeration, i.e., defined in a model POJO JAR file.
{<varName>:DATE:<dateFormat>}
This will render a date selector in place of the DSL variable when the DSL sentence is used in the guided editor.
{<varName>:BOOLEAN:<[checked | unchecked]>}
This will render a dropdown selector in place of the DSL variable, providing boolean choices, when the DSL sentence is used in the guided editor.
Figure 7.33. DSL Editor
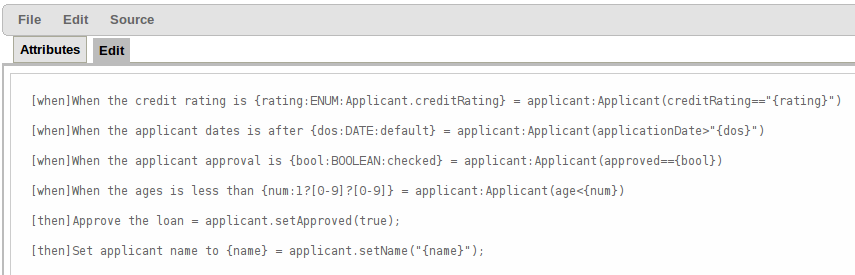
7.7. Data Enumerations
7.7.1. Data Enumerations Drop-Down List Configuration
Data enumerations are an optional type of asset that can be configured to provide drop-down lists for the Guided Decision Table Editor. Double-click on a cell to view the enumeration drop-down list if the cell condition is based the same fact and field as the enumeration.
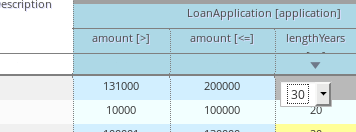
They are stored and edited just like any other asset and only apply to the package they are created in.
The contents of an enumeration configuration are the mapping of a fact.field to a list of values. These values are used to populate the drop-down menu. The list can either be literal or use a utility class (which must be added to the classpath) to load the strings. The strings contain either a value to be shown in the drop-down menu or a mapping from the code value (which is what is used in the rule) and a display value, e.g., M=Mini.
Example 7.2. An Example Enumeration Configuration
'Board.type' : [ 'Short', 'Long', 'M=Mini', 'Boogie']
'Person.age' : [ '20', '25', '30', '35' ]
'Board.type' : [ 'Short', 'Long', 'M=Mini', 'Boogie']
'Person.age' : [ '20', '25', '30', '35' ]This can be also be configured in Business Central as follows:
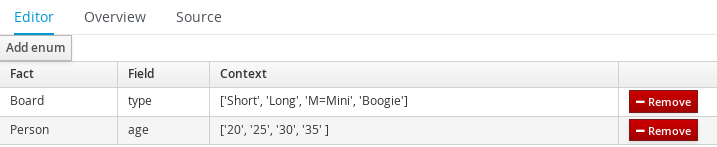
7.7.2. Advanced Enumeration Concepts
Drop-down lists are dependent on field values. With enumerations it is possible to define multiple options based on other field values.
A fact model for insurance policies could have a class called Insurance, consisting of the fields, policyType and coverage. The choices for policyType could be Home or Car. The type of insurance policy will determine the type of coverage that will be available. A home insurance policy could include property or liability. A car insurance policy could include collision or fullCoverage.
The field value policyType determines which options will be presented for coverage, and it is expressed as follows:
 'Insurance.policyType' : ['Home', 'Car']
 'Insurance.coverage[policyType=Home]' : ['property', 'liability']
 'Insurance.coverage[policyType=Car]' : ['collision', 'fullCoverage']
 'Insurance.policyType' : ['Home', 'Car']
 'Insurance.coverage[policyType=Home]' : ['property', 'liability']
'Insurance.coverage[policyType=Car]' : ['collision', 'fullCoverage']7.7.3. Obtaining Data Lists from External Sources
A list of Strings from an external source can be retrieved and used in an enumeration menu. This is achieved by adding code to the classpath that returns a java.util.List (of strings). Instead of specifying a list of values in the user interface, the code can return the list of strings. (As normal, you can use the "=" sign inside the strings if you want to use a different display value to the rule value.) For example, you could use the following:
'Person.age' : ['20','25', '30', '35']
'Person.age' : ['20','25', '30', '35']To:
'Person.age' : (new com.yourco.DataHelper()).getListOfAges()
'Person.age' : (new com.yourco.DataHelper()).getListOfAges()
This assumes you have a class called DataHelper which has a method getListOfAges() which returns a list of strings. The data enumerations are loaded the first time the guided editor is used in a session. To check the enumeration has loaded, go to the package configuration screen. You can "save and validate" the package; this will check it and provide feedback about any errors.
7.8. Scorecards
7.8.1. Scorecards
Scorecard is a Risk Management tool which is a graphical representation of a formula used to calculate an overall score. It is mostly used by financial institutions or banks to calculate the risk they can take to sell a product in market. Thus it can predict the likelihood or probability of a certain outcome. Red Hat JBoss BRMS now supports additive scorecards that calculates an overall score by adding all partial scores assigned to individual rule conditions.
Additionally, Drools Scorecards allows for reason codes to be set, which help in identifying the specific rules (buckets) that have contributed to the overall score. Drools Scorecards will be based on the PMML 4.1 Standard.
In general, a scorecard can be created more or less in this way:
- A statistical analysis is performed on the historical data which is usually collected from the existing customer database.
- A predictive or probable characteristics (attributes or pieces of information) are identified based on this analysis.
- Each characteristics are then broken down into ranges of possible values which are then given a score.
To explain it in detail, following is an example:
Figure 7.34. Scorecard Example
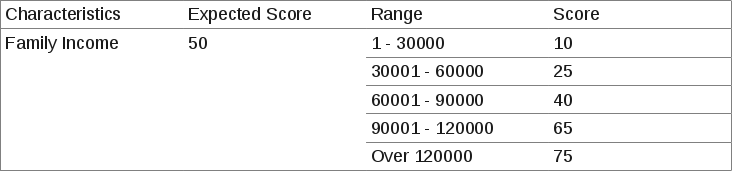
7.8.2. Creating a Scorecard
Procedure: Creating a new Score Card (Spreadsheet)
- Open the Project Authoring perspective: on the main menu, click Authoring → Project Authoring.
In the Project Explorer view, do the following:
- If in the Project view of Project Explorer, select the organizational unit, repository and the project where you want to create the score card.
- If in the Repository view of Project Explorer, navigate to the project root, where you want to create the score card.
- In the perspective menu, go to New Item → Score Card (Spreadsheet).
In the Create new Score Card (Spreadsheet) dialog window, define the package details:
- In the Resource Name text box, enter the score card name.
- Click on Choose File and browse to the location to select the spreadsheet in which the score card is initially created.
- Click OK.
- The new score card spreadsheet is created under the selected project.
When you build your own application comprising guided scorecards, ensure that you have the necessary dependencies added to your classpath. For more information about dependencies for guided decision tables, see the Dependency Management for Guided Decision Tables, Scorecards, and Rule Templates section of the Red Hat JBoss BPM Suite Development Guide.
Scorecard is a Technology Preview feature, and therefore not currently supported in Red Hat JBoss BRMS.
7.9. Guided Decision Trees
A decision tree is a graphical representation of a decision model in a tree-like manner. You can create simple decision trees in Business Central with flat data object models. The editor does not support nested data objects.
The editor offers a palette on the left-hand side (with available data objects, fields and corresponding actions) and a working area on the right-hand side where you can drag and drop the data objects to build a decision tree. You can use connectors and applicable child objects prompted by the editor, to complete your tree. You can manipulate each node using its Delete, Edit, and Collapse icons.
While creating a decision tree, you must remember the following points:
- A tree must have a data object at the root.
- A tree can only have one root.
- Data objects can have other data objects, field constraints, or actions as children.
- The field constraints must be on fields of the same data object as the parent node.
- Field constraints can have either other field constraints or actions as children.
- The field constraints must be on fields of the same data object as the parent node.
- Actions can only have other actions as children.
Guided Decision Tree is a Technology Preview feature, and therefore not currently supported in Red Hat JBoss BRMS.
7.10. Verification and Validation of Guided Decision Tables
In Business Central, the guided decision tables are a way of representing conditional logic (rule) in a precise manner, and they are well suited to business level rules.
7.10.1. Introduction
Business Central provides verification and validation feature to help ensure that a guided decision table is complete and error free. The feature looks for gaps in the logic of a guided decision table and validates the relationship between different cells. Most of the issues that the Business Central verification and validation feature reports are gaps in the author’s logic. The verification and validation feature does not prevent you from saving your work if you choose to ignore the verification and validation notifications.
When you edit a guided decision table, the verification and validation feature notifies you if you do something wrong. For example, if you forget to set an action for a row of the guided decision table or if you have a duplicate row, a new panel, Analysis, will open in the Business Central with a notification about the issue. The Analysis panel presents a list of issues found in the guided decision table, each item also pointing out the affected guided decision table rows. If you select an item in the list of issues, you will see a more in-depth description of the problem.
The validation and verification feature helps you resolve issues around:
Redundancy
Redundancy happens when two rows in a decision table execute the same consequences for the same set of facts. For example, two rows checking a client’s birthday and providing a birthday discount may result in double discount.
Subsumption
Subsumption is similar to redundancy and exists when two rules execute the same consequences, but one executes on a subset of facts of the other. For example, these two rules:
- when Person age > 10 then Increase Counter
- when Person age > 20 then Increase Counter
In this case, if a person is 15 years old, only one rule fires and if a person is 20 years old, both rules fire. Such cases cause similar trouble during runtime as redundancy.
Conflicts
A conflicting situation occurs when two similar conditions have different consequences. Sometimes, there may be conflicts between two rows (rules) or two cells in a decision table.
The example below illustrates conflict between two rows in a decision table:
- when Deposit > 20000 then Approve Loan
when Deposit > 20000 then Refuse Loan
In this case, there is no way to know if the loan will be approved or not.
The example below illustrates conflict between two cells in a decision table:
- When Age > 25
- When Age < 25
A row with conflicting cells never execute.
Defiency
Defiency is similar to a conflict and occurs due to incompleteness in the logic of a rule in a decision table. For example, consider the following two deficient rules:
- when Age > 20 then Approve Loan
- when Deposit < 20000 then Refuse Loan
These two rules may lead to confusion for a person who is over 20 years old and have deposited less than 20000. You may add more constraints to avoid the conflict after noticing the warning to make your rule logic complete.
Missing Columns
In some cases, usually by accident, the user can delete all the condition or action columns. When the conditions are removed all the actions are executed and when the actions columns are missing the rows do nothing. Both may or may not be by design, usually though this is a mistake.
7.10.2. Reporting
The verification and validation feature of Business Central reports different issue levels in the Analysis panel while you are updating a guided decision table.
-
 Error: This means a serious fault, which may lead to the guided decision table failing to work as designed at run time. Conflicts, for example, are reported as errors.
-
 Warning: This is most likely a serious fault, however they may not prevent the guided decision table from working but need to be double checked. Warnings are used e.g. for subsumption.
-
 Information: This kind of issues might be a design decision of the author of the guided decision table as well as a simple accident. This is used e.g. for a row missing any condition.
Business Central verification and validation does not prevent you from saving an incorrect change. The feature only reports issues while editing and you can still continue to overlook those and save your changes.
7.10.3. Disabling Verification and Validation of Guided Decision Tables
The decision table verification and validation feature of Business Central is enabled by default. You can disable it by setting the org.kie.verification.disable-dtable-realtime-verification system property value to true.
For example, if you are using JBoss EAP as your application server, navigate to $EAP_HOME directory and run the following command:
./standalone.sh -Dorg.kie.verification.disable-dtable-realtime-verification=true
./standalone.sh -Dorg.kie.verification.disable-dtable-realtime-verification=true
Alternatively, set this property in the standalone.xml file:
<property name="org.kie.verification.disable-dtable-realtime-verification" value="true"/>
<property name="org.kie.verification.disable-dtable-realtime-verification" value="true"/>Chapter 8. Building and Deploying Assets
Click Build & Deploy as shown in the following screen to build and deploy packages and assets.
Figure 8.1. Build & Deploy Option

The Problems window below the project screen displays error messages (for example compilation errors) that can cause a failure in the build.
You can choose to build the whole package, or its subset.
If a project contains a large number of assets (rules, decision tables, or others), the build process may be slower than usual. After a successful build, you can download the binary package as a JAR file under Authoring → Artifact Repository.
8.1. Duplicate GAV Detection
Every time you perform any of the operations listed below, all Maven repositories are checked for duplicate GroupId, ArtifactId, and Version. If a duplicate exists, the performed operation is cancelled.
The duplicate GAV detection is executed every time you:
- Create a new managed repository.
- Save a project definition in the Project Editor.
- Add new modules to a managed multi-module repository.
-
Save the
pom.xmlfile. - Install, build, or deploy a project.
The following Maven repositories are checked for duplicates:
-
Repositories specified in the
<repositories>and<distributionManagement>elements of thepom.xmlfile. -
Repositories specified in the Maven’s
settings.xmlconfiguration file.
Users with the admin role can modify the list of affected repositories. To do so, open your project in the Project Editor and click Project Settings: Project General Settings → Validation.
Figure 8.2. List of Repositories to Be Checked

Figure 8.3. Duplicate GAV Detected

To disable this feature, set the org.guvnor.project.gav.check.disabled system property to true.
Chapter 9. Managing Assets
9.1. Versions and Storage
Business rules, process definition files, and other assets and resources created in Business Central are stored in Artifact Repository (Knowledge Store), that is accessed by the Realtime Execution Server.
Knowledge Store is a centralized repository for your business knowledge. It connects multiple repositories (currently only GIT repositories are supported) so that you can access them from a single environment while allowing you to store different kinds of knowledge and artifacts in different locations. Business Central provides a web front-end that allows users to view and update the store content. You can access the Knowledge Store from the unified environment of Red Hat JBoss BRMS in the Project Editor and Project Explorer under the Authoring Perspective.
GIT is a distributed version control system and it implements revisions as commit objects. Every time you commit your changes into a repository this creates a new commit object in the GIT repository. Similarly, the user can also copy an existing repository. This copying process is typically called cloning and the resulting repository can be referred to as clone. Every clone contains the full history of the collection of files and a cloned repository has the same content as the original repository.
Chapter 10. Testing
10.1. Test Scenarios
Test Scenarios is a powerful feature that provides the ability for developers to validate the functionality of rules, models, and events. In short, Test Scenarios provide you the ability to test your knowledge base before deploying it and putting it into production.
Test Scenarios can be executed one at the time or as a group. The group execution contains all the Scenarios from one package. Test Scenarios are independent, one Scenario can not affect or modify the other.
After running all the Test Scenarios a report panel is shown. It contains either a success message or a failure message for test scenarios that were run.
Figure 10.1. Test Scenario Screen
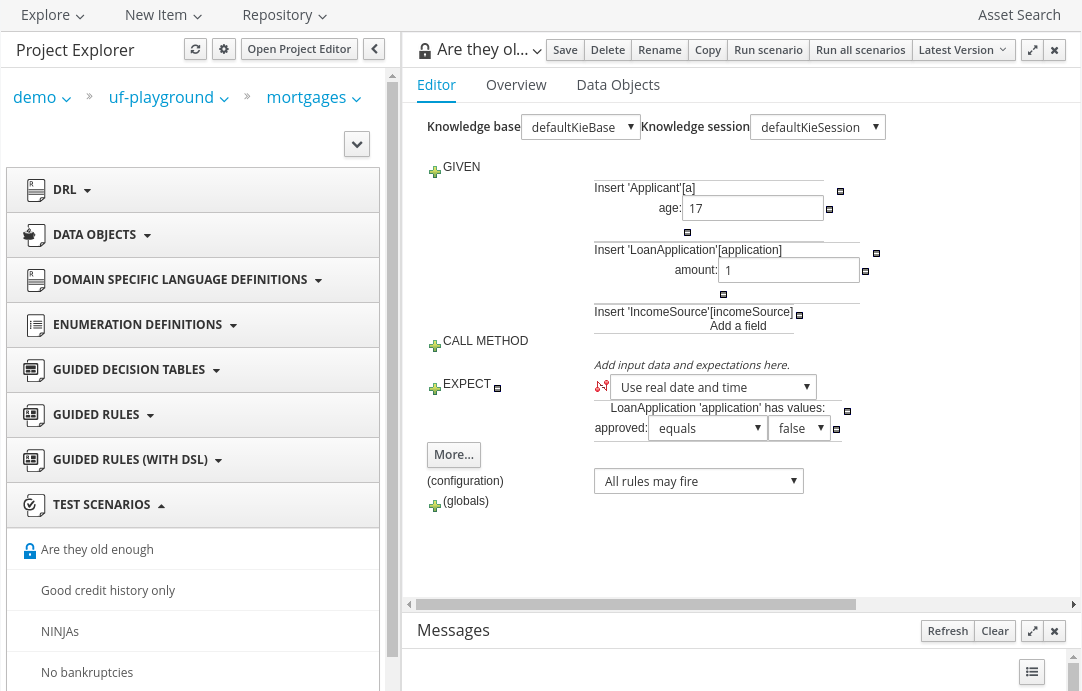
10.2. Creating a Test Scenario
Creating a Test Scenario requires you to provide data for conditions which resemble an instance of your fact or project model. This is matched against a given set of rules and if the expected results are matched against the actual results, the Test Scenario is deemed to have passed.
Creating a new Test Scenario
- In Business Central, click Authoring → Project Authoring to open the Projects view.
- Select a project for your test scenario.
- Click New Item → Test Scenario.
- Enter the name, select the package, and click OK.
You will be presented with the Test Scenario edit screen.
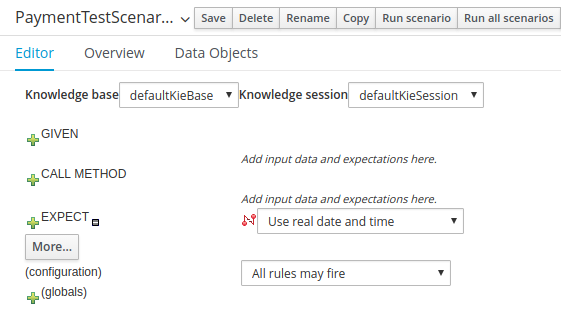
Importing a model for the Test Scenario
Data objects from the same package are available by default. For example, given the package structure org.company.project, and the following:
-
A data object Fact1 in package
org.company. -
A Fact2 in package
org.company.project.
If you create your test scenario in org.company, org.company.Fact1 is available but you must import org.company.Fact2. To import data objects:
- Open your test scenario.
- Click the Data Objects tab.
-
Click New Item, select your import and click Ok. The imports can be specific to your project’s data model or generic ones like
StringorDoubleobjects.
Providing Test Scenario Facts
After importing data objects, click the Editor tab. At minimum, there are two sections that require input: GIVEN and EXPECT.
- GIVEN: The input facts for the test.
EXPECT: The expected results given the input facts.
GIVEN the input parameters, EXPECT these rules to be activated or fired. You can also EXPECT facts to be present and to have specific field values or EXPECT rules not to fire at all.
If the expectations are met, the test scenario has passed and your rules are correct. Otherwise, the test scenario fails.
Providing Given Facts
To add a new fact, click
next to the GIVEN label. Provide your fact data in the New Input dialog window based on the data models that you have imported in the Data Objects tab.

You can select a particular data object from the model and give it a variable name, called Fact Name in the window, or choose to activate a rule flow group instead. Activating a rule flow group allows rules from the specified rule flow group to be tested by activating the group in advance. To add a given fact and activate a rule flow group:
- Add the given fact.
-
Click
again and add the rule flow group activation.
Optionally, add restrictions on the object you will insert.
Click Add a field and select a property of your object.
Click
next to the property.
- Click Create a new fact if the property type is another fact object.
Click Literal value otherwise.
See Section 10.3, “Additional Test Scenario Features” for more information.
Provide the value. For example:
The example above is equivalent to the following:
Customer fact1 = new Customer();
fact1.setHasInternetService(true);
insert(fact1);
Customer fact1 = new Customer();
fact1.setHasInternetService(true);
insert(fact1);
Copy to Clipboard Copied! Toggle word wrap Toggle overflow
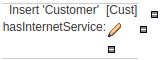
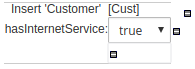
Providing Expected Rules
Once you are satisfied with the GIVEN conditions, you can expect rules that will be fired, facts created, or field values in existing facts changed. Click
next to the EXPECT label to start adding expected results.
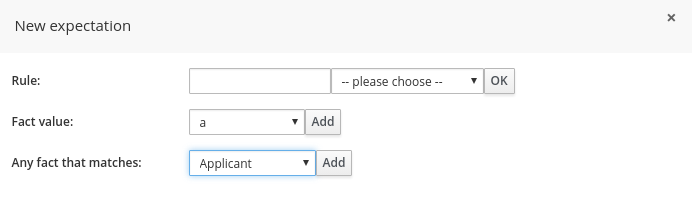
You can provide one of three expectations given the set of data that was created in the Given section:
- Rule: enables you to check for firing of a particular rule. Either type the name of a rule that is expected to be fired or select it from the list of rules. Click the OK when done.
Fact value: enables you to check a specific object instance and its values. In the following example, given a Customer object with the
hasInternetServiceboolean set totrue, we expect the same object to have thehasPhoneServiceboolean set totrue:Any fact that matches: enables you to check any objects in the working memory and the values of their field. In the following example, given a Customer object which has internet service, a new object RecurringPayment is expected to be inserted into the working memory with the
amountfield set to5:


Reviewing, Saving, and Running a Scenario
- Click Save in the upper right corner to save your scenario. Ensure you regularly save and review your scenarios.
Click Run scenario in the upper right corner to execute your test. The results are displayed at the bottom of this screen in a new panel called Reporting.
- If you created more tests in one file, you can run all the tests in a sequence. Click Run all scenarios to do so.
Also note the Audit log:, which informs you about inserted facts and fired rules:

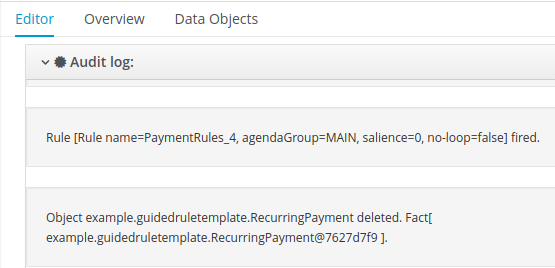
10.3. Additional Test Scenario Features
In addition to the previous Test Scenario features, Test Scenarios include various other features.
Calling Methods
Call Methodenables you to call a method on an existing fact in the beginning of the rule execution. This feature is accessed by clicking next to the CALL METHOD label.
Figure 10.2. Call Method
After selecting an existing fact from the drop-down list, click Add. The green arrow button
 enables you to call a method on the fact.
Figure 10.3. Invoke a Method

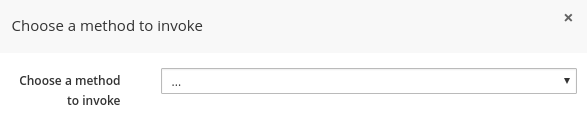
Using Globals in a Test Scenario
Globals are named objects that are visible to the rule engine but are different from the objects for facts. Accordingly, the changes in the object of a global do not trigger the reevaluation of rules. You can use and validate global fields in a Test Scenario.
To make a global variable accessible for your test scenario:
- Click New Item → Global Variable(s) to create a global definition.
- Define your global variable name and type.
- Import the object type in your test. If you do not import the type of your global variable, the variable will not be accessible for your test.
Adding a New Global
Click
next to the (globals) label to add a global and click Add.
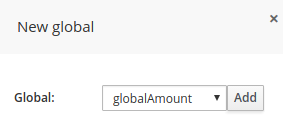
Adding restrictions on fields is similar to adding fields and restrictions in the Given section. See Providing Given Facts for further information.
Configuring Rules
The (configuration) label enables the you to set additional constraints on the firing of rules by providing the following options:
-
Allow these rules to fire:enables you to select which rules are allowed to fire. -
Prevent these rules from firing:enables you to prevent certain rules from firing for the test scenario. -
All rules may fireallows all the rules to fire for the given test.
Figure 10.4. Configuration
-
If you select one of the following:
- Allow these rules to fire:
Prevent these rules from firing:
Enter the rules into the empty field. Clicking
next to the empty field to select which rules are affected by the condition.
Figure 10.5. Selecting rules
- Choose a rule from the drop-down list and click OK. The selected rules will appear in the field next to the rules configuration option.
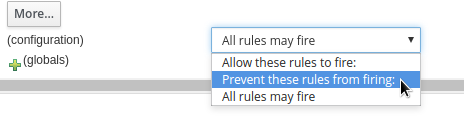
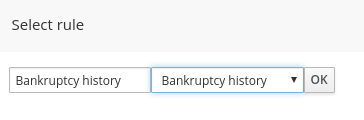
Date and Time Configuration
The Use real date and time option uses real time when running the test scenario.
Figure 10.6. Real Date and Time
The Use a simulated date and time option enables you to specify the year, month, day, hour, and minute associated with the test scenario.
Figure 10.7. Title


Advanced Fact Data
After providing fields to editable properties as part of your created fact, click
to open the Field value dialogue. You can edit literal values or provide advanced fact data.
Figure 10.8. Advanced Options
In the Advanced Options… section, you can choose between the following, depending on the type of fact created and the model objects used for the particular test scenario.
- Bound variable sets the value of the field to the fact bound to the selected variable. The field type must match the bound variable type.
- Create new fact enables you to create a new fact and assign it as a field value of the parent fact. Click on the fact to be assigned as a field value to be supplied with a drop down of various field values. These values may be given further field values.
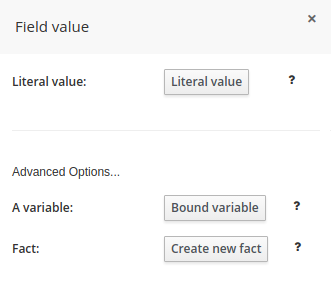
Adding More Sections
-
The Editor tab enables you to add GIVEN, CCALL METHOD, and EXPECT sections to the scenario. Click More below the EXPECT section to do so. This will open a block with all three sections that can be removed by clicking
 .
.
Modifying or Deleting an Existing Fact
When you create more tests in one file, it is recommended to delete facts inserted by previous tests. When you insert a new GIVEN fact, notice the following fields:
- Modify an existing fact enables you to edit a fact between knowledge base executions.
Delete an existing fact enables you to remove facts between executions.
Figure 10.9. Modifying and Deleting Existing Facts

Appendix A. Versioning information
Documentation last updated on: Monday, May 13, 2019.