Installation Guide
This guide is for installation teams.
Abstract
Chapter 1. Downloading the Product
1.1. Back Up Your Data
Warning
1.2. Download JBoss Data Virtualization Installer
- Set up an account on the Red Hat Customer Portal at https://access.redhat.com/.
- Ensure your Red Hat subscriptions are up to date.
- Review the supported configurations and ensure your system is supportable.
- Ensure that you have administration privileges for the installation directory.
- Ensure that JAVA_HOME and PATH have been set in the Environment properties for shortcuts to work on Microsoft Windows servers.
- A Java 7 or 8 JDK is required.
Note
If you intend to use Red Hat SSO, you must have at least Java 7. Java 7 is also a minimum requirement for the Impala, Hive and HBase data sources. Java 1.7 or greater is also required if you wish to use the file translator or Data Services Builder. Also note that if you intend to access Red Hat JBoss Data Grid 7.1, Red Hat JDV must be running JDK 1.8. - Optional: Red Hat JBoss Enterprise Application Platform 6.4.x if you do not want to use the version of Red Hat JBoss EAP that comes bundled with the Data Virtualization installer.
Procedure 1.1. Download JBoss Data Virtualization Installer
- Go to https://access.redhat.com/.
- Click Log in and enter your Red Hat Login and Password to access the Customer Portal.
- Click Downloads -> Red Hat JBoss Data Virtualization.
- Click Download next to the Red Hat JBoss Data Virtualization [Version] Installer option.
- Save the file.
1.3. Verify Downloaded Files
Procedure 1.2. Verify File Checksums on Red Hat Enterprise Linux
Obtain checksum values for the downloaded file
- Go to https://access.redhat.com/jbossnetwork/. Log in if required.
- Select your Product and Version.
- Select the packages you want to verify. Once you have chosen them, navigate to the Software Details page.
- Take note of the MD5 and SHA-256 checksum values.
Run a checksum tool on the file
- Navigate to the directory containing the downloaded file in a terminal window.
- Run
md5sum downloaded_file. - Run
shasum downloaded_file.
Example output:md5sum jboss-dv-installer-[VERSION]-redhat-[VERSION].jar MD5 (jboss-dv-installer-[VERSION]-redhat-[VERSION].jar) = 0d1e72a6b038d8bd27ed22b196e5887f shasum jboss-dv-installer-[VERSION]-redhat-[VERSION].jar a74841391bd243d2ca29f31cd9f190f3f1bdc02d jboss-dv-installer-[VERSION]-redhat-[VERSION].jar
[localhost]$ md5sum jboss-dv-installer-[VERSION]-redhat-[VERSION].jar
MD5 (jboss-dv-installer-[VERSION]-redhat-[VERSION].jar) = 0d1e72a6b038d8bd27ed22b196e5887f
[localhost]$ shasum jboss-dv-installer-[VERSION]-redhat-[VERSION].jar
a74841391bd243d2ca29f31cd9f190f3f1bdc02d  jboss-dv-installer-[VERSION]-redhat-[VERSION].jar
Copy to Clipboard Copied! Toggle word wrap Toggle overflow - Compare the checksum values returned by the
md5sumandshasumcommands with the corresponding values displayed on the Software Details page. - Download the file again if the two checksum values are not identical. A difference between the checksum values indicates that the file has either been corrupted during download or has been modified since it was uploaded to the server. Contact Red Hat Support for assistance if after several downloads the checksum does not successfully validate.
Note
Chapter 2. Installing Prerequisite Components
2.1. Install Open JDK on Red Hat Enterprise Linux
- Install the OpenJDK package:
yum install java-[VERSION]-openjdk-devel
yum install java-[VERSION]-openjdk-develCopy to Clipboard Copied! Toggle word wrap Toggle overflow - To install it to alternatives, run these commands:
sudo alternatives --install /usr/bin/java java usr/lib/jvm/java-[VERSION]-openjdk/bin/java 1000
sudo alternatives --install /usr/bin/java java usr/lib/jvm/java-[VERSION]-openjdk/bin/java 1000Copy to Clipboard Copied! Toggle word wrap Toggle overflow sudo alternatives --install /usr/bin/javac javac /usr/lib/jvm/java-[VERSION]-openjdk/bin/javac 1000
sudo alternatives --install /usr/bin/javac javac /usr/lib/jvm/java-[VERSION]-openjdk/bin/javac 1000Copy to Clipboard Copied! Toggle word wrap Toggle overflow - As root, run the alternatives command for
java:/usr/sbin/alternatives --config java
/usr/sbin/alternatives --config javaCopy to Clipboard Copied! Toggle word wrap Toggle overflow - Select
/usr/lib/jvm/jre-[VERSION]-openjdk/bin/java. - Then do the same for
javac:/usr/sbin/alternatives --config javac
/usr/sbin/alternatives --config javacCopy to Clipboard Copied! Toggle word wrap Toggle overflow - Select
/usr/lib/jvm/java-[VERSION]-openjdk/bin/javac.
2.2. Install Maven
The following software must be installed:
- An archiving tool for extracting the contents of compressed files.
- Open JDK.
Procedure 2.1. Install Maven
Download Maven.
- Download the
apache-maven-[latest-version]ZIP file.
Install and configure Maven.
On Red Hat Enterprise Linux
- Extract the ZIP archive to the directory where you wish to install Maven.
- Open your .bash_profile file:
vi ~/.bash_profile
vi ~/.bash_profileCopy to Clipboard Copied! Toggle word wrap Toggle overflow - Add the M2_HOME environment variable to the file:
export M2_HOME=/path/to/your/maven
export M2_HOME=/path/to/your/mavenCopy to Clipboard Copied! Toggle word wrap Toggle overflow - Add the M2 environment variable to the file:
export M2=$M2_HOME/bin
export M2=$M2_HOME/binCopy to Clipboard Copied! Toggle word wrap Toggle overflow - Add the variable $JAVA_HOME/bin to set the path to the correct Java installation.
Note
Make sure JAVA_HOME is pointing to a valid location. - Add the M2 environment variable to the file:
export PATH=$M2:$PATH
export PATH=$M2:$PATHCopy to Clipboard Copied! Toggle word wrap Toggle overflow - Save the file and exit your text editor.
- Reload your profile:
source ~/.bash_profile
source ~/.bash_profileCopy to Clipboard Copied! Toggle word wrap Toggle overflow - Run the following command to verify that Maven is installed successfully on your machine:
mvn --version
mvn --versionCopy to Clipboard Copied! Toggle word wrap Toggle overflow
On Microsoft Windows
- Extract the ZIP archive to the directory where you wish to install Maven. The subdirectory
apache-maven-[latest-version]is created from the archive. - Press Start+Pause|Break. The System Properties dialog box is displayed.
- Click the Advanced tab and click Environment Variables.
- Under System Variables, select Path.
- Click Edit and add the two Maven paths using a semicolon to separate each entry.
- Add the M2_HOME variable and set the path to
C:\path\to\your\Maven. - Add the M2 variable and set the value to %M2_HOME%\bin.
- Update or create the Path environment variable:
- Add the %M2% variable to allow Maven to be executed from the command line.
- Add the variable %JAVA_HOME%\bin to set the path to the correct Java installation.
- Click OK to close all the dialog boxes including the System Properties dialog box.
- Open Windows command prompt and run the following command to verify that Maven is installed successfully on your machine:
mvn --version
mvn --versionCopy to Clipboard Copied! Toggle word wrap Toggle overflow
Chapter 3. Installing Red Hat JBoss Data Virtualization
3.1. Graphical Installation
You must have already downloaded the Red Hat JBoss Data Virtualization jar file from the Customer Portal.
Procedure 3.1. Install JBoss Data Virtualization
- Open a terminal window and navigate to the location where the GUI installer was downloaded.
- Launch the GUI installer:
java -jar jboss-dv-VERSION-installer.jar
java -jar jboss-dv-VERSION-installer.jarCopy to Clipboard Copied! Toggle word wrap Toggle overflow - A dialogue box will open followed by the End User License Agreement. If you accept the terms of the agreement, click and then click .
- Tell Red Hat JBoss Data Virtualization where Red Hat JBoss EAP is installed on your server or specify a new location if you do not have it installed as it comes bundled with the product. (If you have a pre-existing installation of Red Hat JBoss EAP, ensure that it is patched to the latest version of 6.4.x.) Click .
- Ensure Teiid Installation and Dashboard Builder are selected. Click Data Services Builder if you want the graphical design tool as well or Modeshape Installation if you want that (you cannot have both Data Services Builder and Modeshape). Click .
- You will be prompted to create a new EAP Admin, Dashboard Admin, Teiid data access user and Modeshape user (if Modeshape is selected) and whether you want to enable OData access. Once created, EAP Admin is added to the ManagementRealm and can be used to access the Management Console. The other users are added to the ApplicationRealm and can be used to access specific components of JBoss Data Virtualization. Enter the new username and password in the appropriate fields and click .You must ensure that you remember all of these passwords. They give you access to different parts of the system. The EAP account and password allows you to administer the EAP Server, the Dashboard password is for administrative functions related to the web interface, and the Teiid data access user and ModeShape user are for standard user access.Note that the username and password are not allowed to match and the password must have at least eight characters, with one alphabetical character, one numeric character and one non-numeric character.
- You can install Red Hat JBoss Data Virtualization either with default configuration or with additional configuration options. In this example installation, we will be using the defaults only, so select Perform default configuration to install Red Hat JBoss Data Virtualization with default options. Click .
- The Configure password vault screen appears. Input your desired password, which must have no fewer than six characters. Click .
Note
The default H2 database used to store this data is not suitable for production systems. Use it in testing and evaluation environments only. - If you selected the Data Services Builder option, you will be prompted for SSL security information. Click or use the option to configure your existing keystore if you already have one you set up previously. Leave the SSL Keystore alias as "jboss". Input a password of six characters. Leave the filepath as the default. Click .
- A summary of the installation is displayed. Click Next for the installation to commence. This may take a few moments. Once all the components are installed, click .
- Click if you wish to generate an automatic script. This allows you to quickly reinstall or mass-deploy the product using the settings you have configured during the initial installation, without having to step through the wizard each time.
Note
An automatic installation script created for a given minor release will only work with that release. For example, you cannot use a script created with 6.0 for 6.1 or a script created for 6.3 with 6.4. - Click to exit the installer.
Note
Warning
| Option | Description |
|---|---|
| Check to use one password for all default passwords. | Allows you to use the default EAP password you create for all of the accounts. |
| Add a security domain. | If you select this option, the name of the field is mandatory. You can choose between a default and an Infinispan cache type and an authentication module for additional security. You can also add mapping elements to establish roles and credentials. You can also configure a JSSE element using either a keystore or a truststore. |
| Install JDBC Driver. | The JDBC driver converts application code to the relevant database language. Point to the location of your driver in the address field. You can add more than one. |
| Configure audit/command logging. | You can activate the logging level for the software to provide audit trails. |
| Configure JAVA_OPTS. | Configure additional Java options to override the normal defaults for both standalone and domain mode. Input the options you want in the provided fields. |
| Enable SSL security. | Generate a new keystore or point to an existing one. (The existing location should be that of your SSL certification file.) |
| Add a security domain. | Adds the server to a secure domain. |
3.2. Text-Based Installer
You must have already downloaded the Red Hat JBoss Data Virtualization jar file from the Customer Portal.
Procedure 3.2. Install JBoss Data Virtualization
- Open a terminal window and navigate to the location where the GUI installer was downloaded.
- Start the installation process:
java -jar jboss-dv-VERSION-installer.jar -console
java -jar jboss-dv-VERSION-installer.jar -consoleCopy to Clipboard Copied! Toggle word wrap Toggle overflow - Follow the installation prompts displayed on the terminal. You can either install with default configuration or you can complete additional configuration steps.
- Finally, generate the automatic installation script. You can use this script to perform headless installation or identical installations across multiple instances.
3.3. Automated Installation
- You must have downloaded the relevant installer JAR file from https://access.redhat.com/jbossnetwork/.
- You must have generated the script and saved it as an XML file during a previous installation.
Procedure 3.3. Installing with a Script
java -jar jboss-PRODUCT-installer-VERSION.jar SCRIPT.xml
java -jar jboss-PRODUCT-installer-VERSION.jar SCRIPT.xmlCopy to Clipboard Copied! Toggle word wrap Toggle overflow
Note
java -jar path/to/installer.jar -variablefile /pathtofile to supply variables using a configuration file or use java -jar path/to/installer.jar -variables EXAMPLE1=example1,EXAMPLE2=example2 to provide a comma-separated list of variables.
Chapter 4. Installing the JBoss Data Virtualization Development Tools
4.1. Installing JBoss Data Virtualization Development Tools
The following software must be installed:
- Red Hat Developer Studio 12.0 with Integration Stack. On the Red Hat Customer Portal, click → and download Red Hat Developer Studio Integration Stack 12.0.0 Stand-alone Installer.
Important
Make sure you use Red Hat Developer Studio 12.0.0 as it is the last version that works with Teiid Designer.Important
During installation, make sure you select Red Hat Data Virtualization Development on the Select Additional Features to Install screen. - An archiving tool for extracting the contents of compressed files.
- Open JDK (or another supported Java Virtual Machine).
Procedure 4.1. Install the Latest Version of Teiid Designer
- Go to https://access.redhat.com/ and log in to the Customer Portal with your Red Hat login.
- Click → .
- Click Download next to the Red Hat JBoss Data Virtualization Teiid Designer [VERSION] Update Site Zip option and save the
datavirt-teiid-designer-[VERSION]-updatesite.zipfile. - Start Red Hat Developer Studio.
- In Red Hat Developer Studio, select → from the main menu.
- On the Available Software page, click the Add ... button.
- On the Add Repository dialog:
- Enter “Red Hat Data Virtualization Teiid Designer” (or another unique name) in the Name field.
- Click the Archive... button, navigate to the location where the
datavirt-teiid-designer-[VERSION]-updatesite.zipfile was downloaded, and click OK. - Click Add.
- Back on the Available Software page, select Data Virtualization and all of its children from the list of available items.
- Click Next.
- On the Install Details page, review the items to be installed and click Next.
- Accept any additional dependencies and license agreements, then click Finish.
Chapter 5. Running Red Hat JBoss Data Virtualization
5.1. Starting JBoss Data Virtualization
- You can run JBoss Data Virtualization by starting the JBoss EAP server. To start the JBoss EAP server:
Red Hat Enterprise Linux
Open a terminal and enter the command:$ EAP_HOME/bin/standalone.shMicrosoft Windows
Open a terminal and enter the command:$ EAP_HOME\bin\standalone.bat
Note
EAP_HOME/MODE/log/server.log. You can also verify this by opening the Management Console and logging in using the username and password of a registered JBoss EAP Management User.
5.2. Installing in Domain Mode
domain.xml file.) When you start the server using the domain.xml file, the distributed caching that is used for ResultSet caching and Internal Materialized caching is automatically configured. You use the Admin API the same way in both the standalone mode and the domain mode.
- To start the server in "Domain" mode, install Red Hat JBoss Data Virtualization on all the servers that are going to be part of the cluster. Select one of the servers as the "master" domain controller. (The rest of the servers will be slaves that connect to the "master" domain controller for all the administrative operations.)
- On the domain controller, copy the
domain-controller/init.ddirectory toJBOSS_HOME/bin. - On the host controller, copy the
host-controller/init.ddirectory toJBOSS_HOME/bin. - Prepare the directory structure:
Copy to Clipboard Copied! Toggle word wrap Toggle overflow - Configure the domain:
Copy to Clipboard Copied! Toggle word wrap Toggle overflow - Configure the host controller:
Copy to Clipboard Copied! Toggle word wrap Toggle overflow - Add this Red Hat JBoss Data Virtualization script to systemd:
Copy to Clipboard Copied! Toggle word wrap Toggle overflow - Configure the firewall ports on both hosts:
Copy to Clipboard Copied! Toggle word wrap Toggle overflow firewall-cmd --zone=public --add-service=jboss-data-virtualization firewall-cmd --permanent --zone=public --add-service=jboss-data-virtualization firewall-cmd --zone=public --list-services firewall-cmd --permanent --zone=public --list-services
firewall-cmd --zone=public --add-service=jboss-data-virtualization firewall-cmd --permanent --zone=public --add-service=jboss-data-virtualization firewall-cmd --zone=public --list-services firewall-cmd --permanent --zone=public --list-servicesCopy to Clipboard Copied! Toggle word wrap Toggle overflow If you are using port offsets, adjust the values by adding the offset. - Once you have configured all the servers, start the "master" node:
/bin/domain.sh
/bin/domain.shCopy to Clipboard Copied! Toggle word wrap Toggle overflow - Start the "slave" nodes:
/bin/domain.sh
/bin/domain.shCopy to Clipboard Copied! Toggle word wrap Toggle overflow The slave nodes fetch their domain configuration settings from the "master" node. - Once VDBs have been deployed, users can connect their JDBC applications to Red Hat JBoss Data Virtualization.
- You can enable Red Hat JBoss Data Virtualization as a service with the operating system, using this command:
systemctl enable jboss-data-virtualization
systemctl enable jboss-data-virtualizationCopy to Clipboard Copied! Toggle word wrap Toggle overflow You can now start the service like this:systemctl start jdv
systemctl start jdvCopy to Clipboard Copied! Toggle word wrap Toggle overflow To stop it, run this command:systemctl stop jdv
systemctl stop jdvCopy to Clipboard Copied! Toggle word wrap Toggle overflow To restart, run this command:systemctl restart jdv
systemctl restart jdvCopy to Clipboard Copied! Toggle word wrap Toggle overflow
Note
5.3. Starting JBoss Data Virtualization as Managed Domain
The domain controller must be started before any slave servers in any server groups in the domain. Use this procedure first on the domain controller, and then on each associated host controller and each other host associated with the domain. Please refer to the https://access.redhat.com/documentation/en-us/red_hat_jboss_enterprise_application_platform/6.4/html-single/administration_and_configuration_guide/index for more information.
Procedure 5.1. Start the Platform Service as a Managed Domain
- For Red Hat Enterprise Linux, run this command:
EAP_HOME/bin/domain.sh - For Microsoft Windows, run this command:
EAP_HOME\bin\domain.bat - To list all available parameters for the start-up scripts, use the
-hparameter.
5.4. Stopping JBoss Data Virtualization
Chapter 6. Configuring Your Maven Repositories
6.1. About The Provided Maven Repositories
settings.xml file during installation, Maven is already configured to use the online repositories.
Important
6.2. Configure Maven to Use the File System Repositories
Procedure 6.1. Configure Maven
- Download the desired version.
- Unzip the file on the local file system into a directory of your choosing.
- Add entries for the unzipped repositories to Maven's
settings.xmlfile. The following code sample contains a profile with the repositories and an activation entry for the profile:Copy to Clipboard Copied! Toggle word wrap Toggle overflow
6.3. Configure Maven to Use the Online Repositories
settings.xml file during installation, Maven is already configured to use the online repositories.
Procedure 6.2. Configuring Maven to Use the Online Repositories
- Add entries for the online repositories to Maven's
settings.xmlfile:Copy to Clipboard Copied! Toggle word wrap Toggle overflow - If you modified the
settings.xmlfile while JBoss Developer Studio was running, you must refresh Maven settings in the IDE. From the menu, choose → . In the Preferences Window, expand Maven and choose User Settings. Click the button to refresh the Maven user settings in JBoss Developer Studio.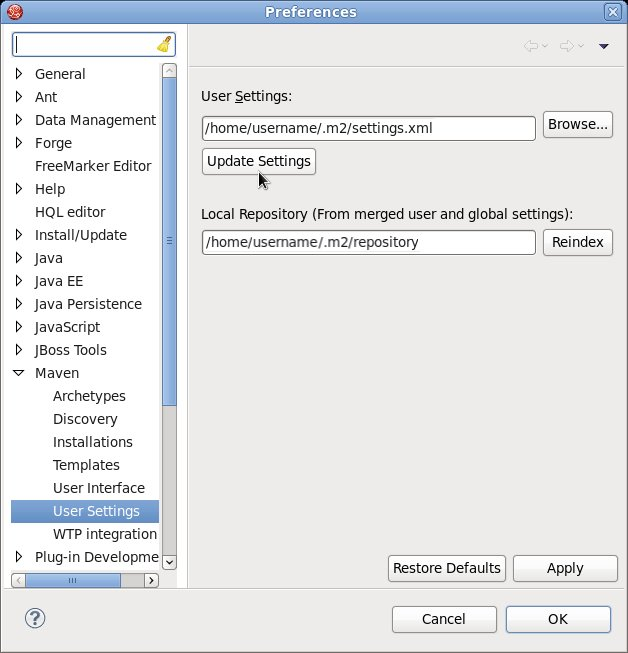
Figure 6.1. Update Maven User Settings
- Missing artifact ARTIFACT_NAME
- [ERROR] Failed to execute goal on project PROJECT_NAME; Could not resolve dependencies for PROJECT_NAME
~/.m2/repository/ directory on Linux or the %SystemDrive%\Users\USERNAME\.m2\repository\ directory on Windows. This will force Maven to download correct versions of required artifacts during the next build.
6.4. Using Maven Dependencies for Red Hat JBoss Data Virtualization
pom.xml file. Adding the BOM and parent POM files ensures that the correct versions of plug-ins and transitive dependencies from the provided Maven repositories are included in the project.
org.jboss.dv.component.management:dv-parent-[VERSION].pom.
org.jboss.dv.component.management:dv-dependency-management-all-[VERSION].pom.
6.5. Offline mode
6.5.1. Using a Custom Offline Repository
features-maven-plugin plug-in.
pom.xml file), you should be able to run the following Maven command:
mvn org.apache.maven.plugins:maven-dependency-plugin:2.8:go-offline -Dmaven.repo.local=/tmp/cheese
mvn org.apache.maven.plugins:maven-dependency-plugin:2.8:go-offline -Dmaven.repo.local=/tmp/cheese/tmp/cheese directory.
ProjectDir/custom-repo, and enter the following Maven command:
mvn generate-resources
mvn generate-resourcesProjectDir/custom-repo/target/features-repo
ProjectDir/custom-repo/target/features-repoChapter 7. Integrating Red Hat JBoss Data Virtualization with Red Hat JBoss Data Grid
7.1. Configure Red Hat JBoss Data Grid Connectors
- Download the required Java web client and apply overlay to the modules directory.
- Navigate to the
docs/teiid/datasources/infinispan/directory (and to thedocs/teiid/datasources/infinispan-hotrod-7.1/directoryfor Hotrod). - Execute the appropriate script:
add-infinispan-cache-translator.cli,add-infinispan-cache-dsl-translator.cliandinfinispan-hotrod-translator.cli.
Chapter 8. ODBC Support
8.1. Install the ODBC Driver on Red Hat Enterprise Linux
Prerequisites
- Administrative permissions are required.
- Download the correct ODBC driver package (
jboss-dv-psqlodbc-[version]-X.rpm) from https://access.redhat.com/jbossnetwork/. - Install the package:
sudo yum localinstall.jboss-dv-psqlodbc-[version]-X.rpm
Note
8.2. Configure the ODBC Environment
- Run the
/opt/redhat/jboss-dv/v6/psqlodbc/etc/setenv.shscript:./setenv.sh
[localhost etc]$ ./setenv.shCopy to Clipboard Copied! Toggle word wrap Toggle overflow
LD_LIBRARY_PATH and PATH environment variables. This script has to be run every time you want to use the driver.
8.3. Configure the DSN for Linux Installation
- Edit the
/opt/redhat/jboss-dv/v6/psqlodbc/etc/odbc.inifile and update it with the correct username, password, and database. The database name is the VDB name.ODBC is enabled in JBoss Data Virtualization on port35432by default.
8.4. Install the ODBC Driver on Microsoft Windows
Prerequisites
- Administrative permissions are required.
Procedure 8.1. Install the ODBC Driver on Microsoft Windows
- Download the correct ODBC driver package (
jboss-dv-psqlodbc-[version]-X.zip) from https://access.redhat.com/jbossnetwork/. - Unzip the installation package.
- Double-click the
jboss-dv-psqlodbc-[version]-X.msifile to start the installer. - The installer wizard is displayed. Click .
- The End-User License Agreement will be displayed. Click if you accept the licensing terms and then click .
- If you want to install in a different directory other than the default directory shown, click the button and select a directory. Click .
- You are presented with a confirmation screen. Review the choices you have made and click to begin installation.
- Click .
Note
8.5. Configure the DSN for Windows Installation
Procedure 8.2. Configure the DSN for Windows Installation
- Set the ODBC driver basic options.
- Set the ODBC driver datasource options.
- Set the ODBC driver global options.
8.6. Configure ODBC Options on Microsoft Windows
Prerequisites
- You must have logged into the workstation with administrative rights.
- You must have used the Control Panel’s Data Sources (ODBC) applet to add a new data source name.Each data source name you configure can only access one VDB within a Teiid System. To make more than one VDB available, you need to configure more than one data source name.
- From the menu, select -> .
- The Control Panel displays. Double-click Administrative Tools.
- Double-click Data Sources (ODBC).
- The ODBC Data Source Administrator applet displays. Click the tab associated with the type of DSN you want to add.
- The Create New Data Source dialog box displays. In the Select a driver for which you want to set up a data source table, select .
- Click .
- In the Data Source Name edit box, type the name you want to assign to this data source.
- In the Database edit box, type the name of the virtual database you want to access through this data source.
- In the Server edit box, type the host name or IP address of your Teiid runtime.
Note
If you are connecting via a firewall or NAT address, you must enter either the firewall address or the NAT address. - In the Port edit box, type the port number to which the system listens for ODBC requests. (By default, Red Hat JBoss Data Virtualization listens for ODBC requests on port 35432.)
- In the User Name and Password edit boxes, supply the user name and password for the Teiid runtime access.
- Leave SSL Mode to disabled. (SSL connections are unsupported at present.)
- Provide any description about the data source in the Description field.
- Click on the button and configure the options. Tick , , , and and set to 255, to 8190, and to dd_:.On the second page, click , , , and set the to 0x0.
- Click .You can optionally click to validate your connection if Red Hat JBoss Data Virtualization is running.
| Name | Description |
|---|---|
| and | Should not be used. |
| Use and and | It is recommended that is enabled and are disabled. |
| SSL mode | See Security Guide https://access.redhat.com/documentation/en/red-hat-jboss-data-virtualization/6.4/paged/security-guide/ |
| Use and | Should be used to better manage resources when large result sets are used. |
8.7. Install the ODBC Driver on Solaris
Prerequisites
- Administrative permissions are required.
- Download the correct ODBC driver package (
jboss-dv-psqlodbc-[VERSION]-X.zip) from https://access.redhat.com/jbossnetwork/. Unzip the installation package
Unzip the installation package to/optdirectory.- Set the PATH property so that the ODBC binaries are used from the directory where you have unzipped the driver.
$ export PATH = $PATH:/opt/redhat/jboss-dv/v6/psqlodbc/bin - Set the ODBCINI environmental variable to match the existing odbc.ini.
$ export ODBCINI=/opt/redhat/jboss-dv/v6/psqlodbc/etc/odbc.iniNote
If you are using the Bourne Shell as your Solaris terminal, you can add the two export commands above to your ~/.profile file, so that you do not need to run them every time. Likewise, if you are using Bash, save them in your ~/.bash_profile file instead.
8.8. Configure the DSN for Solaris Installation
/opt/redhat/jboss-dv/v6/psqlodbc/etc/odbc.ini file and update it with the correct username, password, and database. The database name is the VDB name.
35432 by default.
8.9. Configure ODBC Options on Red Hat Enterprise Linux
Procedure 8.3. Configure ODBC Options on Red Hat Enterprise Linux
- Install the driver manager:
yum install unixODBC
yum install unixODBCCopy to Clipboard Copied! Toggle word wrap Toggle overflow - Verify that your PostGreSQLdriver has installed correctly:
odbcinst -q -d
odbcinst -q -dCopy to Clipboard Copied! Toggle word wrap Toggle overflow - To create the DSN, open the configuration file in a text editor:
sudo vi /opt/redhat/odbc.ini
sudo vi /opt/redhat/odbc.iniCopy to Clipboard Copied! Toggle word wrap Toggle overflow Note
You must either use sudo or be logged in as root to open this file. - Add the following configuration settings to the file:
Copy to Clipboard Copied! Toggle word wrap Toggle overflow - Save the file and exit the text editor.
- Run this command to test the DSN:
isql <DSN-name> [<user-name> <password>] < commands.sql
isql <DSN-name> [<user-name> <password>] < commands.sqlCopy to Clipboard Copied! Toggle word wrap Toggle overflow To connect without DSN, use this DSN-less connection string:ODBC;DRIVER={PostgreSQL};DATABASE=<vdb-name>;SERVER=<host-name>;PORT=<port>;Uid=<username>;Pwd=<password>ODBC;DRIVER={PostgreSQL};DATABASE=<vdb-name>;SERVER=<host-name>;PORT=<port>;Uid=<username>;Pwd=<password>Copy to Clipboard Copied! Toggle word wrap Toggle overflow If you run isql but you encounter an error whereby you see this message: "Can't open lib '/opt/redhat/jboss-dv/v6/psqlodbc/lib64/psqlodbc.so' : file not found" it means that some of the postgres libraries are missing.To fix this issue, run this command as root:yum install postgresTo verify that the packages are now installed, run this command:rpm -qa|grep postYou should see the postgresql and postgresql-jdbc packages listed.
8.10. DSN-less Connection
ODBC;DRIVER={PostgreSQL};DATABASE=<vdb-name>;SERVER=<host-name>;PORT=<port>;Uid=<username>;Pwd=<password>;c4=0;c8=1;
ODBC;DRIVER={PostgreSQL};DATABASE=<vdb-name>;SERVER=<host-name>;PORT=<port>;Uid=<username>;Pwd=<password>;c4=0;c8=1;
ODBC;DRIVER={PostgreSQL Unicode};DATABASE=<vdb-name>;SERVER=<host-name>;PORT=<port>;Uid=<username>;Pwd=<password>;c4=0;c8=1;
ODBC;DRIVER={PostgreSQL Unicode};DATABASE=<vdb-name>;SERVER=<host-name>;PORT=<port>;Uid=<username>;Pwd=<password>;c4=0;c8=1; Chapter 9. Running in Cloud Environments
9.1. Run Red Hat JBoss Data Virtualization in an Amazon AWS Cloud Instance
Procedure 9.1. Running Red Hat JBoss Data Virtualization in an Amazon Cloud
- Open ports by updating the security group. (At a minimum, you will need to open the TCP, HTTP and SSH ports.)
- To start the server, add the following parameters to bind the management and host ports:
-Djboss.bind.address.management=0.0.0.0and-b 0.0.0.0Note
-b is a shortcut for -Djboss.bind.addressHere is an example:./standalone.sh -Djboss.bind.address.management=0.0.0.0 -b 0.0.0.0 - To access the AWS instance from Teiid Designer, go to the JBDS preferences and select General -> Network Connections SSH2.Next, under the Key Management tab, click Load Existing Key to add the key generated by Amazon.
- To create a server connection, on the Server Configuration Overview Panel, under Server Behavior, select Remote System Deployment. Also ensure you check Server is externally managed...Click the New Host button, select the SSH Only option and click Next.Set the Host Name to match the Amazon public IP address and make the connection name the same.Click Finish.
- Open the Remote Systems tab.Right mouse click the new connection and click connect. Fill in the User ID. (You do not need to provide a password if your SSH key is configured.)
- Go back to the server configuration overview panel and confirm that the Host drop-down has selected the new host that you have created.
- Start the server. (This switches the state of the server you already started.)
9.2. Run Red Hat JBoss Data Virtualization in a Google Compute Instance
Procedure 9.2. Run Red Hat JBoss Data Virtualization in a Google Compute Instance
- Open the necessary ports: -> -> -> -> -> .
- Upload your public SSH key: - -> -> -> -> .
- Bind the management ports (jboss.bind.address.management) to an external interface. (The default value for management ports is
localhost.)
9.3. Run Red Hat JBoss Data Virtualization on an Azure Instance
- Go here to learn how to create an Azure virtual machine: https://docs.microsoft.com/en-us/azure/virtual-machines/linux/tutorial-manage-vm.
- Connect to the Azure virtual machine using SSH.
- Copy the Red Hat JBoss Data Virtualization installer to that machine over SSH.
- Run the installer as per normal:
java -jar jboss-dv-VERSION-installer.jar
java -jar jboss-dv-VERSION-installer.jarCopy to Clipboard Copied! Toggle word wrap Toggle overflow - To start the server, add the following parameters to bind the management and host ports:
-Djboss.bind.address.management=0.0.0.0
-Djboss.bind.address.management=0.0.0.0Copy to Clipboard Copied! Toggle word wrap Toggle overflow -b 0.0.0.0
-b 0.0.0.0Copy to Clipboard Copied! Toggle word wrap Toggle overflow Here is an example:./standalone.sh -Djboss.bind.address.management=0.0.0.0 -b 0.0.0.0
./standalone.sh -Djboss.bind.address.management=0.0.0.0 -b 0.0.0.0Copy to Clipboard Copied! Toggle word wrap Toggle overflow
Appendix A. Revision History
| Revision History | |||
|---|---|---|---|
| Revision 6.40-22 | Wed May 10 2017 | ||
| |||