Start Developing
Tutorial for first time users
Abstract
Chapter 1. Start Developing with JBoss Developer Studio
1.1. About Start Developing
1.2. About the TicketMonster Application
1.3. Tutorial Assumptions
- JBoss Developer Studio 8.0 stand-alone or Bring-Your-Own-Eclipse (BYOE) is installed; for instructions, see Install Red Hat JBoss Developer Studio.
- JBoss Enterprise Application Platform 6.x is installed
- Corresponding JBoss Enterprise Application Platform 6.x Maven repository is installed but Maven is not necessarily configured to use it
1.4. Tutorial Outline
- Open the JBoss perspective
- Configure Maven for use with JBoss Central projects
- Set up a server using JBoss Server Tools runtime detection
- Create a Java EE web project to which the TicketMonster functionality is added using JBoss Central
- Create
EventandVenueentity classes for the database entities using Forge Tools and Hibernate Tools - Prepare event records to populate the database at runtime
- Deploy the application on a runtime server using JBoss Server Tools
- Access and query the database holding the member, event and venue records
- Add a RESTful web service so that the application can retrieve the information in the database
- Add a user interface to the application that is optimized for mobile devices using Mobile Web Tools
- Test the mobile user interface using BrowserSim
Note
Chapter 2. Creating the TicketMonster Application
2.1. Open the JBoss Perspective
Procedure 2.1. Open the JBoss Perspective
- Click →→.
- From the list of perspectives, double-click JBoss.
2.2. Configure Maven to use the JBoss EAP Maven Repository
Procedure 2.2. Configure Maven to use the JBoss EAP Maven Repository
- Click →, expand JBoss Tools and select JBoss Maven Integration.
- Click .
- Click .
- Click .
- Navigate to
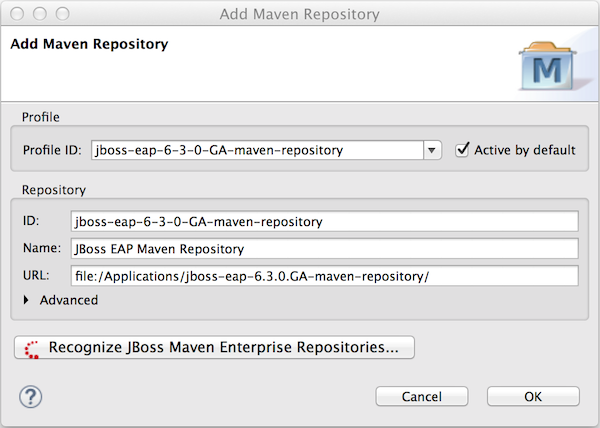
path/to/jboss-eap-6.x.y-maven-repositoryand click . JBoss Maven Tools recursively scans the path searching for the Maven repository. - Modify the information in the ID and Name fields as desired, ensure the Active by default check box is selected and click .
Figure 2.1. JBoss EAP Maven Repository Listed for Adding to the Maven Configuration File
- Click and at the prompt asking if you are sure you want to update the Maven configuration file click . If the specified configuration file does not exist, JBoss Maven Tools creates it.
Note
Maven settings, such as the configuration file, are specified in Preferences under Maven→User Settings. These settings can be customized. - Click and click to close the Preferences window.
2.3. Set Up a Server Using Runtime Detection
Procedure 2.3. Define a Server Using Runtime Detection
- Click →, expand JBoss Tools and select JBoss Runtime Detection.
- Click .
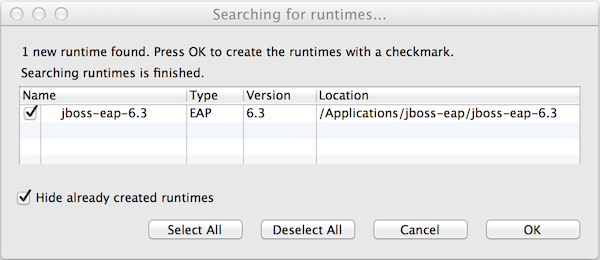
- Select the directory containing the JBoss EAP 6.x installation and click . The directory is now scanned for application servers and JBoss EAP 6.x found.
Figure 2.2. JBoss EAP 6.x Found by Runtime Detection
- To create a server for JBoss EAP 6.x, ensure the jboss-eap-6.x check box is selected and click .
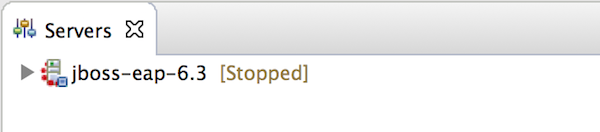
- Click and click to close the Preferences window. The server is listed in the Servers view.
Figure 2.3. JBoss EAP 6.x Server Listed in Servers View
- The server is initially shown in stopped mode. Start the server by right-clicking jboss-eap-6.x and clicking . After a short pause, the view switches to the Console view and shows the startup output of the server.
2.4. Create a Java EE Web Project Using JBoss Central
Procedure 2.4. Create a Web Application Using the Java EE Web Project Wizard
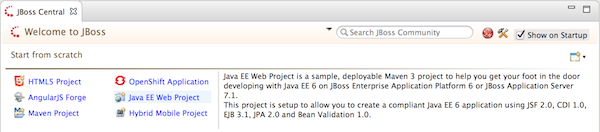
- Click the JBoss Central tab.
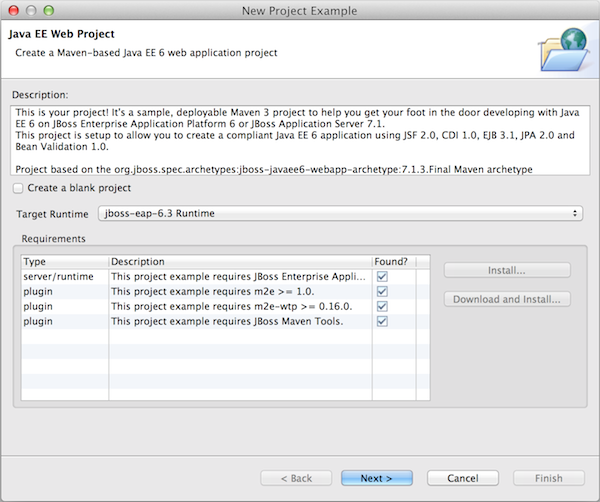
- In JBoss Central under Start from scratch, click Java EE Web Project to open the Java EE Web Project wizard. If JBoss Central is not visible, click →.
Figure 2.4. Java EE Web Project in JBoss Central
- From the Target Runtime list, select jboss-eap-6.x Runtime and click .
Figure 2.5. JBoss EAP 6.x Selected as Target Runtime in Java EE Web Project Wizard
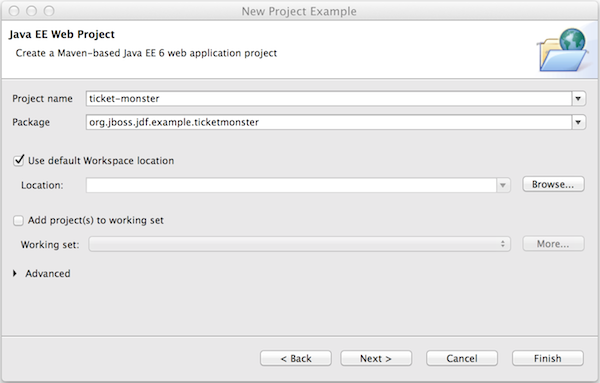
- Complete the fields about the project as follows:
- In the Project name field, type
ticket-monster. - In the Package field, type
org.jboss.jdf.example.ticketmonster.
Figure 2.6. Completed Project Name and Package Fields in Java EE Web Project Wizard
- Click to create the project.
README.md file for the project automatically opens for viewing and the project is listed in the Project Explorer view.
2.5. Add an Entity Using Forge Tools
Event entity class is created to hold information about the events for which users can buy tickets. This Event entity has id, name, description, major and picture fields.
Procedure 2.5. Add an Entity Using Forge Tools
- In the Project Explorer view, expand ticket-monster→Java Resources→src/main/java.
- Click org.jboss.jdf.example.ticketmonster.model and press Ctrl+4 (Cmd+4).
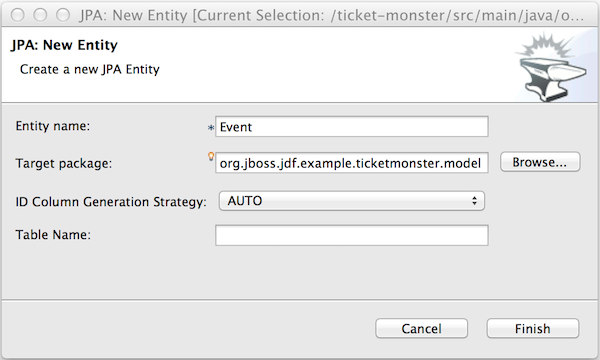
- From the Forge wizards list, click JPA: New Entity.
- In the Entity name field, type
Eventand click .Figure 2.7. New Event Entity using Forge 2 JPA: New Entity Wizard
- In the Project Explorer view, ensure org.jboss.jdf.example.ticketmonster→Event.java is selected and press Ctrl+4.
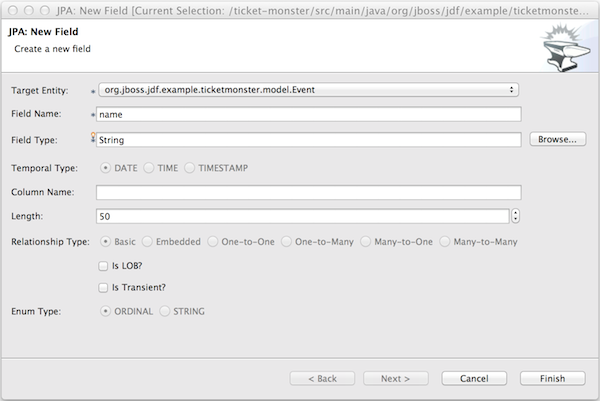
- From the Forge wizards list, click JPA: New Field.
- Complete the fields about the field as follows:
- In the Field name field, type
name. - In the Length field, type
50.
Figure 2.8. New name Field using Forge 2 JPA: New Field Wizard
- Click to create the field.
- Repeat steps 5 and 6 to create three more fields for the Event entity as follows:
description, with Field TypeStringand Length1000major, with Field TypeBooleanpicture, with Field TypeString
- In the Project Explorer view, right-click Event.java and click →.
- In the Forge Console view, on the Forge 2 command line enterand from the list of options enter the number corresponding to
constraint-add --onProperty name
constraint-add --onProperty nameCopy to Clipboard Copied! Toggle word wrap Toggle overflow NotNull.
2.6. Add an Entity Using Hibernate Tools
Venue entity class is created to hold information about the venues where events will be held. This Venue entity has id, name, description and capacity fields.
Procedure 2.6. Add an Entity Using Hibernate Tools
- In the Project Explorer view, expand ticket-monster→Java Resources→src/main/java.
- Right-click org.jboss.jdf.example.ticketmonster.model and click →.
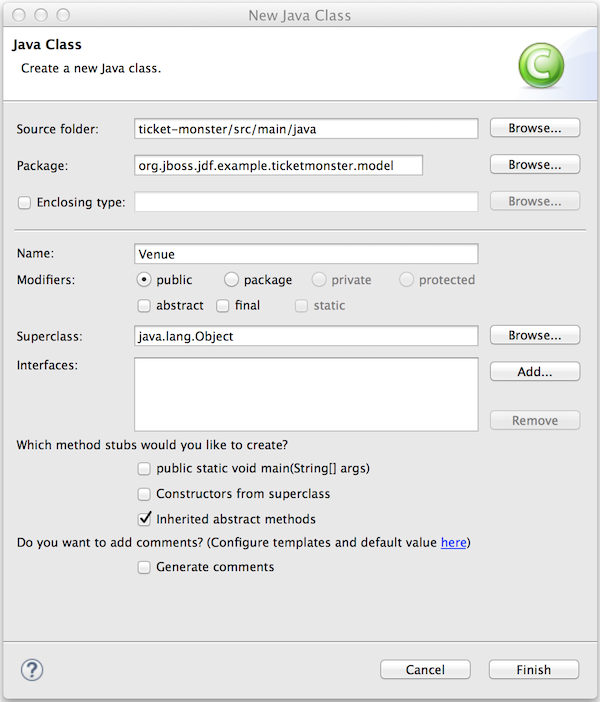
- In the Name field, type
Venueand click . This creates aVenue.javafile that is automatically opened in a Java editor.Figure 2.9. New
VenueClass using Java Class Wizard - Add fields to the entity by adding the following lines in between the braces of the
Venueclassprivate Long id; private String name; private String description; private int capacity;
private Long id; private String name; private String description; private int capacity;Copy to Clipboard Copied! Toggle word wrap Toggle overflow - Save the
Venue.javafile by pressing Ctrl+S (Cmd+S). - Add
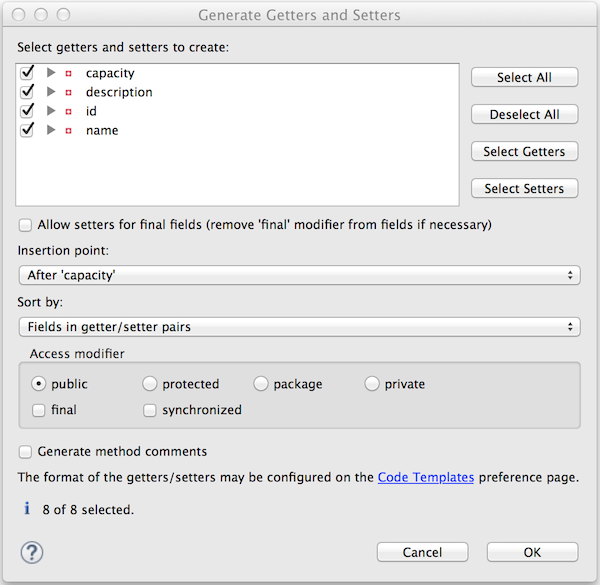
getandsetmethods by right-clicking on a new line afterprivate int capacity;and clicking →. - Click and click .
Figure 2.10. List of Attributes Selected for Creating Get and Set Methods
- Save the
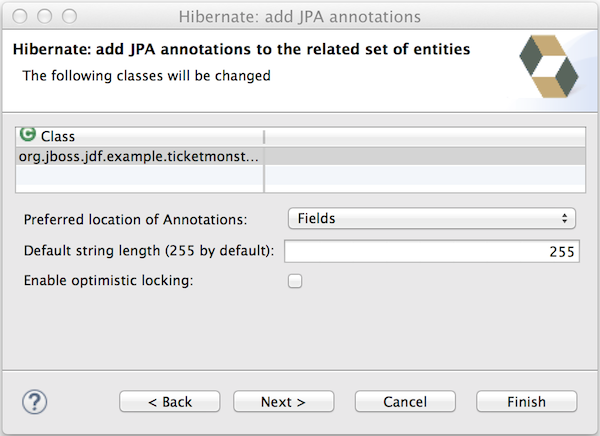
Venue.javafile. - Make the class an entity by right-clicking anywhere in the
Venueclass and clicking →. - Ensure org.jboss.jdf.example.ticketmonster.model.Venue is selected and click .
Figure 2.11.
VenueClass Selected for Adding JPA Annotations - Click and save the
Venue.javafile.
2.7. Prepare Event Records to Populate the Database
Warning
Procedure 2.7. Prepare Event Records
- In the Project Explorer view, expand ticket-monster→Java Resources→src/main/resources.
- Double-click the
import.sqlfile to open it for editing. - Double-click the import.sql view label to make the editor fill the window.
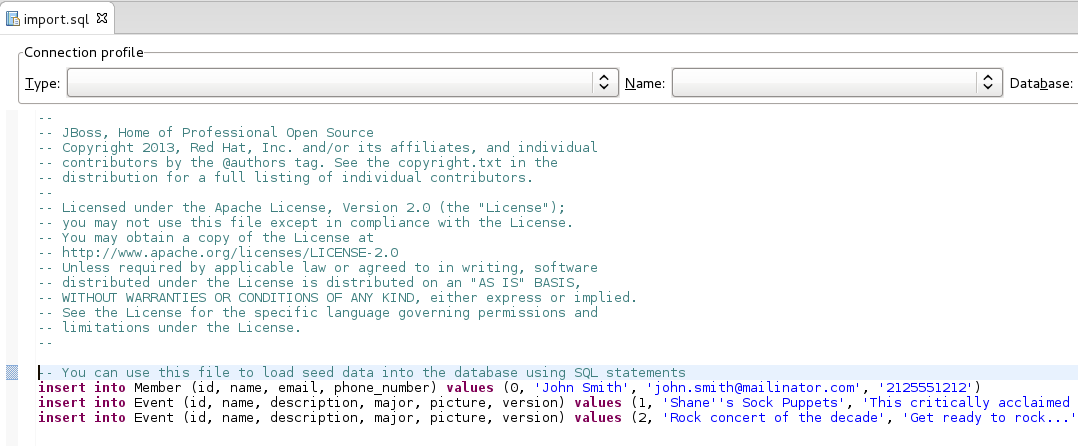
- Create a new Event record by copying the following on one line after the existing Member record
insert into Event (id, name, description, major, picture, version) values (1, 'Shane''s Sock Puppets', 'This critically acclaimed masterpiece...', true, 'http://dl.dropbox.com/u/65660684/640px-Carnival_Puppets.jpg', 1);
insert into Event (id, name, description, major, picture, version) values (1, 'Shane''s Sock Puppets', 'This critically acclaimed masterpiece...', true, 'http://dl.dropbox.com/u/65660684/640px-Carnival_Puppets.jpg', 1);Copy to Clipboard Copied! Toggle word wrap Toggle overflow - Create a second new Event record by copying the following on one line after the first new Event record
insert into Event (id, name, description, major, picture, version) values (2, 'Rock concert of the decade', 'Get ready to rock...', true, 'http://dl.dropbox.com/u/65660684/640px-Weir%2C_Bob_(2007)_2.jpg', 1);
insert into Event (id, name, description, major, picture, version) values (2, 'Rock concert of the decade', 'Get ready to rock...', true, 'http://dl.dropbox.com/u/65660684/640px-Weir%2C_Bob_(2007)_2.jpg', 1);Copy to Clipboard Copied! Toggle word wrap Toggle overflow Figure 2.12. Content of the
import.sqlFile for this TicketMonster Workflow - Save the
import.sqlfile. - Double-click the import.sql view label to make the editor return to its previous size.
2.8. Deploy the Application using JBoss Server Tools
Procedure 2.8. Deploy the Application Using JBoss Server Tools
- In the Project Explorer view, right-click the ticket-monster project name and click →.
- In the Run On Server wizard, ensure Choose an existing server is selected.
- From the Select the server that you want to use table, select jboss-eap-6.x and click .

Figure 2.13. JBoss EAP 6.x Selected in Run on Server Wizard
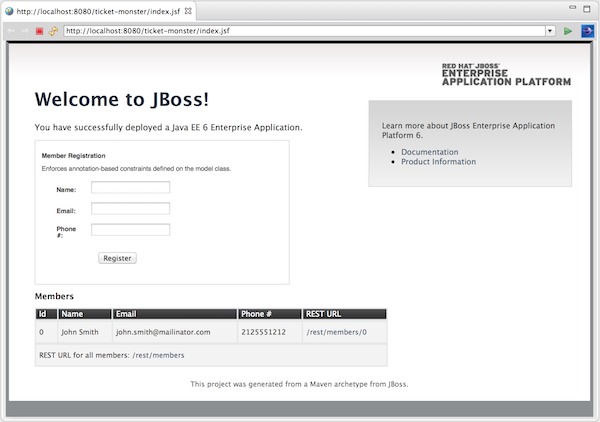
Figure 2.14. Sample Data in the Member Registration Fields
2.9. Access and Query the Database
Procedure 2.9. Access and Query the Database
- Click .
- Extract the contents of the archive
unzip jboss-eap-quickstarts-<version>.zip
$ unzip jboss-eap-quickstarts-<version>.zipCopy to Clipboard Copied! Toggle word wrap Toggle overflow - Copy the
h2console.warfile to the JBoss EAP 6.xdeploymentsdirectorycp jboss-eap-quickstarts-<version>/h2-console/h2console.war /path/to/jboss-eap/standalone/deployments/
$ cp jboss-eap-quickstarts-<version>/h2-console/h2console.war /path/to/jboss-eap/standalone/deployments/Copy to Clipboard Copied! Toggle word wrap Toggle overflow - Confirm the H2 console web application is running by looking at the server output in the Console view in JBoss Developer Studio.
Figure 2.15. Console Output showing
h2console.warDeployed - In the IDE open a new Web Browser by clicking →→, expand General and double-click Internal Web Browser.
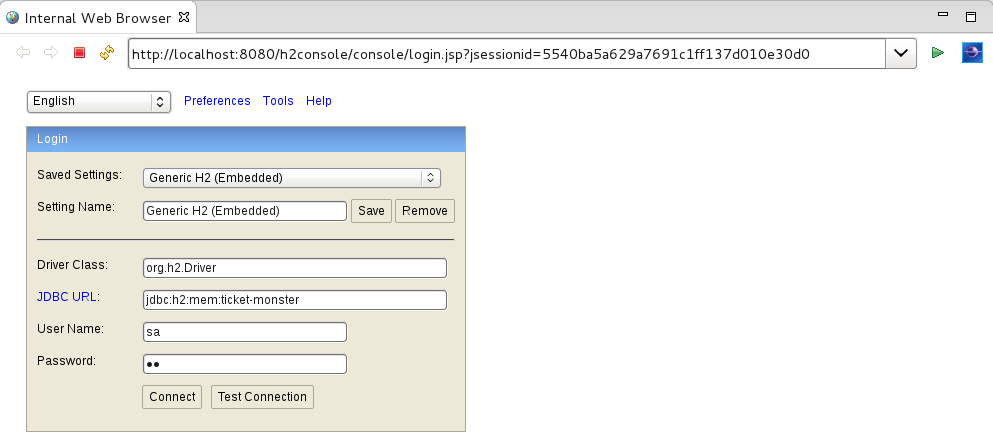
- In the address bar of the Web Browser, enter http://localhost:8080/h2console.
- In the Login area, in the JDBC URL field type
jdbc:h2:mem:ticket-monsterand in both the User Name and Password fields typesa. These settings are defined in theticket-monster-ds.xmlfile in theticket-monster/src/main/webapp/WEB-INFdirectory.Figure 2.16. Completed H2 Login Web Page
- Click to connect to the database.

Event, Member and Venue entities created in the TicketMonster project are displayed under jbdc:h2:mem:ticket-monster. Expanding the entities shows the fields associated with each. The records stored in the database are viewed using SQL search statements. For example, to display all the Event records stored in the database, click Event, which creates a SQL search statement based on Event in the SQL statement field, and click . The details of the Event sample records you added to import.sql earlier in the tutorial are visible in the table below the SQL statement field.
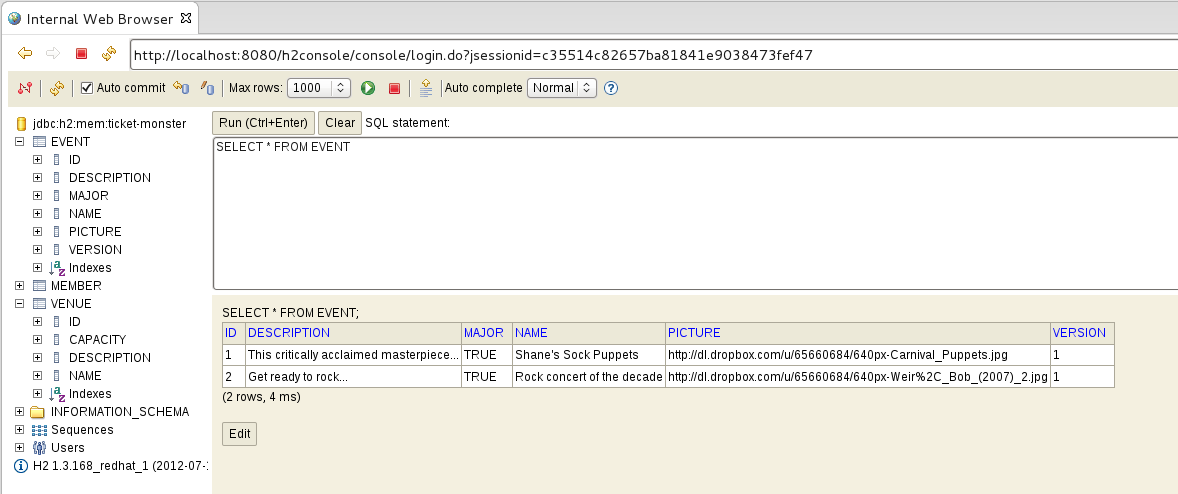
Figure 2.17. Event Records Stored in the H2 Database
2.10. Add a RESTful Web Service
Procedure 2.10. Add a RESTful Web Service
- In the Project Explorer view, expand ticket-monster→Java Resources→src/main/java.
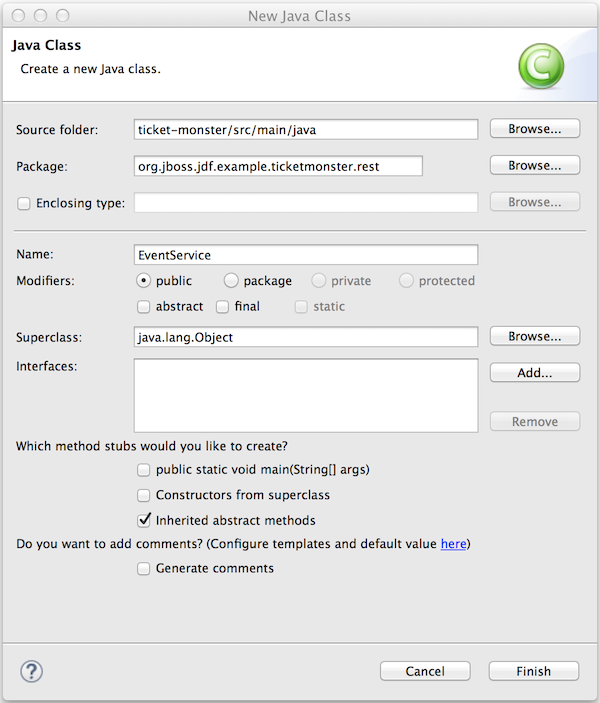
- Right-click org.jboss.jdf.example.ticketmonster.rest and click →.
- In the Name field, type
EventServiceand click . This creates aEventService.javafile that is automatically opened in a Java editor.Figure 2.18. Completed Name Field in Java Class Wizard
- Add the following lines immediately above
public class EventService {and add the following lines in between the braces of the EventService class@Path("/events") @RequestScoped@Path("/events") @RequestScopedCopy to Clipboard Copied! Toggle word wrap Toggle overflow Copy to Clipboard Copied! Toggle word wrap Toggle overflow - Save the
EventService.javafile. - Resolve the errors relating to missing imports by right-clicking anywhere in the
EventServiceclass and clicking →. - For each class name that is not unique, select the class to use as follows and click :
- For
MediaTypeselect javax.ws.rs.core.MediaType - For
Eventselect org.jboss.jdf.example.ticketmonster.model.Event - For
Producesselect javax.ws.rs.Produces - For
Listselect java.util.List - For
Injectselect java.inject.Inject - For
RequestScopedselect java.enterprise.context.RequestScoped
Figure 2.19. javax.ws.rs.core.MediaType Selected for
MediaTypeClass - When all the classes have been chosen, click . The import statements corresponding to the class names selected in the previous step are added to the
EventService.javafile. - Save the
EventService.javafile. - In the Servers view expand jboss-eap-6.x, right-click ticket-monster and click to update the deployed version of the application.
- Open a new Web Browser and in the address bar of the Web Browser enter http://localhost:8080/ticket-monster/rest/events. This shows the output of the new RESTful endpoint.

2.11. Add a User Interface Optimized for Mobile Devices
Procedure 2.11. Add a User Interface Optimized for Mobile Devices
- In the Project Explorer view, expand ticket-monster→src→main.
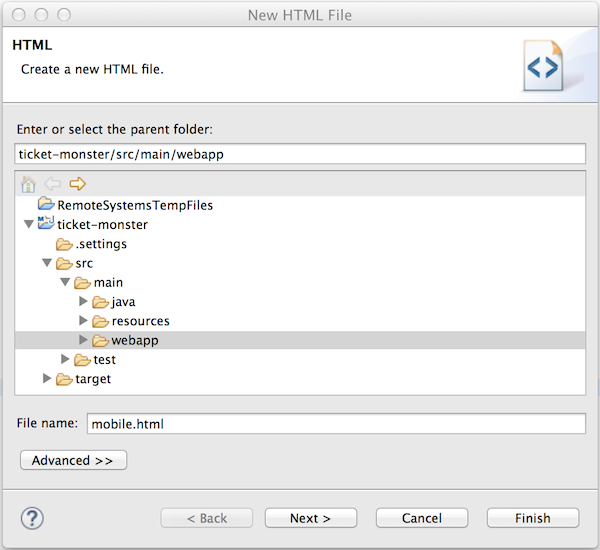
- Right-click webapp and click →.
- Complete the information about the file as follows:
- In the Enter or select the parent folder field, type
ticket-monster/src/main/webapp. - In the File name field, type
mobile.html.
Figure 2.20. New HTML File using the New HTML File Wizard
- Click .
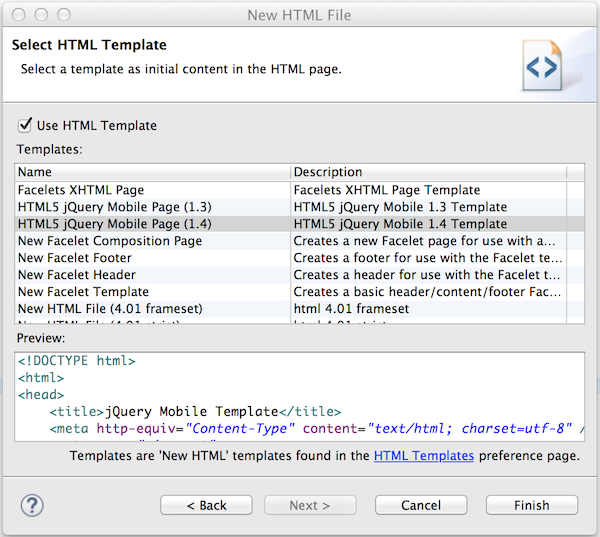
- From the Templates list, select HTML5 jQuery Mobile Page (1.4) and click . This creates a
mobile.htmlfile that is automatically opened in the Visual/Source tab of the Visual Page Editor.Figure 2.21. Selected HTML5 jQuery Mobile Page (1.4) Template in New HTML File Wizard
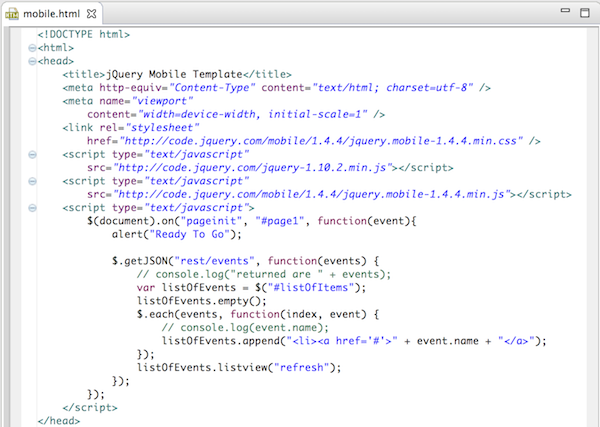
- List the events returned by the web service in the mobile user interface by adding the following lines immediately after the
alert("Ready To Go");lineCopy to Clipboard Copied! Toggle word wrap Toggle overflow Figure 2.22. Completed
mobile.htmlFile - Save the
mobile.htmlfile.
Note
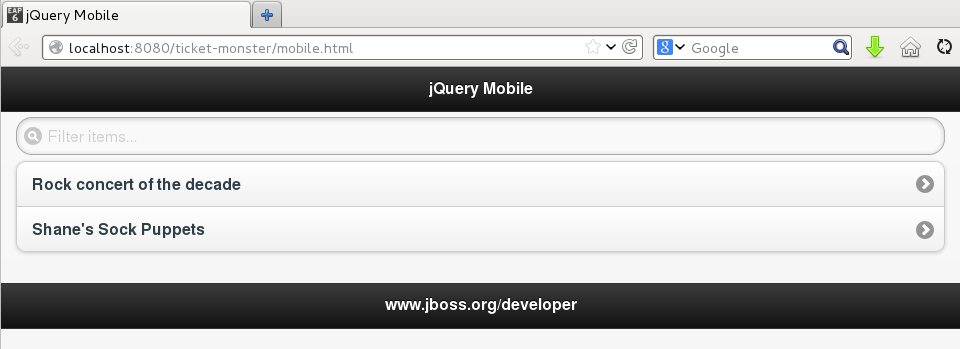
Figure 2.23. Events Displayed via Mobile Interface in External Web Browser
2.12. Test the Mobile User Interface Using BrowserSim
Procedure 2.12. Test the Mobile User Interface Using BrowserSim
- On the toolbar click the icon
 . A simulated device is displayed.
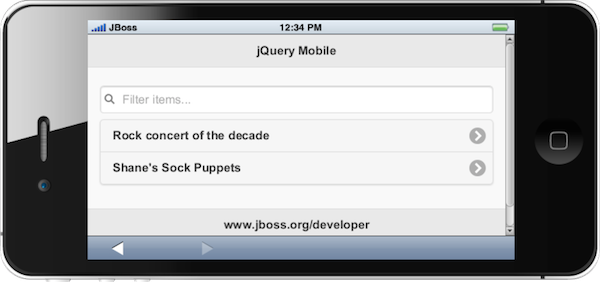
- At the Ready To Go prompt, click . The names of the events in the database are displayed.
Note
If the names of the events in the database are not displayed, check the address bar of the simulated device. The address bar must state http://localhost:8080/ticket-monster/mobile.html. - To rotate the mobile device, click in any corner of the simulated device.
Figure 2.24. Rotated Simulated Device
- Change the type of simulated device displayed by right-clicking anywhere on the simulated device, clicking and selecting from the different skins listed.
- Close BrowserSim by right-clicking anywhere on the simulated device and clicking .
Appendix A. Revision History
| Revision History | ||||
|---|---|---|---|---|
| Revision 8.0.0-3 | Fri Nov 21 2014 | |||
| ||||
| Revision 8.0.0-2 | Thu Oct 16 2014 | |||
| ||||