Install Red Hat JBoss Developer Studio
Red Hat JBoss Developer Studio 8.1
Information for users installing JBoss Developer Studio
Abstract
This document details how to install JBoss Developer Studio.
1. Install Options
Copy linkLink copied to clipboard!
Red Hat JBoss Developer Studio is provided in two variants depending on your circumstance: stand-alone and Bring-Your-Own-Eclipse (BYOE). JBoss Developer Studio stand-alone packages the JBoss Developer Studio plug-ins with Eclipse and dependent third-party plug-ins in an installer for all operating systems. JBoss Developer Studio BYOE packages the JBoss Developer Studio plug-ins for installing in your existing Eclipse instance.
There are a variety of ways of installing each JBoss Developer Studio variant and instructions are given here for completing the following tasks:
There are also several advanced and less common ways of installing JBoss Developer Studio and instructions are given here for completing the following tasks:
2. System Requirements
Copy linkLink copied to clipboard!
This release of JBoss Developer Studio is supported for use with a range of operating system, architecture and Java developer kit combinations; for a complete list, see https://access.redhat.com/articles/427493 on the Red Hat Customer Portal.
To install and run this release of JBoss Developer Studio, the following memory requirements are recommended:
- 4 GB RAM
- 1.5 GB of hard disk space
Note
The minimum memory requirements are 2 GB RAM and 750 MB of hard disk space.
3. Install JBoss Developer Studio BYOE when Online
Copy linkLink copied to clipboard!
JBoss Developer Studio BYOE is available to install from Eclipse Marketplace when you are online.
To install JBoss Developer Studio BYOE from Eclipse Marketplace, complete the following steps:
- Start Eclipse Luna.
- Drag the following link into your Eclipse workspace: http://marketplace.eclipse.org/marketplace-client-intro?mpc_install=1616973. Alternatively, click →, locate Red Hat JBoss Developer Studio 8.1.0 GA and click .
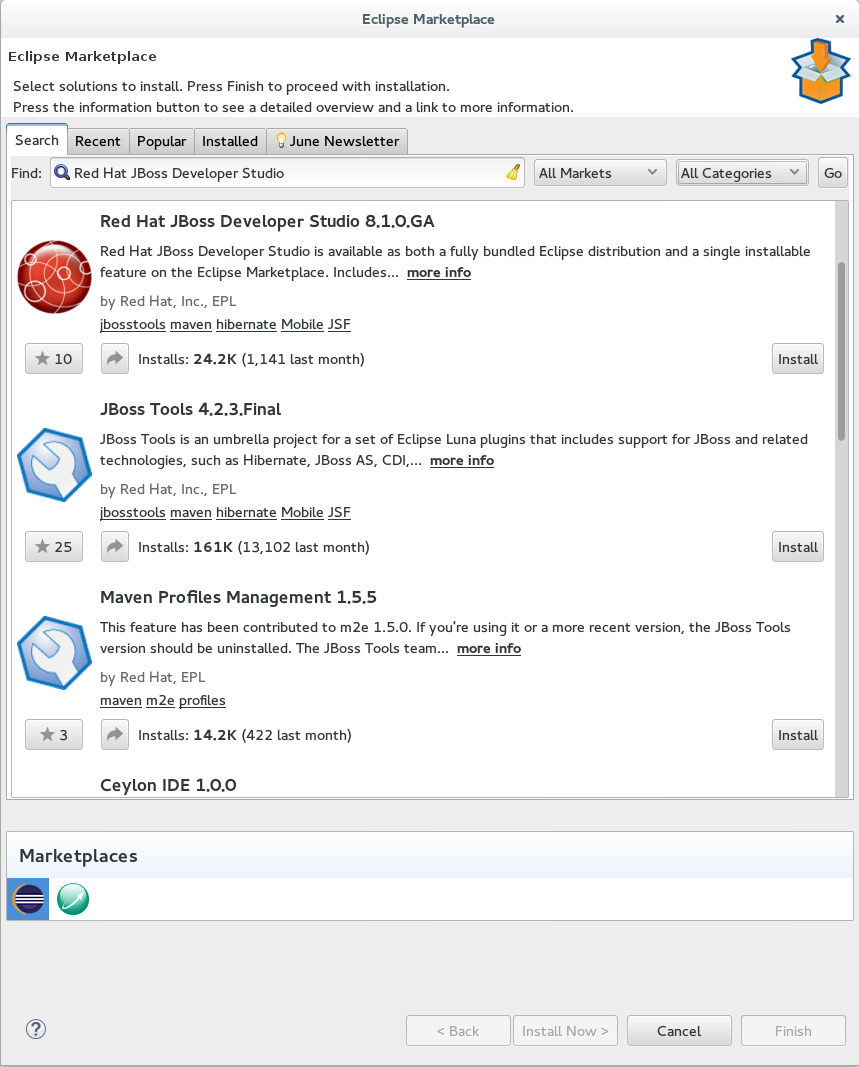
Figure 1. Red Hat JBoss Developer Studio (Luna) Available from Eclipse Marketplace
- Follow the on-screen instructions to complete the installation process.
During the installation process you may receive warnings about installing unsigned content. If this is the case, review the details of the content and if satisfied click to continue with the installation.
Once installation is complete, you are prompted to restart Eclipse. Click to restart immediately and if you need to save any unsaved changes to open projects. Note that IDE changes do not take effect until Eclipse is restarted.
4. Install JBoss Developer Studio BYOE when Offline
Copy linkLink copied to clipboard!
Two .zip files are provided for installing JBoss Developer Studio BYOE in offline mode, namely an Update archive and a Target Platform archive. Both of these .zip files are necessary for a successful install and they can be downloaded from https://devstudio.jboss.com/updates/8.0/ under Offline Install.
Important
You must first be online to download the
.zip files before proceeding to install JBoss Developer Studio BYOE in offline mode.
To install JBoss Developer Studio BYOE in offline mode, complete the following steps:
- Locate and download Red Hat JBoss Developer Studio <version> Update Site Zip and Target Platform Zip.
- Start Eclipse Luna.
- Click →→→.
- Click and click to locate the JBoss Developer Studio Target Platform .zip file.
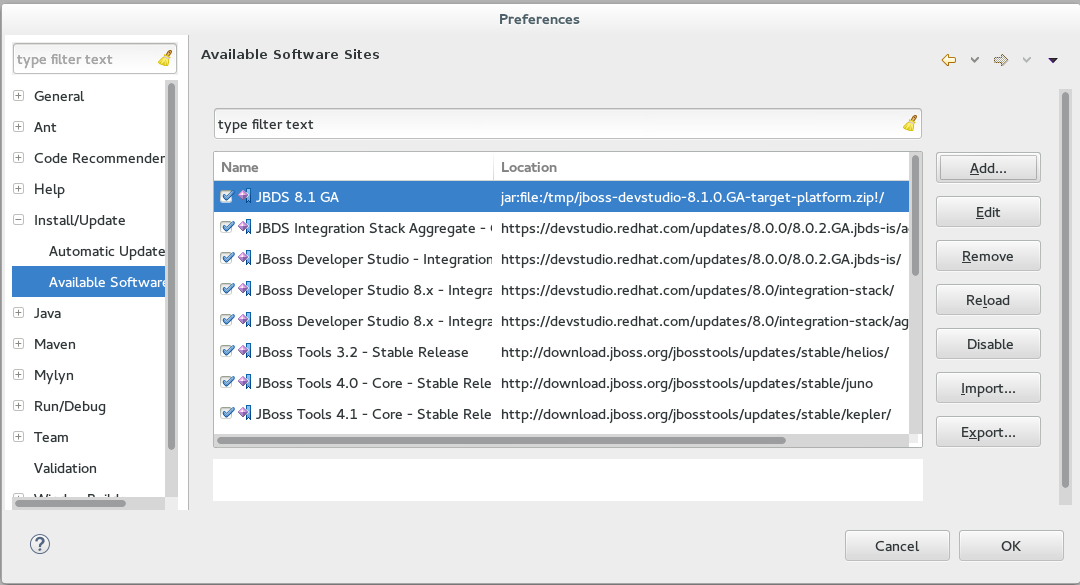
Figure 2. Add JBoss Developer Studio 8.1 Offline Target Platform File
- Click and click again to close the Preferences window.
- Click Help→Install New Software.
- In the Work with field, enter the path of the Update
.zipfile. Alternatively, click Add and click Archive to locate the file. - From the table of components, select JBoss Developer Studio <version> - Bring Your Own Eclipse and click Next.
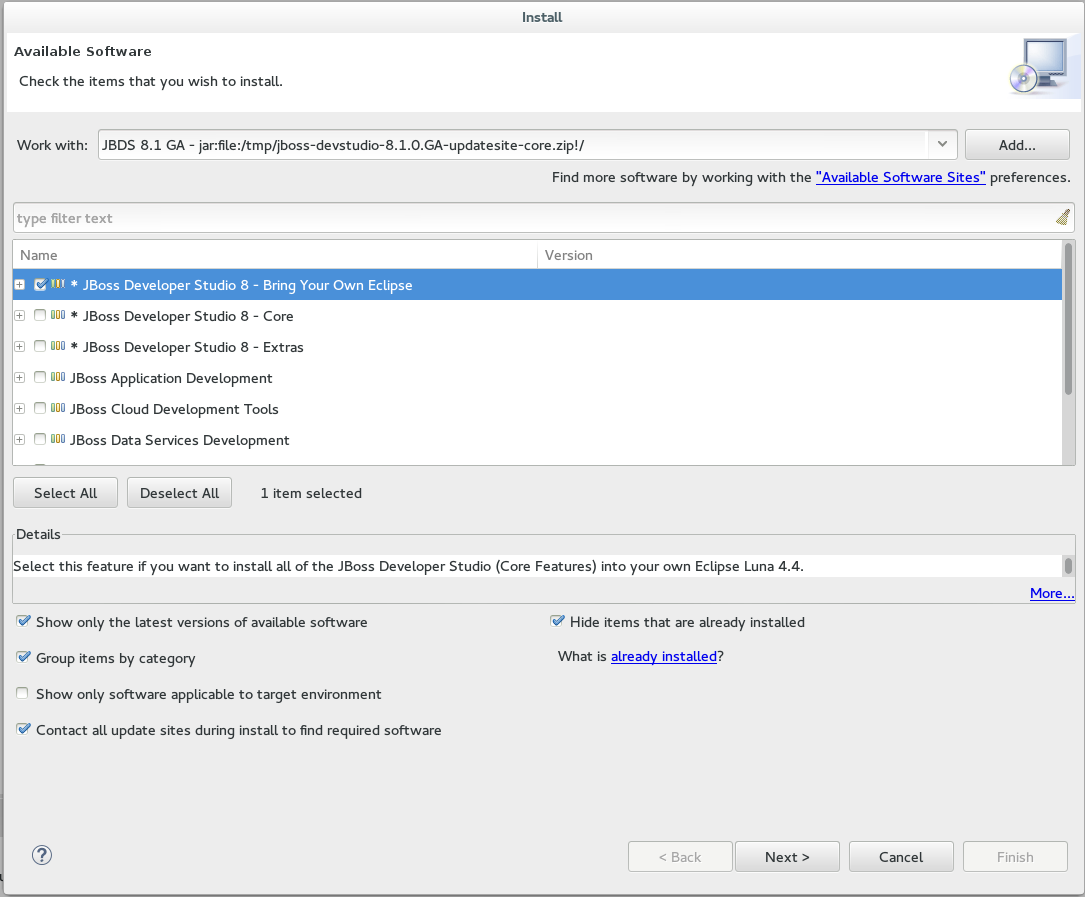
Figure 3. JBoss Developer Studio version - Bring Your Own Eclipse Selected for Installation
- Follow the on-screen instructions to complete the installation process.
During the installation process if you receive warnings about installing unsigned content, review the details of the content and if satisfied click OK to continue with the installation.
Once installation is complete, you are prompted to restart Eclipse. Click Yes to restart immediately and No if you need to save any unsaved changes to open projects. Note that IDE changes do not take effect until Eclipse is restarted.
5. Install JBoss Developer Studio Stand-alone
Copy linkLink copied to clipboard!
An installer is provided for JBoss Developer Studio stand-alone. This installer is available from a variety of sources, including the Red Hat Customer Portal.
To install JBoss Developer Studio stand-alone, complete the following steps:
- Locate and download Red Hat JBoss Developer Studio <version> Stand-alone Installer.
- Start the installerAlternatively, you may be able to start the installer by double-clicking the
$ cd /path/to/.jar $ java -jar jboss-devstudio-version-installer-standalone.jar.jarfile. On OS X systems, hold control and click the.jarfile, click , review the.jarfile details and if satisfied click . - Follow the on-screen instructions to complete the installation process.
When working through the installer you may find the following additional information useful:
- Installer step 4
- You must specify a Java developer kit with a 32-bit JRE to install a 32-bit version of JBoss Developer Studio and a 64-bit JRE to install a 64-bit version of JBoss Developer Studio. To change the bit version of the Java developer kit to be used for installing JBoss Developer Studio, in the text field type the path to the appropriate bit version of the Java developer kit.
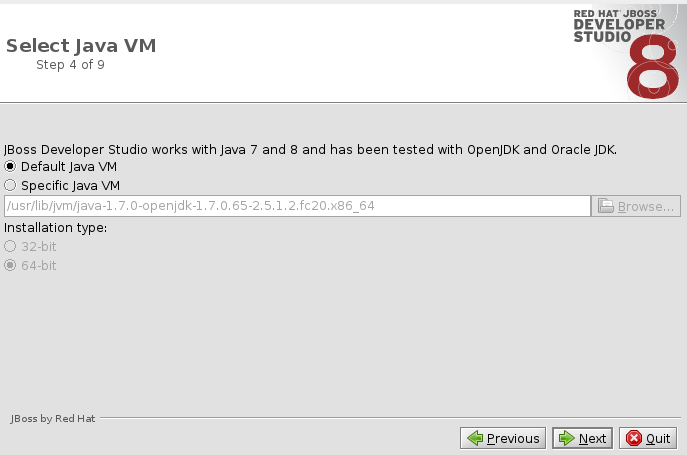
Figure 4. Default Java VM Selected for Running the IDE
- Installer step 5
- To make use of automatic runtime detection for finding already installed application servers, click Add. In the Location field, type the path from which recursive scanning for application servers is to commence or click to navigate to the location:
- To detect a specific application server, select the install directory for that application server.
- To detect multiple application servers, select a directory higher up the directory tree. Alternatively, this can be achieved by adding multiple locations for scanning.
This task can also be completed after JBoss Developer Studio is installed using the JBoss Runtime Detection wizard, accessed through the IDE Preferences window.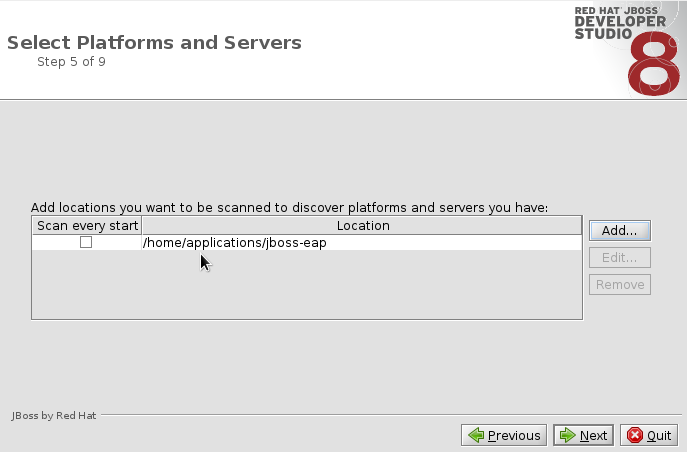
Figure 5. Path Selected for Recursive Scanning for Application Servers
6. Install JBoss Developer Studio Stand-alone and JBoss EAP
Copy linkLink copied to clipboard!
A single installer is provided for both JBoss Developer Studio stand-alone and Red Hat JBoss Enterprise Application Platform. A specific JBoss EAP version is packaged in the installer; for details of the JBoss EAP version see https://access.redhat.com/articles/427493. This installer is available from a variety of sources, including the Red Hat Customer Portal.
To install JBoss Developer Studio stand-alone and JBoss EAP, complete the following steps:
- Locate and download Red Hat JBoss Developer Studio <version> Installer with EAP.
- Start the installerAlternatively, you may be able to start the installer by double-clicking the
$ cd /path/to/.jar $ java -jar jboss-devstudio-version-installer-eap.jar.jarfile. On OS X systems, hold control and click the.jarfile, click , review the.jarfile details and if satisfied click . - Follow the on-screen instructions to continue the installation process.
- At installer step 5, when asked if you want to install JBoss EAP, click .
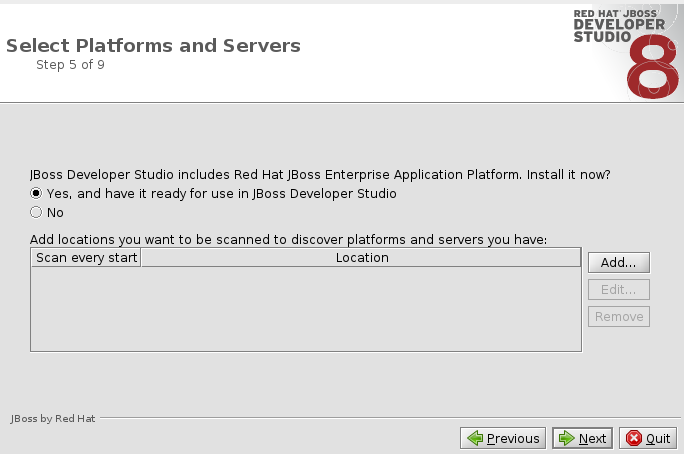
Figure 6. Check Box Selected for Installing JBoss EAP
- Continue to follow the on-screen instructions to complete the installation process.
This additional installer option installs JBoss EAP in a subdirectory of the JBoss Developer Studio installation and generates a complete default server definition within the IDE with which to manage the JBoss EAP instance and deployed applications.
7. Advanced Install Tasks
Copy linkLink copied to clipboard!
7.1. Install JBoss Developer Studio by Script
Copy linkLink copied to clipboard!
A scripted method is available for use when installing JBoss Developer Studio stand-alone with the installer. The scripted installation method removes the need to step through the installer GUI for every installation, enabling simplified repeat installations or installations in bulk.
The instructions here detail how you can install JBoss Developer Studio stand-alone stepping through the installer GUI once and then use a generated script for subsequent installations. The JBoss Developer Studio stand-alone installer is available from a variety of sources, including the Red Hat Customer Portal.
To install JBoss Developer Studio by script, complete the following steps:
- Locate and download Red Hat JBoss Developer Studio <version> Stand-alone Installer.
- Start the installer
$ cd /path/to/.jar $ java -jar jboss-devstudio-version-installer-standalone.jar - Step through the installer GUI once to generate a
InstallConfigRecord.xmlfile located in the/path/to/jboss-devstudio/directory. - Perform repeat identical installations without stepping through the installer GUI
$ java -jar jboss-devstudio-version-installer-standalone.jar /path/to/jboss-devstudio/InstallConfigRecord.xml
Note
The generated
InstallConfigRecord.xml file is machine-specific, using the Java developer kit and installation paths of your system. To use the InstallConfigRecord.xml file for systems with different operating systems, Java developer kits or paths, you must manually modify the file.
7.2. Build the JBoss Developer Studio Stand-alone Installer from Source
Copy linkLink copied to clipboard!
A
.zip file is provided from which you can build the JBoss Developer Studio stand-alone installer. The source code archive is available from a variety of sources, including the Red Hat Customer Portal.
Important
Maven must be installed to build the installer from the source code. To obtain and configure Maven, see http://maven.apache.org/.
To build the JBoss Developer Studio stand-alone installer from source, complete the following steps:
- Locate and download Red Hat JBoss Developer Studio <version> Sources Zip.
- Extract the contents of the downloaded archive
$ cd path/to/.zip $ unzip jboss-devstudio-version-installer-src.zip - Build the installer
$ cd devstudio/product
$ mvn clean install
Building takes some time to complete, after which the installer .jar file is located in the
/path/to/jboss-devstudio/installer/target/ directory.
A. Revision History
Copy linkLink copied to clipboard!
| Revision History | |||
|---|---|---|---|
| Revision 8.1.0-5 | Mon Jul 20 2015 | ||
| |||
| Revision 8.1.0-4 | Tue Mar 31 2015 | ||
| |||
| Revision 8.1.0-3 | Wed Mar 25 2015 | ||
| |||
| Revision 8.1.0-2 | Mon Mar 23 2015 | ||
| |||
| Revision 8.1.0-1 | Wed Feb 18 2015 | ||
| |||
Legal Notice
Copy linkLink copied to clipboard!
Copyright © 2014 Red Hat, Inc.
This document is licensed by Red Hat under the Creative Commons Attribution-ShareAlike 3.0 Unported License. If you distribute this document, or a modified version of it, you must provide attribution to Red Hat, Inc. and provide a link to the original. If the document is modified, all Red Hat trademarks must be removed.
Red Hat, as the licensor of this document, waives the right to enforce, and agrees not to assert, Section 4d of CC-BY-SA to the fullest extent permitted by applicable law.
Red Hat, Red Hat Enterprise Linux, the Shadowman logo, JBoss, OpenShift, Fedora, the Infinity logo, and RHCE are trademarks of Red Hat, Inc., registered in the United States and other countries.
Linux® is the registered trademark of Linus Torvalds in the United States and other countries.
Java® is a registered trademark of Oracle and/or its affiliates.
XFS® is a trademark of Silicon Graphics International Corp. or its subsidiaries in the United States and/or other countries.
MySQL® is a registered trademark of MySQL AB in the United States, the European Union and other countries.
Node.js® is an official trademark of Joyent. Red Hat Software Collections is not formally related to or endorsed by the official Joyent Node.js open source or commercial project.
The OpenStack® Word Mark and OpenStack logo are either registered trademarks/service marks or trademarks/service marks of the OpenStack Foundation, in the United States and other countries and are used with the OpenStack Foundation's permission. We are not affiliated with, endorsed or sponsored by the OpenStack Foundation, or the OpenStack community.
All other trademarks are the property of their respective owners.