Development Guide
For Use with Red Hat JBoss Enterprise Application Platform 6
Abstract
Chapter 1. Get Started Developing Applications
1.1. Introduction
1.1.1. About Red Hat JBoss Enterprise Application Platform 6
1.2. Prerequisites
1.2.1. Become Familiar with Java Enterprise Edition 6
1.2.1.1. Overview of EE 6 Profiles
1.2.1.2. Java Enterprise Edition 6 Web Profile
Java EE 6 Web Profile Requirements
- Java Platform, Enterprise Edition 6
Java Web Technologies
- Servlet 3.0 (JSR 315)
- JSP 2.2 and Expression Language (EL) 1.2
- JavaServer Faces (JSF) 2.1 (JSR 314)
- Java Standard Tag Library (JSTL) for JSP 1.2
- Debugging Support for Other Languages 1.0 (JSR 45)
Enterprise Application Technologies
- Contexts and Dependency Injection (CDI) (JSR 299)
- Dependency Injection for Java (JSR 330)
- Enterprise JavaBeans 3.1 Lite (JSR 318)
- Java Persistence API 2.0 (JSR 317)
- Common Annotations for the Java Platform 1.1 (JSR 250)
- Java Transaction API (JTA) 1.1 (JSR 907)
- Bean Validation (JSR 303)
1.2.1.3. Java Enterprise Edition 6 Full Profile
Items Included in the EE 6 Full Profile
- EJB 3.1 (not Lite) (JSR 318)
- Java EE Connector Architecture 1.6 (JSR 322)
- Java Message Service (JMS) API 1.1 (JSR 914)
- JavaMail 1.4 (JSR 919)
Web Service Technologies
- Jax-RS RESTful Web Services 1.1 (JSR 311)
- Implementing Enterprise Web Services 1.3 (JSR 109)
- JAX-WS Java API for XML-Based Web Services 2.2 (JSR 224)
- Java Architecture for XML Binding (JAXB) 2.2 (JSR 222)
- Web Services Metadata for the Java Platform (JSR 181)
- Java APIs for XML-based RPC 1.1 (JSR 101)
- Java APIs for XML Messaging 1.3 (JSR 67)
- Java API for XML Registries (JAXR) 1.0 (JSR 93)
Management and Security Technologies
- Java Authentication Service Provider Interface for Containers 1.0 (JSR 196)
- Java Authentication Contract for Containers 1.3 (JSR 115)
- Java EE Application Deployment 1.2 (JSR 88)
- J2EE Management 1.1 (JSR 77)
1.2.2. About Modules and the New Modular Class Loading System used in JBoss EAP 6
1.2.2.1. Modules
- Static Modules
- Static Modules are predefined in the
EAP_HOME/modules/directory of the application server. Each sub-directory represents one module and defines amain/subdirectory that contains a configuration file (module.xml) and any required JAR files. The name of the module is defined in themodule.xmlfile. All the application server provided APIs are provided as static modules, including the Java EE APIs as well as other APIs such as JBoss Logging.Example 1.1. Example module.xml file
<?xml version="1.0" encoding="UTF-8"?> <module xmlns="urn:jboss:module:1.0" name="com.mysql"> <resources> <resource-root path="mysql-connector-java-5.1.15.jar"/> </resources> <dependencies> <module name="javax.api"/> <module name="javax.transaction.api"/> </dependencies> </module>The module name,com.mysql, should match the directory structure for the module, excluding themain/subdirectory name.The modules provided in JBoss EAP distributions are located in asystemdirectory within theEAP_HOME/modulesdirectory. This keeps them separate from any modules provided by third parties.Any Red Hat provided layered products that layer on top of JBoss EAP 6.1 or later will also install their modules within thesystemdirectory.Creating custom static modules can be useful if many applications are deployed on the same server that use the same third-party libraries. Instead of bundling those libraries with each application, a module containing these libraries can be created and installed by the JBoss administrator. The applications can then declare an explicit dependency on the custom static modules.Users must ensure that custom modules are installed into theEAP_HOME/modulesdirectory, using a one directory per module layout. This ensures that custom versions of modules that already exist in thesystemdirectory are loaded instead of the shipped versions. In this way, user provided modules will take precedence over system modules.If you use theJBOSS_MODULEPATHenvironment variable to change the locations in which JBoss EAP searches for modules, then the product will look for asystemsubdirectory structure within one of the locations specified. Asystemstructure must exist somewhere in the locations specified withJBOSS_MODULEPATH. - Dynamic Modules
- Dynamic Modules are created and loaded by the application server for each JAR or WAR deployment (or subdeployment in an EAR). The name of a dynamic module is derived from the name of the deployed archive. Because deployments are loaded as modules, they can configure dependencies and be used as dependencies by other deployments.
1.3. Set Up the Development Environment
1.3.1. Download and Install Red Hat JBoss Developer Studio
1.3.1.1. Setup Red Hat JBoss Developer Studio
1.3.1.2. Download Red Hat JBoss Developer Studio
- Go to https://access.redhat.com/.
- Select from the menu at the top of the page.
- Find
Red Hat JBoss Developer Studioin the list and click on it. - Select the appropriate version and click .
1.3.1.3. Install Red Hat JBoss Developer Studio
- Prerequisites:
Procedure 1.1. Install Red Hat JBoss Developer Studio
- Open a terminal.
- Move into the directory containing the downloaded
.jarfile. - Run the following command to launch the GUI installer:
java -jar jbdevstudio-build_version.jar - Click to start the installation process.
- Select I accept the terms of this license agreement and click .
- Adjust the installation path and click .
Note
If the installation path folder does not exist, a prompt will appear. Click to create the folder. - Choose a JVM, or leave the default JVM selected, and click .
- Add any application platforms available, and click .
- Review the installation details, and click .
- Click when the installation process is complete.
- Configure the desktop shortcuts for Red Hat JBoss Developer Studio, and click .
- Click .
1.3.1.4. Start Red Hat JBoss Developer Studio
- Prerequisites:
Procedure 1.2. Command to start Red Hat JBoss Developer Studio
- Open a terminal.
- Change into the installation directory.
- Run the following command to start Red Hat JBoss Developer Studio:
[localhost]$ ./jbdevstudio
1.3.1.5. Add the JBoss EAP Server Using Define New Server
Procedure 1.3. Add the server
- Open the Servers tab. If there is no Servers tab, add it to the panel as follows:
- Click → → .
- Select Servers from the Server folder and click .
- Click on No servers are available. Click this link to create a new server... or, if you prefer, right-click within the blank Server panel and select → .
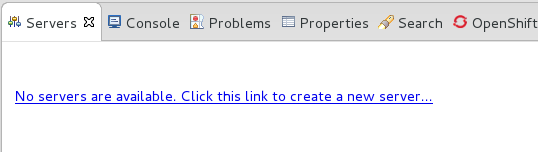
Figure 1.1. Add a new server - No servers available
- Expand JBoss Enterprise Middleware and choose . Enter a server name, for example, "JBoss Enterprise Application Platform 6.4", then click to create the JBoss runtime and define the server. The next time you define a new server, this dialog displays a Server runtime environment selection with the new runtime definition.
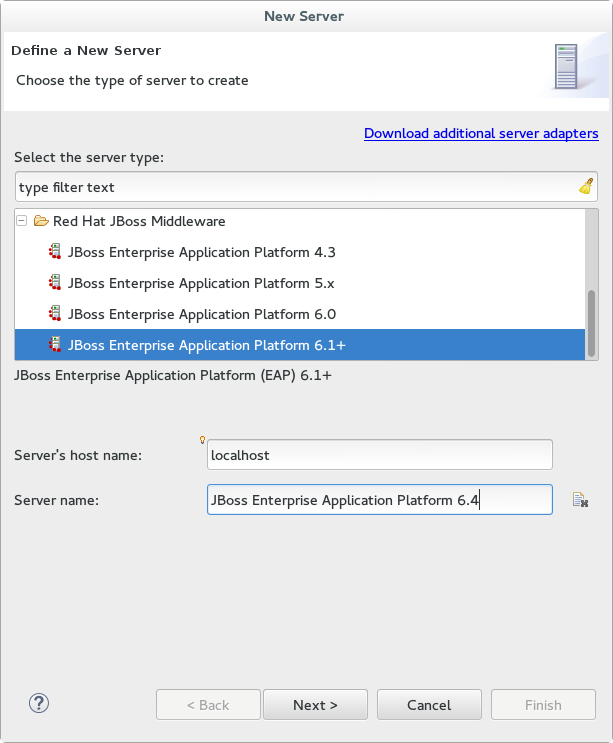
Figure 1.2. Define a New Server
- Create a Server Adapter to manage starting and stopping the server. Keep the defaults and click .
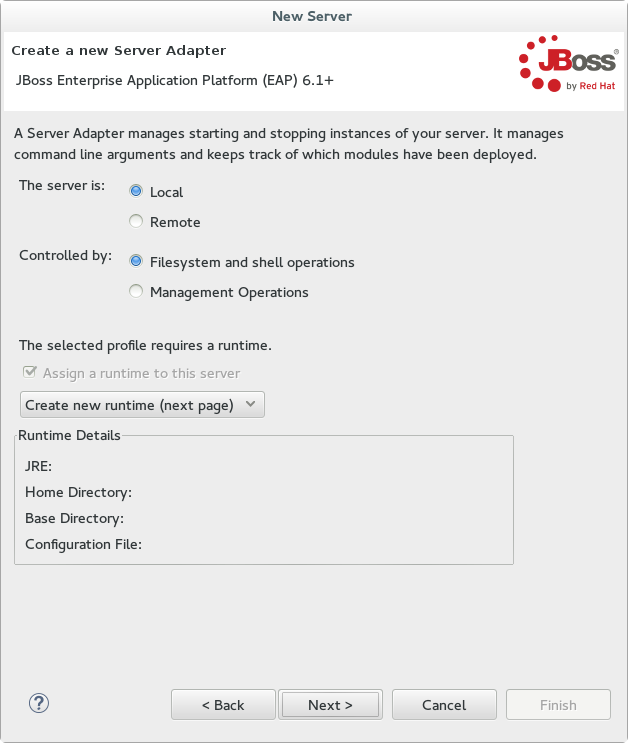
Figure 1.3. Create a New Server Adapter
- Enter a name, for example "JBoss EAP 6.4 Runtime". Under Home Directory, click and navigate to your JBoss EAP install location. Then click .
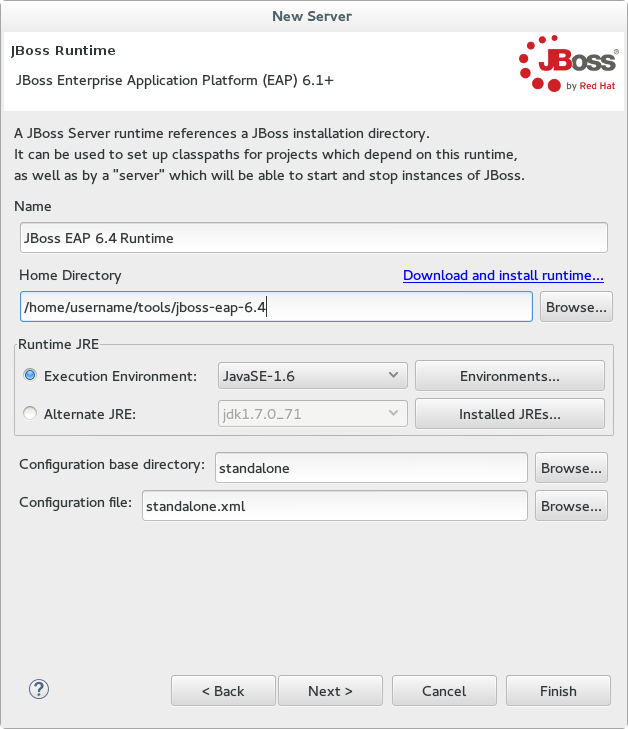
Figure 1.4. Add New Server Runtime Environment
Note
Some quickstarts require that you run the server with a different profile or additional arguments. To deploy a quickstart that requires thefullprofile, you must define a new server and add a Server Runtime Environment that specifiesstandalone-full.xmlfor the Configuration file. Be sure to give the new server a descriptive name. - Configure existing projects for the new server. Because you do not have any projects at this point, click .
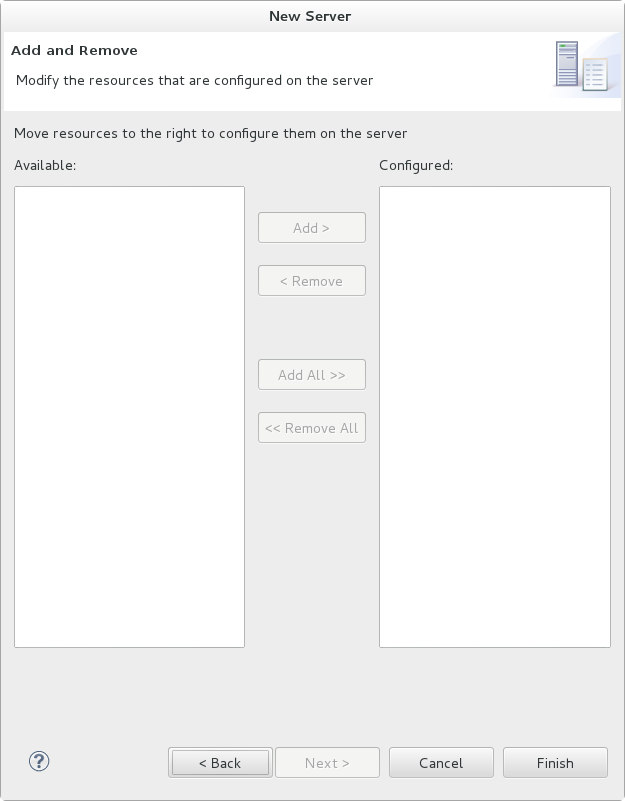
Figure 1.5. Modify resources for the new JBoss server
The JBoss EAP Runtime Server is listed in the Servers tab.

Figure 1.6. Server appears in the server list
1.4. Run Your First Application
1.4.1. Download the Quickstart Code Examples
1.4.1.1. Access the Quickstarts
JBoss EAP 6 comes with a series of quickstart examples designed to help users begin writing applications using the Java EE 6 technologies.
Prerequisites
- Maven 3.0.0 or higher. For more information on installing Maven, refer to http://maven.apache.org/download.html.
- The JBoss EAP 6 Maven repository is available online, so it is not necessary to download and install it locally. If you plan to use the online repository, you can skip to the next step. If you prefer to install a local repository, see: Section 2.2.3, “Install the JBoss EAP 6 Maven Repository Locally”.
Procedure 1.4. Download the Quickstarts
- Open a web browser and access this URL: https://access.redhat.com/jbossnetwork/restricted/listSoftware.html?product=appplatform.
- Find "Quickstarts" in the list.
- Click the button to download a Zip archive containing the examples.
- Unzip the archive in a directory of your choosing.
The JBoss EAP Quickstarts have been downloaded and unzipped. Refer to the README.md file in the top-level directory of the Quickstart archive for instructions about deploying each quickstart.
1.4.2. Run the Quickstarts
1.4.2.1. Run the Quickstarts in Red Hat JBoss Developer Studio
Procedure 1.5. Import the quickstarts into Red Hat JBoss Developer Studio
Important
- If you have not yet done so, Section 2.3.2, “Configure the JBoss EAP 6 Maven Repository Using the Maven Settings”.
- Start Red Hat JBoss Developer Studio.
- From the menu, select → .
- In the selection list, choose → , then click .
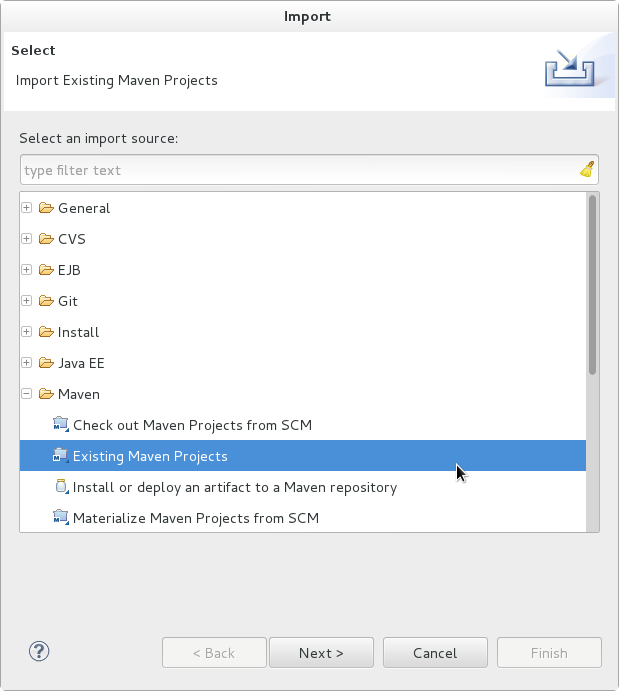
Figure 1.7. Import Existing Maven Projects
- Browse to the directory of the quickstart you plan to test, for example the
helloworldquickstart, and click . The Projects list box is populated with thepom.xmlfile of the selected quickstart project.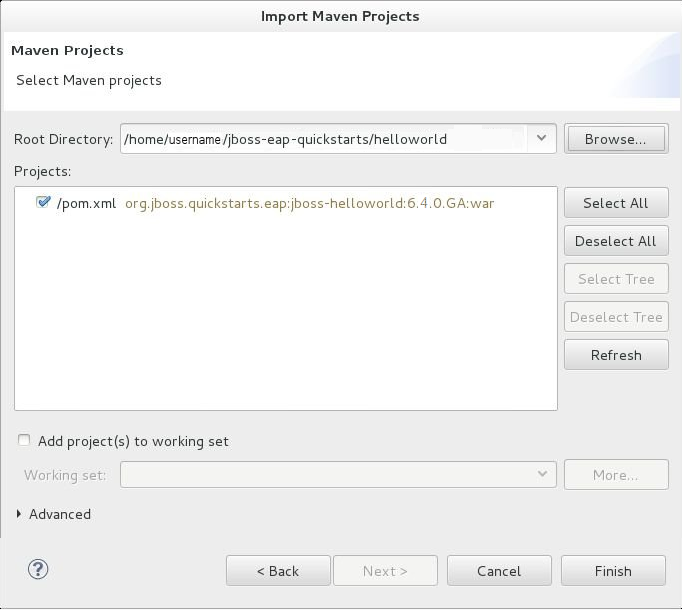
Figure 1.8. Select Maven Projects
- Click .
Procedure 1.6. Build and Deploy the helloworld quickstart
helloworld quickstart is one of the simplest quickstarts and is a good way to verify that the JBoss server is configured and running correctly.
- If you do not see a Servers tab or have not yet defined a server, follow the instructions here: Section 1.3.1.5, “Add the JBoss EAP Server Using Define New Server”. If you plan to deploy a quickstart that requires the
fullprofile or additional startup arguments, be sure to create the server runtime environment as noted in the quickstart instructions. - Right-click on the
jboss-helloworldproject in the Project Explorer tab and select . You are provided with a list of choices. Select .
Figure 1.9. Run As - Run on Server
- Select JBoss EAP 6.1+ Runtime Server from the server list and click .
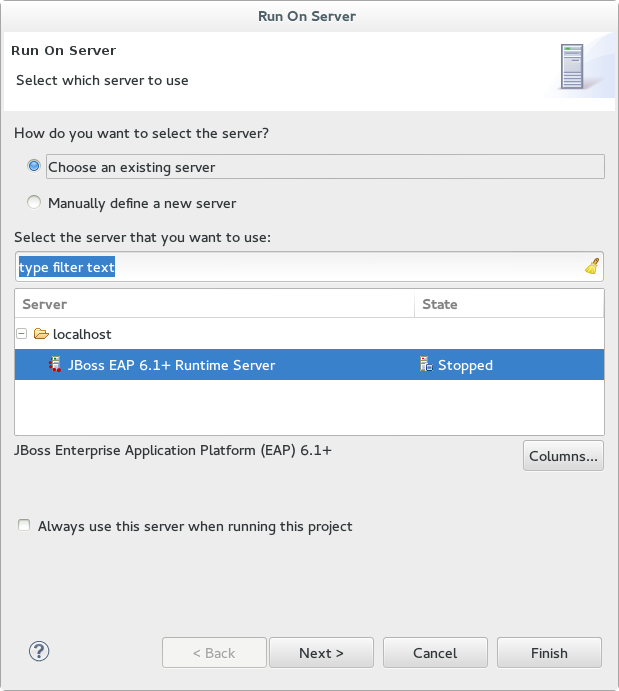
Figure 1.10. Run on Server
- The next screen displays the resources that are configured on the server. The
jboss-helloworldquickstart is configured for you. Click to deploy the quickstart.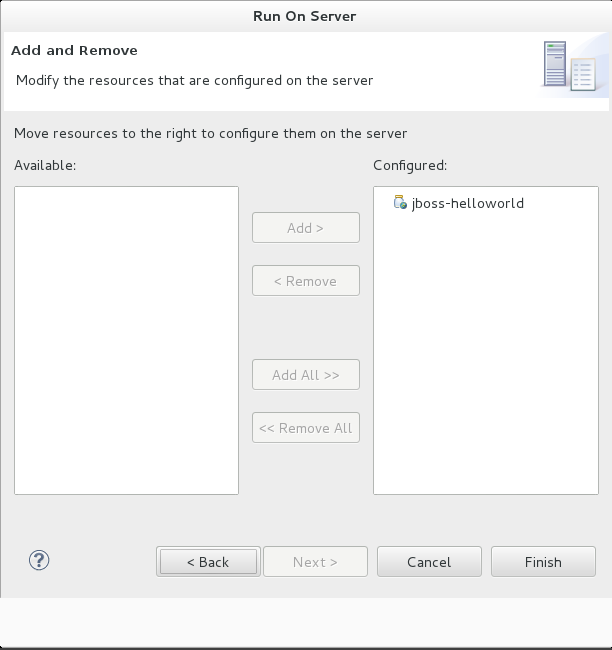
Figure 1.11. Modify Resources Configured on the Server
- Review the results.
- In the
Servertab, the JBoss EAP 6.x Runtime Server status changes to[Started, Republish]. - The server Console tab shows messages detailing the JBoss EAP 6.x server start and the helloworld quickstart deployment.
- A helloworld tab appears displaying the URL http://localhost:8080/jboss-helloworld/HelloWorld and the text "Hello World!".
- The following messages in the Console confirm deployment of the
jboss-helloworld.warfile:The registered web context is appended toJBAS018210: Register web context: /jboss-helloworld JBAS018559: Deployed "jboss-helloworld.war" (runtime-name : "jboss-helloworld.war")http://localhost:8080to provide the URL used to access the deployed application.
- To verify the
helloworldquickstart deployed successfully to the JBoss server, open a web browser and access the application at this URL: http://localhost:8080/jboss-helloworld
Procedure 1.7. Run the bean-validation quickstart Arquillian tests
bean-validation quickstart is an example of a quickstart that provides Arquillian tests.
- Follow the procedure above to import the
bean-validationquickstart into Red Hat JBoss Developer Studio. - In the Servers tab, right-click on the server and choose to start the JBoss EAP server. If you do not see a Servers tab or have not yet defined a server, follow the instructions here: Section 1.3.1.5, “Add the JBoss EAP Server Using Define New Server”.
- Right-click on the
jboss-bean-validationproject in the Project Explorer tab and select . You are provided with a list of choices. Select . - In the Goals input field of the Edit Configuration dialog, type:
clean test -Parq-jbossas-remoteThen click .
Figure 1.12. Edit Configuration
- Review the results.The server Console tab shows messages detailing the JBoss EAP server start and the output of the
bean-validationquickstart Arquillian tests.------------------------------------------------------- T E S T S ------------------------------------------------------- Running org.jboss.as.quickstarts.bean_validation.test.MemberValidationTest Tests run: 5, Failures: 0, Errors: 0, Skipped: 0, Time elapsed: 2.189 sec Results : Tests run: 5, Failures: 0, Errors: 0, Skipped: 0 [INFO] ------------------------------------------------------------------------ [INFO] BUILD SUCCESS [INFO] ------------------------------------------------------------------------
1.4.2.2. Run the Quickstarts Using a Command Line
Procedure 1.8. Build and Deploy the Quickstarts Using a Command Line
- If you have not yet done so, Section 2.3.2, “Configure the JBoss EAP 6 Maven Repository Using the Maven Settings”.
- Review the
README.htmlfile in the root directory of the quickstarts.This file contains general information about system requirements, how to configure Maven, how to add users, and how to run the Quickstarts. Be sure to read through it before you get started.It also contains a table listing the available quickstarts. The table lists each quickstart name and the technologies it demonstrates. It gives a brief description of each quickstart and the level of experience required to set it up. For more detailed information about a quickstart, click on the quickstart name.Some quickstarts are designed to enhance or extend other quickstarts. These are noted in thePrerequisitescolumn. If a quickstart lists prerequisites, you must install them first before working with the quickstart.Some quickstarts require the installation and configuration of optional components. Do not install these components unless the quickstart requires them. - Run the
helloworldquickstart.Thehelloworldquickstart is one of the simplest quickstarts and is a good way to verify that the JBoss server is configured and running correctly. Open theREADME.htmlfile in the root of thehelloworldquickstart. It contains detailed instructions on how to build and deploy the quickstart and access the running application - Run the other quickstarts.Follow the instructions in the
README.htmlfile located in the root folder of each quickstart to run the example.
1.4.3. Review the Quickstart Tutorials
1.4.3.1. Explore the helloworld Quickstart
The helloworld quickstart shows you how to deploy a simple Servlet to JBoss EAP 6. The business logic is encapsulated in a service which is provided as a CDI (Contexts and Dependency Injection) bean and injected into the Servlet. This quickstart is very simple. All it does is print "Hello World" onto a web page. It is a good starting point to be sure you have configured and started your server properly.
helloworld quickstart.
- Install Red Hat JBoss Developer Studio following the procedure here: Section 1.3.1.3, “Install Red Hat JBoss Developer Studio”.
- Configure Maven for use with Red Hat JBoss Developer Studio following the procedure here: Section 2.3.3, “Configure Maven for Use with Red Hat JBoss Developer Studio”.
- Follow the procedures here to import, build, and deploy the
helloworldquickstart in Red Hat JBoss Developer Studio: Section 1.4.2.1, “Run the Quickstarts in Red Hat JBoss Developer Studio” - Verify the
helloworldquickstart was deployed successfully to JBoss EAP by opening a web browser and accessing the application at this URL: http://localhost:8080/jboss-helloworld
Procedure 1.9. Examine the Directory Structure
QUICKSTART_HOME/helloworld directory. The helloworld quickstart is comprised of a Servlet and a CDI bean. It also includes an empty beans.xml file which tells JBoss EAP 6 to look for beans in this application and to activate the CDI.
- The
beans.xmlfile is located in theWEB-INF/folder in thesrc/main/webapp/directory of the quickstart. - The
src/main/webapp/directory also includes anindex.htmlfile which uses a simple meta refresh to redirect the user's browser to the Servlet, which is located at http://localhost:8080/jboss-helloworld/HelloWorld. - All the configuration files for this example are located in
WEB-INF/, which can be found in thesrc/main/webapp/directory of the example. - Notice that the quickstart doesn't even need a
web.xmlfile!
Procedure 1.10. Examine the Code
Review the HelloWorldServlet code
TheHelloWorldServlet.javafile is located in thesrc/main/java/org/jboss/as/quickstarts/helloworld/directory. This Servlet sends the information to the browser.42. @SuppressWarnings("serial") 43. @WebServlet("/HelloWorld") 44. public class HelloWorldServlet extends HttpServlet { 45. 46. static String PAGE_HEADER = "<html><head><title>helloworld</title></head><body>"; 47. 48. static String PAGE_FOOTER = "</body></html>"; 49. 50. @Inject 51. HelloService helloService; 52. 53. @Override 54. protected void doGet(HttpServletRequest req, HttpServletResponse resp) throws ServletException, IOException { 55. resp.setContentType("text/html"); 56. PrintWriter writer = resp.getWriter(); 57. writer.println(PAGE_HEADER); 58. writer.println("<h1>" + helloService.createHelloMessage("World") + "</h1>"); 59. writer.println(PAGE_FOOTER); 60. writer.close(); 61. } 62. 63. }Expand Table 1.1. HelloWorldServlet Details Line Note 43 Before Java EE 6, an XML file was used to register Servlets. It is now much cleaner. All you need to do is add the @WebServletannotation and provide a mapping to a URL used to access the servlet.46-48 Every web page needs correctly formed HTML. This quickstart uses static Strings to write the minimum header and footer output. 50-51 These lines inject the HelloService CDI bean which generates the actual message. As long as we don't alter the API of HelloService, this approach allows us to alter the implementation of HelloService at a later date without changing the view layer. 58 This line calls into the service to generate the message "Hello World", and write it out to the HTTP request. Review the HelloService code
TheHelloService.javafile is located in thesrc/main/java/org/jboss/as/quickstarts/helloworld/directory. This service is very simple. It returns a message. No XML or annotation registration is required.public class HelloService { String createHelloMessage(String name) { return "Hello " + name + "!"; } }
1.4.3.2. Explore the numberguess Quickstart
This quickstart shows you how to create and deploy a simple application to JBoss EAP 6. This application does not persist any information. Information is displayed using a JSF view, and business logic is encapsulated in two CDI (Contexts and Dependency Injection) beans. In the numberguess quickstart, you get 10 attempts to guess a number between 1 and 100. After each attempt, you're told whether your guess was too high or too low.
QUICKSTART_HOME/numberguess directory. The numberguess quickstart is comprised of a number of beans, configuration files and Facelets (JSF) views, packaged as a WAR module.
numberguess quickstart.
- Install Red Hat JBoss Developer Studio following the procedure here: Section 1.3.1.3, “Install Red Hat JBoss Developer Studio”.
- Configure Maven for use with Red Hat JBoss Developer Studio following the procedure here: Section 2.3.3, “Configure Maven for Use with Red Hat JBoss Developer Studio”.
- Follow the procedures here to import, build, and deploy the
numberguessquickstart in Red Hat JBoss Developer Studio: Section 1.4.2.1, “Run the Quickstarts in Red Hat JBoss Developer Studio” - Verify the
numberguessquickstart was deployed successfully to JBoss EAP by opening a web browser and accessing the application at this URL: http://localhost:8080/jboss-numberguess
Procedure 1.11. Examine the Configuration Files
WEB-INF/ directory which can be found in the src/main/webapp/ directory of the quickstart.
- Examine the
faces-config.xmlfile.This quickstart uses the JSF 2.0 version offaces-config.xmlfilename. A standardized version of Facelets is the default view handler in JSF 2.0, so there's really nothing that you have to configure. JBoss EAP 6 goes above and beyond Java EE here. It will automatically configure the JSF for you if you include this configuration file. As a result, the configuration consists of only the root element:19. <faces-config version="2.0" 20. xmlns="http://java.sun.com/xml/ns/javaee" 21. xmlns:xsi="http://www.w3.org/2001/XMLSchema-instance" 22. xsi:schemaLocation=" 23. http://java.sun.com/xml/ns/javaee> 24. http://java.sun.com/xml/ns/javaee/web-facesconfig_2_0.xsd"> 25. 26. </faces-config> - Examine the
beans.xmlfile.There's also an emptybeans.xmlfile, which tells JBoss EAP 6 to look for beans in this application and to activate the CDI. - There is no
web.xmlfileNotice that the quickstart doesn't even need aweb.xmlfile!
Procedure 1.12. Examine the JSF Code
.xhtml file extension for source files, but serves up the rendered views with the .jsf extension.
- Examine the
home.xhtmlcode.Thehome.xhtmlfile is located in thesrc/main/webapp/directory.19. <html xmlns="http://www.w3.org/1999/xhtml" 20. xmlns:ui="http://java.sun.com/jsf/facelets" 21. xmlns:h="http://java.sun.com/jsf/html" 22. xmlns:f="http://java.sun.com/jsf/core"> 23. 24. <head> 25. <meta http-equiv="Content-Type" content="text/html; charset=iso-8859-1" /> 26. <title>Numberguess</title> 27. </head> 28. 29. <body> 30. <div id="content"> 31. <h1>Guess a number...</h1> 32. <h:form id="numberGuess"> 33. 34. <!-- Feedback for the user on their guess --> 35. <div style="color: red"> 36. <h:messages id="messages" globalOnly="false" /> 37. <h:outputText id="Higher" value="Higher!" 38. rendered="#{game.number gt game.guess and game.guess ne 0}" /> 39. <h:outputText id="Lower" value="Lower!" 40. rendered="#{game.number lt game.guess and game.guess ne 0}" /> 41. </div> 42. 43. <!-- Instructions for the user --> 44. <div> 45. I'm thinking of a number between <span 46. id="numberGuess:smallest">#{game.smallest}</span> and <span 47. id="numberGuess:biggest">#{game.biggest}</span>. You have 48. #{game.remainingGuesses} guesses remaining. 49. </div> 50. 51. <!-- Input box for the users guess, plus a button to submit, and reset --> 52. <!-- These are bound using EL to our CDI beans --> 53. <div> 54. Your guess: 55. <h:inputText id="inputGuess" value="#{game.guess}" 56. required="true" size="3" 57. disabled="#{game.number eq game.guess}" 58. validator="#{game.validateNumberRange}" /> 59. <h:commandButton id="guessButton" value="Guess" 60. action="#{game.check}" 61. disabled="#{game.number eq game.guess}" /> 62. </div> 63. <div> 64. <h:commandButton id="restartButton" value="Reset" 65. action="#{game.reset}" immediate="true" /> 66. </div> 67. </h:form> 68. 69. </div> 70. 71. <br style="clear: both" /> 72. 73. </body> 74. </html>Expand Table 1.2. JSF Details Line Note 36-40 These are the messages which can be sent to the user: "Higher!" and "Lower!" 45-48 As the user guesses, the range of numbers they can guess gets smaller. This sentence changes to make sure they know the number range of a valid guess. 55-58 This input field is bound to a bean property using a value expression. 58 A validator binding is used to make sure the user does not accidentally input a number outside of the range in which they can guess. If the validator was not here, the user might use up a guess on an out of bounds number. 59-61 There must be a way for the user to send their guess to the server. Here we bind to an action method on the bean.
Procedure 1.13. Examine the Class Files
src/main/java/org/jboss/as/quickstarts/numberguess/ directory. The package declaration and imports have been excluded from these listings. The complete listing is available in the quickstart source code.
- Review the
Random.javaqualifier code.A qualifier is used to remove ambiguity between two beans, both of which are eligible for injection based on their type. For more information on qualifiers, refer to Section 11.2.3.3, “Use a Qualifier to Resolve an Ambiguous Injection”The@Randomqualifier is used for injecting a random number.@Target({ TYPE, METHOD, PARAMETER, FIELD }) @Retention(RUNTIME) @Documented @Qualifier public @interface Random { } - Review the
MaxNumber.javaqualifier code.The@MaxNumberqualifieris used for injecting the maximum number allowed.@Target({ TYPE, METHOD, PARAMETER, FIELD }) @Retention(RUNTIME) @Documented @Qualifier public @interface MaxNumber { } - Review the
Generator.javacode.TheGeneratorclass is responsible for creating the random number via a producer method. It also exposes the maximum possible number via a producer method. This class is application scoped so you don't get a different random each time.@SuppressWarnings("serial") @ApplicationScoped public class Generator implements Serializable { private java.util.Random random = new java.util.Random(System.currentTimeMillis()); private int maxNumber = 100; java.util.Random getRandom() { return random; } @Produces @Random int next() { // a number between 1 and 100 return getRandom().nextInt(maxNumber - 1) + 1; } @Produces @MaxNumber int getMaxNumber() { return maxNumber; } } - Review the
Game.javacode.The session scoped classGameis the primary entry point of the application. It is responsible for setting up or resetting the game, capturing and validating the user's guess, and providing feedback to the user with aFacesMessage. It uses the post-construct lifecycle method to initialize the game by retrieving a random number from the@Random Instance<Integer>bean.Notice the @Named annotation in the class. This annotation is only required when you want to make the bean accessible to a JSF view via Expression Language (EL), in this case#{game}.@SuppressWarnings("serial") @Named @SessionScoped public class Game implements Serializable { /** * The number that the user needs to guess */ private int number; /** * The users latest guess */ private int guess; /** * The smallest number guessed so far (so we can track the valid guess range). */ private int smallest; /** * The largest number guessed so far */ private int biggest; /** * The number of guesses remaining */ private int remainingGuesses; /** * The maximum number we should ask them to guess */ @Inject @MaxNumber private int maxNumber; /** * The random number to guess */ @Inject @Random Instance<Integer> randomNumber; public Game() { } public int getNumber() { return number; } public int getGuess() { return guess; } public void setGuess(int guess) { this.guess = guess; } public int getSmallest() { return smallest; } public int getBiggest() { return biggest; } public int getRemainingGuesses() { return remainingGuesses; } /** * Check whether the current guess is correct, and update the biggest/smallest guesses as needed. Give feedback to the user * if they are correct. */ public void check() { if (guess > number) { biggest = guess - 1; } else if (guess < number) { smallest = guess + 1; } else if (guess == number) { FacesContext.getCurrentInstance().addMessage(null, new FacesMessage("Correct!")); } remainingGuesses--; } /** * Reset the game, by putting all values back to their defaults, and getting a new random number. We also call this method * when the user starts playing for the first time using {@linkplain PostConstruct @PostConstruct} to set the initial * values. */ @PostConstruct public void reset() { this.smallest = 0; this.guess = 0; this.remainingGuesses = 10; this.biggest = maxNumber; this.number = randomNumber.get(); } /** * A JSF validation method which checks whether the guess is valid. It might not be valid because there are no guesses left, * or because the guess is not in range. * */ public void validateNumberRange(FacesContext context, UIComponent toValidate, Object value) { if (remainingGuesses <= 0) { FacesMessage message = new FacesMessage("No guesses left!"); context.addMessage(toValidate.getClientId(context), message); ((UIInput) toValidate).setValid(false); return; } int input = (Integer) value; if (input < smallest || input > biggest) { ((UIInput) toValidate).setValid(false); FacesMessage message = new FacesMessage("Invalid guess"); context.addMessage(toValidate.getClientId(context), message); } } }
1.4.4. Replace the Default Welcome Web Application
Procedure 1.14. Replace the Default Welcome Web Application With Your Own Web Application
Disable the Welcome application.
Use the Management CLI scriptEAP_HOME/bin/jboss-cli.shto run the following command. You may need to change the profile to modify a different managed domain profile, or remove the/profile=defaultportion of the command for a standalone server./profile=default/subsystem=web/virtual-server=default-host:write-attribute(name=enable-welcome-root,value=false)Configure your Web application to use the root context.
To configure your web application to use the root context (/) as its URL address, modify itsjboss-web.xml, which is located in theMETA-INF/orWEB-INF/directory. Replace its<context-root>directive with one that looks like the following.<jboss-web> <context-root>/</context-root> </jboss-web>Deploy your application.
Deploy your application to the server group or server you modified in the first step. The application is now available onhttp://SERVER_URL:PORT/.
1.4.5. Using WS-AtomicTransaction
wsat-simple quickstart demonstrates the deployment of a WS-AT (WS-AtomicTransaction) enabled JAX-WS Web Service bundled in a WAR archive for deployment to Red Hat JBoss Enterprise Application Platform.
- The Service does not implement the required hooks to support recovery in the presence of failures.
- It also does not utilize a transactional back end resource.
- Only one Web service participates in the protocol. As WS-AT is a 2PC coordination protocol, it is best suited to multi-participant scenarios.
org.jboss.as.quickstarts.wsat.simple.ClientTest#testCommit() method, the following steps occur:
- A new Atomic Transaction (AT) is created by the client.
- An operation on a WS-AT enabled Web service is invoked by the client.
- The JaxWSHeaderContextProcessor in the WS Client handler chain inserts the WS-AT context into the outgoing SOAP message.
- When the service receives the SOAP request, the JaxWSHeaderContextProcessor in its handler chain inspects the WS-AT context and associates the request with this AT.
- The Web service operation is invoked.
- A participant is enlisted in this AT. This allows the Web Service logic to respond to protocol events, such as Commit and Rollback.
- The service invokes the business logic. In this case, a booking is made with the restaurant.
- The backend resource is prepared. This ensures that the Backend resource can undo or make permanent the change when told to do so by the coordinator.
- The client can then decide to commit or rollback the AT. If the client decides to commit, the coordinator will begin the 2PC protocol. If the participant decides to rollback, all participants will be told to rollback.
Chapter 2. Maven Guide
2.1. Learn about Maven
2.1.1. About the Maven Repository
http:// for a repository on an HTTP server or file:// for a repository on a file server.
2.1.2. About the Maven POM File
pom.xml file requires some configuration options and will default all others. See Section 2.1.3, “Minimum Requirements of a Maven POM File” for details.
pom.xml file can be found at http://maven.apache.org/maven-v4_0_0.xsd.
2.1.3. Minimum Requirements of a Maven POM File
The minimum requirements of a pom.xml file are as follows:
- project root
- modelVersion
- groupId - the id of the project's group
- artifactId - the id of the artifact (project)
- version - the version of the artifact under the specified group
A basic pom.xml file might look like this:
<project>
<modelVersion>4.0.0</modelVersion>
<groupId>com.jboss.app</groupId>
<artifactId>my-app</artifactId>
<version>1</version>
</project>
2.1.4. About the Maven Settings File
settings.xml file contains user-specific configuration information for Maven. It contains information that must not be distributed with the pom.xml file, such as developer identity, proxy information, local repository location, and other settings specific to a user.
settings.xml can be found.
- In the Maven installation
- The settings file can be found in the
M2_HOME/conf/directory. These settings are referred to asglobalsettings. The default Maven settings file is a template that can be copied and used as a starting point for the user settings file. - In the user's installation
- The settings file can be found in the
USER_HOME/.m2/directory. If both the Maven and usersettings.xmlfiles exist, the contents are merged. Where there are overlaps, the user'ssettings.xmlfile takes precedence.
settings.xml file:
<?xml version="1.0" encoding="UTF-8"?>
<settings xmlns="http://maven.apache.org/SETTINGS/1.0.0"
xmlns:xsi="http://www.w3.org/2001/XMLSchema-instance"
xsi:schemaLocation="http://maven.apache.org/SETTINGS/1.0.0 http://maven.apache.org/xsd/settings-1.0.0.xsd">
<profiles>
<!-- Configure the JBoss EAP Maven repository -->
<profile>
<id>jboss-eap-maven-repository</id>
<repositories>
<repository>
<id>jboss-eap</id>
<url>file:///path/to/repo/jboss-eap-6.4-maven-repository</url>
<releases>
<enabled>true</enabled>
</releases>
<snapshots>
<enabled>false</enabled>
</snapshots>
</repository>
</repositories>
<pluginRepositories>
<pluginRepository>
<id>jboss-eap-maven-plugin-repository</id>
<url>file:///path/to/repo/jboss-eap-6.4-maven-repository</url>
<releases>
<enabled>true</enabled>
</releases>
<snapshots>
<enabled>false</enabled>
</snapshots>
</pluginRepository>
</pluginRepositories>
</profile>
</profiles>
<activeProfiles>
<!-- Optionally, make the repository active by default -->
<activeProfile>jboss-eap-maven-repository</activeProfile>
</activeProfiles>
</settings>settings.xml file can be found at http://maven.apache.org/xsd/settings-1.0.0.xsd.
2.2. Install Maven and the JBoss Maven Repository
2.2.1. Download and Install Maven
- Go to Apache Maven Project - Download Maven and download the latest distribution for your operating system.
- See the Maven documentation for information on how to download and install Apache Maven for your operating system.
2.2.2. Install the JBoss EAP 6 Maven Repository
2.2.3. Install the JBoss EAP 6 Maven Repository Locally
The JBoss EAP 6 Maven repository is available online, so it is not necessary to download and install it locally. However, if you prefer to install the JBoss EAP Maven repository locally, there are three ways to do it: on your local file system, on Apache Web Server, or with a Maven repository manager. This example covers the steps to download the JBoss EAP 6 Maven Repository to the local file system. This option is easy to configure and allows you to get up and running quickly on your local machine. It can help you become familiar with using Maven for development but is not recommended for team production environments.
Procedure 2.1. Download and Install the JBoss EAP 6 Maven Repository to the Local File System
- Open a web browser and access this URL: https://access.redhat.com/jbossnetwork/restricted/listSoftware.html?product=appplatform.
- Find "Red Hat JBoss Enterprise Application Platform VERSION Maven Repository" in the list.
- Click the button to download a
.zipfile containing the repository. - Unzip the file on the local file system into a directory of your choosing.
This creates a Maven repository directory called jboss-eap-version-maven-repository.
Important
settings.xml configuration file. Each local repository must be configured within its own <repository> tag.
Important
repository/ subdirectory located under the .m2/directory before attempting to use the new Maven repository.
2.2.4. Install the JBoss EAP 6 Maven Repository for Use with Apache httpd
You must configure Apache httpd. See Apache HTTP Server Project documentation for instructions.
Procedure 2.2. Download the JBoss EAP 6 Maven Repository ZIP archive
- Open a web browser and access this URL: https://access.redhat.com/jbossnetwork/restricted/listSoftware.html?product=appplatform.
- Find "Red Hat JBoss Enterprise Application Platform <VERSION> Maven Repository" in the list.
- Click the button to download a
.zipfile containing the repository. - Unzip the files in a directory that is web accessible on the Apache server.
- Configure Apache to allow read access and directory browsing in the created directory.
This allows a multi-user environment to access the Maven repository on Apache httpd.
Note
2.2.5. Install the JBoss EAP 6 Maven Repository Using Nexus Maven Repository Manager
Procedure 2.3. Download the JBoss EAP 6 Maven Repository ZIP archive
- Open a web browser and access this URL: https://access.redhat.com/jbossnetwork/restricted/listSoftware.html?product=appplatform.
- Find "Red Hat JBoss Enterprise Application Platform <VERSION> Maven Repository" in the list.
- Click the button to download a
.zipfile containing the repository. - Unzip the files into a directory of your choosing on the server hosting Nexus.
Procedure 2.4. Add the JBoss EAP 6 Maven Repository using Nexus Maven Repository Manager
- Log into Nexus as an Administrator.
- Select the Repositories section from the → menu to the left of your repository manager.
- Click the Add... dropdown, then select Hosted Repository.
- Give the new repository a name and ID.
- Enter the path on disk to the unzipped repository in the field Override Local Storage Location.
- Continue if you want the artifact to be available in a repository group. Do not continue with this procedure if this is not what you want.
- Select the repository group.
- Click on the Configure tab.
- Drag the new JBoss Maven repository from the Available Repositories list to the Ordered Group Repositories list on the left.
Note
Note that the order of this list determines the priority for searching Maven artifacts.
The repository is configured using Nexus Maven Repository Manager.
2.2.6. About Maven Repository Managers
- They provide the ability to configure proxies between your organization and remote Maven repositories. This provides a number of benefits, including faster and more efficient deployments and a better level of control over what is downloaded by Maven.
- They provide deployment destinations for your own generated artifacts, allowing collaboration between different development teams across an organization.
Commonly used Maven repository managers
- Sonatype Nexus
- See Sonatype Nexus: Manage Artifacts for more information about Nexus.
- Artifactory
- See Artifactory Open Source for more information about Artifactory.
- Apache Archiva
- See Apache Archiva: The Build Artifact Repository Manager for more information about Apache Archiva.
2.3. Use the Maven Repository
2.3.1. Configure the JBoss EAP Maven 6 Repository
There are two approaches to direct Maven to use the JBoss EAP 6 Maven Repository in your project:
- You can configure the repositories in the Maven global or user settings.
- You can configure the repositories in the project's POM file.
Procedure 2.5. Configure Maven Settings to Use the JBoss EAP 6 Maven Repository
Configure the Maven repository using Maven settings
This is the recommended approach. Maven settings used with a repository manager or repository on a shared server provide better control and manageability of projects. Settings also provide the ability to use an alternative mirror to redirect all lookup requests for a specific repository to your repository manager without changing the project files. For more information about mirrors, see http://maven.apache.org/guides/mini/guide-mirror-settings.html.This method of configuration applies across all Maven projects, as long as the project POM file does not contain repository configuration.Configure the Maven repository using the project POM
This method of configuration is generally not recommended. If you decide to configure repositories in your project POM file, plan carefully and be aware that it can slow down your build and you may even end up with artifacts that are not from the expected repository.Note
In an Enterprise environment, where a repository manager is usually used, Maven should query all artifacts for all projects using this manager. Because Maven uses all declared repositories to find missing artifacts, if it can't find what it's looking for, it will try and look for it in the repository central (defined in the built-in parent POM). To override this central location, you can add a definition withcentralso that the default repository central is now your repository manager as well. This works well for established projects, but for clean or 'new' projects it causes a problem as it creates a cyclic dependency.Transitively included POMs are also an issue with this type of configuration. Maven has to query these external repositories for missing artifacts. This not only slows down your build, it also causes you to lose control over where your artifacts are coming from and likely to cause broken builds.This method of configuration overrides the global and user Maven settings for the configured project.
2.3.2. Configure the JBoss EAP 6 Maven Repository Using the Maven Settings
- You can modify the Maven settings. This directs Maven to use the configuration across all projects.
- You can configure the project's POM file. This limits the configuration to the specific project.
Note
- File System
- file:///path/to/repo/jboss-eap-6.x-maven-repository
- Apache Web Server
- http://intranet.acme.com/jboss-eap-6.x-maven-repository/
- Nexus Repository Manager
- https://intranet.acme.com/nexus/content/repositories/jboss-eap-6.x-maven-repository
Procedure 2.6. Configure Maven Using the Settings Shipped with the Quickstart Examples
settings.xml file that is configured to use the online JBoss EAP 6 Maven repository. This is the simplest approach.
- This procedure overwrites the existing Maven settings file, so you must back up the existing Maven
settings.xmlfile.- Locate the Maven install directory for your operating system. It is usually installed in
USER_HOME/.m2/directory.- For Linux or Mac, this is:
~/.m2/ - For Windows, this is:
\Documents and Settings\USER_NAME\.m2\or\Users\USER_NAME\.m2\
- If you have an existing
USER_HOME/.m2/settings.xmlfile, rename it or make a backup copy so you can restore it later.
- Download and unzip the quickstart examples that ship with JBoss EAP 6. For more information, see Section 1.4.1.1, “Access the Quickstarts”
- Copy the
QUICKSTART_HOME/settings.xmlfile to theUSER_HOME/.m2/directory. - If you modify the
settings.xmlfile while Red Hat JBoss Developer Studio is running, follow the procedure below entitled Procedure 2.9, “Refresh the Red Hat JBoss Developer Studio User Settings”.
Procedure 2.7. Manually Edit and Configure the Maven Settings To Use the Online JBoss EAP 6 Maven Repository
- Locate the Maven install directory for your operating system. It is usually installed in
USER_HOME/.m2/directory.- For Linux or Mac, this is
~/.m2/ - For Windows, this is
\Documents and Settings\USER_NAME\.m2\or\Users\USER_NAME\.m2\
- If you do not find a
settings.xmlfile, copy thesettings.xmlfile from theUSER_HOME/.m2/conf/directory into theUSER_HOME/.m2/directory. - Copy the following XML into the
<profiles>element of the file.<!-- Configure the JBoss GA Maven repository --> <profile> <id>jboss-ga-repository</id> <repositories> <repository> <id>jboss-ga-repository</id> <url>http://maven.repository.redhat.com/techpreview/all</url> <releases> <enabled>true</enabled> </releases> <snapshots> <enabled>false</enabled> </snapshots> </repository> </repositories> <pluginRepositories> <pluginRepository> <id>jboss-ga-plugin-repository</id> <url>http://maven.repository.redhat.com/techpreview/all</url> <releases> <enabled>true</enabled> </releases> <snapshots> <enabled>false</enabled> </snapshots> </pluginRepository> </pluginRepositories> </profile> <!-- Configure the JBoss Early Access Maven repository --> <profile> <id>jboss-earlyaccess-repository</id> <repositories> <repository> <id>jboss-earlyaccess-repository</id> <url>http://maven.repository.redhat.com/earlyaccess/all/</url> <releases> <enabled>true</enabled> </releases> <snapshots> <enabled>false</enabled> </snapshots> </repository> </repositories> <pluginRepositories> <pluginRepository> <id>jboss-earlyaccess-plugin-repository</id> <url>http://maven.repository.redhat.com/earlyaccess/all/</url> <releases> <enabled>true</enabled> </releases> <snapshots> <enabled>false</enabled> </snapshots> </pluginRepository> </pluginRepositories> </profile>Copy the following XML into the<activeProfiles>element of thesettings.xmlfile.<activeProfile>jboss-ga-repository</activeProfile> <activeProfile>jboss-earlyaccess-repository</activeProfile> - If you modify the
settings.xmlfile while Red Hat JBoss Developer Studio is running, follow the procedure below entitled Procedure 2.9, “Refresh the Red Hat JBoss Developer Studio User Settings”.
Procedure 2.8. Configure the Settings to Use a Locally Installed JBoss EAP Repository
- Locate the Maven install directory for your operating system. It is usually installed in
USER_HOME/.m2/directory.- For Linux or Mac, this is
~/.m2/ - For Windows, this is
\Documents and Settings\USER_NAME\.m2\or\Users\USER_NAME\.m2\
- If you do not find a
settings.xmlfile, copy thesettings.xmlfile from theUSER_HOME/.m2/conf/directory into theUSER_HOME/.m2/directory. - Copy the following XML into the
<profiles>element of thesettings.xmlfile. Be sure to change the<url>to the actual repository location.<profile> <id>jboss-eap-repository</id> <repositories> <repository> <id>jboss-eap-repository</id> <name>JBoss EAP Maven Repository</name> <url>file:///path/to/repo/jboss-eap-6.x-maven-repository</url> <layout>default</layout> <releases> <enabled>true</enabled> <updatePolicy>never</updatePolicy> </releases> <snapshots> <enabled>false</enabled> <updatePolicy>never</updatePolicy> </snapshots> </repository> </repositories> <pluginRepositories> <pluginRepository> <id>jboss-eap-repository-group</id> <name>JBoss EAP Maven Repository</name> <url> file:///path/to/repo/jboss-eap-6.x-maven-repository </url> <layout>default</layout> <releases> <enabled>true</enabled> <updatePolicy>never</updatePolicy> </releases> <snapshots> <enabled>false</enabled> <updatePolicy>never</updatePolicy> </snapshots> </pluginRepository> </pluginRepositories> </profile>Copy the following XML into the<activeProfiles>element of thesettings.xmlfile.<activeProfile>jboss-eap-repository</activeProfile> - If you modify the
settings.xmlfile while Red Hat JBoss Developer Studio is running, follow the procedure below entitled Procedure 2.9, “Refresh the Red Hat JBoss Developer Studio User Settings”.
Procedure 2.9. Refresh the Red Hat JBoss Developer Studio User Settings
settings.xml file while Red Hat JBoss Developer Studio is running, you must refresh the user settings.
- From the menu, choose → .
- In the Preferences Window, expand Maven and choose User Settings.
- Click the button to refresh the Maven user settings in Red Hat JBoss Developer Studio.
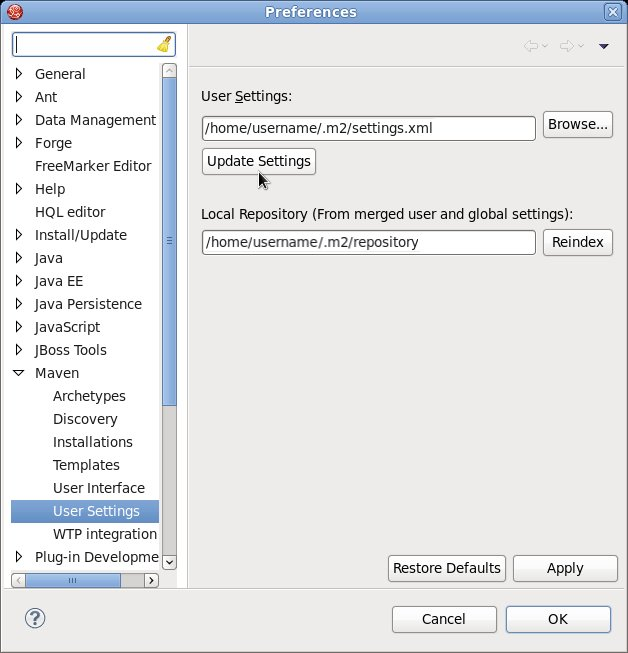
Figure 2.1. Update Maven User Settings
Important
- Missing artifact ARTIFACT_NAME
- [ERROR] Failed to execute goal on project PROJECT_NAME; Could not resolve dependencies for PROJECT_NAME
~/.m2/repository/ subdirectory on Linux, or the %SystemDrive%\Users\USERNAME\.m2\repository\ subdirectory on Windows.
2.3.3. Configure Maven for Use with Red Hat JBoss Developer Studio
Procedure 2.10. Configure Maven in Red Hat JBoss Developer Studio
- Click →, expand JBoss Tools and select JBoss Maven Integration.
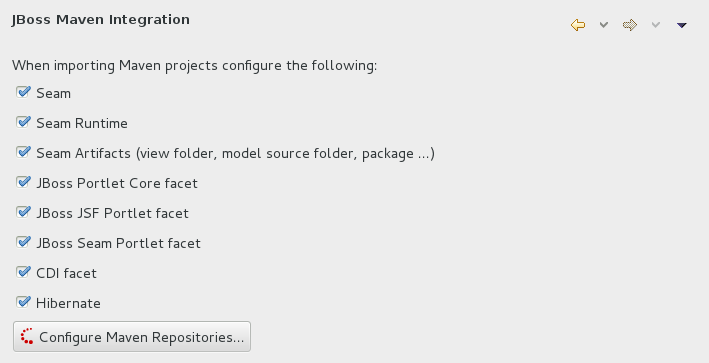
Figure 2.2. JBoss Maven Integration Pane in the Preferences Window
- Click .
- Click to configure the JBoss GA Tech Preview Maven repository. Complete the
Add Maven Repositorydialog as follows:- Set the Profile ID, Repository ID, and Repository Name values to
jboss-ga-repository. - Set the Repository URL value to
http://maven.repository.redhat.com/techpreview/all. - Click the checkbox to enable the Maven repository.
- Click
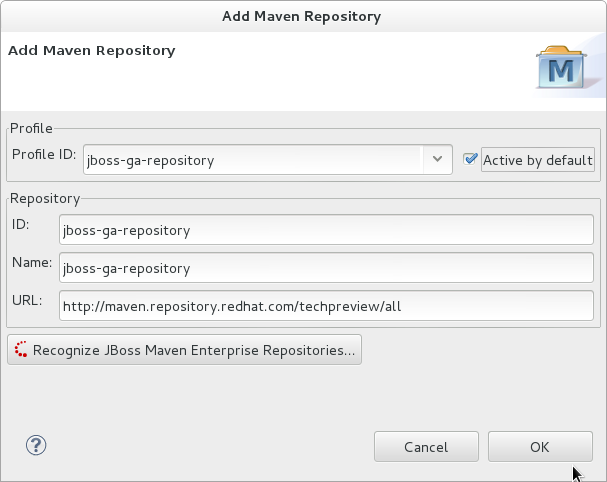
Figure 2.3. Add Maven Repository - JBoss Tech Preview
- Click to configure the JBoss Early Access Maven repository. Complete the
Add Maven Repositorydialog as follows:- Set the Profile ID, Repository ID, and Repository Name values to
jboss-earlyaccess-repository. - Set the Repository URL value to
http://maven.repository.redhat.com/earlyaccess/all/. - Click the checkbox to enable the Maven repository.
- Click
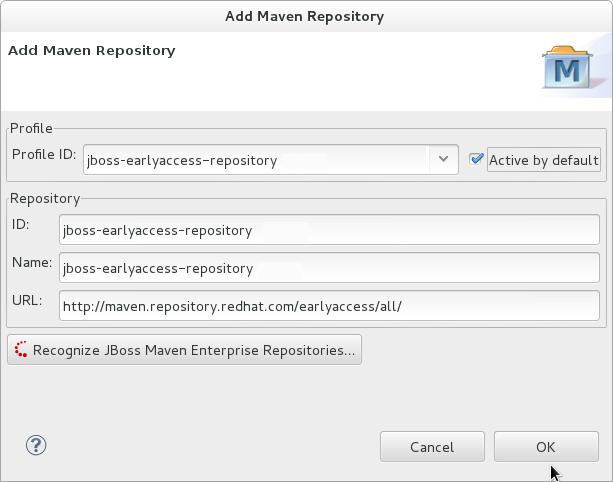
Figure 2.4. Add Maven Repository - JBoss Early Access
- Review the repositories and click .
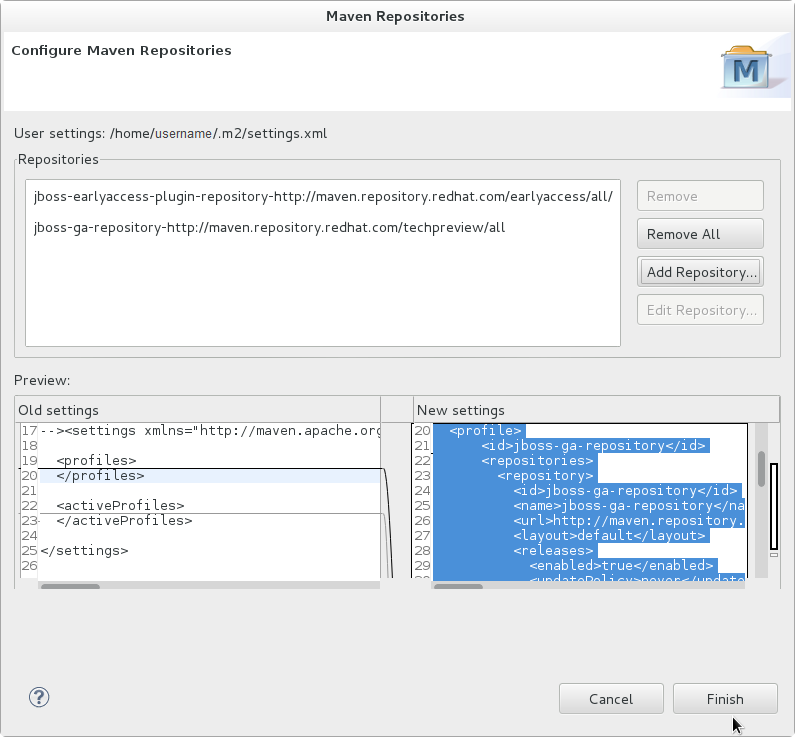
Figure 2.5. Review Maven Repositories
- You are prompted with the message "Are you sure you want to update the file 'MAVEN_HOME/settings.xml'?". Click to update the settings. Click to close the dialog.The JBoss EAP Maven repository is now configured for use with Red Hat JBoss Developer Studio.
2.3.4. Configure the JBoss EAP 6 Maven Repository Using the Project POM
- You can modify the Maven settings.
- You can configure the project's POM file.
pom.xml. This configuration method supercedes and overrides the global and user settings configurations.
Note
central so that the default repository central is now your repository manager as well. This works well for established projects, but for clean or 'new' projects it causes a problem as it creates a cyclic dependency.
Note
- File System
- file:///path/to/repo/jboss-eap-6.x-maven-repository
- Apache Web Server
- http://intranet.acme.com/jboss-eap-6.x-maven-repository/
- Nexus Repository Manager
- https://intranet.acme.com/nexus/content/repositories/jboss-eap-6.x-maven-repository
- Open your project's
pom.xmlfile in a text editor. - Add the following repository configuration. If there is already a
<repositories>configuration in the file, then add the<repository>element to it. Be sure to change the<url>to the actual repository location.<repositories> <repository> <id>jboss-eap-repository-group</id> <name>JBoss EAP Maven Repository</name> <url>file:///path/to/repo/jboss-eap-6.x.0-maven-repository/</url> <layout>default</layout> <releases> <enabled>true</enabled> <updatePolicy>never</updatePolicy> </releases> <snapshots> <enabled>true</enabled> <updatePolicy>never</updatePolicy> </snapshots> </repository> </repositories> - Add the following plug-in repository configuration. If there is already a
<pluginRepositories>configuration in the file, then add the<pluginRepository>element to it.<pluginRepositories> <pluginRepository> <id>jboss-eap-repository-group</id> <name>JBoss EAP Maven Repository</name> <url>file:///path/to/repo/jboss-eap-6.x.0-maven-repository/</url> <releases> <enabled>true</enabled> </releases> <snapshots> <enabled>true</enabled> </snapshots> </pluginRepository> </pluginRepositories>
2.3.5. Manage Project Dependencies
pom.xml (POM) file that specifies the versions of all runtime dependencies for a given module. Version dependencies are listed in the dependency management section of the file.
groupId:artifactId:version (GAV) to the dependency management section of the project pom.xml file and specifying the <scope>import</scope> and <type>pom</type> element values.
Note
provided scope. This is because these classes are provided by the application server at runtime and it is not necessary to package them with the user application.
Supported Maven Artifacts
-redhat version qualifier, for example 1.0.0-redhat-1.
pom.xml file ensures that the build is using the correct binary artifact for local building and testing. Note that an artifact with a -redhat version is not necessarily part of the supported public API, and may change in future revisions. For information about the public supported API, see the JavaDoc documentation included in the release.
<dependency>
<groupId>org.hibernate</groupId>
<artifactId>hibernate-core</artifactId>
<version>4.2.16.Final-redhat-1</version>
<scope>provided</scope>
</dependency><version/> field. However, it is recommended to use Maven dependency management for configuring dependency versions.
Dependency Management
<dependencyManagement>
<dependencies>
...
<dependency>
<groupId>org.jboss.bom</groupId>
<artifactId>eap6-supported-artifacts</artifactId>
<version>6.4.0.GA</version>
<type>pom</type>
<scope>import</scope>
</dependency>
...
</dependencies>
</dependencyManagement>JBoss JavaEE Specs Bom
jboss-javaee-6.0 BOM contains the Java EE Specification API JARs used by JBoss EAP.
3.0.2.Final-redhat-x version of the jboss-javaee-6.0 BOM.
<dependencyManagement>
<dependencies>
<dependency>
<groupId>org.jboss.spec</groupId>
<artifactId>jboss-javaee-6.0</artifactId>
<version>3.0.2.Final-redhat-x</version>
<type>pom</type>
<scope>import</scope>
</dependency>
...
</dependencies>
</dependencyManagement>
<dependencies>
<dependency>
<groupId>org.jboss.spec.javax.servlet</groupId>
<artifactId>jboss-servlet-api_3.0_spec</artifactId>
<scope>provided</scope>
</dependency>
<dependency>
<groupId>org.jboss.spec.javax.servlet.jsp</groupId>
<artifactId>jboss-jsp-api_2.2_spec</artifactId>
<scope>provided</scope>
</dependency>
...
</dependencies>JBoss EAP BOMs and Quickstarts
| Maven artifactId | Description |
|---|---|
| jboss-javaee-6.0-with-hibernate | This BOM builds on the Java EE full profile BOM, adding Hibernate Community projects including Hibernate ORM, Hibernate Search and Hibernate Validator. It also provides tool projects such as Hibernate JPA Model Gen and Hibernate Validator Annotation Processor. |
| jboss-javaee-6.0-with-hibernate3 | This BOM builds on the Java EE full profile BOM, adding Hibernate Community projects including Hibernate 3 ORM, Hibernate Entity Manager (JPA 1.0) and Hibernate Validator. |
| jboss-javaee-6.0-with-logging | This BOM builds on the Java EE full profile BOM, adding the JBoss Logging Tools and Log4j framework. |
| jboss-javaee-6.0-with-osgi | This BOM builds on the Java EE full profile BOM, adding OSGI. |
| jboss-javaee-6.0-with-resteasy | This BOM builds on the Java EE full profile BOM, adding RESTEasy |
| jboss-javaee-6.0-with-security | This BOM builds on the Java EE full profile BOM, adding Picketlink. |
| jboss-javaee-6.0-with-tools | This BOM builds on the Java EE full profile BOM, adding Arquillian to the mix. It also provides a version of JUnit and TestNG recommended for use with Arquillian. |
| jboss-javaee-6.0-with-transactions | This BOM includes a world class transaction manager. Use the JBossTS APIs to access its full capabilities. |
6.4.0.GA version of the jboss-javaee-6.0-with-hibernate BOM.
<dependencyManagement>
<dependencies>
<dependency>
<groupId>org.jboss.bom.eap</groupId>
<artifactId>jboss-javaee-6.0-with-hibernate</artifactId>
<version>6.4.0.GA</version>
<type>pom</type>
<scope>import</scope>
</dependency>
...
</dependencies>
</dependencyManagement>
<dependencies>
<dependency>
<groupId>org.hibernate</groupId>
<artifactId>hibernate-core</artifactId>
<scope>provided</scope>
</dependency>
...
</dependencies>
JBoss Client BOMs
jboss-as-ejb-client-bom and jboss-as-jms-client-bom.
7.4.0.Final-redhat-x version of the jboss-as-ejb-client-bom client BOM.
<dependencies>
<dependency>
<groupId>org.jboss.as</groupId>
<artifactId>jboss-as-ejb-client-bom</artifactId>
<version>7.5.0.Final-redhat-x</version>
<type>pom</type>
</dependency>
...l
</dependencies>
7.4.0.Final-redhat-x version of the jboss-as-jms-client-bom client BOM.
<dependencies>
<dependency>
<groupId>org.jboss.as</groupId>
<artifactId>jboss-as-jms-client-bom</artifactId>
<version>7.4.0.Final-redhat-x</version>
<type>pom</type>
</dependency>
...
</dependencies>
2.4. Upgrade the Maven Repository
2.4.1. Apply a Patch to the Local Maven Repository
A Maven repository stores Java libraries, plug-ins, and other artifacts required to build and deploy applications to JBoss EAP. The JBoss EAP repository is available online or as a downloaded ZIP file. If you use the publicly hosted repository, updates are applied automatically for you. However, if you download and install the Maven repository locally, you are responsible for applying any updates. Whenever a patch is available for JBoss EAP, a corresponding patch is provided for the JBoss EAP Maven repository. This patch is available in the form of an incremental ZIP file that is unzipped into the existing local repository. The ZIP file contains new JAR and POM files. It does not overwrite any existing JARs nor does it remove JARs, so there is no rollback requirement.
unzip command.
Prerequisites
- Valid access and subscription to the Red Hat Customer Portal.
- The Red Hat JBoss Enterprise Application Platform <VERSION> Maven Repository ZIP file, downloaded and installed locally.
Procedure 2.11. Update the Maven Repository
- Open a browser and log into https://access.redhat.com.
- Select from the menu at the top of the page.
- Find
Red Hat JBoss Enterprise Application Platformin the list and click on it. - Select the correct version of JBoss EAP from the Version drop-down menu that appears on this screen, then click on Patches.
- Find
Red Hat JBoss Enterprise Application Platform <VERSION> CPx Incremental Maven Repositoryin the list and click . - You are prompted to save the ZIP file to a directory of your choice. Choose a directory and save the file.
- Locate the path to JBoss EAP Maven repository, referred to in the commands below as EAP_MAVEN_REPOSITORY_PATH, for your operating system. For more information about how to install the Maven repository on the local file system, see Section 2.2.3, “Install the JBoss EAP 6 Maven Repository Locally”.
- Unzip the Maven patch file directly into the installation directory of the JBoss EAP <VERSION>.x Maven repository.
- For Linux, open a terminal and type the following command:
[standalone@localhost:9999 /] unzip -o jboss-eap-<VERSION>.x-incremental-maven-repository.zip -d EAP_MAVEN_REPOSITORY_PATH - For Windows, use the Windows extraction utility to extract the ZIP file into the root of the
EAP_MAVEN_REPOSITORY_PATHdirectory.
The locally installed Maven repository is updated with the latest patch.
Chapter 3. Class Loading and Modules
3.1. Introduction
3.1.1. Overview of Class Loading and Modules
3.1.2. Class Loading
3.1.3. Modules
- Static Modules
- Static Modules are predefined in the
EAP_HOME/modules/directory of the application server. Each sub-directory represents one module and defines amain/subdirectory that contains a configuration file (module.xml) and any required JAR files. The name of the module is defined in themodule.xmlfile. All the application server provided APIs are provided as static modules, including the Java EE APIs as well as other APIs such as JBoss Logging.Example 3.1. Example module.xml file
<?xml version="1.0" encoding="UTF-8"?> <module xmlns="urn:jboss:module:1.0" name="com.mysql"> <resources> <resource-root path="mysql-connector-java-5.1.15.jar"/> </resources> <dependencies> <module name="javax.api"/> <module name="javax.transaction.api"/> </dependencies> </module>The module name,com.mysql, should match the directory structure for the module, excluding themain/subdirectory name.The modules provided in JBoss EAP distributions are located in asystemdirectory within theEAP_HOME/modulesdirectory. This keeps them separate from any modules provided by third parties.Any Red Hat provided layered products that layer on top of JBoss EAP 6.1 or later will also install their modules within thesystemdirectory.Creating custom static modules can be useful if many applications are deployed on the same server that use the same third-party libraries. Instead of bundling those libraries with each application, a module containing these libraries can be created and installed by the JBoss administrator. The applications can then declare an explicit dependency on the custom static modules.Users must ensure that custom modules are installed into theEAP_HOME/modulesdirectory, using a one directory per module layout. This ensures that custom versions of modules that already exist in thesystemdirectory are loaded instead of the shipped versions. In this way, user provided modules will take precedence over system modules.If you use theJBOSS_MODULEPATHenvironment variable to change the locations in which JBoss EAP searches for modules, then the product will look for asystemsubdirectory structure within one of the locations specified. Asystemstructure must exist somewhere in the locations specified withJBOSS_MODULEPATH. - Dynamic Modules
- Dynamic Modules are created and loaded by the application server for each JAR or WAR deployment (or subdeployment in an EAR). The name of a dynamic module is derived from the name of the deployed archive. Because deployments are loaded as modules, they can configure dependencies and be used as dependencies by other deployments.
3.1.4. Module Dependencies
Explicit dependencies are declared by the developer in the configuration file. Static modules can declare dependencies in the module.xml file. Dynamic modules can have dependencies declared in the MANIFEST.MF or jboss-deployment-structure.xml deployment descriptors of the deployment.
Implicit dependencies are added automatically by the application server when certain conditions or meta-data are found in a deployment. The Java EE 6 APIs supplied with JBoss EAP 6 are examples of modules that are added by detection of implicit dependencies in deployments.
jboss-deployment-structure.xml deployment descriptor file. This is commonly done when an application bundles a specific version of a library that the application server will attempt to add as an implicit dependency.
Example 3.2. Module dependencies
- Module A declares an explicit dependency on Module C, or
- Module B exports its dependency on Module C.
3.1.5. Class Loading in Deployments
- WAR Deployment
- A WAR deployment is considered to be a single module. Classes in the
WEB-INF/libdirectory are treated the same as classes inWEB-INF/classesdirectory. All classes packaged in the WAR will be loaded with the same class loader. - EAR Deployment
- EAR deployments are made up of more than one module. The definition of these modules follows these rules:
- The
lib/directory of the EAR is a single module called the parent module. - Each WAR deployment within the EAR is a single module.
- Each EJB JAR deployment within the EAR is a single module.
Subdeployment modules (the WAR and JAR deployments within the EAR) have an automatic dependency on the parent module. However they do not have automatic dependencies on each other. This is called subdeployment isolation and can be disabled on a per deployment basis or for the entire application server.Explicit dependencies between subdeployment modules can be added by the same means as any other module.
3.1.6. Class Loading Precedence
- Implicit dependencies.These are the dependencies that are added automatically by JBoss EAP 6, such as the JAVA EE APIs. These dependencies have the highest class loader precedence because they contain common functionality and APIs that are supplied by JBoss EAP 6.Refer to Section 3.9.1, “Implicit Module Dependencies” for complete details about each implicit dependency.
- Explicit dependencies.These are dependencies that are manually added in the application configuration. This can be done using the application's
MANIFEST.MFfile or the new optional JBoss deployment descriptorjboss-deployment-structure.xmlfile.Refer to Section 3.2, “Add an Explicit Module Dependency to a Deployment” to learn how to add explicit dependencies. - Local resources.Class files packaged up inside the deployment itself, e.g. from the
WEB-INF/classesorWEB-INF/libdirectories of a WAR file. - Inter-deployment dependencies.These are dependencies on other deployments in a EAR deployment. This can include classes in the
libdirectory of the EAR or classes defined in other EJB jars.
3.1.7. Dynamic Module Naming
- Deployments of WAR and JAR files are named with the following format:
deployment.DEPLOYMENT_NAMEFor example,inventory.warandstore.jarwill have the module names ofdeployment.inventory.waranddeployment.store.jarrespectively. - Subdeployments within an Enterprise Archive are named with the following format:
deployment.EAR_NAME.SUBDEPLOYMENT_NAMEFor example, the subdeployment ofreports.warwithin the enterprise archiveaccounts.earwill have the module name ofdeployment.accounts.ear.reports.war.
3.1.8. jboss-deployment-structure.xml
jboss-deployment-structure.xml is a new optional deployment descriptor for JBoss EAP 6. This deployment descriptor provides control over class loading in the deployment.
EAP_HOME/docs/schema/jboss-deployment-structure-1_2.xsd
3.2. Add an Explicit Module Dependency to a Deployment
Prerequisites
- You must already have a working software project that you want to add a module dependency to.
- You must know the name of the module being added as a dependency. See Section 3.9.2, “Included Modules” for the list of static modules included with JBoss EAP 6. If the module is another deployment then see Section 3.1.7, “Dynamic Module Naming” to determine the module name.
- Adding entries to the
MANIFEST.MFfile of the deployment. - Adding entries to the
jboss-deployment-structure.xmldeployment descriptor.
Procedure 3.1. Add dependency configuration to MANIFEST.MF
MANIFEST.MF file. See Section 3.3, “Generate MANIFEST.MF entries using Maven”.
Add
MANIFEST.MFfileIf the project has noMANIFEST.MFfile, create a file calledMANIFEST.MF. For a web application (WAR) add this file to theMETA-INFdirectory. For an EJB archive (JAR) add it to theMETA-INFdirectory.Add dependencies entry
Add a dependencies entry to theMANIFEST.MFfile with a comma-separated list of dependency module names.Dependencies: org.javassist, org.apache.velocityOptional: Make a dependency optional
A dependency can be made optional by appendingoptionalto the module name in the dependency entry.Dependencies: org.javassist optional, org.apache.velocityOptional: Export a dependency
A dependency can be exported by appendingexportto the module name in the dependency entry.Dependencies: org.javassist, org.apache.velocity exportOptional: Dependencies using annotations
This flag is needed when the module dependency contains annotations which need to be processed during annotation scanning, such as when declaring EJB Interceptors. If this is not done, an EJB interceptor declared in a module cannot be used in a deployment. There are other situations involving annotation scanning when this is needed too.Using this flag requires that the module contain a Jandex index. Instructions for creating and using a Jandex index are included at the end of this topic.
Procedure 3.2. Add dependency configuration to jboss-deployment-structure.xml
Add
jboss-deployment-structure.xmlIf the application has nojboss-deployment-structure.xmlfile then create a new file calledjboss-deployment-structure.xmland add it to the project. This file is an XML file with the root element of<jboss-deployment-structure>.<jboss-deployment-structure> </jboss-deployment-structure>For a web application (WAR) add this file to theWEB-INFdirectory. For an EJB archive (JAR) add it to theMETA-INFdirectory.Add dependencies section
Create a<deployment>element within the document root and a<dependencies>element within that.Add module elements
Within the dependencies node, add a module element for each module dependency. Set thenameattribute to the name of the module.<module name="org.javassist" />Optional: Make a dependency optional
A dependency can be made optional by adding theoptionalattribute to the module entry with the value oftrue. The default value for this attribute isfalse.<module name="org.javassist" optional="true" />Optional: Export a dependency
A dependency can be exported by adding theexportattribute to the module entry with the value oftrue. The default value for this attribute isfalse.<module name="org.javassist" export="true" />
Example 3.3. jboss-deployment-structure.xml with two dependencies
<jboss-deployment-structure>
<deployment>
<dependencies>
<module name="org.javassist" />
<module name="org.apache.velocity" export="true" />
</dependencies>
</deployment>
</jboss-deployment-structure>
The annotations flag requires that the module contain a Jandex index. You can create a new "index JAR" to add to the module. Use the Jandex JAR to build the index, and then insert it into a new JAR file:
Procedure 3.3.
Create the index
java -jar EAP_HOME/modules/org/jboss/jandex/main/jandex-1.0.3.Final-redhat-1.jar $JAR_FILECreate a temporary working space
mkdir /tmp/META-INFMove the index file to the working directory
mv $JAR_FILE.ifx /tmp/META-INF/jandex.idx- Option 1: Include the index in a new JAR file
jar cf index.jar -C /tmp META-INF/jandex.idxThen place the JAR in the module directory and editmodule.xmlto add it to the resource roots. - Option 2: Add the index to an existing JAR
java -jar EAP_HOME/modules/org/jboss/jandex/main/jandex-1.0.3.Final-redhat-1.jar -m $JAR_FILE
Tell the module import to utilize the annotation index
Tell the module import to utilize the annotation index, so that annotation scanning can find the annotations.Choose one of the methods below based on your situation:- If you are adding a module dependency using MANIFEST.MF, add
annotationsafter the module name.For example change:Dependencies: test.module, other.moduletoDependencies: test.module annotations, other.module - If you are adding a module dependency using
jboss-deployment-structure.xmladdannotations="true"on the module dependency.
3.3. Generate MANIFEST.MF entries using Maven
MANIFEST.MF file with a Dependencies entry. This does not automatically generate the list of dependencies, this process only creates the MANIFEST.MF file with the details specified in the pom.xml.
Prerequisites
- You must already have a working Maven project.
- The Maven project must be using one of the JAR, EJB, or WAR plug-ins (
maven-jar-plugin,maven-ejb-plugin,maven-war-plugin). - You must know the name of the project's module dependencies. Refer to Section 3.9.2, “Included Modules” for the list of static modules included with JBoss EAP 6. If the module is another deployment , then refer to Section 3.1.7, “Dynamic Module Naming” to determine the module name.
Procedure 3.4. Generate a MANIFEST.MF file containing module dependencies
Add Configuration
Add the following configuration to the packaging plug-in configuration in the project'spom.xmlfile.<configuration> <archive> <manifestEntries> <Dependencies></Dependencies> </manifestEntries> </archive> </configuration>List Dependencies
Add the list of the module dependencies in the<Dependencies>element. Use the same format that is used when adding the dependencies to theMANIFEST.MF. Refer to Section 3.2, “Add an Explicit Module Dependency to a Deployment” for details about that format.<Dependencies>org.javassist, org.apache.velocity</Dependencies>Theoptionalandexportattributes can also be used here.<Dependencies>org.javassist optional, org.apache.velocity export</Dependencies>Build the Project
Build the project using the Maven assembly goal.[Localhost ]$ mvn assembly:assembly
MANIFEST.MF file with the specified module dependencies.
Example 3.4. Configured Module Dependencies in pom.xml
<plugins>
<plugin>
<groupId>org.apache.maven.plugins</groupId>
<artifactId>maven-war-plugin</artifactId>
<configuration>
<archive>
<manifestEntries>
<Dependencies>org.javassist, org.apache.velocity</Dependencies>
</manifestEntries>
</archive>
</configuration>
</plugin>
</plugins>3.4. Prevent a Module Being Implicitly Loaded
Prerequisites
- You must already have a working software project that you want to exclude an implicit dependency from.
- You must know the name of the module to exclude. Refer to Section 3.9.1, “Implicit Module Dependencies” for a list of implicit dependencies and their conditions.
Procedure 3.5. Add dependency exclusion configuration to jboss-deployment-structure.xml
- If the application has no
jboss-deployment-structure.xmlfile, create a new file calledjboss-deployment-structure.xmland add it to the project. This file is an XML file with the root element of<jboss-deployment-structure>.<jboss-deployment-structure> </jboss-deployment-structure>For a web application (WAR) add this file to theWEB-INFdirectory. For an EJB archive (JAR) add it to theMETA-INFdirectory. - Create a
<deployment>element within the document root and an<exclusions>element within that.<deployment> <exclusions> </exclusions> </deployment> - Within the exclusions element, add a
<module>element for each module to be excluded. Set thenameattribute to the name of the module.<module name="org.javassist" />
Example 3.5. Excluding two modules
<jboss-deployment-structure>
<deployment>
<exclusions>
<module name="org.javassist" />
<module name="org.dom4j" />
</exclusions>
</deployment>
</jboss-deployment-structure>3.5. Exclude a Subsystem from a Deployment
This topic covers the steps required to exclude a subsystem from a deployment. This is done by editing the jboss-deployment-structure.xml configuration file. Excluding a subsystem provides the same effect as removing the subsystem, but it applies only to a single deployment.
Procedure 3.6. Exclude a Subsystem
- Open the
jboss-deployment-structure.xmlfile in a text editor. - Add the following XML inside the <deployment> tags:
<exclude-subsystems> <subsystem name="SUBSYSTEM_NAME" /> </exclude-subsystems> - Save the
jboss-deployment-structure.xmlfile.
The subsystem has been successfully excluded. The subsystem's deployment unit processors will no longer run on the deployment.
Example 3.6. Example jboss-deployment-structure.xml file.
<jboss-deployment-structure xmlns="urn:jboss:deployment-structure:1.2">
<ear-subdeployments-isolated>true</ear-subdeployments-isolated>
<deployment>
<exclude-subsystems>
<subsystem name="jaxrs" />
</exclude-subsystems>
<exclusions>
<module name="org.javassist" />
</exclusions>
<dependencies>
<module name="deployment.javassist.proxy" />
<module name="deployment.myjavassist" />
<module name="myservicemodule" services="import"/>
</dependencies>
<resources>
<resource-root path="my-library.jar" />
</resources>
</deployment>
<sub-deployment name="myapp.war">
<dependencies>
<module name="deployment.myear.ear.myejbjar.jar" />
</dependencies>
<local-last value="true" />
</sub-deployment>
<module name="deployment.myjavassist" >
<resources>
<resource-root path="javassist.jar" >
<filter>
<exclude path="javassist/util/proxy" />
</filter>
</resource-root>
</resources>
</module>
<module name="deployment.javassist.proxy" >
<dependencies>
<module name="org.javassist" >
<imports>
<include path="javassist/util/proxy" />
<exclude path="/**" />
</imports>
</module>
</dependencies>
</module>
</jboss-deployment-structure>3.6. Use the Class Loader Programmatically in a Deployment
3.6.1. Programmatically Load Classes and Resources in a Deployment
- Load a Class Using the Class.forName() Method
- You can use the
Class.forName()method to programmatically load and initialize classes. This method has two signatures.The three argument signature is the recommended way to programmatically load a class. This signature allows you to control whether you want the target class to be initialized upon load. It is also more efficient to obtain and provide the class loader because the JVM does not need to examine the call stack to determine which class loader to use. Assuming the class containing the code is named- Class.forName(String className)
- This signature takes only one parameter, the name of the class you need to load. With this method signature, the class is loaded by the class loader of the current class and initializes the newly loaded class by default.
- Class.forName(String className, boolean initialize, ClassLoader loader)
- This signature expects three parameters: the class name, a boolean value that specifies whether to initialize the class, and the ClassLoader that should load the class.
CurrentClass, you can obtain the class's class loader usingCurrentClass.class.getClassLoader()method.The following example provides the class loader to load and initialize theTargetClassclass:Example 3.7. Provide a class loader to load and initialize the TargetClass.
Class<?> targetClass = Class.forName("com.myorg.util.TargetClass", true, CurrentClass.class.getClassLoader()); - Find All Resources with a Given Name
- If you know the name and path of a resource, the best way to load it directly is to use the standard Java development kit Class or ClassLoader API.
- Load a Single Resource
- To load a single resource located in the same directory as your class or another class in your deployment, you can use the
Class.getResourceAsStream()method.Example 3.8. Load a single resource in your deployment.
InputStream inputStream = CurrentClass.class.getResourceAsStream("targetResourceName"); - Load All Instances of a Single Resource
- To load all instances of a single resource that are visible to your deployment's class loader, use the
Class.getClassLoader().getResources(String resourceName)method, whereresourceNameis the fully qualified path of the resource. This method returns an Enumeration of allURLobjects for resources accessible by the class loader with the given name. You can then iterate through the array of URLs to open each stream using theopenStream()method.Example 3.9. Load all instances of a resource and iterate through the result.
Enumeration<URL> urls = CurrentClass.class.getClassLoader().getResources("full/path/to/resource"); while (urls.hasMoreElements()) { URL url = urls.nextElement(); InputStream inputStream = null; try { inputStream = url.openStream(); // Process the inputStream ... } catch(IOException ioException) { // Handle the error } finally { if (inputStream != null) { try { inputStream.close(); } catch (Exception e) { // ignore } } } }Note
Because the URL instances are loaded from local storage, it is not necessary to use theopenConnection()or other related methods. Streams are much simpler to use and minimize the complexity of the code.
- Load a Class File From the Class Loader
- If a class has already been loaded, you can load the class file that corresponds to that class using the following syntax:If the class is not yet loaded, you must use the class loader and translate the path:
Example 3.10. Load a class file for a class that has been loaded.
InputStream inputStream = CurrentClass.class.getResourceAsStream(TargetClass.class.getSimpleName() + ".class");Example 3.11. Load a class file for a class that has not been loaded.
String className = "com.myorg.util.TargetClass" InputStream inputStream = CurrentClass.class.getClassLoader().getResourceAsStream(className.replace('.', '/') + ".class");
3.6.2. Programmatically Iterate Resources in a Deployment
MANIFEST.MF:
Dependencies: org.jboss.modules- List Resources Within a Deployment and Within All Imports
- There are times when it is not possible to look up resources by the exact path. For example, the exact path may not be known or you may need to examine more than one file in a given path. In this case, the JBoss Modules library provides several APIs for iterating all deployment resources. You can iterate through resources in a deployment by utilizing one of two methods.
- Iterate All Resources Found in a Single Module
- The
ModuleClassLoader.iterateResources()method iterates all the resources within this module class loader. This method takes two arguments: the starting directory name to search and a boolean that specifies whether it should recurse into subdirectories.The following example demonstrates how to obtain the ModuleClassLoader and obtain the iterator for resources in thebin/directory, recursing into subdirectories.The resultant iterator may be used to examine each matching resource and query its name and size (if available), open a readable stream, or acquire a URL for the resource.Example 3.12. Find resources in the "bin" directory, recursing into subdirectories.
ModuleClassLoader moduleClassLoader = (ModuleClassLoader) TargetClass.class.getClassLoader(); Iterator<Resource> mclResources = moduleClassLoader.iterateResources("bin",true); - Iterate All Resources Found in a Single Module and Imported Resources
- The
Module.iterateResources()method iterates all the resources within this module class loader, including the resources that are imported into the module. This method returns a much larger set than the previous method. This method requires an argument, which is a filter that narrows the result to a specific pattern. Alternatively, PathFilters.acceptAll() can be supplied to return the entire set.Example 3.13. Find the entire set of resources in this module, including imports.
ModuleClassLoader moduleClassLoader = (ModuleClassLoader) TargetClass.class.getClassLoader(); Module module = moduleClassLoader.getModule(); Iterator<Resource> moduleResources = module.iterateResources(PathFilters.acceptAll());
- Find All Resources That Match a Pattern
- If you need to find only specific resources within your deployment or within your deployment's full import set, you need to filter the resource iteration. The JBoss Modules filtering APIs give you several tools to accomplish this.
- Examine the Full Set of Dependencies
- If you need to examine the full set of dependencies, you can use the
Module.iterateResources()method'sPathFilterparameter to check the name of each resource for a match. - Examine Deployment Dependencies
- If you need to look only within the deployment, use the
ModuleClassLoader.iterateResources()method. However, you must use additional methods to filter the resultant iterator. ThePathFilters.filtered()method can provide a filtered view of a resource iterator this case. ThePathFiltersclass includes many static methods to create and compose filters that perform various functions, including finding child paths or exact matches, or matching an Ant-style "glob" pattern.
- Additional Code Examples For Filtering Resouces
- The following examples demonstrate how to filter resources based on different criteria.
Example 3.14. Find all files named "messages.properties" in your deployment.
ModuleClassLoader moduleClassLoader = (ModuleClassLoader) TargetClass.class.getClassLoader(); Iterator<Resource> mclResources = PathFilters.filtered(PathFilters.match("**/messages.properties"), moduleClassLoader.iterateResources("", true));Example 3.15. Find all files named "messages.properties" in your deployment and imports.
ModuleClassLoader moduleClassLoader = (ModuleClassLoader) TargetClass.class.getClassLoader(); Module module = moduleClassLoader.getModule(); Iterator<Resource> moduleResources = module.iterateResources(PathFilters.match("**/message.properties));Example 3.16. Find all files inside any directory named "my-resources" in your deployment.
ModuleClassLoader moduleClassLoader = (ModuleClassLoader) TargetClass.class.getClassLoader(); Iterator<Resource> mclResources = PathFilters.filtered(PathFilters.match("**/my-resources/**"), moduleClassLoader.iterateResources("", true));Example 3.17. Find all files named "messages" or "errors" in your deployment and imports.
ModuleClassLoader moduleClassLoader = (ModuleClassLoader) TargetClass.class.getClassLoader(); Module module = moduleClassLoader.getModule(); Iterator<Resource> moduleResources = module.iterateResources(PathFilters.any(PathFilters.match("**/messages"), PathFilters.match("**/errors"));Example 3.18. Find all files in a specific package in your deployment.
ModuleClassLoader moduleClassLoader = (ModuleClassLoader) TargetClass.class.getClassLoader(); Iterator<Resource> mclResources = moduleClassLoader.iterateResources("path/form/of/packagename", false);
3.7. Class Loading and Subdeployments
3.7.1. Modules and Class Loading in Enterprise Archives
- The contents of the
lib/directory in the root of the EAR archive is a module. This is called the parent module. - Each WAR and EJB JAR subdeployment is a module. These modules have the same behavior as any other module as well as implicit dependencies on the parent module.
- Subdeployments have implicit dependencies on the parent module and any other non-WAR subdeployments.
Important
Class-Path entries in the MANIFEST.MF file of each subdeployment.
3.7.2. Subdeployment Class Loader Isolation
3.7.3. Enable Subdeployment Class Loader Isolation Within a EAR
Important
Add the deployment descriptor file
Add thejboss-deployment-structure.xmldeployment descriptor file to theMETA-INFdirectory of the EAR if it doesn't already exist and add the following content:<jboss-deployment-structure> </jboss-deployment-structure>Add the
<ear-subdeployments-isolated>elementAdd the<ear-subdeployments-isolated>element to thejboss-deployment-structure.xmlfile if it doesn't already exist with the content oftrue.<ear-subdeployments-isolated>true</ear-subdeployments-isolated>
Subdeployment class loader isolation will now be enabled for this EAR deployment. This means that the subdeployments of the EAR will not have automatic dependencies on each of the non-WAR subdeployments.
3.8. Deploy Tag Library Descriptors (TLDs) in a Custom Module
If you have multiple applications that use common Tag Library Descriptors (TLDs), it may be useful to separate the TLDs from the applications so that they are located in one central and unique location. This enables easier additions and updates to TLDs without necessarily having to update each individual application that uses them.
- At least one JAR containing TLDs. Ensure that the TLDs are packed in
META-INF.
Procedure 3.7. Deploy TLDs in a Custom Module
- Using the Management CLI, connect to your JBoss EAP 6 instance and execute the following command to create the custom module containing the TLD JAR:
module add --name=MyTagLibs --resources=/path/to/TLDarchive.jarIf the TLDs are packaged with classes that require dependencies, use the--dependencies=DEPENDENCYoption to ensure that you specify those dependencies when creating the custom module.When creating the module, you can specify multiple JAR resources by separating each one with:. For example,--resources=/path/to/one.jar:/path/to/two.jar - In your applications, declare a dependency on the new MyTagLibs custom module using one of the methods described in Section 3.2, “Add an Explicit Module Dependency to a Deployment”.
Important
Ensure that you also importMETA-INFwhen declaring the dependency. For example, forMANIFEST.MF:Or, forDependencies: com.MyTagLibs meta-infjboss-deployment-structure.xml, use themeta-infattribute.
In your applications you can use TLDs that are contained in the new custom module.
3.9. Reference
3.9.1. Implicit Module Dependencies
| Subsystem Responsible for Adding the Dependency | Dependencies That Are Always Added | Dependencies That Are Conditionally Added | Conditions That Trigger the Addition of the Dependency |
|---|---|---|---|
| Core Server |
| | |
| EE subsystem |
| | |
| EJB 3 subsystem |
|
|
The presence of an
ejb-jar.xml file within a valid location in the deployment, as described in the Java EE 6 specification.
The presence of annotation-based EJBs, for example:
@Stateless, @Stateful, @MessageDriven
|
| JAX-RS (RESTEasy) subsystem |
|
| The presence of JAX-RS annotations in the deployment. |
| JCA subsystem |
|
| The deployment of a resource adapter (RAR) archive. |
| JPA (Hibernate) subsystem |
|
|
The presence of an
@PersistenceUnit or @PersistenceContext annotation, or a <persistence-unit-ref> or <persistence-context-ref> element in a deployment descriptor.
JBoss EAP 6 maps persistence provider names to module names. If you name a specific provider in the
persistence.xml file, a dependency is added for the appropriate module. If this not the desired behavior, you can exclude it using a jboss-deployment-structure.xml file.
|
| Logging subsystem |
| |
These dependencies are always added unless the
add-logging-api-dependencies attribute is set to false.
|
| SAR subsystem | |
| The deployment of a SAR archive. |
| Security subsystem |
| | |
| Web subsystem | |
| The deployment of a WAR archive. JavaServer Faces (JSF) is added only if it is used. |
| Web Services subsystem |
|
|
If it is not application client type, then it will add the conditional dependencies
|
| Weld (CDI) Subsystem |
|
| The presence of a beans.xml file in the deployment. |
| Container Managed Persistence (CMP) Subsystem | |
|
3.9.2. Included Modules
3.9.3. JBoss Deployment Structure Deployment Descriptor Reference
- Defining explicit module dependencies.
- Preventing specific implicit dependencies from loading.
- Defining additional modules from the resources of that deployment.
- Changing the subdeployment isolation behavior in that EAR deployment.
- Adding additional resource roots to a module in an EAR.
Chapter 4. Valves
4.1. About Valves
- Global Valves are configured at the server level and apply to all applications deployed to the server. Instructions to configure Global Valves are located in the Administration and Configuration Guide for JBoss EAP.
- Valves configured at the application level are packaged with the application deployment and only affect the specific application. Instructions to configure Valves at the application level are located in the Development Guide for JBoss EAP.
4.2. About Global Valves
4.3. About Authenticator Valves
org.apache.catalina.authenticator.AuthenticatorBase and overrides the authenticate(Request request, Response response, LoginConfig config) method.
4.4. Configure a Web Application to use a Valve
jboss-web.xml deployment descriptor.
Important
Prerequisites
- The valve must be created and included in your application's classpath. This can be done by either including it in the application's WAR file or any module that is added as a dependency. Examples of such modules include a static module installed on the server or a JAR file in the
lib/directory of an EAR archive if the WAR is deployed in an EAR. - The application must include a
jboss-web.xmldeployment descriptor.
Procedure 4.1. Configure an application for a local valve
Configure a Valve
Create avalveelement containing theclass-namechild element in the application'sjboss-web.xmlfile. Theclass-nameis the name of the valve class.<valve> <class-name>VALVE_CLASS_NAME</class-name> </valve>Example 4.1. Valve element configured in the jboss-web.xml file
<valve> <class-name>org.jboss.security.negotiation.NegotiationAuthenticator</class-name> </valve>Configure a Custom Valve
If the valve has configurable parameters, add aparamchild element to thevalveelement for each parameter, specifying theparam-nameandparam-valuefor each.Example 4.2. Custom valve element configured in the jboss-web.xml file
<valve> <class-name>org.jboss.web.tomcat.security.GenericHeaderAuthenticator</class-name> <param> <param-name>httpHeaderForSSOAuth</param-name> <param-value>sm_ssoid,ct-remote-user,HTTP_OBLIX_UID</param-value> </param> <param> <param-name>sessionCookieForSSOAuth</param-name> <param-value>SMSESSION,CTSESSION,ObSSOCookie</param-value> </param> </valve>
Example 4.3. jboss-web.xml valve configuration
<valve>
<class-name>org.jboss.samplevalves.RestrictedUserAgentsValve</class-name>
<param>
<param-name>restrictedUserAgents</param-name>
<param-value>^.*MS Web Services Client Protocol.*$</param-value>
</param>
</valve>4.5. Configure a Web Application to use an Authenticator Valve
web.xml deployment descriptor of the application to be configured. In the simplest case, the web.xml configuration is the same as using BASIC authentication except the auth-method child element of login-config is set to the name of the valve performing the configuration.
Prerequisites
- Authentication valve must already be created.
- If the authentication valve is a global valve then it must already be installed and configured, and you must know the name that it was configured as.
- You need to know the realm name of the security realm that the application will use.
Procedure 4.2. Configure an Application to use an Authenticator Valve
Configure the valve
When using a local valve, it must be configured in the application'sjboss-web.xmldeployment descriptor. See Section 4.4, “Configure a Web Application to use a Valve”.When using a global valve, this is not necessary.Add security configuration to web.xml
Add the security configuration to theweb.xmlfile for your application, using the standard elements such assecurity-constraint,login-config, andsecurity-role. In thelogin-configelement, set the value ofauth-methodto the name of the authenticator valve. The realm-name element must also be set to the name of the JBoss security realm being used by the application.<login-config> <auth-method>VALVE_NAME</auth-method> <realm-name>REALM_NAME</realm-name> </login-config>
4.6. Create a Custom Valve
Procedure 4.3. Create a Custom Valve
Configure the Maven dependencies.
Add the following dependency configuration to the projectpom.xmlfile.<dependency> <groupId>org.jboss.web</groupId> <artifactId>jbossweb</artifactId> <version>7.5.7.Final-redhat-1</version> <scope>provided</scope> </dependency>Note
Thejbossweb-VERSION.jarfile should not be included in the application. It is available to the JBoss EAP server runtime classpath as a JBoss module at this location:EAP_HOME/modules/system/layers/base/org/jboss/as/web/main/jbossweb-7.5.7.Final-redhat-1.jar.Create the Valve class
Create a subclass oforg.apache.catalina.valves.ValveBase.package org.jboss.samplevalves; import org.apache.catalina.valves.ValveBase; import org.apache.catalina.connector.Request; import org.apache.catalina.connector.Response; public class RestrictedUserAgentsValve extends ValveBase { }Implement the invoke method.
Theinvoke()method is called when this valve is executed in the pipeline. The request and response objects are passed as parameters. Perform any processing and modification of the request and response here.public void invoke(Request request, Response response) { }Invoke the next pipeline step.
The last thing the invoke method must do is invoke the next step of the pipeline and pass the modified request and response objects along. This is done using thegetNext().invoke()methodgetNext().invoke(request, response);Optional: Specify parameters.
If the valve must be configurable, enable this by adding a parameter. Do this by adding an instance variable and a setter method for each parameter.private String restrictedUserAgents = null; public void setRestricteduserAgents(String mystring) { this.restrictedUserAgents = mystring; }Review the completed code example.
The class should now look like the following example.Example 4.4. Sample Custom Valve
package org.jboss.samplevalves; import java.io.IOException; import java.util.regex.Pattern; import javax.servlet.ServletException; import org.apache.catalina.valves.ValveBase; import org.apache.catalina.connector.Request; import org.apache.catalina.connector.Response; public class RestrictedUserAgentsValve extends ValveBase { private String restrictedUserAgents = null; public void setRestrictedUserAgents(String mystring) { this.restrictedUserAgents = mystring; } public void invoke(Request request, Response response) throws IOException, ServletException { String agent = request.getHeader("User-Agent"); System.out.println("user-agent: " + agent + " : " + restrictedUserAgents); if (Pattern.matches(restrictedUserAgents, agent)) { System.out.println("user-agent: " + agent + " matches: " + restrictedUserAgents); response.addHeader("Connection", "close"); } getNext().invoke(request, response); } }
Chapter 5. Logging for Developers
5.1. Introduction
5.1.1. About Logging
5.1.2. Application Logging Frameworks Supported By JBoss LogManager
- JBoss Logging - included with JBoss EAP 6
- Apache Commons Logging - http://commons.apache.org/logging/
- Simple Logging Facade for Java (SLF4J) - http://www.slf4j.org/
- Apache log4j - http://logging.apache.org/log4j/1.2/
- Java SE Logging (java.util.logging) - http://download.oracle.com/javase/6/docs/api/java/util/logging/package-summary.html
- java.util.logging
- JBoss Logging
- Log4j
- SLF4J
- commons-logging
- java.util.logging Handler
- Log4j Appender
Note
Log4j API and a Log4J Appender, then Objects will be converted to string before being passed.
5.1.3. About Log Levels
TRACE, DEBUG, INFO, WARN, ERROR and FATAL.
WARN will only record messages of the levels WARN, ERROR and FATAL.
5.1.4. Supported Log Levels
| Log Level | Value | Description |
|---|---|---|
| FINEST | 300 |
-
|
| FINER | 400 |
-
|
| TRACE | 400 |
Use for messages that provide detailed information about the running state of an application. Log messages of
TRACE are usually only captured when debugging an application.
|
| DEBUG | 500 |
Use for messages that indicate the progress individual requests or activities of an application. Log messages of
DEBUG are usually only captured when debugging an application.
|
| FINE | 500 |
-
|
| CONFIG | 700 |
-
|
| INFO | 800 |
Use for messages that indicate the overall progress of the application. Often used for application startup, shutdown and other major lifecycle events.
|
| WARN | 900 |
Use to indicate a situation that is not in error but is not considered ideal. May indicate circumstances that may lead to errors in the future.
|
| WARNING | 900 |
-
|
| ERROR | 1000 |
Use to indicate an error that has occurred that could prevent the current activity or request from completing but will not prevent the application from running.
|
| SEVERE | 1000 |
-
|
| FATAL | 1100 |
Use to indicate events that could cause critical service failure and application shutdown and possibly cause JBoss EAP 6 to shutdown.
|
5.1.5. Default Log File Locations
| Log File | Description |
|---|---|
EAP_HOME/standalone/log/server.log |
Server Log. Contains all server log messages, including server startup messages.
|
EAP_HOME/standalone/log/gc.log |
Garbage collection log. Contains details of all garbage collection.
|
| Log File | Description |
|---|---|
EAP_HOME/domain/log/host-controller.log |
Host Controller boot log. Contains log messages related to the startup of the host controller.
|
EAP_HOME/domain/log/process-controller.log |
Process controller boot log. Contains log messages related to the startup of the process controller.
|
EAP_HOME/domain/servers/SERVERNAME/log/server.log |
The server log for the named server. Contains all log messages for that server, including server startup messages.
|
5.2. Logging with the JBoss Logging Framework
5.2.1. About JBoss Logging
5.2.2. Features of JBoss Logging
- Provides an innovative, easy to use "typed" logger.
- Full support for internationalization and localization. Translators work with message bundles in properties files while developers can work with interfaces and annotations.
- Build-time tooling to generate typed loggers for production, and runtime generation of typed loggers for development.
5.2.3. Add Logging to an Application with JBoss Logging
org.jboss.logging.Logger) and call the appropriate methods of that object. This task describes the steps required to add support for this to your application.
Prerequisites
- If you are using Maven as your build system, the project must be configured to include the JBoss Maven Repository. Refer to Section 2.3.2, “Configure the JBoss EAP 6 Maven Repository Using the Maven Settings”
- The JBoss Logging JAR files must be in the build path for your application. How you do this depends on whether you build your application using Red Hat JBoss Developer Studio or with Maven.
- When building using Red Hat JBoss Developer Studio select from the menu, then select and ensure the runtime for JBoss EAP 6 is checked.
- When building using Maven add the following dependency configuration to your project's
pom.xmlfile.<dependency> <groupId>org.jboss.logging</groupId> <artifactId>jboss-logging</artifactId> <version>3.1.2.GA-redhat-1</version> <scope>provided</scope> </dependency>
You do not need to include the JARs in your built application because JBoss EAP 6 provides them to deployed applications.
Procedure 5.1. Add Logging to an Application
Add imports
Add theimportstatements for the JBoss Logging class namespaces that you will be using. At a minimum you will need to importimport org.jboss.logging.Logger.import org.jboss.logging.Logger;Create a Logger object
Create an instance oforg.jboss.logging.Loggerand initialize it by calling the static methodLogger.getLogger(Class). Red Hat recommends creating this as a single instance variable for each class.private static final Logger LOGGER = Logger.getLogger(HelloWorld.class);Add logging messages
Add calls to the methods of theLoggerobject to your code where you want it to send log messages. TheLoggerobject has many different methods with different parameters for different types of messages. The easiest to use are:debug(Object message)info(Object message)error(Object message)trace(Object message)fatal(Object message)These methods send a log message with the corresponding log level and themessageparameter as a string.LOGGER.error("Configuration file not found.");For the complete list of JBoss Logging methods refer to theorg.jboss.loggingpackage in the JBoss EAP 6 API Documentation.
Example 5.1. Using JBoss Logging when opening a properties file
import org.jboss.logging.Logger;
public class LocalSystemConfig
{
private static final Logger LOGGER = Logger.getLogger(LocalSystemConfig.class);
public Properties openCustomProperties(String configname) throws CustomConfigFileNotFoundException
{
Properties props = new Properties();
try
{
LOGGER.info("Loading custom configuration from "+configname);
props.load(new FileInputStream(configname));
}
catch(IOException e) //catch exception in case properties file does not exist
{
LOGGER.error("Custom configuration file ("+configname+") not found. Using defaults.");
throw new CustomConfigFileNotFoundException(configname);
}
return props;
}5.3. Per-deployment Logging
5.3.1. About Per-deployment Logging
5.3.2. Add Per-deployment Logging to an Application
logging.properties into the deployment. This configuration file is recommended because it can be used with any logging facade as the JBoss Log Manager is the underlying log manager used.
Simple Logging Facade for Java (SLF4J) or Apache log4j, the logging.properties configuration file is suitable. If you are using Apache log4j appenders then the configuration file log4j.properties is required. The configuration file jboss-logging.properties is supported only for legacy deployments.
Procedure 5.2. Add Configuration File to the Application
The directory into which the configuration file is added depends on the deployment method:
EAR,WARorJAR.EARdeploymentCopy the logging configuration file to theMETA-INFdirectory.WARorJARdeploymentCopy the logging configuration file to either theMETA-INForWEB-INF/classesdirectory.
5.3.3. Example logging.properties File
# Additional loggers to configure (the root logger is always configured)
loggers=
# Root logger configuration
logger.level=INFO
logger.handlers=FILE
# A handler configuration
handler.FILE=org.jboss.logmanager.handlers.FileHandler
handler.FILE.level=ALL
handler.FILE.formatter=PATTERN
handler.FILE.properties=append,autoFlush,enabled,suffix,fileName
handler.FILE.constructorProperties=fileName,append
handler.FILE.append=true
handler.FILE.autoFlush=true
handler.FILE.enabled=true
handler.FILE.fileName=${jboss.server.log.dir}/app.log
# The formatter to use
formatter.PATTERN=org.jboss.logmanager.formatters.PatternFormatter
formatter.PATTERN.properties=pattern
formatter.PATTERN.constructorProperties=pattern
formatter.PATTERN.pattern=%d %-5p %c: %m%n
5.4. Logging Profiles
5.4.1. About Logging Profiles
Important
- A unique name. This is required.
- Any number of log handlers.
- Any number of log categories.
- Up to one root logger.
MANIFEST.MF file, using the logging-profile attribute.
5.4.2. Specify a Logging Profile in an Application
MANIFEST.MF file.
Prerequisites:
- You must know the name of the logging profile that has been setup on the server for this application to use. Ask your server administrator for the name of the profile to use.
Procedure 5.3. Add Logging Profile configuration to an Application
Edit
MANIFEST.MFIf your application does not have aMANIFEST.MFfile: create one with the following content, replacing NAME with the required profile name.Manifest-Version: 1.0 Logging-Profile: NAMEIf your application already has aMANIFEST.MFfile: add the following line to it, replacing NAME with the required profile name.Logging-Profile: NAME
Note
maven-war-plugin, you can put your MANIFEST.MF file in src/main/resources/META-INF/ and add the following configuration to your pom.xml file.
<plugin>
<artifactId>maven-war-plugin</artifactId>
<configuration>
<archive>
<manifestFile>src/main/resources/META-INF/MANIFEST.MF</manifestFile>
</archive>
</configuration>
</plugin>Chapter 6. Internationalization and Localization
6.1. Introduction
6.1.1. About Internationalization
6.1.2. About Localization
6.2. JBoss Logging Tools
6.2.1. Overview
6.2.1.1. JBoss Logging Tools Internationalization and Localization
org.jboss.logging annotations. It is not necessary to implement the interfaces, JBoss Logging Tools does this at compile time. Once defined you can use these methods to log messages or obtain exception objects in your code.
6.2.1.2. JBoss Logging Tools Quickstart
logging-tools, contains a simple Maven project that demonstrates the features of JBoss Logging Tools. It has been used extensively in this documentation for code samples.
6.2.1.3. Message Logger
@org.jboss.logging.MessageLogger.
6.2.1.4. Message Bundle
@org.jboss.logging.MessageBundle.
6.2.1.5. Internationalized Log Messages
@LogMessage and @Message annotations and specify the log message using the value attribute of @Message. Internationalized log messages are localized by providing translations in a properties file.
6.2.1.6. Internationalized Exceptions
6.2.1.7. Internationalized Messages
6.2.1.8. Translation Properties Files
6.2.1.9. JBoss Logging Tools Project Codes
projectCode attribute of the @MessageLogger annotation.
6.2.1.10. JBoss Logging Tools Message IDs
id attribute of the @Message annotation.
6.2.2. Creating Internationalized Loggers, Messages and Exceptions
6.2.2.1. Create Internationalized Log Messages
logging-tools quick start for a complete example.
Prerequisites:
- You must already have a working Maven project. Refer to Section 6.2.6.1, “JBoss Logging Tools Maven Configuration”.
- The project must have the required Maven configuration for JBoss Logging Tools.
Procedure 6.1. Create an Internationalized Log Message Bundle
Create an Message Logger interface
Add a Java interface to your project to contain the log message definitions. Name the interface descriptively for the log messages that will be defined in it.The log message interface has the following requirements:- It must be annotated with
@org.jboss.logging.MessageLogger. - It must extend
org.jboss.logging.BasicLogger. - The interface must define a field of that is a typed logger that implements this interface. Do this with the
getMessageLogger()method oforg.jboss.logging.Logger.
package com.company.accounts.loggers; import org.jboss.logging.BasicLogger; import org.jboss.logging.Logger; import org.jboss.logging.MessageLogger; @MessageLogger(projectCode="") interface AccountsLogger extends BasicLogger { AccountsLogger LOGGER = Logger.getMessageLogger( AccountsLogger.class, AccountsLogger.class.getPackage().getName() ); }Add method definitions
Add a method definition to the interface for each log message. Name each method descriptively for the log message that it represents.Each method has the following requirements:- The method must return
void. - It must be annotated with the
@org.jboss.logging.LogMessageannotation. - It must be annotated with the
@org.jboss.logging.Messageannotation. - The value attribute of
@org.jboss.logging.Messagecontains the default log message. This is the message that is used if no translation is available.
@LogMessage @Message(value = "Customer query failed, Database not available.") void customerQueryFailDBClosed();The default log level isINFO.Invoke the methods
Add the calls to the interface methods in your code where the messages must be logged from. It is not necessary to create implementations of the interfaces, the annotation processor does this for you when the project is compiled.AccountsLogger.LOGGER.customerQueryFailDBClosed();The custom loggers are sub-classed from BasicLogger so the logging methods ofBasicLogger(debug(),error()etc) can also be used. It is not necessary to create other loggers to log non-internationalized messages.AccountsLogger.LOGGER.error("Invalid query syntax.");
The project now supports one or more internationalized loggers that can be localized.
6.2.2.2. Create and Use Internationalized Messages
logging-tools quickstart for a complete example.
Prerequisites
- You have a working Maven project using the JBoss EAP 6 repository. Refer to Section 2.3.2, “Configure the JBoss EAP 6 Maven Repository Using the Maven Settings”.
- The required Maven configuration for JBoss Logging Tools has been added. Refer to Section 6.2.6.1, “JBoss Logging Tools Maven Configuration”.
Procedure 6.2. Create and Use Internationalized Messages
Create an interface for the exceptions
JBoss Logging Tools defines internationalized messages in interfaces. Name each interface descriptively for the messages that will be defined in it.The interface has the following requirements:- It must be declared as public
- It must be annotated with
@org.jboss.logging.MessageBundle. - The interface must define a field that is a message bundle of the same type as the interface.
@MessageBundle(projectCode="") public interface GreetingMessageBundle { GreetingMessageBundle MESSAGES = Messages.getBundle(GreetingMessageBundle.class); }Add method definitions
Add a method definition to the interface for each message. Name each method descriptively for the message that it represents.Each method has the following requirements:- It must return an object of type
String. - It must be annotated with the
@org.jboss.logging.Messageannotation. - The value attribute of
@org.jboss.logging.Messagemust be set to the default message. This is the message that is used if no translation is available.
@Message(value = "Hello world.") String helloworldString();Invoke methods
Invoke the interface methods in your application where you need to obtain the message.System.console.out.println(helloworldString());
6.2.2.3. Create Internationalized Exceptions
logging-tools quick start for a complete example.
Procedure 6.3. Create and use Internationalized Exceptions
Add JBoss Logging Tools configuration
Add the required project configuration to support JBoss Logging Tools. Refer to Section 6.2.6.1, “JBoss Logging Tools Maven Configuration”Create an interface for the exceptions
JBoss Logging Tools defines internationalized exceptions in interfaces. Name each interface descriptively for the exceptions that will be defined in it.The interface has the following requirements:- It must be declared as
public. - It must be annotated with
@org.jboss.logging.MessageBundle. - The interface must define a field that is a message bundle of the same type as the interface.
@MessageBundle(projectCode="") public interface ExceptionBundle { ExceptionBundle EXCEPTIONS = Messages.getBundle(ExceptionBundle.class); }Add method definitions
Add a method definition to the interface for each exception. Name each method descriptively for the exception that it represents.Each method has the following requirements:- It must return an object of type
Exceptionor a sub-type ofException. - It must be annotated with the
@org.jboss.logging.Messageannotation. - The value attribute of
@org.jboss.logging.Messagemust be set to the default exception message. This is the message that is used if no translation is available. - If the exception being returned has a constructor that requires parameters in addition to a message string, then those parameters must be supplied in the method definition using the
@Paramannotation. The parameters must be the same type and order as the constructor.
@Message(value = "The config file could not be opened.") IOException configFileAccessError(); @Message(id = 13230, value = "Date string '%s' was invalid.") ParseException dateWasInvalid(String dateString, @Param int errorOffset);Invoke methods
Invoke the interface methods in your code where you need to obtain one of the exceptions. The methods do not throw the exceptions, they return the exception object which you can then throw.try { propsInFile=new File(configname); props.load(new FileInputStream(propsInFile)); } catch(IOException ioex) //in case props file does not exist { throw ExceptionBundle.EXCEPTIONS.configFileAccessError(); }
6.2.3. Localizing Internationalized Loggers, Messages and Exceptions
6.2.3.1. Generate New Translation Properties Files with Maven
logging-tools quick start for a complete example.
Prerequisites:
- You must already have a working Maven project.
- The project must already be configured for JBoss Logging Tools.
- The project must contain one or more interfaces that define internationalized log messages or exceptions.
Procedure 6.4. Generate New Translation Properties Files with Maven
Add Maven configuration
Add the-AgenereatedTranslationFilePathcompiler argument to the Maven compiler plug-in configuration and assign it the path where the new files will be created.<plugin> <groupId>org.apache.maven.plugins</groupId> <artifactId>maven-compiler-plugin</artifactId> <version>2.3.2</version> <configuration> <source>1.6</source> <target>1.6</target> <compilerArgument> -AgeneratedTranslationFilesPath=${project.basedir}/target/generated-translation-files </compilerArgument> <showDeprecation>true</showDeprecation> </configuration> </plugin>The above configuration will create the new files in thetarget/generated-translation-filesdirectory of your Maven project.Build the project
Build the project using Maven.[Localhost]$ mvn compile
@MessageBundle or @MessageLogger. The new files are created in a subdirectory corresponding to the Java package that each interface is declared in.
InterfaceName is the name of the interface that this file was generated for: InterfaceName.i18n_locale_COUNTRY_VARIANT.properties.
6.2.3.2. Translate an Internationalized Logger, Exception or Message
logging-tools quick start for a complete example.
Prerequisites
- You must already have a working Maven project.
- The project must already be configured for JBoss Logging Tools.
- The project must contain one or interfaces that define internationalized log messages or exceptions.
- The project must be configured to generate template translation property files.
Procedure 6.5. Translate an internationalized logger, exception or message
Generate the template properties files
Run themvn compilecommand to create the template translation properties files.Add the template file to your project
Copy the template for the interfaces that you want to translate from the directory where they were created into thesrc/main/resourcesdirectory of your project. The properties files must be in the same package as the interfaces they are translating.Rename the copied template file
Rename the copy of the template file according to the translation it will contain. E.g.GreeterLogger.i18n_fr_FR.properties.Translate the contents of the template.
Edit the new translation properties file to contain the appropriate translation.# Level: Logger.Level.INFO # Message: Hello message sent. logHelloMessageSent=Bonjour message envoyé.Repeat steps two, three, and four for each translation of each bundle being performed.
target/generated-sources/annotations/.
6.2.4. Customizing Internationalized Log Messages
6.2.4.1. Add Message IDs and Project Codes to Log Messages
logging-tools quick start for a complete example.
Prerequisites
- You must already have a project with internationalized log messages. Refer to Section 6.2.2.1, “Create Internationalized Log Messages”.
- You need to know the project code you will be using. You can use a single project code, or define different ones for each interface.
Procedure 6.6. Add message IDs and Project Codes to Log Messages
Specify the project code for the interface.
Specify the project code using the projectCode attribute of the@MessageLoggerannotation attached to a custom logger interface. All messages that are defined in the interface will use that project code.@MessageLogger(projectCode="ACCNTS") interface AccountsLogger extends BasicLogger { }Specify Message IDs
Specify a message ID for each message using theidattribute of the@Messageannotation attached to the method that defines the message.@LogMessage @Message(id=43, value = "Customer query failed, Database not available.") void customerQueryFailDBClosed();
10:55:50,638 INFO [com.company.accounts.ejb] (MSC service thread 1-4) ACCNTS000043: Customer query failed, Database not available.6.2.4.2. Specify the Log Level for a Message
INFO. A different log level can be specified with the level attribute of the @LogMessage annotation attached to the logging method.
Procedure 6.7. Specify the log level for a message
Specify level attribute
Add thelevelattribute to the@LogMessageannotation of the log message method definition.Assign log level
Assign thelevelattribute the value of the log level for this message. The valid values forlevelare the six enumerated constants defined inorg.jboss.logging.Logger.Level:DEBUG,ERROR,FATAL,INFO,TRACE, andWARN.Import org.jboss.logging.Logger.Level; @LogMessage(level=Level.ERROR) @Message(value = "Customer query failed, Database not available.") void customerQueryFailDBClosed();
ERROR.
10:55:50,638 ERROR [com.company.app.Main] (MSC service thread 1-4)
Customer query failed, Database not available.6.2.4.3. Customize Log Messages with Parameters
Procedure 6.8. Customize log messages with parameters
Add parameters to method definition
Parameters of any type can be added to the method definition. Regardless of type, the String representation of the parameter is what is displayed in the message.Add parameter references to the log message
References can use explicit or ordinary indexes.- To use ordinary indexes, insert the characters
%sin the message string where you want each parameter to appear. The first instance of%swill insert the first parameter, the second instance will insert the second parameter, and so on. - To use explicit indexes, insert the characters
%{#$}sin the message, where # indicates the number of the parameter you wish to appear.
Important
@Cause annotation is not included in the number of parameters.
Example 6.1. Message parameters using ordinary indexes
@LogMessage(level=Logger.Level.DEBUG)
@Message(id=2, value="Customer query failed, customerid:%s, user:%s")
void customerLookupFailed(Long customerid, String username);Example 6.2. Message parameters using explicit indexes
@LogMessage(level=Logger.Level.DEBUG)
@Message(id=2, value="Customer query failed, user:%2$s, customerid:%1$s")
void customerLookupFailed(Long customerid, String username);6.2.4.4. Specify an Exception as the Cause of a Log Message
Throwable or any of its sub-classes and is marked with the @Cause annotation. This parameter cannot be referenced in the log message like other parameters and is displayed after the log message.
@Cause parameter to indicate the "causing" exception. It is assumed that you have already created internationalized logging messages to which you want to add this functionality.
Procedure 6.9. Specify an exception as the cause of a log message
Add the parameter
Add a parameter of the typeThrowableor a sub-class to the method.@LogMessage @Message(id=404, value="Loading configuration failed. Config file:%s") void loadConfigFailed(Exception ex, File file);Add the annotation
Add the@Causeannotation to the parameter.import org.jboss.logging.Cause @LogMessage @Message(value = "Loading configuration failed. Config file: %s") void loadConfigFailed(@Cause Exception ex, File file);Invoke the method
When the method is invoked in your code, an object of the correct type must be passed and will be displayed after the log message.try { confFile=new File(filename); props.load(new FileInputStream(confFile)); } catch(Exception ex) //in case properties file cannot be read { ConfigLogger.LOGGER.loadConfigFailed(ex, filename); }Below is the output of the above code samples if the code threw an exception of typeFileNotFoundException.10:50:14,675 INFO [com.company.app.Main] (MSC service thread 1-3) Loading configuration failed. Config file: customised.properties java.io.FileNotFoundException: customised.properties (No such file or directory) at java.io.FileInputStream.open(Native Method) at java.io.FileInputStream.<init>(FileInputStream.java:120) at com.company.app.demo.Main.openCustomProperties(Main.java:70) at com.company.app.Main.go(Main.java:53) at com.company.app.Main.main(Main.java:43)
6.2.5. Customizing Internationalized Exceptions
6.2.5.1. Add Message IDs and Project Codes to Exception Messages
Prerequisites
- You must already have a project with internationalized exceptions. Refer to Section 6.2.2.3, “Create Internationalized Exceptions”.
- You need to know the project code you will be using. You can use a single project code, or define different ones for each interface.
Procedure 6.10. Add Message IDs and Project Codes to Exception Messages
Specify a project code
Specify the project code using theprojectCodeattribute of the@MessageBundleannotation attached to a exception bundle interface. All messages that are defined in the interface will use that project code.@MessageBundle(projectCode="ACCTS") interface ExceptionBundle { ExceptionBundle EXCEPTIONS = Messages.getBundle(ExceptionBundle.class); }Specify message IDs
Specify a message ID for each exception using theidattribute of the@Messageannotation attached to the method that defines the exception.@Message(id=143, value = "The config file could not be opened.") IOException configFileAccessError();
Important
Example 6.3. Creating internationalized exceptions
@MessageBundle(projectCode="ACCTS")
interface ExceptionBundle
{
ExceptionBundle EXCEPTIONS = Messages.getBundle(ExceptionBundle.class);
@Message(id=143, value = "The config file could not be opened.")
IOException configFileAccessError();
}throw ExceptionBundle.EXCEPTIONS.configFileAccessError();Exception in thread "main" java.io.IOException: ACCTS000143: The config file could not be opened.
at com.company.accounts.Main.openCustomProperties(Main.java:78)
at com.company.accounts.Main.go(Main.java:53)
at com.company.accounts.Main.main(Main.java:43)6.2.5.2. Customize Exception Messages with Parameters
Procedure 6.11. Customize an exception message with parameters
Add parameters to method definition
Parameters of any type can be added to the method definition. Regardless of type, theStringrepresentation of the parameter is what is displayed in the message.Add parameter references to the exception message
References can use explicit or ordinary indexes.- To use ordinary indexes, insert the characters
%sin the message string where you want each parameter to appear. The first instance of%swill insert the first parameter, the second instance will insert the second parameter, and so on. - To use explicit indexes, insert the characters
%{#$}sin the message where#indicates the number of the parameter which you wish to appear.
Using explicit indexes allows the parameter references in the message to be in a different order than they are defined in the method. This is important for translated messages which may require different ordering of parameters.
Important
@Cause annotation is not included in the number of parameters.
Example 6.4. Using ordinary indexes
@Message(id=2, value="Customer query failed, customerid:%s, user:%s")
void customerLookupFailed(Long customerid, String username);Example 6.5. Using explicit indexes
@Message(id=2, value="Customer query failed, user:%2$s, customerid:%1$s")
void customerLookupFailed(Long customerid, String username);6.2.5.3. Specify One Exception as the Cause of Another Exception
@Cause. This parameter is used to pass the causing exception. This parameter cannot be referenced in the exception message.
@Cause parameter to indicate the causing exception. It is assumed that you have already created an exception bundle to which you want to add this functionality.
Procedure 6.12. Specify one exception as the cause of another exception
Add the parameter
Add the a parameter of the typeThrowableor a sub-class to the method.@Message(id=328, value = "Error calculating: %s.") ArithmeticException calculationError(Throwable cause, String msg);Add the annotation
Add the@Causeannotation to the parameter.import org.jboss.logging.Cause @Message(id=328, value = "Error calculating: %s.") ArithmeticException calculationError(@Cause Throwable cause, String msg);Invoke the method
Invoke the interface method to obtain an exception object. The most common use case is to throw a new exception from a catch block using the caught exception as the cause.try { ... } catch(Exception ex) { throw ExceptionBundle.EXCEPTIONS.calculationError( ex, "calculating payment due per day"); }
Example 6.6. Specify one exception as the cause of another exception
@MessageBundle(projectCode = "TPS")
interface CalcExceptionBundle
{
CalcExceptionBundle EXCEPTIONS = Messages.getBundle(CalcExceptionBundle.class);
@Message(id=328, value = "Error calculating: %s.")
ArithmeticException calcError(@Cause Throwable cause, String value);
}int totalDue = 5;
int daysToPay = 0;
int amountPerDay;
try
{
amountPerDay = totalDue/daysToPay;
}
catch (Exception ex)
{
throw CalcExceptionBundle.EXCEPTIONS.calcError(ex, "payments per day");
}Exception in thread "main" java.lang.ArithmeticException: TPS000328: Error calculating: payments per day.
at com.company.accounts.Main.go(Main.java:58)
at com.company.accounts.Main.main(Main.java:43)
Caused by: java.lang.ArithmeticException: / by zero
at com.company.accounts.Main.go(Main.java:54)
... 1 more6.2.6. Reference
6.2.6.1. JBoss Logging Tools Maven Configuration
pom.xml file.
logging-tools quick start for an example of a complete working pom.xml file.
- JBoss Maven Repository must be enabled for the project. Refer to Section 2.3.2, “Configure the JBoss EAP 6 Maven Repository Using the Maven Settings”.
- The Maven dependencies for
jboss-loggingandjboss-logging-processormust be added. Both of dependencies are available in JBoss EAP 6 so the scope element of each can be set toprovidedas shown.<dependency> <groupId>org.jboss.logging</groupId> <artifactId>jboss-logging-processor</artifactId> <version>1.0.0.Final</version> <scope>provided</scope> </dependency> <dependency> <groupId>org.jboss.logging</groupId> <artifactId>jboss-logging</artifactId> <version>3.1.0.GA</version> <scope>provided</scope> </dependency> - The
maven-compiler-pluginmust be at least version2.2and be configured for target and generated sources of1.6.<plugin> <groupId>org.apache.maven.plugins</groupId> <artifactId>maven-compiler-plugin</artifactId> <version>2.3.2</version> <configuration> <source>1.6</source> <target>1.6</target> </configuration> </plugin>
6.2.6.2. Translation Property File Format
key=value pair format described in the documentation for the java.util.Properties class, http://docs.oracle.com/javase/6/docs/api/java/util/Properties.html.
InterfaceName.i18n_locale_COUNTRY_VARIANT.properties InterfaceNameis the name of the interface that the translations apply to.locale,COUNTRY, andVARIANTidentify the regional settings that the translation applies to.localeandCOUNTRYspecify the language and country using the ISO-639 and ISO-3166 Language and Country codes respectively.COUNTRYis optional.VARIANTis an optional identifier that can be used to identify translations that only apply to a specific operating system or browser.
Example 6.7. Sample Translation Properties File
GreeterService.i18n_fr_FR_POSIX.properties.
# Level: Logger.Level.INFO
# Message: Hello message sent.
logHelloMessageSent=Bonjour message envoyé.6.2.6.3. JBoss Logging Tools Annotations Reference
| Annotation | Target | Description | Attributes |
|---|---|---|---|
@MessageBundle | Interface |
Defines the interface as a Message Bundle.
| projectCode |
@MessageLogger | Interface |
Defines the interface as a Message Logger.
| projectCode |
@Message | Method |
Can be used in Message Bundles and Message Loggers. In a Message Logger it defines a method as being a localized logger. In a Message Bundle it defines the method as being one that returns a localized String or Exception object.
| value, id |
@LogMessage | Method |
Defines a method in a Message Logger as being a logging method.
| level (default INFO) |
@Cause | Parameter |
Defines a parameter as being one that passes an Exception as the cause of either a Log message or another Exception.
| - |
@Param | Parameter |
Defines a parameter as being one that is passed to the constructor of the Exception.
| - |
Chapter 7. Remote JNDI Lookup
7.1. Registering Objects to JNDI
java:jboss/exported context.
messaging subsystem so that it can be looked up by remote JNDI clients.
java:jboss/exported/jms/queue/myTestQueuejava:jboss/exported/ prefix when looking up a remote client. The remote JNDI clients can look up the remote object up using the following name.
jms/queue/myTestQueueExample 7.1. Example of Standalone Server JMS Queue Configuration
<subsystem xmlns="urn:jboss:domain:messaging:1.4">
<hornetq-server>
...
<jms-destinations>
<jms-queue name="myTestQueue">
<entry name="java:jboss/exported/jms/queue/myTestQueue"/>
</jms-queue>
</jms-destinations>
</hornetq-server>
</subsystem>
7.2. Configuring a Remote JNDI Client
jboss-client.jar on its class path.
myTestQueue JMS queue from a remote JNDI client:
Example 7.2. Example Remote JNDI Lookup
Properties properties = new Properties();
properties.put(Context.INITIAL_CONTEXT_FACTORY, "org.jboss.naming.remote.client.InitialContextFactory");
properties.put(Context.PROVIDER_URL, "remote://<hostname>:4447");
context = new InitialContext(properties);
Queue myTestQueue = (Queue) context.lookup("jms/queue/myTestQueue");
Chapter 8. Enterprise JavaBeans
8.1. Introduction
8.1.1. Overview of Enterprise JavaBeans
8.1.2. EJB 3.1 Feature Set
- Session Beans
- Message Driven Beans
- No-interface views
- local interfaces
- remote interfaces
- JAX-WS web services
- JAX-RS web services
- Timer Service
- Asynchronous Calls
- Interceptors
- RMI/IIOP interoperability
- Transaction support
- Security
- Embeddable API
- Entity Beans (container and bean-managed persistence)
- EJB 2.1 Entity Bean client views
- EJB Query Language (EJB QL)
- JAX-RPC based Web Services (endpoints and client views)
8.1.3. EJB 3.1 Lite
- Only supporting the features that make sense for web-applications, and
- allowing EJBs to be deployed in the same WAR file as a web-application.
8.1.4. EJB 3.1 Lite Features
- Stateless, stateful, and singleton session beans
- Local business interfaces and "no interface" beans
- Interceptors
- Container-managed and bean-managed transactions
- Declarative and programmatic security
- Embeddable API
- Remote interfaces
- RMI-IIOP Interoperability
- JAX-WS Web Service Endpoints
- EJB Timer Service
- Asynchronous session bean invocations
- Message-driven beans
8.1.5. Enterprise Beans
Important
8.1.6. Overview of Writing Enterprise Beans
8.1.7. Session Bean Business Interfaces
8.1.7.1. Enterprise Bean Business Interfaces
8.1.7.2. EJB Local Business Interfaces
8.1.7.3. EJB Remote Business Interfaces
8.1.7.4. EJB No-interface Beans
8.2. Creating Enterprise Bean Projects
8.2.1. Create an EJB Archive Project Using Red Hat JBoss Developer Studio
Prerequisites
- A server and server runtime for JBoss EAP 6 has been set up. See Section 1.3.1.5, “Add the JBoss EAP Server Using Define New Server” .
Procedure 8.1. Create an EJB Project in Red Hat JBoss Developer Studio
Create new project
To open the New EJB Project wizard, navigate to the menu, select , and then .
Figure 8.1. New EJB Project wizard
Specify Details
Supply the following details:- Project name.As well as the being the name of the project that appears in Red Hat JBoss Developer Studio this is also the default filename for the deployed JAR file.
- Project location.The directory where the project's files will be saved. The default is a directory in the current workspace.
- Target Runtime.This is the server runtime used for the project. This will need to be set to the same JBoss EAP 6 runtime used by the server that you will be deploying to.
- EJB module version. This is the version of the EJB specification that your enterprise beans will comply with. Red Hat recommends using
3.1. - Configuration. This allows you to adjust the supported features in your project. Use the default configuration for your selected runtime.
Click to continue.Java Build Configuration
This screen allows you to customize the directories will contain Java source files and the directory where the built output is placed.Leave this configuration unchanged and click .EJB Module settings
Check the Generate ejb-jar.xml deployment descriptor checkbox if a deployment descriptor is required. The deployment descriptor is optional in EJB 3.1 and can be added later if required.Click and the project is created and will be displayed in the Project Explorer.
Figure 8.2. Newly created EJB Project in the Project Explorer
Add Build Artifact to Server for Deployment
Open the Add and Remove dialog by right-clicking on the server you want to deploy the built artifact to in the server tab, and select "Add and Remove".Select the resource to deploy from the Available column and click the button. The resource will be moved to the Configured column. Click to close the dialog.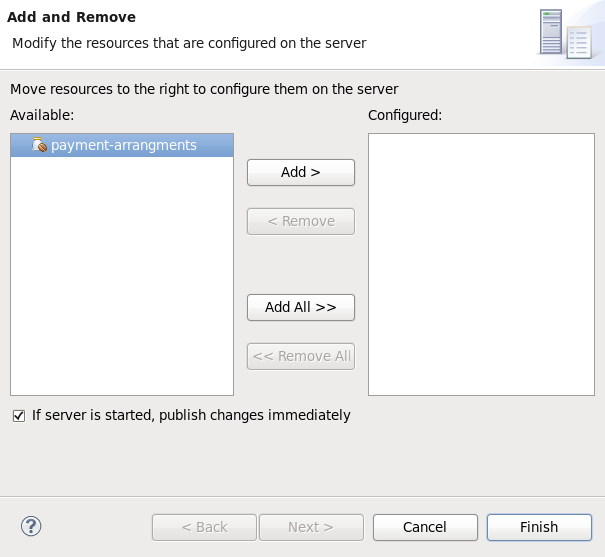
Figure 8.3. Add and Remove dialog
You now have an EJB Project in Red Hat JBoss Developer Studio that can build and deploy to the specified server.
8.2.2. Create an EJB Archive Project in Maven
Prerequisites:
- Maven is already installed.
- You understand the basic usage of Maven.
Procedure 8.2. Create an EJB Archive project in Maven
Create the Maven project
An EJB project can be created using Maven's archetype system and theejb-javaee6archetype. To do this run themvncommand with parameters as shown:mvn archetype:generate -DarchetypeGroupId=org.codehaus.mojo.archetypes -DarchetypeArtifactId=ejb-javaee6Maven will prompt you for thegroupId,artifactId,versionandpackagefor your project.[localhost]$ mvn archetype:generate -DarchetypeGroupId=org.codehaus.mojo.archetypes -DarchetypeArtifactId=ejb-javaee6 [INFO] Scanning for projects... [INFO] [INFO] ------------------------------------------------------------------------ [INFO] Building Maven Stub Project (No POM) 1 [INFO] ------------------------------------------------------------------------ [INFO] [INFO] >>> maven-archetype-plugin:2.0:generate (default-cli) @ standalone-pom >>> [INFO] [INFO] <<< maven-archetype-plugin:2.0:generate (default-cli) @ standalone-pom <<< [INFO] [INFO] --- maven-archetype-plugin:2.0:generate (default-cli) @ standalone-pom --- [INFO] Generating project in Interactive mode [INFO] Archetype [org.codehaus.mojo.archetypes:ejb-javaee6:1.5] found in catalog remote Define value for property 'groupId': : com.shinysparkly Define value for property 'artifactId': : payment-arrangments Define value for property 'version': 1.0-SNAPSHOT: : Define value for property 'package': com.shinysparkly: : Confirm properties configuration: groupId: com.company artifactId: payment-arrangments version: 1.0-SNAPSHOT package: com.company.collections Y: : [INFO] ------------------------------------------------------------------------ [INFO] BUILD SUCCESS [INFO] ------------------------------------------------------------------------ [INFO] Total time: 32.440s [INFO] Finished at: Mon Oct 31 10:11:12 EST 2011 [INFO] Final Memory: 7M/81M [INFO] ------------------------------------------------------------------------ [localhost]$Add your enterprise beans
Write your enterprise beans and add them to the project under thesrc/main/javadirectory in the appropriate sub-directory for the bean's package.Build the project
To build the project, run themvn packagecommand in the same directory as thepom.xmlfile. This will compile the Java classes and package the JAR file. The built JAR file is namedartifactId-version.jarand is placed in thetarget/directory.
8.2.3. Create an EAR Project containing an EJB Project
Prerequisites
- A server and server runtime for JBoss EAP 6 has been set up. See Section 1.3.1.5, “Add the JBoss EAP Server Using Define New Server”.
Procedure 8.3. Create an EAR Project containing an EJB Project
Open the New EAR Application Project Wizard
Navigate to the menu, select , then and the New Project wizard appears. Select and click .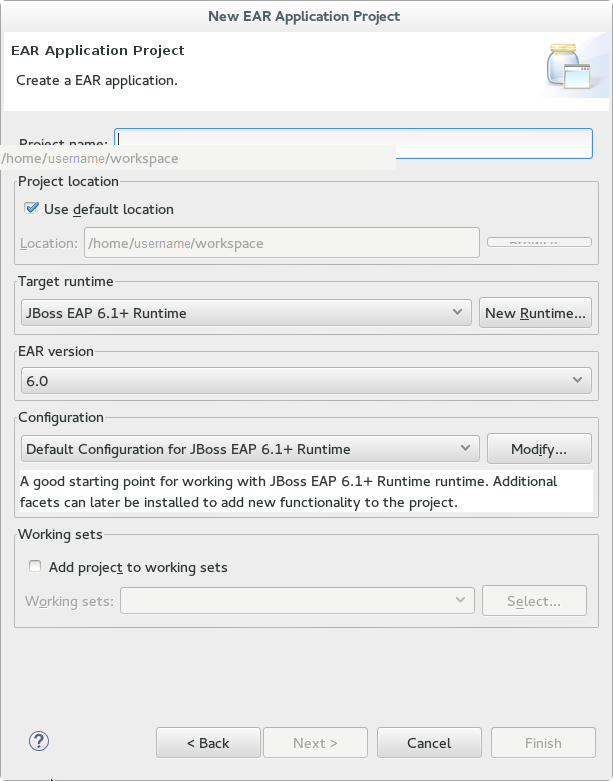
Figure 8.4. New EAR Application Project Wizard
Supply details
Supply the following details:- Project name.As well as the being the name of the project that appears in Red Hat JBoss Developer Studio this is also the default filename for the deployed EAR file.
- Project location.The directory where the project's files will be saved. The default is a directory in the current workspace.
- Target Runtime.This is the server runtime used for the project. This will need to be set to the same JBoss EAP 6 runtime used by the server that you will be deploying to.
- EAR version.This is the version of the Java Enterprise Edition specification that your project will comply with. Red Hat recommends using
6. - Configuration. This allows you to adjust the supported features in your project. Use the default configuration for your selected runtime.
Click to continue.Add a new EJB Module
New Modules can be added from the Enterprise Application page of the wizard. To add a new EJB Project as a module follow the steps below:Add new EJB Module
Click , uncheck Create Default Modules checkbox, select the Enterprise Java Bean and click . The New EJB Project wizard appears.Create EJB Project
New EJB Project wizard is the same as the wizard used to create new standalone EJB Projects and is described in Section 8.2.1, “Create an EJB Archive Project Using Red Hat JBoss Developer Studio”.The minimal details required to create the project are:- Project name
- Target Runtime
- EJB Module version
- Configuration
All the other steps of the wizard are optional. Click to complete creating the EJB Project.
The newly created EJB project is listed in the Java EE module dependencies and the checkbox is checked.Optional: add an application.xml deployment descriptor
Check the Generate application.xml deployment descriptor checkbox if one is required.Click Finish
Two new project will appear, the EJB project and the EAR projectAdd Build Artifact to Server for Deployment
Open the Add and Remove dialog by right-clicking in the Servers tab on the server you want to deploy the built artifact to in the server tab, and select .Select the EAR resource to deploy from the Available column and click the button. The resource will be moved to the Configured column. Click to close the dialog.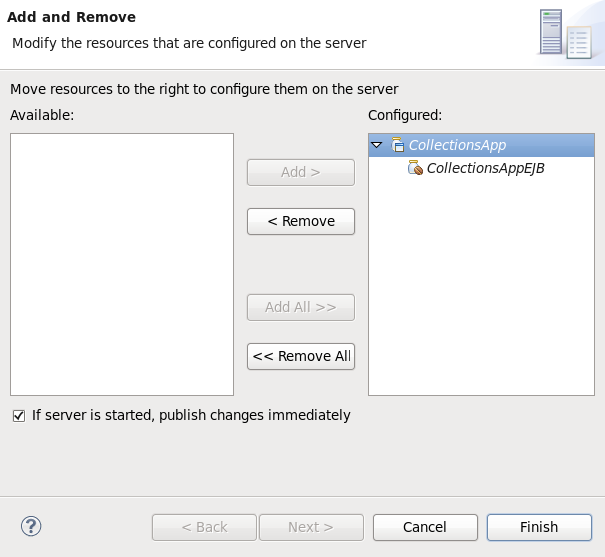
Figure 8.5. Add and Remove dialog
You now have an Enterprise Application Project with a member EJB Project. This will build and deploy to the specified server as a single EAR deployment containing an EJB subdeployment.
8.2.4. Add a Deployment Descriptor to an EJB Project
Perquisites:
- You have a EJB Project in Red Hat JBoss Developer Studio to which you want to add an EJB deployment descriptor.
Procedure 8.4. Add an Deployment Descriptor to an EJB Project
Open the Project
Open the project in Red Hat JBoss Developer Studio.Add Deployment Descriptor
Right-click on the Deployment Descriptor folder in the project view and select .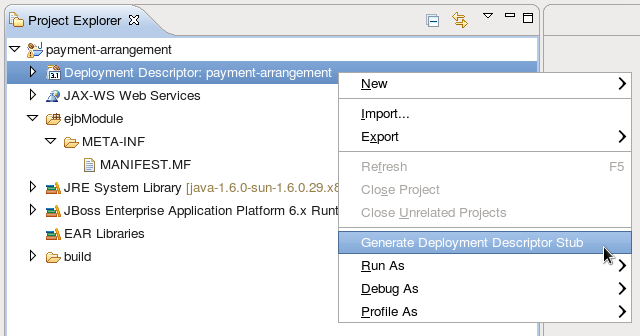
Figure 8.6. Adding a Deployment Descriptor
ejb-jar.xml, is created in ejbModule/META-INF/. Double-clicking on the Deployment Descriptor folder in the project view will also open this file.
8.3. Session Beans
8.3.1. Session Beans
8.3.2. Stateless Session Beans
8.3.3. Stateful Session Beans
8.3.4. Singleton Session Beans
8.3.5. Add Session Beans to a Project in Red Hat JBoss Developer Studio
Prerequisites:
- You have a EJB or Dynamic Web Project in Red Hat JBoss Developer Studio to which you want to add one or more session beans.
Procedure 8.5. Add Session Beans to a Project in Red Hat JBoss Developer Studio
Open the Project
Open the project in Red Hat JBoss Developer Studio.Open the "Create EJB 3.x Session Bean" wizard
To open the Create EJB 3.x Session Bean wizard, navigate to the menu, select , and then .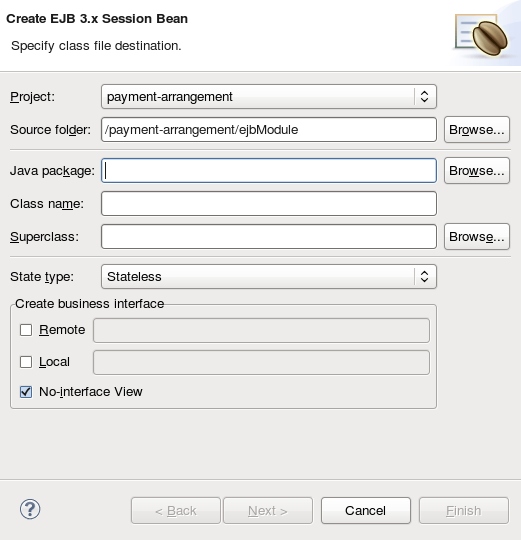
Figure 8.7. Create EJB 3.x Session Bean wizard
Specify class information
Supply the following details:- ProjectVerify the correct project is selected.
- Source folderThis is the folder that the Java source files will be created in. This should not usually need to be changed.
- PackageSpecify the package that the class belongs to.
- Class nameSpecify the name of the class that will be the session bean.
- SuperclassThe session bean class can inherit from a super class. Specify that here if your session has a super class.
- State typeSpecify the state type of the session bean: stateless, stateful, or singleton.
- Business InterfacesBy default the No-interface box is checked so no interfaces will be created. Check the boxes for the interfaces you wish to define and adjust the names if necessary.Remember that enterprise beans in a web archive (WAR) only support EJB 3.1 Lite and this does not include remote business interfaces.
Click .Session Bean Specific Information
You can enter in additional information here to further customize the session bean. It is not required to change any of the information here.Items that you can change are:- Bean name.
- Mapped name.
- Transaction type (Container managed or Bean managed).
- Additional interfaces can be supplied that the bean must implement.
- You can also specify EJB 2.x Home and Component interfaces if required.
Finish
Click and the new session bean will be created and added to the project. The files for any new business interfaces will also be created if they were specified.
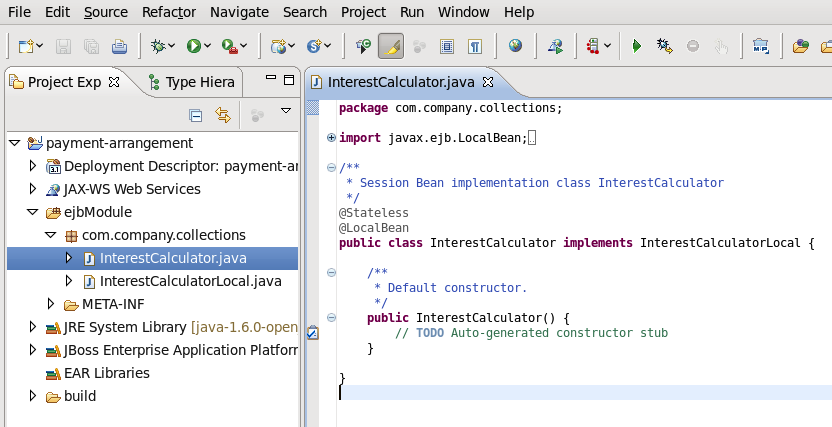
Figure 8.8. New Session Bean in Red Hat JBoss Developer Studio
8.4. Message-Driven Beans
8.4.1. Message-Driven Beans
8.4.2. Resource Adapters
8.4.3. Create a JMS-based Message-Driven Bean in Red Hat JBoss Developer Studio
Prerequisites:
- You must have an existing project open in Red Hat JBoss Developer Studio.
- You must know the name and type of the JMS destination that the bean will be listening to.
- Support for Java Messaging Service (JMS) must be enabled in the JBoss EAP 6 configuration to which this bean will be deployed.
Procedure 8.6. Add a JMS-based Message-Driven Bean in Red Hat JBoss Developer Studio
Open the Create EJB 3.x Message-Driven Bean Wizard
Go to → → . Select EJB/Message-Driven Bean (EJB 3.x) and click the button.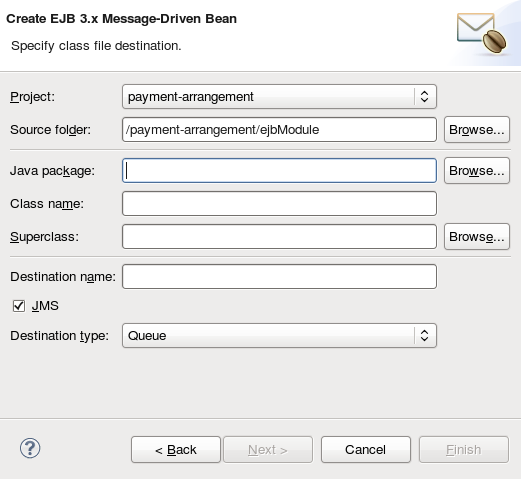
Figure 8.9. Create EJB 3.x Message-Driven Bean Wizard
Specify class file destination details
There are three sets of details to specify for the bean class here: Project, Java class, and message destination.- Project
- If multiple projects exist in the Workspace, ensure that the correct one is selected in the menu.
- The folder where the source file for the new bean will be created is
ejbModuleunder the selected project's directory. Only change this if you have a specific requirement.
- Java class
- The required fields are: Java package and class name.
- It is not necessary to supply a Superclass unless the business logic of your application requires it.
- Message Destination
- These are the details you must supply for a JMS-based Message-Driven Bean:
- Destination name. This is the queue or topic name that contains the messages that the bean will respond to.
- By default the JMS checkbox is selected. Do not change this.
- Set Destination type to Queue or Topic as required.
Click the button.Enter Message-Driven Bean specific information
The default values here are suitable for a JMS-based Message-Driven bean using Container-managed transactions.- Change the Transaction type to Bean if the Bean will use Bean-managed transactions.
- Change the Bean name if a different bean name than the class name is required.
- The JMS Message Listener interface will already be listed. You do not need to add or remove any interfaces unless they are specific to your applications business logic.
- Leave the checkboxes for creating method stubs selected.
Click the button.
onMessage() method. A Red Hat JBoss Developer Studio editor window opened with the corresponding file.
8.4.4. Specifying a Resource Adapter in jboss-ejb3.xml for an MDB
jboss-ejb3.xml deployment descriptor you can specify a resource adapter for an MDB to use. Alternatively, to configure a JBoss EAP 6 server-wide default resource adapter for MDBs, see Configuring Message-Driven Beans in the Administration and Configuration Guide.
jboss-ejb3.xml for an MDB, use the following example.
Example 8.1. jboss-ejb3.xml Configuration for an MDB Resource Adapter
<jboss xmlns="http://www.jboss.com/xml/ns/javaee"
xmlns:jee="http://java.sun.com/xml/ns/javaee"
xmlns:mdb="urn:resource-adapter-binding">
<jee:assembly-descriptor>
<mdb:resource-adapter-binding>
<jee:ejb-name>MyMDB</jee:ejb-name>
<mdb:resource-adapter-name>MyResourceAdapter.rar</mdb:resource-adapter-name>
</mdb:resource-adapter-binding>
</jee:assembly-descriptor>
</jboss><mdb:resource-adapter-name>:
- For a resource adapter that is in another EAR:
<mdb:resource-adapter-name>OtherDeployment.ear#MyResourceAdapter.rar</mdb:resource-adapter-name> - For a resource adapter that is in the same EAR as the MDB, you can omit the EAR name:
<mdb:resource-adapter-name>#MyResourceAdapter.rar</mdb:resource-adapter-name>
8.4.5. Enable EJB and MDB Property Substitution in an Application
@ActivationConfigProperty and @Resource annotations. Property substitution requires the following configuration and code changes.
- You must enable property substitution in the JBoss EAP server configuration file.
- You must define the system properties in the server configuration file or pass them as arguments when you start the JBoss EAP server.
- You must modify the code to use the substitution variables.
Procedure 8.7. Implement Property Substitution in an MDB Application
helloworld-mdb quickstart that ships with JBoss EAP 6.3 or later. This topic shows you how to modify that quickstart to enable property substitution.
Configure the JBoss EAP server to enable property substitution.
The JBoss EAP server must be configured to enable property substitution. To do this, set the<annotation-property-replacement>attribute in theeesubsystem of the server configuration file totrue.- Back up the server configuration file. The
helloworld-mdbquickstart example requires the full profile for a standalone server, so this is thestandalone/configuration/standalone-full.xmlfile. If you are running your server in a managed domain, this is thedomain/configuration/domain.xmlfile. - Start the JBoss EAP server with the full profile.For Linux:For Windows:
EAP_HOME/bin/standalone.sh -c standalone-full.xmlEAP_HOMEbin\standalone.bat -c standalone-full.xml - Launch the Management CLI using the command for your operating system.For Linux:For Windows:
EAP_HOME/bin/jboss-cli.sh --connectEAP_HOME\bin\jboss-cli.bat --connect - Type the following command to enable annotation property substitution.
/subsystem=ee:write-attribute(name=annotation-property-replacement,value=true) - You should see the following result:
{"outcome" => "success"} - Review the changes to the JBoss EAP server configuration file. The
eesubsystem should now contain the following XML.<subsystem xmlns="urn:jboss:domain:ee:1.2"> <spec-descriptor-property-replacement>false</spec-descriptor-property-replacement> <jboss-descriptor-property-replacement>true</jboss-descriptor-property-replacement> <annotation-property-replacement>true</annotation-property-replacement> </subsystem>
Define the system properties.
You can specify the system properties in the server configuration file or you can pass them as command line arguments when you start the JBoss EAP server. System properties defined in the server configuration file take precedence over those passed on the command line when you start the server.- Define the system properties in the server configuration file.
- Start the JBoss EAP server and Management API as described in the previous step.
- Use the following command syntax to configure a system property in the JBoss EAP server:
/system-property=PROPERTY_NAME:add(value=PROPERTY_VALUE)For thehelloworld-mdbquickstart, we configure the following system properties:/system-property=property.helloworldmdb.queue:add(value=java:/queue/HELLOWORLDMDBPropQueue) /system-property=property.helloworldmdb.topic:add(value=java:/topic/HELLOWORLDMDBPropTopic) /system-property=property.connection.factory:add(value=java:/ConnectionFactory) - Review the changes to the JBoss EAP server configuration file. The following system properties should now appear in the after the
<extensions>.<system-properties> <property name="property.helloworldmdb.queue" value="java:/queue/HELLOWORLDMDBPropQueue"/> <property name="property.helloworldmdb.topic" value="java:/topic/HELLOWORLDMDBPropTopic"/> <property name="property.connection.factory" value="java:/ConnectionFactory"/> </system-properties>
- Pass the system properties as arguments on the command line when you start the JBoss EAP server in the form of
-DPROPERTY_NAME=PROPERTY_VALUE. The following is an example of how to pass the arguments for the system properties defined in the previous step.EAP_HOME/bin/standalone.sh -c standalone-full.xml -Dproperty.helloworldmdb.queue=java:/queue/HELLOWORLDMDBPropQueue -Dproperty.helloworldmdb.topic=java:/topic/HELLOWORLDMDBPropTopic -Dproperty.connection.factory=java:/ConnectionFactory
Modify the code to use the system property substitutions.
Replace hard-coded@ActivationConfigPropertyand@Resourceannotation values with substitutions for the newly defined system properties. The following are examples of how to change thehelloworld-mdbquickstart to use the newly defined system property substitutions within the annotations in the source code.- Change the
@ActivationConfigPropertydestinationproperty value in theHelloWorldQueueMDBclass to use the substitution for the system property. The@MessageDrivenannotation should now look like this:@MessageDriven(name = "HelloWorldQueueMDB", activationConfig = { @ActivationConfigProperty(propertyName = "destinationType", propertyValue = "javax.jms.Queue"), @ActivationConfigProperty(propertyName = "destination", propertyValue = "${property.helloworldmdb.queue}"), @ActivationConfigProperty(propertyName = "acknowledgeMode", propertyValue = "Auto-acknowledge") }) - Change the
@ActivationConfigPropertydestinationproperty value in theHelloWorldTopicMDBclass to use the substitution for the system property. The@MessageDrivenannotation should now look like this:@MessageDriven(name = "HelloWorldQTopicMDB", activationConfig = { @ActivationConfigProperty(propertyName = "destinationType", propertyValue = "javax.jms.Topic"), @ActivationConfigProperty(propertyName = "destination", propertyValue = "${property.helloworldmdb.topic}"), @ActivationConfigProperty(propertyName = "acknowledgeMode", propertyValue = "Auto-acknowledge") }) - Change the
@Resourceannotations in theHelloWorldMDBServletClientclass to use the system property substitutions. The code should now look like this:@Resource(mappedName = "${property.connection.factory}") private ConnectionFactory connectionFactory; @Resource(mappedName = "${property.helloworldmdb.queue}") private Queue queue; @Resource(mappedName = "${property.helloworldmdb.topic}") private Topic topic; - Modify the
hornetq-jms.xmlfile to use the system property substitution values.<?xml version="1.0" encoding="UTF-8"?> <messaging-deployment xmlns="urn:jboss:messaging-deployment:1.0"> <hornetq-server> <jms-destinations> <jms-queue name="HELLOWORLDMDBQueue"> <entry name="${property.helloworldmdb.queue}"/> </jms-queue> <jms-topic name="HELLOWORLDMDBTopic"> <entry name="${property.helloworldmdb.topic}"/> </jms-topic> </jms-destinations> </hornetq-server> </messaging-deployment>
- Deploy the application. The application will now use the values specified by the system properties for the
@Resourceand@ActivationConfigPropertyproperty values.
8.5. Invoking Session Beans
8.5.1. Invoke a Session Bean Remotely using JNDI
ejb-remote quickstart contains working Maven projects that demonstrate this functionality. The quickstart contains projects for both the session beans to deploy and the remote client. The code samples below are taken from the remote client project.
Warning
Prerequisites
- You must already have a Maven project created ready to use.
- Configuration for the JBoss EAP 6 Maven repository has already been added.
- The session beans that you want to invoke are already deployed.
- The deployed session beans implement remote business interfaces.
- The remote business interfaces of the session beans are available as a Maven dependency. If the remote business interfaces are only available as a JAR file then it is recommended to add the JAR to your Maven repository as an artifact. Refer to the Maven documentation for the
install:install-filegoal for directions, http://maven.apache.org/plugins/maven-install-plugin/usage.html - You need to know the hostname and JNDI port of the server hosting the session beans.
Procedure 8.8. Add Maven Project Configuration for Remote Invocation of Session Beans
- Add the required project dependenciesThe
pom.xmlfor the project must be updated to include the necessary dependencies. - Add the
jboss-ejb-client.propertiesfileThe JBoss EJB client API expects to find a file in the root of the project namedjboss-ejb-client.propertiesthat contains the connection information for the JNDI service. Add this file to thesrc/main/resources/directory of your project with the following content.# In the following line, set SSL_ENABLED to true for SSL remote.connectionprovider.create.options.org.xnio.Options.SSL_ENABLED=false remote.connections=default # Uncomment the following line to set SSL_STARTTLS to true for SSL # remote.connection.default.connect.options.org.xnio.Options.SSL_STARTTLS=true remote.connection.default.host=localhost remote.connection.default.port = 4447 remote.connection.default.connect.options.org.xnio.Options.SASL_POLICY_NOANONYMOUS=false # Add any of the following SASL options if required # remote.connection.default.connect.options.org.xnio.Options.SASL_POLICY_NOANONYMOUS=false # remote.connection.default.connect.options.org.xnio.Options.SASL_POLICY_NOPLAINTEXT=false # remote.connection.default.connect.options.org.xnio.Options.SASL_DISALLOWED_MECHANISMS=JBOSS-LOCAL-USERChange the host name and port to match your server.4447is the default port number. For a secure connection, set theSSL_ENABLEDline totrueand uncomment theSSL_STARTTLSline. The Remoting interface in the container supports secured and unsecured connections using the same port. - Add dependencies for the remote business interfacesAdd the Maven dependencies to the
pom.xmlfor the remote business interfaces of the session beans.<dependency> <groupId>org.jboss.as.quickstarts</groupId> <artifactId>jboss-ejb-remote-server-side</artifactId> <type>ejb-client</type> <version>${project.version}</version> </dependency>
Procedure 8.9. Obtain a Bean Proxy using JNDI and Invoke Methods of the Bean
- Handle checked exceptionsTwo of the methods used in the following code (
InitialContext()andlookup()) have a checked exception of typejavax.naming.NamingException. These method calls must either be enclosed in a try/catch block that catchesNamingExceptionor in a method that is declared to throwNamingException. Theejb-remotequickstart uses the second technique. - Create a JNDI ContextA JNDI Context object provides the mechanism for requesting resources from the server. Create a JNDI context using the following code:
final Hashtable jndiProperties = new Hashtable(); jndiProperties.put(Context.URL_PKG_PREFIXES, "org.jboss.ejb.client.naming"); final Context context = new InitialContext(jndiProperties);The connection properties for the JNDI service are read from thejboss-ejb-client.propertiesfile. - Use the JNDI Context's lookup() method to obtain a bean proxyInvoke the
lookup()method of the bean proxy and pass it the JNDI name of the session bean you require. This will return an object that must be cast to the type of the remote business interface that contains the methods you want to invoke.final RemoteCalculator statelessRemoteCalculator = (RemoteCalculator) context.lookup( "ejb:/jboss-ejb-remote-server-side//CalculatorBean!" + RemoteCalculator.class.getName());Session bean JNDI names are defined using a special syntax. For more information, see Section 8.8.1, “EJB JNDI Naming Reference” . - Invoke methodsNow that you have a proxy bean object you can invoke any of the methods contained in the remote business interface.
int a = 204; int b = 340; System.out.println("Adding " + a + " and " + b + " via the remote stateless calculator deployed on the server"); int sum = statelessRemoteCalculator.add(a, b); System.out.println("Remote calculator returned sum = " + sum);The proxy bean passes the method invocation request to the session bean on the server, where it is executed. The result is returned to the proxy bean which then returns it to the caller. The communication between the proxy bean and the remote session bean is transparent to the caller.
8.5.2. About EJB Client Contexts
- A remote client, which runs as a standalone Java application.
- A remote client, which runs within another JBoss EAP 6 instance.
8.5.3. Considerations When Using a Single EJB Context
You must consider your application requirements when using a single EJB client context with standalone remote clients. For more information about the different types of remote clients, refer to: Section 8.5.2, “About EJB Client Contexts” .
A remote standalone client typically has just one EJB client context backed by any number of EJB receivers. The following is an example of a standalone remote client application:
public class MyApplication {
public static void main(String args[]) {
final javax.naming.Context ctxOne = new javax.naming.InitialContext();
final MyBeanInterface beanOne = ctxOne.lookup("ejb:app/module/distinct/bean!interface");
beanOne.doSomething();
...
}
}
jboss-ejb-client.properties file, which is used to set up the EJB client context and the EJB receivers. This configuration also includes the security credentials, which are then used to create the EJB receiver that connects to the JBoss EAP 6 server. When the above code is invoked, the EJB client API looks for the EJB client context, which is then used to select the EJB receiver that will receive and process the EJB invocation request. In this case, there is just the single EJB client context, so that context is used by the above code to invoke the bean. The procedure to invoke a session bean remotely using JNDI is described in greater detail here: Section 8.5.1, “Invoke a Session Bean Remotely using JNDI” .
A user application may want to invoke a bean more than once, but connect to the JBoss EAP 6 server using different security credentials. The following is an example of a standalone remote client application that invokes the same bean twice:
public class MyApplication {
public static void main(String args[]) {
// Use the "foo" security credential connect to the server and invoke this bean instance
final javax.naming.Context ctxOne = new javax.naming.InitialContext();
final MyBeanInterface beanOne = ctxOne.lookup("ejb:app/module/distinct/bean!interface");
beanOne.doSomething();
...
// Use the "bar" security credential to connect to the server and invoke this bean instance
final javax.naming.Context ctxTwo = new javax.naming.InitialContext();
final MyBeanInterface beanTwo = ctxTwo.lookup("ejb:app/module/distinct/bean!interface");
beanTwo.doSomething();
...
}
}
Scoped EJB client contexts offer a solution to this issue. They provide a way to have more control over the EJB client contexts and their associated JNDI contexts, which are typically used for EJB invocations. For more information about scoped EJB client contexts, refer to Section 8.5.4, “Using Scoped EJB Client Contexts” and Section 8.5.5, “Configure EJBs Using a Scoped EJB Client Context” .
8.5.4. Using Scoped EJB Client Contexts
To invoke an EJB In earlier versions of JBoss EAP 6, you would typically create a JNDI context and pass it the PROVIDER_URL, which would point to the target server. Any invocations done on EJB proxies that were looked up using that JNDI context, would end up on that server. With scoped EJB client contexts, user applications have control over which EJB receiver is used for a specific invocation.
Prior to the introduction of scoped EJB client contexts, the context was typically scoped to the client application. Scoped client contexts now allow the EJB client contexts to be scoped with the JNDI contexts. The following is an example of a standalone remote client application that invokes the same bean twice using a scoped EJB client context:
public class MyApplication {
public static void main(String args[]) {
// Use the "foo" security credential connect to the server and invoke this bean instance
final Properties ejbClientContextPropsOne = getPropsForEJBClientContextOne():
final javax.naming.Context ctxOne = new javax.naming.InitialContext(ejbClientContextPropsOne);
final MyBeanInterface beanOne = ctxOne.lookup("ejb:app/module/distinct/bean!interface");
beanOne.doSomething();
...
ctxOne.close();
// Use the "bar" security credential to connect to the server and invoke this bean instance
final Properties ejbClientContextPropsTwo = getPropsForEJBClientContextTwo():
final javax.naming.Context ctxTwo = new javax.naming.InitialContext(ejbClientContextPropsTwo);
final MyBeanInterface beanTwo = ctxTwo.lookup("ejb:app/module/distinct/bean!interface");
beanTwo.doSomething();
...
ctxTwo.close();
}
}
jboss-ejb-client.properties file. To scope the EJB client context to the JNDI context, you must also specify the org.jboss.ejb.client.scoped.context property and set its value to true. This property notifies the EJB client API that it must create an EJB client context, which is backed by EJB receivers, and that the created context is then scoped or visible only to the JNDI context that created it. Any EJB proxies looked up or invoked using this JNDI context will only know of the EJB client context associated with this JNDI context. Other JNDI contexts used by the application to lookup and invoke EJBs will not know about the other scoped EJB client contexts.
org.jboss.ejb.client.scoped.context property and aren't scoped to an EJB client context will use the default behavior, which is to use the existing EJB client context that is typically tied to the entire application.
Note
InitialContext when it is no longer needed. When the InitialContext is closed, the resources are released immediately. The proxies that are bound to it are no longer valid and any invocation will throw an Exception. Failure to close the InitialContext may result in resource and performance issues.
8.5.5. Configure EJBs Using a Scoped EJB Client Context
EJBs can be configured using a map-based scoped context. This is achieved by programmatically populating a Properties map using the standard properties found in the jboss-ejb-client.properties, specifying true for the org.jboss.ejb.client.scoped.context property, and passing the properties on the InitialContext creation.
Procedure 8.10. Configure an EJB Using a Map-Based Scoped Context
Set the Properties
Configure the EJB client properties programmatically, specifying the same set of properties that are used in the standardjboss-ejb-client.propertiesfile. To enable the scoped context, you must specify theorg.jboss.ejb.client.scoped.contextproperty and set its value totrue. The following is an example that configures the properties programmatically.// Configure EJB Client properties for the InitialContext Properties ejbClientContextProps = new Properties(); ejbClientContextProps.put(“remote.connections”,”name1”); ejbClientContextProps.put(“remote.connection.name1.host”,”localhost”); ejbClientContextProps.put(“remote.connection.name1.port”,”4447”); // Property to enable scoped EJB client context which will be tied to the JNDI context ejbClientContextProps.put("org.jboss.ejb.client.scoped.context", “true”);Pass the Properties on the Context Creation
// Create the context using the configured properties InitialContext ic = new InitialContext(ejbClientContextProps); MySLSB bean = ic.lookup("ejb:myapp/ejb//MySLSBBean!" + MySLSB.class.getName());
- Contexts generated by lookup EJB proxies are bound by this scoped context and use only the relevant connection parameters. This makes it possible to create different contexts to access data within a client application or to independently access servers using different logins.
- In the client, both the scoped
InitialContextand the scoped proxy are passed to threads, allowing each thread to work with the given context. It is also possible to pass the proxy to multiple threads that can use it concurrently. - The scoped context EJB proxy is serialized on the remote call and then deserialized on the server. When it is deserialized, the scoped context information is removed and it returns to its default state. If the deserialized proxy is used on the remote server, because it no longer has the scoped context that was used when it was created, this can result in an
EJBCLIENT000025error or possibly call an unwanted target by using the EJB name.
8.5.6. EJB Client Properties
The following tables list properties that can be configured programmatically or in the jboss-ejb-client.properties file.
The following table lists properties that are valid for the whole library within the same scope.
| Property Name | Description |
|---|---|
endpoint.name |
Name of the client endpoint. If not set, the default value is
client-endpoint
This can be helpful to distinguish different endpoint settings because the thread name contains this property.
|
remote.connectionprovider.create.options.org.xnio.Options.SSL_ENABLED |
Boolean value that specifies whether the SSL protocol is enabled for all connections.
Warning
Red Hat recommends that you explicitly disable SSL in favor of TLSv1.1 or TLSv1.2 in all affected packages.
|
deployment.node.selector |
The fully qualified name of the implementation of
org.jboss.ejb.client.DeploymentNodeSelector.
This is used to load balance the invocation for the EJBs.
|
invocation.timeout |
The timeout for the EJB handshake or method invocation request/response cycle. The value is in milliseconds.
The invocation of any method throws a
java.util.concurrent.TimeoutException if the execution takes longer than the timeout period. The execution completes and the server is not interrupted.
|
reconnect.tasks.timeout |
The timeout for the background reconnect tasks. The value is in milliseconds.
If a number of connections are down, the next client EJB invocation will use an algorithm to decide if a reconnect is necessary to find the right node.
|
org.jboss.ejb.client.scoped.context |
Boolean value that specifies whether to enable the scoped EJB client context. The default value is
false.
If set to
true, the EJB Client will use the scoped context that is tied to the JNDI context. Otherwise the EJB client context will use the global selector in the JVM to determine the properties used to call the remote EJB and host.
|
The connection properties start with the prefix remote.connection.CONNECTION_NAME where the CONNECTION_NAME is a local identifier only used to uniquely identify the connection.
| Property Name | Description |
|---|---|
remote.connections |
A comma-separated list of active
connection-names. Each connection is configured by using this name.
|
|
The host name or IP for the connection.
|
|
The port for the connection. The default value is 4447.
|
|
The user name used to authenticate connection security.
|
|
The password used to authenticate the user.
|
|
The timeout period for the initial connection. After that, the reconnect task will periodically check whether the connection can be established. The value is in milliseconds.
|
|
Fully qualified name of the
CallbackHandler class. It will be used to establish the connection and can not be changed as long as the connection is open.
|
|
Integer value specifying the maximum number of outbound requests. The default is 80.
There is only one connection from the client (JVM) to the server to handle all invocations.
|
|
Boolean value that determines whether credentials must be provided by the client to connect successfully. The default value is
true.
If set to
true, the client must provide credentials. If set to false, invocation is allowed as long as the remoting connector does not request a security realm.
|
|
Disables certain SASL mechanisms used for authenticating during connection creation.
JBOSS-LOCAL-USER means the silent authentication mechanism, used when the client and server are on the same machine, is disabled.
|
|
Boolean value that enables or disables the use of plain text messages during the authentication. If using JAAS, it must be set to false to allow a plain text password.
|
|
Boolean value that specifies whether the SSL protocol is enabled for this connection.
Warning
Red Hat recommends that you explicitly disable SSL in favor of TLSv1.1 or TLSv1.2 in all affected packages.
|
|
Interval to send a heartbeat between client and server to prevent automatic close, for example, in the case of a firewall. The value is in milliseconds.
|
If the initial connection connects to a clustered environment, the topology of the cluster is received automatically and asynchronously. These properties are used to connect to each received member. Each property starts with the prefix remote.cluster.CLUSTER_NAME where the CLUSTER_NAME refers to the related to the servers Infinispan subsystem configuration.
| Property Name | Description |
|---|---|
|
The fully qualified name of the implementation of
org.jboss.ejb.client.ClusterNodeSelector.
This class, rather than
org.jboss.ejb.client.DeploymentNodeSelector, is used to load balance EJB invocations in a clustered environment. If the cluster is completely down, the invocation will fail with No ejb receiver available.
|
|
Integer value specifying the maximum number of outbound requests that can be made to the entire cluster.
|
|
Integer value specifying the maximum number of outbound requests that can be made to this specific cluster-node.
|
8.5.7. Remote EJB Data Compression
Note
org.jboss.ejb.client.annotation.CompressionHint. The hint values specify whether to compress the request, response or request and response. Adding @CompressionHint defaults to compressResponse=true and compressRequest=true.
import org.jboss.ejb.client.annotation.CompressionHint;
@CompressionHint(compressResponse = false)
public interface ClassLevelRequestCompressionRemoteView {
String echo(String msg);
}import org.jboss.ejb.client.annotation.CompressionHint;
public interface CompressableDataRemoteView {
@CompressionHint(compressResponse = false, compressionLevel = Deflater.BEST_COMPRESSION)
String echoWithRequestCompress(String msg);
@CompressionHint(compressRequest = false)
String echoWithResponseCompress(String msg);
@CompressionHint
String echoWithRequestAndResponseCompress(String msg);
String echoWithNoCompress(String msg);
}compressionLevel setting shown above can have the following values:
- BEST_COMPRESSION
- BEST_SPEED
- DEFAULT_COMPRESSION
- NO_COMPRESSION
compressionLevel setting defaults to Deflater.DEFAULT_COMPRESSION.
@CompressionHint
public interface MethodOverrideDataCompressionRemoteView {
@CompressionHint(compressRequest = false)
String echoWithResponseCompress(final String msg);
@CompressionHint(compressResponse = false)
String echoWithRequestCompress(final String msg);
String echoWithNoExplicitDataCompressionHintOnMethod(String msg);
}org.jboss.ejb.client.view.annotation.scan.enabled system property is set to true. This property tells JBoss EJB Client to scan for annotations.
8.6. Container Interceptors
8.6.1. About Container Interceptors
ejb-jar.xml file for the 3.1 version of the ejb-jar deployment descriptor.
The container interceptors configured for an EJB are guaranteed to be run before the JBoss EAP provided security interceptors, transaction management interceptors, and other server provided interceptors. This allows specific application container interceptors to process or configure relevant context data before the invocation proceeds.
Although container interceptors are modeled to be similar to Java EE interceptors, there are some differences in the semantics of the API. For example, it is illegal for container interceptors to invoke the javax.interceptor.InvocationContext.getTarget() method because these interceptors are invoked long before the EJB components are setup or instantiated.
8.6.2. Create a Container Interceptor Class
Container interceptor classes are simple Plain Old Java Objects (POJOs). They use the @javax.annotation.AroundInvoke to mark the method that is invoked during the invocation on the bean.
iAmAround method for invocation:
Example 8.2. Container Interceptor Class Example
public class ClassLevelContainerInterceptor {
@AroundInvoke
private Object iAmAround(final InvocationContext invocationContext) throws Exception {
return this.getClass().getName() + " " + invocationContext.proceed();
}
}
jboss-ejb3.xml file described here: Section 8.6.3, “Configure a Container Interceptor”.
8.6.3. Configure a Container Interceptor
Container interceptors use the standard Java EE interceptor libraries, meaning they use the same XSD elements that are allowed in ejb-jar.xml file for the 3.1 version of the ejb-jar deployment descriptor. Because they are based on the standard Jave EE interceptor libraries, container interceptors may only be configured using deployment descriptors. This was done by design so applications would not require any JBoss specific annotation or other library dependencies. For more information about container interceptors, refer to: Section 8.6.1, “About Container Interceptors”.
Procedure 8.11. Create the Descriptor File to Configure the Container Interceptor
- Create a
jboss-ejb3.xmlfile in theMETA-INFdirectory of the EJB deployment. - Configure the container interceptor elements in the descriptor file.
- Use the
urn:container-interceptors:1.0namespace to specify configuration of container interceptor elements. - Use the
<container-interceptors>element to specify the container interceptors. - Use the
<interceptor-binding>elements to bind the container interceptor to the EJBs. The interceptors can be bound in either of the following ways:- Bind the interceptor to all the EJBs in the deployment using the
*wildcard. - Bind the interceptor at the individual bean level using the specific EJB name.
- Bind the interceptor at the specific method level for the EJBs.
Note
These elements are configured using the EJB 3.1 XSD in the same way it is done for Java EE interceptors.
- Review the following descriptor file for examples of the above elements.
Example 8.3. jboss-ejb3.xml
<jboss xmlns="http://www.jboss.com/xml/ns/javaee" xmlns:jee="http://java.sun.com/xml/ns/javaee" xmlns:ci ="urn:container-interceptors:1.0"> <jee:assembly-descriptor> <ci:container-interceptors> <!-- Default interceptor --> <jee:interceptor-binding> <ejb-name>*</ejb-name> <interceptor-class>org.jboss.as.test.integration.ejb.container.interceptor.ContainerInterceptorOne</interceptor-class> </jee:interceptor-binding> <!-- Class level container-interceptor --> <jee:interceptor-binding> <ejb-name>AnotherFlowTrackingBean</ejb-name> <interceptor-class>org.jboss.as.test.integration.ejb.container.interceptor.ClassLevelContainerInterceptor</interceptor-class> </jee:interceptor-binding> <!-- Method specific container-interceptor --> <jee:interceptor-binding> <ejb-name>AnotherFlowTrackingBean</ejb-name> <interceptor-class>org.jboss.as.test.integration.ejb.container.interceptor.MethodSpecificContainerInterceptor</interceptor-class> <method> <method-name>echoWithMethodSpecificContainerInterceptor</method-name> </method> </jee:interceptor-binding> <!-- container interceptors in a specific order --> <jee:interceptor-binding> <ejb-name>AnotherFlowTrackingBean</ejb-name> <interceptor-order> <interceptor-class>org.jboss.as.test.integration.ejb.container.interceptor.ClassLevelContainerInterceptor</interceptor-class> <interceptor-class>org.jboss.as.test.integration.ejb.container.interceptor.MethodSpecificContainerInterceptor</interceptor-class> <interceptor-class>org.jboss.as.test.integration.ejb.container.interceptor.ContainerInterceptorOne</interceptor-class> </interceptor-order> <method> <method-name>echoInSpecificOrderOfContainerInterceptors</method-name> </method> </jee:interceptor-binding> </ci:container-interceptors> </jee:assembly-descriptor> </jboss>The XSD for theurn:container-interceptors:1.0namespace is available atEAP_HOME/docs/schema/jboss-ejb-container-interceptors_1_0.xsd.
8.6.4. Change the Security Context Identity
By default, when you make a remote call to an EJB deployed to the application server, the connection to the server is authenticated and any request received over this connection is executed as the identity that authenticated the connection. This is true for both client-to-server and server-to-server calls. If you need to use different identities from the same client, you normally need to open multiple connections to the server so that each one is authenticated as a different identity. Rather than open multiple client connections, you can give permission to the authenticated user to execute a request as a different user.
ejb-security-interceptors quickstart for a complete working example.
Procedure 8.12. Change the Identity of the Security Context
Create the client side interceptor
The client side interceptor must implement theorg.jboss.ejb.client.EJBClientInterceptorinterface. The interceptor must pass the requested identity through the context data map, which can be obtained via a call toEJBClientInvocationContext.getContextData(). The following is an example of client side interceptor code:public class ClientSecurityInterceptor implements EJBClientInterceptor { public void handleInvocation(EJBClientInvocationContext context) throws Exception { Principal currentPrincipal = SecurityActions.securityContextGetPrincipal(); if (currentPrincipal != null) { Map<String, Object> contextData = context.getContextData(); contextData.put(ServerSecurityInterceptor.DELEGATED_USER_KEY, currentPrincipal.getName()); } context.sendRequest(); } public Object handleInvocationResult(EJBClientInvocationContext context) throws Exception { return context.getResult(); } }User applications can insert the interceptor into the interceptor chain in theEJBClientContextin one of the following ways:Programmatically
With this approach, you call theorg.jboss.ejb.client.EJBClientContext.registerInterceptor(int order, EJBClientInterceptor interceptor)method and pass theorderand theinterceptorinstance. Theorderdetermines where this client interceptor is placed in the interceptor chain.ServiceLoader Mechanism
With this approach, you create aMETA-INF/services/org.jboss.ejb.client.EJBClientInterceptorfile and place or package it in the classpath of the client application. The rules for the file are dictated by the Java ServiceLoader Mechanism. This file is expected to contain a separate line for each fully qualified class name of the EJB client interceptor implementation. The EJB client interceptor classes must be available in the classpath. EJB client interceptors added using theServiceLoadermechanism are added to the end of the client interceptor chain, in the order they are found in the classpath. Theejb-security-interceptorsquickstart uses this approach.
Create and configure the server side container interceptor
Container interceptor classes are simple Plain Old Java Objects (POJOs). They use the@javax.annotation.AroundInvoketo mark the method that will be invoked during the invocation on the bean. For more information about container interceptors, refer to: Section 8.6.1, “About Container Interceptors”.Create the container interceptor
This interceptor receives theInvocationContextwith the identity and requests the switch to that new identity. The following is an abridged version of the actual code example:public class ServerSecurityInterceptor { private static final Logger logger = Logger.getLogger(ServerSecurityInterceptor.class); static final String DELEGATED_USER_KEY = ServerSecurityInterceptor.class.getName() + ".DelegationUser"; @AroundInvoke public Object aroundInvoke(final InvocationContext invocationContext) throws Exception { Principal desiredUser = null; UserPrincipal connectionUser = null; Map<String, Object> contextData = invocationContext.getContextData(); if (contextData.containsKey(DELEGATED_USER_KEY)) { desiredUser = new SimplePrincipal((String) contextData.get(DELEGATED_USER_KEY)); Collection<Principal> connectionPrincipals = SecurityActions.getConnectionPrincipals(); if (connectionPrincipals != null) { for (Principal current : connectionPrincipals) { if (current instanceof UserPrincipal) { connectionUser = (UserPrincipal) current; break; } } } else { throw new IllegalStateException("Delegation user requested but no user on connection found."); } } ContextStateCache stateCache = null; try { if (desiredUser != null && connectionUser != null && (desiredUser.getName().equals(connectionUser.getName()) == false)) { // The final part of this check is to verify that the change does actually indicate a change in user. try { // We have been requested to use an authentication token // so now we attempt the switch. stateCache = SecurityActions.pushIdentity(desiredUser, new OuterUserCredential(connectionUser)); } catch (Exception e) { logger.error("Failed to switch security context for user", e); // Don't propagate the exception stacktrace back to the client for security reasons throw new EJBAccessException("Unable to attempt switching of user."); } } return invocationContext.proceed(); } finally { // switch back to original context if (stateCache != null) { SecurityActions.popIdentity(stateCache);; } } }Configure the container interceptor
For information on how to configure server side container interceptors, refer to: Section 8.6.3, “Configure a Container Interceptor”.
Create the JAAS LoginModule
This component is responsible for verifying that user is allowed to execute requests as the requested identity. The following abridged code examples show the methods that peform the login and validation:@SuppressWarnings("unchecked") @Override public boolean login() throws LoginException { if (super.login() == true) { log.debug("super.login()==true"); return true; } // Time to see if this is a delegation request. NameCallback ncb = new NameCallback("Username:"); ObjectCallback ocb = new ObjectCallback("Password:"); try { callbackHandler.handle(new Callback[] { ncb, ocb }); } catch (Exception e) { if (e instanceof RuntimeException) { throw (RuntimeException) e; } return false; // If the CallbackHandler can not handle the required callbacks then no chance. } String name = ncb.getName(); Object credential = ocb.getCredential(); if (credential instanceof OuterUserCredential) { // This credential type will only be seen for a delegation request, if not seen then the request is not for us. if (delegationAcceptable(name, (OuterUserCredential) credential)) { identity = new SimplePrincipal(name); if (getUseFirstPass()) { String userName = identity.getName(); if (log.isDebugEnabled()) log.debug("Storing username '" + userName + "' and empty password"); // Add the username and an empty password to the shared state map sharedState.put("javax.security.auth.login.name", identity); sharedState.put("javax.security.auth.login.password", ""); } loginOk = true; return true; } } return false; // Attempted login but not successful. } protected boolean delegationAcceptable(String requestedUser, OuterUserCredential connectionUser) { if (delegationMappings == null) { return false; } String[] allowedMappings = loadPropertyValue(connectionUser.getName(), connectionUser.getRealm()); if (allowedMappings.length == 1 && "*".equals(allowedMappings[1])) { // A wild card mapping was found. return true; } for (String current : allowedMappings) { if (requestedUser.equals(current)) { return true; } } return false; }
ejb-security-interceptors quickstart README.html file for complete instructions and more detailed information about the code.
8.6.5. Use a Client Side Interceptor in an Application
With this approach, you call the org.jboss.ejb.client.EJBClientContext.registerInterceptor(int order, EJBClientInterceptor interceptor) API and pass the order and the interceptor instance. The order is used to determine where exactly in the client interceptor chain this interceptor is placed.
With this approach, you create a META-INF/services/org.jboss.ejb.client.EJBClientInterceptor file and place or package it in the classpath of the client application. The rules for the file are dictated by the Java ServiceLoader Mechanism. This file is expected to contain a separate line for each fully qualified class name of the EJB client interceptor implementation. The EJB client interceptor classes must be available in the classpath. EJB client interceptors added using the ServiceLoader mechanism are added to the end of the client interceptor chain, in the order they are found in the classpath. The ejb-security-interceptors quickstart uses this approach.
8.7. Clustered Enterprise JavaBeans
8.7.1. About Clustered Enterprise JavaBeans (EJBs)
Note
8.7.2. Standalone and In-server Client Configuration
jboss-ejb-client.properties for standalone EJB client, or even jboss-ejb-client.xml file for a server-side application must be expanded to include a cluster configuration.
Note
in-server when the JVM doing the calling to the remote server is itself running inside of a server. In other words, an EAP instance calling out to another EAP instance would be considered an in-server client.
Example 8.4. Standalone client with jboss-ejb-client.properties configuration
remote.clusters=ejb
remote.cluster.ejb.connect.options.org.xnio.Options.SASL_POLICY_NOANONYMOUS=false
remote.cluster.ejb.connect.options.org.xnio.Options.SSL_ENABLED=false
remote.cluster.ejb.username=test
remote.cluster.ejb.password=password
jboss-ejb-client.xml file and add cluster configuration as shown in the following example:
Example 8.5. Client application which is deployed in another EAP 6 instance (Configuring jboss-ejb-client.xml file)
<jboss-ejb-client xmlns:xsi="urn:jboss:ejb-client:1.2" xsi:noNamespaceSchemaLocation="jboss-ejb-client_1_2.xsd">
<client-context>
<ejb-receivers>
<!-- this is the connection to access the app-one -->
<remoting-ejb-receiver outbound-connection-ref="remote-ejb-connection-1" />
<!-- this is the connection to access the app-two -->
<remoting-ejb-receiver outbound-connection-ref="remote-ejb-connection-2" />
</ejb-receivers>
<!-- if an outbound connection connects to a cluster; a list of members is provided after successful connection.
To connect to this node this cluster element must be defined. -->
<clusters>
<!-- cluster of remote-ejb-connection-1 -->
<cluster name="ejb" security-realm="ejb-security-realm-1" username="quickuser1">
<connection-creation-options>
<property name="org.xnio.Options.SSL_ENABLED" value="false" />
<property name="org.xnio.Options.SASL_POLICY_NOANONYMOUS" value="false" />
</connection-creation-options>
</cluster>
</clusters>
</client-context>
</jboss-ejb-client>
Note
8.7.3. Implementing a Custom Load Balancing Policy for EJB Calls
AllClusterNodeSelector for EJB calls. The node selection behavior of AllClusterNodeSelector is similar to default selector except that AllClusterNodeSelector uses all available cluster nodes even in case of a large cluster (number of nodes>20). If an unconnected cluster node is returned it is opened automatically. The following example shows AllClusterNodeSelector implementation:
package org.jboss.as.quickstarts.ejb.clients.selector;
import java.util.Arrays;
import java.util.Random;
import java.util.logging.Level;
import java.util.logging.Logger;
import org.jboss.ejb.client.ClusterNodeSelector;
public class AllClusterNodeSelector implements ClusterNodeSelector {
private static final Logger LOGGER = Logger.getLogger(AllClusterNodeSelector.class.getName());
@Override
public String selectNode(final String clusterName, final String[] connectedNodes, final String[] availableNodes) {
if(LOGGER.isLoggable(Level.FINER)) {
LOGGER.finer("INSTANCE "+this+ " : cluster:"+clusterName+" connected:"+Arrays.deepToString(connectedNodes)+" available:"+Arrays.deepToString(availableNodes));
}
if (availableNodes.length == 1) {
return availableNodes[0];
}
final Random random = new Random();
final int randomSelection = random.nextInt(availableNodes.length);
return availableNodes[randomSelection];
}
}
SimpleLoadFactorNodeSelector for EJB calls. Load balancing in SimpleLoadFactorNodeSelector happens based on a load factor. The load factor (2/3/4) is calculated based on the names of nodes (A/B/C) irrespective of the load on each node. The following example shows SimpleLoadFactorNodeSelector implementation:
package org.jboss.as.quickstarts.ejb.clients.selector;
import java.util.ArrayList;
import java.util.Arrays;
import java.util.Collection;
import java.util.HashMap;
import java.util.List;
import java.util.Map;
import java.util.logging.Level;
import java.util.logging.Logger;
import org.jboss.ejb.client.DeploymentNodeSelector;
public class SimpleLoadFactorNodeSelector implements DeploymentNodeSelector {
private static final Logger LOGGER = Logger.getLogger(SimpleLoadFactorNodeSelector.class.getName());
private final Map<String, List<String>[]> nodes = new HashMap<String, List<String>[]>();
private final Map<String, Integer> cursor = new HashMap<String, Integer>();
private ArrayList<String> calculateNodes(Collection<String> eligibleNodes) {
ArrayList<String> nodeList = new ArrayList<String>();
for (String string : eligibleNodes) {
if(string.contains("A") || string.contains("2")) {
nodeList.add(string);
nodeList.add(string);
} else if(string.contains("B") || string.contains("3")) {
nodeList.add(string);
nodeList.add(string);
nodeList.add(string);
} else if(string.contains("C") || string.contains("4")) {
nodeList.add(string);
nodeList.add(string);
nodeList.add(string);
nodeList.add(string);
}
}
return nodeList;
}
@SuppressWarnings("unchecked")
private void checkNodeNames(String[] eligibleNodes, String key) {
if(!nodes.containsKey(key) || nodes.get(key)[0].size() != eligibleNodes.length || !nodes.get(key)[0].containsAll(Arrays.asList(eligibleNodes))) {
// must be synchronized as the client might call it concurrent
synchronized (nodes) {
if(!nodes.containsKey(key) || nodes.get(key)[0].size() != eligibleNodes.length || !nodes.get(key)[0].containsAll(Arrays.asList(eligibleNodes))) {
ArrayList<String> nodeList = new ArrayList<String>();
nodeList.addAll(Arrays.asList(eligibleNodes));
nodes.put(key, new List[] { nodeList, calculateNodes(nodeList) });
}
}
}
}
private synchronized String nextNode(String key) {
Integer c = cursor.get(key);
List<String> nodeList = nodes.get(key)[1];
if(c == null || c >= nodeList.size()) {
c = Integer.valueOf(0);
}
String node = nodeList.get(c);
cursor.put(key, Integer.valueOf(c + 1));
return node;
}
@Override
public String selectNode(String[] eligibleNodes, String appName, String moduleName, String distinctName) {
if (LOGGER.isLoggable(Level.FINER)) {
LOGGER.finer("INSTANCE " + this + " : nodes:" + Arrays.deepToString(eligibleNodes) + " appName:" + appName + " moduleName:" + moduleName
+ " distinctName:" + distinctName);
}
// if there is only one there is no sense to choice
if (eligibleNodes.length == 1) {
return eligibleNodes[0];
}
final String key = appName + "|" + moduleName + "|" + distinctName;
checkNodeNames(eligibleNodes, key);
return nextNode(key);
}
}
jboss-ejb-client.properties
You need to add the property remote.cluster.ejb.clusternode.selector with the name of your implementation class (AllClusterNodeSelector or SimpleLoadFactorNodeSelector). The selector will see all configured servers which are available at the invocation time. The following example uses AllClusterNodeSelector as the deployment node selector:
remote.clusters=ejb
remote.cluster.ejb.clusternode.selector=org.jboss.as.quickstarts.ejb.clients.selector.AllClusterNodeSelector
remote.cluster.ejb.connect.options.org.xnio.Options.SASL_POLICY_NOANONYMOUS=false
remote.cluster.ejb.connect.options.org.xnio.Options.SSL_ENABLED=false
remote.cluster.ejb.username=test
remote.cluster.ejb.password=password
remote.connectionprovider.create.options.org.xnio.Options.SSL_ENABLED=false
remote.connections=one,two
remote.connection.one.host=localhost
remote.connection.one.port = 4447
remote.connection.one.connect.options.org.xnio.Options.SASL_POLICY_NOANONYMOUS=false
remote.connection.one.username=user
remote.connection.one.password=user123
remote.connection.two.host=localhost
remote.connection.two.port = 4547
remote.connection.two.connect.options.org.xnio.Options.SASL_POLICY_NOANONYMOUS=false
You need to add the property remote.cluster.ejb.clusternode.selector to the list for the PropertiesBasedEJBClientConfiguration constructor. The following example uses AllClusterNodeSelector as the deployment node selector:
Properties p = new Properties();
p.put("remote.clusters", "ejb");
p.put("remote.cluster.ejb.clusternode.selector", "org.jboss.as.quickstarts.ejb.clients.selector.AllClusterNodeSelector");
p.put("remote.cluster.ejb.connect.options.org.xnio.Options.SASL_POLICY_NOANONYMOUS", "false");
p.put("remote.cluster.ejb.connect.options.org.xnio.Options.SSL_ENABLED", "false");
p.put("remote.cluster.ejb.username", "test");
p.put("remote.cluster.ejb.password", "password");
p.put("remote.connectionprovider.create.options.org.xnio.Options.SSL_ENABLED", "false");
p.put("remote.connections", "one,two");
p.put("remote.connection.one.port", "4447");
p.put("remote.connection.one.host", "localhost");
p.put("remote.connection.two.port", "4547");
p.put("remote.connection.two.host", "localhost");
EJBClientConfiguration cc = new PropertiesBasedEJBClientConfiguration(p);
ContextSelector<EJBClientContext> selector = new ConfigBasedEJBClientContextSelector(cc);
EJBClientContext.setSelector(selector);
p = new Properties();
p.put(Context.URL_PKG_PREFIXES, "org.jboss.ejb.client.naming");
InitialContext context = new InitialContext(p);
jboss-ejb-client.xml
To use the load balancing policy for server to server communication; package the class together with the application and configure it within the jboss-ejb-client.xml settings (located in META-INF folder). The following example uses AllClusterNodeSelector as the deployment node selector:
<jboss-ejb-client xmlns:xsi="urn:jboss:ejb-client:1.2" xsi:noNamespaceSchemaLocation="jboss-ejb-client_1_2.xsd">
<client-context deployment-node-selector="org.jboss.ejb.client.DeploymentNodeSelector">
<ejb-receivers>
<!-- this is the connection to access the app -->
<remoting-ejb-receiver outbound-connection-ref="remote-ejb-connection-1" />
</ejb-receivers>
<!-- if an outbound connection connect to a cluster a list of members is provided after successful connection.
To connect to this node this cluster element must be defined.
-->
<clusters>
<!-- cluster of remote-ejb-connection-1 -->
<cluster name="ejb" security-realm="ejb-security-realm-1" username="test" cluster-node-selector="org.jboss.as.quickstarts.ejb.clients.selector.AllClusterNodeSelector">
<connection-creation-options>
<property name="org.xnio.Options.SSL_ENABLED" value="false" />
<property name="org.xnio.Options.SASL_POLICY_NOANONYMOUS" value="false" />
</connection-creation-options>
</cluster>
</clusters>
</client-context>
</jboss-ejb-client>
ejb-security-realm-1 to client-server configuration. The following example shows the CLI commands for adding security realm (ejb-security-realm-1) the value is the base64 encoded password for the user "test":
core-service=management/security-realm=ejb-security-realm-1:add()
core-service=management/security-realm=ejb-security-realm-1/server-identity=secret:add(value=cXVpY2sxMjMr)
Note
-Djboss.node.name= or the server configuration file standalone.xml to configure the server name (server name=""). Ensure that the server name is unique. In domain mode, the controller automatically validates that the names are unique.
8.7.4. Transaction Behavior of EJB Invocations
Transaction attributes for distributed JBoss EAP applications need to be handled in a way as if the application is called on the same server. To discontinue a transaction, the destination method must be marked REQUIRES_NEW using different interfaces.
Note
To invoke EJB session beans with a JBoss EAP 6 standalone client, the client must have a reference to the InitialContext object while the EJB proxies or UserTransaction are used. It is also important to keep the InitialContext object open while EJB proxies or UserTransaction are being used. Control of the connections will be inside the classes created by the InitialContext with the properties.
InitialContext object.
Example 8.6. EJB client API referencing InitialContext object
package org.jboss.as.quickstarts.ejb.multi.server;
import java.util.Date;
import java.util.Properties;
import java.util.logging.Level;
import java.util.logging.Logger;
import javax.naming.Context;
import javax.naming.InitialContext;
import org.jboss.as.quickstarts.ejb.multi.server.app.MainApp;
import org.jboss.ejb.client.ContextSelector;
import org.jboss.ejb.client.EJBClientConfiguration;
import org.jboss.ejb.client.EJBClientContext;
import org.jboss.ejb.client.PropertiesBasedEJBClientConfiguration;
import org.jboss.ejb.client.remoting.ConfigBasedEJBClientContextSelector;
public class Client {
/**
* @param args no args needed
* @throws Exception
*/
public static void main(String[] args) throws Exception {
// suppress output of client messages
Logger.getLogger("org.jboss").setLevel(Level.OFF);
Logger.getLogger("org.xnio").setLevel(Level.OFF);
Properties p = new Properties();
p.put("remote.connectionprovider.create.options.org.xnio.Options.SSL_ENABLED", "false");
p.put("remote.connections", "one");
p.put("remote.connection.one.port", "4447");
p.put("remote.connection.one.host", "localhost");
p.put("remote.connection.one.username", "quickuser");
p.put("remote.connection.one.password", "quick-123");
EJBClientConfiguration cc = new PropertiesBasedEJBClientConfiguration(p);
ContextSelector<EJBClientContext> selector = new ConfigBasedEJBClientContextSelector(cc);
EJBClientContext.setSelector(selector);
Properties props = new Properties();
props.put(Context.URL_PKG_PREFIXES, "org.jboss.ejb.client.naming");
InitialContext context = new InitialContext(props);
final String rcal = "ejb:jboss-ejb-multi-server-app-main/ejb//" + ("MainAppBean") + "!" + MainApp.class.getName();
final MainApp remote = (MainApp) context.lookup(rcal);
final String result = remote.invokeAll("Client call at "+new Date());
System.out.println("InvokeAll succeed: "+result);
}
}
Note
UserTransaction reference on the client is unsupported for scenarios with a scoped EJB client context and for invocations which use the remote-naming protocol. This is because in these scenarios, InitialContext encapsulates its own EJB client context instance; which cannot be accessed using the static methods of the EJBClient class. When EJBClient.getUserTransaction() is called, it returns a transaction from default (global) EJB client context (which might not be initialized) and not from the desired one.
The following example shows how to get UserTransaction reference on a standalone client.
Example 8.7. Standalone client referencing UserTransaction object
import org.jboss.ejb.client.EJBClient;
import javax.transaction.UserTransaction;
.
.
Context context=null;
UserTransaction tx=null;
try {
Properties props = new Properties();
// REMEMBER: there must be a jboss-ejb-client.properties with the connection parameter
// in the clients classpath
props.put(Context.URL_PKG_PREFIXES, "org.jboss.ejb.client.naming");
context = new InitialContext(props);
System.out.println("\n\tGot initial Context: "+context);
tx=EJBClient.getUserTransaction("yourServerName");
System.out.println("UserTransaction = "+tx.getStatus());
tx.begin();
// do some work
...
}catch (Exception e) {
e.printStackTrace();
tx.rollback();
}finally{
if(context != null) {
context.close();
}
}
Note
UserTransaction reference on the client side; start your server with the following system property -Djboss.node.name=yourServerName and then use it on client side as following:
tx=EJBClient.getUserTransaction("yourServerName");UserTransaction with remote-naming protocol and scoped-context.
8.8. Reference
8.8.1. EJB JNDI Naming Reference
ejb:<appName>/<moduleName>/<distinctName>/<beanName>!<viewClassName>?stateful <appName>- If the session bean's JAR file has been deployed within an enterprise archive (EAR) then this is the name of that EAR. By default, the name of an EAR is its filename without the
.earsuffix. The application name can also be overridden in itsapplication.xmlfile. If the session bean is not deployed in an EAR then leave this blank. <moduleName>- The module name is the name of the JAR file that the session bean is deployed in. By the default, the name of the JAR file is its filename without the
.jarsuffix. The module name can also be overridden in the JAR'sejb-jar.xmlfile. <distinctName>- JBoss EAP 6 allows each deployment to specify an optional distinct name. If the deployment does not have a distinct name then leave this blank.
<beanName>- The bean name is the classname of the session bean to be invoked.
<viewClassName>- The view class name is the fully qualified classname of the remote interface. This includes the package name of the interface.
?stateful- The
?statefulsuffix is required when the JNDI name refers to a stateful session bean. It is not included for other bean types.
8.8.2. EJB Reference Resolution
@EJB and @Resource. Please note that XML always overrides annotations but the same rules apply.
Rules for the @EJB annotation
- The
@EJBannotation also has amappedName()attribute. The specification leaves this as vendor specific metadata, but JBoss recognizesmappedName()as the global JNDI name of the EJB you are referencing. If you have specified amappedName(), then all other attributes are ignored and this global JNDI name is used for binding. - If you specify
@EJBwith no attributes defined:@EJB ProcessPayment myEjbref;Then the following rules apply:- The EJB jar of the referencing bean is searched for an EJB with the interface used in the
@EJBinjection. If there are more than one EJB that publishes same business interface, then an exception is thrown. If there is only one bean with that interface then that one is used. - Search the EAR for EJBs that publish that interface. If there are duplicates, then an exception is thrown. Otherwise the matching bean is returned.
- Search globally in JBoss runtime for an EJB of that interface. Again, if duplicates are found, an exception is thrown.
@EJB.beanName()corresponds to<ejb-link>. If thebeanName()is defined, then use the same algorithm as@EJBwith no attributes defined except use thebeanName()as a key in the search. An exception to this rule is if you use the ejb-link '#' syntax. The '#' syntax allows you to put a relative path to a jar in the EAR where the EJB you are referencing is located. Refer to the EJB 3.1 specification for more details.
8.8.3. Project dependencies for Remote EJB Clients
| GroupID | ArtifactID |
|---|---|
| org.jboss.spec | jboss-javaee-6.0 |
| org.jboss.as | jboss-as-ejb-client-bom |
| org.jboss.spec.javax.transaction | jboss-transaction-api_1.1_spec |
| org.jboss.spec.javax.ejb | jboss-ejb-api_3.1_spec |
| org.jboss | jboss-ejb-client |
| org.jboss.xnio | xnio-api |
| org.jboss.xnio | xnio-nio |
| org.jboss.remoting3 | jboss-remoting |
| org.jboss.sasl | jboss-sasl |
| org.jboss.marshalling | jboss-marshalling-river |
jboss-javaee-6.0 and jboss-as-ejb-client-bom, these dependencies must be added to the <dependencies> section of the pom.xml file.
jboss-javaee-6.0 and jboss-as-ejb-client-bom dependencies should be added to the <dependencyManagement> section of your pom.xml with the scope of import.
Note
artifactID's versions are subject to change. Refer to the Maven repository for the relevant version.
<dependencyManagement>
<dependencies>
<dependency>
<groupId>org.jboss.spec</groupId>
<artifactId>jboss-javaee-6.0</artifactId>
<version>3.0.0.Final-redhat-1</version>
<type>pom</type>
<scope>import</scope>
</dependency>
<dependency>
<groupId>org.jboss.as</groupId>
<artifactId>jboss-as-ejb-client-bom</artifactId>
<version>7.1.1.Final-redhat-1</version>
<type>pom</type>
<scope>import</scope>
</dependency>
</dependencies>
</dependencyManagement>ejb-remote/client/pom.xml in the quickstart files for a complete example of dependency configuration for remote session bean invocation.
8.8.4. jboss-ejb3.xml Deployment Descriptor Reference
jboss-ejb3.xml is a custom deployment descriptor that can be used in either EJB JAR or WAR archives. In an EJB JAR archive it must be located in the META-INF/ directory. In a WAR archive it must be located in the WEB-INF/ directory.
ejb-jar.xml, using some of the same namespaces and providing some other additional namespaces. The contents of jboss-ejb3.xml are merged with the contents of ejb-jar.xml, with the jboss-ejb3.xml items taking precedence.
jboss-ejb3.xml. Refer to http://java.sun.com/xml/ns/javaee/ for documentation on the standard namespaces.
http://www.jboss.com/xml/ns/javaee.
Assembly descriptor namespaces
<assembly-descriptor> element. They can be used to apply their configuration to a single bean, or to all beans in the deployment by using * as the ejb-name.
- The clustering namespace:
urn:clustering:1.0 xmlns:c="urn:clustering:1.0"This allows you to mark EJB's as clustered. It is the deployment descriptor equivalent to@org.jboss.ejb3.annotation.Clustered.<c:clustering> <ejb-name>DDBasedClusteredSFSB</ejb-name> <c:clustered>true</c:clustered> </c:clustering>- The security namespace (
urn:security) xmlns:s="urn:security"This allows you to set thesecurity-domainand therun-as-principalfor an EJB.<s:security> <ejb-name>*</ejb-name> <s:security-domain>myDomain</s:security-domain> <s:run-as-principal>myPrincipal</s:run-as-principal> </s:security>- The resource adapter namespace:
urn:resource-adapter-binding xmlns:r="urn:resource-adapter-binding"This allows you to set the resource adapter for a Message-Driven Bean.<r:resource-adapter-binding> <ejb-name>*</ejb-name> <r:resource-adapter-name>myResourceAdapter</r:resource-adapter-name> </r:resource-adapter-binding>- The IIOP namespace:
urn:iiop xmlns:u="urn:iiop"The IIOP namespace is where IIOP settings are configured.- The pool namespace:
urn:ejb-pool:1.0 xmlns:p="urn:ejb-pool:1.0"This allows you to select the pool that is used by the included stateless session beans or Message-Driven Beans. Pools are defined in the server configuration.<p:pool> <ejb-name>*</ejb-name> <p:bean-instance-pool-ref>my-pool</p:bean-instance-pool-ref> </p:pool>- The cache namespace:
urn:ejb-cache:1.0 xmlns:c="urn:ejb-cache:1.0"This allows you to select the cache that is used by the included stateful session beans. Caches are defined in the server configuration.<c:cache> <ejb-name>*</ejb-name> <c:cache-ref>my-cache</c:cache-ref> </c:cache>
Example 8.8. jboss-ejb3.xml file
<?xml version="1.1" encoding="UTF-8"?>
<jboss:ejb-jar xmlns:jboss="http://www.jboss.com/xml/ns/javaee"
xmlns="http://java.sun.com/xml/ns/javaee"
xmlns:xsi="http://www.w3.org/2001/XMLSchema-instance"
xmlns:c="urn:clustering:1.0"
xsi:schemaLocation="http://www.jboss.com/xml/ns/javaee http://www.jboss.org/j2ee/schema/jboss-ejb3-2_0.xsd"
version="3.1" impl-version="2.0">
<enterprise-beans>
<message-driven>
<ejb-name>ReplyingMDB</ejb-name>
<ejb-class>org.jboss.as.test.integration.ejb.mdb.messagedestination.ReplyingMDB</ejb-class>
<activation-config>
<activation-config-property>
<activation-config-property-name>destination</activation-config-property-name>
<activation-config-property-value>java:jboss/mdbtest/messageDestinationQueue
</activation-config-property-value>
</activation-config-property>
</activation-config>
</message-driven>
</enterprise-beans>
<assembly-descriptor>
<c:clustering>
<ejb-name>DDBasedClusteredSFSB</ejb-name>
<c:clustered>true</c:clustered>
</c:clustering>
</assembly-descriptor>
</jboss:ejb-jar>Note
jboss-ejb3-spec-2_0.xsd that may result in schema validation errors. You can ignore these errors. For more information, see https://bugzilla.redhat.com/show_bug.cgi?id=1192591.
Chapter 9. JBoss MBean Services
9.1. Writing JBoss MBean Services
create, start, stop, and destroy itself.
- If you want specific methods to be called on your MBean, declare those methods in your MBean interface. This approach allows your MBean implementation to avoid dependencies on JBoss specific classes
- If you are not bothered about dependencies on JBoss specific classes then you may have your MBean interface extend the
ServiceMBeaninterface andServiceMBeanSupportclass. TheServiceMBeanSupportclass provides implementations of the service lifecycle methods likecreate,startandstop. To handle a specific event like thestart()event, you need to overridestartService()method provided by the ServiceMBeanSupport class.
9.2. A Standard MBean Example
.sar).
ConfigServiceMBean interface declares specific methods like the start, getTimeout and stop methods to start, hold and stop the MBean correctly without using any JBoss specific classes. ConfigService class implements ConfigServiceMBean interface and consequently implements the methods used within that interface.
PlainThread class extends ServiceMBeanSupport class and implements PlainThreadMBean interface. PlainThread starts a thread and uses ConfigServiceMBean.getTimeout() to determine how long the thread should sleep.
Example 9.1. Sample MBean services
package org.jboss.example.mbean.support;
public interface ConfigServiceMBean {
int getTimeout();
void start();
void stop();
}
package org.jboss.example.mbean.support;
public class ConfigService implements ConfigServiceMBean {
int timeout;
@Override
public int getTimeout() {
return timeout;
}
@Override
public void start() {
//Create a random number between 3000 and 6000 milliseconds
timeout = (int)Math.round(Math.random() * 3000) + 3000;
System.out.println("Random timeout set to " + timeout + " seconds");
}
@Override
public void stop() {
timeout = 0;
}
}
package org.jboss.example.mbean.support;
import org.jboss.system.ServiceMBean;
public interface PlainThreadMBean extends ServiceMBean {
void setConfigService(ConfigServiceMBean configServiceMBean);
}
package org.jboss.example.mbean.support;
import org.jboss.system.ServiceMBeanSupport;
public class PlainThread extends ServiceMBeanSupport implements PlainThreadMBean {
private ConfigServiceMBean configService;
private Thread thread;
private volatile boolean done;
@Override
public void setConfigService(ConfigServiceMBean configService) {
this.configService = configService;
}
@Override
protected void startService() throws Exception {
System.out.println("Starting Plain Thread MBean");
done = false;
thread = new Thread(new Runnable() {
@Override
public void run() {
try {
while (!done) {
System.out.println("Sleeping....");
Thread.sleep(configService.getTimeout());
System.out.println("Slept!");
}
} catch (InterruptedException e) {
Thread.currentThread().interrupt();
}
}
});
thread.start();
}
@Override
protected void stopService() throws Exception {
System.out.println("Stopping Plain Thread MBean");
done = true;
}
}
jboss-service.xml descriptor shows how ConfigService class is injected into PlainThread class using inject tag. The inject tag establishes a dependency between PlainThreadMBean and ConfigServiceMBean and thus allows PlainThreadMBean use ConfigServiceMBean easily.
Example 9.2. JBoss-service.xml Service Descriptor
<server xmlns:xsi="http://www.w3.org/2001/XMLSchema-instance"
xsi:schemaLocation="urn:jboss:service:7.0 jboss-service_7_0.xsd"
xmlns="urn:jboss:service:7.0">
<mbean code="org.jboss.example.mbean.support.ConfigService" name="jboss.support:name=ConfigBean"/>
<mbean code="org.jboss.example.mbean.support.PlainThread" name="jboss.support:name=ThreadBean">
<attribute name="configService">
<inject bean="jboss.support:name=ConfigBean"/>
</attribute>
</mbean>
</server>
jboss-service.xml descriptor in the META-INF folder of a service archive (.sar).
9.3. Deploying JBoss MBean Services
ServiceMBeanTest.sar) in Domain mode use the following commands:
[domain@localhost:9999 /] deploy ~/Desktop/ServiceMBeanTest.sar[domain@localhost:9999 /] deploy ~/Desktop/ServiceMBeanTest.sar --all-server-groupsServiceMBeanTest.sar) in Standalone mode use the following command:
[standalone@localhost:9999 /] deploy ~/Desktop/ServiceMBeanTest.sar[standalone@localhost:9999 /] undeploy ServiceMBeanTest.sarChapter 10. Clustering in Web Applications
10.1. Session Replication
10.1.1. About HTTP Session Replication
10.1.2. About the Web Session Cache
standalone-ha.xml profile, or the managed domain profiles ha or full-ha. The most commonly configured elements are the cache mode and the number of cache owners for a distributed cache. The owners parameter works only in the DIST mode.
The cache mode can either be REPL (the default) or DIST.
- REPL
- The
REPLmode replicates the entire cache to every other node in the cluster. This is the safest option, but introduces more overhead. - DIST
- The
DISTmode is similar to the buddy mode provided in previous implementations. It reduces overhead by distributing the cache to the number of nodes specified in theownersparameter. This number of owners defaults to2.
The owners parameter controls how many cluster nodes hold replicated copies of the session. The default is 2.
10.1.3. Configure the Web Session Cache
REPL. If you wish to use DIST mode, run the following two commands in the Management CLI. If you use a different profile, change the profile name in the commands. If you use a standalone server, remove the /profile=ha portion of the commands.
Procedure 10.1. Configure the Web Session Cache
Change the default cache mode to
DIST./profile=ha/subsystem=infinispan/cache-container=web/:write-attribute(name=default-cache,value=dist)Set the number of owners for a distributed cache.
The following command sets5owners. The default is2./profile=ha/subsystem=infinispan/cache-container=web/distributed-cache=dist/:write-attribute(name=owners,value=5)Change the default cache mode back to
REPL./profile=ha/subsystem=infinispan/cache-container=web/:write-attribute(name=default-cache,value=repl)Restart the Server
After changing the web cache mode, you must restart the server.
Your server is configured for session replication. To use session replication in your own applications, refer to the following topic: Section 10.1.4, “Enable Session Replication in Your Application”.
10.1.4. Enable Session Replication in Your Application
To take advantage of JBoss EAP 6 High Availability (HA) features, you must configure your application to be distributable. This procedure shows how to do that, and then explains some of the advanced configuration options you can use.
Procedure 10.2. Make your Application Distributable
Required: Indicate that your application is distributable.
If your application is not marked as distributable, its sessions will never be distributed. Add the<distributable/>element inside the<web-app>tag of your application'sweb.xmldescriptor file. Here is an example.Example 10.1. Minimum Configuration for a Distributable Application
<?xml version="1.0"?> <web-app xmlns="http://java.sun.com/xml/ns/j2ee" xmlns:xsi="http://www.w3.org/2001/XMLSchema-instance" xsi:schemaLocation="http://java.sun.com/xml/ns/j2ee http://java.sun.com/xml/ns/j2ee/web-app_2_4.xsd" version="2.4"> <distributable/> </web-app>Modify the default replication behavior if desired.
If you want to change any of the values affecting session replication, you can override them inside a<replication-config>element which is a child element of the<jboss-web>element of your application'sjboss-web.xmlfile. For a given element, only include it if you want to override the defaults. The following example lists all of the default settings, and is followed by a table which explains the most commonly changed options.Example 10.2. Example
<replication-config>Values<!DOCTYPE jboss-web PUBLIC "-//JBoss//DTD Web Application 5.0//EN" "http://www.jboss.org/j2ee/dtd/jboss-web_5_0.dtd"> <jboss-web> <replication-config> <replication-trigger>SET_AND_NON_PRIMITIVE_GET</replication-trigger> <replication-granularity>SESSION</replication-granularity> <use-jk>false</use-jk> <max-unreplicated-interval>30</max-unreplicated-interval> <snapshot-mode>INSTANT</snapshot-mode> <snapshot-interval>1000</snapshot-interval> <session-notification-policy>com.example.CustomSessionNotificationPolicy</session-notification-policy> </replication-config> </jboss-web>
|
Option
|
Description
|
|---|---|
<replication-trigger>
|
Controls which conditions should trigger session data replication across the cluster. This option is necessary because after a mutable object (stored as a session attribute) is accessed from the session, the container has no clear way to know if the object has been modified and needs to be replicated, unless method
setAttribute() is called directly.
Regardless of the setting, you can always trigger session replication by calling
setAttribute().
|
<replication-granularity>
|
Determines the granularity of data that is replicated. It defaults to
SESSION, but can be set to ATTRIBUTE instead, to increase performance on sessions where most attributes remain unchanged.
Note FIELD is not supported in JBoss EAP 6.
|
|
Option
|
Description
|
|---|---|
<use-jk>
|
Whether to assume that a load balancer such as
mod_cluster, mod_jk, or mod_proxy is in use. The default is false. If set to true, the container examines the session ID associated with each request and replaces the jvmRoute portion of the session ID if there is a failover.
|
<max-unreplicated-interval>
|
The maximum interval (in seconds) to wait after a session was accessed before triggering a replication of a session's timestamp, even if it is considered to be unchanged. This ensures that cluster nodes are aware of each session's timestamp and that an unreplicated session will not expire incorrectly during a failover. It also ensures that you can rely on a correct value for calls to method
HttpSession.getLastAccessedTime()during a failover.
By default, no value is specified. A value of
0 causes the timestamp to be replicated whenever the session is accessed. A value of -1 causes the timestamp to be replicated only if other activity during the request triggers a replication. A positive value greater than HttpSession.getMaxInactiveInterval() is treated as a misconfiguration and converted to 0.
|
<snapshot-mode>
|
Specifies when sessions are replicated to other nodes. The default is
INSTANT and the other possible value is INTERVAL.
In
INSTANT mode, changes are replicated at the end of a request, by means of the request processing thread. The <snapshot-interval> option is ignored.
In
INTERVAL mode, a background task runs at the interval specified by <snapshot-interval>, and replicates modified sessions.
|
<snapshot-interval>
|
The interval, in milliseconds, at which modified sessions should be replicated when using
INTERVAL for the value of <snapshot-mode>.
|
<session-notification-policy>
|
The fully-qualified class name of the implementation of interface
ClusteredSessionNotificationPolicy which governs whether servlet specification notifications are emitted to any registered HttpSessionListener, HttpSessionAttributeListener, or HttpSessionBindingListener.
|
10.2. HttpSession Passivation and Activation
10.2.1. About HTTP Session Passivation and Activation
- When the container requests the creation of a new session, if the number of currently active session exceeds a configurable limit, the server attempts to passivate some sessions to make room for the new one.
- Periodically, at a configured interval, a background task checks to see if sessions should be passivated.
- When a web application is deployed and a backup copy of sessions active on other servers is acquired by the newly deploying web application's session manager, sessions may be passivated.
- The session has not been in use for longer than a configurable maximum idle time.
- The number of active sessions exceeds a configurable maximum and the session has not been in use for longer than a configurable minimum idle time.
10.2.2. Configure HttpSession Passivation in Your Application
HttpSession passivation is configured in your application's WEB_INF/jboss-web.xml or META_INF/jboss-web.xml file.
Example 10.3. jboss-web.xml File
<!DOCTYPE jboss-web PUBLIC
"-//JBoss//DTD Web Application 5.0//EN"
"http://www.jboss.org/j2ee/dtd/jboss-web_5_0.dtd">
<jboss-web version="6.0"
xmlns="http://www.jboss.com/xml/ns/javaee"
xmlns:xsi="http://www.w3.org/2001/XMLSchema-instance"
xsi:schemaLocation="http://www.jboss.com/xml/ns/javaee http://www.jboss.org/j2ee/schema/jboss-web_6_0.xsd">
<max-active-sessions>20</max-active-sessions>
<passivation-config>
<use-session-passivation>true</use-session-passivation>
<passivation-min-idle-time>60</passivation-min-idle-time>
<passivation-max-idle-time>600</passivation-max-idle-time>
</passivation-config>
</jboss-web>
Passivation Configuration Elements
<max-active-sessions>- The maximum number of active sessions allowed. If the number of sessions managed by the session manager exceeds this value and passivation is enabled, the excess will be passivated based on the configured
<passivation-min-idle-time>. Then, if the number of active sessions still exceeds this limit, attempts to create new sessions will fail. The default value of-1sets no limit on the maximum number of active sessions. <passivation-config>- This element holds the rest of the passivation configuration parameters, as child elements.
<passivation-config> Child Elements
<use-session-passivation>- Whether or not to use session passivation. The default value is
false. <passivation-min-idle-time>- The minimum time, in seconds, that a session must be inactive before the container will consider passivating it in order to reduce the active session count to conform to value defined by max-active-sessions. The default value of
-1disables passivating sessions before<passivation-max-idle-time>has elapsed. Neither a value of -1 nor a high value are recommended if<max-active-sessions>is set. <passivation-max-idle-time>- The maximum time, in seconds, that a session can be inactive before the container attempts to passivate it to save memory. Passivation of such sessions takes place regardless of whether the active session count exceeds
<max-active-sessions>. This value should be less than the<session-timeout>setting in theweb.xml. The default value of-1disables passivation based on maximum inactivity.
Note
<max-active-sessions>. The number of sessions replicated from other nodes also depends on whether REPL or DIST cache mode is enabled. In REPL cache mode, each session is replicated to each node. In DIST cache mode, each session is replicated only to the number of nodes specified by the owners parameter. See Section 10.1.2, “About the Web Session Cache” and Section 10.1.3, “Configure the Web Session Cache” for information on configuring session cache modes.
REPL cache mode, each node would store 800 sessions in memory. With DIST cache mode enabled, and the default owners setting of 2, each node stores 200 sessions in memory.
10.3. Implement an HA Singleton
The following procedure demonstrates how to deploy a service that is wrapped with the SingletonService decorator and used as a cluster-wide singleton service. The service activates a scheduled timer, which is started only once in the cluster.
Procedure 10.3. Implement an HA Singleton Service
- Write the HA singleton service application.The following is a simple example of a
Servicethat is wrapped with theSingletonServicedecorator to be deployed as a singleton service. A complete example can be found in thecluster-ha-singletonquickstart that ships with Red Hat JBoss Enterprise Application Platform 6. This quickstart contains all the instructions to build and deploy the application.- Create a service.The following listing is an example of a service:
package org.jboss.as.quickstarts.cluster.hasingleton.service.ejb; import java.util.Date; import java.util.concurrent.atomic.AtomicBoolean; import javax.naming.InitialContext; import javax.naming.NamingException; import org.jboss.logging.Logger; import org.jboss.msc.service.Service; import org.jboss.msc.service.ServiceName; import org.jboss.msc.service.StartContext; import org.jboss.msc.service.StartException; import org.jboss.msc.service.StopContext; /** * @author <a href="mailto:wfink@redhat.com">Wolf-Dieter Fink</a> */ public class HATimerService implements Service<String> { private static final Logger LOGGER = Logger.getLogger(HATimerService.class); public static final ServiceName SINGLETON_SERVICE_NAME = ServiceName.JBOSS.append("quickstart", "ha", "singleton", "timer"); /** * A flag whether the service is started. */ private final AtomicBoolean started = new AtomicBoolean(false); /** * @return the name of the server node */ public String getValue() throws IllegalStateException, IllegalArgumentException { LOGGER.infof("%s is %s at %s", HATimerService.class.getSimpleName(), (started.get() ? "started" : "not started"), System.getProperty("jboss.node.name")); return ""; } public void start(StartContext arg0) throws StartException { if (!started.compareAndSet(false, true)) { throw new StartException("The service is still started!"); } LOGGER.info("Start HASingleton timer service '" + this.getClass().getName() + "'"); final String node = System.getProperty("jboss.node.name"); try { InitialContext ic = new InitialContext(); ((Scheduler) ic.lookup("global/jboss-cluster-ha-singleton-service/SchedulerBean!org.jboss.as.quickstarts.cluster.hasingleton.service.ejb.Scheduler")).initialize("HASingleton timer @" + node + " " + new Date()); } catch (NamingException e) { throw new StartException("Could not initialize timer", e); } } public void stop(StopContext arg0) { if (!started.compareAndSet(true, false)) { LOGGER.warn("The service '" + this.getClass().getName() + "' is not active!"); } else { LOGGER.info("Stop HASingleton timer service '" + this.getClass().getName() + "'"); try { InitialContext ic = new InitialContext(); ((Scheduler) ic.lookup("global/jboss-cluster-ha-singleton-service/SchedulerBean!org.jboss.as.quickstarts.cluster.hasingleton.service.ejb.Scheduler")).stop(); } catch (NamingException e) { LOGGER.error("Could not stop timer", e); } } } } - Create an activator that installs the
Serviceas a clustered singleton.The following listing is an example of a Service activator that installs theHATimerServiceas a clustered singleton service:package org.jboss.as.quickstarts.cluster.hasingleton.service.ejb; import org.jboss.as.clustering.singleton.SingletonService; import org.jboss.logging.Logger; import org.jboss.msc.service.DelegatingServiceContainer; import org.jboss.msc.service.ServiceActivator; import org.jboss.msc.service.ServiceActivatorContext; import org.jboss.msc.service.ServiceController; /** * Service activator that installs the HATimerService as a clustered singleton service * during deployment. * * @author Paul Ferraro */ public class HATimerServiceActivator implements ServiceActivator { private final Logger log = Logger.getLogger(this.getClass()); @Override public void activate(ServiceActivatorContext context) { log.info("HATimerService will be installed!"); HATimerService service = new HATimerService(); SingletonService<String> singleton = new SingletonService<String>(service, HATimerService.SINGLETON_SERVICE_NAME); /* * To pass a chain of election policies to the singleton, for example, * to tell JGroups to prefer running the singleton on a node with a * particular name, uncomment the following line: */ // singleton.setElectionPolicy(new PreferredSingletonElectionPolicy(new SimpleSingletonElectionPolicy(), new NamePreference("node1/singleton"))); singleton.build(new DelegatingServiceContainer(context.getServiceTarget(), context.getServiceRegistry())) .setInitialMode(ServiceController.Mode.ACTIVE) .install() ; } }Note
The above code example uses a class,org.jboss.as.clustering.singleton.SingletonService, that is part of the JBoss EAP private API. A public API will become available in the JBoss EAP 7 release and the private class will be deprecated, but these classes will be maintained and available for the duration of the JBoss EAP 6.x release cycle. - Create a ServiceActivator FileCreate a file named
org.jboss.msc.service.ServiceActivatorin the application'sresources/META-INF/services/directory. Add a line containing the fully qualified name of the ServiceActivator class created in the previous step.org.jboss.as.quickstarts.cluster.hasingleton.service.ejb.HATimerServiceActivator - Create a Singleton bean that implements a timer to be used as a cluster-wide singleton timer.This Singleton bean must not have a remote interface and you must not reference its local interface from another EJB in any application. This prevents a lookup by a client or other component and ensures the SingletonService has total control of the Singleton.
- Create the Scheduler interface
package org.jboss.as.quickstarts.cluster.hasingleton.service.ejb; /** * @author <a href="mailto:wfink@redhat.com">Wolf-Dieter Fink</a> */ public interface Scheduler { void initialize(String info); void stop(); } - Create the Singleton bean that implements the cluster-wide singleton timer.
package org.jboss.as.quickstarts.cluster.hasingleton.service.ejb; import javax.annotation.Resource; import javax.ejb.ScheduleExpression; import javax.ejb.Singleton; import javax.ejb.Timeout; import javax.ejb.Timer; import javax.ejb.TimerConfig; import javax.ejb.TimerService; import org.jboss.logging.Logger; /** * A simple example to demonstrate a implementation of a cluster-wide singleton timer. * * @author <a href="mailto:wfink@redhat.com">Wolf-Dieter Fink</a> */ @Singleton public class SchedulerBean implements Scheduler { private static Logger LOGGER = Logger.getLogger(SchedulerBean.class); @Resource private TimerService timerService; @Timeout public void scheduler(Timer timer) { LOGGER.info("HASingletonTimer: Info=" + timer.getInfo()); } @Override public void initialize(String info) { ScheduleExpression sexpr = new ScheduleExpression(); // set schedule to every 10 seconds for demonstration sexpr.hour("*").minute("*").second("0/10"); // persistent must be false because the timer is started by the HASingleton service timerService.createCalendarTimer(sexpr, new TimerConfig(info, false)); } @Override public void stop() { LOGGER.info("Stop all existing HASingleton timers"); for (Timer timer : timerService.getTimers()) { LOGGER.trace("Stop HASingleton timer: " + timer.getInfo()); timer.cancel(); } } }
- Start each JBoss EAP 6 instance with clustering enabled.To enable clustering for standalone servers, you must start each server with the
HAprofile, using a unique node name and port offset for each instance.- For Linux, use the following command syntax to start the servers:
EAP_HOME/bin/standalone.sh --server-config=standalone-ha.xml -Djboss.node.name=UNIQUE_NODE_NAME -Djboss.socket.binding.port-offset=PORT_OFFSETExample 10.4. Start multiple standalone servers on Linux
$ EAP_HOME/bin/standalone.sh --server-config=standalone-ha.xml -Djboss.node.name=node1 $ EAP_HOME/bin/standalone.sh --server-config=standalone-ha.xml -Djboss.node.name=node2 -Djboss.socket.binding.port-offset=100 - For Microsoft Windows, use the following command syntax to start the servers:
EAP_HOME\bin\standalone.bat --server-config=standalone-ha.xml -Djboss.node.name=UNIQUE_NODE_NAME -Djboss.socket.binding.port-offset=PORT_OFFSETExample 10.5. Start multiple standalone servers on Microsoft Windows
C:> EAP_HOME\bin\standalone.bat --server-config=standalone-ha.xml -Djboss.node.name=node1 C:> EAP_HOME\bin\standalone.bat --server-config=standalone-ha.xml -Djboss.node.name=node2 -Djboss.socket.binding.port-offset=100
Note
If you prefer not to use command line arguments, you can configure thestandalone-ha.xmlfile for each server instance to bind on a separate interface. - Deploy the application to the serversThe following Maven command deploys the application to a standalone server running on the default ports.
mvn clean install jboss-as:deployTo deploy to additional servers, pass the server name. if it is on a different host, pass the host name and port number on the command line:mvn clean package jboss-as:deploy -Djboss-as.hostname=localhost -Djboss-as.port=10099See thecluster-ha-singletonquickstart that ships with JBoss EAP 6 for Maven configuration and deployment details.
10.4. Apache mod_cluster-manager Application
10.4.1. About mod_cluster-manager Application
10.4.2. Exploring mod_cluster-manager Application

Figure 10.1. mod_cluster Administration Web Page
- [1] mod_cluster/1.2.8.Final: This denotes the version of the mod_cluster native library
- [2] ajp://192.168.122.204:8099: This denotes the protocol used (either one of AJP, HTTP, HTTPS), hostname or IP address of the worker node and the port
- [3] jboss-eap-6.3-2: This denotes the worker node's JVMRoute.
- [4] Virtual Host 1: This denotes the virtual host(s) configured on the worker node
- : This is an administration option which can be used to disable the creation of new sessions on the particular context. However the ongoing sessions do not get disabled and remain intact
- : This is an administration option which can be used to stop the routing of session requests to the context. The remaining sessions will failover to another node unless the property
sticky-session-forceis set to "true" - : These denote operations which can be performed on the whole node. Selecting one of these options affects all the contexts of a node in all its virtual hosts.
- [8] Load balancing group (LBGroup): The
load-balancing-groupproperty is set in the mod_cluster subsystem in EAP configuration to group all worker nodes into custom load balancing groups. Load balancing group (LBGroup) is an informational field which gives information about all set load balancing groups. If this field is not set, then all worker nodes are grouped into a single default load balancing groupNote
This is only an informational field and thus cannot be used to setload-balancing-groupproperty. The property has to be set in mod_cluster subsystem in EAP configuration. - [9] Load (value): This indicates the load factor on the worker node. The load factor(s) are evaluated as below:
-load > 0 : A load factor with value 1 indicates that the worker node is overloaded. A load factor of 100 denotes a free and not-loaded node. -load = 0 :A load factor of value 0 indicates that the worker node is in a standby mode. This means that no session requests will be routed to this node until and unless the other worker nodes are unavailable -load = -1 : A load factor of value -1 indicates that the worker node is in an error state. -load = -2 : A load factor of value -2 indicates that the worker node is undergoing CPing/CPong and is in a transition state
Chapter 11. CDI
11.1. Overview of CDI
11.1.1. Overview of CDI
11.1.2. About Contexts and Dependency Injection (CDI)
11.1.3. Benefits of CDI
- It simplifies and shrinks your code base by replacing big chunks of code with annotations.
- It is flexible, allowing you to disable and enable injections and events, use alternative beans, and inject non-CDI objects easily.
- It is easy to use your old code with CDI. You only need to include a
beans.xmlin yourMETA-INF/orWEB-INF/directory. The file can be empty. - It simplifies packaging and deployments and reduces the amount of XML you need to add to your deployments.
- It provides lifecycle management via contexts. You can tie injections to requests, sessions, conversations, or custom contexts.
- It also provides type-safe dependency injection, which is safer and easier to debug than string-based injection.
- It decouples interceptors from beans.
- It provides complex event notification.
11.1.4. About Type-safe Dependency Injection
11.1.5. Relationship Between Weld, Seam 2, and JavaServer Faces
11.2. Use CDI
11.2.1. First Steps
11.2.1.1. Enable CDI
Contexts and Dependency Injection (CDI) is one of the core technologies in JBoss EAP 6, and is enabled by default. If for some reason it is disabled and you need to enable it, follow this procedure.
Procedure 11.1. Enable CDI in JBoss EAP 6
Check to see if the CDI subsystem details are commented out of the configuration file.
A subsystem can be disabled by commenting out the relevant section of thedomain.xmlorstandalone.xmlconfiguration files, or by removing the relevant section altogether.To find the CDI subsystem inEAP_HOME/domain/configuration/domain.xmlorEAP_HOME/standalone/configuration/standalone.xml, search them for the following string. If it exists, it is located inside the <extensions> section.<extension module="org.jboss.as.weld"/>The following line must also be present in the profile you are using. Profiles are in individual <profile> elements within the <profiles> section.<subsystem xmlns="urn:jboss:domain:weld:1.0"/>Before editing any files, stop JBoss EAP 6.
JBoss EAP 6 modifies the configuration files during the time it is running, so you must stop the server before you edit the configuration files directly.Edit the configuration file to restore the CDI subsystem.
If the CDI subsystem was commented out, remove the comments.If it was removed entirely, restore it by adding this line to the file in a new line directly above the </extensions> tag:<extension module="org.jboss.as.weld"/>- You also need to add the following line to the relevant profile in the <profiles> section.
<subsystem xmlns="urn:jboss:domain:weld:1.0"/> Restart JBoss EAP 6.
Start JBoss EAP 6 with your updated configuration.
JBoss EAP 6 starts with the CDI subsystem enabled.
11.2.2. Use CDI to Develop an Application
11.2.2.1. Use CDI to Develop an Application
Contexts and Dependency Injection (CDI) gives you tremendous flexibility in developing applications, reusing code, adapting your code at deployment or run-time, and unit testing. JBoss EAP 6 includes Weld, the reference implementation of CDI. These tasks show you how to use CDI in your enterprise applications.
11.2.2.2. Use CDI with Existing Code
beans.xml in the META-INF/ or WEB-INF/ directory of your archive. The file can be empty.
Procedure 11.2. Use legacy beans in CDI applications
Package your beans into an archive.
Package your beans into a JAR or WAR archive.Include a
beans.xmlfile in your archive.Place abeans.xmlfile into your JAR archive'sMETA-INF/or your WAR archive'sWEB-INF/directory. The file can be empty.
You can use these beans with CDI. The container can create and destroy instances of your beans and associate them with a designated context, inject them into other beans, use them in EL expressions, specialize them with qualifier annotations, and add interceptors and decorators to them, without any modifications to your existing code. In some circumstances, you may need to add some annotations.
11.2.2.3. Exclude Beans From the Scanning Process
One of the features of Weld, the JBoss EAP 6 implementation of CDI, is the ability to exclude classes in your archive from scanning, having container lifecycle events fired, and being deployed as beans. This is not part of the JSR-299 specification.
Example 11.1. Exclude packages from your bean
- The first one excludes all Swing classes.
- The second excludes Google Web Toolkit classes if Google Web Toolkit is not installed.
- The third excludes classes which end in the string
Blether(using a regular expression), if the system property verbosity is set tolow. - The fourth excludes Java Server Faces (JSF) classes if Wicket classes are present and the viewlayer system property is not set.
<?xml version="1.0" encoding="UTF-8"?>
<beans xmlns="http://java.sun.com/xml/ns/javaee"
xmlns:xsi="http://www.w3.org/2001/XMLSchema-instance"
xmlns:weld="http://jboss.org/schema/weld/beans"
xsi:schemaLocation="
http://java.sun.com/xml/ns/javaee http://docs.jboss.org/cdi/beans_1_0.xsd
http://jboss.org/schema/weld/beans http://jboss.org/schema/weld/beans_1_1.xsd">
<weld:scan>
<!-- Don't deploy the classes for the swing app! -->
<weld:exclude name="com.acme.swing.**" />
<!-- Don't include GWT support if GWT is not installed -->
<weld:exclude name="com.acme.gwt.**">
<weld:if-class-available name="!com.google.GWT"/>
</weld:exclude>
<!--
Exclude classes which end in Blether if the system property verbosity is set to low
i.e.
java ... -Dverbosity=low
-->
<weld:exclude pattern="^(.*)Blether$">
<weld:if-system-property name="verbosity" value="low"/>
</weld:exclude>
<!--
Don't include JSF support if Wicket classes are present, and the viewlayer system
property is not set
-->
<weld:exclude name="com.acme.jsf.**">
<weld:if-class-available name="org.apache.wicket.Wicket"/>
<weld:if-system-property name="!viewlayer"/>
</weld:exclude>
</weld:scan>
</beans>
11.2.2.4. Use an Injection to Extend an Implementation
You can use an injection to add or change a feature of your existing code. This example shows you how to add a translation ability to an existing class. The translation is a hypothetical feature and the way it is implemented in the example is pseudo-code, and only provided for illustration.
buildPhrase. The buildPhrase method takes as an argument the name of a city, and outputs a phrase like "Welcome to Boston." Your goal is to create a version of the Welcome class which can translate the greeting into a different language.
Example 11.2. Inject a Translator Bean Into the Welcome Class
Translator object into the Welcome class. The Translator object may be an EJB stateless bean or another type of bean, which can translate sentences from one language to another. In this instance, the Translator is used to translate the entire greeting, without actually modifying the original Welcome class at all. The Translator is injected before the buildPhrase method is implemented.
public class TranslatingWelcome extends Welcome {
@Inject Translator translator;
public String buildPhrase(String city) {
return translator.translate("Welcome to " + city + "!");
}
...
}
11.2.3. Ambiguous or Unsatisfied Dependencies
11.2.3.1. About Ambiguous or Unsatisfied Dependencies
- It resolves the qualifier annotations on all beans that implement the bean type of an injection point.
- It filters out disabled beans. Disabled beans are @Alternative beans which are not explicitly enabled.
11.2.3.2. About Qualifiers
Example 11.3. Define the @Synchronous and @Asynchronous Qualifiers
@Qualifier
@Retention(RUNTIME)
@Target({TYPE, METHOD, FIELD, PARAMETER})
public @interface Synchronous {}
@Qualifier
@Retention(RUNTIME)
@Target({TYPE, METHOD, FIELD, PARAMETER})
public @interface Asynchronous {}
Example 11.4. Use the @Synchronous and @Asynchronous Qualifiers
@Synchronous
public class SynchronousPaymentProcessor implements PaymentProcessor {
public void process(Payment payment) { ... }
}
@Asynchronous
public class AsynchronousPaymentProcessor implements PaymentProcessor {
public void process(Payment payment) { ... }
}
11.2.3.3. Use a Qualifier to Resolve an Ambiguous Injection
This task shows an ambiguous injection and removes the ambiguity with a qualifier. Read more about ambiguous injections at Section 11.2.3.1, “About Ambiguous or Unsatisfied Dependencies”.
Example 11.5. Ambiguous injection
Welcome, one which translates and one which does not. In that situation, the injection below is ambiguous and needs to be specified to use the translating Welcome.
public class Greeter {
private Welcome welcome;
@Inject
void init(Welcome welcome) {
this.welcome = welcome;
}
...
}
Procedure 11.3. Resolve an Ambiguous Injection with a Qualifier
Create a qualifier annotation called
@Translating.@Qualifier @Retention(RUNTIME) @Target({TYPE,METHOD,FIELD,PARAMETERS}) public @interface Translating{}Annotate your translating
Welcomewith the@Translatingannotation.@Translating public class TranslatingWelcome extends Welcome { @Inject Translator translator; public String buildPhrase(String city) { return translator.translate("Welcome to " + city + "!"); } ... }Request the translating
Welcomein your injection.You must request a qualified implementation explicitly, similar to the factory method pattern. The ambiguity is resolved at the injection point.public class Greeter { private Welcome welcome; @Inject void init(@Translating Welcome welcome) { this.welcome = welcome; } public void welcomeVisitors() { System.out.println(welcome.buildPhrase("San Francisco")); } }
The TranslatingWelcome is used, and there is no ambiguity.
11.2.4. Managed Beans
11.2.4.1. About Managed Beans
bean.
@Inject) is a bean. This includes every JavaBean and every EJB session bean. The only requirement to enable the mentioned services in beans is that they reside in an archive (a JAR, or a Java EE module such as a WAR or EJB JAR) that contains a special marker file: META-INF/beans.xml.
11.2.4.2. Types of Classes That are Beans
@ManagedBean, but in CDI you do not need to. According to the specification, the CDI container treats any class that satisfies the following conditions as a managed bean:
- It is not a non-static inner class.
- It is a concrete class, or is annotated
@Decorator. - It is not annotated with an EJB component-defining annotation or declared as an EJB bean class in
ejb-jar.xml. - It does not implement interface
javax.enterprise.inject.spi.Extension. - It has either a constructor with no parameters, or a constructor annotated with
@Inject.
11.2.4.3. Use CDI to Inject an Object Into a Bean
META-INF/beans.xml or WEB-INF/beans.xml file, each object in your deployment can be injected using CDI.
Inject an object into any part of a bean with the
@Injectannotation.To obtain an instance of a class, within your bean, annotate the field with@Inject.Example 11.6. Injecting a
TextTranslatorinstance into aTranslateControllerpublic class TranslateController { @Inject TextTranslator textTranslator; ...Use your injected object's methods
You can use your injected object's methods directly. Assume thatTextTranslatorhas a methodtranslate.Example 11.7. Use your injected object's methods
// in TranslateController class public void translate() { translation = textTranslator.translate(inputText); }Use injection in the constructor of a bean
You can inject objects into the constructor of a bean, as an alternative to using a factory or service locator to create them.Example 11.8. Using injection in the constructor of a bean
public class TextTranslator { private SentenceParser sentenceParser; private Translator sentenceTranslator; @Inject TextTranslator(SentenceParser sentenceParser, Translator sentenceTranslator) { this.sentenceParser = sentenceParser; this.sentenceTranslator = sentenceTranslator; } // Methods of the TextTranslator class ... }Use the
Instance(<T>)interface to get instances programmatically.TheInstanceinterface can return an instance of TextTranslator when parameterized with the bean type.Example 11.9. Obtaining an instance programmatically
@Inject Instance<TextTranslator> textTranslatorInstance; ... public void translate() { textTranslatorInstance.get().translate(inputText); }
When you inject an object into a bean all of the object's methods and properties are available to your bean. If you inject into your bean's constructor, instances of the injected objects are created when your bean's constructor is called, unless the injection refers to an instance which already exists. For instance, a new instance would not be created if you inject a session-scoped bean during the lifetime of the session.
11.2.5. Contexts, Scopes, and Dependencies
11.2.5.1. Contexts and Scopes
@RequestScoped, @SessionScoped, and @ConversationScope.
11.2.5.2. Available Contexts
| Context | Description |
|---|---|
| @Dependent | The bean is bound to the lifecycle of the bean holding the reference. |
| @ApplicationScoped | Bound to the lifecycle of the application. |
| @RequestScoped | Bound to the lifecycle of the request. |
| @SessionScoped | Bound to the lifecycle of the session. |
| @ConversationScoped | Bound to the lifecycle of the conversation. The conversation scope is between the lengths of the request and the session, and is controlled by the application. |
| Custom scopes | If the above contexts do not meet your needs, you can define custom scopes. |
11.2.6. Bean Lifecycle
11.2.6.1. Manage the Lifecycle of a Bean
This task shows you how to save a bean for the life of a request. Several other scopes exist, and you can define your own scopes.
@Dependent. This means that the bean's lifecycle is dependent upon the lifecycle of the bean which holds the reference. For more information, see Section 11.2.5.1, “Contexts and Scopes”.
Procedure 11.4. Manage Bean Lifecycles
Annotate the bean with the scope corresponding to your desired scope.
@RequestScoped @Named("greeter") public class GreeterBean { private Welcome welcome; private String city; // getter & setter not shown @Inject void init(Welcome welcome) { this.welcome = welcome; } public void welcomeVisitors() { System.out.println(welcome.buildPhrase(city)); } }When your bean is used in the JSF view, it holds state.
<h:form> <h:inputText value="#{greeter.city}"/> <h:commandButton value="Welcome visitors" action="#{greeter.welcomeVisitors}"/> </h:form>
Your bean is saved in the context relating to the scope that you specify, and lasts as long as the scope applies.
11.2.6.2. Use a Producer Method
This task shows how to use producer methods to produce a variety of different objects which are not beans for injection.
Example 11.10. Use a producer method instead of an alternative, to allow polymorphism after deployment
@Preferred annotation in the example is a qualifier annotation. For more information about qualifiers, refer to: Section 11.2.3.2, “About Qualifiers”.
@SessionScoped
public class Preferences implements Serializable {
private PaymentStrategyType paymentStrategy;
...
@Produces @Preferred
public PaymentStrategy getPaymentStrategy() {
switch (paymentStrategy) {
case CREDIT_CARD: return new CreditCardPaymentStrategy();
case CHECK: return new CheckPaymentStrategy();
default: return null;
}
}
}
@Inject @Preferred PaymentStrategy paymentStrategy;
Example 11.11. Assign a scope to a producer method
@Dependent. If you assign a scope to a bean, it is bound to the appropriate context. The producer method in this example is only called once per session.
@Produces @Preferred @SessionScoped
public PaymentStrategy getPaymentStrategy() {
...
}
Example 11.12. Use an injection inside a producer method
@Produces @Preferred @SessionScoped
public PaymentStrategy getPaymentStrategy(CreditCardPaymentStrategy ccps,
CheckPaymentStrategy cps ) {
switch (paymentStrategy) {
case CREDIT_CARD: return ccps;
case CHEQUE: return cps;
default: return null;
}
}
Note
Producer methods allow you to inject non-bean objects and change your code dynamically.
11.2.7. Named Beans and Alternative Beans
11.2.7.1. About Named Beans
@Named annotation. Naming a bean allows you to use it directly in Java Server Faces (JSF).
@Named annotation takes an optional parameter, which is the bean name. If this parameter is omitted, the lower-cased bean name is used as the name.
11.2.7.2. Use Named Beans
Use the
@Namedannotation to assign a name to a bean.@Named("greeter") public class GreeterBean { private Welcome welcome; @Inject void init (Welcome welcome) { this.welcome = welcome; } public void welcomeVisitors() { System.out.println(welcome.buildPhrase("San Francisco")); } }The bean name itself is optional. If it is omitted, the bean is named after the class name, with the first letter decapitalized. In the example above, the default name would begreeterBean.Use the named bean in a JSF view.
<h:form> <h:commandButton value="Welcome visitors" action="#{greeter.welcomeVisitors}"/> </h:form>
Your named bean is assigned as an action to the control in your JSF view, with a minimum of coding.
11.2.7.3. About Alternative Beans
Example 11.13. Defining Alternatives
@Alternative @Synchronous @Asynchronous
public class MockPaymentProcessor implements PaymentProcessor {
public void process(Payment payment) { ... }
}
beans.xml file.
11.2.7.4. Override an Injection with an Alternative
Alternative beans let you override existing beans. They can be thought of as a way to plug in a class which fills the same role, but functions differently. They are disabled by default. This task shows you how to specify and enable an alternative.
Procedure 11.5. Override an Injection
TranslatingWelcome class in your project, but you want to override it with a "mock" TranslatingWelcome class. This would be the case for a test deployment, where the true Translator bean cannot be used.
Define the alternative.
@Alternative @Translating public class MockTranslatingWelcome extends Welcome { public String buildPhrase(string city) { return "Bienvenue à " + city + "!"); } }Substitute the alternative.
To activate the substitute implementation, add the fully-qualified class name to yourMETA-INF/beans.xmlorWEB-INF/beans.xmlfile.<beans> <alternatives> <class>com.acme.MockTranslatingWelcome</class> </alternatives> </beans>
The alternative implementation is now used instead of the original one.
11.2.8. Stereotypes
11.2.8.1. About Stereotypes
- default scope
- a set of interceptor bindings
- all beans with the stereotype have defaulted bean EL names
- all beans with the stereotype are alternatives
@Named annotation, any bean it is placed on has a default bean name. The bean may override this name if the @Named annotation is specified directly on the bean. For more information about named beans, see Section 11.2.7.1, “About Named Beans”.
11.2.8.2. Use Stereotypes
Without stereotypes, annotations can become cluttered. This task shows you how to use stereotypes to reduce the clutter and streamline your code. For more information about what stereotypes are, see Section 11.2.8.1, “About Stereotypes”.
Example 11.14. Annotation clutter
@Secure
@Transactional
@RequestScoped
@Named
public class AccountManager {
public boolean transfer(Account a, Account b) {
...
}
}
Procedure 11.6. Define and Use Stereotypes
Define the stereotype,
@Secure @Transactional @RequestScoped @Named @Stereotype @Retention(RUNTIME) @Target(TYPE) public @interface BusinessComponent { ... }Use the stereotype.
@BusinessComponent public class AccountManager { public boolean transfer(Account a, Account b) { ... } }
Stereotypes streamline and simplify your code.
11.2.9. Observer Methods
11.2.9.1. About Observer Methods
11.2.9.2. Transactional Observers
public void refreshCategoryTree(@Observes(during = AFTER_SUCCESS) CategoryUpdateEvent event) { ... }
- IN_PROGRESS: By default, observers are invoked immediately.
- AFTER_SUCCESS: Observers are invoked after the completion phase of the transaction, but only if the transaction completes successfully.
- AFTER_FAILURE: Observers are invoked after the completion phase of the transaction only if the transaction fails to complete successfully.
- AFTER_COMPLETION: Observers are invoked after the completion phase of the transaction.
- BEFORE_COMPLETION: Observers are invoked before the completion phase of the transaction.
import javax.ejb.Singleton;
import javax.enterprise.inject.Produces;
@ApplicationScoped @Singleton
public class Catalog {
@PersistenceContext EntityManager em;
List<Product> products;
@Produces @Catalog
List<Product> getCatalog() {
if (products==null) {
products = em.createQuery("select p from Product p where p.deleted = false")
.getResultList();
}
return products;
}
}
import javax.enterprise.event.Event;
@Stateless
public class ProductManager {
@PersistenceContext EntityManager em;
@Inject @Any Event<Product> productEvent;
public void delete(Product product) {
em.delete(product);
productEvent.select(new AnnotationLiteral<Deleted>(){}).fire(product);
}
public void persist(Product product) {
em.persist(product);
productEvent.select(new AnnotationLiteral<Created>(){}).fire(product);
}
...
}
import javax.ejb.Singleton;
@ApplicationScoped @Singleton
public class Catalog {
...
void addProduct(@Observes(during = AFTER_SUCCESS) @Created Product product) {
products.add(product);
}
void removeProduct(@Observes(during = AFTER_SUCCESS) @Deleted Product product) {
products.remove(product);
}
}
11.2.9.3. Fire and Observe Events
Example 11.15. Fire an event
public class AccountManager {
@Inject Event<Withdrawal> event;
public boolean transfer(Account a, Account b) {
...
event.fire(new Withdrawal(a));
}
}
Example 11.16. Fire an event with a qualifier
public class AccountManager {
@Inject @Suspicious Event <Withdrawal> event;
public boolean transfer(Account a, Account b) {
...
event.fire(new Withdrawal(a));
}
}
Example 11.17. Observe an event
@Observes annotation.
public class AccountObserver {
void checkTran(@Observes Withdrawal w) {
...
}
}
Example 11.18. Observe a qualified event
public class AccountObserver {
void checkTran(@Observes @Suspicious Withdrawal w) {
...
}
}
11.2.10. Interceptors
11.2.10.1. About Interceptors
Interception points
- business method interception
- A business method interceptor applies to invocations of methods of the bean by clients of the bean.
- lifecycle callback interception
- A lifecycle callback interceptor applies to invocations of lifecycle callbacks by the container.
- timeout method interception
- A timeout method interceptor applies to invocations of the EJB timeout methods by the container.
11.2.10.2. Use Interceptors with CDI
Example 11.19. Interceptors without CDI
- The bean must specify the interceptor implementation directly.
- Every bean in the application must specify the full set of interceptors in the correct order. This makes adding or removing interceptors on an application-wide basis time-consuming and error-prone.
@Interceptors({
SecurityInterceptor.class,
TransactionInterceptor.class,
LoggingInterceptor.class
})
@Stateful public class BusinessComponent {
...
}
Procedure 11.7. Use interceptors with CDI
Define the interceptor binding type.
@InterceptorBinding @Retention(RUNTIME) @Target({TYPE, METHOD}) public @interface Secure {}Mark the interceptor implementation.
@Secure @Interceptor public class SecurityInterceptor { @AroundInvoke public Object aroundInvoke(InvocationContext ctx) throws Exception { // enforce security ... return ctx.proceed(); } }Use the interceptor in your business code.
@Secure public class AccountManager { public boolean transfer(Account a, Account b) { ... } }Enable the interceptor in your deployment, by adding it to
META-INF/beans.xmlorWEB-INF/beans.xml.<beans> <interceptors> <class>com.acme.SecurityInterceptor</class> <class>com.acme.TransactionInterceptor</class> </interceptors> </beans>The interceptors are applied in the order listed.
CDI simplifies your interceptor code and makes it easier to apply to your business code.
11.2.11. About Decorators
@Decorator. To invoke a decorator in a CDI application, it must be specified in the beans.xml file.
Example 11.20. Example Decorator
@Decorator
public abstract class LargeTransactionDecorator
implements Account {
@Inject @Delegate @Any Account account;
@PersistenceContext EntityManager em;
public void withdraw(BigDecimal amount) {
...
}
public void deposit(BigDecimal amount);
...
}
}
@Delegate injection point to obtain a reference to the decorated object.
11.2.12. About Portable Extensions
- integration with Business Process Management engines
- integration with third-party frameworks such as Spring, Seam, GWT or Wicket
- new technology based upon the CDI programming model
- Providing its own beans, interceptors and decorators to the container
- Injecting dependencies into its own objects using the dependency injection service
- Providing a context implementation for a custom scope
- Augmenting or overriding the annotation-based metadata with metadata from some other source
11.2.13. Bean Proxies
11.2.13.1. About Bean Proxies
Java types that cannot be proxied by the container
- Classes which do not have a non-private constructor with no parameters
- Classes which are declared
finalor have afinalmethod - Arrays and primitive types
11.2.13.2. Use a Proxy in an Injection
A proxy is used for injection when the lifecycles of the beans are different from each other. The proxy is a subclass of the bean that is created at run-time, and overrides all the non-private methods of the bean class. The proxy forwards the invocation onto the actual bean instance.
PaymentProcessor instance is not injected directly into Shop. Instead, a proxy is injected, and when the processPayment() method is called, the proxy looks up the current PaymentProcessor bean instance and calls the processPayment() method on it.
Example 11.21. Proxy Injection
@ConversationScoped
class PaymentProcessor
{
public void processPayment(int amount)
{
System.out.println("I'm taking $" + amount);
}
}
@ApplicationScoped
public class Shop
{
@Inject
PaymentProcessor paymentProcessor;
public void buyStuff()
{
paymentProcessor.processPayment(100);
}
}
Chapter 12. Java Transaction API (JTA)
12.1. Overview
12.1.1. Overview of Java Transactions API (JTA)
These topics provide a foundational understanding of the Java Transactions API (JTA).
12.2. Transaction Concepts
12.2.1. About Transactions
12.2.2. About ACID Properties for Transactions
Atomicity, Consistency, Isolation, and Durability. This terminology is usually used in the context of databases or transactional operations.
ACID Definitions
- Atomicity
- For a transaction to be atomic, all transaction members must make the same decision. Either they all commit, or they all roll back. If atomicity is broken, what results is termed a heuristic outcome.
- Consistency
- Consistency means that data written to the database is guaranteed to be valid data, in terms of the database schema. The database or other data source must always be in a consistent state. One example of an inconsistent state would be a field in which half of the data is written before an operation aborts. A consistent state would be if all the data were written, or the write were rolled back when it could not be completed.
- Isolation
- Isolation means that data being operated on by a transaction must be locked before modification, to prevent processes outside the scope of the transaction from modifying the data.
- Durability
- Durability means that in the event of an external failure after transaction members have been instructed to commit, all members will be able to continue committing the transaction when the failure is resolved. This failure may be related to hardware, software, network, or any other involved system.
12.2.3. About the Transaction Coordinator or Transaction Manager
12.2.4. About Transaction Participants
12.2.5. About Java Transactions API (JTA)
12.2.6. About Java Transaction Service (JTS)
Note
12.2.7. About XA Datasources and XA Transactions
12.2.8. About XA Recovery
12.2.9. About the 2-Phase Commit Protocol
In the first phase, the transaction participants notify the transaction coordinator whether they are able to commit the transaction or must roll back.
In the second phase, the transaction coordinator makes the decision about whether the overall transaction should commit or roll back. If any one of the participants cannot commit, the transaction must roll back. Otherwise, the transaction can commit. The coordinator directs the transactions about what to do, and they notify the coordinator when they have done it. At that point, the transaction is finished.
12.2.10. About Transaction Timeouts
12.2.11. About Distributed Transactions
Note
12.2.12. About the ORB Portability API
ORB Portability API Classes
com.arjuna.orbportability.orbcom.arjuna.orbportability.oa
12.2.13. About Nested Transactions
Benefits of Nested Transactions
- Fault Isolation
- If a subtransaction rolls back, perhaps because an object it is using fails, the enclosing transaction does not need to roll back.
- Modularity
- If a transaction is already associated with a call when a new transaction begins, the new transaction is nested within it. Therefore, if you know that an object requires transactions, you can create them within the object. If the object's methods are invoked without a client transaction, then the object's transactions are top-level. Otherwise, they are nested within the scope of the client's transactions. Likewise, a client does not need to know whether an object is transactional. It can begin its own transaction.
12.2.14. About XML Transaction Service
12.2.14.1. Overview of Protocols Used by XTS
12.2.14.2. Web Services-Atomic Transaction Process
- To initiate an AT, the client application first locates a WS-C Activation Coordinator Web Service that supports WS-T.
- The client sends a WS-C
CreateCoordinationContextmessage to the service, specifying http://schemas.xmlsoap.org/ws/2004/10/wsat as its coordination type. - The client receives an appropriate WS-T context from the activation service.
- The response to the
CreateCoordinationContextmessage, the transaction context, has itsCoordinationTypeelement set to the WS-AT namespace, http://schemas.xmlsoap.org/ws/2004/10/wsat. It also contains a reference to the atomic transaction coordinator endpoint, the WS-C Registration Service, where participants can be enlisted. - The client normally proceeds to invoke Web Services and complete the transaction, either committing all the changes made by the Web Services, or rolling them back. In order to be able to drive this completion, the client must register itself as a participant for the Completion protocol, by sending a register message to the Registration Service whose endpoint was returned in the Coordination Context.
- Once registered for completion, the client application then interacts with Web Services to accomplish its business-level work. With each invocation of a business Web Service, the client inserts the transaction context into a SOAP header block, such that each invocation is implicitly scoped by the transaction. The toolkits that support WS-AT aware Web Services provide facilities to correlate contexts found in SOAP header blocks with back-end operations. This ensures that modifications made by the Web Service are done within the scope of the same transaction as the client and subject to commit or rollback by the Transaction Coordinator.
- Once all the necessary application work is complete, the client can terminate the transaction, with the intent of making any changes to the service state permanent. The completion participant instructs the coordinator to try to commit or roll back the transaction. When the commit or rollback operation completes, a status is returned to the participant to indicate the outcome of the transaction.
12.2.14.3. Web Services-Business Activity Process
- Services are requested to do work.
- Wherever these services have the ability to undo any work, they inform the BA, in case the BA later decides the cancel the work. If the BA suffers a failure. it can instruct the service to execute its undo behavior.
12.2.14.4. Transaction Bridging Overview
txbridge provides bi-directional linkage, such that either type of transaction may encompass business logic designed for use with the other type. The technique used by the bridge is a combination of interposition and protocol mapping.
org.jboss.jbossts.txbridge and its sub-packages. It consists of two distinct sets of classes, one for bridging in each direction.
12.3. Transaction Optimizations
12.3.1. Overview of Transaction Optimizations
The Transactions subsystem of JBoss EAP 6 includes several optimizations which you can take advantage of in your applications.
12.3.2. About the LRCO Optimization for Single-phase Commit (1PC)
12.3.2.1. Commit Markable Resource
Configuring access to a resource manager via the Commit Markable Resource (CMR) interface ensures that a 1PC resource manager can be reliably enlisted in a 2PC transaction. It is an implementation of the LRCO algorithm, which makes non-XA resource fully recoverable.
- Prepare 2PC
- Commit LRCO
- Write tx log
- Commit 2PC
Note
exception-sorter parameter in the datasource configuration. You can follow the datasource configuration examples mentioned in the JBoss EAP Administration and Configuration Guide.
A transaction may contain only one CMR resource.
You must have a table created for which the following SQL would work:
SELECT xid,actionuid FROM _tableName_ WHERE transactionManagerID IN (String[])
DELETE FROM _tableName_ WHERE xid IN (byte[[]])
INSERT INTO _tableName_ (xid, transactionManagerID, actionuid) VALUES (byte[],String,byte[])Example 12.1. Some examples of the SQL query
CREATE TABLE xids (xid varbinary(144), transactionManagerID varchar(64), actionuid varbinary(28))CREATE TABLE xids (xid RAW(144), transactionManagerID varchar(64), actionuid RAW(28))
CREATE UNIQUE INDEX index_xid ON xids (xid)CREATE TABLE xids (xid VARCHAR(255) for bit data not null, transactionManagerID
varchar(64), actionuid VARCHAR(255) for bit data not null)
CREATE UNIQUE INDEX index_xid ON xids (xid)CREATE TABLE xids (xid varbinary(144), transactionManagerID varchar(64), actionuid varbinary(28))
CREATE UNIQUE INDEX index_xid ON xids (xid)CREATE TABLE xids (xid bytea, transactionManagerID varchar(64), actionuid bytea)
CREATE UNIQUE INDEX index_xid ON xids (xid)By default, the CMR feature is disabled for datasources. To enable it, you must create or modify the datasource configuration and ensure that the connectible attribute is set to true. An example configuration entry in the datasources section of a server xml configuration file could be as follows:
<datasource enabled="true" jndi-name="java:jboss/datasources/ConnectableDS" pool-name="ConnectableDS" jta="true" use-java-context="true" spy="false" use-ccm="true" connectable="true"/>Note
/subsystem=datasources/data-source=ConnectableDS:add(enabled="true", jndi-name="java:jboss/datasources/ConnectableDS", jta="true", use-java-context="true", spy="false", use-ccm="true", connectable="true", connection-url="validConnectionURL", exception-sorter="org.jboss.jca.adapters.jdbc.extensions.mssql.MSSQLExceptionSorter", driver-name="h2")If you only need to update an existing resource to use the new CMR feature, then simply modifiy the connectable attribute:
/subsystem=datasources/data-source=ConnectableDS:write-attribute(name=connectable,value=true)The transaction subsystem identifies the datasources that are CMR capable through an entry to the transaction subsystem config section as shown below:
<subsystem xmlns="urn:jboss:domain:transactions:3.0">
...
<commit-markable-resources>
<commit-markable-resource jndi-name="java:jboss/datasources/ConnectableDS">
<xid-location name="xids" batch-size="100" immediate-cleanup="false"/>
</commit-markable-resource>
...
</commit-markable-resources>
</subsystem>Note
12.3.3. About the Presumed-Abort Optimization
12.3.4. About the Read-Only Optimization
12.4. Transaction Outcomes
12.4.1. About Transaction Outcomes
- Roll-back
- If any transaction participant cannot commit, or the transaction coordinator cannot direct participants to commit, the transaction is rolled back. See Section 12.4.3, “About Transaction Roll-Back” for more information.
- Commit
- If every transaction participant can commit, the transaction coordinator directs them to do so. See Section 12.4.2, “About Transaction Commit” for more information.
- Heuristic outcome
- If some transaction participants commit and others roll back. it is termed a heuristic outcome. Heuristic outcomes require human intervention. See Section 12.4.4, “About Heuristic Outcomes” for more information.
12.4.2. About Transaction Commit
12.4.3. About Transaction Roll-Back
12.4.4. About Heuristic Outcomes
- Heuristic rollback
- The commit operation failed because some or all of the participants unilaterally rolled back the transaction.
- Heuristic commit
- An attempted rollback operation failed because all of the participants unilaterally committed. This may happen if, for example, the coordinator is able to successfully prepare the transaction but then decides to roll it back because of a failure on its side, such as a failure to update its log. In the interim, the participants may decide to commit.
- Heuristic mixed
- Some participants committed and others rolled back.
- Heuristic hazard
- The outcome of some of the updates is unknown. For the ones that are known, they have either all committed or all rolled back.
12.4.5. JBoss Transactions Errors and Exceptions
UserTransaction class, see the UserTransaction API specification at http://docs.oracle.com/javaee/6/api/javax/transaction/UserTransaction.html.
12.5. Overview of JTA Transactions
12.5.1. About Java Transactions API (JTA)
12.5.2. Lifecycle of a JTA Transaction
Your application starts a new transaction
To begin a transaction, your application obtains an instance of classUserTransactionfrom JNDI or, if it is an EJB, from an annotation. TheUserTransactioninterface includes methods for beginning, committing, and rolling back top-level transactions. Newly-created transactions are automatically associated with their invoking thread. Nested transactions are not supported in JTA, so all transactions are top-level transactions.CallingUserTransaction.begin()using annotations starts a transaction when an EJB method is called (driven by TransactionAttribute rules). Any resource that is used after that point is associated with the transaction. If more than one resource is enlisted, your transaction becomes an XA transaction, and participates in the two-phase commit protocol at commit time.Note
TheUserTransactionobject is used only for BMT transactions. In CMT, the UserTransaction object is not permitted.Your application modifies its state.
In the next step, your application performs its work and makes changes to its state.Your application decides to commit or roll back
When your application has finished changing its state, it decides whether to commit or roll back. It calls the appropriate method, eitherUserTransaction.commit()orUserTransaction.rollback().The transaction manager removes the transaction from its records.
After the commit or rollback completes, the transaction manager cleans up its records and removes information about your transaction from the transaction log.
Failure recovery happens automatically. If a resource, transaction participant, or the application server become unavailable, the Transaction Manager handles recovery when the underlying failure is resolved and the resource is available again.
12.6. Transaction Subsystem Configuration
12.6.1. Transactions Configuration Overview
The following procedures show you how to configure the transactions subsystem of JBoss EAP 6.
12.6.2. Transactional Datasource Configuration
12.6.2.1. Configure an XA Datasource
Log into the Management Console.
Add a new datasource.
Add a new datasource to JBoss EAP 6. Click the XA Datasource tab at the top.Note
Refer to Create an XA Datasource with the Management Interfaces section of the Administration and Configuration Guide on the Red Hat Customer Portal for information on how to add a new datasource to JBoss EAP 6.Configure additional properties as appropriate.
All datasource parameters are listed in Section 12.6.2.5, “Datasource Parameters”.
Your XA Datasource is configured and ready to use.
12.6.2.2. Create a Non-XA Datasource with the Management Interfaces
This topic covers the steps required to create a non-XA datasource, using either the Management Console or the Management CLI.
Prerequisites
- The JBoss EAP 6 server must be running.
Note
Note
Procedure 12.1. Create a Datasource using either the Management CLI or the Management Console
Management CLI
- Launch the CLI tool and connect to your server.
- Run the following Management CLI command to create a non-XA datasource, configuring the variables as appropriate:
Note
The value for DRIVER_NAME depends on the number of classes listed in the/META-INF/services/java.sql.Driverfile located in the JDBC driver JAR. If there is only one class, the value is the name of the JAR. If there are multiple classes, the value is the name of the JAR + driverClassName + "_" + majorVersion +"_" + minorVersion. Failure to do so will result in the following error being logged:JBAS014775: New missing/unsatisfied dependenciesFor example, the DRIVER_NAME value required for the MySQL 5.1.31 driver, ismysql-connector-java-5.1.31-bin.jarcom.mysql.jdbc.Driver_5_1.data-source add --name=DATASOURCE_NAME --jndi-name=JNDI_NAME --driver-name=DRIVER_NAME --connection-url=CONNECTION_URL - Enable the datasource:
data-source enable --name=DATASOURCE_NAME
Management Console
- Login to the Management Console.
Navigate to the Datasources panel in the Management Console
- Select the Configuration tab from the top of the console.
- For Domain mode only, select a profile from the drop-down box in the top left.
- Expand the menu on the left of the console, then expand the menu.
- Select from the menu on the left of the console.
Create a new datasource
- Click at the top of the Datasources panel.
- Enter the new datasource attributes in the Create Datasource wizard and proceed with the button.
- Enter the JDBC driver details in the Create Datasource wizard and click to continue.
- Enter the connection settings in the Create Datasource wizard.
- Click the button to test the connection to the datasource and verify the settings are correct.
- Click to finish
The non-XA datasource has been added to the server. It is now visible in either the standalone.xml or domain.xml file, as well as the management interfaces.
12.6.2.3. Configure Your Datasource to Use JTA Transaction API
This task shows you how to enable Java Transaction API (JTA) on your datasource.
You must meet the following conditions before continuing with this task:
- Your database or other resource must support Java Transaction API. If in doubt, consult the documentation for your database or other resource.
- Create a datasource. Refer to Section 12.6.2.2, “Create a Non-XA Datasource with the Management Interfaces”.
- Stop JBoss EAP 6.
- Have access to edit the configuration files directly, in a text editor.
Procedure 12.2. Configure the Datasource to use Java Transaction API
Open the configuration file in a text editor.
Depending on whether you run JBoss EAP 6 in a managed domain or standalone server, your configuration file will be in a different location.Managed domain
The default configuration file for a managed domain is inEAP_HOME/domain/configuration/domain.xmlfor Red Hat Enterprise Linux, andEAP_HOME\domain\configuration\domain.xmlfor Microsoft Windows Server.Standalone server
The default configuration file for a standalone server is inEAP_HOME/standalone/configuration/standalone.xmlfor Red Hat Enterprise Linux, andEAP_HOME\standalone\configuration\standalone.xmlfor Microsoft Windows Server.
Locate the
<datasource>tag that corresponds to your datasource.The datasource will have thejndi-nameattribute set to the one you specified when you created it. For example, the ExampleDS datasource looks like this:<datasource jndi-name="java:jboss/datasources/ExampleDS" pool-name="H2DS" enabled="true" jta="true" use-java-context="true" use-ccm="true">Set the
jtaattribute totrue.Add the following to the contents of your<datasource>tag, as they appear in the previous step:jta="true"Unless you have a specific use case (such as defining a read only datasource) Red Hat discourages overriding the default value ofjta=true. This setting indicates that the datasource will honor the Java Transaction API and allows better tracking of connections by the JCA implementation.Save the configuration file.
Save the configuration file and exit the text editor.Start JBoss EAP 6.
Relaunch the JBoss EAP 6 server.
JBoss EAP 6 starts, and your datasource is configured to use Java Transaction API.
12.6.2.4. Configure Database Connection Validation Settings
Database maintenance, network problems, or other outage events may cause JBoss EAP 6 to lose the connection to the database. You enable database connection validation using the <validation> element within the <datasource> section of the server configuration file. Follow the steps below to configure the datasource settings to enable database connection validation in JBoss EAP 6.
Procedure 12.3. Configure Database Connection Validation Settings
Choose a Validation Method
Select one of the following validation methods.<validate-on-match>true</validate-on-match>
When the<validate-on-match>option is set totrue, the database connection is validated every time it is checked out from the connection pool using the validation mechanism specified in the next step.If a connection is not valid, a warning is written to the log and it retrieves the next connection in the pool. This process continues until a valid connection is found. If you prefer not to cycle through every connection in the pool, you can use the<use-fast-fail>option. If a valid connection is not found in the pool, a new connection is created. If the connection creation fails, an exception is returned to the requesting application.This setting results in the quickest recovery but creates the highest load on the database. However, this is the safest selection if the minimal performance hit is not a concern.<background-validation>true</background-validation>
When the<background-validation>option is set totrue, it is used in combination with the<background-validation-millis>value to determine how often background validation runs. The default value for the<background-validation-millis>parameter is 0 milliseconds, meaning it is disabled by default. This value should not be set to the same value as your<idle-timeout-minutes>setting.It is a balancing act to determine the optimum<background-validation-millis>value for a particular system. The lower the value, the more frequently the pool is validated and the sooner invalid connections are removed from the pool. However, lower values take more database resources. Higher values result in less frequent connection validation checks and use less database resources, but dead connections are undetected for longer periods of time.
Note
If the<validate-on-match>option is set totrue, the<background-validation>option should be set tofalse. The reverse is also true. If the<background-validation>option is set totrue, the<validate-on-match>option should be set tofalse.Choose a Validation Mechanism
Select one of the following validation mechanisms.Specify a <valid-connection-checker> Class Name
This is the preferred mechanism as it optimized for the particular RDBMS in use. JBoss EAP 6 provides the following connection checkers:- org.jboss.jca.adapters.jdbc.extensions.db2.DB2ValidConnectionChecker
- org.jboss.jca.adapters.jdbc.extensions.mssql.MSSQLValidConnectionChecker
- org.jboss.jca.adapters.jdbc.extensions.mysql.MySQLReplicationValidConnectionChecker
- org.jboss.jca.adapters.jdbc.extensions.mysql.MySQLValidConnectionChecker
- org.jboss.jca.adapters.jdbc.extensions.novendor.JDBC4ValidConnectionChecker
- org.jboss.jca.adapters.jdbc.extensions.novendor.NullValidConnectionChecker
- org.jboss.jca.adapters.jdbc.extensions.oracle.OracleValidConnectionChecker
- org.jboss.jca.adapters.jdbc.extensions.postgres.PostgreSQLValidConnectionChecker
- org.jboss.jca.adapters.jdbc.extensions.sybase.SybaseValidConnectionChecker
Specify SQL for <check-valid-connection-sql>
You provide the SQL statement used to validate the connection.The following is an example of how you might specify a SQL statement to validate a connection for Oracle:For MySQL or PostgreSQL, you might specify the following SQL statement:<check-valid-connection-sql>select 1 from dual</check-valid-connection-sql><check-valid-connection-sql>select 1</check-valid-connection-sql>
Set the <exception-sorter> Class Name
When an exception is marked as fatal, the connection is closed immediately, even if the connection is participating in a transaction. Use the exception sorter class option to properly detect and clean up after fatal connection exceptions. JBoss EAP 6 provides the following exception sorters:- org.jboss.jca.adapters.jdbc.extensions.db2.DB2ExceptionSorter
- org.jboss.jca.adapters.jdbc.extensions.informix.InformixExceptionSorter
- org.jboss.jca.adapters.jdbc.extensions.mysql.MySQLExceptionSorter
- org.jboss.jca.adapters.jdbc.extensions.novendor.NullExceptionSorter
- org.jboss.jca.adapters.jdbc.extensions.oracle.OracleExceptionSorter
- org.jboss.jca.adapters.jdbc.extensions.postgres.PostgreSQLExceptionSorter
- org.jboss.jca.adapters.jdbc.extensions.sybase.SybaseExceptionSorter
- org.jboss.jca.adapters.jdbc.extensions.mssql.MSSQLExceptionSorter
12.6.2.5. Datasource Parameters
| Parameter | Description |
|---|---|
| jndi-name | The unique JNDI name for the datasource. |
| pool-name | The name of the management pool for the datasource. |
| enabled | Whether or not the datasource is enabled. |
| use-java-context |
Whether to bind the datasource to global JNDI.
|
| spy |
Enable
spy functionality on the JDBC layer. This logs all JDBC traffic to the datasource. Note that the logging category jboss.jdbc.spy must also be set to the log level DEBUG in the logging subsystem.
|
| use-ccm | Enable the cached connection manager. |
| new-connection-sql | A SQL statement which executes when the connection is added to the connection pool. |
| transaction-isolation |
One of the following:
|
| url-selector-strategy-class-name | A class that implements interface org.jboss.jca.adapters.jdbc.URLSelectorStrategy. |
| security |
Contains child elements which are security settings. See Table 12.6, “Security parameters”.
|
| validation |
Contains child elements which are validation settings. See Table 12.7, “Validation parameters”.
|
| timeout |
Contains child elements which are timeout settings. See Table 12.8, “Timeout parameters”.
|
| statement |
Contains child elements which are statement settings. See Table 12.9, “Statement parameters”.
|
| Parameter | Description |
|---|---|
| jta | Enable JTA integration for non-XA datasources. Does not apply to XA datasources. |
| connection-url | The JDBC driver connection URL. |
| driver-class | The fully-qualified name of the JDBC driver class. |
| connection-property |
Arbitrary connection properties passed to the method
Driver.connect(url,props). Each connection-property specifies a string name/value pair. The property name comes from the name, and the value comes from the element content.
|
| pool |
Contains child elements which are pooling settings. See Table 12.4, “Pool parameters common to non-XA and XA datasources”.
|
| url-delimiter |
The delimiter for URLs in a connection-url for High Availability (HA) clustered databases.
|
| Parameter | Description |
|---|---|
| xa-datasource-property |
A property to assign to implementation class
XADataSource. Specified by name=value. If a setter method exists, in the format setName, the property is set by calling a setter method in the format of setName(value).
|
| xa-datasource-class |
The fully-qualified name of the implementation class
javax.sql.XADataSource.
|
| driver |
A unique reference to the class loader module which contains the JDBC driver. The accepted format is driverName#majorVersion.minorVersion.
|
| xa-pool |
Contains child elements which are pooling settings. See Table 12.4, “Pool parameters common to non-XA and XA datasources” and Table 12.5, “XA pool parameters”.
|
| recovery |
Contains child elements which are recovery settings. See Table 12.10, “Recovery parameters”.
|
| Parameter | Description |
|---|---|
| min-pool-size | The minimum number of connections a pool holds. |
| max-pool-size | The maximum number of connections a pool can hold. |
| prefill | Whether to try to prefill the connection pool. The default is false. |
| use-strict-min | Whether the idle connection scan should strictly stop marking for closure of any further connections, once the min-pool-size has been reached. The default value is false. |
| flush-strategy |
Whether the pool is flushed in the case of an error. Valid values are:
The default is
FailingConnectionOnly.
|
| allow-multiple-users | Specifies if multiple users will access the datasource through the getConnection(user, password) method, and whether the internal pool type accounts for this behavior. |
| Parameter | Description |
|---|---|
| is-same-rm-override | Whether the javax.transaction.xa.XAResource.isSameRM(XAResource) class returns true or false. |
| interleaving | Whether to enable interleaving for XA connection factories. |
| no-tx-separate-pools |
Whether to create separate sub-pools for each context. This is required for Oracle datasources, which do not allow XA connections to be used both inside and outside of a JTA transaction.
Using this option will cause your total pool size to be twice
max-pool-size, because two actual pools will be created.
|
| pad-xid | Whether to pad the Xid. |
| wrap-xa-resource |
Whether to wrap the XAResource in an
org.jboss.tm.XAResourceWrapper instance.
|
| Parameter | Description |
|---|---|
| user-name | The username to use to create a new connection. |
| password | The password to use to create a new connection. |
| security-domain | Contains the name of a JAAS security-manager which handles authentication. This name correlates to the application-policy/name attribute of the JAAS login configuration. |
| reauth-plugin | Defines a reauthentication plug-in to use to reauthenticate physical connections. |
| Parameter | Description |
|---|---|
| valid-connection-checker |
An implementation of interface
org.jboss.jca.adaptors.jdbc.ValidConnectionChecker which provides a SQLException.isValidConnection(Connection e) method to validate a connection. An exception means the connection is destroyed. This overrides the parameter check-valid-connection-sql if it is present.
|
| check-valid-connection-sql | An SQL statement to check validity of a pool connection. This may be called when a managed connection is taken from a pool for use. |
| validate-on-match |
Indicates whether connection level validation is performed when a connection factory attempts to match a managed connection for a given set.
Specifying "true" for
validate-on-match is typically not done in conjunction with specifying "true" for background-validation. Validate-on-match is needed when a client must have a connection validated prior to use. This parameter is false by default.
|
| background-validation |
Specifies that connections are validated on a background thread. Background validation is a performance optimization when not used with
validate-on-match. If validate-on-match is true, using background-validation could result in redundant checks. Background validation does leave open the opportunity for a bad connection to be given to the client for use (a connection goes bad between the time of the validation scan and prior to being handed to the client), so the client application must account for this possibility.
|
| background-validation-millis | The amount of time, in milliseconds, that background validation runs. |
| use-fast-fail |
If true, fail a connection allocation on the first attempt, if the connection is invalid. Defaults to
false.
|
| stale-connection-checker |
An instance of
org.jboss.jca.adapters.jdbc.StaleConnectionChecker which provides a Boolean isStaleConnection(SQLException e) method. If this method returns true, the exception is wrapped in an org.jboss.jca.adapters.jdbc.StaleConnectionException, which is a subclass of SQLException.
|
| exception-sorter |
An instance of
org.jboss.jca.adapters.jdbc.ExceptionSorter which provides a Boolean isExceptionFatal(SQLException e) method. This method validates whether an exception is broadcast to all instances of javax.resource.spi.ConnectionEventListener as a connectionErrorOccurred message.
|
| Parameter | Description |
|---|---|
| use-try-lock | Uses tryLock() instead of lock(). This attempts to obtain the lock for the configured number of seconds, before timing out, rather than failing immediately if the lock is unavailable. Defaults to 60 seconds. As an example, to set a timeout of 5 minutes, set <use-try-lock>300</use-try-lock>. |
| blocking-timeout-millis | The maximum time, in milliseconds, to block while waiting for a connection. After this time is exceeded, an exception is thrown. This blocks only while waiting for a permit for a connection, and does not throw an exception if creating a new connection takes a long time. Defaults to 30000, which is 30 seconds. |
| idle-timeout-minutes |
The maximum time, in minutes, before an idle connection is closed. If not specified, the default is
30 minutes. The actual maximum time depends upon the idleRemover scan time, which is half of the smallest idle-timeout-minutes of any pool.
|
| set-tx-query-timeout |
Whether to set the query timeout based on the time remaining until transaction timeout. Any configured query timeout is used if no transaction exists. Defaults to
false.
|
| query-timeout | Timeout for queries, in seconds. The default is no timeout. |
| allocation-retry | The number of times to retry allocating a connection before throwing an exception. The default is 0, so an exception is thrown upon the first failure. |
| allocation-retry-wait-millis |
How long, in milliseconds, to wait before retrying to allocate a connection. The default is 5000, which is 5 seconds.
|
| xa-resource-timeout |
If non-zero, this value is passed to method
XAResource.setTransactionTimeout.
|
| Parameter | Description |
|---|---|
| track-statements |
Whether to check for unclosed statements when a connection is returned to a pool and a statement is returned to the prepared statement cache. If false, statements are not tracked.
|
| prepared-statement-cache-size | The number of prepared statements per connection, in a Least Recently Used (LRU) cache. |
| share-prepared-statements |
Whether JBoss EAP should cache, instead of close or terminate, the underlying physical statement when the wrapper supplied to the application is closed by application code. The default is
false.
|
| Parameter | Description |
|---|---|
| recover-credential | A username/password pair or security domain to use for recovery. |
| recover-plugin |
An implementation of the
org.jboss.jca.core.spi.recoveryRecoveryPlugin class, to be used for recovery.
|
12.6.3. Transaction Logging
12.6.3.1. About Transaction Log Messages
DEBUG log level for the transaction logger. For detailed debugging, use the TRACE log level. Refer to Section 12.6.3.2, “Configure Logging for the Transaction Subsystem” for information on configuring the transaction logger.
TRACE log level. Following are some of the most commonly-seen messages. This list is not comprehensive, so you may see other messages than these.
| Transaction Begin |
When a transaction begins, the following code is executed:
|
| Transaction Commit |
When a transaction commits, the following code is executed:
|
| Transaction Rollback |
When a transaction rolls back, the following code is executed:
|
| Transaction Timeout |
When a transaction times out, the following code is executed:
You will then see the same thread rolling back the transaction as shown above.
|
12.6.3.2. Configure Logging for the Transaction Subsystem
Use this procedure to control the amount of information logged about transactions, independent of other logging settings in JBoss EAP 6. The main procedure shows how to do this in the web-based Management Console. The Management CLI command is given afterward.
Procedure 12.4. Configure the Transaction Logger Using the Management Console
Navigate to the Logging configuration area.
In the Management Console, click the Configuration tab. If you use a managed domain, choose the server profile you wish to configure, from the Profile selection box at the top left.Expand the Core menu, and select Logging.Edit the
com.arjunaattributes.Select the Log Categories tab. Selectcom.arjunaand lick Edit in the Details section. This is where you can add class-specific logging information. Thecom.arjunaclass is already present. You can change the log level and whether to use parent handlers.- Log Level
- The log level is
WARNby default. Because transactions can produce a large quantity of logging output, the meaning of the standard logging levels is slightly different for the transaction logger. In general, messages tagged with levels at a lower severity than the chosen level are discarded.Transaction Logging Levels, from Most to Least Verbose
- TRACE
- DEBUG
- INFO
- WARN
- ERROR
- FAILURE
- Use Parent Handlers
- Whether the logger should send its output to its parent logger. The default behavior is
true.
- Changes take effect immediately.
12.6.3.3. Browse and Manage Transactions
log-store. An API operation called probe reads the transaction logs and creates a node for each log. You can call the probe command manually, whenever you need to refresh the log-store. It is normal for transaction logs to appear and disappear quickly.
Example 12.2. Refresh the Log Store
default in a managed domain. For a standalone server, remove the profile=default from the command.
/profile=default/subsystem=transactions/log-store=log-store/:probeExample 12.3. View All Prepared Transactions
ls command.
ls /profile=default/subsystem=transactions/log-store=log-store/transactionsManage a Transaction
- View a transaction's attributes.
- To view information about a transaction, such as its JNDI name, EIS product name and version, or its status, use the
:read-resourceCLI command./profile=default/subsystem=transactions/log-store=log-store/transactions=0\:ffff7f000001\:-b66efc2\:4f9e6f8f\:9:read-resource - View the participants of a transaction.
- Each transaction log contains a child element called
participants. Use theread-resourceCLI command on this element to see the participants of the transaction. Participants are identified by their JNDI names./profile=default/subsystem=transactions/log-store=log-store/transactions=0\:ffff7f000001\:-b66efc2\:4f9e6f8f\:9/participants=java\:\/JmsXA:read-resourceThe result may look similar to this:{ "outcome" => "success", "result" => { "eis-product-name" => "HornetQ", "eis-product-version" => "2.0", "jndi-name" => "java:/JmsXA", "status" => "HEURISTIC", "type" => "/StateManager/AbstractRecord/XAResourceRecord" } }The outcome status shown here is in aHEURISTICstate and is eligible for recovery. See Recover a transaction. for more details.In special cases it is possible to create orphan records in the object store, that is XAResourceRecords, which do not have any corresponding transaction record in the log. For example, XA resource prepared but crashed before the TM recorded and is inaccessible for the domain management API. To access such records you need to set management optionexpose-all-logstotrue. This option is not saved in management model and is restored tofalsewhen the server is restarted./profile=default/subsystem=transactions/log-store=log-store:write-attribute(name=expose-all-logs, value=true) - Delete a transaction.
- Each transaction log supports a
:deleteoperation, to delete the transaction log representing the transaction./profile=default/subsystem=transactions/log-store=log-store/transactions=0\:ffff7f000001\:-b66efc2\:4f9e6f8f\:9:delete - Recover a transaction.
- Each transaction participant supports recovery via the
:recoverCLI command./profile=default/subsystem=transactions/log-store=log-store/transactions=0\:ffff7f000001\:-b66efc2\:4f9e6f8f\:9/participants=2:recoverRecovery of heuristic transactions and participants
- If the transaction's status is
HEURISTIC, the recovery operation changes the state toPREPAREand triggers a recovery. - If one of the transaction's participants is heuristic, the recovery operation tries to replay the
commitoperation. If successful, the participant is removed from the transaction log. You can verify this by re-running the:probeoperation on thelog-storeand checking that the participant is no longer listed. If this is the last participant, the transaction is also deleted.
- Refresh the status of a transaction which needs recovery.
- If a transaction needs recovery, you can use the
:refreshCLI command to be sure it still requires recovery, before attempting the recovery./profile=default/subsystem=transactions/log-store=log-store/transactions=0\:ffff7f000001\:-b66efc2\:4f9e6f8f\:9/participants=2:refresh
If Transaction Manager statistics are enabled, you can view statistics about the Transaction Manager and transaction subsystem. See Section 12.7.8.2, “Configure the Transaction Manager” for information about how to enable Transaction Manager statistics.
| Statistic | Description | CLI Command |
|---|---|---|
| Total |
The total number of transactions processed by the Transaction Manager on this server.
| |
| Committed |
The number of committed transactions processed by the Transaction Manager on this server.
| |
| Aborted |
The number of aborted transactions processed by the Transaction Manager on this server.
| |
| Timed Out |
The number of timed out transactions processed by the Transaction Manager on this server.
| |
| Heuristics |
Not available in the Management Console. Number of transactions in a heuristic state.
| |
| In-Flight Transactions |
Not available in the Management Console. Number of transactions which have begun but not yet terminated.
| |
| Failure Origin - Applications |
The number of failed transactions whose failure origin was an application.
| |
| Failure Origin - Resources |
The number of failed transactions whose failure origin was a resource.
| |
| Participant ID |
The ID of the participant.
| |
| List of all transactions |
The complete list of transactions.
| |
12.7. Use JTA Transactions
12.7.1. Transactions JTA Task Overview
The following procedures are useful when you need to use transactions in your application.
12.7.2. Control Transactions
This list of procedures outlines the different ways to control transactions in your applications which use JTA or JTS APIs.
12.7.3. Begin a Transaction
Get an instance of
UserTransaction.You can get the instance using JNDI, injection, or an EJB's context, if the EJB uses bean-managed transactions, by means of a@TransactionManagement(TransactionManagementType.BEAN)annotation.JNDI
new InitialContext().lookup("java:comp/UserTransaction")Injection
@Resource UserTransaction userTransaction;Context
- In a stateless/stateful bean:
@Resource SessionContext ctx; ctx.getUserTransaction(); - In a message-driven bean:
@Resource MessageDrivenContext ctx; ctx.getUserTransaction()
Call
UserTransaction.begin()after you connect to your datasource.... try { System.out.println("\nCreating connection to database: "+url); stmt = conn.createStatement(); // non-tx statement try { System.out.println("Starting top-level transaction."); userTransaction.begin(); stmtx = conn.createStatement(); // will be a tx-statement ... } }
One of the benefits of EJBs (either used with CMT or BMT) is that the container manages all the internals of the transactional processing, that is, you are free from taking care of transaction being part of XA transaction or transaction distribution amongst EAP containers.
The transaction begins. All uses of your datasource until you commit or roll back the transaction are transactional.
Note
12.7.4. Nested Transactions
12.7.5. Commit a Transaction
You must begin a transaction before you can commit it. For information on how to begin a transaction, refer to Section 12.7.3, “Begin a Transaction”.
Call the
commit()method on theUserTransaction.When you call thecommit()method on theUserTransaction, the Transaction Manager attempts to commit the transaction.@Inject private UserTransaction userTransaction; public void updateTable(String key, String value) EntityManager entityManager = entityManagerFactory.createEntityManager(); try { userTransaction.begin(): <!-- Perform some data manipulation using entityManager --> ... // Commit the transaction userTransaction.commit(); } catch (Exception ex) { <!-- Log message or notify Web page --> ... try { userTransaction.rollback(); } catch (SystemException se) { throw new RuntimeException(se); } throw new RuntimeException(e); } finally { entityManager.close(); } }If you use Container Managed Transactions (CMT), you do not need to manually commit.
If you configure your bean to use Container Managed Transactions, the container will manage the transaction lifecycle for you based on annotations you configure in the code.@PersistenceContext private EntityManager em; @TransactionAttribute(TransactionAttributeType.REQUIRED) public void updateTable(String key, String value) <!-- Perform some data manipulation using entityManager --> ... }
Your datasource commits and your transaction ends, or an exception is thrown.
Note
12.7.6. Roll Back a Transaction
You must begin a transaction before you can roll it back. For information on how to begin a transaction, refer to Section 12.7.3, “Begin a Transaction”.
Call the
rollback()method on theUserTransaction.When you call therollback()method on theUserTransaction, the Transaction Manager attempts to roll back the transaction and return the data to its previous state.@Inject private UserTransaction userTransaction; public void updateTable(String key, String value) EntityManager entityManager = entityManagerFactory.createEntityManager(); try { userTransaction.begin(): <!-- Perform some data manipulation using entityManager --> ... // Commit the transaction userTransaction.commit(); } catch (Exception ex) { <!-- Log message or notify Web page --> ... try { userTransaction.rollback(); } catch (SystemException se) { throw new RuntimeException(se); } throw new RuntimeException(e); } finally { entityManager.close(); } }If you use Container Managed Transactions (CMT), you do not need to manually roll back the transaction.
If you configure your bean to use Container Managed Transactions, the container will manage the transaction lifecycle for you based on annotations you configure in the code.Note
Rollback for CMT occurs if RuntimeException is thrown. You can also explicitly call thesetRollbackOnlymethod to gain the rollback. Or, use the@ApplicationException(rollback=true) for application exception to rollback.
Your transaction is rolled back by the Transaction Manager.
Note
12.7.7. Handle a Heuristic Outcome in a Transaction
Procedure 12.5. Handle a heuristic outcome in a transaction
Determine the cause
The over-arching cause of a heuristic outcome in a transaction is that a resource manager promised it could commit or roll-back, and then failed to fulfill the promise. This could be due to a problem with a third-party component, the integration layer between the third-party component and JBoss EAP 6, or JBoss EAP 6 itself.By far, the most common two causes of heuristic errors are transient failures in the environment and coding errors in the code dealing with resource managers.Fix transient failures in the environment
Typically, if there is a transient failure in your environment, you will know about it before you find out about the heuristic error. This could be a network outage, hardware failure, database failure, power outage, or a host of other things.If you experienced the heuristic outcome in a test environment, during stress testing, it provides information about weaknesses in your environment.Warning
JBoss EAP 6 will automatically recover transactions that were in a non-heuristic state at the time of the failure, but it does not attempt to recover heuristic transactions.Contact resource manager vendors
If you have no obvious failure in your environment, or the heuristic outcome is easily reproducible, it is probably a coding error. Contact third-party vendors to find out if a solution is available. If you suspect the problem is in the transaction manager of JBoss EAP 6 itself, contact Red Hat Global Support Services.In a test environment, delete the logs and restart JBoss EAP 6.
In a test environment, or if you do not care about the integrity of the data, deleting the transaction logs and restarting JBoss EAP 6 gets rid of the heuristic outcome. The transaction logs are located inEAP_HOME/standalone/data/tx-object-store/for a standalone server, orEAP_HOME/domain/servers/SERVER_NAME/data/tx-object-storein a managed domain, by default. In the case of a managed domain, SERVER_NAME refers to the name of the individual server participating in a server group.Note
The location of the transaction log also depends on the object store in use and the values set for theoject-store-relative-toandobject-store-pathparameters. For file system logs (such as a standard shadow and HornetQ logs) the default direction location is used, but when using a JDBC object store, the transaction logs are stored in a database.Resolve the outcome by hand
The process of resolving the transaction outcome by hand is very dependent on the exact circumstance of the failure. Typically, you need to take the following steps, applying them to your situation:- Identify which resource managers were involved.
- Examine the state in the transaction manager and the resource managers.
- Manually force log cleanup and data reconciliation in one or more of the involved components.
The details of how to perform these steps are out of the scope of this documentation.
12.7.8. Transaction Timeouts
12.7.8.1. About Transaction Timeouts
12.7.8.2. Configure the Transaction Manager
default, you may need to modify the steps and commands in the following ways.
Notes about the Example Commands
- For the Management Console, the
defaultprofile is the one which is selected when you first log into the console. If you need to modify the Transaction Manager's configuration in a different profile, select your profile instead ofdefault, in each instruction.Similarly, substitute your profile for thedefaultprofile in the example CLI commands. - If you use a Standalone Server, only one profile exists. Ignore any instructions to choose a specific profile. In CLI commands, remove the
/profile=defaultportion of the sample commands.
Note
transactions subsystem must be enabled. It is enabled by default, and required for many other subsystems to function properly, so it is very unlikely that it would be disabled.
To configure the TM using the web-based Management Console, select the Configuration tab from the top of the screen. If you use a managed domain, choose the correct profile from the Profile selection box at the top left. Expand the Container menu and select Transactions.
In the Management CLI, you can configure the TM using a series of commands. The commands all begin with /profile=default/subsystem=transactions/ for a managed domain with profile default, or /subsystem=transactions for a Standalone Server.
Important
| Option | Description | CLI Command |
|---|---|---|
|
Enable Statistics
|
Whether to enable transaction statistics. These statistics can be viewed in the Management Console in the Subsystem Metrics section of the Runtime tab.
| /profile=default/subsystem=transactions/:write-attribute(name=enable-statistics,value=true)
|
|
Enable TSM Status
|
Whether to enable the transaction status manager (TSM) service, which is used for out-of-process recovery. Running an out of process recovery manager to contact the ActionStatusService from different process is not supported (it is normally contacted in memory).
|
This configuration option is unsupported.
|
|
Default Timeout
|
The default transaction timeout. This defaults to
300 seconds. You can override this programmatically, on a per-transaction basis.
| /profile=default/subsystem=transactions/:write-attribute(name=default-timeout,value=300)
|
|
Object Store Path
|
A relative or absolute filesystem path where the TM object store stores data. By default relative to the
object-store-relative-to parameter's value.
| /profile=default/subsystem=transactions/:write-attribute(name=object-store-path,value=tx-object-store)
|
|
Object Store Path Relative To
|
References a global path configuration in the domain model. The default value is the data directory for JBoss EAP 6, which is the value of the property
jboss.server.data.dir, and defaults to EAP_HOME/domain/data/ for a Managed Domain, or EAP_HOME/standalone/data/ for a Standalone Server instance. The value of the object store object-store-path TM attribute is relative to this path.
| /profile=default/subsystem=transactions/:write-attribute(name=object-store-relative-to,value=jboss.server.data.dir)
|
|
Socket Binding
|
Specifies the name of the socket binding used by the Transaction Manager for recovery and generating transaction identifiers, when the socket-based mechanism is used. Refer to
process-id-socket-max-ports for more information on unique identifier generation. Socket bindings are specified per server group in the Server tab of the Management Console.
| /profile=default/subsystem=transactions/:write-attribute(name=socket-binding,value=txn-recovery-environment)
|
|
Status Socket Binding
|
Specifies the socket binding to use for the Transaction Status manager.
|
This configuration option is unsupported.
|
|
Recovery Listener
|
Whether or not the Transaction Recovery process should listen on a network socket. Defaults to
false.
| /profile=default/subsystem=transactions/:write-attribute(name=recovery-listener,value=false)
|
| Option | Description | CLI Command |
|---|---|---|
|
jts
|
Whether to use Java Transaction Service (JTS) transactions. Defaults to
false, which uses JTA transactions only.
| /profile=default/subsystem=transactions/:write-attribute(name=jts,value=false)
|
|
node-identifier
|
The node identifier for the Transaction Manager. This option is required in the following situations:
node-identifier must be unique for each Transaction Manager as it is required to enforce data integrity during recovery. The node-identifier must also be unique for JTA because multiple nodes may interact with the same resource manager or share a transaction object store.
| /profile=default/subsystem=transactions/:write-attribute(name=node-identifier,value=1)
|
|
process-id-socket-max-ports
|
The Transaction Manager creates a unique identifier for each transaction log. Two different mechanisms are provided for generating unique identifiers: a socket-based mechanism and a mechanism based on the process identifier of the process.
In the case of the socket-based identifier, a socket is opened and its port number is used for the identifier. If the port is already in use, the next port is probed, until a free one is found. The
process-id-socket-max-ports represents the maximum number of sockets the TM will try before failing. The default value is 10.
| /profile=default/subsystem=transactions/:write-attribute(name=process-id-socket-max-ports,value=10)
|
|
process-id-uuid
|
Set to
true to use the process identifier to create a unique identifier for each transaction. Otherwise, the socket-based mechanism is used. Defaults to true. Refer to process-id-socket-max-ports for more information. To enable process-id-socket-binding, set process-id-uuid to false.
| /profile=default/subsystem=transactions/:write-attribute(name=process-id-uuid,value=true)
|
|
process-id-socket-binding
|
The name of the socket binding configuration to use if the transaction manager should use a socket-based process id. Will be
undefined if process-id-uuid is true; otherwise must be set.
| /profile=default/subsystem=transactions/:write-attribute(name=process-id-socket-binding,value=true)
|
|
use-hornetq-store
|
Use HornetQ's journaled storage mechanisms instead of file-based storage, for the transaction logs. This is disabled by default, but can improve I/O performance. It is not recommended for JTS transactions on separate Transaction Managers. When changing this option, the server has to be restarted using the
shutdown command for the change to take effect.
| /profile=default/subsystem=transactions/:write-attribute(name=use-hornetq-store,value=false)
|
12.7.9. JTA Transaction Error Handling
12.7.9.1. Handle Transaction Errors
Note
This type of error often manifests itself when Hibernate is unable to obtain a database connection for lazy loading. If it happens frequently, you can lengthen the timeout value. Refer to Section 12.7.8.2, “Configure the Transaction Manager”.
NotSupportedException exception
The NotSupportedException exception usually indicates that you attempted to nest a JTA transaction, and this is not supported. If you were not attempting to nest a transaction, it is likely that another transaction was started in a thread pool task, but finished the task without suspending or ending the transaction.
UserTransaction, which handles this automatically. If so, there may be a problem with a framework.
TransactionManager or Transaction methods directly, be aware of the following behavior when committing or rolling back a transaction. If your code uses TransactionManager methods to control your transactions, committing or rolling back a transaction disassociates the transaction from the current thread. However, if your code uses Transaction methods, the transaction may not be associated with the running thread, and you need to disassociate it from its threads manually, before returning it to the thread pool.
This error happens if you try to enlist a second non-XA resource into a transaction. If you need multiple resources in a transaction, they must be XA.
12.8. ORB Configuration
12.8.1. About Common Object Request Broker Architecture (CORBA)
12.8.2. Configure the ORB for JTS Transactions
Procedure 12.6. Configure the ORB using the Management Console
View the profile settings.
Select Configuration from the top of the management console. If you use a managed domain, select either the full or full-ha profile from the selection box at the top left.Modify the Initializers Settings
Expand the Subsystems menu. Expand the Container menu and select JacORB.In the form that appears in the main screen, select the Initializers tab and click the Edit button.Enable the security interceptors by setting the value of Security toon.To enable the ORB for JTS, set the Transaction Interceptors value toon, rather than the defaultspec.Refer to the Need Help? link in the form for detailed explanations about these values. Click Save when you have finished editing the values.Advanced ORB Configuration
Refer to the other sections of the form for advanced configuration options. Each section includes a Need Help? link with detailed information about the parameters.
You can configure each aspect of the ORB using the Management CLI. The following commands configure the initializers to the same values as the procedure above, for the Management Console. This is the minimum configuration for the ORB to be used with JTS.
/profile=full portion of the commands.
Example 12.4. Enable the Security Interceptors
/profile=full/subsystem=jacorb/:write-attribute(name=security,value=on)Example 12.5. Enable Transactions in the JacORB Subsystem
/profile=full/subsystem=jacorb/:write-attribute(name=transactions,value=on)Example 12.6. Enable JTS in the Transaction Subsystem
/profile=full/subsystem=transactions:write-attribute(name=jts,value=true)Note
12.9. Transaction References
12.9.1. JBoss Transactions Errors and Exceptions
UserTransaction class, see the UserTransaction API specification at http://docs.oracle.com/javaee/6/api/javax/transaction/UserTransaction.html.
12.9.2. JTA Transaction Example
Example 12.7. JTA Transaction example
public class JDBCExample {
public static void main (String[] args) {
Context ctx = new InitialContext();
// Change these two lines to suit your environment.
DataSource ds = (DataSource)ctx.lookup("jdbc/ExampleDS");
Connection conn = ds.getConnection("testuser", "testpwd");
Statement stmt = null; // Non-transactional statement
Statement stmtx = null; // Transactional statement
Properties dbProperties = new Properties();
// Get a UserTransaction
UserTransaction txn = new InitialContext().lookup("java:comp/UserTransaction");
try {
stmt = conn.createStatement(); // non-tx statement
// Check the database connection.
try {
stmt.executeUpdate("DROP TABLE test_table");
stmt.executeUpdate("DROP TABLE test_table2");
}
catch (Exception e) {
// assume not in database.
}
try {
stmt.executeUpdate("CREATE TABLE test_table (a INTEGER,b INTEGER)");
stmt.executeUpdate("CREATE TABLE test_table2 (a INTEGER,b INTEGER)");
}
catch (Exception e) {
}
try {
System.out.println("Starting top-level transaction.");
txn.begin();
stmtx = conn.createStatement(); // will be a tx-statement
// First, we try to roll back changes
System.out.println("\nAdding entries to table 1.");
stmtx.executeUpdate("INSERT INTO test_table (a, b) VALUES (1,2)");
ResultSet res1 = null;
System.out.println("\nInspecting table 1.");
res1 = stmtx.executeQuery("SELECT * FROM test_table");
while (res1.next()) {
System.out.println("Column 1: "+res1.getInt(1));
System.out.println("Column 2: "+res1.getInt(2));
}
System.out.println("\nAdding entries to table 2.");
stmtx.executeUpdate("INSERT INTO test_table2 (a, b) VALUES (3,4)");
res1 = stmtx.executeQuery("SELECT * FROM test_table2");
System.out.println("\nInspecting table 2.");
while (res1.next()) {
System.out.println("Column 1: "+res1.getInt(1));
System.out.println("Column 2: "+res1.getInt(2));
}
System.out.print("\nNow attempting to rollback changes.");
txn.rollback();
// Next, we try to commit changes
txn.begin();
stmtx = conn.createStatement();
ResultSet res2 = null;
System.out.println("\nNow checking state of table 1.");
res2 = stmtx.executeQuery("SELECT * FROM test_table");
while (res2.next()) {
System.out.println("Column 1: "+res2.getInt(1));
System.out.println("Column 2: "+res2.getInt(2));
}
System.out.println("\nNow checking state of table 2.");
stmtx = conn.createStatement();
res2 = stmtx.executeQuery("SELECT * FROM test_table2");
while (res2.next()) {
System.out.println("Column 1: "+res2.getInt(1));
System.out.println("Column 2: "+res2.getInt(2));
}
txn.commit();
}
catch (Exception ex) {
ex.printStackTrace();
System.exit(0);
}
}
catch (Exception sysEx) {
sysEx.printStackTrace();
System.exit(0);
}
}
}
12.9.3. API Documentation for JBoss Transactions JTA
12.9.4. Limitations of the XA Recovery Process
- The transaction log may not be cleared from a successfully committed transaction.
- If the JBoss EAP server crashes after an
XAResourcecommit method successfully completes and commits the transaction, but before the coordinator can update the log, you may see the following warning message in the log when you restart the server:This is because upon recovery, the JBoss Transaction Manager sees the transaction participants in the log and attempts to retry the commit. Eventually the JBoss Transaction Manager assumes the resources are committed and no longer retries the commit. In this situation, can safely ignore this warning as the transaction is committed and there is no loss of data.ARJUNA016037: Could not find new XAResource to use for recovering non-serializable XAResource XAResourceRecordTo prevent the warning, set the com.arjuna.ats.jta.xaAssumeRecoveryComplete property value totrue. This property is checked whenever a newXAResourceinstance cannot be located from any registeredXAResourceRecoveryinstance. When set totrue, the recovery assumes that a previous commit attempt succeeded and the instance can be removed from the log with no further recovery attempts. This property must be used with care because it is global and when used incorrectly could result inXAResourceinstances remaining in an uncommitted state. - Rollback is not called for JTS transaction when a server crashes at the end of XAResource.prepare().
- If the JBoss EAP server crashes after the completion of an
XAResourceprepare()method call, all of the participating XAResources are locked in the prepared state and remain that way upon server restart, The transaction is not rolled back and the resources remain locked until the transaction times out or a DBA manually rolls back the resources and clears the transaction log. - Periodic recovery can occur on committed transactions.
- When the server is under excessive load, the server log may contain the following warning message, followed by a stacktrace:
ARJUNA016027: Local XARecoveryModule.xaRecovery got XA exception XAException.XAER_NOTA: javax.transaction.xa.XAExceptionUnder heavy load, the processing time taken by a transaction can overlap with the timing of the periodic recovery process’s activity. The periodic recovery process detects the transaction still in progress and attempts to initiate a rollback but in fact the transaction continues to completion. At the time the periodic recovery attempts but fails the rollback, it records the rollback failure in the server log. The underlying cause of this issue will be addressed in a future release, but in the meantime a workaround is available.Increase the interval between the two phases of the recovery process by setting the com.arjuna.ats.jta.orphanSafetyInterval property to a value higher than the default value of 10000 milliseconds. A value of 40000 milliseconds is recommended. Please note that this does not solve the issue, instead it decreases the probability that it will occur and that the warning message will be shown in the log.
Chapter 13. Hibernate
13.1. About Hibernate Core
13.2. Java Persistence API (JPA)
13.2.1. About JPA
bean-validation, greeter, and kitchensink quickstarts: Section 1.4.1.1, “Access the Quickstarts”.
13.2.2. Hibernate EntityManager
13.2.3. Getting Started
13.2.3.1. Create a JPA project in Red Hat JBoss Developer Studio
This example covers the steps required to create a JPA project in Red Hat JBoss Developer Studio.
Procedure 13.1. Create a JPA project in Red Hat JBoss Developer Studio
- In the Red Hat JBoss Developer Studio window, click → → . Find JPA in the list, expand it, and select JPA Project. You are presented with the following dialog.
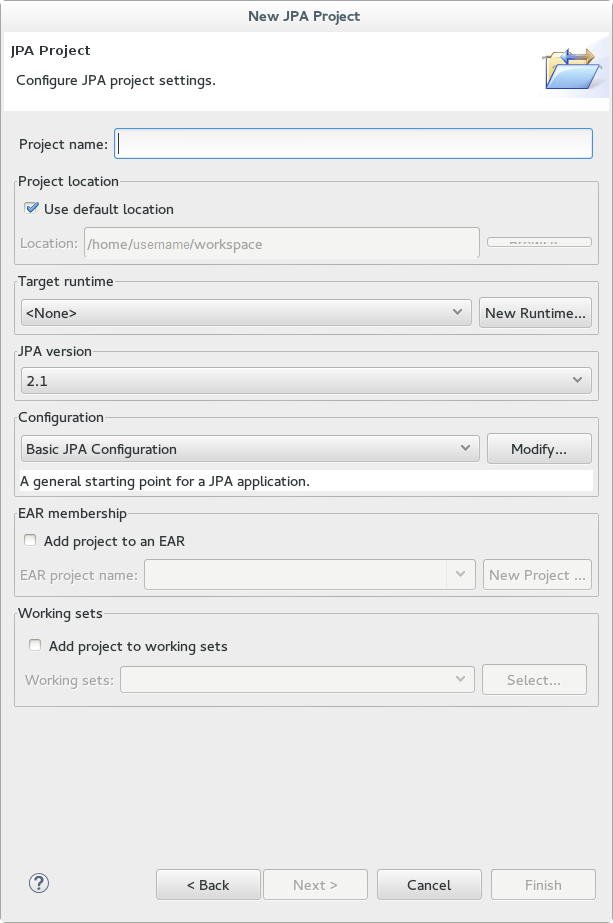
- Enter a Project name.
- Select a Target runtime. If no target runtime is available, follow these instructions to define a new server and runtime: Section 1.3.1.5, “Add the JBoss EAP Server Using Define New Server”.
- Under JPA version, ensure 2.1 is selected.
- Under Configuration, choose Basic JPA Configuration.
- Click .
- If prompted, choose whether you wish to associate this type of project with the JPA perspective window.
13.2.3.2. Create the Persistence Settings File in Red Hat JBoss Developer Studio
This topic covers the process for creating the persistence.xml file in a Java project using Red Hat JBoss Developer Studio.
Prerequisites
Procedure 13.2. Create and Configure a new Persistence Settings File
- Open an EJB 3.x project in Red Hat JBoss Developer Studio.
- Right click the project root directory in the Project Explorer panel.
- Select → .
- Select XML File from the XML folder and click .
- Select the
ejbModule/META-INFfolder as the parent directory. - Name the file
persistence.xmland click . - Select Create XML file from an XML schema file and click .
- Select http://java.sun.com/xml/ns/persistence/persistence_2.0.xsd from the Select XML Catalog entry list and click .

- Click to create the file.
- Result:
- The
persistence.xmlhas been created in theMETA-INF/folder and is ready to be configured. An example file is available here: Section 13.2.3.3, “Example Persistence Settings File”
13.2.3.3. Example Persistence Settings File
Example 13.1. persistence.xml
<persistence xmlns="http://java.sun.com/xml/ns/persistence"
xmlns:xsi="http://www.w3.org/2001/XMLSchema-instance"
xsi:schemaLocation="http://java.sun.com/xml/ns/persistence http://java.sun.com/xml/ns/persistence/persistence_2_0.xsd"
version="2.0">
<persistence-unit name="example" transaction-type="JTA">
<provider>org.hibernate.ejb.HibernatePersistence</provider>
<jta-data-source>java:jboss/datasources/ExampleDS</jta-data-source>
<mapping-file>ormap.xml</mapping-file>
<jar-file>TestApp.jar</jar-file>
<class>org.test.Test</class>
<shared-cache-mode>NONE</shared-cache-mode>
<validation-mode>CALLBACK</validation-mode>
<properties>
<property name="hibernate.dialect" value="org.hibernate.dialect.H2Dialect"/>
<property name="hibernate.hbm2ddl.auto" value="create-drop"/>
</properties>
</persistence-unit>
</persistence>13.2.3.4. Create the Hibernate Configuration File in Red Hat JBoss Developer Studio
Prerequisites
This topic covers the process for creating the hibernate.cfg.xml file in a Java project using Red Hat JBoss Developer Studio.
Procedure 13.3. Create a New Hibernate Configuration File
- Open a Java project in Red Hat JBoss Developer Studio.
- Right click the project root directory in the Project Explorer panel.
- Select → .
- Select Hibernate Configuration File from the Hibernate folder and click .
- Select the
src/directory and click . - Configure the following:
- Session factory name
- Database dialect
- Driver class
- Connection URL
- Username
- Password
- Click to create the file.
- Result:
- The
hibernate.cfg.xmlhas been created in thesrc/folder. An example file is available here: Section 13.2.3.5, “Example Hibernate Configuration File”.
13.2.3.5. Example Hibernate Configuration File
Example 13.2. hibernate.cfg.xml
<?xml version='1.0' encoding='utf-8'?>
<!DOCTYPE hibernate-configuration PUBLIC
"-//Hibernate/Hibernate Configuration DTD 3.0//EN"
"http://www.hibernate.org/dtd/hibernate-configuration-3.0.dtd">
<hibernate-configuration>
<session-factory>
<!-- Datasource Name -->
<property name="connection.datasource">ExampleDS</property>
<!-- SQL dialect -->
<property name="dialect">org.hibernate.dialect.H2Dialect</property>
<!-- Enable Hibernate's automatic session context management -->
<property name="current_session_context_class">thread</property>
<!-- Disable the second-level cache -->
<property name="cache.region.factory_class">org.hibernate.cache.NoCacheProvider</property>
<!-- Echo all executed SQL to stdout -->
<property name="show_sql">true</property>
<!-- Update the database schema on startup -->
<property name="hbm2ddl.auto">update</property>
<mapping resource="org/hibernate/tutorial/domain/Event.hbm.xml"/>
</session-factory>
</hibernate-configuration>13.2.4. Configuration
13.2.4.1. Hibernate Configuration Properties
| Property Name | Description |
|---|---|
| hibernate.dialect |
The classname of a Hibernate
org.hibernate.dialect.Dialect. Allows Hibernate to generate SQL optimized for a particular relational database.
In most cases Hibernate will be able to choose the correct
org.hibernate.dialect.Dialect implementation, based on the JDBC metadata returned by the JDBC driver.
|
| hibernate.show_sql |
Boolean. Writes all SQL statements to console. This is an alternative to setting the log category
org.hibernate.SQL to debug.
|
| hibernate.format_sql |
Boolean. Pretty print the SQL in the log and console.
|
| hibernate.default_schema |
Qualify unqualified table names with the given schema/tablespace in generated SQL.
|
| hibernate.default_catalog |
Qualifies unqualified table names with the given catalog in generated SQL.
|
| hibernate.session_factory_name |
The
org.hibernate.SessionFactory will be automatically bound to this name in JNDI after it has been created. For example, jndi/composite/name.
|
| hibernate.max_fetch_depth |
Sets a maximum "depth" for the outer join fetch tree for single-ended associations (one-to-one, many-to-one). A
0 disables default outer join fetching. The recommended value is between 0 and 3.
|
| hibernate.default_batch_fetch_size |
Sets a default size for Hibernate batch fetching of associations. The recommended values are
4, 8, and 16.
|
| hibernate.default_entity_mode |
Sets a default mode for entity representation for all sessions opened from this
SessionFactory. Values include: dynamic-map, dom4j, pojo.
|
| hibernate.order_updates |
Boolean. Forces Hibernate to order SQL updates by the primary key value of the items being updated. This will result in fewer transaction deadlocks in highly concurrent systems.
|
| hibernate.generate_statistics |
Boolean. If enabled, Hibernate will collect statistics useful for performance tuning.
|
| hibernate.use_identifier_rollback |
Boolean. If enabled, generated identifier properties will be reset to default values when objects are deleted.
|
| hibernate.use_sql_comments |
Boolean. If turned on, Hibernate will generate comments inside the SQL, for easier debugging. Default value is
false.
|
| hibernate.id.new_generator_mappings |
Boolean. This property is relevant when using
@GeneratedValue. It indicates whether or not the new IdentifierGenerator implementations are used for javax.persistence.GenerationType.AUTO, javax.persistence.GenerationType.TABLE and javax.persistence.GenerationType.SEQUENCE. Default value is true.
|
| hibernate.ejb.naming_strategy |
Chooses the
org.hibernate.cfg.NamingStrategy implementation when using Hibernate EntityManager. This class is deprecated and this property is only provided for backward compatibility. This property must not be used with hibernate.ejb.naming_strategy_delegator.
If the application does not use EntityManager, follow the instructions here to configure the NamingStrategy: Hibernate Reference Documentation - Implementing a Naming Strategy.
|
| hibernate.ejb.naming_strategy_delegator |
Specifies an
org.hibernate.cfg.naming.NamingStrategyDelegator implementation for database objects and schema elements when using Hibernate EntityManager. This property has the following possible values.
Note
This property must not be used with hibernate.ejb.naming_strategy. It is a temporary replacement for org.hibernate.cfg.NamingStrategy to address its limitations. A more comprehensive solution is planned for Hibernate 5.0 that replaces both org.hibernate.cfg.NamingStrategy and org.hibernate.cfg.naming.NamingStrategyDelegator.
If the application does not use EntityManager, follow the instructions here to configure the NamingStrategy: Hibernate Reference Documentation - Implementing a Naming Strategy.
|
Important
hibernate.id.new_generator_mappings, new applications should keep the default value of true. Existing applications that used Hibernate 3.3.x may need to change it to false to continue using a sequence object or table based generator, and maintain backward compatibility.
13.2.4.2. Hibernate JDBC and Connection Properties
| Property Name | Description |
|---|---|
| hibernate.jdbc.fetch_size |
A non-zero value that determines the JDBC fetch size (calls
Statement.setFetchSize()).
|
| hibernate.jdbc.batch_size |
A non-zero value enables use of JDBC2 batch updates by Hibernate. The recommended values are between
5 and 30.
|
| hibernate.jdbc.batch_versioned_data |
Boolean. Set this property to
true if the JDBC driver returns correct row counts from executeBatch(). Hibernate will then use batched DML for automatically versioned data. Default value is to false.
|
| hibernate.jdbc.factory_class |
Select a custom
org.hibernate.jdbc.Batcher. Most applications will not need this configuration property.
|
| hibernate.jdbc.use_scrollable_resultset |
Boolean. Enables use of JDBC2 scrollable resultsets by Hibernate. This property is only necessary when using user-supplied JDBC connections. Hibernate uses connection metadata otherwise.
|
| hibernate.jdbc.use_streams_for_binary |
Boolean. This is a system-level property. Use streams when writing/reading
binary or serializable types to/from JDBC.
|
| hibernate.jdbc.use_get_generated_keys |
Boolean. Enables use of JDBC3
PreparedStatement.getGeneratedKeys() to retrieve natively generated keys after insert. Requires JDBC3+ driver and JRE1.4+. Set to false if JDBC driver has problems with the Hibernate identifier generators. By default, it tries to determine the driver capabilities using connection metadata.
|
| hibernate.connection.provider_class |
The classname of a custom
org.hibernate.connection.ConnectionProvider which provides JDBC connections to Hibernate.
|
| hibernate.connection.isolation |
Sets the JDBC transaction isolation level. Check
java.sql.Connection for meaningful values, but note that most databases do not support all isolation levels and some define additional, non-standard isolations. Standard values are 1, 2, 4, 8.
|
| hibernate.connection.autocommit |
Boolean. This property is not recommended for use. Enables autocommit for JDBC pooled connections.
|
| hibernate.connection.release_mode |
Specifies when Hibernate should release JDBC connections. By default, a JDBC connection is held until the session is explicitly closed or disconnected. The default value
auto will choose after_statement for the JTA and CMT transaction strategies, and after_transaction for the JDBC transaction strategy.
Available values are
auto (default), on_close, after_transaction, after_statement.
This setting only affects
Session returned from SessionFactory.openSession. For Session obtained through SessionFactory.getCurrentSession, the CurrentSessionContext implementation configured for use controls the connection release mode for that Session.
|
| hibernate.connection.<propertyName> |
Pass the JDBC property <propertyName> to
DriverManager.getConnection().
|
| hibernate.jndi.<propertyName> |
Pass the property <propertyName> to the JNDI
InitialContextFactory.
|
13.2.4.3. Hibernate Cache Properties
| Property Name | Description |
|---|---|
hibernate.cache.region.factory_class |
The classname of a custom
CacheProvider.
|
hibernate.cache.use_minimal_puts |
Boolean. Optimizes second-level cache operation to minimize writes, at the cost of more frequent reads. This setting is most useful for clustered caches and, in Hibernate3, is enabled by default for clustered cache implementations.
|
hibernate.cache.use_query_cache |
Boolean. Enables the query cache. Individual queries still have to be set cacheable.
|
hibernate.cache.use_second_level_cache |
Boolean. Used to completely disable the second level cache, which is enabled by default for classes that specify a
<cache> mapping.
|
hibernate.cache.query_cache_factory |
The classname of a custom
QueryCache interface. The default value is the built-in StandardQueryCache.
|
hibernate.cache.region_prefix |
A prefix to use for second-level cache region names.
|
hibernate.cache.use_structured_entries |
Boolean. Forces Hibernate to store data in the second-level cache in a more human-friendly format.
|
hibernate.cache.default_cache_concurrency_strategy |
Setting used to give the name of the default
org.hibernate.annotations.CacheConcurrencyStrategy to use when either @Cacheable or @Cache is used. @Cache(strategy="..") is used to override this default.
|
13.2.4.4. Hibernate Transaction Properties
| Property Name | Description |
|---|---|
hibernate.transaction.factory_class |
The classname of a
TransactionFactory to use with Hibernate Transaction API. Defaults to JDBCTransactionFactory).
|
jta.UserTransaction |
A JNDI name used by
JTATransactionFactory to obtain the JTA UserTransaction from the application server.
|
hibernate.transaction.manager_lookup_class |
The classname of a
TransactionManagerLookup. It is required when JVM-level caching is enabled or when using hilo generator in a JTA environment.
|
hibernate.transaction.flush_before_completion |
Boolean. If enabled, the session will be automatically flushed during the before completion phase of the transaction. Built-in and automatic session context management is preferred.
|
hibernate.transaction.auto_close_session |
Boolean. If enabled, the session will be automatically closed during the after completion phase of the transaction. Built-in and automatic session context management is preferred.
|
13.2.4.5. Miscellaneous Hibernate Properties
| Property Name | Description |
|---|---|
hibernate.current_session_context_class |
Supply a custom strategy for the scoping of the "current"
Session. Values include jta, thread, managed, custom.Class.
|
hibernate.query.factory_class |
Chooses the HQL parser implementation:
org.hibernate.hql.internal.ast.ASTQueryTranslatorFactory or org.hibernate.hql.internal.classic.ClassicQueryTranslatorFactory.
|
hibernate.query.substitutions |
Used to map from tokens in Hibernate queries to SQL tokens (tokens might be function or literal names). For example,
hqlLiteral=SQL_LITERAL, hqlFunction=SQLFUNC.
|
hibernate.hbm2ddl.auto |
Automatically validates or exports schema DDL to the database when the
SessionFactory is created. With create-drop, the database schema will be dropped when the SessionFactory is closed explicitly. Property value options are validate, update, create, create-drop
|
hibernate.hbm2ddl.import_files |
Comma-separated names of the optional files containing SQL DML statements executed during the
SessionFactory creation. This is useful for testing or demonstrating. For example, by adding INSERT statements, the database can be populated with a minimal set of data when it is deployed. An example value is /humans.sql,/dogs.sql.
File order matters, as the statements of a given file are executed before the statements of the following files. These statements are only executed if the schema is created (i.e. if
hibernate.hbm2ddl.auto is set to create or create-drop).
|
hibernate.hbm2ddl.import_files_sql_extractor |
The classname of a custom
ImportSqlCommandExtractor. Defaults to the built-in SingleLineSqlCommandExtractor. This is useful for implementing a dedicated parser that extracts a single SQL statement from each import file. Hibernate also provides MultipleLinesSqlCommandExtractor, which supports instructions/comments and quoted strings spread over multiple lines (mandatory semicolon at the end of each statement).
|
hibernate.bytecode.use_reflection_optimizer |
Boolean. This is a system-level property, which cannot be set in the
hibernate.cfg.xml file. Enables the use of bytecode manipulation instead of runtime reflection. Reflection can sometimes be useful when troubleshooting. Hibernate always requires either cglib or javassist even if the optimizer is turned off.
|
hibernate.bytecode.provider |
Both javassist or cglib can be used as byte manipulation engines. The default is
javassist. Property value is either javassist or cglib
|
13.2.4.6. Hibernate SQL Dialects
Important
hibernate.dialect property should be set to the correct org.hibernate.dialect.Dialect subclass for the application database. If a dialect is specified, Hibernate will use sensible defaults for some of the other properties. This means that they do not have to be specified manually.
| RDBMS | Dialect |
|---|---|
| DB2 | org.hibernate.dialect.DB2Dialect |
| DB2 AS/400 | org.hibernate.dialect.DB2400Dialect |
| DB2 OS390 | org.hibernate.dialect.DB2390Dialect |
| Firebird | org.hibernate.dialect.FirebirdDialect |
| FrontBase | org.hibernate.dialect.FrontbaseDialect |
| H2 Database | org.hibernate.dialect.H2Dialect |
| HypersonicSQL | org.hibernate.dialect.HSQLDialect |
| Informix | org.hibernate.dialect.InformixDialect |
| Ingres | org.hibernate.dialect.IngresDialect |
| Interbase | org.hibernate.dialect.InterbaseDialect |
| Mckoi SQL | org.hibernate.dialect.MckoiDialect |
| Microsoft SQL Server 2000 | org.hibernate.dialect.SQLServerDialect |
| Microsoft SQL Server 2005 | org.hibernate.dialect.SQLServer2005Dialect |
| Microsoft SQL Server 2008 | org.hibernate.dialect.SQLServer2008Dialect |
| Microsoft SQL Server 2012 | org.hibernate.dialect.SQLServer2008Dialect |
| MySQL5 | org.hibernate.dialect.MySQL5Dialect |
| MySQL5 with InnoDB | org.hibernate.dialect.MySQL5InnoDBDialect |
| MySQL with MyISAM | org.hibernate.dialect.MySQLMyISAMDialect |
| Oracle (any version) | org.hibernate.dialect.OracleDialect |
| Oracle 9i | org.hibernate.dialect.Oracle9iDialect |
| Oracle 10g | org.hibernate.dialect.Oracle10gDialect |
| Oracle 11g | org.hibernate.dialect.Oracle10gDialect |
| Pointbase | org.hibernate.dialect.PointbaseDialect |
| PostgreSQL | org.hibernate.dialect.PostgreSQLDialect |
| PostgreSQL 9.2 | org.hibernate.dialect.PostgreSQL82Dialect |
| Postgres Plus Advanced Server | org.hibernate.dialect.PostgresPlusDialect |
| Progress | org.hibernate.dialect.ProgressDialect |
| SAP DB | org.hibernate.dialect.SAPDBDialect |
| Sybase | org.hibernate.dialect.SybaseASE15Dialect |
| Sybase 15.7 | org.hibernate.dialect.SybaseASE157Dialect |
| Sybase Anywhere | org.hibernate.dialect.SybaseAnywhereDialect |
13.2.5. Second-Level Caches
13.2.5.1. About Second-Level Caches
- Web Session Clustering
- Stateful Session Bean Clustering
- SSO Clustering
- Hibernate Second Level Cache
13.2.5.2. Configure a Second Level Cache for Hibernate
Procedure 13.4. Create and Edit the hibernate.cfg.xml file
Create the hibernate.cfg.xml file
Create thehibernate.cfg.xmlin the deployment's classpath. For specifics, refer to Section 13.2.3.4, “Create the Hibernate Configuration File in Red Hat JBoss Developer Studio” .- Add these lines of XML to the
hibernate.cfg.xmlfile in your application. The XML needs to be inside the <session-factory> tags:<property name="hibernate.cache.use_second_level_cache">true</property> <property name="hibernate.cache.use_query_cache">true</property> - Add one of the following to the <session-factory> section of the
hibernate.cfg.xmlfile:If the Infinispan CacheManager is bound to JNDI:
<property name="hibernate.cache.region.factory_class"> org.hibernate.cache.infinispan.JndiInfinispanRegionFactory </property> <property name="hibernate.cache.infinispan.cachemanager"> java:CacheManager </property>If the Infinispan CacheManager is standalone:
<property name="hibernate.cache.region.factory_class"> org.hibernate.cache.infinispan.InfinispanRegionFactory </property>
Infinispan is configured as the Second Level Cache for Hibernate.
13.3. Hibernate Annotations
13.3.1. Hibernate Annotations
| Annotation | Description |
|---|---|
| AccessType | Property Access type. |
| Any | Defines a ToOne association pointing to several entity types. Matching the according entity type is done through a metadata discriminator column. This kind of mapping should be only marginal. |
| AnyMetaDef | Defines @Any and @ManyToAny metadata. |
| AnyMedaDefs | Defines @Any and @ManyToAny set of metadata. Can be defined at the entity level or the package level. |
| BatchSize | Batch size for SQL loading. |
| Cache | Add caching strategy to a root entity or a collection. |
| Cascade | Apply a cascade strategy on an association. |
| Check | Arbitrary SQL check constraints which can be defined at the class, property or collection level. |
| Columns | Support an array of columns. Useful for component user type mappings. |
| ColumnTransformer | Custom SQL expression used to read the value from and write a value to a column. Use for direct object loading/saving as well as queries. The write expression must contain exactly one '?' placeholder for the value. |
| ColumnTransformers | Plural annotation for @ColumnTransformer. Useful when more than one column is using this behavior. |
| DiscriminatorFormula | Discriminator formula to be placed at the root entity. |
| DiscriminatorOptions | Optional annotation to express Hibernate specific discriminator properties. |
| Entity | Extends Entity with Hibernate features. |
| Fetch | Defines the fetching strategy used for the given association. |
| FetchProfile | Defines the fetching strategy profile. |
| FetchProfiles | Plural annotation for @FetchProfile. |
| Filter | Adds filters to an entity or a target entity of a collection. |
| FilterDef | Filter definition. |
| FilterDefs | Array of filter definitions. |
| FilterJoinTable | Adds filters to a join table collection. |
| FilterJoinTables | Adds multiple @FilterJoinTable to a collection. |
| Filters | Adds multiple @Filters. |
| Formula | To be used as a replacement for @Column in most places. The formula has to be a valid SQL fragment. |
| Generated | This annotated property is generated by the database. |
| GenericGenerator | Generator annotation describing any kind of Hibernate generator in a detyped manner. |
| GenericGenerators | Array of generic generator definitions. |
| Immutable |
Mark an Entity or a Collection as immutable. No annotation means the element is mutable.
An immutable entity may not be updated by the application. Updates to an immutable entity will be ignored, but no exception is thrown.
@Immutable placed on a collection makes the collection immutable, meaning additions and deletions to and from the collection are not allowed. A HibernateException is thrown in this case.
|
| Index | Defines a database index. |
| JoinFormula | To be used as a replacement for @JoinColumn in most places. The formula has to be a valid SQL fragment. |
| LazyCollection | Defines the lazy status of a collection. |
| LazyToOne | Defines the lazy status of a ToOne association (i.e. OneToOne or ManyToOne). |
| Loader | Overwrites Hibernate default FIND method. |
| ManyToAny | Defines a ToMany association pointing to different entity types. Matching the according entity type is done through a metadata discriminator column. This kind of mapping should be only marginal. |
| MapKeyType | Defines the type of key of a persistent map. |
| MetaValue | Represents a discriminator value associated to a given entity type. |
| NamedNativeQueries | Extends NamedNativeQueries to hold Hibernate NamedNativeQuery objects. |
| NamedNativeQuery | Extends NamedNativeQuery with Hibernate features. |
| NamedQueries | Extends NamedQueries to hold Hibernate NamedQuery objects. |
| NamedQuery | Extends NamedQuery with Hibernate features. |
| NaturalId | Specifies that a property is part of the natural id of the entity. |
| NotFound | Action to do when an element is not found on an association. |
| OnDelete | Strategy to use on collections, arrays and on joined subclasses delete. OnDelete of secondary tables is currently not supported. |
| OptimisticLock | Whether or not a change of the annotated property will trigger an entity version increment. If the annotation is not present, the property is involved in the optimistic lock strategy (default). |
| OptimisticLocking | Used to define the style of optimistic locking to be applied to an entity. In a hierarchy, only valid on the root entity. |
| OrderBy | Order a collection using SQL ordering (not HQL ordering). |
| ParamDef | A parameter definition. |
| Parameter | Key/value pattern. |
| Parent | Reference the property as a pointer back to the owner (generally the owning entity). |
| Persister | Specify a custom persister. |
| Polymorphism | Used to define the type of polymorphism Hibernate will apply to entity hierarchies. |
| Proxy | Lazy and proxy configuration of a particular class. |
| RowId | Support for ROWID mapping feature of Hibernate. |
| Sort | Collection sort (Java level sorting). |
| Source | Optional annotation in conjunction with Version and timestamp version properties. The annotation value decides where the timestamp is generated. |
| SQLDelete | Overwrites the Hibernate default DELETE method. |
| SQLDeleteAll | Overwrites the Hibernate default DELETE ALL method. |
| SQLInsert | Overwrites the Hibernate default INSERT INTO method. |
| SQLUpdate | Overwrites the Hibernate default UPDATE method. |
| Subselect | Maps an immutable and read-only entity to a given SQL subselect expression. |
| Synchronize | Ensures that auto-flush happens correctly and that queries against the derived entity do not return stale data. Mostly used with Subselect. |
| Table | Complementary information to a table either primary or secondary. |
| Tables | Plural annotation of Table. |
| Target | Defines an explicit target, avoiding reflection and generics resolving. |
| Tuplizer | Defines a tuplizer for an entity or a component. |
| Tuplizers | Defines a set of tuplizers for an entity or a component. |
| Type | Hibernate Type. |
| TypeDef | Hibernate Type definition. |
| TypeDefs | Hibernate Type definition array. |
| Where | Where clause to add to the element Entity or target entity of a collection. The clause is written in SQL. |
| WhereJoinTable | Where clause to add to the collection join table. The clause is written in SQL. |
Note
13.4. Hibernate Query Language
13.4.1. About Hibernate Query Language
13.4.2. HQL Statements
SELECT, UPDATE, DELETE, and INSERT statements. The HQL INSERT statement has no equivalent in JPQL.
Important
UPDATE or DELETE statement is executed.
| Statement | Description |
|---|---|
SELECT |
The BNF for
SELECT statements in HQL is:
The simplest possible HQL
SELECT statement is of the form:
|
UDPATE | The BNF for UPDATE statement in HQL is the same as it is in JPQL |
DELETE | The BNF for DELETE statements in HQL is the same as it is in JPQL |
13.4.3. About the INSERT Statement
INSERT statements. There is no JPQL equivalent to this. The BNF for an HQL INSERT statement is:
insert_statement ::= insert_clause select_statement
insert_clause ::= INSERT INTO entity_name (attribute_list)
attribute_list ::= state_field[, state_field ]*attribute_list is analogous to the column specification in the SQL INSERT statement. For entities involved in mapped inheritance, only attributes directly defined on the named entity can be used in the attribute_list. Superclass properties are not allowed and subclass properties do not make sense. In other words, INSERT statements are inherently non-polymorphic.
Warning
select_statement can be any valid HQL select query, with the caveat that the return types must match the types expected by the insert. Currently, this is checked during query compilation rather than allowing the check to relegate to the database. This may cause problems between Hibernate Types which are equivalent as opposed to equal. For example, this might cause lead to issues with mismatches between an attribute mapped as a org.hibernate.type.DateType and an attribute defined as a org.hibernate.type.TimestampType, even though the database might not make a distinction or might be able to handle the conversion.
id attribute, the insert statement gives you two options. You can either explicitly specify the id property in the attribute_list, in which case its value is taken from the corresponding select expression, or omit it from the attribute_list in which case a generated value is used. This latter option is only available when using id generators that operate "in the database"; attempting to use this option with any "in memory" type generators will cause an exception during parsing.
attribute_list in which case its value is taken from the corresponding select expressions, or omit it from the attribute_list in which case the seed value defined by the corresponding org.hibernate.type.VersionType is used.
Example 13.3. INSERT Query Statements
String hqlInsert = "insert into DelinquentAccount (id, name) select c.id, c.name from Customer c where ...";
int createdEntities = s.createQuery( hqlInsert ).executeUpdate();13.4.4. About the FROM Clause
FROM clause is responsible defining the scope of object model types available to the rest of the query. It also is responsible for defining all the "identification variables" available to the rest of the query.
13.4.5. About the WITH Clause
WITH clause to qualify the join conditions. This is specific to HQL; JPQL does not define this feature.
Example 13.4. With Clause
select distinct c
from Customer c
left join c.orders o
with o.value > 5000.00with clause are made part of the on clause in the generated SQL as opposed to the other queries in this section where the HQL/JPQL conditions are made part of the where clause in the generated SQL. The distinction in this specific example is probably not that significant. The with clause is sometimes necessary in more complicated queries.
13.4.6. About Bulk Update, Insert and Delete
Warning
( UPDATE | DELETE ) FROM? EntityName (WHERE where_conditions)?.
Note
FROM keyword and the WHERE Clause are optional.
Example 13.5. Bulk Update Statement
Session session = sessionFactory.openSession();
Transaction tx = session.beginTransaction();
String hqlUpdate = "update Company set name = :newName where name = :oldName";
int updatedEntities = s.createQuery( hqlUpdate )
.setString( "newName", newName )
.setString( "oldName", oldName )
.executeUpdate();
tx.commit();
session.close();
Example 13.6. Bulk Delete statement
Session session = sessionFactory.openSession();
Transaction tx = session.beginTransaction();
String hqlDelete = "delete Company where name = :oldName";
int deletedEntities = s.createQuery( hqlDelete )
.setString( "oldName", oldName )
.executeUpdate();
tx.commit();
session.close();
int value returned by the Query.executeUpdate() method indicates the number of entities within the database that were affected by the operation.
Company table for companies that are named with oldName, but also against joined tables. Thus, a Company table in a BiDirectional ManyToMany relationship with an Employee table, would lose rows from the corresponding join table Company_Employee as a result of the successful execution of the previous example.
int deletedEntries value above will contain a count of all the rows affected due to this operation, including the rows in the join tables.
INSERT INTO EntityName properties_list select_statement.
Note
Example 13.7. Bulk Insert statement
Session session = sessionFactory.openSession();
Transaction tx = session.beginTransaction();
String hqlInsert = "insert into Account (id, name) select c.id, c.name from Customer c where ...";
int createdEntities = s.createQuery( hqlInsert )
.executeUpdate();
tx.commit();
session.close();
id attribute via the SELECT statement, an identifier is generated for you, as long as the underlying database supports auto-generated keys. The return value of this bulk insert operation is the number of entries actually created in the database.
13.4.7. About Collection Member References
Example 13.8. Collection References
select c
from Customer c
join c.orders o
join o.lineItems l
join l.product p
where o.status = 'pending'
and p.status = 'backorder'
// alternate syntax
select c
from Customer c,
in(c.orders) o,
in(o.lineItems) l
join l.product p
where o.status = 'pending'
and p.status = 'backorder'o actually refers to the object model type Order which is the type of the elements of the Customer#orders association.
IN syntax. Both forms are equivalent. Which form an application chooses to use is simply a matter of taste.
13.4.8. About Qualified Path Expressions
| Expression | Description |
|---|---|
VALUE |
Refers to the collection value. Same as not specifying a qualifier. Useful to explicitly show intent. Valid for any type of collection-valued reference.
|
INDEX |
According to HQL rules, this is valid for both Maps and Lists which specify a
javax.persistence.OrderColumn annotation to refer to the Map key or the List position (aka the OrderColumn value). JPQL however, reserves this for use in the List case and adds KEY for the MAP case. Applications interested in JPA provider portability should be aware of this distinction.
|
KEY |
Valid only for Maps. Refers to the map's key. If the key is itself an entity, can be further navigated.
|
ENTRY |
Only valid only for Maps. Refers to the Map's logical
java.util.Map.Entry tuple (the combination of its key and value). ENTRY is only valid as a terminal path and only valid in the select clause.
|
Example 13.9. Qualified Collection References
// Product.images is a Map<String,String> : key = a name, value = file path
// select all the image file paths (the map value) for Product#123
select i
from Product p
join p.images i
where p.id = 123
// same as above
select value(i)
from Product p
join p.images i
where p.id = 123
// select all the image names (the map key) for Product#123
select key(i)
from Product p
join p.images i
where p.id = 123
// select all the image names and file paths (the 'Map.Entry') for Product#123
select entry(i)
from Product p
join p.images i
where p.id = 123
// total the value of the initial line items for all orders for a customer
select sum( li.amount )
from Customer c
join c.orders o
join o.lineItems li
where c.id = 123
and index(li) = 1
13.4.9. About Scalar Functions
13.4.10. HQL Standardized Functions
| Function | Description |
|---|---|
BIT_LENGTH |
Returns the length of binary data.
|
CAST |
Performs a SQL cast. The cast target should name the Hibernate mapping type to use.
|
EXTRACT |
Performs a SQL extraction on datetime values. An extraction extracts parts of the datetime (the year, for example). See the abbreviated forms below.
|
SECOND |
Abbreviated extract form for extracting the second.
|
MINUTE |
Abbreviated extract form for extracting the minute.
|
HOUR |
Abbreviated extract form for extracting the hour.
|
DAY |
Abbreviated extract form for extracting the day.
|
MONTH |
Abbreviated extract form for extracting the month.
|
YEAR |
Abbreviated extract form for extracting the year.
|
STR |
Abbreviated form for casting a value as character data.
|
addSqlFunction method of org.hibernate.cfg.Configuration
13.4.11. About the Concatenation Operation
CONCAT) function. This is not defined by JPQL, so portable applications should avoid using it. The concatenation operator is taken from the SQL concatenation operator - ||.
Example 13.10. Concatenation Operation Example
select 'Mr. ' || c.name.first || ' ' || c.name.last
from Customer c
where c.gender = Gender.MALE
13.4.12. About Dynamic Instantiation
Example 13.11. Dynamic Instantiation Example - Constructor
select new Family( mother, mate, offspr )
from DomesticCat as mother
join mother.mate as mate
left join mother.kittens as offspr
Example 13.12. Dynamic Instantiation Example - List
select new list(mother, offspr, mate.name)
from DomesticCat as mother
inner join mother.mate as mate
left outer join mother.kittens as offspr
Example 13.13. Dynamic Instantiation Example - Map
select new map( mother as mother, offspr as offspr, mate as mate )
from DomesticCat as mother
inner join mother.mate as mate
left outer join mother.kittens as offspr
select new map( max(c.bodyWeight) as max, min(c.bodyWeight) as min, count(*) as n )
from Cat cxt
13.4.13. About HQL Predicates
TRUE or FALSE, although boolean comparisons involving NULLs generally resolve to UNKNOWN.
HQL Predicates
- Nullness Predicate
- Check a value for nullness. Can be applied to basic attribute references, entity references and parameters. HQL additionally allows it to be applied to component/embeddable types.
Example 13.14. Nullness Checking Examples
// select everyone with an associated address select p from Person p where p.address is not null // select everyone without an associated address select p from Person p where p.address is null - Like Predicate
- Performs a like comparison on string values. The syntax is:
like_expression ::= string_expression [NOT] LIKE pattern_value [ESCAPE escape_character]The semantics follow that of the SQL like expression. Thepattern_valueis the pattern to attempt to match in thestring_expression. Just like SQL,pattern_valuecan use "_" and "%" as wildcards. The meanings are the same. "_" matches any single character. "%" matches any number of characters.The optionalescape_characteris used to specify an escape character used to escape the special meaning of "_" and "%" in thepattern_value. This is useful when needing to search on patterns including either "_" or "%".Example 13.15. Like Predicate Examples
select p from Person p where p.name like '%Schmidt' select p from Person p where p.name not like 'Jingleheimmer%' // find any with name starting with "sp_" select sp from StoredProcedureMetadata sp where sp.name like 'sp|_%' escape '|' - Between Predicate
- Analogous to the SQL
BETWEENexpression. Perform a evaluation that a value is within the range of 2 other values. All the operands should have comparable types.Example 13.16. Between Predicate Examples
select p from Customer c join c.paymentHistory p where c.id = 123 and index(p) between 0 and 9 select c from Customer c where c.president.dateOfBirth between {d '1945-01-01'} and {d '1965-01-01'} select o from Order o where o.total between 500 and 5000 select p from Person p where p.name between 'A' and 'E'
13.4.14. About Relational Comparisons
Example 13.17. Relational Comparison Examples
// numeric comparison
select c
from Customer c
where c.chiefExecutive.age < 30
// string comparison
select c
from Customer c
where c.name = 'Acme'
// datetime comparison
select c
from Customer c
where c.inceptionDate < {d '2000-01-01'}
// enum comparison
select c
from Customer c
where c.chiefExecutive.gender = com.acme.Gender.MALE
// boolean comparison
select c
from Customer c
where c.sendEmail = true
// entity type comparison
select p
from Payment p
where type(p) = WireTransferPayment
// entity value comparison
select c
from Customer c
where c.chiefExecutive = c.chiefTechnologist
ALL, ANY, SOME. SOME and ANY are synonymous.
ALL qualifier resolves to true if the comparison is true for all of the values in the result of the subquery. It resolves to false if the subquery result is empty.
Example 13.18. ALL Subquery Comparison Qualifier Example
// select all players that scored at least 3 points
// in every game.
select p
from Player p
where 3 > all (
select spg.points
from StatsPerGame spg
where spg.player = p
)
ANY/SOME qualifier resolves to true if the comparison is true for some of (at least one of) the values in the result of the subquery. It resolves to false if the subquery result is empty.
13.4.15. About the IN Predicate
IN predicate performs a check that a particular value is in a list of values. Its syntax is:
in_expression ::= single_valued_expression
[NOT] IN single_valued_list
single_valued_list ::= constructor_expression |
(subquery) |
collection_valued_input_parameter
constructor_expression ::= (expression[, expression]*)
single_valued_expression and the individual values in the single_valued_list must be consistent. JPQL limits the valid types here to string, numeric, date, time, timestamp, and enum types. In JPQL, single_valued_expression can only refer to:
- "state fields", which is its term for simple attributes. Specifically this excludes association and component/embedded attributes.
- entity type expressions.
single_valued_expression can refer to a far more broad set of expression types. Single-valued association are allowed. So are component/embedded attributes, although that feature depends on the level of support for tuple or "row value constructor syntax" in the underlying database. Additionally, HQL does not limit the value type in any way, though application developers should be aware that different types may incur limited support based on the underlying database vendor. This is largely the reason for the JPQL limitations.
constructor_expression and collection_valued_input_parameter, the list of values must not be empty; it must contain at least one value.
Example 13.19. In Predicate Examples
select p
from Payment p
where type(p) in (CreditCardPayment, WireTransferPayment)
select c
from Customer c
where c.hqAddress.state in ('TX', 'OK', 'LA', 'NM')
select c
from Customer c
where c.hqAddress.state in ?
select c
from Customer c
where c.hqAddress.state in (
select dm.state
from DeliveryMetadata dm
where dm.salesTax is not null
)
// Not JPQL compliant!
select c
from Customer c
where c.name in (
('John','Doe'),
('Jane','Doe')
)
// Not JPQL compliant!
select c
from Customer c
where c.chiefExecutive in (
select p
from Person p
where ...
)
13.4.16. About HQL Ordering
ORDER BY clause is used to specify the selected values to be used to order the result. The types of expressions considered valid as part of the order-by clause include:
- state fields
- component/embeddable attributes
- scalar expressions such as arithmetic operations, functions, etc.
- identification variable declared in the select clause for any of the previous expression types
ASC (ascending) or DESC (descending) to indicated the desired ordering direction.
Example 13.20. Order-by Examples
// legal because p.name is implicitly part of p
select p
from Person p
order by p.name
select c.id, sum( o.total ) as t
from Order o
inner join o.customer c
group by c.id
order by t
13.5. Hibernate Services
13.5.1. About Hibernate Services
13.5.2. About Service Contracts
org.hibernate.service.Service. Hibernate uses this internally for some basic type safety.
org.hibernate.service.spi.Startable and org.hibernate.service.spi.Stoppable interfaces to receive notifications of being started and stopped. Another optional service contract is org.hibernate.service.spi.Manageable which marks the service as manageable in JMX provided the JMX integration is enabled.
13.5.3. Types of Service Dependencies
- @
org.hibernate.service.spi.InjectService - Any method on the service implementation class accepting a single parameter and annotated with @
InjectServiceis considered requesting injection of another service.By default the type of the method parameter is expected to be the service role to be injected. If the parameter type is different than the service role, theserviceRoleattribute of theInjectServiceshould be used to explicitly name the role.By default injected services are considered required, that is the start up will fail if a named dependent service is missing. If the service to be injected is optional, therequiredattribute of theInjectServiceshould be declared asfalse(default istrue). org.hibernate.service.spi.ServiceRegistryAwareService- The second approach is a pull approach where the service implements the optional service interface
org.hibernate.service.spi.ServiceRegistryAwareServicewhich declares a singleinjectServicesmethod.During startup, Hibernate will inject theorg.hibernate.service.ServiceRegistryitself into services which implement this interface. The service can then use theServiceRegistryreference to locate any additional services it needs.
13.5.4. The ServiceRegistry
13.5.4.1. About the ServiceRegistry
org.hibernate.service.ServiceRegistry interface. The main purpose of a service registry is to hold, manage and provide access to services.
org.hibernate.service.ServiceRegistryBuilder to build a org.hibernate.service.ServiceRegistry instance.
Example 13.21. Use ServiceRegistryBuilder to create a ServiceRegistry
ServiceRegistryBuilder registryBuilder = new ServiceRegistryBuilder( bootstrapServiceRegistry );
ServiceRegistry serviceRegistry = registryBuilder.buildServiceRegistry();
13.5.5. Custom Services
13.5.5.1. About Custom Services
org.hibernate.service.ServiceRegistry is built it is considered immutable; the services themselves might accept re-configuration, but immutability here means adding/replacing services. So another role provided by the org.hibernate.service.ServiceRegistryBuilder is to allow tweaking of the services that will be contained in the org.hibernate.service.ServiceRegistry generated from it.
org.hibernate.service.ServiceRegistryBuilder about custom services.
- Implement a
org.hibernate.service.spi.BasicServiceInitiatorclass to control on-demand construction of the service class and add it to theorg.hibernate.service.ServiceRegistryBuildervia itsaddInitiatormethod. - Just instantiate the service class and add it to the
org.hibernate.service.ServiceRegistryBuildervia itsaddServicemethod.
Example 13.22. Use ServiceRegistryBuilder to Replace an Existing Service with a Custom Service
ServiceRegistryBuilder registryBuilder = new ServiceRegistryBuilder( bootstrapServiceRegistry );
registryBuilder.addService( JdbcServices.class, new FakeJdbcService() );
ServiceRegistry serviceRegistry = registryBuilder.buildServiceRegistry();
public class FakeJdbcService implements JdbcServices{
@Override
public ConnectionProvider getConnectionProvider() {
return null;
}
@Override
public Dialect getDialect() {
return null;
}
@Override
public SqlStatementLogger getSqlStatementLogger() {
return null;
}
@Override
public SqlExceptionHelper getSqlExceptionHelper() {
return null;
}
@Override
public ExtractedDatabaseMetaData getExtractedMetaDataSupport() {
return null;
}
@Override
public LobCreator getLobCreator(LobCreationContext lobCreationContext) {
return null;
}
@Override
public ResultSetWrapper getResultSetWrapper() {
return null;
}
}
13.5.6. The Bootstrap Registry
13.5.6.1. About the Boot-strap Registry
ClassLoaderService which is a perfect example. Even resolving configuration files needs access to class loading services (resource look ups). This is the root registry (no parent) in normal use.
org.hibernate.service.BootstrapServiceRegistryBuilder class.
13.5.6.2. Using BootstrapServiceRegistryBuilder
Example 13.23. Using BootstrapServiceRegistryBuilder
BootstrapServiceRegistry bootstrapServiceRegistry = new BootstrapServiceRegistryBuilder()
// pass in org.hibernate.integrator.spi.Integrator instances which are not
// auto-discovered (for whatever reason) but which should be included
.with( anExplicitIntegrator )
// pass in a class loader that Hibernate should use to load application classes
.with( anExplicitClassLoaderForApplicationClasses )
// pass in a class loader that Hibernate should use to load resources
.with( anExplicitClassLoaderForResources )
// see BootstrapServiceRegistryBuilder for rest of available methods
...
// finally, build the bootstrap registry with all the above options
.build();
13.5.6.3. BootstrapRegistry Services
org.hibernate.service.classloading.spi.ClassLoaderService
- the ability to locate application classes
- the ability to locate integration classes
- the ability to locate resources (properties files, xml files, etc)
- the ability to load
java.util.ServiceLoader
Note
org.hibernate.integrator.spi.IntegratorService
java.util.ServiceLoader capability provided by the org.hibernate.service.classloading.spi.ClassLoaderService in order to discover implementations of the org.hibernate.integrator.spi.Integrator contract.
/META-INF/services/org.hibernate.integrator.spi.Integrator and make it available on the classpath.
java.util.ServiceLoader mechanism. It lists, one per line, the fully qualified names of classes which implement the org.hibernate.integrator.spi.Integrator interface.
13.5.7. The SessionFactory Registry
13.5.7.1. SessionFactory Registry
org.hibernate.SessionFactory, the instances of services in this group explicitly belong to a single org.hibernate.SessionFactory.
org.hibernate.SessionFactory to be initiated. This special registry is org.hibernate.service.spi.SessionFactoryServiceRegistry
13.5.7.2. SessionFactory Services
org.hibernate.event.service.spi.EventListenerRegistry
- Description
- Service for managing event listeners.
- Initiator
org.hibernate.event.service.internal.EventListenerServiceInitiator- Implementations
org.hibernate.event.service.internal.EventListenerRegistryImpl
13.5.8. Integrators
13.5.8.1. Integrators
org.hibernate.integrator.spi.Integrator is intended to provide a simple means for allowing developers to hook into the process of building a functioning SessionFactory. The org.hibernate.integrator.spi.Integrator interface defines 2 methods of interest: integrate allows us to hook into the building process; disintegrate allows us to hook into a SessionFactory shutting down.
Note
org.hibernate.integrator.spi.Integrator, an overloaded form of integrate accepting a org.hibernate.metamodel.source.MetadataImplementor instead of org.hibernate.cfg.Configuration. This form is intended for use with the new metamodel code scheduled for completion in 5.0.
13.5.8.2. Integrator use-cases
org.hibernate.integrator.spi.Integrator right now are registering event listeners and providing services (see org.hibernate.integrator.spi.ServiceContributingIntegrator). With 5.0 we plan on expanding that to allow altering the metamodel describing the mapping between object and relational models.
Example 13.24. Registering event listeners
public class MyIntegrator implements org.hibernate.integrator.spi.Integrator {
public void integrate(
Configuration configuration,
SessionFactoryImplementor sessionFactory,
SessionFactoryServiceRegistry serviceRegistry) {
// As you might expect, an EventListenerRegistry is the thing with which event listeners are registered It is a
// service so we look it up using the service registry
final EventListenerRegistry eventListenerRegistry = serviceRegistry.getService( EventListenerRegistry.class );
// If you wish to have custom determination and handling of "duplicate" listeners, you would have to add an
// implementation of the org.hibernate.event.service.spi.DuplicationStrategy contract like this
eventListenerRegistry.addDuplicationStrategy( myDuplicationStrategy );
// EventListenerRegistry defines 3 ways to register listeners:
// 1) This form overrides any existing registrations with
eventListenerRegistry.setListeners( EventType.AUTO_FLUSH, myCompleteSetOfListeners );
// 2) This form adds the specified listener(s) to the beginning of the listener chain
eventListenerRegistry.prependListeners( EventType.AUTO_FLUSH, myListenersToBeCalledFirst );
// 3) This form adds the specified listener(s) to the end of the listener chain
eventListenerRegistry.appendListeners( EventType.AUTO_FLUSH, myListenersToBeCalledLast );
}
}
13.6. Bean Validation
13.6.1. About Bean Validation
bean-validation quickstart example: Section 1.4.1.1, “Access the Quickstarts”.
13.6.2. Hibernate Validator
13.6.3. Validation Constraints
13.6.3.1. About Validation Constraints
13.6.3.2. Create a Constraint Annotation in Red Hat JBoss Developer Studio
This task covers the process of creating a constraint annotation in Red Hat JBoss Developer Studio, for use within a Java application.
Prerequisites
Procedure 13.5. Create a Constraint Annotation
- Open a Java project in Red Hat JBoss Developer Studio.
Create a Data Set
A constraint annotation requires a data set that defines the acceptable values.- Right click on the project root folder in the Project Explorer panel.
- Select → .
- Configure the following elements:
- Package:
- Name:
- Click the button to add any required interfaces.
- Click to create the file.
- Add a set of values to the data set and click .
Example 13.25. Example Data Set
package com.example; public enum CaseMode { UPPER, LOWER; }Create the Annotation File
Create a new Java class.- Configure the constraint annotation and click .
Example 13.26. Example Constraint Annotation File
package com.mycompany; import static java.lang.annotation.ElementType.*; import static java.lang.annotation.RetentionPolicy.*; import java.lang.annotation.Documented; import java.lang.annotation.Retention; import java.lang.annotation.Target; import javax.validation.Constraint; import javax.validation.Payload; @Target( { METHOD, FIELD, ANNOTATION_TYPE }) @Retention(RUNTIME) @Constraint(validatedBy = CheckCaseValidator.class) @Documented public @interface CheckCase { String message() default "{com.mycompany.constraints.checkcase}"; Class<?>[] groups() default {}; Class<? extends Payload>[] payload() default {}; CaseMode value(); }
- Result
- A custom constraint annotation with a set of possible values has been created, ready to be used in the Java project.
13.6.3.3. Hibernate Validator Constraints
| Annotation | Apply on | Runtime checking | Hibernate Metadata impact |
|---|---|---|---|
| @Length(min=, max=) | property (String) | Check if the string length matches the range. | Column length will be set to max. |
| @Max(value=) | property (numeric or string representation of a numeric) | Check if the value is less than or equal to max. | Add a check constraint on the column. |
| @Min(value=) | property (numeric or string representation of a numeric) | Check if the value is more than or equal to Min. | Add a check constraint on the column. |
| @NotNull | property | Check if the value is not null. | Column(s) are not null. |
| @NotEmpty | property | Check if the string is not null nor empty. Check if the connection is not null nor empty. | Column(s) are not null (for String). |
| @Past | property (date or calendar) | Check if the date is in the past. | Add a check constraint on the column. |
| @Future | property (date or calendar) | Check if the date is in the future. | None. |
| @Pattern(regex="regexp", flag=) or @Patterns( {@Pattern(...)} ) | property (string) | Check if the property matches the regular expression given a match flag (see java.util.regex.Pattern). | None. |
| @Range(min=, max=) | property (numeric or string representation of a numeric) | Check if the value is between min and max (included). | Add a check constraint on the column. |
| @Size(min=, max=) | property (array, collection, map) | Check if the element size is between min and max (included). | None. |
| @AssertFalse | property | Check that the method evaluates to false (useful for constraints expressed in code rather than annotations). | None. |
| @AssertTrue | property | Check that the method evaluates to true (useful for constraints expressed in code rather than annotations). | None. |
| @Valid | property (object) | Perform validation recursively on the associated object. If the object is a Collection or an array, the elements are validated recursively. If the object is a Map, the value elements are validated recursively. | None. |
| property (String) | Check whether the string is conform to the e-mail address specification. | None. | |
| @CreditCardNumber | property (String) | Check whether the string is a well formatted credit card number (derivative of the Luhn algorithm). | None. |
| @Digits(integerDigits=1) | property (numeric or string representation of a numeric) | Check whether the property is a number having up to integerDigits integer digits and fractionalDigits fractional digits. | Define column precision and scale. |
| @EAN | property (string) | Check whether the string is a properly formatted EAN or UPC-A code. | None. |
13.6.4. Configuration
13.6.4.1. Example Validation Configuration File
Example 13.27. validation.xml
<validation-config xmlns="http://jboss.org/xml/ns/javax/validation/configuration"
xmlns:xsi="http://www.w3.org/2001/XMLSchema-instance"
xsi:schemaLocation="http://jboss.org/xml/ns/javax/validation/configuration">
<default-provider>
org.hibernate.validator.HibernateValidator
</default-provider>
<message-interpolator>
org.hibernate.validator.messageinterpolation.ResourceBundleMessageInterpolator
</message-interpolator>
<constraint-validator-factory>
org.hibernate.validator.engine.ConstraintValidatorFactoryImpl
</constraint-validator-factory>
<constraint-mapping>
/constraints-example.xml
</constraint-mapping>
<property name="prop1">value1</property>
<property name="prop2">value2</property>
</validation-config>13.7. Envers
13.7.1. About Hibernate Envers
@Audited, which store the history of changes made to the entity. The data can then be retrieved and queried.
- audit all mappings defined by the JPA specification,
- audit all hibernate mappings that extend the JPA specification,
- audit entities mapped by or using the native Hibernate API
- log data for each revision using a revision entity, and
- query historical data.
13.7.2. About Auditing Persistent Classes
@Audited annotation. When the annotation is applied to a class, a table is created, which stores the revision history of the entity.
13.7.3. Auditing Strategies
13.7.3.1. About Auditing Strategies
- Default Audit Strategy
- This strategy persists the audit data together with a start revision. For each row that is inserted, updated or deleted in an audited table, one or more rows are inserted in the audit tables, along with the start revision of its validity.Rows in the audit tables are never updated after insertion. Queries of audit information use subqueries to select the applicable rows in the audit tables, which are slow and difficult to index.
- Validity Audit Strategy
- This strategy stores the start revision, as well as the end revision of the audit information. For each row that is inserted, updated or deleted in an audited table, one or more rows are inserted in the audit tables, along with the start revision of its validity.At the same time, the end revision field of the previous audit rows (if available) is set to this revision. Queries on the audit information can then use between start and end revision, instead of subqueries. This means that persisting audit information is a little slower because of the extra updates, but retrieving audit information is a lot faster.This can also be improved by adding extra indexes.
13.7.3.2. Set the Auditing Strategy
There are two audit strategies supported by JBoss EAP 6: the default and validity audit strategies. This task covers the steps required to define the auditing strategy for an application.
Procedure 13.6. Define a Auditing Strategy
- Configure the
org.hibernate.envers.audit_strategyproperty in thepersistence.xmlfile of the application. If the property is not set in thepersistence.xmlfile, then the default audit strategy is used.Example 13.28. Set the Default Audit Strategy
<property name="org.hibernate.envers.audit_strategy" value="org.hibernate.envers.strategy.DefaultAuditStrategy"/>Example 13.29. Set the Validity Audit Strategy
<property name="org.hibernate.envers.audit_strategy" value="org.hibernate.envers.strategy.ValidityAuditStrategy"/>
13.7.4. Getting Started with Entity Auditing
13.7.4.1. Add Auditing Support to a JPA Entity
Procedure 13.7. Add Auditing Support to a JPA Entity
- Configure the available auditing parameters to suit the deployment: Section 13.7.5.1, “Configure Envers Parameters”.
- Open the JPA entity to be audited.
- Import the
org.hibernate.envers.Auditedinterface. - Apply the
@Auditedannotation to each field or property to be audited, or apply it once to the whole class.Example 13.30. Audit Two Fields
import org.hibernate.envers.Audited; import javax.persistence.Entity; import javax.persistence.Id; import javax.persistence.GeneratedValue; import javax.persistence.Column; @Entity public class Person { @Id @GeneratedValue private int id; @Audited private String name; private String surname; @ManyToOne @Audited private Address address; // add getters, setters, constructors, equals and hashCode here }Example 13.31. Audit an entire Class
import org.hibernate.envers.Audited; import javax.persistence.Entity; import javax.persistence.Id; import javax.persistence.GeneratedValue; import javax.persistence.Column; @Entity @Audited public class Person { @Id @GeneratedValue private int id; private String name; private String surname; @ManyToOne private Address address; // add getters, setters, constructors, equals and hashCode here }
The JPA entity has been configured for auditing. A table called Entity_AUD will be created to store the historical changes.
13.7.5. Configuration
13.7.5.1. Configure Envers Parameters
Procedure 13.8. Configure Envers Parameters
- Open the
persistence.xmlfile for the application. - Add, remove or configure Envers properties as required. For a list of available properties, refer to Section 13.7.5.4, “Envers Configuration Properties”.
Example 13.32. Example Envers Parameters
<persistence-unit name="mypc">
<description>Persistence Unit.</description>
<jta-data-source>java:jboss/datasources/ExampleDS</jta-data-source>
<shared-cache-mode>ENABLE_SELECTIVE</shared-cache-mode>
<properties>
<property name="hibernate.hbm2ddl.auto" value="create-drop" />
<property name="hibernate.show_sql" value="true" />
<property name="hibernate.cache.use_second_level_cache" value="true" />
<property name="hibernate.cache.use_query_cache" value="true" />
<property name="hibernate.generate_statistics" value="true" />
<property name="org.hibernate.envers.versionsTableSuffix" value="_V" />
<property name="org.hibernate.envers.revisionFieldName" value="ver_rev" />
</properties>
</persistence-unit>- Result
- Auditing has been configured for all JPA entities in the application.
13.7.5.2. Enable or Disable Auditing at Runtime
This task covers the configuration steps required to enable/disable entity version auditing at runtime.
Procedure 13.9. Enable/Disable Auditing
- Subclass the
AuditEventListenerclass. - Override the following methods that are called on Hibernate events:
- onPostInsert
- onPostUpdate
- onPostDelete
- onPreUpdateCollection
- onPreRemoveCollection
- onPostRecreateCollection
- Specify the subclass as the listener for the events.
- Determine if the change should be audited.
- Pass the call to the superclass if the change should be audited.
13.7.5.3. Configure Conditional Auditing
Hibernate Envers persists audit data in reaction to various Hibernate events, using a series of event listeners. These listeners are registered automatically if the Envers jar is in the class path. This task covers the steps required to implement conditional auditing, by overriding some of the Envers event listeners.
Procedure 13.10. Implement Conditional Auditing
- Set the
hibernate.listeners.envers.autoRegisterHibernate property to false in thepersistence.xmlfile. - Subclass each event listener to be overridden. Place the conditional auditing logic in the subclass, and call the super method if auditing should be performed.
- Create a custom implementation of
org.hibernate.integrator.spi.Integrator, similar toorg.hibernate.envers.event.EnversIntegrator. Use the event listener subclasses created in step two, rather than the default classes. - Add a
META-INF/services/org.hibernate.integrator.spi.Integratorfile to the jar. This file should contain the fully qualified name of the class implementing the interface.
Conditional auditing has been configured, overriding the default Envers event listeners.
13.7.5.4. Envers Configuration Properties
| Property Name | Default Value | Description |
|---|---|---|
|
org.hibernate.envers.audit_table_prefix
| |
A string that is prepended to the name of an audited entity, to create the name of the entity that will hold the audit information.
|
|
org.hibernate.envers.audit_table_suffix
|
_AUD
|
A string that is appended to the name of an audited entity to create the name of the entity that will hold the audit information. For example, if an entity with a table name of
Person is audited, Envers will generate a table called Person_AUD to store the historical data.
|
|
org.hibernate.envers.revision_field_name
|
REV
|
The name of the field in the audit entity that holds the revision number.
|
|
org.hibernate.envers.revision_type_field_name
|
REVTYPE
|
The name of the field in the audit entity that holds the type of revision. The current types of revisions possible are:
add, mod and del.
|
|
org.hibernate.envers.revision_on_collection_change
|
true
|
This property determines if a revision should be generated if a relation field that is not owned changes. This can either be a collection in a one-to-many relation, or the field using the
mappedBy attribute in a one-to-one relation.
|
|
org.hibernate.envers.do_not_audit_optimistic_locking_field
|
true
|
When true, properties used for optimistic locking (annotated with
@Version) will automatically be excluded from auditing.
|
|
org.hibernate.envers.store_data_at_delete
|
false
|
This property defines whether or not entity data should be stored in the revision when the entity is deleted, instead of only the ID, with all other properties marked as null. This is not usually necessary, as the data is present in the last-but-one revision. Sometimes, however, it is easier and more efficient to access it in the last revision. However, this means the data the entity contained before deletion is stored twice.
|
|
org.hibernate.envers.default_schema
|
null (same as normal tables)
|
The default schema name used for audit tables. Can be overridden using the
@AuditTable(schema="...") annotation. If not present, the schema will be the same as the schema of the normal tables.
|
|
org.hibernate.envers.default_catalog
|
null (same as normal tables)
|
The default catalog name that should be used for audit tables. Can be overridden using the
@AuditTable(catalog="...") annotation. If not present, the catalog will be the same as the catalog of the normal tables.
|
|
org.hibernate.envers.audit_strategy
|
org.hibernate.envers.strategy.DefaultAuditStrategy
|
This property defines the audit strategy that should be used when persisting audit data. By default, only the revision where an entity was modified is stored. Alternatively,
org.hibernate.envers.strategy.ValidityAuditStrategy stores both the start revision and the end revision. Together, these define when an audit row was valid.
|
|
org.hibernate.envers.audit_strategy_validity_end_rev_field_name
|
REVEND
|
The column name that will hold the end revision number in audit entities. This property is only valid if the validity audit strategy is used.
|
|
org.hibernate.envers.audit_strategy_validity_store_revend_timestamp
|
false
|
This property defines whether the timestamp of the end revision, where the data was last valid, should be stored in addition to the end revision itself. This is useful to be able to purge old audit records out of a relational database by using table partitioning. Partitioning requires a column that exists within the table. This property is only evaluated if the
ValidityAuditStrategy is used.
|
|
org.hibernate.envers.audit_strategy_validity_revend_timestamp_field_name
|
REVEND_TSTMP
|
Column name of the timestamp of the end revision at which point the data was still valid. Only used if the
ValidityAuditStrategy is used, and org.hibernate.envers.audit_strategy_validity_store_revend_timestamp evaluates to true.
|
13.7.6. Queries
13.7.6.1. Retrieve Auditing Information
Hibernate Envers provides the functionality to retrieve audit information through queries. This topic provides examples of those queries.
Note
live data, as they involve correlated subselects.
Example 13.33. Querying for Entities of a Class at a Given Revision
AuditQuery query = getAuditReader()
.createQuery()
.forEntitiesAtRevision(MyEntity.class, revisionNumber);AuditEntity factory class. The query below only selects entities where the name property is equal to John:
query.add(AuditEntity.property("name").eq("John"));query.add(AuditEntity.property("address").eq(relatedEntityInstance));
// or
query.add(AuditEntity.relatedId("address").eq(relatedEntityId));List personsAtAddress = getAuditReader().createQuery()
.forEntitiesAtRevision(Person.class, 12)
.addOrder(AuditEntity.property("surname").desc())
.add(AuditEntity.relatedId("address").eq(addressId))
.setFirstResult(4)
.setMaxResults(2)
.getResultList();Example 13.34. Query Revisions where Entities of a Given Class Changed
AuditQuery query = getAuditReader().createQuery()
.forRevisionsOfEntity(MyEntity.class, false, true);AuditEntity.revisionNumber()- Specify constraints, projections and order on the revision number in which the audited entity was modified.
AuditEntity.revisionProperty(propertyName)- Specify constraints, projections and order on a property of the revision entity, corresponding to the revision in which the audited entity was modified.
AuditEntity.revisionType()- Provides accesses to the type of the revision (ADD, MOD, DEL).
MyEntity class, with the entityId ID has changed, after revision number 42:
Number revision = (Number) getAuditReader().createQuery()
.forRevisionsOfEntity(MyEntity.class, false, true)
.setProjection(AuditEntity.revisionNumber().min())
.add(AuditEntity.id().eq(entityId))
.add(AuditEntity.revisionNumber().gt(42))
.getSingleResult();actualDate for a given entity was larger than a given value, but as small as possible:
Number revision = (Number) getAuditReader().createQuery()
.forRevisionsOfEntity(MyEntity.class, false, true)
// We are only interested in the first revision
.setProjection(AuditEntity.revisionNumber().min())
.add(AuditEntity.property("actualDate").minimize()
.add(AuditEntity.property("actualDate").ge(givenDate))
.add(AuditEntity.id().eq(givenEntityId)))
.getSingleResult();minimize() and maximize() methods return a criteria, to which constraints can be added, which must be met by the entities with the maximized/minimized properties.
selectEntitiesOnly- This parameter is only valid when an explicit projection is not set.If true, the result of the query will be a list of entities that changed at revisions satisfying the specified constraints.If false, the result will be a list of three element arrays. The first element will be the changed entity instance. The second will be an entity containing revision data. If no custom entity is used, this will be an instance of
DefaultRevisionEntity. The third element array will be the type of the revision (ADD, MOD, DEL). selectDeletedEntities- This parameter specifies if revisions in which the entity was deleted must be included in the results. If true, the entities will have the revision type
DEL, and all fields, except id, will have the valuenull.
Example 13.35. Query Revisions of an Entity that Modified a Given Property
MyEntity with a given id, where the actualDate property has been changed.
AuditQuery query = getAuditReader().createQuery()
.forRevisionsOfEntity(MyEntity.class, false, true)
.add(AuditEntity.id().eq(id));
.add(AuditEntity.property("actualDate").hasChanged())hasChanged condition can be combined with additional criteria. The query below will return a horizontal slice for MyEntity at the time the revisionNumber was generated. It will be limited to the revisions that modified prop1, but not prop2.
AuditQuery query = getAuditReader().createQuery()
.forEntitiesAtRevision(MyEntity.class, revisionNumber)
.add(AuditEntity.property("prop1").hasChanged())
.add(AuditEntity.property("prop2").hasNotChanged());MyEntities changed in revisionNumber with prop1 modified and prop2 untouched."
forEntitiesModifiedAtRevision query:
AuditQuery query = getAuditReader().createQuery()
.forEntitiesModifiedAtRevision(MyEntity.class, revisionNumber)
.add(AuditEntity.property("prop1").hasChanged())
.add(AuditEntity.property("prop2").hasNotChanged());Example 13.36. Query Entities Modified in a Given Revision
Set<Pair<String, Class>> modifiedEntityTypes = getAuditReader()
.getCrossTypeRevisionChangesReader().findEntityTypes(revisionNumber); org.hibernate.envers.CrossTypeRevisionChangesReader:
List<Object> findEntities(Number)- Returns snapshots of all audited entities changed (added, updated and removed) in a given revision. Executes
n+1SQL queries, wherenis a number of different entity classes modified within the specified revision. List<Object> findEntities(Number, RevisionType)- Returns snapshots of all audited entities changed (added, updated or removed) in a given revision filtered by modification type. Executes
n+1SQL queries, wherenis a number of different entity classes modified within specified revision. Map<RevisionType, List<Object>> findEntitiesGroupByRevisionType(Number)- Returns a map containing lists of entity snapshots grouped by modification operation (e.g. addition, update and removal). Executes
3n+1SQL queries, wherenis a number of different entity classes modified within specified revision.
13.8. Performance Tuning
13.8.1. Alternative Batch Loading Algorithms
- Per-Class LevelWhen Hibernate loads data on a per-class level, it requires the batch size of the association to pre-load when queried. For example, consider that at runtime you have 30 instances of a
carobject loaded in session. Eachcarobject belongs to anownerobject. If you were to iterate through all thecarobjects and request their owners, withlazyloading, Hibernate will issue 30 select statements - one for each owner. This is a performance bottleneck.You can instead, tell Hibernate to pre-load the data for the next batch of owners before they have been sought via a query. When anownerobject has been queried, Hibernate will query many more of these objects in the same SELECT statement.The number ofownerobjects to query in advance depends upon thebatch-sizeparameter specified at configuration time:<class name="owner" batch-size="10"></class>This tells Hibernate to query at least 10 moreownerobjects in expectation of them being needed in the near future. When a user queries theownerofcar A, theownerofcar Bmay already have been loaded as part of batch loading. When the user actually needs theownerofcar B, instead of going to the database (and issuing a SELECT statement), the value can be retrieved from the current session.In addition to thebatch-sizeparameter, Hibernate 4.2.0 has introduced a new configuration item to improve in batch loading performance. The configuration item is calledBatch Fetch Styleconfiguration and specified by thehibernate.batch_fetch_styleparameter.Three different batch fetch styles are supported: LEGACY, PADDED and DYNAMIC. To specify which style to use, useorg.hibernate.cfg.AvailableSettings#BATCH_FETCH_STYLE.- LEGACY: In the legacy style of loading, a set of pre-built batch sizes based on
ArrayHelper.getBatchSizes(int)are utilized. Batches are loaded using the next-smaller pre-built batch size from the number of existing batchable identifiers.Continuing with the above example, with abatch-sizesetting of 30, the pre-built batch sizes would be [30, 15, 10, 9, 8, 7, .., 1]. An attempt to batch load 29 identifiers would result in batches of 15, 10, and 4. There will be 3 corresponding SQL queries, each loading 15, 10 and 4 owners from the database. - PADDED - Padded is similar to LEGACY style of batch loading. It still utilizes pre-built batch sizes, but uses the next-bigger batch size and pads the extra identifier placeholders.As with the example above, if 30 owner objects are to be initialized, there will only be one query executed against the database.However, if 29 owner objects are to be initialized, Hibernate will still execute only 1 SQL select statement of batch size 30, with the extra space padded with a repeated identifier.
- Dynamic - While still conforming to batch-size restrictions, this style of batch loading dynamically builds its SQL SELECT statement using the actual number of objects to be loaded.For example, for 30 owner objects, and a maximum batch size of 30, a call to retrieve 30 owner objects will result in one SQL SELECT statement. A call to retrieve 35 will result in two SQL statements, of batch sizes 30 and 5 respectively. Hibernate will dynamically alter the second SQL statement to keep at 5, the required number, while still remaining under the restriction of 30 as the batch-size. This is different to the PADDED version, as the second SQL will not get PADDED, and unlike the LEGACY style, there is no fixed size for the second SQL statement - the second SQL is created dynamically.For a query of less than 30 identifiers, this style will dynamically only load the number of identifiers requested.
- Per-Collection LevelHibernate can also batch load collections honoring the batch fetch size and styles as listed in the per-class section above.To reverse the example used in the previous section, consider that you need to load all the
carobjects owned by eachownerobject. If 10ownerobjects are loaded in the current session iterating through all owners will generate 10 SELECT statements, one for every call togetCars()method. If you enable batch fetching for the cars collection in the mapping of Owner, Hibernate can pre-fetch these collections, as shown below.<class name="Owner"><set name="cars" batch-size="5"></set></class>Thus, with a batch-size of 5 and using legacy batch style to load 10 collections, Hibernate will execute two SELECT statements, each retrieving 5 collections.
13.8.2. Second Level Caching of Object References for Non-mutable Data
hibernate.cache.use_reference_entries to true. By default, hibernate.cache.use_reference_entries is set to false.
hibernate.cache.use_reference_entries is set to true, an immutable data object that does not have any associations is not copied into the second-level cache, and only a reference to it is stored.
Warning
hibernate.cache.use_reference_entries is set to true, immutable data objects with associations are still deep copied into the second-level cache.
Chapter 14. Hibernate Search
14.1. Getting Started with Hibernate Search
14.1.1. About Hibernate Search
14.1.2. First Steps with Hibernate Search
- See Configuration in the JBoss EAP Administration and Configuration Guide to configure Hibernate Search.
14.1.3. Enable Hibernate Search using Maven
hibernate-search-orm dependencies:
<dependencyManagement>
<dependencies>
<dependency>
<groupId>org.hibernate</groupId>
<artifactId>hibernate-search-orm</artifactId>
<version>4.6.0.Final-redhat-2</version>
</dependency>
</dependencies>
</dependencyManagement>
<dependencies>
<dependency>
<groupId>org.hibernate</groupId>
<artifactId>hibernate-search-orm</artifactId>
<scope>provided</scope>
</dependency>
</dependencies>14.1.4. Add Annotations
example.Book and example.Author and you want to add free text search capabilities to your application to enable searching for books.
Example 14.1. Entities Book and Author Before Adding Hibernate Search Specific Annotations
package example;
...
@Entity
public class Book {
@Id
@GeneratedValue
private Integer id;
private String title;
private String subtitle;
@ManyToMany
private Set<Author> authors = new HashSet<Author>();
private Date publicationDate;
public Book() {}
// standard getters/setters follow here
...
}package example;
...
@Entity
public class Author {
@Id
@GeneratedValue
private Integer id;
private String name;
public Author() {}
// standard getters/setters follow here
...
}Book and Author class. The first annotation @Indexed marks Book as indexable. By design Hibernate Search stores an untokenized ID in the index to ensure index unicity for a given entity. @DocumentId marks the property to use for this purpose and is in most cases the same as the database primary key. The @DocumentId annotation is optional in the case where an @Id annotation exists.
title and subtitle and annotate both with @Field. The parameter index=Index.YES will ensure that the text will be indexed, while analyze=Analyze.YES ensures that the text will be analyzed using the default Lucene analyzer. Usually, analyzing means chunking a sentence into individual words and potentially excluding common words like 'a' or 'the'. We will talk more about analyzers a little later on. The third parameter we specify within @Field, store=Store.NO, ensures that the actual data will not be stored in the index. Whether this data is stored in the index or not has nothing to do with the ability to search for it. From Lucene's perspective it is not necessary to keep the data once the index is created. The benefit of storing it is the ability to retrieve it via projections ( see Section 14.3.1.10.5, “Projection”).
index=Index.YES, analyze=Analyze.YES and store=Store.NO are the default values for these parameters and could be omitted.
@DateBridge. This annotation is one of the built-in field bridges in Hibernate Search. The Lucene index is purely string based. For this reason Hibernate Search must convert the data types of the indexed fields to strings and vice-versa. A range of predefined bridges are provided, including the DateBridge which will convert a java.util.Date into a String with the specified resolution. For more details see Section 14.2.4, “Bridges”.
@IndexedEmbedded.This annotation is used to index associated entities (@ManyToMany, @*ToOne, @Embedded and @ElementCollection) as part of the owning entity. This is needed since a Lucene index document is a flat data structure which does not know anything about object relations. To ensure that the authors' name will be searchable you have to ensure that the names are indexed as part of the book itself. On top of @IndexedEmbedded you will also have to mark all fields of the associated entity you want to have included in the index with @Indexed. For more details see Section 14.2.1.3, “Embedded and Associated Objects”
Example 14.2. Entities After Adding Hibernate Search Annotations
package example;
...
@Entity
@Indexed
public class Book {
@Id
@GeneratedValue
private Integer id;
@Field(index=Index.YES, analyze=Analyze.YES, store=Store.NO)
private String title;
@Field(index=Index.YES, analyze=Analyze.YES, store=Store.NO)
private String subtitle;
@Field(index = Index.YES, analyze=Analyze.NO, store = Store.YES)
@DateBridge(resolution = Resolution.DAY)
private Date publicationDate;
@IndexedEmbedded
@ManyToMany
private Set<Author> authors = new HashSet<Author>();
public Book() {
}
// standard getters/setters follow here
...
}package example;
...
@Entity
public class Author {
@Id
@GeneratedValue
private Integer id;
@Field
private String name;
public Author() {
}
// standard getters/setters follow here
...
}14.1.5. Indexing
Example 14.3. Using the Hibernate Session to Index Data
FullTextSession fullTextSession = org.hibernate.search.Search.getFullTextSession(session);
fullTextSession.createIndexer().startAndWait();Example 14.4. Using JPA to Index Data
EntityManager em = entityManagerFactory.createEntityManager();
FullTextEntityManager fullTextEntityManager = org.hibernate.search.jpa.Search.getFullTextEntityManager(em);
fullTextEntityManager.createIndexer().startAndWait();/var/lucene/indexes/example.Book. Go ahead an inspect this index with Luke. It will help you to understand how Hibernate Search works.
14.1.6. Searching
org.hibernate.Query to get the required functionality from the Hibernate API. The following code prepares a query against the indexed fields. Executing the code returns a list of Books.
Example 14.5. Using a Hibernate Search Session to Create and Execute a Search
FullTextSession fullTextSession = Search.getFullTextSession(session);
Transaction tx = fullTextSession.beginTransaction();
// create native Lucene query using the query DSL
// alternatively you can write the Lucene query using the Lucene query parser
// or the Lucene programmatic API. The Hibernate Search DSL is recommended though
QueryBuilder qb = fullTextSession.getSearchFactory()
.buildQueryBuilder().forEntity( Book.class ).get();
org.apache.lucene.search.Query query = qb
.keyword()
.onFields("title", "subtitle", "authors.name", "publicationDate")
.matching("Java rocks!")
.createQuery();
// wrap Lucene query in a org.hibernate.Query
org.hibernate.Query hibQuery =
fullTextSession.createFullTextQuery(query, Book.class);
// execute search
List result = hibQuery.list();
tx.commit();
session.close();Example 14.6. Using JPA to Create and Execute a Search
EntityManager em = entityManagerFactory.createEntityManager();
FullTextEntityManager fullTextEntityManager =
org.hibernate.search.jpa.Search.getFullTextEntityManager(em);
em.getTransaction().begin();
// create native Lucene query using the query DSL
// alternatively you can write the Lucene query using the Lucene query parser
// or the Lucene programmatic API. The Hibernate Search DSL is recommended though
QueryBuilder qb = fullTextEntityManager.getSearchFactory()
.buildQueryBuilder().forEntity( Book.class ).get();
org.apache.lucene.search.Query query = qb
.keyword()
.onFields("title", "subtitle", "authors.name", "publicationDate")
.matching("Java rocks!")
.createQuery();
// wrap Lucene query in a javax.persistence.Query
javax.persistence.Query persistenceQuery =
fullTextEntityManager.createFullTextQuery(query, Book.class);
// execute search
List result = persistenceQuery.getResultList();
em.getTransaction().commit();
em.close();14.1.7. Analyzer
Refactoring: Improving the Design of Existing Code and that hits are required for the following queries: refactor, refactors, refactored, and refactoring. Select an analyzer class in Lucene that applies word stemming when indexing and searching. Hibernate Search offers several ways to configure the analyzer (see Section 14.2.3.1, “Default Analyzer and Analyzer by Class” for more information):
- Set the
analyzerproperty in the configuration file. The specified class becomes the default analyzer. - Set the
@Analyzer - Set the
@annotation at the field level.Analyzer
@AnalyzerDef annotation with the @Analyzer annotation. The Solr analyzer framework with its factories are utilized for the latter option. For more information about factory classes, see the Solr JavaDoc or read the corresponding section on the Solr Wiki (http://wiki.apache.org/solr/AnalyzersTokenizersTokenFilters)
StandardTokenizerFactory is used by two filter factories: LowerCaseFilterFactory and SnowballPorterFilterFactory. The tokenizer splits words at punctuation characters and hyphens but keeping email addresses and internet hostnames intact. The standard tokenizer is ideal for this and other general operations. The lowercase filter converts all letters in the token into lowercase and the snowball filter applies language specific stemming.
Example 14.7. Using @AnalyzerDef and the Solr Framework to Define and Use an Analyzer
@Indexed
@AnalyzerDef(
name = "customanalyzer",
tokenizer = @TokenizerDef(factory = StandardTokenizerFactory.class),
filters = {
@TokenFilterDef(factory = LowerCaseFilterFactory.class),
@TokenFilterDef(factory = SnowballPorterFilterFactory.class,
params = { @Parameter(name = "language", value = "English") })
})
public class Book implements Serializable {
@Field
@Analyzer(definition = "customanalyzer")
private String title;
@Field
@Analyzer(definition = "customanalyzer")
private String subtitle;
@IndexedEmbedded
private Set authors = new HashSet();
@Field(index = Index.YES, analyze = Analyze.NO, store = Store.YES)
@DateBridge(resolution = Resolution.DAY)
private Date publicationDate;
public Book() {
}
// standard getters/setters follow here
...
}@AnalyzerDef to define an analyzer, then apply it to entities and properties using @Analyzer. In the example, the customanalyzer is defined but not applied on the entity. The analyzer is only applied to the title and subtitle properties. An analyzer definition is global. Define the analyzer for an entity and reuse the definition for other entities as required.
14.2. Mapping Entities to the Index Structure
14.2.1. Mapping an Entity
14.2.1.1. Basic Mapping
- @Indexed
- @Field
- @NumericField
- @Id
14.2.1.1.1. @Indexed
@Indexed (all entities not annotated with @Indexed will be ignored by the indexing process):
Example 14.8. Making a class indexable with @Indexed
@Entity
@Indexed
public class Essay {
...
}index attribute of the @Indexed annotation to change the default name of the index.
14.2.1.1.2. @Field
@Field does declare a property as indexed and allows to configure several aspects of the indexing process by setting one or more of the following attributes:
name: describe under which name, the property should be stored in the Lucene Document. The default value is the property name (following the JavaBeans convention)store: describe whether or not the property is stored in the Lucene index. You can store the valueStore.YES(consuming more space in the index but allowing projection, see Section 14.3.1.10.5, “Projection”), store it in a compressed wayStore.COMPRESS(this does consume more CPU), or avoid any storageStore.NO(this is the default value). When a property is stored, you can retrieve its original value from the Lucene Document. This is not related to whether the element is indexed or not.index: describe whether the property is indexed or not. The different values areIndex.NO(no indexing, ie cannot be found by a query),Index.YES(the element gets indexed and is searchable). The default value isIndex.YES.Index.NOcan be useful for cases where a property is not required to be searchable, but should be available for projection.Note
Index.NOin combination withAnalyze.YESorNorms.YESis not useful, sinceanalyzeandnormsrequire the property to be indexedanalyze: determines whether the property is analyzed (Analyze.YES) or not (Analyze.NO). The default value isAnalyze.YES.Note
Whether or not you want to analyze a property depends on whether you wish to search the element as is, or by the words it contains. It make sense to analyze a text field, but probably not a date field.Note
Fields used for sorting must not be analyzed.norms: describes whether index time boosting information should be stored (Norms.YES) or not (Norms.NO). Not storing it can save a considerable amount of memory, but there won't be any index time boosting information available. The default value isNorms.YES.termVector: describes collections of term-frequency pairs. This attribute enables the storing of the term vectors within the documents during indexing. The default value isTermVector.NO.The different values of this attribute are:Expand Value Definition TermVector.YES Store the term vectors of each document. This produces two synchronized arrays, one contains document terms and the other contains the term's frequency. TermVector.NO Do not store term vectors. TermVector.WITH_OFFSETS Store the term vector and token offset information. This is the same as TermVector.YES plus it contains the starting and ending offset position information for the terms. TermVector.WITH_POSITIONS Store the term vector and token position information. This is the same as TermVector.YES plus it contains the ordinal positions of each occurrence of a term in a document. TermVector.WITH_POSITION_OFFSETS Store the term vector, token position and offset information. This is a combination of the YES, WITH_OFFSETS and WITH_POSITIONS. indexNullAs: Per default null values are ignored and not indexed. However, usingindexNullAsyou can specify a string which will be inserted as token for thenullvalue. Per default this value is set toField.DO_NOT_INDEX_NULLindicating thatnullvalues should not be indexed. You can set this value toField.DEFAULT_NULL_TOKENto indicate that a defaultnulltoken should be used. This defaultnulltoken can be specified in the configuration usinghibernate.search.default_null_token. If this property is not set and you specifyField.DEFAULT_NULL_TOKENthe string "_null_" will be used as default.Note
When theindexNullAsparameter is used it is important to use the same token in the search query to search fornullvalues. It is also advisable to use this feature only with un-analyzed fields (analyze=Analyze.NOWarning
When implementing a customFieldBridgeorTwoWayFieldBridgeit is up to the developer to handle the indexing of null values (see JavaDocs ofLuceneOptions.indexNullAs()).
14.2.1.1.3. @NumericField
@Field called @NumericField that can be specified in the same scope as @Field or @DocumentId. It can be specified for Integer, Long, Float, and Double properties. At index time the value will be indexed using a Trie structure. When a property is indexed as numeric field, it enables efficient range query and sorting, orders of magnitude faster than doing the same query on standard @Field properties. The @NumericField annotation accept the following parameters:
| Value | Definition |
|---|---|
| forField | (Optional) Specify the name of the related @Field that will be indexed as numeric. It's only mandatory when the property contains more than a @Field declaration |
| precisionStep | (Optional) Change the way that the Trie structure is stored in the index. Smaller precisionSteps lead to more disk space usage and faster range and sort queries. Larger values lead to less space used and range query performance more close to the range query in normal @Fields. Default value is 4. |
@NumericField supports only Double, Long, Integer and Float. It is not possible to take any advantage from similar functionality in Lucene for the other numeric types, so remaining types should use the string encoding via the default or custom TwoWayFieldBridge.
NumericFieldBridge assuming you can deal with the approximation during type transformation:
Example 14.9. Defining a custom NumericFieldBridge
public class BigDecimalNumericFieldBridge extends NumericFieldBridge {
private static final BigDecimal storeFactor = BigDecimal.valueOf(100);
@Override
public void set(String name, Object value, Document document, LuceneOptions luceneOptions) {
if ( value != null ) {
BigDecimal decimalValue = (BigDecimal) value;
Long indexedValue = Long.valueOf( decimalValue.multiply( storeFactor ).longValue() );
luceneOptions.addNumericFieldToDocument( name, indexedValue, document );
}
}
@Override
public Object get(String name, Document document) {
String fromLucene = document.get( name );
BigDecimal storedBigDecimal = new BigDecimal( fromLucene );
return storedBigDecimal.divide( storeFactor );
}
}
14.2.1.1.4. @Id
id (identifier) property of an entity is a special property used by Hibernate Search to ensure index uniqueness of a given entity. By design, an id must be stored and must not be tokenized. To mark a property as an index identifier, use the @DocumentId annotation. If you are using JPA and you have specified @Id you can omit @DocumentId. The chosen entity identifier will also be used as the document identifier.
Example 14.10. Specifying indexed properties
@Entity
@Indexed
public class Essay {
...
@Id
@DocumentId
public Long getId() { return id; }
@Field(name="Abstract", store=Store.YES)
public String getSummary() { return summary; }
@Lob
@Field
public String getText() { return text; }
@Field @NumericField( precisionStep = 6)
public float getGrade() { return grade; }
}id , Abstract, text and grade . Note that by default the field name is not capitalized, following the JavaBean specification. The grade field is annotated as numeric with a slightly larger precision step than the default.
14.2.1.2. Mapping Properties Multiple Times
Example 14.11. Using @Fields to map a property multiple times
@Entity
@Indexed(index = "Book" )
public class Book {
@Fields( {
@Field,
@Field(name = "summary_forSort", analyze = Analyze.NO, store = Store.YES)
} )
public String getSummary() {
return summary;
}
...
}summary is indexed twice, once as summary in a tokenized way, and once as summary_forSort in an untokenized way.
14.2.1.3. Embedded and Associated Objects
address.city:Atlanta). The place fields will be indexed in the Place index. The Place index documents will also contain the fields address.id, address.street, and address.city which you will be able to query.
Example 14.12. Indexing associations
@Entity
@Indexed
public class Place {
@Id
@GeneratedValue
@DocumentId
private Long id;
@Field
private String name;
@OneToOne( cascade = { CascadeType.PERSIST, CascadeType.REMOVE } )
@IndexedEmbedded
private Address address;
....
}
@Entity
public class Address {
@Id
@GeneratedValue
private Long id;
@Field
private String street;
@Field
private String city;
@ContainedIn
@OneToMany(mappedBy="address")
private Set<Place> places;
...
}@IndexedEmbedded technique, Hibernate Search must be aware of any change in the Place object and any change in the Address object to keep the index up to date. To ensure the PlaceAddress changes, mark the other side of the bidirectional relationship with @ContainedIn.
Note
@ContainedIn is useful on both associations pointing to entities and on embedded (collection of) objects.
Example 14.13. Nested usage of @IndexedEmbedded and @ContainedIn
@Entity
@Indexed
public class Place {
@Id
@GeneratedValue
@DocumentId
private Long id;
@Field
private String name;
@OneToOne( cascade = { CascadeType.PERSIST, CascadeType.REMOVE } )
@IndexedEmbedded
private Address address;
....
}
@Entity
public class Address {
@Id
@GeneratedValue
private Long id;
@Field
private String street;
@Field
private String city;
@IndexedEmbedded(depth = 1, prefix = "ownedBy_")
private Owner ownedBy;
@ContainedIn
@OneToMany(mappedBy="address")
private Set<Place> places;
...
}
@Embeddable
public class Owner {
@Field
private String name;
...
}@*ToMany, @*ToOne and @Embedded attribute can be annotated with @IndexedEmbedded. The attributes of the associated class will then be added to the main entity index. In Example 14.13, “Nested usage of @IndexedEmbedded and @ContainedIn” the index will contain the following fields:
- id
- name
- address.street
- address.city
- address.ownedBy_name
propertyName., following the traditional object navigation convention. You can override it using the prefix attribute as it is shown on the ownedBy property.
Note
depth property is necessary when the object graph contains a cyclic dependency of classes (not instances). For example, if Owner points to Place. Hibernate Search will stop including Indexed embedded attributes after reaching the expected depth (or the object graph boundaries are reached). A class having a self reference is an example of cyclic dependency. In our example, because depth is set to 1, any @IndexedEmbedded attribute in Owner (if any) will be ignored.
@IndexedEmbedded for object associations allows you to express queries (using Lucene's query syntax) such as:
- Return places where name contains JBoss and where address city is Atlanta. In Lucene query this would be
+name:jboss +address.city:atlanta - Return places where name contains JBoss and where owner's name contain Joe. In Lucene query this would be
+name:jboss +address.ownedBy_name:joe
Note
@Indexed
@ContainedIn (as seen in the previous example). If not, Hibernate Search has no way to update the root index when the associated entity is updated (in our example, a Place index document has to be updated when the associated Address instance is updated).
@IndexedEmbedded is not the object type targeted by Hibernate and Hibernate Search. This is especially the case when interfaces are used in lieu of their implementation. For this reason you can override the object type targeted by Hibernate Search using the targetElement parameter.
Example 14.14. Using the targetElement property of @IndexedEmbedded
@Entity
@Indexed
public class Address {
@Id
@GeneratedValue
@DocumentId
private Long id;
@Field
private String street;
@IndexedEmbedded(depth = 1, prefix = "ownedBy_", targetElement = Owner.class)
@Target(Owner.class)
private Person ownedBy;
...
}
@Embeddable
public class Owner implements Person { ... }14.2.1.4. Limiting Object Embedding to Specific Paths
@IndexedEmbedded annotation provides also an attribute includePaths which can be used as an alternative to depth, or be combined with it.
depth all indexed fields of the embedded type will be added recursively at the same depth. This makes it harder to select only a specific path without adding all other fields as well, which might not be needed.
includePaths property of @IndexedEmbedded”
Example 14.15. Using the includePaths property of @IndexedEmbedded
@Entity
@Indexed
public class Person {
@Id
public int getId() {
return id;
}
@Field
public String getName() {
return name;
}
@Field
public String getSurname() {
return surname;
}
@OneToMany
@IndexedEmbedded(includePaths = { "name" })
public Set<Person> getParents() {
return parents;
}
@ContainedIn
@ManyToOne
public Human getChild() {
return child;
}
...//other fields omittedincludePaths property of @IndexedEmbedded”, you would be able to search on a Person by name and/or surname, and/or the name of the parent. It will not index the surname of the parent, so searching on parent's surnames will not be possible but speeds up indexing, saves space and improve overall performance.
@IndexedEmbeddedincludePaths will include the specified paths in addition to what you would index normally specifying a limited value for depth. When using includePaths, and leaving depth undefined, behavior is equivalent to setting depth=0: only the included paths are indexed.
Example 14.16. Using the includePaths property of @IndexedEmbedded
@Entity
@Indexed
public class Human {
@Id
public int getId() {
return id;
}
@Field
public String getName() {
return name;
}
@Field
public String getSurname() {
return surname;
}
@OneToMany
@IndexedEmbedded(depth = 2, includePaths = { "parents.parents.name" })
public Set<Human> getParents() {
return parents;
}
@ContainedIn
@ManyToOne
public Human getChild() {
return child;
}
...//other fields omittedincludePaths property of @IndexedEmbedded”, every human will have its name and surname attributes indexed. The name and surname of parents will also be indexed, recursively up to second line because of the depth attribute. It will be possible to search by name or surname, of the person directly, his parents or of his grand parents. Beyond the second level, we will in addition index one more level but only the name, not the surname.
id- as primary key_hibernate_class- stores entity typename- as direct fieldsurname- as direct fieldparents.name- as embedded field at depth 1parents.surname- as embedded field at depth 1parents.parents.name- as embedded field at depth 2parents.parents.surname- as embedded field at depth 2parents.parents.parents.name- as additional path as specified byincludePaths. The firstparents.is inferred from the field name, the remaining path is the attribute ofincludePaths
14.2.2. Boosting
14.2.2.1. Static Index Time Boosting
@Boost annotation. You can use this annotation within @Field or specify it directly on method or class level.
Example 14.17. Different ways of using @Boost
@Entity
@Indexed
@Boost(1.7f)
public class Essay {
...
@Id
@DocumentId
public Long getId() { return id; }
@Field(name="Abstract", store=Store.YES, boost=@Boost(2f))
@Boost(1.5f)
public String getSummary() { return summary; }
@Lob
@Field(boost=@Boost(1.2f))
public String getText() { return text; }
@Field
public String getISBN() { return isbn; }
}Essay's probability to reach the top of the search list will be multiplied by 1.7. The summary field will be 3.0 (2 * 1.5, because @Field.boost and @Boost on a property are cumulative) more important than the isbn field. The text field will be 1.2 times more important than the isbn field. Note that this explanation is wrong in strictest terms, but it is simple and close enough to reality for all practical purposes.
14.2.2.2. Dynamic Index Time Boosting
@Boost annotation used in Section 14.2.2.1, “Static Index Time Boosting” defines a static boost factor which is independent of the state of the indexed entity at runtime. However, there are usecases in which the boost factor may depend on the actual state of the entity. In this case you can use the @DynamicBoost annotation together with an accompanying custom BoostStrategy.
Example 14.18. Dynamic boost example
public enum PersonType {
NORMAL,
VIP
}
@Entity
@Indexed
@DynamicBoost(impl = VIPBoostStrategy.class)
public class Person {
private PersonType type;
// ....
}
public class VIPBoostStrategy implements BoostStrategy {
public float defineBoost(Object value) {
Person person = ( Person ) value;
if ( person.getType().equals( PersonType.VIP ) ) {
return 2.0f;
}
else {
return 1.0f;
}
}
}VIPBoostStrategy as implementation of the BoostStrategy interface to be used at indexing time. You can place the @DynamicBoost either at class or field level. Depending on the placement of the annotation either the whole entity is passed to the defineBoost method or just the annotated field/property value. It's up to you to cast the passed object to the correct type. In the example all indexed values of a VIP person would be double as important as the values of a normal person.
Note
BoostStrategy implementation must define a public no-arg constructor.
@Boost and @DynamicBoost annotations in your entity. All defined boost factors are cumulative.
14.2.3. Analysis
Analysis is the process of converting text into single terms (words) and can be considered as one of the key features of a full-text search engine. Lucene uses the concept of Analyzers to control this process. In the following section we cover the multiple ways Hibernate Search offers to configure the analyzers.
14.2.3.1. Default Analyzer and Analyzer by Class
hibernate.search.analyzer property. The default value for this property is org.apache.lucene.analysis.standard.StandardAnalyzer.
Example 14.19. Different ways of using @Analyzer
@Entity
@Indexed
@Analyzer(impl = EntityAnalyzer.class)
public class MyEntity {
@Id
@GeneratedValue
@DocumentId
private Integer id;
@Field
private String name;
@Field
@Analyzer(impl = PropertyAnalyzer.class)
private String summary;
@Field( analyzer = @Analyzer(impl = FieldAnalyzer.class )
private String body;
...
}EntityAnalyzer is used to index tokenized property (name), except summary and body which are indexed with PropertyAnalyzer and FieldAnalyzer respectively.
Warning
14.2.3.2. Named Analyzers
@Analyzer declarations and is composed of:
- a name: the unique string used to refer to the definition
- a list of char filters: each char filter is responsible to pre-process input characters before the tokenization. Char filters can add, change, or remove characters; one common usage is for characters normalization
- a tokenizer: responsible for tokenizing the input stream into individual words
- a list of filters: each filter is responsible to remove, modify, or sometimes even add words into the stream provided by the tokenizer
Tokenizer starts the tokenizing process by turning the character input into tokens which are then further processed by the TokenFilters. Hibernate Search supports this infrastructure by utilizing the Solr analyzer framework.
Note
lucene-snowball jar and for the PhoneticFilterFactory you need the commons-codec jar. Your distribution of Hibernate Search provides these dependencies in its lib/optional directory.
<dependency>
<groupId>org.hibernate</groupId>
<artifactId>hibernate-search-analyzers</artifactId>
<version>4.6.0.Final-redhat-2</version>
<scope>provided</scope>
<dependency>@AnalyzerDef and the Solr framework”. First a char filter is defined by its factory. In our example, a mapping char filter is used, and will replace characters in the input based on the rules specified in the mapping file. Next a tokenizer is defined. This example uses the standard tokenizer. Last but not least, a list of filters is defined by their factories. In our example, the StopFilter filter is built reading the dedicated words property file. The filter is also expected to ignore case.
Example 14.20. @AnalyzerDef and the Solr framework
@AnalyzerDef(name="customanalyzer",
charFilters = {
@CharFilterDef(factory = MappingCharFilterFactory.class, params = {
@Parameter(name = "mapping",
value = "org/hibernate/search/test/analyzer/solr/mapping-chars.properties")
})
},
tokenizer = @TokenizerDef(factory = StandardTokenizerFactory.class),
filters = {
@TokenFilterDef(factory = ISOLatin1AccentFilterFactory.class),
@TokenFilterDef(factory = LowerCaseFilterFactory.class),
@TokenFilterDef(factory = StopFilterFactory.class, params = {
@Parameter(name="words",
value= "org/hibernate/search/test/analyzer/solr/stoplist.properties" ),
@Parameter(name="ignoreCase", value="true")
})
})
public class Team {
...
}Note
@AnalyzerDef annotation. Order matters!
resource_charset parameter.
Example 14.21. Use a specific charset to load the property file
@AnalyzerDef(name="customanalyzer",
charFilters = {
@CharFilterDef(factory = MappingCharFilterFactory.class, params = {
@Parameter(name = "mapping",
value = "org/hibernate/search/test/analyzer/solr/mapping-chars.properties")
})
},
tokenizer = @TokenizerDef(factory = StandardTokenizerFactory.class),
filters = {
@TokenFilterDef(factory = ISOLatin1AccentFilterFactory.class),
@TokenFilterDef(factory = LowerCaseFilterFactory.class),
@TokenFilterDef(factory = StopFilterFactory.class, params = {
@Parameter(name="words",
value= "org/hibernate/search/test/analyzer/solr/stoplist.properties" ),
@Parameter(name="resource_charset", value = "UTF-16BE"),
@Parameter(name="ignoreCase", value="true")
})
})
public class Team {
...
}@Analyzer declaration as seen in Example 14.22, “Referencing an analyzer by name”.
Example 14.22. Referencing an analyzer by name
@Entity
@Indexed
@AnalyzerDef(name="customanalyzer", ... )
public class Team {
@Id
@DocumentId
@GeneratedValue
private Integer id;
@Field
private String name;
@Field
private String location;
@Field
@Analyzer(definition = "customanalyzer")
private String description;
}@AnalyzerDef are also available by their name in the SearchFactory which is quite useful when building queries.
Analyzer analyzer = fullTextSession.getSearchFactory().getAnalyzer("customanalyzer");14.2.3.3. Available Analyzers
| Factory | Description | Parameters | Additional dependencies |
|---|---|---|---|
MappingCharFilterFactory | Replaces one or more characters with one or more characters, based on mappings specified in the resource file | mapping: points to a resource file containing the mappings using the format:
| none |
HTMLStripCharFilterFactory | Remove HTML standard tags, keeping the text | none | none |
| Factory | Description | Parameters | Additional dependencies |
|---|---|---|---|
StandardTokenizerFactory | Use the Lucene StandardTokenizer | none | none |
HTMLStripCharFilterFactory | Remove HTML tags, keep the text and pass it to a StandardTokenizer. | none | solr-core |
PatternTokenizerFactory | Breaks text at the specified regular expression pattern. | pattern: the regular expression to use for tokenizing
group: says which pattern group to extract into tokens
| solr-core |
| Factory | Description | Parameters | Additional dependencies |
|---|---|---|---|
StandardFilterFactory | Remove dots from acronyms and 's from words | none | solr-core |
LowerCaseFilterFactory | Lowercases all words | none | solr-core |
StopFilterFactory | Remove words (tokens) matching a list of stop words | words: points to a resource file containing the stop words
ignoreCase: true if
case should be ignored when comparing stop words, false otherwise
| solr-core |
SnowballPorterFilterFactory | Reduces a word to it's root in a given language. (example: protect, protects, protection share the same root). Using such a filter allows searches matching related words. | language: Danish, Dutch, English, Finnish, French, German, Italian, Norwegian, Portuguese, Russian, Spanish, Swedish and a few more | solr-core |
ISOLatin1AccentFilterFactory | Remove accents for languages like French | none | solr-core |
PhoneticFilterFactory | Inserts phonetically similar tokens into the token stream | encoder: One of DoubleMetaphone, Metaphone, Soundex or RefinedSoundex
inject:
true will add tokens to the stream, false will replace the existing token
maxCodeLength: sets the maximum length of the code to be generated. Supported only for Metaphone and DoubleMetaphone encodings
| solr-core and commons-codec |
CollationKeyFilterFactory | Converts each token into its java.text.CollationKey, and then encodes the CollationKey with IndexableBinaryStringTools, to allow it to be stored as an index term. | custom, language, country, variant, strength, decomposition
For more information, see Lucene's
CollationKeyFilter javadocs
| solr-core and commons-io |
org.apache.solr.analysis.TokenizerFactory and org.apache.solr.analysis.TokenFilterFactory in your IDE to see the implementations available.
14.2.3.4. Dynamic Analyzer Selection
BlogEntry class for example the analyzer could depend on the language property of the entry. Depending on this property the correct language specific stemmer should be chosen to index the actual text.
AnalyzerDiscriminator annotation. Example 14.23, “Usage of @AnalyzerDiscriminator” demonstrates the usage of this annotation.
Example 14.23. Usage of @AnalyzerDiscriminator
@Entity
@Indexed
@AnalyzerDefs({
@AnalyzerDef(name = "en",
tokenizer = @TokenizerDef(factory = StandardTokenizerFactory.class),
filters = {
@TokenFilterDef(factory = LowerCaseFilterFactory.class),
@TokenFilterDef(factory = EnglishPorterFilterFactory.class
)
}),
@AnalyzerDef(name = "de",
tokenizer = @TokenizerDef(factory = StandardTokenizerFactory.class),
filters = {
@TokenFilterDef(factory = LowerCaseFilterFactory.class),
@TokenFilterDef(factory = GermanStemFilterFactory.class)
})
})
public class BlogEntry {
@Id
@GeneratedValue
@DocumentId
private Integer id;
@Field
@AnalyzerDiscriminator(impl = LanguageDiscriminator.class)
private String language;
@Field
private String text;
private Set<BlogEntry> references;
// standard getter/setter
...
}public class LanguageDiscriminator implements Discriminator {
public String getAnalyzerDefinitionName(Object value, Object entity, String field) {
if ( value == null || !( entity instanceof BlogEntry ) ) {
return null;
}
return (String) value;
}
}@AnalyzerDiscriminator is that all analyzers which are going to be used dynamically are predefined via @AnalyzerDef definitions. If this is the case, one can place the @AnalyzerDiscriminator annotation either on the class or on a specific property of the entity for which to dynamically select an analyzer. Via the impl parameter of the AnalyzerDiscriminator you specify a concrete implementation of the Discriminator interface. It is up to you to provide an implementation for this interface. The only method you have to implement is getAnalyzerDefinitionName() which gets called for each field added to the Lucene document. The entity which is getting indexed is also passed to the interface method. The value parameter is only set if the AnalyzerDiscriminator is placed on property level instead of class level. In this case the value represents the current value of this property.
Discriminator interface has to return the name of an existing analyzer definition or null if the default analyzer should not be overridden. Example 14.23, “Usage of @AnalyzerDiscriminator” assumes that the language parameter is either 'de' or 'en' which matches the specified names in the @AnalyzerDefs.
14.2.3.5. Retrieving an Analyzer
Note
Example 14.24. Using the scoped analyzer when building a full-text query
org.apache.lucene.queryParser.QueryParser parser = new QueryParser(
"title",
fullTextSession.getSearchFactory().getAnalyzer( Song.class )
);
org.apache.lucene.search.Query luceneQuery =
parser.parse( "title:sky Or title_stemmed:diamond" );
org.hibernate.Query fullTextQuery =
fullTextSession.createFullTextQuery( luceneQuery, Song.class );
List result = fullTextQuery.list(); //return a list of managed objectstitle and a stemming analyzer is used in the field title_stemmed. By using the analyzer provided by the search factory, the query uses the appropriate analyzer depending on the field targeted.
Note
@AnalyzerDef by their definition name using searchFactory.getAnalyzer(String).
14.2.4. Bridges
@Field have to be converted to strings to be indexed. The reason we have not mentioned it so far is, that for most of your properties Hibernate Search does the translation job for you thanks to set of built-in bridges. However, in some cases you need a more fine grained control over the translation process.
14.2.4.1. Built-in Bridges
- null
- Per default
nullelements are not indexed. Lucene does not support null elements. However, in some situation it can be useful to insert a custom token representing thenullvalue. See Section 14.2.1.1.2, “@Field” for more information. - java.lang.String
- Strings are indexed as are
- short, Short, integer, Integer, long, Long, float, Float, double, Double, BigInteger, BigDecimal
- Numbers are converted into their string representation. Note that numbers cannot be compared by Lucene (that is, used in ranged queries) out of the box: they have to be padded.
Note
Using a Range query has drawbacks, an alternative approach is to use a Filter query which will filter the result query to the appropriate range.Hibernate Search also supports the use of a custom StringBridge as described in Section 14.2.4.2, “Custom Bridges”. - java.util.Date
- Dates are stored as yyyyMMddHHmmssSSS in GMT time (200611072203012 for Nov 7th of 2006 4:03PM and 12ms EST). You shouldn't really bother with the internal format. What is important is that when using a TermRangeQuery, you should know that the dates have to be expressed in GMT time.Usually, storing the date up to the millisecond is not necessary.
@DateBridgedefines the appropriate resolution you are willing to store in the index (@DateBridge(resolution=Resolution.DAY)). The date pattern will then be truncated accordingly.@Entity @Indexed public class Meeting { @Field(analyze=Analyze.NO) @DateBridge(resolution=Resolution.MINUTE) private Date date; ...Warning
A Date whose resolution is lower thanMILLISECONDcannot be a@DocumentId.Important
The defaultDatebridge uses Lucene'sDateToolsto convert from and toString. This means that all dates are expressed in GMT time. If your requirements are to store dates in a fixed time zone you have to implement a custom date bridge. Make sure you understand the requirements of your applications regarding to date indexing and searching. - java.net.URI, java.net.URL
- URI and URL are converted to their string representation.
- java.lang.Class
- Class are converted to their fully qualified class name. The thread context class loader is used when the class is rehydrated.
14.2.4.2. Custom Bridges
14.2.4.2.1. StringBridge
Object to String bridge. To do so you need to implement the org.hibernate.search.bridge.StringBridge interface. All implementations have to be thread-safe as they are used concurrently.
Example 14.25. Custom StringBridge implementation
/**
* Padding Integer bridge.
* All numbers will be padded with 0 to match 5 digits
*
* @author Emmanuel Bernard
*/
public class PaddedIntegerBridge implements StringBridge {
private int PADDING = 5;
public String objectToString(Object object) {
String rawInteger = ( (Integer) object ).toString();
if (rawInteger.length() > PADDING)
throw new IllegalArgumentException( "Try to pad on a number too big" );
StringBuilder paddedInteger = new StringBuilder( );
for ( int padIndex = rawInteger.length() ; padIndex < PADDING ; padIndex++ ) {
paddedInteger.append('0');
}
return paddedInteger.append( rawInteger ).toString();
}
}StringBridge implementation”, any property or field can use this bridge thanks to the @FieldBridge annotation:
@FieldBridge(impl = PaddedIntegerBridge.class)
private Integer length;14.2.4.2.2. Parameterized Bridge
ParameterizedBridge interface and parameters are passed through the @FieldBridge annotation.
Example 14.26. Passing parameters to your bridge implementation
public class PaddedIntegerBridge implements StringBridge, ParameterizedBridge {
public static String PADDING_PROPERTY = "padding";
private int padding = 5; //default
public void setParameterValues(Map<String,String> parameters) {
String padding = parameters.get( PADDING_PROPERTY );
if (padding != null) this.padding = Integer.parseInt( padding );
}
public String objectToString(Object object) {
String rawInteger = ( (Integer) object ).toString();
if (rawInteger.length() > padding)
throw new IllegalArgumentException( "Try to pad on a number too big" );
StringBuilder paddedInteger = new StringBuilder( );
for ( int padIndex = rawInteger.length() ; padIndex < padding ; padIndex++ ) {
paddedInteger.append('0');
}
return paddedInteger.append( rawInteger ).toString();
}
}
//property
@FieldBridge(impl = PaddedIntegerBridge.class,
params = @Parameter(name="padding", value="10")
)
private Integer length;ParameterizedBridge interface can be implemented by StringBridge, TwoWayStringBridge, FieldBridge implementations.
14.2.4.2.3. Type Aware Bridge
- the return type of the property for field/getter-level bridges.
- the class type for class-level bridges.
AppliedOnTypeAwareBridge will get the type the bridge is applied on injected. Like parameters, the type injected needs no particular care with regard to thread-safety.
14.2.4.2.4. Two-Way Bridge
@DocumentId ), you need to use a slightly extended version of StringBridge named TwoWayStringBridge. Hibernate Search needs to read the string representation of the identifier and generate the object out of it. There is no difference in the way the @FieldBridge annotation is used.
Example 14.27. Implementing a TwoWayStringBridge usable for id properties
public class PaddedIntegerBridge implements TwoWayStringBridge, ParameterizedBridge {
public static String PADDING_PROPERTY = "padding";
private int padding = 5; //default
public void setParameterValues(Map parameters) {
Object padding = parameters.get( PADDING_PROPERTY );
if (padding != null) this.padding = (Integer) padding;
}
public String objectToString(Object object) {
String rawInteger = ( (Integer) object ).toString();
if (rawInteger.length() > padding)
throw new IllegalArgumentException( "Try to pad on a number too big" );
StringBuilder paddedInteger = new StringBuilder( );
for ( int padIndex = rawInteger.length() ; padIndex < padding ; padIndex++ ) {
paddedInteger.append('0');
}
return paddedInteger.append( rawInteger ).toString();
}
public Object stringToObject(String stringValue) {
return new Integer(stringValue);
}
}
//id property
@DocumentId
@FieldBridge(impl = PaddedIntegerBridge.class,
params = @Parameter(name="padding", value="10")
private Integer id;
Important
14.2.4.2.5. FieldBridge
FieldBridge. This interface gives you a property value and let you map it the way you want in your Lucene Document. You can for example store a property in two different document fields. The interface is very similar in its concept to the Hibernate UserTypes.
Example 14.28. Implementing the FieldBridge Interface
/**
* Store the date in 3 different fields - year, month, day - to ease Range Query per
* year, month or day (eg get all the elements of December for the last 5 years).
* @author Emmanuel Bernard
*/
public class DateSplitBridge implements FieldBridge {
private final static TimeZone GMT = TimeZone.getTimeZone("GMT");
public void set(String name, Object value, Document document, LuceneOptions luceneOptions) {
Date date = (Date) value;
Calendar cal = GregorianCalendar.getInstance(GMT);
cal.setTime(date);
int year = cal.get(Calendar.YEAR);
int month = cal.get(Calendar.MONTH) + 1;
int day = cal.get(Calendar.DAY_OF_MONTH);
// set year
luceneOptions.addFieldToDocument(
name + ".year",
String.valueOf( year ),
document );
// set month and pad it if needed
luceneOptions.addFieldToDocument(
name + ".month",
month < 10 ? "0" : "" + String.valueOf( month ),
document );
// set day and pad it if needed
luceneOptions.addFieldToDocument(
name + ".day",
day < 10 ? "0" : "" + String.valueOf( day ),
document );
}
}
//property
@FieldBridge(impl = DateSplitBridge.class)
private Date date;LuceneOptions helper; this helper will apply the options you have selected on @Field, like Store or TermVector, or apply the choosen @Boost value. It is especially useful to encapsulate the complexity of COMPRESS implementations. Even though it is recommended to delegate to LuceneOptions to add fields to the Document, nothing stops you from editing the Document directly and ignore the LuceneOptions in case you need to.
Note
LuceneOptions are created to shield your application from changes in Lucene API and simplify your code. Use them if you can, but if you need more flexibility you're not required to.
14.2.4.2.6. ClassBridge
@ClassBridge and @ClassBridges annotations can be defined at the class level, as opposed to the property level. In this case the custom field bridge implementation receives the entity instance as the value parameter instead of a particular property. Though not shown in Example 14.29, “Implementing a class bridge”, @ClassBridge supports the termVector attribute discussed in section Section 14.2.1.1, “Basic Mapping”.
Example 14.29. Implementing a class bridge
@Entity
@Indexed
@ClassBridge(name="branchnetwork",
store=Store.YES,
impl = CatFieldsClassBridge.class,
params = @Parameter( name="sepChar", value=" " ) )
public class Department {
private int id;
private String network;
private String branchHead;
private String branch;
private Integer maxEmployees
...
}
public class CatFieldsClassBridge implements FieldBridge, ParameterizedBridge {
private String sepChar;
public void setParameterValues(Map parameters) {
this.sepChar = (String) parameters.get( "sepChar" );
}
public void set( String name, Object value, Document document, LuceneOptions luceneOptions) {
// In this particular class the name of the new field was passed
// from the name field of the ClassBridge Annotation. This is not
// a requirement. It just works that way in this instance. The
// actual name could be supplied by hard coding it below.
Department dep = (Department) value;
String fieldValue1 = dep.getBranch();
if ( fieldValue1 == null ) {
fieldValue1 = "";
}
String fieldValue2 = dep.getNetwork();
if ( fieldValue2 == null ) {
fieldValue2 = "";
}
String fieldValue = fieldValue1 + sepChar + fieldValue2;
Field field = new Field( name, fieldValue, luceneOptions.getStore(),
luceneOptions.getIndex(), luceneOptions.getTermVector() );
field.setBoost( luceneOptions.getBoost() );
document.add( field );
}
}CatFieldsClassBridge is applied to the department instance, the field bridge then concatenate both branch and network and index the concatenation.
14.3. Querying
- Creating a
FullTextSession - Creating a Lucene query using either Hibernate Search query DSL (recommended) or using the Lucene Query API
- Wrapping the Lucene query using an
org.hibernate.Query - Executing the search by calling for example
list()orscroll()
FullTextSession. This Search specific session wraps a regular org.hibernate.Session in order to provide query and indexing capabilities.
Example 14.30. Creating a FullTextSession
Session session = sessionFactory.openSession();
...
FullTextSession fullTextSession = Search.getFullTextSession(session);FullTextSession to build a full-text query using either the Hibernate Search query DSL or the native Lucene query.
final QueryBuilder b = fullTextSession.getSearchFactory().buildQueryBuilder().forEntity( Myth.class ).get();
org.apache.lucene.search.Query luceneQuery =
b.keyword()
.onField("history").boostedTo(3)
.matching("storm")
.createQuery();
org.hibernate.Query fullTextQuery = fullTextSession.createFullTextQuery( luceneQuery );
List result = fullTextQuery.list(); //return a list of managed objects
Example 14.31. Creating a Lucene query via the QueryParser
SearchFactory searchFactory = fullTextSession.getSearchFactory();
org.apache.lucene.queryParser.QueryParser parser =
new QueryParser("title", searchFactory.getAnalyzer(Myth.class) );
try {
org.apache.lucene.search.Query luceneQuery = parser.parse( "history:storm^3" );
}
catch (ParseException e) {
//handle parsing failure
}
org.hibernate.Query fullTextQuery = fullTextSession.createFullTextQuery(luceneQuery);
List result = fullTextQuery.list(); //return a list of managed objects
org.hibernate.Query. This query remains in the same paradigm as other Hibernate query facilities, such as HQL (Hibernate Query Language), Native, and Criteria. Use methods such as list(), uniqueResult(), iterate() and scroll() with the query.
Example 14.32. Creating a Search query using the JPA API
EntityManager em = entityManagerFactory.createEntityManager();
FullTextEntityManager fullTextEntityManager =
org.hibernate.search.jpa.Search.getFullTextEntityManager(em);
...
final QueryBuilder b = fullTextEntityManager.getSearchFactory()
.buildQueryBuilder().forEntity( Myth.class ).get();
org.apache.lucene.search.Query luceneQuery =
b.keyword()
.onField("history").boostedTo(3)
.matching("storm")
.createQuery();
javax.persistence.Query fullTextQuery = fullTextEntityManager.createFullTextQuery( luceneQuery );
List result = fullTextQuery.getResultList(); //return a list of managed objectsNote
FullTextQuery is retrieved.
14.3.1. Building Queries
14.3.1.1. Building a Lucene Query Using the Lucene API
14.3.1.2. Building a Lucene Query
QueryBuilder for this task.
- Method names are in English. As a result, API operations can be read and understood as a series of English phrases and instructions.
- It uses IDE autocompletion which helps possible completions for the current input prefix and allows the user to choose the right option.
- It often uses the chaining method pattern.
- It is easy to use and read the API operations.
indexedentitytype. This QueryBuilder knows what analyzer to use and what field bridge to apply. Several QueryBuilders (one for each entity type involved in the root of your query) can be created. The QueryBuilder is derived from the SearchFactory.
QueryBuilder mythQB = searchFactory.buildQueryBuilder().forEntity( Myth.class ).get();QueryBuilder mythQB = searchFactory.buildQueryBuilder()
.forEntity( Myth.class )
.overridesForField("history","stem_analyzer_definition")
.get();Query objects assembled using the Lucene programmatic API are used with the Hibernate Search DSL.
14.3.1.3. Keyword Queries
Query luceneQuery = mythQB.keyword().onField("history").matching("storm").createQuery();| Parameter | Description |
|---|---|
| keyword() | Use this parameter to find a specific word |
| onField() | Use this parameter to specify in which lucene field to search the word |
| matching() | use this parameter to specify the match for search string |
| createQuery() | creates the Lucene query object |
- The value "storm" is passed through the
historyFieldBridge. This is useful when numbers or dates are involved. - The field bridge value is then passed to the analyzer used to index the field
history. This ensures that the query uses the same term transformation than the indexing (lower case, ngram, stemming and so on). If the analyzing process generates several terms for a given word, a boolean query is used with theSHOULDlogic (roughly anORlogic).
@Indexed
public class Myth {
@Field(analyze = Analyze.NO)
@DateBridge(resolution = Resolution.YEAR)
public Date getCreationDate() { return creationDate; }
public Date setCreationDate(Date creationDate) { this.creationDate = creationDate; }
private Date creationDate;
...
}
Date birthdate = ...;
Query luceneQuery = mythQb.keyword().onField("creationDate").matching(birthdate).createQuery();
Note
Date object had to be converted to its string representation (in this case the year)
FieldBridge has an objectToString method (and all built-in FieldBridge implementations do).
@AnalyzerDef(name = "ngram",
tokenizer = @TokenizerDef(factory = StandardTokenizerFactory.class ),
filters = {
@TokenFilterDef(factory = StandardFilterFactory.class),
@TokenFilterDef(factory = LowerCaseFilterFactory.class),
@TokenFilterDef(factory = StopFilterFactory.class),
@TokenFilterDef(factory = NGramFilterFactory.class,
params = {
@Parameter(name = "minGramSize", value = "3"),
@Parameter(name = "maxGramSize", value = "3") } )
}
)
public class Myth {
@Field(analyzer=@Analyzer(definition="ngram")
public String getName() { return name; }
public String setName(String name) { this.name = name; }
private String name;
...
}
Date birthdate = ...;
Query luceneQuery = mythQb.keyword().onField("name").matching("Sisiphus")
.createQuery();
y). All that is transparently done for the user.
Note
ignoreAnalyzer() or ignoreFieldBridge() functions can be called.
//search document with storm or lightning in their history
Query luceneQuery =
mythQB.keyword().onField("history").matching("storm lightning").createQuery();onFields method.
Query luceneQuery = mythQB
.keyword()
.onFields("history","description","name")
.matching("storm")
.createQuery();andField() method for that.
Query luceneQuery = mythQB.keyword()
.onField("history")
.andField("name")
.boostedTo(5)
.andField("description")
.matching("storm")
.createQuery();14.3.1.4. Fuzzy Queries
keyword query and add the fuzzy flag.
Query luceneQuery = mythQB
.keyword()
.fuzzy()
.withThreshold( .8f )
.withPrefixLength( 1 )
.onField("history")
.matching("starm")
.createQuery();threshold is the limit above which two terms are considering matching. It is a decimal between 0 and 1 and the default value is 0.5. The prefixLength is the length of the prefix ignored by the "fuzzyness". While the default value is 0, a nonzero value is recommended for indexes containing a huge number of distinct terms.
14.3.1.5. Wildcard Queries
? represents a single character and * represents multiple characters. Note that for performance purposes, it is recommended that the query does not start with either ? or *.
Query luceneQuery = mythQB
.keyword()
.wildcard()
.onField("history")
.matching("sto*")
.createQuery();Note
* or ? being mangled is too high.
14.3.1.6. Phrase Queries
phrase() to do so.
Query luceneQuery = mythQB
.phrase()
.onField("history")
.sentence("Thou shalt not kill")
.createQuery();Query luceneQuery = mythQB
.phrase()
.withSlop(3)
.onField("history")
.sentence("Thou kill")
.createQuery();14.3.1.7. Range Queries
//look for 0 <= starred < 3
Query luceneQuery = mythQB
.range()
.onField("starred")
.from(0).to(3).excludeLimit()
.createQuery();
//look for myths strictly BC
Date beforeChrist = ...;
Query luceneQuery = mythQB
.range()
.onField("creationDate")
.below(beforeChrist).excludeLimit()
.createQuery();14.3.1.8. Combining Queries
SHOULD: the query should contain the matching elements of the subquery.MUST: the query must contain the matching elements of the subquery.MUST NOT: the query must not contain the matching elements of the subquery.
Example 14.33. MUST NOT Query
//look for popular modern myths that are not urban
Date twentiethCentury = ...;
Query luceneQuery = mythQB
.bool()
.must( mythQB.keyword().onField("description").matching("urban").createQuery() )
.not()
.must( mythQB.range().onField("starred").above(4).createQuery() )
.must( mythQB
.range()
.onField("creationDate")
.above(twentiethCentury)
.createQuery() )
.createQuery();Example 14.34. SHOULD Query
//look for popular myths that are preferably urban
Query luceneQuery = mythQB
.bool()
.should( mythQB.keyword().onField("description").matching("urban").createQuery() )
.must( mythQB.range().onField("starred").above(4).createQuery() )
.createQuery();Example 14.35. NOT Query
//look for all myths except religious ones
Query luceneQuery = mythQB
.all()
.except( monthQb
.keyword()
.onField( "description_stem" )
.matching( "religion" )
.createQuery()
)
.createQuery();14.3.1.9. Query Options
boostedTo(on query type and on field) boosts the whole query or the specific field to a given factor.withConstantScore(on query) returns all results that match the query have a constant score equals to the boost.filteredBy(Filter)(on query) filters query results using theFilterinstance.ignoreAnalyzer(on field) ignores the analyzer when processing this field.ignoreFieldBridge(on field) ignores field bridge when processing this field.
Example 14.36. Combination of Query Options
Query luceneQuery = mythQB
.bool()
.should( mythQB.keyword().onField("description").matching("urban").createQuery() )
.should( mythQB
.keyword()
.onField("name")
.boostedTo(3)
.ignoreAnalyzer()
.matching("urban").createQuery() )
.must( mythQB
.range()
.boostedTo(5).withConstantScore()
.onField("starred").above(4).createQuery() )
.createQuery();14.3.1.10. Build a Hibernate Search Query
14.3.1.10.1. Generality
Example 14.37. Wrapping a Lucene Query in a Hibernate Query
FullTextSession fullTextSession = Search.getFullTextSession( session );
org.hibernate.Query fullTextQuery = fullTextSession.createFullTextQuery( luceneQuery );Example 14.38. Filtering the Search Result by Entity Type
fullTextQuery = fullTextSession
.createFullTextQuery( luceneQuery, Customer.class );
// or
fullTextQuery = fullTextSession
.createFullTextQuery( luceneQuery, Item.class, Actor.class );Customers. The second part of the same example returns matching Actors and Items. The type restriction is polymorphic. As a result, if the two subclasses Salesman and Customer of the base class Person return, specify Person.class to filter based on result types.
14.3.1.10.2. Pagination
Example 14.39. Defining pagination for a search query
org.hibernate.Query fullTextQuery =
fullTextSession.createFullTextQuery( luceneQuery, Customer.class );
fullTextQuery.setFirstResult(15); //start from the 15th element
fullTextQuery.setMaxResults(10); //return 10 elementsNote
fulltextQuery.getResultSize()
14.3.1.10.3. Sorting
Example 14.40. Specifying a Lucene Sort
org.hibernate.search.FullTextQuery query = s.createFullTextQuery( query, Book.class );
org.apache.lucene.search.Sort sort = new Sort(
new SortField("title", SortField.STRING));
query.setSort(sort);
List results = query.list();
Note
14.3.1.10.4. Fetching Strategy
Example 14.41. Specifying FetchMode on a query
Criteria criteria =
s.createCriteria( Book.class ).setFetchMode( "authors", FetchMode.JOIN );
s.createFullTextQuery( luceneQuery ).setCriteriaQuery( criteria );Important
Criteria query because the getResultSize() throws a SearchException if used in conjunction with a Criteria with restriction.
setCriteriaQuery.
14.3.1.10.5. Projection
Object[]. Projections prevent a time consuming database round-trip. However, they have following constraints:
- The properties projected must be stored in the index (
@Field(store=Store.YES)), which increases the index size. - The properties projected must use a
FieldBridgeimplementingorg.hibernate.search.bridge.TwoWayFieldBridgeororg.hibernate.search.bridge.TwoWayStringBridge, the latter being the simpler version.Note
All Hibernate Search built-in types are two-way. - Only the simple properties of the indexed entity or its embedded associations can be projected. Therefore a whole embedded entity cannot be projected.
- Projection does not work on collections or maps which are indexed via
@IndexedEmbedded
Example 14.42. Using Projection to Retrieve Metadata
org.hibernate.search.FullTextQuery query =
s.createFullTextQuery( luceneQuery, Book.class );
query.setProjection( FullTextQuery.SCORE, FullTextQuery.THIS, "mainAuthor.name" );
List results = query.list();
Object[] firstResult = (Object[]) results.get(0);
float score = firstResult[0];
Book book = firstResult[1];
String authorName = firstResult[2];FullTextQuery.THIS: returns the initialized and managed entity (as a non projected query would have done).FullTextQuery.DOCUMENT: returns the Lucene Document related to the object projected.FullTextQuery.OBJECT_CLASS: returns the class of the indexed entity.FullTextQuery.SCORE: returns the document score in the query. Scores are handy to compare one result against an other for a given query but are useless when comparing the result of different queries.FullTextQuery.ID: the ID property value of the projected object.FullTextQuery.DOCUMENT_ID: the Lucene document ID. Be careful in using this value as a Lucene document ID can change over time between two different IndexReader opening.FullTextQuery.EXPLANATION: returns the Lucene Explanation object for the matching object/document in the given query. This is not suitable for retrieving large amounts of data. Running explanation typically is as costly as running the whole Lucene query per matching element. As a result, projection is recommended.
14.3.1.10.6. Customizing Object Initialization Strategies
Example 14.43. Check the second-level cache before using a query
FullTextQuery query = session.createFullTextQuery(luceneQuery, User.class);
query.initializeObjectWith(
ObjectLookupMethod.SECOND_LEVEL_CACHE,
DatabaseRetrievalMethod.QUERY
);ObjectLookupMethod defines the strategy to check if an object is easily accessible (without fetching it from the database). Other options are:
ObjectLookupMethod.PERSISTENCE_CONTEXTis used if many matching entities are already loaded into the persistence context (loaded in theSessionorEntityManager).ObjectLookupMethod.SECOND_LEVEL_CACHEchecks the persistence context and then the second-level cache.
- Correctly configure and activate the second-level cache.
- Enable the second-level cache for the relevant entity. This is done using annotations such as
@Cacheable. - Enable second-level cache read access for either
Session,EntityManagerorQuery. UseCacheMode.NORMALin Hibernate native APIs orCacheRetrieveMode.USEin Java Persistence APIs.
Warning
ObjectLookupMethod.SECOND_LEVEL_CACHE. Other second-level cache providers do not implement this operation efficiently.
DatabaseRetrievalMethod as follows:
QUERY(default) uses a set of queries to load several objects in each batch. This approach is recommended.FIND_BY_IDloads one object at a time using theSession.getorEntityManager.findsemantic. This is recommended if the batch size is set for the entity, which allows Hibernate Core to load entities in batches.
14.3.1.10.7. Limiting the Time of a Query
- Raise an exception when arriving at the limit.
- Limit to the number of results retrieved when the time limit is raised.
14.3.1.10.8. Raise an Exception on Time Limit
QueryTimeoutException is raised (org.hibernate.QueryTimeoutException or javax.persistence.QueryTimeoutException depending on the programmatic API).
Example 14.44. Defining a Timeout in Query Execution
Query luceneQuery = ...;
FullTextQuery query = fullTextSession.createFullTextQuery(luceneQuery, User.class);
//define the timeout in seconds
query.setTimeout(5);
//alternatively, define the timeout in any given time unit
query.setTimeout(450, TimeUnit.MILLISECONDS);
try {
query.list();
}
catch (org.hibernate.QueryTimeoutException e) {
//do something, too slow
}getResultSize(), iterate() and scroll() honor the timeout until the end of the method call. As a result, Iterable or the ScrollableResults ignore the timeout. Additionally, explain() does not honor this timeout period. This method is used for debugging and to check the reasons for slow performance of a query.
Example 14.45. Defining a Timeout in Query Execution
Query luceneQuery = ...;
FullTextQuery query = fullTextEM.createFullTextQuery(luceneQuery, User.class);
//define the timeout in milliseconds
query.setHint( "javax.persistence.query.timeout", 450 );
try {
query.getResultList();
}
catch (javax.persistence.QueryTimeoutException e) {
//do something, too slow
}Important
14.3.2. Retrieving the Results
list(), uniqueResult(), iterate(), scroll() are available.
14.3.2.1. Performance Considerations
list() or uniqueResult() are recommended. list() work best if the entity batch-size is set up properly. Note that Hibernate Search has to process all Lucene Hits elements (within the pagination) when using list() , uniqueResult() and iterate().
scroll() is more appropriate. Don't forget to close the ScrollableResults object when you're done, since it keeps Lucene resources. If you expect to use scroll, but wish to load objects in batch, you can use query.setFetchSize(). When an object is accessed, and if not already loaded, Hibernate Search will load the next fetchSize objects in one pass.
Important
14.3.2.2. Result Size
- to provide a total search results feature, as provided by Google searches. For example, "1-10 of about 888,000,000 results"
- to implement a fast pagination navigation
- to implement a multi-step search engine that adds approximation if the restricted query returns zero or not enough results
Example 14.46. Determining the Result Size of a Query
org.hibernate.search.FullTextQuery query =
s.createFullTextQuery( luceneQuery, Book.class );
//return the number of matching books without loading a single one
assert 3245 == query.getResultSize();
org.hibernate.search.FullTextQuery query =
s.createFullTextQuery( luceneQuery, Book.class );
query.setMaxResult(10);
List results = query.list();
//return the total number of matching books regardless of pagination
assert 3245 == query.getResultSize();Note
14.3.2.3. ResultTransformer
Object arrays. If the data structure used for the object does not match the requirements of the application, apply a ResultTransformer. The ResultTransformer builds the required data structure after the query execution.
Example 14.47. Using ResultTransformer with Projections
org.hibernate.search.FullTextQuery query =
s.createFullTextQuery( luceneQuery, Book.class );
query.setProjection( "title", "mainAuthor.name" );
query.setResultTransformer( new StaticAliasToBeanResultTransformer( BookView.class, "title", "author" ) );
List<BookView> results = (List<BookView>) query.list();
for(BookView view : results) {
log.info( "Book: " + view.getTitle() + ", " + view.getAuthor() );
}ResultTransformer implementations can be found in the Hibernate Core codebase.
14.3.2.4. Understanding Results
Luke tool is useful in understanding the outcome. However, Hibernate Search also gives you access to the Lucene Explanation object for a given result (in a given query). This class is considered fairly advanced to Lucene users but can provide a good understanding of the scoring of an object. You have two ways to access the Explanation object for a given result:
- Use the
fullTextQuery.explain(int)method - Use projection
FullTextQuery.DOCUMENT_ID constant.
Warning
Explanation object using the FullTextQuery.EXPLANATION constant.
Example 14.48. Retrieving the Lucene Explanation Object Using Projection
FullTextQuery ftQuery = s.createFullTextQuery( luceneQuery, Dvd.class )
.setProjection(
FullTextQuery.DOCUMENT_ID,
FullTextQuery.EXPLANATION,
FullTextQuery.THIS );
@SuppressWarnings("unchecked") List<Object[]> results = ftQuery.list();
for (Object[] result : results) {
Explanation e = (Explanation) result[1];
display( e.toString() );
}14.3.3. Filters
- security
- temporal data (example, view only last month's data)
- population filter (example, search limited to a given category)
Example 14.49. Enabling Fulltext Filters for a Query
fullTextQuery = s.createFullTextQuery( query, Driver.class );
fullTextQuery.enableFullTextFilter("bestDriver");
fullTextQuery.enableFullTextFilter("security").setParameter( "login", "andre" );
fullTextQuery.list(); //returns only best drivers where andre has credentials@FullTextFilterDef annotation. This annotation can be on any @Indexed entity regardless of the query the filter is later applied to. This implies that filter definitions are global and their names must be unique. A SearchException is thrown in case two different @FullTextFilterDef annotations with the same name are defined. Each named filter has to specify its actual filter implementation.
Example 14.50. Defining and Implementing a Filter
@FullTextFilterDefs( {
@FullTextFilterDef(name = "bestDriver", impl = BestDriversFilter.class),
@FullTextFilterDef(name = "security", impl = SecurityFilterFactory.class)
})
public class Driver { ... }public class BestDriversFilter extends org.apache.lucene.search.Filter {
public DocIdSet getDocIdSet(IndexReader reader) throws IOException {
OpenBitSet bitSet = new OpenBitSet( reader.maxDoc() );
TermDocs termDocs = reader.termDocs( new Term( "score", "5" ) );
while ( termDocs.next() ) {
bitSet.set( termDocs.doc() );
}
return bitSet;
}
}BestDriversFilter is an example of a simple Lucene filter which reduces the result set to drivers whose score is 5. In this example the specified filter implements the org.apache.lucene.search.Filter directly and contains a no-arg constructor.
Example 14.51. Creating a filter using the factory pattern
@FullTextFilterDef(name = "bestDriver", impl = BestDriversFilterFactory.class)
public class Driver { ... }
public class BestDriversFilterFactory {
@Factory
public Filter getFilter() {
//some additional steps to cache the filter results per IndexReader
Filter bestDriversFilter = new BestDriversFilter();
return new CachingWrapperFilter(bestDriversFilter);
}
}@Factory annotated method and use it to build the filter instance. The factory must have a no-arg constructor.
Example 14.52. Passing parameters to a defined filter
fullTextQuery = s.createFullTextQuery( query, Driver.class );
fullTextQuery.enableFullTextFilter("security").setParameter( "level", 5 );Example 14.53. Using parameters in the actual filter implementation
public class SecurityFilterFactory {
private Integer level;
/**
* injected parameter
*/
public void setLevel(Integer level) {
this.level = level;
}
@Key public FilterKey getKey() {
StandardFilterKey key = new StandardFilterKey();
key.addParameter( level );
return key;
}
@Factory
public Filter getFilter() {
Query query = new TermQuery( new Term("level", level.toString() ) );
return new CachingWrapperFilter( new QueryWrapperFilter(query) );
}
}@Key returns a FilterKey object. The returned object has a special contract: the key object must implement equals() / hashCode() so that two keys are equal if and only if the given Filter types are the same and the set of parameters are the same. In other words, two filter keys are equal if and only if the filters from which the keys are generated can be interchanged. The key object is used as a key in the cache mechanism.
@Key methods are needed only if:
- the filter caching system is enabled (enabled by default)
- the filter has parameters
StandardFilterKey implementation will be good enough. It delegates the equals() / hashCode() implementation to each of the parameters equals and hashcode methods.
SoftReferences when needed. Once the limit of the hard reference cache is reached additional filters are cached as SoftReferences. To adjust the size of the hard reference cache, use hibernate.search.filter.cache_strategy.size (defaults to 128). For advanced use of filter caching, implement your own FilterCachingStrategy. The classname is defined by hibernate.search.filter.cache_strategy.
IndexReader around a CachingWrapperFilter. The wrapper will cache the DocIdSet returned from the getDocIdSet(IndexReader reader) method to avoid expensive recomputation. It is important to mention that the computed DocIdSet is only cachable for the same IndexReader instance, because the reader effectively represents the state of the index at the moment it was opened. The document list cannot change within an opened IndexReader. A different/new IndexReader instance, however, works potentially on a different set of Documents (either from a different index or simply because the index has changed), hence the cached DocIdSet has to be recomputed.
cache flag of @FullTextFilterDef is set to FilterCacheModeType.INSTANCE_AND_DOCIDSETRESULTS which will automatically cache the filter instance as well as wrap the specified filter around a Hibernate specific implementation of CachingWrapperFilter. In contrast to Lucene's version of this class SoftReferences are used together with a hard reference count (see discussion about filter cache). The hard reference count can be adjusted using hibernate.search.filter.cache_docidresults.size (defaults to 5). The wrapping behaviour can be controlled using the @FullTextFilterDef.cache parameter. There are three different values for this parameter:
| Value | Definition |
|---|---|
| FilterCacheModeType.NONE | No filter instance and no result is cached by Hibernate Search. For every filter call, a new filter instance is created. This setting might be useful for rapidly changing data sets or heavily memory constrained environments. |
| FilterCacheModeType.INSTANCE_ONLY | The filter instance is cached and reused across concurrent Filter.getDocIdSet() calls. DocIdSet results are not cached. This setting is useful when a filter uses its own specific caching mechanism or the filter results change dynamically due to application specific events making DocIdSet caching in both cases unnecessary. |
| FilterCacheModeType.INSTANCE_AND_DOCIDSETRESULTS | Both the filter instance and the DocIdSet results are cached. This is the default value. |
- the system does not update the targeted entity index often (in other words, the IndexReader is reused a lot)
- the Filter's DocIdSet is expensive to compute (compared to the time spent to execute the query)
14.3.3.1. Using Filters in a Sharded Environment
Procedure 14.1. Query a Subset of Index Shards
- Create a sharding strategy that does select a subset of
IndexManagers depending on a filter configuration. - Activate the filter at query time.
Example 14.54. Query a Subset of Index Shards
customer filter is activated.
public class CustomerShardingStrategy implements IndexShardingStrategy {
// stored IndexManagers in a array indexed by customerID
private IndexManager[] indexManagers;
public void initialize(Properties properties, IndexManager[] indexManagers) {
this.indexManagers = indexManagers;
}
public IndexManager[] getIndexManagersForAllShards() {
return indexManagers;
}
public IndexManager getIndexManagerForAddition(
Class<?> entity, Serializable id, String idInString, Document document) {
Integer customerID = Integer.parseInt(document.getFieldable("customerID").stringValue());
return indexManagers[customerID];
}
public IndexManager[] getIndexManagersForDeletion(
Class<?> entity, Serializable id, String idInString) {
return getIndexManagersForAllShards();
}
/**
* Optimization; don't search ALL shards and union the results; in this case, we
* can be certain that all the data for a particular customer Filter is in a single
* shard; simply return that shard by customerID.
*/
public IndexManager[] getIndexManagersForQuery(
FullTextFilterImplementor[] filters) {
FullTextFilter filter = getCustomerFilter(filters, "customer");
if (filter == null) {
return getIndexManagersForAllShards();
}
else {
return new IndexManager[] { indexManagers[Integer.parseInt(
filter.getParameter("customerID").toString())] };
}
}
private FullTextFilter getCustomerFilter(FullTextFilterImplementor[] filters, String name) {
for (FullTextFilterImplementor filter: filters) {
if (filter.getName().equals(name)) return filter;
}
return null;
}
}customer is present, only the shard dedicated to this customer is queried, otherwise, all shards are returned. A given Sharding strategy can react to one or more filters and depends on their parameters.
ShardSensitiveOnlyFilter class when declaring your filter.
@Indexed
@FullTextFilterDef(name="customer", impl=ShardSensitiveOnlyFilter.class)
public class Customer {
...
}
FullTextQuery query = ftEm.createFullTextQuery(luceneQuery, Customer.class);
query.enableFulltextFilter("customer").setParameter("CustomerID", 5);
@SuppressWarnings("unchecked")
List<Customer> results = query.getResultList();ShardSensitiveOnlyFilter, you do not have to implement any Lucene filter. Using filters and sharding strategy reacting to these filters is recommended to speed up queries in a sharded environment.
14.3.4. Faceting
Example 14.55. Search for Hibernate Search on Amazon
QueryBuilder and FullTextQuery are the entry point into the faceting API. The former creates faceting requests and the latter accesses the FacetManager. The FacetManager applies faceting requests on a query and selects facets that are added to an existing query to refine search results. The examples use the entity Cd as shown in Example 14.56, “Entity Cd”:
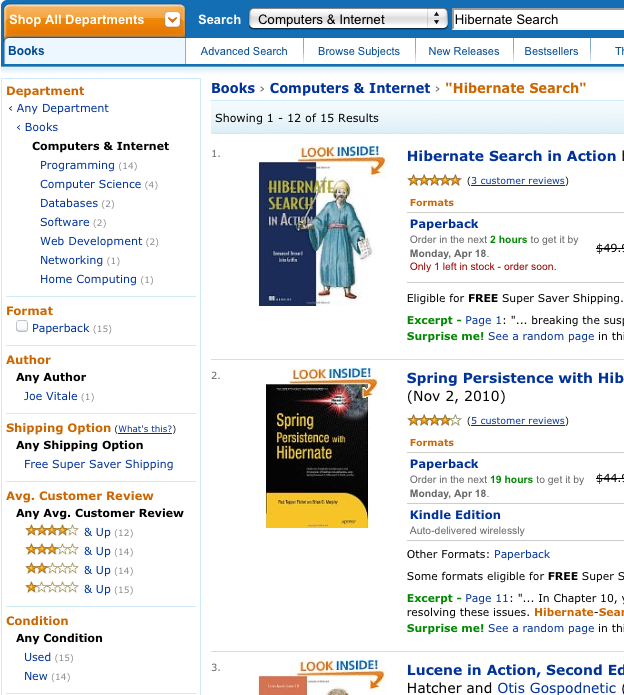
Figure 14.1. Search for Hibernate Search on Amazon
Example 14.56. Entity Cd
@Indexed
public class Cd {
private int id;
@Fields( {
@Field,
@Field(name = "name_un_analyzed", analyze = Analyze.NO)
})
private String name;
@Field(analyze = Analyze.NO)
@NumericField
private int price;
Field(analyze = Analyze.NO)
@DateBridge(resolution = Resolution.YEAR)
private Date releaseYear;
@Field(analyze = Analyze.NO)
private String label;
// setter/getter
...14.3.4.1. Creating a Faceting Request
FacetingRequest. Currently two types of faceting requests are supported. The first type is called discrete faceting and the second type range faceting request. In the case of a discrete faceting request you specify on which index field you want to facet (categorize) and which faceting options to apply. An example for a discrete faceting request can be seen in Example 14.57, “Creating a discrete faceting request”:
Example 14.57. Creating a discrete faceting request
QueryBuilder builder = fullTextSession.getSearchFactory()
.buildQueryBuilder()
.forEntity( Cd.class )
.get();
FacetingRequest labelFacetingRequest = builder.facet()
.name( "labelFaceting" )
.onField( "label")
.discrete()
.orderedBy( FacetSortOrder.COUNT_DESC )
.includeZeroCounts( false )
.maxFacetCount( 1 )
.createFacetingRequest();Facet instance will be created for each discrete value for the indexed field label. The Facet instance will record the actual field value including how often this particular field value occurs within the original query results. orderedBy, includeZeroCounts and maxFacetCount are optional parameters which can be applied on any faceting request. orderedBy allows to specify in which order the created facets will be returned. The default is FacetSortOrder.COUNT_DESC, but you can also sort on the field value or the order in which ranges were specified. includeZeroCount determines whether facets with a count of 0 will be included in the result (per default they are) and maxFacetCount allows to limit the maximum amount of facets returned.
Note
String, Date or a subtype of Number and null values should be avoided. Furthermore the property has to be indexed with Analyze.NO and in case of a numeric property @NumericField needs to be specified.
below and above can only be specified once, but you can specify as many from - to ranges as you want. For each range boundary you can also specify via excludeLimit whether it is included into the range or not.
Example 14.58. Creating a range faceting request
QueryBuilder builder = fullTextSession.getSearchFactory()
.buildQueryBuilder()
.forEntity( Cd.class )
.get();
FacetingRequest priceFacetingRequest = builder.facet()
.name( "priceFaceting" )
.onField( "price" )
.range()
.below( 1000 )
.from( 1001 ).to( 1500 )
.above( 1500 ).excludeLimit()
.createFacetingRequest();14.3.4.2. Applying a Faceting Request
FacetManager class which can be retrieved via the FullTextQuery class.
getFacets() specifying the faceting request name. There is also a disableFaceting() method which allows you to disable a faceting request by specifying its name.
Example 14.59. Applying a faceting request
// create a fulltext query
Query luceneQuery = builder.all().createQuery(); // match all query
FullTextQuery fullTextQuery = fullTextSession.createFullTextQuery( luceneQuery, Cd.class );
// retrieve facet manager and apply faceting request
FacetManager facetManager = fullTextQuery.getFacetManager();
facetManager.enableFaceting( priceFacetingRequest );
// get the list of Cds
List<Cd> cds = fullTextQuery.list();
...
// retrieve the faceting results
List<Facet> facets = facetManager.getFacets( "priceFaceting" );
...14.3.4.3. Restricting Query Results
Facets as additional criteria on your original query in order to implement a "drill-down" functionality. For this purpose FacetSelection can be utilized. FacetSelections are available via the FacetManager and allow you to select a facet as query criteria (selectFacets), remove a facet restriction (deselectFacets), remove all facet restrictions (clearSelectedFacets) and retrieve all currently selected facets (getSelectedFacets). Example 14.60, “Restricting query results via the application of a FacetSelection” shows an example.
Example 14.60. Restricting query results via the application of a FacetSelection
// create a fulltext query
Query luceneQuery = builder.all().createQuery(); // match all query
FullTextQuery fullTextQuery = fullTextSession.createFullTextQuery( luceneQuery, clazz );
// retrieve facet manager and apply faceting request
FacetManager facetManager = fullTextQuery.getFacetManager();
facetManager.enableFaceting( priceFacetingRequest );
// get the list of Cd
List<Cd> cds = fullTextQuery.list();
assertTrue(cds.size() == 10);
// retrieve the faceting results
List<Facet> facets = facetManager.getFacets( "priceFaceting" );
assertTrue(facets.get(0).getCount() == 2)
// apply first facet as additional search criteria
facetManager.getFacetGroup( "priceFaceting" ).selectFacets( facets.get( 0 ) );
// re-execute the query
cds = fullTextQuery.list();
assertTrue(cds.size() == 2);14.3.5. Optimizing the Query Process
- The Lucene query.
- The number of objects loaded: use pagination (always) or index projection (if needed).
- The way Hibernate Search interacts with the Lucene readers: defines the appropriate reader strategy.
- Caching frequently extracted values from the index: see Section 14.3.5.1, “Caching Index Values: FieldCache”
14.3.5.1. Caching Index Values: FieldCache
CacheFromIndex annotation you can experiment with different kinds of caching of the main metadata fields required by Hibernate Search:
import static org.hibernate.search.annotations.FieldCacheType.CLASS;
import static org.hibernate.search.annotations.FieldCacheType.ID;
@Indexed
@CacheFromIndex( { CLASS, ID } )
public class Essay {
...CLASS: Hibernate Search will use a Lucene FieldCache to improve peformance of the Class type extraction from the index.This value is enabled by default, and is what Hibernate Search will apply if you don't specify the @CacheFromIndexannotation.ID: Extracting the primary identifier will use a cache. This is likely providing the best performing queries, but will consume much more memory which in turn might reduce performance.
Note
- Memory usage: these caches can be quite memory hungry. Typically the CLASS cache has lower requirements than the ID cache.
- Index warmup: when using field caches, the first query on a new index or segment will be slower than when you don't have caching enabled.
CLASS field cache, this might not be used; for example if you are targeting a single class, obviously all returned values will be of that type (this is evaluated at each Query execution).
TwoWayFieldBridge (as all builting bridges), and all types being loaded in a specific query must use the fieldname for the id, and have ids of the same type (this is evaluated at each Query execution).
14.4. Manual Index Changes
14.4.1. Adding Instances to the Index
FullTextSession.index(T entity) you can directly add or update a specific object instance to the index. If this entity was already indexed, then the index will be updated. Changes to the index are only applied at transaction commit.
Example 14.61. Indexing an entity via FullTextSession.index(T entity)
FullTextSession fullTextSession = Search.getFullTextSession(session);
Transaction tx = fullTextSession.beginTransaction();
Object customer = fullTextSession.load( Customer.class, 8 );
fullTextSession.index(customer);
tx.commit(); //index only updated at commit timeMassIndexer: see Section 14.4.3.2, “Using a MassIndexer” for more details.
14.4.2. Deleting Instances from the Index
FullTextSession.
Example 14.62. Purging a specific instance of an entity from the index
FullTextSession fullTextSession = Search.getFullTextSession(session);
Transaction tx = fullTextSession.beginTransaction();
for (Customer customer : customers) {
fullTextSession.purge( Customer.class, customer.getId() );
}
tx.commit(); //index is updated at commit timepurgeAll method. This operation removes all entities of the type passed as a parameter as well as all its subtypes.
Example 14.63. Purging all instances of an entity from the index
FullTextSession fullTextSession = Search.getFullTextSession(session);
Transaction tx = fullTextSession.beginTransaction();
fullTextSession.purgeAll( Customer.class );
//optionally optimize the index
//fullTextSession.getSearchFactory().optimize( Customer.class );
tx.commit(); //index changes are applied at commit timeNote
index, purge, and purgeAll are available on FullTextEntityManager as well.
Note
index, purge, and purgeAll) only affect the index, not the database, nevertheless they are transactional and as such they won't be applied until the transaction is successfully committed, or you make use of flushToIndexes.
14.4.3. Rebuilding the Index
- Using
FullTextSession.flushToIndexes()periodically, while usingFullTextSession.index()on all entities. - Use a
MassIndexer.
14.4.3.1. Using flushToIndexes()
FullTextSession.purgeAll() and FullTextSession.index(), however there are some memory and efficiency constraints. For maximum efficiency Hibernate Search batches index operations and executes them at commit time. If you expect to index a lot of data you need to be careful about memory consumption since all documents are kept in a queue until the transaction commit. You can potentially face an OutOfMemoryException if you don't empty the queue periodically; to do this use fullTextSession.flushToIndexes(). Every time fullTextSession.flushToIndexes() is called (or if the transaction is committed), the batch queue is processed, applying all index changes. Be aware that, once flushed, the changes cannot be rolled back.
Example 14.64. Index rebuilding using index() and flushToIndexes()
fullTextSession.setFlushMode(FlushMode.MANUAL);
fullTextSession.setCacheMode(CacheMode.IGNORE);
transaction = fullTextSession.beginTransaction();
//Scrollable results will avoid loading too many objects in memory
ScrollableResults results = fullTextSession.createCriteria( Email.class )
.setFetchSize(BATCH_SIZE)
.scroll( ScrollMode.FORWARD_ONLY );
int index = 0;
while( results.next() ) {
index++;
fullTextSession.index( results.get(0) ); //index each element
if (index % BATCH_SIZE == 0) {
fullTextSession.flushToIndexes(); //apply changes to indexes
fullTextSession.clear(); //free memory since the queue is processed
}
}
transaction.commit();Note
hibernate.search.default.worker.batch_size has been deprecated in favor of this explicit API which provides better control
14.4.3.2. Using a MassIndexer
MassIndexer uses several parallel threads to rebuild the index. You can optionally select which entities need to be reloaded or have it reindex all entities. This approach is optimized for best performance but requires to set the application in maintenance mode. Querying the index is not recommended when a MassIndexer is busy.
Example 14.65. Rebuild the Index Using a MassIndexer
fullTextSession.createIndexer().startAndWait();Warning
Example 14.66. Using a Tuned MassIndexer
fullTextSession
.createIndexer( User.class )
.batchSizeToLoadObjects( 25 )
.cacheMode( CacheMode.NORMAL )
.threadsToLoadObjects( 12 )
.idFetchSize( 150 )
.progressMonitor( monitor ) //a MassIndexerProgressMonitor implementation
.startAndWait();FieldBridges or ClassBridges to output a Lucene document. The threads trigger lazyloading of additional attributes during the conversion process. Because of this, a high number of threads working in parallel is required. The number of threads working on actual index writing is defined by the backend configuration of each index.
CacheMode.IGNORE (the default), as in most reindexing situations the cache will be a useless additional overhead. It might be useful to enable some other CacheMode depending on your data as it could increase performance if the main entity is relating to enum-like data included in the index.
Note
Note
hibernate.search.[default|<indexname>].exclusive_index_usehibernate.search.[default|<indexname>].indexwriter.max_buffered_docshibernate.search.[default|<indexname>].indexwriter.max_merge_docshibernate.search.[default|<indexname>].indexwriter.merge_factorhibernate.search.[default|<indexname>].indexwriter.merge_min_sizehibernate.search.[default|<indexname>].indexwriter.merge_max_sizehibernate.search.[default|<indexname>].indexwriter.merge_max_optimize_sizehibernate.search.[default|<indexname>].indexwriter.merge_calibrate_by_deleteshibernate.search.[default|<indexname>].indexwriter.ram_buffer_sizehibernate.search.[default|<indexname>].indexwriter.term_index_interval
max_field_length but this was removed from Lucene, it's possible to obtain a similar effect by using a LimitTokenCountAnalyzer.
.indexwriter parameters are Lucene specific and Hibernate Search passes these parameters through.
MassIndexer uses a forward only scrollable result to iterate on the primary keys to be loaded, but MySQL's JDBC driver will load all values in memory. To avoid this "optimization" set idFetchSize to Integer.MIN_VALUE.
14.5. Index Optimization
- On an idle system or when searches are least frequent.
- After a large number of index modifications are applied.
MassIndexer (see Section 14.4.3.2, “Using a MassIndexer”) optimizes indexes by default at the start and at the end of processing. Use MassIndexer.optimizeAfterPurge and MassIndexer.optimizeOnFinish to change this default behavior.
14.5.1. Automatic Optimization
- a certain amount of operations (insertion or deletion).
- a certain amount of transactions.
Example 14.67. Defining automatic optimization parameters
hibernate.search.default.optimizer.operation_limit.max = 1000
hibernate.search.default.optimizer.transaction_limit.max = 100
hibernate.search.Animal.optimizer.transaction_limit.max = 50Animal index as soon as either:
- the number of additions and deletions reaches
1000. - the number of transactions reaches
50(hibernate.search.Animal.optimizer.transaction_limit.maxhas priority overhibernate.search.default.optimizer.transaction_limit.max)
org.hibernate.search.store.optimization.OptimizerStrategy and setting the optimizer.implementation property to the fully qualified name of your implementation. This implementation must implement the interface, be a public class and have a public constructor taking no arguments.
Example 14.68. Loading a custom OptimizerStrategy
hibernate.search.default.optimizer.implementation = com.acme.worlddomination.SmartOptimizer
hibernate.search.default.optimizer.SomeOption = CustomConfigurationValue
hibernate.search.humans.optimizer.implementation = defaultdefault can be used to select the Hibernate Search default implementation; all properties after the .optimizer key separator will be passed to the implementation's initialize method at start.
14.5.2. Manual Optimization
SearchFactory:
Example 14.69. Programmatic Index Optimization
FullTextSession fullTextSession = Search.getFullTextSession(regularSession);
SearchFactory searchFactory = fullTextSession.getSearchFactory();
searchFactory.optimize(Order.class);
// or
searchFactory.optimize();Orders and the second optimizes all indexes.
Note
searchFactory.optimize() has no effect on a JMS backend. You must apply the optimize operation on the Master node.
14.5.3. Adjusting Optimization
hibernate.search.[default|<indexname>].indexwriter.max_buffered_docshibernate.search.[default|<indexname>].indexwriter.max_merge_docshibernate.search.[default|<indexname>].indexwriter.merge_factorhibernate.search.[default|<indexname>].indexwriter.ram_buffer_sizehibernate.search.[default|<indexname>].indexwriter.term_index_interval
14.6. Advanced Features
14.6.1. Accessing the SearchFactory
SearchFactory object keeps track of the underlying Lucene resources for Hibernate Search. It is a convenient way to access Lucene natively. The SearchFactory can be accessed from a FullTextSession:
Example 14.70. Accessing the SearchFactory
FullTextSession fullTextSession = Search.getFullTextSession(regularSession);
SearchFactory searchFactory = fullTextSession.getSearchFactory();14.6.2. Using an IndexReader
IndexReader. Hibernate Search might cache index readers to maximize performance, or provide other efficient strategies to retrieve an updated IndexReader minimizing I/O operations. Your code can access these cached resources, but there are several requirements.
Example 14.71. Accessing an IndexReader
IndexReader reader = searchFactory.getIndexReaderAccessor().open(Order.class);
try {
//perform read-only operations on the reader
}
finally {
searchFactory.getIndexReaderAccessor().close(reader);
}SearchFactory determines which indexes are needed to query this entity (considering a Sharding strategy). Using the configured ReaderProvider on each index, it returns a compound IndexReader on top of all involved indexes. Because this IndexReader is shared amongst several clients, you must adhere to the following rules:
- Never call indexReader.close(), instead use readerProvider.closeReader(reader) when necessary, preferably in a finally block.
- Don not use this
IndexReaderfor modification operations (it is a readonlyIndexReader, and any such attempt will result in an exception).
IndexReader freely, especially to do native Lucene queries. Using the shared IndexReaders will make most queries more efficient than by opening one directly from, for example, the filesystem.
open(Class... types) you can use open(String... indexNames), allowing you to pass in one or more index names. Using this strategy you can also select a subset of the indexes for any indexed type if sharding is used.
Example 14.72. Accessing an IndexReader by index names
IndexReader reader = searchFactory.getIndexReaderAccessor().open("Products.1", "Products.3");14.6.3. Accessing a Lucene Directory
Directory is the most common abstraction used by Lucene to represent the index storage; Hibernate Search doesn't interact directly with a Lucene Directory but abstracts these interactions via an IndexManager: an index does not necessarily need to be implemented by a Directory.
Directory and need to access it, you can get a reference to the Directory via the IndexManager. Cast the IndexManager to a DirectoryBasedIndexManager and then use getDirectoryProvider().getDirectory() to get a reference to the underlying Directory. This is not recommended, we would encourage to use the IndexReader instead.
14.6.4. Sharding Indexes
Warning
- A single index is so large that index update times are slowing the application down.
- A typical search will only hit a subset of the index, such as when data is naturally segmented by customer, region or application.
hibernate.search.<indexName>.sharding_strategy.nbr_of_shards property.
Example 14.73. Enabling Index Sharding
hibernate.search.<indexName>.sharding_strategy.nbr_of_shards = 5IndexShardingStrategy. The default sharding strategy splits the data according to the hash value of the ID string representation (generated by the FieldBridge). This ensures a fairly balanced sharding. You can replace the default strategy by implementing a custom IndexShardingStrategy. To use your custom strategy you have to set the hibernate.search.<indexName>.sharding_strategy property.
Example 14.74. Specifying a Custom Sharding Strategy
hibernate.search.<indexName>.sharding_strategy = my.shardingstrategy.ImplementationIndexShardingStrategy property also allows for optimizing searches by selecting which shard to run the query against. By activating a filter a sharding strategy can select a subset of the shards used to answer a query (IndexShardingStrategy.getIndexManagersForQuery) and thus speed up the query execution.
IndexManager and so can be configured to use a different directory provider and back end configuration. The IndexManager index names for the Animal entity in Example 14.75, “Sharding Configuration for Entity Animal” are Animal.0 to Animal.4. In other words, each shard has the name of its owning index followed by . (dot) and its index number.
Example 14.75. Sharding Configuration for Entity Animal
hibernate.search.default.indexBase = /usr/lucene/indexes
hibernate.search.Animal.sharding_strategy.nbr_of_shards = 5
hibernate.search.Animal.directory_provider = filesystem
hibernate.search.Animal.0.indexName = Animal00
hibernate.search.Animal.3.indexBase = /usr/lucene/sharded
hibernate.search.Animal.3.indexName = Animal03Animal index into 5 sub-indexes. All sub-indexes are filesystem instances and the directory where each sub-index is stored is as followed:
- for sub-index 0:
/usr/lucene/indexes/Animal00(shared indexBase but overridden indexName) - for sub-index 1:
/usr/lucene/indexes/Animal.1(shared indexBase, default indexName) - for sub-index 2:
/usr/lucene/indexes/Animal.2(shared indexBase, default indexName) - for sub-index 3:
/usr/lucene/shared/Animal03(overridden indexBase, overridden indexName) - for sub-index 4:
/usr/lucene/indexes/Animal.4(shared indexBase, default indexName)
IndexShardingStrategy any field can be used to determine the sharding selection. Consider that to handle deletions, purge and purgeAll operations, the implementation might need to return one or more indexes without being able to read all the field values or the primary identifier. In that case the information is not enough to pick a single index, all indexes should be returned, so that the delete operation will be propagated to all indexes potentially containing the documents to be deleted.
14.6.5. Customizing Lucene's Scoring Formula
org.apache.lucene.search.Similarity. The abstract methods defined in this class match the factors of the following formula calculating the score of query q for document d:
| Factor | Description |
|---|---|
| tf(t ind) | Term frequency factor for the term (t) in the document (d). |
| idf(t) | Inverse document frequency of the term. |
| coord(q,d) | Score factor based on how many of the query terms are found in the specified document. |
| queryNorm(q) | Normalizing factor used to make scores between queries comparable. |
| t.getBoost() | Field boost. |
| norm(t,d) | Encapsulates a few (indexing time) boost and length factors. |
Similarity's Javadocs for more information.
Similarity implementation using the property hibernate.search.similarity. The default value is org.apache.lucene.search.DefaultSimilarity.
similarity property
hibernate.search.default.similarity = my.custom.Similarity@Similarity annotation.
@Entity
@Indexed
@Similarity(impl = DummySimilarity.class)
public class Book {
...
}tf(float freq) should return 1.0.
Warning
Similarity implementation. Classes in the same class hierarchy always share the index, so it's not allowed to override the Similarity implementation in a subtype.
14.6.6. Exception Handling Configuration
hibernate.search.error_handler = logErrorHandler interface, which provides the handle(ErrorContext context) method. ErrorContext provides a reference to the primary LuceneWork instance, the underlying exception and any subsequent LuceneWork instances that could not be processed due to the primary exception.
public interface ErrorContext {
List<LuceneWork> getFailingOperations();
LuceneWork getOperationAtFault();
Throwable getThrowable();
boolean hasErrors();
}ErrorHandler implementation in the configuration properties:
hibernate.search.error_handler = CustomerErrorHandler14.6.7. Disable Hibernate Search
To disable Hibernate Search indexing, change the indexing_strategy configuration option to manual, then restart JBoss EAP.
hibernate.search.indexing_strategy = manual
To disable Hibernate Search completely, disable all listeners by changing the autoregister_listeners configuration option to false, then restart JBoss EAP.
hibernate.search.autoregister_listeners = falseChapter 15. JAX-RS Web Services
15.1. About JAX-RS
helloworld-rs, jax-rs-client, and kitchensink quickstart: Section 1.4.1.1, “Access the Quickstarts”.
15.2. About RESTEasy
15.3. About RESTful Web Services
15.4. RESTEasy Defined Annotations
| Annotation | Usage |
|---|---|
ClientResponseType | This is an annotation that you can add to a RESTEasy client interface that has a return type of Response. |
ContentEncoding | Meta annotation that specifies a Content-Encoding to be applied via the annotated annotation. |
DecorateTypes | Must be placed on a DecoratorProcessor class to specify the supported types. |
Decorator | Meta-annotation to be placed on another annotation that triggers decoration. |
Form | This can be used as a value object for incoming/outgoing request/responses. |
StringParameterUnmarshallerBinder | Meta-annotation to be placed on another annotation that triggers a StringParameterUnmarshaller to be applied to a string based annotation injector. |
Cache | Set response Cache-Control header automatically. |
NoCache | Set Cache-Control response header of "nocache". |
ServerCached | Specifies that the response to this jax-rs method should be cached on the server. |
ClientInterceptor | Identifies an interceptor as a client-side interceptor. |
DecoderPrecedence | This interceptor is an Content-Encoding decoder. |
EncoderPrecedence | This interceptor is an Content-Encoding encoder. |
HeaderDecoratorPrecedence | HeaderDecoratorPrecedence interceptors should always come first as they decorate a response (on the server), or an outgoing request (on the client) with special, user-defined, headers. |
RedirectPrecedence | Should be placed on a PreProcessInterceptor. |
SecurityPrecedence | Should be placed on a PreProcessInterceptor. |
ServerInterceptor | Identifies an interceptor as a server-side interceptor. |
NoJackson | Placed on class, parameter, field or method when you don't want the Jackson provider to be triggered. |
ImageWriterParams | An annotation that a resource class can use to pass parameters to the IIOImageProvider. |
DoNotUseJAXBProvider | Put this on a class or parameter when you do not want the JAXB MessageBodyReader/Writer used but instead have a more specific provider you want to use to marshall the type. |
Formatted | Format XML output with indentations and newlines. This is a JAXB Decorator. |
IgnoreMediaTypes | Placed on a type, method, parameter, or field to tell JAXRS not to use JAXB provider for a certain media type |
Stylesheet | Specifies an XML stylesheet header. |
Wrapped | Put this on a method or parameter when you want to marshal or unmarshal a collection or array of JAXB objects. |
WrappedMap | Put this on a method or parameter when you want to marshal or unmarshal a map of JAXB objects. |
XmlHeader | Sets an XML header for the returned document. |
BadgerFish | A JSONConfig. |
Mapped | A JSONConfig. |
XmlNsMap | A JSONToXml. |
MultipartForm | This can be used as a value object for incoming/outgoing request/responses of the multipart/form-data mime type. |
PartType | Must be used in conjunction with Multipart providers when writing out a List or Map as a multipart/* type. |
XopWithMultipartRelated | This annotation can be used to process/produce incoming/outgoing XOP messages (packaged as multipart/related) to/from JAXB annotated objects. |
After | Used to add an expiration attribute when signing or as a stale check for verification. |
Signed | Convenience annotation that triggers the signing of a request or response using the DOSETA specification. |
Verify | Verification of input signature specified in a signature header. |
Path | This must exist either in the class or resource method. If it exists in both, the relative path to the resource method is a concatenation of the class and method. |
PathParam | Allows you to map variable URI path fragments into a method call. |
QueryParam | Allows you to map URI query string parameter or URL form encoded parameter to the method invocation. |
CookieParam | Allows you to specify the value of a cookie or object representation of an HTTP request cookie into the method invocation. |
DefaultValue | Can be combined with the other @*Param annotations to define a default value when the HTTP request item does not exist. |
Context | Allows you to specify instances of javax.ws.rs.core.HttpHeaders, javax.ws.rs.core.UriInfo, javax.ws.rs.core.Request, javax.servlet.HttpServletRequest, javax.servlet.HttpServletResponse, and javax.ws.rs.core.SecurityContext objects. |
Encoded | Can be used on a class, method, or param. By default, inject @PathParam and @QueryParams are decoded. By adding the @Encoded annotation, the value of these params are provided in encoded form. |
15.5. RESTEasy Configuration
15.5.1. RESTEasy Configuration Parameters
| Option Name | Default Value | Description |
|---|---|---|
| resteasy.servlet.mapping.prefix | No default | If the url-pattern for the Resteasy servlet-mapping is not /*. |
| resteasy.scan | false | Automatically scan WEB-INF/lib jars and WEB-INF/classes directory for both @Provider and JAX-RS resource classes (@Path, @GET, @POST etc..) and register them. |
| resteasy.scan.providers | false | Scan for @Provider classes and register them. |
| resteasy.scan.resources | false | Scan for JAX-RS resource classes. |
| resteasy.providers | no default | A comma delimited list of fully qualified @Provider class names you want to register. |
| resteasy.use.builtin.providers | true | Whether or not to register default, built-in @Provider classes. |
| resteasy.resources | No default | A comma delimited list of fully qualified JAX-RS resource class names you want to register. |
| resteasy.jndi.resources | No default | A comma delimited list of JNDI names which reference objects you want to register as JAX-RS resources. |
| javax.ws.rs.Application | No default | Fully qualified name of Application class to bootstrap in a spec portable way. |
| resteasy.media.type.mappings | No default | Replaces the need for an Accept header by mapping file name extensions (like .xml or .txt) to a media type. Used when the client is unable to use a Accept header to choose a representation (i.e. a browser). |
| resteasy.language.mappings | No default | Replaces the need for an Accept-Language header by mapping file name extensions (like .en or .fr) to a language. Used when the client is unable to use a Accept-Language header to choose a language (i.e. a browser). |
| resteasy.document.expand.entity.references | false | Whether to expand external entities or replace them with an empty string. In JBoss EAP 6, this parameter defaults to false, so it replaces them with an empty string. |
| resteasy.document.secure.processing.feature | true | Impose security constraints in processing org.w3c.dom.Document documents and JAXB object representations. |
| resteasy.document.secure.disableDTDs | true | Prohibit DTDs in org.w3c.dom.Document documents and JAXB object representations. |
Important
resteasy.scan.* configurations in the web.xml file are ignored, and all JAX-RS annotated components will be automatically scanned.
15.6. JAX-RS Web Service Security
15.6.1. Enable Role-Based Security for a RESTEasy JAX-RS Web Service
RESTEasy supports the @RolesAllowed, @PermitAll, and @DenyAll annotations on JAX-RS methods. However, it does not recognize these annotations by default. Follow these steps to configure the web.xml file and enable role-based security.
Warning
- resteasy.document.expand.entity.references
- resteasy.document.secure.processing.feature
- resteasy.document.secure.disableDTDs
Warning
Procedure 15.1. Enable Role-Based Security for a RESTEasy JAX-RS Web Service
- Open the
web.xmlfile for the application in a text editor. - Add the following <context-param> to the file, within the
web-apptags:<context-param> <param-name>resteasy.role.based.security</param-name> <param-value>true</param-value> </context-param> - Declare all roles used within the RESTEasy JAX-RS WAR file, using the <security-role> tags:
<security-role> <role-name>ROLE_NAME</role-name> </security-role> <security-role> <role-name>ROLE_NAME</role-name> </security-role> - Authorize access to all URLs handled by the JAX-RS runtime for all roles:
<security-constraint> <web-resource-collection> <web-resource-name>Resteasy</web-resource-name> <url-pattern>/PATH</url-pattern> </web-resource-collection> <auth-constraint> <role-name>ROLE_NAME</role-name> <role-name>ROLE_NAME</role-name> </auth-constraint> </security-constraint>
Role-based security has been enabled within the application, with a set of defined roles.
Example 15.1. Example Role-Based Security Configuration
<web-app>
<context-param>
<param-name>resteasy.role.based.security</param-name>
<param-value>true</param-value>
</context-param>
<servlet-mapping>
<servlet-name>Resteasy</servlet-name>
<url-pattern>/*</url-pattern>
</servlet-mapping>
<security-constraint>
<web-resource-collection>
<web-resource-name>Resteasy</web-resource-name>
<url-pattern>/security</url-pattern>
</web-resource-collection>
<auth-constraint>
<role-name>admin</role-name>
<role-name>user</role-name>
</auth-constraint>
</security-constraint>
<security-role>
<role-name>admin</role-name>
</security-role>
<security-role>
<role-name>user</role-name>
</security-role>
</web-app>
15.6.2. Secure a JAX-RS Web Service using Annotations
This topic covers the steps to secure a JAX-RS web service using the supported security annotations
Procedure 15.2. Secure a JAX-RS Web Service using Supported Security Annotations
- Enable role-based security. For more information, refer to: Section 15.6.1, “Enable Role-Based Security for a RESTEasy JAX-RS Web Service”
- Add security annotations to the JAX-RS web service. RESTEasy supports the following annotations:
- @RolesAllowed
- Defines which roles can access the method. All roles should be defined in the
web.xmlfile. - @PermitAll
- Allows all roles defined in the
web.xmlfile to access the method. - @DenyAll
- Denies all access to the method.
15.7. Exception Handling
15.7.1. Create an Exception Mapper
Exception mappers are custom, application provided components that catch thrown exceptions and write specific HTTP responses.
Example 15.2. Exception Mapper
ExceptionMapper interface.
@Provider
public class EJBExceptionMapper implements ExceptionMapper<javax.ejb.EJBException>
{
Response toResponse(EJBException exception) {
return Response.status(500).build();
}
}
web.xml file under the resteasy.providers context-param, or register it programmatically through the ResteasyProviderFactory class.
15.7.2. RESTEasy Internally Thrown Exceptions
| Exception | HTTP Code | Description |
|---|---|---|
| BadRequestException | 400 | Bad Request. The request was not formatted correctly, or there was a problem processing the request input. |
| UnauthorizedException | 401 | Unauthorized. Security exception thrown if you are using RESTEasy's annotation-based role-based security. |
| InternalServerErrorException | 500 | Internal Server Error. |
| MethodNotAllowedException | 405 | There is no JAX-RS method for the resource that can handle the invoked HTTP operation. |
| NotAcceptableException | 406 | There is no JAX-RS method that can produce the media types listed in the Accept header. |
| NotFoundException | 404 | There is no JAX-RS method that serves the request path/resource. |
| ReaderException | 400 | All exceptions thrown from MessageBodyReaders are wrapped within this exception. If there is no ExceptionMapper for the wrapped exception, or if the exception is not a WebApplicationException, then RESTEasy will return a 400 code by default. |
| WriterException | 500 | All exceptions thrown from MessageBodyWriters are wrapped within this exception. If there is no ExceptionMapper for the wrapped exception, or if the exception is not a WebApplicationException, then RESTEasy will return a 400 code by default. |
| JAXBUnmarshalException | 400 | The JAXB providers (XML and Jettison) throw this exception on reads. They may be wrapping JAXBExceptions. This class extends ReaderException. |
| JAXBMarshalException | 500 | The JAXB providers (XML and Jettison) throw this exception on writes. They may be wrapping JAXBExceptions. This class extends WriterException. |
| ApplicationException | N/A | Wraps all exceptions thrown from application code. It functions in the same way as InvocationTargetException. If there is an ExceptionMapper for wrapped exception, then that is used to handle the request. |
| Failure | N/A | Internal RESTEasy error. Not logged. |
| LoggableFailure | N/A | Internal RESTEasy error. Logged. |
| DefaultOptionsMethodException | N/A | If the user invokes HTTP OPTIONS and no JAX-RS method for it, RESTEasy provides a default behavior by throwing this exception. |
15.8. RESTEasy Interceptors
15.8.1. Intercept JAX-RS Invocations
RESTEasy can intercept JAX-RS invocations and route them through listener-like objects called interceptors. This topic covers descriptions of the four types of interceptors.
Example 15.3. MessageBodyReader/Writer Interceptors
@Provider, as well as either @ServerInterceptor or @ClientInterceptor so that RESTEasy knows whether or not to add them to the interceptor list.
MessageBodyReader.readFrom() or MessageBodyWriter.writeTo(). They can be used to wrap the Output or Input streams.
public interface MessageBodyReaderInterceptor
{
Object read(MessageBodyReaderContext context) throws IOException, WebApplicationException;
}
public interface MessageBodyWriterInterceptor
{
void write(MessageBodyWriterContext context) throws IOException, WebApplicationException;
}
MessageBodyReaderContext.proceed() or MessageBodyWriterContext.proceed() is called in order to go to the next interceptor or, if there are no more interceptors to invoke, the readFrom() or writeTo() method of the MessageBodyReader or MessageBodyWriter. This wrapping allows objects to be modified before they get to the Reader or Writer, and then cleaned up after proceed() returns.
@Provider
@ServerInterceptor
public class MyHeaderDecorator implements MessageBodyWriterInterceptor {
public void write(MessageBodyWriterContext context) throws IOException, WebApplicationException
{
context.getHeaders().add("My-Header", "custom");
context.proceed();
}
}
Example 15.4. PreProcessInterceptor
public interface PreProcessInterceptor
{
ServerResponse preProcess(HttpRequest request, ResourceMethod method) throws Failure, WebApplicationException;
}
preProcess() method returns a ServerResponse then the underlying JAX-RS method will not get invoked, and the runtime will process the response and return to the client. If the preProcess() method does not return a ServerResponse, the underlying JAX-RS method will be invoked.
Example 15.5. PostProcessInterceptors
public interface PostProcessInterceptor
{
void postProcess(ServerResponse response);
}
Example 15.6. ClientExecutionInterceptors
@ClientInterceptor and @Provider. These interceptors run after the MessageBodyWriter, and after the ClientRequest has been built on the client side.
public interface ClientExecutionInterceptor
{
ClientResponse execute(ClientExecutionContext ctx) throws Exception;
}
public interface ClientExecutionContext
{
ClientRequest getRequest();
ClientResponse proceed() throws Exception;
}
15.8.2. Bind an Interceptor to a JAX-RS Method
All registered interceptors are invoked for every request by default. The AcceptedByMethod interface can be implemented to fine tune this behavior.
Example 15.7. Binding Interceptors Example
accept() method for interceptors that implement the AcceptedByMethod interface. If the method returns true, the interceptor will be added to the JAX-RS method's call chain; otherwise it will be ignored for that method.
accept() determines if the @GET annotation is present on the JAX-RS method. If it is, the interceptor will be applied to the method's call chain.
@Provider
@ServerInterceptor
public class MyHeaderDecorator implements MessageBodyWriterInterceptor, AcceptedByMethod {
public boolean accept(Class declaring, Method method) {
return method.isAnnotationPresent(GET.class);
}
public void write(MessageBodyWriterContext context) throws IOException, WebApplicationException
{
context.getHeaders().add("My-Header", "custom");
context.proceed();
}
}
15.8.3. Register an Interceptor
This topic covers how to register a RESTEasy JAX-RS interceptor in an application.
Procedure 15.3. Register an Interceptor
- To register an interceptor, list it in the
web.xmlfile under theresteasy.providerscontext-param, or return it as a class or as an object in theApplication.getClasses()orApplication.getSingletons()method.
Example 15.8. Registering an interceptor by listing it in the web.xml file:
<context-param>
<param-name>resteasy.providers</param-name>
<param-value>my.app.CustomInterceptor</paramvalue>
</context-param>Example 15.9. Registering an interceptor using the Application.getClasses() method:
package org.jboss.resteasy.example;
import javax.ws.rs.core.Application;
import java.util.HashSet;
import java.util.Set;
public class MyApp extends Application {
public java.util.Set<java.lang.Class<?>> getClasses() {
Set<Class<?>> resources = new HashSet<Class<?>>();
resources.add(MyResource.class);
resources.add(MyProvider.class);
return resources;
}
}Example 15.10. Registering an interceptor using the Application.getSingletons() method:
package org.jboss.resteasy.example;
import javax.ws.rs.core.Application;
import java.util.HashSet;
import java.util.Set;
public class MyApp extends Application {
protected Set<Object> singletons = new HashSet<Object>();
public PubSubApplication() {
singletons.add(new MyResource());
singletons.add(new MyProvider());
}
@Override
public Set<Object> getSingletons() {
return singletons;
}
}15.8.4. Interceptor Precedence Families
15.8.4.1. About Interceptor Precedence Families
Interceptors can be sensitive to the order they are invoked. RESTEasy groups interceptors in families to make ordering them simpler. This reference topic covers the built-in interceptor precedence families and the interceptors associated with each.
- SECURITY
- SECURITY interceptors are usually PreProcessInterceptors. They are invoked first because as little as possible should be done before the invocation is authorized.
- HEADER_DECORATOR
- HEADER_DECORATOR interceptors add headers to a response or an outgoing request. They follow the security interceptors as the added headers may affect the behavior of other interceptor families.
- ENCODER
- ENCODER interceptors change the OutputStream. For example, the GZIP interceptor creates a GZIPOutputStream to wrap the real OutputStream for compression.
- REDIRECT
- REDIRECT interceptors are usually used in PreProcessInterceptors, as they may reroute the request and totally bypass the JAX-RS method.
- DECODER
- DECODER interceptors wrap the InputStream. For example, the GZIP interceptor decoder wraps the InputStream in a GzipInputStream instance.
org.jboss.resteasy.annotations.interception package: @DecoredPrecedence, @EncoderPrecedence, @HeaderDecoratorPrecedence, @RedirectPrecedence, @SecurityPrecedence. Use these instead of the @Precedence annotation. For more information, refer Section 15.4, “RESTEasy Defined Annotations”.
15.8.4.2. Define a Custom Interceptor Precedence Family
Custom precedence families can be created and registered in the web.xml file. This topic covers examples of the context params available for defining interceptor precedence families.
Example 15.11. resteasy.append.interceptor.precedence
resteasy.append.interceptor.precedence context param appends the new precedence family to the default precedence family list.
<context-param>
<param-name>resteasy.append.interceptor.precedence</param-name>
<param-value>CUSTOM_PRECEDENCE_FAMILY</param-value>
</context-param>
Example 15.12. resteasy.interceptor.before.precedence
resteasy.interceptor.before.precedence context param defines the default precedence family that the custom family is executed before. The parameter value takes the form DEFAULT_PRECEDENCE_FAMILY/CUSTOM_PRECEDENCE_FAMILY, delimited by a ':'.
<context-param>
<param-name>resteasy.interceptor.before.precedence</param-name>
<param-value>DEFAULT_PRECEDENCE_FAMILY : CUSTOM_PRECEDENCE_FAMILY</param-value>
</context-param>
Example 15.13. resteasy.interceptor.after.precedence
resteasy.interceptor.after.precedence context param defines the default precedence family that the custom family is executed after. The parameter value takes the form DEFAULT_PRECEDENCE_FAMILY/CUSTOM_PRECEDENCE_FAMILY, delimited by a :.
<context-param>
<param-name>resteasy.interceptor.after.precedence</param-name>
<param-value>DEFAULT_PRECEDENCE_FAMILY : CUSTOM_PRECEDENCE_FAMILY</param-value>
</context-param>
15.9. String Based Annotations
15.9.1. Convert String Based @*Param Annotations to Objects
@*Param annotations, including @QueryParam, @MatrixParam, @HeaderParam, @PathParam, and @FormParam, are represented as strings in a raw HTTP request. These types of injected parameters can be converted to objects if these objects have a valueOf(String) static method or a constructor that takes one String parameter.
@Provider interfaces to handle this conversion for classes that don't have either a valueOf(String) static method, or a string constructor.
Example 15.14. StringConverter
import org.jboss.resteasy.client.ProxyFactory;
import org.jboss.resteasy.spi.StringConverter;
import org.jboss.resteasy.test.BaseResourceTest;
import org.junit.Assert;
import org.junit.Before;
import org.junit.Test;
import javax.ws.rs.HeaderParam;
import javax.ws.rs.MatrixParam;
import javax.ws.rs.PUT;
import javax.ws.rs.Path;
import javax.ws.rs.PathParam;
import javax.ws.rs.QueryParam;
import javax.ws.rs.ext.Provider;
public class StringConverterTest extends BaseResourceTest
{
public static class POJO
{
private String name;
public String getName()
{
return name;
}
public void setName(String name)
{
this.name = name;
}
}
@Provider
public static class POJOConverter implements StringConverter<POJO>
{
public POJO fromString(String str)
{
System.out.println("FROM STRNG: " + str);
POJO pojo = new POJO();
pojo.setName(str);
return pojo;
}
public String toString(POJO value)
{
return value.getName();
}
}
@Path("/")
public static class MyResource
{
@Path("{pojo}")
@PUT
public void put(@QueryParam("pojo")POJO q, @PathParam("pojo")POJO pp,
@MatrixParam("pojo")POJO mp, @HeaderParam("pojo")POJO hp)
{
Assert.assertEquals(q.getName(), "pojo");
Assert.assertEquals(pp.getName(), "pojo");
Assert.assertEquals(mp.getName(), "pojo");
Assert.assertEquals(hp.getName(), "pojo");
}
}
@Before
public void setUp() throws Exception
{
dispatcher.getProviderFactory().addStringConverter(POJOConverter.class);
dispatcher.getRegistry().addPerRequestResource(MyResource.class);
}
@Path("/")
public static interface MyClient
{
@Path("{pojo}")
@PUT
void put(@QueryParam("pojo")POJO q, @PathParam("pojo")POJO pp,
@MatrixParam("pojo")POJO mp, @HeaderParam("pojo")POJO hp);
}
@Test
public void testIt() throws Exception
{
MyClient client = ProxyFactory.create(MyClient.class, "http://localhost:8081");
POJO pojo = new POJO();
pojo.setName("pojo");
client.put(pojo, pojo, pojo, pojo);
}
}
Example 15.15. StringParameterUnmarshaller
StringParameterUnmarshaller interface is sensitive to the annotations placed on the parameter or field you are injecting into. It is created per injector. The setAnnotations() method is called by resteasy to initialize the unmarshaller.
org.jboss.resteasy.annotations.StringsParameterUnmarshallerBinder.
java.util.Date based @PathParam.
public class StringParamUnmarshallerTest extends BaseResourceTest
{
@Retention(RetentionPolicy.RUNTIME)
@StringParameterUnmarshallerBinder(DateFormatter.class)
public @interface DateFormat
{
String value();
}
public static class DateFormatter implements StringParameterUnmarshaller<Date>
{
private SimpleDateFormat formatter;
public void setAnnotations(Annotation[] annotations)
{
DateFormat format = FindAnnotation.findAnnotation(annotations, DateFormat.class);
formatter = new SimpleDateFormat(format.value());
}
public Date fromString(String str)
{
try
{
return formatter.parse(str);
}
catch (ParseException e)
{
throw new RuntimeException(e);
}
}
}
@Path("/datetest")
public static class Service
{
@GET
@Produces("text/plain")
@Path("/{date}")
public String get(@PathParam("date") @DateFormat("MM-dd-yyyy") Date date)
{
System.out.println(date);
Calendar c = Calendar.getInstance();
c.setTime(date);
Assert.assertEquals(3, c.get(Calendar.MONTH));
Assert.assertEquals(23, c.get(Calendar.DAY_OF_MONTH));
Assert.assertEquals(1977, c.get(Calendar.YEAR));
return date.toString();
}
}
@BeforeClass
public static void setup() throws Exception
{
addPerRequestResource(Service.class);
}
@Test
public void testMe() throws Exception
{
ClientRequest request = new ClientRequest(generateURL("/datetest/04-23-1977"));
System.out.println(request.getTarget(String.class));
}
}15.10. Configure File Extensions
15.10.1. Map File Extensions to Media Types in the web.xml File
Some clients, like browsers, cannot use the Accept and Accept-Language headers to negotiate the representation's media type or language. RESTEasy can map file name suffixes to media types and languages to deal with this issue. Follow these steps to map media types to file extensions, in the web.xml file.
Procedure 15.4. Map Media Types to File Extensions
- Open the
web.xmlfile for the application in a text editor. - Add the context-param
resteasy.media.type.mappingsto the file, inside theweb-apptags:<context-param> <param-name>resteasy.media.type.mappings</param-name> </context-param> - Configure the parameter values. The mappings form a comma delimited list. Each mapping is delimited by a
::Example 15.16. Example Mapping
<context-param> <param-name>resteasy.media.type.mappings</param-name> <param-value>html : text/html, json : application/json, xml : application/xml</param-value> </context-param>
15.10.2. Map File Extensions to Languages in the web.xml File
Some clients, like browsers, cannot use the Accept and Accept-Language headers to negotiate the representation's media type or language. RESTEasy can map file name suffixes to media types and languages to deal with this issue. Follow these steps to map languages to file extensions, in the web.xml file.
Procedure 15.5. Map File Extensions to Languages in the web.xml File
- Open the
web.xmlfile for the application in a text editor. - Add the context-param
resteasy.language.mappingsto the file, inside theweb-apptags:<context-param> <param-name>resteasy.language.mappings</param-name> </context-param> - Configure the parameter values. The mappings form a comma delimited list. Each mapping is delimited by a
::Example 15.17. Example Mapping
<context-param> <param-name>resteasy.language.mappings</param-name> <param-value> en : en-US, es : es, fr : fr</param-name> </context-param>
15.10.3. RESTEasy Supported Media Types
| Media Type | Java Type |
|---|---|
| application/*+xml, text/*+xml, application/*+json, application/*+fastinfoset, application/atom+* | JaxB annotated classes |
| application/*+xml, text/*+xml | org.w3c.dom.Document |
| */* | java.lang.String |
| */* | java.io.InputStream |
| text/plain | primitives, java.lang.String, or any type that has a String constructor, or static valueOf(String) method for input, toString() for output |
| */* | javax.activation.DataSource |
| */* | byte[] |
| */* | java.io.File |
| application/x-www-form-urlencoded | javax.ws.rs.core.MultivaluedMap |
15.11. RESTEasy JavaScript API
15.11.1. About the RESTEasy JavaScript API
Example 15.18. Simple JAX-RS JavaScript API Example
@Path("foo")
public class Foo{
@Path("{id}")
@GET
public String get(@QueryParam("order") String order, @HeaderParam("X-Foo") String header,
@MatrixParam("colour") String colour, @CookieParam("Foo-Cookie") String cookie){
&
}
@POST
public void post(String text){
}
}
var text = Foo.get({order: 'desc', 'X-Foo': 'hello',
colour: 'blue', 'Foo-Cookie': 123987235444});
Foo.put({$entity: text});
15.11.2. Enable the RESTEasy JavaScript API Servlet
The RESTEasy JavaScript API is not enabled by default. Follow these steps to enable it using the web.xml file.
Procedure 15.6. Edit web.xml to enable RESTEasy JavaScript API
- Open the
web.xmlfile of the application in a text editor. - Add the following configuration to the file, inside the
web-apptags:<servlet> <servlet-name>RESTEasy JSAPI</servlet-name> <servlet-class>org.jboss.resteasy.jsapi.JSAPIServlet</servlet-class> </servlet> <servlet-mapping> <servlet-name>RESTEasy JSAPI</servlet-name> <url-pattern>/URL</url-pattern> </servlet-mapping>
15.11.3. RESTEasy Javascript API Parameters
| Property | Default Value | Description |
|---|---|---|
| $entity | The entity to send as a PUT, POST request. | |
| $contentType | The MIME type of the body entity sent as the Content-Type header. Determined by the @Consumes annotation. | |
| $accepts | */* | The accepted MIME types sent as the Accept header. Determined by the @Provides annotation. |
| $callback | Set to a function (httpCode, xmlHttpRequest, value) for an asynchronous call. If not present, the call will be synchronous and return the value. | |
| $apiURL | Set to the base URI of the JAX-RS endpoint, not including the last slash. | |
| $username | If username and password are set, they will be used for credentials for the request. | |
| $password | If username and password are set, they will be used for credentials for the request. |
15.11.4. Build AJAX Queries with the JavaScript API
The RESTEasy JavaScript API can be used to manually construct requests. This topic covers examples of this behavior.
Example 15.19. The REST Object
// Change the base URL used by the API:
REST.apiURL = "http://api.service.com";
// log everything in a div element
REST.log = function(text){
jQuery("#log-div").append(text);
};
- apiURL
- Set by default to the JAX-RS root URL. Used by every JavaScript client API functions when constructing the requests.
- log
- Set to a function(string) in order to receive RESTEasy client API logs. This is useful if you want to debug your client API and place the logs where you can see them.
Example 15.20. The REST.Request Class
var r = new REST.Request();
r.setURI("http://api.service.com/orders/23/json");
r.setMethod("PUT");
r.setContentType("application/json");
r.setEntity({id: "23"});
r.addMatrixParameter("JSESSIONID", "12309812378123");
r.execute(function(status, request, entity){
log("Response is "+status);
});
15.11.5. REST.Request Class Members
| Member | Description |
|---|---|
| execute(callback) | Executes the request with all the information set in the current object. The value is passed to the optional argument callback, not returned. |
| setAccepts(acceptHeader) | Sets the Accept request header. Defaults to */*. |
| setCredentials(username, password) | Sets the request credentials. |
| setEntity(entity) | Sets the request entity. |
| setContentType(contentTypeHeader) | Sets the Content-Type request header. |
| setURI(uri) | Sets the request URI. This should be an absolute URI. |
| setMethod(method) | Sets the request method. Defaults to GET. |
| setAsync(async) | Controls whether the request should be asynchronous. Defaults to true. |
| addCookie(name, value) | Sets the given cookie in the current document when executing the request. This will be persistent in the browser. |
| addQueryParameter(name, value) | Adds a query parameter to the URI query part. |
| addMatrixParameter(name, value) | Adds a matrix parameter (path parameter) to the last path segment of the request URI. |
| addHeader(name, value) | Adds a request header. |
15.12. RESTEasy Asynchronous Job Service
15.12.1. About the RESTEasy Asynchronous Job Service
15.12.2. Enable the Asynchronous Job Service
Procedure 15.7. Modify the web.xml file
- Enable the asynchronous job service in the
web.xmlfile:<context-param> <param-name>resteasy.async.job.service.enabled</param-name> <param-value>true</param-value> </context-param>
The asynchronous job service has been enabled. For configuration options, refer to: Section 15.12.4, “Asynchronous Job Service Configuration Parameters”.
15.12.3. Configure Asynchronous Jobs for RESTEasy
This topic covers examples of the query parameters for asynchronous jobs with RESTEasy.
Warning
web.xml file instead.
Important
Example 15.21. The Asynch Parameter
asynch query parameter is used to run invocations in the background. A 202 Accepted response is returned, as well as a Location header with a URL pointing to where the response of the background method is located.
POST http://example.com/myservice?asynch=trueHTTP/1.1 202 Accepted
Location: http://example.com/asynch/jobs/3332334
/asynch/jobs/{job-id}?wait={millisconds}|nowait=true- GET returns the JAX-RS resource method invoked as a response if the job was completed. If the job has not been completed, this GET will return a 202 Accepted response code. Invoking GET does not remove the job, so it can be called multiple times.
- POST does a read of the job response and removes the job if it has been completed.
- DELETE is called to manually clean up the job queue.
Note
When the Job queue is full, it will evict the earliest job from memory automatically, without needing to call DELETE.
Example 15.22. Wait / Nowait
wait and nowait query parameters. If the wait parameter is not specified, the operation will default to nowait=true, and will not wait at all if the job is not complete. The wait parameter is defined in milliseconds.
POST http://example.com/asynch/jobs/122?wait=3000Example 15.23. The Oneway Parameter
oneway query parameter.
POST http://example.com/myservice?oneway=true15.12.4. Asynchronous Job Service Configuration Parameters
The table below details the configurable context-params for the Asynchronous Job Service. These parameters can be configured in the web.xml file.
| Parameter | Description |
|---|---|
| resteasy.async.job.service.max.job.results | Number of job results that can be held in the memory at any one time. Default value is 100. |
| resteasy.async.job.service.max.wait | Maximum wait time on a job when a client is querying for it. Default value is 300000. |
| resteasy.async.job.service.thread.pool.size | Thread pool size of the background threads that run the job. Default value is 100. |
| resteasy.async.job.service.base.path | Sets the base path for the job URIs. Default value is /asynch/jobs |
Example 15.24. Example Asynchronous Jobs Configuration
<web-app>
<context-param>
<param-name>resteasy.async.job.service.enabled</param-name>
<param-value>true</param-value>
</context-param>
<context-param>
<param-name>resteasy.async.job.service.max.job.results</param-name>
<param-value>100</param-value>
</context-param>
<context-param>
<param-name>resteasy.async.job.service.max.wait</param-name>
<param-value>300000</param-value>
</context-param>
<context-param>
<param-name>resteasy.async.job.service.thread.pool.size</param-name>
<param-value>100</param-value>
</context-param>
<context-param>
<param-name>resteasy.async.job.service.base.path</param-name>
<param-value>/asynch/jobs</param-value>
</context-param>
<listener>
<listener-class>
org.jboss.resteasy.plugins.server.servlet.ResteasyBootstrap
</listener-class>
</listener>
<servlet>
<servlet-name>Resteasy</servlet-name>
<servlet-class>
org.jboss.resteasy.plugins.server.servlet.HttpServletDispatcher
</servlet-class>
</servlet>
<servlet-mapping>
<servlet-name>Resteasy</servlet-name>
<url-pattern>/*</url-pattern>
</servlet-mapping>
</web-app>
15.13. RESTEasy JAXB
15.13.1. Create a JAXB Decorator
RESTEasy's JAXB providers have a pluggable way to decorate Marshaller and Unmarshaller instances. An annotation is created that can trigger either a Marshaller or Unmarshaller instance. This topic covers the steps to create a JAXB decorator with RESTEasy.
Procedure 15.8. Create a JAXB Decorator with RESTEasy
Create the Processor Class
- Create a class that implements DecoratorProcessor<Target, Annotation>. The target is either the JAXB Marshaller or Unmarshaller class. The annotation is created in step two.
- Annotate the class with @DecorateTypes, and declare the MIME Types the decorator should decorate.
- Set properties or values within the
decoratefunction.
Example 15.25. Example Processor Class
import org.jboss.resteasy.core.interception.DecoratorProcessor; import org.jboss.resteasy.annotations.DecorateTypes; import javax.xml.bind.Marshaller; import javax.xml.bind.PropertyException; import javax.ws.rs.core.MediaType; import javax.ws.rs.Produces; import java.lang.annotation.Annotation; @DecorateTypes({"text/*+xml", "application/*+xml"}) public class PrettyProcessor implements DecoratorProcessor<Marshaller, Pretty> { public Marshaller decorate(Marshaller target, Pretty annotation, Class type, Annotation[] annotations, MediaType mediaType) { target.setProperty(Marshaller.JAXB_FORMATTED_OUTPUT, Boolean.TRUE); } }Create the Annotation
- Create a custom interface that is annotated with the @Decorator annotation.
- Declare the processor and target for the @Decorator annotation. The processor is created in step one. The target is either the JAXB Marshaller or Unmarshaller class.
Example 15.26. Example Annotation
import org.jboss.resteasy.annotations.Decorator; @Target({ElementType.TYPE, ElementType.METHOD, ElementType.PARAMETER, ElementType.FIELD}) @Retention(RetentionPolicy.RUNTIME) @Decorator(processor = PrettyProcessor.class, target = Marshaller.class) public @interface Pretty {}- Add the annotation created in step two to a function so that either the input or output is decorated when it is marshalled.
The JAXB decorator has been created and applied within the JAX-RS web service.
15.13.2. JAXB and XML Provider
RESTEasy provides setting an XML header using the @org.jboss.resteasy.annotations.providers.jaxb.XmlHeader annotation. For example:
@XmlRootElement
public static class Thing
{
private String name;
public String getName()
{
return name;
}
public void setName(String name)
{
this.name = name;
}
}
@Path("/test")
public static class TestService
{
@GET
@Path("/header")
@Produces("application/xml")
@XmlHeader("<?xml-stylesheet type='text/xsl' href='${baseuri}foo.xsl' ?>")
public Thing get()
{
Thing thing = new Thing();
thing.setName("bill");
return thing;
}
}@XmlHeader ensures that the XML output has an XML-stylesheet header.
@XmlRootElement
public static class Thing
{
private String name;
public String getName()
{
return name;
}
public void setName(String name)
{
this.name = name;
}
}
@Path("/test")
public static class TestService
{
@GET
@Path("/stylesheet")
@Produces("application/xml")
@Stylesheet(type="text/css", href="${basepath}foo.xsl")
@Junk
public Thing getStyle()
{
Thing thing = new Thing();
thing.setName("bill");
return thing;
}
}15.13.3. JAXB and JSON Provider
<dependency>
<groupId>org.jboss.resteasy</groupId>
<artifactId>resteasy-jettison-provider</artifactId>
<version>${version.org.jboss.resteasy}</version>
<scope>provided</scope>
</dependency>BadgerFish the other is a Jettison mapped convention format. The mapped convention is the default. For more details on the JAXB + JSON Provider integration with Jettison, refer to: http://docs.jboss.org/resteasy/docs/2.3.7.Final/userguide/html_single/index.html
15.14. RESTEasy Atom Support
15.14.1. About the Atom API and Provider
org.jboss.resteasy.plugins.providers.atom package. RESTEasy uses JAXB to marshal and unmarshal the API. The provider is JAXB based, and is not limited to sending atom objects using XML. All JAXB providers that RESTEasy has can be reused by the Atom API and provider, including JSON. Refer to the javadocs available from the Customer Service Portal for more information on the API.
import org.jboss.resteasy.plugins.providers.atom.Content;
import org.jboss.resteasy.plugins.providers.atom.Entry;
import org.jboss.resteasy.plugins.providers.atom.Feed;
import org.jboss.resteasy.plugins.providers.atom.Link;
import org.jboss.resteasy.plugins.providers.atom.Person;
@Path("atom")
public class MyAtomService
{
@GET
@Path("feed")
@Produces("application/atom+xml")
public Feed getFeed() throws URISyntaxException
{
Feed feed = new Feed();
feed.setId(new URI("http://example.com/42"));
feed.setTitle("My Feed");
feed.setUpdated(new Date());
Link link = new Link();
link.setHref(new URI("http://localhost"));
link.setRel("edit");
feed.getLinks().add(link);
feed.getAuthors().add(new Person("John Brown"));
Entry entry = new Entry();
entry.setTitle("Hello World");
Content content = new Content();
content.setType(MediaType.TEXT_HTML_TYPE);
content.setText("Nothing much");
entry.setContent(content);
feed.getEntries().add(entry);
return feed;
}
}
15.14.2. Using JAXB with Atom Provider
@XmlRootElement(namespace = "http://jboss.org/Customer")
@XmlAccessorType(XmlAccessType.FIELD)
public class Customer
{
@XmlElement
private String name;
public Customer()
{
}
public Customer(String name)
{
this.name = name;
}
public String getName()
{
return name;
}
}
@Path("atom")
public static class AtomServer
{
@GET
@Path("entry")
@Produces("application/atom+xml")
public Entry getEntry()
{
Entry entry = new Entry();
entry.setTitle("Hello World");
Content content = new Content();
content.setJAXBObject(new Customer("bill"));
entry.setContent(content);
return entry;
}
}
@Path("atom")
public static class AtomServer
{
@PUT
@Path("entry")
@Produces("application/atom+xml")
public void putCustomer(Entry entry)
{
Content content = entry.getContent();
Customer cust = content.getJAXBObject(Customer.class);
}
}
15.15. YAML Provider
SnakeYAML library. To enable YAML support, you must insert the following dependencies into the project pom file of your application:
<dependency>
<groupId>org.jboss.resteasy</groupId>
<artifactId>resteasy-yaml-provider</artifactId>
<version>${version.org.jboss.resteasy}</version>
<scope>provided</scope>
</dependency>
<dependency>
<groupId>org.yaml</groupId>
<artifactId>snakeyaml</artifactId>
<version>${version.org.yaml.snakeyaml}</version>
</dependency>
- text/x-yaml
- text/yaml
- application/x-yaml
import javax.ws.rs.Consumes;
import javax.ws.rs.GET;
import javax.ws.rs.Path;
import javax.ws.rs.Produces;
@Path("/yaml")
public class YamlResource
{
@GET
@Produces("text/x-yaml")
public MyObject getMyObject() {
return createMyObject();
}
...
}
15.16. EJB Integration
@Remote or @Local interface with JAX-RS annotations:
@Local
@Path("/Library")
public interface Library {
@GET
@Path("/books/{isbn}")
public String getBook(@PathParam("isbn") String isbn);
}
@Stateless
public class LibraryBean implements Library {
...
}web.xml file, you must manually register the EJB with RESTEasy using the resteasy.jndi.resources <context-param>
<web-app>
<display-name>Archetype Created Web Application</display-name>
<context-param>
<param-name>resteasy.jndi.resources</param-name>
<param-value>LibraryBean/local</param-value>
</context-param>
<listener>
<listener-class>org.jboss.resteasy.plugins.server.servlet.ResteasyBootstrap</listener-class>
</listener>
<servlet>
<servlet-name>Resteasy</servlet-name>
<servlet-class>org.jboss.resteasy.plugins.server.servlet.HttpServletDispatcher</servlet-class>
</servlet>
<servlet-mapping>
<servlet-name>Resteasy</servlet-name>
<url-pattern>/*</url-pattern>
</servlet-mapping>
</web-app>
15.17. JSON Support via Jackson
<repository>
<id>jboss</id>
<url>>http://repository.jboss.org/nexus/content/groups/public/</url>
</repository>
...
<dependency>
<groupId>org.jboss.resteasy</groupId>
<artifactId>resteasy-jackson-provider</artifactId>
<version>${version.org.jboss.resteasy}</version>
<scope>provided</scope>
</dependency>
15.18. RESTEasy/Spring Integration
15.18.1. RESTEasy/Spring integration
Prerequisites
- Your application must have an existing JAX-WS service and client configuration.
Procedure 15.9. Enable the RESTEasy/Spring integration functionality
- RESTEasy integrates with Spring 3.0.x.Maven users must use the resteasy-spring artifact. Alternatively, the jar is available as a module in JBoss EAP 6.RESTEasy comes with its own Spring ContextLoaderListener that registers a RESTEasy specific BeanPostProcessor that processes JAX-RS annotations when a bean is created by a BeanFactory.This means that RESTEasy will automatically scan for @Provider and JAX-RS resource annotations on your bean class and register them as JAX-RS resources.
Example 15.27. Edit web.xml
Add the following to your web.xml file to enable the RESTEasy/Spring integration functionality:<web-app> <display-name> Archetype Created Web Application </display-name> <listener> <listener-class> org.jboss.resteasy.plugins.server.servlet.ResteasyBootstrap </listener-class> </listener> <listener> <listener-class> org.jboss.resteasy.plugins.spring.SpringContextLoaderListener </listener-class> </listener> <servlet> <servlet-name>Resteasy </servlet-name> <servlet-class> org.jboss.resteasy.plugins.server.servlet.HttpServletDispatcher </servlet-class> </servlet> <servlet-mapping> <servlet-name> Resteasy </servlet-name> <url-pattern>/*</url-pattern> </servlet-mapping> </web-app>The SpringContextLoaderListener must be declared after ResteasyBootstrap as it uses ServletContext attributes initialized by it.
Chapter 16. JAX-WS Web Services
16.1. About JAX-WS Web Services
WS-Notification, WS-Addressing, WS-Policy, WS-Security, and WS-Trust. They communicate using a specialized XML language called Simple Object Access Protocol (SOAP), which defines a message architecture and message formats.
WebService and WebMethod interfaces.
webservices subsystem.
The JBoss EAP Quickstarts include several fully-functioning JAX-WS Web Service applications. These examples include:
- wsat-simple
- wsba-coordinator-completion-simple
- wsba-participant-completion-simple
16.2. Configure the webservices Subsystem
webservices subsystem, which controls the behavior of Web Services deployed into JBoss EAP 6. The command to modify each element in the Management CLI script (EAP_HOME/bin/jboss-cli.sh or EAP_HOME/bin/jboss-cli.bat) is provided. Remove the /profile=default portion of the command for a standalone server, or replace default with the name of profile to configure.
You can rewrite the <soap:address> element in endpoint-published WSDL contracts. This ability can be used to control the server address that is advertised to clients for each endpoint. Each of the following optional elements can be modified to suit your requirements. If there is any active WS deployment then modification of any of these elements requires a server reload.
| Element | Description | CLI Command |
|---|---|---|
| modify-wsdl-address |
Whether to always modify the WSDL address. If true, the content of
<soap:address> will always be overwritten. If false, the content of <soap:address> will only be overwritten if it is not a valid URL. The values used will be the wsdl-host, wsdl-port, and wsdl-secure-port described below.
| /profile=default/subsystem=webservices/:write-attribute(name=modify-wsdl-address,value=true)
|
| wsdl-host |
The hostname / IP address to be used for rewriting
<soap:address>. If wsdl-host is set to the string jbossws.undefined.host, the requester's host is used when rewriting the <soap:address>.
| /profile=default/subsystem=webservices/:write-attribute(name=wsdl-host,value=10.1.1.1) |
| wsdl-port | An integer which explicitly defines the HTTP port that will be used for rewriting the SOAP address. If undefined, the HTTP port is identified by querying the list of installed HTTP connectors. | /profile=default/subsystem=webservices/:write-attribute(name=wsdl-port,value=8080)
|
| wsdl-secure-port | An integer which explicitly defines the HTTPS port that will be used for rewriting the SOAP address. If undefined, the HTTPS port is identified by querying the list of installed HTTPS connectors. | /profile=default/subsystem=webservices/:write-attribute(name=wsdl-secure-port,value=8443)
|
You can define endpoint configurations which can be referenced by endpoint implementations. One way this might be used is to add a given handler to any WS endpoint that is marked with a given endpoint configuration with the annotation @org.jboss.ws.api.annotation.EndpointConfig.
Standard-Endpoint-Config. An example of a custom configuration, Recording-Endpoint-Config, is also included. This provides an example of a recording handler. The Standard-Endpoint-Config is automatically used for any endpoint which is not associated with any other configuration.
Standard-Endpoint-Config using the Management CLI, use the following command:
/profile=default/subsystem=webservices/endpoint-config=Standard-Endpoint-Config/:read-resource(recursive=true,proxies=false,include-runtime=false,include-defaults=true)
An endpoint configuration, referred to as an endpoint-config in the Management API, includes a pre-handler-chain, post-handler-chain and some properties, which are applied to a particular endpoint. The following commands read and add and endpoint config.
Example 16.1. Read an Endpoint Config
/profile=default/subsystem=webservices/endpoint-config=Recording-Endpoint-Config:read-resourceExample 16.2. Add an Endpoint Config
/profile=default/subsystem=webservices/endpoint-config=My-Endpoint-Config:add
Each endpoint config may be associated with PRE and POST handler chains. Each handler chain may include JAXWS-compliant handlers. For outbound messages, PRE handler chain handlers are executed before any handler attached to the endpoints using standard JAXWS means, such as the @HandlerChain annotation. POST handler chain handlers are executed after usual endpoint handlers. For inbound messages, the opposite applies. JAX-WS is a standard API for XML-based web services, and is documented at http://jcp.org/en/jsr/detail?id=224.
protocol-bindings attribute, which sets the protocols which trigger the chain to start.
Example 16.3. Read a Handler Chain
/profile=default/subsystem=webservices/endpoint-config=Recording-Endpoint-Config/pre-handler-chain=recording-handlers:read-resourceExample 16.4. Add a Handler Chain
/profile=default/subsystem=webservices/endpoint-config=My-Endpoint-Config/post-handler-chain=my-handlers:add(protocol-bindings="##SOAP11_HTTP")
A JAXWS handler is a child element handler within a handler chain. The handler takes a class attribute, which is the fully-qualified classname of the handler class. When the endpoint is deployed, an instance of that class is created for each referencing deployment. Either the deployment class loader or the class loader for module org.jboss.as.webservices.server.integration must be able to load the handler class.
Example 16.5. Read a Handler
/profile=default/subsystem=webservices/endpoint-config=Recording-Endpoint-Config/pre-handler-chain=recording-handlers/handler=RecordingHandler:read-resourceExample 16.6. Add a Handler
/profile=default/subsystem=webservices/endpoint-config=My-Endpoint-Config/post-handler-chain=my-handlers/handler=foo-handler:add(class="org.jboss.ws.common.invocation.RecordingServerHandler")
You can view runtime information about Web Services, such as the web context and the WSDL URL, by querying the endpoints themselves. You can use the * character to query all endpoints at once. The following examples show the command for a both a server in a managed domain and for a standalone server.
Example 16.7. View Runtime Information about All Web Service Endpoints on A Server in a Managed Domain
server-one, which is hosted on physical host master and running in a managed domain.
/host=master/server=server-one/deployment="*"/subsystem=webservices/endpoint="*":read-resourceExample 16.8. View Runtime Information about All Web Service Endpoints on a Standalone Server
/deployment="*"/subsystem=webservices/endpoint="*":read-resourceExample 16.9. Example Endpoint Information
{
"outcome" => "success",
"result" => [{
"address" => [
("deployment" => "jaxws-samples-handlerchain.war"),
("subsystem" => "webservices"),
("endpoint" => "jaxws-samples-handlerchain:TestService")
],
"outcome" => "success",
"result" => {
"class" => "org.jboss.test.ws.jaxws.samples.handlerchain.EndpointImpl",
"context" => "jaxws-samples-handlerchain",
"name" => "TestService",
"type" => "JAXWS_JSE",
"wsdl-url" => "http://localhost:8080/jaxws-samples-handlerchain?wsdl"
}
}]
}
16.3. Configure the HTTP Timeout per Application
- Application - defined in the application's
web.xmlconfiguration file. - Server - specified via the
default-session-timeoutattribute. - Default - 30 minutes.
Procedure 16.1. Configure the HTTP Timeout per Application
- Edit the application's
WEB-INF/web.xmlfile. - Add the following configuration XML to the file, changing
30to the desired timeout (in minutes).<session-config> <session-timeout>30</session-timeout> </session-config> - If you modified the WAR file, redeploy the application. If you exploded the WAR file, no further action is required because JBoss EAP will automatically undeploy and redeploy the application.
16.4. JAX-WS Web Service Endpoints
16.4.1. About JAX-WS Web Service Endpoints
- You can write WSDL descriptors manually.
- You can use JAX-WS annotations that create the WSDL descriptors automatically for you. This is the most common method for creating WSDL descriptors.
A Web Service must fulfill the requirements of the JAX-WS API and the Web Services metadata specification at http://www.jcp.org/en/jsr/summary?id=181. A valid implementation meets the following requirements:
- It contains a
javax.jws.WebServiceannotation. - All method parameters and return types are compatible with the JAXB 2.0 specification, JSR-222. Refer to http://www.jcp.org/en/jsr/summary?id=222 for more information.
Example 16.10. Example POJO Endpoint
@WebService
@SOAPBinding(style = SOAPBinding.Style.RPC)
public class JSEBean01
{
@WebMethod
public String echo(String input)
{
...
}
}
Example 16.11. Example Web Services Endpoint
<web-app ...>
<servlet>
<servlet-name>TestService</servlet-name>
<servlet-class>org.jboss.test.ws.jaxws.samples.jsr181pojo.JSEBean01</servlet-class>
</servlet>
<servlet-mapping>
<servlet-name>TestService</servlet-name>
<url-pattern>/*</url-pattern>
</servlet-mapping>
</web-app>
Example 16.12. Exposing an Endpoint in an EJB
@Stateless
@Remote(EJB3RemoteInterface.class)
@RemoteBinding(jndiBinding = "/ejb3/EJB3EndpointInterface")
@WebService
@SOAPBinding(style = SOAPBinding.Style.RPC)
public class EJB3Bean01 implements EJB3RemoteInterface
{
@WebMethod
public String echo(String input)
{
...
}
}
JAX-WS services typically implement a Java service endpoint interface (SEI), which may be mapped from a WSDL port type, either directly or using annotations. This SEI provides a high-level abstraction which hides the details between Java objects and their XML representations. However, in some cases, services need the ability to operate at the XML message level. The endpoint Provider interface provides this functionality to Web Services which implement it.
After you deploy your Web Service, you can consume the WSDL to create the component stubs which will be the basis for your application. Your application can then access the endpoint to do its work.
The JBoss EAP Quickstarts include several fully-functioning JAX-WS Web Service applications. These examples include:
- wsat-simple
- wsba-coordinator-completion-simple
- wsba-participant-completion-simple
16.4.2. Write and Deploy a JAX-WS Web Service Endpoint
This topic discusses the development of a simple JAX-WS service endpoint, which is the server-side component, which responds to requests from JAX-WS clients and publishes the WSDL definition for itself. For more in-depth information about JAX-WS service endpoints, refer to Section 16.6.2, “JAX-WS Common API Reference” and the API documentation bundle in Javadoc format, distributed with JBoss EAP 6.
A Web Service must fulfill the requirements of the JAXWS API and the Web Services meta data specification at http://www.jcp.org/en/jsr/summary?id=181. A valid implementation meets the following requirements:
- It contains a
javax.jws.WebServiceannotation. - All method parameters and return types are compatible with the JAXB 2.0 specification, JSR-222. Refer to http://www.jcp.org/en/jsr/summary?id=222 for more information.
Example 16.13. Example Service Implementation
package org.jboss.test.ws.jaxws.samples.retail.profile;
import javax.ejb.Stateless;
import javax.jws.WebService;
import javax.jws.WebMethod;
import javax.jws.soap.SOAPBinding;
@Stateless
@WebService(
name="ProfileMgmt",
targetNamespace = "http://org.jboss.ws/samples/retail/profile",
serviceName = "ProfileMgmtService")
@SOAPBinding(parameterStyle = SOAPBinding.ParameterStyle.BARE)
public class ProfileMgmtBean {
@WebMethod
public DiscountResponse getCustomerDiscount(DiscountRequest request) {
return new DiscountResponse(request.getCustomer(), 10.00);
}
}
Example 16.14. Example XML Payload
DiscountRequest class which is used by the ProfileMgmtBean bean in the previous example. The annotations are included for verbosity. Typically, the JAXB defaults are reasonable and do not need to be specified.
package org.jboss.test.ws.jaxws.samples.retail.profile;
import javax.xml.bind.annotation.XmlAccessType;
import javax.xml.bind.annotation.XmlAccessorType;
import javax.xml.bind.annotation.XmlType;
import org.jboss.test.ws.jaxws.samples.retail.Customer;
@XmlAccessorType(XmlAccessType.FIELD)
@XmlType(
name = "discountRequest",
namespace="http://org.jboss.ws/samples/retail/profile",
propOrder = { "customer" }
)
public class DiscountRequest {
protected Customer customer;
public DiscountRequest() {
}
public DiscountRequest(Customer customer) {
this.customer = customer;
}
public Customer getCustomer() {
return customer;
}
public void setCustomer(Customer value) {
this.customer = value;
}
}
The implementation class is wrapped in a JAR deployment. Any metadata required for deployment is taken from the annotations on the implementation class and the service endpoint interface. Deploy the JAR using the Management CLI or the Management Interface, and the HTTP endpoint is created automatically.
Example 16.15. Example JAR Structure for a Web Service Deployment
[user@host ~]$ jar -tf jaxws-samples-retail.jar
org/jboss/test/ws/jaxws/samples/retail/profile/DiscountRequest.class
org/jboss/test/ws/jaxws/samples/retail/profile/DiscountResponse.class
org/jboss/test/ws/jaxws/samples/retail/profile/ObjectFactory.class
org/jboss/test/ws/jaxws/samples/retail/profile/ProfileMgmt.class
org/jboss/test/ws/jaxws/samples/retail/profile/ProfileMgmtBean.class
org/jboss/test/ws/jaxws/samples/retail/profile/ProfileMgmtService.class
org/jboss/test/ws/jaxws/samples/retail/profile/package-info.class
16.5. JAX-WS Web Service Clients
16.5.1. Consume and Access a JAX-WS Web Service
- Create the client artifacts.
- Construct a service stub.
Before you can create client artifacts, you need to create your WSDL contract. The following WSDL contract is used for the examples presented in the rest of this topic.
ProfileMgmtService.wsdl file.
Example 16.16. Example WSDL Contract
<definitions
name='ProfileMgmtService'
targetNamespace='http://org.jboss.ws/samples/retail/profile'
xmlns='http://schemas.xmlsoap.org/wsdl/'
xmlns:ns1='http://org.jboss.ws/samples/retail'
xmlns:soap='http://schemas.xmlsoap.org/wsdl/soap/'
xmlns:tns='http://org.jboss.ws/samples/retail/profile'
xmlns:xsd='http://www.w3.org/2001/XMLSchema'>
<types>
<xs:schema targetNamespace='http://org.jboss.ws/samples/retail'
version='1.0' xmlns:xs='http://www.w3.org/2001/XMLSchema'>
<xs:complexType name='customer'>
<xs:sequence>
<xs:element minOccurs='0' name='creditCardDetails' type='xs:string'/>
<xs:element minOccurs='0' name='firstName' type='xs:string'/>
<xs:element minOccurs='0' name='lastName' type='xs:string'/>
</xs:sequence>
</xs:complexType>
</xs:schema>
<xs:schema
targetNamespace='http://org.jboss.ws/samples/retail/profile'
version='1.0'
xmlns:ns1='http://org.jboss.ws/samples/retail'
xmlns:tns='http://org.jboss.ws/samples/retail/profile'
xmlns:xs='http://www.w3.org/2001/XMLSchema'>
<xs:import namespace='http://org.jboss.ws/samples/retail'/>
<xs:element name='getCustomerDiscount'
nillable='true' type='tns:discountRequest'/>
<xs:element name='getCustomerDiscountResponse'
nillable='true' type='tns:discountResponse'/>
<xs:complexType name='discountRequest'>
<xs:sequence>
<xs:element minOccurs='0' name='customer' type='ns1:customer'/>
</xs:sequence>
</xs:complexType>
<xs:complexType name='discountResponse'>
<xs:sequence>
<xs:element minOccurs='0' name='customer' type='ns1:customer'/>
<xs:element name='discount' type='xs:double'/>
</xs:sequence>
</xs:complexType>
</xs:schema>
</types>
<message name='ProfileMgmt_getCustomerDiscount'>
<part element='tns:getCustomerDiscount' name='getCustomerDiscount'/>
</message>
<message name='ProfileMgmt_getCustomerDiscountResponse'>
<part element='tns:getCustomerDiscountResponse'
name='getCustomerDiscountResponse'/>
</message>
<portType name='ProfileMgmt'>
<operation name='getCustomerDiscount'
parameterOrder='getCustomerDiscount'>
<input message='tns:ProfileMgmt_getCustomerDiscount'/>
<output message='tns:ProfileMgmt_getCustomerDiscountResponse'/>
</operation>
</portType>
<binding name='ProfileMgmtBinding' type='tns:ProfileMgmt'>
<soap:binding style='document'
transport='http://schemas.xmlsoap.org/soap/http'/>
<operation name='getCustomerDiscount'>
<soap:operation soapAction=''/>
<input>
<soap:body use='literal'/>
</input>
<output>
<soap:body use='literal'/>
</output>
</operation>
</binding>
<service name='ProfileMgmtService'>
<port binding='tns:ProfileMgmtBinding' name='ProfileMgmtPort'>
<soap:address
location='SERVER:PORT/jaxws-samples-retail/ProfileMgmtBean'/>
</port>
</service>
</definitions>
Note
wsconsume.sh or wsconsume.bat tool is used to consume the abstract contract (WSDL) and produce annotated Java classes and optional sources that define it. The command is located in the EAP_HOME/bin/ directory of the JBoss EAP 6 installation.
Example 16.17. Syntax of the wsconsume.sh Command
[user@host bin]$ ./wsconsume.sh --help
WSConsumeTask is a cmd line tool that generates portable JAX-WS artifacts from a WSDL file.
usage: org.jboss.ws.tools.cmd.WSConsume [options] <wsdl-url>
options:
-h, --help Show this help message
-b, --binding=<file> One or more JAX-WS or JAXB binding files
-k, --keep Keep/Generate Java source
-c --catalog=<file> Oasis XML Catalog file for entity resolution
-p --package=<name> The target package for generated source
-w --wsdlLocation=<loc> Value to use for @WebService.wsdlLocation
-o, --output=<directory> The directory to put generated artifacts
-s, --source=<directory> The directory to put Java source
-t, --target=<2.0|2.1|2.2> The JAX-WS specification target
-q, --quiet Be somewhat more quiet
-v, --verbose Show full exception stack traces
-l, --load-consumer Load the consumer and exit (debug utility)
-e, --extension Enable SOAP 1.2 binding extension
-a, --additionalHeaders Enable processing of implicit SOAP headers
-n, --nocompile Do not compile generated sources
.java files listed in the output, from the ProfileMgmtService.wsdl file. The sources use the directory structure of the package, which is specified with the -p switch.
[user@host bin]$ wsconsume.sh -k -p org.jboss.test.ws.jaxws.samples.retail.profile ProfileMgmtService.wsdl
output/org/jboss/test/ws/jaxws/samples/retail/profile/Customer.java
output/org/jboss/test/ws/jaxws/samples/retail/profile/DiscountRequest.java
output/org/jboss/test/ws/jaxws/samples/retail/profile/DiscountResponse.java
output/org/jboss/test/ws/jaxws/samples/retail/profile/ObjectFactory.java
output/org/jboss/test/ws/jaxws/samples/retail/profile/ProfileMgmt.java
output/org/jboss/test/ws/jaxws/samples/retail/profile/ProfileMgmtService.java
output/org/jboss/test/ws/jaxws/samples/retail/profile/package-info.java
output/org/jboss/test/ws/jaxws/samples/retail/profile/Customer.class
output/org/jboss/test/ws/jaxws/samples/retail/profile/DiscountRequest.class
output/org/jboss/test/ws/jaxws/samples/retail/profile/DiscountResponse.class
output/org/jboss/test/ws/jaxws/samples/retail/profile/ObjectFactory.class
output/org/jboss/test/ws/jaxws/samples/retail/profile/ProfileMgmt.class
output/org/jboss/test/ws/jaxws/samples/retail/profile/ProfileMgmtService.class
output/org/jboss/test/ws/jaxws/samples/retail/profile/package-info.class
.java source files and compiled .class files are generated into the output/ directory within the directory where you run the command.
| File | Description |
|---|---|
ProfileMgmt.java
|
Service endpoint interface.
|
Customer.java
|
Custom data type.
|
Discount*.java
|
Custom data types.
|
ObjectFactory.java
|
JAXB XML registry.
|
package-info.java
|
JAXB package annotations.
|
ProfileMgmtService.java
|
Service factory.
|
wsconsume.sh command generates all custom data types (JAXB annotated classes), the service endpoint interface and a service factory class. These artifacts are used to build web service client implementations.
Web service clients use service stubs to abstract the details of a remote web service invocation. To a client application, a WS invocation looks like an invocation of any other business component. In this case the service endpoint interface acts as the business interface, and a service factory class is not used to construct it as a service stub.
Example 16.18. Constructing a Service Stub and Accessing the Endpoint
wsconsume.sh command to build the service stub. Finally, the stub can be used just as any other business interface would be.
import javax.xml.ws.Service;
[...]
Service service = Service.create(
new URL("http://example.org/service?wsdl"),
new QName("MyService")
);
ProfileMgmt profileMgmt = service.getPort(ProfileMgmt.class);
// Use the service stub in your application
16.5.2. Develop a JAX-WS Client Application
Service
- Overview
- A
Serviceis an abstraction which represents a WSDL service. A WSDL service is a collection of related ports, each of which includes a port type bound to a particular protocol and a particular endpoint address.Usually, the Service is generated when the rest of the component stubs are generated from an existing WSDL contract. The WSDL contract is available via the WSDL URL of the deployed endpoint, or can be created from the endpoint source using thewsprovide.shcommand in theEAP_HOME/bin/directory.This type of usage is referred to as the static use case. In this case, you create instances of theServiceclass which is created as one of the component stubs.You can also create the service manually, using theService.createmethod. This is referred to as the dynamic use case. - Usage
- Static Use Case
- The static use case for a JAX-WS client assumes that you already have a WSDL contract. This may be generated by an external tool or generated by using the correct JAX-WS annotations when you create your JAX-WS endpoint.To generate your component stubs, you use the
wsconsume.shorwsconsume.batscript which is included inEAP_HOME/bin/. The script takes the WSDL URL or file as a parameter, and generates multiple of files, structured in a directory tree. The source and class files representing yourServiceare namedCLASSNAME_Service.javaandCLASSNAME_Service.class, respectively.The generated implementation class has two public constructors, one with no arguments and one with two arguments. The two arguments represent the WSDL location (ajava.net.URL) and the service name (ajavax.xml.namespace.QName) respectively.The no-argument constructor is the one used most often. In this case the WSDL location and service name are those found in the WSDL. These are set implicitly from the@WebServiceClientannotation that decorates the generated class.Example 16.19. Example Generated Service Class
@WebServiceClient(name="StockQuoteService", targetNamespace="http://example.com/stocks", wsdlLocation="http://example.com/stocks.wsdl") public class StockQuoteService extends javax.xml.ws.Service { public StockQuoteService() { super(new URL("http://example.com/stocks.wsdl"), new QName("http://example.com/stocks", "StockQuoteService")); } public StockQuoteService(String wsdlLocation, QName serviceName) { super(wsdlLocation, serviceName); } ... } - Dynamic Use Case
- In the dynamic case, no stubs are generated automatically. Instead, a web service client uses the
Service.createmethod to createServiceinstances. The following code fragment illustrates this process.Example 16.20. Creating Services Manually
URL wsdlLocation = new URL("http://example.org/my.wsdl"); QName serviceName = new QName("http://example.org/sample", "MyService"); Service service = Service.create(wsdlLocation, serviceName);
- Handler Resolver
- JAX-WS provides a flexible plug-in framework for message processing modules, known as handlers. These handlers extend the capabilities of a JAX-WS runtime system. A
Serviceinstance provides access to aHandlerResolvervia a pair ofgetHandlerResolverandsetHandlerResolvermethods that can configure a set of handlers on a per-service, per-port or per-protocol binding basis.When aServiceinstance creates a proxy or aDispatchinstance, the handler resolver currently registered with the service creates the required handler chain. Subsequent changes to the handler resolver configured for aServiceinstance do not affect the handlers on previously created proxies orDispatchinstances. - Executor
Serviceinstances can be configured with ajava.util.concurrent.Executor. TheExecutorinvokes any asynchronous callbacks requested by the application. ThesetExecutorandgetExecutormethods ofServicecan modify and retrieve theExecutorconfigured for a service.
A dynamic proxy is an instance of a client proxy using one of the getPort methods provided in the Service. The portName specifies the name of the WSDL port the service uses. The serviceEndpointInterface specifies the service endpoint interface supported by the created dynamic proxy instance.
Example 16.21. getPort Methods
public <T> T getPort(QName portName, Class<T> serviceEndpointInterface)
public <T> T getPort(Class<T> serviceEndpointInterface)
wsconsume.sh command, which parses the WSDL and creates Java classes from it.
Example 16.22. Returning the Port of a Service
@WebServiceClient(name = "TestEndpointService", targetNamespace = "http://org.jboss.ws/wsref",
wsdlLocation = "http://localhost.localdomain:8080/jaxws-samples-webserviceref?wsdl")
public class TestEndpointService extends Service
{
...
public TestEndpointService(URL wsdlLocation, QName serviceName) {
super(wsdlLocation, serviceName);
}
@WebEndpoint(name = "TestEndpointPort")
public TestEndpoint getTestEndpointPort()
{
return (TestEndpoint)super.getPort(TESTENDPOINTPORT, TestEndpoint.class);
}
}
@WebServiceRef
The @WebServiceRef annotation declares a reference to a Web Service. It follows the resource pattern shown by the javax.annotation.Resource annotation defined in http://www.jcp.org/en/jsr/summary?id=250.
Use Cases for @WebServiceRef
- You can use it to define a reference whose type is a generated
Serviceclass. In this case, the type and value element each refer to the generatedServiceclass type. Moreover, if the reference type can be inferred by the field or method declaration the annotation is applied to, the type and value elements may (but are not required to) have the default value ofObject.class. If the type cannot be inferred, then at least the type element must be present with a non-default value. - You can use it to define a reference whose type is an SEI. In this case, the type element may (but is not required to) be present with its default value if the type of the reference can be inferred from the annotated field or method declaration. However, the value element must always be present and refer to a generated service class type, which is a subtype of
javax.xml.ws.Service. ThewsdlLocationelement, if present, overrides the WSDL location information specified in the@WebServiceannotation of the referenced generated service class.Example 16.23.
@WebServiceRefExamplespublic class EJB3Client implements EJB3Remote { @WebServiceRef public TestEndpointService service4; @WebServiceRef public TestEndpoint port3;
XML Web Services use XML messages for communication between the endpoint, which is deployed in the Java EE container, and any clients. The XML messages use an XML language called Simple Object Access Protocol (SOAP). The JAX-WS API provides the mechanisms for the endpoint and clients to each be able to send and receive SOAP messages. Marshalling is the process of converting a Java Object into a SOAP XML message. Unmarshalling is the process of converting the SOAP XML message back into a Java Object.
Dispatch class provides this functionality. Dispatch operates in one of two usage modes, which are identified by one of the following constants.
javax.xml.ws.Service.Mode.MESSAGE- This mode directs client applications to work directly with protocol-specific message structures. When used with a SOAP protocol binding, a client application works directly with a SOAP message.javax.xml.ws.Service.Mode.PAYLOAD- This mode causes the client to work with the payload itself. For instance, if it is used with a SOAP protocol binding, a client application would work with the contents of the SOAP body rather than the entire SOAP message.
Dispatch is a low-level API which requires clients to structure messages or payloads as XML, with strict adherence to the standards of the individual protocol and a detailed knowledge of message or payload structure. Dispatch is a generic class which supports input and output of messages or message payloads of any type.
Example 16.24. Dispatch Usage
Service service = Service.create(wsdlURL, serviceName);
Dispatch dispatch = service.createDispatch(portName, StreamSource.class, Mode.PAYLOAD);
String payload = "<ns1:ping xmlns:ns1='http://oneway.samples.jaxws.ws.test.jboss.org/'/>";
dispatch.invokeOneWay(new StreamSource(new StringReader(payload)));
payload = "<ns1:feedback xmlns:ns1='http://oneway.samples.jaxws.ws.test.jboss.org/'/>";
Source retObj = (Source)dispatch.invoke(new StreamSource(new StringReader(payload)));
The BindingProvider interface represents a component that provides a protocol binding which clients can use. It is implemented by proxies and is extended by the Dispatch interface.
BindingProvider instances may provide asynchronous operation capabilities.Asynchronous operation invocations are decoupled from the BindingProvider instance at invocation time. The response context is not updated when the operation completes. Instead, a separate response context is made available using the Response interface.
Example 16.25. Example Asynchronous Invocation
public void testInvokeAsync() throws Exception
{
URL wsdlURL = new URL("http://" + getServerHost() + ":8080/jaxws-samples-asynchronous?wsdl");
QName serviceName = new QName(targetNS, "TestEndpointService");
Service service = Service.create(wsdlURL, serviceName);
TestEndpoint port = service.getPort(TestEndpoint.class);
Response response = port.echoAsync("Async");
// access future
String retStr = (String) response.get();
assertEquals("Async", retStr);
}
@Oneway Invocations
The @Oneway annotation indicates that the given web method takes an input message but returns no output message. Usually, a @Oneway method returns the thread of control to the calling application before the business method is executed.
Example 16.26. Example @Oneway Invocation
@WebService (name="PingEndpoint")
@SOAPBinding(style = SOAPBinding.Style.RPC)
public class PingEndpointImpl
{
private static String feedback;
@WebMethod
@Oneway
public void ping()
{
log.info("ping");
feedback = "ok";
}
@WebMethod
public String feedback()
{
log.info("feedback");
return feedback;
}
}
Two different properties control the timeout behavior of the HTTP connection and the timeout of a client which is waiting to receive a message. The first is javax.xml.ws.client.connectionTimeout and the second is javax.xml.ws.client.receiveTimeout. Each is expressed in milliseconds, and the correct syntax is shown below.
Example 16.27. JAX-WS Timeout Configuration
public void testConfigureTimeout() throws Exception
{
//Set timeout until a connection is established
((BindingProvider)port).getRequestContext().put("javax.xml.ws.client.connectionTimeout", "6000");
//Set timeout until the response is received
((BindingProvider) port).getRequestContext().put("javax.xml.ws.client.receiveTimeout", "1000");
port.echo("testTimeout");
}
16.6. JAX-WS Development Reference
16.6.1. Enable Web Services Addressing (WS-Addressing)
Prerequisites
- Your application must have an existing JAX-WS service and client configuration.
Procedure 16.2. Annotate and Update client code
Annotate the service endpoint
Add the@Addressingannotation to the application's endpoint code.Example 16.28.
@AddressingannotationThis example demonstrates a regular JAX-WS endpoint with the@Addressingannotation added.package org.jboss.test.ws.jaxws.samples.wsa; import javax.jws.WebService; import javax.xml.ws.soap.Addressing; @WebService ( portName = "AddressingServicePort", serviceName = "AddressingService", wsdlLocation = "WEB-INF/wsdl/AddressingService.wsdl", targetNamespace = "http://www.jboss.org/jbossws/ws-extensions/wsaddressing", endpointInterface = "org.jboss.test.ws.jaxws.samples.wsa.ServiceIface" ) @Addressing(enabled=true, required=true) public class ServiceImpl implements ServiceIface { public String sayHello() { return "Hello World!"; } }Update client code
Update the client code in the application so that it configures WS-Addressing.Example 16.29. Client configuration for WS-Addressing
This example demonstrates a regular JAX-WS client updated to configure WS-Addressing.package org.jboss.test.ws.jaxws.samples.wsa; import java.net.URL; import javax.xml.namespace.QName; import javax.xml.ws.Service; import javax.xml.ws.soap.AddressingFeature; public final class AddressingTestCase { private final String serviceURL = "http://localhost:8080/jaxws-samples-wsa/AddressingService"; public static void main(String[] args) throws Exception { // construct proxy QName serviceName = new QName("http://www.jboss.org/jbossws/ws-extensions/wsaddressing", "AddressingService"); URL wsdlURL = new URL(serviceURL + "?wsdl"); Service service = Service.create(wsdlURL, serviceName); ServiceIface proxy = (ServiceIface)service.getPort(ServiceIface.class, new AddressingFeature()); // invoke method proxy.sayHello(); } }
The client and endpoint are now communicating using WS-Addressing.
16.6.2. JAX-WS Common API Reference
The handler framework is implemented by a JAX-WS protocol binding in the runtime of the client and the endpoint, which is the server component. Proxies and Dispatch instances, known collectively as binding providers, each use protocol bindings to bind their abstract functionality to specific protocols.
Types of Message Handlers
- Logical Handler
- Logical handlers only operate on message context properties and message payloads. Logical handlers are protocol-independent and cannot affect protocol-specific parts of a message. Logical handlers implement interface
javax.xml.ws.handler.LogicalHandler. - Protocol Handler
- Protocol handlers operate on message context properties and protocol-specific messages. Protocol handlers are specific to a particular protocol and may access and change protocol-specific aspects of a message. Protocol handlers implement any interface derived from
javax.xml.ws.handler.Handler except javax.xml.ws.handler.LogicalHandler. - Service Endpoint Handler
- On a service endpoint, handlers are defined using the
@HandlerChainannotation. The location of the handler chain file can be either an absolutejava.net.URLinexternalFormor a relative path from the source file or class file.Example 16.30. Example Service Endpoint Handler
@WebService @HandlerChain(file = "jaxws-server-source-handlers.xml") public class SOAPEndpointSourceImpl { ... } - Service Client Handler
- On a JAX-WS client, handlers are defined either by using the
@HandlerChainannotation, as in service endpoints, or dynamically, using the JAX-WS API.Example 16.31. Defining a Service Client Handler Using the API
Service service = Service.create(wsdlURL, serviceName); Endpoint port = (Endpoint)service.getPort(Endpoint.class); BindingProvider bindingProvider = (BindingProvider)port; List<Handler> handlerChain = new ArrayList<Handler>(); handlerChain.add(new LogHandler()); handlerChain.add(new AuthorizationHandler()); handlerChain.add(new RoutingHandler()); bindingProvider.getBinding().setHandlerChain(handlerChain);The call to thesetHandlerChainmethod is required.
The MessageContext interface is the super interface for all JAX-WS message contexts. It extends Map<String,Object> with additional methods and constants to manage a set of properties that enable handlers in a handler chain to share processing related state. For example, a handler may use the put method to insert a property into the message context. One or more other handlers in the handler chain may subsequently obtain the message via the get method.
APPLICATION or HANDLER. All properties are available to all handlers for an instance of a message exchange pattern (MEP) of a particular endpoint. For instance, if a logical handler puts a property into the message context, that property is also available to any protocol handlers in the chain during the execution of an MEP instance.
Note
APPLICATION level are also made available to client applications and service endpoint implementations. The defaultscope for a property is HANDLER.
- Logical Message Context
- When logical handlers are invoked, they receive a message context of type
LogicalMessageContext.LogicalMessageContextextendsMessageContextwith methods which obtain and modify the message payload. It does not provide access to the protocol-specific aspects of a message. A protocol binding defines which components of a message are available via a logical message context. A logical handler deployed in a SOAP binding can access the contents of the SOAP body but not the SOAP headers. On the other hand, the XML/HTTP binding defines that a logical handler can access the entire XML payload of a message. - SOAP Message Context
- When SOAP handlers are invoked, they receive a
SOAPMessageContext.SOAPMessageContextextendsMessageContextwith methods which obtain and modify the SOAP message payload.
An application may throw a SOAPFaultException or an application-specific user exception. In the case of the latter, the required fault wrapper beans are generated at run-time if they are not already part of the deployment.
Example 16.32. Fault Handling Examples
public void throwSoapFaultException()
{
SOAPFactory factory = SOAPFactory.newInstance();
SOAPFault fault = factory.createFault("this is a fault string!", new QName("http://foo", "FooCode"));
fault.setFaultActor("mr.actor");
fault.addDetail().addChildElement("test");
throw new SOAPFaultException(fault);
}
public void throwApplicationException() throws UserException
{
throw new UserException("validation", 123, "Some validation error");
}
The annotations available via the JAX-WS API are defined in JSR-224, which can be found at http://www.jcp.org/en/jsr/detail?id=224. These annotations are in package javax.xml.ws.
javax.jws.
Chapter 17. WebSockets
17.1. About WebSockets
Upgrade header. All communications are then full-duplex over the same TCP/IP connection, with minimal data overhead. Because each message does not include unnecessary HTTP header content, Websocket communications require smaller bandwidth. The result is a low latency communications path, suited to applications which require real-time responsiveness.
17.2. Create a WebSocket Application
- A Java client or a WebSocket enabled HTML client. You can verify HTML client browser support at this location: http://caniuse.com/websockets
- A WebSocket server endpoint class.
- A
jboss-web.xmlfile configured to enable WebSockets. - Project dependencies configured to declare a dependency on the WebSocket API.
- Enable the
NIO2connector in thewebsubsystem of the Red Hat JBoss Enterprise Application Platform server configuration file.
Note
Procedure 17.1. Create the WebSocket Application
Create the JavaScript HTML client.
The following is an example of a WebSocket client. It contains these JavaScript functions:lconnect(): This function creates the WebSocket connection passing the WebSocket URI. The resource location matches the resource defined in the server endpoint class. This function also intercepts and handles the WebSocketonopen,onmessage,onerror, andonclose.sendMessage(): This function gets the name entered in the form, creates a message, and sends it using a WebSocket.send() command.disconnect(): This function issues the WebSocket.close() command.displayMessage(): This function sets the display message on the page to the value returned by the WebSocket endpoint method.displayStatus(): This function displays the WebSocket connection status.
<html xmlns="http://www.w3.org/1999/xhtml" xml:lang="en"> <head> <title>WebSocket: Say Hello</title> <link rel="stylesheet" type="text/css" href="resources/css/hello.css" /> <script type="text/javascript"> var websocket = null; function connect() { var wsURI = 'ws://' + window.location.host + '/jboss-websocket-hello/websocket/helloName'; websocket = new WebSocket(wsURI); websocket.onopen = function() { displayStatus('Open'); document.getElementById('sayHello').disabled = false; displayMessage('Connection is now open. Type a name and click Say Hello to send a message.'); }; websocket.onmessage = function(event) { // log the event displayMessage('The response was received! ' + event.data, 'success'); }; websocket.onerror = function(event) { // log the event displayMessage('Error! ' + event.data, 'error'); }; websocket.onclose = function() { displayStatus('Closed'); displayMessage('The connection was closed or timed out. Please click the Open Connection button to reconnect.'); document.getElementById('sayHello').disabled = true; }; } function disconnect() { if (websocket !== null) { websocket.close(); websocket = null; } message.setAttribute("class", "message"); message.value = 'WebSocket closed.'; // log the event } function sendMessage() { if (websocket !== null) { var content = document.getElementById('name').value; websocket.send(content); } else { displayMessage('WebSocket connection is not established. Please click the Open Connection button.', 'error'); } } function displayMessage(data, style) { var message = document.getElementById('hellomessage'); message.setAttribute("class", style); message.value = data; } function displayStatus(status) { var currentStatus = document.getElementById('currentstatus'); currentStatus.value = status; } </script> </head> <body> <div> <h1>Welcome to JBoss!</h1> <div>This is a simple example of a WebSocket implementation.</div> <div id="connect-container"> <div> <fieldset> <legend>Connect or disconnect using WebSocket :</legend> <input type="button" id="connect" onclick="connect();" value="Open Connection" /> <input type="button" id="disconnect" onclick="disconnect();" value="Close Connection" /> </fieldset> </div> <div> <fieldset> <legend>Type your name below. then click the `Say Hello` button :</legend> <input id="name" type="text" size="40" style="width: 40%"/> <input type="button" id="sayHello" onclick="sendMessage();" value="Say Hello" disabled="disabled"/> </fieldset> </div> <div>Current WebSocket Connection Status: <output id="currentstatus" class="message">Closed</output></div> <div> <output id="hellomessage" /> </div> </div> </div> </body> </html>Create the WebSocket server endpoint.
You can create a WebSocket server endpoint using either of the following methods.The code example below uses the annotated endpoint approach and handles the following events.Programmatic Endpoint: The endpoint extends the Endpoint class.Annotated Endpoint: The endpoint class uses annotations to interact with the WebSocket events. It is simpler to code than the programmatic endpoint
- The
@ServerEndpointannotation identifies this class as a WebSocket server endpoint and specifies the path. - The
@OnOpenannotation is triggered when the WebSocket connection is opened. - The
@OnMessageannotation is triggered when a message is sent to the WebSocket connection. - The
@OnCloseannotation is triggered when the WebSocket connection is closed.
package org.jboss.as.quickstarts.websocket_hello; import javax.websocket.CloseReason; import javax.websocket.OnClose; import javax.websocket.OnMessage; import javax.websocket.OnOpen; import javax.websocket.Session; import javax.websocket.server.ServerEndpoint; @ServerEndpoint("/websocket/helloName") public class HelloName { @OnMessage public String sayHello(String name) { System.out.println("Say hello to '" + name + "'"); return ("Hello" + name); } @OnOpen public void helloOnOpen(Session session) { System.out.println("WebSocket opened: " + session.getId()); } @OnClose public void helloOnClose(CloseReason reason) { System.out.println("Closing a WebSocket due to " + reason.getReasonPhrase()); } }Configure the jboss-web.xml file.
You must create the<enable-websockets>element in the applicationWEB-INF/jboss-web.xmland set it totrue.<?xml version="1.0" encoding="UTF-8"?> <!--Enable WebSockets --> <jboss-web> <enable-websockets>true</enable-websockets> </jboss-web>Declare the WebSocket API dependency in your project POM file.
If you use Maven, you add the following dependency to the projectpom.xmlfile.<dependency> <groupId>org.jboss.spec.javax.websocket</groupId> <artifactId>jboss-websocket-api_1.0_spec</artifactId> <version>1.0.0.Final</version> <scope>provided</scope> </dependency>Configure the JBoss EAP server.
Configure thehttp<connector>in thewebsubsystem of the server configuration file to use theNIO2protocol.- Start the JBoss EAP server.
- Launch the Management CLI using the command for your operating system.For Linux:For Windows:
EAP_HOME/bin/jboss-cli.sh --connectEAP_HOME\bin\jboss-cli.bat --connect - To enable the non blocking Java
NIO2connector protocol in thewebsubsystem of the JBoss EAP server configuration file, type the following command ./subsystem=web/connector=http/:write-attribute(name=protocol,value=org.apache.coyote.http11.Http11NioProtocol)For either command, you should see the following result:{ "outcome" => "success", "response-headers" => { "operation-requires-reload" => true, "process-state" => "reload-required" } } - Notify the server to reload the configuration.
reloadYou should see the following result:{ "outcome" => "success", "result" => undefined } - Review the changes to the JBoss EAP server configuration file. The
websubsystem should now contain the following XML for thehttp<connector>.<subsystem xmlns="urn:jboss:domain:web:2.1" default-virtual-server="default-host" native="false"> <connector name="http" protocol="org.apache.coyote.http11.Http11NioProtocol" scheme="http" socket-binding="http"/> <virtual-server name="default-host" enable-welcome-root="true"> <alias name="localhost"/> <alias name="example.com"/> </virtual-server> </subsystem>
Chapter 18. Application Security
18.1. Foundational Concepts
18.1.1. About Encryption
18.1.2. About Security Domains
18.1.3. About SSL Encryption
Warning
18.1.4. About Declarative Security
18.2. Role-Based Security in Applications
18.2.1. About Application Security
18.2.2. About Authentication
18.2.3. About Authorization
18.2.4. About Security Auditing
18.2.5. About Security Mapping
18.2.6. Java Authentication and Authorization Service (JAAS)
18.2.7. About Java Authentication and Authorization Service (JAAS)
Server groups (in a managed domain) and servers (in a standalone server) include the configuration for security domains. A security domain includes information about a combination of authentication, authorization, mapping, and auditing modules, with configuration details. An application specifies which security domain it requires, by name, in its jboss-web.xml.
Application-specific configuration takes place in one or more of the following four files.
| File | Description |
|---|---|
| ejb-jar.xml |
The deployment descriptor for an Enterprise JavaBean (EJB) application, located in the
META-INF directory of the archive. Use the ejb-jar.xml to specify roles and map them to principals, at the application level. You can also limit specific methods and classes to certain roles. It is also used for other EJB-specific configuration not related to security.
|
| web.xml |
The deployment descriptor for a Java Enterprise Edition (EE) web application. Use the
web.xml to declare the resource and transport constraints for the application, such as limiting the type of HTTP requests that are allowed. You can also configure simple web-based authentication in this file. It is also used for other application-specific configuration not related to security. The security domain the application uses for authentication and authorization is defined in jboss-web.xml.
|
| jboss-ejb3.xml |
Contains JBoss-specific extensions to the
ejb-jar.xml descriptor.
|
| jboss-web.xml |
Contains JBoss-specific extensions to the
web.xml descriptor.
|
Note
ejb-jar.xml and web.xml are defined in the Java Enterprise Edition (Java EE) specification. The jboss-ejb3.xml provides JBoss-specific extensions for the ejb-jar.xml, and the jboss-web.xml provides JBoss-specific extensions for the web.xml.
18.2.8. Use a Security Domain in Your Application
To use a security domain in your application, first you need to define the security domain in the server's configuration and then enable it for an application in the application's deployment descriptor. Then you must add the required annotations to the EJB that uses it. This topic covers the steps required to use a security domain in your application.
Warning
Procedure 18.1. Configure Your Application to Use a Security Domain
Define the Security Domain
You need to define the security domain in the server's configuration file, and then enable it for an application in the application's descriptor file.Configure the security domain in the server's configuration file
The security domain is configured in thesecuritysubsystem of the server's configuration file. If the JBoss EAP 6 instance is running in a managed domain, this is thedomain/configuration/domain.xmlfile. If the JBoss EAP 6 instance is running as a standalone server, this is thestandalone/configuration/standalone.xmlfile.Theother,jboss-web-policy, andjboss-ejb-policysecurity domains are provided by default in JBoss EAP 6. The following XML example was copied from thesecuritysubsystem in the server's configuration file.Thecache-typeattribute of a security domain specifies a cache for faster authentication checks. Allowed values aredefaultto use a simple map as the cache, orinfinispanto use an Infinispan cache.<subsystem xmlns="urn:jboss:domain:security:1.2"> <security-domains> <security-domain name="other" cache-type="default"> <authentication> <login-module code="Remoting" flag="optional"> <module-option name="password-stacking" value="useFirstPass"/> </login-module> <login-module code="RealmDirect" flag="required"> <module-option name="password-stacking" value="useFirstPass"/> </login-module> </authentication> </security-domain> <security-domain name="jboss-web-policy" cache-type="default"> <authorization> <policy-module code="Delegating" flag="required"/> </authorization> </security-domain> <security-domain name="jboss-ejb-policy" cache-type="default"> <authorization> <policy-module code="Delegating" flag="required"/> </authorization> </security-domain> </security-domains> </subsystem>You can configure additional security domains as needed using the Management Console or CLI.Enable the security domain in the application's descriptor file
The security domain is specified in the<security-domain>child element of the<jboss-web>element in the application'sWEB-INF/jboss-web.xmlfile. The following example configures a security domain namedmy-domain.<jboss-web> <security-domain>my-domain</security-domain> </jboss-web>This is only one of many settings which you can specify in theWEB-INF/jboss-web.xmldescriptor.
Add the Required Annotation to the EJB
You configure security in the EJB using the@SecurityDomainand@RolesAllowedannotations. The following EJB code example limits access to theothersecurity domain by users in theguestrole.package example.ejb3; import java.security.Principal; import javax.annotation.Resource; import javax.annotation.security.RolesAllowed; import javax.ejb.SessionContext; import javax.ejb.Stateless; import org.jboss.ejb3.annotation.SecurityDomain; /** * Simple secured EJB using EJB security annotations * Allow access to "other" security domain by users in a "guest" role. */ @Stateless @RolesAllowed({ "guest" }) @SecurityDomain("other") public class SecuredEJB { // Inject the Session Context @Resource private SessionContext ctx; /** * Secured EJB method using security annotations */ public String getSecurityInfo() { // Session context injected using the resource annotation Principal principal = ctx.getCallerPrincipal(); return principal.toString(); } }For more code examples, see theejb-securityquickstart in the JBoss EAP 6 Quickstarts bundle, which is available from the Red Hat Customer Portal.Note
The security domain for an EJB can also be set using thejboss-ejb3.xmldeployment descriptor. See Section 8.8.4, “jboss-ejb3.xml Deployment Descriptor Reference” for details.
Procedure 18.2. Configure JBoss EAP 6 to access custom principal in EJB 3 bean
- Configure the ApplicationRealm to defer to JAAS:
<security-realm name="MyDomainRealm"> <authentication> <jaas name="my-security-domain"/> </security-realm> - Configure the JAAS security-domain to use the custom principal:
<security-domain name="my-security-domain" cache-type="default"> <authentication> <login-module code="UsersRoles" flag="required"> <module-option name="usersProperties" value="file:///${jboss.server.config.dir}/users.properties"/> <module-option name="rolesProperties" value="file:///${jboss.server.config.dir}/roles.properties"/> <module-option name="principalClass" value="org.jboss.example.CustomPrincipalImpl"/> </login-module> </authentication> </security-domain> - Deploy the custom principal as a JBoss module.
- Configure the
org.jboss.as.remotingmodule (modules/org/jboss/as/remoting/main/module.xml) to depend on the module that contains the custom principal:<resources> <resource-root path="jboss-as-remoting-7.1.2.Final-redhat-1.jar"/> <!-- Insert resources here --> </resources> <dependencies> <module name="org.jboss.staxmapper"/> <module name="org.jboss.as.controller"/> <module name="org.jboss.as.domain-management"/> <module name="org.jboss.as.network"/> <module name="org.jboss.as.protocol"/> <module name="org.jboss.as.server"/> <module name="org.jboss.as.security" optional="true"/> <module name="org.jboss.as.threads"/> <module name="org.jboss.logging"/> <module name="org.jboss.modules"/> <module name="org.jboss.msc"/> <module name="org.jboss.remoting3"/> <module name="org.jboss.sasl"/> <module name="org.jboss.threads"/> <module name="org.picketbox" optional="true"/> <module name="javax.api" /> <module name="org.jboss.example" /> <!--FIXME: dependency on custom principal added here --> </dependencies> - Configure the client to use
org.jboss.ejb.client.naming, thejboss-ejb-client.propertiesfile should look like the following:remote.connections=default endpoint.name=client-endpoint remote.connection.default.port=4447 remote.connection.default.host=localhost remote.connectionprovider.create.options.org.xnio.Options.SSL_ENABLED=false remote.connection.default.connect.options.org.xnio.Options.SASL_POLICY_NOANONYMOUS=false # The following setting is required when deferring to JAAS remote.connection.default.connect.options.org.xnio.Options.SASL_POLICY_NOPLAINTEXT=false remote.connection.default.username=admin remote.connection.default.password=testing
18.2.9. Use Role-Based Security In Servlets
jboss-web.xml.
Before you use role-based security in a servlet, the security domain used to authenticate and authorize access needs to be configured in the JBoss EAP 6 container.
Procedure 18.3. Add Role-Based Security to Servlets
Add mappings between servlets and URL patterns.
Use<servlet-mapping>elements in theweb.xmlto map individual servlets to URL patterns. The following example maps the servlet calledDisplayOpResultto the URL pattern/DisplayOpResult.<servlet-mapping> <servlet-name>DisplayOpResult</servlet-name> <url-pattern>/DisplayOpResult</url-pattern> </servlet-mapping>Add security constraints to the URL patterns.
To map the URL pattern to a security constraint, use a<security-constraint>. The following example constrains access from the URL pattern/DisplayOpResultto be accessed by principals with the roleeap_admin. The role needs to be present in the security domain.<security-constraint> <display-name>Restrict access to role eap_admin</display-name> <web-resource-collection> <web-resource-name>Restrict access to role eap_admin</web-resource-name> <url-pattern>/DisplayOpResult/*</url-pattern> </web-resource-collection> <auth-constraint> <role-name>eap_admin</role-name> </auth-constraint> </security-constraint> <security-role> <role-name>eap_admin</role-name> </security-role> <login-config> <auth-method>BASIC</auth-method> </login-config>You need to specify the authentication method, which can be any of the following:BASIC, FORM, DIGEST, CLIENT-CERT, SPNEGO.This example usesBASICauthentication.Specify the security domain in the WAR's
jboss-web.xmlAdd the security domain to the WAR'sjboss-web.xmlin order to connect the servlets to the configured security domain, which knows how to authenticate and authorize principals against the security constraints. The following example uses the security domain calledacme_domain.<jboss-web> ... <security-domain>acme_domain</security-domain> ... </jboss-web>
Example 18.1. Example web.xml with Role-Based Security Configured
<web-app xmlns="http://java.sun.com/xml/ns/javaee"
xmlns:xsi="http://www.w3.org/2001/XMLSchema-instance"
xsi:schemaLocation="http://java.sun.com/xml/ns/javaee http://java.sun.com/xml/ns/javaee/web-app_3_0.xsd"
version="3.0">
<display-name>Use Role-Based Security In Servlets</display-name>
<welcome-file-list>
<welcome-file>/index.jsp</welcome-file>
</welcome-file-list>
<servlet-mapping>
<servlet-name>DisplayOpResult</servlet-name>
<url-pattern>/DisplayOpResult</url-pattern>
</servlet-mapping>
<security-constraint>
<display-name>Restrict access to role eap_admin</display-name>
<web-resource-collection>
<web-resource-name>Restrict access to role eap_admin</web-resource-name>
<url-pattern>/DisplayOpResult/*</url-pattern>
</web-resource-collection>
<auth-constraint>
<role-name>eap_admin</role-name>
</auth-constraint>
</security-constraint>
<security-role>
<role-name>eap_admin</role-name>
</security-role>
<login-config>
<auth-method>BASIC</auth-method>
</login-config>
</web-app>
18.2.10. Use A Third-Party Authentication System In Your Application
Note
context.xml deployment descriptor. Valves are configured directly in the jboss-web.xml descriptor instead. The context.xml is now ignored.
Example 18.2. Basic Authentication Valve
<jboss-web>
<valve>
<class-name>org.jboss.security.negotiation.NegotiationAuthenticator</class-name>
</valve>
</jboss-web>
Example 18.3. Custom Valve With Header Attributes Set
<jboss-web>
<valve>
<class-name>org.jboss.web.tomcat.security.GenericHeaderAuthenticator</class-name>
<param>
<param-name>httpHeaderForSSOAuth</param-name>
<param-value>sm_ssoid,ct-remote-user,HTTP_OBLIX_UID</param-value>
</param>
<param>
<param-name>sessionCookieForSSOAuth</param-name>
<param-value>SMSESSION,CTSESSION,ObSSOCookie</param-value>
</param>
</valve>
</jboss-web>
Writing your own authenticator is out of scope of this document. However, the following Java code is provided as an example.
Example 18.4. GenericHeaderAuthenticator.java
/*
* JBoss, Home of Professional Open Source.
* Copyright 2006, Red Hat Middleware LLC, and individual contributors
* as indicated by the @author tags. See the copyright.txt file in the
* distribution for a full listing of individual contributors.
*
* This is free software; you can redistribute it and/or modify it
* under the terms of the GNU Lesser General Public License as
* published by the Free Software Foundation; either version 2.1 of
* the License, or (at your option) any later version.
*
* This software is distributed in the hope that it will be useful,
* but WITHOUT ANY WARRANTY; without even the implied warranty of
* MERCHANTABILITY or FITNESS FOR A PARTICULAR PURPOSE. See the GNU
* Lesser General Public License for more details.
*
* You should have received a copy of the GNU Lesser General Public
* License along with this software; if not, write to the Free
* Software Foundation, Inc., 51 Franklin St, Fifth Floor, Boston, MA
* 02110-1301 USA, or see the FSF site: http://www.fsf.org.
*/
package org.jboss.web.tomcat.security;
import java.io.IOException;
import java.security.Principal;
import java.util.StringTokenizer;
import javax.management.JMException;
import javax.management.ObjectName;
import javax.servlet.http.Cookie;
import javax.servlet.http.HttpServletRequest;
import javax.servlet.http.HttpServletResponse;
import org.apache.catalina.Realm;
import org.apache.catalina.Session;
import org.apache.catalina.authenticator.Constants;
import org.apache.catalina.connector.Request;
import org.apache.catalina.connector.Response;
import org.apache.catalina.deploy.LoginConfig;
import org.jboss.logging.Logger;
import org.jboss.as.web.security.ExtendedFormAuthenticator;
/**
* JBAS-2283: Provide custom header based authentication support
*
* Header Authenticator that deals with userid from the request header Requires
* two attributes configured on the Tomcat Service - one for the http header
* denoting the authenticated identity and the other is the SESSION cookie
*
* @author <a href="mailto:Anil.Saldhana@jboss.org">Anil Saldhana</a>
* @author <a href="mailto:sguilhen@redhat.com">Stefan Guilhen</a>
* @version $Revision$
* @since Sep 11, 2006
*/
public class GenericHeaderAuthenticator extends ExtendedFormAuthenticator {
protected static Logger log = Logger
.getLogger(GenericHeaderAuthenticator.class);
protected boolean trace = log.isTraceEnabled();
// JBAS-4804: GenericHeaderAuthenticator injection of ssoid and
// sessioncookie name.
private String httpHeaderForSSOAuth = null;
private String sessionCookieForSSOAuth = null;
/**
* <p>
* Obtain the value of the <code>httpHeaderForSSOAuth</code> attribute. This
* attribute is used to indicate the request header ids that have to be
* checked in order to retrieve the SSO identity set by a third party
* security system.
* </p>
*
* @return a <code>String</code> containing the value of the
* <code>httpHeaderForSSOAuth</code> attribute.
*/
public String getHttpHeaderForSSOAuth() {
return httpHeaderForSSOAuth;
}
/**
* <p>
* Set the value of the <code>httpHeaderForSSOAuth</code> attribute. This
* attribute is used to indicate the request header ids that have to be
* checked in order to retrieve the SSO identity set by a third party
* security system.
* </p>
*
* @param httpHeaderForSSOAuth
* a <code>String</code> containing the value of the
* <code>httpHeaderForSSOAuth</code> attribute.
*/
public void setHttpHeaderForSSOAuth(String httpHeaderForSSOAuth) {
this.httpHeaderForSSOAuth = httpHeaderForSSOAuth;
}
/**
* <p>
* Obtain the value of the <code>sessionCookieForSSOAuth</code> attribute.
* This attribute is used to indicate the names of the SSO cookies that may
* be present in the request object.
* </p>
*
* @return a <code>String</code> containing the names (separated by a
* <code>','</code>) of the SSO cookies that may have been set by a
* third party security system in the request.
*/
public String getSessionCookieForSSOAuth() {
return sessionCookieForSSOAuth;
}
/**
* <p>
* Set the value of the <code>sessionCookieForSSOAuth</code> attribute. This
* attribute is used to indicate the names of the SSO cookies that may be
* present in the request object.
* </p>
*
* @param sessionCookieForSSOAuth
* a <code>String</code> containing the names (separated by a
* <code>','</code>) of the SSO cookies that may have been set by
* a third party security system in the request.
*/
public void setSessionCookieForSSOAuth(String sessionCookieForSSOAuth) {
this.sessionCookieForSSOAuth = sessionCookieForSSOAuth;
}
/**
* <p>
* Creates an instance of <code>GenericHeaderAuthenticator</code>.
* </p>
*/
public GenericHeaderAuthenticator() {
super();
}
public boolean authenticate(Request request, HttpServletResponse response,
LoginConfig config) throws IOException {
log.trace("Authenticating user");
Principal principal = request.getUserPrincipal();
if (principal != null) {
if (trace)
log.trace("Already authenticated '" + principal.getName() + "'");
return true;
}
Realm realm = context.getRealm();
Session session = request.getSessionInternal(true);
String username = getUserId(request);
String password = getSessionCookie(request);
// Check if there is sso id as well as sessionkey
if (username == null || password == null) {
log.trace("Username is null or password(sessionkey) is null:fallback to form auth");
return super.authenticate(request, response, config);
}
principal = realm.authenticate(username, password);
if (principal == null) {
forwardToErrorPage(request, response, config);
return false;
}
session.setNote(Constants.SESS_USERNAME_NOTE, username);
session.setNote(Constants.SESS_PASSWORD_NOTE, password);
request.setUserPrincipal(principal);
register(request, response, principal, HttpServletRequest.FORM_AUTH,
username, password);
return true;
}
/**
* Get the username from the request header
*
* @param request
* @return
*/
protected String getUserId(Request request) {
String ssoid = null;
// We can have a comma-separated ids
String ids = "";
try {
ids = this.getIdentityHeaderId();
} catch (JMException e) {
if (trace)
log.trace("getUserId exception", e);
}
if (ids == null || ids.length() == 0)
throw new IllegalStateException(
"Http headers configuration in tomcat service missing");
StringTokenizer st = new StringTokenizer(ids, ",");
while (st.hasMoreTokens()) {
ssoid = request.getHeader(st.nextToken());
if (ssoid != null)
break;
}
if (trace)
log.trace("SSOID-" + ssoid);
return ssoid;
}
/**
* Obtain the session cookie from the request
*
* @param request
* @return
*/
protected String getSessionCookie(Request request) {
Cookie[] cookies = request.getCookies();
log.trace("Cookies:" + cookies);
int numCookies = cookies != null ? cookies.length : 0;
// We can have comma-separated ids
String ids = "";
try {
ids = this.getSessionCookieId();
log.trace("Session Cookie Ids=" + ids);
} catch (JMException e) {
if (trace)
log.trace("checkSessionCookie exception", e);
}
if (ids == null || ids.length() == 0)
throw new IllegalStateException(
"Session cookies configuration in tomcat service missing");
StringTokenizer st = new StringTokenizer(ids, ",");
while (st.hasMoreTokens()) {
String cookieToken = st.nextToken();
String val = getCookieValue(cookies, numCookies, cookieToken);
if (val != null)
return val;
}
if (trace)
log.trace("Session Cookie not found");
return null;
}
/**
* Get the configured header identity id in the tomcat service
*
* @return
* @throws JMException
*/
protected String getIdentityHeaderId() throws JMException {
if (this.httpHeaderForSSOAuth != null)
return this.httpHeaderForSSOAuth;
return (String) mserver.getAttribute(new ObjectName(
"jboss.web:service=WebServer"), "HttpHeaderForSSOAuth");
}
/**
* Get the configured session cookie id in the tomcat service
*
* @return
* @throws JMException
*/
protected String getSessionCookieId() throws JMException {
if (this.sessionCookieForSSOAuth != null)
return this.sessionCookieForSSOAuth;
return (String) mserver.getAttribute(new ObjectName(
"jboss.web:service=WebServer"), "SessionCookieForSSOAuth");
}
/**
* Get the value of a cookie if the name matches the token
*
* @param cookies
* array of cookies
* @param numCookies
* number of cookies in the array
* @param token
* Key
* @return value of cookie
*/
protected String getCookieValue(Cookie[] cookies, int numCookies,
String token) {
for (int i = 0; i < numCookies; i++) {
Cookie cookie = cookies[i];
log.trace("Matching cookieToken:" + token + " with cookie name="
+ cookie.getName());
if (token.equals(cookie.getName())) {
if (trace)
log.trace("Cookie-" + token + " value=" + cookie.getValue());
return cookie.getValue();
}
}
return null;
}
}
18.3. Login Modules
18.3.1. Using Modules
18.3.1.1. Password Stacking
password-stacking attribute to useFirstPass. If a previous module configured for password stacking has authenticated the user, all the other stacking modules will consider the user authenticated and only attempt to provide a set of roles for the authorization step.
password-stacking option is set to useFirstPass, this module first looks for a shared user name and password under the property names javax.security.auth.login.name and javax.security.auth.login.password respectively in the login module shared state map.
Note
Example 18.5. Password Stacking Sample
/subsystem=security/security-domain=pwdStack/authentication=classic/login-module=Ldap:add( \
code=Ldap, \
flag=required, \
module-options=[ \
("password-stacking"=>"useFirstPass"), \
... Ldap login module configuration
])
/subsystem=security/security-domain=pwdStack/authentication=classic/login-module=Database:add( \
code=Database, \
flag=required, \
module-options=[ \
("password-stacking"=>"useFirstPass"), \
... Database login module configuration
])18.3.1.2. Password Hashing
Important
Example 18.6. Password Hashing
nobody and contains based64-encoded, SHA-256 hashes of the passwords in a usersb64.properties file. The usersb64.properties file is part of the deployment classpath.
/subsystem=security/security-domain=testUsersRoles:add
/subsystem=security/security-domain=testUsersRoles/authentication=classic:add
/subsystem=security/security-domain=testUsersRoles/authentication=classic/login-module=UsersRoles:add( \
code=UsersRoles, \
flag=required, \
module-options=[ \
("usersProperties"=>"usersb64.properties"), \
("rolesProperties"=>"test-users-roles.properties"), \
("unauthenticatedIdentity"=>"nobody"), \
("hashAlgorithm"=>"SHA-256"), \
("hashEncoding"=>"base64") \
])
- hashAlgorithm
- Name of the
java.security.MessageDigestalgorithm to use to hash the password. There is no default so this option must be specified to enable hashing. Typical values areSHA-256,SHA-1andMD5. - hashEncoding
- String that specifies one of three encoding types:
base64,hexorrfc2617. The default isbase64. - hashCharset
- Encoding character set used to convert the clear text password to a byte array. The platform default encoding is the default.
- hashUserPassword
- Specifies the hashing algorithm must be applied to the password the user submits. The hashed user password is compared against the value in the login module, which is expected to be a hash of the password. The default is
true. - hashStorePassword
- Specifies the hashing algorithm must be applied to the password stored on the server side. This is used for digest authentication, where the user submits a hash of the user password along with a request-specific tokens from the server to be compare. The hash algorithm (for digest, this would be
rfc2617) is utilized to compute a server-side hash, which should match the hashed value sent from the client.
org.jboss.security.auth.spi.Util class provides a static helper method that will hash a password using the specified encoding. The following example produces a base64-encoded, MD5 hashed password.
String hashedPassword = Util.createPasswordHash("SHA-256",
Util.BASE64_ENCODING, null, null, "password");
password - is piped into the OpenSSL digest function then piped into another OpenSSL function to convert into base64-encoded format.
echo -n password | openssl dgst -sha256 -binary | openssl base64 XohImNooBHFR0OVvjcYpJ3NgPQ1qq73WKhHvch0VQtg=. This value must be stored in the users' properties file specified in the security domain - usersb64.properties - in the example above.
18.3.1.3. Unauthenticated Identity
unauthenticatedIdentity is a login module configuration option that assigns a specific identity (guest, for example) to requests that are made with no associated authentication information. This can be used to allow unprotected servlets to invoke methods on EJBs that do not require a specific role. Such a principal has no associated roles and so can only access either unsecured EJBs or EJB methods that are associated with the unchecked permission constraint.
- unauthenticatedIdentity: This defines the principal name that should be assigned to requests that contain no authentication information.
18.3.1.4. Ldap Login Module
Ldap login module is a LoginModule implementation that authenticates against a Lightweight Directory Access Protocol (LDAP) server. Use the Ldap login module if your user name and credentials are stored in an LDAP server that is accessible using a Java Naming and Directory Interface (JNDI) LDAP provider.
Note
AdvancedLdap login module chained with the SPNEGO login module or only the AdvancedLdap login module.
- Distinguished Name (DN)
- In Lightweight Directory Access Protocol (LDAP), the distinguished name uniquely identifies an object in a directory. Each distinguished name must have a unique name and location from all other objects, which is achieved using a number of attribute-value pairs (AVPs). The AVPs define information such as common names, organization unit, among others. The combination of these values results in a unique string required by the LDAP.
Note
- java.naming.factory.initial
InitialContextFactoryimplementation class name. This defaults to the Sun LDAP provider implementationcom.sun.jndi.ldap.LdapCtxFactory.- java.naming.provider.url
- LDAP URL for the LDAP server.
- java.naming.security.authentication
- Security protocol level to use. The available values include
none,simple, andstrong. If the property is undefined, the behavior is determined by the service provider. - java.naming.security.protocol
- Transport protocol to use for secure access. Set this configuration option to the type of service provider (for example, SSL). If the property is undefined, the behavior is determined by the service provider.
- java.naming.security.principal
- Specifies the identity of the Principal for authenticating the caller to the service. This is built from other properties as described below.
- java.naming.security.credentials
- Specifies the credentials of the Principal for authenticating the caller to the service. Credentials can take the form of a hashed password, a clear-text password, a key, or a certificate. If the property is undefined, the behavior is determined by the service provider.
Note
true.
InitialLdapContext with an environment composed of the LDAP JNDI properties described previously in this section.
InitialLdapContext instance is created), the user's roles are queried by performing a search on the rolesCtxDN location with search attributes set to the roleAttributeName and uidAttributeName option values. The roles names are obtaining by invoking the toString method on the role attributes in the search result set.
Example 18.7. LDAP Login Module Security Domain
/subsystem=security/security-domain=testLDAP:add(cache-type=default)
/subsystem=security/security-domain=testLDAP/authentication=classic:add
/subsystem=security/security-domain=testLDAP/authentication=classic/login-module=Ldap:add( \
code=Ldap, \
flag=required, \
module-options=[ \
("java.naming.factory.initial"=>"com.sun.jndi.ldap.LdapCtxFactory"), \
("java.naming.provider.url"=>"ldap://ldaphost.jboss.org:1389/"), \
("java.naming.security.authentication"=>"simple"), \
("principalDNPrefix"=>"uid="), \
("principalDNSuffix"=>",ou=People,dc=jboss,dc=org"), \
("rolesCtxDN"=>"ou=Roles,dc=jboss,dc=org"), \
("uidAttributeID"=>"member"), \
("matchOnUserDN"=>true), \
("roleAttributeID"=>"cn"), \
("roleAttributeIsDN"=>false) \
])
java.naming.factory.initial, java.naming.factory.url and java.naming.security options in the testLDAP security domain configuration indicate the following conditions:
- The Sun LDAP JNDI provider implementation will be used
- The LDAP server is located on host
ldaphost.jboss.orgon port 1389 - The LDAP simple authentication method will be use to connect to the LDAP server.
jsmith would map to uid=jsmith,ou=People,dc=jboss,dc=org.
Note
userPassword attribute of the user's entry (theduke in this example). Most LDAP servers operate in this manner, however if your LDAP server handles authentication differently you must ensure LDAP is configured according to your production environment requirements.
rolesCtxDN for entries whose uidAttributeID match the user. If matchOnUserDN is true, the search will be based on the full DN of the user. Otherwise the search will be based on the actual user name entered. In this example, the search is under ou=Roles,dc=jboss,dc=org for any entries that have a member attribute equal to uid=jsmith,ou=People,dc=jboss,dc=org. The search would locate cn=JBossAdmin under the roles entry.
cn. The value returned would be JBossAdmin, so the jsmith user is assigned to the JBossAdmin role.
- LDAP Data Interchange Format (LDIF)
- Plain text data interchange format used to represent LDAP directory content and update requests. Directory content is represented as one record for each object or update request. Content consists of add, modify, delete, and rename requests.
Example 18.8. LDIF File Example
dn: dc=jboss,dc=org
objectclass: top
objectclass: dcObject
objectclass: organization
dc: jboss
o: JBoss
dn: ou=People,dc=jboss,dc=org
objectclass: top
objectclass: organizationalUnit
ou: People
dn: uid=jsmith,ou=People,dc=jboss,dc=org
objectclass: top
objectclass: uidObject
objectclass: person
uid: jsmith
cn: John
sn: Smith
userPassword: theduke
dn: ou=Roles,dc=jboss,dc=org
objectclass: top
objectclass: organizationalUnit
ou: Roles
dn: cn=JBossAdmin,ou=Roles,dc=jboss,dc=org
objectclass: top
objectclass: groupOfNames
cn: JBossAdmin
member: uid=jsmith,ou=People,dc=jboss,dc=org
description: the JBossAdmin group
18.3.1.5. LdapExtended Login Module
- Distinguished Name (DN)
- In Lightweight Directory Access Protocol (LDAP), the distinguished name uniquely identifies an object in a directory. Each distinguished name must have a unique name and location from all other objects, which is achieved using a number of attribute-value pairs (AVPs). The AVPs define information such as common names, organization unit, among others. The combination of these values results in a unique string required by the LDAP.
org.jboss.security.auth.spi.LdapExtLoginModule) searches for the user to bind, as well as the associated roles, for authentication. The roles query recursively follows DNs to navigate a hierarchical role structure.
- Context.INITIAL_CONTEXT_FACTORY = "java.naming.factory.initial"
- Context.SECURITY_PROTOCOL = "java.naming.security.protocol"
- Context.PROVIDER_URL = "java.naming.provider.url"
- Context.SECURITY_AUTHENTICATION = "java.naming.security.authentication"
- Context.REFERRAL = "java.naming.referral"
- The initial LDAP server bind is authenticated using the bindDN and bindCredential properties. The bindDN is a user with permissions to search both the baseCtxDN and rolesCtxDN trees for the user and roles. The user DN to authenticate against is queried using the filter specified by the baseFilter property.
- The resulting userDN is authenticated by binding to the LDAP server using the userDN as the InitialLdapContext environment Context.SECURITY_PRINCIPAL. The Context.SECURITY_CREDENTIALS property is either set to the String password obtained by the callback handler.
- If this is successful, the associated user roles are queried using the rolesCtxDN, roleAttributeID, roleAttributeIsDN, roleNameAttributeID, and roleFilter options.
Note
- The top level role is queried only for roleAttributeID and not for roleNameAttributeID.
- When the roleAttributeIsDN module property is set to false, the recursive role search is disabled even if the recurseRoles module option is set to true.

Figure 18.1. LDAP Structure Example
Example 18.9. Example 2 LDAP Configuration
version: 1
dn: o=example2,dc=jboss,dc=org
objectClass: top
objectClass: organization
o: example2
dn: ou=People,o=example2,dc=jboss,dc=org
objectClass: top
objectClass: organizationalUnit
ou: People
dn: uid=jduke,ou=People,o=example2,dc=jboss,dc=org
objectClass: top
objectClass: uidObject
objectClass: person
objectClass: inetOrgPerson
cn: Java Duke
employeeNumber: judke-123
sn: Duke
uid: jduke
userPassword:: dGhlZHVrZQ==
dn: uid=jduke2,ou=People,o=example2,dc=jboss,dc=org
objectClass: top
objectClass: uidObject
objectClass: person
objectClass: inetOrgPerson
cn: Java Duke2
employeeNumber: judke2-123
sn: Duke2
uid: jduke2
userPassword:: dGhlZHVrZTI=
dn: ou=Roles,o=example2,dc=jboss,dc=org
objectClass: top
objectClass: organizationalUnit
ou: Roles
dn: uid=jduke,ou=Roles,o=example2,dc=jboss,dc=org
objectClass: top
objectClass: groupUserEx
memberOf: cn=Echo,ou=Roles,o=example2,dc=jboss,dc=org
memberOf: cn=TheDuke,ou=Roles,o=example2,dc=jboss,dc=org
uid: jduke
dn: uid=jduke2,ou=Roles,o=example2,dc=jboss,dc=org
objectClass: top
objectClass: groupUserEx
memberOf: cn=Echo2,ou=Roles,o=example2,dc=jboss,dc=org
memberOf: cn=TheDuke2,ou=Roles,o=example2,dc=jboss,dc=org
uid: jduke2
dn: cn=Echo,ou=Roles,o=example2,dc=jboss,dc=org
objectClass: top
objectClass: groupOfNames
cn: Echo
description: the echo role
member: uid=jduke,ou=People,dc=jboss,dc=org
dn: cn=TheDuke,ou=Roles,o=example2,dc=jboss,dc=org
objectClass: groupOfNames
objectClass: top
cn: TheDuke
description: the duke role
member: uid=jduke,ou=People,o=example2,dc=jboss,dc=org
dn: cn=Echo2,ou=Roles,o=example2,dc=jboss,dc=org
objectClass: top
objectClass: groupOfNames
cn: Echo2
description: the Echo2 role
member: uid=jduke2,ou=People,dc=jboss,dc=org
dn: cn=TheDuke2,ou=Roles,o=example2,dc=jboss,dc=org
objectClass: groupOfNames
objectClass: top
cn: TheDuke2
description: the duke2 role
member: uid=jduke2,ou=People,o=example2,dc=jboss,dc=org
dn: cn=JBossAdmin,ou=Roles,o=example2,dc=jboss,dc=org
objectClass: top
objectClass: groupOfNames
cn: JBossAdmin
description: the JBossAdmin group
member: uid=jduke,ou=People,dc=jboss,dc=org/subsystem=security/security-domain=testLdapExample2/authentication=classic/login-module=LdapExtended:add( \
code=LdapExtended, \
flag=required, \
module-options=[ \
("java.naming.factory.initial"=>"com.sun.jndi.ldap.LdapCtxFactory"), \
("java.naming.provider.url"=>"ldap://ldaphost.jboss.org"), \
("java.naming.security.authentication"=>"simple"), \
("bindDN"=>"cn=Root,dc=jboss,dc=org"), \
("bindCredential"=>"secret1"), \
("baseCtxDN"=>"ou=People,o=example2,dc=jboss,dc=org"), \
("baseFilter"=>"(uid={0})"), \
("rolesCtxDN"=>"ou=Roles,o=example2,dc=jboss,dc=org"), \
("roleFilter"=>"(uid={0})"), \
("roleAttributeIsDN"=>"true"), \
("roleAttributeID"=>"memberOf"), \
("roleNameAttributeID"=>"cn") \
])
Example 18.10. Example 3 LDAP Configuration
dn: o=example3,dc=jboss,dc=org
objectclass: top
objectclass: organization
o: example3
dn: ou=People,o=example3,dc=jboss,dc=org
objectclass: top
objectclass: organizationalUnit
ou: People
dn: uid=jduke,ou=People,o=example3,dc=jboss,dc=org
objectclass: top
objectclass: uidObject
objectclass: person
objectClass: inetOrgPerson
uid: jduke
employeeNumber: judke-123
cn: Java Duke
sn: Duke
userPassword: theduke
dn: ou=Roles,o=example3,dc=jboss,dc=org
objectClass: top
objectClass: organizationalUnit
ou: Roles
dn: uid=jduke,ou=Roles,o=example3,dc=jboss,dc=org
objectClass: top
objectClass: groupUserEx
memberOf: cn=Echo,ou=Roles,o=example3,dc=jboss,dc=org
memberOf: cn=TheDuke,ou=Roles,o=example3,dc=jboss,dc=org
uid: jduke
dn: cn=Echo,ou=Roles,o=example3,dc=jboss,dc=org
objectClass: top
objectClass: groupOfNames
cn: Echo
description: the JBossAdmin group
member: uid=jduke,ou=People,o=example3,dc=jboss,dc=org
dn: cn=TheDuke,ou=Roles,o=example3,dc=jboss,dc=org
objectClass: groupOfNames
objectClass: top
cn: TheDuke
member: uid=jduke,ou=People,o=example3,dc=jboss,dc=org
/subsystem=security/security-domain=testLdapExample3/authentication=classic/login-module=LdapExtended:add( \
code=LdapExtended, \
flag=required, \
module-options=[ \
("java.naming.factory.initial"=>"com.sun.jndi.ldap.LdapCtxFactory"), \
("java.naming.provider.url"=>"ldap://ldaphost.jboss.org"), \
("java.naming.security.authentication"=>"simple"), \
("bindDN"=>"cn=Root,dc=jboss,dc=org"), \
("bindCredential"=>"secret1"), \
("baseCtxDN"=>"ou=People,o=example3,dc=jboss,dc=org"), \
("baseFilter"=>"(cn={0})"), \
("rolesCtxDN"=>"ou=Roles,o=example3,dc=jboss,dc=org"), \
("roleFilter"=>"(member={1})"), \
("roleAttributeID"=>"cn") \
])
Example 18.11. Example 4 LDAP Configuration
dn: o=example4,dc=jboss,dc=org
objectclass: top
objectclass: organization
o: example4
dn: ou=People,o=example4,dc=jboss,dc=org
objectclass: top
objectclass: organizationalUnit
ou: People
dn: uid=jduke,ou=People,o=example4,dc=jboss,dc=org
objectClass: top
objectClass: uidObject
objectClass: person
objectClass: inetOrgPerson
cn: Java Duke
employeeNumber: jduke-123
sn: Duke
uid: jduke
userPassword:: dGhlZHVrZQ==
dn: ou=Roles,o=example4,dc=jboss,dc=org
objectClass: top
objectClass: organizationalUnit
ou: Roles
dn: cn=RG1,ou=Roles,o=example4,dc=jboss,dc=org
objectClass: groupOfNames
objectClass: top
cn: RG1
member: cn=empty
dn: cn=RG2,cn=RG1,ou=Roles,o=example4,dc=jboss,dc=org
objectClass: groupOfNames
objectClass: top
cn: RG2
member: cn=RG1,ou=Roles,o=example4,dc=jboss,dc=org
member: uid=jduke,ou=People,o=example4,dc=jboss,dc=org
dn: cn=RG3,cn=RG1,ou=Roles,o=example4,dc=jboss,dc=org
objectClass: groupOfNames
objectClass: top
cn: RG3
member: cn=RG1,ou=Roles,o=example4,dc=jboss,dc=org
dn: cn=R1,ou=Roles,o=example4,dc=jboss,dc=org
objectClass: groupOfNames
objectClass: top
cn: R1
member: cn=RG2,cn=RG1,ou=Roles,o=example4,dc=jboss,dc=org
dn: cn=R2,ou=Roles,o=example4,dc=jboss,dc=org
objectClass: groupOfNames
objectClass: top
cn: R2
member: cn=RG2,cn=RG1,ou=Roles,o=example4,dc=jboss,dc=org
dn: cn=R3,ou=Roles,o=example4,dc=jboss,dc=org
objectClass: groupOfNames
objectClass: top
cn: R3
member: cn=RG2,cn=RG1,ou=Roles,o=example4,dc=jboss,dc=org
member: cn=RG3,cn=RG1,ou=Roles,o=example4,dc=jboss,dc=org
dn: cn=R4,ou=Roles,o=example4,dc=jboss,dc=org
objectClass: groupOfNames
objectClass: top
cn: R4
member: cn=RG3,cn=RG1,ou=Roles,o=example4,dc=jboss,dc=org
dn: cn=R5,ou=Roles,o=example4,dc=jboss,dc=org
objectClass: groupOfNames
objectClass: top
cn: R5
member: cn=RG3,cn=RG1,ou=Roles,o=example4,dc=jboss,dc=org
member: uid=jduke,ou=People,o=example4,dc=jboss,dc=org
/subsystem=security/security-domain=testLdapExample4/authentication=classic/login-module=LdapExtended:add( \
code=LdapExtended, \
flag=required, \
module-options=[ \
("java.naming.factory.initial"=>"com.sun.jndi.ldap.LdapCtxFactory"), \
("java.naming.provider.url"=>"ldap://ldaphost.jboss.org"), \
("java.naming.security.authentication"=>"simple"), \
("bindDN"=>"cn=Root,dc=jboss,dc=org"), \
("bindCredential"=>"secret1"), \
("baseCtxDN"=>"ou=People,o=example4,dc=jboss,dc=org"), \
("baseFilter"=>"(cn={0})"), \
("rolesCtxDN"=>"ou=Roles,o=example4,dc=jboss,dc=org"), \
("roleFilter"=>"(member={1})"), \
("roleRecursion"=>"1"), \
("roleAttributeID"=>"memberOf") \
])
Example 18.12. Default Active Directory Configuration
/subsystem=security/security-domain=AD_Default/authentication=classic/login-module=LdapExtended:add( \
code=LdapExtended, \
flag=required, \
module-options=[ \
("java.naming.provider.url"=>"ldap://ldaphost.jboss.org"), \
("bindDN"=>"JBOSS\searchuser"), \
("bindCredential"=>"password"), \
("baseCtxDN"=>"CN=Users,DC=jboss,DC=org"), \
("baseFilter"=>"(sAMAccountName={0})"), \
("rolesCtxDN"=>"CN=Users,DC=jboss,DC=org"), \
("roleFilter"=>"(sAMAccountName={0})"), \
("roleAttributeID"=>"memberOf"), \
("roleAttributeIsDN"=>"true"), \
("roleNameAttributeID"=>"cn"), \
("searchScope"=>"ONELEVEL_SCOPE"), \
("allowEmptyPasswords"=>"false") \
])
Example 18.13. Recursive Roles Active Directory Configuration
/subsystem=security/security-domain=AD_Recursive/authentication=classic/login-module=LdapExtended:add( \
code=LdapExtended, \
flag=required, \
module-options=[ \
("java.naming.provider.url"=>"ldap://ldaphost.jboss.org"), \
("java.naming.referral"=>"follow"), \
("bindDN"=>"JBOSS\searchuser"), \
("bindCredential"=>"password"), \
("baseCtxDN"=>"CN=Users,DC=jboss,DC=org"), \
("baseFilter"=>"(sAMAccountName={0})"), \
("rolesCtxDN"=>"CN=Users,DC=jboss,DC=org"), \
("roleFilter"=>"(member={1})"), \
("roleAttributeID"=>"cn"), \
("roleAttributeIsDN"=>"false"), \
("roleRecursion"=>"2"), \
("searchScope"=>"ONELEVEL_SCOPE"), \
("allowEmptyPasswords"=>"false") \
])
18.3.1.6. UsersRoles Login Module
UsersRoles login module is a simple login module that supports multiple users and user roles loaded from Java properties files. The default username-to-password mapping filename is users.properties and the default username-to-roles mapping filename is roles.properties.
WEB-INF/classes folder in the WAR archive), or into any directory on the server classpath. The primary purpose of this login module is to easily test the security settings of multiple users and roles using properties files deployed with the application.
Example 18.14. UsersRoles Login Module
/subsystem=security/security-domain=ejb3-sampleapp/authentication=classic/login-module=UsersRoles:add( \
code=UsersRoles, \
flag=required, \
module-options=[ \
("usersProperties"=>"ejb3-sampleapp-users.properties"), \
("rolesProperties"=>"ejb3-sampleapp-roles.properties") \
])
ejb3-sampleapp-users.properties file uses a username=password format with each user entry on a separate line:
username1=password1
username2=password2
...
ejb3-sampleapp-roles.properties file referenced in Example 18.14, “UsersRoles Login Module” uses the pattern username=role1,role2, with an optional group name value. For example:
username1=role1,role2,...
username1.RoleGroup1=role3,role4,...
username2=role1,role3,...
ejb3-sampleapp-roles.properties is used to assign the user name roles to a particular named group of roles where the XXX portion of the property name is the group name. The user name=... form is an abbreviation for user name.Roles=..., where the Roles group name is the standard name the JBossAuthorizationManager expects to contain the roles which define the permissions of users.
jduke user name:
jduke=TheDuke,AnimatedCharacter
jduke.Roles=TheDuke,AnimatedCharacter
18.3.1.7. Database Login Module
Database login module is a Java Database Connectivity-based (JDBC) login module that supports authentication and role mapping. Use this login module if you have your user name, password and role information stored in a relational database.
Note
Database login module is based on two logical tables:
Table Principals(PrincipalID text, Password text)
Table Roles(PrincipalID text, Role text, RoleGroup text)
Principals table associates the user PrincipalID with the valid password and the Roles table associates the user PrincipalID with its role sets. The roles used for user permissions must be contained in rows with a RoleGroup column value of Roles.
java.sql.ResultSet has the same logical structure as the Principals and Roles tables described previously. The actual names of the tables and columns are not relevant as the results are accessed based on the column index.
Principals and Roles, as already declared. The following statements populate the tables with the following data:
PrincipalIDjavawith aPasswordofechomanin thePrincipalstablePrincipalIDjavawith a role namedEchoin theRolesRoleGroupin theRolestablePrincipalIDjavawith a role namedcaller_javain theCallerPrincipalRoleGroupin theRolestable
INSERT INTO Principals VALUES('java', 'echoman')
INSERT INTO Roles VALUES('java', 'Echo', 'Roles')
INSERT INTO Roles VALUES('java', 'caller_java', 'CallerPrincipal')
Database login module configuration could be constructed as follows:
CREATE TABLE Users(username VARCHAR(64) PRIMARY KEY, passwd VARCHAR(64))
CREATE TABLE UserRoles(username VARCHAR(64), role VARCHAR(32))
/subsystem=security/security-domain=testDB/authentication=classic/login-module=Database:add( \
code=Database, \
flag=required, \
module-options=[ \
("dsJndiName"=>"java:/MyDatabaseDS"), \
("principalsQuery"=>"select passwd from Users where username=?"), \
("rolesQuery"=>"select role, 'Roles' from UserRoles where username=?") \
])
18.3.1.8. Certificate Login Module
Certificate login module authenticates users based on X509 certificates. A typical use case for this login module is CLIENT-CERT authentication in the web tier.
CertRolesLoginModule and DatabaseCertLoginModule extend the behavior to obtain the authorization roles from either a properties file or database.
Certificate login module options, see the Included Authentication Modules reference in the Security Guide for JBoss EAP.
Certificate login module needs a KeyStore to perform user validation. This is obtained from a JSSE configuration of linked security domain as shown in the following configuration fragment:
/subsystem=security/security-domain=trust-domain:add
/subsystem=security/security-domain=trust-domain/jsse=classic:add( \
truststore={ \
password=>pass1234, \
url=>/home/jbosseap/trusted-clients.jks \
})
/subsystem=security/security-domain=testCert:add
/subsystem=security/security-domain=testCert/authentication=classic:add
/subsystem=security/security-domain=testCert/authentication=classic/login-module=Certificate:add( \
code=Certificate, \
flag=required, \
module-options=[ \
("securityDomain"=>"trust-domain"), \
])
Procedure 18.4. Secure Web Applications with Certificates and Role-based Authorization
user-app.war, using client certificates and role-based authorization. In this example the CertificateRoles login module is used for authentication and authorization. Both the trusted-clients.keystore and the app-roles.properties require an entry that maps to the principal associated with the client certificate.
Declare Resources and Roles
Modifyweb.xmlto declare the resources to be secured along with the allowed roles and security domain to be used for authentication and authorization.<?xml version="1.0" encoding="UTF-8"?> <web-app xmlns="http://java.sun.com/xml/ns/javaee" xmlns:xsi="http://www.w3.org/2001/XMLSchema-instance" xsi:schemaLocation="http://java.sun.com/xml/ns/javaee http://java.sun.com/xml/ns/javaee/web-app_3_0.xsd" version="3.0"> <security-constraint> <web-resource-collection> <web-resource-name>Protect App</web-resource-name> <url-pattern>/*</url-pattern> </web-resource-collection> <auth-constraint> <role-name>Admin</role-name> </auth-constraint> </security-constraint> <login-config> <auth-method>CLIENT-CERT</auth-method> <realm-name>Secured area</realm-name> </login-config> <security-role> <role-name>Admin</role-name> </security-role> </web-app>Specify the Security Domain
In thejboss-web.xmlfile, specify the required security domain.<jboss-web> <security-domain>app-sec-domain</security-domain> </jboss-web>Configure Login Module
Define the login module configuration for theapp-sec-domaindomain you just specified using the management CLI.[ /subsystem=security/security-domain=trust-domain:add /subsystem=security/security-domain=trust-domain/jsse=classic:add( \ truststore={ \ password=>pass1234, \ url=>/home/jbosseap/trusted-clients.jks \ }) /subsystem=security/security-domain=app-sec-domain:add /subsystem=security/security-domain=app-sec-domain/authentication=classic:add /subsystem=security/security-domain=app-sec-domain/authentication=classic/login-module=CertificateRoles:add( \ code=CertificateRoles, \ flag=required, \ module-options=[ \ ("securityDomain"=>"trust-domain"), \ ("rolesProperties"=>"app-roles.properties") \ ])
Example 18.15. Certificate Example
[conf]$ keytool -printcert -file valid-client-cert.crt
Owner: CN=valid-client, OU=Security QE, OU=JBoss, O=Red Hat, C=CZ
Issuer: CN=EAP Certification Authority, OU=Security QE, OU=JBoss, O=Red Hat, C=CZ
Serial number: 2
Valid from: Mon Mar 24 18:21:55 CET 2014 until: Tue Mar 24 18:21:55 CET 2015
Certificate fingerprints:
MD5: 0C:54:AE:6E:29:ED:E4:EF:46:B5:14:30:F2:E0:2A:CB
SHA1: D6:FB:19:E7:11:28:6C:DE:01:F2:92:2F:22:EF:BB:5D:BF:73:25:3D
SHA256: CD:B7:B1:72:A3:02:42:55:A3:1C:30:E1:A6:F0:20:B0:2C:0F:23:4F:7A:8E:2F:2D:FA:AF:55:3E:A7:9B:2B:F4
Signature algorithm name: SHA1withRSA
Version: 3
trusted-clients.keystore would need the certificate in Example 18.15, “Certificate Example” stored with an alias of CN=valid-client, OU=Security QE, OU=JBoss, O=Red Hat, C=CZ. The app-roles.properties must have the same entry. Since the DN contains characters that are normally treated as delimiters, you must escape the problem characters using a backslash ('\') as illustrated below.
# A sample app-roles.properties file
CN\=valid-client,\ OU\=Security\ QE,\ OU\=JBoss,\ O\=Red\ Hat,\ C\=CZ
18.3.1.9. Identity Login Module
Identity login module is a simple login module that associates a hard-coded user name to any subject authenticated against the module. It creates a SimplePrincipal instance using the name specified by the principal option.
Note
jduke and assigns role names of TheDuke, and AnimatedCharacter:.
/subsystem=security/security-domain=testIdentity:add
/subsystem=security/security-domain=testIdentity/authentication=classic:add
/subsystem=security/security-domain=testIdentity/authentication=classic/login-module=Identity:add( \
code=Identity, \
flag=required, \
module-options=[ \
("principal"=>"jduke"), \
("roles"=>"TheDuke,AnimatedCharacter") \
])
18.3.1.10. RunAs Login Module
RunAs login module is a helper module that pushes a run as role onto the stack for the duration of the login phase of authentication, then pops the run as role from the stack in either the commit or abort phase.
RunAs login module must be configured ahead of the login modules that require a run as role established.
18.3.1.10.1. RunAsIdentity Creation
javax.security.auth.Subject instance or an org.jboss.security.RunAsIdentity instance. Both these classes store one or more principals that represent the identity and a list of roles that the identity possesses. In the case of the javax.security.auth.Subject a list of credentials is also stored.
ejb-jar.xml deployment descriptor, you specify one or more roles that a user must have to access the various EJB methods. A comparison of these lists reveals whether the user has one of the roles necessary to access the EJB method.
Example 18.16. org.jboss.security.RunAsIdentity Creation
ejb-jar.xml file, you specify a <security-identity> element with a <run-as> role defined as a child of the <session> element.
<session>
...
<security-identity>
<run-as>
<role-name>Admin</role-name>
</run-as>
</security-identity>
...
</session>Admin RunAsIdentity role must be created.
Admin role, you define a <run-as-principal> element in the jboss-ejb3.xml file.
<jboss:ejb-jar
xmlns="http://java.sun.com/xml/ns/javaee"
xmlns:jboss="http://www.jboss.com/xml/ns/javaee"
xmlns:s="urn:security:1.1"
version="3.1" impl-version="2.0">
<assembly-descriptor>
<s:security>
<ejb-name>WhoAmIBean</ejb-name>
<s:run-as-principal>John</s:run-as-principal>
</s:security>
</assembly-descriptor>
</jboss:ejb-jar>
<security-identity> element in both the ejb-jar.xml and <security> element in the jboss-ejb3.xml files are parsed at deployment time. The <run-as> role name and the <run-as-principal> name are then stored in the org.jboss.metadata.ejb.spec.SecurityIdentityMetaData class.
Example 18.17. Assigning multiple roles to a RunAsIdentity
jboss-ejb3.xml deployment descriptor <assembly-descriptor> element group.
<jboss:ejb-jar xmlns:sr="urn:security-role"
...>
<assembly-descriptor>
...
<sr:security-role>
<sr:role-name>Support</sr:role-name>
<sr:principal-name>John</sr:principal-name>
<sr:principal-name>Jill</sr:principal-name>
<sr:principal-name>Tony</sr:principal-name>
</sr:security-role>
</assembly-descriptor>
</jboss:ejb-jar>
<run-as-principal> of John was created. The configuration in this example extends the Admin role, by adding the Support role. The new role contains extra principals, including the originally defined principal John.
<security-role> element in both the ejb-jar.xml and jboss-ejb3.xml files are parsed at deployment time. The <role-name> and the <principal-name> data is stored in the org.jboss.metadata.ejb.spec.SecurityIdentityMetaData class.
18.3.1.11. Client Login Module
Client login module (org.jboss.security.ClientLoginModule) is an implementation of LoginModule for use by JBoss clients when establishing caller identity and credentials. This creates a new SecurityContext assigns it a principal and a credential and sets the SecurityContext to the ThreadLocal security context.
Client login module is the only supported mechanism for a client to establish the current thread's caller. Both stand-alone client applications, and server environments (acting as JBoss EJB clients where the security environment has not been configured to use the EAP security subsystem transparently) must use Client login module.
Client login module.
18.3.1.12. SPNEGO Login Module
SPNEGO login module (org.jboss.security.negotiation.spnego.SPNEGOLoginModule) is an implementation of LoginModule that establishes caller identity and credentials with a KDC. The module implements SPNEGO (Simple and Protected GSSAPI Negotiation mechanism) and is a part of the JBoss Negotiation project. This authentication can be used in the chained configuration with the AdvancedLdap login module to allow cooperation with an LDAP server.
SPNEGO or AdvancedLdap login modules in your project, you must add the dependency manually by editing the META-INF/jboss-deployment-structure.xml deployment descriptor file.
Example 18.18. Add JBoss Negotiation Module as a Dependency
<jboss-deployment-structure>
<deployment>
<dependencies>
<module name="org.jboss.security.negotiation" />
</dependencies>
</deployment>
</jboss-deployment-structure>
18.3.1.13. RoleMapping Login Module
RoleMapping login module supports mapping roles, that are the end result of the authentication process, to one or more declarative roles. For example, if the authentication process has determined that the user "A" has the roles "ldapAdmin" and "testAdmin", and the declarative role defined in the web.xml or ejb-jar.xml file for access is admin, then this login module maps the admin roles to the user A.
RoleMapping login module options, see the Included Authentication Modules reference in the Security Guide for JBoss EAP.
RoleMapping login module must be defined as an optional module to a login module configuration as it alters mapping of the previously mapped roles.
Example 18.19. Defining mapped roles
/subsystem=security/security-domain=test-domain-2/:add
/subsystem=security/security-domain=test-domain-2/authentication=classic:add
/subsystem=security/security-domain=test-domain-2/authentication=classic/login-module=test-2-lm/:add(\
flag=required,\
code=UsersRoles,\
module-options=[("usersProperties"=>"users.properties"),("rolesProperties"=>"roles.properties")]\
)
/subsystem=security/security-domain=test-domain-2/authentication=classic/login-module=test2-map/:add(\
flag=optional,\
code=RoleMapping,\
module-options=[("rolesProperties"=>"rolesMapping-roles.properties")]\
)
Example 18.20. Preferred method of defining mapped roles
/subsystem=security/security-domain=test-domain-2/:add
/subsystem=security/security-domain=test-domain-2/authentication=classic:add
/subsystem=security/security-domain=test-domain-2/authentication=classic/login-module=test-2-lm/:add(\
flag=required,\
code=UsersRoles,\
module-options=[("usersProperties"=>"users.properties"),("rolesProperties"=>"roles.properties")]\
)
/subsystem=security/security-domain=test-domain-2/mapping=classic/mapping-module=test2-map/:add(\
code=PropertiesRoles,type=role,\
module-options=[("rolesProperties"=>"rolesMapping-roles.properties")]\
)
Example 18.21. Properties File used by a RoleMappingLoginModule
ldapAdmin=admin, testAdmin
ldapAdmin, then the roles admin and testAdmin are added to or substitute the authenticated subject depending on the replaceRole property value.
18.3.1.14. bindCredential Module Option
bindCredential module option is used to store the credentials for the DN and can be used by several login and mapping modules. There are several methods for obtaining the password.
- Plaintext in a management CLI command.
- The password for the
bindCredentialmodule may be provided in plaintext, in a management CLI command. For example:("bindCredential"=>"secret1"). For security reasons, the password should be encrypted using the JBoss EAP vault mechanism. - Use an external command.
- To obtain the password from the output of an external command, use the format
{EXT}...where the...is the external command. The first line of the command output is used as the password.To improve performance, the{EXTC[:expiration_in_millis]}variant caches the password for a specified number of milliseconds. By default the cached password does not expire. If the value0(zero) is specified, the cached credentials do not expire.TheEXTCvariant is only supported by theLdapExtendedlogin module.
Example 18.22. Obtain a password from an external command
{EXT}cat /mysecretpasswordfile
Example 18.23. Obtain a password from an external file and cache it for 500 milliseconds
{EXTC:500}cat /mysecretpasswordfile
18.3.2. Custom Modules
AuthenticationManager requires a particular usage pattern of the Subject principals set. You must understand the JAAS Subject class's information storage features and the expected usage of these features to write a login module that works with the AuthenticationManager.
LoginModule implementations that can help you implement custom login modules.
Subject by using the following methods:
java.util.Set getPrincipals()
java.util.Set getPrincipals(java.lang.Class c)
java.util.Set getPrivateCredentials()
java.util.Set getPrivateCredentials(java.lang.Class c)
java.util.Set getPublicCredentials()
java.util.Set getPublicCredentials(java.lang.Class c)Subject identities and roles, EAP has selected the most logical choice: the principals sets obtained via getPrincipals() and getPrincipals(java.lang.Class). The usage pattern is as follows:
- User identities (for example; user name, social security number, employee ID) are stored as
java.security.Principalobjects in theSubjectPrincipalsset. ThePrincipalimplementation that represents the user identity must base comparisons and equality on the name of the principal. A suitable implementation is available as theorg.jboss.security.SimplePrincipalclass. OtherPrincipalinstances may be added to theSubjectPrincipalsset as needed. - Assigned user roles are also stored in the
Principalsset, and are grouped in named role sets usingjava.security.acl.Groupinstances. TheGroupinterface defines a collection ofPrincipals and/orGroups, and is a subinterface ofjava.security.Principal. - Any number of role sets can be assigned to a
Subject.
- The EAP security framework uses two well-known role sets with the names
RolesandCallerPrincipal.- The
Rolesgroup is the collection ofPrincipals for the named roles as known in the application domain under which theSubjecthas been authenticated. This role set is used by methods like theEJBContext.isCallerInRole(String), which EJBs can use to see if the current caller belongs to the named application domain role. The security interceptor logic that performs method permission checks also uses this role set. - The
CallerPrincipalGroupconsists of the singlePrincipalidentity assigned to the user in the application domain. TheEJBContext.getCallerPrincipal()method uses theCallerPrincipalto allow the application domain to map from the operation environment identity to a user identity suitable for the application. If aSubjectdoes not have aCallerPrincipalGroup, the application identity is the same as operational environment identity.
18.3.2.1. Subject Usage Pattern Support
Subject usage patterns described in Section 18.3.2, “Custom Modules”, EAP includes login modules that populate the authenticated Subject with a template pattern that enforces correct Subject usage.
The most generic of the two is the org.jboss.security.auth.spi.AbstractServerLoginModule class.
javax.security.auth.spi.LoginModule interface and offers abstract methods for the key tasks specific to an operation environment security infrastructure. The key details of the class are highlighted in Example 18.24, “AbstractServerLoginModule Class Fragment”. The JavaDoc comments detail the responsibilities of subclasses.
Important
loginOk instance variable is pivotal. This must be set to true if the log in succeeds, or false by any subclasses that override the log in method. If this variable is incorrectly set, the commit method will not correctly update the subject.
Example 18.24. AbstractServerLoginModule Class Fragment
package org.jboss.security.auth.spi;
/**
* This class implements the common functionality required for a JAAS
* server-side LoginModule and implements the PicketBox standard
* Subject usage pattern of storing identities and roles. Subclass
* this module to create your own custom LoginModule and override the
* login(), getRoleSets(), and getIdentity() methods.
*/
public abstract class AbstractServerLoginModule
implements javax.security.auth.spi.LoginModule
{
protected Subject subject;
protected CallbackHandler callbackHandler;
protected Map sharedState;
protected Map options;
protected Logger log;
/** Flag indicating if the shared credential should be used */
protected boolean useFirstPass;
/**
* Flag indicating if the login phase succeeded. Subclasses that
* override the login method must set this to true on successful
* completion of login
*/
protected boolean loginOk;
// ...
/**
* Initialize the login module. This stores the subject,
* callbackHandler and sharedState and options for the login
* session. Subclasses should override if they need to process
* their own options. A call to super.initialize(...) must be
* made in the case of an override.
*
* <p>
* The options are checked for the <em>password-stacking</em> parameter.
* If this is set to "useFirstPass", the login identity will be taken from the
* <code>javax.security.auth.login.name</code> value of the sharedState map,
* and the proof of identity from the
* <code>javax.security.auth.login.password</code> value of the sharedState map.
*
* @param subject the Subject to update after a successful login.
* @param callbackHandler the CallbackHandler that will be used to obtain the
* the user identity and credentials.
* @param sharedState a Map shared between all configured login module instances
* @param options the parameters passed to the login module.
*/
public void initialize(Subject subject,
CallbackHandler callbackHandler,
Map sharedState,
Map options)
{
// ...
}
/**
* Looks for javax.security.auth.login.name and
* javax.security.auth.login.password values in the sharedState
* map if the useFirstPass option was true and returns true if
* they exist. If they do not or are null this method returns
* false.
* Note that subclasses that override the login method
* must set the loginOk var to true if the login succeeds in
* order for the commit phase to populate the Subject. This
* implementation sets loginOk to true if the login() method
* returns true, otherwise, it sets loginOk to false.
*/
public boolean login()
throws LoginException
{
// ...
}
/**
* Overridden by subclasses to return the Principal that
* corresponds to the user primary identity.
*/
abstract protected Principal getIdentity();
/**
* Overridden by subclasses to return the Groups that correspond
* to the role sets assigned to the user. Subclasses should
* create at least a Group named "Roles" that contains the roles
* assigned to the user. A second common group is
* "CallerPrincipal," which provides the application identity of
* the user rather than the security domain identity.
*
* @return Group[] containing the sets of roles
*/
abstract protected Group[] getRoleSets() throws LoginException;
}
The second abstract base login module suitable for custom login modules is the org.jboss.security.auth.spi.UsernamePasswordLoginModule.
char[] password as the authentication credentials. It also supports the mapping of anonymous users (indicated by a null user name and password) to a principal with no roles. The key details of the class are highlighted in the following class fragment. The JavaDoc comments detail the responsibilities of subclasses.
Example 18.25. UsernamePasswordLoginModule Class Fragment
package org.jboss.security.auth.spi;
/**
* An abstract subclass of AbstractServerLoginModule that imposes a
* an identity == String username, credentials == String password
* view on the login process. Subclasses override the
* getUsersPassword() and getUsersRoles() methods to return the
* expected password and roles for the user.
*/
public abstract class UsernamePasswordLoginModule
extends AbstractServerLoginModule
{
/** The login identity */
private Principal identity;
/** The proof of login identity */
private char[] credential;
/** The principal to use when a null username and password are seen */
private Principal unauthenticatedIdentity;
/**
* The message digest algorithm used to hash passwords. If null then
* plain passwords will be used. */
private String hashAlgorithm = null;
/**
* The name of the charset/encoding to use when converting the
* password String to a byte array. Default is the platform's
* default encoding.
*/
private String hashCharset = null;
/** The string encoding format to use. Defaults to base64. */
private String hashEncoding = null;
// ...
/**
* Override the superclass method to look for an
* unauthenticatedIdentity property. This method first invokes
* the super version.
*
* @param options,
* @option unauthenticatedIdentity: the name of the principal to
* assign and authenticate when a null username and password are
* seen.
*/
public void initialize(Subject subject,
CallbackHandler callbackHandler,
Map sharedState,
Map options)
{
super.initialize(subject, callbackHandler, sharedState,
options);
// Check for unauthenticatedIdentity option.
Object option = options.get("unauthenticatedIdentity");
String name = (String) option;
if (name != null) {
unauthenticatedIdentity = new SimplePrincipal(name);
}
}
// ...
/**
* A hook that allows subclasses to change the validation of the
* input password against the expected password. This version
* checks that neither inputPassword or expectedPassword are null
* and that inputPassword.equals(expectedPassword) is true;
*
* @return true if the inputPassword is valid, false otherwise.
*/
protected boolean validatePassword(String inputPassword,
String expectedPassword)
{
if (inputPassword == null || expectedPassword == null) {
return false;
}
return inputPassword.equals(expectedPassword);
}
/**
* Get the expected password for the current username available
* via the getUsername() method. This is called from within the
* login() method after the CallbackHandler has returned the
* username and candidate password.
*
* @return the valid password String
*/
abstract protected String getUsersPassword()
throws LoginException;
}
The choice of sub-classing the AbstractServerLoginModule versus UsernamePasswordLoginModule is based on whether a string-based user name and credentials are usable for the authentication technology you are writing the login module for. If the string-based semantic is valid, then subclass UsernamePasswordLoginModule, otherwise subclass AbstractServerLoginModule.
The steps your custom login module must execute depend on which base login module class you choose. When writing a custom login module that integrates with your security infrastructure, you should start by sub-classing AbstractServerLoginModule or UsernamePasswordLoginModule to ensure that your login module provides the authenticated Principal information in the form expected by the EAP security manager.
AbstractServerLoginModule, you must override the following:
void initialize(Subject, CallbackHandler, Map, Map): if you have custom options to parse.boolean login(): to perform the authentication activity. Be sure to set theloginOkinstance variable to true if log in succeeds, false if it fails.Principal getIdentity(): to return thePrincipalobject for the user authenticated by thelog()step.Group[] getRoleSets(): to return at least oneGroupnamedRolesthat contains the roles assigned to thePrincipalauthenticated duringlogin(). A second commonGroupis namedCallerPrincipaland provides the user's application identity rather than the security domain identity.
UsernamePasswordLoginModule, you must override the following:
void initialize(Subject, CallbackHandler, Map, Map): if you have custom options to parse.Group[] getRoleSets(): to return at least oneGroupnamedRolesthat contains the roles assigned to thePrincipalauthenticated duringlogin(). A second commonGroupis namedCallerPrincipaland provides the user's application identity rather than the security domain identity.String getUsersPassword(): to return the expected password for the current user name available via thegetUsername()method. ThegetUsersPassword()method is called from withinlogin()after thecallbackhandlerreturns the user name and candidate password.
18.3.2.2. Custom LoginModule Example
UsernamePasswordLoginModule and obtains a user's password and role names from a JNDI lookup.
password/<username> (where <username> is the current user being authenticated). Similarly, a lookup of the form roles/<username> returns the requested user's roles. In Example 18.26, “JndiUserAndPassLoginModule Custom Login Module” is the source code for the JndiUserAndPassLoginModule custom login module.
UsernamePasswordLoginModule, the JndiUserAndPassLoginModule obtains the user's password and roles from the JNDI store. The JndiUserAndPassLoginModule does not interact with the JAAS LoginModule operations.
Example 18.26. JndiUserAndPassLoginModule Custom Login Module
package org.jboss.book.security.ex2;
import java.security.acl.Group;
import java.util.Map;
import javax.naming.InitialContext;
import javax.naming.NamingException;
import javax.security.auth.Subject;
import javax.security.auth.callback.CallbackHandler;
import javax.security.auth.login.LoginException;
import org.jboss.logging.Logger;
import org.jboss.security.SimpleGroup;
import org.jboss.security.SimplePrincipal;
import org.jboss.security.auth.spi.UsernamePasswordLoginModule;
/**
* An example custom login module that obtains passwords and roles for a user from a JNDI lookup.
*
* @author Scott.Stark@jboss.org
*/
public class JndiUserAndPassLoginModule extends UsernamePasswordLoginModule {
/** The JNDI name to the context that handles the password/username lookup */
private String userPathPrefix;
/** The JNDI name to the context that handles the roles/username lookup */
private String rolesPathPrefix;
private static Logger log = Logger.getLogger(JndiUserAndPassLoginModule.class);
/**
* Override to obtain the userPathPrefix and rolesPathPrefix options.
*/
@Override
public void initialize(Subject subject, CallbackHandler callbackHandler, Map sharedState, Map options) {
super.initialize(subject, callbackHandler, sharedState, options);
userPathPrefix = (String) options.get("userPathPrefix");
rolesPathPrefix = (String) options.get("rolesPathPrefix");
}
/**
* Get the roles the current user belongs to by querying the rolesPathPrefix + '/' + super.getUsername() JNDI location.
*/
@Override
protected Group[] getRoleSets() throws LoginException {
try {
InitialContext ctx = new InitialContext();
String rolesPath = rolesPathPrefix + '/' + super.getUsername();
String[] roles = (String[]) ctx.lookup(rolesPath);
Group[] groups = { new SimpleGroup("Roles") };
log.info("Getting roles for user=" + super.getUsername());
for (int r = 0; r < roles.length; r++) {
SimplePrincipal role = new SimplePrincipal(roles[r]);
log.info("Found role=" + roles[r]);
groups[0].addMember(role);
}
return groups;
} catch (NamingException e) {
log.error("Failed to obtain groups for user=" + super.getUsername(), e);
throw new LoginException(e.toString(true));
}
}
/**
* Get the password of the current user by querying the userPathPrefix + '/' + super.getUsername() JNDI location.
*/
@Override
protected String getUsersPassword() throws LoginException {
try {
InitialContext ctx = new InitialContext();
String userPath = userPathPrefix + '/' + super.getUsername();
log.info("Getting password for user=" + super.getUsername());
String passwd = (String) ctx.lookup(userPath);
log.info("Found password=" + passwd);
return passwd;
} catch (NamingException e) {
log.error("Failed to obtain password for user=" + super.getUsername(), e);
throw new LoginException(e.toString(true));
}
}
}Example 18.27. Definition of security-ex2 security domain with the newly-created custom login module
/subsystem=security/security-domain=security-ex2/:add
/subsystem=security/security-domain=security-ex2/authentication=classic:add
/subsystem=security/security-domain=security-ex2/authentication=classic/login-module=ex2/:add(\
flag=required,\
code=org.jboss.book.security.ex2.JndiUserAndPassLoginModule,\
module-options=[("userPathPrefix"=>"/security/store/password"),\
("rolesPathPrefix"=>"/security/store/roles")]\
)
JndiUserAndPassLoginModule custom login module for the server side authentication of the user is determined by the login configuration for the example security domain. The EJB JAR META-INF/jboss-ejb3.xml descriptor sets the security domain. For a web application it is part of the WEB-INF/jboss-web.xml file.
Example 18.28. jboss-ejb3.xml Example
<?xml version="1.0"?>
<jboss:ejb-jar xmlns:jboss="http://www.jboss.com/xml/ns/javaee" xmlns="http://java.sun.com/xml/ns/javaee" xmlns:s="urn:security" version="3.1" impl-version="2.0">
<assembly-descriptor>
<s:security>
<ejb-name>*</ejb-name>
<s:security-domain>security-ex2</s:security-domain>
</s:security>
</assembly-descriptor>
</jboss:ejb-jar>
Example 18.29. jboss-web.xml example
<?xml version="1.0"?>
<jboss-web>
<security-domain>security-ex2</security-domain>
</jboss-web>
18.4. EJB Application Security
18.4.1. Security Identity
18.4.1.1. About EJB Security Identity
18.4.1.2. Set the Security Identity of an EJB
<security-identity> tag in the security configuration.
<security-identity> tag is present - the EJB's own caller identity is used.
Example 18.30. Set the security identity of an EJB to be the same as its caller
<security-identity> element declaration.
<ejb-jar>
<enterprise-beans>
<session>
<ejb-name>ASessionBean</ejb-name>
<!-- ... -->
<security-identity>
<use-caller-identity/>
</security-identity>
</session>
<!-- ... -->
</enterprise-beans>
</ejb-jar>
Example 18.31. Set the security identity of an EJB to a specific role
<run-as> and <role-name> tags inside the <security-identity> tag.
<ejb-jar>
<enterprise-beans>
<session>
<ejb-name>RunAsBean</ejb-name>
<!-- ... -->
<security-identity>
<run-as>
<description>A private internal role</description>
<role-name>InternalRole</role-name>
</run-as>
</security-identity>
</session>
</enterprise-beans>
<!-- ... -->
</ejb-jar>
<run-as>, a principal named anonymous is assigned to outgoing calls. To assign a different principal, uses the <run-as-principal>.
<session>
<ejb-name>RunAsBean</ejb-name>
<security-identity>
<run-as-principal>internal</run-as-principal>
</security-identity>
</session>
Note
<run-as> and <run-as-principal> elements inside a servlet element.
See also:
18.4.2. EJB Method Permissions
18.4.2.1. About EJB Method Permissions
<method-permission> element declaration specifies the roles that can invoke the EJB's interface methods. You can specify permissions for the following combinations:
- All home and component interface methods of the named EJB
- A specified method of the home or component interface of the named EJB
- A specified method within a set of methods with an overloaded name
18.4.2.2. Use EJB Method Permissions
The <method-permission> element defines the logical roles that are allowed to access the EJB methods defined by <method> elements. Several examples demonstrate the syntax of the XML. Multiple method permission statements may be present, and they have a cumulative effect. The <method-permission> element is a child of the <assembly-descriptor> element of the <ejb-jar> descriptor.
Example 18.32. Allow roles to access all methods of an EJB
<method-permission>
<description>The employee and temp-employee roles may access any method
of the EmployeeService bean </description>
<role-name>employee</role-name>
<role-name>temp-employee</role-name>
<method>
<ejb-name>EmployeeService</ejb-name>
<method-name>*</method-name>
</method>
</method-permission>
Example 18.33. Allow roles to access only specific methods of an EJB, and limiting which method parameters can be passed.
<method-permission>
<description>The employee role may access the findByPrimaryKey,
getEmployeeInfo, and the updateEmployeeInfo(String) method of
the AcmePayroll bean </description>
<role-name>employee</role-name>
<method>
<ejb-name>AcmePayroll</ejb-name>
<method-name>findByPrimaryKey</method-name>
</method>
<method>
<ejb-name>AcmePayroll</ejb-name>
<method-name>getEmployeeInfo</method-name>
</method>
<method>
<ejb-name>AcmePayroll</ejb-name>
<method-name>updateEmployeeInfo</method-name>
<method-params>
<method-param>java.lang.String</method-param>
</method-params>
</method>
</method-permission>
Example 18.34. Allow any authenticated user to access methods of EJBs
<unchecked/> element allows any authenticated user to use the specified methods.
<method-permission>
<description>Any authenticated user may access any method of the
EmployeeServiceHelp bean</description>
<unchecked/>
<method>
<ejb-name>EmployeeServiceHelp</ejb-name>
<method-name>*</method-name>
</method>
</method-permission>
Example 18.35. Completely exclude specific EJB methods from being used
<exclude-list>
<description>No fireTheCTO methods of the EmployeeFiring bean may be
used in this deployment</description>
<method>
<ejb-name>EmployeeFiring</ejb-name>
<method-name>fireTheCTO</method-name>
</method>
</exclude-list>
Example 18.36. A complete <assembly-descriptor> containing several <method-permission> blocks
<ejb-jar>
<assembly-descriptor>
<method-permission>
<description>The employee and temp-employee roles may access any
method of the EmployeeService bean </description>
<role-name>employee</role-name>
<role-name>temp-employee</role-name>
<method>
<ejb-name>EmployeeService</ejb-name>
<method-name>*</method-name>
</method>
</method-permission>
<method-permission>
<description>The employee role may access the findByPrimaryKey,
getEmployeeInfo, and the updateEmployeeInfo(String) method of
the AcmePayroll bean </description>
<role-name>employee</role-name>
<method>
<ejb-name>AcmePayroll</ejb-name>
<method-name>findByPrimaryKey</method-name>
</method>
<method>
<ejb-name>AcmePayroll</ejb-name>
<method-name>getEmployeeInfo</method-name>
</method>
<method>
<ejb-name>AcmePayroll</ejb-name>
<method-name>updateEmployeeInfo</method-name>
<method-params>
<method-param>java.lang.String</method-param>
</method-params>
</method>
</method-permission>
<method-permission>
<description>The admin role may access any method of the
EmployeeServiceAdmin bean </description>
<role-name>admin</role-name>
<method>
<ejb-name>EmployeeServiceAdmin</ejb-name>
<method-name>*</method-name>
</method>
</method-permission>
<method-permission>
<description>Any authenticated user may access any method of the
EmployeeServiceHelp bean</description>
<unchecked/>
<method>
<ejb-name>EmployeeServiceHelp</ejb-name>
<method-name>*</method-name>
</method>
</method-permission>
<exclude-list>
<description>No fireTheCTO methods of the EmployeeFiring bean may be
used in this deployment</description>
<method>
<ejb-name>EmployeeFiring</ejb-name>
<method-name>fireTheCTO</method-name>
</method>
</exclude-list>
</assembly-descriptor>
</ejb-jar>
18.4.3. EJB Security Annotations
18.4.3.1. About EJB Security Annotations
javax.annotation.security annotations are defined in JSR250.
- @DeclareRoles
- Declares which roles are available.
- @RunAs
- Configures the propagated security identity of a component.
18.4.3.2. Use EJB Security Annotations
You can use either XML descriptors or annotations to control which security roles are able to call methods in your Enterprise JavaBeans (EJBs). For information on using XML descriptors, refer to Section 18.4.2.2, “Use EJB Method Permissions”.
Annotations for Controlling Security Permissions of EJBs
- @DeclareRoles
- Use @DeclareRoles to define which security roles to check permissions against. If no @DeclareRoles is present, the list is built automatically from the @RolesAllowed annotation. For information about configuring roles, refer to the Java EE 6 Tutorial Specifying Authorized Users by Declaring Security Roles.
- @RolesAllowed, @PermitAll, @DenyAll
- Use
@RolesAllowedto list which roles are allowed to access a method or methods. Use@PermitAllor@DenyAllto either permit or deny all roles from using a method or methods. For information about configuring annotation method permissions, refer to the Java EE 6 Tutorial Specifying Authorized Users by Declaring Security Roles. - @RunAs
- Use
@RunAsto specify a role a method uses when making calls from the annotated method. For information about configuring propagated security identities using annotations, refer to the Java EE 6 Tutorial Propagating a Security Identity (Run-As).
Example 18.37. Security Annotations Example
@Stateless
@RolesAllowed({"admin"})
@SecurityDomain("other")
public class WelcomeEJB implements Welcome {
@PermitAll
public String WelcomeEveryone(String msg) {
return "Welcome to " + msg;
}
@RunAs("tempemployee")
public String GoodBye(String msg) {
return "Goodbye, " + msg;
}
public String GoodbyeAdmin(String msg) {
return "See you later, " + msg;
}
}
WelcomeEveryone. The GoodBye method uses the tempemployee role when making calls. Only the admin role can access method GoodbyeAdmin, and any other methods with no security annotation.
18.4.4. Remote Access to EJBs
18.4.4.1. About Remote Method Access
Supported Transport Types
- Socket / Secure Socket
- RMI / RMI over SSL
- HTTP / HTTPS
- Servlet / Secure Servlet
- Bisocket / Secure Bisocket
Warning
The Remoting system also provides data marshalling and unmarshalling services. Data marshalling refers to the ability to safely move data across network and platform boundaries, so that a separate system can perform work on it. The work is then sent back to the original system and behaves as though it were handled locally.
When you design a client application which uses Remoting, you direct your application to communicate with the server by configuring it to use a special type of resource locator called an InvokerLocator, which is a simple String with a URL-type format. The server listens for requests for remote resources on a connector, which is configured as part of the remoting subsystem. The connector hands the request off to a configured ServerInvocationHandler. Each ServerInvocationHandler implements a method invoke(InvocationRequest), which knows how to handle the request.
JBoss Remoting Framework Layers
- The user interacts with the outer layer. On the client side, the outer layer is the
Clientclass, which sends invocation requests. On the server side, it is the InvocationHandler, which is implemented by the user and receives invocation requests. - The transport is controlled by the invoker layer.
- The lowest layer contains the marshaller and unmarshaller, which convert data formats to wire formats.
18.4.4.2. About Remoting Callbacks
InvocationRequest to the client. Your server-side code works the same regardless of whether the callback is synchronous or asynchronous. Only the client needs to know the difference. The server's InvocationRequest sends a responseObject to the client. This is the payload that the client has requested. This may be a direct response to a request or an event notification.
m_listeners object. It contains a list of all listeners that have been added to your server handler. The ServerInvocationHandler interface includes methods that allow you to manage this list.
org.jboss.remoting.InvokerCallbackHandler, which processes the callback data. After implementing the callback handler, you either add yourself as a listener for a pull callback, or implement a callback server for a push callback.
For a pull callback, your client adds itself to the server's list of listeners using the Client.addListener() method. It then polls the server periodically for synchronous delivery of callback data. This poll is performed using the Client.getCallbacks().
A push callback requires your client application to run its own InvocationHandler. To do this, you need to run a Remoting service on the client itself. This is referred to as a callback server. The callback server accepts incoming requests asynchronously and processes them for the requester (in this case, the server). To register your client's callback server with the main server, pass the callback server's InvokerLocator as the second argument to the addListener method.
18.4.4.3. About Remoting Server Detection
18.4.4.4. Configure the Remoting Subsystem
JBoss Remoting has three top-level configurable elements: the worker thread pool, one or more connectors, and a series of local and remote connection URIs. This topic presents an explanation of each configurable item, example CLI commands for how to configure each item, and an XML example of a fully-configured subsystem. This configuration only applies to the server. Most people will not need to configure the Remoting subsystem at all, unless they use custom connectors for their own applications. Applications which act as Remoting clients, such as EJBs, need separate configuration to connect to a specific connector.
Note
The CLI commands are formulated for a managed domain, when configuring the default profile. To configure a different profile, substitute its name. For a standalone server, omit the /profile=default part of the command.
There are a few configuration aspects which are outside of the remoting subsystem:
- Network Interface
- The network interface used by the
remotingsubsystem is thepublicinterface defined in thedomain/configuration/domain.xmlorstandalone/configuration/standalone.xml.<interfaces> <interface name="management"/> <interface name="public"/> <interface name="unsecure"/> </interfaces>The per-host definition of thepublicinterface is defined in thehost.xmlin the same directory as thedomain.xmlorstandalone.xml. This interface is also used by several other subsystems. Exercise caution when modifying it.<interfaces> <interface name="management"> <inet-address value="${jboss.bind.address.management:127.0.0.1}"/> </interface> <interface name="public"> <inet-address value="${jboss.bind.address:127.0.0.1}"/> </interface> <interface name="unsecure"> <!-- Used for IIOP sockets in the standard configuration. To secure JacORB you need to setup SSL --> <inet-address value="${jboss.bind.address.unsecure:127.0.0.1}"/> </interface> </interfaces> - socket-binding
- The default socket-binding used by the
remotingsubsystem binds to TCP port 4447. Refer to the documentation about socket bindings and socket binding groups for more information if you need to change this.Information about socket binding and socket binding groups can be found in the Socket Binding Groups chapter of JBoss EAP's Administration and Configuration Guide available at https://access.redhat.com/documentation/en-us/red_hat_jboss_enterprise_application_platform/?version=6.4 - Remoting Connector Reference for EJB
- The EJB subsystem contains a reference to the remoting connector for remote method invocations. The following is the default configuration:
<remote connector-ref="remoting-connector" thread-pool-name="default"/> - Secure Transport Configuration
- Remoting transports use StartTLS to use a secure (HTTPS, Secure Servlet, etc) connection if the client requests it. The same socket binding (network port) is used for secured and unsecured connections, so no additional server-side configuration is necessary. The client requests the secure or unsecured transport, as its needs dictate. JBoss EAP 6 components which use Remoting, such as EJBs, the ORB, and the JMS provider, request secured interfaces by default.
Warning
The worker thread pool is the group of threads which are available to process work which comes in through the Remoting connectors. It is a single element <worker-thread-pool>, and takes several attributes. Tune these attributes if you get network timeouts, run out of threads, or need to limit memory usage. Specific recommendations depend on your specific situation. Contact Red Hat Global Support Services for more information.
| Attribute | Description | CLI Command |
|---|---|---|
| read-threads |
The number of read threads to create for the remoting worker. Defaults to
1.
| /profile=default/subsystem=remoting/:write-attribute(name=worker-read-threads,value=1)
|
| write-threads |
The number of write threads to create for the remoting worker. Defaults to
1.
| /profile=default/subsystem=remoting/:write-attribute(name=worker-write-threads,value=1)
|
| task-keepalive |
The number of milliseconds to keep non-core remoting worker task threads alive. Defaults to
60.
| /profile=default/subsystem=remoting/:write-attribute(name=worker-task-keepalive,value=60)
|
| task-max-threads |
The maximum number of threads for the remoting worker task thread pool. Defaults to
16.
| /profile=default/subsystem=remoting/:write-attribute(name=worker-task-max-threads,value=16)
|
| task-core-threads |
The number of core threads for the remoting worker task thread pool. Defaults to
4.
| /profile=default/subsystem=remoting/:write-attribute(name=worker-task-core-threads,value=4)
|
| task-limit |
The maximum number of remoting worker tasks to allow before rejecting. Defaults to
16384.
| /profile=default/subsystem=remoting/:write-attribute(name=worker-task-limit,value=16384)
|
The connector is the main Remoting configuration element. Multiple connectors are allowed. Each consists of a element <connector> element with several sub-elements, as well as a few possible attributes. The default connector is used by several subsystems of JBoss EAP 6. Specific settings for the elements and attributes of your custom connectors depend on your applications, so contact Red Hat Global Support Services for more information.
| Attribute | Description | CLI Command |
|---|---|---|
| socket-binding | The name of the socket binding to use for this connector. | /profile=default/subsystem=remoting/connector=remoting-connector/:write-attribute(name=socket-binding,value=remoting)
|
| authentication-provider |
The Java Authentication Service Provider Interface for Containers (JASPIC) module to use with this connector. The module must be in the classpath.
| /profile=default/subsystem=remoting/connector=remoting-connector/:write-attribute(name=authentication-provider,value=myProvider)
|
| security-realm |
Optional. The security realm which contains your application's users, passwords, and roles. An EJB or Web Application can authenticate against a security realm.
ApplicationRealm is available in a default JBoss EAP 6 installation.
| /profile=default/subsystem=remoting/connector=remoting-connector/:write-attribute(name=security-realm,value=ApplicationRealm)
|
| Attribute | Description | CLI Command |
|---|---|---|
| sasl |
Enclosing element for Simple Authentication and Security Layer (SASL) authentication mechanisms
| N/A
|
| properties |
Contains one or more
<property> elements, each with a name attribute and an optional value attribute.
| /profile=default/subsystem=remoting/connector=remoting-connector/property=myProp/:add(value=myPropValue)
|
You can specify three different types of outbound connection:
- Outbound connection to a URI.
- Local outbound connection – connects to a local resource such as a socket.
- Remote outbound connection – connects to a remote resource and authenticates using a security realm.
<outbound-connections> element. Each of these connection types takes an outbound-socket-binding-ref attribute. The outbound-connection takes a uri attribute. The remote outbound connection takes optional username and security-realm attributes to use for authorization.
| Attribute | Description | CLI Command |
|---|---|---|
| outbound-connection | Generic outbound connection. | /profile=default/subsystem=remoting/outbound-connection=my-connection/:add(uri=http://my-connection)
|
| local-outbound-connection | Outbound connection with a implicit local:// URI scheme. | /profile=default/subsystem=remoting/local-outbound-connection=my-connection/:add(outbound-socket-binding-ref=remoting2)
|
| remote-outbound-connection |
Outbound connections for remote:// URI scheme, using basic/digest authentication with a security realm.
| /profile=default/subsystem=remoting/remote-outbound-connection=my-connection/:add(outbound-socket-binding-ref=remoting,username=myUser,security-realm=ApplicationRealm)
|
Before defining the SASL child elements, you need to create the initial SASL element. Use the following command:
/profile=default/subsystem=remoting/connector=remoting-connector/security=sasl:add| Attribute | Description | CLI Command |
|---|---|---|
| include-mechanisms |
Contains a
value attribute, which is a list of SASL mechanisms.
|
|
| qop |
Contains a
value attribute, which is a list of SASL Quality of protection values, in decreasing order of preference.
|
|
| strength |
Contains a
value attribute, which is a list of SASL cipher strength values, in decreasing order of preference.
|
|
| reuse-session |
Contains a
value attribute which is a boolean value. If true, attempt to reuse sessions.
|
|
| server-auth |
Contains a
value attribute which is a boolean value. If true, the server authenticates to the client.
|
|
| policy |
An enclosing element which contains zero or more of the following elements, which each take a single
value.
|
|
| properties |
Contains one or more
<property> elements, each with a name attribute and an optional value attribute.
|
|
Example 18.38. Example Configurations
<subsystem xmlns="urn:jboss:domain:remoting:1.1">
<connector name="remoting-connector" socket-binding="remoting" security-realm="ApplicationRealm"/>
</subsystem>
<subsystem xmlns="urn:jboss:domain:remoting:1.1">
<worker-thread-pool read-threads="1" task-keepalive="60" task-max-threads="16" task-core-thread="4" task-limit="16384" write-threads="1" />
<connector name="remoting-connector" socket-binding="remoting" security-realm="ApplicationRealm">
<sasl>
<include-mechanisms value="GSSAPI PLAIN DIGEST-MD5" />
<qop value="auth" />
<strength value="medium" />
<reuse-session value="false" />
<server-auth value="false" />
<policy>
<forward-secrecy value="true" />
<no-active value="false" />
<no-anonymous value="false" />
<no-dictionary value="true" />
<no-plain-text value="false" />
<pass-credentials value="true" />
</policy>
<properties>
<property name="myprop1" value="1" />
<property name="myprop2" value="2" />
</properties>
</sasl>
<authentication-provider name="myprovider" />
<properties>
<property name="myprop3" value="propValue" />
</properties>
</connector>
<outbound-connections>
<outbound-connection name="my-outbound-connection" uri="http://myhost:7777/"/>
<remote-outbound-connection name="my-remote-connection" outbound-socket-binding-ref="my-remote-socket" username="myUser" security-realm="ApplicationRealm"/>
<local-outbound-connection name="myLocalConnection" outbound-socket-binding-ref="my-outbound-socket"/>
</outbound-connections>
</subsystem>
Configuration Aspects Not Yet Documented
- JNDI and Multicast Automatic Detection
18.4.4.5. Use Security Realms with Remote EJB Clients
- Add a new security realm to the domain controller or standalone server.
- Add the following parameters to the
jboss-ejb-client.propertiesfile, which is in the classpath of the application. This example assumes the connection is referred to asdefaultby the other parameters in the file.remote.connection.default.username=appuser remote.connection.default.password=apppassword - Create a custom Remoting connector on the domain or standalone server, which uses your new security realm.
- Deploy your EJB to the server group which is configured to use the profile with the custom Remoting connector, or to your standalone server if you are not using a managed domain.
18.4.4.6. Add a New Security Realm
Run the Management CLI.
Start thejboss-cli.shorjboss-cli.batcommand and connect to the server.Create the new security realm itself.
Run the following command to create a new security realm namedMyDomainRealmon a domain controller or a standalone server.For a domain instance, use this command:/host=master/core-service=management/security-realm=MyDomainRealm:add()For a standalone instance, use this command:/core-service=management/security-realm=MyDomainRealm:add()Create the references to the properties file which will store information about the new role.
Run the following command to create a pointer a file namedmyfile.properties, which will contain the properties pertaining to the new role.Note
The newly created properties file is not managed by the includedadd-user.shandadd-user.batscripts. It must be managed externally.For a domain instance, use this command:/host=master/core-service=management/security-realm=MyDomainRealm/authentication=properties:add(path=myfile.properties)For a standalone instance, use this command:/core-service=management/security-realm=MyDomainRealm/authentication=properties:add(path=myfile.properties)
Your new security realm is created. When you add users and roles to this new realm, the information will be stored in a separate file from the default security realms. You can manage this new file using your own applications or procedures.
18.4.4.7. Add a User to a Security Realm
Run the
add-user.shoradd-user.batcommand.Open a terminal and change directories to theEAP_HOME/bin/directory. If you run Red Hat Enterprise Linux or another UNIX-like operating system, runadd-user.sh. If you run Microsoft Windows Server, runadd-user.bat.Choose whether to add a Management User or Application User.
For this procedure, typebto add an Application User.Choose the realm the user will be added to.
By default, the only available realm isApplicationRealm. If you have added a custom realm, you can type its name instead.Type the username, password, and roles, when prompted.
Type the desired username, password, and optional roles when prompted. Verify your choice by typingyes, or typenoto cancel the changes. The changes are written to each of the properties files for the security realm.
18.4.4.8. About Remote EJB Access Using SSL Encryption
Warning
18.5. JAX-RS Application Security
18.5.1. Enable Role-Based Security for a RESTEasy JAX-RS Web Service
RESTEasy supports the @RolesAllowed, @PermitAll, and @DenyAll annotations on JAX-RS methods. However, it does not recognize these annotations by default. Follow these steps to configure the web.xml file and enable role-based security.
Warning
- resteasy.document.expand.entity.references
- resteasy.document.secure.processing.feature
- resteasy.document.secure.disableDTDs
Warning
Procedure 18.5. Enable Role-Based Security for a RESTEasy JAX-RS Web Service
- Open the
web.xmlfile for the application in a text editor. - Add the following <context-param> to the file, within the
web-apptags:<context-param> <param-name>resteasy.role.based.security</param-name> <param-value>true</param-value> </context-param> - Declare all roles used within the RESTEasy JAX-RS WAR file, using the <security-role> tags:
<security-role> <role-name>ROLE_NAME</role-name> </security-role> <security-role> <role-name>ROLE_NAME</role-name> </security-role> - Authorize access to all URLs handled by the JAX-RS runtime for all roles:
<security-constraint> <web-resource-collection> <web-resource-name>Resteasy</web-resource-name> <url-pattern>/PATH</url-pattern> </web-resource-collection> <auth-constraint> <role-name>ROLE_NAME</role-name> <role-name>ROLE_NAME</role-name> </auth-constraint> </security-constraint>
Role-based security has been enabled within the application, with a set of defined roles.
Example 18.39. Example Role-Based Security Configuration
<web-app>
<context-param>
<param-name>resteasy.role.based.security</param-name>
<param-value>true</param-value>
</context-param>
<servlet-mapping>
<servlet-name>Resteasy</servlet-name>
<url-pattern>/*</url-pattern>
</servlet-mapping>
<security-constraint>
<web-resource-collection>
<web-resource-name>Resteasy</web-resource-name>
<url-pattern>/security</url-pattern>
</web-resource-collection>
<auth-constraint>
<role-name>admin</role-name>
<role-name>user</role-name>
</auth-constraint>
</security-constraint>
<security-role>
<role-name>admin</role-name>
</security-role>
<security-role>
<role-name>user</role-name>
</security-role>
</web-app>
18.5.2. Secure a JAX-RS Web Service using Annotations
This topic covers the steps to secure a JAX-RS web service using the supported security annotations
Procedure 18.6. Secure a JAX-RS Web Service using Supported Security Annotations
- Enable role-based security. For more information, refer to: Section 18.5.1, “Enable Role-Based Security for a RESTEasy JAX-RS Web Service”
- Add security annotations to the JAX-RS web service. RESTEasy supports the following annotations:
- @RolesAllowed
- Defines which roles can access the method. All roles should be defined in the
web.xmlfile. - @PermitAll
- Allows all roles defined in the
web.xmlfile to access the method. - @DenyAll
- Denies all access to the method.
18.6. Password Vaults for Sensitive Strings
18.6.1. Password Vault System
18.6.2. Configure and Use Password Vault
Procedure 18.7. Basic steps to configure and use Password Vault
- Setup a Java Keystore to store key for password encryption.For information on creating a keystore, refer Section 18.6.4, “Create a Java Keystore to Store Sensitive Strings”.
- Initialize the Password Vault.For information on masking the password and initialize the password vault, refer Section 18.6.5, “Initialize the Password Vault”.
- Store a Sensitive String in the Password Vault.For information on storing sensitive string in Password Vault, refer Section 18.6.8, “Store a Sensitive String in the Password Vault”.
- Configure JBoss EAP 6 to use the Password Vault.For information on configuring JBoss EAP 6 to use the Password Vault, refer Section 18.6.6, “Configure JBoss EAP 6 to Use the Password Vault”. For custom implementation, refer Section 18.6.7, “Configure JBoss EAP 6 to Use a Custom Implementation of the Password Vault”.
Note
To use an encrypted sensitive string in configuration, refer Section 18.6.9, “Use an Encrypted Sensitive String in Configuration”.To use an encrypted sensitive string in an application, refer Section 18.6.10, “Use an Encrypted Sensitive String in an Application”.To verify a sensitive string in Password Vault, refer Section 18.6.11, “Check if a Sensitive String is in the Password Vault”.To remove a sensitive string from Password Vault, refer Section 18.6.12, “Remove a Sensitive String from the Password Vault”.
18.6.3. Obtain Keystore Password From External Source
<vault-option name="KEYSTORE_PASSWORD" value="[here]"{EXT}...: Refers to the exact command, where ‘…’ is the exact command. For example:{EXT}/usr/bin/getmypassword --section 1 --query company, run the/usr/bin/getmypasswordcommand, which displays the password on standard output and use it as password for Security Vault's keystore. In this example, the command is using two options: --section 1 and --query company.{EXTC[:expiration_in_millis]}...: Refers to the exact command, where the '...' is the exact command line that is passed to the Runtime.exec(String) method to execute a platform command. The first line of the command output is used as the password. EXTC variant caches the passwords for expiration_in_millis milliseconds. Default cache expiration is 0 (zero), meaning items in the cache never expire. For example:{EXTC:120000}/usr/bin/getmypassword --section 1 --query companyVerify if cache contains/usr/bin/getmypasswordoutput, if it contains the output then use it. If it does not contain the output, run the command to output it to cache and use it. In this example, the cache expires in 2 minute (120000 milliseconds).{CMD}...or{CMDC[:expiration_in_millis]}...: The general command is a string delimited by ',' where the first part is the actual command and further parts represents the parameters. The comma can be backslashed to keep it as a part of the parameter. For example,{CMD}/usr/bin/getmypassword,--section,1,--query,company{CLASS[@jboss_module_spec]}classname[:ctorargs]: Where the '[:ctorargs]' is an optional string delimited by the ':' from the classname is passed to the classname ctor. The ctorargs is a comma delimited list of strings. For example,{CLASS@org.test.passwd}org.test.passwd.ExternamPassworProvider. In this example, we loadorg.test.passwd.ExternamPassworProviderclass fromorg.test.passwdmodule and use thetoCharArray()method to get the password. IftoCharArray()is not available usetoString()method. Theorg.test.passwd.ExternamPassworProviderclass must have the default constructor.
18.6.4. Create a Java Keystore to Store Sensitive Strings
Prerequisites
- The
keytoolutility, provided by the Java Runtime Environment (JRE). Locate the path for the file, which on Red Hat Enterprise Linux is/usr/bin/keytool.
Warning
keytool utility from the same vendor as the Java development kit you use.
keytool from one vendor's Java development kit in a JBoss EAP instance running on a Java development kit from a different vendor results in the following exception:
java.io.IOException: com.sun.crypto.provider.SealedObjectForKeyProtectorProcedure 18.8. Set up a Java Keystore
Create a directory to store your keystore and other encrypted information.
Create a directory to store your keystore and other important information. The rest of this procedure assumes that the directory isEAP_HOME/vault/. Since this directory will contain sensitive information it should be accessible to only limited users. At a minimum the user account under which JBoss EAP is running requires read-write access.Determine the parameters to use with
keytoolutility.Decide on values for the following parameters:- alias
- The alias is a unique identifier for the vault or other data stored in the keystore. Aliases are case-insensitive.
- storetype
- The storetype specifies the keystore type. The value
jceksis recommended. - keyalg
- The algorithm to use for encryption. Use the documentation for your JRE and operating system to see which other choices may be available to you.
- keysize
- The size of an encryption key impacts how difficult it is to decrypt through brute force. For information on appropriate values, see the documentation distributed with the
keytoolutility. - storepass
- The value of
storepassis the password is used to authenticate to the keystore so that the key can be read. The password must be at least 6 characters long and must be provided when the keystore is accessed. If you omit this parameter, you will be prompted to enter it when you execute the command. - keypass
- The value of
keypassis the password used to access the specific key and must match the value of thestorepassparameter. - validity
- The value of
validityis the period (in days) for which the key will be valid. - keystore
- The value of
keystoreis the filepath and filename in which the keystore's values are to be stored. The keystore file is created when data is first added to it.Ensure you use the correct file path separator:/(forward slash) for Red Hat Enterprise Linux and similar operating systems,\(backslash) for Microsoft Windows Server.
Thekeytoolutility has many other options. See the documentation for your JRE or your operating system for more details.Run the
keytoolcommandLaunch your operating system's command line interface and run thekeytoolutility, supplying the information that you gathered.
Example 18.40. Create a Java Keystore
$ keytool -genseckey -alias vault -storetype jceks -keyalg AES -keysize 128 -storepass vault22 -keypass vault22 -validity 730 -keystore EAP_HOME/vault/vault.keystore
In this a keystore has been created in the file EAP_HOME/vault/vault.keystore. It stores a single key, with the alias vault, which will be used to store encrypted strings, such as passwords, for JBoss EAP.
18.6.5. Initialize the Password Vault
The Password Vault can be initialized either interactively, where you are prompted for each parameter's value, or non-interactively, where you provide all parameters' values on the commmand line. Each method gives the same result, so choose whichever method you prefer.
Parameter Values
- Keystore URL (KEYSTORE_URL)
- The file system path or URI of the keystore file. The examples use
EAP_HOME/vault/.vault.keystore - Keystore password (KEYSTORE_PASSWORD)
- The password used to access the keystore.
- Salt (SALT)
- The
saltvalue is a random string of eight characters used, together with the iteration count, to encrypt the content of the keystore. - Keystore Alias (KEYSTORE_ALIAS)
- The alias by which the keystore is known.
- Iteration Count (ITERATION_COUNT)
- The number of times the encryption algorithm is run.
- Directory to store encrypted files (ENC_FILE_DIR)
- The path in which the encrypted files are to be stored. This is typically the directory containing the password vault.It is convenient but not mandatory to store all of your encrypted information in the same place as the key store. This directory should be only accessible to limited users. At a minimum the user account under which JBoss EAP is running requires read-write access. If you followed Section 18.6.4, “Create a Java Keystore to Store Sensitive Strings”, your keystore is in a directory called
EAP_HOME/vault/.Note
The trailing backslash or forward slash on the directory name is required. Ensure you use the correct file path separator: / (forward slash) for Red Hat Enterprise Linux and similar operating systems, \ (backslash) for Microsoft Windows Server. - Vault Block (VAULT_BLOCK)
- The name to be given to this block in the password vault. Choose a value which is significant to you.
- Attribute (ATTRIBUTE)
- The name to be given to the attribute being stored. Choose a value which is significant to you. For example, you could choose a name which you associate with a datasource.
- Security Attribute (SEC-ATTR)
- The password which is being stored in the password vault.
Procedure 18.9. Run the Password Vault Command Interactively
Launch the Password Vault command interactively.
Launch your operating system's command line interface and runEAP_HOME/bin/vault.sh(on Red Hat Enterprise Linux and similar operating systems) orEAP_HOME\bin\vault.bat(on Microsoft Windows Server). Start a new interactive session by typing0(zero).Complete the prompted parameters.
Follow the prompts to input the required parameters.Make a note of the masked password information.
The masked password, salt, and iteration count are printed to standard output. Make a note of them in a secure location. They are required to add entries to the Password Vault. Access to the keystore file and these values could allow an attacker access to obtain access to sensitive information in the Password Vault.Exit the interactive console.
Type3(three) to exit the interactive console.
Example 18.41. Run the Password Vault command interactively
Please enter a Digit:: 0: Start Interactive Session 1: Remove Interactive Session 2: Exit
0
Starting an interactive session
Enter directory to store encrypted files:EAP_HOME/vault/
Enter Keystore URL:EAP_HOME/vault/vault.keystore
Enter Keystore password: vault22
Enter Keystore password again: vault22
Values match
Enter 8 character salt:1234abcd
Enter iteration count as a number (Eg: 44):120
Enter Keystore Alias:vault
Initializing Vault
Oct 17, 2014 12:58:11 PM org.picketbox.plugins.vault.PicketBoxSecurityVault init
INFO: PBOX000361: Default Security Vault Implementation Initialized and Ready
Vault Configuration in AS7 config file:
********************************************
...
</extensions>
<vault>
<vault-option name="KEYSTORE_URL" value="EAP_HOME/vault/vault.keystore"/>
<vault-option name="KEYSTORE_PASSWORD" value="MASK-5dOaAVafCSd"/>
<vault-option name="KEYSTORE_ALIAS" value="vault"/>
<vault-option name="SALT" value="1234abcd"/>
<vault-option name="ITERATION_COUNT" value="120"/>
<vault-option name="ENC_FILE_DIR" value="EAP_HOME/vault/"/>
</vault><management> ...
********************************************
Vault is initialized and ready for use
Handshake with Vault completeProcedure 18.10. Run the Password Vault Command Non-interactively
- Launch your operating system's command line interface and run the Password Vault command. Refer to the Parameter Values list, substituting the placeholder values with your preferred values.Use
EAP_HOME/bin/vault.sh(on Red Hat Enterprise Linux and similar operating systems) orEAP_HOME\bin\vault.bat(on Microsoft Windows Server).vault.sh --keystore KEYSTORE_URL --keystore-password KEYSTORE_PASSWORD --alias KEYSTORE_ALIAS --vault-block VAULT_BLOCK --attribute ATTRIBUTE --sec-attr SEC-ATTR --enc-dir ENC_FILE_DIR --iteration ITERATION_COUNT --salt SALTExample 18.42. Run the Password Vault command non-interactively
vault.sh --keystore EAP_HOME/vault/vault.keystore --keystore-password vault22 --alias vault --vault-block vb --attribute password --sec-attr 0penS3sam3 --enc-dir EAP_HOME/vault/ --iteration 120 --salt 1234abcdCommand output========================================================================= JBoss Vault JBOSS_HOME: EAP_HOME JAVA: java ========================================================================= Oct 17, 2014 2:23:43 PM org.picketbox.plugins.vault.PicketBoxSecurityVault init INFO: PBOX000361: Default Security Vault Implementation Initialized and Ready Secured attribute value has been stored in vault. Please make note of the following: ******************************************** Vault Block:vb Attribute Name:password Configuration should be done as follows: VAULT::vb::password::1 ******************************************** Vault Configuration in AS7 config file: ******************************************** ... </extensions> <vault> <vault-option name="KEYSTORE_URL" value="EAP_HOME/vault/vault.keystore"/> <vault-option name="KEYSTORE_PASSWORD" value="MASK-5dOaAVafCSd"/> <vault-option name="KEYSTORE_ALIAS" value="vault"/> <vault-option name="SALT" value="1234abcd"/> <vault-option name="ITERATION_COUNT" value="120"/> <vault-option name="ENC_FILE_DIR" value="EAP_HOME/vault/"/> </vault><management> ... ********************************************
Your keystore password has been masked for use in configuration files and deployments. In addition, your vault is initialized and ready to use.
18.6.6. Configure JBoss EAP 6 to Use the Password Vault
Before you can mask passwords and other sensitive attributes in configuration files, you need to make JBoss EAP 6 aware of the password vault which stores and decrypts them.
Prerequisites
Procedure 18.11. Enable the Password Vault
- Run the following Management CLI command, substituting the placeholder values with those from the output of the Password Vault command in Section 18.6.5, “Initialize the Password Vault”.
Note
If you use Microsoft Windows Server, use two backslashes (\\) in the file path where you would normally use one. For example,C:\\data\\vault\\vault.keystore. This is because a single backslash character (\) is used for character escaping./core-service=vault:add(vault-options=[("KEYSTORE_URL" => "PATH_TO_KEYSTORE"), ("KEYSTORE_PASSWORD" => "MASKED_PASSWORD"), ("KEYSTORE_ALIAS" => "ALIAS"), ("SALT" => "SALT"),("ITERATION_COUNT" => "ITERATION_COUNT"), ("ENC_FILE_DIR" => "ENC_FILE_DIR")])
Example 18.43. Enable the Password Vault
/core-service=vault:add(vault-options=[("KEYSTORE_URL" => "EAP_HOME/vault/vault.keystore"), ("KEYSTORE_PASSWORD" => "MASK-5dOaAVafCSd"), ("KEYSTORE_ALIAS" => "vault"), ("SALT" => "1234abcd"),("ITERATION_COUNT" => "120"), ("ENC_FILE_DIR" => "EAP_HOME/vault/")])JBoss EAP 6 is configured to decrypt masked strings stored in the Password Vault. To add strings to the Password Vault and use them in your configuration, see Section 18.6.8, “Store a Sensitive String in the Password Vault”.
18.6.7. Configure JBoss EAP 6 to Use a Custom Implementation of the Password Vault
You can use your own implementation of SecurityVault to mask passwords and other sensitive attributes in configuration files.
Prerequisites
Procedure 18.12. Use a Custom Implementation of the Password Vault
- Create a class that implements the interface
SecurityVault. - Create a module containing the class from the previous step, and specify a dependency on
org.picketboxwhere the interface isSecurityVault. - Enable the custom Password Vault in the JBoss EAP server configuration by adding the vault element with the following attributes:
- code
- The fully qualified name of class that implements
SecurityVault. - module
- The name of the module that contains the custom class.
Optionally, you can usevault-optionsparameters to initialize the custom class for a Password Vault.Example 18.44. Use
vault-optionsParameters to Initialize the Custom Class/core-service=vault:add(code="custom.vault.implementation.CustomSecurityVault", module="custom.vault.module", vault-options=[("KEYSTORE_URL" => "PATH_TO_KEYSTORE"), ("KEYSTORE_PASSWORD" => "MASKED_PASSWORD"), ("KEYSTORE_ALIAS" => "ALIAS"), ("SALT" => "SALT"),("ITERATION_COUNT" => "ITERATION_COUNT"), ("ENC_FILE_DIR" => "ENC_FILE_DIR")])
JBoss EAP 6 is configured to decrypt masked strings using a custom implementation of the password vault.
18.6.8. Store a Sensitive String in the Password Vault
Including passwords and other sensitive strings in plaintext configuration files is a security risk. Store these strings instead in the Password Vault for improved security, where they can then be referenced in configuration files, Management CLI commands and applications in their masked form.
Procedure 18.13. Store a Sensitive String Interactively
Run the Password Vault command
Launch your operating system's command line interface and run the Password Vault command. UseEAP_HOME/bin/vault.sh(on Red Hat Enterprise Linux and similar operating systems) orEAP_HOME\bin\vault.bat(on Microsoft Windows Server). Start a new interactive session by typing0(zero).Complete the prompted parameters about the Password Vault
Follow the prompts to input the required authentication parameters. These values must match those provided when the Password Vault was created.Note
The keystore password must be given in plaintext form, not masked form.Complete the prompted parameters about the sensitive string
Enter0(zero) to start storing the sensitive string. Follow the prompts to input the required parameters.Make note of the information about the masked string
A message prints to standard output, showing the vault block, attribute name, masked string, and advice about using the string in your configuration. Make note of this information in a secure location. An extract of sample output is as follows:Vault Block:ds_Example1 Attribute Name:password Configuration should be done as follows: VAULT::ds_Example1::password::1Exit the interactive console
Enter3(three) to exit the interactive console.
Example 18.45. Store a Sensitive String Interactively
=========================================================================
JBoss Vault
JBOSS_HOME: EAP_HOME/jboss-eap-6.4
JAVA: java
=========================================================================
**********************************
**** JBoss Vault ***************
**********************************
Please enter a Digit:: 0: Start Interactive Session 1: Remove Interactive Session 2: Exit
0
Starting an interactive session
Enter directory to store encrypted files:11:18:46,086 INFO [org.jboss.security] (management-handler-thread - 4) PBOX0
Enter directory to store encrypted files:EAP_HOME/vault/
Enter Keystore URL:EAP_HOME/vault/vault.keystore
Enter Keystore password:
Enter Keystore password again:
Values match
Enter 8 character salt:1234abcd
Enter iteration count as a number (Eg: 44):120
Enter Keystore Alias:vault
Initializing Vault
Oct 21, 2014 11:20:49 AM org.picketbox.plugins.vault.PicketBoxSecurityVault init
INFO: PBOX000361: Default Security Vault Implementation Initialized and Ready
Vault Configuration in AS7 config file:
********************************************
...
</extensions>
<vault>
<vault-option name="KEYSTORE_URL" value="EAP_HOME/vault/vault.keystore"/>
<vault-option name="KEYSTORE_PASSWORD" value="MASK-5dOaAVafCSd"/>
<vault-option name="KEYSTORE_ALIAS" value="vault"/>
<vault-option name="SALT" value="1234abcd"/>
<vault-option name="ITERATION_COUNT" value="120"/>
<vault-option name="ENC_FILE_DIR" value="EAP_HOME/vault/"/>
</vault><management> ...
********************************************
Vault is initialized and ready for use
Handshake with Vault complete
Please enter a Digit:: 0: Store a secured attribute 1: Check whether a secured attribute exists 2: Remove secured attribute 3: Exit
0
Task: Store a secured attribute
Please enter secured attribute value (such as password):
Please enter secured attribute value (such as password) again:
Values match
Enter Vault Block:ds_Example1
Enter Attribute Name:password
Secured attribute value has been stored in vault.
Please make note of the following:
********************************************
Vault Block:ds_Example1
Attribute Name:password
Configuration should be done as follows:
VAULT::ds_Example1::password::1
********************************************
Please enter a Digit:: 0: Store a secured attribute 1: Check whether a secured attribute exists 2: Remove secured attribute 3: Exit
Procedure 18.14. Store a Sensitive String Non-interactively
- Launch your operating system's command line interface and run the Password Vault command. Use
EAP_HOME/bin/vault.sh(on Red Hat Enterprise Linux and similar operating systems) orEAP_HOME\bin\vault.bat(on Microsoft Windows Server).Substitute the placeholder values with your own values. The values for parametersKEYSTORE_URL,KEYSTORE_PASSWORDandKEYSTORE_ALIASmust match those provided when the Password Vault was created.Note
The keystore password must be given in plaintext form, not masked form.EAP_HOME/bin/vault.sh --keystore KEYSTORE_URL --keystore-password KEYSTORE_PASSWORD --alias KEYSTORE_ALIAS --vault-block VAULT_BLOCK --attribute ATTRIBUTE --sec-attr SEC-ATTR --enc-dir ENC_FILE_DIR --iteration ITERATION_COUNT --salt SALT Make note of the information about the masked string
A message prints to standard output, showing the vault block, attribute name, masked string, and advice about using the string in your configuration. Make note of this information in a secure location. An extract of sample output is as follows:Vault Block:vb Attribute Name:password Configuration should be done as follows: VAULT::vb::password::1
Example 18.46. Run the Password Vault command non-interactively
EAP_HOME/bin/vault.sh --keystore EAP_HOME/vault/vault.keystore --keystore-password vault22 --alias vault --vault-block vb --attribute password --sec-attr 0penS3sam3 --enc-dir EAP_HOME/vault/ --iteration 120 --salt 1234abcd=========================================================================
JBoss Vault
JBOSS_HOME: EAP_HOME
JAVA: java
=========================================================================
Oct 22, 2014 9:24:43 AM org.picketbox.plugins.vault.PicketBoxSecurityVault init
INFO: PBOX000361: Default Security Vault Implementation Initialized and Ready
Secured attribute value has been stored in vault.
Please make note of the following:
********************************************
Vault Block:vb
Attribute Name:password
Configuration should be done as follows:
VAULT::vb::password::1
********************************************
Vault Configuration in AS7 config file:
********************************************
...
</extensions>
<vault>
<vault-option name="KEYSTORE_URL" value="EAP_HOME/vault/vault.keystore"/>
<vault-option name="KEYSTORE_PASSWORD" value="vault22"/>
<vault-option name="KEYSTORE_ALIAS" value="vault"/>
<vault-option name="SALT" value="1234abcd"/>
<vault-option name="ITERATION_COUNT" value="120"/>
<vault-option name="ENC_FILE_DIR" value="EAP_HOME/vault/vault/"/>
</vault><management> ...
********************************************The sensitive string has now been stored in the Password Vault and can be used in configuration files, Management CLI commands and applications in its masked form.
18.6.9. Use an Encrypted Sensitive String in Configuration
Note
/host=HOST_NAME to the command for a managed domain.
/core-service=SUBSYSTEM:read-resource-description(recursive=true)Example 18.47. List the Description of all Resources in the Management Subsystem
/core-service=management:read-resource-description(recursive=true)expressions-allowed parameter. If this is true, then you can use expressions within the configuration of this subsystem.
${VAULT::VAULT_BLOCK::ATTRIBUTE_NAME::MASKED_STRING}Example 18.48. Datasource Definition Using a Password in Masked Form
ds_ExampleDS and the attribute is password.
...
<subsystem xmlns="urn:jboss:domain:datasources:1.0">
<datasources>
<datasource jndi-name="java:jboss/datasources/ExampleDS" enabled="true" use-java-context="true" pool-name="H2DS">
<connection-url>jdbc:h2:mem:test;DB_CLOSE_DELAY=-1</connection-url>
<driver>h2</driver>
<pool></pool>
<security>
<user-name>sa</user-name>
<password>${VAULT::ds_ExampleDS::password::1}</password>
</security>
</datasource>
<drivers>
<driver name="h2" module="com.h2database.h2">
<xa-datasource-class>org.h2.jdbcx.JdbcDataSource</xa-datasource-class>
</driver>
</drivers>
</datasources>
</subsystem>
...
18.6.10. Use an Encrypted Sensitive String in an Application
Example 18.49. Servlet Using a Vaulted Password
/*@DataSourceDefinition(
name = "java:jboss/datasources/LoginDS",
user = "sa",
password = "sa",
className = "org.h2.jdbcx.JdbcDataSource",
url = "jdbc:h2:tcp://localhost/mem:test"
)*/
@DataSourceDefinition(
name = "java:jboss/datasources/LoginDS",
user = "sa",
password = "VAULT::DS::thePass::1",
className = "org.h2.jdbcx.JdbcDataSource",
url = "jdbc:h2:tcp://localhost/mem:test"
)
18.6.11. Check if a Sensitive String is in the Password Vault
Before attempting to store or use a sensitive string in the Password Vault it can be useful to first confirm if it is already stored.
Procedure 18.15. Check For a Sensitive String Interactively
Run the Password Vault command
Launch your operating system's command line interface and run the Password Vault command. UseEAP_HOME/bin/vault.sh(on Red Hat Enterprise Linux and similar operating systems) orEAP_HOME\bin\vault.bat(on Microsoft Windows Server). Start a new interactive session by typing0(zero).Complete the prompted parameters about the Password Vault
Follow the prompts to input the required authentication parameters. These values must match those provided when the Password Vault was created.Note
The keystore password must be given in plaintext form, not masked form.- Enter
1(one) to select “Check whether a secured attribute exists”. - Enter the name of the vault block in which the sensitive string is stored.
- Enter the name of the sensitive string to be checked.
If the sensitive string is stored in the vault block specified, a confirmation message like the following will be output.
A value exists for (VAULT_BLOCK, ATTRIBUTE)No value has been store for (VAULT_BLOCK, ATTRIBUTE)Example 18.50. Check For a Sensitive String Interactively
=========================================================================
JBoss Vault
JBOSS_HOME: EAP_HOME
JAVA: java
=========================================================================
**********************************
**** JBoss Vault ***************
**********************************
Please enter a Digit:: 0: Start Interactive Session 1: Remove Interactive Session 2: Exit
0
Starting an interactive session
Enter directory to store encrypted files:EAP_HOME/vault
Enter Keystore URL:EAP_HOME/vault/vault.keystore
Enter Keystore password:
Enter Keystore password again:
Values match
Enter 8 character salt:1234abcd
Enter iteration count as a number (Eg: 44):120
Enter Keystore Alias:vault
Initializing Vault
Oct 22, 2014 12:53:56 PM org.picketbox.plugins.vault.PicketBoxSecurityVault init
INFO: PBOX000361: Default Security Vault Implementation Initialized and Ready
Vault Configuration in AS7 config file:
********************************************
...
</extensions>
<vault>
<vault-option name="KEYSTORE_URL" value="EAP_HOME/vault/vault.keystore"/>
<vault-option name="KEYSTORE_PASSWORD" value="MASK-5dOaAVafCSd"/>
<vault-option name="KEYSTORE_ALIAS" value="vault"/>
<vault-option name="SALT" value="1234abcd"/>
<vault-option name="ITERATION_COUNT" value="120"/>
<vault-option name="ENC_FILE_DIR" value="EAP_HOME/vault/"/>
</vault><management> ...
********************************************
Vault is initialized and ready for use
Handshake with Vault complete
Please enter a Digit:: 0: Store a secured attribute 1: Check whether a secured attribute exists 2: Remove secured attribute 3: Exit
1
Task: Verify whether a secured attribute exists
Enter Vault Block:vb
Enter Attribute Name:password
A value exists for (vb, password)
Please enter a Digit:: 0: Store a secured attribute 1: Check whether a secured attribute exists 2: Remove secured attribute 3: ExitProcedure 18.16. Check For a Sensitive String Non-Interactively
- Launch your operating system's command line interface and run the Password Vault command. Use
EAP_HOME/bin/vault.sh(on Red Hat Enterprise Linux and similar operating systems) orEAP_HOME\bin\vault.bat(on Microsoft Windows Server).Substitute the placeholder values with your own values. The values for parametersKEYSTORE_URL,KEYSTORE_PASSWORD-passwordandKEYSTORE_ALIASmust match those provided when the Password Vault was created.Note
The keystore password must be given in plaintext form, not masked form.EAP_HOME/bin/vault.sh --keystore KEYSTORE_URL --keystore-password KEYSTORE_PASSWORD --alias KEYSTORE_ALIAS --check-sec-attr --vault-block VAULT_BLOCK --attribute ATTRIBUTE --enc-dir ENC_FILE_DIR --iteration ITERATION_COUNT --salt SALT
If the sensitive string is stored in the vault block specified, the following message will be output.
Password already exists.Password doesn't exist.18.6.12. Remove a Sensitive String from the Password Vault
For security reasons it is best to remove sensitive strings from the Password Vault when they are no longer required. For example, if you are decommissioning an application, any sensitive strings used in datasource definitions should be removed at the same time.
Before removing a sensitive string from the Password Vault, confirm if it is used in the configuration of JBoss EAP. One method of doing this is to use the ‘grep’ utility to search configuration files for instances of the masked string. On Red Hat Enterprise Linux (and similar operating systems), grep is installed by default but for Microsoft Windows Server it must be installed manually.
Procedure 18.17. Remove a Sensitive String Interactively
Run the Password Vault command
Launch your operating system's command line interface and runEAP_HOME/bin/vault.sh(on Red Hat Enterprise Linux and similar operating systems) orEAP_HOME\bin\vault.bat(on Microsoft Windows Server). Start a new interactive session by typing0(zero).Provide Authentication Details
Follow the prompts to input the required authentication parameters. These values must match those provided when the Password Vault was created.Note
The keystore password must be given in plaintext form, not masked form.- Enter
2(two) to choose optionRemove secured attribute. - Enter the name of the vault block in which the sensitive string is stored.
- Enter the name of the sensitive string to be removed.
If the sensitive string is successfully removed, a confirmation message like the following will be output.
Secured attribute [VAULT_BLOCK::ATTRIBUTE] has been successfully removed from vaultSecured attribute [VAULT_BLOCK::ATTRIBUTE] was not removed from vault, check whether it existExample 18.51. Remove a Sensitive String Interactively
**********************************
**** JBoss Vault ***************
**********************************
Please enter a Digit:: 0: Start Interactive Session 1: Remove Interactive Session 2: Exit
0
Starting an interactive session
Enter directory to store encrypted files:EAP_HOME/vault/
Enter Keystore URL:EAP_HOME/vault/vault.keystore
Enter Keystore password:
Enter Keystore password again:
Values match
Enter 8 character salt:1234abcd
Enter iteration count as a number (Eg: 44):120
Enter Keystore Alias:vault
Initializing Vault
Dec 23, 2014 1:40:56 PM org.picketbox.plugins.vault.PicketBoxSecurityVault init
INFO: PBOX000361: Default Security Vault Implementation Initialized and Ready
Vault Configuration in configuration file:
********************************************
...
</extensions>
<vault>
<vault-option name="KEYSTORE_URL" value="EAP_HOME/vault/vault.keystore"/>
<vault-option name="KEYSTORE_PASSWORD" value="MASK-5dOaAVafCSd"/>
<vault-option name="KEYSTORE_ALIAS" value="vault"/>
<vault-option name="SALT" value="1234abcd"/>
<vault-option name="ITERATION_COUNT" value="120"/>
<vault-option name="ENC_FILE_DIR" value="EAP_HOME/vault/"/>
</vault><management> ...
********************************************
Vault is initialized and ready for use
Handshake with Vault complete
Please enter a Digit:: 0: Store a secured attribute 1: Check whether a secured attribute exists 2: Remove secured attribute 3: Exit
2
Task: Remove secured attribute
Enter Vault Block:craft
Enter Attribute Name:password
Secured attribute [craft::password] has been successfully removed from vaultProcedure 18.18. Remove a Sensitive String Non-interactively
- Launch your operating system's command line interface and run the Password Vault command. Use
EAP_HOME/bin/vault.sh(on Red Hat Enterprise Linux and similar operating systems) orEAP_HOME\bin\vault.bat(on Microsoft Windows Server).Substitute the placeholder values with your own values. The values for parametersKEYSTORE_URL,KEYSTORE_PASSWORDandKEYSTORE_ALIASmust match those provided when the Password Vault was created.Note
The keystore password must be given in plaintext form, not masked form.EAP_HOME/bin/vault.sh --keystore KEYSTORE_URL --keystore-password KEYSTORE_PASSWORD --alias KEYSTORE_ALIAS --remove-sec-attr --vault-block VAULT_BLOCK --attribute ATTRIBUTE --enc-dir ENC_FILE_DIR --iteration ITERATION_COUNT --salt SALT
If the sensitive string is successfully removed, a confirmation message like the following will be output.
Secured attribute [VAULT_BLOCK::ATTRIBUTE] has been successfully removed from vaultSecured attribute [VAULT_BLOCK::ATTRIBUTE] was not removed from vault, check whether it existExample 18.52. Remove a Sensitive String Non-interactively
./vault.sh --keystore EAP_HOME/vault/vault.keystore --keystore-password vault22 --alias vault --remove-sec-attr --vault-block craft --attribute password --enc-dir ../vault/ --iteration 120 --salt 1234abcd
=========================================================================
JBoss Vault
JBOSS_HOME: EAP_HOME
JAVA: java
=========================================================================
Dec 23, 2014 1:54:24 PM org.picketbox.plugins.vault.PicketBoxSecurityVault init
INFO: PBOX000361: Default Security Vault Implementation Initialized and Ready
Secured attribute [craft::password] has been successfully removed from vault18.7. Java Authorization Contract for Containers (JACC)
18.7.1. About Java Authorization Contract for Containers (JACC)
18.7.2. Configure Java Authorization Contract for Containers (JACC) Security
jboss-web.xml to include the correct parameters.
To add JACC support to the security domain, add the JACC authorization policy to the authorization stack of the security domain, with the required flag set. The following is an example of a security domain with JACC support. However, the security domain is configured in the Management Console or Management CLI, rather than directly in the XML.
<security-domain name="jacc" cache-type="default">
<authentication>
<login-module code="UsersRoles" flag="required">
</login-module>
</authentication>
<authorization>
<policy-module code="JACC" flag="required"/>
</authorization>
</security-domain>
The jboss-web.xml is located in the WEB-INF/ directory of your deployment, and contains overrides and additional JBoss-specific configuration for the web container. To use your JACC-enabled security domain, you need to include the <security-domain> element, and also set the <use-jboss-authorization> element to true. The following application is properly configured to use the JACC security domain above.
<jboss-web>
<security-domain>jacc</security-domain>
<use-jboss-authorization>true</use-jboss-authorization>
</jboss-web>
Configuring EJBs to use a security domain and to use JACC differs from Web Applications. For an EJB, you can declare method permissions on a method or group of methods, in the ejb-jar.xml descriptor. Within the <ejb-jar> element, any child <method-permission> elements contain information about JACC roles. Refer to the example configuration for more details. The EJBMethodPermission class is part of the Java Enterprise Edition 6 API, and is documented at http://docs.oracle.com/javaee/6/api/javax/security/jacc/EJBMethodPermission.html.
Example 18.53. Example JACC Method Permissions in an EJB
<ejb-jar>
<assembly-descriptor>
<method-permission>
<description>The employee and temp-employee roles may access any method of the EmployeeService bean </description>
<role-name>employee</role-name>
<role-name>temp-employee</role-name>
<method>
<ejb-name>EmployeeService</ejb-name>
<method-name>*</method-name>
</method>
</method-permission>
</assembly-descriptor>
</ejb-jar>
jboss-ejb3.xml descriptor, in the <security> child element. In addition to the security domain, you can also specify the <run-as-principal>, which changes the principal the EJB runs as.
Example 18.54. Example Security Domain Declaration in an EJB
<ejb-jar>
<assembly-descriptor>
<security>
<ejb-name>*</ejb-name>
<security-domain>myDomain</security-domain>
<run-as-principal>myPrincipal</run-as-principal>
</security>
</assembly-descriptor>
</ejb-jar>
18.8. Java Authentication SPI for Containers (JASPI)
18.8.1. About Java Authentication SPI for Containers (JASPI) Security
18.8.2. Configure Java Authentication SPI for Containers (JASPI) Security
<authentication-jaspi> element to your security domain. The configuration is similar to a standard authentication module, but login module elements are enclosed in a <login-module-stack> element. The structure of the configuration is:
Example 18.55. Structure of the authentication-jaspi element
<authentication-jaspi>
<login-module-stack name="...">
<login-module code="..." flag="...">
<module-option name="..." value="..."/>
</login-module>
</login-module-stack>
<auth-module code="..." login-module-stack-ref="...">
<module-option name="..." value="..."/>
</auth-module>
</authentication-jaspi>
EAP_HOME/domain/configuration/domain.xml or EAP_HOME/standalone/configuration/standalone.xml.
Chapter 19. Single Sign On (SSO)
19.1. About Single Sign On (SSO) for Web Applications
Single Sign On (SSO) allows authentication to one resource to implicitly allow access to other resources.
Non-clustered SSO limits the sharing of access information to applications on the same virtual host. In addition, there is no resiliency in the event of a host failure. Clustered SSO data can be shared between applications in multiple hosts, and is resilient to failover. In addition, clustered SSO is able to receive requests from a load balancer.
If a resource is unprotected, a user is not challenged to authenticate at all. If a user accesses a protected resource, the user is required to authenticate.
19.2. About Clustered Single Sign On (SSO) for Web Applications
jboss-web.xml deployment descriptor.
19.3. Choose the Right SSO Implementation
web.xml deployment descriptor. Clustered SSO allows for replication of security context and identity information, regardless of whether or not the applications are themselves clustered. Although these technologies may be used together they are separate concepts.
If your organization already uses a Kerberos-based authentication and authorization system, such as Microsoft Active Directory, you can use the same systems to transparently authenticate to your enterprise applications running on JBoss EAP 6.
If you are running multiple applications on a single instance and need to enable SSO session replication for those applications, non-clustered SSO will meet your requirements.
If you are running either a single application, or multiple applications, across a cluster and need to enable SSO session replication for those applications, clustered SSO will meet your requirements.
19.4. Use Single Sign On (SSO) In A Web Application
Single Sign On (SSO) capabilities are provided by the web and Infinispan subsystems. Use this procedure to configure SSO in web applications.
Prerequisites
- A configured security domain which handles authentication and access.
- The
infinispansubsystem. By default, it is present in all the profiles for managed domain and standalone server. - The
webcache-containerand SSO replicated-cache. The initial configuration files already contain thewebcache-container, and some of the configurations already contain the SSO replicated-cache as well. Use the following commands to check for and enable the SSO replicated-cache. Note that these commands modify thehaprofile of a managed domain. You can change the commands to use a different profile, or remove the/profile=haportion of the command, for a standalone server.Example 19.1. Check for the
webcache-containerThe profiles and configurations mentioned above include thewebcache-container by default. Use the following command to verify its presence. If you use a different profile, substitute its name instead ofha./profile=ha/subsystem=infinispan/cache-container=web/:read-resource(recursive=false,proxies=false,include-runtime=false,include-defaults=true)If the result issuccessthe subsystem is present. Otherwise, you need to add it.Example 19.2. Add the
webcache-containerUse the following three commands to enable thewebcache-container to your configuration. Modify the name of the profile as appropriate, as well as the other parameters. The parameters here are the ones used in a default configuration./profile=ha/subsystem=infinispan/cache-container=web:add(aliases=["standard-session-cache"],default-cache="repl",module="org.jboss.as.clustering.web.infinispan")/profile=ha/subsystem=infinispan/cache-container=web/transport=TRANSPORT:add(lock-timeout=60000)/profile=ha/subsystem=infinispan/cache-container=web/replicated-cache=repl:add(mode="ASYNC",batching=true)Example 19.3. Check for the
SSOreplicated-cacheRun the following Management CLI command:/profile=ha/subsystem=infinispan/cache-container=web/:read-resource(recursive=true,proxies=false,include-runtime=false,include-defaults=true)Look for output like the following:"sso" => {If you do not find it, the SSO replicated-cache is not present in your configuration.Example 19.4. Add the
SSOreplicated-cache/profile=ha/subsystem=infinispan/cache-container=web/replicated-cache=sso:add(mode="SYNC", batching=true)
web subsystem needs to be configured to use SSO. The following command enables SSO on the virtual server called default-host, and the cookie domain domain.com. The cache name is sso, and reauthentication is disabled.
/profile=ha/subsystem=web/virtual-server=default-host/sso=configuration:add(cache-container="web",cache-name="sso",reauthenticate="false",domain="domain.com")jboss-web.xml deployment descriptor and the same Realm in its web.xml configuration file.
Configure sso under the web subsystem in the server profile. The ClusteredSingleSignOn version is used when attribute cache-container is present, otherwise standard SingleSignOn class is used.
Example 19.5. Example Non-Clustered SSO Configuration
/subsystem=web/virtual-server=default-host/sso=configuration:add(reauthenticate="false")
An application can programmatically invalidate a session by invoking method javax.servlet.http.HttpSession.invalidate().
19.5. About Kerberos
19.6. About SPNEGO
19.7. About Microsoft Active Directory
- Lightweight Directory Access Protocol (LDAP), for storing information about users, computers, passwords, and other resources.
- Kerberos, for providing secure authentication over the network.
- Domain Name Service (DNS) for providing mappings between IP addresses and host names of computers and other devices on the network.
19.8. Configure Kerberos or Microsoft Active Directory Desktop SSO for Web Applications
To authenticate your web or EJB applications using your organization's existing Kerberos-based authentication and authorization infrastructure, such as Microsoft Active Directory, you can use the JBoss Negotiation capabilities built into JBoss EAP 6. If you configure your web application properly, a successful desktop or network login is sufficient to transparently authenticate against your web application, so no additional login prompt is required.
There are a few noticeable differences between JBoss EAP 6 and earlier versions:
- Security domains are configured for each profile of a managed domain, or for each standalone server. They are not part of the deployment itself. The security domain a deployment should use is named in the deployment's
jboss-web.xmlorjboss-ejb3.xmlfile. - Security properties are configured as part of a security domain. They are not part of the deployment.
- You can no longer override the authenticators as part of your deployment. However, you can add a NegotiationAuthenticator valve to your
jboss-web.xmldescriptor to achieve the same effect. The valve still requires the<security-constraint>and<login-config>elements to be defined in theweb.xml. These are used to decide which resources are secured. However, the chosen auth-method will be overridden by the NegotiationAuthenticator valve in thejboss-web.xml. - The
CODEattributes in security domains now use a simple name instead of a fully-qualified class name. The following table shows the mappings between the classes used for JBoss Negotiation, and their classes.
| Simple Name | Class Name | Purpose |
|---|---|---|
| Kerberos |
com.sun.security.auth.module.Krb5LoginModule
com.ibm.security.auth.module.Krb5LoginModule
|
Kerberos login module when using the Oracle JDK
Kerberos login module when using the IBM Java development kit
|
| SPNEGO | org.jboss.security.negotiation.spnego.SPNEGOLoginModule | The mechanism which enables your Web applications to authenticate to your Kerberos authentication server. |
| AdvancedLdap | org.jboss.security.negotiation.AdvancedLdapLoginModule | Used with LDAP servers other than Microsoft Active Directory. |
| AdvancedAdLdap | org.jboss.security.negotiation.AdvancedADLoginModule | Used with Microsoft Active Directory LDAP servers. |
The JBoss Negotiation Toolkit is a debugging tool which is available for download from https://community.jboss.org/servlet/JiveServlet/download/16876-2-34629/jboss-negotiation-toolkit.war. It is provided as an extra tool to help you to debug and test the authentication mechanisms before introducing your application into production. It is an unsupported tool, but is considered to be very helpful, as SPNEGO can be difficult to configure for web applications.
Procedure 19.1. Setup SSO Authentication for your Web or EJB Applications
Configure one security domain to represent the identity of the server. Set system properties if necessary.
The first security domain authenticates the container itself to the directory service. It needs to use a login module which accepts some type of static login mechanism, because a real user is not involved. This example uses a static principal and references a keytab file which contains the credential.The XML code is given here for clarity, but you should use the Management Console or Management CLI to configure your security domains.<security-domain name="host" cache-type="default"> <authentication> <login-module code="Kerberos" flag="required"> <module-option name="storeKey" value="true"/> <module-option name="useKeyTab" value="true"/> <module-option name="principal" value="host/testserver@MY_REALM"/> <module-option name="keyTab" value="/home/username/service.keytab"/> <module-option name="doNotPrompt" value="true"/> <module-option name="debug" value="false"/> </login-module> </authentication> </security-domain>Configure a second security domain to secure the web application or applications. Set system properties if necessary.
The second security domain is used to authenticate the individual user to the Kerberos or SPNEGO authentication server. You need at least one login module to authenticate the user, and another to search for the roles to apply to the user. The following XML code shows an example SPNEGO security domain. It includes an authorization module to map roles to individual users. You can also use a module which searches for the roles on the authentication server itself.<security-domain name="SPNEGO" cache-type="default"> <authentication> <!-- Check the username and password --> <login-module code="SPNEGO" flag="requisite"> <module-option name="password-stacking" value="useFirstPass"/> <module-option name="serverSecurityDomain" value="host"/> </login-module> <!-- Search for roles --> <login-module code="UsersRoles" flag="required"> <module-option name="password-stacking" value="useFirstPass" /> <module-option name="usersProperties" value="spnego-users.properties" /> <module-option name="rolesProperties" value="spnego-roles.properties" /> </login-module> </authentication> </security-domain>Specify the security-constraint and login-config in the
web.xmlTheweb.xmldescriptor contain information about security constraints and login configuration. The following are example values for each.<security-constraint> <display-name>Security Constraint on Conversation</display-name> <web-resource-collection> <web-resource-name>examplesWebApp</web-resource-name> <url-pattern>/*</url-pattern> </web-resource-collection> <auth-constraint> <role-name>RequiredRole</role-name> </auth-constraint> </security-constraint> <login-config> <auth-method>SPNEGO</auth-method> <realm-name>SPNEGO</realm-name> </login-config> <security-role> <description> role required to log in to the Application</description> <role-name>RequiredRole</role-name> </security-role>Specify the security domain and other settings in the
jboss-web.xmldescriptor.Specify the name of the client-side security domain (the second one in this example) in thejboss-web.xmldescriptor of your deployment, to direct your application to use this security domain.You can no longer override authenticators directly. Instead, you can add the NegotiationAuthenticator as a valve to yourjboss-web.xmldescriptor, if you need to. The<jacc-star-role-allow>allows you to use the asterisk (*) character to match multiple role names, and is optional.<jboss-web> <security-domain>SPNEGO</security-domain> <valve> <class-name>org.jboss.security.negotiation.NegotiationAuthenticator</class-name> </valve> <jacc-star-role-allow>true</jacc-star-role-allow> </jboss-web>Add a dependency to your application's
MANIFEST.MF, to locate the Negotiation classes.The web application needs a dependency on classorg.jboss.security.negotiationto be added to the deployment'sMETA-INF/MANIFEST.MFmanifest, in order to locate the JBoss Negotiation classes. The following shows a properly-formatted entry.Manifest-Version: 1.0 Build-Jdk: 1.6.0_24 Dependencies: org.jboss.security.negotiation- As an alternative, add a dependency to your application by editing the
META-INF/jboss-deployment-structure.xmlfile:<?xml version="1.0" encoding="UTF-8"?> <jboss-deployment-structure> <deployment> <dependencies> <module name='org.jboss.security.negotiation'/> </dependencies> </deployment> </jboss-deployment-structure>
Note
Your web application accepts and authenticates credentials against your Kerberos, Microsoft Active Directory, or other SPNEGO-compatible directory service. If the user runs the application from a system which is already logged into the directory service, and where the required roles are already applied to the user, the web application does not prompt for authentication, and SSO capabilities are achieved.
19.9. Configure SPNEGO Fall Back to Form Authentication
Procedure 19.2. SPNEGO security with fall back to form authentication
Set up SPNEGO
Refer the procedure described in Section 19.8, “Configure Kerberos or Microsoft Active Directory Desktop SSO for Web Applications”Modify
web.xmlAdd alogin-configelement to your application and setup the login and error pages in web.xml:<login-config> <auth-method>SPNEGO</auth-method> <realm-name>SPNEGO</realm-name> <form-login-config> <form-login-page>/login.jsp</form-login-page> <form-error-page>/error.jsp</form-error-page> </form-login-config> </login-config>Add web content
Add references oflogin.htmlanderror.htmltoweb.xml. These files are added to web application archive to the place specified inform-login-configconfiguration. For more information refer Enable Form-based Authentication section in the Security Guide for JBoss EAP 6. A typicallogin.htmllooks like this:<html> <head> <title>Vault Form Authentication</title> </head> <body> <h1>Vault Login Page</h1> <p> <form method="post" action="j_security_check"> <table> <tr> <td>Username</td><td>-</td> <td><input type="text" name="j_username"></td> </tr> <tr> <td>Password</td><td>-</td> <td><input type="password" name="j_password"></td> </tr> <tr> <td colspan="2"><input type="submit"></td> </tr> </table> </form> </p> <hr> </body> </html>
Note
19.10. About SAML Web Browser Based SSO
Important
Note
19.11. Cookie Domain
19.11.1. About the Cookie Domain
/. This means that only the issuing host can read the contents of a cookie. Setting a specific cookie domain makes the contents of the cookie available to a wider range of hosts. To set the cookie domain, refer to Section 19.11.2, “Configure the Cookie Domain for Single Sign On”.
19.11.2. Configure the Cookie Domain for Single Sign On
http://app1.xyz.com and http://app2.xyz.com to share an SSO context, even if these applications run on different servers in a cluster or the virtual host with which they are associated has multiple aliases.
Using the CLI (in Standalone mode):
/subsystem=web/virtual-server=default-host/sso=configuration:add(cache-container="web",cache-name="sso")standlone.xml or domain.xml and append the below to the relevant web subsystem:
<subsystem xmlns="urn:jboss:domain:web:1.1" default-virtual-server="default-host" native="false">
<connector name="http" protocol="HTTP/1.1" scheme="http" socket-binding="http"/>
<virtual-server name="default-host" enable-welcome-root="true">
<alias name="localhost"/>
<alias name="example.com"/>
<sso cache-container="web" cache-name="sso"/> <!--FIXME: ADD this Line-->
</virtual-server>
</subsystem>
Using the CLI (in Standalone mode):
/subsystem=web/virtual-server=default-host/sso=configuration:add()
standlone.xml or domain.xml and append the below to the relevant web subsystem:
<subsystem xmlns="urn:jboss:domain:web:1.1" default-virtual-server="default-host" native="false">
<connector name="http" protocol="HTTP/1.1" scheme="http" socket-binding="http"/>
<virtual-server name="default-host" enable-welcome-root="true">
<alias name="localhost"/>
<alias name="example.com"/>
<sso/> <!--FIXME: ADD this Line-->
</virtual-server>
</subsystem>
/subsystem=web/virtual-server=default-host/sso=configuration:add(domain="example.com",...)<sso domain="example.com"/>Chapter 20. Development Security References
20.1. EJB Security Parameter Reference
| Element | Description |
|---|---|
<security-identity>
|
Contains child elements pertaining to the security identity of an EJB.
|
<use-caller-identity />
|
Indicates that the EJB uses the same security identity as the caller.
|
<run-as>
|
Contains a
<role-name> element.
|
<run-as-principal>
|
If present, indicates the principal assigned to outgoing calls. If not present, outgoing calls are assigned to a principal named
anonymous.
|
<role-name>
|
Specifies the role the EJB should run as.
|
<description>
|
Describes the role named in
. <role-name>
|
Example 20.1. Security identity examples
ejb-jar.xml file below shows each tag described in Table 20.1, “EJB security parameter elements”. They can also be used inside a <session>.
<ejb-jar>
<enterprise-beans>
<session>
<ejb-name>ASessionBean</ejb-name>
<security-identity>
<use-caller-identity/>
</security-identity>
</session>
<session>
<ejb-name>RunAsBean</ejb-name>
<security-identity>
<run-as>
<description>A private internal role</description>
<role-name>InternalRole</role-name>
</run-as>
</security-identity>
</session>
<session>
<ejb-name>RunAsBean</ejb-name>
<security-identity>
<run-as-principal>internal</run-as-principal>
</security-identity>
</session>
</enterprise-beans>
</ejb-jar>
jboss-ejb3.xml file which is discussed in more detail in Section 8.8.4, “jboss-ejb3.xml Deployment Descriptor Reference”.
Chapter 21. Configuration References
21.1. jboss-web.xml Configuration Reference
The jboss-web.xml and web.xml deployment descriptors are both placed in the deployment's WEB-INF directory. The jboss-web.xml is a web application deployment descriptor for JBoss EAP which contains additional configuration options for additional features of JBoss Web. This descriptor can be used to override the settings from web.xml descriptor and to set JBoss EAP specific settings.
Many of the available settings map requirements set in the application's web.xml to local resources. The explanations of the web.xml settings can be found at http://docs.oracle.com/cd/E13222_01/wls/docs81/webapp/web_xml.html.
web.xml requires jdbc/MyDataSource, the jboss-web.xml may map the global datasource java:/DefaultDS to fulfill this need. The WAR uses the global datasource to fill its need for jdbc/MyDataSource.
| Attribute | Description |
|---|---|
| servlet |
The servlet element specifies servlet specific bindings.
|
| max-active-sessions |
Determines the max number of active sessions allowed. If the number of sessions managed by the session manager exceeds this value and
passivation is enabled, the excess will be passivated based on the configured passivation-min-idle-time
If set to -1, means no limit.
|
| replication-config |
The
replication-config element is used for configuring session replication in the jboss-web.xml file.
|
| passivation-config |
The
passivation-config element is used for configuring session passivation in the jboss-web.xml file.
|
| distinct-name |
The
distinct-name element specifies the EJB 3 distinct name for the web application.
|
| data-source |
A mapping to a
data-source required by the web.xml.
|
| context-root | The root context of the application. The default value is the name of the deployment without the .war suffix. |
| virtual-host | The name of the HTTP virtual-host the application accepts requests from. It refers to the contents of the HTTP Host header. |
| annotation | Describes an annotation used by the application. Refer to <annotation> for more information. |
| listener | Describes a listener used by the application. Refer to <listener> for more information. |
| session-config | This element fills the same function as the <session-config> element of the web.xml and is included for compatibility only. |
| valve | Describes a valve used by the application. Refer to <valve> for more information. |
| overlay | The name of an overlay to add to the application. |
| security-domain | The name of the security domain used by the application. The security domain itself is configured in the web-based management console or the management CLI. |
| security-role | This element fills the same function as the <security-role> element of the web.xml and is included for compatibility only. |
| jacc-star-role-allow |
The
jacc-star-role-allow element specifies whether the jacc permission generating agent in the web layer needs to generate a WebResourcePermission permission such that the jacc provider can make a decision as to bypass authorization or not.
|
| use-jboss-authorization | If this element is present and contains the case insensitive value "true", the JBoss web authorization stack is used. If it is not present or contains any value that is not "true", then only the authorization mechanisms specified in the Java Enterprise Edition specifications are used. This element is new to JBoss EAP 6. |
| disable-audit | Set this boolean element to false to enable and true to disable web auditing. Web security auditing is not part of the Java EE specification. This element is new to JBoss EAP 6. |
| disable-cross-context | If false, the application is able to call another application context. Defaults to true. |
| enable-websockets | Set this element to true in jboss-web.xml to specify if websockets access should be enabled for the web application. |
<annotation>.
| Attribute | Description |
|---|---|
| class-name |
Name of the class of the annotation
|
| servlet-security |
The element, such as
@ServletSecurity, which represents servlet security.
|
| run-as |
The element, such as
@RunAs, which represents the run-as information.
|
| multipart-config |
The element, such as
@MultiPart, which represents the multipart-config information.
|
<listener>.
| Attribute | Description |
|---|---|
| class-name |
Name of the class of the listener
|
| listener-type |
List of
condition elements, which indicate what kind of listener to add to the Context of the application. Valid choices are:
|
| module |
The name of the module containing the listener class.
|
| param |
A parameter. Contains two child elements,
<param-name> and <param-value>.
|
Chapter 22. Supplemental References
22.1. Types of Java Archives
| Archive Type | Extension | Purpose | Directory structure requirements |
|---|---|---|---|
| Java Archive | .jar | Contains Java class libraries. | META-INF/MANIFEST.MF file (optional), which specifies information such as which class is the main class.
|
| Web Archive | .war |
Contains Java Server Pages (JSP) files, servlets, and XML files, in addition to Java classes and libraries. The Web Archive's contents are also referred to as a Web Application.
| WEB-INF/web.xml file, which contains information about the structure of the web application. Other files may also be present in WEB-INF/.
|
| Resource Adapter Archive | .rar |
The directory structure is specified by the JCA specification.
|
Contains a Java Connector Architecture (JCA) resource adapter. Also called a connector.
|
| Enterprise Archive | .ear |
Used by Java Enterprise Edition (EE) to package one or more modules into a single archive, so that the modules can be deployed onto the application server simultaneously. Maven and Ant are the most common tools used to build EAR archives.
| META-INF/ directory, which contains one or more XML deployment descriptor files.
|
|
Any of the following types of modules.
| |||
| Service Archive | .sar |
Similar to an Enterprise Archive, but specific to the JBoss EAP.
| META-INF/ directory containing jboss-service.xml or jboss-beans.xml file.
|
Appendix A. Revision History
| Revision History | |||
|---|---|---|---|
| Revision 6.4.0-48 | Thursday November 16 2017 | ||
| |||