Development Guide
For Use with Red Hat JBoss Enterprise Application Platform 7.0
Abstract
Chapter 1. Get Started Developing Applications
1.1. Introduction
1.1.1. About Red Hat JBoss Enterprise Application Platform 7
Red Hat JBoss Enterprise Application Platform 7 (JBoss EAP) is a middleware platform built on open standards and compliant with the Java Enterprise Edition 7 specification. It integrates WildFly Application Server 10 with messaging, high-availability clustering, and other technologies.
JBoss EAP includes a modular structure that allows service enabling only when required, improving startup speed.
The management console and management command-line interface (CLI) make editing XML configuration files unnecessary and add the ability to script and automate tasks.
JBoss EAP provides two operating modes for JBoss EAP instances: standalone server or managed domain. The standalone server operating mode represents running JBoss EAP as a single server instance. The managed domain operating mode allows for the management of multiple JBoss EAP instances from a single control point.
In addition, JBoss EAP includes APIs and development frameworks for quickly developing secure and scalable Java EE applications.
1.2. Become Familiar with Java Enterprise Edition 7
1.2.1. Overview of EE 7 Profiles
Java Enterprise Edition 7 (EE 7) includes support for multiple profiles, or subsets of APIs. The only two profiles that the EE 7 specification defines are the Full Profile and the Web Profile.
EE 7 Full Profile includes all APIs and specifications included in the EE 7 specification. EE 7 Web Profile includes a selected subset of APIs, which are designed to be useful to web developers.
JBoss EAP is a certified implementation of the Java Enterprise Edition 7 Full Profile and Web Profile specifications.
Java Enterprise Edition 7 Web Profile
The Web Profile is one of two profiles defined by the Java Enterprise Edition 7 specification, and is designed for web application development. The Web Profile supports the following APIs:
Java EE 7 Web Profile Requirements:
- Java Platform, Enterprise Edition 7
Java Web Technologies:
- Servlet 3.1 (JSR 340)
- JSP 2.3
- Expression Language (EL) 3.0
- JavaServer Faces (JSF) 2.2 (JSR 344)
Java Standard Tag Library (JSTL) for JSP 1.2
NoteA known security risk in JBoss EAP exists where the Java Standard Tag Library (JSTL) allows the processing of external entity references in untrusted XML documents which could access resources on the host system and, potentially, allow arbitrary code execution.
To avoid this, the JBoss EAP server has to be run with system property
org.apache.taglibs.standard.xml.accessExternalEntitycorrectly set, usually with an empty string as value. This can be done in two ways:Configuring the system properties and restarting the server.
org.apache.taglibs.standard.xml.accessExternalEntity
org.apache.taglibs.standard.xml.accessExternalEntityCopy to Clipboard Copied! Toggle word wrap Toggle overflow -
Passing
-Dorg.apache.taglibs.standard.xml.accessExternalEntity=""as an argument to thestandalone.shordomain.shscripts.
- Debugging Support for Other Languages 1.0 (JSR 45)
Enterprise Application Technologies:
- Contexts and Dependency Injection (CDI) 1.1 (JSR 346)
- Dependency Injection for Java 1.0 (JSR 330)
- Enterprise JavaBeans 3.2 Lite (JSR 345)
- Java Persistence API 2.1 (JSR 338)
- Common Annotations for the Java Platform 1.1 (JSR 250)
- Java Transaction API (JTA) 1.2 (JSR 907)
- Bean Validation 1.1 (JSR 349)
The other profile defined by the Java EE 7 specification is the Full Profile, and includes several more APIs.
Java Enterprise Edition 7 Full Profile
The Java Enterprise Edition 7 (EE 7) specification defines a concept of profiles, and defines two of them as part of the specification. The Full Profile supports the following APIs, as well as those supported in the Java Enterprise Edition 7 Web Profile:
Included in the EE 7 Full Profile:
- Batch 1.0
- JSON-P 1.0
- Concurrency 1.0
- WebSocket 1.1
- JMS 2.0
- JPA 2.1
- JCA 1.7
- JAX-RS 2.0
- JAX-WS 2.2
- Servlet 3.1
- JSF 2.2
- JSP 2.3
- EL 3.0
- CDI 1.1
- CDI Extensions
- JTA 1.2
- Interceptors 1.2
- Common Annotations 1.1
- Managed Beans 1.0
- EJB 3.2
- Bean Validation 1.1
1.3. Setting Up the Development Environment
1.3.1. Download JBoss Developer Studio
JBoss Developer Studio can be downloaded from the Red Hat Customer Portal.
- Log in to the Red Hat Customer Portal.
- Click Downloads.
- In the Product Downloads list, click Red Hat JBoss Developer Studio.
Select the desired version in the Version drop-down menu.
NoteIt is recommended to use JBoss Developer Studio version 9.1 or later.
- Find the Red Hat JBoss Developer Studio 9.x.x Stand-alone Installer entry in the table and click Download.
- Save the JAR file to the desired directory.
1.3.2. Install JBoss Developer Studio
- Open a terminal and navigate to the directory containing the downloaded JAR file.
Run the following command to launch the GUI installation program:
java -jar jboss-devstudio-BUILD_VERSION-installer-standalone.jar
$ java -jar jboss-devstudio-BUILD_VERSION-installer-standalone.jarCopy to Clipboard Copied! Toggle word wrap Toggle overflow NoteAlternatively, you may be able to double-click the JAR file to launch the installation program.
- Click Next to start the installation process.
- Select I accept the terms of this license agreement and click Next.
Adjust the installation path and click Next.
NoteIf the installation path folder does not exist, a prompt will appear. Click OK to create the folder.
- Choose a JVM, or leave the default JVM selected, and click Next.
- Click Next when asked to select platforms and servers.
- Review the installation details, and click Next.
- Click Next when the installation process is complete.
- Configure the desktop shortcuts for JBoss Developer Studio, and click Next.
- Click Done.
1.3.3. Start JBoss Developer Studio
To start JBoss Developer Studio, you can double-click on the desktop shortcut created during the installation, or you can start it from a command line. Follow the below steps to start JBoss Developer Studio using the command line.
- Open a terminal and navigate to the JBoss Developer Studio installation directory.
Run the following command to start JBoss Developer Studio:
./jbdevstudio
$ ./jbdevstudioCopy to Clipboard Copied! Toggle word wrap Toggle overflow NoteFor Windows Server, use the
jbdevstudio.batfile.
1.3.4. Add the JBoss EAP Server to JBoss Developer Studio
These instructions assume that you have not yet added any JBoss EAP servers to JBoss Developer Studio. Use the following steps to add your JBoss EAP server using the Define New Server wizard.
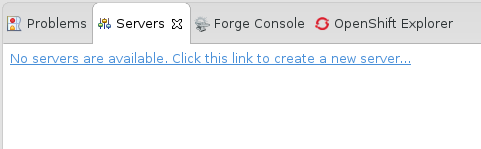
Open the Servers tab.
NoteIf the Servers tab is not shown, add it to the panel by selecting Window → Show View → Servers.
Click on the No servers are available. Click this link to create a new server link.
Figure 1.1. Add a New Server
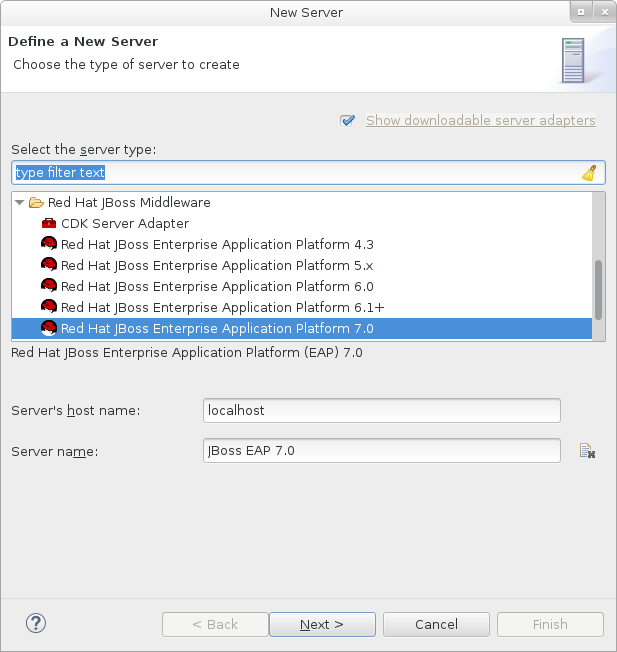
Expand Red Hat JBoss Middleware and choose JBoss Enterprise Application Platform 7.0. Enter a server name, for example,
JBoss EAP 7.0, then click Next.Figure 1.2. Define a New Server
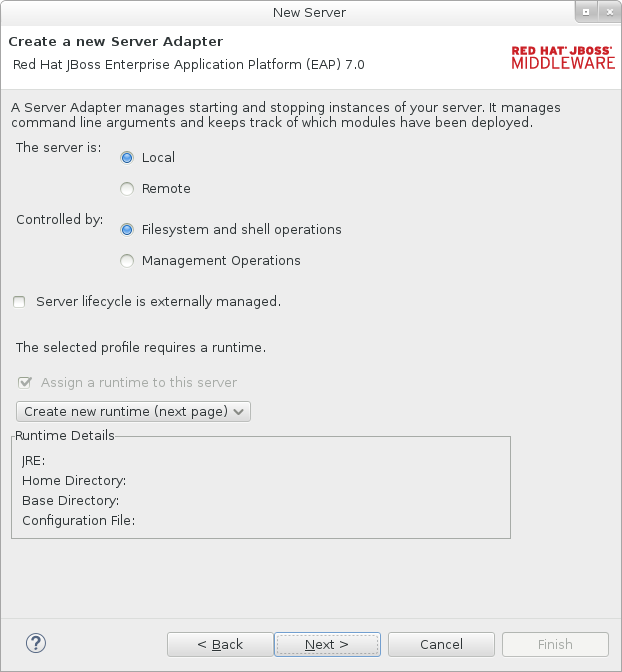
Create a server adapter to manage starting and stopping the server. Keep the defaults and click Next.
Figure 1.3. Create a New Server Adapter
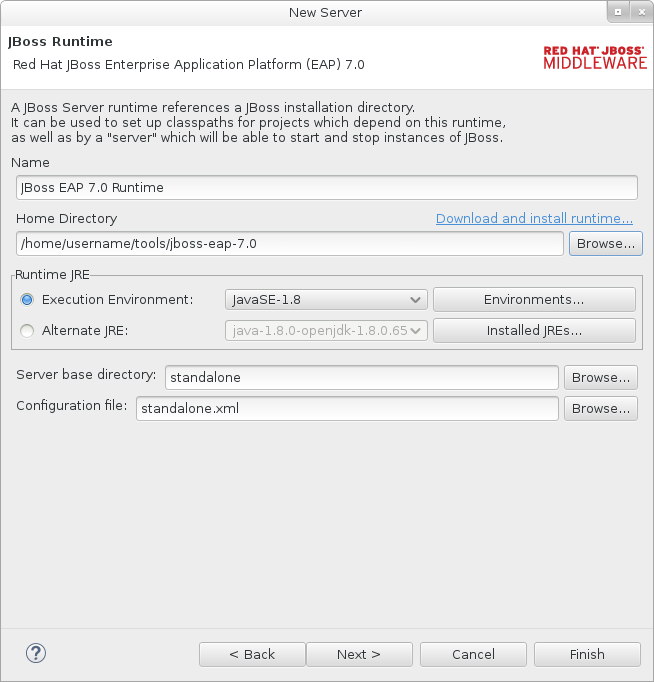
Enter a name, for example
JBoss EAP 7.0 Runtime. Click Browse next to Home Directory and navigate to your JBoss EAP installation directory. Then click Next.Figure 1.4. Add New Server Runtime Environment
 Note
NoteSome quickstarts require that you run the server with a different profile or additional arguments. For example, to deploy a quickstart that requires the full profile, you must define a new server and specify
standalone-full.xmlin the Configuration file field. Be sure to give the new server a descriptive name.Configure existing projects for the new server. Because you do not have any projects at this point, click Finish.
Figure 1.5. Modify Resources for the New Server

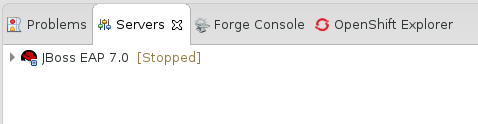
The JBoss EAP 7.0 server is now listed in the Servers tab.
Figure 1.6. Server List
1.4. Using the Quickstart Examples
1.4.1. About Maven
Apache Maven is a distributed build automation tool used in Java application development to create, manage, and build software projects. Maven uses standard configuration files called Project Object Model (POM) files to define projects and manage the build process. POMs describe the module and component dependencies, build order, and targets for the resulting project packaging and output using an XML file. This ensures that the project is built in a correct and uniform manner.
Maven achieves this by using a repository. A Maven repository stores Java libraries, plug-ins, and other build artifacts. The default public repository is the Maven 2 Central Repository, but repositories can be private and internal within a company with a goal to share common artifacts among development teams. Repositories are also available from third-parties. For more information, see the Apache Maven project and the Introduction to Repositories guide.
JBoss EAP includes a Maven repository that contains many of the requirements that Java EE developers typically use to build applications on JBoss EAP.
For more information, see Using Maven with JBoss EAP.
1.4.1.1. Using Maven with the Quickstarts
The artifacts and dependencies needed to build and deploy applications to JBoss EAP 7 are hosted on a public repository. Starting with the JBoss EAP 7 quickstarts, it is no longer necessary to configure your Maven settings.xml file to use these repositories when building the quickstarts. The Maven repositories are now configured in the quickstart project POM files. This method of configuration is provided to make it easier to get started with the quickstarts, however, is generally not recommended for production projects because it can slow down your build.
Red Hat JBoss Developer Studio includes Maven, so there is no need to download and install it separately. It is recommended to use JBoss Developer Studio version 9.1 or later.
If you plan to use the Maven command line to build and deploy your applications, then you must first download Maven from the Apache Maven project and install it using the instructions provided in the Maven documentation.
1.4.2. Download and Run the Quickstart Code Examples
1.4.2.1. Download the Quickstarts
JBoss EAP comes with a comprehensive set of quickstart code examples designed to help users begin writing applications using various Java EE 7 technologies. The quickstarts can be downloaded from the Red Hat Customer Portal.
- Log in to the Red Hat Customer Portal.
- Click Downloads.
- In the Product Downloads list, click Red Hat JBoss Enterprise Application Platform.
- Select the desired version in the Version drop-down menu.
- Find the Red Hat JBoss Enterprise Application Platform 7.0.0 Quickstarts entry in the table and click Download.
- Save the ZIP file to the desired directory.
- Extract the ZIP file.
1.4.2.2. Run the Quickstarts in JBoss Developer Studio
Once the quickstarts have been downloaded, they can be imported into JBoss Developer Studio and deployed to JBoss EAP.
Import a Quickstart into JBoss Developer Studio
Each quickstart ships with a POM file that contains its project and configuration information. Use this POM file to easily import the quickstart into JBoss Developer Studio.
If your quickstart project folder is located within the IDE workspace when you import it into JBoss Developer Studio, the IDE generates an invalid project name and WAR archive name. Be sure your quickstart project folder is located outside the IDE workspace before you begin.
- Start JBoss Developer Studio.
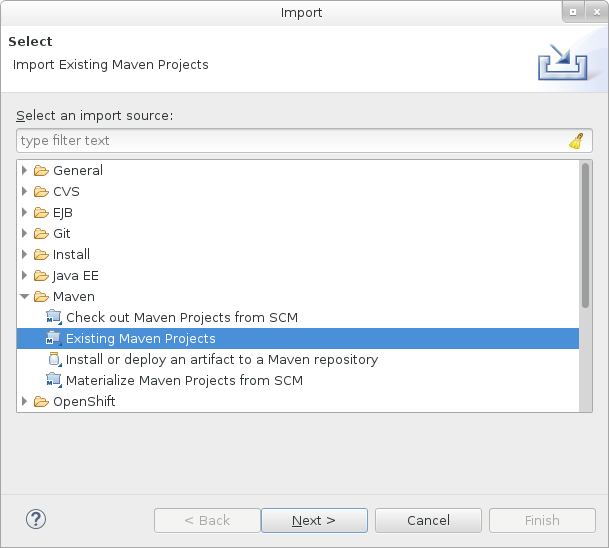
- Select File → Import.
Choose Maven → Existing Maven Projects, then click Next.
Figure 1.7. Import Existing Maven Projects
Browse to the desired quickstart’s directory (for example the
helloworldquickstart), and click OK. The Projects list box is populated with thepom.xmlfile of the selected quickstart project.Figure 1.8. Select Maven Projects

- Click Finish.
Run the helloworld Quickstart
Running the helloworld quickstart is a simple way to verify that the JBoss EAP server is configured and running correctly.
- If you have not yet defined a server, add the JBoss EAP server to JBoss Developer Studio.
Right-click the jboss-helloworld project in the Project Explorer tab and select Run As → Run on Server.
Figure 1.9. Run As - Run on Server

Select JBoss EAP 7.0 from the server list and click Next.
Figure 1.10. Run on Server

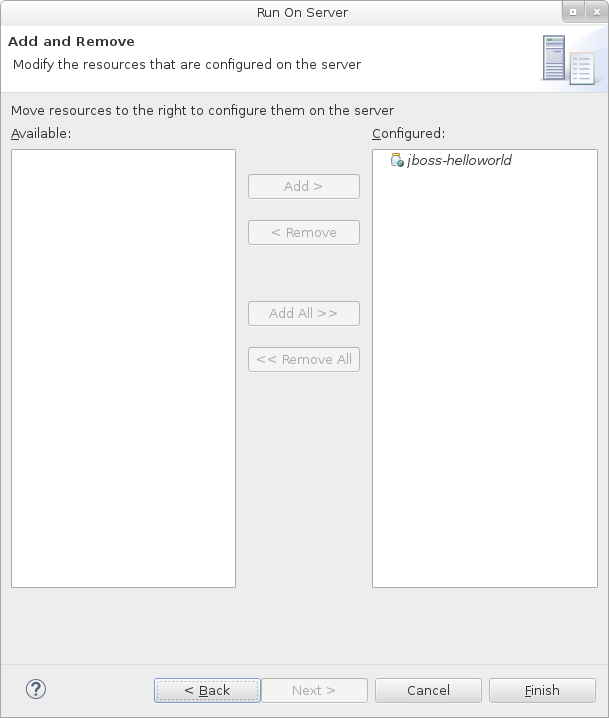
The jboss-helloworld quickstart is already listed to be configured on the server. Click Finish to deploy the quickstart.
Figure 1.11. Modify Resources Configured on the Server
Verify the results.
-
In the Server tab, the
JBoss EAP 7.0server status changes toStarted. The Console tab shows messages detailing the JBoss EAP server start and the
helloworldquickstart deployment.WFLYUT0021: Registered web context: /jboss-helloworld WFLYSRV0010: Deployed "jboss-helloworld.war" (runtime-name : "jboss-helloworld.war")
WFLYUT0021: Registered web context: /jboss-helloworld WFLYSRV0010: Deployed "jboss-helloworld.war" (runtime-name : "jboss-helloworld.war")Copy to Clipboard Copied! Toggle word wrap Toggle overflow -
The
helloworldapplication is available at http://localhost:8080/jboss-helloworld and displays the textHello World!.
-
In the Server tab, the
Run the bean-validation Quickstart
Some quickstarts, such as the bean-validation quickstart, do not provide a user interface layer and instead provide Arquillian tests to demonstrate functionality.
-
Import the
bean-validationquickstart into JBoss Developer Studio. - In the Servers tab, right-click on the server and choose Start to start the JBoss EAP server. If you do not see a Servers tab or have not yet defined a server, add the JBoss EAP server to Red Hat JBoss Developer Studio.
-
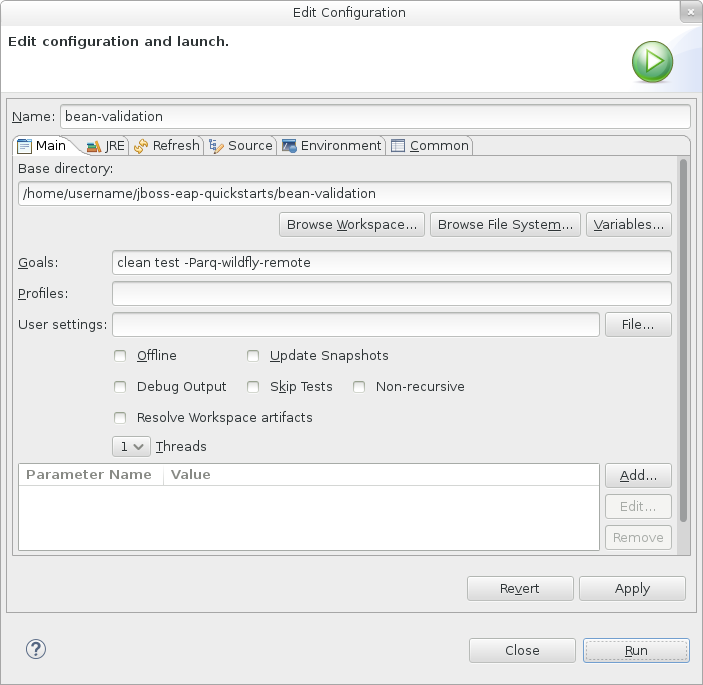
Right-click on the
jboss-bean-validationproject in the Project Explorer tab and select Run As → Maven Build. Enter the following in the Goals input field and then click Run.
clean test -Parq-wildfly-remote
clean test -Parq-wildfly-remoteCopy to Clipboard Copied! Toggle word wrap Toggle overflow Figure 1.12. Edit Configuration
Verify the results.
The Console tab shows the results of the
bean-validationArquillian tests:Copy to Clipboard Copied! Toggle word wrap Toggle overflow
1.4.2.3. Run the Quickstarts from the Command Line
You can easily build and deploy the quickstarts from the command line using Maven. If you do not yet have Maven installed, see the Apache Maven project to download and install it.
A README.md file is provided at the root directory of the quickstarts that contains general information about system requirements, configuring Maven, adding users, and running the quickstarts.
Each quickstart also contains its own README.md file that provides the specific instructions and Maven commands to run that quickstart.
Run the helloworld Quickstart from the Command Line
-
Review the
README.mdfile in the root directory of the helloworld quickstart. Start the JBoss EAP server.
EAP_HOME/bin/standalone.sh
$ EAP_HOME/bin/standalone.shCopy to Clipboard Copied! Toggle word wrap Toggle overflow - Navigate to the helloworld quickstart directory.
Build and deploy the quickstart using the Maven command provided in the quickstart’s
README.mdfile.mvn clean install wildfly:deploy
mvn clean install wildfly:deployCopy to Clipboard Copied! Toggle word wrap Toggle overflow -
The helloworld application is now available at http://localhost:8080/jboss-helloworld and displays the text
Hello World!.
1.4.3. Review the Quickstart Tutorials
1.4.3.1. Explore the helloworld Quickstart
The helloworld quickstart shows you how to deploy a simple servlet to JBoss EAP. The business logic is encapsulated in a service, which is provided as a Contexts and Dependency Injection (CDI) bean and injected into the Servlet. This quickstart is a starting point to be sure you have configured and started your server properly.
Detailed instructions to build and deploy this quickstart using the command line can be found in the README.html file at the root of the helloworld quickstart directory. This topic shows you how to use Red Hat JBoss Developer Studio to run the quickstart and assumes you have installed Red Hat JBoss Developer Studio, configured Maven, and imported and successfully run the helloworld quickstart.
Prerequisites
- Install Red Hat JBoss Developer Studio.
- Follow the instructions to run the quickstarts in JBoss Developer Studio.
-
Verify that the
helloworldquickstart was successfully deployed to JBoss EAP by opening a web browser and accessing the application at http://localhost:8080/jboss-helloworld
Examine the Directory Structure
The code for the helloworld quickstart can be found in the QUICKSTART_HOME/helloworld directory. The helloworld quickstart is comprised of a Servlet and a CDI bean. It also contains a beans.xml file in the application’s WEB-INF directory that has a version number of 1.1 and a bean-discovery-mode of all. This marker file identifies the WAR as a bean archive and tells JBoss EAP to look for beans in this application and to activate the CDI.
The src/main/webapp/ directory contains the files for the quickstart. All the configuration files for this example are located in the WEB-INF/ directory within src/main/webapp/, including the beans.xml file. The src/main/webapp/ directory also includes an index.html file, which uses a simple meta refresh to redirect the user’s browser to the Servlet, which is located at http://localhost:8080/jboss-helloworld/HelloWorld. The quickstart does not require a web.xml file.
Examine the Code
The package declaration and imports have been excluded from these listings. The complete listing is available in the quickstart source code.
Review the
HelloWorldServletcode.The
HelloWorldServlet.javafile is located in thesrc/main/java/org/jboss/as/quickstarts/helloworld/directory. This servlet sends the information to the browser.HelloWorldServlet Class Code Example
Copy to Clipboard Copied! Toggle word wrap Toggle overflow Expand Table 1.1. HelloWorldServlet Details Line Note 43
All you need to do is add the
@WebServletannotation and provide a mapping to a URL used to access the servlet.46-48
Every web page needs correctly formed HTML. This quickstart uses static Strings to write the minimum header and footer output.
50-51
These lines inject the HelloService CDI bean which generates the actual message. As long as we don’t alter the API of HelloService, this approach allows us to alter the implementation of HelloService at a later date without changing the view layer.
58
This line calls into the service to generate the message "Hello World", and write it out to the HTTP request.
Review the
HelloServicecode.The
HelloService.javafile is located in thesrc/main/java/org/jboss/as/quickstarts/helloworld/directory. This service simply returns a message. No XML or annotation registration is required.HelloService Class Code Example
Copy to Clipboard Copied! Toggle word wrap Toggle overflow
1.4.3.2. Explore the numberguess Quickstart
The numberguess quickstart shows you how to create and deploy a simple non-persistant application to JBoss EAP. Information is displayed using a JSF view and business logic is encapsulated in two CDI beans. In the numberguess quickstart, you have ten attempts to guess a number between 1 and 100. After each attempt, you’re told whether your guess was too high or too low.
The code for the numberguess quickstart can be found in the QUICKSTART_HOME/numberguess directory where QUICKSTART_HOME is the directory where you downloaded and unzipped the JBoss EAP quickstarts. The numberguess quickstart is comprised of a number of beans, configuration files, and Facelets (JSF) views, and is packaged as a WAR module.
Detailed instructions to build and deploy this quickstart using the command line can be found in the README.html file at the root of the numberguess quickstart directory. The following examples use Red Hat JBoss Developer Studio to run the quickstart.
Prerequisites
- Install Red Hat JBoss Developer Studio.
-
Follow the instructions to run the quickstarts in Red Hat JBoss Developer Studio, replacing
helloworldwith thenumberguessquickstart in the instructions. -
Verify the
numberguessquickstart was deployed successfully to JBoss EAP by opening a web browser and accessing the application at this URL: http://localhost:8080/jboss-numberguess
Examine the Configuration Files
All the configuration files for this example are located in the QUICKSTART_HOME/numberguess/src/main/webapp/WEB-INF/ directory of the quickstart.
Examine the
faces-config.xmlfile.This quickstart uses the JSF 2.2 version of
faces-config.xmlfilename. A standardized version of Facelets is the default view handler in JSF 2.2 so it requires no configuration. This file consists of only the root element and is simply a marker file to indicate JSF should be enabled in the application.Copy to Clipboard Copied! Toggle word wrap Toggle overflow Examine the
beans.xmlfile.The
beans.xmlfile contains a version number of 1.1 and abean-discovery-modeofall. This file is a marker file that identifies the WAR as a bean archive and tells JBoss EAP to look for beans in this application and to activate the CDI.Copy to Clipboard Copied! Toggle word wrap Toggle overflow
This quickstart does not need a web.xml file.
1.4.3.2.1. Examine the JSF Code
JSF uses the .xhtml file extension for source files, but delivers the rendered views with the .jsf extension. The home.xhtml file is located in the src/main/webapp/ directory.
JSF Source Code
The following line numbers correspond to those seen when viewing the file in JBoss Developer Studio.
| Line | Note |
|---|---|
| 36-40 | These are the messages which can be sent to the user: "Higher!" and "Lower!" |
| 45-48 | As the user guesses, the range of numbers they can guess gets smaller. This sentence changes to make sure they know the number range of a valid guess. |
| 55-58 | This input field is bound to a bean property using a value expression. |
| 58 | A validator binding is used to make sure the user does not accidentally input a number outside of the range in which they can guess. If the validator was not here, the user might use up a guess on an out of bounds number. |
| 59-61 | There must be a way for the user to send their guess to the server. Here we bind to an action method on the bean. |
1.4.3.2.2. Examine the Class Files
All of the numberguess quickstart source files can be found in the QUICKSTART_HOME/numberguess/src/main/java/org/jboss/as/quickstarts/numberguess/ directory. The package declaration and imports have been excluded from these listings. The complete listing is available in the quickstart source code.
Review the
Random.javaQualifier CodeA qualifier is used to remove ambiguity between two beans, both of which are eligible for injection based on their type. For more information on qualifiers, see Use a Qualifier to Resolve an Ambiguous Injection. The
@Randomqualifier is used for injecting a random number.Copy to Clipboard Copied! Toggle word wrap Toggle overflow Review the
MaxNumber.javaQualifier CodeThe
@MaxNumberqualifieris used for injecting the maximum number allowed.Copy to Clipboard Copied! Toggle word wrap Toggle overflow Review the
Generator.javaCodeThe
Generatorclass creates the random number via a producer method, exposing the maximum possible number via the same. This class is application-scoped, so you don’t get a different random each time.Copy to Clipboard Copied! Toggle word wrap Toggle overflow Review the
Game.javaCodeThe session-scoped
Gameclass is the primary entry point of the application. It is responsible for setting up or resetting the game, capturing and validating the user’s guess, and providing feedback to the user with aFacesMessage. It uses the post-construct lifecycle method to initialize the game by retrieving a random number from the@Random Instance<Integer>bean.Notice the
@Namedannotation in the class. This annotation is only required when you want to make the bean accessible to a JSF view by using Expression Language (EL), in this case#{game}.Copy to Clipboard Copied! Toggle word wrap Toggle overflow
1.5. Configure the Default Welcome Web Application
JBoss EAP includes a default Welcome application, which displays at the root context on port 8080 by default.
This default Welcome application can be replaced with your own web application. This can be configured in one of two ways:
You can also disable the welcome content.
Changing the welcome-content File Handler
Modify the existing welcome-content file handler’s path to point to the new deployment.
/subsystem=undertow/configuration=handler/file=welcome-content:write-attribute(name=path,value="/path/to/content")
/subsystem=undertow/configuration=handler/file=welcome-content:write-attribute(name=path,value="/path/to/content")Alternatively, you could create a different file handler to be used by the server’s root.
/subsystem=undertow/configuration=handler/file=NEW_FILE_HANDLER:add(path="/path/to/content") /subsystem=undertow/server=default-server/host=default-host/location=\/:write-attribute(name=handler,value=NEW_FILE_HANDLER)
/subsystem=undertow/configuration=handler/file=NEW_FILE_HANDLER:add(path="/path/to/content")
/subsystem=undertow/server=default-server/host=default-host/location=\/:write-attribute(name=handler,value=NEW_FILE_HANDLER)Reload the server for the changes to take effect.
reload
reloadChanging the default-web-module
Map a deployed web application to the server’s root.
/subsystem=undertow/server=default-server/host=default-host:write-attribute(name=default-web-module,value=hello.war)
/subsystem=undertow/server=default-server/host=default-host:write-attribute(name=default-web-module,value=hello.war)Reload the server for the changes to take effect.
reload
reloadDisabling the Default Welcome Web Application
Disable the welcome application by removing the location entry (/) for the default-host.
/subsystem=undertow/server=default-server/host=default-host/location=\/:remove
/subsystem=undertow/server=default-server/host=default-host/location=\/:removeReload the server for the changes to take effect.
reload
reloadChapter 2. Using Maven with JBoss EAP
2.1. Learn about Maven
2.1.1. About the Maven Repository
Apache Maven is a distributed build automation tool used in Java application development to create, manage, and build software projects. Maven uses standard configuration files called Project Object Model, or POM, files to define projects and manage the build process. POMs describe the module and component dependencies, build order, and targets for the resulting project packaging and output using an XML file. This ensures that the project is built in a correct and uniform manner.
Maven achieves this by using a repository. A Maven repository stores Java libraries, plug-ins, and other build artifacts. The default public repository is the Maven 2 Central Repository, but repositories can be private and internal within a company with a goal to share common artifacts among development teams. Repositories are also available from third-parties. JBoss EAP includes a Maven repository that contains many of the requirements that Java EE developers typically use to build applications on JBoss EAP. To configure your project to use this repository, see Configure the JBoss EAP Maven Repository.
For more information about Maven, see Welcome to Apache Maven.
For more information about Maven repositories, see Apache Maven Project - Introduction to Repositories.
2.1.2. About the Maven POM File
The Project Object Model, or POM, file is a configuration file used by Maven to build projects. It is an XML file that contains information about the project and how to build it, including the location of the source, test, and target directories, the project dependencies, plug-in repositories, and goals it can execute. It can also include additional details about the project including the version, description, developers, mailing list, license, and more. A pom.xml file requires some configuration options and will default all others.
The schema for the pom.xml file can be found at http://maven.apache.org/maven-v4_0_0.xsd.
For more information about POM files, see the Apache Maven Project POM Reference.
Minimum Requirements of a Maven POM File
The minimum requirements of a pom.xml file are as follows:
- project root
- modelVersion
- groupId - the id of the project’s group
- artifactId - the id of the artifact (project)
- version - the version of the artifact under the specified group
Example: Basic pom.xml File
A basic pom.xml file might look like this:
2.1.3. About the Maven Settings File
The Maven settings.xml file contains user-specific configuration information for Maven. It contains information that must not be distributed with the pom.xml file, such as developer identity, proxy information, local repository location, and other settings specific to a user.
There are two locations where the settings.xml can be found:
-
In the Maven installation: The settings file can be found in the
$M2_HOME/conf/directory. These settings are referred to asglobalsettings. The default Maven settings file is a template that can be copied and used as a starting point for the user settings file. -
In the user’s installation: The settings file can be found in the
${user.home}/.m2/directory. If both the Maven and usersettings.xmlfiles exist, the contents are merged. Where there are overlaps, the user’ssettings.xmlfile takes precedence.
Example: Maven Settings file
The schema for the settings.xml file can be found at http://maven.apache.org/xsd/settings-1.0.0.xsd.
2.1.4. About Maven Repository Managers
A repository manager is a tool that allows you to easily manage Maven repositories. Repository managers are useful in multiple ways:
- They provide the ability to configure proxies between your organization and remote Maven repositories. This provides a number of benefits, including faster and more efficient deployments and a better level of control over what is downloaded by Maven.
- They provide deployment destinations for your own generated artifacts, allowing collaboration between different development teams across an organization.
For more information about Maven repository managers, see Best Practice - Using a Repository Manager.
Commonly used Maven repository managers
- Sonatype Nexus
- See Sonatype Nexus documentation for more information about Nexus.
- Artifactory
- See JFrog Artifactory documentation for more information about Artifactory.
- Apache Archiva
- See Apache Archiva: The Build Artifact Repository Manager for more information about Apache Archiva.
In an Enterprise environment, where a repository manager is usually used, Maven should query all artifacts for all projects using this manager. Because Maven uses all declared repositories to find missing artifacts, if it can not find what it is looking for, it will try and look for it in the repository central (defined in the built-in parent POM). To override this central location, you can add a definition with central so that the default repository central is now your repository manager as well. This works well for established projects, but for clean or 'new' projects it causes a problem as it creates a cyclic dependency.
2.2. Install Maven and the JBoss EAP Maven Repository
2.2.1. Download and Install Maven
If you plan to use Maven command line to build and deploy your applications to JBoss EAP, you must download and install Maven. If you plan to use Red Hat JBoss Developer Studio to build and deploy your applications, you can skip this procedure as Maven is distributed with Red Hat JBoss Developer Studio.
- Go to Apache Maven Project - Download Maven and download the latest distribution for your operating system.
- See the Maven documentation for information on how to download and install Apache Maven for your operating system.
2.2.2. Install the JBoss EAP Maven Repository
There are three ways to install the JBoss EAP Maven repository.
- You can install the JBoss EAP Maven repository on your local file system. For detailed instructions, see Install the JBoss EAP Maven Repository Locally.
- You can install the JBoss EAP Maven repository on the Apache Web Server. For more information, see Install the JBoss EAP Maven Repository for Use with Apache httpd.
- You can install the JBoss EAP Maven repository using the Nexus Maven Repository Manager. For more information, see Repository Management Using Nexus Maven Repository Manager.
You can use the JBoss EAP Maven repository available online, or download and install it locally using any one of the three listed methods.
2.2.3. Install the JBoss EAP Maven Repository Locally
This example covers the steps to download the JBoss EAP Maven Repository to the local file system. This option is easy to configure and allows you to get up and running quickly on your local machine. It can help you become familiar with using Maven for development but is not recommended for team production environments.
Follow these steps to download and install the JBoss EAP Maven repository to the local file system.
- Open a web browser and access this URL: https://access.redhat.com/jbossnetwork/restricted/listSoftware.html?product=appplatform.
- Find Red Hat JBoss Enterprise Application Platform 7.0 Maven Repository in the list.
-
Click the Download button to download a
.zipfile containing the repository. Unzip the file on the local file system into a directory of your choosing.
This creates a new
jboss-eap-7.0.0.GA-maven-repository/directory, which contains the Maven repository in a subdirectory namedmaven-repository/.
If you want to continue to use an older local repository, you must configure it separately in the Maven settings.xml configuration file. Each local repository must be configured within its own <repository> tag.
When downloading a new Maven repository, remove the cached repository/ subdirectory located under the .m2/ directory before attempting to use it.
2.2.4. Install the JBoss EAP Maven Repository for Use with Apache httpd
This example will cover the steps to download the JBoss EAP Maven Repository for use with Apache httpd. This option is good for multi-user and cross-team development environments because any developer that can access the web server can also access the Maven repository.
You must first configure Apache httpd. See Apache HTTP Server Project documentation for instructions.
- Open a web browser and access this URL: https://access.redhat.com/jbossnetwork/restricted/listSoftware.html?product=appplatform.
- Find Red Hat JBoss Enterprise Application Platform 7.0 Maven Repository in the list.
-
Click the Download button to download a
.zipfile containing the repository. - Unzip the files in a directory that is web accessible on the Apache server.
Configure Apache to allow read access and directory browsing in the created directory.
This configuration allows a multi-user environment to access the Maven repository on Apache httpd.
2.3. Use the Maven Repository
2.3.1. Configure the JBoss EAP Maven Repository
- Overview
There are two approaches to direct Maven to use the JBoss EAP Maven Repository in your project:
Configure the JBoss EAP Maven Repository Using the Maven Settings
This is the recommended approach. Maven settings used with a repository manager or repository on a shared server provide better control and manageability of projects. Settings also provide the ability to use an alternative mirror to redirect all lookup requests for a specific repository to your repository manager without changing the project files. For more information about mirrors, see http://maven.apache.org/guides/mini/guide-mirror-settings.html.
This method of configuration applies across all Maven projects, as long as the project POM file does not contain repository configuration.
This section describes how to configure the Maven settings. You can configure the Maven install global settings or the user’s install settings.
Configure the Maven Settings File
Locate the Maven
settings.xmlfile for your operating system. It is usually located in the${user.home}/.m2/directory.-
For Linux or Mac, this is
~/.m2/ -
For Windows, this is
\Documents and Settings\.m2\or\Users\.m2\
-
For Linux or Mac, this is
-
If you do not find a
settings.xmlfile, copy thesettings.xmlfile from the${user.home}/.m2/conf/directory into the${user.home}/.m2/directory. Copy the following XML into the
<profiles>element of thesettings.xmlfile. Determine the URL of the JBoss EAP repository and replace JBOSS_EAP_REPOSITORY_URL with it.Copy to Clipboard Copied! Toggle word wrap Toggle overflow The following is an example configuration that accesses the online JBoss EAP Maven repository.
Copy to Clipboard Copied! Toggle word wrap Toggle overflow Copy the following XML into the
<activeProfiles>element of thesettings.xmlfile.<activeProfile>jboss-enterprise-maven-repository</activeProfile>
<activeProfile>jboss-enterprise-maven-repository</activeProfile>Copy to Clipboard Copied! Toggle word wrap Toggle overflow If you modify the
settings.xmlfile while Red Hat JBoss Developer Studio is running, you must refresh the user settings.-
From the menu, choose
Window → Preferences. -
In the
Preferenceswindow, expandMavenand chooseUser Settings. Click the
Update Settingsbutton to refresh the Maven user settings in Red Hat JBoss Developer Studio.The Update Maven User Settings screen shot

-
From the menu, choose
If your Maven repository contains outdated artifacts, you may encounter one of the following Maven error messages when you build or deploy your project:
- Missing artifact ARTIFACT_NAME
- [ERROR] Failed to execute goal on project PROJECT_NAME; Could not resolve dependencies for PROJECT_NAME
To resolve the issue, delete the cached version of your local repository to force a download of the latest Maven artifacts. The cached repository is located here: ${user.home}/.m2/repository/
Configure the JBoss EAP Maven Repository Using the Project POM
You should avoid this method of configuration as it overrides the global and user Maven settings for the configured project.
You must plan carefully if you decide to configure repositories using project POM file. Transitively included POMs are an issue with this type of configuration since Maven has to query the external repositories for missing artifacts and this slows the build process. It can also cause you to lose control over where your artifacts are coming from.
The URL of the repository will depend on where the repository is located: on the file system, or web server. For information on how to install the repository, see: Install the JBoss EAP Maven Repository. The following are examples for each of the installation options:
- File System
- file:///path/to/repo/jboss-eap-maven-repository
- Apache Web Server
- http://intranet.acme.com/jboss-eap-maven-repository/
- Nexus Repository Manager
- https://intranet.acme.com/nexus/content/repositories/jboss-eap-maven-repository
Configuring the Project’s POM File
-
Open your project’s
pom.xmlfile in a text editor. -
Add the following repository configuration. If there is already a
<repositories>configuration in the file, then add the<repository>element to it. Be sure to change the<url>to the actual repository location.
-
Add the following plug-in repository configuration. If there is already a
<pluginRepositories>configuration in the file, then add the<pluginRepository>element to it.
Determine the URL of the JBoss EAP Repository
The repository URL depends on where the repository is located. You can configure Maven to use any of the following repository locations.
- To use the online JBoss EAP Maven repository, specify the following URL: https://maven.repository.redhat.com/ga/
- To use a JBoss EAP Maven repository installed on the local file system, you must download the repository and then use the local file path for the URL. For example: file:///path/to/repo/jboss-eap-7.0-maven-repository/maven-repository/
- If you install the repository on an Apache Web Server, the repository URL will be similar to the following: http://intranet.acme.com/jboss-eap-7.0-maven-repository/maven-repository/
- If you install the JBoss EAP Maven repository using the Nexus Repository Manager, the URL will look something like the following: https://intranet.acme.com/nexus/content/repositories/jboss-eap-7.0-maven-repository/maven-repository/
Remote repositories are accessed using common protocols such as http:// for a repository on an HTTP server or file:// for a repository on a file server.
2.3.2. Configure Maven for Use with Red Hat JBoss Developer Studio
The artifacts and dependencies needed to build and deploy applications to Red Hat JBoss Enterprise Application Platform are hosted on a public repository. You must direct Maven to use this repository when you build your applications. This topic covers the steps to configure Maven if you plan to build and deploy applications using Red Hat JBoss Developer Studio.
Maven is distributed with Red Hat JBoss Developer Studio, so it is not necessary to install it separately. However, you must configure Maven for use by the Java EE Web Project wizard for deployments to JBoss EAP. The procedure below demonstrates how to configure Maven for use with JBoss EAP by editing the Maven configuration file from within Red Hat JBoss Developer Studio.
Configure Maven in Red Hat JBoss Developer Studio
Click
Window → Preferences, expand JBoss Tools and select JBoss Maven Integration.JBoss Maven Integration Pane in the Preferences Window
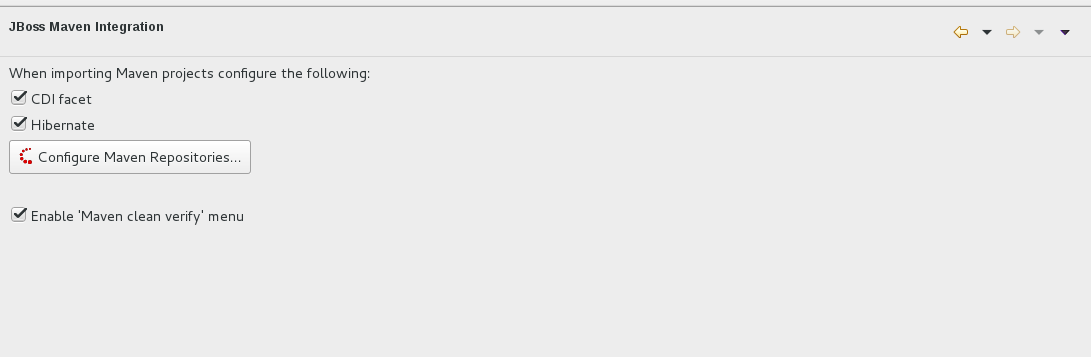
- Click Configure Maven Repositories.
Click Add Repository to configure the JBoss Enterprise Maven repository. Complete the
Add Maven Repositorydialog as follows:-
Set the Profile ID, Repository ID, and Repository Name values to
jboss-ga-repository. -
Set the Repository URL value to
http://maven.repository.redhat.com/ga. - Click the Active by default checkbox to enable the Maven repository.
Click OK.
Add Maven Repository

-
Set the Profile ID, Repository ID, and Repository Name values to
Review the repositories and click Finish.
Review Maven Repositories
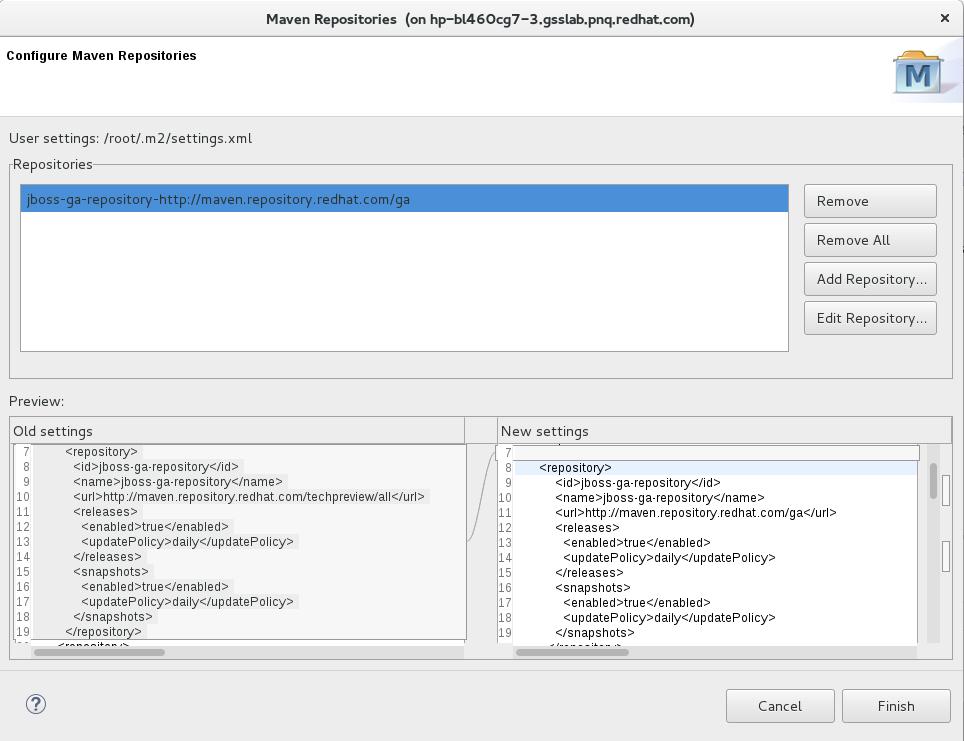
-
You are prompted with the message "Are you sure you want to update the file
MAVEN_HOME/settings.xml?". Click Yes to update the settings. Click OK to close the dialog.
The JBoss EAP Maven repository is now configured for use with Red Hat JBoss Developer Studio.
2.3.3. Manage Project Dependencies
This topic describes the usage of Bill of Materials (BOM) POMs for Red Hat JBoss Enterprise Application Platform.
A BOM is a Maven pom.xml (POM) file that specifies the versions of all runtime dependencies for a given module. Version dependencies are listed in the dependency management section of the file.
A project uses a BOM by adding its groupId:artifactId:version (GAV) to the dependency management section of the project pom.xml file and specifying the <scope>import</scope> and <type>pom</type> element values.
In many cases, dependencies in project POM files use the provided scope. This is because these classes are provided by the application server at runtime and it is not necessary to package them with the user application.
Supported Maven Artifacts
As part of the product build process, all runtime components of JBoss EAP are built from source in a controlled environment. This helps to ensure that the binary artifacts do not contain any malicious code, and that they can be supported for the life of the product. These artifacts can be easily identified by the -redhat version qualifier, for example 1.0.0-redhat-1.
Adding a supported artifact to the build configuration pom.xml file ensures that the build is using the correct binary artifact for local building and testing. Note that an artifact with a -redhat version is not necessarily part of the supported public API, and may change in future revisions. For information about the public supported API, see the JavaDoc documentation included in the release.
For example, to use the supported version of Hibernate, add something similar to the following to your build configuration.
Notice that the above example includes a value for the <version/> field. However, it is recommended to use Maven dependency management for configuring dependency versions.
Dependency Management
Maven includes a mechanism for managing the versions of direct and transitive dependencies throughout the build. For general information about using dependency management, see the Apache Maven Project: Introduction to the Dependency Mechanism.
Using one or more supported Red Hat dependencies directly in your build does not guarantee that all transitive dependencies of the build will be fully supported Red Hat artifacts. It is common for Maven builds to use a mix of artifact sources from the Maven central repository and other Maven repositories.
There is a dependency management BOM included in the JBoss EAP Maven repository, which specifies all the supported JBoss EAP binary artifacts. This BOM can be used in a build to ensure that Maven will prioritize supported JBoss EAP dependencies for all direct and transitive dependencies in the build. In other words, transitive dependencies will be managed to the correct supported dependency version where applicable. The version of this BOM matches the version of the JBoss EAP release.
In JBoss EAP 7 the name of this BOM was changed from eap6-supported-artifacts to eap-runtime-artifacts. The purpose of this change is to make it more clear that the artifacts in this POM are part of the JBoss EAP runtime, but are not necessarily part of the supported public API. Some of the jars contain internal API and functionality which may change between releases.
JBoss EAP Java EE Specs BOM
The jboss-javaee-7.0 BOM contains the Java EE Specification API JARs used by JBoss EAP.
To use this BOM in a project, add a dependency for the GAV that contains the version of the JSP and Servlet API JARs needed to build and deploy the application.
The following example uses the 1.0.3.Final-redhat-1 version of the jboss-javaee-7.0 BOM.
JBoss EAP BOMs and Quickstarts
The quickstarts provide the primary use case examples for the Maven repository. The following table lists the Maven BOMs used by the quickstarts.
| BOM Artifact ID | Use Case |
|---|---|
| jboss-eap-javaee7 | Supported JBoss EAP JavaEE 7 APIs plus additional JBoss EAP API jars |
| jboss-eap-javaee7-with-spring3 | jboss-eap-javaee7 plus recommended Spring 3 versions |
| jboss-eap-javaee7-with-spring4 | jboss-eap-javaee7 plus recommended Spring 4 versions |
| jjboss-eap-javaee7-with-tools | jboss-eap-javaee7 plus development tools such as Arquillian |
These BOMs from JBoss EAP 6 have been consolidated into fewer BOMs to make usage simpler for most use cases. The Hibernate, logging, transactions, messaging, and other public API jars are now included in jboss-javaee7-eap instead of a requiring a separate BOM for each case.
The following example uses the 7.0.0.GA version of the jboss-eap-javaee7 BOM.
JBoss EAP Client BOMs
The client BOMs do not create a dependency management section or define dependencies. Instead, they are an aggregate of other BOMs and are used to package the set of dependencies necessary for a remote client use case.
The wildfly-ejb-client-bom and wildfly-jms-client-bom BOMs are managed by the jboss-eap-javaee7 BOM, so there is no need to manage the versions in your project dependencies.
The following is an example of how to add the wildfly-ejb-client-bom and wildfly-jms-client-bom client BOM dependencies to your project.
For more information about Maven Dependencies and BOM POM files, see Apache Maven Project - Introduction to the Dependency Mechanism.
Chapter 3. Class Loading and Modules
3.1. Introduction
3.1.1. Overview of Class Loading and Modules
JBoss EAP uses a modular class loading system for controlling the class paths of deployed applications. This system provides more flexibility and control than the traditional system of hierarchical class loaders. Developers have fine-grained control of the classes available to their applications, and can configure a deployment to ignore classes provided by the application server in favor of their own.
The modular class loader separates all Java classes into logical groups called modules. Each module can define dependencies on other modules in order to have the classes from that module added to its own class path. Because each deployed JAR and WAR file is treated as a module, developers can control the contents of their application’s class path by adding module configuration to their application.
3.1.2. Modules
A module is a logical grouping of classes used for class loading and dependency management. JBoss EAP identifies two different types of modules: static and dynamic. The main difference between the two is how they are packaged.
Static Modules
Static modules are defined in the EAP_HOME/modules/ directory of the application server. Each module exists as a subdirectory, for example EAP_HOME/modules/com/mysql/. Each module directory then contains a slot subdirectory, which defaults to main and contains the module.xml configuration file and any required JAR files. All the application server-provided APIs are provided as static modules, including the Java EE APIs as well as other APIs.
Example MySQL JDBC Driver module.xml File
The module name (com.mysql) must match the directory structure for the module, excluding the slot name (main).
Creating custom static modules can be useful if many applications are deployed on the same server that use the same third-party libraries. Instead of bundling those libraries with each application, a module containing these libraries can be created and installed by an administrator. The applications can then declare an explicit dependency on the custom static modules.
The modules provided in JBoss EAP distributions are located in the system directory within the EAP_HOME/modules directory. This keeps them separate from any modules provided by third parties. Any Red Hat provided products that layer on top of JBoss EAP also install their modules within the system directory.
Users must ensure that custom modules are installed into the EAP_HOME/modules directory, using one directory per module. This ensures that custom versions of modules that already exist in the system directory are loaded instead of the shipped versions. In this way, user-provided modules will take precedence over system modules.
If you use the JBOSS_MODULEPATH environment variable to change the locations in which JBoss EAP searches for modules, then the product will look for a system subdirectory structure within one of the locations specified. A system structure must exist somewhere in the locations specified with JBOSS_MODULEPATH.
Dynamic Modules
Dynamic modules are created and loaded by the application server for each JAR or WAR deployment (or subdeployment in an EAR). The name of a dynamic module is derived from the name of the deployed archive. Because deployments are loaded as modules, they can configure dependencies and be used as dependencies by other deployments.
Modules are only loaded when required. This usually only occurs when an application is deployed that has explicit or implicit dependencies.
3.1.3. Module Dependencies
A module dependency is a declaration that one module requires the classes of one or more other modules in order to function. When JBoss EAP loads a module, the modular class loader parses the dependencies of that module and adds the classes from each dependency to its class path. If a specified dependency cannot be found, the module will fail to load.
See the Modules section for complete details about modules and the modular class loading system.
Deployed applications (a JAR or WAR, for example) are loaded as dynamic modules and make use of dependencies to access the APIs provided by JBoss EAP.
There are two types of dependencies: explicit and implicit.
- Explicit Dependencies
-
Explicit dependencies are declared by the developer in a configuration file. A static module can declare dependencies in its
module.xmlfile. A dynamic module can declare dependencies in the deployment’sMANIFEST.MForjboss-deployment-structure.xmldeployment descriptor. - Implicit Dependencies
Implicit dependencies are added automatically by JBoss EAP when certain conditions or meta-data are found in a deployment. The Java EE 7 APIs supplied with JBoss EAP are examples of modules that are added by detection of implicit dependencies in deployments.
Deployments can also be configured to exclude specific implicit dependencies by using the
jboss-deployment-structure.xmldeployment descriptor file. This can be useful when an application bundles a specific version of a library that JBoss EAP will attempt to add as an implicit dependency.
See the Add an Explicit Module Dependency to a Deployment section for details on using the jboss-deployment-structure.xml deployment descriptor.
Optional Dependencies
Explicit dependencies can be specified as optional. Failure to load an optional dependency will not cause a module to fail to load. However, if the dependency becomes available later it will not be added to the module’s class path. Dependencies must be available when the module is loaded.
Export a Dependency
A module’s class path contains only its own classes and that of its immediate dependencies. A module is not able to access the classes of the dependencies of one of its dependencies. However, a module can specify that an explicit dependency is exported. An exported dependency is provided to any module that depends on the module that exports it.
For example, Module A depends on Module B, and Module B depends on Module C. Module A can access the classes of Module B, and Module B can access the classes of Module C. Module A cannot access the classes of Module C unless:
- Module A declares an explicit dependency on Module C, or
- Module B exports its dependency on Module C.
Global Modules
A global module is a module that JBoss EAP provides as a dependency to every application. Any module can be made global by adding it to JBoss EAP’s list of global modules. It does not require changes to the module.
See the Define Global Modules section of the JBoss EAP Configuration Guide for details.
3.1.3.1. Display Module Dependencies Using the Management CLI
You can use the following management operation to view information about a particular module and its dependencies:
/core-service=module-loading:module-info(name=$MODULE_NAME)
/core-service=module-loading:module-info(name=$MODULE_NAME)Example of module-info output
3.1.4. Class Loading in Deployments
For the purposes of class loading, JBoss EAP treats all deployments as modules. These are called dynamic modules. Class loading behavior varies according to the deployment type.
- WAR Deployment
-
A WAR deployment is considered to be a single module. Classes in the
WEB-INF/libdirectory are treated the same as classes in theWEB-INF/classesdirectory. All classes packaged in the WAR will be loaded with the same class loader. - EAR Deployment
EAR deployments are made up of more than one module, and are defined by the following rules:
-
The
lib/directory of the EAR is a single module called the parent module. - Each WAR deployment within the EAR is a single module.
- Each EJB JAR deployment within the EAR is a single module.
-
The
Subdeployment modules (the WAR and JAR deployments within the EAR) have an automatic dependency on the parent module. However, they do not have automatic dependencies on each other. This is called subdeployment isolation, and can be disabled per deployment, or for the entire application server.
Explicit dependencies between subdeployment modules can be added by the same means as any other module.
3.1.5. Class Loading Precedence
The JBoss EAP modular class loader uses a precedence system to prevent class loading conflicts.
During deployment, a complete list of packages and classes is created for each deployment and each of its dependencies. The list is ordered according to the class loading precedence rules. When loading classes at runtime, the class loader searches this list, and loads the first match. This prevents multiple copies of the same classes and packages within the deployments class path from conflicting with each other.
The class loader loads classes in the following order, from highest to lowest:
Implicit dependencies: These dependencies are automatically added by JBoss EAP, such as the JAVA EE APIs. These dependencies have the highest class loader precedence because they contain common functionality and APIs that are supplied by JBoss EAP.
Refer to Implicit Module Dependencies for complete details about each implicit dependency.
Explicit dependencies: These dependencies are manually added to the application configuration using the application’s
MANIFEST.MFfile or the new optional JBoss deployment descriptorjboss-deployment-structure.xmlfile.Refer to Add an Explicit Module Dependency to a Deployment to learn how to add explicit dependencies.
-
Local resources: These are class files packaged up inside the deployment itself, e.g. from the
WEB-INF/classesorWEB-INF/libdirectories of a WAR file. -
Inter-deployment dependencies: These are dependencies on other deployments in a EAR deployment. This can include classes in the
libdirectory of the EAR or classes defined in other EJB jars.
3.1.6. Dynamic Module Naming Conventions
JBoss EAP loads all deployments as modules, which are named according to the following conventions.
Deployments of WAR and JAR files are named using the following format:
deployment.DEPLOYMENT_NAME
deployment.DEPLOYMENT_NAMECopy to Clipboard Copied! Toggle word wrap Toggle overflow For example,
inventory.warandstore.jarwill have the module names ofdeployment.inventory.waranddeployment.store.jarrespectively.Subdeployments within an Enterprise Archive (EAR) are named using the following format:
deployment.EAR_NAME.SUBDEPLOYMENT_NAME
deployment.EAR_NAME.SUBDEPLOYMENT_NAMECopy to Clipboard Copied! Toggle word wrap Toggle overflow For example, the subdeployment of
reports.warwithin the enterprise archiveaccounts.earwill have the module name ofdeployment.accounts.ear.reports.war.
3.1.7. jboss-deployment-structure.xml
jboss-deployment-structure.xml is an optional deployment descriptor for JBoss EAP. This deployment descriptor provides control over class loading in the deployment.
The XML schema for this deployment descriptor is in /docs/schema/jboss-deployment-structure-1_2.xsd
3.2. Add an Explicit Module Dependency to a Deployment
Explicit module dependencies can be added to applications to add the classes of those modules to the class path of the application at deployment.
JBoss EAP automatically adds some dependencies to deployments. See Implicit Module Dependencies for details.
Prerequisites
- A working software project that you want to add a module dependency to.
- You must know the name of the module being added as a dependency. See Included Modules for the list of static modules included with JBoss EAP. If the module is another deployment then see Dynamic Module Naming to determine the module name.
Dependencies can be configured using two methods:
-
Adding entries to the
MANIFEST.MFfile of the deployment. -
Adding entries to the
jboss-deployment-structure.xmldeployment descriptor.
Add a Dependency Configuration to MANIFEST.MF
Maven projects can be configured to create the required dependency entries in the MANIFEST.MF file.
-
If the project does not have one, create a file called
MANIFEST.MF. For a web application (WAR) add this file to theMETA-INFdirectory. For an EJB archive (JAR) add it to theMETA-INFdirectory. Add a dependencies entry to the
MANIFEST.MFfile with a comma-separated list of dependency module names:Dependencies: org.javassist, org.apache.velocity, org.antlr
Dependencies: org.javassist, org.apache.velocity, org.antlrCopy to Clipboard Copied! Toggle word wrap Toggle overflow To make a dependency optional, append
optionalto the module name in the dependency entry:Dependencies: org.javassist optional, org.apache.velocity
Dependencies: org.javassist optional, org.apache.velocityCopy to Clipboard Copied! Toggle word wrap Toggle overflow A dependency can be exported by appending
exportto the module name in the dependency entry:Dependencies: org.javassist, org.apache.velocity export
Dependencies: org.javassist, org.apache.velocity exportCopy to Clipboard Copied! Toggle word wrap Toggle overflow The
annotationsflag is needed when the module dependency contains annotations that need to be processed during annotation scanning, such as when declaring EJB interceptors. Without this, an EJB interceptor declared in a module cannot be used in a deployment. There are other situations involving annotation scanning when this is needed too.Dependencies: org.javassist, test.module annotations
Dependencies: org.javassist, test.module annotationsCopy to Clipboard Copied! Toggle word wrap Toggle overflow By default items in the
META-INFof a dependency are not accessible. Theservicesdependency makes items fromMETA-INF/servicesaccessible so thatservicesin the modules can be loaded.Dependencies: org.javassist, org.hibernate services
Dependencies: org.javassist, org.hibernate servicesCopy to Clipboard Copied! Toggle word wrap Toggle overflow To scan a
beans.xmlfile and make its resulting beans available to the application, themeta-infdependency can be used.Dependencies: org.javassist, test.module meta-inf
Dependencies: org.javassist, test.module meta-infCopy to Clipboard Copied! Toggle word wrap Toggle overflow
Add a Dependency Configuration to the jboss-deployment-structure.xml
If the application does not have one, create a new file called
jboss-deployment-structure.xmland add it to the project. This file is an XML file with the root element of<jboss-deployment-structure>.<jboss-deployment-structure> </jboss-deployment-structure>
<jboss-deployment-structure> </jboss-deployment-structure>Copy to Clipboard Copied! Toggle word wrap Toggle overflow For a web application (WAR) add this file to the
WEB-INFdirectory. For an EJB archive (JAR) add it to theMETA-INFdirectory.-
Create a
<deployment>element within the document root and a<dependencies>element within that. Within the
<dependencies>node, add a module element for each module dependency. Set thenameattribute to the name of the module.<module name="org.javassist" />
<module name="org.javassist" />Copy to Clipboard Copied! Toggle word wrap Toggle overflow A dependency can be made optional by adding the
optionalattribute to the module entry with the value oftrue. The default value for this attribute isfalse.<module name="org.javassist" optional="true" />
<module name="org.javassist" optional="true" />Copy to Clipboard Copied! Toggle word wrap Toggle overflow A dependency can be exported by adding the
exportattribute to the module entry with the value oftrue. The default value for this attribute isfalse.<module name="org.javassist" export="true" />
<module name="org.javassist" export="true" />Copy to Clipboard Copied! Toggle word wrap Toggle overflow When the module dependency contains annotations that need to be processed during annotation scanning, the
annotationsflag is used.<module name="test.module" annotations="true" />
<module name="test.module" annotations="true" />Copy to Clipboard Copied! Toggle word wrap Toggle overflow The
Servicesdependency specifies whether and howservicesfound in this dependency are used. The default isnone. Specifying a value ofimportfor this attribute is equivalent to adding a filter at the end of the import filter list which includes theMETA-INF/servicespath from the dependency module. Setting a value ofexportfor this attribute is equivalent to the same action on the export filter list.<module name="org.hibernate" services="import" />
<module name="org.hibernate" services="import" />Copy to Clipboard Copied! Toggle word wrap Toggle overflow The
META-INFdependency specifies whether and howMETA-INFentries in this dependency are used. The default isnone. Specifying a value ofimportfor this attribute is equivalent to adding a filter at the end of the import filter list which includes theMETA-INF/**path from the dependency module. Setting a value ofexportfor this attribute is equivalent to the same action on the export filter list.<module name="test.module" meta-inf="import" />
<module name="test.module" meta-inf="import" />Copy to Clipboard Copied! Toggle word wrap Toggle overflow
Example: jboss-deployment-structure.xml with Two Dependencies
JBoss EAP adds the classes from the specified modules to the class path of the application when it is deployed.
Creating a Jandex Index
The annotations flag requires that the module contain a Jandex index. In JBoss EAP 7.0, this is generated automatically. However, to add the index manually, perhaps for backwards compatibility, create a new "index JAR" to add to the module. Use the Jandex JAR to build the index, and then insert it into a new JAR file.
Creating a Jandex index::
Create the index:
java -jar modules/system/layers/base/org/jboss/jandex/main/jandex-jandex-2.0.0.Final-redhat-1.jar $JAR_FILE
java -jar modules/system/layers/base/org/jboss/jandex/main/jandex-jandex-2.0.0.Final-redhat-1.jar $JAR_FILECopy to Clipboard Copied! Toggle word wrap Toggle overflow Create a temporary working space:
mkdir /tmp/META-INF
mkdir /tmp/META-INFCopy to Clipboard Copied! Toggle word wrap Toggle overflow Move the index file to the working directory
mv $JAR_FILE.ifx /tmp/META-INF/jandex.idx
mv $JAR_FILE.ifx /tmp/META-INF/jandex.idxCopy to Clipboard Copied! Toggle word wrap Toggle overflow Option 1: Include the index in a new JAR file
jar cf index.jar -C /tmp META-INF/jandex.idx
jar cf index.jar -C /tmp META-INF/jandex.idxCopy to Clipboard Copied! Toggle word wrap Toggle overflow Then place the JAR in the module directory and edit
module.xmlto add it to the resource roots.Option 2: Add the index to an existing JAR
java -jar /modules/org/jboss/jandex/main/jandex-1.0.3.Final-redhat-1.jar -m $JAR_FILE
java -jar /modules/org/jboss/jandex/main/jandex-1.0.3.Final-redhat-1.jar -m $JAR_FILECopy to Clipboard Copied! Toggle word wrap Toggle overflow
Tell the module import to utilize the annotation index, so that annotation scanning can find the annotations.
Option 1: If you are adding a module dependency using MANIFEST.MF, add
annotationsafter the module name. For example change:Dependencies: test.module, other.module
Dependencies: test.module, other.moduleCopy to Clipboard Copied! Toggle word wrap Toggle overflow to
Dependencies: test.module annotations, other.module
Dependencies: test.module annotations, other.moduleCopy to Clipboard Copied! Toggle word wrap Toggle overflow Option 2: If you are adding a module dependency using
jboss-deployment-structure.xmladdannotations="true"on the module dependency.NoteAn annotation index is required when an application wants to use annotated Java EE components defined in classes within the static module. In JBoss EAP 7.0, annotation indexes for static modules are automatically generated, so you do not need to create them. However, you must tell the module import to use the annotations by adding the dependencies to either the
MANIFEST.MFor thejboss-deployment-structure.xmlfile.
3.3. Generate MANIFEST.MF entries using Maven
Maven projects using the Maven JAR, EJB, or WAR packaging plug-ins can generate a MANIFEST.MF file with a Dependencies entry. This does not automatically generate the list of dependencies, but only creates the MANIFEST.MF file with the details specified in the pom.xml.
Before generating the MANIFEST.MF entries using Maven, you will require:
-
A working Maven project, which is using one of the JAR, EJB, or WAR plug-ins (
maven-jar-plugin,maven-ejb-plugin, ormaven-war-plugin). - You must know the name of the project’s module dependencies. Refer to Included Modules for the list of static modules included with JBoss EAP. If the module is another deployment, then refer to Dynamic Module Naming to determine the module name.
Generate a MANIFEST.MF File Containing Module Dependencies
Add the following configuration to the packaging plug-in configuration in the project’s
pom.xmlfile.Copy to Clipboard Copied! Toggle word wrap Toggle overflow Add the list of module dependencies to the
<Dependencies>element. Use the same format that is used when adding the dependencies to theMANIFEST.MFfile:<Dependencies>org.javassist, org.apache.velocity</Dependencies>
<Dependencies>org.javassist, org.apache.velocity</Dependencies>Copy to Clipboard Copied! Toggle word wrap Toggle overflow The
optionalandexportattributes can also be used here:<Dependencies>org.javassist optional, org.apache.velocity export</Dependencies>
<Dependencies>org.javassist optional, org.apache.velocity export</Dependencies>Copy to Clipboard Copied! Toggle word wrap Toggle overflow Build the project using the Maven assembly goal:
mvn assembly:single
[Localhost ]$ mvn assembly:singleCopy to Clipboard Copied! Toggle word wrap Toggle overflow When the project is built using the assembly goal, the final archive contains a
MANIFEST.MFfile with the specified module dependencies.Example: Configured Module Dependencies in
pom.xmlNoteThe example here shows the WAR plug-in but it also works with the JAR and EJB plug-ins (maven-jar-plugin and maven-ejb-plugin).
Copy to Clipboard Copied! Toggle word wrap Toggle overflow
3.4. Prevent a Module Being Implicitly Loaded
You can configure a deployable application to prevent implicit dependencies from being loaded. This can be useful when an application includes a different version of a library or framework than the one that will be provided by the application server as an implicit dependency.
Prerequisites
- A working software project that you want to exclude an implicit dependency from.
- You must know the name of the module to exclude. Refer to Implicit Module Dependencies for a list of implicit dependencies and their conditions.
Add dependency exclusion configuration to jboss-deployment-structure.xml
If the application does not have one, create a new file called
jboss-deployment-structure.xmland add it to the project. This is an XML file with the root element of<jboss-deployment-structure>.<jboss-deployment-structure> </jboss-deployment-structure>
<jboss-deployment-structure> </jboss-deployment-structure>Copy to Clipboard Copied! Toggle word wrap Toggle overflow For a web application (WAR) add this file to the
WEB-INFdirectory. For an EJB archive (JAR) add it to theMETA-INFdirectory.Create a
<deployment>element within the document root and an<exclusions>element within that.<deployment> <exclusions> </exclusions> </deployment>
<deployment> <exclusions> </exclusions> </deployment>Copy to Clipboard Copied! Toggle word wrap Toggle overflow Within the exclusions element, add a
<module>element for each module to be excluded. Set thenameattribute to the name of the module.<module name="org.javassist" />
<module name="org.javassist" />Copy to Clipboard Copied! Toggle word wrap Toggle overflow Example: Excluding Two Modules
Copy to Clipboard Copied! Toggle word wrap Toggle overflow
3.5. Exclude a Subsystem from a Deployment
Excluding a subsystem provides the same effect as removing the subsystem, but it applies only to a single deployment. You can exclude a subsystem from a deployment by editing the jboss-deployment-structure.xml configuration file.
Exclude a Subsystem
-
Edit the
jboss-deployment-structure.xmlfile. Add the following XML inside the
<deployment>tags:<exclude-subsystems> <subsystem name="SUBSYSTEM_NAME" /> </exclude-subsystems>
<exclude-subsystems> <subsystem name="SUBSYSTEM_NAME" /> </exclude-subsystems>Copy to Clipboard Copied! Toggle word wrap Toggle overflow -
Save the
jboss-deployment-structure.xmlfile.
The subsystem’s deployment unit processors will no longer run on the deployment.
Example: jboss-deployment-structure.xml File
3.6. Use the Class Loader Programmatically in a Deployment
3.6.1. Programmatically Load Classes and Resources in a Deployment
You can programmatically find or load classes and resources in your application code. The method you choose will depend on a number of factors. This topic describes the methods available and provides guidelines for when to use them.
Load a Class Using the Class.forName() Method
You can use the Class.forName() method to programmatically load and initialize classes. This method has two signatures:
- Class.forName(String className): This signature takes only one parameter, the name of the class you need to load. With this method signature, the class is loaded by the class loader of the current class and initializes the newly loaded class by default.
- Class.forName(String className, boolean initialize, ClassLoader loader): This signature expects three parameters: the class name, a boolean value that specifies whether to initialize the class, and the ClassLoader that should load the class.
The three argument signature is the recommended way to programmatically load a class. This signature allows you to control whether you want the target class to be initialized upon load. It is also more efficient to obtain and provide the class loader because the JVM does not need to examine the call stack to determine which class loader to use. Assuming the class containing the code is named CurrentClass, you can obtain the class’s class loader using CurrentClass.class.getClassLoader() method.
The following example provides the class loader to load and initialize the TargetClass class:
Class<?> targetClass = Class.forName("com.myorg.util.TargetClass", true, CurrentClass.class.getClassLoader());
Class<?> targetClass = Class.forName("com.myorg.util.TargetClass", true, CurrentClass.class.getClassLoader());Find All Resources with a Given Name
If you know the name and path of a resource, the best way to load it directly is to use the standard Java development kit Class or ClassLoader API.
Load a Single Resource: To load a single resource located in the same directory as your class or another class in your deployment, you can use the
Class.getResourceAsStream()method.InputStream inputStream = CurrentClass.class.getResourceAsStream("targetResourceName");InputStream inputStream = CurrentClass.class.getResourceAsStream("targetResourceName");Copy to Clipboard Copied! Toggle word wrap Toggle overflow Load All Instances of a Single Resource: To load all instances of a single resource that are visible to your deployment’s class loader, use the
Class.getClassLoader().getResources(String resourceName)method, whereresourceNameis the fully qualified path of the resource. This method returns an Enumeration of allURLobjects for resources accessible by the class loader with the given name. You can then iterate through the array of URLs to open each stream using theopenStream()method.The following example loads all instances of a resource and iterates through the results.
Copy to Clipboard Copied! Toggle word wrap Toggle overflow
Because the URL instances are loaded from local storage, it is not necessary to use the openConnection() or other related methods. Streams are much simpler to use and minimize the complexity of the code.
Load a Class File From the Class Loader: If a class has already been loaded, you can load the class file that corresponds to that class using the following syntax:
InputStream inputStream = CurrentClass.class.getResourceAsStream(TargetClass.class.getSimpleName() + ".class");
InputStream inputStream = CurrentClass.class.getResourceAsStream(TargetClass.class.getSimpleName() + ".class");Copy to Clipboard Copied! Toggle word wrap Toggle overflow If the class is not yet loaded, you must use the class loader and translate the path:
String className = "com.myorg.util.TargetClass" InputStream inputStream = CurrentClass.class.getClassLoader().getResourceAsStream(className.replace('.', '/') + ".class");String className = "com.myorg.util.TargetClass" InputStream inputStream = CurrentClass.class.getClassLoader().getResourceAsStream(className.replace('.', '/') + ".class");Copy to Clipboard Copied! Toggle word wrap Toggle overflow
3.6.2. Programmatically Iterate Resources in a Deployment
The JBoss Modules library provides several APIs for iterating all deployment resources. The JavaDoc for the JBoss Modules API is located here: http://docs.jboss.org/jbossmodules/1.3.0.Final/api/. To use these APIs, you must add the following dependency to the MANIFEST.MF:
Dependencies: org.jboss.modules
Dependencies: org.jboss.modulesIt is important to note that while these APIs provide increased flexibility, they will also run much more slowly than a direct path lookup.
This topic describes some of the ways you can programmatically iterate through resources in your application code.
List Resources Within a Deployment and Within All Imports: There are times when it is not possible to look up resources by the exact path. For example, the exact path may not be known or you may need to examine more than one file in a given path. In this case, the JBoss Modules library provides several APIs for iterating all deployment resources. You can iterate through resources in a deployment by utilizing one of two methods.
Iterate All Resources Found in a Single Module: The
ModuleClassLoader.iterateResources()method iterates all the resources within this module class loader. This method takes two arguments: the starting directory name to search and a boolean that specifies whether it should recurse into subdirectories.The following example demonstrates how to obtain the ModuleClassLoader and obtain the iterator for resources in the
bin/directory, recursing into subdirectories.ModuleClassLoader moduleClassLoader = (ModuleClassLoader) TargetClass.class.getClassLoader(); Iterator<Resource> mclResources = moduleClassLoader.iterateResources("bin",true);ModuleClassLoader moduleClassLoader = (ModuleClassLoader) TargetClass.class.getClassLoader(); Iterator<Resource> mclResources = moduleClassLoader.iterateResources("bin",true);Copy to Clipboard Copied! Toggle word wrap Toggle overflow The resultant iterator may be used to examine each matching resource and query its name and size (if available), open a readable stream, or acquire a URL for the resource.
Iterate All Resources Found in a Single Module and Imported Resources: The
Module.iterateResources()method iterates all the resources within this module class loader, including the resources that are imported into the module. This method returns a much larger set than the previous method. This method requires an argument, which is a filter that narrows the result to a specific pattern. Alternatively, PathFilters.acceptAll() can be supplied to return the entire set.The following example demonstrates how to find the entire set of resources in this module, including imports.
ModuleClassLoader moduleClassLoader = (ModuleClassLoader) TargetClass.class.getClassLoader(); Module module = moduleClassLoader.getModule(); Iterator<Resource> moduleResources = module.iterateResources(PathFilters.acceptAll());
ModuleClassLoader moduleClassLoader = (ModuleClassLoader) TargetClass.class.getClassLoader(); Module module = moduleClassLoader.getModule(); Iterator<Resource> moduleResources = module.iterateResources(PathFilters.acceptAll());Copy to Clipboard Copied! Toggle word wrap Toggle overflow
Find All Resources That Match a Pattern: If you need to find only specific resources within your deployment or within your deployment’s full import set, you need to filter the resource iteration. The JBoss Modules filtering APIs give you several tools to accomplish this.
-
Examine the Full Set of Dependencies: If you need to examine the full set of dependencies, you can use the
Module.iterateResources()method’sPathFilterparameter to check the name of each resource for a match. -
Examine Deployment Dependencies: If you need to look only within the deployment, use the
ModuleClassLoader.iterateResources()method. However, you must use additional methods to filter the resultant iterator. ThePathFilters.filtered()method can provide a filtered view of a resource iterator this case. ThePathFiltersclass includes many static methods to create and compose filters that perform various functions, including finding child paths or exact matches, or matching an Ant-style "glob" pattern.
-
Examine the Full Set of Dependencies: If you need to examine the full set of dependencies, you can use the
Additional Code Examples For Filtering Resouces: The following examples demonstrate how to filter resources based on different criteria.
Example: Find All Files Named
messages.propertiesin Your DeploymentModuleClassLoader moduleClassLoader = (ModuleClassLoader) TargetClass.class.getClassLoader(); Iterator<Resource> mclResources = PathFilters.filtered(PathFilters.match("**/messages.properties"), moduleClassLoader.iterateResources("", true));ModuleClassLoader moduleClassLoader = (ModuleClassLoader) TargetClass.class.getClassLoader(); Iterator<Resource> mclResources = PathFilters.filtered(PathFilters.match("**/messages.properties"), moduleClassLoader.iterateResources("", true));Copy to Clipboard Copied! Toggle word wrap Toggle overflow Example: Find All Files Named
messages.propertiesin Your Deployment and ImportsModuleClassLoader moduleClassLoader = (ModuleClassLoader) TargetClass.class.getClassLoader(); Module module = moduleClassLoader.getModule(); Iterator<Resource> moduleResources = module.iterateResources(PathFilters.match("**/message.properties"));ModuleClassLoader moduleClassLoader = (ModuleClassLoader) TargetClass.class.getClassLoader(); Module module = moduleClassLoader.getModule(); Iterator<Resource> moduleResources = module.iterateResources(PathFilters.match("**/message.properties"));Copy to Clipboard Copied! Toggle word wrap Toggle overflow Example: Find All Files Inside Any Directory Named
my-resourcesin Your DeploymentModuleClassLoader moduleClassLoader = (ModuleClassLoader) TargetClass.class.getClassLoader(); Iterator<Resource> mclResources = PathFilters.filtered(PathFilters.match("**/my-resources/**"), moduleClassLoader.iterateResources("", true));ModuleClassLoader moduleClassLoader = (ModuleClassLoader) TargetClass.class.getClassLoader(); Iterator<Resource> mclResources = PathFilters.filtered(PathFilters.match("**/my-resources/**"), moduleClassLoader.iterateResources("", true));Copy to Clipboard Copied! Toggle word wrap Toggle overflow Example: Find All Files Named
messagesorerrorsin Your Deployment and ImportsModuleClassLoader moduleClassLoader = (ModuleClassLoader) TargetClass.class.getClassLoader(); Module module = moduleClassLoader.getModule(); Iterator<Resource> moduleResources = module.iterateResources(PathFilters.any(PathFilters.match("**/messages"), PathFilters.match("**/errors"));ModuleClassLoader moduleClassLoader = (ModuleClassLoader) TargetClass.class.getClassLoader(); Module module = moduleClassLoader.getModule(); Iterator<Resource> moduleResources = module.iterateResources(PathFilters.any(PathFilters.match("**/messages"), PathFilters.match("**/errors"));Copy to Clipboard Copied! Toggle word wrap Toggle overflow Example: Find All Files in a Specific Package in Your Deployment
ModuleClassLoader moduleClassLoader = (ModuleClassLoader) TargetClass.class.getClassLoader(); Iterator<Resource> mclResources = moduleClassLoader.iterateResources("path/form/of/packagename", false);ModuleClassLoader moduleClassLoader = (ModuleClassLoader) TargetClass.class.getClassLoader(); Iterator<Resource> mclResources = moduleClassLoader.iterateResources("path/form/of/packagename", false);Copy to Clipboard Copied! Toggle word wrap Toggle overflow
3.7. Class Loading and Subdeployments
3.7.1. Modules and Class Loading in Enterprise Archives
Enterprise Archives (EAR) are not loaded as a single module like JAR or WAR deployments. They are loaded as multiple unique modules.
The following rules determine what modules exist in an EAR:
-
The contents of the
lib/directory in the root of the EAR archive is a module. This is called the parent module. - Each WAR and EJB JAR subdeployment is a module. These modules have the same behavior as any other module as well as implicit dependencies on the parent module.
- Subdeployments have implicit dependencies on the parent module and any other non-WAR subdeployments.
The implicit dependencies on non-WAR subdeployments occur because JBoss EAP has subdeployment class loader isolation disabled by default. Dependencies on the parent module persist, regardless of subdeployment class loader isolation.
No subdeployment ever gains an implicit dependency on a WAR subdeployment. Any subdeployment can be configured with explicit dependencies on another subdeployment as would be done for any other module.
Subdeployment class loader isolation can be enabled if strict compatibility is required. This can be enabled for a single EAR deployment or for all EAR deployments. The Java EE specification recommends that portable applications should not rely on subdeployments being able to access each other unless dependencies are explicitly declared as Class-Path entries in the MANIFEST.MF file of each subdeployment.
3.7.2. Subdeployment Class Loader Isolation
Each subdeployment in an Enterprise Archive (EAR) is a dynamic module with its own class loader. By default a subdeployment can access the resources of other subdeployments.
If a subdeployment is not to be allowed to access the resources of other subdeployments, strict subdeployment isolation can be enabled.
3.7.3. Enable Subdeployment Class Loader Isolation Within a EAR
This task shows you how to enable subdeployment class loader isolation in an EAR deployment by using a special deployment descriptor in the EAR. This does not require any changes to be made to the application server and does not affect any other deployments.
Even when subdeployment class loader isolation is disabled it is not possible to add a WAR deployment as a dependency.
Add the deployment descriptor file: Add the
jboss-deployment-structure.xmldeployment descriptor file to theMETA-INFdirectory of the EAR if it doesn’t already exist and add the following content:<jboss-deployment-structure> </jboss-deployment-structure>
<jboss-deployment-structure> </jboss-deployment-structure>Copy to Clipboard Copied! Toggle word wrap Toggle overflow Add the <ear-subdeployments-isolated> element: Add the
<ear-subdeployments-isolated>element to thejboss-deployment-structure.xmlfile if it doesn’t already exist with the content oftrue.<ear-subdeployments-isolated>true</ear-subdeployments-isolated>
<ear-subdeployments-isolated>true</ear-subdeployments-isolated>Copy to Clipboard Copied! Toggle word wrap Toggle overflow
Result
Subdeployment class loader isolation will now be enabled for this EAR deployment. This means that the subdeployments of the EAR will not have automatic dependencies on each of the non-WAR subdeployments.
3.7.4. Configuring Session Sharing between Subdeployments in Enterprise Archives
JBoss EAP provides the ability to configure enterprise archives (EARs) to share sessions between WAR module subdeployments contained in the EAR. This functionality is disabled by default and must be explicitly enabled in the META-INF/jboss-all.xml file in the EAR.
Since this feature is not a standard servlet feature, your applications may not be portable if this functionality is enabled.
To enable session sharing between WARs within an EAR, you need to declare a shared-session-config element in the META-INF/jboss-all.xml of the EAR:
Example: META-INF/jboss-all.xml
The shared-session-config element is used to configure the shared session manager for all WARs within the EAR. If the shared-session-config element is present, all WARs within the EAR will share the same session manager. Changes made here will affect all the WARs contained within the EAR.
3.8. Deploy Tag Library Descriptors (TLDs) in a Custom Module
If you have multiple applications that use common Tag Library Descriptors (TLDs), it may be useful to separate the TLDs from the applications so that they are located in one central and unique location. This enables easier additions and updates to TLDs without necessarily having to update each individual application that uses them.
This can be done by creating a custom JBoss EAP module that contains the TLD JARs, and declaring a dependency on that module in the applications.
Ensure that at least one JAR contains TLDs and the TLDs are packed in META-INF.
Deploy TLDs in a Custom Module
Using the management CLI, connect to your JBoss EAP instance and execute the following command to create the custom module containing the TLD JAR:
module add --name=MyTagLibs --resources=/path/to/TLDarchive.jar
module add --name=MyTagLibs --resources=/path/to/TLDarchive.jarCopy to Clipboard Copied! Toggle word wrap Toggle overflow ImportantUsing the
modulemanagement CLI command to add and remove modules is provided as technology preview only. This command is not appropriate for use in a managed domain or when connecting to the management CLI remotely. Modules should be added and removed manually in a production environment. For more information, see the Create a Custom Module Manually and Remove a Custom Module Manually sections of the JBoss EAP Configuration Guide.If the TLDs are packaged with classes that require dependencies, use the
--dependencies=option to ensure that you specify those dependencies when creating the custom module.When creating the module, you can specify multiple JAR resources by separating each one with the file system-specific separator for your system.
-
For linux -
:. Example,--resources=<path-to-jar>:<path-to-another-jar> For Windows -
;. Example,--resources=<path-to-jar>;<path-to-another-jar>Note--resources-
It is required unless
--module-xmlis used. It lists file system paths, usually JAR files, separated by a file system-specific path separator, for examplejava.io.File.pathSeparatorChar. The files specified will be copied to the created module’s directory. --resource-delimiter-
It is an optional user-defined path separator for the resources argument. If this argument is present, the command parser will use the value here instead of the file system-specific path separator. This allows the
modulescommand to be used in cross-platform scripts.
-
For linux -
- In your applications, declare a dependency on the new MyTagLibs custom module using one of the methods described in Add an Explicit Module Dependency to a Deployment.
Ensure that you also import META-INF when declaring the dependency. For example, for MANIFEST.MF:
Dependencies: com.MyTagLibs meta-inf
Dependencies: com.MyTagLibs meta-inf
Or, for jboss-deployment-structure.xml, use the meta-inf attribute.
3.9. Reference
3.9.1. Implicit Module Dependencies
The following table lists the modules that are automatically added to deployments as dependencies and the conditions that trigger the dependency.
| Subsystem Responsible for Adding the Dependency | Package Dependencies That Are Always Added | Package Dependencies That Are Conditionally Added | Conditions That Trigger the Addition of the Dependency |
|---|---|---|---|
| Application Client |
| ||
| Batch |
| ||
| Bean Validation |
| ||
| Core Server |
| ||
| DriverDependenciesProcessor |
| ||
| EE |
| ||
| EJB 3 |
|
| |
| IIOP |
| ||
| JAX-RS (RESTEasy) |
|
| The presence of JAX-RS annotations in the deployment. |
| JCA |
|
| The deployment of a resource adapter (RAR) archive. |
| JPA (Hibernate) |
|
|
The presence of an
JBoss EAP maps persistence provider names to module names. If you name a specific provider in the |
| JSF (Java Server Faces) |
| Added to EAR applications.
Added to WAR applications only if the | |
| JSR-77 |
| ||
| Logging |
| ||
| |
| ||
| Messaging |
|
| |
| PicketLink Federation |
| ||
| Pojo |
| ||
| SAR |
|
The deployment of a SAR archive that has a | |
| Seam2 |
| . | |
| Security |
| ||
| ServiceActivator |
| ||
| Transactions |
|
| |
| Undertow |
|
| |
| Web Services |
|
| If it is not application client type, then it will add the conditional dependencies. |
| Weld (CDI) |
|
|
The presence of a |
3.9.2. Included Modules
For the complete listing of the included modules and whether they are supported, see Red Hat JBoss Enterprise Application Platform 7 Included Modules on the Red Hat Customer Portal.
3.9.3. JBoss Deployment Structure Deployment Descriptor Reference
The key tasks that can be performed using this deployment descriptor are:
- Defining explicit module dependencies.
- Preventing specific implicit dependencies from loading.
- Defining additional modules from the resources of that deployment.
- Changing the subdeployment isolation behavior in that EAR deployment.
- Adding additional resource roots to a module in an EAR.
Chapter 4. Logging
4.1. About Logging
Logging is the practice of recording a series of messages from an application that provides a record (or log) of the application’s activities.
Log messages provide important information for developers when debugging an application and for system administrators maintaining applications in production.
Most modern Java logging frameworks also include details such as the exact time and the origin of the message.
4.1.1. Supported Application Logging Frameworks
JBoss LogManager supports the following logging frameworks:
- JBoss Logging (included with JBoss EAP)
- Apache Commons Logging
- Simple Logging Facade for Java (SLF4J)
- Apache log4j
- Java SE Logging (java.util.logging)
JBoss LogManager supports the following APIs:
- JBoss Logging
- commons-logging
- SLF4J
- Log4j
- java.util.logging
JBoss LogManager also supports the following SPIs:
- java.util.logging Handler
- Log4j Appender
If you are using the Log4j API and a Log4J Appender, then Objects will be converted to string before being passed.
4.2. Logging with the JBoss Logging Framework
4.2.1. About JBoss Logging
JBoss Logging is the application logging framework that is included in JBoss EAP. It provides an easy way to add logging to an application. You add code to your application that uses the framework to send log messages in a defined format. When the application is deployed to an application server, these messages can be captured by the server and displayed or written to file according to the server’s configuration.
JBoss Logging provides the following features:
-
An innovative, easy-to-use typed logger. A typed logger is a logger interface annotated with
org.jboss.logging.annotations.MessageLogger. For examples, see Creating Internationalized Loggers, Messages and Exceptions. - Full support for internationalization and localization. Translators work with message bundles in properties files while developers work with interfaces and annotations. For details, see Internationalization and Localization.
- Build-time tooling to generate typed loggers for production and runtime generation of typed loggers for development.
4.2.2. Add Logging to an Application with JBoss Logging
This procedure demonstrates how to add logging to an application using JBoss Logging.
If you use Maven to build your project, you must configure Maven to use the JBoss EAP Maven repository. For more information, see Configure the JBoss EAP Maven Repository.
The JBoss Logging JAR files must be in the build path for your application.
-
If you build using Red Hat JBoss Developer Studio, select
Propertiesfrom theProjectmenu, then selectTargeted Runtimesand ensure the runtime for JBoss EAP is checked. If you use Maven to build your project, make sure you add the
jboss-loggingdependency to your project’spom.xmlfile for access to JBoss Logging framework:Copy to Clipboard Copied! Toggle word wrap Toggle overflow The jboss-javaee-7.0 BOM manages the version of
jboss-logging. For more details, see Manage Project Dependencies. See theloggingquickstart for a working example of logging in an application.
You do not need to include the JARs in your built application because JBoss EAP provides them to deployed applications.
-
If you build using Red Hat JBoss Developer Studio, select
For each class to which you want to add logging:
Add the import statements for the JBoss Logging class namespaces that you will be using. At a minimum you will need the following import:
import org.jboss.logging.Logger;
import org.jboss.logging.Logger;Copy to Clipboard Copied! Toggle word wrap Toggle overflow Create an instance of
org.jboss.logging.Loggerand initialize it by calling the static methodLogger.getLogger(Class). It is recommended to create this as a single instance variable for each class.private static final Logger LOGGER = Logger.getLogger(HelloWorld.class);
private static final Logger LOGGER = Logger.getLogger(HelloWorld.class);Copy to Clipboard Copied! Toggle word wrap Toggle overflow
Call the
Loggerobject methods in your code where you want to send log messages.The
Loggerhas many different methods with different parameters for different types of messages. Use the following methods to send a log message with the corresponding log level and themessageparameter as a string:LOGGER.debug("This is a debugging message."); LOGGER.info("This is an informational message."); LOGGER.error("Configuration file not found."); LOGGER.trace("This is a trace message."); LOGGER.fatal("A fatal error occurred.");LOGGER.debug("This is a debugging message."); LOGGER.info("This is an informational message."); LOGGER.error("Configuration file not found."); LOGGER.trace("This is a trace message."); LOGGER.fatal("A fatal error occurred.");Copy to Clipboard Copied! Toggle word wrap Toggle overflow For the complete list of JBoss Logging methods, see the Logging API documentation.
The following example loads customized configuration for an application from a properties file. If the specified file is not found, an ERROR level log message is recorded.
Example: Application Logging with JBoss Logging
4.3. Per-deployment Logging
Per-deployment logging allows a developer to configure the logging configuration for their application in advance. When the application is deployed, logging begins according to the defined configuration. The log files created through this configuration contain information only about the behavior of the application.
If the per-deployment logging configuration is not done, the configuration from logging subsystem is used for all the applications as well as the server.
This approach has advantages and disadvantages over using system-wide logging. An advantage is that the administrator of the JBoss EAP instance does not need to configure any other logging than the server logging. A disadvantage is that the per-deployment logging configuration is read only on server startup, and so cannot be changed at runtime.
4.3.1. Add Per-deployment Logging to an Application
To configure per-deployment logging to an application, add the logging.properties configuration file to your deployment. This configuration file is recommended because it can be used with any logging facade where JBoss Log Manager is the underlying log manager.
The directory into which the configuration file is added depends on the deployment method:
-
For EAR deployments, copy the logging configuration file to the
META-INFdirectory. -
For WAR or JAR deployments, copy the logging configuration file to the
WEB-INF/classesdirectory.
If you are using Simple Logging Facade for Java (SLF4J) or Apache log4j, the logging.properties configuration file is suitable. If you are using Apache log4j appenders then the configuration file log4j.properties is required. The configuration file jboss-logging.properties is supported only for legacy deployments.
Configuring logging.properties
The logging.properties file is used when the server boots, until the logging subsystem is started. If the logging subsystem is not included in your configuration, then the server uses the configuration in this file as the logging configuration for the entire server.
JBoss Log Manager Configuration Options
Logger options
-
loggers=<category>[,<category>,…]- Specify a comma-separated list of logger categories to be configured. Any categories not listed here will not be configured from the following properties. -
logger.<category>.level=<level>- Specify the level for a category. The level can be one of the valid levels. If unspecified, the level of the nearest parent will be inherited. -
logger.<category>.handlers=<handler>[,<handler>,…]- Specify a comma-separated list of the handler names to be attached to this logger. The handlers must be configured in the same properties file. -
logger.<category>.filter=<filter>- Specify a filter for a category. -
logger.<category>.useParentHandlers=(true|false)- Specify whether log messages should cascade up to parent handlers. The default value istrue.
Handler options
-
handler.<name>=<className>- Specify the class name of the handler to instantiate. This option is mandatory. -
handler.<name>.level=<level>- Restrict the level of this handler. If unspecified, the default value of ALL is retained. -
handler.<name>.encoding=<encoding>- Specify the character encoding, if it is supported by this handler type. If not specified, a handler-specific default is used. -
handler.<name>.errorManager=<name>- Specify the name of the error manager to use. The error manager must be configured in the same properties file. If unspecified, no error manager is configured. -
handler.<name>.filter=<name>- Specify a filter for a category. See the filter expressions for details on defining a filter. -
handler.<name>.formatter=<name>- Specify the name of the formatter to use, if it is supported by this handler type. The formatter must be configured in the same properties file. If not specified, messages will not be logged for most handler types. -
handler.<name>.properties=<property>[,<property>,…]- Specify a list of JavaBean-style properties to additionally configure. A rudimentary type introspection is done to ascertain the appropriate conversion for the given property. -
handler.<name>.constructorProperties=<property>[,<property>,…]- Specify a list of properties that should be used as construction parameters. A rudimentary type introspection is done to ascertain the appropriate conversion for the given property. -
handler.<name>.<property>=<value>- Set the value of the named property.
For further information, see Log Handler Attributes in the JBoss EAP Configuration Guide.
Error manager options
-
errorManager.<name>=<className>- Specify the class name of the error manager to instantiate. This option is mandatory. -
errorManager.<name>.properties=<property>[,<property>,…]- Specify a list of JavaBean-style properties to additionally configure. A rudimentary type introspection is done to ascertain the appropriate conversion for the given property. -
errorManager.<name>.<property>=<value>- Set the value of the named property.
Formatter options
-
formatter.<name>=<className>- Specify the class name of the formatter to instantiate. This option is mandatory. -
formatter.<name>.properties=<property>[,<property>,…]- Specify a list of JavaBean-style properties to additionally configure. A rudimentary type introspection is done to ascertain the appropriate conversion for the given property. -
formatter.<name>.constructorProperties=<property>[,<property>,…]- Specify a list of properties that should be used as construction parameters. A rudimentary type introspection is done to ascertain the appropriate conversion for the given property. -
formatter.<name>.<property>=<value>- Set the value of the named property.
The following example shows the minimal configuration for logging.properties file that will log to the console.
Example: Minimal logging.properties Configuration
4.4. Logging Profiles
Logging profiles are independent sets of logging configurations that can be assigned to deployed applications. As with the regular logging subsystem, a logging profile can define handlers, categories, and a root logger, but it cannot refer to configurations in other profiles or the main logging subsystem. The design of logging profiles mimics the logging subsystem for ease of configuration.
Logging profiles allow administrators to create logging configurations that are specific to one or more applications without affecting any other logging configurations. Because each profile is defined in the server configuration, the logging configuration can be changed without requiring that the affected applications be redeployed. However, logging profiles cannot be configured using the management console. For more information, see Configure a Logging Profile in the JBoss EAP Configuration Guide.
Each logging profile can have:
- A unique name (required)
- Any number of log handlers
- Any number of log categories
- Up to one root logger
An application can specify a logging profile to use in its MANIFEST.MF file, using the Logging-Profile attribute.
4.4.1. Specify a Logging Profile in an Application
An application specifies the logging profile to use in its MANIFEST.MF file.
You must know the name of the logging profile that has been set up on the server for this application to use.
To add a logging profile configuration to an application, edit the MANIFEST.MF file.
If your application does not have a
MANIFEST.MFfile, create one with the following content to specify the logging profile name.Manifest-Version: 1.0 Logging-Profile: LOGGING_PROFILE_NAME
Manifest-Version: 1.0 Logging-Profile: LOGGING_PROFILE_NAMECopy to Clipboard Copied! Toggle word wrap Toggle overflow If your application already has a
MANIFEST.MFfile, add the following line to specify the logging profile name.Logging-Profile: LOGGING_PROFILE_NAME
Logging-Profile: LOGGING_PROFILE_NAMECopy to Clipboard Copied! Toggle word wrap Toggle overflow
If you are using Maven and the maven-war-plugin, put your MANIFEST.MF file in src/main/resources/META-INF/ and add the following configuration to your pom.xml file:
When the application is deployed, it will use the configuration in the specified logging profile for its log messages.
For an example of how to configure a logging profile and the application using it, see Example Logging Profile Configuration in the JBoss EAP Configuration Guide.
4.5. Internationalization and Localization
4.5.1. Introduction
4.5.1.1. About Internationalization
Internationalization is the process of designing software so that it can be adapted to different languages and regions without engineering changes.
4.5.1.2. About Localization
Localization is the process of adapting internationalized software for a specific region or language by adding locale-specific components and translations of text.
4.5.2. JBoss Logging Tools Internationalization and Localization
JBoss Logging Tools is a Java API that provides support for the internationalization and localization of log messages, exception messages, and generic strings. In addition to providing a mechanism for translation, JBoss Logging Tools also provides support for unique identifiers for each log message.
Internationalized messages and exceptions are created as method definitions inside of interfaces annotated using org.jboss.logging.annotations annotations. Implementing the interfaces is not necessary; JBoss Logging Tools does this at compile time. Once defined, you can use these methods to log messages or obtain exception objects in your code.
Internationalized logging and exception interfaces created with JBoss Logging Tools can be localized by creating a properties file for each bundle containing the translations for a specific language and region. JBoss Logging Tools can generate template property files for each bundle that can then be edited by a translator.
JBoss Logging Tools creates an implementation of each bundle for each corresponding translations property file in your project. All you have to do is use the methods defined in the bundles and JBoss Logging Tools ensures that the correct implementation is invoked for your current regional settings.
Message IDs and project codes are unique identifiers that are prepended to each log message. These unique identifiers can be used in documentation to make it easy to find information about log messages. With adequate documentation, the meaning of a log message can be determined from the identifiers regardless of the language that the message was written in.
The JBoss Logging Tools includes support for the following features:
- MessageLogger
-
This interface in the
org.jboss.logging.annotationspackage is used to define internationalized log messages. A message logger interface is annotated with@MessageLogger. - MessageBundle
-
This interface can be used to define generic translatable messages and Exception objects with internationalized messages. A message bundle is not used for creating log messages. A message bundle interface is annotated with
@MessageBundle. - Internationalized Log Messages
These log messages are created by defining a method in a
MessageLogger. The method must be annotated with the@LogMessageand@Messageannotations and must specify the log message using the value attribute of@Message. Internationalized log messages are localized by providing translations in a properties file.JBoss Logging Tools generates the required logging classes for each translation at compile time and invokes the correct methods for the current locale at runtime.
- Internationalized Exceptions
- An internationalized exception is an exception object returned from a method defined in a MessageBundle. These message bundles can be annotated to define a default exception message. The default message is replaced with a translation if one is found in a matching properties file for the current locale. Internationalized exceptions can also have project codes and message IDs assigned to them.
- Internationalized Messages
-
An internationalized message is a string returned from a method defined in a
MessageBundle. Message bundle methods that return Java String objects can be annotated to define the default content of that string, known as the message. The default message is replaced with a translation if one is found in a matching properties file for the current locale. - Translation Properties Files
- Translation properties files are Java properties files that contain the translations of messages from one interface for one locale, country, and variant. Translation properties files are used by the JBoss Logging Tools to generate the classes that return the messages.
- JBoss Logging Tools Project Codes
Project codes are strings of characters that identify groups of messages. They are displayed at the beginning of each log message, prepended to the message ID. Project codes are defined with the projectCode attribute of the
@MessageLoggerannotation.NoteFor a complete list of the new log message project code prefixes, see the Project Codes used in JBoss EAP 7.0.
- JBoss Logging Tools Message IDs
-
Message IDs are numbers that uniquely identify a log message when combined with a project code. Message IDs are displayed at the beginning of each log message, appended to the project code for the message. Message IDs are defined with the ID attribute of the
@Messageannotation.
The logging-tools quickstart that ships with JBoss EAP is a simple Maven project that provides a working example of many of the features of JBoss Logging Tools. The code examples that follow are taken from the logging-tools quickstart.
4.5.3. Creating Internationalized Loggers, Messages and Exceptions
4.5.3.1. Create Internationalized Log Messages
You can use JBoss Logging Tools to create internationalized log messages by creating MessageLogger interfaces.
This topic does not cover all optional features or the localization of the log messages.
If you have not yet done so, configure your Maven settings to use the JBoss EAP Maven repository.
For more information, see Configure the JBoss EAP Maven Repository Using the Maven Settings.
Configure the project’s
pom.xmlfile to use JBoss Logging Tools.For details, see JBoss Logging Tools Maven Configuration.
Create a message logger interface by adding a Java interface to your project to contain the log message definitions.
Name the interface to describe the log messages it will define. The log message interface has the following requirements:
-
It must be annotated with
@org.jboss.logging.annotations.MessageLogger. -
Optionally, it can extend
org.jboss.logging.BasicLogger. The interface must define a field that is a message logger of the same type as the interface. Do this with the
getMessageLogger()method of@org.jboss.logging.Logger.Example: Creating a Message Logger
Copy to Clipboard Copied! Toggle word wrap Toggle overflow
-
It must be annotated with
Add a method definition to the interface for each log message.
Name each method descriptively for the log message that it represents. Each method has the following requirements:
-
The method must return
void. -
It must be annotated with the
@org.jboss.logging.annotation.LogMessageannotation. -
It must be annotated with the
@org.jboss.logging.annotations.Messageannotation. -
The default log level is
INFO. The value attribute of
@org.jboss.logging.annotations.Messagecontains the default log message, which is used if no translation is available.@LogMessage @Message(value = "Customer query failed, Database not available.") void customerQueryFailDBClosed();
@LogMessage @Message(value = "Customer query failed, Database not available.") void customerQueryFailDBClosed();Copy to Clipboard Copied! Toggle word wrap Toggle overflow
-
The method must return
Invoke the methods by adding the calls to the interface methods in your code where the messages must be logged from.
Creating implementations of the interfaces is not necessary, the annotation processor does this for you when the project is compiled.
AccountsLogger.LOGGER.customerQueryFailDBClosed();
AccountsLogger.LOGGER.customerQueryFailDBClosed();Copy to Clipboard Copied! Toggle word wrap Toggle overflow The custom loggers are subclassed from
BasicLogger, so the logging methods ofBasicLoggercan also be used. It is not necessary to create other loggers to log non-internationalized messages.AccountsLogger.LOGGER.error("Invalid query syntax.");AccountsLogger.LOGGER.error("Invalid query syntax.");Copy to Clipboard Copied! Toggle word wrap Toggle overflow - The project now supports one or more internationalized loggers that can be localized.
The logging-tools quickstart that ships with JBoss EAP is a simple Maven project that provides a working example of how to use JBoss Logging Tools.
4.5.3.2. Create and Use Internationalized Messages
This procedure demonstrates how to create and use internationalized messages.
This section does not cover all optional features or the process of localizing those messages.
- If you have not yet done so, configure your Maven settings to use the JBoss EAP Maven repository. For more information, see Configure the JBoss EAP Maven Repository Using the Maven Settings.
-
Configure the project’s
pom.xmlfile to use JBoss Logging Tools. For details, see JBoss Logging Tools Maven Configuration. Create an interface for the exceptions. JBoss Logging Tools defines internationalized messages in interfaces. Name each interface descriptively for the messages that it contains. The interface has the following requirements:
-
It must be declared as
public. -
It must be annotated with
@org.jboss.logging.annotations.MessageBundle. The interface must define a field that is a message bundle of the same type as the interface.
Example: Create a
MessageBundleInterface@MessageBundle(projectCode="") public interface GreetingMessageBundle { GreetingMessageBundle MESSAGES = Messages.getBundle(GreetingMessageBundle.class); }@MessageBundle(projectCode="") public interface GreetingMessageBundle { GreetingMessageBundle MESSAGES = Messages.getBundle(GreetingMessageBundle.class); }Copy to Clipboard Copied! Toggle word wrap Toggle overflow NoteCalling
Messages.getBundle(GreetingMessagesBundle.class)is equivalent to callingMessages.getBundle(GreetingMessagesBundle.class, Locale.getDefault()).Locale.getDefault()gets the current value of the default locale for this instance of the Java Virtual Machine. The Java Virtual Machine sets the default locale during startup, based on the host environment. It is used by many locale-sensitive methods if no locale is explicitly specified. It can be changed using thesetDefaultmethod.See Set the Default Locale of the Server in the JBoss EAP Configuration Guide for more information.
-
It must be declared as
Add a method definition to the interface for each message. Name each method descriptively for the message that it represents. Each method has the following requirements:
-
It must return an object of type
String. -
It must be annotated with the
@org.jboss.logging.annotations.Messageannotation. The value attribute of
@org.jboss.logging.annotations.Messagemust be set to the default message. This is the message that is used if no translation is available.@Message(value = "Hello world.") String helloworldString();
@Message(value = "Hello world.") String helloworldString();Copy to Clipboard Copied! Toggle word wrap Toggle overflow
-
It must return an object of type
Invoke the interface methods in your application where you need to obtain the message:
System.out.println(helloworldString());
System.out.println(helloworldString());Copy to Clipboard Copied! Toggle word wrap Toggle overflow
The project now supports internationalized message strings that can be localized.
See the logging-tools quickstart that ships with JBoss EAP for a complete working example.
4.5.3.3. Create Internationalized Exceptions
You can use JBoss Logging Tools to create and use internationalized exceptions.
The following instructions assume that you want to add internationalized exceptions to an existing software project that is built using either Red Hat JBoss Developer Studio or Maven.
This topic does not cover all optional features or the process of localization of those exceptions.
-
Configure the project’s
pom.xmlfile to use JBoss Logging Tools. For details, see JBoss Logging Tools Maven Configuration. Create an interface for the exceptions. JBoss Logging Tools defines internationalized exceptions in interfaces. Name each interface descriptively for the exceptions that will be defined in it. The interface has the following requirements:
-
It must be declared as
public. -
It must be annotated with
@MessageBundle. The interface must define a field that is a message bundle of the same type as the interface.
Example: Create an
ExceptionBundleInterface@MessageBundle(projectCode="") public interface ExceptionBundle { ExceptionBundle EXCEPTIONS = Messages.getBundle(ExceptionBundle.class); }@MessageBundle(projectCode="") public interface ExceptionBundle { ExceptionBundle EXCEPTIONS = Messages.getBundle(ExceptionBundle.class); }Copy to Clipboard Copied! Toggle word wrap Toggle overflow
-
It must be declared as
Add a method definition to the interface for each exception. Name each method descriptively for the exception that it represents. Each method has the following requirements:
-
It must return an
Exceptionobject, or a sub-type ofException. -
It must be annotated with the
@org.jboss.logging.annotations.Messageannotation. -
The value attribute of
@org.jboss.logging.annotations.Messagemust be set to the default exception message. This is the message that is used if no translation is available. If the exception being returned has a constructor that requires parameters in addition to a message string, then those parameters must be supplied in the method definition using the
@Paramannotation. The parameters must be the same type and order as they are in the constructor of the exception.@Message(value = "The config file could not be opened.") IOException configFileAccessError(); @Message(id = 13230, value = "Date string '%s' was invalid.") ParseException dateWasInvalid(String dateString, @Param int errorOffset);
@Message(value = "The config file could not be opened.") IOException configFileAccessError(); @Message(id = 13230, value = "Date string '%s' was invalid.") ParseException dateWasInvalid(String dateString, @Param int errorOffset);Copy to Clipboard Copied! Toggle word wrap Toggle overflow
-
It must return an
Invoke the interface methods in your code where you need to obtain one of the exceptions. The methods do not throw the exceptions, they return the exception object, which you can then throw.
Copy to Clipboard Copied! Toggle word wrap Toggle overflow
The project now supports internationalized exceptions that can be localized.
See the logging-tools quickstart that ships with JBoss EAP for a complete working example.
4.5.4. Localizing Internationalized Loggers, Messages and Exceptions
4.5.4.1. Generate New Translation Properties Files with Maven
Projects that are built using Maven can generate empty translation property files for each MessageLogger and MessageBundle it contains. These files can then be used as new translation property files.
The following procedure demonstrates how to configure a Maven project to generate new translation property files.
Prerequisites
- You must already have a working Maven project.
- The project must already be configured for JBoss Logging Tools.
- The project must contain one or more interfaces that define internationalized log messages or exceptions.
Generate the Translation Properties Files
Add the Maven configuration by adding the
-AgenereatedTranslationFilePathcompiler argument to the Maven compiler plug-in configuration, and assign it the path where the new files will be created.This configuration creates the new files in the
target/generated-translation-filesdirectory of your Maven project.Example: Define the Translation File Path
Copy to Clipboard Copied! Toggle word wrap Toggle overflow Build the project using Maven:
mvn compile
$ mvn compileCopy to Clipboard Copied! Toggle word wrap Toggle overflow One properties file is created for each interface annotated with
@MessageBundleor@MessageLogger.- The new files are created in a subdirectory corresponding to the Java package in which each interface is declared.
Each new file is named using the following pattern where
INTERFACE_NAMEis the name of the interface used to generated the file.INTERFACE_NAME.i18n_locale_COUNTRY_VARIANT.properties
INTERFACE_NAME.i18n_locale_COUNTRY_VARIANT.propertiesCopy to Clipboard Copied! Toggle word wrap Toggle overflow
The resulting files can now be copied into your project as the basis for new translations.
See the logging-tools quickstart that ships with JBoss EAP for a complete working example.
4.5.4.2. Translate an Internationalized Logger, Exception, or Message
Properties files can be used to provide translations for logging and exception messages defined in interfaces using JBoss Logging Tools.
The following procedure shows how to create and use a translation properties file, and assumes that you already have a project with one or more interfaces defined for internationalized exceptions or log messages.
Prerequisites
- You must already have a working Maven project.
- The project must already be configured for JBoss Logging Tools.
- The project must contain one or more interfaces that define internationalized log messages or exceptions.
- The project must be configured to generate template translation property files.
Translate an Internationalized Logger, Exception, or Message
Run the following command to create the template translation properties files:
mvn compile
$ mvn compileCopy to Clipboard Copied! Toggle word wrap Toggle overflow -
Copy the template for the interfaces that you want to translate from the directory where they were created into the
src/main/resourcesdirectory of your project. The properties files must be in the same package as the interfaces they are translating. -
Rename the copied template file to indicate the language it will contain. For example:
GreeterLogger.i18n_fr_FR.properties. Edit the contents of the new translation properties file to contain the appropriate translation:
# Level: Logger.Level.INFO # Message: Hello message sent. logHelloMessageSent=Bonjour message envoyé.
# Level: Logger.Level.INFO # Message: Hello message sent. logHelloMessageSent=Bonjour message envoyé.Copy to Clipboard Copied! Toggle word wrap Toggle overflow - Repeat the process of copying the template and modifying it for each translation in the bundle.
The project now contains translations for one or more message or logger bundles. Building the project generates the appropriate classes to log messages with the supplied translations. It is not necessary to explicitly invoke methods or supply parameters for specific languages, JBoss Logging Tools automatically uses the correct class for the current locale of the application server.
The source code of the generated classes can be viewed under target/generated-sources/annotations/.
4.5.5. Customizing Internationalized Log Messages
4.5.5.1. Add Message IDs and Project Codes to Log Messages
This procedure demonstrates how to add message IDs and project codes to internationalized log messages created using JBoss Logging Tools. A log message must have both a project code and message ID to be displayed in the log. If a message does not have both a project code and a message ID, then neither is displayed.
Prerequisites
- You must already have a project with internationalized log messages. For details, see Create Internationalized Log Messages.
- You need to know the project code you will be using. You can use a single project code, or define different ones for each interface.
Add Message IDs and Project Codes to Log Messages
Specify the project code for the interface by using the projectCode attribute of the
@MessageLoggerannotation attached to a custom logger interface. All messages that are defined in the interface will use that project code.@MessageLogger(projectCode="ACCNTS") interface AccountsLogger extends BasicLogger { }@MessageLogger(projectCode="ACCNTS") interface AccountsLogger extends BasicLogger { }Copy to Clipboard Copied! Toggle word wrap Toggle overflow Specify a message ID for each message using the
idattribute of the@Messageannotation attached to the method that defines the message.@LogMessage @Message(id=43, value = "Customer query failed, Database not available.") void customerQueryFailDBClosed();
@LogMessage @Message(id=43, value = "Customer query failed, Database not available.") void customerQueryFailDBClosed();Copy to Clipboard Copied! Toggle word wrap Toggle overflow The log messages that have both a message ID and project code associated with them will prepend these to the logged message.
10:55:50,638 INFO [com.company.accounts.ejb] (MSC service thread 1-4) ACCNTS000043: Customer query failed, Database not available.
10:55:50,638 INFO [com.company.accounts.ejb] (MSC service thread 1-4) ACCNTS000043: Customer query failed, Database not available.Copy to Clipboard Copied! Toggle word wrap Toggle overflow
4.5.5.2. Specify the Log Level for a Message
The default log level of a message defined by an interface by JBoss Logging Tools is INFO. A different log level can be specified with the level attribute of the @LogMessage annotation attached to the logging method. Use the following procedure to specify a different log level.
-
Add the
levelattribute to the@LogMessageannotation of the log message method definition. Assign the log level for this message using the
levelattribute. The valid values forlevelare the six enumerated constants defined inorg.jboss.logging.Logger.Level:DEBUG,ERROR,FATAL,INFO,TRACE, andWARN.import org.jboss.logging.Logger.Level; @LogMessage(level=Level.ERROR) @Message(value = "Customer query failed, Database not available.") void customerQueryFailDBClosed();
import org.jboss.logging.Logger.Level; @LogMessage(level=Level.ERROR) @Message(value = "Customer query failed, Database not available.") void customerQueryFailDBClosed();Copy to Clipboard Copied! Toggle word wrap Toggle overflow
Invoking the logging method in the above sample will produce a log message at the level of ERROR.
10:55:50,638 ERROR [com.company.app.Main] (MSC service thread 1-4) Customer query failed, Database not available.
10:55:50,638 ERROR [com.company.app.Main] (MSC service thread 1-4)
Customer query failed, Database not available.4.5.5.3. Customize Log Messages with Parameters
Custom logging methods can define parameters. These parameters are used to pass additional information to be displayed in the log message. Where the parameters appear in the log message is specified in the message itself using either explicit or ordinary indexing.
Customize Log Messages with Parameters
- Add parameters of any type to the method definition. Regardless of type, the String representation of the parameter is what is displayed in the message.
Add parameter references to the log message. References can use explicit or ordinary indexes.
-
To use ordinary indexes, insert
%scharacters in the message string where you want each parameter to appear. The first instance of%swill insert the first parameter, the second instance will insert the second parameter, and so on. -
To use explicit indexes, insert
%#$scharacters in the message, where # indicates the number of the parameter that you wish to appear.
-
To use ordinary indexes, insert
Using explicit indexes allows the parameter references in the message to be in a different order than they are defined in the method. This is important for translated messages that may require different ordering of parameters.
The number of parameters must match the number of references to the parameters in the specified message or the code will not compile. A parameter marked with the @Cause annotation is not included in the number of parameters.
The following is an example of message parameters using ordinary indexes:
@LogMessage(level=Logger.Level.DEBUG) @Message(id=2, value="Customer query failed, customerid:%s, user:%s") void customerLookupFailed(Long customerid, String username);
@LogMessage(level=Logger.Level.DEBUG)
@Message(id=2, value="Customer query failed, customerid:%s, user:%s")
void customerLookupFailed(Long customerid, String username);The following is an example of message parameters using explicit indexes:
@LogMessage(level=Logger.Level.DEBUG) @Message(id=2, value="Customer query failed, user:%2$s, customerid:%1$s") void customerLookupFailed(Long customerid, String username);
@LogMessage(level=Logger.Level.DEBUG)
@Message(id=2, value="Customer query failed, user:%2$s, customerid:%1$s")
void customerLookupFailed(Long customerid, String username);4.5.5.4. Specify an Exception as the Cause of a Log Message
JBoss Logging Tools allows one parameter of a custom logging method to be defined as the cause of the message. This parameter must be the Throwable type or any of its sub-classes, and is marked with the @Cause annotation. This parameter cannot be referenced in the log message like other parameters, and is displayed after the log message.
The following procedure shows how to update a logging method using the @Cause parameter to indicate the "causing" exception. It is assumed that you have already created internationalized logging messages to which you want to add this functionality.
Specify an Exception as the Cause of a Log Message
Add a parameter of the type
Throwableor its subclass to the method.@LogMessage @Message(id=404, value="Loading configuration failed. Config file:%s") void loadConfigFailed(Exception ex, File file);
@LogMessage @Message(id=404, value="Loading configuration failed. Config file:%s") void loadConfigFailed(Exception ex, File file);Copy to Clipboard Copied! Toggle word wrap Toggle overflow Add the
@Causeannotation to the parameter.import org.jboss.logging.annotations.Cause @LogMessage @Message(value = "Loading configuration failed. Config file: %s") void loadConfigFailed(@Cause Exception ex, File file);
import org.jboss.logging.annotations.Cause @LogMessage @Message(value = "Loading configuration failed. Config file: %s") void loadConfigFailed(@Cause Exception ex, File file);Copy to Clipboard Copied! Toggle word wrap Toggle overflow Invoke the method. When the method is invoked in your code, an object of the correct type must be passed and will be displayed after the log message.
Copy to Clipboard Copied! Toggle word wrap Toggle overflow
The following is the output of the above code samples if the code threw an exception of type FileNotFoundException:
4.5.6. Customizing Internationalized Exceptions
4.5.6.1. Add Message IDs and Project Codes to Exception Messages
Message IDs and project codes are unique identifiers that are prepended to each message displayed by internationalized exceptions. These identifying codes make it possible to create a reference for all the exception messages in an application. This allows someone to look up the meaning of an exception message written in language that they do not understand.
The following procedure demonstrates how to add message IDs and project codes to internationalized exception messages created using JBoss Logging Tools.
Prerequisites
- You must already have a project with internationalized exceptions. For details, see Create Internationalized Exceptions.
- You need to know the project code you will be using. You can use a single project code, or define different ones for each interface.
Add Message IDs and Project Codes to Exception Messages
Specify the project code using the
projectCodeattribute of the@MessageBundleannotation attached to a exception bundle interface. All messages that are defined in the interface will use that project code.@MessageBundle(projectCode="ACCTS") interface ExceptionBundle { ExceptionBundle EXCEPTIONS = Messages.getBundle(ExceptionBundle.class); }@MessageBundle(projectCode="ACCTS") interface ExceptionBundle { ExceptionBundle EXCEPTIONS = Messages.getBundle(ExceptionBundle.class); }Copy to Clipboard Copied! Toggle word wrap Toggle overflow Specify message IDs for each exception using the
idattribute of the@Messageannotation attached to the method that defines the exception.@Message(id=143, value = "The config file could not be opened.") IOException configFileAccessError();
@Message(id=143, value = "The config file could not be opened.") IOException configFileAccessError();Copy to Clipboard Copied! Toggle word wrap Toggle overflow
A message that has both a project code and message ID displays them prepended to the message. If a message does not have both a project code and a message ID, neither is displayed.
Example: Internationalized Exception
This exception bundle interface example uses the project code of "ACCTS". It contains a single exception method with the ID of "143".
The exception object can be obtained and thrown using the following code:
throw ExceptionBundle.EXCEPTIONS.configFileAccessError();
throw ExceptionBundle.EXCEPTIONS.configFileAccessError();This would display an exception message like the following:
Exception in thread "main" java.io.IOException: ACCTS000143: The config file could not be opened. at com.company.accounts.Main.openCustomProperties(Main.java:78) at com.company.accounts.Main.go(Main.java:53) at com.company.accounts.Main.main(Main.java:43)
Exception in thread "main" java.io.IOException: ACCTS000143: The config file could not be opened.
at com.company.accounts.Main.openCustomProperties(Main.java:78)
at com.company.accounts.Main.go(Main.java:53)
at com.company.accounts.Main.main(Main.java:43)4.5.6.2. Customize Exception Messages with Parameters
Exception bundle methods that define exceptions can specify parameters to pass additional information to be displayed in the exception message. The exact position of the parameters in the exception message is specified in the message itself using either explicit or ordinary indexing.
Customize Exception Messages with Parameters
- Add parameters of any type to the method definition. Regardless of type, the String representation of the parameter is what is displayed in the message.
Add parameter references to the exception message. References can use explicit or ordinary indexes.
-
To use ordinary indexes, insert
%scharacters in the message string where you want each parameter to appear. The first instance of%swill insert the first parameter, the second instance will insert the second parameter, and so on. -
To use explicit indexes, insert
%#$scharacters in the message, where # indicates the number of the parameter that you wish to appear.
-
To use ordinary indexes, insert
Using explicit indexes allows the parameter references in the message to be in a different order than they are defined in the method. This is important for translated messages that may require different ordering of parameters.
The number of parameters must match the number of references to the parameters in the specified message, or the code will not compile. A parameter marked with the @Cause annotation is not included in the number of parameters.
Example: Using Ordinary Indexes
@Message(id=2, value="Customer query failed, customerid:%s, user:%s") void customerLookupFailed(Long customerid, String username);
@Message(id=2, value="Customer query failed, customerid:%s, user:%s")
void customerLookupFailed(Long customerid, String username);Example: Using Explicit Indexes
@Message(id=2, value="Customer query failed, user:%2$s, customerid:%1$s") void customerLookupFailed(Long customerid, String username);
@Message(id=2, value="Customer query failed, user:%2$s, customerid:%1$s")
void customerLookupFailed(Long customerid, String username);4.5.6.3. Specify One Exception as the Cause of Another Exception
Exceptions returned by exception bundle methods can have another exception specified as the underlying cause. This is done by adding a parameter to the method and annotating the parameter with @Cause. This parameter is used to pass the causing exception, and cannot be referenced in the exception message.
The following procedure shows how to update a method from an exception bundle using the @Cause parameter to indicate the causing exception. It is assumed that you have already created an exception bundle to which you want to add this functionality.
Add a parameter of the type
Throwableor its subclass to the method.@Message(id=328, value = "Error calculating: %s.") ArithmeticException calculationError(Throwable cause, String msg);
@Message(id=328, value = "Error calculating: %s.") ArithmeticException calculationError(Throwable cause, String msg);Copy to Clipboard Copied! Toggle word wrap Toggle overflow Add the
@Causeannotation to the parameter.import org.jboss.logging.annotations.Cause @Message(id=328, value = "Error calculating: %s.") ArithmeticException calculationError(@Cause Throwable cause, String msg);
import org.jboss.logging.annotations.Cause @Message(id=328, value = "Error calculating: %s.") ArithmeticException calculationError(@Cause Throwable cause, String msg);Copy to Clipboard Copied! Toggle word wrap Toggle overflow Invoke the interface method to obtain an exception object. The most common use case is to throw a new exception from a catch block using the caught exception as the cause.
Copy to Clipboard Copied! Toggle word wrap Toggle overflow
The following is an example of specifying an exception as the cause of another exception. This exception bundle defines a single method that returns an exception of type ArithmeticException.
This code snippet performs an operation that throws an exception, because it attempts to divide an integer by zero. The exception is caught, and a new exception is created using the first one as the cause.
The following is an example of the exception message:
4.5.7. References
4.5.7.1. JBoss Logging Tools Maven Configuration
The following procedure configures a Maven project to use JBoss Logging and JBoss Logging Tools for internationalization.
If you have not yet done so, configure your Maven settings to use the JBoss EAP repository. For more information, see Configure the JBoss EAP Maven Repository Using the Maven Settings.
Include the
jboss-eap-javaee7BOM in the<dependencyManagement>section of the project’spom.xmlfile.Copy to Clipboard Copied! Toggle word wrap Toggle overflow Add the Maven dependencies to the project’s
pom.xmlfile:-
Add the
jboss-loggingdependency for access to JBoss Logging framework. If you plan to use the JBoss Logging Tools, also add the
jboss-logging-processordependency.Both of these dependencies are available in JBoss EAP BOM that was added in the previous step, so the scope element of each can be set to
providedas shown.Copy to Clipboard Copied! Toggle word wrap Toggle overflow
-
Add the
The maven-compiler-plugin must be at least version
3.1and configured for target and generated sources of1.8.Copy to Clipboard Copied! Toggle word wrap Toggle overflow
For a complete working example of a pom.xml file that is configured to use JBoss Logging Tools, see the logging-tools quickstart that ships with JBoss EAP.
4.5.7.2. Translation Property File Format
The property files used for the translation of messages in JBoss Logging Tools are standard Java property files. The format of the file is the simple line-oriented, key=value pair format described in the java.util.Properties class documentation.
The file name format has the following format:
InterfaceName.i18n_locale_COUNTRY_VARIANT.properties
InterfaceName.i18n_locale_COUNTRY_VARIANT.properties-
InterfaceNameis the name of the interface that the translations apply to. -
locale,COUNTRY, andVARIANTidentify the regional settings that the translation applies to. -
localeandCOUNTRYspecify the language and country using the ISO-639 and ISO-3166 Language and Country codes respectively.COUNTRYis optional. -
VARIANTis an optional identifier that can be used to identify translations that only apply to a specific operating system or browser.
The properties contained in the translation file are the names of the methods from the interface being translated. The assigned value of the property is the translation. If a method is overloaded, then this is indicated by appending a dot and then the number of parameters to the name. Methods for translation can only be overloaded by supplying a different number of parameters.
Translation Properties File Example
File name: GreeterService.i18n_fr_FR_POSIX.properties.
# Level: Logger.Level.INFO # Message: Hello message sent. logHelloMessageSent=Bonjour message envoyé.
# Level: Logger.Level.INFO
# Message: Hello message sent.
logHelloMessageSent=Bonjour message envoyé.4.5.7.3. JBoss Logging Tools Annotations Reference
The following annotations are defined in JBoss Logging for use with internationalization and localization of log messages, strings, and exceptions.
| Annotation | Target | Description | Attributes |
|---|---|---|---|
|
| Interface | Defines the interface as a message bundle. |
|
|
| Interface | Defines the interface as a message logger. |
|
|
| Method | Can be used in message bundles and message loggers. In a message bundle it defines the method as being one that returns a localized String or Exception object. In a message logger it defines a method as being a localized logger. |
|
|
| Method | Defines a method in a message logger as being a logging method. |
|
|
| Parameter | Defines a parameter as being one that passes an Exception as the cause of either a Log message or another Exception. | - |
|
| Parameter | Defines a parameter as being one that is passed to the constructor of the Exception. | - |
4.5.7.4. Project Codes Used in JBoss EAP
The following table lists all the project codes used in JBoss EAP 7.0, along with the Maven modules they belong to.
| Maven Module | Project Code |
|---|---|
| appclient | WFLYAC |
| batch/extension-jberet | WFLYBATCH |
| batch/extension | WFLYBATCH-DEPRECATED |
| batch/jberet | WFLYBAT |
| bean-validation | WFLYBV |
| controller-client | WFLYCC |
| controller | WFLYCTL |
| clustering/common | WFLYCLCOM |
| clustering/ejb/infinispan | WFLYCLEJBINF |
| clustering/infinispan/extension | WFLYCLINF |
| clustering/jgroups/extension | WFLYCLJG |
| clustering/server | WFLYCLSV |
| clustering/web/infinispan | WFLYCLWEBINF |
| connector | WFLYJCA |
| deployment-repository | WFLYDR |
| deployment-scanner | WFLYDS |
| domain-http | WFLYDMHTTP |
| domain-management | WFLYDM |
| ee | WFLYEE |
| ejb3 | WFLYEJB |
| embedded | WFLYEMB |
| host-controller | WFLYDC |
| host-controller | WFLYHC |
| iiop-openjdk | WFLYIIOP |
| io/subsystem | WFLYIO |
| jaxrs | WFLYRS |
| jdr | WFLYJDR |
| jmx | WFLYJMX |
| jpa/hibernate5 | JIPI |
| jpa/spi/src/main/java/org/jipijapa/JipiLogger.java | JIPI |
| jpa/subsystem | WFLYJPA |
| jsf/subsystem | WFLYJSF |
| jsr77 | WFLYEEMGMT |
| launcher | WFLYLNCHR |
| legacy | WFLYORB |
| legacy | WFLYMSG |
| legacy | WFLYWEB |
| logging | WFLYLOG |
| | WFLYMAIL |
| management-client-content | WFLYCNT |
| messaging-activemq | WFLYMSGAMQ |
| mod_cluster/extension | WFLYMODCLS |
| naming | WFLYNAM |
| network | WFLYNET |
| patching | WFLYPAT |
| picketlink | WFLYPL |
| platform-mbean | WFLYPMB |
| pojo | WFLYPOJO |
| process-controller | WFLYPC |
| protocol | WFLYPRT |
| remoting | WFLYRMT |
| request-controller | WFLYREQCON |
| rts | WFLYRTS |
| sar | WFLYSAR |
| security-manager | WFLYSM |
| security | WFLYSEC |
| server | WFLYSRV |
| system-jmx | WFLYSYSJMX |
| threads | WFLYTHR |
| transactions | WFLYTX |
| undertow | WFLYUT |
| webservices/server-integration | WFLYWS |
| weld | WFLYWELD |
| xts | WFLYXTS |
Chapter 5. Remote JNDI lookup
5.1. Registering objects to JNDI
The Java Naming and Directory Interface (JNDI) is a Java API for a directory service that allows Java software clients to discover and look up objects via a name.
If an object, registered to JNDI, is supposed to be looked up by remote JNDI clients (i.e. a client that runs in a separate JVM), then it must be registered under java:jboss/exported context.
For example, if the JMS queue in a messaging-activemq subsystem must be exposed for remote JNDI clients, then it must be registred to JNDI, like java:jboss/exported/jms/queue/myTestQueue. Remote JNDI client can look it up by name jms/queue/myTestQueue.
Example: Configuration of the Queue in standalone-full(-ha).xml
5.2. Configuring remote JNDI
A remote JNDI client can connect and lookup objects by name from JNDI. It must have jboss-client.jar on its class path. The jboss-client.jar is available at EAP_HOME/bin/client/jboss-client.jar.
The following example shows how to lookup the myTestQueue queue from JNDI in remote JNDI client:
Example: Configuration for an MDB Resource Adapter
Properties properties = new Properties();
properties.put(Context.INITIAL_CONTEXT_FACTORY, "org.jboss.naming.remote.client.InitialContextFactory");
properties.put(Context.PROVIDER_URL, "http-remoting://<hostname>:8080");
context = new InitialContext(properties);
Queue myTestQueue = (Queue) context.lookup("jms/queue/myTestQueue");
Properties properties = new Properties();
properties.put(Context.INITIAL_CONTEXT_FACTORY, "org.jboss.naming.remote.client.InitialContextFactory");
properties.put(Context.PROVIDER_URL, "http-remoting://<hostname>:8080");
context = new InitialContext(properties);
Queue myTestQueue = (Queue) context.lookup("jms/queue/myTestQueue");Chapter 6. Clustering in Web Applications
6.1. Session Replication
6.1.1. About HTTP Session Replication
Session replication ensures that client sessions of distributable applications are not disrupted by failovers of nodes in a cluster. Each node in the cluster shares information about ongoing sessions, and can take over sessions if a node disappears.
Session replication is the mechanism by which mod_cluster, mod_jk, mod_proxy, ISAPI, and NSAPI clusters provide high availability.
6.1.2. Enable Session Replication in Your Application
To take advantage of JBoss EAP High Availability (HA) features and enable clustering of your web application, you must configure your application to be distributable.
Make your Application Distributable
Indicate that your application is distributable. If your application is not marked as distributable, its sessions will never be distributed. Add the
<distributable/>element inside the<web-app>tag of your application’sweb.xmldescriptor file:Example: Minimum Configuration for a Distributable Application
Copy to Clipboard Copied! Toggle word wrap Toggle overflow Next, if desired, modify the default replication behavior. If you want to change any of the values affecting session replication, you can override them inside a
<replication-config>element inside<jboss-web>in an application’sWEB-INF/jboss-web.xmlfile. For a given element, only include it if you want to override the defaults.Example:
<replication-config>ValuesCopy to Clipboard Copied! Toggle word wrap Toggle overflow
The <replication-granularity> parameter determines the granularity of data that is replicated. It defaults to SESSION, but can be set to ATTRIBUTE to increase performance on sessions where most attributes remain unchanged.
Valid values for <replication-granularity> can be :
-
SESSION: The default value. The entire session object is replicated if any attribute is dirty. This policy is required if an object reference is shared by multiple session attributes. The shared object references are maintained on remote nodes since the entire session is serialized in one unit. -
ATTRIBUTE: This is only for dirty attributes in the session and for some session data, such as the last-accessed timestamp.
Immutable Session Attributes
For JBoss EAP7, session replication is triggered when the session is mutated or when any mutable attribute of the session is accessed. Session attributes are assumed to be mutable unless one of the following is true:
The value is a known immutable value:
-
null -
java.util.Collections.EMPTY_LIST,EMPTY_MAP,EMPTY_SET
-
The value type is or implements a known immutable type:
-
java.lang.Boolean,Character,Byte,Short,Integer,Long,Float,Double -
java.lang.Class,Enum,StackTraceElement,String -
java.io.File,java.nio.file.Path -
java.math.BigDecimal,BigInteger,MathContext -
java.net.Inet4Address,Inet6Address,InetSocketAddress,URI,URL -
java.security.Permission -
java.util.Currency,Locale,TimeZone,UUID -
java.time.Clock,Duration,Instant,LocalDate,LocalDateTime,LocalTime,MonthDay,Period,Year,YearMonth,ZoneId,ZoneOffset,ZonedDateTime -
java.time.chrono.ChronoLocalDate,Chronology,Era -
java.time.format.DateTimeFormatter,DecimalStyle -
java.time.temporal.TemporalField,TemporalUnit,ValueRange,WeekFields -
java.time.zone.ZoneOffsetTransition,ZoneOffsetTransitionRule,ZoneRules
-
The value type is annotated with:
-
@org.wildfly.clustering.web.annotation.Immutable -
@net.jcip.annotations.Immutable
-
6.2. HTTP Session Passivation and Activation
6.2.1. About HTTP Session Passivation and Activation
Passivation is the process of controlling memory usage by removing relatively unused sessions from memory while storing them in persistent storage.
Activation is when passivated data is retrieved from persisted storage and put back into memory.
Passivation occurs at different times in an HTTP session’s lifetime:
- When the container requests the creation of a new session, if the number of currently active sessions exceeds a configurable limit, the server attempts to passivate some sessions to make room for the new one.
- When a web application is deployed and a backup copy of sessions active on other servers is acquired by the newly deploying web application’s session manager, sessions may be passivated.
A session is passivated if the number of active sessions exceeds a configurable maximum.
Sessions are always passivated using a Least Recently Used (LRU) algorithm.
6.2.2. Configure HTTP Session Passivation in Your Application
HTTP session passivation is configured in your application’s WEB-INF/jboss-web.xml and META-INF/jboss-web.xml file.
Example: jboss-web.xml File
The <max-active-sessions> element dictates the maximum number of active sessions allowed, and is used to enable session passivation. If session creation would cause the number of active sessions to exceed <max-active-sessions/>, then the oldest session known to the session manager will passivate to make room for the new session.
The total number of sessions in memory includes sessions replicated from other cluster nodes that are not being accessed on this node. Take this into account when setting <max-active-sessions>. The number of sessions replicated from other nodes also depends on whether REPL or DIST cache mode is enabled. In REPL cache mode, each session is replicated to each node. In DIST cache mode, each session is replicated only to the number of nodes specified by the owners parameter. See Configure the Cache Mode in the JBoss EAP Config Guide for information on configuring session cache modes. For example, consider an eight node cluster, where each node handles requests from 100 users. With REPL cache mode, each node would store 800 sessions in memory. With DIST cache mode enabled, and the default owners setting of 2, each node stores 200 sessions in memory.
6.3. Public API for Clustering Services
JBoss EAP 7 introduces a refined public clustering API for use by applications. The new services are designed to be lightweight, easily injectable, with no external dependencies.
org.wildfly.clustering.group.GroupThe group service provides a mechanism to view the cluster topology for a JGroups channel, and to be notified when the topology changes.
@Resource(lookup = "java:jboss/clustering/group/channel-name") private Group channelGroup;
@Resource(lookup = "java:jboss/clustering/group/channel-name") private Group channelGroup;Copy to Clipboard Copied! Toggle word wrap Toggle overflow org.wildfly.clustering.dispatcher.CommandDispatcherThe
CommandDispatcherFactoryservice provides a mechanism to create a dispatcher for executing commands on nodes in the cluster. The resultingCommandDispatcheris a command-pattern analog to the reflection-basedGroupRpcDispatcherfrom previous JBoss EAP releases.Copy to Clipboard Copied! Toggle word wrap Toggle overflow
6.4. HA Singleton Service
A clustered singleton service, also known as a high-availability (HA) singleton, is a service deployed on multiple nodes in a cluster. The service is provided on only one of the nodes. The node running the singleton service is usually called the master node.
When the master node either fails or shuts down, another master is selected from the remaining nodes and the service is restarted on the new master. Other than a brief interval when one master has stopped and another has yet to take over, the service is provided by one, but only one, node.
HA Singleton ServiceBuilder API
JBoss EAP 7 introduces a new public API for building singleton services that simplifies the process significantly.
The SingletonServiceBuilder implementation installs its services so they will start asynchronously, preventing deadlocking of the Modular Service Container (MSC).
HA Singleton Service Election Policies
If there is a preference for which node should start the ha-singleton, you can set the election policy in the ServiceActivator class.
JBoss EAP provides two election policies:
Simple Election Policy
The simple election policy selects a master node based on the relative age. The required age is configured in the position property, which is the index in the list of available nodes where,
- position = 0 – refers to the oldest node (the default)
position = 1 – refers to the 2nd oldest etc.
Position can also be negative to indicate the youngest nodes.
- position = -1 – refers to the youngest node
- position = -2 – refers to the 2nd youngest node etc.
Random Election Policy
The random election policy elects a random member to be the provider of a singleton service.
Create an HA Singleton Service Application
The following is an abbreviated example of the steps required to create and deploy an application as a cluster-wide singleton service. This example service activates a scheduled timer that is started only once in the cluster.
Create an
HATimerServiceservice that implements theorg.jboss.msc.service.Serviceinterface and contains thegetValue(),start(), andstop()methods.Service Class Code Example
Copy to Clipboard Copied! Toggle word wrap Toggle overflow Create a service activator that implements the
org.jboss.msc.service.ServiceActivatorinterface and installs theHATimerServiceas a clustered singleton in theactivate()method. This example specifies thatnode1should start the singleton service.Service Activator Code Example
Copy to Clipboard Copied! Toggle word wrap Toggle overflow Create a file named
org.jboss.msc.service.ServiceActivatorin the application’sMETA-INF/services/directory and add a line containing the fully qualified name of theServiceActivatorclass created in the previous step.META-INF/services/org.jboss.msc.service.ServiceActivator File Example
org.jboss.as.quickstarts.cluster.hasingleton.service.ejb.HATimerServiceActivator
org.jboss.as.quickstarts.cluster.hasingleton.service.ejb.HATimerServiceActivatorCopy to Clipboard Copied! Toggle word wrap Toggle overflow Create a
Schedulerinterface that contains theinitialize()andstop()methods.Scheduler Interface Code Example
Copy to Clipboard Copied! Toggle word wrap Toggle overflow Create a
Singletonbean that implements theSchedulerinterface. This bean is used as the cluster-wide singleton timer.ImportantThe
Singletonbean must not have a remote interface and you must not reference its local interface from another EJB in any application. This prevents a lookup by a client or other component and ensures theHATimerServicehas total control of theSingleton.Singleton Bean Code Example
Copy to Clipboard Copied! Toggle word wrap Toggle overflow
See the cluster-ha-singleton quickstart that ships with JBoss EAP for a complete working example of this application. The quickstart provides detailed instructions to build and deploy the application.
6.5. HA Singleton Deployments
JBoss EAP 7 adds the ability to deploy a given application as a singleton deployment.
When deployed to a group of clustered servers, a singleton deployment will only deploy on a single node at any given time. If the node on which the deployment is active stops or fails, the deployment will automatically start on another node.
The policies for controlling HA singleton behavior are managed by a new singleton subsystem. A deployment may either specify a specific singleton policy or use the default subsystem policy. A deployment identifies itself as singleton deployment via a /META-INF/singleton-deployment.xml deployment descriptor which is most easily applied to an existing deployment as a deployment overlay. Alternatively, the requisite singleton configuration can be embedded within an existing jboss-all.xml.
Defining or Choosing a Singleton Deployment
To define a deployment as a singleton deployment, include a
/META-INF/singleton-deployment.xmldescriptor in your application archive.Example: Singleton Deployment Descriptor
<?xml version="1.0" encoding="UTF-8"?> <singleton-deployment xmlns="urn:jboss:singleton-deployment:1.0"/>
<?xml version="1.0" encoding="UTF-8"?> <singleton-deployment xmlns="urn:jboss:singleton-deployment:1.0"/>Copy to Clipboard Copied! Toggle word wrap Toggle overflow Example: Singleton Deployment Descriptor with a Specific Singleton Policy
<?xml version="1.0" encoding="UTF-8"?> <singleton-deployment policy="my-new-policy" xmlns="urn:jboss:singleton-deployment:1.0"/>
<?xml version="1.0" encoding="UTF-8"?> <singleton-deployment policy="my-new-policy" xmlns="urn:jboss:singleton-deployment:1.0"/>Copy to Clipboard Copied! Toggle word wrap Toggle overflow Alternatively, you can also add a
singleton-deploymentelement to yourjboss-all.xmldescriptor.Example: Defining
singleton-deploymentinjboss-all.xml<?xml version="1.0" encoding="UTF-8"?> <jboss xmlns="urn:jboss:1.0"> <singleton-deployment xmlns="urn:jboss:singleton-deployment:1.0"/> </jboss><?xml version="1.0" encoding="UTF-8"?> <jboss xmlns="urn:jboss:1.0"> <singleton-deployment xmlns="urn:jboss:singleton-deployment:1.0"/> </jboss>Copy to Clipboard Copied! Toggle word wrap Toggle overflow Example: Defining
singleton-deploymentinjboss-all.xmlwith a Specific Singleton Policy<?xml version="1.0" encoding="UTF-8"?> <jboss xmlns="urn:jboss:1.0"> <singleton-deployment policy="my-new-policy" xmlns="urn:jboss:singleton-deployment:1.0"/> </jboss><?xml version="1.0" encoding="UTF-8"?> <jboss xmlns="urn:jboss:1.0"> <singleton-deployment policy="my-new-policy" xmlns="urn:jboss:singleton-deployment:1.0"/> </jboss>Copy to Clipboard Copied! Toggle word wrap Toggle overflow
Creating a Singleton Deployment
JBoss EAP provides two election policies:
Simple Election Policy
The
simple-election-policychooses a specific member, indicated by thepositionattribute, on which a given application will be deployed. Thepositionattribute determines the index of the node to be elected from a list of candidates sorted by descending age, where0indicates the oldest node,1indicates the second oldest node,-1indicates the youngest node,-2indicates the second youngest node, and so on. If the specified position exceeds the number of candidates, a modulus operation is applied.Example: Create a New Singleton Policy with a
simple-election-policyand Position Set to-1, Using the Management CLIbatch /subsystem=singleton/singleton-policy=my-new-policy:add(cache-container=server) /subsystem=singleton/singleton-policy=my-new-policy/election- policy=simple:add(position=-1) run-batch
batch /subsystem=singleton/singleton-policy=my-new-policy:add(cache-container=server) /subsystem=singleton/singleton-policy=my-new-policy/election- policy=simple:add(position=-1) run-batchCopy to Clipboard Copied! Toggle word wrap Toggle overflow NoteTo set the newly created policy
my-new-policyas the default, run this command:/subsystem=singleton:write-attribute(name=default, value=my-new-policy)
/subsystem=singleton:write-attribute(name=default, value=my-new-policy)Copy to Clipboard Copied! Toggle word wrap Toggle overflow Example: Configure a
simple-election-policywith Position Set to-1Usingstandalone-ha.xmlCopy to Clipboard Copied! Toggle word wrap Toggle overflow Random Election Policy
The
random-election-policychooses a random member on which a given application will be deployed.Example: Creating a New Singleton Policy with a
random-election-policy, Using the Management CLIbatch /subsystem=singleton/singleton-policy=my-other-new-policy:add(cache-container=server) /subsystem=singleton/singleton-policy=my-other-new-policy/election-policy=random:add() run-batch
batch /subsystem=singleton/singleton-policy=my-other-new-policy:add(cache-container=server) /subsystem=singleton/singleton-policy=my-other-new-policy/election-policy=random:add() run-batchCopy to Clipboard Copied! Toggle word wrap Toggle overflow Example: Configure a
random-election-policyUsingstandalone-ha.xmlCopy to Clipboard Copied! Toggle word wrap Toggle overflow NoteThe
default-cacheattribute of thecache-containerneeds to be defined before trying to add the policy. Without this, if you are using a custom cache container, you might end up getting error messages.
Preferences
Additionally, any singleton election policy may indicate a preference for one or more members of a cluster. Preferences may be defined either via node name or via outbound socket binding name. Node preferences always take precedent over the results of an election policy.
Example: Indicate Preference in the Existing Singleton Policy Using the Management CLI
/subsystem=singleton/singleton-policy=foo/election-policy=simple:list-add(name=name-preferences, value=nodeA) /subsystem=singleton/singleton-policy=bar/election-policy=random:list-add(name=socket-binding-preferences, value=binding1)
/subsystem=singleton/singleton-policy=foo/election-policy=simple:list-add(name=name-preferences, value=nodeA)
/subsystem=singleton/singleton-policy=bar/election-policy=random:list-add(name=socket-binding-preferences, value=binding1)Example: Create a New Singleton Policy with a simple-election-policy and name-preferences, Using the Management CLI
batch /subsystem=singleton/singleton-policy=my-new-policy:add(cache-container=server) /subsystem=singleton/singleton-policy=my-new-policy/election-policy=simple:add(name-preferences=[node1, node2, node3, node4]) run-batch
batch
/subsystem=singleton/singleton-policy=my-new-policy:add(cache-container=server)
/subsystem=singleton/singleton-policy=my-new-policy/election-policy=simple:add(name-preferences=[node1, node2, node3, node4])
run-batch
To set the newly created policy my-new-policy as the default, run this command:
/subsystem=singleton:write-attribute(name=default, value=my-new-policy)
/subsystem=singleton:write-attribute(name=default, value=my-new-policy)Example: Configure a random-election-policy with socket-binding-preferences Using standalone-ha.xml
Quorum
Network partitions are particularly problematic for singleton deployments, since they can trigger multiple singleton providers for the same deployment to run at the same time. To defend against this scenario, a singleton policy may define a quorum that requires a minimum number of nodes to be present before a singleton provider election can take place. A typical deployment scenario uses a quorum of N/2 + 1, where N is the anticipated cluster size. This value can be updated at runtime, and will immediately affect any singleton deployments using the respective singleton policy.
Example: Quorum Declaration in the standalone-ha.xml File
Example: Quorum Declaration Using the Management CLI
/subsystem=singleton/singleton-policy=foo:write-attribute(name=quorum, value=3)
/subsystem=singleton/singleton-policy=foo:write-attribute(name=quorum, value=3)6.6. Apache mod_cluster-manager Application
6.6.1. About mod_cluster-manager Application
The mod_cluster-manager application is an administration web page, which is available on Apache HTTP Server. It is used for monitoring the connected worker nodes and performing various administration tasks, such as enabling or disabling contexts, and configuring the load-balancing properties of worker nodes in a cluster.
Exploring mod_cluster-manager Application
The mod_cluster-manager application can be used for performing various administration tasks on worker nodes.
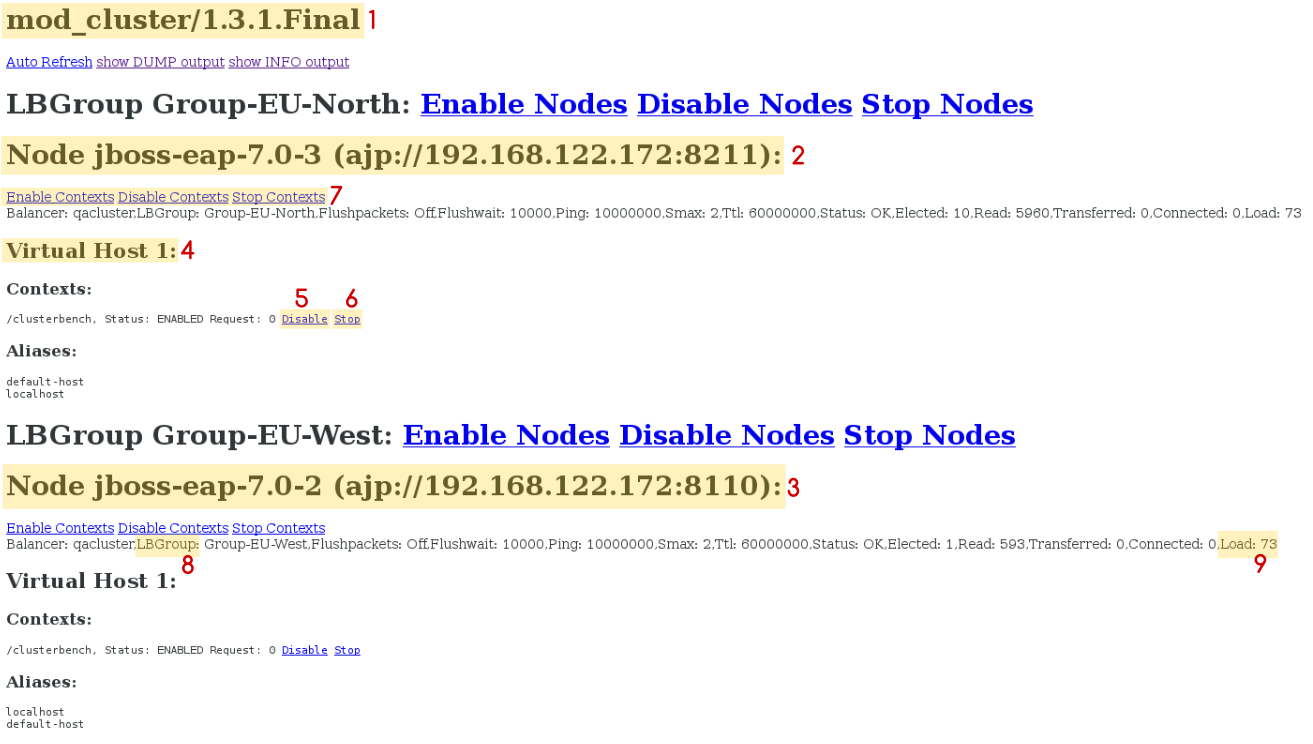 Figure - mod_cluster Administration Web Page
- [1] mod_cluster/1.3.1.Final: The version of the mod_cluster native library.
- [2] ajp://192.168.122.204:8099: The protocol used (either AJP, HTTP, or HTTPS), hostname or IP address of the worker node, and the port.
- [3] jboss-eap-7.0-2: The worker node’s JVMRoute.
- [4] Virtual Host 1: The virtual host(s) configured on the worker node.
- [5] Disable: An administration option that can be used to disable the creation of new sessions on the particular context. However, the ongoing sessions do not get disabled and remain intact.
-
[6] Stop: An administration option that can be used to stop the routing of session requests to the context. The remaining sessions will failover to another node unless the
sticky-session-forceproperty is set totrue. - [7] Enable Contexts Disable Contexts Stop Contexts: The operations that can be performed on the whole node. Selecting one of these options affects all the contexts of a node in all its virtual hosts.
[8] Load balancing group (LBGroup): The
load-balancing-groupproperty is set in themodclustersubsystem in JBoss EAP configuration to group all worker nodes into custom load balancing groups. Load balancing group (LBGroup) is an informational field that gives information about all set load balancing groups. If this field is not set, then all worker nodes are grouped into a single default load balancing group.NoteThis is only an informational field and thus cannot be used to set
load-balancing-groupproperty. The property has to be set inmodclustersubsystem in JBoss EAP configuration.[9] Load (value): The load factor on the worker node. The load factor(s) are evaluated as below:
-load > 0 : A load factor with value 1 indicates that the worker node is overloaded. A load factor of 100 denotes a free and not-loaded node. -load = 0 : A load factor of value 0 indicates that the worker node is in standby mode. This means that no session requests will be routed to this node until and unless the other worker nodes are unavailable. -load = -1 : A load factor of value -1 indicates that the worker node is in an error state. -load = -2 : A load factor of value -2 indicates that the worker node is undergoing CPing/CPong and is in a transition state.
-load > 0 : A load factor with value 1 indicates that the worker node is overloaded. A load factor of 100 denotes a free and not-loaded node. -load = 0 : A load factor of value 0 indicates that the worker node is in standby mode. This means that no session requests will be routed to this node until and unless the other worker nodes are unavailable. -load = -1 : A load factor of value -1 indicates that the worker node is in an error state. -load = -2 : A load factor of value -2 indicates that the worker node is undergoing CPing/CPong and is in a transition state.Copy to Clipboard Copied! Toggle word wrap Toggle overflow
For JBoss EAP 7.0, it is also possible to use Undertow as load balancer.
Chapter 7. Contexts and Dependency Injection (CDI)
7.1. Introduction to CDI
7.1.1. About Contexts and Dependency Injection (CDI)
Contexts and Dependency Injection (CDI) 1.2 is a specification designed to enable Enterprise Java Beans (EJB) 3 components to be used as Java Server Faces (JSF) managed beans. CDI unifies the two component models and enables a considerable simplification to the programming model for web-based applications in Java. CDI 1.2 release is treated as a maintenance release of 1.1. Details about CDI 1.1 can be found in JSR 346: Contexts and Dependency Injection for Java™ EE 1.1.
JBoss EAP includes Weld, which is the reference implementation of JSR-346:Contexts and Dependency Injection for Java™ EE 1.1.
Benefits of CDI
The benefits of CDI include:
- Simplifying and shrinking your code base by replacing big chunks of code with annotations.
- Flexibility, allowing you to disable and enable injections and events, use alternative beans, and inject non-CDI objects easily.
-
Optionally, allowing you to include
beans.xmlin yourMETA-INF/orWEB-INF/directory if you need to customize the configuration to differ from the default. The file can be empty. - Simplifying packaging and deployments and reducing the amount of XML you need to add to your deployments.
- Providing lifecycle management via contexts. You can tie injections to requests, sessions, conversations, or custom contexts.
- Providing type-safe dependency injection, which is safer and easier to debug than string-based injection.
- Decoupling interceptors from beans.
- Providing complex event notification.
7.1.2. Relationship Between Weld, Seam 2, and JavaServer Faces
Weld is the reference implementation of CDI, which is defined in JSR 346: Contexts and Dependency Injection for Java™ EE 1.1. Weld was inspired by Seam 2 and other dependency injection frameworks, and is included in JBoss EAP.
The goal of Seam 2 was to unify Enterprise Java Beans and JavaServer Faces managed beans.
JavaServer Faces 2.2 implements JSR-344: JavaServer™ Faces 2.2. It is an API for building server-side user interfaces.
7.2. Use CDI to Develop an Application
Contexts and Dependency Injection (CDI) gives you tremendous flexibility in developing applications, reusing code, adapting your code at deployment or run-time, and unit testing. JBoss EAP includes Weld, the reference implementation of CDI. These tasks show you how to use CDI in your enterprise applications.
7.2.1. Default Bean Discovery Mode
The default bean discovery mode for a bean archive is annotated. Such a bean archive is said to be an implicit bean archive.
If the bean discovery mode is annotated then:
-
Bean classes that do not have
bean defining annotationand are not bean classes of sessions beans are not discovered. - Producer methods that are not on a session bean and whose bean class does not have a bean defining annotation are not discovered.
- Producer fields that are not on a session bean and whose bean class does not have a bean defining annotation are not discovered.
- Disposer methods that are not on a session bean and whose bean class does not have a bean defining annotation are not discovered.
- Observer methods that are not on a session bean and whose bean class does not have a bean defining annotation are not discovered.
All examples in the CDI section are valid only when you have a discovery mode set to all.
Bean Defining Annotations
A bean class may have a bean defining annotation, allowing it to be placed anywhere in an application, as defined in Bean archives. A bean class with a bean defining annotation is said to be an implicit bean.
The set of bean defining annotations contains:
-
@ApplicationScoped,@SessionScoped,@ConversationScopedand@RequestScopedannotations - All other normal scope types
-
@Interceptorand@Decoratorannotations -
All stereotype annotations, i.e. annotations annotated with
@Stereotype -
The
@Dependentscope annotation
If one of these annotations is declared on a bean class, then the bean class is said to have a bean defining annotation.
Example: Bean Defining Annotation
To ensure compatibility with other JSR-330 implementations, all pseudo-scope annotations, except @Dependent, are not bean defining annotations. However, a stereotype annotation including a pseudo-scope annotation is a bean defining annotation.
7.2.2. Exclude Beans From the Scanning Process
Exclude filters are defined by <exclude> elements in the beans.xml file for the bean archive as children of the <scan> element. By default an exclude filter is active. The exclude filter becomes inactive, if its definition contains:
-
A child element named
<if-class-available>with anameattribute, and the class loader for the bean archive can not load a class for that name, or -
A child element named
<if-class-not-available>with anameattribute, and the class loader for the bean archive can load a class for that name, or -
A child element named
<if-system-property>with anameattribute, and there is no system property defined for that name, or -
A child element named
<if-system-property>with anameattribute and a value attribute, and there is no system property defined for that name with that value.
The type is excluded from discovery, if the filter is active, and:
- The fully qualified name of the type being discovered matches the value of the name attribute of the exclude filter, or
- The package name of the type being discovered matches the value of the name attribute with a suffix ".*" of the exclude filter, or
- The package name of the type being discovered starts with the value of the name attribute with a suffix ".**" of the exclude filter
Example 7.1. Example: beans.xml File
- 1
- The first exclude filter will exclude all classes in
com.acme.restpackage. - 2
- The second exclude filter will exclude all classes in the
com.acme.facespackage, and any subpackages, but only if JSF is not available. - 3
- The third exclude filter will exclude all classes in the
com.acme.verbosepackage if the system propertyverbosityhas the valuelow. - 4
- The fourth exclude filter will exclude all classes in the
com.acme.ejbpackage, and any subpackages, if the system propertyexclude-ejbsis set with any value and if at the same time, thejavax.enterprise.inject.Modelclass is also available to the classloader.
It is safe to annotate Java EE components with @Vetoed to prevent them being considered beans. An event is not fired for any type annotated with @Vetoed, or in a package annotated with @Vetoed. For more information, see @Vetoed.
7.2.3. Use an Injection to Extend an Implementation
You can use an injection to add or change a feature of your existing code.
The following example adds a translation ability to an existing class, and assumes you already have a Welcome class, which has a method buildPhrase. The buildPhrase method takes as an argument the name of a city, and outputs a phrase like "Welcome to Boston!".
Example: Inject a Translator Bean Into the Welcome Class
The following injects a hypothetical Translator object into the Welcome class. The Translator object can be an EJB stateless bean or another type of bean, which can translate sentences from one language to another. In this instance, the Translator is used to translate the entire greeting, without modifying the original Welcome class. The Translator is injected before the buildPhrase method is called.
7.3. Ambiguous or Unsatisfied Dependencies
Ambiguous dependencies exist when the container is unable to resolve an injection to exactly one bean.
Unsatisfied dependencies exist when the container is unable to resolve an injection to any bean at all.
The container takes the following steps to try to resolve dependencies:
- It resolves the qualifier annotations on all beans that implement the bean type of an injection point.
-
It filters out disabled beans. Disabled beans are
@Alternativebeans which are not explicitly enabled.
In the event of an ambiguous or unsatisfied dependency, the container aborts deployment and throws an exception.
To fix an ambiguous dependency, see Use a Qualifier to Resolve an Ambiguous Injection.
7.3.1. Qualifiers
Qualifiers are annotations used to avoid ambiguous dependencies when the container can resolve multiple beans, which fit into an injection point. A qualifier declared at an injection point provides the set of eligible beans, which declare the same Qualifier.
Qualifiers have to be declared with a retention and target as shown in the example below.
Example: Define the @Synchronous and @Asynchronous Qualifiers
@Qualifier
@Retention(RUNTIME)
@Target({TYPE, METHOD, FIELD, PARAMETER})
public @interface Synchronous {}
@Qualifier
@Retention(RUNTIME)
@Target({TYPE, METHOD, FIELD, PARAMETER})
public @interface Synchronous {}@Qualifier
@Retention(RUNTIME)
@Target({TYPE, METHOD, FIELD, PARAMETER})
public @interface Asynchronous {}
@Qualifier
@Retention(RUNTIME)
@Target({TYPE, METHOD, FIELD, PARAMETER})
public @interface Asynchronous {}Example: Use the @Synchronous and @Asynchronous Qualifiers
@Synchronous
public class SynchronousPaymentProcessor implements PaymentProcessor {
public void process(Payment payment) { ... }
}
@Synchronous
public class SynchronousPaymentProcessor implements PaymentProcessor {
public void process(Payment payment) { ... }
}@Asynchronous
public class AsynchronousPaymentProcessor implements PaymentProcessor {
public void process(Payment payment) { ... }
}
@Asynchronous
public class AsynchronousPaymentProcessor implements PaymentProcessor {
public void process(Payment payment) { ... }
}'@Any'
Whenever a bean or injection point does not explicitly declare a qualifier, the container assumes the qualifier @Default. From time to time, you will need to declare an injection point without specifying a qualifier. There is a qualifier for that too. All beans have the qualifier @Any. Therefore, by explicitly specifying @Any at an injection point, you suppress the default qualifier, without otherwise restricting the beans that are eligible for injection.
This is especially useful if you want to iterate over all beans with a certain bean type.
Every bean has the qualifier @Any, even if it does not explicitly declare this qualifier.
Every event also has the qualifier @Any, even if it was raised without explicit declaration of this qualifier.
@Inject @Any Event<User> anyUserEvent;
@Inject @Any Event<User> anyUserEvent;
The @Any qualifier allows an injection point to refer to all beans or all events of a certain bean type.
@Inject @Delegate @Any Logger logger;
@Inject @Delegate @Any Logger logger;7.3.2. Use a Qualifier to Resolve an Ambiguous Injection
You can resolve an ambiguous injection using a qualifier. Read more about ambiguous injections at Ambiguous or Unsatisfied Dependencies.
The following example is ambiguous and features two implementations of Welcome, one which translates and one which does not. The injection needs to be specified to use the translating Welcome.
Example: Ambiguous Injection
Resolve an Ambiguous Injection with a Qualifier
To resolve the ambiguous injection, create a qualifier annotation called
@Translating:@Qualifier @Retention(RUNTIME) @Target({TYPE,METHOD,FIELD,PARAMETERS}) public @interface Translating{}@Qualifier @Retention(RUNTIME) @Target({TYPE,METHOD,FIELD,PARAMETERS}) public @interface Translating{}Copy to Clipboard Copied! Toggle word wrap Toggle overflow Annotate your translating
Welcomewith the@Translatingannotation:Copy to Clipboard Copied! Toggle word wrap Toggle overflow Request the translating
Welcomein your injection. You must request a qualified implementation explicitly, similar to the factory method pattern. The ambiguity is resolved at the injection point.Copy to Clipboard Copied! Toggle word wrap Toggle overflow
7.4. Managed Beans
Java EE establishes a common definition in the Managed Beans specification. Managed Beans are defined as container-managed objects with minimal programming restrictions, otherwise known by the acronym POJO (Plain Old Java Object). They support a small set of basic services, such as resource injection, lifecycle callbacks, and interceptors. Companion specifications, such as EJB and CDI, build on this basic model.
With very few exceptions, almost every concrete Java class that has a constructor with no parameters (or a constructor designated with the annotation @Inject) is a bean. This includes every JavaBean and every EJB session bean.
7.4.1. Types of Classes That are Beans
A managed bean is a Java class. The basic lifecycle and semantics of a managed bean are defined by the Managed Beans specification. You can explicitly declare a managed bean by annotating the bean class @ManagedBean, but in CDI you do not need to. According to the specification, the CDI container treats any class that satisfies the following conditions as a managed bean:
- It is not a non-static inner class.
-
It is a concrete class, or is annotated
@Decorator. -
It is not annotated with an EJB component-defining annotation or declared as an EJB bean class in
ejb-jar.xml. -
It does not implement interface
javax.enterprise.inject.spi.Extension. -
It has either a constructor with no parameters, or a constructor annotated with
@Inject. -
It is not annotated
@Vetoedor in a package annotated@Vetoed.
The unrestricted set of bean types for a managed bean contains the bean class, every superclass and all interfaces it implements directly or indirectly.
If a managed bean has a public field, it must have the default scope @Dependent.
@Vetoed
CDI 1.1 introduces a new annotation, @Vetoed. You can prevent a bean from injection by adding this annotation:
@Vetoed
public class SimpleGreeting implements Greeting {
...
}
@Vetoed
public class SimpleGreeting implements Greeting {
...
}
In this code, the SimpleGreeting bean is not considered for injection.
All beans in a package may be prevented from injection:
@Vetoed package org.sample.beans; import javax.enterprise.inject.Vetoed;
@Vetoed
package org.sample.beans;
import javax.enterprise.inject.Vetoed;
This code in package-info.java in the org.sample.beans package will prevent all beans inside this package from injection.
Java EE components, such as stateless EJBs or JAX-RS resource endpoints, can be marked with @Vetoed to prevent them from being considered beans. Adding the @Vetoed annotation to all persistent entities prevents the BeanManager from managing an entity as a CDI Bean. When an entity is annotated @Vetoed, no injections take place. The reasoning behind this is to prevent the BeanManager from performing the operations that may cause the JPA provider to break.
7.4.2. Use CDI to Inject an Object Into a Bean
CDI is activated automatically if CDI components are detected in an application. If you wish to customize your configuration to differ from the default, you can include META-INF/beans.xml or WEB-INF/beans.xml to your deployment archive.
Inject Objects into Other Objects
To obtain an instance of a class, annotate the field with
@Injectwithin your bean:public class TranslateController { @Inject TextTranslator textTranslator; ...public class TranslateController { @Inject TextTranslator textTranslator; ...Copy to Clipboard Copied! Toggle word wrap Toggle overflow Use your injected object’s methods directly. Assume that
TextTranslatorhas a methodtranslate:// in TranslateController class public void translate() { translation = textTranslator.translate(inputText); }// in TranslateController class public void translate() { translation = textTranslator.translate(inputText); }Copy to Clipboard Copied! Toggle word wrap Toggle overflow Use an injection in the constructor of a bean. You can inject objects into the constructor of a bean as an alternative to using a factory or service locator to create them:
Copy to Clipboard Copied! Toggle word wrap Toggle overflow Use the
Instance(<T>)interface to get instances programmatically. TheInstanceinterface can return an instance ofTextTranslatorwhen parameterized with the bean type.@Inject Instance<TextTranslator> textTranslatorInstance; ... public void translate() { textTranslatorInstance.get().translate(inputText); }@Inject Instance<TextTranslator> textTranslatorInstance; ... public void translate() { textTranslatorInstance.get().translate(inputText); }Copy to Clipboard Copied! Toggle word wrap Toggle overflow
When you inject an object into a bean, all of the object’s methods and properties are available to your bean. If you inject into your bean’s constructor, instances of the injected objects are created when your bean’s constructor is called, unless the injection refers to an instance that already exists. For instance, a new instance would not be created if you inject a session-scoped bean during the lifetime of the session.
7.5. Contexts and Scopes
A context, in terms of CDI, is a storage area that holds instances of beans associated with a specific scope.
A scope is the link between a bean and a context. A scope/context combination may have a specific lifecycle. Several predefined scopes exist, and you can create your own. Examples of predefined scopes are @RequestScoped, @SessionScoped, and @ConversationScope.
| Scope | Description |
|---|---|
|
|
The bean is bound to the lifecycle of the bean holding the reference. The default scope for an injected bean is |
|
| The bean is bound to the lifecycle of the application. |
|
| The bean is bound to the lifecycle of the request. |
|
| The bean is bound to the lifecycle of the session. |
|
| The bean is bound to the lifecycle of the conversation. The conversation scope is between the lengths of the request and the session, and is controlled by the application. |
| Custom scopes | If the above contexts do not meet your needs, you can define custom scopes. |
7.6. Named Beans
You can name a bean by using the @Named annotation. Naming a bean allows you to use it directly in Java Server Faces (JSF) and Expression Language (EL).
The @Named annotation takes an optional parameter, which is the bean name. If this parameter is omitted, the bean name defaults to the class name of the bean with its first letter converted to lower-case.
7.6.1. Use Named Beans
Configure Bean Names Using the @Named Annotation
Use the
@Namedannotation to assign a name to a bean.Copy to Clipboard Copied! Toggle word wrap Toggle overflow In the example above, the default name would be
greeterBeanif no name had been specified.Use the named bean in a JSF view.
<h:form> <h:commandButton value="Welcome visitors" action="#{greeter.welcomeVisitors}"/> </h:form><h:form> <h:commandButton value="Welcome visitors" action="#{greeter.welcomeVisitors}"/> </h:form>Copy to Clipboard Copied! Toggle word wrap Toggle overflow
7.7. Bean Lifecycle
This task shows you how to save a bean for the life of a request.
The default scope for an injected bean is @Dependent. This means that the bean’s lifecycle is dependent upon the lifecycle of the bean that holds the reference. Several other scopes exist, and you can define your own scopes. For more information, see Contexts and Scopes.
Manage Bean Lifecycles
Annotate the bean with the desired scope.
Copy to Clipboard Copied! Toggle word wrap Toggle overflow When your bean is used in the JSF view, it holds state.
<h:form> <h:inputText value="#{greeter.city}"/> <h:commandButton value="Welcome visitors" action="#{greeter.welcomeVisitors}"/> </h:form><h:form> <h:inputText value="#{greeter.city}"/> <h:commandButton value="Welcome visitors" action="#{greeter.welcomeVisitors}"/> </h:form>Copy to Clipboard Copied! Toggle word wrap Toggle overflow
Your bean is saved in the context relating to the scope that you specify, and lasts as long as the scope applies.
7.7.1. Use a Producer Method
A producer method is a method that acts as a source of bean instances. When no instance exists in the specified context, the method declaration itself describes the bean, and the container invokes the method to obtain an instance of the bean. A producer method lets the application take full control of the bean instantiation process.
This task shows how to use producer methods to produce a variety of different objects that are not beans for injection.
Example: Use a Producer Method
By using a producer method instead of an alternative, polymorphism after deployment is allowed.
The @Preferred annotation in the example is a qualifier annotation. For more information about qualifiers, see Qualifiers.
The following injection point has the same type and qualifier annotations as the producer method, so it resolves to the producer method using the usual CDI injection rules. The producer method is called by the container to obtain an instance to service this injection point.
@Inject @Preferred PaymentStrategy paymentStrategy;
@Inject @Preferred PaymentStrategy paymentStrategy;Example: Assign a Scope to a Producer Method
The default scope of a producer method is @Dependent. If you assign a scope to a bean, it is bound to the appropriate context. The producer method in this example is only called once per session.
@Produces @Preferred @SessionScoped
public PaymentStrategy getPaymentStrategy() {
...
}
@Produces @Preferred @SessionScoped
public PaymentStrategy getPaymentStrategy() {
...
}Example: Use an Injection Inside a Producer Method
Objects instantiated directly by an application cannot take advantage of dependency injection and do not have interceptors. However, you can use dependency injection into the producer method to obtain bean instances.
If you inject a request-scoped bean into a session-scoped producer, the producer method promotes the current request-scoped instance into session scope. This is almost certainly not the desired behavior, so use caution when you use a producer method in this way.
The scope of the producer method is not inherited from the bean that declares the producer method.
Producer methods allow you to inject non-bean objects and change your code dynamically.
7.8. Alternative Beans
Alternatives are beans whose implementation is specific to a particular client module or deployment scenario.
By default, @Alternative beans are disabled. They are enabled for a specific bean archive by editing its beans.xml file. However, this activation only applies to the beans in that archive. From CDI 1.1 onwards, the alternative can be enabled for the entire application using the @Priority annotation.
Example: Defining Alternatives
This alternative defines an implementation of the PaymentProcessor class using both @Synchronous and @Asynchronous alternatives:
Example: Enabling @Alternative Using beans.xml
Declaring Selected Alternatives
The @Priority annotation allows an alternative to be enabled for an entire application. An alternative may be given a priority for the application:
-
by placing the
@Priorityannotation on the bean class of a managed bean or session bean, or -
by placing the
@Priorityannotation on the bean class that declares the producer method, field or resource.
7.8.1. Override an Injection with an Alternative
You can use alternative beans to override existing beans. They can be thought of as a way to plug in a class which fills the same role, but functions differently. They are disabled by default.
This task shows you how to specify and enable an alternative.
Override an Injection
This task assumes that you already have a TranslatingWelcome class in your project, but you want to override it with a "mock" TranslatingWelcome class. This would be the case for a test deployment, where the true Translator bean cannot be used.
Define the alternative.
Copy to Clipboard Copied! Toggle word wrap Toggle overflow Activate the substitute implementation by adding the fully-qualified class name to your
META-INF/beans.xmlorWEB-INF/beans.xmlfile.<beans> <alternatives> <class>com.acme.MockTranslatingWelcome</class> </alternatives> </beans><beans> <alternatives> <class>com.acme.MockTranslatingWelcome</class> </alternatives> </beans>Copy to Clipboard Copied! Toggle word wrap Toggle overflow
The alternative implementation is now used instead of the original one.
7.9. Stereotypes
In many systems, use of architectural patterns produces a set of recurring bean roles. A stereotype allows you to identify such a role and declare some common metadata for beans with that role in a central place.
A stereotype encapsulates any combination of:
- Default scope
- A set of interceptor bindings
A stereotype can also specify either:
- All beans where the stereotypes are defaulted bean EL names
- All beans where the stereotypes are alternatives
A bean may declare zero, one, or multiple stereotypes. A stereotype is an @Stereotype annotation that packages several other annotations. Stereotype annotations may be applied to a bean class, producer method, or field.
A class that inherits a scope from a stereotype may override that stereotype and specify a scope directly on the bean.
In addition, if a stereotype has a @Named annotation, any bean it is placed on has a default bean name. The bean may override this name if the @Named annotation is specified directly on the bean. For more information about named beans, see Named Beans.
7.9.1. Use Stereotypes
Without stereotypes, annotations can become cluttered. This task shows you how to use stereotypes to reduce the clutter and streamline your code.
Example: Annotation Clutter
Define and Use Stereotypes
Define the stereotype.
Copy to Clipboard Copied! Toggle word wrap Toggle overflow Use the stereotype.
Copy to Clipboard Copied! Toggle word wrap Toggle overflow
7.10. Observer Methods
Observer methods receive notifications when events occur.
CDI also provides transactional observer methods, which receive event notifications during the before completion or after completion phase of the transaction in which the event was fired.
7.10.1. Fire and Observe Events
Example: Fire an Event
The following code shows an event being injected and used in a method.
Example: Fire an Event with a Qualifier
You can annotate your event injection with a qualifier, to make it more specific. For more information about qualifiers, see Qualifiers.
Example: Observe an Event
To observe an event, use the @Observes annotation.
public class AccountObserver {
void checkTran(@Observes Withdrawal w) {
...
}
}
public class AccountObserver {
void checkTran(@Observes Withdrawal w) {
...
}
}You can use qualifiers to observe only specific types of events.
public class AccountObserver {
void checkTran(@Observes @Suspicious Withdrawal w) {
...
}
}
public class AccountObserver {
void checkTran(@Observes @Suspicious Withdrawal w) {
...
}
}7.10.2. Transactional Observers
Transactional observers receive the event notifications before or after the completion phase of the transaction in which the event was raised. Transactional observers are important in a stateful object model because state is often held for longer than a single atomic transaction.
There are five kinds of transactional observers:
-
IN_PROGRESS: By default, observers are invoked immediately. -
AFTER_SUCCESS: Observers are invoked after the completion phase of the transaction, but only if the transaction completes successfully. -
AFTER_FAILURE: Observers are invoked after the completion phase of the transaction, but only if the transaction fails to complete successfully. -
AFTER_COMPLETION: Observers are invoked after the completion phase of the transaction. -
BEFORE_COMPLETION: Observers are invoked before the completion phase of the transaction.
The following observer method refreshes a query result set cached in the application context, but only when transactions that update the Category tree are successful:
public void refreshCategoryTree(@Observes(during = AFTER_SUCCESS) CategoryUpdateEvent event) { ... }
public void refreshCategoryTree(@Observes(during = AFTER_SUCCESS) CategoryUpdateEvent event) { ... }Assume we have cached a JPA query result set in the application scope:
Occasionally a Product is created or deleted. When this occurs, we need to refresh the Product catalog. But we have to wait for the transaction to complete successfully before performing this refresh.
The bean that creates and deletes Products triggers events:
The Catalog can now observe the events after successful completion of the transaction:
7.11. Interceptors
Interceptors allow you to add functionality to the business methods of a bean without modifying the bean’s method directly. The interceptor is executed before any of the business methods of the bean. Interceptors are defined as part of the JSR 318: Enterprise JavaBeans™ 3.1 specification.
CDI enhances this functionality by allowing you to use annotations to bind interceptors to beans.
Interception points
- Business method interception: A business method interceptor applies to invocations of methods of the bean by clients of the bean.
- Lifecycle callback interception: A lifecycle callback interceptor applies to invocations of lifecycle callbacks by the container.
- Timeout method interception: A timeout method interceptor applies to invocations of the EJB timeout methods by the container.
Enabling Interceptors
By default, all interceptors are disabled. You can enable the interceptor by using the beans.xml descriptor of a bean archive. However, this activation only applies to the beans in that archive. From CDI 1.1 onwards the interceptor can be enabled for the whole application using the @Priority annotation.
Example: Enabling Interceptors in beans.xml
Having the XML declaration solves two problems:
- It enables us to specify an ordering for the interceptors in our system, ensuring deterministic behavior
- It lets us enable or disable interceptor classes at deployment time.
Interceptors enabled using @Priority are called before interceptors enabled using the beans.xml file.
Having an interceptor enabled by @Priority and at the same time invoked by beans.xml, leads to a non-portable behavior. This combination of enablement should therefore be avoided in order to maintain consistent behavior across different CDI implementations.
7.11.1. Use Interceptors with CDI
CDI can simplify your interceptor code and make it easier to apply to your business code.
Without CDI, interceptors have two problems:
- The bean must specify the interceptor implementation directly.
- Every bean in the application must specify the full set of interceptors in the correct order. This makes adding or removing interceptors on an application-wide basis time-consuming and error-prone.
Example: Interceptors Without CDI
Use Interceptors with CDI
Define the interceptor binding type:
@InterceptorBinding @Retention(RUNTIME) @Target({TYPE, METHOD}) public @interface Secure {}@InterceptorBinding @Retention(RUNTIME) @Target({TYPE, METHOD}) public @interface Secure {}Copy to Clipboard Copied! Toggle word wrap Toggle overflow Mark the interceptor implementation:
Copy to Clipboard Copied! Toggle word wrap Toggle overflow Use the interceptor in your business code:
Copy to Clipboard Copied! Toggle word wrap Toggle overflow Enable the interceptor in your deployment, by adding it to
META-INF/beans.xmlorWEB-INF/beans.xml:Copy to Clipboard Copied! Toggle word wrap Toggle overflow
The interceptors are applied in the order listed.
7.12. Decorators
A decorator intercepts invocations from a specific Java interface, and is aware of all the semantics attached to that interface. Decorators are useful for modeling some kinds of business concerns, but do not have the generality of interceptors. A decorator is a bean, or even an abstract class, that implements the type it decorates, and is annotated with @Decorator. To invoke a decorator in a CDI application, it must be specified in the beans.xml file.
Example: Invoke a Decorator Through beans.xml
This declaration serves two main purposes:
- It enables us to specify an ordering for decorators in our system, ensuring deterministic behavior
- It lets us enable or disable decorator classes at deployment time.
A decorator must have exactly one @Delegate injection point to obtain a reference to the decorated object.
Example: Decorator Class
From CDI 1.1 onwards, the decorator can be enabled for the whole application using @Priority annotation.
Decorators enabled using @Priority are called before decorators enabled using beans.xml. The lower priority values are called first.
Having a decorator enabled by @Priority and at the same time invoked by beans.xml, leads to a non-portable behavior. This combination of enablement should therefore be avoided in order to maintain consistent behavior across different CDI implementations.
7.13. Portable Extensions
CDI is intended to be a foundation for frameworks, extensions, and for integration with other technologies. Therefore, CDI exposes a set of SPIs for the use of developers of portable extensions to CDI.
Extensions can provide the following types of functionality:
- Integration with Business Process Management engines
- Integration with third-party frameworks, such as Spring, Seam, GWT, or Wicket
- New technology based upon the CDI programming model
According to the JSR-346 specification, a portable extension can integrate with the container in the following ways:
- Providing its own beans, interceptors, and decorators to the container
- Injecting dependencies into its own objects using the dependency injection service
- Providing a context implementation for a custom scope
- Augmenting or overriding the annotation-based metadata with metadata from another source
7.14. Bean Proxies
Clients of an injected bean do not usually hold a direct reference to a bean instance. Unless the bean is a dependent object, scope @Dependent, the container must redirect all injected references to the bean using a proxy object.
A bean proxy, which can be referred to as client proxy, is responsible for ensuring the bean instance that receives a method invocation is the instance associated with the current context. The client proxy also allows beans bound to contexts, such as the session context, to be serialized to disk without recursively serializing other injected beans.
Due to Java limitations, some Java types cannot be proxied by the container. If an injection point declared with one of these types resolves to a bean with a scope other than @Dependent, the container aborts the deployment.
Certain Java types cannot be proxied by the container. These include:
- Classes that do not have a non-private constructor with no parameters
-
Classes that are declared
finalor have afinalmethod - Arrays and primitive types
7.15. Use a Proxy in an Injection
A proxy is used for injection when the lifecycles of the beans are different from each other. The proxy is a subclass of the bean that is created at run-time, and overrides all the non-private methods of the bean class. The proxy forwards the invocation onto the actual bean instance.
In this example, the PaymentProcessor instance is not injected directly into Shop. Instead, a proxy is injected, and when the processPayment() method is called, the proxy looks up the current PaymentProcessor bean instance and calls the processPayment() method on it.
Example: Proxy Injection
Chapter 8. JBoss EAP MBean Services
A managed bean, sometimes simply referred to as an MBean, is a type of JavaBean that is created with dependency injection. MBean services are the core building blocks of the JBoss EAP server.
8.1. Writing JBoss MBean Services
Writing a custom MBean service that relies on a JBoss service requires the service interface method pattern. A JBoss MBean service interface method pattern consists of a set of life cycle operations that inform an MBean service when it can create, start, stop, and destroy itself.
You can manage the dependency state using any of the following approaches:
- If you want specific methods to be called on your MBean, declare those methods in your MBean interface. This approach allows your MBean implementation to avoid dependencies on JBoss specific classes.
-
If you are not bothered about dependencies on JBoss specific classes, then you may have your MBean interface extend the
ServiceMBeaninterface andServiceMBeanSupportclass. TheServiceMBeanSupportclass provides implementations of the service lifecycle methods like create, start, and stop. To handle a specific event like thestart()event, you need to overridestartService()method provided by theServiceMBeanSupportclass.
8.1.1. A Standard MBean Example
This section develops two sample MBean services packaged together in a service archive (.sar).
ConfigServiceMBean interface declares specific methods like the start, getTimeout, and stop methods to start, hold, and stop the MBean correctly without using any JBoss specific classes. ConfigService class implements ConfigServiceMBean interface and consequently implements the methods used within that interface.
The PlainThread class extends the ServiceMBeanSupport class and implements the PlainThreadMBean interface. PlainThread starts a thread and uses ConfigServiceMBean.getTimeout() to determine how long the thread should sleep.
Example: MBean Services Class
The jboss-service.xml descriptor shows how the ConfigService class is injected into the PlainThread class using the inject tag. The inject tag establishes a dependency between PlainThreadMBean and ConfigServiceMBean, and thus allows PlainThreadMBean use ConfigServiceMBean easily.
Example: jboss-service.xml Service Descriptor
After writing the MBeans example, you can package the classes and the jboss-service.xml descriptor in the META-INF folder of a service archive (.sar).
8.2. Deploying JBoss MBean Services
Deploy and test sample MBeans in managed domain
Use the following command to deploy the sample MBeans (ServiceMBeanTest.sar) in a managed domain:
deploy ~/Desktop/ServiceMBeanTest.sar --all-server-groups
deploy ~/Desktop/ServiceMBeanTest.sar --all-server-groupsDeploy and test sample MBeans on a standalone server
Use the following command to build and deploy the sample MBeans (ServiceMBeanTest.sar) on a standalone server:
deploy ~/Desktop/ServiceMBeanTest.sar
deploy ~/Desktop/ServiceMBeanTest.sarUndeploy sample MBeans
Use the following command to undeploy the sample MBeans:
undeploy ServiceMBeanTest.sar
undeploy ServiceMBeanTest.sarChapter 9. Concurrency Utilities
Concurrency Utilities is an API that accommodates Java SE concurrency utilities into the Java EE application environment specifications. It is defined in JSR 236: Concurrency Utilities for Java™ EE. JBoss EAP allows you to create, edit, and delete instances of EE concurrency utilities, thus making these instances readily available for applications to use.
Concurrency Utilities help to extend the invocation context by pulling in the existing context’s application threads and using these in its own threads. This extending of invocation context includes class loading, JNDI, and security contexts, by default.
Types of Concurrency Utilities include:
- Context Service
- Managed Thread Factory
- Managed Executor Service
- Managed Scheduled Executor Service
Example: Concurrency Utilities in standalone.xml
9.1. Context Service
Context service (javax.enterprise.concurrent.ContextService) allows you to build contextual proxies from existing objects. Contextual proxy prepares the invocation context, which is used by other concurrency utilities when the context is created or invoked, before transferring the invocation to the original object.
Attributes of context service concurrency utility include:
-
name: A unique name within all the context services. -
jndi-name: Defines where the context service should be placed in the JNDI. -
use-transaction-setup-provider: Optional. Indicates if the contextual proxies built by the context service should suspend transactions in context, when invoking the proxy objects. Its value defaults tofalse, but the default context-service has the valuetrue.
See the example above for the usage of context service concurrency utility.
Example: Add a New Context Service
/subsystem=ee/context-service=newContextService:add(jndi-name=java:jboss/ee/concurrency/contextservice/newContextService)
/subsystem=ee/context-service=newContextService:add(jndi-name=java:jboss/ee/concurrency/contextservice/newContextService)Example: Change a Context Service
/subsystem=ee/context-service=newContextService:write-attribute(name=jndi-name, value=java:jboss/ee/concurrency/contextservice/changedContextService)
/subsystem=ee/context-service=newContextService:write-attribute(name=jndi-name, value=java:jboss/ee/concurrency/contextservice/changedContextService)This operation requires reload.
Example: Remove a Context Service
/subsystem=ee/context-service=newContextService:remove()
/subsystem=ee/context-service=newContextService:remove()This operation requires reload.
9.2. Managed Thread Factory
The managed thread factory (javax.enterprise.concurrent.ManagedThreadFactory) concurrency utility allows Java EE applications to create Java threads. JBoss EAP handles the managed thread factory instances, hence Java EE applications cannot invoke any lifecycle related method.
Attributes of managed thread factory concurrency utility include:
-
context-service: A unique name within all managed thread factories. -
jndi-name: Defines where in the JNDI the managed thread factory should be placed. -
priority: Optional. Indicates the priority for new threads created by the factory, and defaults to 5.
Example: Add a New Managed Thread Factory
/subsystem=ee/managed-thread-factory=newManagedTF:add(context-service=newContextService, jndi-name=java:jboss/ee/concurrency/threadfactory/newManagedTF, priority=2)
/subsystem=ee/managed-thread-factory=newManagedTF:add(context-service=newContextService, jndi-name=java:jboss/ee/concurrency/threadfactory/newManagedTF, priority=2)Example: Change a Managed Thread Factory
/subsystem=ee/managed-thread-factory=newManagedTF:write-attribute(name=jndi-name, value=java:jboss/ee/concurrency/threadfactory/changedManagedTF)
/subsystem=ee/managed-thread-factory=newManagedTF:write-attribute(name=jndi-name, value=java:jboss/ee/concurrency/threadfactory/changedManagedTF)This operation requires reload. Similarly, you can change other attributes as well.
Example: Remove a Managed Thread Factory
/subsystem=ee/managed-thread-factory=newManagedTF:remove()
/subsystem=ee/managed-thread-factory=newManagedTF:remove()This operation requires reload.
9.3. Managed Executor Service
Managed executor service (javax.enterprise.concurrent.ManagedExecutorService) allows Java EE applications to submit tasks for asynchronous execution. JBoss EAP handles managed executor service instances, hence Java EE applications cannot invoke any lifecycle related method.
Attributes of managed executor service concurrency utility include:
-
context-service: Optional. References an existing context service by its name. If specified, then the referenced context service will capture the invocation context present when submitting a task to the executor, which will then be used when executing the task. -
jndi-name: Defines where the managed thread factory should be placed in the JNDI. -
max-threads: Defines the maximum number of threads used by the executor, which defaults toInteger.MAX_VALUE. -
thread-factory: References an existing managed thread factory by its name, to handle the creation of internal threads. If not specified, then a managed thread factory with default configuration will be created and used internally. -
core-threads: Provides the number of threads to keep in the executor’s pool, even if they are idle. A value of 0 means there is no limit. -
keepalive-time: Defines the time, in milliseconds, that an internal thread may be idle. The attribute default value is 60000. -
queue-length: Indicates the number of tasks that can be stored in the input queue. The default value is 0, which means the queue capacity is unlimited. -
hung-task-threshold: Defines the time, in milliseconds, after which tasks are considered hung by the managed executor service and forcefully aborted. If the value is 0 (which is the default), tasks are never considered hung. -
long-running-tasks: Suggests optimizing the execution of long running tasks, and defaults to false. -
reject-policy: Defines the policy to use when a task is rejected by the executor. The attribute value may be the defaultABORT, which means an exception should be thrown, orRETRY_ABORT, which means the executor will try to submit it once more, before throwing an exception
Example: Add a New Managed Executor Service
/subsystem=ee/managed-executor-service=newManagedExecutorService:add(jndi-name=java:jboss/ee/concurrency/executor/newManagedExecutorService, core-threads=7, thread-factory=default)
/subsystem=ee/managed-executor-service=newManagedExecutorService:add(jndi-name=java:jboss/ee/concurrency/executor/newManagedExecutorService, core-threads=7, thread-factory=default)Example: Change a Managed Executor Service
/subsystem=ee/managed-executor-service=newManagedExecutorService:write-attribute(name=core-threads,value=10)
/subsystem=ee/managed-executor-service=newManagedExecutorService:write-attribute(name=core-threads,value=10)This operation requires reload. Similarly, you can change other attributes too.
Example: Remove a Managed Executor Service
/subsystem=ee/managed-executor-service=newManagedExecutorService:remove()
/subsystem=ee/managed-executor-service=newManagedExecutorService:remove()This operation requires reload.
9.4. Managed Scheduled Executor Service
Managed scheduled executor service (javax.enterprise.concurrent.ManagedScheduledExecutorService) allows Java EE applications to schedule tasks for asynchronous execution. JBoss EAP handles managed scheduled executor service instances, hence Java EE applications cannot invoke any lifecycle related method.
Attributes of managed executor service concurrency utility include:
-
context-service: References an existing context service by its name. If specified then the referenced context service will capture the invocation context present when submitting a task to the executor, which will then be used when executing the task. -
hung-task-threshold: Defines the time, in milliseconds, after which tasks are considered hung by the managed scheduled executor service and forcefully aborted. If the value is 0 (which is the default), tasks are never considered hung. -
keepalive-time: Defines the time, in milliseconds, that an internal thread may be idle. The attribute default value is 60000. -
reject-policy: Defines the policy to use when a task is rejected by the executor. The attribute value may be the defaultABORT, which means an exception should be thrown, orRETRY_ABORT, which means the executor will try to submit it once more, before throwing an exception. -
core-threads: Provides the number of threads to keep in the executor’s pool, even if they are idle. A value of 0 means there is no limit. -
jndi-name: Defines where the managed scheduled executor service should be placed in the JNDI . -
long-running-tasks: Suggests optimizing the execution of long running tasks, and defaults to false. -
thread-factory: References an existing managed thread factory by its name, to handle the creation of internal threads. If not specified, then a managed thread factory with default configuration will be created and used internally.
Example: Add a New Managed Scheduled Executor Service
/subsystem=ee/managed-scheduled-executor-service=newManagedScheduledExecutorService:add(jndi-name=java:jboss/ee/concurrency/scheduledexecutor/newManagedScheduledExecutorService, core-threads=7, context-service=default)
/subsystem=ee/managed-scheduled-executor-service=newManagedScheduledExecutorService:add(jndi-name=java:jboss/ee/concurrency/scheduledexecutor/newManagedScheduledExecutorService, core-threads=7, context-service=default)This operation requires reload.
Example: Changed a Managed Scheduled Executor Service
/subsystem=ee/managed-scheduled-executor-service=newManagedScheduledExecutorService:write-attribute(name=core-threads, value=10)
/subsystem=ee/managed-scheduled-executor-service=newManagedScheduledExecutorService:write-attribute(name=core-threads, value=10)This operation requires reload. Similarly, you can change other attributes.
Example: Remove a Managed Scheduled Executor Service
/subsystem=ee/managed-scheduled-executor-service=newManagedScheduledExecutorService:remove()
/subsystem=ee/managed-scheduled-executor-service=newManagedScheduledExecutorService:remove()This operation requires reload.
Chapter 10. Undertow
10.1. Introduction to Undertow Handler
Undertow is a web server designed to be used for both blocking and non-blocking tasks. It replaces JBoss Web in JBoss EAP 7. Some of its main features are:
- High Performance
- Embeddable
- Servlet 3.1
- Web Sockets
- Reverse Proxy
Request Lifecycle
When a client connects to the server, Undertow creates a io.undertow.server.HttpServerConnection. When the client sends a request, it is parsed by the Undertow parser, and then the resulting io.undertow.server.HttpServerExchange is passed to the root handler. When the root handler finishes, one of four things can happen:
- The exchange is completed
- And exchange is considered complete if both request and response channels have been fully read or written. For requests with no content, such as GET and HEAD, the request side is automatically considered fully read. The read side is considered complete when a handler has written out the full response and has closed and fully flushed the response channel. If an exchange is already complete, then no action is taken.
- The root handler returns normally without completing the exchange
-
In this case the exchange is completed by calling
HttpServerExchange.endExchange(). - The root handler returns with an Exception
-
In this case a response code of
500is set and the exchange is ended usingHttpServerExchange.endExchange(). - The root handler can return after
HttpServerExchange.dispatch()has been called, or after async IO has been started - In this case the dispatched task will be submitted to the dispatch executor, or if async IO has been started on either the request or response channels then this will be started. In this case the exchange will not be finished. It is up to your async task to finish the exchange when it is done processing.
By far the most common use of HttpServerExchange.dispatch() is to move execution from an IO thread where blocking is not allowed into a worker thread, which does allow for blocking operations. This pattern generally looks like:
Example: Dispatching to a Worker Thread
Because exchange is not actually dispatched until the call stack returns, you can be sure that more that one thread is never active in an exchange at once. The exchange is not thread safe. However it can be passed between multiple threads as long as both threads do not attempt to modify it at once.
Ending the Exchange
There are two ways to end an exchange, either by fully reading the request channel, and calling shutdownWrites() on the response channel and then flushing it, or by calling HttpServerExchange.endExchange(). When endExchange() is called, Undertow will check if the content has been generated yet. If it has, then it will simply drain the request channel and close and flush the response channel. If not and there are any default response listeners registered on the exchange, then Undertow will give each of them a chance to generate a default response. This mechanism is how default error pages are generated.
For more information on configuring the Undertow, see Configuring the Web Server in the JBoss EAP Configuration Guide.
10.2. Using Existing Undertow Handlers with a Deployment
Undertow provides a default set of handlers that you can use with any application deployed to JBoss EAP. You can find a full list of the available handlers as well as their attributes here.
To use a handler with a deployment, you need to add a WEB-INF/undertow-handlers.conf file.
Example: WEB-INF/undertow-handlers.conf File
allowed-methods(methods='GET')
allowed-methods(methods='GET')All handlers may also take an optional predicate to apply that handler in specific cases.
Example: WEB-INF/undertow-handlers.conf File with Optional Predicate
path('/my-path') -> allowed-methods(methods='GET')
path('/my-path') -> allowed-methods(methods='GET')
The above example will only apply the allowed-methods handler to the path /my-path.
Some handlers have a default parameter, which allows you to specify the value of that parameter in the handler definition without using the name.
Example: WEB-INF/undertow-handlers.conf File Using the Default Parameter
path('/a') -> redirect('/b')
path('/a') -> redirect('/b')
You also may update the WEB-INF/jboss-web.xml file to include the definition of one or more handlers but using WEB-INF/undertow-handlers.conf is preferred.
Example: WEB-INF/jboss-web.xml File
A full list of provided Undertow handlers can be found here.
10.3. Creating Custom Handlers
-
A custom handler can be defined in the
WEB-INF/jboss-web.xmlfile.
Example: Define Custom Handler in WEB-INF/jboss-web.xml
<jboss-web>
<http-handler>
<class-name>org.jboss.example.MyHttpHandler</class-name>
</http-handler>
</jboss-web>
<jboss-web>
<http-handler>
<class-name>org.jboss.example.MyHttpHandler</class-name>
</http-handler>
</jboss-web>Example: HttpHandler Class
-
Parameters could also be set for the custom handler via the
WEB-INF/jboss-web.xmlfile.
Example: Defining Parameters in WEB-INF/jboss-web.xml
For these parameters to work, the handler class needs to have corresponding setters.
Example: Defining Setter Methods in Handler
Instead of using the
WEB-INF/jboss-web.xmlfor defining the handler, it could also be defined in theWEB-INF/undertow-handlers.conffile.myHttpHandler(myParam='foobar')
myHttpHandler(myParam='foobar')Copy to Clipboard Copied! Toggle word wrap Toggle overflow For the handler defined in
WEB-INF/undertow-handlers.confto work, two things need to be created:An implementation of
HandlerBuilder, which defines the corresponding syntax bits forundertow-handlers.confand is responsible for creating theHttpHandler, wrapped in aHandlerWrapper.Example:
HandlerBuilderClassCopy to Clipboard Copied! Toggle word wrap Toggle overflow An entry in the file
META-INF/services/io.undertow.server.handlers.builder.HandlerBuilder. This file must be on the class path, for example, inWEB-INF/classes.org.jboss.example.MyHandlerBuilder
org.jboss.example.MyHandlerBuilderCopy to Clipboard Copied! Toggle word wrap Toggle overflow
Chapter 11. Java Transaction API (JTA)
11.1. Overview
11.1.1. Overview of Java Transactions API (JTA)
- Introduction
These topics provide a foundational understanding of the Java Transactions API (JTA).
11.2. Transaction Concepts
11.2.1. About Transactions
A transaction consists of two or more actions which must either all succeed or all fail. A successful outcome is a commit, and a failed outcome is a roll-back. In a roll-back, each member’s state is reverted to its state before the transaction attempted to commit.
The typical standard for a well-designed transaction is that it is Atomic, Consistent, Isolated, and Durable (ACID).
11.2.2. About ACID Properties for Transactions
ACID is an acronym which stands for Atomicity, Consistency, Isolation, and Durability. This terminology is usually used in the context of databases or transactional operations.
- Atomicity
- For a transaction to be atomic, all transaction members must make the same decision. Either they all commit, or they all roll back. If atomicity is broken, what results is termed a heuristic outcome.
- Consistency
- Consistency means that data written to the database is guaranteed to be valid data, in terms of the database schema. The database or other data source must always be in a consistent state. One example of an inconsistent state would be a field in which half of the data is written before an operation aborts. A consistent state would be if all the data were written, or the write were rolled back when it could not be completed.
- Isolation
- Isolation means that data being operated on by a transaction must be locked before modification, to prevent processes outside the scope of the transaction from modifying the data.
- Durability
- Durability means that in the event of an external failure after transaction members have been instructed to commit, all members will be able to continue committing the transaction when the failure is resolved. This failure may be related to hardware, software, network, or any other involved system.
11.2.3. About the Transaction Coordinator or Transaction Manager
The terms Transaction Coordinator and Transaction Manager (TM) are mostly interchangeable in terms of transactions with JBoss EAP. The term Transaction Coordinator is usually used in the context of distributed JTS transactions.
In JTA transactions, the TM runs within JBoss EAP and communicates with transaction participants during the two-phase commit protocol.
The TM tells transaction participants whether to commit or roll back their data, depending on the outcome of other transaction participants. In this way, it ensures that transactions adhere to the ACID standard.
11.2.4. About Transaction Participants
A transaction participant is any resource within a transaction, which has the ability to commit or roll back state. It is generally a database or a JMS broker, but by implementing the transaction interface, a user code could also act as a transaction participant. Each participant of a transaction independently decides whether it is able to commit or roll back its state, and only if all participants can commit, does the transaction as a whole succeed. Otherwise, each participant rolls back its state, and the transaction as a whole fails. The TM coordinates the commit or rollback operations and determines the outcome of the transaction.
11.2.5. About Java Transactions API (JTA)
Java Transactions API (JTA) is part of Java Enterprise Edition specification. It is defined in JSR-907.
Implementation of JTA is done using TM, which is covered by project Narayana for JBoss EAP application server. TM allows application to assign various resources, for example, database or JMS brokers, through a single global transaction. The global transaction is referred as XA transaction. Generally resources with XA capabilities are included in such transaction, but non-XA resources could also be part of global transaction. There are several optimizations which help non-XA resources to behave as XA capable resources. For more information, refer LRCO Optimization for Single-phase Commit
In this document, the term JTA refers to two things:
- Java Transaction API, which is defined by Java EE specification
Indicates how the TM processes the transactions.
TM works in JTA transactions mode, the data is shared via memory and transaction context is transferred by remote EJB calls. In JTS mode, the data is shared by sending Common Object Request Broker Architecture (CORBA) messages and transaction context is transferred by IIOP calls. Both modes support distribution of transaction over multiple JBoss EAP servers.
11.2.6. About Java Transaction Service (JTS)
Java Transaction Service (JTS) is a mapping of the Object Transaction Service (OTS) to Java. Java EE applications use the JTA API to manage transactions. JTA API then interacts with a JTS transaction implementation when the transaction manager is switched to JTS mode. JTS works over the IIOP protocol. Transaction managers that use JTS communicate with each other using a process called an Object Request Broker (ORB), using a communication standard called Common Object Request Broker Architecture (CORBA). For more information, see ORB Configuration in the JBoss EAP Configuration Guide.
Using JTA API from an application standpoint, a JTS transaction behaves in the same way as a JTA transaction.
The implementation of JTS included in JBoss EAP supports distributed transactions. The difference from fully-compliant JTS transactions is interoperability with external third-party ORBs. This feature is unsupported with JBoss EAP. Supported configurations distribute transactions across multiple JBoss EAP containers only.
11.2.7. About XML Transaction Service
The XML Transaction Service (XTS) component supports the coordination of private and public web services in a business transaction. Using XTS, you can coordinate complex business transactions in a controlled and reliable manner. The XTS API supports a transactional coordination model based on the WS-Coordination, WS-Atomic Transaction, and WS-Business Activity protocols.
11.2.7.1. Overview of Protocols Used by XTS
The WS-Coordination (WS-C) specification defines a framework that allows different coordination protocols to be plugged in to coordinate work between clients, services, and participants.
The WS-Transaction (WS-T) protocol comprises the pair of transaction coordination protocols, WS-Atomic Transaction (WS-AT) and WS-Business Activity (WS-BA), which utilize the coordination framework provided by WS-C. WS-T is developed to unify existing traditional transaction processing systems, allowing them to communicate reliably with one another.
11.2.7.2. Web Services-Atomic Transaction Process
An atomic transaction (AT) is designed to support short duration interactions where ACID semantics are appropriate. Within the scope of an AT, web services typically employ bridging to access XA resources, such as databases and message queues, under the control of the WS-T. When the transaction terminates, the participant propagates the outcome decision of the AT to the XA resources, and the appropriate commit or rollback actions are taken by each participant.
11.2.7.2.1. Atomic Transaction Process
- To initiate an AT, the client application first locates a WS-C Activation Coordinator web service that supports WS-T.
-
The client sends a WS-C
CreateCoordinationContextmessage to the service, specifying http://schemas.xmlsoap.org/ws/2004/10/wsat as its coordination type. - The client receives an appropriate WS-T context from the activation service.
-
The response to the
CreateCoordinationContextmessage, the transaction context, has itsCoordinationTypeelement set to the WS-AT namespace, http://schemas.xmlsoap.org/ws/2004/10/wsat. It also contains a reference to the atomic transaction coordinator endpoint, the WS-C Registration Service, where participants can be enlisted. - The client normally proceeds to invoke web services and complete the transaction, either committing all the changes made by the web services, or rolling them back. In order to be able to drive this completion, the client must register itself as a participant for the completion protocol, by sending a register message to the registration service whose endpoint was returned in the coordination context.
- Once registered for completion, the client application then interacts with web services to accomplish its business-level work. With each invocation of a business web service, the client inserts the transaction context into a SOAP header block, such that each invocation is implicitly scoped by the transaction. The toolkits that support WS-AT aware web services provide facilities to correlate contexts found in SOAP header blocks with back-end operations. This ensures that modifications made by the web service are done within the scope of the same transaction as the client and subject to commit or rollback by the Transaction Coordinator.
- Once all the necessary application work is complete, the client can terminate the transaction, with the intent of making any changes to the service state permanent. The completion participant instructs the coordinator to try to commit or roll back the transaction. When the commit or rollback operation completes, a status is returned to the participant to indicate the outcome of the transaction.
For more details, see Web Services-Transaction Documentation.
11.2.7.3. Web Services-Business Activity Process
Web Services-Business Activity (WS-BA) defines a protocol for web service applications to enable existing business processing and workflow systems to wrap their proprietary mechanisms and interoperate across implementations and business boundaries.
Unlike the WS-AT protocol model, where participants inform the transaction coordinator of their state only when asked, a child activity within a WS-BA can specify its outcome to the coordinator directly, without waiting for a request. A participant may choose to exit the activity or notify the coordinator of a failure at any point. This feature is useful when tasks fail because the notification can be used to modify the goals and drive processing forward, without waiting until the end of the transaction to identify failures.
11.2.7.3.1. WS-BA Process
- Services are requested to do work.
-
Wherever these services have the ability to undo any work, they inform the WS-BA, in case the WS-BA later decides the cancel the work. If the WS-BA suffers a failure. it can instruct the service to execute its
undobehavior.
The WS-BA protocols employ a compensation-based transaction model. When a participant in a business activity completes its work, it may choose to exit the activity. This choice does not allow any subsequent rollback. Alternatively, the participant can complete its activity, signaling to the coordinator that the work it has done can be compensated if, at some later point, another participant notifies a failure to the coordinator. In this latter case, the coordinator asks each non-exited participant to compensate for the failure, giving them the opportunity to execute whatever compensating action they consider appropriate. If all participants exit or complete without failure, the coordinator notifies each completed participant that the activity has been closed.
For more details, see Web Services-Transaction Documentation.
11.2.7.4. Transaction Bridging Overview
Transaction Bridging describes the process of linking the Java EE and WS-T domains. The transaction bridge component txbridge provides bi-directional linkage, such that either type of transaction may encompass business logic designed for use with the other type. The technique used by the bridge is a combination of interposition and protocol mapping.
In the transaction bridge, an interposed coordinator is registered into the existing transaction and performs the additional task of protocol mapping; that is, it appears to its parent coordinator to be a resource of its native transaction type, whilst appearing to its children to be a coordinator of their native transaction type, even though these transaction types differ.
The transaction bridge resides in the package org.jboss.jbossts.txbridge and its sub-packages. It consists of two distinct sets of classes, one for bridging in each direction.
For more details, see Transaction Bridge Documentation.
11.2.8. About XA Resources and XA Transactions
XA stands for eXtended Architecture, which was developed by the X/Open Group to define a transaction that uses more than one back-end data store. The XA standard describes the interface between a global TM and a local resource manager. XA allows multiple resources, such as application servers, databases, caches, and message queues, to participate in the same transaction, while preserving all four ACID properties. One of the four ACID properties is atomicity, which means that if one of the participants fails to commit its changes, the other participants abort the transaction, and restore their state to the same status as before the transaction occurred. An XA resource is a resource that can participate in an XA global transaction.
An XA transaction is a transaction which can span multiple resources. It involves a coordinating TM, with one or more databases or other transactional resources, all involved in a single global XA transaction.
11.2.9. About XA Recovery
TM implements X/Open XA specification and supports XA transactions across multiple XA resources.
XA Recovery is the process of ensuring that all resources affected by a transaction are updated or rolled back, even if any of the resources, which are transaction participants, crash or become unavailable. Within the scope of JBoss EAP, the transactions subsystem provides the mechanisms for XA Recovery to any XA resources or subsystems which use them, such as XA datasources, JMS message queues, and JCA resource adapters.
XA Recovery happens without user intervention. In the event of an XA Recovery failure, errors are recorded in the log output. Contact Red Hat Global Support Services if you need assistance. The XA recovery process is driven by periodic recovery thread which is launched by default each 2 minutes. The periodic recovery thread processes all unfinished transactions.
It can take four to eight minutes to complete the recovery for an in-doubt transaction because it might require multiple runs of the recovery process.
11.2.10. Limitations of the XA Recovery Process
XA recovery has the following limitations:
- The transaction log may not be cleared from a successfully committed transaction
If the JBoss EAP server crashes after an XAResource commit method successfully completes and commits the transaction, but before the coordinator can update the log, you may see the following warning message in the log when you restart the server:
ARJUNA016037: Could not find new XAResource to use for recovering non-serializable XAResource XAResourceRecord
ARJUNA016037: Could not find new XAResource to use for recovering non-serializable XAResource XAResourceRecordCopy to Clipboard Copied! Toggle word wrap Toggle overflow This is because upon recovery, the JBoss Transaction Manager (TM) sees the transaction participants in the log and attempts to retry the commit. Eventually the JBoss TM assumes the resources are committed and no longer retries the commit. In this situation, can safely ignore this warning as the transaction is committed and there is no loss of data.
To prevent the warning, set the
com.arjuna.ats.jta.xaAssumeRecoveryCompleteproperty value totrue. This property is checked whenever a new XAResource instance cannot be located from any registered XAResourceRecovery instance. When set totrue, the recovery assumes that a previous commit attempt succeeded and the instance can be removed from the log with no further recovery attempts. This property must be used with care because it is global and when used incorrectly could result in XAResource instances remaining in an uncommitted state.
JBoss EAP 7.0 has an implemented enhancement to clear transaction logs after a successfully committed transaction and the above situation should not occur frequently.
- Rollback is not called for JTS transaction when a server crashes at the end of XAResource.prepare()
-
If the JBoss EAP server crashes after the completion of an XAResource
prepare()method call, all of the participating XAResources are locked in the prepared state and remain that way upon server restart. The transaction is not rolled back and the resources remain locked until the transaction times out or a DBA manually rolls back the resources and clears the transaction log. For more information, see https://issues.jboss.org/browse/JBTM-2124 - Periodic recovery can occur on committed transactions.
When the server is under excessive load, the server log may contain the following warning message, followed by a stacktrace:
ARJUNA016027: Local XARecoveryModule.xaRecovery got XA exception XAException.XAER_NOTA: javax.transaction.xa.XAException
ARJUNA016027: Local XARecoveryModule.xaRecovery got XA exception XAException.XAER_NOTA: javax.transaction.xa.XAExceptionCopy to Clipboard Copied! Toggle word wrap Toggle overflow Under heavy load, the processing time taken by a transaction can overlap with the timing of the periodic recovery process’s activity. The periodic recovery process detects the transaction still in progress and attempts to initiate a rollback but in fact the transaction continues to completion. At the time the periodic recovery attempts but fails the rollback, it records the rollback failure in the server log. The underlying cause of this issue will be addressed in a future release, but in the meantime a workaround is available.
Increase the interval between the two phases of the recovery process by setting the
com.arjuna.ats.jta.orphanSafetyIntervalproperty to a value higher than the default value of 10000 milliseconds. A value of 40000 milliseconds is recommended. Please note that this does not solve the issue, instead it decreases the probability that it will occur and that the warning message will be shown in the log. For more information, see https://developer.jboss.org/thread/266729
11.2.11. About the 2-Phase Commit Protocol
The two-phase commit (2PC) protocol refers to an algorithm to determine the outcome of a transaction. 2PC is driven by the Transaction Manager (TM) as a process of finishing XA transactions.
Phase 1: Prepare
In the first phase, the transaction participants notify the transaction coordinator whether they are able to commit the transaction or must roll back.
Phase 2: Commit
In the second phase, the transaction coordinator makes the decision about whether the overall transaction should commit or roll back. If any one of the participants cannot commit, the transaction must roll back. Otherwise, the transaction can commit. The coordinator directs the resources about what to do, and they notify the coordinator when they have done it. At that point, the transaction is finished.
11.2.12. About Transaction Timeouts
In order to preserve atomicity and adhere to the ACID standard for transactions, some parts of a transaction can be long-running. Transaction participants need to lock an XA resource, that is part of database table or message in a queue, when they commit. The TM needs to wait to hear back from each transaction participant before it can direct them all whether to commit or roll back. Hardware or network failures can cause resources to be locked indefinitely.
Transaction timeouts can be associated with transactions in order to control their lifecycle. If a timeout threshold passes before the transaction commits or rolls back, the timeout causes the transaction to be rolled back automatically.
You can configure default timeout values for the entire transaction subsystem, or you disable default timeout values, and specify timeouts on a per-transaction basis.
11.2.13. About Distributed Transactions
A distributed transaction, is a transaction with participants on multiple JBoss EAP servers. Java Transaction Service (JTS) specification mandates that JTS transactions be able to be distributed across application servers from different vendors. Java Transaction API (JTA) does not define that but JBoss EAP supports distributed JTA transactions among JBoss EAP servers.
Transaction distribution among servers from different vendors is not supported.
In other application server vendor documentation, you can find that term distributed transaction means XA transaction. In context of JBoss EAP documentation, the distributed transaction refers transactions distributed among several JBoss EAP application servers. Transaction which consists from different resources (for example, database resource and jms resource) are referred as XA transactions in this document. For more information, refer to About Java Transaction Service (JTS) and About XA Datasources and XA Transactions.
11.2.14. About the ORB Portability API
The Object Request Broker (ORB) is a process which sends and receives messages to transaction participants, coordinators, resources, and other services distributed across multiple application servers. An ORB uses a standardized Interface Description Language (IDL) to communicate and interpret messages. Common Object Request Broker Architecture (CORBA) is the IDL used by the ORB in JBoss EAP.
The main type of service which uses an ORB is a system of distributed Java Transactions, using the Java Transaction Service (JTS) specification. Other systems, especially legacy systems, may choose to use an ORB for communication, rather than other mechanisms such as remote Enterprise JavaBeans or JAX-WS or JAX-RS web services.
The ORB Portability API provides mechanisms to interact with an ORB. This API provides methods for obtaining a reference to the ORB, as well as placing an application into a mode where it listens for incoming connections from an ORB. Some of the methods in the API are not supported by all ORBs. In those cases, an exception is thrown.
The API consists of two different classes:
-
com.arjuna.orbportability.orb -
com.arjuna.orbportability.oa
Refer to the JBoss EAP Javadocs bundle from the Red Hat Customer Portal for specific details about the methods and properties included in the ORB Portability API.
11.3. Transaction Optimizations
11.3.1. Overview of Transaction Optimizations
The Transaction Manager (TM) of JBoss EAP includes several optimizations that your application can take advantage of.
Optimizations serve to enhance the 2-phase commit protocol in particular cases. Generally, the TM starts a global transaction which passes through the 2-phase commit. But when we optimize these transactions, in certain cases, the TM does not need to proceed with full 2-phased commits and thus the process gets faster.
Different optimizations used by the TM are described in detail below.
11.3.2. About the LRCO Optimization for Single-phase Commit (1PC)
Single-phase Commit (1PC)
Although the 2-phase commit protocol (2PC) is more commonly encountered with transactions, some situations do not require, or cannot accommodate, both phases. In these cases, you can use the single phase commit (1PC) protocol. The single phase commnit protocol is used when only one XA or non-XA resource is a part of the global transaction.
The prepare phase generally locks the resource until the second phase is processed. Single-phase commit means that the prepare phase is skipped and only the commit is processed on the resource. If not specified, the single-phase commit optimization is used automatically when the global transaction contains only one participant.
Last Resource Commit Optimization (LRCO)
In situations where non-XA datasource participate in XA transaction, an optimization known as the Last Resource Commit Optimization (LRCO) is employed. While this protocol allows for most transactions to complete normally, certain types of error can cause an inconsistent transaction outcome. Therefore, use this approach only as a last resort.
The non-XA resource is processed at the end of the prepare phase, and an attempt is made to commit it. If the commit succeeds, the transaction log is written and the remaining resources go through the commit phase. If the last resource fails to commit, the transaction is rolled back.
Where a single local TX datasource is used in a transaction, the LRCO is automatically applied to it.
Previously, adding non-XA resources to an XA transaction was achieved via the LRCO method. However, there is a window of failure in LRCO. The procedure for adding non-XA resources to an XA transaction via the LRCO method is as follows:
- Prepare XA transaction
- Commit LRCO
- Write tx log
- Commit XA transaction
If the procedure crashes between steps 2 and step 3, this could lead to data inconsistency and you cannot commit the XA transaction. The data inconsistency is because the LRCO non-XA resource is committed but information about preparation of XA resource was not recorded. The recovery manager will rollback the resource after the server is up. CMR eliminates this restriction and allows non-XA to be reliably enlisted in an XA transaction.
CMR is a special case of LRCO optimalization, which could be used only for datasources. It is not suitable for all non-XA resources.
11.3.2.1. Commit Markable Resource
Summary
Configuring access to a resource manager using the Commit Markable Resource (CMR) interface ensures that a non-XA datasource can be reliably enlisted to an XA (2PC) transaction. It is an implementation of the LRCO algorithm, which makes non-XA resource fully recoverable.
To configure CMR, you must:
- Create tables in database.
- Enable datasource to be connectable.
-
Add reference to
transactionssubsystem.
Create Tables in Database
A transaction may contain only one CMR resource. You must have a table created for which the following SQL would work.
SELECT xid,actionuid FROM _tableName_ WHERE transactionManagerID IN (String[]) DELETE FROM _tableName_ WHERE xid IN (byte[[]]) INSERT INTO _tableName_ (xid, transactionManagerID, actionuid) VALUES (byte[],String,byte[])
SELECT xid,actionuid FROM _tableName_ WHERE transactionManagerID IN (String[])
DELETE FROM _tableName_ WHERE xid IN (byte[[]])
INSERT INTO _tableName_ (xid, transactionManagerID, actionuid) VALUES (byte[],String,byte[])Example: Sybase Query
CREATE TABLE xids (xid varbinary(144), transactionManagerID varchar(64), actionuid varbinary(28))
CREATE TABLE xids (xid varbinary(144), transactionManagerID varchar(64), actionuid varbinary(28))Example: Oracle Query
CREATE TABLE xids (xid RAW(144), transactionManagerID varchar(64), actionuid RAW(28)) CREATE UNIQUE INDEX index_xid ON xids (xid)
CREATE TABLE xids (xid RAW(144), transactionManagerID varchar(64), actionuid RAW(28))
CREATE UNIQUE INDEX index_xid ON xids (xid)Example: IBM Query
CREATE TABLE xids (xid VARCHAR(255) for bit data not null, transactionManagerID varchar(64), actionuid VARCHAR(255) for bit data not null) CREATE UNIQUE INDEX index_xid ON xids (xid)
CREATE TABLE xids (xid VARCHAR(255) for bit data not null, transactionManagerID
varchar(64), actionuid VARCHAR(255) for bit data not null)
CREATE UNIQUE INDEX index_xid ON xids (xid)Example: SQL Server Query
CREATE TABLE xids (xid varbinary(144), transactionManagerID varchar(64), actionuid varbinary(28)) CREATE UNIQUE INDEX index_xid ON xids (xid)
CREATE TABLE xids (xid varbinary(144), transactionManagerID varchar(64), actionuid varbinary(28))
CREATE UNIQUE INDEX index_xid ON xids (xid)Example: Postgres Query
CREATE TABLE xids (xid bytea, transactionManagerID varchar(64), actionuid bytea) CREATE UNIQUE INDEX index_xid ON xids (xid)
CREATE TABLE xids (xid bytea, transactionManagerID varchar(64), actionuid bytea)
CREATE UNIQUE INDEX index_xid ON xids (xid)Example: MariaDB Query
CREATE TABLE xids (xid BINARY(144), transactionManagerID varchar(64), actionuid BINARY(28)) CREATE UNIQUE INDEX index_xid ON xids (xid)
CREATE TABLE xids (xid BINARY(144), transactionManagerID varchar(64), actionuid BINARY(28))
CREATE UNIQUE INDEX index_xid ON xids (xid)Example: MySQL Query
CREATE TABLE xids (xid VARCHAR(255), transactionManagerID varchar(64), actionuid VARCHAR(255)) CREATE UNIQUE INDEX index_xid ON xids (xid)
CREATE TABLE xids (xid VARCHAR(255), transactionManagerID varchar(64), actionuid VARCHAR(255))
CREATE UNIQUE INDEX index_xid ON xids (xid)Enabling Datasource to be Connectable
By default, the CMR feature is disabled for datasources. To enable it, you must create or modify the datasource configuration and ensure that the connectible attribute is set to true. The following is an example of the datasources section of a server XML configuration file:
<datasource enabled="true" jndi-name="java:jboss/datasources/ConnectableDS" pool-name="ConnectableDS" jta="true" use-java-context="true" connectable="true"/>
<datasource enabled="true" jndi-name="java:jboss/datasources/ConnectableDS" pool-name="ConnectableDS" jta="true" use-java-context="true" connectable="true"/>This feature is not applicable to XA datasources.
You can also enable a resource manager as a CMR, using the management CLI, as follows:
/subsystem=datasources/data-source=ConnectableDS:add(enabled="true", jndi-name="java:jboss/datasources/ConnectableDS", jta="true", use-java-context="true", connectable="true", connection-url="validConnectionURL", exception-sorter="org.jboss.jca.adapters.jdbc.extensions.mssql.MSSQLExceptionSorter", driver-name="h2")
/subsystem=datasources/data-source=ConnectableDS:add(enabled="true", jndi-name="java:jboss/datasources/ConnectableDS", jta="true", use-java-context="true", connectable="true", connection-url="validConnectionURL", exception-sorter="org.jboss.jca.adapters.jdbc.extensions.mssql.MSSQLExceptionSorter", driver-name="h2")Updating an Existing Resource to Use the New CMR Feature
If you only need to update an existing datasource to use the CMR feature, then simply modify the connectable attribute:
/subsystem=datasources/data-source=ConnectableDS:write-attribute(name=connectable,value=true)
/subsystem=datasources/data-source=ConnectableDS:write-attribute(name=connectable,value=true)Add Reference to Transactions Subsystem
The transactions subsystem identifies the datasources that are CMR capable through an entry to the transactions subsystem config section as shown below:
You must restart the server after adding the CMR reference under the transactions subsystem.
Use the exception-sorter parameter in the datasource configuration. For details, see Example Datasource Configurations in the JBoss EAP Configuration Guide.
11.3.3. About the Presumed-Abort Optimization
If a transaction is going to roll back, it can record this information locally and notify all enlisted participants. This notification is only a courtesy, and has no effect on the transaction outcome. After all participants have been contacted, the information about the transaction can be removed.
If a subsequent request for the status of the transaction occurs there will be no information available. In this case, the requester assumes that the transaction has aborted and rolled back. This presumed-abort optimization means that no information about participants needs to be made persistent until the transaction has decided to commit, since any failure prior to this point will be assumed to be an abort of the transaction.
11.3.4. About the Read-Only Optimization
When a participant is asked to prepare, it can indicate to the coordinator that it has not modified any data during the transaction. Such a participant does not need to be informed about the outcome of the transaction, since the fate of the participant has no affect on the transaction. This read-only participant can be omitted from the second phase of the commit protocol.
11.4. Transaction Outcomes
11.4.1. About Transaction Outcomes
There are three possible outcomes for a transaction.
- Commit
- If every transaction participant can commit, the transaction coordinator directs them to do so. See About Transaction Commit for more information.
- Roll-back
- If any transaction participant cannot commit, or the transaction coordinator cannot direct participants to commit, the transaction is rolled back. See About Transaction Roll-Back for more information.
- Heuristic outcome
- If some transaction participants commit and others roll back. it is termed a heuristic outcome. Heuristic outcomes require human intervention. See About Heuristic Outcomes for more information.
11.4.2. About Transaction Commit
When a transaction participant commits, it makes its new state durable. The new state is created by the participant doing the work involved in the transaction. The most common example is when a transaction member writes records to a database.
After commit, information about the transaction is removed from the transaction coordinator, and the newly-written state is now the durable state.
11.4.3. About Transaction Roll-Back
A transaction participant rolls back by restoring its state to reflect the state before the transaction began. After a roll-back, the state is the same as if the transaction had never been started.
11.4.4. About Heuristic Outcomes
A heuristic outcome, or non-atomic outcome, is a situation where the decisions of the participants in a transaction differ from that of the transaction manager. Heuristic outcomes can cause loss of integrity to the system, and usually requires human intervention to resolve. Do not write code which relies on them.
Heuristic outcomes typically occur during the second phase of the 2-phase commit (2PC) protocol. In rare cases, this outcome may occur in 1PC. They are often caused by failures to the underlying hardware or communications subsystems of the underlying servers.
Heuristic is possible due to timeouts in various subsystems or resources even with transaction manager and full crash recovery. In any system that requires some form of distributed agreement, situations may arise some parts of the system diverge in terms of the global outcome.
There are four different types of heuristic outcomes:
Heuristic rollback
The commit operation was not able to commit the resources but all of the participants were able to be rolled back and so an atomic outcome was still achieved.
Heuristic commit
An attempted rollback operation failed because all of the participants unilaterally committed. This may happen if, for example, the coordinator is able to successfully prepare the transaction but then decides to roll it back because of a failure on its side, such as a failure to update its log. In the interim, the participants may decide to commit.
Heuristic mixed
Some participants committed and others rolled back.
Heuristic hazard
The disposition of some of the updates is unknown. For those which are known, they have either all been committed or all rolled back.
11.4.5. JBoss Transactions Errors and Exceptions
For details about exceptions thrown by methods of the UserTransaction class, see the UserTransaction API specification at http://docs.oracle.com/javaee/7/api/javax/transaction/UserTransaction.html.
11.5. Overview of the Transaction Lifecycle
11.5.1. Transaction Lifecycle
See About Java Transactions API (JTA) for more information on Java Transactions API (JTA).
When a resource asks to participate in a transaction, a chain of events is set in motion. The Transaction Manager (TM) is a process that lives within the application server and manages transactions. Transaction participants are objects which participate in a transaction. Resources are datasources, JMS connection factories, or other JCA connections.
Your application starts a new transaction
To begin a transaction, your application obtains an instance of class UserTransaction from JNDI or, if it is an EJB, from an annotation. The UserTransaction interface includes methods for beginning, committing, and rolling back top-level transactions. Newly-created transactions are automatically associated with their invoking thread. Nested transactions are not supported in JTA, so all transactions are top-level transactions.
An EJB starts a transaction when the
UserTransaction.begin()method is called. The default behavior of this transaction could be affected by use of theTransactionAttributeannotation or theejb.xmldescriptor. Any resource that is used after that point is associated with the transaction. If more than one resource is enlisted, your transaction becomes an XA transaction, and participates in the two-phase commit protocol at commit time.NoteBy default, transactions are driven by application containers in EJB. This is called Container Managed Transaction (CMT). To make the transaction user driven, you will need to change the
Transaction Managementto Bean Managed Transaction (BMT). In BMT, theUserTransactionobject is available for user to manage the transaction.Your application modifies its state
In the next step, your application performs its work and makes changes to its state, only on enlisted resources.
Your application decides to commit or roll back
When your application has finished changing its state, it decides whether to commit or roll back. It calls the appropriate method, either
UserTransaction.commit()orUserTransaction.rollback(). For a CMT, this process is driven automatically, whereas for a BMT, a method commit or rollback of theUserTransactionhas to be explicitly called.TM removes the transaction from its records
After the commit or rollback completes, the TM cleans up its records and removes information about your transaction from the transaction log.
Failure Recovery
If a resource, transaction participant, or the application server crashes or become unavailable, the Transaction Manager handles recovery when the underlying failure is resolved and the resource is available again. This process happens automatically. For more information, see XA Recovery.
11.6. Transaction Subsystem Configuration
The transactions subsystem allows you to configure transaction manager options such as statistics, timeout values, and transaction logging. You can also manage transactions and view transaction statistics.
For more information, see Configuring Transactions in the JBoss EAP Configuration Guide.
11.7. Transactions Usage In Practice
11.7.1. Transactions Usage Overview
The following procedures are useful when you need to use transactions in your application.
11.7.2. Control Transactions
Introduction
This list of procedures outlines the different ways to control transactions in your applications which use JTA APIs.
11.7.3. Begin a Transaction
This procedure shows how to begin a new transaction. The API is the same either you run Transaction Manager (TM) configured with JTA or JTS.
Get an instance of UserTransaction
You can get the instance using JNDI, injection, or an EJB’s context, if the EJB uses bean-managed transactions, by means of a
@TransactionManagement(TransactionManagementType.BEAN)annotation.JNDI
new InitialContext().lookup("java:comp/UserTransaction")new InitialContext().lookup("java:comp/UserTransaction")Copy to Clipboard Copied! Toggle word wrap Toggle overflow Injection
@Resource UserTransaction userTransaction;
@Resource UserTransaction userTransaction;Copy to Clipboard Copied! Toggle word wrap Toggle overflow Context
In a stateless/stateful bean:
@Resource SessionContext ctx; ctx.getUserTransaction();
@Resource SessionContext ctx; ctx.getUserTransaction();Copy to Clipboard Copied! Toggle word wrap Toggle overflow In a message-driven bean:
@Resource MessageDrivenContext ctx; ctx.getUserTransaction()
@Resource MessageDrivenContext ctx; ctx.getUserTransaction()Copy to Clipboard Copied! Toggle word wrap Toggle overflow
Call UserTransaction.begin() after you connect to your datasource
Copy to Clipboard Copied! Toggle word wrap Toggle overflow - Participate in an existing transaction using the JTS specification
- One of the benefits of EJBs (either used with CMT or BMT) is that the container manages all the internals of the transactional processing, that is, you are free from taking care of transaction being part of XA transaction or transaction distribution amongst JBoss EAP containers.
Result
The transaction begins. All uses of your datasource until you commit or roll back the transaction are transactional.
For a full example, see JTA Transaction Example.
11.7.4. Nested Transactions
Nested transactions allow an application to create a transaction that is embedded in an existing transaction. In this model, multiple subtransactions can be embedded recursively in a transaction. Subtransactions can be committed or rolled back without committing or rolling back the parent transaction. However, the results of a commit operation are contingent upon the commitment of all the transaction’s ancestors.
For implementation specific information, see the Narayana Project Documentation.
Nested transactions are available only when used with the JTS specification. Nested transactions are not a supported feature of JBoss EAP application server. In addition, many database vendors do not support nested transactions, so consult your database vendor before you add nested transactions to your application.
11.7.5. Commit a Transaction
This procedure shows how to commit a transaction using the Java Transaction API (JTA).
Pre-requisites
You must begin a transaction before you can commit it. For information on how to begin a transaction, refer to Begin a Transaction.
Call the commit() method on the UserTransaction
When you call the commit() method on the UserTransaction, the TM attempts to commit the transaction.
Copy to Clipboard Copied! Toggle word wrap Toggle overflow If you use Container Managed Transactions (CMT), you do not need to manually commit
If you configure your bean to use Container Managed Transactions, the container will manage the transaction lifecycle for you based on annotations you configure in the code.
Copy to Clipboard Copied! Toggle word wrap Toggle overflow
Result
Your datasource commits and your transaction ends, or an exception is thrown.
For a full example, see JTA Transaction Example.
11.7.6. Roll Back a Transaction
This procedure shows how to roll back a transaction using the Java Transaction API (JTA).
Pre-requisites
You must begin a transaction before you can roll it back. For information on how to begin a transaction, refer to Begin a Transaction.
Call the rollback() method on the UserTransaction
When you call the
rollback()method on theUserTransaction, the TM attempts to roll back the transaction and return the data to its previous state.Copy to Clipboard Copied! Toggle word wrap Toggle overflow If you use Container Managed Transactions (CMT), you do not need to manually roll back the transaction
If you configure your bean to use Container Managed Transactions, the container will manage the transaction lifecycle for you based on annotations you configure in the code.
Rollback for CMT occurs if RuntimeException is thrown. You can also explicitly call the setRollbackOnly method to gain the rollback. Or, use the @ApplicationException(rollback=true) for application exception to rollback.
Result
Your transaction is rolled back by the TM.
For a full example, see JTA Transaction Example.
11.7.7. Handle a Heuristic Outcome in a Transaction
Heuristic transaction outcomes are uncommon and usually have exceptional causes. The word heuristic means "by hand", and that is the way that these outcomes usually have to be handled. See About Heuristic Outcomes for more information about heuristic transaction outcomes.
This procedure shows how to handle a heuristic outcome of a transaction using the Java Transaction API (JTA).
Determine the cause: The over-arching cause of a heuristic outcome in a transaction is that a resource manager promised it could commit or roll-back, and then failed to fulfill the promise. This could be due to a problem with a third-party component, the integration layer between the third-party component and JBoss EAP, or JBoss EAP itself.
By far, the most common two causes of heuristic errors are transient failures in the environment and coding errors in the code dealing with resource managers.
Fix transient failures in the environment: Typically, if there is a transient failure in your environment, you will know about it before you find out about the heuristic error. This could be a network outage, hardware failure, database failure, power outage, or a host of other things.
If you experienced the heuristic outcome in a test environment, during stress testing, it provides information about weaknesses in your environment.
WarningJBoss EAP will automatically recover transactions that were in a non-heuristic state at the time of the failure, but it does not attempt to recover heuristic transactions.
- Contact resource manager vendors: If you have no obvious failure in your environment, or the heuristic outcome is easily reproducible, it is probably a coding error. Contact third-party vendors to find out if a solution is available. If you suspect the problem is in the TM of JBoss EAP itself, contact Red Hat Global Support Services.
- Try to manually recover transaction through the management CLI. For more information, see the Recover a Transaction Participant section of the JBoss EAP Configuration Guide.
In a test environment, delete the logs and restart JBoss EAP: In a test environment, or if you do not care about the integrity of the data, deleting the transaction logs and restarting JBoss EAP gets rid of the heuristic outcome. By default, the transaction logs are located in the
EAP_HOME/standalone/data/tx-object-store/directory for a standalone server, or theEAP_HOME/domain/servers/SERVER_NAME/data/tx-object-store/directory in a managed domain. In the case of a managed domain, SERVER_NAME refers to the name of the individual server participating in a server group.NoteThe location of the transaction log also depends on the object store in use and the values set for the
oject-store-relative-toandobject-store-pathparameters. For file system logs (such as a standard shadow and Apache ActiveMQ Artemis logs) the default direction location is used, but when using a JDBC object store, the transaction logs are stored in a database.Resolve the outcome by hand: The process of resolving the transaction outcome by hand is very dependent on the exact circumstance of the failure. Typically, you need to take the following steps, applying them to your situation:
- Identify which resource managers were involved.
- Examine the state in the TM and the resource managers.
Manually force log cleanup and data reconciliation in one or more of the involved components.
The details of how to perform these steps are out of the scope of this documentation.
11.7.8. JTA Transaction Error Handling
11.7.8.1. Handle Transaction Errors
Transaction errors are challenging to solve because they are often dependent on timing. Here are some common errors and ideas for troubleshooting them.
These guidelines do not apply to heuristic errors. If you experience heuristic errors, refer to Handle a Heuristic Outcome in a Transaction and contact Red Hat Global Support Services for assistance.
- The transaction timed out but the business logic thread did not notice
This type of error often manifests itself when Hibernate is unable to obtain a database connection for lazy loading. If it happens frequently, you can lengthen the timeout value. See the JBoss EAP Configuration Guide for information on configuring the transaction manager.
If that is not feasible, you may be able to tune your external environment to perform more quickly, or restructure your code to be more efficient. Contact Red Hat Global Support Services if you still have trouble with timeouts.
- The transaction is already running on a thread, or you receive a
NotSupportedExceptionexception The
NotSupportedExceptionexception usually indicates that you attempted to nest a JTA transaction, and this is not supported. If you were not attempting to nest a transaction, it is likely that another transaction was started in a thread pool task, but finished the task without suspending or ending the transaction.Applications typically use
UserTransaction, which handles this automatically. If so, there may be a problem with a framework.If your code does use
TransactionManagerorTransactionmethods directly, be aware of the following behavior when committing or rolling back a transaction. If your code usesTransactionManagermethods to control your transactions, committing or rolling back a transaction disassociates the transaction from the current thread. However, if your code usesTransactionmethods, the transaction may not be associated with the running thread, and you need to disassociate it from its threads manually, before returning it to the thread pool.- You are unable to enlist a second local resource
- This error happens if you try to enlist a second non-XA resource into a transaction. If you need multiple resources in a transaction, they must be XA.
11.8. Transaction References
11.8.1. JTA Transaction Example
This example illustrates how to begin, commit, and roll back a JTA transaction. You need to adjust the connection and datasource parameters to suit your environment, and set up two test tables in your database.
11.8.2. Transaction API Documentation
The transaction JTA API documentation is available as javadoc at the following location:
If you use Red Hat JBoss Developer Studio to develop your applications, the API documentation is included in the Help menu.
Chapter 12. Java Persistence API (JPA)
12.1. About Java Persistence API (JPA)
The Java Persistence API (JPA) is a Java specification for accessing, persisting, and managing data between Java objects or classes and a relational database. The JPA specification recognizes the interest and the success of the transparent object or relational mapping paradigm. It standardizes the basic APIs and the metadata needed for any object or relational persistence mechanism.
JPA itself is just a specification, not a product; it cannot perform persistence or anything else by itself. JPA is just a set of interfaces, and requires an implementation.
12.2. About Hibernate Core
Hibernate Core is an object-relational mapping framework for the Java language. It provides a framework for mapping an object-oriented domain model to a relational database, allowing applications to avoid direct interaction with the database. Hibernate solves object-relational impedance mismatch problems by replacing direct, persistent database accesses with high-level object handling functions.
12.3. Hibernate EntityManager
Hibernate EntityManager implements the programming interfaces and lifecycle rules as defined by the Java Persistence 2.1 specification. Together with Hibernate Annotations, this wrapper implements a complete (and standalone) JPA persistence solution on top of the mature Hibernate Core. You may use a combination of all three together, annotations without JPA programming interfaces and lifecycle, or even pure native Hibernate Core, depending on the business and technical needs of your project. You can at all times fall back to Hibernate native APIs, or if required, even to native JDBC and SQL. It provides JBoss EAP with a complete Java Persistence solution.
JBoss EAP is 100% compliant with the Java Persistence 2.1 specification. Hibernate also provides additional features to the specification. To get started with JPA and JBoss EAP, see the bean-validation, greeter, and kitchensink quickstarts that ship with JBoss EAP. For information about how to download and run the quickstarts, see Using the Quickstart Examples.
Persistence in JPA is available in containers like EJB 3 or the more modern CDI, Java Context and Dependency Injection, as well as in standalone Java SE applications that execute outside of a particular container. The following programming interfaces and artifacts are available in both environments.
- EntityManagerFactory
- An entity manager factory provides entity manager instances, all instances are configured to connect to the same database, to use the same default settings as defined by the particular implementation, etc. You can prepare several entity manager factories to access several data stores. This interface is similar to the SessionFactory in native Hibernate.
- EntityManager
- The EntityManager API is used to access a database in a particular unit of work. It is used to create and remove persistent entity instances, to find entities by their primary key identity, and to query over all entities. This interface is similar to the Session in Hibernate.
- Persistence context
- A persistence context is a set of entity instances in which for any persistent entity identity there is a unique entity instance. Within the persistence context, the entity instances and their lifecycle is managed by a particular entity manager. The scope of this context can either be the transaction, or an extended unit of work.
- Persistence unit
- The set of entity types that can be managed by a given entity manager is defined by a persistence unit. A persistence unit defines the set of all classes that are related or grouped by the application, and which must be collocated in their mapping to a single data store.
- Container-managed entity manager
- An entity manager whose lifecycle is managed by the container.
- Application-managed entity manager
- An entity manager whose lifecycle is managed by the application.
- JTA entity manager
- Entity manager involved in a JTA transaction.
- Resource-local entity manager
- Entity manager using a resource transaction (not a JTA transaction).
12.4. Create a Simple JPA Application
Follow the procedure below to create a simple JPA application in Red Hat Developer studio.
Create a JPA project in JBoss Developer Studio.
In Red Hat JBoss Developer Studio, click File-→ New -→ Project. Find JPA in the list, expand it, and select JPA Project. You are presented with the following dialog.
Figure 12.1. New JPA Project Dialog
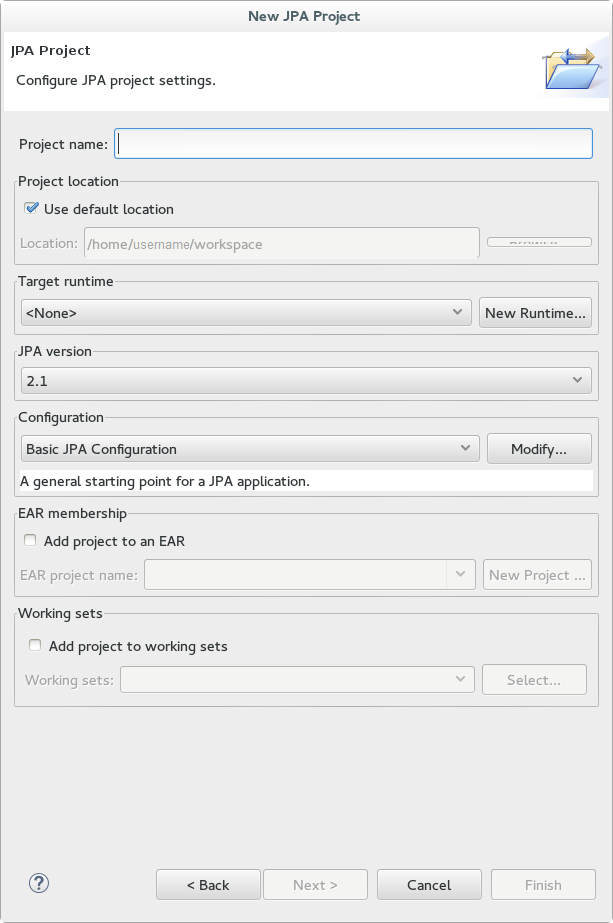
- Enter a Project name.
- Select a Target runtime. If no target runtime is available, follow these instructions to define a new server and runtime: Add the JBoss EAP Server Using Define New Server .
- Under JPA version, ensure 2.1 is selected.
- Under Configuration, choose Basic JPA Configuration.
- Click Finish.
- If prompted, choose whether you wish to associate this type of project with the JPA perspective window.
Create and configure a new persistence settings file.
- Open an EJB 3.x project in Red Hat JBoss Developer Studio.
- Right click the project root directory in the Project Explorer panel.
- Select New → Other….
- Select XML File from the XML folder and click Next.
-
Select the
ejbModule/META-INF/folder as the parent directory. -
Name the file
persistence.xmland click Next. - Select Create XML file from an XML schema file and click Next.
Select http://java.sun.com/xml/ns/persistence/persistence_2.0.xsd from the Select XML Catalog entry list and click Next.
Figure 12.2. Persistence XML Schema
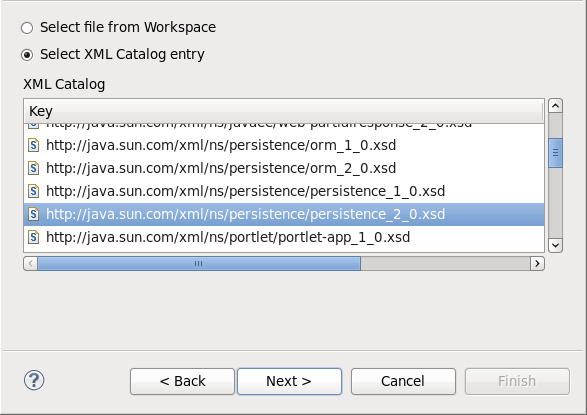
Click Finish to create the file. The
persistence.xmlhas been created in theMETA-INF/folder and is ready to be configured.Example: Persistence Settings File
Copy to Clipboard Copied! Toggle word wrap Toggle overflow
12.5. Hibernate Configuration
The configuration for entity managers both inside an application server and in a standalone application reside in a persistence archive. A persistence archive is a JAR file which must define a persistence.xml file that resides in the META-INF/ folder.
You can connect to the database using the persistence.xml file. There are two ways of doing this:
Specifying a data source which is configured in the
datasourcessubsystem in JBoss EAP.The
jta-data-sourcepoints to the JNDI name of the data source this persistence unit maps to. Thejava:jboss/datasources/ExampleDShere points to theH2 DBembedded in the JBoss EAP.Example of
object-relational-mappingin thepersistence.xmlFileCopy to Clipboard Copied! Toggle word wrap Toggle overflow Explicitly configuring the
persistence.xmlfile by specifying the connection properties.Example of Specifying Connection Properties in the
persistence.xmlfile<property name="javax.persistence.jdbc.driver" value="org.hsqldb.jdbcDriver"/> <property name="javax.persistence.jdbc.user" value="sa"/> <property name="javax.persistence.jdbc.password" value=""/> <property name="javax.persistence.jdbc.url" value="jdbc:hsqldb:."/>
<property name="javax.persistence.jdbc.driver" value="org.hsqldb.jdbcDriver"/> <property name="javax.persistence.jdbc.user" value="sa"/> <property name="javax.persistence.jdbc.password" value=""/> <property name="javax.persistence.jdbc.url" value="jdbc:hsqldb:."/>Copy to Clipboard Copied! Toggle word wrap Toggle overflow For the complete list of connection properties, see Connection Properties Configurable in the
persistence.xmlFile.
There are a number of properties that control the behavior of Hibernate at runtime. All are optional and have reasonable default values. These Hibernate properties are all used in the persistence.xml file. For the complete list of all configurable Hibernate properties, see Hibernate Properties in the appendix of this guide.
12.6. Second-Level Caches
12.6.1. About Second-Level Caches
A second-level cache is a local data store that holds information persisted outside the application session. The cache is managed by the persistence provider, improving run-time by keeping the data separate from the application.
JBoss EAP supports caching for the following purposes:
- Web Session Clustering
- Stateful Session Bean Clustering
- SSO Clustering
- Hibernate Second Level Cache
Each cache container defines a "repl" and a "dist" cache. These caches should not be used directly by user applications.
12.6.2. Configure a Second-level Cache for Hibernate
The configuration of Infinispan to act as the second-level cache for Hibernate can be done in two ways:
-
It is recommended to configure the second-level cache through JPA applications, using the
persistence.xmlfile. -
Alternatively, you can configure the second-level cache through Hibernate native applications, using the
hibernate.cfg.xmlfile.
Configuring a Second-level Cache for Hibernate Using JPA Applications
- See Create a Simple JPA Application for details on how to create a Hibernate configuration file in Red Hat JBoss Developer Studio.
Add the following to the
persistence.xmlfile:Copy to Clipboard Copied! Toggle word wrap Toggle overflow NoteThe following can be value of
$SHARED_CACHE_MODE:- ALL - All entities should be considered cacheable.
- ENABLE_SELECTIVE - Only entities marked as cacheable should be considered cacheable.
- DISABLE_SELECTIVE - All entities except the ones explicitly marked as not cacheable, should be considered cacheable.
Configuring a Second-level Cache for Hibernate Using Hibernate Native Applications
-
Create the
hibernate.cfg.xmlfile in the deployment’s class path. Add the following XML to the
hibernate.cfg.xmlfile. The XML needs to be within the<session-factory>tag:<property name="hibernate.cache.use_second_level_cache">true</property> <property name="hibernate.cache.use_query_cache">true</property> <property name="hibernate.cache.region.factory_class">org.jboss.as.jpa.hibernate5.infinispan.InfinispanRegionFactory</property>
<property name="hibernate.cache.use_second_level_cache">true</property> <property name="hibernate.cache.use_query_cache">true</property> <property name="hibernate.cache.region.factory_class">org.jboss.as.jpa.hibernate5.infinispan.InfinispanRegionFactory</property>Copy to Clipboard Copied! Toggle word wrap Toggle overflow
12.7. Hibernate Annotations
The org.hibernate.annotations package contains some annotations which are offered by Hibernate, on top of the standard JPA annotations.
| Annotation | Description |
|---|---|
|
| Arbitrary SQL check constraints which can be defined at the class, property or collection level. |
|
| Mark an Entity or a Collection as immutable. No annotation means the element is mutable. An immutable entity may not be updated by the application. Updates to an immutable entity will be ignored, but no exception is thrown.
|
| Annotation | Description |
|---|---|
|
| Add caching strategy to a root entity or a collection. |
| Annotation | Description |
|---|---|
|
| Defines the type of key of a persistent map. |
|
|
Defines a |
|
| Order a collection using SQL ordering (not HQL ordering). |
|
|
Strategy to use on collections, arrays and on joined subclasses delete. |
|
| Specify a custom persister. |
|
| Collection sort (Java level sorting). |
|
| Where clause to add to the element Entity or target entity of a collection. The clause is written in SQL. |
|
| Where clause to add to the collection join table. The clause is written in SQL. |
| Annotation | Description |
|---|---|
|
|
Overwrites Hibernate default |
|
|
Overwrites the Hibernate default |
|
|
Overwrites the Hibernate default |
|
|
Overwrites the Hibernate default |
|
|
Overwrites the Hibernate default |
|
| Maps an immutable and read-only entity to a given SQL subselect expression. |
|
|
Ensures that auto-flush happens correctly and that queries against the derived entity do not return stale data. Mostly used with |
| Annotation | Description |
|---|---|
|
| Apply a cascade strategy on an association. |
|
|
Adds additional metadata that may be needed beyond what is defined in the standard
|
|
| Used to define the type of polymorphism Hibernate will apply to entity hierarchies. |
|
| Lazy and proxy configuration of a particular class. |
|
| Complementary information to a table either primary or secondary. |
|
| Plural annotation of Table. |
|
| Defines an explicit target, avoiding reflection and generics resolving. |
|
| Defines a tuplizer for an entity or a component. |
|
| Defines a set of tuplizers for an entity or a component. |
| Annotation | Description |
|---|---|
|
| Batch size for SQL loading. |
|
| Defines the fetching strategy profile. |
|
|
Plural annotation for |
| Annotation | Description |
|---|---|
|
| Adds filters to an entity or a target entity of a collection. |
|
| Filter definition. |
|
| Array of filter definitions. |
|
| Adds filters to a join table collection. |
|
|
Adds multiple |
|
|
Adds multiple |
|
| A parameter definition. |
| Annotation | Description |
|---|---|
|
| This annotated property is generated by the database. |
|
| Generator annotation describing any kind of Hibernate generator in a detyped manner. |
|
| Array of generic generator definitions. |
|
| Specifies that a property is part of the natural id of the entity. |
|
| Key/value pattern. |
|
|
Support for |
| Annotation | Description |
|---|---|
|
| Discriminator formula to be placed at the root entity. |
|
| Optional annotation to express Hibernate specific discriminator properties. |
|
| Maps a given discriminator value to the corresponding entity type. |
| Annotation | Description |
|---|---|
|
|
Extends |
|
|
Extends |
|
|
Extends |
|
|
Extends |
| Annotation | Description |
|---|---|
|
| Property Access type. |
|
| Support an array of columns. Useful for component user type mappings. |
|
| Custom SQL expression used to read the value from and write a value to a column. Use for direct object loading/saving as well as queries. The write expression must contain exactly one '?' placeholder for the value. |
|
|
Plural annotation for |
| Annotation | Description |
|---|---|
|
|
To be used as a replacement for |
|
| Defines a database index. |
|
|
To be used as a replacement for |
|
| Reference the property as a pointer back to the owner (generally the owning entity). |
|
| Hibernate Type. |
|
| Hibernate Type definition. |
|
| Hibernate Type definition array. |
| Annotation | Description |
|---|---|
|
| Defines a ToOne association pointing to several entity types. Matching the according entity type is done through a metadata discriminator column. This kind of mapping should be only marginal. |
|
|
Defines |
|
|
Defines |
|
| Defines the fetching strategy used for the given association. |
|
| Defines the lazy status of a collection. |
|
|
Defines the lazy status of a ToOne association (i.e. |
|
| Action to do when an element is not found on an association. |
| Annotation | Description |
|---|---|
|
| Whether or not a change of the annotated property will trigger an entity version increment. If the annotation is not present, the property is involved in the optimistic lock strategy (default). |
|
| Used to define the style of optimistic locking to be applied to an entity. In a hierarchy, only valid on the root entity. |
|
| Optional annotation in conjunction with Version and timestamp version properties. The annotation value decides where the timestamp is generated. |
12.8. Hibernate Query Language
12.8.1. About Hibernate Query Language
Introduction to JPQL
The Java Persistence Query Language (JPQL) is a platform-independent object-oriented query language defined as part of the Java Persistence API (JPA) specification. JPQL is used to make queries against entities stored in a relational database. It is heavily inspired by SQL, and its queries resemble SQL queries in syntax, but operate against JPA entity objects rather than directly with database tables.
Introduction to HQL
The Hibernate Query Language (HQL) is a powerful query language, similar in appearance to SQL. Compared with SQL, however, HQL is fully object-oriented and understands notions like inheritance, polymorphism and association.
HQL is a superset of JPQL. An HQL query is not always a valid JPQL query, but a JPQL query is always a valid HQL query.
Both HQL and JPQL are non-type-safe ways to perform query operations. Criteria queries offer a type-safe approach to querying.
12.8.2. About HQL Statements
Both HQL and JPQL allow SELECT, UPDATE, and DELETE statements. HQL additionally allows INSERT statements, in a form similar to a SQL INSERT-SELECT.
Care should be taken when executing bulk update or delete operations because they may result in inconsistencies between the database and the entities in the active persistence context. In general, bulk update and delete operations should only be performed within a transaction in a new persistence context or before fetching or accessing entities whose state might be affected by such operations.
| Statement | Description |
|---|---|
|
| The BNF for SELECT statements in HQL is: |
|
| The BNF for UPDATE statement in HQL is the same as it is in JPQL |
|
| The BNF for DELETE statements in HQL is the same as it is in JPQL |
12.8.3. About the INSERT Statement
HQL adds the ability to define INSERT statements. There is no JPQL equivalent to this. The BNF for an HQL INSERT statement is:
insert_statement ::= insert_clause select_statement insert_clause ::= INSERT INTO entity_name (attribute_list) attribute_list ::= state_field[, state_field ]*
insert_statement ::= insert_clause select_statement
insert_clause ::= INSERT INTO entity_name (attribute_list)
attribute_list ::= state_field[, state_field ]*
The attribute_list is analogous to the column specification in the SQL INSERT statement. For entities involved in mapped inheritance, only attributes directly defined on the named entity can be used in the attribute_list. Superclass properties are not allowed and subclass properties do not make sense. In other words, INSERT statements are inherently non-polymorphic.
The select_statement can be any valid HQL select query, with the caveat that the return types must match the types expected by the insert. Currently, this is checked during query compilation rather than allowing the check to relegate to the database. This can cause problems with Hibernate Types that are equivalent as opposed to equal. For example, this might cause mismatch issues between an attribute mapped as an org.hibernate.type.DateType and an attribute defined as a org.hibernate.type.TimestampType, even though the database might not make a distinction or might be able to handle the conversion.
For the id attribute, the insert statement gives you two options. You can either explicitly specify the id property in the attribute_list, in which case its value is taken from the corresponding select expression, or omit it from the attribute_list in which case a generated value is used. This latter option is only available when using id generators that operate "in the database"; attempting to use this option with any "in memory" type generators will cause an exception during parsing.
For optimistic locking attributes, the insert statement again gives you two options. You can either specify the attribute in the attribute_list in which case its value is taken from the corresponding select expressions, or omit it from the attribute_list in which case the seed value defined by the corresponding org.hibernate.type.VersionType is used.
Example. INSERT Query Statements
String hqlInsert = "insert into DelinquentAccount (id, name) select c.id, c.name from Customer c where ..."; int createdEntities = s.createQuery( hqlInsert ).executeUpdate();
String hqlInsert = "insert into DelinquentAccount (id, name) select c.id, c.name from Customer c where ...";
int createdEntities = s.createQuery( hqlInsert ).executeUpdate();12.8.4. About the FROM Clause
The FROM clause is responsible defining the scope of object model types available to the rest of the query. It also is responsible for defining all the "identification variables" available to the rest of the query.
12.8.5. About the WITH Clause
HQL defines a WITH clause to qualify the join conditions. This is specific to HQL; JPQL does not define this feature.
Example. With Clause
select distinct c
from Customer c
left join c.orders o
with o.value > 5000.00
select distinct c
from Customer c
left join c.orders o
with o.value > 5000.00
The important distinction is that in the generated SQL the conditions of the with clause are made part of the on clause in the generated SQL as opposed to the other queries in this section where the HQL/JPQL conditions are made part of the where clause in the generated SQL. The distinction in this specific example is probably not that significant. The with clause is sometimes necessary in more complicated queries.
Explicit joins may reference association or component/embedded attributes. In the case of component/embedded attributes, the join is logical and does not correlate to a physical (SQL) join.
12.8.6. About HQL Ordering
The results of the query can also be ordered. The ORDER BY clause is used to specify the selected values to be used to order the result. The types of expressions considered valid as part of the order-by clause include:
- state fields
- component/embeddable attributes
- scalar expressions such as arithmetic operations, functions, etc.
- identification variable declared in the select clause for any of the previous expression types
HQL does not mandate that all values referenced in the order-by clause must be named in the select clause, but it is required by JPQL. Applications desiring database portability should be aware that not all databases support referencing values in the order-by clause that are not referenced in the select clause.
Individual expressions in the order-by can be qualified with either ASC (ascending) or DESC (descending) to indicate the desired ordering direction.
Example. Order-by Examples
12.8.7. About Bulk Update, Insert and Delete
Hibernate allows the use of Data Manipulation Language (DML) to bulk insert, update and delete data directly in the mapped database through the Hibernate Query Language.
Using DML may violate the object/relational mapping and may affect object state. Object state stays in memory and by using DML, the state of an in-memory object is not affected depending on the operation that is performed on the underlying database. In-memory data must be used with care if DML is used.
The pseudo-syntax for UPDATE and DELETE statements is:
( UPDATE | DELETE ) FROM? EntityName (WHERE where_conditions)?.
The FROM keyword and the WHERE Clause are optional.
The result of execution of a UPDATE or DELETE statement is the number of rows that are actually affected (updated or deleted).
Example. Bulk Update Statement
Example. Bulk Delete Statement
The int value returned by the Query.executeUpdate() method indicates the number of entities within the database that were affected by the operation.
Internally, the database might use multiple SQL statements to execute the operation in response to a DML Update or Delete request. This might be because of relationships that exist between tables and the join tables that may need to be updated or deleted.
For example, issuing a delete statement (as in the example above) may actually result in deletes being executed against not just the Company table for companies that are named with oldName, but also against joined tables. Thus, a Company table in a BiDirectional ManyToMany relationship with an Employee table, would lose rows from the corresponding join table Company_Employee as a result of the successful execution of the previous example.
The int deletedEntries value above will contain a count of all the rows affected due to this operation, including the rows in the join tables.
The pseudo-syntax for INSERT statements is: INSERT INTO EntityName properties_list select_statement.
Only the INSERT INTO … SELECT … form is supported; not the INSERT INTO … VALUES … form.
Example. Bulk Insert Statement
If you do not supply the value for the id attribute via the SELECT statement, an identifier is generated for you, as long as the underlying database supports auto-generated keys. The return value of this bulk insert operation is the number of entries actually created in the database.
12.8.8. About Collection Member References
References to collection-valued associations actually refer to the values of that collection.
Example. Collection References
In the example, the identification variable o actually refers to the object model type Order which is the type of the elements of the Customer#orders association.
The example also shows the alternate syntax for specifying collection association joins using the IN syntax. Both forms are equivalent. Which form an application chooses to use is simply a matter of taste.
12.8.9. About Qualified Path Expressions
It was previously stated that collection-valued associations actually refer to the values of that collection. Based on the type of collection, there are also available a set of explicit qualification expressions.
| Expression | Description |
|---|---|
|
| Refers to the collection value. Same as not specifying a qualifier. Useful to explicitly show intent. Valid for any type of collection-valued reference. |
|
|
According to HQL rules, this is valid for both Maps and Lists which specify a javax.persistence.OrderColumn annotation to refer to the Map key or the List position (aka the OrderColumn value). JPQL however, reserves this for use in the List case and adds |
|
| Valid only for Maps. Refers to the map’s key. If the key is itself an entity, can be further navigated. |
|
|
Only valid only for Maps. Refers to the Map’s logical java.util.Map.Entry tuple (the combination of its key and value). |
Example. Qualified Collection References
12.8.10. About Scalar Functions
HQL defines some standard functions that are available regardless of the underlying database in use. HQL can also understand additional functions defined by the dialect and the application.
12.8.11. About HQL Standardized Functions
The following functions are available in HQL regardless of the underlying database in use.
| Function | Description |
|---|---|
|
| Returns the length of binary data. |
|
| Performs a SQL cast. The cast target should name the Hibernate mapping type to use. |
|
| Performs a SQL extraction on datetime values. An extraction extracts parts of the datetime (the year, for example). See the abbreviated forms below. |
|
| Abbreviated extract form for extracting the second. |
|
| Abbreviated extract form for extracting the minute. |
|
| Abbreviated extract form for extracting the hour. |
|
| Abbreviated extract form for extracting the day. |
|
| Abbreviated extract form for extracting the month. |
|
| Abbreviated extract form for extracting the year. |
|
| Abbreviated form for casting a value as character data. |
Application developers can also supply their own set of functions. This would usually represent either custom SQL functions or aliases for snippets of SQL. Such function declarations are made by using the addSqlFunction method of org.hibernate.cfg.Configuration
12.8.12. About the Concatenation Operation
HQL defines a concatenation operator in addition to supporting the concatenation (CONCAT) function. This is not defined by JPQL, so portable applications should avoid using it. The concatenation operator is taken from the SQL concatenation operator - ||.
Example. Concatenation Operation Example
select 'Mr. ' || c.name.first || ' ' || c.name.last from Customer c where c.gender = Gender.MALE
select 'Mr. ' || c.name.first || ' ' || c.name.last
from Customer c
where c.gender = Gender.MALE12.8.13. About Dynamic Instantiation
There is a particular expression type that is only valid in the select clause. Hibernate calls this "dynamic instantiation". JPQL supports some of this feature and calls it a "constructor expression".
Example. Dynamic Instantiation Example - Constructor
select new Family( mother, mate, offspr )
from DomesticCat as mother
join mother.mate as mate
left join mother.kittens as offspr
select new Family( mother, mate, offspr )
from DomesticCat as mother
join mother.mate as mate
left join mother.kittens as offsprSo rather than dealing with the Object[] here we are wrapping the values in a type-safe java object that will be returned as the results of the query. The class reference must be fully qualified and it must have a matching constructor.
The class here need not be mapped. If it does represent an entity, the resulting instances are returned in the NEW state (not managed!).
This is the part JPQL supports as well. HQL supports additional "dynamic instantiation" features. First, the query can specify to return a List rather than an Object[] for scalar results:
Example. Dynamic Instantiation Example - List
select new list(mother, offspr, mate.name)
from DomesticCat as mother
inner join mother.mate as mate
left outer join mother.kittens as offspr
select new list(mother, offspr, mate.name)
from DomesticCat as mother
inner join mother.mate as mate
left outer join mother.kittens as offsprThe results from this query will be a List<List> as opposed to a List<Object[]>
HQL also supports wrapping the scalar results in a Map.
Example. Dynamic Instantiation Example - Map
The results from this query will be a List<Map<String,Object>> as opposed to a List<Object[]>. The keys of the map are defined by the aliases given to the select expressions.
12.8.14. About HQL Predicates
Predicates form the basis of the where clause, the having clause and searched case expressions. They are expressions which resolve to a truth value, generally TRUE or FALSE, although boolean comparisons involving NULL values generally resolve to UNKNOWN.
HQL Predicates
Null Predicate
Check a value for null. Can be applied to basic attribute references, entity references and parameters. HQL additionally allows it to be applied to component/embeddable types.
Null Check Examples
Copy to Clipboard Copied! Toggle word wrap Toggle overflow Like Predicate
Performs a like comparison on string values. The syntax is:
like_expression ::= string_expression [NOT] LIKE pattern_value [ESCAPE escape_character]like_expression ::= string_expression [NOT] LIKE pattern_value [ESCAPE escape_character]Copy to Clipboard Copied! Toggle word wrap Toggle overflow The semantics follow that of the SQL like expression. The
pattern_valueis the pattern to attempt to match in thestring_expression. Just like SQL,pattern_valuecan use_(underscore) and%(percent) as wildcards. The meanings are the same. The_matches any single character. The%matches any number of characters.The optional
escape_characteris used to specify an escape character used to escape the special meaning of_and%in thepattern_value. This is useful when needing to search on patterns including either_or%.Like Predicate Examples
Copy to Clipboard Copied! Toggle word wrap Toggle overflow Between Predicate
Analogous to the SQL
BETWEENexpression. Perform an evaluation that a value is within the range of 2 other values. All the operands should have comparable types.Between Predicate Examples
Copy to Clipboard Copied! Toggle word wrap Toggle overflow IN Predicate
The
INpredicate performs a check that a particular value is in a list of values. Its syntax is:Copy to Clipboard Copied! Toggle word wrap Toggle overflow The types of the
single_valued_expressionand the individual values in thesingle_valued_listmust be consistent. JPQL limits the valid types here to string, numeric, date, time, timestamp, and enum types. In JPQL,single_valued_expressioncan only refer to:- "state fields", which is its term for simple attributes. Specifically this excludes association and component/embedded attributes.
entity type expressions.
In HQL,
single_valued_expressioncan refer to a far more broad set of expression types. Single-valued association are allowed. So are component/embedded attributes, although that feature depends on the level of support for tuple or "row value constructor syntax" in the underlying database. Additionally, HQL does not limit the value type in any way, though application developers should be aware that different types may incur limited support based on the underlying database vendor. This is largely the reason for the JPQL limitations.The list of values can come from a number of different sources. In the
constructor_expressionandcollection_valued_input_parameter, the list of values must not be empty; it must contain at least one value.In Predicate Examples
Copy to Clipboard Copied! Toggle word wrap Toggle overflow
12.8.15. About Relational Comparisons
Comparisons involve one of the comparison operators - =, >, >=, <, ⇐, <>. HQL also defines != as a comparison operator synonymous with <>. The operands should be of the same type.
Example. Relational Comparison Examples
Comparisons can also involve subquery qualifiers - ALL, ANY, SOME. SOME and ANY are synonymous.
The ALL qualifier resolves to true if the comparison is true for all of the values in the result of the subquery. It resolves to false if the subquery result is empty.
Example. ALL Subquery Comparison Qualifier Example
The ANY/SOME qualifier resolves to true if the comparison is true for some of (at least one of) the values in the result of the subquery. It resolves to false if the subquery result is empty.
12.9. Hibernate Services
12.9.1. About Hibernate Services
Services are classes that provide Hibernate with pluggable implementations of various types of functionality. Specifically they are implementations of certain service contract interfaces. The interface is known as the service role; the implementation class is known as the service implementation. Generally speaking, users can plug in alternate implementations of all standard service roles (overriding); they can also define additional services beyond the base set of service roles (extending).
12.9.2. About Service Contracts
The basic requirement for a service is to implement the marker interface org.hibernate.service.Service. Hibernate uses this internally for some basic type safety.
Optionally, the service can also implement the org.hibernate.service.spi.Startable and org.hibernate.service.spi.Stoppable interfaces to receive notifications of being started and stopped. Another optional service contract is org.hibernate.service.spi.Manageable which marks the service as manageable in JMX provided the JMX integration is enabled.
12.9.3. Types of Service Dependencies
Services are allowed to declare dependencies on other services using either of 2 approaches:
- @org.hibernate.service.spi.InjectService
-
Any method on the service implementation class accepting a single parameter and annotated with
@InjectServiceis considered requesting injection of another service. -
By default the type of the method parameter is expected to be the service role to be injected. If the parameter type is different than the service role, the
serviceRoleattribute of theInjectServiceshould be used to explicitly name the role. -
By default injected services are considered required, that is the start up will fail if a named dependent service is missing. If the service to be injected is optional, the required attribute of the
InjectServiceshould be declared asfalse(default istrue). - org.hibernate.service.spi.ServiceRegistryAwareService
-
The second approach is a pull approach where the service implements the optional service interface
org.hibernate.service.spi.ServiceRegistryAwareServicewhich declares a singleinjectServicesmethod. -
During startup, Hibernate will inject the
org.hibernate.service.ServiceRegistryitself into services which implement this interface. The service can then use theServiceRegistryreference to locate any additional services it needs.
12.9.4. The Service Registry
12.9.4.1. About the ServiceRegistry
The central service API, aside from the services themselves, is the org.hibernate.service.ServiceRegistry interface. The main purpose of a service registry is to hold, manage and provide access to services.
Service registries are hierarchical. Services in one registry can depend on and utilize services in that same registry as well as any parent registries.
Use org.hibernate.service.ServiceRegistryBuilder to build a org.hibernate.service.ServiceRegistry instance.
Example Using ServiceRegistryBuilder to Create a ServiceRegistry
ServiceRegistryBuilder registryBuilder =
new ServiceRegistryBuilder( bootstrapServiceRegistry );
ServiceRegistry serviceRegistry = registryBuilder.buildServiceRegistry();
ServiceRegistryBuilder registryBuilder =
new ServiceRegistryBuilder( bootstrapServiceRegistry );
ServiceRegistry serviceRegistry = registryBuilder.buildServiceRegistry();12.9.5. Custom Services
12.9.5.1. About Custom Services
Once a org.hibernate.service.ServiceRegistry is built it is considered immutable; the services themselves might accept reconfiguration, but immutability here means adding or replacing services. So another role provided by the org.hibernate.service.ServiceRegistryBuilder is to allow tweaking of the services that will be contained in the org.hibernate.service.ServiceRegistry generated from it.
There are two means to tell a org.hibernate.service.ServiceRegistryBuilder about custom services.
-
Implement a
org.hibernate.service.spi.BasicServiceInitiatorclass to control on-demand construction of the service class and add it to theorg.hibernate.service.ServiceRegistryBuilderusing itsaddInitiatormethod. -
Just instantiate the service class and add it to the
org.hibernate.service.ServiceRegistryBuilderusing itsaddServicemethod.
Either approach is valid for extending a registry, such as adding new service roles, and overriding services, such as replacing service implementations.
Example. Use ServiceRegistryBuilder to Replace an Existing Service with a Custom Service
12.9.6. The Boot-Strap Registry
12.9.6.1. About the Boot-strap Registry
The boot-strap registry holds services that absolutely have to be available for most things to work. The main service here is the ClassLoaderService which is a perfect example. Even resolving configuration files needs access to class loading services i.e. resource look ups. This is the root registry, no parent, in normal use.
Instances of boot-strap registries are built using the org.hibernate.service.BootstrapServiceRegistryBuilder class.
Using BootstrapServiceRegistryBuilder
Example. Using BootstrapServiceRegistryBuilder
12.9.6.2. BootstrapRegistry Services
org.hibernate.service.classloading.spi.ClassLoaderServiceHibernate needs to interact with class loaders. However, the manner in which Hibernate, or any library, should interact with class loaders varies based on the runtime environment that is hosting the application. Application servers, OSGi containers, and other modular class loading systems impose very specific class loading requirements. This service provides Hibernate an abstraction from this environmental complexity. And just as importantly, it does so in a single-swappable-component manner.
In terms of interacting with a class loader, Hibernate needs the following capabilities:
- the ability to locate application classes
- the ability to locate integration classes
- the ability to locate resources, such as properties files and XML files
the ability to load
java.util.ServiceLoaderNoteCurrently, the ability to load application classes and the ability to load integration classes are combined into a single load class capability on the service. That may change in a later release.
org.hibernate.integrator.spi.IntegratorServiceApplications, add-ons and other modules need to integrate with Hibernate. The previous approach required a component, usually an application, to coordinate the registration of each individual module. This registration was conducted on behalf of each module’s integrator.
This service focuses on the discovery aspect. It leverages the standard Java
java.util.ServiceLoadercapability provided by theorg.hibernate.service.classloading.spi.ClassLoaderServicein order to discover implementations of theorg.hibernate.integrator.spi.Integratorcontract.Integrators would simply define a file named
/META-INF/services/org.hibernate.integrator.spi.Integratorand make it available on the class path.This file is used by the
java.util.ServiceLoadermechanism. It lists, one per line, the fully qualified names of classes which implement theorg.hibernate.integrator.spi.Integratorinterface.
12.9.7. SessionFactory Registry
While it is best practice to treat instances of all the registry types as targeting a given org.hibernate.SessionFactory, the instances of services in this group explicitly belong to a single org.hibernate.SessionFactory.
The difference is a matter of timing in when they need to be initiated. Generally they need access to the org.hibernate.SessionFactory to be initiated. This special registry is org.hibernate.service.spi.SessionFactoryServiceRegistry
12.9.7.1. SessionFactory Services
org.hibernate.event.service.spi.EventListenerRegistry
- Description
- Service for managing event listeners.
- Initiator
-
org.hibernate.event.service.internal.EventListenerServiceInitiator - Implementations
-
org.hibernate.event.service.internal.EventListenerRegistryImpl
12.9.8. Integrators
The org.hibernate.integrator.spi.Integrator is intended to provide a simple means for allowing developers to hook into the process of building a functioning SessionFactory. The org.hibernate.integrator.spi.Integrator interface defines two methods of interest:
-
integrateallows us to hook into the building process -
disintegrateallows us to hook into aSessionFactoryshutting down.
There is a third method defined in org.hibernate.integrator.spi.Integrator, an overloaded form of integrate, accepting a org.hibernate.metamodel.source.MetadataImplementor instead of org.hibernate.cfg.Configuration.
In addition to the discovery approach provided by the IntegratorService, applications can manually register Integrator implementations when building the BootstrapServiceRegistry.
12.9.8.1. Integrator use-cases
The main use cases for an org.hibernate.integrator.spi.Integrator are registering event listeners and providing services, see org.hibernate.integrator.spi.ServiceContributingIntegrator.
Example. Registering Event Listeners
12.10. Envers
12.10.1. About Hibernate Envers
Hibernate Envers is an auditing and versioning system, providing JBoss EAP with a means to track historical changes to persistent classes. Audit tables are created for entities annotated with @Audited, which store the history of changes made to the entity. The data can then be retrieved and queried.
Envers allows developers to:
- audit all mappings defined by the JPA specification,
- audit all hibernate mappings that extend the JPA specification,
- audit entities mapped by or using the native Hibernate API
- log data for each revision using a revision entity, and
- query historical data.
12.10.2. About Auditing Persistent Classes
Auditing of persistent classes is done in JBoss EAP through Hibernate Envers and the @Audited annotation. When the annotation is applied to a class, a table is created, which stores the revision history of the entity.
Each time a change is made to the class, an entry is added to the audit table. The entry contains the changes to the class, and is given a revision number. This means that changes can be rolled back, or previous revisions can be viewed.
12.10.3. Auditing Strategies
12.10.3.1. About Auditing Strategies
Auditing strategies define how audit information is persisted, queried and stored. There are currently two audit strategies available with Hibernate Envers:
- Default Audit Strategy
- This strategy persists the audit data together with a start revision. For each row that is inserted, updated or deleted in an audited table, one or more rows are inserted in the audit tables, along with the start revision of its validity.
- Rows in the audit tables are never updated after insertion. Queries of audit information use subqueries to select the applicable rows in the audit tables, which are slow and difficult to index.
- Validity Audit Strategy
- This strategy stores the start revision, as well as the end revision of the audit information. For each row that is inserted, updated or deleted in an audited table, one or more rows are inserted in the audit tables, along with the start revision of its validity.
- At the same time, the end revision field of the previous audit rows (if available) is set to this revision. Queries on the audit information can then use between start and end revision, instead of subqueries. This means that persisting audit information is a little slower because of the extra updates, but retrieving audit information is a lot faster.
- This can also be improved by adding extra indexes.
For more information on auditing, refer to About Auditing Persistent Classes. To set the auditing strategy for the application, refer here: Set the Auditing Strategy .
12.10.3.2. Set the Auditing Strategy
There are two audit strategies supported by JBoss EAP:
- The default audit strategy
- The validity audit strategy
Define an Auditing Strategy
Configure the org.hibernate.envers.audit_strategy property in the persistence.xml file of the application. If the property is not set in the persistence.xml file, then the default audit strategy is used.
Set the Default Audit Strategy
<property name="org.hibernate.envers.audit_strategy" value="org.hibernate.envers.strategy.DefaultAuditStrategy"/>
<property name="org.hibernate.envers.audit_strategy" value="org.hibernate.envers.strategy.DefaultAuditStrategy"/>Set the Validity Audit Strategy
<property name="org.hibernate.envers.audit_strategy" value="org.hibernate.envers.strategy.ValidityAuditStrategy"/>
<property name="org.hibernate.envers.audit_strategy" value="org.hibernate.envers.strategy.ValidityAuditStrategy"/>12.10.4. Adding Auditing Support to a JPA Entity
JBoss EAP uses entity auditing, through About Hibernate Envers, to track the historical changes of a persistent class. This topic covers adding auditing support for a JPA entity.
Add Auditing Support to a JPA Entity
- Configure the available auditing parameters to suit the deployment: Configure Envers Parameters .
- Open the JPA entity to be audited.
-
Import the
org.hibernate.envers.Auditedinterface. Apply the
@Auditedannotation to each field or property to be audited, or apply it once to the whole class.Example: Audit Two Fields
Copy to Clipboard Copied! Toggle word wrap Toggle overflow Example: Audit an entire Class
Copy to Clipboard Copied! Toggle word wrap Toggle overflow
Once the JPA entity has been configured for auditing, a table called _AUD will be created to store the historical changes.
12.10.5. Configuration
12.10.5.1. Configure Envers Parameters
JBoss EAP uses entity auditing, through Hibernate Envers, to track the historical changes of a persistent class.
Configuring the Available Envers Parameters
-
Open the
persistence.xmlfile for the application. Add, remove or configure Envers properties as required. For a list of available properties, refer to Envers Configuration Properties .
Example: Envers Parameters
Copy to Clipboard Copied! Toggle word wrap Toggle overflow
12.10.5.2. Enable or Disable Auditing at Runtime
Enable or Disable Entity Version Auditing at Runtime
-
Subclass the
AuditEventListenerclass. Override the following methods that are called on Hibernate events:
-
onPostInsert -
onPostUpdate -
onPostDelete -
onPreUpdateCollection -
onPreRemoveCollection -
onPostRecreateCollection
-
- Specify the subclass as the listener for the events.
- Determine if the change should be audited.
- Pass the call to the superclass if the change should be audited.
12.10.5.3. Configure Conditional Auditing
Hibernate Envers persists audit data in reaction to various Hibernate events, using a series of event listeners. These listeners are registered automatically if the Envers jar is in the class path.
Implement Conditional Auditing
-
Set the
hibernate.listeners.envers.autoRegisterHibernate property to false in thepersistence.xmlfile. - Subclass each event listener to be overridden. Place the conditional auditing logic in the subclass, and call the super method if auditing should be performed.
-
Create a custom implementation of
org.hibernate.integrator.spi.Integrator, similar toorg.hibernate.envers.event.EnversIntegrator. Use the event listener subclasses created in step two, rather than the default classes. -
Add a
META-INF/services/org.hibernate.integrator.spi.Integratorfile to the jar. This file should contain the fully qualified name of the class implementing the interface.
12.10.5.4. Envers Configuration Properties
| Property Name | Default Value | Description |
|---|---|---|
|
| It has is no default value | A string that is prepended to the name of an audited entity, to create the name of the entity that will hold the audit information. |
|
| _AUD |
A string that is appended to the name of an audited entity to create the name of the entity that will hold the audit information. For example, if an entity with a table name of |
|
| REV | The name of the field in the audit entity that holds the revision number. |
|
| REVTYPE |
The name of the field in the audit entity that holds the type of revision. The current types of revisions possible are: |
|
| true |
This property determines if a revision should be generated if a relation field that is not owned changes. This can either be a collection in a one-to-many relation, or the field using the |
|
| true |
When true, properties used for optimistic locking (annotated with |
|
| false | This property defines whether or not entity data should be stored in the revision when the entity is deleted, instead of only the ID, with all other properties marked as null. This is not usually necessary, as the data is present in the last-but-one revision. Sometimes, however, it is easier and more efficient to access it in the last revision. However, this means the data the entity contained before deletion is stored twice. |
|
| null (same as normal tables) |
The default schema name used for audit tables. Can be overridden using the |
|
| null (same as normal tables) |
The default catalog name that should be used for audit tables. Can be overridden using the |
|
|
|
This property defines the audit strategy that should be used when persisting audit data. By default, only the revision where an entity was modified is stored. Alternatively, |
|
| REVEND | The column name that will hold the end revision number in audit entities. This property is only valid if the validity audit strategy is used. |
|
| false |
This property defines whether the timestamp of the end revision, where the data was last valid, should be stored in addition to the end revision itself. This is useful to be able to purge old audit records out of a relational database by using table partitioning. Partitioning requires a column that exists within the table. This property is only evaluated if the |
|
| REVEND_TSTMP |
Column name of the timestamp of the end revision at which point the data was still valid. Only used if the |
12.10.6. Retrieve Auditing Information through Queries
Hibernate Envers provides the functionality to retrieve audit information through queries.
Queries on the audited data will be, in many cases, much slower than corresponding queries on live data, as they involve correlated subselects.
Querying for Entities of a Class at a Given Revision
The entry point for this type of query is:
AuditQuery query = getAuditReader()
.createQuery()
.forEntitiesAtRevision(MyEntity.class, revisionNumber);
AuditQuery query = getAuditReader()
.createQuery()
.forEntitiesAtRevision(MyEntity.class, revisionNumber);
Constraints can then be specified, using the AuditEntity factory class. The query below only selects entities where the name property is equal to John:
query.add(AuditEntity.property("name").eq("John"));
query.add(AuditEntity.property("name").eq("John"));The queries below only select entities that are related to a given entity:
query.add(AuditEntity.property("address").eq(relatedEntityInstance));
// or
query.add(AuditEntity.relatedId("address").eq(relatedEntityId));
query.add(AuditEntity.property("address").eq(relatedEntityInstance));
// or
query.add(AuditEntity.relatedId("address").eq(relatedEntityId));The results can then be ordered, limited, and have aggregations and projections (except grouping) set. The example below is a full query.
Query Revisions where Entities of a Given Class Changed
The entry point for this type of query is:
AuditQuery query = getAuditReader().createQuery()
.forRevisionsOfEntity(MyEntity.class, false, true);
AuditQuery query = getAuditReader().createQuery()
.forRevisionsOfEntity(MyEntity.class, false, true);Constraints can be added to this query in the same way as the previous example. There are additional possibilities for this query:
AuditEntity.revisionNumber()- Specify constraints, projections and order on the revision number in which the audited entity was modified.
AuditEntity.revisionProperty(propertyName)- Specify constraints, projections and order on a property of the revision entity, corresponding to the revision in which the audited entity was modified.
AuditEntity.revisionType()- Provides accesses to the type of the revision (ADD, MOD, DEL).
The query results can then be adjusted as necessary. The query below selects the smallest revision number at which the entity of the MyEntity class, with the entityId ID has changed, after revision number 42:
Queries for revisions can also minimize/maximize a property. The query below selects the revision at which the value of the actualDate for a given entity was larger than a given value, but as small as possible:
The minimize() and maximize() methods return a criteria, to which constraints can be added, which must be met by the entities with the maximized/minimized properties.
There are two boolean parameters passed when creating the query.
selectEntitiesOnly-
This parameter is only valid when an explicit projection is not set.
Iftrue, the result of the query will be a list of entities that changed at revisions satisfying the specified constraints.
Iffalse, the result will be a list of three element arrays. The first element will be the changed entity instance. The second will be an entity containing revision data. If no custom entity is used, this will be an instance ofDefaultRevisionEntity. The third element array will be the type of the revision (ADD, MOD, DEL). selectDeletedEntities-
This parameter specifies if revisions in which the entity was deleted must be included in the results. If true, the entities will have the revision type
DEL, and all fields, except id, will have the valuenull.
Query Revisions of an Entity that Modified a Given Property
The query below will return all revisions of MyEntity with a given id, where the actualDate property has been changed.
AuditQuery query = getAuditReader().createQuery()
.forRevisionsOfEntity(MyEntity.class, false, true)
.add(AuditEntity.id().eq(id));
.add(AuditEntity.property("actualDate").hasChanged())
AuditQuery query = getAuditReader().createQuery()
.forRevisionsOfEntity(MyEntity.class, false, true)
.add(AuditEntity.id().eq(id));
.add(AuditEntity.property("actualDate").hasChanged())
The hasChanged condition can be combined with additional criteria. The query below will return a horizontal slice for MyEntity at the time the revisionNumber was generated. It will be limited to the revisions that modified prop1, but not prop2.
AuditQuery query = getAuditReader().createQuery()
.forEntitiesAtRevision(MyEntity.class, revisionNumber)
.add(AuditEntity.property("prop1").hasChanged())
.add(AuditEntity.property("prop2").hasNotChanged());
AuditQuery query = getAuditReader().createQuery()
.forEntitiesAtRevision(MyEntity.class, revisionNumber)
.add(AuditEntity.property("prop1").hasChanged())
.add(AuditEntity.property("prop2").hasNotChanged());
The result set will also contain revisions with numbers lower than the revisionNumber. This means that this query cannot be read as "Return all MyEntities changed in revisionNumber with prop1 modified and prop2 untouched."
The query below shows how this result can be returned, using the forEntitiesModifiedAtRevision query:
AuditQuery query = getAuditReader().createQuery()
.forEntitiesModifiedAtRevision(MyEntity.class, revisionNumber)
.add(AuditEntity.property("prop1").hasChanged())
.add(AuditEntity.property("prop2").hasNotChanged());
AuditQuery query = getAuditReader().createQuery()
.forEntitiesModifiedAtRevision(MyEntity.class, revisionNumber)
.add(AuditEntity.property("prop1").hasChanged())
.add(AuditEntity.property("prop2").hasNotChanged());Query Entities Modified in a Given Revision
The example below shows the basic query for entities modified in a given revision. It allows entity names and corresponding Java classes changed in a specified revision to be retrieved:
Set<Pair<String, Class>> modifiedEntityTypes = getAuditReader()
.getCrossTypeRevisionChangesReader().findEntityTypes(revisionNumber);
Set<Pair<String, Class>> modifiedEntityTypes = getAuditReader()
.getCrossTypeRevisionChangesReader().findEntityTypes(revisionNumber);There are a number of other queries that are also accessible from org.hibernate.envers.CrossTypeRevisionChangesReader:
List<Object> findEntities(Number)-
Returns snapshots of all audited entities changed (added, updated and removed) in a given revision. Executes
n+1SQL queries, wherenis a number of different entity classes modified within the specified revision. List<Object> findEntities(Number, RevisionType)-
Returns snapshots of all audited entities changed (added, updated or removed) in a given revision filtered by modification type. Executes
n+1SQL queries, wherenis a number of different entity classes modified within specified revision. Map<RevisionType, List<Object>> findEntitiesGroupByRevisionType(Number)-
Returns a map containing lists of entity snapshots grouped by modification operation (e.g. addition, update and removal). Executes
3n+1SQL queries, wherenis a number of different entity classes modified within specified revision.
12.11. Performance Tuning
12.11.1. Alternative Batch Loading Algorithms
Hibernate allows you to load data for associations using one of four fetching strategies: join, select, subselect and batch. Out of these four strategies, batch loading allows for the biggest performance gains as it is an optimization strategy for select fetching. In this strategy, Hibernate retrieves a batch of entity instances or collections in a single SELECT statement by specifying a list of primary or foreign keys. Batch fetching is an optimization of the lazy select fetching strategy.
There are two ways to configure batch fetching: per-class level or per-collection level.
Per-Class Level
When Hibernate loads data on a per-class level, it requires the batch size of the association to pre-load when queried. For example, consider that at runtime you have 30 instances of a
carobject loaded in session. Eachcarobject belongs to anownerobject. If you were to iterate through all thecarobjects and request their owners, withlazyloading, Hibernate will issue 30 select statements - one for each owner. This is a performance bottleneck.You can instead, tell Hibernate to pre-load the data for the next batch of owners before they have been sought via a query. When an
ownerobject has been queried, Hibernate will query many more of these objects in the same SELECT statement.The number of
ownerobjects to query in advance depends upon thebatch-sizeparameter specified at configuration time:<class name="owner" batch-size="10"></class>
<class name="owner" batch-size="10"></class>Copy to Clipboard Copied! Toggle word wrap Toggle overflow This tells Hibernate to query at least 10 more
ownerobjects in expectation of them being needed in the near future. When a user queries theownerofcar A, theownerofcar Bmay already have been loaded as part of batch loading. When the user actually needs theownerofcar B, instead of going to the database (and issuing a SELECT statement), the value can be retrieved from the current session.In addition to the
batch-sizeparameter, Hibernate 4.2.0 has introduced a new configuration item to improve in batch loading performance. The configuration item is calledBatch Fetch Styleconfiguration and specified by thehibernate.batch_fetch_styleparameter.Three different batch fetch styles are supported: LEGACY, PADDED and DYNAMIC. To specify which style to use, use
org.hibernate.cfg.AvailableSettings#BATCH_FETCH_STYLE.LEGACY: In the legacy style of loading, a set of pre-built batch sizes based on
ArrayHelper.getBatchSizes(int)are utilized. Batches are loaded using the next-smaller pre-built batch size from the number of existing batchable identifiers.Continuing with the above example, with a
batch-sizesetting of 30, the pre-built batch sizes would be [30, 15, 10, 9, 8, 7, .., 1]. An attempt to batch load 29 identifiers would result in batches of 15, 10, and 4. There will be 3 corresponding SQL queries, each loading 15, 10 and 4 owners from the database.PADDED - Padded is similar to LEGACY style of batch loading. It still utilizes pre-built batch sizes, but uses the next-bigger batch size and pads the extra identifier placeholders.
As with the example above, if 30 owner objects are to be initialized, there will only be one query executed against the database.
However, if 29 owner objects are to be initialized, Hibernate will still execute only 1 SQL select statement of batch size 30, with the extra space padded with a repeated identifier.
Dynamic - While still conforming to batch-size restrictions, this style of batch loading dynamically builds its SQL SELECT statement using the actual number of objects to be loaded.
For example, for 30 owner objects, and a maximum batch size of 30, a call to retrieve 30 owner objects will result in one SQL SELECT statement. A call to retrieve 35 will result in two SQL statements, of batch sizes 30 and 5 respectively. Hibernate will dynamically alter the second SQL statement to keep at 5, the required number, while still remaining under the restriction of 30 as the batch-size. This is different to the PADDED version, as the second SQL will not get PADDED, and unlike the LEGACY style, there is no fixed size for the second SQL statement - the second SQL is created dynamically.
For a query of less than 30 identifiers, this style will dynamically only load the number of identifiers requested.
Per-Collection Level
Hibernate can also batch load collections honoring the batch fetch size and styles as listed in the per-class section above.
To reverse the example used in the previous section, consider that you need to load all the
carobjects owned by eachownerobject. If 10ownerobjects are loaded in the current session iterating through all owners will generate 10 SELECT statements, one for every call togetCars()method. If you enable batch fetching for the cars collection in the mapping of Owner, Hibernate can pre-fetch these collections, as shown below.<class name="Owner"><set name="cars" batch-size="5"></set></class>
<class name="Owner"><set name="cars" batch-size="5"></set></class>Copy to Clipboard Copied! Toggle word wrap Toggle overflow Thus, with a batch-size of 5 and using legacy batch style to load 10 collections, Hibernate will execute two SELECT statements, each retrieving 5 collections.
12.11.2. Second Level Caching of Object References for Non-mutable Data
Hibernate automatically caches data within memory for improved performance. This is accomplished by an in-memory cache which reduces the number of times that database lookups are required, especially for data that rarely changes.
Hibernate maintains two types of caches. The primary cache (also called the first-level cache) is mandatory. This cache is associated with the current session and all requests must pass through it. The secondary cache (also called the second-level cache) is optional, and is only consulted after the primary cache has been consulted first.
Data is stored in the second-level cache by first disassembling it into a state array. This array is deep copied, and that deep copy is put into the cache. The reverse is done for reading from the cache. This works well for data that changes (mutable data), but is inefficient for immutable data.
Deep copying data is an expensive operation in terms of memory usage and processing speed. For large data sets, memory and processing speed become a performance-limiting factor. Hibernate allows you to specify that immutable data be referenced rather than copied. Instead of copying entire data sets, Hibernate can now store the reference to the data in the cache.
This can be done by changing the value of the configuration setting hibernate.cache.use_reference_entries to true. By default, hibernate.cache.use_reference_entries is set to false.
When hibernate.cache.use_reference_entries is set to true, an immutable data object that does not have any associations is not copied into the second-level cache, and only a reference to it is stored.
When hibernate.cache.use_reference_entries is set to true, immutable data objects with associations are still deep copied into the second-level cache.
Chapter 13. Hibernate Search
13.1. Getting Started with Hibernate Search
13.1.1. About Hibernate Search
Hibernate Search provides full-text search capability to Hibernate applications. It is especially suited to search applications for which SQL-based solutions are not suited, including: full-text, fuzzy and geolocation searches. Hibernate Search uses Apache Lucene as its full-text search engine, but is designed to minimize the maintenance overhead. Once it is configured, indexing, clustering and data synchronization is maintained transparently, allowing you to focus on meeting your business requirements.
The prior release of JBoss EAP included Hibernate 4.2 and Hibernate Search 4.6. JBoss EAP 7 includes Hibernate 5 and Hibernate Search 5.5.
Hibernate Search 5.5 works with Java 7 and now builds upon Lucene 5.3.x. If you are using any native Lucene APIs make sure to align with this version.
13.1.2. Overview
Hibernate Search consists of an indexing component as well as an index search component, both are backed by Apache Lucene. Each time an entity is inserted, updated or removed from the database, Hibernate Search keeps track of this event through the Hibernate event system and schedules an index update. All these updates are handled without having to interact with the Apache Lucene APIs directly. Instead, interaction with the underlying Lucene indexes is handled via an IndexManager. By default there is a one-to-one relationship between IndexManager and Lucene index. The IndexManager abstracts the specific index configuration, including the selected back end, reader strategy and the DirectoryProvider.
Once the index is created, you can search for entities and return lists of managed entities instead of dealing with the underlying Lucene infrastructure. The same persistence context is shared between Hibernate and Hibernate Search. The FullTextSession class is built on top of the Hibernate Session class so that the application code can use the unified org.hibernate.Query or javax.persistence.Query APIs exactly the same way an HQL, JPA-QL, or native query would.
Transactional batching mode is recommended for all operations, whether or not they are JDBC-based.
It is recommended, for both your database and Hibernate Search, to execute your operations in a transaction, whether it is JDBC or JTA.
Hibernate Search works perfectly fine in the Hibernate or EntityManager long conversation pattern, known as atomic conversation.
13.1.3. About the Directory Provider
Apache Lucene, which is part of the Hibernate Search infrastructure, has the concept of a Directory for storage of indexes. Hibernate Search handles the initialization and configuration of a Lucene Directory instance via a Directory Provider.
The directory_provider property specifies the directory provider to be used to store the indexes. The default file system directory provider is filesystem, which uses the local file system to store indexes.
13.1.4. About the Worker
Updates to Lucene indexes are handled by the Hibernate Search Worker, which receives all entity changes, queues them by context and applies them once a context ends. The most common context is the transaction, but may be dependent on the number of entity changes or some other application events.
For better efficiency, interactions are batched and generally applied once the context ends. Outside a transaction, the index update operation is executed right after the actual database operation. In the case of an ongoing transaction, the index update operation is scheduled for the transaction commit phase and discarded in case of transaction rollback. A worker may be configured with a specific batch size limit, after which indexing occurs regardless of the context.
There are two immediate benefits to this method of handling index updates:
- Performance: Lucene indexing works better when operation are executed in batch.
- ACIDity: The work executed has the same scoping as the one executed by the database transaction and is executed if and only if the transaction is committed. This is not ACID in the strict sense, but ACID behavior is rarely useful for full text search indexes since they can be rebuilt from the source at any time.
The two batch modes, no scope vs transactional, are the equivalent of autocommit versus transactional behavior. From a performance perspective, the transactional mode is recommended. The scoping choice is made transparently. Hibernate Search detects the presence of a transaction and adjust the scoping.
13.1.5. Back End Setup and Operations
13.1.5.1. Back End
Hibernate Search uses various back ends to process batches of work. The back end is not limited to the configuration option default.worker.backend. This property specifies a implementation of the BackendQueueProcessor interface which is a part of a back-end configuration. Additional settings are required to set up a back-end, for example the JMS back-end.
13.1.5.2. Lucene
In the Lucene mode, all index updates for a node are executed by the same node to the Lucene directories using the directory providers. Use this mode in a non-clustered environment or in clustered environments with a shared directory store.
Figure 13.1. Lucene Back-end Configuration
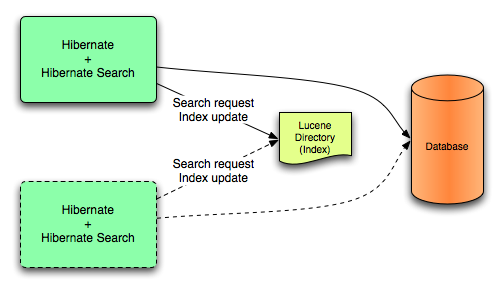
Lucene mode targets non-clustered or clustered applications where the directory manages the locking strategy. The primary advantage of Lucene mode is simplicity and immediate visibility of changes in Lucene queries. The Near Real Time (NRT) back end is an alternative back end for non-clustered and non-shared index configurations.
13.1.5.3. JMS
Index updates for a node are sent to the JMS queue. A unique reader processes the queue and updates the master index. The master index is subsequently replicated regularly to slave copies, to establish the master and slave pattern. The master is responsible for Lucene index updates. The slaves accept read and write operations but process read operations on local index copies. The master is solely responsible for updating the Lucene index. Only the master applies the local changes in an update operation.
Figure 13.2. JMS Back-end Configuration
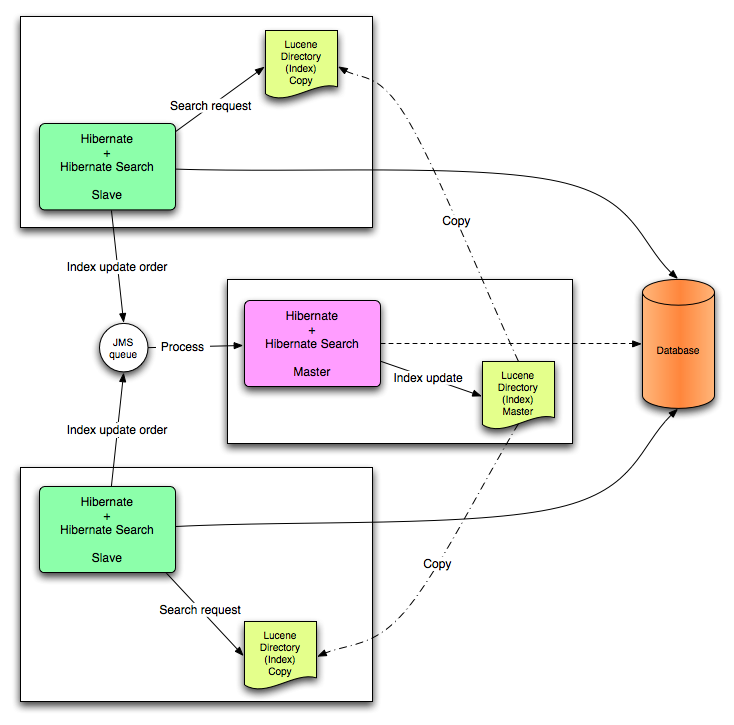
This mode targets clustered environment where throughput is critical and index update delays are affordable. The JMS provider ensures reliability and uses the slaves to change the local index copies.
13.1.6. Reader Strategies
When executing a query, Hibernate Search uses a reader strategy to interact with the Apache Lucene indexes. Choose a reader strategy based on the profile of the application like frequent updates, read mostly, asynchronous index update.
13.1.6.3. Custom Reader Strategies
You can write a custom reader strategy using an implementation of org.hibernate.search.reader.ReaderProvider. The implementation must be thread safe.
13.2. Configuration
13.2.1. Minimum Configuration
Hibernate Search has been designed to provide flexibility in its configuration and operation, with default values carefully chosen to suit the majority of use cases. At a minimum a Directory Provider must be configured, along with its properties. The default Directory Provider is filesystem, which uses the local file system for index storage. For details of available Directory Providers and their configuration, see DirectoryProvider Configuration.
If you are using Hibernate directly, settings such as the DirectoryProvider must be set in the configuration file, either hibernate.properties or hibernate.cfg.xml. If you are using Hibernate via JPA, the configuration file is persistence.xml.
13.2.2. Configuring the IndexManager
Hibernate Search offers several implementations for this interface:
-
directory-based: the default implementation which uses the LuceneDirectoryabstraction to manage index files. -
near-real-time: avoids flushing writes to disk at each commit. This index manager is alsoDirectorybased, but uses Lucene’s near real-time, NRT, functionality.
To specify an IndexManager other than the default, specify the following property:
hibernate.search.[default|<indexname>].indexmanager = near-real-time
hibernate.search.[default|<indexname>].indexmanager = near-real-time13.2.2.1. Directory-based
The Directory-based implementation is the default IndexManager implementation. It is highly configurable and allows separate configurations for the reader strategy, back ends, and directory providers.
13.2.2.2. Near Real Time
The NRTIndexManager is an extension of the default IndexManager and leverages the Lucene NRT, Near Real Time, feature for low latency index writes. However, it ignores configuration settings for alternative back ends other than lucene and acquires exclusive write locks on the Directory.
The IndexWriter does not flush every change to the disk to provide low latency. Queries can read the updated states from the unflushed index writer buffers. However, this means that if the IndexWriter is killed or the application crashes, updates can be lost so the indexes must be rebuilt.
The Near Real Time configuration is recommended for non-clustered websites with limited data due to the mentioned disadvantages and because a master node can be individually configured for improved performance as well.
13.2.2.3. Custom
Specify a fully qualified class name for the custom implementation to set up a customized IndexManager. Set up a no-argument constructor for the implementation as follows:
[default|<indexname>].indexmanager = my.corp.myapp.CustomIndexManager
[default|<indexname>].indexmanager = my.corp.myapp.CustomIndexManager
The custom index manager implementation does not require the same components as the default implementations. For example, delegate to a remote indexing service which does not expose a Directory interface.
13.2.3. DirectoryProvider Configuration
A DirectoryProvider is the Hibernate Search abstraction around a Lucene Directory and handles the configuration and the initialization of the underlying Lucene resources. Directory Providers and their Properties shows the list of the directory providers available in Hibernate Search together with their corresponding options.
Each indexed entity is associated with a Lucene index (except of the case where multiple entities share the same index). The name of the index is given by the index property of the @Indexed annotation. If the index property is not specified the fully qualified name of the indexed class will be used as name (recommended).
The DirectoryProvider and any additional options can be configured by using the prefix hibernate.search.<indexname>. The name default (hibernate.search.default) is reserved and can be used to define properties which apply to all indexes. Configuring Directory Providers shows how hibernate.search.default.directory_provider is used to set the default directory provider to be the filesystem one. hibernate.search.default.indexBase sets then the default base directory for the indexes. As a result the index for the entity Status is created in /usr/lucene/indexes/org.hibernate.example.Status.
The index for the Rule entity, however, is using an in-memory directory, because the default directory provider for this entity is overridden by the property hibernate.search.Rules.directory_provider.
Finally the Action entity uses a custom directory provider CustomDirectoryProvider specified via hibernate.search.Actions.directory_provider.
Specifying the Index Name
Configuring Directory Providers
hibernate.search.default.directory_provider = filesystem hibernate.search.default.indexBase=/usr/lucene/indexes hibernate.search.Rules.directory_provider = ram hibernate.search.Actions.directory_provider = com.acme.hibernate.CustomDirectoryProvider
hibernate.search.default.directory_provider = filesystem
hibernate.search.default.indexBase=/usr/lucene/indexes
hibernate.search.Rules.directory_provider = ram
hibernate.search.Actions.directory_provider = com.acme.hibernate.CustomDirectoryProviderUsing the described configuration scheme you can easily define common rules like the directory provider and base directory, and override those defaults later on a per index basis.
Directory Providers and their Properties
- ram
- None
- filesystem
File system based directory. The directory used will be <indexBase>/< indexName >
- indexBase : base directory
- indexName: override @Indexed.index (useful for sharded indexes)
- locking_strategy : optional, see LockFactory Configuration
-
filesystem_access_type: allows to determine the exact type of
FSDirectoryimplementation used by thisDirectoryProvider. Allowed values areauto(the default value, selectsNIOFSDirectoryon non Windows systems,SimpleFSDirectoryon Windows),simple (SimpleFSDirectory),nio (NIOFSDirectory),mmap (MMapDirectory). Refer to Javadocs of these Directory implementations before changing this setting. Even thoughNIOFSDirectoryorMMapDirectorycan bring substantial performance boosts they also have their issues.
filesystem-masterFile system based directory. Like
filesystem. It also copies the index to a source directory (aka copy directory) on a regular basis.The recommended value for the refresh period is (at least) 50% higher that the time to copy the information (default 3600 seconds - 60 minutes).
Note that the copy is based on an incremental copy mechanism reducing the average copy time.
DirectoryProvider typically used on the master node in a JMS back end cluster.
The
buffer_size_on_copyoptimum depends on your operating system and available RAM; most people reported good results using values between 16 and 64MB.- indexBase: base directory
- indexName: override @Indexed.index (useful for sharded indexes)
- sourceBase: source (copy) base directory.
-
source: source directory suffix (default to
@Indexed.index). The actual source directory name being<sourceBase>/<source> - refresh: refresh period in seconds (the copy will take place every refresh seconds). If a copy is still in progress when the following refresh period elapses, the second copy operation will be skipped.
- buffer_size_on_copy: The amount of MegaBytes to move in a single low level copy instruction; defaults to 16MB.
- locking_strategy : optional, see LockFactory Configuration
-
filesystem_access_type: allows to determine the exact type of
FSDirectoryimplementation used by thisDirectoryProvider. Allowed values areauto(the default value, selectsNIOFSDirectoryon non Windows systems,SimpleFSDirectoryon Windows),simple (SimpleFSDirectory),nio (NIOFSDirectory),mmap (MMapDirectory). Refer to Javadocs of these Directory implementations before changing this setting. Even thoughNIOFSDirectoryorMMapDirectorycan bring substantial performance boosts, there are also issues of which you need to be aware.
filesystem-slaveFile system based directory. Like
filesystem, but retrieves a master version (source) on a regular basis. To avoid locking and inconsistent search results, 2 local copies are kept.The recommended value for the refresh period is (at least) 50% higher that the time to copy the information (default 3600 seconds - 60 minutes).
Note that the copy is based on an incremental copy mechanism reducing the average copy time. If a copy is still in progress when refresh period elapses, the second copy operation will be skipped.
DirectoryProvider typically used on slave nodes using a JMS back end.
The
buffer_size_on_copyoptimum depends on your operating system and available RAM; most people reported good results using values between 16 and 64MB.- indexBase: Base directory
- indexName: override @Indexed.index (useful for sharded indexes)
- sourceBase: Source (copy) base directory.
-
source: Source directory suffix (default to
@Indexed.index). The actual source directory name being<sourceBase>/<source> - refresh: refresh period in second (the copy will take place every refresh seconds).
- buffer_size_on_copy: The amount of MegaBytes to move in a single low level copy instruction; defaults to 16MB.
- locking_strategy : optional, see LockFactory Configuration
- retry_marker_lookup : optional, default to 0. Defines how many times Hibernate Search checks for the marker files in the source directory before failing. Waiting 5 seconds between each try.
-
retry_initialize_period : optional, set an integer value in seconds to enable the retry initialize feature: if the slave cannot find the master index it will try again until it’s found in background, without preventing the application to start: fullText queries performed before the index is initialized are not blocked but will return empty results. When not enabling the option or explicitly setting it to zero it will fail with an exception instead of scheduling a retry timer. To prevent the application from starting without an invalid index but still control an initialization timeout, see
retry_marker_lookupinstead. -
filesystem_access_type: allows to determine the exact type of
FSDirectoryimplementation used by thisDirectoryProvider. Allowed values are auto (the default value, selectsNIOFSDirectoryon non Windows systems,SimpleFSDirectoryon Windows),simple (SimpleFSDirectory),nio (NIOFSDirectory),mmap (MMapDirectory). Refer to Javadocs of these Directory implementations before changing this setting. Even thoughNIOFSDirectoryorMMapDirectorycan bring substantial performance boosts you need also to be aware of the issues.
If the built-in directory providers do not fit your needs, you can write your own directory provider by implementing the org.hibernate.store.DirectoryProvider interface. In this case, pass the fully qualified class name of your provider into the directory_provider property. You can pass any additional properties using the prefix hibernate.search.<indexname>.
13.2.4. Worker Configuration
It is possible to refine how Hibernate Search interacts with Lucene through the worker configuration. There exist several architectural components and possible extension points. Let’s have a closer look.
Use the worker configuration to refine how Infinispan Query interacts with Lucene. Several architectural components and possible extension points are available for this configuration.
First there is a Worker. An implementation of the Worker interface is responsible for receiving all entity changes, queuing them by context and applying them once a context ends. The most intuitive context, especially in connection with ORM, is the transaction. For this reason Hibernate Search will per default use the TransactionalWorker to scope all changes per transaction. One can, however, imagine a scenario where the context depends for example on the number of entity changes or some other application (lifecycle) events.
| Property | Description |
|---|---|
|
|
The fully qualified class name of the |
|
|
All configuration properties prefixed with |
|
|
Defines the maximum number of indexing operation batched per context. Once the limit is reached indexing will be triggered even though the context has not ended yet. This property only works if the |
Once a context ends it is time to prepare and apply the index changes. This can be done synchronously or asynchronously from within a new thread. Synchronous updates have the advantage that the index is at all times in sync with the databases. Asynchronous updates, on the other hand, can help to minimize the user response time. The drawback is potential discrepancies between database and index states.
The following options can be different on each index; in fact they need the indexName prefix or use default to set the default value for all indexes.
| Property | Description |
|---|---|
|
|
|
|
| The back end can apply updates from the same transaction context (or batch) in parallel, using a threadpool. The default value is 1. You can experiment with larger values if you have many operations per transaction. |
|
| Defines the maximal number of work queue if the thread pool is starved. Useful only for asynchronous execution. Default to infinite. If the limit is reached, the work is done by the main thread. |
So far all work is done within the same Virtual Machine (VM), no matter which execution mode. The total amount of work has not changed for the single VM. Luckily there is a better approach, namely delegation. It is possible to send the indexing work to a different server by configuring hibernate.search.default.worker.backend. Again this option can be configured differently for each index.
| Property | Description |
|---|---|
|
|
You can also specify the fully qualified name of a class implementing |
| Property | Description |
|---|---|
|
| Defines the JNDI properties to initiate the InitialContext (if needed). JNDI is only used by the JMS back end. |
|
|
Mandatory for the JMS back end. Defines the JNDI name to lookup the JMS connection factory from ( |
|
| Mandatory for the JMS back end. Defines the JNDI name to lookup the JMS queue from. The queue will be used to post work messages. |
As you probably noticed, some of the shown properties are correlated which means that not all combinations of property values make sense. In fact you can end up with a non-functional configuration. This is especially true for the case that you provide your own implementations of some of the shown interfaces. Make sure to study the existing code before you write your own Worker or BackendQueueProcessor implementation.
13.2.4.1. JMS Master/Slave Back End
This section describes in greater detail how to configure the Master/Slave Hibernate Search architecture.
Figure 13.3. JMS Backend Configuration
13.2.4.2. Slave Nodes
Every index update operation is sent to a JMS queue. Index querying operations are executed on a local index copy.
JMS Slave configuration
A file system local copy is recommended for faster search results.
13.2.4.3. Master Node
Every index update operation is taken from a JMS queue and executed. The master index is copied on a regular basis.
Index update operations in the JMS queue are executed and the master index is copied regularly.
JMS Master Configuration
In addition to the Hibernate Search framework configuration, a Message Driven Bean has to be written and set up to process the index works queue through JMS.
Message Driven Bean processing the indexing queue
This example inherits from the abstract JMS controller class available in the Hibernate Search source code and implements a JavaEE MDB. This implementation is given as an example and can be adjusted to make use of non Java EE Message Driven Beans.
13.2.5. Tuning Lucene Indexing
13.2.5.1. Tuning Lucene Indexing Performance
Hibernate Search is used to tune the Lucene indexing performance by specifying a set of parameters which are passed through to underlying Lucene IndexWriter such as mergeFactor, maxMergeDocs, and maxBufferedDocs. Specify these parameters either as default values applying for all indexes, on a per index basis, or even per shard.
There are several low level IndexWriter settings which can be tuned for different use cases. These parameters are grouped by the indexwriter keyword:
hibernate.search.[default|<indexname>].indexwriter.<parameter_name>
hibernate.search.[default|<indexname>].indexwriter.<parameter_name>
If no value is set for an indexwriter value in a specific shard configuration, Hibernate Search checks the index section, then at the default section.
The configuration in the following table will result in these settings applied on the second shard of the Animal index:
-
max_merge_docs= 10 -
merge_factor= 20 -
ram_buffer_size= 64MB -
term_index_interval= Lucene default
All other values will use the defaults defined in Lucene.
The default for all values is to leave them at Lucene’s own default. The values listed in List of indexing performance and behavior properties depend for this reason on the version of Lucene you are using. The values shown are relative to version 2.4.
Previous versions of Hibernate Search had the notion of batch and transaction properties. This is no longer the case as the back end will always perform work using the same settings.
| Property | Description | Default Value |
|---|---|---|
|
|
Set to |
|
|
|
Each index has a separate "pipeline" which contains the updates to be applied to the index. When this queue is full adding more operations to the queue becomes a blocking operation. Configuring this setting does not make much sense unless the |
|
|
| Determines the minimal number of delete terms required before the buffered in-memory delete terms are applied and flushed. If there are documents buffered in memory at the time, they are merged and a new segment is created. | Disabled (flushes by RAM usage) |
|
| Controls the amount of documents buffered in memory during indexing. The bigger the more RAM is consumed. | Disabled (flushes by RAM usage) |
|
| Defines the largest number of documents allowed in a segment. Smaller values perform better on frequently changing indexes, larger values provide better search performance if the index does not change often. | Unlimited (Integer.MAX_VALUE) |
|
| Controls segment merge frequency and size. Determines how often segment indexes are merged when insertion occurs. With smaller values, less RAM is used while indexing, and searches on unoptimized indexes are faster, but indexing speed is slower. With larger values, more RAM is used during indexing, and while searches on unoptimized indexes are slower, indexing is faster. Thus larger values (> 10) are best for batch index creation, and smaller values (< 10) for indexes that are interactively maintained. The value must not be lower than 2. | 10 |
|
|
Controls segment merge frequency and size. Segments smaller than this size (in MB) are always considered for the next segment merge operation. Setting this too large might result in expensive merge operations, even though they are less frequent. See also | 0 MB (actually ~1K) |
|
| Controls segment merge frequency and size. Segments larger than this size (in MB) are never merged in bigger segments. This helps reduce memory requirements and avoids some merging operations at the cost of optimal search speed. When optimizing an index this value is ignored.
See also | Unlimited |
|
| Controls segment merge frequency and size.
Segments larger than this size (in MB) are not merged in bigger segments even when optimizing the index (see
Applied to | Unlimited |
|
| Controls segment merge frequency and size.
Set to
Applied to |
|
|
| Controls the amount of RAM in MB dedicated to document buffers. When used together max_buffered_docs a flush occurs for whichever event happens first. Generally for faster indexing performance it is best to flush by RAM usage instead of document count and use as large a RAM buffer as you can. | 16 MB |
|
| Expert: Set the interval between indexed terms. Large values cause less memory to be used by IndexReader, but slow random-access to terms.Small values cause more memory to be used by an IndexReader, and speed random-access to terms. See Lucene documentation for more details. | 128 |
|
|
The advantage of using the compound file format is that less file descriptors are used. The disadvantage is that indexing takes more time and temporary disk space. You can set this parameter to
Boolean parameter, use “true” or “false”. The default value for this option is | true |
|
| Not all entity changes require a Lucene index update. If all of the updated entity properties (dirty properties) are not indexed, Hibernate Search skips the re-indexing process.
Disable this option if you use custom
This optimization will not be applied on classes using a
Boolean parameter, use “true” or “false”. The default value for this option is | true |
The blackhole back end is not meant to be used in production, only as a tool to identify indexing bottlenecks.
13.2.5.2. The Lucene IndexWriter
There are several low level IndexWriter settings which can be tuned for different use cases. These parameters are grouped by the indexwriter keyword:
default.<indexname>.indexwriter.<parameter_name>
default.<indexname>.indexwriter.<parameter_name>
If no value is set for indexwriter in a shard configuration, Hibernate Search looks at the index section and then at the default section.
13.2.5.3. Performance Option Configuration
The following configuration will result in these settings being applied on the second shard of the Animal index:
Example performance option configuration
default.Animals.2.indexwriter.max_merge_docs = 10 default.Animals.2.indexwriter.merge_factor = 20 default.Animals.2.indexwriter.term_index_interval = default default.indexwriter.max_merge_docs = 100 default.indexwriter.ram_buffer_size = 64
default.Animals.2.indexwriter.max_merge_docs = 10
default.Animals.2.indexwriter.merge_factor = 20
default.Animals.2.indexwriter.term_index_interval = default
default.indexwriter.max_merge_docs = 100
default.indexwriter.ram_buffer_size = 64-
max_merge_docs= 10 -
merge_factor= 20 -
ram_buffer_size= 64MB -
term_index_interval= Lucene default
All other values will use the defaults defined in Lucene.
The Lucene default values are the default setting for Hibernate Search. Therefore, the values listed in the following table depend on the version of Lucene being used. The values shown are relative to version 2.4. For more information about Lucene indexing performance, see the Lucene documentation.
The back end will always perform work using the same settings.
| Property | Description | Default Value |
|---|---|---|
|
|
Set to |
|
|
|
Each index has a separate "pipeline" which contains the updates to be applied to the index. When this queue is full adding more operations to the queue becomes a blocking operation. Configuring this setting does not make much sense unless the |
|
|
| Determines the minimal number of delete terms required before the buffered in-memory delete terms are applied and flushed. If there are documents buffered in memory at the time, they are merged and a new segment is created. | Disabled (flushes by RAM usage) |
|
| Controls the amount of documents buffered in memory during indexing. The bigger the more RAM is consumed. | Disabled (flushes by RAM usage) |
|
| Defines the largest number of documents allowed in a segment. Smaller values perform better on frequently changing indexes, larger values provide better search performance if the index does not change often. | Unlimited (Integer.MAX_VALUE) |
|
| Controls segment merge frequency and size. Determines how often segment indexes are merged when insertion occurs. With smaller values, less RAM is used while indexing, and searches on unoptimized indexes are faster, but indexing speed is slower. With larger values, more RAM is used during indexing, and while searches on unoptimized indexes are slower, indexing is faster. Thus larger values (> 10) are best for batch index creation, and smaller values (< 10) for indexes that are interactively maintained. The value must not be lower than 2. | 10 |
|
| Controls segment merge frequency and size. Segments smaller than this size (in MB) are always considered for the next segment merge operation. Setting this too large might result in expensive merge operations, even though they are less frequent.
See also | 0 MB (actually ~1K) |
|
| Controls segment merge frequency and size. Segments larger than this size (in MB) are never merged in bigger segments. This helps reduce memory requirements and avoids some merging operations at the cost of optimal search speed. When optimizing an index this value is ignored.
See also | Unlimited |
|
| Controls segment merge frequency and size.
Segments larger than this size (in MB) are not merged in bigger segments even when optimizing the index (see
Applied to | Unlimited |
|
| Controls segment merge frequency and size.
Set to
Applied to |
|
|
| Controls the amount of RAM in MB dedicated to document buffers. When used together max_buffered_docs a flush occurs for whichever event happens first. Generally for faster indexing performance it is best to flush by RAM usage instead of document count and use as large a RAM buffer as you can. | 16 MB |
|
| Expert: Set the interval between indexed terms. Large values cause less memory to be used by IndexReader, but slow random-access to terms. Small values cause more memory to be used by an IndexReader, and speed random-access to terms. See Lucene documentation for more details. | 128 |
|
|
The advantage of using the compound file format is that less file descriptors are used. The disadvantage is that indexing takes more time and temporary disk space. You can set this parameter to
Boolean parameter, use “true” or “false”. The default value for this option is | true |
|
| Not all entity changes require a Lucene index update. If all of the updated entity properties (dirty properties) are not indexed, Hibernate Search skips the re-indexing process.
Disable this option if you use custom
This optimization will not be applied on classes using a
Boolean parameter, use “true” or “false”. The default value for this option is | true |
13.2.5.4. Tuning the Indexing Speed
When the architecture permits it, keep default.exclusive_index_use=true for improved index writing efficiency.
When tuning indexing speed the recommended approach is to focus first on optimizing the object loading, and then use the timings you achieve as a baseline to tune the indexing process. Set the blackhole as worker back end and start your indexing routines. This back end does not disable Hibernate Search. It generates the required change sets to the index, but discards them instead of flushing them to the index. In contrast to setting the hibernate.search.indexing_strategy to manual, using blackhole will possibly load more data from the database because associated entities are re-indexed as well.
hibernate.search.[default|<indexname>].worker.backend blackhole
hibernate.search.[default|<indexname>].worker.backend blackhole
The blackhole back end is not to be used in production, only as a diagnostic tool to identify indexing bottlenecks.
13.2.5.5. Control Segment Size
The following options configure the maximum size of segments created:
-
merge_max_size -
merge_max_optimize_size -
merge_calibrate_by_deletes
Control Segment Size
//to be fairly confident no files grow above 15MB, use: hibernate.search.default.indexwriter.ram_buffer_size = 10 hibernate.search.default.indexwriter.merge_max_optimize_size = 7 hibernate.search.default.indexwriter.merge_max_size = 7
//to be fairly confident no files grow above 15MB, use:
hibernate.search.default.indexwriter.ram_buffer_size = 10
hibernate.search.default.indexwriter.merge_max_optimize_size = 7
hibernate.search.default.indexwriter.merge_max_size = 7
Set the max_size for merge operations to less than half of the hard limit segment size, as merging segments combines two segments into one larger segment.
A new segment may initially be a larger size than expected, however a segment is never created significantly larger than the ram_buffer_size. This threshold is checked as an estimate.
13.2.6. LockFactory Configuration
The Lucene Directory can be configured with a custom locking strategy via LockingFactory for each index managed by Hibernate Search.
Some locking strategies require a filesystem level lock, and may be used on RAM-based indexes. When using this strategy the IndexBase configuration option must be specified to point to a filesystem location in which to store the lock marker files.
To select a locking factory, set the hibernate.search.<index>.locking_strategy option to one the following options:
- simple
- native
- single
- none
| Name | Class | Description |
|---|---|---|
|
LockFactory Configuration | org.apache.lucene.store.SimpleFSLockFactory | Safe implementation based on Java’s File API, it marks the usage of the index by creating a marker file. If for some reason you had to kill your application, you will need to remove this file before restarting it. |
|
| org.apache.lucene.store.NativeFSLockFactory |
As does This implementation has known problems on NFS, avoid it on network shares.
|
|
| org.apache.lucene.store.SingleInstanceLockFactory | This LockFactory does not use a file marker but is a Java object lock held in memory; therefore it’s possible to use it only when you are sure the index is not going to be shared by any other process.
This is the default implementation for the |
|
| org.apache.lucene.store.NoLockFactory | Changes to this index are not coordinated by a lock. |
The following is an example of locking strategy configuration:
hibernate.search.default.locking_strategy = simple hibernate.search.Animals.locking_strategy = native hibernate.search.Books.locking_strategy = org.custom.components.MyLockingFactory
hibernate.search.default.locking_strategy = simple
hibernate.search.Animals.locking_strategy = native
hibernate.search.Books.locking_strategy = org.custom.components.MyLockingFactory13.2.7. Index Format Compatibility
Hibernate Search does not currently offer a backwards compatible API or tool to facilitate porting applications to newer versions. The API uses Apache Lucene for index writing and searching. Occasionally an update to the index format may be required. In this case, there is a possibility that data will need to be re-indexed if Lucene is unable to read the old format.
Back up indexes before attempting to update the index format.
Hibernate Search exposes the hibernate.search.lucene_version configuration property. This property instructs Analyzers and other Lucene classes to conform to their behaviour as defined in an older version of Lucene. See also org.apache.lucene.util.Version contained in the lucene-core.jar. If the option is not specified, Hibernate Search instructs Lucene to use the version default. It is recommended that the version used is explicitly defined in the configuration to prevent automatic changes when an upgrade occurs. After an upgrade, the configuration values can be updated explicitly if required.
Force Analyzers to be compatible with a Lucene 3.0 created index
hibernate.search.lucene_version = LUCENE_30
hibernate.search.lucene_version = LUCENE_30
The configured SearchFactory is global and affects all Lucene APIs that contain the relevant parameter. If Lucene is used and Hibernate Search is bypassed, apply the same value to it for consistent results.
13.3. Hibernate Search for Your Application
13.3.1. First Steps with Hibernate Search
To get started with Hibernate Search for your application, follow these topics.
13.3.2. Enable Hibernate Search using Maven
Use the following configuration in your Maven project to add hibernate-search-orm dependencies:
13.3.3. Add Annotations
For this section, consider the example in which you have a database containing details of books. Your application contains the Hibernate managed classes example.Book and example.Author and you want to add free text search capabilities to your application to enable searching for books.
Example: Entities Book and Author Before Adding Hibernate Search Specific Annotations
To achieve this you have to add a few annotations to the Book and Author class. The first annotation @Indexed marks Book as indexable. By design Hibernate Search stores an untokenized ID in the index to ensure index unicity for a given entity. @DocumentId marks the property to use for this purpose and is in most cases the same as the database primary key. The @DocumentId annotation is optional in the case where an @Id annotation exists.
Next the fields you want to make searchable must be marked as such. In this example, start with title and subtitle and annotate both with @Field. The parameter index=Index.YES will ensure that the text will be indexed, while analyze=Analyze.YES ensures that the text will be analyzed using the default Lucene analyzer. Usually, analyzing means chunking a sentence into individual words and potentially excluding common words like 'a' or ‘the’. We will talk more about analyzers a little later on. The third parameter we specify within @Field, store=Store.NO, ensures that the actual data will not be stored in the index. Whether this data is stored in the index or not has nothing to do with the ability to search for it. From Lucene’s perspective it is not necessary to keep the data once the index is created. The benefit of storing it is the ability to retrieve it via projections.
Without projections, Hibernate Search will per default execute a Lucene query in order to find the database identifiers of the entities matching the query criteria and use these identifiers to retrieve managed objects from the database. The decision for or against projection has to be made on a case to case basis. The default behavior is recommended since it returns managed objects whereas projections only return object arrays. Note that index=Index.YES, analyze=Analyze.YES and store=Store.NO are the default values for these parameters and could be omitted.
Another annotation not yet discussed is @DateBridge. This annotation is one of the built-in field bridges in Hibernate Search. The Lucene index is purely string based. For this reason Hibernate Search must convert the data types of the indexed fields to strings and vice-versa. A range of predefined bridges are provided, including the DateBridge which will convert a java.util.Date into a String with the specified resolution. For more details see Bridges.
This leaves us with @IndexedEmbedded. This annotation is used to index associated entities (@ManyToMany, @*ToOne, @Embedded and @ElementCollection) as part of the owning entity. This is needed since a Lucene index document is a flat data structure which does not know anything about object relations. To ensure that the authors' name will be searchable you have to ensure that the names are indexed as part of the book itself. On top of @IndexedEmbedded you will also have to mark all fields of the associated entity you want to have included in the index with @Indexed. For more details see Embedded and Associated Objects
These settings should be sufficient for now. For more details on entity mapping see Mapping an Entity.
Example: Entities After Adding Hibernate Search Annotations
13.3.4. Indexing
Hibernate Search will transparently index every entity persisted, updated or removed through Hibernate Core. However, you have to create an initial Lucene index for the data already present in your database. Once you have added the above properties and annotations it is time to trigger an initial batch index of your books. You can achieve this by using one of the following code snippets (see also ):
Example: Using the Hibernate Session to Index Data
FullTextSession fullTextSession = org.hibernate.search.Search.getFullTextSession(session); fullTextSession.createIndexer().startAndWait();
FullTextSession fullTextSession = org.hibernate.search.Search.getFullTextSession(session);
fullTextSession.createIndexer().startAndWait();Example: Using JPA to Index Data
EntityManager em = entityManagerFactory.createEntityManager(); FullTextEntityManager fullTextEntityManager = org.hibernate.search.jpa.Search.getFullTextEntityManager(em); fullTextEntityManager.createIndexer().startAndWait();
EntityManager em = entityManagerFactory.createEntityManager();
FullTextEntityManager fullTextEntityManager = org.hibernate.search.jpa.Search.getFullTextEntityManager(em);
fullTextEntityManager.createIndexer().startAndWait();
After executing the above code, you should be able to see a Lucene index under /var/lucene/indexes/example.Book. Go ahead an inspect this index with Luke. It will help you to understand how Hibernate Search works.
13.3.5. Searching
To execute a search, create a Lucene query using either the Lucene API or the Hibernate Search query DSL. Wrap the query in a org.hibernate.Query to get the required functionality from the Hibernate API. The following code prepares a query against the indexed fields. Executing the code returns a list of Books.
Example: Using a Hibernate Search Session to Create and Execute a Search
Example: Using JPA to Create and Execute a Search
13.3.6. Analyzer
Assuming that the title of an indexed book entity is Refactoring: Improving the Design of Existing Code and that hits are required for the following queries: refactor, refactors, refactored, and refactoring. Select an analyzer class in Lucene that applies word stemming when indexing and searching. Hibernate Search offers several ways to configure the analyzer (see Default Analyzer and Analyzer by Class for more information):
-
Set the
analyzerproperty in the configuration file. The specified class becomes the default analyzer. -
Set the
@Analyzerannotation at the entity level. -
Set the
@Analyzerannotation at the field level.
Specify the fully qualified classname or the analyzer to use, or see an analyzer defined by the @AnalyzerDef annotation with the @Analyzer annotation. The Solr analyzer framework with its factories are utilized for the latter option. For more information about factory classes, see the Solr JavaDoc or read the corresponding section on the Solr Wiki (http://wiki.apache.org/solr/AnalyzersTokenizersTokenFilters)
In the example, a StandardTokenizerFactory is used by two filter factories: LowerCaseFilterFactory and SnowballPorterFilterFactory. The tokenizer splits words at punctuation characters and hyphens but keeping email addresses and internet hostnames intact. The standard tokenizer is ideal for this and other general operations. The lowercase filter converts all letters in the token into lowercase and the snowball filter applies language specific stemming.
If using the Solr framework, use the tokenizer with an arbitrary number of filters.
Example: Using @AnalyzerDef and the Solr Framework to Define and Use an Analyzer
Use @AnalyzerDef to define an analyzer, then apply it to entities and properties using @Analyzer. In the example, the customanalyzer is defined but not applied on the entity. The analyzer is only applied to the title and subtitle properties. An analyzer definition is global. Define the analyzer for an entity and reuse the definition for other entities as required.
13.4. Mapping Entities to the Index Structure
13.4.1. Mapping an Entity
All the metadata information required to index entities is described through annotations, so there is no need for XML mapping files. You can still use Hibernate mapping files for the basic Hibernate configuration, but the Hibernate Search specific configuration has to be expressed via annotations.
13.4.1.1. Basic Mapping
Let us start with the most commonly used annotations for mapping an entity.
The Lucene-based Query API uses the following common annotations to map entities:
- @Indexed
- @Field
- @NumericField
- @Id
13.4.1.2. @Indexed
Foremost we must declare a persistent class as indexable. This is done by annotating the class with @Indexed (all entities not annotated with @Indexed will be ignored by the indexing process):
@Entity
@Indexed
public class Essay {
...
}
@Entity
@Indexed
public class Essay {
...
}
You can optionally specify the index attribute of the @Indexed annotation to change the default name of the index.
13.4.1.3. @Field
For each property (or attribute) of your entity, you have the ability to describe how it will be indexed. The default (no annotation present) means that the property is ignored by the indexing process.
Prior to Hibernate Search 5, numeric field encoding was only chosen if explicitly requested via @NumericField. As of Hibernate Search 5 this encoding is automatically chosen for numeric types. To avoid numeric encoding you can explicitly specify a non numeric field bridge via @Field.bridge or @FieldBridge. The package org.hibernate.search.bridge.builtin contains a set of bridges which encode numbers as strings, for example org.hibernate.search.bridge.builtin.IntegerBridge.
@Field does declare a property as indexed and allows to configure several aspects of the indexing process by setting one or more of the following attributes:
-
name: describe under which name, the property should be stored in the Lucene Document. The default value is the property name (following the JavaBeans convention) -
store: describe whether or not the property is stored in the Lucene index. You can store the valueStore.YES(consuming more space in the index but allowing projection, store it in a compressed wayStore.COMPRESS(this does consume more CPU), or avoid any storageStore.NO(this is the default value). When a property is stored, you can retrieve its original value from the Lucene Document. This is not related to whether the element is indexed or not. index: describe whether the property is indexed or not. The different values areIndex.NO(no indexing, ie cannot be found by a query),Index.YES(the element gets indexed and is searchable). The default value isIndex.YES.Index.NOcan be useful for cases where a property is not required to be searchable, but should be available for projection.NoteIndex.NOin combination withAnalyze.YESorNorms.YESis not useful, sinceanalyzeandnormsrequire the property to be indexedanalyze: determines whether the property is analyzed (Analyze.YES) or not (Analyze.NO). The default value isAnalyze.YES.NoteWhether or not you want to analyze a property depends on whether you wish to search the element as is, or by the words it contains. It make sense to analyze a text field, but probably not a date field.
NoteFields used for sorting must not be analyzed.
-
norms: describes whether index time boosting information should be stored (Norms.YES) or not (Norms.NO). Not storing it can save a considerable amount of memory, but there will not be any index time boosting information available. The default value isNorms.YES. termVector: describes collections of term-frequency pairs. This attribute enables the storing of the term vectors within the documents during indexing. The default value isTermVector.NO.The different values of this attribute are:
Expand Value Definition TermVector.YES
Store the term vectors of each document. This produces two synchronized arrays, one contains document terms and the other contains the term’s frequency.
TermVector.NO
Do not store term vectors.
TermVector.WITH_OFFSETS
Store the term vector and token offset information. This is the same as TermVector.YES plus it contains the starting and ending offset position information for the terms.
TermVector.WITH_POSITIONS
Store the term vector and token position information. This is the same as TermVector.YES plus it contains the ordinal positions of each occurrence of a term in a document.
TermVector.WITH_POSITION_OFFSETS
Store the term vector, token position and offset information. This is a combination of the YES, WITH_OFFSETS and WITH_POSITIONS.
indexNullAs: Per default null values are ignored and not indexed. However, usingindexNullAsyou can specify a string which will be inserted as token for thenullvalue. Per default this value is set toField.DO_NOT_INDEX_NULLindicating thatnullvalues should not be indexed. You can set this value toField.DEFAULT_NULL_TOKENto indicate that a defaultnulltoken should be used. This defaultnulltoken can be specified in the configuration usinghibernate.search.default_null_token. If this property is not set and you specifyField.DEFAULT_NULL_TOKENthe string "null" will be used as default.NoteWhen the
indexNullAsparameter is used it is important to use the same token in the search query to search fornullvalues. It is also advisable to use this feature only with un-analyzed fields (Analyze.NO).WarningWhen implementing a custom FieldBridge or TwoWayFieldBridge it is up to the developer to handle the indexing of null values (see JavaDocs of LuceneOptions.indexNullAs()).
13.4.1.4. @NumericField
There is a companion annotation to @Field called @NumericField that can be specified in the same scope as @Field or @DocumentId. It can be specified for Integer, Long, Float, and Double properties. At index time the value will be indexed using a Trie structure. When a property is indexed as numeric field, it enables efficient range query and sorting, orders of magnitude faster than doing the same query on standard @Field properties. The @NumericField annotation accept the following parameters:
| Value | Definition |
|---|---|
| forField | (Optional) Specify the name of the related @Field that will be indexed as numeric. It is only mandatory when the property contains more than a @Field declaration |
| precisionStep | (Optional) Change the way that the Trie structure is stored in the index. Smaller precisionSteps lead to more disk space usage and faster range and sort queries. Larger values lead to less space used and range query performance more close to the range query in normal @Fields. Default value is 4. |
@NumericField supports only Double, Long, Integer and Float. It is not possible to take any advantage from similar functionality in Lucene for the other numeric types, so remaining types should use the string encoding via the default or custom TwoWayFieldBridge.
It is possible to use a custom NumericFieldBridge assuming you can deal with the approximation during type transformation:
Example: Defining a custom NumericFieldBridge
13.4.1.5. @Id
Finally, the id (identifier) property of an entity is a special property used by Hibernate Search to ensure index uniqueness of a given entity. By design, an id must be stored and must not be tokenized. To mark a property as an index identifier, use the @DocumentId annotation. If you are using JPA and you have specified @Id you can omit @DocumentId. The chosen entity identifier will also be used as the document identifier.
Infinispan Query uses the entity’s id property to ensure the index is uniquely identified. By design, an ID is stored and must not be converted into a token. To mark a property as index ID, use the @DocumentId annotation.
Example: Specifying indexed properties
The example above defines an index with four fields: id , Abstract, text and grade . Note that by default the field name is not capitalized, following the JavaBean specification. The grade field is annotated as numeric with a slightly larger precision step than the default.
13.4.1.6. Mapping Properties Multiple Times
Sometimes you need to map a property multiple times per index, with slightly different indexing strategies. For example, sorting a query by field requires the field to be un-analyzed. To search by words on this property and still sort it, it needs to be indexed - once analyzed and once un-analyzed. @Fields allows you to achieve this goal.
Example: Using @Fields to map a property multiple times
In this example the field summary is indexed twice, once as summary in a tokenized way, and once as summary_forSort in an untokenized way.
13.4.1.7. Embedded and Associated Objects
Associated objects as well as embedded objects can be indexed as part of the root entity index. This is useful if you expect to search a given entity based on properties of associated objects. The aim is to return places where the associated city is Atlanta (In the Lucene query parser language, it would translate into address.city:Atlanta). The place fields will be indexed in the Place index. The Place index documents will also contain the fields address.id, address.street, and address.city which you will be able to query.
Example: Indexing associations
Because the data is denormalized in the Lucene index when using the @IndexedEmbedded technique, Hibernate Search must be aware of any change in the Place object and any change in the Address object to keep the index up to date. To ensure the Lucene document is updated when it is Address changes, mark the other side of the bidirectional relationship with @ContainedIn.
@ContainedIn is useful on both associations pointing to entities and on embedded (collection of) objects.
To expand upon this, the following example demonstrates nesting @IndexedEmbedded.
Example: Nested usage of @IndexedEmbedded and @ContainedIn
Any @*ToMany, @*ToOne and @Embedded attribute can be annotated with @IndexedEmbedded. The attributes of the associated class will then be added to the main entity index. The index will contain the following fields:
- id
- name
- address.street
- address.city
- address.ownedBy_name
The default prefix is propertyName., following the traditional object navigation convention. You can override it using the prefix attribute as it is shown on the ownedBy property.
The prefix cannot be set to the empty string.
The depth property is necessary when the object graph contains a cyclic dependency of classes (not instances). For example, if Owner points to Place. Hibernate Search will stop including Indexed embedded attributes after reaching the expected depth (or the object graph boundaries are reached). A class having a self reference is an example of cyclic dependency. In our example, because depth is set to 1, any @IndexedEmbedded attribute in Owner (if any) will be ignored.
Using @IndexedEmbedded for object associations allows you to express queries (using Lucene’s query syntax) such as:
Return places where name contains JBoss and where address city is Atlanta. In Lucene query this would be:
+name:jboss +address.city:atlanta
+name:jboss +address.city:atlantaCopy to Clipboard Copied! Toggle word wrap Toggle overflow Return places where name contains JBoss and where owner’s name contain Joe. In Lucene query this would be
+name:jboss +address.ownedBy_name:joe
+name:jboss +address.ownedBy_name:joeCopy to Clipboard Copied! Toggle word wrap Toggle overflow
This behavior mimics the relational join operation in a more efficient way (at the cost of data duplication). Remember that, out of the box, Lucene indexes have no notion of association, the join operation does not exist. It might help to keep the relational model normalized while benefiting from the full text index speed and feature richness.
An associated object can itself (but does not have to) be @Indexed
When @IndexedEmbedded points to an entity, the association has to be directional and the other side has to be annotated @ContainedIn (as seen in the previous example). If not, Hibernate Search has no way to update the root index when the associated entity is updated (in our example, a Place index document has to be updated when the associated Address instance is updated).
Sometimes, the object type annotated by @IndexedEmbedded is not the object type targeted by Hibernate and Hibernate Search. This is especially the case when interfaces are used in lieu of their implementation. For this reason you can override the object type targeted by Hibernate Search using the targetElement parameter.
Example: Using the targetElement property of @IndexedEmbedded
13.4.1.8. Limiting Object Embedding to Specific Paths
The @IndexedEmbedded annotation provides also an attribute includePaths which can be used as an alternative to depth, or be combined with it.
When using only depth all indexed fields of the embedded type will be added recursively at the same depth. This makes it harder to select only a specific path without adding all other fields as well, which might not be needed.
To avoid unnecessarily loading and indexing entities you can specify exactly which paths are needed. A typical application might need different depths for different paths, or in other words it might need to specify paths explicitly, as shown in the example below:
Example: Using the includePaths property of @IndexedEmbedded
Using a mapping as in the example above, you would be able to search on a Person by name and/or surname, and/or the name of the parent. It will not index the surname of the parent, so searching on parent’s surnames will not be possible but speeds up indexing, saves space and improve overall performance.
The @IndexedEmbeddedincludePaths will include the specified paths in addition to what you would index normally specifying a limited value for depth. When using includePaths, and leaving depth undefined, behavior is equivalent to setting depth=0: only the included paths are indexed.
Example: Using the includePaths property of @IndexedEmbedded
In the example above, every human will have its name and surname attributes indexed. The name and surname of parents will also be indexed, recursively up to second line because of the depth attribute. It will be possible to search by name or surname, of the person directly, his parents or of his grand parents. Beyond the second level, we will in addition index one more level but only the name, not the surname.
This results in the following fields in the index:
-
id: as primary key -
_hibernate_class: stores entity type -
name: as direct field -
surname: as direct field -
parents.name: as embedded field at depth 1 -
parents.surname: as embedded field at depth 1 -
parents.parents.name: as embedded field at depth 2 -
parents.parents.surname: as embedded field at depth 2 -
parents.parents.parents.name: as additional path as specified by includePaths. The firstparents.is inferred from the field name, the remaining path is the attribute of includePaths
Having explicit control of the indexed paths might be easier if you are designing your application by defining the needed queries first, as at that point you might know exactly which fields you need, and which other fields are unnecessary to implement your use case.
13.4.2. Boosting
Lucene has the notion of boosting which allows you to give certain documents or fields more or less importance than others. Lucene differentiates between index and search time boosting. The following sections show you how you can achieve index time boosting using Hibernate Search.
13.4.2.1. Static Index Time Boosting
To define a static boost value for an indexed class or property you can use the @Boost annotation. You can use this annotation within @Field or specify it directly on method or class level.
Example: Different ways of using @Boost
In the example above, Essay’s probability to reach the top of the search list will be multiplied by 1.7. The summary field will be 3.0 (2 * 1.5, because @Field.boost and @Boost on a property are cumulative) more important than the isbn field. The text field will be 1.2 times more important than the isbn field. Note that this explanation is wrong in strictest terms, but it is simple and close enough to reality for all practical purposes.
13.4.2.2. Dynamic Index Time Boosting
The @Boost annotation used in Static Index Time Boosting defines a static boost factor which is independent of the state of the indexed entity at runtime. However, there are use cases in which the boost factor may depend on the actual state of the entity. In this case you can use the @DynamicBoost annotation together with an accompanying custom BoostStrategy.
Example: Dynamic boost example
In the example above, a dynamic boost is defined on class level specifying VIPBoostStrategy as implementation of the BoostStrategy interface to be used at indexing time. You can place the @DynamicBoost either at class or field level. Depending on the placement of the annotation either the whole entity is passed to the defineBoost method or just the annotated field/property value. It is up to you to cast the passed object to the correct type. In the example all indexed values of a VIP person would be double as important as the values of a normal person.
The specified BoostStrategy implementation must define a public no-arg constructor.
Of course you can mix and match @Boost and @DynamicBoost annotations in your entity. All defined boost factors are cumulative.
13.4.3. Analysis
Analysis is the process of converting text into single terms (words) and can be considered as one of the key features of a full-text search engine. Lucene uses the concept of Analyzers to control this process. In the following section we cover the multiple ways Hibernate Search offers to configure the analyzers.
13.4.3.1. Default Analyzer and Analyzer by Class
The default analyzer class used to index tokenized fields is configurable through the hibernate.search.analyzer property. The default value for this property is org.apache.lucene.analysis.standard.StandardAnalyzer.
You can also define the analyzer class per entity, property and even per @Field (useful when multiple fields are indexed from a single property).
Example: Different ways of using @Analyzer
In this example, EntityAnalyzer is used to index tokenized property (name), except summary and body which are indexed with PropertyAnalyzer and FieldAnalyzer respectively.
Mixing different analyzers in the same entity is most of the time a bad practice. It makes query building more complex and results less predictable (for the novice), especially if you are using a QueryParser (which uses the same analyzer for the whole query). As a rule of thumb, for any given field the same analyzer should be used for indexing and querying.
13.4.3.2. Named Analyzers
Analyzers can become quite complex to deal with. For this reason introduces Hibernate Search the notion of analyzer definitions. An analyzer definition can be reused by many @Analyzer declarations and is composed of:
- a name: the unique string used to refer to the definition
- a list of char filters: each char filter is responsible to pre-process input characters before the tokenization. Char filters can add, change, or remove characters; one common usage is for characters normalization
- a tokenizer: responsible for tokenizing the input stream into individual words
- a list of filters: each filter is responsible to remove, modify, or sometimes even add words into the stream provided by the tokenizer
This separation of tasks - a list of char filters, and a tokenizer followed by a list of filters - allows for easy reuse of each individual component and lets you build your customized analyzer in a very flexible way (like Lego). Generally speaking the char filters do some pre-processing in the character input, then the Tokenizer starts the tokenizing process by turning the character input into tokens which are then further processed by the TokenFilters. Hibernate Search supports this infrastructure by utilizing the Solr analyzer framework.
Let us review a concrete example stated below. First a char filter is defined by its factory. In our example, a mapping char filter is used, and will replace characters in the input based on the rules specified in the mapping file. Next a tokenizer is defined. This example uses the standard tokenizer. Last but not least, a list of filters is defined by their factories. In our example, the StopFilter filter is built reading the dedicated words property file. The filter is also expected to ignore case.
Example: @AnalyzerDef and the Solr framework
Filters and char filters are applied in the order they are defined in the @AnalyzerDef annotation. Order matters!
Some tokenizers, token filters or char filters load resources like a configuration or metadata file. This is the case for the stop filter and the synonym filter. If the resource charset is not using the VM default, you can explicitly specify it by adding a resource_charset parameter.
Example: Use a specific charset to load the property file
Once defined, an analyzer definition can be reused by an @Analyzer declaration as seen in the following example.
Example: Referencing an analyzer by name
Analyzer instances declared by @AnalyzerDef are also available by their name in the SearchFactory which is quite useful when building queries.
Analyzer analyzer = fullTextSession.getSearchFactory().getAnalyzer("customanalyzer");
Analyzer analyzer = fullTextSession.getSearchFactory().getAnalyzer("customanalyzer");Fields in queries must be analyzed with the same analyzer used to index the field so that they speak a common "language": the same tokens are reused between the query and the indexing process. This rule has some exceptions but is true most of the time. Respect it unless you know what you are doing.
13.4.3.3. Available Analyzers
Solr and Lucene come with many useful default char filters, tokenizers, and filters. You can find a complete list of char filter factories, tokenizer factories and filter factories at http://wiki.apache.org/solr/AnalyzersTokenizersTokenFilters. Let us check a few of them.
| Factory | Description | Parameters |
|---|---|---|
| MappingCharFilterFactory | Replaces one or more characters with one or more characters, based on mappings specified in the resource file |
|
| HTMLStripCharFilterFactory | Remove HTML standard tags, keeping the text | none |
| Factory | Description | Parameters |
|---|---|---|
| StandardTokenizerFactory | Use the Lucene StandardTokenizer | none |
| HTMLStripCharFilterFactory | Remove HTML tags, keep the text and pass it to a StandardTokenizer. | none |
| PatternTokenizerFactory | Breaks text at the specified regular expression pattern. | pattern: the regular expression to use for tokenizing group: says which pattern group to extract into tokens |
| Factory | Description | Parameters |
|---|---|---|
| StandardFilterFactory | Remove dots from acronyms and 's from words | none |
| LowerCaseFilterFactory | Lowercases all words | none |
| StopFilterFactory | Remove words (tokens) matching a list of stop words | words: points to a resource file containing the stop words ignoreCase: true if case should be ignored when comparing stop words, false otherwise |
| SnowballPorterFilterFactory | Reduces a word to its root in a given language. (example: protect, protects, protection share the same root). Using such a filter allows searches matching related words. |
|
We recommend to check all the implementations of org.apache.lucene.analysis.TokenizerFactory and org.apache.lucene.analysis.TokenFilterFactory in your IDE to see the implementations available.
13.4.3.4. Dynamic Analyzer Selection
So far all the introduced ways to specify an analyzer were static. However, there are use cases where it is useful to select an analyzer depending on the current state of the entity to be indexed, for example in a multilingual applications. For an BlogEntry class for example the analyzer could depend on the language property of the entry. Depending on this property the correct language specific stemmer should be chosen to index the actual text.
To enable this dynamic analyzer selection Hibernate Search introduces the AnalyzerDiscriminator annotation. Following example demonstrates the usage of this annotation.
Example: Usage of @AnalyzerDiscriminator
The prerequisite for using @AnalyzerDiscriminator is that all analyzers which are going to be used dynamically are predefined via @AnalyzerDef definitions. If this is the case, one can place the @AnalyzerDiscriminator annotation either on the class or on a specific property of the entity for which to dynamically select an analyzer. Via the impl parameter of the AnalyzerDiscriminator you specify a concrete implementation of the Discriminator interface. It is up to you to provide an implementation for this interface. The only method you have to implement is getAnalyzerDefinitionName() which gets called for each field added to the Lucene document. The entity which is getting indexed is also passed to the interface method. The value parameter is only set if the AnalyzerDiscriminator is placed on property level instead of class level. In this case the value represents the current value of this property.
An implementation of the Discriminator interface has to return the name of an existing analyzer definition or null if the default analyzer should not be overridden. The example above assumes that the language parameter is either 'de' or 'en' which matches the specified names in the @AnalyzerDefs.
13.4.3.5. Retrieving an Analyzer
Retrieving an analyzer can be used when multiple analyzers have been used in a domain model, in order to benefit from stemming or phonetic approximation, etc. In this case, use the same analyzers to building a query. Alternatively, use the Hibernate Search query DSL, which selects the correct analyzer automatically. See
Whether you are using the Lucene programmatic API or the Lucene query parser, you can retrieve the scoped analyzer for a given entity. A scoped analyzer is an analyzer which applies the right analyzers depending on the field indexed. Remember, multiple analyzers can be defined on a given entity each one working on an individual field. A scoped analyzer unifies all these analyzers into a context-aware analyzer. While the theory seems a bit complex, using the right analyzer in a query is very easy.
When you use programmatic mapping for a child entity, you can only see the fields defined by the child entity. Fields or methods inherited from a parent entity (annotated with @MappedSuperclass) are not configurable. To configure properties inherited from a parent entity, either override the property in the child entity or create a programmatic mapping for the parent entity. This mimics the usage of annotations where you cannot annotate a field or method of a parent entity unless it is redefined in the child entity.
Example: Using the scoped analyzer when building a full-text query
In the example above, the song title is indexed in two fields: the standard analyzer is used in the field title and a stemming analyzer is used in the field title_stemmed. By using the analyzer provided by the search factory, the query uses the appropriate analyzer depending on the field targeted.
You can also retrieve analyzers defined via @AnalyzerDef by their definition name using searchFactory.getAnalyzer(String).
13.4.4. Bridges
When discussing the basic mapping for an entity one important fact was so far disregarded. In Lucene all index fields have to be represented as strings. All entity properties annotated with @Field have to be converted to strings to be indexed. The reason we have not mentioned it so far is, that for most of your properties Hibernate Search does the translation job for you thanks to set of built-in bridges. However, in some cases you need a more fine grained control over the translation process.
13.4.4.1. Built-in Bridges
Hibernate Search comes bundled with a set of built-in bridges between a Java property type and its full text representation.
- null
-
Per default
nullelements are not indexed. Lucene does not support null elements. However, in some situation it can be useful to insert a custom token representing thenullvalue. See for more information. - java.lang.String
- Strings are indexed as are short, Short, integer, Integer, long, Long, float, Float, double,
- Double, BigInteger, BigDecimal
Numbers are converted into their string representation. Note that numbers cannot be compared by Lucene (that is, used in ranged queries) out of the box: they have to be padded.
NoteUsing a Range query has drawbacks, an alternative approach is to use a Filter query which will filter the result query to the appropriate range. Hibernate Search also supports the use of a custom StringBridge as described in Custom Bridges.
- java.util.Date
Dates are stored as yyyyMMddHHmmssSSS in GMT time (200611072203012 for Nov 7th of 2006 4:03PM and 12ms EST). You should not really bother with the internal format. What is important is that when using a TermRangeQuery, you should know that the dates have to be expressed in GMT time.
Usually, storing the date up to the millisecond is not necessary.
@DateBridgedefines the appropriate resolution you are willing to store in the index (@DateBridge(resolution=Resolution.DAY)). The date pattern will then be truncated accordingly.
A Date whose resolution is lower than MILLISECOND cannot be a @DocumentId.
The default Date bridge uses Lucene’s DateTools to convert from and to String. This means that all dates are expressed in GMT time. If your requirements are to store dates in a fixed time zone you have to implement a custom date bridge. Make sure you understand the requirements of your applications regarding to date indexing and searching.
- java.net.URI, java.net.URL
- URI and URL are converted to their string representation.
- java.lang.Class
- Class are converted to their fully qualified class name. The thread context class loader is used when the class is rehydrated.
13.4.4.2. Custom Bridges
Sometimes, the built-in bridges of Hibernate Search do not cover some of your property types, or the String representation used by the bridge does not meet your requirements. The following paragraphs describe several solutions to this problem.
13.4.4.2.1. StringBridge
The simplest custom solution is to give Hibernate Search an implementation of your expected Object to String bridge. To do so you need to implement the org.hibernate.search.bridge.StringBridge interface. All implementations have to be thread-safe as they are used concurrently.
Example: Custom StringBridge implementation
Given the string bridge defined in the previous example, any property or field can use this bridge thanks to the @FieldBridge annotation:
@FieldBridge(impl = PaddedIntegerBridge.class) private Integer length;
@FieldBridge(impl = PaddedIntegerBridge.class)
private Integer length;13.4.4.2.2. Parameterized Bridge
Parameters can also be passed to the bridge implementation making it more flexible. Following example implements a ParameterizedBridge interface and parameters are passed through the @FieldBridge annotation.
Example: Passing parameters to your bridge implementation
The ParameterizedBridge interface can be implemented by StringBridge, TwoWayStringBridge, FieldBridge implementations.
All implementations have to be thread-safe, but the parameters are set during initialization and no special care is required at this stage.
13.4.4.2.3. Type Aware Bridge
It is sometimes useful to get the type the bridge is applied on:
- the return type of the property for field/getter-level bridges.
- the class type for class-level bridges.
An example is a bridge that deals with enums in a custom fashion but needs to access the actual enum type. Any bridge implementing AppliedOnTypeAwareBridge will get the type the bridge is applied on injected. Like parameters, the type injected needs no particular care with regard to thread-safety.
13.4.4.2.4. Two-Way Bridge
If you expect to use your bridge implementation on an id property (that is, annotated with @DocumentId ), you need to use a slightly extended version of StringBridge named TwoWayStringBridge. Hibernate Search needs to read the string representation of the identifier and generate the object out of it. There is no difference in the way the @FieldBridge annotation is used.
Example: Implementing a TwoWayStringBridge usable for id properties
It is important for the two-way process to be idempotent (i.e., object = stringToObject( objectToString( object ) ) ).
13.4.4.2.5. FieldBridge
Some use cases require more than a simple object to string translation when mapping a property to a Lucene index. To give you the greatest possible flexibility you can also implement a bridge as a FieldBridge. This interface gives you a property value and let you map it the way you want in your Lucene Document. You can for example store a property in two different document fields. The interface is very similar in its concept to the Hibernate UserTypes.
Example: Implementing the FieldBridge Interface
In the example above, the fields are not added directly to Document. Instead the addition is delegated to the LuceneOptions helper; this helper will apply the options you have selected on @Field, like Store or TermVector, or apply the chosen @Boost value. It is especially useful to encapsulate the complexity of COMPRESS implementations. Even though it is recommended to delegate to LuceneOptions to add fields to the Document, nothing stops you from editing the Document directly and ignore the LuceneOptions in case you need to.
Classes like LuceneOptions are created to shield your application from changes in Lucene API and simplify your code. Use them if you can, but if you need more flexibility you are not required to.
13.4.4.2.6. ClassBridge
It is sometimes useful to combine more than one property of a given entity and index this combination in a specific way into the Lucene index. The @ClassBridge and @ClassBridges annotations can be defined at the class level, as opposed to the property level. In this case the custom field bridge implementation receives the entity instance as the value parameter instead of a particular property. Though not shown in following example, @ClassBridge supports the termVector attribute discussed in section Basic Mapping.
Example: Implementing a class bridge
In this example, the particular CatFieldsClassBridge is applied to the department instance, the field bridge then concatenate both branch and network and index the concatenation.
13.5. Querying
Hibernate SearchHibernate Search can execute Lucene queries and retrieve domain objects managed by an InfinispanHibernate session. The search provides the power of Lucene without leaving the Hibernate paradigm, giving another dimension to the Hibernate classic search mechanisms (HQL, Criteria query, native SQL query).
Preparing and executing a query consists of following four steps:
- Creating a FullTextSession
- Creating a Lucene query using either Hibernate QueryHibernate Search query DSL (recommended) or using the Lucene Query API
- Wrapping the Lucene query using an org.hibernate.Query
- Executing the search by calling for example list() or scroll()
To access the querying facilities, use a FullTextSession. This Search specific session wraps a regular org.hibernate.Session in order to provide query and indexing capabilities.
Example: Creating a FullTextSession
Session session = sessionFactory.openSession(); ... FullTextSession fullTextSession = Search.getFullTextSession(session);
Session session = sessionFactory.openSession();
...
FullTextSession fullTextSession = Search.getFullTextSession(session);Use the FullTextSession to build a full-text query using either the Hibernate SearchHibernate Search query DSL or the native Lucene query.
Use the following code when using the Hibernate SearchHibernate Search query DSL:
As an alternative, write the Lucene query using either the Lucene query parser or the Lucene programmatic API.
Example: Creating a Lucene query via the QueryParser
A Hibernate query built on the Lucene query is a org.hibernate.Query. This query remains in the same paradigm as other Hibernate query facilities, such as HQL (Hibernate Query Language), Native, and Criteria. Use methods such as list(), uniqueResult(), iterate() and scroll() with the query.
The same extensions are available with the Hibernate Java Persistence APIs:
Example: Creating a Search query using the JPA API
In these examples, the Hibernate API has been used. The same examples can also be written with the Java Persistence API by adjusting the way the FullTextQuery is retrieved.
13.5.1. Building Queries
Hibernate Search queries are built on Lucene queries, allowing users to use any Lucene query type. When the query is built, Hibernate Search uses org.hibernate.Query as the query manipulation API for further query processing.
13.5.1.1. Building a Lucene Query Using the Lucene API
With the Lucene API, use either the query parser (simple queries) or the Lucene programmatic API (complex queries). Building a Lucene query is out of scope for the Hibernate Search documentation. For details, see the online Lucene documentation or a copy of Lucene in Action or Hibernate Search in Action.
13.5.1.2. Building a Lucene Query
The Lucene programmatic API enables full-text queries. However, when using the Lucene programmatic API, the parameters must be converted to their string equivalent and must also apply the correct analyzer to the right field. A ngram analyzer for example uses several ngrams as the tokens for a given word and should be searched as such. It is recommended to use the QueryBuilder for this task.
The Hibernate Search query API is fluent, with the following key characteristics:
- Method names are in English. As a result, API operations can be read and understood as a series of English phrases and instructions.
- It uses IDE autocompletion which helps possible completions for the current input prefix and allows the user to choose the right option.
- It often uses the chaining method pattern.
- It is easy to use and read the API operations.
To use the API, first create a query builder that is attached to a given indexedentitytype. This QueryBuilder knows what analyzer to use and what field bridge to apply. Several QueryBuilders (one for each entity type involved in the root of your query) can be created. The QueryBuilder is derived from the SearchFactory.
QueryBuilder mythQB = searchFactory.buildQueryBuilder().forEntity( Myth.class ).get();
QueryBuilder mythQB = searchFactory.buildQueryBuilder().forEntity( Myth.class ).get();The analyzer used for a given field or fields can also be overridden.
QueryBuilder mythQB = searchFactory.buildQueryBuilder()
.forEntity( Myth.class )
.overridesForField("history","stem_analyzer_definition")
.get();
QueryBuilder mythQB = searchFactory.buildQueryBuilder()
.forEntity( Myth.class )
.overridesForField("history","stem_analyzer_definition")
.get();The query builder is now used to build Lucene queries. Customized queries generated using Lucene’s query parser or Query objects assembled using the Lucene programmatic API are used with the Hibernate Search DSL.
13.5.1.3. Keyword Queries
The following example shows how to search for a specific word:
Query luceneQuery = mythQB.keyword().onField("history").matching("storm").createQuery();
Query luceneQuery = mythQB.keyword().onField("history").matching("storm").createQuery();| Parameter | Description |
|---|---|
| keyword() | Use this parameter to find a specific word |
| onField() | Use this parameter to specify in which lucene field to search the word |
| matching() | use this parameter to specify the match for search string |
| createQuery() | creates the Lucene query object |
-
The value "storm" is passed through the
historyFieldBridge. This is useful when numbers or dates are involved. -
The field bridge value is then passed to the analyzer used to index the field
history. This ensures that the query uses the same term transformation than the indexing (lower case, ngram, stemming and so on). If the analyzing process generates several terms for a given word, a boolean query is used with theSHOULDlogic (roughly anORlogic).
To search a property that is not of type string.
In plain Lucene, the Date object had to be converted to its string representation (in this case the year)
This conversion works for any object, provided that the FieldBridge has an objectToString method (and all built-in FieldBridge implementations do).
The next example searches a field that uses ngram analyzers. The ngram analyzers index succession of ngrams of words, which helps to avoid user typos. For example, the 3-grams of the word hibernate are hib, ibe, ber, ern, rna, nat, ate.
The matching word "Sisiphus" will be lower-cased and then split into 3-grams: sis, isi, sip, iph, phu, hus. Each of these ngram will be part of the query. The user is then able to find the Sysiphus myth (with a y). All that is transparently done for the user.
If the user does not want a specific field to use the field bridge or the analyzer then the ignoreAnalyzer() or ignoreFieldBridge() functions can be called.
To search for multiple possible words in the same field, add them all in the matching clause.
//search document with storm or lightning in their history
Query luceneQuery =
mythQB.keyword().onField("history").matching("storm lightning").createQuery();
//search document with storm or lightning in their history
Query luceneQuery =
mythQB.keyword().onField("history").matching("storm lightning").createQuery();To search the same word on multiple fields, use the onFields method.
Query luceneQuery = mythQB
.keyword()
.onFields("history","description","name")
.matching("storm")
.createQuery();
Query luceneQuery = mythQB
.keyword()
.onFields("history","description","name")
.matching("storm")
.createQuery();Sometimes, one field should be treated differently from another field even if searching the same term, use the andField() method for that.
In the previous example, only field name is boosted to 5.
13.5.1.4. Fuzzy Queries
To execute a fuzzy query (based on the Levenshtein distance algorithm), start with a keyword query and add the fuzzy flag.
The threshold is the limit above which two terms are considering matching. It is a decimal between 0 and 1 and the default value is 0.5. The prefixLength is the length of the prefix ignored by the "fuzzyness". While the default value is 0, a nonzero value is recommended for indexes containing a huge number of distinct terms.
13.5.1.5. Wildcard Queries
Wildcard queries are useful in circumstances where only part of the word is known. The ? represents a single character and * represents multiple characters. Note that for performance purposes, it is recommended that the query does not start with either ? or *.
Wildcard queries do not apply the analyzer on the matching terms. The risk of * or ? being mangled is too high.
13.5.1.6. Phrase Queries
So far we have been looking for words or sets of words, the user can also search exact or approximate sentences. Use phrase() to do so.
Query luceneQuery = mythQB
.phrase()
.onField("history")
.sentence("Thou shalt not kill")
.createQuery();
Query luceneQuery = mythQB
.phrase()
.onField("history")
.sentence("Thou shalt not kill")
.createQuery();Approximate sentences can be searched by adding a slop factor. The slop factor represents the number of other words permitted in the sentence: this works like a within or near operator.
13.5.1.7. Range Queries
A range query searches for a value in between given boundaries (included or not) or for a value below or above a given boundary (included or not).
13.5.1.8. Combining Queries
Queries can be aggregated (combined) to create more complex queries. The following aggregation operators are available:
-
SHOULD: the query should contain the matching elements of the subquery. -
MUST: the query must contain the matching elements of the subquery. -
MUST NOT: the query must not contain the matching elements of the subquery.
The subqueries can be any Lucene query including a boolean query itself.
Example: SHOULD Query
Example: MUST Query
Example: MUST NOT Query
13.5.1.9. Query Options
The Hibernate Search query DSL is an easy to use and easy to read query API. In accepting and producing Lucene queries, you can incorporate query types not yet supported by the DSL.
The following is a summary of query options for query types and fields:
- boostedTo (on query type and on field) boosts the whole query or the specific field to a given factor.
- withConstantScore (on query) returns all results that match the query have a constant score equals to the boost.
- filteredBy(Filter)(on query) filters query results using the Filter instance.
- ignoreAnalyzer (on field) ignores the analyzer when processing this field.
- ignoreFieldBridge (on field) ignores field bridge when processing this field.
Example: Combination of Query Options
13.5.1.10. Build a Hibernate Search Query
13.5.1.10.1. Generality
After building the Lucene query, wrap it within a Hibernate query. The query searches all indexed entities and returns all types of indexed classes unless explicitly configured not to do so.
Example: Wrapping a Lucene Query in a Hibernate Query
FullTextSession fullTextSession = Search.getFullTextSession( session ); org.hibernate.Query fullTextQuery = fullTextSession.createFullTextQuery( luceneQuery );
FullTextSession fullTextSession = Search.getFullTextSession( session );
org.hibernate.Query fullTextQuery = fullTextSession.createFullTextQuery( luceneQuery );For improved performance, restrict the returned types as follows:
Example: Filtering the Search Result by Entity Type
The first part of the second example only returns the matching Customers. The second part of the same example returns matching Actors and Items. The type restriction is polymorphic. As a result, if the two subclasses Salesman and Customer of the base class Person return, specify Person.class to filter based on result types.
13.5.1.10.2. Pagination
To avoid performance degradation, it is recommended to restrict the number of returned objects per query. A user navigating from one page to another page is a very common use case. The way to define pagination is similar to defining pagination in a plain HQL or Criteria query.
Example: Defining pagination for a search query
org.hibernate.Query fullTextQuery =
fullTextSession.createFullTextQuery( luceneQuery, Customer.class );
fullTextQuery.setFirstResult(15); //start from the 15th element
fullTextQuery.setMaxResults(10); //return 10 elements
org.hibernate.Query fullTextQuery =
fullTextSession.createFullTextQuery( luceneQuery, Customer.class );
fullTextQuery.setFirstResult(15); //start from the 15th element
fullTextQuery.setMaxResults(10); //return 10 elements
It is still possible to get the total number of matching elements regardless of the pagination via fulltextQuery.getResultSize().
13.5.1.10.3. Sorting
Apache Lucene contains a flexible and powerful result sorting mechanism. The default sorting is by relevance and is appropriate for a large variety of use cases. The sorting mechanism can be changed to sort by other properties using the Lucene Sort object to apply a Lucene sorting strategy.
Example: Specifying a Lucene Sort
org.hibernate.search.FullTextQuery query = s.createFullTextQuery( query, Book.class );
org.apache.lucene.search.Sort sort = new Sort(
new SortField("title", SortField.STRING));
List results = query.list();
org.hibernate.search.FullTextQuery query = s.createFullTextQuery( query, Book.class );
org.apache.lucene.search.Sort sort = new Sort(
new SortField("title", SortField.STRING));
List results = query.list();Fields used for sorting must not be tokenized. For more information about tokenizing, see @Field.
13.5.1.10.4. Fetching Strategy
Hibernate SearchHibernate Search loads objects using a single query if the return types are restricted to one class. Hibernate SearchHibernate Search is restricted by the static fetching strategy defined in the domain model. It is useful to refine the fetching strategy for a specific use case as follows:
Example: Specifying FetchMode on a query
Criteria criteria =
s.createCriteria( Book.class ).setFetchMode( "authors", FetchMode.JOIN );
s.createFullTextQuery( luceneQuery ).setCriteriaQuery( criteria );
Criteria criteria =
s.createCriteria( Book.class ).setFetchMode( "authors", FetchMode.JOIN );
s.createFullTextQuery( luceneQuery ).setCriteriaQuery( criteria );In this example, the query will return all Books matching the LuceneQuery. The authors collection will be loaded from the same query using an SQL outer join.
In a criteria query definition, the type is guessed based on the provided criteria query. As a result, it is not necessary to restrict the return entity types.
The fetch mode is the only adjustable property. Do not use a restriction (a where clause) on the Criteria query because the getResultSize() throws a SearchException if used in conjunction with a Criteria with restriction.
If more than one entity is expected, do not use setCriteriaQuery.
13.5.1.10.5. Projection
In some cases, only a small subset of the properties is required. Use Hibernate Search to return a subset of properties as follows:
Hibernate Search extracts properties from the Lucene index and converts them to their object representation and returns a list of Object[]. Projections prevent a time consuming database round-trip. However, they have following constraints:
-
The properties projected must be stored in the index (
@Field(store=Store.YES)), which increases the index size. The properties projected must use a
FieldBridgeimplementing org.hibernate.search.bridge.TwoWayFieldBridge ororg.hibernate.search.bridge.TwoWayStringBridge, the latter being the simpler version.NoteAll Hibernate Search built-in types are two-way.
- Only the simple properties of the indexed entity or its embedded associations can be projected. Therefore a whole embedded entity cannot be projected.
- Projection does not work on collections or maps which are indexed via @IndexedEmbedded
Lucene provides metadata information about query results. Use projection constants to retrieve the metadata.
Example: Using Projection to Retrieve Metadata
Fields can be mixed with the following projection constants:
- FullTextQuery.THIS: returns the initialized and managed entity (as a non projected query would have done).
- FullTextQuery.DOCUMENT: returns the Lucene Document related to the object projected.
- FullTextQuery.OBJECT_CLASS: returns the class of the indexed entity.
- FullTextQuery.SCORE: returns the document score in the query. Scores are handy to compare one result against an other for a given query but are useless when comparing the result of different queries.
- FullTextQuery.ID: the ID property value of the projected object.
- FullTextQuery.DOCUMENT_ID: the Lucene document ID. Be careful in using this value as a Lucene document ID can change over time between two different IndexReader opening.
- FullTextQuery.EXPLANATION: returns the Lucene Explanation object for the matching object/document in the given query. This is not suitable for retrieving large amounts of data. Running explanation typically is as costly as running the whole Lucene query per matching element. As a result, projection is recommended.
13.5.1.10.6. Customizing Object Initialization Strategies
By default, Hibernate Search uses the most appropriate strategy to initialize entities matching the full text query. It executes one (or several) queries to retrieve the required entities. This approach minimizes database trips where few of the retrieved entities are present in the persistence context (the session) or the second level cache.
If entities are present in the second level cache, force Hibernate Search to look into the cache before retrieving a database object.
Example: Check the second-level cache before using a query
FullTextQuery query = session.createFullTextQuery(luceneQuery, User.class);
query.initializeObjectWith(
ObjectLookupMethod.SECOND_LEVEL_CACHE,
DatabaseRetrievalMethod.QUERY
);
FullTextQuery query = session.createFullTextQuery(luceneQuery, User.class);
query.initializeObjectWith(
ObjectLookupMethod.SECOND_LEVEL_CACHE,
DatabaseRetrievalMethod.QUERY
);
ObjectLookupMethod defines the strategy to check if an object is easily accessible (without fetching it from the database). Other options are:
-
ObjectLookupMethod.PERSISTENCE_CONTEXTis used if many matching entities are already loaded into the persistence context (loaded in the Session or EntityManager). -
ObjectLookupMethod.SECOND_LEVEL_CACHEchecks the persistence context and then the second-level cache.
Set the following to search in the second-level cache:
- Correctly configure and activate the second-level cache.
- Enable the second-level cache for the relevant entity. This is done using annotations such as @Cacheable.
-
Enable second-level cache read access for either Session, EntityManager or Query. Use
CacheMode.NORMALin Hibernate native APIs orCacheRetrieveMode.USEin Java Persistence APIs.
Unless the second-level cache implementation is EHCache or Infinispan, do not use ObjectLookupMethod.SECOND_LEVEL_CACHE. Other second-level cache providers do not implement this operation efficiently.
Customize how objects are loaded from the database using DatabaseRetrievalMethod as follows:
- QUERY (default) uses a set of queries to load several objects in each batch. This approach is recommended.
-
FIND_BY_ID loads one object at a time using the
Session.getorEntityManager.findsemantic. This is recommended if the batch size is set for the entity, which allows Hibernate Core to load entities in batches.
13.5.1.10.7. Limiting the Time of a Query
Limit the time a query takes in Hibernate Guide as follows:
- Raise an exception when arriving at the limit.
- Limit to the number of results retrieved when the time limit is raised.
13.5.1.10.8. Raise an Exception on Time Limit
If a query uses more than the defined amount of time, a QueryTimeoutException is raised (org.hibernate.QueryTimeoutException or javax.persistence.QueryTimeoutException depending on the programmatic API).
To define the limit when using the native Hibernate APIs, use one of the following approaches:
Example: Defining a Timeout in Query Execution
The getResultSize(), iterate() and scroll() honor the timeout until the end of the method call. As a result, Iterable or the ScrollableResults ignore the timeout. Additionally, explain() does not honor this timeout period. This method is used for debugging and to check the reasons for slow performance of a query.
The following is the standard way to limit execution time using the Java Persistence API (JPA):
Example: Defining a Timeout in Query Execution
The example code does not guarantee that the query stops at the specified results amount.
13.5.2. Retrieving the Results
After building the Hibernate query, it is executed the same way as a HQL or Criteria query. The same paradigm and object semantic apply to a Lucene Query query and the common operations like: list(), uniqueResult(), iterate(), scroll() are available.
13.5.2.1. Performance Considerations
If you expect a reasonable number of results (for example using pagination) and expect to work on all of them, list() or uniqueResult() are recommended. list() work best if the entity batch-size is set up properly. Note that Hibernate Search has to process all Lucene Hits elements (within the pagination) when using list() , uniqueResult() and iterate().
If you wish to minimize Lucene document loading, scroll() is more appropriate. Do not forget to close the ScrollableResults object when you are done, since it keeps Lucene resources. If you expect to use scroll, but wish to load objects in batch, you can use query.setFetchSize(). When an object is accessed, and if not already loaded, Hibernate Search will load the next fetchSize objects in one pass.
Pagination is preferred over scrolling.
13.5.2.2. Result Size
It is sometimes useful to know the total number of matching documents:
- to provide a total search results feature, as provided by Google searches. For example, "1-10 of about 888,000,000 results"
- to implement a fast pagination navigation
- to implement a multi-step search engine that adds approximation if the restricted query returns zero or not enough results
Of course it would be too costly to retrieve all the matching documents. Hibernate Search allows you to retrieve the total number of matching documents regardless of the pagination parameters. Even more interesting, you can retrieve the number of matching elements without triggering a single object load.
Example: Determining the Result Size of a Query
Like Google, the number of results is approximation if the index is not fully up-to-date with the database (asynchronous cluster for example).
13.5.2.3. ResultTransformer
Projection results are returned as Object arrays. If the data structure used for the object does not match the requirements of the application, apply a ResultTransformer. The ResultTransformer builds the required data structure after the query execution.
Projection results are returned as Object arrays. If the data structure used for the object does not match the requirements of the application, apply a ResultTransformer. The ResultTransformer builds the required data structure after the query execution.
Exampl: Using ResultTransformer with Projections
Examples of ResultTransformer implementations can be found in the Hibernate Core codebase.
13.5.2.4. Understanding Results
If the results of a query are not what you expected, the Luke tool is useful in understanding the outcome. However, Hibernate Search also gives you access to the Lucene Explanation object for a given result (in a given query). This class is considered fairly advanced to Lucene users but can provide a good understanding of the scoring of an object. You have two ways to access the Explanation object for a given result:
-
Use the
fullTextQuery.explain(int)method - Use projection
The first approach takes a document ID as a parameter and return the Explanation object. The document ID can be retrieved using projection and the FullTextQuery.DOCUMENT_ID constant.
The Document ID is unrelated to the entity ID. Be careful not to confuse these concepts.
In the second approach you project the Explanation object using the FullTextQuery.EXPLANATION constant.
Example: Retrieving the Lucene Explanation Object Using Projection
Use the Explanation object only when required as it is roughly as expensive as running the Lucene query again.
13.5.2.5. Filters
Apache Lucene has a powerful feature that allows you to filter query results according to a custom filtering process. This is a very powerful way to apply additional data restrictions, especially since filters can be cached and reused. Use cases include:
- security
- temporal data (example, view only last month’s data)
- population filter (example, search limited to a given category)
Hibernate Search pushes the concept further by introducing the notion of parameterizable named filters which are transparently cached. For people familiar with the notion of Hibernate Core filters, the API is very similar:
Example: Enabling Fulltext Filters for a Query
fullTextQuery = s.createFullTextQuery( query, Driver.class );
fullTextQuery.enableFullTextFilter("bestDriver");
fullTextQuery.enableFullTextFilter("security").setParameter( "login", "andre" );
fullTextQuery.list(); //returns only best drivers where andre has credentials
fullTextQuery = s.createFullTextQuery( query, Driver.class );
fullTextQuery.enableFullTextFilter("bestDriver");
fullTextQuery.enableFullTextFilter("security").setParameter( "login", "andre" );
fullTextQuery.list(); //returns only best drivers where andre has credentialsIn this example we enabled two filters on top of the query. You can enable (or disable) as many filters as you like.
Declaring filters is done through the @FullTextFilterDef annotation. This annotation can be on any @Indexed entity regardless of the query the filter is later applied to. This implies that filter definitions are global and their names must be unique. A SearchException is thrown in case two different @FullTextFilterDef annotations with the same name are defined. Each named filter has to specify its actual filter implementation.
Example: Defining and Implementing a Filter
@FullTextFilterDefs( {
@FullTextFilterDef(name = "bestDriver", impl = BestDriversFilter.class),
@FullTextFilterDef(name = "security", impl = SecurityFilterFactory.class)
})
public class Driver { ... }
@FullTextFilterDefs( {
@FullTextFilterDef(name = "bestDriver", impl = BestDriversFilter.class),
@FullTextFilterDef(name = "security", impl = SecurityFilterFactory.class)
})
public class Driver { ... }
BestDriversFilter is an example of a simple Lucene filter which reduces the result set to drivers whose score is 5. In this example the specified filter implements the org.apache.lucene.search.Filter directly and contains a no-arg constructor.
If your Filter creation requires additional steps or if the filter you want to use does not have a no-arg constructor, you can use the factory pattern:
Example: Creating a filter using the factory pattern
Hibernate Search will look for a @Factory annotated method and use it to build the filter instance. The factory must have a no-arg constructor.
Infinispan Query uses a @Factory annotated method to build the filter instance. The factory must have a no argument constructor.
Named filters come in handy where parameters have to be passed to the filter. For example a security filter might want to know which security level you want to apply:
Example: Passing parameters to a defined filter
fullTextQuery = s.createFullTextQuery( query, Driver.class );
fullTextQuery.enableFullTextFilter("security").setParameter( "level", 5 );
fullTextQuery = s.createFullTextQuery( query, Driver.class );
fullTextQuery.enableFullTextFilter("security").setParameter( "level", 5 );Each parameter name should have an associated setter on either the filter or filter factory of the targeted named filter definition. ] Example: Using parameters in the actual filter implementation
Note the method annotated @Key returns a FilterKey object. The returned object has a special contract: the key object must implement equals() / hashCode() so that two keys are equal if and only if the given Filter types are the same and the set of parameters are the same. In other words, two filter keys are equal if and only if the filters from which the keys are generated can be interchanged. The key object is used as a key in the cache mechanism.
@Key methods are needed only if:
- the filter caching system is enabled (enabled by default)
- the filter has parameters
In most cases, using the StandardFilterKey implementation will be good enough. It delegates the equals() / hashCode() implementation to each of the parameters equals and hashcode methods.
As mentioned before the defined filters are per default cached and the cache uses a combination of hard and soft references to allow disposal of memory when needed. The hard reference cache keeps track of the most recently used filters and transforms the ones least used to SoftReferences when needed. Once the limit of the hard reference cache is reached additional filters are cached as SoftReferences. To adjust the size of the hard reference cache, use hibernate.search.filter.cache_strategy.size (defaults to 128). For advanced use of filter caching, implement your own FilterCachingStrategy. The classname is defined by hibernate.search.filter.cache_strategy.
This filter caching mechanism should not be confused with caching the actual filter results. In Lucene it is common practice to wrap filters using the IndexReader around a CachingWrapperFilter. The wrapper will cache the DocIdSet returned from the getDocIdSet(IndexReader reader) method to avoid expensive recomputation. It is important to mention that the computed DocIdSet is only cachable for the same IndexReader instance, because the reader effectively represents the state of the index at the moment it was opened. The document list cannot change within an opened IndexReader. A different/new IndexReader instance, however, works potentially on a different set of Documents (either from a different index or simply because the index has changed), hence the cached DocIdSet has to be recomputed.
Hibernate Search also helps with this aspect of caching. Per default the cache flag of @FullTextFilterDef is set to FilterCacheModeType.INSTANCE_AND_DOCIDSETRESULTS which will automatically cache the filter instance as well as wrap the specified filter around a Hibernate specific implementation of CachingWrapperFilter. In contrast to Lucene’s version of this class SoftReferences are used together with a hard reference count (see discussion about filter cache). The hard reference count can be adjusted using hibernate.search.filter.cache_docidresults.size (defaults to 5). The wrapping behaviour can be controlled using the @FullTextFilterDef.cache parameter. There are three different values for this parameter:
| Value | Definition |
|---|---|
| FilterCacheModeType.NONE | No filter instance and no result is cached by Hibernate Search. For every filter call, a new filter instance is created. This setting might be useful for rapidly changing data sets or heavily memory constrained environments. |
| FilterCacheModeType.INSTANCE_ONLY | The filter instance is cached and reused across concurrent Filter.getDocIdSet() calls. DocIdSet results are not cached. This setting is useful when a filter uses its own specific caching mechanism or the filter results change dynamically due to application specific events making DocIdSet caching in both cases unnecessary. |
| FilterCacheModeType.INSTANCE_AND_DOCIDSETRESULTS | Both the filter instance and the DocIdSet results are cached. This is the default value. |
Last but not least - why should filters be cached? There are two areas where filter caching shines:
Filters should be cached in the following situations:
- the system does not update the targeted entity index often (in other words, the IndexReader is reused a lot)
- the Filter’s DocIdSet is expensive to compute (compared to the time spent to execute the query)
13.5.2.6. Using Filters in a Sharded Environment
In a sharded environment it is possible to execute queries on a subset of the available shards. This can be done in two steps:
Query a Subset of Index Shards
- Create a sharding strategy that does select a subset of IndexManagers depending on a filter configuration.
- Activate the filter at query time.
Example: Query a Subset of Index Shards
In this example the query is run against a specific customer shard if the customer filter is activated.
In this example, if the filter named customer is present, only the shard dedicated to this customer is queried, otherwise, all shards are returned. A given Sharding strategy can react to one or more filters and depends on their parameters.
The second step is to activate the filter at query time. While the filter can be a regular filter (as defined in ) which also filters Lucene results after the query, you can make use of a special filter that will only be passed to the sharding strategy (and is otherwise ignored).
To use this feature, specify the ShardSensitiveOnlyFilter class when declaring your filter.
Note that by using the ShardSensitiveOnlyFilter, you do not have to implement any Lucene filter. Using filters and sharding strategy reacting to these filters is recommended to speed up queries in a sharded environment.
13.5.3. Faceting
Faceted search is a technique which allows the results of a query to be divided into multiple categories. This categorization includes the calculation of hit counts for each category and the ability to further restrict search results based on these facets (categories). The example below shows a faceting example. The search results in fifteen hits which are displayed on the main part of the page. The navigation bar on the left, however, shows the category Computers & Internet with its subcategories Programming, Computer Science, Databases, Software, Web Development, Networking and Home Computing. For each of these subcategories the number of books is shown matching the main search criteria and belonging to the respective subcategory. This division of the category Computers & Internet is one concrete search facet. Another one is for example the average customer review.
Faceted search divides the results of a query into categories. The categorization includes the calculation of hit counts for each category and the further restricts search results based on these facets (categories). The following example displays a faceting search results in fifteen hits displayed on the main page.
The left side navigation bar diplays the categories and subcategories. For each of these subcategories the number of books matches the main search criteria and belongs to the respective subcategory. This division of the category Computers & Internet is one concrete search facet. Another example is the average customer review.
Example: Search for Hibernate Search on Amazon
In Hibernate Search, the classes QueryBuilder and FullTextQuery are the entry point into the faceting API. The former creates faceting requests and the latter accesses the FacetManager. The FacetManager applies faceting requests on a query and selects facets that are added to an existing query to refine search results. The examples use the entity Cd as shown in the example below:

Example: Entity Cd
Prior to Hibernate Search 5.2, there was no need to explicitly use a @Facet annotation. In Hibernate Search 5.2 it became necessary in order to use Lucene’s native faceting API.
13.5.3.1. Creating a Faceting Request
The first step towards a faceted search is to create the FacetingRequest. Currently two types of faceting requests are supported. The first type is called discrete faceting and the second type range faceting request. In the case of a discrete faceting request you specify on which index field you want to facet (categorize) and which faceting options to apply. An example for a discrete faceting request can be seen in the following example:
Example: Creating a discrete faceting request
When executing this faceting request a Facet instance will be created for each discrete value for the indexed field label. The Facet instance will record the actual field value including how often this particular field value occurs within the original query results. orderedBy, includeZeroCounts and maxFacetCount are optional parameters which can be applied on any faceting request. orderedBy allows to specify in which order the created facets will be returned. The default is FacetSortOrder.COUNT_DESC, but you can also sort on the field value or the order in which ranges were specified. includeZeroCount determines whether facets with a count of 0 will be included in the result (per default they are) and maxFacetCount allows to limit the maximum amount of facets returned.
At the moment there are several preconditions an indexed field has to meet in order to apply faceting on it. The indexed property must be of type String, Date or a subtype of Number and null values should be avoided. Furthermore the property has to be indexed with Analyze.NO and in case of a numeric property @NumericField needs to be specified.
The creation of a range faceting request is quite similar except that we have to specify ranges for the field values we are faceting on. A range faceting request can be seen below where three different price ranges are specified. The below and above can only be specified once, but you can specify as many from - to ranges as you want. For each range boundary you can also specify via excludeLimit whether it is included into the range or not.
Example: Creating a range faceting request
13.5.3.2. Applying a Faceting Request
A faceting request is applied to a query via the FacetManager class which can be retrieved via the FullTextQuery class.
You can enable as many faceting requests as you like and retrieve them afterwards via getFacets() specifying the faceting request name. There is also a disableFaceting() method which allows you to disable a faceting request by specifying its name.
A faceting request can be applied on a query using the FacetManager, which can be retrieved via the FullTextQuery.
Example: Applying a faceting request
Multiple faceting requests can be retrieved using getFacets() and specifying the faceting request name.
The disableFaceting() method disables a faceting request by specifying its name.
13.5.3.3. Restricting Query Results
Last but not least, you can apply any of the returned Facets as additional criteria on your original query in order to implement a "drill-down" functionality. For this purpose FacetSelection can be utilized. FacetSelections are available via the FacetManager and allow you to select a facet as query criteria (selectFacets), remove a facet restriction (deselectFacets), remove all facet restrictions (clearSelectedFacets) and retrieve all currently selected facets (getSelectedFacets). The following snippet shows an example.
13.5.4. Optimizing the Query Process
Query performance depends on several criteria:
- The Lucene query.
- The number of objects loaded: use pagination (always) or index projection (if needed).
- The way Hibernate Search interacts with the Lucene readers: defines the appropriate reader strategy.
- Caching frequently extracted values from the index: see Caching Index Values: FieldCache
13.5.4.1. Caching Index Values: FieldCache
The primary function of a Lucene index is to identify matches to your queries. After the query is performed the results must be analyzed to extract useful information. Hibernate Search would typically need to extract the Class type and the primary key.
Extracting the needed values from the index has a performance cost, which in some cases might be very low and not noticeable, but in some other cases might be a good candidate for caching.
The requirements depend on the kind of Projections being used, as in some cases the Class type is not needed as it can be inferred from the query context or other means.
Using the @CacheFromIndex annotation you can experiment with different kinds of caching of the main metadata fields required by Hibernate Search:
It is possible to cache Class types and IDs using this annotation:
CLASS: Hibernate Search will use a Lucene FieldCache to improve performance of the Class type extraction from the index.This value is enabled by default, and is what Hibernate Search will apply if you do not specify the @CacheFromIndex annotation.
-
ID: Extracting the primary identifier will use a cache. This is likely providing the best performing queries, but will consume much more memory which in turn might reduce performance.
Measure the performance and memory consumption impact after warmup (executing some queries). Performance may improve by enabling Field Caches but this is not always the case.
Using a FieldCache has two downsides to consider:
- Memory usage: these caches can be quite memory hungry. Typically the CLASS cache has lower requirements than the ID cache.
- Index warmup: when using field caches, the first query on a new index or segment will be slower than when you do not have caching enabled.
With some queries the classtype will not be needed at all, in that case even if you enabled the CLASS field cache, this might not be used; for example if you are targeting a single class, obviously all returned values will be of that type (this is evaluated at each Query execution).
For the ID FieldCache to be used, the ids of targeted entities must be using a TwoWayFieldBridge (as all builting bridges), and all types being loaded in a specific query must use the fieldname for the id, and have ids of the same type (this is evaluated at each Query execution).
13.6. Manual Index Changes
As Hibernate Core applies changes to the database, Hibernate Search detects these changes and will update the index automatically (unless the EventListeners are disabled). Sometimes changes are made to the database without using Hibernate, as when backup is restored or your data is otherwise affected. In these cases Hibernate Search exposes the Manual Index APIs to explicitly update or remove a single entity from the index, rebuild the index for the whole database, or remove all references to a specific type.
All these methods affect the Lucene Index only, no changes are applied to the database.
13.6.1. Adding Instances to the Index
Using FullTextSession.index(T entity) you can directly add or update a specific object instance to the index. If this entity was already indexed, then the index will be updated. Changes to the index are only applied at transaction commit.
Directly add an object or instance to the index using FullTextSession.index(T entity). The index is updated when the entity is indexed. Infinispan Query applies changes to the index during the transaction commit.
Example: Indexing an entity via FullTextSession.index(T entity)
FullTextSession fullTextSession = Search.getFullTextSession(session); Transaction tx = fullTextSession.beginTransaction(); Object customer = fullTextSession.load( Customer.class, 8 ); fullTextSession.index(customer); tx.commit(); //index only updated at commit time
FullTextSession fullTextSession = Search.getFullTextSession(session);
Transaction tx = fullTextSession.beginTransaction();
Object customer = fullTextSession.load( Customer.class, 8 );
fullTextSession.index(customer);
tx.commit(); //index only updated at commit timeIn case you want to add all instances for a type, or for all indexed types, the recommended approach is to use a MassIndexer: see for more details.
Use a MassIndexer to add all instances for a type (or for all indexed types). See Using a MassIndexer for more information.
13.6.2. Deleting Instances from the Index
It is equally possible to remove an entity or all entities of a given type from a Lucene index without the need to physically remove them from the database. This operation is named purging and is also done through the FullTextSession.
The purging operation permits the removal of a single entity or all entities of a given type from a Lucene index without physically removing them from the database. This operation is performed using the FullTextSession.
Example: Purging a specific instance of an entity from the index
It is recommended to optimize the index after such an operation.
Methods index, purge, and purgeAll are available on FullTextEntityManager as well.
All manual indexing methods (index, purge, and purgeAll) only affect the index, not the database, nevertheless they are transactional and as such they will not be applied until the transaction is successfully committed, or you make use of flushToIndexes.
13.6.3. Rebuilding the Index
If you change the entity mapping to the index, chances are that the whole Index needs to be updated; For example if you decide to index an existing field using a different analyzer you’ll need to rebuild the index for affected types. Also if the Database is replaced (like restored from a backup, imported from a legacy system) you’ll want to be able to rebuild the index from existing data. Hibernate Search provides two main strategies to choose from:
Changing the entity mapping in the indexer may require the entire index to be updated. For example, if an existing field is to be indexed using a different analyzer, the index will need to be rebuilt for affected types.
Additionally, if the database is replaced by restoring from a backup or being imported from a legacy system, the index will need to be rebuilt from existing data. Infinispan Query provides two main strategies:
-
Using
FullTextSession.flushToIndexes()periodically, while usingFullTextSession.index()on all entities. -
Use a
MassIndexer.
13.6.3.1. Using flushToIndexes()
This strategy consists of removing the existing index and then adding all entities back to the index using FullTextSession.purgeAll() and FullTextSession.index(), however there are some memory and efficiency constraints. For maximum efficiency Hibernate Search batches index operations and executes them at commit time. If you expect to index a lot of data you need to be careful about memory consumption since all documents are kept in a queue until the transaction commit. You can potentially face an OutOfMemoryException if you do not empty the queue periodically; to do this use fullTextSession.flushToIndexes(). Every time fullTextSession.flushToIndexes() is called (or if the transaction is committed), the batch queue is processed, applying all index changes. Be aware that, once flushed, the changes cannot be rolled back.
Example: Index rebuilding using index() and flushToIndexes()
hibernate.search.default.worker.batch_size has been deprecated in favor of this explicit API which provides better control
Try to use a batch size that guarantees that your application will not be out of memory: with a bigger batch size objects are fetched faster from database but more memory is needed.
13.6.3.2. Using a MassIndexer
Hibernate Search’s MassIndexer uses several parallel threads to rebuild the index. You can optionally select which entities need to be reloaded or have it reindex all entities. This approach is optimized for best performance but requires to set the application in maintenance mode. Querying the index is not recommended when a MassIndexer is busy.
Example: Rebuild the Index Using a MassIndexer
fullTextSession.createIndexer().startAndWait();
fullTextSession.createIndexer().startAndWait();This will rebuild the index, deleting it and then reloading all entities from the database. Although it is simple to use, some tweaking is recommended to speed up the process.
During the progress of a MassIndexer the content of the index is undefined! If a query is performed while the MassIndexer is working most likely some results will be missing.
Example: Using a Tuned MassIndexer
This will rebuild the index of all User instances (and subtypes), and will create 12 parallel threads to load the User instances using batches of 25 objects per query. These same 12 threads will also need to process indexed embedded relations and custom FieldBridges or ClassBridges to output a Lucene document. The threads trigger lazy loading of additional attributes during the conversion process. Because of this, a high number of threads working in parallel is required. The number of threads working on actual index writing is defined by the back-end configuration of each index.
It is recommended to leave cacheMode to CacheMode.IGNORE (the default), as in most reindexing situations the cache will be a useless additional overhead. It might be useful to enable some other CacheMode depending on your data as it could increase performance if the main entity is relating to enum-like data included in the index.
The ideal of number of threads to achieve best performance is highly dependent on your overall architecture, database design and data values. All internal thread groups have meaningful names so they should be easily identified with most diagnostic tools, including thread dumps.
The MassIndexer is unaware of transactions, therefore there is no need to begin one or commit afterward. Because it is not transactional it is not recommended to let users use the system during its processing, as it is unlikely people will be able to find results and the system load might be too high anyway.
Other parameters which affect indexing time and memory consumption are:
-
hibernate.search.[default|<indexname>].exclusive_index_use -
hibernate.search.[default|<indexname>].indexwriter.max_buffered_docs -
hibernate.search.[default|<indexname>].indexwriter.max_merge_docs -
hibernate.search.[default|<indexname>].indexwriter.merge_factor -
hibernate.search.[default|<indexname>].indexwriter.merge_min_size -
hibernate.search.[default|<indexname>].indexwriter.merge_max_size -
hibernate.search.[default|<indexname>].indexwriter.merge_max_optimize_size -
hibernate.search.[default|<indexname>].indexwriter.merge_calibrate_by_deletes -
hibernate.search.[default|<indexname>].indexwriter.ram_buffer_size -
hibernate.search.[default|<indexname>].indexwriter.term_index_interval
Previous versions also had a max_field_length but this was removed from Lucene, it is possible to obtain a similar effect by using a LimitTokenCountAnalyzer.
All .indexwriter parameters are Lucene specific and Hibernate Search passes these parameters through.
The MassIndexer uses a forward only scrollable result to iterate on the primary keys to be loaded, but MySQL’s JDBC driver will load all values in memory. To avoid this "optimization" set idFetchSize to Integer.MIN_VALUE.
13.7. Index Optimization
From time to time, the Lucene index needs to be optimized. The process is essentially a defragmentation. Until an optimization is triggered Lucene only marks deleted documents as such, no physical are applied. During the optimization process the deletions will be applied which also affects the number of files in the Lucene Directory.
Optimizing the Lucene index speeds up searches but has no effect on the indexation (update) performance. During an optimization, searches can be performed, but will most likely be slowed down. All index updates will be stopped. It is recommended to schedule optimization:
Optimizing the Lucene index speeds up searches, but has no effect on the index update performance. Searches can be performed during an optimization process, however they will be slower than expected. All index updates are on hold during the optimization. It is therefore recommended to schedule optimization:
- On an idle system or when searches are least frequent.
- After a large number of index modifications are applied.
MassIndexer (see Using a MassIndexer) optimizes indexes by default at the start and at the end of processing. Use MassIndexer.optimizeAfterPurge and MassIndexer.optimizeOnFinish to change this default behavior.
13.7.1. Automatic Optimization
Hibernate Search can automatically optimize an index after either:
Infinispan Query automatically optimizes the index after:
- a certain amount of operations (insertion or deletion).
- a certain amount of transactions.
The configuration for automatic index optimization can be defined either globally or per index:
Example: Defining automatic optimization parameters
hibernate.search.default.optimizer.operation_limit.max = 1000 hibernate.search.default.optimizer.transaction_limit.max = 100 hibernate.search.Animal.optimizer.transaction_limit.max = 50
hibernate.search.default.optimizer.operation_limit.max = 1000
hibernate.search.default.optimizer.transaction_limit.max = 100
hibernate.search.Animal.optimizer.transaction_limit.max = 50
An optimization will be triggered to the Animal index as soon as either:
-
the number of additions and deletions reaches
1000. -
the number of transactions reaches
50(hibernate.search.Animal.optimizer.transaction_limit.maxhas priority overhibernate.search.default.optimizer.transaction_limit.max)
If none of these parameters are defined, no optimization is processed automatically.
The default implementation of OptimizerStrategy can be overridden by implementing org.hibernate.search.store.optimization.OptimizerStrategy and setting the optimizer.implementation property to the fully qualified name of your implementation. This implementation must implement the interface, be a public class and have a public constructor taking no arguments.
Example: Loading a custom OptimizerStrategy
hibernate.search.default.optimizer.implementation = com.acme.worlddomination.SmartOptimizer hibernate.search.default.optimizer.SomeOption = CustomConfigurationValue hibernate.search.humans.optimizer.implementation = default
hibernate.search.default.optimizer.implementation = com.acme.worlddomination.SmartOptimizer
hibernate.search.default.optimizer.SomeOption = CustomConfigurationValue
hibernate.search.humans.optimizer.implementation = default
The keyword default can be used to select the Hibernate Search default implementation; all properties after the .optimizer key separator will be passed to the implementation’s initialize method at start.
13.7.2. Manual Optimization
You can programmatically optimize (defragment) a Lucene index from Hibernate Search through the SearchFactory:
Example: Programmatic Index Optimization
The first example optimizes the Lucene index holding Orders and the second optimizes all indexes.
searchFactory.optimize() has no effect on a JMS back end. You must apply the optimize operation on the Master node.
searchFactory.optimize() is applied to the master node because it does not affect the JMC back end.
13.7.3. Adjusting Optimization
Apache Lucene has a few parameters to influence how optimization is performed. Hibernate Search exposes those parameters.
Further index optimization parameters include:
-
hibernate.search.[default|<indexname>].indexwriter.max_buffered_docs -
hibernate.search.[default|<indexname>].indexwriter.max_merge_docs -
hibernate.search.[default|<indexname>].indexwriter.merge_factor -
hibernate.search.[default|<indexname>].indexwriter.ram_buffer_size -
hibernate.search.[default|<indexname>].indexwriter.term_index_interval
13.8. Advanced Features
13.8.1. Accessing the SearchFactory
The SearchFactory object keeps track of the underlying Lucene resources for Hibernate Search. It is a convenient way to access Lucene natively. The SearchFactory can be accessed from a FullTextSession:
Example: Accessing the SearchFactory
FullTextSession fullTextSession = Search.getFullTextSession(regularSession); SearchFactory searchFactory = fullTextSession.getSearchFactory();
FullTextSession fullTextSession = Search.getFullTextSession(regularSession);
SearchFactory searchFactory = fullTextSession.getSearchFactory();13.8.2. Using an IndexReader
Queries in Lucene are executed on an IndexReader. Hibernate Search might cache index readers to maximize performance, or provide other efficient strategies to retrieve an updated IndexReader minimizing I/O operations. Your code can access these cached resources, but there are several requirements.
Example: Accessing an IndexReader
In this example the SearchFactory determines which indexes are needed to query this entity (considering a Sharding strategy). Using the configured ReaderProvider on each index, it returns a compound IndexReader on top of all involved indexes. Because this IndexReader is shared amongst several clients, you must adhere to the following rules:
- Never call indexReader.close(), instead use readerProvider.closeReader(reader) when necessary, preferably in a finally block.
- Don not use this IndexReader for modification operations (it is a readonly IndexReader, and any such attempt will result in an exception).
Aside from those rules, you can use the IndexReader freely, especially to do native Lucene queries. Using the shared IndexReaders will make most queries more efficient than by opening one directly from, for example, the filesystem.
As an alternative to the method open(Class… types) you can use open(String… indexNames), allowing you to pass in one or more index names. Using this strategy you can also select a subset of the indexes for any indexed type if sharding is used.
Example: Accessing an IndexReader by index names
IndexReader reader = searchFactory.getIndexReaderAccessor().open("Products.1", "Products.3");
IndexReader reader = searchFactory.getIndexReaderAccessor().open("Products.1", "Products.3");13.8.3. Accessing a Lucene Directory
A Directory is the most common abstraction used by Lucene to represent the index storage; Hibernate Search does not interact directly with a Lucene Directory but abstracts these interactions via an IndexManager: an index does not necessarily need to be implemented by a Directory.
If you know your index is represented as a Directory and need to access it, you can get a reference to the Directory via the IndexManager. Cast the IndexManager to a DirectoryBasedIndexManager and then use getDirectoryProvider().getDirectory() to get a reference to the underlying Directory. This is not recommended, we would encourage to use the IndexReader instead.
13.8.4. Sharding Indexes
In some cases it can be useful to split (shard) the indexed data of a given entity into several Lucene indexes.
Sharding should only be implemented if the advantages outweigh the disadvantages. Searching sharded indexes will typically be slower as all shards have to be opened for a single search.
Possible use cases for sharding are:
- A single index is so large that index update times are slowing the application down.
- A typical search will only hit a subset of the index, such as when data is naturally segmented by customer, region or application.
By default sharding is not enabled unless the number of shards is configured. To do this use the hibernate.search.<indexName>.sharding_strategy.nbr_of_shards property.
Example: Enabling Index Sharding In this example 5 shards are enabled.
hibernate.search.<indexName>.sharding_strategy.nbr_of_shards = 5
hibernate.search.<indexName>.sharding_strategy.nbr_of_shards = 5
Responsible for splitting the data into sub-indexes is the IndexShardingStrategy. The default sharding strategy splits the data according to the hash value of the ID string representation (generated by the FieldBridge). This ensures a fairly balanced sharding. You can replace the default strategy by implementing a custom IndexShardingStrategy. To use your custom strategy you have to set the hibernate.search.<indexName>.sharding_strategy property.
Example: Specifying a Custom Sharding Strategy
hibernate.search.<indexName>.sharding_strategy = my.shardingstrategy.Implementation
hibernate.search.<indexName>.sharding_strategy = my.shardingstrategy.ImplementationThe IndexShardingStrategy property also allows for optimizing searches by selecting which shard to run the query against. By activating a filter a sharding strategy can select a subset of the shards used to answer a query (IndexShardingStrategy.getIndexManagersForQuery) and thus speed up the query execution.
Each shard has an independent IndexManager and so can be configured to use a different directory provider and back-end configuration. The IndexManager index names for the Animal entity in the example below are Animal.0 to Animal.4. In other words, each shard has the name of its owning index followed by . (dot) and its index number.
Example: Sharding Configuration for Entity Animal
In the example above, the configuration uses the default id string hashing strategy and shards the Animal index into 5 sub-indexes. All sub-indexes are filesystem instances and the directory where each sub-index is stored is as followed:
-
for sub-index 0:
/usr/lucene/indexes/Animal00(shared indexBase but overridden indexName) -
for sub-index 1:
/usr/lucene/indexes/Animal.1(shared indexBase, default indexName) -
for sub-index 2:
/usr/lucene/indexes/Animal.2(shared indexBase, default indexName) -
for sub-index 3:
/usr/lucene/shared/Animal03(overridden indexBase, overridden indexName) -
for sub-index 4:
/usr/lucene/indexes/Animal.4(shared indexBase, default indexName)
When implementing a IndexShardingStrategy any field can be used to determine the sharding selection. Consider that to handle deletions, purge and purgeAll operations, the implementation might need to return one or more indexes without being able to read all the field values or the primary identifier. In that case the information is not enough to pick a single index, all indexes should be returned, so that the delete operation will be propagated to all indexes potentially containing the documents to be deleted.
13.8.5. Customizing Lucene’s Scoring Formula
Lucene allows the user to customize its scoring formula by extending org.apache.lucene.search.Similarity. The abstract methods defined in this class match the factors of the following formula calculating the score of query q for document d:
Extend org.apache.lucene.search.Similarity to customize Lucene’s scoring formula. The abstract methods match the formula used to calculate the score of query q for document d as follows:
*score(q,d) = coord(q,d) · queryNorm(q) · ∑ ~t in q~ ( tf(t in d) · idf(t) ^2^ · t.getBoost() · norm(t,d) )*
*score(q,d) = coord(q,d) · queryNorm(q) · ∑ ~t in q~ ( tf(t in d) ·
idf(t) ^2^ · t.getBoost() · norm(t,d) )*| Factor | Description |
|---|---|
| tf(t ind) | Term frequency factor for the term (t) in the document (d). |
| idf(t) | Inverse document frequency of the term. |
| coord(q,d) | Score factor based on how many of the query terms are found in the specified document. |
| queryNorm(q) | Normalizing factor used to make scores between queries comparable. |
| t.getBoost() | Field boost. |
| norm(t,d) | Encapsulates a few (indexing time) boost and length factors. |
It is beyond the scope of this manual to explain this formula in more detail. Please refer to Similarity’s Javadocs for more information.
Hibernate Search provides three ways to modify Lucene’s similarity calculation.
First you can set the default similarity by specifying the fully specified classname of your Similarity implementation using the property hibernate.search.similarity. The default value is org.apache.lucene.search.DefaultSimilarity.
You can also override the similarity used for a specific index by setting the similarity property
hibernate.search.default.similarity = my.custom.Similarity
hibernate.search.default.similarity = my.custom.Similarity
Finally you can override the default similarity on class level using the @Similarity annotation.
As an example, let us assume it is not important how often a term appears in a document. Documents with a single occurrence of the term should be scored the same as documents with multiple occurrences. In this case your custom implementation of the method tf(float freq) should return 1.0.
When two entities share the same index they must declare the same Similarity implementation. Classes in the same class hierarchy always share the index, so it is not allowed to override the Similarity implementation in a subtype.
Likewise, it does not make sense to define the similarity via the index setting and the class-level setting as they would conflict. Such a configuration will be rejected.
13.8.6. Exception Handling Configuration
Hibernate Search allows you to configure how exceptions are handled during the indexing process. If no configuration is provided then exceptions are logged to the log output by default. It is possible to explicitly declare the exception logging mechanism as follows:
hibernate.search.error_handler = log
hibernate.search.error_handler = logThe default exception handling occurs for both synchronous and asynchronous indexing. Hibernate Search provides an easy mechanism to override the default error handling implementation.
In order to provide your own implementation you must implement the ErrorHandler interface, which provides the handle(ErrorContext context) method. ErrorContext provides a reference to the primary LuceneWork instance, the underlying exception and any subsequent LuceneWork instances that could not be processed due to the primary exception.
To register this error handler with Hibernate Search you must declare the fully qualified classname of your ErrorHandler implementation in the configuration properties:
hibernate.search.error_handler = CustomerErrorHandler
hibernate.search.error_handler = CustomerErrorHandler13.8.7. Disable Hibernate Search
Hibernate Search can be partially or completely disabled as required. Hibernate Search’s indexing can be disabled, for example, if the index is read-only, or you prefer to perform indexing manually, rather than automatically. It is also possible to completely disable Hibernate Search, preventing indexing and searching.
- Disable Indexing
To disable Hibernate Search indexing, change the
indexing_strategyconfiguration option tomanual, then restart JBoss EAP.hibernate.search.indexing_strategy = manual
hibernate.search.indexing_strategy = manualCopy to Clipboard Copied! Toggle word wrap Toggle overflow - Disable Hibernate Search Completely
To disable Hibernate Search completely, disable all listeners by changing the
autoregister_listenersconfiguration option tofalse, then restart JBoss EAP.hibernate.search.autoregister_listeners = false
hibernate.search.autoregister_listeners = falseCopy to Clipboard Copied! Toggle word wrap Toggle overflow
13.9. Monitoring
Hibernate Search offers access to a Statistics object via SearchFactory.getStatistics(). It allows you, for example, to determine which classes are indexed and how many entities are in the index. This information is always available. However, by specifying the hibernate.search.generate_statistics property in your configuration you can also collect total and average Lucene query and object loading timings.
Access to Statistics via JMX
To enable access to statistics via JMX, set the property hibernate.search.jmx_enabled to true. This will automatically register the StatisticsInfoMBean bean, providing access to statistics using the Statistics object. Depending on your configuration the IndexingProgressMonitorMBean bean may also be registered.
Monitoring Indexing
If the mass indexer API is used, you can monitor indexing progress using the IndexingProgressMonitorMBean bean. The bean is only bound to JMX while indexing is in progress.
JMX beans can be accessed remotely using JConsole by setting the system property com.sun.management.jmxremote to true.
Chapter 14. Bean Validation
14.1. About Bean Validation
Bean Validation, or JavaBeans Validation, is a model for validating data in Java objects. The model uses built-in and custom annotation constraints to ensure the integrity of application data. The specification is documented here: JSR 349: Bean Validation 1.1.
Hibernate Validator is the JBoss EAP implementation of Bean Validation. It is also the reference implementation of the JSR.
JBoss EAP is 100% compliant with JSR 349 Bean Validation 1.1 specification. Hibernate Validator also provides additional features to the specification.
To get started with Bean Validation, see the bean-validation quickstart that ships with JBoss EAP. For information about how to download and run the quickstarts, see Using the Quickstart Examples.
14.2. Validation Constraints
14.2.1. About Validation Constraints
Validation constraints are rules applied to a Java element, such as a field, property or bean. A constraint will usually have a set of attributes used to set its limits. There are predefined constraints, and custom ones can be created. Each constraint is expressed in the form of an annotation.
The built-in validation constraints for Hibernate Validator are listed here: Hibernate Validator Constraints.
14.2.2. Hibernate Validator Constraints
When applicable, the application-level constraints lead to creation of database-level constraints that are described in the Hibernate Metadata Impact column in the table below.
Java-specific Validation Constraints
The following table includes validation constraints defined in the Java specifications, which are included in the javax.validation.constraints package.
| Annotation | Property type | Runtime checking | Hibernate Metadata impact |
|---|---|---|---|
|
| Boolean | Check that the method evaluates to false. Useful for constraints expressed in code rather than annotations. | None. |
|
| Boolean | Check that the method evaluates to true. Useful for constraints expressed in code rather than annotations. | None. |
|
| Numeric or string representation of a numeric |
Check whether the property is a number having up to | Define column precision and scale. |
|
| Date or calendar | Check if the date is in the future. | None. |
|
| Numeric or string representation of a numeric | Check if the value is less than or equal to max. | Add a check constraint on the column. |
|
| Numeric or string representation of a numeric | Check if the value is more than or equal to Min. | Add a check constraint on the column. |
|
| Check if the value is not null. | Column(s) are not null. | |
|
| Date or calendar | Check if the date is in the past. | Add a check constraint on the column. |
|
| String |
Check if the property matches the regular expression given a match flag. See | None. |
|
| Array, collection, map | Check if the element size is between min and max, both values included. | None. |
|
| Object | Perform validation recursively on the associated object. If the object is a Collection or an array, the elements are validated recursively. If the object is a Map, the value elements are validated recursively. | None. |
The parameter @Valid is a part of the Bean Validation specification, even though it is located in the javax.validation.constraints package.
Hibernate Validator-specific Validation Constraints
The following table includes vendor-specific validation constraints, which are a part of the org.hibernate.validator.constraints package.
| Annotation | Property type | Runtime checking | Hibernate Metadata impact |
|---|---|---|---|
|
| String | Check if the string length matches the range. | Column length will be set to max. |
|
| String | Check whether the string is a well formatted credit card number, derivative of the Luhn algorithm. | None. |
|
| String | Check whether the string is a properly formatted EAN or UPC-A code. | None. |
|
| String | Check whether the string is conform to the e-mail address specification. | None. |
|
| Check if the string is not null nor empty. Check if the connection is not null nor empty. | Columns are not null for String. | |
|
| Numeric or string representation of a numeric | Check if the value is between min and max, both values included. | Add a check constraint on the column. |
14.2.3. Bean Validation Using Custom Constraints
Bean Validation API defines a set of standard constraint annotations, such as @NotNull, @Size, and so on. However, in cases where these predefined constraints are not sufficient, you can easily create custom constraints tailored to your specific validation requirements.
Creating a Bean Validation custom constraint requires that you create a constraint annotation and implement a constraint validator. The following abbreviated code examples are taken from the bean-validation-custom-constraint quickstart that ships with JBoss EAP. See that quickstart for a complete working example.
14.2.3.1. Creating A Constraint Annotation
The following example shows the personAddress field of entity Person is validated using a set of custom constraints defined in the class AddressValidator.
Create the entity
PersonExample:
PersonClassCopy to Clipboard Copied! Toggle word wrap Toggle overflow Create the constraint validator files:
Example:
AddressInterfaceCopy to Clipboard Copied! Toggle word wrap Toggle overflow Example:
PersonAddressClassCopy to Clipboard Copied! Toggle word wrap Toggle overflow
14.2.3.2. Implementing A Constraint Validator
Having defined the annotation, you need to create a constraint validator that is able to validate elements with an @Address annotation. To do so, implement the interface ConstraintValidator as shown below:
Example: AddressValidator Class
14.3. Validation Configuration
You can configure bean validation using XML descriptors in the validation.xml file located in the /META-INF directory. If this file exists in the class path, its configuration is applied when the ValidatorFactory gets created.
Example: Validation Configuration File
The following example shows several configuration options of the validation.xml file. All the settings are optional. These options can also be configured using the javax.validation package.
The node default-provider allows to choose the bean validation provider. This is useful if there is more than one provider on the classpath. The message-interpolator and constraint-validator-factory properties are used to customize the used implementations for the interfaces MessageInterpolator and ConstraintValidatorFactory, which are defined in the javax.validation package. The constraint-mapping element lists additional XML files containing the actual constraint configuration.
Chapter 15. Creating WebSocket Applications
The WebSocket protocol provides two-way communication between web clients and servers. Communications between clients and the server are event-based, allowing for faster processing and smaller bandwidth compared with polling-based methods. WebSocket is available for use in web applications using a JavaScript API and by client WebSocket endpoints using the Java Websocket API.
A connection is first established between client and server as an HTTP connection. The client then requests a WebSocket connection using the Upgrade header. All communications are then full-duplex over the same TCP/IP connection, with minimal data overhead. Because each message does not include unnecessary HTTP header content, Websocket communications require smaller bandwidth. The result is a low latency communications path suited to applications, which require real-time responsiveness.
The JBoss EAP WebSocket implementation provides full dependency injection support for server endpoints, however, it does not provide CDI services for client endpoints.
A WebSocket application requires the following components and configuration changes:
- A Java client or a WebSocket enabled HTML client. You can verify HTML client browser support at this location: http://caniuse.com/#feat=websockets
- A WebSocket server endpoint class.
- Project dependencies configured to declare a dependency on the WebSocket API.
Create the WebSocket Application
The code examples that follow are taken from the websocket-hello quickstart that ships with JBoss EAP. It is a simple example of a WebSocket application that opens a connection, sends a message, and closes a connection. It does not implement any other functions or include any error handling, which would be required for a real world application.
Create the JavaScript HTML client.
The following is an example of a WebSocket client. It contains these JavaScript functions:
-
connect(): This function creates the WebSocket connection passing the WebSocket URI. The resource location matches the resource defined in the server endpoint class. This function also intercepts and handles the WebSocketonopen,onmessage,onerror, andonclose. -
sendMessage(): This function gets the name entered in the form, creates a message, and sends it using a WebSocket.send() command. -
disconnect(): This function issues the WebSocket.close() command. -
displayMessage(): This function sets the display message on the page to the value returned by the WebSocket endpoint method. displayStatus(): This function displays the WebSocket connection status.Example: Application
index.htmlCodeCopy to Clipboard Copied! Toggle word wrap Toggle overflow
-
Create the WebSocket server endpoint.
You can create a WebSocket server endpoint using either of the following methods.
-
Programmatic Endpoint: The endpoint extends the Endpoint class. -
Annotated Endpoint: The endpoint class uses annotations to interact with the WebSocket events. It is simpler to code than the programmatic endpoint.
The code example below uses the annotated endpoint approach and handles the following events.
-
The
@ServerEndpointannotation identifies this class as a WebSocket server endpoint and specifies the path. -
The
@OnOpenannotation is triggered when the WebSocket connection is opened. -
The
@OnMessageannotation is triggered when a message is received. The
@OnCloseannotation is triggered when the WebSocket connection is closed.Example: WebSocket Endpoint Code
Copy to Clipboard Copied! Toggle word wrap Toggle overflow
-
Declare the WebSocket API dependency in your project POM file.
If you use Maven, you add the following dependency to the project
pom.xmlfile.Example: Maven Dependency
Copy to Clipboard Copied! Toggle word wrap Toggle overflow
The quickstarts that ship with JBoss EAP include additional WebSocket client and endpoint code examples.
Chapter 16. Java Authorization Contract for Containers (JACC)
16.1. About Java Authorization Contract for Containers (JACC)
Java Authorization Contract for Containers (JACC) is a standard which defines a contract between containers and authorization service providers, which results in the implementation of providers for use by containers. It is defined in JSR-115 of the Java Community Process. For details about the specifications, see Java™ Authorization Contract for Containers.
JBoss EAP implements support for JACC within the security functionality of the security subsystem.
16.2. Configure Java Authorization Contract for Containers (JACC) Security
You can configure Java Authorization Contract for Containers (JACC) by configuring your security domain with the correct module, and then modifying your jboss-web.xml to include the required parameters.
Add JACC Support to the Security Domain
To add JACC support to the security domain, add the JACC authorization policy to the authorization stack of the security domain, with the required flag set. The following is an example of a security domain with JACC support. However, it is recommended to configure the security domain from the management console or the management CLI, rather than directly modifying the XML.
Example: Security Domain with JACC Support
Configure a Web Application to Use JACC
The jboss-web.xml file is located in the WEB-INF/ directory of your deployment, and contains overrides and additional JBoss-specific configuration for the web container. To use your JACC-enabled security domain, you need to include the <security-domain> element, and also set the <use-jboss-authorization> element to true. The following XML is configured to use the JACC security domain above.
Example: Utilize the JACC Security Domain
<jboss-web>
<security-domain>jacc</security-domain>
<use-jboss-authorization>true</use-jboss-authorization>
</jboss-web>
<jboss-web>
<security-domain>jacc</security-domain>
<use-jboss-authorization>true</use-jboss-authorization>
</jboss-web>Configure an EJB Application to Use JACC
Configuring EJBs to use a security domain and to use JACC differs from web applications. For an EJB, you can declare method permissions on a method or group of methods, in the ejb-jar.xml descriptor. Within the <ejb-jar> element, any child <method-permission> elements contain information about JACC roles. See the example configuration below for details. The EJBMethodPermission class is part of the Java EE 7 API, and is documented at http://docs.oracle.com/javaee/7/api/javax/security/jacc/EJBMethodPermission.html.
Example: JACC Method Permissions in an EJB
You can also constrain the authentication and authorization mechanisms for an EJB by using a security domain, just as you can do for a web application. Security domains are declared in the jboss-ejb3.xml descriptor, in the <security> child element. In addition to the security domain, you can also specify the <run-as-principal>, which changes the principal that the EJB runs as.
Example: Security Domain Declaration in an EJB
Chapter 17. Java Authentication SPI for Containers (JASPI)
17.1. About Java Authentication SPI for Containers (JASPI) Security
Java Authentication SPI for Containers (JASPI or JASPIC) is a pluggable interface for Java applications. It is defined in JSR-196 of the Java Community Process. Refer to http://www.jcp.org/en/jsr/detail?id=196 for details about the specification.
17.2. Configure Java Authentication SPI for Containers (JASPI) Security
You can authenticate a JASPI provider by adding <authentication-jaspi> element to your security domain. The configuration is similar to that of a standard authentication module, but login module elements are enclosed in a <login-module-stack> element. The structure of the configuration is:
Example: Structure of the authentication-jaspi Element
The login module itself is configured the same way as a standard authentication module.
The web-based management console does not expose the configuration of JASPI authentication modules. You must stop the JBoss EAP running instance completely before adding the configuration directly to /domain/configuration/domain.xml or /standalone/configuration/standalone.xml.
Chapter 18. Java Batch Application Development
Beginning with JBoss EAP 7, JBoss EAP supports Java batch applications as defined by JSR-352. The Batch subsystem in JBoss EAP facilitates batch configuration and monitoring.
To configure your application to use batch processing on JBoss EAP, you must specify the required dependencies. Additional JBoss EAP features for batch processing include Job Specification Language (JSL) inheritance, and batch property injections.
18.1. Required Batch Dependencies
To deploy your batch application to JBoss EAP, some additional dependencies that are required for batch processing need to be declared in your application’s pom.xml. An example of these required dependencies is shown below. Most of the dependencies have the scope set to provided, as they are already included in JBoss EAP.
Example: pom.xml Batch Dependencies
18.2. Job Specification Language (JSL) Inheritance
A feature of the JBoss EAP batch-jberet subsystem is the ability to use Job Specification Language (JSL) inheritance to abstract out some common parts of your job definition. Although JSL inheritance is not included in the JSR-352 1.0 specification, the JBoss EAP batch-jberet subsystem implements JSL inheritance based on the JSL Inheritance v1 draft.
Example: Inherit Step and Flow Within the Same Job XML File
Parent elements (step, flow, etc.) are marked with the attribute abstract="true" to exclude them from direct execution. Child elements contain a parent attribute, which points to the parent element.
Example: Inherit a Step from a Different Job XML File
Child elements (step, job, etc.) contain:
-
a
jsl-nameattribute, which specifies the job XML file name (without the.xmlextension) containing the parent element, and -
a
parentattribute, which points to the parent element in the job XML file specified byjsl-name.
Parent elements are marked with the attribute abstract="true" to exclude them from direct execution.
chunk-child.xml
<job id="chunk-child" xmlns="http://xmlns.jcp.org/xml/ns/javaee" version="1.0">
<step id="chunk-child-step" parent="chunk-parent-step" jsl-name="chunk-parent">
</step>
</job>
<job id="chunk-child" xmlns="http://xmlns.jcp.org/xml/ns/javaee" version="1.0">
<step id="chunk-child-step" parent="chunk-parent-step" jsl-name="chunk-parent">
</step>
</job>chunk-parent.xml
18.3. Batch Property Injections
A feature of the JBoss EAP batch-jberet subsystem is the ability to have properties defined in the job XML file injected into fields in the batch artifact class. Properties defined in the job XML file can be injected into fields using the @Inject and @BatchProperty annotations.
The injection field can be any of the following Java types:
-
java.lang.String -
java.lang.StringBuilder -
java.lang.StringBuffer any primitive type, and its wrapper type:
-
boolean,Boolean -
int,Integer -
double,Double -
long,Long -
char,Character -
float,Float -
short,Short -
byte,Byte
-
-
java.math.BigInteger -
java.math.BigDecimal -
java.net.URL -
java.net.URI -
java.io.File -
java.util.jar.JarFile -
java.util.Date -
java.lang.Class -
java.net.Inet4Address -
java.net.Inet6Address -
java.util.List,List<?>,List<String> -
java.util.Set,Set<?>,Set<String> -
java.util.Map,Map<?, ?>,Map<String, String>,Map<String, ?> -
java.util.logging.Logger -
java.util.regex.Pattern -
javax.management.ObjectName
The following array types are also supported:
-
java.lang.String[] any primitive type, and its wrapper type:
-
boolean[],Boolean[] -
int[],Integer[] -
double[],Double[] -
long[],Long[] -
char[],Character[] -
float[],Float[] -
short[],Short[] -
byte[],Byte[]
-
-
java.math.BigInteger[] -
java.math.BigDecimal[] -
java.net.URL[] -
java.net.URI[] -
java.io.File[] -
java.util.jar.JarFile[] -
java.util.zip.ZipFile[] -
java.util.Date[] -
java.lang.Class[]
Shown below are a few examples of using batch property injections:
Example: Injecting a Number into a Batchlet Class as Various Types
Job XML File
<batchlet ref="myBatchlet">
<properties>
<property name="number" value="10"/>
</properties>
</batchlet>
<batchlet ref="myBatchlet">
<properties>
<property name="number" value="10"/>
</properties>
</batchlet>Artifact Class
Example: Injecting a Number Sequence into a Batchlet Class as Various Arrays
Job XML File
<batchlet ref="myBatchlet">
<properties>
<property name="weekDays" value="1,2,3,4,5,6,7"/>
</properties>
</batchlet>
<batchlet ref="myBatchlet">
<properties>
<property name="weekDays" value="1,2,3,4,5,6,7"/>
</properties>
</batchlet>Artifact Class
Example: Injecting a Class Property into a Batchlet Class
Job XML File
<batchlet ref="myBatchlet">
<properties>
<property name="myClass" value="org.jberet.support.io.Person"/>
</properties>
</batchlet>
<batchlet ref="myBatchlet">
<properties>
<property name="myClass" value="org.jberet.support.io.Person"/>
</properties>
</batchlet>Artifact Class
Example: Assigning a Default Value to a Field Annotated for Property Injection
You can assign a default value to a field in an artifact Java class, in case the target batch property is not defined in the job XML file. If the target property is resolved to a valid value, it is injected into that field; otherwise, no value is injected and the default field value is used.
Artifact Class
Appendix A. Reference Material
A.1. Provided Undertow Handlers
AccessControlListHandler
Class Name: io.undertow.server.handlers.AccessControlListHandler
Name: access-control
Handler that can accept or reject a request based on an attribute of the remote peer.
| Name | Description |
|---|---|
| acl | ACL rules. This parameter is required. |
| attribute | Exchange attribute string. This parameter is required. |
| default-allow |
Boolean specifying whether handler accepts or rejects a request by default. Defaults to |
AccessLogHandler
Class Name: io.undertow.server.handlers.accesslog.AccessLogHandler
Name: access-log
Access log handler. This handler will generate access log messages based on the provided format string and pass these messages into the provided AccessLogReceiver.
This handler can log any attribute that is provides via the ExchangeAttribute mechanism.
This factory produces token handlers for the following patterns.
| Pattern | Description |
|---|---|
| %a | Remote IP address |
| %A | Local IP address |
| %b |
Bytes sent, excluding HTTP headers or |
| %B | Bytes sent, excluding HTTP headers |
| %h | Remote host name |
| %H | Request protocol |
| %l |
Remote logical username from |
| %m | Request method |
| %p | Local port |
| %q |
Query string (excluding the |
| %r | First line of the request |
| %s | HTTP status code of the response |
| %t | Date and time, in Common Log Format format |
| %u | Remote user that was authenticated |
| %U | Requested URL path |
| %v | Local server name |
| %D | Time taken to process the request, in milliseconds |
| %T | Time taken to process the request, in seconds |
| %I | current Request thread name (can compare later with stack traces) |
| common |
|
| combined |
|
There is also support to write information from the cookie, incoming header, or the session.
It is modeled after the Apache syntax:
-
%{i,xxx}for incoming headers -
%{o,xxx}for outgoing response headers -
%{c,xxx}for a specific cookie -
%{r,xxx}wherexxxis an attribute in the ServletRequest -
%{s,xxx}wherexxxis an attribute in the HttpSession
| Name | Description |
|---|---|
| format | Format used to generate the log messages. This is the default parameter. |
AllowedMethodsHandler
Handler that whitelists certain HTTP methods. Only requests with a method in the allowed methods set will be allowed to continue.
Class Name: io.undertow.server.handlers.AllowedMethodsHandler
Name: allowed-methods
| Name | Description |
|---|---|
| methods |
Methods to allow, for example |
BlockingHandler
An HttpHandler that initiates a blocking request. If the thread is currently running in the I/O thread it will be dispatched.
Class Name: io.undertow.server.handlers.BlockingHandler
Name: blocking
This handler has no parameters.
ByteRangeHandler
Handler for range requests. This is a generic handler that can handle range requests to any resource of a fixed content length, for example, any resource where the content-length header has been set. This is not necessarily the most efficient way to handle range requests, as the full content will be generated and then discarded. At present this handler can only handle simple, single range requests. If multiple ranges are requested the Range header will be ignored.
Class Name: io.undertow.server.handlers.ByteRangeHandler
Name: byte-range
| Name | Description |
|---|---|
| send-accept-ranges | Boolean value on whether or not to send accept ranges. This is the default parameter. |
CanonicalPathHandler
This handler transforms a relative path to a canonical path.
Class Name: io.undertow.server.handlers.CanonicalPathHandler
Name: canonical-path
This handler has no parameters.
DisableCacheHandler
Handler that disables response caching by browsers and proxies.
Class Name: io.undertow.server.handlers.DisableCacheHandler
Name: disable-cache
This handler has no parameters.
DisallowedMethodsHandler
Handler that blacklists certain HTTP methods.
Class Name: io.undertow.server.handlers.DisallowedMethodsHandler
Name: disallowed-methods
| Name | Description |
|---|---|
| methods |
Methods to disallow, for example |
EncodingHandler
This handler serves as the basis for content encoding implementations. Encoding handlers are added as delegates to this handler, with a specified server side priority.
The q value will be used to determine the correct handler. If a request comes in with no q value then the server will pick the handler with the highest priority as the encoding to use.
If no handler matches then the identity encoding is assumed. If the identity encoding has been specifically disallowed due to a q value of 0 then the handler will set the response code 406 (Not Acceptable) and return.
Class Name: io.undertow.server.handlers.encoding.EncodingHandler
Name: compress
This handler has no parameters.
FileErrorPageHandler
Handler that serves up a file from disk to serve as an error page. This handler does not serve up any response codes by default, you must configure the response codes it responds to.
Class Name: io.undertow.server.handlers.error.FileErrorPageHandler
Name: error-file
| Name | Description |
|---|---|
| file | Location of file to serve up as an error page. |
| response-codes | List of response codes that result in a redirect to the defined error page file. |
HttpTraceHandler
A handler that handles HTTP trace requests.
Class Name: io.undertow.server.handlers.HttpTraceHandler
Name: trace
This handler has no parameters.
IPAddressAccessControlHandler
Handler that can accept or reject a request based on the IP address of the remote peer.
Class Name: io.undertow.server.handlers.IPAddressAccessControlHandler
Name: ip-access-control
| Name | Description |
|---|---|
| acl | String representing the access control list. This is the default parameter. |
| failure-status | Integer representing the status code to return on rejected requests. |
| default-allow | Boolean representing whether or not to allow by default. |
JDBCLogHandler
Class Name: io.undertow.server.handlers.JDBCLogHandler
Name: jdbc-access-log
| Name | Description |
|---|---|
| format |
Specifies the JDBC Log pattern. Default value is |
| datasource | Name of the datasource to log. This parameter is required and is the default parameter. |
| tableName | Table name. |
| remoteHostField | Remote Host address. |
| userField | Username. |
| timestampField | Timestamp. |
| virtualHostField | VirtualHost. |
| methodField | Method. |
| queryField | Query. |
| statusField | Status. |
| bytesField | Bytes. |
| refererField | Referrer. |
| userAgentField | UserAgent. |
LearningPushHandler
Handler that builds up a cache of resources that a browser requests, and uses server push to push them when supported.
Class Name: io.undertow.server.handlers.LearningPushHandler
Name: learning-push
| Name | Description |
|---|---|
| max-age | Integer representing the maximum time of a cache entry. |
| max-entries | Integer representing the maximum number of cache entries |
LocalNameResolvingHandler
A handler that performs DNS lookup to resolve a local address. Unresolved local address may be created when a front end server has sent a X-forwarded-host header or AJP is in use.
Class Name: io.undertow.server.handlers.LocalNameResolvingHandler
Name: resolve-local-name
This handler has no parameters.
PathSeparatorHandler
A handler that translates non slash separator characters in the URL into a slash. In general this will translate backslash into slash on Windows systems.
Class Name: io.undertow.server.handlers.PathSeparatorHandler
Name: path-separator
This handler has no parameters.
PeerNameResolvingHandler
A handler that performs reverse DNS lookup to resolve a peer address.
Class Name: io.undertow.server.handlers.PeerNameResolvingHandler
Name: resolve-peer-name
This handler has no parameters.
ProxyPeerAddressHandler
Handler that sets the peer address to the value of the X-Forwarded-For header. This should only be used behind a proxy that always sets this header, otherwise it is possible for an attacker to forge their peer address.
Class Name: io.undertow.server.handlers.ProxyPeerAddressHandler
Name: proxy-peer-address
This handler has no parameters.
RedirectHandler
A redirect handler that redirects to the specified location via a 302 redirect. The location is specified as an exchange attribute string.
Class Name: io.undertow.server.handlers.RedirectHandler
Name: redirect
| Name | Description |
|---|---|
| value | Destination for the redirect. This is the default parameter. |
RequestBufferingHandler
Handler that will buffer all request data.
Class Name: io.undertow.server.handlers.RequestBufferingHandler
Name: buffer-request
| Name | Description |
|---|---|
| buffers | Integer that defines the maximum number of buffers. This is the default parameter. |
RequestDumpingHandler
Handler that dumps an exchange to a log.
Class Name: io.undertow.server.handlers.RequestDumpingHandler
Name: dump-request
This handler has no parameters.
RequestLimitingHandler
A handler which limits the maximum number of concurrent requests. Requests beyond the limit will block until the previous request is complete.
Class Name: io.undertow.server.handlers.RequestLimitingHandler
Name: request-limit
| Name | Description |
|---|---|
| requests | Integer that represents the maximum number of concurrent requests. This is the default parameter and is required. |
ResourceHandler
A handler for serving resources.
Class Name: io.undertow.server.handlers.resource.ResourceHandler
Name: resource
| Name | Description |
|---|---|
| location | Location of resources. This is the default parameter and is required. |
| allow-listing | Boolean value to determine whether or not to allow directory listings. |
ResponseRateLimitingHandler
Handler that limits the download rate to a set number of bytes/time.
Class Name: io.undertow.server.handlers.ResponseRateLimitingHandler
Name: response-rate-limit
| Name | Description |
|---|---|
| bytes | Number of bytes to limit the download rate. This parameter is required. |
| time | Time in seconds to limit the download rate. This parameter is required. |
SetHeaderHandler
A handler that sets a fixed response header.
Class Name: io.undertow.server.handlers.SetHeaderHandler
Name: header
| Name | Description |
|---|---|
| header | Name of header attribute. This parameter is required. |
| value | Value of header attribute. This parameter is required. |
SSLHeaderHandler
Handler that sets SSL information on the connection based on the following headers:
- SSL_CLIENT_CERT
- SSL_CIPHER
- SSL_SESSION_ID
If this handler is present in the chain it will always override the SSL session information, even if these headers are not present.
This handler MUST only be used on servers that are behind a reverse proxy, where the reverse proxy has been configured to always set these headers for EVERY request (or strip existing headers with these names if no SSL information is present). Otherwise it may be possible for a malicious client to spoof an SSL connection.
Class Name: io.undertow.server.handlers.SSLHeaderHandler
Name: ssl-headers
This handler has no parameters.
StuckThreadDetectionHandler
This handler detects requests that take a long time to process, which might indicate that the thread that is processing it is stuck.
Class Name: io.undertow.server.handlers.StuckThreadDetectionHandler
Name: stuck-thread-detector
| Name | Description |
|---|---|
| threshhold |
Integer value in seconds that determines the threshold for how long a request should take to process. Default value is |
URLDecodingHandler
A handler that will decode the URL and query parameters to the specified charset. If you are using this handler you must set the UndertowOptions.DECODE_URL parameter to false.
This is not as efficient as using the parser’s built in UTF-8 decoder. Unless you need to decode to something other than UTF-8 you should rely on the parsers decoding instead.
Class Name: io.undertow.server.handlers.URLDecodingHandler
Name: url-decoding
| Name | Description |
|---|---|
| charset | Charset to decode. This is the default parameter and it is required. |
A.2. Hibernate Properties
| Property Name | Value | Description |
|---|---|---|
|
|
| The class name of the JDBC driver to be used. |
|
| sa | The username |
|
| The password | |
|
|
| The JDBC connection url |
| Property Name | Description |
|---|---|
| hibernate.dialect |
The classname of a Hibernate
In most cases Hibernate will be able to choose the correct |
| hibernate.show_sql |
Boolean. Writes all SQL statements to console. This is an alternative to setting the log category |
| hibernate.format_sql | Boolean. Pretty print the SQL in the log and console. |
| hibernate.default_schema | Qualify unqualified table names with the given schema/tablespace in generated SQL. |
| hibernate.default_catalog | Qualifies unqualified table names with the given catalog in generated SQL. |
| hibernate.session_factory_name |
The org.hibernate.SessionFactory will be automatically bound to this name in JNDI after it has been created. For example, |
| hibernate.max_fetch_depth |
Sets a maximum depth for the outer join fetch tree for single-ended associations (one-to-one, many-to-one). A |
| hibernate.default_batch_fetch_size |
Sets a default size for Hibernate batch fetching of associations. The recommended values are |
| hibernate.default_entity_mode |
Sets a default mode for entity representation for all sessions opened from this |
| hibernate.order_updates | Boolean. Forces Hibernate to order SQL updates by the primary key value of the items being updated. This will result in fewer transaction deadlocks in highly concurrent systems. |
| hibernate.generate_statistics | Boolean. If enabled, Hibernate will collect statistics useful for performance tuning. |
| hibernate.use_identifier_rollback | Boolean. If enabled, generated identifier properties will be reset to default values when objects are deleted. |
| hibernate.use_sql_comments |
Boolean. If turned on, Hibernate will generate comments inside the SQL, for easier debugging. Default value is |
| hibernate.id.new_generator_mappings |
Boolean. This property is relevant when using @GeneratedValue. It indicates whether or not the new IdentifierGenerator implementations are used for javax.persistence.GenerationType.AUTO, javax.persistence.GenerationType.TABLE and javax.persistence.GenerationType.SEQUENCE. Default value is |
| hibernate.ejb.naming_strategy |
Chooses the org.hibernate.cfg.NamingStrategy implementation when using Hibernate EntityManager. If the application does not use EntityManager, follow the instructions here to configure the NamingStrategy: Hibernate Reference Documentation - Naming Strategies.
For an example on native bootstrapping using MetadataBuilder and applying the implicit naming strategy, see http://docs.jboss.org/hibernate/orm/5.0/userguide/html_single/Hibernate_User_Guide.html#bootstrap-native-metadata in the Hibernate 5.0 documentation. The physical naming strategy can be applied by using |
| hibernate.implicit_naming_strategy |
Specifies the
The default setting is defined by the |
| hibernate.physical_naming_strategy |
Pluggable strategy contract for applying physical naming rules for database object names. Specifies the PhysicalNamingStrategy class to be used. |
For hibernate.id.new_generator_mappings, new applications should keep the default value of true. Existing applications that used Hibernate 3.3.x may need to change it to false to continue using a sequence object or table based generator, and maintain backward compatibility.
| Property Name | Description |
|---|---|
| hibernate.jdbc.fetch_size |
A non-zero value that determines the JDBC fetch size (calls |
| hibernate.jdbc.batch_size |
A non-zero value enables use of JDBC2 batch updates by Hibernate. The recommended values are between |
| hibernate.jdbc.batch_versioned_data |
Boolean. Set this property to |
| hibernate.jdbc.factory_class | Select a custom org.hibernate.jdbc.Batcher. Most applications will not need this configuration property. |
| hibernate.jdbc.use_scrollable_resultset | Boolean. Enables use of JDBC2 scrollable resultsets by Hibernate. This property is only necessary when using user-supplied JDBC connections. Hibernate uses connection metadata otherwise. |
| hibernate.jdbc.use_streams_for_binary |
Boolean. This is a system-level property. Use streams when writing/reading |
| hibernate.jdbc.use_get_generated_keys |
Boolean. Enables use of JDBC3 |
| hibernate.connection.provider_class | The classname of a custom org.hibernate.connection.ConnectionProvider which provides JDBC connections to Hibernate. |
| hibernate.connection.isolation |
Sets the JDBC transaction isolation level. Check java.sql.Connection for meaningful values, but note that most databases do not support all isolation levels and some define additional, non-standard isolations. Standard values are |
| hibernate.connection.autocommit | Boolean. This property is not recommended for use. Enables autocommit for JDBC pooled connections. |
| hibernate.connection.release_mode |
Specifies when Hibernate should release JDBC connections. By default, a JDBC connection is held until the session is explicitly closed or disconnected. The default value auto will choose
Available values are auto (default), on_close,
This setting only affects Session returned from |
| hibernate.connection.<propertyName> |
Pass the JDBC property <propertyName> to |
| hibernate.jndi.<propertyName> |
Pass the property <propertyName> to the JNDI |
| Property Name | Description |
|---|---|
|
|
The classname of a custom |
|
| Boolean. Optimizes second-level cache operation to minimize writes, at the cost of more frequent reads. This setting is most useful for clustered caches and, in Hibernate3, is enabled by default for clustered cache implementations. |
|
| Boolean. Enables the query cache. Individual queries still have to be set cacheable. |
|
|
Boolean. Used to completely disable the second level cache, which is enabled by default for classes that specify a |
|
|
The classname of a custom |
|
| A prefix to use for second-level cache region names. |
|
| Boolean. Forces Hibernate to store data in the second-level cache in a more human-friendly format. |
|
|
Setting used to give the name of the default org.hibernate.annotations.CacheConcurrencyStrategy to use when either @Cacheable or @Cache is used. |
| Property Name | Description |
|---|---|
|
|
The classname of a |
|
|
A JNDI name used by |
|
|
The classname of a |
|
| Boolean. If enabled, the session will be automatically flushed during the before completion phase of the transaction. Built-in and automatic session context management is preferred. |
|
| Boolean. If enabled, the session will be automatically closed during the after completion phase of the transaction. Built-in and automatic session context management is preferred. |
| Property Name | Description |
|---|---|
|
|
Supply a custom strategy for the scoping of the "current" |
|
|
Chooses the HQL parser implementation: |
|
|
Used to map from tokens in Hibernate queries to SQL tokens (tokens might be function or literal names). For example, |
|
|
Automatically validates or exports schema DDL to the database when the |
|
|
Comma-separated names of the optional files containing SQL DML statements executed during the SessionFactory creation. This is useful for testing or demonstrating. For example, by adding INSERT statements, the database can be populated with a minimal set of data when it is deployed. An example value is
File order matters, as the statements of a given file are executed before the statements of the following files. These statements are only executed if the schema is created (i.e. if |
|
| The classname of a custom ImportSqlCommandExtractor. Defaults to the built-in SingleLineSqlCommandExtractor. This is useful for implementing a dedicated parser that extracts a single SQL statement from each import file. Hibernate also provides MultipleLinesSqlCommandExtractor, which supports instructions/comments and quoted strings spread over multiple lines (mandatory semicolon at the end of each statement). |
|
|
Boolean. This is a system-level property, which cannot be set in the |
|
|
Both javassist or cglib can be used as byte manipulation engines. The default is |
| RDBMS | Dialect |
|---|---|
| DB2 |
|
| DB2 AS/400 |
|
| DB2 OS390 |
|
| Firebird |
|
| FrontBase |
|
| H2 Database |
|
| HypersonicSQL |
|
| Informix |
|
| Ingres |
|
| Interbase |
|
| MariaDB 10 |
|
| Mckoi SQL |
|
| Microsoft SQL Server 2000 |
|
| Microsoft SQL Server 2005 |
|
| Microsoft SQL Server 2008 |
|
| Microsoft SQL Server 2012 |
|
| Microsoft SQL Server 2014 |
|
| MySQL5 |
|
| MySQL5.7 |
|
| MySQL5 with InnoDB |
|
| MySQL with MyISAM |
|
| Oracle (any version) |
|
| Oracle 9i |
|
| Oracle 10g |
|
| Oracle 11g |
|
| Oracle 12c |
|
| Pointbase |
|
| PostgreSQL |
|
| PostgreSQL 9.2 |
|
| PostgreSQL 9.3 |
|
| PostgreSQL 9.4 |
|
| Postgres Plus Advanced Server |
|
| Progress |
|
| SAP DB |
|
| Sybase |
|
| Sybase 15.7 |
|
| Sybase Anywhere |
|
The hibernate.dialect property should be set to the correct org.hibernate.dialect.Dialect subclass for the application database. If a dialect is specified, Hibernate will use sensible defaults for some of the other properties. This means that they do not have to be specified manually.
Revised on 2018-02-08 10:17:22 EST