Red Hat JBoss Enterprise Application Platform Installation Methods
Comprehensive instructions for installing and uninstalling Red Hat JBoss Enterprise Application Platform.
Abstract
Providing feedback on JBoss EAP documentation
To report an error or to improve our documentation, log in to your Red Hat Jira account and submit an issue. If you do not have a Red Hat Jira account, then you will be prompted to create an account.
Procedure
- Click the following link to create a ticket.
- Enter a brief description of the issue in the Summary.
- Provide a detailed description of the issue or enhancement in the Description. Include a URL to where the issue occurs in the documentation.
- Clicking Submit creates and routes the issue to the appropriate documentation team.
Making open source more inclusive
Red Hat is committed to replacing problematic language in our code, documentation, and web properties. We are beginning with these four terms: master, slave, blacklist, and whitelist. Because of the enormity of this endeavor, these changes will be implemented gradually over several upcoming releases. For more details, see our CTO Chris Wright’s message.
Chapter 1. JBoss EAP 8.0 installation methods
You can install JBoss EAP 8.0 using the following methods:
- Archive installation
- JBoss EAP Installation Manager
- GUI installer
- RPM installation
From JBoss EAP 8.0 onward, the JBoss EAP Installation Manager and Graphical (GUI) installer methods support both online and offline installation modes.
- Online installation: You can install JBoss EAP 8.x directly from an online repository. You must have access to the Red Hat repositories or their mirrors to use the online option. When using this mode, the resulting server will always be the latest available JBoss EAP 8.0 update.
- Offline installation: You can install JBoss EAP 8.x from a local file-system. Use the offline installation mode if you do not have access to the Red Hat repositories or their mirrors or want to install a specific JBoss EAP update. After the installation, you may need to perform an update step to use the latest version of JBoss EAP 8.x.
Depending on your requirements, choose the installation method. The following table provides a brief overview of each type of installation method.
| Method | Description | Online/offline options |
|---|---|---|
|
| |
|
| |
|
| |
|
|
You can run JBoss EAP on the following cloud platforms. This documentation does not cover provisioning on other cloud platforms. See the related documentation.
- JBoss EAP on OpenShift.
1.1. Understanding channels in JBoss EAP
The jboss-eap-installation-manager provides a streamlined and controlled pathway to access the most recent supported versions of JBoss EAP components. These streamlined and controlled pathways are called channels. A channel consists of a curated list of component versions (called channel manifest) and a collection of repositories used to resolve and retrieve those components. Each repository has a unique name (id) and a default Maven repository URL. The jboss-eap-installation-manager allows you to manage these channels effectively in both stand-alone and managed domain configurations.
Chapter 2. Installing JBoss EAP 8.0 using the jboss-eap-installation-manager
You can install JBoss EAP 8.0 by using one of the following installation methods:
-
The
jboss-eap-installation-managerinstallation method. - The GUI installer.
- The archive installation method.
- The RPM installation method.
This section only covers the jboss-eap-installation-manager installation method.
Prerequisites
- You have created an account on the Red Hat Customer Portal.
- You have reviewed JBoss EAP 8.0 supported configurations.
- You have installed a supported JDK.
- You have access to the internet.
2.1. Downloading the jboss-eap-installation-manager
Download the jboss-eap-installation-manager CLI tool from the Red Hat Customer Portal
Prerequisites
- You have access to the internet
- You have created an account on the Red Hat customer portal and are logged in.
Procedure
-
On the Red Hat customer portal, download the
jboss-eap-installation-manager.
Additional resources
2.2. Installing JBoss EAP using the jboss-eap-installation-manager
Install JBoss EAP by following the procedures below.
Prerequisites
- You have access to the internet
- You have created an account on the Red Hat customer portal and are logged in.
-
You have downloaded the
jboss-eap-installation-manager.
Procedure
-
Open your terminal emulator and navigate to the directory containing the downloaded
jboss-eap-installation-manager. Install JBoss EAP by running the following command:
Syntax
./jboss-eap-installation-manager.sh install --profile eap-8.0 --dir eap-8Example
./jboss-eap-installation-manager.sh install --profile eap-8.0 --dir eap-8
Installing profile: eap-8.0
Using channels:
# eap-8.0
  manifest: org.jboss.eap.channels:eap-8.0
  repositories:
    id: mrrc
    url: https://maven.repository.redhat.com/ga/
Review the end user license agreement, and follow the rest of the prompts to install JBoss EAP.
Accept the agreement(s) [y/N]y

Feature-packs resolved.
Packages installed.
Downloaded artifacts.
JBoss modules installed.
Configurations generated.
JBoss examples installed.
NOTE: The jboss-eap-installation-manager is also supported on Microsoft Windows. To use this script on a Windows machine, replace the .sh with .bat in your script.
Additional resources
2.3. Reverting JBoss EAP updates using the jboss-eap-installation-manager
After installing an update, you can revert back to a previously installed version of JBoss EAP.
Prerequisites
- You have access to the internet.
- You have created an account on the Red Hat customer portal and are logged in.
-
You have downloaded the
jboss-eap-installation-manager. - You have updated JBoss EAP.
Procedure
-
Navigate to the directory containing the
jboss-eap-installation-managerby using your terminal emulator. View the history of all versions of JBoss EAP, which you have installed:
./jboss-eap-installation-manager.sh history --dir eap-8NoteThis command displays all JBoss EAP installations and updates with their respective installation state ID.
Investigate specific changes made to JBoss EAP during an update:
./jboss-eap-installation-manager.sh history --dir eap-8 --revision <Installation state>This command displays specific JBoss EAP components that have been updated
Revert JBoss EAP by specifying the installation state of the JBoss EAP version in the following command:
Syntax
./jboss-eap-installation-manager.sh revert perform --dir eap-8 --revision <Installation state>ImportantYou must specify the installation state of the JBoss EAP version.
Example
./jboss-eap-installation-manager.sh revert perform --dir eap-8 --revision 6a6f55eb
Feature-packs resolved.
Packages installed.
Downloaded artifacts.
JBoss modules installed.
Configurations generated.
JBoss examples installed.

Reverted server prepared, comparing changes
No changes found
Follow the rest of the prompts to revert JBoss EAP updates.
Continue with revert [y/N]: y
Applying changes

Server reverted to state ea768519.
Operation completed in 55.39 seconds.
2.4. Installing JBoss EAP 8.0 Offline
You can install JBoss EAP 8.0 offline. By choosing this method, you can install from a local or file-system Maven repository.
Prerequisites
-
You have downloaded the
jboss-eap-installation-managerfrom the Red Hat Customer Portal. - You have downloaded Maven repository archive file from the Red Hat Customer Portal.
Procedure
- Extract the Maven repository archive file.
- Open your terminal emulator and navigate to the directory containing the extracted Maven repository file.
Install JBoss EAP by running the following command:
./jboss-eap-installation-manager.sh install --profile eap-8.0 --dir eap-8 --repositories file:maven-repository
2.5. Managing JBoss EAP installation channels
After successfully setting up JBoss EAP, you can change the channels to which your JBoss EAP installation is subscribed.
Prerequisite
-
You have downloaded the
jboss-eap-installation-managerfrom the Red Hat Customer Portal.
Procedure
Managing JBoss EAP installation channels
Investigate the channels your JBoss EAP installation is currently subscribed to by using the following command:
./jboss-eap-installation-manager.sh channel list --dir eap-8Subscribe your JBoss EAP installation to a new channel by using the following command:
./jboss-eap-installation-manager.sh channel add --channel-name <CHANNEL_NAME> --manifest <GROUP_ID:ARTIFACT_ID> --repositories <ID::REPOSITORY_URL> --dir eap-8unsubscribe your JBoss EAP installation from a channel using the following command:
./jboss-eap-installation-manager.sh channel remove --channel-name <CHANNEL_NAME> --dir eap-8Export a server snapshot by using the following command:
./jboss-eap-installation-manager.sh clone export --dir=<directory> --path=<target_archive>
Any modifications you have made to configuration files will not be exported.
Additional resources
Chapter 3. Installing JBoss EAP 8.0 by using the GUI installation program
You can use the JBoss EAP installer to install, configure, and uninstall a JBoss EAP instance on all supported platforms.
3.1. Downloading the JBoss EAP GUI installer
You can download the JBoss EAP 8.0 installer archive file from the Red Hat Customer Portal.
Prerequisites
- Set up an account on the Red Hat Customer Portal.
- Install a supported Java Development Kit (JDK).
Procedure
- Log in to the Red Hat Customer Portal.
- From the Product Downloads list, select Red Hat JBoss Enterprise Application Platform.
- Click Downloads.
- From the Version drop-down list, select 8.0.
Find the Red Hat JBoss Enterprise Application Platform 8.0 Installer file in the list, and then click Download.
3.2. Running the JBoss EAP graphical installation program
The graphical installer offers a convenient way to install, configure, and uninstall a JBoss EAP instance. You can also use the graphical installer to access many optional configuration parameters, which are described in the following section of this chapter.
Prerequisites
- You have set up an account on the Red Hat Customer Portal.
- You have installed a supported Java Development Kit (JDK).
- You have downloaded the JBoss EAP installation package.
Procedure
- Open a terminal instance and navigate to the directory containing the downloaded JBoss EAP installer file.
Run the graphical installer using the following command:
$ java -jar jboss-eap-8.0.0-installer.jar- Choose your preferred language for the installer, and then click OK.
- Agree with the prompt for The EULA for RED HAT JBOSS MIDDLEWARE by selecting "I accept the terms of this license agreement", and then click Next.
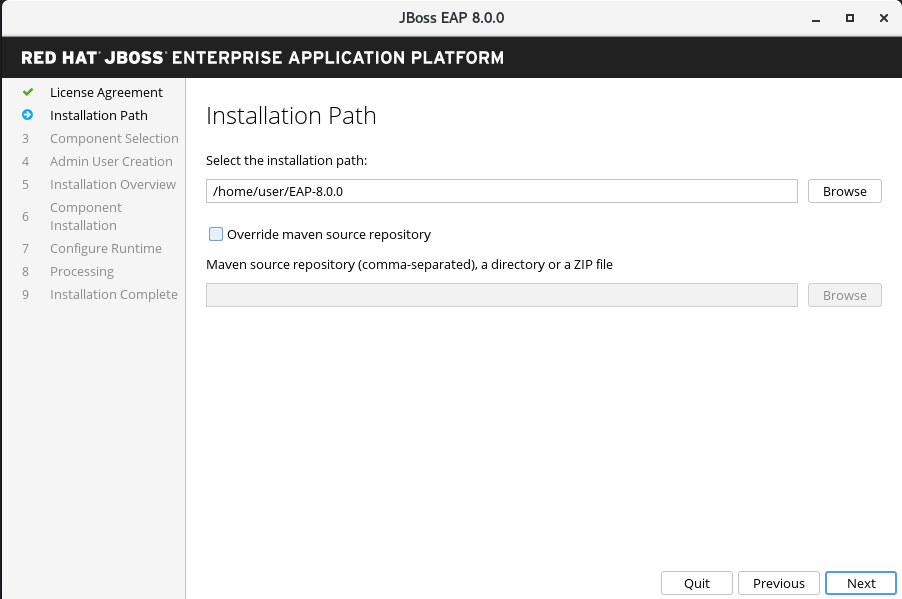
Select the installation path or choose a Maven source repository for JBoss EAP, and then click Next.
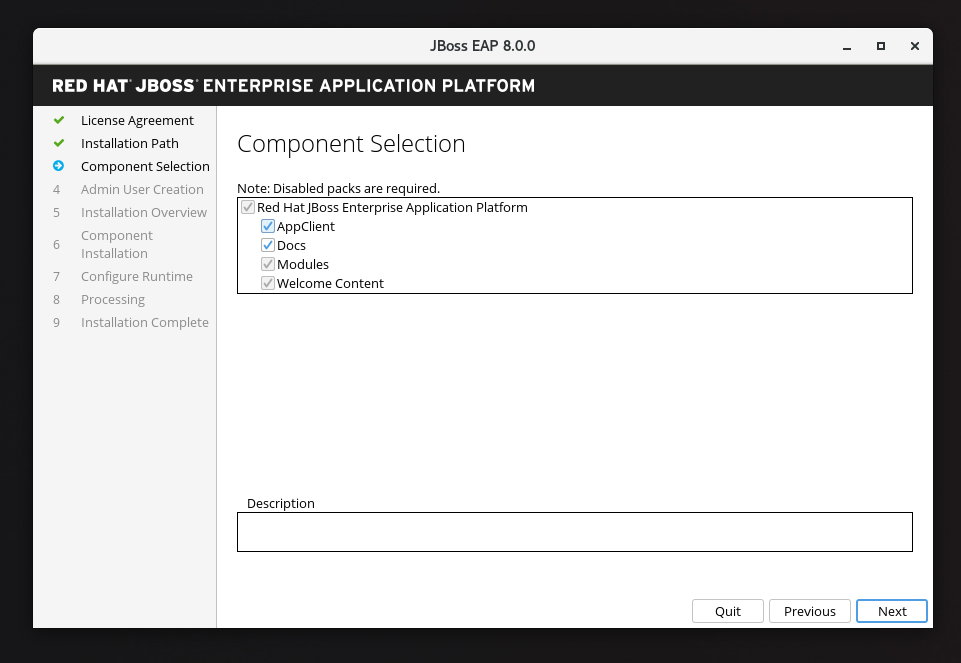
Select the components to install. Required components are disabled for deselection.
3.2.1. Configuring JBoss EAP GUI installation
3.2.1.1. Configuring the Credential Store
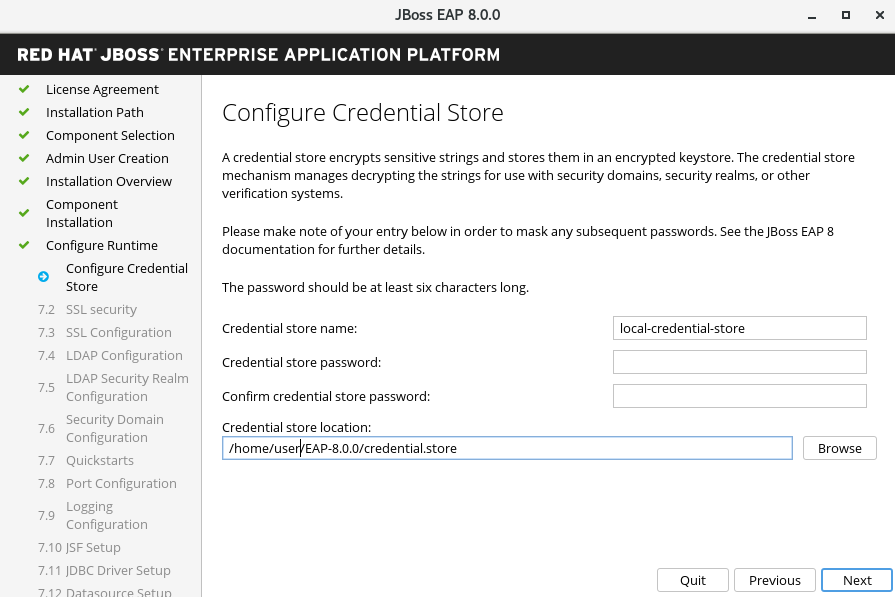
- Use the Configure Credential Store option to encrypt sensitive strings and store them in an encrypted keystore in your Runtimes environment.
Result
When you select this option, your specified keystore is used to store the passwords used in all other configuration screens that follow.
- Provide a password for the credential store and re-confirm it.
- Browse to or specify the path of the credential store, and then click Next.
3.2.1.2. SSL security for management interfaces
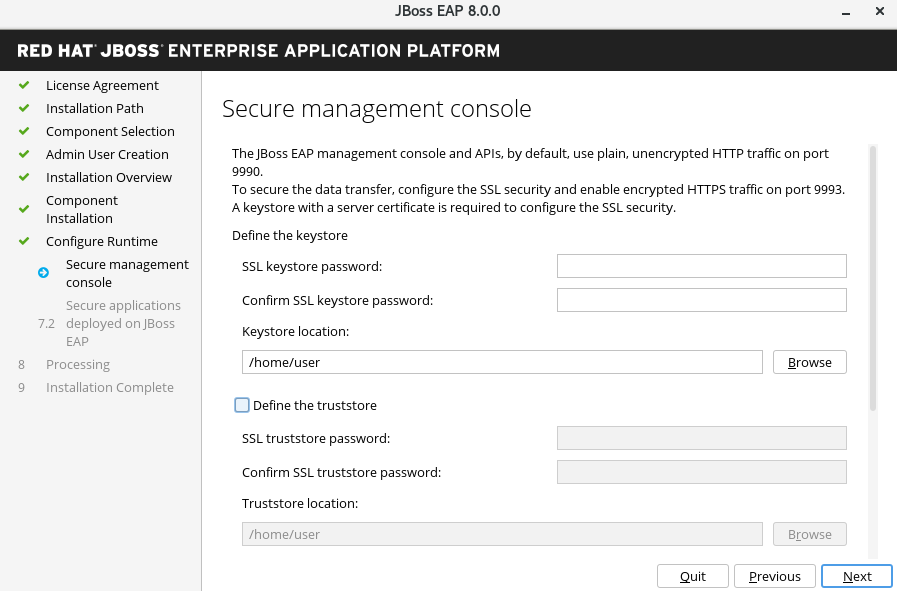
You can enable SSL security for management interfaces in the advanced configuration of the runtime environment by specifying the location of the keystore containing server certificate and the keystore password for securing the JBoss EAP management interfaces.
- Specify the location of the keystore and the password for securing the JBoss EAP management interfaces.
- When you have specified these values, click Next.
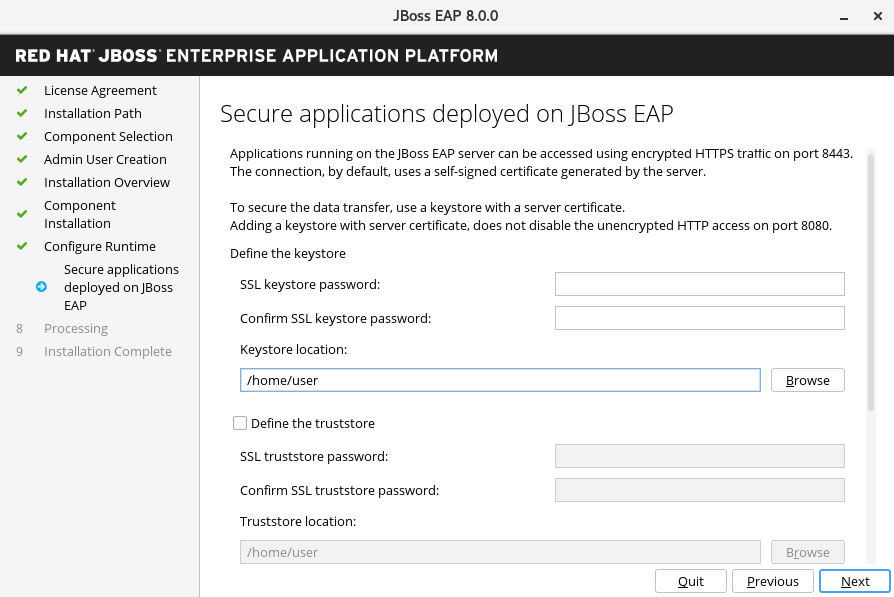
3.2.1.3. SSL security for application interfaces
You can enable SSL security for application interfaces in the advanced configuration of the runtime environment by specifying the location of the keystore containing server certificate and the keystore password for securing the JBoss EAP management interfaces.
- Specify the location of the keystore and the password for securing the JBoss EAP management interfaces.
- When you have specified these values, click Next.
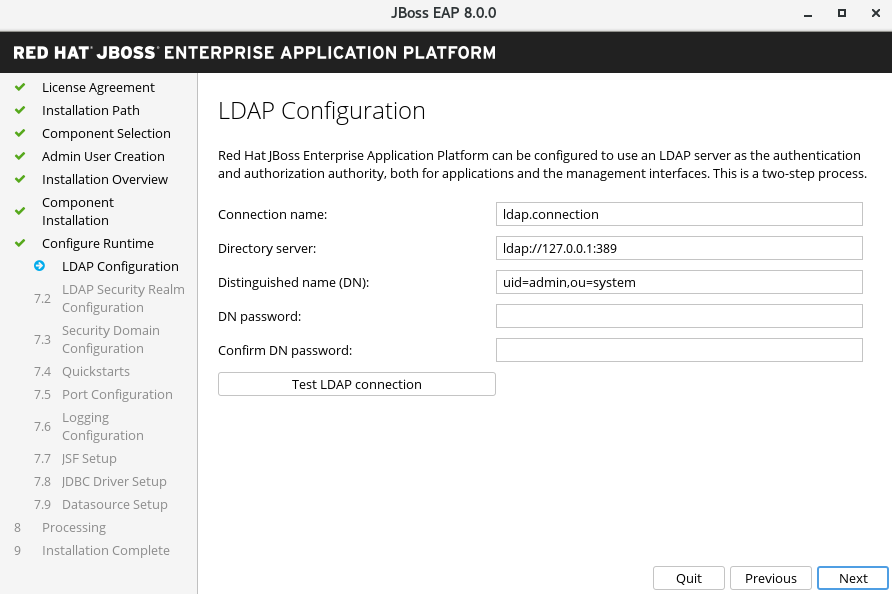
3.2.2. LDAP configuration
You can enable the LDAP server to be the authentication and authorization authority as follows: . Select Configure Runtime. .. Select Enable LDAP authentication. .. On the LDAP Configuration screen, complete the required configurations and click Next.
For more information, see the Securing the Management Interfaces with LDAP chapter of the "How to Configure Identity Management" guide.
3.2.2.1. Configuring the LDAP security realm
You can enable LDAP authentication in the advanced configuration of the runtime environment by using the LDAP connection that you defined in the previous step. Enabling LDAP authentication creates a new security realm and this realm becomes associated with the management interfaces.
- Specify the values for your LDAP Security Realm, and then click Next.
For more information, see Securing the Management Interfaces with LDAP in the "How to Configure Identity Management" guide.

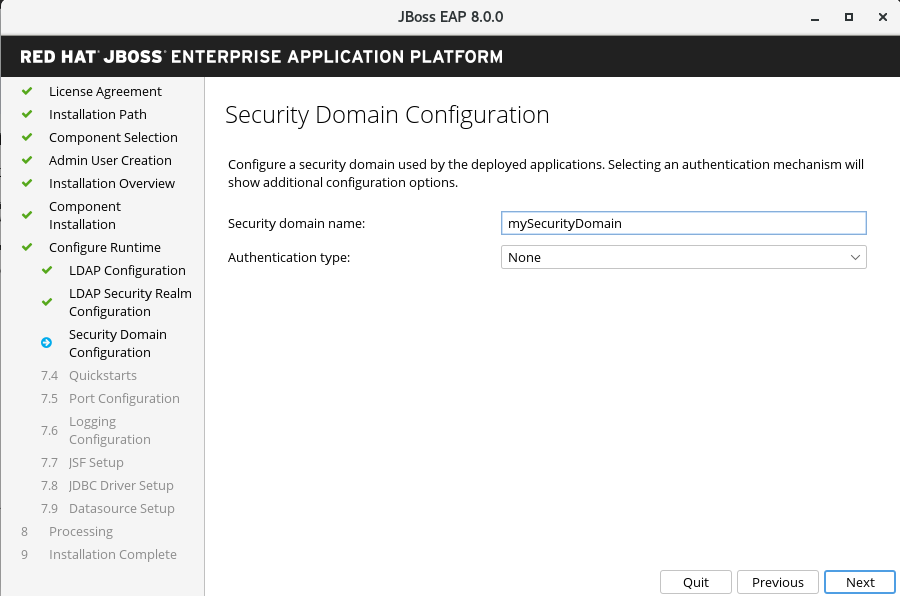
3.2.2.2. Configuring a security Domain
You can add a security domain in the advanced configuration of the Runtime environment by configuring a security domain for the JBoss EAP server instance.
- Enter a security domain name for your JBoss EAP server instance. This security domain can be used for authentication in your applications deployed on JBoss EAP server.
Select the authentication type.
NoteMost of the fields are already populated with default values that can be modified to suit the requirements.
- Click Next.
For more information, see the Security Domains chapter of the "Security Architecture" guide.
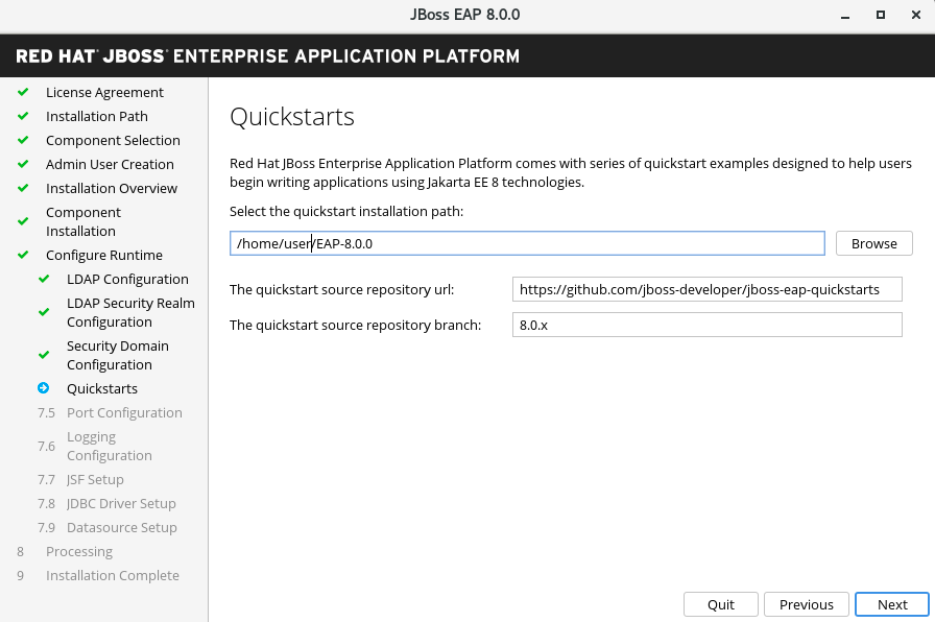
3.2.2.3. Quickstarts
- You can choose to install quickstarts in the advanced configuration of the runtime environment by selecting the quickstart installation path, and then clicking Next.
3.2.2.4. Setting up a Maven repository
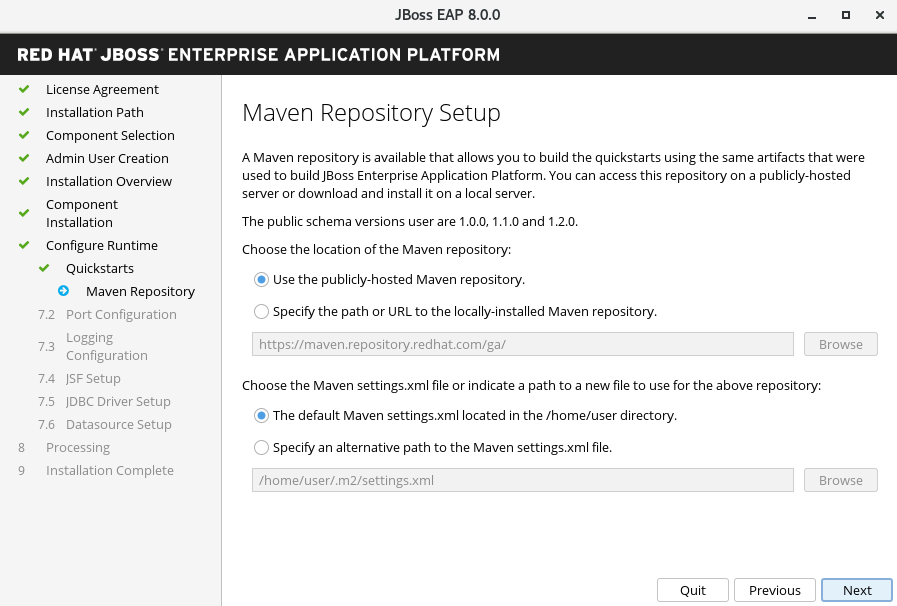
You can configure the Maven settings used to build the quickstarts in the advanced configuration.
- If your settings.xml file is not in the default location, specify the path.
- If you are using a Maven proxy, specify the Maven repository URL.
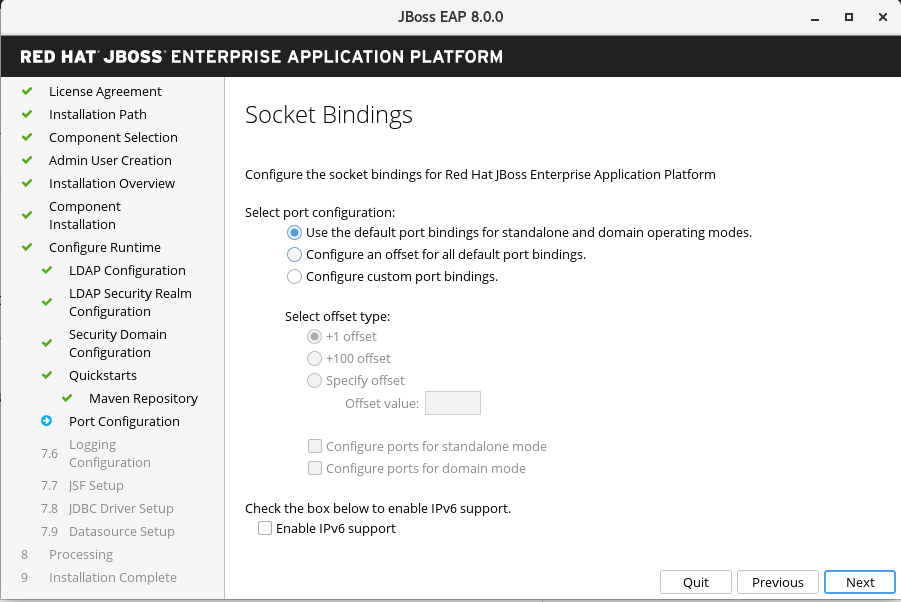
3.2.2.5. Socket bindings
During the installation of JBoss EAP 8.0, in the advanced configuration options, you can configure socket bindings by selecting one of the following items:
- Configure port offsets by choosing the offset type.
- Configure custom bindings by selecting whether to configure the ports for standalone mode, domain mode, or both.
If the host is configured for IPv6 only, select Enable pure IPv6 configuration.
After you have configured your socket binding, click Next.
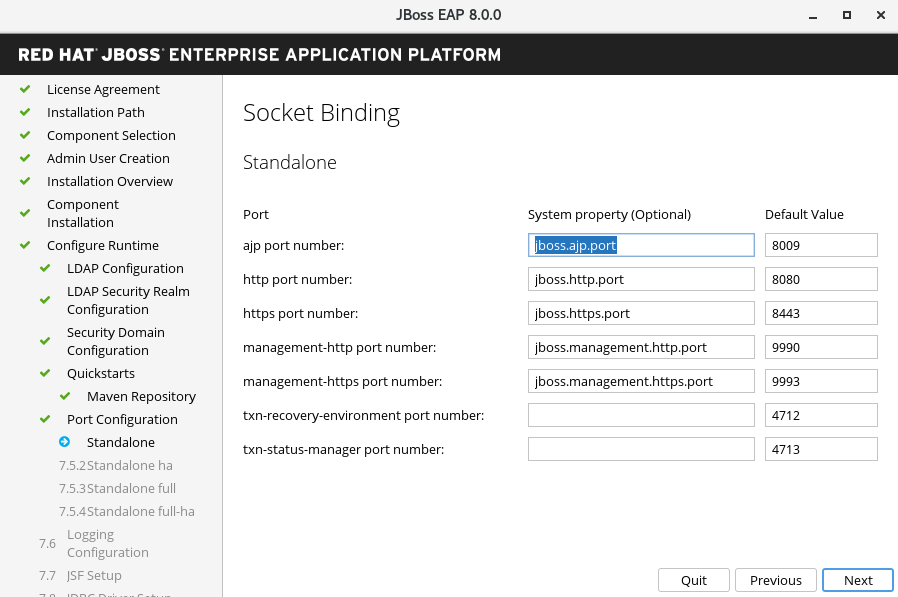
3.2.2.6. Configuring custom socket bindings for standalone mode configurations
Configure custom port bindings for standalone mode by setting the ports and system properties for each of the standalone configurations:
-
standalone, -
standalone ha, -
standalone full, -
standalone full-ha
-
then click Next.
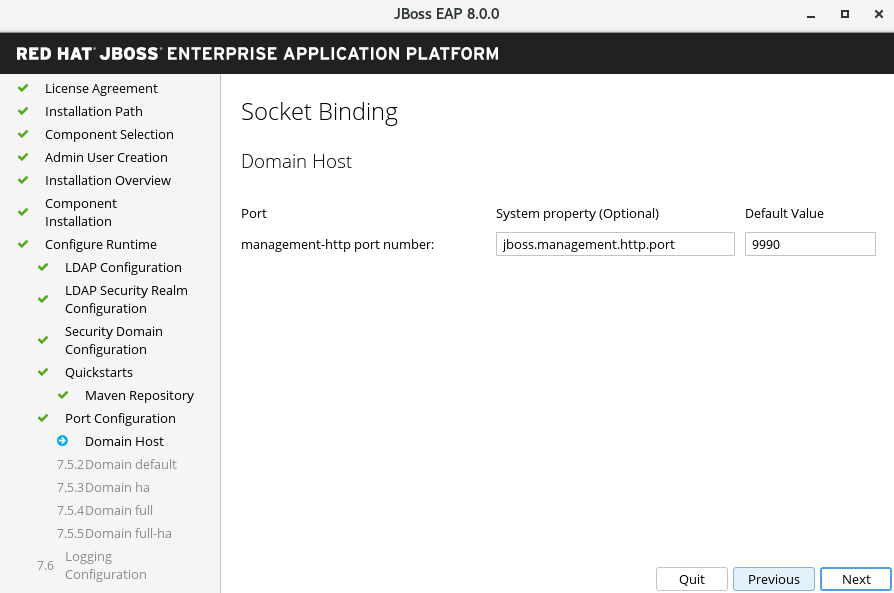
3.2.2.7. Configuring custom socket bindings for domain configurations
Configure custom port bindings for domain operating mode by setting the ports and system properties for the domain host configuration and each of the following domain profiles:
-
domain default -
domain ha -
domain full domain full-ha- Click Next.
-
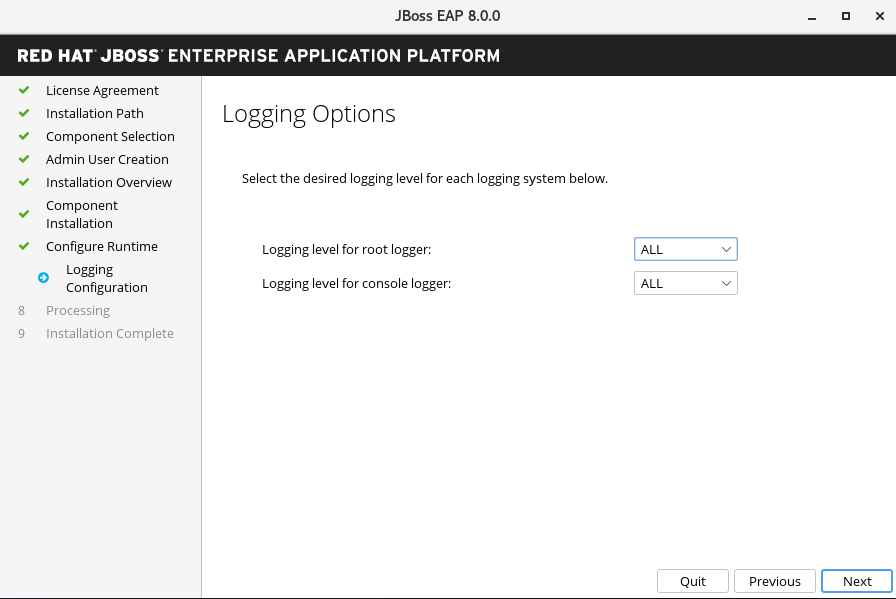
3.2.2.8. Logging options
You can configure logging levels in the advanced configuration settings of the runtime environment as follows:
- Select the desired logging levels for the root logger and the console logger.
- Click Next.
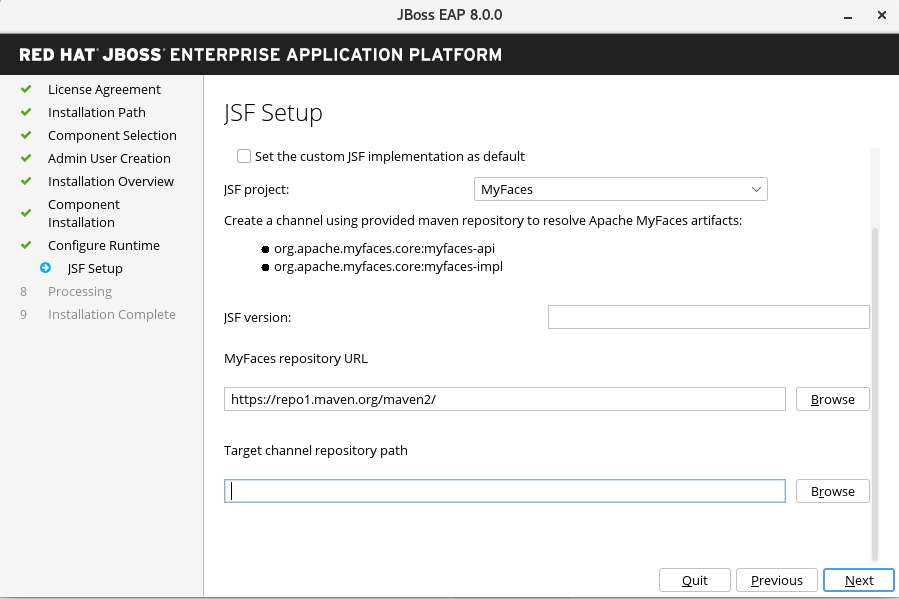
3.2.2.9. Setting up Jakarta Server Faces
You can install an alternative Jakarta Server Faces (JSF) implementation in the advanced configuration settings of the runtime environment, as follows:
- Configure the Jakarta Server Faces options and paths to your Jakarta Server Faces JARs.
- Click Next.
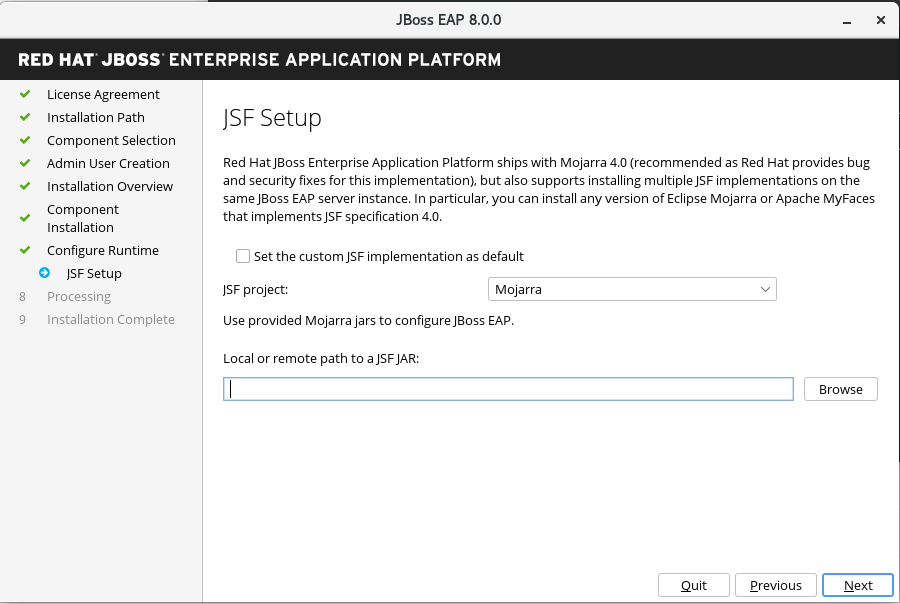
3.2.2.9.1. Custom Jakarta Server Faces Implementation
By default, JBoss EAP ships with Mojara 4.0.0. However, you can install a custom JSF implementation as follows:
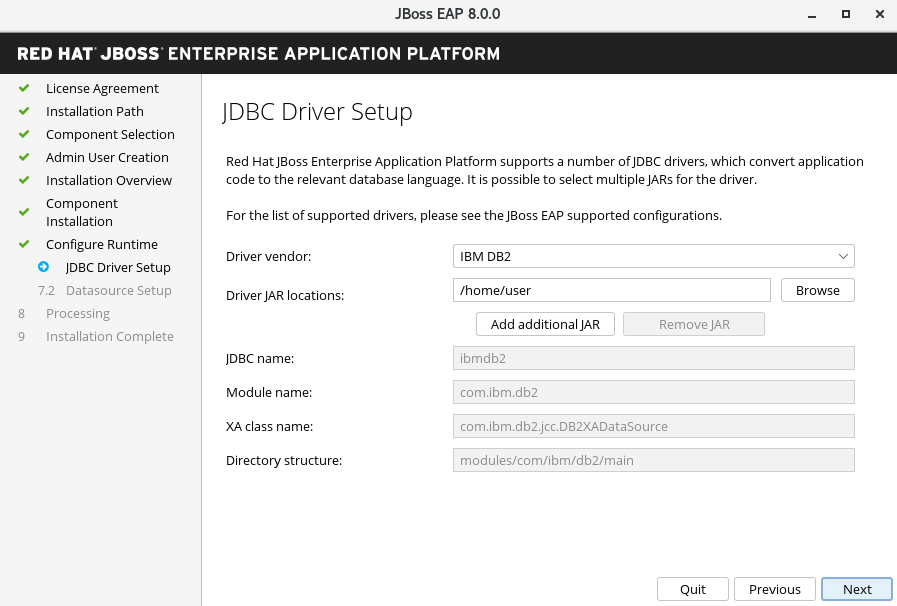
3.2.2.10. Setting up a JDBC driver
To install a JDBC driver, go to the advanced configuration settings of the runtime environment.
Choose the appropriate driver vendor from the list of options.
- Specify the driver’s JAR location(s).
- Click Next. For more information, see the datasource JDBC driver section in the Configuration Guide.
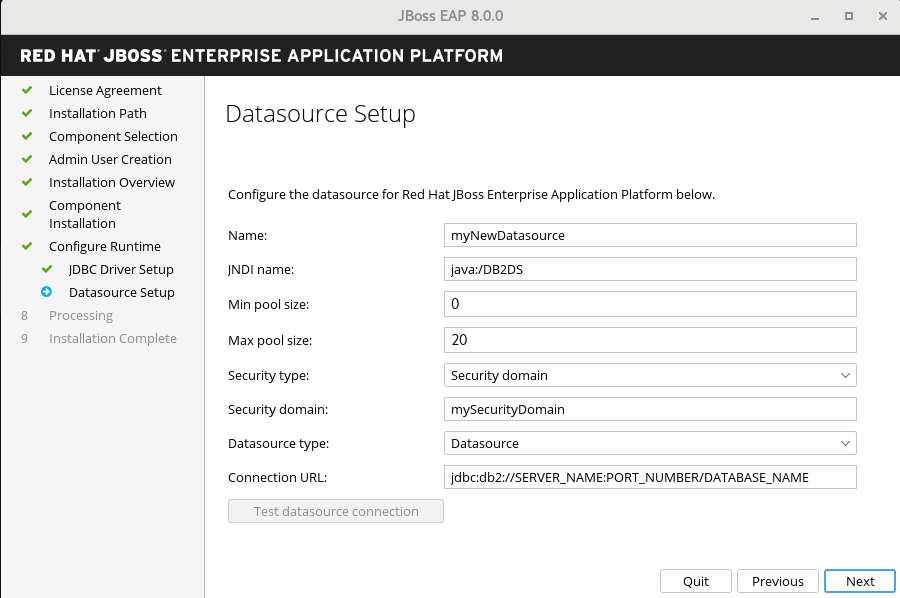
3.2.3. Configuring datasources
In the advanced configuration settings, you can configure a data source for JBoss EAP, also referred to as a datasource throughout the product. When you configure a datasource, specify the JDBC driver that you installed in the previous step.
- Provide a datasource name and configure the other options.
- Click Next.
For more information, see the details of datasource management in the Configuration Guide.
Optional: To save your installation options for future use in an automated installation of JBoss EAP, click Generate installation script and properties file before clicking Done.
Result
Your installation of JBoss EAP is now completed.
The top-level directory for the server that was created by the installation program is otherwise referred to as EAP_HOME.
3.3. Uninstalling JBoss EAP 8.0 by using the GUI
If you installed JBoss EAP 8.0 by using the graphical user interface (GUI), you can uninstall JBoss EAP by running the uninstaller.jar executable file in the EAP 8.0.0 directory.
Prerequisites
- You previously installed JBoss EAP 8.0 by using the GUI.
Procedure
-
Open a terminal and navigate to
EAP_HOME/Uninstaller. Run the graphical uninstaller using the following command:
$ java -jar uninstaller.jar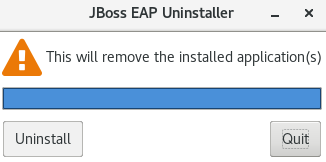
- When prompted, click Uninstall to start the uninstall process.
- When the uninstall process is finished, click Quit to exit the uninstaller.
Chapter 4. Adding Feature Packs to existing JBoss EAP Servers using the jboss-eap-installation-manager
You can use jboss-eap-installation-manager to install and update JBoss EAP. You can also install and update feature packs on your existing JBoss EAP servers using jboss-eap-installation-manager.
4.1. Prerequisites
- You have an account on the Red Hat Customer Portal and are logged in.
- You have reviewed the supported configurations for JBoss EAP 8.0.
- You have installed a supported JDK.
-
You have downloaded the
jboss-eap-installation-manager.
4.2. Adding Feature Packs to an existing JBoss EAP installation
You can install feature packs on existing JBoss EAP servers using jboss-eap-installation-manager.
Prerequisites
- You have installed JBoss EAP 8.0.
Procedure
-
Open your terminal emulator and navigate to the directory containing the downloaded
jboss-eap-installation-manager. Define the channels, that provide the feature packs, you want your JBoss EAP server subscribed to:
./jboss-eap-installation-manager.sh channel add \ --channel-name feature-pack-channel \ --repositories https://fp.repo.org/maven \ --manifest com.example:feature-pack- Create and subscribe your JBoss EAP installation to a channel providing additional artifacts. For more information see Creating and subscribing your JBoss EAP installation to a channel providing additional artifacts.
Select layers and configuration of the installed Feature Pack
The feature-pack add command is used to select which feature pack layer(s) need to be installed and which configuration files should be modified.
Provide the necessary layers for the installation.
$ ./jboss-eap-installation-manager.sh feature-pack add \
  --fpl com.example:feature-pack \
  --layers layer-one,layer-two \
  --dir jboss-eap8
Provide the necessary layers for the installation and choose the configuration file you want to modify.
$ ./jboss-eap-installation-manager.sh feature-pack add \ --fpl com.example:feature-pack \ --layers layer-one,layer-two \ --target-config standalone-ha.xml --dir jboss-eap8Note-
You can modify the default feature pack configuration file by using the
--target-configparameter. This parameter selects the configuration file in thestandalone/configurationfolder that will receive the changes. -
If you have changed the chosen configuration file before, the updates won’t overwrite it. Instead, the changes will be saved in a new file named with a
.glnewending. You’ll need to handle and merge any conflicts yourself. - The feature pack can only modify standalone configuration files and not files in a managed domain.
-
The supported values for the
--target-configparameter are the names of the configuration files provided by the base EAP8/XP5 servers. Additional feature packs should not provide additional configurations.
-
You can modify the default feature pack configuration file by using the
4.3. Adding feature packs to existing JBoss EAP servers
You can add additional feature packs when installing a JBoss EAP server with jboss-eap-installation-manager.
Prerequisites
- You have an account on the Red Hat Customer Portal and are logged in.
- You have reviewed the supported configurations for JBoss EAP 8.0.
- You have installed a supported JDK.
-
You have downloaded the
jboss-eap-installation-manager.
Procedure
-
Open the terminal emulator and navigate to the directory containing
jboss-eap-installation-manager. Create a
provisioning.xmlfile and define the feature packs you want to install:<?xml version="1.0" ?> <installation xmlns="urn:jboss:galleon:provisioning:3.0"> <feature-pack location="org.jboss.eap:wildfly-ee-galleon-pack:zip"> <packages> <include name="docs.examples.configs"/> </packages> </feature-pack> <feature-pack location="<FEATURE_PACK_GROUP_ID>:<FEATURE_ARTIFACT_ID>:zip"> <default-configs inherit="false"/> <packages inherit="false"/> </feature-pack> <config model="standalone" name="standalone.xml"> <layers> <include name="<FEATURE_PACK_LAYER>"/> </layers> </config> </installation>Create a
channels.yamlfile, and define the channels you want JBoss EAP subscribed to.schemaVersion: "2.0.0" name: "eap-8.0" repositories: - id: "mrrc" url: "file:/Users/spyrkob/workspaces/set/prospero/prod-prospero/jboss-eap-8.0.0.GA-maven-repository/maven-repository" manifest: maven: groupId: "org.jboss.eap.channels" artifactId: "eap-8.0" --- schemaVersion: "2.0.0" name: "feature-pack-channel" repositories: - id: "feature-pack-repository" url: "https://repository.example.com/feature-pack" manifest: maven: groupId: "com.example.channels" artifactId: "feature-pack"Install feature packs using the
--definitionand--channelparameters:./jboss-eap-installation-manager.sh install \ --definition provisioning.xml \ --channel channels.yaml \ --dir jboss-eap8 Installing galleon provisioning definition: provisioning.xml Using channels: # eap-8.0 manifest: org.jboss.eap.channels:eap-8.0 repositories: id: mrrc url: file:/tmp/jboss/jboss-eap-8.0.0.GA-maven-repository/maven-repository #feature-pack-channel manifest: com.example.channels:feature-pack repositories: id: feature-pack-repository url: https://repository.example.com/feature-pack =============== END USER LICENSE AGREEMENT RED HAT JBOSS® MIDDLEWARE™ =============== [...] =============== Accept the agreement(s) [y/N]y Feature-packs resolved. Packages installed. Downloaded artifacts. JBoss modules installed. Configurations generated. JBoss examples installed. Server created in /tmp/jboss/jboss-eap8 Operation completed in 16.30 seconds
4.4. Adding Feature Packs to JBoss EAP servers by using an offline repository
You can use the jboss-eap-installation-manager to add feature packs when installing a JBoss EAP from an offline repository.
Prerequisites
- You have downloaded the JBoss EAP 8.0 offline repository from the Red Hat Customer Portal.
- If required, you have the downloaded feature pack repository archive file from the Red Hat Customer Portal.
Downloading the feature pack offline repository is an optional prerequisite because some feature packs are already included in the JBoss EAP 8.0 offline repository.
Procedure
-
Open the terminal emulator and navigate to the directory containing
jboss-eap-installation-manager. Install the required feature pack into JBoss EAP and specify the offline repositories by using
--repositoriesparameter:$ ./jboss-eap-installation-manager.sh feature-pack add \ --fpl com.example:feature-pack \ --layers layer-one,layer-two \ --repositories file:/path/to/eap8/offline_repo,file:/path/to/feature_pack/offline_repo --dir jboss-eap8
4.5. Reverting installed feature packs
You can use the jboss-eap-installation-manager to revert a feature pack previously added to your JBoss EAP server:
Prerequisites
- You have added feature packs to your JBoss EAP server.
Procedure
-
Open the terminal emulator and navigate to the directory containing the downloaded
jboss-eap-installation-manager. Investigate the history of all feature packs added to your JBoss EAP server:
$ ./jboss-eap-installation-manager.sh history --dir jboss-eap-8.0 [79a553e7] 2023-08-23T13:39:10Z - feature_pack [org.jboss.eap.channels:eap-8.0::1.0.1.GA][com.example.channels:myfaces::1.0.0] [744013d2] 2023-08-23T13:38:16Z - config_change [928fe586] 2023-08-23T13:22:11Z - install [org.jboss.eap.channels:eap-8.0::1.0.1.GA]- Stop JBoss EAP server.
Revert your to a previous version.
$ ./jboss-eap-installation-manager.sh revert perform --revision 744013d2 --dir jboss-eap-8.0
Reverting server /tmp/jboss/jboss-eap-8.0 to state 744013d2

Feature-packs resolved.
Packages installed.
Downloaded artifacts.
JBoss modules installed.
Configurations generated.
JBoss examples installed.

Reverted server prepared, comparing changes
Changes found:
  org.jboss.eap:eap-myfaces-feature-pack                8.0.0.GA-redhat-20230816 ==>  []
  org.apache.myfaces.core:myfaces-api                   4.0.0                ==>  []
  org.jboss.eap:eap-myfaces-injection                   8.0.0.GA-redhat-20230816 ==>  []
  org.apache.myfaces.core:myfaces-impl                  4.0.0                ==>  []
Continue with revert [y/N]: y
Applying changes

Server reverted to state 977f97dd.
Operation completed in 51.17 seconds.
4.6. Creating and subscribing to channels when installing JBoss EAP to provide additional artifacts
Some feature packs require additional artifacts that are not supplied by Red Hat. You have to provide the required artifacts by defining custom channels. For example, the MyFaces feature pack requires the org.apache.myfaces.core:myfaces-impl and org.apache.myfaces.core:myfaces-api jar files. However, it is up to you to determine the precise versions of these jars.
The following procedure describes how to create a channel that provides additional artifacts for the MyFaces feature pack.
Prerequisite
- You have an account on the Red Hat Customer Portal and are logged in.
- You have reviewed the supported configurations for JBoss EAP 8.0.
- You have installed a supported JDK.
-
You have downloaded the
jboss-eap-installation-manager. - Your JBoss EAP installation has a feature pack installed on it.
Procedure
-
Open the terminal emulator and navigate to the directory containing
jboss-eap-installation-manager. Create a
manifest.yamlfile:schemaVersion: 1.0.0 name: MyFaces manifest file streams: - groupId: org.apache.myfaces.core artifactId: myfaces-impl version: 4.0.0 - groupId: org.apache.myfaces.core artifactId: myfaces-api version: 4.0.0Deploy the manifest to a local repository:
mvn deploy:deploy-file -Dfile=manifest.yaml \
  -DgroupId=com.example.channels -DartifactId=myfaces \
  -Dclassifier=manifest -Dpackaging=yaml -Dversion=1.0.0 \
  -Durl=file:/path/to/local/repository
Subscribe your JBoss EAP server to the new channel:
$ ./jboss-eap-installation-manager.sh channel add \
  --channel-name myfaces-channel \
  --repositories https://repo1.maven.org/maven2,file:/path/to/local/repository \
    --manifest com.example.channels:myfaces \
  --dir jboss-eap8
Chapter 5. Installing and uninstalling JBoss EAP using archive installation method
5.1. Downloading and installing JBoss EAP using archive installation method
You can download and install JBoss EAP using the archive installation method on Red Hat Enterprise Linux RHEL and on Microsoft Windows server.
Prerequisites
- You are on a supported operating system.
- You have set up an account on the Red Hat Customer Portal.
- You have Installed a supported Java Development Kit (JDK).
- You have reviewed the JBoss EAP 8 supported configurations and have ensured that your system is supported.
-
Microsoft Windows only: You have set the
JAVA_HOMEandPATHenvironment variables.
If you do not set up the environment variables the shortcuts will not work.
Procedure
- Log in to the Red Hat Customer Portal.
-
Click
Downloads -
Select
Red Hat JBoss Enterprise Application Platformfrom theProduct Downloadslist. -
In the
Versiondrop-down list, select8.0. -
Find
Red Hat JBoss Enterprise Application Platform8.0.0in the list and click the Download link. - Optional: Move the archive file to the server and location where you want to install JBoss EAP.
Depending on your operating system, choose one of the following options:
For Red Hat Enterprise Linux, extract the archive file by entering the following command in the management CLI:
$ unzip jboss-eap-8.0.0.zipFor Windows Server, right-click the archive file and select
Extract All.NoteEAP_HOMEis the top-level directory for the JBoss EAP installation. Create the directory by extracting the archive file.
Additional resources
- For more information about configuring your JBoss EAP server, see our configuration guide.
5.2. Uninstalling JBoss EAP archive installation
Depending on your work environment, the archive installation method might not meet the needs of your environment. You can remove the instance of JBoss EAP and any services associated with it. Thereafter, you can install JBoss EAP using a suitable installation method.
Prerequisites
- You have archived any modified configuration files and deployments that you can reuse at a later stage.
Procedure
- Delete the installation directory to uninstall JBoss EAP.
- Delete any scripts that depend on JBoss EAP being installed on your machine.
Chapter 6. Installing JBoss EAP by using the RPM installation method
You can install JBoss EAP by using RPM packages on supported installations of Red Hat Enterprise Linux 8, and Red Hat Enterprise Linux 9.
6.1. Subscribing to the JBoss EAP software repository
If you want to install JBoss EAP by using the RPM installation method, you must subscribe to the Red Hat Enterprise Linux Server base software repository, and a minor JBoss EAP repository.
Prerequisites
- You have set up an account on the Red Hat Customer Portal.
- Your JBoss EAP host is running on a supported operating system.
- You have subscribed to the Red Hat Enterprise Linux Server base software repository.
- You have administrator privileges on the server.
Procedure
Enter the Red Hat Subscription Manager.
ImportantTo subscribe to the Red Hat Enterprise Linux server base repository and a minor JBoss EAP repository, enter one of the following commands:
Replace
EAP_MINOR_VERSIONwith your intended JBoss EAP minor version. For example, 8.0.subscription-manager repos --enable=jb-eap-EAP_MINOR_VERSION-for-rhel-RHEL_VERSION-ARCH-rpms
6.2. Installing JBoss EAP by using the RPM installation method
Prerequisites
- You have set up an account on the Red Hat Customer Portal.
- Your JBoss EAP host is running on a supported operating system.
- You have administrator privileges on the server.
- You have subscribed to the Red Hat Enterprise Linux Server base software repository.
- You have subscribed to the JBoss EAP8 software repository.
Procedure
Install JBoss EAP and JDK 17.
dnf groupinstall jboss-eap8Install JBoss EAP and JDK 11. JDK 11 is available for Red Hat Enterprise Linux 8 and later:
Red Hat Enterprise Linux 8:
dnf groupinstall jboss-eap8-jdk11
If the specified version of the JDK is not already installed on the system, the groupinstall command automatically installs this version of the JDK. If a different version of the JDK is already installed, the system contains multiple installed JDK versions after you run the preceding command.
If multiple JDK versions are installed on your system after you run the groupinstall command, check which JDK version JBoss EAP is using. By default, JBoss EAP uses the system default JDK.
Modify the default JDK in either of the following ways:
Change system wide configuration by using the alternatives command:
alternatives --config java-
Change the JDK that uses JBoss EAP by using the
JAVA_HOMEproperty. Your installation is complete. The defaultEAP_HOMEpath for the RPM installation is/opt/rh/eap8/root/usr/share/wildfly.
When you install JBoss EAP by using RPM packages, you cannot configure multiple domain or host controllers on the same machine.
6.3. Configuring JBoss EAP RPM installation as a service on RHEL
You can configure the Red Hat Packet Manager (RPM) installation to run as a service in Red Hat Enterprise Linux (RHEL). An RPM installation of JBoss EAP installs everything that is required to run JBoss EAP as a service
Run the appropriate command for your RHEL, as demonstrated in this procedure. Replace EAP_SERVICE_NAME with either eap8-standalone for a standalone JBoss EAP server, or eap8-domain for a managed domain.
Prerequisites
- You have installed JBoss EAP as an RPM installation.
- You have administrator privileges on the server.
Procedure
For Red Hat Enterprise Linux 8 and later:
systemctl enable EAP_SERVICE_NAME.service
6.4. Changing the software subscription from one JBoss EAP repository to another
You can change the software subscription from one JBoss EAP repository to another based on the following conditions:
- If you are changing to the next minor JBoss EAP version, you can change from a minor repository to another minor repository. For example, you can change from JBoss EAP 8.0 to JBoss EAP 8.1, but you cannot change from JBoss EAP 8.0 to JBoss EAP 8.2.
Prerequisites
- You have installed JBoss EAP by using the RPM installation method.
- You have chosen a repository.
- You have applied all the applicable updates to your JBoss EAP application.
- You have administrator privileges on the server.
Procedure
Unsubscribe from the existing repository and subscribe to the new repository by using the Red Hat Subscription Manager.
subscription-manager repos --disable=EXISTING_REPOSITORY --enable=NEW_REPOSITORY
6.5. Uninstalling JBoss EAP using the RPM installation method
To avoid potential issues, do not uninstall a JBoss EAP installation that you have installed from RPM packages.
Because of the nature of RPM package management, uninstalling JBoss EAP might not completely remove all installed packages and dependencies. Uninstalling JBoss EAP might also leave the system in an inconsistent state because of missing package dependencies.
Chapter 7. Running and removing JBoss EAP as a service on RHEL
7.1. Running JBoss EAP as a service on RHEL
You can configure JBoss EAP to run as a service in Red Hat Enterprise Linux RHEL. This enables the JBoss EAP service to start automatically when the RHEL server starts.
Prerequisites
- You have downloaded and Installed JBoss EAP.
-
You have set the
JAVA_HOMEsystem environment variable. - You have administrator privileges on the server.
Procedure
-
Configure the start-up options in the
jboss-eap.conffile by opening thejboss-eap.confin a text editor and set the options for your JBoss EAP installation. Copy the service initialization and configuration files into the system directories:
Copy the modified service configuration file to the
/etc/defaultdirectory.NoteThe commands in this procedure require root privileges to run. Either run
su- to switch to the root user or preface the commands withsudo.$ sudo cp EAP_HOME/bin/init.d/jboss-eap.conf /etc/defaultCopy the service startup script to the
/etc/init.ddirectory and give it execute permissions:$ sudo cp EAP_HOME/bin/init.d/jboss-eap-rhel.sh /etc/init.d $ sudo chmod +x /etc/init.d/jboss-eap-rhel.sh $ sudo restorecon /etc/init.d/jboss-eap-rhel.sh
Add the new
jboss-eap-rhel.shservice to the list of automatically started services using thechkconfigservice management command:$ sudo chkconfig --add jboss-eap-rhel.shVerify that the service has been installed correctly by using the following command:
$ sudo systemctl start jboss-eap-rhelOptional: To make the service start automatically when the RHEL server starts, run the following command:
$ sudo chkconfig jboss-eap-rhel.sh on
Verification
-
To check the permissions of a file, enter the
ls -lcommand in the directory containing the file. To check that the automatic service start is enabled, enter the following command:
$ sudo chkconfig --list jboss-eap-rhel.sh
Additional resources
- For more information about controlling the state of services, see Management system services in the JBoss EAP Configuring basic system settings guide.
- For more information about viewing error logs, see Bootup logging in the JBoss EAP Configuration Guide.
7.2. Removing JBoss EAP service on RHEL
You can remove an instance of JBoss EAP and any services associated with it. After you remove these components, you can install JBoss EAP by using a suitable installation method.
Prerequisites
- You have JBoss EAP installed.
Procedure
When the service is running, open a terminal and stop the service with one of the following command:
$ sudo service jboss-eap-rhel.sh stopNoteThe commands in this procedure require root privileges to run. Either run
su- to switch to the root user or preface the commands withsudo.Remove JBoss EAP from the list of services:
$ sudo chkconfig --del jboss-eap-rhel.shDelete the configuration file and startup script:
$ sudo rm /etc/init.d/jboss-eap-rhel.sh
$ sudo rm /etc/default/jboss-eap.conf
Chapter 8. Running and removing JBoss EAP as a service on Microsoft Windows Server
8.1. Running JBoss EAP archive installation as a service on Microsoft Windows Server
You can install JBoss EAP on Microsoft Windows Server by using the archive installation method. This method provides a basic default installation of a server, with configuration files and libraries placed in standard folders. The default installation of the server contains a service.bat script that you can use with Jsvc to stop and start JBoss EAP.
Prerequisites
- You have installed JBoss EAP.
- You have administrator privileges on the server.
-
You have set the
JAVA_HOMEsystem environment variable.
Procedure
Install the JBoss Core Services Jsvc Package.
If not already configured, download and extract the JBoss Core Services Jsvc package.
- Open a browser and log in to the Red Hat Customer Portal JBoss Software Downloads page.
- Select Apache Jsvc in the Product drop-down menu.
- Select the latest version from the Version drop-down menu.
- Find Red Hat JBoss Core Services Apache Jsvc in the list, ensuring that you select the correct platform and architecture for your system, and click the Download link.
- Extract the downloaded archive file into the directory containing your JBoss EAP installation directory.
This results in a
jbcs-jsvc-<VERSION>`directory at the same level as your JBoss EAP installation directory. For example:C:\Program Files ├── jboss-eap-8.0 │ ├── bin │ └── ... └── jbcs-jsvc-<VERSION>
Install the service.
Open a terminal, and change directories to
EAP_HOME\bin.Below are examples of a basic
service.bat installcommand to create a new service for either a standalone server, or a server in a managed domain. For a list of all possible options, runservice.batwithout any arguments.ImportantIf you specify the
/jbossuserand/jbosspassparameters, you must ensure that your JBoss EAP user’s password does not contain a hash (#) or a semicolon (;).
Adjust the log level for the service as required:
For a standalone server:
service.bat install /loglevel INFOFor a server in a managed domain:
Use the
/hostparameter to specify the name of the JBoss EAP host controller that is managed by the service. To list valid values for the name by executingls /hostin the management CLI.Replace
EAP_HOST_NAMEin the command below with your JBoss EAP host controller name. If you specify the`/hostparameter without providing a JBoss EAP host controller name, the name defaults tomaster.service.bat install /host EAP_HOST_NAME /loglevel INFOA new Windows service will be created with name
JBossEAP8.
Verify the new
Servicein the Services console.Open the Windows Services console (
services.msc) and verify that the service was created.If the default service name was used, in the list of Windows services the new service will have the display name:
JBossEAP8. From the Services console you can start and stop the service, as well change its settings of how and when it starts.
Starting and stopping the JBoss EAP Service from a Terminal.
To start the service from a terminal, use the following command, changing the service name if necessary:
net start JBossEAP8To stop the service from a terminal, use the following command, changing the service name if necessary:
net stop JBossEAP8
Additional resources
- To learn more about how to set environment variables on a Microsoft Windows Server, refer to the Microsoft Windows documentation.
8.2. Configuring JBoss EAP archive installation as a service on Microsoft Windows Server
You can install JBoss EAP on Microsoft Windows Server using the archive installation method. This method provides a basic default installation of a server, with configuration files and libraries placed in standard folders.
If you use the set command to set system environment variables in a Windows Server command prompt, it does not permanently set the environment variables. You must use either the setx command, or the System interface in the Control Panel.
Prerequisites
- You have installed JBoss EAP.
- You have administrator privileges on the server.
-
You have set the
JAVA_HOMEsystem environment variable. - You have verified that the JBoss EAP server instance is not running.
Procedure
Use the
setxcommand to configure the two environment variables:-
Set the path for the
JBOSS_HOMEvariable to the JBoss EAP installation directory. -
The
jboss-cli.batscript contains the"x%NOPAUSE%" == "x" pauseline of code. This code creates a status message when you issue the pause command. To disable these messages, you must specify a value for theNOPAUSEvariable. For example, setting theNOPAUSEvariable toNOPAUSE=truedisables status messages from appearing when a script completes.
-
Set the path for the
-
Use the
setxcommand to create two system environment variables:JBOSS_HOMEandNOPAUSE.
8.3. Removing JBoss EAP service on Microsoft Windows Server
You can remove an instance of JBoss EAP and any services associated with it. Thereafter, you can install JBoss EAP by using a suitable installation method.
Prerequisites
- You have JBoss EAP installed.
Procedure
When the service is running, open the command prompt and stop the service by entering the
netstop command with the name of the service:net stop JBossEAP8At a command prompt, change directories to
EAP_HOME\binand execute the following command:service.bat uninstall