Windup Rules Development Guide
Create Custom Rules for Windup
Abstract
Chapter 1. Introduction
This guide is for engineers, consultants, and others who plan to create custom XML-based rules for Windup.
If you are new to Windup, it is recommended that you start with the Windup User Guide. It provides detailed information about system requirements and detailed instructions on how to install and execute Windup. It also contains tips to optimize performance and provides links to other sources of information about Windup.
If you would like to contribute to the Windup source code base or provide Java-based rule add-ons, see the Windup Wiki.
Chapter 2. Getting Started
2.1. Create Your First XML Rule
This section guides you through the process of creating and testing your first Windup XML-based rule. This assumes that you have already installed Windup. See the Windup User Guide for installation instructions.
In this example, you will write a rule to discover instances where an application defines a jboss-web.xml file containing a <class-loading> element and provide a link to the documentation that describes how to migrate the code.
Create the Directory Structure for the Rule
Create a directory structure to contain your first rule and the data file to use for testing.
mkdir -p /home/USER_NAME/migration-rules/rules
mkdir -p /home/USER_NAME/migration-rules/data
$ mkdir -p /home/USER_NAME/migration-rules/rules
$ mkdir -p /home/USER_NAME/migration-rules/dataThis directory structure will also be used to hold the generated Windup reports.
Create Data to Test the Rule
-
Use your favorite editor or IDE to create a
jboss-web.xmlfile in the/home/USER_NAME/migration-rules/data/subdirectory. Copy in the following content.
Copy to Clipboard Copied! Toggle word wrap Toggle overflow
Create the Rule
Windup XML-based rules use the following rule pattern:
when(condition)
  perform(action)
otherwise(action)
when(condition)
  perform(action)
otherwise(action)Ruleset and rule XML elements are covered in more detail in the XML Rule Structure section. See Create a Basic XML Rule for additional details about creating XML rules with example syntax.
Use your favorite editor or IDE to create an XML file in the
/home/USER_NAME/migration-rules/rules/subdirectory namedJBoss5-web-class-loading.windup.xml. Copy in the following content.Copy to Clipboard Copied! Toggle word wrap Toggle overflow NoteWindup identifies files with the
.windup.xmlextension as XML-based rules, so be sure to use this naming convention, otherwise the rule will not be evaluated!Add the unique identifier for the ruleset and rule.
-
Replace the
UNIQUE_RULESET_IDwith an appropriate ruleset ID, for example,JBoss5-web-class-loading. -
Replace the
UNIQUE_RULE_IDwith an appropriate rule ID, for example,JBoss5-web-class-loading_001.
-
Replace the
Add the following ruleset addon dependencies.
<dependencies>
  <addon id="org.jboss.windup.rules,windup-rules-javaee,2.7.0.Final"/>
  <addon id="org.jboss.windup.rules,windup-rules-java,2.7.0.Final"/>
</dependencies>
<dependencies>
  <addon id="org.jboss.windup.rules,windup-rules-javaee,2.7.0.Final"/>
  <addon id="org.jboss.windup.rules,windup-rules-java,2.7.0.Final"/>
</dependencies>
Copy to Clipboard Copied! Toggle word wrap Toggle overflow Add the source and target technologies.
-
Replace
SOURCE_IDwitheap. -
Replace
TARGET_IDwitheap.
-
Replace
Set the source and target technology versions.
-
Replace
SOURCE_VERSION_RANGEwith(4,5). -
Replace
TARGET_VERSION_RANGEwith[6,).
See the Apache Maven version range specification for help with this syntax.
-
Replace
Complete the
whencondition.Because this rule tests for a match in an XML file,
xmlfileis used to evaluate the files.To match on the
class-loadingelement that is a child ofjboss-web, use the xpath expressionjboss-web/class-loading.<when> <xmlfile matches="jboss-web/class-loading" /> </when><when> <xmlfile matches="jboss-web/class-loading" /> </when>Copy to Clipboard Copied! Toggle word wrap Toggle overflow Complete the
performaction for this rule.-
Add a classification with a descriptive title and a level of effort of
1. Provide a hint with an informative message and a link to documentation that describes the migration details.
Copy to Clipboard Copied! Toggle word wrap Toggle overflow
-
Add a classification with a descriptive title and a level of effort of
The rule is now complete and should look like the following example.
Install the Rule
A Windup rule is installed simply by placing the rule into the appropriate directory. See Add the Rule to Windup for the possible locations to place a custom rule.
Copy the JBoss5-web-class-loading.windup.xml file to the WINDUP_HOME/rules directory.
cp /home/USER_NAME/migration-rules/rules/JBoss5-web-class-loading.windup.xml WINDUP_HOME/rules/
$ cp /home/USER_NAME/migration-rules/rules/JBoss5-web-class-loading.windup.xml WINDUP_HOME/rules/Test the Rule
Open a terminal and execute the following command, passing the test file as an input argument and a directory for the output report.
WINDUP_HOME/bin/windup --sourceMode --input /home/USER_NAME/migration-rules/data --output /home/USER_NAME/migration-rules/reports --target eap:6
$ WINDUP_HOME/bin/windup --sourceMode --input /home/USER_NAME/migration-rules/data --output /home/USER_NAME/migration-rules/reports --target eap:6You should see the following result.
Windup report created: /home/USER_NAME/migration-rules/reports/index.html
              Access it at this URL: file:///home/USER_NAME/migration-rules/reports/index.html
Windup report created: /home/USER_NAME/migration-rules/reports/index.html
Access it at this URL: file:///home/USER_NAME/migration-rules/reports/index.htmlReview the Reports
Review the report to be sure that it provides the expected results. For a more detailed walkthrough of Windup reports, see the Review the Reports section of the Windup User Guide.
-
Open
/home/USER_NAME/migration-rules/reports/index.htmlin a web browser. Verify that the rule executed.
-
From the main landing page, click the
Executed rules overviewlink to open the Rule Provider Executions report. Find the
JBoss5-web-class-loading_001rule and verify that its Status? isCondition metand its Result? issuccess.Figure 2.1. Test Rule Execution
-
From the main landing page, click the
Verify that the rule matched on the test data.
-
From the main landing page, click on the name of the application or input folder, which is
datain this example. - Click on the Application Details report link.
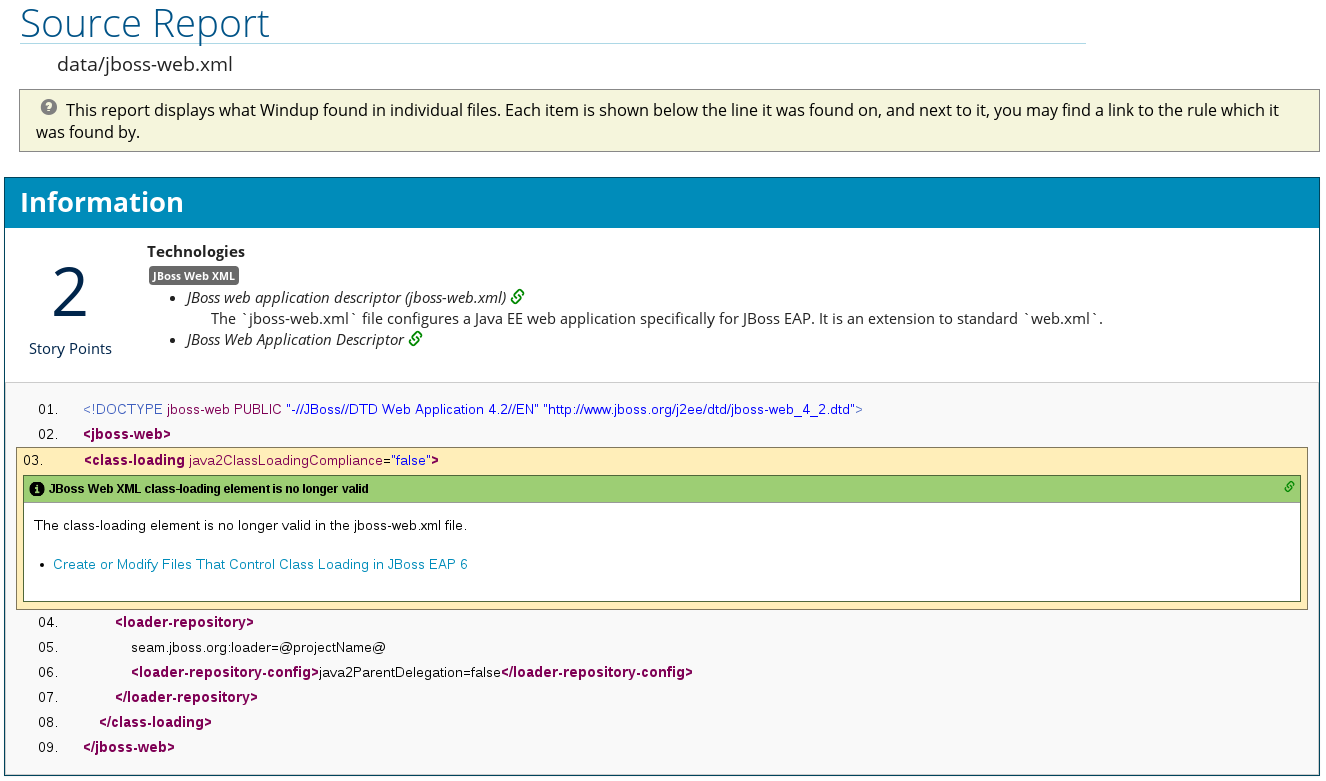
Click on the jboss-web.xml link to view the Source Report.
You can see that the
<class-loading>line is highlighted, and the hint from the custom rule is shown inline.Figure 2.2. Rule Match
The top of the file lists the classifications for matching rules. You can use the link icon to view the details for that rule. Notice that in this example, the
jboss-web.xmlfile matched on another rule (JBoss web application descriptor (jboss-web.xml)) that produced1story point. This, combined with the1story point from our custom rule, brings the total story points for this file to2.
-
From the main landing page, click on the name of the application or input folder, which is

Chapter 3. Creating XML Rules
3.1. XML Rule Structure
This section describes the basic structure of XML rules. All XML rules are defined as elements within rulesets.
3.1.1. Rulesets
A ruleset is a group of one or more rules that targets a specific area of migration. This is the basic structure of the <ruleset> element.
<ruleset id="UNIQUE_RULESET_ID">: Defines this as a Windup ruleset and gives it a unique ruleset ID.
<metadata>: The metadata about the ruleset.
- <description>: The description of the ruleset.
- <dependencies/>: The rule add-ons required by this ruleset.
- <sourceTechnology/>: The source technology.
- <targetTechnology/>: The target technology.
-
<overrideRules>true|false</overrideRules>: Indicates that rules in this ruleset override rules with the same ID from the core ruleset distributed with Windup. Both the ruleset id and the rule id must match a rule within the core ruleset or the rule will be ignored. This is
falseby default.
<rules>: Contains the individual rules.
<rule id="UNIQUE_RULE_ID">: Defines the rule and gives it a unique ID. It is recommended to include the ruleset ID as part of the rule ID, for example,
UNIQUE_RULESET_ID_UNIQUE_RULE_ID. One or more rules can be defined for a ruleset.-
<when>: The conditions to match on. For a detailed description of the elements allowed in a
<when>, see When Condition Syntax. -
<perform>: The action to be performed when the rule condition is matched. For a detailed description of the elements allowed in a
<perform>, see Perform Action Syntax. -
<otherwise>: The action to be performed when the rule condition is not matched. This element takes the same child elements as the
<perform>element. - <where>: A string pattern defined as a parameter, which can be used elsewhere in the rule definition. For more information, see Where Syntax.
-
<when>: The conditions to match on. For a detailed description of the elements allowed in a
- <file-mapping/>: Maps an extension to a graph type.
- <package-mapping/>: Maps from a package pattern (regular expression) to a organization name.
3.1.2. Predefined Rules
Windup provides predefined rules for common migration requirements. These core Windup rules are located in the Windup installation at WINDUP_HOME/rules/migration-core/.
The following is an example of a core Windup rule that matches on a proprietary utility class.
3.2. Create a Basic XML Rule
This section describes how to create a Windup XML rule.
Prerequisites
- You should have already installed Windup. See the Windup User Guide for installation instructions.
Before you begin, you may also want to be familiar with the following documentation:
The Windup XML rule file must use the .windup.xml extension, otherwise the rule will not be evaluated.
3.2.1. Basic XML Rule Template
Windup XML rules consist of conditions and actions and use the following rule pattern.
when(condition)
  perform(action)
otherwise(action)
when(condition)
  perform(action)
otherwise(action)The following is the basic syntax for XML rules.
3.2.2. Create the Ruleset Metadata
The XML ruleset metadata element provides additional information about the ruleset such as a description, the source and target technologies, and add-on dependencies. The metadata also allows for specification of tags, which allow you to provide additional information about a ruleset. For more information about ruleset metadata, see XML Rule Structure.
Example Rule <metadata>
3.2.3. Create the Rule
Individual rules are contained within a <rules> element and consist of one or more conditions and actions. See the XML rule schema for valid rule syntax.
3.2.3.1. Create the Rule When Condition
The XML rule <when> element tests for a condition. The following is a list of valid <when> conditions.
| Element | Description |
|---|---|
| <and> | The standard logical and operator. |
| <filecontent> | Find strings or text within files, for example, properties files. |
| <file-mapping> | Define file names to internal stored File model. |
| <javaclass> | Test for a match in a Java class. |
| <javaclass-ignore> | Exclude javaclass which you would like to ignore in processing discovery. |
| <not> | The standard logical not operator. |
| <or> | The standard logical or operator. |
| <package-mapping> | Define package names to organization or libraries. |
| <project> | Test for project characteristics, such as dependencies. |
| <true> | Always match. |
| <xmlfile> | Test for a match in an XML file. |
The specific syntax is dependent on whether you are creating a rule to evaluate Java class, an XML file, a project, or file content. This is described in more detail in When Condition Syntax.
3.2.3.2. Create the Rule Perform Action
The XML rule <perform> element performs the action when the condition is met. Operations allowed in this section of the rule include the classification of application resources, in-line hints for migration steps, links to migration information, and project lineitem reporting. The following is a list of valid <perform> actions.
| Element | Description |
|---|---|
| <classification> | This operation adds metadata that is intended to apply to the entire file. For example, if the Java Class is a JMS Message Listener, you might want to add a Classification with the title "JMS Message Listener". Information that would apply to the entire file would go here. Also, if an effort level is set, that information would apply to the entire file. |
| <hint> | This operation adds metadata to a line within the file. For example, if the rule were set to apply to all instances of "javax.jms.TextMessage.setText(java.lang.String)" this would highlight every instance of that method call. This is frequently used when there is detailed information to attach that applies at the line level. Each time this operation is fired, the effort level will be added. In our example, if the effort level were 3 and there were 4 instances of "javax.jms.TextMessage.setText(java.lang.String)", then this would add 9 total story points. Whether or not to apply effort at this level or in a classification depends upon the amount of effort required during the migration. |
| <iteration> | Specify to iterate over an implicit or explicit variable defined within the rule. |
| <lineitem> | This provides a high level message that will appear in the application overview page. |
| <link> | Provides an HTML link to additional information or documentation that provides more information about the migration task. |
| <xslt> | Specify how to transform an XML file. |
The syntax is described in more detail in Perform Action Syntax.
3.3. XML Rule Syntax
3.3.1. When Condition Syntax
Conditions allowed in the when portion of a rule must extend GraphOperation and currently include evaluation of Java classes, XML files, projects, and file content. Because XML rules are modeled after the Java-based rule add-ons, links to JavaDocs for the related Java classes are provided for a better understanding of how they behave.
The complete XML rule schema is located here: http://windup.jboss.org/schema/windup-jboss-ruleset.xsd
The following sections describe the more common XML when rule conditions.
3.3.1.1. Syntax
3.3.1.1.1. Summary
Use the <javaclass> element to find imports, methods, variable declarations, annotations, class implementations, and other items related to Java classes. For a better understanding of the <javaclass> condition, see the JavaDoc for the JavaClass class.
The following is an example of a rule that tests for WebLogic-specific Apache XML packages.
3.3.1.1.2. Construct a Element
3.3.1.1.2.1. Element Attributes
| Attribute Name | Type | Description |
|---|---|---|
| references | CLASS_NAME | The package or class name to match on. Wildcard characters can be used. Note
For performance reasons, you should not start the reference with wildcard characters. For example, use references="weblogic.apache.xml.{*}"
|
| matchesSource | STRING | An exact regex to match. This is useful to distinguish hard-coded strings. matchesSource="log4j.logger" |
| as | VARIABLE_NAME |
A variable name assigned to the rule so that it can be used as a reference in later processing. See the as="MyEjbRule" |
| from | VARIABLE_NAME |
Begin the search query with the filtered result from a previous search identified by its from="MyEjbRule" |
| in | PATH_FILTER | Filter input files matching this regex (regular expression) naming pattern. Wildcard characters can be used. (Optional) in="{*}File1"
|
3.3.1.1.2.2. Child Elements
| Child Element | Description |
|---|---|
| <location> | The location where the reference was found in a Java class. Location can refer to annotations, field and variable declarations, imports, and methods. For the complete list of valid values, see the JavaDoc for TypeReferenceLocation. <location>IMPORT</location> |
| <annotation-literal> | Match on literal values inside of annotations.
The below example would match on <javaclass references="org.package.MyAnnotation">
<location>ANNOTATION</location>
<annotation-literal name="myvalue" pattern="test"/>
</javaclass>
Note that in this case, the |
| <annotation-type> | Match on a particular annotation type. You can supply subconditions to be matched against the annotation elements.
The below example would match on a |
| <annotation-list> | Match on an item in an array within an annotation. If an array index is not specified, the condition will be matched if it applies to any item in the array. You can supply subconditions to be matched against this element.
The below example would match on
Note that in this case, the |
3.3.1.2. Syntax
3.3.1.2.1. Summary
Use the <xmlfile> element to find information in XML files. For a better understanding of the <xmlfile> condition, see the XmlFile JavaDoc.
The following is an example of a rule that tests for an XML file.
3.3.1.2.2. Construct an Element
3.3.1.2.2.1. Element Attributes
| Attribute Name | Type | Description |
|---|---|---|
| matches | XPATH | Match on an XML file condition. (Optional) matches="/w:web-app/w:resource-ref/w:res-auth[text() = 'Container']" |
| xpathResultMatch | XPATH_RESULT_STRING | Return results that match the given regex. (Optional) <xmlfile matches="//foo/text()" xpathResultMatch="Text from foo."/> |
| as | VARIABLE_NAME |
A variable name assigned to the rule so that it can be used as a reference in later processing. See the as="MyEjbRule" |
| in | PATH_FILTER | Used to filter input files matching this regex (regular expression) naming pattern. Wildcard characters can be used. (Optional) in="{*}File1"
|
| from | VARIABLE_NAME |
Begin the search query with the filtered result from a previous search identified by its from="MyEjbRule" |
| public-id | PUBLIC_ID | The DTD public-id regex. (Optional) public-id="public" |
3.3.1.2.2.2. matches Custom Functions
The matches attribute may use several built-in custom XPath functions, which may have useful side effects, like setting the matched value on the rule variables stack.
| Function | Description |
|---|---|
|
| Match a XPath expression against a string, possibly containing Windup parameterization placeholders. matches="windup:matches(//foo/@class, '{javaclassname}'"
This will match all |
3.3.1.2.2.3. Child Elements
| Child Element | Description |
|---|---|
| <namespace> |
The namespace referenced in XML files. This element contains 2 optional attributes: The <namespace prefix="abc" uri="http://maven.apache.org/POM/4.0.0"/> |
3.3.1.3. Syntax
3.3.1.3.1. Summary
Use the <project> element to query the Maven POM file for the project characteristics. For a better understanding of the <project> condition, see the JavaDoc for the Project class.
The following is an example of a rule that checks for a JUnit dependency version between 2.0.0.Final and 2.2.0.Final.
3.3.1.3.2. Construct a Element
3.3.1.3.2.1. Element Attributes
The <project> element is used to match against the project’s Maven POM file. You can use this condition to query for dependencies of the project. It does not have any attributes itself.
3.3.1.3.2.2. Child Elements
| Child Element | Description |
|---|---|
| <artifact> |
Subcondition used within |
3.3.1.3.2.3. Element Attributes
| Attribute Name | Type | Description |
|---|---|---|
| groupId | PROJECT_GROUP_ID |
Match on the project |
| artifactId | PROJECT_ARTIFACT_ID |
Match on the project |
| fromVersion | FROM_VERSION |
Specify the lower version bound of the artifact. For example |
| toVersion | TO_VERSION |
Specify the upper version bound of the artifact. For example |
3.3.1.4. Syntax
3.3.1.4.1. Summary
Use the <filecontent> element to find strings or text within files, for example, a line in a Properties file. For a better understanding of the <filecontent> condition, see the JavaDoc for the FileContent class.
3.3.1.4.2. Construct a Element
3.3.1.4.2.1. Element Attributes
| Attribute Name | Type | Description |
|---|---|---|
| pattern | String | Match the file contents against the provided parameterized string. |
| filename | String | Match the file names against the provided parameterized string. |
| as | VARIABLE_NAME |
A variable name assigned to the rule so that it can be used as a reference in later processing. See the as="MyEjbRule" |
| from | VARIABLE_NAME |
Begin the search query with the filtered result from a previous search identified by its from="MyEjbRule" |
3.3.1.5. Syntax
3.3.1.5.1. Summary
Use the <file> element to find the existence of files with a specific name, for example, an ibm-webservices-ext.xmi file. For a better understanding of the <file> condition, see the JavaDoc for the File class.
3.3.1.5.2. Construct a Element
3.3.1.5.2.1. Element Attributes
| Attribute Name | Type | Description |
|---|---|---|
| filename | String | Match the file names against the provided parameterized string. |
| as | VARIABLE_NAME |
A variable name assigned to the rule so that it can be used as a reference in later processing. See the as="MyEjbRule" |
| from | VARIABLE_NAME |
Begin the search query with the filtered result from a previous search identified by its Example: from="MyEjbRule" |
3.3.2. Perform Action Syntax
Operations available in the perform section of the rule include the classification of application resources, in-line hints for migration steps, links to migration information, and project lineitem reporting. Because XML rules are modeled after the Java-based rule add-ons, links to JavaDocs for the related Java classes are provided for a better understanding of how they behave.
The complete XML rule schema is located here: http://windup.jboss.org/schema/windup-jboss-ruleset.xsd
The following sections describe the more common XML rule perform actions.
3.3.2.1. Syntax
3.3.2.1.1. Summary
The <classification> element is used to identify or classify application resources that match the rule. It provides a title that is displayed in the report, a level of effort, and it can also provide links to additional information about how to migrate this resource classification. For a better understanding of the <classification> action, see the JavaDoc for the Classification class.
The following is an example of a rule that classifies a resource as a WebLogic EAR application deployment descriptor file.
3.3.2.1.2. Element Attributes
| Attribute Name | Type | Description |
|---|---|---|
| title | STRING | Title this resource using the specified string. title="JBoss Seam Components" |
| effort | BYTE | The level of effort assigned to this resource. (Optional) effort="2" |
| severity | STRING | Whether this classification is "mandatory" or "optional". (Optional) severity="mandatory" |
| of | VARIABLE_NAME | Create a new classification for the given reference. (Optional) of="MySeamRule" |
3.3.2.1.3. Child Elements
| Child Element | Description |
|---|---|
| <link> | Provides a link URI and text title for additional information. <classification title="Websphere Startup Service" effort="4"> <link href="http://docs.oracle.com/javaee/6/api/javax/ejb/Singleton.html" title="EJB3.1 Singleton Bean"/> <link href="http://docs.oracle.com/javaee/6/api/javax/ejb/Startup.html" title="EJB3.1 Startup Bean"/> </classification> |
| <tag> | Provides additional custom information for the classification. <tag>Seam3</tag> |
| <description> | Description of this resource <description>JBoss Seam components must be replaced</description> |
3.3.2.2. Syntax
3.3.2.2.1. Summary
The <link> element is used in classifications or hints to provide links to informational content. For a better understanding of the <link> action, see the JavaDoc for the Link class.
The following is an example of a rule that creates links to additional information.
3.3.2.2.2. Element Attributes
| Attribute Name | Type | Description |
|---|---|---|
| href | URI | The URI for the referenced link. href="https://access.redhat.com/articles/1249423" |
| title | STRING | A title for the link. title="Migrate WebLogic Proprietary Servlet Annotations" |
3.3.2.3. Syntax
3.3.2.3.1. Summary
The <hint> element is used to provide a hint or inline information about how to migrate a section of code. For a better understanding of the <hint> action, see the JavaDoc for the Hint class.
The following is an example of a rule that creates a hint.
3.3.2.3.2. Element Attributes
| Attribute Name | Type | Description |
|---|---|---|
| title | STRING | Title this hint using the specified string. Title is a required attribute. title="JBoss Seam Component Hint" |
| severity | STRING | Whether this hint is "mandatory" or "optional". (Optional) severity="mandatory" |
| in | VARIABLE_NAME | Create a new Hint in the FileLocationModel resolved by the given variable. (Optional) in="Foo" |
| effort | BYTE | The level of effort assigned to this resource. (Optional) effort="2" |
3.3.2.3.3. Child Elements
| Child Element | Description |
|---|---|
| <message> | A message describing the migration hint. <message>EJB 2.0 is deprecated</message> |
| <link> | Identify or classify links to informational content. See the section on <link> Syntax for details. <link href="http://docs.oracle.com/javaee/6/api/" title="Java Platform, Enterprise Edition 6 API Specification" /> |
| <tag> |
Define a custom tag for this <tag>Needs review</tag> |
3.3.2.4. Syntax
3.3.2.4.1. Summary
The <xslt> element specifies how to transform an XML file. For a better understanding of the <xslt> action, see the JavaDoc for the XSLTTransformation class.
The following is an example of rule that defines an XSLT action.
3.3.2.4.2. Element Attributes
| Attribute Name | Type | Description |
|---|---|---|
| of | STRING | Create a new transformation for the given reference. (Optional) of="testVariable_instance" |
| title | STRING | Sets the title for this XSLTTransformation in the report. title="XSLT Transformed Output" |
| extension | STRING | Sets the extension for this XSLTTransformation. extension="-result.html" |
| template | STRING | Sets the XSL template. template="simpleXSLT.xsl" |
| effort | BYTE | The level of effort required for the transformation. (Optional) |
3.3.2.4.3. Child Elements
| Child Element | Description |
|---|---|
| <xslt-parameter> | Specify XSLTTransformation parameters as property value pairs <xslt-parameter property="title" value="EJB Transformation"/> |
3.3.2.4.3.1. Syntax
3.3.2.4.4. Summary
The <lineitem> element is used to provide general migration requirements for the application, such as the need to replace deprecated libraries or the need to resolve potential class loading issues. This information is displayed on the project or application overview page. For a better understanding of the <lineitem> action, see the JavaDoc for the Lineitem class.
The following is an example of a rule that creates a lineitem message.
3.3.2.4.5. Element Attributes
| Attribute Name | Type | Description |
|---|---|---|
| message | STRING | A lineitem message message="Proprietary code found." |
3.3.2.5. Syntax
3.3.2.5.1. Summary
The <iteration> element specifies to iterate over an implicit or explicit variable defined within the rule. For a better understanding of the <iteration> action, see the JavaDoc for the Iteration class.
The following is an example of a rule that performs an iteration.
3.3.2.5.2. Element Attributes
| Attribute Name | Type | Description |
|---|---|---|
| over | VARIABLE_NAME | Iterate over the condition identified by this VARIABLE_NAME. over="jboss-app" |
3.3.2.5.3. Child Elements
| Child Element | Description |
|---|---|
| <iteration> |
Child elements include a |
3.3.3. Where Syntax
You can define parameters that specify a matching pattern to be used in other elements of an XML rule. This can help simplify the patterns for complex matching expressions.
Use the <where> element to define a parameter. Specify the parameter name using the param attribute and supply the pattern using the <matches> element. This parameter can then be referenced elsewhere in the rule definition using the syntax {PARAM_NAME}.
The following example rule defines a parameter named subpackage that specifies a pattern of (activeio|activemq).
The pattern defined by subpackage will then be substituted in the <javaclass> references attribute. This causes the rule to match on org.apache.activeio.* and org.apache.activemq.* packages.
Chapter 4. Testing XML Rules
4.1. Add the Rule to Windup
A Windup rule is installed simply by copying the rule to the appropriate Windup folder. Windup scans for rules, which are files that end with either *.windup.groovy or .windup.xml, in the following locations:
-
Copy the rule to a directory specified by the
--userRulesDirectoryargument on the Windup command line. - Copy the rule to the WINDUP_HOME/rules/ directory. WINDUP_HOME is the directory where you install and run the Windup executable.
Copy the rule to the
${user.home}/.windup/rules/directory. This directory is created by Windup the first time it is executed and contains rules, add-ons, and the Windup log.NoteFor Windows, this directory would be
\Documents and Settings\USER_NAME\.windup\rules\or\Users\USER_NAME\.windup\rules\
4.2. Test the XML Rule
Test the XML rule against your application file by running Windup in a terminal.
WINDUP_HOME/bin/windup [--sourceMode] --input INPUT_ARCHIVE_OR_FOLDER --output OUTPUT_REPORT_DIRECTORY --target TARGET_TECHNOLOGY --packages PACKAGE_1 PACKAGE_2 PACKAGE_N
$ WINDUP_HOME/bin/windup [--sourceMode] --input INPUT_ARCHIVE_OR_FOLDER --output OUTPUT_REPORT_DIRECTORY --target TARGET_TECHNOLOGY --packages PACKAGE_1 PACKAGE_2 PACKAGE_NYou should see the following result:
Windup report created: OUTPUT_REPORT_DIRECTORY/index.html
              Access it at this URL: file:///OUTPUT_REPORT_DIRECTORY/index.html
Windup report created: OUTPUT_REPORT_DIRECTORY/index.html
Access it at this URL: file:///OUTPUT_REPORT_DIRECTORY/index.html4.3. Additional Resources
- More examples of how to run Windup are located in the Windup User Guide.
- Working examples of XML-based rules can be found in the Windup source code GitHub repository and the Windup quickstarts GitHub repository or latest release ZIP download.
Chapter 5. Overriding Rules
You can override core rules distributed with Windup or even custom-written rules. For example, you might want to change the matching conditions, effort, or hint text for a rule. This is done by making a custom copy of the original rule, marking it as a rule override, and making the necessary adjustments. You can also disable a rule in this same manner.
5.1. Override a Rule
You can override a rule using the following steps.
Copy the XML file that contains the rule you want to override to the custom rules directory.
Custom rules can be placed in either
WINDUP_HOME/rules,${user.home}/.windup/rules/, or the directory specified by the--userRulesDirectorycommand-line argument.Edit the XML file and only keep the
<rule>elements for the rules that you want to override.Note that the rules from the original ruleset that are not overridden in the new ruleset will be executed as normal.
- Ensure that you keep the same rule and ruleset IDs. When you copy the original rule XML, this ensures that the IDs match.
-
Add the
<overrideRules>true</overrideRules>entry to the ruleset metadata. Make the adjustments to the rule as necessary.
You can change anything in the rule definition. This rule will override the entire original rule.
The below is an example of an overridden rule. Notice the <overrideRules>true</overrideRules> element in the ruleset metadata. The rule and ruleset IDs match the original. This rule override simply changed the effort needed from a 1 to a 3.
When you run Windup, this rule will now be used in place of the original rule with the matching rule ID. You can verify that the new rule was used by viewing the contents of the Rule Provider Executions Report.
5.2. Disable a Rule
To disable a rule, follow the same steps as above to override a rule, except just provide an empty <rule> element.
Chapter 6. Additional Resources
6.1. Review the Existing Windup XML Rules
Windup XML-based rules are located on GitHub at the following location: https://github.com/windup/windup-rulesets/tree/master/rules-reviewed.
Instructions to fork and clone the Windup rulesets repository to your local machine are provided on the Wiki.
Rules are grouped by target platform and function. When you create a new rule, it is helpful to find a rule that is similar to the one you need and use it as a starting template.
New rules are continually added, so it is a good idea to check back frequently to review the updates.
6.2. Important Links
- Windup wiki: https://github.com/windup/windup/wiki
- Windup Javadoc: http://windup.github.io/windup/docs/latest/javadoc
- Windup forums: https://developer.jboss.org/en/windup
Windup JIRA issue trackers
- Core Windup: https://issues.jboss.org/browse/WINDUP
- Windup Rules: https://issues.jboss.org/browse/WINDUPRULE
Windup Mailing Lists
- Windup Users: windup-users@lists.jboss.org
- Windup Developers: windup-dev@lists.jboss.org
- Windup Commits: windup-commits@lists.jboss.org
- Windup on Twitter: @JBossWindup
-
Windup IRC channel: Server FreeNode (
irc.freenode.net), channel#windup(transcripts)
Appendix A. Reference Material
A.1. Rule Story Points
A.1.1. What are Story Points?
Story Points are an abstract metric commonly used in Scrum Agile software development methodology to estimate the level of effort needed to implement a feature or change.
Windup uses story points to express the level of effort needed to migrate particular application constructs, and in a sum, the application as a whole. It does not necessarily translate to man-hours, but the value should be consistent across tasks.
A.1.2. How Story Points are Estimated in Rules
Estimating the level of effort for the story points for a rule can be tricky. The following are the general guidelines Windup uses when estimating the level of effort required for a rule.
| Level of Effort | Story Points | Description |
|---|---|---|
| Information | 0 | An informational warning with very low or no priority for migration. |
| Trivial | 1 | The migration is a trivial change or a simple library swap with no or minimal API changes. |
| Complex | 3 | The changes required for the migration task are complex, but have a documented solution. |
| Redesign | 5 | The migration task requires a redesign or a complete library change, with significant API changes. |
| Rearchitecture | 7 | The migration requires a complete rearchitecture of the component or subsystem. |
| Unknown | 13 | The migration solution is not known and may need a complete rewrite. |
A.1.3. Task Severity
In addition to the level of effort, migration tasks can be assigned a severity that indicates whether the task must be completed or can be postponed.
- Mandatory
- The task must be completed for a successful migration. If the changes are not made, the resulting application will not build or run successfully. Examples include replacement of proprietary APIs that are not supported in the target platform.
- Optional
- If the migration task is not completed, the application should work, but the results may not be the optimal. If the change is not made at the time of migration, it is recommended to put it on the schedule soon after migration is completed. An example of this would be the upgrade of EJB 2.x code to EJB 3.
A.2. About the WINDUP_HOME Variable
This documentation uses the WINDUP_HOME replaceable value to denote the path to the Windup distribution. When you encounter this value in the documentation, be sure to replace it with the actual path to your Windup installation.
-
If you download and install the latest distribution of Windup, WINDUP_HOME refers to the
windup-distribution-2.7.0.Finalfolder extracted from the downloaded ZIP file. -
If you build Windup from GitHub source, WINDUP_HOME refers to the
windup-distribution-2.7.0.Finalfolder extracted from thewindup-distribution/target/windup-distribution-2.7.0-SNAPSHOT-offline.zipfile.
Revised on 2017-02-17 07:02:23 EST