Deployment Guide
Deploying Red Hat Openshift Container Storage 3.11
Abstract
Making open source more inclusive
Red Hat is committed to replacing problematic language in our code, documentation, and web properties. We are beginning with these four terms: master, slave, blacklist, and whitelist. Because of the enormity of this endeavor, these changes will be implemented gradually over several upcoming releases. For more details, see our CTO Chris Wright’s message.
Part I. Planning
Chapter 1. Identify your Workloads
This chapter provides a list of workloads that are supported with Red Hat Openshift Container Storage.
Persistent volumes backed by block storage is the recommended method for the following workloads:
- Jenkins
- ElasticSearch
- Prometheus
If using file storage for transactional workloads, turn off the performance translators as described in Chapter 11, Setting up Custom Volume Options.
Chapter 2. Identify your Use Case
This chapter provides a brief introduction of the two use cases available in Containerized Red Hat Gluster Storage.
Red Hat Openshift Container Storage does not support a simultaneous deployment of converged and independent mode with ansible workflow. Therefore, you must deploy either converged mode or independent mode: you cannot mix both modes during deployment.
Red Hat only supports Heketi inside OpenShift Container Platform in OCS.
2.1. Converged Mode
Converged mode was earlier called as Container-Native Storage.
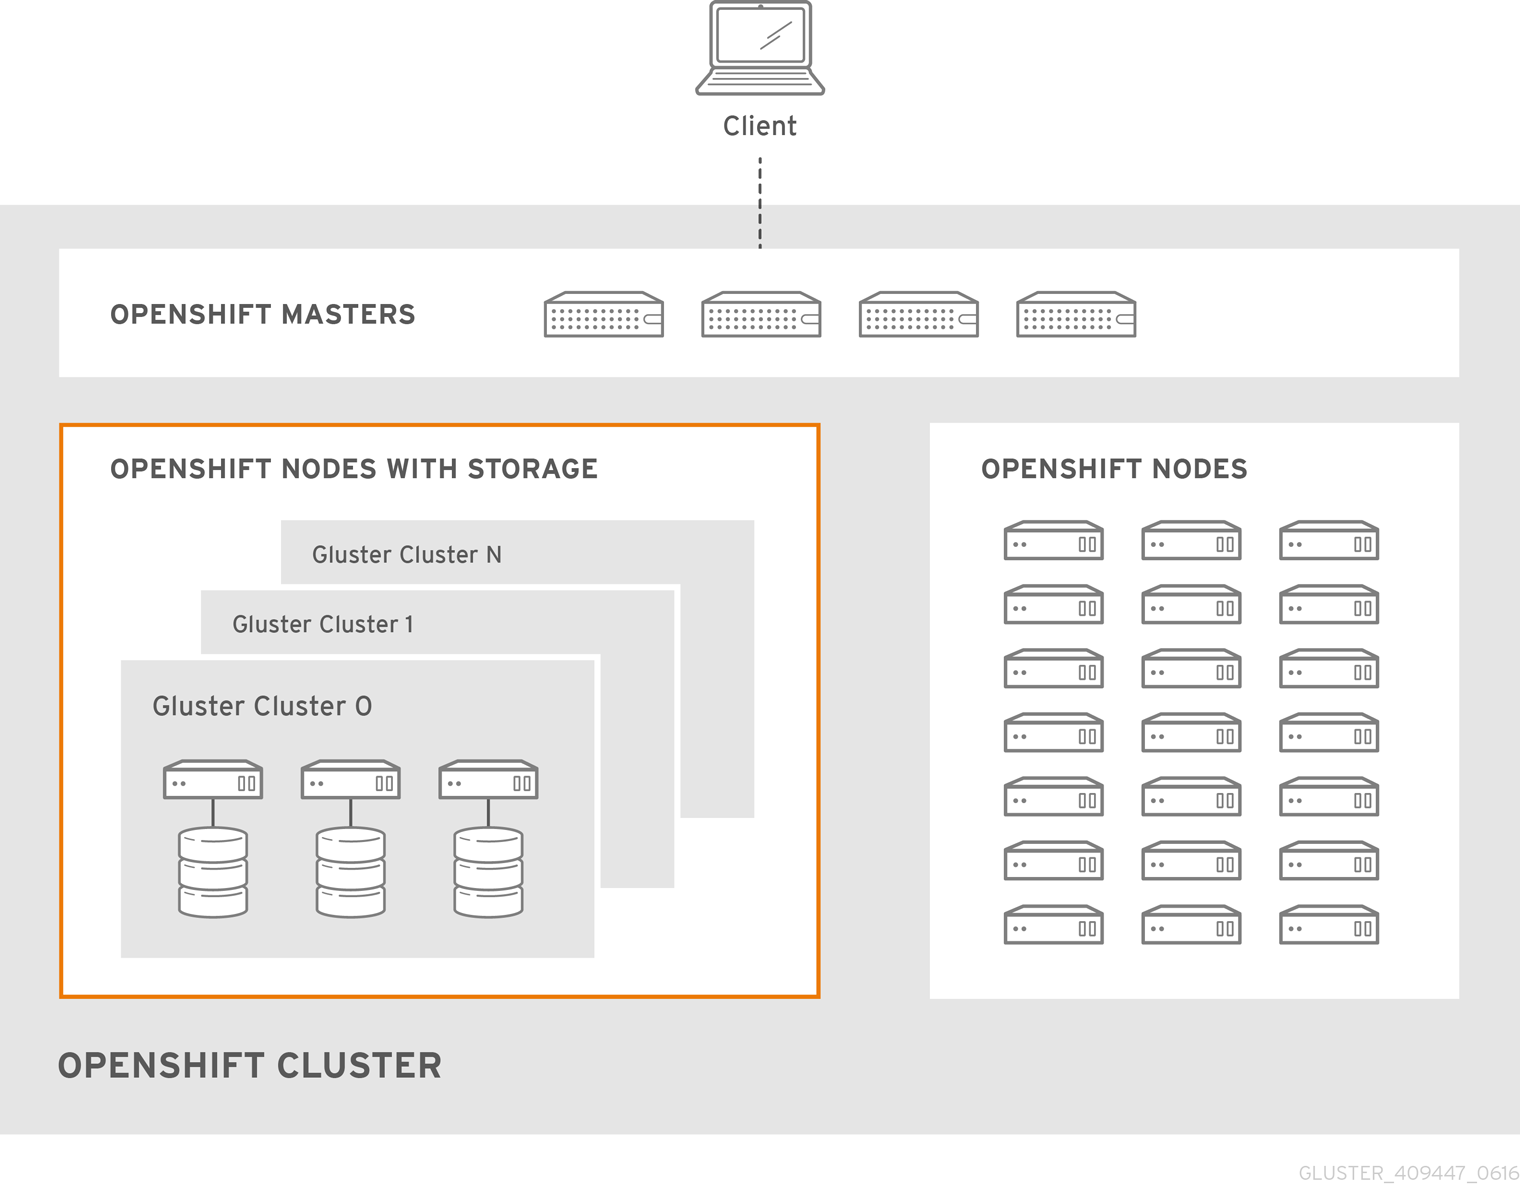
This deployment delivers a hyper-converged solution, where the storage containers that host Red Hat Gluster Storage co-reside with the compute containers and serve out storage from the hosts that have local or direct attached storage to the compute containers. This solution integrates Red Hat Gluster Storage deployment and management with OpenShift services. As a result, persistent storage is delivered within an OpenShift pod that provides both compute and file storage.
Converged Mode for OpenShift Container Platform is built around three key technologies:
- OpenShift provides the platform as a service (PaaS) infrastructure based on Kubernetes container management. Basic OpenShift architecture is built around multiple master systems where each system contains a set of nodes.
- Red Hat Gluster Storage provides the containerized distributed storage based on Red Hat Gluster Storage 3.5 container. Each Red Hat Gluster Storage volume is composed of a collection of bricks, where each brick is the combination of a node and an export directory.
- Heketi provides the Red Hat Gluster Storage volume life-cycle management. It creates the Red Hat Gluster Storage volumes dynamically and supports multiple Red Hat Gluster Storage clusters.
The following list provides the administrators a solution workflow. The administrators can:
- Create multiple persistent volumes (PV) and register these volumes with OpenShift.
- Developers then submit a persistent volume claim (PVC).
- A PV is identified and selected from a pool of available PVs and bound to the PVC.
- The OpenShift pod then uses the PV for persistent storage.
Figure 2.1. Architecture - Converged Mode for OpenShift Container Platform
Red Hat Openshift Container Storage does not support a simultaneous deployment of converged and independent mode with ansible workflow. Therefore, you must deploy either converged mode or independent mode: you cannot mix both modes during deployment.
2.2. Independent mode
Independent mode was earlier called Container-Ready Storage.
When Red Hat Gluster Storage is deployed as stand-alone storage, providing storage to containers, that is called independent mode. In this mode, the life cycle of the storage platform is maintained independently from the life cycle of the container platform.
When Red Hat Gluster Storage is deployed on top an OpenShift cluster, it is called converged mode.
Independent mode provides dynamically provisioned storage, statically provisioned storage, RWO support, and RWX support. Further, it provides full support for OpenShift Container Platform infrastructure services like logging, metrics, and registry services.
For users of persistent storage, the deployment modes are completely transparent. Administrators, however, will see a variation in how they set the system up, manage, and scale. In independent mode, storage is managed like Red Hat Gluster Storage.
Following are some of the key drivers of choosing independent mode of deployment:
- OpenShift Container Platform administrators might not want to manage storage. Independent mode separates storage management from container management.
- Leverage legacy storage (SAN, Arrays, Old filers): Storage arrays from traditional storage vendors often have either limited or no support for OpenShift. Independent mode allows you to leverage existing legacy storage for OpenShift Containers.
- Cost effective: In environments where costs related to new infrastructure is a challenge, you can repurpose existing storage arrays to back OpenShift under independent mode. Independent mode is perfect for situations where you can run Red Hat Gluster Storage inside a VM and serve out LUNs or disks from these storage arrays to OpenShift offering all the features that the OpenShift storage subsystem has to offer including dynamic provisioning. This is a very useful solution in those environments with potential infrastructure additions.
Independent mode may have Heketi, and other provisioners (components of independent mode) deployed on top of OpenShift Cluster nodes. Red Hat only supports Heketi inside OpenShift Container Platform in OCS. Heketi is a service endpoint for automated Red Hat Gluster Storage volume provisioning, where requests for allocation of Red Hat Gluster Storage volumes to back OpenShift PVs land from kubernetes. Heketi manages allocation and de-allocation of Red Hat Gluster Storage volumes dynamically.
Red Hat Openshift Container Storage does not support a simultaneous deployment of converged and independent mode with ansible workflow. Therefore, you must deploy either converged mode or independent mode: you cannot mix both modes during deployment.
In independent mode, Heketi must have complete control of the Gluster cluster.
Chapter 3. Verify Prerequisites
This chapter provides the prerequisites that have to be verified before for the two different use cases available in Containerized Red Hat Gluster Storage before deployment.
Support for Red Hat Enterprise Linux Atomic Host is deprecated as of Red Hat OpenShift Container Storage 3.11.5. Red Hat no longer recommends the use of Red Hat Enterprise Linux Atomic Host and does not support its use in new deployments. Existing deployments that upgrade to Red Hat OpenShift Container Storage 3.11.5 remain supported.
3.1. Converged mode
3.1.1. Supported Versions
For supported versions of OpenShift Container Platform with Red Hat Gluster Storage Server and Container-Native Storage, please see https://access.redhat.com/articles/3403951.
3.1.2. Environment Requirements
The requirements for Red Hat Enterprise Linux Atomic Host, Red Hat OpenShift Container Platform, Red Hat Enterprise Linux, and Red Hat Gluster Storage are described in this section. A Red Hat Gluster Storage Container Native with OpenShift Container Platform environment consists of Red Hat OpenShift Container Platform installed on either Red Hat Enterprise Linux Atomic Host or Red Hat Enterprise Linux.
3.1.2.1. Installing Red Hat Openshift Container Storage with OpenShift Container Platform on Red Hat Enterprise Linux 7
This section describes the procedures to install Red Hat Gluster Storage Container Native with OpenShift Container Platform on Red Hat Enterprise Linux 7 based OpenShift Container Platform 3.11.
3.1.2.1.1. Setting up the Openshift Master as the Client
You can use the OpenShift Master as a client to execute the oc commands across the cluster when installing OpenShift. Generally, this is setup as a non-scheduled node in the cluster. This is the default configuration when using the OpenShift installer. You can also choose to install their client on their local machine to access the cluster remotely. For more information, see https://access.redhat.com/documentation/en-us/openshift_container_platform/3.11/html/cli_reference/cli-reference-get-started-cli#installing-the-cli.
Install heketi-client package
Execute the following commands to install heketi-client package.
# subscription-manager repos --enable=rh-gluster-3-client-for-rhel-7-server-rpms# yum install heketi-client3.1.2.2. OpenShift Container Platform Options
- Container logs by default are not configured to be rotated or limited to a max size by docker. A log file can grow so large that it fills up the disk space if the container runs for long enough and generate enough logs.
To set log limits for containers on a host
--log-optcan be configured withmax-sizeandmax-fileso that a containers logs are rolled over when they reach a max limit and only a certain number of files are saved before being discarded.# cat /etc/sysconfig/docker OPTIONS='--insecure-registry=172.30.0.0/16 --selinux-enabled --log-opt max-size=50m --log-opt max-file=5'
If the above options are not executed , once the logs get large the pod can be evicted.
3.1.3. Red Hat OpenShift Container Platform and Red Hat Openshift Container Storage Requirements
The following list provides the Red Hat OpenShift Container Platform and Red Hat Openshift Container Storage requirements:
All OpenShift nodes on Red Hat Enterprise Linux systems must have
glusterfs-clientRPMs (glusterfs, glusterfs-client-xlators, glusterfs-libs, glusterfs-fuse) installed. You can verify if the RPMs are installed by running the following command:# yum list glusterfs glusterfs-client-xlators glusterfs-libs glusterfs-fuse
The client RPMs must have the same version as the gluster-rhgs-server. The gluster-rhgs-server version is based on the selected OCS version.
For more information on installing native client packages, see https://access.redhat.com/documentation/en-us/red_hat_gluster_storage/3.5/html-single/administration_guide/index#Installing_Native_Client
3.1.4. Deployment and Scaling Guidelines
To prevent potential deployment or scaling issues, review the following guidelines before deploying converged mode with OpenShift Container Platform.
Ensure that the Trusted Storage Pool is appropriately sized and you have room for dynamic scaling on demand. This action ensures that you do not scale beyond the following maximum limits:
Sizing guidelines on converged mode
Persistent volumes backed by the file interface: For typical operations, size for 500-800 persistent volumes backed by files per four-node converged mode cluster. The maximum limit of supported persistent volumes backed by the file interface is 2000 persistent volumes per four-node cluster in a converged mode deployment. Considering that micro-services can dynamically scale as per demand, it is recommended that the initial sizing keep sufficient headroom for the scaling. If additional scaling is needed, add a new four-node converged mode cluster to support additional persistent volumes
The default limit for file-based persistent volumes per trusted storage pool is set to 1000 and the maximum supported limit is 2000. For more information on steps needed to be performed to go beyond 1000+ default limit and max till 2000, see How to have more PV’s beyond default limit in OCS?
- Persistent volumes backed by block-based storage: Size for a maximum of 300 persistent volumes per four-node converged mode cluster.
- Persistent volumes backed by file and block: Size for 300-500 persistent volumes (backed by files) and 100-200 persistent volumes (backed by block). 1000 gluster volumes including file PVs and block-hosting volumes.
- Minimum Red Hat Openshift Container Storage cluster size (4): It is recommended to have a minimum of 4 nodes in the Red Hat Openshift Container Storage cluster to adequately meet high-availability requirements. Although 3 nodes are required to create a persistent volume claim, the failure of one node in a 3 node cluster prevents the persistent volume claim from being created. The fourth node provides high-availability and allows the persistent volume claim to be created even if a node fails.
Minimum requirements: Each physical or virtual node that hosts a converged mode peer requires the following:
- a minimum of 8 GB RAM and 30 MB per persistent volume
- the same disk type
- the heketidb utilises 2 GB distributed replica volume
- a minimum of 2 physical core pair
2 physical core pair translates to 4 vCPU for non hyper-threaded systems and 8 vCPU for hyper-threaded systems.
Deployment guidelines on converged mode
- In converged mode, you can install the Red Hat Openshift Container Storage nodes, Heketi, and all provisioner pods on OpenShift Container Platform Infrastructure nodes or OpenShift Container Platform Application nodes.
-
Red Hat Gluster Storage Container Native with OpenShift Container Platform supports up to 14 snapshots per volume by default (
snap-max-hard-limit =14in Heketi Template). The required kernel version is kernel-3.10.0-862.14.4.el7.x86_64 or higher. Verify the installed and running kernel versions by running the following command:
# rpm -q kernel
kernel-3.10.0-862.14.4.el7.x86_64
# uname -r 3.10.0-862.14.4.el7.x86_64
3.2. Independent mode
3.2.1. Supported Versions
For supported versions of OpenShift Container Platform with Red Hat Gluster Storage Server and Container-Native Storage, please see https://access.redhat.com/articles/3403951.
3.2.2. Environment Requirements
The requirements for Red Hat Enterprise Linux Atomic Host, Red Hat OpenShift Container Platform, Red Hat Enterprise Linux, and Red Hat Gluster Storage are described in this section. A Red Hat Gluster Storage Container Native with OpenShift Container Platform environment consists of Red Hat OpenShift Container Platform installed on either Red Hat Enterprise Linux Atomic Host or Red Hat Enterprise Linux.
3.2.2.1. Installing Red Hat Openshift Container Storage with OpenShift Container Platform on Red Hat Enterprise Linux 7
This section describes the procedures to install Red Hat Gluster Storage Container Native with OpenShift Container Platform on Red Hat Enterprise Linux 7 based OpenShift Container Platform 3.11.
3.2.2.1.1. Setting up the Openshift Master as the Client
You can use the OpenShift Master as a client to execute the oc commands across the cluster when installing OpenShift. Generally, this is setup as a non-scheduled node in the cluster. This is the default configuration when using the OpenShift installer. You can also choose to install their client on their local machine to access the cluster remotely. For more information, see https://access.redhat.com/documentation/en-us/openshift_container_platform/3.11/html/cli_reference/cli-reference-get-started-cli#installing-the-cli.
Install heketi-client package
Execute the following commands to install heketi-client package.
# subscription-manager repos --enable=rh-gluster-3-client-for-rhel-7-server-rpms# yum install heketi-client3.2.2.2. OpenShift Container Platform Options
- Container logs by default are not configured to be rotated or limited to a max size by docker. A log file can grow so large that it fills up the disk space if the container runs for long enough and generate enough logs.
To set log limits for containers on a host
--log-optcan be configured withmax-sizeandmax-fileso that a containers logs are rolled over when they reach a max limit and only a certain number of files are saved before being discarded.# cat /etc/sysconfig/docker OPTIONS='--insecure-registry=172.30.0.0/16 --selinux-enabled --log-opt max-size=50m --log-opt max-file=5'
If the above options are not executed , once the logs get large the pod can be evicted.
3.2.3. Red Hat OpenShift Container Platform and Red Hat Openshift Container Storage Requirements
The following list provides the Red Hat OpenShift Container Platform requirements:
All OpenShift nodes on Red Hat Enterprise Linux systems must have glusterfs-client RPMs (glusterfs, glusterfs-client-xlators, glusterfs-libs, glusterfs-fuse) installed. You can verify if the RPMs are installed by running the following command:
# yum list glusterfs glusterfs-client-xlators glusterfs-libs glusterfs-fuse
Ensure that the latest version of glusterfs-client RPMs are installed. The client RPMs must have the same version as the gluster-rhgs-server version. The gluster-rhgs-server version is based on the selected OCS version.
For more information on installing native client packages, see https://access.redhat.com/documentation/en-us/red_hat_gluster_storage/3.5/html-single/administration_guide/index#Installing_Native_Client
3.2.4. Red Hat Gluster Storage Requirements
The following list provides the details regarding the Red Hat Gluster Storage requirements:
- Installation of Heketi packages must have valid subscriptions to Red Hat Gluster Storage Server repositories.
- Red Hat Gluster Storage installations must adhere to the requirements outlined in the Red Hat Gluster Storage Installation Guide.
- The versions of Red Hat Enterprise OpenShift and Red Hat Gluster Storage integrated must be compatible, according to the information in Section 3.1.1, “Supported Versions” section.
- A fully qualified domain name must be set for Red Hat Gluster Storage server node. Ensure that the correct DNS records exist and that the fully qualified domain name is resolvable via both forward and reverse DNS lookup.
To access GlusterFS volumes, the mount.glusterfs command must be available on all schedulable nodes. For RPM-based systems, the glusterfs-fuse package must be installed:
# yum install glusterfs-fuseThis package comes installed on every RHEL system. However, it is recommended to update to the latest available version from Red Hat Gluster Storage. To do this, the following RPM repository must be enabled:
# subscription-manager repos --enable=rh-gluster-3-client-for-rhel-7-server-rpmsIf glusterfs-fuse is already installed on the nodes, ensure that the latest version is installed:
# yum update glusterfs-fuse
Restrictions for using Snapshot
After a snapshot is created, it must be accessed through the user-serviceable snapshots feature only. This can be used to copy the old versions of files into the required location.
Reverting the volume to a snapshot state is not supported and should never be done as it might damage the consistency of the data.
- On a volume with snapshots, volume changing operations, such as volume expansion, must not be performed.
3.2.5. Deployment and Scaling Guidelines
To prevent potential deployment or scaling issues, review the following guidelines before deploying independent mode with OpenShift Container Platform.
Ensure that the Trusted Storage Pool is appropriately sized and you have room for dynamic scaling on demand. This action ensures that you do not scale beyond the following maximum limits:
Sizing guidelines on Independent mode
-
Persistent volumes backed by the file interface: For typical operations, size for 500-800 persistent volumes backed by files per four-node independent mode cluster. The maximum limit of supported persistent volumes backed by the file interface is 2000 persistent volumes per four-node cluster in an independent mode deployment. Considering that micro-services can dynamically scale as per demand, it is recommended that the initial sizing keep sufficient headroom for the scaling. If additional scaling is needed, add a new four-node independent mode cluster to support additional persistent volumes.
The default limit for file-based persistent volumes per trusted storage pool is set to 1000 and the maximum supported limit is 2000. For more information on steps needed to be performed to go beyond 1000+ default limit and max till 2000, see How to have more PV’s beyond default limit in OCS?
- Persistent volumes backed by block-based storage: Size for a maximum of 300 persistent volumes per four-node independent mode cluster.
- Persistent volumes backed by file and block: Size for 300-500 persistent volumes (backed by files) and 100-200 persistent volumes (backed by block). 1000 gluster volumes including file PVs and block-hosting volumes.
- Volume types: 3-way distributed-replicated volumes and arbitrated volumes are the only supported volume types.
- Minimum Red Hat Openshift Container Storage cluster size (4): It is recommended to have a minimum of 4 nodes in the Red Hat Openshift Container Storage cluster to adequately meet high-availability requirements. Although 3 nodes are required to create a persistent volume claim, the failure of one node in a 3 node cluster prevents the persistent volume claim from being created. The fourth node provides high-availability and allows the persistent volume claim to be created even if a node fails.
Minimum requirements: Each physical or virtual node that hosts a Red Hat Gluster Storage independent mode peer requires the following:
- a minimum of 8 GB RAM and 30 MB per persistent volume.
- the same disk type.
- the heketidb utilises 2 GB distributed replica volume.
- a minimum of 2 physical core pair
2 physical core pair translates to 4vCPU for non hyper-threaded systems and 8 vCPU for hyper-threaded systems.
Deployment guidelines on independent mode
- In independent mode, you can install Heketi and all provisioners pods on OpenShift Container Platform Infrastructure nodes or on OpenShift Container Platform Application nodes
- Red Hat Gluster Storage Container Native with OpenShift Container Platform supports up to 14 snapshots per volume by default (snap-max-hard-limit =14 in Heketi Template).
The required kernel version is kernel-3.10.0-862.14.4.el7.x86_64 version or higher. Verify the installed and running kernel versions by running the following command:
# rpm -q kernel
kernel-3.10.0-862.14.4.el7.x86_64
# uname -r 3.10.0-862.14.4.el7.x86_64
Part II. Deploy
Chapter 4. Deploying Containerized Storage in Converged Mode
Before following the deployment workflow for your preferred solution, make sure to review Section 4.1, “Specify Advanced Installer Variables” to understand ansible variable and playbook recommendations and requirements.
To set up storage to containers on top of an OpenShift Cluster, select the workflow that meets your objectives.
| Deployment workflow | Registry | Metrics | Logging | Applications |
|---|---|---|---|---|
| Section 4.2, “Deploying Red Hat Openshift Container Storage in Converged Mode” | ✔ | |||
| Section 4.3, “Deploying Red Hat Openshift Container Storage in Converged Mode with Registry” | ✔ | |||
| ✔ | ✔ | |||
| ✔ | ✔ | ✔ | ✔ |
- Red Hat Openshift Container Storage does not support a simultaneous deployment of converged and independent mode with ansible workflow. Therefore, you must deploy either converged mode or independent mode: you cannot mix both modes during deployment.
- s3 is deployed manually and not through Ansible installer. For more information on manual deployment, see https://access.redhat.com/documentation/en-us/red_hat_openshift_container_storage/3.11/html-single/operations_guide/#S3_Object_Store
New registry name registry.redhat.io is used throughout in this Guide.
However, if you have not migrated to the new registry yet then replace all occurrences of registry.redhat.io with registry.access.redhat.com where ever applicable.
4.1. Specify Advanced Installer Variables
The cluster installation process as documented in https://access.redhat.com/documentation/en-us/openshift_container_platform/3.11/html-single/installing_clusters/#install-planning, can be used to install one or both the GlusterFS node groups:
-
glusterfs: A general storage cluster for use by user applications. -
glusterfs-registry: A dedicated storage cluster for use by infrastructureapplications such as an integrated OpenShift Container Registry.
It is recommended to deploy both groups to avoid potential impacts on performance in I/O and volume creation. Both of these are defined in the inventory hosts file.
The definition of the clusters is done by including the relevant names in the`[OSEv3:children]` group, creating similarly named groups, and then populating the groups with the node information. The clusters can then be configured through a variety of variables in the [OSEv3:vars] group. glusterfs variables begin with openshift_storage_glusterfs_ and glusterfs-registry variables begin with openshift_storage_glusterfs_registry_. A few other variables, such as openshift_hosted_registry_storage_kind, interact with the GlusterFS clusters.
It is recommended to specify image names and version tags for all containerized components.This is to prevent components such as the Red Hat Gluster Storage pods from upgrading after an outage, which might lead to a cluster of widely disparate software versions. The relevant variables are as follows:
-
openshift_storage_glusterfs_image -
openshift_storage_glusterfs_block_image -
openshift_storage_glusterfs_heketi_image
The following are the recommended values for this release of Red Hat Openshift Container Storage
-
openshift_storage_glusterfs_image=registry.redhat.io/rhgs3/rhgs-server-rhel7:v3.11.8 -
openshift_storage_glusterfs_block_image=registry.redhat.io/rhgs3/rhgs-gluster-block-prov-rhel7:v3.11.8 -
openshift_storage_glusterfs_heketi_image=registry.redhat.io/rhgs3/rhgs-volmanager-rhel7:v3.11.8 -
openshift_storage_glusterfs_s3_server_image=registry.redhat.io/rhgs3/rhgs-s3-server-rhel7:v3.11.8
For a complete list of variables, see https://github.com/openshift/openshift-ansible/tree/release-3.11/roles/openshift_storage_glusterfs on GitHub.
Once the variables are configured, there are several playbooks available depending on the circumstances of the installation:
The main playbook for cluster installations can be used to deploy the GlusterFS clusters in tandem with an initial installation of OpenShift Container Platform.
- This includes deploying an integrated OpenShift Container Registry that uses GlusterFS storage.
-
/usr/share/ansible/openshift-ansible/playbooks/openshift-glusterfs/config.ymlcan be used to deploy the clusters onto an existing OpenShift Container Platform installation. /usr/share/ansible/openshift-ansible/playbooks/openshift-glusterfs/registry.ymlcan be used to deploy the clusters onto an existing OpenShift Container Platform installation. In addition, this will deploy an integrated OpenShift Container Registry, which uses GlusterFS storage.Important- There must not be a pre-existing registry in the OpenShift Container Platform cluster.
playbooks/openshift-glusterfs/uninstall.ymlcan be used to remove existingclusters matching the configuration in the inventory hosts file. This is usefulfor cleaning up the Red Hat Openshift Container Storage environment in the case of a faileddeployment due to configuration errors.NoteThe GlusterFS playbooks are not guaranteed to be idempotent. Running the playbooks more than once for a given installation is currently not supported without deleting the entire GlusterFS installation (including disk data) and starting over.
4.2. Deploying Red Hat Openshift Container Storage in Converged Mode
In your inventory file, include the following variables in the
[OSEv3:vars]section, adjusting them as needed for your configuration:[OSEv3:vars] openshift_storage_glusterfs_namespace=app-storage openshift_storage_glusterfs_storageclass=true openshift_storage_glusterfs_storageclass_default=false openshift_storage_glusterfs_block_deploy=true openshift_storage_glusterfs_block_host_vol_create=true openshift_storage_glusterfs_block_host_vol_size=100 openshift_storage_glusterfs_block_storageclass=true openshift_storage_glusterfs_block_storageclass_default=falseNoteopenshift_storage_glusterfs_block_host_vol_sizetakes an integer, which is the size of the volume in Gi.In your inventory file, add
glusterfsin the[OSEv3:children]section to enable the[glusterfs]group:[OSEv3:children] masters etcd nodes glusterfsAdd a
[glusterfs]section with entries for each storage node that will host the GlusterFS storage. For each node, setglusterfs_devicesto a list of raw block devices that will be completely managed as part of a GlusterFS cluster.There must be at least one device listed. Each device must be bare, with no partitions or LVM PVs. Specifying the variable takes the form:<hostname_or_ip> glusterfs_zone=<zone_number> glusterfs_devices='[ "</path/to/device1/>", "</path/to/device2>", ... ]'For example:
[glusterfs]
node103.example.com glusterfs_zone=1 glusterfs_devices='["/dev/sdd"]'
node104.example.com glusterfs_zone=2 glusterfs_devices='["/dev/sdd"]'
node105.example.com glusterfs_zone=3 glusterfs_devices='["/dev/sdd"]'
Add the hosts listed under
[glusterfs]to the[nodes]group:[nodes] ... node103.example.com openshift_node_group_name="node-config-infra" node104.example.com openshift_node_group_name="node-config-infra" node105.example.com openshift_node_group_name="node-config-infra"The preceding steps detail options that need to be added to a larger, complete inventory file. To use the complete inventory file to deploy {gluster} provide the file path as an option to the following playbooks:
For an initial OpenShift Container Platform installation:
ansible-playbook -i <path_to_inventory_file> /usr/share/ansible/openshift-ansible/playbooks/prerequisites.yml

ansible-playbook -i <path_to_inventory_file> /usr/share/ansible/openshift-ansible/playbooks/deploy_cluster.yml
For a standalone installation onto an existing OpenShift Container Platform cluster:
ansible-playbook -i <path_to_inventory_file> /usr/share/ansible/openshift-ansible/playbooks/openshift-glusterfs/config.yml
- To verify the deployment see, Section 4.8, “Verify your Deployment”.
4.3. Deploying Red Hat Openshift Container Storage in Converged Mode with Registry
In your inventory file, include the following variables in the [OSEv3:vars] section, adjusting them as needed for your configuration:
openshift_storage_glusterfs_registry_namespace=app-storage
openshift_storage_glusterfs_registry_storageclass=true
openshift_storage_glusterfs_registry_storageclass_default=false
openshift_storage_glusterfs_registry_block_deploy=true
openshift_storage_glusterfs_registry_block_host_vol_create=true
openshift_storage_glusterfs_registry_block_host_vol_size=100
openshift_storage_glusterfs_registry_block_storageclass=true
openshift_storage_glusterfs_registry_block_storageclass_default=false
In your inventory file, set the following variable under
[OSEv3:vars]:[OSEv3:vars] ... openshift_hosted_registry_storage_kind=glusterfs openshift_hosted_registry_storage_volume_size=5Gi openshift_hosted_registry_selector='node-role.kubernetes.io/infra=true'Add
glusterfs_registryin the[OSEv3:children]section to enable the`[glusterfs_registry]` group:[OSEv3:children] masters etcd nodes glusterfs_registryAdd a
[glusterfs_registry]section with entries for each storage node that will host the GlusterFS storage. For each node, setglusterfs_devicesto a list of raw block devices that will be completely managed as part of a GlusterFS cluster. There must be at least one device listed. Each device must be bare, with no partitions or LVM PVs. Specifying the variable takes the form:<hostname_or_ip> glusterfs_zone=<zone_number> glusterfs_devices='[ "</path/to/device1/>", "</path/to/device2>", ... ]'For example:
[glusterfs_registry]
node106.example.com glusterfs_zone=1 glusterfs_devices='["/dev/sdd"]'
node107.example.com glusterfs_zone=2 glusterfs_devices='["/dev/sdd"]'
node108.example.com glusterfs_zone=3 glusterfs_devices='["/dev/sdd"]'
Add the hosts listed under
[glusterfs_registry]to the[nodes]group:[nodes] ... node106.example.com openshift_node_group_name="node-config-compute" node107.example.com openshift_node_group_name="node-config-compute" node108.example.com openshift_node_group_name="node-config-compute"
The preceding steps detail options that need to be added to a larger, complete inventory file. To use the complete inventory file to deploy {gluster} provide the file path as an option to the following playbooks:
For an initial OpenShift Container Platform installation:
ansible-playbook -i <path_to_inventory_file> /usr/share/ansible/openshift-ansible/playbooks/prerequisites.yml ansible-playbook -i <path_to_inventory_file> /usr/share/ansible/openshift-ansible/playbooks/deploy_cluster.ymlFor a standalone installation onto an existing OpenShift Container Platform cluster:
ansible-playbook -i <path_to_inventory_file> /usr/share/ansible/openshift-ansible/playbooks/openshift-glusterfs/config.yml
- To verify the deployment see, Section 4.8, “Verify your Deployment”.
4.4. Deploying Red Hat Openshift Container Storage in Converged Mode with Logging and Metrics
In your inventory file, set the following variables under
[OSEv3:vars]:[OSEv3:vars] ... openshift_metrics_install_metrics=true openshift_metrics_cassandra_storage_type=pv openshift_metrics_hawkular_nodeselector={"node-role.kubernetes.io/infra": "true"} openshift_metrics_cassandra_nodeselector={"node-role.kubernetes.io/infra": "true"} openshift_metrics_heapster_nodeselector={"node-role.kubernetes.io/infra": "true"} openshift_metrics_storage_volume_size=20Gi openshift_metrics_cassandra_pvc_storage_class_name="glusterfs-registry-block" openshift_logging_install_logging=true openshift_logging_es_pvc_dynamic=true openshift_logging_storage_kind=dynamic openshift_logging_kibana_nodeselector={"node-role.kubernetes.io/infra": "true"} openshift_logging_curator_nodeselector={"node-role.kubernetes.io/infra": "true"} openshift_logging_es_nodeselector={"node-role.kubernetes.io/infra": "true"} openshift_logging_es_pvc_size=20Gi openshift_logging_es_pvc_storage_class_name="glusterfs-registry-block" openshift_storage_glusterfs_registry_namespace=infra-storage openshift_storage_glusterfs_registry_storageclass=false openshift_storage_glusterfs_registry_storageclass_default=false openshift_storage_glusterfs_registry_block_deploy=true openshift_storage_glusterfs_registry_block_host_vol_create=true openshift_storage_glusterfs_registry_block_host_vol_size=100 openshift_storage_glusterfs_registry_block_storageclass=true openshift_storage_glusterfs_registry_block_storageclass_default=falseNoteFor more details about all the variables, see https://github.com/openshift/openshift-ansible/tree/release-3.11/roles/openshift_storage_glusterfs.
Add
glusterfs_registryin the[OSEv3:children]`section to enable the `[glusterfs_registry]group:[OSEv3:children] masters etcd nodes glusterfs_registryAdd a
[glusterfs_registry]section with entries for each storage node thatwill host the GlusterFS storage. For each node, setglusterfs_devicesto alist of raw block devices that will be completely managed as part of aGlusterFS cluster. There must be at least one device listed. Each device mustbe bare, with no partitions or LVM PVs. Specifying the variable takes the form:<hostname_or_ip> glusterfs_zone=<zone_number> glusterfs_devices='[ "</path/to/device1/>", "</path/to/device2>", ... ]'For example:
[glusterfs_registry] node106.example.com glusterfs_zone=1 glusterfs_devices='["/dev/sdd"]' node107.example.com glusterfs_zone=2 glusterfs_devices='["/dev/sdd"]' node108.example.com glusterfs_zone=3 glusterfs_devices='["/dev/sdd"]'-
Add the hosts listed under
[glusterfs_registry]to the[nodes]group:
[nodes]
...
node106.example.com openshift_node_group_name="node-config-compute"
node107.example.com openshift_node_group_name="node-config-compute"
node108.example.com openshift_node_group_name="node-config-compute"
The preceding steps detail options that need to be added to a larger, complete inventory file. To use the complete inventory file to deploy {gluster} provide the file path as an option to the following playbooks:
For an initial OpenShift Container Platform installation:
ansible-playbook -i <path_to_inventory_file> /usr/share/ansible/openshift-ansible/playbooks/prerequisites.yml

ansible-playbook -i <path_to_inventory_file> /usr/share/ansible/openshift-ansible/playbooks/deploy_cluster.yml
For a standalone installation onto an existing OpenShift Container Platform cluster:
ansible-playbook -i <path_to_inventory_file> /usr/share/ansible/openshift-ansible/playbooks/openshift-glusterfs/config.yml ansible-playbook -i <path_to_the_inventory_file> /usr/share/ansible/openshift-ansible/playbooks/openshift-logging/config.yml ansible-playbook -i <path_to_the_inventory_file> /usr/share/ansible/openshift-ansible/playbooks/openshift-metrics/config.yml
- To verify the deployment see, Section 4.8, “Verify your Deployment”.
4.5. Deploying Red Hat Openshift Container Storage in Converged mode for Applications with Registry, Logging, and Metrics
In your inventory file, set the following variables under
[OSEv3:vars]:[OSEv3:vars] ... openshift_hosted_registry_selector='node-role.kubernetes.io/infra=true' openshift_hosted_registry_storage_volume_size=5Gi openshift_hosted_registry_storage_kind=glusterfs [OSEv3:vars] ... openshift_metrics_install_metrics=true openshift_metrics_cassandra_storage_type=pv openshift_metrics_hawkular_nodeselector={"node-role.kubernetes.io/infra": "true"} openshift_metrics_cassandra_nodeselector={"node-role.kubernetes.io/infra": "true"} openshift_metrics_heapster_nodeselector={"node-role.kubernetes.io/infra": "true"} openshift_metrics_storage_volume_size=20Gi openshift_metrics_cassandra_pvc_storage_class_name="glusterfs-registry-block" openshift_logging_install_logging=true openshift_logging_es_pvc_dynamic=true openshift_logging_storage_kind=dynamic openshift_logging_kibana_nodeselector={"node-role.kubernetes.io/infra": "true"} openshift_logging_curator_nodeselector={"node-role.kubernetes.io/infra": "true"} openshift_logging_es_nodeselector={"node-role.kubernetes.io/infra": "true"} openshift_logging_es_pvc_size=20Gi openshift_logging_es_pvc_storage_class_name="glusterfs-registry-block" openshift_storage_glusterfs_namespace=app-storage openshift_storage_glusterfs_storageclass=true openshift_storage_glusterfs_storageclass_default=false openshift_storage_glusterfs_block_deploy=false openshift_storage_glusterfs_registry_namespace=infra-storage openshift_storage_glusterfs_registry_storageclass=false openshift_storage_glusterfs_registry_storageclass_default=false openshift_storage_glusterfs_registry_block_deploy=true openshift_storage_glusterfs_registry_block_host_vol_create=true openshift_storage_glusterfs_registry_block_host_vol_size=100 openshift_storage_glusterfs_registry_block_storageclass=true openshift_storage_glusterfs_registry_block_storageclass_default=falseNoteEnsure to set
openshift_storage_glusterfs_block_deploy=falsein this deployment scenario.Add
glusterfsandglusterfs_registryin the[OSEv3:children]section toenable the[glusterfs]and[glusterfs_registry]groups:[OSEv3:children] ... glusterfs glusterfs_registryAdd
[glusterfs]and[glusterfs_registry]sections with entries for eachstorage node that will host the GlusterFS storage. For each node, set`glusterfs_devices` to a list of raw block devices that will be completelymanaged as part of a GlusterFS cluster. There must be at least one devicelisted. Each device must be bare, with no partitions or LVM PVs. Specifying thevariable takes the form:<hostname_or_ip> glusterfs_zone=<zone_number> glusterfs_devices='[ "</path/to/device1/>", "</path/to/device2>", ... ]'For example:
[glusterfs] node103.example.com glusterfs_zone=1 glusterfs_devices='["/dev/sdd"]' node104.example.com glusterfs_zone=2 glusterfs_devices='["/dev/sdd"]' node105.example.com glusterfs_zone=3 glusterfs_devices='["/dev/sdd"]' [glusterfs_registry] node106.example.com glusterfs_zone=1 glusterfs_devices='["/dev/sdd"]' node107.example.com glusterfs_zone=2 glusterfs_devices='["/dev/sdd"]' node108.example.com glusterfs_zone=3 glusterfs_devices='["/dev/sdd"]'Add the hosts listed under
[glusterfs]and[glusterfs_registry]to the`[nodes]` group:[nodes] ... node103.example.com openshift_node_group_name="node-config-compute" node104.example.com openshift_node_group_name="node-config-compute" node105.example.com openshift_node_group_name="node-config-compute" node106.example.com openshift_node_group_name="node-config-infra" node107.example.com openshift_node_group_name="node-config-infra" node108.example.com openshift_node_group_name="node-config-infra"The preceding steps detail options that need to be added to a larger, complete inventory file. To use the complete inventory file to deploy {gluster} provide the file path as an option to the following playbooks:
For an initial OpenShift Container Platform installation:
ansible-playbook -i <path_to_inventory_file> /usr/share/ansible/openshift-ansible/playbooks/prerequisites.yml

ansible-playbook -i <path_to_inventory_file> /usr/share/ansible/openshift-ansible/playbooks/deploy_cluster.yml
For a standalone installation onto an existing OpenShift Container Platform cluster:
ansible-playbook -i <path_to_inventory_file> /usr/share/ansible/openshift-ansible/playbooks/openshift-glusterfs/config.yml

ansible-playbook -i <path_to_the_inventory_file> /usr/share/ansible/openshift-ansible/playbooks/openshift-logging/config.yml

ansible-playbook -i <path_to_the_inventory_file>  /usr/share/ansible/openshift-ansible/playbooks/openshift-metrics/config.yml
- To verify the deployment see, Section 4.8, “Verify your Deployment”.
4.6. Single OCS cluster installation
It is possible to support both general-application storage and infrastructure storage in a single OCS cluster. To do this, the inventory file options will change slightly for logging and metrics. This is because when there is only one cluster, the gluster-block StorageClass would be glusterfs-storage-block.
The registry PV will be created on this single cluster if the second cluster,[glusterfs_registry] does not exist. For high availability, it is very important to have four nodes for this cluster. Special attention should be given to choosing the size for openshift_storage_glusterfs_block_host_vol_size.
This is the hosting volume for gluster-block devices that will be created for logging and metrics. Make sure that the size can accommodate all these block volumes and have sufficient storage if another hosting volume must be created.
[OSEv3:children]
...
nodes
glusterfs
[OSEv3:vars]
...
# registry
...
# logging
openshift_logging_install_logging=true
...
openshift_logging_es_pvc_storage_class_name='glusterfs-storage-block'
...
# metrics
openshift_metrics_install_metrics=true
...
openshift_metrics_cassandra_pvc_storage_class_name='glusterfs-storage-block'
...
# glusterfs_registry_storage
openshift_hosted_registry_storage_kind=glusterfs
openshift_hosted_registry_storage_volume_size=20Gi
openshift_hosted_registry_selector="node-role.kubernetes.io/infra=true"
# OCS storage cluster for applications
openshift_storage_glusterfs_namespace=app-storage
openshift_storage_glusterfs_storageclass=true
openshift_storage_glusterfs_storageclass_default=false
openshift_storage_glusterfs_block_deploy=true
openshift_storage_glusterfs_block_host_vol_create=true
openshift_storage_glusterfs_block_host_vol_size=100
openshift_storage_glusterfs_block_storageclass=true
openshift_storage_glusterfs_block_storageclass_default=false
...
[nodes]
…
ose-app-node01.ocpgluster.com openshift_node_group_name="node-config-compute"
ose-app-node02.ocpgluster.com openshift_node_group_name="node-config-compute"
ose-app-node03.ocpgluster.com openshift_node_group_name="node-config-compute"
ose-app-node04.ocpgluster.com openshift_node_group_name="node-config-compute"
[glusterfs]
ose-app-node01.ocpgluster.com glusterfs_zone=1 glusterfs_devices='[ "/dev/xvdf" ]'
ose-app-node02.ocpgluster.com glusterfs_zone=2 glusterfs_devices='[ "/dev/xvdf" ]'
ose-app-node03.ocpgluster.com glusterfs_zone=3 glusterfs_devices='[ "/dev/xvdf" ]'
ose-app-node04.ocpgluster.com glusterfs_zone=1 glusterfs_devices='[ "/dev/xvdf" ]'
openshift_storage_glusterfs_block_host_vol_size takes an integer, which is the size of the volume in Gi.
4.7. Configure Heketi to Place Bricks Across Zones
Heketi uses node zones as a hint for brick placement. To force Heketi to strictly place replica bricks in different zones, "strict zone checking" feature of Heketi has to be enabled. When this feature is enabled, a volume is created successfully only if each brick set is spread across sufficiently many zones.
Ensure that the OCS nodes are labeled with the correct zones before configuring StorageClass to use heketi’s strict zoning.
You can configure this feature by adding the "volumeoptions" field with the desired setting in the parameters section of the StorageClass. For example:
volumeoptions: "user.heketi.zone-checking strict"OR
volumeoptions: "user.heketi.zone-checking none"The settings are as follows:
- strict
- Requires at least 3 nodes to be present in different zones (assuming replica 3).
- none
- Previous (and current default) behavior
A sample StorageClass file with "strict zone checking" feature configured is shown below:
# cat glusterfs-storageclass.yaml
apiVersion: storage.k8s.io/v1
kind: StorageClass
metadata:
name: gluster-container
provisioner: kubernetes.io/glusterfs
reclaimPolicy: Delete
parameters:
resturl: "http://heketi-storage-project.cloudapps.mystorage.com"
restuser: "admin"
volumetype: "replicate:3"
clusterid: "630372ccdc720a92c681fb928f27b53f"
secretNamespace: "default"
secretName: "heketi-secret"
volumeoptions: "user.heketi.zone-checking strict"
volumenameprefix: "test-vol"
allowVolumeExpansion: trueExisting storage class specifications are not editable. You can create a new storage class with the required volume options for all future applications. However, if you need to change the settings of an existing storage class then the existing storage class must first be deleted and then a new storage class with the same name as the previous class has to be re-created.
Execute the following commands to delete and re-create the glusterfs-storage storage class with the new settings:
Export the storage class object to a yaml file:
# oc get sc glusterfs-storage --export=true -o yaml > glusterfs-storage.yaml- Use your preferred editor to add the new parameters.
Delete and re-create the storage class object:
# oc delete sc glusterfs-storage # oc create -f glusterfs-storage.yaml
4.8. Verify your Deployment
Execute the following steps to verify the deployment.
Installation Verification for converged mode
Examine the installation for the app-storage namespace by running the following commands This can be done from an OCP master node or the ansible deploy host that has the OC CLI installed.
# switch to the app-storage namespace oc project app-storage # get the list of pods here (3 gluster pods +1 heketi pod + 1 gluster block provisioner pod) oc get pods NAME READY STATUS RESTARTS AGE glusterblock-storage-provisioner-dc-1-mphfp 1/1 Running 0 1h glusterfs-storage-6tlzx 1/1 Running 0 1h glusterfs-storage-lksps 1/1 Running 0 1h glusterfs-storage-nf7qk 1/1 Running 0 1h glusterfs-storage-tcnd8 1/1 Running 0 1h heketi-storage-1-5m6cl 1/1 Running 0 1hExamine the installation for the infra-storage namespace by running the following commands This can be done from an OCP master node or the ansible deploy host that has the OC CLI installed.
# switch to the infra-storage namespace oc project infra-storage # list the pods here (3 gluster pods, 1 heketi pod and 1 glusterblock-provisioner pod) oc get pods NAME READY STATUS RESTARTS AGE glusterblock-registry-provisioner-dc-1-28sfc 1/1 Running 0 1h glusterfs-registry-cjp49 1/1 Running 0 1h glusterfs-registry-lhgjj 1/1 Running 0 1h glusterfs-registry-v4vqx 1/1 Running 0 1h heketi-registry-5-lht6s 1/1 Running 0 1hCheck the existence of the registry PVC backed by OCP infrastructure Red Hat Openshift Container Storage. This volume was statically provisioned by openshift-ansible deployment.
oc get pvc -n default NAME STATUS VOLUME CAPACITY ACCESSMODES STORAGECLASS AGE registry-claim Bound pvc-7ca4c8de-10ca-11e8-84d3-069df2c4f284 25Gi RWX 1hCheck the registry DeploymentConfig to verify it’s using this glusterfs volume.
oc describe dc/docker-registry -n default | grep -A3 Volumes Volumes: registry-storage: Type: PersistentVolumeClaim (a reference to a PersistentVolumeClaim in the same namespace) ClaimName: registry-claim
Storage Provisioning Verification for Converged Mode
The Storage Class resources can be used to create new PV claims for verification of the RHOCS deployment. Validate PV provisioning using the following OCP Storage Class created during the RHOCS deployment:
- Use the glusterfs-storage-block OCP Storage Class resource to create new PV claims if you deployed RHOCS using Section 4.2, “Deploying Red Hat Openshift Container Storage in Converged Mode”.
Use the glusterfs-registry-block OCP Storage Class resource to create new PV claims if you deployed RHOCS using one of the following workflows:
- Section 4.3, “Deploying Red Hat Openshift Container Storage in Converged Mode with Registry”
- Section 4.4, “Deploying Red Hat Openshift Container Storage in Converged Mode with Logging and Metrics”
- Section 4.5, “Deploying Red Hat Openshift Container Storage in Converged mode for Applications with Registry, Logging, and Metrics”
# oc get storageclass NAME TYPE glusterfs-storage kubernetes.io/glusterfs glusterfs-storage-block gluster.org/glusterblock $ cat pvc-file.yaml kind: PersistentVolumeClaim apiVersion: v1 spec: name: rhocs-file-claim1 annotations: storageClassName: glusterfs-storage spec: accessModes: - ReadWriteMany resources: requests: storage: 5Gi# cat pvc-block.yaml kind: PersistentVolumeClaim apiVersion: v1 spec: name: rhocs-block-claim1 annotations: storageClassName: glusterfs-storage-block spec: accessModes: - ReadWriteOnce resources: requests: storage: 5Gi# oc create -f pvc-file.yaml # oc create -f pvc-block.yamlValidate that the two PVCs and respective PVs are created correctly:
# oc get pvc
Using the heketi-client for Verification
The heketi-client package needs to be installed on the ansible deploy host or on a OCP master. Once it is installed two new files should be created to easily export the required environment variables to run the heketi-client commands (or heketi-cli). The content of each file as well as useful heketi-cli commands are detailed here.
Create a new file (e.g. "heketi-exports-app") with the following contents:
export HEKETI_POD=$(oc get pods -l glusterfs=heketi-storage-pod -n app-storage -o jsonpath="{.items[0].metadata.name}") export HEKETI_CLI_SERVER=http://$(oc get route/heketi-storage -n app-storage -o jsonpath='{.spec.host}') export HEKETI_CLI_KEY=$(oc get pod/$HEKETI_POD -n app-storage -o jsonpath='{.spec.containers[0].env[?(@.name=="HEKETI_ADMIN_KEY")].value}') export HEKETI_ADMIN_KEY_SECRET=$(echo -n ${HEKETI_CLI_KEY} | base64) export HEKETI_CLI_USER=adminSource the file to create the HEKETI app-storage environment variables:
source heketi-exports-app # see if heketi is alive curl -w '\n' ${HEKETI_CLI_SERVER}/hello Hello from Heketi # ask heketi about the cluster it knows about heketi-cli cluster list Clusters: Id:56ed234a384cef7dbef6c4aa106d4477 [file][block] # ask heketi about the topology of the RHOCS cluster for apps heketi-cli topology info # ask heketi about the volumes already created (one for the heketi db should exist after the OCP initial installation) heketi-cli volume list Id:d71a4cbea22af3453615a9020f261b5c Cluster:56ed234a384cef7dbef6c4aa106d4477 Name:heketidbstorageCreate a new file (e.g. "heketi-exports-infra") with the following contents:
export HEKETI_POD=$(oc get pods -l glusterfs=heketi-registry-pod -n infra-storage -o jsonpath="{.items[0].metadata.name}") export HEKETI_CLI_SERVER=http://$(oc get route/heketi-registry -n infra-storage -o jsonpath='{.spec.host}') export HEKETI_CLI_USER=admin export HEKETI_CLI_KEY=$(oc get pod/$HEKETI_POD -n infra-storage -o jsonpath='{.spec.containers[0].env[?(@.name=="HEKETI_ADMIN_KEY")].value}') export HEKETI_ADMIN_KEY_SECRET=$(echo -n ${HEKETI_CLI_KEY} | base64)Source the file to create the HEKETI infra-storage environment variables:
source heketi-exports-infra # see if heketi is alive curl -w '\n' ${HEKETI_CLI_SERVER}/hello Hello from Heketi # ask heketi about the cluster it knows about (the RHOCS cluster for infrastructure) heketi-cli cluster list Clusters: Id:baf91b261cbca2bb4b62caece63f60d0 [file][block] # ask heketi about the volumes already created heketi-cli volume list Id:77baed02f79f4518326d8cc1db6c7af8 Cluster:baf91b261cbca2bb4b62caece63f60d0 Name:heketidbstorage
4.9. Creating an Arbiter Volume (optional)
Arbiter volumes support all persistent volume types with similar consistency and less disk space requirements. An arbitrated replicated volume, or arbiter volume, acts like a three-way replicated volume where every third brick is a special type of brick called an arbiter. Arbiter bricks do not store file data; they only store file names, structure, and metadata. The arbiter uses client quorum to compare this metadata with the metadata of the other nodes to ensure consistency in the volume and prevent split-brain conditions.
Advantages of arbitrated replicated volumes:
- Similar consistency: When an arbiter is configured, arbitration logic uses client-side quorum in auto mode to prevent file operations that would lead to split-brain conditions.
- Less disk space required: Because an arbiter brick only stores file names and metadata, an arbiter brick can be much smaller than the other bricks in the volume.
For more information about Arbitrated Replicated Volumes, see https://access.redhat.com/documentation/en-us/red_hat_gluster_storage/3.5/html-single/administration_guide/index#Creating_Arbitrated_Replicated_Volumes
Before creating the arbiter volume, make sure heketi-client packages are installed.
# subscription-manager repos --enable=rh-gluster-3-for-rhel-7-server-rpms# yum install heketi-clientIf you want to upgrade your already existing Heketi server, then see, https://access.redhat.com/documentation/en-us/red_hat_openshift_container_storage/3.11/html-single/deployment_guide/index#upgrade_heketi_rhgs
Arbiter volumes may not be appropriate for small file or unpredictable file-size workloads as it could fill up the arbiter bricks faster than the data bricks. If you want to use an arbiter volume, we recommend you to choose a conservative average file size based on the size of the data brick and number of files so that the arbiter brick can accommodate your workload.
4.9.1. Creating an Arbiter Volume
Arbiter volume can be created using the Heketi CLI or by updating the storageclass file.
4.9.1.1. Creating an Arbiter Volume using Heketi CLI
To create an Arbiter volume using the Heketi CLI one must request a replica 3 volume as well as provide the Heketi-specific volume option “user.heketi.arbiter true” that will instruct the system to create the Arbiter variant of replica 3.
For example:
# heketi-cli volume create --size=4 --gluster-volume-options='user.heketi.arbiter true'4.9.1.2. Creating an Arbiter Volume using the Storageclass file
To create an arbiter volume using the storageclass file ensure to include the following two parameters in the storageclass file:
- user.heketi.arbiter true
- (Optional) user.heketi.average-file-size 1024
Following is a sample storageclass file:
# cat glusterfs-storageclass.yaml
apiVersion: storage.k8s.io/v1
kind: StorageClass
metadata:
name: gluster-container
provisioner: kubernetes.io/glusterfs
parameters:
resturl: "http://heketi-storage-project.cloudapps.mystorage.com"
restuser: "admin"
volumetype: "replicate:3"
clusterid: "630372ccdc720a92c681fb928f27b53f,796e6db1981f369ea0340913eeea4c9a"
secretNamespace: "default"
secretName: "heketi-secret"
volumeoptions: "user.heketi.arbiter true,user.heketi.average-file-size 1024"
volumenameprefix: "test-vol"
spec:
persistentVolumeReclaimPolicy: Retain
accessModes:
- ReadWriteOnce
resources:
requests:
storage: 5Gi4.9.2. Creating Block Hosting Volume as an Arbiter Volume
There are no changes to the storageclass file.
To create a block hosting volume as an arbiter volume, execute the following:
Edit the configuration file under Glusterfs section in Heketi deployment configuration by adding the following environment variable and value:
HEKETI_BLOCK_HOSTING_VOLUME_OPTIONS: group gluster-block,user.heketi.arbiter trueCreate block volume using Heketi CLI.
# heketi-cli blockvolume create --size=100Ensure that block hosting volume is arbiter volume.
# gluster v infoNoteFor information about managing arbiter volumes see, Chapter 10, Managing Arbitrated Replicated Volumes
Chapter 5. Deploying Container Storage in Independent Mode
Before following the deployment workflow for your preferred solution, make sure to complete ] and review xref:chap-Documentation-Red_Hat_Gluster_Storage_Container_Native_with_OpenShift_Platform-Specify_variables_CRS[ to understand ansible variable and playbook recommendations and requirements.To set up storage to containers as a stand-alone Red Hat Gluster Storage cluster, select the workflow that meets your objectives.
| Deployment workflow | Registry | Metrics | Logging | Applications |
|---|---|---|---|---|
| Section 5.3, “Deploying Red Hat Openshift Container Storage in Independent Mode” | ✔ | |||
| ✔ | ✔ | ✔ | ✔ |
- Red Hat Openshift Container Storage does not support a simultaneous deployment of converged and independent mode with ansible workflow. Therefore, you must deploy either converged mode or independent mode: you cannot mix both modes during deployment.
- s3 is deployed manually and not through Ansible installer. For more information on manual deployment, see https://access.redhat.com/documentation/en-us/red_hat_openshift_container_storage/3.11/html-single/operations_guide/#S3_Object_Store
New registry name registry.redhat.io is used throughout in this Guide.
However, if you have not migrated to the new registry yet then replace all occurrences of registry.redhat.io with registry.access.redhat.com where ever applicable.
5.1. Setting up a RHGS Cluster
In an independent mode set-up a dedicated Red Hat Gluster Storage cluster is available external to the OpenShift Container Platform. The storage is provisioned from the Red Hat Gluster Storage cluster.
5.1.1. Installing Red Hat Gluster Storage Server on Red Hat Enterprise Linux (Layered Install)
Layered install involves installing Red Hat Gluster Storage over Red Hat Enterprise Linux.
It is recommended to create a separate /var partition that is large enough (50GB - 100GB) for log files, geo-replication related miscellaneous files, and other files.
Perform a base install of Red Hat Enterprise Linux 7 Server
Independent mode is supported only on Red Hat Enterprise Linux 7.
Register the System with Subscription Manager
Run the following command and enter your Red Hat Network username and password to register the system with the Red Hat Network:
# subscription-manager registerIdentify Available Entitlement Pools
Run the following commands to find entitlement pools containing the repositories required to install Red Hat Gluster Storage:
# subscription-manager list --availableAttach Entitlement Pools to the System
Use the pool identifiers located in the previous step to attach the
Red Hat Enterprise Linux ServerandRed Hat Gluster Storageentitlements to the system. Run the following command to attach the entitlements:# subscription-manager attach --pool=[POOLID]For example:
# subscription-manager attach --pool=8a85f9814999f69101499c05aa706e47Enable the Required Channels
Run the following commands to enable the repositories required to install Red Hat Gluster Storage 3.5 on Red Hat Enterprise Linux 7.7
# subscription-manager repos --enable=rhel-7-server-rpms # subscription-manager repos --enable=rh-gluster-3-for-rhel-7-server-rpms # subscription-manager repos --enable=rhel-7-server-extras-rpmsVerify if the Channels are Enabled
Run the following command to verify if the channels are enabled:
# yum repolist- Update all packages
Ensure that all packages are up to date by running the following command.
+
# yum updateKernel Version Requirement
Independent mode requires the kernel-3.10.0-862.14.4.el7.x86_64 version or higher to be used on the system. Verify the installed and running kernel versions by running the following command:
# rpm -q kernel kernel-3.10.0-862.14.4.el7.x86_64# uname -r 3.10.0-862.14.4.el7.x86_64ImportantIf any kernel packages are updated, reboot the system with the following command.
+
# shutdown -r nowInstall Red Hat Gluster Storage
Run the following command to install Red Hat Gluster Storage:
# yum install redhat-storage-serverTo enable gluster-block execute the following command:
# yum install gluster-blockReboot
Reboot the system.
5.1.2. Configuring Port Access
This section provides information about the ports that must be open for the independent mode.
Red Hat Gluster Storage Server uses the listed ports. You must ensure that the firewall settings do not prevent access to these ports.
Execute the following commands to open the required ports for both runtime and permanent configurations on all Red Hat Gluster Storage nodes:
# firewall-cmd --zone=zone_name --add-port=24010/tcp --add-port=3260/tcp --add-port=111/tcp --add-port=22/tcp --add-port=24007/tcp --add-port=49152-49664/tcp
# firewall-cmd --zone=zone_name --add-port=24010/tcp --add-port=3260/tcp --add-port=111/tcp --add-port=22/tcp --add-port=24007/tcp --add-port=49152-49664/tcp --permanent- Port 24010 and 3260 are for gluster-blockd and iSCSI targets respectively.
- The port range starting at 49664 defines the range of ports that can be used by GlusterFS for communication to its volume bricks. In the above example the total number of bricks allowed is 512. Configure the port range based on the maximum number of bricks that could be hosted on each node.
-
If the option
client.bind-insecureis set, Gluster native clients (including the gfapi clients ) use the first available port which starts at port 1023 or 49152.
5.1.3. Enabling Kernel Modules
Execute the following commands to enable kernel modules:
You must ensure that the dm_thin_pool and target_core_user modules are loaded in the Red Hat Gluster Storage nodes.
# modprobe target_core_user# modprobe dm_thin_poolExecute the following command to verify if the modules are loaded:
# lsmod | grep dm_thin_pool# lsmod | grep target_core_userNoteTo ensure these operations are persisted across reboots, create the following files and update each file with the content as mentioned:
# cat /etc/modules-load.d/dm_thin_pool.conf dm_thin_pool# cat /etc/modules-load.d/target_core_user.conf target_core_userYou must ensure that the dm_multipath module is loaded on all OpenShift Container Platform nodes.
# modprobe dm_multipathExecute the following command to verify if the modules are loaded:
# lsmod | grep dm_multipathNoteTo ensure these operations are persisted across reboots, create the following file and update it with the content as mentioned:
# cat /etc/modules-load.d/dm_multipath.conf dm_multipath
5.1.4. Starting and Enabling Services
Execute the following commands to start glusterd and gluster-blockd:
# systemctl start sshd# systemctl enable sshd# systemctl start glusterd# systemctl enable glusterd# systemctl start gluster-blockd# systemctl enable gluster-blockd5.1.5. Creating 2 TB (or more) Block Volume
To create 2 TB or more (a maximum of 2.5 TB) of block volume in independent mode, the GB_CLI_TIMEOUT parameter has to be configured as follows:
-
Edit the /etc/sysconfig/gluster-blockd configuration file. Uncomment the
GB_CLI_TIMEOUTparameter and update the parameter value as900.
5.2. Specify Advanced Installer Variables
The cluster installation process as documented in https://access.redhat.com/documentation/en-us/openshift_container_platform/3.11/html-single/installing_clusters/#install-planning, can be used to install one or both the GlusterFS node groups:
-
glusterfs: A general storage cluster for use by user applications. -
glusterfs-registry: A dedicated storage cluster for use by infrastructureapplications such as an integrated OpenShift Container Registry.
It is recommended to deploy both groups to avoid potential impacts onperformance in I/O and volume creation. Both of these are defined in theinventory hosts file.
The definition of the clusters is done by including the relevant names in the`[OSEv3:children]` group, creating similarly named groups, and then populating the groups with the node information. The clusters can then be configured through a variety of variables in the [OSEv3:vars] group. glusterfs variables begin with openshift_storage_glusterfs_ and glusterfs-registry variables begin with openshift_storage_glusterfs_registry_. A few other variables, such as openshift_hosted_registry_storage_kind, interact with the GlusterFS clusters.
It is recommended to specify version tags for all containerized components.This is primarily to prevent components from upgrading after an outage, which might lead to a cluster of widely disparate software versions. The relevant variables are:
-
openshift_storage_glusterfs_image -
openshift_storage_glusterfs_block_image -
openshift_storage_glusterfs_heketi_image
The image variables for gluster-block is necessary only if the corresponding deployment variables (the variables ending in _block_deploy) is true.
The recommended values for this release of Red Hat Openshift Container Storage are as follows:
-
openshift_storage_glusterfs_image=registry.redhat.io/rhgs3/rhgs-server-rhel7:v3.11.8 -
openshift_storage_glusterfs_block_image=registry.redhat.io/rhgs3/rhgs-gluster-block-prov-rhel7:v3.11.8 -
openshift_storage_glusterfs_heketi_image=registry.redhat.io/rhgs3/rhgs-volmanager-rhel7:v3.11.8 -
openshift_storage_glusterfs_s3_server_image=registry.redhat.io/rhgs3/rhgs-s3-server-rhel7:v3.11.8
For a complete list of variables, see https://github.com/openshift/openshift-ansible/tree/release-3.11/roles/openshift_storage_glusterfs on GitHub.
Once the variables are configured, there are several playbooks available depending on the circumstances of the installation:
- The main playbook for cluster installations can be used to deploy theGlusterFS clusters in tandem with an initial installation of OpenShift Container Platform.
- This includes deploying an integrated OpenShift Container Registry thatuses GlusterFS storage.
-
/usr/share/ansible/openshift-ansible/playbooks/openshift-glusterfs/config.ymlcan be used to deploy the clusters onto an existing OpenShift Container Platform installation. /usr/share/ansible/openshift-ansible/playbooks/openshift-glusterfs/registry.ymlcan be used to deploy the clusters onto an existing OpenShift Container Platform installation. In addition, this deploys an integrated OpenShift Container Registry, which uses GlusterFS storage.ImportantThe OpenShift Container Platform cluster must not contain a pre-existing registry.
NoteThe GlusterFS playbooks are not guaranteed to be idempotent. Running the playbooks more than once for a given installation is not supported without deleting the entire GlusterFS installation (including disk data) and starting over.
5.3. Deploying Red Hat Openshift Container Storage in Independent Mode
In your inventory file, add
glusterfsin the[OSEv3:children]section to enable the[glusterfs]group:[OSEv3:children] masters etcd nodes glusterfsInclude the following variables in the
[OSEv3:vars]section, adjusting them as needed for your configuration:[OSEv3:vars] ... openshift_storage_glusterfs_namespace=app-storage openshift_storage_glusterfs_storageclass=true openshift_storage_glusterfs_storageclass_default=false openshift_storage_glusterfs_block_deploy=true openshift_storage_glusterfs_block_host_vol_create=true openshift_storage_glusterfs_block_host_vol_size=100 openshift_storage_glusterfs_block_storageclass=true openshift_storage_glusterfs_block_storageclass_default=false openshift_storage_glusterfs_is_native=false openshift_storage_glusterfs_heketi_is_native=true openshift_storage_glusterfs_heketi_executor=ssh openshift_storage_glusterfs_heketi_ssh_port=22 openshift_storage_glusterfs_heketi_ssh_user=root openshift_storage_glusterfs_heketi_ssh_sudo=false openshift_storage_glusterfs_heketi_ssh_keyfile="/root/.ssh/id_rsa"Noteopenshift_storage_glusterfs_block_host_vol_sizetakes an integer, which is the size of the volume in Gi.Add a
[glusterfs]section with entries for each storage node that will hostthe GlusterFS storage. For each node, setglusterfs_devicesto a list of rawblock devices that will be completely managed as part of a GlusterFS cluster.There must be at least one device listed. Each device must be bare, with nopartitions or LVM PVs. Also, setglusterfs_ipto the IP address of the node.Specifying the variable takes the form:<hostname_or_ip> glusterfs_zone=<zone_number> glusterfs_ip=<ip_address> glusterfs_devices='[ "</path/to/device1/>", "</path/to/device2>", ... ]'For example:
[glusterfs] gluster1.example.com glusterfs_zone=1 glusterfs_ip=192.168.10.11 glusterfs_devices='[ "/dev/xvdc", "/dev/xvdd" ]' gluster2.example.com glusterfs_zone=2 glusterfs_ip=192.168.10.12 glusterfs_devices='[ "/dev/xvdc", "/dev/xvdd" ]' gluster3.example.com glusterfs_zone=3 glusterfs_ip=192.168.10.13 glusterfs_devices='[ "/dev/xvdc", "/dev/xvdd" ]'The preceding steps detail options that need to be added to a larger, complete inventory file. To use the complete inventory file to deploy {gluster} provide the file path as an option to the following playbooks:
For an initial OpenShift Container Platform installation:
ansible-playbook -i <path_to_inventory_file> /usr/share/ansible/openshift-ansible/playbooks/prerequisites.yml

ansible-playbook -i <path_to_inventory_file> /usr/share/ansible/openshift-ansible/playbooks/deploy_cluster.yml
For a standalone installation onto an existing OpenShift Container Platform cluster:
ansible-playbook -i <path_to_inventory_file> /usr/share/ansible/openshift-ansible/playbooks/openshift-glusterfs/config.yml
Brick multiplexing is a feature that allows adding multiple bricks into one process. This reduces resource consumption and allows us to run more bricks than before with the same memory consumption. Execute the following commands on one of the Red Hat Gluster Storage nodes on each cluster to enable brick-multiplexing:
Execute the following command to enable brick multiplexing:
# gluster vol set all cluster.brick-multiplex onFor example:
# gluster vol set all cluster.brick-multiplex on Brick-multiplexing is supported only for container workloads(Independent or Converged mode). Also it is advised to make sure that either all volumes are in stopped state or no bricks are running before this option is modified.Do you still want to continue? (y/n) y volume set: successRestart the heketidb volumes:
# gluster vol stop heketidbstorage Stopping volume will make its data inaccessible. Do you want to continue? (y/n) y volume stop: heketidbstorage: success# gluster vol start heketidbstorage volume start: heketidbstorage: success
5.4. Deploying Red Hat Openshift Container Storage in Independent mode for Applications with Registry, Logging, and Metrics
In your inventory file, set the following variables under
[OSEv3:vars]:[OSEv3:vars] ... openshift_hosted_registry_selector='node-role.kubernetes.io/infra=true' openshift_hosted_registry_storage_volume_size=5Gi openshift_hosted_registry_storage_kind=glusterfs openshift_metrics_install_metrics=true openshift_metrics_cassandra_storage_type=pv openshift_metrics_hawkular_nodeselector={"node-role.kubernetes.io/infra": "true"} openshift_metrics_cassandra_nodeselector={"node-role.kubernetes.io/infra": "true"} openshift_metrics_heapster_nodeselector={"node-role.kubernetes.io/infra": "true"} openshift_metrics_storage_volume_size=20Gi openshift_metrics_cassandra_pvc_storage_class_name="glusterfs-registry-block" openshift_logging_install_logging=true openshift_logging_es_pvc_dynamic=true openshift_logging_storage_kind=dynamic openshift_logging_kibana_nodeselector={"node-role.kubernetes.io/infra": "true"} openshift_logging_curator_nodeselector={"node-role.kubernetes.io/infra": "true"} openshift_logging_es_nodeselector={"node-role.kubernetes.io/infra": "true"} openshift_logging_es_pvc_size=20Gi openshift_logging_es_pvc_storage_class_name="glusterfs-registry-block" openshift_storage_glusterfs_namespace=app-storage openshift_storage_glusterfs_storageclass=true openshift_storage_glusterfs_storageclass_default=false openshift_storage_glusterfs_block_deploy=false openshift_storage_glusterfs_is_native=false openshift_storage_glusterfs_heketi_is_native=true openshift_storage_glusterfs_heketi_executor=ssh openshift_storage_glusterfs_heketi_ssh_port=22 openshift_storage_glusterfs_heketi_ssh_user=root openshift_storage_glusterfs_heketi_ssh_sudo=false openshift_storage_glusterfs_heketi_ssh_keyfile="/root/.ssh/id_rsa" openshift_storage_glusterfs_registry_namespace=infra-storage openshift_storage_glusterfs_registry_storageclass=false openshift_storage_glusterfs_registry_storageclass_default=false openshift_storage_glusterfs_registry_block_deploy=true openshift_storage_glusterfs_registry_block_host_vol_create=true openshift_storage_glusterfs_registry_block_host_vol_size=100 openshift_storage_glusterfs_registry_block_storageclass=true openshift_storage_glusterfs_registry_block_storageclass_default=false openshift_storage_glusterfs_registry_is_native=false openshift_storage_glusterfs_registry_heketi_is_native=true openshift_storage_glusterfs_registry_heketi_executor=ssh openshift_storage_glusterfs_registry_heketi_ssh_port=22 openshift_storage_glusterfs_registry_heketi_ssh_user=root openshift_storage_glusterfs_registry_heketi_ssh_sudo=false openshift_storage_glusterfs_registry_heketi_ssh_keyfile="/root/.ssh/id_rsa"NoteEnsure to set
openshift_storage_glusterfs_block_deploy=falsein this deployment scenario.Add
glusterfsandglusterfs_registryin the[OSEv3:children]section to enable the[glusterfs]and[glusterfs_registry]groups:[OSEv3:children] ... glusterfs glusterfs_registryAdd
[glusterfs]and[glusterfs_registry]sections with entries for eachstorage node that will host the GlusterFS storage. For each node, set`glusterfs_devices` to a list of raw block devices that will be completelymanaged as part of a GlusterFS cluster. There must be at least one devicelisted. Each device must be bare, with no partitions or LVM PVs. Specifying thevariable takes the form:<hostname_or_ip> glusterfs_zone=<zone_number> glusterfs_ip=<ip_address> glusterfs_devices='[ "</path/to/device1/>", "</path/to/device2>", ... ]'For example:
[glusterfs] node11.example.com glusterfs_zone=1 glusterfs_ip=192.168.10.11 glusterfs_devices='["/dev/xvdc", "/dev/xvdd" ]' node12.example.com glusterfs_zone=2 glusterfs_ip=192.168.10.12 glusterfs_devices='["/dev/xvdc", "/dev/xvdd" ]' node13.example.com glusterfs_zone=3 glusterfs_ip=192.168.10.13 glusterfs_devices='["/dev/xvdc", "/dev/xvdd" ]' [glusterfs_registry] node15.example.com glusterfs_zone=1 glusterfs_ip=192.168.10.15 glusterfs_devices='["/dev/xvdc", "/dev/xvdd" ]' node16.example.com glusterfs_zone=2 glusterfs_ip=192.168.10.16 glusterfs_devices='["/dev/xvdc", "/dev/xvdd" ]' node17.example.com glusterfs_zone=3 glusterfs_ip=192.168.10.17 glusterfs_devices='["/dev/xvdc", "/dev/xvdd" ]'The preceding steps detail options that need to be added to a larger, complete inventory file. To use the complete inventory file to deploy {gluster} provide the file path as an option to the following playbooks:
For an initial OpenShift Container Platform installation:
ansible-playbook -i <path_to_inventory_file> /usr/share/ansible/openshift-ansible/playbooks/prerequisites.yml ansible-playbook -i <path_to_inventory_file> /usr/share/ansible/openshift-ansible/playbooks/deploy_cluster.ymlFor a standalone installation onto an existing OpenShift Container Platform cluster:
ansible-playbook -i <path_to_inventory_file> /usr/share/ansible/openshift-ansible/playbooks/openshift-glusterfs/config.yml

ansible-playbook -i <path_to_the_inventory_file> /usr/share/ansible/openshift-ansible/playbooks/openshift-logging/config.yml

ansible-playbook -i <path_to_the_inventory_file>  /usr/share/ansible/openshift-ansible/playbooks/openshift-metrics/config.yml
- To verify the deployment see, Section 5.7, “Verify your Deployment”.
5.5. Single OCS cluster installation
It is possible to support both general-application storage and infrastructure storage in a single OCS cluster. To do this, the inventory file options will change slightly for logging and metrics. This is because when there is only one cluster, the gluster-block StorageClass would be glusterfs-storage-block.
The registry PV will be created on this single cluster if the second cluster,[glusterfs_registry] does not exist. For high availability, it is very important to have four nodes for this cluster. Special attention should be given to choosing the size for openshift_storage_glusterfs_block_host_vol_size.
This is the hosting volume for gluster-block devices that will be created for logging and metrics. Make sure that the size can accommodate all these block volumes and have sufficient storage if another hosting volume must be created.
[OSEv3:children]
...
nodes
glusterfs
[OSEv3:vars]
...
# registry
...
# logging
openshift_logging_install_logging=true
...
openshift_logging_es_pvc_storage_class_name='glusterfs-storage-block'
...
# metrics
openshift_metrics_install_metrics=true
...
openshift_metrics_cassandra_pvc_storage_class_name='glusterfs-storage-block'
...
# glusterfs_registry_storage
openshift_hosted_registry_storage_kind=glusterfs
openshift_hosted_registry_storage_volume_size=20Gi
openshift_hosted_registry_selector="node-role.kubernetes.io/infra=true"
# OCS storage cluster for applications
openshift_storage_glusterfs_namespace=app-storage
openshift_storage_glusterfs_storageclass=true
openshift_storage_glusterfs_storageclass_default=false
openshift_storage_glusterfs_block_deploy=true
openshift_storage_glusterfs_block_host_vol_create=true
openshift_storage_glusterfs_block_host_vol_size=100
openshift_storage_glusterfs_block_storageclass=true
openshift_storage_glusterfs_block_storageclass_default=false
openshift_storage_glusterfs_is_native=false
openshift_storage_glusterfs_heketi_is_native=true
openshift_storage_glusterfs_heketi_executor=ssh
openshift_storage_glusterfs_heketi_ssh_port=22
openshift_storage_glusterfs_heketi_ssh_user=root
openshift_storage_glusterfs_heketi_ssh_sudo=false
openshift_storage_glusterfs_heketi_ssh_keyfile="/root/.ssh/id_rsa"
...
[nodes]
…
ose-app-node01.ocpgluster.com openshift_node_group_name="node-config-compute"
ose-app-node02.ocpgluster.com openshift_node_group_name="node-config-compute"
ose-app-node03.ocpgluster.com openshift_node_group_name="node-config-compute"
ose-app-node04.ocpgluster.com openshift_node_group_name="node-config-compute"
[glusterfs]
ose-app-node01.ocpgluster.com glusterfs_zone=1 glusterfs_devices='["/dev/sdd"]' glusterfs_ip=192.168.0.11
ose-app-node02.ocpgluster.com glusterfs_zone=2 glusterfs_devices='["/dev/sdd"]' glusterfs_ip=192.168.0.12
ose-app-node03.ocpgluster.com glusterfs_zone=3 glusterfs_devices='["/dev/sdd"]' glusterfs_ip=192.168.0.13
ose-app-node04.ocpgluster.com glusterfs_zone=1 glusterfs_devices='["/dev/sdd"]' glusterfs_ip=192.168.0.14
openshift_storage_glusterfs_block_host_vol_size takes an integer, which is the size of the volume in Gi.
5.6. Configure Heketi to Place Bricks Across Zones
Heketi uses node zones as a hint for brick placement. To force Heketi to strictly place replica bricks in different zones, "strict zone checking" feature of Heketi has to be enabled. When this feature is enabled, a volume is created successfully only if each brick set is spread across sufficiently many zones.
Ensure that the OCS nodes are labeled with the correct zones before configuring StorageClass to use heketi’s strict zoning.
You can configure this feature by adding the "volumeoptions" field with the desired setting in the parameters section of the StorageClass. For example:
volumeoptions: "user.heketi.zone-checking strict"OR
volumeoptions: "user.heketi.zone-checking none"The settings are as follows:
- strict
- Requires at least 3 nodes to be present in different zones (assuming replica 3).
- none
- Previous (and current default) behavior
A sample StorageClass file with "strict zone checking" feature configured is shown below:
# cat glusterfs-storageclass.yaml

apiVersion: storage.k8s.io/v1
kind: StorageClass
metadata:
  name: gluster-container
provisioner: kubernetes.io/glusterfs
reclaimPolicy: Delete
parameters:
  resturl: "http://heketi-storage-project.cloudapps.mystorage.com"
  restuser: "admin"
  volumetype: "replicate:3"
  clusterid: "630372ccdc720a92c681fb928f27b53f"
  secretNamespace: "default"
  secretName: "heketi-secret"
  volumeoptions: "user.heketi.zone-checking strict"
  volumenameprefix: "test-vol"
allowVolumeExpansion: trueExisting storage class specifications are not editable. You can create a new storage class with the required volume options for all future applications. However, if you need to change the settings of an existing storage class then the existing storage class must first be deleted and then a new storage class with the same name as the previous class has to be re-created.
Execute the following commands to delete and re-create the glusterfs-storage storage class with the new settings:
Export the storage class object to a yaml file:
# oc get sc glusterfs-storage --export=true -o yaml > glusterfs-storage.yaml- Use your preferred editor to add the new parameters.
Delete and re-create the storage class object:
# oc delete sc glusterfs-storage
# oc create -f glusterfs-storage.yaml
5.7. Verify your Deployment
Execute the following steps to verify the deployment.
Installation Verification for Independent mode
Examine the installation for the app-storage namespace by running the following commands:
# switch to the app-storage namespace oc project app-storage # get the list of pods here (1 heketi pod) oc get pods NAME READY STATUS RESTARTS AGE heketi-storage-1-v5skm 1/1 Running 0 1hExamine the installation for the infra-storage namespace by running the following commands This can be done from an OCP master node or the ansible deploy host that has the OC CLI installed.
# switch to the infra-storage namespace oc project infra-storage # list the pods here (1 heketi pod and 1 glusterblock-provisioner pod) oc get pods NAME READY STATUS RESTARTS AGE glusterblock-registry-provisioner-dc-1-28sfc 1/1 Running 0 1h heketi-registry-5-lht6s 1/1 Running 0 1hCheck the existence of the registry PVC backed by OCP infrastructure Red Hat Openshift Container Storage. This volume was statically provisioned by openshift-ansible deployment.
oc get pvc -n default
NAME                      STATUS      VOLUME                                    CAPACITY         ACCESSMODES      STORAGECLASS               AGE
registry-claim            Bound       pvc-7ca4c8de-10ca-11e8-84d3-069df2c4f284  25Gi             RWX                                         1h
Check the registry DeploymentConfig to verify it’s using this glusterfs volume.
oc describe dc/docker-registry -n default | grep -A3 Volumes
    Volumes:
    registry-storage:
    Type: PersistentVolumeClaim (a reference to a PersistentVolumeClaim in the same namespace)
    ClaimName: registry-claim
Storage Provisioning Verification for Independent Mode
Validate PV provisioning using the glusterfs and glusterblock OCP Storage Class created during the OCP deployment. The two Storage Class resources, glusterfs-storage and glusterfs-storage-block, can be used to create new PV claims for verification of the Red Hat Openshift Container Storage deployment. The new PVC using the glusterfs-storage storageclass will be using storage available to gluster pods in app-storage project.
# oc get storageclass

NAME                                TYPE
glusterfs-storage                   kubernetes.io/glusterfs
glusterfs-storage-block             gluster.org/glusterblock
$ cat pvc-file.yaml
kind: PersistentVolumeClaim
apiVersion: v1
spec:
  name: rhocs-file-claim1
  annotations:
    storageClassName: glusterfs-storage
spec:
  accessModes:
    - ReadWriteMany
  resources:
    requests:
storage: 5Gi
# cat pvc-block.yaml kind: PersistentVolumeClaim apiVersion: v1 spec: name: rhocs-block-claim1 annotations: storageClassName: glusterfs-storage-block spec: accessModes: - ReadWriteOnce resources: requests: storage: 5Gi# oc create -f pvc-file.yaml # oc create -f pvc-block.yaml +Validate that the two PVCs and respective PVs are created correctly:
# oc get pvc
Using the heketi-client for Verification
The heketi-client package needs to be installed on the ansible deploy host or on a OCP master. Once it is installed two new files should be created to easily export the required environment variables to run the heketi-client commands (or heketi-cli). The content of each file as well as useful heketi-cli commands are detailed here.
Create a new file (e.g. "heketi-exports-app") with the following contents:
export HEKETI_POD=$(oc get pods -l glusterfs=heketi-storage-pod -n app-storage -o jsonpath="{.items[0].metadata.name}")
export HEKETI_CLI_SERVER=http://$(oc get route/heketi-storage -n app-storage -o jsonpath='{.spec.host}')
export HEKETI_CLI_KEY=$(oc get pod/$HEKETI_POD -n app-storage -o jsonpath='{.spec.containers[0].env[?(@.name=="HEKETI_ADMIN_KEY")].value}')
export HEKETI_ADMIN_KEY_SECRET=$(echo -n ${HEKETI_CLI_KEY} | base64)
export HEKETI_CLI_USER=admin
Source the file to create the HEKETI app-storage environment variables:
source heketi-exports-app
# see if heketi is alive
curl -w '\n' ${HEKETI_CLI_SERVER}/hello
Hello from Heketi
# ask heketi about the cluster it knows about
heketi-cli cluster list
Clusters:
Id:56ed234a384cef7dbef6c4aa106d4477 [file][block]
# ask heketi about the topology of the RHOCS cluster for apps
heketi-cli topology info
# ask heketi about the volumes already created (one for the heketi db should exist after the OCP initial installation)
heketi-cli volume list
Id:d71a4cbea22af3453615a9020f261b5c Cluster:56ed234a384cef7dbef6c4aa106d4477
Name:heketidbstorage
Create a new file (e.g. "heketi-exports-infra") with the following contents:
export HEKETI_POD=$(oc get pods -l glusterfs=heketi-registry-pod -n infra-storage -o jsonpath="{.items[0].metadata.name}")
export HEKETI_CLI_SERVER=http://$(oc get route/heketi-registry -n infra-storage -o jsonpath='{.spec.host}')
export HEKETI_CLI_USER=admin
export HEKETI_CLI_KEY=$(oc get pod/$HEKETI_POD -n infra-storage -o jsonpath='{.spec.containers[0].env[?(@.name=="HEKETI_ADMIN_KEY")].value}')
export HEKETI_ADMIN_KEY_SECRET=$(echo -n ${HEKETI_CLI_KEY} | base64)
Source the file to create the HEKETI infra-storage environment variables:
source heketi-exports-infra
# see if heketi is alive
curl -w '\n' ${HEKETI_CLI_SERVER}/hello
Hello from Heketi
# ask heketi about the cluster it knows about (the RHOCS cluster for infrastructure)
heketi-cli cluster list
Clusters:
Id:baf91b261cbca2bb4b62caece63f60d0 [file][block]
# ask heketi about the volumes already created
heketi-cli volume list
Id:77baed02f79f4518326d8cc1db6c7af8 Cluster:baf91b261cbca2bb4b62caece63f60d0 Name:heketidbstorage
5.8. Creating an Arbiter Volume (optional)
Arbiter volumes support all persistent volume types with similar consistency and less disk space requirements. An arbitrated replicated volume, or arbiter volume, acts like a three-way replicated volume where every third brick is a special type of brick called an arbiter. Arbiter bricks do not store file data; they only store file names, structure, and metadata. The arbiter uses client quorum to compare this metadata with the metadata of the other nodes to ensure consistency in the volume and prevent split-brain conditions.
Advantages of arbitrated replicated volumes:
- Similar consistency: When an arbiter is configured, arbitration logic uses client-side quorum in auto mode to prevent file operations that would lead to split-brain conditions.
- Less disk space required: Because an arbiter brick only stores file names and metadata, an arbiter brick can be much smaller than the other bricks in the volume.
For more information about Arbitrated Replicated Volumes, see https://access.redhat.com/documentation/en-us/red_hat_gluster_storage/3.5/html-single/administration_guide/index#Creating_Arbitrated_Replicated_Volumes
Before creating the arbiter volume, make sure heketi-client packages are installed.
# subscription-manager repos --enable=rh-gluster-3-for-rhel-7-server-rpms# yum install heketi-clientIf you want to upgrade your already existing Heketi server, then see, https://access.redhat.com/documentation/en-us/red_hat_openshift_container_storage/3.11/html-single/deployment_guide/index#upgrade_heketi_rhgs.
Arbiter volumes may not be appropriate for small file or unpredictable file-size workloads as it could fill up the arbiter bricks faster than the data bricks. If you want to use an arbiter volume, we recommend you to choose a conservative average file size based on the size of the data brick and number of files so that the arbiter brick can accommodate your workload.
5.8.1. Creating an Arbiter Volume
Arbiter volume can be created using the Heketi CLI or by updating the storageclass file.
5.8.1.1. Creating an Arbiter Volume using Heketi CLI
To create an Arbiter volume using the Heketi CLI one must request a replica 3 volume as well as provide the Heketi-specific volume option “user.heketi.arbiter true” that will instruct the system to create the Arbiter variant of replica 3.
For example:
# heketi-cli volume create --size=4 --gluster-volume-options='user.heketi.arbiter true'5.8.1.2. Creating an Arbiter Volume using the Storageclass file
To create an arbiter volume using the storageclass file ensure to include the following two parameters in the storageclass file:
- user.heketi.arbiter true
- (Optional) user.heketi.average-file-size 1024
Following is a sample storageclass file:
# cat glusterfs-storageclass.yaml
apiVersion: storage.k8s.io/v1
kind: StorageClass
metadata:
  name: gluster-container
provisioner: kubernetes.io/glusterfs
parameters:
  resturl: "http://heketi-storage-project.cloudapps.mystorage.com"
  restuser: "admin"
  volumetype: "replicate:3"
  clusterid: "630372ccdc720a92c681fb928f27b53f,796e6db1981f369ea0340913eeea4c9a"
  secretNamespace: "default"
  secretName: "heketi-secret"
  volumeoptions: "user.heketi.arbiter true,user.heketi.average-file-size 1024"
  volumenameprefix: "test-vol"
spec:
  persistentVolumeReclaimPolicy: Retain
  accessModes:
    - ReadWriteOnce
  resources:
    requests:
storage: 5Gi5.8.2. Creating Block Hosting Volume as an Arbiter Volume
There are no changes to the storageclass file.
To create a block hosting volume as an arbiter volume, execute the following:
Edit the configuration file under Glusterfs section in Heketi deployment configuration by adding the following environment variable and value:
HEKETI_BLOCK_HOSTING_VOLUME_OPTIONS: group gluster-block,user.heketi.arbiter trueCreate block volume using Heketi CLI.
# heketi-cli blockvolume create --size=100Ensure that block hosting volume is arbiter volume.
# gluster v infoNoteFor information about managing arbiter volumes see, Chapter 10, Managing Arbitrated Replicated Volumes
Part III. Upgrade
Chapter 6. Upgrading your Red Hat Openshift Container Storage in Converged Mode
This chapter describes the procedure to upgrade your environment from Container Storage in Converged Mode 3.10 to Red Hat Openshift Container Storage in Converged Mode 3.11.
-
New registry name
registry.redhat.iois used throughout in this Guide. However, if you have not migrated to the newregistryyet then replace all occurrences ofregistry.redhat.iowithregistry.access.redhat.comwhere ever applicable. - Follow the same upgrade procedure to upgrade your environment from Red Hat Openshift Container Storage in Converged Mode 3.11.0 and above to Red Hat Openshift Container Storage in Converged Mode 3.11.8. Ensure that the correct image and version numbers are configured before you start the upgrade process.
The valid images for Red Hat Openshift Container Storage 3.11.8 are:
- registry.redhat.io/rhgs3/rhgs-server-rhel7:v3.11.8
- registry.redhat.io/rhgs3/rhgs-volmanager-rhel7:v3.11.8
- registry.redhat.io/rhgs3/rhgs-gluster-block-prov-rhel7:v3.11.8
- registry.redhat.io/rhgs3/rhgs-s3-server-rhel7:v3.11.8
6.1. Upgrading the pods in the glusterfs group
The following sections provide steps to upgrade your Glusterfs pods.
6.1.1. Prerequisites
Ensure the following prerequisites are met:
- Section 3.1.3, “Red Hat OpenShift Container Platform and Red Hat Openshift Container Storage Requirements”
- Ensure to have the supported versions of OpenShift Container Platform with Red Hat Gluster Storage Server and Red Hat Openshift Container Storage. For more information on supported versions, see Section 3.1.1, “Supported Versions”
Ensure to run the following command to get the latest versions of Ansible templates.
# yum update openshift-ansible
For deployments using cns-deploy tool, the templates are available in the following location:
- gluster template - /usr/share/heketi/templates/glusterfs-template.yaml
- heketi template - /usr/share/heketi/templates/heketi-template.yaml
- glusterblock-provisioner template - /usr/share/heketi/templates/glusterblock-provisioner.yaml
For deployments using ansible playbook the templates are available in the following location:
- gluster template - /usr/share/ansible/openshift-ansible/roles/openshift_storage_glusterfs/files/glusterfs-template.yml
- heketi template - /usr/share/ansible/openshift-ansible/roles/openshift_storage_glusterfs/files/heketi-template.yml
- glusterblock-provisioner template - /usr/share/ansible/openshift-ansible/roles/openshift_storage_glusterfs/files/glusterblock-provisioner.yml
6.1.2. Restoring original label values for /dev/log
Follow this procedure only if you are upgrading your environment from Red Hat Container Native Storage 3.9 to Red Hat Openshift Container Storage 3.11.8.
Skip this procedure if you are upgrading your environment from Red Hat Openshift Container Storage 3.10 and above to Red Hat Openshift Container Storage 3.11.8.
To restore the original selinux label, execute the following commands:
Create a directory and soft links on all nodes that run gluster pods:
# mkdir /srv/<directory_name> # cd /srv/<directory_name>/ # same dir as above # ln -sf /dev/null systemd-tmpfiles-setup-dev.service # ln -sf /dev/null systemd-journald.service # ln -sf /dev/null systemd-journald.socketEdit the daemonset that creates the glusterfs pods on the node which has oc client:
# oc edit daemonset <daemonset_name>Under volumeMounts section add a mapping for the volume:
- mountPath: /usr/lib/systemd/system/systemd-journald.service name: systemd-journald-service - mountPath: /usr/lib/systemd/system/systemd-journald.socket name: systemd-journald-socket - mountPath: /usr/lib/systemd/system/systemd-tmpfiles-setup-dev.service name: systemd-tmpfiles-setup-dev-serviceUnder volumes section add a new host path for each service listed:
NoteThe path mentioned in here should be the same as mentioned in Step 1.
- hostPath: path: /srv/<directory_name>/systemd-journald.socket type: "" name: systemd-journald-socket - hostPath: path: /srv/<directory_name>/systemd-journald.service type: "" name: systemd-journald-service - hostPath: path: /srv/<directory_name>/systemd-tmpfiles-setup-dev.service type: "" name: systemd-tmpfiles-setup-dev-serviceRun the following command on all nodes that run gluster pods. This will reset the label:
# restorecon /dev/logExecute the following command to check the status of self heal for all volumes:
# oc rsh <gluster_pod_name> # for each_volume in `gluster volume list`; do gluster volume heal $each_volume info ; done | grep "Number of entries: [^0]$"Wait for self-heal to complete.
Execute the following command and ensure that the bricks are not more than 90% full:
# df -kh | grep -v ^Filesystem | awk '{if(int($5)>90) print $0}'NoteIf the bricks are close to 100% utilization, then the Logical Volume Manager(LVM) activation for these bricks may take a long time or can get stuck once the pod or node is rebooted. It is advised to bring down the utilization of that brick or expand the physical volume(PV) that is using the logical volume(LV).
NoteThe
dfcommand is not applicable to bricks that belong to Block Hosting Volume(BHV). On a BHV , the used size of the bricks generated by thedfcommand is the added size of the blockvolumes of that Gluster volume, it is not the size of the data that resides in the blockvolumes. For more information refer to How To Identify Block Volumes and Block Hosting Volumes in Openshift Container Storage.Execute the following command on any one of the gluster pods to set the maximum number of bricks (250) that can run on a single instance of
glusterfsdprocess:# gluster volume set all cluster.max-bricks-per-process 250Execute the following command on any one of the gluster pods to ensure that the option is set correctly:
# gluster volume get all cluster.max-bricks-per-processFor example:
# gluster volume get all cluster.max-bricks-per-process cluster.max-bricks-per-process 250
Execute the following command on the node which has oc client to delete the gluster pod:
# oc delete pod <gluster_pod_name>To verify if the pod is ready, execute the following command:
# oc get pods -l glusterfs=storage-podLogin to the node hosting the pod and check the selinux label of /dev/log
# ls -lZ /dev/logThe output should show devlog_t label
For example:
# ls -lZ /dev/log srw-rw-rw-. root root system_u:object_r:devlog_t:s0 /dev/logExit the node.
In the gluster pod, check if the label value is devlog_t:
# oc rsh <gluster_pod_name> # ls -lZ /dev/logFor example:
# ls -lZ /dev/log srw-rw-rw-. root root system_u:object_r:devlog_t:s0 /dev/log- Perform steps 4 to 9 for other pods.
6.1.3. Upgrading if existing version deployed by using cns-deploy
6.1.3.1. Upgrading cns-deploy and Heketi Server
The following commands must be executed on the client machine.
Execute the following command to update the heketi client and cns-deploy packages:
# yum update cns-deploy -y # yum update heketi-client -yBackup the Heketi database file
# heketi-cli db dump > heketi-db-dump-$(date -I).jsonExecute the following command to get the current HEKETI_ADMIN_KEY.
The OCS admin can choose to set any phrase for user key as long as it is not used by their infrastructure. It is not used by any of the OCS default installed resources.
oc get secret <heketi-admin-secret> -o jsonpath='{.data.key}'|base64 -d;echo
Execute the following command to delete the heketi template.
# oc delete templates heketiExecute the following command to install the heketi template.
oc create -f /usr/share/heketi/templates/heketi-template.yaml template "heketi" createdExecute the following command to grant the heketi Service Account the necessary privileges.
# oc policy add-role-to-user edit system:serviceaccount:<project_name>:heketi-service-account # oc adm policy add-scc-to-user privileged -z heketi-service-accountFor example,
# oc policy add-role-to-user edit system:serviceaccount:storage-project:heketi-service-account # oc adm policy add-scc-to-user privileged -z heketi-service-accountExecute the following command to generate a new heketi configuration file.
# sed -e "s/\${HEKETI_EXECUTOR}/kubernetes/" -e "s#\${HEKETI_FSTAB}#/var/lib/heketi/fstab#" -e "s/\${SSH_PORT}/22/" -e "s/\${SSH_USER}/root/" -e "s/\${SSH_SUDO}/false/" -e "s/\${BLOCK_HOST_CREATE}/true/" -e "s/\${BLOCK_HOST_SIZE}/500/" "/usr/share/heketi/templates/heketi.json.template" > heketi.json-
The
BLOCK_HOST_SIZEparameter controls the size (in GB) of the automatically created Red Hat Gluster Storage volumes hosting the gluster-block volumes (For more information, see https://access.redhat.com/documentation/en-us/red_hat_openshift_container_storage/3.11/html-single/operations_guide/index#Block_Storage). This default configuration will dynamically create block-hosting volumes of 500GB in size as more space is required. Alternatively, copy the file /usr/share/heketi/templates/heketi.json.template to heketi.json in the current directory and edit the new file directly, replacing each "${VARIABLE}" string with the required parameter.
NoteJSON formatting is strictly required (e.g. no trailing spaces, booleans in all lowercase).
-
The
Execute the following command to create a secret to hold the configuration file.
# oc create secret generic <heketi-config-secret> --from-file=heketi.jsonNoteIf the heketi-config-secret file already exists, then delete the file and run the following command.
Execute the following command to delete the deployment configuration, service, and route for heketi:
# oc delete deploymentconfig,service,route heketiNoteThe names of these parameters can be referenced from output of the following command:
# oc get all | grep heketiEdit the heketi template.
Edit the HEKETI_USER_KEY and HEKETI_ADMIN_KEY parameters.
# oc edit template heketi parameters: - description: Set secret for those creating volumes as type user displayName: Heketi User Secret name: HEKETI_USER_KEY value: <heketiuserkey> - description: Set secret for administration of the Heketi service as user admin displayName: Heketi Administrator Secret name: HEKETI_ADMIN_KEY value: <adminkey> - description: Set the executor type, kubernetes or ssh displayName: heketi executor type name: HEKETI_EXECUTOR value: kubernetes - description: Set the hostname for the route URL displayName: heketi route name name: HEKETI_ROUTE value: heketi-storage - displayName: heketi container image name name: IMAGE_NAME required: true value: registry.redhat.io/rhgs3/rhgs-volmanager-rhel7 - displayName: heketi container image version name: IMAGE_VERSION required: true value: v3.11.8 - description: A unique name to identify this heketi service, useful for running multiple heketi instances displayName: GlusterFS cluster name name: CLUSTER_NAME value: storageNoteIf a cluster has more than 1000 volumes refer to How to change the default PVS limit in Openshift Container Storage and add the required parameters before proceeding with the upgrade.
Add an ENV with the name HEKETI_LVM_WRAPPER and value
/usr/sbin/exec-on-host.- description: Heketi can use a wrapper to execute LVM commands, i.e. run commands in the host namespace instead of in the Gluster container. displayName: Wrapper for executing LVM commands name: HEKETI_LVM_WRAPPER value: /usr/sbin/exec-on-hostAdd an ENV with the name HEKETI_DEBUG_UMOUNT_FAILURES and value
true.- description: When unmounting a brick fails, Heketi will not be able to cleanup the Gluster volume completely. The main causes for preventing to unmount a brick, seem to originate from Gluster processes. By enabling this option, the heketi.log will contain the output of 'lsof' to aid with debugging of the Gluster processes and help with identifying any files that may be left open. displayName: Capture more details in case brick unmounting fails name: HEKETI_DEBUG_UMOUNT_FAILURES required=true-
Add an ENV with the name HEKETI_CLI_USER and value
admin. - Add an ENV with the name HEKETI_CLI_KEY and the same value provided for the ENV HEKETI_ADMIN_KEY.
Replace the
valueunderIMAGE_VERSIONwithv3.11.5orv3.11.8depending on the version you want to upgrade to.- displayName: heketi container image name name: IMAGE_NAME required: true value: registry.redhat.io/rhgs3/rhgs-volmanager-rhel7 - displayName: heketi container image version name: IMAGE_VERSION required: true value: v3.11.8
Execute the following command to deploy the Heketi service, route, and deployment configuration which will be used to create persistent volumes for OpenShift:
# oc process heketi | oc create -f - service "heketi" created route "heketi" created deploymentconfig "heketi" createdNoteIt is recommended that the
heketidbstoragevolume be tuned for db workloads. Newly installed Openshift Container Storage deployments tune the heketidbstorage volume automatically. For older deployments, follow the KCS article Planning to run containerized DB or nosql workloads on Openshift Container Storage? and perform the volume set operation for the volumeheketidbstorage.Execute the following command to verify that the containers are running:
# oc get podsFor example:
# oc get pods NAME READY STATUS RESTARTS AGE glusterblock-storage-provisioner-dc-1-ffgs5 1/1 Running 0 3m heketi-storage-4-9fnvz 2/2 Running 0 8d
6.1.3.2. Upgrading the Red Hat Gluster Storage Pods
The following commands must be executed on the client machine.
Following are the steps for updating a DaemonSet for glusterfs:
Execute the following steps to stop the Heketi pod to prevent it from accepting any new request for volume creation or volume deletion:
Execute the following command to access your project:
# oc project <project_name>For example:
# oc project storage-projectExecute the following command to get the
DeploymentConfig:# oc get dsExecute the following command to set heketi server to accept requests only from the local-client:
# heketi-cli server mode set local-clientWait for the ongoing operations to complete and execute the following command to monitor if there are any ongoing operations:
# heketi-cli server operations infoExecute the following command to reduce the replica count from 1 to 0. This brings down the Heketi pod:
# oc scale dc <heketi_dc> --replicas=0Execute the following command to verify that the heketi pod is no longer present:
# oc get pods
Execute the following command to find the DaemonSet name for gluster
# oc get dsExecute the following command to delete the DaemonSet:
# oc delete ds <ds-name> --cascade=falseUsing
--cascade=falseoption while deleting the old DaemonSet does not delete the gluster pods but deletes only the DaemonSet. After deleting the old DaemonSet, you must load the new one. When you manually delete the old pods, the new pods which are created will have the configurations of the new DaemonSet.For example,
# oc delete ds glusterfs --cascade=false daemonset "glusterfs" deletedExecute the following commands to verify all the old pods are up:
# oc get podsFor example,
# oc get pods NAME READY STATUS RESTARTS AGE glusterblock-storage-provisioner-dc-1-ffgs5 1/1 Running 0 3m glusterfs-storage-5thpc 1/1 Running 0 9d glusterfs-storage-hfttr 1/1 Running 0 9d glusterfs-storage-n8rg5 1/1 Running 0 9d heketi-storage-4-9fnvz 2/2 Running 0 8dExecute the following command to delete the old glusterfs template.
# oc delete templates glusterfsFor example,
# oc delete templates glusterfs template “glusterfs” deletedExecute the following command to register new glusterfs template.
# oc create -f /usr/share/heketi/templates/glusterfs-template.yamlFor example,
# oc create -f /usr/share/heketi/templates/glusterfs-template.yaml template “glusterfs” createdLabel all the OpenShift Container Platform nodes that has the Red Hat Gluster Storage pods:
Check if the nodes are labelled with the appropriate label by using the following command:
# oc get nodes -l glusterfs=storage-host
Edit the glusterfs template.
Execute the following command:
# oc edit template glusterfsAdd the following lines under volume mounts:
- name: kernel-modules mountPath: "/usr/lib/modules" readOnly: true - name: host-rootfs mountPath: "/rootfs"Add the following lines under volumes:
- name: kernel-modules hostPath: path: "/usr/lib/modules" - name: host-rootfs hostPath: path: "/"Replace the
valueunderIMAGE_VERSIONwithv3.11.5orv3.11.8depending on the version you want to upgrade to.- displayName: heketi container image name name: IMAGE_NAME required: true value: registry.redhat.io/rhgs3/rhgs-volmanager-rhel7 - displayName: heketi container image version name: IMAGE_VERSION required: true value: v3.11.8
Execute the following commands to create the gluster DaemonSet:
# oc process glusterfs | oc create -f -For example,
# oc process glusterfs | oc create -f - Deamonset “glusterfs” createdNoteIf a cluster has more than 1000 volumes refer to How to change the default PVS limit in Openshift Container Storage and add the required parameters before proceeding with the upgrade.
Execute the following command to identify the old gluster pods that needs to be deleted:
# oc get podsFor example,
# oc get pods NAME READY STATUS RESTARTS AGE glusterblock-storage-provisioner-dc-1-ffgs5 1/1 Running 0 3m glusterfs-storage-5thpc 1/1 Running 0 9d glusterfs-storage-hfttr 1/1 Running 0 9d glusterfs-storage-n8rg5 1/1 Running 0 9d heketi-storage-4-9fnvz 2/2 Running 0 8dExecute the following command and ensure that the bricks are not more than 90% full:
# df -kh | grep -v ^Filesystem | awk '{if(int($5)>90) print $0}'NoteIf the bricks are close to 100% utilization, then the Logical Volume Manager(LVM) activation for these bricks may take a long time or can get stuck once the pod or node is rebooted. It is advised to bring down the utilization of that brick or expand the physical volume(PV) that is using the logical volume(LV).
NoteThe
dfcommand is not applicable to bricks that belong to Block Hosting Volume(BHV). On a BHV , the used size of the bricks generated by thedfcommand is the added size of the blockvolumes of that Gluster volume, it is not the size of the data that resides in the blockvolumes. For more information refer to How To Identify Block Volumes and Block Hosting Volumes in Openshift Container Storage.Execute the following command to delete the old gluster pods.
Gluster pods should follow rolling upgrade. Hence, you must ensure that the new pod is running before deleting the next old gluster pod. We support OnDelete Strategy DaemonSet update strategy. With OnDelete Strategy update strategy, after you update a DaemonSet template, new DaemonSet pods will only be created when you manually delete old DaemonSet pods.To delete the old gluster pods, execute the following command:
# oc delete pod <gluster_pod>For example,
# oc delete pod glusterfs-0vcf3 pod “glusterfs-0vcf3” deletedNoteBefore deleting the next pod, self heal check has to be made:
Run the following command to access shell on gluster pod:
# oc rsh <gluster_pod_name>Run the following command to check the self-heal status of all the volumes:
# for eachVolume in $(gluster volume list); do gluster volume heal $eachVolume info ; done | grep "Number of entries: [^0]$"
The delete pod command will terminate the old pod and create a new pod. Run
# oc get pods -wand check the Age of the pod and READY status should be 1/1. The following is the example output showing the status progression from termination to creation of the pod.# oc get pods -w NAME READY STATUS RESTARTS AGE glusterfs-0vcf3 1/1 Terminating 0 3d …
Execute the following command to verify that the pods are running:
# oc get podsFor example,
# oc get pods NAME READY STATUS RESTARTS AGE glusterblock-storage-provisioner-dc-1-ffgs5 1/1 Running 0 3m glusterfs-storage-5thpc 1/1 Running 0 9d glusterfs-storage-hfttr 1/1 Running 0 9d glusterfs-storage-n8rg5 1/1 Running 0 9d heketi-storage-4-9fnvz 2/2 Running 0 8dExecute the following command to verify if you have upgraded the pod to the latest version:
# oc rsh <gluster_pod_name> glusterd --versionFor example:
# oc rsh glusterfs-4cpcc glusterd --version glusterfs 6.0Check the Red Hat Gluster Storage op-version by executing the following command on one of the gluster pods.
# gluster vol get all cluster.op-versionAfter you upgrade the Gluster pods, ensure that you set Heketi back to operational mode:
Scale up the DC (Deployment Configuration).
# oc scale dc <heketi_dc> --replicas=1
Set the cluster.op-version to 70200 on any one of the pods:
ImportantEnsure all the gluster pods are updated before changing the cluster.op-version.
# gluster --timeout=3600 volume set all cluster.op-version 70200Execute the following steps to enable server.tcp-user-timeout on all volumes.
NoteThe "server.tcp-user-timeout" option specifies the maximum amount of the time (in seconds) the transmitted data from the application can remain unacknowledged from the brick.
It is used to detect force disconnections and dead connections (if a node dies unexpectedly, a firewall is activated, etc.,) early and make it possible for applications to reduce the overall failover time.
List the glusterfs pod using the following command:
# oc get podsFor example:
# oc get pods NAME READY STATUS RESTARTS AGE glusterblock-storage-provisioner-dc-1-ffgs5 1/1 Running 0 3m glusterfs-storage-5thpc 1/1 Running 0 9d glusterfs-storage-hfttr 1/1 Running 0 9d glusterfs-storage-n8rg5 1/1 Running 0 9d heketi-storage-4-9fnvz 2/2 Running 0 8dRemote shell into one of the glusterfs pods. For example:
# oc rsh glusterfs-0vcf3Execute the following command:
# for eachVolume in `gluster volume list`; do echo $eachVolume; gluster volume set $eachVolume server.tcp-user-timeout 42 ; doneFor example:
# for eachVolume in `gluster volume list`; do echo $eachVolume; gluster volume set $eachVolume server.tcp-user-timeout 42 ; done volume1 volume set: success volume2 volume set: success
If a gluster-block-provisoner-pod already exists then delete it by executing the following commands:
# oc delete dc glusterblock-provisioner-dcFor example:
# oc delete dc glusterblock-storage-provisioner-dcDelete the following resources from the old pod:
# oc delete clusterroles.authorization.openshift.io glusterblock-provisioner-runner # oc delete serviceaccounts glusterblock-provisioner serviceaccount "glusterblock-provisioner" deleted # oc delete clusterrolebindings.authorization.openshift.io glusterblock-provisionerExecute the following commands to deploy the gluster-block provisioner:
`sed -e 's/${NAMESPACE}/<NAMESPACE>/' /usr/share/heketi/templates/glusterblock-provisioner.yaml | sed -e 's/<VERSION>/<NEW-VERSION>/' | oc create -f -- <VERSION>
- Existing version of OpenShift Container Storage.
- <NEW-VERSION>
Either 3.11.5 or 3.11.8 depending on the version you are upgrading to.
# oc adm policy add-cluster-role-to-user glusterblock-provisioner-runner system:serviceaccount:<NAMESPACE>:glusterblock-provisionerFor example:
`sed -e 's/${NAMESPACE}/storage-project/' /usr/share/heketi/templates/glusterblock-provisioner.yaml | sed -e 's/3.11.4/3.11.8/' | oc create -f -# oc adm policy add-cluster-role-to-user glusterblock-provisioner-runner system:serviceaccount:storage-project:glusterblock-provisioner
Brick multiplexing is a feature that allows adding multiple bricks into one process. This reduces resource consumption and allows us to run more bricks than before with the same memory consumption. It is enabled by default from Container-Native Storage 3.6 onward. During an upgrade from Container-Native Storage 3.10 to Red Hat Openshift Container Storage 3.11, to turn brick multiplexing on, execute the following commands:
To exec into the Gluster pod, execute the following command and rsh into any of the gluster pods:
# oc rsh <gluster_pod_name>Verify the brick multiplex status:
# gluster v get all allIf it is disabled, then execute the following command to enable brick multiplexing:
NoteEnsure that all volumes are in a stop state or no bricks are running while brick multiplexing is enabled.
# gluster volume set all cluster.brick-multiplex onFor example:
# oc rsh glusterfs-770ql sh-4.2# gluster volume set all cluster.brick-multiplex on Brick-multiplexing is supported only for container workloads (Independent or Converged mode). Also it is advised to make sure that either all volumes are in stopped state or no bricks are running before this option is modified.Do you still want to continue? (y/n) y volume set: successList all the volumes in the trusted storage pool. This step is only required if the volume set operation is performed:
For example:
# gluster volume list heketidbstorage vol_194049d2565d2a4ad78ef0483e04711e ... ...Restart all the volumes. This step is only required if the volume set operation is performed along with the previous step:
# gluster vol stop <VOLNAME> # gluster vol start <VOLNAME>
- Support for S3 compatible Object Store in Red Hat Openshift Container Storage is under technology preview. To enable S3 compatible object store, see https://access.redhat.com/documentation/en-us/red_hat_openshift_container_storage/3.11/html/operations_guide/s3_object_store.
- If you have glusterfs registry pods, then proceed with the steps listed in Section 6.2, “Upgrading the pods in the glusterfs registry group” to upgrade heketi and glusterfs registry pods.
- If you do not have glusterfs registry pods, then proceed with the steps listed in ] to bring back your heketi pod and then proceed with the steps listed in xref:chap-upgrade_client_common[ to upgrade the client on Red Hat Openshift Container Platform Nodes.
6.1.4. Upgrading if existing version deployed by using Ansible
6.1.4.1. Upgrading Heketi Server
The following commands must be executed on the client machine.
Execute the following steps to check for any pending Heketi operatons:
Execute the following command to access your project:
# oc project <project_name>For example:
# oc project storage-projectWait for the ongoing operations to complete and execute the following command to monitor if there are any ongoing operations:
# heketi-cli server operations info
Backup the Heketi database file.
# heketi-cli db dump > heketi-db-dump-$(date -I).jsonNoteThe json file created can be used to restore and therefore should be stored in persistent storage of your choice.
Execute the following command to update the heketi client packages. Update the
heketi-clientpackage on all the OCP nodes where it is installed. Newer installations may not have theheketi-clientrpm installed on any OCP nodes:# yum update heketi-client -yExecute the following command to get the current HEKETI_ADMIN_KEY.
The OCS admin can choose to set any phrase for user key as long as it is not used by their infrastructure. It is not used by any of the OCS default installed resources.
# oc get secret heketi-storage-admin-secret -o jsonpath='{.data.key}'|base64 -d;echoIf the
HEKETI_USER_KEYwas set previously, you can obtain it by using the following command:# oc describe pod <heketi-pod>Execute the following command to delete the heketi template.
# oc delete templates heketiExecute the following command to install the heketi template.
# oc create -f /usr/share/ansible/openshift-ansible/roles/openshift_storage_glusterfs/files/heketi-template.yml template "heketi" createdExecute the following step to edit the template:
# oc get templates NAME DESCRIPTION PARAMETERS OBJECTS glusterblock-provisioner glusterblock provisioner 3 (2 blank) 4 template glusterfs GlusterFS DaemonSet 5 (1 blank) 1 template heketi Heketi service deployment 7 (3 blank) 3 templateIf the existing template has IMAGE_NAME and IMAGE_VERSION as two parameters, then edit the template to change the HEKETI_USER_KEY, HEKETI_ADMIN_KEY, HEKETI_ROUTE, IMAGE_NAME, IMAGE_VERSION, CLUSTER_NAME and HEKETI_LVM_WRAPPER as shown in the example below.
# oc edit template heketi parameters: - description: Set secret for those creating volumes as type user displayName: Heketi User Secret name: HEKETI_USER_KEY value: <heketiuserkey> - description: Set secret for administration of the Heketi service as user admin displayName: Heketi Administrator Secret name: HEKETI_ADMIN_KEY value: <adminkey> - description: Set the executor type, kubernetes or ssh displayName: heketi executor type name: HEKETI_EXECUTOR value: kubernetes - description: Set the hostname for the route URL displayName: heketi route name name: HEKETI_ROUTE value: heketi-storage - displayName: heketi container image name name: IMAGE_NAME required: true value: registry.redhat.io/rhgs3/rhgs-volmanager-rhel7 - displayName: heketi container image version name: IMAGE_VERSION required: true value: v3.11.8 - description: A unique name to identify this heketi service, useful for running multiple heketi instances displayName: GlusterFS cluster name name: CLUSTER_NAME value: storage - description: Heketi can use a wrapper to execute LVM commands, i.e. run commands in the host namespace instead of in the Gluster container name: HEKETI_LVM_WRAPPER displayName: Wrapper for executing LVM commands value: /usr/sbin/exec-on-hostIf the template has only IMAGE_NAME, then edit the template to change the HEKETI_USER_KEY, HEKETI_ADMIN_KEY, HEKETI_ROUTE, IMAGE_NAME, CLUSTER_NAME and HEKETI_LVM_WRAPPER as shown in the example below.
# oc edit template heketi parameters: - description: Set secret for those creating volumes as type user displayName: Heketi User Secret name: HEKETI_USER_KEY value: <heketiuserkey> - description: Set secret for administration of the Heketi service as user admin displayName: Heketi Administrator Secret name: HEKETI_ADMIN_KEY value: <adminkey> - description: Set the executor type, kubernetes or ssh displayName: heketi executor type name: HEKETI_EXECUTOR value: kubernetes - description: Set the hostname for the route URL displayName: heketi route name name: HEKETI_ROUTE value: heketi-storage - displayName: heketi container image name name: IMAGE_NAME required: true value: registry.redhat.io/rhgs3/rhgs-volmanager-rhel7:v3.11.8 - description: A unique name to identify this heketi service, useful for running multiple heketi instances displayName: GlusterFS cluster name name: CLUSTER_NAME value: storage - description: Heketi can use a wrapper to execute LVM commands, i.e. run commands in the host namespace instead of in the Gluster container name: HEKETI_LVM_WRAPPER displayName: Wrapper for executing LVM commands value: /usr/sbin/exec-on-hostNoteIf a cluster has more than 1000 volumes refer to How to change the default PVS limit in Openshift Container Storage and add the required parameters before proceeding with the upgrade.
Execute the following command to delete the deployment configuration, service, and route for heketi:
NoteThe names of these parameters can be referenced from output of the following command:
# oc get all | grep heketi# oc delete deploymentconfig,service,route heketi-storageExecute the following command to deploy the Heketi service, route, and deployment configuration which will be used to create persistent volumes for OpenShift:
# oc process heketi | oc create -f - service "heketi" created route "heketi" created deploymentconfig "heketi" createdNoteIt is recommended that the
heketidbstoragevolume be tuned for db workloads. Newly installed Openshift Container Storage deployments tune the heketidbstorage volume automatically. For older deployments, follow the KCS article Planning to run containerized DB or nosql workloads on Openshift Container Storage? and perform the volume set operation for the volumeheketidbstorage.Execute the following command to verify that the containers are running:
# oc get podsFor example:
# oc get pods NAME READY STATUS RESTARTS AGE glusterblock-storage-provisioner-dc-1-ffgs5 1/1 Running 0 3m glusterfs-storage-5thpc 1/1 Running 0 9d glusterfs-storage-hfttr 1/1 Running 0 9d glusterfs-storage-n8rg5 1/1 Running 0 9d heketi-storage-4-9fnvz 2/2 Running 0 8d
6.1.4.2. Upgrading the Red Hat Gluster Storage Pods
The following commands must be executed on the client machine.
Following are the steps for updating a DaemonSet for glusterfs:
Execute the following steps to stop the Heketi pod to prevent it from accepting any new request for volume creation or volume deletion:
Execute the following command to access your project:
# oc project <project_name>For example:
# oc project storage-projectExecute the following command to get the
DeploymentConfig:# oc get dcExecute the following command to set heketi server to accept requests only from the local-client:
# heketi-cli server mode set local-clientWait for the ongoing operations to complete and execute the following command to monitor if there are any ongoing operations:
# heketi-cli server operations infoExecute the following command to reduce the replica count from 1 to 0. This brings down the Heketi pod:
# oc scale dc <heketi_dc> --replicas=0Execute the following command to verify that the heketi pod is no longer present:
# oc get pods
Execute the following command to find the DaemonSet name for gluster
# oc get dsExecute the following command to delete the DaemonSet:
# oc delete ds <ds-name> --cascade=falseUsing
--cascade=falseoption while deleting the old DaemonSet does not delete the gluster pods but deletes only the DaemonSet. After deleting the old DaemonSet, you must load the new one. When you manually delete the old pods, the new pods which are created will have the configurations of the new DaemonSet.For example,
# oc delete ds glusterfs-storage --cascade=false daemonset "glusterfs-storage" deletedExecute the following commands to verify all the old pods are up:
# oc get podsFor example,
# oc get pods NAME READY STATUS RESTARTS AGE glusterblock-storage-provisioner-dc-1-ffgs5 1/1 Running 0 3m glusterfs-storage-5thpc 1/1 Running 0 9d glusterfs-storage-hfttr 1/1 Running 0 9d glusterfs-storage-n8rg5 1/1 Running 0 9d heketi-storage-4-9fnvz 2/2 Running 0 8dExecute the following command to delete the old glusterfs template.
# oc delete templates glusterfsExecute the following command to register new glusterfs template.
# oc create -f /usr/share/ansible/openshift-ansible/roles/openshift_storage_glusterfs/files/glusterfs-template.yml template "glusterfs" createdExecute the following command to edit the old glusterfs template.
# oc get templates NAME DESCRIPTION PARAMETERS OBJECTS glusterblock-provisioner glusterblock provisioner 3 (2 blank) 4 template glusterfs GlusterFS DaemonSet 5 (1 blank) 1 template heketi Heketi service deployment 7 (3 blank) 3 templateIf the template has IMAGE_NAME and IMAGE_VERSION as two separate parameters, then update the glusterfs template as following. For example:
# oc edit template glusterfs - displayName: GlusterFS container image name name: IMAGE_NAME required: true value: registry.redhat.io/rhgs3/rhgs-server-rhel7 - displayName: GlusterFS container image version name: IMAGE_VERSION required: true value: v3.11.8 - description: A unique name to identify which heketi service manages this cluster, useful for running multiple heketi instances displayName: GlusterFS cluster name name: CLUSTER_NAME value: storageNoteIf a cluster has more than 1000 volumes refer to How to change the default PVS limit in Openshift Container Storage and add the required parameters before proceeding with the upgrade.
If the template has only IMAGE_NAME as a parameter, then update the glusterfs template as following. For example:
# oc edit template glusterfs - displayName: GlusterFS container image name name: IMAGE_NAME required: true value: registry.redhat.io/rhgs3/rhgs-server-rhel7:v3.11.8 - description: A unique name to identify which heketi service manages this cluster, useful for running multiple heketi instances displayName: GlusterFS cluster name name: CLUSTER_NAME value: storageNoteEnsure that the CLUSTER_NAME variable is set to the correct value
Label all the OpenShift Container Platform nodes that has the Red Hat Gluster Storage pods:
Check if the nodes are labelled with the appropriate label by using the following command:
# oc get nodes -l glusterfs=storage-host
Execute the following commands to create the gluster DaemonSet:
# oc process glusterfs | oc create -f -For example,
# oc process glusterfs | oc create -f - Deamonset “glusterfs” createdExecute the following command to identify the old gluster pods that needs to be deleted:
# oc get podsFor example,
# oc get pods NAME READY STATUS RESTARTS AGE glusterblock-storage-provisioner-dc-1-ffgs5 1/1 Running 0 3m glusterfs-storage-5thpc 1/1 Running 0 9d glusterfs-storage-hfttr 1/1 Running 0 9d glusterfs-storage-n8rg5 1/1 Running 0 9d heketi-storage-4-9fnvz 2/2 Running 0 8d
Execute the following command and ensure that the bricks are not more than 90% full:
# df -kh | grep -v ^Filesystem | awk '{if(int($5)>90) print $0}'NoteIf the bricks are close to 100% utilization, then the Logical Volume Manager(LVM) activation for these bricks may take a long time or can get stuck once the pod or node is rebooted. It is advised to bring down the utilization of that brick or expand the physical volume(PV) that is using the logical volume(LV).
NoteThe
dfcommand is not applicable to bricks that belong to Block Hosting Volume(BHV). On a BHV , the used size of the bricks generated by thedfcommand is the added size of the blockvolumes of that Gluster volume, it is not the size of the data that resides in the blockvolumes. For more information refer to How To Identify Block Volumes and Block Hosting Volumes in Openshift Container Storage.Execute the following command to delete the old gluster pods.
Gluster pods should follow rolling upgrade. Hence, you must ensure that the new pod is running before deleting the next old gluster pod. We support OnDelete Strategy DaemonSet update strategy. With OnDelete Strategy update strategy, after you update a DaemonSet template, new DaemonSet pods will only be created when you manually delete old DaemonSet pods.To delete the old gluster pods, execute the following command:
# oc delete pod <gluster_pod>For example,
# oc delete pod glusterfs-0vcf3 pod “glusterfs-0vcf3” deletedNoteBefore deleting the next pod, self heal check has to be made:
Run the following command to access shell on gluster pod:
# oc rsh <gluster_pod_name>Run the following command to check the self-heal status of all the volumes:
# for eachVolume in $(gluster volume list); do gluster volume heal $eachVolume info ; done | grep "Number of entries: [^0]$"
The delete pod command will terminate the old pod and create a new pod. Run
# oc get pods -wand check the Age of the pod and READY status should be 1/1. The following is the example output showing the status progression from termination to creation of the pod.# oc get pods -w NAME READY STATUS RESTARTS AGE glusterfs-0vcf3 1/1 Terminating 0 3d …
Execute the following command to verify that the pods are running:
# oc get podsFor example,
# oc get pods NAME READY STATUS RESTARTS AGE glusterblock-storage-provisioner-dc-1-ffgs5 1/1 Running 0 3m glusterfs-storage-5thpc 1/1 Running 0 9d glusterfs-storage-hfttr 1/1 Running 0 9d glusterfs-storage-n8rg5 1/1 Running 0 9d heketi-storage-4-9fnvz 2/2 Running 0 8dExecute the following command to verify if you have upgraded the pod to the latest version:
# oc rsh <gluster_pod_name> glusterd --versionFor example:
# oc rsh glusterfs-4cpcc glusterd --version glusterfs 6.0Check the Red Hat Gluster Storage op-version by executing the following command on one of the gluster pods.
# gluster vol get all cluster.op-versionAfter you upgrade the Gluster pods, ensure that you set Heketi back to operational mode:
Scale up the DC (Deployment Configuration).
# oc scale dc <heketi_dc> --replicas=1
Set the cluster.op-version to 70200 on any one of the pods:
NoteEnsure all the gluster pods are updated before changing the cluster.op-version.
# gluster --timeout=3600 volume set all cluster.op-version 70200Execute the following steps to enable server.tcp-user-timeout on all volumes.
NoteThe "server.tcp-user-timeout" option specifies the maximum amount of the time (in seconds) the transmitted data from the application can remain unacknowledged from the brick.
It is used to detect force disconnections and dead connections (if a node dies unexpectedly, a firewall is activated, etc.,) early and make it possible for applications to reduce the overall failover time.
List the glusterfs pod using the following command:
# oc get podsFor example:
# oc get pods NAME READY STATUS RESTARTS AGE glusterblock-storage-provisioner-dc-1-ffgs5 1/1 Running 0 3m glusterfs-storage-5thpc 1/1 Running 0 9d glusterfs-storage-hfttr 1/1 Running 0 9d glusterfs-storage-n8rg5 1/1 Running 0 9d heketi-storage-4-9fnvz 2/2 Running 0 8dRemote shell into one of the glusterfs pods. For example:
# oc rsh glusterfs-0vcf3Execute the following command:
# for eachVolume in `gluster volume list`; do echo $eachVolume; gluster volume set $eachVolume server.tcp-user-timeout 42 ; doneFor example:
# for eachVolume in `gluster volume list`; do echo $eachVolume; gluster volume set $eachVolume server.tcp-user-timeout 42 ; done volume1 volume set: success volume2 volume set: success
If a gluster-block-provisoner-pod already exists then delete it by executing the following commands:
# oc delete dc glusterblock-provisioner-dcFor example:
# oc delete dc glusterblock-storage-provisioner-dcExecute the following command to delete the old glusterblock provisioner template.
# oc delete templates glusterblock-provisionerCreate a glusterblock provisioner template. For example:
# oc create -f /usr/share/ansible/openshift-ansible/roles/openshift_storage_glusterfs/files/glusterblock-provisioner.yml template.template.openshift.io/glusterblock-provisioner createdDepending on the OCP version, edit the glusterblock-provisioner template to change the IMAGE_NAME, IMAGE_VERSION and NAMESPACE.
# oc get templates NAME DESCRIPTION PARAMETERS OBJECTS glusterblock-provisioner glusterblock provisioner 3 (2 blank) 4 template glusterfs GlusterFS DaemonSet 5 (1 blank) 1 template heketi Heketi service deployment 7 (3 blank) 3 templateIf the template has IMAGE_NAME and IMAGE_VERSION as two separate parameters, then update the glusterblock-provisioner template as following. For example:
# oc edit template glusterblock-provisioner - displayName: glusterblock provisioner container image name name: IMAGE_NAME required: true value: registry.redhat.io/rhgs3/rhgs-gluster-block-prov-rhel7 - displayName: glusterblock provisioner container image version name: IMAGE_VERSION required: true value: v3.11.8 - description: The namespace in which these resources are being created displayName: glusterblock provisioner namespace name: NAMESPACE required: true value: glusterfs - description: A unique name to identify which heketi service manages this cluster, useful for running multiple heketi instances displayName: GlusterFS cluster name name: CLUSTER_NAME value: storageIf the template has only IMAGE_NAME as a parameter, then update the glusterblock-provisioner template as following. For example:
# oc edit template glusterblock-provisioner - displayName: glusterblock provisioner container image name name: IMAGE_NAME required: true value: registry.redhat.io/rhgs3/rhgs-gluster-block-prov-rhel7:v3.11.8 - description: The namespace in which these resources are being created displayName: glusterblock provisioner namespace name: NAMESPACE required: true value: glusterfs - description: A unique name to identify which heketi service manages this cluster, useful for running multiple heketi instances displayName: GlusterFS cluster name name: CLUSTER_NAME value: storage
Delete the following resources from the old pod
# oc delete clusterroles.authorization.openshift.io glusterblock-provisioner-runner # oc delete serviceaccounts glusterblock-storage-provisioner # oc delete clusterrolebindings.authorization.openshift.io glusterblock-storage-provisionerBefore running oc process determine the correct
provisionername. If there are more than onegluster block provisionerrunning in your cluster the names must differ from all otherprovisioners.
For example,
-
If there are 2 or more provisioner the name should be
gluster.org/glusterblock-<namespace>where, namespace is replaced by the namespace that the provisioner is deployed in. -
If there is only one provisioner, installed prior to 3.11.8,
gluster.org/glusterblockis sufficent. If the name currently in use already has a unique namespace suffix, reuse the existing name.
-
If there are 2 or more provisioner the name should be
After editing the template, execute the following command to create the deployment configuration:
# oc process glusterblock-provisioner -o yaml | oc create -f -For example:
# oc process glusterblock-provisioner -o yaml | oc create -f - clusterrole.authorization.openshift.io/glusterblock-provisioner-runner created serviceaccount/glusterblock-storage-provisioner created clusterrolebinding.authorization.openshift.io/glusterblock-storage-provisioner created deploymentconfig.apps.openshift.io/glusterblock-storage-provisioner-dc createdBrick multiplexing is a feature that allows adding multiple bricks into one process. This reduces resource consumption and allows us to run more bricks than before with the same memory consumption. It is enabled by default from Container-Native Storage 3.6 onward. During an upgrade from Container-Native Storage 3.10 to Red Hat Openshift Container Storage 3.11, to turn brick multiplexing on, execute the following commands:
To exec into the Gluster pod, execute the following command and rsh into any of the gluster pods:
# oc rsh <gluster_pod_name>Verify the brick multiplex status:
# gluster v get all allIf it is disabled, then execute the following command to enable brick multiplexing:
NoteEnsure that all volumes are in a stop state or no bricks are running while brick multiplexing is enabled.
# gluster volume set all cluster.brick-multiplex onFor example:
# oc rsh glusterfs-770ql sh-4.2# gluster volume set all cluster.brick-multiplex on Brick-multiplexing is supported only for container workloads (Independent or Converged mode). Also it is advised to make sure that either all volumes are in stopped state or no bricks are running before this option is modified.Do you still want to continue? (y/n) y volume set: successList all the volumes in the trusted storage pool. This step is only required if the volume set operation is performed:
For example:
# gluster volume list heketidbstorage vol_194049d2565d2a4ad78ef0483e04711e ... ...Restart all the volumes. This step is only required if the volume set operation is performed along with the previous step:
# gluster vol stop <VOLNAME> # gluster vol start <VOLNAME>
Support for S3 compatible Object Store in Red Hat Openshift Container Storage is under technology preview. To enable S3 compatible object store, see https://access.redhat.com/documentation/en-us/red_hat_openshift_container_storage/3.11/html/operations_guide/s3_object_store.
Note- If you have glusterfs registry pods, then proceed with the steps listed in Section 6.2, “Upgrading the pods in the glusterfs registry group” to upgrade heketi and glusterfs registry pods.
- If you do not have glusterfs registry pods, then proceed with the steps listed in ] to bring back your heketi pod and then proceed with the steps listed in xref:chap-upgrade_client_common[ to upgrade the client on Red Hat Openshift Container Platform Nodes.
All storage classes that use gluster block volume provisioning must match exactly to one of the provisioner names in the cluster. To check the list of storage classes that refer to a
block provisioner, in a givennamespace, run the following command:# oc get sc -o custom-columns=NAME:.metadata.name,PROV:.provisioner,RSNS:.parameters.restsecretnamespace | grep 'gluster.org/glusterblock' | grep <namespace>Example:
# oc get sc -o custom-columns=NAME:.metadata.name,PROV:.provisioner,RSNS:.parameters.restsecretnamespace | grep 'gluster.org/glusterblock' | grep app-storage glusterfs-storage-block gluster.org/glusterblock-app-storage app-storageCheck each storage class
provisioner name, if it does not match theblock provisioner nameconfigured for thatnamespaceit must be updated. If theblock provisionername already matches theconfigured provisionername, nothing else needs to be done. Use the list generated above and include all storage class names where the provionser name must be updated.
For every storage class in this list do the following:# oc get sc -o yaml <storageclass> > storageclass-to-edit.yaml # oc delete sc <storageclass> # sed 's,gluster.org/glusterblock$,gluster.org/glusterblock-<namespace>,' storageclass-to-edit.yaml | oc create -f -Example:
# oc get sc -o yaml gluster-storage-block > storageclass-to-edit.yaml # oc delete sc gluster-storage-block # sed 's,gluster.org/glusterblock$,gluster.org/glusterblock-app-storage,' storageclass-to-edit.yaml | oc create -f -
6.2. Upgrading the pods in the glusterfs registry group
The following sections provide steps to upgrade your glusterfs registry pods.
6.2.1. Prerequisites
Ensure the following prerequisites are met:
- Section 3.1.3, “Red Hat OpenShift Container Platform and Red Hat Openshift Container Storage Requirements”
- Ensure to have the supported versions of OpenShift Container Platform with Red Hat Gluster Storage Server and Red Hat Openshift Container Storage. For more information on supported versions, see Section 3.1.1, “Supported Versions”
Ensure to run the following command to get the latest versions of Ansible templates.
# yum update openshift-ansible
For deployments using cns-deploy tool, the templates are available in the following location:
- gluster template - /usr/share/heketi/templates/glusterfs-template.yaml
- heketi template - /usr/share/heketi/templates/heketi-template.yaml
- glusterblock-provisioner template - /usr/share/heketi/templates/glusterblock-provisioner.yaml
For deployments using ansible playbook the templates are available in the following location:
- gluster template - /usr/share/ansible/openshift-ansible/roles/openshift_storage_glusterfs/files/glusterfs-template.yml
- heketi template - /usr/share/ansible/openshift-ansible/roles/openshift_storage_glusterfs/files/heketi-template.yml
- glusterblock-provisioner template - /usr/share/ansible/openshift-ansible/roles/openshift_storage_glusterfs/files/glusterblock-provisioner.yml
6.2.2. Restoring original label values for /dev/log
Follow this procedure only if you are upgrading your environment from Red Hat Container Native Storage 3.9 to Red Hat Openshift Container Storage 3.11.8.
Skip this procedure if you are upgrading your environment from Red Hat Openshift Container Storage 3.10 and above to Red Hat Openshift Container Storage 3.11.8.
To restore the original selinux label, execute the following commands:
Create a directory and soft links on all nodes that run gluster pods:
# mkdir /srv/<directory_name> # cd /srv/<directory_name>/ # same dir as above # ln -sf /dev/null systemd-tmpfiles-setup-dev.service # ln -sf /dev/null systemd-journald.service # ln -sf /dev/null systemd-journald.socketEdit the daemonset that creates the glusterfs pods on the node which has oc client:
# oc edit daemonset <daemonset_name>Under volumeMounts section add a mapping for the volume:
- mountPath: /usr/lib/systemd/system/systemd-journald.service name: systemd-journald-service - mountPath: /usr/lib/systemd/system/systemd-journald.socket name: systemd-journald-socket - mountPath: /usr/lib/systemd/system/systemd-tmpfiles-setup-dev.service name: systemd-tmpfiles-setup-dev-serviceUnder volumes section add a new host path for each service listed:
NoteThe path mentioned in here should be the same as mentioned in Step 1.
- hostPath: path: /srv/<directory_name>/systemd-journald.socket type: "" name: systemd-journald-socket - hostPath: path: /srv/<directory_name>/systemd-journald.service type: "" name: systemd-journald-service - hostPath: path: /srv/<directory_name>/systemd-tmpfiles-setup-dev.service type: "" name: systemd-tmpfiles-setup-dev-serviceRun the following command on all nodes that run gluster pods. This will reset the label:
# restorecon /dev/logExecute the following command to check the status of self heal for all volumes:
# oc rsh <gluster_pod_name> # for each_volume in `gluster volume list`; do gluster volume heal $each_volume info ; done | grep "Number of entries: [^0]$"Wait for self-heal to complete.
Execute the following command and ensure that the bricks are not more than 90% full:
# df -kh | grep -v ^Filesystem | awk '{if(int($5)>90) print $0}'NoteIf the bricks are close to 100% utilization, then the Logical Volume Manager(LVM) activation for these bricks may take a long time or can get stuck once the pod or node is rebooted. It is advised to bring down the utilization of that brick or expand the physical volume(PV) that is using the logical volume(LV).
NoteThe
dfcommand is not applicable to bricks that belong to Block Hosting Volume(BHV). On a BHV , the used size of the bricks generated by thedfcommand is the added size of the blockvolumes of that Gluster volume, it is not the size of the data that resides in the blockvolumes. For more information refer to How To Identify Block Volumes and Block Hosting Volumes in Openshift Container Storage.Execute the following command on any one of the gluster pods to set the maximum number of bricks (250) that can run on a single instance of
glusterfsdprocess:# gluster volume set all cluster.max-bricks-per-process 250Execute the following command on any one of the gluster pods to ensure that the option is set correctly:
# gluster volume get all cluster.max-bricks-per-processFor example:
# gluster volume get all cluster.max-bricks-per-process cluster.max-bricks-per-process 250
Execute the following command on the node which has oc client to delete the gluster pod:
# oc delete pod <gluster_pod_name>To verify if the pod is ready, execute the following command:
# oc get pods -l glusterfs=registry-podLogin to the node hosting the pod and check the selinux label of /dev/log
# ls -lZ /dev/logThe output should show devlog_t label
For example:
# ls -lZ /dev/log srw-rw-rw-. root root system_u:object_r:devlog_t:s0 /dev/logExit the node.
In the gluster pod, check if the label value is devlog_t:
# oc rsh <gluster_pod_name> # ls -lZ /dev/logFor example:
# ls -lZ /dev/log srw-rw-rw-. root root system_u:object_r:devlog_t:s0 /dev/log- Perform steps 4 to 9 for other pods.
6.2.3. Upgrading if existing version deployed by using cns-deploy
6.2.3.1. Upgrading cns-deploy and Heketi Server
The following commands must be executed on the client machine.
Execute the following command to update the heketi client and cns-deploy packages:
# yum update cns-deploy -y # yum update heketi-client -yBackup the Heketi registry database file
# heketi-cli db dump > heketi-db-dump-$(date -I).jsonExecute the following command to delete the heketi template.
# oc delete templates heketiExecute the following command to get the current HEKETI_ADMIN_KEY.
The OCS admin can choose to set any phrase for user key as long as it is not used by their infrastructure. It is not used by any of the OCS default installed resources.
# oc get secret <heketi-admin-secret-name> -o jsonpath='{.data.key}'|base64 -d;echoExecute the following command to install the heketi template.
# oc create -f /usr/share/heketi/templates/heketi-template.yaml template "heketi" createdExecute the following command to grant the heketi Service Account the necessary privileges.
# oc policy add-role-to-user edit system:serviceaccount:<project_name>:heketi-service-account # oc adm policy add-scc-to-user privileged -z heketi-service-accountFor example,
# oc policy add-role-to-user edit system:serviceaccount:storage-project:heketi-service-account # oc adm policy add-scc-to-user privileged -z heketi-service-accountNoteThe service account used in heketi pod needs to be privileged because Heketi/rhgs-volmanager pod mounts the heketidb storage Gluster volume as a "glusterfs" volume type and not as a PersistentVolume (PV).
As per the security-context-constraints regulations in OpenShift, ability to mount volumes which are not of the type configMap, downwardAPI, emptyDir, hostPath, nfs, persistentVolumeClaim, secret is granted only to accounts with privileged Security Context Constraint (SCC).Execute the following command to generate a new heketi configuration file.
# sed -e "s/\${HEKETI_EXECUTOR}/kubernetes/" -e "s#\${HEKETI_FSTAB}#/var/lib/heketi/fstab#" -e "s/\${SSH_PORT}/22/" -e "s/\${SSH_USER}/root/" -e "s/\${SSH_SUDO}/false/" -e "s/\${BLOCK_HOST_CREATE}/true/" -e "s/\${BLOCK_HOST_SIZE}/500/" "/usr/share/heketi/templates/heketi.json.template" > heketi.json-
The
BLOCK_HOST_SIZEparameter controls the size (in GB) of the automatically created Red Hat Gluster Storage volumes hosting the gluster-block volumes (For more information, see https://access.redhat.com/documentation/en-us/red_hat_openshift_container_storage/3.11/html-single/operations_guide/index#Block_Storage). This default configuration will dynamically create block-hosting volumes of 500GB in size as more space is required. Alternatively, copy the file /usr/share/heketi/templates/heketi.json.template to heketi.json in the current directory and edit the new file directly, replacing each "${VARIABLE}" string with the required parameter.
NoteJSON formatting is strictly required (e.g. no trailing spaces, booleans in all lowercase).
-
The
Execute the following command to create a secret to hold the configuration file.
# oc create secret generic <heketi-registry-config-secret> --from-file=heketi.jsonNoteIf the heketi-registry-config-secret file already exists, then delete the file and run the following command.
Execute the following command to delete the deployment configuration, service, and route for heketi:
# oc delete deploymentconfig,service,route heketi-registryEdit the heketi template.
Edit the HEKETI_USER_KEY and HEKETI_ADMIN_KEY parameters.
# oc edit template heketi parameters: - description: Set secret for those creating volumes as type user displayName: Heketi User Secret name: HEKETI_USER_KEY value: <heketiuserkey> - description: Set secret for administration of the Heketi service as user admin displayName: Heketi Administrator Secret name: HEKETI_ADMIN_KEY value: <adminkey> - description: Set the executor type, kubernetes or ssh displayName: heketi executor type name: HEKETI_EXECUTOR value: kubernetes - description: Set the hostname for the route URL displayName: heketi route name name: HEKETI_ROUTE value: heketi-storage - displayName: heketi container image name name: IMAGE_NAME required: true value: registry.redhat.io/rhgs3/rhgs-volmanager-rhel7 - displayName: heketi container image version name: IMAGE_VERSION required: true value: v3.11.8 - description: A unique name to identify this heketi service, useful for running multiple heketi instances displayName: GlusterFS cluster name name: CLUSTER_NAME value: storageNoteIf a cluster has more than 1000 volumes refer to How to change the default PVS limit in Openshift Container Storage and add the required parameters before proceeding with the upgrade.
Add an ENV with the name HEKETI_LVM_WRAPPER and value
/usr/sbin/exec-on-host.- description: Heketi can use a wrapper to execute LVM commands, i.e. run commands in the host namespace instead of in the Gluster container. displayName: Wrapper for executing LVM commands name: HEKETI_LVM_WRAPPER value: /usr/sbin/exec-on-hostAdd an ENV with the name HEKETI_DEBUG_UMOUNT_FAILURES and value
true.- description: When unmounting a brick fails, Heketi will not be able to cleanup the Gluster volume completely. The main causes for preventing to unmount a brick, seem to originate from Gluster processes. By enabling this option, the heketi.log will contain the output of 'lsof' to aid with debugging of the Gluster processes and help with identifying any files that may be left open. displayName: Capture more details in case brick unmounting fails name: HEKETI_DEBUG_UMOUNT_FAILURES required=true-
Add an ENV with the name HEKETI_CLI_USER and value
admin. - Add an ENV with the name HEKETI_CLI_KEY and the same value provided for the ENV HEKETI_ADMIN_KEY.
Replace the
valueunderIMAGE_VERSIONwithv3.11.5orv3.11.8depending on the version you want to upgrade to.- displayName: heketi container image name name: IMAGE_NAME required: true value: registry.redhat.io/rhgs3/rhgs-volmanager-rhel7 - displayName: heketi container image version name: IMAGE_VERSION required: true value: v3.11.8
Execute the following command to deploy the Heketi service, route, and deployment configuration which will be used to create persistent volumes for OpenShift:
# oc process heketi | oc create -f - service "heketi-registry" created route "heketi-registry" created deploymentconfig-registry "heketi" createdNoteIt is recommended that the
heketidbstoragevolume be tuned for db workloads. Newly installed Openshift Container Storage deployments tune the heketidbstorage volume automatically. For older deployments, follow the KCS article Planning to run containerized DB or nosql workloads on Openshift Container Storage? and perform the volume set operation for the volumeheketidbstorage.Execute the following command to verify that the containers are running:
# oc get podsFor example:
# oc get pods NAME READY STATUS RESTARTS AGE glusterblock-storage-provisioner-dc-1-ffgs5 1/1 Running 0 3m glusterfs-storage-5thpc 1/1 Running 0 9d glusterfs-storage-hfttr 1/1 Running 0 9d glusterfs-storage-n8rg5 1/1 Running 0 9d heketi-storage-4-9fnvz 2/2 Running 0 8d
6.2.3.2. Upgrading the Red Hat Gluster Storage Registry Pods
The following commands must be executed on the client machine. .
Following are the steps for updating a DaemonSet for glusterfs:
Execute the following steps to stop the Heketi pod to prevent it from accepting any new request for volume creation or volume deletion:
Execute the following command to access your project:
# oc project <project_name>For example:
# oc project storage-projectExecute the following command to get the
DeploymentConfig:# oc get dsExecute the following command to set heketi server to accept requests only from the local-client:
# heketi-cli server mode set local-clientWait for the ongoing operations to complete and execute the following command to monitor if there are any ongoing operations:
# heketi-cli server operations infoExecute the following command to reduce the replica count from 1 to 0. This brings down the Heketi pod:
# oc scale dc <heketi_dc> --replicas=0Execute the following command to verify that the heketi pod is no longer present:
# oc get pods
Execute the following command to find the DaemonSet name for gluster
# oc get dsExecute the following command to delete the DaemonSet:
# oc delete ds <ds-name> --cascade=falseUsing
--cascade=falseoption while deleting the old DaemonSet does not delete the glusterfs_registry pods but deletes only the DaemonSet. After deleting the old DaemonSet, you must load the new one. When you manually delete the old pods, the new pods which are created will have the configurations of the new DaemonSet.For example,
# oc delete ds glusterfs-registry --cascade=false daemonset "glusterfs-registry" deletedExecute the following commands to verify all the old pods are up:
# oc get podsFor example,
# oc get pods NAME READY STATUS RESTARTS AGE glusterblock-storage-provisioner-dc-1-ffgs5 1/1 Running 0 3m glusterfs-storage-5thpc 1/1 Running 0 9d glusterfs-storage-hfttr 1/1 Running 0 9d glusterfs-storage-n8rg5 1/1 Running 0 9d heketi-storage-4-9fnvz 2/2 Running 0 8dExecute the following command to delete the old glusterfs template.
# oc delete templates glusterfsFor example,
# oc delete templates glusterfs template “glusterfs” deletedLabel all the OpenShift Container Platform nodes that has the Red Hat Gluster Storage pods:
Check if the nodes are labelled with the appropriate label by using the following command:
# oc get nodes -l glusterfs=registry-host
Execute the following command to register new glusterfs template.
# oc create -f /usr/share/heketi/templates/glusterfs-template.yamlFor example,
# oc create -f /usr/share/heketi/templates/glusterfs-template.yaml template “glusterfs” createdEdit the glusterfs template.
Execute the following command:
# oc edit template glusterfsAdd the following lines under volume mounts:
- name: kernel-modules mountPath: "/usr/lib/modules" readOnly: true - name: host-rootfs mountPath: "/rootfs"Add the following lines under volumes:
- name: kernel-modules hostPath: path: "/usr/lib/modules" - name: host-rootfs hostPath: path: "/"Replace the
valueunderIMAGE_VERSIONwithv3.11.5orv3.11.8depending on the version you want to upgrade to.- displayName: heketi container image name name: IMAGE_NAME required: true value: registry.redhat.io/rhgs3/rhgs-volmanager-rhel7 - displayName: heketi container image version name: IMAGE_VERSION required: true value: v3.11.8
Execute the following commands to create the gluster DaemonSet:
# oc process glusterfs | oc create -f -For example,
# oc process glusterfs | oc create -f - Deamonset “glusterfs” createdNoteIf a cluster has more than 1000 volumes refer to How to change the default PVS limit in Openshift Container Storage and add the required parameters before proceeding with the upgrade.
Execute the following command to identify the old glusterfs_registry pods that needs to be deleted:
# oc get podsFor example,
# oc get pods NAME READY STATUS RESTARTS AGE glusterblock-storage-provisioner-dc-1-ffgs5 1/1 Running 0 3m glusterfs-storage-5thpc 1/1 Running 0 9d glusterfs-storage-hfttr 1/1 Running 0 9d glusterfs-storage-n8rg5 1/1 Running 0 9d heketi-storage-4-9fnvz 2/2 Running 0 8dExecute the following command and ensure that the bricks are not more than 90% full:
# df -kh | grep -v ^Filesystem | awk '{if(int($5)>90) print $0}'NoteIf the bricks are close to 100% utilization, then the Logical Volume Manager(LVM) activation for these bricks may take a long time or can get stuck once the pod or node is rebooted. It is advised to bring down the utilization of that brick or expand the physical volume(PV) that is using the logical volume(LV).
NoteThe
dfcommand is not applicable to bricks that belong to Block Hosting Volume(BHV). On a BHV , the used size of the bricks generated by thedfcommand is the added size of the blockvolumes of that Gluster volume, it is not the size of the data that resides in the blockvolumes. For more information refer to How To Identify Block Volumes and Block Hosting Volumes in Openshift Container Storage.Execute the following command to delete the old glusterfs-registry pods.
glusterfs-registry pods should follow rolling upgrade. Hence, you must ensure that the new pod is running before deleting the next old glusterfs-registry pods. We support OnDelete Strategy DaemonSet update strategy. With OnDelete Strategy update strategy, after you update a DaemonSet template, new DaemonSet pods will only be created when you manually delete old DaemonSet pods.To delete the old glusterfs-registry pods, execute the following command:
# oc delete pod <gluster_pod>For example,
# oc delete pod glusterfs-0vcf3 pod “glusterfs-0vcf3” deletedNoteBefore deleting the next pod, self heal check has to be made:
Run the following command to access shell on glusterfs-registry pods:
# oc rsh <gluster_pod_name>Run the following command to check the self-heal status of all the volumes: :
# for eachVolume in $(gluster volume list); do gluster volume heal $eachVolume info ; done | grep "Number of entries: [^0]$"
The delete pod command will terminate the old pod and create a new pod. Run
# oc get pods -wand check the Age of the pod and READY status should be 1/1. The following is the example output showing the status progression from termination to creation of the pod.# oc get pods -w NAME READY STATUS RESTARTS AGE glusterfs-0vcf3 1/1 Terminating 0 3d …
Execute the following command to verify that the pods are running:
# oc get podsFor example,
# oc get pods NAME READY STATUS RESTARTS AGE glusterblock-storage-provisioner-dc-1-ffgs5 1/1 Running 0 3m glusterfs-storage-5thpc 1/1 Running 0 9d glusterfs-storage-hfttr 1/1 Running 0 9d glusterfs-storage-n8rg5 1/1 Running 0 9d heketi-storage-4-9fnvz 2/2 Running 0 8dExecute the following commands to verify if you have upgraded the pod to the latest version:
# oc rsh <gluster_registry_pod_name> glusterd --versionFor example:
# oc rsh glusterfs-registry-4cpcc glusterd --version glusterfs 6.0# rpm -qa|grep gluster
Check the Red Hat Gluster Storage op-version by executing the following command on one of the glusterfs-registry pods.
# gluster vol get all cluster.op-versionAfter you upgrade the Gluster pods, ensure that you set Heketi back to operational mode:
Scale up the DC (Deployment Configuration).
# oc scale dc <heketi_dc> --replicas=1
Set the cluster.op-version to 70200 on any one of the pods:
NoteEnsure all the glusterfs-registry pods are updated before changing the cluster.op-version.
# gluster volume set all cluster.op-version 70200Execute the following steps to enable server.tcp-user-timeout on all volumes.
NoteThe "server.tcp-user-timeout" option specifies the maximum amount of the time (in seconds) the transmitted data from the application can remain unacknowledged from the brick.
It is used to detect force disconnections and dead connections (if a node dies unexpectedly, a firewall is activated, etc.,) early and make it possible for applications to reduce the overall failover time.
List the glusterfs pod using the following command:
# oc get podsFor example:
# oc get pods NAME READY STATUS RESTARTS AGE glusterblock-storage-provisioner-dc-1-ffgs5 1/1 Running 0 3m glusterfs-storage-5thpc 1/1 Running 0 9d glusterfs-storage-hfttr 1/1 Running 0 9d glusterfs-storage-n8rg5 1/1 Running 0 9d heketi-storage-4-9fnvz 2/2 Running 0 8dRemote shell into one of the glusterfs-registry pods. For example:
# oc rsh glusterfs-registry-g6vd9Execute the following command:
# for eachVolume in `gluster volume list`; do echo $eachVolume; gluster volume set $eachVolume server.tcp-user-timeout 42 ; doneFor example:
# for eachVolume in `gluster volume list`; do echo $eachVolume; gluster volume set $eachVolume server.tcp-user-timeout 42 ; done volume1 volume set: success volume2 volume set: success
If a gluster-block-registry-provisoner-pod already exists then delete it by executing the following commands:
# oc delete dc <gluster-block-registry-dc>For example:
# oc delete dc glusterblock-registry-provisioner-dcDelete the following resources from the old pod
# oc delete clusterroles.authorization.openshift.io glusterblock-provisioner-runner # oc delete serviceaccounts glusterblock-provisioner serviceaccount "glusterblock-provisioner" deleted # oc delete clusterrolebindings.authorization.openshift.io glusterblock-provisionerExecute the following commands to deploy the gluster-block provisioner:
`sed -e 's/${NAMESPACE}/<NAMESPACE>/' /usr/share/heketi/templates/glusterblock-provisioner.yaml | sed -e 's/<VERSION>/<NEW-VERSION>/' | oc create -f -- <VERSION>
- Existing version of OpenShift Container Storage.
- <NEW-VERSION>
Either 3.11.5 or 3.11.8 depending on the version you are upgrading to.
# oc adm policy add-cluster-role-to-user glusterblock-provisioner-runner system:serviceaccount:<NAMESPACE>:glusterblock-provisionerFor example:
`sed -e 's/${NAMESPACE}/storage-project/' /usr/share/heketi/templates/glusterblock-provisioner.yaml | sed -e 's/3.11.4/3.11.8/' | oc create -f -# oc adm policy add-cluster-role-to-user glusterblock-provisioner-runner system:serviceaccount:storage-project:glusterblock-provisioner
Brick multiplexing is a feature that allows adding multiple bricks into one process. This reduces resource consumption and allows us to run more bricks than before with the same memory consumption. It is enabled by default from Container-Native Storage 3.6 onward. During an upgrade from Container-Native Storage 3.10 to Red Hat Openshift Container Storage 3.11, to turn brick multiplexing on, execute the following commands:
To exec into the Gluster pod, execute the following command and rsh into any of the gluster pods:
# oc rsh <gluster_pod_name>Verify the brick multiplex status:
# gluster v get all allIf it is disabled, then execute the following command to enable brick multiplexing:
NoteEnsure that all volumes are in a stop state or no bricks are running while brick multiplexing is enabled.
# gluster volume set all cluster.brick-multiplex onFor example:
# oc rsh glusterfs-registry-g6vd9 sh-4.2# gluster volume set all cluster.brick-multiplex on Brick-multiplexing is supported only for container workloads (Independent or Converged mode). Also it is advised to make sure that either all volumes are in stopped state or no bricks are running before this option is modified.Do you still want to continue? (y/n) y volume set: successList all the volumes in the trusted storage pool. This step is only required if the volume set operation is performed:
For example:
# gluster volume list heketidbstorage vol_194049d2565d2a4ad78ef0483e04711e ... ...Restart all the volumes. This step is only required if the volume set operation is performed along with the previous step:
# gluster vol stop <VOLNAME> # gluster vol start <VOLNAME>
Support for S3 compatible Object Store in Red Hat Openshift Container Storage is under technology preview. To enable S3 compatible object store, see https://access.redhat.com/documentation/en-us/red_hat_openshift_container_storage/3.11/html/operations_guide/s3_object_store.
NoteAfter upgrading the glusterfs registry pods, proceed with the steps listed in ] to bring back your heketi pod and then proceed with the steps listed in xref:chap-upgrade_client_common[ to upgrade the client on Red Hat Openshift Container Platform Nodes.
6.2.4. Upgrading if existing version deployed by using Ansible
6.2.4.1. Upgrading Heketi Server
The following commands must be executed on the client machine.
"yum update cns-deploy -y" is not required to be executed if OCS 3.10 was deployed via Ansible.
Execute the following steps to stop the Heketi pod to prevent it from accepting any new request for volume creation or volume deletion:
Execute the following command to access your project:
# oc project <project_name>For example:
# oc project storage-projectExecute the following command to get the
DeploymentConfig:# oc get dsExecute the following command to set heketi server to accept requests only from the local-client:
# heketi-cli server mode set local-clientWait for the ongoing operations to complete and execute the following command to monitor if there are any ongoing operations:
# heketi-cli server operations info
Backup the Heketi database file
# heketi-cli db dump > heketi-db-dump-$(date -I).jsonNoteThe json file created can be used to restore and therefore should be stored in persistent storage of your choice.
Execute the following command to update the heketi client packages. Update the
heketi-clientpackage on all the OCP nodes where it is installed. Newer installations may not have theheketi-clientrpm installed on any OCP nodes:# yum update heketi-client -yExecute the following command to get the current HEKETI_ADMIN_KEY.
The OCS admin can choose to set any phrase for user key as long as it is not used by their infrastructure. It is not used by any of the OCS default installed resources.
# oc get secret heketi-registry-admin-secret -o jsonpath='{.data.key}'|base64 -d;echoIf the
HEKETI_USER_KEYwas set previously, you can obtain it by using the following command:# oc describe pod <heketi-pod>Execute the following step to edit the template:
If the existing template has IMAGE_NAME, then edit the template to change the HEKETI_USER_KEY, HEKETI_ADMIN_KEY, HEKETI_ROUTE, IMAGE_NAME, CLUSTER_NAME and HEKETI_LVM_WRAPPER as shown in the example below.
# oc edit template heketi parameters: - description: Set secret for those creating volumes as type user displayName: Heketi User Secret name: HEKETI_USER_KEY value: <heketiuserkey> - description: Set secret for administration of the Heketi service as user admin displayName: Heketi Administrator Secret name: HEKETI_ADMIN_KEY value: <adminkey> - description: Set the executor type, kubernetes or ssh displayName: heketi executor type name: HEKETI_EXECUTOR value: kubernetes - description: Set the hostname for the route URL displayName: heketi route name name: HEKETI_ROUTE value: heketi-registry - displayName: heketi container image name name: IMAGE_NAME required: true value: registry.redhat.io/rhgs3/rhgs-volmanager-rhel7:v3.11.8 - description: A unique name to identify this heketi service, useful for running multiple heketi instances displayName: GlusterFS cluster name name: CLUSTER_NAME value: registry - description: Heketi can use a wrapper to execute LVM commands, i.e. run commands in the host namespace instead of in the Gluster container name: HEKETI_LVM_WRAPPER displayName: Wrapper for executing LVM commands value: /usr/sbin/exec-on-hostIf the existing template has IMAGE_NAME and IMAGE_VERSION as two parameters, then edit the template to change the HEKETI_USER_KEY, HEKETI_ADMIN_KEY, HEKETI_ROUTE, IMAGE_NAME, IMAGE_VERSION, CLUSTER_NAME and HEKETI_LVM_WRAPPER as shown in the example below.
# oc edit template heketi parameters: - description: Set secret for those creating volumes as type user displayName: Heketi User Secret name: HEKETI_USER_KEY value: <heketiuserkey> - description: Set secret for administration of the Heketi service as user admin displayName: Heketi Administrator Secret name: HEKETI_ADMIN_KEY value: <adminkey> - description: Set the executor type, kubernetes or ssh displayName: heketi executor type name: HEKETI_EXECUTOR value: kubernetes - description: Set the hostname for the route URL displayName: heketi route name name: HEKETI_ROUTE value: heketi-registry - displayName: heketi container image name name: IMAGE_NAME required: true value: registry.redhat.io/rhgs3/rhgs-volmanager-rhel7 - displayName: heketi container image version name: IMAGE_VERSION required: true value: v3.11.8 - description: A unique name to identify this heketi service, useful for running multiple heketi instances displayName: GlusterFS-registry cluster name name: CLUSTER_NAME value: registry - description: Heketi can use a wrapper to execute LVM commands, i.e. run commands in the host namespace instead of in the Gluster container name: HEKETI_LVM_WRAPPER displayName: Wrapper for executing LVM commands value: /usr/sbin/exec-on-hostNoteIf a cluster has more than 1000 volumes refer to How to change the default PVS limit in Openshift Container Storage and add the required parameters before proceeding with the upgrade.
Execute the following command to delete the deployment configuration, service, and route for heketi:
# oc delete deploymentconfig,service,route heketi-registryExecute the following command to deploy the Heketi service, route, and deployment configuration which will be used to create persistent volumes for OpenShift:
# oc process heketi | oc create -f - service "heketi-registry" created route "heketi-registry" created deploymentconfig-registry "heketi" createdNoteIt is recommended that the
heketidbstoragevolume be tuned for db workloads. Newly installed Openshift Container Storage deployments tune the heketidbstorage volume automatically. For older deployments, follow the KCS article Planning to run containerized DB or nosql workloads on Openshift Container Storage? and perform the volume set operation for the volumeheketidbstorage.Execute the following command to verify that the containers are running:
# oc get podsFor example:
# oc get pods NAME READY STATUS RESTARTS AGE glusterblock-storage-provisioner-dc-1-ffgs5 1/1 Running 0 3m glusterfs-storage-5thpc 1/1 Running 0 9d glusterfs-storage-hfttr 1/1 Running 0 9d glusterfs-storage-n8rg5 1/1 Running 0 9d heketi-storage-4-9fnvz 2/2 Running 0 8d
6.2.4.2. Upgrading the Red Hat Gluster Storage Registry Pods
The following commands must be executed on the client machine.
Following are the steps for updating a DaemonSet for glusterfs:
Execute the following steps to stop the Heketi pod to prevent it from accepting any new request for volume creation or volume deletion:
Execute the following command to access your project:
# oc project <project_name>For example:
# oc project storage-projectExecute the following command to get the
DeploymentConfig:# oc get dcExecute the following command to set heketi server to accept requests only from the local-client:
# heketi-cli server mode set local-clientWait for the ongoing operations to complete and execute the following command to monitor if there are any ongoing operations:
# heketi-cli server operations infoExecute the following command to reduce the replica count from 1 to 0. This brings down the Heketi pod:
# oc scale dc <heketi_dc> --replicas=0Execute the following command to verify that the heketi pod is no longer present:
# oc get pods
Execute the following command to find the DaemonSet name for gluster
# oc get dsExecute the following command to delete the DaemonSet:
# oc delete ds <ds-name> --cascade=falseUsing
--cascade=falseoption while deleting the old DaemonSet does not delete the glusterfs_registry pods but deletes only the DaemonSet. After deleting the old DaemonSet, you must load the new one. When you manually delete the old pods, the new pods which are created will have the configurations of the new DaemonSet.For example,
# oc delete ds glusterfs-registry --cascade=false daemonset "glusterfs-registry" deletedExecute the following commands to verify all the old pods are up:
# oc get podsFor example,
# oc get pods NAME READY STATUS RESTARTS AGE glusterblock-storage-provisioner-dc-1-ffgs5 1/1 Running 0 3m glusterfs-storage-5thpc 1/1 Running 0 9d glusterfs-storage-hfttr 1/1 Running 0 9d glusterfs-storage-n8rg5 1/1 Running 0 9d heketi-storage-4-9fnvz 2/2 Running 0 8dExecute the following command to delete the old glusterfs template.
# oc delete templates glusterfsExecute the following command to register new glusterfs template.
# oc create -f /usr/share/ansible/openshift-ansible/roles/openshift_storage_glusterfs/files/glusterfs-template.yml template "glusterfs" createdExecute the following command to edit the old glusterfs template.
If the template has IMAGE_NAME, then update the glusterfs template as following. For example:
# oc edit template glusterfs - description: Labels which define the daemonset node selector. Must contain at least one label of the format \'glusterfs=<CLUSTER_NAME>-host\' displayName: Daemonset Node Labels name: NODE_LABELS value: '{ "glusterfs": "registry-host" }' - displayName: GlusterFS container image name name: IMAGE_NAME required: true value: registry.redhat.io/rhgs3/rhgs-server-rhel7:v3.11.8 - description: A unique name to identify which heketi service manages this cluster, useful for running multiple heketi instances displayName: GlusterFS cluster name name: CLUSTER_NAME value: registryIf the template has IMAGE_NAME and IMAGE_VERSION as two separate parameters, then update the glusterfs template as following. For example:
# oc edit template glusterfs - description: Labels which define the daemonset node selector. Must contain at least one label of the format \'glusterfs=<CLUSTER_NAME>-host\' displayName: Daemonset Node Labels name: NODE_LABELS value: '{ "glusterfs": "registry-host" }' - displayName: GlusterFS container image name name: IMAGE_NAME required: true value: registry.redhat.io/rhgs3/rhgs-server-rhel7 - description: A unique name to identify which heketi service manages this cluster, useful for running multiple heketi instances - displayName: GlusterFS container image version name: IMAGE_VERSION required: true value: v3.11.8 - displayName: GlusterFS cluster name name: CLUSTER_NAME value: registryNote- Ensure that the CLUSTER_NAME variable is set to the correct value
- If a cluster has more than 1000 volumes refer to How to change the default PVS limit in Openshift Container Storage and add the required parameters before proceeding with the upgrade.
Label all the OpenShift Container Platform nodes that has the Red Hat Gluster Storage pods:
Check if the nodes are labelled with the appropriate label by using the following command:
# oc get nodes -l glusterfs=registry-host
- name: kernel-modules mountPath: "/usr/lib/modules" readOnly: true
- name: host-rootfs mountPath: "/rootfs"
- name: kernel-modules hostPath: path: "/usr/lib/modules"
- name: host-rootfs hostPath: path: "/"
- displayName: heketi container image name name: IMAGE_NAME required: true value: registry.redhat.io/rhgs3/rhgs-volmanager-rhel7
displayName: heketi container image version name: IMAGE_VERSION required: true value: v3.11.8
Execute the following commands to create the gluster DaemonSet:
# oc process glusterfs | oc create -f -For example,
# oc process glusterfs | oc create -f - Deamonset “glusterfs-registry” createdExecute the following command to identify the old glusterfs_registry pods that needs to be deleted:
# oc get podsFor example,
# oc get pods NAME READY STATUS RESTARTS AGE glusterblock-storage-provisioner-dc-1-ffgs5 1/1 Running 0 3m glusterfs-storage-5thpc 1/1 Running 0 9d glusterfs-storage-hfttr 1/1 Running 0 9d glusterfs-storage-n8rg5 1/1 Running 0 9d heketi-storage-4-9fnvz 2/2 Running 0 8dExecute the following command and ensure that the bricks are not more than 90% full:
# df -kh | grep -v ^Filesystem | awk '{if(int($5)>90) print $0}'NoteIf the bricks are close to 100% utilization, then the Logical Volume Manager(LVM) activation for these bricks may take a long time or can get stuck once the pod or node is rebooted. It is advised to bring down the utilization of that brick or expand the physical volume(PV) that is using the logical volume(LV).
NoteThe
dfcommand is not applicable to bricks that belong to Block Hosting Volume(BHV). On a BHV , the used size of the bricks generated by thedfcommand is the added size of the blockvolumes of that Gluster volume, it is not the size of the data that resides in the blockvolumes. For more information refer to How To Identify Block Volumes and Block Hosting Volumes in Openshift Container Storage.Execute the following command to delete the old glusterfs-registry pods.
glusterfs-registry pods should follow rolling upgrade. Hence, you must ensure that the new pod is running before deleting the next old glusterfs-registry pods. We support OnDelete Strategy DaemonSet update strategy. With OnDelete Strategy update strategy, after you update a DaemonSet template, new DaemonSet pods will only be created when you manually delete old DaemonSet pods.To delete the old glusterfs-registry pods, execute the following command:
# oc delete pod <gluster_pod>For example,
# oc delete pod glusterfs-registry-4cpcc pod “glusterfs-registry-4cpcc” deletedNoteBefore deleting the next pod, self heal check has to be made:
Run the following command to access shell on glusterfs-registry pods:
# oc rsh <gluster_pod_name>Run the following command to check the self-heal status of all the volumes: :
# for eachVolume in $(gluster volume list); do gluster volume heal $eachVolume info ; done | grep "Number of entries: [^0]$"
The delete pod command will terminate the old pod and create a new pod. Run
# oc get pods -wand check the Age of the pod and READY status should be 1/1. The following is the example output showing the status progression from termination to creation of the pod.# oc get pods -w NAME READY STATUS RESTARTS AGE glusterfs-registry-4cpcc 1/1 Terminating 0 3d …
Execute the following command to verify that the pods are running:
# oc get podsFor example,
# oc get pods NAME READY STATUS RESTARTS AGE glusterblock-storage-provisioner-dc-1-ffgs5 1/1 Running 0 3m glusterfs-storage-5thpc 1/1 Running 0 9d glusterfs-storage-hfttr 1/1 Running 0 9d glusterfs-storage-n8rg5 1/1 Running 0 9d heketi-storage-4-9fnvz 2/2 Running 0 8dExecute the following commands to verify if you have upgraded the pod to the latest version:
# oc rsh <gluster_registry_pod_name> glusterd --versionFor example:
# oc rsh glusterfs-registry-abmqa glusterd --version glusterfs 6.0# rpm -qa|grep glusterCheck the Red Hat Gluster Storage op-version by executing the following command on one of the glusterfs-registry pods.
# gluster vol get all cluster.op-versionAfter you upgrade the Gluster pods, ensure that you set Heketi back to operational mode:
Scale up the DC (Deployment Configuration).
# oc scale dc <heketi_dc> --replicas=1
Set the cluster.op-version to 70200 on any one of the pods:
NoteEnsure all the glusterfs-registry pods are updated before changing the cluster.op-version.
# gluster volume set all cluster.op-version 70200Execute the following steps to enable server.tcp-user-timeout on all volumes.
NoteThe "server.tcp-user-timeout" option specifies the maximum amount of the time (in seconds) the transmitted data from the application can remain unacknowledged from the brick.
It is used to detect force disconnections and dead connections (if a node dies unexpectedly, a firewall is activated, etc.,) early and make it possible for applications to reduce the overall failover time.
List the glusterfs pod using the following command:
# oc get podsFor example:
# oc get pods NAME READY STATUS RESTARTS AGE glusterblock-storage-provisioner-dc-1-ffgs5 1/1 Running 0 3m glusterfs-storage-5thpc 1/1 Running 0 9d glusterfs-storage-hfttr 1/1 Running 0 9d glusterfs-storage-n8rg5 1/1 Running 0 9d heketi-storage-4-9fnvz 2/2 Running 0 8dRemote shell into one of the glusterfs-registry pods. For example:
# oc rsh glusterfs-registry-g6vd9Execute the following command:
# for eachVolume in `gluster volume list`; do echo $eachVolume; gluster volume set $eachVolume server.tcp-user-timeout 42 ; doneFor example:
# for eachVolume in `gluster volume list`; do echo $eachVolume; gluster volume set $eachVolume server.tcp-user-timeout 42 ; done volume1 volume set: success volume2 volume set: success
If a gluster-block-registry-provisoner-pod already exists then delete it by executing the following commands:
# oc delete dc <gluster-block-registry-dc>For example:
# oc delete dc glusterblock-registry-provisioner-dcExecute the following command to delete the old glusterblock provisioner template.
# oc delete templates glusterblock-provisionerCreate a glusterblock provisioner template. For example:
# oc create -f /usr/share/ansible/openshift-ansible/roles/openshift_storage_glusterfs/files/glusterblock-provisioner.yml template.template.openshift.io/glusterblock-provisioner createdDepending on the OCP version, edit the glusterblock-provisioner template to change the IMAGE_NAME and NAMESPACE.
# oc edit template glusterblock-provisioner - displayName: glusterblock provisioner container image name name: IMAGE_NAME required: true value: registry.redhat.io/rhgs3/rhgs-gluster-block-prov-rhel7:v3.11.8 - description: The namespace in which these resources are being created displayName: glusterblock provisioner namespace name: NAMESPACE required: true value: glusterfs-registry - description: A unique name to identify which heketi service manages this cluster, useful for running multiple heketi instances displayName: GlusterFS cluster name name: CLUSTER_NAME value: registryIf the template has IMAGE_NAME and IMAGE_VERSION as two separate parameters, then update the glusterblock-provisioner template as following.
For example:# oc edit template glusterblock-provisioner - displayName: glusterblock provisioner container image name name: IMAGE_NAME required: true value: registry.redhat.io/rhgs3/rhgs-gluster-block-prov-rhel7 - displayName: glusterblock provisioner container image version name: IMAGE_VERSION required: true value: v3.11.8 - description: The namespace in which these resources are being created displayName: glusterblock provisioner namespace name: NAMESPACE required: true value: glusterfs-registry - description: A unique name to identify which heketi service manages this cluster, useful for running multiple heketi instances displayName: GlusterFS cluster name name: CLUSTER_NAME value: registry
Delete the following resources from the old pod
# oc delete clusterroles.authorization.openshift.io glusterblock-provisioner-runner # oc delete serviceaccounts glusterblock-registry-provisioner # oc delete clusterrolebindings.authorization.openshift.io glusterblock-registry-provisionerBefore running oc process determine the correct
provisionername. If there are more than onegluster block provisionerrunning in your cluster the names must differ from all otherprovisioners.
For example,
-
If there are 2 or more provisioners the name should be
gluster.org/glusterblock-<namespace>where, namespace is replaced by the namespace that the provisioner is deployed in. -
If there is only one provisioner, installed prior to 3.11.8,
gluster.org/glusterblockis sufficent. If the name currently in use already has a unique namespace suffix, reuse the existing name.
-
If there are 2 or more provisioners the name should be
After editing the template, execute the following command to create the deployment configuration:
# oc process glusterblock-provisioner -o yaml | oc create -f -For example:
# oc process glusterblock-provisioner -o yaml | oc create -f - clusterrole.authorization.openshift.io/glusterblock-provisioner-runner created serviceaccount/glusterblock-registry-provisioner created clusterrolebinding.authorization.openshift.io/glusterblock-registry-provisioner created deploymentconfig.apps.openshift.io/glusterblock-registry-provisioner-dc createdBrick multiplexing is a feature that allows adding multiple bricks into one process. This reduces resource consumption and allows us to run more bricks than before with the same memory consumption. It is enabled by default from Container-Native Storage 3.6 onward. During an upgrade from Container-Native Storage 3.10 to Red Hat Openshift Container Storage 3.11, to turn brick multiplexing on, execute the following commands:
To exec into the Gluster pod, execute the following command and rsh into any of the gluster pods:
# oc rsh <gluster_pod_name>Verify the brick multiplex status:
# gluster v get all allIf it is disabled, then execute the following command to enable brick multiplexing:
NoteEnsure that all volumes are in a stop state or no bricks are running while brick multiplexing is enabled.
# gluster volume set all cluster.brick-multiplex onFor example:
# oc rsh glusterfs-registry-g6vd9 sh-4.2# gluster volume set all cluster.brick-multiplex on Brick-multiplexing is supported only for container workloads (Independent or Converged mode). Also it is advised to make sure that either all volumes are in stopped state or no bricks are running before this option is modified.Do you still want to continue? (y/n) y volume set: successList all the volumes in the trusted storage pool. This step is only required if the volume set operation is performed:
For example:
# gluster volume list heketidbstorage vol_194049d2565d2a4ad78ef0483e04711e ... ...Restart all the volumes. This step is only required if the volume set operation is performed along with the previous step:
# gluster vol stop <VOLNAME> # gluster vol start <VOLNAME>
Support for S3 compatible Object Store in Red Hat Openshift Container Storage is under technology preview. To enable S3 compatible object store, see https://access.redhat.com/documentation/en-us/red_hat_openshift_container_storage/3.11/html/operations_guide/s3_object_store.
NoteAfter upgrading the glusterfs registry pods, proceed with the steps listed in ] to bring back your heketi pod and then proceed with the steps listed in xref:chap-upgrade_client_common[ to upgrade the client on Red Hat Openshift Container Platform Nodes.
All storage classes that use gluster block volume provisioning must match exactly to one of the provisioner names in the cluster. To check the list of storage classes that refer to a
block provisioner, in a givennamespace, run the following command:# oc get sc -o custom-columns=NAME:.metadata.name,PROV:.provisioner,RSNS:.parameters.restsecretnamespace | grep 'gluster.org/glusterblock' | grep <namespace>Example:
# oc get sc -o custom-columns=NAME:.metadata.name,PROV:.provisioner,RSNS:.parameters.restsecretnamespace | grep 'gluster.org/glusterblock' | grep infra-storage glusterfs-registry-block gluster.org/glusterblock infra-storageCheck each storage class
provisioner name, if it does not match theblock provisioner nameconfigured for thatnamespaceit must be updated. If theblock provisionername already matches theconfigured provisionername, nothing else needs to be done. Use the list generated above and include all storage class names where the provionser name must be updated.
For every storage class in this list do the following:# oc get sc -o yaml <storageclass> > storageclass-to-edit.yaml # oc delete sc <storageclass> # sed 's,gluster.org/glusterblock$,gluster.org/glusterblock-<namespace>,' storageclass-to-edit.yaml | oc create -f -Example:
# oc get sc -o yaml glusterfs-registry-block > storageclass-to-edit.yaml # oc delete sc glusterfs-registry-block storageclass.storage.k8s.io "glusterfs-registry-block" deleted # sed 's,gluster.org/glusterblock$,gluster.org/glusterblock-infra-storage,' storageclass-to-edit.yaml | oc create -f - storageclass.storage.k8s.io/glusterfs-registry-block created
6.3. Starting the Heketi Pods
Execute the following commands on the client machine for both glusterfs and registry namespace.
Execute the following command to navigate to the project where the Heketi pods are running:
# oc project <project_name>For example for glusterfs namespace:
# oc project glusterfsFor example for registry namespace:
# oc project glusterfs-registryExecute the following command to get the
DeploymentConfig:# oc get dcFor example, on a glusterfs-registry project:
# oc get dc NAME REVISION DESIRED CURRENT TRIGGERED BY glusterblock-storage-provisioner-dc 1 1 0 config heketi-storage 4 1 1 configFor example, on a glusterfs project:
# oc get dc NAME REVISION DESIRED CURRENT TRIGGERED BY glusterblock-storage-provisioner-dc 1 1 0 config heketi-storage 4 1 1 configExecute the following command to increase the replica count from 0 to 1. This brings back the Heketi pod:
# oc scale dc <heketi_dc> --replicas=1Execute the following command to verify that the heketi pod is present in both glusterfs and glusterfs-registry namespace:
# oc get podsFor example for glusterfs:
# oc get pods NAME READY STATUS RESTARTS AGE glusterblock-storage-provisioner-dc-1-ffgs5 1/1 Running 0 3m glusterfs-storage-5thpc 1/1 Running 0 9d glusterfs-storage-hfttr 1/1 Running 0 9d glusterfs-storage-n8rg5 1/1 Running 0 9d heketi-storage-4-9fnvz 2/2 Running 0 8dFor example for registry pods:
# oc get pods NAME READY STATUS RESTARTS AGE glusterblock-storage-provisioner-dc-1-ffgs5 1/1 Running 0 3m glusterfs-storage-5thpc 1/1 Running 0 9d glusterfs-storage-hfttr 1/1 Running 0 9d glusterfs-storage-n8rg5 1/1 Running 0 9d heketi-storage-4-9fnvz 2/2 Running 0 8d
6.4. Upgrading the client on Red Hat OpenShift Container Platform nodes
Execute the following commands on each of the nodes:
To drain the pod, execute the following command on the master node (or any node with cluster-admin access):
# oc adm drain <node_name> --ignore-daemonsetsTo check if all the pods are drained, execute the following command on the master node (or any node with cluster-admin access) :
# oc get pods --all-namespaces --field-selector=spec.nodeName=<node_name>Execute the following command to upgrade the client node to the latest glusterfs-fuse version:
# yum update glusterfs-fuseTo enable node for pod scheduling execute the following command on the master node (or any node with cluster-admin access):
# oc adm manage-node --schedulable=true <node_name>Create and add the following content to the multipath.conf file:
NoteThe multipath.conf file does not require any change as the change was implemented during a previous upgrade.
# cat >> /etc/multipath.conf <<EOF # LIO iSCSI devices { device { vendor "LIO-ORG" user_friendly_names "yes" # names like mpatha path_grouping_policy "failover" # one path per group hardware_handler "1 alua" path_selector "round-robin 0" failback immediate path_checker "tur" prio "alua" no_path_retry 120 rr_weight "uniform" } } EOFExecute the following commands to start multipath daemon and [re]load the multipath configuration:
# systemctl start multipathd# systemctl reload multipathd
Chapter 7. Upgrading using the playbook
Technology Preview features are not supported with Red Hat production service level agreements (SLAs), might not be functionally complete, and Red Hat does not recommend to use them for production. These features provide early access to upcoming product features, enabling customers to test functionality and provide feedback during the development process.
For more information on Red Hat Technology Preview features support scope, see https://access.redhat.com/support/offerings/techpreview/.
The upgrade playbook does not fail or give any warning if the application pods running on the cluster fails and enters into an error state while running the Openshift Container Storage upgrade. Hence, the cluster administrator needs to check the health of the cluster and all the pods and nodes in the cluster while running the Openshift container Storage upgrade playbook.
- The upgrade playbook is to be used only while upgrading to the latest available OpenShift Container Storage bits.
- Playbook: upgrade.yml
This playbook is intended to upgrade the
GlusterFSrelated resources on an existing OpenShift cluster. This is applicable only forGlusterFSresources that were deployed using theconfig.ymlplaybook in the converged mode.
This playbook is in tech-preview and needs to be acknowledged using the variableopenshift_storage_gluster_update_techpreview=true.
The same inventory from install should be reused after updating the following variables to the desired version:
-
openshift_storage_glusterfs_image -
openshift_storage_glusterfs_heketi_image -
openshift_storage_glusterfs_block_image -
openshift_storage_glusterfs_fuse_version
-
7.1. Parameters of upgrade playbook
-
openshift_storage_glusterfs_health_timeout=10: This variable limits the number of cluster health check retries. The variable value should be multiple of 10, 10 means one retry, 20 means 2 retries and this value should not be less than 10. By default value of this var is 30, so do not specify anything and the playbook will do 3 retries. -
openshift_storage_gluster_update_techpreview=true: The playbook is in tech preview. Set this variable to true for using upgrade playbook. -
openshift_storage_glusterfs_fuse_version=<version>: To upgrade nodes to specific client packages we need to mention the version of which you want to upgrade.
example,
openshift_storage_glusterfs_fuse_version=-3.12.2-18.el7-
openshift_storage_glusterfs_check_brick_size_health=false: When the playbook is executing it checks for the brick capacity and while checking brick capacity we need to exclude some bricks from checking, these bricks are the bricks that are part of block hosting volume. For that purpose, we need to set the above variable to false in the inventory file.
Chapter 8. Upgrading Your Red Hat Openshift Container Storage in Independent Mode
This chapter describes the procedures to follow to upgrade your independent mode environment.
New registry name registry.redhat.io is used throughout in this Guide.
However, if you have not migrated to the new registry yet then replace all occurrences of registry.redhat.io with registry.access.redhat.com where ever applicable.
Follow the same upgrade procedure to upgrade your environment from Red Hat Openshift Container Storage in Independent Mode 3.11.0 and above to Red Hat Openshift Container Storage in Independent Mode 3.11.8. Ensure that the correct image and version numbers are configured before you start the upgrade process.
The valid images for Red Hat Openshift Container Storage 3.11.8 are:
- registry.redhat.io/rhgs3/rhgs-server-rhel7:v3.11.8
- registry.redhat.io/rhgs3/rhgs-volmanager-rhel7:v3.11.8
- registry.redhat.io/rhgs3/rhgs-gluster-block-prov-rhel7:v3.11.8
- registry.redhat.io/rhgs3/rhgs-s3-server-rhel7:v3.11.8
8.1. Prerequisites
Ensure the following prerequisites are met:
- Section 3.1.3, “Red Hat OpenShift Container Platform and Red Hat Openshift Container Storage Requirements”
- Configuring Port Access: https://access.redhat.com/documentation/en-us/red_hat_openshift_container_storage/3.11/html-single/deployment_guide/#CRS_port_access
- Enabling Kernel Modules: https://access.redhat.com/documentation/en-us/red_hat_openshift_container_storage/3.11/html-single/deployment_guide/#CRS_enable_kernel
- Starting and Enabling Services: https://access.redhat.com/documentation/en-us/red_hat_openshift_container_storage/3.11/html-single/deployment_guide/#Start_enable_service
- Ensure to have the supported versions of OpenShift Container Platform with Red Hat Gluster Storage Server and Red Hat Openshift Container Storage. For more information on supported versions, see Section 3.1.1, “Supported Versions”
If Heketi is running as a standalone service in one of the Red Hat Gluster Storage nodes, then ensure to open the port for Heketi. By default the port number for Heketi is 8080. To open this port execute the following command on the node where Heketi is running:
# firewall-cmd --zone=zone_name --add-port=8080/tcp # firewall-cmd --zone=zone_name --add-port=8080/tcp --permanentIf Heketi is configured to listen on a different port, then change the port number in the command accordingly.
Ensure that brick multiplexing is enabled. Brick multiplex status can be checked by using the following command.
# gluster v get all allEnsure to run the following command on master nodes to get the latest versions of Ansible templates.
# yum update openshift-ansible
8.2. Upgrading nodes and pods in glusterfs group
Follow the steps in the sections ahead to upgrade your independent mode Setup.
8.2.1. Upgrading the Red Hat Gluster Storage Cluster
To upgrade the Red Hat Gluster Storage cluster, see In-Service Software Upgrade.
8.2.2. Upgrading/Migration of Heketi in RHGS node
If Heketi is in an Openshift node, then skip this section and see Section 8.2.4.1, “Upgrading Heketi in Openshift node” instead.
- In OCS 3.11, upgrade of Heketi in RHGS node is not supported. Hence, you have to migrate heketi to a new heketi pod.
- Ensure to migrate to the supported heketi deployment now, as there might not be a migration path in the future versions.
Ensure that cns-deploy rpm is installed in the master node. This provides template files necessary to setup heketi pod.
# subscription-manager repos --enable=rh-gluster-3-for-rhel-7-server-rpms
# yum install cns-deployUse the newly created containerized Red Hat Gluster Storage project on the master node:
# oc project <project-name>For example:
# oc project glusterExecute the following command on the master node to create the service account:
# oc create -f /usr/share/heketi/templates/heketi-service-account.yaml serviceaccount/heketi-service-account createdExecute the following command on the master node to install the heketi template:
# oc create -f /usr/share/heketi/templates/heketi-template.yaml template.template.openshift.io/heketi createdVerify if the templates are created
# oc get templates NAME DESCRIPTION PARAMETERS OBJECTS heketi Heketi service deployment template 5 (3 blank) 3Execute the following command on the master node to grant the heketi Service Account the necessary privileges:
# oc policy add-role-to-user edit system:serviceaccount:gluster:heketi-service-account role "edit" added: "system:serviceaccount:gluster:heketi-service-account"# oc adm policy add-scc-to-user privileged -z heketi-service-account scc "privileged" added to: ["system:serviceaccount:gluster:heketi-service-account"]On the RHGS node, where heketi is running, execute the following commands:
Create the heketidbstorage volume:
# heketi-cli volume create --size=2 --name=heketidbstorageMount the volume:
# mount -t glusterfs 192.168.11.192:heketidbstorage /mnt/where 192.168.11.192 is one of the RHGS node.
Stop the heketi service:
# systemctl stop heketiDisable the heketi service:
# systemctl disable heketiCopy the heketi db to the heketidbstorage volume:
# cp /var/lib/heketi/heketi.db /mnt/Unmount the volume:
# umount /mntCopy the following files from the heketi node to the master node:
# scp /etc/heketi/heketi.json topology.json /etc/heketi/heketi_key OCP_master_node:/root/where OCP_master_node is the hostname of the master node.
On the master node, set the environment variables for the following three files that were copied from the heketi node. Add the following lines to ~/.bashrc file and run the bash command to apply and save the changes:
export SSH_KEYFILE=heketi_key export TOPOLOGY=topology.json export HEKETI_CONFIG=heketi.jsonNoteIf you have changed the value for "keyfile" in /etc/heketi/heketi.json to a different value, change here accordingly.
Execute the following command to create a secret to hold the configuration file:
# oc create secret generic heketi-config-secret --from-file=${SSH_KEYFILE} --from-file=${HEKETI_CONFIG} --from-file=${TOPOLOGY} secret/heketi-config-secret createdExecute the following command to label the secret:
# oc label --overwrite secret heketi-config-secret glusterfs=heketi-config-secret heketi=config-secret secret/heketi-config-secret labeledCreate the
heketi-gluster-endpoints.yamlfile, and get the IP addresses of all the glusterfs nodes.Create the
heketi-gluster-endpoints.yamlfile.# oc create -f ./heketi-gluster-endpoints.yamlGet the IP addresses of all the glusterfs nodes.
# cat heketi-gluster-endpoints.yaml apiVersion: v1 kind: Endpoints metadata: name: heketi-storage-endpoints subsets: - addresses: - ip: 192.168.11.208 ports: - port: 1 - addresses: - ip: 192.168.11.176 ports: - port: 1 - addresses: - ip: 192.168.11.192 ports: - port: 1In the above example, 192.168.11.208, 192.168.11.176, 192.168.11.192 are the glusterfs nodes.
Execute the following command to create the service:
# oc create -f ./heketi-gluster-service.yamlFor Example:
# cat heketi-gluster-service.yaml apiVersion: v1 kind: Service metadata: name: heketi-storage-endpoints spec: ports: - port: 1Execute the following command to deploy the Heketi service, route, and deployment configuration which will be used to create persistent volumes for OpenShift:
# oc process heketi | oc create -f - service/heketi created route.route.openshift.io/heketi created deploymentconfig.apps.openshift.io/heketi createdNoteIt is recommended that the
heketidbstoragevolume be tuned for db workloads. Newly installed Openshift Container Storage deployments tune the heketidbstorage volume automatically. For older deployments, follow the KCS article Planning to run containerized DB or nosql workloads on Openshift Container Storage? and perform the volume set operation for the volumeheketidbstorage.To verify if Heketi is migrated execute the following command on the master node:
# oc rsh po/<heketi-pod-name>For example:
# oc rsh po/heketi-1-p65c6Execute the following command to check the cluster IDs
# heketi-cli cluster listFrom the output verify if the cluster ID matches with the old cluster.
8.2.3. Upgrading if existing version deployed using cns-deploy
8.2.3.1. Upgrading Heketi in Openshift node
The following commands must be executed on the client machine.
Execute the following command to update the heketi client and cns-deploy packages:
# yum update cns-deploy -y # yum update heketi-client -yBackup the Heketi database file
# heketi-cli db dump > heketi-db-dump-$(date -I).jsonExecute the following command to get the current HEKETI_ADMIN_KEY.
The OCS admin can choose to set any phrase for user key as long as it is not used by their infrastructure. It is not used by any of the OCS default installed resources.
oc get secret <heketi-admin-secret-name> -o jsonpath='{.data.key}'|base64 -d;echoWhere <heketi-admin-secret-name> is the name of the heketi admin secret created by the user.
Execute the following command to delete the heketi template.
# oc delete templates heketiExecute the following command to install the heketi template.
# oc create -f /usr/share/heketi/templates/heketi-template.yaml template "heketi" createdExecute the following command to grant the heketi Service Account the necessary privileges.
# oc policy add-role-to-user edit system:serviceaccount: <project_name>:heketi-service-account # oc adm policy add-scc-to-user privileged -z heketi-service-accountFor example,
# oc policy add-role-to-user edit system:serviceaccount:storage-project:heketi-service-account # oc adm policy add-scc-to-user privileged -z heketi-service-accountNoteThe service account used in heketi pod needs to be privileged because Heketi/rhgs-volmanager pod mounts the heketidb storage Gluster volume as a "glusterfs" volume type and not as a PersistentVolume (PV).
As per the security-context-constraints regulations in OpenShift, ability to mount volumes which are not of the type configMap, downwardAPI, emptyDir, hostPath, nfs, persistentVolumeClaim, secret is granted only to accounts with privileged Security Context Constraint (SCC).
Execute the following command to generate a new heketi configuration file.
# sed -e "s/\${HEKETI_EXECUTOR}/ssh/" -e "s#\${HEKETI_FSTAB}#/etc/fstab#" -e "s/\${SSH_PORT}/22/" -e "s/\${SSH_USER}/root/" -e "s/\${SSH_SUDO}/false/" -e "s/\${BLOCK_HOST_CREATE}/true/" -e "s/\${BLOCK_HOST_SIZE}/500/" "/usr/share/heketi/templates/heketi.json.template" > heketi.json-
The
BLOCK_HOST_SIZEparameter controls the size (in GB) of the automatically created Red Hat Gluster Storage volumes hosting the gluster-block volumes (For more information, see https://access.redhat.com/documentation/en-us/red_hat_openshift_container_storage/3.11/html-single/operations_guide/#Block_Storage). This default configuration will dynamically create block-hosting volumes of 500GB in size as more space is required. Alternatively, copy the file /usr/share/heketi/templates/heketi.json.template to heketi.json in the current directory and edit the new file directly, replacing each "${VARIABLE}" string with the required parameter.
NoteJSON formatting is strictly required (e.g. no trailing spaces, booleans in all lowercase).
-
The
Execute the following command to create a secret to hold the configuration file.
# oc create secret generic heketi-config-secret --from-file=private_key=${SSH_KEYFILE} --from-file=./heketi.jsonNoteIf the heketi-config-secret file already exists, then delete the file and run the following command.
Execute the following command to delete the deployment configuration, service, and route for heketi:
# oc delete deploymentconfig,service,route heketiEdit the heketi template.
Edit the HEKETI_USER_KEY, HEKETI_ADMIN_KEY, and HEKETI_EXECUTOR parameters.
# oc edit template heketi parameters: - description: Set secret for those creating volumes as type user displayName: Heketi User Secret name: HEKETI_USER_KEY value: <heketiuserkey> - description: Set secret for administration of the Heketi service as user admin displayName: Heketi Administrator Secret name: HEKETI_ADMIN_KEY value: <adminkey> - description: Set the executor type, kubernetes or ssh displayName: heketi executor type name: HEKETI_EXECUTOR value: ssh - description: Set the fstab path, file that is populated with bricks that heketi creates displayName: heketi fstab path name: HEKETI_FSTAB value: /etc/fstab - description: Set the hostname for the route URL displayName: heketi route name name: HEKETI_ROUTE value: heketi-storage - displayName: heketi container image name name: IMAGE_NAME required: true value: registry.redhat.io/rhgs3/rhgs-volmanager-rhel7:v3.11.8 - description: A unique name to identify this heketi service, useful for running multiple heketi instances displayName: GlusterFS cluster name name: CLUSTER_NAME value: storageNoteIf a cluster has more than 1000 volumes refer to How to change the default PVS limit in Openshift Container Storage and add the required parameters before proceeding with the upgrade.
Replace the
valueunderIMAGE_NAMEwithv3.11.5orv3.11.8depending on the version you want to upgrade to.- displayName: heketi container image name name: IMAGE_NAME required: true value: registry.redhat.io/rhgs3/rhgs-volmanager-rhel7:v3.11.8
Execute the following command to deploy the Heketi service, route, and deployment configuration which will be used to create persistent volumes for OpenShift:
# oc process heketi | oc create -f - service "heketi" created route "heketi" created deploymentconfig "heketi" createdNoteIt is recommended that the
heketidbstoragevolume be tuned for db workloads. Newly installed Openshift Container Storage deployments tune the heketidbstorage volume automatically. For older deployments, follow the KCS article Planning to run containerized DB or nosql workloads on Openshift Container Storage? and perform the volume set operation for the volumeheketidbstorage.Execute the following command to verify that the containers are running:
# oc get podsFor example:
# oc get pods NAME READY STATUS RESTARTS AGE glusterblock-storage-provisioner-dc-1-ffgs5 1/1 Running 0 3m glusterfs-storage-5thpc 1/1 Running 0 9d glusterfs-storage-hfttr 1/1 Running 0 9d glusterfs-storage-n8rg5 1/1 Running 0 9d heketi-storage-4-9fnvz 2/2 Running 0 8d
8.2.3.2. Upgrading Gluster Block
Execute the following steps to upgrade gluster block.
The recommended Red Hat Enterprise Linux (RHEL) version for block storage is RHEL-7.5.4. Please ensure that your kernel version matches with 3.10.0-862.14.4.el7.x86_64. To verify execute:
# uname -rReboot the node for the latest kernel update to take effect.
To use gluster block, add the following two parameters to the
glusterfssection in the heketi configuration file at /etc/heketi/heketi.JSON:auto_create_block_hosting_volume block_hosting_volume_sizeWhere:
auto_create_block_hosting_volume: Creates Block Hosting volumes automatically if not found or if the existing volume is exhausted. To enable this, set the value totrue.block_hosting_volume_size: New block hosting volume will be created in the size mentioned. This is considered only if auto_create_block_hosting_volume is set to true. Recommended size is 500G.For example:
..... ..... "glusterfs" : { "executor" : "ssh", "db" : "/var/lib/heketi/heketi.db", "sshexec" : { "rebalance_on_expansion": true, "keyfile" : "/etc/heketi/private_key" }, "auto_create_block_hosting_volume": true, "block_hosting_volume_size": 500G }, ..... .....Restart the Heketi service:
# systemctl restart heketiNoteThis step is not applicable if heketi is running as a pod in the Openshift cluster.
If a gluster-block-provisoner-pod already exists then delete it by executing the following commands:
# oc delete dc <gluster-block-dc>For example:
# oc delete dc glusterblock-provisioner-dcDelete the following resources from the old pod
If you have glusterfs pods:
# oc delete clusterroles.authorization.openshift.io glusterblock-provisioner-runner# oc delete serviceaccounts glusterblock-provisioner serviceaccount "glusterblock-provisioner" deleted # oc delete clusterrolebindings.authorization.openshift.io glusterblock-provisionerIf you have registry pods:
# oc delete clusterroles.authorization.openshift.io glusterblock-provisioner-runner# oc delete serviceaccounts glusterblock-provisioner serviceaccount "glusterblock-provisioner" deleted # oc delete clusterrolebindings.authorization.openshift.io glusterblock-provisionerExecute the following commands to deploy the gluster-block provisioner:
# sed -e 's/\\\${NAMESPACE}/<NAMESPACE>/' /usr/share/heketi/templates/glusterblock-provisioner.yaml | oc create -f -# oc adm policy add-cluster-role-to-user glusterblock-provisioner-runner system:serviceaccount:<NAMESPACE>:glusterblock-provisionerFor example:
# sed -e 's/\\\${NAMESPACE}/storage-project/' /usr/share/heketi/templates/glusterblock-provisioner.yaml | oc create -f -# oc adm policy add-cluster-role-to-user glusterblock-provisioner-runner system:serviceaccount:storage-project:glusterblock-provisioner
8.2.4. Upgrading if existing version deployed using Ansible
8.2.4.1. Upgrading Heketi in Openshift node
The following commands must be executed on the client machine.
Execute the following command to update the heketi client:
# yum update heketi-client -yBackup the Heketi database file:
# heketi-cli db dump > heketi-db-dump-$(date -I).jsonExecute the following command to get the current HEKETI_ADMIN_KEY:
The OCS administrator can choose to set any phrase for user key as long as it is not used by their infrastructure. It is not used by any of the OCS default installed resources.
oc get secret heketi-storage-admin-secret -o jsonpath='{.data.key}'|base64 -d;echoIf the HEKETI_USER_KEY was set previously, you can obtain it by using the following command:
# oc describe pod <heketi-pod> |grep "HEKETI_USER_KEY"You can obtain the HEKETI_USER_KEY if it is set earlier with the following command.
# oc describe pod <heketi-pod> |grep "HEKETI_USER_KEY"If the HEKETI_USER_KEY was set previously, you can obtain it by using the following command:
# oc describe pod <heketi-pod> |grep "HEKETI_USER_KEY"Execute the following command to delete the heketi template.
# oc delete templates heketiExecute the following command to install the heketi template.
# oc create -f /usr/share/ansible/openshift-ansible/roles/openshift_storage_glusterfs/files/heketi-template.yml template "heketi" createdExecute the following step to edit the template:
# oc get templates NAME DESCRIPTION PARAMETERS OBJECTS glusterblock-provisioner glusterblock provisioner 3 (2 blank) 4 template glusterfs GlusterFS DaemonSet 5 (1 blank) 1 template heketi Heketi service deployment 7 (3 blank) 3 templateIf the existing template has IMAGE_NAME and IMAGE_VERSION as two parameters, then edit the template to change the HEKETI_USER_KEY, HEKETI_ADMIN_KEY, HEKETI_EXECUTOR, HEKETI_FSTAB, HEKETI_ROUTE, IMAGE_NAME, IMAGE_VERSION ,CLUSTER_NAME and HEKETI_LVM_WRAPPER as shown in the example below.
NoteThe value of the HEKETI_LVM_WRAPPER parameter points to the wrapper command for LVM. In independent mode setups wrapper is not required, change the value to an empty string as shown below.
# oc edit template heketi parameters: - description: Set secret for those creating volumes as type user displayName: Heketi User Secret name: HEKETI_USER_KEY value: <heketiuserkey> - description: Set secret for administration of the Heketi service as user admin displayName: Heketi Administrator Secret name: HEKETI_ADMIN_KEY value: <adminkey> - description: Set the executor type, kubernetes or ssh displayName: heketi executor type name: HEKETI_EXECUTOR value: ssh - description: Set the fstab path, file that is populated with bricks that heketi creates displayName: heketi fstab path name: HEKETI_FSTAB value: /etc/fstab - description: Set the hostname for the route URL displayName: heketi route name name: HEKETI_ROUTE value: heketi-storage - displayName: heketi container image name name: IMAGE_NAME required: true value: registry.redhat.io/rhgs3/rhgs-volmanager-rhel7 - displayName: heketi container image version name: IMAGE_VERSION required: true value: v3.11.8 - description: A unique name to identify this heketi service, useful for running multiple heketi instances displayName: GlusterFS cluster name name: CLUSTER_NAME value: storage - description: Heketi can use a wrapper to execute LVM commands, i.e. run commands in the host namespace instead of in the Gluster container. name: HEKETI_LVM_WRAPPER displayName: Wrapper for executing LVM commands value: ""If the template has only IMAGE_NAME, then edit the template to change the HEKETI_USER_KEY, HEKETI_ADMIN_KEY, HEKETI_EXECUTOR, HEKETI_FSTAB, HEKETI_ROUTE, IMAGE_NAME, CLUSTER_NAME and HEKETI_LVM_WRAPPER as shown in the example below.
parameters:
- description: Set secret for those creating volumes as type user
displayName: Heketi User Secret
name: HEKETI_USER_KEY
value: <heketiuserkey>
- description: Set secret for administration of the Heketi service as user admin
displayName: Heketi Administrator Secret
name: HEKETI_ADMIN_KEY
value: <adminkey>
- description: Set the executor type, kubernetes or ssh
displayName: heketi executor type
name: HEKETI_EXECUTOR
value: ssh
- description: Set the fstab path, file that is populated with bricks that heketi creates
displayName: heketi fstab path
name: HEKETI_FSTAB
value: /etc/fstab
- description: Set the hostname for the route URL
displayName: heketi route name
name: HEKETI_ROUTE
value: heketi-storage
- displayName: heketi container image name
name: IMAGE_NAME
required: true
value: registry.redhat.io/rhgs3/rhgs-volmanager-rhel7:v3.11.7
- description: A unique name to identify this heketi service, useful for running multiple heketi instances
displayName: GlusterFS cluster name
name: CLUSTER_NAME
value: storage
- description: Heketi can use a wrapper to execute LVM commands, i.e. run commands in the host namespace instead of in the Gluster container
name: HEKETI_LVM_WRAPPER
displayName: Wrapper for executing LVM commands
value: ""If a cluster has more than 1000 volumes refer to How to change the default PVS limit in Openshift Container Storage and add the required parameters before proceeding with the upgrade.
Execute the following command to delete the deployment configuration, service, and route for heketi:
# oc delete deploymentconfig,service,route heketi-storageExecute the following command to deploy the Heketi service, route, and deploymentconfig which will be used to create persistent volumes for OpenShift:
# oc process heketi | oc create -f - service "heketi" created route "heketi" created deploymentconfig "heketi" createdNoteIt is recommended that the
heketidbstoragevolume be tuned for db workloads. Newly installed Openshift Container Storage deployments tune the heketidbstorage volume automatically. For older deployments, follow the KCS article Planning to run containerized DB or nosql workloads on Openshift Container Storage? and perform the volume set operation for the volumeheketidbstorage.Execute the following command to verify that the containers are running:
# oc get podsFor example:
# oc get pods NAME READY STATUS RESTARTS AGE glusterblock-storage-provisioner-dc-1-ffgs5 1/1 Running 0 3m heketi-storage-4-9fnvz 2/2 Running 0 8d
8.2.4.2. Upgrading Gluster Block if Deployed by Using Ansible
Execute the following steps to upgrade gluster block.
The recommended Red Hat Enterprise Linux (RHEL) version for block storage is RHEL-7.5.4. Please ensure that your kernel version matches with 3.10.0-862.14.4.el7.x86_64. To verify execute:
# uname -rReboot the node for the latest kernel update to take effect.
Execute the following command to delete the old glusterblock provisioner template.
# oc delete templates glusterblock-provisionerCreate a glusterblock provisioner template. For example:
# oc create -f /usr/share/ansible/openshift-ansible/roles/openshift_storage_glusterfs/files/glusterblock-provisioner.yml template.template.openshift.io/glusterblock-provisioner createdIf a gluster-block-provisoner-pod already exists then delete it by executing the following commands.
For glusterfs namespace:
# oc delete dc glusterblock-storage-provisioner-dcFor glusterfs-registry namespace:
oc delete dc glusterblock-registry-provisioner-dcEdit the glusterblock-provisioner template to change the IMAGE_NAME, IMAGE_VERSION and NAMESPACE.
# oc get templates NAME DESCRIPTION PARAMETERS OBJECTS glusterblock-provisioner glusterblock provisioner template 3 (2 blank) 4 glusterfs GlusterFS DaemonSet template 5 (1 blank) 1 heketi Heketi service deployment template 7 (3 blank)3If the template has IMAGE_NAME and IMAGE_VERSION as two separate parameters, then update the glusterblock-provisioner template as following. For example:
# oc edit template glusterblock-provisioner - displayName: glusterblock provisioner container image name name: IMAGE_NAME required: true value: registry.redhat.io/rhgs3/rhgs-gluster-block-prov-rhel7 - displayName: glusterblock provisioner container image version name: IMAGE_VERSION required: true value: v3.11.8 - description: The namespace in which these resources are being created displayName: glusterblock provisioner namespace name: NAMESPACE required: true value: glusterfs - description: A unique name to identify which heketi service manages this cluster, useful for running multiple heketi instances displayName: GlusterFS cluster name name: CLUSTER_NAME value: storageIf the template has only IMAGE_NAME as a parameter, then update the glusterblock-provisioner template as following. For example:
# oc edit template glusterblock-provisioner - displayName: glusterblock provisioner container image name name: IMAGE_NAME required: true value: registry.redhat.io/rhgs3/rhgs-gluster-block-prov-rhel7:v3.11.8 - description: The namespace in which these resources are being created displayName: glusterblock provisioner namespace name: NAMESPACE required: true value: glusterfs - description: A unique name to identify which heketi service manages this cluster, useful for running multiple heketi instances displayName: GlusterFS cluster name name: CLUSTER_NAME value: storageDelete the following resources from the old pod.
If you have glusterfs pods:
# oc delete clusterroles.authorization.openshift.io glusterblock-provisioner-runner# oc delete serviceaccounts glusterblock-storage-provisioner # oc delete clusterrolebindings.authorization.openshift.io glusterblock-storage-provisionerIf you have registry pods:
# oc delete clusterroles.authorization.openshift.io glusterblock-provisioner-runner# oc delete serviceaccounts glusterblock-registry-provisioner # oc delete clusterrolebindings.authorization.openshift.io glusterblock-registry-provisionerBefore running oc process determine the correct
provisionername. If there are more than onegluster block provisionerrunning in your cluster the names must differ from all otherprovisioners.
For example,
-
If there are 2 or more provisioners the name should be
gluster.org/glusterblock-<namespace>where, namespace is replaced by the namespace that the provisioner is deployed in. -
If there is only one provisioner, installed prior to 3.11.8,
gluster.org/glusterblockis sufficent. If the name currently in use already has a unique namespace suffix, reuse the existing name.
-
If there are 2 or more provisioners the name should be
After editing the template, execute the following command to create the deployment configuration:
# oc process glusterblock-provisioner -o yaml | oc create -f -For example:
# oc process glusterblock-provisioner -o yaml | oc create -f - clusterrole.authorization.openshift.io/glusterblock-provisioner-runner created serviceaccount/glusterblock-storage-provisioner created clusterrolebinding.authorization.openshift.io/glusterblock-storage-provisioner created deploymentconfig.apps.openshift.io/glusterblock-storage-provisioner-dc createdAll storage classes that use gluster block volume provisioning must match exactly to one of the provisioner names in the cluster. To check the list of storage classes that refer to a
block provisioner, in a givennamespace, run the following command:# oc get sc -o custom-columns=NAME:.metadata.name,PROV:.provisioner,RSNS:.parameters.restsecretnamespace | grep 'gluster.org/glusterblock' | grep <namespace>Example:
# oc get sc -o custom-columns=NAME:.metadata.name,PROV:.provisioner,RSNS:.parameters.restsecretnamespace | grep 'gluster.org/glusterblock' | grep app-storage glusterfs-storage-block gluster.org/glusterblock-app-storage app-storageCheck each storage class
provisioner name, if it does not match theblock provisioner nameconfigured for thatnamespaceit must be updated. If theblock provisionername already matches theconfigured provisionername, nothing else needs to be done. Use the list generated above and include all storage class names where the provionser name must be updated.
For every storage class in this list do the following:# oc get sc -o yaml <storageclass> > storageclass-to-edit.yaml # oc delete sc <storageclass> # sed 's,gluster.org/glusterblock$,gluster.org/glusterblock-<namespace>,' storageclass-to-edit.yaml | oc create -f -Example:
# oc get sc -o yaml gluster-storage-block > storageclass-to-edit.yaml # oc delete sc gluster-storage-block # sed 's,gluster.org/glusterblock$,gluster.org/glusterblock-app-storage,' storageclass-to-edit.yaml | oc create -f - storageclass.storage.k8s.io/glusterfs-registry-block created
8.2.5. Enabling S3 Compatible Object store
Support for S3 compatible Object Store is under technology preview. To enable S3 compatible object store, see https://access.redhat.com/documentation/en-us/red_hat_openshift_container_storage/3.11/html-single/operations_guide/#S3_Object_Store.
- If you have gluster nodes and heketi pods in glusterfs registry namespace, then follow the steps in section Section 8.3, “Upgrading nodes and pods in glusterfs registry group”.
- S3 compatible Object store is only available with Red Hat Openshift Container Storage 3.11.4 and older releases.
8.3. Upgrading nodes and pods in glusterfs registry group
Follow the steps in the sections to upgrade your gluster nodes and heketi pods in glusterfs registry namespace.
8.3.1. Upgrading the Red Hat Gluster Storage Registry Cluster
To upgrade the Red Hat Gluster Storage cluster, see In-Service Software Upgrade.
8.3.1.1. Upgrading Heketi Registry pod
If Heketi is not in an Openshift node, then you have to migrate Heketi in RHGS node to Openshift node. For more information on how to migrate, refer Section 8.2.2, “Upgrading/Migration of Heketi in RHGS node”.
To upgrade the Heketi registry pods, perform the following steps:
The following commands must be executed on the client machine.
Execute the following command to update the heketi client:
# yum update heketi-client -yBackup the Heketi registry database file:
# heketi-cli db dump > heketi-db-dump-$(date -I).jsonExecute the following command to get the current HEKETI_ADMIN_KEY:
The OCS administrator is free to set any phrase for user key as long as it is not used by their infrastructure. It is not used by any of the OCS default installed resources.
# oc get secret heketi-registry-admin-secret -o jsonpath='{.data.key}'|base64 -d;echoTo fetch HEKETI_USER_KEY, run below command:
# oc describe pod <heketi-pod> |grep "HEKETI_USER_KEY"Execute the following command to delete the heketi template.
# oc delete templates heketiExecute the following command to install the heketi template.
# oc create -f /usr/share/ansible/openshift-ansible/roles/openshift_storage_glusterfs/files/heketi-template.yml template "heketi" createdExecute the following step to edit the template:
# oc get templates NAME DESCRIPTION PARAMETERS OBJECTS glusterblock- glusterblock provisioner 3 (2 blank) 4 provisioner template heketi Heketi service deployment 7 (3 blank) 3 template
If the existing template has IMAGE_NAME and IMAGE_VERSION as two parameters, then edit the template to change the HEKETI_USER_KEY, HEKETI_ADMIN_KEY, HEKETI_EXECUTOR, HEKETI_FSTAB, HEKETI_ROUTE, IMAGE_NAME, IMAGE_VERSION,CLUSTER_NAME and HEKETI_LVM_WRAPPER as shown in the following example:
The value of the HEKETI_LVM_WRAPPER parameter points to the wrapper command for LVM. In independent mode setups wrapper is not required, change the value to an empty string as shown below.
# oc edit template heketi
parameters:
- description: Set secret for those creating volumes as type _user_
displayName: Heketi User Secret
name: HEKETI_USER_KEY
value: heketiuserkey
- description: Set secret for administration of the Heketi service as
user _admin_
displayName: Heketi Administrator Secret
name: HEKETI_ADMIN_KEY
value: adminkey
- description: Set the executor type, kubernetes or ssh
displayName: heketi executor type
name: HEKETI_EXECUTOR
value: ssh
- description: Set the fstab path, file that is populated with bricks
that heketi creates
displayName: heketi fstab path
name: HEKETI_FSTAB
value: /etc/fstab
- description: Set the hostname for the route URL
displayName: heketi route name
name: HEKETI_ROUTE
value: heketi-registry
- displayName: heketi container image name
name: IMAGE_NAME
required: true
value: registry.redhat.io/rhgs3/rhgs-volmanager-rhel7
- displayName: heketi container image version
name: IMAGE_VERSION
required: true
value: v3.11.8
- description: A unique name to identify this heketi service, useful
for running multiple heketi instances
displayName: GlusterFS cluster name
name: CLUSTER_NAME
value: registry
- description: Heketi can use a wrapper to execute LVM commands, i.e. run commands in the host namespace instead of in the Gluster container
name: HEKETI_LVM_WRAPPER
displayName: Wrapper for executing LVM commands
value: ""If the template has only IMAGE_NAME, then edit the template to change the HEKETI_USER_KEY, HEKETI_ADMIN_KEY, HEKETI_EXECUTOR, HEKETI_FSTAB, HEKETI_ROUTE, IMAGE_NAME, CLUSTER_NAME and HEKETI_LVM_WRAPPER as shown in the following example:
parameters:
- description: Set secret for those creating volumes as type user
displayName: Heketi User Secret
name: HEKETI_USER_KEY
value: heketiuserkey
- description: Set secret for administration of the Heketi service as
user admin
displayName: Heketi Administrator Secret
name: HEKETI_ADMIN_KEY
value: adminkey
- description: Set the executor type, kubernetes or ssh
displayName: heketi executor type
name: HEKETI_EXECUTOR
value: ssh
- description: Set the fstab path, file that is populated with bricks that heketi creates
displayName: heketi fstab path
name: HEKETI_FSTAB
value: /etc/fstab
- description: Set the hostname for the route URL
displayName: heketi route name
name: HEKETI_ROUTE
value: heketi-registry
- displayName: heketi container image name
name: IMAGE_NAME
required: true
value: registry.redhat.io/rhgs3/rhgs-volmanager-rhel7:v3.11.7
- description: A unique name to identify this heketi service, useful for running multiple heketi instances
displayName: GlusterFS cluster name
name: CLUSTER_NAME
value: registry
- description: Heketi can use a wrapper to execute LVM commands, i.e. run commands in the host namespace instead of in the Gluster container
name: HEKETI_LVM_WRAPPER
displayName: Wrapper for executing LVM commands
value:""If a cluster has more than 1000 volumes refer to How to change the default PVS limit in Openshift Container Storage and add the required parameters before proceeding with the upgrade.
Execute the following command to delete the deployment configuration, service, and route for heketi:
# oc delete deploymentconfig,service,route heketi-registryExecute the following command to deploy the Heketi service, route, and deploymentconfig which will be used to create persistent volumes for OpenShift:
# oc process heketi | oc create -f - service "heketi-registry" created route "heketi-registry" created deploymentconfig "heketi-registry" createdNoteIt is recommended that the
heketidbstoragevolume be tuned for db workloads. Newly installed Openshift Container Storage deployments tune the heketidbstorage volume automatically. For older deployments, follow the KCS article Planning to run containerized DB or nosql workloads on Openshift Container Storage? and perform the volume set operation for the volumeheketidbstorage.Execute the following command to verify that the containers are running:
# oc get podsFor example:
# oc get pods NAME READY STATUS RESTARTS AGE glusterblock-storage-provisioner-dc-1-ffgs5 1/1 Running 0 3m heketi-storage-4-9fnvz 2/2 Running 0 8d
8.3.2. Upgrading glusterblock-provisioner Pod
To upgrade the glusterblock-provisioner pods, perform the following steps:
Execute the following command to delete the old glusterblock provisioner template.
# oc delete templates glusterblock-provisionerCreate a glusterblock provisioner template. For example:
# oc create -f /usr/share/ansible/openshift-ansible/roles/openshift_storage_glusterfs/files/glusterblock-provisioner.yml template.template.openshift.io/glusterblock-provisioner createdIf a glusterblock-provisoner pod already exists then delete it by executing the following commands:
# oc delete dc <gluster-block-registry-dc>For example:
# oc delete dc glusterblock-registry-provisioner-dcEdit the glusterblock-provisioner template to change the IMAGE_NAME, IMAGE_VERSION, and NAMESPACE.
# oc get templates NAME DESCRIPTION PARAMETERS OBJECTS glusterblock- glusterblock 3 (2 blank) 4 provisioner provisioner template heketi Heketi service 7 (3 blank) 3 deployment templateIf the template has IMAGE_NAME and IMAGE_VERSION as two separate parameters, then update the glusterblock-provisioner template as follows:
oc edit template glusterblock-provisioner - displayName: glusterblock provisioner container image name name: IMAGE_NAME required: true value: registry.redhat.io/rhgs3/rhgs-gluster-block-prov-rhel7 - displayName: glusterblock provisioner container image version name: IMAGE_VERSION required: true value: v3.11.8 - description: The namespace in which these resources are being created displayName: glusterblock provisioner namespace name: NAMESPACE required: true value: glusterfs-registry - description: A unique name to identify which heketi service manages this cluster, useful for running multiple heketi instances displayName: GlusterFS cluster name name: CLUSTER_NAME value: registryReplace the
valueunderIMAGE_VERSIONwithv3.11.5orv3.11.8depending on the version you want to upgrade to.- displayName: glusterblock provisioner container image version name: IMAGE_VERSION required: true value: v3.11.8If the template has only IMAGE_NAME as a parameter, then update the glusterblock-provisioner template as follows:
# oc edit template glusterblock-provisioner - displayName: glusterblock provisioner container image name name: IMAGE_NAME required: true value: registry.redhat.io/rhgs3/rhgs-gluster-block-prov-rhel7:v3.11.8 - description: The namespace in which these resources are being created - displayName: glusterblock provisioner namespace name: NAMESPACE required: true value: glusterfs-registry - description: A unique name to identify which heketi service manages this cluster, useful for running multiple heketi instances displayName: GlusterFS cluster name name: CLUSTER_NAME value: registryReplace the
valueunderIMAGE_NAMEwithv3.11.5orv3.11.8depending on the version you want to upgrade to.- displayName: glusterblock provisioner container image name name: IMAGE_NAME required: true value: rhgs3/rhgs-gluster-block-prov-rhel7:v3.11.8Delete the following resources from the old pod:
# oc delete clusterroles.authorization.openshift.io glusterblock-provisioner-runner # oc delete serviceaccounts glusterblock-registry-provisioner # oc delete clusterrolebindings.authorization.openshift.io glusterblock-registry-provisionerBefore running oc process determine the correct
provisionername. If there are more than onegluster block provisionerrunning in your cluster the names must differ from all otherprovisioners.
For example,
-
If there are 2 or more provisioners the name should be
gluster.org/glusterblock-<namespace>where, namespace is replaced by the namespace that the provisioner is deployed in. -
If there is only one provisioner, installed prior to 3.11.8,
gluster.org/glusterblockis sufficent. If the name currently in use already has a unique namespace suffix, reuse the existing name.
-
If there are 2 or more provisioners the name should be
After editing the template, execute the following command to create the deployment configuration:
# oc process glusterblock-provisioner -o yaml | oc create -f -For example:
# oc process glusterblock-provisioner -o yaml | oc create -f - clusterrole.authorization.openshift.io/glusterblock-provisioner-runner created serviceaccount/glusterblock-registry-provisioner created clusterrolebinding.authorization.openshift.io/glusterblock-registry-provisioner created deploymentconfig.apps.openshift.io/glusterblock-registry-provisioner-dc createdAll storage classes that use gluster block volume provisioning must match exactly to one of the provisioner names in the cluster. To check the list of storage classes that refer to a
block provisioner, in a givennamespace, run the following command:# oc get sc -o custom-columns=NAME:.metadata.name,PROV:.provisioner,RSNS:.parameters.restsecretnamespace | grep 'gluster.org/glusterblock' | grep <namespace>Example:
# oc get sc -o custom-columns=NAME:.metadata.name,PROV:.provisioner,RSNS:.parameters.restsecretnamespace | grep 'gluster.org/glusterblock' | grep infra-storage glusterfs-registry-block gluster.org/glusterblock infra-storageCheck each storage class
provisioner name, if it does not match theblock provisioner nameconfigured for thatnamespaceit must be updated. If theblock provisionername already matches theconfigured provisionername, nothing else needs to be done. Use the list generated above and include all storage class names where the provionser name must be updated.
For every storage class in this list do the following:# oc get sc -o yaml <storageclass> > storageclass-to-edit.yaml # oc delete sc <storageclass> # sed 's,gluster.org/glusterblock$,gluster.org/glusterblock-<namespace>,' storageclass-to-edit.yaml | oc create -f -Example:
# oc get sc -o yaml glusterfs-registry-block > storageclass-to-edit.yaml # oc delete sc glusterfs-registry-block storageclass.storage.k8s.io "glusterfs-registry-block" deleted # sed 's,gluster.org/glusterblock$,gluster.org/glusterblock-infra-storage,' storageclass-to-edit.yaml | oc create -f - storageclass.storage.k8s.io/glusterfs-registry-block created
8.3.3. Upgrading Gluster Block
To upgrade the gluster block, perform the following steps:
Execute the following command to upgrade the gluster block:
# yum update gluster-blockEnable and start the gluster block service:
# systemctl enable gluster-blockd # systemctl start gluster-blockd
8.4. Upgrading the client on Red Hat OpenShift Container Platform nodes
Execute the following commands on each of the nodes:
To drain the pod, execute the following command on the master node (or any node with cluster-admin access):
# oc adm drain <node_name> --ignore-daemonsetsTo check if all the pods are drained, execute the following command on the master node (or any node with cluster-admin access):
# oc get pods --all-namespaces --field-selector=spec.nodeName=<node_name>Execute the following command on the node to upgrade the client on the node:
# yum update glusterfs-fuseTo enable node for pod scheduling execute the following command on the master node (or any node with cluster-admin access):
# oc adm manage-node --schedulable=true <node_name>- Create and add the following content to the multipath.conf file:
NoteThe multipath.conf file does not require any change as the change was implemented during a previous upgrade.
+
# cat >> /etc/multipath.conf <<EOF # LIO iSCSI devices { device { vendor "LIO-ORG" user_friendly_names "yes" # names like mpatha path_grouping_policy "failover" # one path per group hardware_handler "1 alua" path_selector "round-robin 0" failback immediate path_checker "tur" prio "alua" no_path_retry 120 } } EOFExecute the following commands to start multipath daemon and [re]load the multipath configuration:
# systemctl start multipathd# systemctl reload multipathd
Part IV. Uninstalling
Chapter 9. Uninstall Red Hat Openshift Container Storage
For Red Hat Openshift Container Storage, the OpenShift Container Platform Advanced Installer comes with a playbook to uninstall all resources and artifacts from the cluster. To use it,provide the original inventory file that was used to install the target instance of Red Hat Openshift Container Storage and run the following playbook:
Before uninstalling Openshift Container Storage, ensure all applications using Openshift Container Storage file and block physical volumes(PVs) are removed and all PVs are deleted. If this is not done nodes may continue to hold onto resources until they are rebooted.
This procedure will destroy data. Proceed with caution.
ansible-playbook -i <path_to_inventory_file> /usr/share/ansible/openshift-ansible/playbooks/openshift-glusterfs/uninstall.yml
In addition, the playbook supports the use of a variable called openshift_storage_glusterfs_wipe which, when enabled, will destroy any data on the block devices that were used for Red Hat Gluster Storage backend storage. For more information about the settings/variables that will be destroyed, see Appendix B, Settings that are destroyed when using uninstall playbook. It is recommended to use this variable in the following format:
ansible-playbook -i <path_to_inventory_file> -e "openshift_storage_glusterfs_wipe=true" /usr/share/ansible/openshift-ansible/playbooks/openshift-glusterfs/uninstall.yml- If gluster-block is uninstalled, ensure that the entries corresponding to gluster-block in /etc/target/saveconfig.json is removed. It is possible that the configuration file may contain entries other than gluster-block and hence it is required to remove the gluster-block entries manually.
- Log out of all the dangling iqns from all the initiators after an OCS uninstall.
Part V. Workloads
Chapter 10. Managing Arbitrated Replicated Volumes
10.1. Managing Arbiter Brick Size
A standard replica 3 volume has the same sized bricks in each set, however, an arbiter volume will have one brick in the brick set that can be smaller than the data bricks.
In order to better optimize the sizing of the Arbiter brick, Heketi allows the user to provide an average file size value that is used to calculate the final size of the Arbiter brick. This is done using the volume option “user.heketi.average-file-size NUM” where NUM is an integer value in KiB. By default Heketi uses a value of 64KiB.
To create an arbiter volume with a custom average file size using the heketi-cli command line tool the volume options "user.heketi.arbiter true" and "user.heketi.average-file-size 1024" must be provided.
For example:
# heketi-cli volume create --size=4 --gluster-volume-options='user.heketi.arbiter true,user.heketi.average-file-size 1024'10.2. Managing Arbiter Brick Placement
To accomplish the task of controlling where arbiter bricks are placed, Heketi uses specific node and device tags. For the Arbiter feature, the tag "arbiter" can be applied to a node or device with the values of "supported", "required", or "disabled".
where:
- supported: both arbiter bricks and data bricks are allowed.
- required: only arbiter bricks are allowed, data bricks are rejected.
- disabled: only data bricks are allowed, arbiter bricks are rejected.
Based on your use case, you can set tags on a node or a device.
For example, to use arbiter in order to split nodes such that arbiter nodes can act as dedicated "tiebreakers" between the nodes that host data, you can set a tag on the node.
The following example shows how to set tags on a device. The nodes have heterogeneous device types and you want to set a particular space saving pattern: one node with a small nvme device and two (or more) nodes with larger SSDs. To do this, set a tag on the device by identifying the small device as d1 (arbiter:required) and the larger devices as d2 and d3 (arbiter:disabled).
A device without an explicit tag will automatically inherit the arbiter tag value from the node it is connected to. An explicit tag on the device always has priority over the node’s tag.
10.2.1. Setting Tags with the Heketi CLI
To set tags on nodes and device via the heketi-cli command line tool, execute the following commands:
Node
# heketi-cli node settags <node id> arbiter:<tag>For example:
# heketi-cli node settags e2a792a43ca9a6bac4b9bfa792e89347 arbiter:disabledDevice
# heketi-cli device settags <device id> arbiter:<tag>For example:
# heketi-cli device settags 167fe2831ad0a91f7173dac79172f8d7 arbiter:required10.2.2. Removing Tags using Heketi CLI
If you want to remove the arbiter tags, then execute the following commands:
Node
# heketi-cli node rmtags <node id> arbiterFor example:
# heketi-cli node rmtags e2a792a43ca9a6bac4b9bfa792e89347 arbiterDevice
# heketi-cli device rmtags <device id> arbiterFor example:
# heketi-cli device rmtags 167fe2831ad0a91f7173dac79172f8d7 arbiter10.2.3. Viewing Tags with the Heketi CLI
To view the tags, execute the following commands. If the node or device has any tags it will be displayed in a list below the heading "Tags":
Node
# heketi-cli node info <node id>For example:
# heketi-cli node info e2a792a43ca9a6bac4b9bfa792e89347
Node Id: e2a792a43ca9a6bac4b9bfa792e89347
State: online
Cluster Id: ddb14817873c13c5bb42a5c04969daf9
Zone: 1
Management Hostname: 10.0.0.1
Storage Hostname: 10.0.0.1
Tags:
arbiter: disabled
test: demonstration
Devices:
Id:0b39f89c0677e8c0b796caf00204e726 Name:/dev/vdb State:online Size (GiB):500 Used (GiB):0 Free (GiB):500 Bricks:0
Id:167fe2831ad0a91f7173dac79172f8d7 Name:/dev/vdg State:online Size (GiB):500 Used (GiB):0 Free (GiB):500 Bricks:0Device
# heketi-cli device info <device id>For example:
# heketi-cli device info 167fe2831ad0a91f7173dac79172f8d7
Device Id: 167fe2831ad0a91f7173dac79172f8d7
Name: /dev/vdg
State: online
Size (GiB): 500
Used (GiB): 0
Free (GiB): 500
Tags:
arbiter: required
foobar: magic
Bricks:10.3. Creating Persistent Volumes
For more information about creating persistent volumes, see https://access.redhat.com/documentation/en-us/red_hat_openshift_container_storage/3.11/html-single/operations_guide/#chap-Documentation-Red_Hat_Gluster_Storage_Container_Native_with_OpenShift_Platform-OpenShift_Creating_Persistent_Volumes-Dynamic_Prov
In the Storage Class file ensure to add "user.heketi.arbiter true" under the volumeoptions parameter to create Arbiter volumes.
For example:
apiVersion: storage.k8s.io/v1
kind: StorageClass
metadata:
name: gluster-container
provisioner: kubernetes.io/glusterfs
parameters:
resturl: "http://heketi-storage-project.cloudapps.mystorage.com"
restuser: "admin"
volumetype: "replicate:3"
clusterid: "630372ccdc720a92c681fb928f27b53f,796e6db1981f369ea0340913eeea4c9a"
secretNamespace: "default"
secretName: "heketi-secret"
volumeoptions: "user.heketi.arbiter true"
volumenameprefix: "test-vol"
allowVolumeExpansion: "true"Part VI. Appendix
Appendix A. Optional Deployment Method (with cns-deploy)
Following sections provides an optional method to deploy Red Hat Openshift Container Storage using cns-deploy.
CNS-deploy is deprecated and will not be supported in future Openshift Container Storage versions for new deployments.
A.1. Setting up Converged mode
The converged mode environment addresses the use-case where applications require both shared storage and the flexibility of a converged infrastructure with compute and storage instances being scheduled and run from the same set of hardware.
A.1.1. Configuring Port Access
On each of the OpenShift nodes that will host the Red Hat Gluster Storage container, add the following rules to /etc/sysconfig/iptables in order to open the required ports:
-A OS_FIREWALL_ALLOW -p tcp -m state --state NEW -m tcp --dport 24007 -j ACCEPT -A OS_FIREWALL_ALLOW -p tcp -m state --state NEW -m tcp --dport 2222 -j ACCEPT -A OS_FIREWALL_ALLOW -p tcp -m state --state NEW -m multiport --dports 49152:49664 -j ACCEPT -A OS_FIREWALL_ALLOW -p tcp -m state --state NEW -m tcp --dport 24010 -j ACCEPT -A OS_FIREWALL_ALLOW -p tcp -m state --state NEW -m tcp --dport 3260 -j ACCEPT -A OS_FIREWALL_ALLOW -p tcp -m state --state NEW -m tcp --dport 111 -j ACCEPTNote- Port 24010 and 3260 are for gluster-blockd and iSCSI targets respectively.
- The port range starting at 49664 defines the range of ports that can be used by GlusterFS for communication to its volume bricks. In the above example the total number of bricks allowed is 512. Configure the port range based on the maximum number of bricks that could be hosted on each node.
For more information about Red Hat Gluster Storage Server ports, see https://access.redhat.com/documentation/en-us/red_hat_gluster_storage/3.5/html/administration_guide/chap-getting_started.
Execute the following command to reload the iptables:
# systemctl reload iptables- Execute the following command on each node to verify if the iptables are updated:
# iptables -LA.1.2. Enabling Kernel Modules
Before running the cns-deploy tool, you must ensure that the dm_thin_pool, dm_multipath, and target_core_user modules are loaded in the OpenShift Container Platform node. Execute the following commands only on Gluster nodes to verify if the modules are loaded:
# lsmod | grep dm_thin_pool# lsmod | grep dm_multipath# lsmod | grep target_core_userIf the modules are not loaded, then execute the following command to load the modules:
# modprobe dm_thin_pool# modprobe dm_multipath# modprobe target_core_userTo ensure these operations are persisted across reboots, create the following files and update each with the content as mentioned:
# cat /etc/modules-load.d/dm_thin_pool.conf
dm_thin_pool# cat /etc/modules-load.d/dm_multipath.conf
dm_multipath# cat /etc/modules-load.d/target_core_user.conf
target_core_userA.1.3. Starting and Enabling Services
Execute the following commands to enable and run rpcbind on all the nodes hosting the gluster pod:
# systemctl add-wants multi-user rpcbind.service
# systemctl enable rpcbind.service
# systemctl start rpcbind.serviceExecute the following command to check the status of rpcbind
# systemctl status rpcbind
rpcbind.service - RPC bind service
Loaded: loaded (/usr/lib/systemd/system/rpcbind.service; enabled; vendor preset: enabled)
Active: active (running) since Wed 2017-08-30 21:24:21 IST; 1 day 13h ago
Main PID: 9945 (rpcbind)
CGroup: /system.slice/rpcbind.service
└─9945 /sbin/rpcbind -wNext Step: Proceed to Section A.3, “Setting up the Environment” to prepare the environment for Red Hat Gluster Storage Container Converged in OpenShift.
To remove an installation of Red Hat Openshift Container Storage done using cns-deploy, run the cns-deploy --abort command. Use the -g option if Gluster is containerized.
When the pods are deleted, not all Gluster states are removed from the node. Therefore, you must also run rm -rf /var/lib/heketi /etc/glusterfs /var/lib/glusterd /var/log/glusterfs command on every node that was running a Gluster pod and also run wipefs -a <device> for every storage device that was consumed by Heketi. This erases all the remaining Gluster states from each node. You must be an administrator to run the device wiping command
A.2. Setting up Independent Mode
In an independent mode set-up, a dedicated Red Hat Gluster Storage cluster is available external to the OpenShift Container Platform. The storage is provisioned from the Red Hat Gluster Storage cluster.
A.2.1. Installing Red Hat Gluster Storage Server on Red Hat Enterprise Linux (Layered Install)
Layered install involves installing Red Hat Gluster Storage over Red Hat Enterprise Linux.
It is recommended to create a separate /var partition that is large enough (50GB - 100GB) for log files, geo-replication related miscellaneous files, and other files.
Perform a base install of Red Hat Enterprise Linux 7 Server
Independent mode is supported only on Red Hat Enterprise Linux 7.
Register the System with Subscription Manager
Run the following command and enter your Red Hat Network username and password to register the system with the Red Hat Network:
# subscription-manager registerIdentify Available Entitlement Pools
Run the following commands to find entitlement pools containing the repositories required to install Red Hat Gluster Storage:
# subscription-manager list --availableAttach Entitlement Pools to the System
Use the pool identifiers located in the previous step to attach the
Red Hat Enterprise Linux ServerandRed Hat Gluster Storageentitlements to the system. Run the following command to attach the entitlements:# subscription-manager attach --pool=[POOLID]For example:
# subscription-manager attach --pool=8a85f9814999f69101499c05aa706e47Enable the Required Channels
For Red Hat Gluster Storage 3.5 on Red Hat Enterprise Linux 7.7
Run the following commands to enable the repositories required to install Red Hat Gluster Storage
# subscription-manager repos --enable=rhel-7-server-rpms # subscription-manager repos --enable=rh-gluster-3-for-rhel-7-server-rpmsVerify if the Channels are Enabled
Run the following command to verify if the channels are enabled:
# yum repolistUpdate all packages
Ensure that all packages are up to date by running the following command.
# yum updateKernel Version Requirement
Independent mode requires the kernel-3.10.0-862.14.4.el7.x86_64 version or higher to be used on the system. Verify the installed and running kernel versions by running the following command:
# rpm -q kernel
kernel-3.10.0-862.14.4.el7.x86_64
# uname -r 3.10.0-862.14.4.el7.x86_64ImportantIf any kernel packages are updated, reboot the system with the following command.
+
# shutdown -r nowInstall Red Hat Gluster Storage
Run the following command to install Red Hat Gluster Storage:
# yum install redhat-storage-server- To enable gluster-block execute the following command:
# yum install gluster-blockReboot
Reboot the system.
A.2.2. Configuring Port Access
This section provides information about the ports that must be open for the independent mode.
Red Hat Gluster Storage Server uses the listed ports. You must ensure that the firewall settings do not prevent access to these ports.
Execute the following commands to open the required ports for both runtime and permanent configurations on all Red Hat Gluster Storage nodes:
# firewall-cmd --zone=zone_name --add-port=24010/tcp --add-port=3260/tcp --add-port=111/tcp --add-port=22/tcp --add-port=24007/tcp --add-port=49152-49664/tcp
# firewall-cmd --zone=zone_name --add-port=24010/tcp --add-port=3260/tcp --add-port=111/tcp --add-port=22/tcp --add-port=24007/tcp --add-port=49152-49664/tcp --permanent- Port 24010 and 3260 are for gluster-blockd and iSCSI targets respectively.
- The port range starting at 49664 defines the range of ports that can be used by GlusterFS for communication to its volume bricks. In the above example, the total number of bricks allowed is 512. Configure the port range based on the maximum number of bricks that could be hosted on each node.
A.2.3. Enabling Kernel Modules
Execute the following commands to enable kernel modules:
You must ensure that the dm_thin_pool and target_core_user modules are loaded in the Red Hat Gluster Storage nodes.
# modprobe target_core_user# modprobe dm_thin_poolExecute the following command to verify if the modules are loaded:
# lsmod | grep dm_thin_pool# lsmod | grep target_core_userNoteTo ensure these operations are persisted across reboots, create the following files and update each file with the content as mentioned:
# cat /etc/modules-load.d/dm_thin_pool.conf
dm_thin_pool
# cat /etc/modules-load.d/target_core_user.conf target_core_userYou must ensure that the dm_multipath module is loaded on all OpenShift Container Platform nodes.
# modprobe dm_multipathExecute the following command to verify if the modules are loaded:
# lsmod | grep dm_multipathNoteTo ensure these operations are persisted across reboots, create the following file and update it with the content as mentioned:
# cat /etc/modules-load.d/dm_multipath.conf
dm_multipath
A.2.4. Starting and Enabling Services
Execute the following commands to start glusterd and gluster-blockd:
# systemctl start sshd# systemctl enable sshd# systemctl start glusterd# systemctl enable glusterd# systemctl start gluster-blockd# systemctl enable gluster-blockdNext Step: Proceed to Section A.3, “Setting up the Environment” to prepare the environment for Red Hat Gluster Storage Container Converged in OpenShift.
A.3. Setting up the Environment
This chapter outlines the details for setting up the environment for Red Hat Openshift Container Platform.
A.3.1. Preparing the Red Hat OpenShift Container Platform Cluster
Execute the following steps to prepare the Red Hat OpenShift Container Platform cluster:
On the master or client, execute the following command to login as the cluster admin user:
# oc loginFor example:
# oc login Authentication required for https://dhcp46-24.lab.eng.blr.redhat.com:8443 (openshift) Username: test Password: Login successful. You have access to the following projects and can switch between them with 'oc project <project_name>': * default kube-system logging management-infra openshift openshift-infra Using project "default".On the master or client, execute the following command to create a project, which will contain all the containerized Red Hat Gluster Storage services:
# oc new-project <project_name>For example:
# oc new-project storage-project Now using project "storage-project" on server "https://master.example.com:8443"After the project is created, execute the following command on the master node to enable the deployment of the privileged containers as Red Hat Gluster Storage container can only run in the privileged mode.
# oc adm policy add-scc-to-user privileged -z defaultExecute the following steps on the master to set up the router:
NoteIf a router already exists, proceed to Step 5. To verify if the router is already deployed, execute the following command:
# oc get dc --all-namespacesTo list all routers in all namespaces execute the following command:
# oc get dc --all-namespaces --selector=router=router NAME REVISION DESIRED CURRENT TRIGGERED BY glusterblock-storage-provisioner-dc 1 1 0 config heketi-storage 4 1 1 configExecute the following command to enable the deployment of the router:
# oc adm policy add-scc-to-user privileged -z routerExecute the following command to deploy the router:
# oc adm router storage-project-router --replicas=1Edit the subdomain name in the config.yaml file located at /etc/origin/master/master-config.yaml.
For example:
subdomain: "cloudapps.mystorage.com"For more information, see https://access.redhat.com/documentation/en-us/openshift_container_platform/3.11/html-single/configuring_clusters/#customizing-the-default-routing-subdomain.
For OpenShift Container Platform 3.7 and 3.9 execute the following command to restart the services:
# systemctl restart atomic-openshift-master-api atomic-openshift-master-controllersNoteIf the router setup fails, use the port forward method as described in https://access.redhat.com/documentation/en-us/red_hat_openshift_container_storage/3.11/html-single/operations_guide/#chap-Documentation-Red_Hat_Gluster_Storage_Container_Native_with_OpenShift_Platform-Port_Fwding.
For more information regarding router setup, see https://access.redhat.com/documentation/en-us/openshift_container_platform/3.11/html/configuring_clusters/setting-up-a-router
Execute the following command to verify if the router is running:
# oc get dc <_router_name_>For example:
# oc get dc storage-project-router NAME REVISION DESIRED CURRENT TRIGGERED BY glusterblock-storage-provisioner-dc 1 1 0 config heketi-storage 4 1 1 config
Ensure you do not edit the */etc/dnsmasq.conf *file until the router has started.
After the router is running, the client has to be setup to access the services in the OpenShift cluster. Execute the following steps on the client to set up the DNS.
Execute the following command to find the IP address of the router:
# oc get pods -o wide --all-namespaces | grep router storage-project storage-project-router-1-cm874 1/1 Running 119d 10.70.43.132 dhcp43-132.lab.eng.blr.redhat.comEdit the /etc/dnsmasq.conf file and add the following line to the file:
address=/.cloudapps.mystorage.com/<Router_IP_Address>where, Router_IP_Address is the IP address of the node where the router is running.
Restart the
dnsmasqservice by executing the following command:# systemctl restart dnsmasqEdit /etc/resolv.conf and add the following line:
nameserver 127.0.0.1
For more information regarding setting up the DNS, see https://access.redhat.com/documentation/en-us/openshift_container_platform/3.11/html/installing_clusters/install-config-install-prerequisites#prereq-dns.
A.3.2. Deploying Containerized Red Hat Gluster Storage Solutions
The following section covers deployment of the converged mode pods, independent mode pods, and using the *cns-deploy *tool.
-
It is recommended that a separate cluster for OpenShift Container Platform infrastructure workload (registry, logging and metrics) and application pod storage. Hence, if you have more than 6 nodes ensure you create multiple clusters with a minimum of 3 nodes each. The infrastructure cluster should belong to the
defaultproject namespace. - If you want to enable encryption on Red Hat Openshift Container Storage setup, see https://access.redhat.com/documentation/en-us/red_hat_openshift_container_storage/3.11/html-single/operations_guide/#chap-Documentation-Red_Hat_Gluster_Storage_Container_Native_with_OpenShift_Platform-Enabling_Encryption before proceeding with the following steps.
You must first provide a topology file for heketi which describes the topology of the Red Hat Gluster Storage nodes and their attached storage devices. A sample, formatted topology file (topology-sample.json) is installed with the ‘heketi-client’ package in the /usr/share/heketi/ directory.
{ "clusters": [ { "nodes": [ { "node": { "hostnames": { "manage": [ "node1.example.com" ], "storage": [ "192.168.68.3" ] }, "zone": 1 }, "devices": [ "/dev/sdb", "/dev/sdc", "/dev/sdd", "/dev/sde", "/dev/sdf", "/dev/sdg", "/dev/sdh", "/dev/sdi" ] }, { "node": { "hostnames": { "manage": [ "node2.example.com" ], "storage": [ "192.168.68.2" ] }, "zone": 2 }, "devices": [ "/dev/sdb", "/dev/sdc", "/dev/sdd", "/dev/sde", "/dev/sdf", "/dev/sdg", "/dev/sdh", "/dev/sdi" ] }, ....... .......where, ** clusters: Array of clusters.
+ Each element on the array is a map which describes the cluster as follows.
nodes: Array of OpenShift nodes that will host the Red Hat Gluster Storage container
Each element on the array is a map which describes the node as follows
node: It is a map of the following elements:
- zone: The value represents the zone number that the node belongs to; the zone number is used by heketi for choosing optimum position of bricks by having replicas of bricks in different zones. Hence zone number is similar to a failure domain.
hostnames: It is a map which lists the manage and storage addresses
- manage: It is the hostname/IP Address that is used by Heketi to communicate with the node
- storage: It is the IP address that is used by other OpenShift nodes to communicate with the node. Storage data traffic will use the interface attached to this IP. This must be the IP address and not the hostname because, in an OpenShift environment, Heketi considers this to be the endpoint too.
- devices: Name of each disk to be added
Copy the topology file from the default location to your location and then edit it:
# cp /usr/share/heketi/topology-sample.json /<_Path_>/topology.jsonEdit the topology file based on the Red Hat Gluster Storage pod hostname under the node.hostnames.manage section and node.hostnames.storage section with the IP address. For simplicity, the /usr/share/heketi/topology-sample.json file only sets up 4 nodes with 8 drives each.
Heketi stores its database on a Red Hat Gluster Storage volume. In cases where the volume is down, the Heketi service does not respond due to the unavailability of the volume served by a disabled trusted storage pool.To resolve this issue, restart the trusted storage pool which contains the Heketi volume.
A.3.3. Deploying Converged Mode
Execute the following commands to deploy converged mode:
Execute the following command on the client to deploy the heketi and Red Hat Gluster Storage pods:
# cns-deploy -v -n <namespace> -g --admin-key <admin-key> --user-key <user-key> topology.jsonNote- From Container-Native Storage 3.6, support for S3 compatible Object Store in Red Hat Openshift Container Storage is under technology preview. To deploy S3 compatible object store in Red Hat Openshift Container Storage see substep i below.
-
In the above command, the value for
admin-keyis the secret string for heketi admin user. The heketi administrator will have access toall APIs and commands. Default is to use no secret. The
BLOCK_HOST_SIZEparameter in cns-deploy controls the size (in GB) of the automatically created Red Hat Gluster Storage volumes hosting the gluster-block volumes. This default configuration will dynamically create block-hosting volumes of 500GB in size when more space is required. If you want to change this value then use --block-host in cns-deploy. For example:# cns-deploy -v -n storage-project -g --admin-key secret --user-key mysecret --block-host 1000 topology.json
For example:
# cns-deploy -v -n storage-project -g --admin-key secret --user-key mysecret topology.json Welcome to the deployment tool for GlusterFS on Kubernetes and OpenShift. Before getting started, this script has some requirements of the execution environment and of the container platform that you should verify. The client machine that will run this script must have: * Administrative access to an existing Kubernetes or OpenShift cluster * Access to a python interpreter 'python' Each of the nodes that will host GlusterFS must also have appropriate firewall rules for the required GlusterFS ports: * 111 - rpcbind (for glusterblock) * 2222 - sshd (if running GlusterFS in a pod) * 3260 - iSCSI targets (for glusterblock) * 24010 - glusterblockd * 24007 - GlusterFS Management * 24008 - GlusterFS RDMA * 49152 to 49251 - Each brick for every volume on the host requires its own port. For every new brick, one new port will be used starting at 49152. We recommend a default range of 49152-49251 on each host, though you can adjust this to fit your needs. The following kernel modules must be loaded: * dm_snapshot * dm_mirror * dm_thin_pool * dm_multipath * target_core_user For systems with SELinux, the following settings need to be considered: * virt_sandbox_use_fusefs should be enabled on each node to allow writing to remote GlusterFS volumes In addition, for an OpenShift deployment you must: * Have 'cluster_admin' role on the administrative account doing the deployment * Add the 'default' and 'router' Service Accounts to the 'privileged' SCC * Have a router deployed that is configured to allow apps to access services running in the cluster Do you wish to proceed with deployment? [Y]es, [N]o? [Default: Y]: Y Using OpenShift CLI. Using namespace "storage-project". Checking for pre-existing resources... GlusterFS pods ... not found. deploy-heketi pod ... not found. heketi pod ... not found. glusterblock-provisioner pod ... not found. gluster-s3 pod ... not found. Creating initial resources ... template "deploy-heketi" created serviceaccount "heketi-service-account" created template "heketi" created template "glusterfs" created role "edit" added: "system:serviceaccount:storage-project:heketi-service-account" OK node "ip-172-18-5-29.ec2.internal" labeled node "ip-172-18-8-205.ec2.internal" labeled node "ip-172-18-6-100.ec2.internal" labeled daemonset "glusterfs" created Waiting for GlusterFS pods to start ... OK secret "heketi-config-secret" created secret "heketi-config-secret" labeled service "deploy-heketi" created route "deploy-heketi" created deploymentconfig "deploy-heketi" created Waiting for deploy-heketi pod to start ... OK Creating cluster ... ID: 30cd12e60f860fce21e7e7457d07db36 Allowing file volumes on cluster. Allowing block volumes on cluster. Creating node ip-172-18-5-29.ec2.internal ... ID: 4077242c76e5f477a27c5c47247cb348 Adding device /dev/xvdc ... OK Creating node ip-172-18-8-205.ec2.internal ... ID: dda0e7d568d7b2f76a7e7491cfc26dd3 Adding device /dev/xvdc ... OK Creating node ip-172-18-6-100.ec2.internal ... ID: 30a1795ca515c85dca32b09be7a68733 Adding device /dev/xvdc ... OK heketi topology loaded. Saving /tmp/heketi-storage.json secret "heketi-storage-secret" created endpoints "heketi-storage-endpoints" created service "heketi-storage-endpoints" created job "heketi-storage-copy-job" created service "heketi-storage-endpoints" labeled deploymentconfig "deploy-heketi" deleted route "deploy-heketi" deleted service "deploy-heketi" deleted job "heketi-storage-copy-job" deleted pod "deploy-heketi-1-frjpt" deleted secret "heketi-storage-secret" deleted template "deploy-heketi" deleted service "heketi" created route "heketi" created deploymentconfig "heketi" created Waiting for heketi pod to start ... OK heketi is now running and accessible via http://heketi-storage-project.cloudapps.mystorage.com . To run administrative commands you can install 'heketi-cli' and use it as follows: # heketi-cli -s http://heketi-storage-project.cloudapps.mystorage.com --user admin --secret '<ADMIN_KEY>' cluster list You can find it at https://github.com/heketi/heketi/releases . Alternatively, use it from within the heketi pod: # /bin/oc -n storage-project exec -it <HEKETI_POD> -- heketi-cli -s http://localhost:8080 --user admin --secret '<ADMIN_KEY>' cluster list For dynamic provisioning, create a StorageClass similar to this: --- apiVersion: storage.k8s.io/v1 kind: StorageClass metadata: name: glusterfs-storage provisioner: kubernetes.io/glusterfs parameters: resturl: "http://heketi-storage-project.cloudapps.mystorage.com" Ready to create and provide GlusterFS volumes. clusterrole "glusterblock-provisioner-runner" created serviceaccount "glusterblock-provisioner" created clusterrolebinding "glusterblock-provisioner" created deploymentconfig "glusterblock-provisioner-dc" created Waiting for glusterblock-provisioner pod to start ... OK Ready to create and provide Gluster block volumes. Deployment complete!NoteFor more information on the cns-deploy commands, refer to the man page of cns-deploy.+
# cns-deploy --helpTo deploy S3 compatible object store along with Heketi and Red Hat Gluster Storage pods, execute the following command:
# cns-deploy /opt/topology.json --deploy-gluster --namespace <namespace> --yes --admin-key <admin-key> --user-key <user-key> --log-file=<path/to/logfile> --object-account <object account name> --object-user <object user name> --object-password <object user password> --verboseobject-account,object-user, andobject-passwordare required credentials for deploying the gluster-s3 container.If any of these are missing, gluster-s3 container deployment will be skipped.object-scandobject-capacityare optional parameters. Where,object-scis used to specify a pre-existing StorageClass to use to create Red Hat Gluster Storage volumes to back the object store andobject-capacityis the total capacity of the Red Hat Gluster Storage volume which will store the object data.For example:
# cns-deploy /opt/topology.json --deploy-gluster --namespace storage-project --yes --admin-key secret --user-key mysecret --log-file=/var/log/cns-deploy/444-cns-deploy.log --object-account testvolume --object-user adminuser --object-password itsmine --verbose Using OpenShift CLI. Checking status of namespace matching 'storage-project': storage-project Active 56m Using namespace "storage-project". Checking for pre-existing resources... GlusterFS pods ... Checking status of pods matching '--selector=glusterfs=pod': No resources found. Timed out waiting for pods matching '--selector=glusterfs=pod'. not found. deploy-heketi pod ... Checking status of pods matching '--selector=deploy-heketi=pod': No resources found. Timed out waiting for pods matching '--selector=deploy-heketi=pod'. not found. heketi pod ... Checking status of pods matching '--selector=heketi=pod': No resources found. Timed out waiting for pods matching '--selector=heketi=pod'. not found. glusterblock-provisioner pod ... Checking status of pods matching '--selector=glusterfs=block-provisioner-pod': No resources found. Timed out waiting for pods matching '--selector=glusterfs=block-provisioner-pod'. not found. gluster-s3 pod ... Checking status of pods matching '--selector=glusterfs=s3-pod': No resources found. Timed out waiting for pods matching '--selector=glusterfs=s3-pod'. not found. Creating initial resources ... /usr/bin/oc -n storage-project create -f /usr/share/heketi/templates/deploy-heketi-template.yaml 2>&1 template "deploy-heketi" created /usr/bin/oc -n storage-project create -f /usr/share/heketi/templates/heketi-service-account.yaml 2>&1 serviceaccount "heketi-service-account" created /usr/bin/oc -n storage-project create -f /usr/share/heketi/templates/heketi-template.yaml 2>&1 template "heketi" created /usr/bin/oc -n storage-project create -f /usr/share/heketi/templates/glusterfs-template.yaml 2>&1 template "glusterfs" created /usr/bin/oc -n storage-project policy add-role-to-user edit system:serviceaccount:storage-project:heketi-service-account 2>&1 role "edit" added: "system:serviceaccount:storage-project:heketi-service-account" /usr/bin/oc -n storage-project adm policy add-scc-to-user privileged -z heketi-service-account OK Marking 'dhcp46-122.lab.eng.blr.redhat.com' as a GlusterFS node. /usr/bin/oc -n storage-project label nodes dhcp46-122.lab.eng.blr.redhat.com storagenode=glusterfs 2>&1 node "dhcp46-122.lab.eng.blr.redhat.com" labeled Marking 'dhcp46-9.lab.eng.blr.redhat.com' as a GlusterFS node. /usr/bin/oc -n storage-project label nodes dhcp46-9.lab.eng.blr.redhat.com storagenode=glusterfs 2>&1 node "dhcp46-9.lab.eng.blr.redhat.com" labeled Marking 'dhcp46-134.lab.eng.blr.redhat.com' as a GlusterFS node. /usr/bin/oc -n storage-project label nodes dhcp46-134.lab.eng.blr.redhat.com storagenode=glusterfs 2>&1 node "dhcp46-134.lab.eng.blr.redhat.com" labeled Deploying GlusterFS pods. /usr/bin/oc -n storage-project process -p NODE_LABEL=glusterfs glusterfs | /usr/bin/oc -n storage-project create -f - 2>&1 daemonset "glusterfs" created Waiting for GlusterFS pods to start ... Checking status of pods matching '--selector=glusterfs=pod': glusterfs-6fj2v 1/1 Running 0 52s glusterfs-ck40f 1/1 Running 0 52s glusterfs-kbtz4 1/1 Running 0 52s OK /usr/bin/oc -n storage-project create secret generic heketi-config-secret --from-file=private_key=/dev/null --from-file=./heketi.json --from-file=topology.json=/opt/topology.json secret "heketi-config-secret" created /usr/bin/oc -n storage-project label --overwrite secret heketi-config-secret glusterfs=heketi-config-secret heketi=config-secret secret "heketi-config-secret" labeled /usr/bin/oc -n storage-project process -p HEKETI_EXECUTOR=kubernetes -p HEKETI_FSTAB=/var/lib/heketi/fstab -p HEKETI_ADMIN_KEY= -p HEKETI_USER_KEY= deploy-heketi | /usr/bin/oc -n storage-project create -f - 2>&1 service "deploy-heketi" created route "deploy-heketi" created deploymentconfig "deploy-heketi" created Waiting for deploy-heketi pod to start ... Checking status of pods matching '--selector=deploy-heketi=pod': deploy-heketi-1-hf9rn 1/1 Running 0 2m OK Determining heketi service URL ... OK /usr/bin/oc -n storage-project exec -it deploy-heketi-1-hf9rn -- heketi-cli -s http://localhost:8080 --user admin --secret '' topology load --json=/etc/heketi/topology.json 2>&1 Creating cluster ... ID: 252509038eb8568162ec5920c12bc243 Allowing file volumes on cluster. Allowing block volumes on cluster. Creating node dhcp46-122.lab.eng.blr.redhat.com ... ID: 73ad287ae1ef231f8a0db46422367c9a Adding device /dev/sdd ... OK Adding device /dev/sde ... OK Adding device /dev/sdf ... OK Creating node dhcp46-9.lab.eng.blr.redhat.com ... ID: 0da1b20daaad2d5c57dbfc4f6ab78001 Adding device /dev/sdd ... OK Adding device /dev/sde ... OK Adding device /dev/sdf ... OK Creating node dhcp46-134.lab.eng.blr.redhat.com ... ID: 4b3b62fc0efd298dedbcdacf0b498e65 Adding device /dev/sdd ... OK Adding device /dev/sde ... OK Adding device /dev/sdf ... OK heketi topology loaded. /usr/bin/oc -n storage-project exec -it deploy-heketi-1-hf9rn -- heketi-cli -s http://localhost:8080 --user admin --secret '' setup-openshift-heketi-storage --listfile=/tmp/heketi-storage.json --image rhgs3/rhgs-volmanager-rhel7:3.3.0-17 2>&1 Saving /tmp/heketi-storage.json /usr/bin/oc -n storage-project exec -it deploy-heketi-1-hf9rn -- cat /tmp/heketi-storage.json | /usr/bin/oc -n storage-project create -f - 2>&1 secret "heketi-storage-secret" created endpoints "heketi-storage-endpoints" created service "heketi-storage-endpoints" created job "heketi-storage-copy-job" created Checking status of pods matching '--selector=job-name=heketi-storage-copy-job': heketi-storage-copy-job-87v6n 0/1 Completed 0 7s /usr/bin/oc -n storage-project label --overwrite svc heketi-storage-endpoints glusterfs=heketi-storage-endpoints heketi=storage-endpoints service "heketi-storage-endpoints" labeled /usr/bin/oc -n storage-project delete all,service,jobs,deployment,secret --selector="deploy-heketi" 2>&1 deploymentconfig "deploy-heketi" deleted route "deploy-heketi" deleted service "deploy-heketi" deleted job "heketi-storage-copy-job" deleted pod "deploy-heketi-1-hf9rn" deleted secret "heketi-storage-secret" deleted /usr/bin/oc -n storage-project delete dc,route,template --selector="deploy-heketi" 2>&1 template "deploy-heketi" deleted /usr/bin/oc -n storage-project process -p HEKETI_EXECUTOR=kubernetes -p HEKETI_FSTAB=/var/lib/heketi/fstab -p HEKETI_ADMIN_KEY= -p HEKETI_USER_KEY= heketi | /usr/bin/oc -n storage-project create -f - 2>&1 service "heketi" created route "heketi" created deploymentconfig "heketi" created Waiting for heketi pod to start ... Checking status of pods matching '--selector=heketi=pod': heketi-1-zzblp 1/1 Running 0 31s OK Determining heketi service URL ... OK heketi is now running and accessible via http://heketi-storage-project.cloudapps.mystorage.com . To run administrative commands you can install 'heketi-cli' and use it as follows: # heketi-cli -s http://heketi-storage-project.cloudapps.mystorage.com --user admin --secret '<ADMIN_KEY>' cluster list You can find it at https://github.com/heketi/heketi/releases . Alternatively, use it from within the heketi pod: # /usr/bin/oc -n storage-project exec -it <HEKETI_POD> -- heketi-cli -s http://localhost:8080 --user admin --secret '<ADMIN_KEY>' cluster list For dynamic provisioning, create a StorageClass similar to this: --- apiVersion: storage.k8s.io/v1 kind: StorageClass metadata: name: glusterfs-storage provisioner: kubernetes.io/glusterfs parameters: resturl: "http://heketi-storage-project.cloudapps.mystorage.com" Ready to create and provide GlusterFS volumes. sed -e 's/\${NAMESPACE}/storage-project/' /usr/share/heketi/templates/glusterblock-provisioner.yaml | /usr/bin/oc -n storage-project create -f - 2>&1 clusterrole "glusterblock-provisioner-runner" created serviceaccount "glusterblock-provisioner" created clusterrolebinding "glusterblock-provisioner" created deploymentconfig "glusterblock-provisioner-dc" created Waiting for glusterblock-provisioner pod to start ... Checking status of pods matching '--selector=glusterfs=block-provisioner-pod': glusterblock-provisioner-dc-1-xm6bv 1/1 Running 0 6s OK Ready to create and provide Gluster block volumes. /usr/bin/oc -n storage-project create secret generic heketi-storage-project-admin-secret --from-literal=key= --type=kubernetes.io/glusterfs secret "heketi-storage-project-admin-secret" created /usr/bin/oc -n storage-project label --overwrite secret heketi-storage-project-admin-secret glusterfs=s3-heketi-storage-project-admin-secret gluster-s3=heketi-storage-project-admin-secret secret "heketi-storage-project-admin-secret" labeled sed -e 's/\${STORAGE_CLASS}/glusterfs-for-s3/' -e 's/\${HEKETI_URL}/heketi-storage-project.cloudapps.mystorage.com/' -e 's/\${NAMESPACE}/storage-project/' /usr/share/heketi/templates/gluster-s3-storageclass.yaml | /usr/bin/oc -n storage-project create -f - 2>&1 storageclass "glusterfs-for-s3" created sed -e 's/\${STORAGE_CLASS}/glusterfs-for-s3/' -e 's/\${VOLUME_CAPACITY}/2Gi/' /usr/share/heketi/templates/gluster-s3-pvcs.yaml | /usr/bin/oc -n storage-project create -f - 2>&1 persistentvolumeclaim "gluster-s3-claim" created persistentvolumeclaim "gluster-s3-meta-claim" created Checking status of persistentvolumeclaims matching '--selector=glusterfs in (s3-pvc, s3-meta-pvc)': gluster-s3-claim Bound pvc-35b6c1f0-9c65-11e7-9c8c-005056b3ded1 2Gi RWX glusterfs-for-s3 18s gluster-s3-meta-claim Bound pvc-35b86e7a-9c65-11e7-9c8c-005056b3ded1 1Gi RWX glusterfs-for-s3 18s /usr/bin/oc -n storage-project create -f /usr/share/heketi/templates/gluster-s3-template.yaml 2>&1 template "gluster-s3" created /usr/bin/oc -n storage-project process -p S3_ACCOUNT=testvolume -p S3_USER=adminuser -p S3_PASSWORD=itsmine gluster-s3 | /usr/bin/oc -n storage-project create -f - 2>&1 service "gluster-s3-service" created route "gluster-s3-route" created deploymentconfig "gluster-s3-dc" created Waiting for gluster-s3 pod to start ... Checking status of pods matching '--selector=glusterfs=s3-pod': gluster-s3-dc-1-x3x4q 1/1 Running 0 6s OK Ready to create and provide Gluster object volumes. Deployment complete!
Execute the following command to let the client communicate with the container:
# export HEKETI_CLI_SERVER=http://heketi-<project_name>.<sub_domain_name>For example:
# export HEKETI_CLI_SERVER=http://heketi-storage-project.cloudapps.mystorage.comTo verify if Heketi is loaded with the topology execute the following command:
# heketi-cli topology info
The cns-deploy tool does not support scaling up of the cluster. To manually scale-up the cluster, see link:https://access.redhat.com/documentation/en-us/red_hat_openshift_container_storage/3.11/html-single/operations_guide/#chap-Documentation-Red_Hat_Gluster_Storage_Container_Native_with_OpenShift_Platform-Managing_Clusters[]Next step: If you are installing the independent mode 3.11, proceed to https://access.redhat.com/documentation/en-us/red_hat_openshift_container_storage/3.11/html-single/operations_guide/#chap-Documentation-Red_Hat_Gluster_Storage_Container_Native_with_OpenShift_Platform-Updating_Registry.
A.3.3.1. Deploying Independent Mode
Execute the following commands to deploy Red Hat Openshift Container Storage in Independent mode:
To set a passwordless SSH to all Red Hat Gluster Storage nodes, execute the following command on the client for each of the Red Hat Gluster Storage node:
# ssh-copy-id -i /root/.ssh/id_rsa root@<hostname>Execute the following command on the client to deploy heketi pod and to create a cluster of Red Hat Gluster Storage nodes:
# cns-deploy -v -n <namespace> -g --admin-key <admin-key> --user-key <user-key> topology.jsonNote- Support for S3 compatible Object Store is under technology preview. To deploy S3 compatible object store see substep i below.
-
In the above command, the value for
admin-keyis the secret string for heketi admin user. The heketi administrator will have access toall APIs and commands. Default is to use no secret. The
BLOCK_HOST_SIZEparameter in cns-deploy controls the size (in GB) of the automatically created Red Hat Gluster Storage volumes hosting the gluster-block volumes. This default configuration will dynamically create block-hosting volumes of 500GB in size when more space is required. If you want to change this value then use --block-host in cns-deploy. For example:# cns-deploy -v -n storage-project -g --admin-key secret --user-key mysecret --block-host 1000 topology.json
For example:
# cns-deploy -v -n storage-project -g --admin-key secret -s /root/.ssh/id_rsa --user-key mysecret topology.json Welcome to the deployment tool for GlusterFS on Kubernetes and OpenShift. Before getting started, this script has some requirements of the execution environment and of the container platform that you should verify. The client machine that will run this script must have: * Administrative access to an existing Kubernetes or OpenShift cluster * Access to a python interpreter 'python' Each of the nodes that will host GlusterFS must also have appropriate firewall rules for the required GlusterFS ports: * 2222 - sshd (if running GlusterFS in a pod) * 24007 - GlusterFS Management * 24008 - GlusterFS RDMA * 49152 to 49251 - Each brick for every volume on the host requires its own port. For every new brick, one new port will be used starting at 49152. We recommend a default range of 49152-49251 on each host, though you can adjust this to fit your needs. The following kernel modules must be loaded: * dm_snapshot * dm_mirror * dm_thin_pool For systems with SELinux, the following settings need to be considered: * virt_sandbox_use_fusefs should be enabled on each node to allow writing to remote GlusterFS volumes In addition, for an OpenShift deployment you must: * Have 'cluster_admin' role on the administrative account doing the deployment * Add the 'default' and 'router' Service Accounts to the 'privileged' SCC * Have a router deployed that is configured to allow apps to access services running in the cluster Do you wish to proceed with deployment? [Y]es, [N]o? [Default: Y]: y Using OpenShift CLI. Using namespace "storage-project". Checking for pre-existing resources... GlusterFS pods ... not found. deploy-heketi pod ... not found. heketi pod ... not found. Creating initial resources ... template "deploy-heketi" created serviceaccount "heketi-service-account" created template "heketi" created role "edit" added: "system:serviceaccount:storage-project:heketi-service-account" OK secret "heketi-config-secret" created secret "heketi-config-secret" labeled service "deploy-heketi" created route "deploy-heketi" created deploymentconfig "deploy-heketi" created Waiting for deploy-heketi pod to start ... OK Creating cluster ... ID: 60bf06636eb4eb81d4e9be4b04cfce92 Allowing file volumes on cluster. Allowing block volumes on cluster. Creating node dhcp47-104.lab.eng.blr.redhat.com ... ID: eadc66f9d03563bcfc3db3fe636c34be Adding device /dev/sdd ... OK Adding device /dev/sde ... OK Adding device /dev/sdf ... OK Creating node dhcp47-83.lab.eng.blr.redhat.com ... ID: 178684b0a0425f51b8f1a032982ffe4d Adding device /dev/sdd ... OK Adding device /dev/sde ... OK Adding device /dev/sdf ... OK Creating node dhcp46-152.lab.eng.blr.redhat.com ... ID: 08cd7034ef7ac66499dc040d93cf4a93 Adding device /dev/sdd ... OK Adding device /dev/sde ... OK Adding device /dev/sdf ... OK heketi topology loaded. Saving /tmp/heketi-storage.json secret "heketi-storage-secret" created endpoints "heketi-storage-endpoints" created service "heketi-storage-endpoints" created job "heketi-storage-copy-job" created service "heketi-storage-endpoints" labeled deploymentconfig "deploy-heketi" deleted route "deploy-heketi" deleted service "deploy-heketi" deleted job "heketi-storage-copy-job" deleted pod "deploy-heketi-1-30c06" deleted secret "heketi-storage-secret" deleted template "deploy-heketi" deleted service "heketi" created route "heketi" created deploymentconfig "heketi" created Waiting for heketi pod to start ... OK heketi is now running and accessible via http://heketi-storage-project.cloudapps.mystorage.com . To run administrative commands you can install 'heketi-cli' and use it as follows: # heketi-cli -s http://heketi-storage-project.cloudapps.mystorage.com --user admin --secret '<ADMIN_KEY>' cluster list You can find it at https://github.com/heketi/heketi/releases . Alternatively, use it from within the heketi pod: # /usr/bin/oc -n storage-project exec -it <HEKETI_POD> -- heketi-cli -s http://localhost:8080 --user admin --secret '<ADMIN_KEY>' cluster list For dynamic provisioning, create a StorageClass similar to this: --- apiVersion: storage.k8s.io/v1 kind: StorageClass metadata: name: glusterfs-storage provisioner: kubernetes.io/glusterfs parameters: resturl: "http://heketi-storage-project.cloudapps.mystorage.com" Deployment complete!NoteFor more information on the cns-deploy commands, refer to the man page of the cns-deploy.+
# cns-deploy --helpTo deploy S3 compatible object store along with Heketi and Red Hat Gluster Storage pods, execute the following command:
# cns-deploy /opt/topology.json --deploy-gluster --namespace <namespace> --admin-key <admin-key> --user-key <user-key> --yes --log-file=<path/to/logfile> --object-account <object account name> --object-user <object user name> --object-password <object user password> --verboseobject-account,object-user, andobject-passwordare required credentials for deploying the gluster-s3 container.If any of these are missing, gluster-s3 container deployment will be skipped.object-scandobject-capacityare optional parameters. Where,object-scis used to specify a pre-existing StorageClass to use to create Red Hat Gluster Storage volumes to back the object store andobject-capacityis the total capacity of the Red Hat Gluster Storage volume which will store the object data.For example:
# cns-deploy /opt/topology.json --deploy-gluster --namespace storage-project --admin-key secret --user-key mysecret --yes --log-file=/var/log/cns-deploy/444-cns-deploy.log --object-account testvolume --object-user adminuser --object-password itsmine --verbose Using OpenShift CLI. Checking status of namespace matching 'storage-project': storage-project Active 56m Using namespace "storage-project". Checking for pre-existing resources... GlusterFS pods ... Checking status of pods matching '--selector=glusterfs=pod': No resources found. Timed out waiting for pods matching '--selector=glusterfs=pod'. not found. deploy-heketi pod ... Checking status of pods matching '--selector=deploy-heketi=pod': No resources found. Timed out waiting for pods matching '--selector=deploy-heketi=pod'. not found. heketi pod ... Checking status of pods matching '--selector=heketi=pod': No resources found. Timed out waiting for pods matching '--selector=heketi=pod'. not found. glusterblock-provisioner pod ... Checking status of pods matching '--selector=glusterfs=block-provisioner-pod': No resources found. Timed out waiting for pods matching '--selector=glusterfs=block-provisioner-pod'. not found. gluster-s3 pod ... Checking status of pods matching '--selector=glusterfs=s3-pod': No resources found. Timed out waiting for pods matching '--selector=glusterfs=s3-pod'. not found. Creating initial resources ... /usr/bin/oc -n storage-project create -f /usr/share/heketi/templates/deploy-heketi-template.yaml 2>&1 template "deploy-heketi" created /usr/bin/oc -n storage-project create -f /usr/share/heketi/templates/heketi-service-account.yaml 2>&1 serviceaccount "heketi-service-account" created /usr/bin/oc -n storage-project create -f /usr/share/heketi/templates/heketi-template.yaml 2>&1 template "heketi" created /usr/bin/oc -n storage-project create -f /usr/share/heketi/templates/glusterfs-template.yaml 2>&1 template "glusterfs" created /usr/bin/oc -n storage-project policy add-role-to-user edit system:serviceaccount:storage-project:heketi-service-account 2>&1 role "edit" added: "system:serviceaccount:storage-project:heketi-service-account" /usr/bin/oc -n storage-project adm policy add-scc-to-user privileged -z heketi-service-account OK Marking 'dhcp46-122.lab.eng.blr.redhat.com' as a GlusterFS node. /usr/bin/oc -n storage-project label nodes dhcp46-122.lab.eng.blr.redhat.com storagenode=glusterfs 2>&1 node "dhcp46-122.lab.eng.blr.redhat.com" labeled Marking 'dhcp46-9.lab.eng.blr.redhat.com' as a GlusterFS node. /usr/bin/oc -n storage-project label nodes dhcp46-9.lab.eng.blr.redhat.com storagenode=glusterfs 2>&1 node "dhcp46-9.lab.eng.blr.redhat.com" labeled Marking 'dhcp46-134.lab.eng.blr.redhat.com' as a GlusterFS node. /usr/bin/oc -n storage-project label nodes dhcp46-134.lab.eng.blr.redhat.com storagenode=glusterfs 2>&1 node "dhcp46-134.lab.eng.blr.redhat.com" labeled Deploying GlusterFS pods. /usr/bin/oc -n storage-project process -p NODE_LABEL=glusterfs glusterfs | /usr/bin/oc -n storage-project create -f - 2>&1 daemonset "glusterfs" created Waiting for GlusterFS pods to start ... Checking status of pods matching '--selector=glusterfs=pod': glusterfs-6fj2v 1/1 Running 0 52s glusterfs-ck40f 1/1 Running 0 52s glusterfs-kbtz4 1/1 Running 0 52s OK /usr/bin/oc -n storage-project create secret generic heketi-config-secret --from-file=private_key=/dev/null --from-file=./heketi.json --from-file=topology.json=/opt/topology.json secret "heketi-config-secret" created /usr/bin/oc -n storage-project label --overwrite secret heketi-config-secret glusterfs=heketi-config-secret heketi=config-secret secret "heketi-config-secret" labeled /usr/bin/oc -n storage-project process -p HEKETI_EXECUTOR=kubernetes -p HEKETI_FSTAB=/var/lib/heketi/fstab -p HEKETI_ADMIN_KEY= -p HEKETI_USER_KEY= deploy-heketi | /usr/bin/oc -n storage-project create -f - 2>&1 service "deploy-heketi" created route "deploy-heketi" created deploymentconfig "deploy-heketi" created Waiting for deploy-heketi pod to start ... Checking status of pods matching '--selector=deploy-heketi=pod': deploy-heketi-1-hf9rn 1/1 Running 0 2m OK Determining heketi service URL ... OK /usr/bin/oc -n storage-project exec -it deploy-heketi-1-hf9rn -- heketi-cli -s http://localhost:8080 --user admin --secret '' topology load --json=/etc/heketi/topology.json 2>&1 Creating cluster ... ID: 252509038eb8568162ec5920c12bc243 Allowing file volumes on cluster. Allowing block volumes on cluster. Creating node dhcp46-122.lab.eng.blr.redhat.com ... ID: 73ad287ae1ef231f8a0db46422367c9a Adding device /dev/sdd ... OK Adding device /dev/sde ... OK Adding device /dev/sdf ... OK Creating node dhcp46-9.lab.eng.blr.redhat.com ... ID: 0da1b20daaad2d5c57dbfc4f6ab78001 Adding device /dev/sdd ... OK Adding device /dev/sde ... OK Adding device /dev/sdf ... OK Creating node dhcp46-134.lab.eng.blr.redhat.com ... ID: 4b3b62fc0efd298dedbcdacf0b498e65 Adding device /dev/sdd ... OK Adding device /dev/sde ... OK Adding device /dev/sdf ... OK heketi topology loaded. /usr/bin/oc -n storage-project exec -it deploy-heketi-1-hf9rn -- heketi-cli -s http://localhost:8080 --user admin --secret '' setup-openshift-heketi-storage --listfile=/tmp/heketi-storage.json --image rhgs3/rhgs-volmanager-rhel7:3.3.0-17 2>&1 Saving /tmp/heketi-storage.json /usr/bin/oc -n storage-project exec -it deploy-heketi-1-hf9rn -- cat /tmp/heketi-storage.json | /usr/bin/oc -n storage-project create -f - 2>&1 secret "heketi-storage-secret" created endpoints "heketi-storage-endpoints" created service "heketi-storage-endpoints" created job "heketi-storage-copy-job" created Checking status of pods matching '--selector=job-name=heketi-storage-copy-job': heketi-storage-copy-job-87v6n 0/1 Completed 0 7s /usr/bin/oc -n storage-project label --overwrite svc heketi-storage-endpoints glusterfs=heketi-storage-endpoints heketi=storage-endpoints service "heketi-storage-endpoints" labeled /usr/bin/oc -n storage-project delete all,service,jobs,deployment,secret --selector="deploy-heketi" 2>&1 deploymentconfig "deploy-heketi" deleted route "deploy-heketi" deleted service "deploy-heketi" deleted job "heketi-storage-copy-job" deleted pod "deploy-heketi-1-hf9rn" deleted secret "heketi-storage-secret" deleted /usr/bin/oc -n storage-project delete dc,route,template --selector="deploy-heketi" 2>&1 template "deploy-heketi" deleted /usr/bin/oc -n storage-project process -p HEKETI_EXECUTOR=kubernetes -p HEKETI_FSTAB=/var/lib/heketi/fstab -p HEKETI_ADMIN_KEY= -p HEKETI_USER_KEY= heketi | /usr/bin/oc -n storage-project create -f - 2>&1 service "heketi" created route "heketi" created deploymentconfig "heketi" created Waiting for heketi pod to start ... Checking status of pods matching '--selector=heketi=pod': heketi-1-zzblp 1/1 Running 0 31s OK Determining heketi service URL ... OK heketi is now running and accessible via http://heketi-storage-project.cloudapps.mystorage.com . To run administrative commands you can install 'heketi-cli' and use it as follows: # heketi-cli -s http://heketi-storage-project.cloudapps.mystorage.com --user admin --secret '<ADMIN_KEY>' cluster list You can find it at https://github.com/heketi/heketi/releases . Alternatively, use it from within the heketi pod: # /usr/bin/oc -n storage-project exec -it <HEKETI_POD> -- heketi-cli -s http://localhost:8080 --user admin --secret '<ADMIN_KEY>' cluster list For dynamic provisioning, create a StorageClass similar to this: --- apiVersion: storage.k8s.io/v1 kind: StorageClass metadata: name: glusterfs-storage provisioner: kubernetes.io/glusterfs parameters: resturl: "http://heketi-storage-project.cloudapps.mystorage.com" Ready to create and provide GlusterFS volumes. sed -e 's/\${NAMESPACE}/storage-project/' /usr/share/heketi/templates/glusterblock-provisioner.yaml | /usr/bin/oc -n storage-project create -f - 2>&1 clusterrole "glusterblock-provisioner-runner" created serviceaccount "glusterblock-provisioner" created clusterrolebinding "glusterblock-provisioner" created deploymentconfig "glusterblock-provisioner-dc" created Waiting for glusterblock-provisioner pod to start ... Checking status of pods matching '--selector=glusterfs=block-provisioner-pod': glusterblock-provisioner-dc-1-xm6bv 1/1 Running 0 6s OK Ready to create and provide Gluster block volumes. /usr/bin/oc -n storage-project create secret generic heketi-storage-project-admin-secret --from-literal=key= --type=kubernetes.io/glusterfs secret "heketi-storage-project-admin-secret" created /usr/bin/oc -n storage-project label --overwrite secret heketi-storage-project-admin-secret glusterfs=s3-heketi-storage-project-admin-secret gluster-s3=heketi-storage-project-admin-secret secret "heketi-storage-project-admin-secret" labeled sed -e 's/\${STORAGE_CLASS}/glusterfs-for-s3/' -e 's/\${HEKETI_URL}/heketi-storage-project.cloudapps.mystorage.com/' -e 's/\${NAMESPACE}/storage-project/' /usr/share/heketi/templates/gluster-s3-storageclass.yaml | /usr/bin/oc -n storage-project create -f - 2>&1 storageclass "glusterfs-for-s3" created sed -e 's/\${STORAGE_CLASS}/glusterfs-for-s3/' -e 's/\${VOLUME_CAPACITY}/2Gi/' /usr/share/heketi/templates/gluster-s3-pvcs.yaml | /usr/bin/oc -n storage-project create -f - 2>&1 persistentvolumeclaim "gluster-s3-claim" created persistentvolumeclaim "gluster-s3-meta-claim" created Checking status of persistentvolumeclaims matching '--selector=glusterfs in (s3-pvc, s3-meta-pvc)': gluster-s3-claim Bound pvc-35b6c1f0-9c65-11e7-9c8c-005056b3ded1 2Gi RWX glusterfs-for-s3 18s gluster-s3-meta-claim Bound pvc-35b86e7a-9c65-11e7-9c8c-005056b3ded1 1Gi RWX glusterfs-for-s3 18s /usr/bin/oc -n storage-project create -f /usr/share/heketi/templates/gluster-s3-template.yaml 2>&1 template "gluster-s3" created /usr/bin/oc -n storage-project process -p S3_ACCOUNT=testvolume -p S3_USER=adminuser -p S3_PASSWORD=itsmine gluster-s3 | /usr/bin/oc -n storage-project create -f - 2>&1 service "gluster-s3-service" created route "gluster-s3-route" created deploymentconfig "gluster-s3-dc" created Waiting for gluster-s3 pod to start ... Checking status of pods matching '--selector=glusterfs=s3-pod': gluster-s3-dc-1-x3x4q 1/1 Running 0 6s OK Ready to create and provide Gluster object volumes. Deployment complete!
Brick multiplexing is a feature that allows adding multiple bricks into one process. This reduces resource consumption and allows us to run more bricks than before with the same memory consumption. Execute the following commands on one of the Red Hat Gluster Storage nodes on each cluster to enable brick-multiplexing:
Execute the following command to enable brick multiplexing:
# gluster vol set all cluster.brick-multiplex onFor example:
# gluster vol set all cluster.brick-multiplex on Brick-multiplexing is supported only for container workloads (Independent or Converged mode). Also it is advised to make sure that either all volumes are in stopped state or no bricks are running before this option is modified.Do you still want to continue? (y/n) y volume set: successRestart the heketidb volumes:
# gluster vol stop heketidbstorage
Stopping volume will make its data inaccessible. Do you want to continue? (y/n) y
volume stop: heketidbstorage: success
# gluster vol start heketidbstorage volume start: heketidbstorage: success
Execute the following command to let the client communicate with the container:
# export HEKETI_CLI_SERVER=http://heketi-<project_name>.<sub_domain_name>For example:
# export HEKETI_CLI_SERVER=http://heketi-storage-project.cloudapps.mystorage.comTo verify if Heketi is loaded with the topology execute the following command:
# heketi-cli topology info
The cns-deploy tool does not support scaling up of the cluster. To manually scale-up the cluster, see link:https://access.redhat.com/documentation/en-us/red_hat_openshift_container_storage/3.11/html-single/operations_guide/#chap-Documentation-Red_Hat_Gluster_Storage_Container_Native_with_OpenShift_Platform-Managing_Clusters[].Next step: If you are installing converged mode, proceed to https://access.redhat.com/documentation/en-us/red_hat_openshift_container_storage/3.11/html-single/operations_guide/#chap-Documentation-Red_Hat_Gluster_Storage_Container_Native_with_OpenShift_Platform-Updating_Registry.
Appendix B. Settings that are destroyed when using uninstall playbook
When running the uninstall.yml playbook the following two files are called:
- glusterfs_config_facts.yml
- glusterfs_registry_facts.yml
When the following command is executed then the data/resources/content/settings related to glusterfs_config_facts.yml and glusterfs_registry_facts.yml is destroyed.
ansible-playbook -i <path_to_inventory_file> -e "openshift_storage_glusterfs_wipe=true" /usr/share/ansible/openshift-ansible/playbooks/openshift-glusterfs/uninstall.ymlglusterfs_config_facts.yml variables:
glusterfs_timeout: "{{ openshift_storage_glusterfs_timeout }}"
glusterfs_namespace: "{{ openshift_storage_glusterfs_namespace }}"
glusterfs_is_native: "{{ openshift_storage_glusterfs_is_native | bool }}"
glusterfs_name: "{{ openshift_storage_glusterfs_name }}"
# map_from_pairs is a custom filter plugin in role lib_utils
glusterfs_nodeselector: "{{ openshift_storage_glusterfs_nodeselector | default(['storagenode', openshift_storage_glusterfs_name] | join('=')) | map_from_pairs }}"
glusterfs_use_default_selector: "{{ openshift_storage_glusterfs_use_default_selector }}"
glusterfs_storageclass: "{{ openshift_storage_glusterfs_storageclass }}"
glusterfs_storageclass_default: "{{ openshift_storage_glusterfs_storageclass_default | bool }}"
glusterfs_image: "{{ openshift_storage_glusterfs_image }}"
glusterfs_block_deploy: "{{ openshift_storage_glusterfs_block_deploy | bool }}"
glusterfs_block_image: "{{ openshift_storage_glusterfs_block_image }}"
glusterfs_block_host_vol_create: "{{ openshift_storage_glusterfs_block_host_vol_create }}"
glusterfs_block_host_vol_size: "{{ openshift_storage_glusterfs_block_host_vol_size }}"
glusterfs_block_host_vol_max: "{{ openshift_storage_glusterfs_block_host_vol_max }}"
glusterfs_block_storageclass: "{{ openshift_storage_glusterfs_block_storageclass | bool }}"
glusterfs_block_storageclass_default: "{{ openshift_storage_glusterfs_block_storageclass_default | bool }}"
glusterfs_s3_deploy: "{{ openshift_storage_glusterfs_s3_deploy | bool }}"
glusterfs_s3_image: "{{ openshift_storage_glusterfs_s3_image }}"
glusterfs_s3_account: "{{ openshift_storage_glusterfs_s3_account }}"
glusterfs_s3_user: "{{ openshift_storage_glusterfs_s3_user }}"
glusterfs_s3_password: "{{ openshift_storage_glusterfs_s3_password }}"
glusterfs_s3_pvc: "{{ openshift_storage_glusterfs_s3_pvc }}"
glusterfs_s3_pvc_size: "{{ openshift_storage_glusterfs_s3_pvc_size }}"
glusterfs_s3_meta_pvc: "{{ openshift_storage_glusterfs_s3_meta_pvc }}"
glusterfs_s3_meta_pvc_size: "{{ openshift_storage_glusterfs_s3_meta_pvc_size }}"
glusterfs_wipe: "{{ openshift_storage_glusterfs_wipe | bool }}"
glusterfs_heketi_is_native: "{{ openshift_storage_glusterfs_heketi_is_native | bool }}"
glusterfs_heketi_is_missing: "{{ openshift_storage_glusterfs_heketi_is_missing | bool }}"
glusterfs_heketi_deploy_is_missing: "{{ openshift_storage_glusterfs_heketi_deploy_is_missing | bool }}"
glusterfs_heketi_cli: "{{ openshift_storage_glusterfs_heketi_cli }}"
glusterfs_heketi_image: "{{ openshift_storage_glusterfs_heketi_image }}"
glusterfs_heketi_admin_key: "{{ openshift_storage_glusterfs_heketi_admin_key }}"
glusterfs_heketi_user_key: "{{ openshift_storage_glusterfs_heketi_user_key }}"
glusterfs_heketi_topology_load: "{{ openshift_storage_glusterfs_heketi_topology_load | bool }}"
glusterfs_heketi_wipe: "{{ openshift_storage_glusterfs_heketi_wipe | bool }}"
glusterfs_heketi_url: "{{ openshift_storage_glusterfs_heketi_url }}"
glusterfs_heketi_port: "{{ openshift_storage_glusterfs_heketi_port }}"
glusterfs_heketi_executor: "{{ openshift_storage_glusterfs_heketi_executor }}"
glusterfs_heketi_ssh_port: "{{ openshift_storage_glusterfs_heketi_ssh_port }}"
glusterfs_heketi_ssh_user: "{{ openshift_storage_glusterfs_heketi_ssh_user }}"
glusterfs_heketi_ssh_sudo: "{{ openshift_storage_glusterfs_heketi_ssh_sudo | bool }}"
glusterfs_heketi_ssh_keyfile: "{{ openshift_storage_glusterfs_heketi_ssh_keyfile }}"
glusterfs_heketi_fstab: "{{ openshift_storage_glusterfs_heketi_fstab }}"
glusterfs_nodes: "{{ groups.glusterfs | default([]) }}"glusterfs_registry_facts.yml variables:
glusterfs_timeout: "{{ openshift_storage_glusterfs_registry_timeout }}"
glusterfs_namespace: "{{ openshift_storage_glusterfs_registry_namespace }}"
glusterfs_is_native: "{{ openshift_storage_glusterfs_registry_is_native | bool }}"
glusterfs_name: "{{ openshift_storage_glusterfs_registry_name }}"
# map_from_pairs is a custom filter plugin in role lib_utils
glusterfs_nodeselector: "{{ openshift_storage_glusterfs_registry_nodeselector | default(['storagenode', openshift_storage_glusterfs_registry_name] | join('=')) | map_from_pairs }}"
glusterfs_use_default_selector: "{{ openshift_storage_glusterfs_registry_use_default_selector }}"
glusterfs_storageclass: "{{ openshift_storage_glusterfs_registry_storageclass }}"
glusterfs_storageclass_default: "{{ openshift_storage_glusterfs_registry_storageclass_default | bool }}"
glusterfs_image: "{{ openshift_storage_glusterfs_registry_image }}"
glusterfs_block_deploy: "{{ openshift_storage_glusterfs_registry_block_deploy | bool }}"
glusterfs_block_image: "{{ openshift_storage_glusterfs_registry_block_image }}"
glusterfs_block_host_vol_create: "{{ openshift_storage_glusterfs_registry_block_host_vol_create }}"
glusterfs_block_host_vol_size: "{{ openshift_storage_glusterfs_registry_block_host_vol_size }}"
glusterfs_block_host_vol_max: "{{ openshift_storage_glusterfs_registry_block_host_vol_max }}"
glusterfs_block_storageclass: "{{ openshift_storage_glusterfs_registry_block_storageclass | bool }}"
glusterfs_block_storageclass_default: "{{ openshift_storage_glusterfs_registry_block_storageclass_default | bool }}"
glusterfs_s3_deploy: "{{ openshift_storage_glusterfs_registry_s3_deploy | bool }}"
glusterfs_s3_image: "{{ openshift_storage_glusterfs_registry_s3_image }}"
glusterfs_s3_account: "{{ openshift_storage_glusterfs_registry_s3_account }}"
glusterfs_s3_user: "{{ openshift_storage_glusterfs_registry_s3_user }}"
glusterfs_s3_password: "{{ openshift_storage_glusterfs_registry_s3_password }}"
glusterfs_s3_pvc: "{{ openshift_storage_glusterfs_registry_s3_pvc }}"
glusterfs_s3_pvc_size: "{{ openshift_storage_glusterfs_registry_s3_pvc_size }}"
glusterfs_s3_meta_pvc: "{{ openshift_storage_glusterfs_registry_s3_meta_pvc }}"
glusterfs_s3_meta_pvc_size: "{{ openshift_storage_glusterfs_registry_s3_meta_pvc_size }}"
glusterfs_wipe: "{{ openshift_storage_glusterfs_registry_wipe | bool }}"
glusterfs_heketi_is_native: "{{ openshift_storage_glusterfs_registry_heketi_is_native | bool }}"
glusterfs_heketi_is_missing: "{{ openshift_storage_glusterfs_registry_heketi_is_missing | bool }}"
glusterfs_heketi_deploy_is_missing: "{{ openshift_storage_glusterfs_registry_heketi_deploy_is_missing | bool }}"
glusterfs_heketi_cli: "{{ openshift_storage_glusterfs_registry_heketi_cli }}"
glusterfs_heketi_image: "{{ openshift_storage_glusterfs_registry_heketi_image }}"
glusterfs_heketi_admin_key: "{{ openshift_storage_glusterfs_registry_heketi_admin_key }}"
glusterfs_heketi_user_key: "{{ openshift_storage_glusterfs_registry_heketi_user_key }}"
glusterfs_heketi_topology_load: "{{ openshift_storage_glusterfs_registry_heketi_topology_load | bool }}"
glusterfs_heketi_wipe: "{{ openshift_storage_glusterfs_registry_heketi_wipe | bool }}"
glusterfs_heketi_url: "{{ openshift_storage_glusterfs_registry_heketi_url }}"
glusterfs_heketi_port: "{{ openshift_storage_glusterfs_registry_heketi_port }}"
glusterfs_heketi_executor: "{{ openshift_storage_glusterfs_registry_heketi_executor }}"
glusterfs_heketi_ssh_port: "{{ openshift_storage_glusterfs_registry_heketi_ssh_port }}"
glusterfs_heketi_ssh_user: "{{ openshift_storage_glusterfs_registry_heketi_ssh_user }}"
glusterfs_heketi_ssh_sudo: "{{ openshift_storage_glusterfs_registry_heketi_ssh_sudo | bool }}"
glusterfs_heketi_ssh_keyfile: "{{ openshift_storage_glusterfs_registry_heketi_ssh_keyfile }}"
glusterfs_heketi_fstab: "{{ openshift_storage_glusterfs_registry_heketi_fstab }}"
glusterfs_nodes: "{% if groups.glusterfs_registry is defined and groups['glusterfs_registry'] | length > 0 %}{% set nodes = groups.glusterfs_registry %}{% elif 'groups.glusterfs' is defined and groups['glusterfs'] | length > 0 %}{% set nodes = groups.glusterfs %}{% else %}{% set nodes = '[]' %}{% endif %}{{ nodes }}"Appendix C. Templates
C.1. Glusterblock Provisioner Template
This section provides Glusterblock Provisioner Template.
---
kind: Template
apiVersion: v1
metadata:
name: glusterblock-provisioner
labels:
glusterfs: block-template
glusterblock: template
annotations:
description: glusterblock provisioner template
tags: glusterfs
objects:
- kind: ClusterRole
apiVersion: v1
metadata:
name: glusterblock-provisioner-runner
labels:
glusterfs: block-provisioner-runner-clusterrole
glusterblock: provisioner-runner-clusterrole
rules:
- apiGroups: [""]
resources: ["persistentvolumes"]
verbs: ["get", "list", "watch", "create", "delete"]
- apiGroups: [""]
resources: ["persistentvolumeclaims"]
verbs: ["get", "list", "watch", "update"]
- apiGroups: ["storage.k8s.io"]
resources: ["storageclasses"]
verbs: ["get", "list", "watch"]
- apiGroups: [""]
resources: ["events"]
verbs: ["list", "watch", "create", "update", "patch"]
- apiGroups: [""]
resources: ["services"]
verbs: ["get"]
- apiGroups: [""]
resources: ["secrets"]
verbs: ["get", "create", "delete"]
- apiGroups: [""]
resources: ["routes"]
verbs: ["get", "list"]
- apiGroups: [""]
resources: ["endpoints"]
verbs: ["get", "list", "watch", "create", "update", "patch"]
- apiVersion: v1
kind: ServiceAccount
metadata:
name: glusterblock-${CLUSTER_NAME}-provisioner
labels:
glusterfs: block-${CLUSTER_NAME}-provisioner-sa
glusterblock: ${CLUSTER_NAME}-provisioner-sa
- apiVersion: v1
kind: ClusterRoleBinding
metadata:
name: glusterblock-${CLUSTER_NAME}-provisioner
roleRef:
name: glusterblock-provisioner-runner
subjects:
- kind: ServiceAccount
name: glusterblock-${CLUSTER_NAME}-provisioner
namespace: ${NAMESPACE}
- kind: DeploymentConfig
apiVersion: v1
metadata:
name: glusterblock-${CLUSTER_NAME}-provisioner-dc
labels:
glusterfs: block-${CLUSTER_NAME}-provisioner-dc
glusterblock: ${CLUSTER_NAME}-provisioner-dc
annotations:
description: Defines how to deploy the glusterblock provisioner pod.
spec:
replicas: 1
selector:
glusterfs: block-${CLUSTER_NAME}-provisioner-pod
triggers:
- type: ConfigChange
strategy:
type: Recreate
template:
metadata:
name: glusterblock-provisioner
labels:
glusterfs: block-${CLUSTER_NAME}-provisioner-pod
spec:
serviceAccountName: glusterblock-${CLUSTER_NAME}-provisioner
containers:
- name: glusterblock-provisioner
image: ${IMAGE_NAME}
imagePullPolicy: IfNotPresent
env:
- name: PROVISIONER_NAME
value: gluster.org/glusterblock-${NAMESPACE}
parameters:
- name: IMAGE_NAME
displayName: glusterblock provisioner container image name
required: True
- name: NAMESPACE
displayName: glusterblock provisioner namespace
description: The namespace in which these resources are being created
required: True
- name: CLUSTER_NAME
displayName: GlusterFS cluster name
description: A unique name to identify which heketi service manages this cluster, useful for running multiple heketi instances
value: storageC.2. Sample Inventory File For Converged Mode Setup
This section provides Sample Inventory File For Converged Mode Setup.
[OSEv3:children]
masters
nodes
etcd
glusterfs
glusterfs_registry
[OSEv3:vars]
ansible_ssh_user=root
debug_level=5
os_update=false
install_method=rpm
install_update_docker=true
docker_storage_driver=devicemapper
container_runtime_docker_storage_setup_device=/dev/sdc
oreg_url=registry.access.redhat.com/openshift3/ose-${component}:v3.11
openshift_release=v3.11
openshift_docker_additional_registries=registry.access.redhat.com
openshift_docker_insecure_registries=registry.access.redhat.com
openshift_deployment_type=openshift-enterprise
openshift_web_console_install=true
openshift_enable_service_catalog=false
openshift_set_hostname=true
openshift_override_hostname_check=true
openshift_disable_check=docker_image_availability
openshift_check_min_host_disk_gb=2
openshift_check_min_host_memory_gb=1
openshift_portal_net=172.31.0.0/16
openshift_master_cluster_method=native
openshift_clock_enabled=true
openshift_hosted_router_selector="node-role.kubernetes.io/infra=true"
openshift_hosted_registry_selector="node-role.kubernetes.io/infra=true"
openshift_use_openshift_sdn=true
osm_use_cockpit=false
osm_cockpit_plugins=['cockpit-kubernetes']
openshift_master_dynamic_provisioning_enabled=true
# logging
openshift_logging_install_logging=true
openshift_logging_storage_kind=dynamic
openshift_logging_es_pvc_dynamic=true
openshift_logging_es_cluster_size=1
openshift_logging_kibana_nodeselector={"node-role.kubernetes.io/infra": "true"}
openshift_logging_curator_nodeselector={"node-role.kubernetes.io/infra": "true"}
openshift_logging_es_nodeselector={"node-role.kubernetes.io/infra": "true"}
openshift_logging_es_pvc_size=20Gi
openshift_logging_es_pvc_storage_class_name="glusterfs-registry-block"
# metrics
openshift_metrics_install_metrics=true
openshift_metrics_cassandra_storage_type=pv
openshift_metrics_hawkular_nodeselector={"node-role.kubernetes.io/infra": "true"}
openshift_metrics_cassandra_nodeselector={"node-role.kubernetes.io/infra": "true"}
openshift_metrics_heapster_nodeselector={"node-role.kubernetes.io/infra": "true"}
openshift_metrics_storage_volume_size=20Gi
openshift_metrics_cassandra_pvc_storage_class_name="glusterfs-registry-block"
# glusterfs
openshift_storage_glusterfs_timeout=900
openshift_storage_glusterfs_namespace=glusterfs
openshift_storage_glusterfs_storageclass=true
openshift_storage_glusterfs_storageclass_default=false
openshift_storage_glusterfs_block_storageclass=true
openshift_storage_glusterfs_block_storageclass_default=false
openshift_storage_glusterfs_block_deploy=true
openshift_storage_glusterfs_block_host_vol_create=true
openshift_storage_glusterfs_block_host_vol_size=100
# glusterfs_registry
openshift_storage_glusterfs_registry_namespace=glusterfs-registry
openshift_storage_glusterfs_registry_storageclass=true
openshift_storage_glusterfs_registry_storageclass_default=false
openshift_storage_glusterfs_registry_block_storageclass=true
openshift_storage_glusterfs_registry_block_storageclass_default=false
openshift_storage_glusterfs_registry_block_deploy=true
openshift_storage_glusterfs_registry_block_host_vol_create=true
openshift_storage_glusterfs_registry_block_host_vol_size=100
# glusterfs_registry_storage
openshift_hosted_registry_storage_kind=glusterfs
openshift_hosted_registry_storage_volume_size=20Gi
openshift_storage_glusterfs_heketi_admin_key='<adminkey>'
openshift_storage_glusterfs_heketi_user_key='<heketiuserkey>'
openshift_storage_glusterfs_image='registry.redhat.io/rhgs3/rhgs-server-rhel7:v3.11.x'
openshift_storage_glusterfs_heketi_image='registry.redhat.io/rhgs3/rhgs-volmanager-rhel7:v3.11.x'
openshift_storage_glusterfs_block_image='registry.redhat.io/rhgs3/rhgs-gluster-block-prov-rhel7:v3.11.x'
openshift_master_cluster_hostname=node101.redhat.com
openshift_master_cluster_public_hostname=node101.redhat.com
[masters]
node101.redhat.com
[etcd]
node101.redhat.com
[nodes]
node101.redhat.com openshift_node_group_name="node-config-master"
node102.redhat.com openshift_node_group_name="node-config-infra"
node103.redhat.com openshift_node_group_name="node-config-compute"
node104.redhat.com openshift_node_group_name="node-config-compute"
node105.redhat.com openshift_node_group_name="node-config-compute"
node106.redhat.com openshift_node_group_name="node-config-compute"
node107.redhat.com openshift_node_group_name="node-config-compute"
node108.redhat.com openshift_node_group_name="node-config-compute"
[glusterfs]
node103.redhat.com glusterfs_zone=1 glusterfs_devices='["/dev/sdb"]' glusterfs_cluster=1
node104.redhat.com glusterfs_zone=2 glusterfs_devices='["/dev/sdb"]' glusterfs_cluster=1
node105.redhat.com glusterfs_zone=3 glusterfs_devices='["/dev/sdb"]' glusterfs_cluster=1
[glusterfs_registry]
node106.redhat.com glusterfs_zone=1 glusterfs_devices='["/dev/sdb"]' glusterfs_cluster=1
node107.redhat.com glusterfs_zone=2 glusterfs_devices='["/dev/sdb"]' glusterfs_cluster=1
node108.redhat.com glusterfs_zone=3 glusterfs_devices='["/dev/sdb"]' glusterfs_cluster=1C.3. Sample Inventory File For Independent Mode Setup
This section provides Sample Inventory File For Independent Mode Setup.
[OSEv3:children]
masters
nodes
etcd
glusterfs
glusterfs_registry
[OSEv3:vars]
ansible_ssh_user=root
debug_level=5
os_update=false
install_method=rpm
install_update_docker=true
docker_storage_driver=devicemapper
container_runtime_docker_storage_setup_device=/dev/sdc
oreg_url=registry.access.redhat.com/openshift3/ose-${component}:v3.11
openshift_release=v3.11
openshift_docker_additional_registries=registry.access.redhat.com
openshift_docker_insecure_registries=registry.access.redhat.com
openshift_deployment_type=openshift-enterprise
openshift_web_console_install=true
openshift_enable_service_catalog=false
openshift_set_hostname=true
openshift_override_hostname_check=true
openshift_disable_check=docker_image_availability
openshift_check_min_host_disk_gb=2
openshift_check_min_host_memory_gb=1
openshift_portal_net=172.31.0.0/16
openshift_master_cluster_method=native
openshift_clock_enabled=true
openshift_hosted_router_selector="node-role.kubernetes.io/infra=true"
openshift_hosted_registry_selector="node-role.kubernetes.io/infra=true"
openshift_use_openshift_sdn=true
osm_use_cockpit=false
osm_cockpit_plugins=['cockpit-kubernetes']
openshift_master_dynamic_provisioning_enabled=true
# logging
openshift_logging_install_logging=true
openshift_logging_storage_kind=dynamic
openshift_logging_es_pvc_dynamic=true
openshift_logging_es_cluster_size=1
openshift_logging_kibana_nodeselector={"node-role.kubernetes.io/infra": "true"}
openshift_logging_curator_nodeselector={"node-role.kubernetes.io/infra": "true"}
openshift_logging_es_nodeselector={"node-role.kubernetes.io/infra": "true"}
openshift_logging_es_pvc_size=20Gi
openshift_logging_es_pvc_storage_class_name="glusterfs-registry-block"
# metrics
openshift_metrics_install_metrics=true
openshift_metrics_cassandra_storage_type=pv
openshift_metrics_hawkular_nodeselector={"node-role.kubernetes.io/infra": "true"}
openshift_metrics_cassandra_nodeselector={"node-role.kubernetes.io/infra": "true"}
openshift_metrics_heapster_nodeselector={"node-role.kubernetes.io/infra": "true"}
openshift_metrics_storage_volume_size=20Gi
openshift_metrics_cassandra_pvc_storage_class_name="glusterfs-registry-block"
# glusterfs
openshift_storage_glusterfs_timeout=900
openshift_storage_glusterfs_namespace=glusterfs
openshift_storage_glusterfs_storageclass=true
openshift_storage_glusterfs_storageclass_default=false
openshift_storage_glusterfs_block_storageclass=true
openshift_storage_glusterfs_block_storageclass_default=false
openshift_storage_glusterfs_block_deploy=true
openshift_storage_glusterfs_block_host_vol_create=true
openshift_storage_glusterfs_block_host_vol_size=100
openshift_storage_glusterfs_is_native=false
openshift_storage_glusterfs_heketi_is_native=true
openshift_storage_glusterfs_heketi_executor=ssh
openshift_storage_glusterfs_heketi_ssh_port=22
openshift_storage_glusterfs_heketi_ssh_user=root
openshift_storage_glusterfs_heketi_ssh_sudo=false
openshift_storage_glusterfs_heketi_ssh_keyfile="/root/.ssh/id_rsa"
# glusterfs_registry
openshift_storage_glusterfs_registry_namespace=glusterfs-registry
openshift_storage_glusterfs_registry_storageclass=true
openshift_storage_glusterfs_registry_storageclass_default=false
openshift_storage_glusterfs_registry_block_storageclass=true
openshift_storage_glusterfs_registry_block_storageclass_default=false
openshift_storage_glusterfs_registry_block_deploy=true
openshift_storage_glusterfs_registry_block_host_vol_create=true
openshift_storage_glusterfs_registry_block_host_vol_size=100
openshift_storage_glusterfs_registry_is_native=false
openshift_storage_glusterfs_registry_heketi_is_native=true
openshift_storage_glusterfs_registry_heketi_executor=ssh
openshift_storage_glusterfs_registry_heketi_ssh_port=22
openshift_storage_glusterfs_registry_heketi_ssh_user=root
openshift_storage_glusterfs_registry_heketi_ssh_sudo=false
openshift_storage_glusterfs_registry_heketi_ssh_keyfile="/root/.ssh/id_rsa"
# glusterfs_registry_storage
openshift_hosted_registry_storage_kind=glusterfs
openshift_hosted_registry_storage_volume_size=20Gi
openshift_storage_glusterfs_heketi_admin_key='adminkey'
openshift_storage_glusterfs_heketi_user_key='heketiuserkey'
openshift_storage_glusterfs_heketi_image='registry.redhat.io/rhgs3/rhgs-volmanager-rhel7:v3.11.x'
openshift_storage_glusterfs_block_image='registry.redhat.io/rhgs3/rhgs-gluster-block-prov-rhel7:v3.11.x'
openshift_master_cluster_hostname=node101.redhat.com
openshift_master_cluster_public_hostname=node101.redhat.com
[masters]
node101.redhat.com
[etcd]
node101.redhat.com
[nodes]
node101.redhat.com openshift_node_group_name="node-config-master"
node102.redhat.com openshift_node_group_name="node-config-infra"
node103.redhat.com openshift_node_group_name="node-config-compute"
node104.redhat.com openshift_node_group_name="node-config-compute"
[glusterfs]
node105.redhat.com glusterfs_zone=1 glusterfs_devices='["/dev/sdb"]' glusterfs_cluster=1 glusterfs_ip=node105_ip
node106.redhat.com glusterfs_zone=2 glusterfs_devices='["/dev/sdb"]' glusterfs_cluster=1 glusterfs_ip=node106_ip
node107.redhat.com glusterfs_zone=3 glusterfs_devices='["/dev/sdb"]' glusterfs_cluster=1 glusterfs_ip=node107_ip
[glusterfs_registry]
node108.redhat.com glusterfs_zone=1 glusterfs_devices='["/dev/sdb"]' glusterfs_cluster=1 glusterfs_ip=node108_ip
node109.redhat.com glusterfs_zone=2 glusterfs_devices='["/dev/sdb"]' glusterfs_cluster=1 glusterfs_ip=node109_ip
node110.redhat.com glusterfs_zone=3 glusterfs_devices='["/dev/sdb"]' glusterfs_cluster=1 glusterfs_ip=node110_ip