Deploying OpenShift Container Storage using bare metal infrastructure
How to install and set up your bare metal environment
Abstract
Preface
Red Hat OpenShift Container Storage 4.5 supports deployment on existing Red Hat OpenShift Container Platform (OCP) bare metal clusters in connected or disconnected environments along with out-of-the-box support for proxy environments.
Both internal and external Openshift Container Storage clusters are supported on bare metal. See Planning your deployment for more information about deployment requirements.
To deploy OpenShift Container Storage, follow the appropriate deployment process for your environment:
Internal mode
- External mode
Chapter 1. Deploying using local storage devices
Deploying OpenShift Container Storage on OpenShift Container Platform using local storage devices provides you with the option to create internal cluster resources. This will result in the internal provisioning of the base services, which helps to make additional storage classes available to applications.
Use this section to deploy OpenShift Container Storage on bare metal infrastructure where OpenShift Container Platform is already installed.
To deploy Red Hat OpenShift Container Storage using local storage, follow these steps:
- Understand the requirements for installing OpenShift Container Storage using local storage devices.
For Red Hat Enterprise Linux based hosts, enabling file system access for containers on Red Hat Enterprise Linux based nodes.
NoteSkip this step for Red Hat Enterprise Linux CoreOS (RHCOS).
- Install the Red Hat OpenShift Container Storage Operator.
- Install Local Storage Operator.
- Find the available storage devices.
- Creating OpenShift Container Storage cluster service on bare metal.
1.1. Requirements for installing OpenShift Container Storage using local storage devices
You must have at least three OpenShift Container Platform worker nodes in the cluster with locally attached storage devices on each of them.
- Each of the three selected nodes must have at least one raw block device available to be used by OpenShift Container Storage.
- For minimum starting node requirements, see Resource requirements section in Planning guide.
- The devices to be used must be empty, that is, there should be no PVs, VGs, or LVs remaining on the disks.
You must have a minimum of three labeled nodes.
- It is recommended that the worker nodes are spread across three different physical nodes, racks or failure domains for high availability.
Each node that has local storage devices to be used by OpenShift Container Storage must have a specific label to deploy OpenShift Container Storage pods. To label the nodes, use the following command:
$ oc label nodes <NodeNames> cluster.ocs.openshift.io/openshift-storage=''
- There should not be any storage providers managing locally mounted storage on the storage nodes that would conflict with the use of Local Storage Operator for Red Hat OpenShift Container Storage.
- The Local Storage Operator version must match the Red Hat OpenShift Container Platform version in order to have the Local Storage Operator fully supported with Red Hat OpenShift Container Storage. The Local Storage Operator does not get upgraded when Red Hat OpenShift Container Platform is upgraded.
1.2. Enabling file system access for containers on Red Hat Enterprise Linux based nodes
Deploying OpenShift Container Platform on a Red Hat Enterprise Linux base in a user provisioned infrastructure (UPI) does not automatically provide container access to the underlying Ceph file system.
This process is not necessary for hosts based on Red Hat Enterprise Linux CoreOS.
Procedure
Perform the following steps on each node in your cluster.
- Log in to the Red Hat Enterprise Linux based node and open a terminal.
Verify that the node has access to the rhel-7-server-extras-rpms repository.
# subscription-manager repos --list-enabled | grep rhel-7-serverIf you do not see both
rhel-7-server-rpmsandrhel-7-server-extras-rpmsin the output, or if there is no output, run the following commands to enable each repository.# subscription-manager repos --enable=rhel-7-server-rpms # subscription-manager repos --enable=rhel-7-server-extras-rpmsInstall the required packages.
# yum install -y policycoreutils container-selinuxPersistently enable container use of the Ceph file system in SELinux.
# setsebool -P container_use_cephfs on
1.3. Installing Red Hat OpenShift Container Storage Operator
You can install Red Hat OpenShift Container Storage Operator using the Red Hat OpenShift Container Platform Operator Hub. For information about the hardware and software requirements, see Planning your deployment.
Prerequisites
- You must be logged into the OpenShift Container Platform cluster.
- You must have at least three worker nodes in the OpenShift Container Platform cluster.
When you need to override the cluster-wide default node selector for OpenShift Container Storage, you can use the following command in command line interface to specify a blank node selector for the openshift-storage namespace:
$ oc annotate namespace openshift-storage openshift.io/node-selector=Procedure
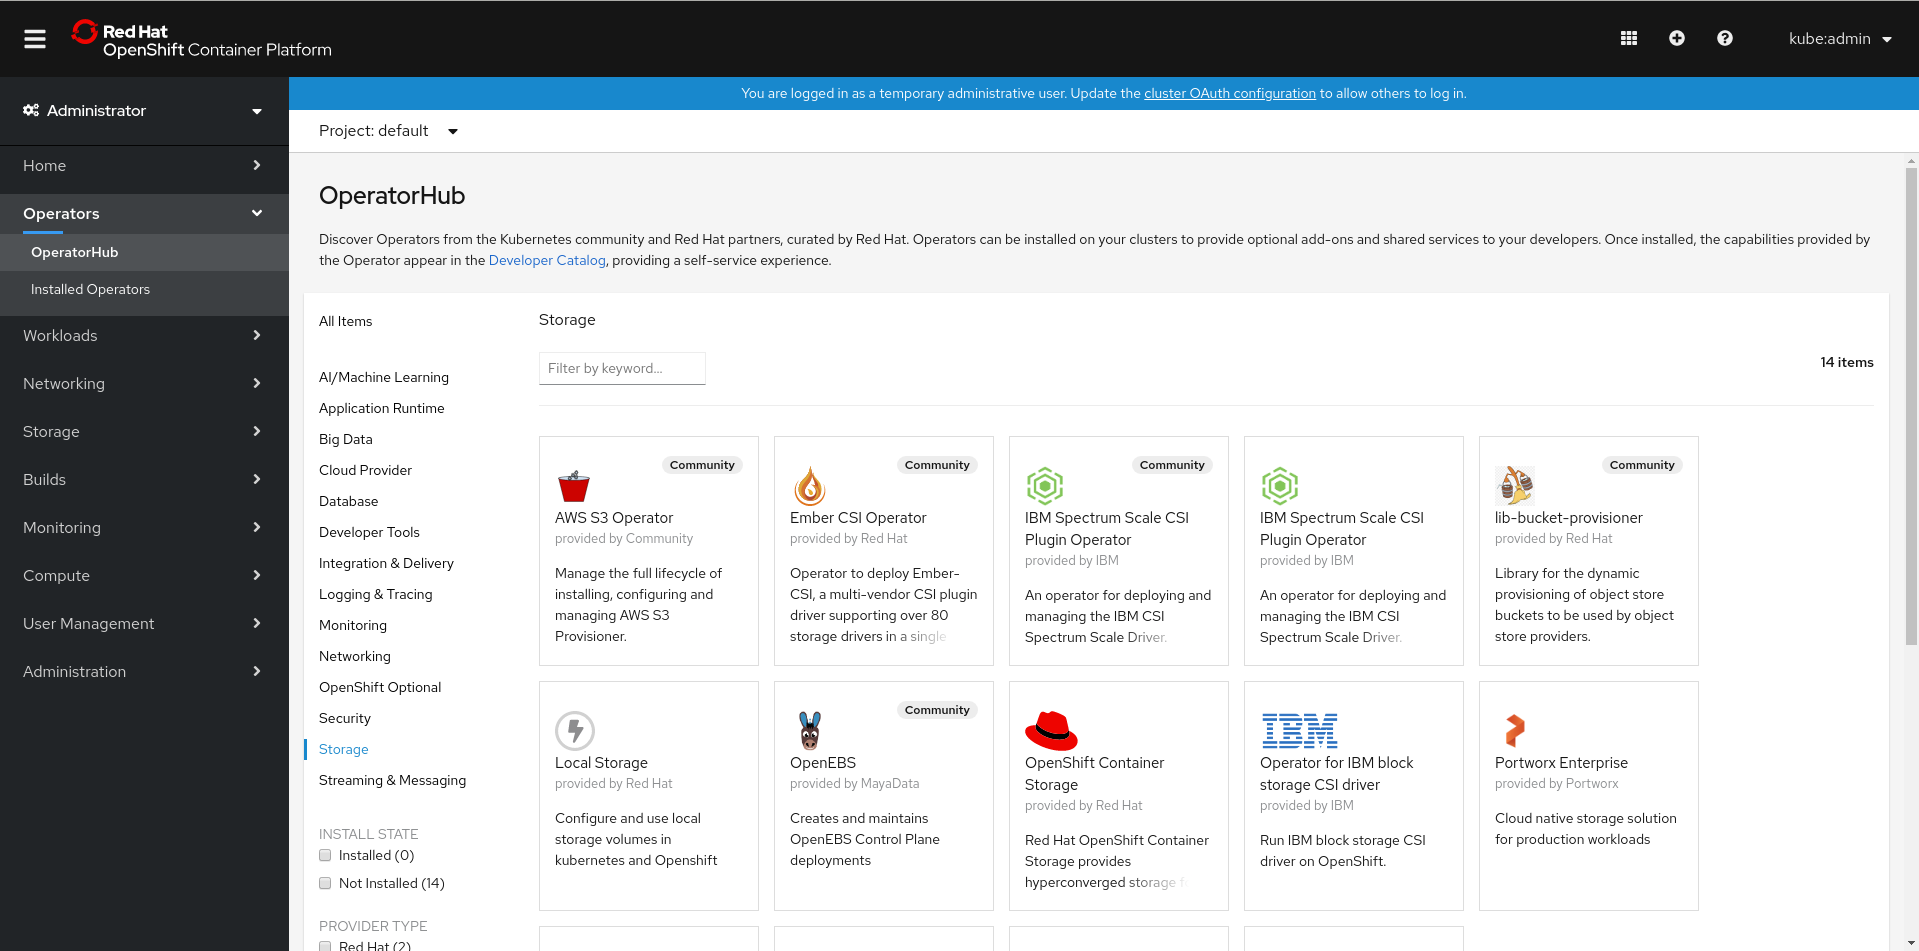
Click Operators → OperatorHub in the left pane of the OpenShift Web Console.
Figure 1.1. List of operators in the Operator Hub
Click on OpenShift Container Storage.
You can use the Filter by keyword text box or the filter list to search for OpenShift Container Storage from the list of operators.
- On the OpenShift Container Storage operator page, click Install.
On the Install Operator page, ensure the following options are selected:
- Update Channel as stable-4.5
- Installation Mode as A specific namespace on the cluster
-
Installed Namespace as Operator recommended namespace PR openshift-storage. If Namespace
openshift-storagedoes not exist, it will be created during the operator installation. Select Approval Strategy as Automatic or Manual. Approval Strategy is set to Automatic by default.
Approval Strategy as Automatic.
NoteWhen you select the Approval Strategy as Automatic, approval is not required either during fresh installation or when updating to the latest version of OpenShift Container Storage.
- Click Install
- Wait for the install to initiate. This may take up to 20 minutes.
- Click Operators → Installed Operators
-
Ensure the Project is
openshift-storage. By default, the Project isopenshift-storage. - Wait for the Status of OpenShift Container Storage to change to Succeeded.
Approval Strategy as Manual.
NoteWhen you select the Approval Strategy as Manual, approval is required during fresh installation or when updating to the latest version of OpenShift Container Storage.
- Click Install.
- On the Installed Operators page, click ocs-operator.
- On the Subscription Details page, click the Install Plan link.
- On the InstallPlan Details page, click Preview Install Plan.
- Review the install plan and click Approve.
- Wait for the Status of the Components to change from Unknown to either Created or Present.
- Click Operators → Installed Operators
-
Ensure the Project is
openshift-storage. By default, the Project isopenshift-storage. - Wait for the Status of OpenShift Container Storage to change to Succeeded.
Verification steps
- Verify that OpenShift Container Storage Operator shows the Status as Succeeded on the Installed Operators dashboard.
1.4. Installing Local Storage Operator
Use this procedure to install the Local Storage Operator from the Operator Hub before creating OpenShift Container Storage clusters on local storage devices.
Prerequisites
Create a namespace called
local-storageas follows:- Click Administration → Namespaces in the left pane of the OpenShift Web Console.
- Click Create Namespace.
-
In the Create Namespace dialog box, enter
local-storagefor Name. - Select No restrictions option for Default Network Policy.
- Click Create.
Procedure
- Click Operators → OperatorHub in the left pane of the OpenShift Web Console.
- Search for Local Storage Operator from the list of operators and click on it.
Click Install.
Figure 1.2. Install Operator page

On the Install Operator page, ensure the following options are selected
- Update Channel as stable-4.5
- Installation Mode as A specific namespace on the cluster
- Installed Namespace as local-storage.
- Approval Strategy as Automatic
- Click Install.
-
Verify that the Local Storage Operator shows the Status as
Succeeded.
1.5. Finding available storage devices
Use this procedure to identify the device names for each of the three or more worker nodes that you have labeled with the OpenShift Container Storage label cluster.ocs.openshift.io/openshift-storage='' before creating PVs for bare metal.
Procedure
List and verify the name of the worker nodes with the OpenShift Container Storage label.
$ oc get nodes -l cluster.ocs.openshift.io/openshift-storage=Example output:
NAME          STATUS   ROLES    AGE     VERSION
bmworker01    Ready    worker   6h45m   v1.16.2
bmworker02    Ready    worker   6h45m   v1.16.2
bmworker03    Ready    worker   6h45m   v1.16.2
Log in to each worker node that is used for OpenShift Container Storage resources and find the unique
by-iddevice name for each available raw block device.$ oc debug node/<Nodename>Example output:
$ oc debug node/bmworker01
Starting pod/bmworker01-debug ...
To use host binaries, run `chroot /host`
Pod IP: 10.0.135.71
If you don't see a command prompt, try pressing enter.
sh-4.2# chroot /host
sh-4.4# lsblk
NAME                         MAJ:MIN RM   SIZE RO TYPE MOUNTPOINT
xvda                         202:0    0   120G  0 disk
|-xvda1                      202:1    0   384M  0 part /boot
|-xvda2                      202:2    0   127M  0 part /boot/efi
|-xvda3                      202:3    0     1M  0 part
`-xvda4                      202:4    0 119.5G  0 part
  `-coreos-luks-root-nocrypt 253:0    0 119.5G  0 dm   /sysroot
nvme0n1                      259:0    0   931G  0 disk
In this example, for
bmworker01, the available local device isnvme0n1.Identify the unique ID for each of the devices selected in Step 2.
sh-4.4#  ls -l /dev/disk/by-id/ | grep nvme0n1
lrwxrwxrwx. 1 root root 13 Mar 17 16:24 nvme-INTEL_SSDPE2KX010T7_PHLF733402LM1P0GGN -> ../../nvme0n1
In the above example, the ID for the local device
nvme0n1nvme-INTEL_SSDPE2KX010T7_PHLF733402LM1P0GGN- Repeat the above step to identify the device ID for all the other nodes that have the storage devices to be used by OpenShift Container Storage. See this Knowledge Base article for more details.
1.6. Creating OpenShift Container Storage cluster on bare metal
Prerequisites
- Ensure that all the requirements in the Requirements for installing OpenShift Container Storage using local storage devices section are met.
- You must have three worker nodes with the same storage type and size attached to each node (for example, 2TB NVMe hard drive) to use local storage devices on bare metal.
Verify your OpenShift Container Platform worker nodes are labeled for OpenShift Container Storage:
$ oc get nodes -l cluster.ocs.openshift.io/openshift-storage -o jsonpath='{range .items[*]}{.metadata.name}{"\n"}'
To identify storage devices on each node, refer to Finding available storage devices.
Procedure
Create the
LocalVolumeCR for block PVs.Example of
LocalVolumeCRlocal-storage-block.yamlusing OCS label as node selector.apiVersion: local.storage.openshift.io/v1 kind: LocalVolume metadata: name: local-block namespace: local-storage labels: app: ocs-storagecluster spec: nodeSelector: nodeSelectorTerms: - matchExpressions: - key: cluster.ocs.openshift.io/openshift-storage operator: In values: - "" storageClassDevices: - storageClassName: localblock volumeMode: Block devicePaths: - /dev/disk/by-id/nvme-INTEL_SSDPEKKA128G7_BTPY81260978128A # <-- modify this line - /dev/disk/by-id/nvme-INTEL_SSDPEKKA128G7_BTPY80440W5U128A # <-- modify this line - /dev/disk/by-id/nvme-INTEL_SSDPEKKA128G7_BTPYB85AABDE128A # <-- modify this lineCreate the
LocalVolumeCR for block PVs.$ oc create -f local-storage-block.yamlCheck if the pods are created.
Example output:
NAME                                    READY
local-block-local-diskmaker-cmfql       1/1
local-block-local-diskmaker-g6fzr       1/1
local-block-local-diskmaker-jkqxt       1/1
local-block-local-provisioner-jgqcc     1/1
local-block-local-provisioner-mx49d     1/1
local-block-local-provisioner-qbcvp     1/1
local-storage-operator-54bc7566c6-ddbrt 1/1

STATUS  RESTARTS AGE
Running 0        31s
Running 0        31s
Running 0        31s
Running 0        31s
Running 0        31s
Running 0        31s
Running 0        12m
Check if the PVs are created.
$ oc get pvExample output:
NAME                CAPACITY   ACCESS MODES   RECLAIM POLICY
local-pv-150fdc87   931Gi      RWO            Delete
local-pv-183bfc0a   931Gi      RWO            Delete
local-pv-b2f5cb25   931Gi      RWO            Delete

STATUS      CLAIM   STORAGECLASS   REASON   AGE
Available           localblock              2m11s
Available           localblock              2m15s
Available           localblock              2m21s
Check for the new
localblockStorageClass.$ oc get sc|egrep -e "localblock|NAME"Example output:
NAME       PROVISIONER                  RECLAIMPOLICY
localblock kubernetes.io/no-provisioner Delete

VOLUMEBINDINGMODE    ALLOWVOLUMEEXPANSION AGE
WaitForFirstConsumer false                4d23h
Create the OpenShift Container Storage Cluster Service that uses the
localblockStorage Class.- Log into the OpenShift Web Console.
- Click Operators → Installed Operators from the OpenShift Web Console to view the installed operators. Ensure that the Project selected is openshift-storage.
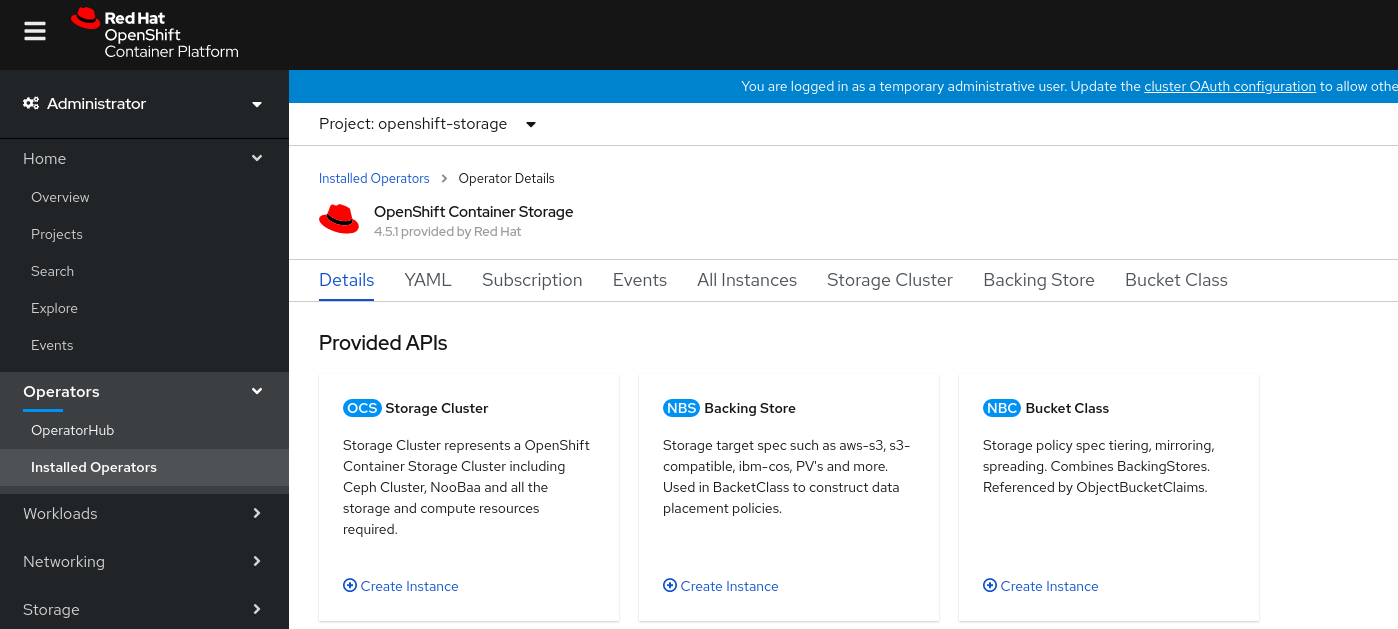
On the Installed Operators page, click Openshift Container Storage.
Figure 1.3. OpenShift Container Storage Operator page

On the Installed Operators → Operator Details page, perform either of the following to create a Storage Cluster Service.
On the Details tab → Provided APIs → OCS Storage Cluster, click Create Instance.
Figure 1.4. Operator Details Page
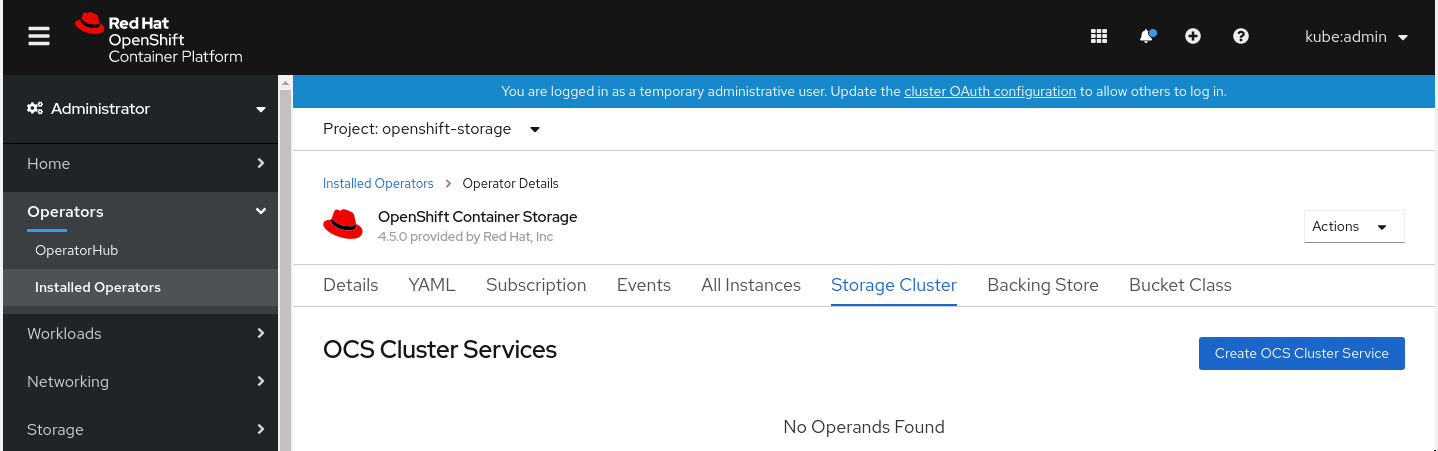
Alternatively, select the Storage cluster tab and click Create OCS Cluster Service.
Figure 1.5. Storage Cluster tab
On the Create Storage Cluster page, ensure that the following options are selected:
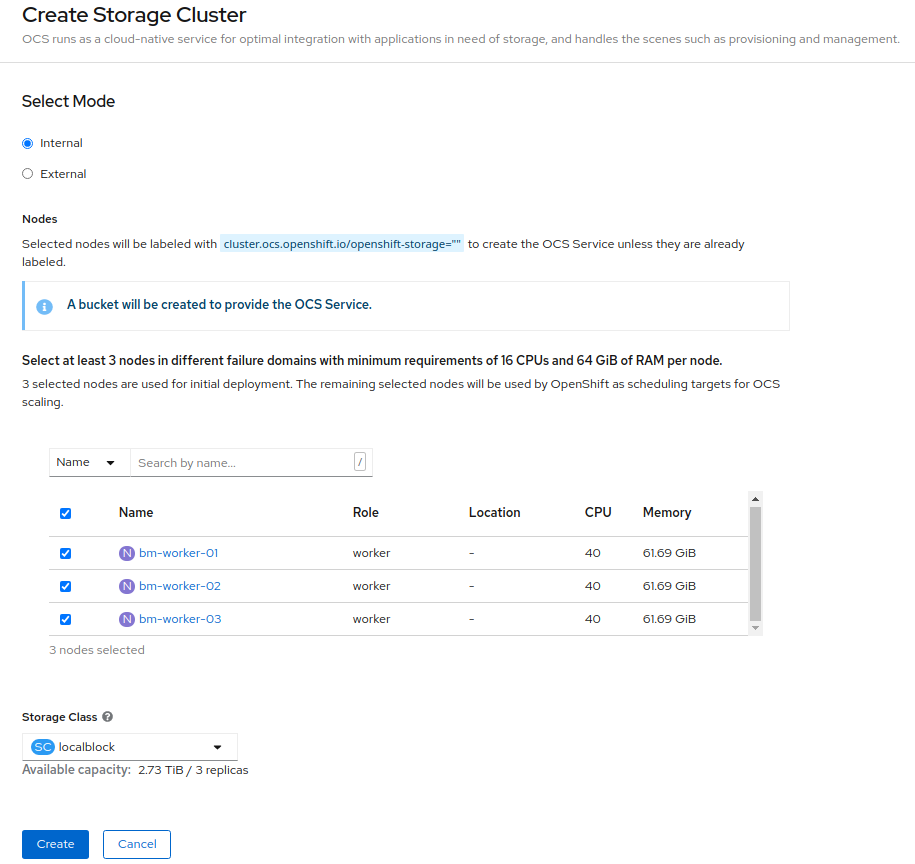
- Leave Select Mode as Internal.
In the Nodes section, for the use of OpenShift Container Storage service, select a minimum of three or a multiple of three worker nodes from the available list.
It is recommended that the worker nodes are spread across three different physical nodes, racks or failure domains for high availability.
NoteTo find specific worker nodes in the cluster, you can filter nodes on the basis of Name or Label.
- Name allows you to search by name of the node
- Label allows you to search by selecting the predefined label
- Ensure OpenShift Container Storage rack labels are aligned with physical racks in the datacenter to prevent a double node failure at the failure domain level.
For minimum starting node requirements, see Resource requirements section in Planning guide.
- Select localblock from the Storage Class dropdown list.
Click Create.
NoteThe Create button is enabled only after selecting a minimum of three worker nodes.
Upon successful deployment, a storage cluster with three storage devices gets created. These devices get distributed across three of the selected nodes. The configuration uses a replication factor of 3. To scale the initial cluster, see Scaling storage nodes.
Verification steps
See Verifying your OpenShift Container Storage installation.
Chapter 2. Verifying OpenShift Container Storage deployment for internal mode
Use this section to verify that OpenShift Container Storage is deployed correctly.
2.1. Verifying the state of the pods
To determine if OpenShift Container storage is deployed successfully, you can verify that the pods are in Running state.
Procedure
- Click Workloads → Pods from the left pane of the OpenShift Web Console.
Select openshift-storage from the Project drop down list.
For more information on the expected number of pods for each component and how it varies depending on the number of nodes, see Table 2.1, “Pods corresponding to OpenShift Container storage cluster”.
Verify that the following pods are in running and completed state by clicking on the Running and the Completed tabs:
Expand Table 2.1. Pods corresponding to OpenShift Container storage cluster Component Corresponding pods OpenShift Container Storage Operator
ocs-operator-*(1 pod on any worker node)
Rook-ceph Operator
rook-ceph-operator-*(1 pod on any worker node)
Multicloud Object Gateway
-
noobaa-operator-*(1 pod on any worker node) -
noobaa-core-*(1 pod on any storage node) -
nooba-db-*(1 pod on any storage node) -
noobaa-endpoint-*(1 pod on any storage node)
MON
rook-ceph-mon-*(3 pods distributed across storage nodes)
MGR
rook-ceph-mgr-*(1 pod on any storage node)
MDS
rook-ceph-mds-ocs-storagecluster-cephfilesystem-*(2 pods distributed across storage nodes)
RGW
rook-ceph-rgw-ocs-storagecluster-cephobjectstore-*(2 pods distributed across storage nodes)CSI
cephfs-
csi-cephfsplugin-*(1 pod on each worker node) -
csi-cephfsplugin-provisioner-*(2 pods distributed across storage nodes)
-
rbd-
csi-rbdplugin-*(1 pod on each worker node) -
csi-rbdplugin-provisioner-*(2 pods distributed across storage nodes)
-
rook-ceph-drain-canary
rook-ceph-drain-canary-*(1 pod on each storage node)
rook-ceph-crashcollector
rook-ceph-crashcollector-*(1 pod on each storage node)
OSD
-
rook-ceph-osd-*(1 pod for each device) -
rook-ceph-osd-prepare-ocs-deviceset-*(1 pod for each device)
-
2.2. Verifying the OpenShift Container Storage cluster is healthy
You can verify health of OpenShift Container Storage cluster using the persistent storage dashboard. For more information, see Monitoring OpenShift Container Storage.
- Click Home → Overview from the left pane of the OpenShift Web Console and click Persistent Storage tab.
In the Status card, verify that OCS Cluster has a green tick mark as shown in the following image:
Figure 2.1. Health status card in Persistent Storage Overview Dashboard

In the Details card, verify that the cluster information is displayed appropriately as follows:
Figure 2.2. Details card in Persistent Storage Overview Dashboard

2.3. Verifying the Multicloud Object Gateway is healthy
You can verify the health of the OpenShift Container Storage cluster using the object service dashboard. For more information, see Monitoring OpenShift Container Storage.
- Click Home → Overview from the left pane of the OpenShift Web Console and click the Object Service tab.
In the Status card, verify that the Multicloud Object Gateway (MCG) storage displays a green tick icon as shown in following image:
Figure 2.3. Health status card in Object Service Overview Dashboard

In the Details card, verify that the MCG information is displayed appropriately as follows:
Figure 2.4. Details card in Object Service Overview Dashboard

2.4. Verifying that the OpenShift Container Storage specific storage classes exist
To verify the storage classes exists in the cluster:
- Click Storage → Storage Classes from the left pane of the OpenShift Web Console.
Verify that the following storage classes are created with the OpenShift Container Storage cluster creation:
-
ocs-storagecluster-ceph-rbd -
ocs-storagecluster-cephfs -
openshift-storage.noobaa.io -
ocs-storagecluster-ceph-rgw
-
Chapter 3. Uninstalling OpenShift Container Storage
3.1. Uninstalling OpenShift Container Storage on Internal mode
Use the steps in this section to uninstall OpenShift Container Storage instead of the Uninstall option from the user interface.
Prerequisites
- Make sure that the OpenShift Container Storage cluster is in a healthy state. The deletion might fail if some of the pods are not terminated successfully due to insufficient resources or nodes. In case the cluster is in an unhealthy state, you should contact Red Hat Customer Support before uninstalling OpenShift Container Storage.
- Make sure that applications are not consuming persistent volume claims (PVCs) or object bucket claims (OBCs) using the storage classes provided by OpenShift Container Storage. PVCs and OBCs will be deleted during the uninstall process.
Procedure
Query for PVCs and OBCs that use the OpenShift Container Storage based storage class provisioners.
For example :
$ oc get pvc -o=jsonpath='{range .items[?(@.spec.storageClassName=="ocs-storagecluster-ceph-rbd")]}{"Name: "}{@.metadata.name}{" Namespace: "}{@.metadata.namespace}{" Labels: "}{@.metadata.labels}{"\n"}{end}' --all-namespaces|awk '! ( /Namespace: openshift-storage/ && /app:noobaa/ )' | grep -v noobaa-default-backing-store-noobaa-pvc$ oc get pvc -o=jsonpath='{range .items[?(@.spec.storageClassName=="ocs-storagecluster-cephfs")]}{"Name: "}{@.metadata.name}{" Namespace: "}{@.metadata.namespace}{"\n"}{end}' --all-namespaces$ oc get obc -o=jsonpath='{range .items[?(@.spec.storageClassName=="ocs-storagecluster-ceph-rgw")]}{"Name: "}{@.metadata.name}{" Namespace: "}{@.metadata.namespace}{"\n"}{end}' --all-namespaces$ oc get obc -o=jsonpath='{range .items[?(@.spec.storageClassName=="openshift-storage.noobaa.io")]}{"Name: "}{@.metadata.name}{" Namespace: "}{@.metadata.namespace}{"\n"}{end}' --all-namespacesFollow these instructions to ensure that the PVCs and OBCs listed in the previous step are deleted.
If you have created PVCs as a part of configuring the monitoring stack, cluster logging operator, or image registry, then you must perform the clean up steps provided in the following sections as required:
- Section 3.2, “Removing monitoring stack from OpenShift Container Storage”
- Section 3.3, “Removing OpenShift Container Platform registry from OpenShift Container Storage”
Section 3.4, “Removing the cluster logging operator from OpenShift Container Storage”
For each of the remaining PVCs or OBCs, follow the steps mentioned below :
- Determine the pod that is consuming the PVC or OBC.
Identify the controlling API object such as a
Deployment,StatefulSet,DaemonSet,Job, or a custom controller.Each API object has a metadata field known as
OwnerReference. This is a list of associated objects. TheOwnerReferencewith thecontrollerfield set to true will point to controlling objects such asReplicaSet,StatefulSet,DaemonSetand so on.Ensure that the API object is not consuming PVC or OBC provided by OpenShift Container Storage. Either the object should be deleted or the storage should be replaced. Ask the owner of the project to make sure that it is safe to delete or modify the object.
NoteYou can ignore the
noobaapods.Delete the OBCs.
$ oc delete obc <obc name> -n <project name>Delete any custom Bucket Class you have created.
$ oc get bucketclass -A | grep -v noobaa-default-bucket-class$ oc delete bucketclass <bucketclass name> -n <project-name>If you have created any custom Multi Cloud Gateway backingstores, delete them.
List and note the backingstores.
for bs in $(oc get backingstore -o name -n openshift-storage | grep -v noobaa-default-backing-store); do echo "Found backingstore $bs"; echo "Its has the following pods running :"; echo "$(oc get pods -o name -n openshift-storage | grep $(echo ${bs} | cut -f2 -d/))"; doneDelete each of the backingstores listed above and confirm that the dependent resources also get deleted.
for bs in $(oc get backingstore -o name -n openshift-storage | grep -v noobaa-default-backing-store); do echo "Deleting Backingstore $bs"; oc delete -n openshift-storage $bs; doneIf any of the backingstores listed above were based on the pv-pool, ensure that the corresponding pod and PVC are also deleted.
$ oc get pods -n openshift-storage | grep noobaa-pod | grep -v noobaa-default-backing-store-noobaa-pod$ oc get pvc -n openshift-storage --no-headers | grep -v noobaa-db | grep noobaa-pvc | grep -v noobaa-default-backing-store-noobaa-pvc
Delete the remaining PVCs listed in Step 1.
$ oc delete pvc <pvc name> -n <project-name>
List and note the backing local volume objects. If there are no results, skip steps 7 and 8.
$ for sc in $(oc get storageclass|grep 'kubernetes.io/no-provisioner' |grep -E $(oc get storagecluster -n openshift-storage -o jsonpath='{ .items[*].spec.storageDeviceSets[*].dataPVCTemplate.spec.storageClassName}' | sed 's/ /|/g')| awk '{ print $1 }');
do
    echo -n "StorageClass: $sc ";
    oc get storageclass $sc -o jsonpath=" { 'LocalVolume: ' }{ .metadata.labels['local\.storage\.openshift\.io/owner-name'] } { '\n' }";
done
Example output:
StorageClass: localblock LocalVolume: local-blockDelete the
StorageClusterobject and wait for the removal of the associated resources.$ oc delete -n openshift-storage storagecluster --all --wait=trueDelete the namespace and wait till the deletion is complete. You will need to switch to another project if openshift-storage is the active project.
Switch to another namespace if openshift-storage is the active namespace.
For example :
$ oc project defaultDelete the openshift-storage namespace.
$ oc delete project openshift-storage --wait=true --timeout=5mWait for approximately five minutes and confirm if the project is deleted successfully.
$ oc get project openshift-storageOutput:
Error from server (NotFound): namespaces "openshift-storage" not foundNoteWhile uninstalling OpenShift Container Storage, if namespace is not deleted completely and remains in Terminating state, perform the steps in the article Troubleshooting and deleting remaining resources during Uninstall to identify objects that are blocking the namespace from being terminated.
Clean up the storage operator artifacts on each node.
$ for i in $(oc get node -l cluster.ocs.openshift.io/openshift-storage= -o jsonpath='{ .items[*].metadata.name }'); do oc debug node/${i} -- chroot /host rm -rfv /var/lib/rook; doneEnsure you can see removed directory
/var/lib/rookin the output.Confirm that the directory no longer exists
$ for i in $(oc get node -l cluster.ocs.openshift.io/openshift-storage= -o jsonpath='{ .items[*].metadata.name }'); do oc debug node/${i} -- chroot /host ls -l /var/lib/rook; doneDelete the local volume created during the deployment and repeat for each of the local volumes listed in step 3.
For each of the local volumes, do the following:
Set the variable
LVto the name of the LocalVolume and variableSCto the name of the StorageClass listed in Step 3.For example:
$ LV=local-block$ SC=localblockList and note the devices to be cleaned up later.
$ oc get localvolume -n local-storage $LV -o jsonpath='{ .spec.storageClassDevices[*].devicePaths[*] }'Example output:
/dev/disk/by-id/nvme-xxxxxx
/dev/disk/by-id/nvme-yyyyyy
/dev/disk/by-id/nvme-zzzzzz
Delete the local volume resource.
$ oc delete localvolume -n local-storage --wait=true $LVDelete the remaining PVs and StorageClasses if they exist.
$ oc delete pv -l storage.openshift.com/local-volume-owner-name=${LV} --wait --timeout=5m$ oc delete storageclass $SC --wait --timeout=5mClean up the artifacts from the storage nodes for that resource.
$ [[ ! -z $SC ]] && for i in $(oc get node -l cluster.ocs.openshift.io/openshift-storage= -o jsonpath='{ .items[*].metadata.name }'); do oc debug node/${i} -- chroot /host rm -rfv /mnt/local-storage/${SC}/; doneExample output :
Starting pod/node-xxx-debug ...
To use host binaries, run `chroot /host`
removed '/mnt/local-storage/localblock/nvme2n1'
removed directory '/mnt/local-storage/localblock'

Removing debug pod ...
Starting pod/node-yyy-debug ...
To use host binaries, run `chroot /host`
removed '/mnt/local-storage/localblock/nvme2n1'
removed directory '/mnt/local-storage/localblock'

Removing debug pod ...
Starting pod/node-zzz-debug ...
To use host binaries, run `chroot /host`
removed '/mnt/local-storage/localblock/nvme2n1'
removed directory '/mnt/local-storage/localblock'

Removing debug pod ...
Wipe the disks for each of the local volumes listed in step 3 so that they can be reused.
List the storage nodes.
$ oc get nodes -l cluster.ocs.openshift.io/openshift-storage=Example output:
NAME      STATUS   ROLES    AGE     VERSION
node-xxx  Ready    worker   4h45m  v1.18.3+6c42de8
node-yyy  Ready    worker   4h46m  v1.18.3+6c42de8
node-zzz  Ready    worker   4h45m  v1.18.3+6c42de8
Obtain the node console and execute
chroot /hostcommand when the prompt appears.$ oc debug node/node-xxx Starting pod/node-xxx-debug ... To use host binaries, run `chroot /host` Pod IP: w.x.y.z If you don't see a command prompt, try pressing enter. sh-4.2# chroot /hostStore the disk paths gathered in step 7(ii) in the
DISKSvariable within quotes.sh-4.2# DISKS="/dev/disk/by-id/nvme-xxxxxx /dev/disk/by-id/nvme-yyyyyy /dev/disk/by-id/nvme-zzzzzz"Run
sgdisk --zap-allon all the disks.sh-4.4# for disk in $DISKS; do sgdisk --zap-all $disk;doneExample output:
Problem opening /dev/disk/by-id/nvme-xxxxxx for reading! Error is 2.
The specified file does not exist!
Problem opening '' for writing! Program will now terminate.
Warning! MBR not overwritten! Error is 2!
Problem opening /dev/disk/by-id/nvme-yyyyy for reading! Error is 2.
The specified file does not exist!
Problem opening '' for writing! Program will now terminate.
Warning! MBR not overwritten! Error is 2!
Creating new GPT entries.
GPT data structures destroyed! You may now partition the disk using fdisk or
other utilities.
NOTE
Ignore file-not-found warnings as they refer to disks that are on other machines.
Exit the shell and repeat for the other nodes.
sh-4.4# exit
exit
sh-4.2# exit
exit

Removing debug pod ...
Delete the
openshift-storage.noobaa.iostorage class.$ oc delete storageclass openshift-storage.noobaa.io --wait=true --timeout=5mUnlabel the storage nodes.
$ oc label nodes --all cluster.ocs.openshift.io/openshift-storage-$ oc label nodes --all topology.rook.io/rack-NoteYou can ignore the warnings displayed for the unlabeled nodes such as label <label> not found.
Confirm all PVs are deleted. If there is any PV left in the Released state, delete it.
# oc get pv | egrep 'ocs-storagecluster-ceph-rbd|ocs-storagecluster-cephfs'# oc delete pv <pv name>Remove
CustomResourceDefinitions.$ oc delete crd backingstores.noobaa.io bucketclasses.noobaa.io cephblockpools.ceph.rook.io cephclusters.ceph.rook.io cephfilesystems.ceph.rook.io cephnfses.ceph.rook.io cephobjectstores.ceph.rook.io cephobjectstoreusers.ceph.rook.io noobaas.noobaa.io ocsinitializations.ocs.openshift.io storageclusterinitializations.ocs.openshift.io storageclusters.ocs.openshift.io cephclients.ceph.rook.io --wait=true --timeout=5mTo ensure that OpenShift Container Storage is uninstalled completely, on the OpenShift Container Platform Web Console,
- Click Home → Overview to access the dashboard.
- Verify that the Persistent Storage and Object Service tabs no longer appear next to the Cluster tab.
3.2. Removing monitoring stack from OpenShift Container Storage
Use this section to clean up monitoring stack from OpenShift Container Storage.
The PVCs that are created as a part of configuring the monitoring stack are in the openshift-monitoring namespace.
Prerequisites
PVCs are configured to use OpenShift Container Platform monitoring stack.
For information, see configuring monitoring stack.
Procedure
List the pods and PVCs that are currently running in the
openshift-monitoringnamespace.$ oc get pod,pvc -n openshift-monitoring NAME READY STATUS RESTARTS AGE pod/alertmanager-main-0 3/3 Running 0 8d pod/alertmanager-main-1 3/3 Running 0 8d pod/alertmanager-main-2 3/3 Running 0 8d pod/cluster-monitoring- operator-84457656d-pkrxm 1/1 Running 0 8d pod/grafana-79ccf6689f-2ll28 2/2 Running 0 8d pod/kube-state-metrics- 7d86fb966-rvd9w 3/3 Running 0 8d pod/node-exporter-25894 2/2 Running 0 8d pod/node-exporter-4dsd7 2/2 Running 0 8d pod/node-exporter-6p4zc 2/2 Running 0 8d pod/node-exporter-jbjvg 2/2 Running 0 8d pod/node-exporter-jj4t5 2/2 Running 0 6d18h pod/node-exporter-k856s 2/2 Running 0 6d18h pod/node-exporter-rf8gn 2/2 Running 0 8d pod/node-exporter-rmb5m 2/2 Running 0 6d18h pod/node-exporter-zj7kx 2/2 Running 0 8d pod/openshift-state-metrics- 59dbd4f654-4clng 3/3 Running 0 8d pod/prometheus-adapter- 5df5865596-k8dzn 1/1 Running 0 7d23h pod/prometheus-adapter- 5df5865596-n2gj9 1/1 Running 0 7d23h pod/prometheus-k8s-0 6/6 Running 1 8d pod/prometheus-k8s-1 6/6 Running 1 8d pod/prometheus-operator- 55cfb858c9-c4zd9 1/1 Running 0 6d21h pod/telemeter-client- 78fc8fc97d-2rgfp 3/3 Running 0 8d NAME STATUS VOLUME CAPACITY ACCESS MODES STORAGECLASS AGE persistentvolumeclaim/my-alertmanager-claim-alertmanager-main-0 Bound pvc-0d519c4f-15a5-11ea-baa0-026d231574aa 40Gi RWO ocs-storagecluster-ceph-rbd 8d persistentvolumeclaim/my-alertmanager-claim-alertmanager-main-1 Bound pvc-0d5a9825-15a5-11ea-baa0-026d231574aa 40Gi RWO ocs-storagecluster-ceph-rbd 8d persistentvolumeclaim/my-alertmanager-claim-alertmanager-main-2 Bound pvc-0d6413dc-15a5-11ea-baa0-026d231574aa 40Gi RWO ocs-storagecluster-ceph-rbd 8d persistentvolumeclaim/my-prometheus-claim-prometheus-k8s-0 Bound pvc-0b7c19b0-15a5-11ea-baa0-026d231574aa 40Gi RWO ocs-storagecluster-ceph-rbd 8d persistentvolumeclaim/my-prometheus-claim-prometheus-k8s-1 Bound pvc-0b8aed3f-15a5-11ea-baa0-026d231574aa 40Gi RWO ocs-storagecluster-ceph-rbd 8dEdit the monitoring
configmap.$ oc -n openshift-monitoring edit configmap cluster-monitoring-configRemove any
configsections that reference the OpenShift Container Storage storage classes as shown in the following example and save it.Before editing
Expand . . . apiVersion: v1 data: config.yaml: | alertmanagerMain: volumeClaimTemplate: metadata: name: my-alertmanager-claim spec: resources: requests: storage: 40Gi storageClassName: ocs-storagecluster-ceph-rbd prometheusK8s: volumeClaimTemplate: metadata: name: my-prometheus-claim spec: resources: requests: storage: 40Gi storageClassName: ocs-storagecluster-ceph-rbd kind: ConfigMap metadata: creationTimestamp: "2019-12-02T07:47:29Z" name: cluster-monitoring-config namespace: openshift-monitoring resourceVersion: "22110" selfLink: /api/v1/namespaces/openshift-monitoring/configmaps/cluster-monitoring-config uid: fd6d988b-14d7-11ea-84ff-066035b9efa8 . . .After editing
Expand . . . apiVersion: v1 data: config.yaml: | kind: ConfigMap metadata: creationTimestamp: "2019-11-21T13:07:05Z" name: cluster-monitoring-config namespace: openshift-monitoring resourceVersion: "404352" selfLink: /api/v1/namespaces/openshift-monitoring/configmaps/cluster-monitoring-config uid: d12c796a-0c5f-11ea-9832-063cd735b81c . . .In this example,
alertmanagerMainandprometheusK8smonitoring components are using the OpenShift Container Storage PVCs.Delete relevant PVCs. Make sure you delete all the PVCs that are consuming the storage classes.
$ oc delete -n openshift-monitoring pvc <pvc-name> --wait=true --timeout=5m
3.3. Removing OpenShift Container Platform registry from OpenShift Container Storage
Use this section to clean up OpenShift Container Platform registry from OpenShift Container Storage. If you want to configure an alternative storage, see image registry
The PVCs that are created as a part of configuring OpenShift Container Platform registry are in the openshift-image-registry namespace.
Prerequisites
- The image registry should have been configured to use an OpenShift Container Storage PVC.
Procedure
Edit the
configs.imageregistry.operator.openshift.ioobject and remove the content in the storage section.$ oc edit configs.imageregistry.operator.openshift.ioExpand Before editing
.
.
.
storage:
  pvc:
    claim: registry-cephfs-rwx-pvc
.
.
.
After editing
. . . storage: emptyDir: {} . . .In this example, the PVC is called
registry-cephfs-rwx-pvc, which is now safe to delete.Delete the PVC.
$ oc delete pvc <pvc-name> -n openshift-image-registry --wait=true --timeout=5m
3.4. Removing the cluster logging operator from OpenShift Container Storage
Use this section to clean up the cluster logging operator from OpenShift Container Storage.
The PVCs that are created as a part of configuring cluster logging operator are in openshift-logging namespace.
Prerequisites
- The cluster logging instance should have been configured to use OpenShift Container Storage PVCs.
Procedure
Remove the
ClusterLogginginstance in the namespace.$ oc delete clusterlogging instance -n openshift-logging --wait=true --timeout=5mThe PVCs in the
openshift-loggingnamespace are now safe to delete.Delete PVCs.
$ oc delete pvc <pvc-name> -n openshift-logging --wait=true --timeout=5m