Creating CI/CD pipelines
Getting started with creating and running tasks and pipelines in OpenShift Pipelines
Abstract
Chapter 1. Creating CI/CD solutions for applications using OpenShift Pipelines
With Red Hat OpenShift Pipelines, you can create a customized CI/CD solution to build, test, and deploy your application.
To create a full-fledged, self-serving CI/CD pipeline for an application, perform the following tasks:
- Create custom tasks, or install existing reusable tasks.
- Create and define the delivery pipeline for your application.
Provide a storage volume or filesystem that is attached to a workspace for the pipeline execution, using one of the following approaches:
- Specify a volume claim template that creates a persistent volume claim
- Specify a persistent volume claim
-
Create a
PipelineRunobject to instantiate and invoke the pipeline. - Add triggers to capture events in the source repository.
This section uses the pipelines-tutorial example to demonstrate the preceding tasks. The example uses a simple application which consists of:
-
A front-end interface,
pipelines-vote-ui, with the source code in thepipelines-vote-uiGit repository. -
A back-end interface,
pipelines-vote-api, with the source code in thepipelines-vote-apiGit repository. -
The
apply-manifestsandupdate-deploymenttasks in thepipelines-tutorialGit repository.
1.1. Prerequisites
- You have access to an OpenShift Container Platform cluster.
- You have installed OpenShift Pipelines using the Red Hat OpenShift Pipelines Operator listed in the OpenShift OperatorHub. After it is installed, it is applicable to the entire cluster.
- You have installed OpenShift Pipelines CLI.
-
You have forked the front-end
pipelines-vote-uiand back-endpipelines-vote-apiGit repositories using your GitHub ID, and have administrator access to these repositories. -
Optional: You have cloned the
pipelines-tutorialGit repository.
1.2. Creating a project and checking your pipeline service account
Procedure
Log in to your OpenShift Container Platform cluster:
oc login -u <login> -p <password> https://openshift.example.com:6443
$ oc login -u <login> -p <password> https://openshift.example.com:6443Copy to Clipboard Copied! Toggle word wrap Toggle overflow Create a project for the sample application. For this example workflow, create the
pipelines-tutorialproject:oc new-project pipelines-tutorial
$ oc new-project pipelines-tutorialCopy to Clipboard Copied! Toggle word wrap Toggle overflow NoteIf you create a project with a different name, be sure to update the resource URLs used in the example with your project name.
View the
pipelineservice account:Red Hat OpenShift Pipelines Operator adds and configures a service account named
pipelinethat has sufficient permissions to build and push an image. This service account is used by thePipelineRunobject.oc get serviceaccount pipeline
$ oc get serviceaccount pipelineCopy to Clipboard Copied! Toggle word wrap Toggle overflow
1.3. Creating pipeline tasks
Procedure
Install the
apply-manifestsandupdate-deploymenttask resources from thepipelines-tutorialrepository, which contains a list of reusable tasks for pipelines:oc create -f https://raw.githubusercontent.com/openshift/pipelines-tutorial/pipelines-1.10/01_pipeline/01_apply_manifest_task.yaml oc create -f https://raw.githubusercontent.com/openshift/pipelines-tutorial/pipelines-1.10/01_pipeline/02_update_deployment_task.yaml
$ oc create -f https://raw.githubusercontent.com/openshift/pipelines-tutorial/pipelines-1.10/01_pipeline/01_apply_manifest_task.yaml
$ oc create -f https://raw.githubusercontent.com/openshift/pipelines-tutorial/pipelines-1.10/01_pipeline/02_update_deployment_task.yaml
Copy to Clipboard Copied! Toggle word wrap Toggle overflow Use the
tkn task listcommand to list the tasks you created:tkn task list
$ tkn task listCopy to Clipboard Copied! Toggle word wrap Toggle overflow The output verifies that the
apply-manifestsandupdate-deploymenttask resources were created:NAME DESCRIPTION AGE apply-manifests 1 minute ago update-deployment 48 seconds ago
NAME DESCRIPTION AGE apply-manifests 1 minute ago update-deployment 48 seconds agoCopy to Clipboard Copied! Toggle word wrap Toggle overflow Use the
tkn clustertasks listcommand to list the Operator-installed additional cluster tasks such asbuildahands2i-python:NoteTo use the
buildahcluster task in a restricted environment, you must ensure that the Dockerfile uses an internal image stream as the base image.tkn clustertasks list
$ tkn clustertasks listCopy to Clipboard Copied! Toggle word wrap Toggle overflow The output lists the Operator-installed
ClusterTaskresources:NAME DESCRIPTION AGE buildah 1 day ago git-clone 1 day ago s2i-python 1 day ago tkn 1 day ago
NAME DESCRIPTION AGE buildah 1 day ago git-clone 1 day ago s2i-python 1 day ago tkn 1 day agoCopy to Clipboard Copied! Toggle word wrap Toggle overflow
In Red Hat OpenShift Pipelines 1.10, cluster task functionality is deprecated and is planned to be removed in a future release.
1.4. Assembling a pipeline
A pipeline represents a CI/CD flow and is defined by the tasks to be executed. It is designed to be generic and reusable in multiple applications and environments.
A pipeline specifies how the tasks interact with each other and their order of execution using the from and runAfter parameters. It uses the workspaces field to specify one or more volumes that each task in the pipeline requires during execution.
In this section, you will create a pipeline that takes the source code of the application from GitHub, and then builds and deploys it on OpenShift Container Platform.
The pipeline performs the following tasks for the back-end application pipelines-vote-api and front-end application pipelines-vote-ui:
-
Clones the source code of the application from the Git repository by referring to the
git-urlandgit-revisionparameters. -
Builds the container image using the
buildahcluster task. -
Pushes the image to the OpenShift image registry by referring to the
imageparameter. -
Deploys the new image on OpenShift Container Platform by using the
apply-manifestsandupdate-deploymenttasks.
Procedure
Copy the contents of the following sample pipeline YAML file and save it:
Copy to Clipboard Copied! Toggle word wrap Toggle overflow The pipeline definition abstracts away the specifics of the Git source repository and image registries. These details are added as
paramswhen a pipeline is triggered and executed.Create the pipeline:
oc create -f <pipeline-yaml-file-name.yaml>
$ oc create -f <pipeline-yaml-file-name.yaml>Copy to Clipboard Copied! Toggle word wrap Toggle overflow Alternatively, you can also execute the YAML file directly from the Git repository:
oc create -f https://raw.githubusercontent.com/openshift/pipelines-tutorial/pipelines-1.10/01_pipeline/04_pipeline.yaml
$ oc create -f https://raw.githubusercontent.com/openshift/pipelines-tutorial/pipelines-1.10/01_pipeline/04_pipeline.yamlCopy to Clipboard Copied! Toggle word wrap Toggle overflow Use the
tkn pipeline listcommand to verify that the pipeline is added to the application:tkn pipeline list
$ tkn pipeline listCopy to Clipboard Copied! Toggle word wrap Toggle overflow The output verifies that the
build-and-deploypipeline was created:NAME AGE LAST RUN STARTED DURATION STATUS build-and-deploy 1 minute ago --- --- --- ---
NAME AGE LAST RUN STARTED DURATION STATUS build-and-deploy 1 minute ago --- --- --- ---Copy to Clipboard Copied! Toggle word wrap Toggle overflow
1.5. Mirroring images to run pipelines in a restricted environment
To run OpenShift Pipelines in a disconnected cluster or a cluster provisioned in a restricted environment, ensure that either the Samples Operator is configured for a restricted network, or a cluster administrator has created a cluster with a mirrored registry.
The following procedure uses the pipelines-tutorial example to create a pipeline for an application in a restricted environment using a cluster with a mirrored registry. To ensure that the pipelines-tutorial example works in a restricted environment, you must mirror the respective builder images from the mirror registry for the front-end interface, pipelines-vote-ui; back-end interface, pipelines-vote-api; and the cli.
Procedure
Mirror the builder image from the mirror registry for the front-end interface,
pipelines-vote-ui.Verify that the required images tag is not imported:
oc describe imagestream python -n openshift
$ oc describe imagestream python -n openshiftCopy to Clipboard Copied! Toggle word wrap Toggle overflow Example output
Copy to Clipboard Copied! Toggle word wrap Toggle overflow Mirror the supported image tag to the private registry:
oc image mirror registry.redhat.io/ubi8/python-38:latest <mirror-registry>:<port>/ubi8/python-38
$ oc image mirror registry.redhat.io/ubi8/python-38:latest <mirror-registry>:<port>/ubi8/python-38Copy to Clipboard Copied! Toggle word wrap Toggle overflow Import the image:
oc tag <mirror-registry>:<port>/ubi8/python-38 python:latest --scheduled -n openshift
$ oc tag <mirror-registry>:<port>/ubi8/python-38 python:latest --scheduled -n openshiftCopy to Clipboard Copied! Toggle word wrap Toggle overflow You must periodically re-import the image. The
--scheduledflag enables automatic re-import of the image.Verify that the images with the given tag have been imported:
oc describe imagestream python -n openshift
$ oc describe imagestream python -n openshiftCopy to Clipboard Copied! Toggle word wrap Toggle overflow Example output
Copy to Clipboard Copied! Toggle word wrap Toggle overflow
Mirror the builder image from the mirror registry for the back-end interface,
pipelines-vote-api.Verify that the required images tag is not imported:
oc describe imagestream golang -n openshift
$ oc describe imagestream golang -n openshiftCopy to Clipboard Copied! Toggle word wrap Toggle overflow Example output
Copy to Clipboard Copied! Toggle word wrap Toggle overflow Mirror the supported image tag to the private registry:
oc image mirror registry.redhat.io/ubi8/go-toolset:1.14.7 <mirror-registry>:<port>/ubi8/go-toolset
$ oc image mirror registry.redhat.io/ubi8/go-toolset:1.14.7 <mirror-registry>:<port>/ubi8/go-toolsetCopy to Clipboard Copied! Toggle word wrap Toggle overflow Import the image:
oc tag <mirror-registry>:<port>/ubi8/go-toolset golang:latest --scheduled -n openshift
$ oc tag <mirror-registry>:<port>/ubi8/go-toolset golang:latest --scheduled -n openshiftCopy to Clipboard Copied! Toggle word wrap Toggle overflow You must periodically re-import the image. The
--scheduledflag enables automatic re-import of the image.Verify that the images with the given tag have been imported:
oc describe imagestream golang -n openshift
$ oc describe imagestream golang -n openshiftCopy to Clipboard Copied! Toggle word wrap Toggle overflow Example output
Copy to Clipboard Copied! Toggle word wrap Toggle overflow
Mirror the builder image from the mirror registry for the
cli.Verify that the required images tag is not imported:
oc describe imagestream cli -n openshift
$ oc describe imagestream cli -n openshiftCopy to Clipboard Copied! Toggle word wrap Toggle overflow Example output
Copy to Clipboard Copied! Toggle word wrap Toggle overflow Mirror the supported image tag to the private registry:
oc image mirror quay.io/openshift-release-dev/ocp-v4.0-art-dev@sha256:65c68e8c22487375c4c6ce6f18ed5485915f2bf612e41fef6d41cbfcdb143551 <mirror-registry>:<port>/openshift-release-dev/ocp-v4.0-art-dev:latest
$ oc image mirror quay.io/openshift-release-dev/ocp-v4.0-art-dev@sha256:65c68e8c22487375c4c6ce6f18ed5485915f2bf612e41fef6d41cbfcdb143551 <mirror-registry>:<port>/openshift-release-dev/ocp-v4.0-art-dev:latestCopy to Clipboard Copied! Toggle word wrap Toggle overflow Import the image:
oc tag <mirror-registry>:<port>/openshift-release-dev/ocp-v4.0-art-dev cli:latest --scheduled -n openshift
$ oc tag <mirror-registry>:<port>/openshift-release-dev/ocp-v4.0-art-dev cli:latest --scheduled -n openshiftCopy to Clipboard Copied! Toggle word wrap Toggle overflow You must periodically re-import the image. The
--scheduledflag enables automatic re-import of the image.Verify that the images with the given tag have been imported:
oc describe imagestream cli -n openshift
$ oc describe imagestream cli -n openshiftCopy to Clipboard Copied! Toggle word wrap Toggle overflow Example output
Copy to Clipboard Copied! Toggle word wrap Toggle overflow
1.6. Running a pipeline
A PipelineRun resource starts a pipeline and ties it to the Git and image resources that should be used for the specific invocation. It automatically creates and starts the TaskRun resources for each task in the pipeline.
Procedure
Start the pipeline for the back-end application:
Copy to Clipboard Copied! Toggle word wrap Toggle overflow The previous command uses a volume claim template, which creates a persistent volume claim for the pipeline execution.
To track the progress of the pipeline run, enter the following command::
$ tkn pipelinerun logs <pipelinerun_id> -f
$ tkn pipelinerun logs <pipelinerun_id> -fCopy to Clipboard Copied! Toggle word wrap Toggle overflow The <pipelinerun_id> in the above command is the ID for the
PipelineRunthat was returned in the output of the previous command.Start the pipeline for the front-end application:
Copy to Clipboard Copied! Toggle word wrap Toggle overflow To track the progress of the pipeline run, enter the following command:
$ tkn pipelinerun logs <pipelinerun_id> -f
$ tkn pipelinerun logs <pipelinerun_id> -fCopy to Clipboard Copied! Toggle word wrap Toggle overflow The <pipelinerun_id> in the above command is the ID for the
PipelineRunthat was returned in the output of the previous command.After a few minutes, use
tkn pipelinerun listcommand to verify that the pipeline ran successfully by listing all the pipeline runs:$ tkn pipelinerun list
$ tkn pipelinerun listCopy to Clipboard Copied! Toggle word wrap Toggle overflow The output lists the pipeline runs:
 NAME                         STARTED      DURATION     STATUS
 build-and-deploy-run-xy7rw   1 hour ago   2 minutes    Succeeded
 build-and-deploy-run-z2rz8   1 hour ago   19 minutes   Succeeded
 NAME                         STARTED      DURATION     STATUS
 build-and-deploy-run-xy7rw   1 hour ago   2 minutes    Succeeded
 build-and-deploy-run-z2rz8   1 hour ago   19 minutes   Succeeded
Copy to Clipboard Copied! Toggle word wrap Toggle overflow Get the application route:
$ oc get route pipelines-vote-ui --template='http://{{.spec.host}}'$ oc get route pipelines-vote-ui --template='http://{{.spec.host}}'Copy to Clipboard Copied! Toggle word wrap Toggle overflow Note the output of the previous command. You can access the application using this route.
To rerun the last pipeline run, using the pipeline resources and service account of the previous pipeline, run:
$ tkn pipeline start build-and-deploy --last
$ tkn pipeline start build-and-deploy --lastCopy to Clipboard Copied! Toggle word wrap Toggle overflow
1.7. Adding triggers to a pipeline
Triggers enable pipelines to respond to external GitHub events, such as push events and pull requests. After you assemble and start a pipeline for the application, add the TriggerBinding, TriggerTemplate, Trigger, and EventListener resources to capture the GitHub events.
Procedure
Copy the content of the following sample
TriggerBindingYAML file and save it:Copy to Clipboard Copied! Toggle word wrap Toggle overflow Create the
TriggerBindingresource:oc create -f <triggerbinding-yaml-file-name.yaml>
$ oc create -f <triggerbinding-yaml-file-name.yaml>Copy to Clipboard Copied! Toggle word wrap Toggle overflow Alternatively, you can create the
TriggerBindingresource directly from thepipelines-tutorialGit repository:oc create -f https://raw.githubusercontent.com/openshift/pipelines-tutorial/pipelines-1.10/03_triggers/01_binding.yaml
$ oc create -f https://raw.githubusercontent.com/openshift/pipelines-tutorial/pipelines-1.10/03_triggers/01_binding.yamlCopy to Clipboard Copied! Toggle word wrap Toggle overflow Copy the content of the following sample
TriggerTemplateYAML file and save it:Copy to Clipboard Copied! Toggle word wrap Toggle overflow The template specifies a volume claim template to create a persistent volume claim for defining the storage volume for the workspace. Therefore, you do not need to create a persistent volume claim to provide data storage.
Create the
TriggerTemplateresource:oc create -f <triggertemplate-yaml-file-name.yaml>
$ oc create -f <triggertemplate-yaml-file-name.yaml>Copy to Clipboard Copied! Toggle word wrap Toggle overflow Alternatively, you can create the
TriggerTemplateresource directly from thepipelines-tutorialGit repository:oc create -f https://raw.githubusercontent.com/openshift/pipelines-tutorial/pipelines-1.10/03_triggers/02_template.yaml
$ oc create -f https://raw.githubusercontent.com/openshift/pipelines-tutorial/pipelines-1.10/03_triggers/02_template.yamlCopy to Clipboard Copied! Toggle word wrap Toggle overflow Copy the contents of the following sample
TriggerYAML file and save it:Copy to Clipboard Copied! Toggle word wrap Toggle overflow Create the
Triggerresource:oc create -f <trigger-yaml-file-name.yaml>
$ oc create -f <trigger-yaml-file-name.yaml>Copy to Clipboard Copied! Toggle word wrap Toggle overflow Alternatively, you can create the
Triggerresource directly from thepipelines-tutorialGit repository:oc create -f https://raw.githubusercontent.com/openshift/pipelines-tutorial/pipelines-1.10/03_triggers/03_trigger.yaml
$ oc create -f https://raw.githubusercontent.com/openshift/pipelines-tutorial/pipelines-1.10/03_triggers/03_trigger.yamlCopy to Clipboard Copied! Toggle word wrap Toggle overflow Copy the contents of the following sample
EventListenerYAML file and save it:Copy to Clipboard Copied! Toggle word wrap Toggle overflow Alternatively, if you have not defined a trigger custom resource, add the binding and template spec to the
EventListenerYAML file, instead of referring to the name of the trigger:Copy to Clipboard Copied! Toggle word wrap Toggle overflow Create the
EventListenerresource by performing the following steps:To create an
EventListenerresource using a secure HTTPS connection:Add a label to enable the secure HTTPS connection to the
Eventlistenerresource:oc label namespace <ns-name> operator.tekton.dev/enable-annotation=enabled
$ oc label namespace <ns-name> operator.tekton.dev/enable-annotation=enabledCopy to Clipboard Copied! Toggle word wrap Toggle overflow Create the
EventListenerresource:oc create -f <eventlistener-yaml-file-name.yaml>
$ oc create -f <eventlistener-yaml-file-name.yaml>Copy to Clipboard Copied! Toggle word wrap Toggle overflow Alternatively, you can create the
EvenListenerresource directly from thepipelines-tutorialGit repository:oc create -f https://raw.githubusercontent.com/openshift/pipelines-tutorial/pipelines-1.10/03_triggers/04_event_listener.yaml
$ oc create -f https://raw.githubusercontent.com/openshift/pipelines-tutorial/pipelines-1.10/03_triggers/04_event_listener.yamlCopy to Clipboard Copied! Toggle word wrap Toggle overflow Create a route with the re-encrypt TLS termination:
oc create route reencrypt --service=<svc-name> --cert=tls.crt --key=tls.key --ca-cert=ca.crt --hostname=<hostname>
$ oc create route reencrypt --service=<svc-name> --cert=tls.crt --key=tls.key --ca-cert=ca.crt --hostname=<hostname>Copy to Clipboard Copied! Toggle word wrap Toggle overflow Alternatively, you can create a re-encrypt TLS termination YAML file to create a secured route.
Example Re-encrypt TLS Termination YAML of the Secured Route
Copy to Clipboard Copied! Toggle word wrap Toggle overflow - 1 2
- The name of the object, which is limited to 63 characters.
- 3
- The
terminationfield is set toreencrypt. This is the only requiredtlsfield. - 4
- Required for re-encryption.
destinationCACertificatespecifies a CA certificate to validate the endpoint certificate, securing the connection from the router to the destination pods. If the service is using a service signing certificate, or the administrator has specified a default CA certificate for the router and the service has a certificate signed by that CA, this field can be omitted.
See
oc create route reencrypt --helpfor more options.
To create an
EventListenerresource using an insecure HTTP connection:-
Create the
EventListenerresource. Expose the
EventListenerservice as an OpenShift Container Platform route to make it publicly accessible:oc expose svc el-vote-app
$ oc expose svc el-vote-appCopy to Clipboard Copied! Toggle word wrap Toggle overflow
-
Create the
1.8. Configuring event listeners to serve multiple namespaces
You can skip this section if you want to create a basic CI/CD pipeline. However, if your deployment strategy involves multiple namespaces, you can configure event listeners to serve multiple namespaces.
To increase reusability of EvenListener objects, cluster administrators can configure and deploy them as multi-tenant event listeners that serve multiple namespaces.
Procedure
Configure cluster-wide fetch permission for the event listener.
Set a service account name to be used in the
ClusterRoleBindingandEventListenerobjects. For example,el-sa.Example
ServiceAccount.yamlapiVersion: v1 kind: ServiceAccount metadata: name: el-sa ---
apiVersion: v1 kind: ServiceAccount metadata: name: el-sa ---Copy to Clipboard Copied! Toggle word wrap Toggle overflow In the
rulessection of theClusterRole.yamlfile, set appropriate permissions for every event listener deployment to function cluster-wide.Example
ClusterRole.yamlCopy to Clipboard Copied! Toggle word wrap Toggle overflow Configure cluster role binding with the appropriate service account name and cluster role name.
Example
ClusterRoleBinding.yamlCopy to Clipboard Copied! Toggle word wrap Toggle overflow
In the
specparameter of the event listener, add the service account name, for exampleel-sa. Fill thenamespaceSelectorparameter with names of namespaces where event listener is intended to serve.Example
EventListener.yamlCopy to Clipboard Copied! Toggle word wrap Toggle overflow Create a service account with the necessary permissions, for example
foo-trigger-sa. Use it for role binding the triggers.Example
ServiceAccount.yamlCopy to Clipboard Copied! Toggle word wrap Toggle overflow Example
RoleBinding.yamlCopy to Clipboard Copied! Toggle word wrap Toggle overflow Create a trigger with the appropriate trigger template, trigger binding, and service account name.
Example
Trigger.yamlCopy to Clipboard Copied! Toggle word wrap Toggle overflow
1.9. Creating webhooks
Webhooks are HTTP POST messages that are received by the event listeners whenever a configured event occurs in your repository. The event payload is then mapped to trigger bindings, and processed by trigger templates. The trigger templates eventually start one or more pipeline runs, leading to the creation and deployment of Kubernetes resources.
In this section, you will configure a webhook URL on your forked Git repositories pipelines-vote-ui and pipelines-vote-api. This URL points to the publicly accessible EventListener service route.
Adding webhooks requires administrative privileges to the repository. If you do not have administrative access to your repository, contact your system administrator for adding webhooks.
Procedure
Get the webhook URL:
For a secure HTTPS connection:
echo "URL: $(oc get route el-vote-app --template='https://{{.spec.host}}')"$ echo "URL: $(oc get route el-vote-app --template='https://{{.spec.host}}')"Copy to Clipboard Copied! Toggle word wrap Toggle overflow For an HTTP (insecure) connection:
echo "URL: $(oc get route el-vote-app --template='http://{{.spec.host}}')"$ echo "URL: $(oc get route el-vote-app --template='http://{{.spec.host}}')"Copy to Clipboard Copied! Toggle word wrap Toggle overflow Note the URL obtained in the output.
Configure webhooks manually on the front-end repository:
-
Open the front-end Git repository
pipelines-vote-uiin your browser. - Click Settings → Webhooks → Add Webhook
On the Webhooks/Add Webhook page:
- Enter the webhook URL from step 1 in Payload URL field
- Select application/json for the Content type
- Specify the secret in the Secret field
- Ensure that the Just the push event is selected
- Select Active
- Click Add Webhook
-
Open the front-end Git repository
-
Repeat step 2 for the back-end repository
pipelines-vote-api.
1.10. Triggering a pipeline run
Whenever a push event occurs in the Git repository, the configured webhook sends an event payload to the publicly exposed EventListener service route. The EventListener service of the application processes the payload, and passes it to the relevant TriggerBinding and TriggerTemplate resource pairs. The TriggerBinding resource extracts the parameters, and the TriggerTemplate resource uses these parameters and specifies the way the resources must be created. This may rebuild and redeploy the application.
In this section, you push an empty commit to the front-end pipelines-vote-ui repository, which then triggers the pipeline run.
Procedure
From the terminal, clone your forked Git repository
pipelines-vote-ui:git clone git@github.com:<your GitHub ID>/pipelines-vote-ui.git -b pipelines-1.10
$ git clone git@github.com:<your GitHub ID>/pipelines-vote-ui.git -b pipelines-1.10Copy to Clipboard Copied! Toggle word wrap Toggle overflow Push an empty commit:
git commit -m "empty-commit" --allow-empty && git push origin pipelines-1.10
$ git commit -m "empty-commit" --allow-empty && git push origin pipelines-1.10Copy to Clipboard Copied! Toggle word wrap Toggle overflow Check if the pipeline run was triggered:
tkn pipelinerun list
$ tkn pipelinerun listCopy to Clipboard Copied! Toggle word wrap Toggle overflow Notice that a new pipeline run was initiated.
1.11. Enabling monitoring of event listeners for Triggers for user-defined projects
As a cluster administrator, to gather event listener metrics for the Triggers service in a user-defined project and display them in the OpenShift Container Platform web console, you can create a service monitor for each event listener. On receiving an HTTP request, event listeners for the Triggers service return three metrics — eventlistener_http_duration_seconds, eventlistener_event_count, and eventlistener_triggered_resources.
Prerequisites
- You have logged in to the OpenShift Container Platform web console.
- You have installed the Red Hat OpenShift Pipelines Operator.
- You have enabled monitoring for user-defined projects.
Procedure
For each event listener, create a service monitor. For example, to view the metrics for the
github-listenerevent listener in thetestnamespace, create the following service monitor:Copy to Clipboard Copied! Toggle word wrap Toggle overflow Test the service monitor by sending a request to the event listener. For example, push an empty commit:
git commit -m "empty-commit" --allow-empty && git push origin main
$ git commit -m "empty-commit" --allow-empty && git push origin mainCopy to Clipboard Copied! Toggle word wrap Toggle overflow - On the OpenShift Container Platform web console, navigate to Administrator → Observe → Metrics.
-
To view a metric, search by its name. For example, to view the details of the
eventlistener_http_resourcesmetric for thegithub-listenerevent listener, search using theeventlistener_http_resourceskeyword.
Chapter 2. Working with Red Hat OpenShift Pipelines in the web console
You can use the Administrator or Developer perspective to create and modify Pipeline, PipelineRun, and Repository objects from the Pipelines page in the OpenShift Container Platform web console. You can also use the +Add page in the Developer perspective of the web console to create CI/CD pipelines for your software delivery process.
2.1. Working with Red Hat OpenShift Pipelines in the Developer perspective
In the Developer perspective, you can access the following options for creating pipelines from the +Add page:
- Use the +Add → Pipelines → Pipeline builder option to create customized pipelines for your application.
- Use the +Add → From Git option to create pipelines using pipeline templates and resources while creating an application.
After you create the pipelines for your application, you can view and visually interact with the deployed pipelines in the Pipelines view. You can also use the Topology view to interact with the pipelines created using the From Git option. You must apply custom labels to pipelines created using the Pipeline builder to see them in the Topology view.
Prerequisites
- You have access to an OpenShift Container Platform cluster and have switched to the Developer perspective.
- You have the OpenShift Pipelines Operator installed in your cluster.
- You are a cluster administrator or a user with create and edit permissions.
- You have created a project.
2.1.1. Constructing pipelines using the Pipeline builder
In the Developer perspective of the console, you can use the +Add → Pipeline → Pipeline builder option to:
- Configure pipelines using either the Pipeline builder or the YAML view.
- Construct a pipeline flow using existing tasks and cluster tasks. When you install the OpenShift Pipelines Operator, it adds reusable pipeline cluster tasks to your cluster.
In Red Hat OpenShift Pipelines 1.10, cluster task functionality is deprecated and is planned to be removed in a future release.
- Specify the type of resources required for the pipeline run, and if required, add additional parameters to the pipeline.
- Reference these pipeline resources in each of the tasks in the pipeline as input and output resources.
- If required, reference any additional parameters added to the pipeline in the task. The parameters for a task are prepopulated based on the specifications of the task.
- Use the Operator-installed, reusable snippets and samples to create detailed pipelines.
Procedure
- In the +Add view of the Developer perspective, click the Pipeline tile to see the Pipeline builder page.
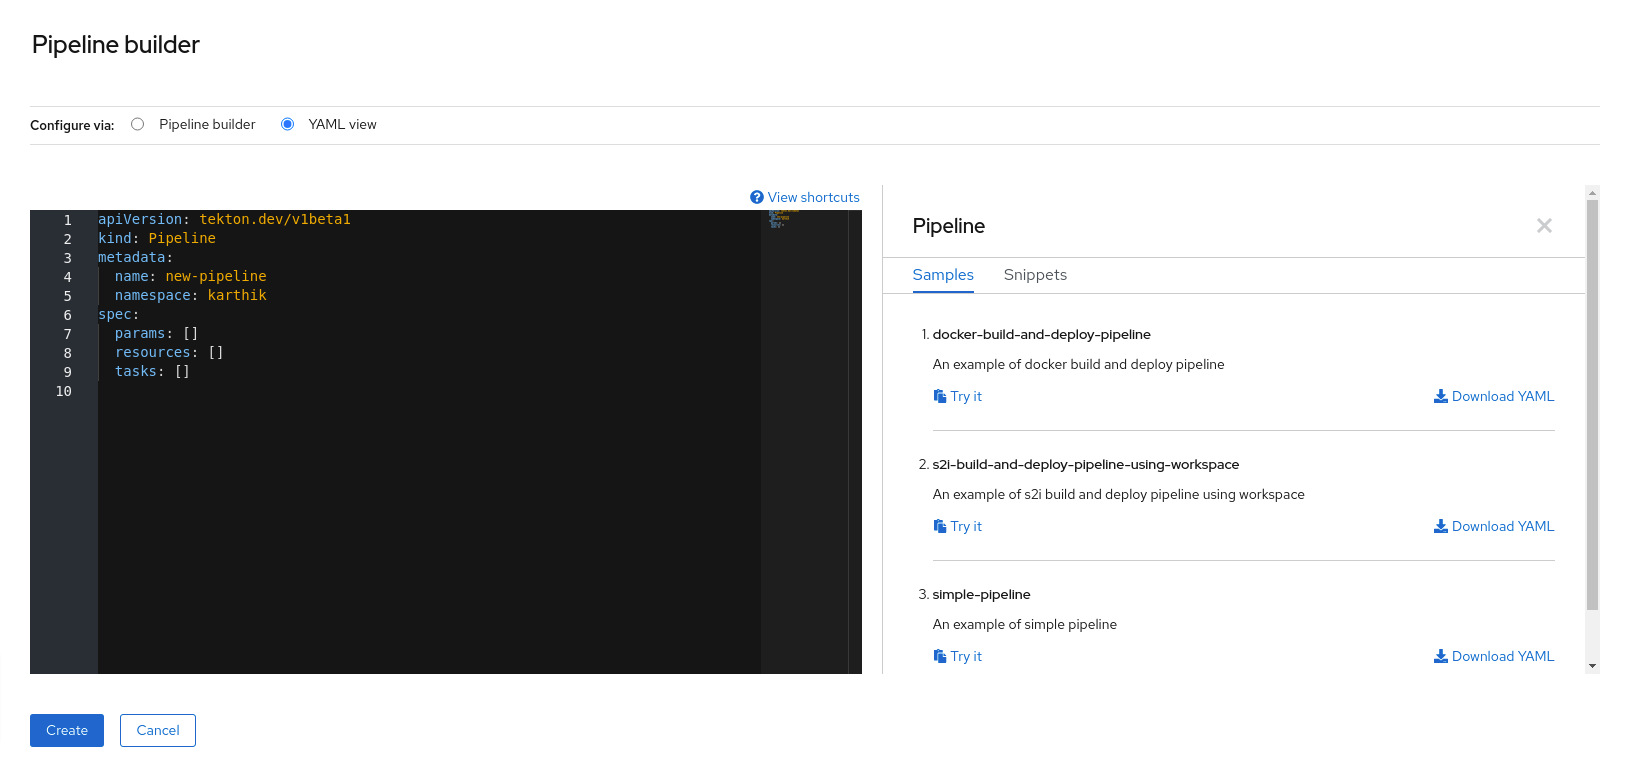
Configure the pipeline using either the Pipeline builder view or the YAML view.
NoteThe Pipeline builder view supports a limited number of fields whereas the YAML view supports all available fields. Optionally, you can also use the Operator-installed, reusable snippets and samples to create detailed pipelines.
Figure 2.1. YAML view
Configure your pipeline by using Pipeline builder:
- In the Name field, enter a unique name for the pipeline.
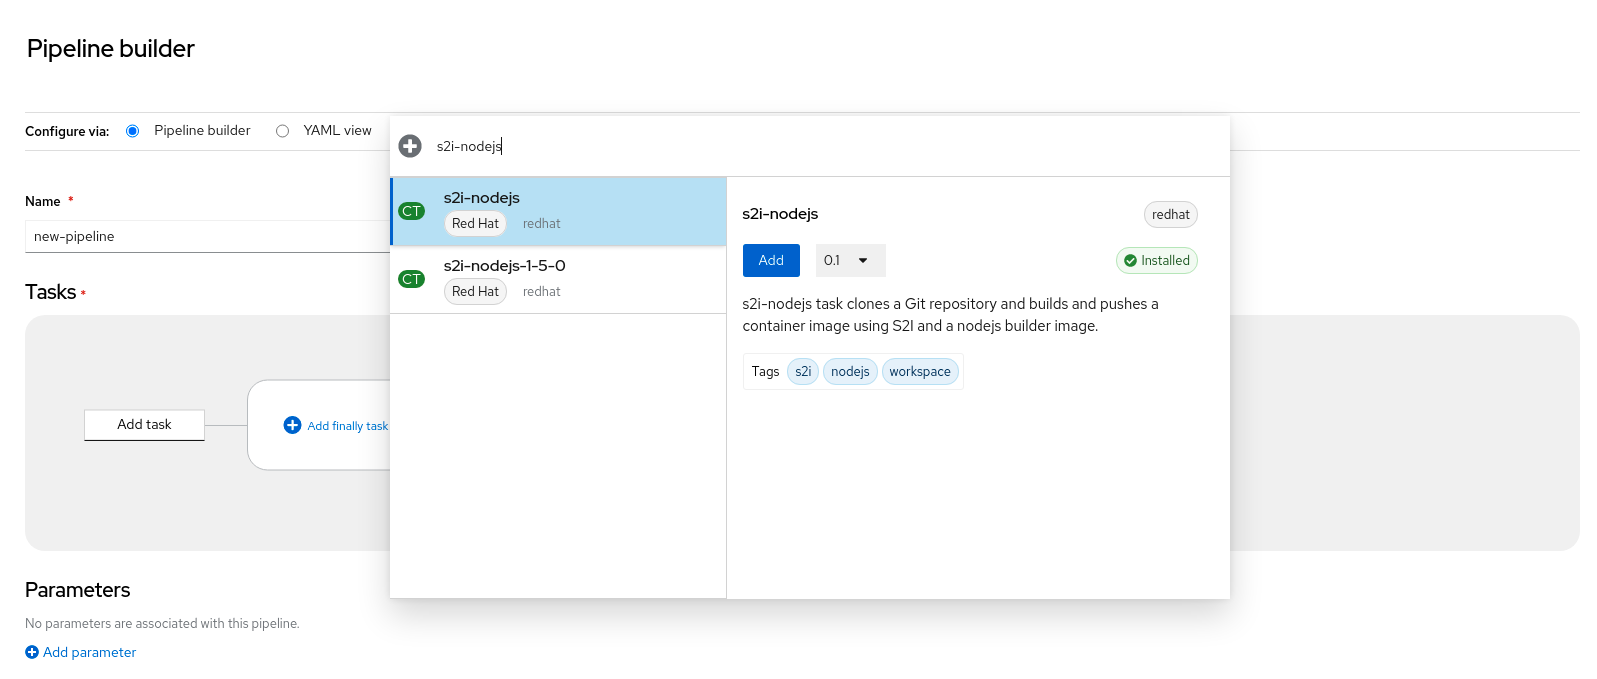
In the Tasks section:
- Click Add task.
- Search for a task using the quick search field and select the required task from the displayed list.
Click Add or Install and add. In this example, use the s2i-nodejs task.
NoteThe search list contains all the Tekton Hub tasks and tasks available in the cluster. Also, if a task is already installed it will show Add to add the task whereas it will show Install and add to install and add the task. It will show Update and add when you add the same task with an updated version.
To add sequential tasks to the pipeline:
- Click the plus icon to the right or left of the task → click Add task.
- Search for a task using the quick search field and select the required task from the displayed list.
Click Add or Install and add.
Figure 2.2. Pipeline builder
To add a final task:
- Click the Add finally task → Click Add task.
- Search for a task using the quick search field and select the required task from the displayed list.
- Click Add or Install and add.
In the Resources section, click Add Resources to specify the name and type of resources for the pipeline run. These resources are then used by the tasks in the pipeline as inputs and outputs. For this example:
-
Add an input resource. In the Name field, enter
Source, and then from the Resource Type drop-down list, select Git. Add an output resource. In the Name field, enter
Img, and then from the Resource Type drop-down list, select Image.NoteA red icon appears next to the task if a resource is missing.
-
Add an input resource. In the Name field, enter
- Optional: The Parameters for a task are pre-populated based on the specifications of the task. If required, use the Add Parameters link in the Parameters section to add additional parameters.
- In the Workspaces section, click Add workspace and enter a unique workspace name in the Name field. You can add multiple workspaces to the pipeline.
In the Tasks section, click the s2i-nodejs task to see the side panel with details for the task. In the task side panel, specify the resources and parameters for the s2i-nodejs task:
- If required, in the Parameters section, add more parameters to the default ones, by using the $(params.<param-name>) syntax.
-
In the Image section, enter
Imgas specified in the Resources section. - Select a workspace from the source drop-down under Workspaces section.
- Add resources, parameters, and workspaces to the openshift-client task.
- Click Create to create and view the pipeline in the Pipeline Details page.
- Click the Actions drop-down menu then click Start, to see the Start Pipeline page.
- The Workspaces section lists the workspaces you created earlier. Use the respective drop-down to specify the volume source for your workspace. You have the following options: Empty Directory, Config Map, Secret, PersistentVolumeClaim, or VolumeClaimTemplate.
2.1.2. Creating OpenShift Pipelines along with applications
To create pipelines along with applications, use the From Git option in the Add+ view of the Developer perspective. You can view all of your available pipelines and select the pipelines you want to use to create applications while importing your code or deploying an image.
The Tekton Hub Integration is enabled by default and you can see tasks from the Tekton Hub that are supported by your cluster. Administrators can opt out of the Tekton Hub Integration and the Tekton Hub tasks will no longer be displayed. You can also check whether a webhook URL exists for a generated pipeline. Default webhooks are added for the pipelines that are created using the +Add flow and the URL is visible in the side panel of the selected resources in the Topology view.
2.1.3. Interacting with pipelines using the Developer perspective
The Pipelines view in the Developer perspective lists all the pipelines in a project, along with the following details:
- The namespace in which the pipeline was created
- The last pipeline run
- The status of the tasks in the pipeline run
- The status of the pipeline run
- The creation time of the last pipeline run
Procedure
- In the Pipelines view of the Developer perspective, select a project from the Project drop-down list to see the pipelines in that project.
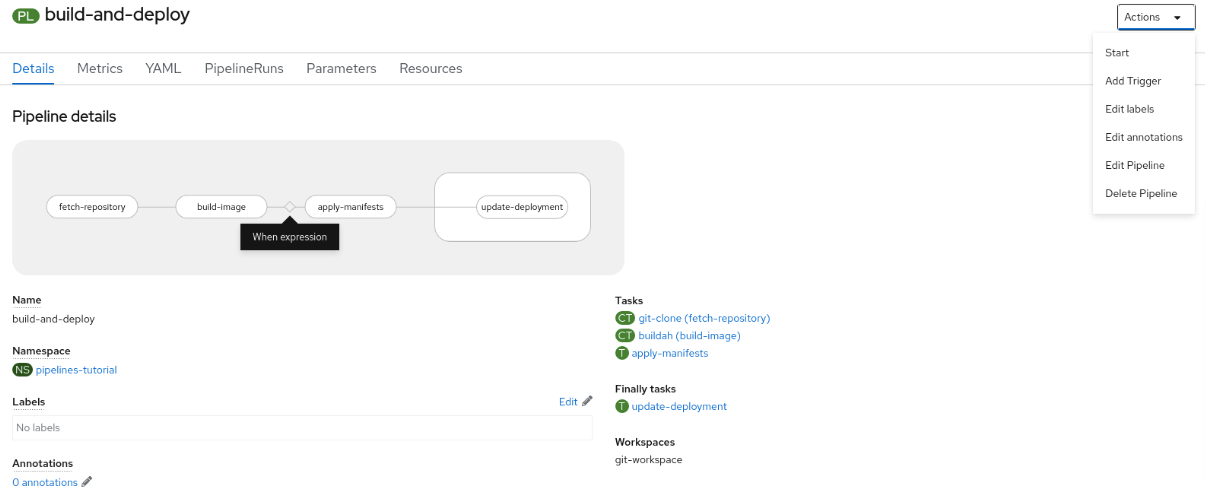
Click the required pipeline to see the Pipeline details page.
By default, the Details tab displays a visual representation of all the all the serial tasks, parallel tasks,
finallytasks, and when expressions in the pipeline. The tasks and thefinallytasks are listed in the lower right portion of the page. Click the listed Tasks and Finally tasks to view the task details.Figure 2.3. Pipeline details
Optional: On the Pipeline details page, click the Metrics tab to see the following information about pipelines:
- Pipeline Success Ratio
- Number of Pipeline Runs
- Pipeline Run Duration
Task Run Duration
You can use this information to improve the pipeline workflow and eliminate issues early in the pipeline lifecycle.
- Optional: Click the YAML tab to edit the YAML file for the pipeline.
Optional: Click the Pipeline Runs tab to see the completed, running, or failed runs for the pipeline.
The Pipeline Runs tab provides details about the pipeline run, the status of the task, and a link to debug failed pipeline runs. Use the Options menu
 to stop a running pipeline, to rerun a pipeline using the same parameters and resources as that of the previous pipeline execution, or to delete a pipeline run.
Click the required pipeline run to see the Pipeline Run details page. By default, the Details tab displays a visual representation of all the serial tasks, parallel tasks,
finallytasks, and when expressions in the pipeline run. The results for successful runs are displayed under the Pipeline Run results pane at the bottom of the page. Additionally, you would only be able to see tasks from Tekton Hub which are supported by the cluster. While looking at a task, you can click the link beside it to jump to the task documentation.NoteThe Details section of the Pipeline Run Details page displays a Log Snippet of the failed pipeline run. Log Snippet provides a general error message and a snippet of the log. A link to the Logs section provides quick access to the details about the failed run.
On the Pipeline Run details page, click the Task Runs tab to see the completed, running, and failed runs for the task.
The Task Runs tab provides information about the task run along with the links to its task and pod, and also the status and duration of the task run. Use the Options menu
to delete a task run.
Click the required task run to see the Task Run details page. The results for successful runs are displayed under the Task Run results pane at the bottom of the page.
NoteThe Details section of the Task Run details page displays a Log Snippet of the failed task run. Log Snippet provides a general error message and a snippet of the log. A link to the Logs section provides quick access to the details about the failed task run.
- Click the Parameters tab to see the parameters defined in the pipeline. You can also add or edit additional parameters, as required.
- Click the Resources tab to see the resources defined in the pipeline. You can also add or edit additional resources, as required.
2.1.4. Starting pipelines from Pipelines view
After you create a pipeline, you need to start it to execute the included tasks in the defined sequence. You can start a pipeline from the Pipelines view, the Pipeline Details page, or the Topology view.
Procedure
To start a pipeline using the Pipelines view:
-
In the Pipelines view of the Developer perspective, click the Options
menu adjoining a pipeline, and select Start.
The Start Pipeline dialog box displays the Git Resources and the Image Resources based on the pipeline definition.
NoteFor pipelines created using the From Git option, the Start Pipeline dialog box also displays an
APP_NAMEfield in the Parameters section, and all the fields in the dialog box are prepopulated by the pipeline template.- If you have resources in your namespace, the Git Resources and the Image Resources fields are prepopulated with those resources. If required, use the drop-downs to select or create the required resources and customize the pipeline run instance.
Optional: Modify the Advanced Options to add the credentials that authenticate the specified private Git server or the image registry.
- Under Advanced Options, click Show Credentials Options and select Add Secret.
In the Create Source Secret section, specify the following:
- A unique Secret Name for the secret.
- In the Designated provider to be authenticated section, specify the provider to be authenticated in the Access to field, and the base Server URL.
Select the Authentication Type and provide the credentials:
For the Authentication Type
Image Registry Credentials, specify the Registry Server Address that you want to authenticate, and provide your credentials in the Username, Password, and Email fields.Select Add Credentials if you want to specify an additional Registry Server Address.
-
For the Authentication Type
Basic Authentication, specify the values for the UserName and Password or Token fields. For the Authentication Type
SSH Keys, specify the value of the SSH Private Key field.NoteFor basic authentication and SSH authentication, you can use annotations such as:
-
tekton.dev/git-0: https://github.com -
tekton.dev/git-1: https://gitlab.com.
-
- Select the check mark to add the secret.
You can add multiple secrets based upon the number of resources in your pipeline.
- Click Start to start the pipeline.
The Pipeline Run Details page displays the pipeline being executed. After the pipeline starts, the tasks and steps within each task are executed. You can:
- Hover over the tasks to see the time taken to execute each step.
- Click on a task to see the logs for each step in the task.
- Click the Logs tab to see the logs relating to the execution sequence of the tasks. You can also expand the pane and download the logs individually or in bulk, by using the relevant button.
Click the Events tab to see the stream of events generated by a pipeline run.
You can use the Task Runs, Logs, and Events tabs to assist in debugging a failed pipeline run or a failed task run.
Figure 2.4. Pipeline run details

2.1.5. Starting pipelines from Topology view
For pipelines created using the From Git option, you can use the Topology view to interact with pipelines after you start them:
To see the pipelines created using Pipeline builder in the Topology view, customize the pipeline labels to link the pipeline with the application workload.
Procedure
- Click Topology in the left navigation panel.
- Click the application to display Pipeline Runs in the side panel.
In Pipeline Runs, click Start Last Run to start a new pipeline run with the same parameters and resources as the previous one. This option is disabled if a pipeline run has not been initiated. You can also start a pipeline run when you create it.
Figure 2.5. Pipelines in Topology view

In the Topology page, hover to the left of the application to see the status of its pipeline run. After a pipeline is added, a bottom left icon indicates that there is an associated pipeline.
2.1.6. Interacting with pipelines from Topology view
The side panel of the application node in the Topology page displays the status of a pipeline run and you can interact with it.
- If a pipeline run does not start automatically, the side panel displays a message that the pipeline cannot be automatically started, hence it would need to be started manually.
- If a pipeline is created but the user has not started the pipeline, its status is not started. When the user clicks the Not started status icon, the start dialog box opens in the Topology view.
- If the pipeline has no build or build config, the Builds section is not visible. If there is a pipeline and build config, the Builds section is visible.
- The side panel displays a Log Snippet when a pipeline run fails on a specific task run. You can view the Log Snippet in the Pipeline Runs section, under the Resources tab. It provides a general error message and a snippet of the log. A link to the Logs section provides quick access to the details about the failed run.
2.1.7. Editing pipelines
You can edit the pipelines in your cluster using the Developer perspective of the web console:
Procedure
- In the Pipelines view of the Developer perspective, select the pipeline you want to edit to see the details of the pipeline. In the Pipeline Details page, click Actions and select Edit Pipeline.
On the Pipeline builder page, you can perform the following tasks:
- Add additional tasks, parameters, or resources to the pipeline.
- Click the task you want to modify to see the task details in the side panel and modify the required task details, such as the display name, parameters, and resources.
- Alternatively, to delete the task, click the task, and in the side panel, click Actions and select Remove Task.
- Click Save to save the modified pipeline.
2.1.8. Deleting pipelines
You can delete the pipelines in your cluster using the Developer perspective of the web console.
Procedure
-
In the Pipelines view of the Developer perspective, click the Options
menu adjoining a Pipeline, and select Delete Pipeline.
- In the Delete Pipeline confirmation prompt, click Delete to confirm the deletion.
2.3. Creating pipeline templates in the Administrator perspective
As a cluster administrator, you can create pipeline templates that developers can reuse when they create a pipeline on the cluster.
Prerequisites
- You have access to an OpenShift Container Platform cluster with cluster administrator permissions, and have switched to the Administrator perspective.
- You have installed the OpenShift Pipelines Operator in your cluster.
Procedure
- Navigate to the Pipelines page to view existing pipeline templates.
-
Click the
 icon to go to the Import YAML page.
Add the YAML for your pipeline template. The template must include the following information:
Copy to Clipboard Copied! Toggle word wrap Toggle overflow - 1
- The template must be created in the
openshiftnamespace. - 2
- The template must contain the
pipeline.openshift.io/runtimelabel. The accepted runtime values for this label arenodejs,golang,dotnet,java,php,ruby,perl,python,nginx, andhttpd. - 3
- The template must contain the
pipeline.openshift.io/type:label. The accepted type values for this label areopenshift,knative, andkubernetes.
- Click Create. After the pipeline has been created, you are taken to the Pipeline details page, where you can view information about or edit your pipeline.
Chapter 3. Managing non-versioned and versioned cluster tasks
As a cluster administrator, installing the Red Hat OpenShift Pipelines Operator creates variants of each default cluster task known as versioned cluster tasks (VCT) and non-versioned cluster tasks (NVCT). For example, installing the Red Hat OpenShift Pipelines Operator v1.7 creates a buildah-1-7-0 VCT and a buildah NVCT.
Both NVCT and VCT have the same metadata, behavior, and specifications, including params, workspaces, and steps. However, they behave differently when you disable them or upgrade the Operator.
In Red Hat OpenShift Pipelines 1.10, cluster task functionality is deprecated and is planned to be removed in a future release.
3.1. Differences between non-versioned and versioned cluster tasks
Non-versioned and versioned cluster tasks have different naming conventions. And, the Red Hat OpenShift Pipelines Operator upgrades them differently.
| Non-versioned cluster task | Versioned cluster task | |
|---|---|---|
| Nomenclature |
The NVCT only contains the name of the cluster task. For example, the name of the NVCT of Buildah installed with Operator v1.7 is |
The VCT contains the name of the cluster task, followed by the version as a suffix. For example, the name of the VCT of Buildah installed with Operator v1.7 is |
| Upgrade | When you upgrade the Operator, it updates the non-versioned cluster task with the latest changes. The name of the NVCT remains unchanged. |
Upgrading the Operator installs the latest version of the VCT and retains the earlier version. The latest version of a VCT corresponds to the upgraded Operator. For example, installing Operator 1.7 installs |
3.2. Advantages and disadvantages of non-versioned and versioned cluster tasks
Before adopting non-versioned or versioned cluster tasks as a standard in production environments, cluster administrators might consider their advantages and disadvantages.
| Cluster task | Advantages | Disadvantages |
|---|---|---|
| Non-versioned cluster task (NVCT) |
| If you deploy pipelines that use NVCT, they might break after an Operator upgrade if the automatically upgraded cluster tasks are not backward-compatible. |
| Versioned cluster task (VCT) |
|
|
3.3. Disabling non-versioned and versioned cluster tasks
As a cluster administrator, you can disable cluster tasks that the OpenShift Pipelines Operator installed.
Procedure
To delete all non-versioned cluster tasks and latest versioned cluster tasks, edit the
TektonConfigcustom resource definition (CRD) and set theclusterTasksparameter inspec.addon.paramstofalse.Example
TektonConfigCRCopy to Clipboard Copied! Toggle word wrap Toggle overflow When you disable cluster tasks, the Operator removes all the non-versioned cluster tasks and only the latest version of the versioned cluster tasks from the cluster.
NoteRe-enabling cluster tasks installs the non-versioned cluster tasks.
Optional: To delete earlier versions of the versioned cluster tasks, use any one of the following methods:
To delete individual earlier versioned cluster tasks, use the
oc delete clustertaskcommand followed by the versioned cluster task name. For example:oc delete clustertask buildah-1-6-0
$ oc delete clustertask buildah-1-6-0Copy to Clipboard Copied! Toggle word wrap Toggle overflow To delete all versioned cluster tasks created by an old version of the Operator, you can delete the corresponding installer set. For example:
oc delete tektoninstallerset versioned-clustertask-1-6-k98as
$ oc delete tektoninstallerset versioned-clustertask-1-6-k98asCopy to Clipboard Copied! Toggle word wrap Toggle overflow ImportantIf you delete an old versioned cluster task, you cannot restore it. You can only restore versioned and non-versioned cluster tasks that the current version of the Operator has created.