Eventing
Using event-driven architectures with OpenShift Serverless
Abstract
Chapter 1. Knative Eventing
Knative Eventing on OpenShift Container Platform enables developers to use an event-driven architecture with serverless applications. An event-driven architecture is based on the concept of decoupled relationships between event producers and event consumers.
Event producers create events, and event sinks, or consumers, receive events. Knative Eventing uses standard HTTP POST requests to send and receive events between event producers and sinks. These events conform to the CloudEvents specifications, which enables creating, parsing, sending, and receiving events in any programming language.
1.1. Knative Eventing use cases:
Knative Eventing supports the following use cases:
- Publish an event without creating a consumer
- You can send events to a broker as an HTTP POST, and use binding to decouple the destination configuration from your application that produces events.
- Consume an event without creating a publisher
- You can use a trigger to consume events from a broker based on event attributes. The application receives events as an HTTP POST.
To enable delivery to multiple types of sinks, Knative Eventing defines the following generic interfaces that can be implemented by multiple Kubernetes resources:
- Addressable resources
-
Able to receive and acknowledge an event delivered over HTTP to an address defined in the
status.address.urlfield of the event. The KubernetesServiceresource also satisfies the addressable interface. - Callable resources
-
Able to receive an event delivered over HTTP and transform it, returning
0or1new events in the HTTP response payload. These returned events may be further processed in the same way that events from an external event source are processed.
Chapter 2. Event sources
2.1. Event sources
A Knative event source can be any Kubernetes object that generates or imports cloud events, and relays those events to another endpoint, known as a sink. Sourcing events is critical to developing a distributed system that reacts to events.
You can create and manage Knative event sources in the OpenShift Container Platform web console, the Knative (kn) CLI, or by applying YAML files.
Currently, OpenShift Serverless supports the following event source types:
- API server source
- Brings Kubernetes API server events into Knative. The API server source sends a new event each time a Kubernetes resource is created, updated or deleted.
- Ping source
- Produces events with a fixed payload on a specified cron schedule.
- Kafka event source
- Connects an Apache Kafka cluster to a sink as an event source.
You can also create a custom event source.
2.1.1. Creating an event source
A Knative event source can be any Kubernetes object that generates or imports cloud events, and relays those events to another endpoint, known as a sink.
Prerequisites
- The OpenShift Serverless Operator and Knative Eventing are installed on your OpenShift Container Platform cluster.
- You have logged in to the web console.
-
You have
cluster-adminprivileges on OpenShift Container Platform, or you have cluster or dedicated administrator permissions on Red Hat OpenShift Service on AWS or OpenShift Dedicated.
Procedure
- In the OpenShift Container Platform web console, navigate to Serverless → Eventing.
- In the Create list, select Event Source. You will be directed to the Event Sources page.
- Select the event source type that you want to create.
2.2. Creating an API server source
The API server source is an event source that can be used to connect an event sink, such as a Knative service, to the Kubernetes API server. The API server source watches for Kubernetes events and forwards them to the Knative Eventing broker.
2.2.1. Creating an API server source by using the web console
After Knative Eventing is installed on your cluster, you can create an API server source by using the web console. Using the OpenShift Container Platform web console provides a streamlined and intuitive user interface to create an event source.
Prerequisites
- You have logged in to the OpenShift Container Platform web console.
- The OpenShift Serverless Operator and Knative Eventing are installed on the cluster.
- You have created a project or have access to a project with the appropriate roles and permissions to create applications and other workloads in OpenShift Container Platform.
-
You have installed the OpenShift CLI (
oc).
If you want to re-use an existing service account, you can modify your existing ServiceAccount resource to include the required permissions instead of creating a new resource.
Create a service account, role, and role binding for the event source as a YAML file:
apiVersion: v1
kind: ServiceAccount
metadata:
  name: events-sa
  namespace: default
1 --- apiVersion: rbac.authorization.k8s.io/v1 kind: Role metadata: name: event-watcher namespace: default2 rules: - apiGroups: - "" resources: - events verbs: - get - list - watch --- apiVersion: rbac.authorization.k8s.io/v1 kind: RoleBinding metadata: name: k8s-ra-event-watcher namespace: default3 roleRef: apiGroup: rbac.authorization.k8s.io kind: Role name: event-watcher subjects: - kind: ServiceAccount name: events-sa namespace: default4 Apply the YAML file:
$ oc apply -f <filename>- Navigate to +Add → Event Source. The Event Sources page is displayed.
- Optional: If you have multiple providers for your event sources, select the required provider from the Providers list to filter the available event sources from the provider.
- Select ApiServerSource and then click Create Event Source. The Create Event Source page is displayed.
Configure the ApiServerSource settings by using the Form view or YAML view:
NoteYou can switch between the Form view and YAML view. The data is persisted when switching between the views.
-
Enter
v1as the APIVERSION andEventas the KIND. - Select the Service Account Name for the service account that you created.
In the Target section, select your event sink. This can be either a Resource or a URI:
- Select Resource to use a channel, broker, or service as an event sink for the event source.
- Select URI to specify a Uniform Resource Identifier (URI) where the events are routed to.
-
Enter
- Click Create.
Verification
After you have created the API server source, check that it is connected to the event sink by viewing it in the Topology view.
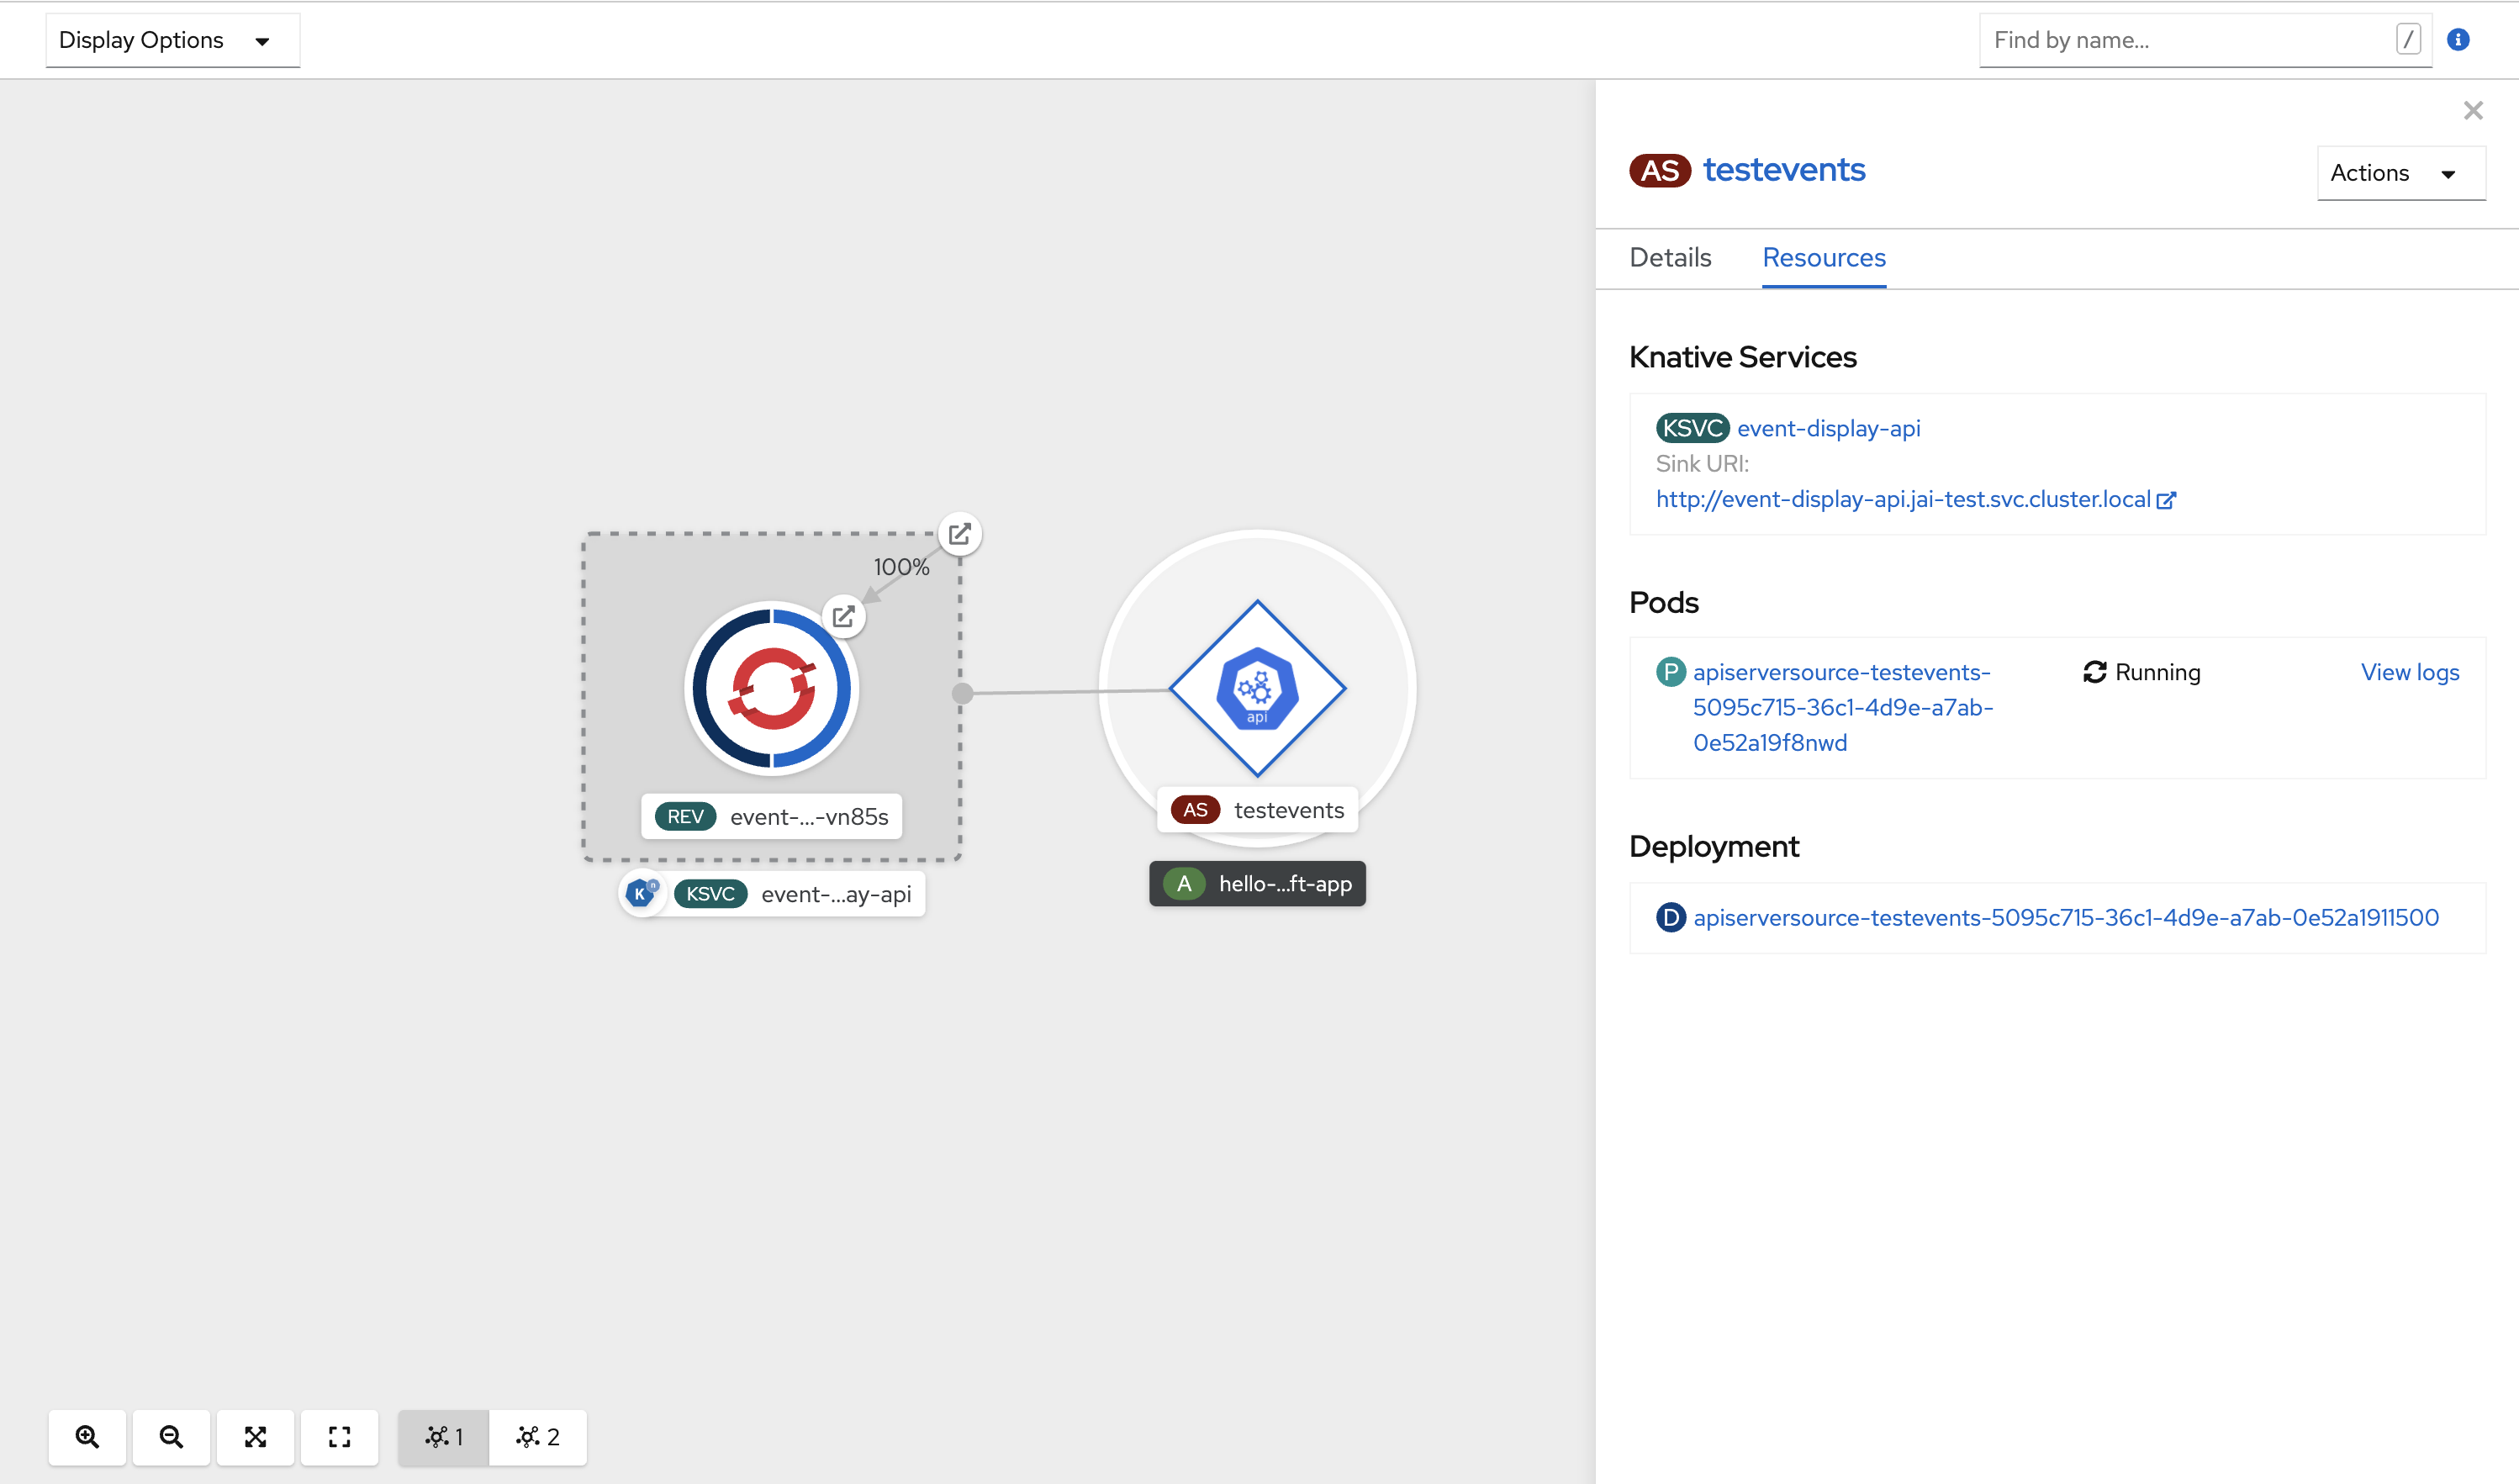
If a URI sink is used, you can modify the URI by right-clicking on URI sink → Edit URI.
Deleting the API server source
- Navigate to the Topology view.
- Right-click the API server source and select Delete ApiServerSource.
2.2.2. Creating an API server source by using the Knative CLI
You can use the kn source apiserver create command to create an API server source by using the kn CLI. Using the kn CLI to create an API server source provides a more streamlined and intuitive user interface than modifying YAML files directly.
Prerequisites
- The OpenShift Serverless Operator and Knative Eventing are installed on the cluster.
- You have created a project or have access to a project with the appropriate roles and permissions to create applications and other workloads in OpenShift Container Platform.
-
You have installed the OpenShift CLI (
oc). -
You have installed the Knative (
kn) CLI.
If you want to re-use an existing service account, you can modify your existing ServiceAccount resource to include the required permissions instead of creating a new resource.
Create a service account, role, and role binding for the event source as a YAML file:
apiVersion: v1
kind: ServiceAccount
metadata:
  name: events-sa
  namespace: default
1 --- apiVersion: rbac.authorization.k8s.io/v1 kind: Role metadata: name: event-watcher namespace: default2 rules: - apiGroups: - "" resources: - events verbs: - get - list - watch --- apiVersion: rbac.authorization.k8s.io/v1 kind: RoleBinding metadata: name: k8s-ra-event-watcher namespace: default3 roleRef: apiGroup: rbac.authorization.k8s.io kind: Role name: event-watcher subjects: - kind: ServiceAccount name: events-sa namespace: default4 Apply the YAML file:
$ oc apply -f <filename>Create an API server source that has an event sink. In the following example, the sink is a broker:
$ kn source apiserver create <event_source_name> --sink broker:<broker_name> --resource "event:v1" --service-account <service_account_name> --mode ResourceTo check that the API server source is set up correctly, create a Knative service that dumps incoming messages to its log:
$ kn service create event-display --image quay.io/openshift-knative/showcaseIf you used a broker as an event sink, create a trigger to filter events from the
defaultbroker to the service:$ kn trigger create <trigger_name> --sink ksvc:event-displayCreate events by launching a pod in the default namespace:
$ oc create deployment event-origin --image quay.io/openshift-knative/showcaseCheck that the controller is mapped correctly by inspecting the output generated by the following command:
$ kn source apiserver describe <source_name>Example output
Name:                mysource
Namespace:           default
Annotations:         sources.knative.dev/creator=developer, sources.knative.dev/lastModifier=developer
Age:                 3m
ServiceAccountName:  events-sa
Mode:                Resource
Sink:
  Name:       default
  Namespace:  default
  Kind:       Broker (eventing.knative.dev/v1)
Resources:
  Kind:        event (v1)
  Controller:  false
Conditions:
  OK TYPE                     AGE REASON
  ++ Ready                     3m
  ++ Deployed                  3m
  ++ SinkProvided              3m
  ++ SufficientPermissions     3m
  ++ EventTypesProvided        3m
Verification
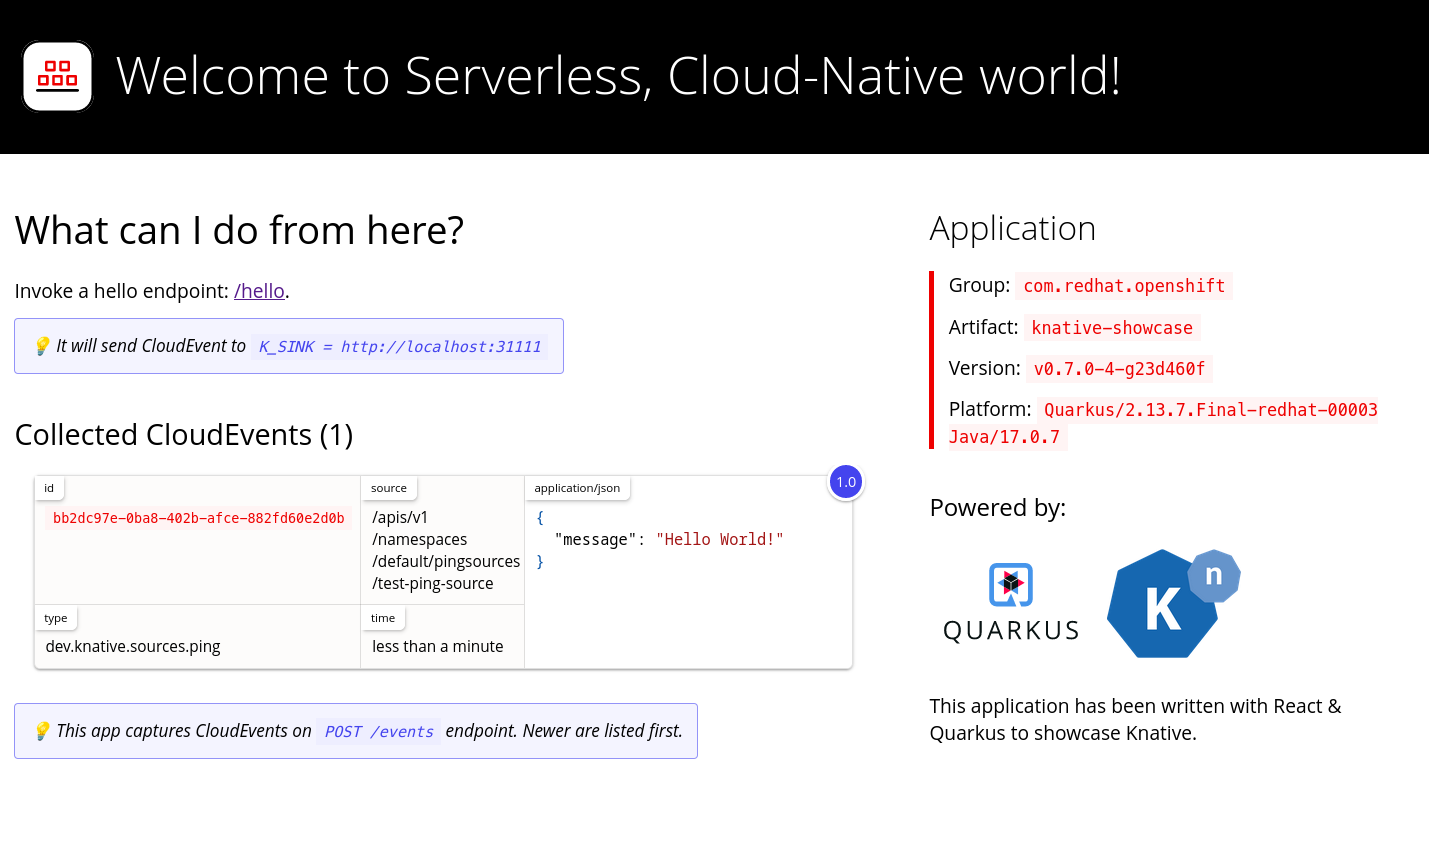
To verify that the Kubernetes events were sent to Knative, look at the event-display logs or use web browser to see the events.
To view the events in a web browser, open the link returned by the following command:
$ kn service describe event-display -o urlFigure 2.1. Example browser page

Alternatively, to see the logs in the terminal, view the event-display logs for the pods by entering the following command:
$ oc logs $(oc get pod -o name | grep event-display) -c user-containerExample output
☁️  cloudevents.Event
Validation: valid
Context Attributes,
  specversion: 1.0
  type: dev.knative.apiserver.resource.update
  datacontenttype: application/json
  ...
Data,
  {
    "apiVersion": "v1",
    "involvedObject": {
      "apiVersion": "v1",
      "fieldPath": "spec.containers{event-origin}",
      "kind": "Pod",
      "name": "event-origin",
      "namespace": "default",
       .....
    },
    "kind": "Event",
    "message": "Started container",
    "metadata": {
      "name": "event-origin.159d7608e3a3572c",
      "namespace": "default",
      ....
    },
    "reason": "Started",
    ...
  }
Deleting the API server source
Delete the trigger:
$ kn trigger delete <trigger_name>Delete the event source:
$ kn source apiserver delete <source_name>Delete the service account, cluster role, and cluster binding:
$ oc delete -f authentication.yaml
2.2.2.1. Knative CLI sink flag
When you create an event source by using the Knative (kn) CLI, you can specify a sink where events are sent to from that resource by using the --sink flag. The sink can be any addressable or callable resource that can receive incoming events from other resources.
The following example creates a sink binding that uses a service, http://event-display.svc.cluster.local, as the sink:
Example command using the sink flag
$ kn source binding create bind-heartbeat \
  --namespace sinkbinding-example \
  --subject "Job:batch/v1:app=heartbeat-cron" \
  --sink http://event-display.svc.cluster.local \
--ce-override "sink=bound"- 1
svcinhttp://event-display.svc.cluster.localdetermines that the sink is a Knative service. Other default sink prefixes includechannel, andbroker.
2.2.3. Creating an API server source by using YAML files
Creating Knative resources by using YAML files uses a declarative API, which enables you to describe event sources declaratively and in a reproducible manner. To create an API server source by using YAML, you must create a YAML file that defines an ApiServerSource object, then apply it by using the oc apply command.
Prerequisites
- The OpenShift Serverless Operator and Knative Eventing are installed on the cluster.
- You have created a project or have access to a project with the appropriate roles and permissions to create applications and other workloads in OpenShift Container Platform.
-
You have created the
defaultbroker in the same namespace as the one defined in the API server source YAML file. -
Install the OpenShift CLI (
oc).
If you want to re-use an existing service account, you can modify your existing ServiceAccount resource to include the required permissions instead of creating a new resource.
Create a service account, role, and role binding for the event source as a YAML file:
apiVersion: v1
kind: ServiceAccount
metadata:
  name: events-sa
  namespace: default
1 --- apiVersion: rbac.authorization.k8s.io/v1 kind: Role metadata: name: event-watcher namespace: default2 rules: - apiGroups: - "" resources: - events verbs: - get - list - watch --- apiVersion: rbac.authorization.k8s.io/v1 kind: RoleBinding metadata: name: k8s-ra-event-watcher namespace: default3 roleRef: apiGroup: rbac.authorization.k8s.io kind: Role name: event-watcher subjects: - kind: ServiceAccount name: events-sa namespace: default4 Apply the YAML file:
$ oc apply -f <filename>Create an API server source as a YAML file:
apiVersion: sources.knative.dev/v1alpha1
kind: ApiServerSource
metadata:
  name: testevents
spec:
  serviceAccountName: events-sa
  mode: Resource
  resources:
    - apiVersion: v1
      kind: Event
  sink:
    ref:
      apiVersion: eventing.knative.dev/v1
      kind: Broker
      name: default
Apply the
ApiServerSourceYAML file:$ oc apply -f <filename>To check that the API server source is set up correctly, create a Knative service as a YAML file that dumps incoming messages to its log:
apiVersion: serving.knative.dev/v1
kind: Service
metadata:
  name: event-display
  namespace: default
spec:
  template:
    spec:
      containers:
        - image: quay.io/openshift-knative/showcase
Apply the
ServiceYAML file:$ oc apply -f <filename>Create a
Triggerobject as a YAML file that filters events from thedefaultbroker to the service created in the previous step:apiVersion: eventing.knative.dev/v1 kind: Trigger metadata: name: event-display-trigger namespace: default spec: broker: default subscriber: ref: apiVersion: serving.knative.dev/v1 kind: Service name: event-displayApply the
TriggerYAML file:$ oc apply -f <filename>Create events by launching a pod in the default namespace:
$ oc create deployment event-origin --image=quay.io/openshift-knative/showcaseCheck that the controller is mapped correctly, by entering the following command and inspecting the output:
$ oc get apiserversource.sources.knative.dev testevents -o yamlExample output
apiVersion: sources.knative.dev/v1alpha1
kind: ApiServerSource
metadata:
  annotations:
  creationTimestamp: "2020-04-07T17:24:54Z"
  generation: 1
  name: testevents
  namespace: default
  resourceVersion: "62868"
  selfLink: /apis/sources.knative.dev/v1alpha1/namespaces/default/apiserversources/testevents2
  uid: 1603d863-bb06-4d1c-b371-f580b4db99fa
spec:
  mode: Resource
  resources:
  - apiVersion: v1
    controller: false
    controllerSelector:
      apiVersion: ""
      kind: ""
      name: ""
      uid: ""
    kind: Event
    labelSelector: {}
  serviceAccountName: events-sa
  sink:
    ref:
      apiVersion: eventing.knative.dev/v1
      kind: Broker
      name: default
Verification
To verify that the Kubernetes events were sent to Knative, you can look at the event-display logs or use web browser to see the events.
To view the events in a web browser, open the link returned by the following command:
$ oc get ksvc event-display -o jsonpath='{.status.url}'Figure 2.2. Example browser page
To see the logs in the terminal, view the event-display logs for the pods by entering the following command:
$ oc logs $(oc get pod -o name | grep event-display) -c user-containerExample output
☁️  cloudevents.Event
Validation: valid
Context Attributes,
  specversion: 1.0
  type: dev.knative.apiserver.resource.update
  datacontenttype: application/json
  ...
Data,
  {
    "apiVersion": "v1",
    "involvedObject": {
      "apiVersion": "v1",
      "fieldPath": "spec.containers{event-origin}",
      "kind": "Pod",
      "name": "event-origin",
      "namespace": "default",
       .....
    },
    "kind": "Event",
    "message": "Started container",
    "metadata": {
      "name": "event-origin.159d7608e3a3572c",
      "namespace": "default",
      ....
    },
    "reason": "Started",
    ...
  }
Deleting the API server source
Delete the trigger:
$ oc delete -f trigger.yamlDelete the event source:
$ oc delete -f k8s-events.yamlDelete the service account, cluster role, and cluster binding:
$ oc delete -f authentication.yaml
2.3. Creating a ping source
A ping source is an event source that can be used to periodically send ping events with a constant payload to an event consumer. A ping source can be used to schedule sending events, similar to a timer.
2.3.1. Creating a ping source by using the web console
After Knative Eventing is installed on your cluster, you can create a ping source by using the web console. Using the OpenShift Container Platform web console provides a streamlined and intuitive user interface to create an event source.
Prerequisites
- You have logged in to the OpenShift Container Platform web console.
- The OpenShift Serverless Operator, Knative Serving and Knative Eventing are installed on the cluster.
- You have created a project or have access to a project with the appropriate roles and permissions to create applications and other workloads in OpenShift Container Platform.
Procedure
To verify that the ping source is working, create a simple Knative service that dumps incoming messages to the logs of the service.
- Navigate to +Add → YAML.
Copy the example YAML:
apiVersion: serving.knative.dev/v1 kind: Service metadata: name: event-display spec: template: spec: containers: - image: quay.io/openshift-knative/showcase- Click Create.
Create a ping source in the same namespace as the service created in the previous step, or any other sink that you want to send events to.
- Navigate to +Add → Event Source. The Event Sources page is displayed.
- Optional: If you have multiple providers for your event sources, select the required provider from the Providers list to filter the available event sources from the provider.
Select Ping Source and then click Create Event Source. The Create Event Source page is displayed.
NoteYou can configure the PingSource settings by using the Form view or YAML view and can switch between the views. The data is persisted when switching between the views.
-
Enter a value for Schedule. In this example, the value is
*/2 * * * *, which creates a PingSource that sends a message every two minutes. - Optional: You can enter a value for Data, which is the message payload.
In the Target section, select your event sink. This can be either a Resource or a URI:
-
Select Resource to use a channel, broker, or service as an event sink for the event source. In this example, the
event-displayservice created in the previous step is used as the target Resource. - Select URI to specify a Uniform Resource Identifier (URI) where the events are routed to.
-
Select Resource to use a channel, broker, or service as an event sink for the event source. In this example, the
- Click Create.
Verification
You can verify that the ping source was created and is connected to the sink by viewing the Topology page.
- Navigate to Topology.
View the ping source and sink.
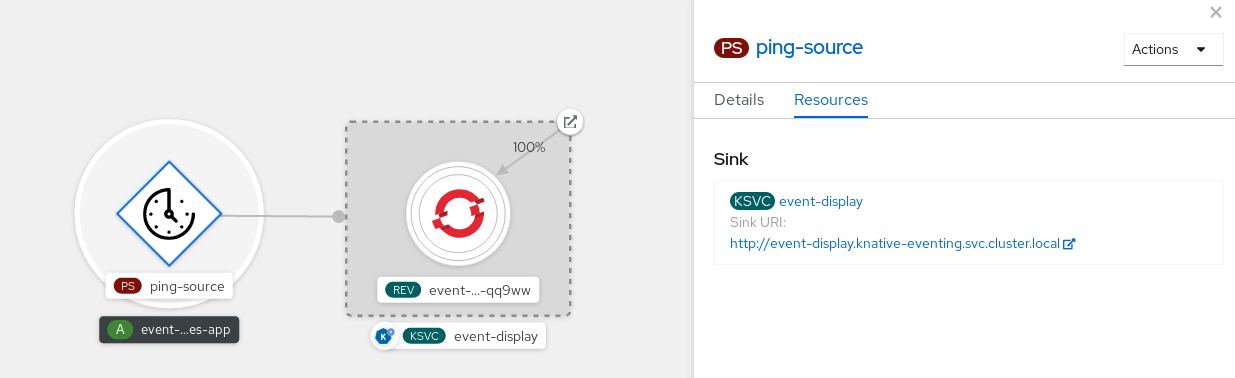
View the event-display service in the web browser. You should see the ping source events in the web UI.
Deleting the ping source
- Navigate to the Topology view.
- Right-click the API server source and select Delete Ping Source.
2.3.2. Creating a ping source by using the Knative CLI
You can use the kn source ping create command to create a ping source by using the Knative (kn) CLI. Using the Knative CLI to create event sources provides a more streamlined and intuitive user interface than modifying YAML files directly.
Prerequisites
- The OpenShift Serverless Operator, Knative Serving and Knative Eventing are installed on the cluster.
-
You have installed the Knative (
kn) CLI. - You have created a project or have access to a project with the appropriate roles and permissions to create applications and other workloads in OpenShift Container Platform.
-
Optional: If you want to use the verification steps for this procedure, install the OpenShift CLI (
oc).
Procedure
To verify that the ping source is working, create a simple Knative service that dumps incoming messages to the service logs:
$ kn service create event-display \
    --image quay.io/openshift-knative/showcase
For each set of ping events that you want to request, create a ping source in the same namespace as the event consumer:
$ kn source ping create test-ping-source \
    --schedule "*/2 * * * *" \
    --data '{"message": "Hello world!"}' \
    --sink ksvc:event-display
Check that the controller is mapped correctly by entering the following command and inspecting the output:
$ kn source ping describe test-ping-sourceExample output
Name:         test-ping-source
Namespace:    default
Annotations:  sources.knative.dev/creator=developer, sources.knative.dev/lastModifier=developer
Age:          15s
Schedule:     */2 * * * *
Data:         {"message": "Hello world!"}

Sink:
  Name:       event-display
  Namespace:  default
  Resource:   Service (serving.knative.dev/v1)

Conditions:
  OK TYPE                 AGE REASON
  ++ Ready                 8s
  ++ Deployed              8s
  ++ SinkProvided         15s
  ++ ValidSchedule        15s
  ++ EventTypeProvided    15s
  ++ ResourcesCorrect     15s
Verification
You can verify that the Kubernetes events were sent to the Knative event sink by looking at the logs of the sink pod.
By default, Knative services terminate their pods if no traffic is received within a 60 second period. The example shown in this guide creates a ping source that sends a message every 2 minutes, so each message should be observed in a newly created pod.
Watch for new pods created:
$ watch oc get podsCancel watching the pods using Ctrl+C, then look at the logs of the created pod:
$ oc logs $(oc get pod -o name | grep event-display) -c user-containerExample output
☁️  cloudevents.Event
Validation: valid
Context Attributes,
  specversion: 1.0
  type: dev.knative.sources.ping
  source: /apis/v1/namespaces/default/pingsources/test-ping-source
  id: 99e4f4f6-08ff-4bff-acf1-47f61ded68c9
  time: 2020-04-07T16:16:00.000601161Z
  datacontenttype: application/json
Data,
  {
    "message": "Hello world!"
  }
Deleting the ping source
Delete the ping source:
$ kn delete pingsources.sources.knative.dev <ping_source_name>
2.3.2.1. Knative CLI sink flag
When you create an event source by using the Knative (kn) CLI, you can specify a sink where events are sent to from that resource by using the --sink flag. The sink can be any addressable or callable resource that can receive incoming events from other resources.
The following example creates a sink binding that uses a service, http://event-display.svc.cluster.local, as the sink:
Example command using the sink flag
$ kn source binding create bind-heartbeat \
  --namespace sinkbinding-example \
  --subject "Job:batch/v1:app=heartbeat-cron" \
  --sink http://event-display.svc.cluster.local \
--ce-override "sink=bound"- 1
svcinhttp://event-display.svc.cluster.localdetermines that the sink is a Knative service. Other default sink prefixes includechannel, andbroker.
2.3.3. Creating a ping source by using YAML
Creating Knative resources by using YAML files uses a declarative API, which enables you to describe event sources declaratively and in a reproducible manner. To create a serverless ping source by using YAML, you must create a YAML file that defines a PingSource object, then apply it by using oc apply.
Example PingSource object
apiVersion: sources.knative.dev/v1
kind: PingSource
metadata:
  name: test-ping-source
spec:
  schedule: "*/2 * * * *"
data: '{"message": "Hello world!"}'
sink:
    ref:
      apiVersion: serving.knative.dev/v1
      kind: Service
name: event-display- 1
- The schedule of the event specified using CRON expression.
- 2
- The event message body expressed as a JSON encoded data string.
- 3
- These are the details of the event consumer. In this example, we are using a Knative service named
event-display.
Prerequisites
- The OpenShift Serverless Operator, Knative Serving and Knative Eventing are installed on the cluster.
-
Install the OpenShift CLI (
oc). - You have created a project or have access to a project with the appropriate roles and permissions to create applications and other workloads in OpenShift Container Platform.
Procedure
To verify that the ping source is working, create a simple Knative service that dumps incoming messages to the service’s logs.
Create a service YAML file:
apiVersion: serving.knative.dev/v1
kind: Service
metadata:
  name: event-display
spec:
  template:
    spec:
      containers:
        - image: quay.io/openshift-knative/showcase
Create the service:
$ oc apply -f <filename>
For each set of ping events that you want to request, create a ping source in the same namespace as the event consumer.
Create a YAML file for the ping source:
apiVersion: sources.knative.dev/v1
kind: PingSource
metadata:
  name: test-ping-source
spec:
  schedule: "*/2 * * * *"
  data: '{"message": "Hello world!"}'
  sink:
    ref:
      apiVersion: serving.knative.dev/v1
      kind: Service
      name: event-display
Create the ping source:
$ oc apply -f <filename>
Check that the controller is mapped correctly by entering the following command:
$ oc get pingsource.sources.knative.dev <ping_source_name> -oyamlExample output
apiVersion: sources.knative.dev/v1
kind: PingSource
metadata:
  annotations:
    sources.knative.dev/creator: developer
    sources.knative.dev/lastModifier: developer
  creationTimestamp: "2020-04-07T16:11:14Z"
  generation: 1
  name: test-ping-source
  namespace: default
  resourceVersion: "55257"
  selfLink: /apis/sources.knative.dev/v1/namespaces/default/pingsources/test-ping-source
  uid: 3d80d50b-f8c7-4c1b-99f7-3ec00e0a8164
spec:
  data: '{ value: "hello" }'
  schedule: '*/2 * * * *'
  sink:
    ref:
      apiVersion: serving.knative.dev/v1
      kind: Service
      name: event-display
      namespace: default
Verification
You can verify that the Kubernetes events were sent to the Knative event sink by looking at the sink pod’s logs.
By default, Knative services terminate their pods if no traffic is received within a 60 second period. The example shown in this guide creates a PingSource that sends a message every 2 minutes, so each message should be observed in a newly created pod.
Watch for new pods created:
$ watch oc get podsCancel watching the pods using Ctrl+C, then look at the logs of the created pod:
$ oc logs $(oc get pod -o name | grep event-display) -c user-containerExample output
☁️  cloudevents.Event
Validation: valid
Context Attributes,
  specversion: 1.0
  type: dev.knative.sources.ping
  source: /apis/v1/namespaces/default/pingsources/test-ping-source
  id: 042ff529-240e-45ee-b40c-3a908129853e
  time: 2020-04-07T16:22:00.000791674Z
  datacontenttype: application/json
Data,
  {
    "message": "Hello world!"
  }
Deleting the ping source
Delete the ping source:
$ oc delete -f <filename>Example command
$ oc delete -f ping-source.yaml
2.4. Source for Apache Kafka
You can create an Apache Kafka source that reads events from an Apache Kafka cluster and passes these events to a sink. You can create a Kafka source by using the OpenShift Container Platform web console, the Knative (kn) CLI, or by creating a KafkaSource object directly as a YAML file and using the OpenShift CLI (oc) to apply it.
See the documentation for Installing Knative broker for Apache Kafka.
2.4.1. Creating an Apache Kafka event source by using the web console
After the Knative broker implementation for Apache Kafka is installed on your cluster, you can create an Apache Kafka source by using the web console. Using the OpenShift Container Platform web console provides a streamlined and intuitive user interface to create a Kafka source.
Prerequisites
-
The OpenShift Serverless Operator, Knative Eventing, and the
KnativeKafkacustom resource are installed on your cluster. - You have logged in to the web console.
- You have access to a Red Hat AMQ Streams (Kafka) cluster that produces the Kafka messages you want to import.
- You have created a project or have access to a project with the appropriate roles and permissions to create applications and other workloads in OpenShift Container Platform.
Procedure
- Navigate to the +Add page and select Event Source.
- In the Event Sources page, select Kafka Source in the Type section.
Configure the Kafka Source settings:
- Add a comma-separated list of Bootstrap Servers.
- Add a comma-separated list of Topics.
- Add a Consumer Group.
- Select the Service Account Name for the service account that you created.
In the Target section, select your event sink. This can be either a Resource or a URI:
- Select Resource to use a channel, broker, or service as an event sink for the event source.
- Select URI to specify a Uniform Resource Identifier (URI) where the events are routed to.
- Enter a Name for the Kafka event source.
- Click Create.
Verification
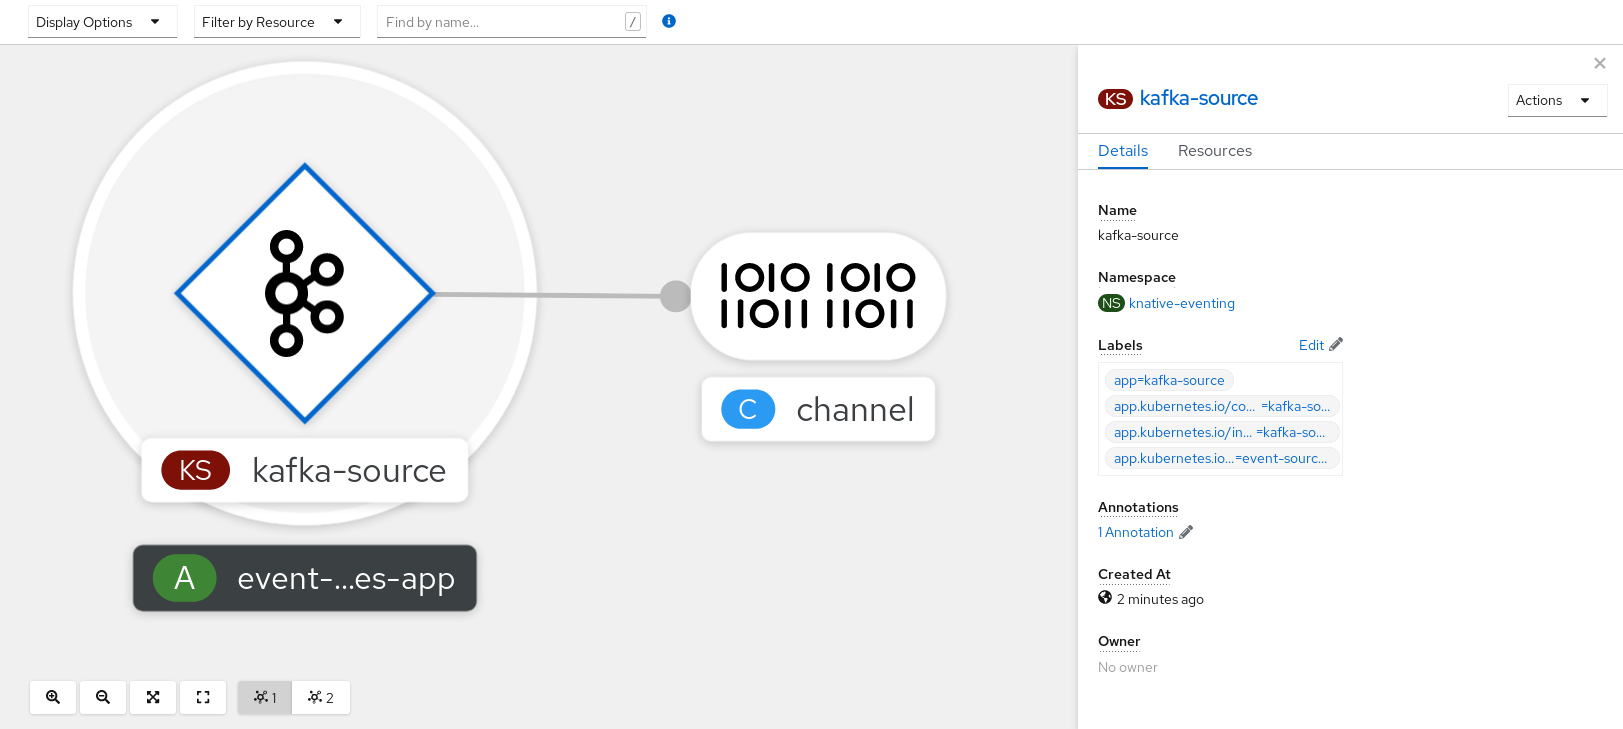
You can verify that the Kafka event source was created and is connected to the sink by viewing the Topology page.
- Navigate to Topology.
View the Kafka event source and sink.
2.4.2. Creating an Apache Kafka event source by using the Knative CLI
You can use the kn source kafka create command to create a Kafka source by using the Knative (kn) CLI. Using the Knative CLI to create event sources provides a more streamlined and intuitive user interface than modifying YAML files directly.
Prerequisites
-
The OpenShift Serverless Operator, Knative Eventing, Knative Serving, and the
KnativeKafkacustom resource (CR) are installed on your cluster. - You have created a project or have access to a project with the appropriate roles and permissions to create applications and other workloads in OpenShift Container Platform.
- You have access to a Red Hat AMQ Streams (Kafka) cluster that produces the Kafka messages you want to import.
-
You have installed the Knative (
kn) CLI. -
Optional: You have installed the OpenShift CLI (
oc) if you want to use the verification steps in this procedure.
Procedure
To verify that the Kafka event source is working, create a Knative service that dumps incoming events into the service logs:
$ kn service create event-display \
    --image quay.io/openshift-knative/showcase
Create a
KafkaSourceCR:$ kn source kafka create <kafka_source_name> \ --servers <cluster_kafka_bootstrap>.kafka.svc:9092 \ --topics <topic_name> --consumergroup my-consumer-group \ --sink event-displayNoteReplace the placeholder values in this command with values for your source name, bootstrap servers, and topics.
The
--servers,--topics, and--consumergroupoptions specify the connection parameters to the Kafka cluster. The--consumergroupoption is optional.Optional: View details about the
KafkaSourceCR you created:$ kn source kafka describe <kafka_source_name>Example output
Name:              example-kafka-source
Namespace:         kafka
Age:               1h
BootstrapServers:  example-cluster-kafka-bootstrap.kafka.svc:9092
Topics:            example-topic
ConsumerGroup:     example-consumer-group

Sink:
  Name:       event-display
  Namespace:  default
  Resource:   Service (serving.knative.dev/v1)

Conditions:
  OK TYPE            AGE REASON
  ++ Ready            1h
  ++ Deployed         1h
  ++ SinkProvided     1h
Verification steps
Trigger the Kafka instance to send a message to the topic:
$ oc -n kafka run kafka-producer \
    -ti --image=quay.io/strimzi/kafka:latest-kafka-2.7.0 --rm=true \
    --restart=Never -- bin/kafka-console-producer.sh \
    --broker-list <cluster_kafka_bootstrap>:9092 --topic my-topic
Enter the message in the prompt. This command assumes that:
-
The Kafka cluster is installed in the
kafkanamespace. -
The
KafkaSourceobject has been configured to use themy-topictopic.
-
The Kafka cluster is installed in the
Verify that the message arrived by viewing the logs:
$ oc logs $(oc get pod -o name | grep event-display) -c user-containerExample output
☁️  cloudevents.Event
Validation: valid
Context Attributes,
  specversion: 1.0
  type: dev.knative.kafka.event
  source: /apis/v1/namespaces/default/kafkasources/example-kafka-source#example-topic
  subject: partition:46#0
  id: partition:46/offset:0
  time: 2021-03-10T11:21:49.4Z
Extensions,
  traceparent: 00-161ff3815727d8755848ec01c866d1cd-7ff3916c44334678-00
Data,
  Hello!
2.4.2.1. Knative CLI sink flag
When you create an event source by using the Knative (kn) CLI, you can specify a sink where events are sent to from that resource by using the --sink flag. The sink can be any addressable or callable resource that can receive incoming events from other resources.
The following example creates a sink binding that uses a service, http://event-display.svc.cluster.local, as the sink:
Example command using the sink flag
$ kn source binding create bind-heartbeat \
  --namespace sinkbinding-example \
  --subject "Job:batch/v1:app=heartbeat-cron" \
  --sink http://event-display.svc.cluster.local \
--ce-override "sink=bound"- 1
svcinhttp://event-display.svc.cluster.localdetermines that the sink is a Knative service. Other default sink prefixes includechannel, andbroker.
2.4.3. Creating an Apache Kafka event source by using YAML
Creating Knative resources by using YAML files uses a declarative API, which enables you to describe applications declaratively and in a reproducible manner. To create a Kafka source by using YAML, you must create a YAML file that defines a KafkaSource object, then apply it by using the oc apply command.
Prerequisites
-
The OpenShift Serverless Operator, Knative Eventing, and the
KnativeKafkacustom resource are installed on your cluster. - You have created a project or have access to a project with the appropriate roles and permissions to create applications and other workloads in OpenShift Container Platform.
- You have access to a Red Hat AMQ Streams (Kafka) cluster that produces the Kafka messages you want to import.
-
Install the OpenShift CLI (
oc).
Procedure
Create a
KafkaSourceobject as a YAML file:apiVersion: sources.knative.dev/v1beta1 kind: KafkaSource metadata: name: <source_name> spec: consumerGroup: <group_name>1 bootstrapServers: - <list_of_bootstrap_servers> topics: - <list_of_topics>2 sink: - <list_of_sinks>3 ImportantOnly the
v1beta1version of the API forKafkaSourceobjects on OpenShift Serverless is supported. Do not use thev1alpha1version of this API, as this version is now deprecated.Example
KafkaSourceobjectapiVersion: sources.knative.dev/v1beta1 kind: KafkaSource metadata: name: kafka-source spec: consumerGroup: knative-group bootstrapServers: - my-cluster-kafka-bootstrap.kafka:9092 topics: - knative-demo-topic sink: ref: apiVersion: serving.knative.dev/v1 kind: Service name: event-displayApply the
KafkaSourceYAML file:$ oc apply -f <filename>
Verification
Verify that the Kafka event source was created by entering the following command:
$ oc get podsExample output
NAME                                    READY     STATUS    RESTARTS   AGE
kafkasource-kafka-source-5ca0248f-...   1/1       Running   0          13m
2.4.4. Configuring SASL authentication for Apache Kafka sources
Simple Authentication and Security Layer (SASL) is used by Apache Kafka for authentication. If you use SASL authentication on your cluster, users must provide credentials to Knative for communicating with the Kafka cluster; otherwise events cannot be produced or consumed.
Prerequisites
- You have cluster or dedicated administrator permissions on OpenShift Container Platform.
-
The OpenShift Serverless Operator, Knative Eventing, and the
KnativeKafkaCR are installed on your OpenShift Container Platform cluster. - You have created a project or have access to a project with the appropriate roles and permissions to create applications and other workloads in OpenShift Container Platform.
- You have a username and password for a Kafka cluster.
-
You have chosen the SASL mechanism to use, for example,
PLAIN,SCRAM-SHA-256, orSCRAM-SHA-512. -
If TLS is enabled, you also need the
ca.crtcertificate file for the Kafka cluster. -
You have installed the OpenShift (
oc) CLI.
Procedure
Create the certificate files as secrets in your chosen namespace:
$ oc create secret -n <namespace> generic <kafka_auth_secret> \
  --from-file=ca.crt=caroot.pem \
  --from-literal=password="SecretPassword" \
  --from-literal=saslType="SCRAM-SHA-512" \
1 --from-literal=user="my-sasl-user"- 1
- The SASL type can be
PLAIN,SCRAM-SHA-256, orSCRAM-SHA-512.
Create or modify your Kafka source so that it contains the following
specconfiguration:apiVersion: sources.knative.dev/v1beta1 kind: KafkaSource metadata: name: example-source spec: ... net: sasl: enable: true user: secretKeyRef: name: <kafka_auth_secret> key: user password: secretKeyRef: name: <kafka_auth_secret> key: password type: secretKeyRef: name: <kafka_auth_secret> key: saslType tls: enable: true caCert:1 secretKeyRef: name: <kafka_auth_secret> key: ca.crt ...- 1
- The
caCertspec is not required if you are using a public cloud Kafka service.
2.4.5. Configuring KEDA autoscaling for KafkaSource
You can configure Knative Eventing sources for Apache Kafka (KafkaSource) to be autoscaled using the Custom Metrics Autoscaler Operator, which is based on the Kubernetes Event Driven Autoscaler (KEDA).
Configuring KEDA autoscaling for KafkaSource is a Technology Preview feature only. Technology Preview features are not supported with Red Hat production service level agreements (SLAs) and might not be functionally complete. Red Hat does not recommend using them in production. These features provide early access to upcoming product features, enabling customers to test functionality and provide feedback during the development process.
For more information about the support scope of Red Hat Technology Preview features, see Technology Preview Features Support Scope.
Prerequisites
-
The OpenShift Serverless Operator, Knative Eventing, and the
KnativeKafkacustom resource are installed on your cluster.
Procedure
In the
KnativeKafkacustom resource, enable KEDA scaling:Example YAML
apiVersion: operator.serverless.openshift.io/v1alpha1
kind: KnativeKafka
metadata:
  name: knative-kafka
  namespace: knative-eventing
spec:
  config:
    kafka-features:
      controller-autoscaler-keda: enabled
Apply the
KnativeKafkaYAML file:$ oc apply -f <filename>
2.5. Custom event sources
If you need to ingress events from an event producer that is not included in Knative, or from a producer that emits events which are not in the CloudEvent format, you can do this by creating a custom event source. You can create a custom event source by using one of the following methods:
-
Use a
PodSpecableobject as an event source, by creating a sink binding. - Use a container as an event source, by creating a container source.
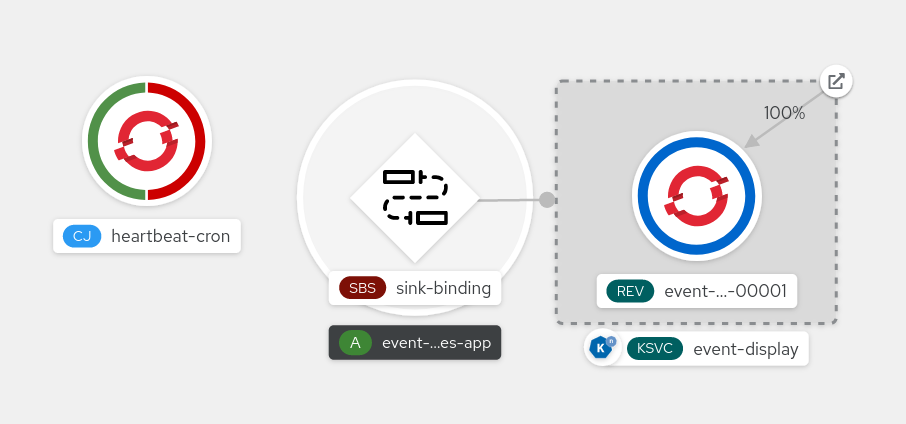
2.5.1. Sink binding
The SinkBinding object supports decoupling event production from delivery addressing. Sink binding is used to connect event producers to an event consumer, or sink. An event producer is a Kubernetes resource that embeds a PodSpec template and produces events. A sink is an addressable Kubernetes object that can receive events.
The SinkBinding object injects environment variables into the PodTemplateSpec of the sink, which means that the application code does not need to interact directly with the Kubernetes API to locate the event destination. These environment variables are as follows:
K_SINK- The URL of the resolved sink.
K_CE_OVERRIDES- A JSON object that specifies overrides to the outbound event.
The SinkBinding object currently does not support custom revision names for services.
2.5.1.1. Creating a sink binding by using YAML
Creating Knative resources by using YAML files uses a declarative API, which enables you to describe event sources declaratively and in a reproducible manner. To create a sink binding by using YAML, you must create a YAML file that defines an SinkBinding object, then apply it by using the oc apply command.
Prerequisites
- The OpenShift Serverless Operator, Knative Serving and Knative Eventing are installed on the cluster.
-
Install the OpenShift CLI (
oc). - You have created a project or have access to a project with the appropriate roles and permissions to create applications and other workloads in OpenShift Container Platform.
Procedure
To check that sink binding is set up correctly, create a Knative event display service, or event sink, that dumps incoming messages to its log.
Create a service YAML file:
Example service YAML file
apiVersion: serving.knative.dev/v1
kind: Service
metadata:
  name: event-display
spec:
  template:
    spec:
      containers:
        - image: quay.io/openshift-knative/showcase
Create the service:
$ oc apply -f <filename>
Create a sink binding instance that directs events to the service.
Create a sink binding YAML file:
Example service YAML file
apiVersion: sources.knative.dev/v1alpha1
kind: SinkBinding
metadata:
  name: bind-heartbeat
spec:
  subject:
    apiVersion: batch/v1
    kind: Job
1 selector: matchLabels: app: heartbeat-cron sink: ref: apiVersion: serving.knative.dev/v1 kind: Service name: event-display- 1
- In this example, any Job with the label
app: heartbeat-cronwill be bound to the event sink.
Create the sink binding:
$ oc apply -f <filename>
Create a
CronJobobject.Create a cron job YAML file:
Example cron job YAML file
apiVersion: batch/v1 kind: CronJob metadata: name: heartbeat-cron spec: # Run every minute schedule: "* * * * *" jobTemplate: metadata: labels: app: heartbeat-cron bindings.knative.dev/include: "true" spec: template: spec: restartPolicy: Never containers: - name: single-heartbeat image: quay.io/openshift-knative/heartbeats:latest args: - --period=1 env: - name: ONE_SHOT value: "true" - name: POD_NAME valueFrom: fieldRef: fieldPath: metadata.name - name: POD_NAMESPACE valueFrom: fieldRef: fieldPath: metadata.namespaceImportantTo use sink binding, you must manually add a
bindings.knative.dev/include=truelabel to your Knative resources.For example, to add this label to a
CronJobresource, add the following lines to theJobresource YAML definition:jobTemplate: metadata: labels: app: heartbeat-cron bindings.knative.dev/include: "true"Create the cron job:
$ oc apply -f <filename>
Check that the controller is mapped correctly by entering the following command and inspecting the output:
$ oc get sinkbindings.sources.knative.dev bind-heartbeat -oyamlExample output
spec:
  sink:
    ref:
      apiVersion: serving.knative.dev/v1
      kind: Service
      name: event-display
      namespace: default
  subject:
    apiVersion: batch/v1
    kind: Job
    namespace: default
    selector:
      matchLabels:
        app: heartbeat-cron
Verification
You can verify that the Kubernetes events were sent to the Knative event sink by looking at the message dumper function logs.
Enter the command:
$ oc get podsEnter the command:
$ oc logs $(oc get pod -o name | grep event-display) -c user-containerExample output
☁️  cloudevents.Event
Validation: valid
Context Attributes,
  specversion: 1.0
  type: dev.knative.eventing.samples.heartbeat
  source: https://knative.dev/eventing-contrib/cmd/heartbeats/#event-test/mypod
  id: 2b72d7bf-c38f-4a98-a433-608fbcdd2596
  time: 2019-10-18T15:23:20.809775386Z
  contenttype: application/json
Extensions,
  beats: true
  heart: yes
  the: 42
Data,
  {
    "id": 1,
    "label": ""
  }
2.5.1.2. Creating a sink binding by using the Knative CLI
You can use the kn source binding create command to create a sink binding by using the Knative (kn) CLI. Using the Knative CLI to create event sources provides a more streamlined and intuitive user interface than modifying YAML files directly.
Prerequisites
- The OpenShift Serverless Operator, Knative Serving and Knative Eventing are installed on the cluster.
- You have created a project or have access to a project with the appropriate roles and permissions to create applications and other workloads in OpenShift Container Platform.
-
Install the Knative (
kn) CLI. -
Install the OpenShift CLI (
oc).
The following procedure requires you to create YAML files.
If you change the names of the YAML files from those used in the examples, you must ensure that you also update the corresponding CLI commands.
Procedure
To check that sink binding is set up correctly, create a Knative event display service, or event sink, that dumps incoming messages to its log:
$ kn service create event-display --image quay.io/openshift-knative/showcaseCreate a sink binding instance that directs events to the service:
$ kn source binding create bind-heartbeat --subject Job:batch/v1:app=heartbeat-cron --sink ksvc:event-displayCreate a
CronJobobject.Create a cron job YAML file:
Example cron job YAML file
apiVersion: batch/v1 kind: CronJob metadata: name: heartbeat-cron spec: # Run every minute schedule: "* * * * *" jobTemplate: metadata: labels: app: heartbeat-cron bindings.knative.dev/include: "true" spec: template: spec: restartPolicy: Never containers: - name: single-heartbeat image: quay.io/openshift-knative/heartbeats:latest args: - --period=1 env: - name: ONE_SHOT value: "true" - name: POD_NAME valueFrom: fieldRef: fieldPath: metadata.name - name: POD_NAMESPACE valueFrom: fieldRef: fieldPath: metadata.namespaceImportantTo use sink binding, you must manually add a
bindings.knative.dev/include=truelabel to your Knative CRs.For example, to add this label to a
CronJobCR, add the following lines to theJobCR YAML definition:jobTemplate: metadata: labels: app: heartbeat-cron bindings.knative.dev/include: "true"Create the cron job:
$ oc apply -f <filename>
Check that the controller is mapped correctly by entering the following command and inspecting the output:
$ kn source binding describe bind-heartbeatExample output
Name:         bind-heartbeat
Namespace:    demo-2
Annotations:  sources.knative.dev/creator=minikube-user, sources.knative.dev/lastModifier=minikub ...
Age:          2m
Subject:
  Resource:   job (batch/v1)
  Selector:
    app:      heartbeat-cron
Sink:
  Name:       event-display
  Resource:   Service (serving.knative.dev/v1)

Conditions:
  OK TYPE     AGE REASON
  ++ Ready     2m
Verification
You can verify that the Kubernetes events were sent to the Knative event sink by looking at the message dumper function logs.
View the message dumper function logs by entering the following commands:
$ oc get pods$ oc logs $(oc get pod -o name | grep event-display) -c user-containerExample output
☁️  cloudevents.Event
Validation: valid
Context Attributes,
  specversion: 1.0
  type: dev.knative.eventing.samples.heartbeat
  source: https://knative.dev/eventing-contrib/cmd/heartbeats/#event-test/mypod
  id: 2b72d7bf-c38f-4a98-a433-608fbcdd2596
  time: 2019-10-18T15:23:20.809775386Z
  contenttype: application/json
Extensions,
  beats: true
  heart: yes
  the: 42
Data,
  {
    "id": 1,
    "label": ""
  }
2.5.1.2.1. Knative CLI sink flag
When you create an event source by using the Knative (kn) CLI, you can specify a sink where events are sent to from that resource by using the --sink flag. The sink can be any addressable or callable resource that can receive incoming events from other resources.
The following example creates a sink binding that uses a service, http://event-display.svc.cluster.local, as the sink:
Example command using the sink flag
$ kn source binding create bind-heartbeat \
  --namespace sinkbinding-example \
  --subject "Job:batch/v1:app=heartbeat-cron" \
  --sink http://event-display.svc.cluster.local \
--ce-override "sink=bound"- 1
svcinhttp://event-display.svc.cluster.localdetermines that the sink is a Knative service. Other default sink prefixes includechannel, andbroker.
2.5.1.3. Creating a sink binding by using the web console
After Knative Eventing is installed on your cluster, you can create a sink binding by using the web console. Using the OpenShift Container Platform web console provides a streamlined and intuitive user interface to create an event source.
Prerequisites
- You have logged in to the OpenShift Container Platform web console.
- The OpenShift Serverless Operator, Knative Serving, and Knative Eventing are installed on your OpenShift Container Platform cluster.
- You have created a project or have access to a project with the appropriate roles and permissions to create applications and other workloads in OpenShift Container Platform.
Procedure
Create a Knative service to use as a sink:
- Navigate to +Add → YAML.
Copy the example YAML:
apiVersion: serving.knative.dev/v1 kind: Service metadata: name: event-display spec: template: spec: containers: - image: quay.io/openshift-knative/showcase- Click Create.
Create a
CronJobresource that is used as an event source and sends an event every minute.- Navigate to +Add → YAML.
Copy the example YAML:
apiVersion: batch/v1
kind: CronJob
metadata:
  name: heartbeat-cron
spec:
  # Run every minute
  schedule: "*/1 * * * *"
  jobTemplate:
    metadata:
      labels:
        app: heartbeat-cron
        bindings.knative.dev/include: true
1 spec: template: spec: restartPolicy: Never containers: - name: single-heartbeat image: quay.io/openshift-knative/heartbeats args: - --period=1 env: - name: ONE_SHOT value: "true" - name: POD_NAME valueFrom: fieldRef: fieldPath: metadata.name - name: POD_NAMESPACE valueFrom: fieldRef: fieldPath: metadata.namespace- 1
- Ensure that you include the
bindings.knative.dev/include: truelabel. The default namespace selection behavior of OpenShift Serverless uses inclusion mode.
- Click Create.
Create a sink binding in the same namespace as the service created in the previous step, or any other sink that you want to send events to.
- Navigate to +Add → Event Source. The Event Sources page is displayed.
- Optional: If you have multiple providers for your event sources, select the required provider from the Providers list to filter the available event sources from the provider.
Select Sink Binding and then click Create Event Source. The Create Event Source page is displayed.
NoteYou can configure the Sink Binding settings by using the Form view or YAML view and can switch between the views. The data is persisted when switching between the views.
-
In the apiVersion field enter
batch/v1. In the Kind field enter
Job.NoteThe
CronJobkind is not supported directly by OpenShift Serverless sink binding, so the Kind field must target theJobobjects created by the cron job, rather than the cron job object itself.In the Target section, select your event sink. This can be either a Resource or a URI:
-
Select Resource to use a channel, broker, or service as an event sink for the event source. In this example, the
event-displayservice created in the previous step is used as the target Resource. - Select URI to specify a Uniform Resource Identifier (URI) where the events are routed to.
-
Select Resource to use a channel, broker, or service as an event sink for the event source. In this example, the
In the Match labels section:
-
Enter
appin the Name field. Enter
heartbeat-cronin the Value field.NoteThe label selector is required when using cron jobs with sink binding, rather than the resource name. This is because jobs created by a cron job do not have a predictable name, and contain a randomly generated string in their name. For example,
hearthbeat-cron-1cc23f.
-
Enter
- Click Create.
Verification
You can verify that the sink binding, sink, and cron job have been created and are working correctly by viewing the Topology page and pod logs.
- Navigate to Topology.
View the sink binding, sink, and heartbeats cron job.
- Observe that successful jobs are being registered by the cron job once the sink binding is added. This means that the sink binding is successfully reconfiguring the jobs created by the cron job.
Browse the
event-displayservice to see events produced by the heartbeats cron job.
2.5.1.4. Sink binding reference
You can use a PodSpecable object as an event source by creating a sink binding. You can configure multiple parameters when creating a SinkBinding object.
SinkBinding objects support the following parameters:
| Field | Description | Required or optional |
|---|---|---|
|
|
Specifies the API version, for example | Required |
|
|
Identifies this resource object as a | Required |
|
|
Specifies metadata that uniquely identifies the | Required |
|
|
Specifies the configuration information for this | Required |
|
| A reference to an object that resolves to a URI to use as the sink. | Required |
|
| References the resources for which the runtime contract is augmented by binding implementations. | Required |
|
| Defines overrides to control the output format and modifications to the event sent to the sink. | Optional |
2.5.1.4.1. Subject parameter
The Subject parameter references the resources for which the runtime contract is augmented by binding implementations. You can configure multiple fields for a Subject definition.
The Subject definition supports the following fields:
| Field | Description | Required or optional |
|---|---|---|
|
| API version of the referent. | Required |
|
| Kind of the referent. | Required |
|
| Namespace of the referent. If omitted, this defaults to the namespace of the object. | Optional |
|
| Name of the referent. |
Do not use if you configure |
|
| Selector of the referents. |
Do not use if you configure |
|
| A list of label selector requirements. |
Only use one of either |
|
| The label key that the selector applies to. |
Required if using |
|
|
Represents a key’s relationship to a set of values. Valid operators are |
Required if using |
|
|
An array of string values. If the |
Required if using |
|
|
A map of key-value pairs. Each key-value pair in the |
Only use one of either |
Subject parameter examples
Given the following YAML, the Deployment object named mysubject in the default namespace is selected:
apiVersion: sources.knative.dev/v1
kind: SinkBinding
metadata:
  name: bind-heartbeat
spec:
  subject:
    apiVersion: apps/v1
    kind: Deployment
    namespace: default
    name: mysubject
  ...
Given the following YAML, any Job object with the label working=example in the default namespace is selected:
apiVersion: sources.knative.dev/v1
kind: SinkBinding
metadata:
  name: bind-heartbeat
spec:
  subject:
    apiVersion: batch/v1
    kind: Job
    namespace: default
    selector:
      matchLabels:
        working: example
  ...
Given the following YAML, any Pod object with the label working=example or working=sample in the default namespace is selected:
apiVersion: sources.knative.dev/v1
kind: SinkBinding
metadata:
  name: bind-heartbeat
spec:
  subject:
    apiVersion: v1
    kind: Pod
    namespace: default
    selector:
      - matchExpression:
        key: working
        operator: In
        values:
          - example
          - sample
  ...
2.5.1.4.2. CloudEvent overrides
A ceOverrides definition provides overrides that control the CloudEvent’s output format and modifications sent to the sink. You can configure multiple fields for the ceOverrides definition.
A ceOverrides definition supports the following fields:
| Field | Description | Required or optional |
|---|---|---|
|
|
Specifies which attributes are added or overridden on the outbound event. Each | Optional |
Only valid CloudEvent attribute names are allowed as extensions. You cannot set the spec defined attributes from the extensions override configuration. For example, you can not modify the type attribute.
CloudEvent Overrides example
apiVersion: sources.knative.dev/v1
kind: SinkBinding
metadata:
  name: bind-heartbeat
spec:
  ...
  ceOverrides:
    extensions:
      extra: this is an extra attribute
      additional: 42
This sets the K_CE_OVERRIDES environment variable on the subject:
Example output
{ "extensions": { "extra": "this is an extra attribute", "additional": "42" } }2.5.1.4.3. The include label
To use a sink binding, you need to do assign the bindings.knative.dev/include: "true" label to either the resource or the namespace that the resource is included in. If the resource definition does not include the label, a cluster administrator can attach it to the namespace by running:
$ oc label namespace <namespace> bindings.knative.dev/include=true2.5.1.5. Integrating Service Mesh with a sink binding
Prerequisites
- You have integrated Service Mesh with OpenShift Serverless.
Procedure
Create a
Servicein a namespace that is a member of theServiceMeshMemberRoll.apiVersion: serving.knative.dev/v1 kind: Service metadata: name: event-display namespace: <namespace>1 spec: template: metadata: annotations: sidecar.istio.io/inject: "true"2 sidecar.istio.io/rewriteAppHTTPProbers: "true" spec: containers: - image: quay.io/openshift-knative/showcaseApply the
Serviceresource.$ oc apply -f <filename>Create a
SinkBindingresource.apiVersion: sources.knative.dev/v1 kind: SinkBinding metadata: name: bind-heartbeat namespace: <namespace>1 spec: subject: apiVersion: batch/v1 kind: Job2 selector: matchLabels: app: heartbeat-cron sink: ref: apiVersion: serving.knative.dev/v1 kind: Service name: event-displayApply the
SinkBindingresource.$ oc apply -f <filename>Create a
CronJob:apiVersion: batch/v1 kind: CronJob metadata: name: heartbeat-cron namespace: <namespace>1 spec: # Run every minute schedule: "* * * * *" jobTemplate: metadata: labels: app: heartbeat-cron bindings.knative.dev/include: "true" spec: template: metadata: annotations: sidecar.istio.io/inject: "true"2 sidecar.istio.io/rewriteAppHTTPProbers: "true" spec: restartPolicy: Never containers: - name: single-heartbeat image: quay.io/openshift-knative/heartbeats:latest args: - --period=1 env: - name: ONE_SHOT value: "true" - name: POD_NAME valueFrom: fieldRef: fieldPath: metadata.name - name: POD_NAMESPACE valueFrom: fieldRef: fieldPath: metadata.namespaceApply the
CronJobresource.$ oc apply -f <filename>
Verification
To verify that the events were sent to the Knative event sink, look at the message dumper function logs.
Enter the following command:
$ oc get podsEnter the following command:
$ oc logs $(oc get pod -o name | grep event-display) -c user-containerExample output
☁️  cloudevents.Event
Validation: valid
Context Attributes,
  specversion: 1.0
  type: dev.knative.eventing.samples.heartbeat
  source: https://knative.dev/eventing/test/heartbeats/#event-test/mypod
  id: 2b72d7bf-c38f-4a98-a433-608fbcdd2596
  time: 2019-10-18T15:23:20.809775386Z
  contenttype: application/json
Extensions,
  beats: true
  heart: yes
  the: 42
Data,
  {
    "id": 1,
    "label": ""
  }
Additional resources
2.5.2. Container source
Container sources create a container image that generates events and sends events to a sink. You can use a container source to create a custom event source, by creating a container image and a ContainerSource object that uses your image URI.
2.5.2.1. Guidelines for creating a container image
Two environment variables are injected by the container source controller: K_SINK and K_CE_OVERRIDES. These variables are resolved from the sink and ceOverrides spec, respectively. Events are sent to the sink URI specified in the K_SINK environment variable. The message must be sent as a POST using the CloudEvent HTTP format.
Example container images
The following is an example of a heartbeats container image:
package main

import (
	"context"
	"encoding/json"
	"flag"
	"fmt"
	"log"
	"os"
	"strconv"
	"time"

	duckv1 "knative.dev/pkg/apis/duck/v1"

	cloudevents "github.com/cloudevents/sdk-go/v2"
	"github.com/kelseyhightower/envconfig"
)

type Heartbeat struct {
	Sequence int    `json:"id"`
	Label    string `json:"label"`
}

var (
	eventSource string
	eventType   string
	sink        string
	label       string
	periodStr   string
)

func init() {
	flag.StringVar(&eventSource, "eventSource", "", "the event-source (CloudEvents)")
	flag.StringVar(&eventType, "eventType", "dev.knative.eventing.samples.heartbeat", "the event-type (CloudEvents)")
	flag.StringVar(&sink, "sink", "", "the host url to heartbeat to")
	flag.StringVar(&label, "label", "", "a special label")
	flag.StringVar(&periodStr, "period", "5", "the number of seconds between heartbeats")
}

type envConfig struct {
	// Sink URL where to send heartbeat cloud events
	Sink string `envconfig:"K_SINK"`

	// CEOverrides are the CloudEvents overrides to be applied to the outbound event.
	CEOverrides string `envconfig:"K_CE_OVERRIDES"`

	// Name of this pod.
	Name string `envconfig:"POD_NAME" required:"true"`

	// Namespace this pod exists in.
	Namespace string `envconfig:"POD_NAMESPACE" required:"true"`

	// Whether to run continuously or exit.
	OneShot bool `envconfig:"ONE_SHOT" default:"false"`
}

func main() {
	flag.Parse()

	var env envConfig
	if err := envconfig.Process("", &env); err != nil {
		log.Printf("[ERROR] Failed to process env var: %s", err)
		os.Exit(1)
	}

	if env.Sink != "" {
		sink = env.Sink
	}

	var ceOverrides *duckv1.CloudEventOverrides
	if len(env.CEOverrides) > 0 {
		overrides := duckv1.CloudEventOverrides{}
		err := json.Unmarshal([]byte(env.CEOverrides), &overrides)
		if err != nil {
			log.Printf("[ERROR] Unparseable CloudEvents overrides %s: %v", env.CEOverrides, err)
			os.Exit(1)
		}
		ceOverrides = &overrides
	}

	p, err := cloudevents.NewHTTP(cloudevents.WithTarget(sink))
	if err != nil {
		log.Fatalf("failed to create http protocol: %s", err.Error())
	}

	c, err := cloudevents.NewClient(p, cloudevents.WithUUIDs(), cloudevents.WithTimeNow())
	if err != nil {
		log.Fatalf("failed to create client: %s", err.Error())
	}

	var period time.Duration
	if p, err := strconv.Atoi(periodStr); err != nil {
		period = time.Duration(5) * time.Second
	} else {
		period = time.Duration(p) * time.Second
	}

	if eventSource == "" {
		eventSource = fmt.Sprintf("https://knative.dev/eventing-contrib/cmd/heartbeats/#%s/%s", env.Namespace, env.Name)
		log.Printf("Heartbeats Source: %s", eventSource)
	}

	if len(label) > 0 && label[0] == '"' {
		label, _ = strconv.Unquote(label)
	}
	hb := &Heartbeat{
		Sequence: 0,
		Label:    label,
	}
	ticker := time.NewTicker(period)
	for {
		hb.Sequence++

		event := cloudevents.NewEvent("1.0")
		event.SetType(eventType)
		event.SetSource(eventSource)
		event.SetExtension("the", 42)
		event.SetExtension("heart", "yes")
		event.SetExtension("beats", true)

		if ceOverrides != nil && ceOverrides.Extensions != nil {
			for n, v := range ceOverrides.Extensions {
				event.SetExtension(n, v)
			}
		}

		if err := event.SetData(cloudevents.ApplicationJSON, hb); err != nil {
			log.Printf("failed to set cloudevents data: %s", err.Error())
		}

		log.Printf("sending cloudevent to %s", sink)
		if res := c.Send(context.Background(), event); !cloudevents.IsACK(res) {
			log.Printf("failed to send cloudevent: %v", res)
		}

		if env.OneShot {
			return
		}

		// Wait for next tick
		<-ticker.C
	}
}
The following is an example of a container source that references the previous heartbeats container image:
apiVersion: sources.knative.dev/v1
kind: ContainerSource
metadata:
  name: test-heartbeats
spec:
  template:
    spec:
      containers:
        # This corresponds to a heartbeats image URI that you have built and published
        - image: gcr.io/knative-releases/knative.dev/eventing/cmd/heartbeats
          name: heartbeats
          args:
            - --period=1
          env:
            - name: POD_NAME
              value: "example-pod"
            - name: POD_NAMESPACE
              value: "event-test"
  sink:
    ref:
      apiVersion: serving.knative.dev/v1
      kind: Service
      name: showcase
...
2.5.2.2. Creating and managing container sources by using the Knative CLI
You can use the kn source container commands to create and manage container sources by using the Knative (kn) CLI. Using the Knative CLI to create event sources provides a more streamlined and intuitive user interface than modifying YAML files directly.
Create a container source
$ kn source container create <container_source_name> --image <image_uri> --sink <sink>Delete a container source
$ kn source container delete <container_source_name>Describe a container source
$ kn source container describe <container_source_name>List existing container sources
$ kn source container listList existing container sources in YAML format
$ kn source container list -o yamlUpdate a container source
This command updates the image URI for an existing container source:
$ kn source container update <container_source_name> --image <image_uri>2.5.2.3. Creating a container source by using the web console
After Knative Eventing is installed on your cluster, you can create a container source by using the web console. Using the OpenShift Container Platform web console provides a streamlined and intuitive user interface to create an event source.
Prerequisites
- You have logged in to the OpenShift Container Platform web console.
- The OpenShift Serverless Operator, Knative Serving, and Knative Eventing are installed on your OpenShift Container Platform cluster.
- You have created a project or have access to a project with the appropriate roles and permissions to create applications and other workloads in OpenShift Container Platform.
Procedure
- Navigate to +Add → Event Source. The Event Sources page is displayed.
- Select Container Source and then click Create Event Source. The Create Event Source page is displayed.
Configure the Container Source settings by using the Form view or YAML view:
NoteYou can switch between the Form view and YAML view. The data is persisted when switching between the views.
- In the Image field, enter the URI of the image that you want to run in the container created by the container source.
- In the Name field, enter the name of the image.
- Optional: In the Arguments field, enter any arguments to be passed to the container.
- Optional: In the Environment variables field, add any environment variables to set in the container.
In the Target section, select your event sink. This can be either a Resource or a URI:
- Select Resource to use a channel, broker, or service as an event sink for the event source.
- Select URI to specify a Uniform Resource Identifier (URI) where the events are routed to.
- After you have finished configuring the container source, click Create.
2.5.2.4. Container source reference
You can use a container as an event source, by creating a ContainerSource object. You can configure multiple parameters when creating a ContainerSource object.
ContainerSource objects support the following fields:
| Field | Description | Required or optional |
|---|---|---|
|
|
Specifies the API version, for example | Required |
|
|
Identifies this resource object as a | Required |
|
|
Specifies metadata that uniquely identifies the | Required |
|
|
Specifies the configuration information for this | Required |
|
| A reference to an object that resolves to a URI to use as the sink. | Required |
|
|
A | Required |
|
| Defines overrides to control the output format and modifications to the event sent to the sink. | Optional |
Template parameter example
apiVersion: sources.knative.dev/v1
kind: ContainerSource
metadata:
  name: test-heartbeats
spec:
  template:
    spec:
      containers:
        - image: quay.io/openshift-knative/heartbeats:latest
          name: heartbeats
          args:
            - --period=1
          env:
            - name: POD_NAME
              value: "mypod"
            - name: POD_NAMESPACE
              value: "event-test"
  ...
2.5.2.4.1. CloudEvent overrides
A ceOverrides definition provides overrides that control the CloudEvent’s output format and modifications sent to the sink. You can configure multiple fields for the ceOverrides definition.
A ceOverrides definition supports the following fields:
| Field | Description | Required or optional |
|---|---|---|
|
|
Specifies which attributes are added or overridden on the outbound event. Each | Optional |
Only valid CloudEvent attribute names are allowed as extensions. You cannot set the spec defined attributes from the extensions override configuration. For example, you can not modify the type attribute.
CloudEvent Overrides example
apiVersion: sources.knative.dev/v1
kind: ContainerSource
metadata:
  name: test-heartbeats
spec:
  ...
  ceOverrides:
    extensions:
      extra: this is an extra attribute
      additional: 42
This sets the K_CE_OVERRIDES environment variable on the subject:
Example output
{ "extensions": { "extra": "this is an extra attribute", "additional": "42" } }2.5.2.5. Integrating Service Mesh with ContainerSource
Prerequisites
- You have integrated Service Mesh with OpenShift Serverless.
Procedure
Create a
Servicein a namespace that is a member of theServiceMeshMemberRoll.apiVersion: serving.knative.dev/v1 kind: Service metadata: name: event-display namespace: <namespace>1 spec: template: metadata: annotations: sidecar.istio.io/inject: "true"2 sidecar.istio.io/rewriteAppHTTPProbers: "true" spec: containers: - image: quay.io/openshift-knative/showcaseApply the
Serviceresource.$ oc apply -f <filename>Create a
ContainerSourceobject in a namespace that is a member of theServiceMeshMemberRolland sink set to theevent-display.apiVersion: sources.knative.dev/v1 kind: ContainerSource metadata: name: test-heartbeats namespace: <namespace>1 spec: template: metadata:2 annotations: sidecar.istio.io/inject: "true" sidecar.istio.io/rewriteAppHTTPProbers: "true" spec: containers: - image: quay.io/openshift-knative/heartbeats:latest name: heartbeats args: - --period=1s env: - name: POD_NAME value: "example-pod" - name: POD_NAMESPACE value: "event-test" sink: ref: apiVersion: serving.knative.dev/v1 kind: Service name: event-displayApply the
ContainerSourceresource.$ oc apply -f <filename>
Verification
To verify that the events were sent to the Knative event sink, look at the message dumper function logs.
Enter the following command:
$ oc get podsEnter the following command:
$ oc logs $(oc get pod -o name | grep event-display) -c user-containerExample output
☁️  cloudevents.Event
Validation: valid
Context Attributes,
  specversion: 1.0
  type: dev.knative.eventing.samples.heartbeat
  source: https://knative.dev/eventing/test/heartbeats/#event-test/mypod
  id: 2b72d7bf-c38f-4a98-a433-608fbcdd2596
  time: 2019-10-18T15:23:20.809775386Z
  contenttype: application/json
Extensions,
  beats: true
  heart: yes
  the: 42
Data,
  {
    "id": 1,
    "label": ""
  }
Additional resources
2.6. Connecting an event source to an event sink
When you create an event source by using the OpenShift Container Platform web console, you can specify a target event sink that events are sent to from that source. The event sink can be any addressable or callable resource that can receive incoming events from other resources.
2.6.1. Connect an event source to an event sink
Prerequisites
- The OpenShift Serverless Operator, Knative Serving, and Knative Eventing are installed on your OpenShift Container Platform cluster.
- You have logged in to the web console.
- You have created a project or have access to a project with the appropriate roles and permissions to create applications and other workloads in OpenShift Container Platform.
- You have created an event sink, such as a Knative service, channel or broker.
Procedure
- Create an event source of any type, by navigating to +Add → Event Source and selecting the event source type that you want to create.
In the Target section of the Create Event Source form view, select your event sink. This can be either a Resource or a URI:
- Select Resource to use a channel, broker, or service as an event sink for the event source.
- Select URI to specify a Uniform Resource Identifier (URI) where the events are routed to.
- Click Create.
Verification
You can verify that the event source was created and is connected to the sink by viewing the Topology page.
- Navigate to Topology.
- View the event source and click the connected event sink to see the sink details in the right panel.
Chapter 3. Event sinks
3.1. Event sinks
When you create an event source, you can specify an event sink where events are sent to from the source. An event sink is an addressable or a callable resource that can receive incoming events from other resources. Knative services, channels, and brokers are all examples of event sinks. There is also a specific Apache Kafka sink type available.
Addressable objects receive and acknowledge an event delivered over HTTP to an address defined in their status.address.url field. As a special case, the core Kubernetes Service object also fulfills the addressable interface.
Callable objects are able to receive an event delivered over HTTP and transform the event, returning 0 or 1 new events in the HTTP response. These returned events may be further processed in the same way that events from an external event source are processed.
3.1.1. Knative CLI sink flag
When you create an event source by using the Knative (kn) CLI, you can specify a sink where events are sent to from that resource by using the --sink flag. The sink can be any addressable or callable resource that can receive incoming events from other resources.
The following example creates a sink binding that uses a service, http://event-display.svc.cluster.local, as the sink:
Example command using the sink flag
$ kn source binding create bind-heartbeat \
  --namespace sinkbinding-example \
  --subject "Job:batch/v1:app=heartbeat-cron" \
  --sink http://event-display.svc.cluster.local \
--ce-override "sink=bound"- 1
svcinhttp://event-display.svc.cluster.localdetermines that the sink is a Knative service. Other default sink prefixes includechannel, andbroker.
You can configure which CRs can be used with the --sink flag for Knative (kn) CLI commands by Customizing kn.
3.2. Creating event sinks
When you create an event source, you can specify an event sink where events are sent to from the source. An event sink is an addressable or a callable resource that can receive incoming events from other resources. Knative services, channels, and brokers are all examples of event sinks. There is also a specific Apache Kafka sink type available.
For information about creating resources that can be used as event sinks, see the following documentation:
3.3. Sink for Apache Kafka
Apache Kafka sinks are a type of event sink that are available if a cluster administrator has enabled Apache Kafka on your cluster. You can send events directly from an event source to a Kafka topic by using a Kafka sink.
3.3.1. Creating an Apache Kafka sink by using YAML
You can create a Kafka sink that sends events to a Kafka topic. By default, a Kafka sink uses the binary content mode, which is more efficient than the structured mode. To create a Kafka sink by using YAML, you must create a YAML file that defines a KafkaSink object, then apply it by using the oc apply command.
Prerequisites
-
The OpenShift Serverless Operator, Knative Eventing, and the
KnativeKafkacustom resource (CR) are installed on your cluster. - You have created a project or have access to a project with the appropriate roles and permissions to create applications and other workloads in OpenShift Container Platform.
- You have access to a Red Hat AMQ Streams (Kafka) cluster that produces the Kafka messages you want to import.
-
Install the OpenShift CLI (
oc).
Procedure
Create a
KafkaSinkobject definition as a YAML file:Kafka sink YAML
apiVersion: eventing.knative.dev/v1alpha1
kind: KafkaSink
metadata:
  name: <sink-name>
  namespace: <namespace>
spec:
  topic: <topic-name>
  bootstrapServers:
   - <bootstrap-server>
To create the Kafka sink, apply the
KafkaSinkYAML file:$ oc apply -f <filename>Configure an event source so that the sink is specified in its spec:
Example of a Kafka sink connected to an API server source
apiVersion: sources.knative.dev/v1alpha2
kind: ApiServerSource
metadata:
  name: <source-name>
1 namespace: <namespace>2 spec: serviceAccountName: <service-account-name>3 mode: Resource resources: - apiVersion: v1 kind: Event sink: ref: apiVersion: eventing.knative.dev/v1alpha1 kind: KafkaSink name: <sink-name>4
3.3.2. Creating an event sink for Apache Kafka by using the OpenShift Container Platform web console
You can create a Kafka sink that sends events to a Kafka topic in the OpenShift Container Platform web console. By default, a Kafka sink uses the binary content mode, which is more efficient than the structured mode.
As a developer, you can create an event sink to receive events from a particular source and send them to a Kafka topic.
Prerequisites
- You have installed the OpenShift Serverless Operator, with Knative Serving, Knative Eventing, and Knative broker for Apache Kafka APIs, from the OperatorHub.
- You have created a Kafka topic in your Kafka environment.
Procedure
- Navigate to the +Add view.
- Click Event Sink in the Eventing catalog.
-
Search for
KafkaSinkin the catalog items and click it. - Click Create Event Sink.
In the form view, type the URL of the bootstrap server, which is a combination of host name and port.
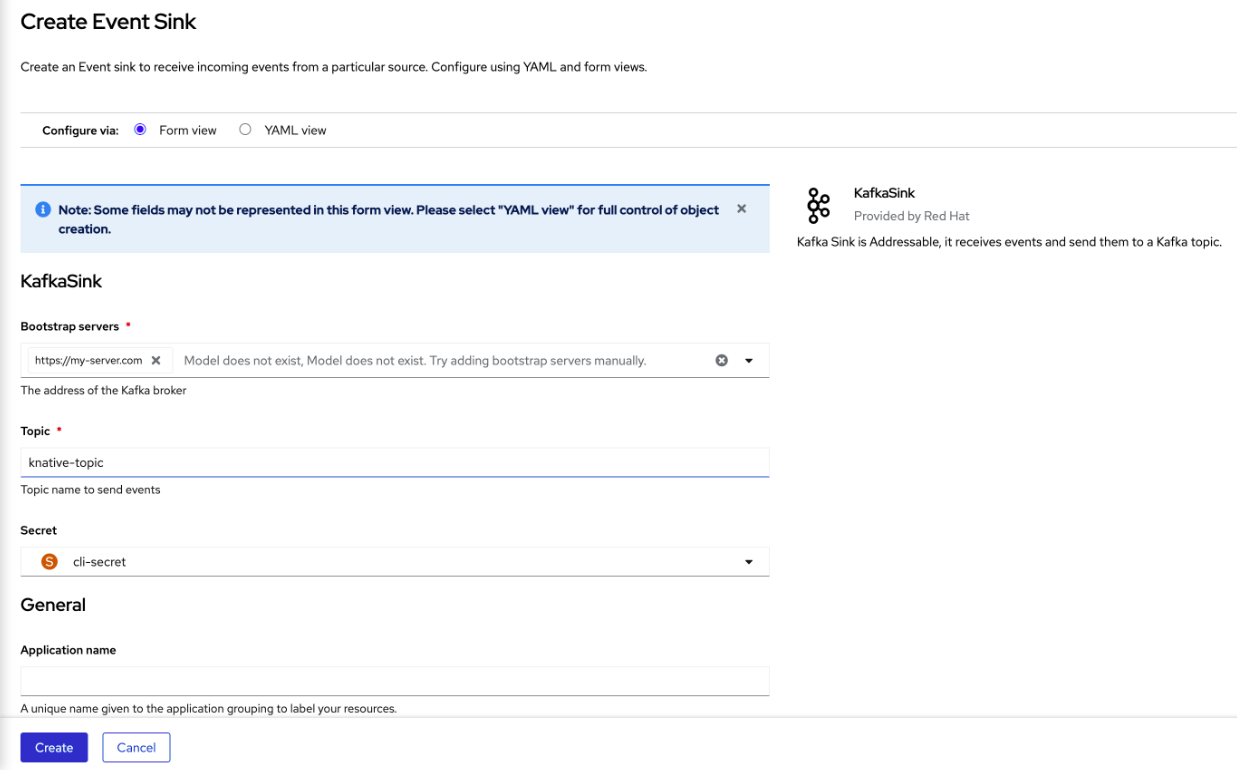
- Type the name of the topic to send event data.
- Type the name of the event sink.
- Click Create.
Verification
- Navigate to the Topology view.
- Click the created event sink to view its details in the right panel.
3.3.3. Configuring security for Apache Kafka sinks
Transport Layer Security (TLS) is used by Apache Kafka clients and servers to encrypt traffic between Knative and Kafka, as well as for authentication. TLS is the only supported method of traffic encryption for the Knative broker implementation for Apache Kafka.
Simple Authentication and Security Layer (SASL) is used by Apache Kafka for authentication. If you use SASL authentication on your cluster, users must provide credentials to Knative for communicating with the Kafka cluster; otherwise events cannot be produced or consumed.
Prerequisites
-
The OpenShift Serverless Operator, Knative Eventing, and the
KnativeKafkacustom resources (CRs) are installed on your OpenShift Container Platform cluster. -
Kafka sink is enabled in the
KnativeKafkaCR. - You have created a project or have access to a project with the appropriate roles and permissions to create applications and other workloads in OpenShift Container Platform.
-
You have a Kafka cluster CA certificate stored as a
.pemfile. -
You have a Kafka cluster client certificate and a key stored as
.pemfiles. -
You have installed the OpenShift (
oc) CLI. -
You have chosen the SASL mechanism to use, for example,
PLAIN,SCRAM-SHA-256, orSCRAM-SHA-512.
Procedure
Create the certificate files as a secret in the same namespace as your
KafkaSinkobject:ImportantCertificates and keys must be in PEM format.
For authentication using SASL without encryption:
$ oc create secret -n <namespace> generic <secret_name> \
  --from-literal=protocol=SASL_PLAINTEXT \
  --from-literal=sasl.mechanism=<sasl_mechanism> \
  --from-literal=user=<username> \
  --from-literal=password=<password>
For authentication using SASL and encryption using TLS:
$ oc create secret -n <namespace> generic <secret_name> \
  --from-literal=protocol=SASL_SSL \
  --from-literal=sasl.mechanism=<sasl_mechanism> \
  --from-file=ca.crt=<my_caroot.pem_file_path> \
1 --from-literal=user=<username> \ --from-literal=password=<password>- 1
- The
ca.crtcan be omitted to use the system’s root CA set if you are using a public cloud managed Kafka service.
For authentication and encryption using TLS:
$ oc create secret -n <namespace> generic <secret_name> \
  --from-literal=protocol=SSL \
  --from-file=ca.crt=<my_caroot.pem_file_path> \
1 --from-file=user.crt=<my_cert.pem_file_path> \ --from-file=user.key=<my_key.pem_file_path>- 1
- The
ca.crtcan be omitted to use the system’s root CA set if you are using a public cloud managed Kafka service.
Create or modify a
KafkaSinkobject and add a reference to your secret in theauthspec:apiVersion: eventing.knative.dev/v1alpha1 kind: KafkaSink metadata: name: <sink_name> namespace: <namespace> spec: ... auth: secret: ref: name: <secret_name> ...Apply the
KafkaSinkobject:$ oc apply -f <filename>
3.4. JobSink
Event processing usually completes within a short time frame, such as a few minutes. This ensures that the HTTP connection remains open and the service does not scale down prematurely.
Maintaining long-running connections increases the risk of failure, potentially leading to processing restarts and repeated request retries.
You can use JobSink to support long-running asynchronous jobs and tasks using the full Kubernetes batch/v1 Job resource and features and Kubernetes job queuing systems such as Kueue.
3.4.1. Using JobSink
When an event is sent to a JobSink, Eventing creates a Job and mounts the received event as JSON file at /etc/jobsink-event/event.
Procedure
Create a
JobSinkobject definition as a YAML file:JobSink YAML
apiVersion: sinks.knative.dev/v1alpha1
kind: JobSink
metadata:
  name: job-sink-logger
spec:
  job:
    spec:
      completions: 1
      parallelism: 1
      template:
        spec:
          restartPolicy: Never
          containers:
            - name: main
              image: docker.io/library/bash:5
              command: [ "cat" ]
              args:
                - "/etc/jobsink-event/event"
Apply the
JobSinkYAML file:$ oc apply -f <job-sink-file.yaml>Verify
JobSinkis ready:$ oc get jobsinks.sinks.knative.devExample output:
NAME              URL                                                                          AGE   READY   REASON
job-sink-logger   http://job-sink.knative-eventing.svc.cluster.local/default/job-sink-logger   5s    True
Trigger a
JobSink.JobSinkcan be triggered by any event source or trigger.$ oc run curl --image=curlimages/curl --rm=true --restart=Never -ti -- -X POST -v \ -H "content-type: application/json" \ -H "ce-specversion: 1.0" \ -H "ce-source: my/curl/command" \ -H "ce-type: my.demo.event" \ -H "ce-id: 123" \ -d '{"details":"JobSinkDemo"}' \ http://job-sink.knative-eventing.svc.cluster.local/default/job-sink-loggerVerify a
Jobis created:$ oc logs job-sink-loggerszoi6-dqbtqExample output:
{"specversion":"1.0","id":"123","source":"my/curl/command","type":"my.demo.event","datacontenttype":"application/json","data":{"details":"JobSinkDemo"}}
JobSink creates a Job for each unique event it receives.
An event is uniquely identified by the combination of its source and id attributes.
If an event with the same attributes is received while a Job for that event already exists, another Job will not be created.
3.4.2. Reading the Job event file
Procedure
Read the
eventfile and deserialize it by using any CloudEvents JSON deserializer. The following example demonstrates how to read and process an event using CloudEvents Go SDK:package mytask import ( "encoding/json" "fmt" "os" cloudevents "github.com/cloudevents/sdk-go/v2" ) func handleEvent() error { eventBytes, err := os.ReadFile("/etc/jobsink-event/event") if err != nil { return err } event := &cloudevents.Event{} if err := json.Unmarshal(eventBytes, event); err != nil { return err } fmt.Println(event) return nil }
3.4.3. Setting custom event file mount path
You can set a custom event file mount path in your JobSink definition.
Procedure
Inside your container definition, include the
volumeMountsconfiguration and set as required.apiVersion: sinks.knative.dev/v1alpha1 kind: JobSink metadata: name: job-sink-custom-mount-path spec: job: spec: completions: 1 parallelism: 1 template: spec: restartPolicy: Never containers: - name: main image: docker.io/library/bash:5 command: [ "bash" ] args: - -c - echo "Hello world!" && sleep 5 # The event will be available in a file at `/etc/custom-path/event` volumeMounts: - name: "jobsink-event" mountPath: "/etc/custom-path" readOnly: true
3.4.4. Cleaning up finished jobs
You can clean up finished jobs by setting a ttlSecondsAfterFinished value in your JobSink definition. For example, setting the value to 600 removes completed jobs 600 seconds (10 minutes) after they finish.
Procedure
In your definition, set the value of
ttlSecondsAfterFinishedto the required amount.Example of ttlSecondsAfterFinished set to 600
apiVersion: sinks.knative.dev/v1alpha1
kind: JobSink
metadata:
  name: job-sink-example
spec:
  job:
    spec:
      ttlSecondsAfterFinished: 600
3.4.5. Simulating FailJob action
Procedure
Trigger a
FailJobaction by including a bug simulating command in your JobSink definition.Example of JobSink failure
apiVersion: sinks.knative.dev/v1alpha1
kind: JobSink
metadata:
  name: job-sink-failure
spec:
  job:
    metadata:
      labels:
        my-label: my-value
    spec:
      completions: 12
      parallelism: 3
      template:
        spec:
          restartPolicy: Never
          containers:
            - name: main
              image: docker.io/library/bash:5
              command: [ "bash" ]        # example command simulating a bug which triggers the FailJob action
              args:
                - -c
                - echo "Hello world!" && sleep 5 && exit 42
      backoffLimit: 6
      podFailurePolicy:
        rules:
          - action: FailJob
            onExitCodes:
              containerName: main      # optional
              operator: In             # one of: In, NotIn
              values: [ 42 ]
          - action: Ignore             # one of: Ignore, FailJob, Count
            onPodConditions:
              - type: DisruptionTarget   # indicates Pod disruption
Chapter 4. Brokers
4.1. Brokers
Brokers can be used in combination with triggers to deliver events from an event source to an event sink. Events are sent from an event source to a broker as an HTTP POST request. After events have entered the broker, they can be filtered by CloudEvent attributes using triggers, and sent as an HTTP POST request to an event sink.
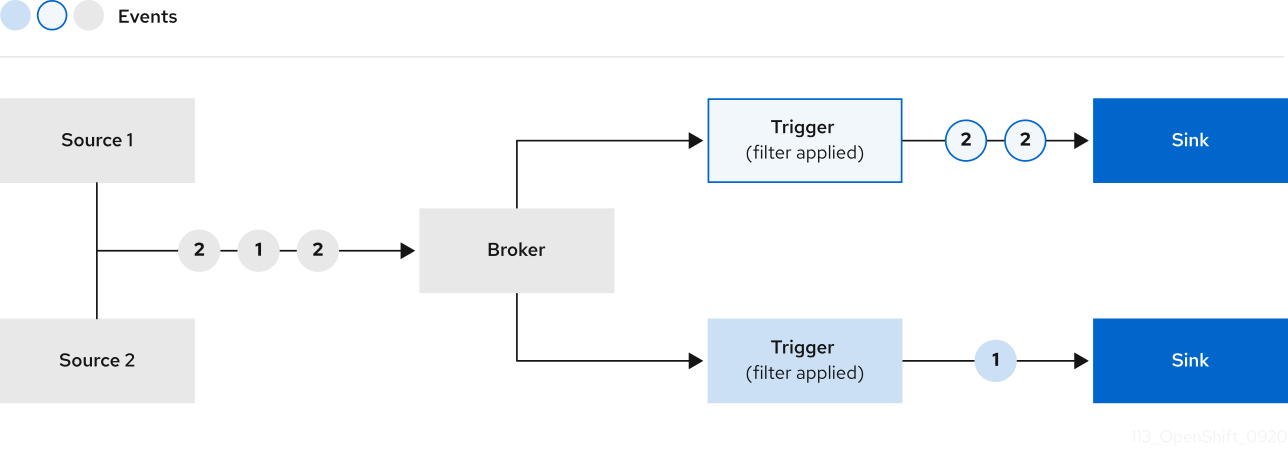
4.2. Broker types
Cluster administrators can set the default broker implementation for a cluster. When you create a broker, the default broker implementation is used, unless you provide set configurations in the Broker object.
4.2.1. Default broker implementation for development purposes
Knative provides a default, channel-based broker implementation. This channel-based broker can be used for development and testing purposes, but does not provide adequate event delivery guarantees for production environments. The default broker is backed by the InMemoryChannel channel implementation by default.
If you want to use Apache Kafka to reduce network hops, use the Knative broker implementation for Apache Kafka. Do not configure the channel-based broker to be backed by the KafkaChannel channel implementation.
4.2.2. Production-ready Knative broker implementation for Apache Kafka
For production-ready Knative Eventing deployments, Red Hat recommends using the Knative broker implementation for Apache Kafka. The broker is an Apache Kafka native implementation of the Knative broker, which sends CloudEvents directly to the Kafka instance.
The Knative broker has a native integration with Kafka for storing and routing events. This allows better integration with Kafka for the broker and trigger model over other broker types, and reduces network hops. Other benefits of the Knative broker implementation include:
- At-least-once delivery guarantees
- Ordered delivery of events, based on the CloudEvents partitioning extension
- Control plane high availability
- A horizontally scalable data plane
The Knative broker implementation for Apache Kafka stores incoming CloudEvents as Kafka records, using the binary content mode. This means that all CloudEvent attributes and extensions are mapped as headers on the Kafka record, while the data spec of the CloudEvent corresponds to the value of the Kafka record.
4.3. Creating brokers
Knative provides a default, channel-based broker implementation. This channel-based broker can be used for development and testing purposes, but does not provide adequate event delivery guarantees for production environments.
If a cluster administrator has configured your OpenShift Serverless deployment to use Apache Kafka as the default broker type, creating a broker by using the default settings creates a Knative broker for Apache Kafka.
If your OpenShift Serverless deployment is not configured to use the Knative broker for Apache Kafka as the default broker type, the channel-based broker is created when you use the default settings in the following procedures.
4.3.1. Creating a broker by using the Knative CLI
Brokers can be used in combination with triggers to deliver events from an event source to an event sink. Using the Knative (kn) CLI to create brokers provides a more streamlined and intuitive user interface over modifying YAML files directly. You can use the kn broker create command to create a broker.
Prerequisites
- The OpenShift Serverless Operator and Knative Eventing are installed on your OpenShift Container Platform cluster.
-
You have installed the Knative (
kn) CLI. - You have created a project or have access to a project with the appropriate roles and permissions to create applications and other workloads in OpenShift Container Platform.
Procedure
Create a broker:
$ kn broker create <broker_name>
Verification
Use the
kncommand to list all existing brokers:$ kn broker listExample output
NAME      URL                                                                     AGE   CONDITIONS   READY   REASON
default   http://broker-ingress.knative-eventing.svc.cluster.local/test/default   45s   5 OK / 5     True
Optional: If you are using the OpenShift Container Platform web console, you can navigate to the Topology view and observe that the broker exists:
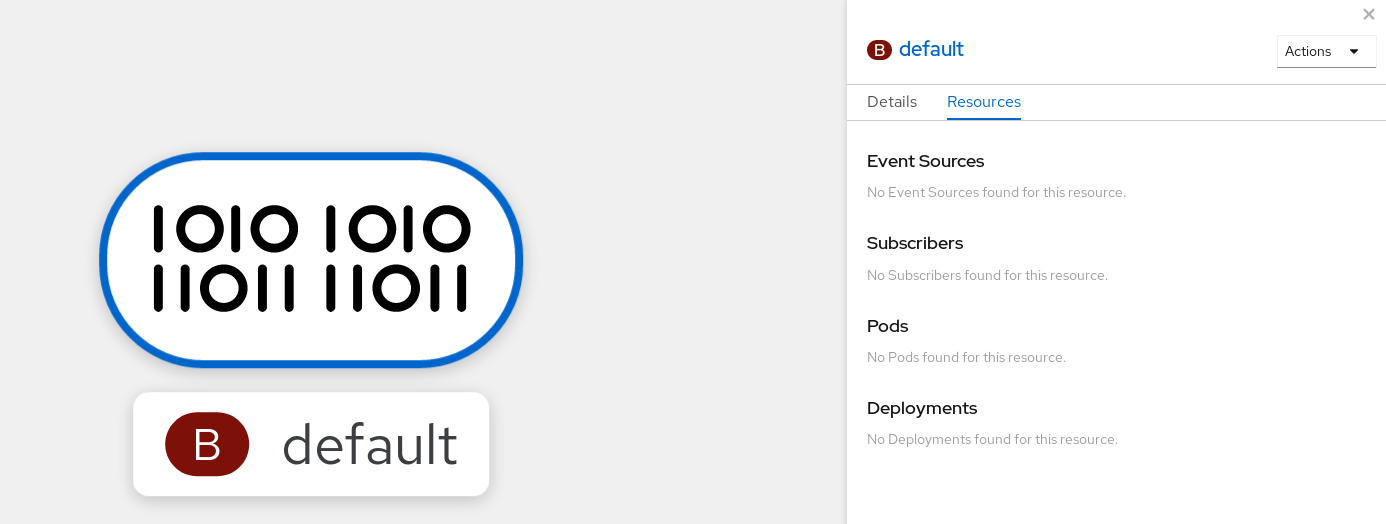
4.3.2. Creating a broker by annotating a trigger
Brokers can be used in combination with triggers to deliver events from an event source to an event sink. You can create a broker by adding the eventing.knative.dev/injection: enabled annotation to a Trigger object.
If you create a broker by using the eventing.knative.dev/injection: enabled annotation, you cannot delete this broker without cluster administrator permissions. If you delete the broker without having a cluster administrator remove this annotation first, the broker is created again after deletion.
Prerequisites
- The OpenShift Serverless Operator and Knative Eventing are installed on your OpenShift Container Platform cluster.
-
Install the OpenShift CLI (
oc). - You have created a project or have access to a project with the appropriate roles and permissions to create applications and other workloads in OpenShift Container Platform.
Procedure
Create a
Triggerobject as a YAML file that has theeventing.knative.dev/injection: enabledannotation:apiVersion: eventing.knative.dev/v1 kind: Trigger metadata: annotations: eventing.knative.dev/injection: enabled name: <trigger_name> spec: broker: default subscriber:1 ref: apiVersion: serving.knative.dev/v1 kind: Service name: <service_name>- 1
- Specify details about the event sink, or subscriber, that the trigger sends events to.
Apply the
TriggerYAML file:$ oc apply -f <filename>
Verification
You can verify that the broker has been created successfully by using the oc CLI, or by observing it in the Topology view in the web console.
Enter the following
occommand to get the broker:$ oc -n <namespace> get broker defaultExample output
NAME      READY     REASON    URL                                                                     AGE
default   True                http://broker-ingress.knative-eventing.svc.cluster.local/test/default   3m56s
Optional: If you are using the OpenShift Container Platform web console, you can navigate to the Topology view and observe that the broker exists:
4.3.3. Creating a broker by labeling a namespace
Brokers can be used in combination with triggers to deliver events from an event source to an event sink. You can create the default broker automatically by labelling a namespace that you own or have write permissions for.
Brokers created using this method are not removed if you remove the label. You must manually delete them.
Prerequisites
- The OpenShift Serverless Operator and Knative Eventing are installed on your OpenShift Container Platform cluster.
-
Install the OpenShift CLI (
oc). - You have created a project or have access to a project with the appropriate roles and permissions to create applications and other workloads in OpenShift Container Platform.
- You have cluster or dedicated administrator permissions if you are using Red Hat OpenShift Service on AWS or OpenShift Dedicated.
Procedure
Label a namespace with
eventing.knative.dev/injection=enabled:$ oc label namespace <namespace> eventing.knative.dev/injection=enabled
Verification
You can verify that the broker has been created successfully by using the oc CLI, or by observing it in the Topology view in the web console.
Use the
occommand to get the broker:$ oc -n <namespace> get broker <broker_name>Example command
$ oc -n default get broker defaultExample output
NAME      READY     REASON    URL                                                                     AGE
default   True                http://broker-ingress.knative-eventing.svc.cluster.local/test/default   3m56s
Optional: If you are using the OpenShift Container Platform web console, you can navigate to the Topology view and observe that the broker exists:
4.3.4. Deleting a broker that was created by injection
If you create a broker by injection and later want to delete it, you must delete it manually. Brokers created by using a namespace label or trigger annotation are not deleted permanently if you remove the label or annotation.
Prerequisites
-
Install the OpenShift CLI (
oc).
Procedure
Remove the
eventing.knative.dev/injection=enabledlabel from the namespace:$ oc label namespace <namespace> eventing.knative.dev/injection-Removing the annotation prevents Knative from recreating the broker after you delete it.
Delete the broker from the selected namespace:
$ oc -n <namespace> delete broker <broker_name>
Verification
Use the
occommand to get the broker:$ oc -n <namespace> get broker <broker_name>Example command
$ oc -n default get broker defaultExample output
No resources found.
Error from server (NotFound): brokers.eventing.knative.dev "default" not found
4.3.5. Creating a broker by using the web console
After Knative Eventing is installed on your cluster, you can create a broker by using the web console. Using the OpenShift Container Platform web console provides a streamlined and intuitive user interface to create a broker.
Prerequisites
- You have logged in to the OpenShift Container Platform web console.
- The OpenShift Serverless Operator, Knative Serving and Knative Eventing are installed on the cluster.
- You have created a project or have access to a project with the appropriate roles and permissions to create applications and other workloads in OpenShift Container Platform.
Procedure
- Navigate to +Add → Broker. The Broker page is displayed.
-
Optional. Update the Name of the broker. If you do not update the name, the generated broker is named
default. - Click Create.
Verification
You can verify that the broker was created by viewing broker components in the Topology page.
- Navigate to Topology.
View the
mt-broker-ingress,mt-broker-filter, andmt-broker-controllercomponents.
4.3.6. Next steps
- Configure event delivery parameters that are applied in cases where an event fails to be delivered to an event sink.
4.4. Configuring the default broker backing channel
If you are using a channel-based broker, you can set the default backing channel type for the broker to either InMemoryChannel or KafkaChannel.
Prerequisites
- You have administrator permissions on OpenShift Container Platform.
- You have installed the OpenShift Serverless Operator and Knative Eventing on your cluster.
-
You have installed the OpenShift (
oc) CLI. -
If you want to use Apache Kafka channels as the default backing channel type, you must also install the
KnativeKafkaCR on your cluster.
Procedure
Modify the
KnativeEventingcustom resource (CR) to add configuration details for theconfig-br-default-channelconfig map:apiVersion: operator.knative.dev/v1beta1 kind: KnativeEventing metadata: name: knative-eventing namespace: knative-eventing spec: config:1 config-br-default-channel: channel-template-spec: | apiVersion: messaging.knative.dev/v1beta1 kind: KafkaChannel2 spec: numPartitions: 63 replicationFactor: 34 - 1
- In
spec.config, you can specify the config maps that you want to add modified configurations for. - 2
- The default backing channel type configuration. In this example, the default channel implementation for the cluster is
KafkaChannel. - 3
- The number of partitions for the Kafka channel that backs the broker.
- 4
- The replication factor for the Kafka channel that backs the broker.
Apply the updated
KnativeEventingCR:$ oc apply -f <filename>
4.5. Configuring the default broker class
You can use the config-br-defaults config map to specify default broker class settings for Knative Eventing. You can specify the default broker class for the entire cluster or for one or more namespaces. Currently the MTChannelBasedBroker and Kafka broker types are supported.
Prerequisites
- You have administrator permissions on OpenShift Container Platform.
- You have installed the OpenShift Serverless Operator and Knative Eventing on your cluster.
-
If you want to use the Knative broker for Apache Kafka as the default broker implementation, you must also install the
KnativeKafkaCR on your cluster.
Procedure
Modify the
KnativeEventingcustom resource to add configuration details for theconfig-br-defaultsconfig map:apiVersion: operator.knative.dev/v1beta1 kind: KnativeEventing metadata: name: knative-eventing namespace: knative-eventing spec: defaultBrokerClass: Kafka1 config:2 config-br-defaults:3 default-br-config: | clusterDefault:4 brokerClass: Kafka apiVersion: v1 kind: ConfigMap name: kafka-broker-config5 namespace: knative-eventing6 namespaceDefaults:7 my-namespace: brokerClass: MTChannelBasedBroker apiVersion: v1 kind: ConfigMap name: config-br-default-channel8 namespace: knative-eventing9 ...- 1
- The default broker class for Knative Eventing.
- 2
- In
spec.config, you can specify the config maps that you want to add modified configurations for. - 3
- The
config-br-defaultsconfig map specifies the default settings for any broker that does not specifyspec.configsettings or a broker class. - 4
- The cluster-wide default broker class configuration. In this example, the default broker class implementation for the cluster is
Kafka. - 5
- The
kafka-broker-configconfig map specifies default settings for the Kafka broker. See "Configuring Knative broker for Apache Kafka settings" in the "Additional resources" section. - 6
- The namespace where the
kafka-broker-configconfig map exists. - 7
- The namespace-scoped default broker class configuration. In this example, the default broker class implementation for the
my-namespacenamespace isMTChannelBasedBroker. You can specify default broker class implementations for multiple namespaces. - 8
- The
config-br-default-channelconfig map specifies the default backing channel for the broker. See "Configuring the default broker backing channel" in the "Additional resources" section. - 9
- The namespace where the
config-br-default-channelconfig map exists.
ImportantConfiguring a namespace-specific default overrides any cluster-wide settings.
4.6. Knative broker implementation for Apache Kafka
For production-ready Knative Eventing deployments, Red Hat recommends using the Knative broker implementation for Apache Kafka. The broker is an Apache Kafka native implementation of the Knative broker, which sends CloudEvents directly to the Kafka instance.
The Knative broker has a native integration with Kafka for storing and routing events. This allows better integration with Kafka for the broker and trigger model over other broker types, and reduces network hops. Other benefits of the Knative broker implementation include:
- At-least-once delivery guarantees
- Ordered delivery of events, based on the CloudEvents partitioning extension
- Control plane high availability
- A horizontally scalable data plane
The Knative broker implementation for Apache Kafka stores incoming CloudEvents as Kafka records, using the binary content mode. This means that all CloudEvent attributes and extensions are mapped as headers on the Kafka record, while the data spec of the CloudEvent corresponds to the value of the Kafka record.
4.6.1. Creating an Apache Kafka broker when it is not configured as the default broker type
If your OpenShift Serverless deployment is not configured to use Kafka broker as the default broker type, you can use one of the following procedures to create a Kafka-based broker.
4.6.1.1. Creating an Apache Kafka broker by using YAML
Creating Knative resources by using YAML files uses a declarative API, which enables you to describe applications declaratively and in a reproducible manner. To create a Kafka broker by using YAML, you must create a YAML file that defines a Broker object, then apply it by using the oc apply command.
Prerequisites
-
The OpenShift Serverless Operator, Knative Eventing, and the
KnativeKafkacustom resource are installed on your OpenShift Container Platform cluster. - You have created a project or have access to a project with the appropriate roles and permissions to create applications and other workloads in OpenShift Container Platform.
-
You have installed the OpenShift CLI (
oc).
Procedure
Create a Kafka-based broker as a YAML file:
apiVersion: eventing.knative.dev/v1 kind: Broker metadata: annotations: eventing.knative.dev/broker.class: Kafka1 name: example-kafka-broker spec: config: apiVersion: v1 kind: ConfigMap name: kafka-broker-config2 namespace: knative-eventing- 1
- The broker class. If not specified, brokers use the default class as configured by cluster administrators. To use the Kafka broker, this value must be
Kafka. - 2
- The default config map for Knative brokers for Apache Kafka. This config map is created when the Kafka broker functionality is enabled on the cluster by a cluster administrator.
Apply the Kafka-based broker YAML file:
$ oc apply -f <filename>
4.6.1.2. Creating an Apache Kafka broker that uses an externally managed Kafka topic
If you want to use a Kafka broker without allowing it to create its own internal topic, you can use an externally managed Kafka topic instead. To do this, you must create a Kafka Broker object that uses the kafka.eventing.knative.dev/external.topic annotation.
Prerequisites
-
The OpenShift Serverless Operator, Knative Eventing, and the
KnativeKafkacustom resource are installed on your OpenShift Container Platform cluster. - You have access to a Kafka instance such as Red Hat AMQ Streams, and have created a Kafka topic.
- You have created a project or have access to a project with the appropriate roles and permissions to create applications and other workloads in OpenShift Container Platform.
-
You have installed the OpenShift CLI (
oc).
Procedure
Create a Kafka-based broker as a YAML file:
apiVersion: eventing.knative.dev/v1 kind: Broker metadata: annotations: eventing.knative.dev/broker.class: Kafka1 kafka.eventing.knative.dev/external.topic: <topic_name>2 ...Apply the Kafka-based broker YAML file:
$ oc apply -f <filename>
4.6.1.3. Knative Broker implementation for Apache Kafka with isolated data plane
The Knative Broker implementation for Apache Kafka with isolated data plane is a Technology Preview feature only. Technology Preview features are not supported with Red Hat production service level agreements (SLAs) and might not be functionally complete. Red Hat does not recommend using them in production. These features provide early access to upcoming product features, enabling customers to test functionality and provide feedback during the development process.
For more information about the support scope of Red Hat Technology Preview features, see Technology Preview Features Support Scope.
The Knative Broker implementation for Apache Kafka has 2 planes:
- Control plane
- Consists of controllers that talk to the Kubernetes API, watch for custom objects, and manage the data plane.
- Data plane
-
The collection of components that listen for incoming events, talk to Apache Kafka, and send events to the event sinks. The Knative Broker implementation for Apache Kafka data plane is where events flow. The implementation consists of
kafka-broker-receiverandkafka-broker-dispatcherdeployments.
When you configure a Broker class of Kafka, the Knative Broker implementation for Apache Kafka uses a shared data plane. This means that the kafka-broker-receiver and kafka-broker-dispatcher deployments in the knative-eventing namespace are used for all Apache Kafka Brokers in the cluster.
However, when you configure a Broker class of KafkaNamespaced, the Apache Kafka broker controller creates a new data plane for each namespace where a broker exists. This data plane is used by all KafkaNamespaced brokers in that namespace. This provides isolation between the data planes, so that the kafka-broker-receiver and kafka-broker-dispatcher deployments in the user namespace are only used for the broker in that namespace.
As a consequence of having separate data planes, this security feature creates more deployments and uses more resources. Unless you have such isolation requirements, use a regular Broker with a class of Kafka.
4.6.1.4. Creating a Knative broker for Apache Kafka that uses an isolated data plane
The Knative Broker implementation for Apache Kafka with isolated data plane is a Technology Preview feature only. Technology Preview features are not supported with Red Hat production service level agreements (SLAs) and might not be functionally complete. Red Hat does not recommend using them in production. These features provide early access to upcoming product features, enabling customers to test functionality and provide feedback during the development process.
For more information about the support scope of Red Hat Technology Preview features, see Technology Preview Features Support Scope.
To create a KafkaNamespaced broker, you must set the eventing.knative.dev/broker.class annotation to KafkaNamespaced.
Prerequisites
-
The OpenShift Serverless Operator, Knative Eventing, and the
KnativeKafkacustom resource are installed on your OpenShift Container Platform cluster. - You have access to an Apache Kafka instance, such as Red Hat AMQ Streams, and have created a Kafka topic.
- You have created a project, or have access to a project, with the appropriate roles and permissions to create applications and other workloads in OpenShift Container Platform.
-
You have installed the OpenShift CLI (
oc).
Procedure
Create an Apache Kafka-based broker by using a YAML file:
apiVersion: eventing.knative.dev/v1 kind: Broker metadata: annotations: eventing.knative.dev/broker.class: KafkaNamespaced1 name: default namespace: my-namespace2 spec: config: apiVersion: v1 kind: ConfigMap name: my-config3 ...Apply the Apache Kafka-based broker YAML file:
$ oc apply -f <filename>
The ConfigMap object in spec.config must be in the same namespace as the Broker object:
apiVersion: v1
kind: ConfigMap
metadata:
name: my-config
namespace: my-namespace
data:
...
After the creation of the first Broker object with the KafkaNamespaced class, the kafka-broker-receiver and kafka-broker-dispatcher deployments are created in the namespace. Subsequently, all brokers with the KafkaNamespaced class in the same namespace will use the same data plane. If no brokers with the KafkaNamespaced class exist in the namespace, the data plane in the namespace is deleted.
4.6.2. Configuring Apache Kafka broker settings
You can configure the replication factor, bootstrap servers, and the number of topic partitions for a Kafka broker, by creating a config map and referencing this config map in the Kafka Broker object.
Knative Eventing supports the full set of topic config options that Kafka supports. To set these options, you must add a key to the ConfigMap with the default.topic.config. prefix.
Prerequisites
- You have cluster or dedicated administrator permissions on OpenShift Container Platform.
-
The OpenShift Serverless Operator, Knative Eventing, and the
KnativeKafkacustom resource (CR) are installed on your OpenShift Container Platform cluster. - You have created a project or have access to a project that has the appropriate roles and permissions to create applications and other workloads in OpenShift Container Platform.
-
You have installed the OpenShift CLI (
oc).
Procedure
Modify the
kafka-broker-configconfig map, or create your own config map that contains the following configuration:apiVersion: v1 kind: ConfigMap metadata: name: <config_map_name>1 namespace: <namespace>2 data: default.topic.partitions: <integer>3 default.topic.replication.factor: <integer>4 bootstrap.servers: <list_of_servers>5 default.topic.config.<config_option>: <value>6 - 1
- The config map name.
- 2
- The namespace where the config map exists.
- 3
- The number of topic partitions for the Kafka broker. This controls how quickly events can be sent to the broker. A higher number of partitions requires greater compute resources.
- 4
- The replication factor of topic messages. This prevents against data loss. A higher replication factor requires greater compute resources and more storage.
- 5
- A comma separated list of bootstrap servers. This can be inside or outside of the OpenShift Container Platform cluster, and is a list of Kafka clusters that the broker receives events from and sends events to.
- 6
- A topic config option. For more information, see the full set of possible options and values.
ImportantThe
default.topic.replication.factorvalue must be less than or equal to the number of Kafka broker instances in your cluster. For example, if you only have one Kafka broker, thedefault.topic.replication.factorvalue should not be more than"1".Example Kafka broker config map
apiVersion: v1 kind: ConfigMap metadata: name: kafka-broker-config namespace: knative-eventing data: default.topic.partitions: "10" default.topic.replication.factor: "3" bootstrap.servers: "my-cluster-kafka-bootstrap.kafka:9092" default.topic.config.retention.ms: "3600"Apply the config map:
$ oc apply -f <config_map_filename>Specify the config map for the Kafka
Brokerobject:Example Broker object
apiVersion: eventing.knative.dev/v1 kind: Broker metadata: name: <broker_name>1 namespace: <namespace>2 annotations: eventing.knative.dev/broker.class: Kafka3 spec: config: apiVersion: v1 kind: ConfigMap name: <config_map_name>4 namespace: <namespace>5 ...Apply the broker:
$ oc apply -f <broker_filename>
4.6.3. Security configuration for the Knative broker implementation for Apache Kafka
Kafka clusters are generally secured by using the TLS or SASL authentication methods. You can configure a Kafka broker or channel to work against a protected Red Hat AMQ Streams cluster by using TLS or SASL.
Red Hat recommends that you enable both SASL and TLS together.
4.6.3.1. Configuring TLS authentication for Apache Kafka brokers
Transport Layer Security (TLS) is used by Apache Kafka clients and servers to encrypt traffic between Knative and Kafka, as well as for authentication. TLS is the only supported method of traffic encryption for the Knative broker implementation for Apache Kafka.
Prerequisites
- You have cluster or dedicated administrator permissions on OpenShift Container Platform.
-
The OpenShift Serverless Operator, Knative Eventing, and the
KnativeKafkaCR are installed on your OpenShift Container Platform cluster. - You have created a project or have access to a project with the appropriate roles and permissions to create applications and other workloads in OpenShift Container Platform.
-
You have a Kafka cluster CA certificate stored as a
.pemfile. -
You have a Kafka cluster client certificate and a key stored as
.pemfiles. -
Install the OpenShift CLI (
oc).
Procedure
Create the certificate files as a secret in the
knative-eventingnamespace:$ oc create secret -n knative-eventing generic <secret_name> \ --from-literal=protocol=SSL \ --from-file=ca.crt=caroot.pem \ --from-file=user.crt=certificate.pem \ --from-file=user.key=key.pemImportantUse the key names
ca.crt,user.crt, anduser.key. Do not change them.Edit the
KnativeKafkaCR and add a reference to your secret in thebrokerspec:apiVersion: operator.serverless.openshift.io/v1alpha1 kind: KnativeKafka metadata: namespace: knative-eventing name: knative-kafka spec: broker: enabled: true defaultConfig: authSecretName: <secret_name> ...
4.6.3.2. Configuring SASL authentication for Apache Kafka brokers
Simple Authentication and Security Layer (SASL) is used by Apache Kafka for authentication. If you use SASL authentication on your cluster, users must provide credentials to Knative for communicating with the Kafka cluster; otherwise events cannot be produced or consumed.
Prerequisites
- You have cluster or dedicated administrator permissions on OpenShift Container Platform.
-
The OpenShift Serverless Operator, Knative Eventing, and the
KnativeKafkaCR are installed on your OpenShift Container Platform cluster. - You have created a project or have access to a project with the appropriate roles and permissions to create applications and other workloads in OpenShift Container Platform.
- You have a username and password for a Kafka cluster.
-
You have chosen the SASL mechanism to use, for example,
PLAIN,SCRAM-SHA-256, orSCRAM-SHA-512. -
If TLS is enabled, you also need the
ca.crtcertificate file for the Kafka cluster. -
Install the OpenShift CLI (
oc).
Procedure
Create the certificate files as a secret in the
knative-eventingnamespace:$ oc create secret -n knative-eventing generic <secret_name> \ --from-literal=protocol=SASL_SSL \ --from-literal=sasl.mechanism=<sasl_mechanism> \ --from-file=ca.crt=caroot.pem \ --from-literal=password="SecretPassword" \ --from-literal=user="my-sasl-user"Use the key names
protocol,sasl.mechanism,ca.crt,password, anduser. Do not change them.NoteThe
ca.crtkey is optional if the Kafka cluster uses a certificate signed by a public CA whose certificate is already in the system truststore.
Edit the
KnativeKafkaCR and add a reference to your secret in thebrokerspec:apiVersion: operator.serverless.openshift.io/v1alpha1 kind: KnativeKafka metadata: namespace: knative-eventing name: knative-kafka spec: broker: enabled: true defaultConfig: authSecretName: <secret_name> ...
4.7. Managing brokers
After you have created a broker, you can manage your broker by using Knative (kn) CLI commands, or by modifying it in the OpenShift Container Platform web console.
4.7.1. Managing brokers using the CLI
The Knative (kn) CLI provides commands that can be used to describe and list existing brokers.
4.7.1.1. Listing existing brokers by using the Knative CLI
Using the Knative (kn) CLI to list brokers provides a streamlined and intuitive user interface. You can use the kn broker list command to list existing brokers in your cluster by using the Knative CLI.
Prerequisites
- The OpenShift Serverless Operator and Knative Eventing are installed on your OpenShift Container Platform cluster.
-
You have installed the Knative (
kn) CLI.
Procedure
List all existing brokers:
$ kn broker listExample output
NAME URL AGE CONDITIONS READY REASON default http://broker-ingress.knative-eventing.svc.cluster.local/test/default 45s 5 OK / 5 True
4.7.1.2. Describing an existing broker by using the Knative CLI
Using the Knative (kn) CLI to describe brokers provides a streamlined and intuitive user interface. You can use the kn broker describe command to print information about existing brokers in your cluster by using the Knative CLI.
Prerequisites
- The OpenShift Serverless Operator and Knative Eventing are installed on your OpenShift Container Platform cluster.
-
You have installed the Knative (
kn) CLI.
Procedure
Describe an existing broker:
$ kn broker describe <broker_name>Example command using default broker
$ kn broker describe defaultExample output
Name: default Namespace: default Annotations: eventing.knative.dev/broker.class=MTChannelBasedBroker, eventing.knative.dev/creato ... Age: 22s Address: URL: http://broker-ingress.knative-eventing.svc.cluster.local/default/default Conditions: OK TYPE AGE REASON ++ Ready 22s ++ Addressable 22s ++ FilterReady 22s ++ IngressReady 22s ++ TriggerChannelReady 22s
4.7.2. Connect a broker to a sink
You can connect a broker to an event sink in the OpenShift Container Platform web console by creating a trigger.
Prerequisites
- The OpenShift Serverless Operator, Knative Serving, and Knative Eventing are installed on your OpenShift Container Platform cluster.
- You have logged in to the web console.
- You have created a project or have access to a project with the appropriate roles and permissions to create applications and other workloads in OpenShift Container Platform.
- You have created a sink, such as a Knative service or channel.
- You have created a broker.
Procedure
- In the Topology view, point to the broker that you have created. An arrow appears. Drag the arrow to the sink that you want to connect to the broker. This action opens the Add Trigger dialog box.
- In the Add Trigger dialog box, enter a name for the trigger and click Add.
Verification
You can verify that the broker is connected to the sink by viewing the Topology page.
- Navigate to Topology.
- Click the line that connects the broker to the sink to see details about the trigger in the Details panel.
Chapter 5. Triggers
5.1. Triggers overview
Triggers are an essential component in Knative Eventing that connect specific event sources to subscriber services based on defined filters. By creating a Trigger, you can dynamically manage how events are routed within your system, ensuring they reach the appropriate destination based on your business logic.
Brokers can be used in combination with triggers to deliver events from an event source to an event sink. Events are sent from an event source to a broker as an HTTP POST request. After events have entered the broker, they can be filtered by CloudEvent attributes using triggers, and sent as an HTTP POST request to an event sink.
5.2. Creating triggers
Triggers in Knative Eventing allow you to route events from a broker to a specific subscriber based on your requirements. By defining a Trigger, you can connect event producers to consumers dynamically, ensuring events are delivered to the correct destination. This section describes the steps to create a Trigger, configure its filters, and verify its functionality. Whether you’re working with simple routing needs or complex event-driven workflows.
The following examples displays common configurations for Triggers, demonstrating how to route events to Knative services or custom endpoints.
Example of routing events to a Knative Serving service
The following Trigger routes all events from the default broker to the Knative Serving service named my-service:
apiVersion: eventing.knative.dev/v1
kind: Trigger
metadata:
name: my-service-trigger
spec:
broker: default
filter:
attributes:
type: dev.knative.foo.bar
subscriber:
ref:
apiVersion: serving.knative.dev/v1
kind: Service
name: my-service
Routing all events without a filter attribute is recommended for debugging purposes. It allows you to observe and analyze all incoming events, helping identify issues or validate the flow of events through the broker before applying specific filters. To know more about filtering, see Advanced trigger filters.
To apply this trigger, you can save the configuration to a file, for example, trigger.yaml and run the following command:
$ oc apply -f trigger.yamlExample of routing events to a custom path
This Trigger routes all events from the default broker to a custom path /my-custom-path on the service named my-service:
apiVersion: eventing.knative.dev/v1
kind: Trigger
metadata:
name: my-service-trigger
spec:
broker: default
subscriber:
ref:
apiVersion: v1
kind: Service
name: my-service
uri: /my-custom-path
You can save the configuration to a file, for example, custom-path-trigger.yaml and run the following command:
$ oc apply -f custom-path-trigger.yaml5.2.1. Creating a trigger
Using the OpenShift Container Platform web console provides a streamlined and intuitive user interface to create a trigger. After Knative Eventing is installed on your cluster and you have created a broker, you can create a trigger by using the web console.
Prerequisites
- The OpenShift Serverless Operator, Knative Serving, and Knative Eventing are installed on your OpenShift Container Platform cluster.
- You have logged in to the web console.
- You have created a project or have access to a project with the appropriate roles and permissions to create applications and other workloads in OpenShift Container Platform.
- You have created a broker and a Knative service or other event sink to connect to the trigger.
Procedure
- Navigate to the Topology page.
- Hover over the broker that you want to create a trigger for, and drag the arrow. The Add Trigger option is displayed.
- Click Add Trigger.
- Select your sink in the Subscriber list.
- Click Add.
Verification
- After the subscription has been created, you can view it in the Topology page, where it is represented as a line that connects the broker to the event sink.
Deleting a trigger
- Navigate to the Topology page.
- Click on the trigger that you want to delete.
- In the Actions context menu, select Delete Trigger.
5.2.2. Creating a trigger by using the Knative CLI
You can use the kn trigger create command to create a trigger.
Prerequisites
- The OpenShift Serverless Operator and Knative Eventing are installed on your OpenShift Container Platform cluster.
-
You have installed the Knative (
kn) CLI. - You have created a project or have access to a project with the appropriate roles and permissions to create applications and other workloads in OpenShift Container Platform.
Procedure
Create a trigger:
$ kn trigger create <trigger_name> --broker <broker_name> --filter <key=value> --sink <sink_name>Alternatively, you can create a trigger and simultaneously create the
defaultbroker using broker injection:$ kn trigger create <trigger_name> --inject-broker --filter <key=value> --sink <sink_name>By default, triggers forward all events sent to a broker to sinks that are subscribed to that broker. Using the
--filterattribute for triggers allows you to filter events from a broker, so that subscribers will only receive a subset of events based on your defined criteria.
5.3. List triggers from the command line
Using the Knative (kn) CLI to list triggers provides a streamlined and intuitive user interface.
5.3.1. Listing triggers by using the Knative CLI
You can use the kn trigger list command to list existing triggers in your cluster.
Prerequisites
- The OpenShift Serverless Operator and Knative Eventing are installed on your OpenShift Container Platform cluster.
-
You have installed the Knative (
kn) CLI.
Procedure
Print a list of available triggers:
$ kn trigger listExample output
NAME BROKER SINK AGE CONDITIONS READY REASON email default ksvc:edisplay 4s 5 OK / 5 True ping default ksvc:edisplay 32s 5 OK / 5 TrueOptional: Print a list of triggers in JSON format:
$ kn trigger list -o json
5.4. Describe triggers from the command line
Using the Knative (kn) CLI to describe triggers provides a streamlined and intuitive user interface.
5.4.1. Describing a trigger by using the Knative CLI
You can use the kn trigger describe command to print information about existing triggers in your cluster by using the Knative CLI.
Prerequisites
- The OpenShift Serverless Operator and Knative Eventing are installed on your OpenShift Container Platform cluster.
-
You have installed the Knative (
kn) CLI. - You have created a trigger.
Procedure
Enter the command:
$ kn trigger describe <trigger_name>Example output
Name: ping Namespace: default Labels: eventing.knative.dev/broker=default Annotations: eventing.knative.dev/creator=kube:admin, eventing.knative.dev/lastModifier=kube:admin Age: 2m Broker: default Filter: type: dev.knative.event Sink: Name: edisplay Namespace: default Resource: Service (serving.knative.dev/v1) Conditions: OK TYPE AGE REASON ++ Ready 2m ++ BrokerReady 2m ++ DependencyReady 2m ++ Subscribed 2m ++ SubscriberResolved 2m
5.5. Connecting a trigger to a sink
You can connect a trigger to a sink, so that events from a broker are filtered before they are sent to the sink. A sink that is connected to a trigger is configured as a subscriber in the Trigger object’s resource spec.
Example of a Trigger object connected to an Apache Kafka sink
apiVersion: eventing.knative.dev/v1
kind: Trigger
metadata:
name: <trigger_name>
spec:
...
subscriber:
ref:
apiVersion: eventing.knative.dev/v1alpha1
kind: KafkaSink
name: <kafka_sink_name> 5.6. Filtering triggers from the command line
Using the Knative (kn) CLI to filter events by using triggers provides a streamlined and intuitive user interface. You can use the kn trigger create command, along with the appropriate flags, to filter events by using triggers.
5.6.1. Filtering events with triggers by using the Knative CLI
In the following trigger example, only events with the attribute type: dev.knative.samples.helloworld are sent to the event sink:
$ kn trigger create <trigger_name> --broker <broker_name> --filter type=dev.knative.samples.helloworld --sink ksvc:<service_name>You can also filter events by using multiple attributes. The following example shows how to filter events using the type, source, and extension attributes:
$ kn trigger create <trigger_name> --broker <broker_name> --sink ksvc:<service_name> \
--filter type=dev.knative.samples.helloworld \
--filter source=dev.knative.samples/helloworldsource \
--filter myextension=my-extension-value5.7. Advanced trigger filters
The advanced trigger filters give you advanced options for more precise event routing. You can filter events by exact matches, prefixes, or suffixes, as well as by CloudEvent extensions. This added control makes it easier to fine-tune how events flow ensuring that only relevant events trigger specific actions.
Advanced trigger filters feature is a Technology Preview feature only. Technology Preview features are not supported with Red Hat production service level agreements (SLAs) and might not be functionally complete. Red Hat does not recommend using them in production. These features provide early access to upcoming product features, enabling customers to test functionality and provide feedback during the development process.
For more information about the support scope of Red Hat Technology Preview features, see Technology Preview Features Support Scope.
5.7.1. Advanced trigger filters overview
The advanced trigger filters feature adds a new filters field to triggers that aligns with the filters API field defined in the CloudEvents Subscriptions API. You can specify filter expressions, where each expression evaluates to true or false for each event.
The following example shows a trigger using the advanced filters field:
apiVersion: eventing.knative.dev/v1
kind: Trigger
metadata:
name: my-service-trigger
spec:
broker: default
filters:
- cesql: "source LIKE '%commerce%' AND type IN ('order.created', 'order.updated', 'order.canceled')"
subscriber:
ref:
apiVersion: serving.knative.dev/v1
kind: Service
name: my-service
The filters field contains an array of filter expressions, each evaluating to either true or false. If any expression evaluates to false, the event is not sent to the subscriber. Each filter expression uses a specific dialect that determines the type of filter and the set of allowed additional properties within the expression.
5.7.2. Supported filter dialects
You can use dialects to define flexible filter expressions to target specific events.
The advanced trigger filters support the following dialects that offer different ways to match and filter events:
-
exact -
prefix -
suffix -
all -
any -
not -
cesql
Each dialect provides a different method for filtering events based on a specific criteria, enabling precise event selection for processing.
5.7.2.1. exact filter dialect
The exact dialect filters events by comparing a string value of the CloudEvent attribute to exactly match the specified string. The comparison is case sensitive. If the attribute is not a string, the filter converts the attribute to its string representation before comparing it to the specified value.
Example of the exact filter dialect
apiVersion: eventing.knative.dev/v1
kind: Trigger
metadata:
...
spec:
...
filters:
- exact:
type: com.github.push5.7.2.2. prefix filter dialect
The prefix dialect filters events by comparing a string value of the CloudEvent attribute that starts with the specified string. This comparison is case sensitive. If the attribute is not a string, the filter converts the attribute to its string representation before matching it against the specified value.
Example of the prefix filter dialect
apiVersion: eventing.knative.dev/v1
kind: Trigger
metadata:
...
spec:
...
filters:
- prefix:
type: com.github.5.7.2.3. suffix filter dialect
The suffix dialect filters events by comparing a string value of the CloudEvent attribute that ends with the specified string. This comparison is case-sensitive. If the attribute is not a string, the filter converts the attribute to its string representation before matching it to the specified value.
Example of the suffix filter dialect
apiVersion: eventing.knative.dev/v1
kind: Trigger
metadata:
...
spec:
...
filters:
- suffix:
type: .created5.7.2.4. all filter dialect
The all filter dialect needs that all nested filter expressions evaluate to true to process the event. If any of the nested expressions return false, the event is not sent to the subscriber.
Example of the all filter dialect
apiVersion: eventing.knative.dev/v1
kind: Trigger
metadata:
...
spec:
...
filters:
- all:
- exact:
type: com.github.push
- exact:
subject: https://github.com/cloudevents/spec5.7.2.5. any filter dialect
The any filter dialect requires at least one of the nested filter expressions to evaluate to true. If none of the nested expressions return true, the event is not sent to the subscriber.
Example of the any filter dialect
apiVersion: eventing.knative.dev/v1
kind: Trigger
metadata:
...
spec:
...
filters:
- any:
- exact:
type: com.github.push
- exact:
subject: https://github.com/cloudevents/spec5.7.2.6. not filter dialect
The not filter dialect requires that the nested filter expression evaluates to false for the event to be processed. If the nested expression evaluates to true, the event is not sent to the subscriber.
Example of the not filter dialect
apiVersion: eventing.knative.dev/v1
kind: Trigger
metadata:
...
spec:
...
filters:
- not:
exact:
type: com.github.push5.7.2.7. cesql filter dialect
CloudEvents SQL expressions (cesql) allow computing values and matching of CloudEvent attributes against complex expressions that lean on the syntax of Structured Query Language (SQL) WHERE clauses.
The cesql filter dialect uses CloudEvents SQL expressions to filter events. The provided CESQL expression must evaluate to true for the event to be processed.
Example of the cesql filter dialect
apiVersion: eventing.knative.dev/v1
kind: Trigger
metadata:
...
spec:
...
filters:
- cesql: "source LIKE '%commerce%' AND type IN ('order.created', 'order.updated', 'order.canceled')"
For more information about the syntax and the features of the cesql filter dialect, see CloudEvents SQL Expression Language.
5.7.3. Conflict with the existing filter field
You can use the filters and the existing filter field at the same time. If you enable the new new-trigger-filters feature and an object contains both filter and filters, the filters field overrides. This setup allows you to test the new filters field while maintaining support for existing filters. You can gradually introduce the new field into existing trigger objects.
Example of filters field overriding the filter field:
apiVersion: eventing.knative.dev/v1
kind: Trigger
metadata:
name: my-service-trigger
spec:
broker: default
# Existing filter field. This will be ignored when the new filters field is present.
filter:
attributes:
type: dev.knative.foo.bar
myextension: my-extension-value
# New filters field. This takes precedence over the old filter field.
filters:
- cesql: "type = 'dev.knative.foo.bar' AND myextension = 'my-extension-value'"
subscriber:
ref:
apiVersion: serving.knative.dev/v1
kind: Service
name: my-service5.7.4. Legacy attributes filter
The legacy attributes filter enables exact match filtering on any number of CloudEvents attributes, including extensions. Its functionality mirrors the exact filter dialect, and you are encouraged to transition to the exact filter whenever possible. However, for backward compatibility, the attributes filter remains available.
The following example displays how to filter events from the default broker that match the type attribute dev.knative.foo.bar and have the extension myextension with the my-extension-value value:
Example of filtering events with specific attributes
apiVersion: eventing.knative.dev/v1
kind: Trigger
metadata:
name: my-service-trigger
spec:
broker: default
filter:
attributes:
type: dev.knative.foo.bar
myextension: my-extension-value
subscriber:
ref:
apiVersion: serving.knative.dev/v1
kind: Service
name: my-service
When both the filters field and the legacy filter field are specified, the filters field takes precedence.
For example, in the following example configuration, events with the dev.knative.a type are delivered, while events with the dev.knative.b type are ignored:
apiVersion: eventing.knative.dev/v1
kind: Trigger
metadata:
name: my-service-trigger
spec:
broker: default
filters:
exact:
type: dev.knative.a
filter:
attributes:
type: dev.knative.b
subscriber:
ref:
apiVersion: serving.knative.dev/v1
kind: Service
name: my-service5.8. Updating triggers from the command line
Using the Knative (kn) CLI to update triggers provides a streamlined and intuitive user interface.
5.8.1. Updating a trigger by using the Knative CLI
You can use the kn trigger update command with certain flags to update attributes for a trigger.
Prerequisites
- The OpenShift Serverless Operator and Knative Eventing are installed on your OpenShift Container Platform cluster.
-
You have installed the Knative (
kn) CLI. - You have created a project or have access to a project with the appropriate roles and permissions to create applications and other workloads in OpenShift Container Platform.
Procedure
Update a trigger:
$ kn trigger update <trigger_name> --filter <key=value> --sink <sink_name> [flags]You can update a trigger to filter exact event attributes that match incoming events. For example, using the
typeattribute:$ kn trigger update <trigger_name> --filter type=knative.dev.eventYou can remove a filter attribute from a trigger. For example, you can remove the filter attribute with key
type:$ kn trigger update <trigger_name> --filter type-You can use the
--sinkparameter to change the event sink of a trigger:$ kn trigger update <trigger_name> --sink ksvc:my-event-sink
5.9. Deleting triggers from the command line
Using the Knative (kn) CLI to delete a trigger provides a streamlined and intuitive user interface.
5.9.1. Deleting a trigger by using the Knative CLI
You can use the kn trigger delete command to delete a trigger.
Prerequisites
- The OpenShift Serverless Operator and Knative Eventing are installed on your OpenShift Container Platform cluster.
-
You have installed the Knative (
kn) CLI. - You have created a project or have access to a project with the appropriate roles and permissions to create applications and other workloads in OpenShift Container Platform.
Procedure
Delete a trigger:
$ kn trigger delete <trigger_name>
Verification
List existing triggers:
$ kn trigger listVerify that the trigger no longer exists:
Example output
No triggers found.
5.10. Event delivery order for triggers
In Knative Eventing, the delivery order of events plays a critical role in ensuring messages are processed according to application requirements. When using a Kafka broker, you can specify whether events should be delivered in order or without strict ordering. By configuring the delivery order, you can optimize event handling for use cases that require sequential processing or prioritize performance for unordered delivery.
5.10.1. Configuring event delivery ordering for triggers
If you are using a Kafka broker, you can configure the delivery order of events from triggers to event sinks.
Prerequisites
- The OpenShift Serverless Operator, Knative Eventing, and Knative Kafka are installed on your OpenShift Container Platform cluster.
- Kafka broker is enabled for use on your cluster, and you have created a Kafka broker.
- You have created a project or have access to a project with the appropriate roles and permissions to create applications and other workloads in OpenShift Container Platform.
-
You have installed the OpenShift (
oc) CLI.
Procedure
Create or modify a
Triggerobject and set thekafka.eventing.knative.dev/delivery.orderannotation using the following example Trigger YAML file::apiVersion: eventing.knative.dev/v1 kind: Trigger metadata: name: <trigger_name> annotations: kafka.eventing.knative.dev/delivery.order: ordered # ...The supported consumer delivery guarantees are:
unordered- An unordered consumer is a non-blocking consumer that delivers messages unordered, while preserving proper offset management.
orderedAn ordered consumer is a per-partition blocking consumer that waits for a successful response from the CloudEvent subscriber before it delivers the next message of the partition.
The default ordering guarantee is
unordered.
Apply the
Triggerobject using the following command::$ oc apply -f <filename>
5.10.2. Next steps
- Configure event delivery parameters that are applied in cases where an event fails to be delivered to an event sink.
Chapter 6. Channels
6.1. Channels and subscriptions
Channels are custom resources that define a single event-forwarding and persistence layer. After events have been sent to a channel from an event source or producer, these events can be sent to multiple Knative services or other sinks by using a subscription.
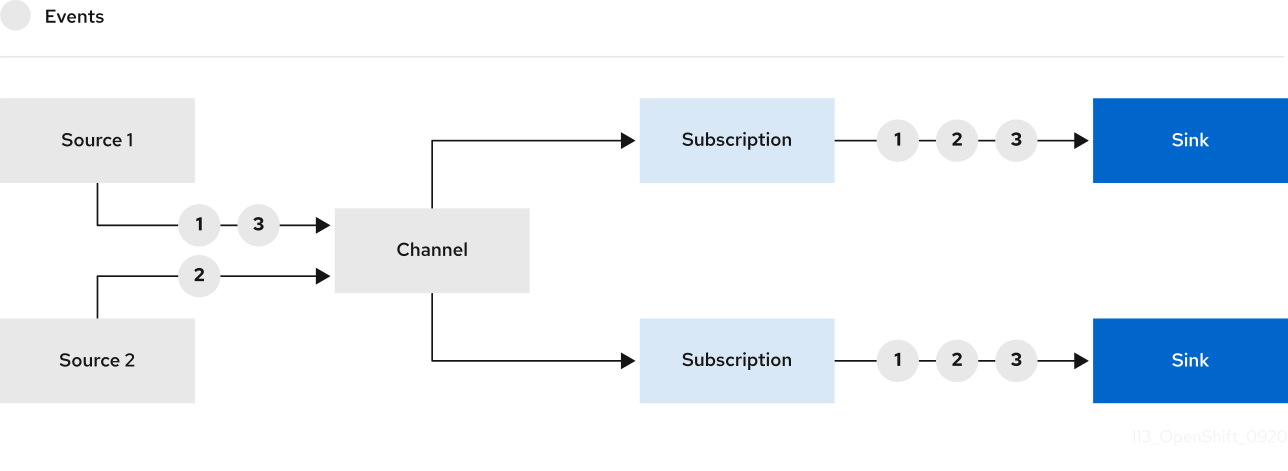
You can create channels by instantiating a supported Channel object, and configure re-delivery attempts by modifying the delivery spec in a Subscription object.
After you create a Channel object, a mutating admission webhook adds a set of spec.channelTemplate properties for the Channel object based on the default channel implementation. For example, for an InMemoryChannel default implementation, the Channel object looks as follows:
apiVersion: messaging.knative.dev/v1
kind: Channel
metadata:
name: example-channel
namespace: default
spec:
channelTemplate:
apiVersion: messaging.knative.dev/v1
kind: InMemoryChannel
The channel controller then creates the backing channel instance based on the spec.channelTemplate configuration.
The spec.channelTemplate properties cannot be changed after creation, because they are set by the default channel mechanism rather than by the user.
When this mechanism is used with the preceding example, two objects are created: a generic backing channel and an InMemoryChannel channel. If you are using a different default channel implementation, the InMemoryChannel is replaced with one that is specific to your implementation. For example, with the Knative broker for Apache Kafka, the KafkaChannel channel is created.
The backing channel acts as a proxy that copies its subscriptions to the user-created channel object, and sets the user-created channel object status to reflect the status of the backing channel.
6.1.1. Channel implementation types
OpenShift Serverless supports the InMemoryChannel and KafkaChannel channels implementations. The InMemoryChannel channel is recommended for development use only due to its limitations. You can use the KafkaChannel channel for a production environment.
The following are limitations of InMemoryChannel type channels:
- No event persistence is available. If a pod goes down, events on that pod are lost.
-
InMemoryChannelchannels do not implement event ordering, so two events that are received in the channel at the same time can be delivered to a subscriber in any order. -
If a subscriber rejects an event, there are no re-delivery attempts by default. You can configure re-delivery attempts by modifying the
deliveryspec in theSubscriptionobject.
6.2. Creating channels
Channels are custom resources that define a single event-forwarding and persistence layer. After events have been sent to a channel from an event source or producer, these events can be sent to multiple Knative services or other sinks by using a subscription.
You can create channels by instantiating a supported Channel object, and configure re-delivery attempts by modifying the delivery spec in a Subscription object.
6.2.1. Creating a channel
Using the OpenShift Container Platform web console provides a streamlined and intuitive user interface to create a channel. After Knative Eventing is installed on your cluster, you can create a channel by using the web console.
Prerequisites
- You have logged in to the OpenShift Container Platform web console.
- The OpenShift Serverless Operator and Knative Eventing are installed on your OpenShift Container Platform cluster.
- You have created a project or have access to a project with the appropriate roles and permissions to create applications and other workloads in OpenShift Container Platform.
Procedure
- Navigate to +Add → Channel.
Select the type of
Channelobject that you want to create in the Type list.NoteCurrently only
InMemoryChannelchannel objects are supported by default. Knative channels for Apache Kafka are available if you have installed the Knative broker implementation for Apache Kafka on OpenShift Serverless.- Click Create.
Verification
Confirm that the channel now exists by navigating to the Topology page.
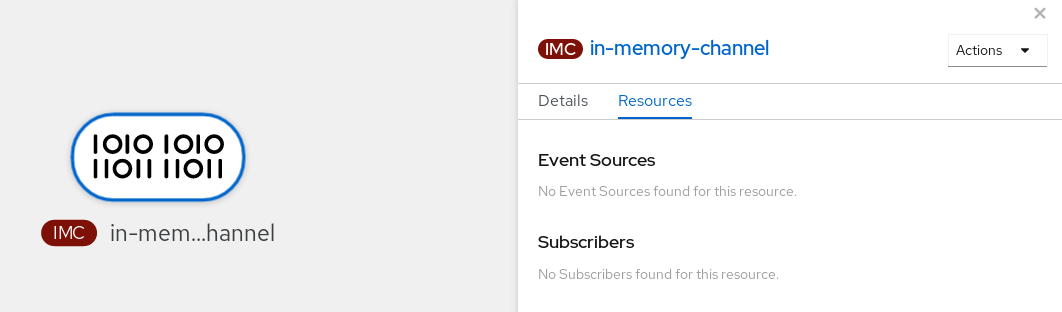
6.2.2. Creating a channel by using the Knative CLI
Using the Knative (kn) CLI to create channels provides a more streamlined and intuitive user interface than modifying YAML files directly. You can use the kn channel create command to create a channel.
Prerequisites
- The OpenShift Serverless Operator and Knative Eventing are installed on the cluster.
-
You have installed the Knative (
kn) CLI. - You have created a project or have access to a project with the appropriate roles and permissions to create applications and other workloads in OpenShift Container Platform.
Procedure
Create a channel:
$ kn channel create <channel_name> --type <channel_type>The channel type is optional, but where specified, must be given in the format
Group:Version:Kind. For example, you can create anInMemoryChannelobject:$ kn channel create mychannel --type messaging.knative.dev:v1:InMemoryChannelExample output
Channel 'mychannel' created in namespace 'default'.
Verification
To confirm that the channel now exists, list the existing channels and inspect the output:
$ kn channel listExample output
kn channel list NAME TYPE URL AGE READY REASON mychannel InMemoryChannel http://mychannel-kn-channel.default.svc.cluster.local 93s True
Deleting a channel
Delete a channel:
$ kn channel delete <channel_name>
6.2.3. Creating a default implementation channel by using YAML
Creating Knative resources by using YAML files uses a declarative API, which enables you to describe channels declaratively and in a reproducible manner. To create a serverless channel by using YAML, you must create a YAML file that defines a Channel object, then apply it by using the oc apply command.
Prerequisites
- The OpenShift Serverless Operator and Knative Eventing are installed on the cluster.
-
Install the OpenShift CLI (
oc). - You have created a project or have access to a project with the appropriate roles and permissions to create applications and other workloads in OpenShift Container Platform.
Procedure
Create a
Channelobject as a YAML file:apiVersion: messaging.knative.dev/v1 kind: Channel metadata: name: example-channel namespace: defaultApply the YAML file:
$ oc apply -f <filename>
6.2.4. Creating a channel for Apache Kafka by using YAML
Creating Knative resources by using YAML files uses a declarative API, which enables you to describe channels declaratively and in a reproducible manner. You can create a Knative Eventing channel that is backed by Kafka topics by creating a Kafka channel. To create a Kafka channel by using YAML, you must create a YAML file that defines a KafkaChannel object, then apply it by using the oc apply command.
Prerequisites
-
The OpenShift Serverless Operator, Knative Eventing, and the
KnativeKafkacustom resource are installed on your OpenShift Container Platform cluster. -
Install the OpenShift CLI (
oc). - You have created a project or have access to a project with the appropriate roles and permissions to create applications and other workloads in OpenShift Container Platform.
Procedure
Create a
KafkaChannelobject as a YAML file:apiVersion: messaging.knative.dev/v1beta1 kind: KafkaChannel metadata: name: example-channel namespace: default spec: numPartitions: 3 replicationFactor: 1ImportantOnly the
v1beta1version of the API forKafkaChannelobjects on OpenShift Serverless is supported. Do not use thev1alpha1version of this API, as this version is now deprecated.Apply the
KafkaChannelYAML file:$ oc apply -f <filename>
6.2.5. Next steps
- After you have created a channel, you can connect the channel to a sink so that the sink can receive events.
- Configure event delivery parameters that are applied in cases where an event fails to be delivered to an event sink.
6.3. Connecting channels to sinks
Events that have been sent to a channel from an event source or producer can be forwarded to one or more sinks by using subscriptions. You can create subscriptions by configuring a Subscription object, which specifies the channel and the sink (also known as a subscriber) that consumes the events sent to that channel.
6.3.1. Creating a subscription
After you have created a channel and an event sink, you can create a subscription to enable event delivery. Using the OpenShift Container Platform web console provides a streamlined and intuitive user interface to create a subscription.
Prerequisites
- The OpenShift Serverless Operator, Knative Serving, and Knative Eventing are installed on your OpenShift Container Platform cluster.
- You have logged in to the web console.
- You have created an event sink, such as a Knative service, and a channel.
- You have created a project or have access to a project with the appropriate roles and privileges to create applications and other workloads in OpenShift Container Platform.
Procedure
- Navigate to the Topology page.
Create a subscription using one of the following methods:
Hover over the channel that you want to create a subscription for, and drag the arrow. The Add Subscription option is displayed.
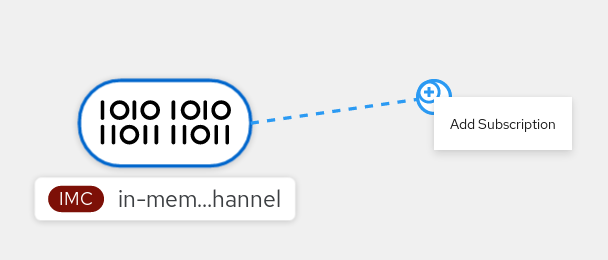
- Select your sink in the Subscriber list.
- Click Add.
- If the service is available in the Topology view under the same namespace or project as the channel, click on the channel that you want to create a subscription for, and drag the arrow directly to a service to immediately create a subscription from the channel to that service.
Verification
After the subscription has been created, you can see it represented as a line that connects the channel to the service in the Topology view:
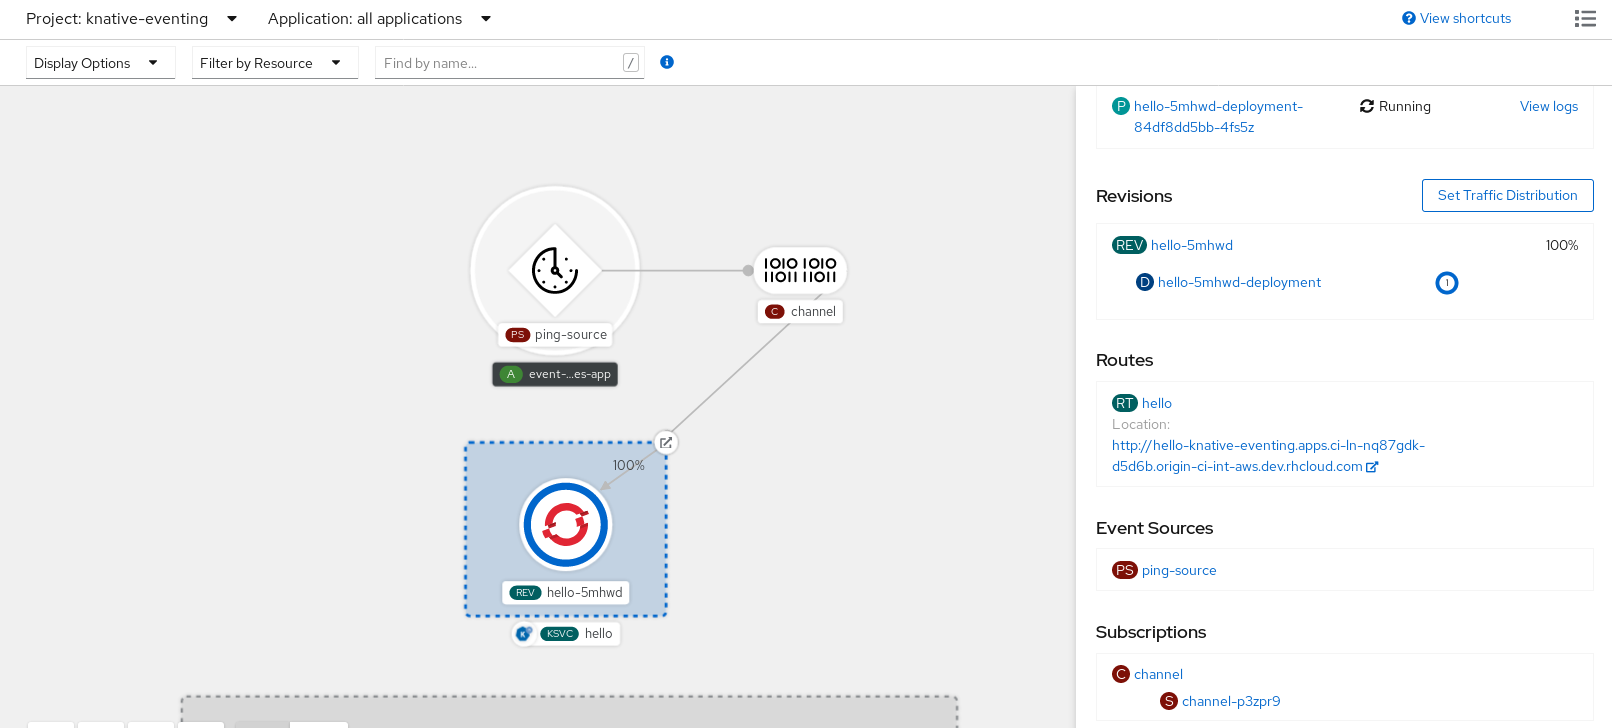
6.3.2. Creating a subscription by using YAML
After you have created a channel and an event sink, you can create a subscription to enable event delivery. Creating Knative resources by using YAML files uses a declarative API, which enables you to describe subscriptions declaratively and in a reproducible manner. To create a subscription by using YAML, you must create a YAML file that defines a Subscription object, then apply it by using the oc apply command.
Prerequisites
- The OpenShift Serverless Operator and Knative Eventing are installed on the cluster.
-
Install the OpenShift CLI (
oc). - You have created a project or have access to a project with the appropriate roles and permissions to create applications and other workloads in OpenShift Container Platform.
Procedure
Create a
Subscriptionobject:Create a YAML file and copy the following sample code into it:
apiVersion: messaging.knative.dev/v1 kind: Subscription metadata: name: my-subscription1 namespace: default spec: channel:2 apiVersion: messaging.knative.dev/v1 kind: Channel name: example-channel delivery:3 deadLetterSink: ref: apiVersion: serving.knative.dev/v1 kind: Service name: error-handler subscriber:4 ref: apiVersion: serving.knative.dev/v1 kind: Service name: event-display- 1
- Name of the subscription.
- 2
- Configuration settings for the channel that the subscription connects to.
- 3
- Configuration settings for event delivery. This tells the subscription what happens to events that cannot be delivered to the subscriber. When this is configured, events that failed to be consumed are sent to the
deadLetterSink. The event is dropped, no re-delivery of the event is attempted, and an error is logged in the system. ThedeadLetterSinkvalue must be a Destination. - 4
- Configuration settings for the subscriber. This is the event sink that events are delivered to from the channel.
Apply the YAML file:
$ oc apply -f <filename>
6.3.3. Creating a subscription by using the Knative CLI
After you have created a channel and an event sink, you can create a subscription to enable event delivery. Using the Knative (kn) CLI to create subscriptions provides a more streamlined and intuitive user interface than modifying YAML files directly. You can use the kn subscription create command with the appropriate flags to create a subscription.
Prerequisites
- The OpenShift Serverless Operator and Knative Eventing are installed on your OpenShift Container Platform cluster.
-
You have installed the Knative (
kn) CLI. - You have created a project or have access to a project with the appropriate roles and permissions to create applications and other workloads in OpenShift Container Platform.
Procedure
Create a subscription to connect a sink to a channel:
$ kn subscription create <subscription_name> \ --channel <group:version:kind>:<channel_name> \1 --sink <sink_prefix>:<sink_name> \2 --sink-dead-letter <sink_prefix>:<sink_name>3 - 1
--channelspecifies the source for cloud events that should be processed. You must provide the channel name. If you are not using the defaultInMemoryChannelchannel that is backed by theChannelcustom resource, you must prefix the channel name with the<group:version:kind>for the specified channel type. For example, this will bemessaging.knative.dev:v1beta1:KafkaChannelfor an Apache Kafka backed channel.- 2
--sinkspecifies the target destination to which the event should be delivered. By default, the<sink_name>is interpreted as a Knative service of this name, in the same namespace as the subscription. You can specify the type of the sink by using one of the following prefixes:ksvc- A Knative service.
channel- A channel that should be used as destination. Only default channel types can be referenced here.
broker- An Eventing broker.
- 3
- Optional:
--sink-dead-letteris an optional flag that can be used to specify a sink which events should be sent to in cases where events fail to be delivered. For more information, see the OpenShift Serverless Event delivery documentation.Example command
$ kn subscription create mysubscription --channel mychannel --sink ksvc:event-displayExample output
Subscription 'mysubscription' created in namespace 'default'.
Verification
To confirm that the channel is connected to the event sink, or subscriber, by a subscription, list the existing subscriptions and inspect the output:
$ kn subscription listExample output
NAME CHANNEL SUBSCRIBER REPLY DEAD LETTER SINK READY REASON mysubscription Channel:mychannel ksvc:event-display True
Deleting a subscription
Delete a subscription:
$ kn subscription delete <subscription_name>
6.3.4. Creating a subscription with administrator privileges
After you have created a channel and an event sink, also known as a subscriber, you can create a subscription to enable event delivery. Subscriptions are created by configuring a Subscription object, which specifies the channel and the subscriber to deliver events to. You can also specify some subscriber-specific options, such as how to handle failures.
Prerequisites
- The OpenShift Serverless Operator and Knative Eventing are installed on your OpenShift Container Platform cluster.
- You have logged in to the web console.
-
You have
cluster-adminprivileges on OpenShift Container Platform, or you have cluster or dedicated administrator privileges on Red Hat OpenShift Service on AWS or OpenShift Dedicated. - You have created an event sink, such as a Knative service, and a channel.
Procedure
- In the OpenShift Container Platform web console, navigate to Serverless → Eventing.
-
In the Channel tab, select the Options menu
 for the channel that you want to add a subscription to.
- Click Add Subscription in the list.
- In the Add Subscription dialogue box, select a Subscriber for the subscription. The subscriber is the Knative service that receives events from the channel.
- Click Add.
6.3.5. Next steps
- Configure Event delivery parameters that are applied in cases where an event fails to be delivered to an event sink.
6.4. Default channel implementation
You can use the default-ch-webhook config map to specify the default channel implementation of Knative Eventing. You can specify the default channel implementation for the entire cluster or for one or more namespaces. Currently the InMemoryChannel and KafkaChannel channel types are supported.
6.4.1. Configuring the default channel implementation
Prerequisites
- You have administrator permissions on OpenShift Container Platform.
- You have installed the OpenShift Serverless Operator and Knative Eventing on your cluster.
-
If you want to use Knative channels for Apache Kafka as the default channel implementation, you must also install the
KnativeKafkaCR on your cluster.
Procedure
Modify the
KnativeEventingcustom resource to add configuration details for thedefault-ch-webhookconfig map:apiVersion: operator.knative.dev/v1beta1 kind: KnativeEventing metadata: name: knative-eventing namespace: knative-eventing spec: config:1 default-ch-webhook:2 default-ch-config: | clusterDefault:3 apiVersion: messaging.knative.dev/v1 kind: InMemoryChannel spec: delivery: backoffDelay: PT0.5S backoffPolicy: exponential retry: 5 namespaceDefaults:4 my-namespace: apiVersion: messaging.knative.dev/v1beta1 kind: KafkaChannel spec: numPartitions: 1 replicationFactor: 1- 1
- In
spec.config, you can specify the config maps that you want to add modified configurations for. - 2
- The
default-ch-webhookconfig map can be used to specify the default channel implementation for the cluster or for one or more namespaces. - 3
- The cluster-wide default channel type configuration. In this example, the default channel implementation for the cluster is
InMemoryChannel. - 4
- The namespace-scoped default channel type configuration. In this example, the default channel implementation for the
my-namespacenamespace isKafkaChannel.
ImportantConfiguring a namespace-specific default overrides any cluster-wide settings.
6.5. Security configuration for channels
6.5.1. Configuring TLS authentication for Knative channels for Apache Kafka
Transport Layer Security (TLS) is used by Apache Kafka clients and servers to encrypt traffic between Knative and Kafka, as well as for authentication. TLS is the only supported method of traffic encryption for the Knative broker implementation for Apache Kafka.
Prerequisites
- You have cluster or dedicated administrator permissions on OpenShift Container Platform.
-
The OpenShift Serverless Operator, Knative Eventing, and the
KnativeKafkaCR are installed on your OpenShift Container Platform cluster. - You have created a project or have access to a project with the appropriate roles and permissions to create applications and other workloads in OpenShift Container Platform.
-
You have a Kafka cluster CA certificate stored as a
.pemfile. -
You have a Kafka cluster client certificate and a key stored as
.pemfiles. -
Install the OpenShift CLI (
oc).
Procedure
Create the certificate files as secrets in your chosen namespace:
$ oc create secret -n <namespace> generic <kafka_auth_secret> \ --from-file=ca.crt=caroot.pem \ --from-file=user.crt=certificate.pem \ --from-file=user.key=key.pemImportantUse the key names
ca.crt,user.crt, anduser.key. Do not change them.Start editing the
KnativeKafkacustom resource:$ oc edit knativekafkaReference your secret and the namespace of the secret:
apiVersion: operator.serverless.openshift.io/v1alpha1 kind: KnativeKafka metadata: namespace: knative-eventing name: knative-kafka spec: channel: authSecretName: <kafka_auth_secret> authSecretNamespace: <kafka_auth_secret_namespace> bootstrapServers: <bootstrap_servers> enabled: true source: enabled: trueNoteMake sure to specify the matching port in the bootstrap server.
For example:
apiVersion: operator.serverless.openshift.io/v1alpha1 kind: KnativeKafka metadata: namespace: knative-eventing name: knative-kafka spec: channel: authSecretName: tls-user authSecretNamespace: kafka bootstrapServers: eventing-kafka-bootstrap.kafka.svc:9094 enabled: true source: enabled: true
6.5.2. Configuring SASL authentication for Knative channels for Apache Kafka
Simple Authentication and Security Layer (SASL) is used by Apache Kafka for authentication. If you use SASL authentication on your cluster, users must provide credentials to Knative for communicating with the Kafka cluster; otherwise events cannot be produced or consumed.
Prerequisites
- You have cluster or dedicated administrator permissions on OpenShift Container Platform.
-
The OpenShift Serverless Operator, Knative Eventing, and the
KnativeKafkaCR are installed on your OpenShift Container Platform cluster. - You have created a project or have access to a project with the appropriate roles and permissions to create applications and other workloads in OpenShift Container Platform.
- You have a username and password for a Kafka cluster.
-
You have chosen the SASL mechanism to use, for example,
PLAIN,SCRAM-SHA-256, orSCRAM-SHA-512. -
If TLS is enabled, you also need the
ca.crtcertificate file for the Kafka cluster. -
Install the OpenShift CLI (
oc).
Procedure
Create the certificate files as secrets in your chosen namespace:
$ oc create secret -n <namespace> generic <kafka_auth_secret> \ --from-literal=protocol="SASL_SSL" --from-literal=sasl.mechanism="SCRAM-SHA-512" \ --from-file=ca.crt=caroot.pem \ --from-literal=password="SecretPassword" \ --from-literal=user="my-sasl-user"Use the key names
protocol,sasl.mechanism,ca.crt,password, anduser. Do not change them.NoteThe
ca.crtkey is optional if the Kafka cluster uses a certificate signed by a public CA whose certificate is already in the system truststore.
Start editing the
KnativeKafkacustom resource:$ oc edit knativekafkaReference your secret and the namespace of the secret:
apiVersion: operator.serverless.openshift.io/v1alpha1 kind: KnativeKafka metadata: namespace: knative-eventing name: knative-kafka spec: channel: authSecretName: <kafka_auth_secret> authSecretNamespace: <kafka_auth_secret_namespace> bootstrapServers: <bootstrap_servers> enabled: true source: enabled: trueNoteMake sure to specify the matching port in the bootstrap server.
For example:
apiVersion: operator.serverless.openshift.io/v1alpha1 kind: KnativeKafka metadata: namespace: knative-eventing name: knative-kafka spec: channel: authSecretName: scram-user authSecretNamespace: kafka bootstrapServers: eventing-kafka-bootstrap.kafka.svc:9093 enabled: true source: enabled: true
Chapter 7. Subscriptions
7.1. Creating subscriptions
After you have created a channel and an event sink, you can create a subscription to enable event delivery. Subscriptions are created by configuring a Subscription object, which specifies the channel and the sink (also known as a subscriber) to deliver events to.
7.1.1. Creating a subscription
After you have created a channel and an event sink, you can create a subscription to enable event delivery. Using the OpenShift Container Platform web console provides a streamlined and intuitive user interface to create a subscription.
Prerequisites
- The OpenShift Serverless Operator, Knative Serving, and Knative Eventing are installed on your OpenShift Container Platform cluster.
- You have logged in to the web console.
- You have created an event sink, such as a Knative service, and a channel.
- You have created a project or have access to a project with the appropriate roles and privileges to create applications and other workloads in OpenShift Container Platform.
Procedure
- Navigate to the Topology page.
Create a subscription using one of the following methods:
Hover over the channel that you want to create a subscription for, and drag the arrow. The Add Subscription option is displayed.
- Select your sink in the Subscriber list.
- Click Add.
- If the service is available in the Topology view under the same namespace or project as the channel, click on the channel that you want to create a subscription for, and drag the arrow directly to a service to immediately create a subscription from the channel to that service.
Verification
After the subscription has been created, you can see it represented as a line that connects the channel to the service in the Topology view:
7.1.2. Creating a subscription by using YAML
After you have created a channel and an event sink, you can create a subscription to enable event delivery. Creating Knative resources by using YAML files uses a declarative API, which enables you to describe subscriptions declaratively and in a reproducible manner. To create a subscription by using YAML, you must create a YAML file that defines a Subscription object, then apply it by using the oc apply command.
Prerequisites
- The OpenShift Serverless Operator and Knative Eventing are installed on the cluster.
-
Install the OpenShift CLI (
oc). - You have created a project or have access to a project with the appropriate roles and permissions to create applications and other workloads in OpenShift Container Platform.
Procedure
Create a
Subscriptionobject:Create a YAML file and copy the following sample code into it:
apiVersion: messaging.knative.dev/v1 kind: Subscription metadata: name: my-subscription1 namespace: default spec: channel:2 apiVersion: messaging.knative.dev/v1 kind: Channel name: example-channel delivery:3 deadLetterSink: ref: apiVersion: serving.knative.dev/v1 kind: Service name: error-handler subscriber:4 ref: apiVersion: serving.knative.dev/v1 kind: Service name: event-display- 1
- Name of the subscription.
- 2
- Configuration settings for the channel that the subscription connects to.
- 3
- Configuration settings for event delivery. This tells the subscription what happens to events that cannot be delivered to the subscriber. When this is configured, events that failed to be consumed are sent to the
deadLetterSink. The event is dropped, no re-delivery of the event is attempted, and an error is logged in the system. ThedeadLetterSinkvalue must be a Destination. - 4
- Configuration settings for the subscriber. This is the event sink that events are delivered to from the channel.
Apply the YAML file:
$ oc apply -f <filename>
7.1.3. Creating a subscription by using the Knative CLI
After you have created a channel and an event sink, you can create a subscription to enable event delivery. Using the Knative (kn) CLI to create subscriptions provides a more streamlined and intuitive user interface than modifying YAML files directly. You can use the kn subscription create command with the appropriate flags to create a subscription.
Prerequisites
- The OpenShift Serverless Operator and Knative Eventing are installed on your OpenShift Container Platform cluster.
-
You have installed the Knative (
kn) CLI. - You have created a project or have access to a project with the appropriate roles and permissions to create applications and other workloads in OpenShift Container Platform.
Procedure
Create a subscription to connect a sink to a channel:
$ kn subscription create <subscription_name> \ --channel <group:version:kind>:<channel_name> \1 --sink <sink_prefix>:<sink_name> \2 --sink-dead-letter <sink_prefix>:<sink_name>3 - 1
--channelspecifies the source for cloud events that should be processed. You must provide the channel name. If you are not using the defaultInMemoryChannelchannel that is backed by theChannelcustom resource, you must prefix the channel name with the<group:version:kind>for the specified channel type. For example, this will bemessaging.knative.dev:v1beta1:KafkaChannelfor an Apache Kafka backed channel.- 2
--sinkspecifies the target destination to which the event should be delivered. By default, the<sink_name>is interpreted as a Knative service of this name, in the same namespace as the subscription. You can specify the type of the sink by using one of the following prefixes:ksvc- A Knative service.
channel- A channel that should be used as destination. Only default channel types can be referenced here.
broker- An Eventing broker.
- 3
- Optional:
--sink-dead-letteris an optional flag that can be used to specify a sink which events should be sent to in cases where events fail to be delivered. For more information, see the OpenShift Serverless Event delivery documentation.Example command
$ kn subscription create mysubscription --channel mychannel --sink ksvc:event-displayExample output
Subscription 'mysubscription' created in namespace 'default'.
Verification
To confirm that the channel is connected to the event sink, or subscriber, by a subscription, list the existing subscriptions and inspect the output:
$ kn subscription listExample output
NAME CHANNEL SUBSCRIBER REPLY DEAD LETTER SINK READY REASON mysubscription Channel:mychannel ksvc:event-display True
Deleting a subscription
Delete a subscription:
$ kn subscription delete <subscription_name>
7.1.4. Next steps
- Configure event delivery parameters that are applied in cases where an event fails to be delivered to an event sink.
7.2. Managing subscriptions
7.2.1. Describing subscriptions by using the Knative CLI
You can use the kn subscription describe command to print information about a subscription in the terminal by using the Knative (kn) CLI. Using the Knative CLI to describe subscriptions provides a more streamlined and intuitive user interface than viewing YAML files directly.
Prerequisites
-
You have installed the Knative (
kn) CLI. - You have created a subscription in your cluster.
Procedure
Describe a subscription:
$ kn subscription describe <subscription_name>Example output
Name: my-subscription Namespace: default Annotations: messaging.knative.dev/creator=openshift-user, messaging.knative.dev/lastModifier=min ... Age: 43s Channel: Channel:my-channel (messaging.knative.dev/v1) Subscriber: URI: http://edisplay.default.example.com Reply: Name: default Resource: Broker (eventing.knative.dev/v1) DeadLetterSink: Name: my-sink Resource: Service (serving.knative.dev/v1) Conditions: OK TYPE AGE REASON ++ Ready 43s ++ AddedToChannel 43s ++ ChannelReady 43s ++ ReferencesResolved 43s
7.2.2. Listing subscriptions by using the Knative CLI
You can use the kn subscription list command to list existing subscriptions on your cluster by using the Knative (kn) CLI. Using the Knative CLI to list subscriptions provides a streamlined and intuitive user interface.
Prerequisites
-
You have installed the Knative (
kn) CLI.
Procedure
List subscriptions on your cluster:
$ kn subscription listExample output
NAME CHANNEL SUBSCRIBER REPLY DEAD LETTER SINK READY REASON mysubscription Channel:mychannel ksvc:event-display True
7.2.3. Updating subscriptions by using the Knative CLI
You can use the kn subscription update command as well as the appropriate flags to update a subscription from the terminal by using the Knative (kn) CLI. Using the Knative CLI to update subscriptions provides a more streamlined and intuitive user interface than updating YAML files directly.
Prerequisites
-
You have installed the Knative (
kn) CLI. - You have created a subscription.
Procedure
Update a subscription:
$ kn subscription update <subscription_name> \ --sink <sink_prefix>:<sink_name> \1 --sink-dead-letter <sink_prefix>:<sink_name>2 - 1
--sinkspecifies the updated target destination to which the event should be delivered. You can specify the type of the sink by using one of the following prefixes:ksvc- A Knative service.
channel- A channel that should be used as destination. Only default channel types can be referenced here.
broker- An Eventing broker.
- 2
- Optional:
--sink-dead-letteris an optional flag that can be used to specify a sink which events should be sent to in cases where events fail to be delivered. For more information, see the OpenShift Serverless Event delivery documentation.Example command
$ kn subscription update mysubscription --sink ksvc:event-display
Chapter 8. Event delivery
You can configure event delivery parameters that are applied in cases where an event fails to be delivered to an event sink. Different channel and broker types have their own behavior patterns that are followed for event delivery.
Configuring event delivery parameters, including a dead letter sink, ensures that any events that fail to be delivered to an event sink are retried. Otherwise, undelivered events are dropped.
If an event is successfully delivered to a channel or broker receiver for Apache Kafka, the receiver responds with a 202 status code, which means that the event has been safely stored inside a Kafka topic and is not lost. If the receiver responds with any other status code, the event is not safely stored, and steps must be taken by the user to resolve the issue.
8.1. Configurable event delivery parameters
The following parameters can be configured for event delivery:
- Dead letter sink
-
You can configure the
deadLetterSinkdelivery parameter so that if an event fails to be delivered, it is stored in the specified event sink. Undelivered events that are not stored in a dead letter sink are dropped. The dead letter sink be any addressable object that conforms to the Knative Eventing sink contract, such as a Knative service, a Kubernetes service, or a URI. - Retries
-
You can set a minimum number of times that the delivery must be retried before the event is sent to the dead letter sink, by configuring the
retrydelivery parameter with an integer value. - Back off delay
-
You can set the
backoffDelaydelivery parameter to specify the time delay before an event delivery retry is attempted after a failure. The duration of thebackoffDelayparameter is specified using the ISO 8601 format. For example,PT1Sspecifies a 1 second delay. - Back off policy
-
The
backoffPolicydelivery parameter can be used to specify the retry back off policy. The policy can be specified as eitherlinearorexponential. When using thelinearback off policy, the back off delay is equal tobackoffDelay * <numberOfRetries>. When using theexponentialbackoff policy, the back off delay is equal tobackoffDelay*2^<numberOfRetries>.
8.2. Examples of configuring event delivery parameters
You can configure event delivery parameters for Broker, Trigger, Channel, and Subscription objects. If you configure event delivery parameters for a broker or channel, these parameters are propagated to triggers or subscriptions created for those objects. You can also set event delivery parameters for triggers or subscriptions to override the settings for the broker or channel.
Example Broker object
apiVersion: eventing.knative.dev/v1
kind: Broker
metadata:
# ...
spec:
delivery:
deadLetterSink:
ref:
apiVersion: eventing.knative.dev/v1alpha1
kind: KafkaSink
name: <sink_name>
backoffDelay: <duration>
backoffPolicy: <policy_type>
retry: <integer>
# ...Example Trigger object
apiVersion: eventing.knative.dev/v1
kind: Trigger
metadata:
# ...
spec:
broker: <broker_name>
delivery:
deadLetterSink:
ref:
apiVersion: serving.knative.dev/v1
kind: Service
name: <sink_name>
backoffDelay: <duration>
backoffPolicy: <policy_type>
retry: <integer>
# ...Example Channel object
apiVersion: messaging.knative.dev/v1
kind: Channel
metadata:
# ...
spec:
delivery:
deadLetterSink:
ref:
apiVersion: serving.knative.dev/v1
kind: Service
name: <sink_name>
backoffDelay: <duration>
backoffPolicy: <policy_type>
retry: <integer>
# ...Example Subscription object
apiVersion: messaging.knative.dev/v1
kind: Subscription
metadata:
# ...
spec:
channel:
apiVersion: messaging.knative.dev/v1
kind: Channel
name: <channel_name>
delivery:
deadLetterSink:
ref:
apiVersion: serving.knative.dev/v1
kind: Service
name: <sink_name>
backoffDelay: <duration>
backoffPolicy: <policy_type>
retry: <integer>
# ...Chapter 9. Event discovery
9.1. Listing event sources and event source types
It is possible to view a list of all event sources or event source types that exist or are available for use on your OpenShift Container Platform cluster. You can use the Knative (kn) CLI or the OpenShift Container Platform web console to list available event sources or event source types.
9.2. Listing event source types from the command line
Using the Knative (kn) CLI provides a streamlined and intuitive user interface to view available event source types on your cluster.
9.2.1. Listing available event source types by using the Knative CLI
You can list event source types that can be created and used on your cluster by using the kn source list-types CLI command.
Prerequisites
- The OpenShift Serverless Operator and Knative Eventing are installed on the cluster.
-
You have installed the Knative (
kn) CLI.
Procedure
List the available event source types in the terminal:
$ kn source list-typesExample output
TYPE NAME DESCRIPTION ApiServerSource apiserversources.sources.knative.dev Watch and send Kubernetes API events to a sink PingSource pingsources.sources.knative.dev Periodically send ping events to a sink SinkBinding sinkbindings.sources.knative.dev Binding for connecting a PodSpecable to a sinkOptional: On OpenShift Container Platform, you can also list the available event source types in YAML format:
$ kn source list-types -o yaml
9.3. Listing event source types from the web console
It is possible to view a list of all available event source types on your cluster. Using the OpenShift Container Platform web console provides a streamlined and intuitive user interface to view available event source types.
9.3.1. Viewing available event source types
Prerequisites
- You have logged in to the OpenShift Container Platform web console.
- The OpenShift Serverless Operator and Knative Eventing are installed on your OpenShift Container Platform cluster.
- You have created a project or have access to a project with the appropriate roles and permissions to create applications and other workloads in OpenShift Container Platform.
Procedure
- Click +Add.
- Click Event Source.
- View the available event source types.
9.4. Listing event sources from the command line
Using the Knative (kn) CLI provides a streamlined and intuitive user interface to view existing event sources on your cluster.
9.4.1. Listing available event sources by using the Knative CLI
You can list existing event sources by using the kn source list command.
Prerequisites
- The OpenShift Serverless Operator and Knative Eventing are installed on the cluster.
-
You have installed the Knative (
kn) CLI.
Procedure
List the existing event sources in the terminal:
$ kn source listExample output
NAME TYPE RESOURCE SINK READY a1 ApiServerSource apiserversources.sources.knative.dev ksvc:eshow2 True b1 SinkBinding sinkbindings.sources.knative.dev ksvc:eshow3 False p1 PingSource pingsources.sources.knative.dev ksvc:eshow1 TrueOptional: You can list event sources of a specific type only, by using the
--typeflag:$ kn source list --type <event_source_type>Example command
$ kn source list --type PingSourceExample output
NAME TYPE RESOURCE SINK READY p1 PingSource pingsources.sources.knative.dev ksvc:eshow1 True
Chapter 10. Tuning eventing configuration
10.1. Overriding Knative Eventing system deployment configurations
You can override the default configurations for some specific deployments by modifying the workloads spec in the KnativeEventing custom resource (CR). Currently, overriding default configuration settings is supported for the eventing-controller, eventing-webhook, and imc-controller fields, as well as for the readiness and liveness fields for probes.
The replicas spec cannot override the number of replicas for deployments that use the Horizontal Pod Autoscaler (HPA), and does not work for the eventing-webhook deployment.
You can only override probes that are defined in the deployment by default.
10.1.1. Overriding deployment configurations
Currently, overriding default configuration settings is supported for the eventing-controller, eventing-webhook, and imc-controller fields, as well as for the readiness and liveness fields for probes.
The replicas spec cannot override the number of replicas for deployments that use the Horizontal Pod Autoscaler (HPA), and does not work for the eventing-webhook deployment.
In the following example, a KnativeEventing CR overrides the eventing-controller deployment so that:
-
The
readinessprobe timeouteventing-controlleris set to be 10 seconds. - The deployment has specified CPU and memory resource limits.
- The deployment has 3 replicas.
-
The
example-label: labellabel is added. -
The
example-annotation: annotationannotation is added. -
The
nodeSelectorfield is set to select nodes with thedisktype: hddlabel.
KnativeEventing CR example
apiVersion: operator.knative.dev/v1beta1
kind: KnativeEventing
metadata:
name: knative-eventing
namespace: knative-eventing
spec:
workloads:
- name: eventing-controller
readinessProbes:
- container: controller
timeoutSeconds: 10
resources:
- container: eventing-controller
requests:
cpu: 300m
memory: 100Mi
limits:
cpu: 1000m
memory: 250Mi
replicas: 3
labels:
example-label: label
annotations:
example-annotation: annotation
nodeSelector:
disktype: hdd- 1
- You can use the
readinessandlivenessprobe overrides to override all fields of a probe in a container of a deployment as specified in the Kubernetes API except for the fields related to the probe handler:exec,grpc,httpGet, andtcpSocket.
The KnativeEventing CR label and annotation settings override the deployment’s labels and annotations for both the deployment itself and the resulting pods.
10.1.2. Modifying consumer group IDs and topic names
You can change templates for generating consumer group IDs and topic names used by your triggers, brokers, and channels.
Prerequisites
- You have cluster or dedicated administrator permissions on OpenShift Container Platform.
-
The OpenShift Serverless Operator, Knative Eventing, and the
KnativeKafkacustom resource (CR) are installed on your OpenShift Container Platform cluster. - You have created a project or have access to a project that has the appropriate roles and permissions to create applications and other workloads in OpenShift Container Platform.
-
You have installed the OpenShift CLI (
oc).
Procedure
To change templates for generating consumer group IDs and topic names used by your triggers, brokers, and channels, modify the
KnativeKafkaresource:apiVersion: v1 kind: KnativeKafka metadata: name: knative-kafka namespace: knative-eventing # ... spec: config: config-kafka-features: triggers.consumergroup.template: <template>1 brokers.topic.template: <template>2 channels.topic.template: <template>3 - 1
- The template for generating the consumer group ID used by your triggers. Use a valid Go
text/templatevalue. Defaults to"knative-trigger-{{ .Namespace }}-{{ .Name }}". - 2
- The template for generating Kafka topic names used by your brokers. Use a valid Go
text/templatevalue. Defaults to"knative-broker-{{ .Namespace }}-{{ .Name }}". - 3
- The template for generating Kafka topic names used by your channels. Use a valid Go
text/templatevalue. Defaults to"messaging-kafka.{{ .Namespace }}.{{ .Name }}".
Example template configuration
apiVersion: v1 kind: KnativeKafka metadata: name: knative-kafka namespace: knative-eventing # ... spec: config: config-kafka-features: triggers.consumergroup.template: "{% raw %}"knative-trigger-{{ .Namespace }}-{{ .Name }}-{{ .annotations.my-annotation }}"{% endraw %}" brokers.topic.template: "{% raw %}"knative-broker-{{ .Namespace }}-{{ .Name }}-{{ .annotations.my-annotation }}"{% endraw %}" channels.topic.template: "{% raw %}"messaging-kafka.{{ .Namespace }}.{{ .Name }}-{{ .annotations.my-annotation }}"{% endraw %}"Apply the
KnativeKafkaYAML file:$ oc apply -f <knative_kafka_filename>
10.2. High availability
High availability (HA) is a standard feature of Kubernetes APIs that helps to ensure that APIs stay operational if a disruption occurs. In an HA deployment, if an active controller crashes or is deleted, another controller is readily available. This controller takes over processing of the APIs that were being serviced by the controller that is now unavailable.
HA in OpenShift Serverless is available through leader election, which is enabled by default after the Knative Serving or Eventing control plane is installed. When using a leader election HA pattern, instances of controllers are already scheduled and running inside the cluster before they are required. These controller instances compete to use a shared resource, known as the leader election lock. The instance of the controller that has access to the leader election lock resource at any given time is called the leader.
HA in OpenShift Serverless is available through leader election, which is enabled by default after the Knative Serving or Eventing control plane is installed. When using a leader election HA pattern, instances of controllers are already scheduled and running inside the cluster before they are required. These controller instances compete to use a shared resource, known as the leader election lock. The instance of the controller that has access to the leader election lock resource at any given time is called the leader.
10.2.1. Configuring high availability replicas for Knative Eventing
High availability (HA) is available by default for the Knative Eventing eventing-controller, eventing-webhook, imc-controller, imc-dispatcher, and mt-broker-controller components, which are configured to have two replicas each by default. You can change the number of replicas for these components by modifying the spec.high-availability.replicas value in the KnativeEventing custom resource (CR).
For Knative Eventing, the mt-broker-filter and mt-broker-ingress deployments are not scaled by HA. If multiple deployments are needed, scale these components manually.
Prerequisites
- You have cluster administrator permissions on OpenShift Container Platform, or you have cluster or dedicated administrator permissions on Red Hat OpenShift Service on AWS or OpenShift Dedicated.
- The OpenShift Serverless Operator and Knative Eventing are installed on your cluster.
Procedure
- In the OpenShift Container Platform web console, navigate to OperatorHub → Installed Operators.
-
Select the
knative-eventingnamespace. - Click Knative Eventing in the list of Provided APIs for the OpenShift Serverless Operator to go to the Knative Eventing tab.
- Click knative-eventing, then go to the YAML tab in the knative-eventing page.
Modify the number of replicas in the
KnativeEventingCR:Example YAML
apiVersion: operator.knative.dev/v1beta1 kind: KnativeEventing metadata: name: knative-eventing namespace: knative-eventing spec: high-availability: replicas: 3You can also specify the number of replicas for a specific workload.
NoteWorkload-specific configuration overrides the global setting for Knative Eventing.
Example YAML
apiVersion: operator.knative.dev/v1beta1 kind: KnativeEventing metadata: name: knative-eventing namespace: knative-eventing spec: high-availability: replicas: 3 workloads: - name: mt-broker-filter replicas: 3Verify that the high availability limits are respected:
Example command
$ oc get hpa -n knative-eventingExample output
NAME REFERENCE TARGETS MINPODS MAXPODS REPLICAS AGE broker-filter-hpa Deployment/mt-broker-filter 1%/70% 3 12 3 112s broker-ingress-hpa Deployment/mt-broker-ingress 1%/70% 3 12 3 112s eventing-webhook Deployment/eventing-webhook 4%/100% 3 7 3 115s
10.2.2. Configuring high availability replicas for the Knative broker implementation for Apache Kafka
High availability (HA) is available by default for the Knative broker implementation for Apache Kafka components kafka-controller and kafka-webhook-eventing, which are configured to have two each replicas by default. You can change the number of replicas for these components by modifying the spec.high-availability.replicas value in the KnativeKafka custom resource (CR).
Prerequisites
- You have cluster administrator permissions on OpenShift Container Platform, or you have cluster or dedicated administrator permissions on Red Hat OpenShift Service on AWS or OpenShift Dedicated.
- The OpenShift Serverless Operator and Knative broker for Apache Kafka are installed on your cluster.
Procedure
- In the OpenShift Container Platform web console, navigate to OperatorHub → Installed Operators.
-
Select the
knative-eventingnamespace. - Click Knative Kafka in the list of Provided APIs for the OpenShift Serverless Operator to go to the Knative Kafka tab.
- Click knative-kafka, then go to the YAML tab in the knative-kafka page.
Modify the number of replicas in the
KnativeKafkaCR:Example YAML
apiVersion: operator.serverless.openshift.io/v1alpha1 kind: KnativeKafka metadata: name: knative-kafka namespace: knative-eventing spec: high-availability: replicas: 3
10.2.3. Overriding disruption budgets
A Pod Disruption Budget (PDB) is a standard feature of Kubernetes APIs that helps limit the disruption to an application when its pods need to be rescheduled for maintenance reasons.
Procedure
-
Override the default PDB for a specific resource by modifying the
minAvailableconfiguration value in theKnativeEventingcustom resource (CR).
Example PDB with a minAvailable seting of 70%
apiVersion: operator.knative.dev/v1beta1
kind: KnativeEventing
metadata:
name: knative-eventing
namespace: knative-eventing
spec:
podDisruptionBudgets:
- name: eventing-webhook
minAvailable: 70%
If you disable high-availability, for example, by changing the high-availability.replicas value to 1, make sure you also update the corresponding PDB minAvailable value to 0. Otherwise, the pod disruption budget prevents automatic cluster or Operator updates.
Chapter 11. Configuring TLS encryption in Eventing
With the transport encryption feature, you can transport data and events over secured and encrypted HTTPS connections by using Transport Layer Security (TLS).
OpenShift Serverless transport encryption for Eventing is a Technology Preview feature only. Technology Preview features are not supported with Red Hat production service level agreements (SLAs) and might not be functionally complete. Red Hat does not recommend using them in production. These features provide early access to upcoming product features, enabling customers to test functionality and provide feedback during the development process.
For more information about the support scope of Red Hat Technology Preview features, see Technology Preview Features Support Scope.
The transport-encryption feature flag is an enum configuration that defines how Addressables, such as Broker, Channel, and Sink, accept events. It controls whether Addressables must accept events over HTTP or HTTPS based on the selected setting.
The possible values for transport-encryption are as follows:
| Value | Description |
|---|---|
|
|
|
|
|
|
|
|
|
11.1. Creating a SelfSigned ClusterIssuer resource for Eventing
ClusterIssuers are Kubernetes resources that represent certificate authorities (CAs) that can generate signed certificates by honoring certificate signing requests. All cert-manager certificates require a referenced issuer in a ready condition to attempt to honor the request. For more details, see Issuer.
For simplicity, this procedure uses a SelfSigned issuer as the root certificate authority. For more details about SelfSigned issuer implications and limitations, see SelfSigned issuers. If you are using a custom public key infrastructure (PKI), you must configure it so its privately signed CA certificates are recognized across the cluster. For more details about cert-manager, see certificate authorities (CAs). You can use any other issuer that is usable for cluster-local services.
Prerequisites
- You have cluster administrator permissions on OpenShift Container Platform, or you have cluster or dedicated administrator permissions on Red Hat OpenShift Service on AWS or OpenShift Dedicated.
- You have installed the OpenShift Serverless Operator.
- You have installed the cert-manager Operator for Red Hat OpenShift.
-
You have installed the OpenShift (
oc) CLI.
Procedure
Create a
SelfSignedClusterIssuerresource as follows:apiVersion: cert-manager.io/v1 kind: ClusterIssuer metadata: name: knative-eventing-selfsigned-issuer spec: selfSigned: {}Apply the
ClusterIssuerresource by running the following command:$ oc apply -f <filename>Create a root certificate by using the
SelfSignedClusterIssuerresource as follows:apiVersion: cert-manager.io/v1 kind: Certificate metadata: name: knative-eventing-selfsigned-ca namespace: cert-manager1 spec: secretName: knative-eventing-ca2 isCA: true commonName: selfsigned-ca privateKey: algorithm: ECDSA size: 256 issuerRef: name: knative-eventing-selfsigned-issuer kind: ClusterIssuer group: cert-manager.ioApply the
Certificateresource by running the following:$ oc apply -f <filename>
11.2. Creating a ClusterIssuer resource for Eventing
ClusterIssuers are Kubernetes resources that represent certificate authorities (CAs) that can generate signed certificates by honoring certificate signing requests.
Prerequisites
- You have cluster administrator permissions on OpenShift Container Platform, or you have cluster or dedicated administrator permissions on Red Hat OpenShift Service on AWS or OpenShift Dedicated.
- You have installed the OpenShift Serverless Operator.
- You have installed the cert-manager Operator for Red Hat OpenShift.
-
You have installed the OpenShift (
oc) CLI.
Procedure
Create the
knative-eventing-ca-issuerClusterIssuerresource as follows:Every Eventing component uses this issuer to issue their server’s certs.
apiVersion: cert-manager.io/v1 kind: ClusterIssuer metadata: name: knative-eventing-ca-issuer spec: ca: secretName: knative-eventing-ca1 - 1
- The
secretNamevalue in thecert-managernamespace (default for cert-manager Operator for Red Hat OpenShift) contains the certificate that can be used by Knative Eventing components.
NoteThe
ClusterIssuername must beknative-eventing-ca-issuer.Apply the
ClusterIssuerresource by running the following command:$ oc apply -f <filename>
11.3. Enabling transport encryption for Knative Eventing
You can enable transport encryption in KnativeEventing by setting the transport-encryption feature to strict.
Prerequisites
- You have cluster administrator permissions on OpenShift Container Platform, or you have cluster or dedicated administrator permissions on Red Hat OpenShift Service on AWS or OpenShift Dedicated.
- You have installed the OpenShift Serverless Operator.
- You have installed the cert-manager Operator for Red Hat OpenShift.
-
You have installed the OpenShift (
oc) CLI.
Procedure
Enable the
transport-encryptioninKnativeEventingas follows:apiVersion: operator.knative.dev/v1beta1 kind: KnativeEventing metadata: name: knative-eventing namespace: knative-eventing spec: # Other spec fields omitted ... # ... config: features: transport-encryption: strictApply the
KnativeEventingresource by running the following command:$ oc apply -f <filename>
11.4. Configuring additional CA trust bundles
By default, Eventing clients trust the OpenShift CA bundle configured for custom PKI. For more details, see Configuring a custom PKI.
When a new connection is established, Eventing clients automatically include these CA bundles in their trusted list.
Prerequisites
- You have cluster administrator permissions on OpenShift Container Platform, or you have cluster or dedicated administrator permissions on Red Hat OpenShift Service on AWS or OpenShift Dedicated.
- You have installed the OpenShift Serverless Operator.
- You have installed the cert-manager Operator for Red Hat OpenShift.
Procedure
Create a CA bundle for Eventing as follows:
kind: ConfigMap metadata: name: <my_org_eventing_bundle>1 namespace: knative-eventing labels: networking.knative.dev/trust-bundle: "true" data:2 ca.crt: ... ca1.crt: ... tls.crt: ...
11.5. Configure custom event sources to trust the Eventing CA
To create a custom event source, use a SinkBinding. The SinkBinding can inject the configured CA trust bundles as a projected volume into each container by using the knative-custom-certs directory.
In specific cases, you might inject company-specific CA trust bundles into base container images and automatically configure runtimes, such as OpenJDK or Node.js, and so on. to trust those CA bundles. In such cases, you might not need to configure your clients.
By using the my_org_eventing_bundle config map from the previous example, with the ca.crt, ca1.crt, and tls.crt data keys, the knative-custom-certs directory has the following layout:
/knative-custom-certs/ca.crt
/knative-custom-certs/ca1.crt
/knative-custom-certs/tls.crtYou can use these files to add CA trust bundles to HTTP clients that send events to Eventing.
Depending on the runtime, programming language, or library you use, different methods exist for configuring custom CA cert files, such as using command-line flags, environment variables, or reading the content of the files.
11.6. Adding a SelfSigned ClusterIssuer resource to CA trust bundles
If you are using a SelfSigned ClusterIssuer resource, you can add the CA to the Eventing CA trust bundles.
Prerequisites
- You have cluster administrator permissions on OpenShift Container Platform, or you have cluster or dedicated administrator permissions on Red Hat OpenShift Service on AWS or OpenShift Dedicated.
- You have installed the OpenShift Serverless Operator.
- You have installed the cert-manager Operator for Red Hat OpenShift.
-
You have installed the OpenShift (
oc) CLI.
Procedure
Export the CA from the
knative-eventing-casecret in the cert-manager Operator for Red Hat OpenShift namespace (default iscert-managercertificate) by running the following command:$ oc get secret -n cert-manager knative-eventing-ca -o=jsonpath='{.data.ca\.crt}' | base64 -d > ca.crtCreate a CA trust bundle in the
knative-eventingnamespace by running the following command:$ oc create configmap -n knative-eventing my-org-selfsigned-ca-bundle --from-file=ca.crtLabel the
ConfigMapby running the following command:$ oc label configmap -n knative-eventing my-org-selfsigned-ca-bundle networking.knative.dev/trust-bundle=true
11.7. Ensuring seamless CA rotation
Ensuring seamless CA rotation is essential to avoid service downtime or to handle emergencies.
Prerequisites
- You have cluster administrator permissions on OpenShift Container Platform, or you have cluster or dedicated administrator permissions on Red Hat OpenShift Service on AWS or OpenShift Dedicated.
- You have installed the OpenShift Serverless Operator.
- You have installed the cert-manager Operator for Red Hat OpenShift.
-
You have installed the OpenShift (
oc) CLI.
Procedure
- Create a CA certificate.
Add the public key of the new CA certificate to the CA trust bundles.
Ensure that you also keep the public key of the existing CA.
Ensure all clients use the latest CA trust bundles.
Knative Eventing components automatically reload the updated CA trust bundles. For custom workloads that consume trust bundles, reload or restart them as needed.
-
Update the
knative-eventing-ca-issuerClusterIssuerto reference the secret containing the CA certificate that you created in step 1. Force
cert-managerto renew certificates in theknative-eventing namespace.For more information about
cert-manager, see Reissuance triggered by user actions.- As soon as the CA rotation is fully completed, remove the public key of the old CA from the trust bundle config map.
11.8. Verifying transport encryption in Eventing
To confirm that transport encryption is correctly configured, you can create and test an InMemoryChannel resource. Follow the steps to ensure that it uses HTTPS as expected.
Prerequisites
- You have cluster administrator permissions on OpenShift Container Platform, or you have cluster or dedicated administrator permissions on Red Hat OpenShift Service on AWS or OpenShift Dedicated.
- You have installed the OpenShift Serverless Operator.
- You have installed the cert-manager Operator for Red Hat OpenShift.
-
You have installed the OpenShift (
oc) CLI.
Procedure
Create an
InMemoryChannelresource as follows:apiVersion: messaging.knative.dev/v1 kind: InMemoryChannel metadata: name: transport-encryption-testApply the
InMemoryChannelresource by running the following command:$ oc apply -f <filename>View the
InMemoryChanneladdress by running the following command:$ oc get inmemorychannels.messaging.knative.dev transport-encryption-testExample output
NAME URL AGE READY REASON transport-encryption-test https://imc-dispatcher.knative-eventing.svc.cluster.local/default/transport-encryption-test 17s True
Chapter 12. Configuring kube-rbac-proxy for Eventing
The kube-rbac-proxy component provides internal authentication and authorization capabilities for Knative Eventing.
12.1. Configuring kube-rbac-proxy resources for Eventing
You can globally override resource allocation for the kube-rbac-proxy container by using the OpenShift Serverless Operator CR.
You can also override resource allocation for a specific deployment.
The following configuration sets Knative Eventing kube-rbac-proxy minimum and maximum CPU and memory allocation:
KnativeEventing CR example
apiVersion: operator.knative.dev/v1beta1
kind: KnativeEventing
metadata:
  name: knative-eventing
  namespace: knative-eventing
spec:
  config:
deployment:
"kube-rbac-proxy-cpu-request": "10m"
"kube-rbac-proxy-memory-request": "20Mi"
"kube-rbac-proxy-cpu-limit": "100m"
"kube-rbac-proxy-memory-limit": "100Mi" 12.2. Configuring kube-rbac-proxy resources for Knative for Apache Kafka
You can globally override resource allocation for the kube-rbac-proxy container by using the OpenShift Serverless Operator CR.
You can also override resource allocation for a specific deployment.
The following configuration sets Knative Kafka kube-rbac-proxy minimum and maximum CPU and memory allocation:
KnativeKafka CR example
apiVersion: operator.serverless.openshift.io/v1alpha1
kind: KnativeKafka
metadata:
name: knative-kafka
namespace: knative-kafka
spec:
config:
deployment:
"kube-rbac-proxy-cpu-request": "10m"
"kube-rbac-proxy-memory-request": "20Mi"
"kube-rbac-proxy-cpu-limit": "100m"
"kube-rbac-proxy-memory-limit": "100Mi" Chapter 13. Using ContainerSource with Service Mesh
You can use container source with Service Mesh.
13.1. Configuring ContainerSource with Service Mesh
This procedure describes how to configure container source with Service Mesh.
Prerequisites
- You have set up integration of Service Mesh and Serverless.
Procedure
Create a
Servicein a namespace that is member of theServiceMeshMemberRoll:Example
event-display-service.yamlconfiguration fileapiVersion: serving.knative.dev/v1 kind: Service metadata: name: event-display namespace: <namespace>1 spec: template: metadata: annotations: sidecar.istio.io/inject: "true"2 sidecar.istio.io/rewriteAppHTTPProbers: "true" spec: containers: - image: quay.io/openshift-knative/knative-eventing-sources-event-display:latestApply the
Serviceresource:$ oc apply -f event-display-service.yamlCreate a
ContainerSourceobject in a namespace that is member of theServiceMeshMemberRolland sink set to theevent-display:Example
test-heartbeats-containersource.yamlconfiguration fileapiVersion: sources.knative.dev/v1 kind: ContainerSource metadata: name: test-heartbeats namespace: <namespace>1 spec: template: metadata:2 annotations: sidecar.istio.io/inject": "true" sidecar.istio.io/rewriteAppHTTPProbers: "true" spec: containers: # This corresponds to a heartbeats image URI that you have built and published - image: quay.io/openshift-knative/heartbeats name: heartbeats args: - --period=1s env: - name: POD_NAME value: "example-pod" - name: POD_NAMESPACE value: "event-test" sink: ref: apiVersion: serving.knative.dev/v1 kind: Service name: event-display-serviceApply the
ContainerSourceresource:$ oc apply -f test-heartbeats-containersource.yamlOptional: Verify that the events were sent to the Knative event sink by looking at the message dumper function logs:
Example command
$ oc logs $(oc get pod -o name | grep event-display) -c user-containerExample output
☁️ cloudevents.Event Validation: valid Context Attributes, specversion: 1.0 type: dev.knative.eventing.samples.heartbeat source: https://knative.dev/eventing-contrib/cmd/heartbeats/#event-test/mypod id: 2b72d7bf-c38f-4a98-a433-608fbcdd2596 time: 2019-10-18T15:23:20.809775386Z contenttype: application/json Extensions, beats: true heart: yes the: 42 Data, { "id": 1, "label": "" }
Chapter 14. Using a sink binding with Service Mesh
You can use a sink binding with Service Mesh.
14.1. Configuring a sink binding with Service Mesh
This procedure describes how to configure a sink binding with Service Mesh.
Prerequisites
- You have set up integration of Service Mesh and Serverless.
Procedure
Create a
Serviceobject in a namespace that is member of theServiceMeshMemberRoll:Example
event-display-service.yamlconfiguration fileapiVersion: serving.knative.dev/v1 kind: Service metadata: name: event-display namespace: <namespace>1 spec: template: metadata: annotations: sidecar.istio.io/inject: "true"2 sidecar.istio.io/rewriteAppHTTPProbers: "true" spec: containers: - image: quay.io/openshift-knative/knative-eventing-sources-event-display:latestApply the
Serviceobject:$ oc apply -f event-display-service.yamlCreate a
SinkBindingobject:Example
heartbeat-sinkbinding.yamlconfiguration fileapiVersion: sources.knative.dev/v1alpha1 kind: SinkBinding metadata: name: bind-heartbeat namespace: <namespace>1 spec: subject: apiVersion: batch/v1 kind: Job2 selector: matchLabels: app: heartbeat-cron sink: ref: apiVersion: serving.knative.dev/v1 kind: Service name: event-displayApply the
SinkBindingobject:$ oc apply -f heartbeat-sinkbinding.yamlCreate a
CronJobobject:Example
heartbeat-cronjob.yamlconfiguration fileapiVersion: batch/v1 kind: CronJob metadata: name: heartbeat-cron namespace: <namespace>1 spec: # Run every minute schedule: "* * * * *" jobTemplate: metadata: labels: app: heartbeat-cron bindings.knative.dev/include: "true" spec: template: metadata: annotations: sidecar.istio.io/inject: "true"2 sidecar.istio.io/rewriteAppHTTPProbers: "true" spec: restartPolicy: Never containers: - name: single-heartbeat image: quay.io/openshift-knative/heartbeats:latest args: - --period=1 env: - name: ONE_SHOT value: "true" - name: POD_NAME valueFrom: fieldRef: fieldPath: metadata.name - name: POD_NAMESPACE valueFrom: fieldRef: fieldPath: metadata.namespaceApply the
CronJobobject:$ oc apply -f heartbeat-cronjob.yamlOptional: Verify that the events were sent to the Knative event sink by looking at the message dumper function logs:
Example command
$ oc logs $(oc get pod -o name | grep event-display) -c user-containerExample output
☁️ cloudevents.Event Validation: valid Context Attributes, specversion: 1.0 type: dev.knative.eventing.samples.heartbeat source: https://knative.dev/eventing-contrib/cmd/heartbeats/#event-test/mypod id: 2b72d7bf-c38f-4a98-a433-608fbcdd2596 time: 2019-10-18T15:23:20.809775386Z contenttype: application/json Extensions, beats: true heart: yes the: 42 Data, { "id": 1, "label": "" }