Network Functions Virtualization Planning Guide
Planning for NFV in Red Hat OpenStack Platform 10
Abstract
Chapter 1. Introduction
Network Functions Virtualization (NFV) is a software-based solution that helps Communication Service Providers (CSPs) to move beyond the traditional, proprietary hardware to achieve greater efficiency and agility while reducing the operational costs.
For a high level overview of the NFV concepts, see the Network Functions Virtualization Product Guide.
For information on configuring SR-IOV and OVS-DPDK with Red Hat OpenStack Platform 10 director, see the Network Functions Virtualization Configuration Guide.
Chapter 2. Software Requirements
This chapter describes the software architecture, supported configurations and drivers, and subscription details necessary for NFV.
2.1. Supported Configurations for NFV Deployments
Red Hat OpenStack Platform 10 supports NFV deployments for SR-IOV and OVS-DPDK installation using the director. Using the composable roles feature available in the Red Hat OpenStack Platform 10 director, you can create custom deployment roles. Hyper-converged Infrastructure (HCI), available with limited support for this release, allows you to co-locate the Compute node with Red Hat Ceph Storage nodes for distributed NFV. To increase the performance in HCI, CPU pinning is used. The HCI model allows more efficient management in the NFV use cases. This release also provides OpenDaylight and Real-Time KVM as technology preview features. OpenDaylight is an open source modular, multi-protocol controller for Software-Defined Network (SDN) deployments. For more information on the support scope for features marked as technology previews, see Technology Preview
2.2. Supported Drivers
For a complete list of supported drivers, see Component, Plug-In, and Driver Support in Red Hat OpenStack Platform .
For a complete list of network adapters, see Network Adapter Feature Support in Red Hat Enterprise Linux.
2.3. Compatibility With Third Party Software
For a complete list of products and services tested, supported, and certified to perform with Red Hat technologies (Red Hat OpenStack Platform), see Third Party Software compatible with Red Hat OpenStack Platform. You can filter the list by product version and software category.
For a complete list of products and services tested, supported, and certified to perform with Red Hat technologies (Red Hat Enterprise Linux), see Third Party Software compatible with Red Hat Enterprise Linux. You can filter the list by product version and software category.
2.4. Subscription Basics
To install Red Hat OpenStack Platform, you must register Red Hat OpenStack Platform director using the Red Hat Subscription Manager, and subscribe to the required channels. See Registering your system for details.
Procedure
Disable the default repositories.
subscription-manager repos --disable=*
Enable required repositories for Red Hat OpenStack Platform with NFV.
sudo subscription-manager repos \
--enable=rhel-7-server-rpms \
--enable=rhel-7-server-extras-rpms \
--enable=rhel-7-server-rh-common-rpms \
--enable=rhel-ha-for-rhel-7-server-rpms \
--enable=rhel-7-server-openstack-10-rpms
To register your overcloud nodes, see Overcloud Registration.
Chapter 3. Hardware
This chapter describes the hardware details necessary for NFV, for example the approved hardware, hardware capacity, topology and so on.
3.1. Approved Hardware
You can use Red Hat Technologies Ecosystem to check for a list of certified hardware, software, cloud provider, component by choosing the category and then selecting the product version.
For a complete list of the certified hardware for Red Hat OpenStack Platform, see Red Hat OpenStack Platform certified hardware.
3.2. Tested NICs
For a list of tested NICs for NFV, see Network Adapter Support. (Customer Portal login required.)
3.3. Discovering Your NUMA Node Topology with Hardware Introspection
When you plan your deployment, you need to understand the NUMA topology of your Compute node to partition the CPU and memory resources for optimum performance. To determine the NUMA information, you can enable hardware introspection to retrieve this information from bare-metal nodes.
You must install and configure the undercloud before you can retrieve NUMA information through hardware introspection. See the Director Installation and Usage Guide for details.
Retrieving Hardware Introspection Details
The Bare Metal service hardware inspection extras (inspection_extras) is enabled by default to retrieve hardware details. You can use these hardware details to configure your overcloud. See Configuring the Director for details on the inspection_extras parameter in the undercloud.conf file.
For example, the numa_topology collector is part of these hardware inspection extras and includes the following information for each NUMA node:
- RAM (in kilobytes)
- Physical CPU cores and their sibling threads
- NICs associated with the NUMA node
Use the openstack baremetal introspection data save _UUID_ | jq .numa_topology command to retrieve this information, with the UUID of the bare-metal node.
The following example shows the retrieved NUMA information for a bare-metal node:
{
  "cpus": [
    {
      "cpu": 1,
      "thread_siblings": [
        1,
        17
      ],
      "numa_node": 0
    },
    {
      "cpu": 2,
      "thread_siblings": [
        10,
        26
      ],
      "numa_node": 1
    },
    {
      "cpu": 0,
      "thread_siblings": [
        0,
        16
      ],
      "numa_node": 0
    },
    {
      "cpu": 5,
      "thread_siblings": [
        13,
        29
      ],
      "numa_node": 1
    },
    {
      "cpu": 7,
      "thread_siblings": [
        15,
        31
      ],
      "numa_node": 1
    },
    {
      "cpu": 7,
      "thread_siblings": [
        7,
        23
      ],
      "numa_node": 0
    },
    {
      "cpu": 1,
      "thread_siblings": [
        9,
        25
      ],
      "numa_node": 1
    },
    {
      "cpu": 6,
      "thread_siblings": [
        6,
        22
      ],
      "numa_node": 0
    },
    {
      "cpu": 3,
      "thread_siblings": [
        11,
        27
      ],
      "numa_node": 1
    },
    {
      "cpu": 5,
      "thread_siblings": [
        5,
        21
      ],
      "numa_node": 0
    },
    {
      "cpu": 4,
      "thread_siblings": [
        12,
        28
      ],
      "numa_node": 1
    },
    {
      "cpu": 4,
      "thread_siblings": [
        4,
        20
      ],
      "numa_node": 0
    },
    {
      "cpu": 0,
      "thread_siblings": [
        8,
        24
      ],
      "numa_node": 1
    },
    {
      "cpu": 6,
      "thread_siblings": [
        14,
        30
      ],
      "numa_node": 1
    },
    {
      "cpu": 3,
      "thread_siblings": [
        3,
        19
      ],
      "numa_node": 0
    },
    {
      "cpu": 2,
      "thread_siblings": [
        2,
        18
      ],
      "numa_node": 0
    }
  ],
  "ram": [
    {
      "size_kb": 66980172,
      "numa_node": 0
    },
    {
      "size_kb": 67108864,
      "numa_node": 1
    }
  ],
  "nics": [
    {
      "name": "ens3f1",
      "numa_node": 1
    },
    {
      "name": "ens3f0",
      "numa_node": 1
    },
    {
      "name": "ens2f0",
      "numa_node": 0
    },
    {
      "name": "ens2f1",
      "numa_node": 0
    },
    {
      "name": "ens1f1",
      "numa_node": 0
    },
    {
      "name": "ens1f0",
      "numa_node": 0
    },
    {
      "name": "eno4",
      "numa_node": 0
    },
    {
      "name": "eno1",
      "numa_node": 0
    },
    {
      "name": "eno3",
      "numa_node": 0
    },
    {
      "name": "eno2",
      "numa_node": 0
    }
  ]
}
3.4. Review BIOS Settings
The following listing describes the required BIOS settings for NFV:
-
C3 Power State- Disabled. -
C6 Power State- Disabled. -
MLC Streamer- Enabled. -
MLC Spacial Prefetcher- Enabled. -
DCU Data Prefetcher- Enabled. -
DCA- Enabled. -
CPU Power and Performance- Performance. -
Memory RAS and Performance Config → NUMA Optimized- Enabled. -
Turbo Boost- Disabled.
Chapter 4. Network Considerations
The undercloud host requires at least the following networks:
- Provisioning network - Provides DHCP and PXE boot functions to help discover bare metal systems for use in the overcloud.
- External network - A separate network for remote connectivity to all nodes. The interface connecting to this network requires a routable IP address, either defined statically, or dynamically through an external DHCP service.
The minimal overcloud network configuration includes:
- Single NIC configuration - One NIC for the Provisioning network on the native VLAN and tagged VLANs that use subnets for the different overcloud network types.
- Dual NIC configuration - One NIC for the Provisioning network and the other NIC for the External network.
- Dual NIC configuration - One NIC for the Provisioning network on the native VLAN and the other NIC for tagged VLANs that use subnets for the different overcloud network types.
- Multiple NIC configuration - Each NIC uses a subnet for a different overcloud network type.
The Provisioning network only uses the native VLAN.
The overcloud network configuration for Ceph (HCI), with NFV SR-IOV topology (see NFV SR-IOV with HCI) includes:
- 3x1G ports, for director, provisioning OVS (isolated in case of SR-IOV)
- 6x10G, 2x10G for Ceph other for DPDK SR-IOV
Ceph HCI is technology preview in Red Hat OpenStack Platform 10. For more information on the support scope for features marked as technology previews, see Technology Preview.
For more information on the networking requirements, see Networking Requirements.
Chapter 5. Planning Your SR-IOV Deployment
To optimize your SR-IOV deployment for NFV, you should understand how to set the individual OVS-DPDK parameters based on your Compute node hardware.
See Discovering Your NUMA Node Topology to evaluate your hardware impact on the SR-IOV parameters.
5.1. Hardware Partitioning for a NFV SR-IOV Deployment
For SR-IOV, to achieve high performance, you need to partition the resources between the host and the guest.
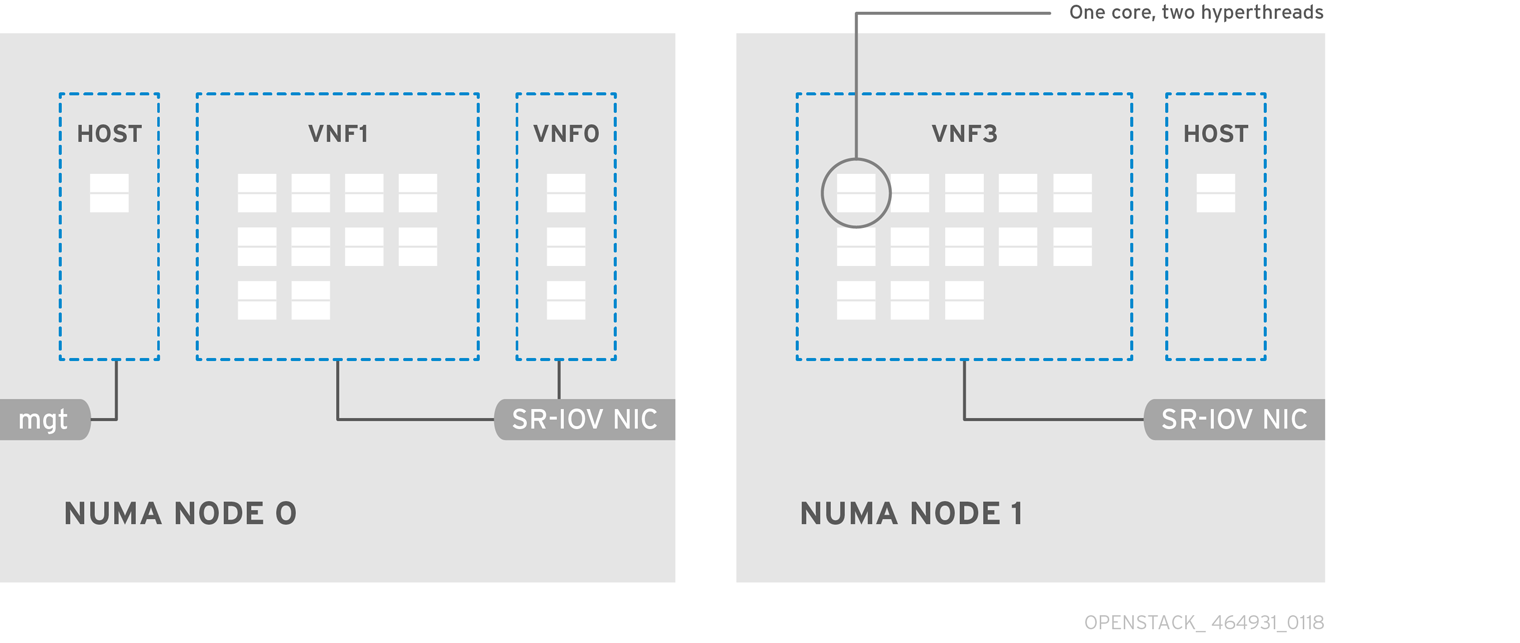
A typical topology includes 14 cores per NUMA node on dual socket Compute nodes. Both hyper-threading (HT) and non-HT cores are supported. Each core has two sibling threads. One core is dedicated to the host on each NUMA node. The VNF handles the SR-IOV interface bonding. All the interrupt requests (IRQs) are routed on the host cores. The VNF cores are dedicated to the VNFs. They provide isolation from other VNFs as well as isolation from the host. Each VNF has to fit on a single NUMA node and use local SR-IOV NICs. This topology does not have a virtualization overhead. The host, OpenStack Networking (neutron) and Compute (nova) configuration parameters are exposed in a single file for ease, consistency and to avoid incoherences that are fatal to proper isolation, causing preemption and packet loss. The host and virtual machine isolation depend on a tuned profile, which takes care of the boot parameters and any OpenStack modifications based on the list of CPUs to isolate.
5.2. Topology of a NFV SR-IOV Deployment
The following image has two VNFs each with the management interface represented by mgt and the dataplane interfaces. The management interface manages ssh access and so on. The dataplane interfaces bonds the VNFs to DPDK to ensure high availability (VNFs bond the dataplane interfaces using the DPDK library). The image also has two redundant provider networks. The Compute node has two regular NICs bonded together and shared between the VNF management and the Red Hat OpenStack Platform API management.
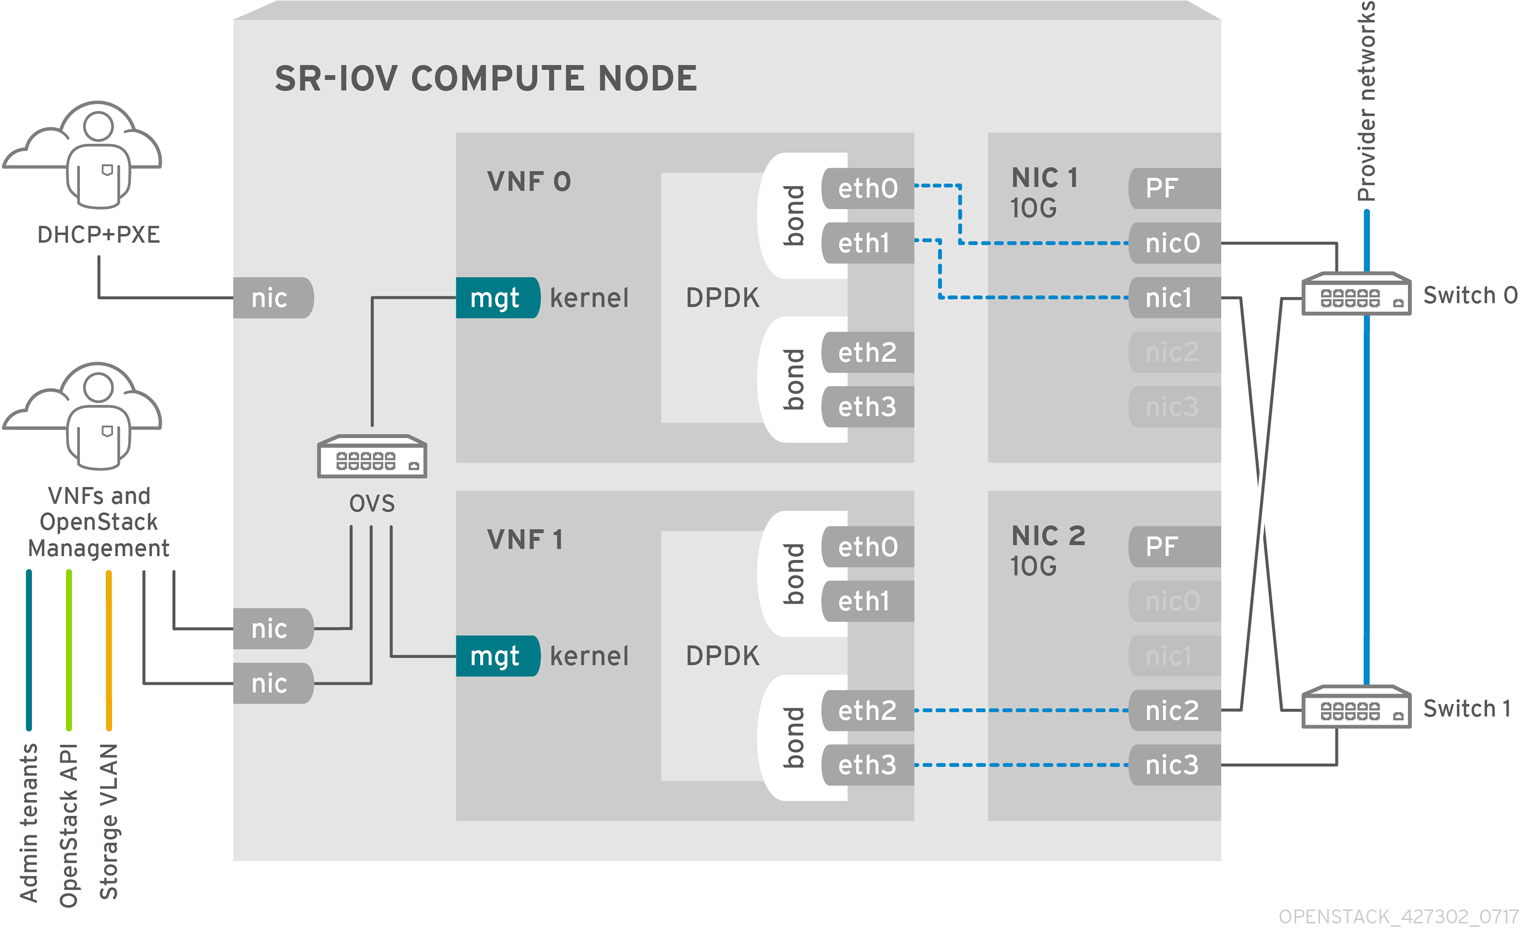
The image shows a VNF that leverages DPDK at an application level and has access to SR-IOV VF/PFs, together for better availability or performance (depending on the fabric configuration). DPDK improves performance, while the VF/PF DPDK bonds support failover (availability). The VNF vendor must ensure their DPDK PMD driver supports the SR-IOV card that is being exposed as a VF/PF. The management network uses OVS so the VNF sees a mgmt network device using the standard VirtIO drivers. Operators can use that device to initially connect to the VNF and ensure their DPDK application bonds properly the two VF/PFs.
5.2.1. NFV SR-IOV without HCI
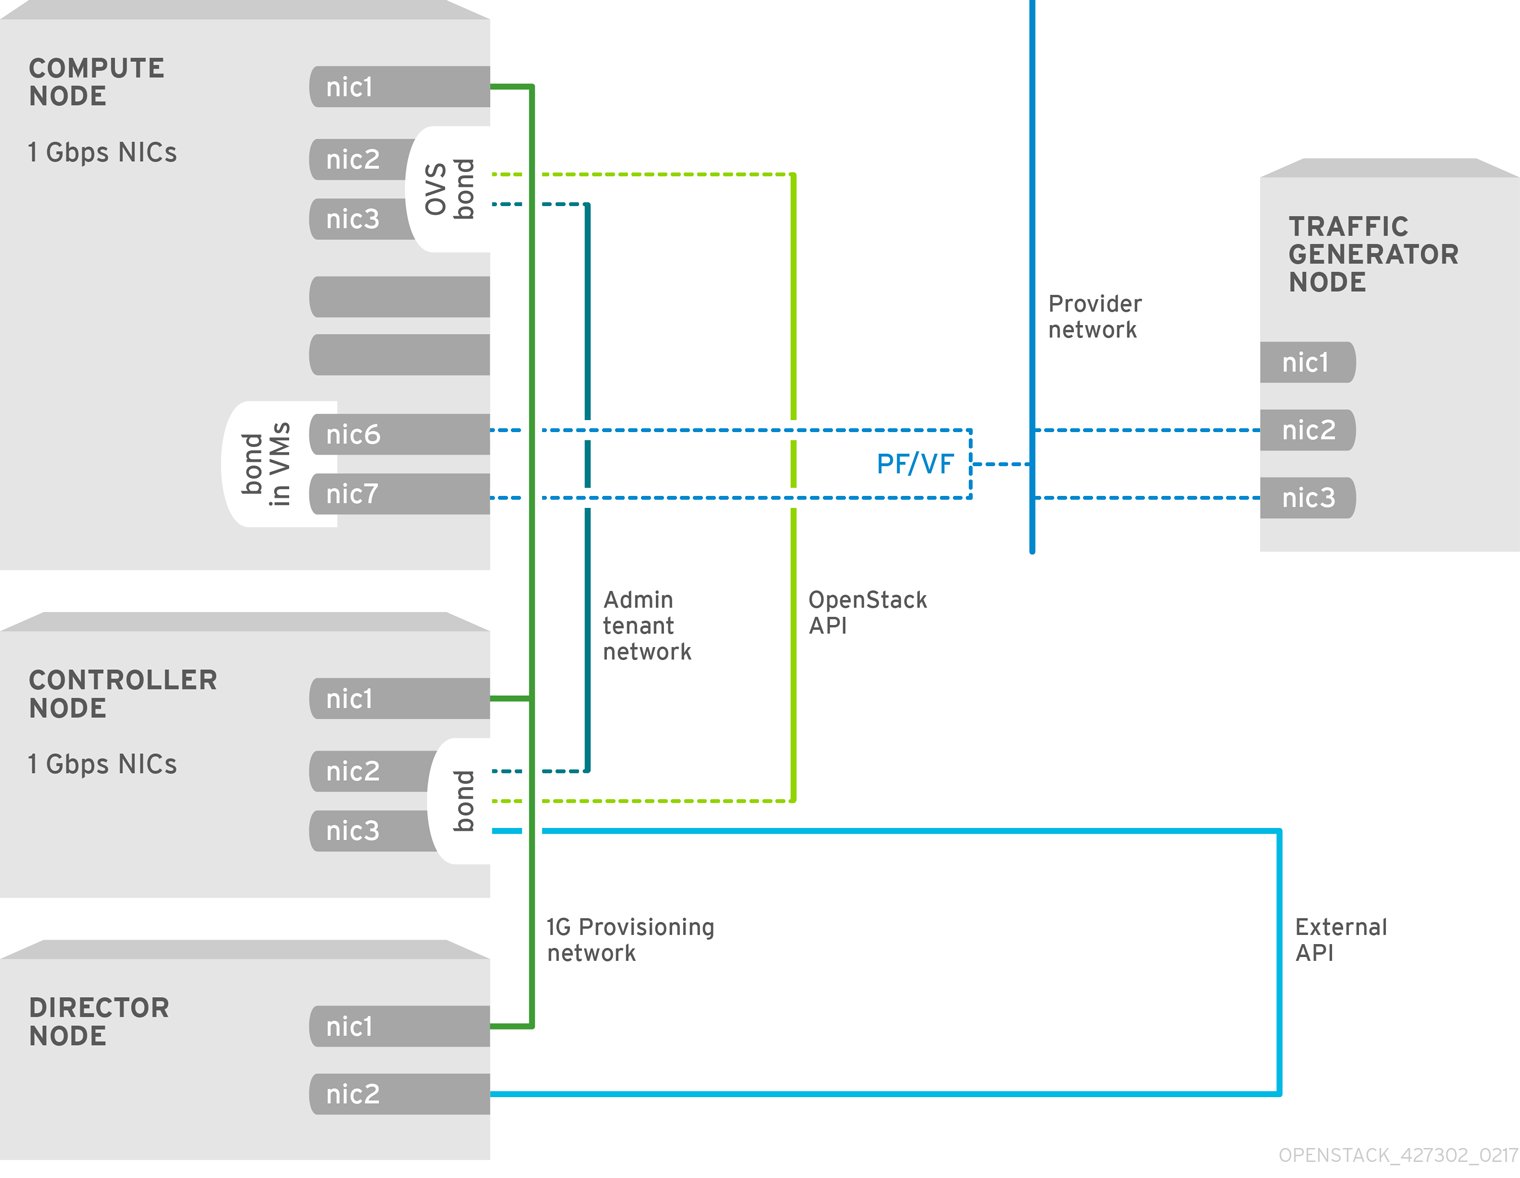
The following image shows the topology for SR-IOV without HCI for the NFV use case. It consists of Compute and Controller nodes with 1 Gbps NICs, and the Director node.
5.2.2. NFV SR-IOV with HCI
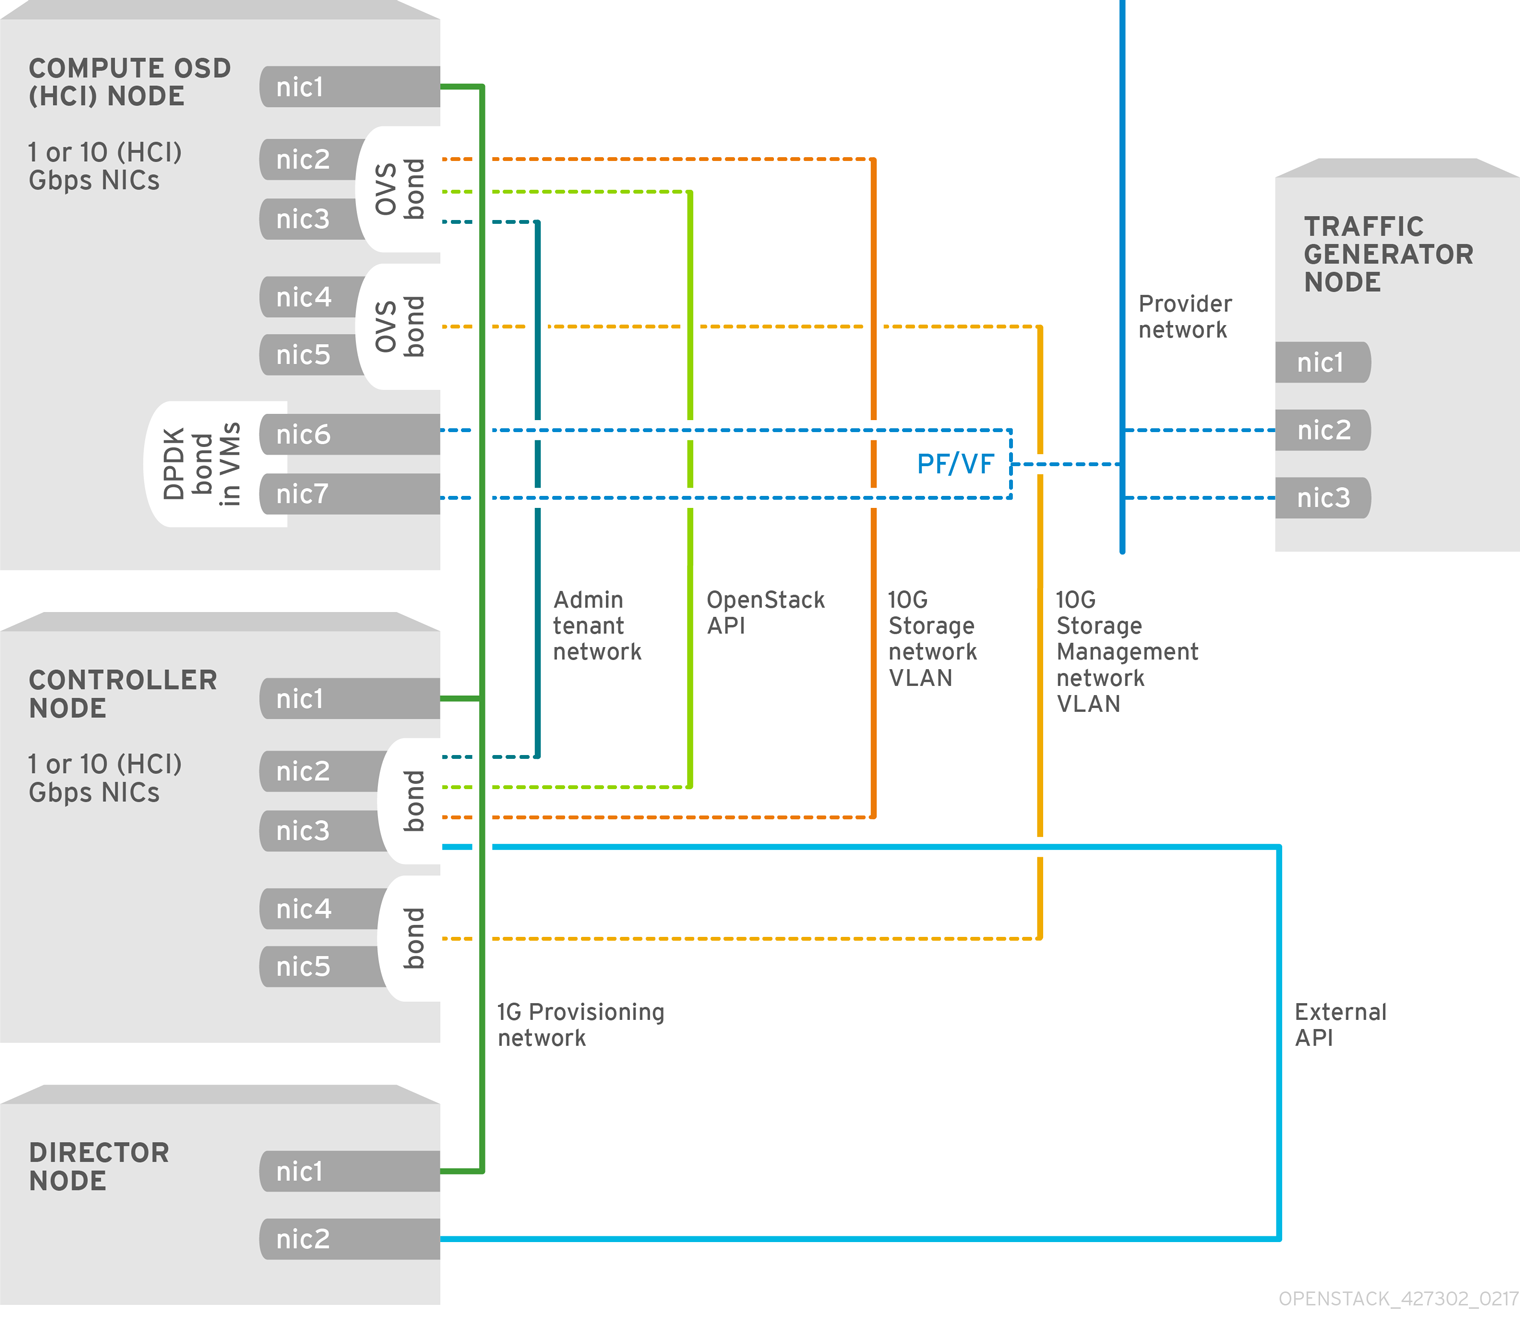
The following image shows the topology for SR-IOV with HCI for the NFV use case. It consists of Compute OSD node with HCI and a Controller node with 1 or 10 Gbps NICs, and the Director node.
Chapter 6. Planning Your OVS-DPDK Deployment
To optimize your OVS-DPDK deployment for NFV, you should understand how OVS-DPDK uses the Compute node hardware (CPU, NUMA nodes, memory, NICs) and the considerations for determining the individual OVS-DPDK parameters based on your Compute node.
See NFV Performance Considerations for a high-level introduction to CPUs and NUMA topology.
6.1. How OVS-DPDK Uses CPU Partitioning and NUMA Topology
OVS-DPDK partitions the hardware resources for host, guests, and OVS-DPDK itself. The OVS-DPDK Poll Mode Drivers (PMDs) run DPDK active loops, which require dedicated cores. This means a list of CPUs and Huge Pages are dedicated to OVS-DPDK.
A sample partitioning includes 16 cores per NUMA node on dual socket Compute nodes. The traffic requires additional NICs since the NICs cannot be shared between the host and OVS-DPDK.
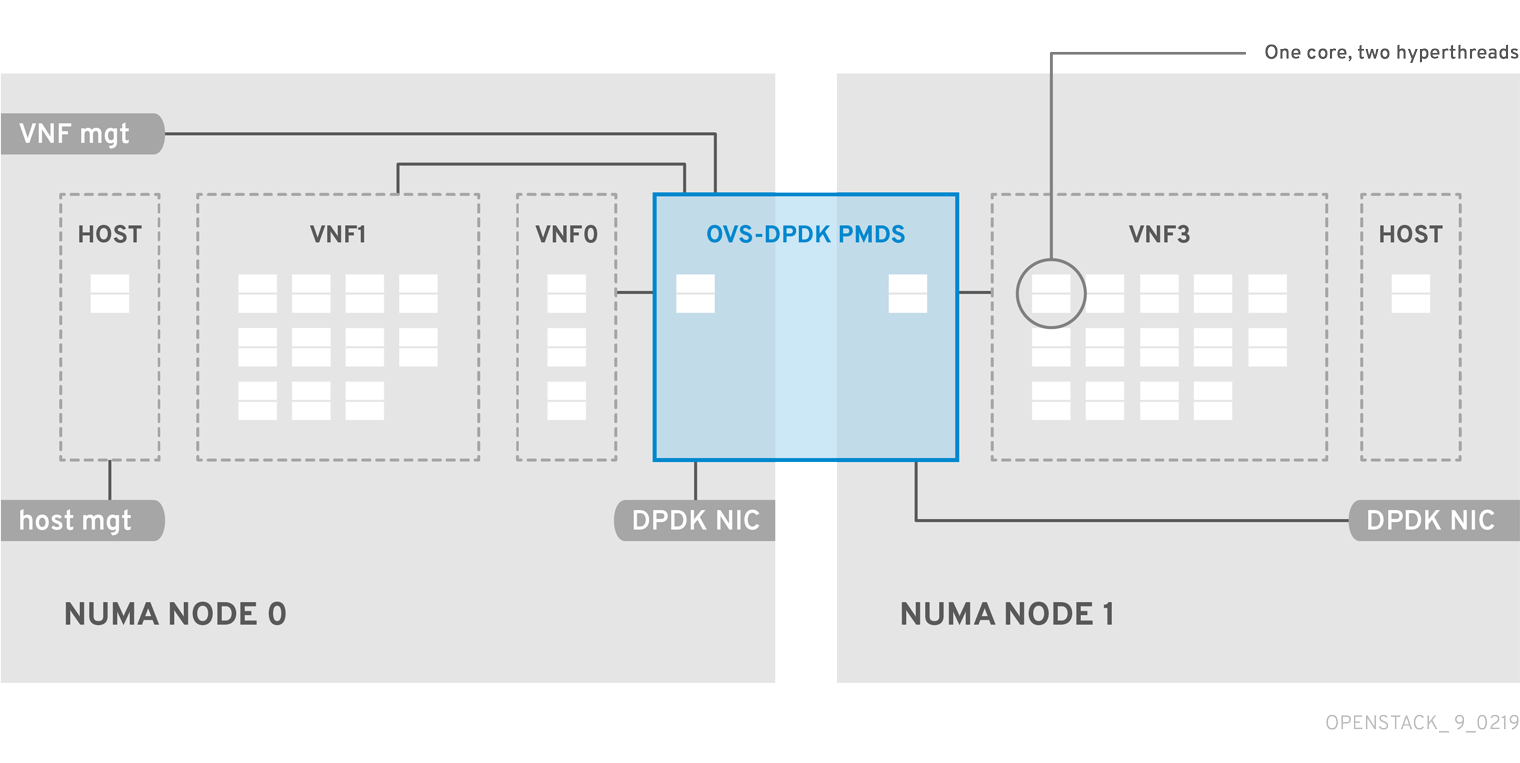
DPDK PMD threads must be reserved on both NUMA nodes even if a NUMA node does not have an associated DPDK NIC.
OVS-DPDK performance also depends on reserving a block of memory local to the NUMA node. Use NICs associated with the same NUMA node that you use for memory and CPU pinning. Also ensure both interfaces in a bond are from NICs on the same NUMA node.
6.2. Understanding OVS-DPDK Parameters
This section describes how OVS-DPDK uses parameters within the director network_environment.yaml HEAT templates to configure the CPU and memory for optimum performance. Use this information to evaluate the hardware support on your Compute nodes and how best to partition that hardware to optimize your OVS-DPDK deployment.
Assign sibling threads together when allocating logical CPUs to a given task.
See Discovering Your NUMA Node Topology to determine the CPU and NUMA nodes on your Compute nodes. You use this information to map CPU and other parameters to support the host, guest instance, and OVS-DPDK process needs.
6.2.1. CPU Parameters
OVS-DPDK uses the following CPU partitioning parameters:
- NeutronDpdkCoreList
Provides the CPU cores that are used for the DPDK poll mode drivers (PMD). Choose CPU cores that are associated with the local NUMA nodes of the DPDK interfaces.
NeutronDpdkCoreListis used for thepmd-cpu-maskvalue in Open vSwitch.- Pair the sibling threads together.
-
Exclude all cores from the
HostCpusList -
Avoid allocating the logical CPUs (both thread siblings) of the first physical core on both NUMA nodes as these should be used for the
HostCpusListparameter. - Performance depends on the number of physical cores allocated for this PMD Core list. On the NUMA node which is associated with DPDK NIC, allocate the required cores.
For NUMA nodes with a DPDK NIC:
- Determine the number of physical cores required based on the performance requirement and include all the sibling threads (logical CPUs) for each physical core.
For NUMA nodes without DPDK NICs:
- Allocate the sibling threads (logical CPUs) of one physical core (excluding the first physical core of the NUMA node). You need a minimal DPDK poll mode driver on the NUMA node even without DPDK NICs present to avoid failures in creating guest instances.
DPDK PMD threads must be reserved on both NUMA nodes even if a NUMA node does not have an associated DPDK NIC.
- NovaVcpuPinSet
Sets cores for CPU pinning. The Compute node uses these cores for guest instances.
NovaVcpuPinSetis used as thevcpu_pin_setvalue in thenova.conffile.-
Exclude all cores from the
NeutronDpdkCoreListand theHostCpusList. - Include all remaining cores.
- Pair the sibling threads together.
-
Exclude all cores from the
- HostIsolatedCoreList
A set of CPU cores isolated from the host processes. This parameter is used as the
isolated_coresvalue in thecpu-partitioning-variable.conffile for thetuned-profiles-cpu-partitioningcomponent.-
Match the list of cores in
NeutronDpdkCoreListandNovaVcpuPinSet. - Pair the sibling threads together.
-
Match the list of cores in
- HostCpusList
Provides CPU cores for non-datapath OVS-DPDK processes, such as handler and revalidator threads. This parameter has no impact on overall data path performance on multi-NUMA node hardware. This parameter is used for the
dpdk-lcore-maskvalue in Open vSwitch and the cores are shared with the host OS.- Allocate the first physical core (and sibling thread) from each NUMA node (even if the NUMA node has no associated DPDK NIC).
-
These cores must be mutually exclusive from the list of cores in
NeutronDpdkCoreListandNovaVcpuPinSet.
6.2.2. Memory Parameters
OVS-DPDK uses the following memory parameters:
- NovaReservedHostMemory
Reserves memory in MB for tasks on the host. This value is used by the Compute node as the
reserved_host_memory_mbvalue innova.conf.- Use the static recommended value of 4096 MB.
- NeutronDpdkSocketMemory
Specifies the amount of memory in MB to pre-allocate from the hugepage pool, per NUMA node, for DPDK NICs. This value is used by Open vSwitch as the
other_config:dpdk-socket-memvalue.-
Provide as a comma-separated list. The
NeutronDpdkSocketMemoryvalue is calculated from the MTU value of each DPDK NIC on the NUMA node. - Round each MTU value to the nearest 1024 bytes (ROUNDUP_PER_MTU).
- For a NUMA node without a DPDK NIC, use the static recommendation of 1024 MB (1GB)
The following equation approximates the value for
NeutronDpdkSocketMemory:MEMORY_REQD_PER_MTU = (ROUNDUP_PER_MTU + 800) * (4096 * 64) Bytes
- 800 is the overhead value
- 4096 * 64 is the number of packets in the mempool
- Add the MEMORY_REQD_PER_MTU for each of the MTU values set on the NUMA node and add another 512 MB as buffer. Round the value up to a multiple of 1024.
-
Provide as a comma-separated list. The
Sample Calculation - MTU 2000 and MTU 9000
DPDK NICs dpdk0 and dpdk1 are on the same NUMA node 0 and configured with MTUs 9000 and 2000 respectively. The sample calculation to derive the memory required is as follows:
Round off the MTU values to the nearest 1024 bytes.
The MTU value of 9000 becomes 9216 bytes.
The MTU value of 2000 becomes 2048 bytes.
Calculate the required memory for each MTU value based on these rounded byte values.
Memory required for 9000 MTU = (9216 + 800) * (4096*64) = 2625634304
Memory required for 2000 MTU = (2048 + 800) * (4096*64) = 746586112
Calculate the combined total memory required, in bytes.
2625634304 + 746586112 + 536870912 = 3909091328 bytes.
This calculation represents (Memory required for MTU of 9000) + (Memory required for MTU of 2000) + (512 MB buffer).
Convert the total memory required into MB.
3909091328 / (1024*1024) = 3728 MB.
Round this value up to the nearest 1024.
3724 MB rounds up to 4096 MB.
Use this value to set
NeutronDpdkSocketMemory.NeutronDpdkSocketMemory: “4096,1024”
Sample Calculation - MTU 2000
DPDK NICs dpdk0 and dpdk1 are on the same NUMA node 0 and configured with MTUs 2000 and 2000 respectively. The sample calculation to derive the memory required is as follows:
Round off the MTU values to the nearest 1024 bytes.
The MTU value of 2000 becomes 2048 bytes.
Calculate the required memory for each MTU value based on these rounded byte values.
Memory required for 2000 MTU = (2048 + 800) * (4096*64) = 746586112
Calculate the combined total memory required, in bytes.
746586112 + 536870912 = 1283457024 bytes.
This calculation represents (Memory required for MTU of 2000) + (512 MB buffer).
Convert the total memory required into MB.
1283457024 / (1024*1024) = 1224 MB.
Round this value up to the nearest 1024.
1224 MB rounds up to 2048 MB.
Use this value to set
NeutronDpdkSocketMemory.NeutronDpdkSocketMemory: “2048,1024”
6.2.3. Networking Parameters
- NeutronDpdkDriverType
-
Sets the driver type used by DPDK. Use the default of
vfio-pci. - NeutronDatapathType
-
Datapath type for OVS bridges. DPDK uses the default value of
netdev. - NeutronVhostuserSocketDir
-
Sets the vhost-user socket directory for OVS. Use
/var/run/openvswitchfor vhost server mode.
6.2.4. Other Parameters
- NovaSchedulerDefaultFilters
- Provides an ordered list of filters that the Compute node uses to find a matching Compute node for a requested guest instance.
- ComputeKernelArgs
Provides multiple kernel arguments to
/etc/default/grubfor the Compute node at boot time. Add the following based on your configuration:hugepagesz: Sets the size of the hugepages on a CPU. This value can vary depending on the CPU hardware. Set to 1G for OVS-DPDK deployments (default_hugepagesz=1GB hugepagesz=1G). Check for thepdpe1gbCPU flag to ensure your CPU supports 1G.lshw -class processor | grep pdpe1gb
-
hugepages count: Sets the number of hugepages available. This value depends on the amount of host memory available. Use most of your available memory (excludingNovaReservedHostMemory). You must also configure the hugepages count value within the OpenStack flavor associated with your Compute nodes. -
iommu: For Intel CPUs, add“intel_iommu=on iommu=pt”` -
isolcpus: Sets the CPU cores to be tuned. This value matchesHostIsolatedCoreList.
6.3. Two NUMA Node Example OVS-DPDK Deployment
This sample Compute node includes two NUMA nodes as follows:
- NUMA 0 has cores 0-7. The sibling thread pairs are (0,1), (2,3), (4,5), and (6,7).
- NUMA 1 has cores 8-15. The sibling thread pairs are (8,9), (10,11), (12,13), and (14,15).
- Each NUMA node connects to a physical NIC (NIC1 on NUMA 0 and NIC2 on NUMA 1).

Reserve the first physical cores (both thread pairs) on each NUMA node (0,1 and 8,9) for non-datapath DPDK processes (HostCpusList).
This example also assumes a 1500 MTU configuration, so the OvsDpdkSocketMemory is the same for all use cases:
OvsDpdkSocketMemory: “1024,1024”
NIC 1 for DPDK, with one physical core for PMD
In this use case, we allocate one physical core on NUMA 0 for PMD. We must also allocate one physical core on NUMA 1, even though there is no DPDK enabled on the NIC for that NUMA node. The remaining cores (not reserved for HostCpusList) are allocated for guest instances. The resulting parameter settings are:
NeutronDpdkCoreList: “'2,3,10,11'”
NovaVcpuPinSet: “4,5,6,7,12,13,14,15”
NIC 1 for DPDK, with two physical cores for PMD
In this use case, we allocate two physical cores on NUMA 0 for PMD. We must also allocate one physical core on NUMA 1, even though there is no DPDK enabled on the NIC for that NUMA node. The remaining cores (not reserved for HostCpusList) are allocated for guest instances. The resulting parameter settings are:
NeutronDpdkCoreList: “'2,3,4,5,10,11'”
NovaVcpuPinSet: “6,7,12,13,14,15”
NIC 2 for DPDK, with one physical core for PMD
In this use case, we allocate one physical core on NUMA 1 for PMD. We must also allocate one physical core on NUMA 0, even though there is no DPDK enabled on the NIC for that NUMA node. The remaining cores (not reserved for HostCpusList) are allocated for guest instances. The resulting parameter settings are:
NeutronDpdkCoreList: “'2,3,10,11'”
NovaVcpuPinSet: “4,5,6,7,12,13,14,15”
NIC 2 for DPDK, with two physical cores for PMD
In this use case, we allocate two physical cores on NUMA 1 for PMD. We must also allocate one physical core on NUMA 0, even though there is no DPDK enabled on the NIC for that NUMA node. The remaining cores (not reserved for HostCpusList) are allocated for guest instances. The resulting parameter settings are:
NeutronDpdkCoreList: “'2,3,10,11,12,13'”
NovaVcpuPinSet: “4,5,6,7,14,15”
NIC 1 and NIC2 for DPDK, with two physical cores for PMD
In this use case, we allocate two physical cores on each NUMA node for PMD. The remaining cores (not reserved for HostCpusList) are allocated for guest instances. The resulting parameter settings are:
NeutronDpdkCoreList: “'2,3,4,5,10,11,12,13'”
NovaVcpuPinSet: “6,7,14,15”
Red Hat recommends using 1 physical core per NUMA node.
6.4. Topology of an NFV OVS-DPDK Deployment
This sample OVS-DPDK deployment consists of two VNFs each with two interfaces, namely, the management interface represented by mgt and the dataplane interface. In the OVS-DPDK deployment, the VNFs run with inbuilt DPDK that supports the physical interface. OVS-DPDK takes care of the bonding at the vSwitch level. In an OVS-DPDK deployment, it is recommended that you do not mix kernel and OVS-DPDK NICs as it can lead to performance degradation. To separate the management (mgt) network, connected to the Base provider network for the virtual machine, you need to ensure you have additional NICs. The Compute node consists of two regular NICs for the OpenStack API management that can be reused by the Ceph API but cannot be shared with any OpenStack tenant.

NFV OVS-DPDK Topology
The following image shows the topology for OVS_DPDK for the NFV use case. It consists of Compute and Controller nodes with 1 or 10 Gbps NICs, and the Director node.

Chapter 7. Performance
Red Hat OpenStack Platform 10 director configures the Compute nodes to enforce resource partitioning and fine tuning to achieve line rate performance for the guest VNFs. The key performance factors in the NFV use case are throughput, latency and jitter.
DPDK-accelerated OVS enables high performance packet switching between physical NICs and virtual machines. OVS 2.5 with DPDK 2.2 adds support for vhost-user multiqueue allowing scalable performance. OVS-DPDK provides line rate performance for guest VNFs.
SR-IOV networking provides enhanced performance characteristics, including improved throughput for specific networks and virtual machines.
Other important features for performance tuning include huge pages, NUMA alignment, host isolation and CPU pinning. VNF flavors require huge pages for better performance. Host isolation and CPU pinning improve NFV performance and prevent spurious packet loss.
For more details on these features and performance tuning for NFV, see NFV Tuning for Performance.
7.1. Configuring RX/TX queue size
You can experience packet loss at high packet rates above 3.5mpps for many reasons, such as:
- a network interrupt
- a SMI
- packet processing latency in the Virtual Network Function
To prevent packet loss, increase the queue size from the default of 256 to a maximum of 1024.
Prerequisites
- To configure RX, ensure that you have libvirt v2.3 and QEMU v2.7.
- To configure TX, ensure that you have libvirt v3.7 and QEMU v2.10.
Procedure
To increase the RX and TX queue size, include the following lines in the
parameter_defaults:section of a relevant director role. Here is an example with ComputeOvsDpdk role:parameter_defaults: ComputeOvsDpdkParameters: -NovaLibvirtRxQueueSize: 1024 -NovaLibvirtTxQueueSize: 1024
Testing
You can observe the values for RX queue size and TX queue size in the nova.conf file:
[libvirt]
rx_queue_size=1024
tx_queue_size=1024
You can check the values for RX queue size and TX queue size in the VM instance XML file generated by libvirt on the compute host.
<devices>
   <interface type='vhostuser'>
     <mac address='56:48:4f:4d:5e:6f'/>
     <source type='unix' path='/tmp/vhost-user1' mode='server'/>
     <model type='virtio'/>
     <driver name='vhost' rx_queue_size='1024'   tx_queue_size='1024' />
     <address type='pci' domain='0x0000' bus='0x00' slot='0x10' function='0x0'/>
   </interface>
</devices>
To verify the values for RX queue size and TX queue size, use the following command on a KVM host:
$ virsh dumpxml <vm name> | grep queue_size
- You can check for improved performance, such as 3.8 mpps/core at 0 frame loss.
Chapter 8. vHost User Ports
vHost user ports are DPDK-backed datapaths for instances with two modes:
-
dpdkvhostuser -
dpdkvhostuserclient
In dpdkvhostuser mode, Open vSwitch (OVS) acts as a server which creates the vHost user socket. OVS shares the socket with QEMU, the client. In this mode, if OVS is restarted, VM instances connected to it will need to be rebooted to regain connectivity.
As of OVS 2.9, dpdkvhostuserclient is used instead. In this mode the QEMU creates and shares the vHost socket as a server, and OVS connects as the client. If OVS is restarted in this mode, it will automatically reconnect to all existing VMs.
8.1. Manually changing the vhost user port mode
DPDK vHost user ports are created exclusively with dpdkvhostuserclient mode since RHOSP 10 maintenance release RHSA-2018:2102, with no option to change this behavior. The usage of dpdkvhostuser mode for existing instances is still supported, however it is recommended to transition to dpdkvhostuserclient mode.
Change to the new dpdkvhostuserclient mode on existing instances by cold migrating them to another host after updating the overcloud to OVS 2.9.
If you have instances configured with CPU pinning, set the cpu_pinning_migration_quick_fail parameter in nova.conf to false. This will allow CPU pinning to be recalculated for a higher chance of migration success. Prior to attempting a live migration of instances with CPU pinning, contact Red Hat support.
openstack server migrate <server_id>
openstack server resize --confirm <server id>
Prior to RHOSP10 maintenance release RHBA-2019:0074, the cold migration may fail when the NUMATopologyFilter value is included in the NovaSchedulerDefaultFilters parameter in nova.conf. This behavior can be prevented by ensuring you are at the latest maintenance release, which includes the cpu_pinning_migration_quick_fail option for Nova. See Red Hat OpenStack Platform 10 Release Notes for more information.
You can check that an instance’s vHost user port is in dpdkvhostuserclient mode. Identify and log in to the hypervisor node where the instance resides.
Run the following:
compute-0# virsh dumpxml <instance name> | less
Identify the interface of type vhostuser and check that mode is set to server.
...
<interface type='vhostuser'>
<model type='virtio'/>
<source type='unix' path='<path-to-socket>' mode='<client|server>'/>
</interface>
...
Chapter 9. Technical Support
The following table includes additional Red Hat documentation for reference:
The Red Hat OpenStack Platform documentation suite can be found here: Red Hat OpenStack Platform 10 Documentation Suite
| Component | Reference |
|---|---|
| Red Hat Enterprise Linux | Red Hat OpenStack Platform is supported on Red Hat Enterprise Linux 7.3. For information on installing Red Hat Enterprise Linux, see the corresponding installation guide at: Red Hat Enterprise Linux. |
| Red Hat OpenStack Platform | To install OpenStack components and their dependencies, use the Red Hat OpenStack Platform director. The director uses a basic OpenStack installation as the undercloud to install, configure and manage the OpenStack nodes in the final overcloud. Be aware that you will need one extra host machine for the installation of the undercloud, in addition to the environment necessary for the deployed overcloud. For detailed instructions, see Red Hat OpenStack Platform director Installation and Usage. For information on configuring advanced features for a Red Hat OpenStack Platform enterprise environment using the Red Hat OpenStack Platform director such as network isolation, storage configuration, SSL communication, and general configuration method, see Advanced Overcloud Customization. You can also manually install the Red Hat OpenStack Platform components, see Manual Installation Procedures. |
| NFV Documentation | For a high level overview of the NFV concepts, see the Network Functions Virtualization Product Guide. For information on configuring SR-IOV and OVS-DPDK with Red Hat OpenStack Platform 10 director, see the Network Functions Virtualization Configuration Guide. |