Bare Metal Provisioning
Install and configure the Bare Metal Provisioning service (ironic)
Abstract
Making open source more inclusive
Red Hat is committed to replacing problematic language in our code, documentation, and web properties. We are beginning with these four terms: master, slave, blacklist, and whitelist. Because of the enormity of this endeavor, these changes will be implemented gradually over several upcoming releases. For more details, see our CTO Chris Wright’s message.
Providing feedback on Red Hat documentation
We appreciate your input on our documentation. Tell us how we can make it better.
Using the Direct Documentation Feedback (DDF) function
Use the Add Feedback DDF function for direct comments on specific sentences, paragraphs, or code blocks.
- View the documentation in the Multi-page HTML format.
- Ensure that you see the Feedback button in the upper right corner of the document.
- Highlight the part of text that you want to comment on.
- Click Add Feedback.
- Complete the Add Feedback field with your comments.
- Optional: Add your email address so that the documentation team can contact you for clarification on your issue.
- Click Submit.
Chapter 1. Bare Metal Provisioning service (ironic) functionality
You use the Bare Metal Provisioning service (ironic) components to provision and manage physical machines as bare metal instances for your cloud users. To provision and manage bare metal instances, the Bare Metal Provisioning service interacts with the following Red Hat OpenStack Platform (RHOSP) services in the overcloud:
- The Compute service (nova) provides scheduling, tenant quotas, and a user-facing API for virtual machine instance management. The Bare Metal Provisioning service provides the administrative API for hardware management.
- The Identity service (keystone) provides request authentication and assists the Bare Metal Provisioning service to locate other RHOSP services.
- The Image service (glance) manages disk and instance images and image metadata.
- The Networking service (neutron) provides DHCP and network configuration, and provisions the virtual or physical networks that instances connect to on boot.
- The Object Storage service (swift) exposes temporary image URLs for some drivers.
Bare Metal Provisioning service components
The Bare Metal Provisioning service consists of services, named ironic-*. The following services are the core Bare Metal Provisioning services:
- Bare Metal Provisioning API (
ironic-api) - This service provides the external REST API to users. The API sends application requests to the Bare Metal Provisioning conductor over remote procedure call (RPC).
- Bare Metal Provisioning conductor (
ironic-conductor) This service uses drivers to perform the following bare metal node management tasks:
- Adds, edits, and deletes bare metal nodes.
- Powers bare metal nodes on and off with IPMI, Redfish, or other vendor-specific protocol.
- Provisions, deploys, and cleans bare metal nodes.
- Bare Metal Provisioning inspector (
ironic-inspector) - This service discovers the hardware properties of a bare metal node that are required for scheduling bare metal instances, and creates the Bare Metal Provisioning service ports for the discovered ethernet MACs.
- Bare Metal Provisioning database
- This database tracks hardware information and state.
- Message queue
-
All services use this messaging service to communicate with each other, including implementing the RPC between
ironic-apiandironic-conductor. - Bare Metal Provisioning agent (
ironic-python-agent) -
This service runs in a temporary ramdisk to provide
ironic-conductorandironic-inspectorservices with remote access, in-band hardware control, and hardware introspection.
Provisioning a bare metal instance
The Bare Metal Provisioning service uses iPXE to provision physical machines as bare metal instances. The following diagram outlines how the RHOSP services interact during the provisioning process when a cloud user launches a new bare metal instance with the default drivers.

Chapter 2. Requirements for bare metal provisioning
To provide an overcloud where cloud users can launch bare metal instances, your Red Hat OpenStack Platform (RHOSP) environment must have the required hardware and network configuration.
2.1. Hardware requirements
The hardware requirements for the bare metal machines that you want to make available to your cloud users for provisioning depend on the operating system. For information about the hardware requirements for Red Hat Enterprise Linux installations, see Product Documentation for Red Hat Enterprise Linux.
All bare metal machines that you want to make available to your cloud users for provisioning must have the following capabilities:
- A NIC to connect to the bare metal network.
-
A power management interface, for example, Redfish or IPMI, that is connected to a network that is reachable from the
ironic-conductorservice. By default,ironic-conductorruns on all of the Controller nodes, unless you use composable roles and runironic-conductorelsewhere. - PXE boot on the bare metal network. Disable PXE boot on all other NICs in the deployment.
2.2. Networking requirements
The bare metal network must be a private network for the Bare Metal Provisioning service to use for the following operations:
- The provisioning and management of bare metal machines on the overcloud.
- Cleaning bare metal nodes when a node is unprovisioned.
- Tenant access to the bare metal machines.
The bare metal network provides DHCP and PXE boot functions to discover bare metal systems. This network must use a native VLAN on a trunked interface so that the Bare Metal Provisioning service can serve PXE boot and DHCP requests.
The Bare Metal Provisioning service in the overcloud is designed for a trusted tenant environment because the bare metal machines have direct access to the control plane network of your Red Hat OpenStack Platform (RHOSP) environment. Therefore, the default bare metal network uses a flat network for ironic-conductor services.
The default flat provisioning network can introduce security concerns in a customer environment because a tenant can interfere with the control plane network. To prevent this risk, you can configure a custom composable bare metal provisioning network for the Bare Metal Provisioning service that does not have access to the control plane.
The bare metal network must be untagged for provisioning, and must also have access to the Bare Metal Provisioning API. The control plane network, also known as the director provisioning network, is always untagged. Other networks can be tagged.
The Controller nodes that host the Bare Metal Provisioning service must have access to the bare metal network.
The NIC that the bare metal machine is configured to PXE-boot from must have access to the bare metal network.
The bare metal network is created by the OpenStack operator. Cloud users have direct access to the public OpenStack APIs, and to the bare metal network. With the default flat bare metal network, cloud users also have indirect access to the control plane.
The Bare Metal Provisioning service uses the bare metal network for node cleaning.
2.2.1. The default bare metal network
In the default Bare Metal Provisioning service deployment architecture, the bare metal network is separate from the control plane network. The bare metal network is a flat network that also acts as the tenant network. This network must route to the Bare Metal Provisioning services on the control plane, known as the director provisioning network. If you define an isolated bare metal network, the bare metal nodes cannot PXE boot.
Default bare metal network architecture diagram
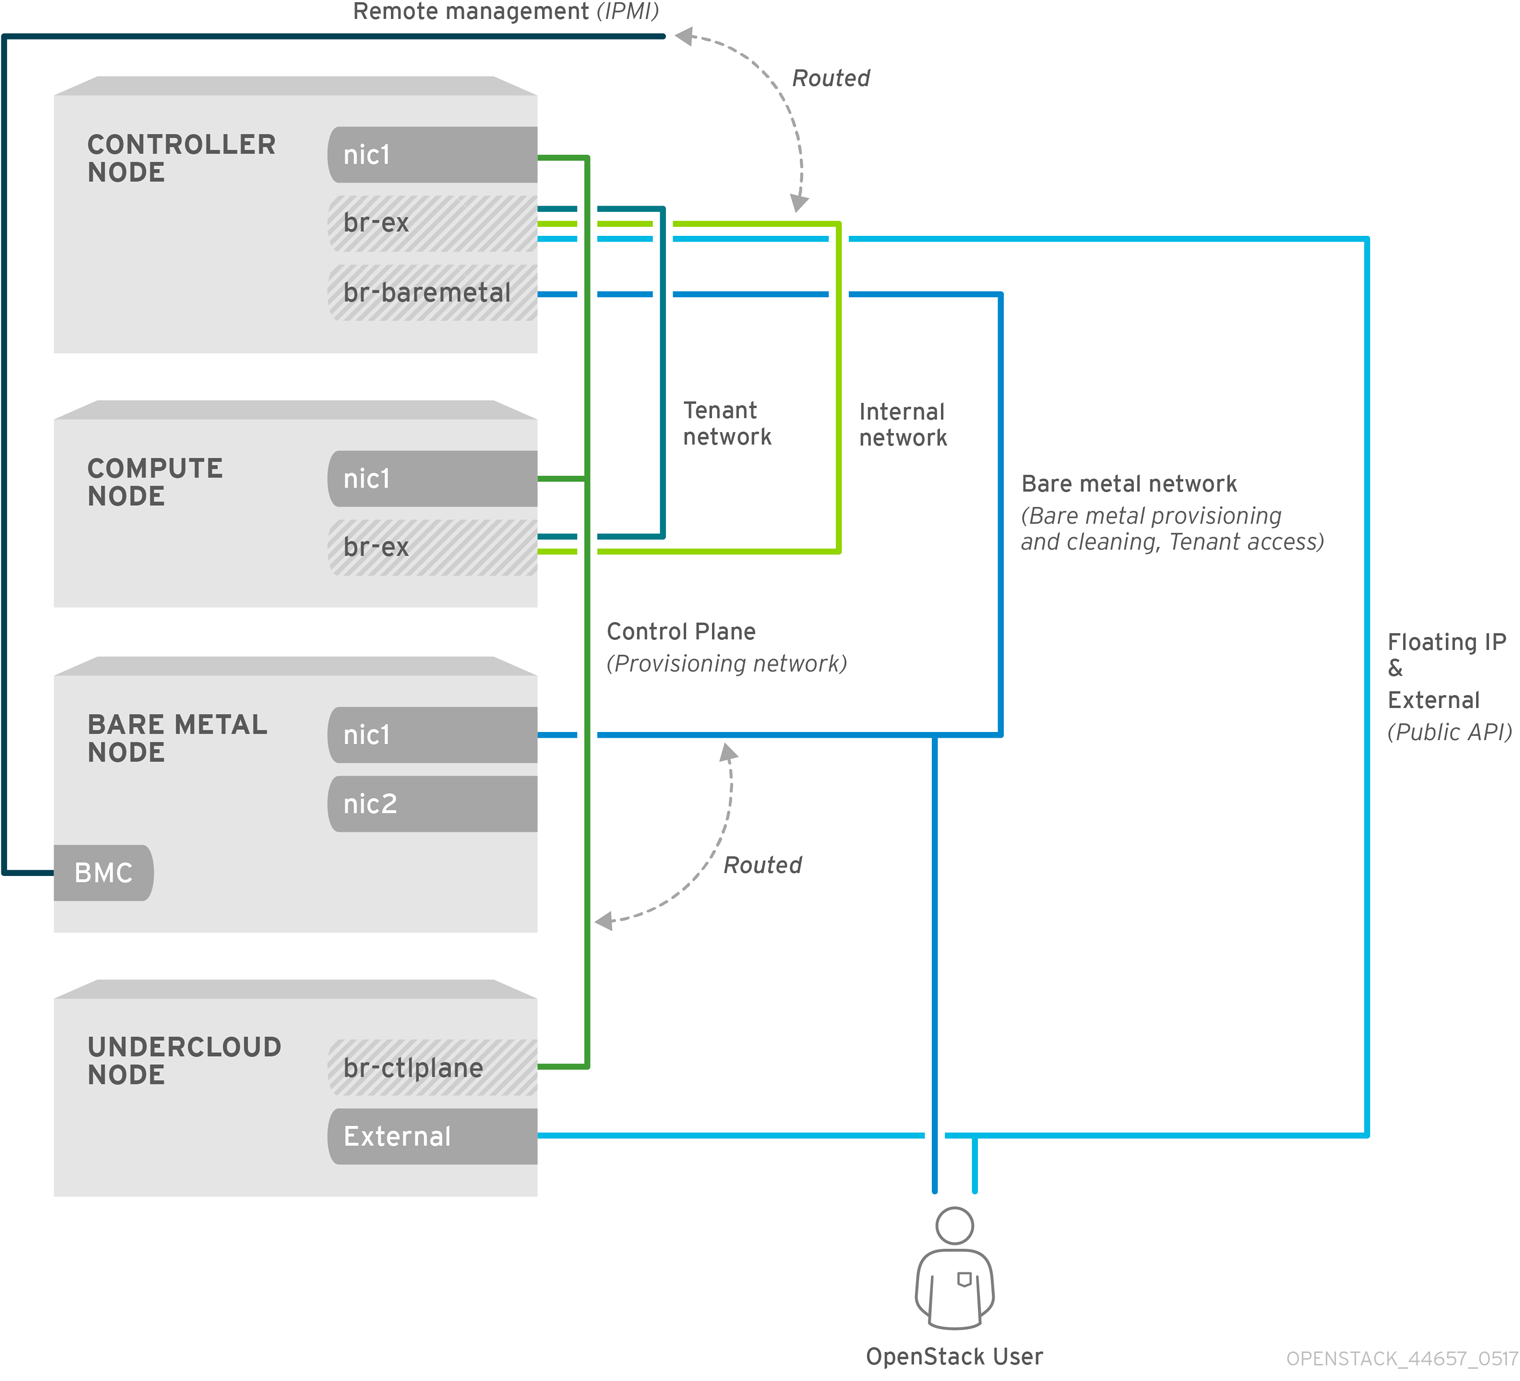
2.2.2. The custom composable bare metal network
When you use a custom composable bare metal network in your Bare Metal Provisioning service deployment architecture, the bare metal network is a custom composable network that does not have access to the control plane. Use a custom composable bare metal network if you want to limit access to the control plane.
Chapter 3. Deploying an overcloud with the Bare Metal Provisioning service
To deploy an overcloud with the Bare Metal Provisioning service (ironic), you must create and configure the bare metal network, and configure the overcloud to enable bare metal provisioning.
Create the bare metal network. You can reuse the provisioning network interface on the Controller nodes to create a flat network, or you can create a custom network:
Configure the overcloud to enable bare metal provisioning:
If you use Open Virtual Network (OVN), the Bare Metal Provisioning service is supported only with the DHCP agent defined in the ironic-overcloud.yaml file, neutron-dhcp-agent. The built-in DHCP server on OVN cannot provision bare metal nodes or serve DHCP for the provisioning networks. To enable iPXE chain loading you must set the --dhcp-match tag in dnsmasq, which is not supported by the OVN DHCP server.
Prerequisites
- Your environment meets the minimum requirements. For more information, see Requirements for bare metal provisioning.
3.1. Configuring the default flat network
To use the default flat bare metal network, you reuse the provisioning network interface on the Controller nodes to create a bridge for the Bare Metal Provisioning service (ironic).
Procedure
-
Log in to the undercloud as the
stackuser. Source the
stackrcfile:[stack@director ~]$ source ~/stackrcModify the
/home/stack/templates/nic-configs/controller.yamlfile to reuse the provisioning network interface on the Controller nodes,eth1, to create a bridge for the bare metal network:network_config: - type: ovs_bridge name: br-baremetal use_dhcp: false members: - type: interface name: eth1 addresses: - ip_netmask: list_join: - / - - get_param: ControlPlaneIp - get_param: ControlPlaneSubnetCidrNoteYou cannot VLAN tag the bare metal network when you create it by reusing the provisioning network.
Add
br-baremetalto theNeutronBridgeMappingsparameter in yournetwork-environment.yamlfile:parameter_defaults: NeutronBridgeMappings: datacentre:br-ex,baremetal:br-baremetalAdd
baremetalto the list of networks specified by theNeutronFlatNetworksparameter in yournetwork-environment.yamlfile:parameter_defaults: NeutronBridgeMappings: datacentre:br-ex,baremetal:br-baremetal NeutronFlatNetworks: datacentre,baremetal
3.2. Configuring a custom IPv4 provisioning network
Create a custom IPv4 provisioning network to provision and deploy the overcloud over IPv4.
Procedure
-
Log in to the undercloud host as the
stackuser. Source the
stackrcundercloud credentials file:$ source ~/stackrcCopy the
network_data.yamlfile to your environment file directory:(undercloud) [stack@host01 ~]$ cp /usr/share/openstack-tripleo-heat-templates/network_data.yaml /home/stack/templates/network_data.yamlAdd a new network for overcloud provisioning to your
network_data.yamlfile:# custom network for overcloud provisioning - name: OcProvisioning name_lower: oc_provisioning vip: true vlan: 205 ip_subnet: '<ipv4_subnet_address>/<ipv4_mask>' allocation_pools: [{'start': '<ipv4_start_address>', 'end': '<ipv4_end_address>'}]-
Replace
<ipv4_subnet_address>with the IPv4 address of your IPv4 subnet. -
Replace
<ipv4_mask>with the IPv4 network mask for your IPv4 subnet. -
Replace
<ipv4_start_address>and<ipv4_end_address>with the IPv4 range that you want to use for address allocation.
-
Replace
Configure
IronicApiNetworkandIronicNetworkin yourServiceNetMapconfiguration to use the new IPv4 provisioning network:ServiceNetMap: IronicApiNetwork: oc_provisioning IronicNetwork: oc_provisioningAdd the new network as an interface to your local Controller NIC configuration file:
network_config:
- type: vlan
  vlan_id:
    get_param: OcProvisioningNetworkVlanID
  addresses:
  - ip_netmask:
      get_param: OcProvisioningIpSubnet
Copy the
roles_data.yamlfile to your environment file directory:(undercloud) [stack@host01 ~]$ cp /usr/share/openstack-tripleo-heat-templates/roles_data.yaml /home/stack/templates/roles_data.yamlAdd the new network for the controller to your
roles_data.yamlfile:networks: ... OcProvisioning: subnet: oc_provisioning_subnetInclude the
IronicInspectorservice in theIronicrole in yourroles_data.yamlfile, if not already present:ServicesDefault: OS::TripleO::Services::IronicInspector
3.3. Configuring a custom IPv6 provisioning network
Create a custom IPv6 provisioning network to provision and deploy the overcloud over IPv6.
Procedure
-
Log in to the undercloud as the
stackuser. Source the
stackrcfile:[stack@director ~]$ source ~/stackrcCopy the
network_data.yamlfile to your environment file directory:(undercloud) [stack@host01 ~]$ cp /usr/share/openstack-tripleo-heat-templates/network_data.yaml /home/stack/templates/network_data.yamlAdd a new IPv6 network for overcloud provisioning to your
network_data.yamlfile:# custom network for IPv6 overcloud provisioning - name: OcProvisioningIPv6 vip: true name_lower: oc_provisioning_ipv6 vlan: 10 ipv6: true ipv6_subnet: '<ipv6_subnet_address>/<ipv6_prefix>' ipv6_allocation_pools: [{'start': '<ipv6_start_address>', 'end': '<ipv6_end_address>'}] gateway_ipv6: '<ipv6_gw_address>'-
Replace
<ipv6_subnet_address>with the IPv6 address of your IPv6 subnet. -
Replace
<ipv6_prefix>with the IPv6 network prefix for your IPv6 subnet. -
Replace
<ipv6_start_address>and<ipv6_end_address>with the IPv6 range that you want to use for address allocation. -
Replace
<ipv6_gw_address>with the IPv6 address of your gateway.
-
Replace
Create a new file
network_environment_overrides.yamlin your environment file directory:$ touch /home/stack/templates/network_environment_overrides.yamlConfigure
IronicApiNetworkandIronicNetworkin yournetwork_environment_overrides.yamlfile to use the new IPv6 provisioning network:ServiceNetMap: IronicApiNetwork: oc_provisioning_ipv6 IronicNetwork: oc_provisioning_ipv6Set the
IronicIpVersionparameter to6:parameter_defaults: IronicIpVersion: 6Enable the
RabbitIPv6,MysqlIPv6, andRedisIPv6parameters:parameter_defaults: RabbitIPv6: True MysqlIPv6: True RedisIPv6: TrueAdd the new network as an interface to your local Controller NIC configuration file:
network_config:
- type: vlan
  vlan_id:
    get_param: OcProvisioningIPv6NetworkVlanID
  addresses:
  - ip_netmask:
      get_param: OcProvisioningIPv6IpSubnet
Copy the
roles_data.yamlfile to your environment file directory:(undercloud) [stack@host01 ~]$ cp /usr/share/openstack-tripleo-heat-templates/roles_data.yaml /home/stack/templates/roles_data.yamlAdd the new network for the Controller role to your
roles_data.yamlfile:networks: ... - OcProvisioningIPv6Include the
IronicInspectorservice in theIronicrole in yourroles_data.yamlfile, if not already present:ServicesDefault: OS::TripleO::Services::IronicInspector
3.4. Configuring the overcloud to enable bare metal provisioning
Use one of the default templates located in the /usr/share/openstack-tripleo-heat-templates/environments/services directory to deploy the overcloud with the Bare Metal Provisioning service (ironic) enabled:
-
For deployments that use OVS:
ironic.yaml -
For deployments that use OVN:
ironic-overcloud.yaml
You can create a local environment file to override the default configuration, as required by your deployment.
Procedure
-
Create an environment file in your local directory to configure the Bare Metal Provisioning service for your deployment, for example,
ironic-overrides.yaml. Optional: Configure the type of cleaning that is performed on the bare metal machines before and between provisioning:
parameter_defaults:
  IronicCleaningDiskErase: <cleaning_type>
Replace
<cleaning_type>with one of the following values:-
full: (Default) Performs a full clean. -
metadata: Clean only the partition table. This type of cleaning substantially speeds up the cleaning process. However, because the deployment is less secure in a multi-tenant environment, use this option only in a trusted tenant environment.
-
Optional: Add additional drivers to the default drivers:
parameter_defaults:
  IronicEnabledHardwareTypes: ipmi,idrac,ilo,[additional_driver_1],...,[additional_driver_n]
Replace
[additional_driver_1], and optionally all drivers up to[additional_driver_n], with the additional drivers you want to enable.To enable bare metal introspection, add the following configuration to your local Bare Metal Provisioning service environment file,
ironic-overrides.yaml:parameter_defaults: IronicInspectorSubnets: - ip_range: <ip_range> IPAImageURLs: '["http://<ip_address>:<port>/agent.kernel", "http://<ip_address>:<port>/agent.ramdisk"]' IronicInspectorInterface: '<baremetal_interface>'-
Replace
<ip_range>with the IP ranges for your environments, for example,192.168.0.100,192.168.0.120. -
Replace
<ip_address>:<port>with the IP address and port of the web server that hosts the IPA kernel and ramdisk. To use the same images that you use on the undercloud, set the IP address to the undercloud IP address, and the port to8088. If you omit this parameter, you must include alternatives on each Controller node. -
Replace
<baremetal_interface>with the bare metal network interface, for example,br-baremetal.
-
Replace
Add your new role and custom environment files to the stack with your other environment files and deploy the overcloud:
(undercloud)$ openstack overcloud deploy --templates \ -e [your environment files] \ -e /home/stack/templates/node-info.yaml -r /home/stack/templates/roles_data.yaml \ -e /usr/share/openstack-tripleo-heat-templates/network-environment.yaml \ -e /usr/share/openstack-tripleo-heat-templates/environments/services/<default_ironic_template> \ -e /usr/share/openstack-tripleo-heat-templates/environments/services/ironic-inspector.yaml \ -e /home/stack/templates/network_environment_overrides.yaml -n /home/stack/templates/network_data.yaml -e /home/stack/templates/ironic-overrides.yaml \-
Replace
<default_ironic_template>with eitherironic.yamlorironic-overcloud.yaml, depending on the Networking service mechanism driver for your deployment.
NoteThe order that you pass your environment files to the
openstack overcloud deploycommand is important, as the configuration in the later files takes precedence. Therefore, your environment file that enables and configures bare metal provisioning on your overcloud must be passed to the command after any network configuration files.-
Replace
3.5. Testing the Bare Metal Provisioning service
You can use the OpenStack Integration Test Suite to validate your Red Hat OpenStack deployment. For more information, see the OpenStack Integration Test Suite Guide.
Additional verification methods for the Bare Metal Provisioning service:
Configure the shell to access Identity as the administrative user:
$ source ~/overcloudrcCheck that the
nova-computeservice is running on the Controller nodes:$ openstack compute service list -c Binary -c Host -c StatusIf you changed the default ironic drivers, ensure that the required drivers are enabled:
$ openstack baremetal driver listEnsure that the ironic endpoints are listed:
$ openstack catalog list
3.6. Additional resources
- Deployment command options in the Director Installation and Usage guide
- IPv6 Networking for the Overcloud
- Bare Metal (ironic) Parameters in the Overcloud Parameters guide
Chapter 4. Configuring the Bare Metal Provisioning service after deployment
When you have deployed your overcloud with the Bare Metal Provisioning service (ironic), you must prepare your overcloud for bare-metal workloads. To prepare your overcloud for bare-metal workloads and enable your cloud users to create bare-metal instances, complete the following tasks:
- Configure the Networking service (neutron) to integrate with the Bare Metal Provisioning service.
- Configure node cleaning.
- Create the bare metal flavor and resource class.
- Optional: Create the bare metal images.
- Add physical machines as bare-metal nodes.
- Optional: Configure Redfish virtual media boot.
- Optional: Create host aggregates to separate physical and virtual machine provisioning.
4.1. Configuring the Networking service for bare metal provisioning
You can configure the Networking service (neutron) to integrate with the Bare Metal Provisioning service (ironic). You can configure the bare-metal network by using one of the following methods:
-
Create a single flat bare-metal network for the Bare Metal Provisioning conductor services,
ironic-conductor. This network must route to the Bare Metal Provisioning services on the control plane network. - Create a custom composable network to implement Bare Metal Provisioning services in the overcloud.
4.1.1. Configuring the Networking service to integrate with the Bare Metal Provisioning service on a flat network
You can configure the Networking service (neutron) to integrate with the Bare Metal Provisioning service (ironic) by creating a single flat bare-metal network for the Bare Metal Provisioning conductor services, ironic-conductor. This network must route to the Bare Metal Provisioning services on the control plane network.
Procedure
-
Log in to the node that hosts the Networking service (neutron) as the
rootuser. Source your overcloud credentials file:
# source ~/<credentials_file>-
Replace
<credentials_file>with the name of your credentials file, for example,overcloudrc.
-
Replace
Create the flat network over which to provision bare-metal instances:
# openstack network create \ --provider-network-type flat \ --provider-physical-network <provider_physical_network> \ --share <network_name>-
Replace
<provider_physical_network>with the name of the physical network over which you implement the virtual network, which is configured with the parameterNeutronBridgeMappingsin yournetwork-environment.yamlfile. -
Replace
<network_name>with a name for this network.
-
Replace
Create the subnet on the flat network:
# openstack subnet create \ --network <network_name> \ --subnet-range <network_cidr> \ --ip-version 4 \ --gateway <gateway_ip> \ --allocation-pool start=<start_ip>,end=<end_ip> \ --dhcp <subnet_name>-
Replace
<network_name>with the name of the provisioning network that you created in the previous step. -
Replace
<network_cidr>with the Classless Inter-Domain Routing (CIDR) representation of the block of IP addresses that the subnet represents. The block of IP addresses that you specify in the range starting with<start_ip>and ending with<end_ip>must be within the block of IP addresses specified by<network_cidr>. -
Replace
<gateway_ip>with the IP address or host name of the router interface that acts as the gateway for the new subnet. This address must be within the block of IP addresses specified by<network_cidr>, but outside of the block of IP addresses specified by the range that starts with<start_ip>and ends with<end_ip>. -
Replace
<start_ip>with the IP address that denotes the start of the range of IP addresses within the new subnet from which floating IP addresses are allocated. -
Replace
<end_ip>with the IP address that denotes the end of the range of IP addresses within the new subnet from which floating IP addresses are allocated. -
Replace
<subnet_name>with a name for the subnet.
-
Replace
Create a router for the network and subnet to ensure that the Networking service serves metadata requests:
# openstack router create <router_name>-
Replace
<router_name>with a name for the router.
-
Replace
Attach the subnet to the new router to enable the metadata requests from
cloud-initto be served and the node to be configured: :# openstack router add subnet <router_name> <subnet>-
Replace
<router_name>with the name of your router. -
Replace
<subnet>with the ID or name of the bare-metal subnet that you created in the step 4.
-
Replace
4.1.2. Configuring the Networking service to integrate with the Bare Metal Provisioning service on a custom composable network
You can configure the Networking service (neutron) to integrate with the Bare Metal Provisioning service (ironic) by creating a custom composable network to implement Bare Metal Provisioning services in the overcloud.
Procedure
- Log in to the undercloud host.
Source your overcloud credentials file:
$ source ~/<credentials_file>-
Replace
<credentials_file>with the name of your credentials file, for example,overcloudrc.
-
Replace
Retrieve the UUID for the provider network that hosts the Bare Metal Provisioning service:
(overcloud)$ openstack network show <network_name> -f value -c id-
Replace
<network_name>with the name of the provider network that you want to use for the bare-metal instance provisioning network.
-
Replace
-
Open your local environment file that configures the Bare Metal Provisioning service for your deployment, for example,
ironic-overrides.yaml. Configure the network to use as the bare-metal instance provisioning network:
parameter_defaults: IronicProvisioningNetwork: <network_uuid>-
Replace
<network_uuid>with the UUID of the provider network retrieved in step 3.
-
Replace
Source the
stackrcundercloud credentials file:$ source ~/stackrcTo apply the bare-metal instance provisioning network configuration, add your Bare Metal Provisioning environment files to the stack with your other environment files and deploy the overcloud:
(undercloud)$ openstack overcloud deploy --templates \ -e [your environment files] \ -e /home/stack/templates/node-info.yaml -r /home/stack/templates/roles_data.yaml \ -e /usr/share/openstack-tripleo-heat-templates/network-environment.yaml \ -e /usr/share/openstack-tripleo-heat-templates/environments/services/<default_ironic_template> \ -e /usr/share/openstack-tripleo-heat-templates/environments/services/ironic-inspector.yaml \ -e /home/stack/templates/network_environment_overrides.yaml -n /home/stack/templates/network_data.yaml -e /home/stack/templates/ironic-overrides.yaml \-
Replace
<default_ironic_template>with eitherironic.yamlorironic-overcloud.yaml, depending on the Networking service mechanism driver for your deployment.
-
Replace
4.2. Cleaning bare-metal nodes
The Bare Metal Provisioning service cleans nodes to prepare them for provisioning. You can clean bare-metal nodes by using one of the following methods:
- Automatic: You can configure your overcloud to automatically perform node cleaning when you unprovision a node.
- Manual: You can manually clean individual nodes when required.
4.2.1. Configuring automatic node cleaning
Automatic bare-metal node cleaning runs after you enroll a node, and before the node reaches the available provisioning state. Automatic cleaning is run each time the node is unprovisioned.
By default, the Bare Metal Provisioning service uses a network named provisioning for node cleaning. However, network names are not unique in the Networking service (neutron), so it is possible for a project to create a network with the same name, which causes a conflict with the Bare Metal Provisioning service. To avoid the conflict, use the network UUID to configure the node cleaning network.
Procedure
- Log in to the undercloud host.
Source your overcloud credentials file:
$ source ~/<credentials_file>-
Replace
<credentials_file>with the name of your credentials file, for example,overcloudrc.
-
Replace
Retrieve the UUID for the provider network that hosts the Bare Metal Provisioning service:
(overcloud)$ openstack network show <network_name> -f value -c id-
Replace
<network_name>with the name of the network that you want to use for the bare-metal node cleaning network.
-
Replace
-
Open your local environment file that configures the Bare Metal Provisioning service for your deployment, for example,
ironic-overrides.yaml. Configure the network to use as the node cleaning network:
parameter_defaults: IronicCleaningNetwork: <network_uuid>-
Replace
<network_uuid>with the UUID of the provider network that you retrieved in step 3.
-
Replace
Source the
stackrcundercloud credentials file:$ source ~/stackrcTo apply the node cleaning network configuration, add your Bare Metal Provisioning environment files to the stack with your other environment files and deploy the overcloud:
(undercloud)$ openstack overcloud deploy --templates \ -e [your environment files] \ -e /home/stack/templates/node-info.yaml -r /home/stack/templates/roles_data.yaml \ -e /usr/share/openstack-tripleo-heat-templates/network-environment.yaml \ -e /usr/share/openstack-tripleo-heat-templates/environments/services/<default_ironic_template> \ -e /usr/share/openstack-tripleo-heat-templates/environments/services/ironic-inspector.yaml \ -e /home/stack/templates/network_environment_overrides.yaml -n /home/stack/templates/network_data.yaml -e /home/stack/templates/ironic-overrides.yaml \-
Replace
<default_ironic_template>with eitherironic.yamlorironic-overcloud.yaml, depending on the Networking service mechanism driver for your deployment.
-
Replace
4.2.2. Cleaning nodes manually
You can clean specific nodes manually as required. Node cleaning has two modes:
- Metadata only clean: Removes partitions from all disks on the node. The metadata only mode of cleaning is faster than a full clean, but less secure because it erases only partition tables. Use this mode only on trusted tenant environments.
- Full clean: Removes all data from all disks, using either ATA secure erase or by shredding. A full clean can take several hours to complete.
Procedure
Source your overcloud credentials file:
$ source ~/<credentials_file>-
Replace
<credentials_file>with the name of your credentials file, for example,overcloudrc.
-
Replace
Check the current state of the node:
$ openstack baremetal node show \ -f value -c provision_state <node>-
Replace
<node>with the name or UUID of the node to clean.
-
Replace
If the node is not in the
manageablestate, then set it tomanageable:$ openstack baremetal node manage <node>Clean the node:
$ openstack baremetal node clean <node> \ --clean-steps '[{"interface": "deploy", "step": "<clean_mode>"}]'-
Replace
<node>with the name or UUID of the node to clean. Replace
<clean_mode>with the type of cleaning to perform on the node:-
erase_devices: Performs a full clean. -
erase_devices_metadata: Performs a metadata only clean.
-
-
Replace
Wait for the clean to complete, then check the status of the node:
-
manageable: The clean was successful, and the node is ready to provision. -
clean failed: The clean was unsuccessful. Inspect thelast_errorfield for the cause of failure.
-
4.3. Creating the bare metal flavor and resource class
You must create a flavor and a resource class to use to tag the bare metal nodes for a particular workload.
Procedure
Source the overcloud credentials file:
$ source ~/overcloudrcCreate a new instance flavor for bare metal nodes:
(overcloud)$ openstack flavor create --id auto \ --ram <ram_size_mb> --disk <disk_size_gb> \ --vcpus <no_vcpus> baremetal-
Replace
<ram_size_mb>with the RAM of the bare metal node, in MB. -
Replace
<disk_size_gb>with the size of the disk on the bare metal node, in GB. Replace
<no_vcpus>with the number of CPUs on the bare metal node.NoteThese properties are not used for scheduling instances. However, the Compute scheduler does use the disk size to determine the root partition size.
-
Replace
Retrieve a list of your nodes to identify their UUIDs:
(overcloud)$ openstack baremetal node listTag each bare metal node with a custom bare metal resource class:
(overcloud)$ openstack baremetal node set \ --resource-class baremetal.<CUSTOM> <node>-
Replace
<CUSTOM>with a string that identifies the purpose of the resource class. For example, set toGPUto create a custom GPU resource class that you can use to tag bare metal nodes that you want to designate for GPU workloads. -
Replace
<node>with the ID of the bare metal node.
-
Replace
Associate the new instance flavor for bare metal nodes with the custom resource class:
(overcloud)$ openstack flavor set \
 --property resources:CUSTOM_BAREMETAL_<CUSTOM>=1 \
 baremetal
To determine the name of a custom resource class that corresponds to a resource class of a Bare Metal service node, convert the resource class to uppercase, replace each punctuation mark with an underscore, and prefix with
CUSTOM_.NoteA flavor can request only one instance of a bare metal resource class.
Set the following flavor properties to prevent the Compute scheduler from using the bare metal flavor properties to schedule instances:
(overcloud)$ openstack flavor set \
 --property resources:VCPU=0 \
 --property resources:MEMORY_MB=0 \
 --property resources:DISK_GB=0 baremetal
Verify that the new flavor has the correct values:
(overcloud)$ openstack flavor list
4.4. Creating the bare metal images
An overcloud that includes the Bare Metal Provisioning service (ironic) requires two sets of images. During deployment, the Bare Metal Provisioning service boots bare metal nodes from the deploy image, and copies the user image onto nodes.
- The deploy image
-
The Bare Metal Provisioning service uses the deploy image to boot the bare metal node and copy a user image onto the bare metal node. The deploy image consists of the
kernelimage and theramdiskimage. - The user image
The user image is the image that you deploy onto the bare metal node. The user image also has a
kernelimage andramdiskimage, but additionally, the user image contains amainimage. The main image is either a root partition, or a whole-disk image.- A whole-disk image is an image that contains the partition table and boot loader. The Bare Metal Provisioning service does not control the subsequent reboot of a node deployed with a whole-disk image as the node supports localboot.
- A root partition image contains only the root partition of the operating system. If you use a root partition, after the deploy image is loaded into the Image service, you can set the deploy image as the node boot image in the node properties. A subsequent reboot of the node uses netboot to pull down the user image.
The examples in this section use a root partition image to provision bare metal nodes.
4.4.1. Preparing the deploy images
You do not have to create the deploy image because it was already created when the overcloud was deployed by the undercloud. The deploy image consists of two images - the kernel image and the ramdisk image:
/tftpboot/agent.kernel
/tftpboot/agent.ramdisk
These images are often in the home directory, unless you have deleted them, or unpacked them elsewhere. If they are not in the home directory, and you still have the rhosp-director-images-ipa package installed, these images are in the /usr/share/rhosp-director-images/ironic-python-agent*.tar file.
Prerequisites
- A successful overcloud deployment that includes the Bare Metal Provisioning service. For more information, see Deploying an overcloud with the Bare Metal Provisioning service.
Procedure
Extract the images and upload them to the Image service:
$ openstack image create \
  --container-format aki \
  --disk-format aki \
  --public \
  --file ./tftpboot/agent.kernel bm-deploy-kernel
$ openstack image create \
  --container-format ari \
  --disk-format ari \
  --public \
  --file ./tftpboot/agent.ramdisk bm-deploy-ramdisk
4.4.2. Preparing the user image
The final image that you need is the user image that you deploy onto the bare metal node. User images also have a kernel and ramdisk, along with a main image. To download and install these packages, you must first configure whole disk image environment variables to suit your requirements.
4.4.3. Installing the user image
Configure the user image and then upload the image to the Image service (glance).
Prerequisites
- A successful overcloud deployment that includes the Bare Metal Provisioning service. For more information, see Deploying an overcloud with the Bare Metal Provisioning service.
Procedure
- Download the Red Hat Enterprise Linux KVM guest image from the Customer Portal.
Define
DIB_LOCAL_IMAGEas the downloaded image:$ export DIB_LOCAL_IMAGE=rhel-8.0-x86_64-kvm.qcow2Set your registration information. If you use Red Hat Customer Portal, you must configure the following information:
$ export REG_USER='USER_NAME'
$ export REG_PASSWORD='PASSWORD'
$ export REG_AUTO_ATTACH=true
$ export REG_METHOD=portal
$ export https_proxy='IP_address:port' (if applicable)
$ export http_proxy='IP_address:port' (if applicable)
If you use Red Hat Satellite, you must configure the following information:
$ export REG_USER='USER_NAME'
$ export REG_PASSWORD='PASSWORD'
$ export REG_SAT_URL='<SATELLITE URL>'
$ export REG_ORG='<SATELLITE ORG>'
$ export REG_ENV='<SATELLITE ENV>'
$ export REG_METHOD=<METHOD>
If you have any offline repositories, you can define DIB_YUM_REPO_CONF as local repository configuration:
$ export DIB_YUM_REPO_CONF=<path-to-local-repository-config-file>Create the user images with the
diskimage-buildertool:$ export DIB_RELEASE=8 $ disk-image-create rhel baremetal -o rhel-imageThis command extracts the kernel as
rhel-image.vmlinuzand initial ramdisk asrhel-image.initrd.Upload the images to the Image service:
$ KERNEL_ID=$(openstack image create \
  --file rhel-image.vmlinuz --public \
  --container-format aki --disk-format aki \
  -f value -c id rhel-image.vmlinuz)
$ RAMDISK_ID=$(openstack image create \
  --file rhel-image.initrd --public \
  --container-format ari --disk-format ari \
  -f value -c id rhel-image.initrd)
$ openstack image create \
  --file rhel-image.qcow2   --public \
  --container-format bare \
  --disk-format qcow2 \
  --property kernel_id=$KERNEL_ID \
  --property ramdisk_id=$RAMDISK_ID \
  rhel-image
4.5. Adding physical machines as bare metal nodes
Use one of the following methods to enroll a bare metal node:
- Prepare an inventory file with the node details, import the file into the Bare Metal Provisioning service, and make the nodes available.
-
Register a physical machine as a bare metal node, and then manually add its hardware details and create ports for each of its Ethernet MAC addresses. You can perform these steps on any node that has your
overcloudrcfile.
4.5.1. Enrolling a bare metal node with an inventory file
Prepare an inventory file with the node details, import the file into the Bare Metal Provisioning service (ironic), and make the nodes available.
Prerequisites
- An overcloud deployment that includes the Bare Metal Provisioning service. For more information, see Deploying an overcloud with the Bare Metal Provisioning service.
Procedure
Create an inventory file,
overcloud-nodes.yaml, that includes the node details. You can enroll multiple nodes with one file.nodes: - name: node0 driver: ipmi driver_info: ipmi_address: <ipmi_ip> ipmi_username: <user> ipmi_password: <password> [<property>: <value>] properties: cpus: <cpu_count> cpu_arch: <cpu_arch> memory_mb: <memory> local_gb: <root_disk> root_device: serial: <serial> ports: - address: <mac_address>-
Replace
<ipmi_ip>with the address of the Bare Metal controller. -
Replace
<user>with your username. -
Replace
<password>with your password. -
Optional: Replace
<property>: <value>with an IPMI property that you want to configure, and the property value. For information on the available properties, see Intelligent Platform Management Interface (IPMI) power management driver. -
Replace
<cpu_count>with the number of CPUs. -
Replace
<cpu_arch>with the type of architecture of the CPUs. -
Replace
<memory>with the amount of memory in MiB. -
Replace
<root_disk>with the size of the root disk in GiB. Only required when the machine has multiple disks. -
Replace
<serial>with the serial number of the disk that you want to use for deployment. -
Replace
<mac_address>with the MAC address of the NIC used to PXE boot. - --driver-info <property>=<value>
-
Replace
Source the
overcloudrcfile:$ source ~/overcloudrcImport the inventory file into the Bare Metal Provisioning service:
$ openstack baremetal create overcloud-nodes.yamlThe nodes are now in the
enrollstate.Specify the deploy kernel and deploy ramdisk on each node:
$ openstack baremetal node set <node> \ --driver-info deploy_kernel=<kernel_file> \ --driver-info deploy_ramdisk=<initramfs_file>-
Replace
<node>with the name or ID of the node. -
Replace
<kernel_file>with the path to the.kernelimage, for example,file:///var/lib/ironic/httpboot/agent.kernel. -
Replace
<initramfs_file>with the path to the.initramfsimage, for example,file:///var/lib/ironic/httpboot/agent.ramdisk.
-
Replace
Optional: Specify the IPMI cipher suite for each node:
$ openstack baremetal node set <node> \ --driver-info ipmi_cipher_suite=<version>-
Replace
<node>with the name or ID of the node. Replace
<version>with the cipher suite version to use on the node. Set to one of the following valid values:-
3- The node uses the AES-128 with SHA1 cipher suite. -
17- The node uses the AES-128 with SHA256 cipher suite.
-
-
Replace
Set the provisioning state of the node to
available:$ openstack baremetal node manage <node> $ openstack baremetal node provide <node>The Bare Metal Provisioning service cleans the node if you enabled node cleaning.
Set the local boot option on the node:
$ openstack baremetal node set <node> --property capabilities="boot_option:local"Check that the nodes are enrolled:
$ openstack baremetal node listThere might be a delay between enrolling a node and its state being shown.
4.5.2. Enrolling a bare-metal node manually
Register a physical machine as a bare metal node, then manually add its hardware details and create ports for each of its Ethernet MAC addresses. You can perform these steps on any node that has your overcloudrc file.
Prerequisites
- An overcloud deployment that includes the Bare Metal Provisioning service. For more information, see Deploying an overcloud with the Bare Metal Provisioning service.
-
The driver for the new node must be enabled by using the
IronicEnabledHardwareTypesparameter. For more information about supported drivers, see Bare metal drivers.
Procedure
-
Log in to the undercloud host as the
stackuser. Source the overcloud credentials file:
(undercloud)$ source ~/overcloudrcAdd a new node:
$ openstack baremetal node create --driver <driver_name> --name <node_name>-
Replace
<driver_name>with the name of the driver, for example,ipmi. -
Replace
<node_name>with the name of your new bare-metal node.
-
Replace
- Note the UUID assigned to the node when it is created.
Set the boot option to
localfor each registered node:$ openstack baremetal node set \ --property capabilities="boot_option:local" <node>Replace
<node>with the UUID of the bare metal node.Specify the deploy kernel and deploy ramdisk for the node driver:
$ openstack baremetal node set <node> \ --driver-info deploy_kernel=<kernel_file> \ --driver-info deploy_ramdisk=<initramfs_file>-
Replace
<node>with the ID of the bare metal node. -
Replace
<kernel_file>with the path to the.kernelimage, for example,file:///var/lib/ironic/httpboot/agent.kernel. -
Replace
<initramfs_file>with the path to the.initramfsimage, for example,file:///var/lib/ironic/httpboot/agent.ramdisk.
-
Replace
Update the node properties to match the hardware specifications on the node:
$ openstack baremetal node set <node> \ --property cpus=<cpu> \ --property memory_mb=<ram> \ --property local_gb=<disk> \ --property cpu_arch=<arch>-
Replace
<node>with the ID of the bare metal node. -
Replace
<cpu>with the number of CPUs. -
Replace
<ram>with the RAM in MB. -
Replace
<disk>with the disk size in GB. -
Replace
<arch>with the architecture type.
-
Replace
Optional: Specify the IPMI cipher suite for each node:
$ openstack baremetal node set <node> \ --driver-info ipmi_cipher_suite=<version>-
Replace
<node>with the ID of the bare metal node. Replace
<version>with the cipher suite version to use on the node. Set to one of the following valid values:-
3- The node uses the AES-128 with SHA1 cipher suite. -
17- The node uses the AES-128 with SHA256 cipher suite.
-
-
Replace
Optional: Specify the IPMI details for each node:
$ openstack baremetal node set <node> \ --driver-info <property>=<value>-
Replace
<node>with the ID of the bare metal node. -
Replace
<property>with the IPMI property that you want to configure. For information on the available properties, see Intelligent Platform Management Interface (IPMI) power management driver. -
Replace
<value>with the property value.
-
Replace
Optional: If you have multiple disks, set the root device hints to inform the deploy ramdisk which disk to use for deployment:
$ openstack baremetal node set <node> \ --property root_device='{"<property>": "<value>"}'-
Replace
<node>with the ID of the bare metal node. Replace
<property>and<value>with details about the disk that you want to use for deployment, for exampleroot_device='{"size": "128"}'RHOSP supports the following properties:
-
model(String): Device identifier. -
vendor(String): Device vendor. -
serial(String): Disk serial number. -
hctl(String): Host:Channel:Target:Lun for SCSI. -
size(Integer): Size of the device in GB. -
wwn(String): Unique storage identifier. -
wwn_with_extension(String): Unique storage identifier with the vendor extension appended. -
wwn_vendor_extension(String): Unique vendor storage identifier. -
rotational(Boolean): True for a rotational device (HDD), otherwise false (SSD). name(String): The name of the device, for example: /dev/sdb1 Use this property only for devices with persistent names.NoteIf you specify more than one property, the device must match all of those properties.
-
-
Replace
Inform the Bare Metal Provisioning service of the node network card by creating a port with the MAC address of the NIC on the provisioning network:
$ openstack baremetal port create --node <node_uuid> <mac_address>-
Replace
<node>with the unique ID of the bare metal node. -
Replace
<mac_address>with the MAC address of the NIC used to PXE boot.
-
Replace
Validate the configuration of the node:
$ openstack baremetal node validate <node>
+------------+--------+---------------------------------------------+
| Interface  | Result | Reason                                      |
+------------+--------+---------------------------------------------+
| boot       | False  | Cannot validate image information for node  |
|            |        | a02178db-1550-4244-a2b7-d7035c743a9b        |
|            |        | because one or more parameters are missing  |
|            |        | from its instance_info. Missing are:        |
|            |        | ['ramdisk', 'kernel', 'image_source']       |
| console    | None   | not supported                               |
| deploy     | False  | Cannot validate image information for node  |
|            |        | a02178db-1550-4244-a2b7-d7035c743a9b        |
|            |        | because one or more parameters are missing  |
|            |        | from its instance_info. Missing are:        |
|            |        | ['ramdisk', 'kernel', 'image_source']       |
| inspect    | None   | not supported                               |
| management | True   |                                             |
| network    | True   |                                             |
| power      | True   |                                             |
| raid       | True   |                                             |
| storage    | True   |                                             |
+------------+--------+---------------------------------------------+
The validation output
Resultindicates the following:-
False: The interface has failed validation. If the reason provided includes missing theinstance_infoparameters[\'ramdisk', \'kernel', and \'image_source'], this might be because the Compute service populates those missing parameters at the beginning of the deployment process, therefore they have not been set at this point. If you are using a whole disk image, then you might need to only setimage_sourceto pass the validation. -
True: The interface has passed validation. -
None: The interface is not supported for your driver.
-
4.5.3. Bare-metal node provisioning states
A bare-metal node transitions through several provisioning states during its lifetime. API requests and conductor events performed on the node initiate the transitions. There are two categories of provisioning states: "stable" and "in transition".
Use the following table to understand the provisioning states a node can be in, and the actions that are available for you to use to transition the node from one provisioning state to another.
| State | Category | Description |
|---|---|---|
|
| Stable | The initial state of each node. For information on enrolling a node, see Adding physical machines as bare metal nodes. |
|
| In transition |
The Bare Metal Provisioning service validates that it can manage the node by using the |
|
| Stable |
The node is transitioned to the manageable state when the Bare Metal Provisioning service has verified that it can manage the node. You can transition the node from the
You must move a node to the
Move a node into the |
|
| In transition |
The Bare Metal Provisioning service uses node introspection to update the hardware-derived node properties to reflect the current state of the hardware. The node transitions to |
|
| In transition |
The provision state that indicates that an asynchronous inspection is in progress. If the node inspection is successful, the node transitions to the |
|
| Stable |
The provisioning state that indicates that the node inspection failed. You can transition the node from the
|
|
| In transition |
Nodes in the
|
|
| In transition |
Nodes in the
You can interrupt the cleaning process of a node in the |
|
| Stable |
After nodes have been successfully preconfigured and cleaned, they are moved into the
|
|
| In transition |
Nodes in the
|
|
| In transition |
Nodes in the
You can interrupt the deployment of a node in the |
|
| Stable |
The provisioning state that indicates that the node deployment failed. You can transition the node from the
|
|
| Stable |
Nodes in the
|
|
| In transition |
When a node is in the |
|
| Stable |
If a node deletion is unsuccessful, the node is moved into the
|
|
| In transition |
You can use the |
|
| In transition |
Nodes in the
|
|
| In transition |
Nodes in the
You can interrupt the rescue operation of a node in the |
|
| Stable |
The provisioning state that indicates that the node rescue failed. You can transition the node from the
|
|
| Stable |
Nodes in the
|
|
| In transition |
Nodes in the |
|
| Stable |
The provisioning state that indicates that the node unrescue operation failed. You can transition the node from the
|
4.6. Configuring Redfish virtual media boot
This feature is available in this release as a Technology Preview, and therefore is not fully supported by Red Hat. It should only be used for testing, and should not be deployed in a production environment. For more information about Technology Preview features, see Scope of Coverage Details.
You can use Redfish virtual media boot to supply a boot image to the Baseboard Management Controller (BMC) of a node so that the BMC can insert the image into one of the virtual drives. The node can then boot from the virtual drive into the operating system that exists in the image.
Redfish hardware types support booting deploy, rescue, and user images over virtual media. The Bare Metal Provisioning service (ironic) uses kernel and ramdisk images associated with a node to build bootable ISO images for UEFI or BIOS boot modes at the moment of node deployment. The major advantage of virtual media boot is that you can eliminate the TFTP image transfer phase of PXE and use HTTP GET, or other methods, instead.
4.6.1. Deploying a bare metal server with Redfish virtual media boot
This feature is available in this release as a Technology Preview, and therefore is not fully supported by Red Hat. It should only be used for testing, and should not be deployed in a production environment. For more information about Technology Preview features, see Scope of Coverage Details.
To boot a node with the redfish hardware type over virtual media, set the boot interface to redfish-virtual-media and, for UEFI nodes, define the EFI System Partition (ESP) image. Then configure an enrolled node to use Redfish virtual media boot.
Prerequisites
-
Redfish driver enabled in the
enabled_hardware_typesparameter in theundercloud.conffile. - A bare metal node registered and enrolled.
- IPA and instance images in the Image Service (glance).
- For UEFI nodes, you must also have an EFI system partition image (ESP) available in the Image Service (glance).
- A bare metal flavor.
- A network for cleaning and provisioning.
Sushy library installed:
$ sudo yum install sushy
Procedure
Set the Bare Metal service (ironic) boot interface to
redfish-virtual-media:$ openstack baremetal node set --boot-interface redfish-virtual-media $NODE_NAMEReplace
$NODE_NAMEwith the name of the node.For UEFI nodes, set the boot mode to
uefi:$ openstack baremetal node set --property capabilities="boot_mode:uefi" $NODE_NAMEReplace
$NODE_NAMEwith the name of the node.NoteFor BIOS nodes, do not complete this step.
For UEFI nodes, define the EFI System Partition (ESP) image:
$ openstack baremetal node set --driver-info bootloader=$ESP $NODE_NAMEReplace
$ESPwith the glance image UUID or URL for the ESP image, and replace$NODE_NAMEwith the name of the node.NoteFor BIOS nodes, do not complete this step.
Create a port on the bare metal node and associate the port with the MAC address of the NIC on the bare metal node:
$ openstack baremetal port create --pxe-enabled True --node $UUID $MAC_ADDRESSReplace
$UUIDwith the UUID of the bare metal node, and replace$MAC_ADDRESSwith the MAC address of the NIC on the bare metal node.Create the new bare metal server:
$ openstack server create \
    --flavor baremetal \
    --image $IMAGE \
    --network $NETWORK \
    test_instance
Replace
$IMAGEand$NETWORKwith the names of the image and network that you want to use.
4.7. Using host aggregates to separate physical and virtual machine provisioning
OpenStack Compute uses host aggregates to partition availability zones, and group together nodes that have specific shared properties. When an instance is provisioned, the Compute scheduler compares properties on the flavor with the properties assigned to host aggregates, and ensures that the instance is provisioned in the correct aggregate and on the correct host: either on a physical machine or as a virtual machine.
Complete the steps in this section to perform the following operations:
-
Add the property
baremetalto your flavors and set it to eithertrueorfalse. -
Create separate host aggregates for bare metal hosts and compute nodes with a matching
baremetalproperty. Nodes grouped into an aggregate inherit this property.
Prerequisites
- A successful overcloud deployment that includes the Bare Metal Provisioning service. For more information, see Deploying an overcloud with the Bare Metal Provisioning service.
Procedure
Set the
baremetalproperty totrueon the baremetal flavor.$ openstack flavor set baremetal --property baremetal=trueSet the
baremetalproperty tofalseon the flavors that virtual instances use:$ openstack flavor set FLAVOR_NAME --property baremetal=falseCreate a host aggregate called
baremetal-hosts:$ openstack aggregate create --property baremetal=true baremetal-hostsAdd each Controller node to the
baremetal-hostsaggregate:$ openstack aggregate add host baremetal-hosts HOSTNAMENoteIf you have created a composable role with the
NovaIronicservice, add all the nodes with this service to thebaremetal-hostsaggregate. By default, only the Controller nodes have theNovaIronicservice.Create a host aggregate called
virtual-hosts:$ openstack aggregate create --property baremetal=false virtual-hostsAdd each Compute node to the
virtual-hostsaggregate:$ openstack aggregate add host virtual-hosts HOSTNAMEIf you did not add the following Compute filter scheduler when you deployed the overcloud, add it now to the existing list under
scheduler_default_filtersin the_/etc/nova/nova.conf_file:AggregateInstanceExtraSpecsFilter
Chapter 5. Administering bare metal nodes
After you deploy an overcloud that includes the Bare Metal Provisioning service (ironic), you can provision a physical machine on an enrolled bare metal node and launch bare metal instances in your overcloud.
Prerequisites
- A successful overcloud deployment that includes the Bare Metal Provisioning service. For more information, see Deploying an overcloud with the Bare Metal Provisioning service.
5.1. Launching bare metal instances
You can launch instances either from the command line or from the OpenStack dashboard.
Prerequisites
- A successful overcloud deployment that includes the Bare Metal Provisioning service. For more information, see Deploying an overcloud with the Bare Metal Provisioning service.
5.1.1. Launching instances with the command line interface
You can create a bare-metal instance by using the OpenStack Client CLI.
Prerequisites
- A successful overcloud deployment that includes the Bare Metal Provisioning service. For more information, see Deploying an overcloud with the Bare Metal Provisioning service.
Procedure
Configure the shell to access the Identity service (keystone) as the administrative user:
$ source ~/overcloudrcCreate your bare-metal instance:
$ openstack server create \ --nic net-id=<network_uuid> \ --flavor baremetal \ --image <image_uuid> \ myBareMetalInstance-
Replace
<network_uuid>with the unique identifier for the network that you created to use with the Bare Metal Provisioning service. -
Replace
<image_uuid>with the unique identifier for the image that has the software profile that your instance requires.
-
Replace
Check the status of the instance:
$ openstack server list --name myBareMetalInstance
5.1.2. Launching instances with the dashboard
Use the dashboard graphical user interface to deploy a bare metal instance.
Prerequisites
- A successful overcloud deployment that includes the Bare Metal Provisioning service. For more information, see Deploying an overcloud with the Bare Metal Provisioning service.
Procedure
- Log in to the dashboard at http[s]://DASHBOARD_IP/dashboard.
- Click Project > Compute > Instances
Click Launch Instance.
-
In the Details tab, specify the Instance Name and select
1for Count. -
In the Source tab, select an
Imagefrom Select Boot Source, then click the+(plus) symbol to select an operating system disk image. The image that you choose moves to Allocated. -
In the Flavor tab, select
baremetal. -
In the Networks tab, use the
+(plus) and-(minus) buttons to move required networks from Available to Allocated. Ensure that the shared network that you created for the Bare Metal Provisioning service is selected here. - If you want to assign the instance to a security group, in the Security Groups tab, use the arrow to move the group to Allocated.
-
In the Details tab, specify the Instance Name and select
- Click Launch Instance.
5.2. Configuring port groups in the Bare Metal Provisioning service
Port group functionality for bare metal nodes is available in this release as a Technology Preview, and therefore is not fully supported by Red Hat. It should be used only for testing, and should not be deployed in a production environment. For more information about Technology Preview features, see Scope of Coverage Details.
Port groups (bonds) provide a method to aggregate multiple network interfaces into a single ‘bonded’ interface. Port group configuration always takes precedence over an individual port configuration.
If a port group has a physical network, then all the ports in that port group must have the same physical network. The Bare Metal Provisioning service uses configdrive to support configuration of port groups in the instances.
Bare Metal Provisioning service API version 1.26 supports port group configuration. .Prerequisites
- A successful overcloud deployment that includes the Bare Metal Provisioning service. For more information, see Deploying an overcloud with the Bare Metal Provisioning service.
5.2.1. Configuring port groups on switches manually
To configure port groups in a bare metal deployment, you must configure the port groups on the switches manually. You must ensure that the mode and properties on the switch correspond to the mode and properties on the bare metal side as the naming can vary on the switch.
You cannot use port groups for provisioning and cleaning if you need to boot a deployment using iPXE.
With port group fallback, all the ports in a port group can fallback to individual switch ports when a connection fails. Based on whether a switch supports port group fallback or not, you can use the --support-standalone-ports and --unsupport-standalone-ports options.
Prerequisites
- A successful overcloud deployment that includes the Bare Metal Provisioning service. For more information, see Deploying an overcloud with the Bare Metal Provisioning service.
5.2.2. Configuring port groups in the Bare Metal Provisioning service
Create a port group to aggregate multiple network interfaces into a single bonded interface.
Prerequisites
- A successful overcloud deployment that includes the Bare Metal Provisioning service. For more information, see Deploying an overcloud with the Bare Metal Provisioning service.
Procedure
Create a port group by specifying the node to which it belongs, its name, address, mode, properties and whether it supports fallback to standalone ports.
# openstack baremetal port group create --node NODE_UUID --name NAME --address MAC_ADDRESS --mode MODE --property miimon=100 --property xmit_hash_policy="layer2+3" --support-standalone-portsYou can also use the
openstack baremetal port group setcommand to update a port group.If you do not specify an address, the deployed instance port group address is the same as the OpenStack Networking port. If you do not attach the neutron port, the port group configuration fails.
During interface attachment, port groups have a higher priority than the ports, so they are used first. Currently, it is not possible to specify whether a port group or a port is desired in an interface attachment request. Port groups that do not have any ports are ignored.
NoteYou must configure port groups manually in standalone mode either in the image or by generating the
configdriveand adding it to the node’sinstance_info. Ensure that you havecloud-initversion 0.7.7 or later for the port group configuration to work.Associate a port with a port group:
During port creation:
# openstack baremetal port create --node NODE_UUID --address MAC_ADDRESS --port-group testDuring port update:
# openstack baremetal port set PORT_UUID --port-group PORT_GROUP_UUID
Boot an instance by providing an image that has
cloud-initor supports bonding.To check if the port group is configured properly, run the following command:
# cat /proc/net/bonding/bondXHere,
Xis a number thatcloud-initgenerates automatically for each configured port group, starting with a0and incremented by one for each configured port group.
5.3. Determining the host to IP address mapping
Use the following commands to determine which IP addresses are assigned to which host and bare metal node. With these commands, you can view the host to IP mapping from the undercloud without accessing the hosts directly.
Prerequisites
- A successful overcloud deployment that includes the Bare Metal Provisioning service. For more information, see Deploying an overcloud with the Bare Metal Provisioning service.
Procedure
Run the following command to display the IP address for each host:
(undercloud) [stack@host01 ~]$ openstack stack output show overcloud HostsEntry --max-width 80

+--------------+---------------------------------------------------------------+
| Field        | Value                                                         |
+--------------+---------------------------------------------------------------+
| description  | The content that should be appended to your /etc/hosts if you |
|              | want to get                                                   |
|              | hostname-based access to the deployed nodes (useful for       |
|              | testing without                                               |
|              | setting up a DNS).                                            |
|              |                                                               |
| output_key   | HostsEntry                                                    |
| output_value | 172.17.0.10 overcloud-controller-0.localdomain overcloud-     |
|              | controller-0                                                  |
|              | 10.8.145.18 overcloud-controller-0.external.localdomain       |
|              | overcloud-controller-0.external                               |
|              | 172.17.0.10 overcloud-controller-0.internalapi.localdomain    |
|              | overcloud-controller-0.internalapi                            |
|              | 172.18.0.15 overcloud-controller-0.storage.localdomain        |
|              | overcloud-controller-0.storage                                |
|              | 172.21.2.12 overcloud-controller-0.storagemgmt.localdomain    |
|              | overcloud-controller-0.storagemgmt                            |
|              | 172.16.0.15 overcloud-controller-0.tenant.localdomain         |
|              | overcloud-controller-0.tenant                                 |
|              | 10.8.146.13 overcloud-controller-0.management.localdomain     |
|              | overcloud-controller-0.management                             |
|              | 10.8.146.13 overcloud-controller-0.ctlplane.localdomain       |
|              | overcloud-controller-0.ctlplane                               |
|              |                                                               |
|              | 172.17.0.21 overcloud-compute-0.localdomain overcloud-        |
|              | compute-0                                                     |
|              | 10.8.146.12 overcloud-compute-0.external.localdomain          |
|              | overcloud-compute-0.external                                  |
|              | 172.17.0.21 overcloud-compute-0.internalapi.localdomain       |
|              | overcloud-compute-0.internalapi                               |
|              | 172.18.0.20 overcloud-compute-0.storage.localdomain           |
|              | overcloud-compute-0.storage                                   |
|              | 10.8.146.12 overcloud-compute-0.storagemgmt.localdomain       |
|              | overcloud-compute-0.storagemgmt                               |
|              | 172.16.0.16 overcloud-compute-0.tenant.localdomain overcloud- |
|              | compute-0.tenant                                              |
|              | 10.8.146.12 overcloud-compute-0.management.localdomain        |
|              | overcloud-compute-0.management                                |
|              | 10.8.146.12 overcloud-compute-0.ctlplane.localdomain          |
|              | overcloud-compute-0.ctlplane                                  |
|              |                                                               |
|              |                                                               |
|              |                                                               |
|              |                                                               |
|              | 10.8.145.16  overcloud.localdomain                            |
|              | 10.8.146.7  overcloud.ctlplane.localdomain                    |
|              | 172.17.0.19  overcloud.internalapi.localdomain                |
|              | 172.18.0.19  overcloud.storage.localdomain                    |
|              | 172.21.2.16  overcloud.storagemgmt.localdomain                |
+--------------+---------------------------------------------------------------+
To filter a particular host, run the following command:
(undercloud) [stack@host01 ~]$ openstack stack output show overcloud HostsEntry -c output_value -f value | grep overcloud-controller-0

172.17.0.12 overcloud-controller-0.localdomain overcloud-controller-0
10.8.145.18 overcloud-controller-0.external.localdomain overcloud-controller-0.external
172.17.0.12 overcloud-controller-0.internalapi.localdomain overcloud-controller-0.internalapi
172.18.0.12 overcloud-controller-0.storage.localdomain overcloud-controller-0.storage
172.21.2.13 overcloud-controller-0.storagemgmt.localdomain overcloud-controller-0.storagemgmt
172.16.0.19 overcloud-controller-0.tenant.localdomain overcloud-controller-0.tenant
10.8.146.13 overcloud-controller-0.management.localdomain overcloud-controller-0.management
10.8.146.13 overcloud-controller-0.ctlplane.localdomain overcloud-controller-0.ctlplane
To map the hosts to bare metal nodes, run the following command:
(undercloud) [stack@host01 ~]$ openstack baremetal node list --fields uuid name instance_info -f json
[
  {
    "UUID": "c0d2568e-1825-4d34-96ec-f08bbf0ba7ae",
    "Instance Info": {
      "root_gb": "40",
      "display_name": "overcloud-compute-0",
      "image_source": "24a33990-e65a-4235-9620-9243bcff67a2",
      "capabilities": "{\"boot_option\": \"local\"}",
      "memory_mb": "4096",
      "vcpus": "1",
      "local_gb": "557",
      "configdrive": "******",
      "swap_mb": "0",
      "nova_host_id": "host01.lab.local"
    },
    "Name": "host2"
  },
  {
    "UUID": "8c3faec8-bc05-401c-8956-99c40cdea97d",
    "Instance Info": {
      "root_gb": "40",
      "display_name": "overcloud-controller-0",
      "image_source": "24a33990-e65a-4235-9620-9243bcff67a2",
      "capabilities": "{\"boot_option\": \"local\"}",
      "memory_mb": "4096",
      "vcpus": "1",
      "local_gb": "557",
      "configdrive": "******",
      "swap_mb": "0",
      "nova_host_id": "host01.lab.local"
    },
    "Name": "host3"
  }
]
5.4. Attaching and detaching virtual network interfaces
The Bare Metal Provisioning service has an API that you can use to manage the mapping between virtual network interfaces. For example, the interfaces in the OpenStack Networking service and your physical interfaces (NICs). You can configure these interfaces for each Bare Metal Provisioning node to set the virtual network interface (VIF) to physical network interface (PIF) mapping logic. To configure the interfaces, use the openstack baremetal node vif* commands.
Prerequisites
- A successful overcloud deployment that includes the Bare Metal Provisioning service. For more information, see Deploying an overcloud with the Bare Metal Provisioning service.
Procedure
List the VIF IDs currently connected to the bare metal node:
$ openstack baremetal node vif list baremetal-0
+--------------------------------------+
| ID                                   |
+--------------------------------------+
| 4475bc5a-6f6e-466d-bcb6-6c2dce0fba16 |
+--------------------------------------+
After the VIF is attached, the Bare Metal Provisioning service updates the virtual port in the OpenStack Networking service with the actual MAC address of the physical port. Check this port address:
$ openstack port show 4475bc5a-6f6e-466d-bcb6-6c2dce0fba16 -c mac_address -c fixed_ips
+-------------+-----------------------------------------------------------------------------+
| Field       | Value                                                                       |
+-------------+-----------------------------------------------------------------------------+
| fixed_ips   | ip_address='192.168.24.9', subnet_id='1d11c677-5946-4733-87c3-23a9e06077aa' |
| mac_address | 00:2d:28:2f:8d:95                                                           |
+-------------+-----------------------------------------------------------------------------+
Create a new port on the network where you created the
baremetal-0node:$ openstack port create --network baremetal --fixed-ip ip-address=192.168.24.24 baremetal-0-extraRemove a port from the instance:
$ openstack server remove port overcloud-baremetal-0 4475bc5a-6f6e-466d-bcb6-6c2dce0fba16Check that the IP address no longer exists on the list:
$ openstack server listCheck if there are VIFs attached to the node:
$ openstack baremetal node vif list baremetal-0
$ openstack port list
Add the newly created port:
$ openstack server add port overcloud-baremetal-0 baremetal-0-extraVerify that the new IP address shows the new port:
$ openstack server list
+--------------------------------------+-------------------------+--------+------------------------+------------------------------+---------+
| ID                                   | Name                    | Status | Networks               | Image                        | Flavor  |
+--------------------------------------+-------------------------+--------+------------------------+------------------------------+---------+
| 53095a64-1646-4dd1-bbf3-b51cbcc38789 | overcloud-controller-2  | ACTIVE | ctlplane=192.168.24.7  | overcloud-hardened-uefi-full | control |
| 3a1bc89c-5d0d-44c7-a569-f2a3b4c73d65 | overcloud-controller-0  | ACTIVE | ctlplane=192.168.24.8  | overcloud-hardened-uefi-full | control |
| 6b01531a-f55d-40e9-b3a2-6d02be0b915b | overcloud-controller-1  | ACTIVE | ctlplane=192.168.24.16 | overcloud-hardened-uefi-full | control |
| c61cc52b-cc48-4903-a971-073c60f53091 | overcloud-novacompute-0overcloud-baremetal-0 | ACTIVE | ctlplane=192.168.24.24 | overcloud-hardened-uefi-full | compute |
+--------------------------------------+-------------------------+--------+------------------------+------------------------------+---------+
Check if the VIF ID is the UUID of the new port:
$ openstack baremetal node vif list baremetal-0
+--------------------------------------+
| ID                                   |
+--------------------------------------+
| 6181c089-7e33-4f1c-b8fe-2523ff431ffc |
+--------------------------------------+
Check if the OpenStack Networking port MAC address is updated and matches one of the Bare Metal Provisioning service ports:
$ openstack port show 6181c089-7e33-4f1c-b8fe-2523ff431ffc -c mac_address -c fixed_ips
+-------------+------------------------------------------------------------------------------+
| Field       | Value                                                                        |
+-------------+------------------------------------------------------------------------------+
| fixed_ips   | ip_address='192.168.24.24', subnet_id='1d11c677-5946-4733-87c3-23a9e06077aa' |
| mac_address | 00:2d:28:2f:8d:95                                                            |
+-------------+------------------------------------------------------------------------------+
Reboot the bare metal node so that it recognizes the new IP address:
$ openstack server reboot overcloud-baremetal-0After you detach or attach interfaces, the bare metal OS removes, adds, or modifies the network interfaces that have changed. When you replace a port, a DHCP request obtains the new IP address, but this might take some time because the old DHCP lease is still valid. To initiate these changes immediately, reboot the bare metal host.
5.5. Configuring notifications for the Bare Metal Provisioning service
You can configure the Bare Metal Provisioning service (ironic) to display notifications for different events that occur within the service. External services can use these notifications for billing purposes, monitoring a data store, and other purposes. To enable notifications for the Bare Metal Provisioning service, you must set the following options in your ironic.conf configuration file.
Prerequisites
- A successful overcloud deployment that includes the Bare Metal Provisioning service. For more information, see Deploying an overcloud with the Bare Metal Provisioning service.
Procedure
-
The
notification_leveloption in the[DEFAULT]section determines the minimum priority level for which notifications are sent. You can set the values for this option todebug,info,warning,error, orcritical. If the option is set towarning, all notifications with priority levelwarning,error, orcriticalare sent, but not notifications with priority leveldebugorinfo. If this option is not set, no notifications are sent. The priority level of each available notification is documented below. -
The
transport_urloption in the[oslo_messaging_notifications]section determines the message bus used when sending notifications. If this is not set, the default transport used for RPC is used.
All notifications are emitted on the ironic_versioned_notifications topic in the message bus. Generally, each type of message that traverses the message bus is associated with a topic that describes the contents of the message.
5.6. Configuring automatic power fault recovery
The Bare Metal Provisioning service (ironic) has a string field fault that records power, cleaning, and rescue abort failures for nodes.
| Fault | Description |
|---|---|
| power failure | The node is in maintenance mode due to power sync failures that exceed the maximum number of retries. |
| clean failure | The node is in maintenance mode due to the failure of a cleaning operation. |
| rescue abort failure | The node is in maintenance mode due to the failure of a cleaning operation during rescue abort. |
| none | There is no fault present. |
Conductor checks the value of this field periodically. If the conductor detects a power failure state and can successfully restore power to the node, the node is removed from maintenance mode and restored to operation.
If the operator places a node in maintenance mode manually, the conductor does not automatically remove the node from maintenance mode.
The default interval is 300 seconds, however, you can configure this interval with director using hieradata.
Prerequisites
- A successful overcloud deployment that includes the Bare Metal Provisioning service. For more information, see Deploying an overcloud with the Bare Metal Provisioning service.
Procedure
Include the following hieradata to configure a custom recovery interval:
ironic::conductor::power_failure_recovery_intervalTo disable automatic power fault recovery, set the value to
0.
5.7. Introspecting overcloud nodes
Perform introspection of overcloud nodes to identify and store the specification of your nodes in director.
Procedure
-
Log in to the undercloud host as the
stackuser. Source the
overcloudrccredentials file:$ source ~/overcloudrcRun the introspection command:
$ openstack baremetal introspection start [--wait] <NODENAME>Replace <NODENAME> with the name or UUID of the node that you want to inspect.
Check the introspection status:
$ openstack baremetal introspection status <NODENAME>Replace <NODENAME> with the name or UUID of the node.
Next steps
Extract introspection data:
$ openstack baremetal introspection data save <NODE-UUID>Replace <NODENAME> with the name or UUID of the node.
Chapter 6. Booting from cinder volumes
You can create volumes in the Block Storage service (cinder) and connect these volumes to bare metal instances that you create with the Bare Metal Provisioning service (ironic).
6.1. Cinder volume boot for bare metal nodes
You can boot bare metal nodes from a block storage device that is stored in OpenStack Block Storage (cinder). OpenStack Bare Metal (ironic) connects bare metal nodes to volumes through an iSCSI interface.
Ironic enables this feature during the overcloud deployment. However, consider the following conditions before you deploy the overcloud:
-
The overcloud requires the cinder iSCSI backend to be enabled. Set the
CinderEnableIscsiBackendheat parameter totrueduring overcloud deployment. - You cannot use the cinder volume boot feature with a Red Hat Ceph Storage backend.
-
You must set the
rd.iscsi.firmware=1kernel parameter on the boot disk.
6.2. Configuring nodes for cinder volume boot
You must configure certain options for each bare metal node to successfully boot from a cinder volume.
Procedure
Source the overcloud credentials file:
$ source ~/<credentials_file>-
Replace
<credentials_file>with the name of your credentials file, for example,overcloudrc.
-
Replace
Set the
iscsi_bootcapability totrueand thestorage-interfacetocinderfor the selected node:$ openstack baremetal node set --property capabilities=iscsi_boot:true --storage-interface cinder <NODEID>Replace
<NODEID>with the ID of the chosen node.Create an iSCSI connector for the node:
$ openstack baremetal volume connector create --node <NODEID> --type iqn --connector-id iqn.2010-10.org.openstack.node<NUM>The connector ID for each node must be unique. In this example, the connector is
iqn.2010-10.org.openstack.node<NUM>where<NUM>is an incremented number for each node.
6.3. Configuring iSCSI kernel parameters on the boot disk
You must enable the iSCSI booting in the kernel on the image. To accomplish this, mount the QCOW2 image and enable iSCSI components on the image.
Prerequisites
Download a Red Hat Enterprise Linux QCOW2 image and copy it to the
/home/stack/directory on the undercloud. You can download Red Hat Enterprise Linux KVM images in QCOW2 format from the following pages:
Procedure
-
Log in to the undercloud as the
stackuser. Mount the QCOW2 image and access it as the
rootuser:Load the
nbdkernel module:$ sudo modprobe nbdConnect the QCOW image as
/dev/nbd0:$ sudo qemu-nbd --connect=/dev/nbd0 <IMAGE>Check the partitions on the NBD:
$ sudo fdisk /dev/nbd0 -lNew Red Hat Enterprise Linux QCOW2 images contain only one partition, which is usually named
/dev/nbd0p1on the NBD.Create a mount point for the image:
mkdir /tmp/mountpointMount the image:
sudo mount /dev/nbd0p1 /tmp/mountpoint/Mount your
devdirectory so that the image has access to device information on the host:sudo mount -o bind /dev /tmp/mountpoint/devChange the root directory to the mount point:
sudo chroot /tmp/mountpoint /bin/bash
Configure iSCSI on the image:
NoteSome commands in this step might report the following error:
lscpu: cannot open /proc/cpuinfo: No such file or directoryThis error is not critical and you can ignore the error.
Move the
resolv.conffile to a temporary location:# mv /etc/resolv.conf /etc/resolv.conf.bakCreate a temporary
resolv.conffile to resolve DNS requests for the Red Hat Content Delivery Network. This example uses8.8.8.8for the nameserver:# echo "nameserver 8.8.8.8" > /etc/resolv.confRegister the mounted image to the Red Hat Content Delivery Network:
# subscription-manager registerEnter your user name and password when the command prompts you.
Attach a subscription that contains Red Hat Enterprise Linux:
# subscription-manager list --all --available
# subscription-manager attach --pool <POOLID>
Substitute
<POOLID>with the pool ID of the subscription.Disable the default repositories:
# subscription-manager repos --disable "*"Enable the Red Hat Enterprise Linux repository:
Red Hat Enterprise Linux 7:
# subscription-manager repos --enable "rhel-7-server-rpms"Red Hat Enterprise Linux 8:
# subscription-manager repos --enable "rhel-8-for-x86_64-baseos-eus-rpms"
Install the
iscsi-initiator-utilspackage:# yum install -y iscsi-initiator-utilsUnregister the mounted image:
# subscription-manager unregisterRestore the original
resolv.conffile:# mv /etc/resolv.conf.bak /etc/resolv.confCheck the kernel version on the mounted image:
# rpm -qa kernelFor example, if the output is
kernel-3.10.0-1062.el7.x86_64, the kernel version is3.10.0-1062.el7.x86_64. Note this kernel version for the next step.NoteNew Red Hat Enterprise Linux QCOW2 images have only one kernel version installed. If more than one kernel version is installed, use the latest one.
Add the
networkandiscsidracut modules to the initramfs image:# dracut --force --add "network iscsi" /boot/initramfs-<KERNELVERSION>.img <KERNELVERSION>Replace
<KERNELVERSION>with the version number that you obtained fromrpm -qa kernel. The following example uses3.10.0-1062.el7.x86_64as the kernel version:# dracut --force --add "network iscsi" /boot/initramfs-3.10.0-1062.el7.x86_64.img 3.10.0-1062.el7.x86_64Exit from the mounted image back to your host operating system:
# exit
Unmount the image:
Unmount the
devdirectory from the temporary mount point:$ sudo umount /tmp/mountpoint/devUnmount the image from the mount point:
$ sudo umount /tmp/mountpointDisconnect the QCOW2 image from
/dev/nbd0/:$ sudo qemu-nbd --disconnect /dev/nbd0
Rebuild the
grubmenu configuration on the image:Install the
libguestfs-toolspackage:$ sudo yum -y install libguestfs-toolsImportantIf you install the
libguestfs-toolspackage on the undercloud, disableiscsid.socketto avoid port conflicts with thetripleo_iscsidservice on the undercloud:$ sudo systemctl disable --now iscsid.socketSet the
libguestfsbackend to use QEMU directly:$ export LIBGUESTFS_BACKEND=directUpdate the grub configuration on the image:
$ guestfish -a /tmp/images/{{ dib_image }} -m /dev/sda3 sh "mount /dev/sda2 /boot/efi && rm /boot/grub2/grubenv && /sbin/grub2-mkconfig -o /boot/grub2/grub.cfg && cp /boot/grub2/grub.cfg /boot/efi/EFI/redhat/grub.cfg && grubby --update-kernel=ALL --args=\"rd.iscsi.firmware=1\" && cp /boot/grub2/grubenv /boot/efi/EFI/redhat/grubenv && echo Success"
6.4. Creating and using a boot volume in cinder
You must upload the iSCSI-enabled image to OpenStack Image Storage (glance) and create the boot volume in OpenStack Block Storage (cinder).
Procedure
-
Log in to the undercloud as the
stackuser. Upload the iSCSI-enabled image to glance:
$ openstack image create --disk-format qcow2 --container-format bare --file rhel-server-7.7-x86_64-kvm.qcow2 rhel-server-7.7-iscsiCreate a volume from the image:
$ openstack volume create --size 10 --image rhel-server-7.7-iscsi --bootable rhel-test-volumeCreate a bare metal instance that uses the boot volume in cinder:
$ openstack server create --flavor baremetal --volume rhel-test-volume --key default rhel-test
Chapter 7. Troubleshooting the Bare Metal Provisioning service
Diagnose issues in an environment that includes the Bare Metal Provisioning service (ironic).
7.1. PXE boot errors
Use the following troubleshooting procedures to assess and remedy issues you might encounter with PXE boot.
Permission Denied errors
If the console of your bare metal node returns a Permission Denied error, ensure that you have applied the appropriate SELinux context to the /httpboot and /tftpboot directories:
# semanage fcontext -a -t httpd_sys_content_t "/httpboot(/.*)?"
# restorecon -r -v /httpboot
# semanage fcontext -a -t tftpdir_t "/tftpboot(/.*)?"
# restorecon -r -v /tftpboot
Boot process freezes at /pxelinux.cfg/XX-XX-XX-XX-XX-XX
On the console of your node, if it looks like you receive an IP address but then the process stops, you might be using the wrong PXE boot template in your ironic.conf file.
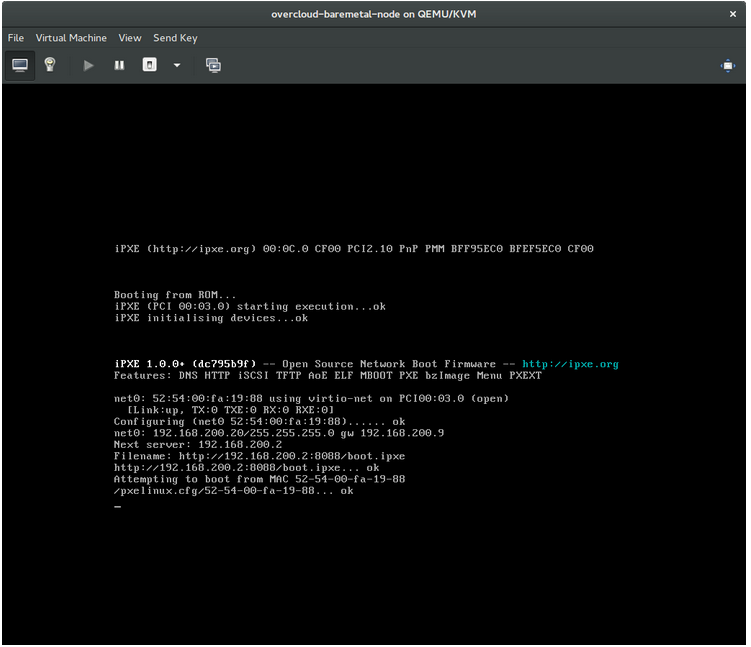
$ grep ^pxe_config_template ironic.conf
pxe_config_template=$pybasedir/drivers/modules/ipxe_config.template
The default template is pxe_config.template, so it is easy to omit the i and inadvertently enter ipxe_config.template instead.
7.2. Login errors after the bare metal node boots
Failure to log in to the node when you use the root password that you set during configuration indicates that you are not booted into the deployed image. You might be logged in to the deploy-kernel/deploy-ramdisk image and the system has not yet loaded the correct image.
To fix this issue, verify that the PXE Boot Configuration file in the /httpboot/pxelinux.cfg/MAC_ADDRESS on the Compute or Bare Metal Provisioning service node and ensure that all the IP addresses listed in this file correspond to IP addresses on the Bare Metal network.
The only network that the Bare Metal Provisioning service node uses is the Bare Metal network. If one of the endpoints is not on the network, the endpoint cannot reach the Bare Metal Provisioning service node as a part of the boot process.
For example, the kernel line in your file is as follows:
kernel http://192.168.200.2:8088/5a6cdbe3-2c90-4a90-b3c6-85b449b30512/deploy_kernel selinux=0 disk=cciss/c0d0,sda,hda,vda iscsi_target_iqn=iqn.2008-10.org.openstack:5a6cdbe3-2c90-4a90-b3c6-85b449b30512 deployment_id=5a6cdbe3-2c90-4a90-b3c6-85b449b30512 deployment_key=VWDYDVVEFCQJNOSTO9R67HKUXUGP77CK ironic_api_url=http://192.168.200.2:6385 troubleshoot=0 text nofb nomodeset vga=normal boot_option=netboot ip=${ip}:${next-server}:${gateway}:${netmask} BOOTIF=${mac} ipa-api-url=http://192.168.200.2:6385 ipa-driver-name=ipmi boot_mode=bios initrd=deploy_ramdisk coreos.configdrive=0 || goto deployValue in the above example kernel line | Corresponding information |
|---|---|
| http://192.168.200.2:8088 |
Parameter |
| 5a6cdbe3-2c90-4a90-b3c6-85b449b30512 |
UUID of the baremetal node in |
| deploy_kernel |
This is the deploy kernel image in the Image service that is copied down as |
| http://192.168.200.2:6385 |
Parameter |
| ipmi | The IPMI Driver in use by the Bare Metal Provisioning service for this node. |
| deploy_ramdisk |
This is the deploy ramdisk image in the Image service that is copied down as |
If a value does not correspond between the /httpboot/pxelinux.cfg/MAC_ADDRESS and the ironic.conf file:
-
Update the value in the
ironic.conffile - Restart the Bare Metal Provisioning service
- Re-deploy the Bare Metal instance
7.3. Boot-to-disk errors on deployed nodes
With certain hardware, you might experience a problem with deployed nodes where the nodes cannot boot from disk during successive boot operations as part of a deployment. This usually happens because the BMC does not honor the persistent boot settings that director requests on the nodes. Instead, the nodes boot from a PXE target.
In this case, you must update the boot order in the BIOS of the nodes. Set the HDD to be the first boot device, and then PXE as a later option, so that the nodes boot from disk by default, but can boot from the network during introspection or deployment as necessary.
This error mostly applies to nodes that use LegacyBIOS firmware.
7.4. The Bare Metal Provisioning service does not receive the correct host name
If the Bare Metal Provisioning service does not receive the right host name, it means that cloud-init is failing. To fix this, connect the Bare Metal subnet to a router in the OpenStack Networking service. This configuration routes requests to the meta-data agent correctly.
7.5. Invalid OpenStack Identity service credentials when executing Bare Metal Provisioning service commands
If you cannot authenticate to the Identity service, check the identity_uri parameter in the ironic.conf file and ensure that you remove the /v2.0 from the keystone AdminURL. For example, set the identity_uri to http://IP:PORT.
7.6. Hardware enrolment
Incorrect node registration details can cause issues with enrolled hardware. Ensure that you enter property names and values correctly. When you input property names incorrectly, the system adds the properties to the node details but ignores them.
Use the openstack baremetal node set command to update node details. For example, update the amount of memory that the node is registered to use to 2 GB:
$ openstack baremetal node set --property memory_mb=2048 NODE_UUID7.7. Troubleshooting iDRAC issues
- Redfish management interface fails to set boot device
When you use the
idrac-redfishmanagement interface with certain iDRAC firmware versions and attempt to set the boot device on a bare metal server with UEFI boot, iDRAC returns the following error:Unable to Process the request because the value entered for the parameter Continuous is not supported by the implementation.If you encounter this issue, set the
force_persistent_boot_deviceparameter in thedriver-infoon the node toNever:openstack baremetal node set --driver-info force_persistent_boot_device=Never ${node_uuid}- Timeout when powering off
Some servers can be too slow when powering off, and time out. The default retry count is
6, which results in a 30 second timeout. To increase the timeout duration to 90 seconds, set theironic::agent::rpc_response_timeoutvalue to18in the undercloud hieradata overrides file and re-run theopenstack undercloud installcommand:ironic::agent::rpc_response_timeout: 18- Vendor passthrough timeout
When iDRAC is not available to execute vendor passthrough commands, these commands take too long and time out:
openstack baremetal node passthru call --http-method GET \
aed58dca-1b25-409a-a32f-3a817d59e1e0 list_unfinished_jobs
Timed out waiting for a reply to message ID 547ce7995342418c99ef1ea4a0054572 (HTTP 500)
To increase the timeout duration for messaging, increase the value of the
ironic::default::rpc_response_timeoutparameter in the undercloud hieradata overrides file and re-run theopenstack undercloud installcommand:ironic::default::rpc_response_timeout: 600
7.8. Configuring the server console
Console output from overcloud nodes is not always sent to the server console. If you want to view this output in the server console, you must configure the overcloud to use the correct console for your hardware. Use one of the following methods to perform this configuration:
-
Modify the
KernelArgsheat parameter for each overcloud role. -
Customize the
overcloud-hardened-uefi-full.qcow2image that director uses to provision the overcloud nodes.
Prerequisites
- A successful undercloud installation. For more information, see the Director Installation and Usage guide.
- Overcloud nodes ready for deployment.
Modifying KernelArgs with heat during deployment
-
Log in to the undercloud host as the
stackuser. Source the
stackrccredentials file:$ source stackrcCreate an environment file
overcloud-console.yamlwith the following content:parameter_defaults: <role>Parameters: KernelArgs: "console=<console-name>"Replace
<role>with the name of the overcloud role that you want to configure, and replace<console-name>with the ID of the console that you want to use. For example, use the following snippet to configure all overcloud nodes in the default roles to usetty0:parameter_defaults: ControllerParameters: KernelArgs: "console=tty0" ComputeParameters: KernelArgs: "console=tty0" BlockStorageParameters: KernelArgs: "console=tty0" ObjectStorageParameters: KernelArgs: "console=tty0" CephStorageParameters: KernelArgs: "console=tty0"-
Include the
overcloud-console-tty0.yamlfile in your deployment command with the-eoption.
Modifying the overcloud-hardened-uefi-full.qcow2 image
-
Log in to the undercloud host as the
stackuser. Source the
stackrccredentials file:$ source stackrcModify the kernel arguments in the
overcloud-hardened-uefi-full.qcow2image to set the correct console for your hardware. For example, set the console totty1:$ virt-customize --selinux-relabel -a overcloud-hardened-uefi-full.qcow2 --run-command 'grubby --update-kernel=ALL --args="console=tty1"'Import the image into director:
$ openstack overcloud image upload --image-path overcloud-hardened-uefi-full.qcow2- Deploy the overcloud.
Verification
Log in to an overcloud node from the undercloud:
$ ssh tripleo-admin@<IP-address>Replace
<IP-address>with the IP address of an overcloud node.Inspect the contents of the
/proc/cmdlinefile and ensure thatconsole=parameter is set to the value of the console that you want to use:[tripleo-admin@controller-0 ~]$ cat /proc/cmdline BOOT_IMAGE=(hd0,msdos2)/boot/vmlinuz-4.18.0-193.29.1.el8_2.x86_64 root=UUID=0ec3dea5-f293-4729-b676-5d38a611ce81 ro console=tty0 console=ttyS0,115200n81 no_timer_check crashkernel=auto rhgb quiet
Chapter 8. Bare metal drivers
You can configure bare metal nodes to use one of the drivers that are enabled in the Bare Metal Provisioning service. Each driver includes a provisioning method and a power management type. Some drivers require additional configuration. Each driver described in this section uses PXE for provisioning. Drivers are listed by their power management type.
You can add drivers by configuring the IronicEnabledHardwareTypes parameter in your ironic.yaml file. By default, ipmi and redfish are enabled.
For the full list of supported plug-ins and drivers, see Component, Plug-In, and Driver Support in Red Hat OpenStack Platform.
8.1. Intelligent Platform Management Interface (IPMI) power management driver
IPMI is an interface that provides out-of-band remote management features, including power management and server monitoring. To use this power management type, all Bare Metal Provisioning service nodes require an IPMI that is connected to the shared Bare Metal network. IPMI power manager driver uses the ipmitool utility to remotely manage hardware. You can use the following driver_info properties to configure the IPMI power manager driver for a node:
| Property | Description | Equivalent ipmitool option |
|---|---|---|
|
| (Mandatory) The IP address or hostname of the node. |
|
|
| The IPMI user name. |
|
|
|
The IPMI password. The password is written to a temporary file. You pass the filename to the |
|
|
| The hexadecimal Kg key for IPMIv2 authentication. |
|
|
| The remote IPMI RMCP port. |
|
|
| IPMI privilege level. Set to one of the following valid values:
|
|
|
| The version of the IPMI protocol. Set to one of the following valid values:
|
|
|
| The type of bridging. Use with nested chassis management controllers (CMCs). Set to one of the following valid values:
| n/a |
|
|
Destination channel for a bridged request. Required only if |
|
|
|
Destination address for a bridged request. Required only if |
|
|
|
Transit channel for a bridged request. Required only if |
|
|
|
Transit address for bridged request. Required only if |
|
|
|
Local IPMB address for bridged requests. Use only if |
|
|
|
Set to | n/a |
|
|
Set to | n/a |
|
| The IPMI cipher suite version to use on the node. Set to one of the following valid values:
| n/a |
8.2. Redfish
A standard RESTful API for IT infrastructure developed by the Distributed Management Task Force (DMTF). You can use the following driver_info properties to configure the Bare Metal Provisioning serive (ironic) connection to Redfish:
| Property | Description |
|---|---|
|
|
(Mandatory) The IP address of the Redfish controller. The address must include the authority portion of the URL. If you do not include the scheme it defaults to |
|
|
The canonical path to the system resource the Redfish driver interacts with. The path must include the root service, version, and the unique path to the system within the same authority as the |
|
| The Redfish username. |
|
| The Redfish password. |
|
|
Either a Boolean value, a path to a CA_BUNDLE file, or a directory with certificates of trusted CAs. If you set this value to |
|
| The Redfish HTTP client authentication method. Set to one of the following valid values:
|
8.3. Dell Remote Access Controller (DRAC)
DRAC is an interface that provides out-of-band remote management features, including power management and server monitoring. To use this power management type, all Bare Metal Provisioning service nodes require a DRAC that is connected to the shared Bare Metal Provisioning network. Enable the idrac driver, and set the following information in the driver_info of the node:
-
drac_address- The IP address of the DRAC NIC. -
drac_username- The DRAC user name. -
drac_password- The DRAC password. -
Optional:
drac_port- The port to use for the WS-Management endpoint. The default is port443. -
Optional:
drac_path- The path to use for the WS-Management endpoint. The default path is/wsman. -
Optional:
drac_protocol- The protocol to use for the WS-Management endpoint. Valid values:http,https. The default protocol ishttps.
8.4. Integrated Remote Management Controller (iRMC)
iRMC from Fujitsu is an interface that provides out-of-band remote management features including power management and server monitoring. To use this power management type on a Bare Metal Provisioning service node, the node requires an iRMC interface that is connected to the shared Bare Metal network. Enable the irmc driver, and set the following information in the driver_info of the node:
-
irmc_address- The IP address of the iRMC interface NIC. -
irmc_username- The iRMC user name. -
irmc_password- The iRMC password.
To use IPMI to set the boot mode or SCCI to get sensor data, you must complete the following additional steps:
Enable the sensor method in the
ironic.conffile:$ openstack-config --set /etc/ironic/ironic.conf \ irmc sensor_method METHODReplace METHOD with
sccioripmitool.If you enabled SCCI, install the
python-scciclientpackage:# dnf install python-scciclientRestart the Bare Metal conductor service:
# systemctl restart openstack-ironic-conductor.service
To use the iRMC driver, iRMC S4 or higher is required.
8.5. Integrated Lights-Out (iLO)
iLO from Hewlett-Packard is an interface that provides out-of-band remote management features including power management and server monitoring. To use this power management type, all Bare Metal nodes require an iLO interface that is connected to the shared Bare Metal network. Enable the ilo driver, and set the following information in the driver_info of the node:
-
ilo_address- The IP address of the iLO interface NIC. -
ilo_username- The iLO user name. -
ilo_password- The iLO password.
You must also install the python-proliantutils package and restart the Bare Metal conductor service:
# dnf install python-proliantutils
# systemctl restart openstack-ironic-conductor.service