Deploying Red Hat Ceph Storage and Red Hat OpenStack Platform together with director
Configuring the director to deploy and use a Red Hat Ceph Storage cluster
Abstract
Providing feedback on Red Hat documentation
We appreciate your input on our documentation. Tell us how we can make it better.
Using the Direct Documentation Feedback (DDF) function
Use the Add Feedback DDF function for direct comments on specific sentences, paragraphs, or code blocks.
- View the documentation in the Multi-page HTML format.
- Ensure that you see the Feedback button in the upper right corner of the document.
- Highlight the part of text that you want to comment on.
- Click Add Feedback.
- Complete the Add Feedback field with your comments.
- Optional: Add your email address so that the documentation team can contact you for clarification on your issue.
- Click Submit.
Chapter 1. Deploying an overcloud and Red Hat Ceph Storage
Red Hat OpenStack Platform (RHOSP) director deploys the cloud environment, also known as the overcloud, and Red Hat Ceph Storage. Director uses Ansible playbooks provided through the tripleo-ansible package to deploy the Ceph Storage cluster. The director also manages the configuration and scaling operations of the Ceph Storage cluster.
For more information about Red Hat Ceph Storage, see Red Hat Ceph Storage Architecture Guide.
For more information about services in the Red Hat OpenStack Platform, see Configuring a basic overcloud with the CLI tools in Director Installation and Usage.
1.1. Red Hat Ceph Storage clusters
Red Hat Ceph Storage is a distributed data object store designed for performance, reliability, and scalability. Distributed object stores use unstructured data to simultaneously service modern and legacy object interfaces.
Ceph Storage is deployed as a cluster. A Ceph Storage cluster consists of two primary types of daemons:
- Ceph Object Storage Daemon (CephOSD) - The CephOSD performs data storage, data replication, rebalancing, recovery, monitoring, and reporting tasks.
- Ceph Monitor (CephMon) - The CephMon maintains the primary copy of the cluster map with the current state of the cluster.
For more information about Red Hat Ceph Storage, see the Red Hat Ceph Storage Architecture Guide.
1.2. Red Hat Ceph Storage node requirements
There are additional node requirements using director to create a Ceph Storage cluster:
- Hardware requirements including processor, memory, and network interface card selection and disk layout are available in the Red Hat Ceph Storage Hardware Guide.
- Each Ceph Storage node requires a supported power management interface, such as Intelligent Platform Management Interface (IPMI) functionality, on the motherboard of the server.
-
Each Ceph Storage node must have at least two disks. RHOSP director uses
cephadmto deploy the Ceph Storage cluster. The cephadm functionality does not support installing Ceph OSD on the root disk of the node.
1.3. Ceph Storage nodes and RHEL compatibility
RHOSP 17.0 is supported on RHEL 9.0. However, hosts that are mapped to the Ceph Storage role update to the latest major RHEL release. Before upgrading, review the Red Hat Knowledgebase article Red Hat Ceph Storage: Supported configurations.
1.4. Deploying Red Hat Ceph Storage
You deploy Red Hat Ceph Storage in two phases:
- Create the Red Hat Ceph Storage cluster before deploying the overcloud.
- Configure the Red Hat Ceph Storage cluster during overcloud deployment.
A Ceph Storage cluster is created ready to serve the Ceph RADOS Block Device (RBD) service. Additionally, the following services are running on the appropriate nodes:
- Ceph Monitor (CephMon)
- Ceph Manager (CephMgr)
- Ceph OSD (CephOSD)
Pools and cephx keys are created during the configuration phase.
The following Ceph Storage components are not available until after the configuration phase:
- Ceph Dashboard (CephDashboard)
- Ceph Object Gateway (CephRGW)
- Ceph MDS (CephMds)
Red Hat Ceph Storage cluster configuration finalizes during overcloud deployment. Daemons and services such as Ceph Object Gateway and Ceph Dashboard deploy according to the overcloud definition. Red Hat OpenStack Platform (RHOSP) services are configured as Ceph Storage cluster clients.
1.5. Red Hat Ceph Storage deployment requirements
Provisioning of network resources and bare metal instances is required before Ceph Storage cluster creation. Configure the following before creating a Red Hat Ceph Storage cluster:
-
Provision networks with the
openstack overcloud network provisioncommand and thecli-overcloud-network-provision.yamlansible playbook. -
Provision bare metal instances with the
openstack overcloud node provisioncommand to provision bare metal instances using thecli-overcloud-node-provision.yamlansible playbook.
For more information about these tasks, see:
The following elements must be present in the overcloud environment to finalize the Ceph Storage cluster configuration:
- Red Hat OpenStack Platform director installed on an undercloud host. See Installing director in Director Installation and Usage.
- Installation of recommended hardware to support Red Hat Ceph Storage. For more information about recommended hardware, see the Red Hat Ceph Storage Hardware Guide.
1.6. Post deployment verification
Director deploys a Ceph Storage cluster ready to serve Ceph RADOS Block Device (RBD) using tripleo-ansible roles executed by the cephadm command.
Verify the following are in place after cephadm completes Ceph Storage deployment:
-
SSH access to a CephMon service node to use the
sudo cephadm shellcommand. All OSDs operational.
NoteCheck inoperative OSDs for environmental issues like uncleaned disks.
-
A Ceph configuration file and client administration keyring file in the
/etc/cephdirectory of CephMon service nodes. - The Ceph Storage cluster is ready to serve RBD.
Pools, cephx keys, CephDashboard, and CephRGW are configured during overcloud deployment by the openstack overcloud deploy command. This is for two reasons:
-
The Dashboard and RGW services must integrate with
haproxy. This is deployed with the overcloud. - The creation of pools and cephx keys are dependent on which OpenStack clients are deployed.
These resources are created in the Ceph Storage cluster using the client administration keyring file and the ~/deployed_ceph.yaml file output by the openstack overcloud ceph deploy command.
For more information about cephadm, see Red Hat Ceph Storage Installation Guide.
Chapter 2. Preparing Ceph Storage nodes for deployment
Red Hat Ceph Storage nodes are bare metal systems with IPMI power management. Director installs Red Hat Enterprise Linux on each node.
Director communicates with each node through the Provisioning network during the introspection and provisioning processes. All nodes connect to the Provisioning network through the native VLAN.
For more information about bare metal provisioning before overcloud deployment, see Provisioning and deploying your overcloud in Director Installation and Usage guide.
For a complete guide to bare metal provisioning, see Bare Metal Provisioning.
2.1. Cleaning Ceph Storage node disks
Ceph Storage OSDs and journal partitions require factory clean disks. All data and metadata must be erased by the Bare Metal Provisioning service (ironic) from these disks before installing the Ceph OSD services.
You can configure director to delete all disk data and metadata by default by using the Bare Metal Provisioning service. When director is configured to perform this task, the Bare Metal Provisioning service performs an additional step to boot the nodes each time a node is set to available.
The Bare Metal Provisioning service uses the wipefs --force --all command. This command deletes all data and metadata on the disk but it does not perform a secure erase. A secure erase takes much longer.
Procedure
Open
/home/stack/undercloud.confand add the following parameter:clean_nodes=true-
Save
/home/stack/undercloud.conf. Update the undercloud configuration.
openstack undercloud install
2.2. Registering nodes
Register the nodes to enable communication with director.
Procedure
-
Create a node inventory JSON file in
/home/stack. Enter hardware and power management details for each node.
For example:
{ "nodes":[ { "mac":[ "b1:b1:b1:b1:b1:b1" ], "cpu":"4", "memory":"6144", "disk":"40", "arch":"x86_64", "pm_type":"ipmi", "pm_user":"admin", "pm_password":"p@55w0rd!", "pm_addr":"192.0.2.205" }, { "mac":[ "b2:b2:b2:b2:b2:b2" ], "cpu":"4", "memory":"6144", "disk":"40", "arch":"x86_64", "pm_type":"ipmi", "pm_user":"admin", "pm_password":"p@55w0rd!", "pm_addr":"192.0.2.206" }, { "mac":[ "b3:b3:b3:b3:b3:b3" ], "cpu":"4", "memory":"6144", "disk":"40", "arch":"x86_64", "pm_type":"ipmi", "pm_user":"admin", "pm_password":"p@55w0rd!", "pm_addr":"192.0.2.207" }, { "mac":[ "c1:c1:c1:c1:c1:c1" ], "cpu":"4", "memory":"6144", "disk":"40", "arch":"x86_64", "pm_type":"ipmi", "pm_user":"admin", "pm_password":"p@55w0rd!", "pm_addr":"192.0.2.208" }, { "mac":[ "c2:c2:c2:c2:c2:c2" ], "cpu":"4", "memory":"6144", "disk":"40", "arch":"x86_64", "pm_type":"ipmi", "pm_user":"admin", "pm_password":"p@55w0rd!", "pm_addr":"192.0.2.209" }, { "mac":[ "c3:c3:c3:c3:c3:c3" ], "cpu":"4", "memory":"6144", "disk":"40", "arch":"x86_64", "pm_type":"ipmi", "pm_user":"admin", "pm_password":"p@55w0rd!", "pm_addr":"192.0.2.210" }, { "mac":[ "d1:d1:d1:d1:d1:d1" ], "cpu":"4", "memory":"6144", "disk":"40", "arch":"x86_64", "pm_type":"ipmi", "pm_user":"admin", "pm_password":"p@55w0rd!", "pm_addr":"192.0.2.211" }, { "mac":[ "d2:d2:d2:d2:d2:d2" ], "cpu":"4", "memory":"6144", "disk":"40", "arch":"x86_64", "pm_type":"ipmi", "pm_user":"admin", "pm_password":"p@55w0rd!", "pm_addr":"192.0.2.212" }, { "mac":[ "d3:d3:d3:d3:d3:d3" ], "cpu":"4", "memory":"6144", "disk":"40", "arch":"x86_64", "pm_type":"ipmi", "pm_user":"admin", "pm_password":"p@55w0rd!", "pm_addr":"192.0.2.213" } ] }- Save the new file.
Initialize the stack user:
$ source ~/stackrcImport the JSON inventory file into director and register nodes
$ openstack overcloud node import <inventory_file>Replace
<inventory_file>with the name of the file created in the first step.Assign the kernel and ramdisk images to each node:
$ openstack overcloud node configure <node>
2.3. Verifying available Red Hat Ceph Storage packages
Verify all required packages are available to avoid overcloud deployment failures.
2.3.1. Verifying cephadm package installation
Verify the cephadm package is installed on at least one overcloud node. The cephadm package is used to bootstrap the first node of the Ceph Storage cluster.
The cephadm package is included in the overcloud-hardened-uefi-full.qcow2 image. The tripleo_cephadm role uses the Ansible package module to ensure it is present in the image.
2.4. Defining the root disk for multi-disk Ceph clusters
Ceph Storage nodes typically use multiple disks. Director must identify the root disk in multiple disk configurations. The overcloud image is written to the root disk during the provisioning process.
Hardware properties are used to identify the root disk. For more information about properties you can use to identify the root disk, see Section 2.4.1, “Properties that identify the root disk”.
Procedure
Verify the disk information from the hardware introspection of each node:
(undercloud)$ openstack baremetal introspection data save <node_uuid> | --file <output_file_name>-
Replace
<node_uuid>with the UUID of the node. Replace
<output_file_name>with the name of the file that contains the output of the node introspection.For example, the data for one node might show three disks:
[
  {
    "size": 299439751168,
    "rotational": true,
    "vendor": "DELL",
    "name": "/dev/sda",
    "wwn_vendor_extension": "0x1ea4dcc412a9632b",
    "wwn_with_extension": "0x61866da04f3807001ea4dcc412a9632b",
    "model": "PERC H330 Mini",
    "wwn": "0x61866da04f380700",
    "serial": "61866da04f3807001ea4dcc412a9632b"
  }
  {
    "size": 299439751168,
    "rotational": true,
    "vendor": "DELL",
    "name": "/dev/sdb",
    "wwn_vendor_extension": "0x1ea4e13c12e36ad6",
    "wwn_with_extension": "0x61866da04f380d001ea4e13c12e36ad6",
    "model": "PERC H330 Mini",
    "wwn": "0x61866da04f380d00",
    "serial": "61866da04f380d001ea4e13c12e36ad6"
  }
  {
    "size": 299439751168,
    "rotational": true,
    "vendor": "DELL",
    "name": "/dev/sdc",
    "wwn_vendor_extension": "0x1ea4e31e121cfb45",
    "wwn_with_extension": "0x61866da04f37fc001ea4e31e121cfb45",
    "model": "PERC H330 Mini",
    "wwn": "0x61866da04f37fc00",
    "serial": "61866da04f37fc001ea4e31e121cfb45"
  }
]
-
Replace
Set the root disk for the node by using a unique hardware property:
(undercloud)$ openstack baremetal node set --property root_device='{<property_value>}' <node-uuid>-
Replace
<property_value>with the unique hardware property value from the introspection data to use to set the root disk. Replace
<node_uuid>with the UUID of the node.NoteA unique hardware property is any property from the hardware introspection step that uniquely identifies the disk. For example, the following command uses the disk serial number to set the root disk:
(undercloud)$ openstack baremetal node set --property root_device='{"serial": "61866da04f380d001ea4e13c12e36ad6"}' 1a4e30da-b6dc-499d-ba87-0bd8a3819bc0
-
Replace
- Configure the BIOS of each node to first boot from the network and then the root disk.
Director identifies the specific disk to use as the root disk. When you run the openstack overcloud node provision command, director provisions and writes the overcloud image to the root disk.
2.4.1. Properties that identify the root disk
There are several properties that you can define to help director identify the root disk:
-
model(String): Device identifier. -
vendor(String): Device vendor. -
serial(String): Disk serial number. -
hctl(String): Host:Channel:Target:Lun for SCSI. -
size(Integer): Size of the device in GB. -
wwn(String): Unique storage identifier. -
wwn_with_extension(String): Unique storage identifier with the vendor extension appended. -
wwn_vendor_extension(String): Unique vendor storage identifier. -
rotational(Boolean): True for a rotational device (HDD), otherwise false (SSD). -
name(String): The name of the device, for example: /dev/sdb1.
Use the name property for devices with persistent names. Do not use the name property to set the root disk for devices that do not have persistent names because the value can change when the node boots.
2.5. Using the overcloud-minimal image to avoid using a Red Hat subscription entitlement
The default image for a Red Hat OpenStack Platform (RHOSP) deployment is overcloud-hardened-uefi-full.qcow2. The overcloud-hardened-uefi-full.qcow2 image uses a valid Red Hat OpenStack Platform (RHOSP) subscription. You can use the overcloud-minimal image when you do not want to consume your subscription entitlements, to avoid reaching the limit of your paid Red Hat subscriptions. This is useful, for example, when you want to provision nodes with only Ceph daemons, or when you want to provision a bare operating system (OS) where you do not want to run any other OpenStack services. For information about how to obtain the overcloud-minimal image, see Obtaining images for overcloud nodes.
The overcloud-minimal image supports only standard Linux bridges. The overcloud-minimal image does not support Open vSwitch (OVS) because OVS is an OpenStack service that requires a Red Hat OpenStack Platform subscription entitlement. OVS is not required to deploy Ceph Storage nodes. Use linux_bond instead of ovs_bond to define bonds.
Procedure
-
Open your
/home/stack/templates/overcloud-baremetal-deploy.yamlfile. Add or update the
imageproperty for the nodes that you want to use theovercloud-minimalimage. You can set the image toovercloud-minimalon specific nodes, or for all nodes for a role.NoteThe overcloud minimal image is not a whole disk image. The kernel and ramdisk must be specified in the
/home/stack/templates/overcloud-baremetal-deploy.yamlfile.Specific nodes
- name: Ceph
  count: 3
  instances:
  - hostname: overcloud-ceph-0
    name: node00
    image:
      href: file:///var/lib/ironic/images/overcloud-minimal.raw
      kernel: file://var/lib/ironic/images/overcloud-minimal.vmlinuz
      ramdisk: file://var/lib/ironic/images/overcloud-minimal.initrd
  - hostname: overcloud-ceph-1
    name: node01
    image:
      href: file:///var/lib/ironic/images/overcloud-minimal.raw
      kernel: file://var/lib/ironic/images/overcloud-minimal.vmlinuz
      ramdisk: file://var/lib/ironic/images/overcloud-minimal.initrd
  - hostname: overcloud-ceph-2
    name: node02
    image:
      href: file:///var/lib/ironic/images/overcloud-minimal.raw
      kernel: file://var/lib/ironic/images/overcloud-minimal.vmlinuz
      ramdisk: file://var/lib/ironic/images/overcloud-minimal.initrd
All nodes for a specific role
- name: Ceph
  count: 3
  defaults:
    image:
      href: file:///var/lib/ironic/images/overcloud-minimal.raw
      kernel: file://var/lib/ironic/images/overcloud-minimal.vmlinuz
      ramdisk: file://var/lib/ironic/images/overcloud-minimal.initrd
  instances:
  - hostname: overcloud-ceph-0
    name: node00
  - hostname: overcloud-ceph-1
    name: node01
  - hostname: overcloud-ceph-2
    name: node02
In the
roles_data.yamlrole definition file, set therhsm_enforceparameter toFalse.rhsm_enforce: FalseRun the provisioning command:
(undercloud)$ openstack overcloud node provision \ --stack overcloud \ --output /home/stack/templates/overcloud-baremetal-deployed.yaml \ /home/stack/templates/overcloud-baremetal-deploy.yaml-
Pass the
overcloud-baremetal-deployed.yamlenvironment file to theopenstack overcloud ceph deploycommand.
2.6. Designating nodes for Red Hat Ceph Storage
To designate nodes for Red Hat Ceph Storage, you must create a new role file to configure the CephStorage role, and configure the bare metal nodes with a resource class for CephStorage.
Procedure
-
Log in to the undercloud as the
stackuser. Source the
stackrcfile:[stack@director ~]$ source ~/stackrcGenerate a new roles data file named
roles_data.yamlthat includes theController,Compute, andCephStorageroles:(undercloud)$ openstack overcloud roles \ generate Controller Compute CephStorage -o /home/stack/templates/roles_data.yaml \Open
roles_data.yamland ensure it has the following parameters and sections:Expand Section/Parameter Value Role comment
Role: CephStorageRole name
name: CephStoragedescriptionCeph node roleHostnameFormatDefault%stackname%-novaceph-%index%deprecated_nic_config_nameceph.yaml- Register the Ceph nodes for the overcloud by adding them to your node definition template.
Inspect the node hardware:
(undercloud)$ openstack overcloud node introspect --all-manageable --provideTag each bare metal node that you want to designate for Ceph with a custom Ceph resource class:
(undercloud)$ openstack baremetal node set \
 --resource-class baremetal.CEPH <node>
Replace
<node>with the ID of the bare metal node.Add the
CephStoragerole to yourovercloud-baremetal-deploy.yamlfile, and define any predictive node placements, resource classes, or other attributes that you want to assign to your nodes:- name: Controller count: 3 - name: Compute count: 3 - name: CephStorage count: 5 defaults: resource_class: baremetal.CEPHRun the provisioning command:
(undercloud)$ openstack overcloud node provision \
--stack stack \
--output /home/stack/templates/overcloud-baremetal-deployed.yaml \
/home/stack/templates/overcloud-baremetal-deploy.yaml
Monitor the provisioning progress in a separate terminal. When provisioning is successful, the node state changes from
availabletoactive:(undercloud)$ watch openstack baremetal node list
Additional resources
- For more information on node registration, see Section 2.2, “Registering nodes”.
- For more information inspecting node hardware, see Creating an inventory of the bare-metal node hardware in the Director Installation and Usage guide.
Chapter 3. Configuring the Red Hat Ceph Storage cluster
To deploy the Red Hat Ceph Storage cluster for your Red Hat OpenStack Platform environment, you must first configure the Red Hat Ceph Storage cluster options for your environment.
Configure the Red Hat Ceph Storage cluster options:
- Configuring time synchronization
- Configuring the Red Hat Ceph Storage cluster name
- Configuring network options with the network data file
- Configuring network options with a configuration file
- Configuring a CRUSH hierarchy for an OSD
- Configuring Ceph service placement options
- Configuring SSH user options for Ceph nodes
- Configuring the container registry
Prerequisites
Before you can configure and deploy the Red Hat Ceph Storage cluster, use the the Bare Metal Provisioning service (ironic) to provision the bare metal instances and networks. For more information, see Bare Metal Provisioning.
3.1. The openstack overcloud ceph deploy command
If you deploy the Ceph cluster using director, you must use the openstack overcloud ceph deploy command. For a complete listing of command options and parameters, see openstack overcloud ceph deploy in the Command Line Interface Reference.
The command openstack overcloud ceph deploy --help provides the current options and parameters available in your environment.
3.2. Ceph configuration file
A standard format initialization file is one way to perform Ceph cluster configuration. This initialization file is used to configure the Ceph cluster. Use one of the following commands to use this file: * cephadm bootstap --config <file_name> * openstack overcloud ceph deploy --config <file_name> commands.
Example
The following example creates a simple initialization file called initial-ceph.conf and then uses the openstack overcloud ceph deploy command to configure the Ceph cluster with it. It demonstrates how to configure the messenger v2 protocol to use a secure mode that encrypts all data passing over the network.
$ cat <<EOF > initial-ceph.conf
[global]
ms_cluster_mode: secure
ms_service_mode: secure
ms_client_mode: secure
EOF
$ openstack overcloud ceph deploy --config initial-ceph.conf ...
3.3. Configuring time synchronization
The Time Synchronization Service (chrony) is enabled for time synchronization by default. You can perform the following tasks to configure the service.
Time synchronization is configured using either a delimited list or an environment file. Use the procedure that is best suited to your administrative practices.
3.3.1. Configuring time synchronization with a delimited list
You can configure the Time Synchronization Service (chrony) to use a delimited list to configure NTP servers.
Procedure
-
Log in to the undercloud node as the
stackuser. Configure NTP servers with a delimited list:
  openstack overcloud ceph deploy \
          --ntp-server "<ntp_server_list>"
Replace
<ntp_server_list>with a comma delimited list of servers.openstack overcloud ceph deploy \ --ntp-server "0.pool.ntp.org,1.pool.ntp.org"
3.3.2. Configuring time synchronization with an environment file
You can configure the Time Synchronization Service (chrony) to use an environment file that defines NTP servers.
Procedure
-
Log in to the undercloud node as the
stackuser. -
Create an environment file, such as
/home/stack/templates/ntp-parameters.yaml, to contain the NTP server configuration. Add the
NtpServerparameter. TheNtpServerparameter contains a comma delimited list of NTP servers.parameter_defaults: NtpServer: 0.pool.ntp.org,1.pool.ntp.orgConfigure NTP servers with an environment file:
  openstack overcloud ceph deploy \
          --ntp-heat-env-file "<ntp_file_name>"
Replace
<ntp_file_name>with the name of the environment file you created.openstack overcloud ceph deploy \ --ntp-heat-env-file "/home/stack/templates/ntp-parameters.yaml"
3.3.3. Disabling time synchronization
The Time Synchronization Service (chrony) is enabled by default. You can disable the service if you do not want to use it.
Procedure
-
Log in to the undercloud node as the
stackuser. Disable the Time Synchronization Service (chrony):
openstack overcloud ceph deploy \
          --skip-ntp
3.4. Configuring the Red Hat Ceph Storage cluster name
You can deploy the Red Hat Ceph Storage cluster with a name that you configure. The default name is ceph.
Procedure
-
Log in to the undercloud node as the
stackuser. Configure the name of the Ceph Storage cluster by using the following command:
openstack overcloud ceph deploy \ --cluster <cluster_name>$ openstack overcloud ceph deploy \ --cluster central \
Keyring files are not created at this time. Keyring files are created during the overcloud deployment. Keyring files inherit the cluster name configured during this procedure. For more information about overcloud deployment see Section 8.1, “Initiating overcloud deployment”
In the example above, the Ceph cluster is named central. The configuration and keyring files for the central Ceph cluster would be created in /etc/ceph during the deployment process.
[root@oc0-controller-0 ~]# ls -l /etc/ceph/
total 16
-rw-------. 1 root root  63 Mar 26 21:49 central.client.admin.keyring
-rw-------. 1  167  167 201 Mar 26 22:17 central.client.openstack.keyring
-rw-------. 1  167  167 134 Mar 26 22:17 central.client.radosgw.keyring
-rw-r--r--. 1 root root 177 Mar 26 21:49 central.conf
Troubleshooting
The following error may be displayed if you configure a custom name for the Ceph Storage cluster:
monclient: get_monmap_and_config cannot identify monitors to contact because
If this error is displayed, use the following command after Ceph deployment:
cephadm shell --config <configuration_file> --keyring <keyring_file>
For example, if this error was displayed when you configured the cluster name to central, you would use the following command:
cephadm shell --config /etc/ceph/central.conf \
              --keyring /etc/ceph/central.client.admin.keyring
The following command could also be used as an alternative:
cephadm shell --mount /etc/ceph:/etc/ceph
export CEPH_ARGS='--cluster central'
3.5. Configuring network options with the network data file
The network data file describes the networks used by the Red Hat Ceph Storage cluster.
Procedure
-
Log in to the undercloud node as the
stackuser. Create a YAML format file that defines the custom network attributes called
network_data.yaml.ImportantUsing network isolation, the standard network deployment consists of two storage networks which map to the two Ceph networks:
-
The storage network,
storage, maps to the Ceph network,public_network. This network handles storage traffic such as the RBD traffic from the Compute nodes to the Ceph cluster. -
The storage network,
storage_mgmt, maps to the Ceph network,cluster_network. This network handles storage management traffic such as data replication between Ceph OSDs.
-
The storage network,
Use the
openstack overcloud ceph deploycommand with the--crush-hierarchyoption to deploy the configuration.openstack overcloud ceph deploy \ deployed_metal.yaml \ -o deployed_ceph.yaml \ --network-data network_data.yamlImportantThe
openstack overcloud ceph deploycommand uses the network data file specified by the--network-dataoption to determine the networks to be used as thepublic_networkandcluster_network. The command assumes these networks are namedstorageandstorage_mgmtin network data file unless a different name is specified by the--public-network-nameand--cluster-network-nameoptions.You must use the
--network-dataoption when deploying with network isolation. The default undercloud (192.168.24.0/24) will be used for both thepublic_networkandcluster_networkif you do not use this option.
3.6. Configuring network options with a configuration file
Network options can be specified with a configuration file as an alternative to the network data file.
Using this method to configure network options overwrites automatically generated values in network_data.yaml. Ensure you set all four values when using this network configuration method.
Procedure
-
Log in to the undercloud node as the
stackuser. - Create a standard format initialization file to configure the Ceph cluster. If you have already created a file to include other configuration options, you can add the network configuration to it.
Add the following parameters to the
[global]section of the file:-
public_network -
cluster_network ms_bind_ipv4ImportantEnsure the
public_networkandcluster_networkmap to the same networks asstorageandstorage_mgmt.The following is an example of a configuration file entry for a network configuration with multiple subnets and custom networking names:
[global]
public_network = 172.16.14.0/24,172.16.15.0/24
cluster_network = 172.16.12.0/24,172.16.13.0/24
ms_bind_ipv4 = True
ms_bind_ipv6 = False
-
Use the command
openstack overcloud ceph deploywith the--configoption to deploy the configuration file.$ openstack overcloud ceph deploy \ --config initial-ceph.conf --network-data network_data.yaml
3.7. Configuring a CRUSH hierarchy for an OSD
You can configure a custom Controlled Replication Under Scalable Hashing (CRUSH) hierarchy during OSD deployment to add the OSD location attribute to the Ceph Storage cluster hosts specification. The location attribute configures where the OSD is placed within the CRUSH hierarchy.
The location attribute sets only the initial CRUSH location. Subsequent changes of the attribute are ignored.
Procedure
-
Log in to the undercloud node as the
stackuser. Source the
stackrcundercloud credentials file:$ source ~/stackrc-
Create a configuration file to define the custom CRUSH hierarchy, for example,
crush_hierarchy.yaml. Add the following configuration to the file:
ceph_crush_hierarchy: <osd_host>: root: default rack: <rack_num> <osd_host>: root: default rack: <rack_num> <osd_host>: root: default rack: <rack_num>-
Replace
<osd_host>with the hostnames of the nodes where the OSDs are deployed, for example,ceph-0. -
Replace
<rack_num>with the number of the rack where the OSDs are deployed, for example,r0.
-
Replace
Deploy the Ceph cluster with your custom OSD layout:
openstack overcloud ceph deploy \
        deployed_metal.yaml \
        -o deployed_ceph.yaml \
        --osd-spec osd_spec.yaml \
        --crush-hierarchy crush_hierarchy.yaml
The Ceph cluster is created with the custom OSD layout.
The example file above would result in the following OSD layout.
ID  CLASS  WEIGHT       TYPE NAME                  STATUS  REWEIGHT  PRI-AFF
-1         0.02939      root default
-3         0.00980      rack r0
-2         0.00980          host ceph-node-00
 0    hdd  0.00980              osd.0                 up   1.00000   1.00000
-5         0.00980      rack r1
-4         0.00980          host ceph-node-01
 1    hdd  0.00980              osd.1                 up   1.00000   1.00000
-7         0.00980      rack r2
-6         0.00980          host ceph-node-02
 2    hdd  0.00980              osd.2                 up   1.00000   1.00000
Device classes are automatically detected by Ceph but CRUSH rules are associated with pools. Pools are still defined and created using the CephCrushRules parameter during the overcloud deployment.
Additional resources
See Red Hat Ceph Storage workload considerations in the Red Hat Ceph Storage Installation Guide for additional information.
3.8. Configuring Ceph service placement options
You can define what nodes run what Ceph services using a custom roles file. A custom roles file is only necessary when default role assignments are not used because of the environment. For example, when deploying hyperconverged nodes, the predeployed compute nodes should be labeled as osd with a service type of osd to have a placement list containing a list of compute instances.
Service definitions in the roles_data.yaml file determine which bare metal instance runs which service. By default, the Controller role has the CephMon and CephMgr service while the CephStorage role has the CephOSD service. Unlike most composable services, Ceph services do not require heat output to determine how services are configured. The roles_data.yaml file always determines Ceph service placement even though the deployed Ceph process occurs before Heat runs.
Procedure
-
Log in to the undercloud node as the
stackuser. - Create a YAML format file that defines the custom roles.
Deploy the configuration file:
$ openstack overcloud ceph deploy \
        deployed_metal.yaml \
        -o deployed_ceph.yaml \
        --roles-data custom_roles.yaml
3.9. Configuring SSH user options for Ceph nodes
The openstack overcloud ceph deploy command creates the user and keys and distributes them to the hosts so it is not necessary to perform the procedures in this section. However, it is a supported option.
Cephadm connects to all managed remote Ceph nodes using SSH. The Red Hat Ceph Storage cluster deployment process creates an account and SSH key pair on all overcloud Ceph nodes. The key pair is then given to Cephadm so it can communicate with the nodes.
3.9.1. Creating the SSH user before Red Hat Ceph Storage cluster creation
You can create the SSH user before Ceph cluster creation with the openstack overcloud ceph user enable command.
Procedure
-
Log in to the undercloud node as the
stackuser. Create the SSH user:
$ openstack overcloud ceph user enableNoteThe default user name is
ceph-admin. To specify a different user name, use the--cephadm-ssh-useroption to specify a different one.openstack overcloud ceph user enable --cephadm-ssh-user <custom_user_name>It is recommended to use the default name and not use the
--cephadm-ssh-userparameter.If the user is created in advance, use the parameter
--skip-user-createwhen executingopenstack overcloud ceph deploy.
3.9.2. Disabling the SSH user
Disabling the SSH user disables Cephadm. Disabling Cephadm removes the ability of the service to administer the Ceph cluster and prevents associated commands from working. It also prevents Ceph node overcloud scaling operations. It also removes all public and private SSH keys.
Procedure
-
Log in to the undercloud node as the
stackuser. Use the command
openstack overcloud ceph user disable --fsid <FSID> ceph_spec.yamlto disable the SSH user.NoteThe FSID is located in the
deployed_ceph.yamlenvironment file.ImportantThe
openstack overcloud ceph user disablecommand is not recommended unless it is necessary to disable Cephadm.ImportantTo enable the SSH user and Cephadm service after being disabled, use the
openstack overcloud ceph user enable --fsid <FSID> ceph_spec.yamlcommand.NoteThis command requires the path to a Ceph specification file to determine:
- Which hosts require the SSH user.
- Which hosts have the _admin label and require the private SSH key.
- Which hosts require the public SSH key.
For more information about specification files and how to generate them, see Generating the service specification.
3.10. Accessing Ceph Storage containers
Obtaining and modifying container images in the Transitioning to Containerized Services guide contains procedures and information on how to prepare the registry and your undercloud and overcloud configuration to use container images. Use the information in this section to adapt these procedures to access Ceph Storage containers.
There are two options for accessing Ceph Storage containers from the overcloud.
3.10.1. Downloading containers directly from a remote registry
You can configure Ceph to download containers directly from a remote registry.
Procedure
-
Create a
containers-prepare-parameter.yamlfile using the procedure Preparing container images. -
Add the remote registry credentials to the
containers-prepare-parameter.yamlfile using theContainerImageRegistryCredentialsparameter as described in Obtaining container images from private registries. When you deploy Ceph, pass the
containers-prepare-parameter.yamlfile using theopenstack overcloud ceph deploycommand.openstack overcloud ceph deploy \ --container-image-prepare containers-prepare-parameter.yamlNoteIf you do not cache the containers on the undercloud, as described in Cacheing containers on the undercloud, then you should pass the same
containers-prepare-parameter.yamlfile to theopenstack overcloud ceph deploycommand when you deploy Ceph. This will cache containers on the undercloud.
Result
The credentials in the containers-prepare-parameter.yaml are used by the cephadm command to authenticate to the remote registry and download the Ceph Storage container.
3.10.2. Cacheing containers on the undercloud
The procedure Modifying images during preparation describes using the following command:
sudo openstack tripleo container image prepare \
  -e ~/containers-prepare-parameter.yaml \
If you do not use the --container-image-prepare option to provide authentication credentials to the openstack overcloud ceph deploy command and directly download the Ceph containers from a remote registry, as described in Downloading containers directly from a remote registry, you must run the sudo openstack tripleo container image prepare command before deploying Ceph.
Chapter 4. Customizing the Red Hat Ceph Storage cluster
Director deploys Red Hat Ceph Storage with a default configuration. You can customize this default configuration.
Prerequisites
- Ceph Storage nodes deployed with their storage network configured.
-
The deployed bare metal file output by
openstack overcloud node provision -o ~/deployed_metal.yaml ….
4.1. Configuration options
There are several options for configuring the Red Hat Ceph Storage cluster.
Procedure
-
Log in to the undercloud node as the
stackuser. Optional: Use a standard format initialization (ini) file to configure the Ceph cluster.
Create the file with configuration options.
The following is an example of a simple configuration file:
[global] osd crush chooseleaf type = 0 log_file = /var/log/ceph/$cluster-$type.$id.log [mon] mon_cluster_log_to_syslog = true- Save the configuration file.
Use the
openstack overcloud ceph deploy --config <configuration_file_name>command to deploy the configuration.Replace
<configuration_file_name>with the name of the file you created.$ openstack overcloud ceph deploy --config initial-ceph.conf
Optional: Send configuration values to the
cephadm bootstrapcommand:openstack overcloud ceph deploy --force \ --cephadm-extra-args '<optional_arguments>' \Replace
<optional_arguments>with the configuration values to provide to the underlying command.NoteWhen using the arguments
--log-to-fileand--skip-prepare-host, the commandopenstack overcloud ceph deploy --force \ --cephadm-extra-args '--log-to-file --skip-prepare-host' \is used.
4.2. Generating the service specification (optional)
The Red Hat Ceph Storage cluster service specification is a YAML file that describes the deployment of Ceph Storage services. It is automatically generated by tripleo before the Ceph Storage cluster is deployed. It does not usually have to be generated separately.
A custom service specification can be created to customize the Red Hat Ceph Storage cluster.
Procedure
-
Log in to the undercloud node as the
stackuser. Generate the specification file:
openstack overcloud ceph spec -o '<specification_file>'Replace
<specification_file>with the name of the file to generate with the current service specification.openstack overcloud ceph spec -o '~/ceph_spec.yaml'- Edit the generated file with the required configuration.
Deploy the custom service specification:
openstack overcloud ceph deploy \ deployed_metal.yaml \ -o deployed_ceph.yaml \ --ceph-spec <specification_file>Replace
<specification_file>with the name of the custom service specification file.openstack overcloud ceph deploy \ deployed_metal.yaml \ -o deployed_ceph.yaml \ --ceph-spec ~/ceph_spec.yaml
4.3. Ceph containers for Red Hat OpenStack Platform with Red Hat Ceph Storage
You must have a Ceph Storage container to configure Red Hat Openstack Platform (RHOSP) to use Red Hat Ceph Storage with NFS Ganesha. You do not require a Ceph Storage container if the external Ceph Storage cluster only provides Block (through RBD), Object (through RGW), or File (through native CephFS) storage.
RHOSP 17.0 requires Red Hat Ceph Storage 5.x (Ceph package 16.x) or later to be compatible with Red Hat Enterprise Linux 9. The Ceph Storage 5.x containers are hosted at registry.redhat.io, a registry that requires authentication. For more information, see Container image preparation parameters.
4.4. Configuring advanced OSD specifications
Configure an advanced OSD specification when the default specification does not provide the necessary functionality for your Ceph Storage cluster.
Procedure
-
Log in to the undercloud node as the
stackuser. Create a YAML format file that defines the advanced OSD specification.
The following is an example of a custom OSD specification.
data_devices:
  rotational: 1
db_devices:
  rotational: 0
This example would create an OSD specification where all rotating devices will be data devices and all non-rotating devices will be used as shared devices. When the dynamic Ceph service specification is built, whatever is in the specification file is appended to the section of the specification if the
service_typeisosd.- Save the specification file.
Deploy the specification:
openstack overcloud ceph deploy \ --osd-spec <osd_specification_file>Replace
<osd_specification_file>with the name of the specification file you created.$ openstack overcloud ceph deploy \ --osd-spec osd_spec.yaml \
Additional resources
For a list of OSD-related attributes used to configure OSDs in the service specification, see Advanced service specifications and filters for deploying OSDs in the Red Hat Ceph Storage Operations Guide.
4.5. Migrating from node-specific overrides
Node-specific overrides were used to manage non-homogenous server hardware before Red Hat OpenStack Platform 17.0. This is now done with a custom OSD specification file. See Configuring advanced OSD specifications for information on how to create a custom OSD specification file.
4.6. Enabling Ceph on-wire encryption
Enable encryption for all Ceph Storage traffic using the secure mode of the messenger version 2 protocol. Configure Ceph Storage as described in Encryption and Key Management in the Red Hat Ceph Storage Data Security and Hardening Guide to enable Ceph on-wire encryption.
Additional resources
For more information about Ceph on-wire encryption, see Ceph on-wire encryption in the Red Hat Ceph Storage Architecture Guide.
Chapter 5. Customizing the storage service
The director heat template collection contains the necessary templates and environment files to enable a basic Ceph Storage configuration.
Director uses the /usr/share/openstack-tripleo-heat-templates/environments/cephadm/cephadm.yaml environment file to add onfiguration to the Ceph Storage cluster deployed by openstack overcloud ceph deploy and integrate it with your overcloud during deployment.
5.1. Configuring a custom environment file
Director applies basic, default settings to the deployed Red Hat Ceph Storage cluster. You must define additional configuration in a custom environment file.
Procedure
-
Log in to the undercloud as the
stackuser. Create a file to define the custom configuration.
vi /home/stack/templates/storage-config.yaml-
Add a
parameter_defaultssection to the file. Add the custom configuration parameters. For more information about parameter definitions, see Overcloud Parameters.
parameter_defaults: CinderEnableIscsiBackend: false CinderEnableRbdBackend: true CinderBackupBackend: ceph NovaEnableRbdBackend: true GlanceBackend: rbdNoteParameters defined in a custom configuration file override any corresponding default settings in
/usr/share/openstack-tripleo-heat-templates/environments/cephadm/cephadm.yaml.- Save the file.
Additional resources
The custom configuration is applied during overcloud deployment.
5.2. Red Hat Ceph Storage placement groups
Placement groups (PGs) facilitate dynamic and efficient object tracking at scale. In the event of OSD failure or Ceph Storage cluster rebalancing, Ceph can move or replicate a placement group and the contents of the placement group. This allows a Ceph Storage cluster to rebalance and recover efficiently.
The placement group and replica count settings are not changed from the defaults unless the following parameters are included in a Ceph configuration file:
-
osd_pool_default_size -
osd_pool_default_pg_num -
osd_pool_default_pgp_num
When the overcloud is deployed with the openstack overcloud deploy command, a pool is created for every enabled Red Hat OpenStack Platform service. For example, the following command creates pools for the Compute service (nova), the Block Storage service (cinder), and the Image service (glance):
openstack overcloud deploy --templates \
  -e /usr/share/openstack-tripleo-heat-templates/environments/cephadm/cephadm-rbd-only.yaml
Adding -e environments/cinder-backup.yaml to the command, creates a pool called backups:
openstack overcloud deploy --templates \
  -e /usr/share/openstack-tripleo-heat-templates/environments/cephadm/cephadm-rbd-only.yaml
  -e environments/cinder-backup.yaml
It is not necessary to configure a placement group number per pool; the pg_autoscale_mode attribute is enabled by default. However, it is recommended to configure the target_size_ratio or pg_num attributes. This minimimzes data rebalancing.
To set the target_size_ratio attribute per pool, use a configuration file entry similar to the following example:
parameter_defaults:
  CephPools:
    - name: volumes
      target_size_ratio: 0.4
      application: rbd
    - name: images
      target_size_ratio: 0.1
      application: rbd
    - name: vms
      target_size_ratio: 0.3
      application: rbd
In this example, the percentage of data used per service will be:
- Cinder volumes - 40%
- Glance images - 10%
- Nova vms - 30%
- Free space for other pools - 20%
Set these values based on your expected usage . If you do not override the CephPools parameter, each pool uses the default placement group number. Though the autoscaler will adjust this number automatically over time based on usage, the data will be moved within the Ceph cluster. This uses computational resources.
If you prefer to set a placement group number instead of a target size ratio, replace target_size_ratio in the example with pg_num. Use a different integer per pool based on your expected usage.
See the Red Hat Ceph Storage Hardware Guide for Red Hat Ceph Storage processor, network interface card, and power management interface recommendations.
5.3. Enabling Ceph Metadata Server
The Ceph Metadata Server (MDS) runs the ceph-mds daemon. This daemon manages metadata related to files stored on CephFS. CephFS can be consumed natively or through the NFS protocol.
Red Hat supports deploying Ceph MDS with the native CephFS and CephFS NFS back ends for the Shared File Systems service (manila).
Procedure
To enable Ceph MDS, use the following environment file when you deploy the overcloud:
/usr/share/openstack-tripleo-heat-templates/environments/cephadm/ceph-mds.yaml
By default, Ceph MDS is deployed on the Controller node. You can deploy Ceph MDS on its own dedicated node.
Additional resources
5.4. Ceph Object Gateway object storage
The Ceph Object Gateway (RGW) provides an interface to access object storage capabilities within a Red Hat Ceph Storage cluster.
When you use director to deploy Ceph, director automatically enables RGW. This is a direct replacement for the Object Storage service (swift). Services that normally use the Object Storage service can use RGW instead without additional configuration. The Object Storage service remains available as an object storage option for upgraded Ceph clusters.
There is no requirement for a separate RGW environment file to enable it. For more information about environment files for other object storage options, see Section 5.5, “Deployment options for Red Hat OpenStack Platform object storage”.
By default, Ceph Storage allows 250 placement groups per Object Storage Daemon (OSD). When you enable RGW, Ceph Storage creates the following six additional pools required by RGW:
-
.rgw.root -
<zone_name>.rgw.control -
<zone_name>.rgw.meta -
<zone_name>.rgw.log -
<zone_name>.rgw.buckets.index -
<zone_name>.rgw.buckets.data
In your deployment, <zone_name> is replaced with the name of the zone to which the pools belong.
Additional resources
- For more information about RGW, see the Red Hat Ceph Storage Object Gateway Guide.
- For more information about using RGW instead of Swift, see the Block Storage Backup Guide.
5.5. Deployment options for Red Hat OpenStack Platform object storage
There are three options for deploying overcloud object storage:
Ceph Object Gateway (RGW)
To deploy RGW as described in Section 5.4, “Ceph Object Gateway object storage”, include the following environment file during overcloud deployment:
-e environments/cephadm/cephadm.yamlThis environment file configures both Ceph block storage (RBD) and RGW.
Object Storage service (swift)
To deploy the Object Storage service (swift) instead of RGW, include the following environment file during overcloud deployment:
-e environments/cephadm/cephadm-rbd-only.yamlThe
cephadm-rbd-only.yamlfile configures Ceph RBD but not RGW.NoteIf you used the Object Storage service (swift) before upgrading your Red Hat Ceph Storage cluster, you can continue to use the Object Storage service (swift) instead of RGW by replacing the
environments/ceph-ansible/ceph-ansible.yamlfile with theenvironments/cephadm/cephadm-rbd-only.yamlduring the upgrade. For more information, see Keeping Red Hat OpenStack Platform Updated.Red Hat OpenStack Platform does not support migration from the Object Storage service (swift) to Ceph Object Gateway (RGW).
No object storage
To deploy Ceph with RBD but not with RGW or the Object Storage service (swift), include the following environment files during overcloud deployment:
-e  environments/cephadm/cephadm-rbd-only.yaml
-e  environments/disable-swift.yaml
The
cephadm-rbd-only.yamlfile configures RBD but not RGW. Thedisable-swift.yamlfile ensures that the Object Storage service (swift) does not deploy.
5.6. Configuring the Block Storage Backup Service to use Ceph
The Block Storage Backup service (cinder-backup) is disabled by default. It must be enabled to use it with Ceph.
Procedure
To enable the Block Storage Backup service (cinder-backup), use the following environment file when you deploy the overcloud:
`/usr/share/openstack-tripleo-heat-templates/environments/cinder-backup.yaml`.5.7. Configuring multiple bonded interfaces for Ceph nodes
Use a bonded interface to combine multiple NICs and add redundancy to a network connection. If you have enough NICs on your Ceph nodes, you can create multiple bonded interfaces on each node to expand redundancy capability.
Use a bonded interface for each network connection the node requires. This provides both redundancy and a dedicated connection for each network.
See Provisioning the overcloud networks in the Director Installation and Usage guide for information and procedures.
Chapter 6. Deploying the Shared File Systems service with native CephFS
CephFS is the highly scalable, open-source, distributed file system component of Red Hat Ceph Storage, a unified distributed storage platform. Ceph Storage implements object, block, and file storage using Reliable Autonomic Distributed Object Store (RADOS). CephFS, which is POSIX compatible, provides file access to a Ceph Storage cluster.
The Shared File Systems service (manila) enables users to create shares in CephFS and access them using the native Ceph FS protocol. The Shared File Systems service manages the life cycle of these shares from within OpenStack.
With this release, director can deploy the Shared File Systems with a native CephFS back end on the overcloud.
This chapter pertains to the deployment and use of native CephFS to provide a self-service Shared File Systems service in your Red Hat OpenStack Platform(RHOSP) cloud through the native CephFS NAS protocol. This type of deployment requires guest VM access to Ceph public network and infrastructure. Deploy native CephFS with trusted OpenStack Platform tenants only, because it requires a permissive trust model that is not suitable for general purpose OpenStack Platform deployments. For general purpose OpenStack Platform deployments that use a conventional tenant trust model, you can deploy CephFS through the NFS protocol.
6.1. CephFS with native driver
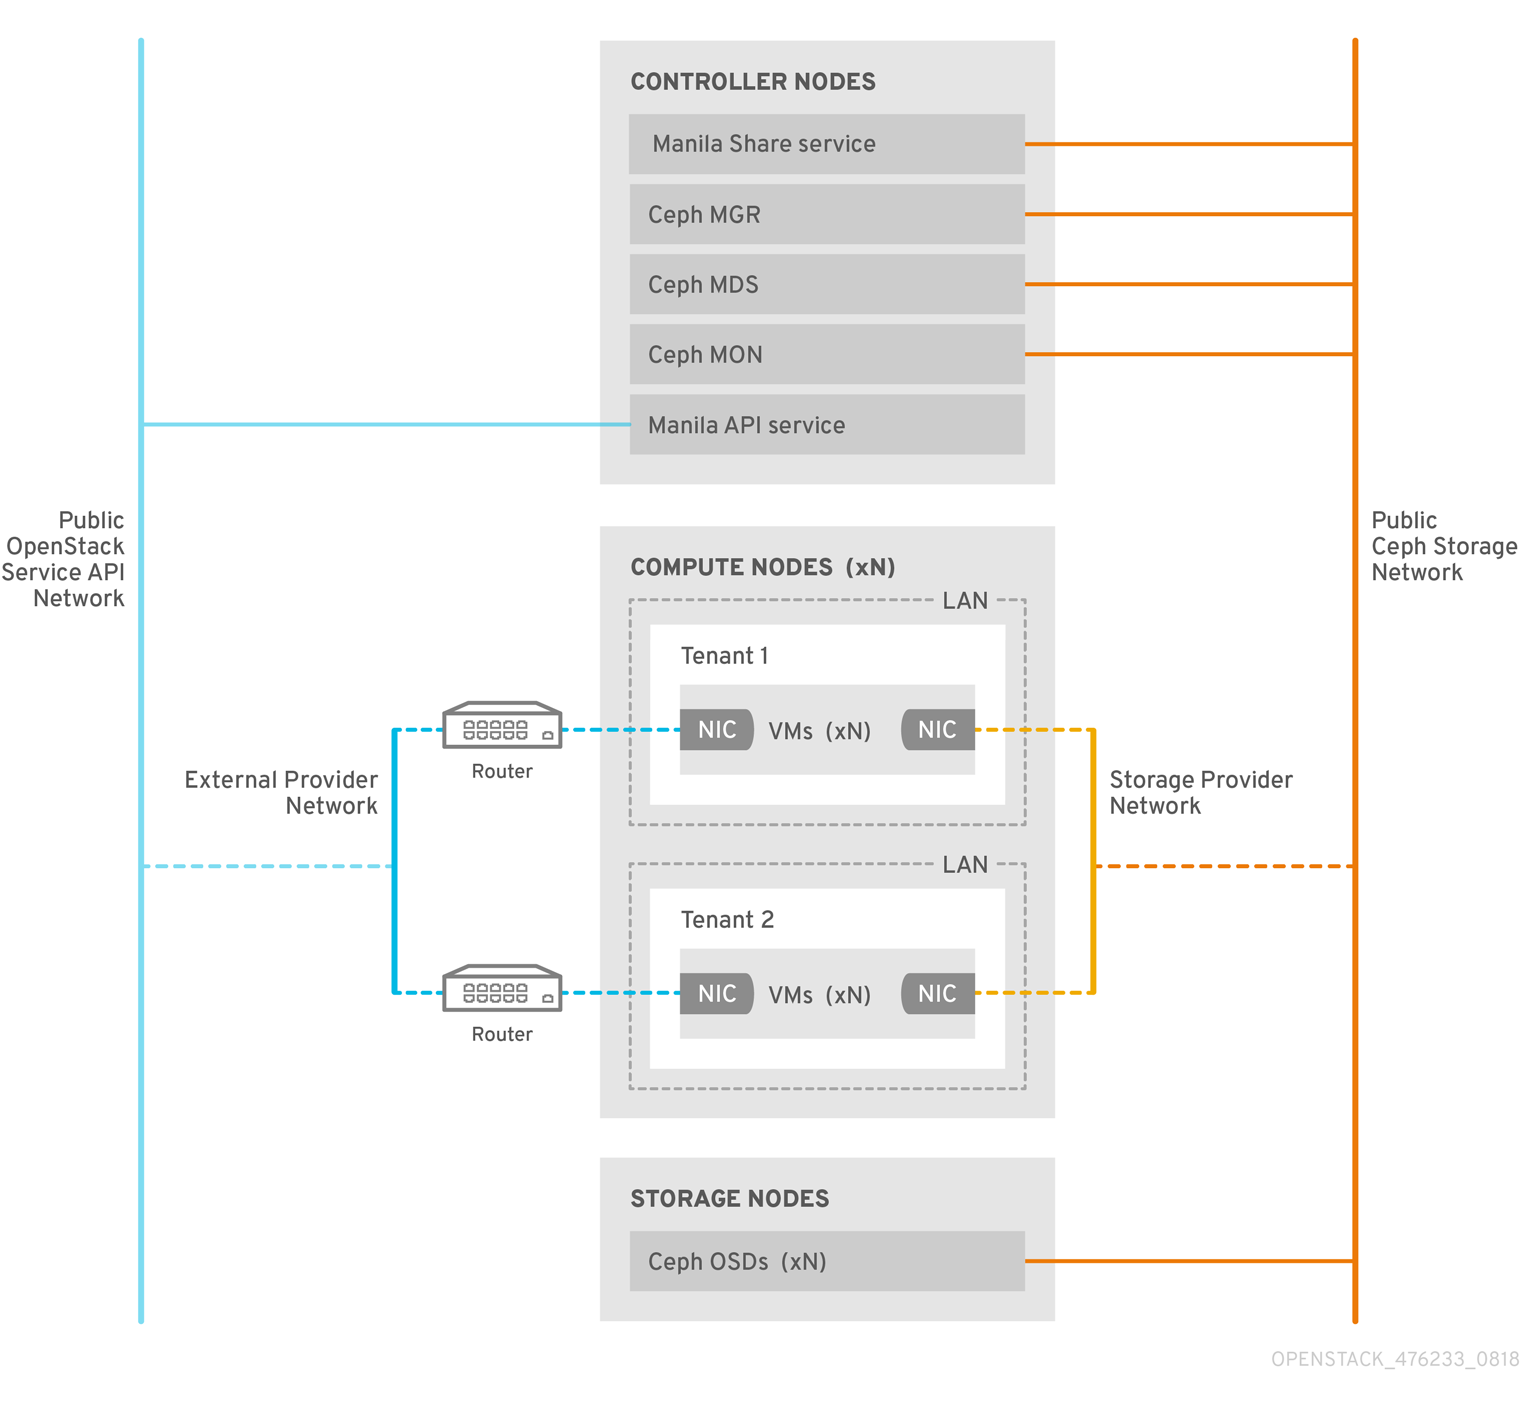
The CephFS native driver combines the OpenStack Shared File Systems service (manila) and Red Hat Ceph Storage. When you use Red Hat OpenStack (RHOSP) director, the Controller nodes host the Ceph daemons, such as the manager, metadata servers (MDS), and monitors (MON) and the Shared File Systems services.
Compute nodes can host one or more projects. Projects, which were formerly referred to as tenants, are represented in the following graphic by the white boxes. Projects contain user-managed VMs, which are represented by gray boxes with two NICs. To access the ceph and manila daemons projects, connect to the daemons over the public Ceph storage network.
On this network, you can access data on the storage nodes provided by the Ceph Object Storage Daemons (OSDs). Instances, or virtual machines (VMs), that are hosted on the project boot with two NICs: one dedicated to the storage provider network and the second to project-owned routers to the external provider network.
The storage provider network connects the VMs that run on the projects to the public Ceph storage network. The Ceph public network provides back-end access to the Ceph object storage nodes, metadata servers (MDS), and Controller nodes.
Using the native driver, CephFS relies on cooperation with the clients and servers to enforce quotas, guarantee project isolation, and for security. CephFS with the native driver works well in an environment with trusted end users on a private cloud. This configuration requires software that is running under user control to cooperate and work correctly.
Chapter 7. Deploying the Shared File Systems service with CephFS-NFS
With the Shared File Systems service (manila) with Ceph File System (CephFS) through NFS, you can use the same Red Hat Ceph Storage cluster that you use for block and object storage to provide file shares through the NFS protocol. For more information, see Configuring the Shared File Systems service (manila) in the Storage Guide.
The RHOSP Shared File Systems service with CephFS through NFS for RHOSP 17.0 and later is supported for use with Red Hat Ceph Storage version 5.x or later. For more information about how to determine the version of Ceph Storage installed on your system, see Red Hat Ceph Storage releases and corresponding Ceph package versions.
CephFS is the highly scalable, open-source distributed file system component of Red Hat Ceph Storage, a unified distributed storage platform. Ceph Storage implements object, block, and file storage using Reliable Autonomic Distributed Object Store (RADOS). CephFS, which is POSIX compatible, provides file access to a Ceph storage cluster.
The Shared File Systems service enables users to create shares in CephFS and access them with NFS 4.1 through NFS-Ganesha. NFS-Ganesha controls access to the shares and exports them to clients through the NFS 4.1 protocol.
The Shared File Systems service manages the life cycle of these shares from within RHOSP. When cloud administrators configure the service to use CephFS through NFS, these file shares come from the CephFS cluster, but are created and accessed as familiar NFS shares.
For more information about the Shared File Systems service, see Configuring the Shared File Systems service (manila) in the Storage Guide.
7.1. CephFS with NFS driver
The CephFS through NFS back end in the Shared File Systems service (manila) is composed of Ceph metadata servers (MDS), the CephFS through NFS gateway (NFS-Ganesha), and the Ceph cluster service components. The Shared File Systems service CephFS NFS driver uses NFS-Ganesha gateway to provide NFSv4 protocol access to CephFS shares. The Ceph MDS service maps the directories and file names of the file system to objects that are stored in RADOS clusters. NFS gateways can serve NFS file shares with different storage back ends, such as Ceph. The NFS-Ganesha service runs on the Controller nodes with the Ceph services.
Instances are booted with at least two NICs: one NIC connects to the project router and the second NIC connects to the StorageNFS network, which connects directly to the NFS-Ganesha gateway. The instance mounts shares by using the NFS protocol. CephFS shares that are hosted on Ceph OSD nodes are provided through the NFS gateway.
NFS-Ganesha improves security by preventing user instances from directly accessing the MDS and other Ceph services. Instances do not have direct access to the Ceph daemons.

Chapter 8. Initiating overcloud deployment
Deploy the overcloud after completing the initial configuration and customization of services.
8.1. Initiating overcloud deployment
Deploy the overcloud to implement the configuration of the Red Hat OpenStack Platform (RHOSP) environment.
Prerequisites
-
During undercloud installation, set
generate_service_certificate=falsein theundercloud.conffile. Otherwise, you must inject a trust anchor when you deploy the overcloud.
If you want to add Ceph Dashboard during your overcloud deployment, see Chapter 10, Adding the Red Hat Ceph Storage Dashboard to an overcloud deployment.
Procedure
Deploy the overcloud using the openstack overcloud deploy command. For a complete list of all command arguments, see openstack overcloud deploy in the Command Line Interface Reference.
The following is an example usage of the command:
$ openstack overcloud deploy --templates -r /home/stack/templates/roles_data_custom.yaml \
  -e /usr/share/openstack-tripleo-heat-templates/environments/cephadm/cephadm.yaml \
  -e /usr/share/openstack-tripleo-heat-templates/environments/cephadm/ceph-mds.yaml \
  -e /usr/share/openstack-tripleo-heat-templates/environments/cinder-backup.yaml \
  -e /home/stack/templates/storage-config.yaml \
  -e /home/stack/templates/deployed-ceph.yaml \
  -e /home/stack/templates/networks-deployed.yaml \
  -e /home/stack/templates/deployed-metal.yaml \
  -e /home/stack/templates/deployed-vips.yaml \
  --ntp-server pool.ntp.org
The example command uses the following options:
--templates-
Creates the overcloud from the default heat template collection,
/usr/share/openstack-tripleo-heat-templates/.
-
Creates the overcloud from the default heat template collection,
-r /home/stack/templates/roles_data_custom.yaml- Specifies a customized roles definition file.
-e /usr/share/openstack-tripleo-heat-templates/environments/cephadm/cephadm.yaml- Sets the director to finalize the previously deployed Ceph Storage cluster. This environment file deploys RGW by default. It also creates pools, keys, and daemons. If you do not want to deploy RGW or object storage, see the options described in Section 5.5, “Deployment options for Red Hat OpenStack Platform object storage”
-e /usr/share/openstack-tripleo-heat-templates/environments/cephadm/ceph-mds.yaml- Enables the Ceph Metadata Server, as described in Section 5.3, “Enabling Ceph Metadata Server”.
-e /usr/share/openstack-tripleo-heat-templates/environments/cinder-backup.yaml-
Enables the Block Storage Backup service (
cinder-backup), as described in Section 5.6, “Configuring the Block Storage Backup Service to use Ceph”.
-
Enables the Block Storage Backup service (
-e /home/stack/templates/storage-config.yaml- Adds the environment file that contains your custom Ceph Storage configuration as described in Section 5.1, “Configuring a custom environment file”
-e /home/stack/templates/deployed-ceph.yaml-
Adds the environment file that contains your Ceph cluster settings, as output by the
openstack overcloud ceph deploycommand run earlier.
-
Adds the environment file that contains your Ceph cluster settings, as output by the
-e /home/stack/templates/networks-deployed.yaml-
Adds the environment file that contains your Ceph cluster network settings, as output by
openstack overcloud network provision.
-
Adds the environment file that contains your Ceph cluster network settings, as output by
-e /home/stack/templates/deployed-metal.yaml-
Adds the environment file that contains your Ceph cluster node settings, as output by
openstack overcloud node provision.
-
Adds the environment file that contains your Ceph cluster node settings, as output by
-e /home/stack/templates/deployed-vips.yaml-
Adds the environment file that contains your Ceph cluster network VIP settings, as output by
openstack overcloud network vip provision.
-
Adds the environment file that contains your Ceph cluster network VIP settings, as output by
--ntp-server pool.ntp.org- Sets the NTP server.
Chapter 9. Using director to define performance tiers for varying workloads
Red Hat OpenStack Platform (RHOSP) director deploys Red Hat Ceph Storage performance tiers. Ceph Storage CRUSH rules combine with the CephPools parameter to use the device classes features. This builds different tiers to accommodate workloads with different performance requirements.
For example, you can define a HDD class for normal workloads and an SSD class that distributes data only over SSDs for high performance loads. In this scenario, when you create a new Block Storage volume, you can choose the performance tier, either HDDs or SSDs.
For more information on CRUSH rule creation, see Configuring CRUSH hierarchies.
Defining performance tiers in an existing environment can result in data movement in the Ceph Storage cluster. Director uses cephadm during the stack update. The cephadm application does not have the logic to verify if a pool exists and contains data. Changing the default CRUSH rule associated with a pool results in data movement. If the pool contains a large amount of data, that data will be moved.
If you require assistance or recommendations for adding or removing nodes, contact Red Hat support.
Ceph Storage automatically detects the disk type and assigns it to the corresponding device class; either HDD, SSD, or NVMe; based on the hardware properties exposed by the Linux kernel.
Prerequisites
- For new deployments, use Red Hat Ceph Storage (RHCS) version 5.2 or later.
9.1. Configuring performance tiers
To deploy different Red Hat Ceph Storage performance tiers, create a new environment file that contains the CRUSH map details and include it in the deployment command. Director does not expose specific parameters for this feature, but you can generate the tripleo-ansible expected variables.
Performance tier configuration can be combined with CRUSH hierarchies. See Configuring CRUSH hierarchies for information on CRUSH rule creation.
In the example procedure, each Ceph Storage node contains three OSDs: sdb and sdc are spinning disks and sdc is an SSD. Ceph automatically detects the correct disk type. You then configure two CRUSH rules, HDD and SSD, to map to the two respective device classes.
The HDD rule is the default and applies to all pools unless you configure pools with a different rule.
Finally, you create an extra pool called fastpool and map it to the SSD rule. This pool is ultimately exposed through a Block Storage (cinder) back end. Any workload that consumes this Block Storage back end is backed by SSD for fast performances only. You can leverage this for either data or boot from volume.
- WARNING
-
Defining performance tiers in an existing environment might result in massive data movement in the Ceph cluster.
cephadm, which director triggers during the stack update, does not have logic to verify whether a pool is already defined in the Ceph cluster and if it contains data. This means that defining performance tiers in an existing environment can be dangerous because the change of the default CRUSH rule that is associated with a pool results in data movement. If you require assistance or recommendations for adding or removing nodes, contact Red Hat support.
Procedure
-
Log in to the undercloud node as the
stackuser. -
Create an environment file, such as
/home/stack/templates/ceph-config.yaml, to contain the Ceph config parameters and the device classes variables. Alternatively, you can add the following configurations to an existing environment file. Add the
CephCrushRulesparameters. Thecrush_rulesparameter must contain a rule for each class that you define or that Ceph detects automatically. When you create a new pool, if no rule is specified, the rule that you want Ceph to use as the default is selected.CephCrushRules: crush_rules: - name: HDD root: default type: host class: hdd default: true - name: SSD root: default type: host class: ssd default: falseAdd the
CephPoolsparameter:-
Use the
rule_nameparameter to specify the tier for each pool that does not use the default rule. In the following example, thefastpoolpool uses the SSD device class that is configured as a fast tier, to manage Block Storage volumes. Use the
CinderRbdExtraPoolsparameter to configurefastpoolas a Block Storage back end.CephPools: - name: fastpool rule_name: SSD application: rbd CinderRbdExtraPools: fastpool
-
Use the
Use the following example to ensure that your environment file contains the correct values:
parameter_defaults:
        crush_rules:
            - name: HDD
              root: default
              type: host
              class: hdd
              default: true
            - name: SSD
              root: default
              type: host
              class: ssd
              default: false
    CinderRbdExtraPools: fastpool
    CephPools:
        - name: fastpool
          rule_name: SSD
          application: rbd
Include the new environment file in the
openstack overcloud deploycommand.$ openstack overcloud deploy \ --templates \ … -e <other_overcloud_environment_files> \ -e /home/stack/templates/ceph-config.yaml \ …Replace
<other_overcloud_environment_files>with the list of other environment files that are part of your deployment.
If you apply the environment file to an existing Ceph cluster, the pre-existing Ceph pools are not updated with the new rules. For this reason, you must enter the following command after the deployment completes to set the rules to the specified pools.
$ ceph osd pool set <pool> crush_rule <rule>- Replace <pool> with the name of the pool that you want to apply the new rule to.
-
Replace <rule> with one of the rule names that you specified with the
crush_rulesparameter.
For every rule that you change with this command, update the existing entry or add a new entry in the CephPools parameter in your existing templates:
CephPools:
    - name: <pool>
      rule_name: <rule>
      application: rbd
9.2. Verifying CRUSH rules and pools
Verify your CRUSH rules and pools settings.
- WARNING
-
Defining performance tiers in an existing environment might result in massive data movement in the Ceph cluster.
tripleo-ansible, which director triggers during the stack update, does not have logic to check if a pool is already defined in the Ceph cluster and if it contains data. This means that defining performance tiers in an existing environment can be dangerous because the change of the default CRUSH rule that is associated with a pool results in data movement. If you require assistance or recommendations for adding or removing nodes, contact Red Hat support.
Procedure
-
Log in to the overcloud Controller node as the
tripleo-adminuser. To verify that your OSD tiers are successfully set, enter the following command.
$ sudo cephadm shell ceph osd tree-
In the resulting tree view, verify that the
CLASScolumn displays the correct device class for each OSD that you set. Also verify that the OSDs are correctly assigned to the device classes with the following command.
$ sudo cephadm shell ceph osd crush tree --show-shadowCompare the resulting hierarchy with the results of the following command to ensure that the same values apply for each rule.
$ sudo cephadm shell ceph osd crush rule dump <rule_name>- Replace <rule_name> with the name of the rule you want to check.
Verify that the rules name and ID that you created are correct according to the
crush_rulesparameter that you used during deployment.$ sudo cephadm shell ceph osd crush rule dump | grep -E "rule_(id|name)"Verify that the Ceph pools are tied to the correct CRUSH rule ID that you retrieved in Step 3.
$ sudo cephadm shell -- ceph osd dump | grep pool- For each pool, ensure that the rule ID matches the rule name that you expect.
Chapter 10. Adding the Red Hat Ceph Storage Dashboard to an overcloud deployment
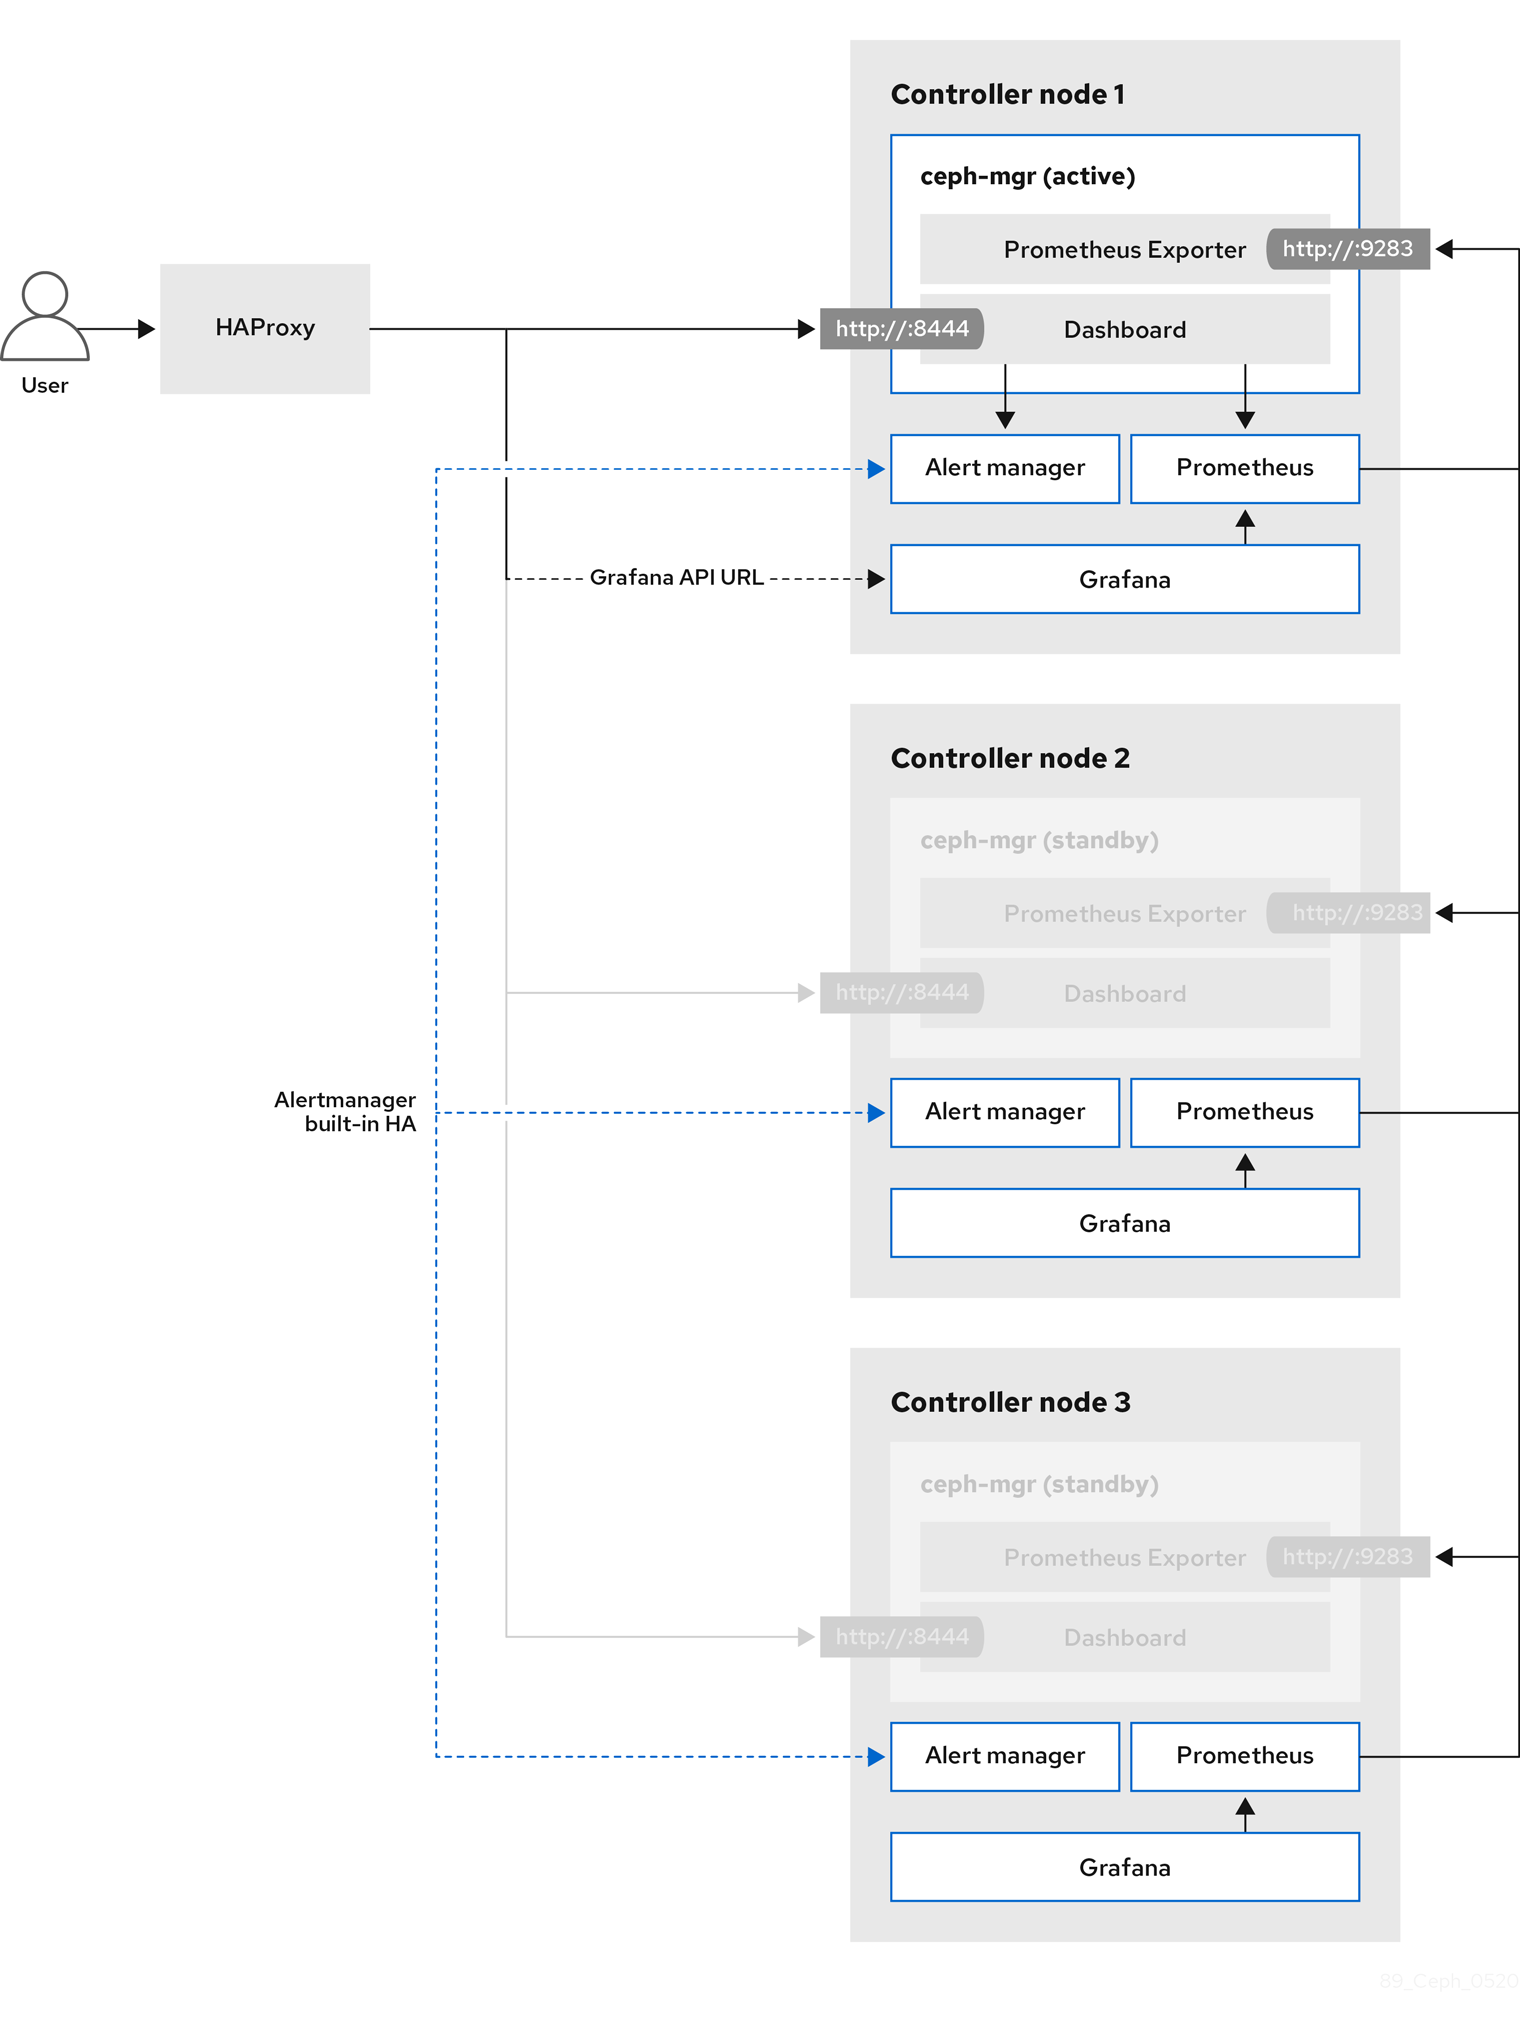
Red Hat Ceph Storage Dashboard is disabled by default but you can enable it in your overcloud with the Red Hat OpenStack Platform (RHOSP) director. The Ceph Dashboard is a built-in, web-based Ceph management and monitoring application that administers various aspects and objects in your Ceph cluster. Red Hat Ceph Storage Dashboard comprises the following components:
- The Ceph Dashboard manager module provides the user interface and embeds the platform front end, Grafana.
- Prometheus, the monitoring plugin.
- Alertmanager sends alerts to the Dashboard.
- Node Exporters export Ceph cluster data to the Dashboard.
This feature is supported with Ceph Storage 4.1 or later. For more information about how to determine the version of Ceph Storage installed on your system, see Red Hat Ceph Storage releases and corresponding Ceph package versions.
The Red Hat Ceph Storage Dashboard is always colocated on the same nodes as the other Ceph manager components.
The following diagram shows the architecture of Ceph Dashboard on Red Hat OpenStack Platform:
For more information about the Dashboard and its features and limitations, see Dashboard features in the Red Hat Ceph Storage Dashboard Guide.
10.1. TLS everywhere with Ceph Dashboard
The Dashboard front end is fully integrated with the TLS everywhere framework. You can enable TLS everywhere provided that you have the required environment files and they are included in the overcloud deploy command. This triggers the certificate request for both Grafana and the Ceph Dashboard and the generated certificate and key files are passed to cephadm during the overcloud deployment. For instructions and more information about how to enable TLS for the Dashboard as well as for other RHOSP services, see the following topics in the Advanced Overcloud Customization guide:
The port to reach the Ceph Dashboard remains the same even in the TLS-everywhere context.
10.2. Including the necessary containers for the Ceph Dashboard
Before you can add the Ceph Dashboard templates to your overcloud, you must include the necessary containers by using the containers-prepare-parameter.yaml file. To generate the containers-prepare-parameter.yaml file to prepare your container images, complete the following steps:
Procedure
-
Log in to your undercloud host as the
stackuser. Generate the default container image preparation file:
$ sudo openstack tripleo container image prepare default \
  --local-push-destination \
  --output-env-file containers-prepare-parameter.yaml
Edit the
containers-prepare-parameter.yamlfile and make the modifications to suit your requirements. The following examplecontainers-prepare-parameter.yamlfile contains the image locations and tags related to the Dashboard services including Grafana, Prometheus, Alertmanager, and Node Exporter. Edit the values depending on your specific scenario:parameter_defaults: ContainerImagePrepare: - push_destination: true set: ceph_alertmanager_image: ose-prometheus-alertmanager ceph_alertmanager_namespace: registry.redhat.io/openshift4 ceph_alertmanager_tag: v4.1 ceph_grafana_image: rhceph-5-dashboard-rhel8 ceph_grafana_namespace: registry.redhat.io/rhceph ceph_grafana_tag: 4 ceph_image: rhceph-5-rhel8 ceph_namespace: registry.redhat.io/rhceph ceph_node_exporter_image: ose-prometheus-node-exporter ceph_node_exporter_namespace: registry.redhat.io/openshift4 ceph_node_exporter_tag: v4.1 ceph_prometheus_image: ose-prometheus ceph_prometheus_namespace: registry.redhat.io/openshift4 ceph_prometheus_tag: v4.1 ceph_tag: latest
For more information about registry and image configuration with the containers-prepare-parameter.yaml file, see Container image preparation parameters in the Transitioning to Containerized Services guide.
10.3. Deploying Ceph Dashboard
Include the ceph-dashboard environment file to deploy the Ceph Dashboard.
If you want to deploy Ceph Dashboard with a composable network, see Section 10.4, “Deploying Ceph Dashboard with a composable network”.
The Ceph Dashboard admin user role is set to read-only mode by default. To change the Ceph Dashboard admin default mode, see Section 10.5, “Changing the default permissions”.
Procedure
-
Log in to the undercloud node as the
stackuser. Optional: The Ceph Dashboard network is set by default to the provisioning network. If you want to deploy the Ceph Dashboard and access it through a different network, create an environment file, for example:
ceph_dashboard_network_override.yaml. SetCephDashboardNetworkto one of the existing overcloud routed networks, for exampleexternal:parameter_defaults: ServiceNetMap: CephDashboardNetwork: externalImportantChanging the
CephDashboardNetworkvalue to access the Ceph Dashboard from a different network is not supported after the initial deployment.Include the following environment files in the
openstack overcloud deploycommand. Include all environment files that are part of your deployment, and theceph_dashboard_network_override.yamlfile if you chose to change the default network:$ openstack overcloud deploy \ --templates \ -e <overcloud_environment_files> \ -e /usr/share/openstack-tripleo-heat-templates/environments/cephadm/cephadm.yaml \ -e /usr/share/openstack-tripleo-heat-templates/environments/cephadm/ceph-dashboard.yaml \ -e ceph_dashboard_network_override.yamlReplace
<overcloud_environment_files>with the list of environment files that are part of your deployment.- Result
- The resulting deployment comprises an external stack with the grafana, prometheus, alertmanager, and node-exporter containers. The Ceph Dashboard manager module is the back end for this stack, and it embeds the grafana layouts to provide Ceph cluster specific metrics to the end users.
10.4. Deploying Ceph Dashboard with a composable network
You can deploy the Ceph Dashboard on a composable network instead of on the default Provisioning network. This eliminates the need to expose the Ceph Dashboard service on the Provisioning network. When you deploy the Dashboard on a composable network, you can also implement separate authorization profiles.
You must choose which network to use before you deploy because you can apply the Dashboard to a new network only when you first deploy the overcloud. Use the following procedure to choose a composable network before you deploy.
Procedure
- Log in to the undercloud as the stack user.
Generate the Controller specific role to include the Dashboard composable network:
$ openstack overcloud roles generate -o /home/stack/roles_data_dashboard.yaml ControllerStorageDashboard Compute BlockStorage ObjectStorage CephStorage- Result
A new
ControllerStorageDashboardrole is generated inside theroles_data.yamldefined as the output of the command. You must include this file in the template list when you use the overcloud deploy command.NOTE: The
ControllerStorageDashboardrole does not containCephNFSnornetwork_data_dashboard.yaml.-
Director provides a network environment file where the composable network is defined. The default location of this file is
/usr/share/openstack-tripleo-heat-templates/network_data_dashboard.yaml. You must include this file in the overcloud template list when you use the overcloud deploy command.
Include the following environment files, with all environment files that are part of your deployment, in the
openstack overcloud deploycommand:$ openstack overcloud deploy \ --templates \ -r /home/stack/roles_data.yaml \ -n /usr/share/openstack-tripleo-heat-templates/network_data_dashboard.yaml \ -e /usr/share/openstack-tripleo-heat-templates/environments/network-isolation.yaml \ -e /usr/share/openstack-tripleo-heat-templates/environments/network-environment.yaml \ -e <overcloud_environment_files> \ -e /usr/share/openstack-tripleo-heat-templates/environments/cephadm/cephadm.yaml \ -e /usr/share/openstack-tripleo-heat-templates/environments/cephadm/ceph-dashboard.yamlReplace
<overcloud_environment_files>with the list of environment files that are part of your deployment.- Result
- The resulting deployment comprises an external stack with the grafana, prometheus, alertmanager, and node-exporter containers. The Ceph Dashboard manager module is the back end for this stack, and it embeds the grafana layouts to provide Ceph cluster-specific metrics to the end users.
10.5. Changing the default permissions
The Ceph Dashboard admin user role is set to read-only mode by default for safe monitoring of the Ceph cluster. To permit an admin user to have elevated privileges so that they can alter elements of the Ceph cluster with the Dashboard, you can use the CephDashboardAdminRO parameter to change the default admin permissions.
A user with full permissions might alter elements of your Ceph cluster that director configures. This can cause a conflict with director-configured options when you run a stack update. To avoid this problem, do not alter director-configured options with Ceph Dashboard, for example, Ceph OSP pools attributes.
Procedure
-
Log in to the undercloud as the
stackuser. Create the following
ceph_dashboard_admin.yamlenvironment file:parameter_defaults: CephDashboardAdminRO: falseRun the overcloud deploy command to update the existing stack and include the environment file you created with all other environment files that are part of your existing deployment:
$ openstack overcloud deploy \
--templates \
-e <existing_overcloud_environment_files> \
-e ceph_dashboard_admin.yml
Replace
<existing_overcloud_environment_files>with the list of environment files that are part of your existing deployment.
10.6. Accessing Ceph Dashboard
To test that Ceph Dashboard is running correctly, complete the following verification steps to access it and check that the data it displays from the Ceph cluster is correct.
Procedure
-
Log in to the undercloud node as the
stackuser. Retrieve the dashboard admin login credentials:
[stack@undercloud ~]$ grep tripleo_cephadm_dashboard_admin_password <config-download>/<stack>/cephadm/cephadm-extra-vars-heat.ymlRetrieve the VIP address to access the Ceph Dashboard:
[stack@undercloud-0 ~]$ grep tripleo_cephadm_dashboard_frontend_vip <config-download>/<stack>/cephadm/cephadm-extra-vars-ansible.ymlUse a web browser to point to the front end VIP and access the Dashboard. Director configures and exposes the Dashboard on the provisioning network, so you can use the VIP that you retrieved to access the Dashboard directly on TCP port 8444. Ensure that the following conditions are met:
- The Web client host is layer 2 connected to the provisioning network.
The provisioning network is properly routed or proxied, and it can be reached from the web client host. If these conditions are not met, you can still open a SSH tunnel to reach the Dashboard VIP on the overcloud:
client_host$ ssh -L 8444:<dashboard_vip>:8444 stack@<your undercloud>Replace <dashboard_vip> with the IP address of the control plane VIP that you retrieved.
To access the Dashboard, go to: http://localhost:8444 in a web browser and log in with the following details:
-
The default user that
cephadmcreates: admin. The password in
<config-download>/<stack>/cephadm/cephadm-extra-vars-heat.yml.- Results
- You can access the Ceph Dashboard.
-
The numbers and graphs that the Dashboard displays reflect the same Ceph cluster status that the CLI command,
ceph -s, returns.
-
The default user that
For more information about the Red Hat Ceph Storage Dashboard, see the Red Hat Ceph Storage Administration Guide
Chapter 11. Post-deployment operations to manage the Red Hat Ceph Storage cluster
After you deploy your Red Hat OpenStack Platform (RHOSP) environment with containerized Red Hat Ceph Storage, there are some operations you can use to manage the Ceph Storage cluster.
11.1. Disabling configuration overrides
After the Ceph Storage cluster is initially deployed, the cluster is configured to allow the setup of services such as RGW during the overcloud deployment. Once overcloud deployment is complete, director should not be used to make changes to the cluster configuration unless you are scaling up the cluster. Cluster configuration changes should be performed using Ceph commands.
Procedure
-
Log in to the undercloud node as the
stackuser. -
Open the file
deployed_ceph.yamlor the file you use in your environment to define the Ceph Storage cluster configuration. -
Locate the
ApplyCephConfigOverridesOnUpdateparameter. -
Change the
ApplyCephConfigOverridesOnUpdateparameter value tofalse. - Save the file.
Additional resources
For more information on the ApplyCephConfigOverridesOnUpdate and CephConfigOverrides parameters, see Overcloud Parameters.
11.2. Accessing the overcloud
Director generates a script to configure and help authenticate interactions with your overcloud from the undercloud. Director saves this file, overcloudrc, in the home directory of the stack user.
Procedure
Run the following command to source the file:
$ source ~/overcloudrcThis loads the necessary environment variables to interact with your overcloud from the undercloud CLI.
To return to interacting with the undercloud, run the following command:
$ source ~/stackrc
11.3. Monitoring Red Hat Ceph Storage nodes
After you create the overcloud, check the status of the Ceph cluster to confirm that it works correctly.
Procedure
Log in to a Controller node as the
tripleo-adminuser:$ nova list $ ssh tripleo-admin@192.168.0.25Check the health of the Ceph cluster:
$ sudo cephadm shell -- ceph healthIf the Ceph cluster has no issues, the command reports back
HEALTH_OK. This means the Ceph cluster is safe to use.Log in to an overcloud node that runs the Ceph monitor service and check the status of all OSDs in the Ceph cluster:
$ sudo cephadm shell -- ceph osd treeCheck the status of the Ceph Monitor quorum:
$ sudo cephadm shell -- ceph quorum_statusThis shows the monitors participating in the quorum and which one is the leader.
Verify that all Ceph OSDs are running:
$ sudo cephadm shell -- ceph osd stat
For more information on monitoring Ceph clusters, see Monitoring a Ceph Storage cluster in the Red Hat Ceph Storage Administration Guide.
11.4. Mapping a Block Storage (cinder) type to your new Ceph pool
After you complete the configuration steps, make the performance tiers feature available to RHOSP tenants by using Block Storage (cinder) to create a type that is mapped to the fastpool tier that you created.
Procedure
-
Log in to the undercloud node as the
stackuser. Source the
overcloudrcfile:$ source overcloudrcCheck the Block Storage volume existing types:
$ cinder type-listCreate the new Block Storage volume fast_tier:
$ cinder type-create fast_tierCheck that the Block Storage type is created:
$ cinder type-listWhen the
fast_tierBlock Storage type is available, set thefastpoolas the Block Storage volume back end for the new tier that you created:$ cinder type-key fast_tier set volume_backend_name=tripleo_ceph_fastpoolUse the new tier to create new volumes:
$ cinder create 1 --volume-type fast_tier --name fastdisk
The Red Hat Ceph Storage documentation provides additional information and procedures for the ongoing maintenance and operation of the Ceph Storage cluster. See Product Documentation for Red Hat Ceph Storage 5 for this documentation.
Chapter 12. Native CephFS post-deployment configuration and verification
You must complete some post-deployment configuration tasks before you create CephFS shares, grant user access, and mount CephFS shares.
- Map the Networking service (neutron) storage network to the isolated data center storage network.
- Make the storage provider network available to trusted tenants only through custom role based access control (RBAC). Do not share the storage provider network globally.
- Create a private share type.
- Grant access to specific trusted tenants.
After you complete these steps, the tenant compute instances can create, allow access to, and mount native CephFS shares.
Deploying native CephFS as a back end of the Shared File Systems service (manila) adds the following new elements to the overcloud environment:
- Storage provider network
- Ceph MDS service on the Controller nodes
The cloud administrator must verify the stability of the native CephFS environment before making it available to service users.
For more information about using the Shared File Systems service with native CephFS, see Configuring the Shared File Systems service (manila) in the Storage Guide.
12.1. Creating the storage provider network
You must map the new isolated storage network to a Networking (neutron) provider network. The Compute VMs attach to the network to access native CephFS share export locations.
For information about network security with the Shared File Systems service (manila), see Hardening the Shared File Systems Service in Hardening Red Hat OpenStack Platform.
Procedure
The openstack network create command defines the configuration for the storage neutron network.
Source the overcloud credentials file:
$ source ~/<credentials_file>-
Replace
<credentials_file>with the name of your credentials file, for example,overcloudrc.
-
Replace
On an undercloud node, create the storage network:
(overcloud) [stack@undercloud-0 ~]$ openstack network create Storage --provider-network-type vlan --provider-physical-network datacentre --provider-segment 30You can enter this command with the following options:
-
For the
--provider-physical-networkoption, use the default valuedatacentre, unless you set another tag for the br-isolated bridge through NeutronBridgeMappings in your tripleo-heat-templates. -
For the
--provider-segmentoption, use the value set for the Storage isolated network in your network environment file. If this was not customized, the default environment file is/usr/share/openstack-tripleo-heat-templates/network_data.yaml. The VLAN associated with the Storage network value is30unless you modified the isolated network definitions. -
For the
--provider-network-typeoption, use the valuevlan.
-
For the
12.2. Configuring the storage provider network
Create a corresponding StorageSubnet on the neutron provider network. Ensure that the subnet is the same for the storage_subnet in the undercloud, and that the allocation range for the storage subnet and the corresponding undercloud subnet do not overlap.
Requirements
- The starting and ending IP range for the allocation pool
- The subnet IP range
Procedure
From an undercloud node, enter the following command:
[stack@undercloud ~]$ source ~/overcloudrcUse the sample command to provision the network. Update the values to suit your environment.
(overcloud) [stack@undercloud-0 ~]$ openstack subnet create \ --allocation-pool start=172.17.3.10,end=172.17.3.149 \ --dhcp \ --network Storage \ --subnet-range 172.17.3.0/24 \ --gateway none StorageSubnet-
For the
--allocation-pooloption, replace thestart=172.17.3.10,end=172.17.3.149IP values with the IP values for your network. -
For the
--subnet-rangeoption, replace the172.17.3.0/24subnet range with the subnet range for your network.
-
For the
12.3. Configuring role-based access control for the storage provider network
After you identify the trusted tenants or projects that can use the storage network, configure role-based access control (RBAC) rules for them through the Networking service (neutron).
Requirements
Names of the projects that need access to the storage network
Procedure
From an undercloud node, enter the following command:
[stack@undercloud ~]$ source ~/overcloudrcIdentify the projects that require access:
(overcloud) [stack@undercloud-0 ~]$ openstack project list
+----------------------------------+---------+
| ID                               | Name    |
+----------------------------------+---------+
| 06f1068f79d2400b88d1c2c33eacea87 | demo    |
| 5038dde12dfb44fdaa0b3ee4bfe487ce | service |
| 820e2d9c956644c2b1530b514127fd0d | admin   |
+----------------------------------+---------+
Create network RBAC rules with the desired projects:
(overcloud) [stack@undercloud-0 ~]$ openstack network rbac create \
--action access_as_shared Storage \
--type network \
--target-project demo
Repeat this step for all of the projects that require access to the storage network.
12.5. Verifying creation of isolated storage network
The network_data.yaml file used to deploy native CephFS as a Shared File Systems service back end creates the storage VLAN. Use this procedure to confirm you successfully created the storage VLAN.
Procedure
- Log in to one of the Controller nodes in the overcloud.
Check the connected networks and verify the existence of the VLAN as set in the
network_data.yamlfile:$ ip a 8: vlan30: <BROADCAST,MULTICAST,UP,LOWER_UP> mtu 1500 qdisc noqueue state UNKNOWN group default qlen 1000 link/ether 52:9c:82:7a:d4:75 brd ff:ff:ff:ff:ff:ff inet 172.17.3.144/24 brd 172.17.3.255 scope global vlan30 valid_lft forever preferred_lft forever inet6 fe80::509c:82ff:fe7a:d475/64 scope link valid_lft forever preferred_lft forever
12.6. Verifying Ceph MDS service
Use the systemctl status command to verify the Ceph MDS service status.
Procedure
Enter the following command on all Controller nodes to check the status of the MDS container:
$ systemctl status ceph-mds<@CONTROLLER-HOST>Example:
$ systemctl status ceph-mds@controller-0.service

ceph-mds@controller-0.service - Ceph MDS
   Loaded: loaded (/etc/systemd/system/ceph-mds@.service; enabled; vendor preset: disabled)
   Active: active (running) since Tue 2018-09-18 20:11:53 UTC; 6 days ago
 Main PID: 65066 (conmon)
   Tasks: 16 (limit: 204320)
   Memory: 38.2M
   CGroup: /system.slice/system-ceph\x2dmds.slice/ceph-mds@controller-0.service
         └─60921 /usr/bin/podman run --rm --net=host --memory=32000m --cpus=4 -v
/var/lib/ceph:/var/lib/ceph:z -v /etc/ceph:/etc/ceph:z -v
/var/run/ceph:/var/run/ceph:z -v /etc/localtime:/etc/localtime:ro>
12.7. Verifying Ceph cluster status
Verify the Ceph cluster status to confirm that the cluster is active.
Procedure
- Log in to any Controller node.
From the Ceph monitor daemon, enter the following command:
$ sudo podman exec ceph-mon-controller-0 ceph -s cluster: id: 670dc288-cd36-4772-a4fc-47287f8e2ebf health: HEALTH_OK services: mon: 3 daemons, quorum controller-1,controller-2,controller-0 (age 14h) mgr: controller-1(active, since 8w), standbys: controller-0, controller-2 mds: cephfs:1 {0=controller-2=up:active} 2 up:standby osd: 15 osds: 15 up (since 8w), 15 in (since 8w) task status: scrub status: mds.controller-2: idle data: pools: 6 pools, 192 pgs objects: 309 objects, 1.6 GiB usage: 21 GiB used, 144 GiB / 165 GiB avail pgs: 192 active+cleanNoteThere is one active MDS and two MDSs on standby.
To see a detailed status of the Ceph File System, enter the following command:
$ sudo ceph fs ls name: cephfs metadata pool: manila_metadata, data pools: [manila_data]NoteIn this example output,
cephfsis the name of Ceph File System that director creates to host CephFS shares that users create through the Shared File Systems service.
12.9. Verifying manila-api services acknowledges scheduler and share services
Complete the following steps to confirm that the manila-api service acknowledges the scheduler and share services.
Procedure
- Log in to the undercloud.
Enter the following command:
$ source /home/stack/overcloudrcEnter the following command to confirm
manila-schedulerandmanila-shareare enabled:$ manila service-list | Id | Binary | Host | Zone | Status | State | Updated_at | | 2 | manila-scheduler | hostgroup | nova | enabled | up | 2018-08-08T04:15:03.000000 | | 5 | manila-share | hostgroup@cephfs | nova | enabled | up | 2018-08-08T04:15:03.000000 |
Chapter 13. CephFS NFS post-deployment configuration and verification
You must complete two post-deployment configuration tasks before you create NFS shares, grant user access, and mount NFS shares.
- Map the Networking service (neutron) StorageNFS network to the isolated data center Storage NFS network. You can omit this option if you do not want to isolate NFS traffic to a separate network.
- Create the default share type.
After you complete these steps, the tenant compute instances can create, allow access to, and mount NFS shares.
When you deploy CephFS through NFS as a back end of the Shared File Systems service (manila), you add the following new elements to the overcloud environment:
- StorageNFS network
- Ceph MDS service on the controllers
- NFS-Ganesha service on the controllers
As the cloud administrator, you must verify the stability of the CephFS through NFS environment before you make it available to service users.
13.1. Creating the storage provider network
You must map the new isolated StorageNFS network to a Networking (neutron) provider network. The Compute VMs attach to the network to access share export locations that are provided by the NFS-Ganesha gateway.
For information about network security with the Shared File Systems service (manila), see Hardening the Shared File Systems Service in Hardening Red Hat OpenStack Platform.
Procedure
The openstack network create command defines the configuration for the StorageNFS neutron network.
Source the overcloud credentials file:
$ source ~/<credentials_file>-
Replace
<credentials_file>with the name of your credentials file, for example,overcloudrc.
-
Replace
On an undercloud node, create the StorageNFS network:
(overcloud) [stack@undercloud-0 ~]$ openstack network create StorageNFS --share --provider-network-type vlan --provider-physical-network datacentre --provider-segment 70You can enter this command with the following options:
-
For the
--provider-physical-networkoption, use the default valuedatacentre, unless you set another tag for the br-isolated bridge through NeutronBridgeMappings in your tripleo-heat-templates. -
For the
--provider-segmentoption, use the VLAN value set for the StorageNFS isolated network in the heat template,/usr/share/openstack-tripleo-heat-templates/network_data_ganesha.yaml. This value is 70, unless the deployer modified the isolated network definitions. -
For the
--provider-network-typeoption, use the valuevlan.
-
For the
13.4. Verifying creation of isolated StorageNFS network
The network_data_ganesha.yaml file used to deploy CephFS through NFS as a Shared File Systems service back end creates the StorageNFS VLAN. Complete the following steps to verify the existence of the isolated StorageNFS network.
Procedure
- Log in to one of the controllers in the overcloud.
Enter the following command to check the connected networks and verify the existence of the VLAN as set in
network_data_ganesha.yaml:$ ip a 15: vlan310: <BROADCAST,MULTICAST,UP,LOWER_UP> mtu 1500 qdisc noqueue state UNKNOWN group default qlen 1000 link/ether 32:80:cf:0e:11:ca brd ff:ff:ff:ff:ff:ff inet 172.16.4.4/24 brd 172.16.4.255 scope global vlan310 valid_lft forever preferred_lft forever inet 172.16.4.7/32 brd 172.16.4.255 scope global vlan310 valid_lft forever preferred_lft forever inet6 fe80::3080:cfff:fe0e:11ca/64 scope link valid_lft forever preferred_lft forever
13.5. Verifying Ceph MDS service
Use the systemctl status command to verify the Ceph MDS service status.
Procedure
Enter the following command on all Controller nodes to check the status of the MDS container:
$ systemctl status ceph-mds<@CONTROLLER-HOST>Example:
$ systemctl status ceph-mds@controller-0.service

ceph-mds@controller-0.service - Ceph MDS
   Loaded: loaded (/etc/systemd/system/ceph-mds@.service; enabled; vendor preset: disabled)
   Active: active (running) since Tue 2018-09-18 20:11:53 UTC; 6 days ago
 Main PID: 65066 (conmon)
   Tasks: 16 (limit: 204320)
   Memory: 38.2M
   CGroup: /system.slice/system-ceph\x2dmds.slice/ceph-mds@controller-0.service
         └─60921 /usr/bin/podman run --rm --net=host --memory=32000m --cpus=4 -v
/var/lib/ceph:/var/lib/ceph:z -v /etc/ceph:/etc/ceph:z -v
/var/run/ceph:/var/run/ceph:z -v /etc/localtime:/etc/localtime:ro>
13.6. Verifying Ceph cluster status
Complete the following steps to verify Ceph cluster status.
Procedure
- Log in to the active Controller node.
Enter the following command:
$ sudo ceph -s

cluster:
    id: 3369e280-7578-11e8-8ef3-801844eeec7c
    health: HEALTH_OK

  services:
    mon: 3 daemons, quorum overcloud-controller-1,overcloud-controller-2,overcloud-controller-0
    mgr: overcloud-controller-1(active), standbys: overcloud-controller-2, overcloud-controller-0
    mds: cephfs-1/1/1 up  {0=overcloud-controller-0=up:active}, 2 up:standby
    osd: 6 osds: 6 up, 6 in
There is one active MDS and two MDSs on standby.
To check the status of the Ceph file system in more detail, enter the following command and replace
<cephfs>with the name of the Ceph file system:$ sudo ceph fs ls name: cephfs, metadata pool: manila_metadata, data pools: [manila_data]
13.8. Verifying manila-api services acknowledges scheduler and share services
Complete the following steps to confirm that the manila-api service acknowledges the scheduler and share services.
Procedure
- Log in to the undercloud.
Enter the following command:
$ source /home/stack/overcloudrcEnter the following command to confirm
manila-schedulerandmanila-shareare enabled:$ manila service-list | Id | Binary | Host | Zone | Status | State | Updated_at | | 2 | manila-scheduler | hostgroup | nova | enabled | up | 2018-08-08T04:15:03.000000 | | 5 | manila-share | hostgroup@cephfs | nova | enabled | up | 2018-08-08T04:15:03.000000 |
Chapter 14. Rebooting the environment
It might become necessary to reboot the environment. For example, when you need to modify physical servers or recover from a power outage. In these types of situations, it is important to make sure your Ceph Storage nodes boot correctly.
You must boot the nodes in the following order:
- Boot all Ceph Monitor nodes first - This ensures the Ceph Monitor service is active in your high availability Ceph cluster. By default, the Ceph Monitor service is installed on the Controller node. If the Ceph Monitor is separate from the Controller in a custom role, make sure this custom Ceph Monitor role is active.
- Boot all Ceph Storage nodes - This ensures the Ceph OSD cluster can connect to the active Ceph Monitor cluster on the Controller nodes.
14.1. Rebooting a Ceph Storage (OSD) cluster
Complete the following steps to reboot a cluster of Ceph Storage (OSD) nodes.
Prerequisites
On a Ceph Monitor or Controller node that is running the
ceph-monservice, check that the Red Hat Ceph Storage cluster status is healthy and the pg status isactive+clean:$ sudo cephadm -- shell ceph statusIf the Ceph cluster is healthy, it returns a status of
HEALTH_OK.If the Ceph cluster status is unhealthy, it returns a status of
HEALTH_WARNorHEALTH_ERR. For troubleshooting guidance, see the Red Hat Ceph Storage 5 Troubleshooting Guide.
Procedure
Log in to a Ceph Monitor or Controller node that is running the
ceph-monservice, and disable Ceph Storage cluster rebalancing temporarily:$ sudo cephadm shell -- ceph osd set noout $ sudo cephadm shell -- ceph osd set norebalanceNoteIf you have a multistack or distributed compute node (DCN) architecture, you must specify the Ceph cluster name when you set the
nooutandnorebalanceflags. For example:sudo cephadm shell -c /etc/ceph/<cluster>.conf -k /etc/ceph/<cluster>.client.keyring.- Select the first Ceph Storage node that you want to reboot and log in to the node.
Reboot the node:
$ sudo reboot- Wait until the node boots.
Log in to the node and check the Ceph cluster status:
$ sudo cephadm -- shell ceph statusCheck that the
pgmapreports allpgsas normal (active+clean).- Log out of the node, reboot the next node, and check its status. Repeat this process until you have rebooted all Ceph Storage nodes.
When complete, log in to a Ceph Monitor or Controller node that is running the
ceph-monservice and enable Ceph cluster rebalancing:$ sudo cephadm shell -- ceph osd unset noout $ sudo cephadm shell -- ceph osd unset norebalanceNoteIf you have a multistack or distributed compute node (DCN) architecture, you must specify the Ceph cluster name when you unset the
nooutandnorebalanceflags. For example:sudo cephadm shell -c /etc/ceph/<cluster>.conf -k /etc/ceph/<cluster>.client.keyringPerform a final status check to verify that the cluster reports
HEALTH_OK:$ sudo cephadm shell ceph status
14.2. Rebooting Ceph Storage OSDs to enable connectivity to the Ceph Monitor service
If a situation occurs where all overcloud nodes boot at the same time, the Ceph OSD services might not start correctly on the Ceph Storage nodes. In this situation, reboot the Ceph Storage OSDs so they can connect to the Ceph Monitor service.
Procedure
Verify a
HEALTH_OKstatus of the Ceph Storage node cluster:$ sudo ceph status
Chapter 15. Scaling the Ceph Storage cluster
You can scale the size of your Ceph Storage cluster by adding or removing storage nodes.
15.1. Scaling up the Ceph Storage cluster
As capacity and performance requirements change, you can scale up your Ceph Storage cluster to meet increased demands. Before doing so, ensure that you have enough nodes for the updated deployment. Then you can register and tag the new nodes in your Red Hat OpenStack Platform (RHOSP) environment.
To register new Ceph Storage nodes with director, complete this procedure.
Procedure
-
Log in to the undercloud node as the
stackuser. Modify the
~/overcloud-baremetal-deploy.yamlto add the CephStorage nodes to the deployment.The following example file represents an original deployment with three CephStorage nodes.
- name: CephStorage
  count: 3
  instances:
    - hostname: ceph-0
      name: ceph-0
    - hostname: ceph-1
      name: ceph-2
    - hostname: ceph-2
      name: ceph-2
The following example modifies this file to add three additional nodes.
- name: CephStorage
  count: 6
  instances:
    - hostname: ceph-0
      name: ceph-0
    - hostname: ceph-1
      name: ceph-2
    - hostname: ceph-2
      name: ceph-2
    - hostname: ceph-3
      name: ceph-3
    - hostname: ceph-4
      name: ceph-4
    - hostname: ceph-5
      name: ceph-5
Use the
openstack overcloud node provisioncommand with the updated~/overcloud-baremetal-deploy.yamlfile.openstack overcloud node provision \ --stack overcloud \ --network-config \ --output ~/overcloud-baremetal-deployed.yaml \ ~/overcloud-baremetal-deploy.yamlNoteThis command will provision the configured nodes and and output an updated copy of
~/overcloud-baremetal-deployed.yaml. The new version updates theCephStorage. TheDeployedServerPortMapandHostnameMapalso contain the new storage nodes.Use the
openstack overcloud deploycommand with the updated~/overcloud-baremetal-deployed.yamlfile.openstack overcloud deploy --templates \ -e /usr/share/openstack-tripleo-heat-templates/environments/cephadm/cephadm.yaml \ -e deployed_ceph.yaml -e overcloud-baremetal-deploy.yaml
Result
The following actions occur when the openstack overcloud deploy command runs:
-
The storage networks and firewall rules are configured on the new
CephStoragenodes. -
The
ceph-adminuser is created on the newCephStoragenodes. -
The
ceph-adminuser public SSH key is distributed to the newCephStoragenodes so thatcephadmcan use SSH to add extra nodes. -
If a new
CephMonorCephMgrnode is added, theceph-adminprivate SSH key is also distributed to that node. -
An updated Ceph specification is generated and installed on the bootstrap node. This updated specification will typically be available in
/home/ceph-admin/specs/ceph_spec.yamlon the bootstrap node. -
The
cephadmbootstrap process is skipped becausecephadm lsindicates the Ceph containers are already running. -
The updated Ceph specification is applied and
cephadmschedules the new nodes to join the Ceph cluster.
15.2. Scaling down and replacing Ceph Storage nodes
In some cases, you might need to scale down your Ceph Storage cluster or replace a Ceph Storage node. In either situation, you must disable and rebalance the Ceph Storage nodes that you want to remove from the overcloud to prevent data loss.
Do not proceed with this procedure if the Ceph Storage cluster does not have the capacity to lose OSDs.
-
Log in to the overcloud Controller node as the
tripleo-adminuser. -
Use the
sudo cephadm shellcommand to start a Ceph shell. Use the
ceph osd treecommand to identify OSDs to be removed by server.In the following example we want to identify the OSDs of
ceph-2host.[ceph: root@oc0-controller-0 /]# ceph osd tree ID CLASS WEIGHT TYPE NAME STATUS REWEIGHT PRI-AFF -1 0.58557 root default -7 0.19519 host ceph-2 5 hdd 0.04880 osd.5 up 1.00000 1.00000 7 hdd 0.04880 osd.7 up 1.00000 1.00000 9 hdd 0.04880 osd.9 up 1.00000 1.00000 11 hdd 0.04880 osd.11 up 1.00000 1.00000Export the Ceph cluster specification to a YAML file.
[ceph: root@oc0-controller-0 /]# ceph orch ls --export > spec.yml-
Edit the exported specification file so that the applicable hosts are removed from the
service-type: osd hostslist and the applicable hosts have theplacement: hostsvalue removed. - Save the edited file.
Apply the modified Ceph specification file.
[ceph: root@oc0-controller-0 /]# ceph orch apply -i spec.ymlImportantIf you do not export and edit the Ceph specification file before removing the OSDs, the Ceph Manager will attempt to recreate the OSDs.
Use the command
ceph orch osd rm --zap <osd_list>to remove the OSDs.[ceph: root@oc0-controller-0 /]# ceph orch osd rm --zap 5 7 9 11 Scheduled OSD(s) for removal [ceph: root@oc0-controller-0 /]# ceph orch osd rm status OSD_ID HOST STATE PG_COUNT REPLACE FORCE DRAIN_STARTED_AT 7 ceph-2 draining 27 False False 2021-04-23 21:35:51.215361 9 ceph-2 draining 8 False False 2021-04-23 21:35:49.111500 11 ceph-2 draining 14 False False 2021-04-23 21:35:50.243762Use the command
ceph orch osd statusto check the status of OSD removal.[ceph: root@oc0-controller-0 /]# ceph orch osd rm status OSD_ID HOST STATE PG_COUNT REPLACE FORCE DRAIN_STARTED_AT 7 ceph-2 draining 34 False False 2021-04-23 21:35:51.215361 11 ceph-2 draining 14 False False 2021-04-23 21:35:50.243762WarningDo not proceed with the next step until this command returns no results.
Use the command
ceph orch host drain <HOST>to drain any remaining daemons.[ceph: root@oc0-controller-0 /]# ceph orch host drain ceph-2Use the command
ceph orch host rm <HOST>to remove the host.[ceph: root@oc0-controller-0 /]# ceph orch host rm ceph-2- End the Ceph shell session.
-
Log out of the
tripleo-adminaccount. -
Log in to the undercloud node as the
stackuser. Modify the
~/overcloud-baremetal-deploy.yamlin the following ways:-
Decrease the
countattribute in the roles to be scaled down. Add an
instancesentry for each node being unprovisioned. Each entry must contain the following:-
The
nameof the baremetal node. -
The
hostnameassigned to that node. A
provisioned: falsevalue.The following example would remove the node
overcloud-compute-1.- name: Compute count: 1 instances: - hostname: overcloud-compute-0 name: node10 # Removed from deployment due to disk failure provisioned: false - hostname: overcloud-compute-1 name: node11
-
The
-
Decrease the
Use the
openstack overcloud node deletecommand to remove the node.openstack overcloud node delete \ --stack overcloud \ --baremetal-deployment ~/overcloud-baremetal-deploy.yamlNoteA list of nodes to delete will be provided with a confirmation prompt before the nodes are deleted.
If scaling down the Ceph cluster is temporary and the nodes removed will be restored later, the scaling up action can increment the count and set provisioned: true on nodes that were previously set provisioned: false. If the node will never reused, it can be set provisioned: false indefinitely and the scaling up action can specify a new instances entry.
+ The following file sample provides some examples of each instance.
+
- name: Compute
  count: 2
  instances:
  - hostname: overcloud-compute-0
    name: node10
    # Removed from deployment due to disk failure
    provisioned: false
  - hostname: overcloud-compute-1
    name: node11
  - hostname: overcloud-compute-2
    name: node12
Chapter 16. Replacing a failed disk
If a disk in your Ceph Storage cluster fails, you can replace it.
16.1. Replacing a disk
See Adding OSDs in the Red Hat Ceph Storage Installation Guide for information on replacing a failed disk.