Configuring DNS as a service
Information about how to manage a domain name system (DNS) using the DNS service in Red Hat OpenStack Platform
Abstract
Providing feedback on Red Hat documentation
We appreciate your feedback. Tell us how we can improve the documentation.
To provide documentation feedback for Red Hat OpenStack Platform (RHOSP), create a Jira issue in the OSPRH Jira project.
Procedure
- Log in to the Red Hat Atlassian Jira.
- Click the following link to open a Create Issue page: Create issue
- Complete the Summary and Description fields. In the Description field, include the documentation URL, chapter or section number, and a detailed description of the issue.
- Click Create.
- Review the details of the bug you created.
Chapter 1. Introduction to the DNS service
The DNS service (designate) provides a DNS-as-a-Service implementation for Red Hat OpenStack platform (RHOSP) deployments.
This section briefly describes some Domain Name System (DNS) basics, describes the DNS service components, presents a simple use case, and lists various ways to run the DNS service.
The topics included in this section are:
1.1. Basics of the Domain Name System (DNS)
The Domain Name System (DNS) is a naming system for resources connected to a private or a public network. A hierarchical, distributed database, DNS associates information about resources with domain names that are organized into various groups called zones. Authoritative name servers store resource and zone information in records which can be queried by resolvers to identify and locate resources for routing network data.
Names are divided up into a hierarchy of zones which facilitates delegation. Separate name servers are responsible for a particular zone.
Figure 1.1. The Domain Name System

The root zone, which is simply . (a dot), contains records that delegate various top-level domains (TLDs) to other name servers. These types of records are called name server (NS) records and identify which DNS server is authoritative for a particular domain. It is not uncommon for there to be more than one NS record to indicate a primary and a backup name server for a domain.
Beneath the root zone are various TLD name servers that contain records for domains only within their TLD. These are address records and canonical name records and are referred to as A and CNAME records, respectively.
For example, the .com name server contains a CNAME record for example.com, in addition to NS records that delegate zones to other name servers. The domain example.com might have its own name server so that it can then create other domains like cloud.example.com.
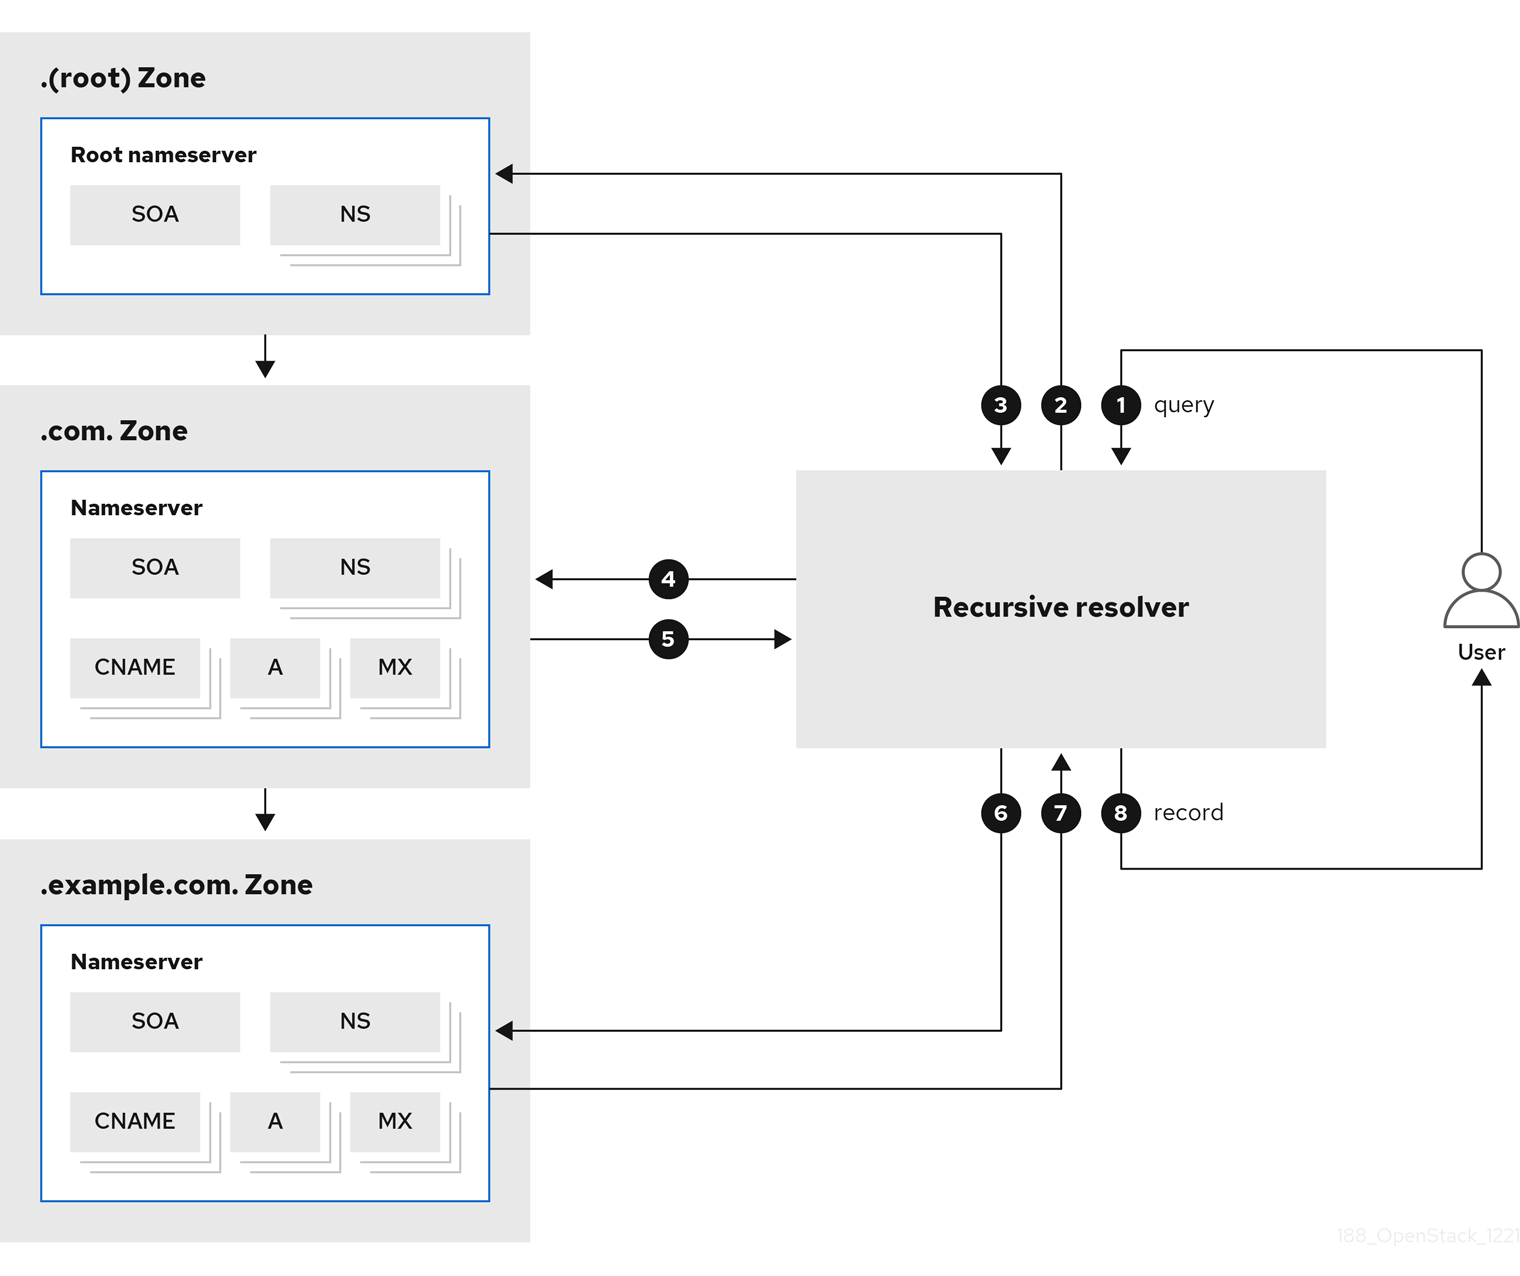
Resolvers are often formed in two parts: a stub resolver which is usually a library on a user’s computer, and a recursive resolver that performs queries against name servers before returning the result to the user. When searching for a domain, the resolver starts at the end of the domain and works toward the beginning of the domain.
For example, when searching for cloud.example.com, the resolver starts with the root name server .. The root replies with the location of the .com name server. The resolver then contacts the .com name server to get the example.com name server. Finally, the resolver locates the cloud.example.com record and returns it to the user.
Figure 1.2. Resolving a DNS query
| 1 |
A user queries for the address of |
| 2 |
The recursive resolver queries the |
| 3 |
The record is not found, and the |
| 4 |
The resolver queries the |
| 5 |
The record is not found, and the |
| 6 |
The resolver queries the |
| 7 |
The |
| 8 |
The resolver forwards the A record for |
To make this search more efficient, the results are cached on the resolver, so after the first user has requested cloud.example.com, the resolver can quickly return the cached result for subsequent requests.
1.2. Introducing the RHOSP DNS service
The Red Hat OpenStack Platform (RHOSP) DNS service (designate) is a multi-tenant service that enables you to manage DNS records, names, and zones. The RHOSP DNS service provides a REST API, and is integrated with the RHOSP Identity service (keystone) for user management.
Using RHOSP director you can deploy BIND instances to contain DNS records, or you can integrate the DNS service into an existing BIND infrastructure. In addition, director can configure DNS service integration with the RHOSP Networking service (neutron) to automatically create records for compute instances, network ports, and floating IPs.
1.3. DNS service components
The Red Hat OpenStack Platform (RHOSP) DNS service (designate) is comprised of several different services that run in containers on one or more RHOSP Controller hosts, by default:
- Designate API (
designate-apicontainer) - Provides the OpenStack standard REST API for users and the RHOSP Networking service (neutron) to interact with designate. The API processes requests by sending them to the Central service over Remote Procedure Call (RPC).
- Producer (
designate-producercontainer) -
Orchestrates periodic tasks that are run by designate. These tasks are long-running and potentially large jobs such as emitting
dns.zone.existsfor Ceilometer, purging deleted zones from the database, polling secondary zones at their refresh intervals, generating delayedNOTIFYtransactions, and invoking a periodic recovery of zones in an error state. - Central (
designate-centralcontainer) - Orchestrates zone and record set creation, update, and deletion. The Central service receives RPC requests sent by the Designate API service and applies the necessary business logic to the data while coordinating its persistent storage.
- Worker (
designate-workercontainer) - Provides the interface to the drivers for the DNS servers that designate manages. The Worker service reads the server configuration from the designate database, and also manages periodic tasks that are requested by the Producer.
- Mini DNS (
designate-mdnscontainer) - Manages zone authoritative transfer (AXFR) requests from the name servers. The Mini DNS service also pulls DNS information about DNS zones hosted outside of the designate infrastructure.
Figure 1.3. The DNS service architecture

In RHOSP, by default, the DNS components are BIND 9 and Unbound:
- BIND 9 (
bindcontainer) - Provides a DNS server for the DNS service. BIND is an open source suite of DNS software, and specifically acts as the authoritative nameserver.
- Unbound (
unboundcontainer) - Fulfills the role of the DNS recursive resolver, which initiates and sequences the queries needed to translate DNS requests into an IP address. Unbound is an open source program that the DNS service uses as its recursive resolver.
The DNS service uses an oslo compatible database to store data and oslo messaging to facilitate communication between services. Multiple instances of the DNS services can be run in tandem to facilitate high availability deployments, with the API process often located behind load balancers.
1.4. A common deployment scenario for the DNS service
A user has created two zones, zone1.cloud.example.com and zone2.cloud.example.com, and the DNS service adds a new Start of Authority (SOA) record and new a name server (NS) record for each new zone, respectively, on the DNS name server.
Using the RHOSP Networking service, the user creates a private network and associates it to zone1 and a public network and associates it to zone2.
Finally, the user connects a VM instance to the private network and attaches a floating IP. The user connects a second instance directly to the public network. These connections trigger the Networking service to request the DNS service to create records on behalf of the user. The DNS service maps the instance names to domains on the authoritative name server and also creates PTR records to enable reverse lookups.
Figure 1.4. Common DNS service deployment

| 1 | You can associate domains and names with floating IPs, ports, and networks in the RHOSP Networking service. The RHOSP Networking service uses the designate API to manage records when ports are created and destroyed. |
| 2 | The designate Worker tells the name server to update its zone information. |
| 3 | The name server requests updated zone information from Mini DNS. |
| 4 | The name server creates both forward and reverse records. |
1.5. Different ways to use the DNS service
The Red Hat OpenStack Platform (RHOSP) DNS service (designate) provides a REST API and that is commonly used in three ways.
- The most common is to use the RHOSP OpenStack client, a python command line tool with commands for interacting with RHOSP services.
- You can also use the DNS service through a graphical user interface, the RHOSP Dashboard (horizon).
- Developers can use the OpenStack SDK for writing applications. For more information, see openstacksdk.
Chapter 2. Planning a DNS service deployment
This section discusses topics that are important to consider when planning your DNS service (designate) deployment with Red Hat OpenStack Platform.
The topics included in this section are:
2.1. DNS server feature support matrix
The following table lists features in the DNS service (designate) that Red Hat OpenStack Platform (RHOSP) 17 supports.
| Feature | Supported in RHOSP 17? |
| x86_64 hardware architecture | Yes |
| All other hardware architectures | No |
| BIND 9 back end | Yes |
| All other back ends | No |
| Denylists (blacklists) | Yes |
| Designate v1 API | No |
| Designate v2 API | Yes |
| Designate admin API | No |
| Designate Central service | Yes |
| Designate Producer service | Yes |
| Designate Worker service | Yes |
| Designate miniDNS service | Yes |
| Designate Agent service | No |
| Designate Zone Manager service | No |
| Designate Pool Manager service | No |
| Designate OpenStack client plug-in (CLI) | Yes |
| Designate client (CLI) | No |
| OpenStack Python SDK (designate) | Yes |
| Designate client (SDK) | No |
| Designate horizon dashboard | Yes |
| Designate tempest plug-in | Yes |
| Designate database MariaDB/Galera | Yes |
| All other databases | No |
| Distributed lock manager (Redis) | Yes |
| All other distributed lock manager options | No |
| Designate sinks | No |
| Designate notifications | Yes |
| High availability deployments | Yes |
| IPv4 | Yes |
| IPv6 | Yes |
| Monasca integration | No |
| Default pool scheduler | Yes |
| All other pool schedulers | No |
| A single pool | Yes |
| Multiple pools | No |
| Quotas | Yes |
| Role-based access control (RBAC) | Yes |
| Record type A | Yes |
| Record type AAAA | Yes |
| Record type CNAME | Yes |
| Record type MX | Yes |
| Record type SRV | Yes |
| Record type TXT | Yes |
| Record type SPF | Yes |
| Record type NS | Yes |
| Record type PTR | Yes |
| Record type SSHFP | Yes |
| Record type SOA | Yes |
| Record type NAPTR | Yes |
| Record type CAA | Yes |
| All other record types | No |
| Top-level domains (TLDs) | Yes |
| TSIG keys | Yes |
| Unbound recursive resolver | Yes |
| All other recursive resolvers | No |
| Primary zones | Yes |
| Secondary zones | No |
| Zone import and export | Yes |
| Zone abandon | No |
| Zone ownership transfer | Yes |
2.2. DNS service software requirements
The Red Hat OpenStack Platform (RHOSP) DNS service (designate) depends on the following RHOSP core components:
- Identity service (keystone)
- RabbitMQ
- MariaDB
- Redis
The RHOSP installation and configuration toolset, director, configures these components for the DNS service automatically.
If you are using VLANs or overlay networks that you want the DNS service to automatically create DNS records for, then set aside some network segmentation IDs for these networks. The DNS service does not create DNS records for networks whose segmentation IDs fall within the ranges specified in the Networking service (neutron) ml2_conf.ini file.
2.3. Configuring existing BIND servers for the DNS service
If you are integrating the Red Hat OpenStack Platform (RHOSP) DNS service (designate) with an existing BIND infrastructure, there are several actions that you must take to ensure that BIND 9 is configured correctly.
This feature is available in this release as a Technology Preview, and therefore is not fully supported by Red Hat. It should only be used for testing, and should not be deployed in a production environment. For more information about Technology Preview features, see Scope of Coverage Details.
If you do not have an existing BIND infrastructure, RHOSP director automatically configures BIND for you.
Prerequisites
- You must be a user that has adequate permissions to make changes to your BIND 9 server.
-
Ensure that BIND can access the files,
/etc/rndc.confand/etc/rndc.key. -
Ensure that BIND is able to receive
rndcutility messages from the RHOSP DNS service (designate).
Procedure
- Log on to your BIND 9 server.
Ensure that
/etc/rndc.keyis configured properly.The
rndc-keymust have a Hash-based Message Authentication Code (HMAC), SHA-256 algorithm and a Base64-encoded secret:key "rndc-key" { algorithm hmac-sha256; secret "<base64-encoded string>"; };If it is not already, enable BIND to create and delete zones remotely using the
rndcutility.In
/etc/named.conf, underoptions {, confirm that the following line is present. If it is not there, create a new line and add it:allow-new-zones yes;If it is not already, configure BIND to send minimal responses.
Also in
/etc/named.conf, underoptions {, confirm that the following line is present. If it is not there, create a new line and add it:minimal-responses yes;By default, BIND 9 includes authority out-of-zone records and additional sections in the responses that it sends to clients. Setting
minimal-responsestoyesprevents the out-of-zone additionals from being processed, and removes susceptibility to a DNS cache poisoning attack.
2.4. Recommended DNS service topology
The recommended topology consists of deploying the DNS service on the Red Hat OpenStack Platform (RHOSP) Controller host. If your RHOSP deployment is highly available, then you have a minimum of three RHOSP Controllers, each containing the DNS service.
Figure 2.1. Recommended DNS service topology

In Figure 2.1, the DNS service components are running in their respective containers. The containers that are darker in color are the resources that the DNS service shares with the other RHOSP services.
The dotted lined containers represent an optional placement for BIND and Unbound. If your site has a heavy data traffic footprint, you might want to use a dedicated host to contain BIND and Unbound, respectively.
2.5. About DNS service high availability
The Red Hat OpenStack Platform (RHOSP) DNS service (designate) combines load balancing of data traffic and fault tolerance in a high availability mode known as active-active High Availability mode. In active-active mode, the DNS service simultaneously runs its component services on three or more nodes. If one of the nodes fail, the remaining nodes continue to run and to avoid interruptions and declines in performance. The DNS service attempts to load balance work across all of the service instances.
The DNS service components are categorized as services that are deployed with the RHOSP Controller role. This means that the RHOSP installation and configuration toolset, director, automatically deploys the DNS service on all Controller hosts. Therefore, if you have three or more Controllers deployed on three or more different hosts, the DNS service is highly available.
Chapter 3. Installing and configuring the DNS service
You install and configure the DNS service (designate) by including the designate environment file when you deploy or redeploy the Red Hat OpenStack Platform (RHOSP). The toolset for deploying RHOSP, director, uses Orchestration service (heat) environment templates and environment files as a set of plans for how to install and configure the DNS service and the rest of your RHOSP deployment.
When deploying the DNS service, director automatically performs such actions as enabling the DNS service for active-active High Availability mode and activating automation for port and floating IP addresses. Director also configures the Networking service (neutron) to point to the Unbound resolvers included with DNS service.
You can explicitly disable the configuration of the Unbound resolvers by setting UnboundForwardResolvers in a custom heat environment file.
You can also integrate the DNS service with a pre-existing DNS infrastructure by providing director with the necessary DNS server information.
In RHOSP 17.1, integrating the DNS service with a pre-existing DNS infrastructure is a technology preview feature.
The topics included in this section are:
3.1. Deploying the DNS service
You use Red Hat OpenStack Platform (RHOSP) director to deploy the DNS service (designate). Director uses Orchestration service (heat) templates and environment files that are a set of plans for your RHOSP deployment. The undercloud imports these plans and follows their instructions to install and configure the DNS service and your RHOSP deployment.
Prerequisites
-
You must be the
stackuser with access to the RHOSP undercloud.
Procedure
- If you are integrating the DNS server with a pre-existing DNS infrastructure, go to the topic, Section 3.2, “Deploying the DNS service with pre-existing BIND 9 servers”.
- Log in to the undercloud host as the stack user.
Source the undercloud credentials file:
$ source ~/stackrcCreate a custom environment YAML file that includes a declaration for the
DesignateBindNSRecordsparameter whose values are the name server records (NS records) for the child zones that reside in the DNS server (designate) pool:parameter_defaults: DesignateBindNSRecords: ['<NS_record_child-zone-1>', '<NS_record_child-zone-2>', '...']- Example
In this example, the DNS pool contains the child zones:
ns1.sales.example.org.,ns2.sales.example.org., andns3.sales.example.org.for the parent zoneexample.org.:parameter_defaults: DesignateBindNSRecords: ['ns1.sales.example.org.', 'ns2.sales.example.org.', 'ns3.sales.example.org.']
Run the deployment command and include the core heat templates, other environment files, the
designate.yamlenvironment file, and the file that contains your pool NS records.- Example
$ openstack overcloud deploy --templates \ -e <other_environment_files> \ -e /usr/share/openstack-tripleo-heat-templates/environments/\ services/designate.yaml \ -e /home/stack/my_pool_ns_records.yamlNoteDirector updates the various DNS service components to the latest designate image during a stack update or upgrade.
Verification
Confirm that the DNS service has been installed and has an endpoint defined.
$ openstack endpoint list -c "Service Name" -c Enabled -c URL- Sample output
+--------------+---------+-------------------------------------------------+
| Service Name | Enabled | URL                                             |
+--------------+---------+-------------------------------------------------+
| swift        | True    | http://198.51.100.61:8080                       |
| designate    | True    | http://203.0.113.103:9001                       |
| heat-cfn     | True    | http://192.0.2.137:8000/v1                      |
| designate    | True    | http://192.0.2.137:9001                         |
| placement    | True    | http://203.0.113.103:8778/placement             |
| cinderv3     | True    | http://203.0.113.103:8776/v3/%(tenant_id)s      |
| heat         | True    | http://203.0.113.103:8004/v1/%(tenant_id)s      |
| heat-cfn     | True    | http://203.0.113.103:8000/v1                    |
| nova         | True    | http://203.0.113.103:8774/v2.1                  |
| heat         | True    | http://192.0.2.137:8004/v1/%(tenant_id)s        |
| glance       | True    | http://203.0.113.103:9292                       |
| heat         | True    | http://203.0.113.103:8004/v1/%(tenant_id)s      |
| glance       | True    | http://203.0.113.103:9292                       |
| neutron      | True    | http://203.0.113.103:9696                       |
| nova         | True    | http://192.0.2.137:8774/v2.1                    |
| cinderv3     | True    | http://192.0.2.137:8776/v3/%(tenant_id)s        |
| placement    | True    | http://203.0.113.103:8778/placement             |
| keystone     | True    | http://192.168.24.17:35357                      |
| neutron      | True    | http://192.0.2.137:9696                         |
| nova         | True    | http://203.0.113.103:8774/v2.1                  |
| heat-cfn     | True    | http://203.0.113.103:8000/v1                    |
| cinderv3     | True    | http://203.0.113.103:8776/v3/%(tenant_id)s      |
| glance       | True    | http://192.0.2.137:9292                         |
| placement    | True    | http://192.0.2.137:8778/placement               |
| swift        | True    | http://198.51.100.61:8080/v1/AUTH_%(tenant_id)s |
| swift        | True    | http://192.0.2.137:8080/v1/AUTH_%(tenant_id)s   |
| designate    | True    | http://203.0.113.103:9001                       |
| keystone     | True    | http://192.0.2.137:5000                         |
| neutron      | True    | http://203.0.113.103:9696                       |
| keystone     | True    | http://203.0.113.103:5000                       |
+--------------+---------+-------------------------------------------------+3.2. Deploying the DNS service with pre-existing BIND 9 servers
You use Red Hat OpenStack Platform (RHOSP) director to install and configure the DNS service (designate) and integrate it with a pre-existing BIND 9 DNS infrastructure. Director uses Orchestration service (heat) templates and environment files that are a set of plans for your RHOSP deployment. You add the specific information about your DNS servers to a heat environment file. The undercloud imports these plans and follows their instructions to install and configure RHOSP and the DNS service and integrate it with your DNS infrastructure.
This feature is available in this release as a Technology Preview, and therefore is not fully supported by Red Hat. It should only be used for testing, and should not be deployed in a production environment. For more information about Technology Preview features, see Scope of Coverage Details.
Prerequisites
- You have a pre-existing DNS infrastructure that relies on BIND 9 servers.
- Ensure that your BIND 9 servers meet the configuration that is described in Configuring existing BIND servers for the DNS service.
-
You must be the
stackuser with access to the RHOSP undercloud.
Procedure
- If you are not integrating the DNS server with a pre-existing DNS infrastructure, go to the topic, Section 3.1, “Deploying the DNS service”.
- Log in to the undercloud host as the stack user.
Source the undercloud credentials file:
$ source ~/stackrcCreate a custom environment YAML file.
- Example
$ vi /home/stack/templates/my-designate-environment.yaml
Your environment file must contain the keywords
parameter_defaultsandDesignateExternalBindServers. Add the IP address and the Remote Name Daemon Control (RNDC) key for each of your BIND 9 DNS servers on new lines beneathDesignateExternalBindServers.- Example
In this example, there are two pre-existing BIND 9 servers,
203.0.113.3and203.0.113.4, with an RNDC key, respectively:parameter_defaults: DesignateExternalBindServers: - host: 203.0.113.3 rndc_key: "FJOdVqZr5gVXbU9kIagY0IJVDq7CV/mDVb/M7mlLMgY=" - host; 203.0.113.4 rndc_key: "QAAACCdIV3KXPJh6U71ImVH0+j4uKRpVV49zVU7A8uvm"
Add a declaration for the
DesignateBindNSRecordsparameter whose values are the name server records (NS records) for the child zones that reside in the DNS server (designate) pool:parameter_defaults: ... DesignateBindNSRecords: ['<NS_record_child-zone-1>', '<NS_record_child-zone-2>', '...']- Example
In this example, the DNS pool contains the child zones:
ns1.sales.example.org.,ns2.sales.example.org., andns3.sales.example.org.for the parent zoneexample.org.:parameter_defaults: ... DesignateBindNSRecords: ['ns1.sales.example.org.', 'ns2.sales.example.org.', 'ns3.sales.example.org.']
Run the deployment command and include the core heat templates, other environment files, the
designate.yamlenvironment file, and this new custom environment file.ImportantThe order of the environment files is important as the parameters and resources defined in subsequent environment files take precedence.
- Example
$ openstack overcloud deploy --templates \ -e <other_environment_files> \ -e /usr/share/openstack-tripleo-heat-templates/environments/\ services/designate.yamlNoteDirector updates the various DNS service components to the latest designate image during a stack update or upgrade.
3.3. Changing DNS service default settings
You make configuration changes to the Red Hat OpenStack Platform (RHOSP) DNS service (designate) by modifying a YAML-formatted environment file and redeploying your RHOSP overcloud. The RHOSP director is a toolset that uses Orchestration service (heat) templates and environment files as a plan to configure the DNS service.
Prerequisites
-
You must be the
stackuser with access to the RHOSP undercloud. Decide which RHOSP DNS service parameters that you want to modify.
Here are a few examples:
DesignateRpcResponseTimeoutThe RPC response timeout, in seconds, for the DNS service. The default is 60 seconds.
DesignateWorkersThe number of workers for Designate services. The default is zero (0), which means that the deployment script uses the RHOSP director value for operating system workers.
For more information, see Determining environment scale in the Installing and managing Red Hat OpenStack Platform with director guide.
DesignateMdnsProxyBasePortThe base port for the MiniDNS proxy endpoints on the external or public access network. The default port is 16000.
Procedure
-
Log in to the undercloud host as the
stackuser. Source the undercloud credentials file:
$ source ~/stackrcCreate a custom YAML environment file.
- Example
$ vi /home/stack/templates/my-designate-environment.yamlYour environment file must contain the keywords
parameter_defaults. Put your parameter value pairs after theparameter_defaultskeyword.- Example
In this example, the RPC response timeout is set to 120 seconds:
parameter_defaults:
  DesignateRpcResponseTimeout: '120'
Run the deployment command and include the core heat templates, other environment files, the
designate.yamlenvironment file, and this new custom environment file.ImportantThe order of the environment files is important as the parameters and resources defined in subsequent environment files take precedence.
- Example
$ openstack overcloud deploy --templates \
-e <other_environment_files> \
-e /usr/share/openstack-tripleo-heat-templates/environments/\
services/designate.yaml \
-e /home/stack/templates/my-designate-environment.yaml
Chapter 4. Using an integrated DNS service
The Red Hat OpenStack Platform (RHOSP) DNS service (designate) integrates with the Networking service (neutron) to provide automatic record set creation for ports and through the Compute service (nova), virtual machine instances.
Cloud administrators use the DNS service to create a zone which they associate to a network. Using this network provided by their cloud administrator, cloud users can create a virtual machine instance, port, or floating IP and the DNS service automatically creates the necessary DNS records.
During DNS service deployment the installation toolset, RHOSP director, loads the Networking service (neutron) extension, dns_domain_ports. This extension enables you to add the following DNS attributes to RHOSP ports, networks, and floating IPs:
| Resource | DNS name | DNS domain (zone) |
|---|---|---|
| Ports | Yes | Yes |
| Networks | No | Yes |
| Floating IPs | Yes | Yes |
For DNS domains that are specified on both a network and a floating IP, the domain on the port of the floating IP takes precedence over the domain set on the network.
In Red Hat OpenStack Platform (RHOSP) 17.1 GA, a technology preview is available for integration between the RHOSP Networking service (neutron) ML2/OVN and the RHOSP DNS service (designate). As a result, the DNS service does not automatically add DNS entries for newly created VMs.
The topics included in this section are:
4.1. Setting up a project for DNS integration
Cloud administrators create the required zones, networks, and subnets that cloud users must specify when they create virtual machine instances, ports, or floating IPs. Because the RHOSP Networking service (neutron) is integrated with the DNS service (designate), when cloud users create these objects, they are automatically added to the DNS service.
This feature is available in this release as a Technology Preview, and therefore is not fully supported by Red Hat. It should only be used for testing, and should not be deployed in a production environment. For more information about Technology Preview features, see Scope of Coverage Details.
Prerequisites
-
You must be a RHOSP user with the
adminrole. -
The network used for ports and VMs cannot have the attribute
router:externalset toTrue. When creating the network, the--externaloption must not be specified. - The network must be one of the following types: FLAT, VLAN, GRE, VXLAN or GENEVE.
For VLAN, GRE, VXLAN, or GENEVE networks, the segmentation ID must be outside the ranges configured in the Networking service
ml2_conf.inifile.The
ml2_conf.inifile resides on the Controller node host in/var/lib/config-data/puppet-generated/neutron/etc/neutron/plugins/ml2.+ Use the following table for determining which section and option to consult for your network segmentation ID range:Expand Table 4.2. ml2_conf.ini options used to set network segmentation IDs Type of network Section Option Geneve
[ml2_type_geneve]
vni_ranges
GRE
[ml2_type_gre]
tunnel_id_ranges
VLAN
[ml2_type_vlan]
network_vlan_ranges
VXLAN
[ml2_type_vxlan]
vni_ranges
If these prerequisites are not all met, the Networking service creates a DNS assignment in the internal resolvers using the default dns_domain value, openstacklocal..
Procedure
As a cloud administrator, source your credentials file.
- Example
$ source ~/overcloudrc
Create the zone that you want users in a particular project to create DNS entries with.
- Example
In this example, the cloud administrator creates a zone called
example.com.and specifies that users in the project ID,f75ec24a-d361-ab86-54c0-dfe6093245a3, have permission to add record sets to the zone:$ openstack zone create --email example@example.com example.com. --sudo-project-id f75ec24a-d361-ab86-54c0-dfe6093245a3NoteThe DNS domain must always be a fully qualified domain name (FQDN), meaning it will always end with a period.
Create the network that you want users in a particular project to create DNS entries with.
- Example
In this example, the cloud administrator creates a network,
example-network, that uses the earlier created zone,example.com., and a segmentation ID,2017, that is outside of the range defined in ml2_conf.ini:$ openstack network create --dns-domain example.com. \ --provider-segment 2017 --provider-network-type geneve \ example-network
On the network, create a subnet.
- Example
In this example, the cloud administrator creates a subnet,
example-subnet, on the network,example-network:$ openstack subnet create \ --allocation-pool start=192.0.2.10,end=192.0.2.200 \ --network example-network \ --subnet-range 192.0.2.0/24 \ example-subnet
- Instruct the cloud users in the project to use the zone and network you have created when they add instances, ports, and floating IPs.
If the user creating the instance, port, or floating IP does not have permission to create record sets in the zone, or if the zone does not exist in the DNS service, the Networking service does the following:
-
creates the port with the
dns_assignmentfield populated using thedns_domainprovided. - does not create a record set in the DNS service.
- logs the error, "Error publishing port data in external DNS service.".
Verification
Confirm that the network you created exists.
- Example
$ openstack network show example-network- Sample output
+---------------------------+--------------------------------------+
| Field                     | Value                                |
+---------------------------+--------------------------------------+
| admin_state_up            | UP                                   |
| availability_zone_hints   |                                      |
| availability_zones        |                                      |
| created_at                | 2022-09-07T19:03:32Z                 |
| description               |                                      |
| dns_domain                | example.com.                         |
| id                        | 9ae5b3d5-f12c-4a67-b0e5-655d53cd4f7c |
| ipv4_address_scope        | None                                 |
| ipv6_address_scope        | None                                 |
| is_default                | None                                 |
| is_vlan_transparent       | None                                 |
| mtu                       | 1450                                 |
| name                      | network-example                      |
| port_security_enabled     | True                                 |
| project_id                | f75ec24a-d361-ab86-54c0-dfe6093245a3 |
| provider:network_type     | vxlan                                |
| provider:physical_network | None                                 |
| provider:segmentation_id  | 2017                                 |
| qos_policy_id             | None                                 |
| revision_number           | 3                                    |
| router:external           | Internal                             |
| segments                  | None                                 |
| shared                    | False                                |
| status                    | ACTIVE                               |
| subnets                   | 15546c9d-6faf-43aa-83e7-b1e705eed060 |
| tags                      |                                      |
| updated_at                | 2022-09-07T19:03:43Z                 |
+---------------------------+--------------------------------------+
4.2. Integrating virtual machine instances with DNS
Integration between the Networking service (neutron) and the DNS service (designate) enables you to automatically enable DNS whenever you create a virtual machine instance.
Prerequisites
- Your cloud administrator has provided you with the required network to use, when creating your DNS-enabled instances.
Procedure
Source your credentials file.
- Example
$ source ~/overcloudrc
Using the network that your cloud administrator has provided, create an instance.
- Example
In this example, the cloud user creates an instance named
my_vm:$ openstack server create --image cirros-0.5.2-x86_64-disk --flavor m1.micro --nic net-id=example-network my_vm
Verification
Confirm that a record exists in the DNS service for the instance you created.
- Example
In this example, the DNS service is queried for the
example.com.zone:$ openstack recordset list --type A example.com.- Sample output
+---------------+---------------------+------+------------+--------+--------+
| id            | name                | type | records    | status | action |
+---------------+---------------------+------+------------+--------+--------+
| 7b8d1be6-1b23 | my_vm.example.com.  | A    | 192.0.2.44 | ACTIVE | NONE   |
| -478a-94d5-60 |                     |      |            |        |        |
| b876dca2c8    |                     |      |            |        |        |
+---------------+---------------------+------+------------+--------+--------+
4.3. Integrating ports with DNS
Integration between the Networking service (neutron) and the DNS service (designate) enables you to automatically add a DNS record set whenever you create a port.
Prerequisites
- Your cloud administrator has provided you with the required network to use, when creating your DNS-enabled ports.
Procedure
Source your credentials file.
- Example
$ source ~/overcloudrc
Using the zone and network that your cloud administrator has provided, create a port.
- Example
In this example, the cloud user creates a port,
my-port, with a DNS name ofexample-portin the network,example-network:$ openstack port create --network example-network \ --dns-name example-port \ my-port
Verification
Confirm that a record exists in the DNS service for the port that you created.
- Example
In this example, the DNS service is queried for the
example.com.zone:$ openstack recordset list --type A example.com.- Sample output
+---------------+---------------------------+------+-------------+--------+--------+
| id            | name                      | type | records     | status | action |
+---------------+---------------------------+------+-------------+--------+--------+
| 9ebbe94f-2442 | example-port.example.com. | A    | 192.0.2.149 | ACTIVE | NONE   |
| -4bb8-9cfa-6d |                           |      |             |        |        |
| ca1daba73f    |                           |      |             |        |        |
+---------------+---------------------------+------+-------------+--------+--------+
4.4. Integrating floating IPs with DNS
Integration between the Networking service (neutron) and the DNS service (designate) enables you to automatically add a DNS record set whenever you create a floating IP.
Prerequisites
- Your cloud administrator has provided you with the required external network to use, when creating your DNS-enabled floating IPs.
Procedure
Source your credentials file.
- Example
$ source ~/overcloudrc
Using the zone and the external network that your cloud administrator has provided, create a floating IP.
- Example
In this example, the cloud user creates a floating IP with a DNS name,
example-fip, in the network,public:$ openstack floating ip create --dns-name example-fip \ --dns-domain example.com. \ public
Verification
Confirm that a record exists in the DNS service for the floating IP that you created.
- Example
In this example, the DNS service is queried for the
example.com.zone:$ openstack recordset list --type A example.com.- Sample output
+---------------+--------------------------+------+-------------+--------+--------+
| id            | name                     | type | records     | status | action |
+---------------+--------------------------+------+-------------+--------+--------+
| e1eca823-169d | example-fip.example.com. | A    | 192.0.2.106 | ACTIVE | NONE   |
| -4d0a-975e-91 |                          |      |             |        |        |
| a9907ec0c1    |                          |      |             |        |        |
+---------------+--------------------------+------+-------------+--------+--------+
Chapter 5. Managing top level domain names
This section introduces top-level domains and describes how to create and manage them in the Red Hat OpenStack Platform DNS service (designate). The way in which you manage what domain names users are allowed to create is through denylists.
The topics included in this section are:
- Section 5.1, “About top-level domains”
- Section 5.2, “Creating top-level domains”
- Section 5.3, “Listing and showing top-level domains”
- Section 5.4, “Modifying top-level domains”
- Section 5.5, “Deleting top-level domains”
- Section 5.6, “About DNS service denylists”
- Section 5.7, “About DNS service regular expressions in denylists”
- Section 5.8, “Creating DNS service denylists”
- Section 5.9, “Listing and showing DNS service denylists”
- Section 5.10, “Modifying DNS service denylists”
- Section 5.11, “Deleting DNS service denylists”
5.1. About top-level domains
You can use top-level domains (TLDs) to restrict the domains under which users can create zones. In the Domain Name System (DNS) the term TLD refers specifically to the set of domains that reside directly below the root, such as .com. In the Red Hat OpenStack Platform (RHOSP) DNS service (designate), a TLD can be any valid domain.
Because TLDs define the set of allowed domains, the zone that a user creates must exist within one of the TLDs. If no TLDs have been created in the DNS service, then users can create any zone. TLDs do not have a policy that allows privileged users to create zones outside the allowed TLDs.
- Example
-
After creating the
.comTLD, if a user attempts to create a zone that is not contained within the.comTLD, the attempt fails.
$ openstack zone create --email admin@test.net test.net.- Sample output
Invalid TLD
You can create, list, show, modify, and delete TLDs using the OpenStack Client openstack tld commands.
5.2. Creating top-level domains
Top-level domains (TLDs) enable you to restrict the domains under which users can create zones. In the Red Hat OpenStack Platform (RHOSP) DNS service (designate), a TLD can be any valid domain. To create TLDs, use the OpenStack Client openstack tld create command.
Prerequisites
-
You must be a RHOSP user with the
adminrole.
Procedure
As a cloud administrator, source your credentials file.
- Example
$ source ~/overcloudrc
You create a TLD by running the
openstack tld createcommand.- Example
For example, if you want to require that users create zones ending in
.org, you can create a single.orgTLD:$ openstack tld create --name org- Sample output
+-------------+--------------------------------------+
| Field       | Value                                |
+-------------+--------------------------------------+
| created_at  | 2022-01-10T13:07:33.000000           |
| description | None                                 |
| id          | 9fd0a12d-511e-4024-bf76-6ec2e3e71edd |
| name        | org                                  |
| updated_at  | None                                 |
+-------------+--------------------------------------+
+
When using the openstack tld command, ensure that the fully qualified domain name (FQDN) that you enter has no trailing dot, for example, .net..
Verification
Run the
openstack tld listcommand, and confirm that your TLD exists.- Example
$ openstack tld list --name zone1.cloud.example.com
5.3. Listing and showing top-level domains
You can query the Red Hat OpenStack Platform DNS service (designate) database and list all of the top-level domains (TLDs), or display properties for a particular TLD. The OpenStack Client commands for doing this are openstack tld list and openstack tld show, respectively.
Prerequisites
-
You must be a RHOSP user with the
adminrole.
Procedure
As a cloud administrator, source your credentials file.
- Example
$ source ~/overcloudrc
Use the following command to list all of the TLDs in the DNS service database:
$ openstack tld listUse the
openstack tld show <TLD_NAME_or_ID>command to display the properties for a particular TLD.- Example
$ openstack tld show org
5.4. Modifying top-level domains
The Red Hat OpenStack Platform (RHOSP) DNS service (designate) enables you to change various properties of a top-level domain (TLD), such as its name. You modify TLDs by using the OpenStack Client openstack tld set command.
Prerequisites
-
You must be a RHOSP user with the
adminrole.
Procedure
As a cloud administrator, source your credentials file.
- Example
$ source ~/overcloudrc
You can modify a TLD in various ways by using the following command options:
openstack tld set [--name NAME] \ [--description DESCRIPTION | --no-description] \ [TLD_ID | TLD_NAME]NoteThe earlier syntax diagram does not show the various formatting options for the
openstack tld setcommand. For the list of all the command options, see the link in "Additional resources," later.In this example, the
openstack tld setcommand renames theorgTLD toexample.net:- Example
$ openstack tld set org --name example.net- Sample output
+-------------+--------------------------------------+
| Field       | Value                                |
+-------------+--------------------------------------+
| created_at  | 2022-01-10T13:07:33.000000           |
| description |                                      |
| id          | 9fd0a12d-511e-4024-bf76-6ec2e3e71edd |
| name        | example.net                          |
| updated_at  | 2022-01-10T22:35:20.000000           |
+-------------+--------------------------------------+
Verification
-
Run the
openstack tld show <TLD_NAME_or_ID>command, and confirm that your modifications exist.
5.5. Deleting top-level domains
The Red Hat OpenStack Platform (RHOSP) DNS service (designate) enables you to remove a top-level domain (TLD) by using the OpenStack Client openstack tld delete command.
Prerequisites
-
You must be a RHOSP user with the
adminrole.
Procedure
As a cloud administrator, source your credentials file.
- Example
$ source ~/overcloudrc
Obtain the ID or the name for the TLD that you want to delete, by running the following command:
$ openstack tld listUsing either the name or the ID from the previous step, enter the following command:
$ openstack tld delete <TLD_NAME_or_ID>There is no output when this command is successful.
Verification
-
Run the openstack
tld show <TLD_NAME_or_ID>command, and verify that the TLD has been removed.
5.6. About DNS service denylists
The Red Hat OpenStack Platform (RHOSP) DNS service (designate) has a denylist feature that enables you to prevent users from creating zones with names that match a particular regular expression. For example, you might use a denylist to prevent users from:
- creating a specific zone.
- creating zones that contain a certain string.
- creating subzones of a certain zone.
If example.com. is a member of a denylist, and a domain or a project user attempts to create a zone like, foo.example.com. or example.com., they encounter an error:
$ openstack zone create --email admin@example.com example.com.
Blacklisted zone name
$ openstack zone create --email admin@example.com foo.example.com.
Blacklisted zone name
Users who satisfy the use_blacklisted_zone role-based access control can create zones with names that are on a denylist. By default, the only users who have this override are RHOSP system administrators.
You can create, list, show, modify, and delete denylists using the OpenStack Client openstack zone blacklist commands.
5.7. About DNS service regular expressions in denylists
A large part of working with denylists in the Red Hat OpenStack Platform DNS service (designate) is using regular expressions (regexes), which can be difficult to use. The Python documentation about regex might serve as a useful introduction. Online regex tools can assist when building and testing regexes for use with the denylist API.
5.8. Creating DNS service denylists
Denylists in the Red Hat OpenStack Platform DNS service (designate) enable you to prevent users from creating zones with names that match a particular regular expression. You create denylists with the OpenStack Client openstack zone blacklist create command.
Prerequisites
-
You must be a RHOSP user with the
adminrole.
Procedure
As a cloud administrator, source your credentials file.
- Example
$ source ~/overcloudrc
Use the
openstack zone blacklist createcommand to create a denylist.In this example, the domain
example.com.and all of its subdomains are added to a denylist.- Example
$ openstack zone blacklist create --pattern ".*example.com."- Sample output
+-------------+--------------------------------------+
| Field       | Value                                |
+-------------+--------------------------------------+
| created_at  | 2021-10-20T16:15:18.000000           |
| description | None                                 |
| id          | 7622e241-8c3d-4c03-a692-8747e3cf2658 |
| pattern     | .*example.com.                       |
| updated_at  | None                                 |
+-------------+--------------------------------------+
Verification
-
Run the
openstack zone blacklist listcommand, and confirm that your denylist exists.
5.9. Listing and showing DNS service denylists
You can query the Red Hat OpenStack Platform DNS service (designate) database and view all of the denylists, or display properties for a particular denylist. The OpenStack Client commands for doing this are openstack zone blacklist list and openstack zone blacklist show, respectively.
Viewing all of the denylists can be helpful, because you must know the denylist ID to be able to use the other denylist commands.
Procedure
Source your credentials file.
- Example
$ source ~/overcloudrc
Use the following command to list the denylists in the DNS service database:
$ openstack zone blacklist listWith the denylist ID obtained in the previous step, use the
openstack zone blacklist show <denylist_ID>command to display properties for a particular denylist.- Example
$ openstack zone blacklist show 7622e241-8c3d-4c03-a692-8747e3cf2658
5.10. Modifying DNS service denylists
The Red Hat OpenStack Platform DNS service (designate) enables you to modify denylists. For example, you might want to change the denylist to allow users to create a zone with a particular domain name that in the past was restricted. You modify denylists with the OpenStack Client openstack zone blacklist set command.
Prerequisites
-
You must be a RHOSP user with the
adminrole.
Procedure
As a cloud administrator, source your credentials file.
- Example
$ source ~/overcloudrc
Obtain the ID for the denylist that you want to modify, by running the following command:
$ openstack zone blacklist listYou can modify a denylist in various ways by using the following command options:
$ openstack zone blacklist set \ [--description DESCRIPTION | --no-description] denylist_IDNoteThe earlier syntax diagram does not show the various formatting options for the
openstack zone blacklist setcommand. For the list of all the command options, see the link in "Additional resources," later.In this example, the regular expression (regex) is changed to allow the
web.example.comdomain:- Example
$ openstack zone blacklist set 81fbfe02-6bf9-4812-a40e-1522ab6862ca --pattern ".*web.example.com"- Sample output
+-------------+--------------------------------------+
| Field       | Value                                |
+-------------+--------------------------------------+
| created_at  | 2022-01-08T09:11:43.000000           |
| description | None                                 |
| id          | 81fbfe02-6bf9-4812-a40e-1522ab6862ca |
| pattern     | .*web.example.com                    |
| updated_at  | 2022-01-15T14:26:18.000000           |
+-------------+--------------------------------------+
Verification
-
Run the
openstack zone blacklist show <denylist_ID>command, and confirm that your modifications exist.
5.11. Deleting DNS service denylists
Denylists in the Red Hat OpenStack Platform DNS service (designate) enable you to prevent users from creating zones with names that match a particular regular expression. You remove denylists with the OpenStack Client openstack zone blacklist delete command.
Prerequisites
-
You must be a RHOSP user with the
adminrole.
Procedure
As a cloud administrator, source your credentials file.
- Example
$ source ~/overcloudrc
Obtain the ID for the denylist that you want to delete, by running the following command:
$ openstack zone blacklist listUsing the ID from the previous step, enter the following command:
$ openstack zone blacklist delete <denylist_ID>There is no output when this command is successful.
Verification
-
Run the openstack
zone blacklist show <denylist_ID>command, and verify that the denylist has been removed.
Chapter 6. Viewing and managing quotas on DNS resources
Red Hat OpenStack Platform (RHOSP) provides a set of DNS resource quotas that cloud administrators can modify using the DNS service (designate). Using DNS quotas can help you to secure your RHOSP site from events like denial-of-service attacks, by setting a limit on projects' DNS resources. Using DNS quotas can also help you to track your users' DNS resource consumption. Cloud administrators can set DNS quota values that apply to all projects, or configure one or more quotas on a project-by-project basis.
The topics included in this section are:
6.1. Viewing quotas for DNS resources
You can view resource quotas for Red Hat OpenStack Platform (RHOSP) projects by using the DNS service (designate).
Prerequisites
- You must be a member of the project whose quotas you want to view.
-
A RHOSP user with the
adminrole can view quotas for any project.
Procedure
Source your credentials file.
- Example
$ source ~/overcloudrc
View the DNS resource quotas set for your project:
$ openstack dns quota list- Sample output
+-------------------+-------+
| Field             | Value |
+-------------------+-------+
| api_export_size   | 1000  |
| recordset_records | 20    |
| zone_records      | 500   |
| zone_recordsets   | 500   |
| zones             | 10    |
+-------------------+-------+
A RHOSP user with the
adminrole can query the quotas for other projects:Obtain the ID for the project whose quotas you want to modify.
Remember the ID, because you need it for a later step.
$ openstack project listUsing the project ID, view the DNS resource quotas set for the project.
- Example
In this example, the DNS quotas for project ID
ecd4341280d645e5959d32a4b7659da1are displayed:$ openstack dns quota list --project-id ecd4341280d645e5959d32a4b7659da1- Sample output
+-------------------+-------+
| Field             | Value |
+-------------------+-------+
| api_export_size   | 2500  |
| recordset_records | 25    |
| zone_records      | 750   |
| zone_recordsets   | 750   |
| zones             | 25    |
+-------------------+-------+
6.2. Modifying quotas for DNS resources
You can change DNS resource quotas for Red Hat OpenStack Platform (RHOSP) projects by using the DNS service (designate).
Prerequisites
-
You must be a RHOSP user with the
adminrole.
Procedure
As a cloud administrator, source your credentials file.
- Example
$ source ~/overcloudrc
Obtain the ID for the project whose quotas you want to modify.
Remember the ID, because you need it for a later step.
$ openstack project listUsing the project ID, modify a DNS resource quota for a project. For a list of available quotas, see Section 6.4, “DNS service quotas and their default values”.
- Example
In this example, the
zonesquota has been modified. The total number of zones that project IDecd4341280d645e5959d32a4b7659da1can contain is 30:$ openstack dns quota set --project-id ecd4341280d645e5959d32a4b7659da1 --zones 30- Sample output
+-------------------+-------+
| Field             | Value |
+-------------------+-------+
| api_export_size   | 1000  |
| recordset_records | 20    |
| zone_records      | 500   |
| zone_recordsets   | 500   |
| zones             | 30    |
+-------------------+-------+
6.3. Resetting DNS resource quotas to their default values
You can reset DNS resource quotas for Red Hat OpenStack Platform (RHOSP) projects to their default values by using the DNS service (designate).
Prerequisites
-
You must be a RHOSP user with the
adminrole.
Procedure
As a cloud administrator, source your credentials file.
- Example
$ source ~/overcloudrc
Obtain the ID for the project whose quotas you want to reset.
Remember the ID, because you need it for a later step.
$ openstack project listUsing the project ID, reset the DNS resource quotas for a project.
- Example
In this example, the quotas for a project whose ID is
ecd4341280d645e5959d32a4b7659da1are being reset to the default values:$ openstack dns quota reset --project-id ecd4341280d645e5959d32a4b7659da1There is no output from a successful
openstack dns quota resetcommand.
Verification
Confirm that the DNS resource quotas for the project have been reset:
- Example
$ openstack dns quota list --project-id ecd4341280d645e5959d32a4b7659da1- Sample output
+-------------------+-------+
| Field             | Value |
+-------------------+-------+
| api_export_size   | 1000  |
| recordset_records | 20    |
| zone_records      | 500   |
| zone_recordsets   | 500   |
| zones             | 10    |
+-------------------+-------+
6.4. DNS service quotas and their default values
The Red Hat OpenStack Platform (RHOSP) DNS service (designate) has quotas that a cloud administrator can set to limit DNS resource consumption by cloud users in one or in all RHOSP projects.
| Quota | Default | Description |
|---|---|---|
|
| 10 | The number of zones allowed per project. |
| Quota | Default | Description |
|---|---|---|
|
| 500 | The number of record sets allowed per zone. |
|
| 500 | The number of records allowed per zone. |
|
| 20 | The number of records allowed per record set. |
| Quota | Default | Description |
|---|---|---|
|
| 1000 | The number of record sets allowed in a zone export. |
Chapter 7. Managing zones
The Red Hat OpenStack Platform (RHOSP) DNS service (designate) uses zones to break up the namespace into easily managed pieces. A user can create, modify, delete, export, and import zones provided that their RHOSP project owns the zone.
The topics included in this section are:
7.1. Zones in the DNS service
The Red Hat OpenStack Platform (RHOSP) DNS service (designate) uses a similar zone ownership model as DNS, with two major differences.
For example, in DNS, within the root zone (.) there are zones for each of the top level domains (TLDs) such as .org. and .com.. Within the TLD zones, there can be delegations to other zones, such as example.org. or example.com. that can be owned and managed by other organizations (or other sets of name servers). This example demonstrates a hierarchy of responsibility, with the higher-level zones composed mostly of delegations to the lower-level zones.
Similar to DNS, with the RHOSP DNS service, a zone can be owned by only one tenant. However, unlike DNS, the DNS service does not support zone delegation between tenants. That is, a tenant cannot create a child zone whose parent zone is owned by a different tenant.
The second difference between DNS and the RHOSP DNS service is that the DNS service manages TLDs differently than zones. The DNS service restricts tenants from creating zones that are not within a managed TLD. If the DNS service manages no TLDs, then tenants can create any TLD and any zone, other than the root zone.
7.2. Creating a zone
Zones enable you to more easily manage namespaces. By default, any user can create Red Hat OpenStack Platform (RHOSP) DNS service (designate) zones.
Prerequisites
- Your RHOSP project must own the zone in which you are creating a sub-zone, or the zone must be an allowed TLD.
Procedure
Source your credentials file.
- Example
$ source ~/overcloudrc
Create a zone by specifying a name for the zone and an email address of the person responsible for the zone.
- Example
$ openstack zone create --email dnsprimary@example.com example.com.When you create a zone, the DNS service automatically creates two record sets: an SOA record and an NS record.
Verification
Confirm that your zone exists by running the
openstack zone listcommand.- Sample output
+--------------------------------------+--------------+---------+------------+--------+--------+
| id                                   | name         | type    |     serial | status | action |
+--------------------------------------+--------------+---------+------------+--------+--------+
| 14093115-0f0f-497a-ac69-42235e46c26f | example.com. | PRIMARY | 1468421656 | ACTIVE | NONE   |
+--------------------------------------+--------------+---------+------------+--------+--------+7.3. Updating a zone
There can be situations when you must update a zone managed by the Red Hat OpenStack Platform (RHOSP) DNS service (designate). For example, when you want to change the email address associated with the zone, or when you want to change the zone TTL (time to live) value. By default, any user can modify a zone.
Prerequisites
- Your RHOSP project must own the zone that you are modifying.
Procedure
Source your credentials file.
- Example
$ source ~/overcloudrc
Modify the zone by specifying the name of the zone and the zone attributes that you want to change:
--email <email_address>- a valid email address for the person responsible (owner) for the zone.
--ttl <seconds>- (Time To Live) the duration, in seconds, that a DNS client—for example, a resolver, a web browser, an operating system—can cache a record before checking to see if it has updated.
--description <string> | --no-description- a string that describes the purpose of the zone.
--masters <dns-server> [<dns-server> ...]- the fully qualified domain name for the DNS server that is the primary instance—the instance that other DNS servers can sync from to become secondary servers.
- Example
$ openstack zone set example.com. --ttl 3000
Verification
Confirm that your modification to the zone succeeded.
- Example
$ openstack zone show example.com.
7.4. Deleting a zone
You can remove zones managed by the Red Hat OpenStack Platform (RHOSP) DNS service (designate). For example, you would delete a zone when the zone name has changed.
Prerequisites
- Your RHOSP project must own the zone that you are deleting.
Procedure
Source your credentials file.
- Example
$ source ~/overcloudrc
Delete the zone.
- Example
$ openstack zone delete example.com.
Verification
-
Confirm that your zone no longer exists by running the
openstack zone listcommand.
7.5. Exporting zones
Exporting zone data from the Red Hat OpenStack Platform (RHOSP) DNS service consists of creating a zone export resource that the DNS service stores internally by default. An example is, designate://v2/zones/tasks/exports/e75aef2c-b562-4cd9-a426-4a73f6cb82be/export. After you create the zone export data resource, you can then access its contents. Exporting zone data is a part of an overall backup strategy for protecting DNS information for your RHOSP deployment.
Prerequisites
- Your RHOSP project must own the zone from which you are exporting data.
Procedure
Source your credentials file.
- Example
$ source ~/overcloudrc
Export the zone.
- Example
$ openstack zone export create example.com.- Sample output
+------------+--------------------------------------+ | Field | Value | +------------+--------------------------------------+ | created_at | 2022-02-11T02:01:30.000000 | | id | e75aef2c-b562-4cd9-a426-4a73f6cb82be | | location | None | | message | None | | project_id | cf5a8f5cc5834d2dacd1d54cd0a354b7 | | status | PENDING | | updated_at | None | | version | 1 | | zone_id | d8f81db6-937b-4388-bfb3-ba620e6c09fb | +------------+--------------------------------------+ImportantAfter you create a zone export resource, the DNS service continues to update the resource with any later changes that are made to the zone.
-
Record the zone export ID (
e75aef2c-b562-4cd9-a426-4a73f6cb82be), because you must use it to verify your zone export, and to access the zone export data.
Verification
Confirm that the DNS service successfully created a zone export resource.
- Example
$ openstack zone export show e75aef2c-b562-4cd9-a426-4a73f6cb82be- Sample output
+------------+--------------------------------------------------------------------------------+
| Field      | Value                                                                          |
+------------+--------------------------------------------------------------------------------+
| created_at | 2022-02-11T02:01:30.000000                                                     |
| id         | e75aef2c-b562-4cd9-a426-4a73f6cb82be                                           |
| location   | designate://v2/zones/tasks/exports/e75aef2c-b562-4cd9-a426-4a73f6cb82be/export |
| message    | None                                                                           |
| project_id | cf5a8f5cc5834d2dacd1d54cd0a354b7                                               |
| status     | COMPLETE                                                                       |
| updated_at | 2022-02-11T02:01:30.000000                                                     |
| version    | 2                                                                              |
| zone_id    | d8f81db6-937b-4388-bfb3-ba620e6c09fb                                           |
+------------+--------------------------------------------------------------------------------+
The
zone export createcommand creates a resource that the DNS service stores internally by default.
Access the contents of the zone export file, by using the zone export ID that you obtained earlier.
TipUsing the
-f valueoption prints the contents of the zone file without any tabulation. You can also redirect the contents to a local text file, which can be useful if you want to modify the exported zone file locally and then import it back into the DNS service to update the zone.- Example
$ openstack zone export showfile e75aef2c-b562-4cd9-a426-4a73f6cb82be -f value- Sample output
$ORIGIN example.com.
$TTL 3600

example.com.  IN NS ns1.example.com.
example.com.  IN SOA ns1.example.com. admin.example.com. 1624414033 3583 600 86400 3600

www.example.com.  IN A 192.0.2.2
www.example.com.  IN A 192.0.2.1
7.6. Importing zones
Importing zone data into the Red Hat OpenStack Platform (RHOSP) DNS service consists of running the openstack zone import command on a file that conforms to the DNS zone data file format, such as a file created from data produced by the openstack zone export showfile command. One reason to import data is when a user accidentally deletes a zone.
Prerequisites
- Your RHOSP project must own the zone in which you are creating a sub-zone, or the zone must be an allowed TLD.
- The zone you are importing must not exist already.
- The zone data that you are importing must contain a zone TTL (time to live) value.
Procedure
Source your credentials file.
- Example
$ source ~/overcloudrc
List the zones on your system:
$ openstack zone listIf a the zone that you want to import already exists, you must delete it first by running the
openstack zone deletecommand.- Example
$ openstack zone delete example.com.
Confirm that your zone no longer exists by listing the zones on your system:
$ openstack zone listConfirm that the zone data you are planning to import contains a zone TTL value.
- Example
$ cat /home/stack/zone_file- Sample output
$ORIGIN example.com.
$TTL 3000

example.com.  IN NS test.example.com.
example.com.  IN SOA test.example.com. admin.example.com. 1624415706 9000 500 86000 5000
www.example.com.  IN A 192.0.2.2
test.example.com.  IN NS test.example.com.
Import a valid zone data file.
- Example
$ openstack zone import create /home/stack/zone_file
Verification
Confirm that the DNS service successfully imported the zone.
- Example
$ openstack recordset list -c name -c type -c records -c status example.com.- Sample output
+-------------------+------+---------------------------------------------------------------------+--------+
| name              | type | records                                                             | status |
+-------------------+------+---------------------------------------------------------------------+--------+
| example.com.      | SOA  | ns1.example.com. admin.example.com. 1624415706 3582 500 86000 3600  | ACTIVE |
| test.example.com. | NS   | test.example.com.                                                   | ACTIVE |
| example.com.      | NS   | ns1.example.com.                                                    | ACTIVE |
| www.example.com.  | A    | 192.0.2.2                                                           | ACTIVE |
+-------------------+------+---------------------------------------------------------------------+--------+
7.7. Transferring zone ownership
You can transfer the ownership of zones from one project to another project. For example, the finance team might want to transfer the ownership of the wow.example.com. zone from their project to a project in the sales team.
You can transfer ownership of zones without a cloud administrator’s involvement. However, both the current project zone owner and a member of the receiving project must agree on the transfer.
Prerequisites
- Your project must own the zone that you want to transfer.
- After you create the transfer request, a member of the receiving project must accept the zone that you are transferring.
Procedure
Source your credentials file.
- Example
$ source ~/overcloudrc
Obtain the ID for the project to which you want to transfer ownership of the zone.
- Example
$ openstack project list- Sample output
+----------------------------------+--------------------+
| ID                               | Name               |
+----------------------------------+--------------------+
| 7af0acba0486472da2447ff55df4a26d | Finance            |
| 1d12e87fad0d437286c2873b36a12316 | Sales              |
+----------------------------------+--------------------+
Using the project ID obtained in the previous step, create a zone transfer request for the zone that you want to transfer.
NoteWhen using a target project ID, no other project can accept the zone transfer. If you do not provide a target project ID, then any project that has the transfer request ID and its key can receive the zone transfer.
- Example
To transfer the zone
wow.example.com.to project1d12e87fad0d437286c2873b36a12316, you run:$ openstack zone transfer request create --target-project-id 1d12e87fad0d437286c2873b36a12316 wow.example.com.- Sample output
+-------------------+-----------------------------------------------------+
| Field             | Value                                               |
+-------------------+-----------------------------------------------------+
| created_at        | 2022-05-26T22:06:39.000000                          |
| description       | None                                                |
| id                | 63cab5e5-65fa-4480-b26c-c16c267c44b2                |
| key               | BIFJIQWH                                            |
| links             | {'self': 'http://127.0.0.1:60053/v2/zones/tasks/tra |
|                   | nsfer_requests/63cab5e5-65fa-4480-b26c-c16c267c44b2 |
|                   | '}                                                  |
| project_id        | 6265985fc493465db6a978b318a01996                    |
| status            | ACTIVE                                              |
| target_project_id | 1d12e87fad0d437286c2873b36a12316                    |
| updated_at        | None                                                |
| zone_id           | 962f08b4-b671-4096-bf24-8908c9d4af0c                |
| zone_name         | wow.example.com.                                    |
+-------------------+-----------------------------------------------------+
Obtain the zone transfer request ID and its key.
- Example
$ openstack zone transfer request list -c id -c zone_name -c key- Sample output
+--------------------------------------+------------------+----------+
| id                                   | zone_name        | key      |
+--------------------------------------+------------------+----------+
| 63cab5e5-65fa-4480-b26c-c16c267c44b2 | wow.example.com. | BIFJIQWH |
+--------------------------------------+------------------+----------+
- Provide the zone transfer request ID and its key to a member of the receiving project.
A member of the receiving project logs in to the receiving project, and sources his or her credentials file.
- Example
$ source ~/overcloudrc
Using the zone transfer request ID and its key, accept the zone transfer.
- Example
$ openstack zone transfer accept request --transfer-id 63cab5e5-65fa-4480-b26c-c16c267c44b2 --key BIFJIQWH- Sample output
+--------------------------+----------------------------------------------+
| Field                    | Value                                        |
+--------------------------+----------------------------------------------+
| created_at               | 2022-05-27T21:37:43.000000                   |
| id                       | a4c4f872-c98c-411b-a787-58ed0e2dce11         |
| key                      | BIFJIQWH                                     |
| links                    | {'self': 'http://127.0.0.1:60053/v2/zones/ta |
|                          | sks/transfer_accepts/a4c4f872-c98c-411b-a787 |
|                          | -58ed0e2dce11', 'zone': 'http://127.0.0.1:60 |
|                          | 053/v2/zones/962f08b4-b671-4096-bf24-8908c9d |
|                          | 4af0c'}                                      |
| project_id               | 1d12e87fad0d437286c2873b36a12316             |
| status                   | COMPLETE                                     |
| updated_at               | 2022-05-27T21:37:43.000000                   |
| zone_id                  | 962f08b4-b671-4096-bf24-8908c9d4af0c         |
| zone_transfer_request_id | 63cab5e5-65fa-4480-b26c-c16c267c44b2         |
+--------------------------+----------------------------------------------+
Verification
Using the zone transfer accept ID from the previous step, check the status of your zone transfer.
- Example
In this example, the zone status accept ID is
a4c4f872-c98c-411b-a787-58ed0e2dce11.$ openstack zone transfer accept show a4c4f872-c98c-411b-a787-58ed0e2dce11- Sample output
+--------------------------+----------------------------------------------+
| Field                    | Value                                        |
+--------------------------+----------------------------------------------+
| created_at               | 2022-05-27T21:37:43.000000                   |
| id                       | a4c4f872-c98c-411b-a787-58ed0e2dce11         |
| key                      | None                                         |
| links                    | {'self': 'http://127.0.0.1:60053/v2/zones/ta |
|                          | sks/transfer_accepts/a4c4f872-c98c-411b-a787 |
|                          | -58ed0e2dce11', 'zone': 'http://127.0.0.1:60 |
|                          | 053/v2/zones/962f08b4-b671-4096-bf24-8908c9d |
|                          | 4af0c'}                                      |
| project_id               | 1d12e87fad0d437286c2873b36a12316             |
| status                   | COMPLETE                                     |
| updated_at               | 2022-05-27T21:37:43.000000                   |
| zone_id                  | 962f08b4-b671-4096-bf24-8908c9d4af0c         |
| zone_transfer_request_id | 63cab5e5-65fa-4480-b26c-c16c267c44b2         |
+--------------------------+----------------------------------------------+
7.8. Modifying zone transfer requests
The first step of transferring the ownership of zones from one project to another project is to create a zone transfer request. If you need to change or delete the zone transfer request, you can do so.
Prerequisites
- Your project must own the zone whose transfer request you are modifying.
Procedure
Source your credentials file.
- Example
$ source ~/overcloudrc
Obtain the ID for the zone transfer request you are modifying.
- Example
$ openstack zone transfer request list -c id -c zone_name- Sample output
+--------------------------------------+------------------+
| id                                   | zone_name        |
+--------------------------------------+------------------+
| 63cab5e5-65fa-4480-b26c-c16c267c44b2 | wow.example.com. |
+--------------------------------------+------------------+
Using the zone transfer request ID obtained in the previous step, you can update a limited set of fields on zone transfer requests, such as the description and target project ID.
- Example
$ openstack zone transfer request set --description "wow zone transfer" 63cab5e5-65fa-4480-b26c-c16c267c44b2- Sample output
+-------------------+-----------------------------------------------------+
| Field             | Value                                               |
+-------------------+-----------------------------------------------------+
| created_at        | 2022-05-26T22:06:39.000000                          |
| description       | wow zone transfer                                   |
| id                | 63cab5e5-65fa-4480-b26c-c16c267c44b2                |
| key               | BIFJIQWH                                            |
| links             | {'self': 'http://127.0.0.1:60053/v2/zones/tasks/tra |
|                   | nsfer_requests/63cab5e5-65fa-4480-b26c-c16c267c44b2 |
|                   | '}                                                  |
| project_id        | 6265985fc493465db6a978b318a01996                    |
| status            | ACTIVE                                              |
| target_project_id | 1d12e87fad0d437286c2873b36a12316                    |
| updated_at        | 2022-05-27T20:52:08.000000                          |
| zone_id           | 962f08b4-b671-4096-bf24-8908c9d4af0c                |
| zone_name         | wow.example.com.                                    |
+-------------------+-----------------------------------------------------+
Using the zone transfer request ID obtained in step 2, you can cancel a pending zone transfer, by deleting its zone transfer request.
- Example
$ openstack zone transfer request delete 63cab5e5-65fa-4480-b26c-c16c267c44b2There is no output from the
zone transfer request deletecommand. Confirm that the zone transfer request is removed by running thezone transfer request listcommand.
Chapter 8. Managing record sets
Red Hat OpenStack (RHOSP) DNS service (designate) stores data about zones in record sets. Record sets consist of one or more DNS resource records. You can query a zone to list its record sets in addition to adding, modifying, and deleting them.
The topics included in this section are:
8.1. About records and record sets in the DNS service
The Domain Name System (DNS) uses resource records to store zone data within namespaces. DNS records in the Red Hat OpenStack (RHOSP) DNS service (designate) are managed using record sets.
Each DNS record contains the following attributes:
- Name - the string that indicates its location in the DNS namespace.
-
Type - the set of letter codes that identifies how the record is used. For example,
Aidentifies address records andCNAMEidentifies canonical name records. -
Class - the set of letter codes that specify the namespace for the record. Typically, this is
INfor internet, though other namespaces do exist. - TTL - (time to live) the duration, in seconds, that the record remains valid.
- Rdata - the data for the record, such as an IP address for an A record or another record name for a CNAME record.
Each zone namespace must contain a start of authority (SOA) record and can have an authoritative name server (NS) record and a variety of other types of records. The SOA record indicates that this name server is the best source of information about the zone. The NS record identifies the name server that is authoritative for a zone. The SOA and NS records for a zone are readable, but cannot be modified.
Besides the required SOA and NS records, three of the most common record types are address (A), canonical name (CNAME), and pointer (PTR) records. A records map hostnames to IP addresses. PTR records map IP addresses to hostnames. CNAME records identify the full hostname for aliases.
A record set represents one or more DNS records with the same name and type, but potentially different data. For example, a record set named web.example.com, with a type of A, that contains the data 192.0.2.1 and 192.0.2.2 might reflect two web servers hosting web.example.com located at those two IP addresses.
You must create record sets within a zone. If you delete a zone that contains record sets, those record sets within the zone are also deleted.
Consider this output obtained by querying the example.com zone with the openstack recordset list -c name -c type -c records example.com command:
+------------------+------+----------------------------------------------+
| name             | type | records                                      |
+------------------+------+----------------------------------------------+
| example.com.     | SOA  | ns1.example.net. admin.example.com. 16200126 |
|                  |      | 16 3599 600 8640 0 3600                      |
|                  |      |                                              |
| example.com.     | NS   | ns1.example.net.                             |
|                  |      |                                              |
| web.example.com. | A    | 192.0.2.1                                    |
|                  |      | 192.0.2.2                                    |
|                  |      |                                              |
| www.example.com. | A    | 192.0.2.1                                    |
+------------------+------+----------------------------------------------+
In this example, the authoritative name server for the example.com. zone is ns1.example.net., the NS record. To verify this, you can use the BIND dig tool to query the name server for the NS record:
$ dig @ns1.example.net example.com. -t NS +short
ns1.example.net.
You can also verify the A record sets:
$ dig @ns1.example.net web.example.com. +short
192.0.2.2
192.0.2.1
$ dig @ns1.example.net www.example.com. +short
192.0.2.1
8.2. Creating a record set
By default, any user can create Red Hat OpenStack Platform DNS service (designate) record sets.
Prerequisites
- Your project must own a zone in which you are creating a record set.
Procedure
Source your credentials file.
- Example
$ source ~/overcloudrc
You create record sets by using the
openstack recordset createcommand. Record sets require a zone, name, type, and data.- Example
$ openstack recordset create --type A --record 192.0.2.1 example.com. wwwNoteThe trailing dot (
.) is required when using fully qualified domain names (FQDN). If you omit the trailing dot, the zone name is duplicated in the resulting record name, for examplewww.example.com.example.com..In the earlier example, a user has created a zone named
example.com.. Because the record set namewwwis not an FQDN, the DNS service prepends it to the zone name. You can achieve the same result by using the FQDN for the record set name argument:$ openstack recordset create --type A --record 192.0.2.1 example.com. www.example.com.
If you want to construct a TXT record set that exceeds the maximum length for a character string (255 characters), then you must split the string into multiple, smaller strings when you create the record set.
In this example, a user creates a TXT record set (
_domainkey.example.com) that contains one string of 410 characters by specifying two strings—each less than the 255 character maximum:$ openstack recordset create --type TXT --record '"210 characters string" "200 characters string"' example.com. _domainkeyYou can supply the
--recordargument multiple times to create multiple records within a record set. A typical use for multiple--recordarguments is round-robin DNS.- Example
$ openstack recordset create --type A --record 192.0.2.1 --record 192.0.2.2 example.com. web
Verification
Run the list command to verify that the record set you created exists:
- Example
$ openstack recordset list -c name -c type -c records example.com.- Sample output
+------------------+------+----------------------------------------------+
| name             | type | records                                      |
+------------------+------+----------------------------------------------+
| example.com.     | SOA  | ns1.example.net. admin.example.com 162001261 |
|                  |      | 6 3599 600 86400 3600                        |
|                  |      |                                              |
| example.com.     | NS   | ns1.example.net.                             |
|                  |      |                                              |
| web.example.com. | A    | 192.0.2.1 192.0.2.2                          |
|                  |      |                                              |
| www.example.com. | A    | 192.0.2.1                                    |
+------------------+------+----------------------------------------------+
8.3. Updating a record set
By default, any user can update Red Hat OpenStack Platform DNS service (designate) record sets.
Prerequisites
- Your project must own a zone in which you are updating a record set.
Procedure
Source your credentials file.
- Example
$ source ~/overcloudrc
You modify record sets by using the
openstack recordset setcommand.- Example
In this example, a user is updating the record set
web.example.com.to contain two records:$ openstack recordset set example.com. web.example.com. --record 192.0.2.5 --record 192.0.2.6NoteWhen updating a record set you can identify it by its ID or its name. If you use its name, you must use the fully qualified domain name (FQDN).
Verification
Run the list command to confirm your modifications.
- Example
$ openstack recordset list -c name -c type -c records example.com.- Sample output
+------------------+------+----------------------------------------------+
| name             | type | records                                      |
+------------------+------+----------------------------------------------+
| example.com.     | SOA  | ns1.example.net. admin.example.com 162001261 |
|                  |      | 6 3599 600 86400 3600                        |
|                  |      |                                              |
| example.com.     | NS   | ns1.example.net.                             |
|                  |      |                                              |
| web.example.com. | A    | 192.0.2.5 192.0.2.6                          |
|                  |      |                                              |
| www.example.com. | A    | 192.0.2.1                                    |
+------------------+------+----------------------------------------------+
8.4. Deleting a record set
By default, any user can delete Red Hat OpenStack Platform DNS service (designate) record sets.
Prerequisites
- Your project must own a zone in which you are deleting a record set.
Procedure
Source your credentials file.
- Example
$ source ~/overcloudrc
You delete record sets by using the
openstack recordset deletecommand.- Example
In this example, a user is deleting the record set
web.example.com.from the example.com. zone:$ openstack recordset delete example.com. web.example.com.
Verification
Run the list command to confirm your deletions.
- Example
$ openstack recordset list -c name -c type -c records example.com.- Sample output
+------------------+------+----------------------------------------------+
| name             | type | records                                      |
+------------------+------+----------------------------------------------+
| example.com.     | SOA  | ns1.example.net. admin.example.com 162001261 |
|                  |      | 6 3599 600 86400 3600                        |
|                  |      |                                              |
| example.com.     | NS   | ns1.example.net.                             |
|                  |      |                                              |
| www.example.com. | A    | 192.0.2.1                                    |
+------------------+------+----------------------------------------------+
Chapter 9. Managing pointer records (PTRs)
A step in configuring the Red Hat OpenStack Platform (RHOSP) DNS service (designate) is to set up IP address-to-domain-name-lookups, also referred to as reverse lookups. The DNS resource, pointer (PTR) records, contain the address-to-name mapping data and are stored in reverse lookup zones. The DNS service also enables you to manage reverse lookups for floating IP addresses.
The topics included in this section are:
9.1. PTR record basics
In the Red Hat OpenStack Platform (RHOSP) DNS service (designate) you use pointer (PTR) records to create a number to name mapping (reverse mapping) from a single IP or set of IP addresses to a fully qualified domain name (FQDN). Because the Domain Name System (DNS) looks up addresses as names, you create a PTR record that contains a name for the IP address. You form this name by following a particular convention: reverse the IP address and append a special string: in-addr.arpa for IPv4 addresses, and ip6.arpa for IPv6 addresses.
For example, if the IP address for my-server.example.com is 198.51.100.42, then you name the corresponding node in the reverse lookup zone, 42.100.51.198.in-addr.arpa. Listing the name of the IP address backwards facilitates its lookup, because like standard fully qualified domain names (FQDNs), a reversed IP address gets less specific as you move from its left side to its right side.
The DNS service writes the contents of the PTR record to a special zone called a reverse lookup zone, whose sole purpose is to provide address-to-name lookups. Because the PTR record contains data that is structured similar to standard FQDNs, you can delegate child zones of the reverse lookup zone in the same way as you delegate other zones. In the earlier example, the host, 198.51.100.42, is a node in the 198.in-addr.arpa zone, and this zone can be delegated to the administrators of the network, 198.51.100.0/8.
The DNS service manages PTR records for floating IP addresses differently than for standard IP addresses, because of the requirement that the user’s RHOSP project owns the zone that contains the IP address. In most use cases involving reverse name lookups, this requirement is easily met. When managing reverse lookups for standard IP addresses, you use the openstack recordset command as you do when managing the other DNS resource record types.
However, when working with floating IP addresses, it is common for multiple projects to share a pool of floating IP addresses. To solve the project ownership issue of a shared pool of addresses, you must use a different command when managing reverse lookups for floating IPs, the openstack ptr record command.
9.2. Creating reverse lookup zones
To properly configure the Red Hat OpenStack Platform (RHOSP) DNS service (designate) you must have a reverse lookup zone. A reverse lookup zone contains PTR records that are required for you to perform address-to-name lookups. You must name reverse lookup zones following this convention: <backward_IP_address>.in-addr.arpa for IPv4 addresses, and <backward_IP_address>.ip6.arpa for IPv6 addresses.
Typically, you align the zones in your RHOSP deployment to your subnet plan. For example, if you have a /24 subnet for your external network, you create a /24 subnet reverse lookup zone to contain your PTR records.
Procedure
Source your credentials file.
- Example
$ source ~/overcloudrc
Create a reverse lookup zone by using the
openstack zone createcommand and specifying these required arguments:--email <email_address>- a valid email address for the person responsible (owner) for the zone.
<name>-
a name for the reverse lookup zone that conforms to the convention:
<backward_IP_address>.in-addr.arpafor IPv4 addresses, and<backward_IP_address>.ip6.arpafor IPv6 addresses. - Example
In this example, the reverse lookup zone is designed for one PTR record, for the 198.51.100.42 address:
$ openstack zone create --email admin@example.com \ 42.100.51.198.in-addr.arpa.- Sample output
+----------------+------------------------------------------+ | Field | Value | +----------------+------------------------------------------+ | action | CREATE | | attributes | | | created_at | 2022-02-02T17:32:47.000000 | | description | None | | email | admin@example.com | | id | f5546034-b27e-4326-bf9d-c53ed879f7fa | | masters | | | name | 42.100.51.198.in-addr.arpa. | | pool_id | 794ccc2c-d751-44fe-b57f-8894c9f5c842 | | project_id | 123d51544df443e790b8e95cce52c285 | | serial | 1591119166 | | status | PENDING | | transferred_at | None | | ttl | 3600 | | type | PRIMARY | | updated_at | None | | version | 1 | +----------------+------------------------------------------+- Example
In another example for a reverse zone that is for a 198.51.100.0/24 subnet, you would create the zone:
$ openstack zone create --email admin@example.com \ 100.51.198.in-addr.arpa.- Sample output
+----------------+------------------------------------------+
| Field          | Value                                    |
+----------------+------------------------------------------+
| action         | CREATE                                   |
| attributes     |                                          |
| created_at     | 2022-02-02T17:40:23.000000               |
| description    | None                                     |
| email          | admin@example.com                        |
| id             | 5669caad86a04256994cdf755df4d3c1         |
| masters        |                                          |
| name           | 100.51.198.in-addr.arpa.                 |
| pool_id        | 794ccc2c-d751-44fe-b57f-8894c9f5c842     |
| project_id     | 123d51544df443e790b8e95cce52c285         |
| serial         | 1739276248                               |
| status         | PENDING                                  |
| transferred_at | None                                     |
| ttl            | 3600                                     |
| type           | PRIMARY                                  |
| updated_at     | None                                     |
| version        | 1                                        |
+----------------+------------------------------------------+
Verification
Confirm that the reverse lookup zone that you created exists:
$ openstack zone list -c id -c name -c status- Sample output
+--------------------------------------+-----------------------------+--------+
| id                                   | name                        | status |
+--------------------------------------+-----------------------------+--------+
| f5546034-b27e-4326-bf9d-c53ed879f7fa | 42.100.51.198.in-addr.arpa. | ACTIVE |
+--------------------------------------+-----------------------------+--------+
- For the address-to-name mapping to be complete, the forward zone—the zone that contains the IP address—must exist. If the forward zone does not exist, create that now.
9.3. Creating a PTR record
In the Red Hat OpenStack Platform (RHOSP) DNS service (designate) you create PTR records to enable reverse lookups (address-to-name mappings). Enabling reverse lookups is a part of properly configuring the DNS service on your RHOSP deployment.
Prerequisites
- Your RHOSP project must own the zone in which you create the PTR record.
- A reverse lookup zone to store the PTR record. For more information, see Section 9.2, “Creating reverse lookup zones”.
Procedure
Source your credentials file.
- Example
$ source ~/overcloudrc
Create a PTR record by using the
openstack recordset createcommand and specifying these required arguments:--record <domain_name>- the target, the domain name, that should be returned when a reverse lookup is performed.
--type PTR-
the kind of record,
PTR, that you are creating. <zone_name>- the name of the zone, the reverse lookup zone, where the record resides.
<record_name>the name of the PTR record.
The record name must match the <zone_name> or be a member of the zone. For example, for the reverse lookup zone
100.51.198.in-addr.arpa., these are valid PTR record names:1.100.51.198.in-addr.arpa.,2.100.51.198.in-addr.arpa., and any other reversed IP addresses in the198.51.100.0/24subnet.- Example
openstack recordset create --record www.example.com. --type PTR \ 42.100.51.198.in-addr.arpa. 42.100.51.198.in-addr.arpa.- Sample output
+-------------+--------------------------------------+
| Field       | Value                                |
+-------------+--------------------------------------+
| action      | CREATE                               |
| created_at  | 2022-02-02T19:55:50.000000           |
| description | None                                 |
| id          | ca604f72-83e6-421f-bf1c-bb4dc1df994a |
| name        | 42.100.51.198.in-addr.arpa.          |
| project_id  | 123d51544df443e790b8e95cce52c285     |
| records     | www.example.com.                     |
| status      | PENDING                              |
| ttl         | 3600                                 |
| type        | PTR                                  |
| updated_at  | None                                 |
| version     | 1                                    |
| zone_id     | f5546034-b27e-4326-bf9d-c53ed879f7fa |
| zone_name   | 42.100.51.198.in-addr.arpa.          |
+-------------+--------------------------------------+
Verification
Perform a reverse lookup to confirm that the IP address (
198.51.100.42) is mapped to the domain name (www.example.com).- Example
In this example,
203.0.113.5is one of the DNS servers in the deployment:$ dig @203.0.113.5 -x 198.51.100.42 +short- Sample output
www.example.com.
9.4. Creating multiple PTR records
In the Red Hat OpenStack Platform (RHOSP) DNS service (designate) you can add many PTR records to a larger subnet by using a more broadly defined reverse lookup zone.
Prerequisites
- Your RHOSP project must own the zone in which you create the PTR record.
-
A reverse lookup zone to store the PTR record that is more broadly defined. For example, a
198.51.100.0/24reverse lookup zone,100.51.198.in-addr-arpa. For more information, see Section 9.2, “Creating reverse lookup zones”.
Procedure
Source your credentials file.
- Example
$ source ~/overcloudrc
Create the PTR record by using the
openstack recordset createcommand and specifying these required arguments:--record <domain_name>- the domain name of the lookup.
--type PTR-
the kind of record,
PTR, that you are creating. <zone_name>- the name of the reverse lookup zone where the record resides.
<record_name>the name of the PTR record.
The record name must match the <zone_name> or be a member of the zone. For example, for the reverse lookup zone
100.51.198.in-addr.arpa., these are valid PTR record names:1.100.51.198.in-addr.arpa.,2.100.51.198.in-addr.arpa., and any other reversed IP addresses in the198.51.100.0/24subnet.- Example
In this example, the reverse lookup zone is more broadly defined, For example, a
100.51.198.0/24reverse lookup zone,100.51.198.in-addr-arpa:$ openstack recordset create --record cats.example.com. --type PTR \ --ttl 3600 100.51.198.in-addr.arpa. 3.100.51.198.in-addr.arpa.- Sample output
+-------------+--------------------------------------+
| Field       | Value                                |
+-------------+--------------------------------------+
| action      | CREATE                               |
| created_at  | 2022-02-02T20:10:54.000000           |
| description | None                                 |
| id          | c843729b-7aaf-4f99-a40a-d9bf70edf271 |
| name        | 3.100.51.198.in-addr.arpa.           |
| project_id  | 123d51544df443e790b8e95cce52c285     |
| records     | cats.example.com.                    |
| status      | PENDING                              |
| ttl         | 3600                                 |
| type        | PTR                                  |
| updated_at  | None                                 |
| version     | 1                                    |
| zone_id     | e9fd0ced-1d3e-43fa-b9aa-6d4b7a73988d |
| zone_name   | 100.51.198.in-addr.arpa.             |
+-------------+--------------------------------------+
Verification
Perform a reverse lookup to confirm that the IP address (
198.51.100.3) is mapped to the domain name (cats.example.com).- Example
In this example,
203.0.113.5is one of the DNS servers in the deployment:$ dig @203.0.113.5 -x 198.51.100.3 +short- Sample output
cats.example.com.
Perform a reverse lookup to confirm that any other IP address (
198.51.100.0/24) is mapped to the domain name (example.com).- Example
In this example,
203.0.113.5is one of the DNS servers in the deployment:$ dig @203.0.113.5 -x 198.51.100.10 +short- Sample output
example.com.
9.5. Setting up PTR records for floating IP addresses
In the Red Hat OpenStack Platform (RHOSP) DNS service (designate) you can create PTR records for floating IP addresses to allow reverse lookups.
Prerequisites
- One or more floating IPs defined.
- A reverse lookup zone for the floating IP for which you want to create a PTR record.
Procedure
Source your credentials file.
- Example
$ source ~/overcloudrc
Determine the ID of the floating IP address for which you want to delete a PTR record. You need this information in a later step.
$ openstack floating ip list -c ID -c "Floating IP Address"- Sample output
+--------------------------------------+---------------------+
| ID                                   | Floating IP Address |
+--------------------------------------+---------------------+
| 5c02c519-4928-4a38-bd10-c748c200912f | 192.0.2.11          |
| 89532684-13e1-4af3-bd79-f434c9920cc3 | 192.0.2.12          |
| ea3ebc6d-a146-47cd-aaa8-35f06e1e8c3d | 192.0.2.13          |
+--------------------------------------+---------------------+
Determine the RHOSP region name of the neutron instance that hosts the floating IP. You need this information in a later step.
$ openstack endpoint list -c ID -c Region -c "Service Name"- Sample output
+----------------------------------+-----------+--------------+
| ID                               | Region    | Service Name |
+----------------------------------+-----------+--------------+
| 16526452effd467a915155ceccf79dae | RegionOne | placement    |
| 21bf826a62a14456a61bd8f39648e849 | RegionOne | keystone     |
| 9cb1956999c54001a39d11ea14e037a1 | RegionOne | nova         |
| bdeec4e2665d4605bb89e16a8b1bc50d | RegionOne | glance       |
| ced05a1c03ab44caa1a351ace95429e6 | RegionOne | neutron      |
| e79e3113ea544d039b3a6378e60bdf3f | RegionOne | nova         |
| f91ee44123954b6c82162dcd2d4fc965 | RegionOne | designate    |
+----------------------------------+-----------+--------------+
Create the PTR record by using the
openstack ptr record setcommand and specifying these required arguments:<floating_IP_ID>- the floating IP ID in the format: <region_name>:<floating_IP_ID>.
<ptrd_name>- the target, the domain name, that should be returned when a reverse lookup is performed.
- Example
$ openstack ptr record set RegionOne:5c02c519-4928-4a38-bd10-c748c200912f ftp.example.com.- Sample output
+-------------+------------------------------------------------+
| Field       | Value                                          |
+-------------+------------------------------------------------+
| action      | CREATE                                         |
| address     | 192.0.2.11                                     |
| description | None                                           |
| id          | RegionOne:5c02c519-4928-4a38-bd10-c748c200912f |
| ptrdname    | ftp.example.com.                               |
| status      | PENDING                                        |
| ttl         | 3600                                           |
+-------------+------------------------------------------------+
Verification
Perform a reverse lookup to confirm that the floating IP address (
192.0.2.11) is mapped to the domain name (ftp.example.com).- Example
In this example,
203.0.113.5is one of the DNS servers in the deployment:$ dig @203.0.113.5 -x 192.0.2.11 +short- Sample output
ftp.example.com.
9.6. Unsetting PTR records for floating IP addresses
In the Red Hat OpenStack Platform (RHOSP) DNS service (designate) you can remove PTR records associated with floating IP addresses.
Prerequisites
- A PTR record for a floating IP.
Procedure
Source your credentials file.
- Example
$ source ~/overcloudrc
Determine the ID of the floating IP address for which you want to delete a PTR record. You need this information in a later step.
$ openstack floating ip list -c ID -c "Floating IP Address"- Sample output
+--------------------------------------+---------------------+
| ID                                   | Floating IP Address |
+--------------------------------------+---------------------+
| 5c02c519-4928-4a38-bd10-c748c200912f | 192.0.2.11          |
| 89532684-13e1-4af3-bd79-f434c9920cc3 | 192.0.2.12          |
| ea3ebc6d-a146-47cd-aaa8-35f06e1e8c3d | 192.0.2.13          |
+--------------------------------------+---------------------+
Determine the name of your RHOSP region. You need this information in a later step.
$ openstack endpoint list -c ID -c Region -c "Service Name"- Sample output
+----------------------------------+-----------+--------------+
| ID                               | Region    | Service Name |
+----------------------------------+-----------+--------------+
| 16526452effd467a915155ceccf79dae | RegionOne | placement    |
| 21bf826a62a14456a61bd8f39648e849 | RegionOne | keystone     |
| 9cb1956999c54001a39d11ea14e037a1 | RegionOne | nova         |
| bdeec4e2665d4605bb89e16a8b1bc50d | RegionOne | glance       |
| ced05a1c03ab44caa1a351ace95429e6 | RegionOne | neutron      |
| e79e3113ea544d039b3a6378e60bdf3f | RegionOne | nova         |
| f91ee44123954b6c82162dcd2d4fc965 | RegionOne | designate    |
+----------------------------------+-----------+--------------+
Delete the PTR record by using the
openstack ptr record unsetcommand and specifying these required arguments:<floating_IP_ID>- the floating IP ID in the format: <region>:<floating_IP_ID>.
- Example
$ openstack ptr record unset RegionOne:5c02c519-4928-4a38-bd10-c748c200912f
Verification
Confirm that you removed the PTR record.
$ openstack ptr record list
Chapter 10. Troubleshooting the DNS service
By reviewing the Red Hat OpenStack Platform DNS service (designate) logs and using some simple commands, you can verify that the service is running properly. These actions are the first steps in troubleshooting the DNS service.
The topics included in this section are:
10.1. DNS service and BIND logs
Reviewing the Red Hat OpenStack Platform DNS service (designate) logs, can be useful when troubleshooting issues.
The DNS service logs are located in /var/log/containers/designate. There is one log for each of the component services:
-
central.log -
designate-api.log -
mdns.log -
producer.log -
worker.log
The logs for the BIND server that Red Hat supplies with the RHOSP DNS service are located in /var/log/containers/designate/designate-bind:
-
central.log -
designate-api.log
10.2. Exporting the DNS service pool configuration
You can use a copy of the DNS pool configuration to troubleshoot the Red Hat OpenStack Platform (RHOSP) DNS service (designate).
In RHOSP 17.1, multiple pools are not supported.
Procedure
Log in to one of the Controller nodes and display the current running DNS service pool configuration to the console.
- Example
In this example, the administrator accesses a Controller node,
controller-0.ctlplane, through SSH as thetripleo-adminuser and executes thedesignate-manage pool show_configcommand running in thedesignate_centralcontainer:$ ssh tripleo-admin@controller-0.ctlplane sudo podman exec \ designate_central designate-manage pool show_config- Sample output
Pool Configuration:
-------------------
also_notifies: []
attributes: {}
description: Default Pool
id: 794ccc2c-d751-44fe-b57f-8894c9f5c842
name: default
nameservers:
- host: 192.0.2.111
  port: 53
- host: 192.0.2.109
  port: 53
- host: 192.0.2.131
  port: 53
ns_records:
- hostname: ns2.example.com.
  priority: 2
- hostname: ns1.example.com.
  priority: 1
- hostname: ns3.example.com.
  priority: 3
targets:
- description: BIND9 Server 3
  masters:
  - host: 192.0.2.137
    port: 16002
  - host: 192.0.2.137
    port: 16001
  - host: 192.0.2.137
    port: 16000
  options:
    host: 192.0.2.111
    port: '53'
    rndc_config_file: /etc/designate/private/bind3.conf
    rndc_host: 192.0.2.111
    rndc_port: '953'
  type: bind9
- description: BIND9 Server 2
  masters:
  - host: 192.0.2.137
    port: 16001
  - host: 192.0.2.137
    port: 16002
  - host: 192.0.2.137
    port: 16000
  options:
    host: 192.0.2.131
    port: '53'
    rndc_config_file: /etc/designate/private/bind2.conf
    rndc_host: 192.0.2.131
    rndc_port: '953'
  type: bind9
- description: BIND9 Server 1
  masters:
  - host: 192.0.2.137
    port: 16002
  - host: 192.0.2.137
    port: 16001
  - host: 192.0.2.137
    port: 16000
  options:
    host: 192.0.2.109
    port: '53'
    rndc_config_file: /etc/designate/private/bind1.conf
    rndc_host: 192.0.2.109
    rndc_port: '953'
  type: bind9
If you want to export the current pool configuration to a file, use the
designate-manage pool generate_filecommand.- Example
In this example, the administrator accesses a Controller node,
controller-0.ctlplane, through SSH as thetripleo-adminuser and executes thedesignate-manage pool generate_file --file <file_name>command running in thedesignate_centralcontainer. The DNS service exports the current pool configuration to a file that is specified by the--fileoption, in this example,~/my_dns_service_config.yaml:$ ssh tripleo-admin@controller-0.ctlplane sudo podman exec \ designate_central designate-manage pool generate_file \ --file ~/my_dns_service_config.yamlTipUse the
podman cpcommand to copy files from a container to your local system.
10.3. Listing available DNS service endpoints
Determining the Red Hat OpenStack Platform DNS service (designate) endpoint and its status, can be useful when troubleshooting issues.
Procedure
Source your credentials file.
- Example
$ source ~/overcloudrc
List the available RHOSP service endpoints:
$ openstack endpoint list --service designate -c Interface -c URL- Sample output
+-----------+-------------------------+
| Interface | URL                     |
+-----------+-------------------------+
| internal  | http://172.17.1.44:9001 |
| public    | http://10.0.0.147:9001  |
| admin     | http://172.17.1.44:9001 |
+-----------+-------------------------+