Deploy Red Hat Quay on OpenShift
Deploy Red Hat Quay on OpenShift
Abstract
Preface
Red Hat Quay is an enterprise-quality container registry. Use Quay to build and store containers, then deploy them to the servers across your enterprise.
This procedure describes how to deploy a Red Hat Quay setup to run on an OpenShift cluster. Deploying Red Hat Quay on OpenShift is done by running containerized versions of Redis, PostgreSQL, Quay and other services using the oc command.
Chapter 1. Overview
Features of Quay include:
- High availability
- Geo-replication
- Continuous integration
- Security scanning
- Custom log rotation
- 24/7 support
Quay provides support for multiple:
- Authentication and access methods
- Storage backends
- SSL certificates
- Application registries
Chapter 2. Architecture
Quay is made up of three core components for a basic setup. In highly available setups, an additional object storage component is needed. The three core components are:
- Database (MySQL or PostgreSQL): Used by Quay as its primary metadata storage (not for image storage).
- Redis (key, value store): Used for providing real time events and during Quay setup and installation.
- Quay (container registry): Runs Quay as a service, consisting of several components in the pod.
For the high availability installation, you need to use one of the following types of storage:
- Public cloud storage: In public cloud environments, you should use the cloud provider’s object storage, such as Amazon S3 (for AWS) or Google Cloud Storage (for Google Cloud).
- Private cloud storage: In private clouds, an S3 or Swift compliant Object Store is needed, such as Ceph RADOS, or OpenStack Swift.
Local storage is supported for the Red Hat Quay test-only installation, but not for high-availability.
Chapter 3. Installing Red Hat Quay on OpenShift
This procedure presents guidance on how to set up a deployment of Red Hat Quay on an OpenShift cluster.
3.1. Prerequisites
Here are are a few things you need to know before you begin the Red Hat Quay on OpenShift deployment:
- OpenShift cluster: You need a privileged account to an OpenShift cluster on which to deploy the Red Hat Quay. That account must have the ability to create namespaces at the cluster scope.
Storage: Ceph Object Gateway (also called RADOS Gateway) provides the object storage needed by Red Hat Quay. If you want your Red Hat Quay setup to do geo-replication, Ceph Object Gateway or other supported object storage is required. For cloud installations, you can use any of the following cloud object storage:
- Amazon S3 (see S3 IAM Bucket Policy for details on configuring an S3 bucket policy for Quay)
- Azure Blob Storage
- Google Cloud Storage
- Ceph Object Gateway
- OpenStack Swift
- CloudFront + S3
Storage setup is not part of this procedure. However, you can create Ceph cloud storage using steps from the Set up Ceph section of the high availability Red Hat Quay deployment guide.
Services: Because you are deploying to an OpenShift cluster, instead of to bare metal or virtual machines, you simply need to make sure that your cluster has enough capacity to run the following containerized services:
Database: Either Postgres or MySQL can be used to provide the database service. Postgres was chosen here as the database because it includes the features needed to support Clair security scanning.
NoteYou can substitute your own enterprise-quality database if you choose. The Postgres database illustrated here is not, itself, configured for high availability.
- Proxy server: The haproxy server is used in this example, to distribute access to the Quay, Redis, and storage services. However, you can use any proxy service that works for your environment.
- Key-value database: Redis is used to serve non-critical data to your Red Hat Quay configuration.
- Quay: The Quay service provides the features to manage the Quay registry.
Chapter 4. Set up Red Hat Quay services
Deploying Red Hat Quay on OpenShift requires you to get a set of yml files that you use with the oc command to set up name spaces, add secrets, configure networking, and start the required containerized services. Although the oc command is used to configure the Red Hat Quay registry here, you could use the OpenShift web UI instead, if you prefer.
Here are a few things to keep in mind:
- Your OpenShift account must have permission to create namespaces at the cluster scope.
-
Quay runs under its own namespace inside a Kubernetes cluster, so that needs to be created first. You can create it through the
New projectin the OpenShift web console or using quay-enterprise-namespace.yml (as described here): - You have two choices here for starting the quay service: one using a loadbalancer yaml file (appropriate for cloud environments) and one using a nodeport yaml file (good for bare metal and other on-premise).
- You need a working PostgreSQL, 9.4 and above. We recommend 9.6.
You can use an existing Redis service (needed for build logs) or start one as described in this procedure (using the quay-enterprise-redis.yml file).
Download the yml files needed to create the container pods and services needed for your Red Hat Quay configuration:
$ mkdir ~/quaydeploy $ cd ~/quaydeploy $ wget https://coreos.com/quay-enterprise/docs/latest/tectonic/files/quay-enterprise-namespace.yml $ wget https://coreos.com/quay-enterprise/docs/latest/tectonic/files/quay-enterprise-config-secret.yml $ wget https://coreos.com/quay-enterprise/docs/latest/tectonic/files/quay-enterprise-redis.yml $ wget https://coreos.com/quay-enterprise/docs/latest/tectonic/files/quay-enterprise-app-rc.yml $ wget https://coreos.com/quay-enterprise/docs/latest/tectonic/files/quay-enterprise-service-nodeport.yml $ wget https://coreos.com/quay-enterprise/docs/latest/tectonic/files/quay-enterprise-service-loadbalancer.yml $ wget https://coreos.com/quay-enterprise/docs/latest/tectonic/files/quay-servicetoken-role-k8s1-6.yaml $ wget https://coreos.com/quay-enterprise/docs/latest/tectonic/files/quay-servicetoken-role-binding-k8s1-6.yaml- Modify yml files: The “quay-enterprise” namespace is hard-coded into this set of yml files. Therefore, that namespace is used throughout this procedure. If you want to change the namespace name or any other settings in the yml files, do that now and be sure to replace options in the procedure below as appropriate.
Login as a user with cluster scope permissions to the OpenShift cluster. For example:
$ oc login -u system:adminCreate the
quay-enterprisenamespace: All objects will be deployed to this namespace:$ oc create -f quay-enterprise-namespace.yml namespace "quay-enterprise" created- Add Quay authentication: Set up authentication to Quay.io, so you can pull the Quay container, as described in Accessing Red Hat Quay without a CoreOS login .
Create the config secret:
$ oc create -f quay-enterprise-config-secret.yml
secret "quay-enterprise-config-secret" created
Create the pull secret: Include the location of your config.json file, which must contain the correct robot account credentials. This example uses the $HOME/.docker/config.json file created when you run docker login.
$ oc create secret generic coreos-pull-secret \
     --from-file=".dockerconfigjson=$HOME/.docker/config.json" \
     --type='kubernetes.io/dockerconfigjson' -n quay-enterprise
Create the role and the role binding: Red Hat Quay has native Kubernetes integrations. These integrations require Service Account to have access to the Kubernetes API. When Kubernetes RBAC is enabled, Role Based Access Control policy manifests also have to be deployed. This role will be used to run Quay and also to write the config.yaml file that Quay creates at the end of the web interface setup:
$ oc create -f quay-servicetoken-role-k8s1-6.yaml
$ oc create -f quay-servicetoken-role-binding-k8s1-6.yaml
Add privilege: Make sure that the service account has root privileges, because Quay runs strictly under root (this will be changed in the future versions). Replace “quay-enterprise” if you are using a different namespace name:
$ oc adm policy add-scc-to-user anyuid \
     system:serviceaccount:quay-enterprise:default
Start Redis: If you haven’t already deployed Redis, you can use the quay-enterprise-redis.yml file to deploy our version now:
$ oc create -f quay-enterprise-redis.ymlStart Quay: To access Red Hat Quay, you must route to it through a Kubernetes Service. Choose one of the two methods:
- A LoadBalancer is recommended if the Kubernetes cluster is integrated with a cloud provider
A NodePort will suffice for on-premise deployments.
Use one of these two examples to deploy the quay-enterprise pod and expose the service:
$ oc create -f quay-enterprise-app-rc.yml -f quay-enterprise-service-nodeport.ymlOR
$ oc create -f quay-enterprise-app-rc.yml -f quay-enterprise-service-loadbalancer.yml
Install / Deploy a Database: Install, enable and start the PostgreSQL database container. The following commands will:
- Start the PostgreSQL database with the user, password and database all set. Data from the container will be stored on the host system in the /var/lib/pgsql/data directory.
- List available extensions.
- Create the pg_trgm extension.
Confirm the extension is installed
$ mkdir -p /var/lib/pgsql/data
$ chmod 777 /var/lib/pgsql/data
$ sudo docker run -d --name postgresql_database \
        -v /var/lib/pgsql/data:/var/lib/pgsql/data:Z  \
        -e POSTGRESQL_USER=quayuser -e POSTGRESQL_PASSWORD=quaypass \
        -e POSTGRESQL_DATABASE=quaydb -p 5432:5432 \
        rhscl/postgresql-96-rhel7

$ sudo docker exec -it postgresql_database /bin/bash -c 'echo "SELECT * FROM pg_available_extensions" | /opt/rh/rh-postgresql96/root/usr/bin/psql'
   name    | default_version | installed_version |           comment
-----------+-----------------+-------------------+----------------------------------------
 adminpack | 1.0             |                   | administrative functions for PostgreSQL
...


$ sudo docker exec -it postgresql_database /bin/bash -c 'echo "CREATE EXTENSION pg_trgm" | /opt/rh/rh-postgresql96/root/usr/bin/psql'
    CREATE EXTENSION

$ sudo docker exec -it postgresql_database /bin/bash -c 'echo "SELECT * FROM pg_extension" | /opt/rh/rh-postgresql96/root/usr/bin/psql'
     extname | extowner | extnamespace | extrelocatable | extversion | extconfig | extcondition
    ---------+----------+--------------+----------------+------------+-----------+--------------
     plpgsql |       10 |           11 | f              | 1.0        |           |
     pg_trgm |       10 |         2200 | t              | 1.3        |           |
    (2 rows)

$ sudo docker exec -it postgresql_database /bin/bash -c 'echo "ALTER USER quayuser WITH SUPERUSER;" | /opt/rh/rh-postgresql96/root/usr/bin/psql'
    ALTER ROLE
Check pods: In a couple of minutes (depending on your connection speed), Quay Enterprise should be up and running and the following pods should be visible in the Red Hat Quay namespace:
$ oc get pods -n quay-enterprise
NAME                                     READY     STATUS    RESTARTS   AGE
quay-enterprise-app-7478c7c997-5k9bd     1/1       Running   0          25m
quay-enterprise-redis-6b59dc84b8-xssm2   1/1       Running   0          27m
Check postgresql: On the system where you are running the postgresql container, check that it is running as follows:
$ sudo docker ps | grep postgres
f27941eda96f rhscl/postgresql-96-rhel7 "container-entrypo..." 8 minutes ago Up 8 minutes 0.0.0.0:5432->5432/tcp postgresql_database
Get the URL for Red Hat Quay setup: Because we used the nodeport yaml file, the quay service was exposed from port 80 (http) in the OpenShift cluster to port 30080 on the host, as shown here:
$ oc get services -n quay-enterprise
NAME                  TYPE      CLUSTER-IP     EXTERNAL-IP PORT(S)        AGE
quay-enterprise       NodePort  172.30.106.206 <none>      80:30080/TCP   14h
quay-enterprise-redis ClusterIP 172.30.172.106 <none>      6379/TCP       21h
You can continue on to configure Red Hat Quay through the Web UI using either the hostname or IP address of the host, with the exposed port number. For example: http://192.168.42.219:30080/setup/ or http://myopenshift.example.com:30080/setup/.
Chapter 5. Completing the Guided Setup
Open a browser to the setup page on the system where you just started quay (for example http://hostname/setup) and complete the following steps:
Identify the database: Add the following information about the type and location of the database to be used by Quay:
- Database Type: Choose MySQL or PostgreSQL. (MySQL is used in the basic example; PostgreSQL is used with the high availability example.)
- Database Server: Identify the IP address or hostname of the database, along with the port number if it is different from 3306.
- Username: Identify a user with full access to the database.
- Password: Enter the password you assigned to the selected user.
- Database Name: Enter the database name you assigned when you started the database server.
SSL Certificate: For production environments, you should provide an SSL certificate to connect to the database.
Figure 1 shows an example of the screen for identifying the database used by Red Hat Quay.
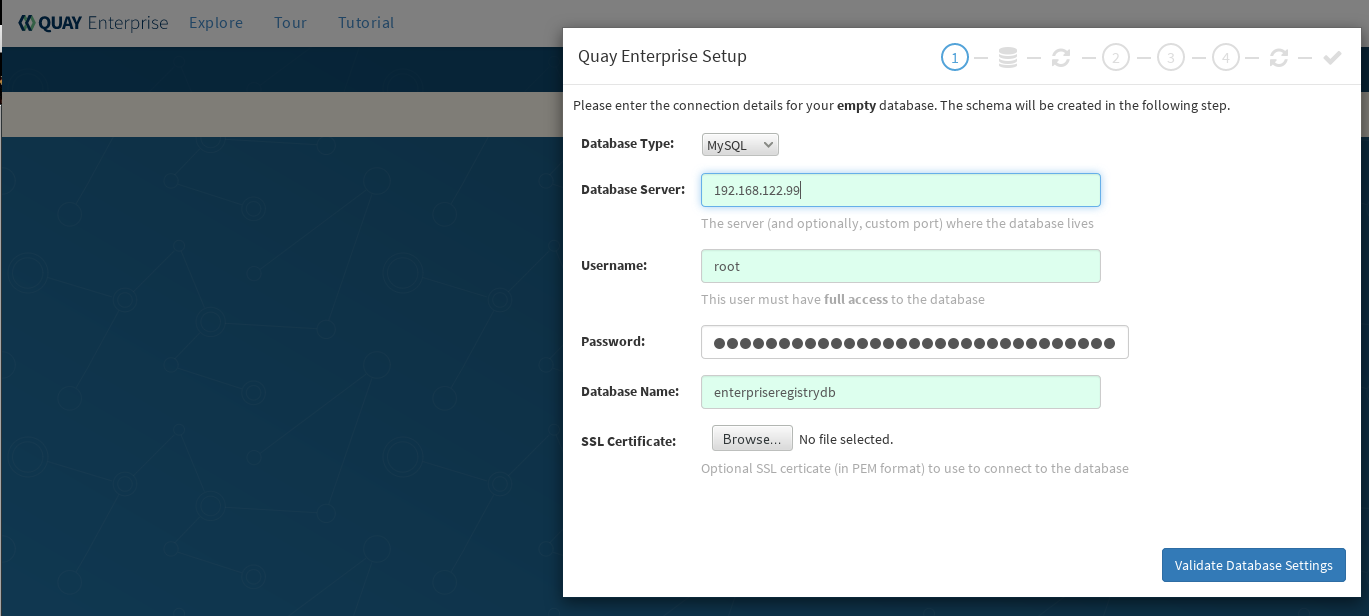
Select "Validate Database Settings", and proceed to the next section.
Figure 2 shows an example of the Red Hat Quay Setup screen as the database schema is set up.

NoteAt this point a restart of the Quay container should happen. If the container does not restart, the docker restart policy may not be working properly, and a manual restart of the container may be required.
Create Quay superuser: You need to set up an account with superuser privileges to Quay, to use for editing Quay configuration settings. That information includes a Username, Email address, and Password (entered twice).
Figure 3 shows an example of the Red Hat Quay Setup screen for setting up a Quay superuser account:
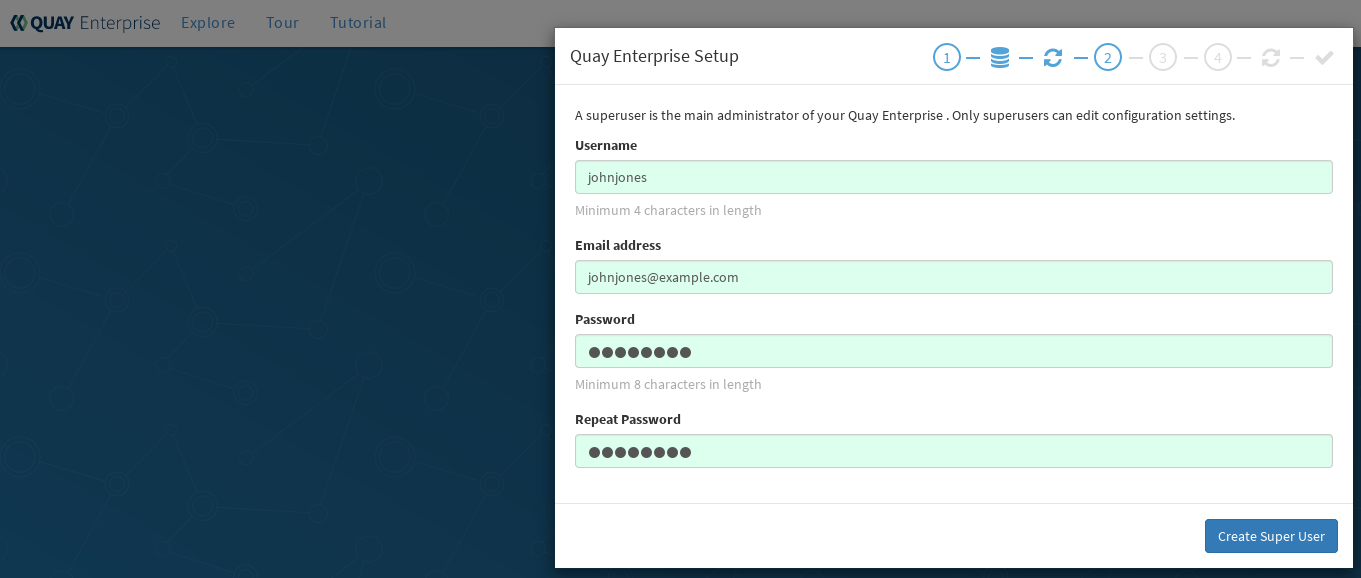
Select "Create Super User", and proceed to the next section.
Identify the Redis hostname and add other desired settings: Other setting you can add to complete the setup are as follows. More settings for high availability Quay deployment that for the basic deployment:
- For the basic, test configuration, identifying the Redis Hostname should be all you need to do.
For the high availability configuration, more settings are needed (as noted below) to allow for shared storage, secure communications between systems, and other features.
Here are the settings you need to consider:
- Custom SSL Certificates: Upload custom or self-signed SSL certificates for use by Quay. See Using SSL to protect connections to Red Hat Quay for details. Recommended for high availability.
- Basic Configuration: Upload a company logo to rebrand your Quay registry.
- Server Configuration: Hostname or IP address to reach the Quay service, along with TLS indication (recommended for production installations). Recommended for high availability.
- Data Consistency Settings: Select to relax logging consistency guarantees to improve performance and availability.
- Time Machine: Allow older image tags to remain in the repository for set periods of time and allow users to select their own tag expiration times.
- redis: Identify the hostname or IP address (and optional password) to connect to the redis service used by Quay.
- Registry Storage: Identify the location of storage. A variety of cloud and local storage options are available. Remote storage is required for high availability.
- Action Log Rotation and Archiving: Select to enable log rotation, which moves logs older than 30 days into storage, then indicate storage area.
- Security Scanner: Enable security scanning by selecting a security scanner endpoint and authentication key. To setup Clair to do image scanning, refer to Clair Setup and Configuring Clair. Recommended for high availability.
- Application Registry: Enable an additional application registry that includes things like Kubernetes manifests or Helm charts (see the App Registry specification).
- BitTorrent-based download: Allow all registry images to be downloaded using BitTorrent protocol (using quayctl tool).
-
rkt Conversion: Allow
rkt fetchto be used to fetch images from Quay registry. Public and private GPG2 keys are needed (see Generating signing keys for ACI conversion for details. - E-mail: Enable e-mail to use for notifications and user password resets.
- Internal Authentication: Change default authentication for the registry from Local Database to LDAP, Keystone (OpenStack), JWT Custom Authentication, or External Application Token.
- External Authorization (OAuth): Enable to allow GitHub or GitHub Enterprise to authenticate to the registry.
- Google Authentication: Enable to allow Google to authenticate to the registry.
- Access settings: Basic username/password authentication is enabled by default. Other authentication types that can be enabled include: external application tokens (user-generated tokens used with docker or rkt commands), anonymous access (enable for public access to anyone who can get to the registry), user creation (let users create their own accounts), encrypted client password (require command-line user access to include encrypted passwords), and prefix username autocompletion (disable to require exact username matches on autocompletion).
Dockerfile Build Support: Enable to allow users to submit Dockerfiles to be built and pushed to Quay.
Select "Save Configuration Changes", then "Save Configuration.
- Restart Quay: When prompted, select "Restart Container" to restart Quay. Figure 4 shows that screen that appears as you wait for Quay to restart.

At this point a restart of the Quay container should happen. If the container does not restart, the docker restart policy may not be working properly, and a manual restart of the container may be required.
Chapter 6. Start using Red Hat Quay
With Red Hat Quay now running, you can:
- Select Tutorial from the Quay home page to try the 15-minute tutorial. In the tutorial, you learn to log into Quay, start a container, create images, push repositories, view repositories, and change repository permissions with Quay.
- Refer to the Use Red Hat Quay for information on working with Red Hat Quay repositories.