Manage Red Hat Quay
Preface
Once you have deployed a Red Hat Quay registry, there are many ways you can further configure and manage that deployment. Topics covered here include:
- Setting notifications to alert you of a new Red Hat Quay release
- Securing connections with SSL and TLS certificates
- Configuring image security scanning with Clair
- Scan pod images with the Container Security Operator
- Mirroring images with repository mirroring
- Sharing Quay images with a BitTorrent service
- Authenticating users with LDAP
- Enabling Quay for Prometheus and Grafana metrics
- Setting up geo-replication
- Troubleshooting Quay
Chapter 1. Getting Red Hat Quay release notifications
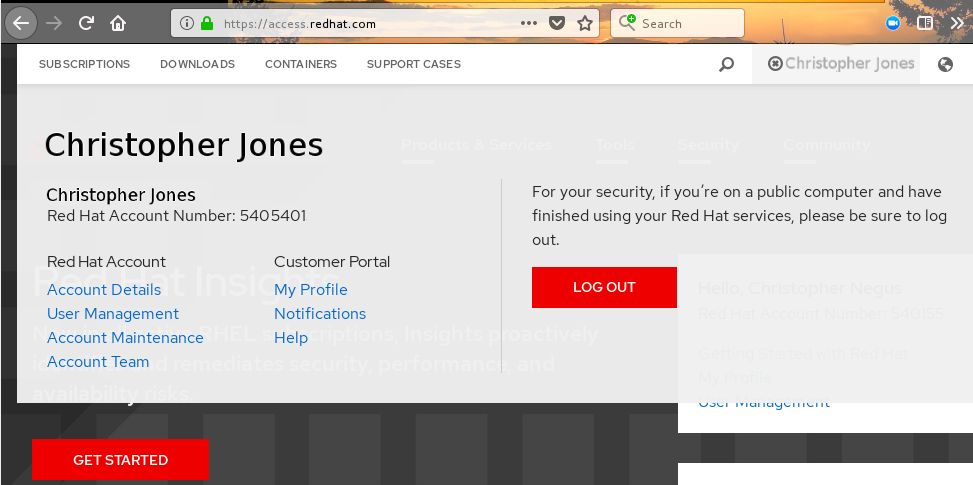
To keep up with the latest Red Hat Quay releases and other changes related to Red Hat Quay, you can sign up for update notifications on the Red Hat Customer Portal. After signing up for notifications, you will receive notifications letting you know when there is new a Red Hat Quay version, updated documentation, or other Red Hat Quay news.
- Log into the Red Hat Customer Portal with your Red Hat customer account credentials.
-
Select your user name (upper-right corner) to see Red Hat Account and Customer Portal selections:
- Select Notifications. Your profile activity page appears.
- Select the Notifications tab.
- Select Manage Notifications.
- Select Follow, then choose Products from the drop-down box.
-
From the drop-down box next to the Products, search for and select Red Hat Quay:
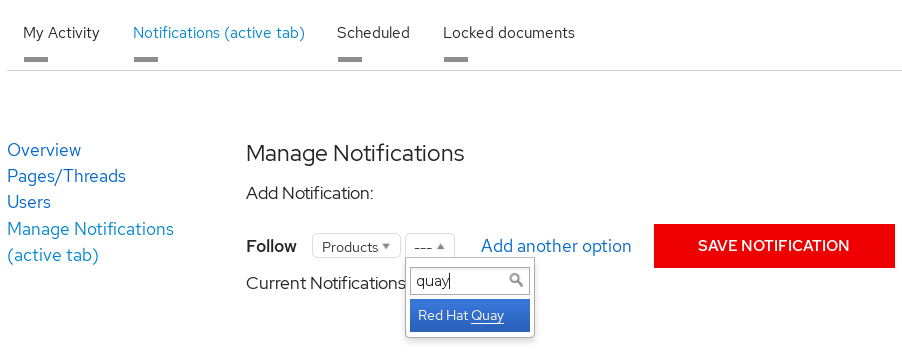
- Select the SAVE NOTIFICATION button. Going forward, you will receive notifications when there are changes to the Red Hat Quay product, such as a new release.
Chapter 2. Using SSL to protect connections to Red Hat Quay
This document assumes you have deployed Red Hat Quay in a single-node or highly available deployment.
To configure Red Hat Quay with a self-signed certificate, you need to create a Certificate Authority (CA), then generate the required key and certificate files. You then enter those files using the Red Hat Quay superuser GUI or command line.
2.1. Create a CA and sign a certificate
Create a root CA.
openssl genrsa -out rootCA.key 2048
openssl req -x509 -new -nodes -key rootCA.key -sha256 -days 1024 -out rootCA.pem
$ openssl genrsa -out rootCA.key 2048
$ openssl req -x509 -new -nodes -key rootCA.key -sha256 -days 1024 -out rootCA.pem
Copy to Clipboard Copied! Toggle word wrap Toggle overflow The result are rootCA.key and rootCA.pem files in the current directory.
Create certificate and private key: If you are having Red Hat Quay handle TLS, you need to create a certificate and private key to provide during configuration. You can get those files from a certificate signing authority. Here we show how to create those files using the self-signed certificate authority you just created.
In this example, you create device.crt and device.key files, which will be uploaded to Red Hat Quay and renamed ssl.cert and ssl.key, respectively.
Because OpenShift creates long fully qualified domain names, consider using a wildcard to identify the larger domain, instead of the specific route to the Red Hat Quay application. For example, use something like *.apps.openshift.example.com when prompted for the server’s hostname:
Common Name (eg, your name or your server's hostname) []:*apps.openshift.example.com
Common Name (eg, your name or your server's hostname) []:*apps.openshift.example.comCopy to Clipboard Copied! Toggle word wrap Toggle overflow openssl genrsa -out device.key 2048 openssl req -new -key device.key -out device.csr
$ openssl genrsa -out device.key 2048
$ openssl req -new -key device.key -out device.csr
Copy to Clipboard Copied! Toggle word wrap Toggle overflow Then sign the certificate with the root CA created earlier:
openssl x509 -req -in device.csr -CA rootCA.pem \
       -CAkey rootCA.key -CAcreateserial -out device.crt -days 500 -sha256
$ openssl x509 -req -in device.csr -CA rootCA.pem \ -CAkey rootCA.key -CAcreateserial -out device.crt -days 500 -sha256Copy to Clipboard Copied! Toggle word wrap Toggle overflow
Instead generating the *.key and *.crt files as just shown, you could create an openssl.cnf file. This lets you add more information to the resulting certificate than you can get by just responding to the prompts in the command for generating the certificate request. In this example of an openssl.cnf file, replace DNS.1 and IP.1 with the hostname and IP address of the Red Hat Quay server:
openssl.cnf
You could then generate the key as follows:
openssl x509 -req -in ssl.csr -CA rootCA.pem \
   -CAkey rootCA.key -CAcreateserial -out ssl.cert \
   -days 356 -extensions v3_req -extfile openssl.cnf
$ openssl x509 -req -in ssl.csr -CA rootCA.pem \
   -CAkey rootCA.key -CAcreateserial -out ssl.cert \
-days 356 -extensions v3_req -extfile openssl.cnf2.2. Configure Red Hat Quay to use the new certificate
The next step can be accomplished either in the Red Hat Quay screen or from the terminal.
2.2.1. Configure SSL from the Red Hat Quay Setup screen
Start the quay container in config mode, as described in each deployment guide. In the server Configuration section, enable SSL as follows:
-
Set the
Server Hostnameto the appropriate value and check theEnable SSLbox, then upload thessl.keyandssl.certfiles (in our example, nameddevice.keyanddevice.crt, respectively):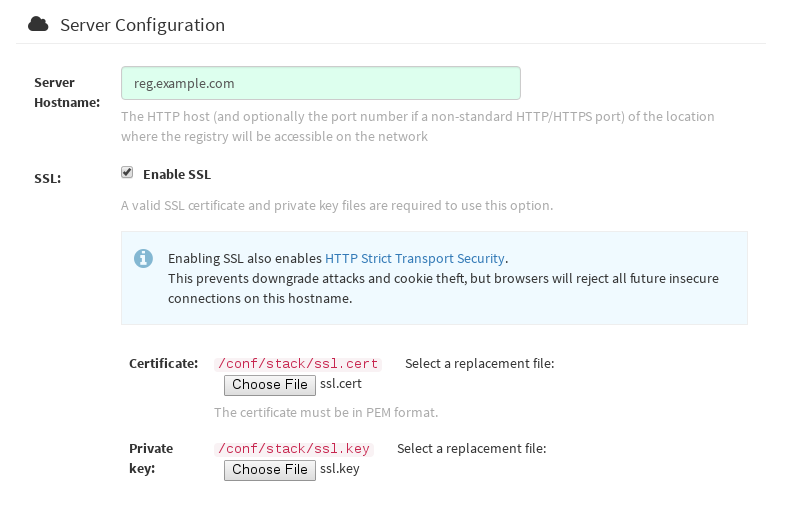
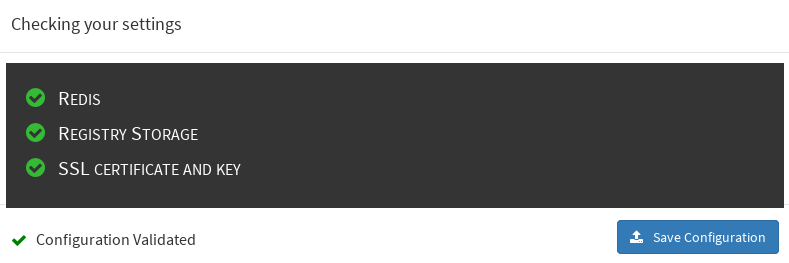
-
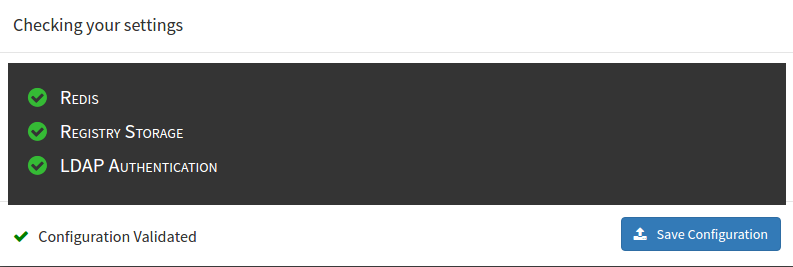
Save the configuration. Red Hat Quay will automatically validate the SSL certificate:
-
Restart the container

2.2.2. Configure with the command line
By not using the web interface the configuration checking mechanism built into Red Hat Quay is unavailable. It is suggested to use the web interface if possible. For non-OpenShift installations, you can configure SSL from the command-line interface as follows:
Copy the
ssl.keyandssl.certinto the specifiedconfigdirectory. In this example, the config directory for Red Hat Quay is on a host named reg.example.com in a directory named /mnt/quay/config.NoteThe certificate/key files must be named ssl.key and ssl.cert.
ls
ssl.cert  ssl.key
scp ssl.* root@reg.example.com:/mnt/quay/config/
[root@reg.example.com ~]$ ls /mnt/quay/config/
config.yaml  ssl.cert  ssl.key
$ ls
ssl.cert  ssl.key
$ scp ssl.* root@reg.example.com:/mnt/quay/config/
[root@reg.example.com ~]$ ls /mnt/quay/config/
config.yaml  ssl.cert  ssl.key
Copy to Clipboard Copied! Toggle word wrap Toggle overflow Modify the
PREFERRED_URL_SCHEME:parameter in config.yaml fromhttptohttpsPREFERRED_URL_SCHEME: https
PREFERRED_URL_SCHEME: httpsCopy to Clipboard Copied! Toggle word wrap Toggle overflow Restart the Red Hat Quay container:
Copy to Clipboard Copied! Toggle word wrap Toggle overflow
2.2.3. Test the secure connection
Confirm the configuration by visiting the URL from a browser https://reg.example.com/  "Your Connection is not secure" means the CA is untrusted but confirms that SSL is functioning properly. To avoid these messages, you need to get a certificate from a trusted certificate authority.
2.3. Configuring Docker to Trust a Certificate Authority
Docker requires that custom certs be installed to /etc/docker/certs.d/ under a directory with the same name as the hostname private registry. It is also required for the cert to be called ca.crt. Here is how to do that:
Copy the rootCA file.
cp tmp/rootCA.pem /etc/docker/certs.d/reg.example.com/ca.crt
$ cp tmp/rootCA.pem /etc/docker/certs.d/reg.example.com/ca.crtCopy to Clipboard Copied! Toggle word wrap Toggle overflow After you have copied the rootCA.pem file,
docker loginshould authenticate successfully and pushing to the repository should succeed.Copy to Clipboard Copied! Toggle word wrap Toggle overflow
Chapter 3. Adding TLS Certificates to the Red Hat Quay Container
To add custom TLS certificates to Red Hat Quay, create a new directory named extra_ca_certs/ beneath the Red Hat Quay config directory. Copy any required site-specific TLS certificates to this new directory.
3.1. Add TLS certificates to Red Hat Quay
View certificate to be added to the container
cat storage.crt
-----BEGIN CERTIFICATE-----
MIIDTTCCAjWgAwIBAgIJAMVr9ngjJhzbMA0GCSqGSIb3DQEBCwUAMD0xCzAJBgNV
[...]
-----END CERTIFICATE-----
$ cat storage.crt
-----BEGIN CERTIFICATE-----
MIIDTTCCAjWgAwIBAgIJAMVr9ngjJhzbMA0GCSqGSIb3DQEBCwUAMD0xCzAJBgNV
[...]
-----END CERTIFICATE-----
Copy to Clipboard Copied! Toggle word wrap Toggle overflow Create certs directory and copy certificate there
Copy to Clipboard Copied! Toggle word wrap Toggle overflow Obtain the quay container’s
CONTAINER IDwithdocker ps:docker ps CONTAINER ID IMAGE COMMAND CREATED STATUS PORTS 5a3e82c4a75f <registry>/<repo>/quay:v3.2.2 "/sbin/my_init" 24 hours ago Up 18 hours 0.0.0.0:80->80/tcp, 0.0.0.0:443->443/tcp, 443/tcp grave_keller
$ docker ps
CONTAINER ID        IMAGE                                COMMAND                  CREATED             STATUS              PORTS
5a3e82c4a75f        <registry>/<repo>/quay:v3.2.2 "/sbin/my_init"          24 hours ago        Up 18 hours         0.0.0.0:80->80/tcp, 0.0.0.0:443->443/tcp, 443/tcp   grave_keller
Copy to Clipboard Copied! Toggle word wrap Toggle overflow Restart the container with that ID:
docker restart 5a3e82c4a75f
$ docker restart 5a3e82c4a75fCopy to Clipboard Copied! Toggle word wrap Toggle overflow Examine the certificate copied into the container namespace:
docker exec -it 5a3e82c4a75f cat /etc/ssl/certs/storage.pem
-----BEGIN CERTIFICATE-----
MIIDTTCCAjWgAwIBAgIJAMVr9ngjJhzbMA0GCSqGSIb3DQEBCwUAMD0xCzAJBgNV
$ docker exec -it 5a3e82c4a75f cat /etc/ssl/certs/storage.pem
-----BEGIN CERTIFICATE-----
MIIDTTCCAjWgAwIBAgIJAMVr9ngjJhzbMA0GCSqGSIb3DQEBCwUAMD0xCzAJBgNV
Copy to Clipboard Copied! Toggle word wrap Toggle overflow
3.2. Add certs when deployed on Kubernetes
When deployed on Kubernetes, Red Hat Quay mounts in a secret as a volume to store config assets. Unfortunately, this currently breaks the upload certificate function of the superuser panel.
To get around this error, a base64 encoded certificate can be added to the secret after Red Hat Quay has been deployed. Here’s how:
Begin by base64 encoding the contents of the certificate:
Copy to Clipboard Copied! Toggle word wrap Toggle overflow Use the
kubectltool to edit the quay-enterprise-config-secret.kubectl --namespace quay-enterprise edit secret/quay-enterprise-config-secret
$ kubectl --namespace quay-enterprise edit secret/quay-enterprise-config-secretCopy to Clipboard Copied! Toggle word wrap Toggle overflow Add an entry for the cert and paste the full base64 encoded string under the entry:
  custom-cert.crt:
c1psWGpqeGlPQmNEWkJPMjJ5d0pDemVnR2QNCnRsbW9JdEF4YnFSdVd3PT0KLS0tLS1FTkQgQ0VSVElGSUNBVEUtLS0tLQo=
  custom-cert.crt:
c1psWGpqeGlPQmNEWkJPMjJ5d0pDemVnR2QNCnRsbW9JdEF4YnFSdVd3PT0KLS0tLS1FTkQgQ0VSVElGSUNBVEUtLS0tLQo=
Copy to Clipboard Copied! Toggle word wrap Toggle overflow -
Finally, recycle all Red Hat Quay pods. Use
kubectl deleteto remove all Red Hat Quay pods. The Red Hat Quay Deployment will automatically schedule replacement pods with the new certificate data.
Chapter 4. Red Hat Quay Security Scanning with Clair
Red Hat Quay supports scanning container images for known vulnerabilities with a scanning engine such as Clair. This document explains how to configure Clair with Red Hat Quay.
4.1. Set up Clair in the Red Hat Quay config tool
Enabling Clair in Red Hat Quay consists of:
- Starting the Red Hat Quay config tool. See the Red Hat Quay deployment guide for the type of deployment you are doing (OpenShift, Basic, or HA) for how to start the config tool for that environment.
- Enabling security scanning, then generating a private key and PEM file in the config tool
- Including the key and PEM file in the Clair config file
- Start the Clair container
The procedure varies, based on whether you are running Red Hat Quay on OpenShift or directly on a host.
4.1.1. Enabling Clair on a Red Hat Quay OpenShift deployment
To set up Clair on Red Hat Quay in OpenShift, see Add Clair image scanning to Red Hat Quay.
4.1.2. Enabling Clair on a Red Hat Quay Basic or HA deployment
To set up Clair on a Red Hat Quay deployment where the container is running directly on the host system, do the following:
-
Restart the Red Hat Quay config tool: Run the quay container again in config mode, open the configuration UI in a browser, then select
Modify an existing configuration. When prompted, upload thequay-config.tar.gzfile that was originally created for the deployment. Enable Security Scanning: Scroll to the Security Scanner section and select the "Enable Security Scanning" checkbox. From the fields that appear you need to create an authentication key and enter the security scanner endpoint. Here’s how:
-
Generate key: Click
Create Key, then from the pop-up window type a name for the Clair private key and an optional expiration date (if blank, the key never expires). Then select Generate Key. Copy the Clair key and PEM file: Save the Key ID (to a notepad or similar) and download a copy of the Private Key PEM file (
named security_scanner.pem) by selecting "Download Private Key" (if you lose the key, you need to generate a new one). You will need the key and PEM file when you start the Clair container later.Close the pop-up when you are done. Here is an example of a completed Security Scanner config:

-
Generate key: Click
-
Save the configuration: Click
Save Configuration Changesand then selectDownload Configurationto save it to your local system. Deploy the configuration: To pick up the changes enabling scanning, as well as other changes you may have made to the configuration, unpack the
quay-config.tar.gzand copy the resulting files to the config directory. For example:tar xvf quay-config.tar.gz config.yaml ssl.cert ssl.key cp config.yaml ssl* /mnt/quay/config
$ tar xvf quay-config.tar.gz
config.yaml  ssl.cert  ssl.key
$ cp config.yaml ssl* /mnt/quay/config
Copy to Clipboard Copied! Toggle word wrap Toggle overflow
Next, start the Clair container and associated database, as described in the following sections.
Chapter 5. Setting Up Clair Security Scanning
Once you have created the necessary key and pem files from the Red Hat Quay config UI, you are ready to start up the Clair container and associated database. Once that is done, you an restart your Red Hat Quay cluster to have those changes take effect.
Procedures for running the Clair container and associated database are different on OpenShift than they are for running those containers directly on a host.
5.1. Run Clair on a Red Hat Quay OpenShift deployment
To run the Clair image scanning container and its associated database on an OpenShift environment with your Red Hat Quay cluster, see Add Clair image scanning to Red Hat Quay.
5.2. Run Clair on a Red Hat Quay Basic or HA deployment
To run Clair and its associated database on non-OpenShift environments (directly on a host), you need to:
- Start up a database
- Configure and start Clair
5.2.1. Get Postgres and Clair
In order to run Clair, a database is required. For production deployments, MySQL is not supported. For production, we recommend you use PostgreSQL or other supported database:
- Running on machines other than those running Red Hat Quay
- Ideally with automatic replication and failover
For testing purposes, a single PostgreSQL instance can be started locally:
To start Postgres locally, do the following:
Copy to Clipboard Copied! Toggle word wrap Toggle overflow The configuration string for this test database is:
postgresql://postgres@{DOCKER HOST GOES HERE}:5432/clairtest?sslmode=disablepostgresql://postgres@{DOCKER HOST GOES HERE}:5432/clairtest?sslmode=disableCopy to Clipboard Copied! Toggle word wrap Toggle overflow Pull the security-enabled Clair image:
docker pull quay.io/redhat/clair-jwt:v3.2.2
docker pull quay.io/redhat/clair-jwt:v3.2.2Copy to Clipboard Copied! Toggle word wrap Toggle overflow Make a configuration directory for Clair
mkdir clair-config
cd clair-config
# mkdir clair-config
# cd clair-config
Copy to Clipboard Copied! Toggle word wrap Toggle overflow
5.2.2. Configure Clair
Clair can run either as a single instance or in high-availability mode. It is recommended to run more than a single instance of Clair, ideally in an auto-scaling group with automatic healing.
-
Create a
config.yamlfile to be used in the Clair config directory (/clair/config) from one of the two Clair configuration files shown here. - If you are doing a high-availability installation, go through the procedure in Authentication for high-availability scanners to create a Key ID and Private Key (PEM).
- Save the Private Key (PEM) to a file (such as, $HOME/config/security_scanner.pem).
Replace the value of key_id (CLAIR_SERVICE_KEY_ID) with the Key ID you generated and the value of private_key_path with the location of the PEM file (for example, /config/security_scanner.pem).
For example, those two value might now appear as:
key_id: { 4fb9063a7cac00b567ee921065ed16fed7227afd806b4d67cc82de67d8c781b1 }
private_key_path: /clair/config/security_scanner.pem
key_id: { 4fb9063a7cac00b567ee921065ed16fed7227afd806b4d67cc82de67d8c781b1 } private_key_path: /clair/config/security_scanner.pemCopy to Clipboard Copied! Toggle word wrap Toggle overflow - Change other values in the configuration file as needed.
5.2.2.1. Clair configuration: High availability
5.2.2.2. Clair configuration: Single instance
5.2.3. Configuring Clair for TLS
To configure Clair to run with TLS, a few additional steps are required.
5.2.3.1. Using certificates from a public CA
For certificates that come from a public certificate authority, follow these steps:
- Generate a TLS certificate and key pair for the DNS name at which Clair will be accessed
-
Place these files as
clair.crtandclair.keyin your Clair configuration directory -
Uncomment the
key_fileandcrt_filelines underverifier_proxiesin your Clairconfig.yaml
If your certificates use a public CA, you are now ready to run Clair. If you are using your own certificate authority, configure Clair to trust it below.
5.2.3.2. Configuring trust of self-signed SSL
Similar to the process for setting up Docker to trust your self-signed certificates, Clair must also be configured to trust your certificates. Using the same CA certificate bundle used to configure Docker, complete the following steps:
-
Rename the same CA certificate bundle used to set up Quay Registry to
ca.crt Make sure the
ca.crtfile is mounted inside the Clair container under/etc/pki/ca-trust/source/anchors/as in the example below:NoteAdd
--loglevel=debugto thedocker runcommand line for the clair container to enable debug level logging.docker run --restart=always -p 6060:6060 -p 6061:6061 \ -v /path/to/clair/config/directory:/clair/config \ -v /path/to/quay/cert/ca.crt:/etc/pki/ca-trust/source/anchors/ca.crt \ quay.io/redhat/clair-jwt:v3.2.2
# docker run --restart=always -p 6060:6060 -p 6061:6061 \
   -v /path/to/clair/config/directory:/clair/config \
   -v /path/to/quay/cert/ca.crt:/etc/pki/ca-trust/source/anchors/ca.crt  \
   quay.io/redhat/clair-jwt:v3.2.2
Copy to Clipboard Copied! Toggle word wrap Toggle overflow
Now Clair will be able to trust the source of your TLS certificates and use them to secure communication between Clair and Quay.
5.2.4. Using Clair data sources
Before scanning container images, Clair tries to figure out the operating system on which the container was built. It does this by looking for specific filenames inside that image (see Table 1). Once Clair knows the operating system, it uses specific security databases to check for vulnerabilities (see Table 2).
| Operating system | Files identifying OS type |
|---|---|
| Redhat/CentOS/Oracle | etc/oracle-release etc/centos-release etc/redhat-release etc/system-release |
| Alpine | etc/alpine-release |
| Debian/Ubuntu: | etc/os-release usr/lib/os-release etc/apt/sources.list |
| Ubuntu | etc/lsb-release |
The data sources that Clair uses to scan containers are shown in Table 2.
You must be sure that Clair has access to all listed data sources by whitelisting access to each data source’s location. You might need to add a wild-card character (*) at the end of some URLS that may not be fully complete because they are dynamically built by code.
| Data source | Data collected | Whitelist links | Format | License |
|---|---|---|---|---|
| Debian 6, 7, 8, unstable namespaces | ||||
| Ubuntu 12.04, 12.10, 13.04, 14.04, 14.10, 15.04, 15.10, 16.04 namespaces | ||||
| CentOS 5, 6, 7 namespace | ||||
| Oracle Linux 5, 6, 7 namespaces | ||||
| Alpine 3.3, 3.4, 3.5 namespaces | ||||
| Generic vulnerability metadata | N/A |
5.2.5. Run Clair
Execute the following command to run Clair:
docker run --restart=always -p 6060:6060 -p 6061:6061 \
    -v /path/to/clair/config/directory:/clair/config \
    quay.io/redhat/clair-jwt:v3.2.2
# docker run --restart=always -p 6060:6060 -p 6061:6061 \
    -v /path/to/clair/config/directory:/clair/config \
quay.io/redhat/clair-jwt:v3.2.2Output similar to the following will be seen on success:
To verify Clair is running, execute the following command:
curl -X GET -I http://path/to/clair/here:6061/health
curl -X GET -I http://path/to/clair/here:6061/health
If a 200 OK code is returned, Clair is running:
HTTP/1.1 200 OK
Server: clair
Date: Wed, 04 May 2016 20:02:16 GMT
Content-Length: 0
Content-Type: text/plain; charset=utf-8
HTTP/1.1 200 OK
Server: clair
Date: Wed, 04 May 2016 20:02:16 GMT
Content-Length: 0
Content-Type: text/plain; charset=utf-8Once Clair and its associated database are running, you man need to restart your quay application for the changes to take effect.
Chapter 6. Scan pod images with the Container Security Operator
Using the Container Security Operator, (CSO) you can scan container images associated with active pods, running on OpenShift and other Kubernetes platforms, for known vulnerabilities. The CSO:
- Watches containers associated with pods on all or specified namespaces
- Queries the container registry where the containers came from for vulnerability information provided an image’s registry supports image scanning (such as a Quay registry with Clair scanning)
- Exposes vulnerabilities via the ImageManifestVuln object in the Kubernetes API
Using the instructions here, the CSO is installed in the marketplace-operators namespace, so it is available to all namespaces on your OpenShift cluster.
To see instructions on installing the CSO on Kubernetes, select the Install button from the Container Security OperatorHub.io page.
6.1. Run the CSO in OpenShift
To start using the CSO in OpenShift, do the following:
-
Go to Operators → OperatorHub (select Security) to see the available
Container SecurityOperator. -
Select the
Container SecurityOperator, then selectInstallto go to the Create Operator Subscription page. -
Check the settings (all namespaces and automatic approval strategy, by default), and select
Subscribe. TheContainer Securityappears after a few moments on theInstalled Operatorsscreen. Open the OpenShift Dashboard (Home → Dashboards). A link to Image Security appears under the status section, with a listing of the number of vulnerabilities found so far. Select the link to see a Security breakdown, as shown in the following figure:
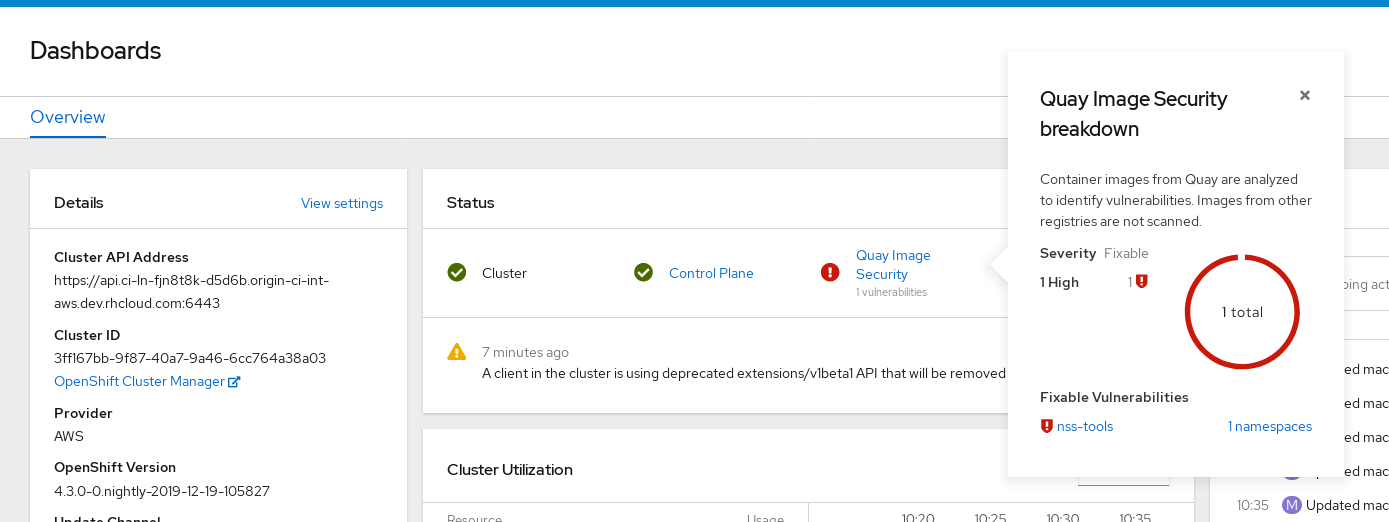
You can do one of two things at this point to follow up on any detected vulnerabilities:
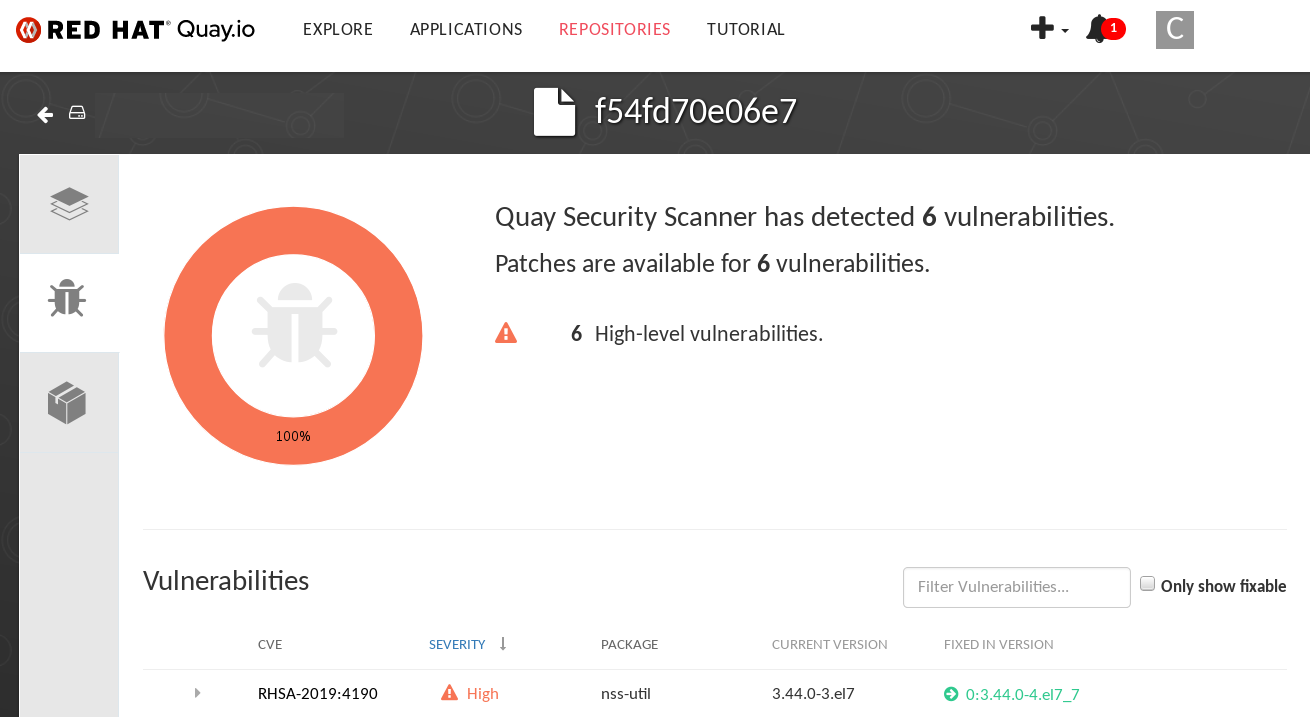
Select the link to the vulnerability. You are taken to the container registry, Red Hat Quay or other registry where the container came from, where you can see information about the vulnerability. The following figure shows an example of detected vulnerabilities from a Quay.io registry:
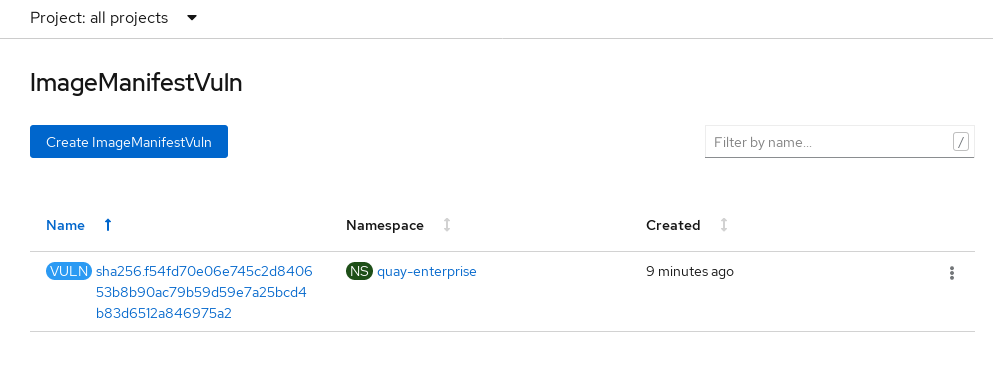
Select the namespaces link to go to the ImageManifestVuln screen, where you can see the name of the selected image and all namespaces where that image is running. The following figure indicates that a particular vulnerable image is running in two namespaces:
At this point, you know what images are vulnerable, what you need to do to fix those vulnerabilities, and every namespace that the image was run in. So you can:
- Alert anyone running the image that they need to correct the vulnerability
- Stop the images from running (by deleting the deployment or other object that started the pod the image is in)
Note that if you do delete the pod, it may take a few minutes for the vulnerability to reset on the dashboard.
6.2. Query image vulnerabilities from the CLI
You can query information on security from the command line. To query for detected vulnerabilities, type:
oc get vuln --all-namespaces
NAMESPACE     NAME              AGE
default       sha256.ca90...    6m56s
skynet        sha256.ca90...    9m37s
$ oc get vuln --all-namespaces
NAMESPACE     NAME              AGE
default       sha256.ca90...    6m56s
skynet        sha256.ca90...    9m37s
To display details for a particular vulnerability, identify one of the vulnerabilities, along with its namespace and the describe option. This example shows an active container whose image includes an RPM package with a vulnerability:
Chapter 7. Repository Mirroring in Red Hat Quay
Red Hat Quay repository mirroring lets you mirror images from external container registries (or the local registry) into your local Red Hat Quay cluster. Using repository mirroring you can synchronize images to Red Hat Quay based on repository names and tags.
7.1. Overview of repository mirroring
From your Red Hat Quay cluster with repository mirroring enabled, you can:
- Choose a repository from an external registry to mirror
- Add credentials to access the external registry
- Set intervals at which a repository is synced
- Identify specific container image repository names and tags to sync
- Check the current state of synchronization
With repository mirroring, you mirror a specific subset of content, between two or more distinct registries, to selected datacenters, clusters, or regions. By contrast, Georeplication provides a single, globally distributed Red Hat Quay to serve container images from localized storage. The two approaches to sharing content differ in the following ways:
| Feature / Capability | Georeplication | Repository Mirroring |
| What is the feature designed to do? | A shared, global registry | Distinct, different registries |
| What happens if replication or mirroring hasn’t been completed yet? | The remote copy is used (slower) | No image is served |
| Is access to all storage backends in both regions required? | Yes (all Red Hat Quay nodes) | No (distinct storage) |
| Can users push images from both sites to the same repository? | Yes | No |
| Is all registry content and configuration identical across all regions (shared database) | Yes | No |
| Can users select individual namespaces or repositories to be mirrored? | No,by default | Yes |
| Can users apply filters to synchronization rules? | No | Yes |
Here are a few tips for using Red Hat Quay repository mirroring:
- With repository mirroring, you can mirror an entire repository or selectively limit which images are synced based on a comma-separated list of tags, a range of tags, or other means of identifying tags through regular expressions and globs.
- Once set as a mirrored repository, you cannot manually add other images to that repository.
- Because the mirrored repository is based on the repository and tags you set, it will hold only the content represented by the repo/tag pair. In other words, if you change the tag so that some images in the repository don’t match any more, those images will be deleted.
- Only the designated robot can push images to a mirrored repository, superseding any role-based access control permissions set on the repository.
- With a mirrored repository, a user can pull images (given read permission) from the repository but not push images to the repository.
- Changing setting on your mirrored repository is done from a Mirrors tab on the Repositories page for the mirrored repository you create.
- Images are synced at set intervals, but can also be synced on demand.
7.2. Prerequisites
Before you can use repository mirroring, you must enable repository mirroring from the Red Hat Quay configuration screen and start the repository mirroring worker. Ways of starting up this service are described in the Red Hat Quay deployment guides:
The steps shown in the following section assumes you already have the repository mirroring service running and that you have enabled repository mirroring on your Red Hat Quay cluster.
7.3. Create a mirrored repository
To mirror an external repository from an external container registry, do the following:
- Log into your Red Hat Quay registry.
Create a robot account to pull images for the mirrored repository:
- Select Account Settings from the drop-down in the upper right corner.
- Select the Robot Accounts button in the left column.
- Select Create Robot Account.
- Add the name and description of the robot account and select Create robot account.
- Select Close, since the mirrored repository you are adding does not exist yet.
- Select the ROBOT ACCOUNT NAME from the listing.
- When prompted, add the credentials needed by the robot to access the external registry of the repository you want to mirror, then close the Credentials window.
- Select REPOSITORIES.
- Select Create New Repository and give it a name.
- Fill in a repository name, select Public or Private, and select Create Repository.
- Select the Settings button and change the repository state to MIRROR.
- Open the new repository and select the Mirroring button in the left column.
Fill in the fields to identify the repository you are mirroring in your new repository:
- Registry URL: Location of the container registry you want to mirror from.
- User or Organization: Typically, the account name associated with the content you are mirroring. For example, with the image registry.example.com/jsmith/myimage:latest, jsmith would be entered here.
- Repository Name: The name identifying the name of the set of images. For example, with the image registry.example.com/jsmith/myimage:latest, myimage would be entered here.
- Sync Interval: Defaults to syncing every 24 hours. You can change that based on hours or days.
- Robot User: Select the robot account you created earlier to do the mirroring.
- Username: The username for logging into the external registry holding the repository you are mirroring.
- Password: The password associated with the Username. Note that the password cannot include characters that require an escape character (\).
- Start Date: The date on which mirroring begins. The current date and time used by default.
- Verify TLS: Check this box if you want to verify the authenticity of the external registry. Uncheck this box if, for example, you set up Red Hat Quay for testing with a self-signed certificate or no certificate.
- HTTP Proxy: Identify the proxy server needed to access the remote site, if one is required.
Tags: This field is required. You may enter a comma-separated list of individual tags or tag patterns. (See Tag Patterns section for details.)
NoteAt least one Tag must be explicitly entered (ie. not a tag pattern) or the tag "latest" must exist in the remote repository. This is required for Quay to get the list of tags in the remote repository to compare to the specified list to mirror.
Here is an example of a completed Repository Mirroring screen:
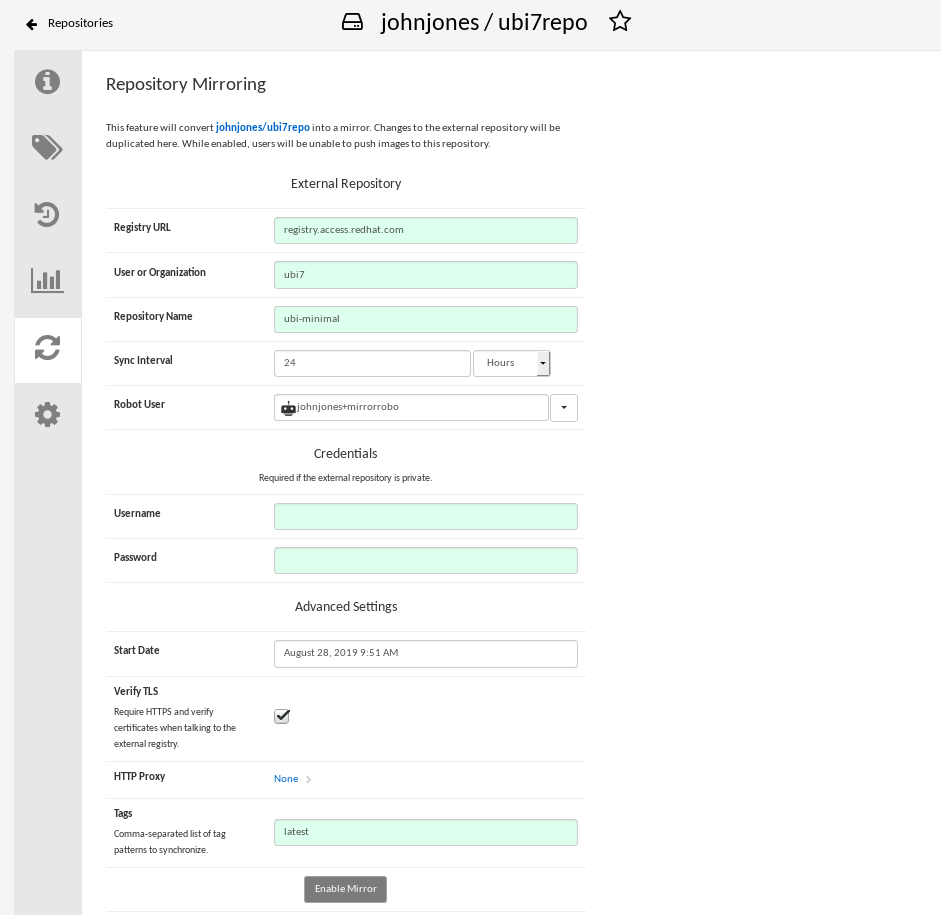
Select the Enable Mirror button. Here’s the resulting Repository Mirroring page:

You can return to this page later to change any of those settings.
7.4. Working with mirrored repositories
Once you have created a mirrored repository, there are several ways you can work with that repository. Select your mirrored repository from the Repositories page and do any of the following:
- Enable/disable the repository: Select the Mirroring button in the left column, then toggle the Enabled check box to enable or disable the repository temporarily.
Check mirror logs: To make sure the mirrored repository is working properly, you can check the mirror logs. To do that, select the Usage Logs button in the left column. Here’s an example:

- Sync mirror now: To immediately sync the images in your repository, select the Sync Now button.
- Change credentials: To change the username and password, select DELETE from the Credentials line. Then select None and add the username and password needed to log into the external registry when prompted.
- Cancel mirroring: To stop mirroring, which keeps the current images available but stops new ones from being synced, select the CANCEL button.
Set robot permissions: Red Hat Quay robot accounts are named tokens that hold credentials for accessing external repositories. By assigning credentials to a robot, that robot can be used across multiple mirrored repositories that need to access the same external registry.
You can assign an existing robot to a repository by going to Account Settings, then selecting the Robot Accounts icon in the left column. For the robot account, choose the link under the REPOSITORIES column. From the pop-up window, you can:
- Check which repositories are assigned to that robot.
-
Assign read, write or Admin privileges to that robot from the PERMISSION field shown in this figure:

Change robot credentials: Robots can hold credentials such as Kubernetes secrets, Docker login information, and Mesos bundles. To change robot credentials, select the Options gear on the robot’s account line on the Robot Accounts window and choose View Credentials. Add the appropriate credentials for the external repository the robot needs to access.

- Check and change general setting: Select the Settings button (gear icon) from the left column on the mirrored repository page. On the resulting page, you can change settings associated with the mirrored repository. In particular, you can change User and Robot Permissions, to specify exactly which users and robots can read from or write to the repo.
7.5. Tag Patterns
As noted above, at least one Tag must be explicitly entered (ie. not a tag pattern) or the tag "latest" must exist in the report repository. (The tag "latest" will not be synced unless specified in the tag list.). This is required for Quay to get the list of tags in the remote repository to compare to the specified list to mirror.
Pattern syntax
| Pattern | Description |
| * | Matches all characters |
| ? | Matches any single character |
| [seq] | Matches any character in seq |
| [!seq] | Matches any character not in seq |
Example tag patterns
| Example Pattern | Example Matches |
| v3* | v32, v3.1, v3.2, v3.2-4beta, v3.3 |
| v3.* | v3.1, v3.2, v3.2-4beta |
| v3.? | v3.1, v3.2, v3.3 |
| v3.[12] | v3.1, v3.2 |
| v3.[12]* | v3.1, v3.2, v3.2-4beta |
| v3.[!1]* | v3.2, v3.2-4beta, v3.3 |
Chapter 8. Distributing Images with BitTorrent
Red Hat Quay supports BitTorrent-based distribution of its images to clients via the quayctl tool. BitTorrent-based distribution allows for machines to share image data amongst themselves, resulting in faster downloads and shorter production launch times.
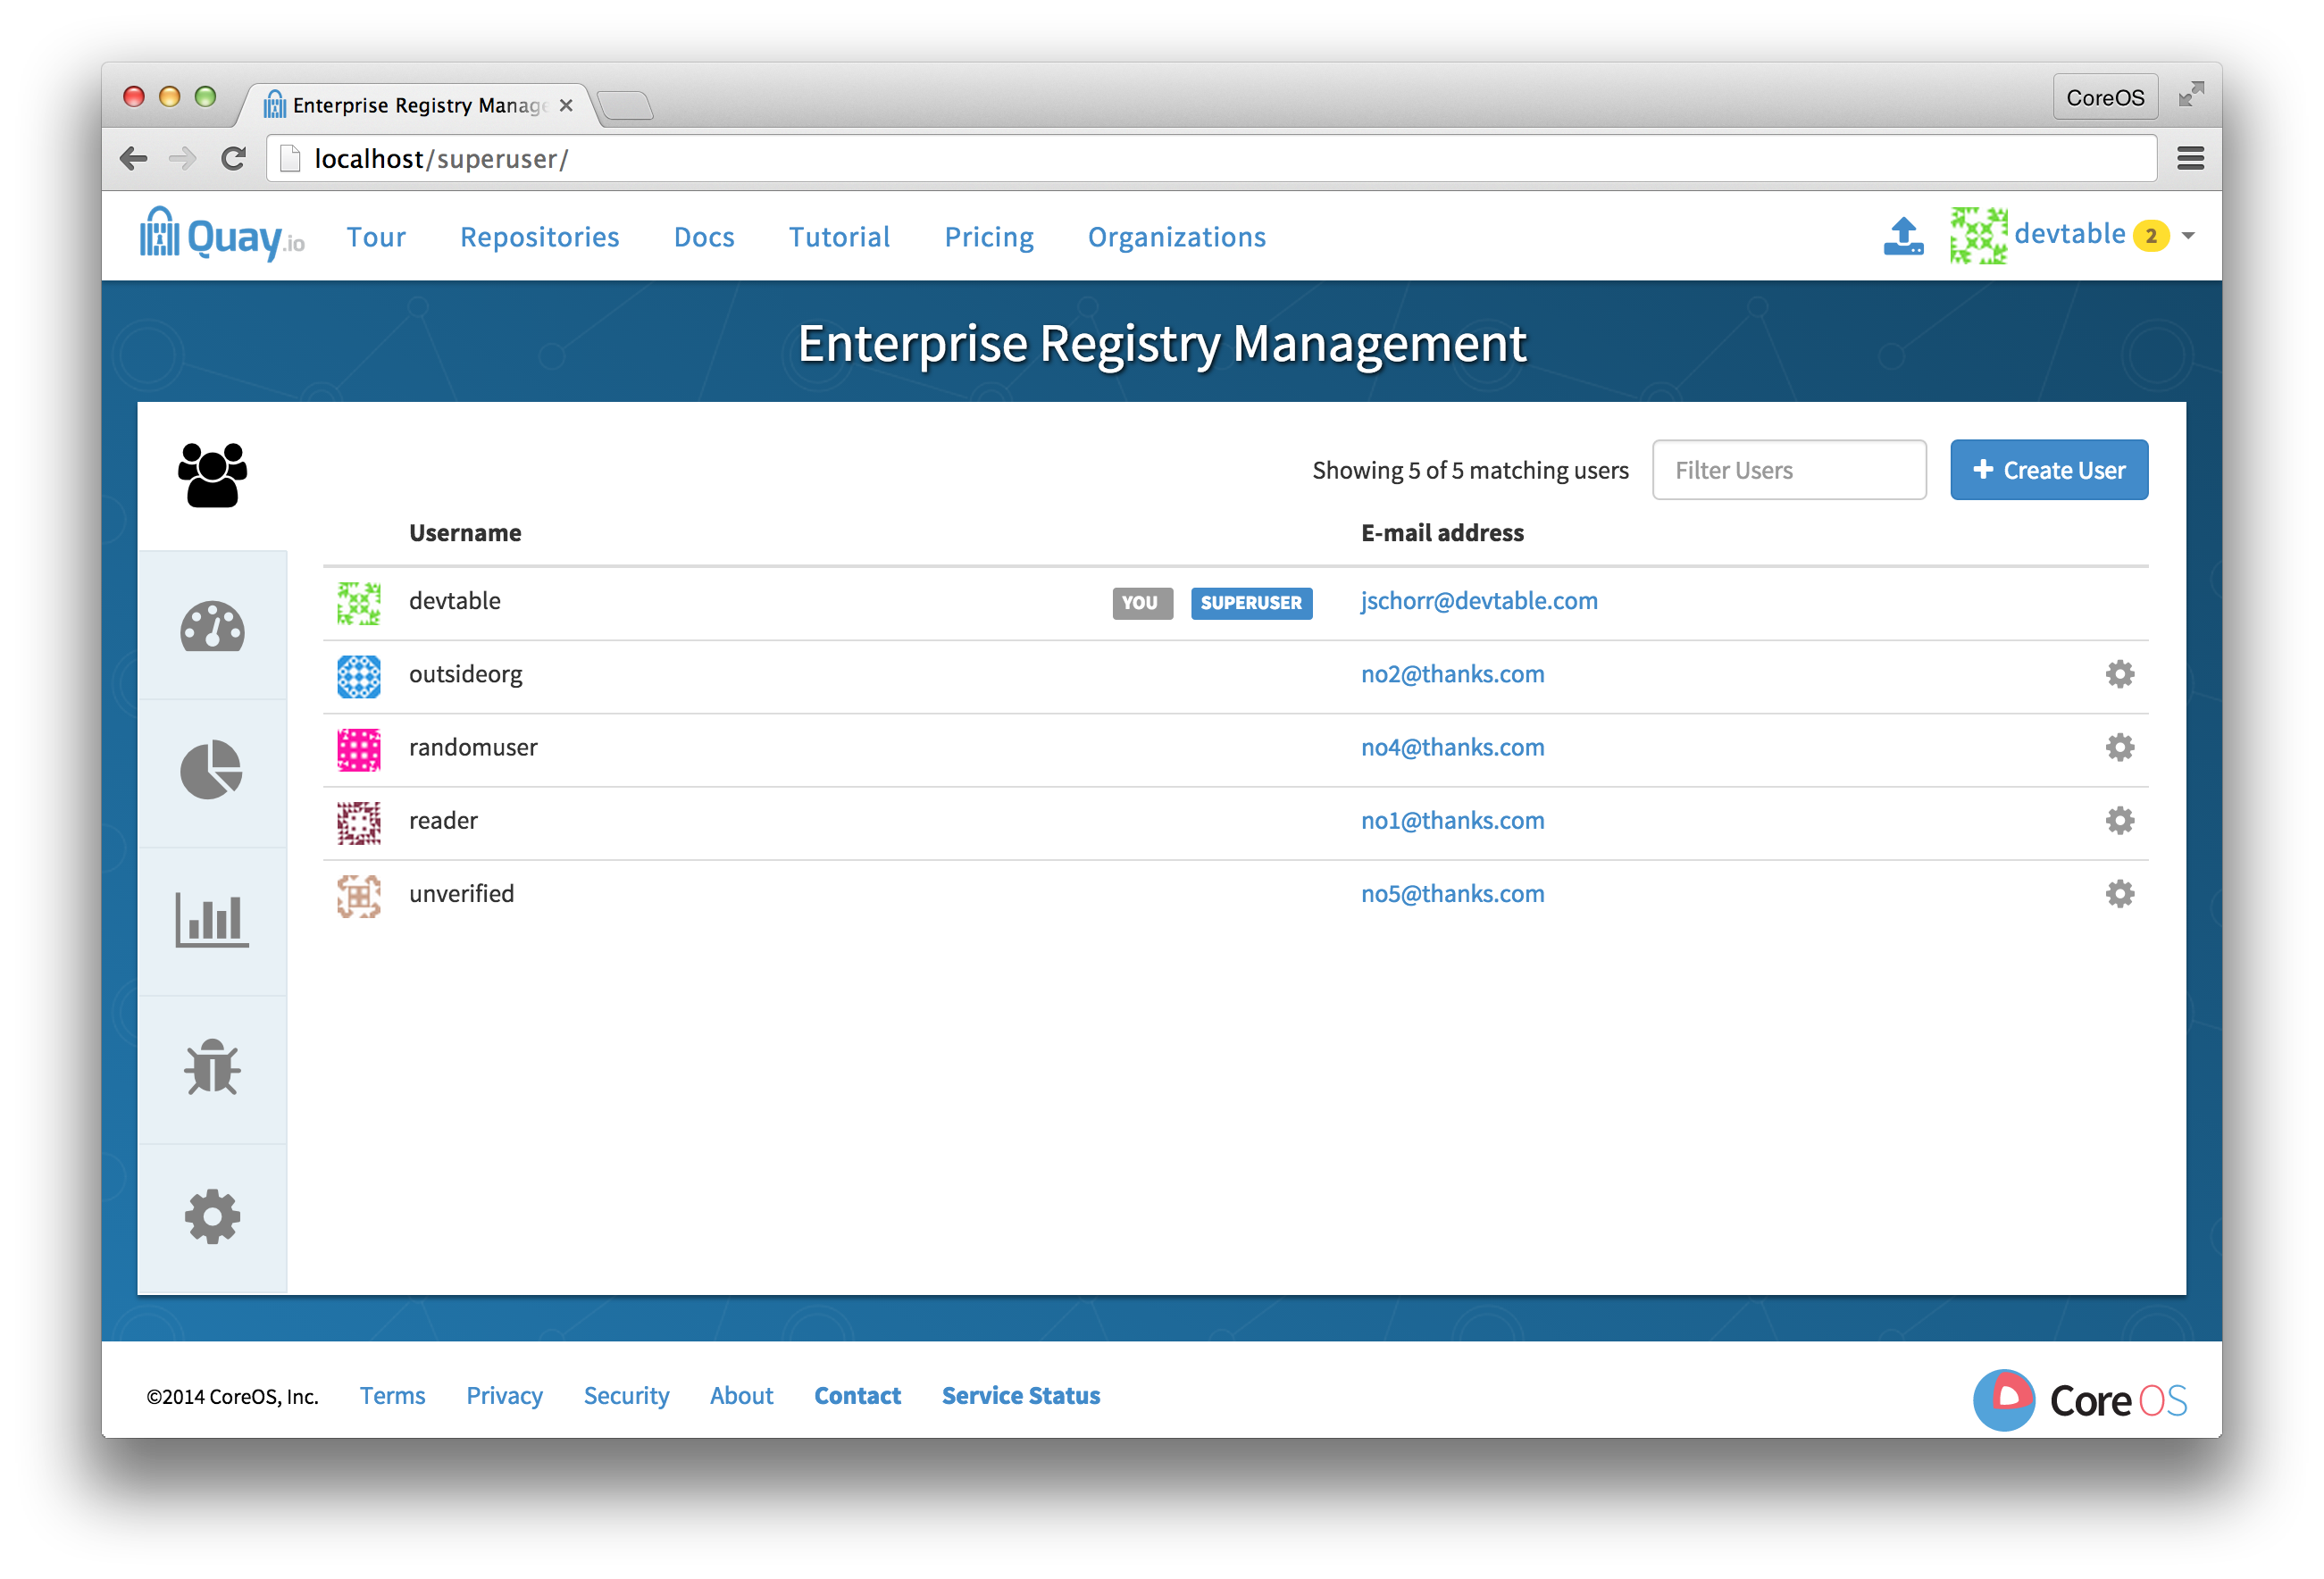
8.1. Visit the management panel
Sign in to a superuser account from the Red Hat Quay login screen. For example, if the host were reg.example.com, you would go to http://reg.example.com/superuser to view the management panel:
8.2. Enable BitTorrent distribution
-
Click the configuration tab and scroll down to the section entitled BitTorrent-based download.

- Check the "Enable BitTorrent downloads" box
8.3. Enter an announce URL
In the "Announce URL" field, enter the HTTP endpoint of a JWT-capable BitTorrent tracker’s announce URL. This will typically be a URL ending in /announce.
8.4. Save configuration
- Click "Save Configuration Changes"
- Restart the container (you will be prompted)
Chapter 9. LDAP Authentication Setup for Red Hat Quay
The Lightweight Directory Access Protocol (LDAP) is an open, vendor-neutral, industry standard application protocol for accessing and maintaining distributed directory information services over an Internet Protocol (IP) network. Red Hat Quay supports using LDAP as an identity provider.
9.1. Prerequisites
The Red Hat Quay LDAP setup workflow requires that the user configuring the LDAP Setup already exist in the LDAP directory. Before attempting the setup, make sure that you are logged in as a superuser that matches user crendentials in LDAP. In order to do so, Navigate to the SuperUser panel (ex: http(s)://quay.enterprise/superuser) and click on the “Create User” button to create a new User. Make sure to create a user that matches the username/email syntax in LDAP.
Once the user is created, click on the Settings icon next to the user and choose “Make Superuser” option. For ease of troubleshooting, set the User password to the LDAP password.

You will be prompted to restart the container once the new user is created. Restart the Red Hat Quay container and log in to the Superuser panel as the user that was just created.
9.2. Setup LDAP Configuration
Navigate to the Superuser panel and navigate to settings section. Locate the Authentication section and select “LDAP” from the drop-down menu.

Enter LDAP configuration fields as required.

9.3. Tips for LDAP configuration:
- LDAP URI must be in ldap:// or ldaps:// syntax. Typing a URI with ldaps:// prefix will surface the option to provide custom SSL certificate for TLS setup
- User Relative DN is relative to BaseDN (ex: ou=NYC not ou=NYC,dc=example,dc=org)
- Logged in Username must exist in User Relative DN
- You can enter multiple “Secondary User Relative DNs” if there are multiple Organizational Units where User objects are located at. (ex: ou=Users,ou=NYC and ou=Users,ou=SFO). Simply type in the Organizational Units and click on Add button to add multiple RDNs
- sAMAccountName is the UID attribute for against Microsoft Active Directory setups
-
Red Hat Quay searches "User Relative DN" with subtree scope. For example, if your Organization has Organizational Units NYC and SFO under the Users OU (
ou=SFO,ou=Users and ou=NYC,ou=Users), Red Hat Quay can authenticate users from both the NYC and SFO Organizational Units if the User Relative DN is set to Users (ou=Users)
Once the configuration is completed, click on “Save Configuration Changes” button to validate the configuration.
You will be prompted to login with LDAP credentials.
9.4. Common Issues
Invalid credentials
Administrator DN or Administrator DN Password values are incorrect
Verification of superuser %USERNAME% failed: Username not found The user either does not exist in the remote authentication system OR LDAP auth is misconfigured.
Red Hat Quay can connect to the LDAP server via Username/Password specified in the Administrator DN fields however cannot find the current logged in user with the UID Attribute or Mail Attribute fields in the User Relative DN Path. Either current logged in user does not exist in User Relative DN Path, or Administrator DN user do not have rights to search/read this LDAP path.
Chapter 10. Prometheus and Grafana metrics under Red Hat Quay
Red Hat Quay exports a Prometheus- and Grafana-compatible endpoint on each instance to allow for easy monitoring and alerting.
10.1. Exposing the Prometheus endpoint
The Prometheus- and Grafana-compatible endpoint on the Red Hat Quay instance can be found at port 9092. See Monitoring Quay with Prometheus and Grafana for details on configuring Prometheus and Grafana to monitor Quay repository counts.
10.1.1. Setting up Prometheus to consume metrics
Prometheus needs a way to access all Red Hat Quay instances running in a cluster. In the typical setup, this is done by listing all the Red Hat Quay instances in a single named DNS entry, which is then given to Prometheus.
10.1.2. DNS configuration under Kubernetes
A simple Kubernetes service can be configured to provide the DNS entry for Prometheus. Details on running Prometheus under Kubernetes can be found at Prometheus and Kubernetes and Monitoring Kubernetes with Prometheus.
10.1.3. DNS configuration for a manual cluster
SkyDNS is a simple solution for managing this DNS record when not using Kubernetes. SkyDNS can run on an etcd cluster. Entries for each Red Hat Quay instance in the cluster can be added and removed in the etcd store. SkyDNS will regularly read them from there and update the list of Quay instances in the DNS record accordingly.
Chapter 11. Georeplication of storage in Red Hat Quay
Georeplication allows for a single globally-distributed Red Hat Quay to serve container images from localized storage.
When georeplication is configured, container image pushes will be written to the preferred storage engine for that Red Hat Quay instance. After the initial push, image data will be replicated in the background to other storage engines. The list of replication locations is configurable. An image pull will always use the closest available storage engine, to maximize pull performance.
11.1. Prerequisites
Georeplication requires that there be a high availability storage engine (S3, GCS, RADOS, Swift) in each geographic region. Further, each region must be able to access every storage engine due to replication requirements.
Local disk storage is not compatible with georeplication at this time.
11.2. Visit the Management Panel
Sign in to a superuser account from the Red Hat Quay login screen. For example, if the host were reg.example.com, you would go to http://reg.example.com/superuser to view the management panel:
11.3. Enable storage replication
-
Click the configuration tab and scroll down to the section entitled
Registry Storage. -
Click
Enable Storage Replication. - Add each of the storage engines to which data will be replicated. All storage engines to be used must be listed.
-
If complete replication of all images to all storage engines is required, under each storage engine configuration click
Replicate to storage engine by default. This will ensure that all images are replicated to that storage engine. To instead enable per-namespace replication, please contact support. - Click Save to validate.
After adding storage and enabling “Replicate to storage engine by default” for Georeplications, you need to sync existing image data across all storage. To do this, you need to
oc exec(or docker/kubectl exec) into the container and run:scl enable python27 bash python -m util.backfillreplication
# scl enable python27 bash
# python -m util.backfillreplication
Copy to Clipboard Copied! Toggle word wrap Toggle overflow This is a one time operation to sync content after adding new storage.
11.4. Run Red Hat Quay with storage preferences
- Copy the config.yaml to all machines running Red Hat Quay
For each machine in each region, add a
QUAY_DISTRIBUTED_STORAGE_PREFERENCEenvironment variable with the preferred storage engine for the region in which the machine is running.For example, for a machine running in Europe with the config directory on the host available from /mnt/quay/config:
Copy to Clipboard Copied! Toggle word wrap Toggle overflow NoteThe value of the environment variable specified must match the name of a Location ID as defined in the config panel.
- Restart all Red Hat Quay containers
Chapter 12. Red Hat Quay Troubleshooting
Common failure modes and best practices for recovery.
- I’m receiving HTTP Status Code 429
- I’m authorized but I’m still getting 403s
- Base image pull in Dockerfile fails with 403
- Cannot add a build trigger
- Build logs are not loading
- I’m receiving "Cannot locate specified Dockerfile" * Could not reach any registry endpoint
- Cannot access private repositories using EC2 Container Service
- Docker is returning an i/o timeout
- Docker login is failing with an odd error
- Pulls are failing with an odd error
- I just pushed but the timestamp is wrong
- Pulling Private Quay.io images with Marathon/Mesos fails
Chapter 13. Schema for Red Hat Quay
All fields are optional unless otherwise marked.
AUTHENTICATION_TYPE [string] required: The authentication engine to use for credential authentication.
- enum: Database, LDAP, JWT, Keystone, OIDC.
-
Example:
Database
BUILDLOGS_REDIS [object] required: Connection information for Redis for build logs caching.
HOST [string] required: The hostname at which Redis is accessible.
-
Example:
my.redis.cluster
-
Example:
PASSWORD [string]: The password to connect to the Redis instance.
-
Example:
mypassword
-
Example:
PORT [number]: The port at which Redis is accessible.
-
Example:
1234
-
Example:
DB_URI [string] required: The URI at which to access the database, including any credentials.
- Reference: https://www.postgresql.org/docs/9.3/static/libpq-connect.html#AEN39495
-
Example:
mysql+pymysql://username:password@dns.of.database/quay
DEFAULT_TAG_EXPIRATION [string] required: The default, configurable tag expiration time for time machine. Defaults to
2w.-
Pattern:
^[0-9]+(w|m|d|h|s)$
-
Pattern:
DISTRIBUTED_STORAGE_CONFIG [object] required: Configuration for storage engine(s) to use in Red Hat Quay. Each key is a unique ID for a storage engine, with the value being a tuple of the type and configuration for that engine.
-
Example:
{"local_storage": ["LocalStorage", {"storage_path": "some/path/"}]}
-
Example:
DISTRIBUTED_STORAGE_PREFERENCE [array] required: The preferred storage engine(s) (by ID in DISTRIBUTED_STORAGE_CONFIG) to use. A preferred engine means it is first checked for pulling and images are pushed to it.
Min Items: None
-
Example:
[u’s3_us_east', u’s3_us_west'] - array item [string]
-
Example:
preferred_url_scheme [string] required: The URL scheme to use when hitting Red Hat Quay. If Red Hat Quay is behind SSL at all, this must be
https.-
enum:
http, https -
Example:
https
-
enum:
SERVER_HOSTNAME [string] required: The URL at which Red Hat Quay is accessible, without the scheme.
-
Example:
quay.io
-
Example:
TAG_EXPIRATION_OPTIONS [array] required: The options that users can select for expiration of tags in their namespace (if enabled).
- Min Items: None
- array item [string]
-
Pattern:
^[0-9]+(w|m|d|h|s)$
USER_EVENTS_REDIS [object] required: Connection information for Redis for user event handling.
HOST [string] required: The hostname at which Redis is accessible.
-
Example:
my.redis.cluster
-
Example:
PASSWORD [string]: The password to connect to the Redis instance.
-
Example:
mypassword
-
Example:
PORT [number]: The port at which Redis is accessible.
-
Example:
1234
-
Example:
ACTION_LOG_ARCHIVE_LOCATION [string]: If action log archiving is enabled, the storage engine in which to place the archived data.
-
Example:
s3_us_east
-
Example:
ACTION_LOG_ARCHIVE_PATH' [string]: If action log archiving is enabled, the path in storage in which to place the archived data.
-
Example:
archives/actionlogs
-
Example:
APP_SPECIFIC_TOKEN_EXPIRATION [string,
null]: The expiration for external app tokens. Defaults to None.-
Pattern:
^[0-9]+(w|m|d|h|s)$
-
Pattern:
ALLOW_PULLS_WITHOUT_STRICT_LOGGING [boolean]: If true, pulls in which the pull audit log entry cannot be written will still succeed. Useful if the database can fallback into a read-only state and it is desired for pulls to continue during that time. Defaults to False.
-
Example:
True
-
Example:
AVATAR_KIND [string]: The types of avatars to display, either generated inline (local) or Gravatar (gravatar)
- enum: local, gravatar
BITBUCKET_TRIGGER_CONFIG ['object', 'null']: Configuration for using BitBucket for build triggers.
consumer_key [string] required: The registered consumer key(client ID) for this Red Hat Quay instance.
-
Example:
0e8dbe15c4c7630b6780
-
Example:
CONSUMER_SECRET [string] required: The registered consumer secret(client secret) for this Red Hat Quay instance
- Example: e4a58ddd3d7408b7aec109e85564a0d153d3e846
BITTORRENT_ANNOUNCE_URL [string]: The URL of the announce endpoint on the bittorrent tracker.
-
Pattern:
^http(s)?://(.)+$ -
Example:
https://localhost:6881/announce
-
Pattern:
BITTORRENT_PIECE_SIZE [number]: The bittorent piece size to use. If not specified, defaults to 512 * 1024.
-
Example:
524288
-
Example:
BROWSER_API_CALLS_XHR_ONLY [boolean]: If enabled, only API calls marked as being made by an XHR will be allowed from browsers. Defaults to True.
- Example: False
CONTACT_INFO [array]: If specified, contact information to display on the contact page. If only a single piece of contact information is specified, the contact footer will link directly.
- Min Items: 1
Unique Items: True
- array item 0 [string]: Adds a link to send an e-mail
-
Pattern:
^mailto:(.)+$ -
Example:
mailto:support@quay.io
array item 1 [string]: Adds a link to visit an IRC chat room
-
Pattern:
^irc://(.)+$ -
Example:
irc://chat.freenode.net:6665/quay
-
Pattern:
array item 2 [string]: Adds a link to call a phone number
-
Pattern:
^tel:(.)+$ -
Example:
tel:+1-888-930-3475
-
Pattern:
array item 3 [string]: Adds a link to a defined URL
-
Pattern:
^http(s)?://(.)+$ -
Example:
https://twitter.com/quayio
-
Pattern:
BLACKLIST_V2_SPEC [string]: The Docker CLI versions to which Red Hat Quay will respond that V2 is unsupported. Defaults to
<1.6.0.- Reference: http://pythonhosted.org/semantic_version/reference.html#semantic_version.Spec
-
Example:
<1.8.0
DB_CONNECTION_ARGS [object]: If specified, connection arguments for the database such as timeouts and SSL.
-
threadlocals [boolean] required: Whether to use thread-local connections. Should ALWAYS be
true -
autorollback [boolean] required: Whether to use auto-rollback connections. Should ALWAYS be
true ssl [object]: SSL connection configuration
- ca [string] required: Absolute container path to the CA certificate to use for SSL connections.
-
Example:
conf/stack/ssl-ca-cert.pem
-
threadlocals [boolean] required: Whether to use thread-local connections. Should ALWAYS be
DEFAULT_NAMESPACE_MAXIMUM_BUILD_COUNT [number,
null]: If not None, the default maximum number of builds that can be queued in a namespace.-
Example:
20
-
Example:
DIRECT_OAUTH_CLIENTID_WHITELIST [array]: A list of client IDs of Red Hat Quay-managed applications that are allowed to perform direct OAuth approval without user approval.
- Min Items: None
- Unique Items: True
Reference: https://coreos.com/quay-enterprise/docs/latest/direct-oauth.html
- array item [string]
DISTRIBUTED_STORAGE_DEFAULT_LOCATIONS [array]: The list of storage engine(s) (by ID in DISTRIBUTED_STORAGE_CONFIG) whose images should be fully replicated, by default, to all other storage engines.
- Min Items: None
Example:
s3_us_east, s3_us_west- array item [string]
EXTERNAL_TLS_TERMINATION [boolean]: If TLS is supported, but terminated at a layer before Red Hat Quay, must be true.
-
Example:
True
-
Example:
ENABLE_HEALTH_DEBUG_SECRET [string,
null]: If specified, a secret that can be given to health endpoints to see full debug info when not authenticated as a superuser.-
Example:
somesecrethere
-
Example:
EXPIRED_APP_SPECIFIC_TOKEN_GC [string,
null]: Duration of time expired external app tokens will remain before being garbage collected. Defaults to 1d.-
pattern:
^[0-9]+(w|m|d|h|s)$
-
pattern:
FEATURE_ACI_CONVERSION [boolean]: Whether to enable conversion to ACIs. Defaults to False.
-
Example:
False
-
Example:
FEATURE_ACTION_LOG_ROTATION [boolean]: Whether or not to rotate old action logs to storage. Defaults to False.
-
Example:
False
-
Example:
FEATURE_ADVERTISE_V2 [boolean]: Whether the v2/ endpoint is visible. Defaults to True.
-
Example:
True
-
Example:
FEATURE_ANONYMOUS_ACCESS [boolean]: Whether to allow anonymous users to browse and pull public repositories. Defaults to True.
-
Example:
True
-
Example:
FEATURE_APP_REGISTRY [boolean]: Whether to enable support for App repositories. Defaults to False.
-
Example:
False
-
Example:
FEATURE_APP_SPECIFIC_TOKENS [boolean]: If enabled, users can create tokens for use by the Docker CLI. Defaults to True.
- Example: False
FEATURE_BITBUCKET_BUILD [boolean]: Whether to support Bitbucket build triggers. Defaults to False.
-
Example:
False
-
Example:
FEATURE_BITTORRENT [boolean]: Whether to allow using Bittorrent-based pulls. Defaults to False.
FEATURE_BUILD_SUPPORT [boolean]: Whether to support Dockerfile build. Defaults to True.
-
Example:
True
-
Example:
FEATURE_CHANGE_TAG_EXPIRARTION [boolean]: Whether users and organizations are allowed to change the tag expiration for tags in their namespace. Defaults to True.
-
Example:
False
-
Example:
FEATURE_DIRECT_LOGIN [boolean]: Whether users can directly login to the UI. Defaults to True.
-
Example:
True
-
Example:
FEATURE_GITHUB_BUILD [boolean]: Whether to support GitHub build triggers. Defaults to False.
-
Example:
False
-
Example:
FEATURE_GITHUB_LOGIN [boolean]: Whether GitHub login is supported. Defaults to False.
-
Example:
False
-
Example:
FEATURE_GITLAB_BUILD[boolean]: Whether to support GitLab build triggers. Defaults to False.
-
Example:
False
-
Example:
FEATURE_GOOGLE_LOGIN [boolean]: Whether Google login is supported. Defaults to False.
-
Example:
False
-
Example:
FEATURE_INVITE_ONLY_USER_CREATION [boolean]: Whether users being created must be invited by another user. Defaults to False.
-
Example:
False
-
Example:
FEATURE_LIBRARY_SUPPORT [boolean]: Whether to allow for "namespace-less" repositories when pulling and pushing from Docker. Defaults to True.
-
Example:
True
-
Example:
FEATURE_MAILING [boolean]: Whether emails are enabled. Defaults to True.
-
Example:
True
-
Example:
FEATURE_NONSUPERUSER_TEAM_SYNCING_SETUP [boolean]: If enabled, non-superusers can setup syncing on teams to backing LDAP or Keystone. Defaults To False.
-
Example:
True
-
Example:
FEATURE_PARTIAL_USER_AUTOCOMPLETE [boolean]: If set to true, autocompletion will apply to partial usernames. Defaults to True.
-
Example:
True
-
Example:
FEATURE_PERMANENT_SESSIONS [boolean]: Whether sessions are permanent. Defaults to True.
-
Example:
True
-
Example:
FEATURE_PROXY_STORAGE [boolean]: Whether to proxy all direct download URLs in storage via the registry nginx. Defaults to False.
-
Example:
False
-
Example:
FEATURE_PUBLIC_CATALOG [boolean]: If set to true, the
_catalogendpoint returns public repositories. Otherwise, only private repositories can be returned. Defaults to False.-
Example:
False
-
Example:
FEATURE_READER_BUILD_LOGS [boolean]: If set to true, build logs may be read by those with read access to the repo, rather than only write access or admin access. Defaults to False.
- Example: False
FEATURE_RECAPTCHA [boolean]: Whether Recaptcha is necessary for user login and recovery. Defaults to False.
-
Example:
False - Reference: https://www.google.com/recaptcha/intro/
-
Example:
FEATURE_REQUIRE_ENCRYPTED_BASIC_AUTH [boolean]: Whether non-encrypted passwords (as opposed to encrypted tokens) can be used for basic auth. Defaults to False.
-
Example:
False
-
Example:
FEATURE_REQUIRE_TEAM_INVITE [boolean]: Whether to require invitations when adding a user to a team. Defaults to True.
-
Example:
True
-
Example:
FEATURE_SECURITY_NOTIFICATIONS [boolean]: If the security scanner is enabled, whether to turn on/off security notifications. Defaults to False.
-
Example:
False
-
Example:
FEATURE_SECURITY_SCANNER [boolean]: Whether to turn on/off the security scanner. Defaults to False.
FEATURE_STORAGE_REPLICATION [boolean]: Whether to automatically replicate between storage engines. Defaults to False.
-
Example:
False
-
Example:
FEATURE_SUPER_USERS [boolean]: Whether superusers are supported. Defaults to True.
-
Example:
True
-
Example:
FEATURE_TEAM_SYNCING [boolean]: Whether to allow for team membership to be synced from a backing group in the authentication engine (LDAP or Keystone).
-
Example:
True
-
Example:
FEATURE_USER_CREATION [boolean] :Whether users can be created (by non-superusers). Defaults to True.
-
Example:
True
-
Example:
FEATURE_USER_LOG_ACCESS [boolean]: If set to true, users will have access to audit logs for their namespace. Defaults to False.
-
Example:
True
-
Example:
FEATURE_USER_METADATA [boolean]: Whether to collect and support user metadata. Defaults to False.
-
Example:
False
-
Example:
FEATURE_USER_RENAME [boolean]: If set to true, users can rename their own namespace. Defaults to False.
-
Example:
True
-
Example:
GITHUB_LOGIN_CONFIG [object, 'null']: Configuration for using GitHub (Enterprise) as an external login provider.
- Reference: https://coreos.com/quay-enterprise/docs/latest/github-auth.html
allowed_organizations [array]: The names of the GitHub (Enterprise) organizations whitelisted to work with the ORG_RESTRICT option.
- Min Items: None
Unique Items: True
- array item [string]
API_ENDPOINT [string]: The endpoint of the GitHub (Enterprise) API to use. Must be overridden for github.com.
-
Example:
https://api.github.com/
-
Example:
CLIENT_ID [string] required: The registered client ID for this Red Hat Quay instance; cannot be shared with GITHUB_TRIGGER_CONFIG.
- Reference: https://coreos.com/quay-enterprise/docs/latest/github-app.html
-
Example:
0e8dbe15c4c7630b6780
CLIENT_SECRET [string] required: The registered client secret for this Red Hat Quay instance.
- Reference: https://coreos.com/quay-enterprise/docs/latest/github-app.html
-
Example:
e4a58ddd3d7408b7aec109e85564a0d153d3e846
GITHUB_ENDPOINT [string] required: The endpoint of the GitHub (Enterprise) being hit.
-
Example:
https://github.com/
-
Example:
- ORG_RESTRICT [boolean]: If true, only users within the organization whitelist can login using this provider.
-
Example:
True
GITHUB_TRIGGER_CONFIG [object,
null]: Configuration for using GitHub (Enterprise) for build triggers.- Reference: https://coreos.com/quay-enterprise/docs/latest/github-build.html
API_ENDPOINT [string]: The endpoint of the GitHub (Enterprise) API to use. Must be overridden for github.com.
-
Example:
https://api.github.com/
-
Example:
CLIENT_ID [string] required: The registered client ID for this Red Hat Quay instance; cannot be shared with GITHUB_LOGIN_CONFIG.
- Reference: https://coreos.com/quay-enterprise/docs/latest/github-app.html
-
Example:
0e8dbe15c4c7630b6780
CLIENT_SECRET [string] required: The registered client secret for this Red Hat Quay instance.
- Reference: https://coreos.com/quay-enterprise/docs/latest/github-app.html
-
Example:
e4a58ddd3d7408b7aec109e85564a0d153d3e846
GITHUB_ENDPOINT [string] required: The endpoint of the GitHub (Enterprise) being hit.
-
Example:
https://github.com/
-
Example:
GITLAB_TRIGGER_CONFIG [object]: Configuration for using Gitlab (Enterprise) for external authentication.
CLIENT_ID [string] required: The registered client ID for this Red Hat Quay instance.
-
Example:
0e8dbe15c4c7630b6780
-
Example:
CLIENT_SECRET [string] required: The registered client secret for this Red Hat Quay instance.
-
Example:
e4a58ddd3d7408b7aec109e85564a0d153d3e846 gitlab_endpoint [string] required: The endpoint at which Gitlab(Enterprise) is running.
-
Example:
https://gitlab.com
-
Example:
-
Example:
GOOGLE_LOGIN_CONFIG [object,
null]: Configuration for using Google for external authenticationCLIENT_ID [string] required: The registered client ID for this Red Hat Quay instance.
-
Example:
0e8dbe15c4c7630b6780
-
Example:
CLIENT_SECRET [string] required: The registered client secret for this Red Hat Quay instance.
- Example: e4a58ddd3d7408b7aec109e85564a0d153d3e846
HEALTH_CHECKER [string]: The configured health check.
-
Example:
('RDSAwareHealthCheck', {'access_key': 'foo', 'secret_key': 'bar'})
-
Example:
LOG_ARCHIVE_LOCATION [string]:If builds are enabled, the storage engine in which to place the archived build logs.
-
Example:
s3_us_east
-
Example:
LOG_ARCHIVE_PATH [string]: If builds are enabled, the path in storage in which to place the archived build logs.
-
Example:
archives/buildlogs
-
Example:
MAIL_DEFAULT_SENDER [string,
null]: If specified, the e-mail address used as thefromwhen Red Hat Quay sends e-mails. If none, defaults tosupport@quay.io.-
Example:
support@myco.com
-
Example:
MAIL_PASSWORD [string,
null]: The SMTP password to use when sending e-mails.-
Example:
mypassword
-
Example:
MAIL_PORT [number]: The SMTP port to use. If not specified, defaults to 587.
-
Example:
588
-
Example:
MAIL_SERVER [string]: The SMTP server to use for sending e-mails. Only required if FEATURE_MAILING is set to true.
-
Example:
smtp.somedomain.com
-
Example:
MAIL_USERNAME [string, 'null']: The SMTP username to use when sending e-mails.
-
Example:
myuser
-
Example:
MAIL_USE_TLS [boolean]: If specified, whether to use TLS for sending e-mails.
-
Example:
True
-
Example:
MAXIMUM_LAYER_SIZE [string]: Maximum allowed size of an image layer. Defaults to 20G.
-
Pattern:
^[0-9]+(G|M)$ -
Example:
100G
-
Pattern:
PUBLIC_NAMESPACES [array]: If a namespace is defined in the public namespace list, then it will appear on all user’s repository list pages, regardless of whether that user is a member of the namespace. Typically, this is used by an enterprise customer in configuring a set of "well-known" namespaces.
- Min Items: None
Unique Items: True
- array item [string]
PROMETHEUS_NAMESPACE [string]: The prefix applied to all exposed Prometheus metrics. Defaults to
quay.-
Example:
myregistry
-
Example:
- RECAPTCHA_SITE_KEY [string]: If recaptcha is enabled, the site key for the Recaptcha service.
- RECAPTCHA_SECRET_KEY [string]: 'If recaptcha is enabled, the secret key for the Recaptcha service.
REGISTRY_TITLE [string]: If specified, the long-form title for the registry. Defaults to
Quay Enterprise.-
Example:
Corp Container Service
-
Example:
REGISTRY_TITLE_SHORT [string]: If specified, the short-form title for the registry. Defaults to
Quay Enterprise.-
Example:
CCS
-
Example:
SECURITY_SCANNER_ENDPOINT [string]: The endpoint for the security scanner.
-
Pattern:
^http(s)?://(.)+$ -
Example:
http://192.168.99.101:6060
-
Pattern:
SECURITY_SCANNER_INDEXING_INTERVAL [number]: The number of seconds between indexing intervals in the security scanner. Defaults to 30.
-
Example:
30
-
Example:
SESSION_COOKIE_SECURE [boolean]: Whether the
secureproperty should be set on session cookies. Defaults to False. Recommended to be True for all installations using SSL.- Example: True
- Reference: https://en.wikipedia.org/wiki/Secure_cookies
SUPER_USERS [array]: Red Hat Quay usernames of those users to be granted superuser privileges.
- Min Items: None
Unique Items: True
- array item [string]
TEAM_RESYNC_STALE_TIME [string]: If team syncing is enabled for a team, how often to check its membership and resync if necessary (Default: 30m).
-
Pattern:
^[0-9]+(w|m|d|h|s)$ -
Example:
2h
-
Pattern:
USERFILES_LOCATION [string]: ID of the storage engine in which to place user-uploaded files.
-
Example:
s3_us_east
-
Example:
USERFILES_PATH [string]: Path under storage in which to place user-uploaded files.
-
Example:
userfiles
-
Example:
USER_RECOVERY_TOKEN_LIFETIME [string]: The length of time a token for recovering a user accounts is valid. Defaults to 30m.
-
Example:
10m -
Pattern:
^[0-9]+(w|m|d|h|s)$
-
Example:
V2_PAGINATION_SIZE [number]: The number of results returned per page in V2 registry APIs.
-
Example:
100
-
Example: