Configure Red Hat Quay
Customizing Red Hat Quay using configuration options
Abstract
Chapter 1. Getting started with Red Hat Quay configuration
Red Hat Quay can be deployed by an independent, standalone configuration, or by using the OpenShift Container Platform Red Hat Quay Operator.
How you create, retrieve, update, and validate the Red Hat Quay configuration varies depending on the type of deployment you are using. However, the core configuration options are the same for either deployment type. Core configuration can be set by one of the following options:
-
Directly, by editing the
config.yamlfile. See "Editing the configuration file" for more information. - Programmatically, by using the configuration API. See "Using the configuration API" for more information.
- Visually, by using the configuration tool UI. See "Using the configuration tool" for more information.
For standalone deployments of Red Hat Quay, you must supply the minimum required configuration parameters before the registry can be started. The minimum requirements to start a Red Hat Quay registry can be found in the "Retrieving the current configuration" section.
If you install Red Hat Quay on OpenShift Container Platform using the Red Hat Quay Operator, you do not need to supply configuration parameters because the Red Hat Quay Operator supplies default information to deploy the registry.
After you have deployed Red Hat Quay with the desired configuration, you should retrieve, and save, the full configuration from your deployment. The full configuration contains additional generated values that you might need when restarting or upgrading your system.
1.1. Configuration updates for Quay 3.8
The following configuration fields have been introduced with Red Hat Quay 3.8:
| Field | Type | Description |
|---|---|---|
| Boolean | When set, allows users to try the beta UI environment.
Default: | |
| String | Enables IPv4, IPv6, or dual-stack protocol family. This configuration field must be properly set, otherwise Red Hat Quay fails to start.
Default:
Additional configurations: | |
| String |
Subset of the With this field, administrators can add or remove superusers without having to update the Red Hat Quay configuration file and restart their deployment. | |
| String |
Subset of the | |
| Boolean | Grants superusers the ability to read, write, and delete content from other repositories in namespaces that they do not own or have explicit permissions for.
Default: | |
| String | When set, grants users of this list read access to all repositories, regardless of whether they are public repositories. | |
| Boolean |
When set with
Default: | |
| String |
When set with |
1.2. Configuration updates for Quay 3.7
1.2.1. New configuration fields for Red Hat Quay 3.7.7
| Field | Type | Description |
|---|---|---|
| REPO_MIRROR_ROLLBACK | Boolean |
When set to
Default: |
1.2.2. New configuration fields
The following configuration fields have been introduced with Red Hat Quay 3.7:
| Parameter | Description |
|---|---|
| FEATURE_QUOTA_MANAGEMENT | Quota management is now supported. With this feature, users have the ability to report storage consumption and to contain registry growth by establishing configured storage quota limits. For more information about quota management, see Red Hat Quay Quota management and enforcement. |
| DEFAULT_SYSTEM_REJECT_QUOTA_BYTES | The quota size to apply to all organizations and users. For more information about quota management, see Red Hat Quay Quota management and enforcement. |
| FEATURE_PROXY_CACHE | Using Red Hat Quay to proxy a remote organization is now supported. With this feature, Red Hat Quay will act as a proxy cache to circumvent pull-rate limitations from upstream registries. For more information about quota management, see Red Hat Quay as proxy cache for upstream registries. |
1.3. Configuration updates for Red Hat Quay 3.6
1.3.1. New configuration fields
The following configuration fields have been introduced with Red Hat Quay 3.6:
| Parameter | Description |
|---|---|
| FEATURE_EXTENDED_REPOSITORY_NAMES |
Support for nested repositories and extended repository names has been added. This change allows the use of |
| FEATURE_USER_INITIALIZE |
If set to true, the first |
| ALLOWED_OCI_ARTIFACT_TYPES |
Helm, cosign, and ztsd compression scheme artifacts are built into Red Hat Quay 3.6 by default. For any other Open Container Initiative (OCI) media types that are not supported by default, you can add them to the |
| CREATE_PRIVATE_REPO_ON_PUSH |
Registry users now have the option to set |
| CREATE_NAMESPACE_ON_PUSH | Pushing to a non-existent organization can now be configured to automatically create the organization. |
1.3.2. Deprecated configuration fields
The following configuration fields have been deprecated with Red Hat Quay 3.6:
| Parameter | Description |
|---|---|
| FEATURE_HELM_OCI_SUPPORT |
This option has been deprecated and will be removed in a future version of Red Hat Quay. In Red Hat Quay 3.6, Helm artifacts are supported by default and included under the |
1.4. Editing the configuration file
To deploy a standalone instance of Red Hat Quay, you must provide the minimal configuration information. The requirements for a minimal configuration can be found in "Red Hat Quay minimal configuration."
After supplying the required fields, you can validate your configuration. If there are any issues, they will be highlighted.
It is possible to use the configuration API to validate the configuration, but this requires starting the Quay container in configuration mode. For more information, see "Using the configuration tool."
For changes to take effect, the registry must be restarted.
1.5. Location of configuration file in a standalone deployment
For standalone deployments of Red Hat Quay, the config.yaml file must be specified when starting the Red Hat Quay registry. This file is located in the configuration volume. For example, the configuration file is located at $QUAY/config/config.yaml when deploying Red Hat Quay by the following command:
sudo podman run -d --rm -p 80:8080 -p 443:8443 \
   --name=quay \
   -v $QUAY/config:/conf/stack:Z \
   -v $QUAY/storage:/datastorage:Z \
   registry.redhat.io/quay/quay-rhel8:v3.8.15
$ sudo podman run -d --rm -p 80:8080 -p 443:8443 \
   --name=quay \
   -v $QUAY/config:/conf/stack:Z \
   -v $QUAY/storage:/datastorage:Z \
registry.redhat.io/quay/quay-rhel8:v3.8.151.6. Minimal configuration
The following configuration options are required for a standalone deployment of Red Hat Quay:
- Server hostname
- HTTP or HTTPS
- Authentication type, for example, Database or Lightweight Directory Access Protocol (LDAP)
- Secret keys for encrypting data
- Storage for images
- Database for metadata
- Redis for build logs and user events
- Tag expiration options
1.6.1. Sample minimal configuration file
The following example shows a sample minimal configuration file that uses local storage for images:
The SETUP_COMPLETE field indicates that the configuration has been validated. You should use the configuration editor tool to validate your configuration before starting the registry.
1.6.2. Local storage
Using local storage for images is only recommended when deploying a registry for proof of concept purposes.
When configuring local storage, storage is specified on the command line when starting the registry. The following command maps a local directory, $QUAY/storage to the datastorage path in the container:
sudo podman run -d --rm -p 80:8080 -p 443:8443 \
   --name=quay \
   -v $QUAY/config:/conf/stack:Z \
   -v $QUAY/storage:/datastorage:Z \
   registry.redhat.io/quay/quay-rhel8:v3.8.15
$ sudo podman run -d --rm -p 80:8080 -p 443:8443 \
   --name=quay \
   -v $QUAY/config:/conf/stack:Z \
   -v $QUAY/storage:/datastorage:Z \
registry.redhat.io/quay/quay-rhel8:v3.8.151.6.3. Cloud storage
Storage configuration is detailed in the Image storage section. For some users, it might be useful to compare the difference between Google Cloud Platform and local storage configurations. For example, the following YAML presents a Google Cloud Platform storage configuration:
$QUAY/config/config.yaml
When starting the registry using cloud storage, no configuration is required on the command line. For example:
sudo podman run -d --rm -p 80:8080 -p 443:8443 \
   --name=quay \
   -v $QUAY/config:/conf/stack:Z \
   registry.redhat.io/quay/quay-rhel8:v3.8.15
$ sudo podman run -d --rm -p 80:8080 -p 443:8443 \
   --name=quay \
   -v $QUAY/config:/conf/stack:Z \
registry.redhat.io/quay/quay-rhel8:v3.8.15Chapter 2. Configuration fields
This section describes the both required and optional configuration fields when deploying Red Hat Quay.
2.1. Required configuration fields
The fields required to configure Red Hat Quay are covered in the following sections:
2.2. Automation options
The following sections describe the available automation options for Red Hat Quay deployments:
2.3. Optional configuration fields
Optional fields for Red Hat Quay can be found in the following sections:
- Basic configuration
- SSL
- LDAP
- Repository mirroring
- Security scanner
- OCI and Helm
- Action log
- Build logs
- Dockerfile build
- OAuth
- Configuring nested repositories
- Adding other OCI media types to Quay
- User
- Recaptcha
- ACI
- JWT
- App tokens
- Miscellaneous
- Legacy options
- User interface v2
- IPv6 configuration field
2.4. General required fields
The following table describes the required configuration fields for a Red Hat Quay deployment:
| Field | Type | Description |
|---|---|---|
|
AUTHENTICATION_TYPE | String |
The authentication engine to use for credential authentication. |
|
PREFERRED_URL_SCHEME | String |
The URL scheme to use when accessing Red Hat Quay. |
|
SERVER_HOSTNAME | String |
The URL at which Red Hat Quay is accessible, without the scheme. |
|
DATABASE_SECRET_KEY | String | Key used to encrypt sensitive fields within the database. This value should never be changed once set, otherwise all reliant fields, for example, repository mirror username and password configurations, are invalidated. |
|
SECRET_KEY | String | Key used to encrypt sensitive fields within the database and at run time. This value should never be changed once set, otherwise all reliant fields, for example, encrypted password credentials, are invalidated. |
|
SETUP_COMPLETE | Boolean |
This is an artefact left over from earlier versions of the software and currently it must be specified with a value of |
2.5. Database configuration
This section describes the database configuration fields available for Red Hat Quay deployments.
2.5.1. Database URI
With Red Hat Quay, connection to the database is configured by using the required DB_URI field.
The following table describes the DB_URI configuration field:
| Field | Type | Description |
|---|---|---|
|
DB_URI | String | The URI for accessing the database, including any credentials.
Example postgresql://quayuser:quaypass@quay-server.example.com:5432/quay |
2.5.2. Database connection arguments
Optional connection arguments are configured by the DB_CONNECTION_ARGS parameter. Some of the key-value pairs defined under DB_CONNECTION_ARGS are generic, while others are database specific.
The following table describes database connection arguments:
| Field | Type | Description |
|---|---|---|
| DB_CONNECTION_ARGS | Object | Optional connection arguments for the database, such as timeouts and SSL. |
| .autorollback | Boolean |
Whether to use thread-local connections. |
| .threadlocals | Boolean |
Whether to use auto-rollback connections. |
2.5.2.1. PostgreSQL SSL connection arguments
With SSL, configuration depends on the database you are deploying. The following example shows a PostgreSQL SSL configuration:
DB_CONNECTION_ARGS:
  sslmode: verify-ca
  sslrootcert: /path/to/cacert
DB_CONNECTION_ARGS:
  sslmode: verify-ca
  sslrootcert: /path/to/cacert
The sslmode option determines whether, or with, what priority a secure SSL TCP/IP connection will be negotiated with the server. There are six modes:
| Mode | Description |
|---|---|
| disable | Your configuration only tries non-SSL connections. |
| allow | Your configuration first tries a non-SSL connection. Upon failure, tries an SSL connection. |
|
prefer | Your configuration first tries an SSL connection. Upon failure, tries a non-SSL connection. |
| require | Your configuration only tries an SSL connection. If a root CA file is present, it verifies the certificate in the same way as if verify-ca was specified. |
| verify-ca | Your configuration only tries an SSL connection, and verifies that the server certificate is issued by a trusted certificate authority (CA). |
| verify-full | Only tries an SSL connection, and verifies that the server certificate is issued by a trusted CA and that the requested server host name matches that in the certificate. |
For more information on the valid arguments for PostgreSQL, see Database Connection Control Functions.
2.5.2.2. MySQL SSL connection arguments
The following example shows a sample MySQL SSL configuration:
DB_CONNECTION_ARGS:
  ssl:
    ca: /path/to/cacert
DB_CONNECTION_ARGS:
  ssl:
ca: /path/to/cacertInformation on the valid connection arguments for MySQL is available at Connecting to the Server Using URI-Like Strings or Key-Value Pairs.
2.6. Image storage
This section details the image storage features and configuration fields that are available with Red Hat Quay.
2.6.1. Image storage features
The following table describes the image storage features for Red Hat Quay:
| Field | Type | Description |
|---|---|---|
| FEATURE_REPO_MIRROR | Boolean |
If set to true, enables repository mirroring. |
| FEATURE_PROXY_STORAGE | Boolean |
Whether to proxy all direct download URLs in storage through NGINX. |
| FEATURE_STORAGE_REPLICATION | Boolean |
Whether to automatically replicate between storage engines. |
2.6.2. Image storage configuration fields
The following table describes the image storage configuration fields for Red Hat Quay:
| Field | Type | Description |
|---|---|---|
|
DISTRIBUTED_STORAGE_CONFIG | Object |
Configuration for storage engine(s) to use in Red Hat Quay. Each key represents an unique identifier for a storage engine. The value consists of a tuple of (key, value) forming an object describing the storage engine parameters. |
|
DISTRIBUTED_STORAGE_DEFAULT_LOCATIONS | Array of string |
The list of storage engine(s) (by ID in |
|
DISTRIBUTED_STORAGE_PREFERENCE | Array of string |
The preferred storage engine(s) (by ID in |
| MAXIMUM_LAYER_SIZE | String |
Maximum allowed size of an image layer. |
2.6.3. Local storage
The following YAML shows a sample configuration using local storage:
2.6.4. OCS/NooBaa
The following YAML shows a sample configuration using an Open Container Storage/NooBaa instance:
2.6.5. Ceph / RadosGW Storage / Hitachi HCP
The following YAML shows a sample configuration using Ceph/RadosGW and Hitachi HCP storage:
2.6.6. AWS S3 storage
The following YAML shows a sample configuration using AWS S3 storage:
2.6.7. Google Cloud Storage
The following YAML shows a sample configuration using Google Cloud Storage:
2.6.8. Azure Storage
The following YAML shows a sample configuration using Azure Storage:
- 1
- The
endpoint_urlparameter for Azure storage is optional and can be used with Microsoft Azure Government (MAG) endpoints. If left blank, theendpoint_urlwill connect to the normal Azure region.As of Red Hat Quay 3.7, you must use the Primary endpoint of your MAG Blob service. Using the Secondary endpoint of your MAG Blob service will result in the following error:
AuthenticationErrorDetail:Cannot find the claimed account when trying to GetProperties for the account whusc8-secondary.
2.6.9. Swift storage
The following YAML shows a sample configuration using Swift storage:
2.7. Redis configuration fields
This section details the configuration fields available for Redis deployments.
2.7.1. Build logs
The following build logs configuration fields are available for Redis deployments:
| Field | Type | Description |
|---|---|---|
|
BUILDLOGS_REDIS | Object | Redis connection details for build logs caching. |
|
.host | String |
The hostname at which Redis is accessible. |
|
.port | Number |
The port at which Redis is accessible. |
| .password | String |
The password to connect to the Redis instance. |
|
.ssl | Boolean | Whether to enable TLS communication between Redis and Quay. Defaults to false. |
2.7.2. User events
The following user event fields are available for Redis deployments:
| Field | Type | Description |
|---|---|---|
|
USER_EVENTS_REDIS | Object | Redis connection details for user event handling. |
|
.host | String |
The hostname at which Redis is accessible. |
|
.port | Number |
The port at which Redis is accessible. |
| .password | String |
The password to connect to the Redis instance. |
| .ssl | Boolean | Whether to enable TLS communication between Redis and Quay. Defaults to false. |
|
.ssl_keyfile | String |
The name of the key database file, which houses the client certificate to be used. |
|
.ssl_certfile | String |
Used for specifying the file path of the SSL certificate. |
|
.ssl_cert_reqs | String |
Used to specify the level of certificate validation to be performed during the SSL/TLS handshake. |
|
.ssl_ca_certs | String |
Used to specify the path to a file containing a list of trusted Certificate Authority (CA) certificates. |
|
.ssl_ca_data | String |
Used to specify a string containing the trusted CA certificates in PEM format. |
|
.ssl_check_hostname | Boolean |
Used when setting up an SSL/TLS connection to a server. It specifies whether the client should check that the hostname in the server’s SSL/TLS certificate matches the hostname of the server it is connecting to. |
2.7.3. Example Redis configuration
The following YAML shows a sample configuration using Redis with optional SSL/TLS fields:
If your deployment uses Azure Cache for Redis and ssl is set to true, the port defaults to 6380.
2.8. ModelCache configuration options
The following options are available on Red Hat Quay for configuring ModelCache.
2.8.1. Memcache configuration option
Memcache is the default ModelCache configuration option. With Memcache, no additional configuration is necessary.
2.8.2. Single Redis configuration option
The following configuration is for a single Redis instance with optional read-only replicas:
2.8.3. Clustered Redis configuration option
Use the following configuration for a clustered Redis instance:
2.9. Tag expiration configuration fields
The following tag expiration configuration fields are available with Red Hat Quay:
| Field | Type | Description |
|---|---|---|
| FEATURE_GARBAGE_COLLECTION | Boolean |
Whether garbage collection of repositories is enabled. |
|
TAG_EXPIRATION_OPTIONS | Array of string |
If enabled, the options that users can select for expiration of tags in their namespace. |
|
DEFAULT_TAG_EXPIRATION | String |
The default, configurable tag expiration time for time machine. |
| FEATURE_CHANGE_TAG_EXPIRATION | Boolean |
Whether users and organizations are allowed to change the tag expiration for tags in their namespace. |
2.9.1. Example tag expiration configuration
The following YAML shows a sample tag expiration configuration:
2.10. Pre-configuring Red Hat Quay for automation
Red Hat Quay has several configuration options that support automation. These options can be set before deployment to minimize the need to interact with the user interface.
2.10.1. Allowing the API to create the first user
To create the first user using the /api/v1/user/initialize API, set the FEATURE_USER_INITIALIZE parameter to true. Unlike all other registry API calls which require an OAuth token that is generated by an OAuth application in an existing organization, the API endpoint does not require authentication.
After you have deployed Red Hat Quay, you can use the API to create a user, for example, quayadmin, assuming that no other users have already been created. For more information see Using the API to create the first user.
2.10.2. Enabling general API access
Set the config option BROWSER_API_CALLS_XHR_ONLY to false to allow general access to the Red Hat Quay registry API.
2.10.3. Adding a superuser
After deploying Red Hat Quay, you can create a user. It is suggested that the first user be given administrator privileges with full permissions. Full permissions can be configured in advance by using the SUPER_USER configuration object. For example:
2.10.4. Restricting user creation
After you have configured a super user, you can restrict the ability to create new users to the super user group. Set the FEATURE_USER_CREATION to false to restrict user creation. For example:
2.10.5. Enabling new functionality
To use new Red Hat Quay 3.8 functionality, enable some or all of the following features:
2.10.6. Enabling new functionality
To use new Red Hat Quay 3.7 functionality, enable some or all of the following features:
2.10.7. Suggested configuration for automation
The following config.yaml parameters are suggested for automation:
2.10.8. Deploying the Red Hat Quay Operator using the initial configuration
Use the following procedure to deploy Red Hat Quay on OpenShift Container Platform using the initial configuration.
Prerequisites
-
You have installed the
ocCLI.
Procedure
Create a secret using the configuration file:
oc create secret generic -n quay-enterprise --from-file config.yaml=./config.yaml init-config-bundle-secret
$ oc create secret generic -n quay-enterprise --from-file config.yaml=./config.yaml init-config-bundle-secretCopy to Clipboard Copied! Toggle word wrap Toggle overflow Create a
quayregistry.yamlfile. Identify the unmanaged components and reference the created secret, for example:Copy to Clipboard Copied! Toggle word wrap Toggle overflow Deploy the Red Hat Quay registry:
oc create -n quay-enterprise -f quayregistry.yaml
$ oc create -n quay-enterprise -f quayregistry.yamlCopy to Clipboard Copied! Toggle word wrap Toggle overflow
Next Steps
- Using the API to create the first user
2.10.9. Using the API to deploy Red Hat Quay
This section introduces using the API to deploy Red Hat Quay.
Prerequisites
-
The config option
FEATURE_USER_INITIALIZEmust be set totrue. - No users can already exist in the database.
For more information on pre-configuring your Red Hat Quay deployment, see the section Pre-configuring Red Hat Quay for automation
2.10.9.1. Using the API to create the first user
Use the following procedure to create the first user in your Red Hat Quay organization.
This procedure requests an OAuth token by specifying "access_token": true.
As the root user, install
python39by entering the following command:sudo yum install python39
$ sudo yum install python39Copy to Clipboard Copied! Toggle word wrap Toggle overflow Upgrade the
pippackage manager for Python 3.9:python3.9 -m pip install --upgrade pip
$ python3.9 -m pip install --upgrade pipCopy to Clipboard Copied! Toggle word wrap Toggle overflow Use the
pippackage manager to install thebcryptpackage:pip install bcrypt
$ pip install bcryptCopy to Clipboard Copied! Toggle word wrap Toggle overflow Generate a secure, hashed password using the
bcryptpackage in Python 3.9 by entering the following command:python3.9 -c 'import bcrypt; print(bcrypt.hashpw(b"subquay12345", bcrypt.gensalt(12)).decode("utf-8"))'$ python3.9 -c 'import bcrypt; print(bcrypt.hashpw(b"subquay12345", bcrypt.gensalt(12)).decode("utf-8"))'Copy to Clipboard Copied! Toggle word wrap Toggle overflow Open your Red Hat Quay configuration file and update the following configuration fields:
FEATURE_USER_INITIALIZE: true SUPER_USERS: - quayadminFEATURE_USER_INITIALIZE: true SUPER_USERS: - quayadminCopy to Clipboard Copied! Toggle word wrap Toggle overflow Stop the Red Hat Quay service by entering the following command:
sudo podman stop quay
$ sudo podman stop quayCopy to Clipboard Copied! Toggle word wrap Toggle overflow Start the Red Hat Quay service by entering the following command:
sudo podman run -d -p 80:8080 -p 443:8443 --name=quay -v $QUAY/config:/conf/stack:Z -v $QUAY/storage:/datastorage:Z {productrepo}/{quayimage}:{productminv}$ sudo podman run -d -p 80:8080 -p 443:8443 --name=quay -v $QUAY/config:/conf/stack:Z -v $QUAY/storage:/datastorage:Z {productrepo}/{quayimage}:{productminv}Copy to Clipboard Copied! Toggle word wrap Toggle overflow Run the following
CURLcommand to generate a new user with a username, password, email, and access token:curl -X POST -k http://quay-server.example.com/api/v1/user/initialize --header 'Content-Type: application/json' --data '{ "username": "quayadmin", "password":"quaypass12345", "email": "quayadmin@example.com", "access_token": true}'$ curl -X POST -k http://quay-server.example.com/api/v1/user/initialize --header 'Content-Type: application/json' --data '{ "username": "quayadmin", "password":"quaypass12345", "email": "quayadmin@example.com", "access_token": true}'Copy to Clipboard Copied! Toggle word wrap Toggle overflow If successful, the command returns an object with the username, email, and encrypted password. For example:
{"access_token":"6B4QTRSTSD1HMIG915VPX7BMEZBVB9GPNY2FC2ED", "email":"quayadmin@example.com","encrypted_password":"1nZMLH57RIE5UGdL/yYpDOHLqiNCgimb6W9kfF8MjZ1xrfDpRyRs9NUnUuNuAitW","username":"quayadmin"} # gitleaks:allow{"access_token":"6B4QTRSTSD1HMIG915VPX7BMEZBVB9GPNY2FC2ED", "email":"quayadmin@example.com","encrypted_password":"1nZMLH57RIE5UGdL/yYpDOHLqiNCgimb6W9kfF8MjZ1xrfDpRyRs9NUnUuNuAitW","username":"quayadmin"} # gitleaks:allowCopy to Clipboard Copied! Toggle word wrap Toggle overflow If a user already exists in the database, an error is returned:
{"message":"Cannot initialize user in a non-empty database"}{"message":"Cannot initialize user in a non-empty database"}Copy to Clipboard Copied! Toggle word wrap Toggle overflow If your password is not at least eight characters or contains whitespace, an error is returned:
{"message":"Failed to initialize user: Invalid password, password must be at least 8 characters and contain no whitespace."}{"message":"Failed to initialize user: Invalid password, password must be at least 8 characters and contain no whitespace."}Copy to Clipboard Copied! Toggle word wrap Toggle overflow Log in to your Red Hat Quay deployment by entering the following command:
sudo podman login -u quayadmin -p quaypass12345 http://quay-server.example.com --tls-verify=false
$ sudo podman login -u quayadmin -p quaypass12345 http://quay-server.example.com --tls-verify=falseCopy to Clipboard Copied! Toggle word wrap Toggle overflow Example output
Login Succeeded!
Login Succeeded!Copy to Clipboard Copied! Toggle word wrap Toggle overflow
2.10.9.2. Using the OAuth token
After invoking the API, you can call out the rest of the Red Hat Quay API by specifying the returned OAuth code.
Prerequisites
-
You have invoked the
/api/v1/user/initializeAPI, and passed in the username, password, and email address.
Procedure
Obtain the list of current users by entering the following command:
curl -X GET -k -H "Authorization: Bearer 6B4QTRSTSD1HMIG915VPX7BMEZBVB9GPNY2FC2ED" https://example-registry-quay-quay-enterprise.apps.docs.quayteam.org/api/v1/superuser/users/
$ curl -X GET -k -H "Authorization: Bearer 6B4QTRSTSD1HMIG915VPX7BMEZBVB9GPNY2FC2ED" https://example-registry-quay-quay-enterprise.apps.docs.quayteam.org/api/v1/superuser/users/Copy to Clipboard Copied! Toggle word wrap Toggle overflow Example output:
Copy to Clipboard Copied! Toggle word wrap Toggle overflow In this instance, the details for the
quayadminuser are returned as it is the only user that has been created so far.
2.10.9.3. Using the API to create an organization
The following procedure details how to use the API to create a Red Hat Quay organization.
Prerequisites
-
You have invoked the
/api/v1/user/initializeAPI, and passed in the username, password, and email address. - You have called out the rest of the Red Hat Quay API by specifying the returned OAuth code.
Procedure
To create an organization, use a POST call to
api/v1/organization/endpoint:curl -X POST -k --header 'Content-Type: application/json' -H "Authorization: Bearer 6B4QTRSTSD1HMIG915VPX7BMEZBVB9GPNY2FC2ED" https://example-registry-quay-quay-enterprise.apps.docs.quayteam.org/api/v1/organization/ --data '{"name": "testorg", "email": "testorg@example.com"}'$ curl -X POST -k --header 'Content-Type: application/json' -H "Authorization: Bearer 6B4QTRSTSD1HMIG915VPX7BMEZBVB9GPNY2FC2ED" https://example-registry-quay-quay-enterprise.apps.docs.quayteam.org/api/v1/organization/ --data '{"name": "testorg", "email": "testorg@example.com"}'Copy to Clipboard Copied! Toggle word wrap Toggle overflow Example output:
"Created"
"Created"Copy to Clipboard Copied! Toggle word wrap Toggle overflow You can retrieve the details of the organization you created by entering the following command:
curl -X GET -k --header 'Content-Type: application/json' -H "Authorization: Bearer 6B4QTRSTSD1HMIG915VPX7BMEZBVB9GPNY2FC2ED" https://min-registry-quay-quay-enterprise.apps.docs.quayteam.org/api/v1/organization/testorg
$ curl -X GET -k --header 'Content-Type: application/json' -H "Authorization: Bearer 6B4QTRSTSD1HMIG915VPX7BMEZBVB9GPNY2FC2ED" https://min-registry-quay-quay-enterprise.apps.docs.quayteam.org/api/v1/organization/testorgCopy to Clipboard Copied! Toggle word wrap Toggle overflow Example output:
Copy to Clipboard Copied! Toggle word wrap Toggle overflow
2.11. Basic configuration fields
| Field | Type | Description |
|---|---|---|
| REGISTRY_TITLE | String |
If specified, the long-form title for the registry. Displayed in frontend of your Red Hat Quay deployment, for example, at the sign in page of your organization. Should not exceed 35 characters. |
| REGISTRY_TITLE_SHORT | String |
If specified, the short-form title for the registry. Title is displayed on various pages of your organization, for example, as the title of the tutorial on your organization’s Tutorial page. |
| CONTACT_INFO | Array of String | If specified, contact information to display on the contact page. If only a single piece of contact information is specified, the contact footer will link directly. |
| [0] | String |
Adds a link to send an e-mail. |
| [1] | String |
Adds a link to visit an IRC chat room. |
| [2] | String |
Adds a link to call a phone number.+ |
| [3] | String |
Adds a link to a defined URL. |
2.12. SSL configuration fields
| Field | Type | Description |
|---|---|---|
| PREFERRED_URL_SCHEME | String |
One of
+ Users must set their |
|
SERVER_HOSTNAME | String |
The URL at which Red Hat Quay is accessible, without the scheme |
| SSL_CIPHERS | Array of String |
If specified, the nginx-defined list of SSL ciphers to enabled and disabled |
| SSL_PROTOCOLS | Array of String |
If specified, nginx is configured to enabled a list of SSL protocols defined in the list. Removing an SSL protocol from the list disables the protocol during Red Hat Quay startup. |
| SESSION_COOKIE_SECURE | Boolean |
Whether the |
2.12.1. Configuring SSL
Copy the certificate file and primary key file to your configuration directory, ensuring they are named
ssl.certandssl.keyrespectively:cp ~/ssl.cert $QUAY/config cp ~/ssl.key $QUAY/config cd $QUAY/config
$ cp ~/ssl.cert $QUAY/config
$ cp ~/ssl.key $QUAY/config
$ cd $QUAY/config
Copy to Clipboard Copied! Toggle word wrap Toggle overflow Edit the
config.yamlfile and specify that you want Quay to handle TLS:config.yaml
...
SERVER_HOSTNAME: quay-server.example.com
...
PREFERRED_URL_SCHEME: https
...
...
SERVER_HOSTNAME: quay-server.example.com
...
PREFERRED_URL_SCHEME: https
...
Copy to Clipboard Copied! Toggle word wrap Toggle overflow -
Stop the
Quaycontainer and restart the registry
2.13. Adding TLS Certificates to the Red Hat Quay Container
To add custom TLS certificates to Red Hat Quay, create a new directory named extra_ca_certs/ beneath the Red Hat Quay config directory. Copy any required site-specific TLS certificates to this new directory.
2.13.1. Add TLS certificates to Red Hat Quay
View certificate to be added to the container
cat storage.crt
-----BEGIN CERTIFICATE-----
MIIDTTCCAjWgAwIBAgIJAMVr9ngjJhzbMA0GCSqGSIb3DQEBCwUAMD0xCzAJBgNV
[...]
-----END CERTIFICATE-----
$ cat storage.crt
-----BEGIN CERTIFICATE-----
MIIDTTCCAjWgAwIBAgIJAMVr9ngjJhzbMA0GCSqGSIb3DQEBCwUAMD0xCzAJBgNV
[...]
-----END CERTIFICATE-----
Copy to Clipboard Copied! Toggle word wrap Toggle overflow Create certs directory and copy certificate there
Copy to Clipboard Copied! Toggle word wrap Toggle overflow Obtain the
Quaycontainer’sCONTAINER IDwithpodman ps:sudo podman ps CONTAINER ID IMAGE COMMAND CREATED STATUS PORTS 5a3e82c4a75f <registry>/<repo>/quay:v3.8.15 "/sbin/my_init" 24 hours ago Up 18 hours 0.0.0.0:80->80/tcp, 0.0.0.0:443->443/tcp, 443/tcp grave_keller
$ sudo podman ps
CONTAINER ID        IMAGE                                COMMAND                  CREATED             STATUS              PORTS
5a3e82c4a75f        <registry>/<repo>/quay:v3.8.15 "/sbin/my_init"          24 hours ago        Up 18 hours         0.0.0.0:80->80/tcp, 0.0.0.0:443->443/tcp, 443/tcp   grave_keller
Copy to Clipboard Copied! Toggle word wrap Toggle overflow Restart the container with that ID:
sudo podman restart 5a3e82c4a75f
$ sudo podman restart 5a3e82c4a75fCopy to Clipboard Copied! Toggle word wrap Toggle overflow Examine the certificate copied into the container namespace:
sudo podman exec -it 5a3e82c4a75f cat /etc/ssl/certs/storage.pem
-----BEGIN CERTIFICATE-----
MIIDTTCCAjWgAwIBAgIJAMVr9ngjJhzbMA0GCSqGSIb3DQEBCwUAMD0xCzAJBgNV
$ sudo podman exec -it 5a3e82c4a75f cat /etc/ssl/certs/storage.pem
-----BEGIN CERTIFICATE-----
MIIDTTCCAjWgAwIBAgIJAMVr9ngjJhzbMA0GCSqGSIb3DQEBCwUAMD0xCzAJBgNV
Copy to Clipboard Copied! Toggle word wrap Toggle overflow
2.14. LDAP configuration fields
| Field | Type | Description |
|---|---|---|
|
AUTHENTICATION_TYPE | String |
Must be set to |
| FEATURE_TEAM_SYNCING | Boolean |
Whether to allow for team membership to be synced from a backing group in the authentication engine (LDAP or Keystone) |
| FEATURE_NONSUPERUSER_TEAM_SYNCING_SETUP | Boolean |
If enabled, non-superusers can setup syncing on teams using LDAP |
| LDAP_ADMIN_DN | String | The admin DN for LDAP authentication. |
| LDAP_ADMIN_PASSWD | String | The admin password for LDAP authentication. |
| LDAP_ALLOW_INSECURE_FALLBACK | Boolean | Whether or not to allow SSL insecure fallback for LDAP authentication. |
| LDAP_BASE_DN | Array of String | The base DN for LDAP authentication. |
| LDAP_EMAIL_ATTR | String | The email attribute for LDAP authentication. |
| LDAP_UID_ATTR | String | The uid attribute for LDAP authentication. |
| LDAP_URI | String | The LDAP URI. |
| LDAP_USER_FILTER | String | The user filter for LDAP authentication. |
| LDAP_USER_RDN | Array of String | The user RDN for LDAP authentication. |
| TEAM_RESYNC_STALE_TIME | String |
If team syncing is enabled for a team, how often to check its membership and resync if necessary |
| LDAP_SUPERUSER_FILTER | String |
Subset of the With this field, administrators can add or remove superusers without having to update the Red Hat Quay configuration file and restart their deployment.
This field requires that your |
| LDAP_RESTRICTED_USER_FILTER | String |
Subset of the
This field requires that your |
2.14.1. LDAP configuration field references
Use the following references to update your config.yaml file with the desired configuration field.
2.14.1.1. Basic LDAP user configuration
2.14.1.2. LDAP restricted user configuration
2.14.1.3. LDAP superuser configuration reference
2.15. Mirroring configuration fields
| Field | Type | Description |
|---|---|---|
| FEATURE_REPO_MIRROR | Boolean |
Enable or disable repository mirroring |
| REPO_MIRROR_INTERVAL | Number |
The number of seconds between checking for repository mirror candidates |
| REPO_MIRROR_SERVER_HOSTNAME | String |
Replaces the |
| REPO_MIRROR_TLS_VERIFY | Boolean |
Require HTTPS and verify certificates of Quay registry during mirror. |
| REPO_MIRROR_ROLLBACK | Boolean |
When set to
Default: |
2.16. Security scanner configuration fields
| Field | Type | Description |
|---|---|---|
| FEATURE_SECURITY_SCANNER | Boolean |
Enable or disable the security scanner |
| FEATURE_SECURITY_NOTIFICATIONS | Boolean |
If the security scanner is enabled, turn on or turn off security notifications |
| SECURITY_SCANNER_V4_REINDEX_THRESHOLD | String |
This parameter is used to determine the minimum time, in seconds, to wait before re-indexing a manifest that has either previously failed or has changed states since the last indexing. The data is calculated from the |
| SECURITY_SCANNER_V4_ENDPOINT | String |
The endpoint for the V4 security scanner |
| SECURITY_SCANNER_V4_PSK | String | The generated pre-shared key (PSK) for Clair |
| SECURITY_SCANNER_ENDPOINT | String |
The endpoint for the V2 security scanner |
| SECURITY_SCANNER_INDEXING_INTERVAL | Number | This parameter is used to determine the number of seconds between indexing intervals in the security scanner. When indexing is triggered, Red Hat Quay will query its database for manifests that must be indexed by Clair. These include manifests that have not yet been indexed and manifests that previously failed indexing. Default: 30 |
The following is a special case for re-indexing:
When Clair v4 indexes a manifest, the result should be deterministic. For example, the same manifest should produce the same index report. This is true until the scanners are changed, as using different scanners will produce different information relating to a specific manifest to be returned in the report. Because of this, Clair v4 exposes a state representation of the indexing engine (/indexer/api/v1/index_state) to determine whether the scanner configuration has been changed.
Red Hat Quay leverages this index state by saving it to the index report when parsing to Quay’s database. If this state has changed since the manifest was previously scanned, Quay will attempt to re-index that manifest during the periodic indexing process.
By default this parameter is set to 30 seconds. Users might decrease the time if they want the indexing process to run more frequently, for example, if they did not want to wait 30 seconds to see security scan results in the UI after pushing a new tag. Users can also change the parameter if they want more control over the request pattern to Clair and the pattern of database operations being performed on the Quay database.
2.17. OCI and Helm configuration fields
Support for Helm is now supported under the FEATURE_GENERAL_OCI_SUPPORT property. If you need to explicitly enable the feature, for example, if it has previously been disabled or if you have upgraded from a version where it is not enabled by default, you need to add two properties in the Quay configuration to enable the use of OCI artifacts:
FEATURE_GENERAL_OCI_SUPPORT: true
FEATURE_HELM_OCI_SUPPORT: true
FEATURE_GENERAL_OCI_SUPPORT: true
FEATURE_HELM_OCI_SUPPORT: true| Field | Type | Description |
|---|---|---|
| FEATURE_GENERAL_OCI_SUPPORT | Boolean |
Enable support for OCI artifacts |
| FEATURE_HELM_OCI_SUPPORT | Boolean |
Enable support for Helm artifacts |
As of Red Hat Quay 3.6, FEATURE_HELM_OCI_SUPPORT has been deprecated and will be removed in a future version of Red Hat Quay. In Red Hat Quay 3.6, Helm artifacts are supported by default and included under the FEATURE_GENERAL_OCI_SUPPORT property. Users are no longer required to update their config.yaml files to enable support.
2.18. Action log configuration fields
2.18.1. Action log storage configuration
| Field | Type | Description |
|---|---|---|
| FEATURE_LOG_EXPORT | Boolean |
Whether to allow exporting of action logs |
| LOGS_MODEL | String |
Enable or disable the security scanner |
| LOGS_MODEL_CONFIG | Object | Logs model config for action logs |
LOGS_MODEL_CONFIG [object]: Logs model config for action logs
elasticsearch_config [object]: Elasticsearch cluster configuration
access_key [string]: Elasticsearch user (or IAM key for AWS ES)
-
Example:
some_string
-
Example:
host [string]: Elasticsearch cluster endpoint
-
Example:
host.elasticsearch.example
-
Example:
index_prefix [string]: Elasticsearch’s index prefix
-
Example:
logentry_
-
Example:
- index_settings [object]: Elasticsearch’s index settings
use_ssl [boolean]: Use ssl for Elasticsearch. Defaults to True
-
Example:
True
-
Example:
secret_key [string]: Elasticsearch password (or IAM secret for AWS ES)
-
Example:
some_secret_string
-
Example:
aws_region [string]: Amazon web service region
-
Example:
us-east-1
-
Example:
port [number]: Elasticsearch cluster endpoint port
-
Example:
1234
-
Example:
kinesis_stream_config [object]: AWS Kinesis Stream configuration
aws_secret_key [string]: AWS secret key
-
Example:
some_secret_key
-
Example:
stream_name [string]: Kinesis stream to send action logs to
-
Example:
logentry-kinesis-stream
-
Example:
aws_access_key [string]: AWS access key
-
Example:
some_access_key
-
Example:
retries [number]: Max number of attempts made on a single request
-
Example:
5
-
Example:
read_timeout [number]: Number of seconds before timeout when reading from a connection
-
Example:
5
-
Example:
max_pool_connections [number]: The maximum number of connections to keep in a connection pool
-
Example:
10
-
Example:
aws_region [string]: AWS region
-
Example:
us-east-1
-
Example:
connect_timeout [number]: Number of seconds before timeout when attempting to make a connection
-
Example:
5
-
Example:
producer [string]: Logs producer if logging to Elasticsearch
- enum: kafka, elasticsearch, kinesis_stream
-
Example:
kafka
kafka_config [object]: Kafka cluster configuration
topic [string]: Kafka topic to publish log entries to
-
Example:
logentry
-
Example:
- bootstrap_servers [array]: List of Kafka brokers to bootstrap the client from
max_block_seconds [number]: Max number of seconds to block during a
send(), either because the buffer is full or metadata unavailable-
Example:
10
-
Example:
2.18.2. Action log rotation and archiving configuration
| Field | Type | Description |
|---|---|---|
| FEATURE_ACTION_LOG_ROTATION | Boolean |
Enabling log rotation and archival will move all logs older than 30 days to storage |
| ACTION_LOG_ARCHIVE_LOCATION | String |
If action log archiving is enabled, the storage engine in which to place the archived data |
| ACTION_LOG_ARCHIVE_PATH | String |
If action log archiving is enabled, the path in storage in which to place the archived data |
| ACTION_LOG_ROTATION_THRESHOLD | String |
The time interval after which to rotate logs |
2.19. Build logs configuration fields
| Field | Type | Description |
|---|---|---|
| FEATURE_READER_BUILD_LOGS | Boolean |
If set to true, build logs may be read by those with read access to the repo, rather than only write access or admin access. |
| LOG_ARCHIVE_LOCATION | String |
The storage location, defined in DISTRIBUTED_STORAGE_CONFIG, in which to place the archived build logs |
| LOG_ARCHIVE_PATH | String |
The path under the configured storage engine in which to place the archived build logs in JSON form |
2.20. Dockerfile build triggers fields
| Field | Type | Description |
|---|---|---|
| FEATURE_BUILD_SUPPORT | Boolean |
Whether to support Dockerfile build. |
| SUCCESSIVE_TRIGGER_FAILURE_DISABLE_THRESHOLD | Number |
If not None, the number of successive failures that can occur before a build trigger is automatically disabled |
| SUCCESSIVE_TRIGGER_INTERNAL_ERROR_DISABLE_THRESHOLD | Number |
If not None, the number of successive internal errors that can occur before a build trigger is automatically disabled |
2.20.1. GitHub build triggers
| Field | Type | Description |
|---|---|---|
| FEATURE_GITHUB_BUILD | Boolean |
Whether to support GitHub build triggers |
|
|
|
|
| GITHUB_TRIGGER_CONFIG | Object | Configuration for using GitHub (Enterprise) for build triggers |
|
.GITHUB_ENDPOINT | String |
The endpoint for GitHub (Enterprise) |
| .API_ENDPOINT | String |
The endpoint of the GitHub (Enterprise) API to use. Must be overridden for |
|
.CLIENT_ID | String | The registered client ID for this Red Hat Quay instance; this cannot be shared with GITHUB_LOGIN_CONFIG. |
|
.CLIENT_SECRET | String | The registered client secret for this Red Hat Quay instance. |
2.20.2. BitBucket build triggers
| Field | Type | Description |
|---|---|---|
| FEATURE_BITBUCKET_BUILD | Boolean |
Whether to support Bitbucket build triggers |
|
|
|
|
| BITBUCKET_TRIGGER_CONFIG | Object | Configuration for using BitBucket for build triggers |
|
.CONSUMER_KEY | String | The registered consumer key (client ID) for this Quay instance |
|
.CONSUMER_SECRET | String | The registered consumer secret (client secret) for this Quay instance |
2.20.3. GitLab build triggers
| Field | Type | Description |
|---|---|---|
| FEATURE_GITLAB_BUILD | Boolean |
Whether to support GitLab build triggers |
|
|
|
|
| GITLAB_TRIGGER_CONFIG | Object | Configuration for using Gitlab for build triggers |
|
.GITLAB_ENDPOINT | String | The endpoint at which Gitlab (Enterprise) is running |
|
.CLIENT_ID | String | The registered client ID for this Quay instance |
|
.CLIENT_SECRET | String | The registered client secret for this Quay instance |
2.21. OAuth configuration fields
| Field | Type | Description |
|---|---|---|
| DIRECT_OAUTH_CLIENTID_WHITELIST | Array of String | A list of client IDs for Quay-managed applications that are allowed to perform direct OAuth approval without user approval. |
2.21.1. GitHub OAuth configuration fields
| Field | Type | Description |
|---|---|---|
| FEATURE_GITHUB_LOGIN | Boolean |
Whether GitHub login is supported |
| GITHUB_LOGIN_CONFIG | Object | Configuration for using GitHub (Enterprise) as an external login provider. |
| .ALLOWED_ORGANIZATIONS | Array of String | The names of the GitHub (Enterprise) organizations whitelisted to work with the ORG_RESTRICT option. |
| .API_ENDPOINT | String |
The endpoint of the GitHub (Enterprise) API to use. Must be overridden for github.com |
|
.CLIENT_ID | String |
The registered client ID for this Red Hat Quay instance; cannot be shared with |
|
.CLIENT_SECRET | String |
The registered client secret for this Red Hat Quay instance. |
|
.GITHUB_ENDPOINT | String |
The endpoint for GitHub (Enterprise). |
| .ORG_RESTRICT | Boolean | If true, only users within the organization whitelist can login using this provider. |
2.21.2. Google OAuth configuration fields
| Field | Type | Description |
|---|---|---|
| FEATURE_GOOGLE_LOGIN | Boolean |
Whether Google login is supported. |
| GOOGLE_LOGIN_CONFIG | Object | Configuration for using Google for external authentication. |
|
.CLIENT_ID | String |
The registered client ID for this Red Hat Quay instance. |
|
.CLIENT_SECRET | String |
The registered client secret for this Red Hat Quay instance. |
2.22. OIDC configuration fields
| Field | Type | Description |
|
<string>_LOGIN_CONFIG | String |
The parent key that holds the OIDC configuration settings. Typically the name of the OIDC provider, for example, |
|
.CLIENT_ID | String |
The registered client ID for this Red Hat Quay instance. |
|
.CLIENT_SECRET | String |
The registered client secret for this Red Hat Quay instance. |
| .DEBUGLOG | Boolean | Whether to enable debugging. |
| .LOGIN_BINDING_FIELD | String | Used when the internal authorization is set to LDAP. Red Hat Quay reads this parameter and tries to search through the LDAP tree for the user with this username. If it exists, it automatically creates a link to that LDAP account. |
| .LOGIN_SCOPES | Object | Adds additional scopes that Red Hat Quay uses to communicate with the OIDC provider. |
| .OIDC_ENDPOINT_CUSTOM_PARAMS | String |
Support for custom query parameters on OIDC endpoints. The following endpoints are supported: |
| .OIDC_ISSUER | String |
Allows the user to define the issuer to verify. For example, JWT tokens container a parameter known as |
|
.OIDC_SERVER | String |
The address of the OIDC server that is being used for authentication. |
| .PREFERRED_USERNAME_CLAIM_NAME | String | Sets the preferred username to a parameter from the token. |
| .SERVICE_ICON | String | Changes the icon on the login screen. |
|
.SERVICE_NAME | String |
The name of the service that is being authenticated. |
| .VERIFIED_EMAIL_CLAIM_NAME | String | The name of the claim that is used to verify the email address of the user. |
2.22.1. OIDC configuration
The following example shows a sample OIDC configuration.
Example OIDC configuration
2.23. Nested repositories configuration fields
With Red Hat Quay 3.6, support for nested repository path names has been added under the FEATURE_EXTENDED_REPOSITORY_NAMES property. This optional configuration is added to the config.yaml by default. Enablement allows the use of / in repository names.
FEATURE_EXTENDED_REPOSITORY_NAMES: true
FEATURE_EXTENDED_REPOSITORY_NAMES: true| Field | Type | Description |
|---|---|---|
| FEATURE_EXTENDED_REPOSITORY_NAMES | Boolean |
Enable support for nested repositories |
2.24. Adding other OCI media types to Quay
Helm, cosign, and ztsd compression scheme artifacts are built into Red Hat Quay 3.6 by default. For any other OCI media type that is not supported by default, you can add them to the ALLOWED_OCI_ARTIFACT_TYPES configuration in Quay’s config.yaml using the following format:
For example, you can add Singularity (SIF) support by adding the following to your config.yaml:
When adding OCI media types that are not configured by default, users will also need to manually add support for cosign and Helm if desired. The ztsd compression scheme is supported by default, so users will not need to add that OCI media type to their config.yaml to enable support.
2.25. Mail configuration fields
| Field | Type | Description |
|---|---|---|
| FEATURE_MAILING | Boolean |
Whether emails are enabled |
| MAIL_DEFAULT_SENDER | String |
If specified, the e-mail address used as the |
| MAIL_PASSWORD | String | The SMTP password to use when sending e-mails |
| MAIL_PORT | Number | The SMTP port to use. If not specified, defaults to 587. |
| MAIL_SERVER | String |
The SMTP server to use for sending e-mails. Only required if FEATURE_MAILING is set to true. |
| MAIL_USERNAME | String | The SMTP username to use when sending e-mails |
| MAIL_USE_TLS | Boolean |
If specified, whether to use TLS for sending e-mails |
2.26. User configuration fields
| Field | Type | Description |
|---|---|---|
| FEATURE_SUPER_USERS | Boolean |
Whether superusers are supported |
| FEATURE_USER_CREATION | Boolean |
Whether users can be created (by non-superusers) |
| FEATURE_USER_LAST_ACCESSED | Boolean |
Whether to record the last time a user was accessed |
| FEATURE_USER_LOG_ACCESS | Boolean |
If set to true, users will have access to audit logs for their namespace |
| FEATURE_USER_METADATA | Boolean |
Whether to collect and support user metadata |
| FEATURE_USERNAME_CONFIRMATION | Boolean |
If set to true, users can confirm and modify their initial usernames when logging in via OpenID Connect (OIDC) or a non-database internal authentication provider like LDAP. |
| FEATURE_USER_RENAME | Boolean |
If set to true, users can rename their own namespace |
| FEATURE_INVITE_ONLY_USER_CREATION | Boolean |
Whether users being created must be invited by another user |
| FRESH_LOGIN_TIMEOUT | String |
The time after which a fresh login requires users to re-enter their password |
| USERFILES_LOCATION | String |
ID of the storage engine in which to place user-uploaded files |
| USERFILES_PATH | String |
Path under storage in which to place user-uploaded files |
| USER_RECOVERY_TOKEN_LIFETIME | String |
The length of time a token for recovering a user accounts is valid |
| FEATURE_SUPERUSERS_FULL_ACCESS | Boolean | Grants superusers the ability to read, write, and delete content from other repositories in namespaces that they do not own or have explicit permissions for.
Default: |
| FEATURE_RESTRICTED_USERS | Boolean |
When set with
Default: |
| RESTRICTED_USERS_WHITELIST | String |
When set with |
| GLOBAL_READONLY_SUPER_USERS | String | When set, grants users of this list read access to all repositories, regardless of whether they are public repositories. |
2.26.1. User configuration fields references
Use the following references to update your config.yaml file with the desired configuration field.
2.26.1.1. FEATURE_SUPERUSERS_FULL_ACCESS configuration reference
---
SUPER_USERS:
- quayadmin
FEATURE_SUPERUSERS_FULL_ACCESS: True
---
---
SUPER_USERS:
- quayadmin
FEATURE_SUPERUSERS_FULL_ACCESS: True
---2.26.1.2. GLOBAL_READONLY_SUPER_USERS configuration reference
---
GLOBAL_READONLY_SUPER_USERS:
      - user1
---
---
GLOBAL_READONLY_SUPER_USERS:
      - user1
---2.26.1.3. FEATURE_RESTRICTED_USERS configuration reference
2.26.1.4. RESTRICTED_USERS_WHITELIST configuration reference
Prerequisites
-
FEATURE_RESTRICTED_USERSis set totruein yourconfig.yamlfile.
When this field is set, whitelisted users can create organizations, or read or write content from the repository even if FEATURE_RESTRICTED_USERS is set to true. Other users, for example, user2, user3, and user4 are restricted from creating organizations, reading, or writing content
2.27. Recaptcha configuration fields
| Field | Type | Description |
|---|---|---|
| FEATURE_RECAPTCHA | Boolean |
Whether Recaptcha is necessary for user login and recovery |
| RECAPTCHA_SECRET_KEY | String | If recaptcha is enabled, the secret key for the Recaptcha service |
| RECAPTCHA_SITE_KEY | String | If recaptcha is enabled, the site key for the Recaptcha service |
2.28. ACI configuration fields
| Field | Type | Description |
|---|---|---|
| FEATURE_ACI_CONVERSION | Boolean |
Whether to enable conversion to ACIs |
| GPG2_PRIVATE_KEY_FILENAME | String | The filename of the private key used to decrypte ACIs |
| GPG2_PRIVATE_KEY_NAME | String | The name of the private key used to sign ACIs |
| GPG2_PUBLIC_KEY_FILENAME | String | The filename of the public key used to encrypt ACIs |
2.29. JWT configuration fields
| Field | Type | Description |
|---|---|---|
| JWT_AUTH_ISSUER | String |
The endpoint for JWT users |
| JWT_GETUSER_ENDPOINT | String |
The endpoint for JWT users |
| JWT_QUERY_ENDPOINT | String |
The endpoint for JWT queries |
| JWT_VERIFY_ENDPOINT | String |
The endpoint for JWT verification |
2.30. App tokens configuration fields
| Field | Type | Description |
|---|---|---|
| FEATURE_APP_SPECIFIC_TOKENS | Boolean |
If enabled, users can create tokens for use by the Docker CLI |
| APP_SPECIFIC_TOKEN_EXPIRATION | String |
The expiration for external app tokens. |
| EXPIRED_APP_SPECIFIC_TOKEN_GC | String |
Duration of time expired external app tokens will remain before being garbage collected |
2.31. Miscellaneous configuration fields
| Field | Type | Description |
|---|---|---|
| ALLOW_PULLS_WITHOUT_STRICT_LOGGING | String |
If true, pulls will still succeed even if the pull audit log entry cannot be written . This is useful if the database is in a read-only state and it is desired for pulls to continue during that time. |
| AVATAR_KIND | String |
The types of avatars to display, either generated inline (local) or Gravatar (gravatar) |
| BROWSER_API_CALLS_XHR_ONLY | Boolean |
If enabled, only API calls marked as being made by an XHR will be allowed from browsers |
| DEFAULT_NAMESPACE_MAXIMUM_BUILD_COUNT | Number |
The default maximum number of builds that can be queued in a namespace. |
| ENABLE_HEALTH_DEBUG_SECRET | String | If specified, a secret that can be given to health endpoints to see full debug info when not authenticated as a superuser |
| EXTERNAL_TLS_TERMINATION | Boolean |
Set to |
| FRESH_LOGIN_TIMEOUT | String |
The time after which a fresh login requires users to re-enter their password |
| HEALTH_CHECKER | String |
The configured health check |
| PROMETHEUS_NAMESPACE | String |
The prefix applied to all exposed Prometheus metrics |
| PUBLIC_NAMESPACES | Array of String | If a namespace is defined in the public namespace list, then it will appear on all users' repository list pages, regardless of whether the user is a member of the namespace. Typically, this is used by an enterprise customer in configuring a set of "well-known" namespaces. |
| REGISTRY_STATE | String |
The state of the registry |
| SEARCH_MAX_RESULT_PAGE_COUNT | Number |
Maximum number of pages the user can paginate in search before they are limited |
| SEARCH_RESULTS_PER_PAGE | Number |
Number of results returned per page by search page |
| V2_PAGINATION_SIZE | Number |
The number of results returned per page in V2 registry APIs |
| WEBHOOK_HOSTNAME_BLACKLIST | Array of String | The set of hostnames to disallow from webhooks when validating, beyond localhost |
| CREATE_PRIVATE_REPO_ON_PUSH | Boolean |
Whether new repositories created by push are set to private visibility |
| CREATE_NAMESPACE_ON_PUSH | Boolean |
Whether new push to a non-existent organization creates it |
| NON_RATE_LIMITED_NAMESPACES | Array of String |
If rate limiting has been enabled using |
| Boolean | When set, allows users to try the beta UI environment.
Default: |
2.31.1. Miscellaneous configuration field references
Use the following references to update your config.yaml file with the desired configuration field.
2.31.1.1. v2 user interface configuration
With FEATURE_UI_V2 enabled, you can toggle between the current version of the user interface and the new version of the user interface.
- This UI is currently in beta and subject to change. In its current state, users can only create, view, and delete organizations, repositories, and image tags.
- When running Red Hat Quay in the old UI, timed-out sessions would require that the user input their password again in the pop-up window. With the new UI, users are returned to the main page and required to input their username and password credentials. This is a known issue and will be fixed in a future version of the new UI.
- There is a discrepancy in how image manifest sizes are reported between the legacy UI and the new UI. In the legacy UI, image manifests were reported in mebibytes. In the new UI, Red Hat Quay uses the standard definition of megabyte (MB) to report image manifest sizes.
Procedure
In your deployment’s
config.yamlfile, add theFEATURE_UI_V2parameter and set it totrue, for example:--- FEATURE_TEAM_SYNCING: false FEATURE_UI_V2: true FEATURE_USER_CREATION: true ---
--- FEATURE_TEAM_SYNCING: false FEATURE_UI_V2: true FEATURE_USER_CREATION: true ---Copy to Clipboard Copied! Toggle word wrap Toggle overflow - Log in to your Red Hat Quay deployment.
In the navigation pane of your Red Hat Quay deployment, you are given the option to toggle between Current UI and New UI. Click the toggle button to set it to new UI, and then click Use Beta Environment, for example:

2.31.1.1.1. Creating a new organization in the Red Hat Quay 3.8 beta UI
Prerequisites
- You have toggled your Red Hat Quay deployment to use the 3.8 beta UI.
Use the following procedure to create an organization using the Red Hat Quay 3.8 beta UI.
Procedure
- Click Organization in the navigation pane.
- Click Create Organization.
-
Enter an Organization Name, for example,
testorg. - Click Create.
Now, your example organization should populate under the Organizations page.
2.31.1.1.2. Deleting an organization using the Red Hat Quay 3.8 beta UI
Use the following procedure to delete an organization using the Red Hat Quay 3.8 beta UI.
Procedure
-
On the Organizations page, select the name of the organization you want to delete, for example,
testorg. - Click the More Actions drop down menu.
Click Delete.
NoteOn the Delete page, there is a Search input box. With this box, users can search for specific organizations to ensure that they are properly scheduled for deletion. For example, if a user is deleting 10 organizations and they want to ensure that a specific organization was deleted, they can use the Search input box to confirm said organization is marked for deletion.
- Confirm that you want to permanently delete the organization by typing confirm in the box.
- Click Delete.
After deletion, you are returned to the Organizations page.
You can delete more than one organization at a time by selecting multiple organizations, and then clicking More Actions → Delete.
2.31.1.1.3. Creating a new repository using the Red Hat Quay 3.8 beta UI
Use the following procedure to create a repository using the Red Hat Quay 3.8 beta UI.
Procedure
- Click Repositories on the navigation pane.
- Click Create Repository.
-
Select a namespace, for example, quayadmin, and then enter a Repository name, for example,
testrepo. - Click Create.
Now, your example repository should populate under the Repositories page.
2.31.1.1.4. Deleting a repository using the Red Hat Quay 3.8 beta UI
Prerequisites
- You have created a repository.
Procedure
-
On the Repositories page of the Red Hat Quay 3.8 beta UI, click the name of the image you want to delete, for example,
quay/admin/busybox. - Click the More Actions drop-down menu.
Click Delete.
NoteIf desired, you could click Make Public or Make Private.
- Type confirm in the box, and then click Delete.
- After deletion, you are returned to the Repositories page.
2.31.1.1.5. Pushing an image to the Red Hat Quay 3.8 beta UI
Use the following procedure to push an image to the Red Hat Quay 3.8 beta UI.
Procedure
Pull a sample image from an external registry:
podman pull busybox
$ podman pull busyboxCopy to Clipboard Copied! Toggle word wrap Toggle overflow Tag the image:
podman tag docker.io/library/busybox quay-server.example.com/quayadmin/busybox:test
$ podman tag docker.io/library/busybox quay-server.example.com/quayadmin/busybox:testCopy to Clipboard Copied! Toggle word wrap Toggle overflow Push the image to your Red Hat Quay registry:
podman push quay-server.example.com/quayadmin/busybox:test
$ podman push quay-server.example.com/quayadmin/busybox:testCopy to Clipboard Copied! Toggle word wrap Toggle overflow - Navigate to the Repositories page on the Red Hat Quay UI and ensure that your image has been properly pushed.
- You can check the security details by selecting your image tag, and then navigating to the Security Report page.
2.31.1.1.6. Deleting an image using the Red Hat Quay 3.8 beta UI
Use the following procedure to delete an image using theRed Hat Quay 3.8 beta UI.
Prerequisites
- You have pushed an image to your Red Hat Quay registry.
Procedure
-
On the Repositories page of the Red Hat Quay 3.8 beta UI, click the name of the image you want to delete, for example,
quay/admin/busybox. - Click the More Actions drop-down menu.
Click Delete.
NoteIf desired, you could click Make Public or Make Private.
- Type confirm in the box, and then click Delete.
- After deletion, you are returned to the Repositories page.
2.31.1.1.7. Enabling the Red Hat Quay legacy UI
In the navigation pane of your Red Hat Quay deployment, you are given the option to toggle between Current UI and New UI. Click the toggle button to set it to Current UI.
2.32. Legacy configuration fields
Some fields are deprecated or obsolete:
| Field | Type | Description |
|---|---|---|
| FEATURE_BLACKLISTED_EMAILS | Boolean | If set to true, no new User accounts may be created if their email domain is blacklisted |
| BLACKLISTED_EMAIL_DOMAINS | Array of String |
The list of email-address domains that is used if FEATURE_BLACKLISTED_EMAILS is set to true |
| BLACKLIST_V2_SPEC | String |
The Docker CLI versions to which Red Hat Quay will respond that V2 is unsupported |
| DOCUMENTATION_ROOT | String | Root URL for documentation links |
| SECURITY_SCANNER_V4_NAMESPACE_WHITELIST | String | The namespaces for which the security scanner should be enabled |
| FEATURE_RESTRICTED_V1_PUSH | Boolean |
If set to true, only namespaces listed in V1_PUSH_WHITELIST support V1 push |
| V1_PUSH_WHITELIST | Array of String | The array of namespace names that support V1 push if FEATURE_RESTRICTED_V1_PUSH is set to true |
2.33. User interface v2 configuration field
| Field | Type | Description |
|---|---|---|
| FEATURE_UI_V2 | Boolean | When set, allows users to try the beta UI environment.
Default: |
2.34. IPv6 configuration field
| Field | Type | Description |
|---|---|---|
| FEATURE_LISTEN_IP_VERSION | String | Enables IPv4, IPv6, or dual-stack protocol family. This configuration field must be properly set, otherwise Red Hat Quay fails to start.
Default:
Additional configurations: |
2.35. Branding configuration fields
| Field | Type | Description |
|---|---|---|
| BRANDING | Object | Custom branding for logos and URLs in the Red Hat Quay UI. |
|
.logo | String |
Main logo image URL.
The header logo defaults to 205x30 PX. The form logo on the Red Hat Quay sign in screen of the web UI defaults to 356.5x39.7 PX. |
| .footer_img | String |
Logo for UI footer. Defaults to 144x34 PX. |
| .footer_url | String |
Link for footer image. |
2.35.1. Example configuration for Red Hat Quay branding
Branding config.yaml example
BRANDING:
    logo: https://www.mend.io/wp-content/media/2020/03/5-tips_small.jpg
    footer_img: https://www.mend.io/wp-content/media/2020/03/5-tips_small.jpg
    footer_url: https://opensourceworld.org/
BRANDING:
    logo: https://www.mend.io/wp-content/media/2020/03/5-tips_small.jpg
    footer_img: https://www.mend.io/wp-content/media/2020/03/5-tips_small.jpg
footer_url: https://opensourceworld.org/2.36. Session timeout configuration field
The following configuration field relies on on the Flask API configuration field of the same name.
| Field | Type | Description |
|---|---|---|
| PERMANENT_SESSION_LIFETIME | Integer |
A
Default: |
2.36.1. Example session timeout configuration
The following YAML is the suggest configuration when enabling session lifetime.
Altering session lifetime is not recommended. Administrators should be aware of the allotted time when setting a session timeout. If you set the time too early, it might interrupt your workflow.
Session timeout YAML configuration
PERMANENT_SESSION_LIFETIME: 3000
PERMANENT_SESSION_LIFETIME: 3000Chapter 3. Environment variables
Red Hat Quay supports a limited number of environment variables for dynamic configuration.
3.1. Geo-replication
The same configuration should be used across all regions, with exception of the storage backend, which can be configured explicitly using the QUAY_DISTRIBUTED_STORAGE_PREFERENCE environment variable.
| Variable | Type | Description |
|---|---|---|
| QUAY_DISTRIBUTED_STORAGE_PREFERENCE | String | The preferred storage engine (by ID in DISTRIBUTED_STORAGE_CONFIG) to use. |
3.2. Database connection pooling
Red Hat Quay is composed of many different processes which all run within the same container. Many of these processes interact with the database.
If enabled, each process that interacts with the database will contain a connection pool. These per-process connection pools are configured to maintain a maximum of 20 connections. Under heavy load, it is possible to fill the connection pool for every process within a Red Hat Quay container. Under certain deployments and loads, this might require analysis to ensure that Red Hat Quay does not exceed the configured database’s maximum connection count.
Overtime, the connection pools will release idle connections. To release all connections immediately, Red Hat Quay requires a restart.
Database connection pooling can be toggled by setting the environment variable DB_CONNECTION_POOLING to true or false.
| Variable | Type | Description |
|---|---|---|
| DB_CONNECTION_POOLING | Boolean | Enable or disable database connection pooling |
If database connection pooling is enabled, it is possible to change the maximum size of the connection pool. This can be done through the following config.yaml option:
config.yaml
...
DB_CONNECTION_ARGS:
  max_connections: 10
...
...
DB_CONNECTION_ARGS:
  max_connections: 10
...3.3. HTTP connection counts
It is possible to specify the quantity of simultaneous HTTP connections using environment variables. These can be specified as a whole, or for a specific component. The default for each is 50 parallel connections per process.
| Variable | Type | Description |
|---|---|---|
| WORKER_CONNECTION_COUNT | Number |
Simultaneous HTTP connections |
| WORKER_CONNECTION_COUNT_REGISTRY | Number |
Simultaneous HTTP connections for registry |
| WORKER_CONNECTION_COUNT_WEB | Number |
Simultaneous HTTP connections for web UI |
| WORKER_CONNECTION_COUNT_SECSCAN | Number |
Simultaneous HTTP connections for Clair |
3.4. Worker count variables
| Variable | Type | Description |
|---|---|---|
| WORKER_COUNT | Number | Generic override for number of processes |
| WORKER_COUNT_REGISTRY | Number |
Specifies the number of processes to handle Registry requests within the |
| WORKER_COUNT_WEB | Number |
Specifies the number of processes to handle UI/Web requests within the container |
| WORKER_COUNT_SECSCAN | Number |
Specifies the number of processes to handle Security Scanning (e.g. Clair) integration within the container |
3.5. Debug variables
The following debug variables are available on Red Hat Quay.
| Variable | Type | Description |
|---|---|---|
| DEBUGLOG | Boolean | Whether to enable or disable debug logs. |
| USERS_DEBUG |
Integer. Either |
Used to debug LDAP operations in clear text, including passwords. Must be used with Important
Setting |
Chapter 4. Using the config tool to reconfigure Quay on OpenShift
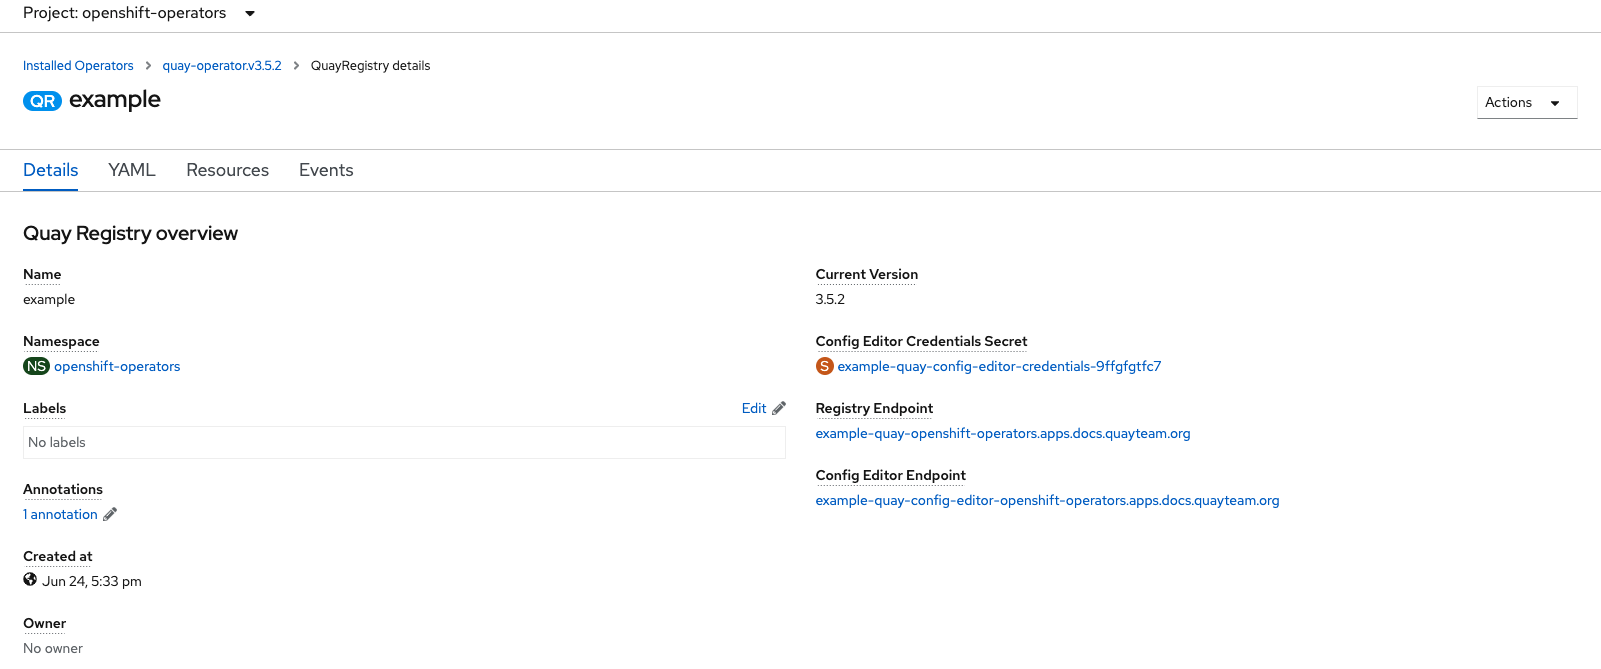
4.1. Accessing the config editor
In the Details section of the QuayRegistry screen, the endpoint for the config editor is available, along with a link to the secret containing the credentials for logging into the config editor:
4.1.1. Retrieving the config editor credentials
Click on the link for the config editor secret:
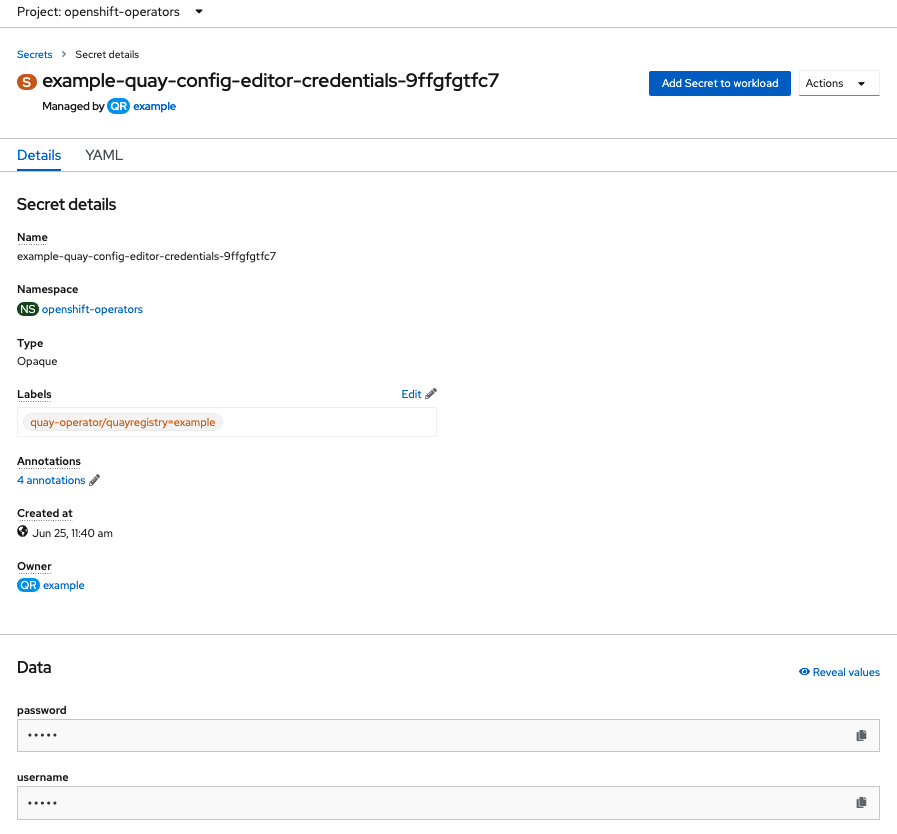
In the Data section of the Secret details screen, click
Reveal valuesto see the credentials for logging in to the config editor: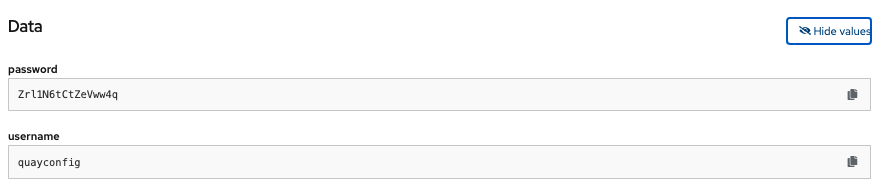
4.1.2. Logging in to the config editor
Browse to the config editor endpoint and then enter the username, typically quayconfig, and the corresponding password to access the config tool:
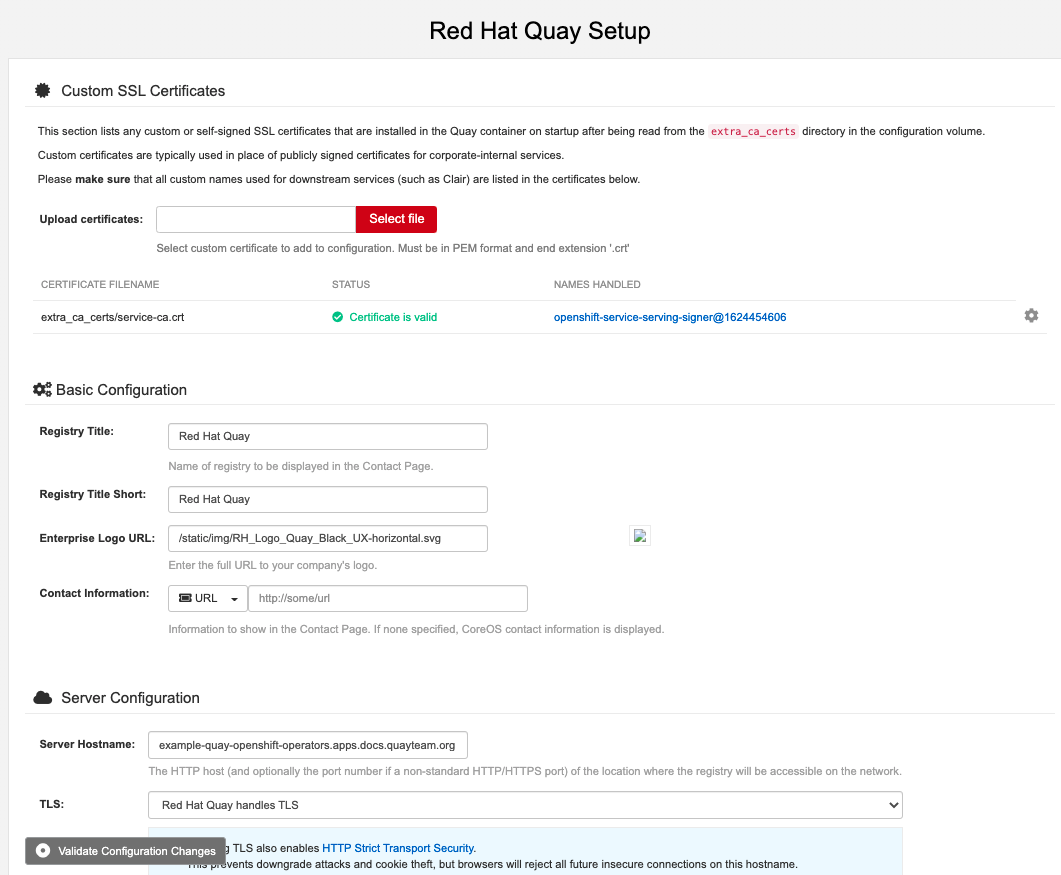
4.1.3. Changing configuration
In the following example, you will update your configuration file by changing the default expiration period of deleted tags.
Procedure
- On the config editor, locate the Time Machine section.
Add an expiration period to the Allowed expiration periods box, for example,
4w: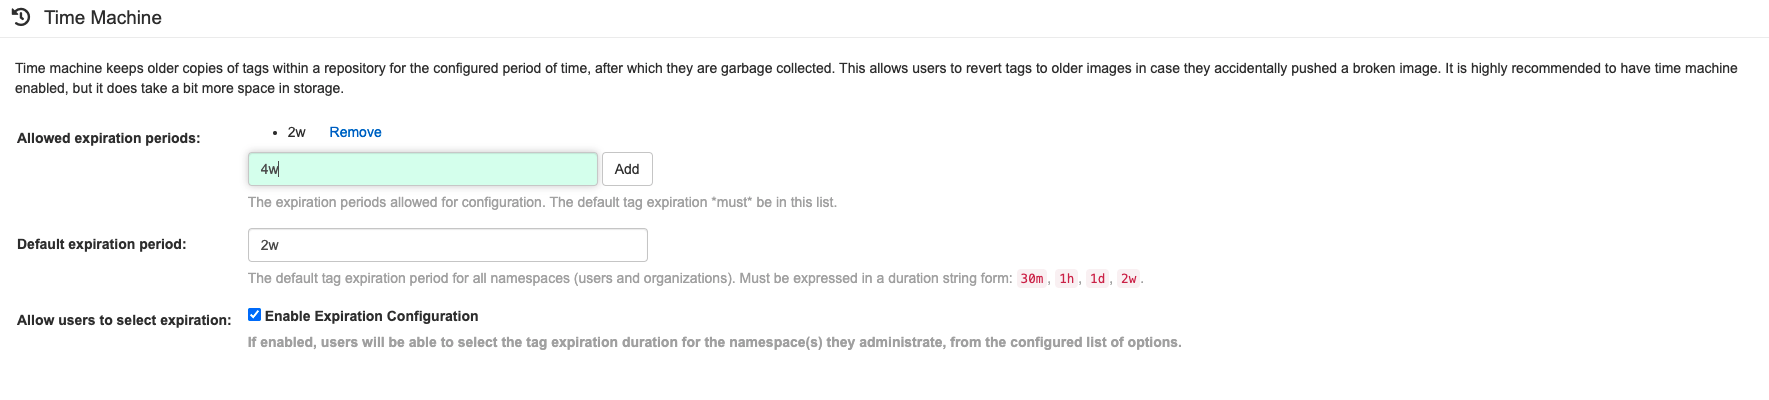
- Select Validate Configuration Changes to ensure that the changes are valid.
Apply the changes by pressing Reconfigure Quay:

After applying the changes, the config tool notifies you that the changes made have been submitted to your Red Hat Quay deployment:
+
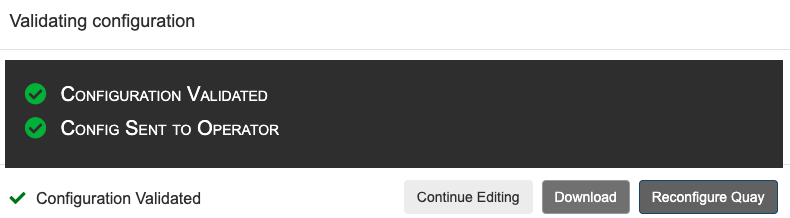
Reconfiguring Red Hat Quay using the config tool UI can lead to the registry being unavailable for a short time while the updated configuration is applied.
4.2. Monitoring reconfiguration in the UI
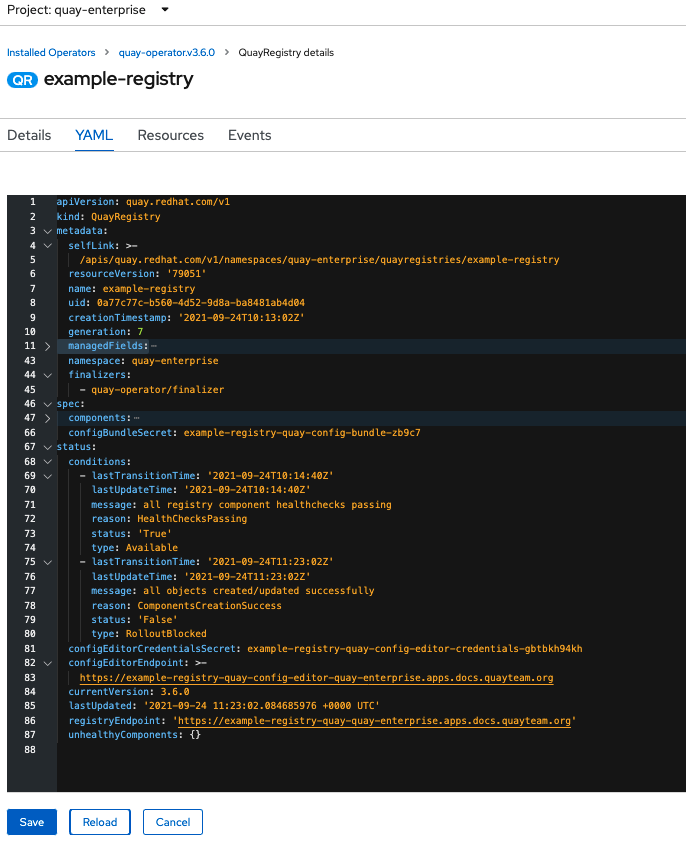
4.2.1. QuayRegistry resource
After reconfiguring the Operator, you can track the progress of the redeployment in the YAML tab for the specific instance of QuayRegistry, in this case, example-registry:
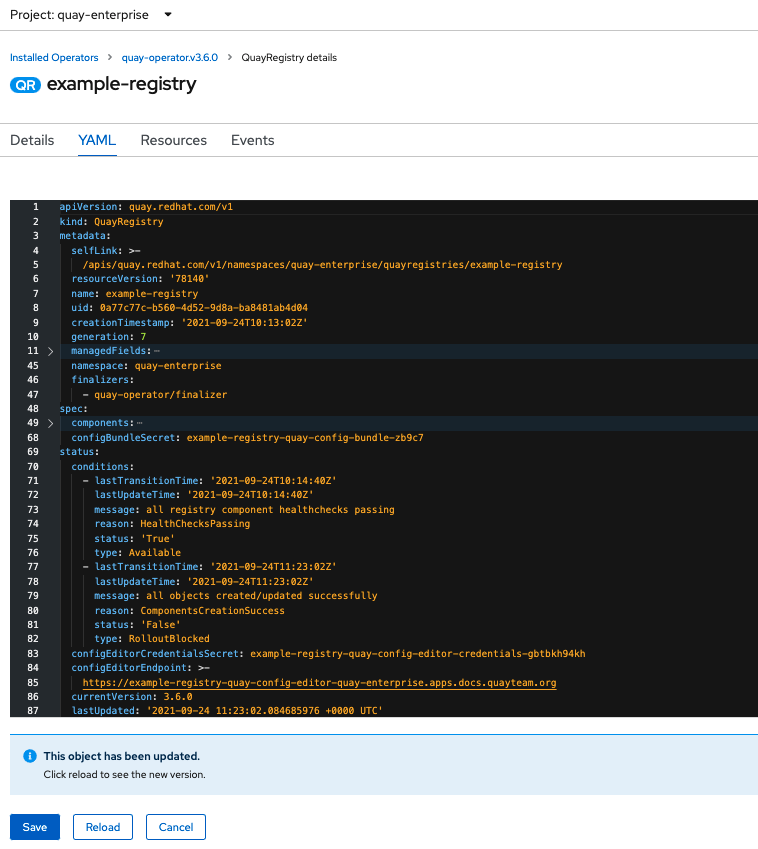
Each time the status changes, you will be prompted to reload the data to see the updated version. Eventually, the Operator will reconcile the changes, and there will be no unhealthy components reported.
4.2.2. Events
The Events tab for the QuayRegistry shows some events related to the redeployment:
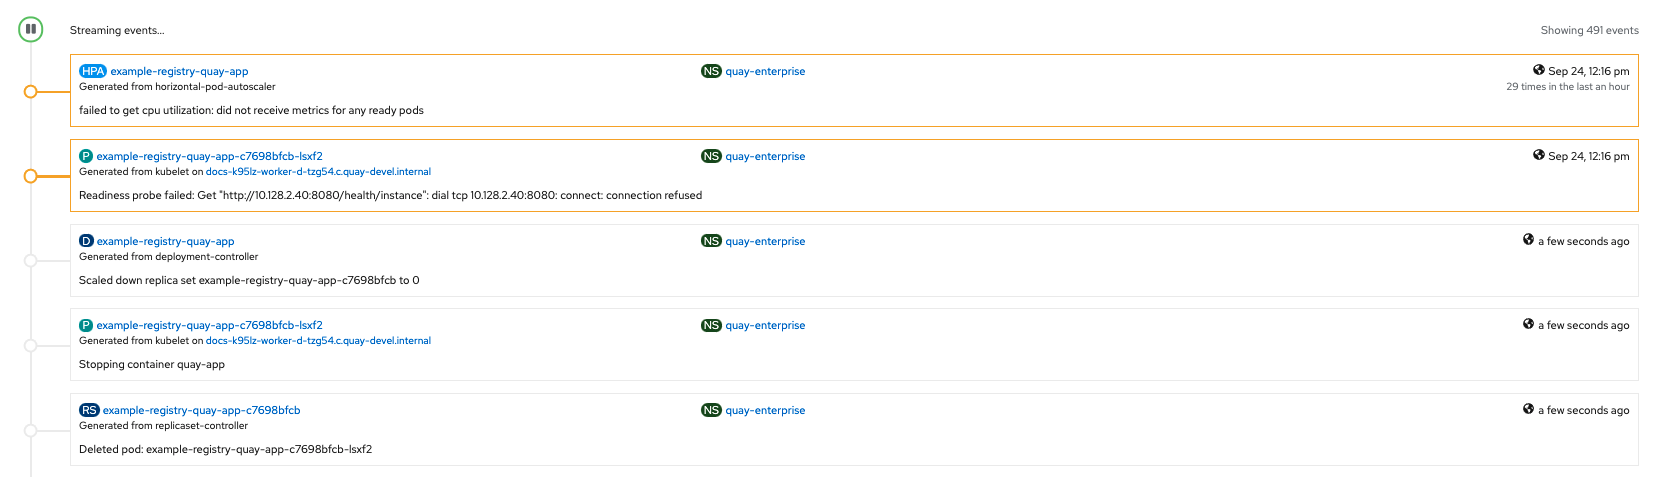
Streaming events, for all resources in the namespace that are affected by the reconfiguration, are available in the OpenShift console under Home → Events:
4.3. Accessing updated information after reconfiguration
4.3.1. Accessing the updated config tool credentials in the UI
With Red Hat Quay 3.7, reconfiguring Quay through the UI no longer generates a new login password. The password now generates only once, and remains the same after reconciling QuayRegistry objects.
4.3.2. Accessing the updated config.yaml in the UI
Use the config bundle to access the updated config.yaml file.
- On the QuayRegistry details screen, click on the Config Bundle Secret
-
In the Data section of the Secret details screen, click Reveal values to see the
config.yamlfile Check that the change has been applied. In this case,
4wshould be in the list ofTAG_EXPIRATION_OPTIONS:Copy to Clipboard Copied! Toggle word wrap Toggle overflow
Chapter 5. Quay Operator components
Quay is a powerful container registry platform and as a result, has a significant number of dependencies. These include a database, object storage, Redis, and others. The Quay Operator manages an opinionated deployment of Quay and its dependencies on Kubernetes. These dependencies are treated as components and are configured through the QuayRegistry API.
In the QuayRegistry custom resource, the spec.components field configures components. Each component contains two fields: kind - the name of the component, and managed - boolean whether the component lifecycle is handled by the Operator. By default (omitting this field), all components are managed and will be autofilled upon reconciliation for visibility:
5.1. Using managed components
Unless your QuayRegistry custom resource specifies otherwise, the Red Hat Quay Operator uses defaults for the following managed components:
- quay: Holds overrides for the Red Hat Quay deployment. For example, environment variables and number of replicas. This component is new in Red Hat Quay 3.7 and cannot be set to unmanaged.
- postgres: For storing the registry metadata, uses a version of Postgres 10 from the Software Collections
- clair: Provides image vulnerability scanning
- redis: Stores live builder logs and the Red Hat Quay tutorial. Also includes the locking mechanism that is required for garbage collection.
-
horizontalpodautoscaler: Adjusts the number of
Quaypods depending on memory/cpu consumption -
objectstorage: For storing image layer blobs, utilizes the
ObjectBucketClaimKubernetes API which is provided by Noobaa/RHOCS - route: Provides an external entrypoint to the Red Hat Quay registry from outside of OpenShift Container Platform
- mirror: Configures repository mirror workers to support optional repository mirroring
- monitoring: Features include a Grafana dashboard, access to individual metrics, and alerting to notify for frequently restarting Quay pods
- tls: Configures whether Red Hat Quay or OpenShift Container Platform handles SSL/TLS
- clairpostgres: Configures a managed Clair database
The Red Hat Quay Operator handles any required configuration and installation work needed for Red Hat Quay to use the managed components. If the opinionated deployment performed by the Red Hat Quay Operator is unsuitable for your environment, you can provide the Red Hat Quay Operator with unmanaged resources (overrides) as described in the following sections.
5.2. Using unmanaged components for dependencies
If you have existing components such as Postgres, Redis or object storage that you would like to use with Quay, you first configure them within the Quay configuration bundle (config.yaml) and then reference the bundle in your QuayRegistry (as a Kubernetes Secret) while indicating which components are unmanaged.
The Quay config editor can also be used to create or modify an existing config bundle and simplifies the process of updating the Kubernetes Secret, especially for multiple changes. When Quay’s configuration is changed via the config editor and sent to the Operator, the Quay deployment will be updated to reflect the new configuration.
5.2.1. Using an existing Postgres database
Requirements:
If you are using an externally managed PostgreSQL database, you must manually enable pg_trgm extension for a successful deployment.
Create a configuration file
config.yamlwith the necessary database fields:config.yaml:
DB_URI: postgresql://test-quay-database:postgres@test-quay-database:5432/test-quay-database
DB_URI: postgresql://test-quay-database:postgres@test-quay-database:5432/test-quay-databaseCopy to Clipboard Copied! Toggle word wrap Toggle overflow Create a Secret using the configuration file:
kubectl create secret generic --from-file config.yaml=./config.yaml config-bundle-secret
$ kubectl create secret generic --from-file config.yaml=./config.yaml config-bundle-secretCopy to Clipboard Copied! Toggle word wrap Toggle overflow Create a QuayRegistry YAML file
quayregistry.yamlwhich marks thepostgrescomponent as unmanaged and references the created Secret:quayregistry.yaml
Copy to Clipboard Copied! Toggle word wrap Toggle overflow - Deploy the registry as detailed in the following sections.
5.2.2. NooBaa unmanaged storage
- Create a NooBaa Object Bucket Claim in the console at Storage → Object Bucket Claims.
- Retrieve the Object Bucket Claim Data details including the Access Key, Bucket Name, Endpoint (hostname) and Secret Key.
Create a
config.yamlconfiguration file, using the information for the Object Bucket Claim:Copy to Clipboard Copied! Toggle word wrap Toggle overflow
5.2.3. Horizontal Pod Autoscaler
Horizontal Pod Autoscalers (HPAs) have been added to the Clair, Quay, and Mirror pods, so that they now automatically scale during load spikes.
As HPA is configured by default to be managed, the number of Clair, Quay, and Mirror pods is set to two. This facilitates the avoidance of downtime when updating or reconfiguring Red Hat Quay by the Operator or during rescheduling events.
5.2.3.1. Disabling the Horizontal Pod Autoscaler
To disable autoscaling or create your own HorizontalPodAutoscaler, specify the component as unmanaged in the QuayRegistry instance. For example:
5.3. Add certs when deployed on Kubernetes
When deployed on Kubernetes, Red Hat Quay mounts in a secret as a volume to store config assets. Unfortunately, this currently breaks the upload certificate function of the superuser panel.
To get around this error, a base64 encoded certificate can be added to the secret after Red Hat Quay has been deployed. Here’s how:
Begin by base64 encoding the contents of the certificate:
Copy to Clipboard Copied! Toggle word wrap Toggle overflow Use the
kubectltool to edit the quay-enterprise-config-secret.kubectl --namespace quay-enterprise edit secret/quay-enterprise-config-secret
$ kubectl --namespace quay-enterprise edit secret/quay-enterprise-config-secretCopy to Clipboard Copied! Toggle word wrap Toggle overflow Add an entry for the cert and paste the full base64 encoded string under the entry:
  custom-cert.crt:
c1psWGpqeGlPQmNEWkJPMjJ5d0pDemVnR2QNCnRsbW9JdEF4YnFSdVd3PT0KLS0tLS1FTkQgQ0VSVElGSUNBVEUtLS0tLQo=
  custom-cert.crt:
c1psWGpqeGlPQmNEWkJPMjJ5d0pDemVnR2QNCnRsbW9JdEF4YnFSdVd3PT0KLS0tLS1FTkQgQ0VSVElGSUNBVEUtLS0tLQo=
Copy to Clipboard Copied! Toggle word wrap Toggle overflow -
Finally, recycle all Red Hat Quay pods. Use
kubectl deleteto remove all Red Hat Quay pods. The Red Hat Quay Deployment will automatically schedule replacement pods with the new certificate data.
5.4. Configuring OCI and Helm with the Operator
Customizations to the configuration of Quay can be provided in a secret containing the configuration bundle. Execute the following command which will create a new secret called quay-config-bundle, in the appropriate namespace, containing the necessary properties to enable OCI support.
quay-config-bundle.yaml
As of Red Hat Quay 3.8, FEATURE_HELM_OCI_SUPPORT has been deprecated and will be removed in a future version of Red Hat Quay. In Red Hat Quay 3.6, Helm artifacts are supported by default and included under the FEATURE_GENERAL_OCI_SUPPORT property. Users are no longer required to update their config.yaml files to enable support.
Create the secret in the appropriate namespace, in this example quay-enterprise:
oc create -n quay-enterprise -f quay-config-bundle.yaml
$ oc create -n quay-enterprise -f quay-config-bundle.yaml
Specify the secret for the spec.configBundleSecret field:
quay-registry.yaml
Create the registry with the specified configuration:
oc create -n quay-enterprise -f quay-registry.yaml
$ oc create -n quay-enterprise -f quay-registry.yaml5.5. Volume size overrides
You can specify the desired size of storage resources provisioned for managed components. The default size for Clair and Quay PostgreSQL databases is 50Gi. You can now choose a large enough capacity upfront, either for performance reasons or in the case where your storage backend does not have resize capability.
In the following example, the volume size for the Clair and the Quay PostgreSQL databases has been set to 70Gi:
The volume size of the clairpostgres component cannot be overridden. This is a known issue and will be fixed in a future version of Red Hat Quay.(PROJQUAY-4301)
Chapter 6. Clair for Red Hat Quay
Clair v4 (Clair) is an open source application that leverages static code analyses for parsing image content and reporting vulnerabilities affecting the content. Clair is packaged with Red Hat Quay and can be used in both standalone and Operator deployments. It can be run in highly scalable configurations, where components can be scaled separately as appropriate for enterprise environments.
6.1. Clair configuration overview
Clair is configured by a structured YAML file. Each Clair node needs to specify what mode it will run in and a path to a configuration file through CLI flags or environment variables. For example:
clair -conf ./path/to/config.yaml -mode indexer
$ clair -conf ./path/to/config.yaml -mode indexeror
clair -conf ./path/to/config.yaml -mode matcher
$ clair -conf ./path/to/config.yaml -mode matcherThe aforementioned commands each start two Clair nodes using the same configuration file. One runs the indexing facilities, while other runs the matching facilities.
Environment variables respected by the Go standard library can be specified if needed, for example:
-
HTTP_PROXY -
HTTPS_PROXY -
SSL_CERT_DIR
If you are running Clair in combo mode, you must supply the indexer, matcher, and notifier configuration blocks in the configuration.
6.1.1. Clair configuration reference
The following YAML shows an example Clair configuration:
The above YAML file lists every key for completeness. Using this configuration file as-is will result in some options not having their defaults set normally.
6.1.2. Clair general fields
The following section describes the general configuration fields available for a Clair deployment:
| Field | Typhttp_listen_ae | Description |
|---|---|---|
| http_listen_addr | String | Configures where the HTTP API is exposed.
Default: |
| introspection_addr | String | Configures where Clair’s metrics and health endpoints are exposed. |
| log_level | String | Sets the logging level. Requires one of the following strings: debug-color, debug, info, warn, error, fatal, panic |
| tls | String | A map containing the configuration for serving the HTTP API of TLS/SSL and HTTP/2. |
| .cert | String | The TLS certificate to be used. Must be a full-chain certificate. |
6.1.3. Clair indexer configuration fields
The following indexer configuration fields are available for Clair.
| Field | Type | Description |
|---|---|---|
| indexer | Object | Provides Clair indexer node configuration. |
| .airgap | Boolean | Disables HTTP access to the internet for indexers and fetchers. Private IPv4 and IPv6 addresses are allowed. Database connections are unaffected. |
| .connstring | String | A Postgres connection string. Accepts format as a URL or libpq connection string. |
| .index_report_request_concurrency | Integer |
Rate limits the number of index report creation requests. Setting this to
The API returns a |
| .scanlock_retry | Integer | A positive integer representing seconds. Concurrent indexers lock on manifest scans to avoid clobbering. This value tunes how often a waiting indexer polls for the lock. |
| .layer_scan_concurrency | Integer | Positive integer limiting the number of concurrent layer scans. Indexers will match a manifest’s layer concurrently. This value tunes the number of layers an indexer scans in parallel. |
| .migrations | Boolean | Whether indexer nodes handle migrations to their database. |
| .scanner | String | Indexer configuration. Scanner allows for passing configuration options to layer scanners. The scanner will have this configuration pass to it on construction if designed to do so. |
| .scanner.dist | String | A map with the name of a particular scanner and arbitrary YAML as a value. |
| .scanner.package | String | A map with the name of a particular scanner and arbitrary YAML as a value. |
| .scanner.repo | String | A map with the name of a particular scanner and arbitrary YAML as a value. |
6.1.4. Clair matcher configuration fields
The following matcher configuration fields are available for Clair.
Differs from matchers configuration fields.
| Field | Type | Description |
|---|---|---|
| matcher | Object | Provides Clair matcher node configuration. |
| .cache_age | String | Controls how long users should be hinted to cache responses for. |
| .connstring | String | A Postgres connection string. Accepts format as a URL or libpq connection string. |
| .max_conn_pool | Integer | Limits the database connection pool size. Clair allows for a custom connection pool size. This number directly sets how many active database connections are allowed concurrently. This parameter will be ignored in a future version. Users should configure this through the connection string. |
| .indexer_addr | String |
A matcher contacts an indexer to create a
Defaults to |
| .migrations | Boolean | Whether matcher nodes handle migrations to their databases. |
| .period | String | Determines how often updates for new security advisories take place.
Defaults to |
| .disable_updaters | Boolean | Whether to run background updates or not. |
| .update_retention | Integer | Sets the number of update operations to retain between garbage collection cycles. This should be set to a safe MAX value based on database size constraints.
Defaults to
If a value of less than |
6.1.5. Clair matchers configuration fields
The following matchers configuration fields are available for Clair.
Differs from matcher configuration fields.
| Field | Type | Description |
|---|---|---|
| matchers | Array of strings |
Provides configuration for the in-tree |
| .names | String |
A list of string values informing the matcher factory about enabled matchers. If value is set to |
| .config | String | Provides configuration to a specific matcher. A map keyed by the name of the matcher containing a sub-object which will be provided to the matchers factory constructor. For example: config:
python:
ignore_vulns:
- CVE-XYZ
- CVE-ABC
|
6.1.6. Clair updaters configuration fields
The following updaters configuration fields are available for Clair.
| Field | Type | Description |
|---|---|---|
| updaters | Object | Provides configuration for the matcher’s update manager. |
| .sets | String | A list of values informing the update manager which updaters to run.
If value is set to If left blank, zero updaters run. |
| .config | String | Provides configuration to specific updater sets. A map keyed by the name of the updater set containing a sub-object which will be provided to the updater set’s constructor. For example: config:
ubuntu:
security_tracker_url: http://security.url
ignore_distributions:
- cosmic
|
6.1.7. Clair notifier configuration fields
The following notifier configuration fields are available for Clair.
| Field | Type | Description |
|---|---|---|
| notifier | Object | Provides Clair notifier node configuration. |
| .connstring | String | Postgres connection string. Accepts format as URL, or libpq connection string. |
| .migrations | Boolean | Whether notifier nodes handle migrations to their database. |
| .indexer_addr | String | A notifier contacts an indexer to create or obtain manifests affected by vulnerabilities. The location of this indexer is required. |
| .matcher_addr | String | A notifier contacts a matcher to list update operations and acquire diffs. The location of this matcher is required. |
| .poll_interval | String | The frequency at which the notifier will query a matcher for update operations. |
| .delivery_interval | String | The frequency at which the notifier attempts delivery of created, or previously failed, notifications. |
| .disable_summary | Boolean | Controls whether notifications should be summarized to one per manifest. |
| .webhook | Object | Configures the notifier for webhook delivery. |
| .webhook.target | String | URL where the webhook will be delivered. |
| .webhook.callback | String | The callback URL where notifications can be retrieved. The notification ID will be appended to this URL. This will typically be where the Clair notifier is hosted. |
| .webhook.headers | String | A map associating a header name to a list of values. |
| .amqp | Object | Configures the notifier for AMQP delivery. Note Clair does not declare any AMQP components on its own. All attempts to use an exchange or queue are passive only and will fail. Broker administrators should setup exchanges and queues ahead of time. |
| .amqp.direct | Boolean |
If |
| .amqp.rollup | Integer |
When |
| .amqp.exchange | Object | The AMQP exchange to connect to. |
| .amqp.exchange.name | String | The name of the exchange to connect to. |
| .amqp.exchange.type | String | The type of the exchange. Typically one of the following: direct, fanout, topic, headers. |
| .amqp.exchange.durability | Boolean | Whether the configured queue is durable. |
| .amqp.exchange.auto_delete | Boolean |
Whether the configured queue uses an |
| .amqp.routing_key | String | The name of the routing key each notification is sent with. |
| .amqp.callback | String |
If |
| .amqp.uris | String | A list of one or more AMQP brokers to connect to, in priority order. |
| .amqp.tls | Object | Configures TLS/SSL connection to an AMQP broker. |
| .amqp.tls.root_ca | String | The filesystem path where a root CA can be read. |
| .amqp.tls.cert | String | The filesystem path where a TLS/SSL certificate can be read. Note
Clair also allows |
| .amqp.tls.key | String | The filesystem path where a TLS/SSL private key can be read. |
| .stomp | Object | Configures the notifier for STOMP delivery. |
| .stomp.direct | Boolean |
If |
| .stomp.rollup | Integer |
If |
| .stomp.callback | String |
If |
| .stomp.destination | String | The STOMP destination to deliver notifications to. |
| .stomp.uris | String | A list of one or more STOMP brokers to connect to in priority order. |
| .stomp.tls | Object | Configured TLS/SSL connection to STOMP broker. |
| .stomp.tls.root_ca | String | The filesystem path where a root CA can be read. Note
Clair also respects |
| .stomp.tls.cert | String | The filesystem path where a TLS/SSL certificate can be read. |
| .stomp.tls.key | String | The filesystem path where a TLS/SSL private key can be read. |
| .stomp.user | String | Configures login details for the STOMP broker. |
| .stomp.user.login | String | The STOMP login to connect with. |
| .stomp.user.passcode | String | The STOMP passcode to connect with. |
6.1.8. Clair authorization configuration fields
The following authorization configuration fields are available for Clair.
| Field | Type | Description |
|---|---|---|
| auth | Object |
Defines Clair’s external and intra-service JWT based authentication. If multiple |
| .psk | String | Defines pre-shared key authentication. |
| .psk.key | String | A shared base64 encoded key distributed between all parties signing and verifying JWTs. |
| .psk.iss | String | A list of JWT issuers to verify. An empty list accepts any issuer in a JWT claim. |
6.1.9. Clair trace configuration fields
The following trace configuration fields are available for Clair.
| Field | Type | Description |
|---|---|---|
| trace | Object | Defines distributed tracing configuration based on OpenTelemetry. |
| .name | String | The name of the application traces will belong to. |
| .probability | Integer | The probability a trace will occur. |
| .jaeger | Object | Defines values for Jaeger tracing. |
| .jaeger.agent | Object | Defines values for configuring delivery to a Jaeger agent. |
| .jaeger.agent.endpoint | String |
An address in the |
| .jaeger.collector | Object | Defines values for configuring delivery to a Jaeger collector. |
| .jaeger.collector.endpoint | String |
An address in the |
| .jaeger.collector.username | String | A Jaeger username. |
| .jaeger.collector.password | String | A Jaeger password. |
| .jaeger.service_name | String | The service name registered in Jaeger. |
| .jaeger.tags | String | Key-value pairs to provide additional metadata. |
| .jaeger.buffer_max | Integer | The maximum number of spans that can be buffered in memory before they are sent to the Jaeger backend for storage and analysis. |
6.1.10. Clair metrics configuration fields
The following metrics configuration fields are available for Clair.
| Field | Type | Description |
|---|---|---|
| metrics | Object | Defines distributed tracing configuration based on OpenTelemetry. |
| .name | String | The name of the metrics in use. |
| .prometheus | String | Configuration for a Prometheus metrics exporter. |
| .prometheus.endpoint | String | Defines the path where metrics are served. |
Chapter 7. Scanning pod images with the Container Security Operator
The Container Security Operator (CSO) is an addon for the Clair security scanner available on OpenShift Container Platform and other Kubernetes platforms. With the CSO, users can scan container images associated with active pods for known vulnerabilities.
The CSO does not work without Red Hat Quay and Clair.
The Container Security Operator (CSO) performs the following features:
- Watches containers associated with pods on either specified or all namespaces.
- Queries the container registry where the containers came from for vulnerability information (provided that an image’s registry supports image scanning, such a a Red Hat Quay registry with Clair scanning).
-
Exposes vulnerabilities via the
ImageManifestVulnobject in the Kubernetes API.
To see instructions on installing the CSO on Kubernetes, select the Install button from the Container Security OperatorHub.io page.
7.1. Downloading and running the Container Security Operator in OpenShift Container Platform
Use the following procedure to download the Container Security Operator (CSO).
In the following procedure, the CSO is installed in the marketplace-operators namespace. This allows the CSO to be used in all namespaces of your OpenShift Container Platform cluster.
Procedure
- On the OpenShift Container Platform console page, select Operators → OperatorHub and search for Container Security Operator.
- Select the Container Security Operator, then select Install to go to the Create Operator Subscription page.
- Check the settings (all namespaces and automatic approval strategy, by default), and select Subscribe. The Container Security appears after a few moments on the Installed Operators screen.
Optional: you can add custom certificates to the CSO. In this example, create a certificate named
quay.crtin the current directory. Then, run the following command to add the certificate to the CSO:oc create secret generic container-security-operator-extra-certs --from-file=quay.crt -n openshift-operators
$ oc create secret generic container-security-operator-extra-certs --from-file=quay.crt -n openshift-operatorsCopy to Clipboard Copied! Toggle word wrap Toggle overflow NoteYou must restart the Operator pod for the new certificates to take effect.
Navigate to Home → Dashboards. A link to Image Security appears under the status section, with a listing of the number of vulnerabilities found so far. Select the link to see a security breakdown, as shown in the following image:
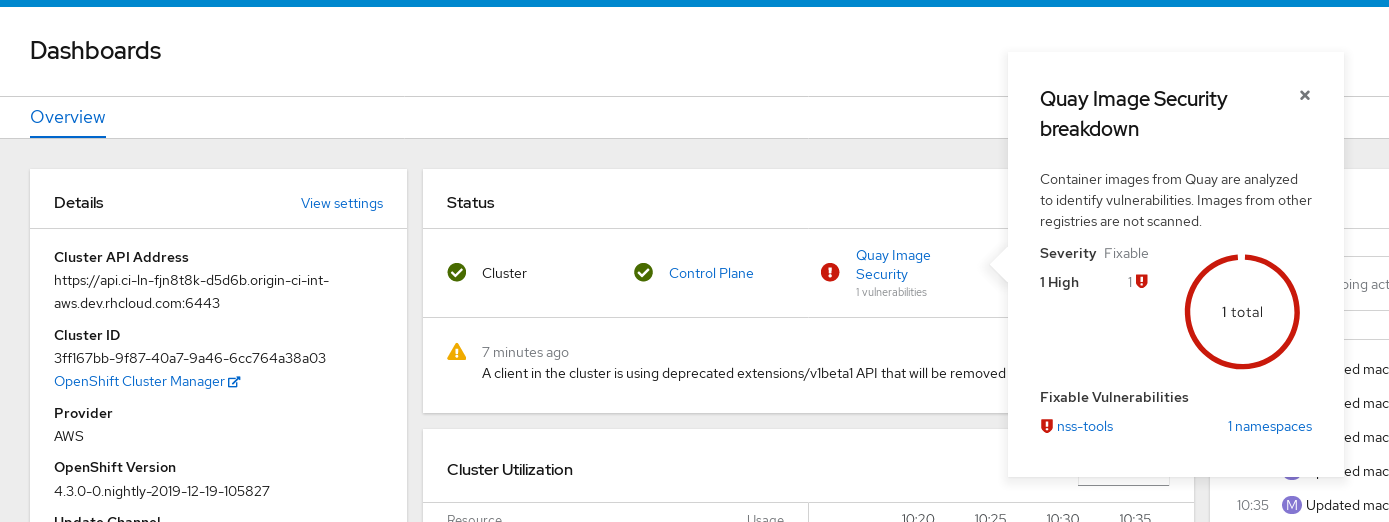 Important
The Container Security Operator currently provides broken links for Red Hat Security advisories. For example, the following link might be provided:
https://access.redhat.com/errata/RHSA-2023:1842%20https://access.redhat.com/security/cve/CVE-2023-23916. The%20in the URL represents a space character, however it currently results in the combination of the two URLs into one incomplete URL, for example,https://access.redhat.com/errata/RHSA-2023:1842andhttps://access.redhat.com/security/cve/CVE-2023-23916. As a temporary workaround, you can copy each URL into your browser to navigate to the proper page. This is a known issue and will be fixed in a future version of Red Hat Quay.You can do one of two things at this point to follow up on any detected vulnerabilities:
Select the link to the vulnerability. You are taken to the container registry, Red Hat Quay or other registry where the container came from, where you can see information about the vulnerability. The following figure shows an example of detected vulnerabilities from a Quay.io registry:

Select the namespaces link to go to the ImageManifestVuln screen, where you can see the name of the selected image and all namespaces where that image is running. The following figure indicates that a particular vulnerable image is running in two namespaces:
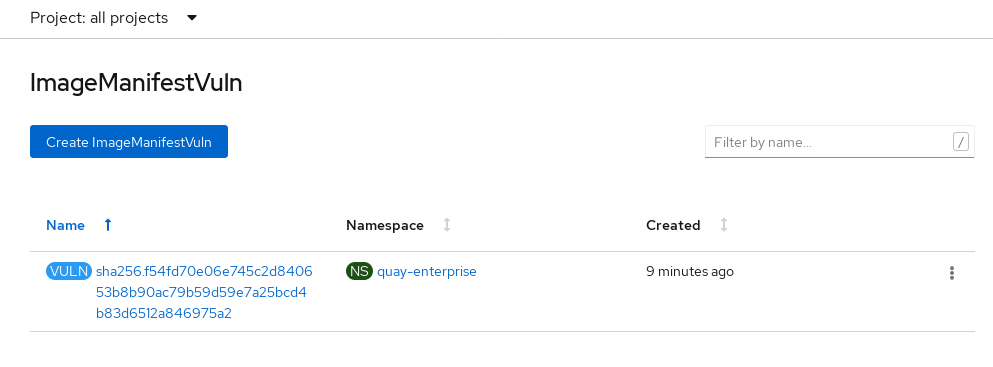
After executing this procedure, you are made aware of what images are vulnerable, what you must do to fix those vulnerabilities, and every namespace that the image was run in. Knowing this, you can perform the following actions:
- Alert users who are running the image that they need to correct the vulnerability.
Stop the images from running by deleting the deployment or the object that started the pod that the image is in.
NoteIf you delete the pod, it might take a few minutes for the vulnerability to reset on the dashboard.
7.2. Query image vulnerabilities from the CLI
You can query information on security from the command line. To query for detected vulnerabilities, type:
oc get vuln --all-namespaces
NAMESPACE     NAME              AGE
default       sha256.ca90...    6m56s
skynet        sha256.ca90...    9m37s
$ oc get vuln --all-namespaces
NAMESPACE     NAME              AGE
default       sha256.ca90...    6m56s
skynet        sha256.ca90...    9m37s
To display details for a particular vulnerability, identify one of the vulnerabilities, along with its namespace and the describe option. This example shows an active container whose image includes an RPM package with a vulnerability: