Red Hat Quay Operator features
Advanced Red Hat Quay Operator features
Abstract
Chapter 1. Federal Information Processing Standard (FIPS) readiness and compliance
The Federal Information Processing Standard (FIPS) developed by the National Institute of Standards and Technology (NIST) is regarded as the highly regarded for securing and encrypting sensitive data, notably in highly regulated areas such as banking, healthcare, and the public sector. Red Hat Enterprise Linux (RHEL) and OpenShift Container Platform support FIPS by providing a FIPS mode, in which the system only allows usage of specific FIPS-validated cryptographic modules like openssl. This ensures FIPS compliance.
1.1. Enabling FIPS compliance
Use the following procedure to enable FIPS compliance on your Red Hat Quay deployment.
Prerequisite
- If you are running a standalone deployment of Red Hat Quay, your Red Hat Enterprise Linux (RHEL) deployment is version 8 or later and FIPS-enabled.
- If you are using the Red Hat Quay Operator, OpenShift Container Platform is version 4.10 or later.
- Your Red Hat Quay version is 3.5.0 or later.
- You have administrative privileges for your Red Hat Quay deployment.
Procedure
In your Red Hat Quay
config.yamlfile, set theFEATURE_FIPSconfiguration field toTrue. For example:--- FEATURE_FIPS = true ---
--- FEATURE_FIPS = true ---Copy to Clipboard Copied! Toggle word wrap Toggle overflow With
FEATURE_FIPSset toTrue, Red Hat Quay runs using FIPS-compliant hash functions.
Chapter 2. Console monitoring and alerting
Red Hat Quay provides support for monitoring instances that were deployed by using the Red Hat Quay Operator, from inside the OpenShift Container Platform console. The new monitoring features include a Grafana dashboard, access to individual metrics, and alerting to notify for frequently restarting Quay pods.
To enable the monitoring features, the Red Hat Quay Operator must be installed in All Namespaces mode.
2.1. Dashboard
On the OpenShift Container Platform console, click Monitoring → Dashboards and search for the dashboard of your desired Red Hat Quay registry instance:

The dashboard shows various statistics including the following:
- The number of Organizations, Repositories, Users, and Robot accounts
- CPU Usage
- Max memory usage
- Rates of pulls and pushes, and authentication requests
- API request rate
- Latencies

2.2. Metrics
You can see the underlying metrics behind the Red Hat Quay dashboard by accessing Monitoring → Metrics in the UI. In the Expression field, enter the text quay_ to see the list of metrics available:

Select a sample metric, for example, quay_org_rows:

This metric shows the number of organizations in the registry. It is also directly surfaced in the dashboard.
2.3. Alerting
An alert is raised if the Quay pods restart too often. The alert can be configured by accessing the Alerting rules tab from Monitoring → Alerting in the console UI and searching for the Quay-specific alert:

Select the QuayPodFrequentlyRestarting rule detail to configure the alert:

Chapter 3. Configuring Red Hat Quay on OpenShift Container Platform
After deployment, you can configure the Red Hat Quay application by editing the Red Hat Quay configuration bundle secret spec.configBundleSecret. You can also change the managed status of components in the spec.components object of the QuayRegistry resource.
Alternatively, you can use the config editor UI to configure the Red Hat Quay application. For more information, see Using the config tool to reconfigure Red Hat Quay on OpenShift Container Platform.
3.1. Editing the config bundle secret in the OpenShift Container Platform console
Use the following procedure to edit the config bundle secret in the OpenShift Container Platform console.
Procedure
On the Red Hat Quay Registry overview screen, click the link for the Config Bundle Secret.

To edit the secret, click Actions → Edit Secret.

Modify the configuration and save the changes.

- Monitor the deployment to ensure successful completion and that the configuration changes have taken effect.
3.2. Determining QuayRegistry endpoints and secrets
Use the following procedure to find QuayRegistry endpoints and secrets.
Procedure
You can examine the
QuayRegistryresource, usingoc describe quayregistryoroc get quayregistry -o yaml, to find the current endpoints and secrets by entering the following command:oc get quayregistry example-registry -n quay-enterprise -o yaml
$ oc get quayregistry example-registry -n quay-enterprise -o yamlCopy to Clipboard Copied! Toggle word wrap Toggle overflow Example output
Copy to Clipboard Copied! Toggle word wrap Toggle overflow - 1
- The config bundle secret, containing the
config.yamlfile and any SSL/TLS certificates. - 2
- The secret containing the username (typically
quayconfig) and the password for the config editor tool. - 3
- The URL for the config editor tool, for browser access to the config tool, and for the configuration API.
- 4
- The URL for your registry, for browser access to the registry UI, and for the registry API endpoint.
3.2.1. Locating the username and password for the config editor tool
Use the following procedure to locate the username and password for the config editor tool.
Procedure
Enter the following command to retrieve the secret:
oc get secret -n quay-enterprise example-registry-quay-config-editor-credentials-fg2gdgtm24 -o yaml
$ oc get secret -n quay-enterprise example-registry-quay-config-editor-credentials-fg2gdgtm24 -o yamlCopy to Clipboard Copied! Toggle word wrap Toggle overflow Example output
apiVersion: v1
data:
  password: SkZwQkVKTUN0a1BUZmp4dA==
  username: cXVheWNvbmZpZw==
kind: Secret
apiVersion: v1
data:
  password: SkZwQkVKTUN0a1BUZmp4dA==
  username: cXVheWNvbmZpZw==
kind: Secret
Copy to Clipboard Copied! Toggle word wrap Toggle overflow Decode the username by entering the following command:
echo 'cXVheWNvbmZpZw==' | base64 --decode
$ echo 'cXVheWNvbmZpZw==' | base64 --decodeCopy to Clipboard Copied! Toggle word wrap Toggle overflow Example output
quayconfig
quayconfigCopy to Clipboard Copied! Toggle word wrap Toggle overflow Decode the password by entering the following command:
echo 'SkZwQkVKTUN0a1BUZmp4dA==' | base64 --decode
$ echo 'SkZwQkVKTUN0a1BUZmp4dA==' | base64 --decodeCopy to Clipboard Copied! Toggle word wrap Toggle overflow Example output
JFpBEJMCtkPTfjxt
JFpBEJMCtkPTfjxtCopy to Clipboard Copied! Toggle word wrap Toggle overflow
3.3. Downloading the existing configuration
The following procedures detail how to download the existing configuration using different strategies.
3.3.1. Using the config editor endpoint to download the existing configuration
Use the following procedure to download the existing configuration through the config editor endpoint.
Procedure
Enter the following command, specifying the username and password for the config editor, to download the existing configuration:
curl -k -u quayconfig:JFpBEJMCtkPTfjxt https://example-registry-quay-config-editor-quay-enterprise.apps.docs.quayteam.org/api/v1/config
$ curl -k -u quayconfig:JFpBEJMCtkPTfjxt https://example-registry-quay-config-editor-quay-enterprise.apps.docs.quayteam.org/api/v1/configCopy to Clipboard Copied! Toggle word wrap Toggle overflow Example output
Copy to Clipboard Copied! Toggle word wrap Toggle overflow
3.3.2. Using the config bundle secret to download the existing configuration
You can use the config bundle secret to download the existing configuration.
Procedure
Obtain the secret data by entering the following command:
oc get secret -n quay-enterprise init-config-bundle-secret -o jsonpath='{.data}'$ oc get secret -n quay-enterprise init-config-bundle-secret -o jsonpath='{.data}'Copy to Clipboard Copied! Toggle word wrap Toggle overflow Example output
{
    "config.yaml": "RkVBVFVSRV9VU0 ... MDAwMAo="
}
{ "config.yaml": "RkVBVFVSRV9VU0 ... MDAwMAo=" }Copy to Clipboard Copied! Toggle word wrap Toggle overflow Enter the following command to decode the data:
echo 'RkVBVFVSRV9VU0 ... MDAwMAo=' | base64 --decode
$ echo 'RkVBVFVSRV9VU0 ... MDAwMAo=' | base64 --decodeCopy to Clipboard Copied! Toggle word wrap Toggle overflow Example output
Copy to Clipboard Copied! Toggle word wrap Toggle overflow
3.4. Using the config bundle to configure custom SSL/TLS certs
You can configure custom SSL/TLS certificates before the initial deployment, or after Red Hat Quay is deployed on OpenShift Container Platform. This is done by creating or updating the config bundle secret.
If you are adding the certificates to an existing deployment, you must include the existing config.yaml file in the new config bundle secret, even if you are not making any configuration changes.
Use the following procedure to add custom SSL/TLS certificates.
Procedure
In your
QuayRegistryYAML file, setkind: tlstomanaged:false, for example:- kind: tls managed: false- kind: tls managed: falseCopy to Clipboard Copied! Toggle word wrap Toggle overflow Navigate to the Events page, which should reveal that the change is blocked until you set up the appropriate config. For example:
Copy to Clipboard Copied! Toggle word wrap Toggle overflow Create the secret using embedded data or by using files.
Embed the configuration details directly in the
Secretresource YAML file. For example:custom-ssl-config-bundle.yaml
Copy to Clipboard Copied! Toggle word wrap Toggle overflow Create the secret from the YAML file:
oc create -f custom-ssl-config-bundle.yaml
$ oc create -f custom-ssl-config-bundle.yamlCopy to Clipboard Copied! Toggle word wrap Toggle overflow ..
Alternatively, you can create files containing the desired information, and then create the secret from those files.
Enter the following command to create a generic
Secretobject that contains theconfig.yamlfile and acustom-ssl.crtfile:oc create secret generic custom-ssl-config-bundle-secret \ --from-file=config.yaml \ --from-file=extra_ca_cert_my-custom-ssl.crt=my-custom-ssl.crt
$ oc create secret generic custom-ssl-config-bundle-secret \
  --from-file=config.yaml \
  --from-file=extra_ca_cert_my-custom-ssl.crt=my-custom-ssl.crt
Copy to Clipboard Copied! Toggle word wrap Toggle overflow Create or update the
QuayRegistryYAML file, referencing the createdSecret, for example:Example
QuayRegistryYAML fileCopy to Clipboard Copied! Toggle word wrap Toggle overflow Deploy or update the registry using the YAML file by entering the following command:
oc apply -f quayregistry.yaml
oc apply -f quayregistry.yamlCopy to Clipboard Copied! Toggle word wrap Toggle overflow
Chapter 4. Using the config tool to reconfigure Red Hat Quay on OpenShift Container Platform
4.1. Accessing the config editor
In the Details section of the QuayRegistry object, the endpoint for the config editor is available, along with a link to the Secret object that contains the credentials for logging into the config editor. For example:
4.1.1. Retrieving the config editor credentials
Use the following procedure to retrieve the config editor credentials.
Procedure
Click on the link for the config editor secret:

In the Data section of the Secret details page, click Reveal values to see the credentials for logging into the config editor. For example:

4.1.2. Logging into the config editor
Use the following procedure to log into the config editor.
Procedure
Navigate the config editor endpoint. When prompted, enter the username, for example,
quayconfig, and the password. For example:
4.1.3. Changing configuration
In the following example, you will update your configuration file by changing the default expiration period of deleted tags.
Procedure
- On the config editor, locate the Time Machine section.
Add an expiration period to the Allowed expiration periods box, for example,
4w:
- Select Validate Configuration Changes to ensure that the changes are valid.
Apply the changes by pressing Reconfigure Quay:

After applying the changes, the config tool notifies you that the changes made have been submitted to your Red Hat Quay deployment:

Reconfiguring Red Hat Quay using the config tool UI can lead to the registry being unavailable for a short time while the updated configuration is applied.
4.2. Monitoring reconfiguration in the Red Hat Quay UI
You can monitor the reconfiguration of Red Hat Quay in real-time.
4.2.1. QuayRegistry resource
After reconfiguring the Red Hat Quay Operator, you can track the progress of the redeployment in the YAML tab for the specific instance of QuayRegistry, in this case, example-registry:

Each time the status changes, you will be prompted to reload the data to see the updated version. Eventually, the Red Hat Quay Operator reconciles the changes, and there are be no unhealthy components reported.

4.2.2. Events
The Events tab for the QuayRegistry shows some events related to the redeployment. For example:

Streaming events, for all resources in the namespace that are affected by the reconfiguration, are available in the OpenShift Container Platform console under Home → Events. For example:
4.3. Accessing updated information after reconfiguration
Use the following procedure to access the updated config.yaml file using the Red Hat Quay UI and the config bundle.
Procedure
-
On the
QuayRegistryDetails screen, click on the Config Bundle Secret. -
In the Data section of the
Secretdetails screen, click Reveal values to see theconfig.yamlfile. Check that the change has been applied. In this case,
4wshould be in the list ofTAG_EXPIRATION_OPTIONS. For example:Copy to Clipboard Copied! Toggle word wrap Toggle overflow
4.4. Custom SSL/TLS certificates UI
The config tool can be used to load custom certificates to facilitate access to resources like external databases. Select the custom certs to be uploaded, ensuring that they are in PEM format, with an extension .crt.
The config tool also displays a list of any uploaded certificates. After you upload your custom SSL/TLS cert, it will appear in the list. For example:
4.5. External Access to the Registry
When running on OpenShift Container Platform, the Routes API is available and is automatically used as a managed component. After creating the QuayRegistry object, the external access point can be found in the status block of the QuayRegistry object. For example:
status:
  registryEndpoint: some-quay.my-namespace.apps.mycluster.com
status:
registryEndpoint: some-quay.my-namespace.apps.mycluster.com4.6. QuayRegistry API
The Red Hat Quay Operator provides the QuayRegistry custom resource API to declaratively manage Quay container registries on the cluster. Use either the OpenShift Container Platform UI or a command-line tool to interact with this API.
-
Creating a
QuayRegistryresults in the Red Hat Quay Operator deploying and configuring all necessary resources needed to run Red Hat Quay on the cluster. -
Editing a
QuayRegistryresults in the Red Hat Quay Operator reconciling the changes and creating, updating, and deleting objects to match the desired configuration. -
Deleting a
QuayRegistryresults in garbage collection of all previously created resources. After deletion, theQuaycontainer registry is no longer be available.
QuayRegistry API fields are outlined in the following sections.
Chapter 5. Clair for Red Hat Quay
Clair v4 (Clair) is an open source application that leverages static code analyses for parsing image content and reporting vulnerabilities affecting the content. Clair is packaged with Red Hat Quay and can be used in both standalone and Operator deployments. It can be run in highly scalable configurations, where components can be scaled separately as appropriate for enterprise environments.
5.1. Clair vulnerability databases
Clair uses the following vulnerability databases to report for issues in your images:
- Ubuntu Oval database
- Debian Security Tracker
- Red Hat Enterprise Linux (RHEL) Oval database
- SUSE Oval database
- Oracle Oval database
- Alpine SecDB database
- VMWare Photon OS database
- Amazon Web Services (AWS) UpdateInfo
- Open Source Vulnerability (OSV) Database
For information about how Clair does security mapping with the different databases, see Claircore Severity Mapping.
5.1.1. Information about Open Source Vulnerability (OSV) database for Clair
Open Source Vulnerability (OSV) is a vulnerability database and monitoring service that focuses on tracking and managing security vulnerabilities in open source software.
OSV provides a comprehensive and up-to-date database of known security vulnerabilities in open source projects. It covers a wide range of open source software, including libraries, frameworks, and other components that are used in software development. For a full list of included ecosystems, see defined ecosystems.
Clair also reports vulnerability and security information for golang, java, and ruby ecosystems through the Open Source Vulnerability (OSV) database.
By leveraging OSV, developers and organizations can proactively monitor and address security vulnerabilities in open source components that they use, which helps to reduce the risk of security breaches and data compromises in projects.
For more information about OSV, see the OSV website.
5.2. Clair on OpenShift Container Platform
To set up Clair v4 (Clair) on a Red Hat Quay deployment on OpenShift Container Platform, it is recommended to use the Red Hat Quay Operator. By default, the Red Hat Quay Operator will install or upgrade a Clair deployment along with your Red Hat Quay deployment and configure Clair automatically.
5.3. Testing Clair
Use the following procedure to test Clair on either a standalone Red Hat Quay deployment, or on an OpenShift Container Platform Operator-based deployment.
Prerequisites
- You have deployed the Clair container image.
Procedure
Pull a sample image by entering the following command:
podman pull ubuntu:20.04
$ podman pull ubuntu:20.04Copy to Clipboard Copied! Toggle word wrap Toggle overflow Tag the image to your registry by entering the following command:
sudo podman tag docker.io/library/ubuntu:20.04 <quay-server.example.com>/<user-name>/ubuntu:20.04
$ sudo podman tag docker.io/library/ubuntu:20.04 <quay-server.example.com>/<user-name>/ubuntu:20.04Copy to Clipboard Copied! Toggle word wrap Toggle overflow Push the image to your Red Hat Quay registry by entering the following command:
sudo podman push --tls-verify=false quay-server.example.com/quayadmin/ubuntu:20.04
$ sudo podman push --tls-verify=false quay-server.example.com/quayadmin/ubuntu:20.04Copy to Clipboard Copied! Toggle word wrap Toggle overflow - Log in to your Red Hat Quay deployment through the UI.
- Click the repository name, for example, quayadmin/ubuntu.
In the navigation pane, click Tags.
Report summary
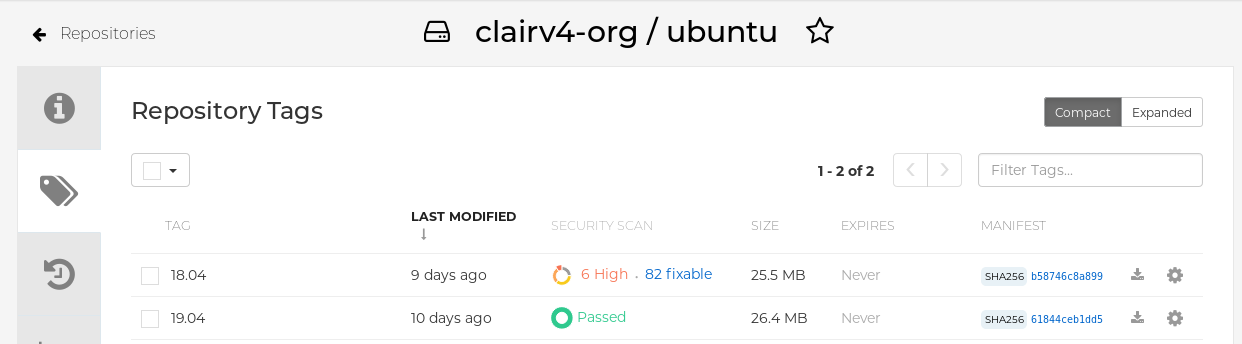
Click the image report, for example, 45 medium, to show a more detailed report:
Report details
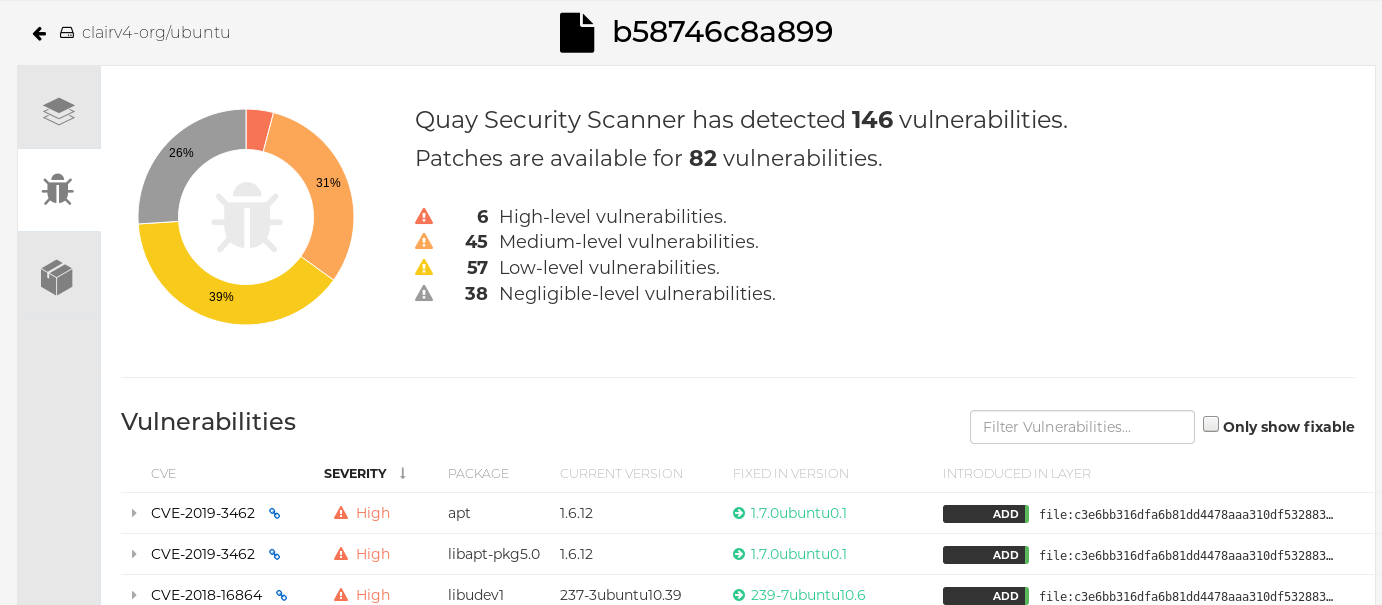 Note
NoteIn some cases, Clair shows duplicate reports on images, for example,
ubi8/nodejs-12orubi8/nodejs-16. This occurs because vulnerabilities with same name are for different packages. This behavior is expected with Clair vulnerability reporting and will not be addressed as a bug.
5.4. Advanced Clair configuration
Use the procedures in the following sections to configure advanced Clair settings.
5.4.1. Unmanaged Clair configuration
Red Hat Quay users can run an unmanaged Clair configuration with the Red Hat Quay OpenShift Container Platform Operator. This feature allows users to create an unmanaged Clair database, or run their custom Clair configuration without an unmanaged database.
An unmanaged Clair database allows the Red Hat Quay Operator to work in a geo-replicated environment, where multiple instances of the Operator must communicate with the same database. An unmanaged Clair database can also be used when a user requires a highly-available (HA) Clair database that exists outside of a cluster.
5.4.1.1. Running a custom Clair configuration with an unmanaged Clair database
Use the following procedure to set your Clair database to unmanaged.
Procedure
In the Quay Operator, set the
clairpostgrescomponent of theQuayRegistrycustom resource tomanaged: false:Copy to Clipboard Copied! Toggle word wrap Toggle overflow
5.4.1.2. Configuring a custom Clair database with an unmanaged Clair database
The Red Hat Quay Operator for OpenShift Container Platform allows users to provide their own Clair database.
Use the following procedure to create a custom Clair database.
The following procedure sets up Clair with SSL/TLS certifications. To view a similar procedure that does not set up Clair with SSL/TSL certifications, see "Configuring a custom Clair database with a managed Clair configuration".
Procedure
Create a Quay configuration bundle secret that includes the
clair-config.yamlby entering the following command:oc create secret generic --from-file config.yaml=./config.yaml --from-file extra_ca_cert_rds-ca-2019-root.pem=./rds-ca-2019-root.pem --from-file clair-config.yaml=./clair-config.yaml --from-file ssl.cert=./ssl.cert --from-file ssl.key=./ssl.key config-bundle-secret
$ oc create secret generic --from-file config.yaml=./config.yaml --from-file extra_ca_cert_rds-ca-2019-root.pem=./rds-ca-2019-root.pem --from-file clair-config.yaml=./clair-config.yaml --from-file ssl.cert=./ssl.cert --from-file ssl.key=./ssl.key config-bundle-secretCopy to Clipboard Copied! Toggle word wrap Toggle overflow Example Clair
config.yamlfileCopy to Clipboard Copied! Toggle word wrap Toggle overflow Note-
The database certificate is mounted under
/run/certs/rds-ca-2019-root.pemon the Clair application pod in theclair-config.yaml. It must be specified when configuring yourclair-config.yaml. -
An example
clair-config.yamlcan be found at Clair on OpenShift config.
-
The database certificate is mounted under
Add the
clair-config.yamlfile to your bundle secret, for example:Copy to Clipboard Copied! Toggle word wrap Toggle overflow NoteWhen updated, the provided
clair-config.yamlfile is mounted into the Clair pod. Any fields not provided are automatically populated with defaults using the Clair configuration module.You can check the status of your Clair pod by clicking the commit in the Build History page, or by running
oc get pods -n <namespace>. For example:oc get pods -n <namespace>
$ oc get pods -n <namespace>Copy to Clipboard Copied! Toggle word wrap Toggle overflow Example output
NAME                                               READY   STATUS    RESTARTS   AGE
f192fe4a-c802-4275-bcce-d2031e635126-9l2b5-25lg2   1/1     Running   0          7s
NAME                                               READY   STATUS    RESTARTS   AGE
f192fe4a-c802-4275-bcce-d2031e635126-9l2b5-25lg2   1/1     Running   0          7s
Copy to Clipboard Copied! Toggle word wrap Toggle overflow
5.4.2. Running a custom Clair configuration with a managed Clair database
In some cases, users might want to run a custom Clair configuration with a managed Clair database. This is useful in the following scenarios:
- When a user wants to disable specific updater resources.
When a user is running Red Hat Quay in an disconnected environment. For more information about running Clair in a disconnected environment, see Configuring access to the Clair database in the air-gapped OpenShift cluster.
Note-
If you are running Red Hat Quay in an disconnected environment, the
airgapparameter of yourclair-config.yamlmust be set toTrue. - If you are running Red Hat Quay in an disconnected environment, you should disable all updater components.
-
If you are running Red Hat Quay in an disconnected environment, the
5.4.2.1. Setting a Clair database to managed
Use the following procedure to set your Clair database to managed.
Procedure
In the Quay Operator, set the
clairpostgrescomponent of theQuayRegistrycustom resource tomanaged: true:Copy to Clipboard Copied! Toggle word wrap Toggle overflow
5.4.2.2. Configuring a custom Clair database with a managed Clair configuration
The Red Hat Quay Operator for OpenShift Container Platform allows users to provide their own Clair database.
Use the following procedure to create a custom Clair database.
Procedure
Create a Quay configuration bundle secret that includes the
clair-config.yamlby entering the following command:oc create secret generic --from-file config.yaml=./config.yaml --from-file extra_ca_cert_rds-ca-2019-root.pem=./rds-ca-2019-root.pem --from-file clair-config.yaml=./clair-config.yaml config-bundle-secret
$ oc create secret generic --from-file config.yaml=./config.yaml --from-file extra_ca_cert_rds-ca-2019-root.pem=./rds-ca-2019-root.pem --from-file clair-config.yaml=./clair-config.yaml config-bundle-secretCopy to Clipboard Copied! Toggle word wrap Toggle overflow Example Clair
config.yamlfileCopy to Clipboard Copied! Toggle word wrap Toggle overflow Note-
The database certificate is mounted under
/run/certs/rds-ca-2019-root.pemon the Clair application pod in theclair-config.yaml. It must be specified when configuring yourclair-config.yaml. -
An example
clair-config.yamlcan be found at Clair on OpenShift config.
-
The database certificate is mounted under
Add the
clair-config.yamlfile to your bundle secret, for example:Copy to Clipboard Copied! Toggle word wrap Toggle overflow Note-
When updated, the provided
clair-config.yamlfile is mounted into the Clair pod. Any fields not provided are automatically populated with defaults using the Clair configuration module.
-
When updated, the provided
You can check the status of your Clair pod by clicking the commit in the Build History page, or by running
oc get pods -n <namespace>. For example:oc get pods -n <namespace>
$ oc get pods -n <namespace>Copy to Clipboard Copied! Toggle word wrap Toggle overflow Example output
NAME                                               READY   STATUS    RESTARTS   AGE
f192fe4a-c802-4275-bcce-d2031e635126-9l2b5-25lg2   1/1     Running   0          7s
NAME                                               READY   STATUS    RESTARTS   AGE
f192fe4a-c802-4275-bcce-d2031e635126-9l2b5-25lg2   1/1     Running   0          7s
Copy to Clipboard Copied! Toggle word wrap Toggle overflow
5.4.3. Clair in disconnected environments
Clair uses a set of components called updaters to handle the fetching and parsing of data from various vulnerability databases. Updaters are set up by default to pull vulnerability data directly from the internet and work for immediate use. However, some users might require Red Hat Quay to run in a disconnected environment, or an environment without direct access to the internet. Clair supports disconnected environments by working with different types of update workflows that take network isolation into consideration. This works by using the clairctl command line interface tool, which obtains updater data from the internet by using an open host, securely transferring the data to an isolated host, and then important the updater data on the isolated host into Clair.
Use this guide to deploy Clair in a disconnected environment.
Currently, Clair enrichment data is CVSS data. Enrichment data is currently unsupported in disconnected environments.
For more information about Clair updaters, see "Clair updaters".
5.4.3.1. Setting up Clair in a disconnected OpenShift Container Platform cluster
Use the following procedures to set up an OpenShift Container Platform provisioned Clair pod in a disconnected OpenShift Container Platform cluster.
5.4.3.1.1. Installing the clairctl command line utility tool for OpenShift Container Platform deployments
Use the following procedure to install the clairctl CLI tool for OpenShift Container Platform deployments.
Procedure
Install the
clairctlprogram for a Clair deployment in an OpenShift Container Platform cluster by entering the following command:oc -n quay-enterprise exec example-registry-clair-app-64dd48f866-6ptgw -- cat /usr/bin/clairctl > clairctl
$ oc -n quay-enterprise exec example-registry-clair-app-64dd48f866-6ptgw -- cat /usr/bin/clairctl > clairctlCopy to Clipboard Copied! Toggle word wrap Toggle overflow NoteUnofficially, the
clairctltool can be downloadedSet the permissions of the
clairctlfile so that it can be executed and run by the user, for example:chmod u+x ./clairctl
$ chmod u+x ./clairctlCopy to Clipboard Copied! Toggle word wrap Toggle overflow
5.4.3.1.2. Retrieving and decoding the Clair configuration secret for Clair deployments on OpenShift Container Platform
Use the following procedure to retrieve and decode the configuration secret for an OpenShift Container Platform provisioned Clair instance on OpenShift Container Platform.
Prerequisites
-
You have installed the
clairctlcommand line utility tool.
Procedure
Enter the following command to retrieve and decode the configuration secret, and then save it to a Clair configuration YAML:
oc get secret -n quay-enterprise example-registry-clair-config-secret -o "jsonpath={$.data['config\.yaml']}" | base64 -d > clair-config.yaml$ oc get secret -n quay-enterprise example-registry-clair-config-secret -o "jsonpath={$.data['config\.yaml']}" | base64 -d > clair-config.yamlCopy to Clipboard Copied! Toggle word wrap Toggle overflow Update the
clair-config.yamlfile so that thedisable_updatersandairgapparameters are set toTrue, for example:Copy to Clipboard Copied! Toggle word wrap Toggle overflow
5.4.3.1.3. Exporting the updaters bundle from a connected Clair instance
Use the following procedure to export the updaters bundle from a Clair instance that has access to the internet.
Prerequisites
-
You have installed the
clairctlcommand line utility tool. -
You have retrieved and decoded the Clair configuration secret, and saved it to a Clair
config.yamlfile. -
The
disable_updatersandairgapparameters are set toTruein your Clairconfig.yamlfile.
Procedure
From a Clair instance that has access to the internet, use the
clairctlCLI tool with your configuration file to export the updaters bundle. For example:./clairctl --config ./config.yaml export-updaters updates.gz
$ ./clairctl --config ./config.yaml export-updaters updates.gzCopy to Clipboard Copied! Toggle word wrap Toggle overflow
5.4.3.1.4. Configuring access to the Clair database in the disconnected OpenShift Container Platform cluster
Use the following procedure to configure access to the Clair database in your disconnected OpenShift Container Platform cluster.
Prerequisites
-
You have installed the
clairctlcommand line utility tool. -
You have retrieved and decoded the Clair configuration secret, and saved it to a Clair
config.yamlfile. -
The
disable_updatersandairgapparameters are set toTruein your Clairconfig.yamlfile. - You have exported the updaters bundle from a Clair instance that has access to the internet.
Procedure
Determine your Clair database service by using the
ocCLI tool, for example:oc get svc -n quay-enterprise
$ oc get svc -n quay-enterpriseCopy to Clipboard Copied! Toggle word wrap Toggle overflow Example output
NAME                                  TYPE           CLUSTER-IP       EXTERNAL-IP   PORT(S)                             AGE
example-registry-clair-app            ClusterIP      172.30.224.93    <none>        80/TCP,8089/TCP                     4d21h
example-registry-clair-postgres       ClusterIP      172.30.246.88    <none>        5432/TCP                            4d21h
...
Copy to Clipboard Copied! Toggle word wrap Toggle overflow Forward the Clair database port so that it is accessible from the local machine. For example:
oc port-forward -n quay-enterprise service/example-registry-clair-postgres 5432:5432
$ oc port-forward -n quay-enterprise service/example-registry-clair-postgres 5432:5432Copy to Clipboard Copied! Toggle word wrap Toggle overflow Update your Clair
config.yamlfile, for example:Copy to Clipboard Copied! Toggle word wrap Toggle overflow - 1
- Replace the value of the
hostin the multipleconnstringfields withlocalhost. - 2
- For more information about the
rhel-repository-scannerparameter, see "Mapping repositories to Common Product Enumeration information". - 3
- For more information about the
rhel_containerscannerparameter, see "Mapping repositories to Common Product Enumeration information".
5.4.3.1.5. Importing the updaters bundle into the disconnected OpenShift Container Platform cluster
Use the following procedure to import the updaters bundle into your disconnected OpenShift Container Platform cluster.
Prerequisites
-
You have installed the
clairctlcommand line utility tool. -
You have retrieved and decoded the Clair configuration secret, and saved it to a Clair
config.yamlfile. -
The
disable_updatersandairgapparameters are set toTruein your Clairconfig.yamlfile. - You have exported the updaters bundle from a Clair instance that has access to the internet.
- You have transferred the updaters bundle into your disconnected environment.
Procedure
Use the
clairctlCLI tool to import the updaters bundle into the Clair database that is deployed by OpenShift Container Platform. For example:./clairctl --config ./clair-config.yaml import-updaters updates.gz
$ ./clairctl --config ./clair-config.yaml import-updaters updates.gzCopy to Clipboard Copied! Toggle word wrap Toggle overflow
5.4.3.2. Setting up a self-managed deployment of Clair for a disconnected OpenShift Container Platform cluster
Use the following procedures to set up a self-managed deployment of Clair for a disconnected OpenShift Container Platform cluster.
5.4.3.2.1. Installing the clairctl command line utility tool for a self-managed Clair deployment on OpenShift Container Platform
Use the following procedure to install the clairctl CLI tool for self-managed Clair deployments on OpenShift Container Platform.
Procedure
Install the
clairctlprogram for a self-managed Clair deployment by using thepodman cpcommand, for example:sudo podman cp clairv4:/usr/bin/clairctl ./clairctl
$ sudo podman cp clairv4:/usr/bin/clairctl ./clairctlCopy to Clipboard Copied! Toggle word wrap Toggle overflow Set the permissions of the
clairctlfile so that it can be executed and run by the user, for example:chmod u+x ./clairctl
$ chmod u+x ./clairctlCopy to Clipboard Copied! Toggle word wrap Toggle overflow
5.4.3.2.2. Deploying a self-managed Clair container for disconnected OpenShift Container Platform clusters
Use the following procedure to deploy a self-managed Clair container for disconnected OpenShift Container Platform clusters.
Prerequisites
-
You have installed the
clairctlcommand line utility tool.
Procedure
Create a folder for your Clair configuration file, for example:
mkdir /etc/clairv4/config/
$ mkdir /etc/clairv4/config/Copy to Clipboard Copied! Toggle word wrap Toggle overflow Create a Clair configuration file with the
disable_updatersparameter set toTrue, for example:Copy to Clipboard Copied! Toggle word wrap Toggle overflow Start Clair by using the container image, mounting in the configuration from the file you created:
Copy to Clipboard Copied! Toggle word wrap Toggle overflow
5.4.3.2.3. Exporting the updaters bundle from a connected Clair instance
Use the following procedure to export the updaters bundle from a Clair instance that has access to the internet.
Prerequisites
-
You have installed the
clairctlcommand line utility tool. - You have deployed Clair.
-
The
disable_updatersandairgapparameters are set toTruein your Clairconfig.yamlfile.
Procedure
From a Clair instance that has access to the internet, use the
clairctlCLI tool with your configuration file to export the updaters bundle. For example:./clairctl --config ./config.yaml export-updaters updates.gz
$ ./clairctl --config ./config.yaml export-updaters updates.gzCopy to Clipboard Copied! Toggle word wrap Toggle overflow
5.4.3.2.4. Configuring access to the Clair database in the disconnected OpenShift Container Platform cluster
Use the following procedure to configure access to the Clair database in your disconnected OpenShift Container Platform cluster.
Prerequisites
-
You have installed the
clairctlcommand line utility tool. - You have deployed Clair.
-
The
disable_updatersandairgapparameters are set toTruein your Clairconfig.yamlfile. - You have exported the updaters bundle from a Clair instance that has access to the internet.
Procedure
Determine your Clair database service by using the
ocCLI tool, for example:oc get svc -n quay-enterprise
$ oc get svc -n quay-enterpriseCopy to Clipboard Copied! Toggle word wrap Toggle overflow Example output
NAME                                  TYPE           CLUSTER-IP       EXTERNAL-IP   PORT(S)                             AGE
example-registry-clair-app            ClusterIP      172.30.224.93    <none>        80/TCP,8089/TCP                     4d21h
example-registry-clair-postgres       ClusterIP      172.30.246.88    <none>        5432/TCP                            4d21h
...
NAME                                  TYPE           CLUSTER-IP       EXTERNAL-IP   PORT(S)                             AGE
example-registry-clair-app            ClusterIP      172.30.224.93    <none>        80/TCP,8089/TCP                     4d21h
example-registry-clair-postgres       ClusterIP      172.30.246.88    <none>        5432/TCP                            4d21h
...
Copy to Clipboard Copied! Toggle word wrap Toggle overflow Forward the Clair database port so that it is accessible from the local machine. For example:
oc port-forward -n quay-enterprise service/example-registry-clair-postgres 5432:5432
$ oc port-forward -n quay-enterprise service/example-registry-clair-postgres 5432:5432Copy to Clipboard Copied! Toggle word wrap Toggle overflow Update your Clair
config.yamlfile, for example:Copy to Clipboard Copied! Toggle word wrap Toggle overflow - 1
- Replace the value of the
hostin the multipleconnstringfields withlocalhost. - 2
- For more information about the
rhel-repository-scannerparameter, see "Mapping repositories to Common Product Enumeration information". - 3
- For more information about the
rhel_containerscannerparameter, see "Mapping repositories to Common Product Enumeration information".
5.4.3.2.5. Importing the updaters bundle into the disconnected OpenShift Container Platform cluster
Use the following procedure to import the updaters bundle into your disconnected OpenShift Container Platform cluster.
Prerequisites
-
You have installed the
clairctlcommand line utility tool. - You have deployed Clair.
-
The
disable_updatersandairgapparameters are set toTruein your Clairconfig.yamlfile. - You have exported the updaters bundle from a Clair instance that has access to the internet.
- You have transferred the updaters bundle into your disconnected environment.
Procedure
Use the
clairctlCLI tool to import the updaters bundle into the Clair database that is deployed by OpenShift Container Platform:./clairctl --config ./clair-config.yaml import-updaters updates.gz
$ ./clairctl --config ./clair-config.yaml import-updaters updates.gzCopy to Clipboard Copied! Toggle word wrap Toggle overflow
5.4.4. Mapping repositories to Common Product Enumeration information
Clair’s Red Hat Enterprise Linux (RHEL) scanner relies on a Common Product Enumeration (CPE) file to map RPM packages to the corresponding security data to produce matching results. These files are owned by product security and updated daily.
The CPE file must be present, or access to the file must be allowed, for the scanner to properly process RPM packages. If the file is not present, RPM packages installed in the container image will not be scanned.
| CPE | Link to JSON mapping file |
|---|---|
|
| |
|
|
In addition to uploading CVE information to the database for disconnected Clair installations, you must also make the mapping file available locally:
- For standalone Red Hat Quay and Clair deployments, the mapping file must be loaded into the Clair pod.
-
For Red Hat Quay Operator deployments on OpenShift Container Platform and Clair deployments, you must set the Clair component to
unmanaged. Then, Clair must be deployed manually, setting the configuration to load a local copy of the mapping file.
5.4.4.1. Mapping repositories to Common Product Enumeration example configuration
Use the repo2cpe_mapping_file and name2repos_mapping_file fields in your Clair configuration to include the CPE JSON mapping files. For example:
For more information, see How to accurately match OVAL security data to installed RPMs.
5.5. Deploying Red Hat Quay on infrastructure nodes
By default, Quay related pods are placed on arbitrary worker nodes when using the Red Hat Quay Operator to deploy the registry. For more information about how to use machine sets to configure nodes to only host infrastructure components, see Creating infrastructure machine sets.
If you are not using OpenShift Container Platform machine set resources to deploy infra nodes, the section in this document shows you how to manually label and taint nodes for infrastructure purposes. After you have configured your infrastructure nodes either manually or use machines sets, you can control the placement of Quay pods on these nodes using node selectors and tolerations.
5.5.1. Labeling and tainting nodes for infrastructure use
Use the following procedure to label and tain nodes for infrastructure use.
Enter the following command to reveal the master and worker nodes. In this example, there are three master nodes and six worker nodes.
oc get nodes
$ oc get nodesCopy to Clipboard Copied! Toggle word wrap Toggle overflow Example output
Copy to Clipboard Copied! Toggle word wrap Toggle overflow Enter the following commands to label the three worker nodes for infrastructure use:
oc label node --overwrite user1-jcnp6-worker-c-pwxfp.c.quay-devel.internal node-role.kubernetes.io/infra=
$ oc label node --overwrite user1-jcnp6-worker-c-pwxfp.c.quay-devel.internal node-role.kubernetes.io/infra=Copy to Clipboard Copied! Toggle word wrap Toggle overflow oc label node --overwrite user1-jcnp6-worker-d-h5tv2.c.quay-devel.internal node-role.kubernetes.io/infra=
$ oc label node --overwrite user1-jcnp6-worker-d-h5tv2.c.quay-devel.internal node-role.kubernetes.io/infra=Copy to Clipboard Copied! Toggle word wrap Toggle overflow oc label node --overwrite user1-jcnp6-worker-d-m9gg4.c.quay-devel.internal node-role.kubernetes.io/infra=
$ oc label node --overwrite user1-jcnp6-worker-d-m9gg4.c.quay-devel.internal node-role.kubernetes.io/infra=Copy to Clipboard Copied! Toggle word wrap Toggle overflow Now, when listing the nodes in the cluster, the last three worker nodes have the
infrarole. For example:oc get nodes
$ oc get nodesCopy to Clipboard Copied! Toggle word wrap Toggle overflow Example
Copy to Clipboard Copied! Toggle word wrap Toggle overflow When a worker node is assigned the
infrarole, there is a chance that user workloads could get inadvertently assigned to an infra node. To avoid this, you can apply a taint to the infra node, and then add tolerations for the pods that you want to control. For example:oc adm taint nodes user1-jcnp6-worker-c-pwxfp.c.quay-devel.internal node-role.kubernetes.io/infra:NoSchedule
$ oc adm taint nodes user1-jcnp6-worker-c-pwxfp.c.quay-devel.internal node-role.kubernetes.io/infra:NoScheduleCopy to Clipboard Copied! Toggle word wrap Toggle overflow oc adm taint nodes user1-jcnp6-worker-d-h5tv2.c.quay-devel.internal node-role.kubernetes.io/infra:NoSchedule
$ oc adm taint nodes user1-jcnp6-worker-d-h5tv2.c.quay-devel.internal node-role.kubernetes.io/infra:NoScheduleCopy to Clipboard Copied! Toggle word wrap Toggle overflow oc adm taint nodes user1-jcnp6-worker-d-m9gg4.c.quay-devel.internal node-role.kubernetes.io/infra:NoSchedule
$ oc adm taint nodes user1-jcnp6-worker-d-m9gg4.c.quay-devel.internal node-role.kubernetes.io/infra:NoScheduleCopy to Clipboard Copied! Toggle word wrap Toggle overflow
5.5.2. Creating a project with node selector and tolerations
Use the following procedure to create a project with node selector and tolerations.
If you have already deployed Red Hat Quay using the Operator, remove the installed Operator and any specific namespaces that you created for the deployment.
Procedure
Create a project resource, specifying a node selector and toleration. For example:
quay-registry.yaml
Copy to Clipboard Copied! Toggle word wrap Toggle overflow Enter the following command to create the project:
oc apply -f quay-registry.yaml
$ oc apply -f quay-registry.yamlCopy to Clipboard Copied! Toggle word wrap Toggle overflow Example output
project.project.openshift.io/quay-registry created
project.project.openshift.io/quay-registry createdCopy to Clipboard Copied! Toggle word wrap Toggle overflow
Subsequent resources created in the quay-registry namespace should now be scheduled on the dedicated infrastructure nodes.
5.5.3. Installing the Red Hat Quay Operator in the namespace
Use the following procedure to install the Red Hat Quay Operator in the namespace.
To install the Red Hat Quay Operator in a specific namespace, you must explicitly specify the appropriate project namespace, as in the following command. In this example, we are using
quay-registry. Ths results in the Operator pod landing on one of the three infrastructure nodes. For example:oc get pods -n quay-registry -o wide
$ oc get pods -n quay-registry -o wideCopy to Clipboard Copied! Toggle word wrap Toggle overflow Example output
NAME                                    READY   STATUS    RESTARTS   AGE   IP            NODE
quay-operator.v3.4.1-6f6597d8d8-bd4dp   1/1     Running   0          30s   10.131.0.16   user1-jcnp6-worker-d-h5tv2.c.quay-devel.internal
NAME                                    READY   STATUS    RESTARTS   AGE   IP            NODE
quay-operator.v3.4.1-6f6597d8d8-bd4dp   1/1     Running   0          30s   10.131.0.16   user1-jcnp6-worker-d-h5tv2.c.quay-devel.internal
Copy to Clipboard Copied! Toggle word wrap Toggle overflow
5.5.4. Creating the Red Hat Quay registry
Use the following procedure to create the Red Hat Quay registry.
Enter the following command to create the Red Hat Quay registry. Then, wait for the deployment to be marked as
ready. In the following example, you should see that they have only been scheduled on the three nodes that you have labelled for infrastructure purposes.oc get pods -n quay-registry -o wide
$ oc get pods -n quay-registry -o wideCopy to Clipboard Copied! Toggle word wrap Toggle overflow Example output
Copy to Clipboard Copied! Toggle word wrap Toggle overflow
5.6. Resizing Managed Storage
When deploying the Red Hat Quay Operator, three distinct persistent volume claims (PVCs) are deployed:
- One for the PostgreSQL 13 registry.
- One for the Clair PostgreSQL 13 registry.
- One that uses NooBaa as a backend storage.
The connection between Red Hat Quay and NooBaa is done through the S3 API and ObjectBucketClaim API in OpenShift Container Platform. Red Hat Quay leverages that API group to create a bucket in NooBaa, obtain access keys, and automatically set everything up. On the backend, or NooBaa, side, that bucket is creating inside of the backing store. As a result, NooBaa PVCs are not mounted or connected to Red Hat Quay pods.
The default size for the PostgreSQL 13 and Clair PostgreSQL 13 PVCs is set to 50 GiB. You can expand storage for these PVCs on the OpenShift Container Platform console by using the following procedure.
The following procedure shares commonality with Expanding Persistent Volume Claims on Red Hat OpenShift Data Foundation.
5.6.1. Resizing PostgreSQL 13 PVCs on Red Hat Quay
Use the following procedure to resize the PostgreSQL 13 and Clair PostgreSQL 13 PVCs.
Prerequisites
- You have cluster admin privileges on OpenShift Container Platform.
Procedure
- Log into the OpenShift Container Platform console and select Storage → Persistent Volume Claims.
-
Select the desired
PersistentVolumeClaimfor either PostgreSQL 13 or Clair PostgreSQL 13, for example,example-registry-quay-postgres-13. - From the Action menu, select Expand PVC.
Enter the new size of the Persistent Volume Claim and select Expand.
After a few minutes, the expanded size should reflect in the PVC’s Capacity field.
5.7. Customizing Default Operator Images
In certain circumstances, it might be useful to override the default images used by the Red Hat Quay Operator. This can be done by setting one or more environment variables in the Red Hat Quay Operator ClusterServiceVersion.
Using this mechanism is not supported for production Red Hat Quay environments and is strongly encouraged only for development or testing purposes. There is no guarantee your deployment will work correctly when using non-default images with the Red Hat Quay Operator.
5.7.1. Environment Variables
The following environment variables are used in the Red Hat Quay Operator to override component images:
| Environment Variable | Component |
|
|
|
|
|
|
|
|
|
|
|
|
Overridden images must be referenced by manifest (@sha256:) and not by tag (:latest).
5.7.2. Applying overrides to a running Operator
When the Red Hat Quay Operator is installed in a cluster through the Operator Lifecycle Manager (OLM), the managed component container images can be easily overridden by modifying the ClusterServiceVersion object.
Use the following procedure to apply overrides to a running Red Hat Quay Operator.
Procedure
The
ClusterServiceVersionobject is Operator Lifecycle Manager’s representation of a running Operator in the cluster. Find the Red Hat Quay Operator’sClusterServiceVersionby using a Kubernetes UI or thekubectl/ocCLI tool. For example:oc get clusterserviceversions -n <your-namespace>
$ oc get clusterserviceversions -n <your-namespace>Copy to Clipboard Copied! Toggle word wrap Toggle overflow Using the UI,
oc edit, or another method, modify the Red Hat QuayClusterServiceVersionto include the environment variables outlined above to point to the override images:JSONPath:
spec.install.spec.deployments[0].spec.template.spec.containers[0].envCopy to Clipboard Copied! Toggle word wrap Toggle overflow
This is done at the Operator level, so every QuayRegistry will be deployed using these same overrides.
5.8. AWS S3 CloudFront
Use the following procedure if you are using AWS S3 Cloudfront for your backend registry storage.
Procedure
Enter the following command to specify the registry key:
oc create secret generic --from-file config.yaml=./config_awss3cloudfront.yaml --from-file default-cloudfront-signing-key.pem=./default-cloudfront-signing-key.pem test-config-bundle
$ oc create secret generic --from-file config.yaml=./config_awss3cloudfront.yaml --from-file default-cloudfront-signing-key.pem=./default-cloudfront-signing-key.pem test-config-bundleCopy to Clipboard Copied! Toggle word wrap Toggle overflow
Chapter 6. Red Hat Quay build enhancements
Red Hat Quay builds can be run on virtualized platforms. Backwards compatibility to run previous build configurations are also available.
6.1. Red Hat Quay build limitations
Running builds in Red Hat Quay in an unprivileged context might cause some commands that were working under the previous build strategy to fail. Attempts to change the build strategy could potentially cause performance issues and reliability with the build.
Running builds directly in a container does not have the same isolation as using virtual machines. Changing the build environment might also caused builds that were previously working to fail.
6.2. Creating a Red Hat Quay builders environment with OpenShift Container Platform
The procedures in this section explain how to create a Red Hat Quay virtual builders environment with OpenShift Container Platform.
6.2.1. OpenShift Container Platform TLS component
The tls component allows you to control TLS configuration.
Red Hat Quay 3.9 does not support builders when the TLS component is managed by the Operator.
If you set tls to unmanaged, you supply your own ssl.cert and ssl.key files. In this instance, if you want your cluster to support builders, you must add both the Quay route and the builder route name to the SAN list in the cert, or use a wildcard.
To add the builder route, use the following format:
[quayregistry-cr-name]-quay-builder-[ocp-namespace].[ocp-domain-name]:443
[quayregistry-cr-name]-quay-builder-[ocp-namespace].[ocp-domain-name]:4436.2.2. Using OpenShift Container Platform for Red Hat Quay builders
Builders require SSL/TLS certificates. For more information about SSL/TLS certificates, see Adding TLS certificates to the Red Hat Quay container.
If you are using Amazon Web Service (AWS) S3 storage, you must modify your storage bucket in the AWS console, prior to running builders. See "Modifying your AWS S3 storage bucket" in the following section for the required parameters.
6.2.2.1. Preparing OpenShift Container Platform for virtual builders
Use the following procedure to prepare OpenShift Container Platform for Red Hat Quay virtual builders.
- This procedure assumes you already have a cluster provisioned and a Quay Operator running.
- This procedure is for setting up a virtual namespace on OpenShift Container Platform.
Procedure
- Log in to your Red Hat Quay cluster using a cluster administrator account.
Create a new project where your virtual builders will be run, for example,
virtual-builders, by running the following command:oc new-project virtual-builders
$ oc new-project virtual-buildersCopy to Clipboard Copied! Toggle word wrap Toggle overflow Create a
ServiceAccountin the project that will be used to run builds by entering the following command:oc create sa -n virtual-builders quay-builder
$ oc create sa -n virtual-builders quay-builderCopy to Clipboard Copied! Toggle word wrap Toggle overflow Provide the created service account with editing permissions so that it can run the build:
oc adm policy -n virtual-builders add-role-to-user edit system:serviceaccount:virtual-builders:quay-builder
$ oc adm policy -n virtual-builders add-role-to-user edit system:serviceaccount:virtual-builders:quay-builderCopy to Clipboard Copied! Toggle word wrap Toggle overflow Grant the Quay builder
anyuid sccpermissions by entering the following command:oc adm policy -n virtual-builders add-scc-to-user anyuid -z quay-builder
$ oc adm policy -n virtual-builders add-scc-to-user anyuid -z quay-builderCopy to Clipboard Copied! Toggle word wrap Toggle overflow NoteThis action requires cluster admin privileges. This is required because builders must run as the Podman user for unprivileged or rootless builds to work.
Obtain the token for the Quay builder service account.
If using OpenShift Container Platform 4.10 or an earlier version, enter the following command:
oc sa get-token -n virtual-builders quay-builder
oc sa get-token -n virtual-builders quay-builderCopy to Clipboard Copied! Toggle word wrap Toggle overflow If using OpenShift Container Platform 4.11 or later, enter the following command:
oc create token quay-builder -n virtual-builders
$ oc create token quay-builder -n virtual-buildersCopy to Clipboard Copied! Toggle word wrap Toggle overflow Example output
eyJhbGciOiJSUzI1NiIsImtpZCI6IldfQUJkaDVmb3ltTHZ0dGZMYjhIWnYxZTQzN2dJVEJxcDJscldSdEUtYWsifQ...
eyJhbGciOiJSUzI1NiIsImtpZCI6IldfQUJkaDVmb3ltTHZ0dGZMYjhIWnYxZTQzN2dJVEJxcDJscldSdEUtYWsifQ...Copy to Clipboard Copied! Toggle word wrap Toggle overflow
Determine the builder route by entering the following command:
oc get route -n quay-enterprise
$ oc get route -n quay-enterpriseCopy to Clipboard Copied! Toggle word wrap Toggle overflow Example output
NAME                                  HOST/PORT                                                                    PATH   SERVICES                              PORT   TERMINATION     WILDCARD
...
example-registry-quay-builder         example-registry-quay-builder-quay-enterprise.apps.docs.quayteam.org                example-registry-quay-app             grpc   edge/Redirect   None
...
Copy to Clipboard Copied! Toggle word wrap Toggle overflow Generate a self-signed SSL/TlS certificate with the .crt extension by entering the following command:
oc extract cm/kube-root-ca.crt -n openshift-apiserver
$ oc extract cm/kube-root-ca.crt -n openshift-apiserverCopy to Clipboard Copied! Toggle word wrap Toggle overflow Example output
ca.crt
ca.crtCopy to Clipboard Copied! Toggle word wrap Toggle overflow Rename the
ca.crtfile toextra_ca_cert_build_cluster.crtby entering the following command:mv ca.crt extra_ca_cert_build_cluster.crt
$ mv ca.crt extra_ca_cert_build_cluster.crtCopy to Clipboard Copied! Toggle word wrap Toggle overflow Locate the secret for you configuration bundle in the Console, and select Actions → Edit Secret and add the appropriate builder configuration:
Copy to Clipboard Copied! Toggle word wrap Toggle overflow - 1
- The build route is obtained by running
oc get route -nwith the name of your OpenShift Operator’s namespace. A port must be provided at the end of the route, and it should use the following format:[quayregistry-cr-name]-quay-builder-[ocp-namespace].[ocp-domain-name]:443. - 2
- If the
JOB_REGISTRATION_TIMEOUTparameter is set too low, you might receive the following error:failed to register job to build manager: rpc error: code = Unauthenticated desc = Invalid build token: Signature has expired. It is suggested that this parameter be set to at least 240. - 3
- If your Redis host has a password or SSL/TLS certificates, you must update accordingly.
- 4
- Set to match the name of your virtual builders namespace, for example,
virtual-builders. - 5
- For early access, the
BUILDER_CONTAINER_IMAGEis currentlyquay.io/projectquay/quay-builder:3.7.0-rc.2. Note that this might change during the early access window. If this happens, customers are alerted. - 6
- The
K8S_API_SERVERis obtained by runningoc cluster-info. - 7
- You must manually create and add your custom CA cert, for example,
K8S_API_TLS_CA: /conf/stack/extra_ca_certs/build_cluster.crt. - 8
- Defaults to
5120Miif left unspecified. - 9
- For virtual builds, you must ensure that there are enough resources in your cluster. Defaults to
1000mif left unspecified. - 10
- Defaults to
3968Miif left unspecified. - 11
- Defaults to
500mif left unspecified. - 12
- Obtained when running
oc create sa.
Sample configuration
Copy to Clipboard Copied! Toggle word wrap Toggle overflow
6.2.2.2. Manually adding SSL/TLS certificates
Due to a known issue with the configuration tool, you must manually add your custom SSL/TLS certificates to properly run builders. Use the following procedure to manually add custom SSL/TLS certificates.
For more information creating SSL/TLS certificates, see Adding TLS certificates to the Red Hat Quay container.
6.2.2.2.1. Creating and signing certificates
Use the following procedure to create and sign an SSL/TLS certificate.
Procedure
Create a certificate authority and sign a certificate. For more information, see Create a Certificate Authority and sign a certificate.
openssl.cnf
Copy to Clipboard Copied! Toggle word wrap Toggle overflow Sample commands
openssl genrsa -out rootCA.key 2048
openssl req -x509 -new -nodes -key rootCA.key -sha256 -days 1024 -out rootCA.pem
openssl genrsa -out ssl.key 2048
openssl req -new -key ssl.key -out ssl.csr
openssl x509 -req -in ssl.csr -CA rootCA.pem -CAkey rootCA.key -CAcreateserial -out ssl.cert -days 356 -extensions v3_req -extfile openssl.cnf
$ openssl genrsa -out rootCA.key 2048
$ openssl req -x509 -new -nodes -key rootCA.key -sha256 -days 1024 -out rootCA.pem
$ openssl genrsa -out ssl.key 2048
$ openssl req -new -key ssl.key -out ssl.csr
$ openssl x509 -req -in ssl.csr -CA rootCA.pem -CAkey rootCA.key -CAcreateserial -out ssl.cert -days 356 -extensions v3_req -extfile openssl.cnf
Copy to Clipboard Copied! Toggle word wrap Toggle overflow
6.2.2.2.2. Setting TLS to unmanaged
Use the following procedure to set king:tls to unmanaged.
Procedure
In your Red Hat Quay Registry YAML, set
kind: tlstomanaged: false:- kind: tls managed: false- kind: tls managed: falseCopy to Clipboard Copied! Toggle word wrap Toggle overflow On the Events page, the change is blocked until you set up the appropriate
config.yamlfile. For example:Copy to Clipboard Copied! Toggle word wrap Toggle overflow
6.2.2.2.3. Creating temporary secrets
Use the following procedure to create temporary secrets for the CA certificate.
Procedure
Create a secret in your default namespace for the CA certificate:
oc create secret generic -n quay-enterprise temp-crt --from-file extra_ca_cert_build_cluster.crt
$ oc create secret generic -n quay-enterprise temp-crt --from-file extra_ca_cert_build_cluster.crtCopy to Clipboard Copied! Toggle word wrap Toggle overflow Create a secret in your default namespace for the
ssl.keyandssl.certfiles:oc create secret generic -n quay-enterprise quay-config-ssl --from-file ssl.cert --from-file ssl.key
$ oc create secret generic -n quay-enterprise quay-config-ssl --from-file ssl.cert --from-file ssl.keyCopy to Clipboard Copied! Toggle word wrap Toggle overflow
6.2.2.2.4. Copying secret data to the configuration YAML
Use the following procedure to copy secret data to your config.yaml file.
Procedure
- Locate the new secrets in the console UI at Workloads → Secrets.
For each secret, locate the YAML view:
Copy to Clipboard Copied! Toggle word wrap Toggle overflow Copy to Clipboard Copied! Toggle word wrap Toggle overflow Locate the secret for your Red Hat Quay registry configuration bundle in the UI, or through the command line by running a command like the following:
oc get quayregistries.quay.redhat.com -o jsonpath="{.items[0].spec.configBundleSecret}{'\n'}" -n quay-enterprise$ oc get quayregistries.quay.redhat.com -o jsonpath="{.items[0].spec.configBundleSecret}{'\n'}" -n quay-enterpriseCopy to Clipboard Copied! Toggle word wrap Toggle overflow In the OpenShift Container Platform console, select the YAML tab for your configuration bundle secret, and add the data from the two secrets you created:
Copy to Clipboard Copied! Toggle word wrap Toggle overflow - Click Save.
Enter the following command to see if your pods are restarting:
oc get pods -n quay-enterprise
$ oc get pods -n quay-enterpriseCopy to Clipboard Copied! Toggle word wrap Toggle overflow Example output
Copy to Clipboard Copied! Toggle word wrap Toggle overflow After your Red Hat Quay registry has reconfigured, enter the following command to check if the Red Hat Quay app pods are running:
oc get pods -n quay-enterprise
$ oc get pods -n quay-enterpriseCopy to Clipboard Copied! Toggle word wrap Toggle overflow Example output
Copy to Clipboard Copied! Toggle word wrap Toggle overflow In your browser, access the registry endpoint and validate that the certificate has been updated appropriately. For example:
Common Name (CN)	example-registry-quay-quay-enterprise.apps.docs.quayteam.org
Organisation (O)	DOCS
Organisational Unit (OU)	QUAY
Common Name (CN)	example-registry-quay-quay-enterprise.apps.docs.quayteam.org
Organisation (O)	DOCS
Organisational Unit (OU)	QUAY
Copy to Clipboard Copied! Toggle word wrap Toggle overflow
6.2.2.3. Using the UI to create a build trigger
Use the following procedure to use the UI to create a build trigger.
Procedure
- Log in to your Red Hat Quay repository.
-
Click Create New Repository and create a new registry, for example,
testrepo. On the Repositories page, click the Builds tab on the navigation pane. Alternatively, use the corresponding URL directly:
https://example-registry-quay-quay-enterprise.apps.docs.quayteam.org/repository/quayadmin/testrepo?tab=builds
https://example-registry-quay-quay-enterprise.apps.docs.quayteam.org/repository/quayadmin/testrepo?tab=buildsCopy to Clipboard Copied! Toggle word wrap Toggle overflow ImportantIn some cases, the builder might have issues resolving hostnames. This issue might be related to the
dnsPolicybeing set todefaulton the job object. Currently, there is no workaround for this issue. It will be resolved in a future version of Red Hat Quay.- Click Create Build Trigger → Custom Git Repository Push.
Enter the HTTPS or SSH style URL used to clone your Git repository, then click Continue. For example:
https://github.com/gabriel-rh/actions_test.git
https://github.com/gabriel-rh/actions_test.gitCopy to Clipboard Copied! Toggle word wrap Toggle overflow - Check Tag manifest with the branch or tag name and then click Continue.
-
Enter the location of the Dockerfile to build when the trigger is invoked, for example,
/Dockerfileand click Continue. -
Enter the location of the context for the Docker build, for example,
/, and click Continue. - If warranted, create a Robot Account. Otherwise, click Continue.
- Click Continue to verify the parameters.
- On the Builds page, click Options icon of your Trigger Name, and then click Run Trigger Now.
- Enter a commit SHA from the Git repository and click Start Build.
You can check the status of your build by clicking the commit in the Build History page, or by running
oc get pods -n virtual-builders. For example:oc get pods -n virtual-builders
$ oc get pods -n virtual-buildersCopy to Clipboard Copied! Toggle word wrap Toggle overflow Example output
NAME                                               READY   STATUS    RESTARTS   AGE
f192fe4a-c802-4275-bcce-d2031e635126-9l2b5-25lg2   1/1     Running   0          7s
NAME                                               READY   STATUS    RESTARTS   AGE
f192fe4a-c802-4275-bcce-d2031e635126-9l2b5-25lg2   1/1     Running   0          7s
Copy to Clipboard Copied! Toggle word wrap Toggle overflow oc get pods -n virtual-builders
$ oc get pods -n virtual-buildersCopy to Clipboard Copied! Toggle word wrap Toggle overflow Example output
NAME                                               READY   STATUS        RESTARTS   AGE
f192fe4a-c802-4275-bcce-d2031e635126-9l2b5-25lg2   1/1     Terminating   0          9s
NAME                                               READY   STATUS        RESTARTS   AGE
f192fe4a-c802-4275-bcce-d2031e635126-9l2b5-25lg2   1/1     Terminating   0          9s
Copy to Clipboard Copied! Toggle word wrap Toggle overflow oc get pods -n virtual-builders
$ oc get pods -n virtual-buildersCopy to Clipboard Copied! Toggle word wrap Toggle overflow Example output
No resources found in virtual-builders namespace.
No resources found in virtual-builders namespace.Copy to Clipboard Copied! Toggle word wrap Toggle overflow When the build is finished, you can check the status of the tag under Tags on the navigation pane.
NoteWith early access, full build logs and timestamps of builds are currently unavailable.
6.2.2.4. Modifying your AWS S3 storage bucket
If you are using AWS S3 storage, you must change your storage bucket in the AWS console, prior to running builders.
Procedure
- Log in to your AWS console at s3.console.aws.com.
-
In the search bar, search for
S3and then click S3. -
Click the name of your bucket, for example,
myawsbucket. - Click the Permissions tab.
Under Cross-origin resource sharing (CORS), include the following parameters:
Copy to Clipboard Copied! Toggle word wrap Toggle overflow
6.2.2.5. Modifying your Google Cloud Platform object bucket
Use the following procedure to configure cross-origin resource sharing (CORS) for virtual builders.
Without CORS configuration, uploading a build Dockerfile fails.
Procedure
Use the following reference to create a JSON file for your specific CORS needs. For example:
cat gcp_cors.json
$ cat gcp_cors.jsonCopy to Clipboard Copied! Toggle word wrap Toggle overflow Example output
Copy to Clipboard Copied! Toggle word wrap Toggle overflow Enter the following command to update your GCP storage bucket:
gcloud storage buckets update gs://<bucket_name> --cors-file=./gcp_cors.json
$ gcloud storage buckets update gs://<bucket_name> --cors-file=./gcp_cors.jsonCopy to Clipboard Copied! Toggle word wrap Toggle overflow Example output
Updating
  Completed 1
Updating
  Completed 1
Copy to Clipboard Copied! Toggle word wrap Toggle overflow You can display the updated CORS configuration of your GCP bucket by running the following command:
gcloud storage buckets describe gs://<bucket_name> --format="default(cors)"
$ gcloud storage buckets describe gs://<bucket_name> --format="default(cors)"Copy to Clipboard Copied! Toggle word wrap Toggle overflow Example output
Copy to Clipboard Copied! Toggle word wrap Toggle overflow
Chapter 7. Geo-replication
Geo-replication allows multiple, geographically distributed Red Hat Quay deployments to work as a single registry from the perspective of a client or user. It significantly improves push and pull performance in a globally-distributed Red Hat Quay setup. Image data is asynchronously replicated in the background with transparent failover and redirect for clients.
Deployments of Red Hat Quay with geo-replication is supported on standalone and Operator deployments.
Additional resources
- For more information about the geo-replication feature’s architecture, see the architecture guide, which includes technical diagrams and a high-level overview.
7.1. Geo-replication features
- When geo-replication is configured, container image pushes will be written to the preferred storage engine for that Red Hat Quay instance. This is typically the nearest storage backend within the region.
- After the initial push, image data will be replicated in the background to other storage engines.
- The list of replication locations is configurable and those can be different storage backends.
- An image pull will always use the closest available storage engine, to maximize pull performance.
- If replication has not been completed yet, the pull will use the source storage backend instead.
7.2. Geo-replication requirements and constraints
- In geo-replicated setups, Red Hat Quay requires that all regions are able to read and write to all other region’s object storage. Object storage must be geographically accessible by all other regions.
- In case of an object storage system failure of one geo-replicating site, that site’s Red Hat Quay deployment must be shut down so that clients are redirected to the remaining site with intact storage systems by a global load balancer. Otherwise, clients will experience pull and push failures.
- Red Hat Quay has no internal awareness of the health or availability of the connected object storage system. Users must configure a global load balancer (LB) to monitor the health of your distributed system and to route traffic to different sites based on their storage status.
-
To check the status of your geo-replication deployment, you must use the
/health/endtoendcheckpoint, which is used for global health monitoring. You must configure the redirect manually using the/health/endtoendendpoint. The/health/instanceend point only checks local instance health. - If the object storage system of one site becomes unavailable, there will be no automatic redirect to the remaining storage system, or systems, of the remaining site, or sites.
- Geo-replication is asynchronous. The permanent loss of a site incurs the loss of the data that has been saved in that sites' object storage system but has not yet been replicated to the remaining sites at the time of failure.
A single database, and therefore all metadata and Red Hat Quay configuration, is shared across all regions.
Geo-replication does not replicate the database. In the event of an outage, Red Hat Quay with geo-replication enabled will not failover to another database.
- A single Redis cache is shared across the entire Red Hat Quay setup and needs to accessible by all Red Hat Quay pods.
-
The exact same configuration should be used across all regions, with exception of the storage backend, which can be configured explicitly using the
QUAY_DISTRIBUTED_STORAGE_PREFERENCEenvironment variable. - Geo-replication requires object storage in each region. It does not work with local storage.
- Each region must be able to access every storage engine in each region, which requires a network path.
- Alternatively, the storage proxy option can be used.
- The entire storage backend, for example, all blobs, is replicated. Repository mirroring, by contrast, can be limited to a repository, or an image.
- All Red Hat Quay instances must share the same entrypoint, typically through a load balancer.
- All Red Hat Quay instances must have the same set of superusers, as they are defined inside the common configuration file.
-
Geo-replication requires your Clair configuration to be set to
unmanaged. An unmanaged Clair database allows the Red Hat Quay Operator to work in a geo-replicated environment, where multiple instances of the Red Hat Quay Operator must communicate with the same database. For more information, see Advanced Clair configuration. - Geo-Replication requires SSL/TLS certificates and keys. For more information, see Using SSL/TLS to protect connections to Red Hat Quay.
If the above requirements cannot be met, you should instead use two or more distinct Red Hat Quay deployments and take advantage of repository mirroring functions.
7.2.1. Setting up geo-replication on OpenShift Container Platform
Use the following procedure to set up geo-replication on OpenShift Container Platform.
Procedure
- Deploy a postgres instance for Red Hat Quay.
Login to the database by entering the following command:
psql -U <username> -h <hostname> -p <port> -d <database_name>
psql -U <username> -h <hostname> -p <port> -d <database_name>Copy to Clipboard Copied! Toggle word wrap Toggle overflow Create a database for Red Hat Quay named
quay. For example:CREATE DATABASE quay;
CREATE DATABASE quay;Copy to Clipboard Copied! Toggle word wrap Toggle overflow Enable pg_trm extension inside the database
\c quay;
CREATE EXTENSION IF NOT EXISTS pg_trgm;
\c quay;
CREATE EXTENSION IF NOT EXISTS pg_trgm;
Copy to Clipboard Copied! Toggle word wrap Toggle overflow Deploy a Redis instance:
Note- Deploying a Redis instance might be unnecessary if your cloud provider has its own service.
- Deploying a Redis instance is required if you are leveraging Builders.
- Deploy a VM for Redis
- Verify that it is accessible from the clusters where Red Hat Quay is running
- Port 6379/TCP must be open
Run Redis inside the instance
sudo dnf install -y podman
podman run -d --name redis -p 6379:6379 redis
sudo dnf install -y podman
podman run -d --name redis -p 6379:6379 redis
Copy to Clipboard Copied! Toggle word wrap Toggle overflow
- Create two object storage backends, one for each cluster. Ideally, one object storage bucket will be close to the first, or primary, cluster, and the other will run closer to the second, or secondary, cluster.
- Deploy the clusters with the same config bundle, using environment variable overrides to select the appropriate storage backend for an individual cluster.
- Configure a load balancer to provide a single entry point to the clusters.
7.2.1.1. Configuring geo-replication for the Red Hat Quay Operator on OpenShift Container Platform
Use the following procedure to configure geo-replication for the Red Hat Quay Operator.
Procedure
Create a
config.yamlfile that is shared between clusters. Thisconfig.yamlfile contains the details for the common PostgreSQL, Redis and storage backends:Geo-replication
config.yamlfileCopy to Clipboard Copied! Toggle word wrap Toggle overflow - 1
- A proper
SERVER_HOSTNAMEmust be used for the route and must match the hostname of the global load balancer. - 2
- To retrieve the configuration file for a Clair instance deployed using the OpenShift Container Platform Operator, see Retrieving the Clair config.
Create the
configBundleSecretby entering the following command:oc create secret generic --from-file config.yaml=./config.yaml georep-config-bundle
$ oc create secret generic --from-file config.yaml=./config.yaml georep-config-bundleCopy to Clipboard Copied! Toggle word wrap Toggle overflow In each of the clusters, set the
configBundleSecretand use theQUAY_DISTRIBUTED_STORAGE_PREFERENCEenvironmental variable override to configure the appropriate storage for that cluster. For example:NoteThe
config.yamlfile between both deployments must match. If making a change to one cluster, it must also be changed in the other.US cluster
QuayRegistryexampleCopy to Clipboard Copied! Toggle word wrap Toggle overflow NoteBecause SSL/TLS is unmanaged, and the route is managed, you must supply the certificates with either with the config tool or directly in the config bundle. For more information, see Configuring TLS and routes.
European cluster
Copy to Clipboard Copied! Toggle word wrap Toggle overflow NoteBecause SSL/TLS is unmanaged, and the route is managed, you must supply the certificates with either with the config tool or directly in the config bundle. For more information, see Configuring TLS and routes.
7.2.2. Mixed storage for geo-replication
Red Hat Quay geo-replication supports the use of different and multiple replication targets, for example, using AWS S3 storage on public cloud and using Ceph storage on premise. This complicates the key requirement of granting access to all storage backends from all Red Hat Quay pods and cluster nodes. As a result, it is recommended that you use the following:
- A VPN to prevent visibility of the internal storage, or
- A token pair that only allows access to the specified bucket used by Red Hat Quay
This results in the public cloud instance of Red Hat Quay having access to on-premise storage, but the network will be encrypted, protected, and will use ACLs, thereby meeting security requirements.
If you cannot implement these security measures, it might be preferable to deploy two distinct Red Hat Quay registries and to use repository mirroring as an alternative to geo-replication.
7.3. Upgrading a geo-replication deployment of the Red Hat Quay Operator
Use the following procedure to upgrade your geo-replicated Red Hat Quay Operator.
- When upgrading geo-replicated Red Hat Quay Operator deployments to the next y-stream release (for example, Red Hat Quay 3.7 → Red Hat Quay 3.8), you must stop operations before upgrading.
- There is intermittent downtime down upgrading from one y-stream release to the next.
- It is highly recommended to back up your Red Hat Quay Operator deployment before upgrading.
This procedure assumes that you are running the Red Hat Quay Operator on three (or more) systems. For this procedure, we will assume three systems named System A, System B, and System C. System A will serve as the primary system in which the Red Hat Quay Operator is deployed.
On System B and System C, scale down your Red Hat Quay Operator deployment. This is done by disabling auto scaling and overriding the replica county for Red Hat Quay, mirror workers, and Clair (if it is managed). Use the following
quayregistry.yamlfile as a reference:Copy to Clipboard Copied! Toggle word wrap Toggle overflow NoteYou must keep the Red Hat Quay Operator running on System A. Do not update the
quayregistry.yamlfile on System A.Wait for the
registry-quay-app,registry-quay-mirror, andregistry-clair-apppods to disappear. Enter the following command to check their status:oc get pods -n <quay-namespace>
oc get pods -n <quay-namespace>Copy to Clipboard Copied! Toggle word wrap Toggle overflow Example output
quay-operator.v3.7.1-6f9d859bd-p5ftc               1/1     Running     0             12m
quayregistry-clair-postgres-7487f5bd86-xnxpr       1/1     Running     1 (12m ago)   12m
quayregistry-quay-app-upgrade-xq2v6                0/1     Completed   0             12m
quayregistry-quay-config-editor-6dfdcfc44f-hlvwm   1/1     Running     0             73s
quayregistry-quay-redis-84f888776f-hhgms           1/1     Running     0             12m
Copy to Clipboard Copied! Toggle word wrap Toggle overflow - On System A, initiate a Red Hat Quay Operator upgrade to the latest y-stream version. This is a manual process. For more information about upgrading installed Operators, see Upgrading installed Operators. For more information about Red Hat Quay upgrade paths, see Upgrading the Red Hat Quay Operator.
-
After the new Red Hat Quay Operator is installed, the necessary upgrades on the cluster are automatically completed. Afterwards, new Red Hat Quay pods are started with the latest y-stream version. Additionally, new
Quaypods are scheduled and started. Confirm that the update has properly worked by navigating to the Red Hat Quay UI:
In the OpenShift console, navigate to Operators → Installed Operators, and click the Registry Endpoint link.
ImportantDo not execute the following step until the Red Hat Quay UI is available. Do not upgrade the Red Hat Quay Operator on System B and on System C until the UI is available on System A.
After confirming that the update has properly worked on System A, initiate the Red Hat Quay Operator on System B and on System C. The Operator upgrade results in an upgraded Red Hat Quay installation, and the pods are restarted.
NoteBecause the database schema is correct for the new y-stream installation, the new pods on System B and on System C should quickly start.
7.3.1. Removing a geo-replicated site from your Red Hat Quay Operator deployment
By using the following procedure, Red Hat Quay administrators can remove sites in a geo-replicated setup.
Prerequisites
- You are logged into OpenShift Container Platform.
-
You have configured Red Hat Quay geo-replication with at least two sites, for example,
usstorageandeustorage. - Each site has its own Organization, Repository, and image tags.
Procedure
Sync the blobs between all of your defined sites by running the following command:
python -m util.backfillreplication
$ python -m util.backfillreplicationCopy to Clipboard Copied! Toggle word wrap Toggle overflow WarningPrior to removing storage engines from your Red Hat Quay
config.yamlfile, you must ensure that all blobs are synced between all defined sites.When running this command, replication jobs are created which are picked up by the replication worker. If there are blobs that need replicated, the script returns UUIDs of blobs that will be replicated. If you run this command multiple times, and the output from the return script is empty, it does not mean that the replication process is done; it means that there are no more blobs to be queued for replication. Customers should use appropriate judgement before proceeding, as the allotted time replication takes depends on the number of blobs detected.
Alternatively, you could use a third party cloud tool, such as Microsoft Azure, to check the synchronization status.
This step must be completed before proceeding.
-
In your Red Hat Quay
config.yamlfile for siteusstorage, remove theDISTRIBUTED_STORAGE_CONFIGentry for theeustoragesite. Enter the following command to identify your
Quayapplication pods:oc get pod -n <quay_namespace>
$ oc get pod -n <quay_namespace>Copy to Clipboard Copied! Toggle word wrap Toggle overflow Example output
quay390usstorage-quay-app-5779ddc886-2drh2
quay390eustorage-quay-app-66969cd859-n2ssm
quay390usstorage-quay-app-5779ddc886-2drh2
quay390eustorage-quay-app-66969cd859-n2ssm
Copy to Clipboard Copied! Toggle word wrap Toggle overflow Enter the following command to open an interactive shell session in the
usstoragepod:oc rsh quay390usstorage-quay-app-5779ddc886-2drh2
$ oc rsh quay390usstorage-quay-app-5779ddc886-2drh2Copy to Clipboard Copied! Toggle word wrap Toggle overflow Enter the following command to permanently remove the
eustoragesite:ImportantThe following action cannot be undone. Use with caution.
python -m util.removelocation eustorage
sh-4.4$ python -m util.removelocation eustorageCopy to Clipboard Copied! Toggle word wrap Toggle overflow Example output
Copy to Clipboard Copied! Toggle word wrap Toggle overflow
Chapter 8. Backing up and restoring Red Hat Quay managed by the Red Hat Quay Operator
Use the content within this section to back up and restore Red Hat Quay when managed by the Red Hat Quay Operator on OpenShift Container Platform
8.1. Backing up Red Hat Quay
Database backups should be performed regularly using either the supplied tools on the PostgreSQL image or your own backup infrastructure. The Red Hat Quay Operator does not currently ensure that the PostgreSQL database is backed up.
This procedure covers backing up your Red Hat Quay PostgreSQL database. It does not cover backing up the Clair PostgreSQL database. Strictly speaking, backing up the Clair PostgreSQL database is not needed because it can be recreated. If you opt to recreate it from scratch, you will wait for the information to be repopulated after all images inside of your Red Hat Quay deployment are scanned. During this downtime, security reports are unavailable.
If you are considering backing up the Clair PostgreSQL database, you must consider that its size is dependent upon the number of images stored inside of Red Hat Quay. As a result, the database can be extremely large.
This procedure describes how to create a backup of Red Hat Quay deployed on OpenShift Container Platform using the Red Hat Quay Operator.
Prerequisites
-
A healthy Red Hat Quay deployment on OpenShift Container Platform using the Red Hat Quay Operator. The status condition
Availableis set toTrue. -
The components
quay,postgresandobjectstorageare set tomanaged: true -
If the component
clairis set tomanaged: truethe componentclairpostgresis also set tomanaged: true(starting with Red Hat Quay Operator v3.7 or later)
If your deployment contains partially unmanaged database or storage components and you are using external services for PostgreSQL or S3-compatible object storage to run your Red Hat Quay deployment, you must refer to the service provider or vendor documentation to create a backup of the data. You can refer to the tools described in this guide as a starting point on how to backup your external PostgreSQL database or object storage.
8.1.1. Red Hat Quay configuration backup
Use the following procedure to back up your Red Hat Quay configuration.
Procedure
To back the
QuayRegistrycustom resource by exporting it, enter the following command:oc get quayregistry <quay_registry_name> -n <quay_namespace> -o yaml > quay-registry.yaml
$ oc get quayregistry <quay_registry_name> -n <quay_namespace> -o yaml > quay-registry.yamlCopy to Clipboard Copied! Toggle word wrap Toggle overflow Edit the resulting
quayregistry.yamland remove the status section and the following metadata fields:metadata.creationTimestamp metadata.finalizers metadata.generation metadata.resourceVersion metadata.uid
metadata.creationTimestamp metadata.finalizers metadata.generation metadata.resourceVersion metadata.uidCopy to Clipboard Copied! Toggle word wrap Toggle overflow Backup the managed keys secret by entering the following command:
NoteIf you are running a version older than Red Hat Quay 3.7.0, this step can be skipped. Some secrets are automatically generated while deploying Red Hat Quay for the first time. These are stored in a secret called
<quay_registry_name>-quay_registry_managed_secret_keysin the namespace of theQuayRegistryresource.oc get secret -n <quay_namespace> <quay_registry_name>_quay_registry_managed_secret_keys -o yaml > managed_secret_keys.yaml
$ oc get secret -n <quay_namespace> <quay_registry_name>_quay_registry_managed_secret_keys -o yaml > managed_secret_keys.yamlCopy to Clipboard Copied! Toggle word wrap Toggle overflow Edit the resulting
managed_secret_keys.yamlfile and remove the entrymetadata.ownerReferences. Yourmanaged_secret_keys.yamlfile should look similar to the following:Copy to Clipboard Copied! Toggle word wrap Toggle overflow All information under the
dataproperty should remain the same.Redirect the current
Quayconfiguration file by entering the following command:oc get secret -n <quay-namespace> $(oc get quayregistry <quay_registry_name> -n <quay_namespace> -o jsonpath='{.spec.configBundleSecret}') -o yaml > config-bundle.yaml$ oc get secret -n <quay-namespace> $(oc get quayregistry <quay_registry_name> -n <quay_namespace> -o jsonpath='{.spec.configBundleSecret}') -o yaml > config-bundle.yamlCopy to Clipboard Copied! Toggle word wrap Toggle overflow Backup the
/conf/stack/config.yamlfile mounted inside of theQuaypods:oc exec -it quay_pod_name -- cat /conf/stack/config.yaml > quay_config.yaml
$ oc exec -it quay_pod_name -- cat /conf/stack/config.yaml > quay_config.yamlCopy to Clipboard Copied! Toggle word wrap Toggle overflow
8.1.2. Scaling down your Red Hat Quay deployment
Use the following procedure to scale down your Red Hat Quay deployment.
This step is needed to create a consistent backup of the state of your Red Hat Quay deployment. Do not omit this step, including in setups where PostgreSQL databases and/or S3-compatible object storage are provided by external services (unmanaged by the Red Hat Quay Operator).
Procedure
Depending on the version of your Red Hat Quay deployment, scale down your deployment using one of the following options.
For Operator version 3.7 and newer: Scale down the Red Hat Quay deployment by disabling auto scaling and overriding the replica count for Red Hat Quay, mirror workers, and Clair (if managed). Your
QuayRegistryresource should look similar to the following:Copy to Clipboard Copied! Toggle word wrap Toggle overflow For Operator version 3.6 and earlier: Scale down the Red Hat Quay deployment by scaling down the Red Hat Quay Operator first and then the managed Red Hat Quay resources:
oc scale --replicas=0 deployment $(oc get deployment -n <quay-operator-namespace>|awk '/^quay-operator/ {print $1}') -n <quay-operator-namespace>$ oc scale --replicas=0 deployment $(oc get deployment -n <quay-operator-namespace>|awk '/^quay-operator/ {print $1}') -n <quay-operator-namespace>Copy to Clipboard Copied! Toggle word wrap Toggle overflow oc scale --replicas=0 deployment $(oc get deployment -n <quay-namespace>|awk '/quay-app/ {print $1}') -n <quay-namespace>$ oc scale --replicas=0 deployment $(oc get deployment -n <quay-namespace>|awk '/quay-app/ {print $1}') -n <quay-namespace>Copy to Clipboard Copied! Toggle word wrap Toggle overflow oc scale --replicas=0 deployment $(oc get deployment -n <quay-namespace>|awk '/quay-mirror/ {print $1}') -n <quay-namespace>$ oc scale --replicas=0 deployment $(oc get deployment -n <quay-namespace>|awk '/quay-mirror/ {print $1}') -n <quay-namespace>Copy to Clipboard Copied! Toggle word wrap Toggle overflow oc scale --replicas=0 deployment $(oc get deployment -n <quay-namespace>|awk '/clair-app/ {print $1}') -n <quay-namespace>$ oc scale --replicas=0 deployment $(oc get deployment -n <quay-namespace>|awk '/clair-app/ {print $1}') -n <quay-namespace>Copy to Clipboard Copied! Toggle word wrap Toggle overflow
Wait for the
registry-quay-app,registry-quay-mirrorandregistry-clair-apppods (depending on which components you set to be managed by the Red Hat Quay Operator) to disappear. You can check their status by running the following command:oc get pods -n <quay_namespace>
$ oc get pods -n <quay_namespace>Copy to Clipboard Copied! Toggle word wrap Toggle overflow Example output:
oc get pod
$ oc get podCopy to Clipboard Copied! Toggle word wrap Toggle overflow Example output
Copy to Clipboard Copied! Toggle word wrap Toggle overflow
8.1.3. Backing up the Red Hat Quay managed database
Use the following procedure to back up the Red Hat Quay managed database.
If your Red Hat Quay deployment is configured with external, or unmanged, PostgreSQL database(s), refer to your vendor’s documentation on how to create a consistent backup of these databases.
Procedure
Identify the Quay PostgreSQL pod name:
oc get pod -l quay-component=postgres -n <quay_namespace> -o jsonpath='{.items[0].metadata.name}'$ oc get pod -l quay-component=postgres -n <quay_namespace> -o jsonpath='{.items[0].metadata.name}'Copy to Clipboard Copied! Toggle word wrap Toggle overflow Example output:
quayregistry-quay-database-59f54bb7-58xs7
quayregistry-quay-database-59f54bb7-58xs7Copy to Clipboard Copied! Toggle word wrap Toggle overflow Obtain the Quay database name:
oc -n <quay_namespace> rsh $(oc get pod -l app=quay -o NAME -n <quay_namespace> |head -n 1) cat /conf/stack/config.yaml|awk -F"/" '/^DB_URI/ {print $4}'
quayregistry-quay-database
$ oc -n <quay_namespace> rsh $(oc get pod -l app=quay -o NAME -n <quay_namespace> |head -n 1) cat /conf/stack/config.yaml|awk -F"/" '/^DB_URI/ {print $4}' quayregistry-quay-databaseCopy to Clipboard Copied! Toggle word wrap Toggle overflow Download a backup database:
oc exec quayregistry-quay-database-59f54bb7-58xs7 -- /usr/bin/pg_dump -C quayregistry-quay-database > backup.sql
$ oc exec quayregistry-quay-database-59f54bb7-58xs7 -- /usr/bin/pg_dump -C quayregistry-quay-database > backup.sqlCopy to Clipboard Copied! Toggle word wrap Toggle overflow
8.1.3.1. Backing up the Red Hat Quay managed object storage
Use the following procedure to back up the Red Hat Quay managed object storage. The instructions in this section apply to the following configurations:
- Standalone, multi-cloud object gateway configurations
- OpenShift Data Foundations storage requires that the Red Hat Quay Operator provisioned an S3 object storage bucket from, through the ObjectStorageBucketClaim API
If your Red Hat Quay deployment is configured with external (unmanged) object storage, refer to your vendor’s documentation on how to create a copy of the content of Quay’s storage bucket.
Procedure
Decode and export the
AWS_ACCESS_KEY_IDby entering the following command:export AWS_ACCESS_KEY_ID=$(oc get secret -l app=noobaa -n <quay-namespace> -o jsonpath='{.items[0].data.AWS_ACCESS_KEY_ID}' |base64 -d)$ export AWS_ACCESS_KEY_ID=$(oc get secret -l app=noobaa -n <quay-namespace> -o jsonpath='{.items[0].data.AWS_ACCESS_KEY_ID}' |base64 -d)Copy to Clipboard Copied! Toggle word wrap Toggle overflow Decode and export the
AWS_SECRET_ACCESS_KEY_IDby entering the following command:export AWS_SECRET_ACCESS_KEY=$(oc get secret -l app=noobaa -n <quay-namespace> -o jsonpath='{.items[0].data.AWS_SECRET_ACCESS_KEY}' |base64 -d)$ export AWS_SECRET_ACCESS_KEY=$(oc get secret -l app=noobaa -n <quay-namespace> -o jsonpath='{.items[0].data.AWS_SECRET_ACCESS_KEY}' |base64 -d)Copy to Clipboard Copied! Toggle word wrap Toggle overflow Create a new directory:
mkdir blobs
$ mkdir blobsCopy to Clipboard Copied! Toggle word wrap Toggle overflow
Copy all blobs to the directory by entering the following command:
aws s3 sync --no-verify-ssl --endpoint https://$(oc get route s3 -n openshift-storage -o jsonpath='{.spec.host}') s3://$(oc get cm -l app=noobaa -n <quay-namespace> -o jsonpath='{.items[0].data.BUCKET_NAME}') ./blobs$ aws s3 sync --no-verify-ssl --endpoint https://$(oc get route s3 -n openshift-storage -o jsonpath='{.spec.host}') s3://$(oc get cm -l app=noobaa -n <quay-namespace> -o jsonpath='{.items[0].data.BUCKET_NAME}') ./blobsCopy to Clipboard Copied! Toggle word wrap Toggle overflow
8.1.4. Scale the Red Hat Quay deployment back up
Depending on the version of your Red Hat Quay deployment, scale up your deployment using one of the following options.
For Operator version 3.7 and newer: Scale up the Red Hat Quay deployment by re-enabling auto scaling, if desired, and removing the replica overrides for Quay, mirror workers and Clair as applicable. Your
QuayRegistryresource should look similar to the following:Copy to Clipboard Copied! Toggle word wrap Toggle overflow For Operator version 3.6 and earlier: Scale up the Red Hat Quay deployment by scaling up the Red Hat Quay Operator again:
oc scale --replicas=1 deployment $(oc get deployment -n <quay_operator_namespace> | awk '/^quay-operator/ {print $1}') -n <quay_operator_namespace>$ oc scale --replicas=1 deployment $(oc get deployment -n <quay_operator_namespace> | awk '/^quay-operator/ {print $1}') -n <quay_operator_namespace>Copy to Clipboard Copied! Toggle word wrap Toggle overflow
Check the status of the Red Hat Quay deployment by entering the following command:
oc wait quayregistry registry --for=condition=Available=true -n <quay_namespace>
$ oc wait quayregistry registry --for=condition=Available=true -n <quay_namespace>Copy to Clipboard Copied! Toggle word wrap Toggle overflow Example output:
Copy to Clipboard Copied! Toggle word wrap Toggle overflow
8.2. Restoring Red Hat Quay
Use the following procedures to restore Red Hat Quay when the Red Hat Quay Operator manages the database. It should be performed after a backup of your Red Hat Quay registry has been performed. See Backing up Red Hat Quay for more information.
Prerequisites
- Red Hat Quay is deployed on OpenShift Container Platform using the Red Hat Quay Operator.
- A backup of the Red Hat Quay configuration managed by the Red Hat Quay Operator has been created following the instructions in the Backing up Red Hat Quay section
- Your Red Hat Quay database has been backed up.
- The object storage bucket used by Red Hat Quay has been backed up.
-
The components
quay,postgresandobjectstorageare set tomanaged: true -
If the component
clairis set tomanaged: true, the componentclairpostgresis also set tomanaged: true(starting with Red Hat Quay Operator v3.7 or later) - There is no running Red Hat Quay deployment managed by the Red Hat Quay Operator in the target namespace on your OpenShift Container Platform cluster
If your deployment contains partially unmanaged database or storage components and you are using external services for PostgreSQL or S3-compatible object storage to run your Red Hat Quay deployment, you must refer to the service provider or vendor documentation to restore their data from a backup prior to restore Red Hat Quay
8.2.1. Restoring Red Hat Quay and its configuration from a backup
Use the following procedure to restore Red Hat Quay and its configuration files from a backup.
These instructions assume you have followed the process in the Backing up Red Hat Quay guide and create the backup files with the same names.
Procedure
Restore the backed up Red Hat Quay configuration by entering the following command:
oc create -f ./config-bundle.yaml
$ oc create -f ./config-bundle.yamlCopy to Clipboard Copied! Toggle word wrap Toggle overflow ImportantIf you receive the error
Error from server (AlreadyExists): error when creating "./config-bundle.yaml": secrets "config-bundle-secret" already exists, you must delete your existing resource with$ oc delete Secret config-bundle-secret -n <quay-namespace>and recreate it with$ oc create -f ./config-bundle.yaml.Restore the generated keys from the backup by entering the following command:
oc create -f ./managed-secret-keys.yaml
$ oc create -f ./managed-secret-keys.yamlCopy to Clipboard Copied! Toggle word wrap Toggle overflow Restore the
QuayRegistrycustom resource:oc create -f ./quay-registry.yaml
$ oc create -f ./quay-registry.yamlCopy to Clipboard Copied! Toggle word wrap Toggle overflow Check the status of the Red Hat Quay deployment and wait for it to be available:
oc wait quayregistry registry --for=condition=Available=true -n <quay-namespace>
$ oc wait quayregistry registry --for=condition=Available=true -n <quay-namespace>Copy to Clipboard Copied! Toggle word wrap Toggle overflow
8.2.2. Scaling down your Red Hat Quay deployment
Use the following procedure to scale down your Red Hat Quay deployment.
Procedure
Depending on the version of your Red Hat Quay deployment, scale down your deployment using one of the following options.
For Operator version 3.7 and newer: Scale down the Red Hat Quay deployment by disabling auto scaling and overriding the replica count for Quay, mirror workers and Clair (if managed). Your
QuayRegistryresource should look similar to the following:Copy to Clipboard Copied! Toggle word wrap Toggle overflow For Operator version 3.6 and earlier: Scale down the Red Hat Quay deployment by scaling down the Red Hat Quay Operator first and then the managed Red Hat Quay resources:
oc scale --replicas=0 deployment $(oc get deployment -n <quay-operator-namespace>|awk '/^quay-operator/ {print $1}') -n <quay-operator-namespace>$ oc scale --replicas=0 deployment $(oc get deployment -n <quay-operator-namespace>|awk '/^quay-operator/ {print $1}') -n <quay-operator-namespace>Copy to Clipboard Copied! Toggle word wrap Toggle overflow oc scale --replicas=0 deployment $(oc get deployment -n <quay-namespace>|awk '/quay-app/ {print $1}') -n <quay-namespace>$ oc scale --replicas=0 deployment $(oc get deployment -n <quay-namespace>|awk '/quay-app/ {print $1}') -n <quay-namespace>Copy to Clipboard Copied! Toggle word wrap Toggle overflow oc scale --replicas=0 deployment $(oc get deployment -n <quay-namespace>|awk '/quay-mirror/ {print $1}') -n <quay-namespace>$ oc scale --replicas=0 deployment $(oc get deployment -n <quay-namespace>|awk '/quay-mirror/ {print $1}') -n <quay-namespace>Copy to Clipboard Copied! Toggle word wrap Toggle overflow oc scale --replicas=0 deployment $(oc get deployment -n <quay-namespace>|awk '/clair-app/ {print $1}') -n <quay-namespace>$ oc scale --replicas=0 deployment $(oc get deployment -n <quay-namespace>|awk '/clair-app/ {print $1}') -n <quay-namespace>Copy to Clipboard Copied! Toggle word wrap Toggle overflow
Wait for the
registry-quay-app,registry-quay-mirrorandregistry-clair-apppods (depending on which components you set to be managed by Red Hat Quay Operator) to disappear. You can check their status by running the following command:oc get pods -n <quay-namespace>
$ oc get pods -n <quay-namespace>Copy to Clipboard Copied! Toggle word wrap Toggle overflow Example output:
registry-quay-config-editor-77847fc4f5-nsbbv   1/1     Running            0          9m1s
registry-quay-database-66969cd859-n2ssm        1/1     Running            0          6d1h
registry-quay-redis-7cc5f6c977-956g8           1/1     Running            0          5d21h
registry-quay-config-editor-77847fc4f5-nsbbv   1/1     Running            0          9m1s
registry-quay-database-66969cd859-n2ssm        1/1     Running            0          6d1h
registry-quay-redis-7cc5f6c977-956g8           1/1     Running            0          5d21h
Copy to Clipboard Copied! Toggle word wrap Toggle overflow
8.2.3. Restoring your Red Hat Quay database
Use the following procedure to restore your Red Hat Quay database.
Procedure
Identify your
Quaydatabase pod by entering the following command:oc get pod -l quay-component=postgres -n <quay-namespace> -o jsonpath='{.items[0].metadata.name}'$ oc get pod -l quay-component=postgres -n <quay-namespace> -o jsonpath='{.items[0].metadata.name}'Copy to Clipboard Copied! Toggle word wrap Toggle overflow Example output:
quayregistry-quay-database-59f54bb7-58xs7
quayregistry-quay-database-59f54bb7-58xs7Copy to Clipboard Copied! Toggle word wrap Toggle overflow Upload the backup by copying it from the local environment and into the pod:
oc cp ./backup.sql -n <quay-namespace> registry-quay-database-66969cd859-n2ssm:/tmp/backup.sql
$ oc cp ./backup.sql -n <quay-namespace> registry-quay-database-66969cd859-n2ssm:/tmp/backup.sqlCopy to Clipboard Copied! Toggle word wrap Toggle overflow Open a remote terminal to the database by entering the following command:
oc rsh -n <quay-namespace> registry-quay-database-66969cd859-n2ssm
$ oc rsh -n <quay-namespace> registry-quay-database-66969cd859-n2ssmCopy to Clipboard Copied! Toggle word wrap Toggle overflow Enter psql by running the following command:
bash-4.4$ psql
bash-4.4$ psqlCopy to Clipboard Copied! Toggle word wrap Toggle overflow You can list the database by running the following command:
postgres=# \l
postgres=# \lCopy to Clipboard Copied! Toggle word wrap Toggle overflow Example output
                                                  List of databases
           Name            |           Owner            | Encoding |  Collate   |   Ctype    |   Access privileges
----------------------------+----------------------------+----------+------------+------------+-----------------------
postgres                   | postgres                   | UTF8     | en_US.utf8 | en_US.utf8 |
quayregistry-quay-database | quayregistry-quay-database | UTF8     | en_US.utf8 | en_US.utf8 |
List of databases Name | Owner | Encoding | Collate | Ctype | Access privileges ----------------------------+----------------------------+----------+------------+------------+----------------------- postgres | postgres | UTF8 | en_US.utf8 | en_US.utf8 | quayregistry-quay-database | quayregistry-quay-database | UTF8 | en_US.utf8 | en_US.utf8 |Copy to Clipboard Copied! Toggle word wrap Toggle overflow Drop the database by entering the following command:
postgres=# DROP DATABASE "quayregistry-quay-database";
postgres=# DROP DATABASE "quayregistry-quay-database";Copy to Clipboard Copied! Toggle word wrap Toggle overflow Example output
DROP DATABASE
DROP DATABASECopy to Clipboard Copied! Toggle word wrap Toggle overflow Exit the postgres CLI to re-enter bash-4.4:
\q
\qCopy to Clipboard Copied! Toggle word wrap Toggle overflow Redirect your PostgreSQL database to your backup database:
psql < /tmp/backup.sql
sh-4.4$ psql < /tmp/backup.sqlCopy to Clipboard Copied! Toggle word wrap Toggle overflow Exit bash by entering the following command:
exit
sh-4.4$ exitCopy to Clipboard Copied! Toggle word wrap Toggle overflow
8.2.4. Restore your Red Hat Quay object storage data
Use the following procedure to restore your Red Hat Quay object storage data.
Procedure
Export the
AWS_ACCESS_KEY_IDby entering the following command:export AWS_ACCESS_KEY_ID=$(oc get secret -l app=noobaa -n <quay-namespace> -o jsonpath='{.items[0].data.AWS_ACCESS_KEY_ID}' |base64 -d)$ export AWS_ACCESS_KEY_ID=$(oc get secret -l app=noobaa -n <quay-namespace> -o jsonpath='{.items[0].data.AWS_ACCESS_KEY_ID}' |base64 -d)Copy to Clipboard Copied! Toggle word wrap Toggle overflow Export the
AWS_SECRET_ACCESS_KEYby entering the following command:export AWS_SECRET_ACCESS_KEY=$(oc get secret -l app=noobaa -n <quay-namespace> -o jsonpath='{.items[0].data.AWS_SECRET_ACCESS_KEY}' |base64 -d)$ export AWS_SECRET_ACCESS_KEY=$(oc get secret -l app=noobaa -n <quay-namespace> -o jsonpath='{.items[0].data.AWS_SECRET_ACCESS_KEY}' |base64 -d)Copy to Clipboard Copied! Toggle word wrap Toggle overflow Upload all blobs to the bucket by running the following command:
aws s3 sync --no-verify-ssl --endpoint https://$(oc get route s3 -n openshift-storage -o jsonpath='{.spec.host}') ./blobs s3://$(oc get cm -l app=noobaa -n <quay-namespace> -o jsonpath='{.items[0].data.BUCKET_NAME}')$ aws s3 sync --no-verify-ssl --endpoint https://$(oc get route s3 -n openshift-storage -o jsonpath='{.spec.host}') ./blobs s3://$(oc get cm -l app=noobaa -n <quay-namespace> -o jsonpath='{.items[0].data.BUCKET_NAME}')Copy to Clipboard Copied! Toggle word wrap Toggle overflow
8.2.5. Scaling up your Red Hat Quay deployment
Depending on the version of your Red Hat Quay deployment, scale up your deployment using one of the following options.
For Operator version 3.7 and newer: Scale up the Red Hat Quay deployment by re-enabling auto scaling, if desired, and removing the replica overrides for Quay, mirror workers and Clair as applicable. Your
QuayRegistryresource should look similar to the following:Copy to Clipboard Copied! Toggle word wrap Toggle overflow For Operator version 3.6 and earlier: Scale up the Red Hat Quay deployment by scaling up the Red Hat Quay Operator again:
oc scale --replicas=1 deployment $(oc get deployment -n <quay-operator-namespace> | awk '/^quay-operator/ {print $1}') -n <quay-operator-namespace>$ oc scale --replicas=1 deployment $(oc get deployment -n <quay-operator-namespace> | awk '/^quay-operator/ {print $1}') -n <quay-operator-namespace>Copy to Clipboard Copied! Toggle word wrap Toggle overflow
Check the status of the Red Hat Quay deployment:
oc wait quayregistry registry --for=condition=Available=true -n <quay-namespace>
$ oc wait quayregistry registry --for=condition=Available=true -n <quay-namespace>Copy to Clipboard Copied! Toggle word wrap Toggle overflow Example output:
Copy to Clipboard Copied! Toggle word wrap Toggle overflow
Chapter 9. Enabling OCI support with the Red Hat Quay Operator
Use the following procedure to configure Open Container Initiative (OCI) support for Red Hat Quay.
Procedure
Create a
quay-config-bundleYAML file that includes the following information:Copy to Clipboard Copied! Toggle word wrap Toggle overflow Enter the following command to create a the
quay-config-bundleobject in the appropriate namespace, passing in the necessary properties to enable OCI support. For example:oc create -n quay-enterprise -f quay-config-bundle.yaml
$ oc create -n quay-enterprise -f quay-config-bundle.yamlCopy to Clipboard Copied! Toggle word wrap Toggle overflow In your
quay-registry.yamlfile, reference the secret for thespec.configBundleSecretfield. For example:Copy to Clipboard Copied! Toggle word wrap Toggle overflow
Chapter 10. Volume size overrides
You can specify the desired size of storage resources provisioned for managed components. The default size for Clair and the PostgreSQL databases is 50Gi. You can now choose a large enough capacity upfront, either for performance reasons or in the case where your storage backend does not have resize capability.
In the following example, the volume size for the Clair and the Quay PostgreSQL databases has been set to 70Gi:
The volume size of the clairpostgres component cannot be overridden. This is a known issue and will be fixed in a future version of Red Hat Quay.(PROJQUAY-4301)
Chapter 11. Scanning pod images with the Container Security Operator
The Container Security Operator (CSO) is an addon for the Clair security scanner available on OpenShift Container Platform and other Kubernetes platforms. With the CSO, users can scan container images associated with active pods for known vulnerabilities.
The CSO does not work without Red Hat Quay and Clair.
The Container Security Operator (CSO) includes the following features:
- Watches containers associated with pods on either specified or all namespaces.
- Queries the container registry where the containers came from for vulnerability information, provided that an image’s registry supports image scanning, such a a Red Hat Quay registry with Clair scanning.
-
Exposes vulnerabilities through the
ImageManifestVulnobject in the Kubernetes API.
To see instructions on installing the CSO on Kubernetes, select the Install button from the Container Security OperatorHub.io page.
11.1. Downloading and running the Container Security Operator in OpenShift Container Platform
Use the following procedure to download the Container Security Operator (CSO).
In the following procedure, the CSO is installed in the marketplace-operators namespace. This allows the CSO to be used in all namespaces of your OpenShift Container Platform cluster.
Procedure
- On the OpenShift Container Platform console page, select Operators → OperatorHub and search for Container Security Operator.
- Select the Container Security Operator, then select Install to go to the Create Operator Subscription page.
- Check the settings (all namespaces and automatic approval strategy, by default), and select Subscribe. The Container Security appears after a few moments on the Installed Operators screen.
Optional: you can add custom certificates to the CSO. In this example, create a certificate named
quay.crtin the current directory. Then, run the following command to add the certificate to the CSO:oc create secret generic container-security-operator-extra-certs --from-file=quay.crt -n openshift-operators
$ oc create secret generic container-security-operator-extra-certs --from-file=quay.crt -n openshift-operatorsCopy to Clipboard Copied! Toggle word wrap Toggle overflow NoteYou must restart the Operator pod for the new certificates to take effect.
Navigate to Home → Dashboards. A link to Image Security appears under the status section, with a listing of the number of vulnerabilities found so far. Select the link to see a security breakdown, as shown in the following image:
 Important
The Container Security Operator currently provides broken links for Red Hat Security advisories. For example, the following link might be provided:
https://access.redhat.com/errata/RHSA-2023:1842%20https://access.redhat.com/security/cve/CVE-2023-23916. The%20in the URL represents a space character, however it currently results in the combination of the two URLs into one incomplete URL, for example,https://access.redhat.com/errata/RHSA-2023:1842andhttps://access.redhat.com/security/cve/CVE-2023-23916. As a temporary workaround, you can copy each URL into your browser to navigate to the proper page. This is a known issue and will be fixed in a future version of Red Hat Quay.You can do one of two things at this point to follow up on any detected vulnerabilities:
Select the link to the vulnerability. You are taken to the container registry, Red Hat Quay or other registry where the container came from, where you can see information about the vulnerability. The following figure shows an example of detected vulnerabilities from a Quay.io registry:

Select the namespaces link to go to the ImageManifestVuln screen, where you can see the name of the selected image and all namespaces where that image is running. The following figure indicates that a particular vulnerable image is running in two namespaces:
After executing this procedure, you are made aware of what images are vulnerable, what you must do to fix those vulnerabilities, and every namespace that the image was run in. Knowing this, you can perform the following actions:
- Alert users who are running the image that they need to correct the vulnerability.
Stop the images from running by deleting the deployment or the object that started the pod that the image is in.
NoteIf you delete the pod, it might take a few minutes for the vulnerability to reset on the dashboard.
11.2. Query image vulnerabilities from the CLI
Use the following procedure to query image vulnerabilities from the command line interface (CLI).
Procedure
Enter the following command to query for detected vulnerabilities:
oc get vuln --all-namespaces
$ oc get vuln --all-namespacesCopy to Clipboard Copied! Toggle word wrap Toggle overflow Example output
NAMESPACE     NAME              AGE
default       sha256.ca90...    6m56s
skynet        sha256.ca90...    9m37s
NAMESPACE     NAME              AGE
default       sha256.ca90...    6m56s
skynet        sha256.ca90...    9m37s
Copy to Clipboard Copied! Toggle word wrap Toggle overflow Optional. To display details for a particular vulnerability, identify a specific vulnerability and its namespace, and use the
oc describecommand. The following example shows an active container whose image includes an RPM package with a vulnerability:oc describe vuln --namespace mynamespace sha256.ac50e3752...
$ oc describe vuln --namespace mynamespace sha256.ac50e3752...Copy to Clipboard Copied! Toggle word wrap Toggle overflow Example output
Copy to Clipboard Copied! Toggle word wrap Toggle overflow
Chapter 12. Integrating Red Hat Quay into OpenShift Container Platform with the Quay Bridge Operator
The Quay Bridge Operator duplicates the features of the integrated OpenShift Container Platform registry into the new Red Hat Quay registry. Using the Quay Bridge Operator, you can replace the integrated container registry in OpenShift Container Platform with a Red Hat Quay registry.
The features enabled with the Quay Bridge Operator include:
- Synchronizing OpenShift Container Platform namespaces as Red Hat Quay organizations.
- Creating robot accounts for each default namespace service account.
-
Creating secrets for each created robot account, and associating each robot secret to a service account as
MountableandImage Pull Secret. - Synchronizing OpenShift Container Platform image streams as Red Hat Quay repositories.
- Automatically rewriting new builds making use of image streams to output to Red Hat Quay.
- Automatically importing an image stream tag after a build completes.
By using the following procedures, you can enable bi-directional communication between your Red Hat Quay and OpenShift Container Platform clusters.
12.1. Setting up Red Hat Quay for the Quay Bridge Operator
In this procedure, you will create a dedicated Red Hat Quay organization, and from a new application created within that organization you will generate an OAuth token to be used with the Quay Bridge Operator in OpenShift Container Platform.
Procedure
- Log in to Red Hat Quay through the web UI.
- Select the organization for which the external application will be configured.
- On the navigation pane, select Applications.
-
Select Create New Application and enter a name for the new application, for example,
openshift. -
On the OAuth Applications page, select your application, for example,
openshift. - On the navigation pane, select Generate Token.
Select the following fields:
- Administer Organization
- Administer Repositories
- Create Repositories
- View all visible repositories
- Read/Write to any accessible repositories
- Administer User
- Read User Information
- Review the assigned permissions.
- Select Authorize Application and then confirm confirm the authorization by selecting Authorize Application.
Save the generated access token.
ImportantRed Hat Quay does not offer token management. You cannot list tokens, delete tokens, or modify tokens. The generated access token is only shown once and cannot be re-obtained after closing the page.
12.2. Installing the Quay Bridge Operator on OpenShift Container Platform
In this procedure, you will install the Quay Bridge Operator on OpenShift Container Platform.
Prerequiites
- You have set up Red Hat Quay and obtained an Access Token.
- An OpenShift Container Platform 4.6 or greater environment for which you have cluster administrator permissions.
Procedure
- Open the Administrator perspective of the web console and navigate to Operators → OperatorHub on the navigation pane.
-
Search for
Quay Bridge Operator, click the Quay Bridge Operator title, and then click Install. - Select the version to install, for example, stable-3.7, and then click Install.
- Click View Operator when the installation finishes to go to the Quay Bridge Operator’s Details page. Alternatively, you can click Installed Operators → Red Hat Quay Bridge Operator to go to the Details page.
12.3. Creating an OpenShift Container Platform secret for the OAuth token
In this procedure, you will add the previously obtained access token to communicate with your Red Hat Quay deployment. The access token will be stored within OpenShift Container Platform as a secret.
Prerequisites
- You have set up Red Hat Quay and obtained an access token.
- You have deployed the Quay Bridge Operator on OpenShift Container Platform.
- An OpenShift Container Platform 4.6 or greater environment for which you have cluster administrator permissions.
- You have installed the OpenShift CLI (oc).
Procedure
Create a secret that contains the access token in the
openshift-operatorsnamespace:oc create secret -n openshift-operators generic <secret-name> --from-literal=token=<access_token>
$ oc create secret -n openshift-operators generic <secret-name> --from-literal=token=<access_token>Copy to Clipboard Copied! Toggle word wrap Toggle overflow
12.4. Creating the QuayIntegration custom resource
In this procedure, you will create a QuayIntegration custom resource, which can be completed from either the web console or from the command line.
Prerequisites
- You have set up Red Hat Quay and obtained an access token.
- You have deployed the Quay Bridge Operator on OpenShift Container Platform.
- An OpenShift Container Platform 4.6 or greater environment for which you have cluster administrator permissions.
- Optional: You have installed the OpenShift CLI (oc).
12.4.1. Optional: Creating the QuayIntegration custom resource using the CLI
Follow this procedure to create the QuayIntegration custom resource using the command line.
Procedure
Create a
quay-integration.yaml:touch quay-integration.yaml
$ touch quay-integration.yamlCopy to Clipboard Copied! Toggle word wrap Toggle overflow Use the following configuration for a minimal deployment of the
QuayIntegrationcustom resource:Copy to Clipboard Copied! Toggle word wrap Toggle overflow - 1
- The clusterID value should be unique across the entire ecosystem. This value is required and defaults to
openshift. - 2
- The
credentialsSecretproperty refers to the namespace and name of the secret containing the token that was previously created. - 3
- Replace the
QUAY_URLwith the hostname of your Red Hat Quay instance. - 4
- If Red Hat Quay is using self signed certificates, set the property to
insecureRegistry: true.
For a list of all configuration fields, see "QuayIntegration configuration fields".
Create the
QuayIntegrationcustom resource:oc create -f quay-integration.yaml
$ oc create -f quay-integration.yamlCopy to Clipboard Copied! Toggle word wrap Toggle overflow
12.4.2. Optional: Creating the QuayIntegration custom resource using the web console
Follow this procedure to create the QuayIntegration custom resource using the web console.
Procedure
- Open the Administrator perspective of the web console and navigate to Operators → Installed Operators.
- Click Red Hat Quay Bridge Operator.
- On the Details page of the Quay Bridge Operator, click Create Instance on the Quay Integration API card.
On the Create QuayIntegration page, enter the following required information in either Form view or YAML view:
-
Name: The name that will refer to the
QuayIntegrationcustom resource object. -
Cluster ID: The ID associated with this cluster. This value should be unique across the entire ecosystem. Defaults to
openshiftif left unspecified. - Credentials secret: Refers to the namespace and name of the secret containing the token that was previously created.
- Quay hostname: The hostname of the Quay registry.
-
Name: The name that will refer to the
For a list of all configuration fields, see "QuayIntegration configuration fields".
After the QuayIntegration custom resource is created, your OpenShift Container Platform cluster will be linked to your Red Hat Quay instance. Organizations within your Red Hat Quay registry should be created for the related namespace for the OpenShift Container Platform environment.
12.5. Using Quay Bridge Operator
Use the following procedure to use the Quay Bridge Operator.
Prerequisites
- You have downloaded the Red Hat Quay Operator.
- You have logged into OpenShift Container Platform as a cluster administrator.
- You have logged into your Red Hat Quay registry.
- You have downloaded the Quay Bridge Operator.
-
You have configured the
QuayIntegrationcustom resource.
Procedure
Enter the following command to create a new OpenShift Container Platform project called
e2e-demo:oc new-project e2e-demo
$ oc new-project e2e-demoCopy to Clipboard Copied! Toggle word wrap Toggle overflow After you have created a new project, a new Organization is created in Red Hat Quay. Navigate to the Red Hat Quay registry and confirm that you have created a new Organization named
openshift_e2e-demo.NoteThe
openshiftvalue of the Organization might different if the clusterID in yourQuayIntegrationresource used a different value.- On the Red Hat Quay UI, click the name of the new Organization, for example, openshift_e2e-demo.
Click Robot Accounts in the navigation pane. As part of new project, the following Robot Accounts should have been created:
- openshift_e2e-demo+deployer
- openshift_e2e-demo+default
- openshift_e2e-demo+builder
Enter the following command to confirm three secrets containing Docker configuration associated with the applicable Robot Accounts were created:
oc get secrets builder-quay-openshift deployer-quay-openshift default-quay-openshift
$ oc get secrets builder-quay-openshift deployer-quay-openshift default-quay-openshiftCopy to Clipboard Copied! Toggle word wrap Toggle overflow Example output
stevsmit@stevsmit ocp-quay $ oc get secrets builder-quay-openshift deployer-quay-openshift default-quay-openshift
NAME                      TYPE                             DATA   AGE
builder-quay-openshift    kubernetes.io/dockerconfigjson   1      77m
deployer-quay-openshift   kubernetes.io/dockerconfigjson   1      77m
default-quay-openshift    kubernetes.io/dockerconfigjson   1      77m
Copy to Clipboard Copied! Toggle word wrap Toggle overflow Enter the following command to display detailed information about
builderServiceAccount (SA), including its secrets, token expiration, and associated roles and role bindings. This ensures that the project is integrated via the Quay Bridge Operator.oc describe sa builder default deployer
$ oc describe sa builder default deployerCopy to Clipboard Copied! Toggle word wrap Toggle overflow Example output
Copy to Clipboard Copied! Toggle word wrap Toggle overflow Enter the following command to create and deploy a new application called
httpd-template:oc new-app --template=httpd-example
$ oc new-app --template=httpd-exampleCopy to Clipboard Copied! Toggle word wrap Toggle overflow Example output
Copy to Clipboard Copied! Toggle word wrap Toggle overflow After running this command,
BuildConfig,ImageStream,Service,Route, andDeploymentConfigresources are created. When theImageStreamresource is created, an associated repository is created in Red Hat Quay. For example:
The
ImageChangeTriggerfor theBuildConfigtriggers a new Build when the Apache HTTPD image, located in theopenshiftnamespace, is resolved. As the new Build is created, theMutatingWebhookConfigurationautomatically rewriters the output to point at Red Hat Quay. You can confirm that the build is complete by querying the output field of the build by running the following command:oc get build httpd-example-1 --template='{{ .spec.output.to.name }}'$ oc get build httpd-example-1 --template='{{ .spec.output.to.name }}'Copy to Clipboard Copied! Toggle word wrap Toggle overflow Example output
example-registry-quay-quay-enterprise.apps.quay-ocp.gcp.quaydev.org/openshift_e2e-demo/httpd-example:latest
example-registry-quay-quay-enterprise.apps.quay-ocp.gcp.quaydev.org/openshift_e2e-demo/httpd-example:latestCopy to Clipboard Copied! Toggle word wrap Toggle overflow -
On the Red Hat Quay UI, navigate to the
openshift_e2e-demoOrganization and select the httpd-example repository. -
Click Tags in the navigation pane and confirm that the
latesttag has been successfully pushed. Enter the following command to ensure that the latest tag has been resolved:
oc describe is httpd-example
$ oc describe is httpd-exampleCopy to Clipboard Copied! Toggle word wrap Toggle overflow Example output
Copy to Clipboard Copied! Toggle word wrap Toggle overflow After the
ImageStreamis resolwillved, a new deployment should have been triggered. Enter the following command to generate a URL output:oc get route httpd-example --template='{{ .spec.host }}'$ oc get route httpd-example --template='{{ .spec.host }}'Copy to Clipboard Copied! Toggle word wrap Toggle overflow Example output
httpd-example-e2e-demo.apps.quay-ocp.gcp.quaydev.org
httpd-example-e2e-demo.apps.quay-ocp.gcp.quaydev.orgCopy to Clipboard Copied! Toggle word wrap Toggle overflow - Navigate to the URL. If a sample webpage appears, the deployment was successful.
Enter the following command to delete the resources and clean up your Red Hat Quay repository:
oc delete project e2e-demo
$ oc delete project e2e-demoCopy to Clipboard Copied! Toggle word wrap Toggle overflow NoteThe command waits until the project resources have been removed. This can be bypassed by adding the
--wait=falseto the above command-
After the command completes, navigate to your Red Hat Quay repository and confirm that the
openshift_e2e-demoOrganization is no longer available.
Additional resources
- Best practices dictate that all communication between a client and an image registry be facilitated through secure means. Communication should leverage HTTPS/TLS with a certificate trust between the parties. While Red Hat Quay can be configured to serve an insecure configuration, proper certificates should be utilized on the server and configured on the client. Follow the OpenShift Container Platform documentation for adding and managing certificates at the container runtime level.
Chapter 13. Deploying IPv6 on the Red Hat Quay Operator
Your Red Hat Quay Operator deployment can now be served in locations that only support IPv6, such as Telco and Edge environments.
For a list of known limitations, see IPv6 limitations
13.1. Enabling the IPv6 protocol family
Use the following procedure to enable IPv6 support on your standalone Red Hat Quay deployment.
Prerequisites
- You have updated Red Hat Quay to 3.8.
- Your host and container software platform (Docker, Podman) must be configured to support IPv6.
Procedure
In your deployment’s
config.yamlfile, add theFEATURE_LISTEN_IP_VERSIONparameter and set it toIPv6, for example:Copy to Clipboard Copied! Toggle word wrap Toggle overflow - Start, or restart, your Red Hat Quay deployment.
Check that your deployment is listening to IPv6 by entering the following command:
curl <quay_endpoint>/health/instance
{"data":{"services":{"auth":true,"database":true,"disk_space":true,"registry_gunicorn":true,"service_key":true,"web_gunicorn":true}},"status_code":200}
$ curl <quay_endpoint>/health/instance {"data":{"services":{"auth":true,"database":true,"disk_space":true,"registry_gunicorn":true,"service_key":true,"web_gunicorn":true}},"status_code":200}Copy to Clipboard Copied! Toggle word wrap Toggle overflow
After enabling IPv6 in your deployment’s config.yaml, all Red Hat Quay features can be used as normal, so long as your environment is configured to use IPv6 and is not hindered by the IPv6 and dual-stack limitations.
If your environment is configured to IPv4, but the FEATURE_LISTEN_IP_VERSION configuration field is set to IPv6, Red Hat Quay will fail to deploy.
13.2. IPv6 limitations
Currently, attempting to configure your Red Hat Quay deployment with the common Microsoft Azure Blob Storage configuration will not work on IPv6 single stack environments. Because the endpoint of Microsoft Azure Blob Storage does not support IPv6, there is no workaround in place for this issue.
For more information, see PROJQUAY-4433.
Currently, attempting to configure your Red Hat Quay deployment with Amazon S3 CloudFront will not work on IPv6 single stack environments. Because the endpoint of Amazon S3 CloudFront does not support IPv6, there is no workaround in place for this issue.
For more information, see PROJQUAY-4470.
- Currently, Red Hat OpenShift Data Foundation is unsupported when Red Hat Quay is deployed on IPv6 single stack environments. As a result, Red Hat OpenShift Data Foundation cannot be used in IPv6 environments. This limitation is scheduled to be fixed in a future version of OpenShift Data Foundations.
- Currently, dual-stack (IPv4 and IPv6) support does not work on Red Hat Quay OpenShift Container Platform deployments. When Red Hat Quay 3.8 is deployed on OpenShift Container Platform with dual-stack support enabled, the Quay Route generated by the Red Hat Quay Operator only generates an IPv4 address, and not an IPv6 address. As a result, clients with an IPv6 address cannot access the Red Hat Quay application on OpenShift Container Platform. This limitation is scheduled to be fixed in a future version of OpenShift Container Platform.
Chapter 14. Adding custom SSL/TLS certificates when Red Hat Quay is deployed on Kubernetes
When deployed on Kubernetes, Red Hat Quay mounts in a secret as a volume to store config assets. Currently, this breaks the upload certificate function of the superuser panel.
As a temporary workaround, base64 encoded certificates can be added to the secret after Red Hat Quay has been deployed.
Use the following procedure to add custom SSL/TLS certificates when Red Hat Quay is deployed on Kubernetes.
Prerequisites
- Red Hat Quay has been deployed.
-
You have a custom
ca.crtfile.
Procedure
Base64 encode the contents of an SSL/TLS certificate by entering the following command:
cat ca.crt | base64 -w 0
$ cat ca.crt | base64 -w 0Copy to Clipboard Copied! Toggle word wrap Toggle overflow Example output
...c1psWGpqeGlPQmNEWkJPMjJ5d0pDemVnR2QNCnRsbW9JdEF4YnFSdVd3PT0KLS0tLS1FTkQgQ0VSVElGSUNBVEUtLS0tLQo=
...c1psWGpqeGlPQmNEWkJPMjJ5d0pDemVnR2QNCnRsbW9JdEF4YnFSdVd3PT0KLS0tLS1FTkQgQ0VSVElGSUNBVEUtLS0tLQo=Copy to Clipboard Copied! Toggle word wrap Toggle overflow Enter the following
kubectlcommand to edit thequay-enterprise-config-secretfile:kubectl --namespace quay-enterprise edit secret/quay-enterprise-config-secret
$ kubectl --namespace quay-enterprise edit secret/quay-enterprise-config-secretCopy to Clipboard Copied! Toggle word wrap Toggle overflow Add an entry for the certificate and paste the full
base64encoded stringer under the entry. For example:custom-cert.crt: c1psWGpqeGlPQmNEWkJPMjJ5d0pDemVnR2QNCnRsbW9JdEF4YnFSdVd3PT0KLS0tLS1FTkQgQ0VSVElGSUNBVEUtLS0tLQo=
custom-cert.crt: c1psWGpqeGlPQmNEWkJPMjJ5d0pDemVnR2QNCnRsbW9JdEF4YnFSdVd3PT0KLS0tLS1FTkQgQ0VSVElGSUNBVEUtLS0tLQo=Copy to Clipboard Copied! Toggle word wrap Toggle overflow Use the
kubectl deletecommand to remove all Red Hat Quay pods. For example:kubectl delete pod quay-operator.v3.7.1-6f9d859bd-p5ftc quayregistry-clair-postgres-7487f5bd86-xnxpr quayregistry-quay-app-upgrade-xq2v6 quayregistry-quay-config-editor-6dfdcfc44f-hlvwm quayregistry-quay-database-859d5445ff-cqthr quayregistry-quay-redis-84f888776f-hhgms
$ kubectl delete pod quay-operator.v3.7.1-6f9d859bd-p5ftc quayregistry-clair-postgres-7487f5bd86-xnxpr quayregistry-quay-app-upgrade-xq2v6 quayregistry-quay-config-editor-6dfdcfc44f-hlvwm quayregistry-quay-database-859d5445ff-cqthr quayregistry-quay-redis-84f888776f-hhgmsCopy to Clipboard Copied! Toggle word wrap Toggle overflow Afterwards, the Red Hat Quay deployment automatically schedules replace pods with the new certificate data.
Chapter 15. Upgrading the Red Hat Quay Operator Overview
The Red Hat Quay Operator follows a synchronized versioning scheme, which means that each version of the Operator is tied to the version of Red Hat Quay and the components that it manages. There is no field on the QuayRegistry custom resource which sets the version of Red Hat Quay to deploy; the Operator can only deploy a single version of all components. This scheme was chosen to ensure that all components work well together and to reduce the complexity of the Operator needing to know how to manage the lifecycles of many different versions of Red Hat Quay on Kubernetes.
15.1. Operator Lifecycle Manager
The Red Hat Quay Operator should be installed and upgraded using the Operator Lifecycle Manager (OLM). When creating a Subscription with the default approvalStrategy: Automatic, OLM will automatically upgrade the Red Hat Quay Operator whenever a new version becomes available.
When the Red Hat Quay Operator is installed by Operator Lifecycle Manager, it might be configured to support automatic or manual upgrades. This option is shown on the Operator Hub page for the Red Hat Quay Operator during installation. It can also be found in the Red Hat Quay Operator Subscription object by the approvalStrategy field. Choosing Automatic means that your Red Hat Quay Operator will automatically be upgraded whenever a new Operator version is released. If this is not desirable, then the Manual approval strategy should be selected.
15.2. Upgrading the Quay Operator
The standard approach for upgrading installed Operators on OpenShift Container Platform is documented at Upgrading installed Operators.
In general, Red Hat Quay supports upgrades from a prior (N-1) minor version only. For example, upgrading directly from Red Hat Quay 3.0.5 to the latest version of 3.5 is not supported. Instead, users would have to upgrade as follows:
- 3.0.5 → 3.1.3
- 3.1.3 → 3.2.2
- 3.2.2 → 3.3.4
- 3.3.4 → 3.4.z
- 3.4.z → 3.5.z
This is required to ensure that any necessary database migrations are done correctly and in the right order during the upgrade.
In some cases, Red Hat Quay supports direct, single-step upgrades from prior (N-2, N-3) minor versions. This simplifies the upgrade procedure for customers on older releases. The following upgrade paths are supported:
- 3.3.z → 3.6.z
- 3.4.z → 3.6.z
- 3.4.z → 3.7.z
- 3.5.z → 3.7.z
- 3.7.z → 3.8.z
- 3.6.z → 3.9.z
- 3.7.z → 3.9.z
- 3.8.z → 3.9.z
For users on standalone deployments of Red Hat Quay wanting to upgrade to 3.9, see the Standalone upgrade guide.
15.2.1. Upgrading Quay
To update Red Hat Quay from one minor version to the next, for example, 3.4 → 3.5, you must change the update channel for the Red Hat Quay Operator.
For z stream upgrades, for example, 3.4.2 → 3.4.3, updates are released in the major-minor channel that the user initially selected during install. The procedure to perform a z stream upgrade depends on the approvalStrategy as outlined above. If the approval strategy is set to Automatic, the Quay Operator will upgrade automatically to the newest z stream. This results in automatic, rolling Quay updates to newer z streams with little to no downtime. Otherwise, the update must be manually approved before installation can begin.
15.2.2. Updating Red Hat Quay from 3.8 → 3.9
If your Red Hat Quay deployment is upgrading from one y-stream to the next, for example, from 3.8.10 → 3.8.11, you must not switch the upgrade channel from stable-3.8 to stable-3.9. Changing the upgrade channel in the middle of a y-stream upgrade will disallow Red Hat Quay from upgrading to 3.9. This is a known issue and will be fixed in a future version of Red Hat Quay.
When updating Red Hat Quay 3.8 → 3.9, the Operator automatically upgrades the existing PostgreSQL databases for Clair and Red Hat Quay from version 10 to version 13.
- This upgrade is irreversible. It is highly recommended that you upgrade to PostgreSQL 13. PostgreSQL 10 had its final release on November 10, 2022 and is no longer supported. For more information, see the PostgreSQL Versioning Policy.
-
By default, Red Hat Quay is configured to remove old persistent volume claims (PVCs) from PostgreSQL 10. To disable this setting and backup old PVCs, you must set
POSTGRES_UPGRADE_RETAIN_BACKUPtoTruein yourquay-operatorSubscriptionobject.
Prerequisites
- You have installed Red Hat Quay 3.8 on OpenShift Container Platform.
100 GB of free, additional storage.
During the upgrade process, additional persistent volume claims (PVCs) are provisioned to store the migrated data. This helps prevent a destructive operation on user data. The upgrade process rolls out PVCs for 50 GB for both the Red Hat Quay database upgrade, and the Clair database upgrade.
Procedure
Optional. Back up your old PVCs from PostgreSQL 10 by setting
POSTGRES_UPGRADE_RETAIN_BACKUPtoTrueyourquay-operatorSubscriptionobject. For example:Copy to Clipboard Copied! Toggle word wrap Toggle overflow - In the OpenShift Container Platform Web Console, navigate to Operators → Installed Operators.
- Click on the Red Hat Quay Operator.
- Navigate to the Subscription tab.
- Under Subscription details click Update channel.
- Select stable-3.9 and save the changes.
- Check the progress of the new installation under Upgrade status. Wait until the upgrade status changes to 1 installed before proceeding.
- In your OpenShift Container Platform cluster, navigate to Workloads → Pods. Existing pods should be terminated, or in the process of being terminated.
-
Wait for the following pods, which are responsible for upgrading the database and alembic migration of existing data, to spin up:
clair-postgres-upgrade,quay-postgres-upgrade, andquay-app-upgrade. -
After the
clair-postgres-upgrade,quay-postgres-upgrade, andquay-app-upgradepods are marked as Completed, the remaining pods for your Red Hat Quay deployment spin up. This takes approximately ten minutes. -
Verify that the
quay-databaseandclair-postgrespods now use thepostgresql-13image. -
After the
quay-apppod is marked as Running, you can reach your Red Hat Quay registry.
15.2.3. Upgrading directly from 3.3.z or 3.4.z to 3.6
The following section provides important information when upgrading from Red Hat Quay 3.3.z or 3.4.z to 3.6.
15.2.3.1. Upgrading with edge routing enabled
- Previously, when running a 3.3.z version of Red Hat Quay with edge routing enabled, users were unable to upgrade to 3.4.z versions of Red Hat Quay. This has been resolved with the release of Red Hat Quay 3.6.
When upgrading from 3.3.z to 3.6, if
tls.terminationis set tononein your Red Hat Quay 3.3.z deployment, it will change to HTTPS with TLS edge termination and use the default cluster wildcard certificate. For example:Copy to Clipboard Copied! Toggle word wrap Toggle overflow
15.2.3.2. Upgrading with custom SSL/TLS certificate/key pairs without Subject Alternative Names
There is an issue for customers using their own SSL/TLS certificate/key pairs without Subject Alternative Names (SANs) when upgrading from Red Hat Quay 3.3.4 to Red Hat Quay 3.6 directly. During the upgrade to Red Hat Quay 3.6, the deployment is blocked, with the error message from the Red Hat Quay Operator pod logs indicating that the Red Hat Quay SSL/TLS certificate must have SANs.
If possible, you should regenerate your SSL/TLS certificates with the correct hostname in the SANs. A possible workaround involves defining an environment variable in the quay-app, quay-upgrade and quay-config-editor pods after upgrade to enable CommonName matching:
GODEBUG=x509ignoreCN=0
GODEBUG=x509ignoreCN=0
The GODEBUG=x509ignoreCN=0 flag enables the legacy behavior of treating the CommonName field on X.509 certificates as a hostname when no SANs are present. However, this workaround is not recommended, as it will not persist across a redeployment.
15.2.3.3. Configuring Clair v4 when upgrading from 3.3.z or 3.4.z to 3.6 using the Red Hat Quay Operator
To set up Clair v4 on a new Red Hat Quay deployment on OpenShift Container Platform, it is highly recommended to use the Red Hat Quay Operator. By default, the Red Hat Quay Operator will install or upgrade a Clair deployment along with your Red Hat Quay deployment and configure Clair automatically.
For instructions about setting up Clair v4 in a disconnected OpenShift Container Platform cluster, see Setting Up Clair on a Red Hat Quay OpenShift deployment.
15.2.4. Swift configuration when upgrading from 3.3.z to 3.6
When upgrading from Red Hat Quay 3.3.z to 3.6.z, some users might receive the following error: Switch auth v3 requires tenant_id (string) in os_options. As a workaround, you can manually update your DISTRIBUTED_STORAGE_CONFIG to add the os_options and tenant_id parameters:
15.2.5. Changing the update channel for the Red Hat Quay Operator
The subscription of an installed Operator specifies an update channel, which is used to track and receive updates for the Operator. To upgrade the Red Hat Quay Operator to start tracking and receiving updates from a newer channel, change the update channel in the Subscription tab for the installed Red Hat Quay Operator. For subscriptions with an Automatic approval strategy, the upgrade begins automatically and can be monitored on the page that lists the Installed Operators.
15.2.6. Manually approving a pending Operator upgrade
If an installed Operator has the approval strategy in its subscription set to Manual, when new updates are released in its current update channel, the update must be manually approved before installation can begin. If the Red Hat Quay Operator has a pending upgrade, this status will be displayed in the list of Installed Operators. In the Subscription tab for the Red Hat Quay Operator, you can preview the install plan and review the resources that are listed as available for upgrade. If satisfied, click Approve and return to the page that lists Installed Operators to monitor the progress of the upgrade.
The following image shows the Subscription tab in the UI, including the update Channel, the Approval strategy, the Upgrade status and the InstallPlan:

The list of Installed Operators provides a high-level summary of the current Quay installation:

15.3. Upgrading a QuayRegistry
When the Red Hat Quay Operator starts, it immediately looks for any QuayRegistries it can find in the namespace(s) it is configured to watch. When it finds one, the following logic is used:
-
If
status.currentVersionis unset, reconcile as normal. -
If
status.currentVersionequals the Operator version, reconcile as normal. -
If
status.currentVersiondoes not equal the Operator version, check if it can be upgraded. If it can, perform upgrade tasks and set thestatus.currentVersionto the Operator’s version once complete. If it cannot be upgraded, return an error and leave theQuayRegistryand its deployed Kubernetes objects alone.
15.4. Upgrading a QuayEcosystem
Upgrades are supported from previous versions of the Operator which used the QuayEcosystem API for a limited set of configurations. To ensure that migrations do not happen unexpectedly, a special label needs to be applied to the QuayEcosystem for it to be migrated. A new QuayRegistry will be created for the Operator to manage, but the old QuayEcosystem will remain until manually deleted to ensure that you can roll back and still access Quay in case anything goes wrong. To migrate an existing QuayEcosystem to a new QuayRegistry, use the following procedure.
Procedure
Add
"quay-operator/migrate": "true"to themetadata.labelsof theQuayEcosystem.oc edit quayecosystem <quayecosystemname>
$ oc edit quayecosystem <quayecosystemname>Copy to Clipboard Copied! Toggle word wrap Toggle overflow metadata: labels: quay-operator/migrate: "true"metadata: labels: quay-operator/migrate: "true"Copy to Clipboard Copied! Toggle word wrap Toggle overflow -
Wait for a
QuayRegistryto be created with the samemetadata.nameas yourQuayEcosystem. TheQuayEcosystemwill be marked with the label"quay-operator/migration-complete": "true". -
After the
status.registryEndpointof the newQuayRegistryis set, access Red Hat Quay and confirm that all data and settings were migrated successfully. -
If everything works correctly, you can delete the
QuayEcosystemand Kubernetes garbage collection will clean up all old resources.
15.4.1. Reverting QuayEcosystem Upgrade
If something goes wrong during the automatic upgrade from QuayEcosystem to QuayRegistry, follow these steps to revert back to using the QuayEcosystem:
Procedure
Delete the
QuayRegistryusing either the UI orkubectl:kubectl delete -n <namespace> quayregistry <quayecosystem-name>
$ kubectl delete -n <namespace> quayregistry <quayecosystem-name>Copy to Clipboard Copied! Toggle word wrap Toggle overflow -
If external access was provided using a
Route, change theRouteto point back to the originalServiceusing the UI orkubectl.
If your QuayEcosystem was managing the PostgreSQL database, the upgrade process will migrate your data to a new PostgreSQL database managed by the upgraded Operator. Your old database will not be changed or removed but Red Hat Quay will no longer use it once the migration is complete. If there are issues during the data migration, the upgrade process will exit and it is recommended that you continue with your database as an unmanaged component.
15.4.2. Supported QuayEcosystem Configurations for Upgrades
The Red Hat Quay Operator reports errors in its logs and in status.conditions if migrating a QuayEcosystem component fails or is unsupported. All unmanaged components should migrate successfully because no Kubernetes resources need to be adopted and all the necessary values are already provided in Red Hat Quay’s config.yaml file.
Database
Ephemeral database not supported (volumeSize field must be set).
Redis
Nothing special needed.
External Access
Only passthrough Route access is supported for automatic migration. Manual migration required for other methods.
-
LoadBalancerwithout custom hostname: After theQuayEcosystemis marked with label"quay-operator/migration-complete": "true", delete themetadata.ownerReferencesfield from existingServicebefore deleting theQuayEcosystemto prevent Kubernetes from garbage collecting theServiceand removing the load balancer. A newServicewill be created withmetadata.nameformat<QuayEcosystem-name>-quay-app. Edit thespec.selectorof the existingServiceto match thespec.selectorof the newServiceso traffic to the old load balancer endpoint will now be directed to the new pods. You are now responsible for the oldService; the Quay Operator will not manage it. -
LoadBalancer/NodePort/Ingresswith custom hostname: A newServiceof typeLoadBalancerwill be created withmetadata.nameformat<QuayEcosystem-name>-quay-app. Change your DNS settings to point to thestatus.loadBalancerendpoint provided by the newService.
Clair
Nothing special needed.
Object Storage
QuayEcosystem did not have a managed object storage component, so object storage will always be marked as unmanaged. Local storage is not supported.
Repository Mirroring
Nothing special needed.
Additional resources
- For more details on the Red Hat Quay Operator, see the upstream quay-operator project.