Installation Guide
Installing Red Hat Satellite Server and Capsule Server
Abstract
Chapter 1. What Satellite Server and Capsule Server do
Red Hat Satellite is a system management solution that enables you to deploy, configure, and maintain your systems across physical, virtual, and cloud environments. Satellite provides provisioning, remote management and monitoring of multiple Red Hat Enterprise Linux deployments with a single, centralized tool. Red Hat Satellite Server synchronizes the content from Red Hat Customer Portal, and provides functionality including fine-grained life cycle management, user and group role-based access control, integrated subscription management, as well as advanced GUI, CLI, and API access.
Red Hat Satellite Capsule Server mirrors content from Red Hat Satellite Server to facilitate content federation across various geographical locations. Host systems can pull content from the Capsule Server and not from the central Satellite Server. The Capsule Server also provides localized services such as Puppet Master, DHCP, DNS, or TFTP. Capsule Servers assist you in scaling your Satellite environment as the number of your managed systems increases.
Capsule Servers decrease the load on the central server, increase redundancy, and reduce bandwidth usage. For more information, see the Capsule Server Overview.
Chapter 2. Preparing your environment for installation
2.1. System Requirements
The following requirements apply to the networked base system:
- 64-bit architecture
- The latest version of Red Hat Enterprise Linux 7 Server
- 4-core 2.0 GHz CPU at a minimum
- A minimum of 20 GB memory is required for the Satellite Server to function. In addition, a minimum of 4 GB of swap space is also recommended. Satellite running with less memory than the minimum value might not operate correctly.
- A unique host name, which can contain lower-case letters, numbers, dots (.) and hyphens (-)
- A current Red Hat Satellite subscription
- Administrative user (root) access
- A system umask of 0022
- Full forward and reverse DNS resolution using a fully-qualified domain name
Before you install Satellite Server or Capsule Server, ensure that your environment meets the requirements for installation.
Satellite Server must be installed on a freshly provisioned system that serves no other function except to run Satellite Server.
The Red Hat Satellite Server and Capsule Server versions must match. For example, a Satellite 6.2 Server cannot run a 6.3 Capsule Server and a Satellite 6.3 Server cannot run a 6.2 Capsule Server. Mismatching Satellite Server and Capsule Server versions results in the Capsule Server failing silently.
Self-registered Satellites are not supported.
If you have a large number of content hosts, see Appendix A, Large Deployment Considerations to ensure that your environment is set up appropriately.
For more information on scaling your Capsule Servers, see Appendix B, Capsule Server Scalability Considerations.
Certified hypervisors
Red Hat Satellite is fully supported on both physical systems and virtual machines that run on hypervisors that are supported to run Red Hat Enterprise Linux. For more information about certified hypervisors, see Which hypervisors are certified to run Red Hat Enterprise Linux?
2.2. Storage Requirements and Recommendations
Ensure that your environment meets the minimum requirements before installing Satellite Server or Capsule Server.
Packages that are duplicated in different repositories are only stored once on the disk. Additional repositories containing duplicate packages require less additional storage. The bulk of storage resides in the /var/lib/mongodb/ and /var/lib/pulp/ directories. These end points are not manually configurable. Make sure that storage is available on the /var file system to prevent storage issues.
The /var/cache/pulp/ directory is used to temporarily store content while it is being synchronized. For content in RPM format, a maximum of 5 RPM files are stored in this directory at any time. After each file is synchronized, it is moved to the /var/lib/pulp/ directory. Up to eight RPM content synchronization tasks can be running simultaneously by default, with each using up to 1 GB of metadata. For content in ISO format, all ISO files per synchronization task are stored in /var/cache/pulp/ until the task is complete, after which they are moved to the /var/lib/pulp/ directory. For example, if you are synchronizing four ISO files, each 4 GB in size, this requires a total of 16 GB in the /var/cache/pulp/ directory. Take into account the number of ISO files you intend synchronizing because the temporary disk space required for them typically exceeds that of RPM content.
The /var/lib/qpidd/ directory uses slightly more than 2 MB per Content Host managed by the goferd service. For example, 10 000 Content Hosts require 20 GB of disk space in /var/lib/qpidd/.
Storage Requirements
The following tables detail recommended storage requirements for specific directories. These values are based on expected use case scenarios and can vary according to individual environments. The Capsule Server table also applies to the Satellite Server as it has an integrated Capsule by default. Pay attention to your specific use case when reading the tables. For example, you can have a Capsule Server without Pulp enabled, in which case you do not need the same level of storage requirements for directories related to Pulp such as /var/lib/pulp/.
In the following two tables, the runtime size was measured with Red Hat Enterprise Linux 5, 6, and 7 repositories synchronized.
| Directory | Installation Size | Runtime Size | Considerations |
|---|---|---|---|
| /var/cache/pulp/ | 1 MB | 10 GB (Connected Installations Minimum) | See the notes in this section’s introduction. |
| /var/cache/pulp/ | 1 MB | 30 GB (Disconnected Installations Minimum) | See the notes in this section’s introduction. |
| /var/lib/pulp/ | 1 MB | 500 GB |
|
| /var/lib/mongodb/ | 3.5 GB | 50 GB |
|
| /var/lib/qpidd/ | 25 MB | Not Applicable |
Continues to grow as content hosts managed by |
| /var/log/ | 10 MB | 250 MB | None |
| /var/lib/pgsql/ | 100 MB | 10 GB |
A minimum of 2 GB of available storage in |
| /var/spool/squid/ | 0 MB | 10 GB | None |
| /usr | 3 GB | Not Applicable | None |
| /opt | 500 MB (Connected Installations) | Not Applicable |
Software collections are installed into the |
| /opt | 3 GB (Disconnected Installations) | Not Applicable |
|
| Directory | Installation Size | Runtime Size | Considerations |
|---|---|---|---|
| /var/cache/pulp/ | 1 MB | 10 GB (Minimum) | See the notes in this section’s introduction. |
| /var/lib/pulp/ | 1 MB | 500 GB |
|
| /var/lib/mongodb/ | 3.5 GB | 50 GB |
|
Log files are written to /var/log/messages/, /var/log/httpd/, and /var/lib/foreman-proxy/openscap/content/. You can manage the size of these files using logrotate. For more information, see Log Rotation in the System Administrator’s Guide.
Storage Recommendations
-
Because most Satellite as well as Capsule Server data is stored within the
/vardirectory, it is strongly recommended to mount/varon LVM storage, enabling the system to scale. -
Use high-bandwidth, low-latency storage for the
/var/lib/pulp/and/var/lib/mongodb/directories. As Red Hat Satellite has many operations that are I/O intensive, using high latency, low-bandwidth storage will cause performance degradation. Ensure your installation has a speed in the range 60 - 80 Megabytes per second. You can use thefiotool to get this data. See the Red Hat Knowledgebase solution Impact of Disk Speed on Satellite 6 Operations for more information on using thefiotool. -
It is recommended not to use NFS with MongoDB as MongoDB does not use conventional I/O to access data files and performance problems occur when both the data files and the journal files are hosted on NFS. If required to use NFS, mount the volumes with the following option in the
/etc/fstabfile:bg,nolock, andnoatime. - Do not use the GFS2 file system as the input-output latency has been found to be too high.
- For improved performance, use solid state drives (SSD) rather than hard disk drives (HDD).
-
The XFS file system is recommended for Red Hat Satellite 6 because it does not have the inode limitations that
ext4does. As Satellite uses a lot of symbolic links it is likely that your system may run out of inodes if usingext4and the default number of inodes. When
/var/lib/pulpdirectory is mounted using an NFS share, SELinux blocks the synchronization process. To avoid this, specify the SELinux context of the/var/lib/pulpdirectory in the file system table by adding the following lines to/etc/fstab:nfs.example.com:/nfsshare /var/lib/pulp/content nfs context="system_u:object_r:httpd_sys_rw_content_t:s0" 1 2If NFS share is already mounted, remount it using the above recommendation and enter the following command:
# chcon -R system_u:object_r:httpd_sys_rw_content_t:s0 /var/lib/pulp
2.3. Supported Operating Systems
You can install the operating system from disc, local ISO image, kickstart, or any other method that Red Hat supports. Red Hat Satellite Server and Red Hat Satellite Capsule Server are supported only on the latest versions of Red Hat Enterprise Linux 7 Server that is available at the time when Satellite 6.3 is installed. Previous versions of Red Hat Enterprise Linux including EUS or z-stream are not supported.
Red Hat Satellite Server and Red Hat Satellite Capsule Server require Red Hat Enterprise Linux installations with the @Base package group with no other package-set modifications, and without third-party configurations or software not directly necessary for the direct operation of the server. This restriction includes hardening and other non-Red Hat security software. If you require such software in your infrastructure, install and verify a complete working Satellite Server first, then create a backup of the system before adding any non-Red Hat software.
It is recommended that the Satellite Server be a freshly provisioned system. It is also recommended that Capsule Servers be freshly provisioned systems and not registered to the Red Hat CDN. Using the system for anything other than running Satellite is not supported.
If any of the following exist on the system, they must be removed before installation:
- Java virtual machines
- Puppet RPM files
- Additional yum repositories other than those explicitly required in this guide for installation
2.4. Supported Browsers
The following web browsers are fully supported:
- Firefox versions 39 and later
- Chrome versions 28 and later
The following web browsers are partially supported. The Satellite web UI interface functions correctly but certain design elements may not align as expected:
- Firefox version 38
- Chrome version 27
- Internet Explorer versions 10 and 11
The web UI and command-line interface for Satellite Server supports English, Portuguese, Simplified Chinese, Traditional Chinese, Korean, Japanese, Italian, Spanish, Russian, French, and German.
2.5. Ports and Firewalls Requirements
Specific network ports must be open and free on the base operating system, as well as open in any network-based firewalls, to enable the components of Satellite architecture to communicate. The tables in this section explain the need for the ports, and the corresponding firewall commands for host-based firewalls are given in the following section. The installation of a Capsule Server fails if the ports between the Satellite Server and the Capsule Server are not open before installation starts.
The tables indicate the destination port and the direction of network traffic, use this information to configure any network-based firewalls. Note that some cloud solutions need to be specifically configured to allow communications between machines as they isolate machines similarly to network-based firewalls.
The Satellite Server has an integrated Capsule and any host that is directly connected to the Satellite Server is a Client of the Satellite in the context of these tables. This includes the base system on which a Capsule Server is running. Remember to take this into account when planing any network-based firewall configurations.
Systems which are clients of Capsules, other than Satellite’s integrated Capsule, do not need access to the Satellite Server. For more information on Satellite Topology, see Capsule Networking in the Red Hat Satellite Architecture Guide.
Required ports can change based on your configuration.
| Port | Protocol | Service | Required For |
|---|---|---|---|
| 443 | TCP | HTTPS | Subscription Management Services (access.redhat.com) and connecting to the Red Hat CDN (cdn.redhat.com). |
Except in the case of a disconnected Satellite, the Satellite Server needs access to the Red Hat CDN. For a list of IP addresses used by the Red Hat CDN (cdn.redhat.com), see the Knowledgebase article Public CIDR Lists for Red Hat on the Red Hat Customer Portal.
| Port | Protocol | Service | Required For |
|---|---|---|---|
| 443 | TCP | HTTPS | Browser-based UI access to Satellite |
| 80 | TCP | HTTP | Redirection to HTTPS for web UI access to Satellite (Optional) |
| Port | Protocol | Service | Required For |
|---|---|---|---|
| 80 | TCP | HTTP | Anaconda, yum, for obtaining Katello certificates, templates, and for downloading iPXE firmware |
| 443 | TCP | HTTPS | Subscription Management Services, yum, Telemetry Services, and for connection to the Katello Agent |
| 5647 | TCP | amqp | The Katello Agent to communicate with the Satellite’s Qpid dispatch router |
| 8000 | TCP | HTTP | Anaconda to download kickstart templates to hosts, and for downloading iPXE firmware |
| 8140 | TCP | HTTPS | Puppet agent to Puppet master connections |
| 9090 | TCP | HTTPS | Sending SCAP reports to the Smart Proxy in the integrated Capsule and for the discovery image during provisioning |
| 5000 | TCP | HTTPS | Connection to Katello for the Docker registry |
Any managed host that is directly connected to Satellite Server is a client in this context because it is a client of the integrated Capsule. This includes the base system on which a Capsule Server is running.
| Port | Protocol | Service | Required for |
|---|---|---|---|
| 80 | TCP | HTTP | Anaconda, yum, and for obtaining Katello certificate updates |
| 443 | TCP | HTTPS | Anaconda, yum, Telemetry Services, and Puppet |
| 5647 | TCP | amqp | The Katello agent to communicate with the Capsule’s Qpid dispatch router |
| 8000 | TCP | HTTP | Anaconda to download kickstart templates to hosts, and for downloading iPXE firmware |
| 8140 | TCP | HTTPS | Puppet agent to Puppet master connections |
| 8443 | TCP | HTTPS | Subscription Management Services and Telemetry Services |
| 9090 | TCP | HTTPS | Sending SCAP reports to the Smart Proxy in the Capsule and for the discovery image during provisioning |
| 5000 | TCP | HTTPS | Connection to Katello for the Docker registry |
| 53 | TCP and UDP | DNS | Client to Capsule DNS queries to a Capsule’s DNS service (Optional) |
| 67 | UDP | DHCP | Client to Capsule broadcasts, DHCP broadcasts for Client provisioning from a Capsule (Optional) |
| 69 | UDP | TFTP | Clients downloading PXE boot image files from a Capsule for provisioning (Optional) |
| Port | Protocol | Service | Required For |
|---|---|---|---|
| 80 | TCP | HTTP | Anaconda, yum, and for obtaining Katello certificate updates |
| 443 | TCP | HTTPS | Connections to Katello, Foreman, Foreman API, and Pulp |
| 5646 | TCP | amqp | Capsule’s Qpid dispatch router to Qpid dispatch router in the Satellite |
| 5647 | TCP | amqp | The Katello agent to communicate with the Satellite’s Qpid dispatch router |
| 5000 | TCP | HTTPS | Connection to Katello for the Docker registry |
Note that the base system on which a Capsule Server is running is a client of the Satellite’s integrated Capsule. See the table Ports for Client to Satellite Communication.
| Port | Protocol | Service | Required For |
|---|---|---|---|
| 443 | TCP | HTTPS | Connections to the Pulp server in the Capsule |
| 9090 | TCP | HTTPS | Connections to the proxy in the Capsule |
| 80 | TCP | HTTP | Downloading a bootdisk (Optional) |
| Port | Protocol | Service | Required For |
|---|---|---|---|
| 7 | TCP and UDP | ICMP | DHCP Capsule to Client network, ICMP ECHO to verify IP address is free (Optional) |
| 68 | UDP | DHCP | Capsule to Client broadcasts, DHCP broadcasts for Client provisioning from a Capsule (Optional) |
| 8443 | TCP | HTTP | Capsule to Client "reboot" command to a discovered host during provisioning (Optional) |
Any managed host that is directly connected to Satellite Server is a client in this context because it is a client of the integrated Capsule. This includes the base system on which a Capsule Server is running.
| Port | Protocol | Service | Required For |
|---|---|---|---|
| 22 | TCP | SSH | Satellite and Capsule originated communications, for Remote Execution (Rex) |
| 443 | TCP | HTTPS | Satellite originated communications, for vCenter compute resource |
| 7911 | TCP | DHCP |
|
| 5000 | TCP | HTTP | Satellite originated communications, for compute resources in OpenStack or for running containers |
| 22, 16514 | TCP | SSH, SSL/TLS | Satellite originated communications, for compute resources in libvirt |
| 389, 636 | TCP | LDAP, LDAPS | Satellite originated communications, for LDAP and secured LDAP authentication sources |
| 5900 to 5930 | TCP | SSL/TLS | Satellite originated communications, for NoVNC console in web UI to hypervisors |
A DHCP Capsule sends an ICMP ECHO to confirm an IP address is free, no response of any kind is expected. ICMP can be dropped by a networked-based firewall, but any response prevents the allocation of IP addresses.
2.6. Enabling Connections from a Client to Satellite Server
Capsules and Content Hosts that are clients of a Satellite Server’s internal Capsule require access through Satellite’s host-based firewall and any network-based firewalls.
Use this section to configure the host-based firewall on the Red Hat Enterprise Linux 7 system that Satellite is installed on, to enable incoming connections from Clients, and to make the configuration persistent across system reboots. For more information on the ports used, see Section 2.5, “Ports and Firewalls Requirements”.
Configuring the Firewall
Open the ports required for Client to Satellite communication.
# firewall-cmd \
--add-port="53/udp" --add-port="53/tcp" \
--add-port="67/udp" --add-port="69/udp" \
--add-port="80/tcp"  --add-port="443/tcp" \
--add-port="5000/tcp" --add-port="5647/tcp" \
--add-port="8000/tcp" --add-port="8140/tcp" \
--add-port="9090/tcp"
Repeat the command adding the
--permanentoption to make these settings persistent.# firewall-cmd --permanent \ --add-port="53/udp" --add-port="53/tcp" \ --add-port="67/udp" --add-port="69/udp" \ --add-port="80/tcp" --add-port="443/tcp" \ --add-port="5000/tcp" --add-port="5647/tcp" \ --add-port="8000/tcp" --add-port="8140/tcp" \ --add-port="9090/tcp"
2.7. Enabling Connections from Capsule Server to Satellite Server
Follow this procedure to enable incoming connections from a Capsule Server to a Satellite Server, and make these rules persistent across reboots. If you do not use an external Capsule Server, you do not need to enable this connection.
Prerequisites
A Capsule Server’s base system is a client of the Satellite Server, therefore the procedure in Section 2.6, “Enabling Connections from a Client to Satellite Server” should be completed first. This procedure opens the extra ports required by an external Capsule Server.
For more information on the ports used, see Section 2.5, “Ports and Firewalls Requirements”.
Configure the firewall.
# firewall-cmd --add-port="5000/tcp" --add-port="5646/tcp"Repeat the command adding the
--permanentoption to make the settings persistent.# firewall-cmd --permanent --add-port="5000/tcp" --add-port="5646/tcp"
2.8. Enabling Connections from Satellite Server and Clients to a Capsule Server
You can enable incoming connections from Satellite Server and clients to Capsule Server and make these rules persistent during reboots. If you do not use an external Capsule Server, you do not need to enable this connection.
For more information on the ports used, see Ports and Firewalls Requirements.
Configure the firewall.
# firewall-cmd --add-port="53/udp" --add-port="53/tcp" \
--add-port="67/udp" --add-port="69/udp" \
--add-port="80/tcp" --add-port="443/tcp" \
--add-port="5000/tcp" --add-port="5647/tcp" \
--add-port="8000/tcp" --add-port="8140/tcp" \
--add-port="8443/tcp" --add-port="9090/tcp"
Repeat the command adding the
--permanentoption to make the settings persistent.# firewall-cmd --permanent --add-port="53/udp" --add-port="53/tcp" \ --add-port="67/udp" --add-port="69/udp" \ --add-port="80/tcp" --add-port="443/tcp" \ --add-port="5000/tcp" --add-port="5647/tcp" \ --add-port="8000/tcp" --add-port="8140/tcp" \ --add-port="8443/tcp" --add-port="9090/tcp"
2.9. Verifying Firewall Settings
You can verify changes to firewall settings using the firewall-cmd command.
To verify firewall settings:
# firewall-cmd --list-allFor more information, see Configuring the Firewall Using the firewall-cmd Command-Line Tool in the Red Hat Enterprise Linux 7 Security Guide.
2.10. Verifying DNS resolution
Verify the full forward and reverse DNS resolution using a fully-qualified domain name to prevent issues while installing Satellite.
Ensure that the host name and local host resolve correctly.
# ping -c1 localhost
# ping -c1 `hostname -f` # my_system.domain.com
Successful name resolution results in output similar to the following:
# ping -c1 localhost
PING localhost (127.0.0.1) 56(84) bytes of data.
64 bytes from localhost (127.0.0.1): icmp_seq=1 ttl=64 time=0.043 ms

--- localhost ping statistics ---
1 packets transmitted, 1 received, 0% packet loss, time 0ms
rtt min/avg/max/mdev = 0.043/0.043/0.043/0.000 ms

# ping -c1 `hostname -f`
PING hostname.gateway (XX.XX.XX.XX) 56(84) bytes of data.
64 bytes from hostname.gateway (XX.XX.XX.XX): icmp_seq=1 ttl=64 time=0.019 ms

--- localhost.gateway ping statistics ---
1 packets transmitted, 1 received, 0% packet loss, time 0ms
rtt min/avg/max/mdev = 0.019/0.019/0.019/0.000 ms
To avoid discrepancies with static and transient host names, set all the host names on the system by entering the following command:
# hostnamectl set-hostname nameFor more information, see the Configuring Host Names Using hostnamectl in the Red Hat Enterprise Linux 7 Networking Guide.
Name resolution is critical to the operation of Satellite 6. If Satellite cannot properly resolve its fully qualified domain name, many options fail. Among these options are content management, subscription management, and provisioning.
2.11. Changing Default SELinux ports
Red Hat Satellite 6 uses a set of predefined ports. Because Red Hat recommends that SELinux on Satellite 6 systems be set to permissive or enforcing, if you need to change the port for any service, you also need to change the associated SELinux port type to allow access to the resources. You only need to change these ports if you use non-standard ports.
For example, if you change the Satellite web UI ports (HTTP/HTTPS) to 8018/8019, you need to add these port numbers to the httpd_port_t SELinux port type.
This change is also required for target ports. For example, when Satellite 6 connects to an external source, like Red Hat Virtualization or Red Hat OpenStack Platform.
You only need to make changes to default port assignments once. Updating or upgrading Satellite has no effect on these assignments. Updating only adds default SELinux ports if no assignments exist.
Before You Begin
- SELinux must be enabled and running in permissive or enforcing mode before installing Satellite. For more information, see the Red Hat Enterprise Linux 7 SELinux User’s and Administrator’s Guide.
Changing default ports to user-specified ports
To change the port from the default port to a user-specified port, execute the commands using values that are relevant to your environment. These examples use port 99999 for demonstration purposes.
Expand Default Port SELinux Command 80, 443, 8443
semanage port -a -t http_port_t -p tcp 99999
8080
semanage port -a -t http_cache_port_t -p tcp 99999
8140
semanage port -a -t puppet_port_t -p tcp 99999
9090
semanage port -a -t websm_port_t -p tcp 99999
69
semanage port -a -t tftp_port_t -p udp 99999
53 (TCP)
semanage port -a -t dns_port_t -p tcp 99999
53 (UDP)
semanage port -a -t dns_port_t -p udp 99999
67, 68
semanage port -a -t dhcpd_port_t -p udp 99999
5671
semanage port -a -t amqp_port_t -p tcp 99999
8000
semanage port -a -t soundd_port_t -p tcp 99999
7911
semanage port -a -t dhcpd_port_t -p tcp 99999
5000 on Red Hat Enterprise Linux 7
semanage port -a -t commplex_main_port_t -p tcp 99999
22
semanage port -a -t ssh_port_t -p tcp 99999
16514 (libvirt)
semanage port -a -t virt_port_t -p tcp 99999
389, 636
semanage port -a -t ldap_port_t -p tcp 99999
5910 to 5930
semanage port -a -t vnc_port_t -p tcp 99999
- Disassociate the previously used port number and port type.
# semanage port -d -t virt_port_t -p tcp 99999Chapter 3. Installing Satellite Server
You can use this chapter to find information about installing Red Hat Satellite Server, performing the initial configuration, creating and installing manifests, and performing additional configuration.
Red Hat Satellite 6.3 uses Puppet 3 by default, but you can optionally install Puppet 4 as part of the following installation procedures by enabling the Puppet 4 upgrade repository before running the installation script. To upgrade to Puppet 4 after installation, and for information on upgrading Puppet modules, see the Upgrading Puppet section in the Upgrading and Updating Red Hat Satellite guide.
There are two methods of installing Satellite Server:
Connected:
You can obtain the packages required to install Satellite Server directly from the Red Hat Content Delivery Network (CDN). Using the CDN ensures that your system always receives the latest updates.
Disconnected:
You must use an external computer to download an ISO image of the packages and copy the packages to the system you want to install Satellite Server on. Use an ISO image only if you require a disconnected environment. The ISO image might not contain the latest updates.
You cannot register Satellite Server to itself.
3.1. Installing Satellite Server from a Connected Network
When you install Satellite Server from a connected network, you can obtain packages and receive updates directly from the Red Hat Content Delivery Network.
Note that the Satellite 6 installation script is based on Puppet, which means that if you run the installation script more than once, it might overwrite any manual configuration changes. To avoid this and determine which future changes apply, use the --noop argument when you run the installation script. This argument ensures that no actual changes are made. Potential changes are written to /var/log/katello-installer.log.
Files are always backed up and so you can revert any unwanted changes. For example, in the katello-installer logs, you can see an entry similar to the following about Filebucket:
/Stage[main]/Dhcp/File[/etc/dhcp/dhcpd.conf]: Filebucketed /etc/dhcp/dhcpd.conf to puppet with sum 622d9820b8e764ab124367c68f5fa3a1You can restore the previous file as follows:
# puppet filebucket -l \
restore /etc/dhcp/dhcpd.conf 622d9820b8e764ab124367c68f5fa3a1
3.1.1. Registering to Red Hat Subscription Management
Registering the host to Red Hat Subscription Management enables the host to subscribe to and consume content for any subscriptions available to the user. This includes content such as Red Hat Enterprise Linux, Red Hat Software Collections (RHSCL), and Red Hat Satellite.
Register your system with the Red Hat Content Delivery Network, entering your Customer Portal user name and password when prompted:
# subscription-manager registerThe command displays output similar to the following:
# subscription-manager register
Username: user_name
Password:
The system has been registered with ID: 541084ff2-44cab-4eb1-9fa1-7683431bcf9a
3.1.2. Identifying and Attaching the Satellite Subscription to the Host
After you have registered your host, you need to identify and attach an available Satellite subscription. The Satellite subscription provides access to the Satellite content, as well as Red Hat Enterprise Linux, Red Hat Software Collections (RHSCL), and Red Hat Satellite. This is the only subscription required. Every Red Hat subscription is identified by a Pool ID.
Identify your Satellite subscription.
# subscription-manager list --available --matches 'Red Hat Satellite'This command performs a case-insensitive search of all available subscriptions' fields, including
Subscription NameandProvides, matching any instances ofRed Hat Satellite. Subscriptions are classified as available if they are not already attached to a system. The search string may also contain the wildcards?or*to match a single character or zero or more characters, respectively. The wildcard characters may be escaped with a backslash to represent a literal question mark or asterisk. Likewise, to represent a backslash, it must be escaped with another backslash.If you are unable to find an available Satellite subscription, see the Red Hat Knowledgebase solution How do I figure out which subscriptions have been consumed by clients registered under Red Hat Subscription Manager? to run a script to allow you to see if your subscription is being consumed by another system.
If the output is too long, pipe it into a pager utility, such as
lessormore, so that you can look over the output one screenful at a time.Regardless of which form of the
subscription-managercommand is run, the output should be similar to the following:Subscription Name: Red Hat Satellite Provides: Red Hat Satellite 6 Red Hat Enterprise Linux Server Red Hat Satellite Red Hat Enterprise Linux Load Balancer (for RHEL Server) SKU: MCT0370 Pool ID: 8a85f9874152663c0541943739717d11 Available: 3 Suggested: 1 Service Level: Premium Service Type: L1-L3 Multi-Entitlement: No Ends: 10/07/2014 System Type: Physical
- Make a note of the Pool ID so that you can attach it to your Satellite host. Your Pool ID is different than the example provided.
To attach your subscription to your Satellite Server, enter the following command, using your Pool ID:
# subscription-manager attach --pool=pool_idThe output should be similar to the following:
Successfully attached a subscription for: Red Hat SatelliteTo verify that the subscriptions are successfully attached, enter the following command:
# subscription-manager list --consumedThe outputs displays something similar to the following:
+-------------------------------------------+
   Consumed Subscriptions
+-------------------------------------------+
Subscription Name: Red Hat Satellite
Provides:          Red Hat Satellite
                   Red Hat Enterprise Linux Server
                   Red Hat Software Collections (for RHEL Server)
                   Red Hat Satellite
                   Red Hat Satellite 6
                   Red Hat Software Collections  (for RHEL Server)
                   Red Hat Satellite Capsule
                   Red Hat Enterprise Linux Load Balancer (for RHEL Server)
                   Red Hat Satellite with Embedded Oracle
                   Red Hat Satellite Capsule
                   Red Hat Enterprise Linux High Availability (for RHEL Server)
SKU:               MCT0370
Contract:          10293569
Account:           5361051
Serial:            1653856191250699363
Pool ID:           8a85f9874152663c0541943739717d11
Active:            True
Quantity Used:     1
Service Level:     Premium
Service Type:      L1-L3
Status Details:
Starts:            10/08/2013
Ends:              10/07/2014
System Type:       Physical
3.1.3. Configuring Repositories
Disable all existing repositories.
# subscription-manager repos --disable "*"Enable the required repositories:
To enable the Red Hat Satellite, Red Hat Enterprise Linux, Red Hat Software Collections, and Puppet 4 repositories, enter the following command:
# subscription-manager repos \
--enable=rhel-7-server-rpms \
--enable=rhel-server-rhscl-7-rpms \
--enable=rhel-7-server-satellite-6.3-rpms \
--enable=rhel-7-server-satellite-6.3-puppet4-rpms
Alternatively, to enable the Red Hat Satellite, Red Hat Enterprise Linux, Red Hat Software Collections, and Puppet 3 repositories, enter the following command:
# subscription-manager repos \ --enable=rhel-7-server-rpms \ --enable=rhel-server-rhscl-7-rpms \ --enable=rhel-7-server-satellite-6.3-rpmsNoteSatellite 6.3 is the last supported release for Puppet 3. You must upgrade from Puppet 3 to Puppet 4 while on Satellite 6.3, and before upgrading to Satellite 6.4. Satellite 6.4 only supports Puppet 5, and the upgrade to Puppet 5 will be made during the Satellite upgrade.
NoteIf you are installing Red Hat Satellite as a virtual machine hosted on Red Hat Virtualization (RHV), you also need to enable the Red Hat Common repository, and install RHV guest agents and drivers. For more information, see Installing the Guest Agents and Drivers on Red Hat Enterprise Linux in the Virtual Machine Management Guide for more information.
Ensure that Red Hat Subscription Manager is not set to use a specific operating system release.
# subscription-manager release --unsetClear out any metadata left from any non-Red Hat
yumrepositories.# yum clean allVerify that the repositories have been enabled.
# yum repolist enabledOutput similar to the following displays:
Loaded plugins: product-id, subscription-manager
repo id                                    repo name                                                                status
!rhel-7-server-rpms/x86_64                 Red Hat Enterprise Linux 7 Server (RPMs)                                 9,889
!rhel-7-server-satellite-6.3-rpms/x86_64   Red Hat Satellite 6.3 (for RHEL 7 Server) (RPMs)                           545
!rhel-server-rhscl-7-rpms/x86_64           Red Hat Software Collections RPMs for Red Hat Enterprise Linux 7 Server  4,279
repolist: 14,713
3.1.4. Installing the Satellite Server Packages
You must update all packages before installing the Satellite Server packages. After installation, you must perform the initial configuration of Satellite Server, including configuring server certificates, setting your user name, password, and the default organization and location.
Update all packages.
# yum updateInstall the installation package.
# yum install satellite- Go to Section 3.3, “Performing the Initial Configuration” to run the installation script and perform the initial configuration of your Satellite Server.
3.2. Downloading and Installing from a Disconnected Network
When the intended host for the Red Hat Satellite Server is in a disconnected environment, it is possible to install the Satellite Server by using an ISO image. This method is not recommended for any other situation as ISO images might not contain the latest updates, bug fixes, and functionality.
If the base system has not been updated from the Red Hat CDN, package dependency errors are possible. You must manually download and install the latest version of the required packages. For more information, see Section 3.2.4, “Downloading Packages Manually”.
Before You Begin
-
A copy of the repositories used in the installation are stored in the
/opt/directory. Ensure you have a minimum of 3 GB of space for this file system and directory.
3.2.1. Downloading the Binary DVD Images
- Go to Red Hat Customer Portal and log in.
- Click DOWNLOADS.
- Select Red Hat Enterprise Linux.
Ensure that you have the correct product and version for your environment.
- Product Variant is set to Red Hat Enterprise Linux Server.
- Version is set to the latest minor version of the product you plan to use as the base system.
- Architecture is set to the 64 bit version.
- On the Product Software tab, download the Binary DVD image for the latest Red Hat Enterprise Linux Server version.
- Click DOWNLOADS and select Red Hat Satellite.
Ensure that you have the correct product and version for your environment.
- Product Variant is set to Red Hat Satellite.
- Version is set to the latest minor version of the product you plan to use as the base system.
- Architecture is set to the 64 bit version.
- On the Product Software tab, download the Binary DVD image for the latest Red Hat Satellite version.
Copy the ISO files to the Satellite base system or other accessible storage device.
# scp localfile username@hostname:remotefile
3.2.2. Configuring the Base System with Offline Repositories
Create a directory to serve as the mount point for the ISO file corresponding to the base system’s version.
# mkdir /media/rhel7-serverMount the ISO image for Red Hat Enterprise Linux to the mount point.
# mount -o loop rhel7-Server-DVD.iso /media/rhel7-serverThe following example shows mounting the ISO using Red Hat Enterprise Linux 7.2:
# mount -o loop RHEL-7.2-20151030.0-Server-x86_64-dvd1.iso \
/media/rhel7-server
mount: /dev/loop0 is write-protected, mounting read-only
Copy the ISO file’s repository data file.
# cp /media/rhel7-server/media.repo /etc/yum.repos.d/rhel7-server.repoEdit the repository data file and add the
baseurldirective.baseurl=file:///media/rhel7-server/The following example shows the repository data file using Red Hat Enterprise Linux 7.2:
# vi /etc/yum.repos.d/rhel7-server.repo
[InstallMedia]
name=Red Hat Enterprise Linux 7.2
mediaid=1446216863.790260
metadata_expire=-1
gpgcheck=0
cost=500
baseurl=file:///media/rhel7-server/
enabled=1
Verify that the repository has been configured.
# yum repolist
Loaded plugins: product-id, search-disabled-repos, subscription-manager
This system is not registered to Red Hat Subscription Management. You can use subscription-manager to register.
repo id          repo name                       status
InstallMedia     Red Hat Enterprise Linux 7.2    4,620
Create a directory to serve as the mount point for the ISO file of the Satellite Server.
# mkdir /media/sat6Mount the ISO image for Red Hat Satellite Server to the mount point.
# mount -o loop sat6-DVD.iso /media/sat6The following example shows mounting the ISO using Red Hat Satellite 6.3.0 for Red Hat Enterprise Linux 7:
# mount -o loop satellite-6.3.0-rhel-7-x86_64-dvd.iso /media/sat6
mount: /dev/loop1 is write-protected, mounting read-only
Red Hat Satellite 6.3 uses Puppet 3 by default, but you can also use Puppet 4. To use Puppet 4, create a local repository to access the required packages and add the following contents:
# vi /etc/yum.repos.d/satellite-puppet4.repo
[satellite-puppet4]
name=satellite-puppet4
baseurl=file:///media/sat6/addons/Puppet4
enabled=1
gpgcheck=1
3.2.3. Installing from the Offline Repositories
Ensure the ISO images for Red Hat Enterprise Linux Server and Red Hat Satellite are mounted:
# findmnt -t iso9660Import the Red Hat GPG keys.
# rpm --import /etc/pki/rpm-gpg/RPM-GPG-KEY-redhat-releaseEnsure the base system is up to date with the Binary DVD image.
# yum updateChange to the directory where the Satellite ISO is mounted.
# cd /media/sat6/Run the installation script in the mounted directory.
# ./install_packages
	This script will install the foreman packages on the current machine.
   - Ensuring we are in an expected directory.
   - Copying installation files.
   - Creating a Repository File
   - Creating RHSCL Repository File
   - Checking to see if Foreman is already installed.
   - Importing the gpg key.
   - Foreman is not yet installed, installing it.
   - Installation repository will remain configured for future package installs.
   - Installation media can now be safely unmounted.

Install is complete. Please run satellite-installer --scenario satellite.
If the script fails due to missing or outdated packages, you must download and install these separately. See Section 3.2.4, “Downloading Packages Manually” for instructions.
If the script fails due to installed packages being newer than those required, enter
yum distribution-synchronizationto downgrade the installed packages to the versions that came from the Red Hat Enterprise Linux ISO, then run the installation script again. This should only occur if you have repositories configured whose source is not the Red Hat Enterprise Linux ISO. Use of such repositories is an unsupported configuration.
3.2.4. Downloading Packages Manually
If required to download a package manually, proceed as follows:
- Go to Red Hat Customer Portal and log in.
- Click DOWNLOADS.
- Select Red Hat Satellite.
Ensure that you have the correct product and version for your environment.
- Product Variant is set to Red Hat Satellite.
- Version is set to the latest minor version of the product you are using as the base system.
- Architecture is set to the 64 bit version.
- On the Packages tab, enter the name of the package required in the Search box.
- Click Download Latest next to the package required.
3.3. Performing the Initial Configuration
This section details how to perform the initial configuration of the host operating system when installing Red Hat Satellite Server. This includes synchronizing the time, installing the sos package, and specifying an installation option.
Before you continue, consider which manifests or packages are relevant for your environment. For more information on manifests, see Managing Subscriptions in the Red Hat Satellite Content Management Guide.
3.3.1. Synchronizing Time
You must start and enable a time synchronizer on the host operating system to minimize the effects of time drift. If a system’s time is incorrect, certificate verification can fail.
Two NTP based time synchronizers are available: chronyd and ntpd. The chronyd implementation is specifically recommended for systems that are frequently suspended and for systems that have intermittent network access. The ntpd implementation should only be used when you specifically need support for a protocol or driver not yet supported by chronyd.
For more information about the differences between ntpd and chronyd, see Differences Between ntpd and chronyd in the Red Hat Enterprise Linux 7 System Administrator’s Guide.
Synchronizing Time using chronyd
Install chronyd.
# yum install chronyStart and enable the chronyd service.
# systemctl start chronyd
# systemctl enable chronyd
3.3.2. Installing the SOS Package on the Host Operating System
You should install the sos package on the host operating system. The sos package enables you to collect configuration and diagnostic information from a Red Hat Enterprise Linux system. You can also use it to provide the initial system analysis, which is required when opening a service request with Red Hat Technical Support. For more information on using sos, see the Knowledgebase solution What is a sosreport and how to create one in Red Hat Enterprise Linux 4.6 and later? on the Red Hat Customer Portal.
Install the sos package.
# yum install sos3.3.3. Specifying Installation Options
Satellite Server is installed using the satellite-installer installation script and as part of the initial configuration, you either automatically or manually configure Satellite.
Choose from one of these two methods:
Automatic Configuration - This method is performed by using an answer file to automate the configuration process when running the installation script. An answer file is a file containing a list of parameters that are read by a command or script. The default Satellite answer file is
/etc/foreman-installer/scenarios.d/satellite-answers.yaml. The answer file in use is set by theanswer_filedirective in the/etc/foreman-installer/scenarios.d/satellite.yamlconfiguration file.To perform the initial configuration using the installation script with an answer file, see Section 3.3.3.2, “Performing the Initial Configuration Automatically using an Answer File”.
Manual Configuration - This method is performed by running the installation script with one or more command options. The command options override the corresponding default initial configuration options and are recorded in the Satellite answer file. You can run the script as often as needed to configure any necessary options.
To perform the initial configuration using the installation script with command-line options, see Section 3.3.3.1, “Performing the Initial Configuration Manually”.
Depending on the options that you use when running the Satellite installer, the configuration can take several minutes to complete. An administrator is able to view the answer file to see previously used options for both methods.
3.3.3.1. Performing the Initial Configuration Manually
This initial configuration procedure creates an organization, location, user name, and password. After the initial configuration, you can create additional organizations and locations if required.
The installation process can take tens of minutes to complete. If you are connecting remotely to the system, consider using a utility such as screen that allows suspending and reattaching a communication session so that you can check the installation progress in case you become disconnected from the remote system. The Red Hat Knowledgebase article How to use the screen command describes installing screen; alternately see the screen manual page for more information. If you lose connection to the shell where the installation command is running, see the log at /var/log/foreman-installer/satellite.log to determine if the process completed successfully.
Manually configuring Satellite Server
Use the satellite-installer --scenario satellite --help command to display the available options and any default values. If you do not specify any values, the default values are used.
It is recommended to specify a meaningful value for the option: --foreman-initial-organization. This can be your company name. An internal label that matches the value is also created and cannot be changed later on. If you do not specify a value, an organization called Default Organization with the label Default_Organization is created. You can rename the organization name but not the label.
By default, all configuration files configured by the installer are managed by Puppet. When satellite-installer runs, it overwrites any manual changes to the Puppet managed files with the initial values. By default, Satellite Server is installed with the Puppet agent running as a service. If required, you can disable Puppet agent on Satellite Server using the --puppet-runmode=none option.
If you want to be able to manage DNS files and DHCP files manually, use the --foreman-proxy-dns-managed=false and --foreman-proxy-dhcp-managed=false options so that Puppet does not manages the files related to the respective services. For more information on how to apply custom configuration on other services, see Appendix C, Applying Custom Configuration to Red Hat Satellite.
# satellite-installer --scenario satellite \
--foreman-initial-organization "initial_organization_name" \
--foreman-initial-location "initial_location_name" \
--foreman-admin-username admin_user_name \
--foreman-admin-password admin_password \
--foreman-proxy-dns-managed=false \
--foreman-proxy-dhcp-managed=false
The script displays its progress and writes logs to /var/log/foreman-installer/satellite.log.
If you have been installing in a disconnected environment, unmount the ISO images.
# umount /media/sat6
# umount /media/rhel7-server
3.3.3.2. Performing the Initial Configuration Automatically using an Answer File
You can use answer files to automate installations with customized options. The initial answer file is sparsely populated and after you run the satellite-installer script the first time, the answer file is populated with the standard parameter values for installation. If you have already installed Satellite Server using the method described in Section 3.3.3.1, “Performing the Initial Configuration Manually”, then you do not need to use this method. You can, however, use it to make changes to the configuration of Satellite Server at any time.
You should use the FQDN instead of the IP address where possible in case of network changes.
Automatically configuring Satellite Server using an Answer File
Copy the default answer file
/etc/foreman-installer/scenarios.d/satellite-answers.yamlto a location on your local file system.# cp /etc/foreman-installer/scenarios.d/satellite-answers.yaml \ /etc/foreman-installer/scenarios.d/my-answer-file.yaml-
To view all of the configurable options, enter the
satellite-installer --scenario satellite --helpcommand. - Open your copy of the answer file, edit the values to suit your environment, and save the file.
Open the
/etc/foreman-installer/scenarios.d/satellite.yamlfile and edit the answer file entry to point to your custom answer file.:answer_file: /etc/foreman-installer/scenarios.d/my-answer-file.yamlRun the
satellite-installerscript.# satellite-installer --scenario satelliteIf you have been installing in a disconnected environment, unmount the ISO images.
# umount /media/sat6
# umount /media/rhel7-server
3.3.4. Creating a Subscription Allocation in Customer Portal
You can access your subscription information on the Red Hat Customer Portal. You can also assign subscriptions for use in on-premise management applications, such as Red Hat Satellite, using subscription allocations.
- Open https://access.redhat.com/ in your browser and log in to your Red Hat account.
- Navigate to Subscriptions in the upper-left corner of the Customer Portal.
- Navigate to Subscription Allocations.
- Click Create New subscription allocation.
- In the Name field, enter a name.
- From the Type list, select the type and version that corresponds to your Satellite Server.
- Click Create.
3.3.5. Adding Subscriptions to an Allocation
The following procedure explains how to add subscriptions to an allocation.
- Navigate to Subscription Allocations.
- Select the name of the subscription you want to change.
- Click the Subscriptions tab.
- Click Add Subscriptions.
- A list of your Red Hat product subscriptions appears. Enter the Entitlement Quantity for each product.
- Click Submit to complete the assignment.
When you have added subscriptions to the allocation, export the manifest file.
3.3.6. Exporting a Subscription Manifest from the Customer Portal
While viewing a subscription allocation that has at least one subscription, you can export a manifest in either of two places:
- From the Details tab, under the Subscription section, by clicking the Export Manifest button.
- From the Subscriptions tab, by clicking the Export Manifest button.
When the manifest is exported, the Customer Portal encodes the selected subscriptions certificates and creates a .zip archive. This is the Subscription Manifest, which can be uploaded into the Satellite Server.
3.3.6.1. Importing a Subscription Manifest into the Satellite Server
Both the Red Hat Satellite 6 Web UI and CLI provide methods for importing the manifest.
For Web UI Users
- Ensure the context is set to the organization you want to use.
- Navigate to Content > Red Hat Subscriptions.
- Click Manage Manifest to display the manifest page for the organization.
- Click Choose file, select the Subscription Manifest, then click Upload.
For CLI Users
The Red Hat Satellite 6 CLI requires the manifest to be on the Satellite Server. On your local client system, copy the manifest to the Satellite Server:
[user@client ~]$ scp ~/manifest_file.zip root@satellite.example.com:~/.Then import it using the following command:
[root@satellite ~]# hammer subscription upload \
--file ~/manifest_file.zip \
--organization "organization_name"
After a few minutes, the CLI reports a successful manifest import.
When you complete this section, you can enable repositories and import Red Hat content. This is a prerequisite for some of the following procedures. For more information, see Importing Red Hat Content in the Red Hat Satellite Content Management Guide.
3.4. Performing Additional Configuration
3.4.1. Installing the Satellite Tools Repository
The Satellite Tools repository provides the katello-agent and puppet packages for clients registered to Satellite Server. Installing the katello agent is recommended to allow remote updates of clients. The base system of a Capsule Server is a client of Satellite Server and therefore should also have the katello agent installed.
To Install the Satellite Tools Repository:
- In the Satellite web UI, go to Content > Red Hat Repositories and select the RPMs tab.
- Find and expand the Red Hat Enterprise Linux Server item.
Find and expand the Red Hat Satellite Tools 6.3 (for Red Hat Enterprise Linux 7 Server) (RPMs) item.
If the Red Hat Satellite Tools 6.3 items are not visible, it may be because they are not included in the Subscription Manifest obtained from the Customer Portal. To correct that, log in to the Customer Portal, add these repositories, download the Subscription Manifest and import it into Satellite.
- Select the Enabled check box next to the Satellite 6.3 Tools repository’s name.
Enable the Satellite Tools repository for every supported major version of Red Hat Enterprise Linux running on your hosts. After enabling a Red Hat repository, a Product for this repository is automatically created.
To Synchronize the Satellite Tools Repository:
Go to Content > Sync Status.
A list of product repositories available for synchronization is displayed.
- Click the arrow next to the product content to view available content.
- Select the content you want to synchronize.
- Click Synchronize Now.
3.4.2. Configuring Satellite Server with HTTP Proxy
If your network uses an HTTP Proxy, you can configure Satellite Server to use it. Use the FQDN instead of the IP address where possible to avoid losing connectivity because of network changes.
Authentication Methods
Only basic authentication is supported: add your username and password information to the --katello-proxy-url option, or use the --katello-proxy-username and --katello-proxy-password options.
To Configure Satellite with an HTTP Proxy
Verify that the
http_proxy,https_proxy, andno_proxyvariables are not set.# unset http_proxy # unset https_proxy # unset no_proxyRun
satellite-installerwith the HTTP proxy options.# satellite-installer --scenario satellite \ --katello-proxy-url=http://myproxy.example.com \ --katello-proxy-port=8080 \ --katello-proxy-username=proxy_username \ --katello-proxy-password=proxy_passwordVerify that Satellite Server can connect to the Red Hat Content Delivery Network (CDN) and can synchronize its repositories.
On the network gateway and the HTTP Proxy, enable TCP for the following host names:
Expand Host name Port Protocol subscription.rhsm.redhat.com
443
HTTPS
cdn.redhat.com
443
HTTPS
*.akamaiedge.net
443
HTTPS
cert-api.access.redhat.com (if using Red Hat Insights)
443
HTTPS
api.access.redhat.com (if using Red Hat Insights)
443
HTTPS
Satellite Server communicates with the Red Hat CDN securely over SSL. Use of an SSL interception proxy interferes with this communication. These hosts must be whitelisted on the proxy.
For a list of IP addresses used by the Red Hat CDN (cdn.redhat.com), see the Knowledgebase article Public CIDR Lists for Red Hat on the Red Hat Customer Portal.
On Satellite Server, complete the following details in the
/etc/rhsm/rhsm.conffile:# an http proxy server to use (enter server FQDN) proxy_hostname = myproxy.example.com # port for http proxy server proxy_port = 8080 # user name for authenticating to an http proxy, if needed proxy_user = # password for basic http proxy auth, if needed proxy_password =
SELinux Considerations for Custom Ports
SELinux ensures access of Red Hat Satellite 6 and Red Hat Subscription Manager only to specific ports. In the case of the HTTP cache, the TCP ports are 8080, 8118, 8123, and 10001 - 10010. If you use a port that does not have SELinux type http_cache_port_t, complete the following steps:
To verify the ports that are permitted by SELinux for the HTTP cache, enter a command as follows:
# semanage port -l | grep http_cache
http_cache_port_t       tcp    8080, 8118, 8123, 10001-10010
[output truncated]
To configure SELinux to permit a port for the HTTP cache, for example 8088, enter a command as follows:
# semanage port -a -t http_cache_port_t -p tcp 8088
For more information on SELinux port settings, see Section 2.11, “Changing Default SELinux ports”.
3.4.3. Enabling Power Management on Managed Hosts
When you enable the baseboard management controller (BMC) module on Satellite Server, you can use power management commands on managed hosts using the intelligent platform management interface (IPMI) or a similar protocol.
The BMC service enables you to perform a range of power management tasks. The underlying protocol for this feature is IPMI; also referred to as the BMC function. IPMI uses a special network interface on the managed hardware that is connected to a dedicated processor that runs independently of the host’s CPUs. In many instances the BMC functionality is built into chassis-based systems as part of chassis management (a dedicated module in the chassis).
For more information on the BMC service, see Configuring an Additional Network Interface in Managing Hosts.
Before You Begin
- All managed hosts must have a network interface, with type BMC. Satellite uses this NIC to pass the appropriate credentials to the host.
Enable Power Management on Managed Hosts
Run the installer with the options to enable BMC.
# satellite-installer --foreman-proxy-bmc "true" \
--foreman-proxy-bmc-default-provider "freeipmi"
3.4.4. Configuring DNS, DHCP, and TFTP on Satellite Server
You can configure DNS, DHCP, and TFTP on Satellite Server.
If you want to configure external services, see Chapter 5, Configuring External Services for more information.
If you want to disable these services in Satellite in order to manage them manually, see Section 3.4.5, “Disabling DNS, DHCP, and TFTP for Unmanaged Networks” for more information.
To view a complete list of configurable options, enter the satellite-installer --scenario satellite --help command.
Before You Begin
- Contact your network administrator to ensure that you have the correct settings.
You should have the following information available:
- DHCP IP address ranges
- DHCP gateway IP address
- DHCP nameserver IP address
- DNS information
- TFTP server name
- Use the FQDN instead of the IP address where possible in case of network changes.
The information in the task is an example. You should use the information relevant to your own environment.
Configure DNS, DHCP, and TFTP on Satellite Server
Run
satellite-installerwith the options appropriate for your environment.# satellite-installer --scenario satellite \ --foreman-proxy-dns true \ --foreman-proxy-dns-managed true \ --foreman-proxy-dns-interface eth0 \ --foreman-proxy-dns-zone example.com \ --foreman-proxy-dns-forwarders 172.17.13.1 \ --foreman-proxy-dns-reverse 13.17.172.in-addr.arpa \ --foreman-proxy-dhcp true \ --foreman-proxy-dhcp-managed true \ --foreman-proxy-dhcp-interface eth0 \ --foreman-proxy-dhcp-range "172.17.13.100 172.17.13.150" \ --foreman-proxy-dhcp-gateway 172.17.13.1 \ --foreman-proxy-dhcp-nameservers 172.17.13.2 \ --foreman-proxy-tftp true \ --foreman-proxy-tftp-managed true \ --foreman-proxy-tftp-servername $(hostname)For more information about configuring DHCP, DNS, and TFTP services, see the Configuring Network Services section in the Provisioning Guide.
The script displays its progress and writes logs to
/var/log/foreman-installer/satellite.log. You can view the settings used, including theadmin_passwordparameter, in the/etc/foreman-installer/scenarios.d/satellite-answers.yamlfile.
Any changes to the settings require running satellite-installer again. You can run the script multiple times and it updates all configuration files with the changed values.
3.4.5. Disabling DNS, DHCP, and TFTP for Unmanaged Networks
Satellite 6 provides full management capabilities for TFTP, DHCP, and DNS network services running on Satellite’s internal or external Capsules. If you want to manage those services manually or use some external method, then Satellite 6 cannot directly integrate with them. While it is possible to develop custom integration scripts using Foreman Hooks (such as creating DNS records after a new host is created), this integration, also known as orchestration, must be disabled in order to prevent DHCP and DNS validation errors.
- In the web UI, go to Infrastructure > Subnets and select a subnet.
- On the Capsules tab, ensure that there is no DHCP Capsule or TFTP Capsule associated by setting the drop-down list to None.
Disable forward record orchestration.
- Go to Infrastructure > Domains and select a domain.
- On the Domain tab, setting the DNS Capsule drop-down list to None.
Disable reverse (PTR) record orchestration.
- Go to Infrastructure > Subnets and select a subnet.
- On the Capsules tab, setting the Reverse DNS Capsule drop-down list to None.
Optional: If you use a DHCP service supplied by a third party, configure your DHCP server to pass the following options:
Option 66: IP_address_of_Satellite_or_Capsule
Option 67: /pxelinux.0
For more information about DHCP options, see RFC 2132.
Satellite 6 does not perform orchestration when a Capsule is not set for a given subnet and domain. When enabling or disabling Capsule associations, orchestration commands for existing hosts can fail if the expected records and configuration files are not present. When associating a Capsule in order to turn orchestration on, make sure the required DHCP and DNS records as well as the TFTP files are in place for existing Satellite 6 managed hosts in order to prevent host deletion failures in the future.
3.4.6. Configuring Satellite Server for Outgoing Emails
To send email messages from Satellite Server, you can use either an SMTP server, or the sendmail command.
Prerequisites
If you have upgraded from a previous release, rename or remove the configuration file /usr/share/foreman/config/email.yaml and restart the httpd service. For example:
# mv /usr/share/foreman/config/email.yaml \
/usr/share/foreman/config/email.yaml-backup
# systemctl restart httpd
To Configure Satellite Server for Outgoing Emails:
- In the Satellite web UI, navigate to Administer → Settings.
Click the Email tab and set the configuration options to match your preferred delivery method. The changes have an immediate effect.
The following example shows the configuration options for using an SMTP server:
Expand Table 3.1. Using an SMTP server as a delivery method Name Example value Delivery method
SMTP
SMTP address
smtp.example.com
SMTP authentication
login
SMTP HELO/EHLO domain
example.com
SMTP password
password
SMTP port
25
SMTP username
satellite@example.com
The
SMTP usernameandSMTP passwordspecify the login credentials for the SMTP server.The following example uses gmail.com as an SMTP server:
Expand Table 3.2. Using gmail.com as an SMTP server Name Example value Delivery method
SMTP
SMTP address
smtp.gmail.com
SMTP authentication
plain
SMTP HELO/EHLO domain
smtp.gmail.com
SMTP enable StartTLS auto
Yes
SMTP password
password
SMTP port
587
SMTP username
user@gmail.com
The following example uses the
sendmailcommand as a delivery method:Expand Table 3.3. Using sendmail as a delivery method Name Example value Delivery method
Sendmail
Sendmail arguments
-i -t -G
The
Sendmail argumentsspecify the options passed to thesendmailcommand. The default value is-i -t. For more information see the sendmail 1 man page.
If you decide to send email using an SMTP server which uses TLS authentication, also perform one of the following steps:
Mark the CA certificate of the SMTP server as trusted. To do so, execute the following commands on Satellite Server:
# cp mailca.crt /etc/pki/ca-trust/source/anchors/
# update-ca-trust enable
# update-ca-trust
Where
mailca.crtis the CA certificate of the SMTP server.-
Alternatively, in the web UI, set the
SMTP enable StartTLS autooption toNo.
-
Click Test email to send a test message to the user’s email address to confirm the configuration is working. If a message fails to send, the web UI displays an error. See the log at
/var/log/foreman/production.logfor further details.
For information on configuring email notifications for individual users or user groups, see Configuring Email Notifications in Administering Red Hat Satellite.
3.4.7. Configuring Satellite Server with a Custom Server Certificate
SSL certificates are used to protect information and enable secure communication. Red Hat Satellite 6 creates self-signed SSL certificates to enable encrypted communications between the Satellite Server, external Capsule Servers, and all hosts. Instead of using these self-signed certificates, you can install custom SSL certificates issued by a Certificate Authority which is an external, trusted company. For example, your company might have a security policy stating that SSL certificates must be obtained from a Certificate Authority. To obtain the certificate, create a Certificate Signing Request and send it to the Certificate Authority, as described in Section 3.4.7.1, “Obtain an SSL Certificate for the Satellite Server”. In return, you receive a signed SSL certificate.
Obtain custom SSL certificates for the Satellite Server and all external Capsule Servers before starting this procedure.
To use a custom certificate on Satellite Server, complete these steps:
- Section 3.4.7.1, “Obtain an SSL Certificate for the Satellite Server”
- Section 3.4.7.2, “Validate the Satellite Server’s SSL Certificate”
- Section 3.4.7.3, “Run the Satellite Installer with Custom Certificate Parameters”
- Section 3.4.7.4, “Install the New Certificate on all Hosts Connected to the Satellite Server”
If you have external Capsule Servers, you must also complete the steps in Section 4.7.6, “Configuring Capsule Server with a Custom Server Certificate”.
3.4.7.1. Obtain an SSL Certificate for the Satellite Server
Only PEM encoding must be used for the SSL Certificates.
If you already have a custom SSL Certificate for the Satellite Server, skip this procedure.
Create a directory to contain all the source certificate files, accessible to only the
rootuser.In these examples, the directory is
/root/sat_cert.# mkdir /root/sat_cert # cd /root/sat_certCreate a private key with which to sign the Certificate Signing Request (CSR).
NoteIf you already have a private key for the Satellite Server, skip this step.
# openssl genrsa -out /root/sat_cert/satellite_cert_key.pem 4096Create a Certificate Signing Request (CSR)
A Certificate Signing Request is a text file containing details of the server for which you are requesting a certificate. For this command, you provide the private key (output by the previous step), answer some questions about the Satellite Server, and the Certificate Signing Request is created.
NoteThe certificate’s Common Name (CN) must match the fully-qualified domain name (FQDN) of the server on which it is used. If you are requesting a certificate for a Satellite Server, this is the FQDN of the Satellite Server. If you are requesting a certificate for a Capsule Server, this is the FQDN of the Capsule Server.
To confirm a server’s FQDN, enter the following command on that server:
hostname -f.# openssl req -new \ -key /root/sat_cert/satellite_cert_key.pem \1 -out /root/sat_cert/satellite_cert_csr.pem2 Example Certificate Signing Request session
You are about to be asked to enter information that will be incorporated
into your certificate request.
What you are about to enter is what is called a Distinguished Name or a DN.
There are quite a few fields but you can leave some blank
For some fields there will be a default value,
If you enter '.', the field will be left blank.

Country Name (2 letter code) [XX]:AU
State or Province Name (full name) []:Queensland
Locality Name (eg, city) [Default City]:Brisbane
Organization Name (eg, company) [Default Company Ltd]:Example
Organizational Unit Name (eg, section) []:Sales
Common Name (eg, your name or your server's hostname) []:satellite.example.com
Email Address []:example@example.com

Please enter the following 'extra' attributes
to be sent with your certificate request
A challenge password []:password
An optional company name []:Example
Send the certificate signing request to the Certificate Authority. The same Certificate Authority must sign certificates for Satellite Server and Capsule Server.
When you submit the request, specify the lifespan of the certificate. The method for sending the certificate request varies, so consult the Certificate Authority for the preferred method. In response to the request you can expect to receive a Certificate Authority bundle, and a signed certificate, in separate files.
3.4.7.2. Validate the Satellite Server’s SSL Certificate
Enter the katello-certs-check command with the required parameters as per the following example. This validates the input files required for custom certificates and outputs the commands necessary to install them on the Satellite Server, all Capsule Servers, and hosts under management with Satellite.
Validate the custom SSL certificate input files. Change the files' names to match your files.
# katello-certs-check \
   -c /root/sat_cert/satellite_cert.pem \
1 -k /root/sat_cert/satellite_cert_key.pem \2 -b /root/sat_cert/ca_cert_bundle.pem \3 -r /root/sat_cert/satellite_cert_csr.pem4
Example output of katello-certs-check
Checking expiration of certificate: [OK]
Checking expiration of CA bundle: [OK]
Validating the certificate subject= /C=AU/ST=Queensland/L=Brisbane/O=Example/OU=Sales/CN=satellite.example.com/emailAddress=example@example.com
Checking to see if the private key matches the certificate: [OK]
Checking ca bundle against the cert file: [OK]
Checking for non ascii characters[OK]

Validation succeeded.

To install the Satellite server with the following custom certificates, run:

    satellite-installer --scenario satellite\
              --certs-server-cert "/root/sat_cert/satellite_cert.pem"\
              --certs-server-cert-req "/root/sat_cert/satellite_cert_csr.pem"\
              --certs-server-key "/root/sat_cert/satellite_cert_key.pem"\
              --certs-server-ca-cert "/root/sat_cert/ca_cert_bundle.pem"

To update the certificates on a currently running Satellite installation, run:

    satellite-installer --scenario satellite\
              --certs-server-cert "/root/sat_cert/satellite_cert.pem"\
              --certs-server-cert-req "/root/sat_cert/satellite_cert_csr.pem"\
              --certs-server-key "/root/sat_cert/satellite_cert_key.pem"\
              --certs-server-ca-cert "/root/sat_cert/ca_cert_bundle.pem"\
              --certs-update-server --certs-update-server-ca

To use them inside a NEW $CAPSULE, run this command:

    capsule-certs-generate --foreman-proxy-fqdn "$CAPSULE"\
              --certs-tar  "~/$CAPSULE-certs.tar"\
              --server-cert "/root/sat_cert/satellite_cert.pem"\
              --server-cert-req "/root/sat_cert/satellite_cert_csr.pem"\
              --server-key "/root/sat_cert/satellite_cert_key.pem"\
              --server-ca-cert "/root/sat_cert/ca_cert_bundle.pem"\

To use them inside an EXISTING $CAPSULE, run this command INSTEAD:

    capsule-certs-generate --foreman-proxy-fqdn "$CAPSULE"\
              --certs-tar  "~/$CAPSULE-certs.tar"\
              --server-cert "/root/sat_cert/satellite_cert.pem"\
              --server-cert-req "/root/sat_cert/satellite_cert_csr.pem"\
              --server-key "/root/sat_cert/satellite_cert_key.pem"\
              --server-ca-cert "/root/sat_cert/ca_cert_bundle.pem"\
              --certs-update-server
3.4.7.3. Run the Satellite Installer with Custom Certificate Parameters
Now that you have created an SSL certificate and verified it is valid for use with Red Hat Satellite 6, the next step is to install the custom SSL certificate on the Satellite Server and all its hosts.
There is a minor variation to this step, depending on whether or not the Satellite Server is already installed. If it is already installed, the existing certificates must be updated with those in the certificates archive.
The commands in this section are output by the katello-certs-check command, as detailed in Section 3.4.7.2, “Validate the Satellite Server’s SSL Certificate”, and can be copied and pasted into a terminal.
Enter the
satellite-installercommand, depending on your situation:If Satellite is already installed, enter the following command on the Satellite Server:
# satellite-installer --scenario satellite \
--certs-server-cert /root/sat_cert/satellite_cert.pem \
--certs-server-cert-req /root/sat_cert/satellite_cert_csr.pem \
--certs-server-key /root/sat_cert/satellite_cert_key.pem \
--certs-server-ca-cert /root/sat_cert/ca_cert_bundle.pem \
--certs-update-server --certs-update-server-ca
Important parameters in this command include
--certs-update-serverand--certs-update-server-ca, which specify that the server’s SSL certificate and certificate authority are to be updated. For a brief description of all the installer’s parameters, enter the command:satellite-installer --scenario satellite --help.NoteFor all files in the
satellite-installercommand, use full path names, not relative path names. The installer records all files' paths and names, and if you enter the installer again, but from a different directory, it may fail as it is unable to find the original files.If Satellite is not already installed, enter the following command on the Satellite Server:
# satellite-installer --scenario satellite \ --certs-server-cert /root/sat_cert/satellite_cert.pem \ --certs-server-cert-req /root/sat_cert/satellite_cert_csr.pem \ --certs-server-key /root/sat_cert/satellite_cert_key.pem \ --certs-server-ca-cert /root/sat_cert/ca_cert_bundle.pemNoteFor all files in the
satellite-installercommand, use full path names, not relative path names. The installer records all files' paths and names, and if you enter the installer again, but from a different directory, it may fail as it is unable to find the original files.
-
Verify the certificate has been successfully installed on the Satellite Server before installing it on hosts. On a computer with network access to the Satellite Server, start a web browser, navigate to the URL
https://satellite.example.comand view the certificate’s details.
3.4.7.4. Install the New Certificate on all Hosts Connected to the Satellite Server
Now that the custom SSL certificate has been installed on the Satellite Server, it must also be installed on every host registered to the Satellite Server. Enter the following commands on all applicable hosts.
Delete the current
katello-ca-consumerpackage on the host.# yum remove 'katello-ca-consumer*'Install the custom SSL certificate on the host.
# yum localinstall http://satellite.example.com/pub/katello-ca-consumer-latest.noarch.rpm
3.4.8. Restricting Access to mongod
Only the apache and root users should be allowed access to the MongoDB database daemon, mongod, to reduce the risk of data loss.
Restrict access to mongod on Satellite and Capsule Servers using the following commands.
Configure the Firewall.
# firewall-cmd  --direct --add-rule ipv4 filter OUTPUT 0 -o lo -p \
tcp -m tcp --dport 27017 -m owner --uid-owner apache -j ACCEPT \
&& firewall-cmd  --direct --add-rule ipv6 filter OUTPUT 0 -o lo -p \
tcp -m tcp --dport 27017 -m owner --uid-owner apache -j ACCEPT \
&& firewall-cmd  --direct --add-rule ipv4 filter OUTPUT 0 -o lo -p \
tcp -m tcp --dport 27017 -m owner --uid-owner root -j ACCEPT \
&& firewall-cmd  --direct --add-rule ipv6 filter OUTPUT 0 -o lo -p \
tcp -m tcp --dport 27017 -m owner --uid-owner root -j ACCEPT \
&& firewall-cmd  --direct --add-rule ipv4 filter OUTPUT 1 -o lo -p \
tcp -m tcp --dport 27017 -j DROP \
&& firewall-cmd  --direct --add-rule ipv6 filter OUTPUT 1 -o lo -p \
tcp -m tcp --dport 27017 -j DROP \
&& firewall-cmd  --direct --add-rule ipv4 filter OUTPUT 0 -o lo -p \
tcp -m tcp --dport 28017 -m owner --uid-owner apache -j ACCEPT \
&& firewall-cmd  --direct --add-rule ipv6 filter OUTPUT 0 -o lo -p \
tcp -m tcp --dport 28017 -m owner --uid-owner apache -j ACCEPT \
&& firewall-cmd  --direct --add-rule ipv4 filter OUTPUT 0 -o lo -p \
tcp -m tcp --dport 28017 -m owner --uid-owner root -j ACCEPT \
&& firewall-cmd  --direct --add-rule ipv6 filter OUTPUT 0 -o lo -p \
tcp -m tcp --dport 28017 -m owner --uid-owner root -j ACCEPT \
&& firewall-cmd  --direct --add-rule ipv4 filter OUTPUT 1 -o lo -p \
tcp -m tcp --dport 28017 -j DROP \
&& firewall-cmd  --direct --add-rule ipv6 filter OUTPUT 1 -o lo -p \
tcp -m tcp --dport 28017 -j DROP
Repeat the command adding the
--permanentoption to make the settings persistent.# firewall-cmd --permanent --direct --add-rule ipv4 filter OUTPUT 0 \ -o lo -p tcp -m tcp --dport 27017 -m owner \ --uid-owner apache -j ACCEPT \ && firewall-cmd --permanent --direct --add-rule ipv6 filter OUTPUT 0 \ -o lo -p tcp -m tcp --dport 27017 -m owner \ --uid-owner apache -j ACCEPT \ && firewall-cmd --permanent --direct --add-rule ipv4 filter OUTPUT 0 \ -o lo -p tcp -m tcp --dport 27017 -m owner \ --uid-owner root -j ACCEPT \ && firewall-cmd --permanent --direct --add-rule ipv6 filter OUTPUT 0 \ -o lo -p tcp -m tcp --dport 27017 -m owner \ --uid-owner root -j ACCEPT \ && firewall-cmd --permanent --direct --add-rule ipv4 filter OUTPUT 1 \ -o lo -p tcp -m tcp --dport 27017 -j DROP \ && firewall-cmd --permanent --direct --add-rule ipv6 filter OUTPUT 1 \ -o lo -p tcp -m tcp --dport 27017 -j DROP \ && firewall-cmd --permanent --direct --add-rule ipv4 filter OUTPUT 0 \ -o lo -p tcp -m tcp --dport 28017 -m owner \ --uid-owner apache -j ACCEPT \ && firewall-cmd --permanent --direct --add-rule ipv6 filter OUTPUT 0 \ -o lo -p tcp -m tcp --dport 28017 -m owner \ --uid-owner apache -j ACCEPT \ && firewall-cmd --permanent --direct --add-rule ipv4 filter OUTPUT 0 \ -o lo -p tcp -m tcp --dport 28017 -m owner \ --uid-owner root -j ACCEPT \ && firewall-cmd --permanent --direct --add-rule ipv6 filter OUTPUT 0 \ -o lo -p tcp -m tcp --dport 28017 -m owner \ --uid-owner root -j ACCEPT \ && firewall-cmd --permanent --direct --add-rule ipv4 filter OUTPUT 1 \ -o lo -p tcp -m tcp --dport 28017 -j DROP \ && firewall-cmd --permanent --direct --add-rule ipv6 filter OUTPUT 1 \ -o lo -p tcp -m tcp --dport 28017 -j DROP
Chapter 4. Installing Capsule Server
Before you install Capsule Server, you should ensure that your environment meets the requirements for installation. Capsule Server has the same requirements for installation as Satellite Server, with the additional requirement that you have not configured it to use a proxy to connect to the Red Hat CDN. For more information, see Section 2.1, “System Requirements”.
4.1. Registering to Satellite Server
Use this procedure to register the base system on which you want to install Capsule to Satellite Server.
Subscription Manifest Considerations
- The Satellite Server must have a manifest installed with the appropriate repositories for the organization you want the future Capsule to belong to.
- The manifest must contain repositories for the base system on which you want to install Capsule, as well as any clients that you want to connect to the Capsule.
- The repositories must be synchronized.
For more information on manifests and repositories, see Managing Subscriptions in the Red Hat Satellite Content Management Guide.
Proxy and Network Considerations
- The Satellite Server’s base system must be able to resolve the host name of the base system on which you want to install Capsule and vice versa.
- You must revert any changes related to the use of proxies which prevent access to Red Hat Satellite.
- You must have configured host and network-based firewalls. For more information, see Section 2.5, “Ports and Firewalls Requirements”.
- You must have a Satellite Server user name and password. For more information, see Configuring External Authentication in Administering Red Hat Satellite.
Register to Satellite Server
Install the Satellite Server’s CA certificate on the base system on which you want to install Capsule.
# rpm -Uvh http://satellite.example.com/pub/katello-ca-consumer-latest.noarch.rpmRegister the base system on which you want to install Capsule with the environments that you want the future Capsule to belong to. Use an activation key to simplify specifying the environments.
# subscription-manager register --org=organization_name --activationkey=example_activation_key
4.2. Identifying and Attaching the Capsule Server Subscription
After you have registered the Capsule Server, you must identify your Capsule Server subscription Pool ID. The Pool ID enables you to attach the required subscription to your Capsule Server. The Capsule Server subscription provides access to the Capsule Server content, as well as Red Hat Enterprise Linux, Red Hat Software Collections (RHSCL), and Red Hat Satellite. This is the only subscription required.
Identify your Capsule Server subscription.
# subscription-manager list --all --availableThe command displays output similar to the following:
+-------------------------------------------+ Available Subscriptions +-------------------------------------------+ Subscription Name: Red Hat Satellite Capsule Server Provides: Red Hat Satellite Proxy Red Hat Satellite Capsule Red Hat Software Collections (for RHEL Server) Red Hat Satellite Capsule Red Hat Enterprise Linux Server Red Hat Enterprise Linux High Availability (for RHEL Server) Red Hat Software Collections (for RHEL Server) Red Hat Enterprise Linux Load Balancer (for RHEL Server) SKU: MCT0369 Pool ID: 9e4cc4e9b9fb407583035861bb6be501 Available: 3 Suggested: 1 Service Level: Premium Service Type: L1-L3 Multi-Entitlement: No Ends: 10/07/2022 System Type: Physical- Make a note of the Pool ID so that you can attach it to your Satellite host. Your Pool ID is different than the example provided.
Attach your subscription to your Capsule Server, using your Pool ID:
# subscription-manager attach --pool=Red_Hat_Satellite_Capsule_Pool_IdThe outputs displays something similar to the following:
Successfully attached a subscription for: Red Hat Capsule ServerTo verify that the subscriptions are successfully attached, enter the following command:
# subscription-manager list --consumed
4.3. Configuring Repositories
Disable all existing repositories.
# subscription-manager repos --disable "*"Enable the Red Hat Satellite Capsule, Red Hat Enterprise Linux, and Red Hat Software Collections repositories.
The Red Hat Software Collections repository provides a later version of Ruby required by some Red Hat Satellite Capsule features, including the Remote Execution feature.
# subscription-manager repos --enable rhel-7-server-rpms \
--enable rhel-7-server-satellite-capsule-6.3-rpms \
--enable rhel-server-rhscl-7-rpms
Optionally, if your Puppet modules have been upgraded to Puppet 4, you can change from the default Puppet 3 to Puppet 4 as part of the installation process. To enable the Puppet 4 repositories.
# subscription-manager repos \
--enable=rhel-7-server-satellite-capsule-6.3-puppet4-rpms
Clear out any metadata left from any non-Red Hat
yumrepositories.# yum clean allVerify that the repositories have been enabled.
# yum repolist enabledOutput similar to the following displays:
Loaded plugins: langpacks, product-id, subscription-manager
repo id                                            repo name                                                 status
!rhel-7-server-rpms/7Server/x86_64                 Red Hat Enterprise Linux 7 Server (RPMs)                   7,617
!rhel-7-server-satellite-capsule-6.3-rpms/x86_64   Red Hat Satellite Capsule 6.3(for RHEL 7 Server) (RPMs)      176
repolist: 7,793
4.4. Synchronizing Time
You must start and enable a time synchronizer on the host operating system to minimize the effects of time drift. If a system’s time is incorrect, certificate verification can fail.
Two NTP based time synchronizers are available: chronyd and ntpd. The chronyd implementation is specifically recommended for systems that are frequently suspended and for systems that have intermittent network access. The ntpd implementation should only be used when you specifically need support for a protocol or driver not yet supported by chronyd.
For more information about the differences between ntpd and chronyd, see Differences Between ntpd and chronyd in the Red Hat Enterprise Linux 7 System Administrator’s Guide.
Synchronizing Time using chronyd
Install chronyd.
# yum install chronyStart and enable the chronyd service.
# systemctl start chronyd
# systemctl enable chronyd
4.5. Installing Capsule Server
Install the installation package.
# yum install satellite-capsule
4.6. Performing Initial Configuration of Capsule Server
This section demonstrates a default installation of Capsule Server, including use of default certificates, DNS, and DHCP configuration. For details of more advanced configuration options, see Section 4.7, “Performing Additional Configuration on Capsule Server”.
4.6.1. Configuring Capsule Server with a Default Server Certificate
You can use the default certificate authority (CA) that comes with Capsule Server, which is used by both the server and the client SSL certificates for the authentication of subservices.
Before You Begin
- You must have configured host and network-based firewalls. For more information, see Section 2.5, “Ports and Firewalls Requirements”.
-
You must have installed the
katello-ca-consumer-latestpackage. For more information, see Section 4.1, “Registering to Satellite Server”. - You must have registered your Capsule Server to the Satellite Server.
- You must have attached the required subscription to the Capsule Server.
Configure Capsule Server with a Default Server Certificate
Create the certificates archive on Satellite Server.
# capsule-certs-generate \ --foreman-proxy-fqdn mycapsule.example.com \ --certs-tar mycapsule.example.com-certs.tar-
Ensure that the
satellite-installerpackage is available on the Capsule Server. -
Copy the generated archive
.tarfile from Satellite Server to Capsule Server. Enable the certificate based on the needs of your environment. For more information, see
satellite-installer --scenario capsule --help.# satellite-installer --scenario capsule \ --foreman-proxy-content-parent-fqdn satellite.example.com \ --foreman-proxy-register-in-foreman true \ --foreman-proxy-foreman-base-url https://satellite.example.com \ --foreman-proxy-trusted-hosts satellite.example.com \ --foreman-proxy-trusted-hosts mycapsule.example.com \ --foreman-proxy-oauth-consumer-key UVrAZfMaCfBiiWejoUVLYCZHT2xhzuFV \ --foreman-proxy-oauth-consumer-secret \ ZhH8p7M577ttNU3WmUGWASag3JeXKgUX \ --foreman-proxy-content-pulp-oauth-secret TPk42MYZ42nAE3rZvyLBh7Lxob3nEUi8 \ --foreman-proxy-content-certs-tar mycapsule.example.com-certs.tar
When network connections or ports to the Satellite are not yet open, you can set the --foreman-proxy-register-in-foreman option to false to prevent Capsule from attempting to connect to Satellite and reporting errors. Run the installer again with this option set to true when the network and firewalls are correctly configured.
4.7. Performing Additional Configuration on Capsule Server
4.7.1. Installing the katello Agent
Installing the katello agent is recommended to allow remote updates of clients. The base system of a Capsule Server is a client of Satellite Server and therefore should also have the katello agent installed.
Before You Begin
- You must have enabled the Satellite Tools repositories in Satellite Server.
- You must have synchronized the Satellite Tools repositories in Satellite Server.
To Install katello-agent:
- Log into the system.
Enable the Satellite tools repository for this version of Satellite.
# subscription-manager repos \
--enable=rhel-7-server-satellite-tools-6.3-rpms
Install the package.
# yum install katello-agent
4.7.2. Enabling Remote Execution on Capsule Server
If you want to run commands on a Capsule Server’s hosts, ensure that you enable the remote execution.
Remote execution on external Capsules is disabled by default. To use remote execution on a Capsule Server you need to enable it by running the following command:
# satellite-installer --scenario capsule \
--enable-foreman-proxy-plugin-remote-execution-ssh
4.7.3. Adding Life Cycle Environments to Capsule Servers
If your Capsule Server has content functionality enabled, you must add one or more life cycle environments to it. Adding an environment enables Capsule Server to synchronize content from Satellite Server and provide content to host systems.
Red Hat recommends that you create one or multiple life cycle environments and assign them to your Capsule Server. This ensures that Capsule receives only the repositories contained in Content Views that are promoted to the respective life cycle environments, and results in optimizing the usage of system resources.
Avoid assigning the Library Lifecycle Environment to your Capsule Server as it triggers an automated Capsule sync every time a repository is updated from the CDN. This may consume multiple system resources on Capsules, network bandwidth between Satellite and Capsules, and available disk space on Capsules.
Capsule Server is configurable using Hammer CLI on Satellite Server, or through the web UI.
To add Life Cycle Environments to Capsule Servers using Hammer CLI:
- Log in to the Satellite Server CLI as root.
Display a list of all Capsule Servers and note the ID:
# hammer capsule listUsing the ID, verify the details of your Capsule Server:
# hammer capsule info --id capsule_id_numberVerify the life cycle environments available and note the environment ID:
# hammer capsule content available-lifecycle-environments \
--id capsule_id_number
Available life cycle environments are available for Capsule Server, but not currently attached.
Add the life cycle environment to your Capsule Server:
# hammer capsule content add-lifecycle-environment \ --id capsule_id_number --environment-id environment_id_number- Repeat for each life cycle environment you want to add to Capsule Server.
To synchronize all content from your Satellite Server environment to Capsule Server, enter the following command:
# hammer capsule content synchronize --id capsule_id_numberTo synchronize a specific life cycle environment from your Satellite Server to Capsule Server, enter the following command:
# hammer capsule content synchronize --id external_capsule_id_number \
--environment-id environment_id_number
For more information on working with Life Cycle Environments, see Creating an Application Life Cycle in the Red Hat Satellite Content Management Guide.
To Add Life Cycle Environments to Capsule Servers using Web UI:
- In the Satellite web UI, go to Infrastructure > Capsules, and select the Capsule.
- Click Edit.
- Select Env in the Life Cycle Environments tab.
- To synchronize capsule’s content, click the Synchronize button in the Overview tab.
Select one of two options:
- Optimized Sync
- Complete Sync
4.7.4. Enabling Power Management on Managed Hosts
When you enable the baseboard management controller (BMC) module on the Capsule Server, you can use power management commands on managed hosts using the intelligent platform management interface (IPMI) or a similar protocol.
The BMC service on the satellite Capsule Server enables you to perform a range of power management tasks. The underlying protocol for this feature is IPMI; also referred to as the BMC function. IPMI uses a special network interface on the managed hardware that is connected to a dedicated processor that runs independently of the host’s CPUs. In many instances the BMC functionality is built into chassis-based systems as part of chassis management (a dedicated module in the chassis).
For more information on the BMC service, see Configuring an Additional Network Interface in Managing Hosts.
Before You Begin
- All managed hosts must have a network interface, with type BMC. Satellite uses this NIC to pass the appropriate credentials to the host.
Enable Power Management on Managed Hosts
Run the installer with the options to enable BMC.
# satellite-installer --scenario capsule \
--foreman-proxy-bmc "true" \
--foreman-proxy-bmc-default-provider "freeipmi"
4.7.5. Configuring DNS, DHCP, and TFTP on Capsule Server
You can configure DNS, DHCP, and TFTP on Capsule Server.
You can also configure Capsule Server to use external DNS and DHCP services. See Chapter 5, Configuring External Services for more information.
To view a complete list of configurable options, enter the satellite-installer --scenario capsule --help command.
Before You Begin
-
You must have the correct network name (
dns-interface) for the DNS server. -
You must have the correct interface name (
dhcp-interface) for the DHCP server.
Configure DNS, DHCP, and TFTP on Capsule Server
Run capsule installer with the options applicable to your environment.
The following example shows full provisioning services:
# satellite-installer --scenario capsule \
--foreman-proxy-dns true \
--foreman-proxy-dns-managed true \
--foreman-proxy-dns-interface eth0 \
--foreman-proxy-dns-zone example.com \
--foreman-proxy-dns-forwarders 172.17.13.1 \
--foreman-proxy-dns-reverse 13.17.172.in-addr.arpa \
--foreman-proxy-dhcp true \
--foreman-proxy-dhcp-managed true \
--foreman-proxy-dhcp-interface eth0 \
--foreman-proxy-dhcp-range "172.17.13.100 172.17.13.150" \
--foreman-proxy-dhcp-gateway 172.17.13.1 \
--foreman-proxy-dhcp-nameservers 172.17.13.2 \
--foreman-proxy-tftp true \
--foreman-proxy-tftp-managed true \
--foreman-proxy-tftp-servername $(hostname)
For more information about configuring DHCP, DNS, and TFTP services, see the Configuring Network Services section in the Provisioning Guide.
4.7.6. Configuring Capsule Server with a Custom Server Certificate
Red Hat Satellite 6 includes default SSL certificates to enable encrypted communications between the Satellite Server, Capsule Servers, and all hosts. You can replace the default certificates with custom certificates if required. For example, your company’s security policy might dictate that SSL certificates must be obtained from a specific Certificate Authority.
Prerequisites
- Satellite Server configured with custom certificates. For more information, see Section 3.4.7, “Configuring Satellite Server with a Custom Server Certificate”.
- Capsule Server installed and registered to the Satellite Server. For more information, see Chapter 4, Installing Capsule Server.
To use custom certificates on each Capsule Server, complete these procedures:
- Section 4.7.6.1, “Obtain an SSL Certificate for the Capsule Server”
- Section 4.7.6.2, “Validate the Capsule Server’s SSL Certificate”
- Section 4.7.6.3, “Create the Capsule Server’s Certificate Archive File”
- Section 4.7.6.4, “Install the Capsule Server’s Custom Certificate”
- Section 4.7.6.5, “Install the Capsule Server’s New Certificate on All Hosts”
4.7.6.1. Obtain an SSL Certificate for the Capsule Server
This procedure generates PEM encoded certificates. Only PEM encoding must be used for the SSL Certificates.
- Do not use the Satellite Server’s certificate on any Capsule Server as each server’s certificate is unique.
Create a directory to contain all the source certificate files, accessible to only the
rootuser.# mkdir /root/capsule_cert # cd /root/capsule_certIn these examples, the directory is
/root/capsule_cert. If you have multiple Capsule Servers, name the directory to match. For example, if you have Capsule Servers namedcapsule_apacandcapsule_emea, you might create directories named capsule_apac and capsule_emea respectively. This is not required, but reduces the risk of using files from one Capsule Server on another Capsule Server.Create a private key with which to sign the Certificate Signing Request (CSR).
NoteIf you already have a private key for the Capsule Server, skip this step.
# openssl genrsa -out /root/capsule_cert/capsule_cert_key.pem 4096Create a Certificate Signing Request (CSR).
A Certificate Signing Request is a text file containing details of the server for which you are requesting a certificate. For this command, you provide the private key (output by the previous step), answer some questions about the Capsule Server, and the Certificate Signing Request is stored in a file.
NoteThe certificate’s Common Name (CN) must match the fully-qualified domain name (FQDN) of the server on which it is used.
To confirm a server’s FQDN, enter the command
hostname -fon the server.# openssl req -new \ -key /root/capsule_cert/capsule_cert_key.pem \1 -out /root/capsule_cert/capsule_cert_csr.pem2 Example Certificate Signing Request session
You are about to be asked to enter information that will be incorporated
into your certificate request.
What you are about to enter is what is called a Distinguished Name or a DN.
There are quite a few fields but you can leave some blank
For some fields there will be a default value,
If you enter '.', the field will be left blank.

Country Name (2 letter code) [XX]:AU
State or Province Name (full name) []:Queensland
Locality Name (eg, city) [Default City]:Brisbane
Organization Name (eg, company) [Default Company Ltd]:Example
Organizational Unit Name (eg, section) []:Sales
Common Name (eg, your name or your server's hostname) []:capsule.example.com
Email Address []:example@example.com

Please enter the following 'extra' attributes
to be sent with your certificate request
A challenge password []:password
An optional company name []:Example
Send the certificate signing request to the Certificate Authority. The same Certificate Authority must sign certificates for Satellite Server and Capsule Server.
When you submit the request, specify the lifespan of the certificate. The method for sending the certificate signing request varies, so consult the Certificate Authority for the preferred method. In response to the request you can expect to receive a Certificate Authority bundle, and a signed certificate, in separate files.
4.7.6.2. Validate the Capsule Server’s SSL Certificate
On the Satellite Server, validate the Capsule Server’s certificate input files with the katello-certs-check command. This process requires that you have copied the Capsule Server key, CSR, and SSL certificate from Capsule Server to Satellite Server.
# katello-certs-check \
   -c /root/capsule_cert/capsule_cert.pem \
-k /root/capsule_cert/capsule_cert_key.pem \
-b /root/capsule_cert/ca_cert_bundle.pem If the certificate is successfully validated, the output contains the following information.
Check private key matches the certificate: [OK]
Check ca bundle verifies the cert file: [OK]
Retain a copy of the example capsule-certs-generate command that is output by the katello-certs-check command for use in the following procedure.
Proceed to Section 4.7.6.3, “Create the Capsule Server’s Certificate Archive File”.
4.7.6.3. Create the Capsule Server’s Certificate Archive File
The Capsule Server’s installer requires the server certificates to be in an archive file. To create this file, use the capsule-certs-generate command on the Satellite Server.
The capsule-certs-generate command must be run once for every external Capsule Server. In these examples, capsule.example.com is the example FQDN and capsule_certs.tar the example archive file’s name. Replace these with values appropriate to your environment, taking care not to overwrite an existing certificate archive file. For example, if you have Capsule Servers named capsule1 and capsule2, you can name the certificate archive files capsule1_certs.tar and capsule2_certs.tar.
The capsule-certs-generate command, including parameters, is output by the katello-certs-check command in Section 3.4.7.2, “Validate the Satellite Server’s SSL Certificate”.
-
In an editor, prepare a copy of the
capsule-certs-generatecommand. -
Edit the values for
--foreman-proxy-fqdnto match the Capsule Server’s FQDN, and--certs-tarto the file path and name for the certificate archive file. -
If the Capsule Server has not already been installed, remove the
--certs-update-serverparameter. This is used only to update an existing Capsule Server’s certificate. -
Copy the modified
capsule-certs-generatecommand from the text editor to the terminal. Run the modified
capsule-certs-generatecommand.Example
capsule-certs-generatecommand# capsule-certs-generate --foreman-proxy-fqdn capsule.example.com \ --certs-tar /root/capsule_cert/capsule_certs.tar \ --server-cert /root/capsule_cert/capsule_cert.pem \ --server-cert-req /root/capsule_cert/capsule_cert_csr.pem \ --server-key /root/capsule_cert/capsule_cert_key.pem \ --server-ca-cert /root/sat_cert/ca_cert_bundle.pem \ --certs-update-serverOn the Satellite Server, copy the certificate archive file to the Capsule Server, providing the
rootuser’s password when prompted.In this example the archive file is copied to the
rootuser’s home directory, but you may prefer to copy it elsewhere.# scp /root/capsule_cert/capsule_certs.tar root@capsule.example.com:
Retain a copy of the example satellite-installer command that is output by the capsule-certs-generate command for use in the following procedure.
Proceed to Section 4.7.6.4, “Install the Capsule Server’s Custom Certificate”.
4.7.6.4. Install the Capsule Server’s Custom Certificate
Complete this procedure on the Capsule Server.
To install the Capsule Server’s custom certificates, run the satellite-installer script with custom parameters. The command, including parameters, is output by the capsule-certs-generate command in Section 4.7.6.3, “Create the Capsule Server’s Certificate Archive File”.
-
In an editor, prepare a copy of the
satellite-installercommand. -
Edit the value for
--foreman-proxy-content-certs-tarto match the location of the certificates archive file. -
If you want to enable additional features on the Capsule Server, append their parameters to the
satellite-installercommand. For a description of all the installer’s parameters, enter the commandsatellite-installer --scenario capsule --help. -
Copy the modified
satellite-installercommand from the text editor to the terminal. Run the modified
satellite-installercommand.Example custom
satellite-installercommand# satellite-installer --scenario capsule \ --foreman-proxy-content-parent-fqdn "satellite.example.com" \ --foreman-proxy-register-in-foreman "true" \ --foreman-proxy-foreman-base-url "https://satellite.example.com" \ --foreman-proxy-trusted-hosts "satellite.example.com" \ --foreman-proxy-trusted-hosts "capsule.example.com" \ --foreman-proxy-oauth-consumer-key "FeQsbASvCjvvaqE6duKH6SoYZWg4jwjg" \ --foreman-proxy-oauth-consumer-secret "7UhPXFPDBongvdTbNixbsWR5WFZsKEgF" \ --foreman-proxy-content-pulp-oauth-secret "VpQ9587tVmYeuY4Du6VitmZpZE5vy9ac" \ --foreman-proxy-content-certs-tar "/root/capsule_certs.tar"
The satellite-installer command, as output by the capsule-certs-generate command, is unique to each Capsule Server. Do not use the same command on more than one Capsule Server.
Do NOT delete the certificates archive file (the .tar file) even after the certificates have been deployed to all relevant hosts. It is required, for example, when upgrading the Capsule Server. If the certificates archive file is not found by the installer, it fails with a message similar to the following:
[ERROR YYYY-MM-DD hh:mm:ss main] tar -xzf /var/tmp/srvcapsule01.tar returned 2 instead of one of [0]Proceed to Section 4.7.6.5, “Install the Capsule Server’s New Certificate on All Hosts”.
4.7.6.5. Install the Capsule Server’s New Certificate on All Hosts
Hosts which connect to an external Capsule Server require that server’s custom certificate. Run the following command on all the Capsule Server’s hosts.
Use the Capsule Server’s host name, not that of the Satellite Server.
# yum -y localinstall \
http://capsule.example.com/pub/katello-ca-consumer-latest.noarch.rpm
4.7.7. Restricting Access to mongod
Only the apache and root users should be allowed access to the MongoDB database daemon, mongod, to reduce the risk of data loss.
Restrict access to mongod on Satellite and Capsule Servers using the following commands.
Configure the Firewall.
# firewall-cmd  --direct --add-rule ipv4 filter OUTPUT 0 -o lo -p \
tcp -m tcp --dport 27017 -m owner --uid-owner apache -j ACCEPT \
&& firewall-cmd  --direct --add-rule ipv6 filter OUTPUT 0 -o lo -p \
tcp -m tcp --dport 27017 -m owner --uid-owner apache -j ACCEPT \
&& firewall-cmd  --direct --add-rule ipv4 filter OUTPUT 0 -o lo -p \
tcp -m tcp --dport 27017 -m owner --uid-owner root -j ACCEPT \
&& firewall-cmd  --direct --add-rule ipv6 filter OUTPUT 0 -o lo -p \
tcp -m tcp --dport 27017 -m owner --uid-owner root -j ACCEPT \
&& firewall-cmd  --direct --add-rule ipv4 filter OUTPUT 1 -o lo -p \
tcp -m tcp --dport 27017 -j DROP \
&& firewall-cmd  --direct --add-rule ipv6 filter OUTPUT 1 -o lo -p \
tcp -m tcp --dport 27017 -j DROP \
&& firewall-cmd  --direct --add-rule ipv4 filter OUTPUT 0 -o lo -p \
tcp -m tcp --dport 28017 -m owner --uid-owner apache -j ACCEPT \
&& firewall-cmd  --direct --add-rule ipv6 filter OUTPUT 0 -o lo -p \
tcp -m tcp --dport 28017 -m owner --uid-owner apache -j ACCEPT \
&& firewall-cmd  --direct --add-rule ipv4 filter OUTPUT 0 -o lo -p \
tcp -m tcp --dport 28017 -m owner --uid-owner root -j ACCEPT \
&& firewall-cmd  --direct --add-rule ipv6 filter OUTPUT 0 -o lo -p \
tcp -m tcp --dport 28017 -m owner --uid-owner root -j ACCEPT \
&& firewall-cmd  --direct --add-rule ipv4 filter OUTPUT 1 -o lo -p \
tcp -m tcp --dport 28017 -j DROP \
&& firewall-cmd  --direct --add-rule ipv6 filter OUTPUT 1 -o lo -p \
tcp -m tcp --dport 28017 -j DROP
Repeat the command adding the
--permanentoption to make the settings persistent.# firewall-cmd --permanent --direct --add-rule ipv4 filter OUTPUT 0 \ -o lo -p tcp -m tcp --dport 27017 -m owner \ --uid-owner apache -j ACCEPT \ && firewall-cmd --permanent --direct --add-rule ipv6 filter OUTPUT 0 \ -o lo -p tcp -m tcp --dport 27017 -m owner \ --uid-owner apache -j ACCEPT \ && firewall-cmd --permanent --direct --add-rule ipv4 filter OUTPUT 0 \ -o lo -p tcp -m tcp --dport 27017 -m owner \ --uid-owner root -j ACCEPT \ && firewall-cmd --permanent --direct --add-rule ipv6 filter OUTPUT 0 \ -o lo -p tcp -m tcp --dport 27017 -m owner \ --uid-owner root -j ACCEPT \ && firewall-cmd --permanent --direct --add-rule ipv4 filter OUTPUT 1 \ -o lo -p tcp -m tcp --dport 27017 -j DROP \ && firewall-cmd --permanent --direct --add-rule ipv6 filter OUTPUT 1 \ -o lo -p tcp -m tcp --dport 27017 -j DROP \ && firewall-cmd --permanent --direct --add-rule ipv4 filter OUTPUT 0 \ -o lo -p tcp -m tcp --dport 28017 -m owner \ --uid-owner apache -j ACCEPT \ && firewall-cmd --permanent --direct --add-rule ipv6 filter OUTPUT 0 \ -o lo -p tcp -m tcp --dport 28017 -m owner \ --uid-owner apache -j ACCEPT \ && firewall-cmd --permanent --direct --add-rule ipv4 filter OUTPUT 0 \ -o lo -p tcp -m tcp --dport 28017 -m owner \ --uid-owner root -j ACCEPT \ && firewall-cmd --permanent --direct --add-rule ipv6 filter OUTPUT 0 \ -o lo -p tcp -m tcp --dport 28017 -m owner \ --uid-owner root -j ACCEPT \ && firewall-cmd --permanent --direct --add-rule ipv4 filter OUTPUT 1 \ -o lo -p tcp -m tcp --dport 28017 -j DROP \ && firewall-cmd --permanent --direct --add-rule ipv6 filter OUTPUT 1 \ -o lo -p tcp -m tcp --dport 28017 -j DROP
Chapter 5. Configuring External Services
Some environments have existing DNS, DHCP, and TFTP services and do not need to use the Satellite Server to provide these services. If you want to use external servers to provide DNS, DHCP, or TFTP, you can configure them for use with Satellite Server.
If you want to disable these services in Satellite in order to manage them manually, see Section 3.4.5, “Disabling DNS, DHCP, and TFTP for Unmanaged Networks” for more information.
5.1. Configuring Satellite with External DNS
You can configure Satellite to use an external server to provide DNS service.
Deploy a Red Hat Enterprise Linux Server and install the ISC DNS Service.
# yum install bind bind-utilsCreate the configuration file for a domain.
The following example configures a domain
virtual.lanas one subnet 192.168.38.0/24, a security key namedcapsule, and sets forwarders to Google’s public DNS addresses (8.8.8.8 and 8.8.4.4). 192.168.38.2 is the IP address of a DNS server and 192.168.38.1 is the IP address of a Satellite Server or a Capsule Server.# cat /etc/named.conf include "/etc/rndc.key"; controls { inet 127.0.0.1 port 953 allow { 127.0.0.1; } keys { "capsule"; }; inet 192.168.38.2 port 953 allow { 192.168.38.1; 192.168.38.2; } keys { "capsule"; }; }; options { directory "/var/named"; forwarders { 8.8.8.8; 8.8.4.4; }; }; include "/etc/named.rfc1912.zones"; zone "38.168.192.in-addr.arpa" IN { type master; file "dynamic/38.168.192-rev"; update-policy { grant "capsule" zonesub ANY; }; }; zone "virtual.lan" IN { type master; file "dynamic/virtual.lan"; update-policy { grant "capsule" zonesub ANY; }; };The
inetline must be entered as one line in the configuration file.Create a key file.
# ddns-confgen -k capsuleThis command can take a long time to complete.
Copy and paste the output from the key section into a separate file called
/etc/rndc.key.# cat /etc/rndc.key key "capsule" { algorithm hmac-sha256; secret "GeBbgGoLedEAAwNQPtPh3zP56MJbkwM84UJDtaUS9mw="; };ImportantThis is the key used to change DNS server configuration. Only the root user should read and write to it.
Create zone files.
# cat /var/named/dynamic/virtual.lan
$ORIGIN .
$TTL 10800      ; 3 hours
virtual.lan             IN SOA  service.virtual.lan. root.virtual.lan. (
                                9          ; serial
                                86400      ; refresh (1 day)
                                3600       ; retry (1 hour)
                                604800     ; expire (1 week)
                                3600       ; minimum (1 hour)
                                )
                        NS      service.virtual.lan.
$ORIGIN virtual.lan.
$TTL 86400      ; 1 day
capsule                 A       192.168.38.1
service                 A       192.168.38.2
Create the reverse zone file.
# cat /var/named/dynamic/38.168.192-rev
$ORIGIN .
$TTL 10800      ; 3 hours
38.168.192.in-addr.arpa IN SOA  service.virtual.lan. root.38.168.192.in-addr.arpa. (
                                4          ; serial
                                86400      ; refresh (1 day)
                                3600       ; retry (1 hour)
                                604800     ; expire (1 week)
                                3600       ; minimum (1 hour)
                                )
                        NS      service.virtual.lan.
$ORIGIN 38.168.192.in-addr.arpa.
$TTL 86400      ; 1 day
1                PTR     capsule.virtual.lan.
2                PTR     service.virtual.lan.
There should be no extra non-ASCII characters.
5.2. Verifying and Starting the DNS Service
Validate the syntax.
# named-checkconf -z /etc/named.confStart the server.
# systemctl restart namedAdd a new host.
The following uses the example host 192.168.38.2. You should change this to suit your environment.
# echo -e "server 192.168.38.2\n \
update add aaa.virtual.lan 3600 IN A 192.168.38.10\n \
send\n" | nsupdate -k /etc/rndc.key
Test that the DNS service can resolve the new host.
# nslookup aaa.virtual.lan 192.168.38.2If necessary, delete the new entry.
# echo -e "server 192.168.38.2\n \
update delete aaa.virtual.lan 3600 IN A 192.168.38.10\n \
send\n" | nsupdate -k /etc/rndc.key
Configure the firewall for external access to the DNS service (UDP and TCP on port 53).
# firewall-cmd --add-port="53/udp" --add-port="53/tcp" \
&& firewall-cmd --permanent --add-port="53/udp" --add-port="53/tcp"
5.3. Configuring Capsule Server with External DNS
On the Red Hat Enterprise Linux Server, install the ISC DNS Service.
# yum install bind bind-utilsEnsure that the
nsupdateutility was installed. The Capsule uses thensupdateutility to update DNS records on the remote server.Copy the
/etc/rndc.keyfile from the services server to the Capsule Server.# scp localfile username@hostname:remotefileEnsure that the ownership, permissions, and SELinux context are correct.
# restorecon -v /etc/rndc.key
# chown -v root:named /etc/rndc.key
# chmod -v 640 /etc/rndc.key
Test the
nsupdateutility by adding a host remotely.# echo -e "server 192.168.38.2\n \ update add aaa.virtual.lan 3600 IN A 192.168.38.10\n \ send\n" | nsupdate -k /etc/rndc.key # nslookup aaa.virtual.lan 192.168.38.2 # echo -e "server 192.168.38.2\n \ update delete aaa.virtual.lan 3600 IN A 192.168.38.10\n \ send\n" | nsupdate -k /etc/rndc.keyRun the
satellite-installerscript to make the following persistent changes to the/etc/foreman-proxy/settings.d/dns.ymlfile.# satellite-installer --foreman-proxy-dns=true \ --foreman-proxy-dns-managed=false \ --foreman-proxy-dns-provider=nsupdate \ --foreman-proxy-dns-server="192.168.38.2" \ --foreman-proxy-keyfile=/etc/rndc.key \ --foreman-proxy-dns-ttl=86400Restart the foreman-proxy service.
# systemctl restart foreman-proxy- Log in to the Satellite Server web UI.
- Go to Infrastructure > Capsules. Locate the appropriate Capsule Server and from the Actions drop-down list, select Refresh. The DNS feature should appear.
- Associate the DNS service with the appropriate subnets and domain.
5.4. Configuring Satellite Server with External DHCP
You can use this section to configure your Red Hat Satellite Server to work with an external DHCP server.
To configure the DHCP server and share the DHCP configuration and lease files
Deploy a Red Hat Enterprise Linux Server and install the ISC DHCP Service and Berkeley Internet Name Domain (BIND).
# yum install dhcp bindGenerate a security token in an empty directory.
# dnssec-keygen -a HMAC-MD5 -b 512 -n HOST omapi_keyThe above command can take a long time, for less-secure proof-of-concept deployments you can use a non-blocking random number generator.
# dnssec-keygen -r /dev/urandom -a HMAC-MD5 -b 512 -n HOST omapi_keyThis creates the key pair in two files in the current directory.
Copy the secret hash from the key.
# cat Komapi_key.+*.private |grep ^Key|cut -d ' ' -f2Edit the
dhcpdconfiguration file for all of the subnets and add the key as in the example:# cat /etc/dhcp/dhcpd.conf default-lease-time 604800; max-lease-time 2592000; log-facility local7; subnet 192.168.38.0 netmask 255.255.255.0 { range 192.168.38.10 192.168.38.100; option routers 192.168.38.1; option subnet-mask 255.255.255.0; option domain-search "virtual.lan"; option domain-name "virtual.lan"; option domain-name-servers 8.8.8.8; } omapi-port 7911; key omapi_key { algorithm HMAC-MD5; secret "jNSE5YI3H1A8Oj/tkV4...A2ZOHb6zv315CkNAY7DMYYCj48Umw=="; }; omapi-key omapi_key;- Delete the two key files from the directory where you created them.
Define each subnet on the Satellite Server.
It is recommended to set up a lease range and reservation range separately to prevent conflicts. For example, the lease range is 192.168.38.10 to 192.168.38.100 so the reservation range (defined in the Satellite web UI) is 192.168.38.101 to 192.168.38.250. Do not set DHCP Capsule for the defined Subnet yet.
Configure the firewall for external access to the DHCP server.
# firewall-cmd --add-service dhcp \
&& firewall-cmd --permanent --add-service dhcp
Determine the UID and GID numbers of the foreman user on the Satellite Server.
# id -u foreman
993
# id -g foreman
990
Create the same user and group with the same IDs on the DHCP server.
# groupadd -g 990 foreman
# useradd -u 993 -g 990 -s /sbin/nologin foreman
To make the configuration files readable, restore the read and execute flags.
# chmod o+rx /etc/dhcp/
# chmod o+r /etc/dhcp/dhcpd.conf
# chattr +i /etc/dhcp/ /etc/dhcp/dhcpd.conf
Start the DHCP service.
# systemctl start dhcpdExport the DHCP configuration and leases files using NFS.
# yum install nfs-utils
# systemctl enable rpcbind nfs-server
# systemctl start rpcbind nfs-server nfs-lock nfs-idmapd
Create the DHCP configuration and leases files to be exported using NFS.
# mkdir -p /exports/var/lib/dhcpd /exports/etc/dhcpAdd the following line to the
/etc/fstabfile to create mount points for the newly created directories./var/lib/dhcpd /exports/var/lib/dhcpd none bind,auto 0 0 /etc/dhcp /exports/etc/dhcp none bind,auto 0 0Mount the file systems in
/etc/fstab.# mount -aEnsure the following lines are present in /etc/exports:
/exports 192.168.38.1(rw,async,no_root_squash,fsid=0,no_subtree_check)

/exports/etc/dhcp 192.168.38.1(ro,async,no_root_squash,no_subtree_check,nohide)

/exports/var/lib/dhcpd 192.168.38.1(ro,async,no_root_squash,no_subtree_check,nohide)
Reload the NFS server.
# exportfs -rvaConfigure the firewall for the DHCP omapi port 7911 for the Satellite Server.
# firewall-cmd --add-port="7911/tcp" \
&& firewall-cmd --permanent --add-port="7911/tcp"
If required, configure the firewall for external access to NFS.
Clients are configured using NFSv3.
Use the
firewallddaemon’s NFS service to configure the firewall.# firewall-cmd --zone public --add-service mountd \ && firewall-cmd --zone public --add-service rpc-bind \ && firewall-cmd --zone public --add-service nfs \ && firewall-cmd --permanent --zone public --add-service mountd \ && firewall-cmd --permanent --zone public --add-service rpc-bind \ && firewall-cmd --permanent --zone public --add-service nfs
To configure the Satellite Server
Install the NFS client.
# yum install nfs-utilsCreate the DHCP directories for NFS.
# mkdir -p /mnt/nfs/etc/dhcp /mnt/nfs/var/lib/dhcpdChange the file owner.
# chown -R foreman-proxy /mnt/nfsVerify communication with the NFS server and RPC communication paths.
# showmount -e your_DHCP_server_FQDN
# rpcinfo -p your_DHCP_server_FQDN
Add the following lines to the
/etc/fstabfile:your_DHCP_server_FQDN:/exports/etc/dhcp /mnt/nfs/etc/dhcp nfs ro,vers=3,auto,nosharecache,context="system_u:object_r:dhcp_etc_t:s0" 0 0 your_DHCP_server_FQDN:/exports/var/lib/dhcpd /mnt/nfs/var/lib/dhcpd nfs ro,vers=3,auto,nosharecache,context="system_u:object_r:dhcpd_state_t:s0" 0 0Mount the file systems on
/etc/fstab.# mount -aRead the relevant files.
# su foreman-proxy -s /bin/bash
bash-4.2$ cat /mnt/nfs/etc/dhcp/dhcpd.conf
bash-4.2$ cat /mnt/nfs/var/lib/dhcpd/dhcpd.leases
bash-4.2$ exit
Run the
satellite-installerscript to make the following persistent changes to the/etc/foreman-proxy/settings.d/dhcp.ymlfile.# satellite-installer --foreman-proxy-dhcp=true \ --foreman-proxy-dhcp-provider=remote_isc \ --foreman-proxy-plugin-dhcp-remote-isc-dhcp-config /mnt/nfs/etc/dhcp/dhcpd.conf \ --foreman-proxy-plugin-dhcp-remote-isc-dhcp-leases /mnt/nfs/var/lib/dhcpd/dhcpd.leases \ --foreman-proxy-plugin-dhcp-remote-isc-key-name=omapi_key \ --foreman-proxy-plugin-dhcp-remote-isc-key-secret=jNSE5YI3H1A8Oj/tkV4...A2ZOHb6zv315CkNAY7DMYYCj48Umw== \ --foreman-proxy-plugin-dhcp-remote-isc-omapi-port=7911 \ --enable-foreman-proxy-plugin-dhcp-remote-isc \ --foreman-proxy-dhcp-server=your_DHCP_server_FQDNRestart the foreman-proxy service.
# systemctl restart foreman-proxy- Log in to the Satellite Server web UI.
- Go to Infrastructure > Capsules. Locate the appropriate Capsule Server and from the Actions drop-down list, select Refresh. The DHCP feature should appear.
- Associate the DHCP service with the appropriate subnets and domain.
5.5. Configuring Capsule Server with External DHCP
You can use this section to configure your Red Hat Satellite Capsule Server to work with an external DHCP server.
Prerequisites
The DHCP server is configured and the DHCP configuration and lease files are shared via NFS, see Section 5.4, “Configuring Satellite Server with External DHCP” for more information.
Install the NFS client.
# yum install nfs-utilsCreate the DHCP directories for NFS.
# mkdir -p /mnt/nfs/etc/dhcp /mnt/nfs/var/lib/dhcpdChange the file owner.
# chown -R foreman-proxy /mnt/nfsVerify communication with the NFS server and RPC communication paths.
# showmount -e your_DHCP_server_FQDN
# rpcinfo -p your_DHCP_server_FQDN
Add the following lines to the
/etc/fstabfile:your_DHCP_server_FQDN:/exports/etc/dhcp /mnt/nfs/etc/dhcp nfs ro,vers=3,auto,nosharecache,context="system_u:object_r:dhcp_etc_t:s0" 0 0 your_DHCP_server_FQDN:/exports/var/lib/dhcpd /mnt/nfs/var/lib/dhcpd nfs ro,vers=3,auto,nosharecache,context="system_u:object_r:dhcpd_state_t:s0" 0 0Mount the file systems on
/etc/fstab.# mount -aRead the relevant files.
# su foreman-proxy -s /bin/bash
bash-4.2$ cat /mnt/nfs/etc/dhcp/dhcpd.conf
bash-4.2$ cat /mnt/nfs/var/lib/dhcpd/dhcpd.leases
bash-4.2$ exit
Run the
satellite-installerscript to make the following persistent changes to the/etc/foreman-proxy/settings.d/dhcp.ymlfile.# satellite-installer --foreman-proxy-dhcp=true \ --foreman-proxy-dhcp-provider=remote_isc \ --foreman-proxy-plugin-dhcp-remote-isc-dhcp-config /mnt/nfs/etc/dhcp/dhcpd.conf \ --foreman-proxy-plugin-dhcp-remote-isc-dhcp-leases /mnt/nfs/var/lib/dhcpd/dhcpd.leases \ --foreman-proxy-plugin-dhcp-remote-isc-key-name=omapi_key \ --foreman-proxy-plugin-dhcp-remote-isc-key-secret=jNSE5YI3H1A8Oj/tkV4...A2ZOHb6zv315CkNAY7DMYYCj48Umw== \ --foreman-proxy-plugin-dhcp-remote-isc-omapi-port=7911 \ --enable-foreman-proxy-plugin-dhcp-remote-isc \ --foreman-proxy-dhcp-server=your_DHCP_server_FQDNRestart the foreman-proxy service.
# systemctl restart foreman-proxy- Log in to the Satellite Server web UI.
- Go to Infrastructure > Capsules. Locate the appropriate Capsule Server and from the Actions drop-down list, select Refresh. The DHCP feature should appear.
- Associate the DHCP service with the appropriate subnets and domain.
5.6. Configuring Satellite Server with External TFTP
Before You Begin
- You should have already configured NFS and the firewall for external access to NFS. See Section 5.4, “Configuring Satellite Server with External DHCP”.
Configure Satellite Server with External TFTP
Install and enable the TFTP server.
# yum install tftp-server syslinuxEnable and activate the
tftp.socketunit.# systemctl enable tftp.socket # systemctl start tftp.socketConfigure the PXELinux environment.
# mkdir -p /var/lib/tftpboot/{boot,pxelinux.cfg,grub2}
# cp /usr/share/syslinux/{pxelinux.0,menu.c32,chain.c32} \
/var/lib/tftpboot/
Restore SELinux file contexts.
# restorecon -RvF /var/lib/tftpboot/Create the TFTP directory to be exported using NFS.
# mkdir -p /exports/var/lib/tftpbootAdd the newly created mount point to the /etc/fstab file.
/var/lib/tftpboot /exports/var/lib/tftpboot none bind,auto 0 0Mount the file systems in
/etc/fstab.# mount -aEnsure the following lines are present in
/etc/exports:/exports 192.168.38.1(rw,async,no_root_squash,fsid=0,no_subtree_check)/exports/var/lib/tftpboot 192.168.38.1(rw,async,no_root_squash,no_subtree_check,nohide)The first line is common to the DHCP configuration and therefore should already be present if the previous procedure was completed on this system.
Reload the NFS server.
# exportfs -rva
5.6.1. Configuring the Firewall for External Access to TFTP
Configure the firewall (UDP on port 69).
# firewall-cmd --add-port="69/udp" \
&& firewall-cmd --permanent --add-port="69/udp"
5.7. Configuring Capsule Server with External TFTP
Create the TFTP directory to prepare for NFS.
# mkdir -p /mnt/nfs/var/lib/tftpbootAdd the following line in the
/etc/fstabfile:192.168.38.2:/exports/var/lib/tftpboot /mnt/nfs/var/lib/tftpboot nfs rw,vers=3,auto,nosharecache,context="system_u:object_r:tftpdir_rw_t:s0" 0 0Mount the file systems in
/etc/fstab.# mount -aRun the
satellite-installerscript to make the following persistent changes to the/etc/foreman-proxy/settings.d/tftp.ymlfile.# satellite-installer --foreman-proxy-tftp=true \ --foreman-proxy-tftp-root /mnt/nfs/var/lib/tftpbootIf the TFTP service is running on a different server than the DHCP service, update the
tftp_servernamesetting with the FQDN or IP address of that server.# satellite-installer --foreman-proxy-tftp-servername=new_FQDNThis updates all configuration files with the new value.
- Log in to the Satellite Server web UI.
- Go to Infrastructure > Capsules. Locate the appropriate Capsule Server and from the Actions drop-down list, select Refresh. The TFTP feature should appear.
- Associate the TFTP service with the appropriate subnets and domain.
5.8. Configuring Satellite with External IdM DNS
Red Hat Satellite can be configured to use a Red Hat Identity Management (IdM) server to provide the DNS service. Two methods are described here to achieve this, both using a transaction key. For more information on Red Hat Identity Management, see the Linux Domain Identity, Authentication, and Policy Guide.
The first method is to install the IdM client which automates the process with the generic security service algorithm for secret key transaction (GSS-TSIG) technology defined in RFC3645. This method requires installing the IdM client on the Satellite Server or Capsule’s base system and having an account created by the IdM server administrator for use by the Satellite administrator. See Section 5.8.1, “Configuring Dynamic DNS Update with GSS-TSIG Authentication” to use this method.
The second method, secret key transaction authentication for DNS (TSIG), uses an rndc.key for authentication. It requires root access to the IdM server to edit the BIND configuration file, installing the BIND utility on the Satellite Server’s base system, and coping the rndc.key to between the systems. This technology is defined in RFC2845. See Section 5.8.2, “Configuring Dynamic DNS Update with TSIG Authentication” to use this method.
You are not required to use Satellite to manage DNS. If you are using the Realm enrollment feature of Satellite, where provisioned hosts are enrolled automatically to IdM, then the ipa-client-install script creates DNS records for the client. The following procedure and Realm enrollment are therefore mutually exclusive. For more information on configuring Realm enrollment, see External Authentication for Provisioned Hosts in Administering Red Hat Satellite.
Determining where to install the IdM Client
When Satellite Server wants to add a DNS record for a host, it first determines which Capsule is providing DNS for that domain. It then communicates with the Capsule and adds the record. The hosts themselves are not involved in this process. This means you should install and configure the IdM client on the Satellite or Capsule that is currently configured to provide a DNS service for the domain you want to manage using the IdM server.
5.8.1. Configuring Dynamic DNS Update with GSS-TSIG Authentication
In this example, Satellite Server has the following settings.
| Host name |
|
| Network |
|
The IdM server has the following settings.
| Host name |
|
| Domain name |
|
Before you Begin.
- Confirm the IdM server is deployed and the host-based firewall has been configured correctly. For more information, see Port Requirements in the Linux Domain Identity, Authentication, and Policy Guide.
- Obtain an account on the IdM server with permissions to create zones on the IdM server.
- Confirm if the Satellite or an external Capsule is managing DNS for a domain.
- Confirm that the Satellite or external Capsule are currently working as expected.
- In the case of a newly installed system, complete the installation procedures in this guide first. In particular, DNS and DHCP configuration should have been completed.
- Make a backup of the answer file in case you have to revert the changes. See Section 3.3.3, “Specifying Installation Options” for more information.
Create a Kerberos Principal on the IdM Server.
Ensure you have a Kerberos ticket.
# kinit idm_userWhere idm_user is the account created for you by the IdM administrator.
Create a new Kerberos principal for the Satellite or Capsule to use to authenticate to the IdM server.
# ipa service-add capsule/satellite.example.com
Install and Configure the IdM Client.
Do this on the Satellite or Capsule Server that is managing the DNS service for a domain.
Install the IdM client package.
# yum install ipa-clientConfigure the IdM client by running the installation script and following the on-screen prompts.
# ipa-client-installEnsure you have a Kerberos ticket.
# kinit adminRemove any preexisting keytab.
# rm /etc/foreman-proxy/dns.keytabGet the keytab created for this system.
# ipa-getkeytab -p capsule/satellite.example.com@EXAMPLE.COM \ -s idm1.example.com -k /etc/foreman-proxy/dns.keytabNoteWhen adding a keytab to a standby system with the same host name as the original system in service, add the
roption to prevent generating new credentials and rendering the credentials on the original system invalid.Set the group and owner for the keytab file to
foreman-proxyas follows.# chown foreman-proxy:foreman-proxy /etc/foreman-proxy/dns.keytabIf required, check the keytab is valid.
# kinit -kt /etc/foreman-proxy/dns.keytab \
capsule/satellite.example.com@EXAMPLE.COM
Configure DNS Zones in the IdM web UI.
Create and configure the zone to be managed:
- Navigate to Network Services > DNS > DNS Zones.
-
Select Add and enter the zone name. In this example,
example.com. - Click Add and Edit.
On the Settings tab, in the BIND update policy box, add an entry as follows to the semi-colon separated list.
grant capsule\047satellite.example.com@EXAMPLE.COM wildcard * ANY;- Ensure Dynamic update is set to True.
- Enable Allow PTR sync.
- Select Save to save the changes.
Create and Configure the reverse zone.
- Navigate to Network Services > DNS > DNS Zones.
- Select Add.
- Select Reverse zone IP network and add the network address in CIDR format to enable reverse lookups.
- Click Add and Edit.
On the Settings tab, in the BIND update policy box, add an entry as follows to the semi-colon separated list:
grant capsule\047satellite.example.com@EXAMPLE.COM wildcard * ANY;- Ensure Dynamic update is set to True.
- Select Save to save the changes.
Configure the Satellite or Capsule Server Managing the DNS Service for the Domain.
On a Satellite Server’s Base System.
satellite-installer --scenario satellite \
--foreman-proxy-dns=true \
--foreman-proxy-dns-managed=true \
--foreman-proxy-dns-provider=nsupdate_gss \
--foreman-proxy-dns-server="idm1.example.com" \
--foreman-proxy-dns-tsig-principal="capsule/satellite.example.com@EXAMPLE.COM" \
--foreman-proxy-dns-tsig-keytab=/etc/foreman-proxy/dns.keytab \
--foreman-proxy-dns-reverse="55.168.192.in-addr.arpa" \
--foreman-proxy-dns-zone=example.com \
--foreman-proxy-dns-ttl=86400
On a Capsule Server’s Base System.
satellite-installer --scenario capsule \
--foreman-proxy-dns=true \
--foreman-proxy-dns-managed=true \
--foreman-proxy-dns-provider=nsupdate_gss \
--foreman-proxy-dns-server="idm1.example.com" \
--foreman-proxy-dns-tsig-principal="capsule/satellite.example.com@EXAMPLE.COM" \
--foreman-proxy-dns-tsig-keytab=/etc/foreman-proxy/dns.keytab \
--foreman-proxy-dns-reverse="55.168.192.in-addr.arpa" \
--foreman-proxy-dns-zone=example.com \
--foreman-proxy-dns-ttl=86400
Restart the Satellite or Capsule’s Proxy Service.
# systemctl restart foreman-proxyUpdate the Configuration in Satellite web UI.
After you have run the installation script to make any changes to a Capsule, instruct Satellite to scan the configuration on each affected Capsule as follows:
- Navigate to Infrastructure > Capsules.
- For each Capsule to be updated, from the Actions drop-down menu, select Refresh.
Configure the domain:
- Go to Infrastructure > Domains and select the domain name.
- On the Domain tab, ensure DNS Capsule is set to the Capsule where the subnet is connected.
Configure the subnet:
- Go to Infrastructure > Subnets and select the subnet name.
- On the Subnet tab, set IPAM to None.
- On the Domains tab, ensure the domain to be managed by the IdM server is selected.
- On the Capsules tab, ensure Reverse DNS Capsule is set to the Capsule where the subnet is connected.
- Click Submit to save the changes.
5.8.2. Configuring Dynamic DNS Update with TSIG Authentication
In this example, Satellite Server has the following settings.
| IP address |
|
| Host name |
|
The IdM server has the following settings.
| Host name |
|
| IP address |
|
| Domain name |
|
Before you Begin
- Confirm the IdM Server is deployed and the host-based firewall has been configured correctly. For more information, see Port Requirements in the Linux Domain Identity, Authentication, and Policy Guide.
-
Obtain
rootuser privileges on the IdM server. - Confirm if the Satellite or an external Capsule is managing DNS for a domain.
- Confirm that the Satellite or external Capsule are currently working as expected.
- In the case of a newly installed system, complete the installation procedures in this guide first. In particular, DNS and DHCP configuration should have been completed.
- Make a backup of the answer file in case you have to revert the changes. See Section 3.3.3, “Specifying Installation Options” for more information.
Enabling External Updates to the DNS Zone in the IdM Server
On the IdM Server, add the following to the top of the
/etc/named.conffile.// This was added to allow Satellite Server at 192.168.25.1 to make DNS updates. ######################################################################## include "/etc/rndc.key"; controls { inet 192.168.25.2 port 953 allow { 192.168.25.1; } keys { "rndc-key"; }; }; ########################################################################Reload
namedto make the changes take effect.# systemctl reload namedIn the IdM web UI, go to Network Services > DNS > DNS Zones. Select the name of the zone. On the Settings tab:
Add the following in the
BIND update policybox.grant "rndc-key" zonesub ANY;- Ensure Dynamic update is set to True.
- Click Update to save the changes.
Copy the
/etc/rndc.keyfile from the IdM server to Satellite’s base system as follows.# scp /etc/rndc.key root@satellite.example.com:/etc/rndc.keyEnsure that the ownership, permissions, and SELinux context are correct.
# restorecon -v /etc/rndc.key
# chown -v root:named /etc/rndc.key
# chmod -v 640 /etc/rndc.key
On Satellite Server, run the installation script as follows to use the external DNS server.
# satellite-installer --scenario satellite \
--foreman-proxy-dns=true \
--foreman-proxy-dns-managed=false \
--foreman-proxy-dns-provider=nsupdate \
--foreman-proxy-dns-server="192.168.25.2" \
--foreman-proxy-keyfile=/etc/rndc.key \
--foreman-proxy-dns-ttl=86400
Testing External Updates to the DNS Zone in the IdM Server
Install
bind-utilsfor testing withnsupdate.# yum install bind-utilsEnsure the key in the
/etc/rndc.keyfile on Satellite Server is the same one as used on the IdM server.key "rndc-key" { algorithm hmac-md5; secret "secret-key=="; };On Satellite Server, create a test DNS entry for a host. For example, host
test.example.comwith an A record of192.168.25.20on the IdM server at192.168.25.1.# echo -e "server 192.168.25.1\n \ update add test.example.com 3600 IN A 192.168.25.20\n \ send\n" | nsupdate -k /etc/rndc.keyOn Satellite Server, test the DNS entry.
# nslookup test.example.com 192.168.25.1 Server: 192.168.25.1 Address: 192.168.25.1#53 Name: test.example.com Address: 192.168.25.20- To view the entry in the IdM web UI, go to Network Services > DNS > DNS Zones. Select the name of the zone and search for the host by name.
If resolved successfully, remove the test DNS entry.
# echo -e "server 192.168.25.1\n \
update delete test.example.com 3600 IN A 192.168.25.20\n \
send\n" | nsupdate -k /etc/rndc.key
Confirm that the DNS entry was removed.
# nslookup test.example.com 192.168.25.1The above
nslookupcommand fails and outputs the SERVFAIL error message if the record was successfully deleted.
5.8.3. Reverting to Internal DNS Service
To revert to using Satellite Server and Capsule Server as DNS providers, follow this procedure.
On the Satellite or Capsule Server that is to manage DNS for the domain.
If you backed up the answer file before the change to external DNS, restore the answer file and then run the installation script:
# satellite-installerIf you do not have a suitable backup of the answer file, back up the answer file now, and then run the installation script on Satellite and Capsules as described below.
See Section 3.3.3, “Specifying Installation Options” for more information on the answer file.
To configure Satellite or Capsule as DNS server without using an answer file.
# satellite-installer \
--foreman-proxy-dns=true \
--foreman-proxy-dns-managed=true \
--foreman-proxy-dns-provider=nsupdate \
--foreman-proxy-dns-server="127.0.0.1"  \
--foreman-proxy-dns-tsig-principal="foremanproxy/satellite.example.com@EXAMPLE.COM" \
--foreman-proxy-dns-tsig-keytab=/etc/foreman-proxy/dns.keytab
See Section 4.7.5, “Configuring DNS, DHCP, and TFTP on Capsule Server” for more information.
Update the Configuration in Satellite web UI.
After you have run the installation script to make any changes to a Capsule, instruct Satellite to scan the configuration on each affected Capsule as follows:
- Navigate to Infrastructure > Capsules.
- For each Capsule to be updated, from the Actions drop-down menu, select Refresh.
Configure the domain:
- Go to Infrastructure > Domains and select the domain name.
- On the Domain tab, ensure DNS Capsule is set to the Capsule where the subnet is connected.
Configure the subnet:
- Go to Infrastructure > Subnets and select the subnet name.
- On the Subnet tab, set IPAM to DHCP or Internal DB.
- On the Domains tab, ensure the domain to be managed by the Satellite or Capsule is selected.
- On the Capsules tab, ensure Reverse DNS Capsule is set to the Capsule where the subnet is connected.
- Click Submit to save the changes.
Chapter 6. Uninstalling Satellite Server and Capsule Server
If you no longer need Satellite Server or Capsule Server, you can uninstall them.
6.1. Uninstalling Satellite Server
Uninstalling Satellite Server and Capsule Server erases all applications used on the target system. If you use any applications or application data for purposes other than Satellite Server, you should back up the information before the removal process.
Before you Begin
The katello-remove script issues two warnings, requiring confirmation before removing all packages and configuration files in the system.
This script erases many packages and config files, such as the following important packages:
- httpd (apache)
- mongodb
- tomcat6
- puppet
- ruby
- rubygems
- All Katello and Foreman Packages
Uninstall Satellite Server
Uninstall Satellite Server.
# katello-removeThe following message displays:
Once these packages and configuration files are removed there is no going back.
If you use this system for anything other than Katello and Foreman you probably
do not want to execute this script.
Read the source for a list of what is removed.  Are you sure(Y/N)? y
ARE YOU SURE?: This script permanently deletes data and configuration.
Read the source for a list of what is removed.  Type [remove] to continue? remove
Shutting down Katello services...
6.2. Uninstalling Capsule Servers
Uninstalling Capsule Server erases all applications used on the target system. If you use any applications or application data for purposes other than Satellite Server, you must back up the information before the removal process.
Before you Begin
The katello-remove script issues two warnings, requiring confirmation before removing all packages and configuration files in the system.
This script erases packages and config files such as the following:
- httpd (apache)
- mongodb
- tomcat6
- puppet
- ruby
- rubygems
- All Katello and Foreman Packages
Uninstall Capsule Server
Uninstall Capsule Server.
# katello-removeThe following message displays:
Once these packages and configuration files are removed there is no going back.
If you use this system for anything other than Katello and Foreman you probably
do not want to execute this script.
Read the source for a list of what is removed.  Are you sure(Y/N)? y
ARE YOU SURE?: This script permanently deletes data and configuration.
Read the source for a list of what is removed.  Type [remove] to continue? remove
Shutting down Katello services...
Chapter 7. Where to find more information
At the end of the initial installation and setup, you can perform additional configuration and set up your Satellite environment. You can use the following Satellite documentation resources to assist you:
Chapter 8. Running Red Hat Satellite on Amazon Web Services
Use this guide to ensure that you make all the necessary preparations for installing Red Hat Satellite Server and Capsules in Amazon Web Services (AWS) Elastic Compute Cloud (Amazon EC2).
Use the Deployment Scenarios section to understand the different architecture setups that are available for Satellite and Capsule installation on AWS.
Use the Prerequisites section to prepare your Red Hat and Amazon Web resources for the Red Hat Satellite installation.
Subscriptions
Not all subscriptions are eligible to run in public cloud environments. For more information about subscription eligibility, see the Cloud Access Page. You can create additional organizations and then import additional manifests to the organizations. For more information, see Creating an Organization in the Content Management Guide.
8.1. Use case considerations
Because Amazon Web Services is an image-only service, there are common Satellite use cases that do not work, or require extra configuration in an Amazon Web Service environment. If you plan to use Satellite on AWS, ensure that the use case scenarios that you want to use are available in an AWS environment.
8.1.1. Use Cases Known to Work
You can perform the following Red Hat Satellite use cases on AWS:
Multi-homed Satellite and Capsule
If you want Satellite to use multiple interfaces with distinct host names, you must perform additional configuration of the Satellite Server and Satellite Capsule Server CA certificates. If you want to deploy Satellite in this configuration, contact Red Hat.
You must do this when Satellite Server or Capsule Server has different internal and external DNS host names and there is no site-to-site VPN connection between the locations where you deploy Satellite Server and Capsule Server.
On demand content sources
You can use the On demand download policy to reduce the storage footprint of the Red Hat Enterprise Linux server that runs Satellite. When you set the download policy to On Demand, content syncs to the Satellite Server or Capsule Server when a content host requests it.
For more information, see Importing Red Hat Content in the Content Management Guide.
8.1.2. Use Cases that Do Not Work
In AWS, you cannot manage the DHCP. Because of this, most of Satellite Server’s kickstart and PXE provisioning models are unusable. This includes:
- PXE Provisioning
- Discovery and Discovery Rules
ISO Provisioning methods.
- PXE-Less Discovery (iPXE)
- Per-host ISO
- Generic ISO
- Full-host ISO
8.2. Deployment Scenarios
There are three deployment scenarios for Red Hat Satellite in Amazon Web Services:
- One region setup
- Connecting on-premise and AWS region
- Connecting different regions
Scenario 1: One region setup

The least complex configuration of Satellite Server in Amazon Web Services consists of both the Satellite Server and the content hosts residing within the same region and within the Virtual Private Cloud (VPC).
You can also use a different availability zone.
Scenario 2: Connecting on-premise and AWS region
Create a VPN connection between the on-premise location and the AWS region where the Capsule resides.
It is also possible to use the external host name of Satellite Server when you register the instance which runs Capsule Server.
Option 1: Site-to-Site VPN connection between the AWS region and the On-Premise Datacenter

Option 2: Direct connection using the External DNS host name
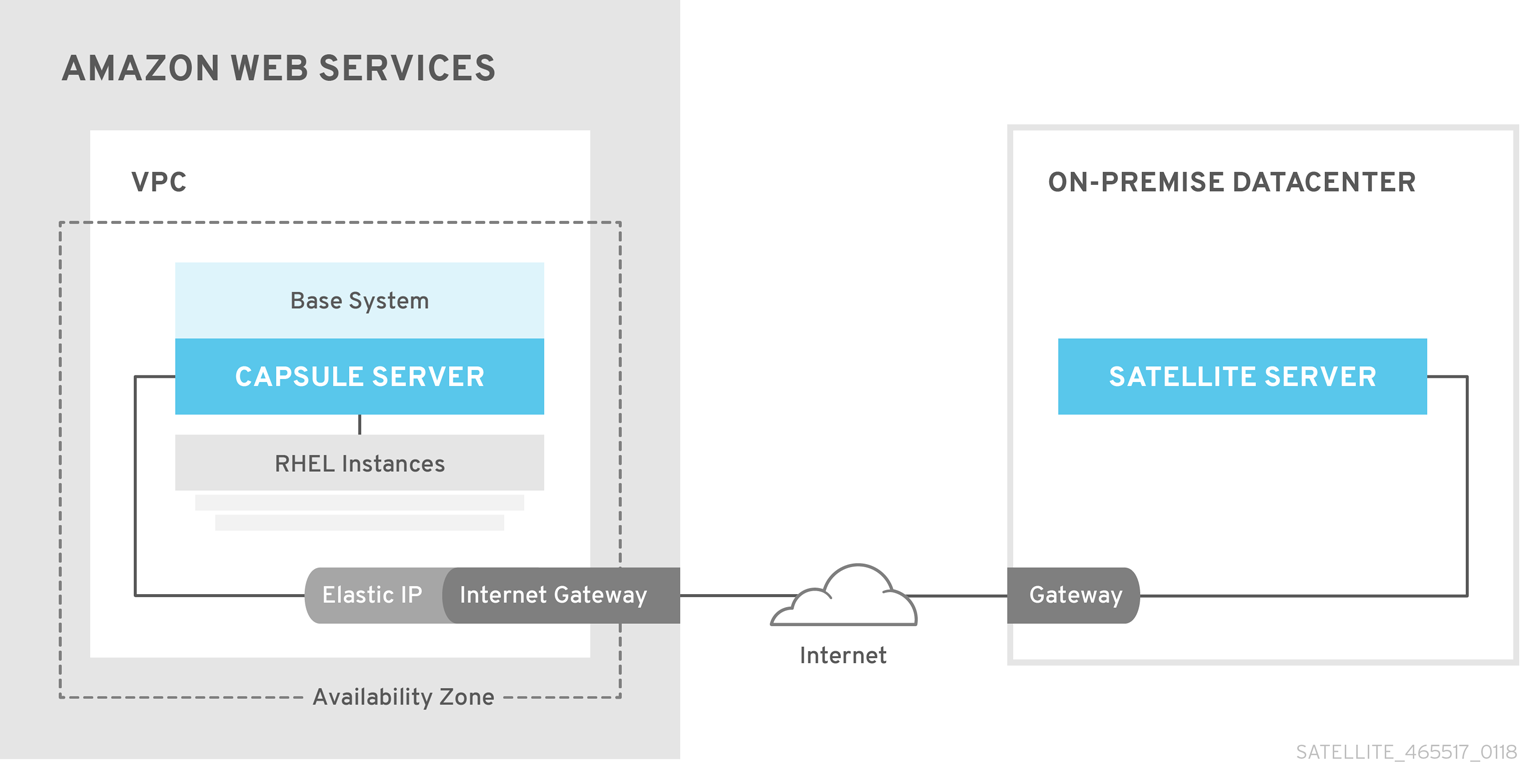
Scenario 3: Connecting different regions
Create a site-to-site VPN connection between the different regions so that you can use the Internal DNS host name when you register the instance that runs Capsule Server to the Satellite Server.
If you do not establish a site-to-site VPN connection, use the external DNS host name when you register the instance that runs Capsule Server to the Satellite Server.
Most Public Cloud Providers do not charge for data being transferred into a region, or between availability zones within a single region; however, they do charge for data leaving the region to the Internet.
Option 1: Site-to-Site VPN connection between AWS regions

Option 2: Direct connection using the External DNS host name
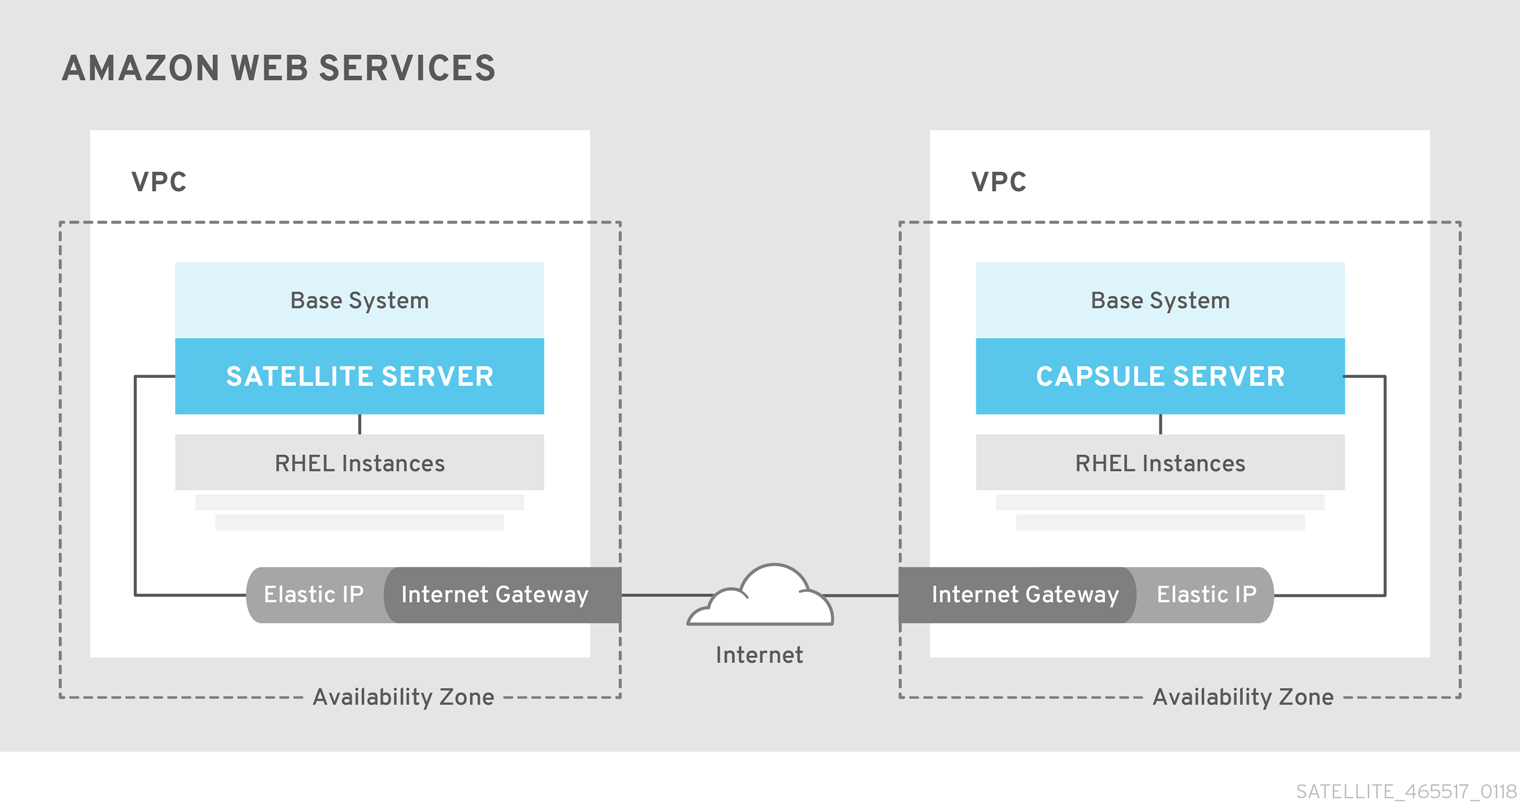
8.3. Prerequisites
Before you can install and register Red Hat Satellite and Capsule, you must set up accounts with Amazon Web Services (AWS) and create and start Red Hat Enterprise Linux instances on AWS.
8.3.1. Amazon Web Service Assumptions
To use this guide, you must have a working knowledge of the following aspects of Amazon Web Services:
- Creating and accessing Red Hat Enterprise Linux images in AWS
- Editing network access in AWS Security
- Creating EC2 instances and how to create EBS volumes
- Launching instances
- Importing and exporting virtual machines in AWS.
- Using AWS Direct Connect
To install Satellite and Capsule in an AWS environment, you must ensure that your AWS set up meets the Section 2.1, “System Requirements” for Satellite and Capsule.
For more information about Amazon Web Services and terminology, see Amazon Elastic Compute Cloud Documentation.
For more information about Amazon Web Services Direct Connect, see What is AWS Direct Connect?
8.3.2. Red Hat Cloud prerequisites
To use this guide, you must complete the following steps:
- Register with Red Hat Cloud Access.
- Migrate any Red Hat subscriptions that you want to use.
- Create an AWS instance and deploy a Red Hat Enterprise Linux virtual machine to the instance.
- Ensure that your subscriptions are eligible for transfer to Red Hat Cloud. For more information, see Red Hat Cloud Access Program Details.
For more information about deploying Red Hat Enterprise Linux in AWS, see How to Locate Red Hat Cloud Access Gold Images on AWS EC2.
8.3.3. Red Hat Satellite-specific prerequisites
- Ensure that the Amazon EC2 instance type meets or exceeds the system and storage requirements in Chapter 2, Preparing your environment for installation. For the best performance, use an AWS Storage Optimized instance.
- Use Chapter 2, Preparing your environment for installation to understand and assign the correct storage to your AWS EBS volumes.
- Store the synced content on an EBS volume that is separate to the boot volume.
- Mount the synced content EBS volume separately in the operating system.
- Optional: store other data, for example, the mongodb directory on a separate EBS volume.
- If you want the Satellite Server and Capsule Server to communicate using external DNS hostnames, open the required ports for communication in the AWS Security Group that is associated with the instance.
8.3.4. Preparing for the Red Hat Satellite Installation
In your AWS environment, complete the following steps:
- Launch an EC2 instance of a Red Hat Enterprise Linux AMI
- Connect to the newly created instance.
If you use a Red Hat Gold Image, remove the RHUI client and set the enabled parameter in the product-id.conf to 1.
# yum -y remove rh-amazon-rhui-client*
# yum clean all
# cat << EOF > /etc/yum/pluginconf.d/product-id.conf
> [main]
> enabled=1
> EOF
8.4. Installing Satellite Server on AWS
On your AWS environment, complete the following steps:
- Connect to the new instance.
- Use Chapter 3, Installing Satellite Server to install Satellite Server.
8.5. Installing Capsule on AWS
On your AWS environment, complete the following steps:
- Connect to the new instance.
- Use Chapter 4, Installing Capsule Server to install Capsule Server.
8.6. Registering Hosts to Satellite Using The Bootstrap Script
When you install Satellite Server and Capsule Server, you must then register the content hosts on EC2 instances to Satellite with the bootstrap script.
For more information about using the bootstrap script, see Registering Hosts to Satellite Using The Bootstrap Script in the User Guide.
Install the Katello Agent. For more information, see Section 4.7.1, “Installing the katello Agent”.
Appendix A. Large Deployment Considerations
Increasing the Maximum Number of File Descriptors for Apache
With more than 800 content hosts registered, Apache can reach several system-level limits, resulting in new content host registration failure. To avoid this, file descriptor limits must be increased before deploying a large number of content hosts.
Create the
/etc/systemd/system/httpd.service.d/limits.conffile and insert the following text:[Service] LimitNOFILE=65536Apply the changes to the unit.
# systemctl daemon-reloadRestart Katello services.
# katello-service restart
Increasing the Maximum Number of File Descriptors for qpid
With more than 1100 content hosts with goferd running for errata updates, the qpid reach system-level limits, resulting in registration failures. To avoid this, file descriptors limits must be increased before deploying a large number of content hosts.
Increasing the Maximum Number of File Descriptors for qpid
Create the
/etc/systemd/system/qpidd.service.d/limits.conffile and insert the following text:[Service] LimitNOFILE=65536Apply the changes to the unit.
# systemctl daemon-reload
# systemctl restart qpidd.service
Increasing the Shared Buffer and Work Memory
You can increase the shared_buffer and work_mem to 256M and 4M respectively.
On Red Hat Enterprise Linux 7, create the
/var/lib/pgsql/data/postgresql.conffile and insert the following text:work_mem = 4MB shared_buffers = 256MBRestart postgresql services.
# systemctl restart postgresql
Increasing Concurrent Content Host Registrations
To avoid reaching system-level limits, you can increase the global passenger queue limit to accommodate up to 250 concurrent content hosts. For more information, see Passenger Configuration in the Tuning Red Hat Satellite Guide. Follow these steps to increase the global passenger queue limit.
Adjust the maximum passenger pool size to 1.5 times the physical CPU cores available to the Satellite Server.
For example, if you have a Satellite Server with 16 cores, then the maximum passenger pool size is 24. This number is referenced as an example and you should use the number applicable to your environment.
Edit the
/etc/httpd/conf.d/passenger.conffile, updating the IfModule stanza to match the following text:<IfModule mod_passenger.c> PassengerRoot /usr/share/gems/gems/passenger-4.0.18/lib/phusion_passenger/locations.ini PassengerRuby /usr/bin/ruby PassengerMaxPoolSize 24 PassengerMaxRequestQueueSize 200 PassengerStatThrottleRate 120 </IfModule>Edit the Foreman Passenger application configuration file
/etc/httpd/conf.d/05-foreman-ssl.conf, updating the stanza starting with PassengerAppRoot to match the following text:PassengerAppRoot /usr/share/foreman PassengerRuby /usr/bin/tfm-ruby PassengerMinInstances 6 PassengerStartTimeout 90 PassengerMaxPreloaderIdleTime 0 PassengerMaxRequests 10000 PassengerPreStart https://example.comEdit the Puppet Passenger application configuration file
/etc/httpd/conf.d/25-puppet.conf, adding the following text to the end of the virtual host definition:PassengerMinInstances 6 PassengerStartTimeout 90 PassengerMaxPreloaderIdleTime 0 PassengerMaxRequests 10000 PassengerPreStart https://example.com:8140Change the maximum connections in the
/var/lib/pgsql/data/postgresql.conffile.max_connections = 500Restart postgresql services.
# systemctl restart postgresql
Increasing the maximum number of open files for qdrouterd
With more than 1000 content hosts registered, qdrouterd can reach the default maximum number of open files. To avoid this, increase the maximum number of open files on the Satellite Server and all external Capsule Servers.
Calculate the required maximum number of open files, using the following equation.
(3 x number of content hosts) + 100For example, with 1020 content hosts, the new maximum should be set to 3160 ((3 x 10²⁰) + 100).
Create the file
/etc/systemd/system/qdrouterd.service.d/limits.confand add the following text.[Service] LimitNOFILE=maximum_number_of_filesApply the changes to the unit.
# systemctl daemon-reloadRestart the Satellite services.
# katello-service restart
Reducing delays in host registration
Communication between Satellite and each registered host is secured by use of certificates. When a host is registered, Satellite creates two certificates, an identity certificate and a Puppet certificate. The algorithm used to create each certificate requires random data from the Red Hat Enterprise Linux kernel. If not enough entropy is available when a host is registered, there is a delay until a suitable level of entropy is available. In very large environments, with more than 10,000 hosts, the rate of host registration is likely to be slowed by the lack of entropy. Several methods can be used to improve the availability of entropy to the Linux kernel, and so reduce the risk to performance of Satellite.
By default, the Linux kernel uses the /dev/random device as the source of random numbers. This is a blocking device, which means it stops supplying numbers when it determines that the amount of entropy is insufficient for generating a properly random output. It is this wait time which causes the delay in registering hosts. To resolve this issue, use the /dev/urandom device, as this is a non-blocking device.
Some hardware servers have processors which include hardware random number generators. For those that are supported by the Red Hat Enterprise Linux kernel, you can use that as the source of random numbers. For more information, see the hardware vendor’s documentation.
If Satellite is hosted on a virtual machine, note that some hypervisors make the hardware server’s random number generator available to the virtual machines it hosts. Red Hat Virtualization features the virtio RNG (Random Number Generator) device that provides KVM virtual machines access to entropy from the Red Hat Virtualization Host. On guests running Red Hat Enterprise Linux 7.0, you must install and configure rngd. On guests running Red Hat Enterprise Linux 7.1 and later, the guest kernel fetches entropy from the host as required. If a host’s random number generator is shared by guests, use of a hardware random number generator is recommended.
For more information about random number generators for guests, see Random Number Generator Device in the Red Hat Enterprise Linux 7 Virtualization Deployment and Administration Guide. For other hypervisors, see the vendor’s documentation.
For more information about the random number generator daemon, rngd, see Using the Random Number Generator in the Red Hat Enterprise Linux 7 Security Guide.
Appendix B. Capsule Server Scalability Considerations
The maximum number of Capsule Servers that the Satellite Server can support has no fixed limit. The tested limit is 17 Capsule Servers with 2 vCPUs on a Satellite Server with Red Hat Enterprise Linux 7. However, scalability is highly variable, especially when managing Puppet clients.
Capsule Server scalability when managing Puppet clients depends on the number of CPUs, the run-interval distribution, and the number of Puppet managed resources. The Capsule Server has a limitation of 100 concurrent Puppet agents running at any single point in time. Running more than 100 concurrent Puppet agents results in a 503 HTTP error.
For example, assuming that Puppet agent runs are evenly distributed with less than 100 concurrent Puppet agents running at any single point during a run-interval, a Capsule Server with 4 CPUs has a maximum of 1250-1600 Puppet clients with a moderate workload of 10 Puppet classes assigned to each Puppet client. Depending on the number of Puppet clients required, the Satellite installation can scale out the number of Capsule Servers to support them.
If you want to scale your Capsule Server when managing Puppet clients, the following assumptions are made:
- There are no external Puppet clients reporting directly to the Satellite 6 integrated Capsule.
- All other Puppet clients report directly to an external Capsule.
- There is an evenly distributed run-interval of all Puppet agents.
Deviating from the even distribution increases the risk of filling the passenger request queue. The limit of 100 concurrent requests applies.
The following table describes the scalability limits using the recommended 4 CPUs.
| Puppet Managed Resources per Host | Run-Interval Distribution |
|---|---|
| 1 | 3000-2500 |
| 10 | 2400-2000 |
| 20 | 1700-1400 |
The following table describes the scalability limits using the minimum 2 CPUs.
| Puppet Managed Resources per Host | Run-Interval Distribution |
|---|---|
| 1 | 1700-1450 |
| 10 | 1500-1250 |
| 20 | 850-700 |
For more information about tuning your Satellite environment for stability and scalability, see the Tuning Red Hat Satellite Guide.
Appendix C. Applying Custom Configuration to Red Hat Satellite
When you install and configure Satellite for the first time using satellite-installer, you can specify that the DNS and DHCP configuration files are not to be managed by Puppet using the installer flags --foreman-proxy-dns-managed=false and --foreman-proxy-dhcp-managed=false. If these flags are not specified during the initial installer run, rerunning of the installer overwrites all manual changes, for example, rerun for upgrade purposes. If changes are overwritten, you must run the restore procedure to restore the manual changes. For more information, see How to Restore Manual Changes Overwritten by a Puppet Run in the Installation Guide.
To view all installer flags available for custom configuration, run satellite-installer --scenario satellite --full-help. Some Puppet classes are not exposed to the Satellite installer. To manage them manually and prevent the installer from overwriting their values, specify the configuration values by adding entries to configuration file /etc/foreman-installer/custom-hiera.yaml. This configuration file is in YAML format, consisting of one entry per line in the format of <puppet class>::<parameter name>: <value>. Configuration values specified in this file persist across installer reruns.
Common examples include:
For Apache, to set the ServerTokens directive to only return the Product name:
apache::server_tokens: ProdTo turn off the Apache server signature entirely:
apache::server_signature: OffFor Pulp, to configure the number of pulp workers:
pulp::num_workers: 8
The Puppet modules for the Satellite installer are stored under /usr/share/foreman-installer/modules and /usr/share/katello-installer-base/modules. Check the .pp files (for example: moduleName/manifests/example.pp) to look up the classes, parameters, and values. Alternatively, use the grep command to do keyword searches.
Setting some values may have unintended consequences that affect the performance or functionality of Red Hat Satellite. Consider the impact of the changes before you apply them, and test the changes in a non-production environment first. If you do not have a non-production Satellite environment, run the Satellite installer with the --noop and --verbose options. If your changes cause problems, remove the offending lines from custom-hiera.yaml and rerun the Satellite installer. If you have any specific questions about whether a particular value is safe to alter, contact Red Hat support.
C.1. How to Restore Manual Changes Overwritten by a Puppet Run
If your manual configuration has been overwritten by a Puppet run, you can restore the files to the previous state. The following example shows you how to restore a DHCP configuration file overwritten by a Puppet run.
Copy the file you intend to restore. This allows you to compare the files to check for any mandatory changes required by the upgrade. This is not common for DNS or DHCP services.
# cp /etc/dhcp/dhcpd.conf /etc/dhcp/dhcpd.backupCheck the log files to note down the md5sum of the overwritten file. For example:
# journalctl -xe
...
/Stage[main]/Dhcp/File[/etc/dhcp/dhcpd.conf]: Filebucketed /etc/dhcp/dhcpd.conf to puppet with sum 622d9820b8e764ab124367c68f5fa3a1
...
Restore the overwritten file:
# puppet filebucket restore --local --bucket \ /var/lib/puppet/clientbucket /etc/dhcp/dhcpd.conf \ 622d9820b8e764ab124367c68f5fa3a1- Compare the backup file and the restored file, and edit the restored file to include any mandatory changes required by the upgrade.