Using Service Interconnect
Creating a service network with the CLI and YAML
Abstract
Chapter 1. Using the Skupper CLI
Using the skupper command-line interface (CLI) allows you to create and manage Skupper sites from the context of the current namespace.
A typical workflow is to create a site, link sites together, and expose services to the service network.
1.1. Checking the Skupper CLI
Installing the skupper command-line interface (CLI) provides a simple method to get started with Skupper.
Procedure
Verify the installation.
$ skupper version
client version 1.5.3-rh-5
1.2. Creating a site using the CLI
A service network consists of Skupper sites. This section describes how to create a site in a Kubernetes cluster using the default settings. See Using Skupper Podman for information about using the Skupper CLI to create Podman sites.
Prerequisites
-
The
skupperCLI is installed. - You are logged into the cluster.
- The services you want to expose on the service network are in the active namespace.
Procedure
Create a default site:
$ skupper initStarting with Skupper release 1.3, the console is not enabled by default. To use the new console, see Using the console.
Check the site:
$ skupper statusThe output should look similar to the following:
Skupper is enabled for namespace "west" in interior mode. It is not connected to any other sites.NoteThe default message above is displayed when you initialize a site on a cluster that does not have a Skupper policy installed. If you install a Skupper policy as described in Securing a service network using policies, the message becomes
Skupper is enabled for namespace "west" in interior mode (with policies).By default, the site name defaults to the namespace name, for example,
west.
1.3. Custom sites
The default skupper init creates sites that satisfy typical requirements.
Starting with Skupper release 1.3, the console is not enabled by default. To use the new console, see Using the console.
If you require a custom configuration, note the following options:
Configuring console authentication. There are several
skupperoptions regarding authentication for the console:--console-auth <authentication-mode>Set the authentication mode for the console:
-
openshift- Use OpenShift authentication, so that users who have permission to log into OpenShift and view the Project (namespace) can view the console. -
internal- Use Skupper authentication, see theconsole-userandconsole-passwordoptions. -
unsecured- No authentication, anyone with the URL can view the console.
-
--console-user <username>-
Username for the console user when authentication mode is set to
internal. Defaults toadmin. --console-password <password>-
Password for the console user when authentication mode is set to
internal. If not specified, a random passwords is generated.
Configuring service access
$ skupper init --create-network-policyNoteAll sites are associated with a namespace, called the active namespace in this procedure.
Services in the active namespace may be accessible to pods in other namespaces on that cluster by default, depending on your cluster network policies. As a result, you can expose services to pods in namespaces not directly connected to the service network. This setting applies a Kubernetes network policy to restrict access to services to those pods in the active namespace.
For example, if you create a site in the namespace
projectAofclusterAand link that site to a service network where thedatabaseservice is exposed, thedatabaseservice is available to pods inprojectBofclusterA.You can use the
--create-network-policyoption to restrict thedatabaseservice access toprojectAofclusterA.
1.4. Linking sites
A service network consists of Skupper sites. This section describes how to link sites to form a service network.
Linking two sites requires a single initial directional connection. However:
- Communication between the two sites is bidirectional, only the initial linking is directional.
- The choice of direction for linking is typically determined by accessibility. For example, if you are linking an OpenShift Dedicated cluster with a CodeReady Containers cluster, you must link from the CodeReady Containers cluster to the OpenShift Dedicated cluster because that route is accessible.
Procedure
- Determine the direction of the link. If both clusters are publicly addressable, then the direction is not significant. If one of the clusters is addressable from the other cluster, perform step 2 below on the addressable cluster.
Generate a token on the cluster that you want to link to:
$ skupper token create <filename>where
<filename>is the name of a YAML file that is saved on your local filesystem.This file contains a key and the location of the site that created it.
NoteAccess to this file provides access to the service network. Protect it appropriately.
For more information about protecting access to the service network, see Using Skupper tokens.
Use a token on the cluster that you want to connect from:
To create a link to the service network:
$ skupper link create <filename> [-name <link-name>]where
<filename>is the name of a YAML file generated from theskupper token createcommand and<link-name>is the name of the link.To check the link:
$ skupper link status
Link link1 not connected
In this example no <link-name> was specified, the name defaulted to
link1.To delete a link:
$ skupper link delete <link-name>where
<link-name>is the name of the link specified during creation.
Chapter 2. Specifying link cost
When linking sites, you can assign a cost to each link to influence the traffic flow. By default, link cost is set to 1 for a new link. In a service network, the routing algorithm attempts to use the path with the lowest total cost from client to target server.
If you have services distributed across different sites, you might want a client to favor a particular target or link. In this case, you can specify a cost of greater than
1on the alternative links to reduce the usage of those links.NoteThe distribution of open connections is statistical, that is, not a round robin system.
- If a connection only traverses one link, then the path cost is equal to the link cost. If the connection traverses more than one link, the path cost is the sum of all the links involved in the path.
Cost acts as a threshold for using a path from client to server in the network. When there is only one path, traffic flows on that path regardless of cost.
NoteIf you start with two targets for a service, and one of the targets is no longer available, traffic flows on the remaining path regardless of cost.
- When there are a number of paths from a client to server instances or a service, traffic flows on the lowest cost path until the number of connections exceeds the cost of an alternative path. After this threshold of open connections is reached, new connections are spread across the alternative path and the lowest cost path.
Prerequisite
- You have set your Kubernetes context to a site that you want to link from.
- A token for the site that you want to link to.
Procedure
Create a link to the service network:
$ skupper link create <filename> --cost <integer-cost>where
<integer-cost>is an integer greater than 1 and traffic favors lower cost links.NoteIf a service can be called without traversing a link, that service is considered local, with an implicit cost of
0.For example, create a link with cost set to
2using a token file namedtoken.yaml:$ skupper link create token.yaml --cost 2Check the link cost:
$ skupper link status link1 --verboseThe output is similar to the following:
 Cost:          2
 Created:       2022-11-17 15:02:01 +0000 GMT
 Name:          link1
 Namespace:     default
 Site:          default-0d99d031-cee2-4cc6-a761-697fe0f76275
 Status:        Connected
Observe traffic using the console.
If you have a console on a site, log in and navigate to the processes for each server. You can view the traffic levels corresponding to each client.
NoteIf there are multiple clients on different sites, filter the view to each client to determine the effect of cost on traffic. For example, in a two site network linked with a high cost with servers and clients on both sites, you can see that a client is served by the local servers while a local server is available.
2.1. Exposing services on the service network from a namespace
After creating a service network, exposed services can communicate across that network.
The skupper CLI has two options for exposing services that already exist in a namespace:
-
exposesupports simple use cases, for example, a deployment with a single service. See Section 2.1.1, “Exposing simple services on the service network” for instructions. -
service createandservice bindis a more flexible method of exposing services, for example, if you have multiple services for a deployment. See Section 2.1.2, “Exposing complex services on the service network” for instructions.
2.1.1. Exposing simple services on the service network
This section describes how services can be enabled for a service network for simple use cases.
Procedure
Create a deployment, some pods, or a service in one of your sites, for example:
$ kubectl create deployment hello-world-backend --image quay.io/skupper/hello-world-backendThis step is not Skupper-specific, that is, this process is unchanged from standard processes for your cluster.
Create a service that can communicate on the service network:
Deployments and pods
$ skupper expose [deployment <name>|pods <selector>]where
-
<name>is the name of a deployment -
<selector>is a pod selector
Kubernetes services
Specify a resulting service name using the
--addressoption.$ skupper expose service <name> --address <skupper-service-name>where
-
<name>is the name of a service -
<skupper-service-name>is the name of the resulting service shared on the service network.
StatefulSets
You can expose a statefulset using:
$ skupper expose statefulset <statefulsetname>A StatefulSet in Kubernetes is often associated with a headless service to provide stable, unique network identifiers for each pod. If you require stable network identifiers for each pod on the service network, use the
--headlessoption.$ skupper expose statefulset --headlessNoteWhen you use the '--headless" option, only one statefulset in the service network can be exposed through the address (routing key).
For the example deployment in step 1, you can create a service using the following command:
$ skupper expose deployment/hello-world-backend --port 8080Options for the
exposecommand include:-
--port <port-number>:: Specify the port number that this service is available on the service network. NOTE: You can specify more than one port by repeating this option. -
--target-port <port-number>:: Specify the port number of pods that you want to expose. -
--protocol <protocol>allows you specify the protocol you want to use,tcp,httporhttp2
NoteIf you do not specify ports,
skupperuses thecontainerPortvalue of the deployment.-
Check the status of services exposed on the service network (
-vis only available on Kubernetes):$ skupper service status -v Services exposed through Skupper: ╰─ backend:8080 (tcp) ╰─ Sites: ├─ 4d80f485-52fb-4d84-b10b-326b96e723b2(west) │ policy: disabled ╰─ 316fbe31-299b-490b-9391-7b46507d76f1(east) │ policy: disabled ╰─ Targets: ╰─ backend:8080 name=backend-9d84544df-rbzjx
2.1.2. Exposing complex services on the service network
This section describes how services can be enabled for a service network for more complex use cases.
Procedure
Create a deployment, some pods, or a service in one of your sites, for example:
$ kubectl create deployment hello-world-backend --image quay.io/skupper/hello-world-backendThis step is not Skupper-specific, that is, this process is unchanged from standard processes for your cluster.
Create a service that can communicate on the service network:
$ skupper service create <name> <port>where
-
<name>is the name of the service you want to create -
<port>is the port the service uses
For the example deployment in step 1, you create a service using the following command:
$ skupper service create hello-world-backend 8080-
Bind the service to a cluster service:
$ skupper service bind <service-name> <target-type> <target-name>where
-
<service-name>is the name of the service on the service network -
<target-type>is the object you want to expose,deployment,statefulset,pods, orservice. -
<target-name>is the name of the cluster service
For the example deployment in step 1, you bind the service using the following command:
$ skupper service bind hello-world-backend deployment hello-world-backend-
2.1.3. Exposing services from a different namespace to the service network
This section shows how to expose a service from a namespace where Skupper is not deployed.
Skupper allows you expose Kubernetes services from other namespaces for any site. However, if you want to expose workloads, for example deployments, you must create a site as described in this section.
Prerequisites
- A namespace where Skupper is deployed.
- A network policy that allows communication between the namespaces
- cluster-admin permissions if you want to expose resources other than services
Procedure
Create a site with cluster permissions if you want to expose a workload from a namespace other than the site namespace:
NoteThe site does not require the extra permissions granted with the
--enable-cluster-permissionsto expose a Kubernetes service resource.$ skupper init --enable-cluster-permissionsTo expose a Kubernetes service from a namespace other than the site namespace:
$ skupper expose service <service>.<namespace> --address <service>- <service> - the name of the service on the service network.
- <namespace> - the name of the namespace where the service you want to expose runs.
For example, if you deployed Skupper in the
eastnamespace and you created abackendKubernetes service in theeast-backendnamespace, you set the context to theeastnamespace and expose the service asbackendon the service network using:$ skupper expose service backend.east-backend --port 8080 --address backendTo expose a workload from a site created with
--enable-cluster-permissions:$ skupper expose <resource> --port <port-number> --target-namespace <namespace>- <resource> - the name of the resource.
- <namespace> - the name of the namespace where the resource you want to expose runs.
For example, if you deployed Skupper in the
eastnamespace and you created abackenddeployment in theeast-backendnamespace, you set the context to theeastnamespace and expose the service asbackendon the service network using:$ skupper expose deployment/backend --port 8080 --target-namespace east-backend
Chapter 3. Exposing services on the service network from a local machine
After creating a service network, you can expose services from a local machine on the service network.
For example, if you run a database on a server in your data center, you can deploy a front end in a cluster that can access the data as if the database was running in the cluster.
This documentation describes creating a gateway from a local host to a cluster site. An alternative approach is to create a site on the local host and link to the cluster site. See Using Skupper Podman for information about using the Skupper CLI to create Podman sites.
3.1. Exposing simple local services to the service network
This section shows how to expose a single service running locally on a service network.
Prerequisites
- A service network. Only one site is required.
- Access to the service network.
Procedure
- Run your service locally.
- Log into your cluster and change to the namespace for your site.
Expose the service on the service network:
$ skupper gateway expose <service> localhost <port>- <service> - the name of the service on the service network.
- <port> - the port that runs the service locally.
NoteYou can also expose services from other machines on your local network, for example if MySQL is running on a dedicated server (with an IP address of
192.168.1.200), but you are accessing the cluster from a machine in the same network:$ skupper gateway expose mysql 192.168.1.200 3306Check the status of Skupper gateways:
$ skupper gateway status Gateway Definition: ╰─ machine-user type:service version:1.5 ╰─ Bindings: ╰─ mydb:3306 tcp mydb:3306 localhost 3306This shows that there is only one exposed service and that service is only exposing a single port (BIND). There are no ports forwarded to the local host.
The URL field shows the underlying communication and can be ignored.
3.2. Working with complex local services on the service network
This section shows more advanced usage of skupper gateway.
If you want to create a service type gateway on Linux, you need the
skrouterdbinary in your path.Use the
yumordnfcommand to install theskupper-routerpackage:$ sudo dnf install skupper-routerFor podman or docker type gateways, you can skip this step.
Create a Skupper gateway:
$ skupper gateway init --type <gateway-type>By default a service type gateway is created, however you can also specify:
-
podman -
docker
-
Create a service that can communicate on the service network:
$ skupper service create <name> <port>where
-
<name>is the name of the service you want to create -
<port>is the port the service uses
For example:
$ skupper service create mydb 3306-
Bind the service on the service network:
$ skupper gateway bind <service> <host> <port>-
<service> - the name of the service on the service network,
mydbin the example above. - <host> - the host that runs the service.
-
<port> - the port the service is running on,
3306from the example above.
-
<service> - the name of the service on the service network,
Check the status of Skupper gateways:
$ skupper gateway statusThe output looks similar to the following:
Gateway Definitions Summary Gateway Definition: ╰─ machine-user type:service version:1.5 ╰─ Bindings: ╰─ mydb:3306 tcp mydb:3306 localhost 3306This shows that there is only one exposed service and that service is only exposing a single port (BIND). There are no ports forwarded to the local host.
The URL field shows the underlying communication and can be ignored.
You can create more services in the service network and bind more local services to expose those services on the service network.
Forward a service from the service network to the local machine.
$ skupper gateway forward <service> <port>where
-
<service>is the name of an existing service on the service network. -
<port>is the port on the local machine that you want to use.
-
3.3. Creating a gateway and applying it on a different machine
If you have access to a cluster from one machine but want to create a gateway to the service network from a different machine, you can create the gateway definition bundle on the first machine and later apply that definition bundle on a second machine as described in this procedure. For example, if you want to expose a local database service to the service network, but you never want to access the cluster from the database server, you can use this procedure to create the definition bundle and apply it on the database server.
Procedure
- Log into your cluster from the first machine and change to the namespace for your site.
Create a service that can communicate on the service network:
$ skupper service create <name> <port>where
-
<name>is the name of the service you want to create -
<port>is the port the service uses
For example:
$ skupper service create database 5432-
Create a YAML file to represent the service you want to expose, for example:
name: database1 bindings: - name: database2 host: localhost3 service: address: database:54324 protocol: tcp5 ports: - 54326 target_ports: - 54327 qdr-listeners: - name: amqp host: localhost port: 5672- 1
- Gateway name, useful for reference only.
- 2
- Binding name, useful to track multiple bindings.
- 3
- Name of host providing the service you want to expose.
- 4
- Service name and port on service network. You created the service in a previous step.
- 5
- The protocol you want to use to expose the service,
tcp,httporhttp2. - 6
- The port on the service network that you want this service to be available on.
- 7
- The port of the service running on the host specified in point 3.
-
Save the YAML file using the name of the gateway, for example,
gateway.yaml. Generate a bundle that can be applied to the machine that hosts the service you want to expose on the service network:
$ skupper gateway generate-bundle <config-filename> <destination-directory>where:
- <config-filename> - the name of the YAML file, including suffix, that you generated in the previous step.
-
<destination-directory> - the location where you want to save the resulting gateway bundle, for example
~/gateways.
For example:
$ skupper gateway generate-bundle database.yaml ./This bundle contains the gateway definition YAML and a certificate that allow access to the service network.
-
Copy the gateway definition file, for example,
mylaptop-jdoe.tar.gzto the machine that hosts the service you want to expose on the service network. From the machine that hosts the service you want to expose:
$ mkdir gateway $ tar -xvf <gateway-definition-file> --directory gateway $ cd gateway $ sh ./launch.pyNoteUse
./launch.py -t podmanor./launch.py -t dockerto run the Skupper router in a container.Running the gateway bundle uses the gateway definition YAML and a certificate to access and expose the service on the service network.
Check the status of the gateway service:
To check a service type gateway:
$ systemctl --user status <gateway-definition-name>To check a podman type gateway:
$ podman inspectTo check a docker type gateway:
$ docker inspectNoteYou can later remove the gateway using
./remove.py.From the machine with cluster access, check the status of Skupper gateways:
$ skupper gateway status Gateway Definition: ╰─ machine-user type:service version:1.5 ╰─ Bindings: ╰─ mydb:3306 tcp mydb:3306 localhost 3306This shows that there is only one exposed service and that service is only exposing a single port (BIND). There are no ports forwarded to the local host.
If you need to change the gateway definition, for example to change port, you need to remove the existing gateway and repeat this procedure from the start to redefine the gateway.
3.4. Gateway YAML reference
The Section 3.3, “Creating a gateway and applying it on a different machine” describes how to create a gateway to apply on a separate machine using a gateway definition YAML file.
The following are valid entries in a gateway definition YAML file.
- name
- Name of gateway
- bindings.name
- Name of binding for a single host.
- bindings.host
- Hostname of local service.
- bindings.service
- Definition of service you want to be available on service network.
- bindings.service.address
- Address on the service network, name and port.
- bindings.service.protocol
-
Skupper protocol,
tcp,httporhttp2. - bindings.service.ports
- A single port that becomes available on the service network.
- bindings.service.exposeIngress
-
(optional) The traffic direction,
ingressoregress. - bindings.service.tlscredentials
- (optional) The TLS certificate and key for the service.
- bindings.service.tlscertauthority
- (optional) The TLS public certificate.
- bindings.target_ports
- A single port that you want to expose on the service network.
If the local service requires more than one port, create separate bindings for each port.
- forwards.name
- Name of forward for a single host.
- forwards.host
- Hostname of local service.
- forwards.service
- Definition of service you want to be available locally.
- forwards.service.address
- Address on the service network that you want to use locally, name and port.
- forwards.service.protocol
-
Skupper protocol,
tcp,httporhttp2. - forwards.service.ports
- A single port that is available on the service network.
- forwards.target_ports
- A single port that you want to use locally.
If the network service requires more than one port, create separate forwards for each port.
- qdr-listeners
- Definition of skupper router listeners
- qdr-listeners.name
-
Name of skupper router, typically
amqp. - qdr-listeners.host
-
Hostname for skupper router, typically
localhost. - qdr-listeners.port
-
Port for skupper router, typically
5672.
Chapter 4. Exploring a service network
Skupper includes a command to allow you report all the sites and the services available on a service network.
Prerequisites
- A service network with more than one site
Procedure
- Set your Kubernetes context to a namespace on the service network.
Use the following command to report the status of the service network:
$ skupper network statusFor example:
Sites: ├─ [local] a960b766-20bd-42c8-886d-741f3a9f6aa2(west)1 │ │ namespace: west │ │ site name: west2 │ │ version: 1.5.13 │ ╰─ Linked sites: │ ├─ 496ca1de-0c80-4e70-bbb4-d0d6ec2a09c0(east) │ │ direction: outgoing │ ╰─ 484cccc3-401c-4c30-a6ed-73382701b18a() │ direction: incoming ├─ [remote] 496ca1de-0c80-4e70-bbb4-d0d6ec2a09c0(east)4 │ │ namespace: east │ │ site name: east │ │ version: 1.5.1 │ ╰─ Linked sites: │ ╰─ a960b766-20bd-42c8-886d-741f3a9f6aa2(west)5 │ direction: incoming ╰─ [remote] 484cccc3-401c-4c30-a6ed-73382701b18a()6 │ site name: vm-user-c3d98 │ version: 1.5.1 ╰─ Linked sites: ╰─ a960b766-20bd-42c8-886d-741f3a9f6aa2(west) direction: outgoing- 1
- The unique identifier of the site associated with the current context, that is, the
westnamespace - 2
- The site name. By default, skupper uses the name of the current namespace. If you want to specify a site name, use
skupper init --site-name <site-name>. - 3
- The version of Skupper running the site. The site version can be different from the current
skupperCLI version. To update a site to the version of the CLI, useskupper update. - 4
- The unique identifier of a remote site on the service network.
- 5
- The sites that the remote site is linked to.
- 6
- The unique identifier of a remote podman site. Podman sites do not have an associated context.
Chapter 5. Securing a service network
Skupper provides default, built-in security that scales across clusters and clouds. This section describes additional security you can configure.
See Securing a service network using policies for information about creating granular policies for each cluster.
5.1. Restricting access to services using a Kubernetes network policy
By default, if you expose a service on the service network, that service is also accessible from other namespaces in the cluster. You can avoid this situation when creating a site using the --create-network-policy option.
Procedure
Create the service network router with a Kubernetes network policy:
$ skupper init --create-network-policyCheck the site status:
$ skupper statusThe output should be similar to the following:
Skupper enabled for namespace 'west'. It is not connected to any other sites.
You can now expose services on the service network and those services are not accessible from other namespaces in the cluster.
5.2. Applying TLS to TCP or HTTP2 traffic on the service network
By default, the traffic between sites is encrypted, however the traffic between the service pod and the router pod is not encrypted. For services exposed as TCP or HTTP2, the traffic between the pod and the router pod can be encrypted using TLS.
Prerequisites
- Two or more linked sites
- A TCP or HTTP2 frontend and backend service
Procedure
- Deploy your backend service.
Expose your backend deployment on the service network, enabling TLS.
For example, if you want to expose a TCP service:
$ skupper expose deployment <deployment-name> --port 443 --enable-tlsEnabling TLS creates the necessary certificates required for TLS backends and stores them in a secret named
skupper-tls-<deployment-name>.Modify the backend deployment to include the generated certificates, for example:
... spec: containers: ... command: ... - "/certs/tls.key" - "/certs/tls.crt" ... volumeMounts: ... - mountPath: /certs name: certs readOnly: true volumes: - name: index-html configMap: name: index-html - name: certs secret: secretName: skupper-tls-<deployment-name>Each site creates the necessary certificates required for TLS clients and stores them in a secret named
skupper-service-client.Modify the frontend deployment to include the generated certificates, for example:
spec: template: spec: containers: ... volumeMounts: - name: certs mountPath: /tmp/certs/skupper-service-client ... volumes: - name: certs secret: secretName: skupper-service-client- Test calling the service from a TLS enabled frontend.
Chapter 6. Supported standards and protocols
Skupper supports the following protocols for your service network:
- TCP - default
- HTTP1
- HTTP2
When exposing or creating a service, you can specify the protocol, for example:
$ skupper expose deployment hello-world-backend --port 8080 --protocol <protocol>
where <protocol> can be:
- tcp
- http
- http2
When choosing which protocol to specify, note the following:
-
tcpsupports any protocol overlayed on TCP, for example, HTTP1 and HTTP2 work when you specifytcp. -
If you specify
httporhttp2, the IP address reported by a client may not be accessible. All service network traffic is converted to AMQP messages in order to traverse the service network.
TCP is implemented as a single streamed message, whereas HTTP1 and HTTP2 are implemented as request/response message routing.
6.1. CLI options
For a full list of options, see the Skupper Kubernetes CLI reference and Skupper Podman CLI reference documentation.
When you create a site and set logging level to trace, you can inadvertently log sensitive information from HTTP headers.
$ skupper init --router-logging trace
By default, all skupper commands apply to the cluster you are logged into and the current namespace. The following skupper options allow you to override that behavior and apply to all commands:
--namespace <namespace-name>Apply command to
<namespace-name>. For example, if you are currently working onfrontendnamespace and want to initialize a site in thebackendnamespace:$ skupper init --namespace backend--kubeconfig <kubeconfig-path>-
Path to the kubeconfig file - This allows you run multiple sessions to a cluster from the same client. An alternative is to set the
KUBECONFIGenvironment variable. --context <context-name>- The kubeconfig file can contain defined contexts, and this option allows you to use those contexts.
Chapter 7. Using Skupper Podman
Using the skupper command-line interface (CLI) allows you to create and manage Skupper sites from the context of the current Linux user. Skupper Podman allows you to create a site using containers, without requiring Kubernetes.
A typical workflow is to create a site, link sites together, and expose services to the service network.
7.1. About Skupper Podman
Skupper Podman is available with the following precedence:
skupper --platform podman <command>- Use this option to avoid changing mode, for example, if you are working on Kubernetes and Podman simultaneously.
export SKUPPER_PLATFORM=podmanUse this command to use Skupper Podman for the current session, for example, if you have two terminals set to different contexts. To set the environment to target Kubernetes sites:
$ export SKUPPER_PLATFORM=kubernetesskupper switch podman- If you enter this command, all subsequent command target Podman rather than Kubernetes for all terminal sessions.
To determine which mode is currently active:
$ skupper switch
podman
To switch back to target Kubernetes sites: skupper switch kubernetes
Services exposed on remote sites are not automatically available to Podman sites. This is the equivalent to Kubernetes sites created using skupper init --enable-service-sync false.
To consume an exposed service on a Podman site, check that it exists using skupper service status on the original site and use that information to create the service on the Podman site:
$ skupper service create <name> <port>7.2. Creating a site using Skupper podman
A service network consists of Skupper sites. This section describes how to create a site in on a Linux host using the default settings. See Using the Skupper CLI for information about using the Skupper CLI to create Podman sites.
Prerequisites
-
The latest
skupperCLI is installed. - Podman is installed, see https://podman.io/
netavarkis configured as the podman network backend.By default, Podman v4 uses Netavark which works with Skupper.
If you are using CNI, for example, if you upgrade from Podman v3, you must also install the
podman-pluginspackage. For example,dnf install podman-pluginsfor RPM based distributions.NoteCNI will be deprecated in the future in preference of Netavark.
To check if
netavarkis configured as the podman network backend:$ podman info | grep networkBackendTo install
netavarkon rpm based Linux, eg RHEL8:$ sudo dnf install netavarkConfigure podman to use
netavarkby making sure the following lines exist in the/etc/containers/containers.conffile:[network] network_backend = "netavark"Podman service endpoint.
Use
systemctl status podman.socketto make sure the Podman API Socket is running.Use
systemctl --user enable --now podman.socketto start the Podman API Socket.See Podman socket activation for information about enabling this endpoint.
Procedure
Set your session to use Skupper Podman:
$ export SKUPPER_PLATFORM=podmanTo verify the
skuppermode:$ skupper switch podmanCreate a Skupper site:
Use the following command to create a site where tokens are created to link on any network interface:
$ skupper initNoteBy default, this command times out after 2 minutes for podman sites. You can increase the time with the
--timeoutoption.The following output is displayed:
It is recommended to enable lingering for <username>, otherwise Skupper may not start on boot. Skupper is now installed for user '<username>'. Use 'skupper status' to get more information.Use the following command to start the site service at system start and persist over logouts:
# loginctl enable-linger <username>By default,
skupper inittries to include all IP addresses associated with local network interfaces as valid ingress hosts. You can use--ingress-host <IP/Hostname>to restrict token ingress to a specific network context:$ skupper init --ingress-host my-cloud-vm.example.comIf you do not require that other sites can link to the site you are creating:
$ skupper init --ingress noneIn this guide we assume you have enabled ingress using the first command. This allows you create tokens that allow links from every network interface on the host.
NoteWhen creating a token you can specify the ingress host.
You can also restrict ingress to an IP address or hostname when initializing as described in the Skupper Podman CLI reference documentation.
Check the status of your site:
$ skupper status Skupper is enabled for "<username>" with site name "<machine-name>-<username>" in interior mode. It is not connected to any other sites. It has no exposed services.NoteYou can only create one site per user. If you require a host to support many sites, create a user for each site.
7.3. Linking sites using Skupper Podman
A service network consists of Skupper sites. This section describes how to link sites to form a service network.
Linking two sites requires a single initial directional connection. However:
- Communication between the two sites is bidirectional, only the initial linking is directional.
- The choice of direction for linking is typically determined by accessibility. For example, if you are linking a virtual machine running in the cloud with a Linux host running behind a firewall, you must link from the Linux host to the cloud virtual machine because that route is accessible.
Procedure
Generate a token on one site:
$ skupper token create <filename>If you created the site without specifying an
ingress-host, the token is valid for all network contexts. You can use--ingress-host <IP/Hostname>to restrict token ingress to a specific network context:$ skupper token create <filename> --ingress-host <IP/Hostname>Create a link from the other site:
$ skupper link create <filename>
After you have linked to a network, you can check the link status:
$ skupper link statusChapter 8. Specifying link cost
When linking sites, you can assign a cost to each link to influence the traffic flow. By default, link cost is set to 1 for a new link. In a service network, the routing algorithm attempts to use the path with the lowest total cost from client to target server.
If you have services distributed across different sites, you might want a client to favor a particular target or link. In this case, you can specify a cost of greater than
1on the alternative links to reduce the usage of those links.NoteThe distribution of open connections is statistical, that is, not a round robin system.
- If a connection only traverses one link, then the path cost is equal to the link cost. If the connection traverses more than one link, the path cost is the sum of all the links involved in the path.
Cost acts as a threshold for using a path from client to server in the network. When there is only one path, traffic flows on that path regardless of cost.
NoteIf you start with two targets for a service, and one of the targets is no longer available, traffic flows on the remaining path regardless of cost.
- When there are a number of paths from a client to server instances or a service, traffic flows on the lowest cost path until the number of connections exceeds the cost of an alternative path. After this threshold of open connections is reached, new connections are spread across the alternative path and the lowest cost path.
Prerequisite
- You have set your Kubernetes context to a site that you want to link from.
- A token for the site that you want to link to.
Procedure
Create a link to the service network:
$ skupper link create <filename> --cost <integer-cost>where
<integer-cost>is an integer greater than 1 and traffic favors lower cost links.NoteIf a service can be called without traversing a link, that service is considered local, with an implicit cost of
0.For example, create a link with cost set to
2using a token file namedtoken.yaml:$ skupper link create token.yaml --cost 2Check the link cost:
$ skupper link status link1 --verboseThe output is similar to the following:
Cost: 2 Created: 2022-11-17 15:02:01 +0000 GMT Name: link1 Namespace: default Site: default-0d99d031-cee2-4cc6-a761-697fe0f76275 Status: ConnectedObserve traffic using the console.
If you have a console on a site, log in and navigate to the processes for each server. You can view the traffic levels corresponding to each client.
NoteIf there are multiple clients on different sites, filter the view to each client to determine the effect of cost on traffic. For example, in a two site network linked with a high cost with servers and clients on both sites, you can see that a client is served by the local servers while a local server is available.
8.1. Exposing services on the service network from a Linux host
After creating a service network, exposed services can communicate across that network.
The general flow for working with services is the same for Kubernetes and Podman sites.
The skupper CLI has two options for exposing services that already exist on a host:
-
exposesupports simple use cases, for example, a host with a single service. See Section 8.1.1, “Exposing simple services on the service network” for instructions. -
service createandservice bindis a more flexible method of exposing services, for example, if you have multiple services for a host. See Section 8.1.2, “Exposing complex services on the service network” for instructions.
8.1.1. Exposing simple services on the service network
This section describes how services can be enabled for a service network for simple use cases.
Prerequisites
- A Skupper Podman site
Procedure
Run a server, for example:
$ podman run --name backend-target --network skupper --detach --rm -p 8080:8080 quay.io/skupper/hello-world-backendThis step is not Skupper-specific, that is, this process is unchanged from standard processes for your host.
Create a service that can communicate on the service network:
$ skupper expose [host <hostname|ip>]where
-
<host>is the name of the host where the server is running. For example, the name of the container if you run the server as a container. -
<ip>is the IP address where the server is running
For the example deployment in step 1, you create a service using the following command:
$ skupper expose host backend-target --address backend --port 8080Options for this command include:
-
--port <port-number>:: Specify the port number that this service is available on the service network. NOTE: You can specify more than one port by repeating this option. -
--target-port <port-number>:: Specify the port number of pods that you want to expose. -
--protocol <protocol>allows you specify the protocol you want to use,tcp,httporhttp2
-
Create the service on another site in the service network:
$ skupper service create backend 8080
8.1.2. Exposing complex services on the service network
This section describes how services can be enabled for a service network for more complex use cases.
Prerequisites
- A Skupper Podman site
Procedure
Run a server, for example:
$ podman run --name backend-target --network skupper --detach --rm -p 8080:8080 quay.io/skupper/hello-world-backendThis step is not Skupper-specific, that is, this process is unchanged from standard processes for your host.
Create a service that can communicate on the service network:
$ skupper service create <name> <port>where
-
<name>is the name of the service you want to create -
<port>is the port the service uses
For the example deployment in step 1, you create a service using the following command:
$ skupper service create hello-world-backend 8080-
Bind the service to a cluster service:
$ skupper service bind <service-name> <target-type> <target-name>where
-
<service-name>is the name of the service on the service network -
<target-type>is the object you want to expose,hostis the only current valid value. -
<target-name>is the name of the cluster service
For the example deployment in step 1, you bind the service using the following command:
$ skupper service bind hello-world-backend host hello-world-backend-
8.1.3. Consuming simple services from the service network
Services exposed on Podman sites are not automatically available to other sites. This is the equivalent to Kubernetes sites created using skupper init --enable-service-sync false.
Prerequisites
- A remote site where a service is exposed on the service network
- A Podman site
Procedure
- Log into the host as the user associated with the Skupper site.
Create the local service:
$ skupper service create <service-name> <port number>
8.2. Deleting a Podman site
When you no longer want the Linux host to be part of the service network, you can delete the site.
This procedure removes all containers, volumes and networks labeled application=skupper.
To check the labels associated with running containers:
$ podman ps -a --format "{{.ID}} {{.Image}} {{.Labels}}"Procedure
Make sure you are logged in as the user that created the site:
$ skupper status Skupper is enabled for "<username>" with site name "<machine-name>-<username>".Delete the site and all podman resources (containers, volumes and networks) labeled with "application=skupper":
$ skupper delete Skupper is now removed for user "<username>".
Chapter 9. Using the Service Interconnect Console
The Service Interconnect Console provides data and visualizations of the traffic flow between Skupper sites.
9.1. Enabling the Service Interconnect Console
By default, when you create a Skupper site, a Service Interconnect Console is not available.
When enabled, the Service Interconnect Console URL is displayed whenever you check site status using skupper status.
Prerequisites
- A Kubernetes namespace where you plan to create a site
Procedure
Determine which site in your service network is best to enable the console.
Enabling the console also requires that you enable the flow-collector component, which requires resources to process traffic data from all sites. You might locate the console using the following criteria:
- Does the service network cross a firewall? For example, if you want the console to be available only inside the firewall, you need to locate the flow-collector and console on a site inside the firewall.
- Is there a site that processes more traffic than other sites? For example, if you have a frontend component that calls a set of services from other sites, it might make sense to locate the flow collector and console on that site to minimize data traffic.
- Is there a site with more or cheaper resources that you want to use? For example, if you have two sites, A and B, and resources are more expensive on site A, you might want to locate the flow collector and console on site B.
Create a site with the flow collector and console enabled:
$ skupper init --enable-console --enable-flow-collector
9.2. Accessing the Service Interconnect Console
By default, the Service Interconnect Console is protected by credentials available in the skupper-console-users secret.
Procedure
Determine the Service Interconnect Console URL using the
skupperCLI, for example:$ skupper status Skupper is enabled for namespace "west" in interior mode. It is not connected to any other sites. It has no exposed services. The site console url is: https://skupper-west.apps-crc.testingBrowse to the Service Interconnect Console URL. The credential prompt depends on how the site was created using
skupper init:-
Using the
--console-auth unsecuredoption, you are not prompted for credentials. -
Using the
--console-auth openshiftoption, you are prompted to enter OpenShift cluster credentials. -
Using the default or
--console-user <user> --console-password <password>options, you are prompted to enter those credentials.
-
Using the
If you created the site using default settings, that is
skupper init, a random password is generated for theadminuser.To retrieve the password the
adminuser for a Kubernetes site:+
$ kubectl get secret skupper-console-users -o jsonpath={.data.admin} | base64 -d JNZWzMHtygTo retrieve the password the
adminuser for a Podman site:+
$ cat ~/.local/share/containers/storage/volumes/skupper-console-users/_data/admin JNZWzMHtyg
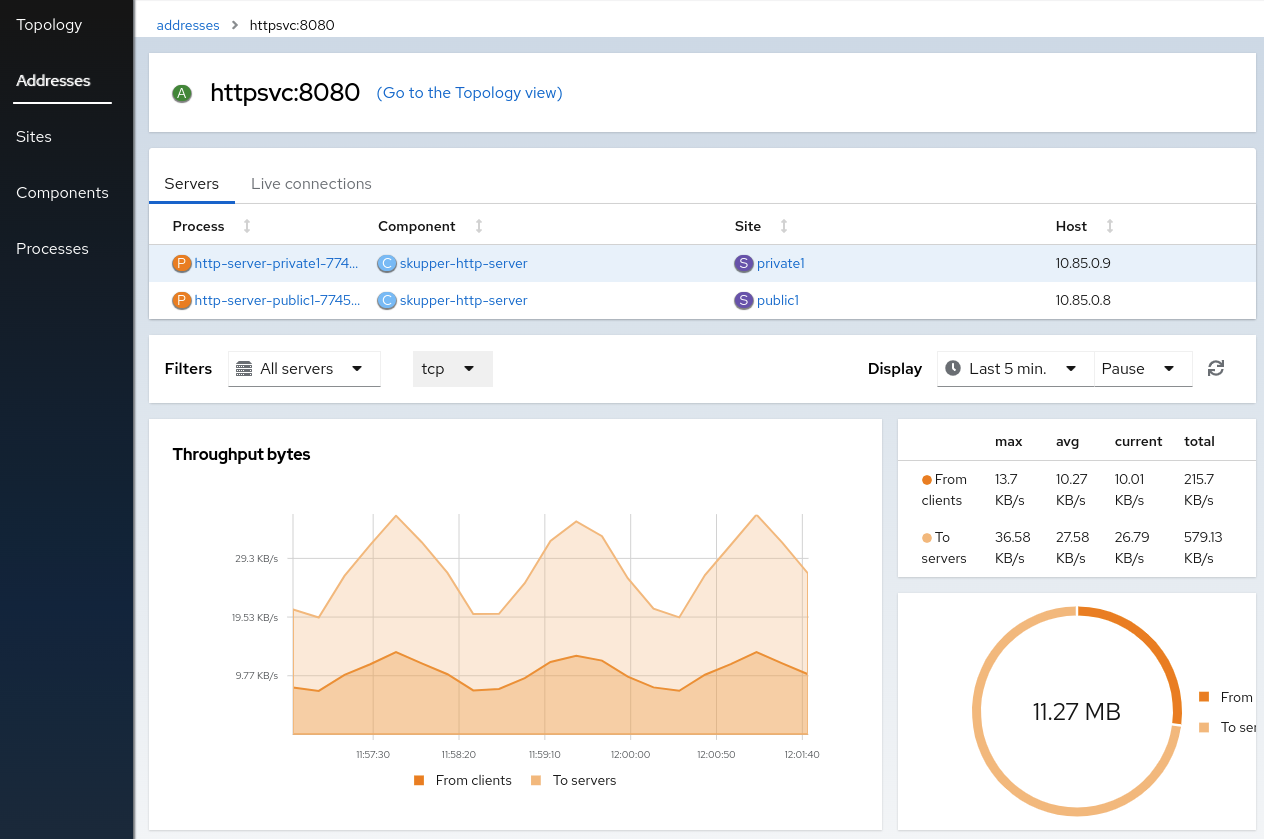
9.3. Exploring the Service Interconnect Console
After exposing a service on the service network, you create an address, that is, a service name and port number associated with a site. There might be many replicas associated with an address. These replicas are shown in the Service Interconnect Console as processes. Not all participants on a service network are services. For example, a frontend deployment might call an exposed service named backend, but that frontend is not part of the service network. In the console, both are shown so that you can view the traffic and these are called components.
The Service Interconnect Console provides an overview of the following:
- Topology
- Addresses
- Sites
- Components
- Processes
The Service Interconnect Console also provides useful networking information about the service network, for example, traffic levels.
- Check the Sites tab. All your sites should be listed. See the Topology tab to view how the sites are linked.
- Check that all the services you exposed are visible in the Components tab.
- Click a component to show the component details and associated processes.
Click on a process to display the process traffic.
NoteThe process detail displays the associated image, host, and addresses. You can also view the clients that are calling the process.
- Click Addresses and choose an address to show the details for that address. This shows the set of servers that are exposed across the service network.
To view information about each window, click the ? icon.
Chapter 10. Configuring Skupper sites using YAML
Using YAML files to configure Skupper allows you to use source control to track and manage Skupper network changes.
10.1. Creating a Skupper site using YAML
Using YAML files to create Skupper sites allows you to use source control to track and manage Skupper network changes.
Prerequisites
- Skupper is installed in the cluster or namespace you want to target.
- You are logged into the cluster.
Procedure
Create a YAML file to define the site, for example,
my-site.yaml:apiVersion: v1 kind: ConfigMap metadata: name: skupper-site data: name: my-site console: "true" console-user: "admin" console-password: "changeme" flow-collector: "true"The YAML creates a site with a console and you can create tokens from this site.
To create a site that has no ingress:
apiVersion: v1 kind: ConfigMap metadata: name: skupper-site data: name: my-site ingress: "none"Apply the YAML file to your cluster:
kubectl apply -f ~/my-site.yml
Additional resources
See the Section 10.3, “Site ConfigMap YAML reference” section for more reference.
10.2. Configuring services using annotations
After creating and linking sites, you can use Kubernetes annotations to control which services are available on the service network.
10.2.1. Exposing simple services on a service network using annotations
This section provides an alternative to the skupper expose command, allowing you to annotate existing resources to expose simple services on the service network.
Prerequisites
- A site with a service you want to expose
Procedure
- Log into the namespace in your cluster that is configured as a site.
Create a deployment, some pods, or a service in one of your sites, for example:
$ kubectl create deployment hello-world-backend --image quay.io/skupper/hello-world-backendThis step is not Skupper-specific, that is, this process is unchanged from standard processes for your cluster.
Annotate the kubernetes resource to create a service that can communicate on the service network, for example:
$ kubectl annotate deployment backend "skupper.io/address=backend" "skupper.io/port=8080" "skupper.io/proxy=tcp"The annotations include:
-
skupper.io/proxy- the protocol you want to use,tcp,httporhttp2. This is the only annotation that is required. For example, if you annotate a simple deployment namedbackendwithskupper.io/proxy=tcp, the service is exposed asbackendand thecontainerPortvalue of the deployment is used as the port number. -
skupper.io/address- the name of the service on the service network. -
skupper.io/port- one or more ports for the service on the service network.
NoteWhen exposing services, rather than other resources like deployments, you can use the
skupper.io/targetannotation to avoid modifying the original service. For example, if you want to expose thebackendservice:$ kubectl annotate service backend "skupper.io/address=van-backend" "skupper.io/port=8080" \ "skupper.io/proxy=tcp" "skupper.io/target=backend"This allows you to delete and recreate the
backendservice without having to apply the annotation again.-
Check that you have exposed the service:
$ skupper service status -v Services exposed through Skupper: ╰─ backend:8080 (tcp) ╰─ Sites: ├─ 4d80f485-52fb-4d84-b10b-326b96e723b2(west) │ policy: disabled ╰─ 316fbe31-299b-490b-9391-7b46507d76f1(east) │ policy: disabled ╰─ Targets: ╰─ backend:8080 name=backend-9d84544df-rbzjxNoteThe related targets for services are only displayed when the target is available on the current cluster.
10.2.2. Understanding Skupper annotations
Annotations allow you to expose services on the service network. This section provides details on the scope of those annotations
- skupper.io/address
The name of the service on the service network. Applies to:
- Deployments
- StatefulSets
- DaemonSets
- Services
- skupper.io/port
The port for the service on the service network. Applies to:
- Deployments
- StatefulSets
- DaemonSets
- skupper.io/proxy
The protocol you want to use,
tcp,httporhttp2. Applies to:- Deployments
- StatefulSets
- DaemonSets
- Services
- skupper.io/target
The name of the target service you want to expose. Applies to:
- Services
- skupper.io/service-labels
A comma separated list of label keys and values for the exposed service. You can use this annotation to set up labels for monitoring exposed services. Applies to:
- Deployments
- DaemonSets
- Services
10.3. Site ConfigMap YAML reference
Using YAML files to configure Skupper requires that you understand all the fields so that you provision the site you require.
The following YAML defines a Skupper site:
apiVersion: v1
data:
  name: my-site
  console: "true"
  flow-collector: "true"
  console-authentication: internal
  console-user: "username"
  console-password: "password"
  cluster-local: "false"
  edge: "false"
  service-sync: "true"
  ingress: "none"
kind: ConfigMap
metadata:
name: skupper-site- name
- Specifies the site name.
- console
Enables the skupper console, defaults to
false.NoteYou must enable
consoleandflow-collectorfor the console to function.- flow-collector
-
Enables the flow collector, defaults to
false. - console-authentication
-
Specifies the skupper console authentication method. The options are
openshift,internal,unsecured. - console-user
-
Username for the
internalauthentication option. - console-password
-
Password for the
internalauthentication option. - cluster-local
-
Only accept connections from within the local cluster, defaults to
false. - edge
-
Specifies whether an edge site is created, defaults to
false. - service-sync
-
Specifies whether the services are synchronized across the service network, defaults to
true. - ingress
- Specifies whether the site supports ingress. If you do not specify a value, the default ingress ('loadbalancer' on Kubernetes, 'route' on OpenShift) is enabled. This allows you to create tokens usable from remote sites.
All ingress types are supported using the same parameters as the skupper CLI.
Chapter 11. Using the Skupper Operator on Kubernetes
The Red Hat Service Interconnect Operator creates and manages Skupper sites in Kubernetes.
11.1. Creating a site using the Skupper Operator
Create a YAML file defining the ConfigMap of the site you want to create.
For example, create
skupper-site.yamlthat provisions a site with a console:apiVersion: v1 kind: ConfigMap metadata: name: skupper-site namespace: my-namespace data: console: "true" flow-collector: "true" console-user: "admin" console-password: "changeme"NoteCurrently, you must enable the console on the same site as you enable the flow collector.
You can also create a site without a console:
apiVersion: v1
kind: ConfigMap
metadata:
  name: skupper-site
  namespace: my-namespace
Apply the YAML to create a ConfigMap named
skupper-sitein the namespace you want to use:$ kubectl apply -f skupper-site.yamlVerify that the site is created by checking that the Skupper router and service controller pods are running:
$ kubectl get pods NAME READY STATUS RESTARTS AGE skupper-router-8c6cc6d76-27562 1/1 Running 0 40s skupper-service-controller-57cdbb56c5-vc7s2 1/1 Running 0 34sNoteIf you deployed the Operator to a single namespace, an additional site controller pod is also running.
Chapter 12. Securing a service network using Skupper policies
By default, Skupper includes many security features, including using mutual TLS for all service network communication between sites. You can add extra security features by installing the Skupper policy CRD. By default, applying a Skupper policy CRD to a cluster prevents all service network communication to and from that cluster. You specify granular Skupper policies CRs to permit only the service network communication you require.
A Skupper policy is distinct from the Kubernetes network policy, that is the network-policy option, which restricts access to Skupper services to the current namespace as described in Using the Skupper CLI.
Each site in a service network runs a Skupper router and has a private, dedicated certificate authority (CA). Communication between sites is secured with mutual TLS, so the service network is isolated from external access, preventing security risks such as lateral attacks, malware infestations, and data exfiltration. A set of Skupper policies adds another layer at a cluster level to help a cluster administrator control access to a service network.
This guide assumes that you understand the following Skupper concepts:
- site
- A namespace in which Skupper is installed.
- token
- A token is required to establish a link between two sites.
- service network
- After exposing services using Skupper, you have created a service network.
12.1. About Skupper policies
After a cluster administrator installs a Skupper policy Custom Resource Definition (CRD), the cluster administrator needs to configure one or more policies to allow developers create and use services on the service network.
In this guide, developers refers to users of a cluster who have access to a namespace, but do not have administrator privileges.
A cluster administrator configures one or more of following items using custom resources (CRs) to enable communication:
- Allow incoming links
-
Use
allowIncomingLinksto enable developers create tokens and configure incoming links. - Allow outgoing links to specific hosts
-
Use
allowedOutgoingLinksHostnamesto specify hosts that developers can create links to. - Allow services
-
Use
allowedServicesto specify which services developers can create or use on the service network. - Allow resources to be exposed
-
Use
allowedExposedResourcesto specify which resources a developer can expose on the service network.
A cluster administrator can apply each policy CR setting to one or more namespaces.
For example, the following policy CR fully allows all Skupper capabilities on all namespaces, except for:
-
only allows outgoing links to any domain ending in
.example.com. - only allows 'deployment/nginx' resources to be exposed on the service network.
apiVersion: skupper.io/v1alpha1
kind: SkupperClusterPolicy
metadata:
  name: cluster-policy-sample-01
spec:
  namespaces:
    - "*"
  allowIncomingLinks: true
  allowedExposedResources:
    - "deployment/nginx"
  allowedOutgoingLinksHostnames: [".*\.example.com$"]
  allowedServices:
    - "*"
You can apply many policy CRs, and if there are conflicts in the items allowed, the most permissive policy is applied. For example, if you apply an additional policy CR with the line allowedOutgoingLinksHostnames: [], which does not list any hostnames, outgoing links to *.example.com are still permitted because that is permitted in the original CR.
namespaces- One or more patterns to specify the namespaces that this policy applies to. Note that you can use Label selectors to match the namespaces.
allowIncomingLinks-
Specify
trueto allow other sites create links to the specified namespaces. allowedOutgoingLinksHostnames- Specify one or more patterns to determine which hosts you can create links to from the specified namespaces.
allowedServices- Specify one or more patterns to determine the permitted names of services allowed on the service network from the specified namespaces.
allowedExposedResources- Specify one or more permitted names of resources allowed on the service network from the specified namespaces. Note that patterns are not supported.
Use regular expressions to create pattern matches, for example:
-
.*\.com$matches any string ending in.com. A double backslash is required to avoid issues in YAML. -
^abc$matches the stringabc.
If you create another Skupper policy CR that allows outgoing links for a specific namespace, a user can create a link from that namespace to join a service network. That is, the logic for multiple policy CRs is OR. An operation is permitted if any single policy CR permits the operation.
12.2. Installing the Skupper policy CRD
Installing the Skupper policy CRD enables a cluster administrator to enforce policies for service networks.
If there are existing sites on the cluster, see Section 12.3, “Installing a Skupper policy CRD on a cluster with existing sites” to avoid service network disruption.
Prerequisites
-
Access to a cluster using a
cluster-adminaccount - The Skupper operator is installed
Procedure
-
Log in to the cluster using a
cluster-adminaccount. Download the CRD:
$ wget https://raw.githubusercontent.com/skupperproject/skupper/1.5/api/types/crds/skupper_cluster_policy_crd.yamlApply the CRD:
$ kubectl apply -f skupper_cluster_policy_crd.yaml

customresourcedefinition.apiextensions.k8s.io/skupperclusterpolicies.skupper.io created
clusterrole.rbac.authorization.k8s.io/skupper-service-controller created
To verify that a Skupper policy is active, use the
skupper statuscommand and check that the output includes the following line:Skupper is enabled for namespace "<namespace>" in interior mode (with policies).
12.3. Installing a Skupper policy CRD on a cluster with existing sites
If the cluster already hosts Skupper sites, note the following before installing the CRD:
- All existing connections are closed. You must apply a policy CR to reopen connections.
- All existing service network services and exposed resources are removed. You must create those resources again.
Procedure
To avoid disruption:
- Plan the CRD deployment for an appropriate time.
Search your cluster for sites:
$ kubectl get pods --all-namespaces --selector=app=skupper- Document each service and resource exposed on the service network.
- Install the CRD as described in Section 12.2, “Installing the Skupper policy CRD”. This step closes connections and removes all service network services and exposed resources.
If Skupper sites that were not created by
cluster-adminexist in the cluster, you must grant permissions to read Skupper policies to avoid that site being blocked from the service network.For each site namespace:
$ kubectl create clusterrolebinding skupper-service-controller-<namespace> --clusterrole=skupper-service-controller --serviceaccount=<namespace>:skupper-service-controllerwhere
<namespace>is the site namespace.- Create Skupper policy CRs as described in Section 12.4, “Creating Skupper policy CRs”
- Recreate any services and exposed resources as required.
12.4. Creating Skupper policy CRs
Skupper Policy CRs allow a cluster administrator to control communication across the service network from a cluster.
Prerequisites
-
Access to a cluster using a
cluster-adminaccount. - The Skupper policy CRD is installed on the cluster.
Typically, you create a Skupper policy CR that combines many elements from the steps below. See Section 12.1, “About Skupper policies” for an example CR.
12.4.1. Implement a policy to allow incoming links
Use allowIncomingLinks to enable developers create tokens and configure incoming links.
Procedure
- Determine which namespaces you want to apply this policy to.
-
Create a CR with
allowIncomingLinksset totrueorfalse. - Create and apply the CR.
For example, the following CR allows incoming links for all namespaces:
apiVersion: skupper.io/v1alpha1
kind: SkupperClusterPolicy
metadata:
  name: allowincominglinks
spec:
  namespaces:
    - "*"
  allowIncomingLinks: true
12.4.2. Implement a policy to allow outgoing links to specific hosts
Use allowedOutgoingLinksHostnames to specify hosts that developers can create links to. You cannot create a allowedOutgoingLinksHostnames policy to disallow a specific host that was previously allowed.
- Determine which namespaces you want to apply this policy to.
-
Create a CR with
allowedOutgoingLinksHostnamesset to a pattern of allowed hosts. - Create and apply the CR.
For example, the following CR allows links to all subdomains of example.com for all namespaces:
apiVersion: skupper.io/v1alpha1
kind: SkupperClusterPolicy
metadata:
  name: allowedoutgoinglinkshostnames
spec:
  namespaces:
    - "*"
  allowedOutgoingLinksHostnames: ['.*\.example\.com']
12.4.3. Implement a policy to allow specific services
Use allowedServices to specify which services a developer can create or use on the service network. You cannot create a allowedServices policy to disallow a specific service that was previously allowed.
Procedure
- Determine which namespaces you want to apply this policy to.
-
Create a CR with
allowedServicesset to specify the services allowed on the service network. - Create and apply the CR.
For example, the following CR allows users to expose and consume services with the prefix backend- for all namespaces:
apiVersion: skupper.io/v1alpha1
kind: SkupperClusterPolicy
metadata:
  name: allowedservices
spec:
  namespaces:
    - "*"
  allowedServices: ['^backend-']
When exposing services, you can use the --address <name> parameter of the skupper CLI to name services to match your policy.
12.4.4. Implement a policy to allow specific resources
Use allowedExposedResources to specify which resources a developer can expose on the service network. You cannot create a allowedExposedResources policy to disallow a specific resource that was previously allowed.
Procedure
- Determine which namespaces you want to apply this policy to.
-
Create a CR with
allowedExposedResourcesset to specify resources that a developer can expose on the service network. - Create and apply the CR.
For example, the following CR allows you to expose an nginx deployment for all namespaces:
apiVersion: skupper.io/v1alpha1
kind: SkupperClusterPolicy
metadata:
  name: allowedexposedresources
spec:
  namespaces:
    - "*"
  allowedExposedResources: ['deployment/nginx']
For allowedExposedResources, each entry must conform to the type/name syntax.
Chapter 13. Troubleshooting a service network
Typically, you can create a service network without referencing this troubleshooting guide. However, this guide provides some tips for situations when the service network does not perform as expected.
See Section 13.8, “Resolving common problems” if you have encountered a specific issue using the skupper CLI.
A typical troubleshooting workflow is to check all the sites and create debug tar files.
13.1. Checking sites
Using the skupper command-line interface (CLI) provides a simple method to get started with troubleshooting Skupper.
Procedure
Check the site status:
$ skupper status --namespace west

Skupper is enabled for namespace "west" in interior mode. It is connected to 2 other sites. It has 1 exposed services.
The output shows:
- A site exists in the specified namespace.
- A link exists to two other sites.
- A service is exposed on the service network and is accessible from this namespace.
Check the service network:
$ skupper network status Sites: ├─ [local] a960b766-20bd-42c8-886d-741f3a9f6aa2(west) │ │ namespace: west │ │ site name: west │ │ version: 1.5.1 │ ╰─ Linked sites: │ ├─ 496ca1de-0c80-4e70-bbb4-d0d6ec2a09c0(east) │ │ direction: outgoing │ ╰─ 484cccc3-401c-4c30-a6ed-73382701b18a() │ direction: incoming ├─ [remote] 496ca1de-0c80-4e70-bbb4-d0d6ec2a09c0(east) │ │ namespace: east │ │ site name: east │ │ version: 1.5.1 │ ╰─ Linked sites: │ ╰─ a960b766-20bd-42c8-886d-741f3a9f6aa2(west) │ direction: incoming ╰─ [remote] 484cccc3-401c-4c30-a6ed-73382701b18a() │ site name: vm-user-c3d98 │ version: 1.5.1 ╰─ Linked sites: ╰─ a960b766-20bd-42c8-886d-741f3a9f6aa2(west) direction: outgoingNoteIf the output is not what you expected, you might want to check links before proceeding.
The output shows:
-
There are 3 sites on the service network,
vm-user-c3d98,eastandwest. - Details for each site, for example the namespace names.
-
There are 3 sites on the service network,
Check the status of services exposed on the service network (
-vis only available on Kubernetes):$ skupper service status -v Services exposed through Skupper: ╰─ backend:8080 (tcp) ╰─ Sites: ├─ 4d80f485-52fb-4d84-b10b-326b96e723b2(west) │ policy: disabled ╰─ 316fbe31-299b-490b-9391-7b46507d76f1(east) │ policy: disabled ╰─ Targets: ╰─ backend:8080 name=backend-9d84544df-rbzjxThe output shows the
backendservice and the related target of that service.NoteAs part of output each site reports the status of the policy system on that cluster.
List the Skupper events for a site:
$ skupper debug events
NAME                         COUNT                                                          AGE
GatewayQueryRequest          3                                                              9m12s
                             3     gateway request                                          9m12s
SiteQueryRequest             3                                                              9m12s
                             3     site data request                                        9m12s
ServiceControllerEvent       9                                                              10m24s
                             2     service event for west/frontend                          10m24s
                             1     service event for west/backend                           10m26s
                             1     Checking service for: backend                            10m26s
                             2     Service definitions have changed                         10m26s
                             1     service event for west/skupper-router                    11m4s
DefinitionMonitorEvent       15                                                             10m24s
                             2     service event for west/frontend                          10m24s
                             1     service event for west/backend                           10m26s
                             1     Service definitions have changed                         10m26s
                             5     deployment event for west/frontend                       10m34s
                             1     deployment event for west/skupper-service-controller     11m4s
ServiceControllerUpdateEvent 1                                                              10m26s
                             1     Updating skupper-internal                                10m26s
ServiceSyncEvent             3                                                              10m26s
                             1     Service interface(s) added backend                       10m26s
                             1     Service sync sender connection to                        11m4s
                                   amqps://skupper-router-local.west.svc.cluster.local:5671
                                   established
                             1     Service sync receiver connection to                      11m4s
                                   amqps://skupper-router-local.west.svc.cluster.local:5671
                                   established
IpMappingEvent               5                                                              10m34s
                             1     172.17.0.7 mapped to frontend-6b4688bf56-rp9hc           10m34s
                             2      mapped to frontend-6b4688bf56-rp9hc                     10m54s
                             1     172.17.0.4 mapped to                                     11m4s
                                   skupper-service-controller-6c97c5cf5d-6nzph
                             1     172.17.0.3 mapped to skupper-router-547dffdcbf-l8pdc     11m4s
TokenClaimVerification       1                                                              10m59s
                             1     Claim for efe3a241-3e4f-11ed-95d0-482ae336eb38 succeeded 10m59s
The output shows sites being linked and a service being exposed on a service network. However, this output is most useful when reporting an issue and is included in the Skupper debug tar file.
List the Kubernetes events for a site:
kubectl get events | grep "deployment/skupper-service-controller"
10m         Normal    ServiceSyncEvent               deployment/skupper-service-controller   Service sync receiver connection to amqps://skupper-router-local.private1.svc.cluster.local:5671 established
10m         Normal    ServiceSyncEvent               deployment/skupper-service-controller   Service sync sender connection to amqps://skupper-router-local.private1.svc.cluster.local:5671 established
10m         Normal    ServiceControllerCreateEvent   deployment/skupper-service-controller   Creating service productcatalogservice
7m59s       Normal    TokenHandler                   deployment/skupper-service-controller   Connecting using token link1
7m54s       Normal    TokenHandler                   deployment/skupper-service-controller   Connecting using token link2
The output shows events relating to Kubernetes resources.
Additional information
13.2. Checking links
You must link sites before you can expose services on the service network.
By default, tokens expire after 5 minutes and you can only use a token once. Generate a new token if the link is not connected. You can also generate tokens using the -token-type cert option for permanent reusable tokens.
This section outlines some advanced options for checking links.
Check the link status:
$ skupper link status --namespace east

Links created from this site:
-------------------------------
Link link1 is connected
A link exists from the specified site to another site, meaning a token from another site was applied to the specified site.
NoteRunning
skupper link statuson a connected site produces output only if a token was used to create a link.If you use this command on a site where you did not create the link, but there is an incoming link to the site:
$ skupper link status --namespace west

Links created from this site:
-------------------------------
There are no links configured or connected

Currently connected links from other sites:
----------------------------------------
A link from the namespace east on site east(536695a9-26dc-4448-b207-519f56e99b71) is connected
Check the verbose link status:
$ skupper link status link1 --verbose --namespace east

 Cost:          1
 Created:       2022-10-24 12:50:33 +0100 IST
 Name:          link1
 Namespace:     east
 Site:          east-536695a9-26dc-4448-b207-519f56e99b71
 Status:        Connected
The output shows detail about the link, including a timestamp of when the link was created and the associated relative cost of using the link.
The status of the link must be
Connectedto allow service traffic.
Additional information
13.3. Checking gateways
By default, skupper gateway creates a service type gateway and these gateways run properly after a machine restart.
However, if you create a docker or podman type gateway, check that the container is running after a machine restart. For example:
Check the status of Skupper gateways:
$ skupper gateway status

Gateway Definition:
╰─ machine-user type:podman version:1.5
   ╰─ Bindings:
      ╰─ mydb:3306 tcp mydb:3306 localhost 3306
This shows a podman type gateway.
Check that the container is running:
$ podman ps
CONTAINER ID  IMAGE                                           COMMAND               CREATED         STATUS             PORTS                   NAMES
4e308ef8ee58  quay.io/skupper/skupper-router:1.5             /home/skrouterd/b...  26 seconds ago  Up 27 seconds ago                          machine-user
This shows the container running.
NoteTo view stopped containers, use
podman ps -aordocker ps -a.Start the container if necessary:
$ podman start machine-user
13.4. Checking policies
As a developer you might not be aware of the Skupper policy applied to your site. Follow this procedure to explore the policies applied to the site.
Procedure
- Log into a namespace where a Skupper site has been initialized.
Check whether incoming links are permitted:
$ kubectl exec deploy/skupper-service-controller -- get policies incominglink

ALLOWED POLICY ENABLED ERROR                                                   ALLOWED BY
false   true           Policy validation error: incoming links are not allowed
In this example incoming links are not allowed by policy.
Check other policies:
$ kubectl exec deploy/skupper-service-controller -- get policies
Validates existing policies

Usage:
  get policies [command]

Available Commands:
  expose       Validates if the given resource can be exposed
  incominglink Validates if incoming links can be created
  outgoinglink Validates if an outgoing link to the given hostname is allowed
  service      Validates if service can be created or imported
As shown, there are commands to check each policy type by specifying what you want to do, for example, to check if you can expose an nginx deployment:
$ kubectl  exec deploy/skupper-service-controller -- get policies expose deployment nginx
ALLOWED POLICY ENABLED ERROR                                                       ALLOWED BY
false   true           Policy validation error: deployment/nginx cannot be exposed
If you allowed an nginx deployment, the same command shows that the resource is allowed and displays the name of the policy CR that enabled it:
$ kubectl  exec deploy/skupper-service-controller -- get policies expose deployment nginx
ALLOWED POLICY ENABLED ERROR                                                       ALLOWED BY
true    true                                                                       allowedexposedresources
13.5. Creating a Skupper debug tar file
The debug tar file contains all the logs from the Skupper components for a site and provides detailed information to help debug issues.
Create the debug tar file:
$  skupper debug dump my-site

Skupper dump details written to compressed archive:  `my-site.tar.gz`
You can expand the file using the following command:
$ tar -xvf kind-site.tar.gz

k8s-versions.txt
skupper-versions.txt
skupper-router-deployment.yaml
skupper-router-867f5ddcd8-plrcg-skstat-g.txt
skupper-router-867f5ddcd8-plrcg-skstat-c.txt
skupper-router-867f5ddcd8-plrcg-skstat-l.txt
skupper-router-867f5ddcd8-plrcg-skstat-n.txt
skupper-router-867f5ddcd8-plrcg-skstat-e.txt
skupper-router-867f5ddcd8-plrcg-skstat-a.txt
skupper-router-867f5ddcd8-plrcg-skstat-m.txt
skupper-router-867f5ddcd8-plrcg-skstat-p.txt
skupper-router-867f5ddcd8-plrcg-router-logs.txt
skupper-router-867f5ddcd8-plrcg-config-sync-logs.txt
skupper-service-controller-deployment.yaml
skupper-service-controller-7485756984-gvrf6-events.txt
skupper-service-controller-7485756984-gvrf6-service-controller-logs.txt
skupper-site-configmap.yaml
skupper-services-configmap.yaml
skupper-internal-configmap.yaml
skupper-sasl-config-configmap.yaml
These files can be used to provide support for Skupper, however some items you can check:
- versions
-
See
*versions.txtfor the versions of various components. - ingress
-
See
skupper-site-configmap.yamlto determine theingresstype for the site. - linking and services
-
See the
skupper-service-controller-*-events.txtfile to view details of token usage and service exposure.
13.6. Understanding Skupper sizing
In September 2023, a number of tests were performed to explore Skupper performance at varying allocations of router CPU. You can view the results in the sizing guide.
The conclusions for router CPU and memory are shown below.
Router CPU
The primary factor to consider when scaling Skupper for your workload is router CPU. (Note that due to the nature of cluster ingress and connection routing, it is important to focus on scaling the router vertically, not horizontally.)
Two CPU cores (2,000 millicores) per router is a good starting point. It includes some headroom and provides low latencies for a large set of workloads.
If the peak throughput required by your workload is low, it is possible to achieve satisfactory latencies with less router CPU.
Some workloads are sensitive to network latency. In these cases, the overhead introduced by the router can limit the achievable throughput. This is when CPU amounts higher than two cores per router may be required.
On the flip side, some workloads are tolerant of network latency. In these cases, one core or less may be sufficient.
These benchmark results are not the last word. They depend on the specifics of our test environment. To get a better idea of how Skupper performs in your environment, you can run these benchmarks yourself.
Router memory
Router memory use scales with the number of open connections. In general, a good starting point is 4G.
| Memory | Concurrent open connections | |
| 512M | 8,192 | |
| 1G | 16,384 | |
| 2G | 32,768 | |
| 4G | 65,536 | |
| 8G | 131,072 | |
| 16G | 262,144 | |
| 32G | 524,288 | |
| 64G | 104,8576 |
13.7. Improving Skupper router performance
If you encounter Skupper router performance issues, you can scale the Skupper router to address those concerns.
Currently, you must delete and recreate a site to reconfigure the Skupper router.
For example, use this procedure to increase throughput, and if you have many clients, latency.
Delete your site or create a new site in a different namespace.
Note all configuration and delete your existing site:
$ skupper deleteAs an alternative, you can create a new namespace and configure a new site with optimized Skupper router performance. After validating the performance improvement, you can delete and recreate your original site.
Create a site with optimal performance CPU settings:
$ skupper init --router-cpu 5- Recreate your configuration from step 1, recreating links and services.
While you can address availability concerns by scaling the number of routers, typically this is not necessary.
13.8. Resolving common problems
The following issues and workarounds might help you debug simple scenarios when evaluating Skupper.
Cannot initialize skupper
If the skupper init command fails, consider the following options:
Check the load balancer.
If you are evaluating Skupper on minikube, use the following command to create a load balancer:
$ minikube tunnelFor other Kubernetes flavors, see the documentation from your provider.
Initialize without ingress.
This option prevents other sites from linking to this site, but linking outwards is supported. Once a link is established, traffic can flow in either direction. Enter the following command:
$ skupper init --ingress noneNoteSee the Skupper Podman CLI reference documentation for
skupper init.
Cannot link sites
To link two sites, one site must be accessible from the other site. For example, if one site is behind a firewall and the other site is on an AWS cluster, you must:
- Create a token on the AWS cluster site.
- Create the link on the site inside the firewall.
By default, a token is valid for only 15 minutes and can only be used once. See Using Skupper tokens for more information on creating different types of tokens.
Cannot access Skupper console
Starting with Skupper release 1.3, the console is not enabled by default. To use the new console, see Using the console.
Use skupper status to find the console URL.
Use the following command to display the password for the admin user:doctype: article
$ kubectl get secret/skupper-console-users -o jsonpath={.data.admin} | base64 -dCannot create a token for linking clusters
There are several reasons why you might have difficulty creating tokens:
- Site not ready
After creating a site, you might see the following message when creating a token:
Error: Failed to create token: Policy validation error: Skupper is not enabled in namespaceUse
skupper statusto verify the site is working and try to create the token again.- No ingress
You might see the following note after using the
skupper token createcommand:Token written to <path> (Note: token will only be valid for local cluster)This output indicates that the site was deployed without an ingress option. For example
skupper init --ingress none. You must specify an ingress to allow sites on other clusters to link to your site.You can also use the
skupper token createcommand to check if an ingress was specified when the site was created.
13.9. Deleting services from the service network
This section describes how services can be disabled for a service network.
Prerequisites
- A service network
- An exposed service
Procedure
- Navigate to the context where the service was exposed.
Delete the service:
$ skupper service delete <service-name>where
service-nameis the name of the service you want to remove.NoteTCP connections can remain active for an extended duration. After deleting the service, existing connections continue to communicate until the TCP connection is terminated. For example, if you exposed a database connection over the service network, and then delete the service. New database connections cannot be established. However, deleting the service does not affect existing connections. To terminate the existing connection, manually stop the database connection.
Check that the service is removed.
$ skupper service statusThe service should not be listed.
NoteTypically, if the service is still listed, it is because you issued the
deletecommand from the wrong site context. By default, when you expose a service from a site, that service becomes available on all other sites, however you can delete the service only from the original site context.