Getting Started with Red Hat Trusted Application Pipeline
Explore ready-to-use software templates for building applications that are infused with secure supply chain features, such as signatures, attestations, Software Bill of Materials (SBOM), SLSA verification, CVE scanning, and release policy guardrails.
Abstract
Chapter 1. Understanding RHTAP's foundations
Discover the robust foundation of Red Hat Trusted Application Pipeline (RHTAP), a framework designed to revolutionize cybersecurity practices across the software development lifecycle (SDLC). With RHTAP, you embark on a journey that transcends traditional security measures, integrating cutting-edge solutions and a DevSecOps CI/CD framework from inception to deployment. This proactive strategy accelerates developer onboarding, process acceleration, and the embedding of security from the beginning.
1.1. Secure CI/CD Framework
Central to RHTAP is its pioneering secure CI/CD framework, designed to uphold highest standards in software development. By aligning with the Supply-chain Levels for Software Artifacts (SLSA) level 3, RHTAP ensures that every line of code contributes to a fortress of security, significantly enhancing early vulnerability detection and mitigation.
1.2. Deep dive into RHTAP's security tools
Ensuring the security of software throughout its development is essential for mitigating potential vulnerabilities. The RHTAP leverages a powerful suite of tools designed to bolster your security measures. Let’s explore how RHTAP utilizes its components — RHDH, RHTAS, and RHTPA — to provide a robust defense against security threats.
Red Hat Developer Hub (RHDH)
- Red Hat Developer Hub serves as a self-service portal for developers. It streamlines the onboarding process and offers access to a wealth of resources and tools necessary for secure software development. This platform encourages best practices and facilitates the integration of security measures right from the start of the development process.
Red Hat Trusted Artifact Signer (RHTAS)
- Red Hat Trusted Artifact Signer focuses on enhancing software integrity through signature and attestation mechanisms. By ensuring that every piece of code and every artifact is signed and attested, RHTAS provides a verifiable trust chain that confirms the authenticity and security of the software components being used.
Red Hat Trusted Profile Analyzer (RHTPA)
- Red Hat Trusted Profile Analyzer, deals with the generation and management of Software Bills of Materials (SBOMs). SBOMs are critical for maintaining transparency and compliance, as they provide a detailed list of all components, libraries, and dependencies included in a software product. RHTPA automates the creation of SBOMs, ensuring that stakeholders have accurate and up-to-date information on the software’s composition.
1.3. Leveraging ready-to-use software templates
RHTAP offers ready-to-use software templates, embedding security directly into the development workflow, thus allowing developers to concentrate on innovation while minimizing security related distractions. These ready-to-use software templates are fully customizable, ensuring they meet your organization’s unique requirements seamlessly.
Benefit from integrated features right out of the box:
- Red Hat Advanced Cluster Security (RHACS): Strengthens your deployments against vulnerabilities.
- Quay: Provides a secure repository for your container images.
- Tekton pipelines: Enables precision in automated deployments.
- GitOps: Maintains consistency and automated configuration management.
1.4. Key security practices
RHTAP incorporates these tools to address specific security concerns effectively:
- Vulnerability Scanning: With each pull request, RHTAP conducts thorough scans with your CVE scanner of choice, such as Advanced Cluster Security, to identify and address vulnerabilities at the earliest possible stage.
- SBOM Generation: RHTAP’s automated generation of SBOMs plays a vital role in maintaining software transparency and compliance. By providing a comprehensive inventory of software components, organizations can better manage and secure their software supply chain.
- Container Image Security: RHTAP verifies that container images comply with SLSA (Supply-chain Levels for Software Artifacts) guidelines. This is achieved through an enterprise contract that includes over 41 rules, ensuring that the container images used in the development process meet stringent security standards.
1.5. The path forward
Embracing a DevSecOps mindset and utilizing RHTAP promotes a secure and efficient development environment. This ongoing journey of assessment and elevation equips organizations to address both current and future cybersecurity challenges effectively.
Chapter 2. Your path to secure application development
Red Hat Trusted Application Pipeline (RHTAP) significantly enhances the efficiency of containerizing and deploying applications, enabling developers to deploy their work within minutes. This innovative platform not only facilitates the creation of a build pipeline for testing and integrating application changes swiftly but also fortifies security measures against supply-chain attacks. By adhering to the rigorous standards of the Supply-chain Levels for Software Artifacts (SLSA) security framework, RHTAP ensures compliance with high-level security requirements.
2.1. Installation overview
Before tapping into the vast array of benefits offered by RHTAP, the initial step involves its installation within your organization. The installation of RHTAP is structured around seven key procedures:
- Creating a GitHub application for RHTAP
- Forking the template catalog
- Creating a GitOps git token
- Creating the Docker configuration value
- Creating a private-values.yaml file
- Installing RHTAP in your cluster
- Finalizing your GitHub application
2.2. Initial setup
Prior to beginning the installation process, certain prerequisites must be met to ensure a smooth and successful setup:
- Cluster Access: Ensure you have ClusterAdmin access to an OpenShift Container Platform (OCP) cluster, accessible both via the CLI and the web console.
Red Hat Advanced Cluster Security (ACS): Obtain necessary values from your ACS instance, including:
Configure ACS for Private Repositories: If you’re using private repositories in image registries like Quay.io, configure ACS accordingly:
- For Quay.io, navigate to Integrations > Image Integrations and select the Quay.io card.
- Add your OAuth tokens to access your specific Quay.io instance.
- Validate access via the test button to ensure ACS can scan private images when required.
- Quay.io Account: Ensure you have an active Quay.io account.
- Helm CLI Tool: Install the Helm CLI tool by following the guidelines provided here.
- GitHub Account: Lastly, make sure you have a GitHub account to facilitate certain installation procedures.
With these prerequisites in place, you are well-prepared to initiate the installation process by creating a new GitHub application specifically for your RHTAP instance.
Next step
Chapter 3. Build an application with sample software templates
RHTAP transforms the development landscape with its ready-to-use software templates available in Red Hat Developer Hub (RHDH). These templates are meticulously designed for seamless integration with Red Hat’s comprehensive suite of tools (RHDH, RHTAS, RHTPA) and technologies. This integration furnishes a solid framework for a secure, effective, and developer-oriented SDLC within an on-premises environment.
Beyond these foundational elements, RHTAP’s ready-to-use software templates include default integrations with key technologies to further secure and optimize your development experience:
- ACS (Advanced Cluster Security): Bolsters your deployments by identifying and mitigating vulnerabilities early in the development process, ensuring your applications are fortified from inception to deployment.
- Quay: Acts as a secure harbor for your container images, providing a reliable repository that continuously scans for vulnerabilities, keeping your containerized applications safe.
- Tekton Pipelines: Automates your build and deployment processes with precision, enabling a CI/CD framework that integrates seamlessly into your SDLC, thus accelerating your path to production.
- GitOps: Implements a GitOps strategy by maintaining your infrastructure and application configurations in Git repositories, ensuring consistent and automated deployment across all environments.
Additionally, RHTAP supports the development and containerization of applications across a wide range of popular programming languages such as Java, Python, Node.js, and Go, expanding your application development capabilities.
Upon the installation of RHTAP, cluster administrators have the capability to tailor the Red Hat Developer Hub portal with specific templates and enhancements. This customization process is crucial for enabling developers to focus primarily on coding by simplifying development workflows and mitigating concerns related to pipelines, vulnerabilities, and policies.
Before proceeding with customization, it’s essential for cluster administrators to familiarize themselves with the available software and pipeline templates through this guide. Such exploration is key to grasping how RHTAP supports a secure supply chain, laying the groundwork for any subsequent customization.
3.1. Setting the stage
- Ensure you have successfully installed RHTAP.
- Log in to Red Hat Developer Hub (RHDH) using the link provided by RHTAP. RHDH operates as an inclusive developer platform, facilitating the creation of developer portals. It offers engineering teams a unified platform that enhances the development process, providing an assortment of tools and resources for crafting high-quality software efficiently.
3.2. Build an application
On the RHDH portal, select Create, and then select an appropriate template. For example, Quarkus Java - Trusted Application Pipeline.
Building an application or microservice for your developers in RHDH using the templates offered by RHTAP is essentially only a three step process:
- Provide application information
- Provide application repository information
- Provide deployment information
Provide application information
-
In the Name field, provide an application name. Your name may incorporate lowercase letters (a-z), numbers (0-9), and dashes (-), but it must start and end with a lowercase alphanumeric character. Examples of valid names are
my-nameorabc-123, and the length should range from 1 to 63 characters. -
From the Owner dropdown list, select an appropriate RHDH component owner for this application. The default value is
user:guest, which appears if no specific owner is registered in the system. If you have not registered an owner, retain the defaultuser:guestselection. If needed, you have the option to replaceguestwith your username, personalizing ownership of the application. - Select Next. The system displays the Application Repository Information form.
Provide application repository information
- From the Host Type dropdown list, select an appropriate repository host type.
- In the Repository Owner field, enter name of the organization that owns the Git App you are using. This could be a personal user account, an organization, or a project within your organization.
- In the Repository Name field, enter an appropriate repository name using characters restricted to A-Z, a-z, 0-9, underscore (_), and dashes (-). The system uses this information to name the repository that it creates on the host repository server.
-
In the Repository Default Branch field, enter the default branch for your repository. This field displays
mainby default you can choose to keep it the same. -
In the Repository Server field, enter your on-prem host URL without the
HTTPprotocol and without the.gitextension. For example, gitlab-gitlab.apps.cluster-ljg9z.sandbox219.opentlc.com - Select Next. The system displays the Deployment Information form.
Provide deployment information
-
In the Image Registry field, enter your on-prem image registry URL without the
HTTPprotocol. For example, quay-tv2pb.apps.cluster-tv2pb.sandbox1194.opentlc.com. - In the Image Organization field, enter the image organization for the image registry you provided in the Step 1.
In the Image Name field, enter an appropriate image name following these guidelines: use only lowercase letters, dights, and separators. Separators include a period (.), up to two underscores (_), or one or more hyphens (-). For example,
my-app_1.2.NoteYou must ensure that the name does not start or end with a separator.
In the Deployment Namespace field, enter the prefix for the namespaces or cluster where your intend to deploy your application. The system creates the actual namespaces as
rhtap-app-development,rhtap-app-stage, andrhtap-app-prod.Noterhtap-appis the default deployment namespace prefix. Cluster administrators have the option to customize this prefix. For instructions on how to customize the default deployment namespace prefix, refer to Customizing sample software templates.- Select Review to review all the information that you added.
Select Create. RHTAP initiates a sequence of automated tasks that are pivotal for setting up your application’s infrastructure and deployment pipeline. This process involves several key operations that unfold behind the scenes:
- Repository Creation and Configuration: A new repository is automatically created in your specified hosting service (GitLab or GitHub), tailored specifically for your application. This includes the setup of both the GitOps repository, which holds your deployment configurations, and the source repository, where your application code resides.
- Argo CD Integration: With the repositories in place, Argo CD resources are created and configured. Argo CD, a declarative, GitOps continuous delivery tool, springs into action, orchestrating the deployment of your application across the specified namespaces.
- Namespace Creation: As part of setting up your deployment environments, various namespaces are automatically generated based on your application’s requirements. This includes separate namespaces for development, staging, and production environments, ensuring isolation and security between stages.
- Pipeline Definition: Finally, a pipeline definition is added to your setup, providing you with a 'Pipeline as code' model. This defines the automated workflow for building, testing, and deploying your application, aligning with best practices and security measures.
3.3. Review your application
Once you’ve successfully created an application using RHTAP, reviewing its components, source code, GitOps configurations, and associated documentation is straightforward. Here’s how you can conduct a comprehensive analysis:
Access Your Application:
- To find your application, select Open Component in catalog. You can also navigate to the Catalog where the system lists your newly created application.
Examine the Source Code:
- Go to the Overview tab.
- Select View Source to open the repository where your application’s source code is housed. This step provides insight into the construction and logic of your application.
Review GitOps repository:
- On the Overview tab, use the Kind dropdown to select Resource and find the relevant GitOps repository.
- Choose View Source to examine the GitOps configurations directly. Alternatively, for a broader overview including technical documentation, select View TechDocs from the Catalog section and then choose the GitOps repository under the Home > Repository section.
Review the Documentation:
- From the Overview tab, click View Tech Docs.
- This opens the technical documentation for your application, providing detailed insights into its features, configuration steps, and how to utilize it effectively.
3.4. Unregister your application
This process removes the application’s source and GitOps repository from your catalog and resource view, essentially hiding it. The application itself remains functional within the cluster. Unregistered applications can be re-registered at any time.
- Navigate to the Catalog and select the component that you want to unregister.
Select vertical three-dot menu associated with the component, and then select Unregister entity. A confirmation dialog appears.
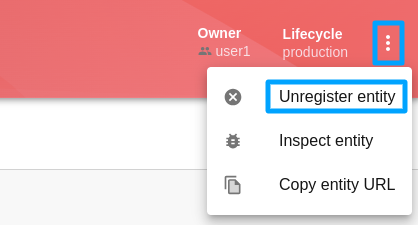
- Select Unregister Location. This removes the application’s Git repository from your catalog view.
- Navigate to the Catalog, from the Kind drop down list, select Resource, and then unregister the corresponding GitOps resource.
Remove the application from the cluster, by running the following command:
oc delete application your-app-name-app-of-apps -n rhtap1 - 1
rhtapis the default namespace. Additionally,your-app-nameis the name of your application.
Chapter 4. Update code and view security insights
After successfully building your component with RHTAP, the next step is to make a code change and delve into the security insights.
4.1. Initiating code updates
With RHTAP, this process is straightforward.
- Select Catalog and then select an appropriate component for which you want to view security insights.
-
On the Overview tab, select View Source tab to see your project in GitLab or GitHub. Here, you can also select View Tech Docs to see your project’s documentation. The source of the documentation is the
docsdirectory in your repository. If you update these files and the pipeline runs successfully, your Tech Docs will update too.
4.2. Making changes to your code
With access to your repository, you’re ready to engage in the familiar process of working with a git repository. Here’s how to proceed:
- Clone your repository to start working on it either locally or in your development environment.
-
Modify your application, like updating technical docs or
index.html, or by adding new features or bug fixes. - Commit your changes.
- Push your changes to the repository.
- You can also use GitLab or GitHub UI, to directly update your code within the web interface.
- For GitLab users only: You have to set up webhooks and secrets in GitLab to automatically trigger pipeline run upon code updates. For information on setting up webhooks and secrets in GitLab, refer to Configuring GitLab Webhooks for automated pipeline triggers.
4.3. Viewing the pipeline run
To view the pipeline run after making changes to your code:
- Return to RHDH platform to see how your changes progressed.
- Navigate to the Catalog and select the specific component you just modified.
- Open the CI tab to access the pipeline run.
Beyond the pipeline run, RHDH offers valuable insights through other tabs:
- CD: Gain insights into deployments managed by ArgoCD and GitOps using the CD tab.
- Topology: Visualize your application’s deployment within the development namespace with the Topology tab.
4.4. View security insights
When you update your code and push the changes, the system triggers the on-push pipeline automatically. By default, RHTAP uses a standard build pipeline for quick, containerized deployment, enhancing supply chain security by meeting Software Artifacts (SLSA) level 3 specifications.
Figure 4.1. A successful pipeline run

This visual representation outlines each pipeline task. A green status indicates successful completion, streamlining your workflow without extensive oversight.
The initial build pipeline tasks comprise:
-
init: Initializes the pipeline, configuring rebuild flags and authentication, and generates an image repository secret for the PipelineRun. -
clone-repository: Clones the specified repository into the workspace, readying it for action with the git-clone Task. build-container: This task employs Buildah to convert source code into a container image, which is then pushed to a specified registry. Key actions and outcomes of this task include:- Container Image Creation and Deployment: Buildah compiles the source code into a container image. Upon successful creation, the image is pushed to the designated image registry.
- Software Bill of Materials (SBOM) Generation: As part of ensuring transparency and compliance, an SBOM is generated, detailing the components, libraries, and dependencies included in the container image. This SBOM is then embedded within the final container image for easy access and verification.
- SBOM Publishing: In addition to incorporating the SBOM into the container image, this task pushes the SBOM as an independent image using Cosign. This facilitates easier management and verification of the SBOM by security and compliance teams.
-
Artifact Creation: The task generates critical security artifacts, including the image signature (
.sig) and attestation (.att). These artifacts are essential for verifying the integrity and authenticity of the container image and its contents, providing a robust mechanism for trust and security verification within the deployment pipeline.
-
update-deployment: Updates the deployment environment with the newly built image. This update is performed in the GitOps repository in theOverlay>Developmentdirectory. -
acstasks: Conducts security assessments on the code and deployment configurations, ensuring compliance with established security policies and best practices. -
show-sbom: Creates a comprehensive list of all software components and libraries utilized in the application, improving transparency and supporting vulnerability management. -
summary: Provides a summary of the PipelineRun, includes PipelineRun information, and removes the image repository secret utilized by the PipelineRun.
You can click on any tasks within the pipeline run to access logs and additional details produced upon the successful completion of a task, indicated by a green check.
4.4.1. Red Hat Advanced Cluster Security tasks
RHTAP leverages Red Hat Advanced Cluster Security (RHACS) and its security checks within the pipeline. If RHACS is installed and configured, the pipeline runs the RHACS tasks (for example, roxctl image scan) and displays a green check upon completion. However, if RHACS is not installed or configured, pipeline skips the RHACS tasks.
- RHACS tasks in the pipeline succeed only if you already have installed and configured RHACS as part of the RHTAP installation process. For detailed instructions on installing RHACS, refer Installing Red Hat Red Hat Advanced Cluster Security for Kubernetes.
- If you did not install and configure RHACS during the RHTAP installation process, refer Configure ACS.
Figure 4.2. The RHACS tasks in the pipeline run
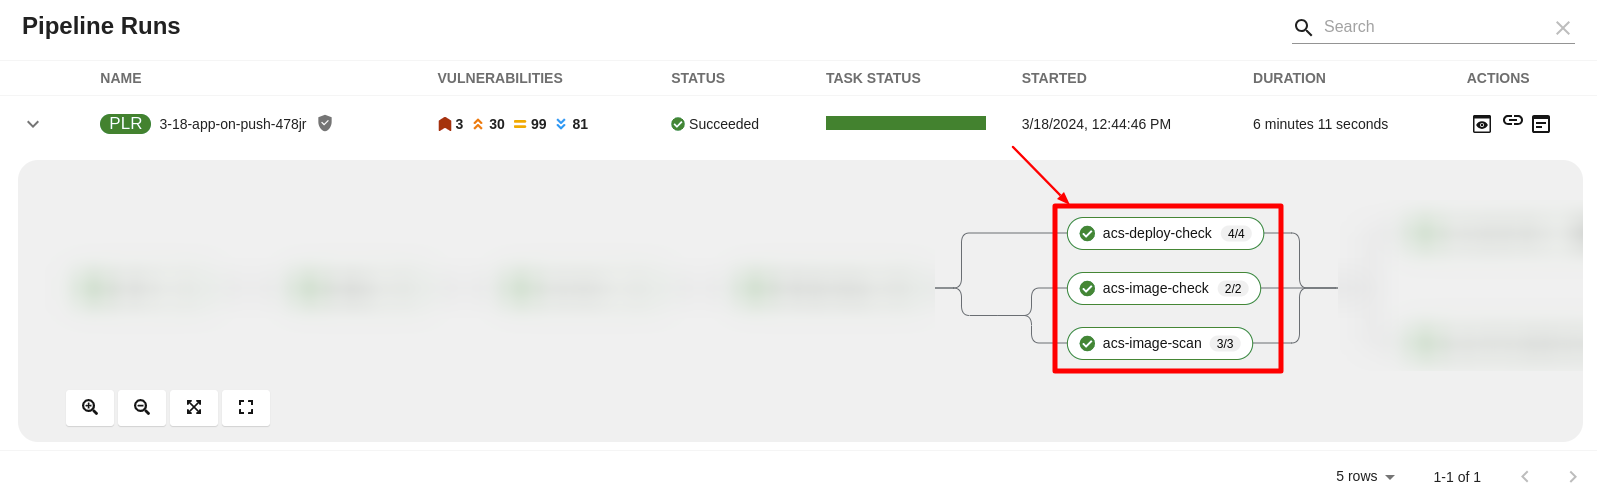
The pipeline incorporates three RHACS tasks using roxctl to perform comprehensive security checks:
-
roxctl image scan- Returns the components and vulnerabilities found in the image in JSON format. -
roxctl image check- Checks the build-time violations of your security policies in the image. For example, 'No log4j allowed' or perhaps no curl, wget nor a package manager in a production image. -
roxctl deployment check- Checks the build-time and deploy-time violations of your security policies in YAML deployment files.
These tasks ensure adherence to security policies and configurations right from the development stage.
Visualizing RHACS reports
In Red Hat Developer Hub, under the CI tab, the Pipeline Runs section offers a feature to access and interpret detailed task reports through a structured pop-up interface. The pop-up consists of the following sections:
- Red Hat Advanced Cluster Security (conditionally shown on the availability of RHACS tasks): This section displays the individual tabs all the RHACS tasks, for example, Image scan, Image check, and Deployment check, and offers an initial summary of the security issues.
-
Others: This section displays the results of a
PipelineRun, for example, IMAGE_URL, andIMAGE_DIGEST. This section displays only when there is more than one section (for example, Enterprise Contract or {RHRHACSLongName}) available in the pop-up.
To view RHACS reports:
- Select Catalog and open an appropriate component for which you want to review the RHACS reports
Select the CI tab > Actions column > View output icon and review the detailed RHACS reports in the software components.
Figure 4.3. The detailed RHACS reports

If you have appropriate permissions, you can manage vulnerabilities, policies, and review detailed vulnerability reports for a specific image by navigating to your RHACS console. For more information, refer Viewing the dashboard.
Interpreting RHACS reports
The detailed reports generated by Red Hat Advanced Cluster Security (RHACS) tasks are instrumental in providing security insights crucial for maintaining a robust security posture.
Here’s an example of how to interpret roxctl image scan (Image Scan) reports. You can apply a similar approach to interpret reports from roxctl image check (Image Check) and roxctl deployment check (Deployment Check).
- Vulnerability Breakdown: RHACS categorize detected vulnerabilities by severity (Critical, Important, Moderate, Low), status (fixable, non-fixable), and offer a summary of the scan results. This categorization includes the total number of vulnerabilities and components analyzed, alongside specific Common Vulnerabilities and Exposures (CVEs) identified.
Details Provided: For each identified vulnerability, the report includes:
- CVE ID: A unique identifier for the vulnerability.
- Severity: The level of threat posed by the vulnerability.
- Component: The software component affected by the vulnerability.
- Component Version: The version of the affected component.
- Remediation Suggestions: Recommendations for addressing the vulnerability, including the version in which the vulnerability is fixed, if applicable.
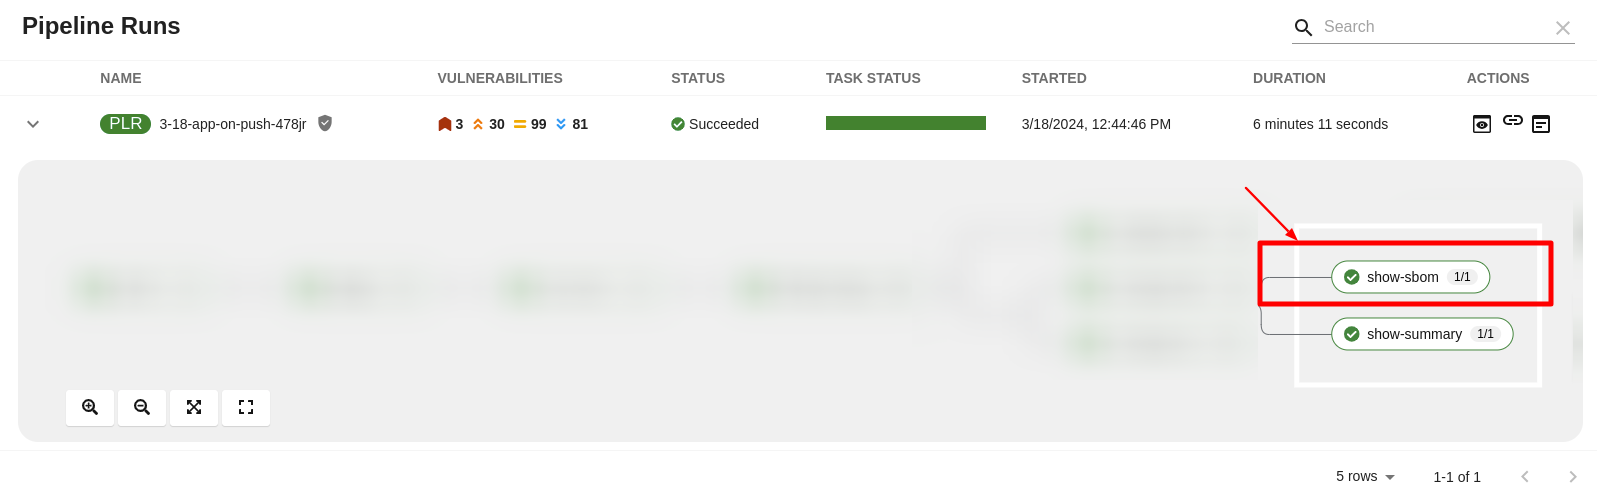
4.4.2. Understanding SBOM
The show-sbom task contributes to software supply chain transparency by listing all software libraries a component uses, facilitating the identification of vulnerabilities and assessment of security impacts.
Figure 4.4. The show-sbom task in the pipeline run
Viewing SBOM
Procedures
- Select Catalog and open an appropriate component for which you want to view SBOM.
Select the CI tab and then select the link icon. The system displays the SBOM task logs and you can use your web browser to immediately search the SBOM for terms that indicate vulnerabilities in your software supply chain. For example, try searching for
log4j.Figure 4.5. The SBOM details

Downloading an SBOM in the CLI
Prerequisites
- You have installed the Cosign CLI tool.
-
The
build-containerandshow-sbomtasks ran successfully.
Procedures
-
Expand an appropriate successful pipeline run and select the
show-summarytask. Find and copy the SBOM image URL, and run the following command on your terminal.
Example cosign command
$ cosign download sbom <the-sbom-url-you-copied>(Optional) To view the full SBOM in a searchable format, run the following command to redirect the output:
Example cosign command
$ cosign download sbom <the-sbom-url-you-copied> > sbom.txt
Reading the SBOM
In the SBOM, as the following sample excerpt shows, you can see four characteristics of each library that a project uses:
- Its author or publisher
- Its name
- Its version
- Its licenses
This information helps you verify that individual libraries are safely-sourced, updated, and compliant.
Example SBOM
{
    "bomFormat": "CycloneDX",
    "specVersion": "1.4",
    "serialNumber": "urn:uuid:89146fc4-342f-496b-9cc9-07a6a1554220",
    "version": 1,
    "metadata": {
        ...
    },
    "components": [
        {
            "bom-ref": "pkg:pypi/flask@2.1.0?package-id=d6ad7ed5aac04a8",
            "type": "library",
            "author": "Armin Ronacher <armin.ronacher@active-4.com>",
            "name": "Flask",
            "version": "2.1.0",
            "licenses": [
                {
                    "license": {
                        "id": "BSD-3-Clause"
                    }
                }
            ],
            "cpe": "cpe:2.3:a:armin-ronacher:python-Flask:2.1.0:*:*:*:*:*:*:*",
            "purl": "pkg:pypi/Flask@2.1.0",
            "properties": [
                {
                    "name": "syft:package:foundBy",
                    "value": "python-package-cataloger"
                    ...
Chapter 5. Deploy application and view security insights
Organizations leverage a structured approach for application deployment, typically involving development, pre-production, and production stages. This process is often automated and governed by defined rules and triggers.
This guide outlines deploying applications through ArgoCD in OpenShift GitOps, enabling continuous deployment across all stages. ArgoCD facilitates a GitOps-based deployment strategy, treading your Git repository as a single source of truth for your infrastructure configurations. Updates to this repository trigger deployments across environments.
This guide shows an example deployment approach; organizations may adopt any method that suits their workflow.
5.1. Promoting a build to a pre-production or production environment
Promoting a build from one environment to another (like from development to stage or production) involves updating the GitOps repository through a pull request (PR).
- On RHDH platform, select Catalog.
- From the Kind dropdown list, select Resource, and then select an appropriate GitOps repository.
- On the Overview tab, select View Source.
(Optional) Alternatively, select Catalog, and then on the Overview tab, select View TechDocs
- In the Home > Repository section, select the GitOps repository.
Clone your GitOps repository, and go to the
component/<app-name>directory.NoteEnsure that the local clone is up-to-date.
- Checkout a new branch.
-
Within the repository, locate the
component/<app-name>/overlaysdirectory, where you’ll find thedevelopment,stage, andprodsubdirectories, each correspond to an environment. Manually move an application from development environment to the stage or production environment.
Expand To move your application Do this From development to stage environment
-
Expand
developmentdirectory and selectdeployment-patch.yaml. - Copy the containers image URL. For example, quay.io/<username>/<app-name>/imageurl.
-
Go to
stagedirectory, selectdeployment-patch.yaml, and replace the existing container image URL with the one copied.
NoteIf you want to promote other configuration changes (for example, replicas) in addition to the container image from the development to the stage environment, copy the changes from the
deployment-patch.yamlfile located in thedevelopmentdirectory and paste them into thedeployment-patch.yamlfile in thestagedirectory.From stage to production environment
-
Expand
stagedirectory and selectdeployment-patch.yaml. - Copy the containers image URL. For example, quay.io/<username>/<app-name>/imageurl.
-
Go to
proddirectory, selectdeployment-patch.yaml, and replace the existing container image URL with the one copied.
NoteIf you want to promote other configuration changes (for example, replicas) in addition to the container image from the stage to the production environment, copy the changes from the
deployment-patch.yamlfile located in thestagedirectory and paste them into thedeployment-patch.yamlfile in theproddirectory.-
Expand
- Commit and push your updates.
Create a pull request (PR). This action initiates a promotion pipeline run that validates the updated container images against Red Hat Enterprise Contract (Enterprise Contract) policies. The pipeline run visually represents all tasks, with a green status signifying successful completion.
- Review the promotion pipeline in the CI tab within RHDH.
Review and merge the PR. Merging the PR triggers ArgoCD, which then automatically applies the necessary changes to promote the build to the next environment.
- Review the latest deployment updates in the CD tab within RHDH. It displays updates on the application’s current status, deployment details, the author of the pipeline run, the commit message (for example, Promote stage to prod), and the container image advanced to production.
Verification
- To assess the successful promotion of your application, navigate to the Topology tab. Here, you can review the application’s distribution across the designated namespaces.
5.2. View security insights
The promotion pipeline run offers a visual representation of all the tasks in a pipeline. A green status indicates successful completion, streamlining your workflow without extensive oversight.
The promotion pipeline tasks comprise:
-
clone-repository: Clones the specified repository into the workspace, readying it for action with the git-clone Task. -
gather-deploy-images: Detects container images to scan based on the changes in the PR. -
verify-enterprise-contract: Validates the changed container images. This task ensures images originate from a corporate standard or approved build system. It leverages the Enterprise Contract (EC) policies, working alongside Sigstore’s cosign tool, to assess the integrity of image signatures and attestations.
You can click on any tasks within the pipeline run to access logs and additional details related to that task.
5.2.1. Enterprise contract task
The Enterprise Contract is a suite of tools designed to maintain software supply chain security. It allows for defining and enforcing policies related to how container images are built and tested.
The Enterprise Contract ensures container images produced by Red Hat Trusted Application Pipeline meet clearly defined requirements before releasing them to production. Should an image fail to meet these criteria, the EC generates a report outlining the specific issues that need to be addressed.
The Red Hat Trusted Application Pipeline build process utilizes Tekton Chains to create a signed in-toto attestation of the build pipeline. The EC then leverages this signed attestation to cryptographically verify the build’s integrity and assess it against a set of policies. These policies ensure that the build process adheres to prescribed best practices and any organization-specific security guidelines.
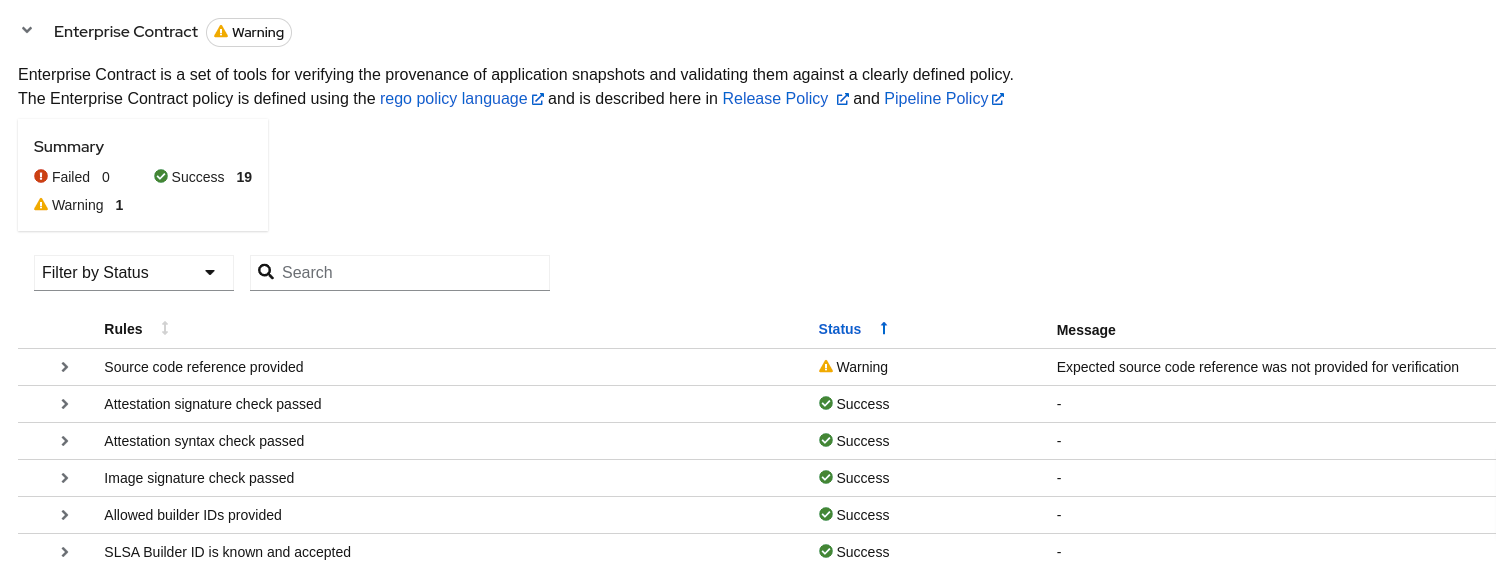
Interpreting compliance reports
The detailed reports generated by Enterprise Contract (EC) scans are instrumental in providing security insights crucial for maintaining a robust security posture. Here’s how to interpret these reports:
- Policy Compliance Overview: EC scans assess the application’s compliance with the Supply Chain Levels for Software Artifacts (SLSA) security framework. The reports list the checks conducted, the status (success, warning, failure) of each check, and provide messages for any warnings or failures observed.
Details Provided: Policy reports detail:
- Successful Checks: Counts and specifics of policy rules met.
- Warnings and Failures: Any policy rules that resulted in warnings or failures, with messages explaining the reason.
- Rule Compliance: Specifics on how well the application adheres to individual policy rules, such as source code reference and attestation checks.
Figure 5.1. The EC report
Utilizing the insights from compliance reports
The insights gleaned EC scan reports are critical for prioritizing security and compliance efforts:
- Review Policy Compliance: Ensure your application’s integrity by closely reviewing compliance with SLSA and other relevant standards. Address any compliance gaps as per the EC scan recommendations.
- Streamline Report Review: Employ provided filters within the reports to focus on significant areas, facilitating a more efficient review process and allowing for quick identification of critical issues and compliance gaps.
Revised on 2024-07-15 21:03:20 UTC