Introduction to the User Portal
Accessing and Using the User Portal
Abstract
Chapter 1. Accessing the User Portal
1.1. Browser and Client Requirements
- Tier 1: Browser and operating system combinations that are fully tested and fully supported. Red Hat Engineering is committed to fixing issues with browsers on this tier.
- Tier 2: Browser and operating system combinations that are partially tested, and are likely to work. Limited support is provided for this tier. Red Hat Engineering will attempt to fix issues with browsers on this tier.
- Tier 3: Browser and operating system combinations that are not tested, but may work. Minimal support is provided for this tier. Red Hat Engineering will attempt to fix only minor issues with browsers on this tier.
| Support Tier | Operating System Family | Browser | Portal Access |
|---|---|---|---|
| Tier 1 | Red Hat Enterprise Linux | Mozilla Firefox Extended Support Release (ESR) version | Administration Portal and User Portal |
| Tier 2 | Windows | Internet Explorer 10 or later | Administration Portal and User Portal |
| Any | Most recent version of Google Chrome or Mozilla Firefox | Administration Portal and User Portal | |
| Tier 3 | Any | Earlier versions of Google Chrome or Mozilla Firefox | Administration Portal and User Portal |
| Any | Other browsers | Administration Portal and User Portal |
- Tier 1: Operating systems on which remote-viewer has been fully tested and is supported.
- Tier 2: Operating systems on which remote-viewer is partially tested and is likely to work. Limited support is provided for this tier. Red Hat Engineering will attempt to fix issues with remote-viewer on this tier.
| Support Tier | Operating System | SPICE Support |
|---|---|---|
| Tier 1 | Red Hat Enterprise Linux 6 | Fully supported on Red Hat Enterprise Linux 6.8 and above |
| Tier 1 | Red Hat Enterprise Linux 7 | Fully supported on Red Hat Enterprise Linux 7.2 and above |
| Microsoft Windows 7 | Fully supported on Microsoft Windows 7 | |
| Tier 2 | Microsoft Windows 8 | Supported when spice-vdagent is running on these guest operating systems |
| Microsoft Windows 10 | Supported when spice-vdagent is running on these guest operating systems |
1.2. Logging in to and out of the User Portal
Procedure 1.1. Logging in to the User Portal
- Access the User Portal:
- Enter the provided User Portal URL in the address bar of your web browser. The address must be in the format of
https://server.example.com/UserPortal. - Enter the provided server address into the web browser to access the welcome screen. Click User Portal to be directed to the User Portal.
- Enter your User Name and Password. Use the Profile drop-down menu to select the correct domain.
- If you have only one running virtual machine in use, optionally select the Connect Automatically check box to connect directly to your virtual machine.
- Select the required language from the drop-down list.
- Click . The list of virtual machines assigned to you displays.
1.3. Logging in for the First Time: Installing the Engine Certificate
1.3.1. Installing the Red Hat Enterprise Virtualization Manager Certificate in Firefox
Procedure 1.2. Installing the Red Hat Enterprise Virtualization Manager Certificate in Firefox
- Navigate to the URL for the User Portal in Firefox.
- Click to open the Add Security Exception window.
- Ensure the check box is selected.
- Click the button.
1.3.2. Installing the Red Hat Enterprise Virtualization Manager Certificate in Internet Explorer
Procedure 1.3. Installing the Red Hat Enterprise Virtualization Manager Certificate in Internet Explorer
- Navigate to the following URL:
https://[your manager's address]/ca.crt
https://[your manager's address]/ca.crtCopy to Clipboard Copied! Toggle word wrap Toggle overflow - Click the Open button in the File Download - Security Warning window to open the Certificate window.
- Click the button to open the Certificate Import Wizard window.
- Select the radio button and click to open the Select Certificate Store window.
- Select Trusted Root Certification Authorities from the list of certificate stores, then click .
- Click to proceed to the Certificate Store screen.
- Click to proceed to the Completing the Certificate Import Wizard screen.
- Click to install the certificate.
Important
console.vv mime files and Remote Desktop connection files.
Chapter 2. The Basic Tab
2.1. Basic Tab Graphical Interface

Figure 2.1. The User Portal
 The green button starts up the virtual machine. It is available when the virtual machine is paused, stopped or powered off.
 The red button stops the virtual machine. It is available when the virtual machine is running.
 The blue button temporarily halts the virtual machine. To restart it, press the green button.
 The green button reboots the virtual machine. It is available when the virtual machine is running.
2.2. Running Virtual Machines
2.2.1. Turning on a Virtual Machine
Note
Procedure 2.1. Turning on a Virtual Machine
- Turn on the standalone virtual machine or take a virtual machine from a pool as follows:
- To turn on a standalone virtual machine, select the virtual machine icon and click the
button.

Figure 2.2. Turn on virtual machine
- To take a virtual machine from a pool, select the virtual machine pool icon and click the
button.

Figure 2.3. Take virtual machine from a pool
If there is an available virtual machine in the pool, an icon for that virtual machine will appear in your list. The rest of this procedure then applies to that virtual machine. If you can take multiple virtual machines from a pool, the icon for the virtual machine pool will change into an icon for the last virtual machine you have taken when you take the maximum number of virtual machines possible for that pool.
- The virtual machine powers up.

Figure 2.4. Virtual machine powering up
- When the virtual machine is powered up, the icon is no longer grayed out. The text displays as Machine is Ready. You are now ready to connect.

Figure 2.5. Virtual machine turned on
Note
2.2.2. Connecting to a Powered-On Virtual Machine
Procedure 2.2. Connecting to a Powered on Virtual Machine
- Double-click on the selected virtual machine to connect.

Figure 2.6. Connect to Virtual Machine
- A console window of the virtual machine displays. You can now use the virtual machine in the same way that you would use a physical desktop.
Note
2.2.3. Logging out of a Virtual Machine
Procedure 2.3. Shutting down a virtual machine
- Log out of the guest operating system.
- If you were using your virtual machine in full screen mode, press Shift+F11 to exit full screen mode, and close the virtual machine's console window. You are now returned to the User Portal.
- To shut down the virtual machine, click the
button. The virtual machine is grayed out and displays as "Machine is Down" when it has been turned off.
Chapter 3. The Extended Tab
3.1. Extended Tab Graphical Interface
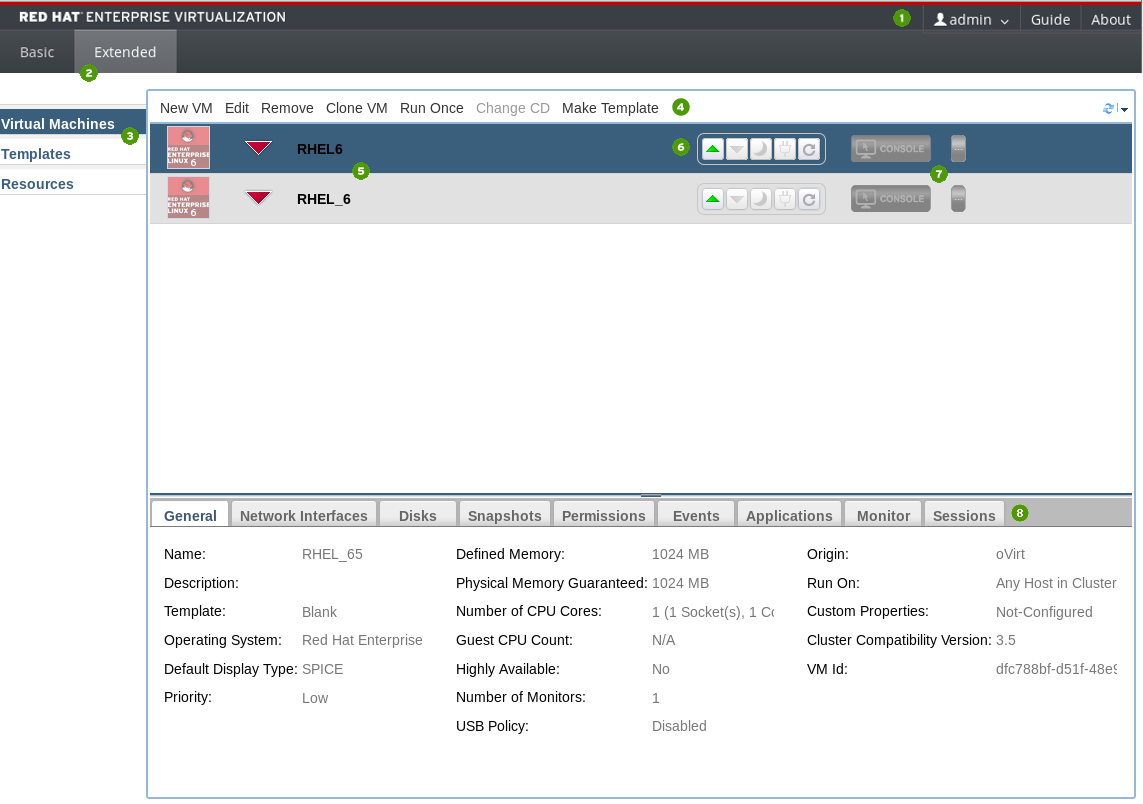
Figure 3.1. The Extended Tab
| Number | Element Name | Description |
|---|---|---|
| 1 | Title Bar | Includes the name of the User logged in to the portal and links to the Guide and About pages. |
| 2 | User Portal View Option Tabs | Power Users have access to the Extended tab of the User Portal and the Basic tab of the User Portal. The Basic view is the default view for users with basic permissions. |
| 3 | Navigation Pane | The Navigation Pane allows you to toggle between the Virtual Machines, Templates, and Resources tabs. |
| 4 | Management Bar | The management bar is used to create and make changes to virtual machines. |
| 5 | Virtual Machine List | The list of virtual machines, with the operating systems installed on them and their statuses (running, paused, or stopped). |
| 6 | Virtual Machine Control Buttons | Virtual Machine Control Buttons allow you to start, stop, pause, or power off virtual machines.
|
| 7 | Console Button | The console button launches a SPICE window and connects to machines that have been powered-up. |
| 8 | Details Pane | The Details Pane displays the statistics of the virtual machine selected in the Navigation Pane. |
Details Pane Tab Functions:
- The General tab displays basic software and hardware information of the virtual machine, including its name, operating system, display protocol and defined memory.
- The Network Interfaces tab displays the name, type and speed of the network connected to the virtual machine. You can add, edit and remove network interfaces using this tab.
- The Disks tab displays the name, size and format of the disk attached to the virtual machine. You can add, edit and remove virtual disks using this tab.
- The Snapshots tab displays a view of the virtual machine's operating system and applications. You can create and use snapshots using this tab.
- The Permissions tab displays the users and roles assigned to each virtual machine. You can assign and remove user permissions using this tab.
- The Events tab displays the description and time of events which affect the virtual machine.
- The Applications tab displays the applications which have been installed on the virtual machine.
- The Monitor tab displays the CPU Usage, Memory Usage, and Network Usage statistics for the machine selected in the Navigation Pane.
- The Sessions tab displays the Logged-In User, Console User, and Console Client IP for the machine selected in the Navigation Pane.
3.2. Running Virtual machines
3.2.1. Connecting to Virtual Machines
Procedure 3.1. Connecting to Virtual Machines
- Select the required virtual machine, then click the Run
button. The virtual machine powers up.

Figure 3.2. Virtual machine turned off
The Stop symbol next to the virtual machine's name changes to a Powering Up symbol.When the virtual machine is turned on, the Run symbol displays next to the virtual machine's name.
Figure 3.3. Virtual machine turned on
- Click the button to connect to the virtual machine.

Figure 3.4. Connect to virtual machine
- If it is the first time connecting with SPICE, you will be prompted to install virt-viewer.
Warning
3.2.2. Turning Off a Virtual Machine from the User Portal
Important
Procedure 3.2. Turning Off a Virtual Machine from the User Portal
- Log out of the guest operating system.
- If you were using your virtual machine in full screen mode, press Shift+F11 to exit full screen mode, and close the virtual machine's console window. You are now returned to the User Portal.
- To turn off the virtual machine, click the
button. The Stop symbol appears next to the name of the virtual machine when it has been turned off.
Note
3.2.3. Rebooting a Virtual Machine from the User Portal
Important
Procedure 3.3. Rebooting a Virtual Machine from the User Portal
- Log out of the guest operating system.
- If you were using your virtual machine in full screen mode, press Shift+F11 to exit full screen mode, and close the virtual machine's console window. You are now returned to the User Portal.
- To reboot the virtual machine, click the
button. The Reboot symbol appears next to the name of the virtual machine while it is rebooting, then changes back to a Run symbol when reboot completes.
3.3. Resources
3.3.1. Monitoring Resources

Figure 3.5. Resources tab
- Virtual CPUs: This box displays the number of your machines' virtual CPUs in use, and the consumption of CPU quota used by you and others.
- Memory: This box displays the consumption of memory quota used by you and others, and available memory as defined by the quota.
- Storage: This box displays the consumption of storage quota by you and others, the total size of all your virtual disks, and the number and total size of your virtual machines' snapshots. It also displays a breakdown of storage details for each virtual machine. Click the button next to the virtual machine name to display all the virtual disks attached to the virtual machine.
3.3.2. Quota - A User's Introduction
Figure 3.6. Resources tab
3.3.3. What to Do When You Exceed Your Quota

Figure 3.7. Quota exceeded error message
- Shut down the virtual machines that you do not need to bring your resource consumption down to a level that does not exceed the quota. Once the resource consumption level is below the quota you will be able to run virtual machines again.
- If you cannot shut down any existing virtual machines, contact your system administrator to extend your quota allowance or remove any unused virtual machines.
Appendix A. Revision History
| Revision History | |||
|---|---|---|---|
| Revision 3.6-5 | Fri 07 Oct 2016 | ||
| |||
| Revision 3.6-4 | Mon 22 Feb 2016 | ||
| |||
| Revision 3.6-3 | Wed 2 Dec 2015 | ||
| |||
| Revision 3.6-2 | Wed 18 Nov 2015 | ||
| |||
| Revision 3.6-1 | Wed 30 Sep 2015 | ||
| |||