Centralize company knowledge with an Enterprise RAG Chatbot
Use retrieval-augmented generation (RAG) to enhance large language models with specialized data sources for more accurate and context-aware responses.
This content is authored by Red Hat experts, but has not yet been tested on every supported configuration.
Centralize company knowledge with an Enterprise RAG Chatbot

Use retrieval-augmented generation (RAG) to enhance large language models with specialized data sources for more accurate and context-aware responses.
Table of Contents
Detailed description
See how FantaCo, a fictional large enterprise, launched a secure RAG chatbot that connects employees to internal HR, procurement, sales, and IT documentation. From policies to startup guides, employees get fast, accurate answers through a single chat interface. Advanced users can extend the experience with AI agents for deeper workflows.
Retrieval-Augmented Generation (RAG) enhances Large Language Models (LLMs) by retrieving relevant external knowledge to improve accuracy, reduce hallucinations, and support domain-specific conversations.
This QuickStart allows users to explore the capabilities of RAG by:
- Exploring FantaCo's solution
- Uploading new documents to be embedded
- Tweaking sampling parameters to influence LLM responses
- Using custom system prompts
- Switching between simple and agent based RAG
Architecture diagrams
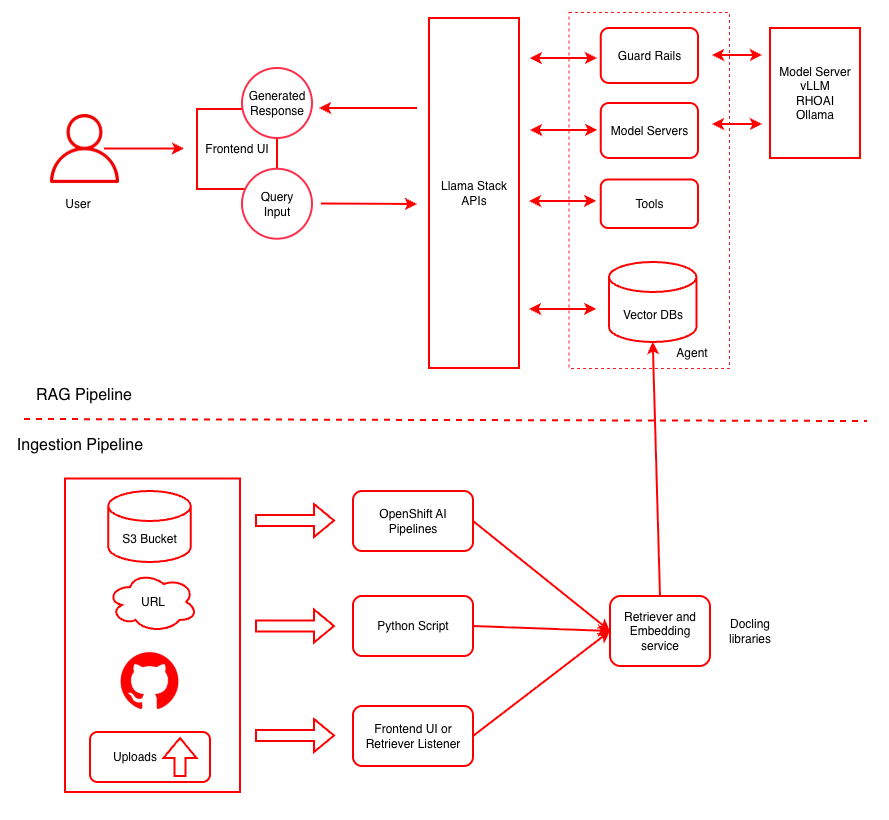
This diagram illustrates both the ingestion pipeline for document processing and the RAG pipeline for query handling. For more details click here.
| Layer/Component | Technology | Purpose/Description |
|---|---|---|
| Orchestration | OpenShift AI | Container orchestration and GPU acceleration |
| Framework | LLaMA Stack | Standardizes core building blocks and simplifies AI application development |
| UI Layer | Streamlit | User-friendly chatbot interface for chat-based interaction |
| LLM | Llama-3.2-3B-Instruct | Generates contextual responses based on retrieved documents |
| Safety | Safety Guardrail | Blocks harmful requests and responses for secure AI interactions |
| Integration | MCP Servers | Model Context Protocol servers for enhanced functionality |
| Embedding | all-MiniLM-L6-v2 | Converts text to vector embeddings |
| Vector DB | PostgreSQL + PGVector | Stores embeddings and enables semantic search |
| Retrieval | Vector Search | Retrieves relevant documents based on query similarity |
| Data Ingestion | Kubeflow Pipelines | Multi-modal data ingestion with preprocessing pipelines for cleaning, chunking, and embedding generation |
| Storage | S3 Bucket | Document source for enterprise content |
Requirements
Minimum hardware requirements
- 1 GPU/HPU with 24GB of VRAM for the LLM, refer to the chart below
- 1 GPU/HPU with 24GB of VRAM for the safety/shield model (optional)
- Xeon deployments: one worker node with Intel Xeon processors, Sapphire Rapids (SPR) or newer (EMR/GNR)
- for example: m8i.8xlarge, m7i.8xlarge, r8i.8xlarge
- vLLM requires a minimum of 16 vCPUs and 64 GB of RAM to run
Minimum software requirements
- OpenShift Client CLI - oc
- OpenShift Cluster 4.18+
- OpenShift AI
- Helm CLI - helm
Required user permissions
- Regular user permission for default deployment
- Cluster admin required for advanced configurations
Deploy
The instructions below will deploy this quickstart to your OpenShift environment.
Please see the local deployments section for additional deployment options.
Prerequisites
- huggingface-cli (optional)
- Hugging Face Token
- Access to Meta Llama model
- Access to Meta Llama Guard model
- Some of the example scripts use
jqa JSON parsing utility which you can acquire viabrew install jq
Supported Models
| Function | Model Name | Hardware | AWS |
|---|---|---|---|
| Embedding | all-MiniLM-L6-v2 |
CPU/GPU/HPU | |
| Generation | meta-llama/Llama-3.2-3B-Instruct |
L4 HPU Xeon |
g6.2xlarge N/A m8i.8xlarge |
| Generation | meta-llama/Llama-3.1-8B-Instruct |
L4 HPU Xeon |
g6.2xlarge N/A m8i.8xlarge |
| Generation | meta-llama/Meta-Llama-3-70B-Instruct |
A100 x2/HPU | p4d.24xlarge |
| Safety | meta-llama/Llama-Guard-3-8B |
L4/HPU | g6.2xlarge |
Note: the 70B model is NOT required for initial testing of this example. The safety/shield model Llama-Guard-3-8B is also optional.
Installation Steps
- Clone Repository
git clone https://github.com/rh-ai-quickstart/RAG
- Login to OpenShift
oc login --server="<cluster-api-endpoint>" --token="sha256~XYZ"
- Hardware Configuration
Determine what hardware acceleration is available in your cluster and configure accordingly.
For NVIDIA GPU nodes: If GPU nodes are tainted, find the taint key. In the example below the key for the taint is nvidia.com/gpu
oc get nodes -l nvidia.com/gpu.present=true -o yaml | grep -A 3 taint
For Intel Gaudi HPU nodes: If HPU nodes are tainted, find the taint key. The taint key is typically habana.ai/gaudi
oc get nodes -l habana.ai/gaudi.present=true -o yaml | grep -A 3 taint
The output of either command may be something like below:
taints:
  - effect: NoSchedule
    key: nvidia.com/gpu  # or habana.ai/gaudi for HPU
    value: "true"
You can work with your OpenShift cluster admin team to determine what labels and taints identify GPU-enabled or HPU-enabled worker nodes. It is also possible that all your worker nodes have accelerators therefore have no distinguishing taint.
- Navigate to Deployment Directory
cd deploy/helm
- List Available Models
make list-models
The above command will list the models to use in the next command:
(Output)
model: llama-3-1-8b-instruct (meta-llama/Llama-3.1-8B-Instruct)
model: llama-3-2-1b-instruct (meta-llama/Llama-3.2-1B-Instruct)
model: llama-3-2-1b-instruct-quantized (RedHatAI/Llama-3.2-1B-Instruct-quantized.w8a8)
model: llama-3-2-3b-instruct (meta-llama/Llama-3.2-3B-Instruct)
model: llama-3-3-70b-instruct (meta-llama/Llama-3.3-70B-Instruct)
model: llama-guard-3-1b (meta-llama/Llama-Guard-3-1B)
model: llama-guard-3-8b (meta-llama/Llama-Guard-3-8B)
The "guard" models can be used to test shields for profanity, hate speech, violence, etc.
- Deploy with Helm
Use the taint key from above as the LLM_TOLERATION and SAFETY_TOLERATION. The namespace will be auto-created.
Note Running just
make installfrom the deploy/helm directory will create a rag_values.yml file which can be edited to use in deployments.
GPU Deployment Examples (Default):
To install only the RAG example, no shields:
make install NAMESPACE=llama-stack-rag LLM=llama-3-2-3b-instruct LLM_TOLERATION="nvidia.com/gpu"
To install both the RAG example as well as the guard model to allow for shields:
make install NAMESPACE=llama-stack-rag LLM=llama-3-2-3b-instruct LLM_TOLERATION="nvidia.com/gpu" SAFETY=llama-guard-3-8b SAFETY_TOLERATION="nvidia.com/gpu"
Note: DEVICE=gpu is the default and can be omitted.
Intel Gaudi HPU Deployment Examples:
To install only the RAG example on Intel Gaudi HPU nodes:
make install NAMESPACE=llama-stack-rag LLM=llama-3-2-3b-instruct LLM_TOLERATION="habana.ai/gaudi" DEVICE=hpu
To install both the RAG example and guard model on Intel Gaudi HPU nodes:
make install NAMESPACE=llama-stack-rag LLM=llama-3-2-3b-instruct LLM_TOLERATION="habana.ai/gaudi" SAFETY=llama-guard-3-8b SAFETY_TOLERATION="habana.ai/gaudi" DEVICE=hpu
CPU Deployment Example:
To install on CPU nodes only:
make install NAMESPACE=llama-stack-rag LLM=llama-3-2-3b-instruct DEVICE=cpu
Xeon Deployment Example: To install on Xeon nodes only:
make install NAMESPACE=llama-stack-rag LLM=llama-3-2-3b-instruct DEVICE=xeon
- This assumes that all your worker nodes use Sapphire Rapids (SPR) or newer Intel Xeon processors.
- If you have heterogeneous worker nodes, work with your cluster administrator to identify SPR+ nodes and use taint keys, similar to the GPU and HPU deployments above, to set
LLM_TOLERATIONandSAFETY_TOLERATIONto schedule on valid nodes.
Simplified Commands (No Tolerations Needed):
If you have no tainted nodes (all worker nodes have accelerators), you can use simplified commands:
# GPU deployment (default - DEVICE=gpu can be omitted)
make install NAMESPACE=llama-stack-rag LLM=llama-3-2-3b-instruct SAFETY=llama-guard-3-8b

# HPU deployment
make install NAMESPACE=llama-stack-rag LLM=llama-3-2-3b-instruct SAFETY=llama-guard-3-8b DEVICE=hpu

# CPU deployment
make install NAMESPACE=llama-stack-rag LLM=llama-3-2-3b-instruct SAFETY=llama-guard-3-8b DEVICE=cpu

# Xeon deployment
make install NAMESPACE=llama-stack-rag LLM=llama-3-2-3b-instruct SAFETY=llama-guard-3-8b DEVICE=xeon
Remote LLM Deployment Example:
To connect to a remote LLM endpoint instead of deploying a local model, use LLM_URL and LLM_API_TOKEN:
make install NAMESPACE=llama-stack-rag \
  LLM=remotellm \
  LLM_URL=https://my-model-endpoint.example.com/v1 \
  LLM_API_TOKEN=my-api-token \
  LLM_ID=llm_model_id
| Parameter | Description |
|---|---|
LLM=remotellm |
Indicates a remote model (no local vLLM deployment) |
LLM_URL |
The base URL of the remote model endpoint |
LLM_API_TOKEN |
Authentication token for the remote endpoint |
LLM_ID |
The model of the llm you wish to use |
This skips local model deployment and configures LlamaStack to use the remote inference endpoint directly. No GPU or HF token is required for the LLM.
When prompted, enter your Hugging Face Token.
Note: This process may take 10 to 30 minutes depending on the number and size of models to be downloaded.
- Note: Developers can also use a remote LLM via the helm chart (see Remote LLM Deployment) or by modifying the
rag-values.yamlfile directly:
  global:
    models:
      remotellm:
        id: meta-llama/Llama-3.3-70B-Instruct
        url: https://llm-gateway.com/v1
        apiToken: api-token
        enabled: true
- Monitor Deployment
oc get pods -n llama-stack-rag
Watch for all pods to reach Running or Completed status. Key pods to watch include predictor in their name (these are the KServe model servers running vLLM):
oc get pods -l component=predictor
Look for 2/2 (or 3/3 when RAW_DEPLOYMENT=false) under the Ready column.
- Verify Installation
Watch the llamastack pod as that one becomes available after all the model servers are up:
oc get pods -l app.kubernetes.io/name=llamastack
Verify all resources:
oc get pods -n llama-stack-rag
oc get svc -n llama-stack-rag
oc get routes -n llama-stack-rag
For detailed post-installation verification, configuration options, and usage instructions, see the complete OpenShift deployment guide.
Local Deployment
For local development and testing, see the Local Setup Guide.