Este contenido no está disponible en el idioma seleccionado.
Administering the system using the GNOME desktop environment
Administering Red Hat Enterprise Linux 9 using the GNOME desktop environment
Abstract
Preface
To function properly, GNOME requires your system to support 3D acceleration. This includes bare metal systems, as well as hypervisor solutions such as VMWare.
If GNOME does not start or performs poorly on your VMWare virtual machine (VM), see Why does the GUI fail to start on my VMware virtual machine? (Red Hat Knowledgebase)
Providing feedback on Red Hat documentation
We appreciate your feedback on our documentation. Let us know how we can improve it.
Submitting feedback through Jira (account required)
- Log in to the Jira website.
- Click Create in the top navigation bar
- Enter a descriptive title in the Summary field.
- Enter your suggestion for improvement in the Description field. Include links to the relevant parts of the documentation.
- Click Create at the bottom of the dialogue.
Chapter 1. Installing software in GNOME
You can install applications and other software packages using several methods in GNOME.
1.1. Prerequisites
- You have administrator permissions on the system.
1.2. The GNOME Software application
GNOME Software is an utility that enables you to install and update applications and software components in a graphical interface.
GNOME Software provides a catalog of graphical applications, which are the applications that include a *.desktop file. The available applications are grouped into multiple categories according to their purpose.
GNOME Software uses the PackageKit and Flatpak technologies as its back ends.
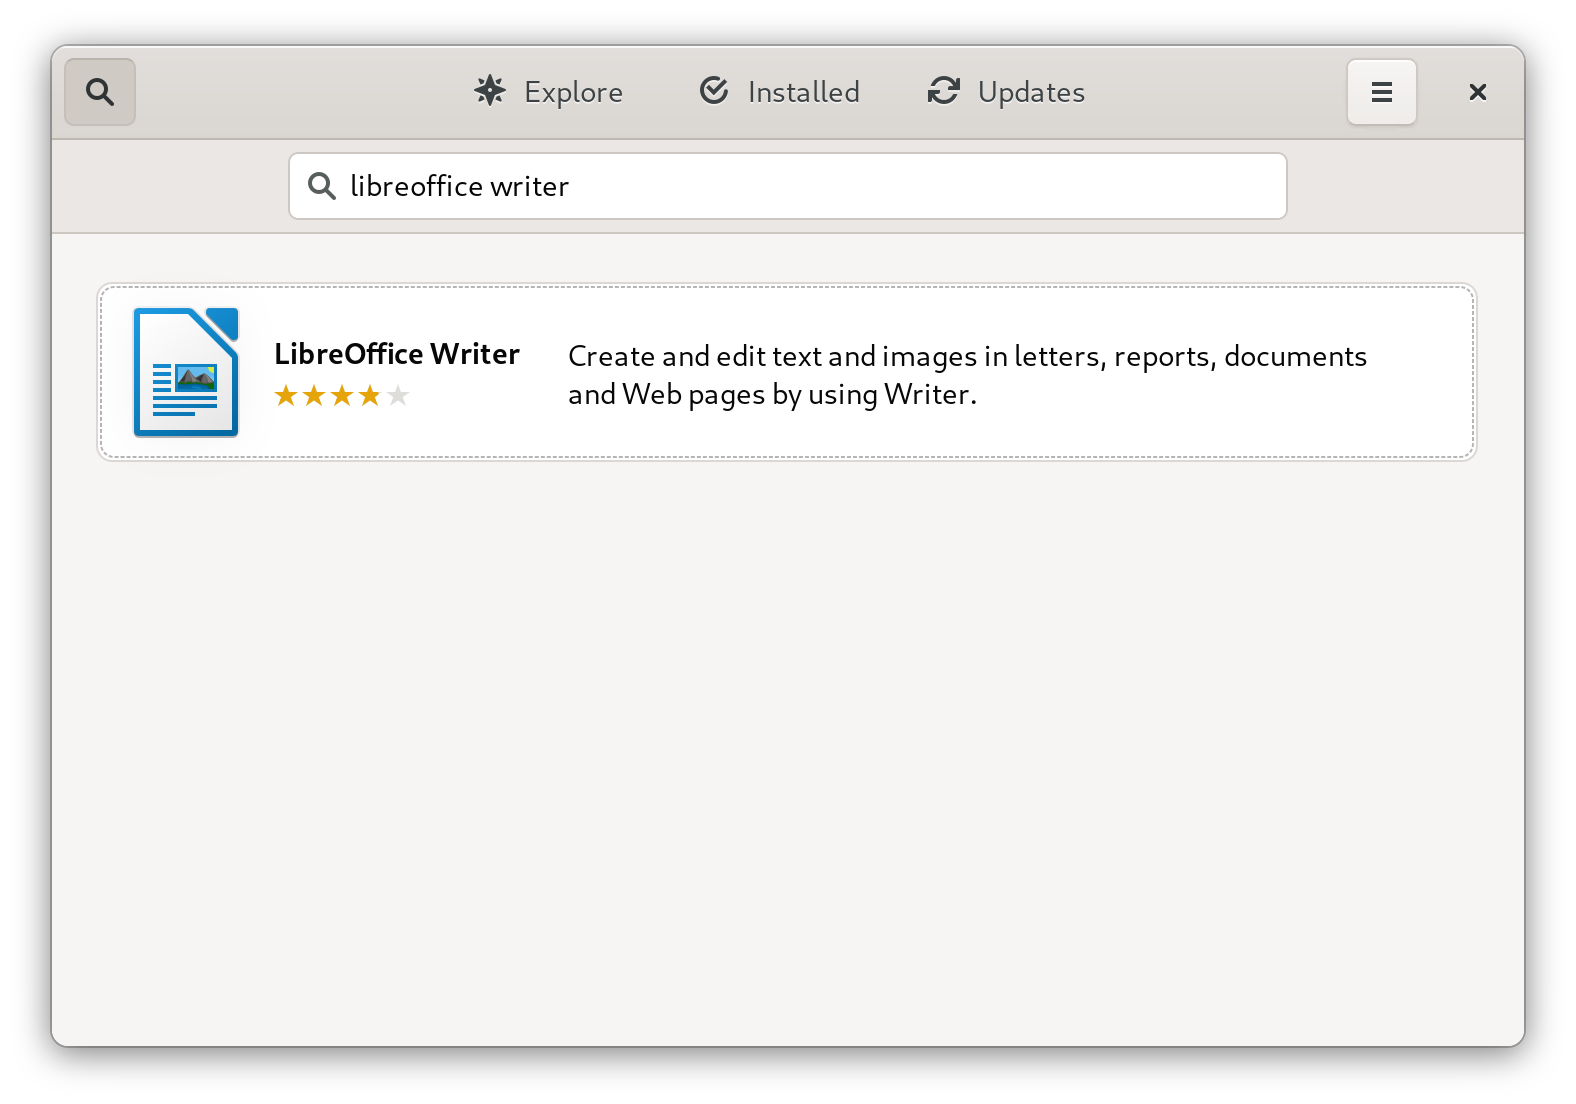
1.3. Installing an application using GNOME Software
This procedure installs a graphical application using the GNOME Software utility.
Procedure
- Launch the GNOME Software application.
Find the application that you want to install using any of the following methods:
Click the search button in the upper-left corner of the window and type the name of the application.
Browse the application categories in the Explore tab.

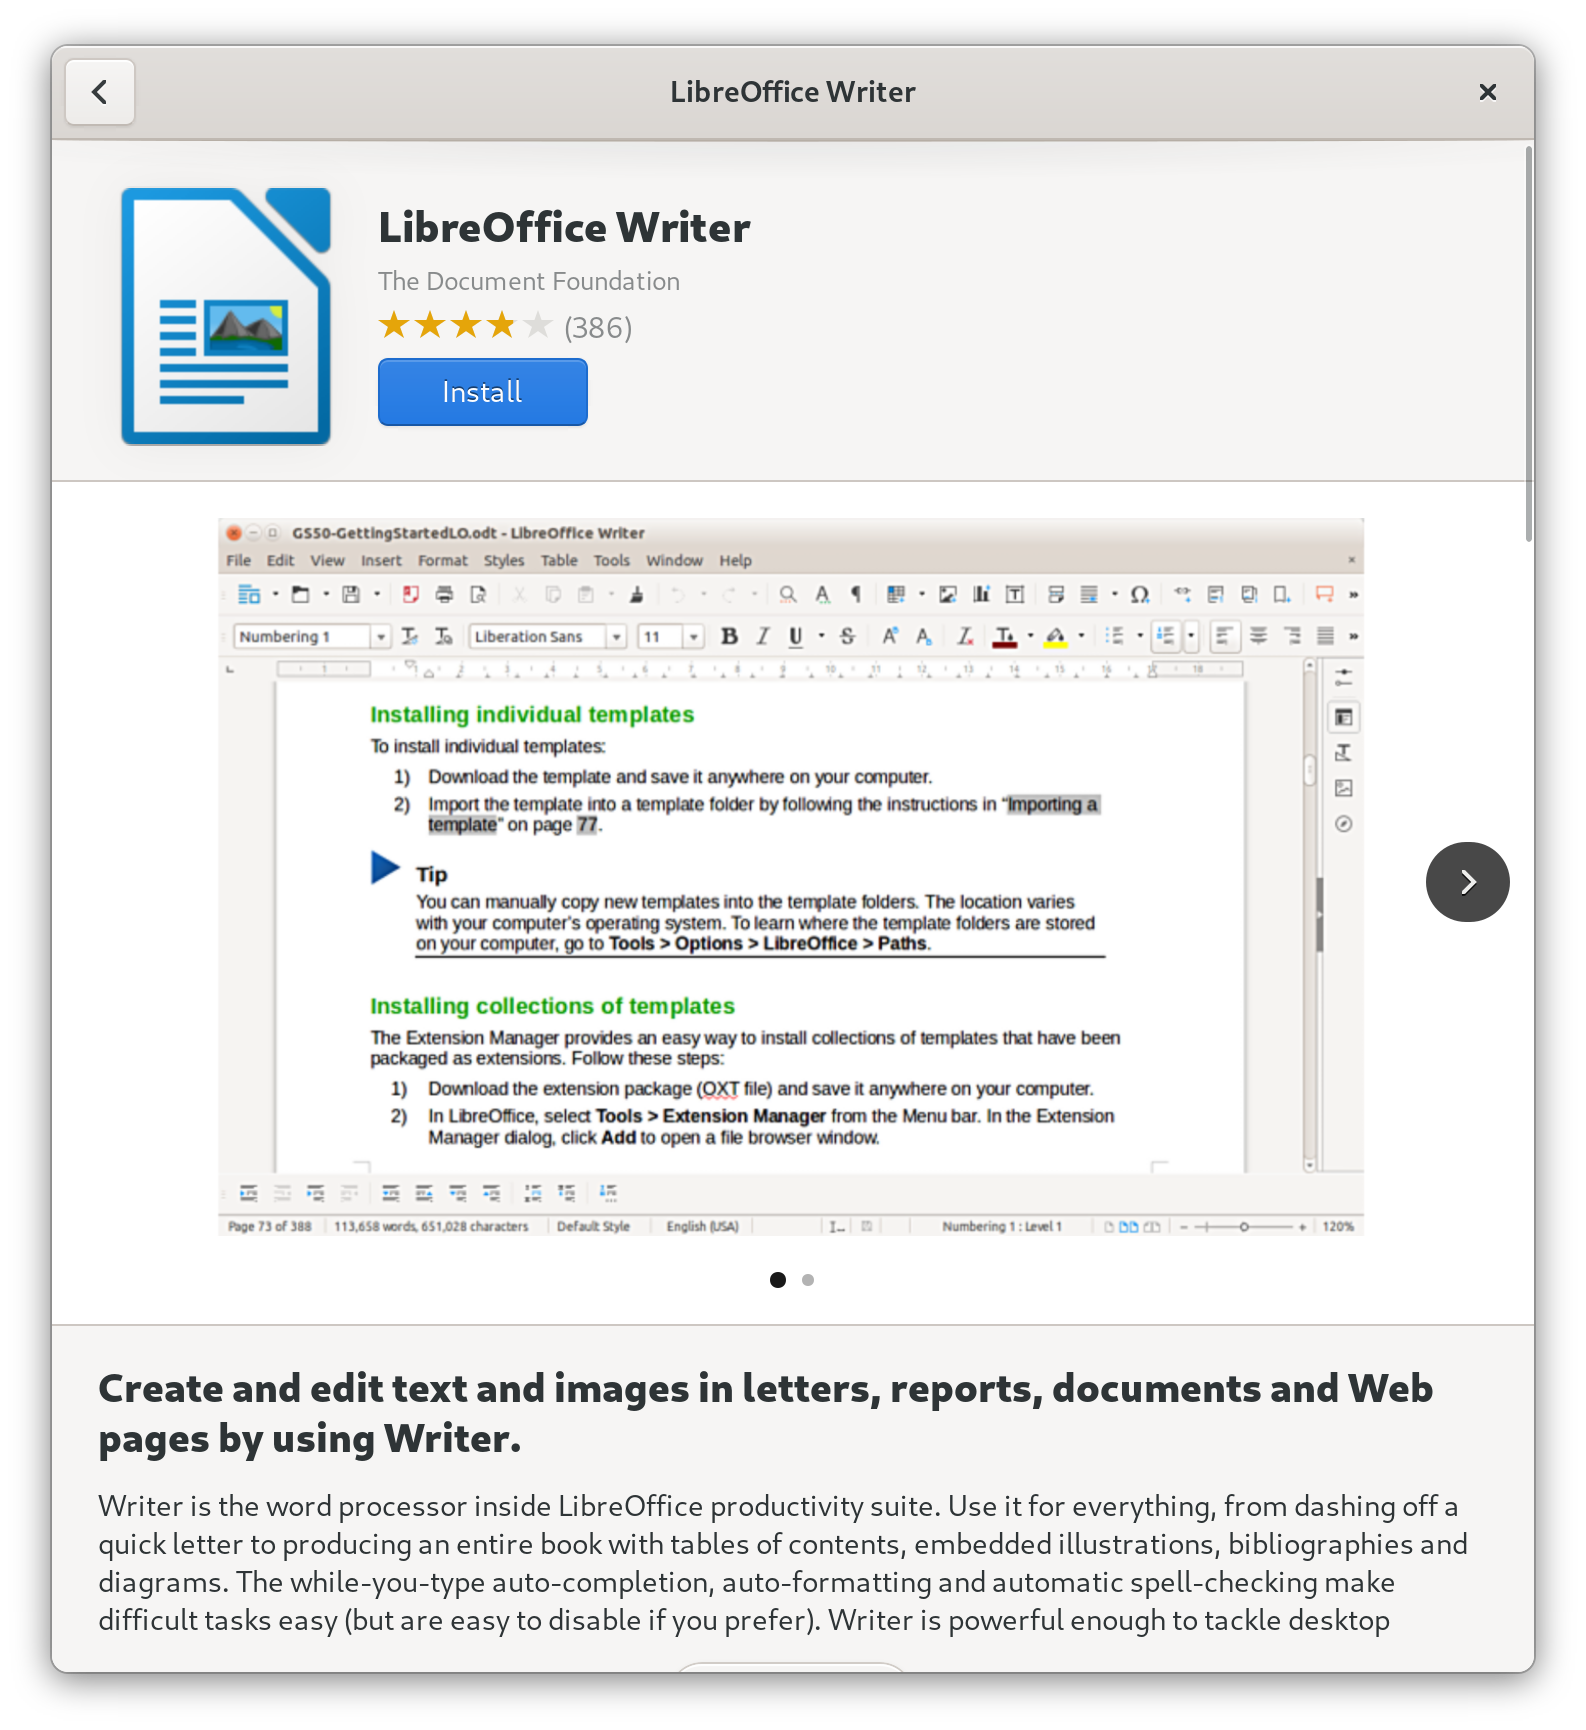
- Click the selected application.
Click .
1.4. Installing an application to open a file type
This procedure installs an application that can open a given file type.
Prerequisites
- You can access a file of the required file type in your file system.
Procedure
- Try opening a file that is associated with an application that is currently not installed on your system.
- GNOME automatically identifies the suitable application that can open the file, and offers to download the application.
1.5. Installing an RPM package file in GNOME
This procedure installs an RPM software package that you manually downloaded as a file.
Prerequisites
- You have downloaded the required RPM package.
Procedure
In the Files application, open the directory that stores the downloaded RPM package.
NoteBy default, downloaded files are stored in the
/home/user/Downloads/directory.- Double-click the RPM package file to install it.
1.6. Installing an application from the Activities Overview search
This procedure installs a graphical application from search results on the GNOME Activities Overview screen.
Procedure
- Open the Activities Overview screen.
Type the name of the required application in the search entry.
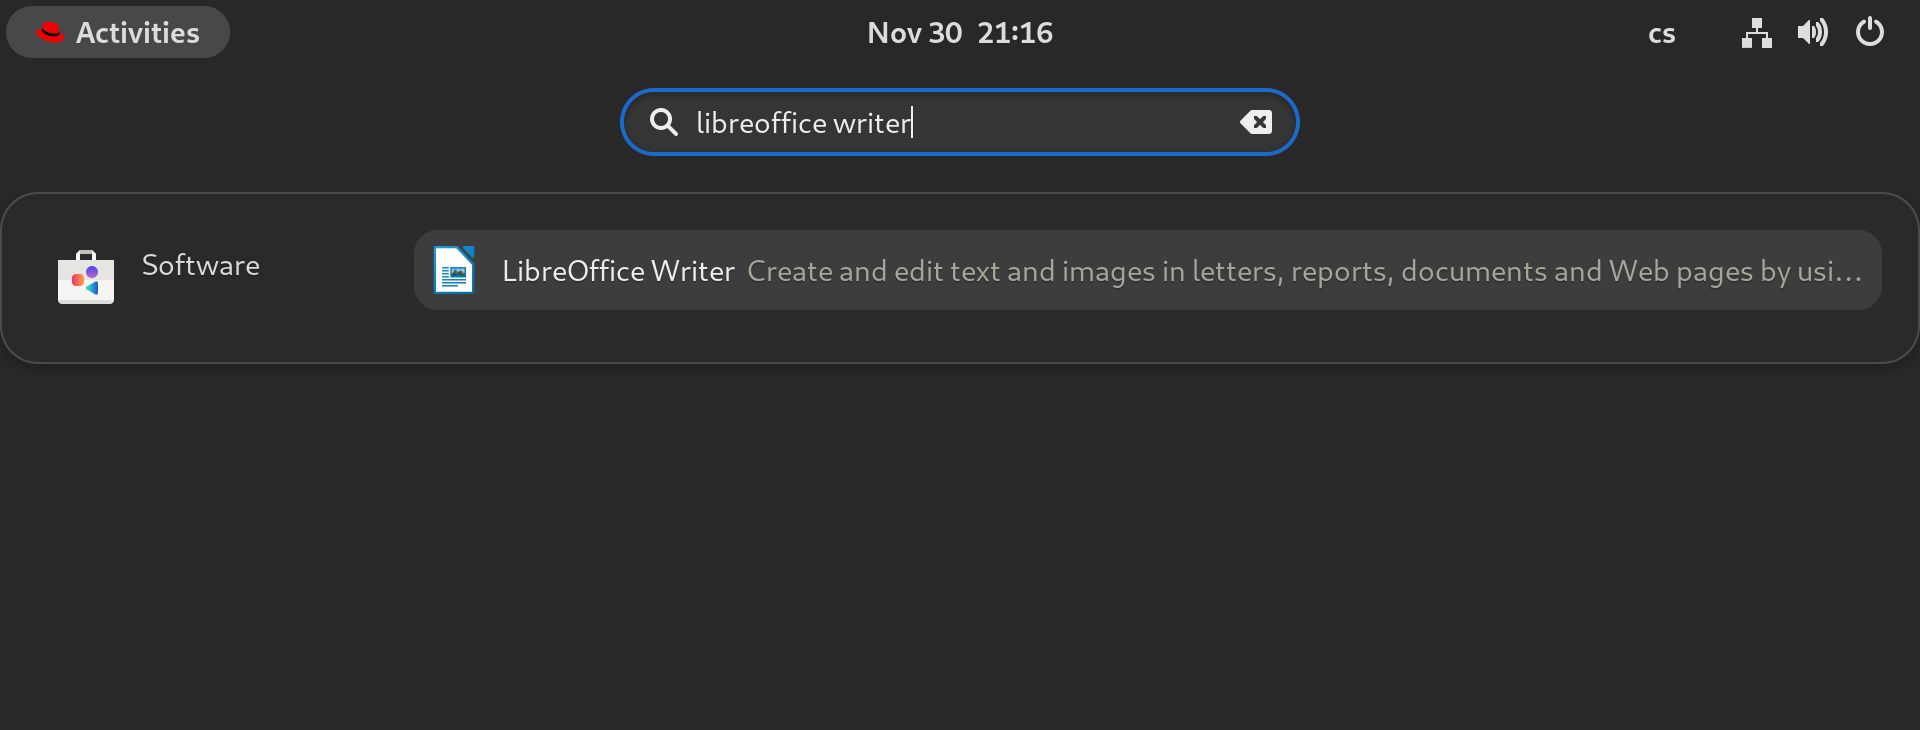
The search results display the application’s icon, name, and description.
Click the application’s icon to open the Software application.
- Click to finish the installation in Software.
Verification
- Click to launch the installed application.
Chapter 2. Installing applications using Flatpak
You can install certain applications using the Flatpak package manager. The following sections describe how to search for, install, launch, and update Flatpak applications on the command line and in the graphical interface.
Red Hat provides Flatpak applications only as a Technology Preview feature. Technology Preview features are not supported with Red Hat production service level agreements (SLAs) and might not be functionally complete. Red Hat does not recommend using them in production. These features provide early access to upcoming product features, enabling customers to test functionality and provide feedback during the development process. For more information about the support scope of Red Hat Technology Preview features, see https://access.redhat.com/support/offerings/techpreview.
The Flatpak package manager itself is fully supported.
2.1. The Flatpak technology
Flatpak provides a sandbox environment for application building, deployment, distribution, and installation.
Applications that you launch using Flatpak have minimum access to the host system, which protects the system installation against third-party applications. Flatpak provides application stability regardless of the versions of libraries installed on the host system.
Flatpak applications are distributed from repositories called remotes. Red Hat provides a remote with RHEL applications. Additionally, third-party remotes are available as well. Red Hat does not support applications from third-party remotes.
2.2. Setting up Flatpak
This procedure installs the Flatpak package manager.
Procedure
Install the
flatpakpackage:dnf install flatpak
# dnf install flatpakCopy to Clipboard Copied! Toggle word wrap Toggle overflow
2.3. Enabling the Red Hat Flatpak remote
This procedure configures the Red Hat Container Catalog as a Flatpak remote on your system.
Prerequisites
You have an account on the Red Hat Customer Portal.
NoteFor large-scale deployments where the users do not have Customer Portal accounts, Red Hat recommends using registry service accounts. For details, see Registry Service Accounts.
Procedure
Enable the
rhelFlatpak remote:flatpak remote-add \ --if-not-exists \ rhel \ https://flatpaks.redhat.io/rhel.flatpakrepo$ flatpak remote-add \ --if-not-exists \ rhel \ https://flatpaks.redhat.io/rhel.flatpakrepoCopy to Clipboard Copied! Toggle word wrap Toggle overflow Log into the Red Hat Container Catalog:
podman login registry.redhat.io
$ podman login registry.redhat.io

Username: your-user-name
Password: your-password
Copy to Clipboard Copied! Toggle word wrap Toggle overflow Provide the credentials to your Red Hat Customer Portal account or your registry service account tokens.
By default, Podman saves the credentials only until you log out.
Optional: Save your credentials permanently. Use one of the following options:
Save the credentials for the current user:
cp $XDG_RUNTIME_DIR/containers/auth.json \
     $HOME/.config/flatpak/oci-auth.json
$ cp $XDG_RUNTIME_DIR/containers/auth.json \ $HOME/.config/flatpak/oci-auth.jsonCopy to Clipboard Copied! Toggle word wrap Toggle overflow Save the credentials system-wide:
cp $XDG_RUNTIME_DIR/containers/auth.json \
     /etc/flatpak/oci-auth.json
# cp $XDG_RUNTIME_DIR/containers/auth.json \ /etc/flatpak/oci-auth.jsonCopy to Clipboard Copied! Toggle word wrap Toggle overflow For best practices, Red Hat recommends that you log into the Red Hat Container Catalog using registry account tokens when installing credentials system-wide.
Verification
List the enabled Flatpak remotes:
flatpak remotes
$ flatpak remotes

Name    Options
rhel    system,oci,no-gpg-verify
Copy to Clipboard Copied! Toggle word wrap Toggle overflow
2.4. Searching for Flatpak applications
This procedure searches for an application in the enabled Flatpak remotes on the command line. The search uses the application name and description.
Prerequisites
- Flatpak is installed.
- The Red Hat Flatpak repository is enabled.
Procedure
Search for an application by name:
flatpak search application-name
$ flatpak search application-nameCopy to Clipboard Copied! Toggle word wrap Toggle overflow For example, to search for the Thunderbird application, use:
flatpak search Thunderbird
$ flatpak search ThunderbirdCopy to Clipboard Copied! Toggle word wrap Toggle overflow The search results include the ID of the application:
Application ID               Version  Branch  Remotes  Description

org.mozilla.Thunderbird           stable  rhel     Thunderbird is a free and open source email, newsfeed, chat, and calendaring client
Application ID               Version  Branch  Remotes  Description

org.mozilla.Thunderbird           stable  rhel     Thunderbird is a free and open source email, newsfeed, chat, and calendaring client
Copy to Clipboard Copied! Toggle word wrap Toggle overflow
2.5. Installing Flatpak applications
This procedure installs a selected application from the enabled Flatpak remotes on the command line.
Prerequisites
- Flatpak is installed.
- The Red Hat Flatpak remote is enabled.
Procedure
Install an application from the
rhelremote:flatpak install rhel application-id
$ flatpak install rhel application-idCopy to Clipboard Copied! Toggle word wrap Toggle overflow Replace application-id with the ID of the application. For example:
flatpak install rhel org.mozilla.Thunderbird
$ flatpak install rhel org.mozilla.ThunderbirdCopy to Clipboard Copied! Toggle word wrap Toggle overflow
2.6. Launching Flatpak applications
This procedure launches an installed Flatpak application from the command line.
Prerequisites
- Flatpak is installed.
- The selected Flatpak application is installed.
Procedure
Launch the application:
flatpak run application-id
$ flatpak run application-idCopy to Clipboard Copied! Toggle word wrap Toggle overflow Replace application-id with the ID of the application. For example:
flatpak run org.mozilla.Thunderbird
$ flatpak run org.mozilla.ThunderbirdCopy to Clipboard Copied! Toggle word wrap Toggle overflow
2.7. Updating Flatpak applications
This procedure updates one or more installed Flatpak applications to the most recent version in the corresponding Flatpak remote.
Prerequisites
- Flatpak is installed.
- A Flatpak remote is enabled.
Procedure
Update one or more Flatpak applications:
To update a specific Flatpak application, specify the application ID:
flatpak update application-id
$ flatpak update application-idCopy to Clipboard Copied! Toggle word wrap Toggle overflow To update all Flatpak applications, specify no application ID:
flatpak update
$ flatpak updateCopy to Clipboard Copied! Toggle word wrap Toggle overflow
2.8. Installing Flatpak applications in the graphical interface
This procedure searches for Flatpak applications using the Software application.
Prerequisites
- Flatpak is installed.
- The Red Hat Flatpak remote is enabled.
Procedure
- Open the Software application.
- Make sure that the tab is active.
- Click the search button in the upper-left corner of the window.
- In the input box, type the name of the application that you want to install, such as Thunderbird.
Select the correct application in the search results.
If the application is listed several times, select the version where the Source field in the Details section reports
flatpaks.redhat.io.- Click the button.
- If Software asks you to log in, enter your Customer Portal credentials or your registry service account tokens.
- Wait for the installation process to complete.
- Optional: Click the button to launch the application.
2.9. Updating Flatpak applications in the graphical interface
This procedure updates one or more installed Flatpak applications using the Software application.
Prerequisites
- Flatpak is installed.
- A Flatpak remote is enabled.
Procedure
- Open the Software application.
- Select the tab.
- In the Application Updates section, you can find all available updates to Flatpak applications.
Update one or more applications:
- To apply all available updates, click the button.
- To update only a specific application, click the button next to the application item.
Optional: Enable automatic application updates.
- Click the menu button in the upper-right corner of the window.
- Select Update Preferences.
Enable Automatic Updates.
Flatpak applications now update automatically.
Chapter 3. Registering the system for updates using GNOME
You must register your system to get software updates for your system. This section explains how you can register your system using GNOME.
Prerequisites
A valid account with Red Hat customer portal
See the Create a Red Hat Login page for new user registration.
- Activation Key or keys, if you are registering the system with activation key
- A registration server, if you are registering system using the registration server
3.1. Registering a system using an activation key on GNOME
Follow the steps in this procedure to register your system with an activation key. You can get the activation key from your organization administrator.
Prerequisites
Activation key or keys.
See the Activation Keys page for creating new activation keys.
Procedure
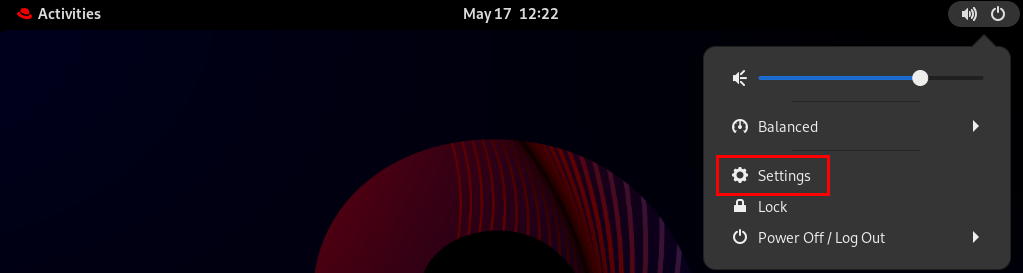
Open the system menu, which is accessible from the upper-right screen corner, and click Settings.

- Go to → .
If you are not using the Red Hat server:
- In the Registration Server section, select Custom Address.
- Enter the server address in the URL field.
- In the Registration Type section, select Activation Keys.
Under Registration Details:
Enter your activation keys in the Activation Keys field.
Separate your keys by a comma (
,).- Enter the name or ID of your organization in the Organization field.
- Click .
3.2. Unregistering the system using GNOME
Follow the steps in this procedure to unregister your system. After unregistering, your system no longer receives software updates.
Procedure
Open the system menu, which is accessible from the upper-right screen corner, and click Settings.
Go to → .
The Registration Details screen appears.
Click .
A warning appears about the impact of unregistering the system.
- Click .
Chapter 4. Changing the language by using desktop GUI
This section describes how to change the system language using the desktop GUI.
Prerequisites
- Required language packages are installed on your system
Procedure
Open the Settings application from the system menu by clicking on its icon.
- In Settings, choose Region & Language from the left side bar.
Click the Language menu.
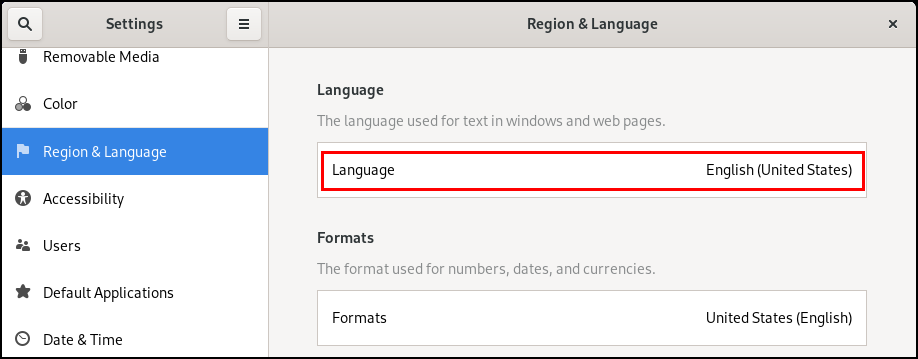
Select the required region and language from the menu.
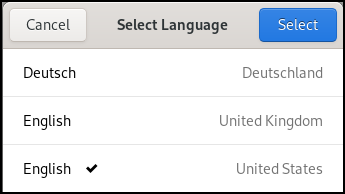
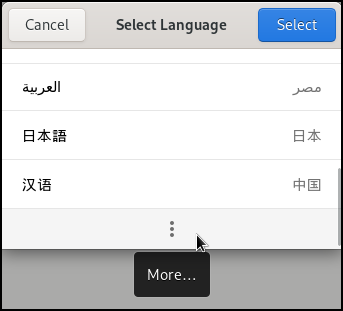
If your region and language are not listed, scroll down, and click More to select from available regions and languages.
- Click Done.
Click Restart for changes to take effect.

Some applications do not support certain languages. The text of an application that cannot be translated into the selected language remains in US English.
Chapter 5. Changing how your system behaves when you close the laptop lid
When you close the lid of your laptop, it suspends by default to save battery. You can customize this behavior according to your preferences.
- WARNING
- Some laptops can overheat if they are left running with the lid closed, especially in confined spaces. Consider whether changing this setting is safe for your laptop, especially if you intend to keep the laptop running with the lid closed for extended periods of time.
Prerequisites
- Administrative access.
Procedure
-
Open the
/etc/systemd/logind.confconfiguration file. -
Look for the line that says
HandleLidSwitch=suspend. -
If the line starts with the
#symbol, remove it to enable the setting. Replace
suspendwith one of the following options:-
poweroffto shut down the computer. -
lockto lock the screen. -
ignoreto do nothing.
For example, to lock the screen upon closing the lid, use this setting:
HandleLidSwitch=lock
HandleLidSwitch=lockCopy to Clipboard Copied! Toggle word wrap Toggle overflow -
- Save your changes and close the editor.
Chapter 6. Changing the power button behavior
When you press the power button on your computer, it suspends or shuts down the system by default. You can customize this behavior according to your preferences.
6.1. Changing the behavior of the power button when pressing the button and GNOME is not running
When you press the power button in a non-graphical systemd target, it shuts down the system by default. You can customize this behavior according to your preferences.
Prerequisites
- Administrative access.
Procedure
Edit the
/etc/systemd/logind.confconfiguration file and set theHandlePowerKey=poweroffvariable to one of the following options:poweroff- Shut down the computer.
reboot- Reboot the system.
halt- Initiate a system halt.
kexec-
Initiate a
kexecreboot. suspend- Suspend the system.
hibernate- Initiate system hibernation.
ignore- Do nothing.
For example, to reboot the system upon pressing the power button, use this setting:
HandlePowerKey=reboot
HandlePowerKey=rebootCopy to Clipboard Copied! Toggle word wrap Toggle overflow
6.2. Changing the behavior of the power button when pressing the button and GNOME is running
On the graphical login screen or in the graphical user session, pressing the power button suspends the machine by default. This happens both in cases when the user presses the power button physically or when pressing a virtual power button from a remote console. You can select a different power button behavior.
Procedure
Create a local database for system-wide settings in the
/etc/dconf/db/local.d/01-powerfile with the following content:[org/gnome/settings-daemon/plugins/power] power-button-action=<value>
[org/gnome/settings-daemon/plugins/power] power-button-action=<value>Copy to Clipboard Copied! Toggle word wrap Toggle overflow Replace
<value>with one of the following power button actions:nothing- Does nothing .
suspend- Suspends the system.
hibernate- Hibernates the system.
interactiveShows a pop-up query asking the user what to do.
With interactive mode, the system powers off automatically after 60 seconds when pressing the power button. However, you can choose a different behavior from the pop-up query.
Optional: Override the user’s setting, and prevent the user from changing it. Enter the following configuration in the
/etc/dconf/db/local.d/locks/01-powerfile:/org/gnome/settings-daemon/plugins/power/power-button-action
/org/gnome/settings-daemon/plugins/power/power-button-actionCopy to Clipboard Copied! Toggle word wrap Toggle overflow Update the system databases:
dconf update
# dconf updateCopy to Clipboard Copied! Toggle word wrap Toggle overflow - Log out and back in again for the system-wide settings to take effect.
Chapter 7. Displaying system security classification
As an administrator of deployments where the user must be aware of the security classification of the system, you can set up a notification of the security classification. This can be either a permanent banner or a temporary notification, and it can appear on login screen, in the GNOME session, and on the lock screen.
7.1. Enabling system security classification banners
You can create a permanent classification banner to state the overall security classification level of the system. This is useful for deployments where the user must always be aware of the security classification level of the system that they are logged into.
The permanent classification banner can appear within the running session, the lock screen, and login screen, and customize its background color, its font, and its position within the screen.
This procedure creates a red banner with a white text placed on both the top and bottom of the login screen.
Procedure
Install the
gnome-shell-extension-classification-bannerpackage:dnf install gnome-shell-extension-classification-banner
# dnf install gnome-shell-extension-classification-bannerCopy to Clipboard Copied! Toggle word wrap Toggle overflow Create the
99-class-bannerfile at either of the following locations:-
To configure a notification at the login screen, create
/etc/dconf/db/gdm.d/99-class-banner. -
To configure a notification in the user session, create
/etc/dconf/db/local.d/99-class-banner.
-
To configure a notification at the login screen, create
Enter the following configuration in the created file:
Copy to Clipboard Copied! Toggle word wrap Toggle overflow WarningThis configuration overrides similar configuration files that also enable an extension, such as Notifying of the system security classification.
To enable multiple extensions, specify all of them in the
enabled-extensionslist. For example:enabled-extensions=['heads-up-display@gnome-shell-extensions.gcampax.github.com', 'classification-banner@gnome-shell-extensions.gcampax.github.com']
enabled-extensions=['heads-up-display@gnome-shell-extensions.gcampax.github.com', 'classification-banner@gnome-shell-extensions.gcampax.github.com']Copy to Clipboard Copied! Toggle word wrap Toggle overflow Update the
dconfdatabase:dconf update
# dconf updateCopy to Clipboard Copied! Toggle word wrap Toggle overflow - Reboot the system.
Troubleshooting
- If the classification banners are not displayed for an existing user, log in as the user and enable the Classification banner extension using the Extensions application.
7.2. Notifying of the system security classification
You can set up a notification that contains a predefined message in an overlay banner. This is useful for deployments where the user is required to read the security classification of the system before logging in.
Depending on your configuration, the notification can appear at the login screen, after logging in, on the lock screen, or after a longer time with no user activity. You can always dismiss the notification when it appears.
Procedure
Install the
gnome-shell-extension-heads-up-displaypackage:dnf install gnome-shell-extension-heads-up-display
# dnf install gnome-shell-extension-heads-up-displayCopy to Clipboard Copied! Toggle word wrap Toggle overflow Create the
99-hud-messagefile at either of the following locations:-
To configure a notification at the login screen, create
/etc/dconf/db/gdm.d/99-hud-message. -
To configure a notification in the user session, create
/etc/dconf/db/local.d/99-hud-message.
-
To configure a notification at the login screen, create
Enter the following configuration in the created file:
Copy to Clipboard Copied! Toggle word wrap Toggle overflow Replace the following values with text that describes the security classification of your system:
- Security classification title
- A short heading that identifies the security classification.
- Security classification description
- A longer message that provides additional details, such as references to various guidelines.
WarningThis configuration overrides similar configuration files that also enable an extension, such as Enabling system security classification banners.
To enable multiple extensions, specify all of them in the
enabled-extensionslist. For example:enabled-extensions=['heads-up-display@gnome-shell-extensions.gcampax.github.com', 'classification-banner@gnome-shell-extensions.gcampax.github.com']
enabled-extensions=['heads-up-display@gnome-shell-extensions.gcampax.github.com', 'classification-banner@gnome-shell-extensions.gcampax.github.com']Copy to Clipboard Copied! Toggle word wrap Toggle overflow Update the
dconfdatabase:dconf update
# dconf updateCopy to Clipboard Copied! Toggle word wrap Toggle overflow - Reboot the system.
Troubleshooting
- If the notifications are not displayed for an existing user, log in as the user and enable the Heads-up display message extension using the Extensions application.
Chapter 8. Setting a default desktop session for all users
You can configure a default desktop session that is preselected for all users that have not logged in yet.
If a user logs in using a different session than the default, their selection persists to their next login.
Procedure
Copy the configuration file template:
cp /usr/share/accountsservice/user-templates/standard \
     /etc/accountsservice/user-templates/standard
# cp /usr/share/accountsservice/user-templates/standard \ /etc/accountsservice/user-templates/standardCopy to Clipboard Copied! Toggle word wrap Toggle overflow -
Edit the new
/etc/accountsservice/user-templates/standardfile. On theSession=gnomeline, replacegnomewith the session that you want to set as the default. Optional: To configure an exception to the default session for a certain user, follow these steps:
Copy the template file to
/var/lib/AccountsService/users/user-name:cp /usr/share/accountsservice/user-templates/standard \ /var/lib/AccountsService/users/user-name# cp /usr/share/accountsservice/user-templates/standard \ /var/lib/AccountsService/users/user-nameCopy to Clipboard Copied! Toggle word wrap Toggle overflow -
In the new file, replace variables such as
${USER}and${ID}with the user values. -
Edit the
Sessionvalue.
Chapter 9. Setting up a printer
In GNOME, you can set up printing using the Settings application.
9.1. Accessing printer settings in GNOME
Procedure
Use one of the approaches described in Launching applications to start the Settings application.
Moreover, you can also start the Settings application from the system menu in the upper right corner by clicking on the "Settings" icon.
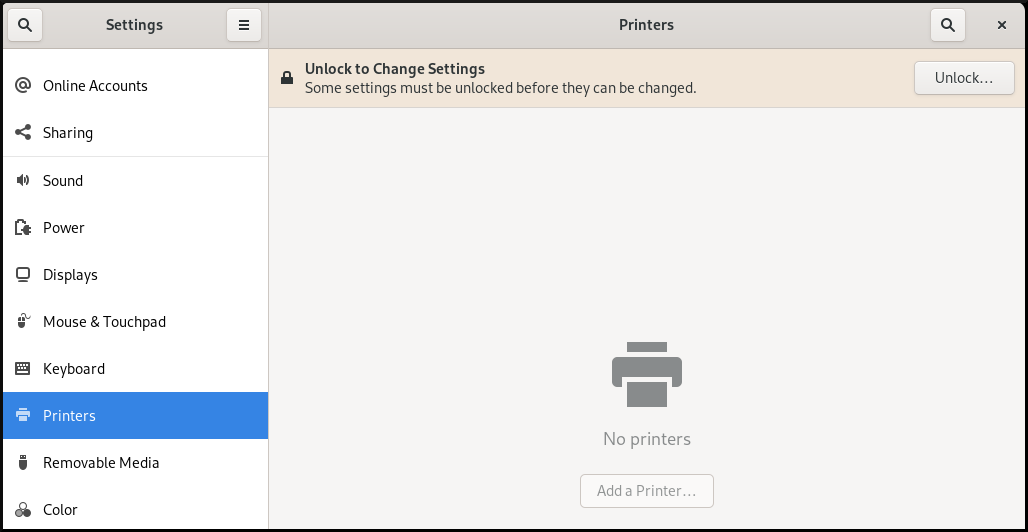
When the Settings application GUI appears, go to Printers.
Figure 9.1. GNOME Control center configuration tool
9.2. Adding a new printer in Settings
You can add a new printer using the Settings application.
Prerequisites
Click the button, which appears near the upper-right corner of the Printers screen, and authenticate as one of the following users:
- Superuser
-
Any user with the administrative access provided by
sudo(users listed within/etc/sudoers) -
Any user belonging to the
printadmingroup in/etc/group
Procedure
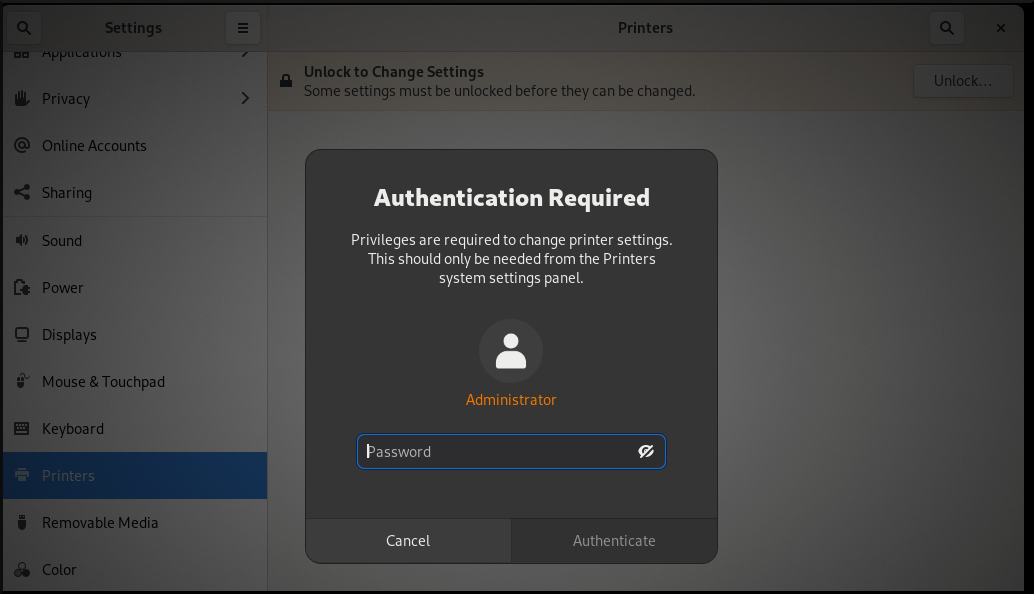
Open the Printers dialog.
Click on Unlock and authenticate.
Select one of the available printers (including also network printers), or enter printer IP address or the host name of a printer server.
Confirm your selection by clicking in the top right corner.


9.3. Printing a test page in Settings
You can print a test page to make sure that the printer functions properly.
Prerequisites
- A printer has been set up.
Procedure
Click the settings (⚙️) button on the right to display a settings menu for the selected printer:
- Click → .
Chapter 10. Modifying printer settings
In GNOME, you can modify printer settings using the Settings application.
Prerequisites
- You have started Settings for setting up printing by following the procedure Accessing printer settings in GNOME
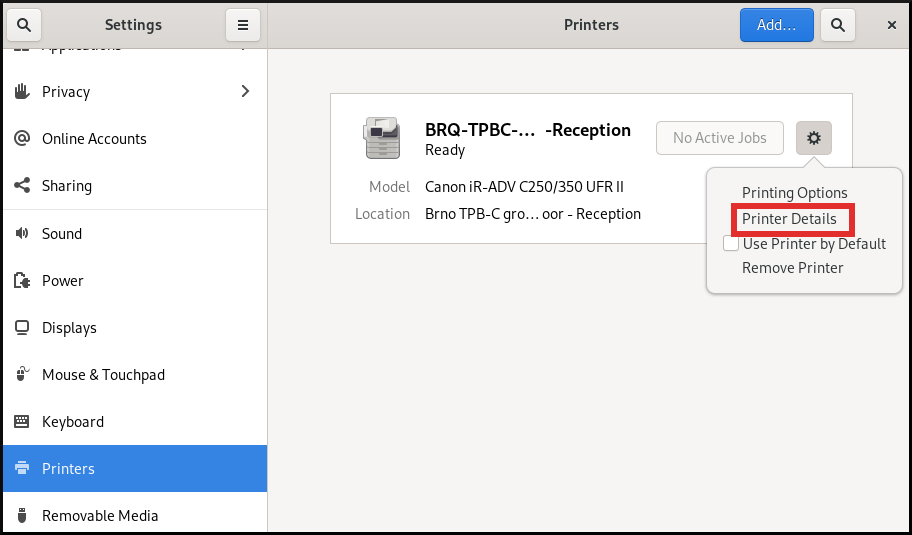
10.1. Displaying and modifying printer’s details
To maintain a configuration of a printer, use the Settings application:
Procedure
Click the settings (⚙️) button on the right to display a settings menu for the selected printer:
Click Printer Details to display and modify selected printer’s settings:
In this menu, you can select the following actions:
- Search for Drivers
- GNOME Control Center communicates with PackageKit that searches for a suitable driver suitable in available repositories.
- Select from Database
- This option enables you to select a suitable driver from databases that have already been installed on the system.
- Install PPD File
- This option enables you to select from a list of available postscript printer description (PPD) files that can be used as a driver for your printer.

10.2. Setting the default printer
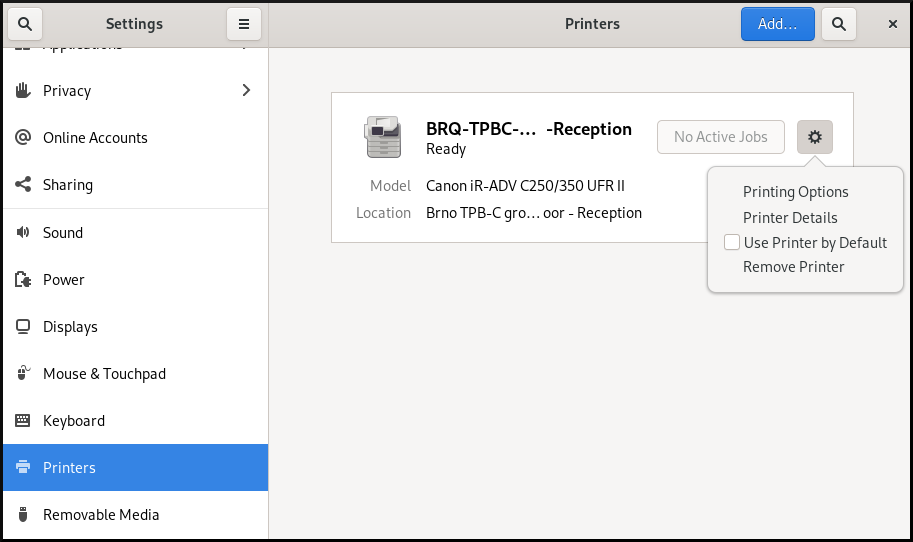
You can set the selected printer as the default printer.
Procedure
Click the settings (⚙️) button on the right to display a settings menu for the selected printer:
Click Use Printer by Default to set the selected printer as the default printer:

10.3. Setting printing options
Procedure
Click the settings (⚙️) button on the right to display a settings menu for the selected printer:
- Click Printing Options.
10.4. Removing a printer
You can remove a printer using the Settings application.
Procedure
Click the settings (⚙️) button on the right to display a settings menu for the selected printer:
Click Remove Printer to remove the selected printer:

Chapter 12. Managing storage volumes in GNOME
This section describes how you can manage storage volumes in GNOME with a virtual file system. GNOME Virtual File System (GVFS) is an extension of the virtual file system interface provided by the libraries the GNOME desktop is built on.
12.1. The GVFS system
GVFS provides complete virtual file system infrastructure and handles storage in the GNOME desktop. It uses addresses for full identification based on the Uniform Resource Identifier (URI) standard, syntactically similar to URL addresses in web browsers. These addresses in the form of schema://user@server/path are the key information determining the kind of service.
GVFS helps to mount the resources. These mounts are shared between multiple applications. Resources are tracked globally within the running desktop session, which means that even if you quit an application that triggered the mount, the mount continues to be available for any other application. Multiple applications can access the mount at the same time unless it is limited by a back end. Some protocols by design permit only a single channel.
GVFS mounts removable media in the /run/media/ directory.
12.2. The format of the GVFS URI string
You must form a URI string to use back end services. This string is a basic identifier used in GVFS, which carries all necessary information needed for unique identification, such as type of service, back end ID, absolute path, or user name if required. You can see this information in the Files address bar and GTK+ open or save file dialog.
The following example is a very basic form of the URI string, which points to a root directory (/) of the File Transfer Protocol (FTP) server running at the ftp.myserver.net domain:
Example 12.1. A URI string pointing to the root FTP directory
ftp://ftp.myserver.net/
ftp://ftp.myserver.net/Example 12.2. A URI string pointing to a text file on FTP
ssh://joe@ftp.myserver.net/home/joe/todo.txt
ssh://joe@ftp.myserver.net/home/joe/todo.txt12.3. Mounting a storage volume in GNOME
You can manually mount a local storage volume or a network share in the Files application.
Procedure
- Open the Files application.
Click Other Locations in the side bar.
The window lists all connected storage volumes and all network shares that are publicly available on your local area network.
If you can see the volume or network share in this list, mount it by clicking the item.
If you want to connect to a different network share, use the following steps.
- Enter the GVFS URI string to the network share in the Connect to Server field.
- Press .
- If the dialog asks you for login credentials, enter your name and password into the relevant fields.
- When the mounting process finishes, you can browse the files on the volume or network share.
12.4. Unmounting a storage volume in GNOME
You can unmount a storage volume, a network share, or another resource in the Files application.
Procedure
- Open the Files application.
- In the side bar, click the Unmount (⏏) icon next to the chosen mount.
- Wait until the mount disappears from the side bar or a notification about the safe removal appears.
12.5. Access to GVFS mounts in the file system
Learn more about FUSE, the main daemon for the GVFS virtual file system.
Applications built with the GIO library can access GVFS mounts. In addition, GVFS provides a FUSE daemon which exposes active GVFS mounts. Any application can access active GVFS mounts using the standard POSIX APIs as though mounts were regular file systems.
In certain applications, additional library dependency and new virtual file system (VFS) subsystem specifics might be unsuitable or too complicated. For such reasons and to boost compatibility, GVFS provides a File System in Userspace (FUSE) daemon, which exposes active mounts through its mount for standard Portable Operating System Interface (POSIX) access. This daemon transparently translates incoming requests to imitate a local file system for applications.
You might experience difficulties with certain combinations of applications and GVFS back ends.
The FUSE daemon starts automatically with the main gvfs daemon and mounts volumes either in the /run/user/UID/gvfs/ or ~/.gvfs/ directories as a fallback.
Manual browsing shows individual directories for each GVFS mount. The system passes the transformed path as an argument when you are opening documents from GVFS locations with non-native applications. Note that native GIO applications automatically translate this path back to a native URI.
12.6. Available GIO commands
GIO provides several commands that might be useful for scripting or testing.
Here is a set of POSIX commands counterparts as follows:
| Command | Description |
|---|---|
|
| Displays the content of a file. |
|
| Creates a new directory. |
|
| Renames a file. |
|
|
Provides access to various aspects of the |
|
| Sets a file attribute on a file. |
|
| Makes a copy of a file. |
|
| Lists directory contents. |
|
| Moves a file from one location to another. |
|
| Removes a file. |
|
|
Sends files or directories to the |
|
| Displays information of the given locations. |
|
| Reads from standard input and saves the data to the given location. |
|
| Lists the contents of the given locations recursively, in a tree-like format. If no location is given, it defaults to the current directory. |
Following additional commands provide more control of GIO specifics:
| Command | Description |
|---|---|
|
| Monitors files or directories for changes, such as creation, deletion, content and attribute changes, and mount and unmount operations affecting the monitored locations. |
|
| Lists the registered and recommended applications for the mimetype if no handler is given, else, it is set as the default handler for the mimetype. |
|
| Opens files with the default application that is registered to handle files of this type. |
For user convenience, bash completion is provided as a part of the package.
All these commands are native GIO clients, there is no need for the fallback FUSE daemon to be running. Their purpose is not to be drop-in replacements for POSIX commands, in fact, a very little range of switches is supported. In their basic form, these commands take an URI string as an argument instead of a local path.
12.7. Sample GIO commands
The following section provides a few examples of the GIO commands usage.
Example 12.3. List all files in the local /tmp directory
gio list file:///tmp
$ gio list file:///tmpExample 12.4. List the content of a text file from a remote system
gio cat ssh://joe@ftp.myserver.net/home/joe/todo.txt
$ gio cat ssh://joe@ftp.myserver.net/home/joe/todo.txtExample 12.5. Copy the previous text file to a local /tmp directory
gio copy ssh://joe@ftp.myserver.net/home/joe/todo.txt /tmp/
$ gio copy ssh://joe@ftp.myserver.net/home/joe/todo.txt /tmp/12.8. Overview of GVFS metadata
The GVFS metadata storage is implemented as a set of key-and-value pairs that bind information to a particular file. Thus, there is a tool for a user or application to save small data designed for runtime information such as icon position, last-played location, position in a document, emblems, notes, and so on.
Whenever you move a file or directory, GVFS moves the metadata accordingly so that metadata stays connected to the respective file. The GVFS stores all metadata privately, so metadata is available only on the machine. However, GVFS tracks mounts and removable media as well.
GVFS mounts removable media in the /run/media/ directory.
To view and manipulate with metadata, you can use:
-
the
gio infocommand, -
the
gio setcommand, or - any other native GIO way of working with attributes.
12.9. Setting custom GIO metadata attribute
This procedure describes how to set a custom metadata attribute.
Notice the differences between particular gio info calls and data persistence after a move or rename. Note the gio info command output.
Procedure
Create an empty file:
touch /tmp/myfile
$ touch /tmp/myfileCopy to Clipboard Copied! Toggle word wrap Toggle overflow View the metadata of this file:
gio info -a 'metadata::*' /tmp/myfile
$ gio info -a 'metadata::*' /tmp/myfile
uri: file:///tmp/myfile
attributes:
Copy to Clipboard Copied! Toggle word wrap Toggle overflow Set a string to this file:
gio set -t string /tmp/myfile 'metadata::mynote' 'Please remember to delete this file!'
$ gio set -t string /tmp/myfile 'metadata::mynote' 'Please remember to delete this file!'Copy to Clipboard Copied! Toggle word wrap Toggle overflow View the metadata:
gio info -a 'metadata::*' /tmp/myfile
$ gio info -a 'metadata::*' /tmp/myfile
uri: file:///tmp/myfile
attributes:
  metadata::mynote: Please remember to delete this file!
Copy to Clipboard Copied! Toggle word wrap Toggle overflow Move this file to a new location:
gio move /tmp/myfile /tmp/newfile
$ gio move /tmp/myfile /tmp/newfileCopy to Clipboard Copied! Toggle word wrap Toggle overflow View the metadata:
gio info -a 'metadata::*' /tmp/newfile
$ gio info -a 'metadata::*' /tmp/newfile
uri: file:///tmp/newfile
attributes:
  metadata::mynote: Please remember to delete this file!
Copy to Clipboard Copied! Toggle word wrap Toggle overflow
The metadata persists when you move the file using the GIO API.
12.10. Password management of GVFS mounts
Learn more about the GVFS mount authentication.
A typical GVFS mount authenticates on its activation unless the resource allows anonymous authentication or does not require any authentication at all.
In a standard GTK+ dialog, you can choose whether to store the password.
When you select the persistent storage, the password is stored in the user keyring. GNOME Keyring is a central place for secrets storage. The password is encrypted and automatically unlocked on desktop session start using the password provided on login. For protecting it by a different password, you can set the password at the first use.
The Passwords and Keys application helps to manage the stored password and GNOME Keyring. It allows removing individual records or changing passwords.
12.11. GVFS back ends
Back ends in GVFS provide access to a specific type of resource. This section provides a list of available GVFS back ends and their specifications.
Some back ends are packaged separately and not installed by default. For installing additional back ends, use the dnf package manager.
| Back end | Description |
|---|---|
|
| Provides administrator access to the local file system. |
|
| A virtual back end that burning applications use as a temporary storage for new CD, DVD, or BD medium content. |
|
| Exposes Audio CD through separate Waveform Audio File Format (WAV) files. |
|
| A virtual back end consolidating active mounts and physical volumes. Acts similarly to a signpost. Previously used by Files for its Computer view. |
|
| A WebDAV client, including secure variant. Authentication is possible only during mount. The back end does not support later re-authentication on per-folder basis. |
|
| DNS Service Discovery: An Avahi client, used during network browsing, forms persistent URIs to discovered services. |
|
|
A fully featured File Transfer Protocol (FTP) client. Supports passive transfers by default. Also, handles secure mode over |
|
| A Picture Transfer Protocol (PTP) client to access your camera attached by USB or FireWire. |
|
| Provides access to Google Drive. The Google Drive account needs to be configured in the Online Accounts settings. |
|
| Handles all HTTP requests. Useful for easy downloading files from web in client applications. |
|
|
A simple testing back end that proxies the |
|
| A Media Transfer Protocol (MTP) back end for accessing media player and smart phone memory. |
|
| Allows you to browse Window Network and show shares discovered over Avahi. |
|
| A back end used in the file chooser dialog to list recent files used by GNOME applications. |
|
| A fully-featured SSH File Transfer Protocol (SFTP) client. |
|
| Accesses Samba and Windows shares. |
|
| A trash back end that allows to restore deleted files. |
Chapter 13. Troubleshooting volume management in GNOME
Following are some common errors of volume management in GNOME and ways to resolve them.
13.1. Troubleshooting access to GVFS locations from non-GIO clients
If you have problems accessing GVFS locations from your application, it might mean that it is not native GIO client. Native GIO clients are typically all GNOME applications using GNOME libraries (glib, gio). The gvfs-fuse service is provided as a fallback for non-GIO clients.
Prerequisites
The
gvfs-fusepackage is installed.dnf install gvfs-fuse
$ dnf install gvfs-fuseCopy to Clipboard Copied! Toggle word wrap Toggle overflow
Procedure
Ensure that
gvfs-fuseis running.ps ax | grep gvfsd-fuse
$ ps ax | grep gvfsd-fuseCopy to Clipboard Copied! Toggle word wrap Toggle overflow If
gvfs-fuseis not running, log out and log back in. Red Hat does not recommend startinggvfs-fusemanually.Find the system user ID (UID) for the
/run/user/UID/gvfs/path.The
gvfsd-fusedaemon requires a path where it can expose its services. When the/run/user/UID/gvfs/path is unavailable,gvfsd-fuseuses the~/.gvfspath.id -u
$ id -uCopy to Clipboard Copied! Toggle word wrap Toggle overflow If
gvfsd-fuseis still not running, start thegvfsd-fusedaemon:/usr/libexec/gvfsd-fuse -f /run/user/_UID_/gvfs
$ /usr/libexec/gvfsd-fuse -f /run/user/_UID_/gvfsCopy to Clipboard Copied! Toggle word wrap Toggle overflow Now, the FUSE mount is available, and you can manually browse for the path in your application.
-
Find the GVFS mounts under the
/run/user/UID/gvfs/or~/.gvfslocations.
13.2. Troubleshooting an invisible connected USB disk
When you connect a flash drive, the GNOME Desktop might not display it. If your flash drive is not visible in Files, but you can see it in the Disks application, you can attempt to set the Show in user interface option in Disks.
Procedure
- Open the Disks application.
- Select the disk in the side bar.
- Below Volumes, click Additional partition options > Edit Mount Options
- Click Show in user interface.
- Confirm by clicking .
- If the flash drive is still not visible, you can try to physically remove the drive and try connecting it again.
13.3. Troubleshooting unknown or unwanted partitions listed in Files
You might see unknown or unwanted partitions when you plug a disk in. For example, when you plug in a flash disk, it is automatically mounted and its volumes are shown in the Files side bar. Some devices have a special partition with backups or help files, which you might not want to see each time you plug in the device.
Procedure
- Open the Disks application.
- Select the disk in the side bar.
- Below Volumes, click Additional partition options > Edit Mount Options
- Deselect Show in user interface.
- Confirm by clicking .
13.5. Troubleshooting a busy disk in GNOME
If you receive a notification about your disk being busy, determine the programs that are accessing the disk. Then, you can end the programs that are running. You can also use the System Monitor application to kill the programs forcefully.
Prerequisites
The
iotoputility is installed:dnf install iotop
# dnf install iotopCopy to Clipboard Copied! Toggle word wrap Toggle overflow
Procedure
Examine the list of open files.
-
Run the
lsofcommand to get the list of open files. -
If
lsofis not available, run theps axcommand. - You can use System Monitor to display the running processes in a GUI.
-
Run the
When you have determined the programs, terminate them using any of the following methods:
-
On the command line, execute the
killcommand. - In System Monitor, right-click the line with the program process name, and click End or Kill from the context menu.
-
On the command line, execute the
Chapter 15. Configuring file associations
You can configure RHEL to open or access files with different formats.
In GNOME, MIME (Multipurpose Internet Mail Extension) types help to identify the format of a file and applications to use to open these files.
15.1. Multipurpose Internet Mail Extension types
The GNOME desktop uses MIME types to:
- Determine which application should open a specific file format by default.
- Register other applications that can open files of a specific format.
- Set a string describing the type of a file, for example, in a file properties dialog of the files application.
- Set an icon representing a specific file format, for example, in a file properties dialog of the files application.
MIME type names follow a given format:
media-type/subtype-identifier
media-type/subtype-identifier
In the image/jpeg MIME type name, image is a media type and jpeg is the subtype identifier.
GNOME follows Multipurpose Internet Mail Extension (MIME) info specification from the Freedesktop.org to determine:
- The machine-wide and user-specific location to store all the MIME type specification files.
- How to register a MIME type so that the desktop environment knows which application you can use to open a specific file format.
- How users can change which applications should open with what file formats.
MIME database
The MIME database is a collection of all the MIME type specification files that GNOME uses to store information about known MIME types.
The most important part of the MIME database from the system administrator’s point of view is the /usr/share/mime/packages/ directory, where the MIME type-related files specifying information about known MIME types are stored. One example of such a file is /usr/share/mime/packages/freedesktop.org.xml, specifying information about the standard MIME types available on the system, by default. The shared-mime-info package provides this file.
15.2. Adding a custom MIME type for all users
You can add a custom MIME type for all the users on the system and register a default application for that MIME type.
Procedure
Create the
/usr/share/mime/packages/application-x-newtype.xmlfile with following content:Copy to Clipboard Copied! Toggle word wrap Toggle overflow The sample
application-x-newtype.xmlfile here defines a new MIME typeapplication/x-newtypeand assigns file names with the.xyzextension to that MIME type.Create a new
.desktopfile named, for example,myapplication1.desktopin the/usr/share/applications/with following content:[Desktop Entry] Type=Application MimeType=application/x-newtype Name=My Application 1 Exec=myapplication1 field_code
[Desktop Entry] Type=Application MimeType=application/x-newtype Name=My Application 1 Exec=myapplication1 field_codeCopy to Clipboard Copied! Toggle word wrap Toggle overflow The sample
myapplication1.desktopfile here associates theapplication/x-newtypeMIME type with an application namedMy Application 1. It is run by a commandmyapplication1.Based on how
myapplication1gets started, choose one respective field code from Desktop Entry Specification. For example, for an application capable of opening multiple files, use:Exec=myapplication1 %F
Exec=myapplication1 %FCopy to Clipboard Copied! Toggle word wrap Toggle overflow As a root user, update the MIME database for your changes to take effect.
update-mime-database /usr/share/mime
# update-mime-database /usr/share/mimeCopy to Clipboard Copied! Toggle word wrap Toggle overflow As a root user, update the application database.
update-desktop-database /usr/share/applications
# update-desktop-database /usr/share/applicationsCopy to Clipboard Copied! Toggle word wrap Toggle overflow
Verification
To verify that you have successfully associated
*.xyzfiles with theapplication/x-newtypeMIME type, first create an empty file, for example test.xyz and execute the following commands:touch test.xyz gvfs-info test.xyz | grep "standard::content-type"
$ touch test.xyz $ gvfs-info test.xyz | grep "standard::content-type" standard::content-type: application/x-newtypeCopy to Clipboard Copied! Toggle word wrap Toggle overflow To verify
myapplication1.desktopis correctly set as the default registered application for theapplication/x-newtypeMIME type, execute following command:Copy to Clipboard Copied! Toggle word wrap Toggle overflow
15.3. Adding a custom MIME type for individual users
You can add a custom MIME type for individual user on the system and register a default application for that MIME type.
Procedure
Create the
~/.local/share/mime/packages/application-x-newtype.xmlfile with following content:Copy to Clipboard Copied! Toggle word wrap Toggle overflow The sample
application-x-newtype.xmlfile here defines a new MIME typeapplication/x-newtypeand assigns file names with the.xyzextension to that MIME type.Create a new .desktop file named, for example,
myapplication1.desktop, and place it in the~/.local/share/applications/directory with following content:[Desktop Entry] Type=Application MimeType=application/x-newtype Name=My Application 1 Exec=myapplication1 field_code
[Desktop Entry]
Type=Application
MimeType=application/x-newtype
Name=My Application 1
Exec=myapplication1 field_code
Copy to Clipboard Copied! Toggle word wrap Toggle overflow The sample
myapplication1.desktopfile above associates theapplication/x-newtypeMIME type with an application named My Application 1. It is run by a commandmyapplication1.Based on how
myapplication1gets started, choose one respective field code from Desktop Entry Specification. For example, for an application capable of opening multiple files, use:Exec=myapplication1 %F
Exec=myapplication1 %FCopy to Clipboard Copied! Toggle word wrap Toggle overflow Update the MIME database for your changes to take effect:
update-mime-database ~/.local/share/mime
$ update-mime-database ~/.local/share/mimeCopy to Clipboard Copied! Toggle word wrap Toggle overflow Update the application database:
update-desktop-database ~/.local/share/applications
$ update-desktop-database ~/.local/share/applicationsCopy to Clipboard Copied! Toggle word wrap Toggle overflow
Verification
To verify that you have successfully associated
*.xyzfiles with theapplication/x-newtypeMIME type, first create an empty file, for example, test.xyz and execute the following commands:touch test.xyz gvfs-info test.xyz | grep "standard::content-type"
$ touch test.xyz

$ gvfs-info test.xyz | grep "standard::content-type"
  standard::content-type: application/x-newtype
Copy to Clipboard Copied! Toggle word wrap Toggle overflow To verify that
myapplication1.desktopis correctly set as the default registered application for theapplication/x-newtypeMIME type, execute following command:Copy to Clipboard Copied! Toggle word wrap Toggle overflow
15.4. Options to override default MIME types
By default, the package-installed /usr/share/applications/mimeapps.list and /usr/share/applications/gnome-mimeapps.list files specify which application is registered to open specific MIME types.
System administrators can create the /etc/xdg/mimeapps.list or /etc/xdg/gnome-mimeapps.list file with a list of MIME types they want to override with the default registered application.
Local users can create the ~/.local/share/applications/mimeapps.list or ~/.local/share/applications/gnome-mimeapps.list file with a list of MIME types for which they want to override the default registered application.
Configurations are applied in the following order:
-
/usr/share/applications/ -
/etc/xdg/ -
~/.local/share/application/
Within a particular location, the configurations are applied in the following order:
- mimeapps.list
- gnome-mimeapps.list
15.5. Overriding default registered application for all the users
As a system administer, you can update the configuration based on the requirements. System administrator’s configuration takes precedence over default package configuration. Within each, the desktop-specific configuration takes precedence over the configuration that does not specify the desktop environment.
Procedure
Consult the
/usr/share/applications/mimeapps.listfile to determine the MIME types for which you want to change the default registered application. For example, the following sample of themimeapps.listfile specifies the default registered application for thetext/htmlandapplication/xhtml+xmlMIME types:[Default Applications] text/html=firefox.desktop application/xhtml+xml=firefox.desktop
[Default Applications] text/html=firefox.desktop application/xhtml+xml=firefox.desktopCopy to Clipboard Copied! Toggle word wrap Toggle overflow This example above specifies default application (Mozilla Firefox) by specifying its corresponding
.desktopfile (firefox.desktop). You can find.desktopfiles for other applications in the/usr/share/applications/directory.Create the
/etc/xdg/mimeapps.listfile and specify the MIME types and their corresponding default registered applications in this file.[Default Applications] text/html=myapplication1.desktop application/xhtml+xml=myapplication2.desktop
[Default Applications] text/html=myapplication1.desktop application/xhtml+xml=myapplication2.desktopCopy to Clipboard Copied! Toggle word wrap Toggle overflow This example above sets the default registered application for the
text/htmlMIME type tomyapplication1.desktopandapplication/xhtml+xmlMIME type tomyapplication2.desktop.
Verification
-
For these settings to function correctly, ensure that both the
myapplication1.desktopandmyapplication2.desktopfiles are placed in the/usr/share/applications/directory. Verify that the default registered application is set correctly:
Copy to Clipboard Copied! Toggle word wrap Toggle overflow
15.6. Overriding default registered application for individual users
Individual users can also update the configuration based on the requirements. This configuration takes precedence over the system administrator’s configuration and the system administrator’s configuration takes precedence over the package configuration. Within each, the desktop-specific configuration takes precedence over the configuration that does not specify the desktop environment.
Procedure
Consult the
/usr/share/applications/mimeapps.listfile to determine the MIME types for which you want to change the default registered application. For example, the following sample of themimeapps.listfile specifies the default registered application for thetext/htmlandapplication/xhtml+xmlMIME types:[Default Applications] text/html=firefox.desktop application/xhtml+xml=firefox.desktop
[Default Applications]
text/html=firefox.desktop
application/xhtml+xml=firefox.desktop
Copy to Clipboard Copied! Toggle word wrap Toggle overflow This example above specifies default application (Mozilla Firefox) by specifying its corresponding
.desktopfile (firefox.desktop). You can find.desktopfiles for other applications in the/usr/share/applications/directory.Create the
~/.local/share/applications/mimeapps.listfile and specify the MIME types and their corresponding default registered applications in this file.[Default Applications] text/html=myapplication1.desktop application/xhtml+xml=myapplication2.desktop
[Default Applications] text/html=myapplication1.desktop application/xhtml+xml=myapplication2.desktopCopy to Clipboard Copied! Toggle word wrap Toggle overflow This example above sets the default registered application for the
text/htmlMIME type tomyapplication1.desktopandapplication/xhtml+xmlMIME type tomyapplication2.desktop.
Verification
-
For these settings to function correctly, ensure that both the
myapplication1.desktopandmyapplication2.desktopfiles are placed in the/usr/share/applications/directory. Execute the
gio mime querycommand to verify that the default registered application is set correctly.Copy to Clipboard Copied! Toggle word wrap Toggle overflow