Este contenido no está disponible en el idioma seleccionado.
Tooling Tutorials
Building Solutions with Red Hat JBoss Fuse Tooling
Copyright © 2014 Red Hat, Inc. and/or its affiliates.
Abstract
About Red Hat JBoss Fuse Tooling
- JBoss Fuse Camel Editor Feature (
org.fusesource.ide.camel.editor.feature)The JBoss Fuse Camel Editor Feature is the base building block for the remaining features that make up JBoss Fuse Tooling. It provides the tools for creating a Fuse project, including the route editor, with its palette of supported Enterprise Integration Patterns, and the logic for running camel contexts inside the editor.If you want only to create, test, and visualize routes, but not to debug them, you need install only the JBoss Fuse Camel Editor Feature.NoteRed Hat JBoss Fuse Service Works tooling uses the JBoss Fuse Camel Editor Feature only.Part I, Developing Applications of Using the JBoss Fuse Tooling describes the functionality that this feature provides. - JBoss Fuse Runtimes Feature (
org.fusesource.ide.runtimes.feature)This feature extends the functionality of the JBoss Fuse Camel Editor Feature, allowing you to debug and monitor camel routes running in JMX-connected containers or as local processes, and to deploy camel routes to JMX-connected containers and Fabric8 containers. It includes the JMX and Fabric8 tooling.If you want to debug and deploy the routes that you created with JBoss Fuse Camel Editor Feature, you also need to install the JBoss Fuse Runtimes Feature.Part II, Debugging Applications and Part III, Working with Fabrics of Using the JBoss Fuse Tooling describe how to use the functionality this feature provides. - JBoss Fuse Server Extensions Feature (
org.fusesource.ide.server.extensions.feature)This feature extends the functionality of the JBoss Fuse Camel Editor and the JBoss Fuse Runtimes Feature features to allow you to configure, run, and interact with any of the supported servers via a Karaf command shell inside JBoss Fuse Tooling. For example, with JBoss Fuse installed on your machine, you can start it up and then create a fabric in which to deploy the camel routes you created with the JBoss Fuse Camel Editor Feature.If you want to run and interact directly with any of the supported servers from inside the JBoss Fuse Tooling, you also need to install the JBoss Fuse Server Extensions Feature.Managing servers in Part II, Debugging Applications of the Using the JBoss Fuse Tooling guide describes how to use the functionality this feature group provides.
- Red Hat JBoss Fuse
- Red Hat JBoss A-MQ
- Red Hat JBoss Fuse Service Works (works with JBoss Fuse Camel Editor Feature only)
- Apache Camel
- Apache CXF
- Apache Karaf
- Create a Maven project for your application.The tooling loads all of the relevant Maven archetypes for creating integration projects using the Red Hat supported Apache projects.
- Add new pieces of logic and functionality to an application.The tooling has a wizard for creating Apache Camel context files.
- Edit the integration logic.The tooling has a visual route editor that makes editing Apache Camel routes as easy as dragging and dropping route components.
- Test the application.The tooling includes testing tools that provide the full gamut of testing capabilities including:
- creating JUnit test cases for Apache Camel routes
- JMX analysis of running components
- message tracing through Apache Camel routes
- Deploy the application.The tooling can deploy applications to a number of containers.
Chapter 1. To Create a New Route
Abstract
Goals
- create a routing project
- add endpoints to a route
- connect two endpoints
- configure the endpoints
Creating the Fuse project
- Open the JBoss perspective.This is the default perspective when you start up JBoss Developer Studio for the first time.
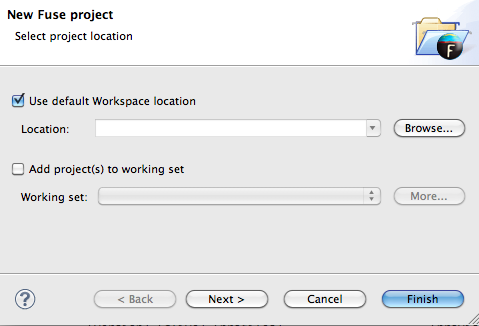
- On the Toolbar, select → → to open the New Fuse project wizard, as shown in Figure 1.1, “New Fuse project location page”.
Figure 1.1. New Fuse project location page
- Click to open the New Fuse Project details page, as shown in Figure 1.2, “New Fuse project details page”.
Figure 1.2. New Fuse project details page
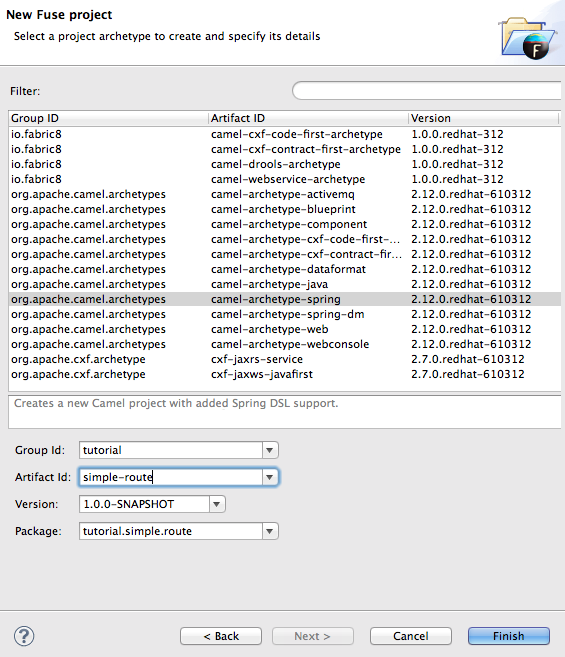
- Select
camel-archetype-spring. - Enter
tutorialin the Group Id: field. - Enter
simple-routein the Artifact Id: field. - The Version: field defaults to
1.0.0-SNAPSHOT. To change it, enter a different version identifier. - The Package: field defaults to
tutorial.simple.route, the name of the package that containscamel-archetype-spring. To include the route in a different package, enter the name of that package. - Click .This procedure creates a Fuse project,
simple-route, in Project Explorer that contains everything needed to create and run routes. As shown in Figure 1.3, the files generated forsimple-routeinclude:simple-route/pom.xml(Maven project file)simple-route/src/main/resources/META-INF/spring/camel-context.xml(Spring XML file containing the routing rules)Figure 1.3. Generated project files

Creating the route
- In Project Explorer, locate
simple-route/src/main/resources/META-INF/spring/camel-context.xml. - Right-click it to open the context menu, then select Delete.You're going to replace the old
camel-context.xmlfile with your own to create a new route. - In the Delete dialog, click OK to confirm the operation.
- In Project Explorer, select
simple-route/src/main/resources/META-INF/spring. - Right-click it to open the context menu.
- Select → to open the Camel XML File wizard, as shown in Figure 1.4.
Figure 1.4. Camel XML File wizard
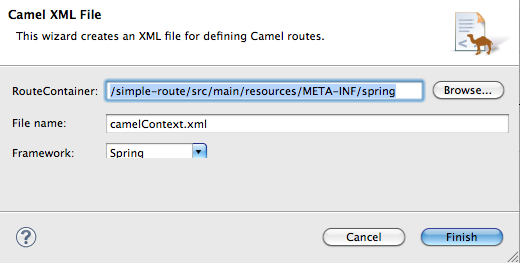
- Check that
/simple-route/src/main/resources/META-INF/springappears in the Container: field. Otherwise enter it manually, or select it using the button.
NoteThe
button opens a dialog that displays the folders of all active projects, which you can browse to find and select the files you need.
button.
NoteThe
button opens a dialog that displays the folders of all active projects, which you can browse to find and select the files you need.
- Check that
camelContext.xmlappears in the File Name: field. Otherwise enter it manually. - Check that appears in the Framework field, or select it from the field's drop-down list.
- Click .NoteBy default, Outline view is located in the upper, right corner of the JBoss perspective. To provide more room for Design view to display the graphical representation of your route, drag Outline view to the lower, left corner of the workspace, below Project Explorer.
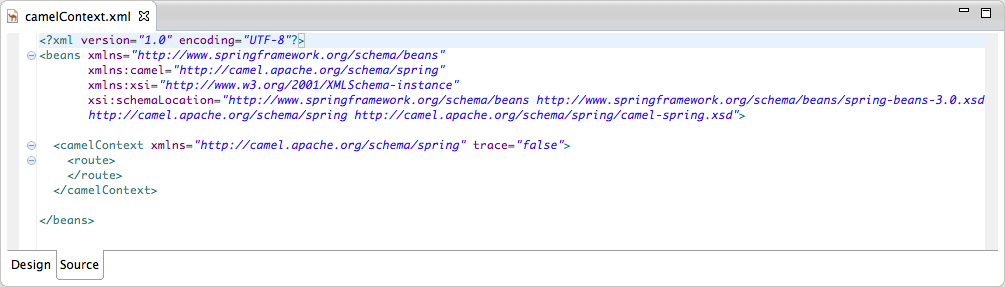
- Click the Source tab at the bottom, left of the canvas to open the new
camelContext.xmlfile in the route editor's Source view, as shown in Figure 1.5, “New camelContext file in the route editor's source view”.Figure 1.5. New camelContext file in the route editor's source view
- Click the Design tab at the bottom, left of the canvas to return to the route editor's Design view.
- Drag an Endpoint element (
 ) from the Palette to the canvas.
- Drag a second Endpoint element from the Palette to the canvas.
- Select the first endpoint you dragged onto the canvas.The Properties editor, located below the canvas, displays the endpoint's property fields for editing, as shown in Figure 1.6, “Endpoint property editor”.
Figure 1.6. Endpoint property editor
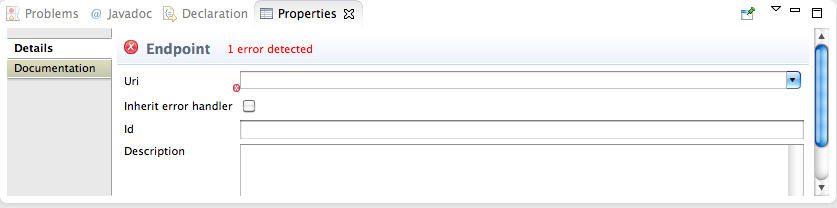
- Enter
file:src/data?noop=truein the Uri field. Leave the other fields blank. - Select the second endpoint you dragged onto the canvas.
- Enter
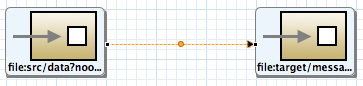
file:target/messages/othersin the Uri field. Leave the other fields blank. - On the canvas, select the first endpoint (
file:src/data?noop=true), and drag it's connector arrow ( ) to the second endpoint (
file:target/messages/others), then release it.A segmented line connects the two endpoints, as shown in Figure 1.7.Figure 1.7. Completed route, diagram view
 NoteYou can drag the line's bendpoint (orange dot) to change the angle of the line's segments. Doing so creates two new bendpoints, one on either side of the original. This behavior enables you to easily adjust your diagram to accommodate increasingly complex routes.
 - To quickly align the connected endpoints, right-click the canvas to open the context menu, and then select .
- Select → to save the route.
- Click the Source tab at bottom, left of the canvas.
Example 1.1. XML for simple route
Copy to Clipboard Copied! Toggle word wrap Toggle overflow
Next steps
Further reading
- using the editor, see Red Hat JBoss Fuse Tooling: JBoss Fuse Tooling User Guide at https://access.redhat.com/site/documentation/JBoss_Fuse/
- Apache Camel endpoints, see Red Hat JBoss Fuse: Component Reference that comes with Red Hat JBoss Fuse.
Chapter 2. To Run a Route
Abstract
Goals
- run a route as a local Apache Camel context
- send messages through a route
- examine the messages received by the endpoints
Prerequisites
Running the route
- Open the simple-route project you created in the section called “Creating the Fuse project”.
- In Project Explorer, select
simple-route/src/main/resources/META-INF/spring/camelContext.xml. - Right-click it to open the context menu, then select → .The Console panel opens to display messages that reflect the progress of the project's execution. A message similar to the following
[INFO] Using org.apache.camel.spring.Main to initiate a CamelContext [pache.camel.spring.Main.main()] MainSupport INFO Apache Camel 2.12.0.redhat-610062 starting [pache.camel.spring.Main.main()] SpringCamelContext INFO Apache Camel 2.12.0.redhat-610062 (CamelContext: camel-1) is starting [pache.camel.spring.Main.main()] ManagedManagementStrategy INFO JMX is enabled [pache.camel.spring.Main.main()] DefaultTypeConverter INFO Loaded 176 type converters [pache.camel.spring.Main.main()] SpringCamelContext INFO StreamCaching is not in use. If using streams then its recommended to enable stream caching. See more details at http://camel.apache.org/stream-caching.html [pache.camel.spring.Main.main()] FileEndpoint INFO Endpoint is configured with noop=true so forcing endpoint to be idempotent as well [pache.camel.spring.Main.main()] FileEndpoint INFO Using default memory based idempotent repository with cache max size: 1000 [pache.camel.spring.Main.main()] SpringCamelContext INFO Route: route1 started and consuming from: Endpoint[file://src/data?noop=true] [pache.camel.spring.Main.main()] SpringCamelContext INFO Total 1 routes, of which 1 is started. [pache.camel.spring.Main.main()] SpringCamelContext INFO Apache Camel 2.12.0.redhat-610062 (CamelContext: camel-1) started in 0.354 seconds
[INFO] Using org.apache.camel.spring.Main to initiate a CamelContext [pache.camel.spring.Main.main()] MainSupport INFO Apache Camel 2.12.0.redhat-610062 starting [pache.camel.spring.Main.main()] SpringCamelContext INFO Apache Camel 2.12.0.redhat-610062 (CamelContext: camel-1) is starting [pache.camel.spring.Main.main()] ManagedManagementStrategy INFO JMX is enabled [pache.camel.spring.Main.main()] DefaultTypeConverter INFO Loaded 176 type converters [pache.camel.spring.Main.main()] SpringCamelContext INFO StreamCaching is not in use. If using streams then its recommended to enable stream caching. See more details at http://camel.apache.org/stream-caching.html [pache.camel.spring.Main.main()] FileEndpoint INFO Endpoint is configured with noop=true so forcing endpoint to be idempotent as well [pache.camel.spring.Main.main()] FileEndpoint INFO Using default memory based idempotent repository with cache max size: 1000 [pache.camel.spring.Main.main()] SpringCamelContext INFO Route: route1 started and consuming from: Endpoint[file://src/data?noop=true] [pache.camel.spring.Main.main()] SpringCamelContext INFO Total 1 routes, of which 1 is started. [pache.camel.spring.Main.main()] SpringCamelContext INFO Apache Camel 2.12.0.redhat-610062 (CamelContext: camel-1) started in 0.354 secondsCopy to Clipboard Copied! Toggle word wrap Toggle overflow indicates the route executed successfully. - To shutdown the route, click the red square (
 ) located at the top, right of the Console panel.
Verifying the route
- In Project Explorer, select
simple-route. - Right-click it to open the context menu, then select .
Figure 2.1. Target message destinations in Project Explorer tree

- Verify that the
target/messages/subfolders contain these files:uk/message1.xmlothers/message2.xml
- Double-click
message1.xmlto open it in the editor's Design view, then select the Source tab at the bottom, left of the canvas to see the xml code.It's contents should match that shown in Example 2.1.Example 2.1. Contents of message1.xml
Copy to Clipboard Copied! Toggle word wrap Toggle overflow
Further reading
- configuring runtime profiles, see Red Hat JBoss Fuse Tooling: JBoss Fuse Tooling User Guide at https://access.redhat.com/site/documentation/JBoss_Fuse/.
- deploying Apache Camel applications see Red Hat JBoss Fuse: Deploying into the Container that comes with Red Hat JBoss Fuse.
Chapter 3. To Add a Content-Based Router
Abstract
Goals
- add a content based-router to a route
- configure the content-based router
- add a log endpoint to each output branch of the content-based router
- rewire the route to use the content-based router and log its output
Prerequisites
Procedure
- In Project Explorer, double-click
simple-route/src/main/resources/META-INF/spring/camelContext.xmlto open your simple-route project. - Select the connector joining the two endpoint nodes
file:src/data?noop=trueandfile:target/messages/others. - Right-click it to open the context menu, and select → to delete the connector.NoteAlternatively, you can delete the connector by selecting it, then selecting from the toolbar's menu.
- On the canvas, select the terminal endpoint node,
file:target/messages/others, and drag it out of the way. - On the canvas, select the starting endpoint node,
file:src/data?noop=true, and right-click it to open the context menu. - Select → → .A choice node (
 ) appears on the canvas connected to the starting endpoint node.
- On the canvas, select the choice node, then right-click it to open the context menu.
- Select → → .A when node (
 ) appears on the canvas connected to the choice node. The Properties editor opens, displaying the when node's property fields for you to edit, as shown in Figure 3.1.
Figure 3.1. When property editor
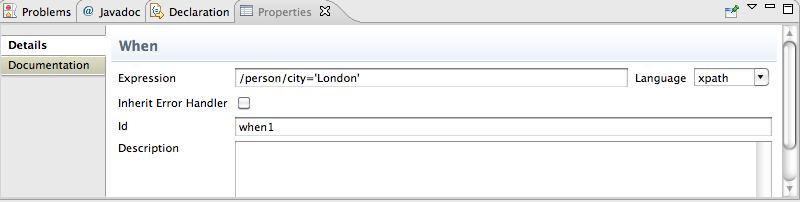
- In the Expression field, enter
/person/city='London'.This XPath expression determines which messages will transit this path in the route. - From the Language drop-down menu, select xpath.
- In the Id field, enter when1.
- On the canvas, reselect the Choice node, then right-click it to open the context menu.
- Select → → .An otherwise node (
) appears on the canvas, connected to the choice node.
The otherwise node will eventually route to the terminal endpoint (
file:target/messages/others) any message that does not match the XPath expression set for the when1 node. - On the canvas, select the when1 node, and then right-click it to open the context menu.
- Select → →A log node (
) appears on the canvas, connected to the when1 node. The Properties editor opens, displaying the log node's property fields for you to edit.
- In the Message field, enter
uk messages, and in the Log Name field, enter1.NoteIn Fuse Integration perspective's Messages View, the tooling inserts the contents of the log node's Id field in theTrace Node Idcolumn for message instances, when tracing is enabled on the route (see Figure 4.4). In the Console, it adds the contents of the log node's Message field to the log data whenever the route runs. - On the canvas, select the otherwise node, and then right-click it to open the context menu.
- Select → →A log node (
) appears on the canvas, connected to the otherwise node. The Properties editor opens, displaying the log node's property fields for you to edit.
- In the Message field, enter
other messages, and in the Log Name field, enter2. - On the canvas, select the log 1 node, and then right-click it to open the context menu.
- Select → →An Endpoint node (
) appears on the canvas, connected to the log 1 node. The Properties editor opens, displaying the Endpoint node's property fields for you to edit.
- In the Uri field, enter
file:target/messages/uk, and leave the other property fields blank. - On the canvas, select the log 2 node, and then drag its connector arrow (
) to the terminal endpoint node,
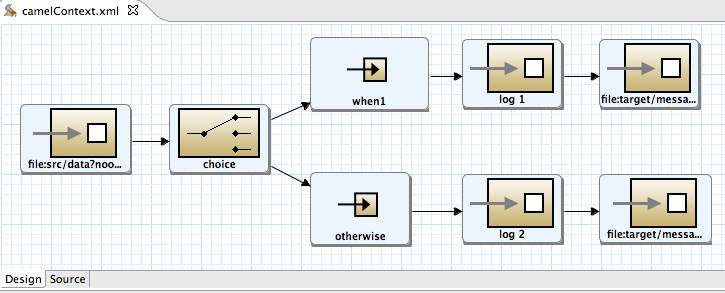
file:target/messages/others, and release it. - To quickly realign all of the nodes on the canvas, right-click the canvas to open the context menu, and then select .The route on the canvas should resemble Figure 3.2.
Figure 3.2. Completed content-based router with logs
- On the toolbar, select → to save the completed route.
- Click the Source tab at the bottom, left of the canvas to display the XML for the route.The
camelContextelement will look like that shown in Example 3.1.Example 3.1. XML for content-based router
Copy to Clipboard Copied! Toggle word wrap Toggle overflow
Next steps
Further reading
- the
whenEIP in Red Hat JBoss Fuse: Enterprise Implementing Integration Patterns
Chapter 4. To Trace a Message Through a Route
Abstract
Goals
- run a route in the Fuse Integration perspective
- enable tracing on your route
- drop messages onto your route and track them through the route's nodes
Prerequisites
simple-route project you updated in Chapter 3, To Add a Content-Based Router.
Procedure
- Select → → → to open the Fuse Integration perspective as shown in Figure 4.1, “Fuse Integration perspective”).
Figure 4.1. Fuse Integration perspective
 NoteYou can use the Open Perspective icon (
 ) in the perspectives tab to access the list of available perspectives.
- In Project Explorer, expand the
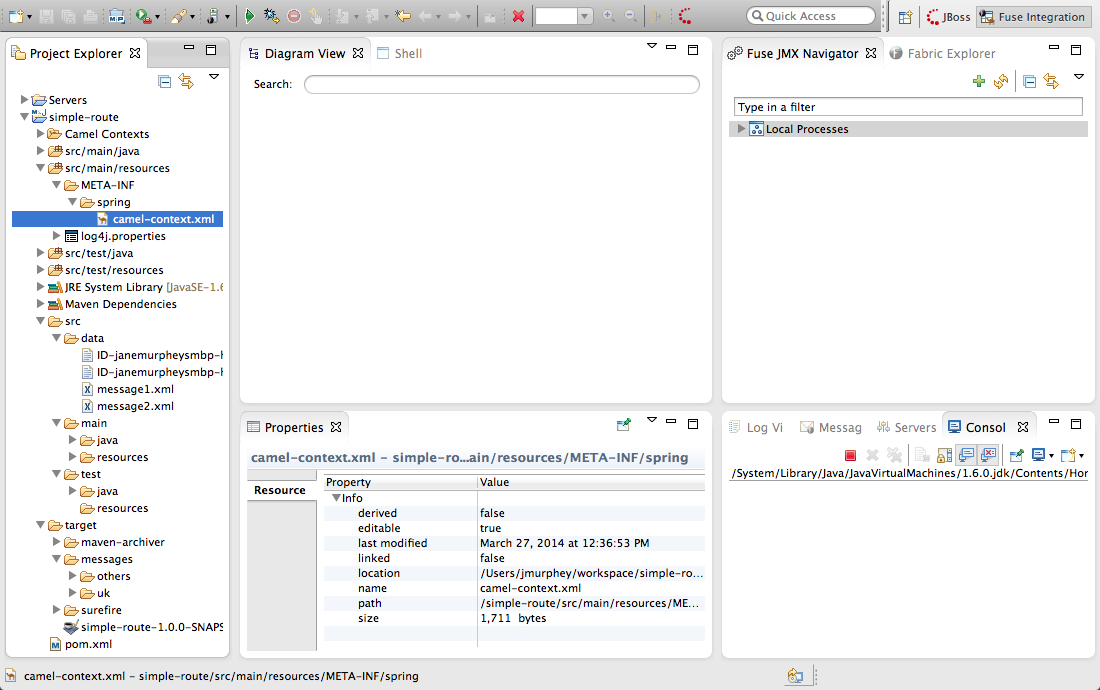
simple-routeproject to expose thesrc/main/resources/META-INF/spring/camel-context.xmlfile. - Select → from the
camel-context.xmlfile's context menu. - In Fuse JMX Navigator, expand Local Processes.
- Double click to connect to the context and expand the elements of your route as shown in Figure 4.2, “Route elements in Fuse JMX Navigator”).
Figure 4.2. Route elements in Fuse JMX Navigator
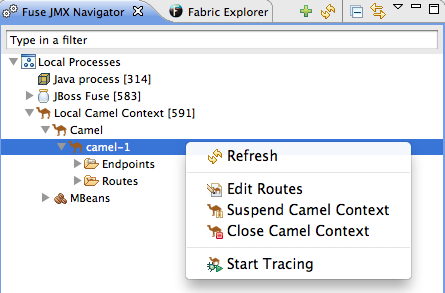
- In Fuse JMX Navigator, select from the node's context menu.The tooling displays a graphical representation of your route in Diagram View.
- In Diagram View, drag the nodes to rearrange them, so you can clearly see the route's flow paths.NoteYou will have to rearrange the nodes in Diagram View each time you select a different node in Fuse JMX Navigator.
- In Project Explorer, expand
simple-route/src/data, so you can access themessage1.xmlandmessage2.xmlfiles as shown in Figure 4.3, “Message files in simple-route project”.Figure 4.3. Message files in simple-route project

- Drag
message1.xmland drop it on.../camel-1/Endpoints/file/src/data?noop=true.As the message traverses the route, the tooling traces and records its passage at each step and displays the results in Messages View. - Repeat Step 9, but this time drag
message2.xmland drop it on.../camel-1/Endpoints/file/src/data?noop=true. - In the bottom, right panel, switch from Console to Messages View.
- In Fuse JMX Navigator, click to populate Messages View with the traces of each message.As shown in Figure 4.4, “Fuse Integration perspective's message tracing components”, the tooling draws the route in Diagram View, tagging paths exiting a processing step with timing and performance metrics. Only the metric Total exchanges is displayed in the diagram. Hovering over the displayed metrics reveals additional metrics about message flow:
- mean time the step took to process a message
- maximum time the step took to process a message
- minimum time the step took to process a message
Figure 4.4. Fuse Integration perspective's message tracing components
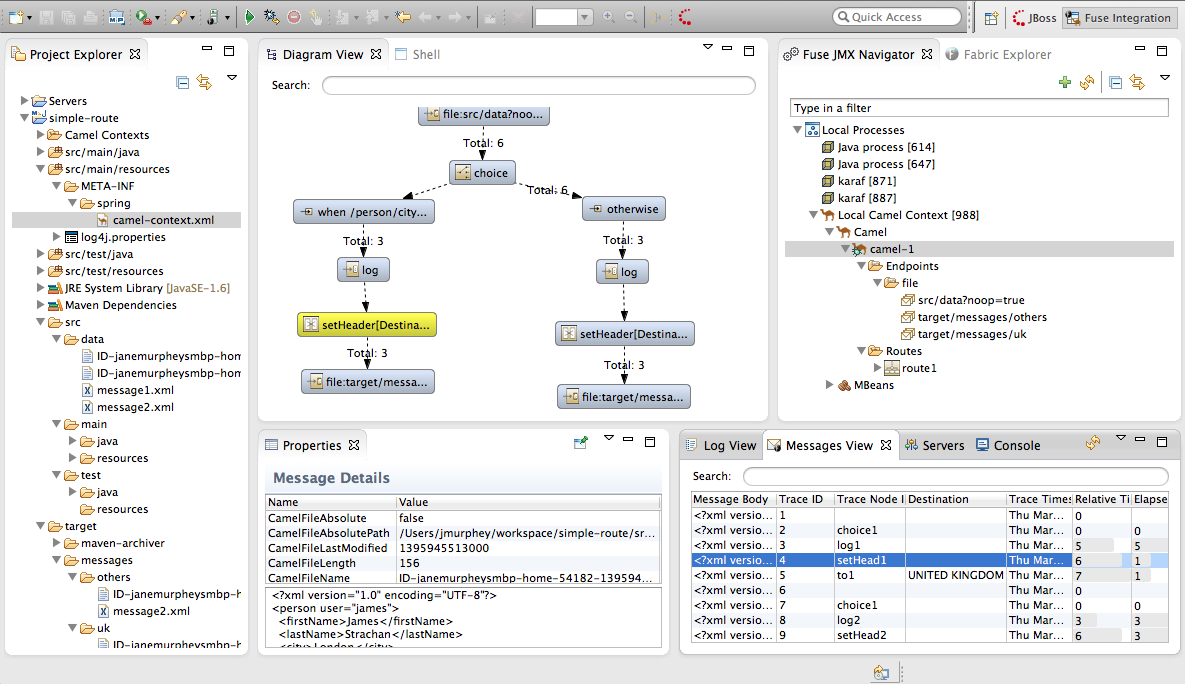
- In Messages View, click a message instance.The associated step in the route is highlighted in Diagram View. You can step through the message instances to see how a particular message traversed the route and whether it was processed as expected at each step in the route.The tooling displays the details about a message instance in the top half of the Properties panel and the contents of the message instance, including any headers, in the bottom half of the Properties panel. So, if your application sets headers at any step within a route, you can check whether they are set as expected.NoteYou can control columnar layout in all of the tooling's tables. Use the drag method to temporarily rearrange tabular format. For example, drag a column's border rule to expand or contract its width. To hide a column, totally contract its borders. Drag the column header to relocate a column within the table. If you want your arrangement to persist, use the → method instead. To access it, click the
 icon on the panel's menu bar.
- When done, switch back to the Console and click the button (
) in the upper, right side of its pane.
Next steps
Further reading
- the
choice,when, andlogEIPEnterprise Integration Patterns in Red Hat JBoss Fuse: Implementing Enterprise Integration Patterns that comes with Red Hat JBoss Fuse.
Chapter 5. To Test a Route with JUnit
Abstract
Overview
Goals
- create a Apache Camel test case
- run the route with the test case
- observe the output
Prerequisites
- the simple-route project you created in Chapter 3, To Add a Content-Based Router
Creating the test case
- In Project Explorer, select
src/test/java. - Right-click it to open the context menu, and then select → to open the New Camel JUnit Test Case wizard, as shown in Figure 5.1, “New Camel JUnit Test Case wizard”.
Figure 5.1. New Camel JUnit Test Case wizard
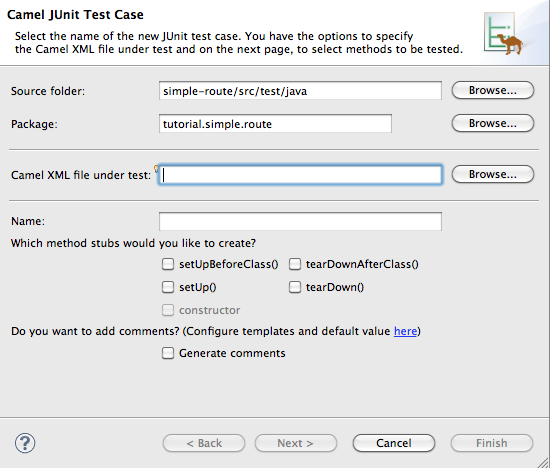
- Make sure the Source folder field contains
simple-route/src/test/java.NoteIf needed, you can click
to find the proper folder.
- The Package field defaults to
tutorial.simple-route. To include the test case in a different package, enter the name of the package. - In the Camel XML file under test field, enter
src/main/resources/META-INF/spring/camelContext.xml, or use
to open a file explorer, configured to screen for XML files, to locate the file.
NoteThe Name field defaults to CamelContextXmlTest for the name of the test file. - Click to open the Test Endpoints page, shown in Figure 5.2, “Test Endpoints page”.
Figure 5.2. Test Endpoints page
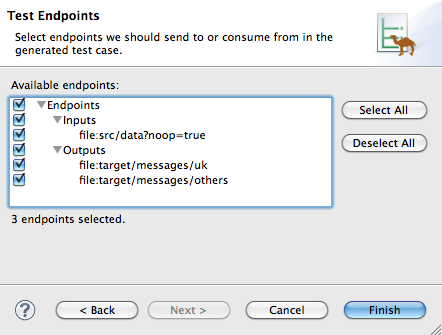
- By default, all endpoints are selected and will be included in the test case. You can select or deselect all endpoints by clicking the Select All or Deselect All button, or you can select and deselect individual endpoints by clicking the check box next to each.
- Click .NoteIf prompted, add JUnit to the build path.
Running the test
- Select the project root,
simple-route, in the Project Explorer. - Open the context menu.
- Select → .The JUnit view, shown in Figure 5.3, “JUnit view”, opens in the Eclipse sidebar.
Figure 5.3. JUnit view
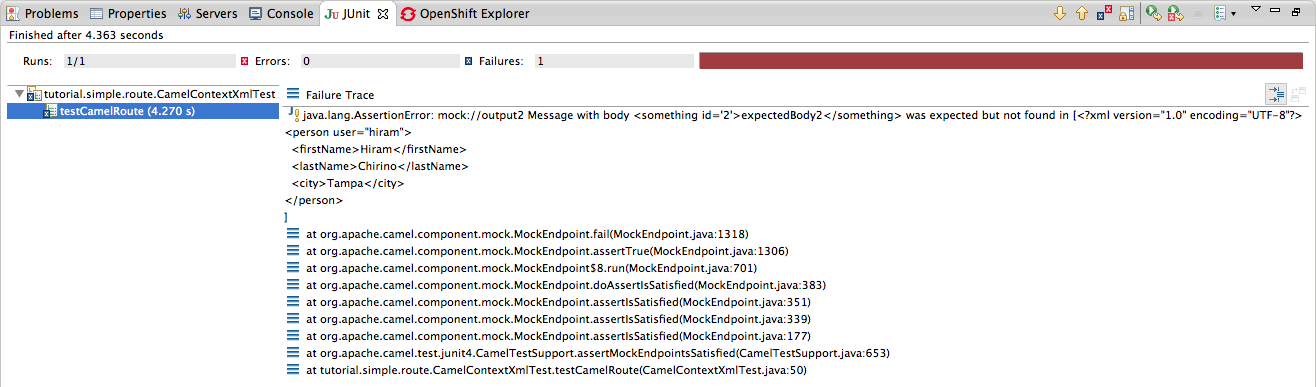
- Examine the output and take action to resolve any test failures.NoteYou may have to run this boilerplate test twice before it runs without a failure.
Further reading
- see JUnit
Chapter 6. To Deploy a Camel Project to Red Hat JBoss Fuse
Abstract
Goals
- start up Red Hat JBoss Fuse 6.x Server
- deploy your project into Red Hat JBoss Fuse 6.x Server
- check whether your project was successfully built and deployed
- uninstall your deployed bundle
Prerequisites
- access to a Red Hat JBoss Fuse instance
- the simple-route project you updated in Chapter 3, To Add a Content-Based Router
Starting up Red Hat JBoss Fuse 6.x Server
- In Fuse Integration perspective, click the Servers tab in the lower, right pane to open the Servers view.
- Click the link No servers are available. Click this link to create a new server... to open the Define a New Server page.
- Expand the
JBoss Fusenode to expose the available server options as shown in Figure 6.1.Figure 6.1. Define a New Server page
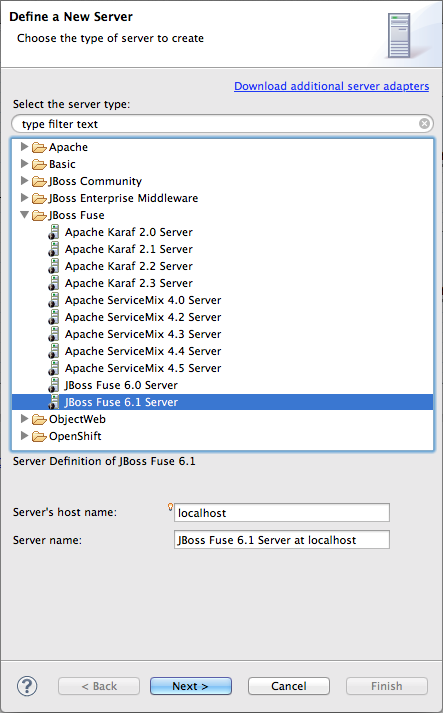
- Click
JBoss Fuse 6.1 Server. - Accept the defaults for Server's host name (localhost) and Server name (JBoss Fuse 6.1 Server at localhost), and then click to open the JBoss Fuse Runtime page.
- In Installation directory, enter the path where the JBoss Fuse 6.1 installation is located, or click the to search for it, and then click to open the New Server> JBoss Fuse server configuration details page.
Figure 6.2. New server configuration
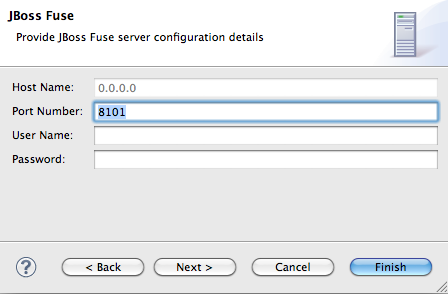
- Accept the defaults for Host Name (0.0.0.0) and Port Number (8101).
- In User name, enter the name used to log into the server.This is a user name stored in Red Hat JBoss Fuse's installDir
/etc/users.propertiesfile.If one has not been set, you can either add one to that file using the formatuser=password,role(for example,admin=admin,admin), or you can set one using the karafjaascommand set:jaas:realms—to list the realmsjaas:manage --index 1—to edit the first (server) realmjaas:useradd <username> <password>—to add a user and associated passwordjaas:roleadd <username> admin—to specify the new user's rolejaas:update—to update the realm with the new user information
If a jaas realm has already been selected for the server, you can discover the user name by issuing the commandJBossFuse:karaf@root>jaas:users. - In Password, enter the password required for User name to log into the server.This is the password set either in Red Hat JBoss Fuse's installDir
/etc/users.propertiesfile or by the karafjaascommands. - Click , and then click .
jboss-fuse-6.1.0.redhat-xxx [stopped]appears in Servers view. - In Servers view, right-click
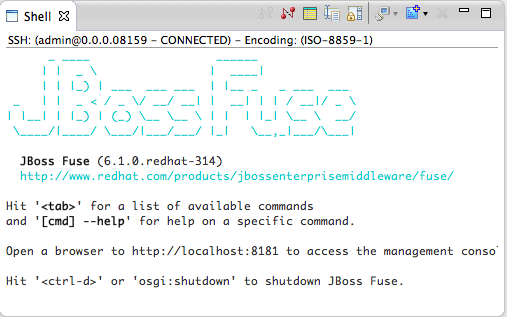
jboss-fuse-6.1.0.redhat-xxxto open the context menu, and then click .ImportantIf the warning that the remote host identification has changed appears, click to delete the old key and insert the new key, only if the JBoss Fuse 6.1 server runtime is installed on the same machine where the Red Hat JBoss Fuse Tooling is running! Otherwise click and contact your system administrator.Wait a few seconds for JBoss Fuse 6.1 Server to start up. When it does,JBoss Fuse [xxx]is added to the Fuse JMX Navigator tree under the Local Processes node, but you need to expand the Local Processes node to see it.The JBoss Fuse console also starts up in Shell view, as shown in Figure 6.3:Figure 6.3. JBoss Fuse console
- In Fuse JMX Navigator, right-click
JBoss Fuse [xxx]to open the context menu, and then click . - In Fuse JMX Navigator, expand the
JBoss Fuse [xxx]node to see its tree structure.Now you're ready to deploy your project.
Deploying a project to Red Hat JBoss Fuse
- From Project Explorer, drag the
simple-routeroot project over to Fuse JMX Navigator and drop it onJBoss Fuse [xxx].NoteThe tool provides an alternative to the drag and drop method of deployment. For details, see Deploying Projects to a Container in the Red Hat JBoss Fuse Tooling: JBoss Fuse Tooling User Guide.Console view chronicles the process as the tooling builds thesimple-routeproject, runs the tests, and then installs the project as a bundle insideJBoss Fuse [xxx]. - In Fuse JMX Navigator, right-click
JBoss Fuse [xxx]to open the context menu, and then click .NoteYou may have to repeat the operation before your project appears in Fuse JMX Navigator under → as<bundleIdentifier>-camel-#. (Camel generates and appends an ID number to the end of the node name to ensure that every camel context is uniquely identified.)In the mean time, you can verify whether your project's bundle was installed by clicking the node underJBoss Fuse [xxx]to display, in view, all installed bundles. Start typing tutorial in view's Search tool to quickly determine whether your project'stutorial.simple-routebundle is included in the list.Once your project appears in Fuse JMX Navigator, you can start tracing on it, as described in Chapter 4, To Trace a Message Through a Route.
Uninstalling your project's bundle
- Switch to the JBoss Fuse console in Shell view.
- At the JBoss Fuse console command line, type
uninstall<bundleIdentifier>
Further reading
- Deploying Projects to a Container in the Red Hat JBoss Fuse Tooling: JBoss Fuse Tooling User Guide
Chapter 7. To Deploy a Camel Project to a fabric profile
Abstract
Goals
- create a fabric in JBoss Fuse 6.x Server
- connect to the JBoss Fuse 6.x Server
- connect to the fabric
- create a new fabric profile
- deploy your project to the new fabric profile
Prerequisites
- access to Red Hat JBoss Fuse
- a user with admin privileges configured in JBoss Fuse's installDir
/etc/users.propertiesfile, as described in Starting up Red Hat JBoss Fuse 6.x Server starting at Step 8. - the simple-route project you updated in Chapter 3, To Add a Content-Based Router
Creating a fabric in Red Hat JBoss Fuse
- Open a terminal and
cdto the JBoss Fuse server's installDir. - Enter
./bin/fuseto start up a standalone instance ofjboss-fuse-6.x.x.redhat-xxx.Wait a few seconds for the JBoss Fuse 6.x server to start up. - At the JBoss Fuse console command line, enter
fabric:createand pressEnterto create a fabric.Copy to Clipboard Copied! Toggle word wrap Toggle overflow You can use thefabric:statuscommand to check whether the fabric has been created and provisioned.Copy to Clipboard Copied! Toggle word wrap Toggle overflow - Once the fabric is running, enter
fabric:container-listand pressEnterto list the new fabric's default container (root*) and its status.JBossFuse:karaf@root> fabric:container-list [id] [version] [alive] [profiles] [provision status] root* 1.0 true fabric,fabric-ensemble-0000-1,jboss-fuse-full success JBossFuse:karaf@root>
JBossFuse:karaf@root> fabric:container-list [id] [version] [alive] [profiles] [provision status] root* 1.0 true fabric,fabric-ensemble-0000-1,jboss-fuse-full success JBossFuse:karaf@root>Copy to Clipboard Copied! Toggle word wrap Toggle overflow
Connecting to the JBoss Fuse server
- If necessary, reopen Fuse Integration perspective.
- In Fabric Explorer, right-click Fabrics to open the context menu, and then click Add Fabric details to open the Fabric Details wizard.
Figure 7.1. Fabric Details wizard
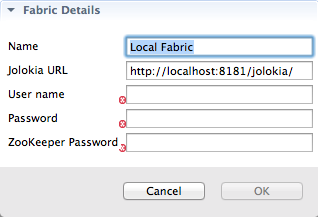
- In Name, enter the name of the fabric to which you want to connect. The name you enter identifies the fabric whose location you specify in Jolokia URL, and this name will appear in Fabric Explorer.The default Name is Local Fabric.
- In Jolokia URL, enter the url, in the form
http://hostname:port/jolokia/, of the fabric to which you want to connect. This URL specifies the location of a fabric registry agent, whose default port is 8181.The default URL is http://localhost:8181/jolokia. - In User name, enter the name used to log into the specified fabric.This is the user name specified when the fabric was created, has
adminprivileges, and is stored in Red Hat JBoss Fuse's installDir/etc/users.propertiesfile. In that file, user information is specified using this format:user=password,role(for example,admin=admin,admin).You can also discover the user name by issuing the commandJBossFuse:karaf@root>jaas:users, if the Jaas realm has been selected for the fabric. - In Password, enter the password required for User name to log into the specified fabric.This is the password specified for User name when the fabric was created and is stored in Red Hat JBoss Fuse's installDir
/etc/users.propertiesfile. - In Zookeeper Password, enter the password required for logging into the specified fabric's zookeeper registry.This is the password that was specified when the fabric was created, or it is the password of the first user defined in Red Hat JBoss Fuse's installDir
/etc/users.propertiesfile.You can also discover the Zookeeper password by issuing the commandJBossFuse:karaf@root>fabric:ensemble-password. - Click OK.The fabric's name appears in Fabric Explorer as a node beneath Fabrics.
Connecting to the fabric
Creating a new fabric profile
- In Fabric Explorer, expand → → to reveal the fabric's top-level profiles.
- Further expand the profiles tree to find the
example-quickstarts-jmsprofile nested underdefault/karaf/feature-camel/feature-camel-jms/. - Right-click
example-quickstarts-jmsto open the context menu, and then click . - In Profile name, enter
myCamelRoute, and then click OK.The new profilemyCamelRouteappears under its parent profile,example-quickstarts-jms, in Fabric Explorer. - Click the
myCamelRouteprofile to populate the Details tab's Profiles page with its information. - In the Parents pane, you can see that
example-quickstarts-jmsis the new profile's immediate parent. Leaveexample-quickstarts-jmsselected.Now you're ready to deploy your camel project to the profilemyCamelRoute.
Deploying your camel project to the new fabric profile
myCamelRoute fabric profile:
- From Project Explorer, drag the
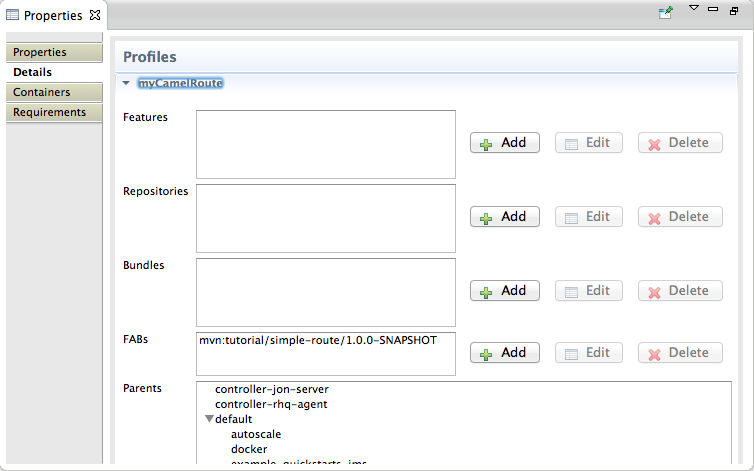
simple-routeroot project over to Fabric Explorer and drop it on → → → → → → → → .NoteThe tool provides an alternative to the drag and drop method of deployment. For details, see Deploying a Project to a Fabric Container in Red Hat JBoss Fuse Tooling: JBoss Fuse Tooling User Guide.Console view chronicles the process as the tooling builds thesimple-routeproject, runs the tests, installs the project as a bundle in themyCamelRouteprofile, and then uploads the profile to the fabric's internal Maven repository. - In Fabric Explorer, click the
myCamelRouteprofile to populate Properties view with its properties and profile information.NoteIt can take some time for the tooling to build the project, run the tests, and install the project bundle. The simple-route bundle will appear in the FABs field on the Profiles page only when the process has finished. You can use Fabric Explorer's button to trigger an update of the Profiles page. - On the Profiles page, check that the simple-route bundle appears in the FABs field, as shown in Figure 7.2, “simple-route bundle deployed”.
Figure 7.2. simple-route bundle deployed
 Now you can deploy your camel project to the fabric by creating one or more containers on the fabric and assigning the
myCamelRouteprofile to them. Once the containers are started, you can start tracing on the deployed projects, as described in Chapter 4, To Trace a Message Through a Route.
Further reading
- Deploying Projects to a Container
- Working with Fabric Containers
- Working with Fabric Profiles
- Working with Versions
Legal Notice
Trademark Disclaimer
Legal Notice
Third Party Acknowledgements
- JLine (http://jline.sourceforge.net) jline:jline:jar:1.0License: BSD (LICENSE.txt) - Copyright (c) 2002-2006, Marc Prud'hommeaux
mwp1@cornell.eduAll rights reserved.Redistribution and use in source and binary forms, with or without modification, are permitted provided that the following conditions are met:- Redistributions of source code must retain the above copyright notice, this list of conditions and the following disclaimer.
- Redistributions in binary form must reproduce the above copyright notice, this list of conditions and the following disclaimer in the documentation and/or other materials provided with the distribution.
- Neither the name of JLine nor the names of its contributors may be used to endorse or promote products derived from this software without specific prior written permission.
THIS SOFTWARE IS PROVIDED BY THE COPYRIGHT HOLDERS AND CONTRIBUTORS "AS IS" AND ANY EXPRESS OR IMPLIED WARRANTIES, INCLUDING, BUT NOT LIMITED TO, THE IMPLIED WARRANTIES OF MERCHANTABILITY AND FITNESS FOR A PARTICULAR PURPOSE ARE DISCLAIMED. IN NO EVENT SHALL THE COPYRIGHT OWNER OR CONTRIBUTORS BE LIABLE FOR ANY DIRECT, INDIRECT, INCIDENTAL, SPECIAL, EXEMPLARY, OR CONSEQUENTIAL DAMAGES (INCLUDING, BUT NOT LIMITED TO, PROCUREMENT OF SUBSTITUTE GOODS OR SERVICES; LOSS OF USE, DATA, OR PROFITS; OR BUSINESS INTERRUPTION) HOWEVER CAUSED AND ON ANY THEORY OF LIABILITY, WHETHER IN CONTRACT, STRICT LIABILITY, OR TORT (INCLUDING NEGLIGENCE OR OTHERWISE) ARISING IN ANY WAY OUT OF THE USE OF THIS SOFTWARE, EVEN IF ADVISED OF THE POSSIBILITY OF SUCH DAMAGE. - Stax2 API (http://woodstox.codehaus.org/StAX2) org.codehaus.woodstox:stax2-api:jar:3.1.1License: The BSD License (http://www.opensource.org/licenses/bsd-license.php)Copyright (c) <YEAR>, <OWNER> All rights reserved.Redistribution and use in source and binary forms, with or without modification, are permitted provided that the following conditions are met:
- Redistributions of source code must retain the above copyright notice, this list of conditions and the following disclaimer.
- Redistributions in binary form must reproduce the above copyright notice, this list of conditions and the following disclaimer in the documentation and/or other materials provided with the distribution.
THIS SOFTWARE IS PROVIDED BY THE COPYRIGHT HOLDERS AND CONTRIBUTORS "AS IS" AND ANY EXPRESS OR IMPLIED WARRANTIES, INCLUDING, BUT NOT LIMITED TO, THE IMPLIED WARRANTIES OF MERCHANTABILITY AND FITNESS FOR A PARTICULAR PURPOSE ARE DISCLAIMED. IN NO EVENT SHALL THE COPYRIGHT HOLDER OR CONTRIBUTORS BE LIABLE FOR ANY DIRECT, INDIRECT, INCIDENTAL, SPECIAL, EXEMPLARY, OR CONSEQUENTIAL DAMAGES (INCLUDING, BUT NOT LIMITED TO, PROCUREMENT OF SUBSTITUTE GOODS OR SERVICES; LOSS OF USE, DATA, OR PROFITS; OR BUSINESS INTERRUPTION) HOWEVER CAUSED AND ON ANY THEORY OF LIABILITY, WHETHER IN CONTRACT, STRICT LIABILITY, OR TORT (INCLUDING NEGLIGENCE OR OTHERWISE) ARISING IN ANY WAY OUT OF THE USE OF THIS SOFTWARE, EVEN IF ADVISED OF THE POSSIBILITY OF SUCH DAMAGE. - jibx-run - JiBX runtime (http://www.jibx.org/main-reactor/jibx-run) org.jibx:jibx-run:bundle:1.2.3License: BSD (http://jibx.sourceforge.net/jibx-license.html) Copyright (c) 2003-2010, Dennis M. Sosnoski.All rights reserved.Redistribution and use in source and binary forms, with or without modification, are permitted provided that the following conditions are met:
- Redistributions of source code must retain the above copyright notice, this list of conditions and the following disclaimer.
- Redistributions in binary form must reproduce the above copyright notice, this list of conditions and the following disclaimer in the documentation and/or other materials provided with the distribution.
- Neither the name of JiBX nor the names of its contributors may be used to endorse or promote products derived from this software without specific prior written permission.
THIS SOFTWARE IS PROVIDED BY THE COPYRIGHT HOLDERS AND CONTRIBUTORS "AS IS" AND ANY EXPRESS OR IMPLIED WARRANTIES, INCLUDING, BUT NOT LIMITED TO, THE IMPLIED WARRANTIES OF MERCHANTABILITY AND FITNESS FOR A PARTICULAR PURPOSE ARE DISCLAIMED. IN NO EVENT SHALL THE COPYRIGHT OWNER OR CONTRIBUTORS BE LIABLE FOR ANY DIRECT, INDIRECT, INCIDENTAL, SPECIAL, EXEMPLARY, OR CONSEQUENTIAL DAMAGES (INCLUDING, BUT NOT LIMITED TO, PROCUREMENT OF SUBSTITUTE GOODS OR SERVICES; LOSS OF USE, DATA, OR PROFITS; OR BUSINESS INTERRUPTION) HOWEVER CAUSED AND ON ANY THEORY OF LIABILITY, WHETHER IN CONTRACT, STRICT LIABILITY, OR TORT (INCLUDING NEGLIGENCE OR OTHERWISE) ARISING IN ANY WAY OUT OF THE USE OF THIS SOFTWARE, EVEN IF ADVISED OF THE POSSIBILITY OF SUCH DAMAGE. - JavaAssist (http://www.jboss.org/javassist) org.jboss.javassist:com.springsource.javassist:jar:3.9.0.GA:compileLicense: MPL (http://www.mozilla.org/MPL/MPL-1.1.html)
- HAPI-OSGI-Base Module (http://hl7api.sourceforge.net/hapi-osgi-base/) ca.uhn.hapi:hapi-osgi-base:bundle:1.2License: Mozilla Public License 1.1 (http://www.mozilla.org/MPL/MPL-1.1.txt)