Questo contenuto non è disponibile nella lingua selezionata.
BRMS User Guide
For JBoss Developers, Rule Authors, and Business Analysts.
Edition 5.3.1
Abstract
Preface
Chapter 1. Introduction
1.1. JBoss Enterprise Business Rules Management System Platform
1.2. User Interface
- Browse: Which includes an Inbox to view changes to assets, and an asset browser to view assets by status and by category.
- Knowledge Bases: Which provides access to the asset packages and assets. Assets can be created, viewed, and modified from this section.
- QA: Which provides access to test scenarios and the package analysis tool.
- Package Snapshots: Which provides access to the all the package snapshots and tools to rebuild and deploy new snapshots.
- Administration: Which provides access to administration tools to manage categories, available statuses, archived items, event logs, user permissions, a tool to import and export the repository, and repository configuration.
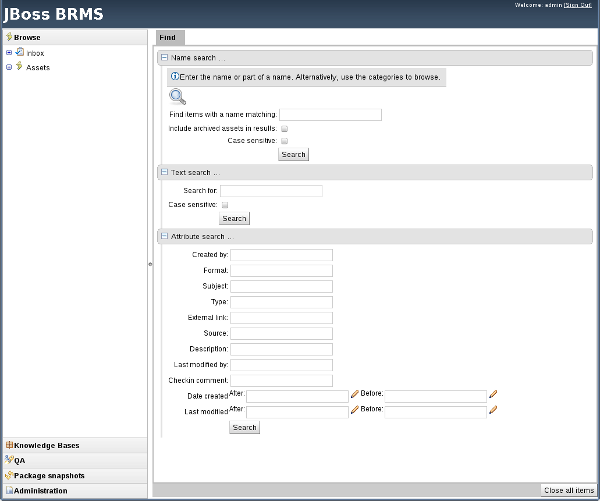
Figure 1.1. BRMS User Interface
Chapter 2. Managing Assets
2.1. Assets
Rules provide the logic for the rule engine to execute against. A rule includes a name, attributes, a 'when' statement on the left hand side of the rule, and a 'then' statement on the right hand side of the rule.
Packages are deployable collections of assets. Rules and other assets must be collected into a package before they can be deployed. When a package is built, the assets contained in the package are validated and compiled into a deployable package.
Business Processes are flow charts that describe the steps necessary to achieve business goals (see the BRMS Business Process Management Guide for more details).
Decision Tables are collections of rules stored in either a spreadsheet or in the JBoss Enterprise BRMS user interface as guided decision tables.
Fact models are a collection of facts about the business domain. The rules interact with the fact model in rules-based applications.
A domain specific languages, or DSL, is a rule language that is dedicated to the problem domain.
2.2. Packages
2.2.1. Packages
2.2.2. Creating a New Package
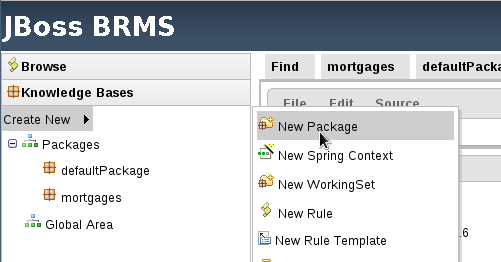
Figure 2.1. Create a New Package
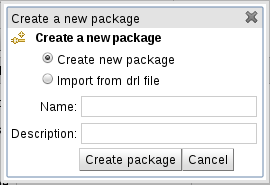
Figure 2.2. New Package Menu
2.3. Categories
Draft and Review categories make it possible to tag a rule so that it is clear exactly where the rule is in its life-cycle.
2.4. Asset Status
2.4.1. Status Management
2.4.2. Setting the Available Statuses
Procedure 2.1. Setting the Available Statuses
- From the navigation panel, select → .
- Click New status, enter the status name in the text box, and click OK.
2.4.3. Changing Status
Procedure 2.2. Changing Status
- Open the asset in the asset editor.
- Select → . Choose the status from the drop down menu and click Change status.
2.5. Versions and Storage
2.6. Discussion
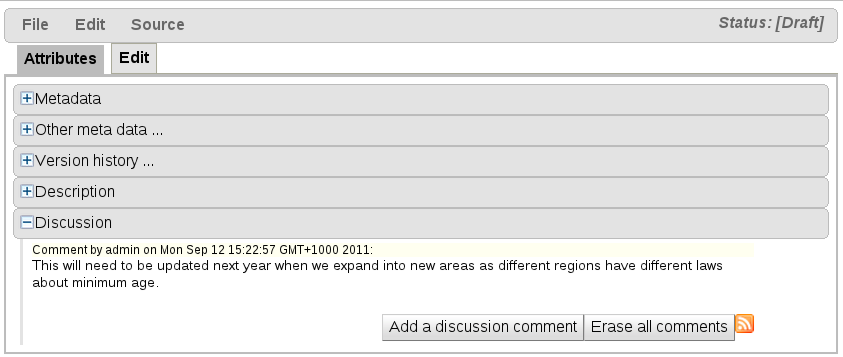
Figure 2.3. Discussion
2.7. Inbox
- Incoming ChangeThe incoming changes inbox lists changes to any assets the logged in user has edited or commented on in the past.
- Recently OpenedThe recently opened inbox lists the 100 most recently edited assets.
- Recently EditedThe recently edited inbox lists the 100 most recently edited assets the logged in user has edited.
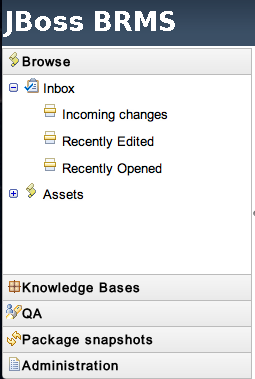
Figure 2.4. Inbox
2.8. Spring Context
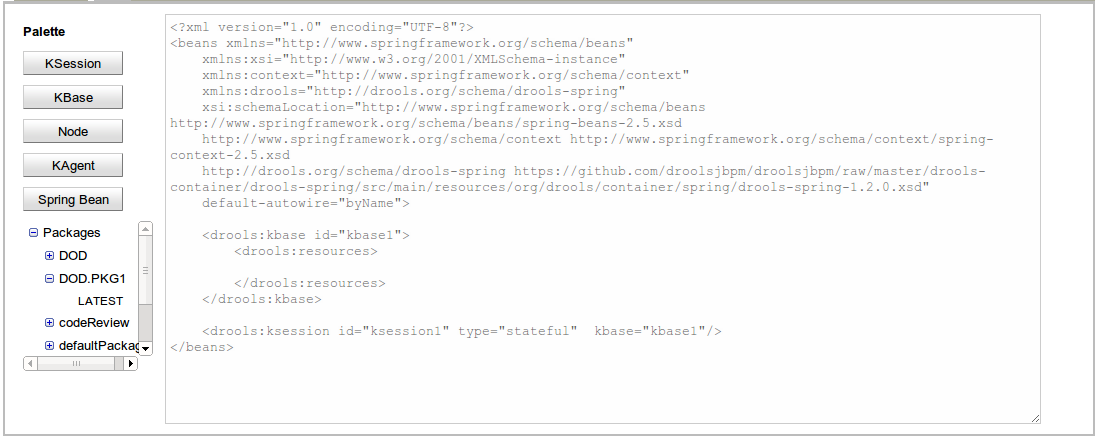
Figure 2.5. Spring Context Editor
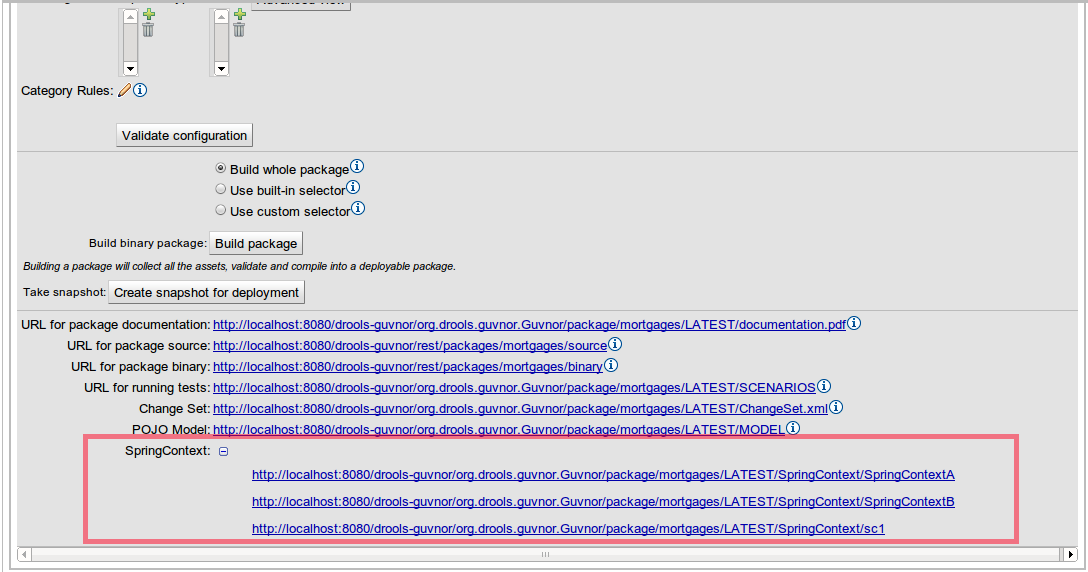
Figure 2.6. Spring Context URLs
2.9. Working Sets
2.9.1. Working Sets
2.9.2. Create a New Working Set
Procedure 2.3. Create a New Working Set
- From the navigation panel, select → → .
- Enter a name and description for the working set in the New Working Set menu. Select which package to create the working set in or specify that it should be added to the Global Area. Click OK.
- Add fact types to the working set by moving them from the Available Facts list on the left to the WorkingSet Facts list on the right.
2.9.3. Add constraints to fact types in a working set
2.9.4. Verifying Field Constraints
- On Demand Validation.
- Real-time Validation.
Note
2.10. The Global Area
Chapter 3. Writing Rules
3.1. The Asset Editor
3.1.1. The Asset Editor
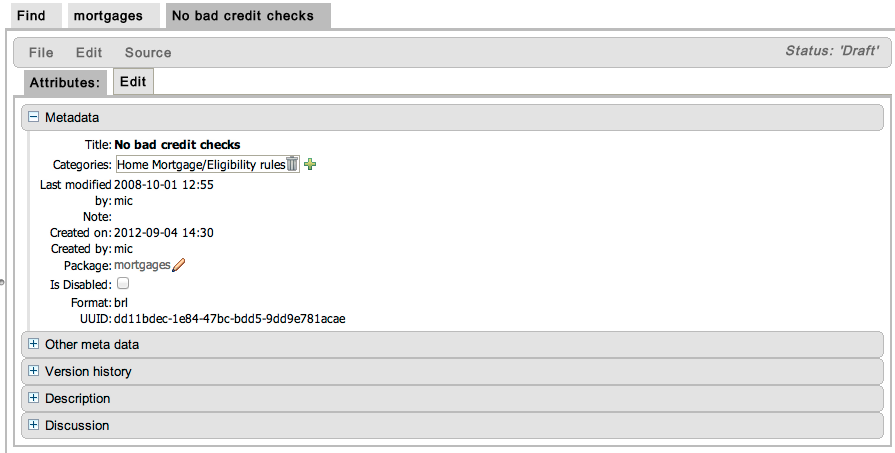
Figure 3.1. The Asset Editor View - Attributes

Figure 3.2. The Asset Editor View - Edit
3.1.2. Business Rules with the Guided Editor
Example 3.1. The Guided Editor

3.1.3. The Anatomy of a Rule
- WhenThe When part of the rule is the condition that must be met. For instance, a bank providing credit in the form of a loan may specify that customers must be over twenty-one years of age. This would be represented by using when to determine if the customer is over twenty-one years of age.
- ThenThe Then part of the rule is the action to be performed when the conditional part of the rule has been met. For instance, when the customer is under twenty-one years of age, then decline the loan because the applicant is under age.
- OptionalOptional attributes such as salience can be defined on rules.
3.1.4. Salience
3.1.5. Adding Conditions or Actions to Rules
Procedure 3.1. Adding Conditions or Actions to Rules
- Click the plus icon in the When section of the guided editor to add a condition, or click the plus icon in the Then section of the guided editor to add an action.
- Select the condition or action from the menu and click Ok. If the package the rule belongs to has been configured to include DSL (Domain Specific Language) sentences, DSL sentences can be chosen from the menu.
- If the condition or action requires input, i.e., a date, true or false, am integer, or other input type, enter the required value.
3.1.6. Adding a Field to a Fact Type
Procedure 3.2. Adding a Field to a Fact Type
Select the Model
From the navigation panel, select Knowledge Bases. Expand the package that contains the model and select model.Open the model from the list by clicking open.Add the Field
Expand the fact type by clicking the plus sign next to it and select Add Field.Enter the Field Details
Add the details to the pop up dialogue. In this case, enter the name guarantor in the Field name field and select True or False from the Type drop down menu.Save the changes made to the model by selecting File and Save changes.
3.1.7. Technical Rules (DRL)

Figure 3.3. Technical Rule (DRL)
3.2. Decision Tables
3.2.1. Spreadsheet Decision Tables
3.2.2. Uploading Spreadsheet Decision Tables
Procedure 3.3. Uploading a Spreadsheet Decision Table
- To upload an existing spreadsheet, select → → .
- Enter a name for the spreadsheet.
- Select Decision Table (Spreadsheet) from the Type (format) of rule: drop down menu. Add a description if required and click OK.
- From the edit screen, click Choose File, select the file from the local filesystem (XLS format is supported), and click upload.
3.3. Web Based Guided Decision Tables
3.3.1. Web Based Guided Decision Tables
Figure 3.4. Guided Decision Table
3.3.2. Column Configuration
- LiteralThe value in the cell will be compared with the field using the operator.
- FormulaThe expression in the cell will be evaluated and then compared with the field.
- PredicateNo field is needed, the expression will be evaluated to true or false.
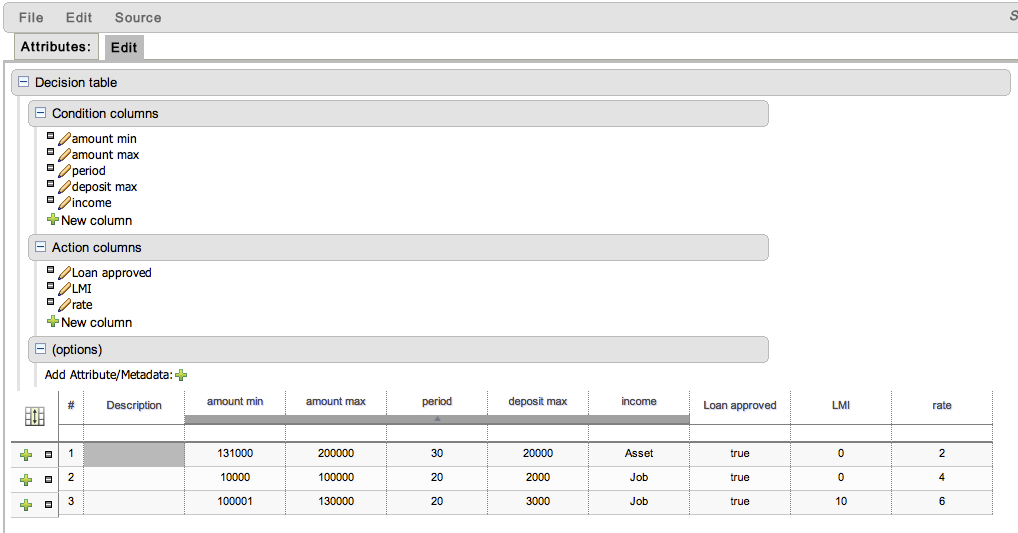
Figure 3.5. Column Configuration
3.3.3. Attribute Columns
when
  $c : Cheese( name == "Cheddar" )
then
  ...
end
when
not Cheese( name == "Cheddar" )
then
...
end3.3.4. Utility Columns
3.3.5. Metadata Columns
3.3.6. Condition Columns
3.3.7. Action Columns
3.3.8. Rule Definition

Figure 3.6. Rule Definition
3.3.9. Cell Merging

Figure 3.7. Cell Merging
3.3.10. Cell Grouping
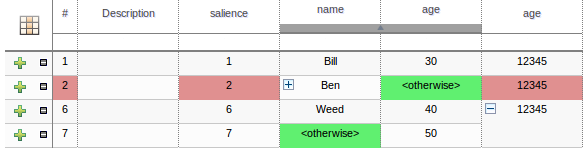
Figure 3.8. Cell Grouping
3.3.11. Otherwise Operations
== or inequality != operators can take advantage of a special decision table cell value of otherwise. This special value allows a rule to be defined that matches on all values not explicitly defined in all other rules defined in the table. This is best illustrated with an example:
when
  Cheese( name not in ("Cheddar", "Edam", "Brie") )
  ...
then
  ...
end
when
Cheese( name in ("Cheddar", "Edam", "Brie") )
...
then
...
end3.4. Rule Templates
3.4.1. Rule Templates
Note
3.4.2. Creating a Rule Template
Procedure 3.4. Creating a Rule Template
- From the navigation panel, select → → .
- Enter a name, select a category, specify which package the template should be added to, and add a description for the template.
- Use the guided editor to construct the rule.Template keys are placeholders within the field constraint and action sections. Literal values, formula and expressions can continue to be used as in the standard guided editor.
3.4.3. An Example Rule Template
Example 3.2. Example Template
![An example template that uses [when] and [then] statements.](https://access.redhat.com/webassets/avalon/d/JBoss_Enterprise_BRMS_Platform-5-BRMS_User_Guide-en-US/images/4c2c4316d07ccf3cd8023b7efb74242a/1217.png)
3.4.4. Defining the Template Data
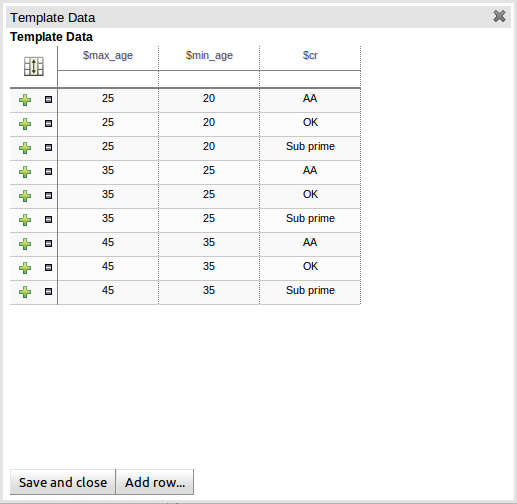
Figure 3.9. Template Data Grid
3.4.5. Generated DRL
3.5. Functions
Procedure 3.5. Creating a New Function
- From the navigation panel, select → → .
- Enter a name for the new function. Select the package to create the function in or choose to create it in the global area and click OK.
- Add the function code to the function editor and select → .
3.6. The Domain Specific Language Editor
- {<varName>:<regular expression>}This will render a text field in place of the DSL variable when the DSL sentence is used in the guided editor. The content of the text field will be validated against the regular expression.
- {<varName>:ENUM:<factType.fieldName>}This will render an enumeration in place of the DSL variable when the DSL sentence is used in the guided editor. <factType.fieldName> binds the enumeration to the model fact and field enumeration definition. This could be either a Knowledge Base enumeration or a Java enumeration, i.e., defined in a model POJO JAR file.
- {<varName>:DATE:<dateFormat>}This will render a date selector in place of the DSL variable when the DSL sentence is used in the guided editor.
- {<varName>:BOOLEAN:<[checked | unchecked]>}This will render a dropdown selector in place of the DSL variable, providing boolean choices, when the DSL sentence is used in the guided editor.

Figure 3.10. DSL Editor
3.7. Data Enumerations
3.7.1. Data Enumerations Drop Down List Configuration
fact.field to a list of values. These values are used to populate the drop-down menu. The list can either be literal or use a utility class (which must be added to the classpath) to load the strings. The strings contain either a value to be shown in the drop-down menu or a mapping from the code value (which is what is used in the rule) and a display value, e.g., M=Mini.
Example 3.3. An Example Enumeration Configuration
'Board.type' : [ 'Short', 'Long', 'M=Mini', 'Boogie']
'Person.age' : [ '20', '25', '30', '35' ]3.7.2. Advanced Enumeration Concepts
policyType and coverage. The choices for policyType could be Home or Car. The type of insurance policy will determine the type of coverage that will be available. A home insurance policy could include property or liability. A car insurance policy could include collision or fullCoverage.
 'Insurance.policyType' : ['Home', 'Car']
 'Insurance.coverage[policyType=Home]' : ['property', 'liability']
 'Insurance.coverage[policyType=Car]' : ['collision', 'fullCoverage']
3.7.3. Obtaining Data Lists from External Sources
java.util.List (of strings). Instead of specifying a list of values in the user interface, the code can return the list of strings. (As normal, you can use the "=" sign inside the strings if you want to use a different display value to the rule value.) For example, you could use the following:
'Person.age' : ['20','25', '30', '35']
'Person.age' : (new com.yourco.DataHelper()).getListOfAges()DataHelper which has a method getListOfAges() which returns a list of strings. The data enumerations are loaded the first time the guided editor is used in a session. To check the enumeration has loaded, go to the package configuration screen. You can "save and validate" the package; this will check it and provide feedback about any errors.
Chapter 4. The Fact Model
4.1. Fact Models
- Upload a
JARfile containing the Java classes used by both the application and the rules. - Declare a model within BRMS that can be exported as a KnowledgeBase and used within your Java code.
4.2. Creating a JAR Model
Procedure 4.1. Creating a Jar Model
Open the New model archive (jar) menu
From the navigation panel, select → → .- Enter the Jar model's name, category, and a description. Select which package to create the model in or specify that it should be added to the Global Area. Click OK when all the details have been entered.
- Upload the JAR containing the model defined as Java classes and packages in a regular Java JAR file.
4.3. Declarative Model
4.3.1. Declarative Model
- It reinforces that the model belongs to the knowledge base, not the application.
- The model can have a lifecycle that is separate from the applications.
- Java types can be enriched with rule specific annotations.
- JAR files must be kept synchronized between the rules and the applications that use them; however, a declarative model does not need to be kept synchronized.
- A standalone definition of the entire Fact model used within your rules.
- Supplementary Fact definitions to support a Java POJO Model.
4.3.2. Creating a Declarative Model
Procedure 4.2. Creating a Declarative Model
Open the New Declarative Model menu
From the navigation panel, select → → .- Specify a name for the new model. Select which package to create the model in or specify that it should be added to the Global Area. Click OK when all the details have been entered.
- Click Add new fact type and enter the fact name in the name field of the popup menu.
- Create Fact Fields by selecting the Add field button and entering the information in the popup menu.
- Create Fact annotations by selecting the Add annotation button. The annotation Name and Value fields are mandatory, but the Key field is optional. If a Key value is not specified, a default value of
valuewill be assigned. - Select Type Extends to extend an existing Java class uploaded as part of JAR (POJO) model or other declared types in the same package.
4.3.3. Extending a Java Class
- Import the applicable Java JAR into BRMS.
- If the Java package name in which the class belongs to is different to the package name in to which the JAR has been imported, ensure the BRMS package imports the class from which you want to extend. This is normally completed for you automatically when you upload a JAR model; however, if you have multiple classes with the same name in the JAR, you should check the appropriate one has been imported.
- Within the Declarative Modeling screen define an empty type (i.e. with no fields) of the same name as that you want to extend.
- Create a new declarative type as appropriate, extending the empty declaration created in the preceding step.
Note
4.3.4. Consuming a Declarative Model with Java
Example 4.1. Handling Declared Fact Types Through the API
// get a reference to a knowledge base with a declared type:
KnowledgeBase kbase = ...

// get the declared FactType
FactType personType = kbase.getFactType( "org.drools.examples",
                                         "Person" );

// handle the type as necessary:
// create instances:
Object bob = personType.newInstance();

// set attributes values
personType.set( bob,
                "name",
                "Bob" );
personType.set( bob,
                "age",
                42 );

// insert fact into a session
StatefulKnowledgeSession ksession = ...
ksession.insert( bob );
ksession.fireAllRules();

// read attributes
String name = personType.get( bob, "name" );
int age = personType.get( bob, "age" );
Note
org.drools.examples in the above example).
Chapter 5. Packaging
5.1. Packaging Assets
com.something.Hello; you would then add import com.something.Hello in your package configuration and save the change.
5.2. Configuring Packages
Procedure 5.1. Configuring Packages
- From the navigation panel, select Knowledge Bases, and then select the package.
- Select the Edit tab to access the package configuration screen.
- To add globals and imports, click the plus symbol next to either and select the class type from the drop down menu.Alternatively, the advanced view can be accessed by clicking the Advanced View button. This presents a text-box which package-level DRL can be entered into.
- Choose a selector if one is being used for the package.
- Select Build Package to build the package. A message is displayed when the package has been successfully built.
5.3. Selectors
5.3.1. Selectors
This selector builds the whole package without excluding any assets.
This selector makes it possible to specify the status and the category of the assets to be included in the compiled package.
5.3.2. Custom Selectors
jboss-brms.war/WEB-INF/classes/selectors.properties file. Please refer to this file for further instructions as it contains all the information necessary to define custom selectors.
Chapter 6. Integrating Rules
6.1. The Knowledge Agent
drools-core dependencies in its classpath, i.e. the drools and mvel JARs.
KnowledgeAgent kagent = KnowledgeAgentFactory.newKnowledgeAgent( "MyAgent" );
kagent.applyChangeSet( ResourceFactory.newUrlResource( url ) );
KnowledgeBase kbase = kagent.getKnowledgeBase();KnowledgeBase kbase = KnowledgeBaseFactory.newKnowledgeBase();
KnowledgeAgentConfiguration kaconf = KnowledgeAgentFactory.newKnowledgeAgentConfiguration();
kaconf.setProperty( "drools.agent.scanDirectories", "false" ); // we don't scan directories, only files
KnowledgeAgent kagent = KnowledgeAgentFactory.newKnowledgeAgent( "test agent", kaconf );
// resource to the change-set xml for the resources to add
kagent.applyChangeSet( ResourceFactory.newUrlResource( url ) );change-set.xml file.
<change-set xmlns='http://drools.org/drools-5.0/change-set'";
    xmlns:xs='http://www.w3.org/2001/XMLSchema-instance'
    xs:schemaLocation='http://drools.org/drools-5.0/change-set drools-change-set-5.0.xsd' >
    <add>
        <resource source='http://localhost:9000/TEST.pkg' type='PKG' />
    </add>
</change-set>ResourceFactory.getResourceChangeNotifierService().start();
ResourceFactory.getResourceChangeScannerService().start();6.2. Deploying Snapshots

Figure 6.1. Package Snapshots
change-set.xml file to specify which package is being deployed. Each snapshot of a package has its own URL which can be deployed or downloaded. The most recent version of a package can be specified by replacing the name of the snapshot with the word LATEST in the URL.
6.3. Using the URL to Obtain the Package DRL
6.4. Rest API
6.4.1. Repository Rest API
6.4.2. Accessing Rules by Package
- application/atom+XML
- application/json
- application/xml
- application/atom+XML
- application/json
- application/xml
- application/octet-stream
- application/atom+xml
- application/json
- application/xml
http://localhost:8080/jboss-brms/rest/packages/{packageName}
- application/atom+xml
- application/json
- application/xml
- application/atom+xml
http://localhost:8080/jboss-brms/rest/packages/{packageName}/source
- text/plain
http://localhost:8080/jboss-brms/rest/packages/{packageName}/binary
- application/octet-stream
http://localhost:8080/jboss-brms/rest/packages/{packageName}/versions
- application/atom+xml
http://localhost:8080/jboss-brms/rest/packages/{packageName}/versions/{version}
- application/atom+xml
http://localhost:8080/jboss-brms/rest/packages{packageName}/versions/{version}/source
- text/plain
http://localhost:8080/jboss-brms/rest/packages/{packageName}/versions/{version}/binary
- application/octet-stream
http://localhost:8080/jboss-brms/rest/packages{packageName}/assets
- application/atom+xml
- application/json
- application/xml
- application/atom+xml
- application/octet-stream
http://localhost:8080/jboss-brms/rest/packages{packageName}/assets/{assetName}
- application/atom+xml
- application/json
- application/xml
- application/atom+xml
- application/json
- application/xml
http://localhost:8080/jboss-brms/rest/packages{packageName}/assets/{assetName}/binary
- application/octet-stream
- application/octet-stream
http://localhost:8080/jboss-brms/rest/packages{packageName}/assets/{assetName}/source
- plain/text
- plain/text
http://localhost:8080/jboss-brms/rest/packages{packageName}/assets/{assetName}/versions
- application/atom+xml
http://localhost:8080/jboss-brms/rest/packages{packageName}/assets/{assetName}/versions/{version}
- application/atom+xml
- plain/text
- application/octet-stream
6.4.3. Accessing Rules by Category
http://localhost:8080/jboss-brms/rest/categories/{categoryName}
- application/atom+xml
- application/json
- application/xml
http://localhost:8080/jboss-brms/rest/categories/{categoryPath}/assets/page/{page}
- application/json
- application/xml
6.4.4. Source Code Examples
Example 6.1. Retrieving the source code for the web decision table
	WebClient client = WebClient.create("http://127.0.0.1:8080/");
	String content=client.path("jboss-brms/rest/packages/essaiRest/assets/tab2/source").accept("text/plain").get(String.class);
	GuidedDecisionTable52 dt = GuidedDTXMLPersistence.getInstance().unmarshal(content);
Example 6.2. Updating the source code of the web decision table
	String authorizationHeader = "Basic " + org.apache.cxf.common.util.Base64Utility.encode("guest:".getBytes());
	GuidedDecisionTable52 dt = new GuidedDecisionTable52();
	..
	Do some stuff here
	..
	String newContent = GuidedDTXMLPersistence.getInstance().marshal(dt);
	WebClient client2 = WebClient.create("http://127.0.0.1:8080/");
	client2.header("Authorization", authorizationHeader);
	Response response= client2.path("jboss-brms/rest/packages/essaiRest/assets/tab2/source").accept("application/xml").put(newContent);
6.5. WebDAV
6.5.1. WebDAV
WebDav. WebDAV is a HTTP-based file system application programming interface. Most modern operating systems provide integrated support for accessing WebDav shares. Please refer to your operating system vendor's documentation for configuration instructions. There are third-party WebDav clients available for most platforms.
http://localhost:8080/jboss-brms/org.drools.guvnor.Guvnor/webdav/6.5.2. WebDAV and Special Characters
6.5.3. Adding Unicode Support
Procedure 6.1. Adding Unicode Support
- Stop the application server.
- Open the
jboss-as/server/profile/deploy/jbossweb.sar/server.xmlfile. - Add
URIEncoding="UTF-8"to the web connector. For instance, for HTTP the code should be as follows:<Connector protocol="HTTP/1.1" port="8080" address="${jboss.bind.address}" connectionTimeout="20000" redirectPort="8443" URIEncoding="UTF-8" /> - Start the application server.
Appendix A. Revision History
| Revision History | |||
|---|---|---|---|
| Revision 5.3.1-7.400 | 2013-10-31 | ||
| |||
| Revision 5.3.1-7 | Mon Dec 03 2012 | ||
| |||