Questo contenuto non è disponibile nella lingua selezionata.
Administering RHEL by using the GNOME desktop environment
Configure RHEL system settings and GNOME settings from the GNOME desktop environment.
Abstract
Providing feedback on Red Hat documentation
We are committed to providing high-quality documentation and value your feedback. To help us improve, you can submit suggestions or report errors through the Red Hat Jira tracking system.
Procedure
Log in to the Jira website.
If you do not have an account, select the option to create one.
- Click Create in the top navigation bar.
- Enter a descriptive title in the Summary field.
- Enter your suggestion for improvement in the Description field. Include links to the relevant parts of the documentation.
- Click Create at the bottom of the window.
Chapter 1. Remotely accessing the desktop
You can remotely connect to the desktop on a RHEL server by using graphical GNOME applications. The connection depends on how the server is configured.
You can use one or more of the following options:
- Desktop sharing
- Allows remote clients to connect to the desktop session of the Linux user that is currently logged in on the server.
- Remote login
- Allows remote clients to open the GNOME login screen, where they can login as a Linux user with the correct credentials.
1.1. Enabling desktop sharing on the server by using GNOME
You can enable a remote desktop connection from a single client by configuring the Red Hat Enterprise Linux server.
Prerequisites
-
The
gnome-remote-desktoppackage is installed.
Procedure
Configure a firewall rule to enable access to the server:
$ sudo firewall-cmd --permanent --add-port=3389/tcp successNoteIf you also configure remote login on the server, the port number for desktop sharing changes. In that case, modify the firewall rule to add port number
3390instead.Reload firewall rules:
$ sudo firewall-cmd --reload success- Open Settings in GNOME.
- Open the System screen.
Select Remote Desktop.
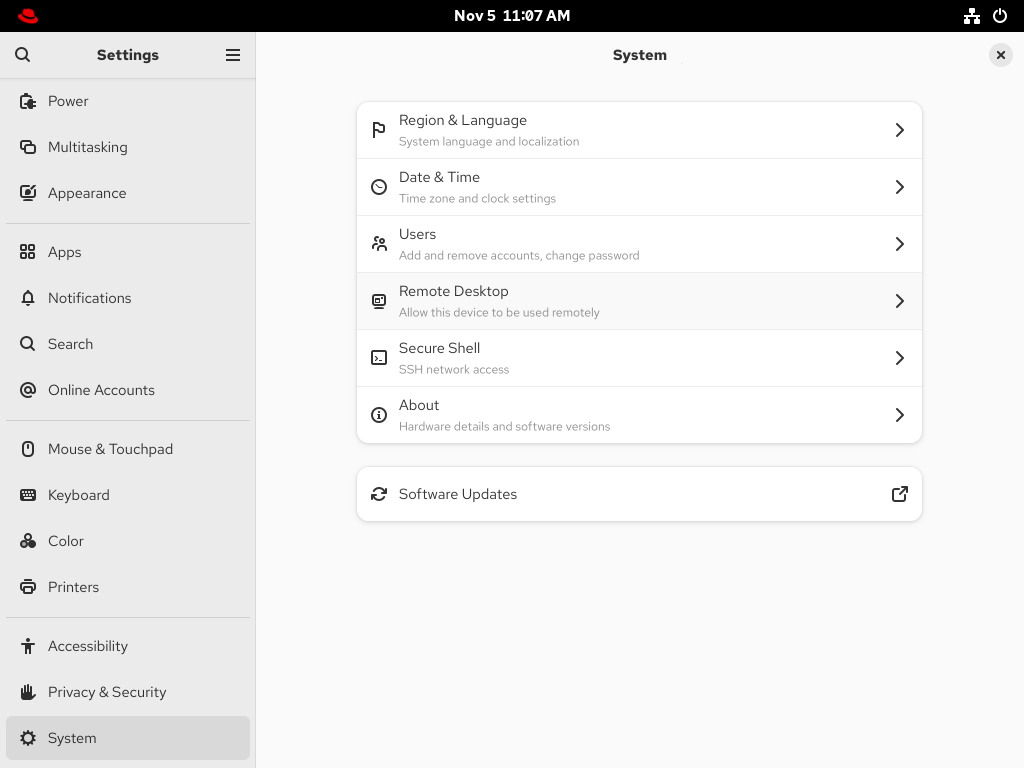
- Set Desktop Sharing to On.
- Optional: To allow the remote user to control your screen, set Remote Control to On.
Set a user name and a password in the Login Details section. Remote clients must enter these credentials when connecting to your desktop from a remote client.

1.2. Configuring GNOME remote login
By activating Remote Login in GNOME, you can allow remote clients to log in to the GNOME session as the Linux users on your system.
Prerequisites
-
The
gnome-remote-desktoppackage is installed.
Procedure
Configure a firewall rule to enable access to the server:
$ sudo firewall-cmd --permanent --add-port=3389/tcp
success
Reload firewall rules:
$ sudo firewall-cmd --reload success- Open Settings in GNOME.
- Open the System screen.
Select Remote Desktop.
- Click the Remote Login tab in the menu header.
Set Remote Login to On to enable screen sharing.

- Set a user name and a password in the Login Details section. Remote clients must enter these credentials when connecting to this system’s login screen from a remote client.
1.3. Connecting to a remote desktop by using GNOME
You can connect from a Red Hat Enterprise Linux client to a remote desktop server by using the Connections application. The connection depends on the remote server configuration.
Prerequisites
- Desktop sharing or remote login is enabled on the server. For more information, see Enabling desktop sharing on the server by using GNOME or Configuring GNOME remote login.
- For desktop sharing, a user is logged in to the GNOME graphical session on the server.
-
The
gnome-connectionspackage is installed on the client.
Procedure
- On the client, launch the Connections application.
Click the button in the top bar to open a new connection.

- Enter the IP address of the server.
Choose the connection type based on the operating system you want to connect to:
- Remote Desktop Protocol (RDP)
- Use RDP for connecting to Windows and RHEL 10 servers.
- Virtual Network Computing (VNC)
- Use VNC for connecting to servers with RHEL 9 and previous versions.
- Click .
Verification
- On the client, check that you can see the shared server desktop.
On the server, a screen sharing indicator appears on the right side of the top panel:

You can control screen sharing in the System menu of the server.
1.4. Connecting to a remote desktop session on a headless server for a single user
You can connect to a remote desktop session on a headless server for a single user through RDP (Remote Desktop Protocol).
A headless server is a system that operates without a connected monitor. You can initiate and manage a GNOME desktop session to manage servers securely in environments where direct physical access is not available.
Run the setup as a non-root user with sudo privileges. Attempting to run it as the root user causes the setup to fail. The credentials used to access this type of session are different from the system credentials of the user. For example, changing the user password on the host does not update the password used for RDP access.
Connecting to a remote desktop through RDP protocol requires setting up a TLS key and a TLS certificate.
Prerequisites
-
gnome-remote-desktoppackage is installed. -
gdmpackage is installed. -
freerdppackage is installed. - The session, such as the kiosk session or the workstation session, is installed. For more information, see How to install a graphical user internface (GUI) for Red Hat Enterprise Linux?
- SELinux is running in permissive mode. For more information, see Changing SELinux to permissive mode
Procedure
Configure a firewall rule to enable access to the server:
$ sudo firewall-cmd --permanent --add-port=3389/tcp
success
Reload firewall rules:
$ sudo firewall-cmd --reload
success
Create a directory for the self-signed TLS certificate:
$ mkdir -p ~/.local/share/gnome-remote-desktopGenerate a self-signed TLS certificate for the RDP service:
$ winpr-makecert -silent -rdp -path ~/.local/share/gnome-remote-desktop tlsConfigure GNOME Remote Desktop by using RDP:
$ grdctl --headless rdp set-tls-key ~/.local/share/gnome-remote-desktop/tls.key
$ grdctl --headless rdp set-tls-cert ~/.local/share/gnome-remote-desktop/tls.crt
$ grdctl --headless rdp set-credentials
$ grdctl --headless rdp enable
Refer
gdrctlman page for more information.Enable a headless server for single-user service:
$ systemctl --user enable --now gnome-remote-desktop-headless.serviceStart the headless GNOME session persistently for a single user as root:
$ sudo systemctl enable --now gnome-headless-session@<your_username>.serviceReplace
<your_username>with the username of the user for whom you want to start the headless GNOME session.Make
<your_username>.servicepersistent across system reboot:$ sudo systemctl set-default graphical.target
Verification
Verify that the session started successfully:
$ sudo systemctl status gnome-headless-session@<your_username>.service
1.5. Connecting to a remote desktop session on a headless server for multiple users
Integrate GNOME Remote Desktop with the GNOME Display Manager (GDM) to provide remote login functionality for multiple users by using the Remote Desktop Protocol (RDP).
Remote users authenticate by using a system-wide password, which grants access to the graphical login screen. Then they log in with their individual credentials, enabling remote access to the desktop environment.
Connecting to a remote desktop through RDP for multiple users requires setting up a TLS key and a TLS certificate.
Prerequisites
The
gnome-remote-desktop,gdm, andfreerdppackages are installed.NoteYou must reboot your system after installing the
gnome-remote-desktoppackage.- The session, such as the kiosk session or the workstation session, is installed. For more information, see How to install a graphical user interface (GUI) for Red Hat Enterprise Linux?
Procedure
Create a directory for the self-signed TLS certificate as the
gnome-remote-desktopuser:$ sudo -u gnome-remote-desktop mkdir -p ~gnome-remote-desktop/.local/share/gnome-remote-desktopGenerate a self-signed TLS certificate for the RDP service as the
gnome-remote-desktopuser:$ sudo -u gnome-remote-desktop winpr-makecert -silent -rdp -path ~gnome-remote-desktop/.local/share/gnome-remote-desktop tlsConnecting to a remote desktop through RDP for multiple users:
$ sudo grdctl --system rdp set-tls-key ~gnome-remote-desktop/.local/share/gnome-remote-desktop/tls.key
$ sudo grdctl --system rdp set-tls-cert ~gnome-remote-desktop/.local/share/gnome-remote-desktop/tls.crt
$ sudo grdctl --system rdp set-credentials
$ sudo grdctl --system rdp enable
Refer
gdrctlman page for more information.Enable the system remote login service and GDM:
$ sudo systemctl enable --now gdm
$ sudo systemctl enable --now gnome-remote-desktop.service
Make
gnome-remote-desktop.servicepersistent across system reboot:$ sudo systemctl set-default graphical.target
Verification
Verify that the session started successfully:
$ sudo systemctl status gnome-remote-desktop.service
Chapter 2. Remotely accessing a graphical application
You can remotely launch a graphical application on a RHEL server and use it from the remote client.
From RHEL 10 clients, you can remotely launch applications that support the Wayland display protocol by using the waypipe proxy, and applications that support the X11 display protocol by using X11 forwarding. You can also configure a RHEL 10 server for remotely launching graphical applications via SSH with X11 forwarding.
2.1. Launching an application remotely by using waypipe
You can access a Wayland-based graphical application on a RHEL server from a remote client by using SSH and the waypipe proxy.
Prerequisites
-
The
waypipepackage is installed on both the client and the remote system. - The application can run natively on Wayland.
Procedure
Launch the application remotely through
waypipeand SSH.[local-user]$ waypipe -c lz4=9 ssh <remote-server> <application-binary> The authenticity of host '<remote-server> (<192.168.122.120>)' can't be established. ECDSA key fingerprint is SHA256:<uYwFlgtP/2YABMHKv5BtN7nHK9SHRL4hdYxAPJVK/kY>. Are you sure you want to continue connecting (yes/no/[fingerprint])?- Confirm that a server key is valid by checking its fingerprint.
Continue connecting by typing
yes.Warning: Permanently added '<remote-server>' (ECDSA) to the list of known hosts.When prompted, type the server password.
remote-user's password:
[remote-user]$
2.2. Launching an application remotely by using X11 forwarding
You can access a graphical application on a remote RHEL server from a client by using SSH.
Prerequisites
- X11 forwarding over SSH is enabled on the server. For details, see Enabling X11 forwarding on the server.
Ensure that an X11 display server is running on your system:
- On RHEL, X11 is available by default in the graphical interface.
- On Microsoft Windows, install an X11 server such as Xming.
- On macOS, install the XQuartz X11 server.
- You have configured and restarted an OpenSSH server. For details, see Configuring the OpenSSH server and client by using RHEL system roles.
Procedure
Log in to the server by using SSH:
[<local_user>]$ ssh -X -Y <remote_server>
The authenticity of host '<remote_server> (192.168.122.120)' can't be established.
ECDSA key fingerprint is SHA256:uYwFlgtP/2YABMHKv5BtN7nHK9SHRL4hdYxAPJVK/kY.
Are you sure you want to continue connecting (yes/no/[fingerprint])?
Confirm that a server key is valid by checking its fingerprint.
NoteIf you plan to log in to the server on a regular basis, add the user’s public key to the server by using the
ssh-copy-idcommand.Confirm by typing yes.
Warning: Permanently added '<remote_server>' (ECDSA) to the list of known hosts.When prompted, type the password of the user on the remote server:
<remote_user>'s password:
[<remote_user> ~]$
Launch the application from the command line:
[<remote_user>]$ <application-binary>TipTo skip the intermediate terminal session, use the following command:
[<local_user>]$ ssh user@server -X -Y -C <application-binary>
2.3. Enabling X11 forwarding on the server
Configure a RHEL server so that remote clients can use graphical applications on the server over SSH.
Procedure
Install basic X11 packages:
# dnf install xorg-x11-xauth xorg-x11-fonts-\* dbus-x11NoteYour applications might require additional graphical libraries.
Enable the
X11Forwardingoption in the/etc/ssh/sshd_configconfiguration file:X11Forwarding yesThe option is disabled by default in RHEL.
Restart the
sshdservice:# systemctl restart sshd.service
Chapter 3. Setting a default desktop session for all users
You can configure a default desktop session for all users that have not logged in yet.
If a user logs in by using a different session than the default, their selection persists to their next login.
Procedure
To apply the default desktop session for ordinary users:
Copy the configuration file template for ordinary users:
# cp /usr/share/accountsservice/user-templates/standard \ /etc/accountsservice/user-templates/standard-
Edit the new
/etc/accountsservice/user-templates/standardfile. -
On the
Session=line, add the name of the session you want to set as the default, for example,gnome.
To apply the default desktop session to administrator users (members of the
wheelorsudogroups), create and configure the administrator template:Copy the administrator template:
# cp /usr/share/accountsservice/user-templates/administrator \ /etc/accountsservice/user-templates/administrator-
Edit the new
/etc/accountsservice/user-templates/administratorfile. -
On the
Session=line, add the name of the default session for administrators, for example,gnome.
Optional: To configure an exception to the default session for a certain user, follow these steps:
Copy the template file to
/var/lib/AccountsService/users/user-name:# cp /usr/share/accountsservice/user-templates/standard \ /var/lib/AccountsService/users/user-name-
In the new file, replace variables such as
${USER}and${ID}with the user values. -
On the
Session=line, add the name of the session you want to set as default for that user, for example,gnome.
Chapter 5. Tablets
You can manage Wacom tablets connected to your system from the Wacom Tablet settings panel in the GNOME environment.
Figure 5.1. The Wacom Tablet settings panel

The Wacom Tablet settings panel and the libinput stack use the libwacom tablet client library, which stores additional data about Wacom tablets that the system cannot obtain by querying the device directly.
If your tablet is listed in the libwacom library, it is visible in the Wacom Tablet settings panel.
If the Wacom Tablet settings panel displays This device is unknown and may present wrong capabilities, the tablet is supported by the underlying input stack but some functionality might be missing.
If the Wacom Tablet settings panel is empty, the tablet is not exposed by the kernel. In that case, contact Red Hat support.
5.1. Adding support for a new tablet
If the Wacom Tablet settings panel displays “This device is unknown and may present wrong capabilities", the tablet is supported by the underlying input stack but some functionality might be missing.
You can resolve this by adding a definition file for the tablet into the libwacom tablet information client library.
Prerequisites
-
The
libwacompackage is installed on your system.
Procedure
List all local devices recognized by the
libwacomdatabase:$ libwacom-list-local-devicesMake sure that your device is recognized in the output.
If your device is not listed, the device is missing from the
libwacomdatabase. However, the device might still be supported by the kernel if it is listed in the/proc/bus/input/devicesfile.-
Optional: Check whether the device is supported at all by entering the
libwacom-list-devicescommand, provided in thelibwacom-utilspackage. This command lists all devices supported by your installed version oflibwacom. Check whether the definition file is available in the
/usr/share/libwacom/directory.To use screen mapping correctly, support for your tablet must be included in the
libwacomdatabase.ImportantA common indicator that a device is not supported by
libwacomis that it works normally in a GNOME session, but the device is not correctly mapped to the screen.If the definition file for your device is not available in
/usr/share/libwacom/, you have these options:- Find the definition file in the linuxwacom/libwacom upstream repository and copy the file to your system.
- Find a similar device in the linuxwacom/libwacom upstream repository and modify the definition file accordingly.
Add and install the definition file with the
.tabletsuffix:# cp <tablet_definition_file>.tablet /etc/libwacomAfter the file is installed, the device is part of the
libwacomdatabase. The device is then available throughlibwacom-list-local-devices.
5.2. Setting Wacom tablet configuration values in the CLI
Instead of changing the settings in the Wacom Tablet settings panel, you can change the settings on the command line.
Wacom tablet and stylus configuration files are saved in the following locations by default:
- Tablet configuration
-
org.gnome.desktop.peripherals.tablet:/org/gnome/desktop/peripherals/tablets/<vid>:<pid>/ - Stylus configuration
-
org.gnome.desktop.peripherals.tablet.stylus:/org/gnome/desktop/peripherals/tablet/stylus/<serial number>/
By using <vid>, <pid>, and <serial_number> in configuration paths, you can configure tablets and styli independently.
Prerequisites
-
The
libwacompackage is installed on your system.
Procedure
List local devices to display their IDs:
$ libwacom-list-local-devices
devices:
- name: 'Wacom Intuos Pro M'
  bus: 'usb'
  vid: '0x056a'
  pid: '0x0357'
  nodes:
  - /dev/input/event6: 'Wacom Co.,Ltd. Wacom Intuos Pro M Pen'
  - /dev/input/event7: 'Wacom Co.,Ltd. Wacom Intuos Pro M Pad'
  styli:
   - id: 0x100802
If a device does not support unique serial numbers, the stylus is identified with a generic identifier based on the tablet’s VID and PID:
org.gnome.desktop.peripherals.tablet.stylus:/org/gnome/desktop/peripherals/tablet/stylus/default-<vid>:<pid>/Determine the serial number for the particular device:
# libwacom-show-stylus /dev/input/event6
Please put tool in proximity
Tool id 0x100802 serial 0x2380369c in-proximity: False
List the available settings for the selected device:
For a tablet:
$ gsettings list-recursively org.gnome.desktop.peripherals.tablet:/org/gnome/desktop/peripherals/tablet/<vid>:<pid>/
org.gnome.desktop.peripherals.tablet area [0.0, 0.0, 0.0, 0.0]
org.gnome.desktop.peripherals.tablet keep-aspect false
org.gnome.desktop.peripherals.tablet left-handed false
org.gnome.desktop.peripherals.tablet mapping 'absolute'
org.gnome.desktop.peripherals.tablet output ['', '', '']
Replace
<vid>and<pid>with the IDs of your device.For a stylus:
$ gsettings list-recursively org.gnome.desktop.peripherals.tablet.stylus:/org/gnome/desktop/peripherals/tablet/stylus/<serial_number>/
org.gnome.desktop.peripherals.tablet.stylus button-action 'default'
org.gnome.desktop.peripherals.tablet.stylus button-keybinding ''
org.gnome.desktop.peripherals.tablet.stylus eraser-pressure-curve [0, 0, 100, 100]
org.gnome.desktop.peripherals.tablet.stylus eraser-pressure-range [0, 100]
org.gnome.desktop.peripherals.tablet.stylus pressure-curve [0, 0, 100, 100]
org.gnome.desktop.peripherals.tablet.stylus pressure-range [0, 100]
org.gnome.desktop.peripherals.tablet.stylus secondary-button-action 'default'
org.gnome.desktop.peripherals.tablet.stylus secondary-button-keybinding ''
org.gnome.desktop.peripherals.tablet.stylus tertiary-button-action 'default'
org.gnome.desktop.peripherals.tablet.stylus tertiary-button-keybinding ''
Replace
<serial_number>with the ID of your device.
Set an option to the value that you want:
$ gsettings set <schema_name>:<path> <key> <value>Replace:
-
<schema_name>:<path>with the schema and path to your device. -
<key>with the option you want to change. -
<value>with the value you want to set.
For example:
$ gsettings set org.gnome.desktop.peripherals.tablet.stylus:/org/gnome/desktop/peripherals/tablet/stylus/0x2380369c pressure-range "[0, 75]"-
Chapter 6. Managing storage volumes in GNOME
GNOME Virtual File System (GVFS) is an extension that hides the details of storage from applications to act like a standard file system. The virtual file system is independent of hardware and device drivers.
6.1. The GVFS system
GNOME Virtual File System (GVFS) uses addresses for full identification based on the Uniform Resource Identifier (URI) standard, syntactically similar to URL addresses in web browsers. These addresses in the form of schema://user@server/path are the key information determining the kind of service.
GVFS helps to mount the resources. These mounts are shared between multiple applications. Resources are tracked globally within the running desktop session, which means that even if you quit an application that triggered the mount, the mount continues to be available for any other application. Multiple applications can access the mount at the same time unless it is limited by a back end. Some protocols by design permit only a single channel.
GVFS mounts removable media in the /run/media/ directory.
6.2. The format of the GVFS URI string
You must form a URI string to use back-end services. This string is a basic identifier used in GVFS, which carries all necessary information needed for unique identification, such as type of service, back-end ID, absolute path, or user name if required.
You can see this information in the Files address bar and GTK+ open or save file dialog.
The following example is a very basic form of the URI string, which points to a root directory (/) of the File Transfer Protocol (FTP) server running at the <your_ftp_server> domain:
Example 6.1. A URI string pointing to the root FTP directory
ftp://<your_ftp_server_domain>/Example 6.2. A URI string pointing to a text file on FTP
ssh://<username>@<your_ftp_server_domain>/home/<username>/<file_name>.txt6.3. Mounting a storage volume in GNOME
To access and browse files on connected drives or your local area network, mount a local storage volume or network share in the Files application.
Procedure
- Open the Files application.
Click Other Locations in the side bar.
The window lists all connected storage volumes and all network shares that are publicly available on your local area network.
If you can see the volume or network share in this list, mount it by clicking the item.
If you want to connect to a different network share, use the following steps.
- Enter the GVFS URI string to the network share in the Enter server address field.
- Press .
- If the dialog asks you for login credentials, enter your name and password into the relevant fields.
- When the mounting process finishes, you can browse the files on the volume or network share.
6.4. Unmounting a storage volume in GNOME
To prevent data corruption before physically removing a drive, unmount a storage volume or network share in the Files application.
Always unmount a storage volume before removing the drive from the computer. Removing a drive might corrupt the data on the volumes that are still mounted.
Procedure
- Open the Files application.
- In the side bar, click the Unmount (⏏) icon next to the chosen mount.
- Wait until the mount disappears from the side bar or a notification about the safe removal appears.
6.5. Access to GVFS mounts in the file system
Applications built with the GIO library can access GNOME Virtual File System (GVFS) mounts. GVFS provides the File System in Userspace (FUSE) daemon, which exposes active GVFS mounts.
Any application can access active GVFS mounts by using the standard POSIX APIs as though mounts were regular file systems.
In certain applications, additional library dependency and new virtual file system (VFS) subsystem specifics might be unsuitable or too complicated. For such reasons and to boost compatibility, GVFS provides a File System in Userspace (FUSE) daemon, which exposes active mounts through its mount for standard Portable Operating System Interface (POSIX) access. This daemon transparently translates incoming requests to imitate a local file system for applications.
You might experience difficulties with certain combinations of applications and GVFS back ends.
The FUSE daemon starts automatically with the main gvfs daemon and mounts volumes either in the /run/user/UID/gvfs/ or ~/.gvfs/ directories as a fallback.
Manual browsing shows individual directories for each GVFS mount. The system passes the transformed path as an argument when you are opening documents from GVFS locations with non-native applications. Note that native GIO applications automatically translate this path back to a native URI.
6.6. Available GIO commands
GIO (GNOME Integrated Objects) is a library and an API to access various file system types and data sources within the GNOME desktop environment. GIO allows applications to interact with the sources such as local files, network shares, databases, web services and so on.
GIO provides several commands that might be useful for scripting or testing.
GIO uses the following commands that correspond to POSIX commands:
gio cat- Displays the content of a file.
gio mkdir- Creates a new directory.
gio rename- Renames a file.
gio mount-
Provides access to various aspects of the
giomounting functionality. gio set- Sets a file attribute on a file.
gio copy- Makes a copy of a file.
gio list- Lists directory contents.
gio move- Moves a file from one location to another.
gio remove- Removes a file.
gio trash-
Sends files or directories to the
Trashcan. This can be a different folder depending on where the file is located, and not all file systems support this concept. In the common case that the file lives inside a user’s home directory, the trash folder is$XDG_DATA_HOME/Trash. gio info- Displays information of the given locations.
gio save- Reads from standard input and saves the data to the given location.
gio tree- Lists the contents of the given locations recursively, in a tree-like format. If no location is given, it defaults to the current directory.
You can control GIO specifics with the following additional commands:
gio monitor- Monitors files or directories for changes, such as creation, deletion, content and attribute changes, and mount and unmount operations affecting the monitored locations.
gio mime- Lists the registered and recommended applications for the mimetype if no handler is given, else, it is set as the default handler for the mimetype.
gio open- Opens files with the default application that is registered to handle files of this type.
For user convenience, bash completion is provided as a part of the package.
All these commands are native GIO clients, there is no need for the fallback FUSE daemon to be running. Their purpose is not to be drop-in replacements for POSIX commands, in fact, a very little range of switches is supported. In their basic form, these commands take an URI string as an argument instead of a local path.
Example 6.3. Examples of the GIO commands usage
-
List all files in the local
/tmpdirectory
$ gio list file:///tmp- List the content of a text file from a remote system
$ gio cat ssh://joe@ftp.myserver.net/home/joe/todo.txt-
Copy the previous text file to a local
/tmpdirectory
$ gio copy ssh://joe@ftp.myserver.net/home/joe/todo.txt /tmp/
For more information about GIO, see the gio(1) man page on your system.
6.7. Overview of GVFS metadata
GNOME Virtual File System (GVFS) metadata storage is implemented as a set of key-and-value pairs that bind information to a particular file.
GNOME applications rely on GIO (GNOME Integrated Objects) to access files and data. With GIO, you can save metadata for runtime information such as icon position, last-played location, position in a document, emblems, notes, and so on.
Whenever you move a file or directory, GVFS moves the metadata of that file or directory at the same time. The GVFS stores all metadata privately, so metadata is available only on the machine. However, GVFS tracks mounts and removable media as well.
GVFS mounts removable media in the /run/media/ directory.
To view and manipulate with metadata, you can use:
-
the
gio infocommand, -
the
gio setcommand, or - any other native GIO way of working with attributes.
For more information, check the gio man page on your system.
6.8. Setting custom GIO metadata attribute
GIO (GNOME Integrated Objects) allows applications to attach metadata to the files. You can add and manage your own custom metadata attributes using GIO to determine how applications interact with specific files and provide more detailed information about them.
Procedure
Create an empty file:
$ touch /tmp/myfileView the metadata of this file:
$ gio info -a 'metadata::*' /tmp/myfile
uri: file:///tmp/myfile
attributes:
Set a string to this file:
$ gio set -t string /tmp/myfile 'metadata::mynote' 'Please remember to delete this file!'View the metadata:
$ gio info -a 'metadata::*' /tmp/myfile
uri: file:///tmp/myfile
attributes:
  metadata::mynote: Please remember to delete this file!
Result
The metadata persists when you move the file by using the GIO API.
For more information about GIO, see the gio man page on your system.
6.9. Password management of GVFS mounts
A typical GNOME Virtual File System (GVFS) mount authenticates on its activation unless the resource allows anonymous authentication or does not require authentication.
In a standard GTK+ dialog, you can choose whether to store the password.
When you select the persistent storage, the password is stored in the user keyring. GNOME Keyring is a central place for secrets storage. The password is encrypted and automatically unlocked on desktop session start by using the password provided on login. For protecting it by a different password, you can set the password at the first use.
The Passwords and Keys application helps to manage the stored password and GNOME Keyring. It allows removing individual records or changing passwords.
6.10. GVFS back ends
Back ends in GNOME Virtual File System (GVFS) provide access to a specific type of resource. This section provides a list of available GVFS back ends and their specifications.
Some back ends are packaged separately and not installed by default. For installing additional back ends, use the dnf package manager.
The available GVFS back ends are:
admin- Provides administrator access to the local file system.
burn- A virtual back end that burning applications use as a temporary storage for new CD, DVD, or BD medium content.
cdda- Exposes Audio CD through separate Waveform Audio File Format (WAV) files.
computer- A virtual back end consolidating active mounts and physical volumes. Acts similarly to a signpost. Previously used by Files for its Computer view.
dav,davs- A WebDAV client, including secure variant. Authentication is possible only during mount. The back end does not support later re-authentication on per-folder basis.
dns-sd- DNS Service Discovery: An Avahi client, used during network browsing, forms persistent URIs to discovered services.
ftp-
A fully featured File Transfer Protocol (FTP) client. Supports passive transfers by default. Also, handles secure mode over
ftps(explicit mode) andftpis(implicit mode) schemes. gphoto2- A Picture Transfer Protocol (PTP) client to access your camera attached by USB or FireWire.
google- Provides access to Google Drive. The Google Drive account needs to be configured in the Online Accounts settings.
http- Handles all HTTP requests. Useful for easy downloading files from web in client applications.
locatest-
A simple testing back end that proxies the
file://URI. The back end supports error injection. mtp- A Media Transfer Protocol (MTP) back end for accessing media player and cell phone memory.
network- Allows you to browse Window Network and show shares discovered over Avahi.
recent- A back end used in the file chooser dialog to list recent files used by GNOME applications.
sftp- A fully-featured SSH File Transfer Protocol (SFTP) client.
smb- Accesses Samba and Windows shares.
trash- A trash back end that allows to restore deleted files.
6.11. Troubleshooting volume management in GNOME
Following are some common errors of volume management in GNOME and ways to resolve them.
6.11.1. Troubleshooting access to GVFS locations from non-GIO clients
If you have problems accessing GVFS locations from your application, it might mean that it is not native GIO client. Native GIO clients are typically all GNOME applications by using GNOME libraries (glib, gio). The gvfs-fuse service is provided as a fallback for non-GIO clients.
Prerequisites
The
gvfs-fusepackage is installed.$ dnf install gvfs-fuse
Procedure
Ensure that
gvfs-fuseis running.$ ps ax | grep gvfsd-fuseIf
gvfs-fuseis not running, log out and log back in. You must not startgvfs-fusemanually.Find the system user ID (UID) for the
/run/user/UID/gvfs/path.The
gvfsd-fusedaemon requires a path where it can expose its services. When the/run/user/UID/gvfs/path is unavailable,gvfsd-fuseuses the~/.gvfspath.$ id -uIf
gvfsd-fuseis still not running, start thegvfsd-fusedaemon:$ /usr/libexec/gvfsd-fuse -f /run/user/UID/gvfsNow, the FUSE mount is available, and you can manually browse for the path in your application.
-
Find the GVFS mounts under the
/run/user/UID/gvfs/or~/.gvfslocations.
6.11.2. Troubleshooting an invisible connected USB disk
When you connect a flash drive, the GNOME Desktop might not display it. If your flash drive is not visible in Files, but you can see it in the Disks application, you can set the Show in user interface option in Disks.
Procedure
- Open the Disks application.
- Select the disk in the side bar.
- Below Volumes, click Additional partition options > Edit Mount Options
- Click Show in user interface.
- Confirm by clicking .
- If the flash drive is still not visible, you can try to physically removing and connecting it again.
6.11.3. Troubleshooting unknown or unwanted partitions listed in Files
Some devices have a special partition with backups or help files, which you might not want to see each time you plug in the device. For example, when you plug in a flash disk, it is automatically mounted and its volumes are displayed in the *Files* side bar.Procedure
- Open the Disks application.
- Select the disk in the side bar.
- Below Volumes, click Additional partition options > Edit Mount Options
- Clear Show in user interface.
- Confirm by clicking .
6.11.5. Troubleshooting a busy disk in GNOME
If you receive a notification about your disk being busy, identify the programs that are accessing the disk. Then, you can end the programs that are running. You can also use the System Monitor application to kill the programs forcefully.
Prerequisites
The
iotoputility is installed:# dnf install iotop
Procedure
Examine the list of open files.
-
Run the
lsofcommand to get the list of open files. -
If
lsofis not available, run theps axcommand. - You can use System Monitor to display the running processes in a GUI.
-
Run the
When you have identified the programs, terminate them using any of the following methods:
On the command line, run the
killcommand.For more information about the
killcommand, see thekillman page on your system.- In System Monitor, right-click the line with the program process name, and click End or Kill from the menu.
Chapter 7. Enabling automatic login
You can enable automatic login to streamline your computing experience, avoiding the need to repeatedly enter your password during every session startup.
This can be convenient for single-user environments where security risks are minimal, such as on a personal home computer that is not shared with others.
Enabling automatic login poses security risks. It allows direct access to the user account without requiring a password. This might lead to unauthorized use of the system or sensitive data. This risk is significant when the computer is shared, in public spaces, or physically accessible.
Consider if login convenience is a priority over potential compromise of security and privacy.
Procedure
- Open Settings.
- Click Users.
- Select the button and enter your password.
- Toggle the switch to enable automatic login.
Result
- Once you have enabled automatic login, your computer will automatically log in to the specified user account the next time you start it up.
Chapter 8. Enabling authentication with enterprise credentials in GNOME
If your workplace uses a system called Active Directory or IPA, and you have an account there, you can use that account to log in to the GNOME desktop environment.
Logging in by using enterprise credentials provides centralized account management, streamlines access to work-related resources, and gives the convenience of Single Sign-On (SSO).
8.1. Configuring enterprise credentials in GNOME
To streamline access to work-related resources and enable Single Sign-On (SSO), configure your system to use enterprise credentials by using Settings.
Procedure
- Open Settings.
- Click Online Accounts.
- Select Enterprise Authentication (Kerberos).
-
In the Principal field, enter your domain username in the
username@domain.comformat. - Click Connect.
Enter your enterprise password and click Continue.
Depending on the configuration of your domain, you might be asked for the domain administrator credentials.
8.2. Adding enterprise users in GNOME
Add an enterprise user to GNOME by using Settings to use centralized account management from an Active Directory or Identity Management server.
Prerequisites
- Administrative access.
- You have enterprise credentials from an Active Directory (AD), LDAP, or Identity Management (IdM) server.
Procedure
- Open Settings.
- Open the System screen.
- Click Users.
- Click Add Enterprise Login
- Enter the domain, username, and password for your Enterprise account.
Click .
Depending on the domain configuration, you might need to enter administrator credentials.
8.3. Logging in to GNOME with enterprise credentials
If your network has an Active Directory, LDAP, or Identity Management (IdM) domain available, and you have a domain account, you can log in to GNOME with your enterprise credentials.
Procedure
At the GNOME login prompt, type your domain username followed by an
@sign and then your domain name.username@domain.com
Chapter 9. Customizing desktop appearance and branding
As a system administrator, you can configure the default appearance and branding of the GNOME interface for all users on the system.
9.1. Customizing desktop backgrounds
As a system administrator, you can configure the default desktop background, add extra backgrounds, or add multiple backgrounds available to all users of the system.
By default, users are permitted to change the background. As an administrator, you can prevent users from changing the background with the settings in the locks directory.
9.1.1. Customizing the default desktop background
You can configure the default desktop background and its appearance by setting the relevant GSettings keys in the org.gnome.desktop.background schema.
Procedure
Create a local database for machine-wide settings in
/etc/dconf/db/local.d/00-background:[org/gnome/desktop/background] picture-uri='file:///usr/local/share/backgrounds/wallpaper.jpg' picture-options='scaled' primary-color='000000' secondary-color='FFFFFF'-
picture-uri: Specify the path to the desktop background image file. picture-options: Specify one of the rendering options for the background image:-
none -
wallpaper -
centered -
scaled -
stretched -
zoom -
spanned
-
-
primary-color: Specify the left or top color when drawing gradients or the solid color. -
secondary-color: Specify the right or bottom color when drawing gradients.
-
Optional: If you want to prevent a user from changing the default background, override the user’s setting in the
/etc/dconf/db/local.d/locks/backgroundfile:# List the keys used to configure the desktop background /org/gnome/desktop/background/picture-uri /org/gnome/desktop/background/picture-options /org/gnome/desktop/background/primary-color /org/gnome/desktop/background/secondary-colorUpdate the system databases:
# dconf update- Users must log out and back in again before the system-wide settings take effect.
9.1.2. Adding extra backgrounds
You can make extra backgrounds available to users on your system.
Procedure
-
Create the
/usr/share/gnome-background-properties/extra-backgrounds.xmlfile. In the new file, specify the extra background files and their appearance in the following format:
<?xml version="1.0" encoding="UTF-8"?> <!DOCTYPE wallpapers SYSTEM "gnome-wp-list.dtd"> <wallpapers> <wallpaper deleted="false"> <name>Background name</name> <filename>full-path-to-the-image</filename> <options>display-option</options> <shade_type>background-shade</shade_type> <pcolor>primary-color</pcolor> <scolor>secondary-color</scolor> </wallpaper> </wallpapers>- The new backgrounds are now available to all users in the Background section of the Settings application.
9.1.3. Frequently used background schema keys
The following configuration controls the behavior of desktop backgrounds in the GSettings system.
| Key name | XML name | Possible values | Description |
|---|---|---|---|
|
|
|
|
Determines how the image set by |
|
|
|
| Determines the shade of the background color. |
|
|
|
default: | Left or Top color when drawing gradients, or the solid color. |
|
|
|
default: | Right or Bottom color when drawing gradients, not used for solid color. |
Example 9.1. An extra backgrounds file with one <wallpaper> element
<?xml version="1.0" encoding="UTF-8"?>
<!DOCTYPE wallpapers SYSTEM "gnome-wp-list.dtd">
<wallpapers>
  <wallpaper deleted="false">
    <name>Company Background</name>
    <name xml:lang="de">Firmenhintergrund</name>
    <filename>/usr/local/share/backgrounds/company-wallpaper.jpg</filename>
    <options>zoom</options>
    <shade_type>solid</shade_type>
    <pcolor>#ffffff</pcolor>
    <scolor>#000000</scolor>
  </wallpaper>
</wallpapers>
Example 9.2. An extra backgrounds file with two <wallpaper> elements
In one configuration file, you can specify multiple <wallpaper> elements to add more backgrounds as shown in the following example with two <wallpaper> elements, adding two different backgrounds.
<?xml version="1.0" encoding="UTF-8"?>
<!DOCTYPE wallpapers SYSTEM "gnome-wp-list.dtd">
<wallpapers>
  <wallpaper deleted="false">
    <name>Company Background</name>
    <name xml:lang="de">Firmenhintergrund</name>
    <filename>/usr/local/share/backgrounds/company-wallpaper.jpg</filename>
    <options>zoom</options>
    <shade_type>solid</shade_type>
    <pcolor>#ffffff</pcolor>
    <scolor>#000000</scolor>
  </wallpaper>
  <wallpaper deleted="false">
    <name>Company Background 2</name>
    <name xml:lang="de">Firmenhintergrund 2</name>
    <filename>/usr/local/share/backgrounds/company-wallpaper-2.jpg</filename>
    <options>zoom</options>
    <shade_type>solid</shade_type>
    <pcolor>#ff0000</pcolor>
    <scolor>#00ffff</scolor>
  </wallpaper>
</wallpapers>
9.1.4. Setting the screen shield
Screen shield is the screen that slides down when you lock the system. You can set a default screen shield picture for all users on the system.
Procedure
Create the
/etc/dconf/db/gdm.d/01-screensaverfile:[org/gnome/desktop/screensaver] picture-uri='file://<path_to_your_background_file>'Replace
<path_to_your_background_file>with the absolute path to the image file that you want to use as the default screen shield. Supported formats are PNG, JPG, JPEG, and TGA. Note that the screen shield scales your image if necessary to fit the screen.Update the system databases:
# dconf update- Users must log out and back in again before the system-wide settings take effect.
Troubleshooting
If the screen shield does not update:
Verify that you have updated the system databases:
# dconf updateTry restarting GDM:
# systemctl restart gdm.serviceWarningRestarting the
gdmservice terminates all currently running GNOME sessions of all desktop users who are logged in. This might result in users losing unsaved data.
9.2. Customizing the branding of the login screen
You can change the logo that displays on the GNOME login screen (GDM) by using a dconf profile.
Prerequisites
- Prepare an image file in any of the supported formats: ANI, BPM, GIF, GTIFF, ICNS, ICO, JPEG, JPEG 2000, PCX, PNM, PBM, PGM, PPM, RAS, SVG, TGA, TIFF, WBMP, XBM, or XPM.
- The image must be around 48 pixels in height. If it is significantly larger, it will exceed the logo area.
-
Store the image file in a location that the
gdmuser can access. For example, select a universally readable system directory such as/opt/or/usr/local/.
Procedure
Create the
/etc/dconf/db/gdm.d/01-override-logoconfiguration file with the following content:[org/gnome/login-screen] logo=<path_to_logo>Replace
<path_to_logo>with the full path to the image file that you want to use as the login screen logo.Update the system databases:
# dconf update
Verification
- Log out or otherwise switch to the login screen.
- Check if the selected logo is displayed.
If the logo does not update, restart GDM:
# systemctl restart gdmWarningRestarting the
gdmservice terminates all currently running GNOME sessions of all desktop users who are logged in. This might result in users losing unsaved data.
Chapter 10. Displaying system security classification
As an administrator of deployments where the user must be aware of the security classification of the system, you can set up a notification of the security classification.
This can be either a permanent banner or a temporary notification, and it can appear on the login screen, in the GNOME session, or on the lock screen.
10.1. Enabling system security classification banners
You can create a permanent classification banner to state the overall security classification level of the system. This is useful for deployments where the user must always be aware of the security classification level of the system that they are logged into.
The permanent classification banner can appear within the running session, the lock screen, and login screen, and you can customize its background color, its font, and its position within the screen.
Procedure
Install the
gnome-shell-extension-classification-bannerpackage:# dnf install gnome-shell-extension-classification-bannerCreate the
99-class-bannerfile at either of the following locations:-
To configure a notification at the login screen, create
/etc/dconf/db/gdm.d/99-class-banner. -
To configure a notification in the user session, create
/etc/dconf/db/local.d/99-class-banner.
-
To configure a notification at the login screen, create
Enter the following configuration in the created file:
[org/gnome/shell]
enabled-extensions=['classification-banner@gnome-shell-extensions.gcampax.github.com']

[org/gnome/shell/extensions/classification-banner]
background-color='<rgba(value, value, value, value)>'
message='<your_message>'
top-banner=<true_or_false>
bottom-banner=<true_or_false>
system-info=<true_or_false>
color='<rgb(value, value, value)>'
To enable multiple extensions, specify all of them in the
enabled-extensionslist. For example:enabled-extensions=['heads-up-display@gnome-shell-extensions.gcampax.github.com', 'classification-banner@gnome-shell-extensions.gcampax.github.com']Update the
dconfdatabase:# dconf update- Reboot the system.
Troubleshooting
- If the classification banners are not displayed for an existing user, log in as the user and enable the Classification banner extension by using the Extensions application.
10.2. Notifying of the system security classification
You can set up a notification that contains a predefined message in an overlay banner. This is useful for deployments where the user is required to read the security classification of the system before logging in.
Depending on your configuration, the notification can appear at the login screen, after logging in, on the lock screen, or after a longer time with no user activity. You can always clear the notification when it is displayed.
Procedure
Install the
gnome-shell-extension-heads-up-displaypackage:# dnf install gnome-shell-extension-heads-up-displayCreate the
99-hud-messagefile at either of the following locations:-
To configure a notification at the login screen, create
/etc/dconf/db/gdm.d/99-hud-message. -
To configure a notification in the user session, create
/etc/dconf/db/local.d/99-hud-message.
-
To configure a notification at the login screen, create
Enter the following configuration in the created file:
[org/gnome/shell]
enabled-extensions=['heads-up-display@gnome-shell-extensions.gcampax.github.com']

[org/gnome/shell/extensions/heads-up-display]
message-heading="<security_classification_title>"
message-body="<security_classification_description>"
# The following options control when the notification appears:
show-when-locked=true
show-when-unlocking=true
show-when-unlocked=true
Replace the following values with text that describes the security classification of your system:
- Security classification title
- A short heading that identifies the security classification.
- Security classification description
- A longer message that provides additional details, such as references to various guidelines.
WarningThis configuration overrides similar configuration files that also enable an extension, such as Enabling system security classification banners.
To enable multiple extensions, specify all of them in the
enabled-extensionslist. For example:enabled-extensions=['heads-up-display@gnome-shell-extensions.gcampax.github.com', 'classification-banner@gnome-shell-extensions.gcampax.github.com']Update the
dconfdatabase:# dconf update- Reboot the system.
Troubleshooting
- If the notifications are not displayed for an existing user, log in as the user and enable the Heads-up display message extension using the Extensions application.
Chapter 11. Changing system power settings
You can configure the power settings of your system to manage energy consumption and optimize performance. Changing the system power settings enables you to balance between energy conservation and performance.
11.1. Changing the power button behavior
To customize the action of the power button, you can change its default behavior both when GNOME is running and when it is not running.
11.1.1. Changing the behavior of the power button when GNOME is not running
To prevent the system from shutting down when you press the power button, you need to modify settings for the non-graphical systemd target. Select the option according to requirement.
Prerequisites
- You have administrative privileges.
Procedure
-
Edit the
/etc/systemd/logind.confconfiguration file to set theHandlePowerKeyvariable. To reboot the system when you press the power button, set the
rebootvalue:HandlePowerKey=rebootUse one of the following options:
-
poweroff: Shut down the computer. -
reboot: Reboot the system. -
halt: Initiate a system halt. -
kexec: Initiate akexecreboot. -
suspend: Suspend the system. -
hibernate: Initiate system hibernation. -
ignore: Do nothing.
-
Restart the
systemd-logindservice to apply the changes:# systemctl reload systemd-logind
11.1.2. Changing the behavior of the power button in GNOME
To prevent the system from suspending when you press the power button, modify settings for the GNOME login screen and user session. You can select one of the options: physically on a system or virtually from a remote console.
Prerequisites
- You have administrative privileges.
Procedure
Create a local database for system-wide settings in the
/etc/dconf/db/local.d/01-powerfile:[org/gnome/settings-daemon/plugins/power] power-button-action=<value>Replace
<value>with one of the following power button actions:-
nothing: Does nothing. -
suspend: Suspends the system. -
hibernate: Hibernates the system. interactive: Shows a pop-up query asking the user what to do.In the interactive mode, when you press the power button, the system automatically powers off after 60 seconds. You can select a different behavior from the pop-up query.
-
Optional: To override existing settings and prevent other users from changing it, edit configuration in the
/etc/dconf/db/local.d/locks/01-powerfile:/org/gnome/settings-daemon/plugins/power/power-button-actionUpdate the system databases:
# dconf update- Log out and log in again for the system-wide settings to take effect.
Verification
- Press the power button and check if the system performs the action you configured.
11.2. Changing how your system behaves when you close the laptop lid
When you close the lid of your laptop, it suspends by default to save battery. You can customize this behavior according to your preferences.
Some laptops can overheat if they are left running with the lid closed, especially in confined spaces. Consider whether changing this setting is safe for your laptop, especially if you intend to keep the laptop running with the lid closed for extended periods of time.
Prerequisites
- Administrative access
Procedure
-
Open the
/etc/systemd/logind.confconfiguration file. -
Look for the line that says
HandleLidSwitch=suspend. -
If the line starts with the
#symbol, remove it to enable the setting. Replace
suspendwith one of the following options:-
poweroffto shut down the computer. -
lockto lock the screen. -
ignoreto do nothing.
For example, to lock the screen upon closing the lid, use this setting:
HandleLidSwitch=lock-
- Save your changes and close the editor.
Chapter 12. Restricting the desktop session
You can restrict and control various functionalities of the GNOME desktop environment. You can enforce specific configurations and restrictions to maintain system integrity and prevent unauthorized access.
12.1. Disabling user logout and user switching
Disabling user logout and user switching can improve security, prevent user errors, and enforce a specific workflow. This can mitigate unauthorized access to sensitive data and disruptions to the workflow caused by users accidentally logging out or switching to another user.
Prerequisites
- Administrative access.
Procedure
Create a plain text
/etc/dconf/db/local.d/00-logoutkeyfile in the/etc/dconf/db/local.d/directory with the following content:[org/gnome/desktop/lockdown] # Disable user logout disable-log-out=true # Disable user switching disable-user-switching=trueCreate a new file under the
/etc/dconf/db/local.d/locks/directory and list the keys or subpaths you want to lock down:# Lock user logout /org/gnome/desktop/lockdown/disable-log-out # Lock user switching /org/gnome/desktop/lockdown/disable-user-switchingApply the changes to the system databases:
# dconf update
12.2. Disabling printing
Disabling printing can prevent unauthorized access to sensitive documents and safeguard confidential information from potential breaches.
Prerequisites
- Administrative access.
Procedure
Create a plain text
/etc/dconf/db/local.d/00-printingkeyfile in the/etc/dconf/db/local.d/directory with the following content:[org/gnome/desktop/lockdown] # Disable printing disable-printing=trueCreate a new file under the
/etc/dconf/db/local.d/locks/directory and list the keys or subpaths you want to lock down:# Lock printing /org/gnome/desktop/lockdown/disable-printingApply the changes to the system databases:
# dconf update
12.3. Disabling file saving
Preventing files from being saved on the system can help protect sensitive data from unauthorized access and protect against potential data leaks.
Prerequisites
- Administrative access
Procedure
Create a plain text
/etc/dconf/db/local.d/00-filesavingkeyfile in the/etc/dconf/db/local.d/directory with the following content:[org/gnome/desktop/lockdown] # Disable saving files on disk disable-save-to-disk=trueCreate a new file under the
/etc/dconf/db/local.d/locks/directory and list the keys or subpaths you want to lock down:# Lock file saving /org/gnome/desktop/lockdown/disable-save-to-diskApply the changes to the system databases:
# dconf update
12.4. Disabling the shell prompt
Disabling the shell prompt can simplify user interactions with the system, prevent inexperienced users from executing potentially harmful commands that might cause system instability or data loss, and reduce the risk of unauthorized changes to system settings or configurations.
Prerequisites
- Administrative access.
Procedure
Create a plain text
/etc/dconf/db/local.d/00-lockdownkeyfile in the/etc/dconf/db/local.d/directory with the following content:[org/gnome/desktop/lockdown] # Disable command prompt disable-command-line=trueCreate a new file under the
/etc/dconf/db/local.d/locks/directory and list the keys or subpaths you want to lock down:# Lock command prompt /org/gnome/desktop/lockdown/disable-command-lineApply the changes to the system databases:
# dconf update- Log out and log in again for the changes to take effect.
12.5. Disabling repartitioning
You can override the default system settings that control disk management.
Avoid modifying the /usr/share/polkit-1/actions/org.freedesktop.udisks2.policy file directly. Any changes you make will be replaced during the next package update.
Prerequisites
- Administrative access.
Procedure
Copy the
/usr/share/polkit-1/actions/org.freedesktop.udisks2.policyfile under the/etc/share/polkit-1/actions/directory:# cp /usr/share/polkit-1/actions/org.freedesktop.udisks2.policy /etc/share/polkit-1/actions/org.freedesktop.udisks2.policyIn the
/etc/polkit-1/actions/org.freedesktop.udisks2.policyfile, delete any actions that you do not need and add the following lines:<action id="org.freedesktop.udisks2.modify-device"> <message>Authentication is required to modify the disks settings</message> <defaults> <allow_any>no</allow_any> <allow_inactive>no</allow_inactive> <allow_active>yes</allow_active> </defaults> </action>If you want to restrict access only to the root user, replace
<allow_any>no</allow_any>with<allow_any>auth_admin</allow_any>.
12.6. Restricting the session to a single application
You can start the GNOME session in single-application mode, also known as kiosk mode. In this session, GNOME displays only a full-screen window of the application that you have selected.
12.6.1. Single-application mode
Single-application mode is a modified GNOME session that reconfigures the Mutter window manager into an interactive kiosk. This session locks down certain behavior to make the standard desktop more restrictive. The user can interact only with a single application selected by the administrator.
You can set up single-application mode for several use cases, such as:
- In the communication, entertainment, or education fields
- As a self-serve machine
- As an event manager
- As a registration point
The GNOME Kiosk utility provides the single-application mode configuration and sessions.
The following single-application sessions are available:
- Search Appliance Session
-
This session always starts the Mozilla Firefox web browser at the
www.google.comwebsite. - Kiosk Script Session
- This session starts an arbitrary application that you specify in a shell script.
12.6.2. Enabling search appliance mode
You can restrict the GNOME session to the Google search engine in a web browser by installing and enabling the Search Appliance Session.
Prerequisites
- Administrative access.
Procedure
Install the GNOME Kiosk packages:
# dnf install gnome-kiosk gnome-kiosk-search-appliance- At the GNOME login screen, select Search Appliance Session from the gear button menu and log in as the single-application user.
- The Mozilla Firefox browser opens as a full-screen window in its kiosk mode. It shows the Google search page.
12.6.3. Enabling single-application mode
You can install and enable the Kiosk Script Session to restrict the GNOME session to a selected single application. This configuration provides a secure and isolated environment for the target application.
Procedure
Install the GNOME Kiosk packages:
# dnf install gnome-kiosk gnome-kiosk-script-session- At the GNOME login screen, select Kiosk Script Session from the gear button menu and log in as the single-application user.
The gedit text editor opens as a full-screen window. It shows the shell script that configures which application runs in your single-application session.
Edit the shell script and enter the application that you want to start in the single-application session.
For example, to start the Mozilla Firefox browser, enter the following content:
#!/usr/bin/sh firefox --kiosk https://example.org- Save the script file.
Close the gedit window.
The session terminates and restarts with your selected application.
- The next time you log in to the single-application session, your selected application runs.
Chapter 13. Setting up a printer
In GNOME, you can set up printing by using the Settings application.
13.1. Accessing printer settings in GNOME
You can access the options for you printers from the Settings application.
Procedure
Use one of the approaches described in Launching applications to start the Settings application.
Moreover, you can also start the Settings application from the system menu in the upper right corner by clicking on the gear button.

When the Settings application GUI is displayed, go to Printers.
Figure 13.1. GNOME Control center configuration tool

13.2. Adding a new printer in Settings
You can add a new printer by using the Settings application.
Prerequisites
Click the button, which is displayed near the upper-right corner of the Printers screen, and authenticate as one of the following users:
- Superuser
-
Any user with the administrative access provided by
sudo(users listed within/etc/sudoers) -
Any user belonging to the
printadmingroup in/etc/group
Procedure
Open the Printers dialog.
Click Unlock and authenticate.

Select one of the available printers (including also network printers), or enter printer IP address or the hostname of a printer server.


Confirm your selection by clicking in the top right corner.

13.3. Printing a test page in Settings
You can print a test page to make sure that the printer functions properly.
Prerequisites
- A printer is set up.
Procedure
Click the settings (⚙️) button on the right to display a settings menu for the selected printer:

- Click → .
13.4. Modifying printer settings
In GNOME, you can modify printer settings by using the Settings application.
13.4.1. Displaying and modifying printer details
You can use the Settings application to maintain a configuration of a printer.
Procedure
Click the settings (⚙️) button on the right to display a settings menu for the selected printer:
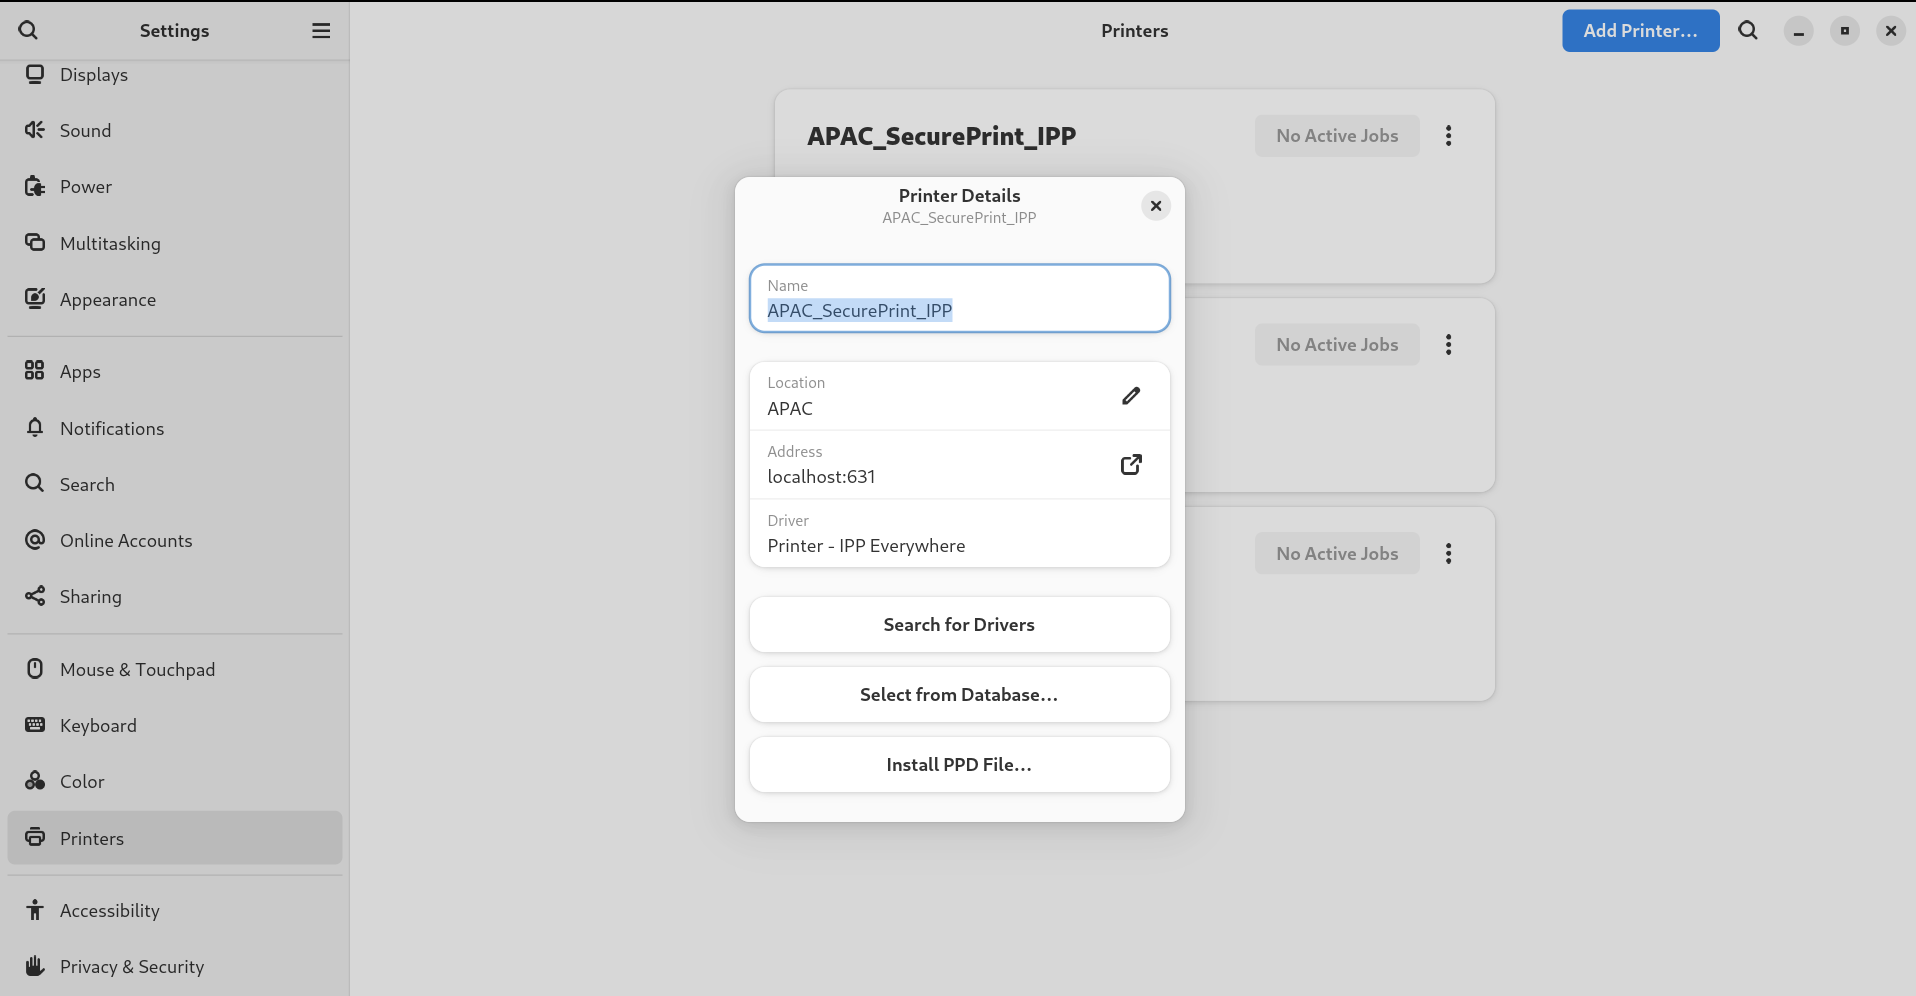
Click Printer Details to display and modify selected printer’s settings:

In this menu, you can select the following actions:
- Search for Drivers
- GNOME Control Center communicates with PackageKit that searches for a suitable driver suitable in available repositories.
- Select from Database
- This option enables you to select a suitable driver from databases that have already been installed on the system.
- Install PPD File
- This option enables you to select from a list of available postscript printer description (PPD) files that can be used as a driver for your printer.
13.4.2. Setting the default printer
You can set the selected printer as the default printer.
Procedure
Click the settings (⚙️) button on the right to display a settings menu for the selected printer:
Click Use Printer by Default to set the selected printer as the default printer:

13.4.3. Setting printing options
Access the printing options menu for your selected printer.
Procedure
Click the settings (⚙️) button on the right to display a settings menu for the selected printer:
- Click Printing Options.
13.4.4. Removing a printer
You can remove a printer by using the Settings application.
Procedure
Click the settings (⚙️) button on the right to display a settings menu for the selected printer:
Click Remove Printer to remove the selected printer:

Chapter 14. Enabling and enforcing GNOME Shell extensions
GNOME Shell extensions are add-ons that enhance the functionality and appearance of the GNOME desktop environment. Users can enable extensions for their own desktop session or for all users on the system.
14.1. Enabling system-wide GNOME Shell extensions
You can automatically enable GNOME extensions for all users, which eliminates the need for individual installations. Existing users with personalized extensions are not affected.
Prerequisites
- Administrative access.
Procedure
- Download the extension archive from the GNOME Extensions website.
Extract the archive into the
/usr/share/gnome-shell/extensions/directory:# unzip -q <extension-file.zip> -d /usr/share/gnome-shell/extensions/Replace
<extension-file.zip>with the name of the extension zip file.Adjust the permissions to ensure that the extension files are readable and executable by everyone:
# chmod -R 755 /usr/share/gnome-shell/extensions/<extension-directory>/Replace
<extension-directory>with the name of the extension directory.Create a new
/etc/dconf/db/local.d/00-extensionsfile with the following content:[org/gnome/shell] enabled-extensions=['myextension1@myname.example.com', 'myextension2@myname.example.com']Replace the UUIDs (
myextension1@myname.example.com,myextension2@myname.example.com)with the ones you want to enable. You can find the UUID of an extension on its GNOME Shell extensions website page.Apply the changes to the system databases:
# dconf update
Result
- After completing these steps, the specified extensions are enabled by default for all new users on your system.
14.2. Restricting GNOME Shell extensions
By locking down specific GNOME Shell extensions, you can ensure that a predefined set of extensions is consistently available to all users. You can configure a set of mandatory extensions and prevent users from modifying them. .Prerequisites
- Administrative access.
Procedure
Create a new
/etc/dconf/db/local.d/00-extensionsfile with the following content:[org/gnome/shell] # The GNOME Shell does not load extensions that are not listed in the `org.gnome.shell.enabled-extensions` file, preventing the user from using them. enabled-extensions=['myextension1@myname.example.com', 'myextension2@myname.example.com'] development-tools=falseReplace the UUIDs (
myextension1@myname.example.com,myextension2@myname.example.com)with the ones you want to enable. You can find the UUID of an extension on its GNOME Shell extensions website page.To prevent users from changing these settings, create a new
/etc/dconf/db/local.d/locks/extensionsfile with the following content:/org/gnome/shell/enabled-extensions /org/gnome/shell/development-toolsApply the changes to the system databases:
# dconf update
Result
-
Extensions that are not listed in the
org.gnome.shell.enabled-extensionsfile are not loaded by the GNOME Shell, preventing the user from using them.
14.3. Managing GNOME Shell extensions by using the command line
The gnome-extensions utility is a command-line tool to manage GNOME Shell extensions from the terminal. It provides various commands to list, install, enable, disable, remove, and get information about extensions.
Each GNOME Shell extension has a Universally Unique Identifier (UUID). You can find the UUID of an extension on its GNOME Shell extensions website page.
Procedure
To list the installed GNOME Shell extensions, use:
$ gnome-extensions listTo install a GNOME Shell extension, use:
$ gnome-extensions install <UUID>To enable a GNOME Shell extension, use:
$ gnome-extensions enable <UUID>To show information about a GNOME Shell extension, use:
$ gnome-extensions info <UUID>To disable a GNOME Shell extension, use:
$ gnome-extensions disable <UUID>To remove a GNOME Shell extension, use:
$ gnome-extensions uninstall <UUID>Replace the
<UUIDs>with the unique identifier assigned to the GNOME Shell extension you want to install.