Questo contenuto non è disponibile nella lingua selezionata.
Manage Red Hat Quay
Preface
Once you have deployed a Red Hat Quay registry, there are many ways you can further configure and manage that deployment. Topics covered here include:
- Advanced Red Hat Quay configuration
- Setting notifications to alert you of a new Red Hat Quay release
- Securing connections with SSL and TLS certificates
- Directing action logs storage to Elasticsearch
- Configuring image security scanning with Clair
- Scan pod images with the Container Security Operator
- Integrate Red Hat Quay into OpenShift with the Quay Bridge Operator
- Mirroring images with repository mirroring
- Sharing Quay images with a BitTorrent service
- Authenticating users with LDAP
- Enabling Quay for Prometheus and Grafana metrics
- Setting up geo-replication
- Troubleshooting Quay
Chapter 1. Advanced Red Hat Quay configuration
You can configure your Red Hat Quay after initial deployment using several different interfaces:
-
The Red Hat Quay Config Tool: Running the
quaycontainer inconfigmode presents a Web-based interface for configuring the Red Hat Quay cluster. This is the recommended method for most configuration of the Red Hat Quay service itself. -
Editing the
config.yaml: Theconfig.yamlfile holds most of the configuration information for the Red Hat Quay cluster. Editing that file directly is possible, but it is only recommended for advanced tuning and performance features that are not available through the Config Tool. - Red Hat Quay API: Some Red Hat Quay configuration can be done through the API.
While configuration for specific features is covered in separate sections, this section describes how to use each of those interfaces and perform some more advanced configuration.
1.1. Using Red Hat Quay Config Tool to modify Red Hat Quay
The Red Hat Quay Config Tool is made available by running a quay container in config mode alongside the regular Red Hat Quay service. Running the Config Tool is different for Red Hat Quay clusters running on OpenShift than it is for those running directly on host systems.
1.1.1. Running the Config Tool from the Red Hat Quay Operator
If you are running the Red Hat Quay Operator from OpenShift, the Config Tool is probably already available for you to use. To access the Config Tool, do the following:
- From the OpenShift console, select the project in which Red Hat Quay is running. For example, quay-enterprise.
From the left column, select Networking → Routes. You should see routes to both the Red Hat Quay application and Config Tool, as shown in the following image:
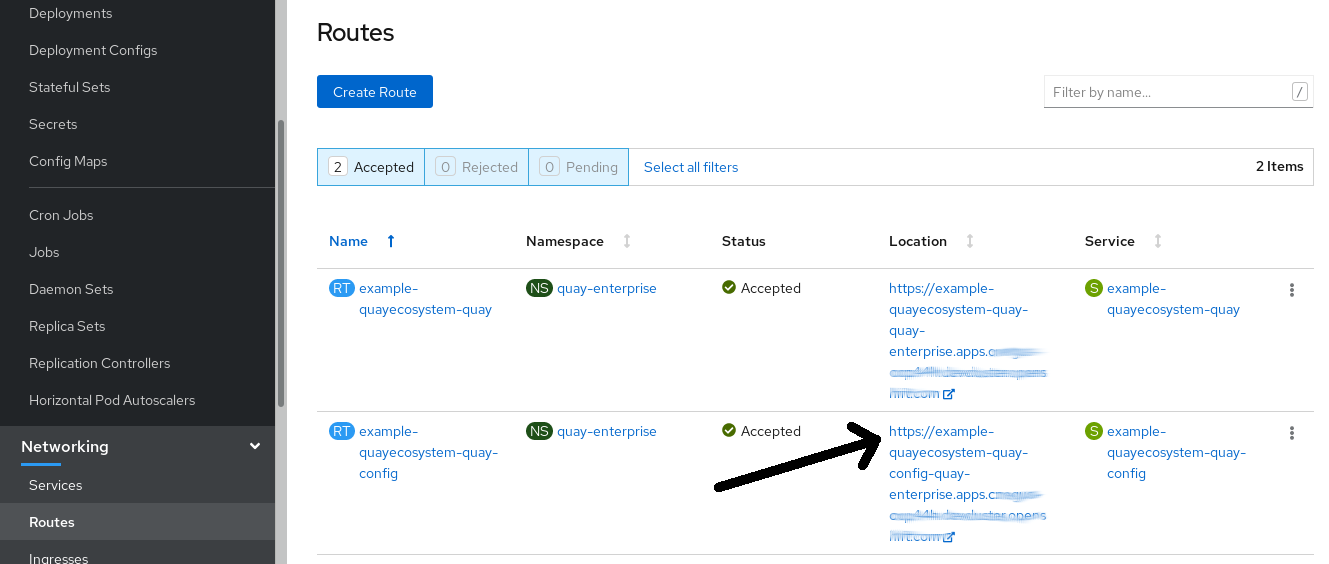
- Select the route to the Config Tool (for example, example-quayecosystem-quay-config) and select it. The Config tool Web UI should open in your browser.
Select
Modify configuration for this cluster. You should see the Config Tool, ready for you to change features of your Red Hat Quay cluster, as shown in the following image:
-
When you have made the changes you want, select
Save Configuration Changes. The Config Tool will validate your changes. -
Make any corrections as needed by selecting
Continue Editingor selectNextto continue on. -
When prompted, it is recommended that you select
Download Configuration. That will download a tarball of your newconfig.yaml, as well as any certificates and keys used with your Red Hat Quay setup. -
Select
Go to deployment rollout, thenPopulate the configuration to deployments. The Red Hat Quay pods will be restarted and the changes will take effect.
The config.yaml file you saved can be used to make advanced changes to your configuration or just kept for future reference.
1.1.2. Running the Config Tool from the command line
If you are running Red Hat Quay directly from a host system, using tools such as the podman or docker commands, after the initial Red Hat Quay deployment, you can restart the Config Tool to modify your Red Hat Quay cluster. Here’s how:
Start quay in config mode: On the first
quaynode run the following, replacingmy-secret-passwordwith your password. If you would like to modify an existing config bundle, you can simply mount your configuration directory into the Quay container as you would in registry mode.podman run --rm -it --name quay_config -p 8080:8080 \ -v path/to/config-bundle:/conf/stack \ registry.redhat.io/quay/quay-rhel8:v3.4.7 config my-secret-password# podman run --rm -it --name quay_config -p 8080:8080 \ -v path/to/config-bundle:/conf/stack \ registry.redhat.io/quay/quay-rhel8:v3.4.7 config my-secret-passwordCopy to Clipboard Copied! Toggle word wrap Toggle overflow - Open browser: When the quay configuration tool starts up, open a browser to the URL and port 8080 of the system you are running the configuration tool on (for example https://myquay.example.com:8080). You are prompted for a username and password.
At this point, you can begin modifying your Red Hat Quay cluster as described earlier.
1.2. Using the API to modify Red Hat Quay
See the Red Hat Quay API Guide for information on how to access Red Hat Quay API.
1.3. Editing the config.yaml file to modify Red Hat Quay
Some advanced Red Hat Quay configuration that is not available through the Config Tool can be achieved by editing the config.yaml file directly. Available settings are described in the Schema for Red Hat Quay configuration The following are examples of settings you can change directly in the config.yaml file.
1.3.1. Add name and company to Red Hat Quay sign-in
Setting the following will cause users to be prompted for their name and company when they first sign in. Although this is optional, it can provide you with extra data about your Red Hat Quay users:
+ FEATURE_USER_METADATA: true
1.3.2. Disable TLS Protocols
You can change the SSL_PROTOCOLS setting to remove SSL protocols that you do not want to support in your Red Hat Quay instance. For example, to remove TLS v1 support from the default SSL_PROTOCOLS : ['TLSv1','TLSv1.1','TLSv1.2'], change it as follows:
+ SSL_PROTOCOLS : ['TLSv1.1','TLSv1.2']
1.3.3. Rate limit API calls
Adding the FEATURE_RATE_LIMITS parameter to the config.yaml causes nginx to limit certain API calls to 30 per second. If that feature is not set, API calls are limied to 300 per second (effectively unlimited). Rate limiting can be an important feature, if you need to make sure the resources available are not overwhelmed with traffic.
Some namespace may require unlimited access (perhaps they are important to CI/CD and take priority, for example). In this case, those namespace may be placed in a list in config.yaml for NON_RATE_LIMITED_NAMESPACES.
1.3.4. Adjust database connection pooling
Red Hat Quay is composed of many different processes which all run within the same container. Many of these processes interact with the database.
If enabled, each process that interacts with the database will contain a connection pool. These per-process connection pools are configured to maintain a maximum of 20 connections. Under heavy load, it is possible to fill the connection pool for every process within a Red Hat Quay container. Under certain deployments and loads, this may require analysis to ensure Red Hat Quay does not exceed the database’s configured maximum connection count.
Overtime, the connection pools will release idle connections. To release all connections immediately, Red Hat Quay requires a restart.
Database connection pooling may be toggled by setting the environment variable DB_CONNECTION_POOLING={true|false}
If database connection pooling is enabled, it is possible to change the maximum size of the connection pool. This can be done through the following config.yaml option:
DB_CONNECTION_ARGS:
  max_connections: 10
DB_CONNECTION_ARGS:
max_connections: 101.3.4.1. Database connection arguments
You can customize Red Hat Quay database connection settings within the config.yaml file. These are entirely dependent upon the underlying database driver, such as psycopg2 for Postgres and pymysql for MySQL. It is also possible to pass in arguments used by Peewee’s Connection Pooling mechanism as seen below.
DB_CONNECTION_ARGS:
  max_connections: n  # Max Connection Pool size. (Connection Pooling only)
  timeout: n  # Time to hold on to connections. (Connection Pooling only)
  stale_timeout: n  # Number of seconds to block when the pool is full. (Connection Pooling only)
DB_CONNECTION_ARGS:
  max_connections: n  # Max Connection Pool size. (Connection Pooling only)
  timeout: n  # Time to hold on to connections. (Connection Pooling only)
stale_timeout: n # Number of seconds to block when the pool is full. (Connection Pooling only)1.3.4.2. HTTP connection counts
It is possible to specify the quantity of simultaneous HTTP connections using environment variables. These can be specified as a whole, or for a specific component. The default for each is 50 parallel connections per process.
Environment variables: - WORKER_CONNECTION_COUNT_REGISTRY=n - WORKER_CONNECTION_COUNT_WEB=n - WORKER_CONNECTION_COUNT_SECSCAN=n - WORKER_CONNECTION_COUNT=n
Specifying a count for a specific component will override any value set in WORKER_CONNECTION_COUNT.
1.3.4.3. Dynamic process counts
To estimate the quantity of dynamically sized processes, the following calculation is used by default.
Red Hat Quay queries the available CPU count from the entire machine. Any limits applied using kubernetes or other non-virtualized mechanisms will not affect this behavior; Red Hat Quay will makes its calculation based on the total number of processors on the Node. The default values listed are simply targets, but shall not exceed the maximum or be lower than the minimum.
Each of the following process quantities can be overridden using the environment variable specified below.
registry - Provides HTTP endpoints to handle registry action
- minimum: 8
- maximum: 64
- default: $CPU_COUNT x 4
- environment variable: WORKER_COUNT_REGISTRY
web - Provides HTTP endpoints for the web-based interface
- minimum: 2
- maximum: 32
- default: $CPU_COUNT x 2
- environment_variable: WORKER_COUNT_WEB
secscan - Interacts with Clair
- minimum: 2
- maximum: 4
- default: $CPU_COUNT x 2
- environment variable: WORKER_COUNT_SECSCAN
1.3.4.4. Environment variables
Red Hat Quay allows overriding default behavior using environment variables. This table lists and describes each variable and the values they can expect.
| Variable | Description | Values |
|---|---|---|
| WORKER_COUNT_REGISTRY | Specifies the number of processes to handle Registry requests within the Quay container. | Integer between 8 and 64 |
| WORKER_COUNT_WEB | Specifies the number of processes to handle UI/Web requests within the container. | Integer between 2 and 32 |
| WORKER_COUNT_SECSCAN | Specifies the number of processes to handle Security Scanning (e.g. Clair) integration within the container. | Integer between 2 and 4 |
| DB_CONNECTION_POOLING | Toggle database connection pooling. In 3.4, it is disabled by default. | "true" or "false" |
1.3.4.5. Turning off connection pooling
Red Hat Quay deployments with a large amount of user activity can regularly hit the 2k maximum database connection limit. In these cases, connection pooling, which is enabled by default for Red Hat Quay, can cause database connection count to rise exponentially and require you to turn off connection pooling.
If turning off connection pooling is not enough to prevent hitting that 2k database connection limit, you need to take additional steps to deal with the problem. In this case you might need to increase the maximum database connections to better suit your workload.
1.4. Using the configuration API
The configuration tool exposes 4 endpoints that can be used to build, validate, bundle and deploy a configuration. The config-tool API is documented at https://github.com/quay/config-tool/blob/master/pkg/lib/editor/API.md. In this section, you will see how to use the API to retrieve the current configuration and how to validate any changes you make.
1.4.1. Retrieving the default configuration
If you are running the configuration tool for the first time, and do not have an existing configuration, you can retrieve the default configuration. Start the container in config mode:
sudo podman run --rm -it --name quay_config \
  -p 8080:8080 \
  registry.redhat.io/quay/quay-rhel8:v3.4.7 config secret
$ sudo podman run --rm -it --name quay_config \
  -p 8080:8080 \
  registry.redhat.io/quay/quay-rhel8:v3.4.7 config secret
Use the config endpoint of the configuration API to get the default:
curl -X GET -u quayconfig:secret http://quay-server:8080/api/v1/config | jq
$ curl -X GET -u quayconfig:secret http://quay-server:8080/api/v1/config | jqThe value returned is the default configuration in JSON format:
1.4.2. Retrieving the current configuration
If you have already configured and deployed the Quay registry, stop the container and restart it in configuration mode, loading the existing configuration as a volume:
sudo podman run --rm -it --name quay_config \
  -p 8080:8080 \
  -v $QUAY/config:/conf/stack:Z \
  registry.redhat.io/quay/quay-rhel8:v3.4.7 config secret
$ sudo podman run --rm -it --name quay_config \
  -p 8080:8080 \
  -v $QUAY/config:/conf/stack:Z \
  registry.redhat.io/quay/quay-rhel8:v3.4.7 config secret
Use the config endpoint of the API to get the current configuration:
curl -X GET -u quayconfig:secret http://quay-server:8080/api/v1/config | jq
$ curl -X GET -u quayconfig:secret http://quay-server:8080/api/v1/config | jqThe value returned is the current configuration in JSON format, including database and Redis configuration data:
1.4.3. Validating configuration using the API
You can validate a configuration by posting it to the config/validate endpoint:
The returned value is an array containing the errors found in the configuration. If the configuration is valid, an empty array [] is returned.
1.4.4. Determining the required fields
You can determine the required fields by posting an empty configuration structure to the config/validate endpoint:
The value returned is an array indicating which fields are required:
Chapter 2. Getting Red Hat Quay release notifications
To keep up with the latest Red Hat Quay releases and other changes related to Red Hat Quay, you can sign up for update notifications on the Red Hat Customer Portal. After signing up for notifications, you will receive notifications letting you know when there is new a Red Hat Quay version, updated documentation, or other Red Hat Quay news.
- Log into the Red Hat Customer Portal with your Red Hat customer account credentials.
-
Select your user name (upper-right corner) to see Red Hat Account and Customer Portal selections:

- Select Notifications. Your profile activity page appears.
- Select the Notifications tab.
- Select Manage Notifications.
- Select Follow, then choose Products from the drop-down box.
-
From the drop-down box next to the Products, search for and select Red Hat Quay:
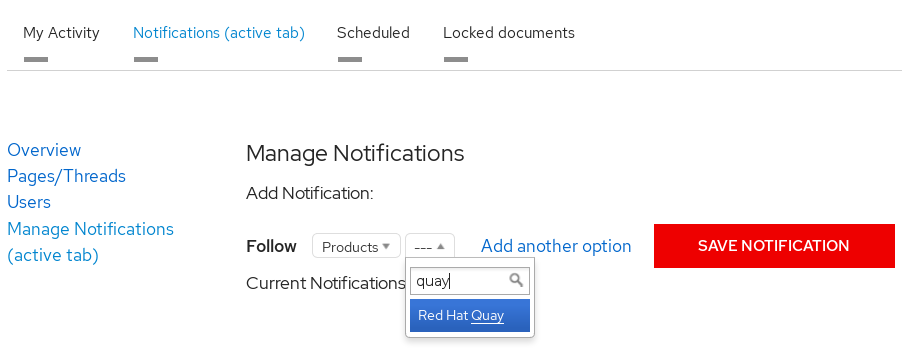
- Select the SAVE NOTIFICATION button. Going forward, you will receive notifications when there are changes to the Red Hat Quay product, such as a new release.
Chapter 3. Using SSL to protect connections to Red Hat Quay
This document assumes you have deployed Red Hat Quay in a single-node or highly available deployment.
To configure Red Hat Quay with a self-signed certificate, you need to create a Certificate Authority (CA), then generate the required key and certificate files. You then enter those files using the Red Hat Quay Config Tool or command line.
3.1. Create a CA and sign a certificate
Create a root CA.
openssl genrsa -out rootCA.key 2048
openssl req -x509 -new -nodes -key rootCA.key -sha256 -days 1024 -out rootCA.pem
$ openssl genrsa -out rootCA.key 2048
$ openssl req -x509 -new -nodes -key rootCA.key -sha256 -days 1024 -out rootCA.pem
Copy to Clipboard Copied! Toggle word wrap Toggle overflow The result are rootCA.key and rootCA.pem files in the current directory.
Create certificate and private key: If you are having Red Hat Quay handle TLS, you need to create a certificate and private key to provide during configuration. You can get those files from a certificate signing authority. Here we show how to create those files using the self-signed certificate authority you just created.
In this example, you create device.crt and device.key files, which will be uploaded to Red Hat Quay and renamed ssl.cert and ssl.key, respectively.
Because OpenShift creates long fully qualified domain names, consider using a wildcard to identify the larger domain, instead of the specific route to the Red Hat Quay application. For example, use something like *.apps.openshift.example.com when prompted for the server’s hostname:
Common Name (eg, your name or your server's hostname) []:*apps.openshift.example.com
Common Name (eg, your name or your server's hostname) []:*apps.openshift.example.comCopy to Clipboard Copied! Toggle word wrap Toggle overflow openssl genrsa -out device.key 2048 openssl req -new -key device.key -out device.csr
$ openssl genrsa -out device.key 2048
$ openssl req -new -key device.key -out device.csr
Copy to Clipboard Copied! Toggle word wrap Toggle overflow Then sign the certificate with the root CA created earlier:
openssl x509 -req -in device.csr -CA rootCA.pem \
       -CAkey rootCA.key -CAcreateserial -out device.crt -days 500 -sha256
$ openssl x509 -req -in device.csr -CA rootCA.pem \ -CAkey rootCA.key -CAcreateserial -out device.crt -days 500 -sha256Copy to Clipboard Copied! Toggle word wrap Toggle overflow
Instead generating the *.key and *.crt files as just shown, you could create an openssl.cnf file. This lets you add more information to the resulting certificate than you can get by just responding to the prompts in the command for generating the certificate request. In this example of an openssl.cnf file, replace DNS.1 and IP.1 with the hostname and IP address of the Red Hat Quay server:
openssl.cnf
You could then generate the key as follows:
openssl x509 -req -in ssl.csr -CA rootCA.pem \
   -CAkey rootCA.key -CAcreateserial -out ssl.cert \
   -days 356 -extensions v3_req -extfile openssl.cnf
$ openssl x509 -req -in ssl.csr -CA rootCA.pem \
   -CAkey rootCA.key -CAcreateserial -out ssl.cert \
-days 356 -extensions v3_req -extfile openssl.cnf3.2. Configure Red Hat Quay to use the new certificate
The next step can be accomplished either in the Red Hat Quay screen or from the terminal.
3.2.1. Configure SSL from the Red Hat Quay Setup screen
Start the quay container in config mode, as described in each deployment guide. In the server Configuration section, enable SSL as follows:
-
Set the
Server Hostnameto the appropriate value and check theEnable SSLbox, then upload thessl.keyandssl.certfiles (in our example, nameddevice.keyanddevice.crt, respectively):
-
Save the configuration. Red Hat Quay will automatically validate the SSL certificate:

-
Restart the container

3.2.2. Configure with the command line
By not using the web interface the configuration checking mechanism built into Red Hat Quay is unavailable. It is suggested to use the web interface if possible. For non-OpenShift installations, you can configure SSL from the command-line interface as follows:
Copy the
ssl.keyandssl.certinto the specifiedconfigdirectory. In this example, the config directory for Red Hat Quay is on a host named reg.example.com in a directory named /mnt/quay/config.NoteThe certificate/key files must be named ssl.key and ssl.cert.
ls
ssl.cert  ssl.key
scp ssl.* root@reg.example.com:/mnt/quay/config/
[root@reg.example.com ~]$ ls /mnt/quay/config/
config.yaml  ssl.cert  ssl.key
$ ls
ssl.cert  ssl.key
$ scp ssl.* root@reg.example.com:/mnt/quay/config/
[root@reg.example.com ~]$ ls /mnt/quay/config/
config.yaml  ssl.cert  ssl.key
Copy to Clipboard Copied! Toggle word wrap Toggle overflow Modify the
PREFERRED_URL_SCHEME:parameter in config.yaml fromhttptohttpsPREFERRED_URL_SCHEME: https
PREFERRED_URL_SCHEME: httpsCopy to Clipboard Copied! Toggle word wrap Toggle overflow Restart the Red Hat Quay container:
Copy to Clipboard Copied! Toggle word wrap Toggle overflow
3.2.3. Test the secure connection
Confirm the configuration by visiting the URL from a browser https://reg.example.com/  "Your Connection is not secure" means the CA is untrusted but confirms that SSL is functioning properly. To avoid these messages, you need to get a certificate from a trusted certificate authority.
3.3. Configuring Docker to Trust a Certificate Authority
Docker requires that custom certs be installed to /etc/docker/certs.d/ under a directory with the same name as the hostname private registry. It is also required for the cert to be called ca.crt. Here is how to do that:
Copy the rootCA file.
cp tmp/rootCA.pem /etc/docker/certs.d/reg.example.com/ca.crt
$ cp tmp/rootCA.pem /etc/docker/certs.d/reg.example.com/ca.crtCopy to Clipboard Copied! Toggle word wrap Toggle overflow After you have copied the rootCA.pem file,
docker loginshould authenticate successfully and pushing to the repository should succeed.Copy to Clipboard Copied! Toggle word wrap Toggle overflow
Chapter 4. Adding TLS Certificates to the Red Hat Quay Container
To add custom TLS certificates to Red Hat Quay, create a new directory named extra_ca_certs/ beneath the Red Hat Quay config directory. Copy any required site-specific TLS certificates to this new directory.
4.1. Add TLS certificates to Red Hat Quay
View certificate to be added to the container
cat storage.crt
-----BEGIN CERTIFICATE-----
MIIDTTCCAjWgAwIBAgIJAMVr9ngjJhzbMA0GCSqGSIb3DQEBCwUAMD0xCzAJBgNV
[...]
-----END CERTIFICATE-----
$ cat storage.crt
-----BEGIN CERTIFICATE-----
MIIDTTCCAjWgAwIBAgIJAMVr9ngjJhzbMA0GCSqGSIb3DQEBCwUAMD0xCzAJBgNV
[...]
-----END CERTIFICATE-----
Copy to Clipboard Copied! Toggle word wrap Toggle overflow Create certs directory and copy certificate there
Copy to Clipboard Copied! Toggle word wrap Toggle overflow Obtain the quay container’s
CONTAINER IDwithpodman ps:sudo podman ps CONTAINER ID IMAGE COMMAND CREATED STATUS PORTS 5a3e82c4a75f <registry>/<repo>/quay:v3.4.7 "/sbin/my_init" 24 hours ago Up 18 hours 0.0.0.0:80->80/tcp, 0.0.0.0:443->443/tcp, 443/tcp grave_keller
$ sudo podman ps
CONTAINER ID        IMAGE                                COMMAND                  CREATED             STATUS              PORTS
5a3e82c4a75f        <registry>/<repo>/quay:v3.4.7 "/sbin/my_init"          24 hours ago        Up 18 hours         0.0.0.0:80->80/tcp, 0.0.0.0:443->443/tcp, 443/tcp   grave_keller
Copy to Clipboard Copied! Toggle word wrap Toggle overflow Restart the container with that ID:
sudo podman restart 5a3e82c4a75f
$ sudo podman restart 5a3e82c4a75fCopy to Clipboard Copied! Toggle word wrap Toggle overflow Examine the certificate copied into the container namespace:
sudo podman exec -it 5a3e82c4a75f cat /etc/ssl/certs/storage.pem
-----BEGIN CERTIFICATE-----
MIIDTTCCAjWgAwIBAgIJAMVr9ngjJhzbMA0GCSqGSIb3DQEBCwUAMD0xCzAJBgNV
$ sudo podman exec -it 5a3e82c4a75f cat /etc/ssl/certs/storage.pem
-----BEGIN CERTIFICATE-----
MIIDTTCCAjWgAwIBAgIJAMVr9ngjJhzbMA0GCSqGSIb3DQEBCwUAMD0xCzAJBgNV
Copy to Clipboard Copied! Toggle word wrap Toggle overflow
4.2. Add certs when deployed on Kubernetes
When deployed on Kubernetes, Red Hat Quay mounts in a secret as a volume to store config assets. Unfortunately, this currently breaks the upload certificate function of the superuser panel.
To get around this error, a base64 encoded certificate can be added to the secret after Red Hat Quay has been deployed. Here’s how:
Begin by base64 encoding the contents of the certificate:
Copy to Clipboard Copied! Toggle word wrap Toggle overflow Use the
kubectltool to edit the quay-enterprise-config-secret.kubectl --namespace quay-enterprise edit secret/quay-enterprise-config-secret
$ kubectl --namespace quay-enterprise edit secret/quay-enterprise-config-secretCopy to Clipboard Copied! Toggle word wrap Toggle overflow Add an entry for the cert and paste the full base64 encoded string under the entry:
  custom-cert.crt:
c1psWGpqeGlPQmNEWkJPMjJ5d0pDemVnR2QNCnRsbW9JdEF4YnFSdVd3PT0KLS0tLS1FTkQgQ0VSVElGSUNBVEUtLS0tLQo=
  custom-cert.crt:
c1psWGpqeGlPQmNEWkJPMjJ5d0pDemVnR2QNCnRsbW9JdEF4YnFSdVd3PT0KLS0tLS1FTkQgQ0VSVElGSUNBVEUtLS0tLQo=
Copy to Clipboard Copied! Toggle word wrap Toggle overflow -
Finally, recycle all Red Hat Quay pods. Use
kubectl deleteto remove all Red Hat Quay pods. The Red Hat Quay Deployment will automatically schedule replacement pods with the new certificate data.
Chapter 5. Configuring action log storage for Elasticsearch
By default, the past three months of usage logs are stored in the Red Hat Quay database and exposed via the web UI on organization and repository levels. Appropriate administrative privileges are required to see log entries. For deployments with a large amount of logged operations, you can now store the usage logs in Elasticsearch instead of the Red Hat Quay database backend. To do this, you need to provide your own Elasticsearch stack, as it is not included with Red Hat Quay as a customizable component.
Enabling Elasticsearch logging can be done during Red Hat Quay deployment or post-deployment using the Red Hat Quay Config Tool. The resulting configuration is stored in the config.yaml file. Once configured, usage log access continues to be provided the same way, via the web UI for repositories and organizations.
Here’s how to configure action log storage to change it from the default Red Hat Quay database to use Elasticsearch:
- Obtain an Elasticsearch account.
- Open the Red Hat Quay Config Tool (either during or after Red Hat Quay deployment).
Scroll to the Action Log Storage Configuration setting and select Elasticsearch instead of Database. The following figure shows the Elasticsearch settings that appear:

Fill in the following information for your Elasticsearch instance:
- Elasticsearch hostname: The hostname or IP address of the system providing the Elasticsearch service.
- Elasticsearch port: The port number providing the Elasticsearch service on the host you just entered. Note that the port must be accessible from all systems running the Red Hat Quay registry. The default is TCP port 9200.
- Elasticsearch access key: The access key needed to gain access to the Elastic search service, if required.
- Elasticsearch secret key: The secret key needed to gain access to the Elastic search service, if required.
- AWS region: If you are running on AWS, set the AWS region (otherwise, leave it blank).
- Index prefix: Choose a prefix to attach to log entries.
Logs Producer: Choose either Elasticsearch (default) or Kinesis to direct logs to an intermediate Kinesis stream on AWS. You need to set up your own pipeline to send logs from Kinesis to Elasticsearch (for example, Logstash). The following figure shows additional fields you would need to fill in for Kinesis:
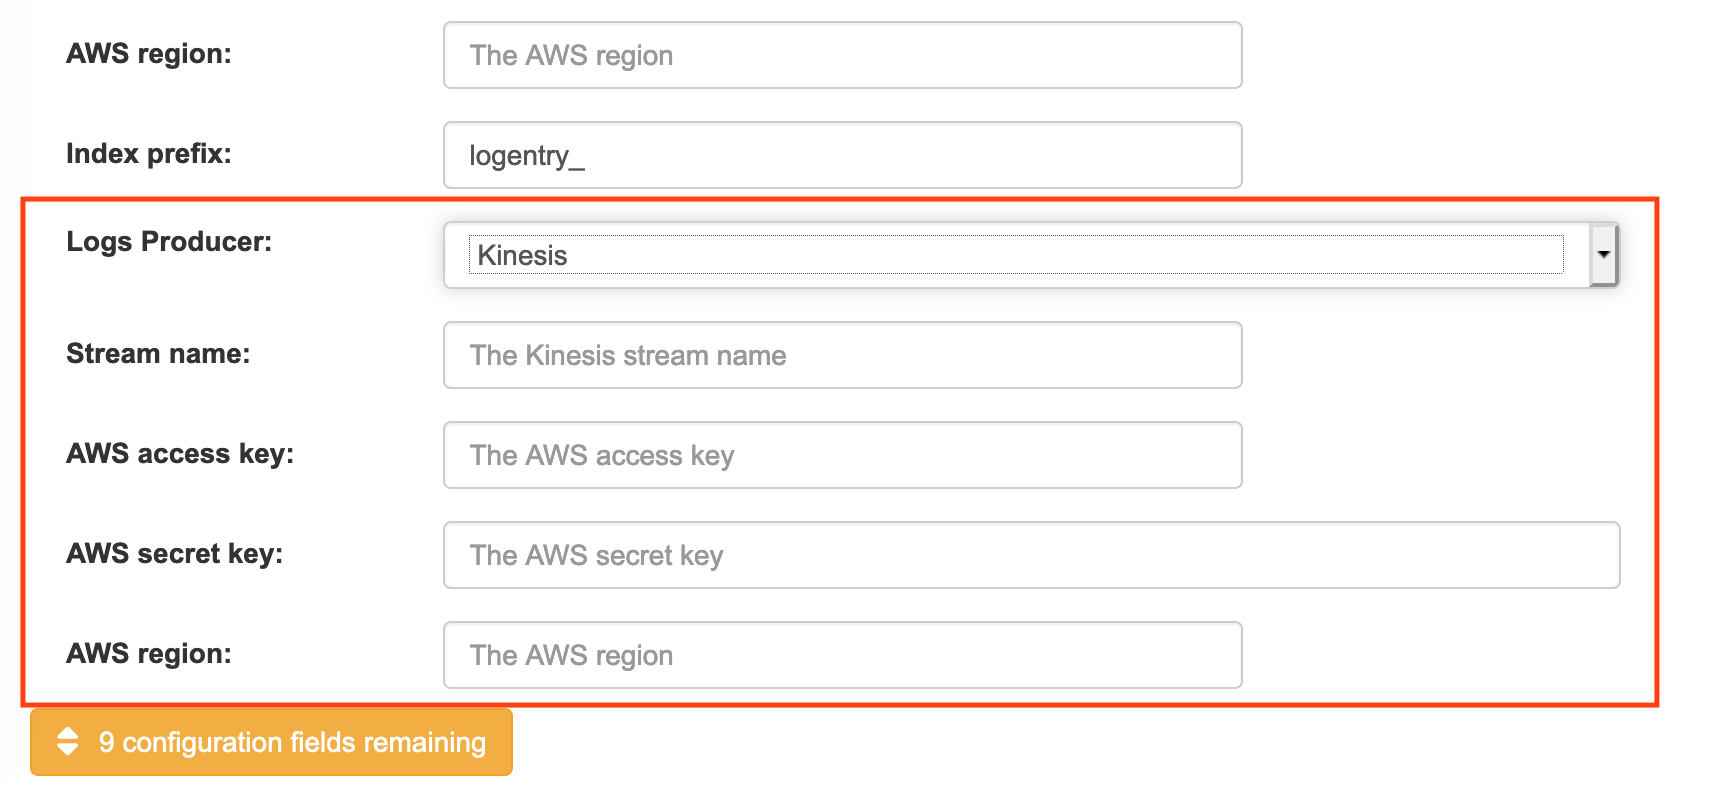
If you chose Elasticsearch as the Logs Producer, no further configuration is needed. If you chose Kinesis, fill in the following:
- Stream name: The name of the Kinesis stream.
- AWS access key: The name of the AWS access key needed to gain access to the Kinesis stream, if required.
- AWS secret key: The name of the AWS secret key needed to gain access to the Kinesis stream, if required.
- AWS region: The AWS region.
- When you are done, save the configuration. The Config Tool checks your settings. If there is a problem connecting to the Elasticsearch or Kinesis services, you will see an error and have the opportunity to continue editing. Otherwise, logging will begin to be directed to your Elasticsearch configuration after the cluster restarts with the new configuration.
Chapter 6. Clair Security Scanning
6.1. What is Clair?
Clair is a set of micro services that can be used with Red Hat Quay to perform vulnerability scanning of container images associated with a set of Linux operating systems. The micro services design of Clair makes it appropriate to run in a highly scalable configuration, where components can be scaled separately as appropriate for enterprise environments.
Clair uses the following vulnerability databases to scan for issues in your images:
- Alpine SecDB database
- AWS UpdateInfo
- Debian Oval database
- Oracle Oval database
- RHEL Oval database
- SUSE Oval database
- Ubuntu Oval database
- Pyup.io (python) database
For information on how Clair does security mapping with the different databases, see ClairCore Severity Mapping.
With the release of Red Hat Quay 3.4, the new Clair V4 (image registry.redhat.io/quay/clair-rhel8 fully replaces the prior Clair V2 (image quay.io/redhat/clair-jwt). See below for how to run V2 in read-only mode while V4 is updating.
6.1.1. Running Clair V4 and Clair V2 Simultaneously
While Clair V4 (registry.redhat.io/quay/clair-rhel8:v3.4.7) is the version of Clair that Red Hat Quay uses, both it and the prior Clair V2 (quay.io/redhat/clair-jwt) can run concurrently with Red Hat Quay. This is useful for existing Red Hat Quay deployments that have relied on Clair V2 but wish to have no interruption of scan results using Clair V4. All new image scans will happen in Clair V4 and existing images will be re-scanned automatically. When scan results are requested through Red Hat Quay, if the new Clair V4 results are not available, the existing Clair V2 results will be retrieved. Once the Clair V2 scan results are not needed, it may be decommissioned and removed from Red Hat Quay’s configuration.
The progress of rescanning images may be monitored via Red Hat Quay API. (Refer to Using The Quay API for details):
/secscan/_backfill_status
/secscan/_backfill_statusThis will produce a simple JSON response with the percentage of completed manifests scanned by Clair V4:
{"backfill_percent": 73.4}
{"backfill_percent": 73.4}Once the majority of the images in your registry have been scanned by Clair V4, the Clair V2 deployment should be removed entirely (both running containers and removal from config).
6.2. Setting Up Clair on a Red Hat Quay OpenShift deloyment
6.2.1. Deploying Via the Quay Operator
To set up Clair V4 on a new Red Hat Quay deployment on OpenShift, it is highly recommended to use the Quay Operator. By default, the Quay Operator will install or upgrade a Clair deployment along with your Red Hat Quay deployment and configure Clair security scanning automatically.
6.2.2. Manually Deploying Clair
To configure Clair V4 on an existing Red Hat Quay OpenShift deployment running Clair V2, first ensure Red Hat Quay has been upgraded to at least version 3.4.0. Then use the following steps to manually set up Clair V4 alongside Clair V2.
Set your current project to the name of the project in which Red Hat Quay is running. For example:
oc project quay-enterprise
$ oc project quay-enterpriseCopy to Clipboard Copied! Toggle word wrap Toggle overflow Create a Postgres deployment file for Clair v4 (for example,
clairv4-postgres.yaml) as follows.clairv4-postgres.yaml
Copy to Clipboard Copied! Toggle word wrap Toggle overflow Deploy the postgres database as follows:
oc create -f ./clairv4-postgres.yaml
$ oc create -f ./clairv4-postgres.yamlCopy to Clipboard Copied! Toggle word wrap Toggle overflow Create a Clair
config.yamlfile to use for Clair v4. For example:config.yaml
Copy to Clipboard Copied! Toggle word wrap Toggle overflow
More information about Clair’s configuration format can be found in upstream Clair documentation.
Create a secret from the Clair
config.yaml:oc create secret generic clairv4-config-secret --from-file=./config.yaml
$ oc create secret generic clairv4-config-secret --from-file=./config.yamlCopy to Clipboard Copied! Toggle word wrap Toggle overflow Create the Clair v4 deployment file (for example,
clair-combo.yaml) and modify it as necessary:clair-combo.yaml
Copy to Clipboard Copied! Toggle word wrap Toggle overflow - 1
- Change image to latest clair image name and version.
- 2
- With the Service set to clairv4, the scanner endpoint for Clair v4 is entered later into the Red Hat Quay config.yaml in the
SECURITY_SCANNER_V4_ENDPOINTashttp://clairv4.
Create the Clair v4 deployment as follows:
oc create -f ./clair-combo.yaml
$ oc create -f ./clair-combo.yamlCopy to Clipboard Copied! Toggle word wrap Toggle overflow Modify the
config.yamlfile for your Red Hat Quay deployment to add the following entries at the end:FEATURE_SECURITY_SCANNER: true SECURITY_SCANNER_V4_ENDPOINT: http://clairv4
FEATURE_SECURITY_SCANNER: true SECURITY_SCANNER_V4_ENDPOINT: http://clairv41 Copy to Clipboard Copied! Toggle word wrap Toggle overflow - 1
- Identify the Clair v4 service endpoint
Redeploy the modified
config.yamlto the secret containing that file (for example,quay-enterprise-config-secret:oc delete secret quay-enterprise-config-secret oc create secret generic quay-enterprise-config-secret --from-file=./config.yaml
$ oc delete secret quay-enterprise-config-secret
$ oc create secret generic quay-enterprise-config-secret --from-file=./config.yaml
Copy to Clipboard Copied! Toggle word wrap Toggle overflow -
For the new
config.yamlto take effect, you need to restart the Red Hat Quay pods. Simply deleting thequay-apppods causes pods with the updated configuration to be deployed.
At this point, images in any of the organizations identified in the namespace whitelist will be scanned by Clair v4.
6.3. Setting up Clair on a non-OpenShift Red Hat Quay deployment
For Red Hat Quay deployments not running on OpenShift, it is possible to configure Clair security scanning manually. Red Hat Quay deployments already running Clair V2 can use the instructions below to add Clair V4 to their deployment.
Deploy a (preferably fault-tolerant) Postgres database server. Note that Clair requires the
uuid-osspextension to be added to its Postgres database. If the user supplied in Clair’sconfig.yamlhas the necessary privileges to create the extension then it will be added automatically by Clair itself. If not, then the extension must be added before starting Clair. If the extension is not present, the following error will be displayed when Clair attempts to start.ERROR: Please load the "uuid-ossp" extension. (SQLSTATE 42501)
ERROR: Please load the "uuid-ossp" extension. (SQLSTATE 42501)Copy to Clipboard Copied! Toggle word wrap Toggle overflow Create a Clair config file in a specific folder (e.g.
/etc/clairv4/config/config.yaml) file.config.yaml
Copy to Clipboard Copied! Toggle word wrap Toggle overflow
More information about Clair’s configuration format can be found in upstream Clair documentation.
Run Clair via the container image, mounting in the configuration from the file you created.
podman run -p 8080:8080 -p 8089:8089 -e CLAIR_CONF=/clair/config.yaml -e CLAIR_MODE=combo -v /etc/clair4/config:/clair -d registry.redhat.io/quay/clair-rhel8:v3.4.7
$ podman run -p 8080:8080 -p 8089:8089 -e CLAIR_CONF=/clair/config.yaml -e CLAIR_MODE=combo -v /etc/clair4/config:/clair -d registry.redhat.io/quay/clair-rhel8:v3.4.7Copy to Clipboard Copied! Toggle word wrap Toggle overflow - Follow the remaining instructions from the previous section for configuring Red Hat Quay to use the new Clair V4 endpoint.
Running multiple Clair containers in this fashion is also possible, but for deployment scenarios beyond a single container the use of a container orchestrator like Kubernetes or OpenShift is strongly recommended.
6.4. Using Clair
- Log in to your Red Hat Quay cluster and select an organization for which you have configured Clair scanning.
Select a repository from that organization that holds some images and select Tags from the left navigation. The following figure shows an example of a repository with two images that have been scanned:

If vulnerabilities are found, select to under the Security Scan column for the image to see either all vulnerabilities or those that are fixable. The following figure shows information on all vulnerabilities found:

6.5. Clair Notifications
When Clair received a new vulnerability affecting a previously indexed manifest, it will notify Red Hat Quay so that a new scan can be requested. Only the most severe vulnerabilities trigger a notification to avoid excessive scan requests. This notification mechanism is automatically set up when Clair is configured in Red Hat Quay’s configuration.
Clair notifications can also be set up for external consumption via AMQP and STOMP protocols. For details on how to set this up please consult the upstream Clair documentation.
6.6. Configuring Clair for Disconnected Environments
Clair utilizes a set of components called Updaters to handle the fetching and parsing of data from various vulnerability databases. These Updaters are set up by default to pull vulnerability data directly from the internet and work out of the box. For customers in disconnected environments without direct access to the internet this poses a problem. Clair supports these environments through the ability to work with different types of update workflows that take into account network isolation. Using the clairctl command line utility, any process can easily fetch Updater data from the internet via an open host, securely transfer the data to an isolated host, and then import the Updater data on the isolated host into Clair itself.
The steps are as follows.
First ensure that your Clair configuration has disabled automated Updaters from running.
config.yaml
matcher:
  disable_updaters: true
matcher:
  disable_updaters: true
Copy to Clipboard Copied! Toggle word wrap Toggle overflow Export out the latest Updater data to a local archive. This requires the
clairctltool which can be run directly as a binary, or via the Clair container image. Assume your Clair configuration is in/etc/clairv4/config/config.yaml, to run via the container image:podman run -it --rm -v /etc/clairv4/config:/cfg:Z -v $(pwd):/updaters:Z --entrypoint /bin/clairctl registry.redhat.io/quay/clair-rhel8:v3.4.7 export-updaters --config /cfg/config.yaml /updaters/updaters.gz
$ podman run -it --rm -v /etc/clairv4/config:/cfg:Z -v $(pwd):/updaters:Z --entrypoint /bin/clairctl registry.redhat.io/quay/clair-rhel8:v3.4.7 export-updaters --config /cfg/config.yaml /updaters/updaters.gzCopy to Clipboard Copied! Toggle word wrap Toggle overflow Note that you need to explicitly reference the Clair configuration. This will create the Updater archive in
/etc/clairv4/updaters/updaters.gz. If you want to ensure the archive was created without any errors from the source databases, you can supply the--strictflag toclairctl. The archive file should be copied over to a volume that is accessible from the disconnected host running Clair. From the disconnected host, use the same procedure now to import the archive into Clair.podman run -it --rm -v /etc/clairv4/config:/cfg:Z -v $(pwd):/updaters:Z --entrypoint /bin/clairctl registry.redhat.io/quay/clair-rhel8:v3.4.7 import-updaters --config /cfg/config.yaml /updaters/updaters.gz
$ podman run -it --rm -v /etc/clairv4/config:/cfg:Z -v $(pwd):/updaters:Z --entrypoint /bin/clairctl registry.redhat.io/quay/clair-rhel8:v3.4.7 import-updaters --config /cfg/config.yaml /updaters/updaters.gzCopy to Clipboard Copied! Toggle word wrap Toggle overflow
6.7. Additional Information
For detailed documentation on the internals of Clair, including how the microservices are structured, please see the Upstream Clair and ClairCore documentation.
Chapter 7. Scan pod images with the Container Security Operator
Using the Container Security Operator, (CSO) you can scan container images associated with active pods, running on OpenShift (4.2 or later) and other Kubernetes platforms, for known vulnerabilities. The CSO:
- Watches containers associated with pods on all or specified namespaces
- Queries the container registry where the containers came from for vulnerability information provided an image’s registry supports image scanning (such as a Quay registry with Clair scanning)
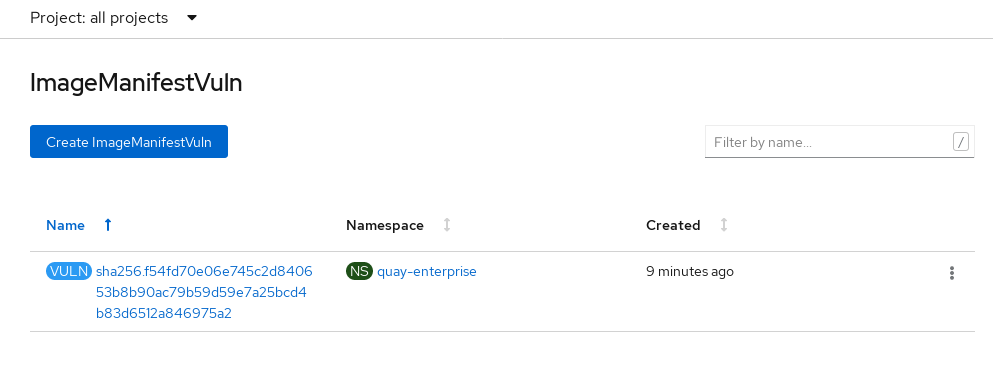
- Exposes vulnerabilities via the ImageManifestVuln object in the Kubernetes API
Using the instructions here, the CSO is installed in the marketplace-operators namespace, so it is available to all namespaces on your OpenShift cluster.
To see instructions on installing the CSO on Kubernetes, select the Install button from the Container Security OperatorHub.io page.
7.1. Run the CSO in OpenShift
To start using the CSO in OpenShift, do the following:
-
Go to Operators → OperatorHub (select Security) to see the available
Container SecurityOperator. -
Select the
Container SecurityOperator, then selectInstallto go to the Create Operator Subscription page. -
Check the settings (all namespaces and automatic approval strategy, by default), and select
Subscribe. TheContainer Securityappears after a few moments on theInstalled Operatorsscreen. Optionally, you can add custom certificates to the CSO. In this example, create a certificate named quay.crt in the current directory. Then run the following command to add the cert to the CSO (restart the Operator pod for the new certs to take effect):
oc create secret generic container-security-operator-extra-certs --from-file=quay.crt -n openshift-operators
$ oc create secret generic container-security-operator-extra-certs --from-file=quay.crt -n openshift-operatorsCopy to Clipboard Copied! Toggle word wrap Toggle overflow Open the OpenShift Dashboard (Home → Dashboards). A link to Image Security appears under the status section, with a listing of the number of vulnerabilities found so far. Select the link to see a Security breakdown, as shown in the following figure:
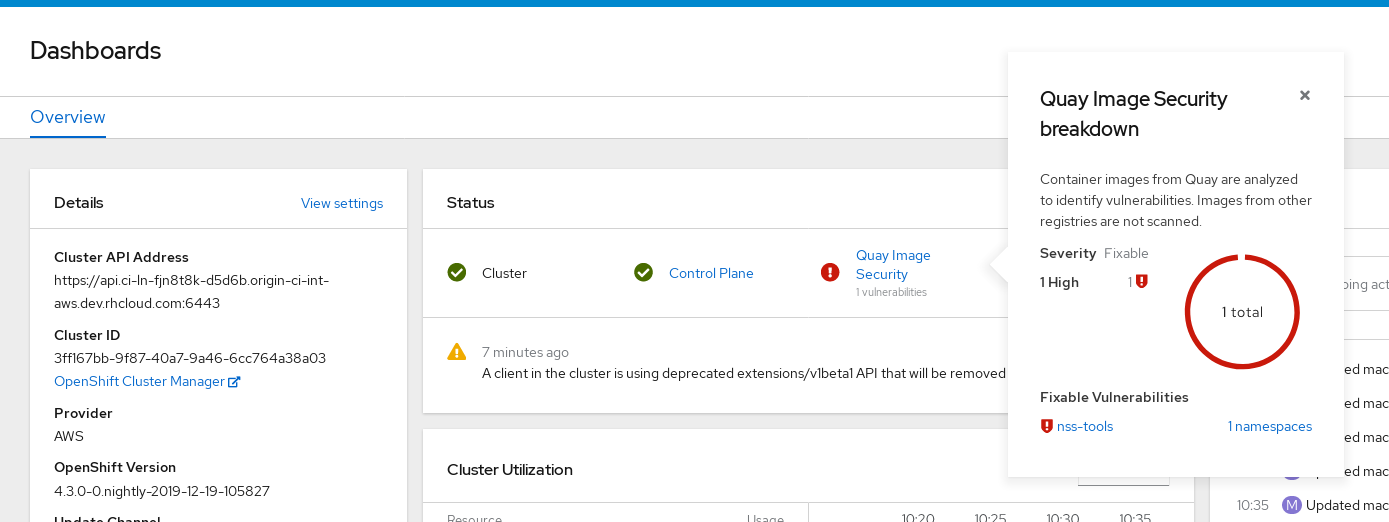
You can do one of two things at this point to follow up on any detected vulnerabilities:
Select the link to the vulnerability. You are taken to the container registry, Red Hat Quay or other registry where the container came from, where you can see information about the vulnerability. The following figure shows an example of detected vulnerabilities from a Quay.io registry:

Select the namespaces link to go to the ImageManifestVuln screen, where you can see the name of the selected image and all namespaces where that image is running. The following figure indicates that a particular vulnerable image is running in two namespaces:
At this point, you know what images are vulnerable, what you need to do to fix those vulnerabilities, and every namespace that the image was run in. So you can:
- Alert anyone running the image that they need to correct the vulnerability
- Stop the images from running (by deleting the deployment or other object that started the pod the image is in)
Note that if you do delete the pod, it may take a few minutes for the vulnerability to reset on the dashboard.
7.2. Query image vulnerabilities from the CLI
You can query information on security from the command line. To query for detected vulnerabilities, type:
oc get vuln --all-namespaces
NAMESPACE     NAME              AGE
default       sha256.ca90...    6m56s
skynet        sha256.ca90...    9m37s
$ oc get vuln --all-namespaces
NAMESPACE     NAME              AGE
default       sha256.ca90...    6m56s
skynet        sha256.ca90...    9m37s
To display details for a particular vulnerability, identify one of the vulnerabilities, along with its namespace and the describe option. This example shows an active container whose image includes an RPM package with a vulnerability:
Chapter 8. Integrate Red Hat Quay into OpenShift with the Bridge Operator
Using the Quay Bridge Operator, you can replace the integrated container registry in OpenShift with a Red Hat Quay registry. By doing this, your integrated OpenShift registry becomes a highly available, enterprise-grade Red Hat Quay registry with enhanced role based access control (RBAC) features.
The primary goals of the Bridge Operator is to duplicate the features of the integrated OpenShift registry in the new Red Hat Quay registry. The features enabled with this Operator include:
Synchronizing OpenShift namespaces as Red Hat Quay organizations.
- Creating Robot accounts for each default namespace service account
- Creating Secrets for each created Robot Account (associating each Robot Secret to a Service Account as Mountable and Image Pull Secret)
- Synchronizing OpenShift ImageStreams as Quay Repositories
- Automatically rewriting new Builds making use of ImageStreams to output to Red Hat Quay
- Automatically importing an ImageStream tag once a build completes
Using this procedure with the Quay Bridge Operator, you enable bi-directional communication between your Red Hat Quay and OpenShift clusters.
You cannot have more than one OpenShift Container Platform cluster pointing to the same Red Hat Quay instance from a Quay Bridge Operator. If you did, it would prevent you from creating namespaces of the same name on the two clusters.
8.1. Running the Quay Bridge Operator
8.1.1. Prerequisites
Before setting up the Bridge Operator, have the following in place:
- An existing Red Hat Quay environment for which you have superuser permissions
- A Red Hat OpenShift Container Platform environment (4.2 or later is recommended) for which you have cluster administrator permissions
-
An OpenShift command line tool (
occommand)
8.1.2. Setting up and configuring OpenShift and Red Hat Quay
Both Red Hat Quay and OpenShift configuration is required:
8.1.2.1. Red Hat Quay setup
Create a dedicated Red Hat Quay organization, and from a new application you create within that organization, generate an OAuth token to be used with the Quay Bridge Operator in OpenShift
- Log in to Red Hat Quay as a user with superuser access and select the organization for which the external application will be configured.
- In the left navigation, select Applications.
-
Select
Create New Applicationand entering a name for the new application (for example,openshift). - With the new application displayed, select it.
-
In the left navigation, select
Generate Tokento create a new OAuth2 token. - Select all checkboxes to grant the access needed for the integration.
-
Review the assigned permissions and then select
Authorize Application, then confirm it. - Copy and save the generated Access Token that appears to use in the next section.
8.1.2.2. OpenShift Setup
Setting up OpenShift for the Quay Bridge Operator requires several steps, including:
- Creating an OpenShift secret: Using the OAuth token created earlier in Quay, create an OpenShift secret.
- Adding MutatingWebhookConfiguration support: To support Red Hat Quay integration with OpenShift, any new Build requests should be intercepted so that the output can be modified to target Red Hat Quay instead of OpenShift’s integrated registry.
Support for dynamic interception of API requests that are performed as part of OpenShift’s typical build process is facilitated through a MutatingWebhookConfiguration. A MutatingWebhookConfiguration allows for invoking an API running within a project on OpenShift when certain API requests are received.
Kubernetes requires that the webhook endpoint is secured via SSL using a certificate that makes use of the certificate authority for the cluster. Fortunately, OpenShift provides support for generating a certificate signed by the cluster.
-
Using the OpenShift
occommand line tool, log in to OpenShift as a cluster administrator. -
Choose an OpenShift namespace to use, such as
openshift-operatorsor create a new one. Create an OpenShift secret, replacing <access_token> with the Access Token obtained earlier from Red Hat Quay. For example, this creates a secret with your <access_token> called
quay-integrationwith a key calledtoken:oc create secret generic quay-integration --from-literal=token=<access_token>
$ oc create secret generic quay-integration --from-literal=token=<access_token>Copy to Clipboard Copied! Toggle word wrap Toggle overflow The result places the newly created private key and certificate within a secret specified. The secret will be mounted into the appropriate located within the operator as declared in the Deployment of the Operator.
Create a Service for the Operator’s webhook endpoint:
quay-webhook.yaml
Copy to Clipboard Copied! Toggle word wrap Toggle overflow Create the webhook service as follows:
oc create -f quay-webhook.yaml
$ oc create -f quay-webhook.yamlCopy to Clipboard Copied! Toggle word wrap Toggle overflow - Download the webhook-create-signed-cert.sh script, so you can use it to generate a certificate signed by a Kubernetes certificate authority.
Execute the following command to request the certificate:
./webhook-create-signed-cert.sh --namespace openshift-operators \
   --secret quay-bridge-operator-webhook-certs \
   --service quay-bridge-operator
$ ./webhook-create-signed-cert.sh --namespace openshift-operators \
   --secret quay-bridge-operator-webhook-certs \
   --service quay-bridge-operator
Copy to Clipboard Copied! Toggle word wrap Toggle overflow Execute the following command to retrieve the CA and format the result as a single line so that it can be entered into the MutatingWebhookConfiguration resource:
oc get configmap -n kube-system \
   extension-apiserver-authentication \
   -o=jsonpath='{.data.client-ca-file}' | base64 | tr -d '\n'
$ oc get configmap -n kube-system \ extension-apiserver-authentication \ -o=jsonpath='{.data.client-ca-file}' | base64 | tr -d '\n'Copy to Clipboard Copied! Toggle word wrap Toggle overflow Replace the ${CA_BUNDLE} variable in the following MutatingWebhookConfiguration YAML:
quay-mutating-webhook.yaml
Copy to Clipboard Copied! Toggle word wrap Toggle overflow - 1
- Replace ${CA_BUNDLE} with the output of the previous step. It will appear as one long line that you copy and paste to replace ${CA_BUNDLE}.
Create the MutatingWebhookConfiguration as follows:
oc create -f quay-mutating-webhook.yaml
$ oc create -f quay-mutating-webhook.yamlCopy to Clipboard Copied! Toggle word wrap Toggle overflow Until the operator is running, new requests for builds will fail since the webserver the MutatingWebhookConfiguration invokes is not available and a proper is response is required in order for the object to be persisted in etcd.
Go to the OpenShift console and install the Quay Bridge Operator as follows:
- Select OperatorHub and search for Quay Bridge Operator.
- Select Install
- Choose Installation Mode (all namespaces), Update Channel, and Approval Strategy (Automatic or Manual).
- Select Subscribe
Create the custom resource (CR) called
QuayIntegration. For example:quay-integration.yaml
Copy to Clipboard Copied! Toggle word wrap Toggle overflow - 1
- The clusterID value should be unique across the entire ecosystem. This value is optional and defaults to openshift.
- 2
- For credentialsSecretName, replace
openshift-operators/quay-integrationwith the name of the namespace and the secret containing the token you created earlier. - 3
- Replace QUAY_URL with the hostname of your Red Hat Quay instance.
- 4
- The whitelistNamespaces is optional. If not used, the Bridge Operator will sync all namespaces to Red Hat Quay except the openshift prefixed project. In this example, the white listed namespace (default) will now have an associated Red Hat Quay organization. Use any namespace you like here.
- 5
- If Quay is using self signed certificates, set the property
insecureRegistry: true.
The result is that organizations within Red Hat Quay should be created for the related namespaces in OpenShift.
Create the
QuayIntegrationas follows:oc create -f quay-integration.yaml
$ oc create -f quay-integration.yamlCopy to Clipboard Copied! Toggle word wrap Toggle overflow
At this point a Quay integration resource is created, linking the OpenShift cluster to the Red Hat Quay instance.
The whitelisted namespace you created should now have a Red Hat Quay organization. If you were to use a command such as oc new-app to create a new application in that namespace, you would see a new Red Hat Quay repository created for it instead of using the internal registry.
Chapter 9. Repository Mirroring in Red Hat Quay
Red Hat Quay repository mirroring lets you mirror images from external container registries (or the local registry) into your local Red Hat Quay cluster. Using repository mirroring you can synchronize images to Red Hat Quay based on repository names and tags.
9.1. Overview of repository mirroring
From your Red Hat Quay cluster with repository mirroring enabled, you can:
- Choose a repository from an external registry to mirror
- Add credentials to access the external registry
- Set intervals at which a repository is synced
- Identify specific container image repository names and tags to sync
- Check the current state of synchronization
With repository mirroring, you mirror a specific subset of content, between two or more distinct registries, to selected datacenters, clusters, or regions. By contrast, Georeplication provides a single, globally distributed Red Hat Quay to serve container images from localized storage. The two approaches to sharing content differ in the following ways:
| Feature / Capability | Georeplication | Repository Mirroring |
| What is the feature designed to do? | A shared, global registry | Distinct, different registries |
| What happens if replication or mirroring hasn’t been completed yet? | The remote copy is used (slower) | No image is served |
| Is access to all storage backends in both regions required? | Yes (all Red Hat Quay nodes) | No (distinct storage) |
| Can users push images from both sites to the same repository? | Yes | No |
| Is all registry content and configuration identical across all regions (shared database) | Yes | No |
| Can users select individual namespaces or repositories to be mirrored? | No,by default | Yes |
| Can users apply filters to synchronization rules? | No | Yes |
Here are a few tips for using Red Hat Quay repository mirroring:
- With repository mirroring, you can mirror an entire repository or selectively limit which images are synced based on a comma-separated list of tags, a range of tags, or other means of identifying tags through regular expressions and globs.
- Once set as a mirrored repository, you cannot manually add other images to that repository.
- Because the mirrored repository is based on the repository and tags you set, it will hold only the content represented by the repo/tag pair. In other words, if you change the tag so that some images in the repository don’t match any more, those images will be deleted.
- Only the designated robot can push images to a mirrored repository, superseding any role-based access control permissions set on the repository.
- With a mirrored repository, a user can pull images (given read permission) from the repository but not push images to the repository.
- Changing setting on your mirrored repository is done from a Mirrors tab on the Repositories page for the mirrored repository you create.
- Images are synced at set intervals, but can also be synced on demand.
9.2. Prerequisites
Before you can use repository mirroring, you must enable repository mirroring from the Red Hat Quay configuration screen and start the repository mirroring worker. Ways of starting up this service are described in the Red Hat Quay deployment guides:
The steps shown in the following section assumes you already have the repository mirroring service running and that you have enabled repository mirroring on your Red Hat Quay cluster.
9.3. Create a mirrored repository
To mirror an external repository from an external container registry, do the following:
- Log into your Red Hat Quay registry.
Create a robot account to pull images for the mirrored repository:
- Select Account Settings from the drop-down in the upper right corner.
- Select the Robot Accounts button in the left column.
- Select Create Robot Account.
- Add the name and description of the robot account and select Create robot account.
- Select Close, since the mirrored repository you are adding does not exist yet.
- Select the ROBOT ACCOUNT NAME from the listing.
- When prompted, add the credentials needed by the robot to access the external registry of the repository you want to mirror, then close the Credentials window.
- Select REPOSITORIES.
- Select Create New Repository and give it a name.
- Fill in a repository name, select Public or Private, and select Create Repository.
- Select the Settings button and change the repository state to MIRROR.
- Open the new repository and select the Mirroring button in the left column.
Fill in the fields to identify the repository you are mirroring in your new repository:
- Registry URL: Location of the container registry you want to mirror from.
- User or Organization: Typically, the account name associated with the content you are mirroring. For example, with the image registry.example.com/jsmith/myimage:latest, jsmith would be entered here.
- Repository Name: The name identifying the name of the set of images. For example, with the image registry.example.com/jsmith/myimage:latest, myimage would be entered here.
- Sync Interval: Defaults to syncing every 24 hours. You can change that based on hours or days.
- Robot User: Select the robot account you created earlier to do the mirroring.
- Username: The username for logging into the external registry holding the repository you are mirroring.
- Password: The password associated with the Username. Note that the password cannot include characters that require an escape character (\).
- Start Date: The date on which mirroring begins. The current date and time used by default.
- Verify TLS: Check this box if you want to verify the authenticity of the external registry. Uncheck this box if, for example, you set up Red Hat Quay for testing with a self-signed certificate or no certificate.
- HTTP Proxy: Identify the proxy server needed to access the remote site, if one is required.
Tags: This field is required. You may enter a comma-separated list of individual tags or tag patterns. (See Tag Patterns section for details.)
NoteAt least one Tag must be explicitly entered (ie. not a tag pattern) or the tag "latest" must exist in the remote repository. This is required for Quay to get the list of tags in the remote repository to compare to the specified list to mirror.
Here is an example of a completed Repository Mirroring screen:

Select the Enable Mirror button. Here’s the resulting Repository Mirroring page:

You can return to this page later to change any of those settings.
9.4. Working with mirrored repositories
Once you have created a mirrored repository, there are several ways you can work with that repository. Select your mirrored repository from the Repositories page and do any of the following:
- Enable/disable the repository: Select the Mirroring button in the left column, then toggle the Enabled check box to enable or disable the repository temporarily.
Check mirror logs: To make sure the mirrored repository is working properly, you can check the mirror logs. To do that, select the Usage Logs button in the left column. Here’s an example:

- Sync mirror now: To immediately sync the images in your repository, select the Sync Now button.
- Change credentials: To change the username and password, select DELETE from the Credentials line. Then select None and add the username and password needed to log into the external registry when prompted.
- Cancel mirroring: To stop mirroring, which keeps the current images available but stops new ones from being synced, select the CANCEL button.
Set robot permissions: Red Hat Quay robot accounts are named tokens that hold credentials for accessing external repositories. By assigning credentials to a robot, that robot can be used across multiple mirrored repositories that need to access the same external registry.
You can assign an existing robot to a repository by going to Account Settings, then selecting the Robot Accounts icon in the left column. For the robot account, choose the link under the REPOSITORIES column. From the pop-up window, you can:
- Check which repositories are assigned to that robot.
-
Assign read, write or Admin privileges to that robot from the PERMISSION field shown in this figure:

Change robot credentials: Robots can hold credentials such as Kubernetes secrets, Docker login information, and Mesos bundles. To change robot credentials, select the Options gear on the robot’s account line on the Robot Accounts window and choose View Credentials. Add the appropriate credentials for the external repository the robot needs to access.

- Check and change general setting: Select the Settings button (gear icon) from the left column on the mirrored repository page. On the resulting page, you can change settings associated with the mirrored repository. In particular, you can change User and Robot Permissions, to specify exactly which users and robots can read from or write to the repo.
9.5. Tag Patterns
As noted above, at least one Tag must be explicitly entered (ie. not a tag pattern) or the tag "latest" must exist in the report repository. (The tag "latest" will not be synced unless specified in the tag list.). This is required for Quay to get the list of tags in the remote repository to compare to the specified list to mirror.
Pattern syntax
| Pattern | Description |
| * | Matches all characters |
| ? | Matches any single character |
| [seq] | Matches any character in seq |
| [!seq] | Matches any character not in seq |
Example tag patterns
| Example Pattern | Example Matches |
| v3* | v32, v3.1, v3.2, v3.2-4beta, v3.3 |
| v3.* | v3.1, v3.2, v3.2-4beta |
| v3.? | v3.1, v3.2, v3.3 |
| v3.[12] | v3.1, v3.2 |
| v3.[12]* | v3.1, v3.2, v3.2-4beta |
| v3.[!1]* | v3.2, v3.2-4beta, v3.3 |
Chapter 10. LDAP Authentication Setup for Red Hat Quay
The Lightweight Directory Access Protocol (LDAP) is an open, vendor-neutral, industry standard application protocol for accessing and maintaining distributed directory information services over an Internet Protocol (IP) network. Red Hat Quay supports using LDAP as an identity provider.
10.1. Set Up LDAP Configuration
In the config tool, locate the Authentication section and select “LDAP” from the drop-down menu. Update LDAP configuration fields as required.

- Here is an example of the resulting entry in the config.yaml file:
AUTHENTICATION_TYPE: LDAP
AUTHENTICATION_TYPE: LDAP10.1.1. Full LDAP URI


- The full LDAP URI, including the ldap:// or ldaps:// prefix.
- A URI beginning with ldaps:// will make use of the provided SSL certificate(s) for TLS setup.
- Here is an example of the resulting entry in the config.yaml file:
LDAP_URI: ldaps://ldap.example.org
LDAP_URI: ldaps://ldap.example.org10.1.2. Team Synchronization

- If enabled, organization administrators who are also superusers can set teams to have their membership synchronized with a backing group in LDAP.

- The resynchronization duration is the period at which a team must be re-synchronized. Must be expressed in a duration string form: 30m, 1h, 1d.
- Optionally allow non-superusers to enable and manage team syncing under organizations in which they are administrators.
- Here is an example of the resulting entries in the config.yaml file:
FEATURE_TEAM_SYNCING: true
TEAM_RESYNC_STALE_TIME: 60m
FEATURE_NONSUPERUSER_TEAM_SYNCING_SETUP: true
FEATURE_TEAM_SYNCING: true
TEAM_RESYNC_STALE_TIME: 60m
FEATURE_NONSUPERUSER_TEAM_SYNCING_SETUP: true10.1.3. Base and Relative Distinguished Names
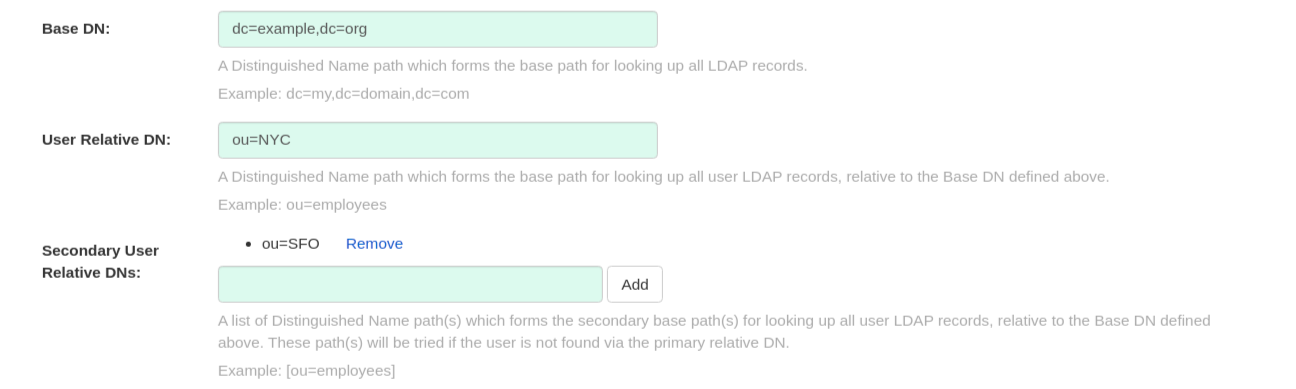
- A Distinguished Name path which forms the base path for looking up all LDAP records. Example: dc=my,dc=domain,dc=com
- Optional list of Distinguished Name path(s) which form the secondary base path(s) for looking up all user LDAP records, relative to the Base DN defined above. These path(s) will be tried if the user is not found via the primary relative DN.
- User Relative DN is relative to BaseDN. Example: ou=NYC not ou=NYC,dc=example,dc=org
- Multiple “Secondary User Relative DNs” may be entered if there are multiple Organizational Units where User objects are located at. Simply type in the Organizational Units and click on Add button to add multiple RDNs. Example: ou=Users,ou=NYC and ou=Users,ou=SFO
- The "User Relative DN" searches with subtree scope. For example, if your Organization has Organizational Units NYC and SFO under the Users OU (ou=SFO,ou=Users and ou=NYC,ou=Users), Red Hat Quay can authenticate users from both the NYC and SFO Organizational Units if the User Relative DN is set to Users (ou=Users).
- Here is an example of the resulting entries in the config.yaml file:
10.1.4. Additional User Filters

- If specified, the additional filter used for all user lookup queries. Note that all Distinguished Names used in the filter must be full paths; the Base DN is not added automatically here. Must be wrapped in parens. Example: (&(someFirstField=someValue)(someOtherField=someOtherValue))
- Here is an example of the resulting entry in the config.yaml file:
LDAP_USER_FILTER: (memberof=cn=developers,ou=groups,dc=example,dc=com)
LDAP_USER_FILTER: (memberof=cn=developers,ou=groups,dc=example,dc=com)10.1.5. Administrator DN

- The Distinguished Name and password for the administrator account. This account must be able to login and view the records for all user accounts. Example: uid=admin,ou=employees,dc=my,dc=domain,dc=com
- The password will be stored in plaintext inside the config.yaml, so setting up a dedicated account or using a password hash is highly recommended.
- Here is an example of the resulting entries in the config.yaml file:
LDAP_ADMIN_DN: cn=admin,dc=example,dc=com
LDAP_ADMIN_PASSWD: changeme
LDAP_ADMIN_DN: cn=admin,dc=example,dc=com
LDAP_ADMIN_PASSWD: changeme10.1.6. UID and Mail attributes

- The UID attribute is the name of the property field in LDAP user record to use as the username. Typically "uid".
- The Mail attribute is the name of the property field in LDAP user record that stores user e-mail address(es). Typically "mail".
- Either of these may be used during login.
- The logged in username must exist in User Relative DN.
- sAMAccountName is the UID attribute for against Microsoft Active Directory setups.
- Here is an example of the resulting entries in the config.yaml file:
LDAP_UID_ATTR: uid
LDAP_EMAIL_ATTR: mail
LDAP_UID_ATTR: uid
LDAP_EMAIL_ATTR: mail10.1.7. Validation
Once the configuration is completed, click on “Save Configuration Changes” button to validate the configuration.

All validation must succeed before proceeding, or additional configuration may be performed by selecting the "Continue Editing" button.
10.2. Common Issues
Invalid credentials
Administrator DN or Administrator DN Password values are incorrect
Verification of superuser %USERNAME% failed: Username not found The user either does not exist in the remote authentication system OR LDAP auth is misconfigured.
Red Hat Quay can connect to the LDAP server via Username/Password specified in the Administrator DN fields however cannot find the current logged in user with the UID Attribute or Mail Attribute fields in the User Relative DN Path. Either current logged in user does not exist in User Relative DN Path, or Administrator DN user do not have rights to search/read this LDAP path.
10.3. Configure an LDAP user as superuser
Once LDAP is configured, you can log in to your Red Hat Quay instance with a valid LDAP username and password. You are prompted to confirm your Red Hat Quay username as shown in the following figure:

To attach superuser privilege to an LDAP user, modify the config.yaml file with the username. For example:
SUPER_USERS:
- testadmin
SUPER_USERS:
- testadminRestart the Red Hat Quay container with the updated config.yaml file. The next time you log in, the user will have superuser privileges.
Chapter 11. Prometheus and Grafana metrics under Red Hat Quay
Red Hat Quay exports a Prometheus- and Grafana-compatible endpoint on each instance to allow for easy monitoring and alerting.
11.1. Exposing the Prometheus endpoint
The Prometheus- and Grafana-compatible endpoint on the Red Hat Quay instance can be found at port 9091. See Monitoring Quay with Prometheus and Grafana for details on configuring Prometheus and Grafana to monitor Quay repository counts.
11.1.1. Setting up Prometheus to consume metrics
Prometheus needs a way to access all Red Hat Quay instances running in a cluster. In the typical setup, this is done by listing all the Red Hat Quay instances in a single named DNS entry, which is then given to Prometheus.
11.1.2. DNS configuration under Kubernetes
A simple Kubernetes service can be configured to provide the DNS entry for Prometheus. Details on running Prometheus under Kubernetes can be found at Prometheus and Kubernetes and Monitoring Kubernetes with Prometheus.
11.1.3. DNS configuration for a manual cluster
SkyDNS is a simple solution for managing this DNS record when not using Kubernetes. SkyDNS can run on an etcd cluster. Entries for each Red Hat Quay instance in the cluster can be added and removed in the etcd store. SkyDNS will regularly read them from there and update the list of Quay instances in the DNS record accordingly.
Chapter 12. Georeplication of storage in Red Hat Quay
Georeplication allows for a single globally-distributed Red Hat Quay to serve container images from localized storage.
When georeplication is configured, container image pushes will be written to the preferred storage engine for that Red Hat Quay instance. After the initial push, image data will be replicated in the background to other storage engines. The list of replication locations is configurable. An image pull will always use the closest available storage engine, to maximize pull performance.
12.1. Prerequisites
Georeplication requires that there be a high availability storage engine (S3, GCS, RADOS, Swift) in each geographic region. Further, each region must be able to access every storage engine due to replication requirements.
Local disk storage is not compatible with georeplication at this time.
12.2. Visit the Config Tool
Open the Red Hat Quay Config Tool to configure storage for georeplication.
12.3. Enable storage replication
-
Scroll down to the section entitled
Registry Storage. -
Click
Enable Storage Replication. - Add each of the storage engines to which data will be replicated. All storage engines to be used must be listed.
-
If complete replication of all images to all storage engines is required, under each storage engine configuration click
Replicate to storage engine by default. This will ensure that all images are replicated to that storage engine. To instead enable per-namespace replication, please contact support. -
When you are done, click
Save Configuration Changes. Configuration changes will take effect the next time Red Hat Quay restarts. After adding storage and enabling “Replicate to storage engine by default” for Georeplications, you need to sync existing image data across all storage. To do this, you need to
oc exec(or docker/kubectl exec) into the container and run:scl enable python27 bash python -m util.backfillreplication
# scl enable python27 bash
# python -m util.backfillreplication
Copy to Clipboard Copied! Toggle word wrap Toggle overflow This is a one time operation to sync content after adding new storage.
12.4. Run Red Hat Quay with storage preferences
- Copy the config.yaml to all machines running Red Hat Quay
For each machine in each region, add a
QUAY_DISTRIBUTED_STORAGE_PREFERENCEenvironment variable with the preferred storage engine for the region in which the machine is running.For example, for a machine running in Europe with the config directory on the host available from /mnt/quay/config:
Copy to Clipboard Copied! Toggle word wrap Toggle overflow NoteThe value of the environment variable specified must match the name of a Location ID as defined in the config panel.
- Restart all Red Hat Quay containers
Chapter 13. Red Hat Quay Troubleshooting
Common failure modes and best practices for recovery.
- I’m receiving HTTP Status Code 429
- I’m authorized but I’m still getting 403s
- Base image pull in Dockerfile fails with 403
- Cannot add a build trigger
- Build logs are not loading
- I’m receiving "Cannot locate specified Dockerfile" * Could not reach any registry endpoint
- Cannot access private repositories using EC2 Container Service
- Docker is returning an i/o timeout
- Docker login is failing with an odd error
- Pulls are failing with an odd error
- I just pushed but the timestamp is wrong
- Pulling Private Quay.io images with Marathon/Mesos fails
Chapter 14. Schema for Red Hat Quay configuration
Most Red Hat Quay configuration information is stored in the config.yaml file that is created using the browser-based config tool when Red Hat Quay is first deployed. This chapter describes the schema of those settings that are available to use in the`config.yaml` file.
The following fields required (all other are optional):
ACTION_LOG_ARCHIVE_LOCATION [string]: If action log archiving is enabled, the storage engine in which to place the archived data.
-
Example:
s3_us_east
-
Example:
ACTION_LOG_ARCHIVE_PATH [string]: If action log archiving is enabled, the path in storage in which to place the archived data.
-
Example:
archives/actionlogs
-
Example:
ACTION_LOG_ROTATION_THRESHOLD [string]: If action log archiving is enabled, the time interval after which to rotate logs.
-
Example:
30d
-
Example:
ALLOW_PULLS_WITHOUT_STRICT_LOGGING [boolean]: If true, pulls in which the pull audit log entry cannot be written will still succeed. Useful if the database can fallback into a read-only state and it is desired for pulls to continue during that time. Defaults to False.
-
Example:
True
-
Example:
APP_SPECIFIC_TOKEN_EXPIRATION [string,
null]: The expiration for external app tokens. Defaults to None.-
Pattern:
^[0-9]+(w|m|d|h|s)$
-
Pattern:
AUTHENTICATION_TYPE [string] required: The authentication engine to use for credential authentication.
- enum: Database, LDAP, JWT, Keystone, OIDC.
-
Example:
Database
AVATAR_KIND [string]: The types of avatars to display, either generated inline (local) or Gravatar (gravatar)
- enum: local, gravatar
BITBUCKET_TRIGGER_CONFIG ['object', 'null']: Configuration for using BitBucket for build triggers.
consumer_key [string] required: The registered consumer key(client ID) for this Red Hat Quay instance.
-
Example:
0e8dbe15c4c7630b6780
-
Example:
BLACKLISTED_EMAIL_DOMAINS [array]: The array of email-address domains that is used if FEATURE_BLACKLISTED_EMAILS is set to true.
-
Example:
"example.com", "example.org"
-
Example:
BLACKLIST_V2_SPEC [string]: The Docker CLI versions to which Red Hat Quay will respond that V2 is unsupported. Defaults to
<1.6.0.- Reference: http://pythonhosted.org/semantic_version/reference.html#semantic_version.Spec
-
Example:
<1.8.0
BRANDING [object]: Custom branding for logos and URLs in the Red Hat Quay UI.
- Required: logo
properties:
logo [string]: Main logo image URL.
-
Example:
/static/img/quay-horizontal-color.svg
-
Example:
footer_img [string]: Logo for UI footer.
-
Example:
/static/img/RedHat.svg
-
Example:
footer_url [string]: Link for footer image.
-
Example:
https://redhat.com
-
Example:
BROWSER_API_CALLS_XHR_ONLY [boolean]: If enabled, only API calls marked as being made by an XHR will be allowed from browsers. Defaults to True.
- Example: False
BUILDLOGS_REDIS [object] required: Connection information for Redis for build logs caching.
HOST [string] required: The hostname at which Redis is accessible.
-
Example:
my.redis.cluster
-
Example:
PASSWORD [string]: The password to connect to the Redis instance.
-
Example:
mypassword
-
Example:
PORT [number]: The port at which Redis is accessible.
-
Example:
1234
-
Example:
CONTACT_INFO [array]: If specified, contact information to display on the contact page. If only a single piece of contact information is specified, the contact footer will link directly.
- Min Items: 1
Unique Items: True
- array item 0 [string]: Adds a link to send an e-mail
-
Pattern:
^mailto:(.)+$ -
Example:
mailto:support@quay.io
array item 1 [string]: Adds a link to visit an IRC chat room
-
Pattern:
^irc://(.)+$ -
Example:
irc://chat.freenode.net:6665/quay
-
Pattern:
array item 2 [string]: Adds a link to call a phone number
-
Pattern:
^tel:(.)+$ -
Example:
tel:+1-888-930-3475
-
Pattern:
array item 3 [string]: Adds a link to a defined URL
-
Pattern:
^http(s)?://(.)+$ -
Example:
https://twitter.com/quayio
-
Pattern:
DB_CONNECTION_ARGS [object]: If specified, connection arguments for the database such as timeouts and SSL.
-
threadlocals [boolean] required: Whether to use thread-local connections. Should ALWAYS be
true. -
autorollback [boolean] required: Whether to use auto-rollback connections. Should ALWAYS be
true. ssl [object]: SSL connection configuration
- ca [string] required: Absolute container path to the CA certificate to use for SSL connections.
-
Example:
conf/stack/ssl-ca-cert.pem
-
threadlocals [boolean] required: Whether to use thread-local connections. Should ALWAYS be
DATABASE_SECRET_KEY [string] required: Key used to encrypt sensitive fields within the database. It is imperative that once set, this value is never changed. The consequence of changing this is invalidating all reliant fields (repository mirror username and password configurations, for example).
-
Example:
40157269433064266822674401740626984898972632465622168464725100311621640999470
-
Example:
DB_URI [string] required: The URI at which to access the database, including any credentials.
- Reference: https://www.postgresql.org/docs/9.3/static/libpq-connect.html#AEN39495
-
Example:
mysql+pymysql://username:password@dns.of.database/quay
DEFAULT_NAMESPACE_MAXIMUM_BUILD_COUNT [number,
null]: If not None, the default maximum number of builds that can be queued in a namespace.-
Example:
20
-
Example:
DEFAULT_TAG_EXPIRATION [string] required: The default, configurable tag expiration time for time machine. Defaults to
2w.-
Pattern:
^[0-9]+(w|m|d|h|s)$
-
Pattern:
DIRECT_OAUTH_CLIENTID_WHITELIST [array]: A list of client IDs of Red Hat Quay-managed applications that are allowed to perform direct OAuth approval without user approval.
- Min Items: None
- Unique Items: True
Reference: https://coreos.com/quay-enterprise/docs/latest/direct-oauth.html
- array item [string]
DISTRIBUTED_STORAGE_CONFIG [object] required: Configuration for storage engine(s) to use in Red Hat Quay. Each key is a unique ID for a storage engine, with the value being a tuple of the type and configuration for that engine.
-
Example:
{"local_storage": ["LocalStorage", {"storage_path": "some/path/"}]}
-
Example:
DISTRIBUTED_STORAGE_DEFAULT_LOCATIONS [array]: The list of storage engine(s) (by ID in DISTRIBUTED_STORAGE_CONFIG) whose images should be fully replicated, by default, to all other storage engines.
- Min Items: None
Example:
s3_us_east, s3_us_west- array item [string]
DISTRIBUTED_STORAGE_PREFERENCE [array] required: The preferred storage engine(s) (by ID in DISTRIBUTED_STORAGE_CONFIG) to use. A preferred engine means it is first checked for pulling and images are pushed to it.
Min Items: None
-
Example:
[u’s3_us_east', u’s3_us_west'] - array item [string]
-
Example:
preferred_url_scheme [string] required: The URL scheme to use when hitting Red Hat Quay. If Red Hat Quay is behind SSL at all, this must be
https.-
enum:
http, https -
Example:
https
-
enum:
- DOCUMENTATION_ROOT [string]: Root URL for documentation links.
ENABLE_HEALTH_DEBUG_SECRET [string,
null]: If specified, a secret that can be given to health endpoints to see full debug info when not authenticated as a superuser.-
Example:
somesecrethere
-
Example:
EXPIRED_APP_SPECIFIC_TOKEN_GC [string,
null]: Duration of time expired external app tokens will remain before being garbage collected. Defaults to 1d.-
pattern:
^[0-9]+(w|m|d|h|s)$
-
pattern:
EXTERNAL_TLS_TERMINATION [boolean]: If TLS is supported, but terminated at a layer before Red Hat Quay, must be true.
-
Example:
True
-
Example:
FEATURE_ACI_CONVERSION [boolean]: Whether to enable conversion to ACIs. Defaults to False.
-
Example:
False
-
Example:
FEATURE_ACTION_LOG_ROTATION [boolean]: Whether or not to rotate old action logs to storage. Defaults to False.
-
Example:
False
-
Example:
FEATURE_ADVERTISE_V2 [boolean]: Whether the v2/ endpoint is visible. Defaults to True.
-
Example:
True
-
Example:
FEATURE_AGGREGATED_LOG_COUNT_RETRIEVAL [boolean]: Whether to allow retrieval of aggregated log counts. Defaults to True.
-
Example:
True
-
Example:
FEATURE_ANONYMOUS_ACCESS [boolean]: Whether to allow anonymous users to browse and pull public repositories. Defaults to True.
-
Example:
True
-
Example:
FEATURE_APP_REGISTRY [boolean]: Whether to enable support for App repositories. Defaults to False.
-
Example:
False
-
Example:
FEATURE_APP_SPECIFIC_TOKENS [boolean]: If enabled, users can create tokens for use by the Docker CLI. Defaults to True.
- Example: False
FEATURE_BITBUCKET_BUILD [boolean]: Whether to support Bitbucket build triggers. Defaults to False.
-
Example:
False
-
Example:
- FEATURE_BLACKLISTED_EMAIL
FEATURE_BUILD_SUPPORT [boolean]: Whether to support Dockerfile build. Defaults to True.
-
Example:
True
-
Example:
FEATURE_CHANGE_TAG_EXPIRARTION [boolean]: Whether users and organizations are allowed to change the tag expiration for tags in their namespace. Defaults to True.
-
Example:
False
-
Example:
FEATURE_DIRECT_LOGIN [boolean]: Whether users can directly login to the UI. Defaults to True.
-
Example:
True
-
Example:
FEATURE_GARBAGE_COLLECTION [boolean]: Whether garbage collection of repositories is enabled. Defaults to True.
-
Example:
True
-
Example:
FEATURE_GITHUB_BUILD [boolean]: Whether to support GitHub build triggers. Defaults to False.
-
Example:
False
-
Example:
FEATURE_GITHUB_LOGIN [boolean]: Whether GitHub login is supported. Defaults to False.
-
Example:
False
-
Example:
FEATURE_GITLAB_BUILD[boolean]: Whether to support GitLab build triggers. Defaults to False.
-
Example:
False
-
Example:
FEATURE_GOOGLE_LOGIN [boolean]: Whether Google login is supported. Defaults to False.
-
Example:
False
-
Example:
FEATURE_INVITE_ONLY_USER_CREATION [boolean]: Whether users being created must be invited by another user. Defaults to False.
-
Example:
False
-
Example:
FEATURE_LIBRARY_SUPPORT [boolean]: Whether to allow for "namespace-less" repositories when pulling and pushing from Docker. Defaults to True.
-
Example:
True
-
Example:
FEATURE_LOG_EXPORT [boolean]: Whether to allow exporting of action logs. Defaults to True.
-
Example:
True
-
Example:
FEATURE_MAILING [boolean]: Whether emails are enabled. Defaults to True.
-
Example:
True
-
Example:
FEATURE_NONSUPERUSER_TEAM_SYNCING_SETUP [boolean]: If enabled, non-superusers can setup syncing on teams to backing LDAP or Keystone. Defaults To False.
-
Example:
True
-
Example:
FEATURE_PARTIAL_USER_AUTOCOMPLETE [boolean]: If set to true, autocompletion will apply to partial usernames. Defaults to True.
-
Example:
True
-
Example:
FEATURE_PERMANENT_SESSIONS [boolean]: Whether sessions are permanent. Defaults to True.
-
Example:
True
-
Example:
FEATURE_PROXY_STORAGE [boolean]: Whether to proxy all direct download URLs in storage via the registry nginx. Defaults to False.
-
Example:
False
-
Example:
FEATURE_PUBLIC_CATALOG [boolean]: If set to true, the
_catalogendpoint returns public repositories. Otherwise, only private repositories can be returned. Defaults to False.-
Example:
False
-
Example:
FEATURE_RATE_LIMITS [boolean]: Whether to enable rate limits on API and registry endpoints. Defaults to False.
-
Example:
False
-
Example:
FEATURE_READER_BUILD_LOGS [boolean]: If set to true, build logs may be read by those with read access to the repo, rather than only write access or admin access. Defaults to False.
- Example: False
FEATURE_READONLY_APP_REGISTRY [boolean]: Whether to App repositories are read-only. Defaults to False.
-
Example:
True
-
Example:
FEATURE_RECAPTCHA [boolean]: Whether Recaptcha is necessary for user login and recovery. Defaults to False.
-
Example:
False - Reference: https://www.google.com/recaptcha/intro/
-
Example:
FEATURE_REPO_MIRROR [boolean]: Require HTTPS and verify certificates of Quay registry during mirror. Defaults to True.
-
Example:
True
-
Example:
FEATURE_REQUIRE_ENCRYPTED_BASIC_AUTH [boolean]: Whether non-encrypted passwords (as opposed to encrypted tokens) can be used for basic auth. Defaults to False.
-
Example:
False
-
Example:
FEATURE_REQUIRE_TEAM_INVITE [boolean]: Whether to require invitations when adding a user to a team. Defaults to True.
-
Example:
True
-
Example:
FEATURE_RESTRICTED_V1_PUSH [boolean]: If set to true, only namespaces listed in V1_PUSH_WHITELIST support V1 push. Defaults to True.
-
Example:
True
-
Example:
FEATURE_SECURITY_NOTIFICATIONS [boolean]: If the security scanner is enabled, whether to turn on/off security notifications. Defaults to False.
-
Example:
False
-
Example:
FEATURE_SECURITY_SCANNER [boolean]: Whether to turn on/off the security scanner. Defaults to False.
FEATURE_STORAGE_REPLICATION [boolean]: Whether to automatically replicate between storage engines. Defaults to False.
-
Example:
False
-
Example:
FEATURE_SUPER_USERS [boolean]: Whether superusers are supported. Defaults to True.
-
Example:
True
-
Example:
FEATURE_TEAM_SYNCING [boolean]: Whether to allow for team membership to be synced from a backing group in the authentication engine (LDAP or Keystone).
-
Example:
True
-
Example:
FEATURE_USER_CREATION [boolean]: Whether users can be created (by non-superusers). Defaults to True.
-
Example:
True
-
Example:
FEATURE_USER_LAST_ACCESSED [boolean]: Whether to record the last time a user was accessed. Defaults to True.
-
Example:
True
-
Example:
FEATURE_USER_LOG_ACCESS [boolean]: If set to true, users will have access to audit logs for their namespace. Defaults to False.
-
Example:
True
-
Example:
FEATURE_USER_METADATA [boolean]: Whether to collect and support user metadata. Defaults to False.
-
Example:
False
-
Example:
FEATURE_USERNAME_CONFIRMATION [boolean]: If set to true, users can confirm their generated usernames. Defaults to True.
-
Example:
False
-
Example:
FEATURE_USER_RENAME [boolean]: If set to true, users can rename their own namespace. Defaults to False.
-
Example:
True
-
Example:
FRESH_LOGIN_TIMEOUT [string]: The time after which a fresh login requires users to reenter their password
-
Example:
5m
-
Example:
GITHUB_LOGIN_CONFIG [object, 'null']: Configuration for using GitHub (Enterprise) as an external login provider.
- Reference: https://coreos.com/quay-enterprise/docs/latest/github-auth.html
allowed_organizations [array]: The names of the GitHub (Enterprise) organizations whitelisted to work with the ORG_RESTRICT option.
- Min Items: None
Unique Items: True
- array item [string]
API_ENDPOINT [string]: The endpoint of the GitHub (Enterprise) API to use. Must be overridden for github.com.
-
Example:
https://api.github.com/
-
Example:
CLIENT_ID [string] required: The registered client ID for this Red Hat Quay instance; cannot be shared with GITHUB_TRIGGER_CONFIG.
- Reference: https://coreos.com/quay-enterprise/docs/latest/github-app.html
-
Example:
0e8dbe15c4c7630b6780
CLIENT_SECRET [string] required: The registered client secret for this Red Hat Quay instance.
- Reference: https://coreos.com/quay-enterprise/docs/latest/github-app.html
-
Example:
e4a58ddd3d7408b7aec109e85564a0d153d3e846
GITHUB_ENDPOINT [string] required: The endpoint of the GitHub (Enterprise) being hit.
-
Example:
https://github.com/
-
Example:
- ORG_RESTRICT [boolean]: If true, only users within the organization whitelist can login using this provider.
-
Example:
True
GITHUB_TRIGGER_CONFIG [object,
null]: Configuration for using GitHub (Enterprise) for build triggers.- Reference: https://coreos.com/quay-enterprise/docs/latest/github-build.html
API_ENDPOINT [string]: The endpoint of the GitHub (Enterprise) API to use. Must be overridden for github.com.
-
Example:
https://api.github.com/
-
Example:
CLIENT_ID [string] required: The registered client ID for this Red Hat Quay instance; cannot be shared with GITHUB_LOGIN_CONFIG.
- Reference: https://coreos.com/quay-enterprise/docs/latest/github-app.html
-
Example:
0e8dbe15c4c7630b6780
CLIENT_SECRET [string] required: The registered client secret for this Red Hat Quay instance.
- Reference: https://coreos.com/quay-enterprise/docs/latest/github-app.html
-
Example:
e4a58ddd3d7408b7aec109e85564a0d153d3e846
GITHUB_ENDPOINT [string] required: The endpoint of the GitHub (Enterprise) being hit.
-
Example:
https://github.com/
-
Example:
GITLAB_TRIGGER_CONFIG [object]: Configuration for using Gitlab (Enterprise) for external authentication.
CLIENT_ID [string] required: The registered client ID for this Red Hat Quay instance.
-
Example:
0e8dbe15c4c7630b6780
-
Example:
CLIENT_SECRET [string] required: The registered client secret for this Red Hat Quay instance.
-
Example:
e4a58ddd3d7408b7aec109e85564a0d153d3e846 gitlab_endpoint [string] required: The endpoint at which Gitlab(Enterprise) is running.
-
Example:
https://gitlab.com
-
Example:
-
Example:
GOOGLE_LOGIN_CONFIG [object,
null]: Configuration for using Google for external authenticationCLIENT_ID [string] required: The registered client ID for this Red Hat Quay instance.
-
Example:
0e8dbe15c4c7630b6780
-
Example:
CLIENT_SECRET [string] required: The registered client secret for this Red Hat Quay instance.
- Example: e4a58ddd3d7408b7aec109e85564a0d153d3e846
GPG2_PRIVATE_KEY_FILENAME [string]: The filename of the private key used to decrypte ACIs.
-
Example:
/path/to/file
-
Example:
GPG2_PRIVATE_KEY_NAME [string]: The name of the private key used to sign ACIs.
-
Example:
gpg2key
-
Example:
GPG2_PUBLIC_KEY_FILENAME [string]: The filename of the public key used to encrypt ACIs.
-
Example:
/path/to/file
-
Example:
HEALTH_CHECKER [string]: The configured health check.
-
Example:
('RDSAwareHealthCheck', {'access_key': 'foo', 'secret_key': 'bar'})
-
Example:
JWT_AUTH_ISSUER [string]: The endpoint for JWT users.
-
Example:
http://192.168.99.101:6060 -
Pattern:
^http(s)?://(.)+$
-
Example:
JWT_GETUSER_ENDPOINT [string]: The endpoint for JWT users.
-
Example:
http://192.168.99.101:6060 -
Pattern:
^http(s)?://(.)+$
-
Example:
JWT_QUERY_ENDPOINT [string]: The endpoint for JWT queries.
-
Example:
http://192.168.99.101:6060 -
Pattern:
^http(s)?://(.)+$
-
Example:
JWT_VERIFY_ENDPOINT [string]: The endpoint for JWT verification.
-
Example:
http://192.168.99.101:6060 -
Pattern:
^http(s)?://(.)+$
-
Example:
- LDAP_ADMIN_DN [string]: The admin DN for LDAP authentication.
- LDAP_ADMIN_PASSWD [string]: The admin password for LDAP authentication.
- LDAP_ALLOW_INSECURE_FALLBACK [boolean]: Whether or not to allow SSL insecure fallback for LDAP authentication.
- LDAP_BASE_DN [string]: The base DN for LDAP authentication.
- LDAP_EMAIL_ATTR [string]: The email attribute for LDAP authentication.
- LDAP_UID_ATTR [string]: The uid attribute for LDAP authentication.
- LDAP_URI [string]: The LDAP URI.
- LDAP_USER_FILTER [string]: The user filter for LDAP authentication.
- LDAP_USER_RDN [array]: The user RDN for LDAP authentication.
LOGS_MODEL [string]: Logs model for action logs.
- enum: database, transition_reads_both_writes_es, elasticsearch
-
Example:
database
LOGS_MODEL_CONFIG [object]: Logs model config for action logs
elasticsearch_config [object]: Elasticsearch cluster configuration
access_key [string]: Elasticsearch user (or IAM key for AWS ES)
-
Example:
some_string
-
Example:
host [string]: Elasticsearch cluster endpoint
-
Example:
host.elasticsearch.example
-
Example:
index_prefix [string]: Elasticsearch’s index prefix
-
Example:
logentry_
-
Example:
- index_settings [object]: Elasticsearch’s index settings
use_ssl [boolean]: Use ssl for Elasticsearch. Defaults to True
-
Example:
True
-
Example:
secret_key [string]: Elasticsearch password (or IAM secret for AWS ES)
-
Example:
some_secret_string
-
Example:
aws_region [string]: Amazon web service region
-
Example:
us-east-1
-
Example:
port [number]: Elasticsearch cluster endpoint port
-
Example:
1234
-
Example:
kinesis_stream_config [object]: AWS Kinesis Stream configuration
aws_secret_key [string]: AWS secret key
-
Example:
some_secret_key
-
Example:
stream_name [string]: Kinesis stream to send action logs to
-
Example:
logentry-kinesis-stream
-
Example:
aws_access_key [string]: AWS access key
-
Example:
some_access_key
-
Example:
retries [number]: Max number of attempts made on a single request
-
Example:
5
-
Example:
read_timeout [number]: Number of seconds before timeout when reading from a connection
-
Example:
5
-
Example:
max_pool_connections [number]: The maximum number of connections to keep in a connection pool
-
Example:
10
-
Example:
aws_region [string]: AWS region
-
Example:
us-east-1
-
Example:
connect_timeout [number]: Number of seconds before timeout when attempting to make a connection
-
Example:
5
-
Example:
producer [string]: Logs producer if logging to Elasticsearch
- enum: kafka, elasticsearch, kinesis_stream
-
Example:
kafka
kafka_config [object]: Kafka cluster configuration
topic [string]: Kafka topic to publish log entries to
-
Example:
logentry
-
Example:
- bootstrap_servers [array]: List of Kafka brokers to bootstrap the client from
max_block_seconds [number]: Max number of seconds to block during a
send(), either because the buffer is full or metadata unavailable-
Example:
10
-
Example:
LOG_ARCHIVE_LOCATION [string]: If builds are enabled, the storage engine in which to place the archived build logs.
-
Example:
s3_us_east
-
Example:
LOG_ARCHIVE_PATH [string]: If builds are enabled, the path in storage in which to place the archived build logs.
-
Example:
archives/buildlogs
-
Example:
- LOGS_MODEL [string]: Logs model for action logs.
-
enum:
database,transition_reads_both_writes_es,elasticsearch -
Example:
database MAIL_DEFAULT_SENDER [string,
null]: If specified, the e-mail address used as thefromwhen Red Hat Quay sends e-mails. If none, defaults tosupport@quay.io.-
Example:
support@myco.com
-
Example:
MAIL_PASSWORD [string,
null]: The SMTP password to use when sending e-mails.-
Example:
mypassword
-
Example:
MAIL_PORT [number]: The SMTP port to use. If not specified, defaults to 587.
-
Example:
588
-
Example:
MAIL_SERVER [string]: The SMTP server to use for sending e-mails. Only required if FEATURE_MAILING is set to true.
-
Example:
smtp.somedomain.com
-
Example:
MAIL_USERNAME [string, 'null']: The SMTP username to use when sending e-mails.
-
Example:
myuser
-
Example:
MAIL_USE_TLS [boolean]: If specified, whether to use TLS for sending e-mails.
-
Example:
True
-
Example:
MAXIMUM_LAYER_SIZE [string]: Maximum allowed size of an image layer. Defaults to 20G.
-
Pattern:
^[0-9]+(G|M)$ -
Example:
100G
-
Pattern:
PREFERRED_URL_SCHEME [string]: The URL scheme to use when hitting Red Hat Quay. If Red Hat Quay is behind SSL at all, this must be
https-
enum:
httporhttps -
Example:
https
-
enum:
PROMETHEUS_NAMESPACE [string]: The prefix applied to all exposed Prometheus metrics. Defaults to
quay.-
Example:
myregistry
-
Example:
PUBLIC_NAMESPACES [array]: If a namespace is defined in the public namespace list, then it will appear on all user’s repository list pages, regardless of whether that user is a member of the namespace. Typically, this is used by an enterprise customer in configuring a set of "well-known" namespaces.
- Min Items: None
Unique Items: True
- array item [string]
- RECAPTCHA_SECRET_KEY [string]: If recaptcha is enabled, the secret key for the Recaptcha service.
- RECAPTCHA_SITE_KEY [string]: If recaptcha is enabled, the site key for the Recaptcha service.
REGISTRY_STATE [string]: The state of the registry.
-
enum:
normalorread-only -
Example:
read-only
-
enum:
REGISTRY_TITLE [string]: If specified, the long-form title for the registry. Defaults to
Quay Enterprise.-
Example:
Corp Container Service
-
Example:
REGISTRY_TITLE_SHORT [string]: If specified, the short-form title for the registry. Defaults to
Quay Enterprise.-
Example:
CCS
-
Example:
REPO_MIRROR_INTERVAL [number]: The number of seconds between checking for repository mirror candidates. Defaults to 30.
-
Example:
30
-
Example:
REPO_MIRROR_SERVER_HOSTNAME [string]: Replaces the SERVER_HOSTNAME as the destination for mirroring. Defaults to unset.
-
Example:
openshift-quay-service
-
Example:
REPO_MIRROR_TLS_VERIFY [boolean]: Require HTTPS and verify certificates of Quay registry during mirror. Defaults to True.
-
Example:
True
-
Example:
SEARCH_MAX_RESULT_PAGE_COUNT [number]: Maximum number of pages the user can paginate in search before they are limited. Defaults to 10.
-
Example:
10
-
Example:
SEARCH_RESULTS_PER_PAGE [number]: Number of results returned per page by search page. Defaults to 10.
-
Example:
10
-
Example:
SECRET_KEY [string] required: Key used to encrypt sensitive fields within the database and a run time. It is imperative that once set, this value is never changed. The consequence of changing this is invalidating all reliant fields (encrypted password credentials, for example).
-
Example:
40157269433064266822674401740626984898972632465622168464725100311621640999470
-
Example:
SECURITY_SCANNER_ENDPOINT [string]: The endpoint for the security scanner.
-
Pattern:
^http(s)?://(.)+$ -
Example:
http://192.168.99.101:6060
-
Pattern:
SECURITY_SCANNER_INDEXING_INTERVAL [number]: The number of seconds between indexing intervals in the security scanner. Defaults to 30.
-
Example:
30
-
Example:
SECURITY_SCANNER_NOTIFICATIONS [boolean]: Whether or not to the security scanner notification feature
-
Example:
false
-
Example:
SECURITY_SCANNER_V4_ENDPOINT [string]: The endpoint for the V4 security scanner.
-
Pattern:
^http(s)?://(.)+$ -
Example:
http://192.168.99.101:6060
-
Pattern:
SERVER_HOSTNAME [string] required: The URL at which Red Hat Quay is accessible, without the scheme.
-
Example:
quay.io
-
Example:
SESSION_COOKIE_SECURE [boolean]: Whether the
secureproperty should be set on session cookies. Defaults to False. Recommended to be True for all installations using SSL.- Example: True
- Reference: https://en.wikipedia.org/wiki/Secure_cookies
SSL_CIPHERS [array]: If specified, the nginx-defined list of SSL ciphers to enabled and disabled.
-
Example:
CAMELLIA,!3DES
-
Example:
SSL_PROTOCOLS [array]: If specified, nginx is configured to enabled a list of SSL protocols defined in the list. Removing an SSL protocol from the list disables the protocol during Red Hat Quay startup.
- SSL_PROTOCOLS: ['TLSv1','TLSv1.1','TLSv1.2']
SUCCESSIVE_TRIGGER_FAILURE_DISABLE_THRESHOLD [number]: If not None, the number of successive failures that can occur before a build trigger is automatically disabled. Defaults to 100.
-
Example:
50
-
Example:
- SUCCESSIVE_TRIGGER_INTERNAL_ERROR_DISABLE_THRESHOLD [number]: If not None, the number of successive internal errors that can occur before a build trigger is automatically disabled. Defaults to 5.
SUPER_USERS [array]: Red Hat Quay usernames of those users to be granted superuser privileges.
- Min Items: None
Unique Items: True
- array item [string]
TAG_EXPIRATION_OPTIONS [array] required: The options that users can select for expiration of tags in their namespace (if enabled).
- Min Items: None
- array item [string]
-
Pattern:
^[0-9]+(w|m|d|h|s)$
TEAM_RESYNC_STALE_TIME [string]: If team syncing is enabled for a team, how often to check its membership and resync if necessary (Default: 30m).
-
Pattern:
^[0-9]+(w|m|d|h|s)$ -
Example:
2h
-
Pattern:
USERFILES_LOCATION [string]: ID of the storage engine in which to place user-uploaded files
-
Example:
s3_us_east
-
Example:
USERFILES_PATH [string]: Path under storage in which to place user-uploaded files
-
Example:
userfiles
-
Example:
USER_EVENTS_REDIS [object] required: Connection information for Redis for user event handling.
HOST [string] required: The hostname at which Redis is accessible.
-
Example:
my.redis.cluster
-
Example:
PASSWORD [string]: The password to connect to the Redis instance.
-
Example:
mypassword
-
Example:
PORT [number]: The port at which Redis is accessible.
-
Example:
1234
-
Example:
CONSUMER_SECRET [string] required: The registered consumer secret(client secret) for this Red Hat Quay instance
- Example: e4a58ddd3d7408b7aec109e85564a0d153d3e846
USERFILES_LOCATION [string]: ID of the storage engine in which to place user-uploaded files.
-
Example:
s3_us_east
-
Example:
USERFILES_PATH [string]: Path under storage in which to place user-uploaded files.
-
Example:
userfiles
-
Example:
USER_RECOVERY_TOKEN_LIFETIME [string]: The length of time a token for recovering a user accounts is valid. Defaults to 30m.
-
Example:
10m -
Pattern:
^[0-9]+(w|m|d|h|s)$
-
Example:
V1_PUSH_WHITELIST [array]: The array of namespace names that support V1 push if FEATURE_RESTRICTED_V1_PUSH is set to true.
-
Example:
some,namespaces
-
Example:
V2_PAGINATION_SIZE [number]: The number of results returned per page in V2 registry APIs.
-
Example:
100
-
Example:
WEBHOOK_HOSTNAME_BLACKLIST [array]: The set of hostnames to disallow from webhooks when validating, beyond localhost.
-
Example:
someexternaldomain.com
-
Example: