 Red Hat Summit
このコンテンツは選択した言語では利用できません。
Getting Started Guide
For use with Red Hat JBoss Data Grid 6.2.1
Edition 3
Abstract
Part I. Introducing Red Hat JBoss Data Grid
Chapter 1. Red Hat JBoss Data Grid
- Schemaless key-value store – JBoss Data Grid is a NoSQL database that provides the flexibility to store different objects without a fixed data model.
- Grid-based data storage – JBoss Data Grid is designed to easily replicate data across multiple nodes.
- Elastic scaling – Adding and removing nodes is simple and non-disruptive.
- Multiple access protocols – It is easy to access the data grid using REST, Memcached, Hot Rod, or simple map-like API.
1.1. Supported Configurations
1.2. Components and Versions
1.3. Red Hat JBoss Data Grid Usage Modes
- Remote Client-Server mode
- Library mode
1.3.1. Remote Client-Server Mode
- easier scaling of the data grid.
- easier upgrades of the data grid without impact on client applications.
$JBOSS_HOME/bin/standalone.sh$JBOSS_HOME\bin\standalone.bat1.3.2. Library Mode
- transactions
- listeners and notifications
1.4. Red Hat JBoss Data Grid Benefits
Benefits of JBoss Data Grid
- Performance
- Accessing objects from local memory is faster than accessing objects from remote data stores (such as a database). JBoss Data Grid provides an efficient way to store in-memory objects coming from a slower data source, resulting in faster performance than a remote data store. JBoss Data Grid also offers optimization for both clustered and non clustered caches to further improve performance.
- Consistency
- Storing data in a cache carries the inherent risk: at the time it is accessed, the data may be outdated (stale). To address this risk, JBoss Data Grid uses mechanisms such as cache invalidation and expiration to remove stale data entries from the cache. Additionally, JBoss Data Grid supports JTA, distributed (XA) and two-phase commit transactions along with transaction recovery and a version API to remove or replace data according to saved versions.
- Massive Heap and High Availability
- In JBoss Data Grid, applications no longer need to delegate the majority of their data lookup processes to a large single server database for performance benefits. JBoss Data Grid employs techniques such as replication and distribution to completely remove the bottleneck that exists in the majority of current enterprise applications.
Example 1.1. Massive Heap and High Availability Example
In a sample grid with 16 blade servers, each node has 2 GB storage space dedicated for a replicated cache. In this case, all the data in the grid is copies of the 2 GB data. In contrast, using a distributed grid (assuming the requirement of one copy per data item, resulting in the capacity of the overall heap being divided by two) the resulting memory backed virtual heap contains 16 GB data. This data can now be effectively accessed from anywhere in the grid. In case of a server failure, the grid promptly creates new copies of the lost data and places them on operational servers in the grid. - Scalability
- A significant benefit of a distributed data grid over a replicated clustered cache is that a data grid is scalable in terms of both capacity and performance. Add a node to JBoss Data Grid to increase throughput and capacity for the entire grid. JBoss Data Grid uses a consistent hashing algorithm that limits the impact of adding or removing a node to a subset of the nodes instead of every node in the grid.Due to the even distribution of data in JBoss Data Grid, the only upper limit for the size of the grid is the group communication on the network. The network's group communication is minimal and restricted only to the discovery of new nodes. Nodes are permitted by all data access patterns to communicate directly via peer-to-peer connections, facilitating further improved scalability. JBoss Data Grid clusters can be scaled up or down in real time without requiring an infrastructure restart. The result of the real time application of changes in scaling policies results in an exceptionally flexible environment.
- Data Distribution
- JBoss Data Grid uses consistent hash algorithms to determine the locations for keys in clusters. Benefits associated with consistent hashing include:Data distribution ensures that sufficient copies exist within the cluster to provide durability and fault tolerance, while not an abundance of copies, which would reduce the environment's scalability.
- cost effectiveness.
- speed.
- deterministic location of keys with no requirements for further metadata or network traffic.
- Persistence
- JBoss Data Grid exposes a
CacheStoreinterface and several high-performance implementations, including the JDBC Cache stores and file system based cache stores. Cache stores can be used to populate the cache when it starts and to ensure that the relevant data remains safe from corruption. The cache store also overflows data to the disk when required to prevent running out of memory. - Language bindings
- JBoss Data Grid supports both the popular Memcached protocol, with existing clients for a large number of popular programming languages, as well as an optimized JBoss Data Grid specific protocol called Hot Rod. As a result, instead of being restricted to Java, JBoss Data Grid can be used for any major website or application. Additionally, remote caches can be accessed using the HTTP protocol via a RESTful API.
- Management
- In a grid environment of several hundred or more servers, management is an important feature. JBoss Operations Network, the enterprise network management software, is the best tool to manage multiple JBoss Data Grid instances. JBoss Operations Network's features allow easy and effective monitoring of the Cache Manager and cache instances.
- Remote Data Grids
- Rather than scale up the entire application server architecture to scale up your data grid, JBoss Data Grid provides a Remote Client-Server mode which allows the data grid infrastructure to be upgraded independently from the application server architecture. Additionally, the data grid server can be assigned different resources than the application server and also allow independent data grid upgrades and application redeployment within the data grid.
1.5. Red Hat JBoss Data Grid Version Information
| JBoss Data Grid Product | Infinispan Version |
|---|---|
| JBoss Data Grid 6.0.0 | Infinispan 5.1.5 |
| JBoss Data Grid 6.0.1 | Infinispan 5.1.7 |
| JBoss Data Grid 6.1.0 | Infinispan 5.2.4 |
| JBoss Data Grid 6.2.0 | Infinispan 6.0.1 |
1.6. Red Hat JBoss Data Grid Cache Architecture
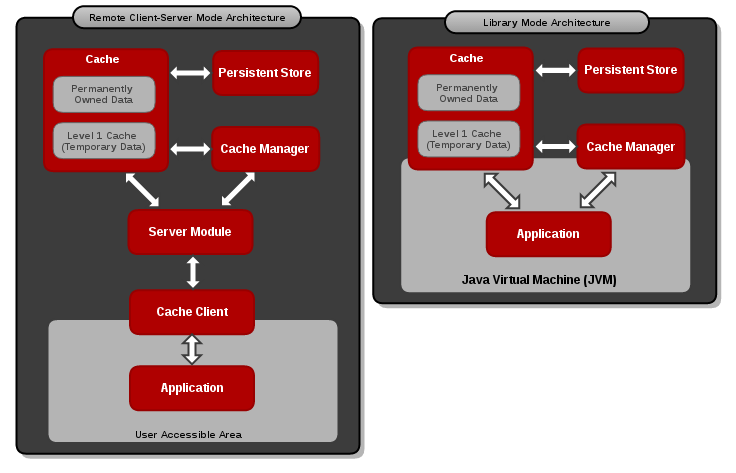
Figure 1.1. JBoss Data Grid Cache Architecture
- Elements that a user cannot directly interact with (depicted within a dark box). In Remote Client-Server mode, this includes Persistent Store, Cache, Cache Manager, L1 Cache, and Server Module. In Library mode, user cannot directly interact with Persistent Store and L1 Cache.
- Elements that a user can interact directly with (depicted within a light gray box). In Remote Client-Server mode, this includes the Application and the Cache Client. In Library mode, programmatic configurations are used to allow the user to interact with the Cache and Cache Manager, as well as the Application.
JBoss Data Grid's cache architecture includes the following elements:
- The Persistent Store is an optional component. It can permanently store the cached entries for restoration after a data grid shutdown.
- The Level 1 Cache (or L1 Cache) stores remote cache entries after they are initially accessed, preventing unnecessary remote fetch operations for each subsequent use of the same entries.
- The Cache Manager controls the life cycle of Cache instances and can store and retrieve them when required.
- The Cache is the main component for storage and retrieval of the key-value entries.
In Library mode, the Application (user code) can interact with the Cache and Cache Manager components directly. In this case the Application resides in the same Java Virtual Machine (JVM) and can call Cache and Cache Manager Java API methods directly.
1.7. Red Hat JBoss Data Grid APIs
- Cache
- Batching
- Grouping
- Persistence (formerly CacheStore)
- ConfigurationBuilder
- Externalizable
- Notification (also known as the Listener API because it deals with Notifications and Listeners)
- The Asynchronous API (can only be used in conjunction with the Hot Rod Client in Remote Client-Server Mode)
- The REST Interface
- The Memcached Interface
- The Hot Rod Interface
- The RemoteCache API
Part II. Download and Install Red Hat JBoss Data Grid
Chapter 2. Download Red Hat JBoss Data Grid
2.1. Red Hat JBoss Data Grid Installation Prerequisites
2.2. Java Virtual Machine
2.3. Install OpenJDK on Red Hat Enterprise Linux
Procedure 2.1. Install OpenJDK on Red Hat Enterprise Linux
Subscribe to the Base Channel
Obtain the OpenJDK from the RHN base channel. Your installation of Red Hat Enterprise Linux is subscribed to this channel by default.Install the Package
Use the yum utility to install OpenJDK:$ sudo yum install java-1.6.0-openjdk-develVerify that OpenJDK is the System Default
Ensure that the correct JDK is set as the system default as follows:- Log in as a user with root privileges and run the alternatives command:
$ /usr/sbin/alternatives --config java - Depending on the OpenJDK version, select
/usr/lib/jvm/jre-1.6.0-openjdk.x86_64/bin/java/usr/lib/jvm/jre-1.7.0-openjdk.x86_64/bin/java. - Use the following command to set
javac:$ /usr/sbin/alternatives --config javac - Depending on the OpenJDK version used, select
/usr/lib/jvm/java-1.6.0-openjdk/bin/javaor/usr/lib/jvm/java-1.7.0-openjdk/bin/java.
2.4. Download and Install JBoss Data Grid
- Download JBoss Data Grid from the Red Hat Customer Service Portal
- Verify the downloaded files
- Install JBoss Data Grid
2.4.1. Download Red Hat JBoss Data Grid
Procedure 2.2. Download JBoss Data Grid
Access the Customer Service Portal
Log into the Customer Service Portal at https://access.redhat.com.Locate the Product
Mouse over and navigate to .Select the Product
Select .Download JBoss Data Grid
Select the appropriate JBoss Data Grid download and click the link.Select for JBoss Data Grid with the Remote Client-Server mode or for JBoss Data Grid with the Library mode.
2.4.2. About the Red Hat Customer Portal
- Manage and maintain Red Hat entitlements and support contracts;
- Download officially-supported software;
- Access product documentation and the Red Hat Knowledgebase;
- Contact Global Support Services; and
- File bugs against Red Hat products.
2.4.3. Checksum Validation
2.4.4. Verify the Downloaded File
Procedure 2.3. Verify the Downloaded File
- To verify that a file downloaded from the Red Hat Customer Portal is error-free, access the portal site and go to that package's Software Details page. The Software Details page displays the
MD5andSHA256"checksum" values. Use the checksum values to check the integrity of the file. - Open a terminal window and run either the
md5sumorsha256sumcommand, with the downloaded file as an argument. The program displays the checksum value for the file as the output for the command. - Compare the checksum value returned by the command to the corresponding value displayed on the Software Details page for the file.
Note
Microsoft Windows does not come equipped with a checksum tool. Windows operating system users have to download a third-party product instead.
If the two checksum values are identical then the file has not been altered or corrupted and is, therefore, safe to use.
2.4.5. Install Red Hat JBoss Data Grid
Locate the appropriate version, platform, and file type and download Red Hat JBoss Data Grid from the Customer Service Portal.
Procedure 2.4. Install JBoss Data Grid
- Copy the downloaded JBoss Data Grid package to the preferred location on your machine.
- Run the following command to unzip the downloaded JBoss Data Grid package:
$ unzip JDG_PACKAGEReplace JDG_PACKAGE with the name of the JBoss Data Grid usage mode package downloaded from the Red Hat Customer Portal. - The resulting unzipped directory will now be referred to as $JDG_HOME.
2.4.6. Red Hat Documentation Site
Chapter 3. Install and Use the Maven Repositories
3.1. About Maven
Important
3.2. Required Maven Repositories
- The JBoss Data Grid Maven Repository
- The JBoss Enterprise Application Platform Maven Repository
3.3. Install the Maven Repository
- On your local file system.
- On Apache Web Server.
- With a Maven repository manager.
3.3.1. Local File System Repository Installation
Procedure 3.1. Local File System Repository Installation (JBoss Data Grid)
Log Into the Customer Service Portal
In a browser window, navigate to the Customer Service Portal and log in.Download the JBoss Data Grid Repository File
Download thejboss-datagrid-{VERSION}-maven-repository.zipfile from the Red Hat Customer Portal.- Unzip the file to a directory on your local file system such as
$JDG_HOME/projects/maven-repositories/
3.3.2. Maven Repository Manager Installation
- Apache Archiva: http://archiva.apache.org/
- JFrog Artifactory: http://www.jfrog.com/products.php
- Sonatype Nexus: http://nexus.sonatype.org/ For details, see Section B.1, “Install the JBoss Enterprise Application Platform Repository Using Nexus”
3.4. Configure the Maven Repository
settings.xml file. The default version of this file is available in the conf directory of your Maven installation.
.m2 sub-directory of the user's home directory. See http://maven.apache.org/settings.html (the Maven documentation) for more information about configuring Maven.
3.4.1. Next Steps
Part III. Run Red Hat JBoss Data Grid in Remote Client-Server Mode
Chapter 4. Run Red Hat JBoss Data Grid in Remote Client-Server Mode
4.1. Prerequisites
- Ensure an appropriate version of OpenJDK is installed. For more information, see Section 2.3, “Install OpenJDK on Red Hat Enterprise Linux”
- Download and install the latest version of JBoss Data Grid. For more information, see Section 2.4.1, “Download Red Hat JBoss Data Grid”
4.2. Run Red Hat JBoss Data Grid in Standalone Mode
$JDG_HOME/bin/standalone.sh$JDG_HOME/standalone/configuration/standalone.xml file.
4.3. Run Red Hat JBoss Data Grid in Clustered Mode
$JDG_HOME/bin/clustered.sh$JDG_HOME/standalone/configuration/clustered.xml file.
4.4. Run Red Hat JBoss Data Grid with a Custom Configuration
$JDG_HOME/standalone/configuration directory.
$JDG_HOME/bin/standalone.sh -c ${FILENAME}$JDG_HOME/bin/clustered.sh -c ${FILENAME}-c used for this script does not allow absolute paths, therefore the specified file must be available in the $JDG_HOME/standalone/configuration directory.
-c parameter, JBoss Data Grid uses the default configuration.
4.5. Set an IP Address to Run Red Hat JBoss Data Grid
127.0.0.1/localhost. Use the -b parameter with the script to specify an IP address.
$JDG_HOME/bin/standalone.sh -b ${IP_ADDRESS}$JDG_HOME/bin/clustered.sh -b ${IP_ADDRESS}4.6. Running Red Hat JBoss Data Grid
- Use the following command to run JBoss Data Grid using the configuration defined in the
standalone.xmlfile (located at$JDG_HOME/standalone/configuration):$JDG_HOME/bin/standalone.sh - Use the following command with an appended
-cfollowed by the configuration file name to run JBoss Data Grid with a non-default configuration file:$JDG_HOME/bin/standalone.sh -c clustered.xml - Use the following command to run JBoss Data Grid with a clustered configuration:
$JDG_HOME/bin/clustered.sh
Chapter 5. Run a Red Hat JBoss Data Grid as a Node without Endpoints
5.1. Benefits of a Node Without Endpoints
5.2. Sample Configuration for a Node without Endpoints
Procedure 5.1. Find the JBoss Data Grid Sample Configuration for a Node Without Endpoints
Extract the JBoss Data Grid ZIP
1. Extract the ZIP file for JBoss Data Grid Remote Client-Server mode. This is namedjboss-datagrid-server-${version}-GA. Add the relevant version to the file name.Navigate to the Appropriate Folder
In the extracted folder, navigate to the$JDG_HOME/docs/examples/configfolder.Find the Configuration Sample File
View thestandalone-storage-only.xmlfile, which contains the configuration for a node with no endpoints.
5.3. Configure a Node with No Endpoints
- Remove the
datagridsubsystem. - Remove the
modclustersubsystem. - Remove the
datasourcedefinition. - Remove
socket-bindingsformod_cluster,Hot Rodandmemcached.
Part IV. Run Red Hat JBoss Data Grid in Library Mode
- As a prerequisite for the subsequent chapters, set up a new project using the instructions in Chapter 6, Create a New Red Hat JBoss Data Grid Project
- Next, use JBoss Data Grid either as an embedded cache (see Chapter 7, Run Red Hat JBoss Data Grid in Library Mode (Single-Node Setup) for more information) or as a clustered cache (see Chapter 8, Run Red Hat JBoss Data Grid in Library Mode (Multi-Node Setup). Each tutorial is based on an Infinispan quickstart.
- Finally, monitor Red Hat JBoss EAP applications using JBoss Data Grid using the instructions in Chapter 9, Monitor Red Hat JBoss Data Grid Applications in Red Hat JBoss EAP
Chapter 6. Create a New Red Hat JBoss Data Grid Project
6.1. Add Dependencies to Your Project
pom.xml file, located in the Maven repository folder:
<dependency>
          <groupId>org.infinispan</groupId>
          <artifactId>infinispan-core</artifactId>
          <version>5.1.5.FINAL-redhat-1</version>
</dependency>
Note
version value with the appropriate version of the libraries included in JBoss Data Grid.
6.2. Add a Profile to Your Project
settings.xml file in $HOME/.m2/settings.xml as follows:
<profile>
    <id>jboss-datagrid-repository</id>
    <repositories>
	<repository>
	    <id>jboss-datagrid-repository</id>
	    <name>JBoss Data Grid Maven Repository</name>
            <url>file:///path/to/repo/jboss-datagrid-{VERSION}-maven-repository</url>
            <layout>default</layout>
            <releases>
            	<enabled>true</enabled>
            	<updatePolicy>never</updatePolicy>
            </releases>
            <snapshots>
            	<enabled>false</enabled>
            	<updatePolicy>never</updatePolicy>
            </snapshots>
	</repository>
	<repository>
	    <id>jboss-public-repository-group</id>
	    <name>JBoss Public Maven Repository Group</name>
            <url>https://repository.jboss.org/nexus/content/groups/public-jboss/</url>
            <layout>default</layout>
            <releases>
        	<enabled>true</enabled>
        	<updatePolicy>never</updatePolicy>
            </releases>
            <snapshots>
        	<enabled>true</enabled>
        	<updatePolicy>never</updatePolicy>
            </snapshots>
        </repository>
    </repositories>
    <pluginRepositories>
        <pluginRepository>
	    <id>jboss-datagrid-repository-group</id>
	    <name>JBoss Data Grid Maven Repository</name>
	    <url>file:///path/to/repo/jboss-datagrid-{VERSION}-maven-repository</url>
	    <layout>default</layout>
            <releases>
            	<enabled>true</enabled>
            	<updatePolicy>never</updatePolicy>
            </releases>
            <snapshots>
            	<enabled>false</enabled>
            	<updatePolicy>never</updatePolicy>
            </snapshots>
        </pluginRepository>
        <pluginRepository>
            <id>jboss-public-repository-group</id>
	    <name>JBoss Public Maven Repository Group</name>
            <url>https://repository.jboss.org/nexus/content/groups/public-jboss/</url>
            <layout>default</layout>
            <releases>
        	<enabled>true</enabled>
        	<updatePolicy>never</updatePolicy>
            </releases>
            <snapshots>
        	<enabled>true</enabled>
        	<updatePolicy>never</updatePolicy>
            </snapshots>
        </pluginRepository>
    </pluginRepositories>
</profile>
settings.xml file:
<activeProfiles>
    <!-- make the profile active by default -->
      <activeProfile>jboss-datagrid-repository</activeProfile>
</activeProfiles>
client/java/ directory, included in the Red Hat JBoss Data Grid package to the build classpath.
Chapter 7. Run Red Hat JBoss Data Grid in Library Mode (Single-Node Setup)
7.1. Create a Main Method in the Quickstart Class
These quickstarts use the Infinispan quickstarts located at https://github.com/infinispan/infinispan-quickstart. The following procedure uses the infinispan-quickstart/embedded-cache quickstart.
Procedure 7.1. Create a Main Method in the Quickstart Class
Create the Quickstart.java File
Create a file calledQuickstart.javaat your project's location.Add the Quickstart Class
Add the following class and method:package com.mycompany.app; import org.infinispan.manager.DefaultCacheManager import org.infinispan.Cache public class Quickstart { public static void main(String args[]) throws Exception { Cache<Object, Object> cache = new DefaultCacheManager().getCache(); } }Copy Dependencies and Compile Java Classes
Use the following command to copy all project dependencies to a directory and compile the Java classes from our project:$ mvn clean compile dependency:copy-dependencies -DstripVersionRun the Main Method
Use the following command to run the main method:$ java -cp target/classes/:target/dependency/* com.mycompany.app.Quickstart
7.2. Use the Default Cache
7.2.1. Add and Remove Data from the Cache
Procedure 7.2. Add and Remove Data from the Cache
- Add an entry, replacing key and value with the desired key and value:
cache.put("key", "value"); - Confirm that the entry is present in the cache:
assertEquals(1, cache.size()); assertTrue(cache.containsKey("key")); - Remove the entry from the cache:
Object v = cache.remove("key"); - Confirm that the entry is no longer present in the cache:
assertEquals("value", v);
assertTrue(cache.isEmpty());
7.2.2. Adding and Replacing a Key Value
DefaultCacheQuickstart.java file does:
Procedure 7.3. Adding and Replacing a Key Value
- Add an entry
keywithvalueas the key's value.cache.put("key", "value");
Procedure 7.4. Replacing a Key Value
- The following code searches for keys (named
keyandkey2). If the two specific keys beings searched for are not found, JBoss Data Grid creates two new keys with the specified key names and values.cache.putIfAbsent("key", "newValue"); cache.putIfAbsent("key2", "value2"); - The following code confirms that the value of the stored key equals the value we wanted to store.
assertEquals(cache.get("key"), "value");
assertEquals(cache.get("key2"), "value2");
See Also:
7.2.3. Adjust Data Life
DefaultCacheQuickstart.java file does:
Procedure 7.5. Adjust the Data Life
- Alter the key's
lifespanvalue:cache.put("key", "value", 5, TimeUnit.SECONDS); - Check if the cache contains the key:
assertTrue(cache.containsKey("key")); - After the allocated
lifespantime has expired, the key is no longer in the cache:Thread.sleep(10000); assertFalse(cache.containsKey("key"));
7.2.4. Default Data Mortality
7.2.5. Register the Named Cache Using XML
infinispan.xml file.
infinispan.xml file is located in https://github.com/infinispan/infinispan-quickstart in the infinispan-quickstart/embedded-cache/src/main/resources folder.
Chapter 8. Run Red Hat JBoss Data Grid in Library Mode (Multi-Node Setup)
8.1. Sharing JGroup Channels
EmbeddedCacheManager cm = $LOCATION
Cache<Object, Object> cache1 = cm.getCache("replSyncCache");
Cache<Object, Object> cache2 = cm.getCache("replAsyncCache");
Cache<Object, Object> cache3 = cm.getCache("invalidationSyncCache");
8.2. Run Red Hat JBoss Data Grid in a Cluster
8.2.1. Compile the Project
$ mvn clean compile dependency:copy-dependencies -DstripVersion
8.2.2. Run the Clustered Cache with Replication Mode
Procedure 8.1. Run the Clustered Cache with Replication Mode
- Use the following command to launch the first node:
$ java -cp target/classes/:target/dependency/* org.infinispan.quickstart.clusteredcache.replication.Node0 - Use the following command to launch the second node:
$ java -cp target/classes/:target/dependency/* org.infinispan.quickstart.clusteredcache.replication.Node1
JGroups and JBoss Data Grid initialized on both nodes. After approximately fifteen seconds, the cache entry log message appears on the console of the first node.
8.2.3. Run the Clustered Cache with Distribution Mode
Procedure 8.2. Run the Clustered Cache with Distribution Mode
- Use the following command to launch the first node:
$ java -cp target/classes/:target/dependency/* org.infinispan.quickstart.clusteredcache.distribution.Node0 - Use the following command to launch the second node:
$ java -cp target/classes/:target/dependency/* org.infinispan.quickstart.clusteredcache.distribution.Node1 - Use the following command to launch the third node:
$ java -cp target/classes/:target/dependency/* org.infinispan.quickstart.clusteredcache.distribution.Node2
JGroups and JBoss Data Grid initialized on the three nodes. After approximately fifteen seconds, the ten entries added by the third node can be seen as they are distributed to the first and second nodes.
8.2.4. Configure the Cluster
8.2.4.1. Configuring the Cluster
Procedure 8.3. Configure the Cluster
- Add the default configuration for a new cluster
- Customize the default cluster configuration according to the requirements of your network. This can be done declaratively (using XML) or programmatically.
- Configure the replicated or distributed data grid.
8.2.4.2. Add the Default Cluster Configuration
new ConfigurationBuilder()
   .clustering().cacheMode(CacheMode.REPL_SYNC)
   .build()
Note
GlobalConfiguration.clusteredDefault() to quickly create a preconfigured and cluster-aware GlobalConfiguration for clusters. This configuration can also be customized.
8.2.4.3. Customize the Default Cluster Configuration
Use the following GlobalConfiguration code to specify the name of the file to use for JGroups configuration:
new GlobalConfigurationBuilder().transport().addProperty("configurationFile", "jgroups.xml")
   .build()
jgroups.xml with the desired file name.
jgroups.xml file is located at $Infinispan-Quickstart/clustered-cache/src/main/resources/.
Note
-Djgroups.bind_addr="127.0.0.1". This is particularly useful to test a cluster where all nodes are on a single machine.
Use the following XML snippet in the infinispan.xml file to configure the JGroups properties to use Red Hat JBoss Data Grid's XML configuration:
<global>
   <transport>
      <properties>
         <property name="configurationFile" value="jgroups.xml"/>
      </properties>
   </transport>
</global>
8.2.4.4. Configure the Replicated Data Grid
Use the following code snippet to programmatically configure the cache for replication mode (either synchronous or asynchronous):
private static EmbeddedCacheManager createCacheManagerProgramatically() {
   return new DefaultCacheManager(
      new GlobalConfigurationBuilder()
         .transport().addProperty("configurationFile", "jgroups.xml")
         .build(),
      new ConfigurationBuilder()
         .clustering().cacheMode(CacheMode.REPL_SYNC)
         .build()
   );
}
Edit the infinispan-replication.xml file to include the following XML code to declaratively configure the cache for replication mode (either synchronous or asynchronous):
<infinispan xsi:schemaLocation="urn:infinispan:config:5.1 http://www.infinispan.org/schemas/infinispan-config-5.1.xsd" xmlns:xsi="http://www.w3.org/2001/XMLSchema-instance" xmlns="urn:infinispan:config:5.1">
   <global>
      <transport>
         <properties>
            <property name="configurationFile" value="jgroups.xml"/>
         </properties>
      </transport>
   </global>
   <default>
      <clustering mode="replication">
         <sync/>
      </clustering>
   </default>
</infinispan>
private static EmbeddedCacheManager createCacheManagerFromXml() throws IOException {
   return new DefaultCacheManager("infinispan-replication.xml");}
Note
org.infinispan.jmx.JmxDomainConflictException: Domain already registered org.infinispan.
GlobalConfiguration glob = new GlobalConfigurationBuilder()
	.clusteredDefault()
        .globalJmxStatistics()
          .allowDuplicateDomains(true)
          .enable()
        .build();
8.2.4.5. Configure the Distributed Data Grid
numOwners parameter to indicate how many owners each entry has.
numOwners value to set the desired trade off between space, durability and availability. Durability is further improved by JBoss Data Grid's topology aware consistent hash, which locates entry owners across a variety of data centers, racks and nodes.
Use the following code snippet to programmatically configure the cache for distributed mode (either synchronous or asynchronous):
new ConfigurationBuilder()
   .clustering()
      .cacheMode(CacheMode.DIST_SYNC)
      .hash().numOwners(2)
   .build()
Edit the cfg.xml file to include the following XML code to declaratively configure the cache for distributed mode (either synchronous or asynchronous):
<default>
   <clustering mode="distribution">
      <sync/>
      <hash numOwners="2"/>
   </clustering>
</default>
Chapter 9. Monitor Red Hat JBoss Data Grid Applications in Red Hat JBoss EAP
9.1. Prerequisites
- Install and configure JBoss Enterprise Application Platform 6 (or better).
- Install and configure JBoss Operations Network 3.1 (or better) or RHQ (4.5.1 or better) from http://www.jboss.org/rhq.
- Install and configure JBoss Data Grid (6.1 or better) Library mode plug-in.
9.2. Monitor Red Hat JBoss Data Grid Applications in Red Hat JBoss EAP
Procedure 9.1. Monitor JBoss Data Grid Applications in JBoss Enterprise Application Platform
Configure RHQ/JBoss Operations Network
Add an RHQ/JBoss Operations Network specific property (namedorg.rhq.resourceKey) to the/bin/standalone.conffile as follows:JAVA_OPTS="$JAVA_OPTS -Dorg.rhq.resourceKey=MyEAP"This command adds the property to the JBoss Enterprise Application Platform's command line indirectly.Check RHQ/JBoss Operations Network is Running Using a Full JDK
Ensure that the RHQ/JBoss Operations Network agent started using a full JDK instead of a JRE. This is because the agent requires access to the JDK'stools.jarfile.To configure your RHQ/JBoss Operations Network agent to use the JDK, follow the instructions relevant to your operating system:- For Linux users, set the
RHQ_AGENT_JAVA_HOMEenvironment variable to the JDK home directory in the agent'srhq-agent-env.shfile. - For Windows users, set the
RHQ_AGENT_JAVA_HOMEenvironment variable to the JDK home directory in the agent'srhq-agent-env.batfile.
Ensure the Agent is Local to the JBoss Enterprise Application Platform Instance
Ensure that the RHQ/JBoss Operations Network agent runs locally to and under the same user as the JBoss Application Platform instance. This is required for the Java Attach API to connect to the process.Import Resources to the Agent Inventory
RHQ/JBoss Operations Network can now discover resources. These resources can subsequently be imported into the agent inventory.When a JBoss Data Grid user deployment enables JMX statistics to expose JBoss Data Grid Cache Managers or caches, the resources appear as children resources of the JBoss Enterprise Application Platform instance.
Part V. Red Hat JBoss Data Grid Quickstarts
Chapter 10. The Hello World Quickstart
- from a servlet.
- from a JSF page using request scoped beans.
Important
JBoss Data Grid's Hello World quickstart is available at the following location: jboss-datagrid-{VERSION}-quickstarts/
10.1. Quickstart Prerequisites
- Java 6.0 (Java SDK 1.6) or better
- JBoss Enterprise Application Platform 6.x or WildFly 7.x
- Maven 3.0 or better
- Configure the Maven Repository. For details, see Chapter 3, Install and Use the Maven Repositories
10.2. Start Two Application Server Instances
Procedure 10.1. Start the First Application Server Instance
Navigate to the Root Directory
In the command line terminal, navigate to the root for your JBoss server directory.Start the First Application Server
Depending on your operating system, use the appropriate command from the following to start the first instance of your selected application server:- For Linux:
$JBOSS_HOME/bin/standalone.sh - For Windows:
$JBOSS_HOME\bin\standalone.bat
Procedure 10.2. Start the Second Application Server Instance
Clone the Application Server
Create a copy of the selected JBoss Server to create a second instance.Navigate to the Root Directory
In the command line terminal, navigate to the root for your JBoss server directory.Start the Second Application Server
Use the appropriate command for your operating system from the following commands. This command starts the server with the provided port offset to ensure that both the server instances run on the same host.- For Linux:
$JBOSS_HOME2/bin/standalone.sh -Djboss.socket.binding.port-offset=100 - For Windows:
$JBOSS_HOME2\bin\standalone.bat -Djboss.socket.binding.port-offset=100
10.3. Build and Deploy the Hello World Quickstart
Important
Procedure 10.3. Build and Deploy the Hello World Quickstart
Navigate to the Required Directory
In the command line terminal, navigate to the root directory of the quickstart on the command line interface.Build and Deploy to the First Application Server Instance
Use the following command to build and deploy the quickstart to the first application server instance as follows:# mvn clean package jboss-as:deployThis command deploystarget/jboss-helloworld-jdg.warto the first running server instance.Build and Deploy to the Second Application Server Instance
Use the following command to build and deploy the quickstart to the second application server instance with the specified ports as follows:# mvn clean package jboss-as:deploy -Djboss-as.port=10099This command deploystarget/jboss-helloworld-jdg.warto the second running server instance.
10.4. Access the Running Application
- First Server Instance: http://localhost:8080/jboss-helloworld-jdg
- Second Server Instance: http://localhost:8180/jboss-helloworld-jdg
10.5. Test Replication on the Application
Procedure 10.4. Test Replication on the Application
Access the First Server
Access the first application server and enter the key and value.- Access the first application server in a browser window using the following URL:
http://localhost:8080/jboss-helloworld-jdg - Insert the key
foo. - Insert the value
bar.
Access the Second Server
Access the second application server and enter the key and value.- Access the second application server in a browser window using the following URL:
http://localhost:8180/jboss-helloworld-jdg - Click .
- Get the key
foo. - Click .
- Insert the key
mykey. - Insert the value
myvalue.
Get All Keys and Values
Access the first server and request all keys.- Access the first application server in a browser window using the following URL:
http://localhost:8080/jboss-helloworld-jdg - Click .
- Click to request all key and values.
As the results of the last step show, all the data added at each server has been replicated to the other server.
Note
60 seconds from the most recent update.
To interact with predefined servlets or to directly store and retrieve keys from the cache, use the following URLs:
http://localhost:8080/jboss-helloworld-jdg/TestServletPut
http://localhost:8180/jboss-helloworld-jdg/TestServletGet
10.6. Remove the Application
Procedure 10.5. Remove the Application
Start the Application Servers
Ensure that both server instances are running.Navigate to the Root
In the command line terminal, navigate to the root directory of the quickstartRemove the Archive
Use the following commands to remove the archive from both the server instances.- Remove the archive from the first server as follows:
mvn jboss-as:undeploy - Remove the archive from the second server as follows:
mvn jboss-as:undeploy -Djboss-as.port=10099
10.7. Debug the Application
# mvn dependency:source
# mvn dependency:resolve -Dclassifier=javadoc
Important
Chapter 11. The CarMart Quickstarts
11.1. About the CarMart Quickstart
The CarMart quickstart offers the following features:
- List all cars
- Add new cars
- Remove cars
- View statistics for caches, such as hits, stores, and retrievals
The CarMart quickstart can be used in the following JBoss Data Grid usage modes:
- Remote Client-Server Mode, where the application includes the Hot Rod client to communicate with a remote JBoss Data Grid server.
- Library Mode, where all libraries are bundled with the application in the form of
jarfiles.
JBoss Data Grid's CarMart quickstart is available at the following location: jboss-datagrid-{VERSION}-quickstarts/
Important
11.2. About the CarMart Transactional Quickstart
The Transactional CarMart Quickstart offers the following features:
- List all cars
- Add new cars
- Add new cars with rollback
- Remove cars
- View statistics for caches, such as hits, stores, and retrievals
The Transactional CarMart Quickstart can only be used in JBoss Data Grid's Library mode. A standalone transaction manager from JBoss Transactions is used when the Transactional CarMart Quickstart is run in Red Hat JBoss Web Server 2.
JBoss Data Grid's Transactional CarMart Quickstart can be found at the following location: jboss-datagrid-{VERSION}-quickstarts/carmart-tx
Important
11.3. Differences Between the CarMart and Transactional Quickstarts
- CarMart is available for both Remote Client-Server Mode and Library Mode. Transactional CarMart is only available in Library Mode because transactions are not available in Remote Client-Server Mode.
- The Transactional Quickstart also displays how a transaction rollback occurs. Use the button to view the rollback. The CarMart example has a simple button instead.
11.4. Quickstart Prerequisites
- Java 6.0 (Java SDK 1.6) or better
- JBoss Enterprise Application Platform 6.x or WildFly 7.x
- Maven 3.0 or better
- Configure the Maven Repository. For details, see Chapter 3, Install and Use the Maven Repositories
11.5. The CarMart Quickstart Using WildFly
11.5.1. Build and Deploy the CarMart Quickstart to WildFly
Note
Prerequisites for this procedure are as follows:
- Obtain the supported JBoss Data Grid Library Mode distribution files.
- Ensure that the JBoss Data Grid and JBoss Enterprise Application Platform Maven repositories are installed and configured. For details, see Chapter 3, Install and Use the Maven Repositories
- Select a JBoss server to use (JBoss Enterprise Application Platform 6 (or better) or WildFly 7 (or better).
Procedure 11.1. Build and Deploy CarMart to WildFly
Start WildFly
Navigate to the root of the WildFly server directory in a terminal window and enter the following command:For Linux users:$JBOSS_HOME/bin/standalone.shFor Windows users:$JBOSS_HOME\bin\standalone.batBuild and Deploy the Application
Use the following command to build and deploy the application using Maven:$ mvn clean package jboss-as:deploy
The target war file (target/jboss-carmart.war) is deployed to the running instance of WildFly.
11.5.2. View the CarMart Quickstart on WildFly
The CarMart quickstart must be built and deployed to be viewed.
Procedure 11.2. View the CarMart Quickstart on WildFly
- To view the application, use your browser to navigate to the links provided.When using the non transactional Carmart Quickstart, use the following link:
http://localhost:8080/jboss-carmartWhen using the transactional Carmart Quickstart, use the following link:http://localhost:8080/jboss-carmart-tx
11.5.3. Remove the CarMart Quickstart from WildFly
Procedure 11.3. Remove an Application from the WildFly
- To remove an application, use the following command:
$ mvn jboss-as:undeploy
11.6. The CarMart Quickstart to a Server
11.6.1. Build and Deploy the CarMart Quickstart to the Server
Prerequisites for this procedure are as follows:
- Ensure that the JBoss Data Grid and JBoss Enterprise Application Platform Maven repositories are installed and configured. For details, see Chapter 3, Install and Use the Maven Repositories
- Select JBoss Web Server 2 (or better) for your application and install it.
Procedure 11.4. Build the CarMart Quickstart to the Server (Library Mode)
Start the Server
Run the selected server by navigating to the root directory in a terminal window and enter the following command:For Linux users:$JBOSS_EWS_HOME/tomcat7/bin/catalina.sh runFor Windows users:$JBOSS_EWS_HOME\tomcat7\bin\catalina.bat runBuild and Deploy your Application
Use the following command to build and deploy your application using Maven:$ mvn -Plibrary-tomcat clean package tomcat:deploy
The target war file (target/jboss-carmart.war) is deployed to the running instance of the selected server.
11.6.2. View the CarMart Quickstart on the Server
The CarMart quickstart must be built and deployed to be viewed.
Procedure 11.5. View the CarMart Quickstart
- To view the application, use your browser to navigate to the following link:
http://localhost:8080/jboss-carmart
11.6.3. Remove the CarMart Quickstart from the Server
Procedure 11.6. Remove an Application from the Server
- To remove an application, use the following command:
$ mvn tomcat:undeploy -Plibrary-tomcat
11.7. The CarMart Quickstart in Remote Client-Server Mode
11.7.1. Build and Deploy the CarMart Quickstart in Remote Client-Server Mode
Important
Prerequisites for this procedure are as follows:
- Obtain the most recent supported JBoss Data Grid Remote Client-Server Mode distribution files from Red Hat.
- Ensure that the JBoss Data Grid and JBoss Enterprise Application Platform Maven repositories are installed and configured. For details, see Chapter 3, Install and Use the Maven Repositories
- Select a JBoss server to use (JBoss Enterprise Application Platform 6 (or better) or Wildfly 7 (or better). Navigate to the root of the JBoss server directory in a terminal window and enter the following command:For Linux users:
$JBOSS_HOME/bin/standalone.shFor Windows users:$JBOSS_HOME\bin\standalone.bat
Procedure 11.7. Build and Deploy the CarMart Quickstart in Remote Client-Server Mode
Configure the Standalone File
Add the following configuration to thestandalone.xmlfile located in the$JDG_HOME/standalone/configuration/directory.- Add the following configuration within the infinispan subsystem tags:
<local-cache name="carcache"
	     start="EAGER"
	     batching="false"
	     statistics="true">
	<eviction strategy="LIRS"
		  max-entries="4"/>
</local-cache>
Note
If thecarcacheelement already exists in your configuration, replace it with the provided configuration.
Start the JBoss Data Grid Server
Run the following script to start the JBoss Data Grid Server:$JDG_HOME/bin/standalone.sh -Djboss.socket.binding.port-offset=100Start the JBoss Server
Run the following script to start the JBoss server instance where your application will deploy:$JBOSS_HOME/bin/standalone.shOptional: Specify the Host and Port Address
The application uses the values in thejboss-datagrid-{VERSION}-quickstarts/carmart/src/main/resources/META-INF/datagrid.propertiesfile to locate the JBoss Data Grid server. If your JBoss Data Grid server is not running using the default host and port values, edit the file and insert the correct host and port values, as follows:datagrid.host=localhost datagrid.hotrod.port=11322Build and Deploy the Application
Use the following command to build and deploy your application in the relevant directory:$ mvn clean package -Premote
11.7.2. View the CarMart Quickstart in Remote Client-Server Mode
The CarMart quickstart must be built and deployed be viewed.
Procedure 11.8. View the CarMart Quickstart in Remote Client-Server Mode
- Visit the following link in a browser window to view the application:
http://localhost:8080/jboss-carmart
11.7.3. Remove the CarMart Quickstart in Remote Client-Server Mode
Procedure 11.9. Remove an Application in Remote Client-Server Mode
- To remove an application, use the following command:
$ mvn jboss-as:undeploy -Premote
Chapter 12. The Football Quickstart Endpoint Examples
The following features are available with the example Football Manager application:
- Add a team
- Add players
- Remove all entities (teams and players)
- Listing all teams and players
JBoss Data Grid's Football quickstart can be found at the following locations:
jboss-datagrid-{VERSION}-quickstarts/rest-endpointjboss-datagrid-{VERSION}-quickstarts/hotrod-endpointjboss-datagrid-{VERSION}-quickstarts/memcached-endpoint
12.1. Quickstart Prerequisites
- Java 6.0 (Java SDK 1.6) or better
- JBoss Enterprise Application Platform 6.x or WildFly 7.x
- Maven 3.0 or better
- Configure the Maven Repository. For details, see Chapter 3, Install and Use the Maven Repositories
12.2. Build the Football Application
Important
Prerequisites for this procedure are as follows:
- Obtain the most recent supported JBoss Data Grid Remote Client-Server Mode distribution files from Red Hat.
- Ensure that the JBoss Data Grid and JBoss Enterprise Application Platform Maven repositories are installed and configured. For details, see Chapter 3, Install and Use the Maven Repositories
Procedure 12.1. Build the Football Application
Add Configurations
Edit thestandalone.xmlfile (located at$JDG_HOME/standalone/configuration/) to add definitions for the datasource and infinispan subsystems.- Add the following subsystem definition for the datasource:
<subsystem xmlns="urn:jboss:domain:datasources:1.0"> <!-- Define this Datasource with jndi name java:jboss/datasources/ExampleDS --> <datasources> <datasource jndi-name="java:jboss/datasources/ExampleDS" pool-name="ExampleDS" enabled="true" use-java-context="true"> <!-- The connection URL uses H2 Database Engine with in-memory database called test --> <connection-url>jdbc:h2:mem:test;DB_CLOSE_DELAY=-1</connection-url> <!-- JDBC driver name --> <driver>h2</driver> <!-- Credentials --> <security> <user-name>sa</user-name> <password>sa</password> </security> </datasource> <!-- Define the JDBC driver called 'h2' --> <drivers> <driver name="h2" module="com.h2database.h2"> <xa-datasource-class>org.h2.jdbcx.JdbcDataSource</xa-datasource-class> </driver> </drivers> </datasources> </subsystem> - Add the following subsystem definition for infinispan:
<subsystem xmlns="urn:infinispan:server:core:6.0"
	     default-cache-container="local">

	<cache-container name="local"
			 default-cache="default"
			 statistics="true">

	        <local-cache name="default"
			     start="EAGER"
			     statistics="true">

			<locking isolation="NONE"
				 acquire-timeout="30000"
				 concurrency-level="1000"
				 striping="false"/>

			<transaction mode="NONE"/>

		</local-cache>

		<local-cache name="memcachedCache"
			     start="EAGER"
			     statistics="true">

			<locking isolation="NONE"
				 acquire-timeout="30000"
				 concurrency-level="1000"
				 striping="false"/>
			<transaction mode="NONE"/>

		</local-cache>

	        <local-cache name="namedCache"
			     start="EAGER"
			     statistics="true"/>

	        <!-- ADD a local cache called 'teams' -->

		<local-cache name="teams"
		             start="EAGER"
	         	     batching="false"
	         	     statistics="true">

	            <!-- Disable transactions for this cache -->
			<transaction mode="NONE" />

	            <!-- Define the JdbcBinaryStores
			to point to the ExampleDS previously
			defined -->

			<string-keyed-jdbc-store
				datasource="java:jboss/datasources/ExampleDS"
 				passivation="false"
				preload="false"
				purge="false">

		                <!-- Define the database dialect -->
		                <property name="databaseType">H2</property>

	                <!-- specifies information about
			     database table/column names
			     and data types -->

				<string-keyed-table prefix="JDG">
		                   <id-column name="id"
				              type="VARCHAR"/>
				   <data-column name="datum"
				                type="BINARY"/>
				   <timestamp-column name="version"
				                     type="BIGINT"/>
				</string-keyed-table>

			</string-keyed-jdbc-store>

	        </local-cache>

	        <!-- End of local cache called 'teams' definition -->

	</cache-container>
</subsystem>
Note
The Hot Rod and REST endpoints use the cache namedteamsand memcached endpoint usesmemcachedCacheas a default.Disable REST Security
As a default, thestandalone.xmlconfiguration file protects the REST endpoint withBASICauthentication. This quickstart cannot perform authentication, therefore the REST authentication must be disabled in the REST connector by removing thesecurity-domainandauth-methodparameters. The resulting configuration (with REST authentication disabled) is as follows:<rest-connector virtual-server="default-host" cache-container="local" />For more details about security, see the REST Authentication Chapter in JBoss Data Grid's Developer Guide.Edit the Submodule Configuration File
Each submodule (specificallyhotrod-endpoint,rest-endpointandmemcached-endpoint) contains a configuration file (located at$JDG_QUICKSTART/src/main/resources/jdg.properties). Modify the default values in the configuration file to set the values required for your specific JBoss Data Grid installation.Build the Application
Use the following command to build the example application in its directory:mvn clean packageThis step results in the use of Maven's shade plugin, which bundles all dependencies into a single jar file for ease of use. This file is named{PROTOCOL}-endpoint-quickstart.jar, for examplerest-endpoint-quickstart.jarfor the REST version.Start JBoss Data Grid
Run the following script to run JBoss Data Grid:$JDG_HOME/bin/standalone.shRun the Application
Run the example application in its directory with the following command:mvn exec:java
Part VI. Uninstall Red Hat JBoss Data Grid
Chapter 13. Remove Red Hat JBoss Data Grid
13.1. Remove Red Hat JBoss Data Grid from Your Linux System
Warning
Procedure 13.1. Remove JBoss Data Grid from Your Linux System
Shut Down Server
Ensure that the JBoss Data Grid server is shut down.Navigate to the JBoss Data Grid Home Directory
Use the command line to change into the level above the$JDG_HOMEfolder.Delete the JBoss Data Grid Home Directory
Enter the following command in the terminal to remove JBoss Data Grid, replacing$JDG_HOMEwith the name of your JBoss Data Grid home directory:$ rm -Rf $JDG_HOME
13.2. Remove Red Hat JBoss Data Grid from Your Windows System
Warning
Procedure 13.2. Remove JBoss Data Grid from Your Windows System
Shut Down Server
Ensure that the JBoss Data Grid server is shut down.Navigate to the JBoss Data Grid Home Directory
Use the Windows Explorer to navigate to the directory in which the$JDG_HOMEfolder is located.Delete the JBoss Data Grid Home Directory
Select the$JDG_HOMEfolder and delete it.
Appendix A. References
A.1. About Key-Value Pairs
- A key is unique to a particular data entry and is composed from data attributes of the particular entry it relates to.
- A value is the data assigned to and identified by the key.
Appendix B. Maven Configuration Information
B.1. Install the JBoss Enterprise Application Platform Repository Using Nexus
Procedure B.1. Download the JBoss Enterprise Application Platform 6 Maven Repository ZIP archive
- Open a web browser and access this URL: https://access.redhat.com/jbossnetwork/restricted/listSoftware.html?product=appplatform.
- Find "Application Platform 6 Maven Repository" in the list.
- Click the button to download a
.zipfile containing the repository. - Unzip the files into a directory of your choosing.
Procedure B.2. Add the JBoss Enterprise Application Platform 6 Maven Repository using Nexus Maven Repository Manager
- Log into Nexus as an Administrator.
- Select the Repositories section from the → menu to the left of your repository manager.
- Click the Add... drop-down menu, then select Hosted Repository.
- Give the new repository a name and ID.
- Enter the path on disk to the unzipped repository in the field Override Local Storage Location.
- Continue if the artifact must be available in a repository group. If not, do not continue with this procedure.
- Select the repository group.
- Click on the Configure tab.
- Drag the new JBoss Maven repository from the Available Repositories list to the Ordered Group Repositories list on the left.
Note
The order of this list determines the priority for searching Maven artifacts.
The repository is configured using Nexus Maven Repository Manager.
B.2. Maven Repository Configuration Example
example-settings.xml is available in the root directory of the Maven repository folder after it is unzipped. The following is an excerpt that contains the relevant parts of the example-settings.xml file:
<?xml version="1.0" encoding="UTF-8"?>

<settings xmlns="http://maven.apache.org/SETTINGS/1.0.0"
xmlns:xsi="http://www.w3.org/2001/XMLSchema-instance"
xsi:schemaLocation="http://maven.apache.org/SETTINGS/1.0.0
http://maven.apache.org/xsd/settings-1.0.0.xsd">

<profiles>
	<profile>
		<id>jboss-datagrid-repository</id>
		<repositories>
			<repository>
				<id>techpreview-all-repository</id>
				<name>Red Hat Enterprise Maven Repository</name>
				<url>http://maven.repository.redhat.com/techpreview/all/</url>
				<layout>default</layout>
				<releases>
					<enabled>true</enabled>
					<updatePolicy>never</updatePolicy>
				</releases>
				<snapshots>
					<enabled>false</enabled>
					<updatePolicy>never</updatePolicy>
				</snapshots>
			</repository>
			<repository>
				<id>jboss-datagrid-repository</id>
				<name>JBoss Data Grid Maven Repository</name>
				<url>file:///path/to/repo/jboss-datagrid-maven-repository</url>
				<layout>default</layout>
				<releases>
					<enabled>true</enabled>
					<updatePolicy>never</updatePolicy>
				</releases>
				<snapshots>
					<enabled>false</enabled>
					<updatePolicy>never</updatePolicy>
				</snapshots>
			</repository>
		</repositories>
		<pluginRepositories>
			<pluginRepository>
				<id>techpreview-all-repository</id>
				<name>Red Hat Enterprise Maven Repository</name>
				<url>http://maven.repository.redhat.com/techpreview/all/</url>
				<layout>default</layout>
				<releases>
					<enabled>true</enabled>
					<updatePolicy>never</updatePolicy>
				</releases>
				<snapshots>
					<enabled>false</enabled>
					<updatePolicy>never</updatePolicy>
				</snapshots>
			</pluginRepository>
			<pluginRepository>
				<id>jboss-datagrid-repository</id>
				<name>JBoss Data Grid Maven Repository</name>
				<url>file:///path/to/repo/jboss-datagrid-maven-repository</url>
				<layout>default</layout>
				<releases>
					<enabled>true</enabled>
					<updatePolicy>never</updatePolicy>
				</releases>
				<snapshots>
					<enabled>false</enabled>
					<updatePolicy>never</updatePolicy>
				</snapshots>
			</pluginRepository>
		</pluginRepositories>
	</profile>
</profiles>
<activeProfiles>
	<!-- make the profile active by default -->
	<activeProfile>jboss-datagrid-repository</activeProfile>
</activeProfiles>

</settings>
Appendix C. Revision History
| Revision History | ||||||
|---|---|---|---|---|---|---|
| Revision 6.2.1-2 | Tue Mar 18 2014 | |||||
| ||||||
| Revision 6.2.1-1 | Tue Mar 11 2014 | |||||
| ||||||

'%20d='M201.5%20305.5c-13.8%200-24.9-11.1-24.9-24.6%200-13.8%2011.1-24.9%2024.9-24.9%2013.6%200%2024.6%2011.1%2024.6%2024.9%200%2013.6-11.1%2024.6-24.6%2024.6zM504%20256c0%20137-111%20248-248%20248S8%20393%208%20256%20119%208%20256%208s248%20111%20248%20248zm-132.3-41.2c-9.4%200-17.7%203.9-23.8%2010-22.4-15.5-52.6-25.5-86.1-26.6l17.4-78.3%2055.4%2012.5c0%2013.6%2011.1%2024.6%2024.6%2024.6%2013.8%200%2024.9-11.3%2024.9-24.9s-11.1-24.9-24.9-24.9c-9.7%200-18%205.8-22.1%2013.8l-61.2-13.6c-3-.8-6.1%201.4-6.9%204.4l-19.1%2086.4c-33.2%201.4-63.1%2011.3-85.5%2026.8-6.1-6.4-14.7-10.2-24.1-10.2-34.9%200-46.3%2046.9-14.4%2062.8-1.1%205-1.7%2010.2-1.7%2015.5%200%2052.6%2059.2%2095.2%20132%2095.2%2073.1%200%20132.3-42.6%20132.3-95.2%200-5.3-.6-10.8-1.9-15.8%2031.3-16%2019.8-62.5-14.9-62.5zM302.8%20331c-18.2%2018.2-76.1%2017.9-93.6%200-2.2-2.2-6.1-2.2-8.3%200-2.5%202.5-2.5%206.4%200%208.6%2022.8%2022.8%2087.3%2022.8%20110.2%200%202.5-2.2%202.5-6.1%200-8.6-2.2-2.2-6.1-2.2-8.3%200zm7.7-75c-13.6%200-24.6%2011.1-24.6%2024.9%200%2013.6%2011.1%2024.6%2024.6%2024.6%2013.8%200%2024.9-11.1%2024.9-24.6%200-13.8-11-24.9-24.9-24.9z'/%3e%3c/svg%3e)