論理ボリュームマネージャの管理
Red Hat Enterprise Linux 6
LVM 管理者ガイド
概要
本ガイドは、クラスター化環境における LVM の実行に関する情報など、LVM 論理ボリュームマネージャについて説明しています。
第1章 はじめに
リンクのコピーリンクがクリップボードにコピーされました!
本ガイドは、クラスター化環境における LVM の実行に関する情報など、論理ボリュームマネージャ (LVM) について説明しています。
1.1. 対象読者
リンクのコピーリンクがクリップボードにコピーされました!
This book is intended to be used by system administrators managing systems running the Linux operating system. It requires familiarity with Red Hat Enterprise Linux 6.
1.2. ソフトウェアのバージョン
リンクのコピーリンクがクリップボードにコピーされました!
| ソフトウェア | 説明 |
|---|---|
|
Red Hat Enterprise Linux 6
|
Red Hat Enterprise Linux 6 以降を指します
|
|
GFS2
|
Red Hat Enterprise Linux 6 以降の GFS2 を指します
|
1.3. 関連ドキュメント
リンクのコピーリンクがクリップボードにコピーされました!
For more information about using Red Hat Enterprise Linux, see the following resources:
- 『インストールガイド』 — Red Hat Enterprise Linux 6 のインストールについての情報を記載しています。
- 『導入ガイド』 — Red Hat Enterprise Linux 6 の導入、設定、および管理に関する情報を提供します。
- 『ストレージ管理ガイド』 — Red Hat Enterprise Linux 6 上でのストレージデバイスおよびファイルシステムの効果的な管理方法について説明しています。
For more information about the High Availability Add-On and the Resilient Storage Add-On for Red Hat Enterprise Linux 6, see the following resources:
- 『High Availability アドオン概要』 — Red Hat High Availability アドオンの全体的な概要を説明しています。
- 『クラスターの管理』 — Red Hat High Availability アドオンのインストール、設定、および管理に関する情報を提供します。
- 『Global File System 2: 設定と管理』 — Resilient Storage アドオンに含まれている Red Hat GFS2 (Red Hat Global File System 2) のインストール、設定、および維持に関する情報を提供します。
- 『DM Multipath』 — Provides information about using the Device-Mapper Multipath feature of Red Hat Enterprise Linux 6.
- 『Load Balancer 管理』 — 実サーバー群全体にわたって IP 負荷を分散するための Linux Virtual Servers (LVS) を提供する、一式の統合ソフトウェアコンポーネントである Load Balancer アドオンを利用したハイパフォーマンスのシステムとサービスの設定に関する情報を提供します。
- 『リリースノート』 — Red Hat 製品の現在のリリースに関する情報を提供します。
Red Hat documents are available in HTML, PDF, and RPM versions on the Red Hat Enterprise Linux Documentation CD and online at https://access.redhat.com/site/documentation/.
1.4. フィードバック
リンクのコピーリンクがクリップボードにコピーされました!
誤字/脱字を発見された場合、もしくは本ガイドを改善するためのご意見/ご提案がございましたら、弊社にご連絡ください。その場合は、製品 Red Hat Enterprise Linux 6 およびコンポーネント doc-Logical_Volume_Manager に対して、Bugzilla (http://bugzilla.redhat.com/) 内でご報告ください。バグ報告を提出される時には、以下のマニュアルの識別子を必ずご記入いただくようお願いします。
Logical_Volume_Manager_Administration(EN)-6 (2017-3-8-15:20)
Logical_Volume_Manager_Administration(EN)-6 (2017-3-8-15:20)
If you have a suggestion for improving the documentation, try to be as specific as possible when describing it. If you have found an error, include the section number and some of the surrounding text so we can find it easily.
第2章 LVM 論理ボリュームマネージャ
リンクのコピーリンクがクリップボードにコピーされました!
この章では、Red Hat Enterprise Linux 6 の初期リリースならびにそれ以降のリリースに新たに組み込まれている LVM 論理ボリュームマネージャの機能についてまとめています。その後に、論理ボリュームマネージャ (LVM) のコンポーネントの概要を大まかに説明します。
2.1. 新機能および変更された機能
リンクのコピーリンクがクリップボードにコピーされました!
このセクションでは、Red Hat Enterprise Linux 6 の初期リリース以降に組み込まれている LVM 論理ボリュームマネージャの新機能および変更された機能について説明します。
2.1.1. Red Hat Enterprise Linux 6.0 で新規追加および変更された機能
リンクのコピーリンクがクリップボードにコピーされました!
Red Hat Enterprise Linux 6.0 では、ドキュメントと機能が以下のように更新/変更されています。
lvm.confファイルのactivationセクション内のmirror_image_fault_policyとmirror_log_fault_policyのパラメーターを使用して、デバイスに障害が発生した場合にミラー化論理ボリュームがどのように動作するかを定義することができます。このパラメーターがremoveに設定されている場合、システムは、障害の発生したデバイスを削除し、そのデバイスなしで稼働を試みます。このパラメーターがallocateに設定されている場合、システムは障害の発生したデバイスを削除し、そのデバイスの代わりとなる新たなデバイス上にスペースの割り当てを試みます。代わりとなる適切なデバイスとスペースを割り当てることができない場合、このポリシーはremoveと同様に機能します。LVM のミラー障害ポリシーに関する情報は、「ミラー化論理ボリュームの障害ポリシー」 をご覧ください。- Red Hat Enterprise Linux 6 リリースでは、Linux I/O スタックが強化され、ベンダーの提供する I/O 制限情報を処理できるようになりました。これによって、LVM を含むストレージ管理ツールでデータの配置とアクセスを最適化することができます。このサポートは、
lvm.confファイル内のdata_alignment_detectionとdata_alignment_offset_detectionのデフォルト値を変更することによって無効にすることが可能ですが、このサポートの無効化は推奨されません。LVM 内のデータ配置に関する情報ならびにdata_alignment_detectionとdata_alignment_offset_detectionのデフォルト値の変更に関する情報は、/etc/lvm/lvm.confファイルのインラインドキュメントをご覧ください。これは、付録B LVM 設定ファイル にも記載されています。Red Hat Enterprise Linux 6 における I/O スタックおよび I/O 制限のサポートに関する概説は、『ストレージ管理ガイド』 をご覧ください。 - Red Hat Enterprise Linux 6 では、デバイスマッパーが
udev統合に対する直接のサポートを提供します。これによって、デバイスマッパーは、LVM デバイスを含むすべてのデバイスマッパーデバイスに関連したすべてのudev処理と同期化されます。udevデバイスマネージャに対するデバイスマッパーのサポートに関する情報は、「デバイスマッパーの udev デバイスマネージャサポート」 をご覧ください。 - Red Hat Enterprise Linux 6 リリースでは、ディスク障害発生後に、
lvconvert --repairコマンドを使用してミラーを修復することができます。これによって、ミラーが一貫性のある状態に戻ります。lvconvert --repairコマンドに関する情報は、 「ミラー化論理ボリュームの修復」 をご覧ください。 - Red Hat Enterprise Linux 6 リリースでは、
lvconvertコマンドの--mergeオプションを使用してスナップショットを複製元のボリュームにマージすることができます。スナップショットのマージに関する情報は、「スナップショットボリュームのマージ」 をご覧ください。 - Red Hat Enterprise Linux 6 リリースでは、
lvconvertコマンドの--splitmirrors引数を使用してミラー化論理ボリュームの冗長イメージを分割して新たな論理ボリュームを形成することができます。このオプションの使用に関する情報は、「ミラー化論理ボリュームの冗長イメージの分割」 をご覧ください。 - ミラー化論理デバイスを作成する際に、
lvcreateコマンドの--mirrorlog mirrored引数を使用して、自動的にミラー化されるミラー化論理デバイスのミラーログを作成できるようになりました。このオプションの使用に関する情報は、「ミラー化ボリュームの作成」 をご覧ください。
2.1.2. Red Hat Enterprise Linux 6.1 で新規追加および変更された機能
リンクのコピーリンクがクリップボードにコピーされました!
Red Hat Enterprise Linux 6.1 では、ドキュメントと機能が以下のように更新/変更されています。
- Red Hat Enterprise Linux 6.1 リリースは、ミラー化論理ボリュームのスナップショット論理ボリューム作成をサポートしています。リニアまたはストライプ化された論理ボリュームの作成と同様に、ミラー化ボリュームのスナップショットを作成することができます。スナップショットボリュームの作成方法については、 「スナップショットボリュームの作成」 をご覧ください。
- LVM ボリュームを拡張する際には、
lvextendコマンドの--alloc clingオプションを使用して、cling割り当てポリシーを指定することができます。このポリシーによって、同一の物理ボリューム上のスペースが、既存の論理ボリュームの最終セグメントとして選択されます。物理ボリューム上に十分なスペースがなく、タグの一覧がlvm.confファイル内で定義されている場合には、LVM は、その物理ボリュームにいずれかのタグが付けられているかを確認し、既存エクステントと新規エクステント間で、物理ボリュームのタグを適合させようとします。lvextendコマンドで--alloc clingオプションを使用した LVM ミラー化ボリュームの拡張については、「cling割り当てポリシーを使用した論理ボリュームの拡張」 をご覧ください。 pvchange、vgchange、またはlvchangeの単一のコマンドで、--addtagおよび--deltagの引数を複数指定することができるようになりました。オブジェクトタグの追加と削除については、「オブジェクトタグの追加と削除」 をご覧ください。- LVM オブジェクトタグで使用可能な文字の一覧が拡大され、タグには "/"、"="、"!"、":"、"#"、および "&" の文字が使用できるようになりました。LVM オブジェクトタグについては、付録D LVM オブジェクトタグ をご覧ください。
- 単一の論理ボリューム内で RAID0 (ストライピング) と RAID1 (ミラーリング) の併用ができるようになりました。論理ボリュームの作成と同時にミラーの数 (
--mirrors X) とストライプの数 (--stripes Y) を指定すると、ミラーデバイスの構成デバイスがストライプ化されます。ミラー化論理ボリュームの作成については、「ミラー化ボリュームの作成」 をご覧ください。 - Red Hat Enterprise Linux 6.1 リリースでは、クラスター化されたボリューム上で恒常的なデータバックアップ作成が必要な場合、ボリュームを排他的にアクティブ化した上で、スナップショットを作成することができます。ノード上における論理ボリュームの排他的なアクティブ化についての情報については、「クラスター内の個別ノード上の論理ボリュームのアクティブ化」 をご覧ください。
2.1.3. Red Hat Enterprise Linux 6.2 で新規追加および変更された機能
リンクのコピーリンクがクリップボードにコピーされました!
Red Hat Enterprise Linux 6.2 では、ドキュメントと機能が以下のように更新/変更されています。
- The Red Hat Enterprise Linux 6.2 release supports the
issue_discardsparameter in thelvm.confconfiguration file. When this parameter is set, LVM will issue discards to a logical volume's underlying physical volumes when the logical volume is no longer using the space on the physical volumes. For information on this parameter, see the inline documentation for the/etc/lvm/lvm.conffile, which is also documented in 付録B LVM 設定ファイル.
2.1.4. Red Hat Enterprise Linux 6.3 で新規追加および変更された機能
リンクのコピーリンクがクリップボードにコピーされました!
Red Hat Enterprise Linux 6.3 では、ドキュメントと機能が以下のように更新/変更されています。
- As of the Red Hat Enterprise Linux 6.3 release, LVM supports RAID4/5/6 and a new implementation of mirroring. For information on RAID logical volumes, see 「RAID 論理ボリューム」.
- When you are creating a new mirror that does not need to be revived, you can specify the
--nosyncargument to indicate that an initial synchronization from the first device is not required. For information on creating mirrored volumes, see 「ミラー化ボリュームの作成」. - This manual now documents the snapshot
autoextendfeature. For information on creating snapshot volumes, see 「スナップショットボリュームの作成」.
2.1.5. Red Hat Enterprise Linux 6.4 で新規追加および変更された機能
リンクのコピーリンクがクリップボードにコピーされました!
Red Hat Enterprise Linux 6.4 では、ドキュメントと機能が以下のように更新/変更されています。
- 論理ボリュームのシンプロビジョニングが可能になりました。これにより、利用可能なエクステントより大きい論理ボリュームを作成できます。シンプロビジョニングを使用すると、空き領域のストレージプール (シンプールと呼ばれる) を管理して、アプリケーションにより必要な場合に任意の数のデバイスに割り当てることができます。その後、アプリケーションを実際に論理ボリュームに書き込むときに、シンプールにバインド可能なデバイスを後ほどの割り当て用に作成できます。シンプールは、コスト効率が高いストレージ領域の割り当てに必要な場合に動的に拡張できます。For general information on thinly-provisioned logical volumes, see 「シンプロビジョニングされた論理ボリューム (シンボリューム)」. For information on creating thin volumes, see 「シンプロビジョニングされた論理ボリュームの作成」.
- Red Hat Enterprise Linux 6.4 バージョンの LVM は、シンプロビジョニングされたスナップショットボリュームのサポートを提供します。シンプロビジョニングされたスナップショットボリュームにより、多くの仮想デバイスを同じデータボリューム上に格納することができます。これにより管理が簡略化され、スナップショットボリューム間でのデータシェアが可能になります。For general information on thinly-provisioned snapshot volumes, see 「シンプロビジョニングされたスナップショットボリューム」. For information on creating thin snapshot volumes, see 「シンプロビジョニングされたスナップショットボリュームの作成」.
- 本ガイドには、LVM の割り当てポリシーについて説明した 「LVM の割り当て」 のセクションが新たに追加されました。
- LVM now provides support for
raid10logical volumes. For information on RAID logical volumes, see 「RAID 論理ボリューム」. - Red Hat Enterprise Linux 6.4 リリースは、LVM メタデータデーモンである
lvmetadをサポートしています。このデーモンを有効にすることで、多くのブロックデバイスを持つシステムのスキャン量を減らすことができます。lvmetadデーモンは、クラスターのノード間では現在サポートされておらず、ロックタイプはローカルのファイルベースである必要があります。For information on the metadata daemon, see 「メタデータデーモン (lvmetad)」.
さらに、ドキュメント全体にわたり技術的な内容の若干の修正と明確化を行いました。
2.1.6. New and Changed Features for Red Hat Enterprise Linux 6.5
リンクのコピーリンクがクリップボードにコピーされました!
Red Hat Enterprise Linux 6.5 includes the following documentation and feature updates and changes.
- You can control I/O operations on a RAID1 logical volume with the
--writemostlyand--writebehindparameters of thelvchangecommand. For information on these parameters, see 「Controlling I/O Operations on a RAID1 Logical Volume」. - The
lvchangecommand now supports a--refreshparameter that allows you to restore a transiently failed device without having to reactivate the device. This feature is described in 「RAID の割り当てフォルトポリシー」. - LVM provides scrubbing support for RAID logical volumes. For information on this feature, see 「Scrubbing a RAID Logical Volume」.
- The fields that the
lvscommand supports have been updated. For information on thelvscommand, see 表5.4「lvs 表示フィールド」. - The
lvchangecommand supports the new--maxrecoveryrateand--minrecoveryrateparameters, which allow you to control the rate at whichsyncoperations are performed. For information on these parameters, see 「Scrubbing a RAID Logical Volume」. - You can control the rate at which a RAID logical volume is initialized by implementing recovery throttling. You control the rate at which
syncoperations are performed by setting the minimum and maximum I/O rate for those operations with the--minrecoveryrateand--maxrecoveryrateoptions of thelvcreatecommand, as described in 「RAID 論理ボリュームの作成」. - You can now create a thinly-provisioned snapshot of a non-thinly-provisioned logical volume. For information on creating these volumes, known as external volumes, see 「シンプロビジョニングされたスナップショットボリューム」.
さらに、ドキュメント全体にわたり技術的な内容の若干の修正と明確化を行いました。
2.1.7. New and Changed Features for Red Hat Enterprise Linux 6.6
リンクのコピーリンクがクリップボードにコピーされました!
Red Hat Enterprise Linux 6.6 includes the following documentation and feature updates and changes.
- The documentation for thinly-provisioned volumes and thinly-provisioned snapshots has been clarified. Additional information about LVM thin provisioning is now provided in the
lvmthin(7) man page. For general information on thinly-provisioned logical volumes, see 「シンプロビジョニングされた論理ボリューム (シンボリューム)」. For information on thinly-provisioned snapshot volumes, see 「シンプロビジョニングされたスナップショットボリューム」. - This manual now documents the
lvm dumpconfigcommand, in 「ThelvmconfigCommand」. Note that as of the Red Hat Enterprise Linux 6.8 release, this command was renamedlvmconf, although the old format continues to work. - This manual now documents LVM profiles, in 「LVM Profiles」.
- This manual now documents the
lvmcommand in 「Displaying LVM Information with thelvmCommand」. - In the Red Hat Enterprise Linux 6.6 release, you can control activation of thin pool snapshots with the -k and -K options of the
lvcreateandlvchangecommand, as documented in 「Controlling Logical Volume Activation」. - This manual documents the
--forceargument of thevgimportcommand. This allows you to import volume groups that are missing physical volumes and subsequently run thevgreduce --removemissingcommand. For information on thevgimportcommand, see 「ボリュームグループの別のシステムへの移動」.
さらに、ドキュメント全体にわたり技術的な内容の若干の修正と明確化を行いました。
2.1.8. New and Changed Features for Red Hat Enterprise Linux 6.7
リンクのコピーリンクがクリップボードにコピーされました!
Red Hat Enterprise Linux 6.7 includes the following documentation and feature updates and changes.
- As of Red Hat Enterprise Linux release 6.7, many LVM processing commands accept the
-Sor--selectoption to define selection criteria for those commands. LVM selection criteria are documented in the new appendix 付録C LVM Selection Criteria. - This document provides basic procedures for creating cache logical volumes in 「Creating LVM Cache Logical Volumes」.
- The troubleshooting chapter of this document includes a new section, 「Duplicate PV Warnings for Multipathed Devices」.
2.1.9. New and Changed Features for Red Hat Enterprise Linux 6.8
リンクのコピーリンクがクリップボードにコピーされました!
Red Hat Enterprise Linux 6.8 includes the following documentation and feature updates and changes.
- When defining selection criteria for LVM commands, you can now specify time values as selection criteria for fields with a field type of
time. For information on specifying time values as selection criteria, see 「Specifying Time Values」.
2.2. 論理ボリューム
リンクのコピーリンクがクリップボードにコピーされました!
ボリューム管理によって、物理ストレージ上に抽象化レイヤが作成され、論理ストレージボリュームを作成できるようになります。これは、物理ストレージディレクトリを使用するよりもはるかに高い柔軟性を数々の方法で提供します。論理ボリュームが作成されると、物理ディスクのサイズに制限されません。また、ハードウェアストレージ設定は、ソフトウェアには表示されないので、アプリケーションを停止したりファイルシステムをアンマウントせずに、サイズ変更や移動が可能になります。これにより運用コストを削減することができます。
論理ボリュームは、物理ストレージを直接使用するのと比べると、以下のような利点があります:
- 容量の柔軟性論理ボリュームを使用している場合、ディスクとパーティションを1つの論理ボリュームに集約できるため、ファイルシステムを複数のディスクに渡って拡張することが可能です。
- サイズ変更可能なストレージプール基になるディスクデバイスを再フォーマットしたり再パーティションせずに、簡単なソフトウェアコマンドを使用して論理ボリュームのサイズを拡大したり縮小したりすることができます。
- オンラインデータ移動より新しく、迅速で、障害耐性の高いストレージサブシステムを導入するために、システムがアクティブな時でもデータを移動することができます。データはディスクが使用中の場合でもディスク上で再配置できます。例えば、ホットスワップ可能なディスクを削除する前に空にすることができます。
- 便宜的なデバイスの命名論理ストレージボリュームはユーザー定義のグループで管理することができ、便宜的な命名をすることが可能です。
- ディスクのストライプ化2つまたはそれ以上のディスクに渡ってデータをストライプ化する論理ボリュームを作成することができます。これにより、スループットが劇的に向上します。
- ボリュームのミラー化論理ボリュームはデータのミラー化の設定に便利な手法を提供します。
- ボリュームスナップショット論理ボリュームを使用すると、一貫性のあるバックアップのためのデバイススナップショットを取ったり、実際のデータに影響を及ぼすことなく変更の効果をテストすることができます。
LVM でのこれらの機能の実装については、本ガイドの後半で説明しています。
2.3. LVM アーキテクチャーの概要
リンクのコピーリンクがクリップボードにコピーされました!
Linux オペレーティングシステムの Red Hat Enterprise Linux 4 リリースでは、オリジナルの LVM1 論理ボリュームマネージャが LVM2 に置き換えられました。LVM2 は、LVM1 よりも汎用性の高いカーネルフレームワークを採用しています。また、LVM2 は、LVM1 と比べて、以下のような点が改善されています:
- 容量の柔軟性
- より効率的なメタデータストレージ
- より優れた復元の形式
- 新たな ASCII メタデータ形式
- メタデータのアトミックな変更
- メタデータの冗長コピー
LVM2 は LVM1 に対して下位互換性を持っています。ただし、スナップショットとクラスターサポートは例外となっています。ボリュームグループは、
vgconvert コマンドを使用して LVM1 形式から LVM2 形式に変換することができます。LVM メタデータ形式の変換に関する情報は、vgconvert(8) の man ページをご覧ください。
LVM 論理ボリュームの配下の物理ストレージユニットは、パーティションあるいはディスク全体などのブロックデバイスです。このデバイスは LVM 物理ボリューム (Physical Volume: PV) として初期化されます。
LVM 論理ボリュームを作成するために、物理ボリュームは ボリュームグループ (Volume Group: VG) に統合されます。これによってディスク領域のプールが作成され、そこから LVM 論理ボリューム (Logical Volume: LV) が割り当てられます。この工程は、ディスクがパーティションに分割される方法に類似しています。論理ボリュームはファイルシステムやアプリケーション (データベースなど) に使用されます。
図2.1「LVM 論理ボリュームのコンポーネント」 簡易 LVM 論理ボリュームのコンポーネントを示しています:
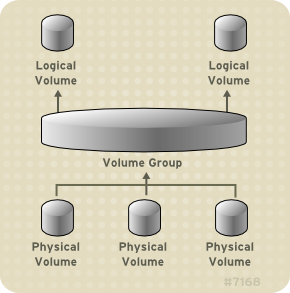
図2.1 LVM 論理ボリュームのコンポーネント
LVM 論理ボリュームのコンポーネントに関する詳細情報については、3章LVM コンポーネント をご覧ください。
2.4. クラスター化論理ボリュームマネージャ (CLVM)
リンクのコピーリンクがクリップボードにコピーされました!
Clustered Logical Volume Manager (CLVM) は LVM のクラスタリング拡張機能セットです。これらの拡張機能により、コンピューターのクラスターは、LVM を使用した共有ストレージ (例: SAN 上のストレージ) を管理できるようになります。CLVM は、Resilient Storage アドオンの一部です。
CLVM を使用すべきかどうかはシステム要件により左右されます:
- ご使用のシステムのノードの1つのみが、論理ボリュームとして設定するストレージへのアクセスを必要とする場合は、CLVM 拡張機能を使用せずに LVM が使用可能であり、そのノードで作成される論理ボリュームは、そのノードに対してすべてローカルとなります。
- フェイルオーバーにクラスター化したシステムを使用しており、ストレージにアクセスする単一のノードのみが常にアクティブである場合は、High Availability Logical Volume Management (HA-LVM) エージェントの使用をお勧めします。
- ご使用のクラスターの複数のノードが共有ストレージへのアクセスを必要とし、そのストレージがアクティブなノード間で共有される場合は、CLVM を使用する必要があります。CLVM の使用により、ユーザーは論理ボリュームの設定中に物理ストレージへのアクセスをロックすることによって、共有ストレージ上の論理ボリュームを設定することができるようになります。CLVM は、クラスター化ロッキングサービスを使用して共有ストレージを管理します。
CLVM を使用するには、
clvmd デーモンを含む High Availability アドオンおよび Resilient Storage アドオンのソフトウェアが稼働していなければなりません。clvmd デーモンは LVM の主要なクラスタリング拡張機能です。clvmd デーモンは、各クラスターコンピューター内で稼働し、クラスター内で LVM メタデータ更新を配布して、各クラスターコンピューターに論理ボリュームの同一ビューを提供します。High Availability アドオンのインストールと管理の詳細については、『クラスターの管理』 を参照してください。
clmvd が起動時に確実に開始するようにするためには、以下のようにして、chkconfig ... on コマンドをclvmd サービスに対して実行します:
chkconfig clvmd on
# chkconfig clvmd onclvmd デーモンが開始していない場合は、以下のようにして、clvmd サービスを service ... start コマンドで実行します。
service clvmd start
# service clvmd start
クラスター環境で LVM 論理ボリュームを作成することは、単一ノード上に LVM 論理ボリュームを作成することと同じです。5章CLI コマンドでの LVM 管理 と 8章LVM GUI での LVM 管理 で示してあるように、LVM コマンド自体や LVM グラフィカルユーザーインターフェースに相違はありません。クラスター内に作成する LVM ボリュームを有効にするためには、クラスターインフラストラクチャーが稼働中で、かつクラスターが定足数を満たしている必要があります。
デフォルトでは、共有ストレージ上に CLVM で作成された論理ボリュームは、その共有ストレージにアクセス可能なすべてのシステムに対して可視となっています。ただし、全ストレージデバイスがクラスター内の 1 つのノードのみに可視となるようにボリュームグループを作成することも可能です。また、ボリュームグループのステータスをローカルボリュームグループからクラスター化ボリュームグループへ変更することもできます。詳細については、「クラスター内でのボリュームグループ作成」 および 「ボリュームグループのパラメーター変更」 をご覧ください。
警告
CLVM を使用して共有ストレージ上にボリュームグループを作成する際には、クラスター内のすべてのノードがボリュームグループを構成する物理ボリュームに確実にアクセスできるようにする必要があります。ストレージにアクセスできるノードとできないノードが混在する、非対称型のクラスター構成はサポートされていません。
図2.2「CLVM の概観」 は、クラスター内の CLVM の概観を示しています。
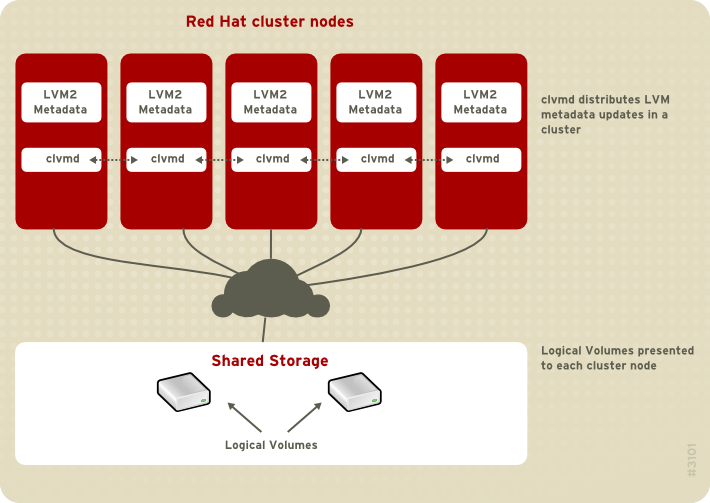
図2.2 CLVM の概観
注記
CLVM で、クラスター全体をロッキングするには、
lvm.conf ファイルを変更する必要があります。クラスター化ロッキングをサポートするための lvm.conf ファイルの設定に関する情報は、lvm.conf ファイル自体に記載されています。lvm.conf ファイルについての情報は 付録B LVM 設定ファイル をご覧ください。
2.5. ドキュメントの概要
リンクのコピーリンクがクリップボードにコピーされました!
本ガイドの後半には、以下のような章が含まれています:
- 3章LVM コンポーネント では、LVM 論理ボリュームを構成するコンポーネントについて説明しています。
- 4章LVM 管理の概要 では、LVM コマンドラインインターフェース (CLI) コマンドを使用するか、LVM グラフィカルユーザーインターフェース (GUI) を使用するかにかかわらず、LVM 論理ボリュームを設定するにあたって実行する基本手順の概要を提供します。
- 5章CLI コマンドでの LVM 管理 では、論理ボリュームの作成と保守を行うために LVM CLI コマンドで実行できる個別の管理タスクをまとめています。
- 6章LVM 設定の例 では、LVM の各種設定を示した例を記載しています。
- 7章LVM トラブルシューティング では、LVM の各種問題のトラブルシューティングの手順について説明します。
- 8章LVM GUI での LVM 管理 では、LVM GUI の操作についてまとめています。
- 付録A デバイスマッパー では、論理ボリュームと物理ボリュームをマップするために LVM が使用するデバイスマッパーについて説明します。
- 付録B LVM 設定ファイル では、LVM 設定ファイルについて説明します。
- 付録D LVM オブジェクトタグ では、LVM オブジェクトタグとホストタグについて説明します。
- 付録E LVM ボリュームグループメタデータ では、LVM ボリュームグループメタデータについて説明しており、LVM ボリュームグループ用のメタデータのサンプルコピーを含んでいます。
第3章 LVM コンポーネント
リンクのコピーリンクがクリップボードにコピーされました!
この章では、LVM 論理ボリュームのコンポーネントについて説明します。
3.1. 物理ボリューム
リンクのコピーリンクがクリップボードにコピーされました!
LVM 論理ボリュームの配下にある物理ストレージユニットは、パーティションやディスク全体のようなブロックデバイスです。LVM 論理ボリューム用にデバイスを使用するには、デバイスは物理ボリューム (PV) として初期化されなければなりません。ブロックデバイスを物理ボリュームとして初期化すると、デバイスの先頭位置にラベルを付けられます。
デフォルトでは、LVM ラベルは2番目の 512 バイトセクターに配置されます。先頭の4つのセクターのいずれかにラベルを配置することにより、このデフォルトを書き換えることができます。これにより、LVM ボリュームは、必要であればこれらのセクターの他のユーザーと共存できるようになります。
システム起動時にデバイスは任意の順序で立ち上がることがあります。そのため、LVM ラベルでは、物理デバイスに正しい ID とデバイスの順序を提供します。LVM ラベルは再起動後にもクラスター全域に渡って永続的な状態が維持されます。
LVM ラベルは、デバイスを LVM 物理ボリュームとして識別するものです。これは、物理ボリューム用のランダムな一意識別子 (UUID) を含んでいます。また、ブロックデバイスのサイズもバイト単位で保存し、LVM メタデータがデバイス上で保存される位置も記録します。
LVM メタデータには、システム上の LVM ボリュームグループの設定詳細が含まれています。デフォルトでは、メタデータの複製コピーが、ボリュームグループ内ですべての物理ボリュームのすべてのメタデータエリアで維持されています。LVM メタデータは小規模で ASCII 形式で格納されます。
現在、LVM により、各物理ボリューム上のメタデータの1つまたは2つの同一コピーの保存が可能になっています。デフォルトでは、コピーは1つです。物理ボリューム上のメタデータのコピー数を一旦設定すると、後でその数を変更することはできません。最初のコピーはデバイスの先頭のラベルの後に保存されます。2つ目のコピーがある場合は、それはデバイスの最終位置に配置されます。意図したものとは異なるディスクに書き込みをして、ディスクの先頭位置に誤って上書きしてしまった場合でも、デバイス後部にあるメタデータの2つ目のコピーでメタデータの復元が可能となります。
LVM メタデータとメタデータパラメーターの変更に関する詳細については、付録E LVM ボリュームグループメタデータ をご覧ください。
3.1.1. LVM 物理ボリュームレイアウト
リンクのコピーリンクがクリップボードにコピーされました!
図3.1「物理ボリュームレイアウト」 LVM 物理ボリュームのレイアウトを示しています。LVM ラベルは2番目のセクターにあり、その後にメタデータ領域とデバイスの使用可能なスペースが順に続いています。
注記
Linux カーネル (および本ガイド全体) では、セクターは 512 バイトのサイズとされています。
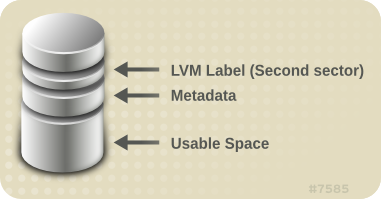
図3.1 物理ボリュームレイアウト
3.1.2. ディスク上の複数パーティション
リンクのコピーリンクがクリップボードにコピーされました!
LVM の使用により、ディスクパーティションから物理ボリュームを作成することが可能になります。それを以下のような理由により、ディスク全体をカバーする1つのパーティションを作成して、単一の LVM 物理ボリュームとしてラベルを付けることが一般的に推奨されます:
- 管理上の便宜それぞれの実ディスクが1度だけ提示されると、システム内のハードウェアを追跡記録するのが簡単になります。これはディスクに障害が発生した場合に、特に役に立ちます。更には、単一のディスク上の複数物理ボリュームは、起動時にカーネルによって不明なパーティションとして警告を受ける原因となる可能性があります。
- ストライピングのパフォーマンスLVM は、2 つの物理ボリュームが同一の物理ディスクにあることは認識しません。2 つの物理ボリュームが同一の物理ディスク上にある場合にストライプ化された論理ボリュームを作成すると、ストライプ化されたボリュームは同じディスク上の異なるパーティション上にある可能性があります。これはパフォーマンスの向上ではなく、低下をもたらします。
推奨されることではありませんが、1 つのディスクを別々の LVM 物理ボリュームに分割しなければならない状況が考えられます。例えば、少数のディスクしかないシステム上では、既存システムを LVM ボリュームに移行する場合にデータをパーティション間で移動しなければならない場合があります。さらに、大容量のディスクが存在し、管理目的で複数のボリュームグループを必要とする場合は、そのディスクでパーティションを設定する必要があります。ディスクに複数のパーティションがあり、それらのパーティションがいずれも同じボリュームグループ内に存在する場合にストライプ化ボリュームを作成する時には、論理ボリュームに含めるパーティションの指定は注意して行ってください。
3.2. ボリュームグループ
リンクのコピーリンクがクリップボードにコピーされました!
物理ボリュームはボリュームグループ (VG) に統合されます。これにより、論理ボリュームに割り当てるためのディスク領域のプールが作成されます。
ボリュームグループ内で、割り当て可能なディスク領域はエクステントと呼ばれる固定サイズの単位に分割されます。1 エクステントが割り当て可能な領域の最小単位となります。物理ボリューム内では、エクステントは物理エクステントと呼ばれます。
論理ボリュームは物理エスクテントと同サイズの論理エクステント割り当てることができます。そのため、エクステントは、ボリュームグループ内のすべての論理ボリュームで同じサイズになります。ボリュームグループは論理エクステントを物理エクステントにマッピングします。
3.3. LVM 論理ボリューム
リンクのコピーリンクがクリップボードにコピーされました!
LVM では、ボリュームグループは複数のボリュームに分割されます。LVM 論理ボリュームには 3つのタイプがあります。リニア (linear) ボリューム、 ストライプ化 (striped) ボリューム、および ミラー化 (mirrored) ボリュームです。これらについては、以下のセクションで説明します。
3.3.1. リニアボリューム
リンクのコピーリンクがクリップボードにコピーされました!
リニアボリュームは複数の物理ボリュームの領域を 1 つの論理ボリュームに統合します。例えば、60GB ディスクが 2 つある場合、120GB の論理ボリュームを作成できます。物理ストレージは連結されます。
リニアボリュームを作成すると、物理エクステントの範囲を順番に論理ボリュームの領域に割り当てることになります。例えば、図3.2「エクステントマッピング」 に示してあるように、1から 99 までの論理エクステントを1つの物理ボリュームにマッピングして、 100 から 198 までの論理エクステントを2番目の物理ボリュームにマッピングすることができます。アプリケーションの観点からは、デバイスには 198 のエクステントのサイズのデバイスが1つあることになります。
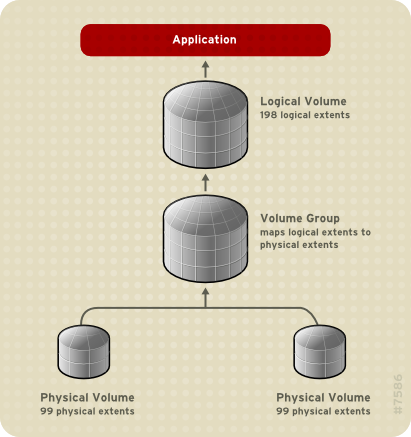
図3.2 エクステントマッピング
The physical volumes that make up a logical volume do not have to be the same size. 図3.3「サイズの異なる物理ボリュームを用いたリニアボリューム」 shows volume group
VG1 with a physical extent size of 4MB. This volume group includes 2 physical volumes named PV1 and PV2. The physical volumes are divided into 4MB units, since that is the extent size. In this example, PV1 is 200 extents in size (800MB) and PV2 is 100 extents in size (400MB). You can create a linear volume any size between 1 and 300 extents (4MB to 1200MB). In this example, the linear volume named LV1 is 300 extents in size.
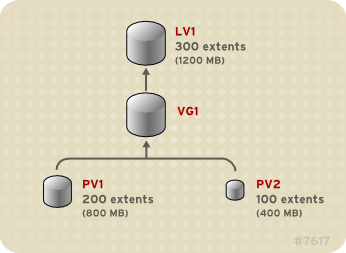
図3.3 サイズの異なる物理ボリュームを用いたリニアボリューム
物理エクステントのプールから希望のサイズのリニア論理ボリュームを複数設定することができます。図3.4「複数の論理ボリューム」 は、図3.3「サイズの異なる物理ボリュームを用いたリニアボリューム」 と同じボリュームグループを示していますが、この場合は、そのボリュームグループから 2 つの論理ボリュームが作り出されています。
LV1 は 250 エクステントでサイズは 1000MB です。LV2 は 50 エクステントでサイズは 200MB です。
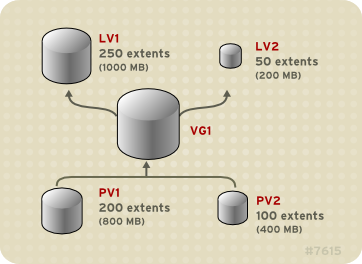
図3.4 複数の論理ボリューム
3.3.2. ストライプ化論理ボリューム
リンクのコピーリンクがクリップボードにコピーされました!
LVM 論理ボリューム上にデータを書き込む場合、ファイルシステムは、配下にある物理ボリュームすべてに渡ってデータを分配します。その場合、ストライプ化論理ボリュームを作成することにより、データを物理ボリュームに書き込む方法を制御することができます。大量の順次読み取りと書き込みには、この方法でデータ I/O の効率を向上させることが可能です。
ストライピングは、所定数の物理ボリュームにデータをラウンドロビン式に書き込んでいくことにより、パフォーマンスを向上させます。ストライピングでは、I/O は並行して実行されます。場合によっては、これはストライプ内に追加する各物理ボリュームに、ほぼ直線的なパフォーマンス向上をもたらします。
以下のイラストでは、3つの物理ボリュームに渡ってデータがストライプ化されている状態を示しています。この図では:
- データの1番目のストライプは PV1 に書き込まれます。
- データの2番目のストライプは PV2 に書き込まれます。
- データの3番目のストライプは PV3 に書き込まれます。
- データの4番目のストライプは PV1 に書き込まれます。
ストライプ化された論理ボリュームでは、ストライプのサイズはエクステントのサイズを超過することはできません。
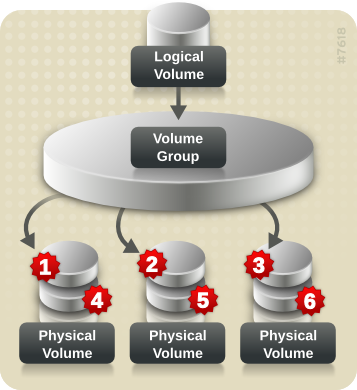
図3.5 3つの PV に渡るストライプのデータ
Striped logical volumes can be extended by concatenating another set of devices onto the end of the first set. In order to extend a striped logical volume, however, there must be enough free space on the underlying physical volumes that make up the volume group to support the stripe. For example, if you have a two-way stripe that uses up an entire volume group, adding a single physical volume to the volume group will not enable you to extend the stripe. Instead, you must add at least two physical volumes to the volume group. For more information on extending a striped volume, see 「ストライプ化ボリュームの拡張」.
3.3.3. ミラー化論理ボリューム
リンクのコピーリンクがクリップボードにコピーされました!
ミラーはデータの同一コピーを異なるデバイスに維持します。データが1つのデバイスに書き込まれると、それはまた2つ目のデバイスにも書き込まれて、データのミラー化をします。この重複保存により、デバイス障害に対する保護を提供します。ミラーレッグの1つに障害が発生した場合、論理ボリュームはリニアボリュームとなりますが、依然としてアクセス可能です。
LVM はミラー化ボリュームに対応しています。ミラー化論理ボリュームを作成する場合、LVM は、配下にある物理ボリュームに書き込まれるデータが、別の物理ボリュームに確実にミラー化されるようにします。LVM では、複数のミラーを持つミラー化論理ボリュームを作成することができます。
LVM ミラーは複製されるデバイスを、標準的な 512KB サイズのリージョンに分割します。LVM はミラーと同期しているリージョンを追跡記録するのに使用する小さなログを維持します。このログは、再起動後にも永続的に残るようにディスク上に保存したり、メモリー内で維持したりすることができます。
図3.6「ミラー化論理ボリューム」 は、単一のミラーを用いたミラー化論理ボリュームを示しています。この設定では、ログはディスク上で維持されます。
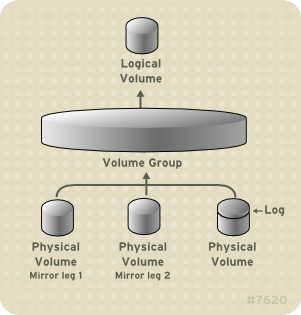
図3.6 ミラー化論理ボリューム
ミラーの作成と修正に関する情報は、 「ミラー化ボリュームの作成」 をご覧ください。
3.3.4. RAID Logical Volumes
リンクのコピーリンクがクリップボードにコピーされました!
As of the Red Hat Enterprise Linux 6.3 release, LVM supports RAID logical volumes. For information on the RAID implementations that LVM supports, see 「RAID 論理ボリューム」.
3.3.5. シンプロビジョニングされた論理ボリューム (シンボリューム)
リンクのコピーリンクがクリップボードにコピーされました!
As of the Red Hat Enterprise Linux 6.4 release, logical volumes can be thinly provisioned. This allows you to create logical volumes that are larger than the available extents. Using thin provisioning, you can manage a storage pool of free space, known as a thin pool, which can be allocated to an arbitrary number of devices when needed by applications. You can then create devices that can be bound to the thin pool for later allocation when an application actually writes to the logical volume. The thin pool can be expanded dynamically when needed for cost-effective allocation of storage space.
注記
シンボリュームはクラスターのノード間ではサポートされません。シンプールとそのすべてのシンボリュームは、1 つのクラスターノードでのみ排他的にアクティブ化する必要があります。
ストレージ管理者は、シンプロビジョニングを使用することで物理ストレージをオーバーコミットできるため、多くの場合、追加のストレージを購入する必要がなくなります。例えば、10 人のユーザーが各アプリケーション用にそれぞれ 100GB ファイルシステムを要求した場合、ストレージ管理者は各ユーザーに 100GB ファイルシステムと思われるもの (しかし実際は 100GB より少ないストレージにより利用可能で必要な場合にのみ使用される) を作成できます。シンプロビジョニングの使用時には、ストレージ管理者は、ストレージプールをモニターして、容量が一杯になり始めたら容量を追加することが重要です。
すべての利用可能な領域が使用できるようにするために、LVM ではデータの破棄が可能です。これにより、破棄されたファイルやその他のブロックの範囲で以前に使用された領域を再利用できます。
For information on creating thin volumes, see 「シンプロビジョニングされた論理ボリュームの作成」.
Thin volumes provide support for a new implementation of copy-on-write (COW) snapshot logical volumes, which allow many virtual devices to share the same data in the thin pool. For information on thin snapshot volumes, see 「シンプロビジョニングされたスナップショットボリューム」.
3.3.6. スナップショットボリューム
リンクのコピーリンクがクリップボードにコピーされました!
LVM スナップショット機能により、サービスを中断せずに任意の時点でデバイスの仮想イメージを作成することができます。スナップショットの取得後に複製元のデバイスに変更が加えられた場合、このスナップショット機能により、データが変更される前に変更部分のコピーを作成してデバイスの状態を再構築できます。
注記
As of the Red Hat Enterprise Linux 6.4 release, LVM supports thinly-provisioned snapshots. For information on thinly provisioned snapshot volumes, see 「シンプロビジョニングされたスナップショットボリューム」.
注記
LVM スナップショットは、クラスター内のノード全域に渡ってはサポートされていません。クラスター化されたボリュームグループ内ではスナップショットボリュームを作成できません。
スナップショットは、スナップショットが作成された後に変更されたデータ部分のみをコピーするため、スナップショット機能に必要なストレージの容量は最小限で済みます。例えば、複製元が稀にしか更新されない場合、その容量の 3-5 % だけで十分にスナップショットを維持することができます。
注記
ファイルシステムのスナップショットコピーは仮想コピーであり、ファイルシステム用の実際のメディアバックアップではありません。スナップショットはバックアップ手順の代替を提供するものではありません。
スナップショットのサイズによって、複製元のボリュームへの変更を保管するために確保するスペースの量が左右されます。例えば、スナップショットを作成後に複製元を完全に上書きした場合に、その変更を保管するには、スナップショットが最低でも複製元のボリュームと同じサイズである必要があることになります。スナップショットのサイズは、予想される変更レベルに応じて決定する必要があります。例えば、
/usr などの、ほとんど読み取り用に使用されるボリュームの短期的なスナップショットには、/home のように大量の書き込みが行われるボリュームの長期的なスナップショットほどスペースを必要としません。
スナップショットが満杯になると、スナップショットは無効になります。これは、複製元のボリューム上の変更をトラッキングできなくなるためです。スナップショットのサイズは常時監視する必要があります。ただし、スナップショットは完全にサイズ変更可能のため、ストレージに余裕があれば、スナップショットのボリュームサイズを拡大してそれが停止することを防止できます。逆に、スナップショットボリュームサイズが必要以上に大きければ、そのボリュームのサイズを縮小して、他の論理ボリューム用に必要となる領域を開放することができます。
スナップショットファイルシステムを作成すると、複製元への完全な読み取り/書き込みのアクセスがそのまま残ります。スナップショット上のチャンクが変更された場合、そのチャンクはマーク付けされ、そこには複製元のボリュームのコピーは入りません。
スナップショット機能にはいくつかの用途があります:
- 最も一般的な用途は、継続的にデータを更新している稼動中のシステムを停止せずに、論理ボリューム上でバックアップを実行する必要がある場合のスナップショット作成です。
- スナップショットファイルシステム上で
fsckコマンドを実行すると、ファイルシステムの整合性をチェックして、複製元のファイルシステムが修復を必要とするかどうかを判断することができます。 - スナップショットは読み取り/書き込み用のため、スナップショットを取ってそのスナップショットに対してテストを実行することにより、実際のデータに触れることなく実稼働データに対するアプリケーションのテストができます。
- LVM ボリュームを作成して、Red Hat の仮想化と併用することが可能です。LVM スナップショットを使用して、仮想ゲストイメージのスナップショットを作成することができます。これらのスナップショットは、最小限のストレージを使用して、既存のゲストの変更や新規ゲストの作成を行う利便性の高い方法を提供します。Red Hat の仮想化による LVM ベースのストレージプールの作成についての詳細は、『仮想化管理ガイド』 を参照してください。
スナップショットボリュームの作成に関する情報は、「ミラー化ボリュームの作成」 をご覧ください。
Red Hat Enterprise Linux 6 リリースでは、
lvconvert の --merge オプションを使用して、スナップショットを複製元のボリュームにマージすることが可能です。この機能の用途の1つとしてあげられるのは、データやファイルを紛失した際のシステムロールバックの実行で、これがなければ、以前の状態に復元する必要があります。スナップショットボリュームのマージの結果作成される論理ボリュームには複製元のボリューム名、マイナー番号、UUID が使用され、マージされたスナップショットは削除されます。このオプションの使用方法についての情報は、 「スナップショットボリュームのマージ」 をご覧ください。
3.3.7. シンプロビジョニングされたスナップショットボリューム
リンクのコピーリンクがクリップボードにコピーされました!
Red Hat Enterprise Linux 6.4 バージョンの LVM は、シンプロビジョニングされたスナップショットボリュームのサポートを提供します。シンプロビジョニングされたスナップショットボリュームにより、多くの仮想デバイスを同じデータボリューム上に格納することができます。これにより管理が簡略化され、スナップショットボリューム間でのデータシェアが可能になります。
すべてのシンボリュームだけでなくすべての LVM スナップショットボリュームの場合、シンプロビジョニングされたスナップショットボリュームはクラスター内のノード間でサポートされていません。スナップショットボリュームは、1 つのクラスターノードでのみ排他的にアクティブ化する必要があります。
シンプロビジョニングされたスナップショットボリュームの利点は以下のとおりです。
- 同じボリュームからのスナップショットが複数ある場合、シンプロビジョニングされたスナップショットボリュームはディスクの使用量を減らすことができます。
- 複製元が同じスナップショットが複数ある場合は、複製元に 1 回書き込むことにより 1 回の COW 操作でデータを保存できます。複製元のスナップショットの数を増やしても、大幅な速度の低下は発生しないはずです。
- シンプロビジョニングされたスナップショットボリュームは、別のスナップショットの作成元の論理ボリュームとして使用できます。これにより、再帰的スナップショット (スナップショットのスナップショットのそのまたスナップショットなど) の深度を任意に決定できます。
- シン論理ボリュームのスナップショットは、シン論理ボリュームを作成することもできます。これにより、COW 操作が必要になるまで、あるいはスナップショット自体が書き込まれるまで、データ領域は消費されません。
- シンプロビジョニングされたスナップショットボリュームは、その複製元によりアクティブ化する必要はありません。そのため、アクティブでないスナップショットボリュームが多くある間は、ユーザーは複製元のみをアクティブにしておくことができます。
- シンプロビジョニングされたスナップショットボリュームの複製元を削除する場合、複製元のボリュームの各スナップショットは、独立するシンプロビジョニングされたボリュームになります。これは、あるスナップショットとその複製元のボリュームをマージする代わりに、複製元のボリュームを削除して、その独立したボリュームを新しいスナップショットの複製元のボリュームとして使用して新しいシンプロビジョニングされたスナップショットを作成することが選択できることを意味しています。
シンプロビジョニングされたスナップショットボリュームを使用する利点は数多くありますが、旧の LVM スナップショットボリューム機能の方がご使用のニーズに合うケースがあります。
- シンプールのチャンクサイズは変更できません。シンプールのチャンクサイズが大きい場合 (1MB など) やチャンクサイズが短時間のスナップショットには効率的でない場合は、旧のスナップショット機能の使用を選択することができます。
- シンプロビジョニングされたスナップショットボリュームのサイズを制限することはできません。スナップショットは、必要な場合はシンプール内の全領域を使用するため、ご使用のニーズに合わない場合があります。
一般的には、使用するスナップショットの形式を決定する際に使用しているサイトの特定の要件を考慮に入れるようにしてください。
For information on configuring thin snapshot volumes, see 「シンプロビジョニングされたスナップショットボリュームの作成」.
3.3.8. Cache Volumes
リンクのコピーリンクがクリップボードにコピーされました!
As of the Red Hat Enterprise Linux 6.7 release, LVM supports the use of fast block devices (such as SSD drives) as write-back or write-though caches for larger slower block devices. Users can create cache logical volumes to improve the performance of their existing logical volumes or create new cache logical volumes composed of a small and fast device coupled with a large and slow device.
For information on creating LVM cache volumes, see 「Creating LVM Cache Logical Volumes」.
第4章 LVM 管理の概要
リンクのコピーリンクがクリップボードにコピーされました!
この章では、LVM 論理ボリュームの設定に用いる管理手続きの概要を説明し、必要な手順についての全般的な理解を図ることを目的としています。一般的な LVM 設定手順における特定の段階的な例については、6章LVM 設定の例 をご覧ください。
LVM 管理を執行するために使用できる CLI コマンドの説明については、5章CLI コマンドでの LVM 管理 を ご覧ください。別の方法として、8章LVM GUI での LVM 管理 で説明している LVM GUI を使用することもできます。
4.1. クラスター内での LVM ボリューム作成
リンクのコピーリンクがクリップボードにコピーされました!
クラスター環境内で論理ボリュームを作成するには、CLVM (Clustered Logical Volume Manager) を使用します。これは LVM へのクラスタリング拡張のセットです。この拡張により、コンピューターのクラスターが LVM を使用して共有ストレージ (例えば SAN 上など) を管理できるようになります。CLVM を使用するには、「クラスター化論理ボリュームマネージャ (CLVM)」 で示してあるように
clmvd デーモンを含む High Availability アドオンおよび Resilient Storage アオドンソフトウェアが、起動時に開始する必要があります。
クラスター環境で LVM 論理ボリュームを作成することは、単一ノード上に LVM 論理ボリュームを作成することと同じです。LVM コマンド自体や LVM GUI インターフェースに相違はありません。クラスター内に作成する LVM ボリュームを有効にするためには、クラスターインフラストラクチャーが稼働中で、かつクラスターが定足数を満たしている必要があります。
CLVM で、クラスター全体をロッキングするには、
lvm.conf ファイルを変更する必要があります。クラスター化ロッキングをサポートするための lvm.conf ファイルの設定に関する情報は、lvm.conf ファイル自体に記載されています。lvm.conf ファイルについての情報は 付録B LVM 設定ファイル をご覧ください。
デフォルトでは、共有ストレージ上に CLVM で作成された論理ボリュームは、その共有ストレージにアクセス可能なすべてのシステムに対して可視となっています。ただし、全ストレージデバイスがクラスター内の 1 つのノードのみに可視となるようにボリュームグループを作成することも可能です。また、ボリュームグループのステータスをローカルボリュームグループからクラスター化ボリュームグループへ変更することもできます。詳細については、「クラスター内でのボリュームグループ作成」 および 「ボリュームグループのパラメーター変更」 をご覧ください。
警告
CLVM を使用して共有ストレージ上にボリュームグループを作成する際には、クラスター内のすべてのノードがボリュームグループを構成する物理ボリュームに確実にアクセスできるようにする必要があります。ストレージにアクセスできるノードとできないノードが混在する、非対称型のクラスター構成はサポートされていません。
High Availability アドオンのインストールとクラスターインフラストラクチャーのセットアップ方法についての情報は、『クラスターの管理』 をご覧ください。
クラスター内でミラー化された論理ボリュームを作成する例は、「クラスター内でのミラー化 LVM 論理ボリュームの作成」 をご覧ください。
4.2. 論理ボリューム作成の概要
リンクのコピーリンクがクリップボードにコピーされました!
LVM 論理ボリュームを作成するために実行すべき手順を簡単にまとめると以下のようになります。
- LVM ボリューム用に使用するパーティションを物理ボリュームとして初期化します (この操作によってラベル付けされます)。
- ボリュームグループを作成します。
- 論理ボリュームを作成します。
論理ボリュームを作成した後は、ファイルシステムを作成してマウントできます。この文書内の例では、GFS2 ファイルシステムを使用します。
注記
GFS2 ファイルシステムはスタンドアロンシステムもしくはクラスター構成の一部として実装することが可能ですが、Red Hat Enterprise Linux 6 リリースでは、Red Hat は単一ノードのファイルシステムとしての GFS2 の使用をサポートしていません。クラスターファイルシステムのスナップショット (例: バックアップ目的) をマウントするための単一ノードの GFS2 ファイルシステムは引き続きサポートします。
mkfs.gfs2コマンドを使用して、論理ボリューム上に GFS2 ファイルシステムを作成します。mkdirコマンドで新規のマウントポイントを作成します。クラスター化システムでは、そのクラスター内のすべてのノード上にマウントポイントを作成します。- ファイルシステムをマウントします。システム内の各ノード用の
fstabに一行追加することもできます。
別の方法として、LVM GUI を使用して GFS2 ファイルシステムを作成してマウントすることもできます。
LVM セットアップ情報の保存エリアは物理ボリューム上にあって、ボリュームが作成されたマシンではないため、LVM ボリュームの作成はマシンから独立しています。ストレージを使用するサーバーがローカルコピーを持っていますが、それは物理ボリューム上にあるものから復元できます。LVM のバージョンが互換性を持つ場合には、物理ボリュームを異なるサーバーに接続することができます。
4.3. 論理ボリューム上におけるファイルシステムの拡張
リンクのコピーリンクがクリップボードにコピーされました!
論理ボリューム上でファイルシステムを拡張するには、以下の手順を実行します:
- 新規の物理ボリュームを作成します。
- 拡張するファイルシステムを持つ論理ボリュームを含んだボリュームグループを拡張して、新規の物理ボリュームを組み入れます。
- 論理ボリュームを拡張して新規の物理ボリュームを組み入れます。
- ファイルシステムを拡張します。
ボリュームグループ内に十分な未割り当ての領域がある場合は、手順1と2を実行する代わりに、その領域を使用して論理ボリュームを拡張することができます。
4.4. 論理ボリュームのバックアップ
リンクのコピーリンクがクリップボードにコピーされました!
メタデータのバックアップとアーカイブは、
lvm.conf ファイル内で無効になっていない限り、すべてのボリュームグループと論理ボリューム設定の変更時に自動的に作成されます。デフォルトでは、メタデータのバックアップは /etc/lvm/backup ファイルに保存され、メタデータのアーカイブは /etc/lvm/archive ファイルに保存されます。メタデータのアーカイブが /etc/lvm/archive ファイルに保存される期間と保存されるアーカイブファイルの数は、lvm.conf ファイル内で設定可能なパラメーターにより決定されます。日次のシステムバックアップでは、バックアップに /etc/lvm ディレクトリの内容が含まれる必要があります。
メタデータバックアップでは、論理ボリュームに含まれているユーザーとシステムのデータはバックアップされない点に注意してください。
vgcfgbackup コマンドを使用すると、/etc/lvm/backup ファイルにメタデータを手動でバックアップできます。また、vgcfgrestore コマンドを使用すると、メタデータを復元できます。vgcfgbackup コマンドと vgcfgrestore コマンドに ついては 「ボリュームグループメタデータのバックアップ」 で説明しています。
4.5. ロギング
リンクのコピーリンクがクリップボードにコピーされました!
すべてのメッセージ出力は、以下のロギングレベル用に独立した選択を持つロギングモジュールを通過します。
- 標準出力/エラー
- syslog
- ログファイル
- 外部ログ関数
ロギングのレベルは
/etc/lvm/lvm.conf ファイル内にセットされており、これに関しては、付録B LVM 設定ファイル で説明があります。
4.6. メタデータデーモン (lvmetad)
リンクのコピーリンクがクリップボードにコピーされました!
LVM はオプションで中央メタデータキャッシュを使用できます。これはデーモン (
lvmetad) と udev ルールにより実装されます。このメタデータデーモンの目的は主に 2 つあります。1 つ目は LVM コマンドのパフォーマンスを向上すること、2 つ目はシステムが論理ボリュームまたはボリュームグループ全体を利用できるようになった時に udev がそれらを自動的にアクティブ化できることです。
注記
lvmetad デーモンは、クラスターのノード間では現在サポートされておらず、ロックタイプはローカルのファイルベースである必要があります。
このデーモンの利点を活用するには、以下を実行してください。
lvm2-lvmetadサービスを使ってデーモンを起動します。デーモンをブート時に自動起動するには、chkconfig lvm2-lvmetad onコマンドを使用してください。手動でデーモンを起動するには、service lvm2-lvmetad startコマンドを使用してください。- Configure LVM to make use of the daemon by setting the
global/use_lvmetadvariable to 1 in thelvm.confconfiguration file. For information on thelvm.confconfiguration file, see 付録B LVM 設定ファイル.
Normally, each LVM command issues a disk scan to find all relevant physical volumes and to read volume group metadata. However, if the metadata daemon is running and enabled, this expensive scan can be skipped. Instead, the
lvmetad daemon scans each device only once, when it becomes available, by means of udev rules. This can save a significant amount of I/O and reduce the time required to complete LVM operations, particularly on systems with many disks. For information on the udev device manager and udev rules, see 「デバイスマッパーの udev デバイスマネージャサポート」.
When a new volume group is made available at runtime (for example, through hotplug or iSCSI), its logical volumes must be activated in order to be used. When the
lvmetad daemon is enabled, the activation/auto_activation_volume_list option in the lvm.conf configuration file can be used to configure a list of volume groups and logical volumes that should be automatically activated. Without the lvmetad daemon, a manual activation is necessary. By default, this list is not defined, which means that all volumes are autoactivated once all of the physical volumes are in place. The autoactivation works recursively for LVM stacked on top of other devices, as it is event-based.
注記
When the
lvmetad daemon is running, the filter = setting in the /etc/lvm/lvm.conf file does not apply when you execute the pvscan --cache device command. To filter devices, you need to use the global_filter = setting. Devices that fail the global filter are not opened by LVM and are never scanned. You may need to use a global filter, for example, when you use LVM devices in VMs and you do not want the contents of the devices in the VMs to be scanned by the physical host.
4.7. Displaying LVM Information with the lvm Command
リンクのコピーリンクがクリップボードにコピーされました!
The
lvm command provides several built-in options that you can use to display information about LVM support and configuration.
lvm devtypesDisplays the recognized built-in block device types (Red Hat Enterprise Linux release 6.6 and later).lvm formatsDisplays recognizes metadata formats.lvm helpDisplays LVM help text.lvm segtypesDisplays recognized logical volume segment types.lvm tagsDisplays any tags defined on this host. For information on LVM object tags, see 付録D LVM オブジェクトタグ.lvm versionDisplays the current version information.
第5章 CLI コマンドでの LVM 管理
リンクのコピーリンクがクリップボードにコピーされました!
この章では、論理ボリュームを作成し、保守するために LVM CLI (Command Line Interface) コマンドで実行できる個別の管理タスクについてまとめています。
注記
クラスター化環境用に LVM ボリュームを作成または変更する場合、
clvmd デーモンが稼働していることを確認する必要があります。詳細は 「クラスター内での LVM ボリューム作成」 を参照してください。
5.1. CLI コマンドの使用
リンクのコピーリンクがクリップボードにコピーされました!
すべての LVM CLI コマンドには一般的な特性がいくつかあります。
コマンドライン引数でサイズが必要な場合は、単位を常に明示的に指定することができます。単位を指定しないと、デフォルト (通常 KB か MB) が使用されます。LVM CLI コマンドでは小数は使用できません。
コマンドライン引数内で単位を指定する場合、LVM は大文字/小文字を区別せず (例えば、M か m の指定は同じことです)、2 の累乗 (1024 の倍数) が使用されます。しかし、コマンド内で
--units 引数を指定する場合、小文字では単位が 1024 の倍数、大文字では 1000 の倍数であることを示します。
コマンドが、ボリュームグループ名または論理ボリューム名を引数として取る場合、完全なパス名はオプションとなります。ボリュームグループ
vg0 内の論理ボリューム lvol0 は vg0/lvol0 と指定できます。ボリュームグループの一覧が必要であるのに空のままの場合、すべてのボリュームグループの一覧が代用されます。論理ボリュームの一覧が必要な状態で、1つのボリュームグループだけ提示されている場合、そのボリュームグループ内のすべての論理ボリュームの一覧が代用されます。例えば、lvdisplay vg0 コマンドは、ボリュームグループ vg0 内の すべての論理ボリュームを表示します。
すべての LVM コマンドは
-v 引数を使用できるため、これを複数回入力して出力の詳細度を高くすることができます。例えば、次の例では lvcreate コマンドのデフォルト出力を示しています。
lvcreate -L 50MB new_vg
  Rounding up size to full physical extent 52.00 MB
  Logical volume "lvol0" created
# lvcreate -L 50MB new_vg
  Rounding up size to full physical extent 52.00 MB
  Logical volume "lvol0" created
以下の例は、
-v 引数を使用した lvcreate コマンドの出力を示しています。
また、
-vv、-vvv、あるいは -vvvv の引数を使用して、コマンドの実行内容を徐々に詳しく表示することができます。-vvvv 引数は、現時点で最も詳細な情報を提供します。以下の例では、-vvvv 引数が指定された lvcreate コマンドの出力のうち最初の数行のみを示しています。
LVM CLI コマンドのいずれにも
--help 引数を付けると、そのコマンドのヘルプを表示することができます。
commandname --help
# commandname --help
コマンドの man ページを表示するには、
man コマンドを実行します。
man commandname
# man commandnameman lvm コマンドは、LVM に関する一般的なオンライン情報を提供します。
すべての LVM オブジェクトは、オブジェクトを作成した時に割り当てられる UUID によって、内部で参照されます。これは、例えばボリュームグループの一部である物理ボリューム
/dev/sdf を削除した後で、接続し直した際に、/dev/sdk となっていることが判明した場合などに役立ちます。LVM は物理ボリュームをそのデバイス名ではなく、UUID で識別するため、物理ボリュームを見つけることができます。物理ボリュームの作成時に物理ボリュームの UUID を指定する方法については、「物理ボリュームメタデータの復元」 をご覧ください。
5.2. 物理ボリュームの管理
リンクのコピーリンクがクリップボードにコピーされました!
このセクションでは、物理ボリューム管理の様々な側面を実行するコマンドを説明しています。
5.2.1. 物理ボリュームの作成
リンクのコピーリンクがクリップボードにコピーされました!
以下のサブセクションは、物理ボリューム作成に使用するコマンドを説明しています。
5.2.1.1. パーティションタイプの設定
リンクのコピーリンクがクリップボードにコピーされました!
物理ボリューム用にディスクデバイス全体を使用している場合、そのディスクにパーティションテーブルがあってはなりません。DOS のディスクパーティションの場合は、
fdisk または cfdisk もしくはそれらに相当するコマンドを使用して、パーティション ID が 0x8e にセットされている必要があります。ディスクデバイス全体のみの場合は、パーティションテーブルを消去する必要があり、これによって、そのディスク上の全データが実質的に破棄されます。以下のコマンドを使用して、最初のセクターをゼロで初期化すると既存のパーティションテーブルを削除することができます:
dd if=/dev/zero of=PhysicalVolume bs=512 count=1
# dd if=/dev/zero of=PhysicalVolume bs=512 count=15.2.1.2. 物理ボリュームの初期化
リンクのコピーリンクがクリップボードにコピーされました!
pvcreate コマンドを使用して、物理ボリュームとして使用するブロックデバイスを初期化します。初期化は、ファイルシステムのフォーマッティングと同様です。
以下のコマンドは、
/dev/sdd、/dev/sde、および /dev/sdf を LVM 物理ボリュームとして初期化します。これは LVM 論理ボリュームの一部として後ほど使用するためです。
pvcreate /dev/sdd /dev/sde /dev/sdf
# pvcreate /dev/sdd /dev/sde /dev/sdf
ディスク全体でなく、パーティションを初期化するには、そのパーティション上で
pvcreate コマンドを実行します。以下の例では、パーティション /dev/hdb1 を LVM 論理ボリュームの一部として後で使用するために、LVM 物理ボリュームとして初期化します。
pvcreate /dev/hdb1
# pvcreate /dev/hdb15.2.1.3. ブロックデバイスのスキャン
リンクのコピーリンクがクリップボードにコピーされました!
以下の例に示してあるように、
lvmdiskscan コマンドを使用して 物理ボリュームとして使用可能なブロックデバイスをスキャンできます。
5.2.2. 物理ボリュームの表示
リンクのコピーリンクがクリップボードにコピーされました!
LVM 物理ボリュームのプロパティを表示するのに使用できるコマンドは 3 つあります。
pvs、 pvdisplay、および pvscan です。
pvs コマンドは、物理ボリューム情報を設定可能な形式で提供して、1 つの物理ボリュームにつき 1 行ずつ表示します。pvs コマンドは豊富な書式制御を提供するため、スクリプティングに役立ちます。出力をカスタマイズするための pvs コマンドの使用に関する情報は 「LVM 用のカスタム報告」 をご覧ください。
The
pvdisplay command provides a verbose multi-line output for each physical volume. It displays physical properties (size, extents, volume group, and so on) in a fixed format.
以下の例では、単一物理ボリュームの
pvdisplay コマンドの出力を示しています。
pvscan コマンドは、物理ボリューム用にシステム内のサポートされたすべての LVM ブロックデバイスをスキャンします。
以下のコマンドは、検出された物理デバイスをすべて表示します。
You can define a filter in the
/etc/lvm/lvm.conf file so that this command will avoid scanning specific physical volumes. For information on using filters to control which devices are scanned, see 「フィルターを使用した LVM デバイススキャンの制御」.
5.2.3. 物理ボリューム上での割り当て防止
リンクのコピーリンクがクリップボードにコピーされました!
pvchange コマンドを使用すると、単一または複数の物理ボリュームの空き領域上での物理エクステントの割り当てを防止することができます。これは、ディスクエラーが発生した場合や、物理ボリュームを取り除く場合に必要となる可能性があります。
以下のコマンドは、
/dev/sdk1 上での物理エクステントの割り当てを無効にします。
pvchange -x n /dev/sdk1
# pvchange -x n /dev/sdk1pvchange コマンドで -xy 引数を使用すると、以前に無効にされていた割り当てを許可することができます。
5.2.4. 物理ボリュームのサイズ変更
リンクのコピーリンクがクリップボードにコピーされました!
なんらかの理由で配下のブロックデバイスのサイズを変更する必要がある場合は、
pvresize コマンドを使用して LVM を新規サイズに更新します。このコマンドは LVM が物理ボリュームを使用している間に実行することができます。
5.2.5. 物理ボリュームの削除
リンクのコピーリンクがクリップボードにコピーされました!
デバイスを LVM で使用する必要がなくなった場合、
pvremove コマンドを使用して LVM ラベルを削除することができます。pvremove コマンドを実行すると、空の物理ボリューム上の LVM メタデータをゼロにします。
削除したい物理ボリュームが現在ボリュームグループの一部である場合、「ボリュームグループからの物理ボリュームの削除」 で説明してあるように、
vgreduce コマンドでボリュームグループから物理ボリュームを取り除く必要があります。
pvremove /dev/ram15
  Labels on physical volume "/dev/ram15" successfully wiped
# pvremove /dev/ram15
  Labels on physical volume "/dev/ram15" successfully wiped
5.3. ボリュームグループ管理
リンクのコピーリンクがクリップボードにコピーされました!
このセクションでは、ボリュームグループ管理の各種事項を実行するためのコマンドについて説明しています。
5.3.1. ボリュームグループの作成
リンクのコピーリンクがクリップボードにコピーされました!
To create a volume group from one or more physical volumes, use the
vgcreate command. The vgcreate command creates a new volume group by name and adds at least one physical volume to it.
以下のコマンドは、
vg1 と言う名前のボリュームグループを作成します。これには、物理ボリューム /dev/sdd1 と /dev/sde1 が含まれます。
vgcreate vg1 /dev/sdd1 /dev/sde1
# vgcreate vg1 /dev/sdd1 /dev/sde1
ボリュームグループの作成に物理ボリュームが使用される場合、ディスク領域はデフォルトでは 4MB のエクステントに分割されます。このエクステントは、論理ボリュームのサイズを拡張/縮小するための最小単位です。エクステントの数が多くても、論理ボリュームの I/O パフォーマンスに影響を与えることはありません。
エクステントサイズのデフォルト設定が適切でない場合、
vgcreate コマンドに -s オプションを使用して、サイズを指定することができます。vgcreate コマンドに -p と -l の引数を使用すると、ボリュームグループに追加可能な物理ボリュームまたは論理ボリュームの数を限定することができます。
By default, a volume group allocates physical extents according to common-sense rules such as not placing parallel stripes on the same physical volume. This is the
normal allocation policy. You can use the --alloc argument of the vgcreate command to specify an allocation policy of contiguous, anywhere, or cling. In general, allocation policies other than normal are required only in special cases where you need to specify unusual or nonstandard extent allocation. For further information on how LVM allocates physical extents, see 「LVM の割り当て」.
LVM ボリュームグループと配下にある論理ボリュームは、以下のような配置で
/dev ディレクトリ内のデバイス特有のファイルがあるディレクトリツリーに格納されます。
/dev/vg/lv/
/dev/vg/lv/
For example, if you create two volume groups
myvg1 and myvg2, each with three logical volumes named lv01, lv02, and lv03, six device special files are created:
The device special files are not present if the corresponding logical volume is not currently active.
LVM でのデバイスの最大サイズは、64 ビット CPU 上で 8 エクサバイトです。
5.3.2. LVM の割り当て
リンクのコピーリンクがクリップボードにコピーされました!
LVM の操作で物理エクステントを単一または複数の論理ボリュームに割り当てる必要がある場合、割り当ては以下のように行われます。
- ボリュームグループ内で未割り当ての物理エクステントが割り当て用に生成されます。コマンドラインの末尾で物理エクステントの範囲を指定した場合は、指定した物理ボリューム上のその範囲内で未割り当ての物理エクステントのみが割り当て用として考慮に入れられます。
- 各割り当てポリシーは、最も厳しいポリシー (
contiguous) から始まり、最後は--allocオプションを使用して指定される、あるいは特定の論理ボリュームやボリュームグループ用にデフォルトとしてセットされる割り当てポリシーと、順番に試行されます。割り当てポリシーでは、埋める必要がある空の論理ボリューム領域の最少の論理エクステントから、割り当てポリシーによる制限に沿って、できるだけ多くの領域の割り当てを行います。領域がさらに必要な場合は、LVM は次のポリシーに移動します。
割り当てポリシーの制限は以下のとおりです。
contiguousの割り当てポリシーでは、論理ボリュームの 1 番目の論理エクステントではない論理エクステントは、直接先行する論理エクステントに物理的に隣接する必要があります。論理ボリュームがストライプ化またはミラー化されると、contiguousの割り当て制限が、領域を必要とする各ストライプまたはミラーイメージ (レッグ) に個別に適用されます。clingの割り当てポリシーでは、既存の論理ボリュームに追加される任意の論理エクステントに使用される物理ボリュームは、その論理ボリューム内でそれより前から 1 つ以上の論理エクステントにより使用されている必要があります。allocation/cling_tag_listの設定パラメーターが定義されている場合に、一覧表示されているいずれかのタグが 2 つの物理ボリュームに存在していると、この両方の物理ボリュームは適合すると考えられます。これにより、同じプロパティ (物理的な場所など) を持つ物理ボリュームのグループを、割り当て目的でタグして同等に処理することができます。LVM ボリュームの拡張時に使用する追加の物理ボリュームを指定する LVM タグとともに、clingポリシーの使用に関しては、「cling割り当てポリシーを使用した論理ボリュームの拡張」 をご覧ください。論理ボリュームがストライプ化またはミラー化されると、clingの割り当て制限が、領域を必要とする各ストライプまたはミラーイメージ (レッグ) に個別に適用されます。normalの割り当てポリシーは、並列の論理ボリューム (異なるストライプまたはミラーイメージ/レッグ) 内の同じオフセットで、その並列の論理ボリュームにすでに割り当て済みの論理エクステントと同じ物理ボリュームを共有する物理エクステントは選択しません。ミラーデータ保持のために論理ボリュームと同時にミラーログを割り当てる場合、normalの割り当てポリシーは最初にログやデータに対して異なる物理ボリュームを選択しようとします。それが不可能で、かつallocation/mirror_logs_require_separate_pvs設定パラメーターが 0 にセットされている場合は、ログが物理ボリュームとデータの一部を共有できるようになります。同様に、シンプールメタデータを割り当てる場合、normalの割り当てポリシーはミラーログを割り当てる場合と同じ注意事項に沿います。allocation/thin_pool_metadata_require_separate_pvs設定パラメーターの値に基づきます。- 割り当て要求を満たすだけの十分な空きエクステントがあっても
normalの割り当てポリシーがそれらを使用しない場合は、たとえパフォーマンスが低下しても、同じ物理ボリュームに 2 つのストライプを配置することによって、anywhere割り当てポリシーが使用します。
割り当てポリシーは
vgchange コマンドを使用して変更できます。
注記
If you rely upon any layout behavior beyond that documented in this section according to the defined allocation policies, you should note that this might change in future versions of the code. For example, if you supply on the command line two empty physical volumes that have an identical number of free physical extents available for allocation, LVM currently considers using each of them in the order they are listed; there is no guarantee that future releases will maintain that property. If it is important to obtain a specific layout for a particular Logical Volume, then you should build it up through a sequence of
lvcreate and lvconvert steps such that the allocation policies applied to each step leave LVM no discretion over the layout.
割り当てプロセスが特定のケースで現在実行する方法を表示するには、コマンドに
-vvvv オプションを追加するなどして、デバッグロギングの出力を読み取ることができます。
5.3.3. クラスター内でのボリュームグループ作成
リンクのコピーリンクがクリップボードにコピーされました!
vgcreate コマンドでクラスター環境内にボリュームグループを作成します。単一ノードでボリュームグループを作成する時と同様です。
By default, volume groups created with CLVM on shared storage are visible to all computers that have access to the shared storage. It is possible, however, to create volume groups that are local, visible only to one node in the cluster, by using the
-c n option of the vgcreate command.
クラスター環境内で以下のコマンドを実行すると、コマンドの実行元であるノードに対してローカルとなるボリュームグループが作成されます。このコマンドは、物理ボリュームである
/dev/sdd1 と /dev/sde1 を含むローカルボリューム vg1 を作成します。
vgcreate -c n vg1 /dev/sdd1 /dev/sde1
# vgcreate -c n vg1 /dev/sdd1 /dev/sde1
既存のボリュームグループがクラスター化したボリュームグループであるかどうかは
vgs コマンドでチェックできます。ボリュームがクラスター化されている場合は、c 属性を表示します。以下のコマンドは VolGroup00と testvg1 のボリュームグループの属性を表示します。この例では、VolGroup00 はクラスター化されていませんが、testvg1 は、Attr 見出しの下にある c 属性が示すようにクラスター化されています。
vgs
  VG            #PV #LV #SN Attr   VSize  VFree
  VolGroup00      1   2   0 wz--n- 19.88G    0
  testvg1         1   1   0 wz--nc 46.00G 8.00M
# vgs
  VG            #PV #LV #SN Attr   VSize  VFree
  VolGroup00      1   2   0 wz--n- 19.88G    0
  testvg1         1   1   0 wz--nc 46.00G 8.00M
5.3.4. ボリュームグループへの物理ボリュームの追加
リンクのコピーリンクがクリップボードにコピーされました!
新規に物理ボリュームを既存のボリュームグループに追加するには、
vgextend コマンドを使用します。vgextend コマンドは、1つ、または複数の空き物理ボリュームを追加することによってボリュームグループの容量を拡大します。
以下のコマンドは、物理ボリューム
/dev/sdf1 をボリュームグループ vg1 に追加します。
vgextend vg1 /dev/sdf1
# vgextend vg1 /dev/sdf15.3.5. ボリュームグループの表示
リンクのコピーリンクがクリップボードにコピーされました!
LVM ボリュームグループのプロパティを表示するのに使用できるコマンドは 2 つあります。
vgs と vgdisplay です。
vgscan コマンドは、ボリュームグループのすべてのディスクをスキャンして LVM キャッシュファイルを再構築する以外に、ボリュームグループを表示することもできます。vgscan コマンドに関する情報は 「キャッシュファイル構築のためのボリュームグループのディスクスキャン」 をご覧ください。
vgs コマンドは、ボリュームグループの情報を設定可能な形式で提供し、1 ボリュームグループにつき 1 行ずつ表示します。vgs コマンドは豊富な書式制御を提供するため、スクリプティングに役立ちます。出力をカスタマイズするための vgs コマンドの使用については、「LVM 用のカスタム報告」 をご覧ください。
The
vgdisplay command displays volume group properties (such as size, extents, number of physical volumes, and so on) in a fixed form. The following example shows the output of a vgdisplay command for the volume group new_vg. If you do not specify a volume group, all existing volume groups are displayed.
5.3.6. キャッシュファイル構築のためのボリュームグループのディスクスキャン
リンクのコピーリンクがクリップボードにコピーされました!
The
vgscan command scans all supported disk devices in the system looking for LVM physical volumes and volume groups. This builds the LVM cache file in the /etc/lvm/cache/.cache file, which maintains a listing of current LVM devices.
LVM は、システムの起動時、ならびに
vgcreate コマンドを実行した時や LVM が不整合を検出した時など、LVM が動作している他の時点で vgscan コマンドを自動的に実行します。
注記
ハードウェア構成を変更して、ノードに対してデバイスの追加/削除を行う場合、システムの起動時に存在していなかったデバイスがシステムに認識されるように
vgscan コマンドを手動で実行しなければならない場合があります。これは、例えば、SAN 上のシステムに新しいディスクを追加したり、物理ボリュームとしてラベルが付けられた新しいディスクをホットプラグする場合に必要になる可能性があります。
lvm.conf ファイル内でフィルターを定義することで、特定デバイスを避けるようにスキャンを限定できます。スキャンするデバイスを制御するためのフィルターの使用については、「フィルターを使用した LVM デバイススキャンの制御」 をご覧ください。
次の例では、
vgscan コマンドの出力を示しています。
vgscan
  Reading all physical volumes.  This may take a while...
  Found volume group "new_vg" using metadata type lvm2
  Found volume group "officevg" using metadata type lvm2
# vgscan
  Reading all physical volumes.  This may take a while...
  Found volume group "new_vg" using metadata type lvm2
  Found volume group "officevg" using metadata type lvm2
5.3.7. ボリュームグループからの物理ボリュームの削除
リンクのコピーリンクがクリップボードにコピーされました!
ボリュームグループから使用しない物理ボリュームを削除するには、
vgreduce コマンドを使用します。vgreduce コマンドは、1つまたは複数の空の物理ボリュームを削除することにより、ボリュームグループの容量を縮小します。これによって、物理ボリュームが開放され、異なるボリュームグループで使用したり、システムから削除できるようになります。
ボリュームグループから物理ボリュームを削除する前に、
pvdisplay コマンドを使用して、その物理ボリュームが論理ボリュームによって使用されていないことを確認することができます。
If the physical volume is still being used you will have to migrate the data to another physical volume using the
pvmove command. Then use the vgreduce command to remove the physical volume.
以下のコマンドは、物理ボリューム
/dev/hda1 を ボリュームグループ my_volume_group から取り除きます。
vgreduce my_volume_group /dev/hda1
# vgreduce my_volume_group /dev/hda1
If a logical volume contains a physical volume that fails, you cannot use that logical volume. To remove missing physical volumes from a volume group, you can use the
--removemissing parameter of the vgreduce command, if there are no logical volumes that are allocated on the missing physical volumes.
5.3.8. ボリュームグループのパラメーター変更
リンクのコピーリンクがクリップボードにコピーされました!
「ボリュームグループのアクティブ化と非アクティブ化」 で説明しているように、
vgchange コマンドは、ボリュームグループの非アクティブ化およびアクティブ化に使用されます。また、このコマンドを使用して、既存のボリュームグループを対象とする、いくつかのボリュームグループパラメーターを変更することも可能です。
以下のコマンドは、ボリュームグループ
vg00 の論理ボリュームの最大数を 128 に変更します。
vgchange -l 128 /dev/vg00
# vgchange -l 128 /dev/vg00vgchange コマンドで変更できるボリュームグループパラメーターの説明については vgchange(8) の man ページをご覧ください。
5.3.9. ボリュームグループのアクティブ化と非アクティブ化
リンクのコピーリンクがクリップボードにコピーされました!
ボリュームグループを作成すると、デフォルトでアクティブ化されます。これは、そのグループ内の論理ボリュームがアクセス可能で、かつ変更される可能性があることを意味します。
ボリュームグループを非アクティブ化して、カーネルに認識されないようにする必要がある、様々な状況があります。ボリュームグループを非アクティブ化、またはアクティブ化するには、
vgchange コマンドで -a (--available) 引数を使用します。
以下の例では、ボリュームグループ
my_volume_group を非アクティブ化します。
vgchange -a n my_volume_group
# vgchange -a n my_volume_group
クラスター化されたロッキングが有効な場合には、「e」を追加すると 1 つのノード上でボリュームグループが排他的にアクティブ化または非アクティブ化されます。「l」を追加すると、ローカルノード上のみでボリュームグループがアクティブ化または非アクティブ化されます。単一ホストのスナップショットを使用する論理ボリュームは、1 度に 1 つのノード上でしか利用できないため、常に排他的にアクティブ化されます。
「論理ボリュームグループのパラメーター変更」 で説明してあるように、
lvchange コマンドを使用して、個別の論理ボリュームを非アクティブ化できます。クラスター内の個別ノード上で論理ボリュームをアクティブ化する方法については、「クラスター内の個別ノード上の論理ボリュームのアクティブ化」 をご覧ください。
5.3.10. ボリュームグループの削除
リンクのコピーリンクがクリップボードにコピーされました!
論理ボリュームがないボリュームグループを削除するには、
vgremove コマンドを使用します。
vgremove officevg
  Volume group "officevg" successfully removed
# vgremove officevg
  Volume group "officevg" successfully removed
5.3.11. ボリュームグループの分割
リンクのコピーリンクがクリップボードにコピーされました!
ボリュームグループの物理ボリュームを分割して、新しいボリュームグループを作成するには、
vgsplit コマンドを使用します。
論理ボリュームはボリュームグループ間で分割することはできません。それぞれの既存の論理ボリュームは完全に物理ボリューム上に存在し、既存または新規のボリュームグループを形成している必要があります。しかし必要であれば、
pvmove コマンドを使用して、その分割を強制することができます。
以下の例では、オリジナルのボリュームグループ
bigvg から新規のボリュームグループ smallvg を分割しています。
vgsplit bigvg smallvg /dev/ram15
  Volume group "smallvg" successfully split from "bigvg"
# vgsplit bigvg smallvg /dev/ram15
  Volume group "smallvg" successfully split from "bigvg"
5.3.12. ボリュームグループの統合
リンクのコピーリンクがクリップボードにコピーされました!
2 つのボリュームグループを統合して 1 つのボリュームグループにするには、
vgmerge コマンドを使用します。ボリュームの物理エクステントサイズが同じで、かつ両ボリュームグループの物理および論理ボリュームのサマリーが「マージ先」ボリュームグループの制限内に収まる場合は、非アクティブな「マージ元」のボリュームを、アクティブまたは非アクティブの「マージ先」ボリュームにマージすることができます。
以下のコマンドは、非アクティブなボリュームグループ
my_vg をアクティブまたは非アクティブなボリュームグループ databases にマージして、詳細なランタイム情報を提供します。
vgmerge -v databases my_vg
# vgmerge -v databases my_vg5.3.13. ボリュームグループメタデータのバックアップ
リンクのコピーリンクがクリップボードにコピーされました!
メタデータのバックアップとアーカイブは、
lvm.conf ファイル内で無効になっていない限り、すべてのボリュームグループと論理ボリューム設定の変更時に自動的に作成されます。デフォルトでは、メタデータのバックアップは /etc/lvm/backup ファイルに保存され、メタデータのアーカイブは /etc/lvm/archives ファイルに保存されます。vgcfgbackup コマンドを使用するとメタデータを /etc/lvm/backup ファイルに手動でバックアップできます。
vgcfrestore コマンドは、アーカイブからボリュームグループのメタデータをボリュームグループのすべての物理ボリュームに復元します。
物理ボリュームのメタデータを復元するための
vgcfgrestore コマンドの使用例は、「物理ボリュームメタデータの復元」 をご覧ください。
5.3.14. ボリュームグループの名前変更
リンクのコピーリンクがクリップボードにコピーされました!
既存ボリュームグループの名前を変更するには、
vgrename コマンドを使用します。
以下のいずれかのコマンドで、既存ボリュームグループ
vg02 の名前を my_volume_group に変更できます。
vgrename /dev/vg02 /dev/my_volume_group
# vgrename /dev/vg02 /dev/my_volume_groupvgrename vg02 my_volume_group
# vgrename vg02 my_volume_group5.3.15. ボリュームグループの別のシステムへの移動
リンクのコピーリンクがクリップボードにコピーされました!
LVM ボリュームグループ全体を別のシステムに移動することができます。これを実行するには、
vgexport と vgimport のコマンドの使用が推奨されます。
注記
As of Red Hat Enterprise Linux 6.5, you can use the
--force argument of the vgimport command. This allows you to import volume groups that are missing physical volumes and subsequently run the vgreduce --removemissing command.
vgexport コマンドは、システムが非アクティブのボリュームグループにアクセスできないようにするため、物理ボリュームのデタッチが可能になります。vgimport コマンドは、vgexport コマンドで停止していたボリュームグループにマシンが再度アクセスできるようにします。
ボリュームグループを 2 つのシステム間で移動するには、以下の手順に従います。
- ボリュームグループ内のアクティブなボリュームのファイルにアクセスしているユーザーがいないことを確認してから、論理ボリュームをアンマウントします。
vgchangeコマンドで-a n引数を使用して、そのボリュームグループを非アクティブとしてマークします。これによりボリュームグループがこれ以上活動しないようにします。vgexportコマンドを使用してボリュームグループをエクスポートします。これは、削除中のシステムからのボリュームグループへのアクセスを防止します。ボリュームグループをエクスポートした後に、pvscanコマンドを実行すると、以下の例のように物理ボリュームがエクスポート先のボリュームグループ内に表示されます。Copy to Clipboard Copied! Toggle word wrap Toggle overflow システムが次回シャットダウンされる時に、ボリュームグループを構成していたディスクを切断して、それらを新しいシステムに接続することができます。- ディスクが新しいシステムに接続されると、
vgimportコマンドを使用してボリュームグループをインポートし、新しいシステムにアクセスできるようにします。 vgchangeコマンドで-a y引数を使用してボリュームグループをアクティブ化します。- ファイルシステムをマウントして使用可能にします。
5.3.16. ボリュームグループディレクトリの再作成
リンクのコピーリンクがクリップボードにコピーされました!
ボリュームグループディレクトリと論理ボリューム特別ファイルを再作成するには、
vgmknodes コマンドを使用します。このコマンドは、/dev ディレクトリ内の LVM2 特別ファイルをチェックします。このファイルはアクティブな論理ボリュームに必要です。このコマンドは不足している特別ファイルを作成し、未使用のファイルを削除します。
vgscan コマンドに mknodes 引数を指定することにより、vgmknodes コマンドを vgscan コマンドに統合することができます。
5.4. 論理ボリュームの管理
リンクのコピーリンクがクリップボードにコピーされました!
このセクションでは、論理ボリューム管理の各種事項を実行するコマンドを説明しています。
5.4.1. リニア論理ボリュームの作成
リンクのコピーリンクがクリップボードにコピーされました!
論理ボリュームを作成するには、
lvcreate コマンドを使用します。論理ボリューム用に名前を指定しないと、デフォルトの名前 lvol# が使用されます (# の部分には論理ボリュームの内部番号が入ります)。
論理ボリュームを作成する場合、論理ボリュームはボリュームグループを構成する物理ボリューム上の空きエクステントを使用してボリュームグループから構築されます。通常は論理ボリュームは配下の物理ボリューム上で次に使用可能な空きを基準にして空き領域を占有します。論理ボリュームを変更することで、物理ボリューム内の領域の開放と再割り当てができます。
As of the Red Hat Enterprise Linux 6.3 release, you can use LVM to create, display, rename, use, and remove RAID logical volumes. For information on RAID logical volumes, see 「RAID 論理ボリューム」.
以下のコマンドは、ボリュームグループ
vg1 内に 10 ギガバイトのサイズの論理ボリュームを作成します。
lvcreate -L 10G vg1
# lvcreate -L 10G vg1
The default unit for logical volume size is megabytes. The following command creates a 1500 MB linear logical volume named
testlv in the volume group testvg, creating the block device /dev/testvg/testlv.
lvcreate -L 1500 -n testlv testvg
# lvcreate -L 1500 -n testlv testvg
次のコマンドは、ボリュームグループ
vg0 内の空きエクステントから gfslv と言う 50 ギガバイトの論理ボリュームを作成します。
lvcreate -L 50G -n gfslv vg0
# lvcreate -L 50G -n gfslv vg0lvcreate コマンドで -l 引数を使用すると、エクステント内の論理ボリュームのサイズを指定することができます。この引数を使用すると、論理ボリュームに使用するボリュームグループのパーセンテージも指定できます。以下のコマンドは、ボリュームグループ testvg 内で全体の 60% を使用する mylv と呼ばれる論理ボリュームを作成します。
lvcreate -l 60%VG -n mylv testvg
# lvcreate -l 60%VG -n mylv testvglvcreate コマンドで -l 引数を使用すると、ボリュームグループ内で残っている空き領域のパーセンテージを、論理ボリュームのサイズとして指定することもできます。以下のコマンドは、ボリュームグループ testvol 内の未割り当て領域をすべて使用する yourlv と呼ばれる論理ボリュームを作成します。
lvcreate -l 100%FREE -n yourlv testvg
# lvcreate -l 100%FREE -n yourlv testvglvcreate コマンドで、-l 引数を使用して、ボリュームグループ全域を使用する論理ボリュームを作成することができます。ボリュームグループ全域を使用する論理ボリュームを作成する別の方法としては、vgdisplay コマンドを使用して「合計 PE」サイズを確認し、その結果を lvcreate コマンドへのインプットとして使用することです。
以下のコマンドは、
testvg と言うボリュームグループ全域を使用する mylv と言う論理ボリュームを作成します。
vgdisplay testvg | grep "Total PE"
Total PE              10230
lvcreate -l 10230 testvg -n mylv
# vgdisplay testvg | grep "Total PE"
Total PE              10230
# lvcreate -l 10230 testvg -n mylv
論理ボリュームの作成に使用した、配下の物理ボリュームは、物理ボリュームを削除する必要がある場合に重要となる可能性があります。そのため、論理ボリュームを作成する時にはこの可能性を考慮する必要があります。ボリュームグループから物理ボリュームを削除する方法についての情報は、「ボリュームグループからの物理ボリュームの削除」 をご覧ください。
ボリュームグループ内の特定の物理ボリュームから割り当てる論理ボリュームを作成するには、
lvcreate コマンドラインの末尾に物理ボリュームを指定する必要があります。以下のコマンドは、物理ボリューム /dev/sdg1 から割り当てられるボリュームグループ testvg 内に論理ボリューム testlv を作成します。
lvcreate -L 1500 -ntestlv testvg /dev/sdg1
# lvcreate -L 1500 -ntestlv testvg /dev/sdg1
論理ボリュームに使用する物理ボリュームのエクステントを指定することができます。以下の例では、ボリュームグループ
testvg 内にエクステントが 0 から 24 の物理ボリューム /dev/sda1 およびエクステントが 50 から 124 の物理ボリューム /dev/sdb1 のリニア論理ボリュームを作成します。
lvcreate -l 100 -n testlv testvg /dev/sda1:0-24 /dev/sdb1:50-124
# lvcreate -l 100 -n testlv testvg /dev/sda1:0-24 /dev/sdb1:50-124
以下の例では、エクステントが 0 から 25 の物理ボリューム
/dev/sda1 からリニア論理ボリュームを作成した後に、エクステントが 100 の論理ボリュームを配置しています。
lvcreate -l 100 -n testlv testvg /dev/sda1:0-25:100-
# lvcreate -l 100 -n testlv testvg /dev/sda1:0-25:100-
論理ボリュームのエクステントが割り当てられる方法についてのデフォルトポリシーは、
inherit であり、ボリュームグループ用の同じポリシーに適用されます。これらのポリシーは lvchange コマンドを使用して変更できます。割り当てポリシーの詳細については、「ボリュームグループの作成」 をご覧ください。
5.4.2. ストライプ化ボリュームの作成
リンクのコピーリンクがクリップボードにコピーされました!
大量の連続的な読み取りと書き込みを行う場合、ストライプ化論理ボリュームを作成すると、データ I/O が効率化されます。ストライプ化ボリュームに関する一般情報は、「ストライプ化論理ボリューム」 をご覧ください。
ストライプ化論理ボリュームを作成する時には、
lvcreate コマンドで -i 引数を使用してストライプの数を指定します。これは、論理ボリュームがストライプ化される物理ボリュームの数を決定します。ストライプ数は、ボリュームグループ内の物理ボリュームの数よりも多くすることはできません (--alloc anywhere 引数が使用される場合は例外)。
ストライプ化論理ボリュームを構成する配下の物理デバイスのサイズが異なる場合、ストライブ化ボリュームの最大サイズはその配下の最小デバイスで決定されます。例えば、2 レッグのストライプがある場合、最大サイズは小さいデバイスの 2 倍になります。3 レッグのストライプの場合、最大サイズは最小デバイスの 3 倍になります。
以下のコマンドは、64KB のストライプを持つ 2 つの物理ボリュームに渡ってストライプ化論理ボリュームを作成します。論理ボリュームのサイズは 50 ギガバイトで、
gfslv と呼ばれ、ボリュームグループ vg0 から作り出されます。
lvcreate -L 50G -i2 -I64 -n gfslv vg0
# lvcreate -L 50G -i2 -I64 -n gfslv vg0
リニアボリュームと同じく、ストライプに使用する物理ボリュームのエクステントを指定することができます。以下のコマンドは、2 つの物理ボリュームに渡ってストライプ化する、
stripelv と呼ばれる 100 エクステントのストライプ化ボリュームを testvg のボリュームグループ内に作成します。ストライプは /dev/sda1 のセクター 0-49 と /dev/sdb1 のセクター 50-99 を使用します。
lvcreate -l 100 -i2 -nstripelv testvg /dev/sda1:0-49 /dev/sdb1:50-99
  Using default stripesize 64.00 KB
  Logical volume "stripelv" created
# lvcreate -l 100 -i2 -nstripelv testvg /dev/sda1:0-49 /dev/sdb1:50-99
  Using default stripesize 64.00 KB
  Logical volume "stripelv" created
5.4.3. ミラー化ボリュームの作成
リンクのコピーリンクがクリップボードにコピーされました!
注記
As of the Red Hat Enterprise Linux 6.3 release, LVM supports RAID4/5/6 and a new implementation of mirroring. For information on this new implementation, see 「RAID 論理ボリューム」.
注記
ミラー化された LVM 論理ボリュームをクラスター内に作成するには、単一ノード上でミラー化論理ボリュームを作成するのと同じコマンドと手順が必要です。しかし、クラスター内にミラー化 LVM ボリュームを作成するには、クラスターとクラスターミラーインフラストラクチャーが稼動中であり、クラスターが定足数を満たしており、かつクラスターロッキングを有効化するように
lvm.conf ファイル内のロッキングタイプが正しく設定されている必要があります。クラスター内におけるミラー化ボリューム作成の例については、「クラスター内でのミラー化 LVM 論理ボリュームの作成」 をご覧ください。
単一のクラスター内の複数のノードから短時間に連続して複数の LVM ミラー作成および変換コマンドを実行しようとすると、これらのコマンドのバックログが生じる場合があります。これによって、要求した動作がタイムアウトとなった後で失敗となる可能性があります。この問題を回避するために、クラスターミラー作成コマンドは、そのクラスターの単一ノードから実行することを推奨します。
ミラー化ボリュームを作成する場合、
lvcreate コマンドの -m 引数を使用して、データのコピー数を指定します。-m1 と指定すると、1 つのミラーが作成され、ファイルシステムのコピーが合計 2 つとなります (1 つのリニア論理ボリュームと 1 つのコピー)。同じように -m2 と指定すると、2 つのミラーが作成され、ファイルシステムのコピーが合計 3 つとなります。
以下のコマンドは、単一のミラーを持つミラー化論理ボリュームを作成します。ボリュームのサイズは 50 ギガバイトで、
mirrorlv と呼ばれ、ボリュームグループ vg0 から作り出されます。
lvcreate -L 50G -m1 -n mirrorlv vg0
# lvcreate -L 50G -m1 -n mirrorlv vg0
デフォルトでは、LVM ミラーデバイスは、複製されるデバイスをサイズが 512KB のリージョンに分割します。
lvcreate コマンドで -R 引数を使用して、リージョンサイズをメガバイト単位で指定できます。また、lvm.conf ファイル内の mirror_region_size 設定を変更して、デフォルトのリージョンサイズを変更することも可能です。
注記
クラスターインフラストラクチャーの制限により、デフォルトのリージョンサイズが 512KB では、1.5TB を超えるクラスターミラーは作成できません。1.5TB よりも大きなミラーを必要とするユーザーは、リージョンサイズをデフォルトよりも大きくする必要があります。リージョンサイズを大きくしておかないと、LVM の作成がハングしてしまい、またその他の LVM コマンドもハングしてしまう可能性もあります。
1.5TB を超えるミラー用のリージョンサイズを指定するための一般的なガイドラインとして、ミラーサイズをテラバイト単位で考えて、2 の次の累乗に切り上げ、その数を
lvcreate コマンドの -R 引数として使用することができます。例えば、ミラーサイズが 1.5TB の場合、-R 2 と指定することができます。また、ミラーサイズが 3TB の場合は -R 4、5TB の場合は -R 8と指定することができます。
以下のコマンドは、リージョンサイズが 2MB のミラー化論理ボリュームを作成します。
lvcreate -m1 -L 2T -R 2 -n mirror vol_group
# lvcreate -m1 -L 2T -R 2 -n mirror vol_group
ミラーが作成されると、ミラーのリージョンは同期されます。大きなミラーコンポーネントの場合は、同期プロセスに長時間かかる可能性があります。Red Hat Enterprise Linux 6.3 では、再開が不要な新規のミラーを作成している場合は、
--nosync 引数を指定して、最初のデバイスからの初期同期化は不要であることを示すことができます。
LVM maintains a small log which it uses to keep track of which regions are in sync with the mirror or mirrors. By default, this log is kept on disk, which keeps it persistent across reboots and ensures that the mirror does not need to be resynced every time a machine reboots or crashes. You can specify instead that this log be kept in memory with the
--mirrorlog core argument; this eliminates the need for an extra log device, but it requires that the entire mirror be resynchronized at every reboot.
以下のコマンドは、ボリュームグループ
bigvg からミラー化論理ボリュームを作成します。論理ボリュームは、ondiskmirvol と呼ばれ、単一のミラーがあります。ボリュームのサイズは 12MB で、ミラーログをメモリーに保存します。
lvcreate -L 12MB -m1 --mirrorlog core -n ondiskmirvol bigvg
  Logical volume "ondiskmirvol" created
# lvcreate -L 12MB -m1 --mirrorlog core -n ondiskmirvol bigvg
  Logical volume "ondiskmirvol" created
このミラーログは、いずれかのミラーレッグが作成されるデバイスとは異なるデバイス上で作成されます。しかし、
vgcreate コマンドに --alloc anywhere 引数を使用することにより、ミラーレッグの 1 つと同じデバイス上にミラーログを作成することが可能です。これはパフォーマンスを低下させる可能性がありますが、配下のデバイスが 2 つしかない場合でもミラーを作成できます。
以下のコマンドは、単一のミラーを持つミラー化論理ボリュームを作成します。このミラーログはミラーレッグの 1 つと同じデバイス上にあります。この例では、ボリュームグループ
vg0 は 2 つのデバイスのみで構成されています。このコマンドによって、ボリュームグループ vg0 内に mirrorlv という名前で、サイズが 500 MB のボリュームが作成されます。
lvcreate -L 500M -m1 -n mirrorlv -alloc anywhere vg0
# lvcreate -L 500M -m1 -n mirrorlv -alloc anywhere vg0注記
クラスター化されたミラーでは、ミラーログ管理は、その時点でクラスター ID が最も低いクラスターノードの完全な責任です。そのため、クラスターミラーログを保持するデバイスがクラスターのサブセット上で利用できない場合、最も低い ID のクラスターノードがミラーログへのアクセスを維持している限りは、クラスター化されたミラーは影響を受けることなく、操作を持続することができます。ミラーは影響を受けないため、自動修正アクション (修復) も生じません。ただし、最も低い ID のクラスターノードがミラーログにアクセスできなくなると、(他のノードからログへのアクセスが可能か否かにかかわらず) 自動アクションが作動します。
自動的にミラー化されるミラーログを作成するために、
--mirrorlog mirrored 引数を指定することができます。以下のコマンドはボリュームグループ bigvg からミラー化論理ボリュームを作成します。論理ボリュームは twologvol と言う名前で、単一のミラーを持ちます。このボリュームのサイズは 12MB で、ミラーログがミラー化され、各ログは別個のデバイス上に保管されます。
lvcreate -L 12MB -m1 --mirrorlog mirrored -n twologvol bigvg
  Logical volume "twologvol" created
# lvcreate -L 12MB -m1 --mirrorlog mirrored -n twologvol bigvg
  Logical volume "twologvol" created
標準ミラーログと同様に、
vgcreate コマンドの --alloc anywhere 引数を使用してミラーレッグと同じデバイス上に冗長ミラーログを作成することが可能です。これによってパフォーマンスが低下する可能性がありますが、各ログを別個のデバイス上に保管するための配下のデバイス数がミラーレッグに対して十分でない場合でも、冗長ミラーログの作成が可能となります。
ミラーが作成されると、ミラーのリージョンは同期されます。大きなミラーコンポーネントの場合は、同期プロセスに長時間かかる可能性があります。再開が不要な新規のミラーを作成している場合は、
--nosync 引数を指定して、最初のデバイスからの初期同期化は不要であることを示すことができます。
ミラーレッグとログ用に使用するデバイス、およびそのデバイスで使用するエクステントを指定することができます。ログを特定のディスクに強制するには、それが配置されるディスク上のエクステントを正確に 1 つ指定します。LVM は、コマンドラインでデバイスが一覧表示される順序を必ずしも優先しません。物理ボリュームが一覧にあれば、それが割り当てを実行する唯一のスペースです。既に割り当て済みの物理エクステントが一覧にあれば、それは無視されます。
以下のコマンドは、単一のミラーを持つミラー化論理ボリュームを作成します。このボリュームのサイズは 500 MB で、
mirrorlv と呼ばれ、ボリュームグループ vg0 から作り出されます。第 1 のミラーレッグはデバイス /dev/sda1 上、第 2 のミラーレッグはデバイス /dev/sdb1 上、そのミラーログは /dev/sdc1 上にあります。
lvcreate -L 500M -m1 -n mirrorlv vg0 /dev/sda1 /dev/sdb1 /dev/sdc1
# lvcreate -L 500M -m1 -n mirrorlv vg0 /dev/sda1 /dev/sdb1 /dev/sdc1
以下のコマンドは、単一のミラーを持つミラー化論理ボリュームを作成します。このボリュームサイズは 500 MB で、
mirrorlv と呼ばれ、ボリュームグループ vg0 から作り出されます。第 1 のミラーレッグは、エクステントが 0 から 499 のデバイス /dev/sda1 にあり、第 2 のミラーレッグはエクステントが 0 から 499 のデバイス /dev/sdb1 にあります。ミラーログは、エクステントが 0 のデバイス /dev/sdc1 から始まります。これらは 1MB のエクステントです。指定されたエクステントのいずれかが既に割り当て済みの場合は、それらは無視されます。
lvcreate -L 500M -m1 -n mirrorlv vg0 /dev/sda1:0-499 /dev/sdb1:0-499 /dev/sdc1:0
# lvcreate -L 500M -m1 -n mirrorlv vg0 /dev/sda1:0-499 /dev/sdb1:0-499 /dev/sdc1:0注記
Red Hat Enterprise Linux 6.1 リリースでは、単一の論理ボリューム内でストライピングとミラーリングを併用することが可能です。論理ボリュームの作成と同時にミラーの数 (
--mirrors X) とストライプの数 (--stripes Y) を指定すると、ミラーデバイスの構成デバイスがストライプ化されます。
5.4.3.1. ミラー化論理ボリュームの障害ポリシー
リンクのコピーリンクがクリップボードにコピーされました!
lvm.conf ファイルの activation セクション内の mirror_image_fault_policy と mirror_log_fault_policy のパラメーターを使用すると、デバイスの障害が発生した場合にミラー化論理ボリュームがどのような動作をするかを定義することができます。これらのパラメーターが remove に設定されると、システムは障害のあるデバイスを削除して、そのデバイスなしで稼働を試みます。このパラメーター allocate に設定されていると、システムは障害のあるデバイスを削除して、そのデバイスの代わりとなる新たなデバイス上でのスペースの割り当てを試みます。代わりに割り当てることができる適切なデバイスとスペースがない場合、このポリシーは remove ポリシーと同様に機能します。
By default, the
mirror_log_fault_policy parameter is set to allocate. Using this policy for the log is fast and maintains the ability to remember the sync state through crashes and reboots. If you set this policy to remove, when a log device fails the mirror converts to using an in-memory log and the mirror will not remember its sync status across crashes and reboots and the entire mirror will be resynced.
デフォルトでは、
mirror_image_fault_policy パラメーターは remove に設定されています。このポリシーでは、ミラーイメージに障害が発生すると、良好なコピーが1つしか残っていない場合は、ミラーが非ミラー化デバイスに変換されます。ミラーデバイスに対してこのポリシーをallocate に設定すると、ミラーはデバイスを再同期する必要があるため、処理に時間がかかりますが、これによってデバイスのミラー特性を保持することができます。
注記
LVM ミラーにデバイス障害が発生すると、2 段階のリカバリが実行されます。第 1 段階では、障害が発生したデバイスの削除が行われます。これによってミラーは、単一のリニアデバイスに縮小されます。第 2 段階では、
mirror_log_fault_policy パラメーターが allocate に設定されている場合、障害の発生したデバイスの置き換えを試みます。ただし、第 2 段階で、ミラーが以前使用していたデバイスの中で、障害の要因となったデバイスが利用可能な場合には、障害とは関係のないデバイスが選択されるという保証はない点に注意してください。
For information on manually recovering from an LVM mirror failure, see 「LVM ミラー障害からの回復」.
5.4.3.2. ミラー化論理ボリュームの冗長イメージの分割
リンクのコピーリンクがクリップボードにコピーされました!
ミラー化論理ボリュームの冗長イメージを分割して、新たな論理ボリュームを形成することが可能です。イメージを分割するには、
lvconvert コマンドの --splitmirrors 引数を使用して、分割する冗長イメージの数を指定します。新たに分割する論理ボリュームの名前を指定するには、このコマンドの --name 引数を使用する必要があります。
以下のコマンドは、ミラー化論理ボリューム
vg/lv から、copy という名前の新たな論理ボリュームを分割します。新しい論理ボリュームには 2 つのミラーレッグが含まれます。この例では、LVM は分割するデバイスを選択しています。
lvconvert --splitmirrors 2 --name copy vg/lv
# lvconvert --splitmirrors 2 --name copy vg/lv
分割するデバイスを指定することが可能です。以下のコマンドは、ミラー化論理ボリューム
vg/lv から copy という名前の新たな論理ボリュームを分割します。新しい論理ボリュームには、/dev/sdc1 と /dev/sde1 のデバイスで構成される、2 つのミラーレッグが含まれます。
lvconvert --splitmirrors 2 --name copy vg/lv /dev/sd[ce]1
# lvconvert --splitmirrors 2 --name copy vg/lv /dev/sd[ce]15.4.3.3. ミラー化論理ボリュームの修復
リンクのコピーリンクがクリップボードにコピーされました!
lvconvert --repair コマンドを使用すると、ディスク障害後にミラーを修復することができます。これによって、ミラーは整合性のある状態に戻ります。lvconvert --repair コマンドは、インタラクティブなコマンドで、障害のあるデバイスの置き換えをシステムが試みるようにしたいかどうかのプロンプトを表示します。
- プロンプトをスキップして障害の発生したデバイスをすべて置き換えるには、コマンドライン上で
-yオプションを指定します。 - プロンプトをスキップして、障害の発生したデバイスを一切置き換えないようにするには、コマンドライン上で
-fオプションを指定します。 - プロンプトをスキップしつつ、ミラーイメージとミラーログを対象とする異なる置き換えポリシーを示すには、
--use-policies引数を指定して、lvm.confファイル内のmirror_log_fault_policyとmirror_device_fault_policyのパラメーターによって指定されているデバイス置き換えポリシーを使用することができます。
5.4.3.4. ミラー化ボリューム設定の変更
リンクのコピーリンクがクリップボードにコピーされました!
lvconvert コマンドを使用して論理ボリュームが含むミラーの数の増減を行うことができます。これにより、論理ボリュームをミラー化ボリュームからリニアボリュームに、またはリニアボリュームからミラー化ボリュームに変換できます。また、このコマンドを使用して、corelog などの既存の論理ボリュームの他のミラーパラメーターも再設定できます。
When you convert a linear volume to a mirrored volume, you are creating mirror legs for an existing volume. This means that your volume group must contain the devices and space for the mirror legs and for the mirror log.
ミラーレッグを 1 つ失うと、LVM はそのボリュームをリニアボリュームに変換して、ミラー冗長なしでもボリュームへのアクセスを可能にします。そのレッグを置き換えた後は、
lvconvert コマンドを使用して、ミラーを復元できます。この手順は 「LVM ミラー障害からの回復」 で説明してあります。
以下のコマンドは、リニア論理ボリューム
vg00/lvol1 をミラー化論理ボリュームに変換します。
lvconvert -m1 vg00/lvol1
# lvconvert -m1 vg00/lvol1
以下のコマンドは、ミラー化論理ボリューム
vg00/lvol1 をリニア論理ボリュームに変換して、ミラーレッグを削除します。
lvconvert -m0 vg00/lvol1
# lvconvert -m0 vg00/lvol1
以下のコマンドは、既存の論理ボリューム
vg00/lvol1 にミラーレッグを追加します。この例は、lvconvert コマンドがそのボリュームを 2 つのミラーレッグがあるボリュームに変更する前と後のボリュームの設定を示しています。
5.4.4. シンプロビジョニングされた論理ボリュームの作成
リンクのコピーリンクがクリップボードにコピーされました!
As of the Red Hat Enterprise Linux 6.4 release, logical volumes can be thinly provisioned. This allows you to create logical volumes that are larger than the available extents. Using thin provisioning, you can manage a storage pool of free space, known as a thin pool, which can be allocated to an arbitrary number of devices when needed by applications. You can then create devices that can be bound to the thin pool for later allocation when an application actually writes to the logical volume. The thin pool can be expanded dynamically when needed for cost-effective allocation of storage space.
注記
This section provides an overview of the basic commands you use to create and grow thinly-provisioned logical volumes. For detailed information on LVM thin provisioning as well as information on using the LVM commands and utilities with thinly-provisioned logical volumes, see the
lvmthin(7) man page.
注記
シンボリュームはクラスターのノード間ではサポートされません。シンプールとそのすべてのシンボリュームは、1 つのクラスターノードでのみ排他的にアクティブ化する必要があります。
シンプロビジョニングされたボリュームを作成するには、以下のタスクを実行してください。
vgcreateコマンドを使用して、ボリュームグループを作成します。lvcreateコマンドを使用して、シンプールを作成します。lvcreateコマンドを使用して、シンプール内にシンプロビジョニングされたボリュームを作成します。
lvcreate コマンドに -T (または --thin) オプションを使用して、シンプールまたはシンプロビジョニングされたボリュームを作成します。また、lvcreate コマンドの -T オプションを使用して、1 つのコマンドで同時にプール内にシンプールとシンプロビジョニングされたボリュームの両方を作成することも可能です。
以下のコマンドは、
lvcreate コマンドに -T オプションを使用して、mythinpool と呼ばれるシンプールを作成します。これは、ボリュームグループ vg001 内にあり、サイズは 100M です。物理領域のプールを作成しているため、プールのサイズを指定する必要があります。lvcreate コマンドの -T オプションは引数を取りません。コマンドが指定する他のオプションから作成されるデバイスのタイプを推定します。
以下のコマンドは、
lvcreate コマンドに -T オプションを使用して、シンプール vg001/mythinpool に thinvolume と呼ばれるシンプロビジョニングされたボリュームを作成します。ここでは、仮想サイズを指定して、ボリュームを含むプールよりも大きなボリュームの仮想サイズを指定している点に注意してください。
以下のコマンドは、
lvcreate コマンドに -T オプションを使用して、プール内にシンプールとシンプロビジョニングされたボリュームを作成します。その際、lvcreate コマンドでサイズと仮想サイズの引数を指定します。また、このコマンドは、ボリュームグループ vg001 内に mythinpool と呼ばれるシンプールを作成し、そのプール内に thinvolume と呼ばれるシンプロビジョニングされたボリュームも作成します。
また、
lvcreate コマンドの --thinpool パラメーターを指定して、シンプールを作成することも可能です。-T オプションとは異なり、--thinpool パラメーターには作成しているシンプール論理ボリューム名の引数が必要です。以下の例は、lvcreate コマンドで --thinpool パラメーターを指定して、mythinpool と呼ばれるシンプールを作成します。これは、ボリュームグループ vg001 内にあり、サイズは 100M です。
プール作成用に、ストライピングはサポートされています。以下のコマンドは、2 つの 64 kB のストライプと 256 kB のチャンクサイズがあるボリュームグループ
vg001 内に pool と呼ばれる 100M のシンプールを作成します。また、1T のシンプロビジョニングされたボリューム vg00/thin_lv も作成します。
lvcreate -i 2 -I 64 -c 256 -L100M -T vg00/pool -V 1T --name thin_lv
# lvcreate -i 2 -I 64 -c 256 -L100M -T vg00/pool -V 1T --name thin_lvlvextend コマンドを使用してシンプロビジョニングされたボリュームのサイズを拡張できます。ただし、シンプールのサイズを縮小することはできません。
以下のコマンドは、既存のシンプールのサイズ (100M) を変更し、100M 拡張します。
他の論理ボリュームのタイプと同様に、
lvrename を使用してボリューム名の変更、lvremove を使用してボリュームの削除、lvs と lvdisplay のコマンドを使用してボリュームの情報の表示を行うことができます。
By default, the
lvcreate command sets the size of the thin pool's metadata logical volume according to the formula (Pool_LV_size / Pool_LV_chunk_size * 64). You cannot currently resize the metadata volume, however, so if you expect significant growth of the size of thin pool at a later time you should increase this value with the --poolmetadatasize parameter of the lvcreate command. The supported value for the thin pool's metadata logical volume is in the range between 2MiB and 16GiB.
You can use the
--thinpool parameter of the lvconvert command to convert an existing logical volume to a thin pool volume. When you convert an existing logical volume to a thin pool volume, you must use the --poolmetadata parameter in conjunction with the --thinpool parameter of the lvconvert to convert an existing logical volume to the thin pool volume's metadata volume.
注記
Converting a logical volume to a thin pool volume or a thin pool metadata volume destroys the content of the logical volume, since in this case the
lvconvert does not preserve the content of the devices but instead overwrites the content.
The following example converts the existing logical volume
lv1 in volume group vg001 to a thin pool volume and converts the existing logical volume lv2 in volume group vg001 to the metadata volume for that thin pool volume.
lvconvert --thinpool vg001/lv1 --poolmetadata vg001/lv2
  Converted vg001/lv1 to thin pool.
# lvconvert --thinpool vg001/lv1 --poolmetadata vg001/lv2
  Converted vg001/lv1 to thin pool.
5.4.5. スナップショットボリュームの作成
リンクのコピーリンクがクリップボードにコピーされました!
注記
As of the Red Hat Enterprise Linux 6.4 release, LVM supports thinly-provisioned snapshots. For information on creating thinly provisioned snapshot volumes, see 「シンプロビジョニングされたスナップショットボリュームの作成」.
スナップショットボリュームを作成するには、
lvcreate コマンドで -s 引数を使用します。スナップショットボリュームは書き込み可能です。
注記
LVM スナップショットは、クラスター内のノード間ではサポートされていません。クラスター化されたボリュームグループ内にスナップショットボリュームは作成できません。ただし、Red Hat Enterprise Linux 6.1 リリースでは、クラスター化論理ボリューム上で恒常的なデータのバックアップ作成が必要な場合、ボリュームを排他的にアクティブ化した上で、スナップショットを作成することができます。ノード上における論理ボリュームの排他的なアクティブ化についての情報については、「クラスター内の個別ノード上の論理ボリュームのアクティブ化」 をご覧ください。
注記
Red Hat Enterprise Linux 6.1 リリースでは、ミラー化論理ボリュームを対象とした LVM スナップショットがサポートされています。
As of the Red Hat Enterprise Linux 6.3 release, snapshots are supported for RAID logical volumes. For information on RAID logical volumes, see 「RAID 論理ボリューム」.
As of the Red Hat Enterprise Linux 6.5 release, LVM does not allow you to create a snapshot volume that is larger than the size of the origin volume plus needed metadata for the volume. If you specify a snapshot volume that is larger than this, the system will create a snapshot volume that is only as large as will be needed for the size of the origin.
By default, a snapshot volume is skipped during normal activation commands. For information on controlling the activation of a snapshot volume, see 「Controlling Logical Volume Activation」.
以下のコマンドは、
/dev/vg00/snap と言う名前の 100 MB のスナップショット論理ボリュームを作成します。これは、/dev/vg00/lvol1 と呼ばれる複製元となる論理ボリュームのスナップショットを作成します。複製元となる論理ボリュームに、ファイルシステムが含まれている場合、任意のディレクトリ上でスナップショット論理ボリュームをマウントして、そのファイルシステムのコンテンツにアクセスして、複製元のファイルシステムが更新を継続している間にバックアップを実行することができます。
lvcreate --size 100M --snapshot --name snap /dev/vg00/lvol1
# lvcreate --size 100M --snapshot --name snap /dev/vg00/lvol1
スナップショット論理ボリュームを作成した後に、
lvdisplay コマンドで、複製元のボリュームを指定すると、すべてのスナップショット論理ボリュームとそのステータス (アクティブまたは非アクティブ) の一覧が出力されます。
以下の例は、論理ボリューム
/dev/new_vg/lvol0 のステータスを示しています。これに対して、スナップショットボリューム /dev/new_vg/newvgsnap が作成されています。
デフォルトでは
lvs コマンドは、元のボリュームと、各スナップショットボリューム用に使用されているスナップショットボリュームの現在のパーセンテージを表示します。以下の例は、論理ボリューム /dev/new_vg/lvol0 を含むシステム用の lvs コマンドのデフォルト出力を示しています。スナップショットボリューム /dev/new_vg/newvgsnap はこの論理ボリューム用に作成されています。
lvs
  LV         VG     Attr   LSize  Origin Snap%  Move Log Copy%
  lvol0      new_vg owi-a- 52.00M
  newvgsnap1 new_vg swi-a-  8.00M lvol0    0.20
# lvs
  LV         VG     Attr   LSize  Origin Snap%  Move Log Copy%
  lvol0      new_vg owi-a- 52.00M
  newvgsnap1 new_vg swi-a-  8.00M lvol0    0.20
警告
複製元ボリュームが変更されると、スナップショットのサイズが拡大されるため、
lvs コマンドを使用して、スナップショットボリュームのパーセンテージを定期的に監視して、満杯にならないように確認することが重要です。100% 満杯のスナップショットは、完全に消失します。これは、複製元ボリュームの無変更部分への書き込みが、スナップショットを破損せずには成功させることができないためです。
Red Hat Enterprise Linux 6.2 リリースでは、スナップショット関連の新機能が 2 つあります。1 つ目は、スナップショットが満杯になったときに無効になるスナップショットに加えて、そのスナップショットデバイスにマウントされているすべてのファイルシステムは強制的にマウント解除されます。これにより、マウントポイントへのアクセス時に必ず発生するファイルシステムエラーを防止しようとします。2 つ目は、
lvm.conf ファイル内で snapshot_autoextend_threshold オプションを指定できるようになりました。このオプションによって、スナップショットの残りの領域がセットした閾値よりも小さくなると、常にスナップショットを自動的に拡張できるようになりました。これが機能するには、ボリュームグループ内に未割り当ての領域がなければなりません。
As of the Red Hat Enterprise Linux 6.5 release, LVM does not allow you to create a snapshot volume that is larger than the size of the origin volume plus needed metadata for the volume. Similarly, automatic extension of a snapshot will not increase the size of a snapshot volume beyond the maximum calculated size that is necessary for the snapshot. Once a snapshot has grown large enough to cover the origin, it is no longer monitored for automatic extension.
Information on setting
snapshot_autoextend_threshold and snapshot_autoextend_percent is provided in the lvm.conf file itself. For information about the lvm.conf file, see 付録B LVM 設定ファイル.
5.4.6. シンプロビジョニングされたスナップショットボリュームの作成
リンクのコピーリンクがクリップボードにコピーされました!
The Red Hat Enterprise Linux release 6.4 version of LVM provides support for thinly-provisioned snapshot volumes. For information on the benefits and limitations of thin snapshot volumes, see 「シンプロビジョニングされたスナップショットボリューム」.
注記
This section provides an overview of the basic commands you use to create and grow thinly-provisioned snapshot volumes. For detailed information on LVM thin provisioning as well as information on using the LVM commands and utilities with thinly-provisioned logical volumes, see the
lvmthin(7) man page.
重要
シンプロビジョニングされたスナップショットボリュームを作成する場合、ボリュームのサイズは指定しません。サイズのパラメーターを指定すると、作成されるスナップショットはシンプロビジョニングされたスナップショットボリュームにはならず、データ保管用にシンプールを使用することもありません。例えば、
lvcreate -s vg/thinvolume -L10M のコマンドは、複製元ボリュームがシンボリュームであっても、シンスナップショットを作成しません。
Thin snapshots can be created for thinly-provisioned origin volumes. As of the Red Hat Enterprise Linux 6.5 release, thin snapshots can also be created for origin volumes that are not thinly-provisioned.
You can specify a name for the snapshot volume with the
--name option of the lvcreate command. It is recommended that you use this option when creating a logical volume so that you can more easily see the volume you have created when you display logical volumes with the lvs command.
The following command creates a thinly-provisioned snapshot volume of the thinly-provisioned logical volume
vg001/thinvolume that is named mysnapshot1.
シンプロビジョニングされたスナップショットボリュームには、他のシンボリュームと同じ特徴があります。ボリュームのアクティブ化、拡張、名前変更、削除、さらにはスナップショット作成も個別に行うことができます。
By default, a snapshot volume is skipped during normal activation commands. For information on controlling the activation of a snapshot volume, see 「Controlling Logical Volume Activation」.
As of the Red Hat Enterprise Linux 6.5 release, you can create a thinly-provisioned snapshot of a non-thinly-provisioned logical volume. Since the non-thinly-provisioned logical volume is not contained within a thinpool, it is referred to as an external origin. External origin volumes can be used and shared by many thinly-provisioned snapshot volumes, even from different thin pools. The external origin must be inactive and read-only at the time the thinly-provisioned snapshot is created.
To create a thinly-provisioned snapshot of an external origin, you must specify the
--thinpool option. The following command creates a thin snapshot volume of the read-only inactive volume origin_volume. The thin snapshot volume is named mythinsnap. The logical volume origin_volume then becomes the thin external origin for the thin shapshot volume mythinsnap in volume group vg001 that will use the existing thin pool vg001/pool. Because the origin volume must be in the same volume group as the snapshot volume, you do not need to specify the volume group when specifying the origin logical volume.
lvcreate -s --thinpool vg001/pool origin_volume --name mythinsnap
# lvcreate -s --thinpool vg001/pool origin_volume --name mythinsnap
You can create a second thinly-provisioned snapshot volume of the first snapshot volume, as in the following command.
lvcreate -s vg001/mythinsnap --name my2ndthinsnap
# lvcreate -s vg001/mythinsnap --name my2ndthinsnap5.4.7. Creating LVM Cache Logical Volumes
リンクのコピーリンクがクリップボードにコピーされました!
As of the Red Hat Enterprise Linux 6.7 release, LVM provides full support for LVM cache logical volumes. A cache logical volume uses a small logical volume consisting of fast block devices (such as SSD drives) to improve the performance of a larger and slower logical volume by storing the frequently used blocks on the smaller, faster logical volume.
LVM caching uses the following LVM logical volume types. All of these associated logical volumes must be in the same volume group.
- Origin logical volume — the large, slow logical volume
- Cache pool logical volume — the small, fast logical volume, which is composed of two devices: the cache data logical volume, and the cache metadata logical volume
- Cache data logical volume — the logical volume containing the data blocks for the cache pool logical volume
- Cache metadata logical volume — the logical volume containing the metadata for the cache pool logical volume, which holds the accounting information that specifies where data blocks are stored (for example, on the origin logical volume or the cache data logical volume).
- Cache logical volume — the logical volume containing the origin logical volume and the cache pool logical volume. This is the resultant usable device which encapsulates the various cache volume components.
The following procedure creates an LVM cache logical volume.
- Create a volume group that contains a slow physical volume and a fast physical volume. In this example.
/dev/sde1is a slow device and/dev/sdf1is a fast device and both devices are contained in volume groupVG.pvcreate /dev/sde1 pvcreate /dev/sdf1 vgcreate VG /dev/sde1 /dev/sdf1
# pvcreate /dev/sde1
# pvcreate /dev/sdf1
# vgcreate VG /dev/sde1 /dev/sdf1
Copy to Clipboard Copied! Toggle word wrap Toggle overflow - Create the origin volume. This example creates an origin volume named
lvthat is 4G in size and that consists of/dev/sde1, the slow physical volume.lvcreate -L 4G -n lv VG /dev/sde1
# lvcreate -L 4G -n lv VG /dev/sde1Copy to Clipboard Copied! Toggle word wrap Toggle overflow - Create the cache data logical volume. This logical volume will hold data blocks from the origin volume. The size of this logical volume is the size of the cache and will be reported as the size of the cache pool logical volume. This example creates the cache data volume named
lv_cache. It is 2G in size and is contained on the fast device/dev/sdf1, which is part of the volume groupVG.lvcreate -L 2G -n lv_cache VG /dev/sdf1
# lvcreate -L 2G -n lv_cache VG /dev/sdf1Copy to Clipboard Copied! Toggle word wrap Toggle overflow - Create the cache metadata logical volume. This logical volume will hold cache pool metadata. The ratio of the size of the cache data logical volume to the size of the cache metadata logical volume should be about 1000:1, with a minimum size of 8MiB for the cache metadata logical volume. This example creates the cache metadata volume named
lv_cache_meta. It is 12M in size and is also contained on the fast device/dev/sdf1, which is part of the volume groupVG.lvcreate -L 12M -n lv_cache_meta VG /dev/sdf1
# lvcreate -L 12M -n lv_cache_meta VG /dev/sdf1Copy to Clipboard Copied! Toggle word wrap Toggle overflow - Create the cache pool logical volume by combining the cache data and the cache metadata logical volumes into a logical volume of type
cache-pool. You can set the behavior of the cache pool in this step; in this example thecachemodeargument is set towritethrough, which indicates that a write is considered complete only when it has been stored in both the cache pool logical volume and on the origin logical volume.When you execute this command, the cache data logical volume is renamed with_cdataappended to the original name of the cache data logical volume, and the cache metadata logical volume is renamed with_cmetaappended to the original name of the cache data logical volume; both of these volumes become hidden.Copy to Clipboard Copied! Toggle word wrap Toggle overflow - Create the cache logical volume by combining the cache pool logical volume with the origin logical volume. The user-accessible cache logical volume takes the name of the origin logical volume. The origin logical volume becomes a hidden logical volume with
_corigappended to the original name. You can execute this command when the origin logical volume is in use.Copy to Clipboard Copied! Toggle word wrap Toggle overflow
For further information on LVM cache volumes, including additional administrative examples, see the
lvmcache(7) man page.
5.4.8. スナップショットボリュームのマージ
リンクのコピーリンクがクリップボードにコピーされました!
Red Hat Enterprise Linux 6 リリースでは、
lvconvert コマンドの --merge オプションを使用して、スナップショットを複製元のボリュームにマージすることができます。複製元とスナップショットボリュームの両方が開いている状態でなければ、マージは直ちに開始します。そうでない場合は、複製元もしくはスナップショットのいずれかがアクティブ化されており、かつ両方が閉じた状態で初めてマージが開始します。root ファイルシステムのように、閉じることができない複製元へのスナップショットのマージは、次回複製元ボリュームがアクティブ化されるまで先延ばしされます。マージが開始すると、結果として作成される論理ボリュームには、複製元の名前、マイナーナンバー、UUID が付けられます。マージの進行中は、複製元の読み取りまたは書き込みはマージ中のスナップショットにダイレクトされているように見えます。マージが完了すると、マージされたスナップショットは削除されます。
以下のコマンドは、スナップショットボリューム
vg00/lvol1_snap をその複製元にマージします。
lvconvert --merge vg00/lvol1_snap
# lvconvert --merge vg00/lvol1_snap
コマンドライン上で複数のスナップショットを指定したり、LVM オブジェクトタグを使用して複数のスナップショットをそれぞれの複製元にマージしたりすることが可能です。以下の例では、論理ボリューム
vg00/lvol1、vg00/lvol2 および vg00/lvol3 はすべて、@some_tag でタグ付けされます。以下のコマンドは、3 つすべてのボリュームのスナップショット論理ボリュームを連続的にマージします。vg00/lvol1、vg00/lvol2、vg00/lvol3 の順で行われます。--background オプションを使用している場合は、すべてのスナップショット論理ボリュームのマージが並行して開始されます。
lvconvert --merge @some_tag
# lvconvert --merge @some_tag
LVM オブジェクトのタグ付けに関する情報は、付録D LVM オブジェクトタグ をご覧ください。
lvconvert --merge コマンドについては、lvconvert(8) の man ページをご覧ください。
5.4.9. 永続的なデバイス番号
リンクのコピーリンクがクリップボードにコピーされました!
メジャーデバイス番号とマイナーデバイス番号はモジュールのロード時に動的に割り当てられます。一部のアプリケーションは、ブロックデバイスが常に同じデバイス (メジャーとマイナー) 番号でアクティブ化されている場合に、最も良く機能します。これらは
lvcreate と lvchange コマンドで、以下の引数を使用することによって指定できます。
--persistent y --major major --minor minor
--persistent y --major major --minor minor
大きなマイナー番号を使用して、その番号が既に別のデバイスに動的に割り当てられていないようにします。
NFS を使用してファイルシステムをエクスポートする場合は、そのエクスポートファイルで
fsid パラメーターを指定すると、LVM 内で永続的なデバイス番号をセットする必要がなくなります。
5.4.10. 論理ボリュームグループのパラメーター変更
リンクのコピーリンクがクリップボードにコピーされました!
論理ボリュームのパラメーターを変更するには、
lvchange コマンドを使用します。変更可能なパラメーターの一覧は、lvchange(8) の man ページを参照してください。
lvchange コマンドを使用して論理ボリュームのアクティブ化と非アクティブ化ができます。ボリュームグループ内のすべての論理ボリュームのアクティブ化と非アクティブ化を同時に行うには、「ボリュームグループのパラメーター変更」 で説明してあるように vgchange コマンドを使用します。
以下のコマンドは、ボリュームグループ
vg00 内のボリューム lvol1 のパーミッションを読み取り専用に変更します。
lvchange -pr vg00/lvol1
# lvchange -pr vg00/lvol15.4.11. 論理ボリュームの名前変更
リンクのコピーリンクがクリップボードにコピーされました!
既存の論理ボリューム名を変更するには、
lvrename コマンドを使用します。
以下のいずれかのコマンドも、ボリュームグループ
vg02 内の論理ボリューム lvold の名前を lvnew に変更します。
lvrename /dev/vg02/lvold /dev/vg02/lvnew
# lvrename /dev/vg02/lvold /dev/vg02/lvnewlvrename vg02 lvold lvnew
# lvrename vg02 lvold lvnew
Renaming the root logical volume requires additional reconfiguration. For information on renaming a root volume, see How to rename root volume group or logical volume in Red Hat Enterprise Linux.
クラスター内の個別ノード上での論理ボリュームのアクティブ化に関する情報は 「クラスター内の個別ノード上の論理ボリュームのアクティブ化」 をご覧ください。
5.4.12. 論理ボリュームの削除
リンクのコピーリンクがクリップボードにコピーされました!
アクティブでない論理ボリュームを削除するには、
lvremove コマンドを使用します。論理ボリュームが現在マウントされている場合は、削除する前にボリュームをアンマウントしてください。また、クラスター化環境では削除前に論理ボリュームを非アクティブ化しておく必要があります。
以下のコマンドは、論理ボリューム
/dev/testvg/testlv をボリュームグループ testvg から削除します。このケースでは、論理ボリュームは非アクティブ化されていないことに注意してください。
lvremove /dev/testvg/testlv
Do you really want to remove active logical volume "testlv"? [y/n]: y
  Logical volume "testlv" successfully removed
# lvremove /dev/testvg/testlv
Do you really want to remove active logical volume "testlv"? [y/n]: y
  Logical volume "testlv" successfully removed
lvchange -an コマンドの使用で、削除する前に明示的に論理ボリュームを非アクティブ化することができます。この場合、アクティブな論理ボリュームを削除したいかどうかを確認するプロンプトは表示されません。
5.4.13. 論理ボリュームの表示
リンクのコピーリンクがクリップボードにコピーされました!
LVM 論理ボリュームのプロパティを表示するのに使用できるコマンドは 3 つあります。
lvs、lvdisplay、および lvscan です。
lvs コマンドは、論理ボリューム情報を設定可能な形式で提供して、1 つの論理ボリュームにつき 1 行ずつ表示します。lvs コマンドは豊富な書式制御を提供するため、スクリプティングに役立ちます。出力をカスタマイズするための lvs コマンドの使用に関する情報は 「LVM 用のカスタム報告」 をご覧ください。
lvdisplay コマンドは、固定した形式で、論理ボリュームのプロパティ (サイズ、レイアウト、マッピングなど) を表示します。
以下のコマンドは、
vg00 内にある lvol2 の属性を示しています。スナップショット論理ボリュームがこのオリジナル論理ボリューム用に作成されている場合、このコマンドはすべてのスナップショット論理ボリュームとそのステータス (アクティブまたは非アクティブ) の一覧も表示します。
lvdisplay -v /dev/vg00/lvol2
# lvdisplay -v /dev/vg00/lvol2lvscan コマンドは、システム内のすべての論理ボリュームをスキャンし、以下の例のように一覧表示します。
lvscan
 ACTIVE                   '/dev/vg0/gfslv' [1.46 GB] inherit
# lvscan
 ACTIVE                   '/dev/vg0/gfslv' [1.46 GB] inherit
5.4.14. 論理ボリュームの拡張
リンクのコピーリンクがクリップボードにコピーされました!
論理ボリュームのサイズを拡張するには、
lvextend コマンドを使用します。
論理ボリュームを拡張する場合、そのボリュームの追加容量もしくは拡張後のサイズを指定することができます。
以下のコマンドは、論理ボリューム
/dev/myvg/homevol を 12 ギガバイトに拡張します。
lvextend -L12G /dev/myvg/homevol
lvextend -- extending logical volume "/dev/myvg/homevol" to 12 GB
lvextend -- doing automatic backup of volume group "myvg"
lvextend -- logical volume "/dev/myvg/homevol" successfully extended
# lvextend -L12G /dev/myvg/homevol
lvextend -- extending logical volume "/dev/myvg/homevol" to 12 GB
lvextend -- doing automatic backup of volume group "myvg"
lvextend -- logical volume "/dev/myvg/homevol" successfully extended
以下のコマンドは、論理ボリューム
/dev/myvg/homevol にさらに 1 ギガバイトを追加します。
lvextend -L+1G /dev/myvg/homevol
lvextend -- extending logical volume "/dev/myvg/homevol" to 13 GB
lvextend -- doing automatic backup of volume group "myvg"
lvextend -- logical volume "/dev/myvg/homevol" successfully extended
# lvextend -L+1G /dev/myvg/homevol
lvextend -- extending logical volume "/dev/myvg/homevol" to 13 GB
lvextend -- doing automatic backup of volume group "myvg"
lvextend -- logical volume "/dev/myvg/homevol" successfully extended
lvcreate コマンドと同様に、lvextend コマンドで -l 引数を使用すると、論理ボリュームの拡張サイズをエクステント数で指定することができます。また、この引数を使用してボリュームグループのパーセンテージ、またはボリュームグループ内の残りの空き領域をパーセンテージで指定することもできます。以下のコマンドは、testlv と言う論理ボリュームを拡張して、ボリュームグループ myvg 内の未割り当て領域をすべて満たすようにします。
lvextend -l +100%FREE /dev/myvg/testlv
  Extending logical volume testlv to 68.59 GB
  Logical volume testlv successfully resized
# lvextend -l +100%FREE /dev/myvg/testlv
  Extending logical volume testlv to 68.59 GB
  Logical volume testlv successfully resized
論理ボリュームを拡張した後は、それに適合するようにファイルシステムのサイズも拡張する必要があります。
デフォルトでは、ほとんどのファイルシステムサイズ変更ツールは、ファイルシステムのサイズを配下の論理ボリュームのサイズに拡大するので、2 つのコマンドそれぞれで同じサイズを指定する必要はありません。
5.4.14.1. ストライプ化ボリュームの拡張
リンクのコピーリンクがクリップボードにコピーされました!
ストライプ化論理ボリュームのサイズを拡大するには、ボリュームグループを構成している配下の物理ボリュームに、ストライプをサポートするための十分な空き領域がなければなりません。例えば、ボリュームグループ全域を使用してしまう 2 方向ストライプがある場合、ボリュームグループに 1 つの物理ボリュームを追加しただけでは、ストライプの拡張ができるようにはなりません。そのためには、少なくとも 2 つの物理ボリュームをボリュームグループに追加する必要があります。
例えば、以下の
vgs コマンドで表示された、2 つの配下の物理ボリュームで構成されるボリュームグループ vg について考えてみましょう。
vgs
  VG   #PV #LV #SN Attr   VSize   VFree
  vg     2   0   0 wz--n- 271.31G 271.31G
# vgs
  VG   #PV #LV #SN Attr   VSize   VFree
  vg     2   0   0 wz--n- 271.31G 271.31G
ボリュームグループのすべての領域を使用してストライプを作成することができます。
ボリュームグループには、空き領域がなくなったことに注意してください。
vgs
  VG   #PV #LV #SN Attr   VSize   VFree
  vg     2   1   0 wz--n- 271.31G    0
# vgs
  VG   #PV #LV #SN Attr   VSize   VFree
  vg     2   1   0 wz--n- 271.31G    0
以下のコマンドにより、ボリュームグループにもう1つの物理ボリュームが追加されて、135G の追加領域が提供されます。
この時点では、ストライプ化論理ボリュームをボリュームグループの最大サイズまで拡大することはできません。データをストライプ化するのには配下のデバイスが 2 つ必要です。
ストライプ化論理ボリュームを拡張するには、もう 1 つの物理ボリュームを追加してから、論理ボリュームを拡張します。この例では、ボリュームグループに 2 つの物理ボリュームを追加することにより、論理ボリュームをボリュームグループの最大サイズまで拡張できるようになっています。
ストライプ化論理ボリュームを拡張するのに十分な配下の物理デバイスがない場合でも、その拡張部分がストライプ化されなくても問題がないならば、ボリュームの拡張は可能です。ただし、これによってパフォーマンスにむらがでる可能性があります。論理ボリュームに領域を追加する場合、デフォルトの動作では、既存論理ボリュームの最後のセグメントと同じストライプパラメーターを使用するようになっていますが、これらのパラメーターはオーバーライドすることができます。以下の例では、初回の
lvextend コマンドが失敗した後に、既存のストライプ化論理ボリュームを拡張して残りの空き領域を使用するようにしています。
5.4.14.2. ミラー化ボリュームの拡張
リンクのコピーリンクがクリップボードにコピーされました!
Red Hat Enterprise Linux 6.3 リリースでは、新しいミラーリージョンの同期を実行しなくても
lvextend コマンドでミラー化論理ボリュームを拡張することができます。
lvcreate コマンドでミラー化論理ボリュームを作成する場合、--nosync オプションを指定すると、ミラー作成時にミラーリージョンは同期されません。詳細は、「ミラー化ボリュームの作成」 を参照してください。後ほど --nosync オプションを使用して作成したミラーを拡張する場合も、ミラーの拡張部分は同期されません。
--nosync オプションを使用して既存の論理ボリュームが作成されたかどうかを決定するには、lvs コマンドを使用して論理ボリュームの属性を表示します。論理ボリュームが初期同期を行わずに作成されたミラー化ボリュームの場合、その論理ボリュームには「M」の属性ビット 1 が設定されます。論理ボリュームが初期同期により作成された場合は、「m」の属性ビット 1 が設定されます。
The following command displays the attributes of a mirrored logical volume named
lv that was created without initial synchronization, showing attribute bit 1 as "M". Attribute bit 7 is "m", indicating a target type of mirror. For information on the meaning of the attribute bits, see 表5.4「lvs 表示フィールド」.
lvs vg
  LV   VG   Attr     LSize Pool Origin Snap%  Move Log     Copy%  Convert
  lv   vg   Mwi-a-m- 5.00g                         lv_mlog 100.00
# lvs vg
  LV   VG   Attr     LSize Pool Origin Snap%  Move Log     Copy%  Convert
  lv   vg   Mwi-a-m- 5.00g                         lv_mlog 100.00
このミラー化論理ボリュームを
lvextend コマンドで拡張する場合、ミラーの拡張部分は再同期されません。
lvcreate コマンドで --nosync オプションを指定せずにミラー化論理ボリュームを作成した場合、lvextend コマンドで --nosync オプションを指定することでミラーを再同期することなく論理ボリュームを拡張することができます。
以下の例では、
--nosync オプションなしに作成された論理ボリュームを拡張し、ミラーの作成時にそれが同期されたことを示しています。ただし、この例では、ボリュームの拡張時にミラーが同期されていないことを示しています。ボリュームには「m」の属性が設定されていますが、lvextend コマンドに --nosync オプションを付けて実行すると、ボリュームには「M」の属性が設定されることに注意してください。
ミラーが非アクティブの場合、ミラーの拡張時に同期はが自動的に省略されます。これは、
--nosync オプションを指定してミラーを作成する場合でも当てはまります。その代わりに、論理ボリュームの拡張部分を完全に再同期するかどうかがプロンプトされます。
注記
ミラーがリカバリを行う場合、
--nosync オプションを指定してボリュームの作成/拡張を行うと、ミラー化論理ボリュームを拡張することはできません。ただし、--nosync オプションを指定しないと、リカバリ中にミラーを拡張できます。
5.4.14.3. cling 割り当てポリシーを使用した論理ボリュームの拡張
リンクのコピーリンクがクリップボードにコピーされました!
LVM ボリュームを拡張する際には、
lvextend コマンドの --alloc cling オプションを使用して、cling 割り当てポリシーを指定することができます。このポリシーによって、同一の物理ボリューム上のスペースが、既存の論理ボリュームの最終セグメントとして選択されます。物理ボリューム上に十分なスペースがなく、タグの一覧が lvm.conf ファイル内で定義されている場合には、LVM は、その物理ボリュームにいずれかのタグが付けられているかを確認し、既存エクステントと新規エクステント間で、物理ボリュームのタグを適合させようとします。
例えば、ご使用の論理ボリュームが、単一のボリュームグループ内の 2 サイト間でミラーリングされている場合、それらの場所に応じて、物理ボリュームにタグ付けすることができます。これには、物理ボリュームに @site1 や @site2 というタグを付けて、
lvm.conf ファイル内に以下の行を指定します:
cling_tag_list = [ "@site1", "@site2" ]
cling_tag_list = [ "@site1", "@site2" ]
物理ボリュームのタグ付けに関する情報は、付録D LVM オブジェクトタグ をご覧ください。
以下の例では、
lvm.conf ファイルが変更されて、次のような行が追加されています。
cling_tag_list = [ "@A", "@B" ]
cling_tag_list = [ "@A", "@B" ]
また、この例では、
/dev/sdb1、/dev/sdc1、/dev/sdd1、/dev/sde1、/dev/sdf1、/dev/sdg1、および /dev/sdh1 の物理ボリュームで構成されるボリュームグループ taft が作成されています。これらの物理ボリュームは、A、B、および C のタグが付けられています。この例では、C のタグは使用されていませんが、LVM がタグを使用して、ミラーレッグに使用する物理ボリュームを選択することを示しています。
以下のコマンドは、ボリュームグループ
taft から 100GB のミラー化ボリュームを作成します。
lvcreate -m 1 -n mirror --nosync -L 100G taft
# lvcreate -m 1 -n mirror --nosync -L 100G taft
以下のコマンドは、ミラーレッグおよびミラーログに使用されるデバイスを表示します。
以下のコマンドは、ミラー化ボリュームのサイズを拡張します。
cling 割り当てポリシーを使用して、同じタグが付いた物理ボリュームを使用してミラーレッグが拡張される必要があることを示します。
lvextend --alloc cling -L +100G taft/mirror
  Extending 2 mirror images.
  Extending logical volume mirror to 200.00 GiB
  Logical volume mirror successfully resized
# lvextend --alloc cling -L +100G taft/mirror
  Extending 2 mirror images.
  Extending logical volume mirror to 200.00 GiB
  Logical volume mirror successfully resized
以下に表示したコマンドは、レッグとして同一のタグが付いた物理ボリュームを使用してミラーレッグが拡張されているのを示しています。
C のタグが付いた物理ボリュームは無視される点に注意してください。
5.4.15. 論理ボリュームの縮小
リンクのコピーリンクがクリップボードにコピーされました!
You can reduce the size of a logical volume with the
lvreduce command.
注記
Shrinking is not supported on a GFS2 or XFS file system, so you cannot reduce the size of a logical volume that contains a GFS2 or XFS file system.
If the logical volume you are reducing contains a file system, to prevent data loss you must ensure that the file system is not using the space in the logical volume that is being reduced. For this reason, it is recommended that you use the
--resizefs option of the lvreduce command when the logical volume contains a file system. When you use this option, the lvreduce command attempts to reduce the file system before shrinking the logical volume. If shrinking the file sytem fails, as can occur if the file system is full or the file system does not support shrinking, then the lvreduce command will fail and not attempt to shrink the logical volume.
警告
In most cases, the
lvreduce command warns about possible data loss and asks for a confirmation. However, you should not rely on these confirmation prompts to prevent data loss because in some cases you will not see these prompts, such as when the logical volume is inactive or the --resizefs option is not used.
Note that using the
--test option of the lvreduce command does not indicate where the operation is safe, as this option does not check the file system or test the file system resize.
The following command shrinks the logical volume
lvol1 in volume group vg00 to be 64 megabytes. In this example, lvol1 contains a file system, which this command resizes together with the logical volume. This example shows the output to the command.
Specifying the - sign before the resize value indicates that the value will be subtracted from the logical volume's actual size. The following example shows the command you would use if, instead of shrinking a logical volume to an absolute size of 64 megabytes, you wanted to shrink the volume by a value 64 megabytes.
lvreduce --resizefs -L -64M vg00/lvol1
# lvreduce --resizefs -L -64M vg00/lvol15.4.16. RAID 論理ボリューム
リンクのコピーリンクがクリップボードにコピーされました!
Red Hat Enterprise Linux 6.3 リリースでは、LVM は RAID4/5/6 およびミラーリングの新実装をサポートしています。最新のミラーリングの実装と以前のミラーリングの実装 (「ミラー化ボリュームの作成」 で説明) が異なる点は以下のとおりです。
- ミラーリングの新実装でのセグメントタイプは
raid1です。以前の実装でのセグメントタイプはmirrorです。 - RAID 4/5/6 実装のように、ミラーリングの新実装は MD ソフトウェア RAID を活用します。
- ミラーリングの新実装は、各ミラーイメージの完全な冗長性を備えたビットマップ領域を管理することで、そのフォルト処理機能を拡大します。これは、このセグメントタイプで作成されるミラーには
--mirrorlogや--corelogオプションはないことを意味しています。 - ミラーリングの新実装は、一時的な障害を処理することができます。
- ミラーイメージはアレイから一時的に離して、後ほどそれとマージしなおすことができます。
- ミラーリングの新実装はスナップショットをサポートします (レベルの高い RAID の新実装も同様)。
- RAID の新実装はクラスター対応ではありません。クラスター化ボリュームグループ内で LVM RAID 論理ボリュームを作成することはできません。
For information on how failures are handled by the RAID logical volumes, see 「RAID フォルトポリシーの設定」.
このセクションの残りでは、LVM RAID デバイスで実行できる以下の管理タスクについて説明しています。
5.4.16.1. RAID 論理ボリュームの作成
リンクのコピーリンクがクリップボードにコピーされました!
RAID 論理ボリュームを作成するには、
lvcreate コマンドの --type 引数として raid タイプを指定します。通常、lvcreate コマンドを使用して論理ボリュームを作成する場合、--type 引数は暗黙的です。例えば、-i stripes 引数を指定する場合、lvcreate コマンドは --type stripe オプションを想定します。-m mirrors 引数を指定する場合は、lvcreate コマンドは --type mirror オプションを想定します。ただし、RAID 論理ボリュームを作成する場合は、任意のセグメントタイプを明示的に指定する必要があります。可能な RAID のセグメントタイプは 表5.1「RAID のセグメントタイプ」 に記載されています。
| セグメントタイプ | 説明 | ||
|---|---|---|---|
raid1 | RAID1 ミラーリング | ||
raid4 | RAID4 専用のパリティディスク | ||
raid5 | raid5_ls と同様 | ||
raid5_la |
| ||
raid5_ra |
| ||
raid5_ls |
| ||
raid5_rs |
| ||
raid6 | raid6_zr と同様 | ||
raid6_zr |
| ||
raid6_nr |
| ||
raid6_nc |
| ||
raid10 (Red Hat Enterprise Linux 6.4 以降) |
|
For most users, specifying one of the five available primary types (
raid1, raid4, raid5, raid6, raid10) should be sufficient. For more information on the different algorithms used by RAID 5/6, see chapter four of the 『Common RAID Disk Data Format Specification』 at http://www.snia.org/sites/default/files/SNIA_DDF_Technical_Position_v2.0.pdf.
RAID 論理ボリュームを作成する場合、LVM は、各データまたはアレイ内のパリティサブボリュームごとに、サイズが 1 エクステントのメタデータサブボリュームを作成します。例えば、2 方向の RAID1 アレイを作成すると、2 つのメタデータサブボリューム (
lv_rmeta_0 および lv_rmeta_1) と 2 つのデータサブボリューム (lv_rimage_0 および lv_rimage_1) が生じます。同様に、3 方向のストライプ (プラス、1 つの暗黙的なパリティデバイス) RAID4 を作成すると、4 つのメタデータサブボリューム (lv_rmeta_0、lv_rmeta_1、lv_rmeta_2、および lv_rmeta_3) と 4 つのデータサブボリューム (lv_rimage_0、lv_rimage_1、lv_rimage_2、および lv_rimage_3) が生じます。
以下のコマンドは、ボリュームグループ
my_vg 内にサイズが 1G の my_lv と呼ばれる 2 方向の RAID1 アレイを作成します。
lvcreate --type raid1 -m 1 -L 1G -n my_lv my_vg
# lvcreate --type raid1 -m 1 -L 1G -n my_lv my_vg-m 引数に指定する値に沿って、異なる数のコピーで RAID1 アレイを作成することができます。-m 引数は、以前のミラー実装用のコピー数を指定するために使用される同じ引数ですが、この場合はセグメントタイプを raid1 と明示的に指定することで、デフォルトのセグメントタイプ mirror を上書きします。同様に、-i argument を使用して RAID 4/5/6 論理ボリュームのストライプ数を指定して、デフォルトのセグメントタイプを任意の RAID タイプで上書きします。また、ストライプサイズも -I 引数で指定できます。
注記
デフォルトのミラーセグメントタイプを
raid1 にセットするには、lvm.conf ファイルの mirror_segtype_default を変更します。
以下のコマンドは、ボリュームグループ
my_vg 内のサイズが 1G の my_lv と呼ばれる RAID5 アレイ (3 つのストライプ + 1 つの暗黙的なパリティドライブ) を作成します。ストライプ数の指定は、LVM ストライプ化ボリュームに対して指定するのと同じように行います。パリティドライブの正確な数は自動的に追加されます。
lvcreate --type raid5 -i 3 -L 1G -n my_lv my_vg
# lvcreate --type raid5 -i 3 -L 1G -n my_lv my_vg
以下のコマンドは、ボリュームグループ
my_vg 内にサイズが 1G の my_lv と呼ばれる RAID6 アレイ (3 つのストライプ + 2 つの暗黙的なパリティドライブ) を作成します。
lvcreate --type raid6 -i 3 -L 1G -n my_lv my_vg
# lvcreate --type raid6 -i 3 -L 1G -n my_lv my_vg
LVM によって RAID 論理ボリュームを作成した後には、ボリュームのアクティブ化、変更、削除、表示、使用を他の LVM 論理ボリュームと同じように行うことができます。
When you create RAID10 logical volumes, the background I/O required to initialize the logical volumes with a
sync operation can crowd out other I/O operations to LVM devices, such as updates to volume group metadata, particularly when you are creating many RAID logical volumes. This can cause the other LVM operations to slow down.
As of Red Hat Enterprise Linux 6.5, you can control the rate at which a RAID logical volume is initialized by implementing recovery throttling. You control the rate at which
sync operations are performed by setting the minimum and maximum I/O rate for those operations with the --minrecoveryrate and --maxrecoveryrate options of the lvcreate command. You specify these options as follows.
--maxrecoveryrate Rate[bBsSkKmMgG]Sets the maximum recovery rate for a RAID logical volume so that it will not crowd out nominal I/O operations. The Rate is specified as an amount per second for each device in the array. If no suffix is given, then kiB/sec/device is assumed. Setting the recovery rate to 0 means it will be unbounded.--minrecoveryrate Rate[bBsSkKmMgG]Sets the minimum recovery rate for a RAID logical volume to ensure that I/O forsyncoperations achieves a minimum throughput, even when heavy nominal I/O is present. The Rate is specified as an amount per second for each device in the array. If no suffix is given, then kiB/sec/device is assumed.
The following command creates a 2-way RAID10 array with 3 stripes that is 10G is size with a maximum recovery rate of 128 kiB/sec/device. The array is named
my_lv and is in the volume group my_vg.
lvcreate --type raid10 -i 2 -m 1 -L 10G --maxrecoveryrate 128 -n my_lv my_vg
lvcreate --type raid10 -i 2 -m 1 -L 10G --maxrecoveryrate 128 -n my_lv my_vg
You can also specify minimum and maximum recovery rates for a RAID scrubbing operation. For information on RAID scrubbing, see 「Scrubbing a RAID Logical Volume」.
5.4.16.2. リニアデバイスの RAID デバイスへの変換
リンクのコピーリンクがクリップボードにコピーされました!
既存のリニア論理ボリュームを RAID デバイスに変換するには、
lvconvert コマンドの --type 引数を使用します。
以下のコマンドは、ボリュームグループ
my_vg 内のリニア論理ボリューム my_lv を 2 方向の RAID1 アレイに変換します。
lvconvert --type raid1 -m 1 my_vg/my_lv
# lvconvert --type raid1 -m 1 my_vg/my_lv
RAID 論理ボリュームはメタデータとデータサブボリュームのペアで構成されているため、リニアデバイスを RAID1 アレイに変換すると、新しいメタデータサブボリュームが作成され、リニアボリュームが存在する同じ物理ボリューム上の複製元の論理ボリュームに関連付けられます。メタデータ/データサブボリュームのペアにイメージが追加されます。例えば、複製元のデバイスは以下のとおりです。
lvs -a -o name,copy_percent,devices my_vg
  LV     Copy%  Devices
  my_lv         /dev/sde1(0)
# lvs -a -o name,copy_percent,devices my_vg
  LV     Copy%  Devices
  my_lv         /dev/sde1(0)
2 方向の RAID1 アレイへの変換後、デバイスには以下のデータとメタデータサブボリュームのペアが含まれます。
複製元の論理ボリュームとペアのメタデータイメージを同じ物理ボリュームに配置できない場合、
lvconvert は失敗します。
5.4.16.3. LVM RAID1 論理ボリュームの LVM リニア論理ボリュームへの変換
リンクのコピーリンクがクリップボードにコピーされました!
lvconvert コマンドを使用して、既存の RAID1 LVM 論理ボリュームを LVM リニア論理ボリュームに変換するには -m0 引数を指定します。これにより、すべての RAID データサブボリュームおよび RAID アレイを構成するすべての RAID メタデータサブボリュームを削除し、最高レベルの RAID1 イメージをリニア論理ボリュームとして残します。
以下の例は、既存の LVM RAID1 論理ボリュームを表示しています。
以下のコマンドは、LVM RAID1 論理ボリューム
my_vg/my_lv を LVM リニアデバイスに変換します。
lvconvert -m0 my_vg/my_lv
lvs -a -o name,copy_percent,devices my_vg
  LV      Copy%  Devices
  my_lv          /dev/sde1(1)
# lvconvert -m0 my_vg/my_lv
# lvs -a -o name,copy_percent,devices my_vg
  LV      Copy%  Devices
  my_lv          /dev/sde1(1)
When you convert an LVM RAID1 logical volume to an LVM linear volume, you can specify which physical volumes to remove. The following example shows the layout of an LVM RAID1 logical volume made up of two images:
/dev/sda1 and /dev/sdb1. In this example, the lvconvert command specifies that you want to remove /dev/sda1, leaving /dev/sdb1 as the physical volume that makes up the linear device.
5.4.16.4. ミラー化 LVM デバイスの RAID1 デバイスへの変換
リンクのコピーリンクがクリップボードにコピーされました!
lvconvert コマンドを使用して、既存のミラー化 LVM デバイスを RAID1 LVM デバイスに変換するには、--type raid1 引数を指定します。これにより、ミラーサブボリューム (*_mimage_*) の名前を RAID サブボリューム (*_rimage_*) に変更します。また、ミラーログは削除され、対応するデータサブボリュームと同じ物理ボリューム上のデータサブボリューム用にメタデータサブボリューム (*_rmeta_*) が作成されます。
以下の例は、ミラー化論理ボリューム
my_vg/my_lv のレイアウトを表示しています。
以下のコマンドは、ミラー化論理ボリューム
my_vg/my_lv を RAID1 論理ボリュームに変換します。
5.4.16.5. 既存の RAID1 デバイス内のイメージ数の変更
リンクのコピーリンクがクリップボードにコピーされました!
You can change the number of images in an existing RAID1 array just as you can change the number of images in the earlier implementation of LVM mirroring, by using the
lvconvert command to specify the number of additional metadata/data subvolume pairs to add or remove. For information on changing the volume configuration in the earlier implementation of LVM mirroring, see 「ミラー化ボリューム設定の変更」.
lvconvert コマンドを使用して RAID1 デバイスにイメージを追加する場合、結果として生じるデバイス用のイメージの合計数を指定できます。または、デバイスに追加するイメージ数を指定することも可能です。また、オプションとして新しいメタデータ/データイメージのペアが存在する物理ボリュームを指定することもできます。
メタデータサブボリューム (
*_rmeta_* と呼ばれる) は、対応するデータサブボリューム (*_rimage_*) と同じ物理デバイス上に常に存在します。メタデータ/データのサブボリュームのペアは、(--alloc anywhere を指定しない限り) RAID アレイ内の別のメタデータ/データのサブボリュームのペアと同じ物理ボリューム上には作成されません。
RAID1 ボリュームにイメージを追加するコマンドの形式は、以下のとおりです。
lvconvert -m new_absolute_count vg/lv [removable_PVs]
lvconvert -m +num_additional_images vg/lv [removable_PVs]
lvconvert -m new_absolute_count vg/lv [removable_PVs]
lvconvert -m +num_additional_images vg/lv [removable_PVs]
例えば、以下は 2 方向 RAID1 アレイの LVM デバイス
my_vg/my_lv を示しています。
以下のコマンドは、2 方向の RAID1 デバイス
my_vg/my_lv を 3 方向の RAID1 デバイスに変換します。
イメージを RAID1 アレイに追加する場合、イメージに使用する物理ボリュームを指定できます。以下のコマンドは、2 方向の RAID1 デバイス
my_vg/my_lv を 3 方向の RAID1 デバイスに変換して、物理ボリューム /dev/sdd1 がアレイに使用されることを指定します。
RAID1 アレイからイメージを削除するには、以下のコマンドを使用します。
lvconvert コマンドを使用して RAID1 デバイスからイメージを削除する場合、結果として生じるデバイス用のイメージの合計数を指定できます。または、デバイスから削除するイメージ数を指定することも可能です。また、オプションとしてデバイスを削除する物理ボリュームを指定することもできます。
lvconvert -m new_absolute_count vg/lv [removable_PVs]
lvconvert -m -num_fewer_images vg/lv [removable_PVs]
lvconvert -m new_absolute_count vg/lv [removable_PVs]
lvconvert -m -num_fewer_images vg/lv [removable_PVs]
また、イメージとその関連付けされたメタデータのサブボリュームが削除されると、それより数が大きいイメージはスロットを埋めるために小さくなります。
lv_rimage_0、lv_rimage_1、および lv_rimage_2 で構成される 3 方向の RAID1 アレイから lv_rimage_1 を削除する場合、lv_rimage_0 と lv_rimage_1 で構成される RAID1 アレイが生じます。サブボリューム lv_rimage_2 の名前は変更され、空のスロットを引き継ぎ、lv_rimage_1 となります。
以下の例は、3 方向の RAID1 論理ボリューム
my_vg/my_lv のレイアウトを示しています。
以下のコマンドは、3 方向の RAID1 論理ボリュームを 2 方向の RAID1 論理ボリュームに変換します。
以下のコマンドは、3 方向の RAID1 論理ボリュームを 2 方向の RAID1 論理ボリュームに変換して、削除するイメージを含む物理ボリュームを
/dev/sde1 として指定します。
5.4.16.6. 別々の論理ボリュームとしての RAID イメージの分割
リンクのコピーリンクがクリップボードにコピーされました!
RAID 論理ボリュームのイメージを分割して、新しい論理ボリュームを形成します。RAID イメージを分割する手順は、「ミラー化論理ボリュームの冗長イメージの分割」 で説明されている、ミラー化論理ボリュームの冗長イメージを分割する手順と同じです。
RAID イメージを分割するコマンドの形式は、以下のとおりです。
lvconvert --splitmirrors count -n splitname vg/lv [removable_PVs]
lvconvert --splitmirrors count -n splitname vg/lv [removable_PVs]
既存の RAID1 論理ボリュームから RAID イメージを削除する場合と同様に (「既存の RAID1 デバイス内のイメージ数の変更」 で説明)、RAID データのサブボリューム (およびその関連付けされたメタデータのサブボリューム) をデバイスの中心から削除する場合、それより数が大きいイメージはスロットを埋めるために小さくなります。そのため、RAID アレイを構成する論理ボリューム上のインデックス番号は連続する整数となります。
注記
RAID1 アレイがまだ同期していない場合は、RAID イメージを分割できません。
以下の例は、2 方向の RAID1 論理ボリューム
my_lv を my_lv と new の 2 つのリニア論理ボリュームに分割します。
以下の例は、3 方向の RAID1 論理ボリューム
my_lv を、2 方向の RAID1 論理ボリューム my_lv とリニア論理ボリューム new に分割します。
5.4.16.7. RAID イメージの分割とマージ
リンクのコピーリンクがクリップボードにコピーされました!
lvconvert コマンドで --splitmirrors 引数とともに --trackchanges 引数を使用することにより、すべての変更を追跡しながら、読み取り専用に RAID1 アレイのイメージを一時的に分割することができます。これにより、イメージの分割後に変更になったアレイの部分のみを再同期する一方で、後ほどそのイメージをアレイにマージしなおすことができます。
RAID イメージを分割する
lvconvert コマンドの形式は、以下のとおりです。
lvconvert --splitmirrors count --trackchanges vg/lv [removable_PVs]
lvconvert --splitmirrors count --trackchanges vg/lv [removable_PVs]
--trackchanges 引数を使用して RAID イメージを分割する場合、分割するイメージを指定することはできますが、分割されるボリューム名を変更することはできません。また、結果として生じるボリュームには以下の制限があります。
- 作成する新規ボリュームは読み取り専用です。
- 新規ボリュームのサイズは変更できません。
- 残っているアレイの名前は変更できません。
- 残っているアレイのサイズは変更できません。
- 新規のボリュームおよび残っているアレイを個別にアクティブ化することはできません。
--trackchanges 引数を使用して分割したイメージをマージするには、その後の lvconvert コマンドで --merge 引数を指定して実行します。イメージをマージする場合、イメージが分割されてから変更になったアレイの部分のみが再同期されます。
RAID イメージをマージする
lvconvert コマンドの形式は、以下のとおりです。
lvconvert --merge raid_image
lvconvert --merge raid_image
以下の例は、残りのアレイへの変更を追跡する一方で、RAID1 論理ボリュームを作成し、そのボリュームからイメージを分割しています。
以下の例は、残りのアレイへの変更を追跡する一方で、RAID1 ボリュームからイメージを分割しています。その後、ボリュームをアレイにマージしなおしています。
RAID1 ボリュームからイメージを分割したら、その分割を永続的にするためには第 2 のコマンド
lvconvert --splitmirrors を発行し、--trackchanges 引数を指定せずに、イメージを分割する最初の lvconvert コマンドを繰り返します。これで --trackchanges 引数が作成したリンクが機能しなくなります。
--trackchanges 引数を使用してイメージを分割した後は、アレイ上でその後に lvconvert --splitmirrors コマンドを発行することはできません。ただし、追跡されるイメージを永久に分割する場合は例外です。
以下の一連のコマンドは、イメージを分割して追跡し、追跡されるイメージを永久に分割します。
ただし、以下の一連のコマンドは失敗する点に注意してください。
同様に、以下の一連のコマンドも失敗します。分割されたイメージが追跡されていないためです。
5.4.16.8. RAID フォルトポリシーの設定
リンクのコピーリンクがクリップボードにコピーされました!
LVM RAID は、
lvm.conf ファイルの raid_fault_policy フィールドで定義されている詳細設定に基づいて、デバイス障害を自動で処理します。
raid_fault_policyフィールドがallocateにセットされている場合、システムは障害が発生したデバイスをボリュームグループの予備のデバイスと置き換えようとします。予備のデバイスがない場合、これはシステムログにレポートされます。raid_fault_policyフィールドがwarnにセットされている場合、システムは警告を発して、ログはデバイスが失敗したことを示します。これにより、ユーザーは一連の動作を決定することができます。
そのポリシーを使用するデバイスが残っている限り、RAID 論理ボリュームは操作を続行します。
5.4.16.8.1. RAID の割り当てフォルトポリシー
リンクのコピーリンクがクリップボードにコピーされました!
以下の例では、
raid_fault_policy フィールドは lvm.conf ファイルで allocate にセットされています。RAID 論理ボリュームは、以下のように配置されます。
/dev/sde デバイスが失敗した場合は、システムログはエラーメッセージを表示します。
raid_fault_policy フィールドは allocate にセットされているため、障害が発生したデバイスはボリュームグループの新しいデバイスと置き換わります。
障害が発生したデバイスが置き換わっても、LVM は障害が発生したデバイスを見つけることができなかったことを引き続き表示する点に注意してください。これは、障害が発生したデバイスは RAID 論理ボリュームから削除されていますが、ボリュームグループからはまだ削除されていないためです。障害が発生したデバイスをボリュームグループから削除するには、
vgreduce --removemissing VG を実行できます。
raid_fault_policy は allocate にセットされているが予備のデバイスがない場合、割り当ては失敗し、論理ボリュームはそのまま残ります。割り当てが失敗した場合は、「warn の RAID フォルトポリシー」 の説明のとおり、オプションとしてドライブを修正することができ、論理ボリュームを非アクティブ化/アクティブ化します。別の方法として、「RAID デバイスの置き換え」 で説明しているように、障害が発生したデバイスを置き換えることも可能です。
5.4.16.8.2. warn の RAID フォルトポリシー
リンクのコピーリンクがクリップボードにコピーされました!
以下の例では、
raid_fault_policy フィールドは lvm.conf ファイル内で warn にセットされています。RAID 論理ボリュームは以下のように配置されます。
/dev/sdh デバイスに障害が発生すると、システムログはエラーメッセージを表示します。ただし、この場合、LVM はイメージの 1 つを置き換えて、RAID デバイスを自動的に修復しようとはしません。代わりに、デバイスに障害が発生したら、以下のように lvconvert コマンドの --repair 引数を使用してデバイスを置き換えることができます。
障害が発生したデバイスが置き換わっても、LVM は障害が発生したデバイスを見つけることができなかったことを引き続き表示する点に注意してください。これは、障害が発生したデバイスは RAID 論理ボリュームから削除されていますが、ボリュームグループからはまだ削除されていないためです。障害が発生したデバイスをボリュームグループから削除するには、
vgreduce --removemissing VG を実行できます。
If the device failure is a transient failure or you are able to repair the device that failed, as of Red Hat Enterprise Linux release 6.5 you can initiate recovery of the failed device with the
--refresh option of the lvchange command. Previously it was necessary to deactivate and then activate the logical volume.
The following command refreshes a logical volume.
lvchange --refresh my_vg/my_lv
# lvchange --refresh my_vg/my_lv5.4.16.9. RAID デバイスの置き換え
リンクのコピーリンクがクリップボードにコピーされました!
RAID は従来の LVM ミラーリングのようなものではありません。LVM ミラーリングでは、障害が発生したデバイスは削除する必要がありました。そうしないと、ミラー化論理ボリュームはハングしていました。RAID アレイは、障害があるデバイスがあっても稼働し続けることが可能です。RAID1 以外の RAID タイプの場合、デバイスを削除することはレベルが下の RAID に変換することを意味します (例えば、RAID6 から RAID5、または RAID4 もしくは RAID5 から RAID0)。そのため、無条件に障害のあるデバイスを削除してから置き換えを行うのではなく、LVM により、
lvconvert コマンドに --replace 引数を使用することで RAID ボリューム内のデバイスをワンステップで置き換えることができます。
lvconvert --replace の形式は、以下のとおりです。
lvconvert --replace dev_to_remove vg/lv [possible_replacements]
lvconvert --replace dev_to_remove vg/lv [possible_replacements]
以下の例は、RAID1 論理ボリュームを作成した後、そのボリューム内のデバイスを置き換えます。
以下の例は、RAID1 論理ボリュームを作成した後、そのボリューム内のデバイスを置き換えます。また、置き換える物理ボリュームを指定します。
1 度に 1 つ以上の RAID デバイスを置き換えるには、以下の例のように複数の
replace 引数を指定します。
注記
lvconvert --replace コマンドを使用して置き換えるドライブを指定する場合、置き換えるドライブはアレイ内ですでに使用されている予備のドライブ領域から割り当てないようにしてください。例えば、lv_rimage_0 と lv_rimage_1 は同じ物理ボリューム上に存在しないようにしてください。
5.4.16.10. Scrubbing a RAID Logical Volume
リンクのコピーリンクがクリップボードにコピーされました!
As of the Red Hat Enterprise Linux 6.5 release, LVM provides scrubbing support for RAID logical volumes. RAID scrubbing is the process of reading all the data and parity blocks in an array and checking to see whether they are coherent.
You initiate a RAID scrubbing operation with the
--syncaction option of the lvchange command. You specify either a check or repair operation. A check operation goes over the array and records the number of discrepancies in the array but does not repair them. A repair operation corrects the discrepancies as it finds them.
The format of the command to scrub a RAID logical volume is as follows:
lvchange --syncaction {check|repair} vg/raid_lv
lvchange --syncaction {check|repair} vg/raid_lv注記
The
lvchange --syncaction repair vg/raid_lv operation does not perform the same function as the lvconvert --repair vg/raid_lv operation. The lvchange --syncaction repair operation initiates a background synchronization operation on the array, while the lvconvert --repair operation is designed to repair/replace failed devices in a mirror or RAID logical volume.
In support of the new RAID scrubbing operation, the
lvs command now supports two new printable fields: raid_sync_action and raid_mismatch_count. These fields are not printed by default. To display these fields you specify them with the -o parameter of the lvs, as follows.
lvs -o +raid_sync_action,raid_mismatch_count vg/lv
lvs -o +raid_sync_action,raid_mismatch_count vg/lv
The
raid_sync_action field displays the current synchronization operation that the raid volume is performing. It can be one of the following values:
idle: All sync operations complete (doing nothing)resync: Initializing an array or recovering after a machine failurerecover: Replacing a device in the arraycheck: Looking for array inconsistenciesrepair: Looking for and repairing inconsistencies
The
raid_mismatch_count field displays the number of discrepancies found during a check operation.
The
Cpy%Sync field of the lvs command now prints the progress of any of the raid_sync_action operations, including check and repair.
The
lv_attr field of the lvs display now provides additional indicators in support of the RAID scrubbing operation. Bit 9 of this field displays the health of the logical volume, and it now supports the following indicators.
- (m)ismatches indicates that there are discrepancies in a RAID logical volume. This character is shown after a scrubbing operation has detected that portions of the RAID are not coherent.
- (r)efresh indicates that a device in a RAID array has suffered a failure and the kernel regards it as failed, even though LVM can read the device label and considers the device to be operational. The logical should be (r)efreshed to notify the kernel that the device is now available, or the device should be (r)eplaced if it is suspected of having failed.
For information on the
lvs command, see 「オブジェクトの選択」.
When you perform a RAID scrubbing operation, the background I/O required by the
sync operations can crowd out other I/O operations to LVM devices, such as updates to volume group metadata. This can cause the other LVM operations to slow down. You can control the rate at which the RAID logical volume is scrubbed by implementing recovery throttling.
You control the rate at which
sync operations are performed by setting the minimum and maximum I/O rate for those operations with the --minrecoveryrate and --maxrecoveryrate options of the lvchange command. You specify these options as follows.
--maxrecoveryrate Rate[bBsSkKmMgG]Sets the maximum recovery rate for a RAID logical volume so that it will not crowd out nominal I/O operations. The Rate is specified as an amount per second for each device in the array. If no suffix is given, then kiB/sec/device is assumed. Setting the recovery rate to 0 means it will be unbounded.--minrecoveryrate Rate[bBsSkKmMgG]Sets the minimum recovery rate for a RAID logical volume to ensure that I/O forsyncoperations achieves a minimum throughput, even when heavy nominal I/O is present. The Rate is specified as an amount per second for each device in the array. If no suffix is given, then kiB/sec/device is assumed.
5.4.16.11. Controlling I/O Operations on a RAID1 Logical Volume
リンクのコピーリンクがクリップボードにコピーされました!
As of the Red Hat Enterprise Linux release 6.5, you can control the I/O operations for a device in a RAID1 logical volume by using the
--writemostly and --writebehind parameters of the lvchange command. The format for using these parameters is as follows.
--[raid]writemostly PhysicalVolume[:{t|y|n}]Marks a device in a RAID1 logical volume aswrite-mostly. All reads to these drives will be avoided unless necessary. Setting this parameter keeps the number of I/O operations to the drive to a minimum. The default behavior is to set thewrite-mostlyattribute for the specified physical volume in the logical volume. It is possible to remove thewrite-mostlyflag by appending:nto the physical volume or to toggle the value by specifying:t. The--writemostlyargument can be specified more than one time in a single command, making it possible to toggle the write-mostly attributes for all the physical volumes in a logical volume at once.--[raid]writebehind IOCountSpecifies the maximum number of outstanding writes that are allowed to devices in a RAID1 logical volume that are marked aswrite-mostly. Once this value is exceeded, writes become synchronous, causing all writes to the constituent devices to complete before the array signals the write has completed. Setting the value to zero clears the preference and allows the system to choose the value arbitrarily.
5.4.17. Controlling Logical Volume Activation
リンクのコピーリンクがクリップボードにコピーされました!
You can flag a logical volume to be skipped during normal activation commands with the
-k or --setactivationskip {y|n} option of the lvcreate or lvchange command. This flag is not applied during deactivation.
You can determine whether this flag is set for a logical volume with the
lvs command, which displays the k attribute as in the following example.
lvs vg/thin1s1
LV         VG  Attr       LSize Pool  Origin
thin1s1    vg  Vwi---tz-k 1.00t pool0 thin1
# lvs vg/thin1s1
LV         VG  Attr       LSize Pool  Origin
thin1s1    vg  Vwi---tz-k 1.00t pool0 thin1
By default, thin snapshot volumes are flagged for activation skip. You can activate a logical volume with the
k attribute set by using the -K or --ignoreactivationskip option in addition to the standard -ay or --activate y option.
The following command activates a thin snapshot logical volume.
lvchange -ay -K VG/SnapLV
# lvchange -ay -K VG/SnapLV
The persistent "activation skip" flag can be turned off when the logical volume is created by specifying the
-kn or --setactivationskip n option of the lvcreate command. You can turn the flag off for an existing logical volume by specifying the -kn or --setactivationskip n option of the lvchange command. You can turn the flag on again with the -ky or --setactivationskip y option.
The following command creates a snapshot logical volume without the activation skip flag
lvcreate --type thin -n SnapLV -kn -s ThinLV --thinpool VG/ThinPoolLV
# lvcreate --type thin -n SnapLV -kn -s ThinLV --thinpool VG/ThinPoolLV
The following command removes the activation skip flag from a snapshot logical volume.
lvchange -kn VG/SnapLV
# lvchange -kn VG/SnapLV
You can control the default activation skip setting with the
auto_set_activation_skip setting in the /etc/lvm/lvm.conf file.
5.5. フィルターを使用した LVM デバイススキャンの制御
リンクのコピーリンクがクリップボードにコピーされました!
At startup, the
vgscan command is run to scan the block devices on the system looking for LVM labels, to determine which of them are physical volumes and to read the metadata and build up a list of volume groups. The names of the physical volumes are stored in the LVM cache file of each node in the system, /etc/lvm/cache/.cache. Subsequent commands may read that file to avoiding rescanning.
lvm.conf 設定ファイル内にフィルターを設定することにより、LVM がスキャンするデバイスを制御することができます。lvm.conf ファイル内のフィルターは、一連の簡単な正規表現で構成されており、/dev ディレクトリ内のデバイス名に適用されて、各ブロックデバイスを受理するか、拒否するかの決定をします。
以下の例では、LVM がスキャンするデバイスを制御するフィルターの使用を示しています。正規表現は完全なパス名に対して自由にマッチングされるため、これらの例の一部は、必ずしもベストプラクティスを示すものではないことに注意してください。例えば、
a/loop/ は a/.*loop.*/ と同等であり、/dev/solooperation/lvol1 と適合します。
以下のフィルターは、検出されたすべてのデバイスを追加します。設定ファイル内で設定されているフィルターはないため、これがデフォルトの動作です。
filter = [ "a/.*/" ]
filter = [ "a/.*/" ]
以下のフィルターは、ドライブにメディアが入っていない場合の遅延を回避するために cdrom デバイスを削除します。
filter = [ "r|/dev/cdrom|" ]
filter = [ "r|/dev/cdrom|" ]
以下のフィルターはすべてのループを追加して、すべての他のブロックデバイスを削除します。
filter = [ "a/loop.*/", "r/.*/" ]
filter = [ "a/loop.*/", "r/.*/" ]
以下のフィルターはすべてのループと IDE を追加して、すべての他のブロックデバイスを削除します。
filter =[ "a|loop.*|", "a|/dev/hd.*|", "r|.*|" ]
filter =[ "a|loop.*|", "a|/dev/hd.*|", "r|.*|" ]
以下のフィルターは 1 番目の IDE ドライブ上にパーティション 8 のみを追加して、他のすべてのブロックデバイスを削除します。
filter = [ "a|^/dev/hda8$|", "r/.*/" ]
filter = [ "a|^/dev/hda8$|", "r/.*/" ]
注記
When the
lvmetad daemon is running, the filter = setting in the /etc/lvm/lvm.conf file does not apply when you execute the pvscan --cache device command. To filter devices, you need to use the global_filter = setting. Devices that fail the global filter are not opened by LVM and are never scanned. You may need to use a global filter, for example, when you use LVM devices in VMs and you do not want the contents of the devices in the VMs to be scanned by the physical host.
5.6. オンラインデータ移動
リンクのコピーリンクがクリップボードにコピーされました!
pvmove コマンドを使用すると、システムの使用中にデータを移動することができます。
pvmove コマンドは、データを分割してセクションに移動して、各セクションを移動する一時的なミラーを作成します。pvmove コマンドの操作に関する情報は、pvmove(8) の man ページをご覧ください。
注記
In order to perform a
pvmove operation in a cluster, you should ensure that the cmirror package is installed and the cmirrord service is running.
以下のコマンドはすべての割り当て領域を、物理ボリューム
/dev/sdc1 からボリュームグループ内の他の空き物理ボリュームへ移動します:
pvmove /dev/sdc1
# pvmove /dev/sdc1
以下のコマンドは、論理ボリューム
MyLV のエクステントのみを移動します。
pvmove -n MyLV /dev/sdc1
# pvmove -n MyLV /dev/sdc1pvmove コマンドは、その実行に長時間を要するため、バックグラウンドでコマンドを実行して、フォアグラウンドでの進捗状況表示を回避した方が良いでしょう。以下のコマンドは、物理ボリューム /dev/sdc1 に割り当てられているすべてのエクステントを、バックグラウンドで /dev/sdf1 に移動します。
pvmove -b /dev/sdc1 /dev/sdf1
# pvmove -b /dev/sdc1 /dev/sdf1
以下のコマンドは、移動の進捗状況を 5 秒間隔でパーセンテージで報告します。
pvmove -i5 /dev/sdd1
# pvmove -i5 /dev/sdd15.7. クラスター内の個別ノード上の論理ボリュームのアクティブ化
リンクのコピーリンクがクリップボードにコピーされました!
クラスター環境に LVM をインストールしている場合は、単一のノード上で論理ボリュームを排他的にアクティブ化しなければならない可能性があります。
論理ボリュームを単一のノード上で排他的にアクティブ化するには、
lvchange -aey コマンドを使用します。また、lvchange -aly コマンドを使用すると、論理ボリュームを排他的にではなくローカルノード上のみでアクティブ化することもできます。これらの論理ボリュームは、後で、追加のノード上で同時にアクティブ化することができます。
また、付録D LVM オブジェクトタグ で説明してあるように、LVM タグを使用した個別ノード上での論理ボリュームのアクティブ化も可能です。また、設定ファイル内でノードのアクティブ化を指定することもできます。これについては、付録B LVM 設定ファイル で説明しています。
5.8. LVM 用のカスタム報告
リンクのコピーリンクがクリップボードにコピーされました!
pvs、lvs、および vgs コマンドを使用して、LVM オブジェクトについての簡潔でカスタマイズ可能なレポートを作成することができます。これらのコマンドが生成するレポートには、オブジェクトごとに 1 行の出力が含まれます。各行には、オブジェクトに関連するプロパティのフィールドの順序付けられた一覧が含まれます。レポートするオブジェクトを選択する方法は 5 つあります。物理ボリューム、ボリュームグループ、論理ボリューム、物理ボリュームセグメント、論理ボリュームセグメントです。
以下のセクションでは、次のような内容を説明します。
- 生成されたレポートの形式を制御するために使用できるコマンド引数の概要
- 各 LVM オブジェクト用に選択できるフィールドの一覧
- 生成されたレポートをソートするために使用できるコマンド引数の概要
- レポート出力の単位を指定する手順
5.8.1. 形式の制御
リンクのコピーリンクがクリップボードにコピーされました!
pvs、lvs、または vgs コマンドのどれを使用するかによって、表示されるデフォルトのフィールドセットとソート順序が決定します。これらのコマンドの出力は、以下の引数を使用することによって制御できます。
-o引数を使用すると、表示するフィールドをデフォルト以外に変更することができます。例えば、以下の出力はpvsコマンドのデフォルト表示です (物理ボリュームに関する情報を表示)。Copy to Clipboard Copied! Toggle word wrap Toggle overflow 以下のコマンドは物理ボリュームの名前とサイズだけを表示します。Copy to Clipboard Copied! Toggle word wrap Toggle overflow - -o 引数との組み合わせで使用するプラスサイン (+) を使って、出力にフィールドを追加することができます。以下の例では、デフォルトフィールドに加えて、物理ボリュームの UUID を表示しています。
Copy to Clipboard Copied! Toggle word wrap Toggle overflow - コマンドに
-v引数を追加すると、追加のフィールドが含まれます。例えば、pvs -vコマンドは、デフォルトフィールドに加えて、DevSizeとPV UUIDのフィールドも表示します。Copy to Clipboard Copied! Toggle word wrap Toggle overflow --noheadings引数は、見出し行を表示しません。これはスクリプトを書くときに便利です。以下の例はpv_name引数と共に--noheadings引数を使用して、すべての物理ボリュームの一覧を生成しています。pvs --noheadings -o pv_name /dev/sdb1 /dev/sdc1 /dev/sdd1
# pvs --noheadings -o pv_name
  /dev/sdb1
  /dev/sdc1
  /dev/sdd1
Copy to Clipboard Copied! Toggle word wrap Toggle overflow --separator separator引数は separator を使用して、各フィールドを分離します。次の例では、pvsコマンドのデフォルト出力フィールドをイコールサイン (=) で分割しています。Copy to Clipboard Copied! Toggle word wrap Toggle overflow separator引数の使用時にフィールドを整列させるには、--aligned引数と共にseparator引数を使用します。Copy to Clipboard Copied! Toggle word wrap Toggle overflow
lvs または vgs コマンドで -P 引数を使用して、障害が発生したボリュームについて、出力では表示されないような情報を表示することができます。この引数によって得られる出力に関する情報は、「障害の発生したデバイスの情報表示」 をご覧ください。
表示に関する引数の完全な一覧は、
pvs(8), vgs(8)、および lvs(8) の man ページをご覧ください。
ボリュームグループフィールドは、物理ボリューム (および物理ボリュームセグメント) フィールド、または論理ボリューム (および論理ボリュームセグメント) フィールドと混在させることができますが、物理ボリュームフィールドと論理ボリュームフィールドは混在させることはできません。例えば、以下のコマンドは、1 つの物理ボリュームつき 1 行の出力を表示します。
5.8.2. オブジェクトの選択
リンクのコピーリンクがクリップボードにコピーされました!
このセクションでは、
pvs、vgs、および lvs コマンドを使って LVM オブジェクトについて表示できる情報を一覧表示する一連の表を提供します。
便宜上、フィールド名の接頭辞は、コマンドのデフォルトと一致する場合は省略できます。例えば、
pvs コマンドでは、name は pv_name、vgs コマンドでは、name は vg_name と解釈されます。
以下のコマンドの実行は、
pvs -o pv_free の実行に相当します。
注記
The number of characters in the attribute fields in
pvs, vgs, and lvs output may increase in later releases. The existing character fields will not change position, but new fields may be added to the end. You should take this into account when writing scripts that search for particular attribute characters, searching for the character based on its relative position to the beginning of the field, but not for its relative position to the end of the field. For example, to search for the character p in the ninth bit of the lv_attr field, you could search for the string "^/........p/", but you should not search for the string "/*p$/".
pvs コマンド
リンクのコピーリンクがクリップボードにコピーされました!
表5.2「pvs 表示フィールド」 は、
pvs コマンドの表示引数、ヘッダーに表示されるフィールド名、フィールドの説明を一覧にまとめています。
| 引数 | ヘッダー | 説明 |
|---|---|---|
dev_size | DevSize | 物理ボリュームを作成する基となる配下のデバイスのサイズ |
pe_start | 1st PE | 配下のデバイス内の最初の物理エクステントの開始点までのオフセット |
pv_attr | Attr | 物理ボリュームのステータス: (a)llocatable または e(x)ported |
pv_fmt | Fmt | 物理ボリュームのメタデータ形式 (lvm2 または lvm1) |
pv_free | PFree | 物理ボリュームにある残りの空き領域 |
pv_name | PV | 物理ボリュームの名前 |
pv_pe_alloc_count | Alloc | 使用される物理エクステントの数 |
pv_pe_count | PE | 物理エクステントの数 |
pvseg_size | SSize | 物理ボリュームのセグメントサイズ |
pvseg_start | Start | 物理ボリュームセグメントのうち最初の物理エクステント |
pv_size | PSize | 物理ボリュームのサイズ |
pv_tags | PV Tags | 物理ボリュームにアタッチされた LVM タグ |
pv_used | Used | 物理ボリューム上で現在使用中の領域の量 |
pv_uuid | PV UUID | 物理ボリュームの UUID |
デフォルトで
pvs コマンドが表示するフィールドは、pv_name、vg_name、pv_fmt、pv_attr、pv_size、pv_free です。表示は pv_name でソートされます。
pvs コマンドに -v 引数を使用すると、デフォルトの表示に dev_size および pv_uuid のフィールドが追加されます。
pvs コマンドに --segments 引数を使用すると、各物理ボリュームセグメントの情報を表示します。セグメントとは、エクステントの集合のことです。セグメントの表示は、論理ボリュームがフラグメント化 (断片化) しているかどうかを確認するのに役立ちます。
デフォルトで
pvs --segments コマンドが表示するフィールドは、pv_name, vg_name、pv_fmt、pv_attr、pv_size、pv_free、pvseg_start、pvseg_size です。この表示は、物理ボリューム内で pv_name と pvseg_size でソートされます。
pvs -a コマンドを使用して、LVM 物理ボリュームとして初期化されていなかった LVM が検出したデバイスを確認できます。
vgs コマンド
リンクのコピーリンクがクリップボードにコピーされました!
表5.3「vgs 表示フィールド」 は、
vgs コマンドの表示引数、ヘッダーに表示されるフィールド名、フィールドの説明を一覧にまとめています。
| 引数 | ヘッダー | 説明 |
|---|---|---|
lv_count | #LV | ボリュームグループに含まれる論理ボリュームの数 |
max_lv | MaxLV | ボリュームグループ内で許容される論理ボリュームの最大数 (無制限には 0) |
max_pv | MaxPV | ボリュームグループ内で許容される物理ボリュームの最大数 (無制限には 0) |
pv_count | #PV | ボリュームグループを定義する物理ボリューム数 |
snap_count | #SN | ボリュームグループに含まれるスナップショット数 |
vg_attr | Attr | ボリュームグループのステータス: (w)riteable、(r)eadonly、resi(z)eable、e(x)ported、(p)artial、および (c)lustered. |
vg_extent_count | #Ext | ボリュームグループ内の物理エクステントの数 |
vg_extent_size | Ext | ボリュームグループ内の物理エクステントのサイズ |
vg_fmt | Fmt | ボリュームグループのメタデータ形式 (lvm2 または lvm1) |
vg_free | VFree | ボリュームグループ内の残りの空き領域のサイズ |
vg_free_count | Free | ボリュームグループ内の空き物理エクステントの数 |
vg_name | VG | ボリュームグループ名 |
vg_seqno | Seq | ボリュームグループの改訂を示す番号 |
vg_size | VSize | ボリュームグループのサイズ |
vg_sysid | SYS ID | LVM1 システム ID |
vg_tags | VG Tags | ボリュームグループにアタッチされた LVM タグ |
vg_uuid | VG UUID | ボリュームグループの UUID |
デフォルトで
vgs コマンドが表示するフィールドは、vg_name、pv_count、lv_count、snap_count、vg_attr、vg_size、vg_free です。表示は vg_name でソートされます。
vgs
  VG     #PV #LV #SN Attr   VSize  VFree
  new_vg   3   1   1 wz--n- 51.42G 51.36G
# vgs
  VG     #PV #LV #SN Attr   VSize  VFree
  new_vg   3   1   1 wz--n- 51.42G 51.36G
vgs コマンドに -v 引数を使用すると、デフォルトの表示に vg_extent_size および vg_uuid のフィールドが追加されます。
lvs コマンド
リンクのコピーリンクがクリップボードにコピーされました!
表5.4「lvs 表示フィールド」 は、
lvs コマンドの表示引数、ヘッダーに表示されるフィールド名、フィールドの説明を一覧にまとめています。
| 引数 | ヘッダー | 説明 | ||||||||||
|---|---|---|---|---|---|---|---|---|---|---|---|---|
| Chunk | スナップショットボリュームのユニットサイズ | ||||||||||
copy_percent | Copy% | ミラー化論理ボリュームの同期のパーセンテージ。これは、また pv_move コマンドで物理エクステントを移動する時にも使用されます。 | ||||||||||
devices | Devices | 論理ボリュームを構成する配下のデバイス: 物理ボリューム、論理ボリューム、そして物理エクステントと論理エクステントの開始点 | ||||||||||
lv_attr | Attr | 論理ボリュームのステータス。論理ボリュームの属性ビットは以下のようになります。
| ||||||||||
lv_kernel_major | KMaj | 論理ボリュームの実際のメジャーデバイス番号 (停止中の場合、-1) | ||||||||||
lv_kernel_minor | KMIN | 論理ボリュームの実際のマイナーデバイス番号 (停止中の場合、-1) | ||||||||||
lv_major | Maj | 論理ボリュームの永続的なメジャーデバイス番号 (未指定の場合、-1) | ||||||||||
lv_minor | Min | 論理ボリュームの永続的なマイナーデバイス番号 (未指定の場合、-1) | ||||||||||
lv_name | LV | 論理ボリュームの名前 | ||||||||||
lv_size | LSize | 論理ボリュームのサイズ | ||||||||||
lv_tags | LV Tags | 論理ボリュームにアタッチされた LVM タグ | ||||||||||
lv_uuid | LV UUID | 論理ボリュームの UUID | ||||||||||
mirror_log | Log | ミラーログが存在するデバイス | ||||||||||
modules | Modules | この論理ボリュームを使用するのに必要な対応するカーネルデバイスマッパーターゲット | ||||||||||
move_pv | Move | pvmove コマンドで作成された一時的な論理ボリュームの元となる物理ボリューム | ||||||||||
origin | Origin | スナップショットボリュームの複製元のデバイス | ||||||||||
| Region | ミラー化論理ボリュームのユニットサイズ | ||||||||||
seg_count | #Seg | 論理ボリューム内のセグメント数 | ||||||||||
seg_size | SSize | 論理ボリューム内のセグメントサイズ | ||||||||||
seg_start | Start | 論理ボリューム内のセグメントのオフセット | ||||||||||
seg_tags | Seg Tags | 論理ボリュームのセグメントにアタッチされている LVM タグ | ||||||||||
segtype | Type | 論理ボリュームのセグメントタイプ (例: ミラー、ストライプ、リニア) | ||||||||||
snap_percent | Snap% | 使用中スナップショットボリュームの現在のパーセンテージ | ||||||||||
stripes | #Str | 論理ボリューム内のストライプ、またはミラーの数 | ||||||||||
| Stripe | ストライプ化論理ボリューム内のストライプのユニットサイズ |
デフォルトで
lvs コマンドが表示するフィールドは、lv_name、vg_name、lv_attr、lv_size、origin、snap_percent、move_pv、mirror_log、copy_percent、convert_lv です。デフォルトの表示は、ボリュームグループ内で vg_name と lv_name でソートされます。
lvs
  LV         VG     Attr   LSize  Origin Snap%  Move Log Copy%  Convert
  lvol0      new_vg owi-a- 52.00M
  newvgsnap1 new_vg swi-a-  8.00M lvol0    0.20
# lvs
  LV         VG     Attr   LSize  Origin Snap%  Move Log Copy%  Convert
  lvol0      new_vg owi-a- 52.00M
  newvgsnap1 new_vg swi-a-  8.00M lvol0    0.20
lvs コマンドで -v 引数を使用すると、デフォルトの表示に seg_count、lv_major、lv_minor、lv_kernel_major、lv_kernel_minor、lv_uuid のフィールドが追加されます。
lvs コマンドで --segments 引数を使用すると、セグメント情報を強調したデフォルトのコラムで情報を表示します。segments 引数を使用すると、seg 接頭辞はオプションとなります。デフォルトで lvs --segments コマンドが表示するフィールドは、lv_name、vg_name、lv_attr、stripes、segtype、seg_size です。デフォルトの表示は、ボリュームグループ内の vg_name と lv_name でソートされ、論理ボリューム内では seg_start でソートされます。論理ボリュームがフラグメント化されている場合、このコマンドの出力は以下を表示します。
lvs --segments コマンドで -v 引数を使用すると、デフォルトの表示に seg_start、stripesize、chunksize のフィールドが追加されます。
以下の例は、1 つの設定された論理ボリュームを持つシステム上での
lvs コマンドのデフォルト出力を示しています。その後に、segments 引数を指定した lvs コマンドのデフォルト出力を表示しています。
5.8.3. LVM 報告のソート
リンクのコピーリンクがクリップボードにコピーされました!
通常、
lvs、vgs、または pvs のコマンドの全出力をソートして、コラムを正しく配置するには、まずそれを生成して内部に格納する必要があります。--unbuffered 引数を指定すると、生成直後にソートされていないままの出力で表示することができます。
別の順列でコラム一覧のソートを指定するには、報告コマンドのいずれかと一緒に
-O 引数を使用します。出力自体の中にこれらのフィールドを含める必要はありません。
以下の例では、物理ボリュームの名前、サイズ、および空き領域を表示する
pvs コマンドの出力を示しています。
以下の例では、空き領域のフィールドでソートされた同じ出力を示しています。
以下の例では、ソートするフィールドを表示する必要がないことを示しています。
逆順でソートするには、
-O 引数の後で指定するフィールドの先頭に - 印を付けます。
5.8.4. ユニットの指定
リンクのコピーリンクがクリップボードにコピーされました!
LVM 報告表示用の単位を指定するには、報告コマンドに
--units 引数を使用します。バイト(b)、キロバイト(k)、メガバイト(m)、ギガバイト(g)、テラバイト(t)、エクサバイト(e)、ペタバイト(p)、および人間が読める表示(h) を指定できます。デフォルトは人間が読める表示です。このデフォルト設定を上書きするには、lvm.conf ファイルの global セクション内の units パラメーターを設定します。
以下の例では、
pvs コマンドの出力をデフォルトのギガバイトでなく、メガバイトで指定しています。
デフォルトでは、単位は 2 の累乗 (1024 の倍数) で表示されます。単位を 1000 の倍数で表示するには、大文字 (B、K、M、G、T、H) で指定することができます。
以下のコマンドは、デフォルト動作である 1024 の倍数として出力を表示します。
以下のコマンドは 1000 の倍数として出力を表示します。
セクター (512 バイトとして定義) またはカスタム単位も指定できます。
以下の例では、
pvs コマンドの出力を、セクター数として表示します。
以下の例では、
pvs コマンドの出力を 4 MB 単位で表示しています。
第6章 LVM 設定の例
リンクのコピーリンクがクリップボードにコピーされました!
この章では、基本的な LVM 設定の例をいくつか紹介します。
6.1. 3つのディスク上での LVM 論理ボリューム作成
リンクのコピーリンクがクリップボードにコピーされました!
この例では、
new_logical_volume と言う LVM 論理ボリュームを作成しており、これは、/dev/sda1、/dev/sdb1、および /dev/sdc1 で構成されています。
6.1.1. 物理ボリュームの作成
リンクのコピーリンクがクリップボードにコピーされました!
ボリュームグループ内のディスクを使用するには、それらにLVM 物理ボリュームとしてラベルを付けます。
警告
このコマンドは、
/dev/sda1、/dev/sdb1、および /dev/sdc1 上のデータを破棄します。
pvcreate /dev/sda1 /dev/sdb1 /dev/sdc1 Physical volume "/dev/sda1" successfully created Physical volume "/dev/sdb1" successfully created Physical volume "/dev/sdc1" successfully created
# pvcreate /dev/sda1 /dev/sdb1 /dev/sdc1
Physical volume "/dev/sda1" successfully created
Physical volume "/dev/sdb1" successfully created
Physical volume "/dev/sdc1" successfully created
6.1.2. ボリュームグループの作成
リンクのコピーリンクがクリップボードにコピーされました!
以下のコマンドはボリュームグループ
new_vol_group を作成します。
vgcreate new_vol_group /dev/sda1 /dev/sdb1 /dev/sdc1 Volume group "new_vol_group" successfully created
# vgcreate new_vol_group /dev/sda1 /dev/sdb1 /dev/sdc1
Volume group "new_vol_group" successfully created
vgs コマンドを使用すると、新規ボリュームグループの属性を表示することができます。
vgs VG #PV #LV #SN Attr VSize VFree new_vol_group 3 0 0 wz--n- 51.45G 51.45G
# vgs
VG #PV #LV #SN Attr VSize VFree
new_vol_group 3 0 0 wz--n- 51.45G 51.45G
6.1.3. 論理ボリュームの作成
リンクのコピーリンクがクリップボードにコピーされました!
以下のコマンドは、ボリュームグループ
new_vol_group から、論理ボリューム new_logical_volume を作成します。この例では、ボリュームグループの 2GB を使用する論理ボリュームを作成しています。
lvcreate -L2G -n new_logical_volume new_vol_group Logical volume "new_logical_volume" created
# lvcreate -L2G -n new_logical_volume new_vol_group
Logical volume "new_logical_volume" created
6.1.4. ファイルシステムの作成
リンクのコピーリンクがクリップボードにコピーされました!
以下のコマンドは論理ボリューム上に GFS2 ファイルシステムを作成します。
以下のコマンドは、論理ボリュームをマウントして、ファイルシステムディスクの領域使用率を報告します。
6.2. ストライプ化論理ボリュームの作成
リンクのコピーリンクがクリップボードにコピーされました!
この例では、
striped_logical_volume と言う LVM ストライプ化論理ボリュームを作成しており、これは /dev/sda1、/dev/sdb1、および /dev/sdc1 のディスクに渡ってデータをストライプ化しています。
6.2.1. 物理ボリュームの作成
リンクのコピーリンクがクリップボードにコピーされました!
ボリュームグループ内で使用するディスクに LVM 物理ボリュームとしてラベルを付けます。
警告
このコマンドは、
/dev/sda1、/dev/sdb1、および /dev/sdc1 上のデータを破棄します。
pvcreate /dev/sda1 /dev/sdb1 /dev/sdc1 Physical volume "/dev/sda1" successfully created Physical volume "/dev/sdb1" successfully created Physical volume "/dev/sdc1" successfully created
# pvcreate /dev/sda1 /dev/sdb1 /dev/sdc1
Physical volume "/dev/sda1" successfully created
Physical volume "/dev/sdb1" successfully created
Physical volume "/dev/sdc1" successfully created
6.2.2. ボリュームグループの作成
リンクのコピーリンクがクリップボードにコピーされました!
以下のコマンドはボリュームグループ
volgroup01 を作成します。
vgcreate volgroup01 /dev/sda1 /dev/sdb1 /dev/sdc1 Volume group "volgroup01" successfully created
# vgcreate volgroup01 /dev/sda1 /dev/sdb1 /dev/sdc1
Volume group "volgroup01" successfully created
vgs コマンドを使用すると、新規ボリュームグループの属性を表示することができます。
vgs VG #PV #LV #SN Attr VSize VFree volgroup01 3 0 0 wz--n- 51.45G 51.45G
# vgs
VG #PV #LV #SN Attr VSize VFree
volgroup01 3 0 0 wz--n- 51.45G 51.45G
6.2.3. 論理ボリュームの作成
リンクのコピーリンクがクリップボードにコピーされました!
以下のコマンドは、ボリュームグループ
volgroup01 から ストライプ化論理ボリューム striped_logical_volume を作成します。この例では、2 ギガバイトサイズで、ストライプサイズが4キロバイトのストライプを3つを持つ論理ボリュームを作成します。
lvcreate -i3 -I4 -L2G -nstriped_logical_volume volgroup01 Rounding size (512 extents) up to stripe boundary size (513 extents) Logical volume "striped_logical_volume" created
# lvcreate -i3 -I4 -L2G -nstriped_logical_volume volgroup01
Rounding size (512 extents) up to stripe boundary size (513 extents)
Logical volume "striped_logical_volume" created
6.2.4. ファイルシステムの作成
リンクのコピーリンクがクリップボードにコピーされました!
以下のコマンドは論理ボリューム上に GFS2 ファイルシステムを作成します。
以下のコマンドは、論理ボリュームをマウントして、ファイルシステムディスクの領域使用率を報告します。
6.3. ボリュームグループの分割
リンクのコピーリンクがクリップボードにコピーされました!
この例では、既存ボリュームグループは3つの物理ボリュームから構成されています。これらの 物理ボリュームに十分な未使用領域があれば、新しくディスクを追加しないで新規のボリュームグループを作成することができます。
最初のセットアップでは、論理ボリューム
mylv は、ボリュームグループ myvol から作成され、そのボリュームグループは、/dev/sda1、 /dev/sdb1、および /dev/sdc1 の3つの物理ボリュームで構成されます。
この手順を完了した後には、ボリュームグループ
myvg は /dev/sda1 と /dev/sdb1 で構成されます。2つ目のボリュームグループ yourvg は /dev/sdc1 で構成されます。
6.3.1. 空き領域の測定
リンクのコピーリンクがクリップボードにコピーされました!
pvscan コマンドを使用すると、どの位の空き領域が現在ボリュームグループで利用可能かを測定することができます。
6.3.2. データの移動
リンクのコピーリンクがクリップボードにコピーされました!
pvmove コマンドを使用して、/dev/sdc1 内の すべての使用中物理エクステントを /dev/sdb1 に移動することができます。pvmove コマンドはその実行に長時間を要します。
データを移動した後は、
/dev/sdc1 上のすべての領域が空きになっていることが分ります。
6.3.3. ボリュームグループの分割
リンクのコピーリンクがクリップボードにコピーされました!
新規のボリュームグループ
yourvg を作成するには、vgsplit コマンドを使用して、ボリュームグループ myvg を分割します。
ボリュームグループを分割する前に、論理ボリュームは停止している必要があります。ファイルシステムがマウントされている場合は、論理ボリュームを停止する前にそのファイルシステムをアンマウントしなければなりません。
ボリュームグループを停止するには
lvchange コマンド、または、 vgchange コマンドを使用します。以下のコマンドは論理ボリューム mylv を非アクティブ化して、ボリュームグループ myvg から ボリュームグループ yourvg を分離させて、物理ボリューム /dev/sdc1 をその新規のボリュームグループ yourvg に移動させます。
lvchange -a n /dev/myvg/mylv vgsplit myvg yourvg /dev/sdc1 Volume group "yourvg" successfully split from "myvg"
# lvchange -a n /dev/myvg/mylv
# vgsplit myvg yourvg /dev/sdc1
Volume group "yourvg" successfully split from "myvg"
vgs を使用すると、2つのボリュームグループの属性を確認できます。
vgs VG #PV #LV #SN Attr VSize VFree myvg 2 1 0 wz--n- 34.30G 10.80G yourvg 1 0 0 wz--n- 17.15G 17.15G
# vgs
VG #PV #LV #SN Attr VSize VFree
myvg 2 1 0 wz--n- 34.30G 10.80G
yourvg 1 0 0 wz--n- 17.15G 17.15G
6.3.4. 新規論理ボリュームの作成
リンクのコピーリンクがクリップボードにコピーされました!
新規のボリュームグループを作成した後は、新規の論理ボリューム
yourlv を作成することができます。
lvcreate -L5G -n yourlv yourvg Logical volume "yourlv" created
# lvcreate -L5G -n yourlv yourvg
Logical volume "yourlv" created
6.3.5. ファイルシステムの作成と新規論理ボリュームのマウント
リンクのコピーリンクがクリップボードにコピーされました!
新しい論理ボリューム上にファイルシステムを作成して、それをマウントすることができます。
6.3.6. オリジナル論理ボリュームのアクティブ化とマウント
リンクのコピーリンクがクリップボードにコピーされました!
論理ボリューム
mylv を非アクティブ化しなければならなかったため、マウントできるようにする前に、それを再度アクティブ化する必要があります。
6.4. 論理ボリュームからのディスクの削除
リンクのコピーリンクがクリップボードにコピーされました!
この例では、ディスクを置き換えるために、あるいは異なるボリュームの一部としてディスクを使用するために、既存の論理ボリュームからディスクを削除する方法を示しています。ディスクを削除するには、まず、LVM 物理ボリューム上のエクステントを異なるディスク、またはディスクセットに移動しなければなりません。
6.4.1. 既存物理ボリュームへのエクステントの移動
リンクのコピーリンクがクリップボードにコピーされました!
この例では、論理ボリュームはボリュームグループ
myvg の4つの物理ボリュームに渡って分配されています。
/dev/sdb1 からエクステントを移動して、ボリュームグループから削除できるようにします。
ボリュームグループ内の他の物理ボリューム上に十分な空きのエクステントがある場合、その削除したいデバイス上でオプション無しで
pvmove コマンドを実行すると、それらのエクステントは他のデバイスに分配されるようになります。
pvmove コマンドの実行が終了した後は、エクステントの分配は次のようになります:
vgreduce コマンドを使用して、ボリュームグループから物理ボリューム /dev/sdb1 を削除することができます。
これでディスクは物理的に削除可能となり、他のユーザーへの割り当ても可能になります。
6.4.2. 新規ディスクへのエクステントの移動
リンクのコピーリンクがクリップボードにコピーされました!
この例では、論理ボリュームは、以下のようにボリュームグループ
myvg 内の3つの物理ボリュームに渡って分配されています。
/dev/sdb1 のエクステントを新しいデバイス /dev/sdd1 に移動してみましょう。
6.4.2.1. 新規物理ボリュームの作成
リンクのコピーリンクがクリップボードにコピーされました!
/dev/sdd1 から新規の物理ボリュームを作成します。
pvcreate /dev/sdd1 Physical volume "/dev/sdd1" successfully created
# pvcreate /dev/sdd1
Physical volume "/dev/sdd1" successfully created
6.4.2.2. ボリュームグループへの新規物理ボリュームの追加
リンクのコピーリンクがクリップボードにコピーされました!
/dev/sdd1 を既存のボリュームグループ myvg に追加します。
6.4.2.3. データの移動
リンクのコピーリンクがクリップボードにコピーされました!
pvmove を使用して、データを /dev/sdb1 から /dev/sdd1 へ移動します。
6.4.2.4. ボリュームグループからの古い物理ボリュームの削除
リンクのコピーリンクがクリップボードにコピーされました!
データを
/dev/sdb1 から移動したら、それをボリュームグループから削除することができます。
vgreduce myvg /dev/sdb1 Removed "/dev/sdb1" from volume group "myvg"
# vgreduce myvg /dev/sdb1
Removed "/dev/sdb1" from volume group "myvg"
これで、このディスクを別のボリュームグループに再割り当てしたり、システムから削除することができるようになります。
6.5. クラスター内でのミラー化 LVM 論理ボリュームの作成
リンクのコピーリンクがクリップボードにコピーされました!
クラスター内にミラー化 LVM 論理ボリュームを作成するには、単一ノード上にミラー化 LVM 論理ボリュームを作成するのと同一のコマンドと手順が必要です。しかし、クラスター内にミラー化 LVM ボリュームを作成するには、クラスターとクラスターミラーインフラストラクチャーが稼働中で、クラスターが定足数を満たしており、かつクラスターのロッキングを有効にするように
lvm.conf ファイル内のロッキングタイプが正しく設定されている必要があります。これは、「クラスター内での LVM ボリューム作成」 で説明しているように、直接もしくは lvmconf のコマンドを使用して行います。
クラスター内でミラー化された LVM ボリュームを作成するには、以下の手順で行います。この手順では、最初に、クラスターサービスがインストール済みで稼働しているかをチェックし、次にミラー化ボリュームを作成します。
- クラスター内のすべてのノードが共有するミラー化論理ボリュームを作成するには、クラスターの各ノード内の
lvm.confファイル内でロッキングタイプを正しくセットする必要があります。デフォルトでは、ロッキングタイプは、ローカルに設定されます。これを変更するには、クラスターの各ノードで以下のコマンドを実行し、クラスター化したロッキングを有効にします。/sbin/lvmconf --enable-cluster
# /sbin/lvmconf --enable-clusterCopy to Clipboard Copied! Toggle word wrap Toggle overflow 注記
As of Red Hat Enterprise Linux 6.7, thelvmconfcommand provides a--servicesoption that will also enable the services required for LVM in a cluster, a--mirrorserviceoption that enables thecmirrordservice, and a--startstopservicesoption that immediately starts or stops the services that have been enabled. For information on thelvmconfcommand, see thelvmconfman page. - クラスター化論理ボリュームを作成するには、クラスター内のすべてのノード上でクラスターインフラストラクチャーが稼動中である必要があります。以下の例では
clvmdデーモンが発行されたノード上で稼働中であることを検証します。ps auxw | grep clvmd root 17642 0.0 0.1 32164 1072 ? Ssl Apr06 0:00 clvmd -T20 -t 90
ps auxw | grep clvmd root 17642 0.0 0.1 32164 1072 ? Ssl Apr06 0:00 clvmd -T20 -t 90Copy to Clipboard Copied! Toggle word wrap Toggle overflow 以下のコマンドは、クラスターステータスのローカルビューを表示します。Copy to Clipboard Copied! Toggle word wrap Toggle overflow cmirrorパッケージがインストールされていることを確認します。cmirrordサービスを開始します。service cmirrord start Starting cmirrord: [ OK ]
# service cmirrord start Starting cmirrord: [ OK ]Copy to Clipboard Copied! Toggle word wrap Toggle overflow - ミラーを作成します。最初のステップは、物理ボリュームの作成です。次のコマンドは、3つの物理ボリュームを作成します。そのうちの2つの物理ボリュームは、ミラーレッグとして使用され、3つめの物理ボリュームにはミラーログが格納されます。
Copy to Clipboard Copied! Toggle word wrap Toggle overflow - ボリュームグループを作成します。この例では、前のステップで作成された3つの物理ボリュームで構成される、ボリュームグループ
vg001を作成します。vgcreate vg001 /dev/sdb1 /dev/sdc1 /dev/sdd1 Clustered volume group "vg001" successfully created
# vgcreate vg001 /dev/sdb1 /dev/sdc1 /dev/sdd1 Clustered volume group "vg001" successfully createdCopy to Clipboard Copied! Toggle word wrap Toggle overflow vgcreateコマンドの出力に、ボリュームグループがクラスター化されていることが示されている点に注意してください。ボリュームグループの属性を表示するvgsコマンドを使用すると、ボリュームグループがクラスター化されていることを検証することができます。ボリュームグループがクラスター化されている場合は、c 属性が表示されます。vgs vg001 VG #PV #LV #SN Attr VSize VFree vg001 3 0 0 wz--nc 68.97G 68.97G
vgs vg001 VG #PV #LV #SN Attr VSize VFree vg001 3 0 0 wz--nc 68.97G 68.97GCopy to Clipboard Copied! Toggle word wrap Toggle overflow - ミラー化論理ボリュームを作成します。この例では、ボリュームグループ
vg001から論理ボリュームmirrorlvを作成します。このボリュームのミラーレッグは1つです。この例では、物理ボリュームのどのエクステントが論理ボリュームに使用されるかを指定します。lvcreate -l 1000 -m1 vg001 -n mirrorlv /dev/sdb1:1-1000 /dev/sdc1:1-1000 /dev/sdd1:0 Logical volume "mirrorlv" created
# lvcreate -l 1000 -m1 vg001 -n mirrorlv /dev/sdb1:1-1000 /dev/sdc1:1-1000 /dev/sdd1:0 Logical volume "mirrorlv" createdCopy to Clipboard Copied! Toggle word wrap Toggle overflow lvsコマンドを使用すると、ミラー作成の進捗状況を表示することができます。以下の例では、ミラーの同期が、47%、91% と進み、ミラー完了時には 100% 同期したことを示しています。Copy to Clipboard Copied! Toggle word wrap Toggle overflow ミラー完了は、システムログに記録されます:May 10 14:52:52 doc-07 [19402]: Monitoring mirror device vg001-mirrorlv for events May 10 14:55:00 doc-07 lvm[19402]: vg001-mirrorlv is now in-sync
May 10 14:52:52 doc-07 [19402]: Monitoring mirror device vg001-mirrorlv for events May 10 14:55:00 doc-07 lvm[19402]: vg001-mirrorlv is now in-syncCopy to Clipboard Copied! Toggle word wrap Toggle overflow lvsに-o +devicesのオプションを併せてを使用すると、ミラーの設定を表示することができます。これには、どのデバイスがミラーレッグを構成しているかが含まれます。この例では、論理ボリュームが2つのリニアイメージと1つのログで構成されていることがわかります。Copy to Clipboard Copied! Toggle word wrap Toggle overflow lvsのseg_pe_rangesオプションを使用すると、データレイアウトを表示することができます。このオプションを使用して、レイアウトに適切な冗長性があることを検証することが可能です。このコマンドのアウトプットは、lvcreateおよびlvresizeのコマンドが入力として受け取るのと同一のフォーマットでPE 範囲を表示します。Copy to Clipboard Copied! Toggle word wrap Toggle overflow
注記
LVMミラー化ボリュームのいずれかのレッグに障害が発生した際の回復についての情報は、「LVM ミラー障害からの回復」 をご覧ください。
第7章 LVM トラブルシューティング
リンクのコピーリンクがクリップボードにコピーされました!
この章では、様々な LVM 問題のトラブルシューティングについて説明します。
7.1. トラブルシューティング診断
リンクのコピーリンクがクリップボードにコピーされました!
コマンドが期待通りに機能しない場合は、以下の方法で診断情報を収集できます:
- 任意のコマンドに
-v、-vv、-vvv、-vvvvのいずれかの引数を使用して、出力の詳細レベルを徐々に高くしてゆくことができます - 問題が論理ボリュームのアクティブ化に関連している場合は、設定ファイルの「log」セクションで activation = 1 とセットして、
-vvvv引数を付けてコマンドを実行します。この出力を検証し終わった後には、このパラメーターを 0 にリセットして、低メモリー状況で起こり得るマシンのロッキング問題を回避します。 lvmdumpコマンドを実行すると、診断目的の情報ダンプを提供します。詳細はlvmdump(8) man ページでご覧ください。- 追加のシステム情報を得るには、
lvs -v、pvs -a、またはdmsetup info -cのコマンドを実行します。 /etc/lvm/backupファイル内の最後のメタデータバックアップと/etc/lvm/archiveファイル内のアーカイブバージョンを検証します。- Check the current configuration information by running the
lvmconfigcommand. - どのデバイスが物理ボリュームを持っているかの記録を調べるために
/etc/lvmディレクトリ内の.cacheファイルをチェックします。
7.2. 障害の発生したデバイスの情報表示
リンクのコピーリンクがクリップボードにコピーされました!
lvs か vgs コマンドに -P 引数を使用すると、他の方法では出力に表示されないような障害ボリュームに関する情報を表示することができます。この引数は、メタデータが内部で完全に一貫していない場合でも、一部の操作を許可します。例えば、ボリュームグループ vg を構成するデバイスの1つに障害が発生した場合、vgs コマンドで以下のような出力が表示される場合があります。
vgs -o +devices Volume group "vg" not found
# vgs -o +devices
Volume group "vg" not found
vgs コマンドで -P オプションを指定すると、ボリュームグループはまだ使用不可ですが、障害のあるデバイスに関する、より多く情報を確認することができます。
この例では、障害デバイスはボリュームグループ内のリニアとストライプの両方の論理ボリュームの障害の原因になっています。
-P 引数を付けない lvs コマンドでは、以下のような出力が表示されます。
lvs -a -o +devices Volume group "vg" not found
# lvs -a -o +devices
Volume group "vg" not found
-P 引数を使用すると、障害の発生した論理ボリュームが表示されます。
以下の例では、ミラー化論理ボリュームの1つのレッグに障害が発生した場合における、
-P 引数を指定した pvs と lvs コマンドの出力を示しています。
7.3. LVM ミラー障害からの回復
リンクのコピーリンクがクリップボードにコピーされました!
This section provides an example of recovering from a situation where one leg of an LVM mirrored volume fails because the underlying device for a physical volume goes down and the
mirror_log_fault_policy parameter is set to remove, requiring that you manually rebuild the mirror. For information on setting the mirror_log_fault_policy parameter, see 「ミラー化論理ボリュームの障害ポリシー」.
ミラーレッグに障害が発生すると、LVM はミラー化ボリュームをリニアボリュームに変換します。このボリュームは、以前と同様に動作を継続しますが、ミラー化による冗長性はありません。この時点で、代替物理デバイスとして使用し、ミラーを再構築するために新たなディスクデバイスをシステムに追加することができます。
以下のコマンドは、ミラー用に使用される物理ボリューム群を作成します。
以下のコマンドはボリュームグループ
vg とミラー化ボリューム groupfs を作成します。
lvs コマンドを使用すると、ミラー化ボリュームのレイアウトとミラーレッグ用に配下のデバイスとミラーログを確認できます。最初の例ではミラーは完全には同期化されていないことに注意してください。Copy% フィールドが 100.00 に なるまで待ってから継続する必要があります。
この例では、ミラーのプライマリレッグ
/dev/sda1 に障害が発生しています。ミラー化 ボリュームへの書き込みアクティビティーはいずれも LVM がミラーの障害を検知する結果となります。 これが発生すると、LVM はミラーを単一のリニアボリュームに変換します。この場合は、この変換をトリガーするために、dd コマンドを実行します。
dd if=/dev/zero of=/dev/vg/groupfs count=10 10+0 records in 10+0 records out
# dd if=/dev/zero of=/dev/vg/groupfs count=10
10+0 records in
10+0 records out
lvs コマンドを使用して、デバイスが現在リニアデバイスであることを確認することができます。障害が発生したディスクが原因で I/O エラーが発生します。
この時点では、論理ボリュームは使用することができるはずですが、ミラーの冗長性がなくなります。
ミラー化ボリュームを再構築するには、破損したボリュームを交換して、物理ボリュームを再作成します。新規ディスクに交換せずに同じディスクを使用すると、
pvcreate コマンドを実行した時に、"inconsistent" の警告が 表示されます。この警告が表示されないようにするには、vgreduce --removemissing のコマンドを実行してください。
次に、新規物理ボリュームでオリジナルボリュームグループを拡張します。
リニアボリュームが元のミラー状態に戻るように変換します。
lvconvert -m 1 /dev/vg/groupfs /dev/sdi1 /dev/sdb1 /dev/sdc1 Logical volume mirror converted.
# lvconvert -m 1 /dev/vg/groupfs /dev/sdi1 /dev/sdb1 /dev/sdc1
Logical volume mirror converted.
lvs コマンドを使用すると、ミラーが復元したことを確認できます。
7.4. 物理ボリュームメタデータの復元
リンクのコピーリンクがクリップボードにコピーされました!
物理ボリュームのボリュームグループメタデータが誤って上書きされたり、破棄されたりした場合は、メタデータエリアが正しくないこと、またはシステムが特定の UUID を持つ物理ボリュームを見つけることができないことを示すエラーメッセージが出ます。物理ボリュームのデータを復元するには、紛失したメタデータと同じ UUID を指定して、物理ボリューム上に新規のメタデータエリアを書き込みます。
警告
機能している LVM 論理ボリュームについては、この手順を試みないでください。間違った UUID を指定するとデータ損失の原因となります。
以下の例では、メタデータエリアが欠如していたり、破損している場合に表示される出力の種類を示しています。
上書きされている物理ボリュームの UUID は、
/etc/lvm/archive ディレクトリを 開けば見つけることができます。そのボリュームの最後の有効なアーカイブ化した LVM メタデータの VolumeGroupName_xxxx.vg ファイルを確認します。
別の方法としては、そのボリュームを停止して、
partial (-P) 引数をセットすると欠如/破損した物理ボリュームの UUID を見つけることができます。
pvcreate コマンドで、--uuid と --restorefile 引数を使用して、物理ボリュームの復元をします。以下の例では、/dev/sdh1 デバイスを上記の UUID (FmGRh3-zhok-iVI8-7qTD-S5BI-MAEN-NYM5Sk) を持つ物理ボリュームとしてラベルを付けます。このコマンドがボリュームグループ用の最も最近の正しいアーカイブのメタデータ VG_00050.vg に含まれているメタデータ情報で ボリュームグループラベルを復元します。restorefile 引数は、ボリュームグループ上の古いものと互換性のある新規物理ボリュームを作るように pvcreate コマンドに指示をして、新規のメタデータが古い物理ボリュームが含んでいたデータの場所に配置されないように確認します。(これは、例えば、複製元の pvcreate コマンドが、メタデータの配置を制御をするコマンドライン引数を使用していた場合や、物理ボリュームが当初、異なるデフォルトを使用するソフトウェアの異なるバージョンを使用して作成されていた場合などに発生する可能性があります)。pvcreate コマンドは LVM メタデータ領域のみを上書きし、既存のデータ領域には影響を与えません。
pvcreate --uuid "FmGRh3-zhok-iVI8-7qTD-S5BI-MAEN-NYM5Sk" --restorefile /etc/lvm/archive/VG_00050.vg /dev/sdh1 Physical volume "/dev/sdh1" successfully created
# pvcreate --uuid "FmGRh3-zhok-iVI8-7qTD-S5BI-MAEN-NYM5Sk" --restorefile /etc/lvm/archive/VG_00050.vg /dev/sdh1
Physical volume "/dev/sdh1" successfully created
その後に、
vgcfgrestore コマンドを使用して、ボリュームグループのメタデータを復元することができます。
vgcfgrestore VG Restored volume group VG
# vgcfgrestore VG
Restored volume group VG
これで論理ボリュームが表示できるようになります。
lvs -a -o +devices LV VG Attr LSize Origin Snap% Move Log Copy% Devices stripe VG -wi--- 300.00G /dev/sdh1 (0),/dev/sda1(0) stripe VG -wi--- 300.00G /dev/sdh1 (34728),/dev/sdb1(0)
# lvs -a -o +devices
LV VG Attr LSize Origin Snap% Move Log Copy% Devices
stripe VG -wi--- 300.00G /dev/sdh1 (0),/dev/sda1(0)
stripe VG -wi--- 300.00G /dev/sdh1 (34728),/dev/sdb1(0)
以下のコマンドはボリュームをアクティブ化してそのアクティブになったボリュームを表示します。
オンディスク LVM メタデータが、それを書き換えるデータと同じ容量である場合、このコマンドは物理ボリュームを復元できます。メタデータの書き換えがメタデータエリアを越えた場合、ボリューム上のデータは影響を受ける可能性があります。そのデータを復元するには、
fsck コマンドを使用すると良いでしょう。
7.5. 紛失した物理ボリュームの入れ替え
リンクのコピーリンクがクリップボードにコピーされました!
物理ボリュームに障害が発生した場合、あるいは交換の必要がある場合、「物理ボリュームメタデータの復元」 で説明したように、物理ボリュームメタデータを復元するのと同じ手順に従って、既存ボリュームグループ内の紛失した物理ボリュームと交換する新しい物理ボリュームにラベルを付けることができます。
vgdisplay コマンドで --partial と --verbose 引数を使用すると、すでに存在しない物理ボリュームの UUID およびサイズを表示することができます。もう1つ同じサイズの物理ボリュームを置き換えたい場合は、pvcreate コマンドで --restorefile と --uuid 引数を使用して、紛失した物理ボリュームと同じ UUID を持つ新規デバイスを初期化することができます。その後、vgcfgrestore コマンドを使用してボリュームグループのメタデータを復元します。
7.6. 紛失した物理ボリュームのボリュームグループからの削除
リンクのコピーリンクがクリップボードにコピーされました!
物理ボリュームが無くなった場合、ボリュームグループ内の残りの物理ボリュームをアクティブ化するには、
vgchange コマンドで --partial 引数を使用します。その物理ボリュームを使用していた論理ボリュームのすべてをボリュームグループから取り除くには vgreduce コマンドで --removemissing 引数を使用します。
vgreduce コマンドで --test 引数を使用することで、何を破棄しようとしているのかを先に検証することを推奨します。
ほとんどの LVM 操作と同じく、
vgcfgrestore コマンドを直後に使用して、ボリュームグループメタデータをその以前の状態に戻すならば、ある意味で、vgreduce コマンドは反転可能です。例えば、--test 引数なしで vgreduce コマンドで、--removemissing 引数を使用して、保存するつもりだった論理ボリュームを削除してしまった場合、まだその物理ボリュームの入れ替えは可能であり、vgcfgrestore コマンドを使用して、ボリュームグループを以前の状態に戻すことができます。
7.7. 論理ボリュームでの不十分な空きエクステント
リンクのコピーリンクがクリップボードにコピーされました!
論理ボリュームの作成時に、"Insufficient free extents" と言うエラーメッセージが表示されることがあります。これは
vgdisplay や vgs のコマンドの出力に基づき十分なエクステントがあると思っている時でも発生することがあります。その理由はこれらのコマンドが第 2 小数点まで四捨五入して人間に認識可能な出力を提供するからです。実際のサイズを指定するには、物理ボリュームのサイズ決定にバイトの倍数を使用せずに、空き物理エクステントカウントを使用します。
vgdisplay コマンドの出力には、デフォルトで、空き物理エクステントを示す以下のような行が含まれます。
vgdisplay --- Volume group --- ... Free PE / Size 8780 / 34.30 GB
# vgdisplay
--- Volume group ---
...
Free PE / Size 8780 / 34.30 GB
別の方法として、
vgs コマンドで vg_free_countと vg_extent_count 引数を使用して、空きエクステントと合計エクステント数を表示します。
vgs -o +vg_free_count,vg_extent_count VG #PV #LV #SN Attr VSize VFree Free #Ext testvg 2 0 0 wz--n- 34.30G 34.30G 8780 8780
# vgs -o +vg_free_count,vg_extent_count
VG #PV #LV #SN Attr VSize VFree Free #Ext
testvg 2 0 0 wz--n- 34.30G 34.30G 8780 8780
With 8780 free physical extents, you can enter the following command, using the lower-case l argument to use extents instead of bytes:
lvcreate -l8780 -n testlv testvg
# lvcreate -l8780 -n testlv testvg
これが、ボリュームグループ内のすべてのエクステントを使用します。
vgs -o +vg_free_count,vg_extent_count VG #PV #LV #SN Attr VSize VFree Free #Ext testvg 2 1 0 wz--n- 34.30G 0 0 8780
# vgs -o +vg_free_count,vg_extent_count
VG #PV #LV #SN Attr VSize VFree Free #Ext
testvg 2 1 0 wz--n- 34.30G 0 0 8780
別の方法として、
lvcreate コマンドで -l 引数を使用して、ボリュームグループ内の残りの空き領域のパーセント指定で使用できる論理ボリュームを拡大することができます。詳しくは、「リニア論理ボリュームの作成」 をご覧ください。
7.8. Duplicate PV Warnings for Multipathed Devices
リンクのコピーリンクがクリップボードにコピーされました!
When using LVM with multipathed storage, some LVM commands (such as
vgs or lvchange) may display messages such as the following when listing a volume group or logical volume.
Found duplicate PV GDjTZf7Y03GJHjteqOwrye2dcSCjdaUi: using /dev/dm-5 not /dev/sdd Found duplicate PV GDjTZf7Y03GJHjteqOwrye2dcSCjdaUi: using /dev/emcpowerb not /dev/sde Found duplicate PV GDjTZf7Y03GJHjteqOwrye2dcSCjdaUi: using /dev/sddlmab not /dev/sdf
Found duplicate PV GDjTZf7Y03GJHjteqOwrye2dcSCjdaUi: using /dev/dm-5 not /dev/sdd
Found duplicate PV GDjTZf7Y03GJHjteqOwrye2dcSCjdaUi: using /dev/emcpowerb not /dev/sde
Found duplicate PV GDjTZf7Y03GJHjteqOwrye2dcSCjdaUi: using /dev/sddlmab not /dev/sdf
After providing information on the root cause for these warnings, this section describes how to address this issue in the following two cases.
- The two devices displayed in the output are both single paths to the same device
- The two devices displayed in the output are both multipath maps
7.8.1. Root Cause of Duplicate PV Warning
リンクのコピーリンクがクリップボードにコピーされました!
With a default configuration, LVM commands will scan for devices in
/dev and check every resulting device for LVM metadata. This is caused by the default filter in the /etc/lvm/lvm.conf, which is as follows:
filter = [ "a/.*/" ]
filter = [ "a/.*/" ]
When using Device Mapper Multipath or other multipath software such as EMC PowerPath or Hitachi Dynamic Link Manager (HDLM), each path to a particular logical unit number (LUN) is registered as a different SCSI device, such as
/dev/sdb or /dev/sdc. The multipath software will then create a new device that maps to those individual paths, such as /dev/mapper/mpath1 or /dev/mapper/mpatha for Device Mapper Multipath, /dev/emcpowera for EMC PowerPath, or /dev/sddlmab for Hitachi HDLM. Since each LUN has multiple device nodes in /dev that point to the same underlying data, they all contain the same LVM metadata and thus LVM commands will find the same metadata multiple times and report them as duplicates.
These duplicate messages are only warnings and do not mean the LVM operation has failed. Rather, they are alerting the user that only one of the devices has been used as a physical volume and the others are being ignored. If the messages indicate the incorrect device is being chosen or if the warnings are disruptive to users, then a filter can be applied to search only the necessary devices for physical volumes, and to leave out any underlying paths to multipath devices.
7.8.2. Duplicate Warnings for Single Paths
リンクのコピーリンクがクリップボードにコピーされました!
The following example shows a duplicate PV warning in which the duplicate devices displayed are both single paths to the same device. In this case, both
/dev/sdd and /dev/sdf can be found under the same multipath map in the output to the multipath -ll command.
Found duplicate PV GDjTZf7Y03GJHjteqOwrye2dcSCjdaUi: using **/dev/sdd** not **/dev/sdf**
Found duplicate PV GDjTZf7Y03GJHjteqOwrye2dcSCjdaUi: using **/dev/sdd** not **/dev/sdf**
To prevent this warning from appearing, you can configure a filter in the
/etc/lvm/lvm.conf file to restrict the devices that LVM will search for metadata. The filter is a list of patterns that will be applied to each device found by a scan of /dev (or the directory specified by the dir keyword in the /etc/lvm/lvm.conf file). Patterns are regular expressions delimited by any character and preceded by a (for accept) or r (for reject). The list is traversed in order, and the first regex that matches a device determines if the device will be accepted or rejected (ignored). Devices that don’t match any patterns are accepted. For general information on LVM filters, see 「フィルターを使用した LVM デバイススキャンの制御」.
The filter you configure should include all devices that need to be checked for LVM metadata, such as the local hard drive with the root volume group on it and any multipathed devices. By rejecting the underlying paths to a multipath device (such as
/dev/sdb, /dev/sdd, and so on) you can avoid these duplicate PV warnings, since each unique metadata area will only be found once on the multipath device itself.
The following examples show filters that will avoid duplicate PV warnings due to multiple storage paths being available.
- This filter accepts the second partition on the first hard drive (
/dev/sdaand any device-mapper-multipath devices, while rejecting everything else.filter = [ "a|/dev/sda2$|", "a|/dev/mapper/mpath.*|", "r|.*|" ]
filter = [ "a|/dev/sda2$|", "a|/dev/mapper/mpath.*|", "r|.*|" ]Copy to Clipboard Copied! Toggle word wrap Toggle overflow - This filter accepts all HP SmartArray controllers and any EMC PowerPath devices.
filter = [ "a|/dev/cciss/.*|", "a|/dev/emcpower.*|", "r|.*|" ]
filter = [ "a|/dev/cciss/.*|", "a|/dev/emcpower.*|", "r|.*|" ]Copy to Clipboard Copied! Toggle word wrap Toggle overflow - This filter accepts any partitions on the first IDE drive and any multipath devices.
filter = [ "a|/dev/hda.*|", "a|/dev/mapper/mpath.*|", "r|.*|" ]
filter = [ "a|/dev/hda.*|", "a|/dev/mapper/mpath.*|", "r|.*|" ]Copy to Clipboard Copied! Toggle word wrap Toggle overflow
注記
When adding a new filter to the
/etc/lvm/lvm.conf file, ensure that the original filter is either commented out with a # or is removed.
Once a filter has been configured and the
/etc/lvm/lvm.conf file has been saved, check the output of these commands to ensure that no physical volumes or volume groups are missing.
pvscan vgscan
# pvscan
# vgscan
You can also test a filter on the fly, without modifying the
/etc/lvm/lvm.conf file, by adding the --config argument to the LVM command, as in the following example.
lvs --config 'devices{ filter = [ "a|/dev/emcpower.*|", "r|.*|" ] }'
# lvs --config 'devices{ filter = [ "a|/dev/emcpower.*|", "r|.*|" ] }'注記
Testing filters using the
--config argument will not make permanent changes to the server's configuration. Make sure to include the working filter in the /etc/lvm/lvm.conf file after testing.
After configuring an LVM filter, it is recommended that you rebuild the
initrd device with the dracut command so that only the necessary devices are scanned upon reboot.
7.8.3. Duplicate Warnings for Multipath Maps
リンクのコピーリンクがクリップボードにコピーされました!
The following examples show a duplicate PV warning for two devices that are both multipath maps. In these examples we are not looking at two different paths, but two different devices.
Found duplicate PV GDjTZf7Y03GJHjteqOwrye2dcSCjdaUi: using **/dev/mapper/mpatha** not **/dev/mapper/mpathc**
Found duplicate PV GDjTZf7Y03GJHjteqOwrye2dcSCjdaUi: using **/dev/mapper/mpatha** not **/dev/mapper/mpathc**
Found duplicate PV GDjTZf7Y03GJHjteqOwrye2dcSCjdaUi: using **/dev/emcpowera** not **/dev/emcpowerh**
Found duplicate PV GDjTZf7Y03GJHjteqOwrye2dcSCjdaUi: using **/dev/emcpowera** not **/dev/emcpowerh**
This situation is more serious than duplicate warnings for devices that are both single paths to the same device, since these warnings often mean that the machine has been presented devices which it should not be seeing (for example, LUN clones or mirrors). In this case, unless you have a clear idea of what devices should be removed from the machine, the situation could be unrecoverable. It is recommended that you contact Red Hat Technical Support to address this issue.
第8章 LVM GUI での LVM 管理
リンクのコピーリンクがクリップボードにコピーされました!
In addition to the Command Line Interface (CLI), LVM provides a Graphical User Interface (GUI) which you can use to configure LVM logical volumes. You can open this utility by typing
system-config-lvm. The LVM chapter of the Storage Administration Guide provides step-by-step instructions for configuring an LVM logical volume using this utility.
付録A デバイスマッパー
リンクのコピーリンクがクリップボードにコピーされました!
デバイスマッパーとは、ボリューム管理用のフレームワークを提供するカーネルドライバーです。これは論理ボリュームとして使用可能な、マップされたデバイスを作成する一般的な方法を提供します。ボリュームグループやメタデータ形式を具体的に認識するものではありません。
デバイスマッパーは多くの高度技術のための土台を提供します。LVM の他にも、デバイスマッパーマルチパスと
dmraid コマンドがデバイスマッパーを使用します。デバイスマッパーに対するアプリケーションインターフェースは ioctl システムコールです。ユーザーインターフェースは dmsetup コマンドです。
LVM 論理ボリュームは、デバイスマッパーを使用してアクティブ化されます。それぞれの論理ボリュームは、マップされたデバイスに変換され、それぞれのセグメントが、そのデバイスを記述するマッピングテーブル内の行に変換されます。デバイスマッパーはリニアマッピング、ストライプ化マッピング、およびエラーマッピングを含む各種のマッピングターゲットをサポートします。ディスクがそれぞれ 1 つのリニアマッピングを持つような一対のリニアマッピングを維持する 2 つのディスクを、1 つの論理ボリュームとして連結することができます。LVM2 がボリュームを作成する場合、
dmsetup コマンドでクエリ可能なデバイスマッパーデバイスを配下に作成します。マッピングテーブルのデバイスの形式に関する情報については、「デバイステーブルのマッピング」 をご覧ください。デバイスをクエリするための dmsetup コマンドの使用方法についての情報は、「dmsetup コマンド」 をご覧ください。
A.1. デバイステーブルのマッピング
リンクのコピーリンクがクリップボードにコピーされました!
マップ済デバイスは、サポートされているデバイステーブルのマッピングを使用するデバイスの論理セクターの各範囲をマッピングする方法を指定するテーブルによって定義されます。マッピング済みデバイス用のテーブルは以下の形式の行の一覧から構築されます:
start length mapping [mapping_parameters...]
start length mapping [mapping_parameters...]
デバイスマッパーテーブルの最初の行では、
start パラメーターがゼロ (0) になる必要があります。1 行にある start + length のパラメーター群は、次の行の start と同じでなければなりません。マッピングテーブルの1行に指定されるマッピングパラメーターの種類は、その行に指定される mapping タイプによって決まります。
デバイスマッパー内のサイズは常にセクター内で指定されます (512 バイト)。
1 つのデバイスがデバイスマッパー内でマッピングパラメーターとして指定されている時、そのデバイスはファイルシステム内のデバイス名で参照されるか (例えば、
/dev/hda)、あるいは、major:minor の形式でメジャー番号とマイナー番号で参照されます。major:minor の形式は、パス名ルックアップを回避するので推奨されます。
デバイスのマッピングテーブルの例を以下に示します。このテーブルには 4 つのリニアターゲットがあります。
0 35258368 linear 8:48 65920 35258368 35258368 linear 8:32 65920 70516736 17694720 linear 8:16 17694976 88211456 17694720 linear 8:16 256
0 35258368 linear 8:48 65920
35258368 35258368 linear 8:32 65920
70516736 17694720 linear 8:16 17694976
88211456 17694720 linear 8:16 256
各行の最初の 2 つのパラメーターはセグメントの始点ブロックとセグメントの長さです。次のキーワードはマッピングターゲットであり、この例内のすべてのケースで
linear となります。行のその他の部分は linear ターゲットのパラメーターで構成されます。
The following subsections describe these mapping formats:
- linear
- striped
- mirror
- snapshot and snapshot-origin
- error
- zero
- multipath
- crypt
- device-mapper RAID
- thin
- thin-pool
A.1.1. リニアマッピングターゲット
リンクのコピーリンクがクリップボードにコピーされました!
リニアマッピングターゲットは連続範囲のブロックを別のブロックデバイスにマップします。リニアターゲットの形式は以下のようになります:
start length linear device offset
start length linear device offsetstart- 仮想デバイス内の始点ブロック
length- このセグメントの長さ
device- ブロックデバイス。ファイルシステム内のデバイス名で参照、または
major:minorの形式のメジャー番号とマイナー番号で参照されます。 offset- デバイス上のマッピングの始点オフセット
以下の例では、仮想デバイスの始点ブロックが 0 、セグメントの長さが 1638400、メジャー/ マイナー番号ペアが 8:2、デバイス用の始点オフセットが 41146992 であるリニアターゲットを示しています。
0 16384000 linear 8:2 41156992
0 16384000 linear 8:2 41156992
以下の例では、デバイスパラメーターがデバイス
/dev/hda として指定されたリニアターゲットを示しています。
0 20971520 linear /dev/hda 384
0 20971520 linear /dev/hda 384
A.1.2. ストライプ化マッピングターゲット
リンクのコピーリンクがクリップボードにコピーされました!
ストライプ化マッピングターゲットは物理デバイス全域でストライプ化をサポートします。これは、ストライプの数、ストライプのチャンクサイズ、そしてデバイス名とセクターのペアのリストを引数として取ります。ストライプ化ターゲットの形式は以下のようになります:
start length striped #stripes chunk_size device1 offset1 ... deviceN offsetN
start length striped #stripes chunk_size device1 offset1 ... deviceN offsetN
それぞれのストライプには、
device と offset のパラメーターの 1 つのセットがあります。
start- 仮想デバイス内の始点ブロック
length- このセグメントの長さ
#stripes- 仮想デバイスのストライプの数
chunk_size- 次にスイッチするまでに各ストライプに書き込まれるセクターの数。2 の累乗であり、最低でもカーネルページサイズの大きさでなければなりません。
device- ブロックデバイス。ファイルシステム内のデバイス名で参照、または
major:minorの形式でメジャー番号とマイナーの番号で参照されます。 offset- デバイス上のマッピングの始点オフセット
以下の例では、3 つのストライプと、チャンクサイズ 128 を持つストライプ化ターゲットを示します。
0 73728 striped 3 128 8:9 384 8:8 384 8:7 9789824
0 73728 striped 3 128 8:9 384 8:8 384 8:7 9789824
- 0
- 仮想デバイス内の始点ブロック
- 73728
- このセグメントの長さ
- striped 3 128
- チャンクサイズ 128 ブロックを持つ 3 つのデバイスに渡るストライプ
- 8:9
- 最初のデバイスのメジャー番号:マイナー番号
- 384
- 最初のデバイス上のマッピングの始点オフセット
- 8:8
- 2 つ目のデバイスのメジャー番号:マイナー番号
- 384
- 2 つ目のデバイスのマッピングの始点オフセット
- 8:7
- 3 つ目のデバイスのメジャー番号:マイナー番号
- 9789824
- 3 つ目のデバイス上のマッピングの始点オフセット
以下の例では、2 つのストライプ、256 KiB のチャンク、およびメジャー番号とマイナー番号の代わりにファイルシステム内のデバイス名で指定されたデバイスパラメーターを持つストライプ化ターゲットを示します。
0 65536 striped 2 512 /dev/hda 0 /dev/hdb 0
0 65536 striped 2 512 /dev/hda 0 /dev/hdb 0
A.1.3. ミラーマッピングターゲット
リンクのコピーリンクがクリップボードにコピーされました!
ミラーマッピングターゲットはミラー化した論理デバイスのマッピングをサポートします。ミラー化ターゲットの形式は次のようになります:
start length mirror log_type #logargs logarg1 ... logargN #devs device1 offset1 ... deviceN offsetN
start length mirror log_type #logargs logarg1 ... logargN #devs device1 offset1 ... deviceN offsetNstart- 仮想デバイス内の始点ブロック
length- このセグメントの長さ
log_type- 可能なログタイプとその引数は以下のようになります:
core- ミラーはローカルであり、ミラーログはコアメモリーに保管されます。このログ タイプは 1 - 3 の引数を取ります:regionsize [[
no]sync] [block_on_error] disk- ミラーはローカルであり、ミラーログはディスクに保管されます。ログタイプは 2 - 4 の引数を取ります:logdevice regionsize [[
no]sync] [block_on_error] clustered_core- ミラーはクラスター化されており、ミラーログはコアメモリーに保管されます。このログタイプは 2 - 4 の引数を取ります。regionsize UUID [[
no]sync] [block_on_error] clustered_disk- ミラーはクラスター化されており、ミラーログはディスクに保管されます。このログタイプは 3 - 5 の引数を取ります。logdevice regionsize UUID [[
no]sync] [block_on_error]
LVM は、どのリージョンがミラー (ミラー群) と同期しているかを追跡記録するのに使用する小さなログを維持します。regionsize 引数は、それらのリージョンのサイズを指定します。クラスター化環境では、UUID 引数はミラーログデバイスに関連付けされた一意識別子であるため、ログの状態はクラスター全域で維持できます。オプションの[no]sync引数を使用して、ミラーを "in-sync" か "out-of-sync" として指定することができます。block_on_error引数はミラーに対して、エラーを無視するのではなくエラーに対応するように指示するために使用されます。 #log_args- マッピング内で指定されるログ引数の数
logargs- ミラー用のログ引数。提供されるログ引数の数は
#log-argsパラメーターで指定され、有効なログ引数はlog_typeパラメーターで決定されます。 #devs- ミラー内のレッグ数。デバイスとオフセットは各レッグ用に指定されます。
device- それぞれのレッグ用のブロックデバイス。ファイルシステム内のデバイス名で参照、または
major:minorの形式でメジャーとマイナーの番号で参照。ブロックデバイスとオフセットは各ミラーレッグに対して指定されます。#devsパラメーターで示されます。 offset- デバイス上のマッピングの始点オフセット。ブロックデバイスとオフセットは
#devsで示されるようにそれぞれのミラーレッグ用に指定されます。
以下の例では、ミラーログをディスク上に持つクラスター化ミラー用のミラーマッピングターゲットを示します。
0 52428800 mirror clustered_disk 4 253:2 1024 UUID block_on_error 3 253:3 0 253:4 0 253:5 0
0 52428800 mirror clustered_disk 4 253:2 1024 UUID block_on_error 3 253:3 0 253:4 0 253:5 0
- 0
- 仮想デバイス内の始点ブロック
- 52428800
- このセグメントの長さ
- mirror clustered_disk
- ミラーがクラスター化されており、ディスク上でミラーログを管理することを指定するタイプのログを持つミラーターゲット
- 4
- 4 つのミラーログ引数が続きます
- 253:2
- ログデバイスのメジャー番号:マイナー番号
- 1024
- 何が同期しているかを追跡記録するためにミラーログが使用するリージョンのサイズ
UUID- クラスター全域でログ情報を維持するためのミラーログデバイスの UUID
block_on_error- ミラーはエラーに対応する必要があります
- 3
- ミラー内のレッグ数
- 253:3 0 253:4 0 253:5 0
- ミラーの各レッグを構成しているデバイス用のメジャー番号:マイナー番号およびオフセット
A.1.4. スナップショットとスナップショット複製元のマッピングターゲット
リンクのコピーリンクがクリップボードにコピーされました!
ボリュームの最初の LVM スナップショットを作成する場合に、4つのデバイスマッパーデバイスが使用されます:
linearマッピングを持つデバイスが1つ。ソースボリュームのオリジナルマッピングテーブルを持っています。- ソースボリューム用の COW (copy-on-write) デバイスとして使用される
linearマッピングを持つデバイスが1つ。書き込みを行う度に、オリジナルデータは各スナップショットの COW デバイス内に保存され、その可視コンテンツを不変のまま維持します (COW デバイスが満杯になるまで)。 - 上記の 1 と 2 を組み合わせた
snapshotマッピングを持つ 1 つのデバイス。これは可視のスナップショットボリュームです。 - "複製元" のボリューム (これは、オリジナルソースボリュームで使用されるデバイス番号を使用します)。このテーブルはデバイス #1 からの "snapshot-origin" マッピングに置き換えられます。
これらのデバイスを作成には固定の命名スキームが使用されます。例えば以下のようなコマンドを使用して
base と言う名前の LVM ボリュームを作成し、snap と言う名前のスナップショットをそのボリューム上に作成することができます。
lvcreate -L 1G -n base volumeGroup lvcreate -L 100M --snapshot -n snap volumeGroup/base
# lvcreate -L 1G -n base volumeGroup
# lvcreate -L 100M --snapshot -n snap volumeGroup/base
これによって 4 つのデバイスが作成され、以下のコマンドで表示できます。
snapshot-origin ターゲットのフォーマットは以下のようになります:
start length snapshot-origin origin
start length snapshot-origin originstart- 仮想デバイス内の始点ブロック
length- このセグメントの長さ
origin- スナップショットのベースボリューム
snapshot-origin は通常、それをベースにした1つまたは複数のスナップショットを持っています。読み取りは直接バッキングデバイスにマップされます。それぞれの書き込みには、オリジナルデータが各スナップショットの COW デバイス内に保存されて、COW デバイスが満杯になるまでその可視コンテンツを不変のまま維持します。
snapshot ターゲットの形式は以下のようになります:
start length snapshot origin COW-device P|N chunksize
start length snapshot origin COW-device P|N chunksizestart- 仮想デバイス内の始点ブロック
length- このセグメントの長さ
origin- スナップショットのベースボリューム
COW-device- 変更されたデータチャンクが保存されるデバイス
- P|N
- P (Persistent) または N (Not persistent) は、スナップショットが再起動後に維持されるかどうかを示します。一時的なスナップショット (N) には、多くのメタデータをディスク上に保存できません。それはカーネルによってメモリー内に保存できます。
chunksize- COW デバイスに保存されるデータの変更したチャンクのセクターサイズ
次の例では、複製元デバイスが 254:11 の
snapshot-origin ターゲットを示しています。
0 2097152 snapshot-origin 254:11
0 2097152 snapshot-origin 254:11
以下の例では、複製元デバイスが 254:11 で、COW デバイスが 254:12 の
snapshot ターゲットを示しています。このスナップショットデバイスは再起動後にも永続し、COW デバイス上に保存されるデータのチャンクサイズは 16 セクターです。
0 2097152 snapshot 254:11 254:12 P 16
0 2097152 snapshot 254:11 254:12 P 16
A.1.5. エラーマッピングターゲット
リンクのコピーリンクがクリップボードにコピーされました!
エラーマッピングターゲットを使用すると、マッピングされたセクターへの I/O オペレーションはいずれも失敗します。
エラーマッピングターゲットはテスト用に使用できます。障害時にデバイスがどのように動作するかをテストするには、1つのデバイスの中に不良セクターがあるデバイスマッピングを1つ作成するか、あるいは、ミラーレッグをスワップアウトして、そのレッグをエラーターゲットに置き換えます。
エラーターゲットは、実際のデバイス上でタイムアウトおよび再試行を回避する方法として、障害のあるデバイスの代わりに使用することができます。エラーターゲットは、障害時に LVM メタデータを再配置している間に中間的ターゲットとして機能します。
error マッピングターゲットは、start と length のパラメーター以外には追加のパラメーターを取りません。
以下の例では、
error ターゲットを示しています。
0 65536 error
0 65536 error
A.1.6. ゼロマッピングターゲット
リンクのコピーリンクがクリップボードにコピーされました!
zero マッピングターゲットは、/dev/zero と同等のブロックデバイスです。このマッピングの読み取り操作はゼロのブロックを返します。このマッピングに書き込まれたデータは破棄されますが、書き込みは成功します。zero マッピングターゲットは start と length パラメーター以外には追加のパラメーターは取りません。
以下の例では、16Tb デバイス用の
zero ターゲットを示しています。
0 65536 zero
0 65536 zero
A.1.7. マルチパスマッピングターゲット
リンクのコピーリンクがクリップボードにコピーされました!
マルチパスマッピングターゲットはマルチパス化したデバイスのマッピングをサポートします。
multipath ターゲットの形式は以下のようになります:
start length multipath #features [feature1 ... featureN] #handlerargs [handlerarg1 ... handlerargN] #pathgroups pathgroup pathgroupargs1 ... pathgroupargsN
start length multipath #features [feature1 ... featureN] #handlerargs [handlerarg1 ... handlerargN] #pathgroups pathgroup pathgroupargs1 ... pathgroupargsN
それぞれのパスグループ用に 1 つのセットの
pathgroupargs パラメーター群があります。
start- 仮想デバイス内の始点ブロック
length- このセグメントの長さ
#features- マルチパス機能の数。その後にその機能が続きます。このパラメーターがゼロであれば、
featureパラメーターは存在せず、次のデバイスマッピングパラメーターは#handlerargsとなります。現在、multipath.confファイルのfeatures属性で設定可能なサポートされている機能が 1 つあります。queue_if_no_pathです。これは、パスがない場合には、マルチパス化したデバイスが I/O 操作をキューに登録するように現在セットされていることを意味します。下記の例では、パスを使用するための試行を設定回数行った後にすべてのパスが失敗とマークされるまでのみ、multipath.confファイルのno_path_retry属性は I/O 操作をキューに登録するようにセットされます。この場合、すべてのパスチェッカーが指定回数失敗するまでマッピングは以下のように表示されます。0 71014400 multipath 1 queue_if_no_path 0 2 1 round-robin 0 2 1 66:128 \ 1000 65:64 1000 round-robin 0 2 1 8:0 1000 67:192 1000
0 71014400 multipath 1 queue_if_no_path 0 2 1 round-robin 0 2 1 66:128 \ 1000 65:64 1000 round-robin 0 2 1 8:0 1000 67:192 1000Copy to Clipboard Copied! Toggle word wrap Toggle overflow すべてのパスチェッカーがチェックに指定回数失敗した後には、マッピングは以下のように表示されるでしょう。0 71014400 multipath 0 0 2 1 round-robin 0 2 1 66:128 1000 65:64 1000 \ round-robin 0 2 1 8:0 1000 67:192 1000
0 71014400 multipath 0 0 2 1 round-robin 0 2 1 66:128 1000 65:64 1000 \ round-robin 0 2 1 8:0 1000 67:192 1000Copy to Clipboard Copied! Toggle word wrap Toggle overflow #handlerargs- ハードウェアハンドラー引数の数です。それらの引数がその後に付きます。ハードウェアハンドラーは、パスグループを切り替える時、または I/O エラーを処理する時に、ハードウェア特有のアクションを実行するために使用されるモジュールを指定します。これがゼロにセットしてある場合は、次のパラメーターは
#pathgroupsとなります。 #pathgroups- パスグループの数です。バスグループとは、マルチパス化したデバイスがロードバランシングを行うパスのセットのことです。それぞれのパスグループに 1 つのセットの
pathgroupargsパラメーターがあります。 pathgroup- 試行する次のパスグループ
pathgroupsargs- 各パスグループは以下の引数で構成されます:
pathselector #selectorargs #paths #pathargs device1 ioreqs1 ... deviceN ioreqsN
pathselector #selectorargs #paths #pathargs device1 ioreqs1 ... deviceN ioreqsNCopy to Clipboard Copied! Toggle word wrap Toggle overflow パスグループ内の各パス用に1つのセットのパス引数群があります。pathselector- 次の I/O オペレーションで使用するのに、このパスグループ内でのパスを決定するために使用するアルゴリズムを指定します。
#selectorargs- マルチパスマッピングでこの引数に従うパスセレクター引数の数。現在、この引数の値は常に 0 (ゼロ) です。
#paths- このパスグループ内のパスの数
#pathargs- このグループ内の各パス用に指定されたパス引数の数。現在、この数は 常に 1 で
ioreqs引数です。 device- パスのブロックデバイス数。
major:minorの形式で、メジャー番号とマイナー番号によって参照されます。 ioreqs- 現在のグループ内の次のパスへ切り替えるまでのこのパスへルーティングする I/O 要求数。
図A.1「マルチパスマッピングターゲット」 2つのパスグループを持つマルチパスターゲットの形式を示します。
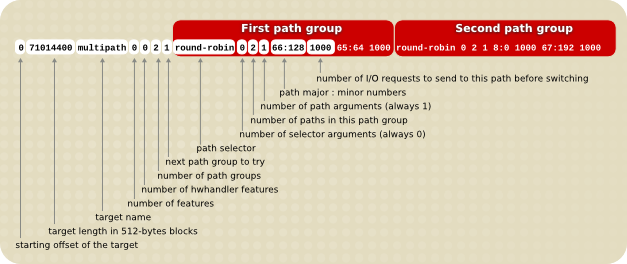
図A.1 マルチパスマッピングターゲット
以下の例では、同じマルチパスデバイスのための純粋なフェイルオーバーターゲットの定義を示しています。このターゲットには、4つのパスグループがあります。マルチパス化したデバイスが一度に1つのパスのみを使用するように、パスグループ毎に1つのパスのみが開いています。
0 71014400 multipath 0 0 4 1 round-robin 0 1 1 66:112 1000 \ round-robin 0 1 1 67:176 1000 round-robin 0 1 1 68:240 1000 \ round-robin 0 1 1 65:48 1000
0 71014400 multipath 0 0 4 1 round-robin 0 1 1 66:112 1000 \
round-robin 0 1 1 67:176 1000 round-robin 0 1 1 68:240 1000 \
round-robin 0 1 1 65:48 1000
次の例では、同じマルチパス化したデバイスを対象とする、完全に拡散した (multibus) ターゲットの定義を示しています。このターゲットでは、すべてのパスを含む1つのパスグループのみが存在しています。このセットアップでは、マルチパスはパスのすべてに渡って均等に負荷を拡散します。
0 71014400 multipath 0 0 1 1 round-robin 0 4 1 66:112 1000 \ 67:176 1000 68:240 1000 65:48 1000
0 71014400 multipath 0 0 1 1 round-robin 0 4 1 66:112 1000 \
67:176 1000 68:240 1000 65:48 1000
マルチパッシングに関する詳細情報は、『DM マルチパスの使用 (Using Device Mapper Multipath)』 をご覧ください。
A.1.8. crypt マッピングターゲット
リンクのコピーリンクがクリップボードにコピーされました!
crypt ターゲットは、指定したデバイスを経由してデータパッシングを暗号化します。これは、kernel Crypto API を使用します。
crypt ターゲットの形式は以下のようになります:
start length crypt cipher key IV-offset device offset
start length crypt cipher key IV-offset device offsetstart- 仮想デバイス内の始点ブロック
length- このセグメントの長さ
cipher- Cipher は、
cipher[-chainmode]-ivmode[:iv options]で構成されます。cipher- 利用できる Cipher は
/proc/crypto(例えば、aes) 内に一覧表示してあります。 chainmode- 常に
cbcを使用します。ebcは 使用しません。これは初期ベクトル (IV) を使いません。 ivmode[:iv options]- IV は暗号化を変更するために使用する初期ベクトルです。IV モードは
plainかessiv:hashです。-plainのivmodeは、セクター番号 (プラス、IV オフセット) を IV として使用します。-essivのivmodeはウォーターマークの弱点を回避するための機能強化です。
key- 暗号化キー、16進法で供給
IV-offset- 初期ベクトル (IV) オフセット
device- ブロックデバイス。ファイルシステム内のデバイス名で参照、または
major:minorの形式のメジャー番号とマイナー番号で参照されます。 offset- デバイス上のマッピングの始点オフセット
以下に
crypt ターゲットの例を示します。
0 2097152 crypt aes-plain 0123456789abcdef0123456789abcdef 0 /dev/hda 0
0 2097152 crypt aes-plain 0123456789abcdef0123456789abcdef 0 /dev/hda 0
A.1.9. The device-mapper RAID Mapping Target
リンクのコピーリンクがクリップボードにコピーされました!
The device-mapper RAID (dm-raid) target provides a bridge from DM to MD. It allows the MD RAID drivers to be accessed using a device-mapper interface. The format of the dm-raid target is as follows
start length raid raid_type #raid_params raid_params #raid_devs metadata_dev0 dev0 [.. metadata_devN devN]
start length raid raid_type #raid_params raid_params #raid_devs metadata_dev0 dev0 [.. metadata_devN devN]
start- 仮想デバイス内の始点ブロック
length- このセグメントの長さ
raid_type- The RAID type can be one of the following
- raid1
- RAID1 mirroring
- raid4
- RAID4 dedicated parity disk
- raid5_la
- RAID5 left asymmetric— rotating parity 0 with data continuation
- raid5_ra
- RAID5 right asymmetric— rotating parity N with data continuation
- raid5_ls
- RAID5 left symmetric— rotating parity 0 with data restart
- raid5_rs
- RAID5 right symmetric— rotating parity N with data restart
- raid6_zr
- RAID6 zero restart— rotating parity 0 (left to right) with data restart
- raid6_nr
- RAID6 N restart— rotating parity N (right to left) with data restart
- raid6_nc
- RAID6 N continue— rotating parity N (right to left) with data continuation
- raid10
- Various RAID10-inspired algorithms selected by further optional arguments— RAID 10: Striped mirrors (striping on top of mirrors)— RAID 1E: Integrated adjacent striped mirroring— RAID 1E: Integrated offset striped mirroring— Other similar RAID10 variants
#raid_params- The number of parameters that follow
raid_params- Mandatory parameters:
chunk_size- Chunk size in sectors. This parameter is often known as "stripe size". It is the only mandatory parameter and is placed first.
Followed by optional parameters (in any order):- [sync|nosync]
- Force or prevent RAID initialization.
- rebuild
idx - Rebuild drive number
idx(first drive is 0). - daemon_sleep
ms - Interval between runs of the bitmap daemon that clear bits. A longer interval means less bitmap I/O but resyncing after a failure is likely to take longer.
- min_recovery_rate
KB/sec/disk - Throttle RAID initialization
- max_recovery_rate
KB/sec/disk - Throttle RAID initialization
- write_mostly
idx - Mark drive index
idxwrite-mostly. - max_write_behind
sectors - See the description of
--write-behindin themdadmman page. - stripe_cache
sectors - Stripe cache size (RAID 4/5/6 only)
- region_size
sectors - The
region_sizemultiplied by the number of regions is the logical size of the array. The bitmap records the device synchronization state for each region. - raid10_copies
#copies - The number of RAID10 copies. This parameter is used in conjunction with the
raid10_formatparameter to alter the default layout of a RAID10 configuration. The default value is 2. - raid10_format near|far|offset
- This parameter is used in conjunction with the
raid10_copiesparameter to alter the default layout of a RAID10 configuration. The default value isnear, which specifies a standard mirroring layout.If theraid10_copiesandraid10_formatare left unspecified, orraid10_copies 2and/orraid10_format nearis specified, then the layouts for 2, 3 and 4 devices are as follows:Copy to Clipboard Copied! Toggle word wrap Toggle overflow The 2-device layout is equivalent to 2-way RAID1. The 4-device layout is what a traditional RAID10 would look like. The 3-device layout is what might be called a 'RAID1E - Integrated Adjacent Stripe Mirroring'.Ifraid10_copies 2andraid10_format farare specified, then the layouts for 2, 3 and 4 devices are as follows:Copy to Clipboard Copied! Toggle word wrap Toggle overflow Ifraid10_copies 2andraid10_format offsetare specified, then the layouts for 2, 3 and 4 devices are as follows:Copy to Clipboard Copied! Toggle word wrap Toggle overflow These layouts closely resemble the layouts fo RAID1E - Integrated Offset Stripe Mirroring'
#raid_devs- The number of devices composing the arrayEach device consists of two entries. The first is the device containing the metadata (if any); the second is the one containing the data.If a drive has failed or is missing at creation time, a '-' can be given for both the metadata and data drives for a given position.
The following example shows a RAID4 target with a starting block of 0 and a segment length of 1960893648. There are 4 data drives, 1 parity, with no metadata devices specified to hold superblock/bitmap info and a chunk size of 1MiB
0 1960893648 raid raid4 1 2048 5 - 8:17 - 8:33 - 8:49 - 8:65 - 8:81
0 1960893648 raid raid4 1 2048 5 - 8:17 - 8:33 - 8:49 - 8:65 - 8:81
The following example shows a RAID4 target with a starting block of 0 and a segment length of 1960893648. there are 4 data drives, 1 parity, with metadata devices, a chunk size of 1MiB, force RAID initialization, and a
min_recovery rate of 20 kiB/sec/disks.
0 1960893648 raid raid4 4 2048 sync min_recovery_rate 20 5 8:17 8:18 8:33 8:34 8:49 8:50 8:65 8:66 8:81 8:82
0 1960893648 raid raid4 4 2048 sync min_recovery_rate 20 5 8:17 8:18 8:33 8:34 8:49 8:50 8:65 8:66 8:81 8:82
A.1.10. The thin and thin-pool Mapping Targets
リンクのコピーリンクがクリップボードにコピーされました!
The format of a thin-pool target is as follows:
start length thin-pool metadata_dev data_dev data_block_size low_water_mark [#feature_args [arg*] ]
start length thin-pool metadata_dev data_dev data_block_size low_water_mark [#feature_args [arg*] ]
start- 仮想デバイス内の始点ブロック
length- このセグメントの長さ
metadata_dev- The metadata device
data_dev- The data device
data_block_size- The data block size (in sectors). The data block size gives the smallest unit of disk space that can be allocated at a time expressed in units of 512-byte sectors. Data block size must be between 64KB (128 sectors) and 1GB (2097152 sectors) inclusive and it must be a mutlipole of 128 (64KB).
low_water_mark- The low water mark, expressed in blocks of size
data_block_size. If free space on the data device drops below this level then a device-mapper event will be triggered which a user-space daemon should catch allowing it to extend the pool device. Only one such event will be sent. Resuming a device with a new table itself triggers an event so the user-space daemon can use this to detect a situation where a new table already exceeds the threshold.A low water mark for the metadata device is maintained in the kernel and will trigger a device-mapper event if free space on the metadata device drops below it. #feature_args- The number of feature arguments
arg- The thin pool feature argument are as follows:
- skip_block_zeroing
- Skip the zeroing of newly-provisioned blocks.
- ignore_discard
- Disable discard support.
- no_discard_passdown
- Do not pass discards down to the underlying data device, but just remove the mapping.
- read_only
- Do not allow any changes to be made to the pool metadata.
- error_if_no_space
- Error IOs, instead of queuing, if no space.
The following example shows a thin-pool target with a starting block in the virtual device of 0, a segment length of 1638400.
/dev/sdc1 is a small metadata device and /dev/sdc2 is a larger data device. The chunksize is 64k, the low_water_mark is 0, and there are no features.
0 16384000 thin-pool /dev/sdc1 /dev/sdc2 128 0 0
0 16384000 thin-pool /dev/sdc1 /dev/sdc2 128 0 0
The format of a thin target is as follows:
start length thin pool_dev dev_id [external_origin_dev]
start length thin pool_dev dev_id [external_origin_dev]
start- 仮想デバイス内の始点ブロック
length- このセグメントの長さ
pool_dev- The thin-pool device, for example
/dev/mapper/my_poolor 253:0 dev_id- The internal device identifier of the device to be activated.
external_origin_dev- An optional block device outside the pool to be treated as a read-only snapshot origin. Reads to unprovisioned areas of the thin target will be mapped to this device.
The following example shows a 1 GiB thinLV that uses
/dev/mapper/pool as its backing store (thin-pool). The target has a starting block in the virtual device of 0 and a segment length of 2097152.
0 2097152 thin /dev/mapper/pool 1
0 2097152 thin /dev/mapper/pool 1
A.2. dmsetup コマンド
リンクのコピーリンクがクリップボードにコピーされました!
dmsetup コマンドはデバイスマッパーとの通信のためのコマンドラインラッパーです。LVM デバイスに関する全般的システム情報については、以下のサブセクションに記載したように、 dmsetup コマンドの info、ls、status、および deps オプションが役に立つでしょう。
dmsetup コマンドのその他のオプションとその機能に関する情報は、 dmsetup(8) の man ページをご覧ください。
A.2.1. dmsetup info コマンド
リンクのコピーリンクがクリップボードにコピーされました!
dmsetup info device コマンドは デバイスマッパーデバイスに関する要約情報を提供します。デバイス名を指定しないと、その出力は現在設定されているすべてのデバイスマッパーデバイスに関する情報となります。デバイスを1つ指定すると、このコマンドはそのデバイスのみについて情報を出します。
dmsetup info コマンドは以下のカテゴリ内で情報を提供します:
Name- The name of the device. An LVM device is expressed as the volume group name and the logical volume name separated by a hyphen. A hyphen in the original name is translated to two hyphens. During standard LVM operations, you should not use the name of an LVM device in this format to specify an LVM device directly, but instead you should use the vg/lv alternative.
State- 可能なデバイスの状態 (state) は、
SUSPENDED、ACTIVE、およびREAD-ONLYとなります。dmsetup suspendコマンドはデバイスをSUSPENDEDの状態にします。デバイスがサスペンドになっている時は、そのデバイスへのすべての I/O オペレーションは停止します。dmsetup resumeコマンドはそのデバイスの状態をACTIVEに復元します。 Read Ahead- 読み取りオペレーションが進行中の開いたファイルを対象にシステムが先読みをするデータブロックの数です。デフォルトでカーネルは自動的に適切な値を選択します。この値を変更するには、
dmsetupコマンドで--readaheadを使用します。 Tables present- このカテゴリ用の可能な状態は
LIVEとINACTIVEです。INACTIVE状態は、テーブルの状態がLIVEとなるようにdmsetup resumeコマンドがデバイス状態をACTIVEに復元する時に入れ替えられるようなテーブルがロードされていることを示します。詳細はdmsetupman ページをご覧ください。 Open count- open reference count はデバイスが開かれた回数を示します。
mountコマンドはデバイスを開きます。 Event number- 現在の受信イベント数。
dmsetup wait nコマンドを発行すると、ユーザーは ’n' 番めのイベントを待つことができ、それが受理されるまでコールをブロックします。 Major, minor- メジャーとマイナーのデバイス番号
Number of targets- デバイスを構成するフラグメントの数です。例えば、3つのディスクに渡るリニアデバイスは3つのターゲットを持つことになります。ディスクの先頭と終点で構成されて、中間を持たないリニアデバイスは2つのターゲットを持ちます。
UUID- デバイスの UUID
以下の例では、
dmsetup info コマンド用の一部の出力を示しています。
A.2.2. dmsetup ls コマンド
リンクのコピーリンクがクリップボードにコピーされました!
マップ済みデバイスのデバイス名は、
dmsetup ls コマンドで一覧表示できます。指定タイプのターゲットを少なくとも1つ持つデバイスは、dmsetup ls --target target_type コマンドを使用して一覧表示できます。 dmsetup ls の他のオペレーションについては、dmsetup man ページをご覧ください。
以下の例では、現在設定されているマップ済みデバイスのデバイス名を一覧表示するコマンドを示します。
以下の例では、現在設定されているミラーマッピングのデバイス名を一覧表示するコマンドを示します。
マルチパスまたはその他のデバイスマッパーデバイス上にスタックされる LVM 設定は複雑でわかりにくい場合があります。
dmsetup ls のコマンドには、以下に示した例のように、デバイス間の依存関係をツリーとして表示する --tree オプションがあります。
A.2.3. dmsetup status コマンド
リンクのコピーリンクがクリップボードにコピーされました!
dmsetup status device コマンドは指定されたデバイス内の各ターゲット用の状態情報を提供します。デバイス名を指定しないと、その出力は現在設定されているすべてのデバイスマッパーデバイスに関する情報となります。dmsetup status --target target_type コマンドを使用すると、1つの指定されたタイプの最低でも1つのターゲットを持つデバイスのみの状態を一覧表示することができます。
以下の例では、現在設定されているすべてのマップ済みデバイス内のターゲットの状態を一覧表示するコマンドを示しています。
A.2.4. dmsetup deps コマンド
リンクのコピーリンクがクリップボードにコピーされました!
dmsetup deps device コマンドは、指定デバイスのマッピングテーブルによって参照されるデバイス用の (メジャー/マイナー) ペアの一覧を提供します。デバイス名を指定しないと、その出力は現在設定済のすべてのデバイスマッパーデバイスに関する情報になります。
以下の例では、現在設定されているマップ済みデバイスのすべての依存関係を一覧表示するコマンドを示しています。
以下の例では、デバイス
lock_stress-grant--02.1722 の依存関係のみを一覧表示するコマンドを示しています。
dmsetup deps lock_stress-grant--02.1722 3 dependencies : (253, 33) (253, 32) (253, 31)
# dmsetup deps lock_stress-grant--02.1722
3 dependencies : (253, 33) (253, 32) (253, 31)
A.3. デバイスマッパーの udev デバイスマネージャサポート
リンクのコピーリンクがクリップボードにコピーされました!
The primary role of the
udev device manager is to provide a dynamic way of setting up nodes in the /dev directory. The creation of these nodes is directed by the application of udev rules in user space. These rules are processed on udev events sent from the kernel directly as a result of adding, removing or changing particular devices. This provides a convenient and central mechanism for hotplugging support.
udev デバイスマネージャは、実際のノードを作成するだけでなく、ユーザーによる名前付けが可能なシンボリックリンクも作成できます。これにより、ユーザーは独自のカスタマイズされた命名および /dev ディレクトリ内のディレクトリ構造を必要に応じて自由に選択できるようになります。
各
udev イベントには、処理中のデバイスに関する基本情報が格納されています。これには、そのデバイスの名前、属するサブシステム、デバイスのタイプ、使用されているメジャーとマイナーの番号、イベントのタイプなどが含まれます。udev ルール内でもアクセス可能な /sys ディレクトリ内にあるすべての情報にアクセスする可能性があることを考慮すると、ユーザーはこの情報に基づいてシンプルなフィルターを利用し、この情報に基づいて条件付きでルールを実行することができます。
udev デバイスマネージャは、ノードのアクセス権設定の一元化された方法も提供します。ユーザーはカスタマイズされたルールセットを用意に追加し、イベント処理中に入手可能な情報のいずれかのビットによって指定されている任意のデバイスのアクセス権を定義することができます。
udev ルール内に直接プログラムのフックを追加することも可能です。udev デバイスマネージャは、これらのプログラムを呼び出して、イベントを処理するにあたって必要とされる更なる処理を提供することが可能です。また、プログラムは、この処理の結果として、環境変数をエクスポートすることもできます。追加の情報源として、任意の結果を更にルール内で使用することが可能です。
udev ライブラリを使用するソフトウェアは、入手可能なすべての情報とともに、udev イベントを受信および処理することが可能です。このため、処理は、udev デーモンのみにバインドされません。
A.3.1. udev のデバイスマッパーとの統合
リンクのコピーリンクがクリップボードにコピーされました!
Red Hat Enterprise Linux 6 では、デバイスマッパーは
udev 統合に対して直接のサポートを提供します。これによって、デバイスマッパーは、LVM デバイスを含むデバイスマッパーデバイスに関連したすべての udev 処理と同期します。udev デーモンにルールを適用する方式は、デバイスの変更元であるプログラム (dmsetup や LVM など) を使用した並列処理であるため、同期が必要です。このサポートがなかったため、前回の変更イベントの結果、引き続きオープンな udev ルールで処理されたデバイスをユーザーが削除しようとする問題が頻繁に発生していました。この問題は、デバイスに対する変更の間隔が短い場合に特に多く発生していました。
Red Hat Enterprise Linux 6 リリースは、一般的なデバイスマッパーデバイスおよび LVM 向けの
udev ルールを正式にサポートしています。表A.1「デバイスマッパーデバイス向けの udev ルール」 は、/lib/udev/rules.d にインストールされているこれらのルールについてまとめています。
| ファイル名 | 説明 | ||
|---|---|---|---|
10-dm.rules |
| ||
11-dm-lvm.rules |
| ||
13-dm-disk.rules | 全デバイスマッパーデバイスに適用されるルールを格納し、/dev/disk/by-id、/dev/disk/by-uuid、および /dev/disk/by-uuidのディレクトリ内にシンボリックリンクを作成します。 | ||
95-dm-notify.rules | libdevmapper を使用する待機中のプロセスを通知するルールを格納します。(LVM や dmsetup と同様)。以前の全ルールが適用された後で通知が行われ、udev 処理が確実に完了するようにします。通知されたプロセスは、その後で再開します。 | ||
69-dm-lvm-metad.rules | Contains a hook to trigger an LVM scan on any newly appeared block device in the system and do any LVM autoactivation if possible. This supports the lvmetad daemon, which is set with use_lvmetad=1 in the lvm.conf file. The lvmeetad daemon and autoactivation are not supported in a clustered environment. |
12-dm-permissions.rules ファイルを用いて、さらなるカスタマイズされたアクセス権ルールを追加することができます。このファイルは/lib/udev/rules ディレクトリにはインストール されず、/usr/share/doc/device-mapper-version ディレクトリにあります。12-dm-permissions.rules ファイルは、アクセス権設定方法のヒントが記載されたテンプレートで、一例として取り上げられている一部のマッチングルールをベースとしています。ファイルには、一般的な状況の例が記載されています。このファイルを編集して、手動で/etc/udev/rules.d ディレクトリに配置すると、アップデートがあってもそのまま残り、設定が維持されます。
これらのルールは、イベントの処理中に、他のルールによっても使用可能なすべての基本的な変数をセットします。
以下の変数は、10-dm.rules 内でセットされています:
DM_NAME: デバイスマッパーデバイスの名前DM_UUID: デバイスマッパーデバイスのUUIDDM_SUSPENDED: デバイスマッパーデバイスの停止状態DM_UDEV_RULES_VSN:udevルールバージョン (これは主に、前述の変数が。正式なデバイスマッパールールによって直接セットされていることを、他すべてのルールが確認するためのものです)
以下の変数は、
11-dm-lvm.rules で設定されています:
DM_LV_NAME: 論理ボリューム名DM_VG_NAME: ボリュームグループ名DM_LV_LAYER: LVM レイヤー名
12-dm-permissions.rules ファイルに文書化されているように、これらの変数を、12-dm-permissions.rules ファイル内で使用して、特定のデバイスマッパーデバイスのアクセス権を定義することができます。
A.3.2. udev をサポートするコマンドとインターフェース
リンクのコピーリンクがクリップボードにコピーされました!
| コマンド | 説明 |
|---|---|
dmsetup udevcomplete | udev がルールの処理を完了し、待機中のプロセスのロックを解除したことを通知するのに使用されます (95-dm-notify.rules 内の udev ルールの中から呼び出されます)。 |
dmsetup udevcomplete_all | デバッグの目的で使用され、待機中の全プロセスのロックを手動で解除します。 |
dmsetup udevcookies | デバッグの目的で使用され、既存の全クッキー (システム全体のセマフォ) を表示します。 |
dmsetup udevcreatecookie | クッキー (セマフォ) を手動で作成するのに使用されます。これは、単一の同期リソース下で、より多くのプロセスを実行するのに役立ちます。 |
dmsetup udevreleasecookie | その単一の同期クッキー下に置かれるすべてのプロセスに関連した、全 udev 処理に待つのに使用されます。 |
udev 統合をサポートする dmsetup オプションは、以下の通りです。
--udevcookie- udevトランザクションに追加したいすべての dmsetup プロセスを対象に定義する必要があります。
udevcreatecookieおよびudevreleasecookieと併せて使用されます:Copy to Clipboard Copied! Toggle word wrap Toggle overflow --udevcookieオプションを使用する以外には、プロセスの環境に変数を単にエクスポートすることができます。Copy to Clipboard Copied! Toggle word wrap Toggle overflow --noudevrules- udev ルールを無効にします。Nodes/symlinks は、
libdevmapper自体によって作成されます (旧式の方法)。このオプションは、udevが適正に機能しない場合のデバッグを目的としています。 --noudevsyncudevの同期を無効にします。これもデバッグを目的としています。
dmsetup とそのオプション関する情報は、dmsetup(8) の man ページをご覧ください。
LVM コマンドは、
udev の統合に対応した以下のオプションをサポートします。
--noudevrules:dmsetupコマンドにおいて、udevルールを無効にします。--noudevsync:dmsetupコマンドにおいて、udev同期を無効にします。
lvm.conf ファイルには、udev の統合をサポートする以下のオプションが含まれます:
udev_rules: すべての LVM2 コマンドを対象にudev_rulesをグローバルに有効/無効にします。udev_sync: すべての LVM コマンドを対象にudev同期をグローバルに有効/無効にします。
lvm.conf ファイルオプションに関する詳細情報は、lvm.conf ファイルのインラインコメントをご覧ください。
付録B LVM 設定ファイル
リンクのコピーリンクがクリップボードにコピーされました!
LVM は複数の設定ファイルに対応しています。システム起動時に
lvm.conf 設定ファイルが、環境変数 LVM_SYSTEM_DIR によって指定されたディレクトリからロードされます。このディレクトリはデフォルトでは /etc/lvm にセットしてあります。
The
lvm.conf file can specify additional configuration files to load. Settings in later files override settings from earlier ones. To display the settings in use after loading all the configuration files, execute the lvmconfig command.
追加の設定ファイルのロードに関する情報は、「ホストタグ」 をご覧ください。
B.1. LVM 設定ファイル
リンクのコピーリンクがクリップボードにコピーされました!
LVM 設定に使用されるファイルは以下のとおりです。
- /etc/lvm/lvm.conf
- ツールで読み込まれる中央設定ファイル
- etc/lvm/lvm_hosttag.conf
- For each host tag, an extra configuration file is read if it exists:
lvm_hosttag.conf. If that file defines new tags, then further configuration files will be appended to the list of files to read in. For information on host tags, see 「ホストタグ」. - LVM profiles
- An LVM profile is a set of selected customizable configuration settings that can be implemented for specific environments. The settings in an LVM profile can be used to override existing configuration. For information on LVM profiles see 「LVM Profiles」.
LVM 設定ファイルの他にも、LVM を稼働しているシステムには LVM システムセットアップに影響する以下のようなファイルが含まれます。
- /etc/lvm/cache/.cache
- デバイス名フィルターキャッシュファイル (設定可能)
- /etc/lvm/backup/
- ボリュームグループメタデータの自動バックアップ用ディレクトリ (設定可能)
- /etc/lvm/archive/
- ボリュームグループメタデータの自動アーカイブ用ディレクトリ (ディレクトリパスとアーカイブ履歴の範囲に関して設定可能)
- /var/lock/lvm/
- 単一ホストの設定では、並行ツール実行によるメタデータの破損を防止するロックファイルが使用され、クラスターでは、クラスター全域の DLM が使用されます。
B.2. The lvmconfig Command
リンクのコピーリンクがクリップボードにコピーされました!
You can display the current LVM configuration, or save the configuration to a file, with the
lvmconfig command. The lvmconfig command displays the LVM configuration information after loading the /etc/lvm/lvm.conf file and any other configuration files.
There are a variety of features that the
lvmconfig command provides, including the following;
- You can dump the current lvm configuration merged with any tag configuration files.
- You can dump all current configuration settings for which the values differ from the defaults.
- You can dump all new configuration settings introduced in the current LVM version, in a specific LVM version.
- You can dump all profilable configuration settings, either in their entirety or separately for command and metadata profiles. For information on LVM profiles see 「LVM Profiles」.
- You can dump only the configuration settings for a specific version of LVM.
- You can validate the current configuration.
For a full list of supported features and information on specifying the
lvmconfig options, see the lvmconfig man page.
B.3. LVM Profiles
リンクのコピーリンクがクリップボードにコピーされました!
An LVM profile is a set of selected customizable configuration settings that can be used to achieve certain characteristics in various environments or uses. Normally, the name of the profile should reflect that environment or use. An LVM profile overrides existing configuration.
There are two groups of LVM profiles that LVM recognizes: command profiles and metadata profiles.
- A command profile is used to override selected configuration settings at the global LVM command level. The profile is applied at the beginning of LVM command execution and it is used throughout the time of the LVM command execution. You apply a command profile by specifying the
--commandprofile ProfileNameoption when executing an LVM command. - A metadata profile is used to override selected configuration settings at the volume group/logical volume level. It is applied independently for each volume group/logical volume that is being processed. As such, each volume group/logical volume can store the profile name used in its metadata so that next time the volume group/logical volume is processed, the profile is applied automatically. If the volume group and any of its logical volumes have different profiles defined, the profile defined for the logical volume is preferred.
- You can attach a metadata profile to a volume group or logical volume by specifying the
--metadataprofile ProfileNameoption when you create the volume group or logical volume with thevgcreateorlvcreatecommand. - You can attach or detach a metadata profile to an existing volume group or logical volume by specifying the
--metadataprofile ProfileNameor the--detachprofileoption of thelvchangeorvgchangecommand. - You can specify the
-o vg_profileand-o lv_profileoutput options of thevgsandlvscommands to display the metadata profile currently attached to a volume group or a logical volume.
The set of options allowed for command profiles and the set of options allowed for metadata profiles are mutually exclusive. The settings that belong to either of these two sets cannot be mixed together and the LVM tools will reject such profiles.
LVM provides a few predefined configuration profiles. The LVM profiles are stored in the
/etc/lvm/profile directory by default. This location can be changed by using the profile_dir setting in the /etc/lvm/lvm.conf file. Each profile configuration is stored in ProfileName.profile file in the profile directory. When referencing the profile in an LVM command, the .profile suffix is omitted.
You can create additional profiles with different values. For this purpose, LVM provides the
command_profile_template.profile file (for command profiles) and the metadata_profile_template.profile file (for metadata profiles) which contain all settings that are customizable by profiles of each type. You can copy these template profiles and edit them as needed.
Alternatively, you can use the
lvmconfig command to generate a new profile for a given section of the profile file for either profile type. The following command creates a new command profile named ProfileName.profile consisting of the settings in section.
lvmconfig --file ProfileName.profile --type profilable-command section
lvmconfig --file ProfileName.profile --type profilable-command section
The following command creates a new metadata profile named ProfileName.profile consisting of the settings in section.
lvmconfig --file ProfileName.profile --type profilable-metadata section
lvmconfig --file ProfileName.profile --type profilable-metadata section
If the section is not specified, all profilable settings are reported.
B.4. サンプルの lvm.conf ファイル
リンクのコピーリンクがクリップボードにコピーされました!
lvm.conf 設定ファイルのサンプルを以下に示します。ご使用のデフォルト設定とは若干異なる可能性があります。
注記
You can generate an
lvm.conf file with all of the default values set and with the comments included by running the following command:
lvmconfig --type default --withcomments
lvmconfig --type default --withcomments
付録C LVM Selection Criteria
リンクのコピーリンクがクリップボードにコピーされました!
As of Red Hat Enterpise Linux release 6.6, many LVM reporting commmands accept the
-S or --select option to define selection criteria for those commands. As of Red Hat Enterprise Linux release 6.7, many processing commands support selection criteria as well. These two categories of commands for which you can define selection criteria are defined as follows:
- Reporting commands — Display only the lines that satisfy the selection criteria. Examples of reporting commands for which you can define selection criteria include
pvs,vgs,lvs,pvdisplay,vgdisplay,lvdisplay,lvm devtypes, anddmsetup info -c.Specifying the-o selectedoption in addition to the-Soption displays all rows and adds a "selected" column that shows 1 if the row matches the selection criteria and 0 if it does not. - Processing commands — Process only the items that satisfy the selection criteria. Examples of processing commands for which you can define selection criteria include
pvchange,vgchange,lvchange,vgimport,vgexport,vgremove, andlvremove.
Selection criteria are a set of statements that use comparison operators to define the valid values for particular fields to display or process. The selected fields are, in turn, combined by logical and grouping operators.
When specifying which fields to display using selection criteria, there is no requirement for the field which is in the selection criteria to be displayed. The selection criteria can contain one set of fields while the output can contain a different set of fields.
- For a listing of available fields for the various LVM components, see 「Selection Criteria Fields」.
- For a listing of allowed operators, see 「Selection Criteria Operators」. The operators are also provided on the lvm(8) man page.
- You can also see full sets of fields and possible operators by specifying the
help(or?) keyword for the-S/--selectoption of a reporting commands. For example, the following command displays the fields and possible operators for thelvscommand.lvs -S help
# lvs -S helpCopy to Clipboard Copied! Toggle word wrap Toggle overflow
For the Red Hat Enterprise Linux 6.8 release, you can specify time values as selection criteria for fields with a field type of
time. For information on specifying time values, see 「Specifying Time Values」.
C.1. Selection Criteria Field Types
リンクのコピーリンクがクリップボードにコピーされました!
The fields you specify for selection criteria are of a particular type. The help output for each field display the field type enclosed in brackets. The following help output examples show the output indicating the field types
string, string_list, number, percent, and size.
表C.1「Selection Criteria Field Types」 describes the selection criteria field types
| Field Type | Description |
|---|---|
| number | Non-negative integer value. |
| size | Floating point value with units, 'm' unit used by default if not specified. |
| percent | Non-negative integer with or without % suffix. |
| string | Characters quoted by ' or " or unquoted. |
| string list | Strings enclosed by [ ] or { } and elements delimited by either "all items must match" or "at least one item must match" operator. |
The values you specify for a field can be the following:
- Concrete values of the field type
- Regular expressions that include any fields of the
stringfield type, such as "+~" operator. - Reserved values; for example -1, unknown, undefined, undef are all keywords to denote an undefined numeric value.
- Defined synonyms for the field values, which can be used in selection criteria for values just as for their original values. For a listing of defined synonyms for field values, see 表C.14「Selection Criteria Synonyms」.
C.2. Selection Criteria Operators
リンクのコピーリンクがクリップボードにコピーされました!
表C.2「Selection Criteria Grouping Operators」 describes the selection criteria grouping operators.
| Grouping Operator | Description |
|---|---|
| ( ) | Used for grouping statements |
| [ ] | Used to group strings into a string list (exact match) |
| { } | Used to group strings into a string list (subset match) |
表C.3「Selection Criteria Comparison Operators」 describes the selection criteria comparison operators and the field types with which they can be used.
| Comparison Operator | Description | Field Type |
|---|---|---|
| =~ | Matching regular expression | regex |
| !~ | Not matching regular expression. | regex |
| = | Equal to | number, size, percent, string, string list |
| != | Not equal to | number, size, percent, string, string list |
| >= | Greater than or equal to | number, size, percent |
| > | Greater than | number, size, percent |
| <= | Less than or equal to | number, size, percent |
| < | Less than | number, size, percent |
表C.4「Selection Criteria Logical and Grouping Operators」 describes the selection criteria logical and grouping operators.
| Logical and Grouping Operator | Description |
|---|---|
| && | All fields must match |
| , | All fields must match (same as &&) |
| || | At least one field must match |
| # | At least one field must match (same as ||) |
| ! | Logical negation |
| ( | Left parenthesis (grouping operator) |
| ) | Right parenthesis (grouping operator) |
| [ | List start (grouping operator) |
| ] | List end (grouping operator) |
| { | List subset start (grouping operator) |
| } | List subset end (grouping operator) |
C.3. Selection Criteria Fields
リンクのコピーリンクがクリップボードにコピーされました!
This section describes the logical and physical volume selection criteria fields you can specify.
表C.5「Logical Volume Fields」 describes the logical volume fields and their field types.
| Logical Volume Field | Description | Field Type |
|---|---|---|
lv_uuid | Unique identifier | string |
lv_name | Name (logical volumes created for internal use are enclosed in brackets) | string |
lv_full_name | Full name of logical volume including its volume group, namely VG/LV | string |
lv_path | Full pathname for logical volume (blank for internal logical volumes) | string |
lv_dm_path | Internal device mapper pathname for logical volume (in /dev/mapper directory) | string |
lv_parent | For logical volumes that are components of another logical volume, the parent logical volume | string |
lv_layout | logical volume layout | string list |
lv_role | logical volume role | string list |
lv_initial_image_sync | Set if mirror/RAID images underwent initial resynchronization | number |
lv_image_synced | Set if mirror/RAID image is synchronized | number |
lv_merging | Set if snapshot logical volume is being merged to origin | number |
lv_converting | Set if logical volume is being converted | number |
lv_allocation_policy | logical volume allocation policy | string |
lv_allocation_locked | Set if logical volume is locked against allocation changes | number |
lv_fixed_minor | Set if logical volume has fixed minor number assigned | number |
lv_merge_failed | Set if snapshot merge failed | number |
lv_snapshot_invalid | Set if snapshot logical volume is invalid | number |
lv_skip_activation | Set if logical volume is skipped on activation | number |
lv_when_full | For thin pools, behavior when full | string |
lv_active | Active state of the logical volume | string |
lv_active_locally | Set if the logical volume is active locally | number |
lv_active_remotely | Set if the logical volume is active remotely | number |
lv_active_exclusively | Set if the logical volume is active exclusively | number |
lv_major | Persistent major number or -1 if not persistent | number |
lv_minor | Persistent minor number or -1 if not persistent | number |
lv_read_ahead | Read ahead setting in current units | size |
lv_size | Size of logical volume in current units | size |
lv_metadata_size | For thin and cache pools, the size of the logical volume that holds the metadata | size |
seg_count | Number of segments in logical volume | number |
origin | For snapshots, the origin device of this logical volume | string |
origin_size | For snapshots, the size of the origin device of this logical volume | size |
data_percent | For snapshot and thin pools and volumes, the percentage full if logical volume is active | percent |
snap_percent | For snapshots, the percentage full if logical volume is active | percent |
metadata_percent | For thin pools, the percentage of metadata full if logical volume is active | percent |
copy_percent | For RAID, mirrors and pvmove, current percentage in-sync | percent |
sync_percent | For RAID, mirrors and pvmove, current percentage in-sync | percent |
raid_mismatch_count | For RAID, number of mismatches found or repaired | number |
raid_sync_action | For RAID, the current synchronization action being performed | string |
raid_write_behind | For RAID1, the number of outstanding writes allowed to writemostly devices | number |
raid_min_recovery_rate | For RAID1, the minimum recovery I/O load in kiB/sec/disk | number |
raid_max_recovery_rate | For RAID1, the maximum recovery I/O load in kiB/sec/disk | number |
move_pv | For pvmove, source physical volume of temporary logical volume created by pvmove | string |
convert_lv | For lvconvert, name of temporary logical volume created by lvconvert | string |
mirror_log | For mirrors, the logical volume holding the synchronization log | string |
data_lv | For thin and cache pools, the logical volume holding the associated data | string |
metadata_lv | For thin and cache pools, the logical volume holding the associated metadata | string |
pool_lv | For thin volumes, the thin pool logical volume for this volume | string |
lv_tags | Tags, if any | string list |
lv_profile | Configuration profile attached to this logical volume | string |
lv_time | Creation time of the logical volume, if known | string |
lv_host | Creation host of the logical volume, if known | string |
lv_modules | Kernel device-mapper modules required for this logical volume | string list |
表C.6「Logical Volume Device Combined Info and Status Fields」 describes the logical volume device fields that combine both logical device info and logical device status.
| Logical Volume Field | Description | Field Type |
|---|---|---|
lv_attr | Selects according to both logical volume device info as well as logical volume status. | string |
表C.7「Logical Volume Device Info Fields」 describes the logical volume device info fields and their field types.
| Logical Volume Field | Description | Field Type |
|---|---|---|
lv_kernel_major | Currently assigned major number or -1 if logical volume is not active | number |
lv_kernel_minor | Currently assigned minor number or -1 if logical volume is not active | number |
lv_kernel_read_ahead | Currently-in-use read ahead setting in current units | size |
lv_permissions | logical volume permissions | string |
lv_suspended | Set if logical volume is suspended | number |
lv_live_table | Set if logical volume has live table present | number |
lv_inactive_table | Set if logical volume has inactive table present | number |
lv_device_open | Set if logical volume device is open | number |
表C.8「Logical Volume Device Status Fields」 describes the logical volume device status fields and their field types.
| Logical Volume Field | Description | Field Type |
|---|---|---|
cache_total_blocks | Total cache blocks | number |
cache_used_blocks | Used cache blocks | number |
cache_dirty_blocks | Dirty cache blocks | number |
cache_read_hits | Cache read hits | number |
cache_read_misses | Cache read misses | number |
cache_write_hits | Cache write hits | number |
cache_write_misses | Cache write misses | number |
lv_health_status | logical volume health status | string |
表C.9「Physical Volume Label Fields」 describes the physical volume label fields and their field types.
| Physical Volume Field | Description | Field Type |
|---|---|---|
pv_fmt | Type of metadata | string |
pv_uuid | Unique identifier | string |
dev_size | Size of underlying device in current units | size |
pv_name | Name | string |
pv_mda_free | Free metadata area space on this device in current units | size |
pv_mda_size | Size of smallest metadata area on this device in current units | size |
表C.5「Logical Volume Fields」 describes the physical volume fields and their field types.
| Physical Volume Field | Description | Field Type |
|---|---|---|
pe_start | Offset to the start of data on the underlying device | number |
pv_size | Size of physical volume in current units | size |
pv_free | Total amount of unallocated space in current units | size |
pv_used | Total amount of allocated space in current units | size |
pv_attr | Various attributes | string |
pv_allocatable | Set if this device can be used for allocation | number |
pv_exported | Set if this device is exported | number |
pv_missing | Set if this device is missing in system | number |
pv_pe_count | Total number of physical extents | number |
pv_pe_alloc_count | Total number of allocated physical extents | number |
pv_tags | Tags, if any | string list |
pv_mda_count | Number of metadata areas on this device | number |
pv_mda_used_count | Number of metadata areas in use on this device | number |
pv_ba_start | Offset to the start of PV Bootloader Area on the underlying device in current units | size |
pv_ba_size | Size of PV Bootloader Area in current units | size |
表C.11「Volume Group Fields」 describes the volume group fields and their field types.
| Volume Group Field | Description | Field Type |
|---|---|---|
vg_fmt | Type of metadata | string |
vg_uuid | Unique identifier | string |
vg_name | Name | string |
vg_attr | Various attributes | string |
vg_permissions | Volume group permissions | string |
vg_extendable | Set if volume group is extendable | number |
vg_exported | Set if volume group is exported | number |
vg_partial | Set if volume group is partial | number |
vg_allocation_policy | Volume group allocation policy | string |
vg_clustered | Set if volume group is clustered | number |
vg_size | Total size of volume group in current units | size |
vg_free | Total amount of free space in current units | size |
vg_sysid | System ID of the volume group indicating which host owns it | string |
vg_systemid | System ID of the volume group indicating which host owns it | string |
vg_extent_size | Size of physical extents in current units | size |
vg_extent_count | Total number of physical extents | number |
vg_free_count | Total number of unallocated physical extents | number |
max_lv | Maximum number of logical volumes allowed in volume group or 0 if unlimited | number |
max_pv | Maximum number of physical volumes allowed in volume group or 0 if unlimited | number |
pv_count | Number of physical volumes | number |
lv_count | Number of logical volumes | number |
snap_count | Number of snapshots | number |
vg_seqno | Revision number of internal metadata — incremented whenever it changes | number |
vg_tags | Tags, if any | string list |
vg_profile | Configuration profile attached to this volume group | string |
vg_mda_count | Number of metadata areas on this volume group | number |
vg_mda_used_count | Number of metadata areas in use on this volume group | number |
vg_mda_free | Free metadata area space for this volume group in current units | size |
vg_mda_size | Size of smallest metadata area for this volume group in current units | size |
vg_mda_copies | Target number of in use metadata areas in the volume group | number |
表C.12「Logical Volume Segment Fields」 describes the logical volume segment fields and their field types.
| Logical Volume Segment Field | Description | Field Type |
|---|---|---|
segtype | Type of logical volume segment | string |
stripes | Number of stripes or mirror legs | number |
stripesize | For stripes, amount of data placed on one device before switching to the next | size |
stripe_size | For stripes, amount of data placed on one device before switching to the next | size |
regionsize | For mirrors, the unit of data copied when synchronizing devices | size |
region_size | For mirrors, the unit of data copied when synchronizing devices | size |
chunksize | For snapshots, the unit of data used when tracking changes | size |
chunk_size | For snapshots, the unit of data used when tracking changes | size |
thin_count | For thin pools, the number of thin volumes in this pool | number |
discards | For thin pools, how discards are handled | string |
cachemode | For cache pools, how writes are cached | string |
zero | For thin pools, if zeroing is enabled | number |
transaction_id | For thin pools, the transaction id | number |
thin_id | For thin volumes, the thin device id | number |
seg_start | Offset within the logical volume to the start of the segment in current units | size |
seg_start_pe | Offset within the logical volume to the start of the segment in physical extents. | number |
seg_size | Size of segment in current units | size |
seg_size_pe | Size of segment in physical extents | size |
seg_tags | Tags, if any | string list |
seg_pe_ranges | Ranges of physical extents of underlying devices in command line format | string |
devices | Underlying devices used with starting extent numbers | string |
seg_monitor | dmeventd monitoring status of the segment | string |
cache_policy | The cache policy (cached segments only) | string |
cache_settings | Cache settings/parameters (cached segments only) | string list |
表C.13「Pysical Volume Segment Fields」 describes the physical volume segment fields and their field types.
| Physical Volume Segment Field | Description | Field Type |
|---|---|---|
pvseg_start | Physical extent number of start of segment | number |
pvseg_size | Number of extents in segment | number |
表C.14「Selection Criteria Synonyms」 lists the synonyms you can use for field values. These synonyms can be used in selection criteria as well as for values just like their original values. In this table, a field value of "" indicates a blank string, which can be matched by specifying
-S 'field_name=""'.
In this table, a field indicated by 0 or 1 indicates a binary value. You can specify a
--binary option for reporting tools which causes binary fields to display 0 or 1 instead of what is indicated in this table as "some text" or "".
| Field | Field Value | Synonyms |
|---|---|---|
pv_allocatable | allocatable | 1 |
pv_allocatable | "" | 0 |
pv_exported | exported | 1 |
pv_exported | "" | 0 |
pv_missing | missing | 1 |
pv_missing | "" | 0 |
vg_extendable | extendable | 1 |
vg_extendable | "" | 0 |
vg_exported | exported | 1 |
vg_exported | "" | 0 |
vg_partial | partial | 1 |
vg_partial | "" | 0 |
vg_clustered | clustered | 1 |
vg_clustered | "" | 0 |
vg_permissions | writeable | rw, read-write |
vg_permissions | read-only | r, ro |
vg_mda_copies | unmanaged | unknown, undefined, undef, -1 |
lv_initial_image_sync | initial image sync | sync, 1 |
lv_initial_image_sync | "" | 0 |
lv_image_synced | image synced | synced, 1 |
lv_image_synce | "" | 0 |
lv_merging | merging | 1 |
lv_merging | "" | 0 |
lv_converting | converting | 1 |
lv_converting | "" | 0 |
lv_allocation_locked | allocation locked | locked, 1 |
lv_allocation_locked | "" | 0 |
lv_fixed_minor | fixed minor | fixed, 1 |
lv_fixed_minor | "" | 0 |
lv_active_locally | active locally | active, locally, 1 |
lv_active_locally | "" | 0 |
lv_active_remotely | active remotely | active, remotely, 1 |
lv_active_remotely | "" | 0 |
lv_active_exclusively | active exclusively | active, exclusively, 1 |
lv_active_exclusively | "" | 0 |
lv_merge_failed | merge failed | failed, 1 |
lv_merge_failed | "" | 0 |
lv_snapshot_invalid | snapshot invalid | invalid, 1 |
lv_snapshot_invalid | "" | 0 |
lv_suspended | suspended | 1 |
lv_suspended | "" | 0 |
lv_live_table | live table present | live table, live, 1 |
lv_live_table | "" | 0 |
lv_inactive_table | inactive table present | inactive table, inactive, 1 |
lv_inactive_table | "" | 0 |
lv_device_open | open | 1 |
lv_device_open | "" | 0 |
lv_skip_activation | skip activation | skip, 1 |
lv_skip_activation | "" | 0 |
zero | zero | 1 |
zero | "" | 0 |
lv_permissions | writeable | rw, read-write |
lv_permissions | read-only | r, ro |
lv_permissions | read-only-override | ro-override, r-override, R |
lv_when_full | error | error when full, error if no space |
lv_when_full | queue | queue when full, queue if no space |
lv_when_full | "" | undefined |
cache_policy | "" | undefined |
seg_monitor | "" | undefined |
lv_health_status | "" | undefined |
C.3.1. Specifying Time Values
リンクのコピーリンクがクリップボードにコピーされました!
When specifying time values for LVM selection, you can use either a standardized time specification format or a more free-form specification, as described in 「Standard time selection format」 and 「Freeform time selection format」.
You can specify the way time values are displayed with the report/time format configuration option in the
/etc/lvm/lvm.conf configuration file. Information on specifying this option is provided in the lvm.conf file.
When specifying time values, you can use the comparison operator aliases
since, after, until, and before, as described in 表C.3「Selection Criteria Comparison Operators」.
C.3.1.1. Standard time selection format
リンクのコピーリンクがクリップボードにコピーされました!
You can specify time values for LVM selection in the following format.
date time timezone
date time timezone
表C.15「Time Specification Formats」 summarizes the formats you can use when specifying these time values.
| Field | Field Value | |||
|---|---|---|---|---|
| date |
| |||
| time |
| |||
| timezone (always with + or - sign) |
|
The full date/time specification is YYYY-MM-DD hh:mm:ss. Users are able to leave date/time parts from right to left. Whenever these parts are left out, a range is assumed automatically with second granularity. For example:
- "2015-07-07 9:51" means range of "2015-07-07 9:51:00" - "2015-07-07 9:51:59"
- "2015-07" means range of "2015-07-01 0:00:00" - "2015-07-31 23:59:59"
- "2015" means range of "2015-01-01 0:00:00" - "2015-12-31 23:59:59"
The following examples show the date/time specification as used in selection criteria.
lvs -S 'time since "2015-07-07 9:51"' lvs -S 'time = "2015-07"" lvs -S 'time = "2015"'
lvs -S 'time since "2015-07-07 9:51"'
lvs -S 'time = "2015-07""
lvs -S 'time = "2015"'
C.3.1.2. Freeform time selection format
リンクのコピーリンクがクリップボードにコピーされました!
You can specify the date/time specification in LVM selection criteria using the following entitles.
- weekday names ("Sunday" - "Saturday" or abbreviated as "Sun" - "Sat")
- labels for points in time ("noon", "midnight")
- labels for a day relative to current day ("today", "yesterday")
- points back in time with relative offset from today (N is a number)
- ( "N" "seconds"/"minutes"/"hours"/"days"/"weeks"/"years" "ago")
- ( "N" "secs"/"mins"/"hrs" ... "ago")
- ( "N" "s"/"m"/"h" ... "ago")
- time specification either in hh:mm:ss format or with AM/PM suffixes
- month names ("January" - "December" or abbreviated as "Jan" - "Dec")
The following examples the show the freeform date/time specificaiton as used in selection criteria.
C.4. Selection Criteria Display Examples
リンクのコピーリンクがクリップボードにコピーされました!
This section provides a series of examples showing how to use selection criteria for LVM display commands. The examples in this section use a system configured with LVM volumes that yield the following output when selection criteria are not used.
The following command displays all logical volumes with "lvol[13]" in their name, using a regular expression to specify this.
lvs -a -o+layout,role -S 'lv_name=~lvol[13]' LV VG Attr LSize Pool Origin Data% Layout Role lvol1 vg Vwi-a-tz-- 1.00g pool 0.00 thin,sparse public lvol3 vg Vwi---tz-k 1.00g pool lvol2 thin,sparse public,snapshot,thinsnapshot
# lvs -a -o+layout,role -S 'lv_name=~lvol[13]'
LV VG Attr LSize Pool Origin Data% Layout Role
lvol1 vg Vwi-a-tz-- 1.00g pool 0.00 thin,sparse public
lvol3 vg Vwi---tz-k 1.00g pool lvol2 thin,sparse public,snapshot,thinsnapshot
The following command displays all logical volumes greater than 500m in size.
The following command displays all logical volumes that include
thin as a logical volume role, indicating that the logical volume is used in constructing a thin pool. This example uses braces ({}) to indicate a subset in the display.
lvs -a -o+layout,role -S 'lv_role={thin}'
LV VG Attr LSize Layout Role
[pool_tdata] vg Twi-ao---- 100.00m linear private,thin,pool,data
[pool_tmeta] vg ewi-ao---- 4.00m linear private,thin,pool,metadata
# lvs -a -o+layout,role -S 'lv_role={thin}'
LV VG Attr LSize Layout Role
[pool_tdata] vg Twi-ao---- 100.00m linear private,thin,pool,data
[pool_tmeta] vg ewi-ao---- 4.00m linear private,thin,pool,metadata
The following command displays all usable top-level logical volumes, which are the logical volumes with a role of "public". If you do not specify braces ({}) in a string list to indicate a subset, it is assumed by default; specifying
lv_role=public is equivalent to specifying lv_role={public}.
The following command displays all logical volumes with a thin layout.
The following command displays all logical volumes with a layout field that matches "sparse,thin" exactly. Note that it is not necessary to specify the string list members for the match to be positive.
The following command displays the logical volume names of the logical volumes that are thin, sparse logical volumes. Note that the list of fields used for selection criteria do not need to be the same as the list of fields to display.
C.5. Selection Criteria Processing Examples
リンクのコピーリンクがクリップボードにコピーされました!
This section provides a series of examples showing how to use selection criteria in commands that process LVM logical volumes.
This example shows the initial configuration of a group of logical volumes, including thin snapshots. Thin snapshots have the "skip activation" flag set by default. This example also includes the logical volume
lvol4 which also has the "skip activation" flag set.
The following command removes the skip activation flag from all logical volmes that are thin snapshots.
lvchange --setactivationskip n -S 'role=thinsnapshot' Logical volume "lvol3" changed.
# lvchange --setactivationskip n -S 'role=thinsnapshot'
Logical volume "lvol3" changed.
The following command shows the configuration of the logical volumes after executing the
lvchange command. Note that the "skip activation" flag has not been unset from the logical volume that is not a thin snapshot.
The following command shows the configuration of the logical volumes after an additional thin origin/snapshot volume has been created.
The following command activates logical volumes that are both thin snapshot volumes and have an origin volume of
lvol2.
If you execute a command on a whole item while specifying selection criteria that match an item from that whole, the entire whole item is processed. For example, if you change a volume group while selecting one or more items from that volume group, the whole volume group is selected. This example selects logical volume
lvol1, which is part of volume group vg. All of the logical volumes in volume group vg are processed.
The following example shows a more complex selection criteria statement. In this example, all logical volumes are tagged with "mytag" if they have a role of origin and are also named lvol[456] or the logical volume size is more than 5g.
lvchange --addtag mytag -S '(role=origin && lv_name=~lvol[456]) || lv_size > 5g' Logical volume "root" changed. Logical volume "lvol5" changed.
# lvchange --addtag mytag -S '(role=origin && lv_name=~lvol[456]) || lv_size > 5g'
Logical volume "root" changed.
Logical volume "lvol5" changed.
付録D LVM オブジェクトタグ
リンクのコピーリンクがクリップボードにコピーされました!
An LVM tag is a word that can be used to group LVM2 objects of the same type together. Tags can be attached to objects such as physical volumes, volume groups, and logical volumes. Tags can be attached to hosts in a cluster configuration.
タグは、コマンドラインで引数 PV、VG、または LV の代わりに表示することができます。混乱を防ぐために、タグには @ を前に付ける必要があります。各タグは、コマンドライン上の位置から想定されるタイプの、そのタグを処理するすべてのオブジェクトに置き換えることによって拡張されます。
Red Hat Enterprise Linux 6.1 リリースでは、LVM タグは、最長 1024 文字の文字列です (旧リリースでは、文字数制限は 128 文字でした)。LVM タグの先頭にハイフンを使用することはできません。
有効なタグには、限定された範囲の文字のみで構成されます。Red Hat Enterprise Linux 6.0 リリースで使用可能な文字は、 [A-Za-z0-9_+.-] です。Red Hat Enterprise Linux 6.1 リリースでは、使用可能な文字の一覧が拡大され、タグには "/"、"="、"!"、":"、"#"、および "&" の文字が使用できるようになりました。
Only objects in a volume group can be tagged. Physical volumes lose their tags if they are removed from a volume group; this is because tags are stored as part of the volume group metadata and that is deleted when a physical volume is removed.
以下のコマンドは、
database タグを持つすべての論理ボリュームを一覧表示します。
lvs @database
lvs @database
The following command lists the currently active host tags.
lvm tags
lvm tags
D.1. オブジェクトタグの追加と削除
リンクのコピーリンクがクリップボードにコピーされました!
物理ボリュームにタグを追加したり、そこからタグを削除したりするには、
pvchange コマンドで --addtag オプションや --deltag オプションを使用します。
ボリュームグループにタグを追加したり、そこからタグを削除するには、
vgchange か、vgcreate コマンドで --addtag や、--deltag オプションを使用します。
論理ボリュームにタグを追加したり、そこからタグを削除するには、
lvchange か、lvcreate コマンドで --addtag や --deltag オプションを使用します。
Red Hat Enterprise Linux 6.1 リリースでは、
pvchange、vgchange、またはlvchange の単一のコマンドで、--addtag および --deltag の引数を複数指定することができます。例えば、以下のコマンドでは、タグ T9 と T10 が削除され、the タグ T13 と T14 がボリュームグループ grant に追加されます。
vgchange --deltag T9 --deltag T10 --addtag T13 --addtag T14 grant
vgchange --deltag T9 --deltag T10 --addtag T13 --addtag T14 grant
D.2. ホストタグ
リンクのコピーリンクがクリップボードにコピーされました!
In a cluster configuration, you can define host tags in the configuration files. If you set
hosttags = 1 in the tags section, a host tag is automatically defined using the machine's host name. This allow you to use a common configuration file which can be replicated on all your machines so they hold identical copies of the file, but the behavior can differ between machines according to the host name.
設定ファイルに関する情報は、付録B LVM 設定ファイルをご覧ください。
各ホストタグには、存在する場合は余分の設定ファイルが読み込まれます (lvm_hosttag.conf)。このファイルが新規タグを定義する場合、更なる設定ファイルが読み取りのためにファイルの一覧に追記されます。
For example, the following entry in the configuration file always defines
tag1, and defines tag2 if the host name is host1.
tags { tag1 { } tag2 { host_list = ["host1"] } }
tags { tag1 { } tag2 { host_list = ["host1"] } }
D.3. タグを使用したアクティブ化の制御
リンクのコピーリンクがクリップボードにコピーされました!
特定の論理ボリュームのみがホスト上でアクティブ化されるように設定ファイルで指定することができます。例えば、以下のエントリはアクティベーション要求 (
vgchange -ay など) のフィルタとして動作して、vg1/lvol0 とホスト上のメタデータ内に database タグを持ついずれかの論理ボリューム、またはボリュームグループのみをアクティブ化します。
activation { volume_list = ["vg1/lvol0", "@database" ] }
activation { volume_list = ["vg1/lvol0", "@database" ] }
いずれかのメタデータタグがマシンのホストタグのいずれかに一致する場合のみに一致する要因となる特別一致記号 "@*" が存在します。
もう一つの例として、クラスター内の各マシンの設定ファイルに以下のエントリがあるような状況を考えてみます。
tags { hosttags = 1 }
tags { hosttags = 1 }
ホスト
db2 上のみで vg1/lvol2 をアクティブ化したい場合は、以下のようにします:
- クラスター内のいずれかのホストから
lvchange --addtag @db2 vg1/lvol2を実行します。 lvchange -ay vg1/lvol2を実行します。
この解決法では、ボリュームグループメタデータの中にホスト名を保存する必要があります。
付録E LVM ボリュームグループメタデータ
リンクのコピーリンクがクリップボードにコピーされました!
ボリュームグループの設定詳細は、メタデータと呼ばれます。デフォルトでは、メタデータの同一のコピーは、ボリュームグループ内のすべての物理ボリュームのすべてのメタデータ領域で管理されます。LVM ボリュームグループメタデータは ASCII として保存されます。
ボリュームグループが多くの物理ボリュームを含む場合、それだけ多くのメタデータの冗長コピーを持つことは効率的ではありません。メタデータのコピー無しで物理ボリュームを作成するには、
pvcreate コマンドで --metadatacopies 0 オプションを使用することで達成できます。物理ボリュームが含むべきメタデータコピーの数を一旦選択すると、後で変更はできません。0 コピーを選択すると、設定変更での更新が 迅速になります。しかし、注意することは、すべてのボリュームグループは常時、メタデータエリア1つを持つ物理ボリュームを最低1つ含む必要があることです (高度な設定を使用してボリュームグループメタデータをファイルシステム内に保存できる場合を除く)。将来、ボリュームグループを分割する予定がある場合は、それぞれのボリュームグループに、最低1つのメタデータが必要となります。
核となるメタデータは ASCII 形式で保存されます。メタデータ領域は循環バッファです。新規のメタデータは古いメタデータに追記され、その開始点へのポインターが更新されます。
メタデータ領域のサイズは、
pvcreate コマンドで --metadatasize オプションを使用して指定することができます。デフォルトのサイズは、数百の物理ボリュームや論理ボリュームを持つボリュームグループには小さすぎる場合があります。
E.1. 物理ボリュームラベル
リンクのコピーリンクがクリップボードにコピーされました!
デフォルトでは、
pvcreate コマンドは 物理ボリュームラベルを 2 番めの 512-byte セクターに配置します。物理ボリュームラベルをスキャンする LVM ツールが 最初の 4 つのセクターをチェックするため、このラベルはオプションとしてその 4 つのセクターのいずれかに配置することができます。物理ボリュームラベルは文字列 LABELONE で始まります。
物理ボリュームラベルに含まれる内容:
- 物理ボリューム UUID
- ブロックデバイスの容量 (バイト)
- データエリアロケーションの NULL-終了一覧
- メタデータエリアロケーションの NULL-終了一覧
メタデータロケーションはオフセットおよびサイズ (バイト) として保存されます。ラベルには、15 ロケーション用のスペースがありますが、LVM ツールは現在3つしか使いません:1つのデータエリアと最大で2つのメタデータエリアです。
E.2. メタデータの内容
リンクのコピーリンクがクリップボードにコピーされました!
ボリュームグループメタデータに含まれる内容:
- それが作成された手段と時期の情報
- ボリュームグループに関する情報
ボリュームグループ情報に含まれる内容:
- 名前と一意識別子
- メタデータが更新される度に増加するバージョン番号
- プロパティ: 読み取り/書き込み? サイズ変更可能?
- 含まれる物理ボリュームと論理ボリュームの数に対する管理制限
- エクステントのサイズ (512 byte として定義されるセクターのユニットで表示)
- ボリュームグループを構成する物理ボリュームの順序なし一覧。それぞれ以下を含みます:
- UUID: 物理ボリュームを格納するブロックデバイスの確認に使用
- プロパティ: 物理ボリュームの割り当て可能性など
- 物理ボリューム内の一番目のエクステントの開始点までのオフセット (セクターで表示)
- エクステントの数
- 論理ボリュームの順序なし一覧。それぞれ以下の要素で構成されています。
- 論理ボリュームセグメントの順序付き一覧。各セグメントに対して、物理ボリュームセグメントまたは論理ボリュームセグメントの順序付き一覧に適用されるマッピングがメタデータに含まれます。
E.3. サンプルのメタデータ
リンクのコピーリンクがクリップボードにコピーされました!
myvg と呼ばれるボリュームグループ用の LVM ボリュームグループメタデータの例を以下に示します。
付録F 改訂履歴
リンクのコピーリンクがクリップボードにコピーされました!
| 改訂履歴 | |||
|---|---|---|---|
| 改訂 10.0-3 | Wed Mar 8 2017 | ||
| |||
| 改訂 10.0-1 | Fri Dec 16 2016 | ||
| |||
| 改訂 9.0-5 | Tue Nov 29 2016 | ||
| |||
| 改訂 9.0-4 | Wed Apr 27 2016 | ||
| |||
| 改訂 9.0-3 | Wed Mar 9 2016 | ||
| |||
| 改訂 8.0-16 | Mon Jul 13 2015 | ||
| |||
| 改訂 8.0-14 | Wed Jul 8 2015 | ||
| |||
| 改訂 8.0-13 | Tue Apr 14 2015 | ||
| |||
| 改訂 7.0-9 | Wed Oct 8 2014 | ||
| |||
| 改訂 7.0-8 | Thu Aug 7 2014 | ||
| |||
| 改訂 6.0-14 | Wed Nov 13 2013 | ||
| |||
| 改訂 6.0-10 | Fri Sep 27 2013 | ||
| |||
| 改訂 5.0-19 | Mon Feb 18 2013 | ||
| |||
| 改訂 5.0-12 | Mon Nov 27 2012 | ||
| |||
| 改訂 4.0-2 | Fri Jun 15 2012 | ||
| |||
| 改訂 3.0-1 | Mon Sep 19 2011 | ||
| |||
| 改訂 2.0-1 | Thu May 19 2011 | ||
| |||
| 改訂 1.0-1 | Wed Nov 10 2010 | ||
| |||
索引
シンボル
- /lib/udev/rules.d ディレクトリ, udev のデバイスマッパーとの統合
- アーカイブファイル, 論理ボリュームのバックアップ
- エクステント
- 割り当て, ボリュームグループの作成, LVM の割り当て
- 定義, ボリュームグループ, ボリュームグループの作成
- オンラインでのデータの再配置, オンラインデータ移動
- キャッシュファイル
- クラスター環境, クラスター化論理ボリュームマネージャ (CLVM), クラスター内での LVM ボリューム作成
- コマンドラインユニット, CLI コマンドの使用
- サイズ変更
- 物理ボリューム, 物理ボリュームのサイズ変更
- シンプロビジョニングされたスナップショットボリューム, シンプロビジョニングされたスナップショットボリューム
- シンプロビジョニングされたスナップショット論理ボリューム
- シンプロビジョニングされた論理ボリューム, シンプロビジョニングされた論理ボリューム (シンボリューム)
- スキャン
- ブロックデバイス, ブロックデバイスのスキャン
- ストライプ化論理ボリューム
- 作成, ストライプ化ボリュームの作成
- 作成例, ストライプ化論理ボリュームの作成
- 定義, ストライプ化論理ボリューム
- 拡張, ストライプ化ボリュームの拡張
- スナップショットボリューム
- 定義, スナップショットボリューム
- スナップショット論理ボリューム
- 作成, スナップショットボリュームの作成
- デバイスのスキャン、フィルター, フィルターを使用した LVM デバイススキャンの制御
- デバイスサイズ、最大, ボリュームグループの作成
- デバイススキャンフィルター, フィルターを使用した LVM デバイススキャンの制御
- デバイスパス名, CLI コマンドの使用
- デバイス特有のファイルがあるディレクトリ, ボリュームグループの作成
- デバイス番号
- マイナー, 永続的なデバイス番号
- メジャー, 永続的なデバイス番号
- 永続的, 永続的なデバイス番号
- データの再配置、オンライン, オンラインデータ移動
- トラブルシューティング, LVM トラブルシューティング
- バックアップ
- ファイル, 論理ボリュームのバックアップ
- メタデータ, 論理ボリュームのバックアップ, ボリュームグループメタデータのバックアップ
- パス名, CLI コマンドの使用
- パーティション
- 複数, ディスク上の複数パーティション
- パーティションタイプ、設定, パーティションタイプの設定
- ファイルシステム
- 論理ボリューム上における拡張, 論理ボリューム上におけるファイルシステムの拡張
- ファイルシステムの拡張
- 論理ボリューム, 論理ボリューム上におけるファイルシステムの拡張
- フィルター, フィルターを使用した LVM デバイススキャンの制御
- フィードバック
- 本マニュアルに関する連絡先情報, フィードバック
- ブロックデバイス
- スキャン, ブロックデバイスのスキャン
- ヘルプの表示, CLI コマンドの使用
- ボリュームグループ
- vgs 引数の表示, vgs コマンド
- アクティブ化, ボリュームグループのアクティブ化と非アクティブ化
- クラスター内での作成, クラスター内でのボリュームグループ作成
- システム間での移動, ボリュームグループの別のシステムへの移動
- パラーメーターの変更, ボリュームグループのパラメーター変更
- マージ, ボリュームグループの統合
- 分割, ボリュームグループの分割
- 手順の例, ボリュームグループの分割
- 削除, ボリュームグループの削除
- 名前変更, ボリュームグループの名前変更
- 定義, ボリュームグループ
- 拡張, ボリュームグループへの物理ボリュームの追加
- 管理、一般, ボリュームグループ管理
- 結合, ボリュームグループの統合
- 縮小, ボリュームグループからの物理ボリュームの削除
- 表示, ボリュームグループの表示 , LVM 用のカスタム報告, vgs コマンド
- 非アクティブ化, ボリュームグループのアクティブ化と非アクティブ化
- ボリュームグループのアクティブ化, ボリュームグループのアクティブ化と非アクティブ化
- ローカルノードのみ, ボリュームグループのアクティブ化と非アクティブ化
- 個別のノード, ボリュームグループのアクティブ化と非アクティブ化
- ボリュームグループの非アクティブ化, ボリュームグループのアクティブ化と非アクティブ化
- ローカルノードのみ, ボリュームグループのアクティブ化と非アクティブ化
- 単一ノード上で排他的, ボリュームグループのアクティブ化と非アクティブ化
- ミラー化論理ボリューム
- クラスター化された, クラスター内でのミラー化 LVM 論理ボリュームの作成
- リニアへの変換, ミラー化ボリューム設定の変更
- 作成, ミラー化ボリュームの作成
- 再設定, ミラー化ボリューム設定の変更
- 定義, ミラー化論理ボリューム
- 拡張, ミラー化ボリュームの拡張
- 障害ポリシー, ミラー化論理ボリュームの障害ポリシー
- 障害回復, LVM ミラー障害からの回復
- メタデータ
- バックアップ, 論理ボリュームのバックアップ, ボリュームグループメタデータのバックアップ
- 回復, 物理ボリュームメタデータの復元
- メタデータデーモン, メタデータデーモン (lvmetad)
- ユニット、コマンドライン, CLI コマンドの使用
- リニア論理ボリューム
- ミラー化への変換, ミラー化ボリューム設定の変更
- 作成, リニア論理ボリュームの作成
- 定義, リニアボリューム
- レポートのフォーマット、LVM デバイス, LVM 用のカスタム報告
- ロギング, ロギング
- 不十分な空きエクステントメッセージ, 論理ボリュームでの不十分な空きエクステント
- 作成
- クラスター内でのLVM ボリューム, クラスター内での LVM ボリューム作成
- ストライプ化論理ボリューム、例, ストライプ化論理ボリュームの作成
- ボリュームグループ、クラスター化, クラスター内でのボリュームグループ作成
- 物理ボリューム, 物理ボリュームの作成
- 論理ボリューム, リニア論理ボリュームの作成
- 論理ボリューム、例, 3つのディスク上での LVM 論理ボリューム作成
- 初期化
- パーティション, 物理ボリュームの初期化
- 物理ボリューム, 物理ボリュームの初期化
- 削除
- 物理ボリューム, 物理ボリュームの削除
- 論理ボリューム, 論理ボリュームの削除
- 論理ボリュームからディスクを, 論理ボリュームからのディスクの削除
- 割り当て, LVM の割り当て
- ポリシー, ボリュームグループの作成
- 防止, 物理ボリューム上での割り当て防止
- 名前変更
- ボリュームグループ, ボリュームグループの名前変更
- 論理ボリューム, 論理ボリュームの名前変更
- 新機能および変更された機能, 新機能および変更された機能
- 概要
- 新機能および変更された機能, 新機能および変更された機能
- 永続的なデバイス番号, 永続的なデバイス番号
- 物理エクステント
- 割り当ての防止, 物理ボリューム上での割り当て防止
- 物理ボリューム
- pvs 引数の表示, pvs コマンド
- サイズ変更, 物理ボリュームのサイズ変更
- ボリュームグループから削除, ボリュームグループからの物理ボリュームの削除
- ボリュームグループに追加, ボリュームグループへの物理ボリュームの追加
- レイアウト, LVM 物理ボリュームレイアウト
- 作成, 物理ボリュームの作成
- 初期化, 物理ボリュームの初期化
- 削除, 物理ボリュームの削除
- 回復, 紛失した物理ボリュームの入れ替え
- 図, LVM 物理ボリュームレイアウト
- 定義, 物理ボリューム
- 管理、一般, 物理ボリュームの管理
- 紛失したボリュームの削除, 紛失した物理ボリュームのボリュームグループからの削除
- 表示, 物理ボリュームの表示, LVM 用のカスタム報告, pvs コマンド
- 管理の手順, LVM 管理の概要
- 表示
- ボリュームグループ, ボリュームグループの表示 , vgs コマンド
- 出力のソート, LVM 報告のソート
- 物理ボリューム, 物理ボリュームの表示, pvs コマンド
- 論理ボリューム, 論理ボリュームの表示, lvs コマンド
- 設定の例, LVM 設定の例
- 詳細出力, CLI コマンドの使用
- 論理ボリューム
- lvs 引数の表示, lvs コマンド
- シンプロビジョニング, シンプロビジョニングされた論理ボリュームの作成
- シンプロビジョニングされたスナップショット, シンプロビジョニングされたスナップショットボリュームの作成
- ストライプ化, ストライプ化ボリュームの作成
- スナップショット, スナップショットボリュームの作成
- パラメーターの変更, 論理ボリュームグループのパラメーター変更
- ミラー化, ミラー化ボリュームの作成
- リニア, リニア論理ボリュームの作成
- ローカルアクセス, クラスター内の個別ノード上の論理ボリュームのアクティブ化
- 作成, リニア論理ボリュームの作成
- 作成例, 3つのディスク上での LVM 論理ボリューム作成
- 削除, 論理ボリュームの削除
- 名前変更, 論理ボリュームの名前変更
- 定義, 論理ボリューム, LVM 論理ボリューム
- 拡張, 論理ボリュームの拡張
- 排他的アクセス, クラスター内の個別ノード上の論理ボリュームのアクティブ化
- 管理、一般, 論理ボリュームの管理
- 縮小, 論理ボリュームの縮小
- 表示, 論理ボリュームの表示, LVM 用のカスタム報告, lvs コマンド
- 論理ボリュームのアクティブ化
- 個別のノード, クラスター内の個別ノード上の論理ボリュームのアクティブ化
- 障害の発生したデバイス
- 表示, 障害の発生したデバイスの情報表示
A
- archive ファイル, ボリュームグループメタデータのバックアップ
B
- backup ファイル, ボリュームグループメタデータのバックアップ
C
- cache logical volume
- creation, Creating LVM Cache Logical Volumes
- cache volumes, Cache Volumes
- CLVM
- clvmd デーモン, クラスター化論理ボリュームマネージャ (CLVM)
- creating
- volume groups, ボリュームグループの作成
L
- logical volume
- activation, Controlling Logical Volume Activation
- cache, Creating LVM Cache Logical Volumes
- lvchange コマンド, 論理ボリュームグループのパラメーター変更
- lvconvert コマンド, ミラー化ボリューム設定の変更
- lvcreate コマンド, リニア論理ボリュームの作成
- lvdisplay コマンド, 論理ボリュームの表示
- lvextend コマンド, 論理ボリュームの拡張
- LVM
- アーキテクチャーの概要, LVM アーキテクチャーの概要
- カスタムレポートのフォーマット, LVM 用のカスタム報告
- クラスター化, クラスター化論理ボリュームマネージャ (CLVM)
- コンポーネント, LVM アーキテクチャーの概要, LVM コンポーネント
- ディレクトリ構造, ボリュームグループの作成
- ヘルプ, CLI コマンドの使用
- ボリュームグループ、定義, ボリュームグループ
- ラベル, 物理ボリューム
- ロギング, ロギング
- 履歴, LVM アーキテクチャーの概要
- 物理ボリューム、定義, 物理ボリューム
- 物理ボリュームの管理, 物理ボリュームの管理
- 論理ボリュームの管理, 論理ボリュームの管理
- LVM ボリュームの作成
- 概要, 論理ボリューム作成の概要
- LVM1, LVM アーキテクチャーの概要
- LVM2, LVM アーキテクチャーの概要
- lvmdiskscan コマンド, ブロックデバイスのスキャン
- lvmetad デーモン, メタデータデーモン (lvmetad)
- lvreduce コマンド, 論理ボリュームの縮小
- lvremove コマンド, 論理ボリュームの削除
- lvrename コマンド, 論理ボリュームの名前変更
- lvs コマンド, LVM 用のカスタム報告, lvs コマンド
- 引数の表示, lvs コマンド
- lvscan コマンド, 論理ボリュームの表示
M
- man ページの表示, CLI コマンドの使用
- mirror_image_fault_policy 設定パラメーター, ミラー化論理ボリュームの障害ポリシー
- mirror_log_fault_policy 設定パラメーター, ミラー化論理ボリュームの障害ポリシー
P
- pvdisplay コマンド, 物理ボリュームの表示
- pvmove コマンド, オンラインデータ移動
- pvremove コマンド, 物理ボリュームの削除
- pvresize コマンド, 物理ボリュームのサイズ変更
- pvs コマンド, LVM 用のカスタム報告
- 引数の表示, pvs コマンド
- pvscan コマンド, 物理ボリュームの表示
R
- RAID logical volume, RAID Logical Volumes
- rules.d ディレクトリ, udev のデバイスマッパーとの統合
U
- udev デバイスマネージャ, デバイスマッパーの udev デバイスマネージャサポート
- udev ルール, udev のデバイスマッパーとの統合
V
- vgcfbackup コマンド, ボリュームグループメタデータのバックアップ
- vgcfrestore コマンド, ボリュームグループメタデータのバックアップ
- vgchange コマンド, ボリュームグループのパラメーター変更
- vgcreate command, ボリュームグループの作成
- vgcreate コマンド, クラスター内でのボリュームグループ作成
- vgdisplay コマンド, ボリュームグループの表示
- vgexport コマンド, ボリュームグループの別のシステムへの移動
- vgextend コマンド, ボリュームグループへの物理ボリュームの追加
- vgimport コマンド, ボリュームグループの別のシステムへの移動
- vgmerge コマンド, ボリュームグループの統合
- vgmknodes コマンド, ボリュームグループディレクトリの再作成
- vgreduce コマンド, ボリュームグループからの物理ボリュームの削除
- vgrename コマンド, ボリュームグループの名前変更
- vgs コマンド, LVM 用のカスタム報告
- 引数の表示, vgs コマンド
- vgscan コマンド, キャッシュファイル構築のためのボリュームグループのディスクスキャン
- vgsplit コマンド, ボリュームグループの分割
- volume group
- creating, ボリュームグループの作成
法律上の通知
リンクのコピーリンクがクリップボードにコピーされました!
Copyright © 2017 Red Hat, Inc.
This document is licensed by Red Hat under the Creative Commons Attribution-ShareAlike 3.0 Unported License. If you distribute this document, or a modified version of it, you must provide attribution to Red Hat, Inc. and provide a link to the original. If the document is modified, all Red Hat trademarks must be removed.
Red Hat, as the licensor of this document, waives the right to enforce, and agrees not to assert, Section 4d of CC-BY-SA to the fullest extent permitted by applicable law.
Red Hat, Red Hat Enterprise Linux, the Shadowman logo, the Red Hat logo, JBoss, OpenShift, Fedora, the Infinity logo, and RHCE are trademarks of Red Hat, Inc., registered in the United States and other countries.
Linux® is the registered trademark of Linus Torvalds in the United States and other countries.
Java® is a registered trademark of Oracle and/or its affiliates.
XFS® is a trademark of Silicon Graphics International Corp. or its subsidiaries in the United States and/or other countries.
MySQL® is a registered trademark of MySQL AB in the United States, the European Union and other countries.
Node.js® is an official trademark of Joyent. Red Hat is not formally related to or endorsed by the official Joyent Node.js open source or commercial project.
The OpenStack® Word Mark and OpenStack logo are either registered trademarks/service marks or trademarks/service marks of the OpenStack Foundation, in the United States and other countries and are used with the OpenStack Foundation's permission. We are not affiliated with, endorsed or sponsored by the OpenStack Foundation, or the OpenStack community.
All other trademarks are the property of their respective owners.