Spring Boot へのデプロイ
スタンドアロンモードでの Spring Boot アプリケーションのビルドおよび実行
概要
第1章 Spring Boot スタンドアロンの使用
1.1. Spring Boot スタンドアロンデプロイメントモード
スタンドアロンデプロイメントモードでは、Spring Boot アプリケーションは Jar ファイルとしてパッケージ化され、Java 仮想マシン (JVM) 内で直接実行されます。アプリケーションをパッケージ化および実行するこの方法は、サービスが最小限の要件でパッケージ化されるマイクロサービスの概念と一致しています。Spring Boot アプリケーションは、java コマンドに -jar オプションを指定すると接実行できます。以下に例を示します。
java -jar SpringBootApplication.jar
java -jar SpringBootApplication.jarSpring Boot は、実行可能な Jar のメインクラスを提供します。Fuse で Spring Boot スタンドアロンアプリケーションをビルドするには、以下が必要です。
Fuse BOM (Bill of Materials): Red Hat Maven リポジトリーから、厳選された依存関係のセットを定義します。BOM は、Maven の 依存関係管理 メカニズムを利用して、適切なバージョンの Maven 依存関係を定義します。
注記: Fuse BOM で定義された依存関係のみが Red Hat によってサポートされます。
- Spring Boot Maven プラグイン - Maven でスタンドアロン Spring Boot アプリケーションのビルドプロセスを実装します。このプラグインは、Spring Boot アプリケーションを実行可能な Jar ファイルとしてパッケージ化します。
1.2. Spring Boot 2 へのデプロイ
Spring Boot 1 に加えて、Spring Boot 2 にデプロイするオプションもあります。
OpenShift のデプロイメントのモードに関する詳細は Fuse on OpenShift ガイド を参照してください。
Spring Boot 1 と Spring Boot 2 の相違点はすべて、Spring Boot の Migration Guide と Spring Boot 2 リリースノート を参照してください。
1.3. Spring Boot 2 の新しい Camel コンポーネント
Spring Boot 2 は Camel バージョン 2. 23 をサポートしているため、Spring Boot 1 では利用できない新しい camel コンポーネントの一部をサポートします。
Spring Boot 2 の新しい Camel コンポーネント
- as2-component
- aws-iam-component
- fhir-component
- google-calendar-stream-component
- google-mail-stream-component
- google-sheets-component
- google-sheets-stream-component
- ipfs コンポーネント
- kubernetes-hpa-component
- kubernetes-job-component
- micrometer-component
- mybatis-bean-component
- nsq-component
- rxjava2
- service-component
- spring-cloud-consul
- spring-cloud-zookeeper
- testcontainers-spring
- testcontainers
- web3j-component
第2章 Fuse ブースターの使用
Red Hat Fuse では、Fuse アプリケーションや便利なコンポーネントを使用するために、以下のブースターが提供されます。
- 「サーキットブレーカーブースターのビルドと実行」 - ネットワーク接続の中断やバックエンドサービスの一時的な使用停止に対応するために分散アプリケーションを有効にする例。
- 「Externalized Configuration ブースターのビルドおよび実行」 - Apache Camel ルートの設定を外部化する方法の例。
- 「REST API ブースターのビルドおよび実行」 - HTTP プロトコルを使用して、Apache Camel によって公開されるリモートサービスと対話する仕組みを紹介する例。
ブースターのデモンストレーションをビルドおよび実行するための前提条件として、以下をインストールします。
- サポートされるバージョンの Java Developer Kit (JDK)。詳細は Red Hat Fuse でサポートされる構成 を参照してください。
- Apache Maven 3.3.x 以上。Maven の Download ページを参照してください。
2.1. ブースタープロジェクトの生成
Fuse ブースタープロジェクトは、スタンドアロンアプリケーションの実行を手助けする開発者向けのプロジェクトです。ここでは、ブースタープロジェクトの 1 つである Circuit Breaker ブースターの生成手順を説明します。この演習では、Fuse on Spring Boot の便利なコンポーネントを使用します。
Netflix/Hystrix サーキットブレーカーを使用すると、ネットワーク接続の中断やバックエンドサービスの一時的な利用停止に分散アプリケーションが対処できるようになります。サーキットブレーカーパターンの基本概念は、バックエンドサービスが一時的に利用できなくなった場合に備えて、依存するサービスの損失を自動的に検出し、代替動作をプログラムで作成できるようにすることです。
Fuse サーキットブレーカーブースターは、次の 2 つの関連サービスで構成されます。
-
呼び名を返すバックエンドサービスである
nameサービス。 -
名前を取得する
nameサービスを呼び出し、文字列Hello, NAMEを返すフロントエンドサービスであるgreetingsサービス。
このブースターデモンストレーションでは、Hystrix サーキットブレーカーは greetings サービスと name サービスとの間に挿入されます。バックエンドの name サービスが利用できなくなると、name サービスが再起動するまでの間に greetings サービスはブロックされず、代替動作にフォールバックして即座にクライアントに応答します。
前提条件
- Red Hat Developer Platform にアクセスできる。
- サポートされるバージョンの Java Developer Kit (JDK) を持っている。詳細は Red Hat Fuse でサポートされる設定 を参照してください。
- Apache Maven 3.3.x 以上が必要です。
手順
- https://developers.redhat.com/launch に移動します。
START をクリックします。
ランチャーウィザードによって、Red Hat アカウントにログインするよう要求されます。
- Log in or register ボタンをクリックし、ログインします。
- Launcher ページで Deploy an Example Application ボタンをクリックします。
- Create Example Application ページで Create Example Application as フィールドに名前 fuse-circuit-breaker を入力します。
- Select an Example をクリックします。
Example ダイアログで、Circuit Breaker オプションを選択します。Select a Runtime ドロップダウンメニューが表示されます。
- Select a Runtime ドロップダウンメニューで Fuse を選択します。
-
バージョンのドロップダウンメニューで 7.7 (Red Hat Fuse) を選択します。
2.21.2 (Community)バージョンは選択しないでください。 - Save をクリックします。
- Create Example Application ページで Download をクリックします。
-
Your Application is Ready ダイアログが表示されたら、
Download.zipをクリックします。ブラウザーが生成されたブースタープロジェクト (ZIP ファイルとしてパッケージ) をダウンロードします。 - アーカイブユーティリティーを使用して、生成されたプロジェクトをローカルファイルシステムの任意の場所にデプロイメントします。
2.2. サーキットブレーカーブースターのビルドと実行
Netflix/Hystrix サーキットブレーカーコンポーネントは、ネットワーク接続の中断や、バックエンドサービスの一時的な利用停止に分散アプリケーションが対応できるようにします。サーキットブレーカーパターンの基本概念は、バックエンドサービスが一時的に利用できなくなった場合に備えて、依存するサービスの損失を自動的に検出し、代替動作をプログラムで作成できるようにすることです。
Fuse サーキットブレーカーブースターは、次の 2 つの関連サービスで構成されます。
- 対象の名前を返す name サービス。
-
名前を取得するために name サービスを呼び出し、文字列
Hello, NAMEを返す greetings サービス。
このデモンストレーションでは、Hystrix サーキットブレーカーは greetings サービスと name サービスとの間に挿入されます。name サービスが利用できなくなると、greetings サービスは name サービスが再起動するまでの間にブロックまたはタイムアウトせずに、代替動作にフォールバックして即座にクライアントに応答することができます。
前提条件
- 「ブースタープロジェクトの生成」 に記載されている手順を完了している必要があります。
手順
以下の手順に従って、サーキットブレーカーブースタープロジェクトをビルドおよび実行します。
シェルプロンプトを開き、Maven を使用してコマンドラインからプロジェクトをビルドします。
cd PROJECT_DIR
mvn clean package
cd PROJECT_DIR
mvn clean package
Copy to Clipboard Copied! Toggle word wrap Toggle overflow 新しいシェルプロンプトを開き、以下のように name サービスを起動します。
cd name-service
mvn spring-boot:run -DskipTests -Dserver.port=8081
cd name-service
mvn spring-boot:run -DskipTests -Dserver.port=8081
Copy to Clipboard Copied! Toggle word wrap Toggle overflow Spring Boot が起動すると、以下のような出力が表示されます。
...
2017-12-08 15:44:24.223  INFO 22758 --- [           main] o.a.camel.spring.SpringCamelContext      : Total 1 routes, of which 1 are started
2017-12-08 15:44:24.227  INFO 22758 --- [           main] o.a.camel.spring.SpringCamelContext      : Apache Camel 2.20.0 (CamelContext: camel-1) started in 0.776 seconds
2017-12-08 15:44:24.234  INFO 22758 --- [           main] org.jboss.fuse.boosters.cb.Application   : Started Application in 4.137 seconds (JVM running for 4.744)
Copy to Clipboard Copied! Toggle word wrap Toggle overflow 新しいシェルプロンプトを開き、以下のように greetings サービスを起動します。
cd greetings-service
mvn spring-boot:run -DskipTests
cd greetings-service
mvn spring-boot:run -DskipTests
Copy to Clipboard Copied! Toggle word wrap Toggle overflow Spring Boot が起動すると、以下のような出力が表示されます。
...
2017-12-08 15:46:58.521  INFO 22887 --- [           main] o.a.c.c.s.CamelHttpTransportServlet      : Initialized CamelHttpTransportServlet[name=CamelServlet, contextPath=]
2017-12-08 15:46:58.524  INFO 22887 --- [           main] s.b.c.e.t.TomcatEmbeddedServletContainer : Tomcat started on port(s): 8080 (http)
2017-12-08 15:46:58.536  INFO 22887 --- [           main] org.jboss.fuse.boosters.cb.Application   : Started Application in 6.263 seconds (JVM running for 6.819)
Copy to Clipboard Copied! Toggle word wrap Toggle overflow greetings サービスは、URL
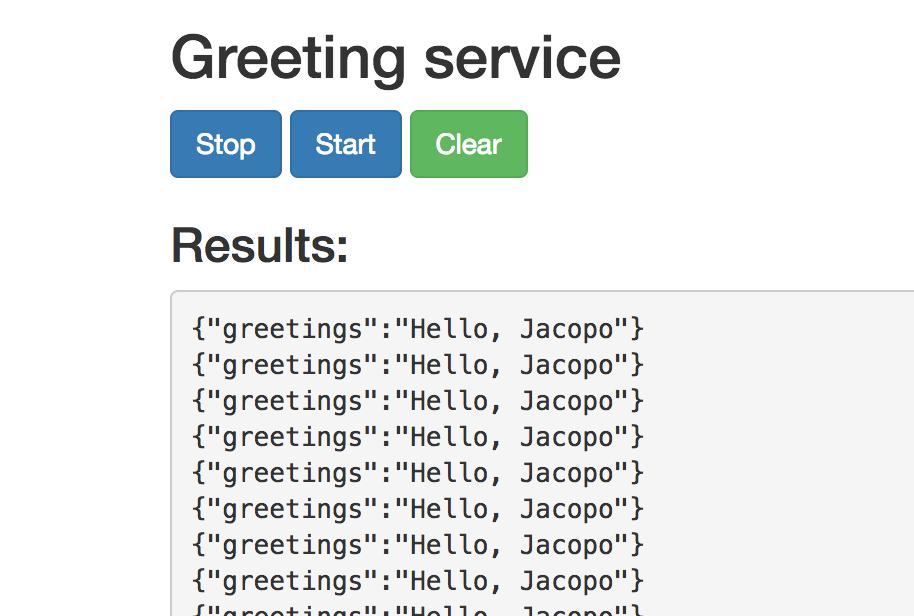
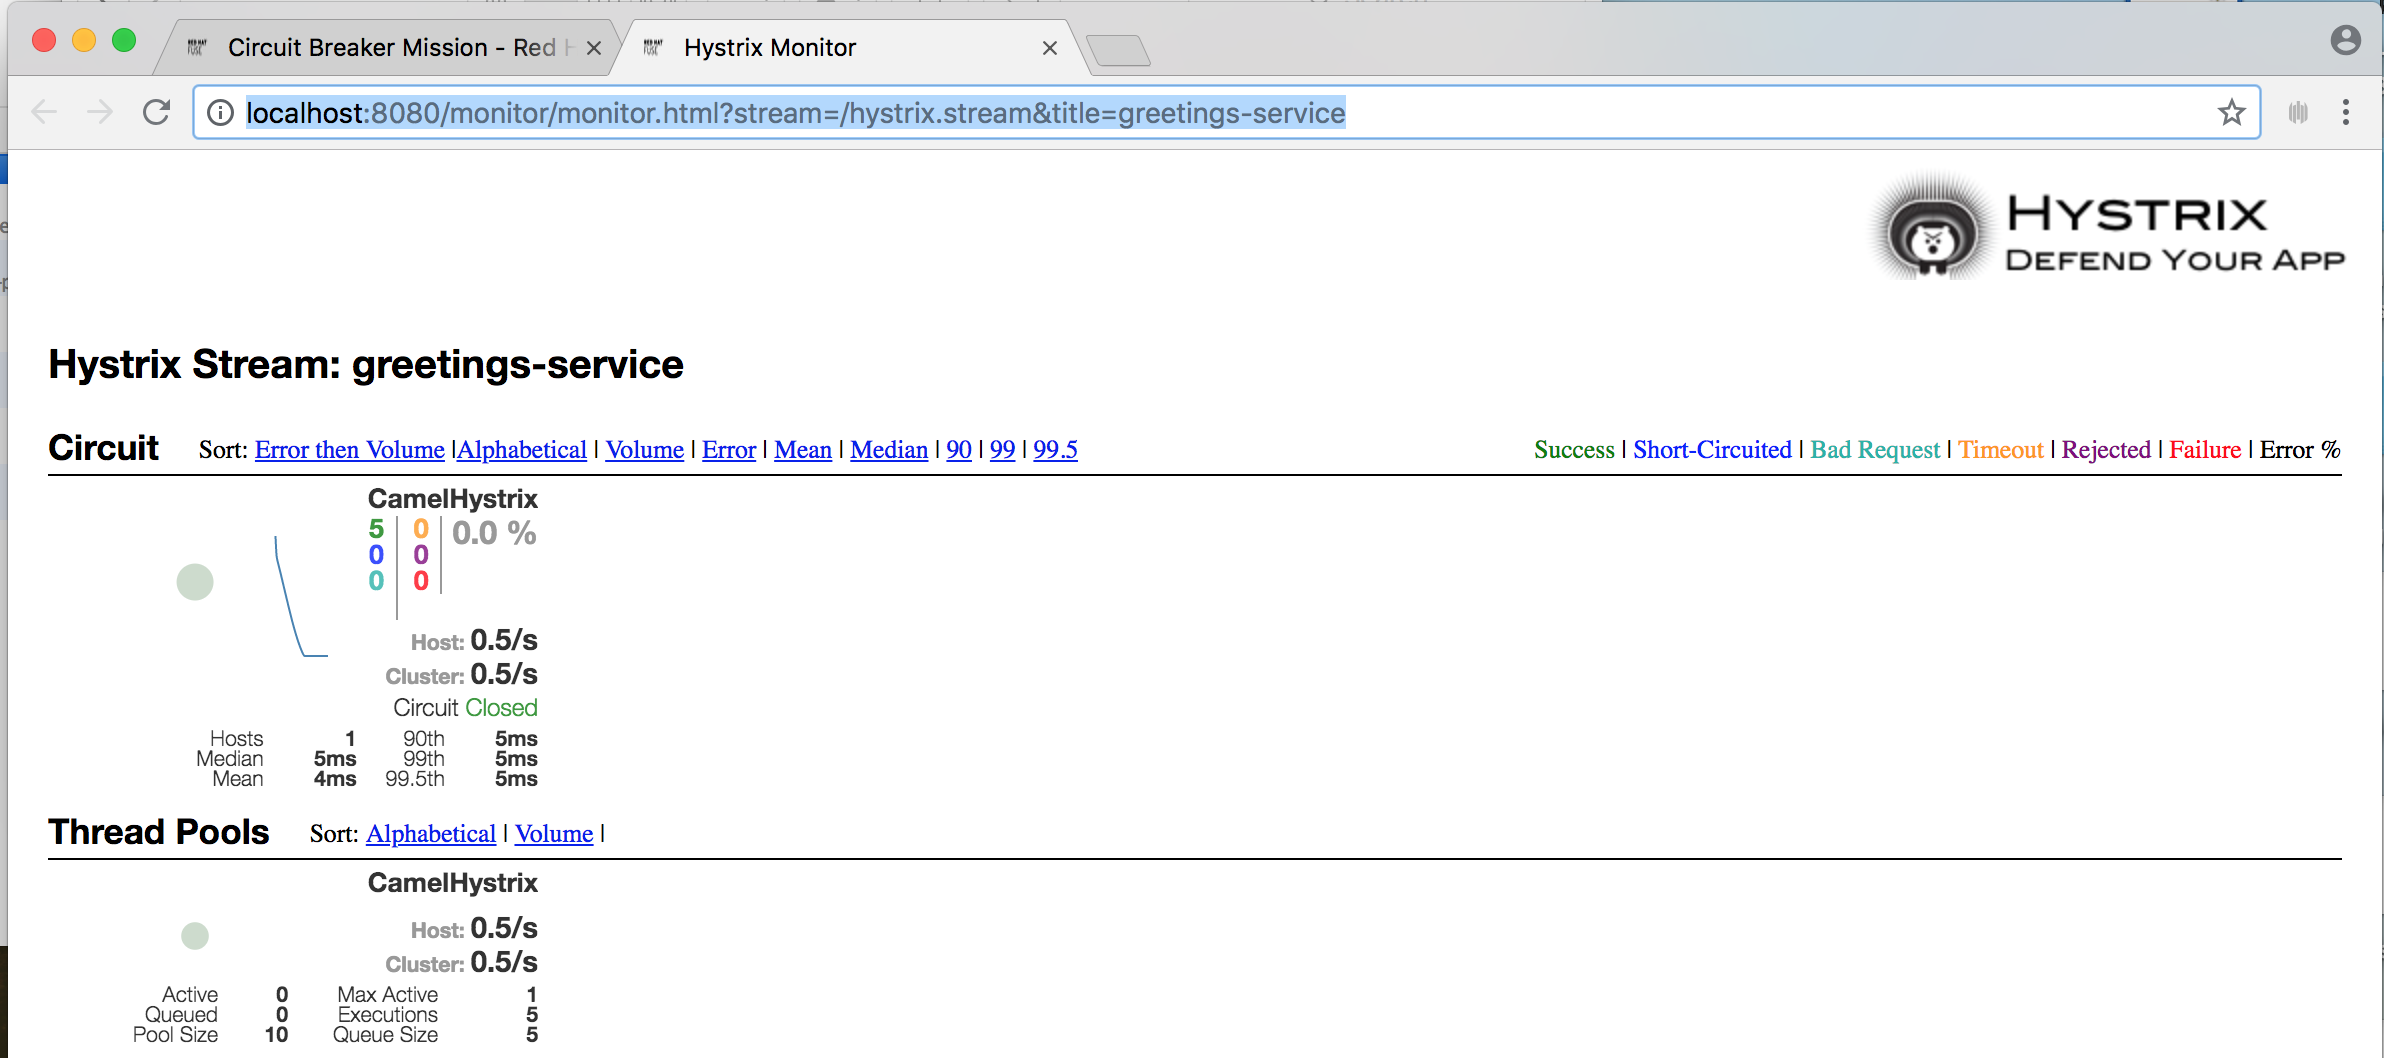
http://localhost:8080/camel/greetingsで REST エンドポイントを公開します。http://localhost:8080 にアクセスします。
このページを開くと、Greeting Service が呼び出されます。
このページには、サーキットブレーカーの状態を監視する Hystrix ダッシュボードへのリンクも提供されます。
Camel Hystrix によって提供されるサーキットブレーカー機能を実証するには、name サービスが実行されているシェルプロンプトウインドウで Ctrl+C を押して、バックエンド name サービスを中止します。
これで name サービスが利用できなくなるため、呼び出されたときに greetings サービスがハングしないよう、サーキットブレーカーが作動します。
Hystrix Monitor ダッシュボードおよび Greeting Service の出力で変更を確認します。
2.3. Externalized Configuration ブースターのビルドおよび実行
Externalized Configuration (外部化設定) ブースターは、Apache Camel ルートの設定を外部化する方法の例を提供します。Spring Boot スタンドアロンデプロイメントでは、設定データは application.properties ファイルに保存されます。
Fuse on OpenShift デプロイメントでは、設定データは ConfigMap オブジェクトに保存されます。
前提条件
- 「ブースタープロジェクトの生成」 に記載されている手順を完了している必要があります。
手順
Externalized Configuration ミッションの 「ブースタープロジェクトの生成」 の手順に従った後、以下のステップに従って Externalized Configuration ブースターをローカルマシンのスタンドアロンプロジェクトとしてビルドおよび実行します。
- プロジェクトをダウンロードし、ローカルファイルシステムでアーカイブをデプロイメントします。
プロジェクトをビルドします。
cd PROJECT_DIR
mvn clean package
cd PROJECT_DIR
mvn clean package
Copy to Clipboard Copied! Toggle word wrap Toggle overflow サービスを実行します。
mvn spring-boot:run
mvn spring-boot:runCopy to Clipboard Copied! Toggle word wrap Toggle overflow Web ブラウザーで http://localhost:8080 を開きます。このページは、5 秒ごとに Greeting Service を呼び出します。Greetings サービスは、
target/classes/application.propertiesファイルからbooster.nameToGreetvalueを使用して応答します。Greeting Service は default へのグリーティングを 5 秒ごとに出力します。
booster.nameToGreetの値を変更します。-
エディターで
target/classes/application.propertiesファイルを開きます。 booster.nameToGreetvalueの値を、default から他の値 (例: Thomas) に変更します。booster.nameToGreetvalue=Thomas
booster.nameToGreetvalue=ThomasCopy to Clipboard Copied! Toggle word wrap Toggle overflow
-
エディターで
- ターミナルウィンドウで CTRL+C を押してサービスを停止します。
サービスを再実行します。
mvn spring-boot:run
mvn spring-boot:runCopy to Clipboard Copied! Toggle word wrap Toggle overflow Web ブラウザーで http://localhost:8080 ページに戻り、Greeting Service の Results ウィンドウで変更された値を確認します。


2.4. REST API ブースターのビルドおよび実行
REST API Level 0 のミッションでは、REST フレームワークを使用して、HTTP 経由でリモートプロシージャー呼び出しエンドポイントにビジネスオペレーションをマッピングする方法を示します。このミッションは、Richardson Maturity Model の Level 0 に該当します。
REST API ブースターは、HTTP プロトコルを使用して、Apache Camel によって公開されるリモートサービスと対話する仕組みを紹介します。この Fuse ブースターを使用すると、迅速に REST API のプロトタイプを作成し、柔軟に REST API を設定することができます。
このブースターを使用して、以下を行います。
-
camel/greetings/{name}エンドポイントで HTTP GET 要求を実行します。このリクエストは、ペイロードHello, $name!を使用して JSON 形式の応答を生成します ($nameは HTTP GET リクエストからの URL パラメーターの値に置き換えられます)。 -
URL
{name}パラメーターの値を変更すると、変更後の値が応答に反映されます。 - REST API の Swagger ページを表示します。
前提条件
- 「ブースタープロジェクトの生成」 に記載されている手順を完了している必要があります。
手順
以下の手順に従って、REST API ブースターをローカルマシンのスタンドアロンプロジェクトとしてビルドおよび実行します。
- プロジェクトをダウンロードし、ローカルファイルシステムでアーカイブをデプロイメントします。
プロジェクトをビルドします。
cd PROJECT_DIR
mvn clean package
cd PROJECT_DIR
mvn clean package
Copy to Clipboard Copied! Toggle word wrap Toggle overflow サービスを実行します。
mvn spring-boot:run
mvn spring-boot:runCopy to Clipboard Copied! Toggle word wrap Toggle overflow - Web ブラウザーで http://localhost:8080 を開きます。
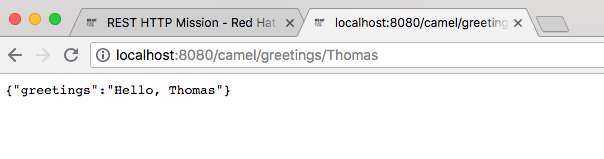
HTTP GET リクエストの例を実行するには、camel/greetings/{name} ボタンをクリックします。
localhost:8080/camel/greetings/JacopoURL で新しい Web ブラウザーウインドウが開きます。URL{name}パラメーターのデフォルト値は Jacopo です。ブラウザーウインドウに JSON 応答が表示されます。
{name}パラメーターの値を変更するには、URL を変更します。たとえば、名前を Thomas に変更するには、URL localhost:8080/camel/greetings/Thomas を使用します。ブラウザーウインドウに更新された JSON 応答が表示されます。
REST API の Swagger ページを表示するには、API Swagger ページボタンをクリックします。
ブラウザーウィンドウに API swagger ページが表示されます。


第3章 Maven でのビルド
Fuse で Spring Boot のアプリケーションを開発する場合、Apache Maven ビルドツールを使用して、ソースコードを Maven プロジェクトとして構築することが標準的な方法です。すぐに開発できるようにするため、Fuse には Maven クイックスタートが提供されています。また、多くの Fuse ビルドツールは Maven プラグインとして提供されています。このため、Fuse の Spring Boot プロジェクトのビルドツールとして Maven を採用することが強く推奨されます。
3.1. Maven プロジェクトの生成
Fuse には、Maven アーキタイプを基にした複数の Spring Boot アプリケーションが提供され、これらを使用して Spring Boot アプリケーションの最初の Maven プロジェクトを生成できます。さまざまな Maven アーキタイプの場所情報とバージョンを把握する必要をなくすため、Fuse はスタンドアロン Spring Boot プロジェクトの Maven プロジェクトを生成するためのツールを提供します。
3.1.1. developers.redhat.com/launch のプロジェクトジェネレーター
Fuse で Spring Boot スタンドアロンを使い始める最も簡単な方法は、developers.redhat.com/launch にアクセスし、Spring Boot スタンドアロンランタイムの手順に従って、新しい Maven プロジェクトを生成することです。画面の指示に従うと、ローカルにビルドおよび実行できる完全な Maven プロジェクトが含まれるアーカイブファイルをダウンロードするように指示されます。
3.1.2. Developer Studio の Fuse ツールウィザード
また、Fuse Tooling が含まれる Red Hat JBoss Developer Studio をダウンロードおよびインストールすることもできます。Fuse New Integration Project ウィザードを使用すると、新しい Spring Boot スタンドアロンプロジェクトを生成し、Eclipse ベースの IDE 内で開発を継続できます。
3.2. Spring Boot BOM の使用
最初の Spring Boot プロジェクトを作成およびビルドした後、コンポーネントをすぐ追加したくなるでしょう。しかし、プロジェクトに追加する Maven 依存関係のバージョンはどのように判断したらよいのでしょうか。最も簡単な方法は、すべてのバージョンの依存関係を自動的に定義する、BOM (Bill of Materials) ファイルを使用することです。これは推奨される方法でもあります。
3.2.1. Spring Boot の BOM ファイル
Maven BOM (Bill of Materials) ファイルの目的は、正常に動作する Maven 依存関係バージョンのセットを提供し、各 Maven アーティファクトに対して個別にバージョンを定義する必要をなくすことです。
使用している Spring Boot のバージョン (Spring Boot 1 または Spring Boot 2) に適した Fuse BOM が使用されているようにしてください。
Spring Boot の Fuse BOM には以下の利点があります。
- Maven 依存関係のバージョンを定義するため、依存関係を POM に追加するときにバージョンを指定する必要がありません。
- 特定バージョンの Fuse に対して完全にテストされ、完全にサポートする依存関係のセットを定義します。
- Fuse のアップグレードを簡素化します。
Fuse BOM によって定義される依存関係のセットのみが Red Hat によってサポートされます。
3.2.2. BOM ファイルの組み込み
Maven プロジェクトに BOM ファイルを組み込むには、以下の Spring Boot 2 および Spring Boot 1 の例のように、プロジェクトの pom.xml ファイル (または親 POM ファイル内の) dependencyManagement 要素を指定します。
Spring Boot 2 の BOM
Spring Boot 1 の BOM
依存関係管理のメカニズムを使用して BOM を指定した後、アーティファクトのバージョンを指定しなくても、Maven 依存関係を POM に追加できるようになります。たとえば、camel-hystrix コンポーネントの依存関係を追加するには、以下の XML フラグメントを POM の dependencies 要素に追加します。
<dependency>
  <groupId>org.apache.camel</groupId>
  <artifactId>camel-hystrix-starter</artifactId>
</dependency>
<dependency>
  <groupId>org.apache.camel</groupId>
  <artifactId>camel-hystrix-starter</artifactId>
</dependency>
Camel アーティファクト ID が -starter 接尾辞とともに追加されていることに注意してください。つまり、Camel Hystrix コンポーネントを camel-hystrix ではなく camel-hystrix-starter として指定します。Camel スターターコンポーネントは、Spring Boot 環境に対して最適化されるようにパッケージ化されています。
3.2.3. Spring Boot Maven プラグイン
Spring Boot Maven プラグインは Spring Boot によって提供されます。これは、Spring Boot プロジェクトをビルドおよび実行するための開発者ユーティリティーです。
-
ビルド: プロジェクトディレクトリーでコマンド
mvn packageを入力し、Spring Boot アプリケーションの実行可能な Jar パッケージを作成します。ビルドの出力は、Maven プロジェクトのtarget/サブディレクトリーに格納されます。 -
実行: 新規ビルドされたアプリケーションは
mvn spring-boot:startコマンドで実行することができます。
Spring Boot Maven プラグインをプロジェクトの POM ファイルに組み込むには、以下の例のように、プラグイン設定を pom.xml ファイルの project/build/plugins セクションに追加します。
Example
第4章 Spring Boot での Apache Camel アプリケーションの実行
Apache Camel Spring Boot コンポーネントは、自動的に Camel コンテキストを Spring Boot に設定します。Camel コンテキストの自動設定によって、Spring コンテキストで使用できる Camel ルートが自動検出され、プロデューサーテンプレート、コンシューマーテンプレート、タイプコンバーターなどの主な Camel ユーティリティーが Bean として登録されます。Apache Camel コンポーネントには、スターターを使用して Spring Boot アプリケーションを開発できるようにする Spring Boot スターターモジュールが含まれます。
4.1. Camel Spring Boot コンポーネント
Camel Spring Boot アプリケーションはすべてプロジェクトの pom.xml にある dependencyManagement を使用して、依存関係の製品化バージョンを指定する必要があります。これらの依存関係は Red Hat Fuse BOM で定義され、特定バージョンの Red Hat Fuse でサポートされます。BOM からのバージョンをオーバーライドしないようにするため、追加のスターターのバージョン番号を省略することができます。詳細は、quickstart pom を参照してください。
Example
camel-spring-boot jar には spring.factories ファイルが含まれています。このファイルにより、依存関係をクラスパスに追加できるため、Spring Boot によって Camel コンテキストが自動的に設定されます。
4.2. Camel Spring Boot スターターモジュール
スターターは、Spring Boot アプリケーションでの使用を目的とする Apache Camel モジュールです。「スターターモジュールのない Camel コンポーネントリスト」に記載されている一部の例外を除き、camel-xxx-starter モジュールは各 Camel コンポーネントにあります。
スターターは以下の要件を満たしています。
- IDE ツールと互換性のあるネイティブ Spring Boot 設定システムを使用して、コンポーネントの自動設定を可能にします。
- データ形式および言語の自動設定を可能にします。
- 推移的なログの依存関係を管理し、Spring Boot ロギングシステムと統合します。
- 追加の依存関係を含め、推移的な依存関係を合わせることで Spring Boot アプリケーションを作成するための労力を最小限にします。
各スターターの tests/camel-itest-spring-boot に独自の統合テストがあり、現在のリリースの Spring Boot との互換性を検証します。
詳細は、Apache Camel Spring-Boot examples を参照してください。
4.3. スターターモジュールのない Camel コンポーネントリスト
互換性の問題があるため、以下のコンポーネントにはスターターモジュールがありません。
- camel-blueprint (OSGi のみを対象)
- camel-cdi (CDI のみを対象)
- camel-core-osgi (OSGi のみを対象)
- camel-ejb (JEE のみを対象)
- camel-eventadmin (OSGi のみを対象)
-
camel-ibatis (
camel-mybatis-starterが含まれます) - camel-jclouds
-
camel-mina (
camel-mina2-starterが含まれます) - camel-paxlogging (OSGi のみを対象)
-
camel-quartz (
camel-quartz2-starterが含まれます) - camel-spark-rest
-
camel-openapi-java (
camel-openapi-java-starterが含まれます)
4.4. Camel Spring Boot スターターの使用
Apache Camel では、Spring Boot アプリケーションをすぐに開発できるようにするスターターモジュールが提供されます。
手順
以下の依存関係を Spring Boot の pom.xml に追加します。
<dependency>
    <groupId>org.apache.camel</groupId>
    <artifactId>camel-spring-boot-starter</artifactId>
</dependency>
<dependency> <groupId>org.apache.camel</groupId> <artifactId>camel-spring-boot-starter</artifactId> </dependency>Copy to Clipboard Copied! Toggle word wrap Toggle overflow 以下のスニペットのように、Camel ルートでクラスを追加します。これらのルートがクラスパスに追加されると、ルートは自動的に開始されます。
Copy to Clipboard Copied! Toggle word wrap Toggle overflow 任意手順:Camel の稼働を維持するためにメインスレッドがブロックされた状態を維持するには、以下の 1 つを行います。
-
spring-boot-starter-web関係が含まれるようにします。 または、
camel.springboot.main-run-controller=trueをapplication.propertiesまたはapplication.ymlファイルに追加します。application.propertiesまたはapplication.ymlファイルでcamel.springboot.* propertiesを使用すると Camel アプリケーションをカスタマイズできます。
-
任意手順:Bean の ID 名を使用してカスタム Bean を参照するには、
src/main/resources/application.propertiesまたはapplication.ymlファイルのオプションを設定します。以下の例は、Bean ID を使用して xslt コンポーネントがカスタム Bean を参照する方法を示しています。ID
myExtensionFactoryでカスタム Bean を参照します。camel.component.xslt.saxon-extension-functions=myExtensionFactory
camel.component.xslt.saxon-extension-functions=myExtensionFactoryCopy to Clipboard Copied! Toggle word wrap Toggle overflow 次に、Spring Boot の @Bean アノテーションを使用してカスタム Bean を作成します。
@Bean(name = "myExtensionFactory")
public ExtensionFunctionDefinition myExtensionFactory() {
    }
@Bean(name = "myExtensionFactory") public ExtensionFunctionDefinition myExtensionFactory() { }Copy to Clipboard Copied! Toggle word wrap Toggle overflow または、Jackson ObjectMapper の場合は、
camel-jacksonデータ形式を以下のようにします。camel.dataformat.json-jackson.object-mapper=myJacksonMapper
camel.dataformat.json-jackson.object-mapper=myJacksonMapperCopy to Clipboard Copied! Toggle word wrap Toggle overflow
4.5. Spring Boot の Camel コンテキストの自動設定
Camel Spring Boot auto-configuration は、CamelContext インスタンスを提供し、SpringCamelContext を作成します。また、コンテキストの初期化およびシャットダウンを実行します。この Camel コンテキストは、camelContext Bean 名で Spring アプリケーションコンテキストに登録され、他の Spring Bean と同様にアクセスできます。camelContext には次のようにアクセスできます。
Example
4.6. Spring Boot アプリケーションでの Camel ルートの自動検出
Camel auto-configuration は、Spring コンテキストからすべての RouteBuilder インスタンスを収集し、自動的に CamelContext にインジェクトします。これにより、Spring Boot スターターで新しい Camel ルートを作成する処理が簡単になります。以下のようにルートを作成できます。
例
@Component アノテーションが付けられたクラスをクラスパスに追加します。
または、新しいルート RouteBuilder Bean を @Configuration クラスで作成します。
4.7. Camel Spring Boot auto configuration の Camel プロパティーの設定
Spring Boot auto-configuration は、プロパティーのプレースホルダー、OS 環境変数、Camel プロパティーがサポートされるシステムプロパティーなどの Spring Boot 外部設定に接続します。
手順
application.propertiesファイルにプロパティーを定義します。route.from = jms:invoices
route.from = jms:invoicesCopy to Clipboard Copied! Toggle word wrap Toggle overflow または、以下の例のように Camel プロパティーをシステムプロパティーとして設定します。
java -Droute.to=jms:processed.invoices -jar mySpringApp.jar
java -Droute.to=jms:processed.invoices -jar mySpringApp.jarCopy to Clipboard Copied! Toggle word wrap Toggle overflow 次のように、設定されたプロパティーを Camel ルートのプレースホルダーとして使用します。
Copy to Clipboard Copied! Toggle word wrap Toggle overflow
4.8. カスタム Camel コンテキストの設定
Camel Spring Boot auto-configuration によって作成された CamelContext Bean でオペレーションを実行するには、Spring コンテキストで CamelContextConfiguration インスタンスを登録します。
手順
以下のように、Spring コンテキストで
CamelContextConfigurationのインスタンスを登録します。Copy to Clipboard Copied! Toggle word wrap Toggle overflow
Spring コンテキストの開始前に CamelContextConfiguration および beforeApplicationStart(CamelContext) メソッドが呼び出され、このコールバックに渡された CamelContext インスタンスは完全に自動設定されます。複数のインスタンスの CamelContextConfiguration を Spring コンテキストに追加でき、すべてが実行されます。
4.9. 自動設定された CamelContext での JMX の無効化
自動設定された CamelContext で JMX を無効にするには、camel.springboot.jmxEnabled プロパティーを使用できます。JMX はデフォルトで有効になっています。
手順
以下のプロパティーを
application.propertiesファイルに追加し、falseに設定します。camel.springboot.jmxEnabled = false
camel.springboot.jmxEnabled = falseCopy to Clipboard Copied! Toggle word wrap Toggle overflow
4.10. 自動設定されたコンシューマーおよびプロデューサーテンプレートの Spring 管理 Bean へのインジェクト
Camel 自動設定によって、事前設定された ConsumerTemplate および ProducerTemplate インスタンスが提供されます。これらを Spring 管理の Bean にインジェクトすることができます。
例
デフォルトでは、コンシューマーテンプレートとプロデューサーテンプレートのエンドポイントキャッシュサイズは 1000 に設定されています。これらの値を変更するには、以下の Spring プロパティーを希望するキャッシュサイズに設定します。例を以下に示します。
camel.springboot.consumerTemplateCacheSize = 100
camel.springboot.producerTemplateCacheSize = 200
camel.springboot.consumerTemplateCacheSize = 100
camel.springboot.producerTemplateCacheSize = 2004.11. Spring コンテキストの自動設定された TypeConverter
Camel 自動設定 は、Spring コンテキストに typeConverter という名前の TypeConverter インスタンスを登録します。
Example
4.12. Spring タイプコンバージョン API ブリッジ
Spring は、強力な タイプコンバージョン API で設定されます。Spring API は Camel の タイプコンバーター API と似ています。これらの API は似ているため、Camel Spring Boot は Spring コンバージョン API に委譲するブリッジコンバーター (SpringTypeConverter) を自動的に登録します。つまり、追加設定のない Camel は Spring コンバーターを Camel と同様に扱います。
これにより、以下のように Camel TypeConverter API を使用して、Camel および Spring コンバーターの両方にアクセスできます。
Example
ここでは、Spring Boot はアプリケーションコンテキストで使用できる Spring の ConversionService インスタンスに変換を委譲します。ConversionService インスタンスがない場合は、Camel Spring Boot の自動設定が ConversionService のインスタンスを作成します。
4.13. タイプ変換機能の無効化
Camel Spring Boot のタイプ変換機能を無効にするには、camel.springboot.typeConversion プロパティーを false に設定します。このプロパティーが false に設定されると、auto-configuration によってタイプコンバーターインスタンスが登録されず、Spring Boot タイプコンバージョン API へのタイプ変換の委譲が有効になりません。
手順
Camel Spring Boot コンポーネントのタイプ変換機能を無効にするには、以下のように
camel.springboot.typeConversionプロパティーをfalseに設定します。camel.springboot.typeConversion = false
camel.springboot.typeConversion = falseCopy to Clipboard Copied! Toggle word wrap Toggle overflow
4.14. 自動設定の XML ルートのクラスパスへの追加
デフォルトでは、camel ディレクトリーのクラスパスにある Camel XML ルートは Camel Spring Boot コンポーネントによって自動検出され、含まれます。設定オプションを使用すると、ディレクトリー名を設定でき、設定オプションを使用してこの機能を無効化できます。
手順
以下のようにクラスパスの Camel Spring Boot XML ルートを設定します。
// turn off
camel.springboot.xmlRoutes = false
// scan in the com/foo/routes classpath
camel.springboot.xmlRoutes = classpath:com/foo/routes/*.xml
// turn off
camel.springboot.xmlRoutes = false
// scan in the com/foo/routes classpath
camel.springboot.xmlRoutes = classpath:com/foo/routes/*.xml
Copy to Clipboard Copied! Toggle word wrap Toggle overflow 注記XML ファイルによって Camel XML ルート要素が定義され、
CamelContext要素は定義されないはずです。例を以下に示します。Copy to Clipboard Copied! Toggle word wrap Toggle overflow
Spring XML ファイルの使用
<camelContext> で Spring XML ファイルを使用するには、Spring XML ファイルまたは application.properties ファイルの Camel コンテキストを設定します。Camel コンテキストの名前を設定し、ストリームキャッシングを有効にするには、以下を application.properties ファイルに追加します。
camel.springboot.name = MyCamel
camel.springboot.stream-caching-enabled=true
camel.springboot.name = MyCamel
camel.springboot.stream-caching-enabled=true4.15. 自動設定の XML Rext-DSL ルートの追加
Camel Spring Boot コンポーネントによって、camel-rest ディレクトリー以下のクラスパスに追加される Camel Rest-DSL XML ルートが自動検出され、組み込まれます。設定オプションを使用すると、ディレクトリー名を設定でき、設定オプションを使用してこの機能を無効化できます。
手順
以下のように、クラスパスの Camel Spring Boot Rest-DSL XML ルートを設定します。
// turn off
camel.springboot.xmlRests = false
// scan in the com/foo/routes classpath
camel.springboot.xmlRests = classpath:com/foo/rests/*.xml
// turn off
camel.springboot.xmlRests = false
// scan in the com/foo/routes classpath
camel.springboot.xmlRests = classpath:com/foo/rests/*.xml
Copy to Clipboard Copied! Toggle word wrap Toggle overflow 注記Rest-DSL ファイルによって、Camel XML REST 要素が定義され、
CamelContext要素は定義されないはずです。例を以下に示します。Copy to Clipboard Copied! Toggle word wrap Toggle overflow
4.16. Camel Spring Boot でのテスト
Camel を Spring Boot で実行すると、Spring Boot は自動的に Camel と @Component アノテーションが付けられたそのルートを組み込みします。Spring Boot でテストする場合、@ContextConfiguration ではなく @SpringBootTest を使用して、使用する設定クラスを指定します。
異なる RouteBuilder クラスに複数の Camel ルートがある場合、アプリケーションの実行時に Camel Spring Boot コンポーネントによってこれらのルートがすべて自動的に組み込まれます。1 つの RouteBuilder クラスのみからルートをテストする場合は、以下のパターンを使用して、有効にする RouteBuilder を include (含める) または exclude (除外) することができます。
- java-routes-include-pattern: パターンに一致する RouteBuilder クラスを include (含める) ために使用されます。
- java-routes-exclude-pattern: パターンに一致する RouteBuilder クラスを exclude (除外) するために使用されます。exclude は include よりも優先されます。
手順
以下のように、ユニットテストクラスの
includeまたはexcludeパターンを@SpringBootTestアノテーションへのプロパティーとして指定します。@RunWith(CamelSpringBootRunner.class) @SpringBootTest(classes = {MyApplication.class); properties = {"camel.springboot.java-routes-include-pattern=**/Foo*"}) public class FooTest {@RunWith(CamelSpringBootRunner.class) @SpringBootTest(classes = {MyApplication.class); properties = {"camel.springboot.java-routes-include-pattern=**/Foo*"}) public class FooTest {Copy to Clipboard Copied! Toggle word wrap Toggle overflow FooTestクラスの include パターンは Ant スタイルパターンを表す**/Foo*です。このパターンは、すべてのパッケージ名と一致する 2 つのアスタリスクで始まります。/Foo*は、FooRoute のようにクラス名が Foo で始まる必要があることを意味します。以下の maven コマンドを使用してテストを実行します。
mvn test -Dtest=FooTest
mvn test -Dtest=FooTestCopy to Clipboard Copied! Toggle word wrap Toggle overflow
4.17. Spring Boot、Apache Camel、および外部メッセージングブローカーの使用
Fuse は外部メッセージングブローカーを使用します。サポートされるブローカー、クライアント、および Camel コンポーネントの組み合わせに関する詳細は Red Hat Fuse でサポートされる構成 を参照してください。
Camel コンポーネントは JMS 接続ファクトリーに接続されている必要があります。以下の例は、camel-amqp コンポーネントを JMS 接続ファクトリーに接続する方法を示しています。
付録A Maven を使用する準備
ここでは、Red Hat Fuse プロジェクトをビルドするために Maven を準備する方法の概要を説明し、Maven アーティファクトの検索に使用される Maven コーディネートの概念を紹介します。
A.1. Maven 設定の準備
Maven は、Apache の無料のオープンソースビルドツールです。通常は、Maven を使用して Fuse アプリケーションを構築します。
手順
- Maven ダウンロードページ から最新バージョンの Maven をダウンロードします。
システムがインターネットに接続していることを確認します。
デフォルトの動作では、プロジェクトのビルド中、Maven は外部リポジトリーを検索し、必要なアーティファクトをダウンロードします。Maven はインターネット上でアクセス可能なリポジトリーを探します。
このデフォルト動作を変更し、Maven によってローカルネットワーク上のリポジトリーのみが検索されるようにすることができます。これは Maven をオフラインモードで実行できることを意味します。オフラインモードでは、Maven によってローカルリポジトリーのアーティファクトが検索されます。「ローカル Maven リポジトリーの使用」 を参照してください。
A.2. Maven への Red Hat リポジトリーの追加
Red Hat Maven リポジトリーにあるアーティファクトにアクセスするには、Red Hat Maven リポジトリーを Maven の settings.xml ファイルに追加する必要があります。Maven は、ユーザーのホームディレクトリーの .m2 ディレクトリーで settings.xml ファイルを探します。ユーザー指定の settings.xml ファイルがない場合、Maven は M2_HOME/conf/settings.xml にあるシステムレベルの settings.xml ファイルを使用します。
前提条件
Red Hat リポジトリーを追加する settings.xml ファイルがある場所を把握している。
手順
以下の例のように、settings.xml ファイルに Red Hat リポジトリーの repository 要素を追加します。
A.3. ローカル Maven リポジトリーの使用
インターネットへ接続せずに Apache Karaf コンテナーを実行し、オフライン状態では使用できない依存関係を持つアプリケーションをデプロイする場合、Maven 依存関係プラグインを使用してアプリケーションの依存関係を Maven オフラインリポジトリーにダウンロードすることができます。ダウンロード後、このカスタマイズされた Maven オフラインリポジトリーをインターネットに接続していないマシンに提供することができます。
手順
pom.xmlファイルが含まれるプロジェクトディレクトリーで、以下のようなコマンドを実行し、Maven プロジェクトのリポジトリーをダウンロードします。mvn org.apache.maven.plugins:maven-dependency-plugin:3.1.0:go-offline -Dmaven.repo.local=/tmp/my-project
mvn org.apache.maven.plugins:maven-dependency-plugin:3.1.0:go-offline -Dmaven.repo.local=/tmp/my-projectCopy to Clipboard Copied! Toggle word wrap Toggle overflow この例では、プロジェクトのビルドに必要な Maven 依存関係とプラグインは
/tmp/my-projectディレクトリーにダウンロードされます。etc/org.ops4j.pax.url.mvn.cfgファイルを編集し、org.ops4j.pax.url.mvn.offlineを true に設定します。これによりオフラインモードが有効になります。## # If set to true, no remote repository will be accessed when resolving artifacts # org.ops4j.pax.url.mvn.offline = true
## # If set to true, no remote repository will be accessed when resolving artifacts # org.ops4j.pax.url.mvn.offline = trueCopy to Clipboard Copied! Toggle word wrap Toggle overflow - このカスタマイズされた Maven オフラインリポジトリーを、インターネットに接続していない内部のマシンに提供します。
A.4. Maven アーティファクトおよびコーディネート
Maven ビルドシステムでは、アーティファクト が基本的なビルディングブロックです。ビルド後のアーティファクトの出力は、通常 JAR や WAR ファイルなどのアーカイブになります。
Maven の主な特徴として、アーティファクトを検索し、検索したアーティファクト間で依存関係を管理できる機能が挙げられます。Maven コーディネート は、特定のアーティファクトの場所を特定する値のセットです。基本的なコーディネートには、以下の形式の 3 つの値があります。
groupId:artifactId:version
Maven は、packaging の値、または packaging 値と classifier 値の両方を使用して基本的なコーディネートを拡張することがあります。Maven コーディネートには以下の形式のいずれかを使用できます。
groupId:artifactId:version
groupId:artifactId:packaging:version
groupId:artifactId:packaging:classifier:version
groupId:artifactId:version
groupId:artifactId:packaging:version
groupId:artifactId:packaging:classifier:version値の説明は次のとおりです。
- groupdId
-
アーティファクトの名前の範囲を定義します。通常、パッケージ名のすべてまたは一部をグループ ID として使用します。たとえば、
org.fusesource.exampleです。 - artifactId
- グループ名に関連するアーティファクト名を定義します。
- version
-
アーティファクトのバージョンを指定します。バージョン番号には
n.n.n.nのように最大 4 つの部分を使用でき、最後の部分には数字以外の文字を使用できます。たとえば1.0-SNAPSHOTの場合は、最後の部分が英数字のサブ文字列である0-SNAPSHOTになります。 - packaging
-
プロジェクトのビルド時に生成されるパッケージ化されたエンティティーを定義します。OSGi プロジェクトでは、パッケージングは
bundleになります。デフォルト値はjarです。 - classifier
- 同じ POM からビルドされた内容が異なるアーティファクトを区別できるようにします。
次に示すように、アーティファクトの POM ファイル内の要素で、アーティファクトのグループ ID、アーティファクト ID、パッケージング、およびバージョンを定義します。
前述のアーティファクトの依存関係を定義するには、以下の dependency 要素を POM ファイルに追加します。
前述の依存関係に bundle パッケージを指定する必要はありません。バンドルは特定タイプの JAR ファイルであり、jar はデフォルトの Maven パッケージタイプであるためです。依存関係でパッケージタイプを明示的に指定する必要がある場合は、type 要素を使用できます。
付録B Spring Boot Maven プラグイン
Spring Boot Maven プラグインによって Maven で Spring Boot のサポートが提供され、実行可能な jar または war アーカイブをパッケージ化や、アプリケーション in-place の実行を可能にします。
B.1. Spring Boot Maven プラグインのゴール
Spring Boot Maven プラグインには以下のゴールが含まれます。
-
spring-boot:runは Spring Boot アプリケーションを実行します。 -
spring-boot:repackageは、.jarおよび.warファイルを再パッケージして実行可能にします。 -
spring-boot:startおよびspring-boot:stopの両方は、Spring Boot アプリケーションのライフサイクルを管理するために使用されます。 -
spring-boot:build-infoは、Actuator が使用できるビルド情報を生成します。
B.2. Spring Boot Maven プラグインの使用
Spring Boot プラグインの使用方法に関する一般的な手順は、https://docs.spring.io/spring-boot/docs/current/maven-plugin/reference/htmlsingle/#using を参照してください。以下の例は Spring Boot の spring-boot-maven-plugin の使用方法を示しています。
Spring Boot Maven プラグインの詳細は、https://docs.spring.io/spring-boot/docs/current/maven-plugin/reference/htmlsingle/ を参照してください。
B.2.1. Spring Boot 2 の Spring Boot Maven プラグインの使用
以下の例は Spring Boot 2 の spring-boot-maven-plugin の使用方法を示しています。
Example
B.2.2. Spring Boot 1 の Spring Boot Maven プラグインの使用
以下の例は Spring Boot 1 の spring-boot-maven-plugin の使用方法を示しています。
Example