이 콘텐츠는 선택한 언어로 제공되지 않습니다.
23.2. Creating a container on a remote host
Overview
링크 복사링크가 클립보드에 복사되었습니다!
To create a container on a remote host, the remote host machine must be ssh-enabled.
Note
Creating a container via ssh on a remote Windows machine is not supported.
Procedure
링크 복사링크가 클립보드에 복사되었습니다!
To create a new container on a remote machine:
- If necessary, in Fabric Navigator, expand the tree of the fabric for which you want to create the new remote container.
- Right-click Containers to open the context menu, and then select .
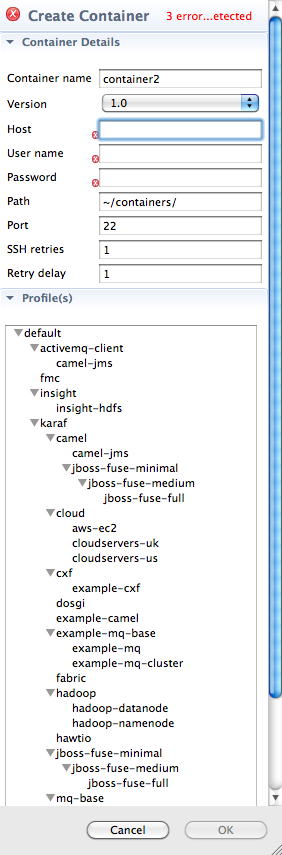
Figure 23.2. Create Container via SSH wizard
 NoteAn error icon (
 ) marks required fields that lack a valid value, and the dialog banner displays the number of errors detected.
- In Container name, enter a name for the new container.We recommend that you replace the default name with a meaningful name that identifies the container's role or function.
- If multiple versions exist, you can select one from the Version drop-down list. Otherwise, accept the default value.
- In Host, enter the name or the IP address of the remote host.
- In User name, enter the name of a user authorized to log into the remote host.
- In Password, enter the user's password.
- In Path, enter the path of the new container's location on the remote host.
- In Port, accept the default port number (22), or enter a new port number to use for establishing an ssh connection on the remote host.
- In SSH retries, accept the default number of retries (5), or enter the maximum number of retries to attempt at establishing an ssh connection on the remote host.
- In Retry delay, enter the delay, in milliseconds, between retry attempts.
- Under Profiles, click the checkbox next to the profile or profiles you want to assign to the container.Profiles determine the function of a container; what applications it runs. You can assign multiple profiles to a container, as long as the applications they install do not conflict with one another.ImportantDo not assign a base profile (one ending in
-base) to a container. - Click OK.The new container appears in Fabric Navigator as a container node under ContainersSelecting the new container in Fabric Navigator populates its Profiles and Profile Details pages in Properties viewer.
Related topics
링크 복사링크가 클립보드에 복사되었습니다!
| Section 24.1, “Creating a new profile” |
| Section 25.1, “Creating a new version of a profile” |