이 콘텐츠는 선택한 언어로 제공되지 않습니다.
Deploying into Spring Boot
Building and running Spring Boot applications in standalone mode
Abstract
Chapter 1. Getting Started with Spring Boot Standalone
1.1. About Spring Boot standalone deployment mode
In standalone deployment mode, a Spring Boot application is packaged as a Jar file and runs directly inside the Java Virtual Machine (JVM). That is, the Spring Boot application can be run directly using the java command with the -jar option — for example:
java -jar SpringBootApplication.jar
java -jar SpringBootApplication.jarWhere Spring Boot provides the main class for the executable Jar. This approach to packaging and running the application is consistent with the microservices philosophy, where a service is packaged with the minimum set of requirements. The container is also minimal, being just the JVM itself.
The following elements are required for building a Spring Boot standalone application in Fuse:
The Fuse Bill of Materials (BOM) — defines a carefully curated set of dependencies from the Red Hat Maven repository. The BOM exploits Maven’s dependency management mechanism to define the appropriate versions of Maven dependencies.
Note that only dependencies defined in the Fuse BOM are supported by Red Hat.
- The Spring Boot Maven Plug-In — implements the build process for a standalone Spring Boot application in Maven. This plug-in is responsible for packaging your Spring Boot application as an executable Jar file.
For details about the OpenShift mode of deployment, see the Fuse on OpenShift Guide.
1.2. Overview of Fuse boosters
Red Hat Fuse provides the following boosters to help you get started with Fuse applications and demonstrate useful components:
- Section 1.3, “Circuit Breaker booster” - An example of enabling a distributed application to cope with interruptions to network connectivity and temporary unavailability of backend services.
- Section 1.4, “Externalized Configuration booster” - An example of how to externalize configuration for an Apache Camel route.
- Section 1.5, “REST API booster” - An example that introduces the mechanics of interacting with a remote (exposed by Apache Camel) service using the HTTP protocol.
1.2.1. Prerequisites
To build and run the booster demonstrations, install the following prerequisites:
- A supported version of the Java Developer Kit (JDK). See the Supported Configurations page for details.
- Apache Maven 3.3.x or later. See the Maven Download page. To learn more about Maven, see Appendix A, Preparing to use Maven.
1.2.2. Generate a booster project
To generate a project for any of the Fuse boosters:
- Navigate to https://developers.redhat.com/launch.
- Click LAUNCH YOUR PROJECT.
- The launcher wizard prompts you to log in to your Red Hat account. Click the Log in or register button to log in.
- On the first page, type a name for the project.
- On the Select Target Environment page, click Build and run locally.
On the Select Mission & Runtime page:
- Select the mission that you want to use (Circuit Breaker, Externalized Configuration, or REST API Level 0.
- Select the Fuse runtime (not the Spring Boot runtime).
- Select the latest 7.x.x (Red Hat Fuse) version from the Runtime Version dropdown menu.
- On the Confirm Application Summary & Setup page, click Set Up Application.
- After downloading the ZIP file, use an archive utility to extract the generated project to a convenient location on your local filesystem.
Follow the instructions to build and run the booster that you downloaded:
1.3. Circuit Breaker booster
The Netflix/Hystrix circuit breaker component enables distributed applications to cope with interruptions to network connectivity and temporary unavailability of backend services. The basic idea of the circuit breaker pattern is that the loss of a dependent service is detected automatically and an alternative behavior can be programmed, in case the backend service is temporarily unavailable.
The Fuse circuit breaker booster consists of two related services:
- A name service, which returns a name to greet
-
A greetings service, which invokes the name service to get a name and then returns the string,
Hello, NAME.
In this demonstration, the Hystrix circuit breaker is inserted between the greetings service and the name service. If the name service becomes unavailable, the greetings service can fall back to an alternative behavior and respond to the client immediately, instead of blocking or timing out while it waits for the name service to restart.
1.3.1. Build and run the Circuit Breaker booster
After you follow the Section 1.2.2, “Generate a booster project” steps for the Circuit Breaker mission, follow these steps to build and run the Circuit breaker booster project:
Open a shell prompt and build the project from the command line, using Maven:
cd PROJECT_DIR
mvn clean package
cd PROJECT_DIR
mvn clean package
Copy to Clipboard Copied! Toggle word wrap Toggle overflow Open a new shell prompt and start the name service, as follows:
cd name-service
mvn spring-boot:run -DskipTests -Dserver.port=8081
cd name-service
mvn spring-boot:run -DskipTests -Dserver.port=8081
Copy to Clipboard Copied! Toggle word wrap Toggle overflow As Spring Boot starts up, you should see some output like the following:
...
2017-12-08 15:44:24.223  INFO 22758 --- [           main] o.a.camel.spring.SpringCamelContext      : Total 1 routes, of which 1 are started
2017-12-08 15:44:24.227  INFO 22758 --- [           main] o.a.camel.spring.SpringCamelContext      : Apache Camel 2.20.0 (CamelContext: camel-1) started in 0.776 seconds
2017-12-08 15:44:24.234  INFO 22758 --- [           main] org.jboss.fuse.boosters.cb.Application   : Started Application in 4.137 seconds (JVM running for 4.744)
Copy to Clipboard Copied! Toggle word wrap Toggle overflow Open a new shell prompt and start the greetings service, as follows:
cd greetings-service
mvn spring-boot:run -DskipTests
cd greetings-service
mvn spring-boot:run -DskipTests
Copy to Clipboard Copied! Toggle word wrap Toggle overflow As Spring Boot starts up, you should see some output like the following:
...
2017-12-08 15:46:58.521  INFO 22887 --- [           main] o.a.c.c.s.CamelHttpTransportServlet      : Initialized CamelHttpTransportServlet[name=CamelServlet, contextPath=]
2017-12-08 15:46:58.524  INFO 22887 --- [           main] s.b.c.e.t.TomcatEmbeddedServletContainer : Tomcat started on port(s): 8080 (http)
2017-12-08 15:46:58.536  INFO 22887 --- [           main] org.jboss.fuse.boosters.cb.Application   : Started Application in 6.263 seconds (JVM running for 6.819)
Copy to Clipboard Copied! Toggle word wrap Toggle overflow The greetings service exposes a REST endpoint at the URL,
http://localhost:8080/camel/greetings.Go to http://localhost:8080
When you open this page, it invokes the Greeting Service:
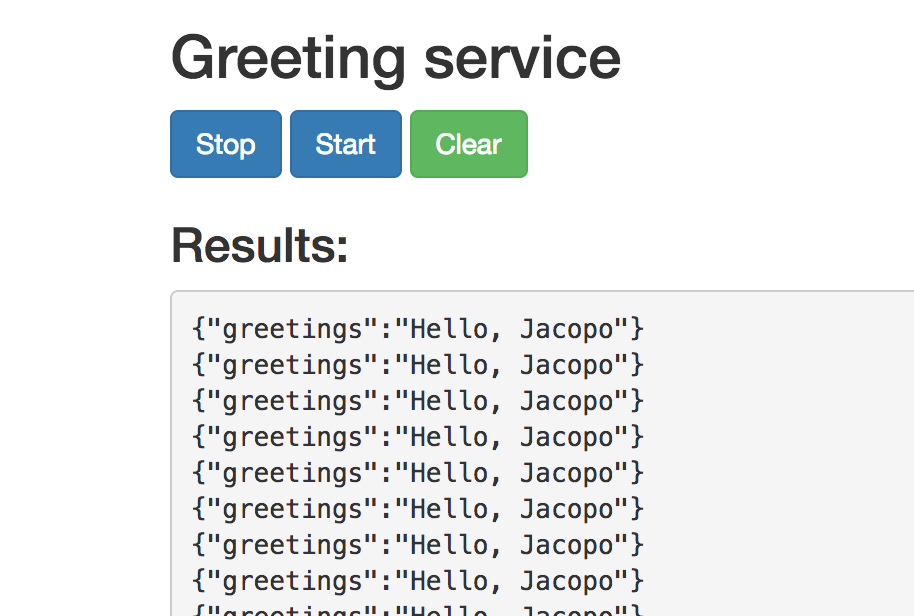
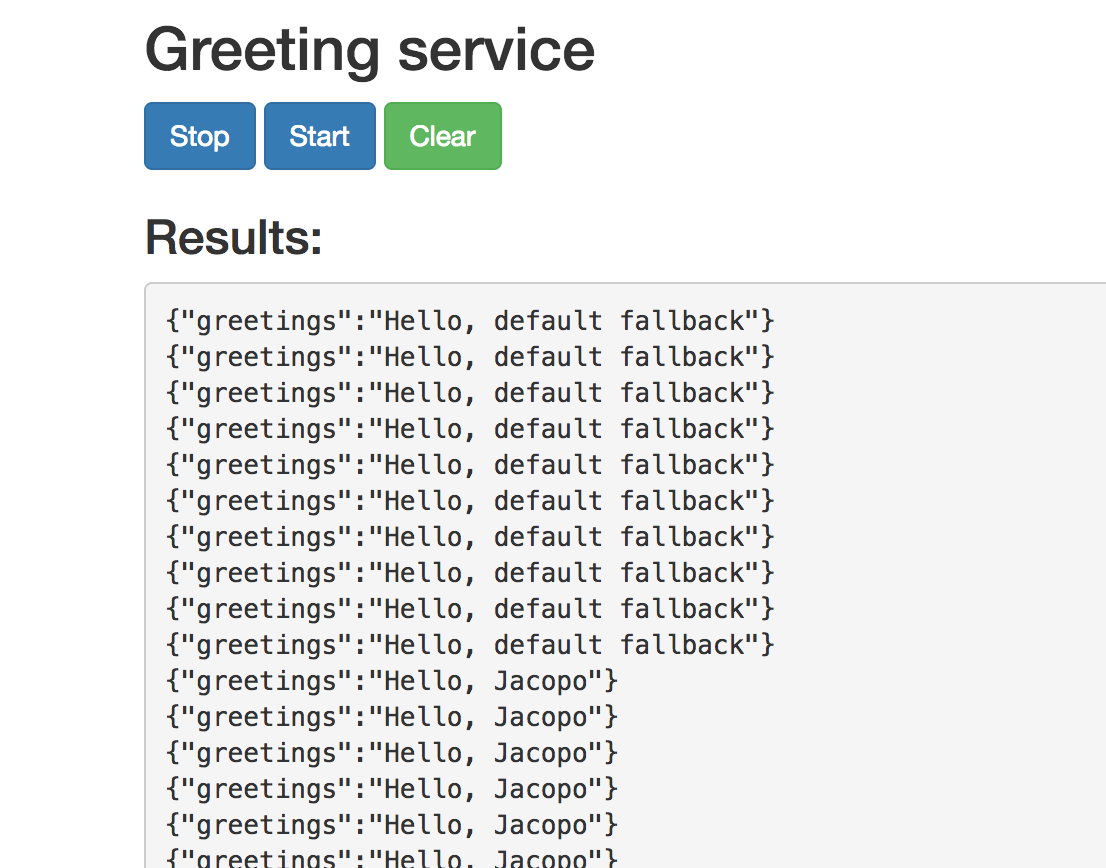
This page also provides a link to the Hystrix dashboard, which monitors the state of the circuit breaker.
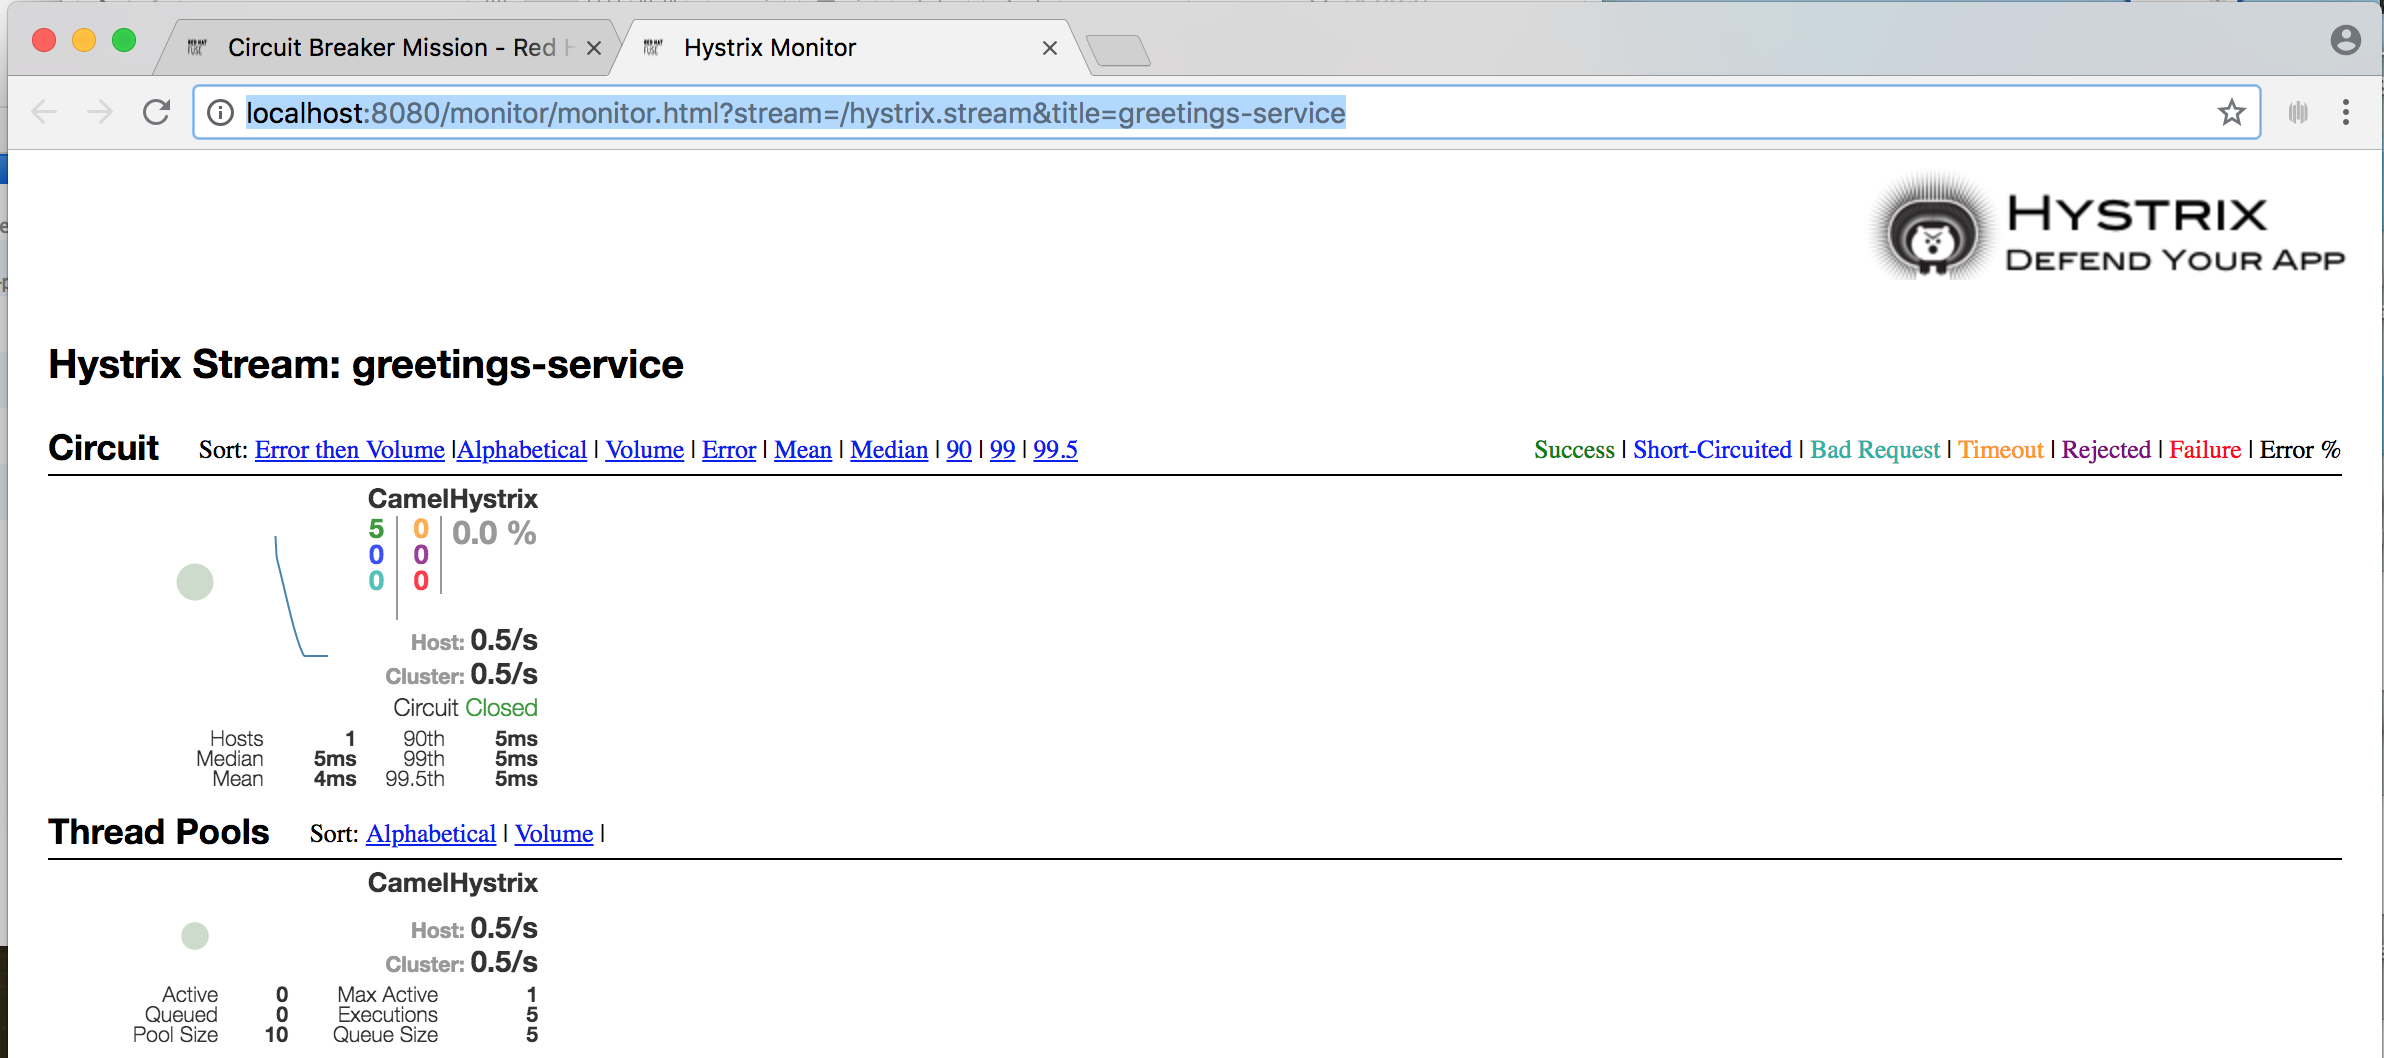
To demonstrate the circuit breaker functionality provided by Camel Hystrix, kill the backend name service by pressing Ctrl+C while in the window of the shell prompt where the name service is running.
Now that the name service is unavailable, the circuit breaker kicks in to prevent the greetings service from hanging when it is invoked.
Observe the changes in the Hystrix Monitor dashboard and in the Greeting Service output:
1.4. Externalized Configuration booster
The Externalized Configuration booster provides an example of how to externalize configuration for an Apache Camel route. For Spring Boot standalone deployments, the configuration data is stored in an application.properties file.
For Fuse on OpenShift deployments, the configuration data is stored in a ConfigMap object.
1.4.1. Build and run the Externalized Configuration booster
After you follow the Section 1.2.2, “Generate a booster project” steps for the Externalized Configuration mission, follow these steps to build and run the Externalized Configuration booster as a standalone project on your local machine:
- Download the project and extract the archive on your local filesystem.
Build the project:
cd PROJECT_DIR
mvn clean package
cd PROJECT_DIR
mvn clean package
Copy to Clipboard Copied! Toggle word wrap Toggle overflow Run the service:
mvn spring-boot:run
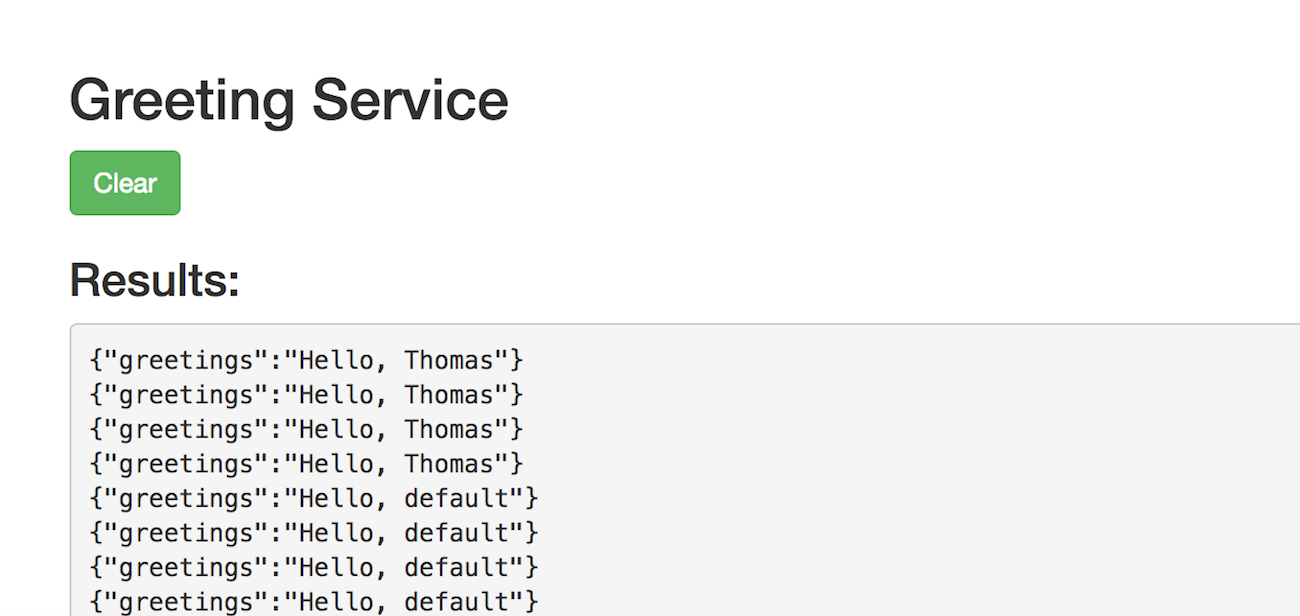
mvn spring-boot:runCopy to Clipboard Copied! Toggle word wrap Toggle overflow Open a web browser to http://localhost:8080. This page invokes a Greeting Service every 5 seconds. The Greetings Service responds by using the
booster.nameToGreetvaluefrom thetarget/classes/application.propertiesfile.The Greeting Service prints a greeting to “default” every five seconds:

Modify the
booster.nameToGreetvalue:-
Open the
target/classes/application.propertiesfile in an editor. Change the value of the
booster.nameToGreetvaluefrom default to another value, for example Thomas:booster.nameToGreetvalue=Thomas
booster.nameToGreetvalue=ThomasCopy to Clipboard Copied! Toggle word wrap Toggle overflow
-
Open the
- In the Terminal window, stop the service by pressing CTRL+C.
Run the service again:
mvn spring-boot:run
mvn spring-boot:runCopy to Clipboard Copied! Toggle word wrap Toggle overflow In the web browser, return to the http://localhost:8080 page to view the changed value in the Greeting Service’s results window.
1.5. REST API booster
The REST API Level 0 mission shows how to map business operations to a remote procedure call endpoint over HTTP by using a REST framework. This mission corresponds to Level 0 in the Richardson Maturity Model.
This booster introduces the mechanics of interacting with a remote (exposed by Apache Camel) service using the HTTP protocol. By using this Fuse booster, you can quickly prototype and flexibly design a REST API.
Use this booster to:
-
Execute an HTTP GET request on the
camel/greetings/{name}endpoint. This request produces a response in JSON format with a payload ofHello, $name!(where$nameis replaced by the value of the URL parameter from the HTTP GET request). -
Change the value of the URL
{name}parameter to see the changed value reflected in the response. - View the REST API’s Swagger page.
1.5.1. Build and run the REST API booster
After you follow the Section 1.2.2, “Generate a booster project” steps for the REST API mission, follow these steps to build and run the REST API booster as a standalone project on your local machine:
- Download the project and extract the archive on your local filesystem.
Build the project:
cd PROJECT_DIR
mvn clean package
cd PROJECT_DIR
mvn clean package
Copy to Clipboard Copied! Toggle word wrap Toggle overflow Run the service:
mvn spring-boot:run
mvn spring-boot:runCopy to Clipboard Copied! Toggle word wrap Toggle overflow - Open a web browser to: http://localhost:8080
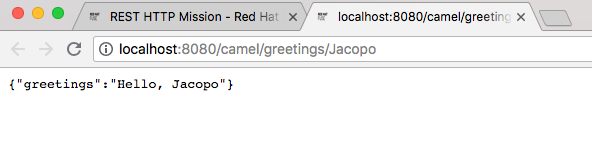
To execute the example HTTP GET request, click the camel/greetings/{name} button.
A new web browser window opens with the
localhost:8080/camel/greetings/JacopoURL. The default value of the URL{name}parameter is Jacopo.The JSON response appears in the browser window:
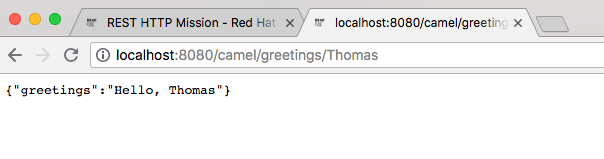
To change the value of the
{name} `parameter, change the URL. For example, to change the name to Thomas, use this URL: `localhost:8080/camel/greetings/Thomas.The updated JSON response appears in the browser window:
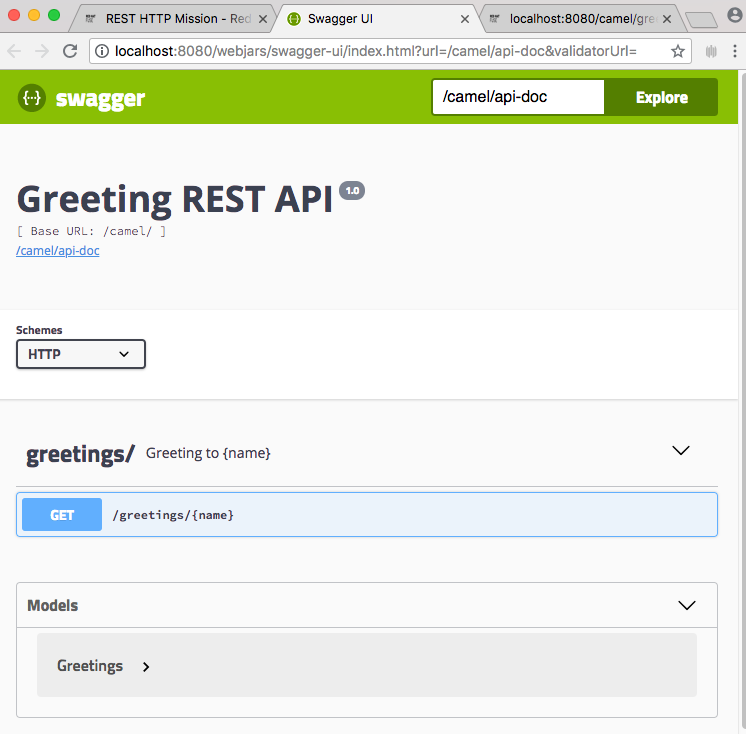
To view the REST API’s Swagger page, click the API Swagger page button.
The API swagger page opens in a browser window.
Chapter 2. Building with Maven
The standard approach to developing applications for Spring Boot in Fuse is to use the Apache Maven build tool and to structure your source code as a Maven project. Fuse provides Maven quickstarts to get you started quickly and many of the Fuse buld tools are provided as Maven plug-ins. For this reason, it is highly recommended that you adopt Maven as the build tool for Spring Boot projects in Fuse.
2.1. Generating a Maven project
Fuse provides a selection of quickstarts, based on Maven archetypes, which you can use to generate an initial Maven project for a Spring Boot application. To save you having to remember the location information and versions for various Maven archetypes, Fuse provides tooling to help you generate Maven projects for standalone Spring Boot projects.
2.1.1. Project generator at launch.openshift.io
The quickest way to get started with Spring Boot standalone in Fuse is to navigate to launch.openshift.io and follow the instructions for the Spring Boot standalone runtime, to generate a new Maven project. After following the on-screen instructions, you will be prompted to download an archive file, which contains a complete Maven project that you can build and run locally.
2.1.2. Fuse tooling wizard in Developer Studio
Alternatively, you can download and install Red Hat JBoss Developer Studio (which includes Fuse Tooling). Using the Fuse New Integration Project wizard, you can generate a new Spring Boot standalone project and continue to develop inside the Eclipse-based IDE.
2.2. Depend on the BOM for Spring Boot
After creating and building your first Spring Boot project, you will soon want to add more components. But how do you know which versions of the Maven dependencies to add to your project? The simplest (and recommended) approach is to use the relevant Bill of Materials (BOM) file, which automatically defines all of the version dependencies for you.
2.2.1. BOM file for Spring Boot
The purpose of a Maven Bill of Materials (BOM) file is to provide a curated set of Maven dependency versions that work well together, saving you from having to define versions individually for every Maven artifact.
The Fuse BOM for Spring Boot offers the following advantages:
- Defines versions for Maven dependencies, so that you do not need to specify the version when you add a dependency to your POM.
- Defines a set of curated dependencies that are fully tested and supported for a specific version of Fuse.
- Simplifies upgrades of Fuse.
Only the set of dependencies defined by a Fuse BOM are supported by Red Hat.
To incorporate a BOM file into your Maven project, specify a dependencyManagement element in your project’s pom.xml file (or, possibly, in a parent POM file), as shown in the following example:
The org.jboss.redhat-fuse BOM is new in Fuse 7 and has been designed to simplify BOM versioning. The Fuse quickstarts and Maven archetypes still use the old style of BOM, however, as they have not yet been refactored to use the new one. Both BOMs are correct and you can use either one in your Maven projects. In an upcoming Fuse release, the quickstarts and Maven archetypes will be refactored to use the new BOM.
After specifying the BOM using the dependency management mechanism, it becomes possible to add Maven dependencies to your POM without specifying the version of the artifact. For example, to add a dependency for the camel-hystrix component, you would add the following XML fragment to the dependencies element in your POM:
<dependency>
  <groupId>org.apache.camel</groupId>
  <artifactId>camel-hystrix-starter</artifactId>
</dependency>
<dependency>
  <groupId>org.apache.camel</groupId>
  <artifactId>camel-hystrix-starter</artifactId>
</dependency>
Note how the Camel artifact ID is specified with the -starter suffix — that is, you specify the Camel Hystrix component as camel-hystrix-starter, not as camel-hystrix. The Camel starter components are packaged in a way that is optimized for the Spring Boot environment.
2.2.2. Spring Boot Maven plugin
The Spring Boot Maven plugin is provided by Spring Boot and it is a developer utility for building and running a Spring Boot project:
-
Building — create an executable Jar package for your Spring Boot application by entering the command
mvn packagein the project directory. The output of the build is placed in thetarget/subdirectory of your Maven project. -
Running — for convenience, you can run the newly-built application with the command,
mvn spring-boot:start.
To incorporate the Spring Boot Maven plugin into your project POM file, add the plugin configuration to the project/build/plugins section of your pom.xml file, as shown in the following example:
Chapter 3. Apache Camel in Spring Boot
3.1. Introduction to Camel Spring Boot
The Camel Spring Boot component provides auto configuration for Apache Camel. Auto-configuration of the Camel context auto-detects Camel routes available in the Spring context and registers the key Camel utilities such as producer template, consumer template, and the type converter as beans.
Every Camel Spring Boot application should use dependencyManagement with productized versions, see quickstart pom. Versions that are tagged later can be omitted to not override the versions from BOM.
camel-spring-boot jar comes with the spring.factories file which allows you to add that dependency into your classpath and hence Spring Boot will automatically auto-configure Camel.
3.2. Introduction to Camel Spring Boot Starter
Apache Camel includes a Spring Boot starter module that allows you to develop Spring Boot applications using starters.
For more details, see sample application in the source code.
To use the starter, add the following snippet to your Spring Boot pom.xml file:
<dependency>
    <groupId>org.apache.camel</groupId>
    <artifactId>camel-spring-boot-starter</artifactId>
</dependency>
<dependency>
    <groupId>org.apache.camel</groupId>
    <artifactId>camel-spring-boot-starter</artifactId>
</dependency>The starter allows you to add classes with your Camel routes, as shown in the snippet below. Once these routes are added to the class path the routes are started automatically.
You can customize the Camel application in the application.properties or application.yml file.
Camel Spring Boot now supports referring to bean by the id name in the configuration files (application.properties or yaml file) when you configure any of the Camel starter components. In the src/main/resources/application.properties (or yaml) file you can now easily configure the options on the Camel that refers to other beans by refering to the beans ID name. For example, the xslt component can refer to a custom bean using the bean ID as follows:
Or, in case of a Jackson ObjectMapper in the camel-jackson data-format:
camel.dataformat.json-jackson.object-mapper=myJacksonMapper
camel.dataformat.json-jackson.object-mapper=myJacksonMapper3.3. Auto-configured Camel context
Camel auto-configuration provides a CamelContext instance and creates a SpringCamelContext. It also initializes and performs shutdown of that context. This Camel context is registered in the Spring application context under camelContext bean name and you can access it like other Spring bean.
For example, you can access the camelContext as shown below:
3.4. Auto-detecting Camel routes
Camel auto configuration collects all the RouteBuilder instances from the Spring context and automatically injects them into the CamelContext. It simplifies the process of creating new Camel route with the Spring Boot starter. You can create the routes by adding the @Component annotated class to your classpath.
To create a new route RouteBuilder bean in your @Configuration class, see below:
3.5. Camel properties
Spring Boot auto configuration automatically connects to Spring Boot external configuration such as properties placeholders, OS environment variables, or system properties with Camel properties support.
These properties are defined in application.properties file:
route.from = jms:invoices
route.from = jms:invoicesUse as system property
java -Droute.to=jms:processed.invoices -jar mySpringApp.jar
java -Droute.to=jms:processed.invoices -jar mySpringApp.jarUse as placeholders in Camel route:
3.6. Custom Camel context configuration
To perform operations on CamelContext bean created by Camel auto configuration, you need to register CamelContextConfiguration instance in your Spring context as shown below:
The method CamelContextConfiguration and beforeApplicationStart(CamelContext) will be called before the Spring context is started, so the CamelContext instance passed to this callback is fully auto-configured. You can add many instances of CamelContextConfiguration into your Spring context and all of them will be executed.
3.7. Disabling JMX
To disable JMX of the auto-configured CamelContext use camel.springboot.jmxEnabled property as JMX is enabled by default.
For example, you could add the following property to your application.properties file:
camel.springboot.jmxEnabled = false
camel.springboot.jmxEnabled = false3.8. Auto-configured consumer and producer templates
Camel auto configuration provides pre-configured ConsumerTemplate and ProducerTemplate instances. You can inject them into your Spring-managed beans:
By default consumer templates and producer templates come with the endpoint cache sizes set to 1000. You can change those values using the following Spring properties:
camel.springboot.consumerTemplateCacheSize = 100
camel.springboot.producerTemplateCacheSize = 200
camel.springboot.consumerTemplateCacheSize = 100
camel.springboot.producerTemplateCacheSize = 2003.9. Auto-configured TypeConverter
Camel auto configuration registers a TypeConverter instance named typeConverter in the Spring context.
3.10. Spring type conversion API bridge
Spring consist of type conversion API. Spring API is similar to the Camel type converter API. Due to the similarities between the two APIs Camel Spring Boot automatically registers a bridge converter (SpringTypeConverter) that delegates to the Spring conversion API. That means that out-of-the-box Camel will treat Spring Converters similar to Camel.
This allows you to access both Camel and Spring converters using the Camel TypeConverter API, as shown below:
Here, Spring Boot delegates conversion to the Spring’s ConversionService instances available in the application context. If no ConversionService instance is available, Camel Spring Boot auto configuration creates an instance of ConversionService.
3.11. Disabling type conversions features
To disable registering type conversion features of Camel Spring Boot such as TypeConverter instance or Spring bridge, set the camel.springboot.typeConversion property to false as shown below:
camel.springboot.typeConversion = false
camel.springboot.typeConversion = false3.12. Adding XML routes
By default, you can put Camel XML routes in the classpath under the directory camel, which camel-spring-boot will auto detect and include. From Camel version 2.17 onwards you can configure the directory name or disable this feature using the configuration option, as shown below:
// turn off
camel.springboot.xmlRoutes = false
// scan in the com/foo/routes classpath
camel.springboot.xmlRoutes = classpath:com/foo/routes/*.xml
// turn off
camel.springboot.xmlRoutes = false
// scan in the com/foo/routes classpath
camel.springboot.xmlRoutes = classpath:com/foo/routes/*.xml
The XML files should be Camel XML routes and not CamelContext such as:
When using Spring XML files with <camelContext>, you can configure Camel in the Spring XML file as well as in the application.properties file. For example, to set a name on Camel and turn On the stream caching, add:
camel.springboot.name = MyCamel
camel.springboot.stream-caching-enabled=true
camel.springboot.name = MyCamel
camel.springboot.stream-caching-enabled=true3.13. Adding XML Rest-DSL
By default, you can put Camel Rest-DSL XML routes in the classpath under the directory camel-rest, which camel-spring-boot will auto detect and include. You can configure the directory name or disable this feature using the configuration option, as shown below:
// turn off
camel.springboot.xmlRests = false
// scan in the com/foo/routes classpath
camel.springboot.xmlRests = classpath:com/foo/rests/*.xml
// turn off
camel.springboot.xmlRests = false
// scan in the com/foo/routes classpath
camel.springboot.xmlRests = classpath:com/foo/rests/*.xml
The Rest-DSL XML files should be Camel XML rests and not CamelContext such as:
3.14. Testing with Camel Spring Boot
In case on Camel running on Spring Boot, Spring Boot automatically embeds Camel and all its routes, which are annotated with @Component. When testing with Spring boot you use @SpringBootTest instead of @ContextConfiguration to specify which configuration class to use.
When you have multiple Camel routes in different RouteBuilder classes, Camel Spring Boot will include all these routes. Hence, when you wish to test routes from only one RouteBuilder class you can use the following patterns to include or exclude which RouteBuilders to enable:
- java-routes-include-pattern: Used for including RouteBuilder classes that match the pattern.
- java-routes-exclude-pattern: Used for excluding RouteBuilder classes that match the pattern. Exclude takes precedence over include.
You can specify these patterns in your unit test classes as properties to @SpringBootTest annonation, as shown below:
@RunWith(CamelSpringBootRunner.class)
@SpringBootTest(classes = {MyApplication.class);
   properties = {"camel.springboot.java-routes-include-pattern=**/Foo*"})
public class FooTest {
@RunWith(CamelSpringBootRunner.class)
@SpringBootTest(classes = {MyApplication.class);
   properties = {"camel.springboot.java-routes-include-pattern=**/Foo*"})
public class FooTest {
In the FooTest class, the include pattern is **/Foo*, which represents an Ant style pattern. Here, the pattern starts with double asterisk, which matches with any leading package name. /Foo* means the class name must start with Foo, for example, FooRoute. You can run a test using following maven command:
mvn test -Dtest=FooTest
mvn test -Dtest=FooTest3.15. See Also
3.16. Using Spring Boot, Apache Camel and external messaging brokers
3.16.1. Using an external messaging broker.
Fuse uses external messaging brokers. See Supported Configurations for more information about the supported broker, client and Camel component combinations.
The Camel component must be connected to the JMS connection-factory. The example below shows how to connect the camel-amqp component to a JMS connection-factory.
Appendix A. Preparing to use Maven
A.1. Overview
This section gives a brief overview of how to prepare Maven for building Red Hat Fuse projects and introduces the concept of Maven coordinates, which are used to locate Maven artifacts.
A.2. Prerequisites
In order to build a project using Maven, you must have the following prerequisites:
- Maven installation — Maven is a free, open source build tool from Apache. You can download the latest version from the Maven download page.
Network connection — whilst performing a build, Maven dynamically searches external repositories and downloads the required artifacts on the fly. By default, Maven looks for repositories that are accessed over the Internet. You can change this behavior so that Maven will prefer searching repositories that are on a local network.
NoteMaven can run in an offline mode. In offline mode Maven only looks for artifacts in its local repository.
A.3. Adding the Red Hat Maven repositories
In order to access artifacts from the Red Hat Maven repositories, you need to add them to Maven’s settings.xml file. Maven looks for your settings.xml file in the .m2 directory of the user’s home directory. If there is not a user specified settings.xml file, Maven will use the system-level settings.xml file at M2_HOME/conf/settings.xml.
To add the Red Hat repositories to Maven’s list of repositories, you can either create a new .m2/settings.xml file or modify the system-level settings. In the settings.xml file, add repository elements for the Red Hat repositories as shown in Adding the Red Hat Fuse Repositories to Maven.
Adding the Red Hat Fuse Repositories to Maven
A.4. Artifacts
The basic building block in the Maven build system is an artifact. The output of an artifact, after performing a Maven build, is typically an archive, such as a JAR or a WAR.
A.5. Maven coordinates
A key aspect of Maven functionality is the ability to locate artifacts and manage the dependencies between them. Maven defines the location of an artifact using the system of Maven coordinates, which uniquely define the location of a particular artifact. A basic coordinate tuple has the form, {groupId, artifactId, version}. Sometimes Maven augments the basic set of coordinates with the additional coordinates, packaging and classifier. A tuple can be written with the basic coordinates, or with the additional packaging coordinate, or with the addition of both the packaging and classifier coordinates, as follows:
groupdId:artifactId:version
groupdId:artifactId:packaging:version
groupdId:artifactId:packaging:classifier:version
groupdId:artifactId:version
groupdId:artifactId:packaging:version
groupdId:artifactId:packaging:classifier:versionEach coordinate can be explained as follows:
- groupdId
-
Defines a scope for the name of the artifact. You would typically use all or part of a package name as a group ID — for example,
org.fusesource.example. - artifactId
- Defines the artifact name (relative to the group ID).
- version
-
Specifies the artifact’s version. A version number can have up to four parts:
n.n.n.n, where the last part of the version number can contain non-numeric characters (for example, the last part of1.0-SNAPSHOTis the alphanumeric substring,0-SNAPSHOT). - packaging
-
Defines the packaged entity that is produced when you build the project. For OSGi projects, the packaging is
bundle. The default value isjar. - classifier
- Enables you to distinguish between artifacts that were built from the same POM, but have different content.
The group ID, artifact ID, packaging, and version are defined by the corresponding elements in an artifact’s POM file. For example:
For example, to define a dependency on the preceding artifact, you could add the following dependency element to a POM:
It is not necessary to specify the bundle package type in the preceding dependency, because a bundle is just a particular kind of JAR file and jar is the default Maven package type. If you do need to specify the packaging type explicitly in a dependency, however, you can use the type element.
Appendix B. Spring Boot Maven Plug-In
B.1. Spring Boot Maven Plugin Overview
This appendix describes the Spring Boot Maven Plugin. It provides the Spring Boot support in Maven and allows you to package the executable jar or war archives and run an application in-place.
B.2. Goals
The Spring Boot Plugin includes the following goals:
-
spring-boot:runruns your Spring Boot application. -
spring-boot:repackagerepackages your.jarand.warfiles to be executable. -
spring-boot:startandspring-boot:stopboth are used to manage the lifecycle of your Spring Boot application. -
spring-boot:build-infogenerates build information that can be used by the Actuator.
B.3. Usage
You can find general instructions on how to use the Spring Boot Plugin at: http://docs.spring.io/spring-boot/docs/current/maven-plugin/usage.html. Following is an example that illustrates the usage of the spring-boot-maven-plugin plugin:
For more information on Spring Boot Maven Plugin, refer the http://docs.spring.io/spring-boot/docs/current/maven-plugin link.