Este conteúdo não está disponível no idioma selecionado.
Performance Tuning Guide
Monitoring and optimizing subsystem throughput in RHEL 7
Abstract
Note
Chapter 1. Introduction
- Back up before you configure
- The default settings in Red Hat Enterprise Linux 7 are suitable for most services running under moderate loads. Improving the performance of a specific subsystem may affect another system adversely. Back up all data and configuration information before you begin tuning your system.
- Test configuration out of production
- The procedures documented in the Performance Tuning Guide are tested extensively by Red Hat engineers in both lab and field. Nonetheless, Red Hat recommends testing all planned configurations in a secure testing environment before applying those configurations to production systems.
Who Should Read This Book
- System administrators
- The Performance Tuning Guide documents the effects of each configuration option in detail so that system administrators can optimize Red Hat Enterprise Linux 7 for their specific purpose. Procedures in this guide are suitable for system administrators with Red Hat Certified Engineer (RHCE) certification or an equivalent amount of experience (3–5 years' experience deploying and managing Linux-based systems).
- System and business analysts
- This guide explains Red Hat Enterprise Linux 7 performance features at a high level. It provides information about how subsystems perform under specific workloads, allowing analysts to determine whether Red Hat Enterprise Linux 7 is suitable for their use case.Where possible, the Performance Tuning Guide also refers readers to more detailed feature documentation. This allows readers to develop the in-depth knowledge required to formulate the detailed deployment and optimization strategies necessary for infrastructure and deployment proposals.
Chapter 2. Performance Monitoring Tools
2.1. /proc
/proc "file system" is a directory that contains a hierarchy of files that represent the current state of the Linux kernel. It allows users and applications to see the kernel's view of the system.
/proc directory also contains information about system hardware and any currently running processes. Most files in the /proc file system are read-only, but some files (primarily those in /proc/sys) can be manipulated by users and applications to communicate configuration changes to the kernel.
/proc directory, refer to the Red Hat Enterprise Linux 7 System Administrator's Guide.
2.2. GNOME System Monitor
- System
- This tab displays basic information about the system's hardware and software.
- Processes
- This tab displays detailed information about active processes and the relationships between those processes. The processes displayed can be filtered to make certain processes easier to find. This tab also lets you perform some actions on the processes displayed, such as start, stop, kill, and change priority.
- Resources
- This tab displays the current CPU time usage, memory and swap space usage, and network usage.
- File Systems
- This tab lists all mounted file systems, and provides some basic information about each, such as the file system type, mount point, and memory usage.
2.3. Built-in Command-Line Tools
2.3.1. top
$ man top2.3.2. ps
$ man ps2.3.3. Virtual Memory Statistics (vmstat)
$ man vmstat2.3.4. System Activity Reporter (sar)
-i option to set the interval time in seconds, for example, sar -i 60 tells sar to check CPU usage every minute.
$ man sar2.4. perf
2.5. turbostat
- invariant time stamp counters
- APERF model-specific registers
- MPERF model-specific registers
$ man turbostat2.6. iostat
await value and what can cause its values to be high, see the following Red Hat Knowledgebase article: What exactly is the meaning of value "await" reported by iostat?
2.7. irqbalance
$ man irqbalance2.8. ss
ss -tmpie which displays detailed information (including internal information) about TCP sockets, memory usage, and processes using the socket.
$ man ss2.9. numastat
numa_hit values and low numa_miss values. Numastat also provides a number of command line options, which can show how system and process memory is distributed across NUMA nodes in the system.
$ man numastat2.10. numad
/proc file system. It tries to maintain a specified resource usage level, and rebalances resource allocation when necessary by moving processes between NUMA nodes. numad attempts to achieve optimal NUMA performance by localizing and isolating significant processes on a subset of the system's NUMA nodes.
$ man numad2.11. SystemTap
2.12. OProfile
- Performance monitoring samples may not be precise. Because the processor may execute instructions out of order, samples can be recorded from a nearby instruction instead of the instruction that triggered the interrupt.
- OProfile expects processes to start and stop multiple times. As such, samples from multiple runs are allowed to accumulate. You may need to clear the sample data from previous runs.
- OProfile focuses on identifying problems with processes limited by CPU access. It is therefore not useful for identifying processes that are sleeping while they wait for locks on other events.
/usr/share/doc/oprofile-version.
2.13. Valgrind
$ man valgrind/usr/share/doc/valgrind-version when the valgrind package is installed.
2.14. pqos
- Monitoring
- Last Level Cache (LLC) usage and contention monitoring using the Cache Monitoring Technology (CMT)
- Per-thread memory bandwidth monitoring using the Memory Bandwidth Monitoring (MBM) technology
- Allocation
- Controlling the amount of LLC space that is available for specific threads and processes using the Cache Allocation Technology (CAT)
- Controlling code and data placement in the LLC using the Code and Data Prioritization (CDP) technology
# pqos --show --verboseAdditional Resources
- For more information about using pqos, see the pqos(8) man page.
- For detailed information on the CMT, MBM, CAT, and CDP processor features, see the official Intel documentation: Intel® Resource Director Technology (Intel® RDT).
Chapter 3. Tuned
3.1. Tuned Overview
udev to monitor connected devices and statically and dynamically tunes system settings according to a selected profile. Tuned is distributed with a number of predefined profiles for common use cases like high throughput, low latency, or powersave. It is possible to modify the rules defined for each profile and customize how to tune a particular device. To revert all changes made to the system settings by a certain profile, you can either switch to another profile or deactivate the tuned service.
Note
no-daemon mode, which does not require any resident memory. In this mode, tuned applies the settings and exits. The no-daemon mode is disabled by default because a lot of tuned functionality is missing in this mode, including D-Bus support, hot-plug support, or rollback support for settings. To enable no-daemon mode, set the following in the /etc/tuned/tuned-main.conf file: daemon = 0.
sysctl and sysfs settings and one-shot activation of several configuration tools like ethtool. Tuned also monitors the use of system components and tunes system settings dynamically based on that monitoring information.
/etc/tuned/tuned-main.conf file and changing the dynamic_tuning flag to 1.
3.1.1. Plug-ins
disk- Gets disk load (number of IO operations) per device and measurement interval.
net- Gets network load (number of transferred packets) per network card and measurement interval.
load- Gets CPU load per CPU and measurement interval.
cpu- Sets the CPU governor to the value specified by the
governorparameter and dynamically changes the PM QoS CPU DMA latency according to the CPU load. If the CPU load is lower than the value specified by theload_thresholdparameter, the latency is set to the value specified by thelatency_highparameter, otherwise it is set to value specified bylatency_low. Also the latency can be forced to a specific value without being dynamically changed further. This can be accomplished by setting theforce_latencyparameter to the required latency value. eeepc_she- Dynamically sets the FSB speed according to the CPU load; this feature can be found on some netbooks and is also known as the Asus Super Hybrid Engine. If the CPU load is lower or equal to the value specified by the
load_threshold_powersaveparameter, the plugin sets the FSB speed to the value specified by theshe_powersaveparameter (for details about the FSB frequencies and corresponding values, see the kernel documentation, the provided defaults should work for most users). If the CPU load is higher or equal to the value specified by theload_threshold_normalparameter, it sets the FSB speed to the value specified by theshe_normalparameter. Static tuning is not supported and the plugin is transparently disabled if the hardware support for this feature is not detected. net- Configures wake-on-lan to the values specified by the
wake_on_lanparameter (it uses same syntax as the ethtool utility). It also dynamically changes the interface speed according to the interface utilization. sysctl- Sets various
sysctlsettings specified by the plugin parameters. The syntax isname=value, wherenameis the same as the name provided by the sysctl tool. Use this plugin if you need to change settings that are not covered by other plugins (but prefer specific plugins if the settings are covered by them). usb- Sets autosuspend timeout of USB devices to the value specified by the
autosuspendparameter. The value 0 means that autosuspend is disabled. vm- Enables or disables transparent huge pages depending on the Boolean value of the
transparent_hugepagesparameter. audio- Sets the autosuspend timeout for audio codecs to the value specified by the
timeoutparameter. Currentlysnd_hda_intelandsnd_ac97_codecare supported. The value0means that the autosuspend is disabled. You can also enforce the controller reset by setting the Boolean parameterreset_controllertotrue. disk- Sets the elevator to the value specified by the
elevatorparameter. It also sets ALPM to the value specified by thealpmparameter, ASPM to the value specified by theaspmparameter, scheduler quantum to the value specified by thescheduler_quantumparameter, disk spindown timeout to the value specified by thespindownparameter, disk readahead to the value specified by thereadaheadparameter, and can multiply the current disk readahead value by the constant specified by thereadahead_multiplyparameter. In addition, this plugin dynamically changes the advanced power management and spindown timeout setting for the drive according to the current drive utilization. The dynamic tuning can be controlled by the Boolean parameterdynamicand is enabled by default.Note
Applying a tuned profile which stipulates a different disk readahead value overrides the disk readahead value settings if they have been configured using audevrule. Red Hat recommends using the tuned tool to adjust the disk readahead values. mounts- Enables or disables barriers for mounts according to the Boolean value of the
disable_barriersparameter. script- This plugin can be used for the execution of an external script that is run when the profile is loaded or unloaded. The script is called by one argument which can be
startorstop(it depends on whether the script is called during the profile load or unload). The script file name can be specified by thescriptparameter. Note that you need to correctly implement the stop action in your script and revert all setting you changed during the start action, otherwise the roll-back will not work. For your convenience, thefunctionsBash helper script is installed by default and allows you to import and use various functions defined in it. Note that this functionality is provided mainly for backwards compatibility and it is recommended that you use it as the last resort and prefer other plugins if they cover the required settings. sysfs- Sets various
sysfssettings specified by the plugin parameters. The syntax isname=value, wherenameis thesysfspath to use. Use this plugin in case you need to change some settings that are not covered by other plugins (please prefer specific plugins if they cover the required settings). video- Sets various powersave levels on video cards (currently only the Radeon cards are supported). The powersave level can be specified by using the
radeon_powersaveparameter. Supported values are:default,auto,low,mid,high, anddynpm. For details, refer to http://www.x.org/wiki/RadeonFeature#KMS_Power_Management_Options. Note that this plugin is experimental and the parameter may change in the future releases. bootloader- Adds parameters to the kernel boot command line. This plugin supports the legacy GRUB 1, GRUB 2, and also GRUB with Extensible Firmware Interface (EFI). Customized non-standard location of the grub2 configuration file can be specified by the
grub2_cfg_fileoption. The parameters are added to the current grub configuration and its templates. The machine needs to be rebooted for the kernel parameters to take effect.The parameters can be specified by the following syntax:cmdline=arg1 arg2 ... argn.
3.1.2. Installation and Usage
yum install tunedthroughput-performance- This is pre-selected on Red Hat Enterprise Linux 7 operating systems which act as compute nodes. The goal on such systems is the best throughput performance.
virtual-guest- This is pre-selected on virtual machines. The goal is best performance. If you are not interested in best performance, you would probably like to change it to the
balancedorpowersaveprofile (see bellow). balanced- This is pre-selected in all other cases. The goal is balanced performance and power consumption.
systemctl start tunedsystemctl enable tunedtuned-admtuned-adm listtuned-adm activetuned-adm profile profiletuned-adm profile powersavehigh throughput by using the throughput-performance profile and concurrently setting the disk spindown to the low value by the spindown-disk profile. The following example optimizes the system for run in a virtual machine for the best performance and concurrently tune it for the low power consumption while the low power consumption is the priority:
tuned-adm profile virtual-guest powersavetuned-adm recommendtuned --help3.1.3. Custom Profiles
/usr/lib/tuned/ directory. Each profile has its own directory. The profile consists of the main configuration file called tuned.conf, and optionally other files, for example helper scripts.
/etc/tuned/ directory, which is used for custom profiles. If there are two profiles of the same name, the profile included in /etc/tuned/ is used.
/etc/tuned/ directory to use a profile included in /usr/lib/tuned/ with only certain parameters adjusted or overridden.
tuned.conf file contains several sections. There is one [main] section. The other sections are configurations for plugins instances. All sections are optional including the [main] section. Lines starting with the hash sign (#) are comments.
[main] section has the following option:
include=profile- The specified profile will be included, e.g.
include=powersavewill include thepowersaveprofile.
[NAME]
type=TYPE
devices=DEVICES
devices line can contain a list, a wildcard (*), and negation (!). You can also combine rules. If there is no devices line all devices present or later attached on the system of the TYPE will be handled by the plugin instance. This is same as using devices=*. If no instance of the plugin is specified, the plugin will not be enabled. If the plugin supports more options, they can be also specified in the plugin section. If the option is not specified, the default value will be used (if not previously specified in the included plugin). For the list of plugin options refer to Section 3.1.1, “Plug-ins”).
Example 3.1. Describing Plug-ins Instances
sd, such as sda or sdb, and does not disable barriers on them:
[data_disk]
type=disk
devices=sd*
disable_barriers=false
sda1 and sda2:
[data_disk]
type=disk
devices=!sda1, !sda2
disable_barriers=false
[TYPE]
devices=DEVICES
type line. The instance will then be referred to with a name, same as the type. The previous example could be then rewritten into:
[disk]
devices=sdb*
disable_barriers=false
include option, then the settings are merged. If they cannot be merged due to a conflict, the last conflicting definition overrides the previous settings in conflict. Sometimes, you do not know what was previously defined. In such cases, you can use the replace boolean option and set it to true. This will cause all the previous definitions with the same name to be overwritten and the merge will not happen.
enabled=false option. This has the same effect as if the instance was never defined. Disabling the plugin can be useful if you are redefining the previous definition from the include option and do not want the plugin to be active in your custom profile.
balanced profile and extends it the way that ALPM for all devices is set to the maximal powersaving.
[main]
include=balanced

[disk]
alpm=min_power
isolcpus=2 to the kernel boot command line:
[bootloader]
cmdline=isolcpus=2
3.1.4. Tuned-adm
tuned-adm utility. You can also create, modify, and delete profiles.
tuned-adm listtuned-adm activetuned-adm profile profile_nametuned-adm profile latency-performancetuned-adm offNote
tuned-adm listyum search tuned-profilesyum install tuned-profiles-profile-namebalanced- The default power-saving profile. It is intended to be a compromise between performance and power consumption. It tries to use auto-scaling and auto-tuning whenever possible. It has good results for most loads. The only drawback is the increased latency. In the current tuned release it enables the CPU, disk, audio and video plugins and activates the
conservativegovernor. Theradeon_powersaveis set toauto. powersave- A profile for maximum power saving performance. It can throttle the performance in order to minimize the actual power consumption. In the current tuned release it enables USB autosuspend, WiFi power saving and ALPM power savings for SATA host adapters. It also schedules multi-core power savings for systems with a low wakeup rate and activates the
ondemandgovernor. It enables AC97 audio power saving or, depending on your system, HDA-Intel power savings with a 10 seconds timeout. In case your system contains supported Radeon graphics card with enabled KMS it configures it to automatic power saving. On Asus Eee PCs a dynamic Super Hybrid Engine is enabled.Note
Thepowersaveprofile may not always be the most efficient. Consider there is a defined amount of work that needs to be done, for example a video file that needs to be transcoded. Your machine can consume less energy if the transcoding is done on the full power, because the task will be finished quickly, the machine will start to idle and can automatically step-down to very efficient power save modes. On the other hand if you transcode the file with a throttled machine, the machine will consume less power during the transcoding, but the process will take longer and the overall consumed energy can be higher. That is why thebalancedprofile can be generally a better option. throughput-performance- A server profile optimized for high throughput. It disables power savings mechanisms and enables sysctl settings that improve the throughput performance of the disk, network IO and switched to the
deadlinescheduler. CPU governor is set toperformance. latency-performance- A server profile optimized for low latency. It disables power savings mechanisms and enables sysctl settings that improve the latency. CPU governor is set to
performanceand the CPU is locked to the low C states (by PM QoS). network-latency- A profile for low latency network tuning. It is based on the
latency-performanceprofile. It additionally disables transparent hugepages, NUMA balancing and tunes several other network related sysctl parameters. network-throughput- Profile for throughput network tuning. It is based on the
throughput-performanceprofile. It additionally increases kernel network buffers. virtual-guest- A profile designed for Red Hat Enterprise Linux 7 virtual machines as well as VMware guests based on the enterprise-storage profile that, among other tasks, decreases virtual memory swappiness and increases disk readahead values. It does not disable disk barriers.
virtual-host- A profile designed for virtual hosts based on the
enterprise-storageprofile that, among other tasks, decreases virtual memory swappiness, increases disk readahead values and enables a more aggressive value of dirty pages. oracle- A profile optimized for Oracle databases loads based on
throughput-performanceprofile. It additionally disables transparent huge pages and modifies some other performance related kernel parameters. This profile is provided by tuned-profiles-oracle package. It is available in Red Hat Enterprise Linux 6.8 and later. desktop- A profile optimized for desktops, based on the
balancedprofile. It additionally enables scheduler autogroups for better response of interactive applications. cpu-partitioning- The
cpu-partitioningprofile partitions the system CPUs into isolated and housekeeping CPUs. To reduce jitter and interruptions on an isolated CPU, the profile clears the isolated CPU from user-space processes, movable kernel threads, interrupt handlers, and kernel timers.A housekeeping CPU can run all services, shell processes, and kernel threads.You can configure thecpu-partitioningprofile in the/etc/tuned/cpu-partitioning-variables.conffile. The configuration options are:isolated_cores=cpu-list- Lists CPUs to isolate. The list of isolated CPUs is comma-separated or the user can specify the range. You can specify a range using a dash, such as
3-5. This option is mandatory. Any CPU missing from this list is automatically considered a housekeeping CPU. no_balance_cores=cpu-list- Lists CPUs which are not considered by the kernel during system wide process load-balancing. This option is optional. This is usually the same list as
isolated_cores.
For more information oncpu-partitioning, see the tuned-profiles-cpu-partitioning(7) man page.
Note
Optional channel. These profiles are intended for backward compatibility and are no longer developed. The generalized profiles from the base package will mostly perform the same or better. If you do not have specific reason for using them, please prefer the above mentioned profiles from the base package. The compat profiles are following:
default- This has the lowest impact on power saving of the available profiles and only enables CPU and disk plugins of tuned.
desktop-powersave- A power-saving profile directed at desktop systems. Enables ALPM power saving for SATA host adapters as well as the CPU, Ethernet, and disk plugins of tuned.
laptop-ac-powersave- A medium-impact power-saving profile directed at laptops running on AC. Enables ALPM powersaving for SATA host adapters, Wi-Fi power saving, as well as the CPU, Ethernet, and disk plugins of tuned.
laptop-battery-powersave- A high-impact power-saving profile directed at laptops running on battery. In the current tuned implementation it is an alias for the
powersaveprofile. spindown-disk- A power-saving profile for machines with classic HDDs to maximize spindown time. It disables the tuned power savings mechanism, disables USB autosuspend, disables Bluetooth, enables Wi-Fi power saving, disables logs syncing, increases disk write-back time, and lowers disk swappiness. All partitions are remounted with the
noatimeoption. enterprise-storage- A server profile directed at enterprise-class storage, maximizing I/O throughput. It activates the same settings as the
throughput-performanceprofile, multiplies readahead settings, and disables barriers on non-root and non-boot partitions.
Note
atomic-host profile on physical machines, and the atomic-guest profile on virtual machines.
yum install tuned-profiles-atomicatomic-host- A profile optimized for Red Hat Enterprise Linux Atomic Host, when used as a host system on a bare-metal server, using the throughput-performance profile. It additionally increases SELinux AVC cache, PID limit, and tunes netfilter connections tracking.
atomic-guest- A profile optimized for Red Hat Enterprise Linux Atomic Host, when used as a guest system based on the virtual-guest profile. It additionally increases SELinux AVC cache, PID limit, and tunes netfilter connections tracking.
Note
realtime, realtime-virtual-host and realtime-virtual-guest.
realtime profile, install the tuned-profiles-realtime package. Run, as root, the following command:
yum install tuned-profiles-realtimerealtime-virtual-host and realtime-virtual-guest profiles, install the tuned-profiles-nfv package. Run, as root, the following command:
yum install tuned-profiles-nfv3.1.5. powertop2tuned
yum install tuned-utilspowertop2tuned new_profile_name/etc/tuned directory and it bases it on the currently selected tuned profile. For safety reasons all PowerTOP tunings are initially disabled in the new profile. To enable them uncomment the tunings of your interest in the /etc/tuned/profile/tuned.conf. You can use the --enable or -e option that will generate the new profile with most of the tunings suggested by PowerTOP enabled. Some dangerous tunings like the USB autosuspend will still be disabled. If you really need them you will have to uncomment them manually. By default, the new profile is not activated. To activate it run the following command:
tuned-adm profile new_profile_namepowertop2tuned --help3.2. Performance Tuning with tuned and tuned-adm
tuned Profiles Overview
throughput-performance.
- low latency for storage and network
- high throughput for storage and network
- virtual machine performance
- virtualization host performance
tuned Boot Loader plug-in
tuned Bootloader plug-in to add parameters to the kernel (boot or dracut) command line. Note that only the GRUB 2 boot loader is supported and a reboot is required to apply profile changes. For example, to add the quiet parameter to a tuned profile, include the following lines in the tuned.conf file:
[bootloader]
cmdline=quiet
grub.cfg file.
Environment Variables and Expanding tuned Built-In Functions
tuned-adm profile profile_name and then grub2-mkconfig -o profile_path after updating GRUB 2 configuration, you can use Bash environment variables, which are expanded after running grub2-mkconfig. For example, the following environment variable is expanded to nfsroot=/root:
[bootloader]
cmdline="nfsroot=$HOME"
tuned variables as an alternative to environment variables. In the following example, ${isolated_cores} expands to 1,2, so the kernel boots with the isolcpus=1,2 parameter:
[variables]
isolated_cores=1,2

[bootloader]
cmdline=isolcpus=${isolated_cores}
${non_isolated_cores} expands to 0,3-5, and the cpulist_invert built-in function is called with the 0,3-5 arguments:
[variables]
non_isolated_cores=0,3-5

[bootloader]
cmdline=isolcpus=${f:cpulist_invert:${non_isolated_cores}}
cpulist_invert function inverts the list of CPUs. For a 6-CPU machine, the inversion is 1,2, and the kernel boots with the isolcpus=1,2 command-line parameter.
tuned.conf:
[variables]
include=/etc/tuned/my-variables.conf

[bootloader]
cmdline=isolcpus=${isolated_cores}
isolated_cores=1,2 to the /etc/tuned/my-variables.conf file, the kernel boots with the isolcpus=1,2 parameter.
Modifying Default System tuned Profiles
Procedure 3.1. Creating a New Tuned Profile Directory
- In
/etc/tuned/, create a new directory named the same as the profile you want to create:/etc/tuned/my_profile_name/. - In the new directory, create a file named
tuned.conf, and include the following lines at the top:[main] include=profile_name - Include your profile modifications. For example, to use the settings from the
throughput-performanceprofile with the value ofvm.swappinessset to 5, instead of default 10, include the following lines:[main] include=throughput-performance [sysctl] vm.swappiness=5 - To activate the profile, run:
# tuned-adm profile my_profile_name
tuned.conf file enables you to keep all your profile modifications after system tuned profiles are updated.
/user/lib/tuned/ to /etc/tuned/. For example:
# cp -r /usr/lib/tuned/throughput-performance /etc/tuned
/etc/tuned according to your needs. Note that if there are two profiles of the same name, the profile located in /etc/tuned/ is loaded. The disadvantage of this approach is that if a system profile is updated after a tuned upgrade, the changes will not be reflected in the now-outdated modified version.
Resources
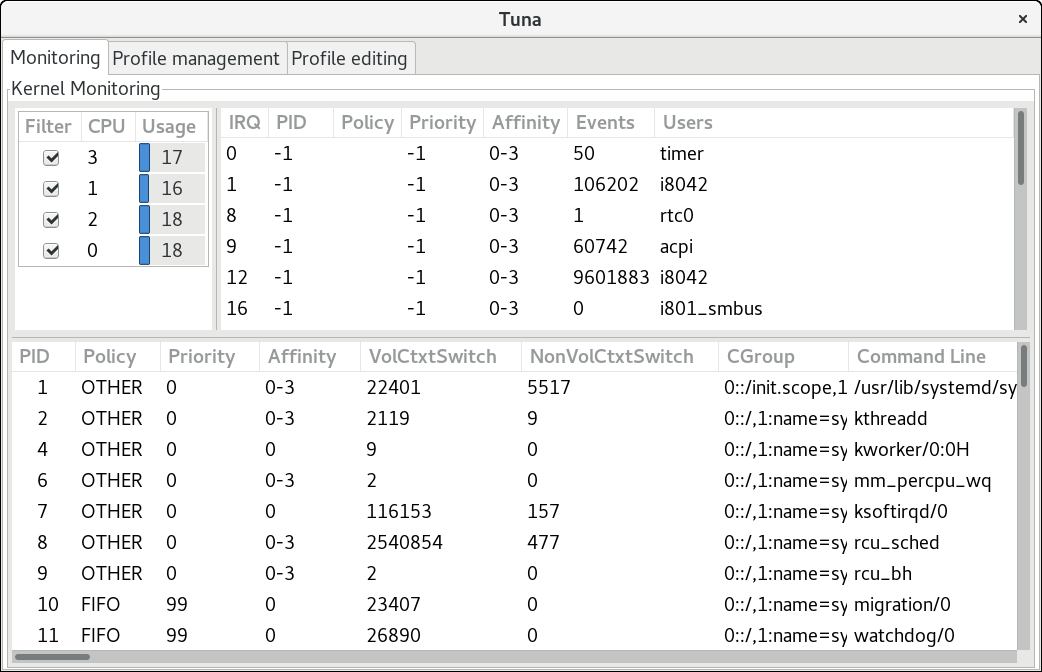
Chapter 4. Tuna
tuna command without any arguments to start the Tuna graphical user interface (GUI). Use the tuna -h command to display available command-line interface (CLI) options. Note that the tuna(8) manual page distinguishes between action and modifier options.
Important
tuna --save=filename command with a descriptive file name to save the current configuration. Note that this command does not save every option that Tuna can change, but saves the kernel thread changes only. Any processes that are not currently running when they are changed are not saved.
4.1. Reviewing the System with Tuna
tuna --show_threads command:
# tuna --show_threads
		    thread
pid   SCHED_ rtpri affinity             cmd
1      OTHER     0      0,1            init
2       FIFO    99        0     migration/0
3      OTHER     0        0     ksoftirqd/0
4       FIFO    99        0      watchdog/0
--threads option before --show_threads:
# tuna --threads=pid_or_cmd_list --show_threadstuna --show_irqs command:
# tuna --show_irqs
# users            affinity
0 timer                   0
1 i8042                   0
7 parport0                0
--irqs option before --show_irqs:
# tuna --irqs=number_or_user_list --show_irqs4.2. Tuning CPUs with Tuna
/proc/cpuinfo file for detailed information.
# tuna --cpus=cpu_list --run=COMMAND# tuna --cpus=cpu_list --isolate# tuna --cpus=cpu_list --include--cpus=0,2.
4.3. Tuning IRQs with Tuna
/proc/interrpupts file. You can also use the tuna --show_irqs command.
--irqs parameter:
# tuna --irqs=irq_list --run=COMMAND--move parameter:
# tuna --irqs=irq_list --cpus=cpu_list --move--cpus=0,2.
sfc1 and spread them over two CPUs:
# tuna --irqs=sfc1\* --cpus=7,8 --move --spread--show_irqs parameter both before and after modifying the IRQs with the --move parameter:
# tuna --irqs=128 --show_irqs

   # users            affinity
 128 iwlwifi           0,1,2,3

# tuna --irqs=128 --cpus=3 --move

# tuna --irqs=128 --show_irqs

   # users            affinity
 128 iwlwifi                 3
Note
4.4. Tuning Tasks with Tuna
--priority parameter:
# tuna --threads=pid_or_cmd_list --priority=[policy:]rt_priority- The pid_or_cmd_list argument is a list of comma-separated PIDs or command-name patterns.
- Set the policy to
RRfor round-robin,FIFOfor first in, first out, orOTHERfor the default policy.For an overview of the scheduling policies, see Section 6.3.6, “Tuning Scheduling Policy”. - Set the rt_priority in the range 1–99. 1 is the lowest priority, and 99 is the highest priority.
# tuna --threads=7861 --priority=RR:40--show_threads parameter both before and after the modifying --priority parameter:
# tuna --threads=sshd --show_threads --priority=RR:40 --show_threads

                      thread       ctxt_switches
    pid SCHED_ rtpri affinity voluntary nonvoluntary             cmd
  1034   OTHER     0  0,1,2,3        12           17            sshd
                      thread       ctxt_switches
    pid SCHED_ rtpri affinity voluntary nonvoluntary             cmd
  1034      RR    40  0,1,2,3        12           17            sshd
4.5. Examples of Using Tuna
Example 4.1. Assigning Tasks to Specific CPUs
ssh threads run on CPU 0 and 1, and all http threads on CPU 2 and 3.
# tuna --cpus=0,1 --threads=ssh\* --move --cpus=2,3 --threads=http\* --move- Select CPUs 0 and 1.
- Select all threads that begin with
ssh. - Move the selected threads to the selected CPUs. Tuna sets the affinity mask of threads starting with
sshto the appropriate CPUs. The CPUs can be expressed numerically as 0 and 1, in hex mask as0x3, or in binary as11. - Reset the CPU list to 2 and 3.
- Select all threads that begin with
http. - Move the selected threads to the selected CPUs. Tuna sets the affinity mask of threads starting with
httpto the appropriate CPUs. The CPUs can be expressed numerically as 2 and 3, in hex mask as0xC, or in binary as1100.
Example 4.2. Viewing Current Configurations
--show_threads (-P) parameter to display the current configuration, and then tests if the requested changes were made as expected.
# tuna --threads=gnome-sc\* \
        --show_threads \
        --cpus=0 \
        --move \
        --show_threads \
        --cpus=1 \
        --move \
        --show_threads \
        --cpus=+0 \
        --move \
        --show_threads

                       thread       ctxt_switches
     pid SCHED_ rtpri affinity voluntary nonvoluntary             cmd
   3861   OTHER     0      0,1     33997           58 gnome-screensav
                       thread       ctxt_switches
     pid SCHED_ rtpri affinity voluntary nonvoluntary             cmd
   3861   OTHER     0        0     33997           58 gnome-screensav
                       thread       ctxt_switches
     pid SCHED_ rtpri affinity voluntary nonvoluntary             cmd
   3861   OTHER     0        1     33997           58 gnome-screensav
                       thread       ctxt_switches
     pid SCHED_ rtpri affinity voluntary nonvoluntary             cmd
   3861   OTHER     0      0,1     33997           58 gnome-screensav
- Select all threads that begin with
gnome-sc. - Show the selected threads to enable the user to verify their affinity mask and RT priority.
- Select CPU 0.
- Move the
gnome-scthreads to the selected CPU (CPU 0). - Show the result of the move.
- Reset the CPU list to CPU 1.
- Move the
gnome-scthreads to the selected CPU (CPU 1). - Show the result of the move.
- Add CPU 0 to the CPU list.
- Move the
gnome-scthreads to the selected CPUs (CPUs 0 and 1). - Show the result of the move.
Chapter 5. Performance Co-Pilot (PCP)
5.1. PCP Overview and Resources
- the monitoring and management of real-time data
- the logging and retrieval of historical data
pmcd) is responsible for collecting performance data on the host system, and various client tools, such as pminfo or pmstat, can be used to retrieve, display, archive, and process this data on the same host or over the network. The pcp package provides the command-line tools and underlying functionality. The graphical tool requires the pcp-gui package.
Resources
- The manual page named PCPIntro serves as an introduction to Performance Co-Pilot. It provides a list of available tools as well as a description of available configuration options and a list of related manual pages. By default, comprehensive documentation is installed in the
/usr/share/doc/pcp-doc/directory, notably the Performance Co-Pilot User's and Administrator's Guide and Performance Co-Pilot Programmer's Guide. - For information on PCP, see the Index of Performance Co-Pilot (PCP) articles, solutions, tutorials and white papers on the Red Hat Customer Portal.
- If you need to determine what PCP tool has the functionality of an older tool you are already familiar with, see the Side-by-side comparison of PCP tools with legacy tools Red Hat Knowledgebase article.
- See the official PCP documentation for an in-depth description of the Performance Co-Pilot and its usage. If you want to start using PCP on Red Hat Enterprise Linux quickly, see the PCP Quick Reference Guide. The official PCP website also contains a list of frequently asked questions.
5.2. XFS File System Performance Analysis with Performance Co-Pilot
5.2.1. Installing XFS PMDA to Gather XFS Data with PCP
# yum install pcp# systemctl enable pmcd.service# systemctl start pmcd.service# pcp
Performance Co-Pilot configuration on workstation:
platform: Linux workstation 3.10.0-123.20.1.el7.x86_64 #1 SMP Thu Jan
29 18:05:33 UTC 2015 x86_64
hardware: 2 cpus, 2 disks, 1 node, 2048MB RAM
timezone: BST-1
services pmcd
pmcd: Version 3.10.6-1, 7 agents
pmda: root pmcd proc xfs linux mmv jbd2
Installing XFS PMDA Manually
- The
collectorrole allows the collection of performance metrics on the current system
- The
monitorrole allows the system to monitor local systems, remote systems, or both.
both collector and monitor, which allows the XFS PMDA to operate correctly in most scenarios.
# cd /var/lib/pcp/pmdas/xfs/xfs directory, enter:
xfs]# ./Install

You will need to choose an appropriate configuration for install of
the “xfs” Performance Metrics Domain Agent (PMDA).

  collector     collect performance statistics on this system
  monitor       allow this system to monitor local and/or remote systems
  both          collector and monitor configuration for this system

Please enter c(ollector) or m(onitor) or (both) [b]
Updating the Performance Metrics Name Space (PMNS) ...
Terminate PMDA if already installed ...
Updating the PMCD control file, and notifying PMCD ...
Waiting for pmcd to terminate ...
Starting pmcd ...
Check xfs metrics have appeared ... 149 metrics and 149 values
5.2.2. Configuring and Examining XFS Performance Metrics
Examining Metrics with pminfo
pminfo tool, which displays information about available performance metrics. The command displays a list of all available metrics provided by the XFS PMDA.
# pminfo xfs-t metric- Displays one-line help information describing the selected metric.
-T metric- Displays more verbose help text describing the selected metric.
-f metric- Displays the current reading of the performance value that corresponds to the metric.
-t, -T, and -f options with a group of metrics or an individual metric. Most metric data is provided for each mounted XFS file system on the system at time of probing.
.) as a separator. The leaf node semantics (dots) applies to all PCP metrics. For an overview of the types of metrics that are available in each of the groups, see Table A.3, “PCP Metric Groups for XFS”.
Example 5.1. Using the pminfo Tool to Examine XFS Read and Write Metrics
xfs.write_bytes metric:
# pminfo -t xfs.write_bytes

xfs.write_bytes [number of bytes written in XFS file system write operations]
xfs.read_bytes metric:
# pminfo -T xfs.read_bytes

xfs.read_bytes
Help:
This is the number of bytes read via read(2) system calls to files in
XFS file systems. It can be used in conjunction with the read_calls
count to calculate the average size of the read operations to file in
XFS file systems.
xfs.read_bytes metric:
# pminfo -f xfs.read_bytes

xfs.read_bytes
    value 4891346238
Configuring Metrics with pmstore
xfs.control.reset metric. To modify a metric value, use the pmstore tool.
Example 5.2. Using pmstore to Reset the xfs.control.reset Metric
pmstore with the xfs.control.reset metric to reset the recorded counter values for the XFS PMDA back to zero.
$ pminfo -f xfs.write

xfs.write
    value 325262
# pmstore xfs.control.reset 1

xfs.control.reset old value=0 new value=1
$ pminfo -f xfs.write

xfs.write
    value 0
5.2.3. Examining XFS Metrics Available per File System
Example 5.3. Obtaining per-Device XFS Metrics with pminfo
pminfo command provides per-device XFS metrics that give instance values for each mounted XFS file system.
# pminfo -f -t xfs.perdev.read xfs.perdev.write

xfs.perdev.read [number of XFS file system read operations]
inst [0 or "loop1"] value 0
inst [0 or "loop2"] value 0

xfs.perdev.write [number of XFS file system write operations]
inst [0 or "loop1"] value 86
inst [0 or "loop2"] value 0
5.2.4. Logging Performance Data with pmlogger
pmlogger tool to create archived logs of selected metrics on the system.
/var/lib/pcp/config/pmlogger/config.default. The configuration file specifies which metrics are logged by the primary logging instance.
pmlogger, start a primary logging instance:
# systemctl start pmlogger.service# systemctl enable pmlogger.servicepmlogger is enabled and a default configuration file is set, a pmlogger line is included in the PCP configuration:
# pcp

Performance Co-Pilot configuration on workstation:

platform: Linux workstation 3.10.0-123.20.1.el7.x86_64 #1 SMP Thu Jan
[...]
pmlogger: primary logger:/var/log/pcp/pmlogger/workstation/20160820.10.15
Modifying the pmlogger Configuration File with pmlogconf
pmlogger service is running, PCP logs a default set of metrics on the host. You can use the pmlogconf utility to check the default configuration, and enable XFS logging groups as needed. Important XFS groups to enable include the XFS information, XFS data, and log I/O traffic groups.
pmlogconf prompts to enable or disable groups of related performance metrics, and to control the logging interval for each enabled group. Group selection is made by pressing y (yes) or n (no) in response to the prompt. To create or modify the generic PCP archive logger configuration file with pmlogconf, enter:
# pmlogconf -r /var/lib/pcp/config/pmlogger/config.defaultModifying the pmlogger Configuration File Manually
pmlogger configuration file manually and add specific metrics with given intervals to create a tailored logging configuration.
Example 5.4. The pmlogger Configuration File with XFS Metrics
pmlogger config.default file with some specific XFS metrics added.
# It is safe to make additions from here on ...
#

log mandatory on every 5 seconds {
    xfs.write
    xfs.write_bytes
    xfs.read
    xfs.read_bytes
}

log mandatory on every 10 seconds {
    xfs.allocs
    xfs.block_map
    xfs.transactions
    xfs.log

}

[access]
disallow * : all;
allow localhost : enquire;
Replaying the PCP Log Archives
- You can export the logs to text files and import them into spreadsheets by using PCP utilities such as
pmdumptext,pmrep, orpmlogsummary. - You can replay the data in the PCP Charts application and use graphs to visualize the retrospective data alongside live data of the system. See Section 5.2.5, “Visual Tracing with PCP Charts”.
pmdumptext tool to view the log files. With pmdumptext, you can parse the selected PCP log archive and export the values into an ASCII table. The pmdumptext tool enables you to dump the entire archive log, or only select metric values from the log by specifying individual metrics on the command line.
Example 5.5. Displaying a Specific XFS Metric Log Information
xfs.perdev.log metric collected in an archive at a 5 second interval and display all headers:
$ pmdumptext -t 5seconds -H -a 20170605 xfs.perdev.log.writes

Time local::xfs.perdev.log.writes["/dev/mapper/fedora-home"] local::xfs.perdev.log.writes["/dev/mapper/fedora-root"]
? 0.000 0.000
none count / second count / second
Mon Jun 5 12:28:45 ? ?
Mon Jun 5 12:28:50 0.000 0.000
Mon Jun 5 12:28:55 0.200 0.200
Mon Jun 5 12:29:00 6.800 1.000
5.2.5. Visual Tracing with PCP Charts
# yum install pcp-guipmchart command.
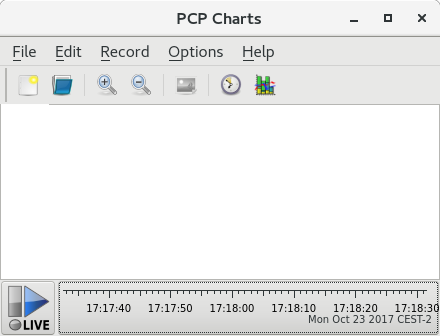
pmtime server settings are located at the bottom. The and button allows you to control:
- The interval in which PCP polls the metric data
- The date and time for the metrics of historical data
- Click → to save an image of the current view.
- Click → to start a recording. Click → to stop the recording. After stopping the recording, the recorded metrics are archived to be viewed later.
- line plot
- bar graphs
- utilization graphs
view, allows the metadata associated with one or more charts to be saved. This metadata describes all chart aspects, including the metrics used and the chart columns. You can create a custom view configuration, save it by clicking → , and load the view configuration later. For more information about view configuration files and their syntax, see the pmchart(1) manual page.
Example 5.6. Stacking Chart Graph in PCP Charts View Configuration
loop1.
#kmchart
version 1

chart title "Filesystem Throughput /loop1" style stacking antialiasing off
    plot legend "Read rate"   metric xfs.read_bytes   instance  "loop1"
    plot legend "Write rate"  metric xfs.write_bytes  instance  "loop1"
5.3. Performing Minimal PCP Setup to Gather File System Data
tar.gz archive of the pmlogger output can be analyzed by using various PCP tools, such as PCP Charts, and compared with other sources of performance information.
- Install the pcp package:
# yum install pcp - Start the
pmcdservice:# systemctl start pmcd.service - Run the
pmlogconfutility to update thepmloggerconfiguration and enable the XFS information, XFS data, and log I/O traffic groups:# pmlogconf -r /var/lib/pcp/config/pmlogger/config.default - Start the
pmloggerservice:# systemctl start pmlogger.service - Perform operations on the XFS file system.
- Stop the
pmloggerservice:# systemctl stop pmcd.service# systemctl stop pmlogger.service - Collect the output and save it to a
tar.gzfile named based on the hostname and the current date and time:# cd /var/log/pcp/pmlogger/# tar -czf $(hostname).$(date +%F-%Hh%M).pcp.tar.gz $(hostname)
Chapter 6. CPU
6.1. Considerations
- How processors are connected to each other and to related resources like memory.
- How processors schedule threads for execution.
- How processors handle interrupts in Red Hat Enterprise Linux 7.
6.1.1. System Topology
- Symmetric Multi-Processor (SMP) topology
- SMP topology allows all processors to access memory in the same amount of time. However, because shared and equal memory access inherently forces serialized memory accesses from all the CPUs, SMP system scaling constraints are now generally viewed as unacceptable. For this reason, practically all modern server systems are NUMA machines.
- Non-Uniform Memory Access (NUMA) topology
- NUMA topology was developed more recently than SMP topology. In a NUMA system, multiple processors are physically grouped on a socket. Each socket has a dedicated area of memory, and processors that have local access to that memory are referred to collectively as a node.Processors on the same node have high speed access to that node's memory bank, and slower access to memory banks not on their node. Therefore, there is a performance penalty to accessing non-local memory.Given this performance penalty, performance sensitive applications on a system with NUMA topology should access memory that is on the same node as the processor executing the application, and should avoid accessing remote memory wherever possible.When tuning application performance on a system with NUMA topology, it is therefore important to consider where the application is being executed, and which memory bank is closest to the point of execution.In a system with NUMA topology, the
/sysfile system contains information about how processors, memory, and peripheral devices are connected. The/sys/devices/system/cpudirectory contains details about how processors in the system are connected to each other. The/sys/devices/system/nodedirectory contains information about NUMA nodes in the system, and the relative distances between those nodes.
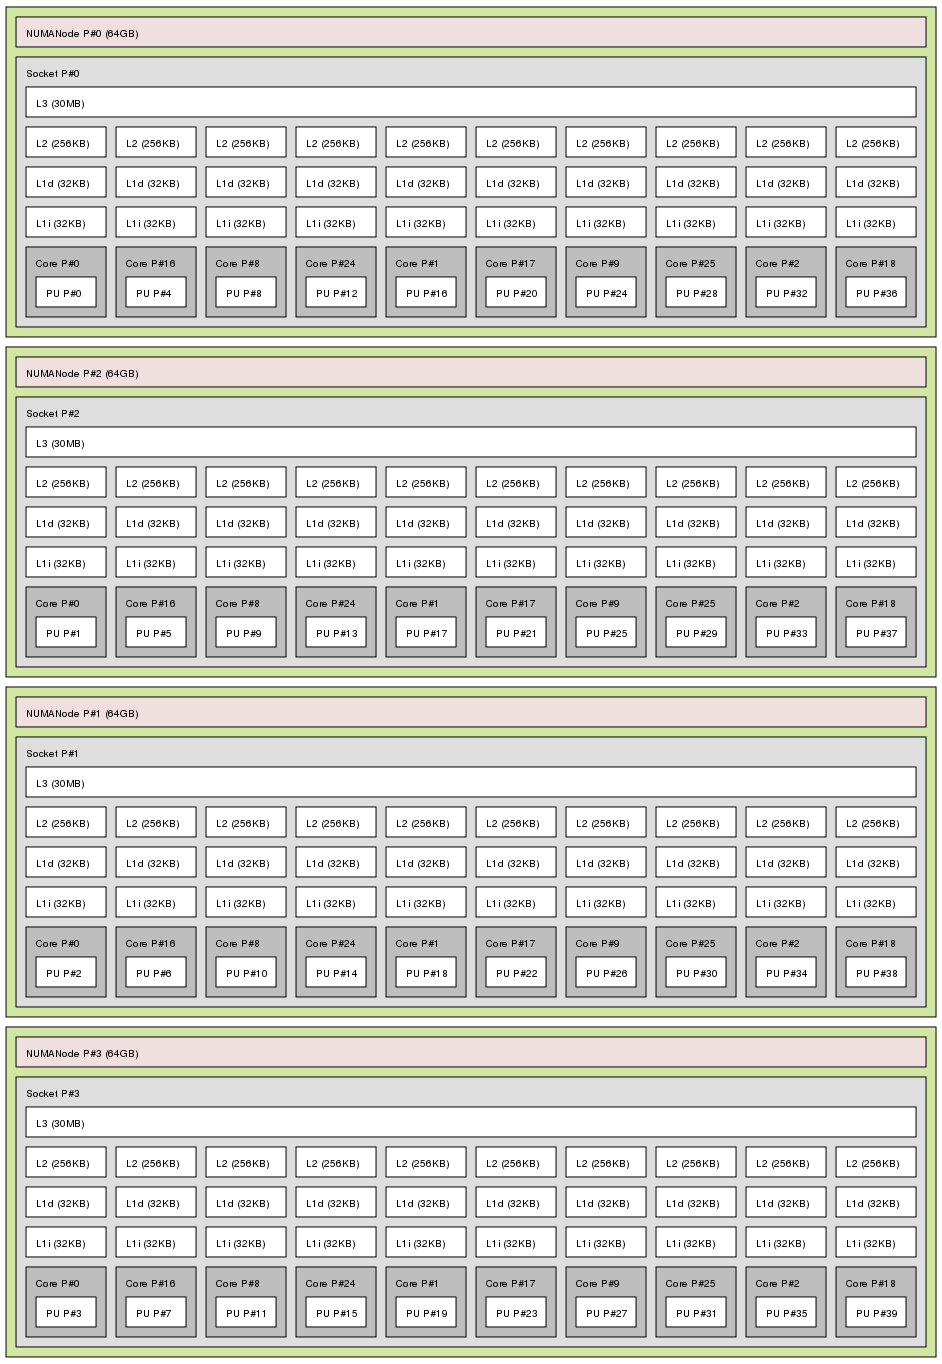
6.1.1.1. Determining System Topology
numactl --hardware command gives an overview of your system's topology.
$ numactl --hardware
available: 4 nodes (0-3)
node 0 cpus: 0 4 8 12 16 20 24 28 32 36
node 0 size: 65415 MB
node 0 free: 43971 MB
node 1 cpus: 2 6 10 14 18 22 26 30 34 38
node 1 size: 65536 MB
node 1 free: 44321 MB
node 2 cpus: 1 5 9 13 17 21 25 29 33 37
node 2 size: 65536 MB
node 2 free: 44304 MB
node 3 cpus: 3 7 11 15 19 23 27 31 35 39
node 3 size: 65536 MB
node 3 free: 44329 MB
node distances:
node   0   1   2   3
  0:  10  21  21  21
  1:  21  10  21  21
  2:  21  21  10  21
3: 21 21 21 10lscpu command, provided by the util-linux package, gathers information about the CPU architecture, such as the number of CPUs, threads, cores, sockets, and NUMA nodes.
$ lscpu
Architecture:          x86_64
CPU op-mode(s):        32-bit, 64-bit
Byte Order:            Little Endian
CPU(s):                40
On-line CPU(s) list:   0-39
Thread(s) per core:    1
Core(s) per socket:    10
Socket(s):             4
NUMA node(s):          4
Vendor ID:             GenuineIntel
CPU family:            6
Model:                 47
Model name:            Intel(R) Xeon(R) CPU E7- 4870  @ 2.40GHz
Stepping:              2
CPU MHz:               2394.204
BogoMIPS:              4787.85
Virtualization:        VT-x
L1d cache:             32K
L1i cache:             32K
L2 cache:              256K
L3 cache:              30720K
NUMA node0 CPU(s):     0,4,8,12,16,20,24,28,32,36
NUMA node1 CPU(s):     2,6,10,14,18,22,26,30,34,38
NUMA node2 CPU(s):     1,5,9,13,17,21,25,29,33,37
NUMA node3 CPU(s): 3,7,11,15,19,23,27,31,35,39lstopo command, provided by the hwloc package, creates a graphical representation of your system. The lstopo-no-graphics command provides detailed textual output.
6.1.2. Scheduling
6.1.2.1. Kernel Ticks
nohz_full) to further improve determinism by reducing kernel interference with user-space tasks. This option can be enabled on specified cores with the nohz_full kernel parameter. When this option is enabled on a core, all timekeeping activities are moved to non-latency-sensitive cores. This can be useful for high performance computing and realtime computing workloads where user-space tasks are particularly sensitive to microsecond-level latencies associated with the kernel timer tick.
6.1.3. Interrupt Request (IRQ) Handling
6.2. Monitoring and Diagnosing Performance Problems
6.2.1. turbostat
$ man turbostat6.2.2. numastat
Important
$ man numastat6.2.3. /proc/interrupts
/proc/interrupts file lists the number of interrupts sent to each processor from a particular I/O device. It displays the interrupt request (IRQ) number, the number of that type of interrupt request handled by each processor in the system, the type of interrupt sent, and a comma-separated list of devices that respond to the listed interrupt request.
6.2.4. Cache and Memory Bandwidth Monitoring with pqos
- The instructions per cycle (IPC).
- The count of last level cache MISSES.
- The size in kilobytes that the program executing in a given CPU occupies in the LLC.
- The bandwidth to local memory (MBL).
- The bandwidth to remote memory (MBR).
# pqos --mon-topAdditional Resources
- For a general overview of the pqos utility and the related processor features, see Section 2.14, “pqos”.
- For an example of how using CAT can minimize the impact of a noisy neighbor virtual machine on the network performance of Data Plane Development Kit (DPDK), see the Increasing Platform Determinism with Platform Quality of Service for the Data Plane Development Kit Intel white paper.
6.3. Configuration Suggestions
6.3.1. Configuring Kernel Tick Time
nohz_full parameter. On a 16 core system, specifying nohz_full=1-15 enables dynamic tickless behavior on cores 1 through 15, moving all timekeeping to the only unspecified core (core 0). This behavior can be enabled either temporarily at boot time, or persistently via the GRUB_CMDLINE_LINUX option in the /etc/default/grub file. For persistent behavior, run the grub2-mkconfig -o /boot/grub2/grub.cfg command to save your configuration.
- When the system boots, you must manually move rcu threads to the non-latency-sensitive core, in this case core 0.
# for i in `pgrep rcu[^c]` ; do taskset -pc 0 $i ; done - Use the
isolcpusparameter on the kernel command line to isolate certain cores from user-space tasks. - Optionally, set CPU affinity for the kernel's write-back bdi-flush threads to the housekeeping core:
echo 1 > /sys/bus/workqueue/devices/writeback/cpumask
# perf stat -C 1 -e irq_vectors:local_timer_entry taskset -c 1 stress -t 1 -c 1while :; do d=1; done.
# perf stat -C 1 -e irq_vectors:local_timer_entry taskset -c 1 stress -t 1 -c 1
1000 irq_vectors:local_timer_entry# perf stat -C 1 -e irq_vectors:local_timer_entry taskset -c 1 stress -t 1 -c 1
1 irq_vectors:local_timer_entry6.3.2. Setting Hardware Performance Policy (x86_energy_perf_policy)
performance mode. It requires processor support, which is indicated by the presence of CPUID.06H.ECX.bit3, and must be run with root privileges.
$ man x86_energy_perf_policy6.3.3. Setting Process Affinity with taskset
Important
$ man taskset6.3.4. Managing NUMA Affinity with numactl
$ man numactlNote
libnuma library. This library offers a simple programming interface to the NUMA policy supported by the kernel, and can be used for more fine-grained tuning than the numactl application. For more information, see the man page:
$ man numa6.3.5. Automatic NUMA Affinity Management with numad
numad is an automatic NUMA affinity management daemon. It monitors NUMA topology and resource usage within a system in order to dynamically improve NUMA resource allocation and management.
$ man numad6.3.6. Tuning Scheduling Policy
6.3.6.1. Scheduling Policies
6.3.6.1.1. Static Priority Scheduling with SCHED_FIFO
SCHED_FIFO (also called static priority scheduling) is a realtime policy that defines a fixed priority for each thread. This policy allows administrators to improve event response time and reduce latency, and is recommended for time sensitive tasks that do not run for an extended period of time.
SCHED_FIFO is in use, the scheduler scans the list of all SCHED_FIFO threads in priority order and schedules the highest priority thread that is ready to run. The priority level of a SCHED_FIFO thread can be any integer from 1 to 99, with 99 treated as the highest priority. Red Hat recommends starting at a low number and increasing priority only when you identify latency issues.
Warning
SCHED_FIFO bandwidth to prevent realtime application programmers from initiating realtime tasks that monopolize the processor.
- /proc/sys/kernel/sched_rt_period_us
- This parameter defines the time period in microseconds that is considered to be one hundred percent of processor bandwidth. The default value is
1000000μs, or 1 second. - /proc/sys/kernel/sched_rt_runtime_us
- This parameter defines the time period in microseconds that is devoted to running realtime threads. The default value is
950000μs, or 0.95 seconds.
6.3.6.1.2. Round Robin Priority Scheduling with SCHED_RR
SCHED_RR is a round-robin variant of SCHED_FIFO. This policy is useful when multiple threads need to run at the same priority level.
SCHED_FIFO, SCHED_RR is a realtime policy that defines a fixed priority for each thread. The scheduler scans the list of all SCHED_RR threads in priority order and schedules the highest priority thread that is ready to run. However, unlike SCHED_FIFO, threads that have the same priority are scheduled round-robin style within a certain time slice.
sched_rr_timeslice_ms kernel parameter (/proc/sys/kernel/sched_rr_timeslice_ms). The lowest value is 1 millisecond.
6.3.6.1.3. Normal Scheduling with SCHED_OTHER
SCHED_OTHER is the default scheduling policy in Red Hat Enterprise Linux 7. This policy uses the Completely Fair Scheduler (CFS) to allow fair processor access to all threads scheduled with this policy. This policy is most useful when there are a large number of threads or data throughput is a priority, as it allows more efficient scheduling of threads over time.
6.3.6.2. Isolating CPUs
isolcpus boot parameter. This prevents the scheduler from scheduling any user-space threads on this CPU.
isolcpus=2,5-7isolcpus parameter, and does not currently achieve the performance gains associated with isolcpus. See Section 6.3.8, “Configuring CPU, Thread, and Interrupt Affinity with Tuna” for more details about this tool.
6.3.7. Setting Interrupt Affinity on AMD64 and Intel 64
smp_affinity, which defines the processors that will handle the interrupt request. To improve application performance, assign interrupt affinity and process affinity to the same processor, or processors on the same core. This allows the specified interrupt and application threads to share cache lines.
Important
Procedure 6.1. Balancing Interrupts Automatically
- If your BIOS exports its NUMA topology, the
irqbalanceservice can automatically serve interrupt requests on the node that is local to the hardware requesting service.For details on configuringirqbalance, see Section A.1, “irqbalance”.
Procedure 6.2. Balancing Interrupts Manually
- Check which devices correspond to the interrupt requests that you want to configure.Starting with Red Hat Enterprise Linux 7.5, the system configures the optimal interrupt affinity for certain devices and their drivers automatically. You can no longer configure their affinity manually. This applies to the following devices:
- Devices using the
be2iscsidriver - NVMe PCI devices
- Find the hardware specification for your platform. Check if the chipset on your system supports distributing interrupts.
- If it does, you can configure interrupt delivery as described in the following steps.Additionally, check which algorithm your chipset uses to balance interrupts. Some BIOSes have options to configure interrupt delivery.
- If it does not, your chipset will always route all interrupts to a single, static CPU. You cannot configure which CPU is used.
- Check which Advanced Programmable Interrupt Controller (APIC) mode is in use on your system.Only non-physical flat mode (
flat) supports distributing interrupts to multiple CPUs. This mode is available only for systems that have up to 8 CPUs.$ journalctl --dmesg | grep APICIn the command output:- If your system uses a mode other than
flat, you can see a line similar toSetting APIC routing to physical flat. - If you can see no such message, your system uses
flatmode.
If your system usesx2apicmode, you can disable it by adding thenox2apicoption to the kernel command line in the bootloader configuration. - Calculate the
smp_affinitymask.Thesmp_affinityvalue is stored as a hexadecimal bit mask representing all processors in the system. Each bit configures a different CPU. The least significant bit is CPU 0.The default value of the mask isf, meaning that an interrupt request can be handled on any processor in the system. Setting this value to1means that only processor 0 can handle the interrupt.Procedure 6.3. Calculating the Mask
- In binary, use the value
1for CPUs that will handle the interrupts.For example, to handle interrupts by CPU 0 and CPU 7, use0000000010000001as the binary code:Expand Table 6.1. Binary Bits for CPUs CPU 15 14 13 12 11 10 9 8 7 6 5 4 3 2 1 0 Binary 0 0 0 0 0 0 0 0 1 0 0 0 0 0 0 1 - Convert the binary code to hexadecimal.For example, to convert the binary code using Python:
>>> hex(int('0000000010000001', 2))

'0x81'
On systems with more than 32 processors, you must delimitsmp_affinityvalues for discrete 32 bit groups. For example, if you want only the first 32 processors of a 64 processor system to service an interrupt request, use0xffffffff,00000000. - Set the
smp_affinitymask.The interrupt affinity value for a particular interrupt request is stored in the associated/proc/irq/irq_number/smp_affinityfile.Write the calculated mask to the associated file:# echo mask > /proc/irq/irq_number/smp_affinity
Additional Resources
- On systems that support interrupt steering, modifying the
smp_affinityproperty of an interrupt request sets up the hardware so that the decision to service an interrupt with a particular processor is made at the hardware level with no intervention from the kernel.For more information about interrupt steering, see Chapter 9, Networking.
6.3.8. Configuring CPU, Thread, and Interrupt Affinity with Tuna
Chapter 7. Memory
7.1. Considerations
7.1.1. Larger Page Size
HugeTLB feature, also called static huge pages in this guide, and the Transparent Huge Page feature.
7.1.2. Translation Lookaside Buffer Size
7.2. Monitoring and Diagnosing Performance Problems
7.2.1. Monitoring Memory Usage with vmstat
$ vmstat -s$ man vmstat7.2.2. Profiling Application Memory Usage with Valgrind
# yum install valgrind7.2.2.1. Profiling Memory Usage with Memcheck
- Memory access that should not occur
- Undefined or uninitialized value use
- Incorrectly freed heap memory
- Pointer overlap
- Memory leaks
Note
# valgrind --tool=memcheck application- --leak-check
- After the application finishes executing, memcheck searches for memory leaks. The default value is
--leak-check=summary, which prints the number of memory leaks found. You can specify--leak-check=yesor--leak-check=fullto output details of each individual leak. To disable, specify--leak-check=no. - --undef-value-errors
- The default value is
--undef-value-errors=yes, which reports errors when undefined values are used. You can also specify--undef-value-errors=no, which will disable this report and slightly speed up Memcheck. - --ignore-ranges
- Specifies one or more ranges that memcheck should ignore when checking for memory addressability, for example,
--ignore-ranges=0xPP-0xQQ,0xRR-0xSS.
/usr/share/doc/valgrind-version/valgrind_manual.pdf.
7.2.2.2. Profiling Cache Usage with Cachegrind
# valgrind --tool=cachegrind application- --I1
- Specifies the size, associativity, and line size of the first level instruction cache, like so:
--I1=size,associativity,line_size. - --D1
- Specifies the size, associativity, and line size of the first level data cache, like so:
--D1=size,associativity,line_size. - --LL
- Specifies the size, associativity, and line size of the last level cache, like so:
--LL=size,associativity,line_size. - --cache-sim
- Enables or disables the collection of cache access and miss counts. This is enabled (
--cache-sim=yes) by default. Disabling both this and--branch-simleaves cachegrind with no information to collect. - --branch-sim
- Enables or disables the collection of branch instruction and incorrect prediction counts. This is enabled (
--branch-sim=yes) by default. Disabling both this and--cache-simleaves cachegrind with no information to collect.Cachegrind writes detailed profiling information to a per-processcachegrind.out.pidfile, where pid is the process identifier. This detailed information can be further processed by the companion cg_annotate tool, like so:# cg_annotate cachegrind.out.pid
# cg_diff first second/usr/share/doc/valgrind-version/valgrind_manual.pdf.
7.2.2.3. Profiling Heap and Stack Space with Massif
# valgrind --tool=massif application- --heap
- Specifies whether massif profiles the heap. The default value is
--heap=yes. Heap profiling can be disabled by setting this to--heap=no. - --heap-admin
- Specifies the number of bytes per block to use for administration when heap profiling is enabled. The default value is
8bytes. - --stacks
- Specifies whether massif profiles the stack. The default value is
--stack=no, as stack profiling can greatly slow massif. Set this option to--stack=yesto enable stack profiling. Note that massif assumes that the main stack starts with a size of zero in order to better indicate the changes in stack size that relate to the application being profiled. - --time-unit
- Specifies the interval at which massif gathers profiling data. The default value is
i(instructions executed). You can also specifyms(milliseconds, or realtime) andB(bytes allocated or deallocated on the heap and stack). Examining bytes allocated is useful for short run applications and for testing purposes, as it is most reproducible across different hardware.
massif.out.pid file, where pid is the process identifier of the specified application. The ms_print tool graphs this profiling data to show memory consumption over the execution of the application, as well as detailed information about the sites responsible for allocation at points of peak memory allocation. To graph the data from the massif.out.pid file, execute the following command:
# ms_print massif.out.pid/usr/share/doc/valgrind-version/valgrind_manual.pdf.
7.3. Configuring HugeTLB Huge Pages
boot time and at run time. Reserving at boot time increases the possibility of success because the memory has not yet been significantly fragmented. However, on NUMA machines, the number of pages is automatically split among NUMA nodes. The run-time method allows you to reserve huge pages per NUMA node. If the run-time reservation is done as early as possible in the boot process, the probability of memory fragmentation is lower.
7.3.1. Configuring Huge Pages at Boot Time
- hugepages
- Defines the number of persistent huge pages configured in the kernel at boot time. The default value is 0. It is only possible to allocate huge pages if there are sufficient physically contiguous free pages in the system. Pages reserved by this parameter cannot be used for other purposes.This value can be adjusted after boot by changing the value of the
/proc/sys/vm/nr_hugepagesfile.In a NUMA system, huge pages assigned with this parameter are divided equally between nodes. You can assign huge pages to specific nodes at runtime by changing the value of the node's/sys/devices/system/node/node_id/hugepages/hugepages-1048576kB/nr_hugepagesfile.For more information, read the relevant kernel documentation, which is installed in/usr/share/doc/kernel-doc-kernel_version/Documentation/vm/hugetlbpage.txtby default. - hugepagesz
- Defines the size of persistent huge pages configured in the kernel at boot time. Valid values are 2 MB and 1 GB. The default value is 2 MB.
- default_hugepagesz
- Defines the default size of persistent huge pages configured in the kernel at boot time. Valid values are 2 MB and 1 GB. The default value is 2 MB.
Procedure 7.1. Reserving 1 GB Pages During Early Boot
- Create a HugeTLB pool for 1 GB pages by appending the following line to the kernel command-line options in the
/etc/default/grubfile as root:default_hugepagesz=1G hugepagesz=1G - Regenerate the GRUB2 configuration using the edited default file. If your system uses BIOS firmware, execute the following command:
# grub2-mkconfig -o /boot/grub2/grub.cfgOn a system with UEFI firmware, execute the following command:# grub2-mkconfig -o /boot/efi/EFI/redhat/grub.cfg - Create a file named
/usr/lib/systemd/system/hugetlb-gigantic-pages.servicewith the following content:[Unit] Description=HugeTLB Gigantic Pages Reservation DefaultDependencies=no Before=dev-hugepages.mount ConditionPathExists=/sys/devices/system/node ConditionKernelCommandLine=hugepagesz=1G [Service] Type=oneshot RemainAfterExit=yes ExecStart=/usr/lib/systemd/hugetlb-reserve-pages.sh [Install] WantedBy=sysinit.target - Create a file named
/usr/lib/systemd/hugetlb-reserve-pages.shwith the following content:#!/bin/sh nodes_path=/sys/devices/system/node/ if [ ! -d $nodes_path ]; then echo "ERROR: $nodes_path does not exist" exit 1 fi reserve_pages() { echo $1 > $nodes_path/$2/hugepages/hugepages-1048576kB/nr_hugepages } reserve_pages number_of_pages nodeOn the last line, replace number_of_pages with the number of 1GB pages to reserve and node with the name of the node on which to reserve these pages.Example 7.1. Reserving Pages on
node0andnode1For example, to reserve two 1GB pages onnode0and one 1GB page onnode1, replace the last line with the following code:reserve_pages 2 node0 reserve_pages 1 node1You can modify it to your needs or add more lines to reserve memory in other nodes. - Make the script executable:
# chmod +x /usr/lib/systemd/hugetlb-reserve-pages.sh - Enable early boot reservation:
# systemctl enable hugetlb-gigantic-pages
Note
nr_hugepages at any time. However, to prevent failures due to memory fragmentation, reserve 1GB pages early during the boot process.
7.3.2. Configuring Huge Pages at Run Time
- /sys/devices/system/node/node_id/hugepages/hugepages-size/nr_hugepages
- Defines the number of huge pages of the specified size assigned to the specified NUMA node. This is supported as of Red Hat Enterprise Linux 7.1. The following example moves adds twenty 2048 kB huge pages to
node2.# numastat -cm | egrep 'Node|Huge' Node 0 Node 1 Node 2 Node 3 Total add AnonHugePages 0 2 0 8 10 HugePages_Total 0 0 0 0 0 HugePages_Free 0 0 0 0 0 HugePages_Surp 0 0 0 0 0 # echo 20 > /sys/devices/system/node/node2/hugepages/hugepages-2048kB/nr_hugepages # numastat -cm | egrep 'Node|Huge' Node 0 Node 1 Node 2 Node 3 Total AnonHugePages 0 2 0 8 10 HugePages_Total 0 0 40 0 40 HugePages_Free 0 0 40 0 40 HugePages_Surp 0 0 0 0 0 - /proc/sys/vm/nr_overcommit_hugepages
- Defines the maximum number of additional huge pages that can be created and used by the system through overcommitting memory. Writing any non-zero value into this file indicates that the system obtains that number of huge pages from the kernel's normal page pool if the persistent huge page pool is exhausted. As these surplus huge pages become unused, they are then freed and returned to the kernel's normal page pool.
7.4. Configuring Transparent Huge Pages
madvise() system call.
# cat /sys/kernel/mm/transparent_hugepage/enabled
# echo always > /sys/kernel/mm/transparent_hugepage/enabled
# echo madvise > /sys/kernel/mm/transparent_hugepage/enabled
# echo never > /sys/kernel/mm/transparent_hugepage/enabled
direct compaction can be disabled while leaving THP enabled.
# echo madvise > /sys/kernel/mm/transparent_hugepage/defrag
/usr/share/doc/kernel-doc-kernel_version/Documentation/vm/transhuge.txt file, which is available after installing the kernel-doc package.
7.5. Configuring System Memory Capacity
/proc file system. Once you have determined the values that produce optimal performance for your use case, you can set them permanently by using the sysctl command.
# echo 1 > /proc/sys/vm/overcommit_memorysysctl vm.overcommit_memory=1 in /etc/sysctl.conf then run the following command:
# sysctl -pNote
7.5.1. Virtual Memory Parameters
/proc/sys/vm unless otherwise indicated.
- dirty_ratio
- A percentage value. When this percentage of total system memory is modified, the system begins writing the modifications to disk with the
pdflushoperation. The default value is20percent. - dirty_background_ratio
- A percentage value. When this percentage of total system memory is modified, the system begins writing the modifications to disk in the background. The default value is
10percent. - overcommit_memory
- Defines the conditions that determine whether a large memory request is accepted or denied.The default value is
0. By default, the kernel performs heuristic memory overcommit handling by estimating the amount of memory available and failing requests that are too large. However, since memory is allocated using a heuristic rather than a precise algorithm, overloading memory is possible with this setting.When this parameter is set to1, the kernel performs no memory overcommit handling. This increases the possibility of memory overload, but improves performance for memory-intensive tasks.When this parameter is set to2, the kernel denies requests for memory equal to or larger than the sum of total available swap space and the percentage of physical RAM specified inovercommit_ratio. This reduces the risk of overcommitting memory, but is recommended only for systems with swap areas larger than their physical memory. - overcommit_ratio
- Specifies the percentage of physical RAM considered when
overcommit_memoryis set to2. The default value is50. - max_map_count
- Defines the maximum number of memory map areas that a process can use. The default value (
65530) is appropriate for most cases. Increase this value if your application needs to map more than this number of files. - min_free_kbytes
- Specifies the minimum number of kilobytes to keep free across the system. This is used to determine an appropriate value for each low memory zone, each of which is assigned a number of reserved free pages in proportion to their size.
Warning
Extreme values can damage your system. Settingmin_free_kbytesto an extremely low value prevents the system from reclaiming memory, which can result in system hangs and OOM-killing processes. However, settingmin_free_kbytestoo high (for example, to 5–10% of total system memory) causes the system to enter an out-of-memory state immediately, resulting in the system spending too much time reclaiming memory. - oom_adj
- In the event that the system runs out of memory and the
panic_on_oomparameter is set to0, theoom_killerfunction kills processes until the system can recover, starting from the process with the highestoom_score.Theoom_adjparameter helps determine theoom_scoreof a process. This parameter is set per process identifier. A value of-17disables theoom_killerfor that process. Other valid values are from-16to15.Note
Processes spawned by an adjusted process inherit theoom_scoreof the process. - swappiness
- The swappiness value, ranging from
0to100, controls the degree to which the system favors anonymous memory or the page cache. A high value improves file-system performance while aggressively swapping less active processes out of RAM. A low value avoids swapping processes out of memory, which usually decreases latency at the cost of I/O performance. The default value is60.Warning
Settingswappiness==0will very aggressively avoids swapping out, which increase the risk of OOM killing under strong memory and I/O pressure.
7.5.2. File System Parameters
/proc/sys/fs unless otherwise indicated.
- aio-max-nr
- Defines the maximum allowed number of events in all active asynchronous input/output contexts. The default value is
65536. Modifying this value does not pre-allocate or resize any kernel data structures. - file-max
- Determines the maximum number of file handles for the entire system. The default value on Red Hat Enterprise Linux 7 is the maximum of either
8192, or one tenth of the free memory pages available at the time the kernel starts.Raising this value can resolve errors caused by a lack of available file handles.
7.5.3. Kernel Parameters
/proc/sys/kernel/ directory, can be calculated by the kernel at boot time depending on available system resources.
- msgmax
- Defines the maximum allowable size in bytes of any single message in a message queue. This value must not exceed the size of the queue (
msgmnb). To determine the currentmsgmaxvalue on your system, use:# sysctl kernel.msgmax - msgmnb
- Defines the maximum size in bytes of a single message queue. To determine the current
msgmnbvalue on your system, use:# sysctl kernel.msgmnb - msgmni
- Defines the maximum number of message queue identifiers, and therefore the maximum number of queues. To determine the current
msgmnivalue on your system, use:# sysctl kernel.msgmni - shmall
- Defines the total amount of shared memory pages that can be used on the system at one time. A page is 4096 bytes on the AMD64 and Intel 64 architecture, for example.To determine the current
shmallvalue on your system, use:# sysctl kernel.shmall - shmmax
- Defines the maximum size (in bytes) of a single shared memory segment allowed by the kernel. To determine the current
shmmaxvalue on your system, use:# sysctl kernel.shmmax - shmmni
- Defines the system-wide maximum number of shared memory segments. The default value is
4096on all systems. - threads-max
- Defines the system-wide maximum number of threads available to the kernel at one time. To determine the current
threads-maxvalue on your system, use:The default value is the result of:# sysctl kernel.threads-maxThe minimum value ismempages / (8 * THREAD_SIZE / PAGE SIZE )20.
Chapter 8. Storage and File Systems
8.1. Considerations
- Data write or read patterns
- Data alignment with underlying geometry
- Block size
- File system size
- Journal size and location
- Recording access times
- Ensuring data reliability
- Pre-fetching data
- Pre-allocating disk space
- File fragmentation
- Resource contention
8.1.1. I/O Schedulers
- deadline
- The default I/O scheduler for all block devices, except for SATA disks.
Deadlineattempts to provide a guaranteed latency for requests from the point at which requests reach the I/O scheduler. This scheduler is suitable for most use cases, but particularly those in which read operations occur more often than write operations.Queued I/O requests are sorted into a read or write batch and then scheduled for execution in increasing LBA order. Read batches take precedence over write batches by default, as applications are more likely to block on read I/O. After a batch is processed,deadlinechecks how long write operations have been starved of processor time and schedules the next read or write batch as appropriate. The number of requests to handle per batch, the number of read batches to issue per write batch, and the amount of time before requests expire are all configurable; see Section 8.4.4, “Tuning the Deadline Scheduler” for details. - cfq
- The default scheduler only for devices identified as SATA disks. The Completely Fair Queueing scheduler,
cfq, divides processes into three separate classes: real time, best effort, and idle. Processes in the real time class are always performed before processes in the best effort class, which are always performed before processes in the idle class. This means that processes in the real time class can starve both best effort and idle processes of processor time. Processes are assigned to the best effort class by default.cfquses historical data to anticipate whether an application will issue more I/O requests in the near future. If more I/O is expected,cfqidles to wait for the new I/O, even if I/O from other processes is waiting to be processed.Because of this tendency to idle, the cfq scheduler should not be used in conjunction with hardware that does not incur a large seek penalty unless it is tuned for this purpose. It should also not be used in conjunction with other non-work-conserving schedulers, such as a host-based hardware RAID controller, as stacking these schedulers tends to cause a large amount of latency.cfqbehavior is highly configurable; see Section 8.4.5, “Tuning the CFQ Scheduler” for details. - noop
- The
noopI/O scheduler implements a simple FIFO (first-in first-out) scheduling algorithm. Requests are merged at the generic block layer through a simple last-hit cache. This can be the best scheduler for CPU-bound systems using fast storage.
8.1.2. File Systems
8.1.2.1. XFS
8.1.2.2. Ext4
8.1.2.3. Btrfs (Technology Preview)
- The ability to take snapshots of specific files, volumes or sub-volumes rather than the whole file system;
- supporting several versions of redundant array of inexpensive disks (RAID);
- back referencing map I/O errors to file system objects;
- transparent compression (all files on the partition are automatically compressed);
- checksums on data and meta-data.
8.1.2.4. GFS2
8.1.3. Generic Tuning Considerations for File Systems
8.1.3.1. Considerations at Format Time
- Size
- Create an appropriately-sized file system for your workload. Smaller file systems have proportionally shorter backup times and require less time and memory for file system checks. However, if your file system is too small, its performance will suffer from high fragmentation.
- Block size
- The block is the unit of work for the file system. The block size determines how much data can be stored in a single block, and therefore the smallest amount of data that is written or read at one time.The default block size is appropriate for most use cases. However, your file system will perform better and store data more efficiently if the block size (or the size of multiple blocks) is the same as or slightly larger than amount of data that is typically read or written at one time. A small file will still use an entire block. Files can be spread across multiple blocks, but this can create additional runtime overhead. Additionally, some file systems are limited to a certain number of blocks, which in turn limits the maximum size of the file system.Block size is specified as part of the file system options when formatting a device with the
mkfscommand. The parameter that specifies the block size varies with the file system; see themkfsman page for your file system for details. For example, to see the options available when formatting an XFS file system, execute the following command.$ man mkfs.xfs - Geometry
- File system geometry is concerned with the distribution of data across a file system. If your system uses striped storage, like RAID, you can improve performance by aligning data and metadata with the underlying storage geometry when you format the device.Many devices export recommended geometry, which is then set automatically when the devices are formatted with a particular file system. If your device does not export these recommendations, or you want to change the recommended settings, you must specify geometry manually when you format the device with mkfs.The parameters that specify file system geometry vary with the file system; see the
mkfsman page for your file system for details. For example, to see the options available when formatting an ext4 file system, execute the following command.$ man mkfs.ext4 - External journals
- Journaling file systems document the changes that will be made during a write operation in a journal file prior to the operation being executed. This reduces the likelihood that a storage device will become corrupted in the event of a system crash or power failure, and speeds up the recovery process.Metadata-intensive workloads involve very frequent updates to the journal. A larger journal uses more memory, but reduces the frequency of write operations. Additionally, you can improve the seek time of a device with a metadata-intensive workload by placing its journal on dedicated storage that is as fast as, or faster than, the primary storage.
Warning
Ensure that external journals are reliable. Losing an external journal device will cause file system corruption.External journals must be created at format time, with journal devices being specified at mount time. For details, see themkfsandmountman pages.$ man mkfs$ man mount
8.1.3.2. Considerations at Mount Time
- Barriers
- File system barriers ensure that file system metadata is correctly written and ordered on persistent storage, and that data transmitted with
fsyncpersists across a power outage. On previous versions of Red Hat Enterprise Linux, enabling file system barriers could significantly slow applications that relied heavily onfsync, or created and deleted many small files.In Red Hat Enterprise Linux 7, file system barrier performance has been improved such that the performance effects of disabling file system barriers are negligible (less than 3%).For further information, see the Red Hat Enterprise Linux 7 Storage Administration Guide. - Access Time
- Every time a file is read, its metadata is updated with the time at which access occurred (
atime). This involves additional write I/O. In most cases, this overhead is minimal, as by default Red Hat Enterprise Linux 7 updates theatimefield only when the previous access time was older than the times of last modification (mtime) or status change (ctime).However, if updating this metadata is time consuming, and if accurate access time data is not required, you can mount the file system with thenoatimemount option. This disables updates to metadata when a file is read. It also enablesnodiratimebehavior, which disables updates to metadata when a directory is read. - Read-ahead
- Read-ahead behavior speeds up file access by pre-fetching data that is likely to be needed soon and loading it into the page cache, where it can be retrieved more quickly than if it were on disk. The higher the read-ahead value, the further ahead the system pre-fetches data.Red Hat Enterprise Linux attempts to set an appropriate read-ahead value based on what it detects about your file system. However, accurate detection is not always possible. For example, if a storage array presents itself to the system as a single LUN, the system detects the single LUN, and does not set the appropriate read-ahead value for an array.Workloads that involve heavy streaming of sequential I/O often benefit from high read-ahead values. The storage-related tuned profiles provided with Red Hat Enterprise Linux 7 raise the read-ahead value, as does using LVM striping, but these adjustments are not always sufficient for all workloads.The parameters that define read-ahead behavior vary with the file system; see the mount man page for details.
$ man mount
8.1.3.3. Maintenance
- Batch discard
- This type of discard is part of the fstrim command. It discards all unused blocks in a file system that match criteria specified by the administrator.Red Hat Enterprise Linux 7 supports batch discard on XFS and ext4 formatted devices that support physical discard operations (that is, on HDD devices where the value of
/sys/block/devname/queue/discard_max_bytesis not zero, and SSD devices where the value of/sys/block/devname/queue/discard_granularityis not0). - Online discard
- This type of discard operation is configured at mount time with the
discardoption, and runs in real time without user intervention. However, online discard only discards blocks that are transitioning from used to free. Red Hat Enterprise Linux 7 supports online discard on XFS and ext4 formatted devices.Red Hat recommends batch discard except where online discard is required to maintain performance, or where batch discard is not feasible for the system's workload. - Pre-allocation
- Pre-allocation marks disk space as being allocated to a file without writing any data into that space. This can be useful in limiting data fragmentation and poor read performance. Red Hat Enterprise Linux 7 supports pre-allocating space on XFS, ext4, and GFS2 devices at mount time; see the
mountman page for the appropriate parameter for your file system. Applications can also benefit from pre-allocating space by using thefallocate(2)glibccall.
8.2. Monitoring and Diagnosing Performance Problems
8.2.1. Monitoring System Performance with vmstat
- si
- Swap in, or reads from swap space, in KB.
- so
- Swap out, or writes to swap space, in KB.
- bi
- Block in, or block write operations, in KB.
- bo
- Block out, or block read operations, in KB.
- wa
- The portion of the queue that is waiting for I/O operations to complete.
$ man vmstat8.2.2. Monitoring I/O Performance with iostat
$ man iostat8.2.2.1. Detailed I/O Analysis with blktrace
$ man blktrace$ man blkparse8.2.2.2. Analyzing blktrace Output with btt
blktrace mechanism and analyzed by btt are:
- Queuing of the I/O event (
Q) - Dispatch of the I/O to the driver event (
D) - Completion of I/O event (
C)
blktrace events for the I/O device. For example, the following command reports the total amount of time spent in the lower part of the kernel I/O stack (Q2C), which includes scheduler, driver, and hardware layers, as an average under await time:
$ iostat -x

[...]
Device:         await r_await w_await
vda             16.75    0.97  162.05
dm-0            30.18    1.13  223.45
dm-1             0.14    0.14    0.00
[...]D2C), the device may be overloaded, or the workload sent to the device may be sub-optimal. If block I/O is queued for a long time before being dispatched to the storage device (Q2G), it may indicate that the storage in use is unable to serve the I/O load. For example, a LUN queue full condition has been reached and is preventing the I/O from being dispatched to the storage device.
Q2Q) is larger than the total time that requests spent in the block layer (Q2C), this indicates that there is idle time between I/O requests and the I/O subsystem may not be responsible for performance issues.
Q2C values across adjacent I/O can show the amount of variability in storage service time. The values can be either:
- fairly consistent with a small range, or
- highly variable in the distribution range, which indicates a possible storage device side congestion issue.
$ man btt8.2.2.3. Analyzing blktrace Output with iowatcher
8.2.3. Storage Monitoring with SystemTap
/usr/share/doc/systemtap-client/examples/io directory.
disktop.stp- Checks the status of reading/writing disk every 5 seconds and outputs the top ten entries during that period.
iotime.stp- Prints the amount of time spent on read and write operations, and the number of bytes read and written.
traceio.stp- Prints the top ten executables based on cumulative I/O traffic observed, every second.
traceio2.stp- Prints the executable name and process identifier as reads and writes to the specified device occur.
inodewatch.stp- Prints the executable name and process identifier each time a read or write occurs to the specified inode on the specified major/minor device.
inodewatch2.stp- Prints the executable name, process identifier, and attributes each time the attributes are changed on the specified inode on the specified major/minor device.
8.3. Solid-State Disks
SSD Tuning Considerations
/usr/share/doc/kernel-version/Documentation/block/switching-sched.txt file.
vm_dirty_background_ratio and vm_dirty_ratio settings, as increased write-out activity does not usually have a negative impact on the latency of other operations on the disk. However, this tuning can generate more overall I/O, and is therefore not generally recommended without workload-specific testing.
8.4. Configuration Tools
8.4.1. Configuring Tuning Profiles for Storage Performance
- latency-performance
- throughput-performance (the default)
$ tuned-adm profile nametuned-adm recommend command recommends an appropriate profile for your system.
8.4.2. Setting the Default I/O Scheduler
cfq scheduler is used for SATA drives, and the deadline scheduler is used for all other drives. If you specify a default scheduler by following the instructions in this section, that default scheduler is applied to all devices.
/etc/default/grub file manually.
elevator parameter, enable the disk plug-in. For information on the disk plug-in, see Section 3.1.1, “Plug-ins” in the Tuned chapter.
elevator parameter to the kernel command line, either at boot time, or when the system is booted. You can use the Tuned tool, or modify the /etc/default/grub file manually, as described in Procedure 8.1, “Setting the Default I/O Scheduler by Using GRUB 2”.
Procedure 8.1. Setting the Default I/O Scheduler by Using GRUB 2
- Add the
elevatorparameter to theGRUB_CMDLINE_LINUXline in the/etc/default/grubfile.# cat /etc/default/grub ... GRUB_CMDLINE_LINUX="crashkernel=auto rd.lvm.lv=vg00/lvroot rd.lvm.lv=vg00/lvswap elevator=noop" ...In Red Hat Enterprise Linux 7, the available schedulers aredeadline,noop, andcfq. For more information, see thecfq-iosched.txtanddeadline-iosched.txtfiles in the documentation for your kernel, available after installing the kernel-doc package. - Create a new configuration with the
elevatorparameter added.The location of the GRUB 2 configuration file is different on systems with the BIOS firmware and on systems with UEFI. Use one of the following commands to recreate the GRUB 2 configuration file.- On a system with the BIOS firmware, use:
# grub2-mkconfig -o /etc/grub2.cfg - On a system with the UEFI firmware, use:
# grub2-mkconfig -o /etc/grub2-efi.cfg
- Reboot the system for the change to take effect.For more information on version 2 of the GNU GRand Unified Bootloader (GRUB 2), see the Working with the GRUB 2 Boot Loader chapter of the Red Hat Enterprise Linux 7 System Administrator's Guide.
8.4.3. Generic Block Device Tuning Parameters
/sys/block/sdX/queue/ directory. The listed tuning parameters are separate from I/O scheduler tuning, and are applicable to all I/O schedulers.
- add_random
- Some I/O events contribute to the entropy pool for
/dev/random. This parameter can be set to0if the overhead of these contributions becomes measurable. - iostats
- The default value is
1(enabled). Settingiostatsto0disables the gathering of I/O statistics for the device, which removes a small amount of overhead with the I/O path. Settingiostatsto0might slightly improve performance for very high performance devices, such as certain NVMe solid-state storage devices. It is recommended to leaveiostatsenabled unless otherwise specified for the given storage model by the vendor.If you disableiostats, the I/O statistics for the device are no longer present within the/proc/diskstatsfile. The content of/sys/diskstatsis the source of I/O information for monitoring I/O tools, such assaroriostats. Therefore, if you disable theiostatsparameter for a device, the device is no longer present in the output of I/O monitoring tools. - max_sectors_kb
- Specifies the maximum size of an I/O request in kilobytes. The default value is
512KB. The minimum value for this parameter is determined by the logical block size of the storage device. The maximum value for this parameter is determined by the value ofmax_hw_sectors_kb.Certain solid-state disks perform poorly when the I/O requests are larger than the internal erase block size. To determine if this is the case of the solid-state disk model attached to the system, check with the hardware vendor, and follow their recommendations. Red Hat recommendsmax_sectors_kbto always be a multiple of the optimal I/O size and the internal erase block size. Use a value oflogical_block_sizefor either parameter if they are zero or not specified by the storage device. - nomerges
- Most workloads benefit from request merging. However, disabling merges can be useful for debugging purposes. By default, the
nomergesparameter is set to0, which enables merging. To disable simple one-hit merging, setnomergesto1. To disable all types of merging, setnomergesto2. - nr_requests
- Specifies the maximum number of read and write requests that can be queued at one time. The default value is
128, which means that 128 read requests and 128 write requests can be queued before the next process to request a read or write is put to sleep.For latency-sensitive applications, lower the value of this parameter and limit the command queue depth on the storage so that write-back I/O cannot fill the device queue with write requests. When the device queue fills, other processes attempting to perform I/O operations are put to sleep until queue space becomes available. Requests are then allocated in a round-robin manner, which prevents one process from continuously consuming all spots in the queue.The maximum number of I/O operations within the I/O scheduler isnr_requests*2. As stated,nr_requestsis applied separately for reads and writes. Note thatnr_requestsonly applies to the I/O operations within the I/O scheduler and not to I/O operations already dispatched to the underlying device. Therefore, the maximum outstanding limit of I/O operations against a device is(nr_requests*2)+(queue_depth)wherequeue_depthis/sys/block/sdN/device/queue_depth, sometimes also referred to as the LUN queue depth. You can see this total outstanding number of I/O operations in, for example, the output ofiostatin theavgqu-szcolumn. - optimal_io_size
- Some storage devices report an optimal I/O size through this parameter. If this value is reported, Red Hat recommends that applications issue I/O aligned to and in multiples of the optimal I/O size wherever possible.
- read_ahead_kb
- Defines the maximum number of kilobytes that the operating system may read ahead during a sequential read operation. As a result, the likely-needed information is already present within the kernel page cache for the next sequential read, which improves read I/O performance.Device mappers often benefit from a high
read_ahead_kbvalue. 128 KB for each device to be mapped is a good starting point, but increasing theread_ahead_kbvalue up to 4–8 MB might improve performance in application environments where sequential reading of large files takes place. - rotational
- Some solid-state disks do not correctly advertise their solid-state status, and are mounted as traditional rotational disks. If your solid-state device does does not set this to
0automatically, set it manually to disable unnecessary seek-reducing logic in the scheduler. - rq_affinity
- By default, I/O completions can be processed on a different processor than the processor that issued the I/O request. Set
rq_affinityto1to disable this ability and perform completions only on the processor that issued the I/O request. This can improve the effectiveness of processor data caching. - scheduler
- To set the scheduler or scheduler preference order for a particular storage device, edit the
/sys/block/devname/queue/schedulerfile, where devname is the name of the device you want to configure.# echo cfq > /sys/block/hda/queue/scheduler
8.4.4. Tuning the Deadline Scheduler
deadline is in use, queued I/O requests are sorted into a read or write batch and then scheduled for execution in increasing LBA order. Read batches take precedence over write batches by default, as applications are more likely to block on read I/O. After a batch is processed, deadline checks how long write operations have been starved of processor time and schedules the next read or write batch as appropriate.
deadline scheduler.
- fifo_batch
- The number of read or write operations to issue in a single batch. The default value is
16. A higher value can increase throughput, but will also increase latency. - front_merges
- If your workload will never generate front merges, this tunable can be set to
0. However, unless you have measured the overhead of this check, Red Hat recommends the default value of1. - read_expire
- The number of milliseconds in which a read request should be scheduled for service. The default value is
500(0.5 seconds). - write_expire
- The number of milliseconds in which a write request should be scheduled for service. The default value is
5000(5 seconds). - writes_starved
- The number of read batches that can be processed before processing a write batch. The higher this value is set, the greater the preference given to read batches.
8.4.5. Tuning the CFQ Scheduler
ionice command.
/sys/block/devname/queue/iosched directory.
- back_seek_max
- The maximum distance in kilobytes that CFQ will perform a backward seek. The default value is
16KB. Backward seeks typically damage performance, so large values are not recommended. - back_seek_penalty
- The multiplier applied to backward seeks when the disk head is deciding whether to move forward or backward. The default value is
2. If the disk head position is at 1024 KB, and there are equidistant requests in the system (1008 KB and 1040 KB, for example), theback_seek_penaltyis applied to backward seek distances and the disk moves forward. - fifo_expire_async
- The length of time in milliseconds that an asynchronous (buffered write) request can remain unserviced. After this amount of time expires, a single starved asynchronous request is moved to the dispatch list. The default value is
250milliseconds. - fifo_expire_sync
- The length of time in milliseconds that a synchronous (read or
O_DIRECTwrite) request can remain unserviced. After this amount of time expires, a single starved synchronous request is moved to the dispatch list. The default value is125milliseconds. - group_idle
- This parameter is set to
0(disabled) by default. When set to1(enabled), thecfqscheduler idles on the last process that is issuing I/O in a control group. This is useful when using proportional weight I/O control groups and whenslice_idleis set to0(on fast storage). - group_isolation
- This parameter is set to
0(disabled) by default. When set to1(enabled), it provides stronger isolation between groups, but reduces throughput, as fairness is applied to both random and sequential workloads. Whengroup_isolationis disabled (set to0), fairness is provided to sequential workloads only. For more information, see the installed documentation in/usr/share/doc/kernel-doc-version/Documentation/cgroups/blkio-controller.txt. - low_latency
- This parameter is set to
1(enabled) by default. When enabled,cfqfavors fairness over throughput by providing a maximum wait time of300ms for each process issuing I/O on a device. When this parameter is set to0(disabled), target latency is ignored and each process receives a full time slice. - quantum
- This parameter defines the number of I/O requests that
cfqsends to one device at one time, essentially limiting queue depth. The default value is8requests. The device being used may support greater queue depth, but increasing the value of quantum will also increase latency, especially for large sequential write work loads. - slice_async
- This parameter defines the length of the time slice (in milliseconds) allotted to each process issuing asynchronous I/O requests. The default value is
40milliseconds. - slice_idle
- This parameter specifies the length of time in milliseconds that cfq idles while waiting for further requests. The default value is
0(no idling at the queue or service tree level). The default value is ideal for throughput on external RAID storage, but can degrade throughput on internal non-RAID storage as it increases the overall number of seek operations. - slice_sync
- This parameter defines the length of the time slice (in milliseconds) allotted to each process issuing synchronous I/O requests. The default value is
100ms.
8.4.5.1. Tuning CFQ for Fast Storage
cfq scheduler is not recommended for hardware that does not suffer a large seek penalty, such as fast external storage arrays or solid-state disks. If your use case requires cfq to be used on this storage, you will need to edit the following configuration files:
- Set
/sys/block/devname/queue/iosched/slice_idleto0 - Set
/sys/block/devname/queue/iosched/quantumto64 - Set
/sys/block/devname/queue/iosched/group_idleto1
8.4.6. Tuning the noop Scheduler
noop I/O scheduler is primarily useful for CPU-bound systems that use fast storage. Also, the noop I/O scheduler is commonly, but not exclusively, used on virtual machines when they are performing I/O operations to virtual disks.
noop I/O scheduler.
8.4.7. Configuring File Systems for Performance
8.4.7.1. Tuning XFS
8.4.7.1.1. Formatting Options
$ man mkfs.xfs- Directory block size
- The directory block size affects the amount of directory information that can be retrieved or modified per I/O operation. The minimum value for directory block size is the file system block size (4 KB by default). The maximum value for directory block size is
64KB.At a given directory block size, a larger directory requires more I/O than a smaller directory. A system with a larger directory block size also consumes more processing power per I/O operation than a system with a smaller directory block size. It is therefore recommended to have as small a directory and directory block size as possible for your workload.Red Hat recommends the directory block sizes listed in Table 8.1, “Recommended Maximum Directory Entries for Directory Block Sizes” for file systems with no more than the listed number of entries for write-heavy and read-heavy workloads.Expand Table 8.1. Recommended Maximum Directory Entries for Directory Block Sizes Directory block size Max. entries (read-heavy) Max. entries (write-heavy) 4 KB 100,000–200,000 1,000,000–2,000,000 16 KB 100,000–1,000,000 1,000,000–10,000,000 64 KB >1,000,000 >10,000,000 For detailed information about the effect of directory block size on read and write workloads in file systems of different sizes, see the XFS documentation.To configure directory block size, use themkfs.xfs -loption. See themkfs.xfsman page for details. - Allocation groups
- An allocation group is an independent structure that indexes free space and allocated inodes across a section of the file system. Each allocation group can be modified independently, allowing XFS to perform allocation and deallocation operations concurrently as long as concurrent operations affect different allocation groups. The number of concurrent operations that can be performed in the file system is therefore equal to the number of allocation groups. However, since the ability to perform concurrent operations is also limited by the number of processors able to perform the operations, Red Hat recommends that the number of allocation groups be greater than or equal to the number of processors in the system.A single directory cannot be modified by multiple allocation groups simultaneously. Therefore, Red Hat recommends that applications that create and remove large numbers of files do not store all files in a single directory.To configure allocation groups, use the
mkfs.xfs -doption. See themkfs.xfsman page for details. - Growth constraints
- If you may need to increase the size of your file system after formatting time (either by adding more hardware or through thin-provisioning), you must carefully consider initial file layout, as allocation group size cannot be changed after formatting is complete.Allocation groups must be sized according to the eventual capacity of the file system, not the initial capacity. The number of allocation groups in the fully-grown file system should not exceed several hundred, unless allocation groups are at their maximum size (1 TB). Therefore for most file systems, the recommended maximum growth to allow for a file system is ten times the initial size.Additional care must be taken when growing a file system on a RAID array, as the device size must be aligned to an exact multiple of the allocation group size so that new allocation group headers are correctly aligned on the newly added storage. The new storage must also have the same geometry as the existing storage, since geometry cannot be changed after formatting time, and therefore cannot be optimized for storage of a different geometry on the same block device.
- Inode size and inline attributes
- If the inode has sufficient space available, XFS can write attribute names and values directly into the inode. These inline attributes can be retrieved and modified up to an order of magnitude faster than retrieving separate attribute blocks, as additional I/O is not required.The default inode size is 256 bytes. Only around 100 bytes of this is available for attribute storage, depending on the number of data extent pointers stored in the inode. Increasing inode size when you format the file system can increase the amount of space available for storing attributes.Both attribute names and attribute values are limited to a maximum size of 254 bytes. If either name or value exceeds 254 bytes in length, the attribute is pushed to a separate attribute block instead of being stored inline.To configure inode parameters, use the
mkfs.xfs -ioption. See themkfs.xfsman page for details. - RAID
- If software RAID is in use,
mkfs.xfsautomatically configures the underlying hardware with an appropriate stripe unit and width. However, stripe unit and width may need to be manually configured if hardware RAID is in use, as not all hardware RAID devices export this information. To configure stripe unit and width, use themkfs.xfs -doption. See themkfs.xfsman page for details. - Log size
- Pending changes are aggregated in memory until a synchronization event is triggered, at which point they are written to the log. The size of the log determines the number of concurrent modifications that can be in-progress at one time. It also determines the maximum amount of change that can be aggregated in memory, and therefore how often logged data is written to disk. A smaller log forces data to be written back to disk more frequently than a larger log. However, a larger log uses more memory to record pending modifications, so a system with limited memory will not benefit from a larger log.Logs perform better when they are aligned to the underlying stripe unit; that is, they start and end at stripe unit boundaries. To align logs to the stripe unit, use the
mkfs.xfs -doption. See themkfs.xfsman page for details.To configure the log size, use the followingmkfs.xfsoption, replacing logsize with the size of the log:# mkfs.xfs -l size=logsizeFor further details, see themkfs.xfsman page:$ man mkfs.xfs - Log stripe unit
- Log writes on storage devices that use RAID5 or RAID6 layouts may perform better when they start and end at stripe unit boundaries (are aligned to the underlying stripe unit).
mkfs.xfsattempts to set an appropriate log stripe unit automatically, but this depends on the RAID device exporting this information.Setting a large log stripe unit can harm performance if your workload triggers synchronization events very frequently, because smaller writes need to be padded to the size of the log stripe unit, which can increase latency. If your workload is bound by log write latency, Red Hat recommends setting the log stripe unit to 1 block so that unaligned log writes are triggered as possible.The maximum supported log stripe unit is the size of the maximum log buffer size (256 KB). It is therefore possible that the underlying storage may have a larger stripe unit than can be configured on the log. In this case,mkfs.xfsissues a warning and sets a log stripe unit of 32 KB.To configure the log stripe unit, use one of the following options, where N is the number of blocks to use as the stripe unit, and size is the size of the stripe unit in KB.mkfs.xfs -l sunit=Nb mkfs.xfs -l su=sizeFor further details, see themkfs.xfsman page:$ man mkfs.xfs
8.4.7.1.2. Mount Options
- Inode allocation
- Highly recommended for file systems greater than 1 TB in size. The
inode64parameter configures XFS to allocate inodes and data across the entire file system. This ensures that inodes are not allocated largely at the beginning of the file system, and data is not largely allocated at the end of the file system, improving performance on large file systems. - Log buffer size and number
- The larger the log buffer, the fewer I/O operations it takes to write all changes to the log. A larger log buffer can improve performance on systems with I/O-intensive workloads that do not have a non-volatile write cache.The log buffer size is configured with the
logbsizemount option, and defines the maximum amount of information that can be stored in the log buffer; if a log stripe unit is not set, buffer writes can be shorter than the maximum, and therefore there is no need to reduce the log buffer size for synchronization-heavy workloads. The default size of the log buffer is 32 KB. The maximum size is 256 KB and other supported sizes are 64 KB, 128 KB or power of 2 multiples of the log stripe unit between 32 KB and 256 KB.The number of log buffers is defined by thelogbufsmount option. The default value is 8 log buffers (the maximum), but as few as two log buffers can be configured. It is usually not necessary to reduce the number of log buffers, except on memory-bound systems that cannot afford to allocate memory to additional log buffers. Reducing the number of log buffers tends to reduce log performance, especially on workloads sensitive to log I/O latency. - Delay change logging
- XFS has the option to aggregate changes in memory before writing them to the log. The
delaylogparameter allows frequently modified metadata to be written to the log periodically instead of every time it changes. This option increases the potential number of operations lost in a crash and increases the amount of memory used to track metadata. However, it can also increase metadata modification speed and scalability by an order of magnitude, and does not reduce data or metadata integrity whenfsync,fdatasync, orsyncare used to ensure data and metadata is written to disk.
man xfs
8.4.7.2. Tuning ext4
8.4.7.2.1. Formatting Options
- Inode table initialization
- Initializing all inodes in the file system can take a very long time on very large file systems. By default, the initialization process is deferred (lazy inode table initialization is enabled). However, if your system does not have an ext4 driver, lazy inode table initialization is disabled by default. It can be enabled by setting
lazy_itable_initto 1). In this case, kernel processes continue to initialize the file system after it is mounted.
mkfs.ext4 man page:
$ man mkfs.ext48.4.7.2.2. Mount Options
- Inode table initialization rate
- When lazy inode table initialization is enabled, you can control the rate at which initialization occurs by specifying a value for the
init_itableparameter. The amount of time spent performing background initialization is approximately equal to 1 divided by the value of this parameter. The default value is10. - Automatic file synchronization
- Some applications do not correctly perform an
fsyncafter renaming an existing file, or after truncating and rewriting. By default, ext4 automatically synchronizes files after each of these operations. However, this can be time consuming.If this level of synchronization is not required, you can disable this behavior by specifying thenoauto_da_allocoption at mount time. Ifnoauto_da_allocis set, applications must explicitly use fsync to ensure data persistence. - Journal I/O priority
- By default, journal I/O has a priority of
3, which is slightly higher than the priority of normal I/O. You can control the priority of journal I/O with thejournal_ioprioparameter at mount time. Valid values forjournal_iopriorange from0to7, with0being the highest priority I/O.
mount man page:
$ man mount8.4.7.3. Tuning Btrfs
Data Compression
compress=zlib– the default option with a high compression ratio, safe for older kernels.compress=lzo– compression faster, but lower, than zlib.compress=no– disables compression.compress-force=method– enables compression even for files that do not compress well, such as videos and disk images. The available methods arezlibandlzo.
zlib or lzo:
$ btrfs filesystem defragment -cmethodlzo, run:
$ btrfs filesystem defragment -r -v -clzo /8.4.7.4. Tuning GFS2
- Directory spacing
- All directories created in the top-level directory of the GFS2 mount point are automatically spaced to reduce fragmentation and increase write speed in those directories. To space another directory like a top-level directory, mark that directory with the
Tattribute, as shown, replacing dirname with the path to the directory you wish to space:# chattr +T dirnamechattris provided as part of the e2fsprogs package. - Reduce contention
- GFS2 uses a global locking mechanism that can require communication between the nodes of a cluster. Contention for files and directories between multiple nodes lowers performance. You can minimize the risk of cross-cache invalidation by minimizing the areas of the file system that are shared between multiple nodes.
Chapter 9. Networking
9.1. Considerations
/proc/sys/net/core/dev_weight) are transferred.
tuned tuning daemon, numad NUMA daemon, CPU power states, interrupt balancing, pause frames, interrupt coalescence, adapter queue (netdev backlog), adapter RX and TX buffers, adapter TX queue, module parameters, adapter offloading, Jumbo Frames, TCP and UDP protocol tuning, and NUMA locality.
9.1.1. Before You Tune
9.1.2. Bottlenecks in Packet Reception
- The NIC hardware buffer or ring buffer
- The hardware buffer might be a bottleneck if a large number of packets are being dropped. For information about monitoring your system for dropped packets, see Section 9.2.4, “ethtool”.
- The hardware or software interrupt queues
- Interrupts can increase latency and processor contention. For information on how interrupts are handled by the processor, see Section 6.1.3, “Interrupt Request (IRQ) Handling”. For information on how to monitor interrupt handling in your system, see Section 6.2.3, “/proc/interrupts”. For configuration options that affect interrupt handling, see Section 6.3.7, “Setting Interrupt Affinity on AMD64 and Intel 64”.
- The socket receive queue for the application
- A bottleneck in an application's receive queue is indicated by a large number of packets that are not copied to the requesting application, or by an increase in UDP input errors (
InErrors) in/proc/net/snmp. For information about monitoring your system for these errors, see Section 9.2.1, “ss” and Section 9.2.5, “/proc/net/snmp”.
9.2. Monitoring and Diagnosing Performance Problems
9.2.1. ss
$ man ss9.2.2. ip
ip monitor command can continuously monitor the state of devices, addresses, and routes.
$ man ip9.2.3. dropwatch
$ man dropwatch9.2.4. ethtool
ethtool -S and the name of the device you want to monitor.
$ ethtool -S devname$ man ethtool9.2.5. /proc/net/snmp
/proc/net/snmp file displays data that is used by snmp agents for IP, ICMP, TCP and UDP monitoring and management. Examining this file on a regular basis can help administrators identify unusual values and thereby identify potential performance problems. For example, an increase in UDP input errors (InErrors) in /proc/net/snmp can indicate a bottleneck in a socket receive queue.
9.2.6. Network Monitoring with SystemTap
/usr/share/doc/systemtap-client/examples/network directory.
nettop.stp- Every 5 seconds, prints a list of processes (process identifier and command) with the number of packets sent and received and the amount of data sent and received by the process during that interval.
socket-trace.stp- Instruments each of the functions in the Linux kernel's
net/socket.cfile, and prints trace data. dropwatch.stp- Every 5 seconds, prints the number of socket buffers freed at locations in the kernel. Use the
--all-modulesoption to see symbolic names.
latencytap.stp script records the effect that different types of latency have on one or more processes. It prints a list of latency types every 30 seconds, sorted in descending order by the total time the process or processes spent waiting. This can be useful for identifying the cause of both storage and network latency. Red Hat recommends using the --all-modules option with this script to better enable the mapping of latency events. By default, this script is installed to the /usr/share/doc/systemtap-client-version/examples/profiling directory.
9.3. Configuration Tools
9.3.1. Tuned Profiles for Network Performance
- latency-performance
- network-latency
- network-throughput
9.3.2. Configuring the Hardware Buffer
- Slow the input traffic
- Filter incoming traffic, reduce the number of joined multicast groups, or reduce the amount of broadcast traffic to decrease the rate at which the queue fills. For details of how to filter incoming traffic, see the Red Hat Enterprise Linux 7 Security Guide. For details about multicast groups, see the Red Hat Enterprise Linux 7 Clustering documentation. For details about broadcast traffic, see the Red Hat Enterprise Linux 7 System Administrator's Guide, or documentation related to the device you want to configure.
- Resize the hardware buffer queue
- Reduce the number of packets being dropped by increasing the size of the queue so that the it does not overflow as easily. You can modify the rx/tx parameters of the network device with the ethtool command:
# ethtool --set-ring devname value - Change the drain rate of the queue
- Device weight refers to the number of packets a device can receive at one time (in a single scheduled processor access). You can increase the rate at which a queue is drained by increasing its device weight, which is controlled by the
dev_weightparameter. This parameter can be temporarily altered by changing the contents of the/proc/sys/net/core/dev_weightfile, or permanently altered with sysctl, which is provided by the procps-ng package.
9.3.3. Configuring Interrupt Queues
9.3.3.1. Configuring Busy Polling
- Set
sysctl.net.core.busy_pollto a value other than0. This parameter controls the number of microseconds to wait for packets on the device queue for socket poll and selects. Red Hat recommends a value of50. - Add the
SO_BUSY_POLLsocket option to the socket.
sysctl.net.core.busy_read to a value other than 0. This parameter controls the number of microseconds to wait for packets on the device queue for socket reads. It also sets the default value of the SO_BUSY_POLL option. Red Hat recommends a value of 50 for a small number of sockets, and a value of 100 for large numbers of sockets. For extremely large numbers of sockets (more than several hundred), use epoll instead.
- bnx2x
- be2net
- ixgbe
- mlx4
- myri10ge
# ethtool -k device | grep "busy-poll"busy-poll: on [fixed], busy polling is available on the device.
9.3.4. Configuring Socket Receive Queues
- Decrease the speed of incoming traffic
- Decrease the rate at which the queue fills by filtering or dropping packets before they reach the queue, or by lowering the weight of the device.
- Increase the depth of the application's socket queue
- If a socket queue that receives a limited amount of traffic in bursts, increasing the depth of the socket queue to match the size of the bursts of traffic may prevent packets from being dropped.
9.3.4.1. Decrease the Speed of Incoming Traffic
dev_weight parameter. This parameter can be temporarily altered by changing the contents of the /proc/sys/net/core/dev_weight file, or permanently altered with sysctl, which is provided by the procps-ng package.
9.3.4.2. Increasing Queue Depth
- Increase the value of /proc/sys/net/core/rmem_default
- This parameter controls the default size of the receive buffer used by sockets. This value must be smaller than or equal to the value of
/proc/sys/net/core/rmem_max. - Use setsockopt to configure a larger SO_RCVBUF value
- This parameter controls the maximum size in bytes of a socket's receive buffer. Use the
getsockoptsystem call to determine the current value of the buffer. For further information, see the socket(7) manual page.
9.3.5. Configuring Receive-Side Scaling (RSS)
/proc/interrupts. For example, if you are interested in the p1p1 interface:
# egrep 'CPU|p1p1' /proc/interrupts
   CPU0    CPU1    CPU2    CPU3    CPU4    CPU5
89:   40187       0       0       0       0       0   IR-PCI-MSI-edge   p1p1-0
90:       0     790       0       0       0       0   IR-PCI-MSI-edge   p1p1-1
91:       0       0     959       0       0       0   IR-PCI-MSI-edge   p1p1-2
92:       0       0       0    3310       0       0   IR-PCI-MSI-edge   p1p1-3
93:       0       0       0       0     622       0   IR-PCI-MSI-edge   p1p1-4
94: 0 0 0 0 0 2475 IR-PCI-MSI-edge p1p1-5p1p1 interface (p1p1-0 through p1p1-5). It also shows how many interrupts were processed by each queue, and which CPU serviced the interrupt. In this case, there are 6 queues because by default, this particular NIC driver creates one queue per CPU, and this system has 6 CPUs. This is a fairly common pattern among NIC drivers.
ls -1 /sys/devices/*/*/device_pci_address/msi_irqs after the network driver is loaded. For example, if you are interested in a device with a PCI address of 0000:01:00.0, you can list the interrupt request queues of that device with the following command:
# ls -1 /sys/devices/*/*/0000:01:00.0/msi_irqs
101
102
103
104
105
106
107
108
109bnx2x driver, it is configured in num_queues. For the sfc driver, it is configured in the rss_cpus parameter. Regardless, it is typically configured in /sys/class/net/device/queues/rx-queue/, where device is the name of the network device (such as eth1) and rx-queue is the name of the appropriate receive queue.
ethtool --show-rxfh-indir and --set-rxfh-indir parameters to modify how network activity is distributed, and weight certain types of network activity as more important than others.
irqbalance daemon can be used in conjunction with RSS to reduce the likelihood of cross-node memory transfers and cache line bouncing. This lowers the latency of processing network packets.
9.3.6. Configuring Receive Packet Steering (RPS)
- RPS can be used with any network interface card.
- It is easy to add software filters to RPS to deal with new protocols.
- RPS does not increase the hardware interrupt rate of the network device. However, it does introduce inter-processor interrupts.
/sys/class/net/device/queues/rx-queue/rps_cpus file, where device is the name of the network device (such as eth0) and rx-queue is the name of the appropriate receive queue (such as rx-0).
rps_cpus file is 0. This disables RPS, so the CPU that handles the network interrupt also processes the packet.
rps_cpus file with the CPUs that should process packets from the specified network device and receive queue.
rps_cpus files use comma-delimited CPU bitmaps. Therefore, to allow a CPU to handle interrupts for the receive queue on an interface, set the value of their positions in the bitmap to 1. For example, to handle interrupts with CPUs 0, 1, 2, and 3, set the value of rps_cpus to f, which is the hexadecimal value for 15. In binary representation, 15 is 00001111 (1+2+4+8).
9.3.7. Configuring Receive Flow Steering (RFS)
/proc/sys/net/core/rps_sock_flow_entries- Set the value of this file to the maximum expected number of concurrently active connections. We recommend a value of
32768for moderate server loads. All values entered are rounded up to the nearest power of 2 in practice. /sys/class/net/device/queues/rx-queue/rps_flow_cnt- Replace device with the name of the network device you wish to configure (for example,
eth0), and rx-queue with the receive queue you wish to configure (for example,rx-0).Set the value of this file to the value ofrps_sock_flow_entriesdivided byN, whereNis the number of receive queues on a device. For example, ifrps_flow_entriesis set to32768and there are 16 configured receive queues,rps_flow_cntshould be set to2048. For single-queue devices, the value ofrps_flow_cntis the same as the value ofrps_sock_flow_entries.
numactl or taskset in conjunction with RFS to pin applications to specific cores, sockets, or NUMA nodes. This can help prevent packets from being processed out of order.
9.3.8. Configuring Accelerated RFS
- Accelerated RFS must be supported by the network interface card. Accelerated RFS is supported by cards that export the
ndo_rx_flow_steer()netdevicefunction. ntuplefiltering must be enabled.
Appendix A. Tool Reference
A.1. irqbalance
--oneshot option.
- --powerthresh
- Sets the number of CPUs that can idle before a CPU is placed into powersave mode. If more CPUs than the threshold are more than 1 standard deviation below the average
softirqworkload and no CPUs are more than one standard deviation above the average, and have more than oneirqassigned to them, a CPU is placed into powersave mode. In powersave mode, a CPU is not part ofirqbalancing so that it is not woken unnecessarily. - --hintpolicy
- Determines how
irqkernel affinity hinting is handled. Valid values areexact(irqaffinity hint is always applied),subset(irqis balanced, but the assigned object is a subset of the affinity hint), orignore(irqaffinity hint is ignored completely). - --policyscript
- Defines the location of a script to execute for each interrupt request, with the device path and
irqnumber passed as arguments, and a zero exit code expected by irqbalance. The script defined can specify zero or more key value pairs to guide irqbalance in managing the passedirq.The following are recognized as valid key value pairs.- ban
- Valid values are
true(exclude the passedirqfrom balancing) orfalse(perform balancing on thisirq). - balance_level
- Allows user override of the balance level of the passed
irq. By default the balance level is based on the PCI device class of the device that owns theirq. Valid values arenone,package,cache, orcore. - numa_node
- Allows user override of the NUMA node that is considered local to the passed
irq. If information about the local node is not specified in ACPI, devices are considered equidistant from all nodes. Valid values are integers (starting from 0) that identify a specific NUMA node, and-1, which specifies that anirqshould be considered equidistant from all nodes.
- --banirq
- The interrupt with the specified interrupt request number is added to the list of banned interrupts.
IRQBALANCE_BANNED_CPUS environment variable to specify a mask of CPUs that are ignored by irqbalance.
$ man irqbalanceA.2. ethtool
$ man ethtoolA.3. ss
ss -tmpie, which displays all TCP sockets (t, internal TCP information (i), socket memory usage (m), processes using the socket (p), and detailed socket information (i).
$ man ssA.4. tuned
dynamic_tuning parameter in the /etc/tuned/tuned-main.conf file. Tuned then periodically analyzes system statistics and uses them to update your system tuning settings. You can configure the time interval in seconds between these updates with the update_interval parameter.
$ man tunedA.5. tuned-adm
tuned-adm recommend sub-command that assesses your system and outputs a recommended tuning profile.
include parameter in profile definition files, allowing you to base your own Tuned profiles on existing profiles.
- throughput-performance
- A server profile focused on improving throughput. This is the default profile, and is recommended for most systems.This profile favors performance over power savings by setting
intel_pstateandmin_perf_pct=100. It enables transparent huge pages and uses cpupower to set theperformancecpufreq governor. It also setskernel.sched_min_granularity_nsto10μs,kernel.sched_wakeup_granularity_nsto15μs, andvm.dirty_ratioto40%. - latency-performance
- A server profile focused on lowering latency. This profile is recommended for latency-sensitive workloads that benefit from c-state tuning and the increased TLB efficiency of transparent huge pages.This profile favors performance over power savings by setting
intel_pstateandmax_perf_pct=100. It enables transparent huge pages, uses cpupower to set theperformancecpufreq governor, and requests acpu_dma_latencyvalue of1. - network-latency
- A server profile focused on lowering network latency.This profile favors performance over power savings by setting
intel_pstateandmin_perf_pct=100. It disables transparent huge pages, and automatic NUMA balancing. It also uses cpupower to set theperformancecpufreq governor, and requests acpu_dma_latencyvalue of1. It also setsbusy_readandbusy_polltimes to50μs, andtcp_fastopento3. - network-throughput
- A server profile focused on improving network throughput.This profile favors performance over power savings by setting
intel_pstateandmax_perf_pct=100and increasing kernel network buffer sizes. It enables transparent huge pages, and uses cpupower to set theperformancecpufreq governor. It also setskernel.sched_min_granularity_nsto10μs,kernel.sched_wakeup_granularity_nsto 15 μs, andvm.dirty_ratioto40%. - virtual-guest
- A profile focused on optimizing performance in Red Hat Enterprise Linux 7 virtual machines as well as VMware guests.This profile favors performance over power savings by setting
intel_pstateandmax_perf_pct=100. It also decreases the swappiness of virtual memory. It enables transparent huge pages, and uses cpupower to set theperformancecpufreq governor. It also setskernel.sched_min_granularity_nsto10μs,kernel.sched_wakeup_granularity_nsto 15 μs, andvm.dirty_ratioto40%. - virtual-host
- A profile focused on optimizing performance in Red Hat Enterprise Linux 7 virtualization hosts.This profile favors performance over power savings by setting
intel_pstateandmax_perf_pct=100. It also decreases the swappiness of virtual memory. This profile enables transparent huge pages and writes dirty pages back to disk more frequently. It uses cpupower to set theperformancecpufreq governor. It also setskernel.sched_min_granularity_nsto10μs,kernel.sched_wakeup_granularity_nsto 15 μs,kernel.sched_migration_costto5μs, andvm.dirty_ratioto40%. cpu-partitioning- The
cpu-partitioningprofile partitions the system CPUs into isolated and housekeeping CPUs. To reduce jitter and interruptions on an isolated CPU, the profile clears the isolated CPU from user-space processes, movable kernel threads, interrupt handlers, and kernel timers.A housekeeping CPU can run all services, shell processes, and kernel threads.You can configure thecpu-partitioningprofile in the/etc/tuned/cpu-partitioning-variables.conffile. The configuration options are:isolated_cores=cpu-list- Lists CPUs to isolate. The list of isolated CPUs is comma-separated or the user can specify the range. You can specify a range using a dash, such as
3-5. This option is mandatory. Any CPU missing from this list is automatically considered a housekeeping CPU. no_balance_cores=cpu-list- Lists CPUs which are not considered by the kernel during system wide process load-balancing. This option is optional. This is usually the same list as
isolated_cores.
For more information oncpu-partitioning, see the tuned-profiles-cpu-partitioning(7) man page.
tuned-adm, see the Red Hat Enterprise Linux 7 Power Management Guide.
tuned-adm, see the man page:
$ man tuned-admA.6. perf
- perf stat
- This command provides overall statistics for common performance events, including instructions executed and clock cycles consumed. You can use the option flags to gather statistics on events other than the default measurement events. As of Red Hat Enterprise Linux 6.4, it is possible to use
perf statto filter monitoring based on one or more specified control groups (cgroups).For further information, read the man page:$ man perf-stat - perf record
- This command records performance data into a file which can be later analyzed using
perf report. For further details, read the man page:$ man perf-record - perf report
- This command reads the performance data from a file and analyzes the recorded data. For further details, read the man page:
$ man perf-report - perf list
- This command lists the events available on a particular machine. These events vary based on the performance monitoring hardware and the software configuration of the system. For further information, read the man page:
$ man perf-list - perf top
- This command performs a similar function to the top tool. It generates and displays a performance counter profile in realtime. For further information, read the man page:
$ man perf-top - perf trace
- This command performs a similar function to the strace tool. It monitors the system calls used by a specified thread or process and all signals received by that application. Additional trace targets are available; refer to the man page for a full list:
$ man perf-trace
A.7. Performance Co-Pilot (PCP)
| Metric Group | Metrics provided |
|---|---|
| xfs.* | General XFS metrics including the read and write operation counts, read and write byte counts. Along with counters for the number of times inodes are flushed, clustered and number of failure to cluster. |
|
xfs.allocs.*
xfs.alloc_btree.*
| Range of metrics regarding the allocation of objects in the file system, these include number of extent and block creations/frees. Allocation tree lookup and compares along with extend record creation and deletion from the btree. |
|
xfs.block_map.*
xfs.bmap_tree.*
| Metrics include the number of block map read/write and block deletions, extent list operations for insertion, deletions and lookups. Also operations counters for compares, lookups, insertions and deletion operations from the blockmap. |
| xfs.dir_ops.* | Counters for directory operations on XFS file systems for creation, entry deletions, count of “getdent” operations. |
| xfs.transactions.* | Counters for the number of meta-data transactions, these include the count for the number of synchronous and asynchronous transactions along with the number of empty transactions. |
| xfs.inode_ops.* | Counters for the number of times that the operating system looked for an XFS inode in the inode cache with different outcomes. These count cache hits, cache misses, and so on. |
|
xfs.log.*
xfs.log_tail.*
| Counters for the number of log buffer writes over XFS file sytems includes the number of blocks written to disk. Metrics also for the number of log flushes and pinning. |
| xfs.xstrat.* | Counts for the number of bytes of file data flushed out by the XFS flush deamon along with counters for number of buffers flushed to contiguous and non-contiguous space on disk. |
| xfs.attr.* | Counts for the number of attribute get, set, remove and list operations over all XFS file systems. |
| xfs.quota.* | Metrics for quota operation over XFS file systems, these include counters for number of quota reclaims, quota cache misses, cache hits and quota data reclaims. |
| xfs.buffer.* | Range of metrics regarding XFS buffer objects. Counters include the number of requested buffer calls, successful buffer locks, waited buffer locks, miss_locks, miss_retries and buffer hits when looking up pages. |
| xfs.btree.* | Metrics regarding the operations of the XFS btree. |
| xfs.control.reset | Configuration metrics which are used to reset the metric counters for the XFS stats. Control metrics are toggled by means of the pmstore tool. |
| Metric Group | Metrics provided |
|---|---|
| xfs.perdev.* | General XFS metrics including the read and write operation counts, read and write byte counts. Along with counters for the number of times inodes are flushed, clustered and number of failure to cluster. |
|
xfs.perdev.allocs.*
xfs.perdev.alloc_btree.*
| Range of metrics regarding the allocation of objects in the file system, these include number of extent and block creations/frees. Allocation tree lookup and compares along with extend record creation and deletion from the btree. |
|
xfs.perdev.block_map.*
xfs.perdev.bmap_tree.*
| Metrics include the number of block map read/write and block deletions, extent list operations for insertion, deletions and lookups. Also operations counters for compares, lookups, insertions and deletion operations from the blockmap. |
| xfs.perdev.dir_ops.* | Counters for directory operations of XFS file systems for creation, entry deletions, count of “getdent” operations. |
| xfs.perdev.transactions.* | Counters for the number of meta-data transactions, these include the count for the number of synchronous and asynchronous transactions along with the number of empty transactions. |
| xfs.perdev.inode_ops.* | Counters for the number of times that the operating system looked for an XFS inode in the inode cache with different outcomes. These count cache hits, cache misses, and so on. |
|
xfs.perdev.log.*
xfs.perdev.log_tail.*
| Counters for the number of log buffer writes over XFS filesytems includes the number of blocks written to disk. Metrics also for the number of log flushes and pinning. |
| xfs.perdev.xstrat.* | Counts for the number of bytes of file data flushed out by the XFS flush deamon along with counters for number of buffers flushed to contiguous and non-contiguous space on disk. |
| xfs.perdev.attr.* | Counts for the number of attribute get, set, remove and list operations over all XFS file systems. |
| xfs.perdev.quota.* | Metrics for quota operation over XFS file systems, these include counters for number of quota reclaims, quota cache misses, cache hits and quota data reclaims. |
| xfs.perdev.buffer.* | Range of metrics regarding XFS buffer objects. Counters include the number of requested buffer calls, successful buffer locks, waited buffer locks, miss_locks, miss_retries and buffer hits when looking up pages. |
| xfs.perdev.btree.* | Metrics regarding the operations of the XFS btree. |
A.8. vmstat
- -a
- Displays active and inactive memory.
- -f
- Displays the number of forks since boot. This includes the
fork,vfork, andclonesystem calls, and is equivalent to the total number of tasks created. Each process is represented by one or more tasks, depending on thread usage. This display does not repeat. - -m
- Displays slab information.
- -n
- Specifies that the header will appear once, not periodically.
- -s
- Displays a table of various event counters and memory statistics. This display does not repeat.
- delay
- The delay between reports in seconds. If no delay is specified, only one report is printed, with the average values since the machine was last booted.
- count
- The number of times to report on the system. If no count is specified and delay is defined, vmstat reports indefinitely.
- -d
- Displays disk statistics.
- -p
- Takes a partition name as a value, and reports detailed statistics for that partition.
- -S
- Defines the units output by the report. Valid values are
k(1000 bytes),K(1024 bytes),m(1,000,000 bytes), orM(1,048,576 bytes). - -D
- Report summary statistics about disk activity.
$ man vmstatA.9. x86_energy_perf_policy
# x86_energy_perf_policy -r# x86_energy_perf_policy profile_name- performance
- The processor does not sacrifice performance for the sake of saving energy. This is the default value.
- normal
- The processor tolerates minor performance compromises for potentially significant energy savings. This is a reasonable saving for most servers and desktops.
- powersave
- The processor accepts potentially significant performance decreases in order to maximize energy efficiency.
$ man x86_energy_perf_policyA.10. turbostat
- pkg
- The processor package number.
- core
- The processor core number.
- CPU
- The Linux CPU (logical processor) number.
- %c0
- The percentage of the interval for which the CPU retired instructions.
- GHz
- When this number is higher than the value in TSC, the CPU is in turbo mode
- TSC
- The average clock speed over the course of the entire interval.
- %c1, %c3, and %c6
- The percentage of the interval for which the processor was in the c1, c3, or c6 state, respectively.
- %pc3 or %pc6
- The percentage of the interval for which the processor was in the pc3 or pc6 state, respectively.
-i option, for example, run turbostat -i 10 to print results every 10 seconds instead.
Note
A.11. numastat
numastat command are outlined as follows:
- numa_hit
- The number of pages that were successfully allocated to this node.
- numa_miss
- The number of pages that were allocated on this node because of low memory on the intended node. Each
numa_missevent has a correspondingnuma_foreignevent on another node. - numa_foreign
- The number of pages initially intended for this node that were allocated to another node instead. Each
numa_foreignevent has a correspondingnuma_missevent on another node. - interleave_hit
- The number of interleave policy pages successfully allocated to this node.
- local_node
- The number of pages successfully allocated on this node, by a process on this node.
- other_node
- The number of pages allocated on this node, by a process on another node.
- -c
- Horizontally condenses the displayed table of information. This is useful on systems with a large number of NUMA nodes, but column width and inter-column spacing are somewhat unpredictable. When this option is used, the amount of memory is rounded to the nearest megabyte.
- -m
- Displays system-wide memory usage information on a per-node basis, similar to the information found in
/proc/meminfo. - -n
- Displays the same information as the original numastat command (
numa_hit,numa_miss,numa_foreign,interleave_hit,local_node, andother_node), with an updated format, using megabytes as the unit of measurement. - -p pattern
- Displays per-node memory information for the specified pattern. If the value for pattern is comprised of digits, numastat assumes that it is a numerical process identifier. Otherwise, numastat searches process command lines for the specified pattern.Command line arguments entered after the value of the
-poption are assumed to be additional patterns for which to filter. Additional patterns expand, rather than narrow, the filter. - -s
- Sorts the displayed data in descending order so that the biggest memory consumers (according to the total column) are listed first.Optionally, you can specify a node, and the table will be sorted according to the node column. When using this option, the node value must follow the
-soption immediately, as shown here:numastat -s2Do not include white space between the option and its value. - -v
- Displays more verbose information. Namely, process information for multiple processes will display detailed information for each process.
- -V
- Displays numastat version information.
- -z
- Omits table rows and columns with only zero values from the displayed information. Note that some near-zero values that are rounded to zero for display purposes will not be omitted from the displayed output.
A.12. numactl
- --hardware
- Displays an inventory of available nodes on the system, including relative distances between nodes.
- --membind
- Ensures that memory is allocated only from specific nodes. If there is insufficient memory available in the specified location, allocation fails.
- --cpunodebind
- Ensures that a specified command and its child processes execute only on the specified node.
- --physcpubind
- Ensures that a specified command and its child processes execute only on the specified processor.
- --localalloc
- Specifies that memory should always be allocated from the local node.
- --preferred
- Specifies a preferred node from which to allocate memory. If memory cannot be allocated from this specified node, another node will be used as a fallback.
$ man numactlA.13. numad
A.13.1. Using numad from the Command Line
# numad/var/log/numad.log. It will run until stopped with the following command:
# numad -i 0# numad -S 0 -p pid- -p pid
- This option adds the specified pid to an explicit inclusion list. The process specified will not be managed until it meets the numad process significance threshold.
- -S 0
- This sets the type of process scanning to
0, which limits numad management to explicitly included processes.
$ man numadA.13.2. Using numad as a Service
/var/log/numad.log.
# systemctl start numad.service# chkconfig numad on$ man numadA.13.3. Pre-Placement Advice
A.13.4. Using numad with KSM
/sys/kernel/mm/ksm/merge_nodes parameter to 0 to avoid merging pages across NUMA nodes. Otherwise, KSM increases remote memory accesses as it merges pages across nodes. Furthermore, kernel memory accounting statistics can eventually contradict each other after large amounts of cross-node merging. As such, numad can become confused about the correct amounts and locations of available memory, after the KSM daemon merges many memory pages. KSM is beneficial only if you are overcommitting the memory on your system. If your system has sufficient free memory, you may achieve higher performance by turning off and disabling the KSM daemon.
A.14. OProfile
opcontrol tool and the new operf tool are mutually exclusive.
- ophelp
- Displays available events for the system’s processor along with a brief description of each.
- opimport
- Converts sample database files from a foreign binary format to the native format for the system. Only use this option when analyzing a sample database from a different architecture.
- opannotate
- Creates annotated source for an executable if the application was compiled with debugging symbols.
- opcontrol
- Configures which data is collected in a profiling run.
- operf
- Intended to replace
opcontrol. Theoperftool uses the Linux Performance Events subsystem, allowing you to target your profiling more precisely, as a single process or system-wide, and allowing OProfile to co-exist better with other tools using the performance monitoring hardware on your system. Unlikeopcontrol, no initial setup is required, and it can be used without the root privileges unless the--system-wideoption is in use. - opreport
- Retrieves profile data.
- oprofiled
- Runs as a daemon to periodically write sample data to disk.
opcontrol, oprofiled, and post-processing tools) remains available, but is no longer the recommended profiling method.
$ man oprofileA.15. taskset
Important
# taskset -pc processors pid1,3,5-7. Replace pid with the process identifier of the process that you want to reconfigure.
# taskset -c processors -- application$ man tasksetA.16. SystemTap
Appendix B. Revision History
| Revision History | |||
|---|---|---|---|
| Revision 10.13-59 | Mon May 21 2018 | ||
| |||
| Revision 10.14-00 | Fri Apr 6 2018 | ||
| |||
| Revision 10.13-58 | Fri Mar 23 2018 | ||
| |||
| Revision 10.13-57 | Wed Feb 28 2018 | ||
| |||
| Revision 10.13-50 | Thu Jul 27 2017 | ||
| |||
| Revision 10.13-44 | Tue Dec 13 2016 | ||
| |||
| Revision 10.08-38 | Wed Nov 11 2015 | ||
| |||
| Revision 0.3-23 | Tue Feb 17 2015 | ||
| |||
| Revision 0.3-3 | Mon Apr 07 2014 | ||
| |||