Ansible Automation Platform 1.2 到 2 迁移指南
摘要
注释和反馈
在开源的感觉中,我们邀请任何人提供有关任何参考架构的反馈和评论。虽然我们在内部回顾了我们的文档,但有时会遇到问题或排字错误。反馈使我们不仅能提高我们生成的文档质量,而是让读者能够向其潜在改进和主题扩展提供自己的想法。您可以通过发送电子邮件至 ansible-feedback@redhat.com 来提供关于文档的反馈。请参阅电子邮件中的标题。
第 1 章 概述
Ansible Automation Platform 1.2 到 Ansible Automation Platform 2 迁移指南提供了有关如何使用 Ansible Automation Platform 安装程序进行并行迁移的方法。在本指南中,您将提供相应的步骤,以确保备份、导入和升级到 Ansible Automation Platform 2 的过程成功。此参考架构最适合希望迁移到最新版本的 Ansible Automation Platform 2 的系统和平台管理员。
这种并行迁移参考架构包括有两个环境:环境 A 和环境 B,其中您的环境 A Ansible Automation Platform 1.2 环境的所有数据都会被迁移并升级到新的环境 B Ansible Automation Platform 2 替换环境。
平台迁移过程的高级方法:
- 使用 环境 A上的 Ansible Automation Platform 安装程序创建完整的 Ansible Automation Platform 1.2 数据备份
- 将完整的 Ansible Automation Platform 数据备份导入到新的和空的替换 Ansible Automation Platform 1.2 环境 control plane (环境 B)
- 使用 Ansible Automation Platform 2 安装程序从 Ansible Automation Platform 1.2 版本升级 环境 B
- 在 环境 B中部署自动化网格执行和跃点节点
成功迁移基础架构后,重点是将 Ansible Automation Platform 1.2 环境中的 Python 虚拟环境从环境 A 迁移到自动化执行环境,该环境将在环境 B 上新可用的 Ansible Automation Platform 2 环境中使用。这种一次性工作将开来者利用最新的 Ansible Automation Platform 2 功能,并能够在多个平台上执行一致的自动化,从而降低运营开销。
高级别执行环境采用过程包括:
- 从环境 A上的 Ansible Automation Platform 1.2 导出自定义虚拟环境
- 在环境 A上将每个导出的虚拟环境与 Ansible 2.9 基础执行环境进行比较
- 使用 Ansible 2.9 执行环境创建新的执行环境,以及没有包含在虚拟环境中的额外依赖项
- 将新的执行环境附加到环境 B上的对应作业模板
本文档演示了一个建议的参考环境,显示整体的迁移方法,可帮助客户了解如何在复杂架构中的两个集群之间保留其作业运行历史记录和平台对象。根据您的现有架构和要求,迁移过程可以进一步简化。在很多情况下,默认的 Ansible Automation Platform 安装程序值就足够了。此处记录的迁移过程适用于简单和复杂的环境。
从 Ansible Automation Platform 1.2 迁移到版本 2 的客户可能会在两个集群/实例中使用同一清单进行升级,只要受管节点清单在两个集群/实例都相同。迁移周期不得超过 6 个月,而没有从 Ansible 事业获得批准的例外,即来自红帽账户代表的正式 BU Guid 请求。
1.1. 架构概述
本节重点介绍了两个环境的架构详情,它们通过并行迁移过程。
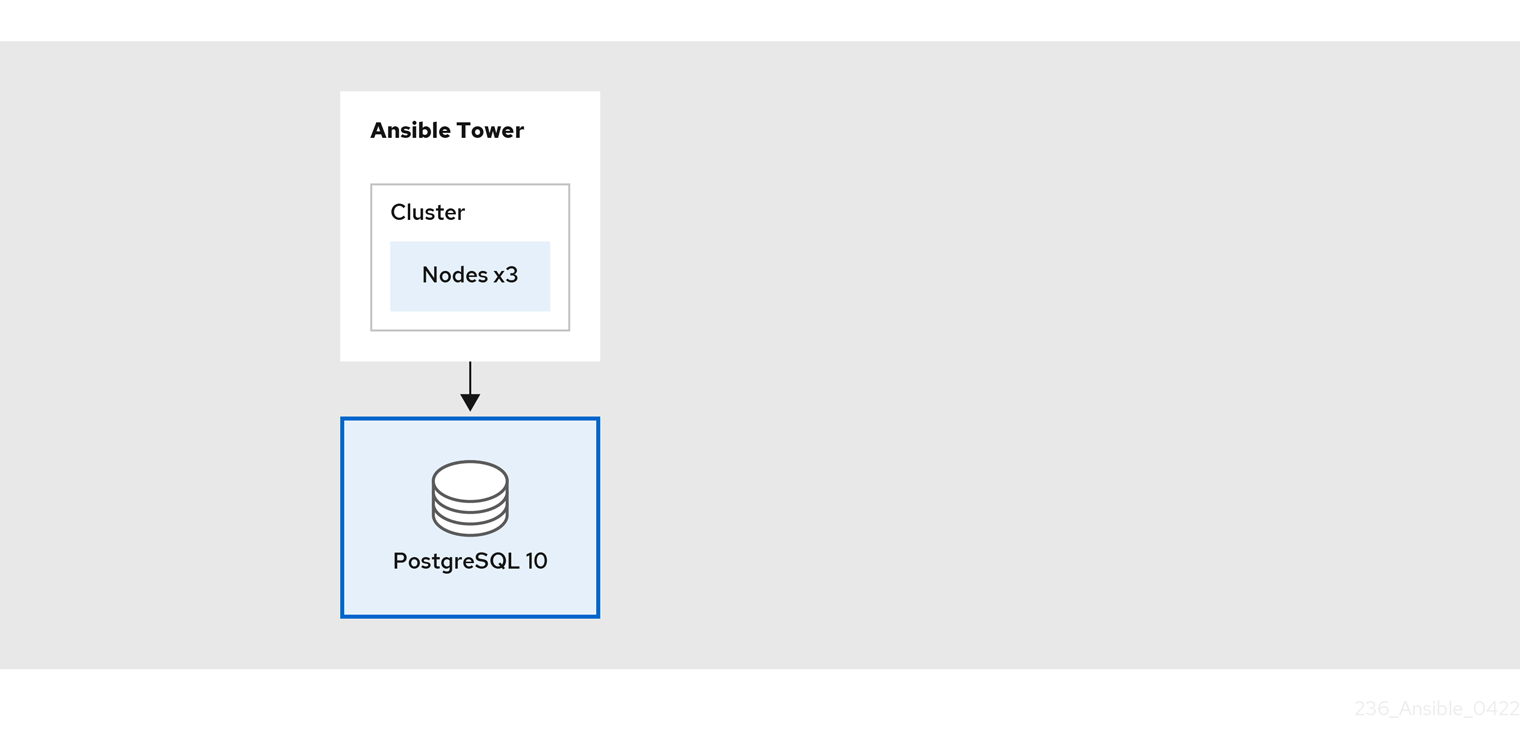
第一个环境 环境 A 包括:
- 3 个运行 Red Hat Enterprise Linux 7 的 Ansible Tower 3.8.5 节点(位于 Raleigh, NC 数据中心)
- 1 Red Hat Enterprise Linux 7 数据库节点
- 2 堡垒主机(跳过主机来访问其对应的隔离节点)
- 2 个隔离的节点位于 Sacramento, CA 数据中心
- 2 个隔离的节点位于 New Delhi, India 数据中心
此环境的 pictorial 表示如下:
图 1.1. 环境架构概述

第二个环境环境 B 是一个新的和空的 Ansible Automation Platform 1.2 环境,它将用于在升级到 Ansible Automation Platform 2 之前使用 Ansible Automation Platform 1.2 安装程序从 Environment A 导入所有数据。
最初 ,环境 B 包括:
- 运行 Red Hat Enterprise Linux 8 的 3 Ansible Tower 3.8.5 节点
- 1 Red Hat Enterprise Linux 8 数据库节点
Ansible Automation Platform 2 不支持 Red Hat Enterprise Linux 7。在升级到 Ansible Automation Platform 2 之前,Red Hat Enterprise Linux 8 会被用作 Ansible Automation Platform 1.2 环境 B 的基本操作系统。
在此参考架构中,您将查找对 Ansible Automation Platform 2.1 的引用。但是,本文档中找到的 Ansible Automation Platform 迁移过程适用于 2.1 或更高版本。
初始 环境 B 占用空间的可疑表示如下:
图 1.2. 初始环境 B 架构概述
当数据从 环境 A 迁移到 环境 B 成功后,我们在升级过程中扩展了 环境 B 架构,包括:
- 2 个执行节点可由 Ansible 控制器直接访问
-
3 hop nodes (
sacramento-hop,dublin-hopnew-delhi-hop) -
2 个执行节点只能通过跃点节点
sacramento-hop访问 -
2 个执行节点可通过跃点节点
dublin-hop和new-delhi-hop访问
dublin-hop 通过自动化网格提供另一个路由,可用于访问位于印度的 New Delhi 的执行节点。
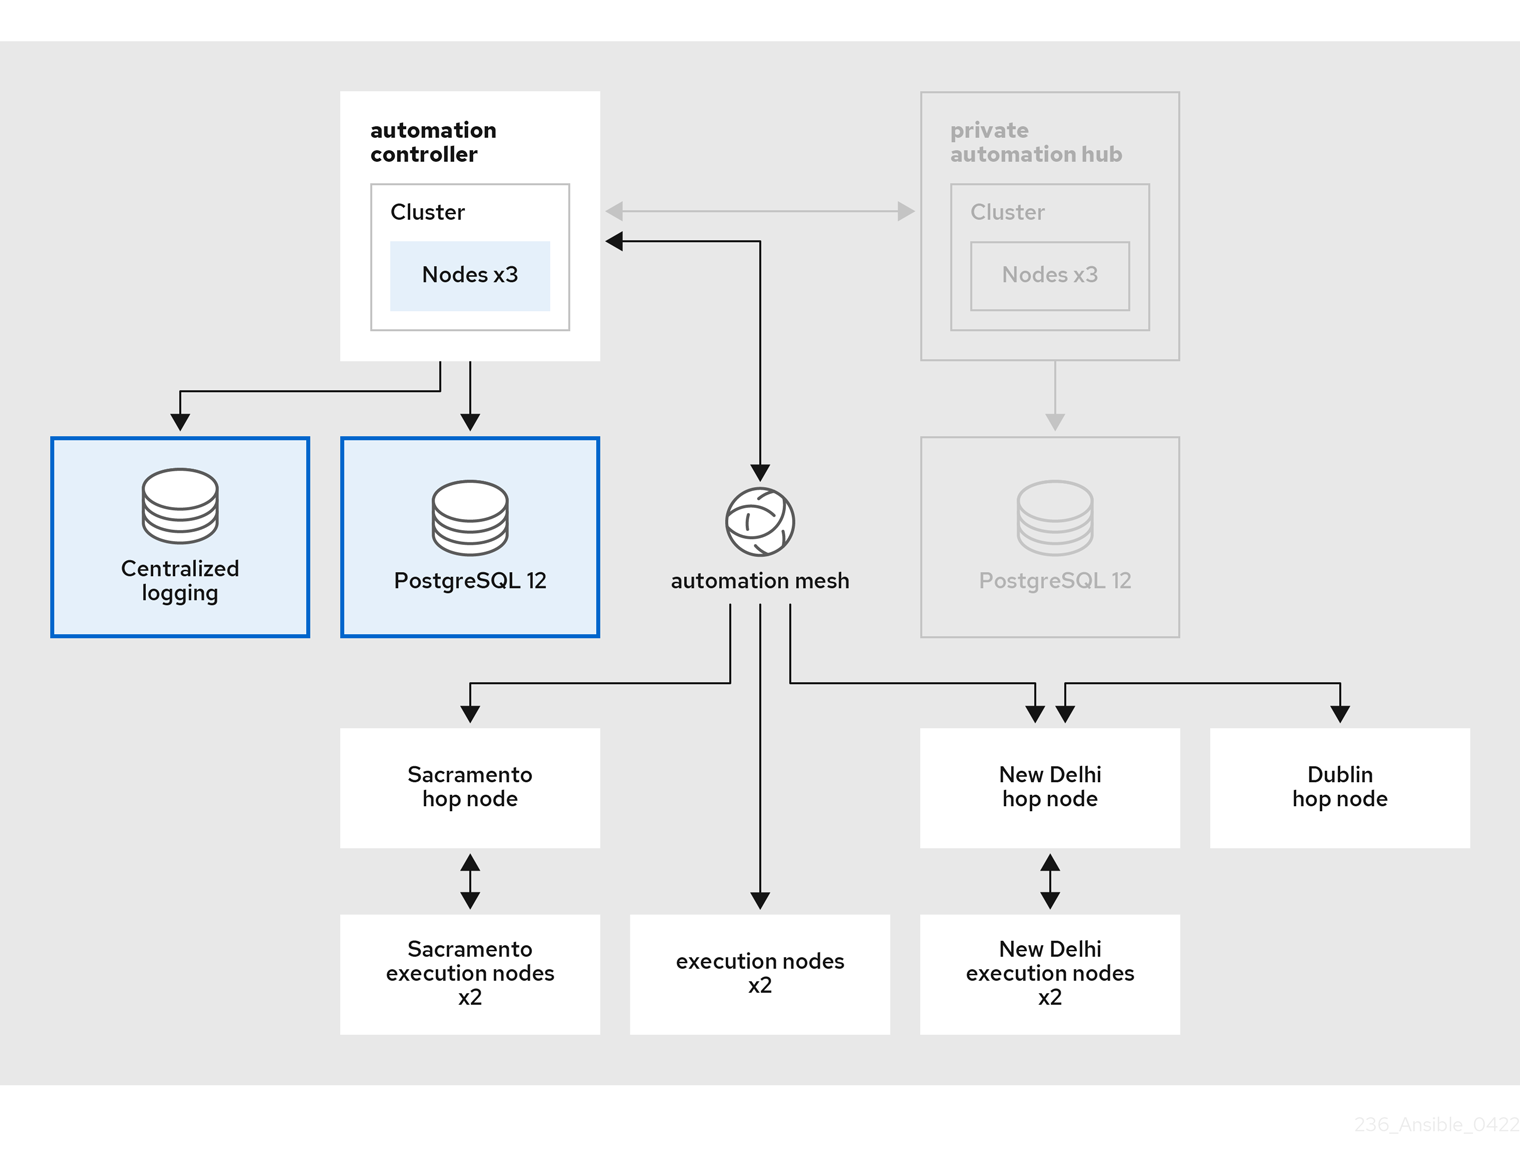
扩展 Ansible Automation Platform 2 环境 B 的全局 视图如下所示:
图 1.3. 环境 B 世界视图

扩展 Ansible Automation Platform 2 环境 B 架构占用空间的详细表示如下:
图 1.4. 扩展环境 B 架构概述
在这个参考架构中不涵盖从作业模板禁用调度的过程。迁移成功后,从 Environment A 禁用调度,以确保您没有同时运行相同作业 的环境 A 和 Environment B。
第 2 章 迁移考虑
随着 Ansible Automation Platform 2 的推出,创建了一个 re-imagined 架构,它扩展了自动化功能。Ansible Automation Platform 2 现在分离自动化 control plane 和执行平面,这为更灵活的架构提供。这种新功能与自动化网格的引入使组织能够跨全球扩展自动化,并允许自动化尽可能接近端点运行。
在为此参考架构提供的逐步迁移方法之前,务必要仔细评估和规划您的整个迁移准备状态,而无需例外。
2.1. 技术注意事项
Ansible Automation Platform 1.2 和 Ansible Automation Platform 2 之间的一个关键变化是删除隔离的节点,而是使用跃点节点以及使用自动化网格执行节点。自动化网格是一个覆盖网络,它提供了一种简单、灵活且可靠的方式,可在不同网络拓扑、平台和区域间扩展大型清单的自动化。自动化网格提供灵活的设计选项,可构建弹性和容错架构,同时提供增强安全性,以便在整个 IT estate 标准化和规范自动化。
在本参考环境中,我们捕获迁移使用隔离节点和第三方工具(如 SSH 代理和跳过主机)的 Ansible Automation Platform 1.2 的步骤,以使用自动化网格跃点和执行节点升级到 Ansible Automation Platform 2。
使用自动化网格和执行节点需要在防火墙中打开额外的端口。
| 协议 | 端口 | 用途 |
|---|---|---|
| SSH | 22/TCP | Ansible Automation Platform 安装 |
| HTTPS | 443/TCP | Web UI、API、执行环境(EE)拉取 |
| Receptor | 27199/TCP | 自动化网格 |
receptor TCP 端口可以在 Ansible Automation Platform 升级过程中自定义。
另一个重要的考虑因素是数据库可支持性。随着自动化控制器的引入,引入 Postgres 12 数据库的要求。如果您的现有 Postgres 10 数据库由 Ansible Automation Platform 1.2 安装/管理,则 Ansible Automation Platform 2 的升级过程会处理 Postgres 数据库升级到新版本 12。
对于此参考架构,Postgres 数据库由 Ansible Automation Platform 管理。
如果您管理自己的 Postgres 10 数据库,则需要:
- 安装一个新的 Postgres 10 数据库,它将作为并排迁移的一部分
- 将数据从 Environment A 导入到新创建的 Postgres 10 数据库,该数据库供 环境 B使用
- 在 环境 B使用的数据库上,从 Postgres 10 升级到 Postgres 12
- 使用升级的 Postgres 12,将 Ansible Automation Platform 1.2 升级到 环境 B上的 Ansible Automation Platform 2
管理您自己的 Postgres 数据库超出了此参考架构的范围。
有关数据库支持性的更多信息,请访问 数据库覆盖范围 文章。
除了隔离节点和数据库可支持性的关键考虑外,还有 Ansible Automation Platform 2 中删除的功能列表。列表包括:
- 通过用户界面删除默认实例组的功能
- 在 CentOS(任何版本)和 RHEL 7 上部署的支持
- 支持 Mercurial 项目
- 支持存储在控制器中的自定义清单脚本
- 资源性能分析代码(AWX_RESOURCE_PROFILINGuildDefaults)
- 支持自定义 Python 虚拟环境,而是使用执行环境
-
顶级
/api/v2/job_events/API 端点 - 作业隔离通过使用执行环境来实现,不再是 Ansible Tower 的功能。
后续章节中通过此参考架构提供的 Ansible Playbook 介绍了使用用户构建执行环境的自定义 Python 虚拟环境。
2.2. Ansible 内容迁移注意事项
当您评估将环境迁移到 Ansible Automation Platform 1.2 的过程到 Ansible Automation Platform 2 时,在 Ansible 内容(收集、模块、角色、插件等)时可能会有额外的注意事项。
这些注意事项不仅限于此列表,而是包括以下内容:
- Ansible Playbook 必须在 Ansible Engine 2.9.10 或更高版本上运行,才能在兼容性执行环境中使用(必需)
- playbook 中的 Ansible 内容应该使用 Ansible Collections (不强制要求,但建议)
- playbook 中的 Ansible 内容应该使用完全限定域名(FQCN) (不需要,但建议使用)
- 如使用执行环境一样,必须修改 Ansible Playbook 以解决对 localhost 的任何引用,这指的是 pod 本身,而不是底层主机。
如果需要额外的依赖项才能成功执行 Ansible 内容,则需要用户构建的执行环境。
2.3. 操作模型注意事项
采用新的 Ansible Automation Platform 架构后,务必要计划如何集成新设计的 Ansible Automation Platform 环境。
有答案的关键问题包括:
- 我的组织需要什么培训和启用才能运行 Ansible Automation Platform 2?
- 如何管理执行环境和 Ansible 内容集合?
哪些执行环境容器版本最适合我的机构?
- 我是否需要用于开发和生产的不同模型?
- 如果需要用户构建的执行环境,如何管理和分发这些环境?
- 我们是否计划围绕执行环境构建 CI?
- 补丁 CVE 并保持合规的安全响应计划是什么?
- 我如何升级 Ansible Automation Platform 集群?
虽然这些只是几个示例,但关键问题需要回答以确保为您的组织提供成功策略。
第 3 章 先决条件
并行迁移和升级到 Ansible Automation Platform 2 需要 环境 A 和 环境 B。环境 A 应该是您的主集群,如 图 1.1 “环境架构概述” 所示:
- 3 个运行 Red Hat Enterprise Linux 7 的 Ansible Tower 3.8.5 节点(位于 Raleigh NC 数据中心)
- 1 个 Red Hat Enterprise Linux 7 数据库节点。
- 2 堡垒主机(跳过主机来访问其对应的隔离节点)
- 2 个隔离的节点位于 Sacramento, CA 数据中心
- 2 个隔离的节点位于 New Delhi, India 数据中心
最初,环境 B 是一个简化的 Ansible Automation Platform 1.2 架构,如 图 1.2 “初始环境 B 架构概述” 所示。在升级到 Ansible Automation Platform 2 的过程中,Red Hat Enterprise Linux 8.4 服务器池会扩展集群,使其包含:
- 2 个执行节点可由 control plane 节点直接访问
-
3 hop 节点(
sacramento-hop、dublin-hop和new-delhi-hop) -
2 个执行节点只能通过跃点节点
sacramento-hop访问 -
2 个执行节点可通过跃点节点
dublin-hop和new-delhi-hop访问
最终的集群发布升级架构可以在其中查看 图 1.4 “扩展环境 B 架构概述”
这些节点不需要是物理服务器。
3.1. 环境规格
| 节点类型 | 控制 | 执行 | hop | 数据库 |
| CPU | 4 | 4 | 4 | 4 |
| RAM | 16 | 16 | 16 | 16 |
| 磁盘 | 40GB | 40GB | 40GB | 150GB+ |
| 备注 |
|
|
|
|
所有自动化控制器数据都存储在 PostgreSQL 数据库中。通过管理的主机数量、作业运行数量、事实缓存中存储的 fact 数量以及单个作业中的任务数量,数据库存储会增加。例如,一个 playbook 在 250 个主机之间每小时运行一次(一天 24 次),20 个任务每周会将 800,000 个事件存储在数据库中。
如果数据库中没有足够的空间,则需要定期清理旧的作业运行和事实。如需更多信息,请参阅自动化控制器 管理指南中的管理作业
3.2. 网络要求
Ansible Automation Platform 2 需要分配给运行 control plane 作业的自动化控制器实例和网格 worker 节点之间直接网络连接。
如果跃点节点将流量路由到 DMZ 或隔离网络后面的执行节点,您的 Ansible Automation Platform 集群可以跨越多个网络。网络管理员应确保 ssh 连接适用于所有节点进行安装。对于此参考环境 hop-nodes,充当 ssh 代理,以获取其相应的执行节点。
要访问 Ansible Automation Platform 仪表板,需要一个可以访问 control plane 节点所在的网络的浏览器。如果要从外部访问 Ansible Automation Platform 仪表板,请确保在 control plane 节点中添加公共 IP 地址。
建议网络管理员为所有节点和适当的 DNS 记录提供专用 IP 地址。网络管理员可以为节点分配静态 IP 地址,并将 DHCP 服务器配置为使用无限租期保留 IP,或者网络管理员应确保分配的 IP 地址是排除范围的一部分。这样可确保在没有 DHCP 服务器时每个节点的 IP 地址保持恒定状态。注意:为此参考架构、DHCP 服务器的设置、设置 DNS 记录和设置负载均衡器超出范围。
在本参考架构中,设置 DHCP 服务器,设置 DNS 记录和设置负载均衡器超出范围。
网络管理员应至少保留以下 IP 地址数,包括:
- 每个 control plane 节点有一个 IP 地址。
- 每个执行节点有一个 IP 地址。
- 每个跃点节点有一个 IP 地址。
- 数据库节点的一个 IP 地址。
此参考环境为每个站点保留 13 个 IP 地址。
下表提供了参考环境的 Environment B 示例。
| 使用方法 | 主机名 | IP |
| 自动化控制器 1 | envb_controller1.example.com | 192.168.0.10 |
| 自动化控制器 2 | envb_controller2.example.com | 192.168.0.11 |
| 自动化控制器 3 | envb_controller3.example.com | 192.168.0.12 |
| Control Plane 数据库 | envb_database.example.com | 192.168.0.13 |
| 执行节点 1 | envb_executionnode-1.example.com | 192.168.0.14 |
| 执行节点 2 | envb_executionnode-2.example.com | 192.168.0.15 |
| hop 节点 1 | envb_hopnode-sacramento.example.com | 192.168.0.16 |
| hop 节点 2 | envb_hopnode-new-delhi.example.com | 192.168.0.17 |
| hop 节点 3 | envb_hopnode-dublin.example.com | 192.168.0.18 |
| 执行节点 3 | envb_executionnode-3.example.com | 10.14.1.11 |
| 执行节点 4 | envb_executionnode-4.example.com | 10.14.1.12 |
| 执行节点 5 | envb_executionnode-5.example.com | 10.15.1.11 |
| 执行节点 6 | envb_executionnode-6.example.com | 10.15.1.12 |
3.3. 节点验证清单
以下是所有要求的概述:
- <.> 16 GB RAM 用于控制器节点、数据库节点、执行节点和跃点节点
- <.> 4 个 CPU 用于控制器节点、数据库节点、执行节点和跃点(hop)节点
- <.> 数据库节点有 150 GB+ 磁盘空间
- <.> 非数据库节点的 40 GB+ 磁盘空间
- <.> DHCP 保留使用无限租期来部署使用静态 IP 地址的集群。
- <.> 所有节点的 DNS 记录
- <.> 为所有节点安装 Red Hat Enterprise Linux {rhel_version} 或更高的 64 位(x86)
- <.> 为所有节点配置 chrony
检查 第 3.1 节 “环境规格” 以了解节点要求的详情。
3.4. 自动化控制器配置详情
此参考架构侧重于将 Ansible Automation Platform 1.2 迁移到 Ansible Automation Platform 2。该配置旨在提供一个全面的 Ansible Automation Platform 解决方案,涵盖 isde-side migration scenarios。本参考构架中涵盖的关键解决方案组件包括:
- Ansible Automation Platform 1.2
- Ansible Automation Platform 2
- Ansible Automation Platform 安装程序
- 用于自定义 Python 虚拟环境迁移的 Ansible Playbook
3.4.1. 操作系统配置
3.4.1.1. chrony 配置
集群中的每个 Ansible Automation Platform 节点都必须有权访问 NTP 服务器。chronyd 是一个用于同步系统时钟的守护进程。它可以与 NTP 服务器同步时钟。这样可确保当集群节点使用需要验证的 SSL 证书时,如果节点之间的日期和时间没有同步,则不会失败。
在 环境 B 上的所有节点上,包括用于 Ansible Automation Platform 集群扩展的、
如果没有安装,请安装
chrony,如下所示# dnf install chrony --assumeyes使用文本编辑器(如
vi)编辑/etc/chrony.conf文件。# vi /etc/chrony.conf找到以下公共服务器池部分,并将它修改为包含适当的服务器。只需要一个服务器,但建议使用三个服务器。添加
iburst选项,以加快与服务器正确同步所需的时间。# Use public servers from the pool.ntp.org project. # Please consider joining the pool (http://www.pool.ntp.org/join.html). server <ntp-server-address> iburst-
将所有更改保存到
/etc/chrony.conf文件中。 启动并启用
chronyd守护进程在主机引导时启动。# systemctl --now enable chronyd.service验证 chronyd 守护进程状态。
# systemctl status chronyd.service
3.4.1.2. Red Hat Subscription Manager
subscription-manager 命令将系统注册到 Red Hat Network (RHN),并管理系统的订阅权利。--help 选项在命令行中指定,以查询可用选项的命令。如果与 command 指令一起发出 --help 选项,则会列出可用于特定 command 指令的选项。
要使用红帽订阅管理为系统提供软件包,系统必须首先注册到该服务。要注册系统,请使用 subscription-manager 命令并传递 register 命令指令。如果指定了 --username 和 --password 选项,则命令不会提示输入 RHN 网络身份验证凭据。
以下是使用 subscription-manager 注册系统的示例。
以下内容应在 环境 B 中的所有节点上完成,包括用于 Ansible Automation Platform 集群扩展的节点。
# subscription-manager register --username [User] --password '[Password]'
The system has been registered with id: abcd1234-ab12-ab12-ab12-481ba8187f60
注册系统后,必须将其附加到授权池。在本参考环境中,Red Hat Ansible Automation Platform 是所选的池。识别并订阅 Red Hat Ansible Automation Platform 权利池,需要以下命令指令。
# subscription-manager list --available | grep -A8 "Red Hat Ansible Automation Platform"
---
Subscription Name:   Red Hat Ansible Automation Platform, Premium (5000 Managed Nodes)
Provides:            Red Hat Ansible Engine
                     Red Hat Single Sign-On
                     Red Hat Ansible Automation Platform
SKU:                 MCT3695
Contract:            <contract>
Pool ID:             <pool_id>
Provides Management: No
Available:           9990
Suggested:           1
Service Type:        L1-L3
Roles:
# subscription-manager attach --pool <pool_id>
Successfully attached a subscription for: Red Hat Ansible Automation Platform, Premium (5000 Managed Nodes)# subscription-manager repos --enable=ansible-automation-platform-2.1-for-rhel-8-x86_64-rpms作为 Ansible Automation Platform 订阅的一部分,10 个 Red Hat Enterprise Linux (RHEL)订阅可用于您的自动化控制器、私有自动化中心和其他 Ansible Automation Platform 组件。
3.4.1.3. 用户帐户
在安装 Ansible Automation Platform 2 之前,建议为部署过程创建一个具有 sudo 特权的非 root 用户。此用户用于:
- SSH 连接
- 在安装过程中进行免密码身份验证
- 权限升级(sudo)权限
然而,出于此参考环境,选择了 ansible 用户,但任何用户名都会挂起。
在 Environment B 上的所有节点上,包括用于 Ansible Automation Platform 集群扩展的节点,创建一个名为 ansible 的用户并生成 ssh 密钥。
创建非 root 用户
# useradd ansible为您的
ansible用户设置密码。# passwd ansible以
ansible用户身份生成ssh密钥。$ ssh-keygen -t rsa将
sudo用作ansible用户时禁用密码要求# echo "ansible ALL=(ALL) NOPASSWD:ALL" | sudo tee -a /etc/sudoers.d/ansible
3.4.1.4. 将 SSH 密钥复制到所有节点
创建 ansible 用户后,以 ansible 用户身份,将 ssh 密钥复制到 Environment B 上的所有节点,包括用于 Ansible Automation Platform 集群扩展的节点。这样可确保在 Ansible Automation Platform 安装运行时,它可以在没有密码的情况下 ssh 到所有节点。
这可以通过 ssh-copy-id 命令完成,如下所示:
$ ssh-copy-id ansible@hostname.example.com
如果在云供应商中运行,您可能需要创建一个 ~/.ssh/authorized_keys 文件,其中包含所有节点上的 ansible 用户的公钥,并将权限设置为 authorized_keys 文件,使其只能具有读写访问权限(权限 600)。
3.4.1.5. 配置防火墙设置
防火墙访问和限制在保护 Ansible Automation Platform 2 环境时发挥了关键作用。Red Hat Enterprise Linux {rhel_version} 的使用默认为使用 firewalld,一个动态防火墙守护进程。firewalld 的工作原理是将网络区分配给网络及其关联的连接和接口。
建议将防火墙配置为允许访问成功 Ansible Automation Platform 2 安装的适当服务和端口。
在 环境 B 中的所有节点上,包括用于 Ansible Automation Platform 集群扩展的节点,确保已安装、启动和启用 firewalld。
安装
firewalld软件包# dnf install firewalld --assumeyes启动
firewalld服务# systemctl start firewalld启用
firewalld服务# systemctl enable firewalld
3.5. Ansible Automation Platform 配置详情
3.5.1. 配置执行和跃点节点的防火墙设置
对于成功的 Ansible Automation Platform 升级到 2,其中一个先决条件是在网格节点上启用自动化网格端口(execution 和 hop 节点)。用于所有节点上的网格网络的默认端口被设置为 27199/tcp,但也可以通过将 receptor_listener_port 指定为 清单文件中 每个节点的变量来配置为使用不同的端口。有关修改清单文件的更多详细信息,请参阅 第 4.3 节 “将 环境 B 升级到 Ansible Automation Platform 2”
对于此参考环境,所有 Ansible Automation Platform 2 控制器节点被指定为节点类型控制。如果将控制节点指定为混合节点(默认节点类型),则需要启用网格端口(默认为 27199/tcp)。
在跃点和执行节点中,以 ansible 用户身份设置用于安装的 firewalld 端口。
确保
firewalld正在运行。$ sudo systemctl status firewalld在控制器数据库节点上添加
firewalld端口(如端口 27199)$ sudo firewall-cmd --permanent --zone=public --add-port=27199/tcp重新加载
firewalld$ sudo firewall-cmd --reload确认端口已打开
$ sudo firewall-cmd --list-ports
第 4 章 基础架构迁移
为了从 Ansible Automation Platform 1.2 迁移到 Ansible Automation Platform 2,此参考环境可以利用 Ansible Automation Platform 安装程序的功能。
使用 Ansible Automation Platform 安装程序,您可以通过几个简单命令备份、导入和升级到最新的 Ansible Automation Platform 2。
以下小节提供了此过程的逐步。
4.1. 在 环境 A上备份 Ansible Automation Platform 1.2
当环境 A 中的 Ansible Automation Platform 1.2 环境 包含我们的所有数据时,以下命令会在 环境 A 上使用 Ansible Automation Platform 安装程序创建备份。
在进行备份之前,请确保没有计划运行的当前正在运行的作业或将来的作业。进行备份后收集的任何数据都将为 LOST。
在 环境 A 中,
以
ansible用户身份登录$ ssh ansible@enva_controller1.example.com注意此引用环境使用
enva_controller1作为包含 Ansible Automation Platform 安装程序目录和二进制文件的主机。进入
ansible-tower-setup-3.8.5-X目录$ cd /path/to/ansible-tower-setup-3.8.5-X运行 Ansible Automation Platform 安装程序以创建备份
-
backup_dest提供存储 Ansible Automation Platform 数据库备份的位置 -
use_compression缩小 Ansible Automation Platform 数据库备份的大小 -
@credentials.yml传递密码变量及其值通过ansible-vault加密 -
--ask-vault-pass请求用于访问加密credentials.yml文件的密码 -b将创建备份选项设置为 True$ ./setup.sh -e 'backup_dest=<mount_point>' -e 'use_compression=True' -e @credentials.yml -b
-
此参考环境利用了加密凭证,且不以纯文本形式包含密码。附录 C, 创建加密的 credentials.yml 文件 中详细介绍了如何使用 ansible-vault 加密您的凭证。
备份过程可能需要一些时间才能完成。
4.2. 将 Ansible Automation Platform 1.2 数据库导入到 环境 B
在 环境 A 创建并可用时,以下使用环境 B 上的 Ansible Automation Platform 安装程序导入备份的 Ansible Automation Platform 数据库。
在 环境 B 中,
以
ansible用户身份登录$ ssh ansible@envb_controller1.example.com注意此引用环境使用
envb_controller1作为包含 Ansible Automation Platform 安装程序目录和二进制文件的主机。进入
ansible-tower-setup-3.8.5-X目录$ cd /path/to/ansible-tower-setup-3.8.5-X运行 Ansible Automation Platform 安装程序以导入 Ansible Automation Platform 数据库
-
restore_backup_file提供备份的 Ansible Automation Platform 数据库的位置 -
use_compression设置为 True,因为备份过程中使用了压缩 -r将 restore 数据库选项设置为 True$ ./setup.sh -e ‘restore_backup_file=<mount_point>/tower-backup-latest.tar.gz -e ‘use_compression=True’ -e @credentials.yml -r -- --ask-vault-pass
-
此参考环境利用了加密凭证,且不以纯文本形式包含密码。附录 C, 创建加密的 credentials.yml 文件 中详细介绍了如何使用 ansible-vault 加密您的凭证。
导入过程可能需要一些时间才能完成。
4.3. 将 环境 B 升级到 Ansible Automation Platform 2
成功导入 Ansible Automation Platform 数据库后,迁移过程中的最后一步是将 环境 B Ansible Automation Platform 1.2 环境升级到 Ansible Automation Platform 2,并扩展环境 B 的架构,如 图 1.4 “扩展环境 B 架构概述” 所示。
在 环境 B 中,
以
ansible用户身份登录$ ssh ansible@envb_controller1.example.com注意此引用环境使用
envb_controller1作为包含 Ansible Automation Platform 安装程序目录和二进制文件的主机。下载 Ansible Automation Platform 2.1.1 Setup tar ansible-automation-platform-setup-2.1.1-1.tar.gz
注意对于断开连接的安装,请下载 Ansible Automation Platform 2.1.1 Setup Bundle
解压 ansible-automation-platform-setup-2.1.1-1.tar.gz
$ tar zxvf ansible-automation-platform-setup-2.1.1-1.tar.gz将目录改为 ansible-automation-platform-setup-2.1.1-1
$ cd ansible-automation-platform-setup-2.1.1-1/将 Ansible Automation Platform 1.2 清单文件复制到 ansible-automation-platform-setup-2.1.1-1 目录中
$ cp /path/to/ansible-tower-setup-3.8.5-X/inventory .使用 Ansible Automation Platform 安装程序复制的 Ansible Automation Platform 1.2 清单文件生成 Ansible Automation Platform 2 安装清单提议
$ ./setup.sh注意Ansible-core在此过程中安装(如果尚未安装)。警告在创建提议 inventory.new.ini 时,预期的 Ansible Automation Platform 安装程序会在进程早期失败。
预期错误任务类似如下:
TASK [ansible.automation_platform_installer.check_config_static : Detect pre-2.x inventory and offer a migration] ***
fatal: [172.16.58.48 -> localhost]: FAILED! => {"changed": false, "msg": "The installer has detected that you are using an inventory format from a version prior to 4.0. We have created an example inventory based on your old style inventory. Please check the file `/home/ansible/aap_install-2.1.1/ansible-automation-platform-setup-bundle-2.1.1-2/inventory.new.ini` and make necessary adjustments so that the file can be used by the installer."}
建议 inventory.new.ini
[all:vars] pg_host='10.0.188.133' pg_port='5432' pg_database='awx' pg_username='awx' pg_sslmode='prefer' ansible_become='true' ansible_user='ansible' tower_package_name='automation-controller' tower_package_version='4.1.1' automationhub_package_name='automation-hub' automationhub_package_version='4.4.1' automation_platform_version='2.1.1' automation_platform_channel='ansible-automation-platform-2.1-for-rhel-8-x86_64-rpms' minimum_ansible_version='2.11' # In AAP 2.X [tower] has been renamed to [automationcontroller] # Nodes in [automationcontroller] will be hybrid by default, capable of executing user jobs. # To specify that any of these nodes should be control-only instead, give them a host var of `node_type=control` [automationcontroller] envb_controller1.example.com envb_controller2.example.com envb_controller3.example.com [database] envb_database.example.com注意变量
admin_password、pg_password和registry_password不是 inventory.new.ini 文件的一部分,因为不建议以纯文本形式存储密码。改为使用加密的 credentials.yml 文件。创建建议的
inventory.new.ini后,修改该文件,使其包含包含跃点节点和执行节点的扩展环境 B 架构扩展环境 B inventory.new.ini
[all:vars]
pg_host='envb_database.example.com'
pg_port='5432'
pg_database='awx'
pg_username='awx'
pg_sslmode='prefer'
ansible_become='true'
ansible_user='ansible'
tower_package_name='automation-controller'
tower_package_version='4.1.1'
automationhub_package_name='automation-hub'
automationhub_package_version='4.4.1'
automation_platform_version='2.1.1'
automation_platform_channel='ansible-automation-platform-2.1-for-rhel-8-x86_64-rpms'
minimum_ansible_version='2.11'
registry_url='registry.redhat.io'
1 registry_username='myusername'2 # In AAP 2.X [tower] has been renamed to [automationcontroller] # Nodes in [automationcontroller] will be hybrid by default, capable of executing user jobs. # To specify that any of these nodes should be control-only instead, give them a host var of `node_type=control` [automationcontroller] envb_controller1.example.com envb_controller2.example.com envb_controller3.example.com [database] envb_database.example.com [automationcontroller:vars] node_type=control3 peers=envb_datacenter_execution_nodes,envb_datacenter_hop_nodes4 [execution_nodes] envb_executionnode-1.example.com envb_executionnode-2.example.com envb_hopnnode-sacramento.example.com node_type=hop peers=sacramento_execution_nodes5 envb_hopnode-new-delhi.example.com node_type=hop peers=new-delhi_execution_nodes envb_hopnode-dublin.example.com node_type=hop peers=env_hopnode-new-delhi.example.com envb_executionnode-3.example.com envb_executionnode-4.example.com envb_executionnode-5.example.com envb_executionnode-6.example.com [envb_datacenter_execution_nodes]6 envb_executionnode-1.example.com envb_executionnode-2.example.com [envb_datacenter_hop_nodes]7 envb_hopnnode-sacramento.example.com envb_hopnode-new-delhi.example.com envb_hopnode-dublin.example.com [sacramento_execution_nodes]8 envb_executionnode-3.example.com envb_executionnode-4.example.com [new-delhi_execution_nodes]9 envb_executionnode-5.example.com envb_executionnode-6.example.com使用以下选项运行
setup.sh以升级到 Ansible Automation Platform 2$ ./setup.sh -i inventory.new.ini -e @credentials.yml -- --ask-vault-pass验证所有自动化控制器节点都可以访问 Ansible Automation Platform 仪表板 UI。
注意如果您在通过任何自动化控制器访问 Ansible Automation Platform 仪表板时遇到 502 错误或安全连接失败,这可能是因为以下其中一个或两个问题:
- 证书不匹配
-
nginx的 SELinux 上下文不正确
附录 D, 升级后 playbook 提供了修复这些问题的临时解决方案。当前正在实施修复,并在即将发布的点版本中修复。
证书不匹配的问题已在 2.1.2 版和 Ansible Automation Platform 版本中解决。
nginx的不正确的 SELinux 上下文仍然需要临时解决方案 Ansible Playbook。检查 附录 D, 升级后 playbook 以了解更多详情。
此引用环境将 credentials.yml 用于以下变量:* admin_password * registry_password * pg_password
有关清单文件中可设置的不同值的更多信息,请访问: 设置清单文件
4.4. 配置实例和实例组
完成升级过程后,您需要将您的实例关联到对应的实例组,例如 sacramento 和 new-delhi。
- 选择 Administration→Instance Groups
- 点 sacramento 实例组
- 选择 Instances 选项卡
- 单击蓝色 关联 按钮
在 Select Instances 窗口中选择
- envb_executionnode-3.example.com
- envb_executionnode-4.example.com
- 点 Save
对 new-delhi 实例组重复该过程,并将以下实例与 new-delhi 实例组关联:
- envb_executionnode-5.example.com
- envb_executionnode-6.example.com
完成后,在 default 组中取消关联这些实例。
- 选择 Administration→Instance Groups
- 点 default 实例组
- 选择 Instances 选项卡
选中以下实例的复选框
- envb_executionnode-3.example.com
- envb_executionnode-4.example.com
- envb_executionnode-5.example.com
- envb_executionnode-6.example.com
- 点标有 Disassociate的蓝色按钮
- 通过红色 解除关联按钮确认解除关联
默认 实例组应该只包含以下实例:
- envb_executionnode-1.example.com
- envb_executionnode-2.example.com
完成基础架构迁移后,重点是将 Python 虚拟环境迁移到用户构建的执行环境。
第 5 章 将虚拟环境迁移到执行环境
Ansible Automation Platform 2 附带一个 re-imagined 架构,完全分离自动化 control plane 和执行平面。新功能可以更轻松地在全球范围内扩展自动化,并可让您尽可能地运行自动化,而无需绑定到在单个数据中心中运行自动化。与 Ansible Automation Platform 1.2 相比,它更为动态、可扩展、弹性和灵活性。
随着自动化执行环境的引入,这些容器镜像允许打包并运行所有自动化,包括 Ansible Core、Ansible 内容集合、Python 依赖项、Red Hat Enterprise Linux UBI 8 以及任何其他软件包依赖项。
本章重点介绍将 Ansible Automation Platform 1.2 集群中的自定义 Python 虚拟环境迁移到用户构建的自动化执行环境。
这种一次性工作将开来者利用最新的 Ansible Automation Platform 2 功能,并能够在低长期维护的多个平台上执行一致的自动化。
要访问用户构建的执行环境,需要在私有自动化中心或容器 registry 中托管它们。有关如何安装私有自动化中心的更多信息,请访问 部署 Ansible Automation Platform 2.1 参考架构。
5.1. 自动将虚拟环境迁移到执行环境
为简单起见,我们包括通过运行 Ansible 命令自动化流程的补充 Ansible Playbook。
为实现完整性,手动过程包括:
- 带有自定义 Python 虚拟环境的 Ansible Automation Platform 1.2 环境
-
使用
awx-manage命令行工具获取自定义 Python 虚拟环境列表 -
在每个 Python 虚拟环境上运行
awx-manage export_custom_venv命令,以获取已安装的 Python 软件包列表 -
使用
awx-manage custom_venv_associations命令检查 Python 虚拟环境的关联 -
使用
ansible-builder工具过滤以上信息以创建执行环境
自动过程包括:
- 从 Ansible Automation Platform 1.2 环境中每个自定义 Python 虚拟环境中拉取软件包列表
- 将上一步中的软件包列表与 Ansible-2.9 的软件包列表进行比较[1] 查找基础 Ansible-2.9 执行环境中不存在的软件包
- 创建一个新的自定义执行环境,它使用 Ansible-2.9 执行环境作为基础,并包含上一步中列表中缺少的依赖项
要运行可能如下所示的情况,我们来看以下示例。
在我们现有的 Ansible Automation Platform 1.2 中,有两个自定义 Python 虚拟环境标记为 custom-venv1 和 custom-venv2。
使用打包在 redhat_cop.ee_utilities 集合中的 角色 virtualenv_migrate,我们将通过 ssh 访问 Ansible Tower 节点来提取软件包及其当前没有与基础执行环境(Ansible 2.9 执行环境进行比较)中的软件包及其版本。
redhat_cop.ee_utilities 集合是一个社区项目,不受红帽的正式支持。
下面分别找到环境的 playbook 和清单文件示例:
playbook.yml
---
- name: Review custom virtualenvs and pull requirements
  hosts: enva_tower
  become: true
  tasks:
    - name: Include venv role
      include_role:
        name: redhat_cop.ee_utilities.virtualenv_migrate
清单(Inventory)
[tower]
ansibletower.example.com
ansible_ssh_private_key_file=/path/to/example.pem


[all:vars]
###############################################################################
# Required configuration variables for migration from venv -> EE              #
###############################################################################

# The default URL location to the execution environment (Default Ansible 2.9)
# If you want to use the newest Ansible base, change to: ee-minimal-rhel8:latest
venv_migrate_default_ee_url="registry.redhat.io/ansible-automation-platform-21/ee-29-rhel8:latest"

# User credential for access to venv_migrate_default_ee_url
registry_username='myusername'-
根据
ssh到 Ansible Tower 节点所需的用户,添加 ansible_user=<ANSIBLE_USER>。 -
此参考环境利用了加密凭证,且不以纯文本形式包含密码。附录 C, 创建加密的 credentials.yml 文件 中的详情请查看如何使用
ansible-vault加密 registry 凭证。加密的 credentials.yml 文件用于提供registry_password
此角色需要 sudo 特权才能运行 podman 命令。
Ansible playbook 的示例输出显示每个自定义 Python 虚拟环境所需的附加软件包列表。在这种情况下,custom-venv1 Python 虚拟环境还需要以下软件包,而其他软件包已是 Ansible 2.9 执行环境的一部分:
- certifi
- charset-normalizer
- enum34
- future
- solidfire-sdk-python
虽然 custom-venv2 Python 虚拟环境除了已经属于标准 Ansible-2.9 执行环境的一部分外,还需要 zabbix-api。
Ansible 2.9 执行环境用于与自定义 Python 虚拟环境进行比较,因为大多数 Ansible Automation Platform 1.2 环境都使用 Ansible 2.9。这样可确保因为向后兼容而更容易迁移。
TASK [redhat_cop.tower_utilities.virtualenv_migrate : diff | Show the packages that are extra from default EEs in custom venvs.] ******************************************************************************
ok: [3.228.23.40 -> localhost] => {
    "msg": [
        {
            "/opt/my-envs/custom-venv1/": [
                "certifi",
                "charset-normalizer",
                "enum34",
                "future",
                "solidfire-sdk-python"
            ]
        },
        {
            "/opt/my-envs/custom-venv2/": [
                "zabbix-api"
            ]
        }
    ]
}
在为每个自定义 Python 虚拟环境捕获软件包后,Ansible playbook 将使用作为 redhat_cop.ee_utilities 集合一部分的 ee_ builder 角色,该角色可在本地用户环境中自动创建执行环境。
在运行提供的 Ansible playbook 之前,在 localhost 机器上安装 ansible-builder,playbook 运行会根据自定义 Python 虚拟环境和提供的基本执行环境的软件包 delta 创建执行环境。
$ podman images

REPOSITORY                           TAG                IMAGE ID
localhost/custom-venv2               latest             c017418d1919
localhost/custom-venv1               latest             7cbe3b49974d
localhost/custom-venv                latest             9d5d809f38b0
5.1.1. 推送到私有自动化中心
使用本地执行环境,您可以使用以下方法将其推送到私有自动化中心:
在这个参考架构中,我们将自动化执行环境的名称保留为自定义 Python 虚拟环境的名称,以便简化。如果需要更改名称,请在将执行环境推送到私有自动化中心或所选容器 registry 前使用 podman tag 命令。
$ podman login [automation-hub-url]
# Enter the username and password to access Private Automation Hub.
$ podman tag [image-id] [automation-hub-url]/[container image name]
$ podman push [automation-hub-url]/[container image name]如需更多信息,请访问: 在私有自动化中心中管理容器
然后,通过在控制器用户界面中为私有自动化中心创建 registry 凭证,将执行环境同步到自动化控制器。
在自动化控制器中创建 registry 凭证:
- 选择 Resources→Credentials
- 在 凭据 中,选择蓝色 添加按钮
在 Create New Credentials 窗口中,
- 提供 名称,如 My 私有自动化 hub 凭证
- 在 Credential Type 下选择下拉菜单并选择 Container Registry
在 类型详情下
- 提供身份验证 URL,如 pah.example.com
- 在 Username 字段中提供您的私有自动化中心用户名
- 在 Password 或 Token 字段中提供您的私有自动化中心密码或令牌
- 如果您的私有自动化中心环境支持 SSL,请选择 Verify SSL
- 点 Save
要使执行环境在自动化控制器中可用,请创建一个新的执行环境,它将从您的私有自动化中心拉取镜像。
在自动化控制器中,
- 选择 Administration→Execution Environments
- 在 执行环境 中,选择蓝色 添加按钮
在 Create new execution environment 窗口中,
- 提供一个名称,如 我的执行环境
- 提供执行环境的镜像位置,如 repo/project/image-name:tag
选择 Registry 凭证 放大镜
- 点私有自动化中心凭证的单选按钮,如我的私有自动化中心凭证
现在,在自动化控制器中提供执行环境时,它们可用于任何现有作业模板或新创建的作业模板。
在创建新用户构建的执行环境时,不要受到向后兼容性,建议使用 ee-minimal 执行环境作为您的基本执行环境,以针对其构建新镜像。
附录 A. 关于 Authors


附录 B. 贡献者
当我们与此过程合作时,我们借此感谢以下个人的时间和变动。在没有很多贡献的情况下,无法实现本文档。
| 贡献者 | 标题 | 贡献 |
|---|---|---|
| Julen Landa Alustiza | 高级软件质量工程师 | 技术审查 |
| Cconsistent Brandt | 首席技术营销经理 | 内容审核 |
附录 C. 创建加密的 credentials.yml 文件
本节论述了如何创建传递给 Ansible Automation Platform 安装程序的加密 credentials.yml 文件。
使用的密码必须在 环境 A 和环境 B 间 匹配。
在初始 环境 B Ansible Automation Platform 环境中,
创建一个 credentials.yml 文件来存储加密凭证
$ cat credentials.ymladmin_password: my_long_admin_password pg_password: my_long_pg_password registry_password: my_long_registry_password使用
ansible-vault加密 credentials.yml 文件$ ansible-vault encrypt credentials.ymlNew Vault password: Confirm New Vault password: Encryption successful警告admin_password和pg_password凭据需要与 Ansible Automation Platform 1.2 Environment A 中使用的值匹配。警告确保将加密的 vault 密码存储在安全位置。
验证 credentials.yml 文件是否已加密
$ cat credentials.yml$ANSIBLE_VAULT;1.1;AES256 36383639653562386534316333333961383336306465336465613831353435313530376464616539 3765393063303065323466663330646232363065316666310a373062303133376339633831303033 34313534383962613632303761636632623932653062343839613639653635643365616233313365 3636616639313864300a353239373433313339613465326339313035633565353464356538653631 63346434383534643237663862353361366632613634333231316334363939396461326561643336 3430633534303935646264633034383966336232303365383763
加密凭证的创建是可选的,但建议在清单文件中存储密码不应以纯文本形式保存。
如果您已使用加密的 credentails,请使用 credentials.yml 文件,而不是创建新文件。
附录 D. 升级后 playbook
本节提供了一个 Ansible Playbook,如果您无法在迁移后访问所有自动化控制器节点上的自动化控制器 UI,则应该运行它。这解决了 SELinux 上下文以及 第 4 章 基础架构迁移 部分中描述的证书不匹配问题。
复制以下 Ansible Playbook 内容,并将其放在 untarred installer 目录中的名为 post_upgrade_playbook.yml 的文件中。
此目录由安装程序清单文件组成,此 playbook 使用安装程序清单对自动化控制器节点进行一些更改。
post_upgrade_playbook.yml
---
- name: Play to apply workaround to known issues in upgrade
  hosts: automationcontroller
  become: true
  tasks:
    - block:
      - name: Remove certs from all the controllers
        file:
          name: "{{ item }}"
          state: absent
        loop:
          - /etc/tower/tower.cert
          - /etc/tower/tower.key
      - name: Role to create new certs and copy to all controllers
        include_role:
          name: ansible.automation_platform_installer.nginx
      when:
        - automation_platform_version is version('2.1.1', '<=')
    - name: Add to targeted policy and apply selinux policy to controller dirs
      ansible.builtin.command: "{{ item }}"
      loop:
        - semodule -s targeted -i /usr/share/selinux/targeted/automation-controller.pp
        - /sbin/restorecon -R /var/lib/awx/venv /var/lib/awx/job_status /var/run/tower
    - name: Restart the controller service
      service:
        name: automation-controller
        state: restarted
运行 命令,在控制器节点上执行 playbook。
$ ansible-playbook -i inventory.new.ini post_upgrade_playbook.yml附录 E. Revision History
| 修订历史 | ||
|---|---|---|
| 修订 1.1-0 | 2022-04-29 | Roger Lopez |
| ||
| 修订 1.0-0 | 2022-03-31 | Anshul Behl and Roger Lopez |
| ||