此内容没有您所选择的语言版本。
End-user Guide
Using Red Hat CodeReady Workspaces 2.0
Abstract
Chapter 2. Che-Theia IDE basics
This section describes basics workflows and commands for Che-Theia: the native integrated development environment for Red Hat CodeReady Workspaces.
2.1. Defining custom commands for Che-Theia
The Che-Theia IDE allows users to define custom commands in a devfile that are then available when working in a workspace.
The following is an example of the commands section of a devfile.
- CodeReady Workspaces commands
theia:build-
The
exectype implies that the CodeReady Workspaces runner is used for command execution. The user can specify the component in whose container the command is executed. -
The
commandfield contains the command line for execution. -
The
workdiris the working directory in which the command is executed.
-
The
- Visual Studio Code (VS Code) tasks
run-
The type is
vscode-task. -
For this type of command, the
referenceContentfield must contain content with task configurations in the VS Code format. - For more information about VS Code tasks, see the Task section on the Visual Studio User Guide page.
-
The type is
- VS Code launch configurations
debug-
The type is
vscode-launch. - It contains the launch configurations in the VS Code format.
- For more information about VS Code launch configurations, see the Debugging section on the Visual Studio documentation page.
-
The type is
For a list of available tasks and launch configurations, see the tasks.json and the launch.json configuration files in the /workspace/.theia directory where the configuration from the devfile is exported to.
2.1.1. Che-Theia task types
There are two types of tasks in a devfile: tasks in the VS Code format and CodeReady Workspaces commands. Tasks from the devfile are copied to the configuration file when the workspace is started. Depending on the type of the task, the task is then available for running:
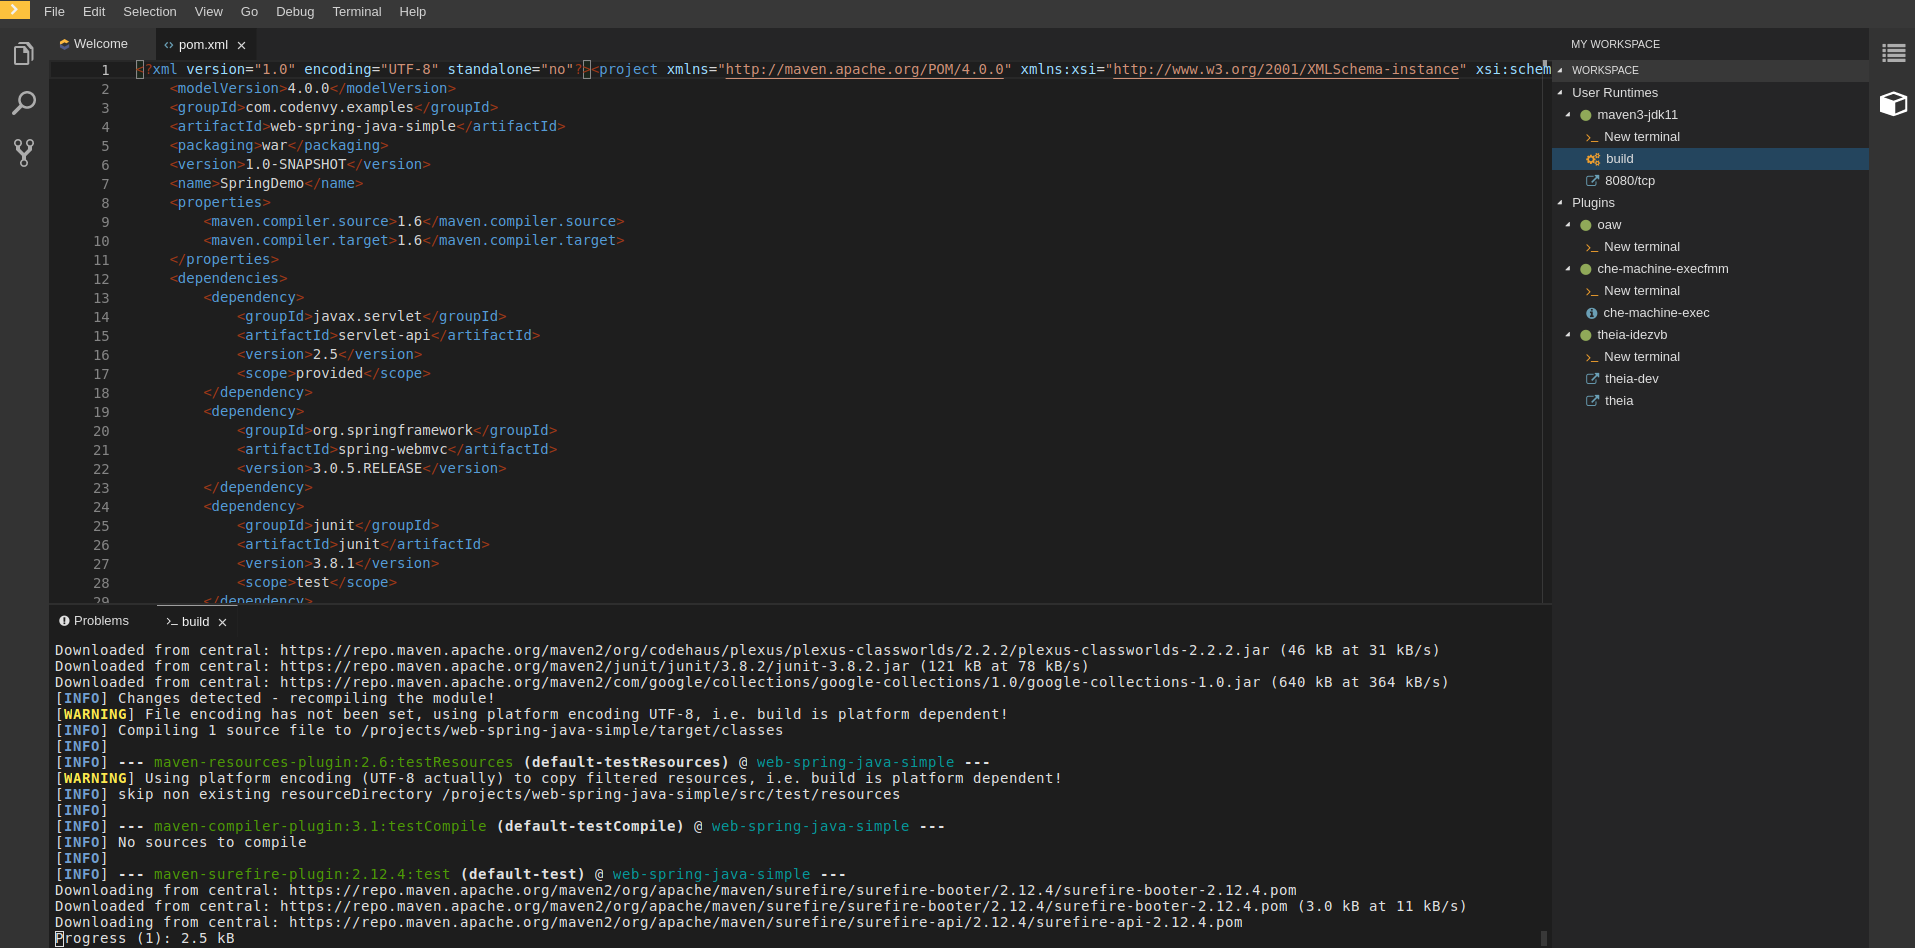
- CodeReady Workspaces commands: From the Terminal → Run Task menu in the configured tasks section, or from the My Workspace panel
- Tasks in the VS Code format: From the Run Tasks menu
To run the task definitions provided by plug-ins, select the Terminal → Run Task menu option. The tasks are placed in the detected tasks section.
2.1.2. Running and debugging
Che-Theia supports the Debug Adapter Protocol. This protocol defines a generic way for how a development tool can communicate with a debugger. It means Che-Theia works with all implementations.
Prerequisites
- A running instance of Red Hat CodeReady Workspaces. To install an instance of Red Hat CodeReady Workspaces, see the CodeReady Workspaces 2.0 Installation Guide.
Procedure
To debug an application:
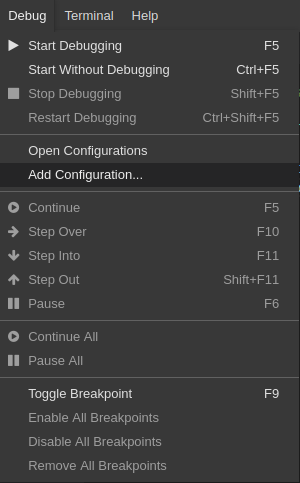
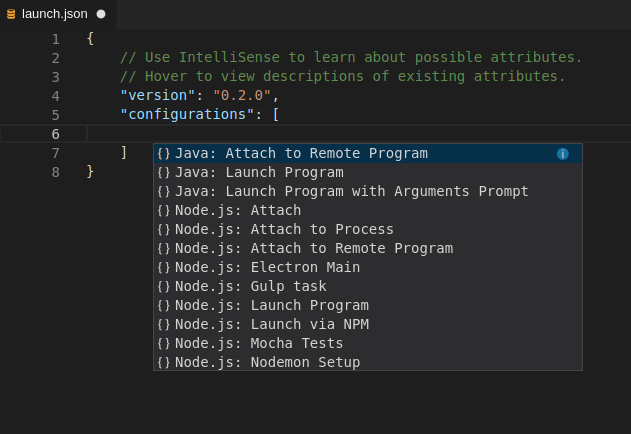
Click Debug → Add Configuration to add debugging or launch configuration to the project.
From the pop-up menu, select the appropriate configuration for the application that you want to debug.
Update the configuration by modifying or adding attributes.
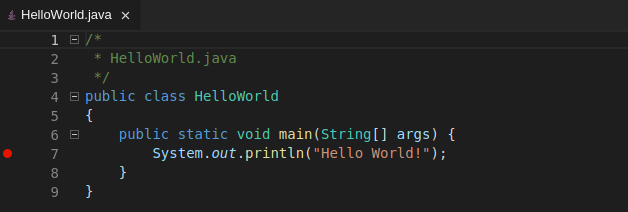
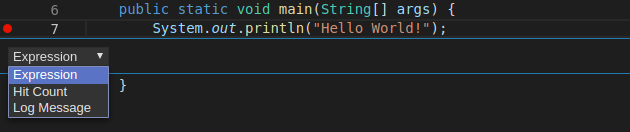
Breakpoints can be toggled by clicking the editor margin.
Open the context menu of the breakpoint to add conditions.
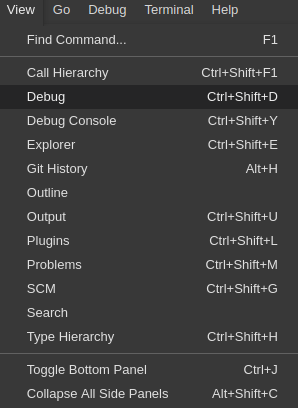
To start debugging, click View → Debug.
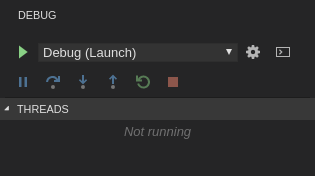
In the Debug view, select the configuration and press F5 to debug the application. Or, start the application without debugging by pressing Ctrl+F5.

2.1.3. Editing a task and launch configuration
Procedure
To customize the configuration file:
-
Edit the
tasks.jsonorlaunch.jsonconfiguration files. Add new definitions to the configuration file or modify the existing ones.
NoteThe changes are stored in the configuration file.
-
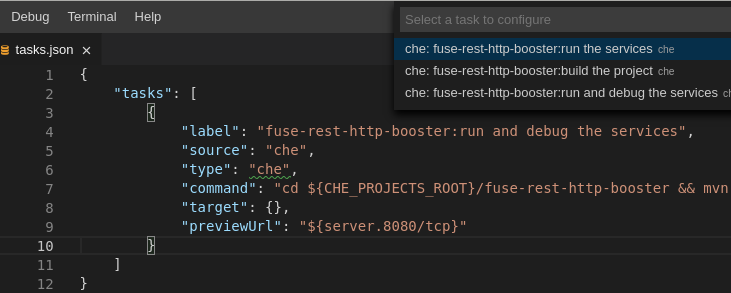
To customize the task configuration provided by plug-ins, select the Terminal → Configure TasksS menu option, and choose the task to configure. The configuration is then copied to the
tasks.jsonfile and is available for editing.
2.2. Version Control
Red Hat CodeReady Workspaces natively supports the VS Code SCM model. By default, Red Hat CodeReady Workspaces includes the native VS Code Git extension as a Source Code Management (SCM) provider.
2.2.1. Managing Git configuration: identity
The first thing to do before starting to use Git is to set a user name and email address. This is important because every Git commit uses this information.
Prerequisites
- The Visual Studio Code Git extension installed.
Procedure
To configure Git identity using the CodeReady Workspaces user interface, go to in Preferences.
Open File > Settings > Open Preferences:
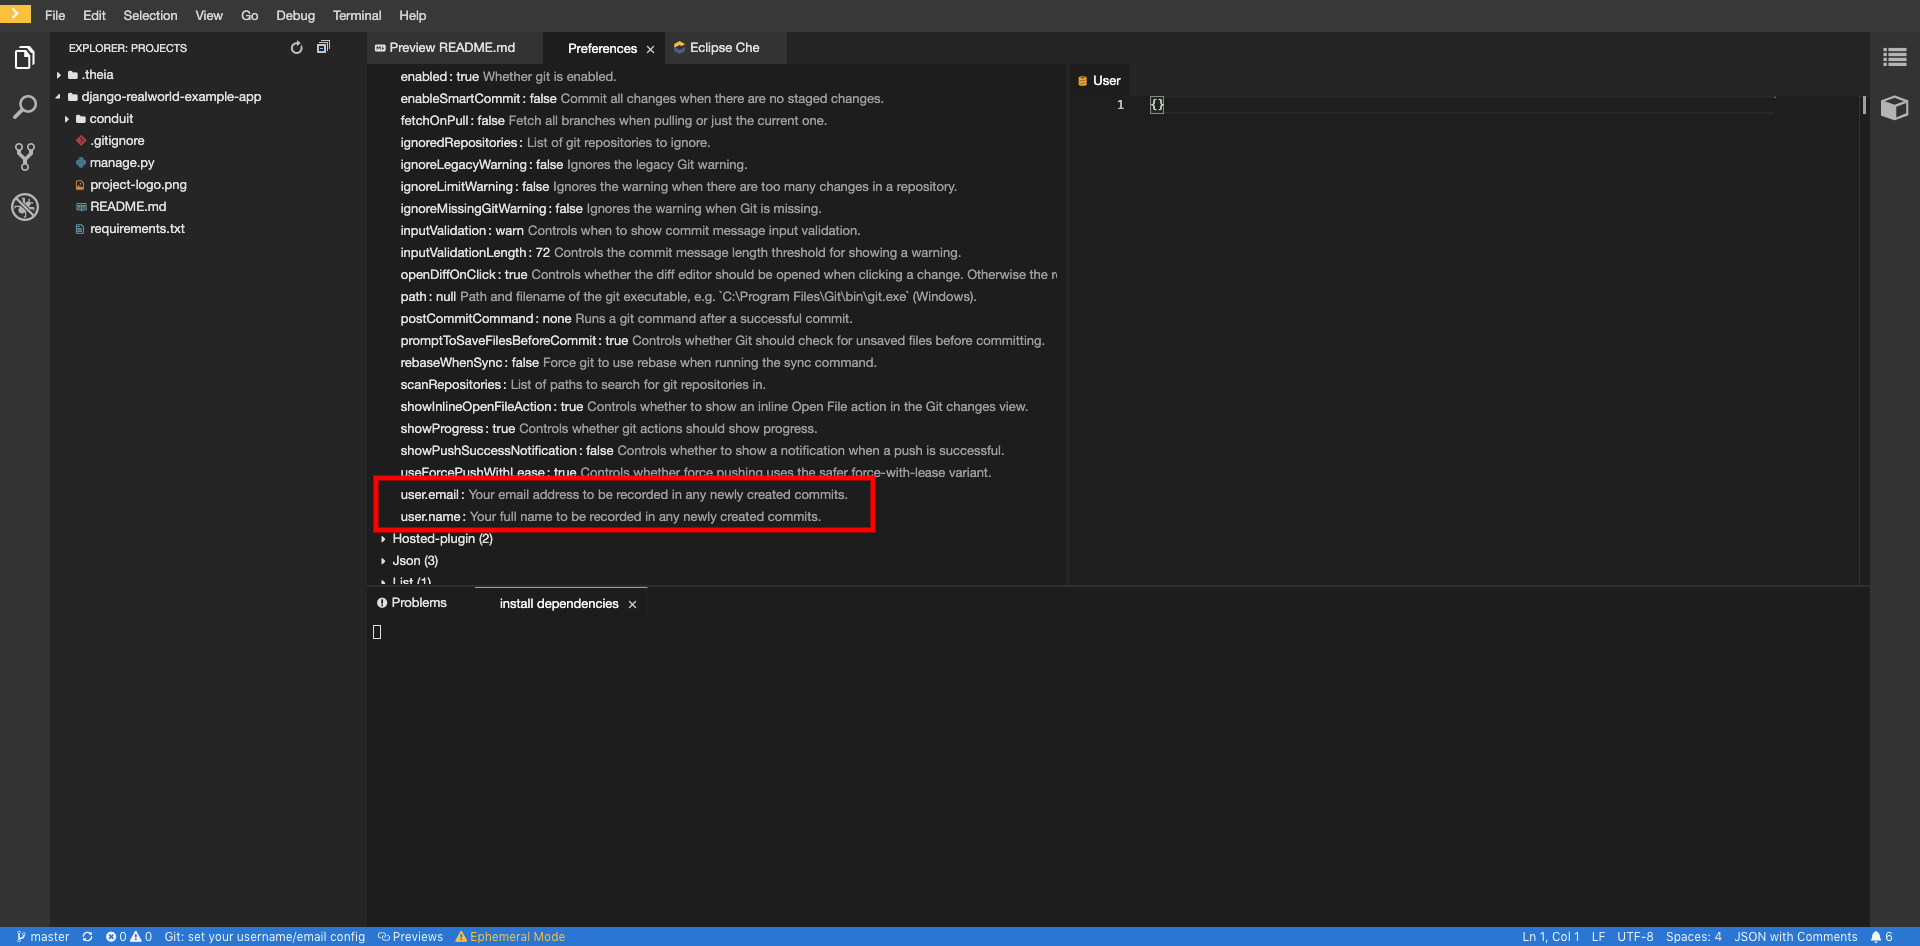
In the opened window, navigate to the Git section, and find:
 user.name
 user.email
 user.name
 user.email
Copy to Clipboard Copied! Toggle word wrap Toggle overflow And configure the identity.
To configure Git identity using the command line, open the terminal of the Che-Theia container.
Navigate to the My Workspace view, and open Plugins > theia-ide… > New terminal:
Execute the following commands:
git config --global user.name "John Doe"
git config --global user.email johndoe@example.com
$ git config --global user.name "John Doe"
$ git config --global user.email johndoe@example.com
Copy to Clipboard Copied! Toggle word wrap Toggle overflow

Che-Theia permanently stores this information and restores it on future workspace starts.
2.2.2. Accessing a Git repository via HTTPS
Prerequisites
- Git is installed. Install Git if needed by following Getting Started - Installing Git.
Procedure
To clone a repository using HTTPS:
- Use the clone command provided by the Visual Studio Code Git extension.
Alternatively, use the native Git commands in the terminal to clone a project.
-
Navigate to destination folder using the
cdcommand. Use
git cloneto clone a repository:git clone <link>
$ git clone <link>Copy to Clipboard Copied! Toggle word wrap Toggle overflow
Self-signed SSL certificates are not supported. Use SSH keys instead.
2.2.3. Accessing a Git repository via SSH
Prerequisites
- Personal GitHub account or other Git provider account created.
2.2.3.1. Generating an SSH key
A common SSH key that works with all Git providers is present by default. To start using it, add the public key to the Git provider.
To generate an SSH key pair that only works with a particular Git provider:
- Run the SSH: generate key pair for particular host command.
- After the key is generated, click the button and copy the public key from the editor.
- Add the public key to the Git provider.
To add the associated public key to a repository or account on GitHub:
- Navigate to github.com.
- Click the drop-down arrow next to the user icon in the top-right corner of the window.
- Click Settings → SSH and GPG keys and then click the button.
- In the Title field, type a title for the key, and in the Key field, paste the public key copied from CodeReady Workspaces.
Click the button.

To add the associated public key to a Git repository or account on GitLab:
- Navigate to gitlab.com.
- Click the user icon in the top-right corner of the window.
- Click Settings → SSH Keys.
- In the Title field, type a title for the key and in the Key field, paste the public key copied from CodeReady Workspaces.
Click the button.

2.2.4. Configuring GitHub OAuth
OAuth for Github allows users to clone projects using SSH addresses (git@) and push to repositories.
Procedure
To enable automatic SSH key upload to GitHub for users:
- On github.com, click your user icon (top right).
- Go to Settings > Developer settings > OAuth Apps.
- Click the button.
-
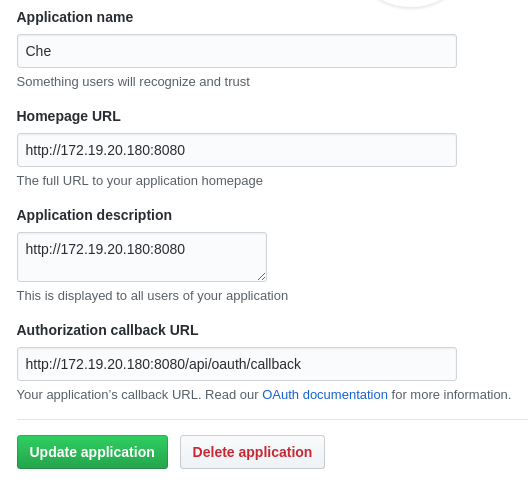
In the Application name field, enter, for example,
Red Hat CodeReady Workspaces. -
In the Homepage URL field, enter
http://$\{CODEREADY_HOST}:$\{CODEREADY_PORT}. In the Authorization callback URL field, enter
http://$\{CODEREADY_HOST}:$\{CODEREADY_PORT}/api/oauth/callback.
-
Substitute all occurrences of
${CODEREADY_HOST}and${CODEREADY_PORT}with the URL and port of your CodeReady Workspaces installation. -
Substitute
<your-github-client-id>and<your-github-secret>with your GitHub client ID and secret.
To manage GitHub pull requests, the VS Code GitHub Pull Request plug-in is available in the list of plug-ins of the workspace.
2.2.5.1. Using the GitHub Pull Requests plug-in
- Authenticate by running the GitHub Pull Requests: Manually Provide Authentication Response command and paste the GitHub token.
- Select the repository permissions when generating the token.
2.2.5.2. Creating a new pull request
- Open the GitHub repository. To be able to execute remote operations, the repository must have a remote with an SSH URL.
- Checkout a new branch and make changes that you want to publish.
- Run the GitHub Pull Requests: Create Pull Request command.
2.3. Che-Theia Troubleshooting
This section describes some of the most frequent issues with the Che-Theia IDE.
- Che-Theia shows a notification with the following message:
Plugin runtime crashed unexpectedly, all plugins are not working, please reload the page. Probably there is not enough memory for the plugins. This means that one of the Che-Theia plug-ins that are running in the Che-Theia IDE container requires more memory than the container has. To fix this problem, increase the amount of memory for the Che-Theia IDE container:
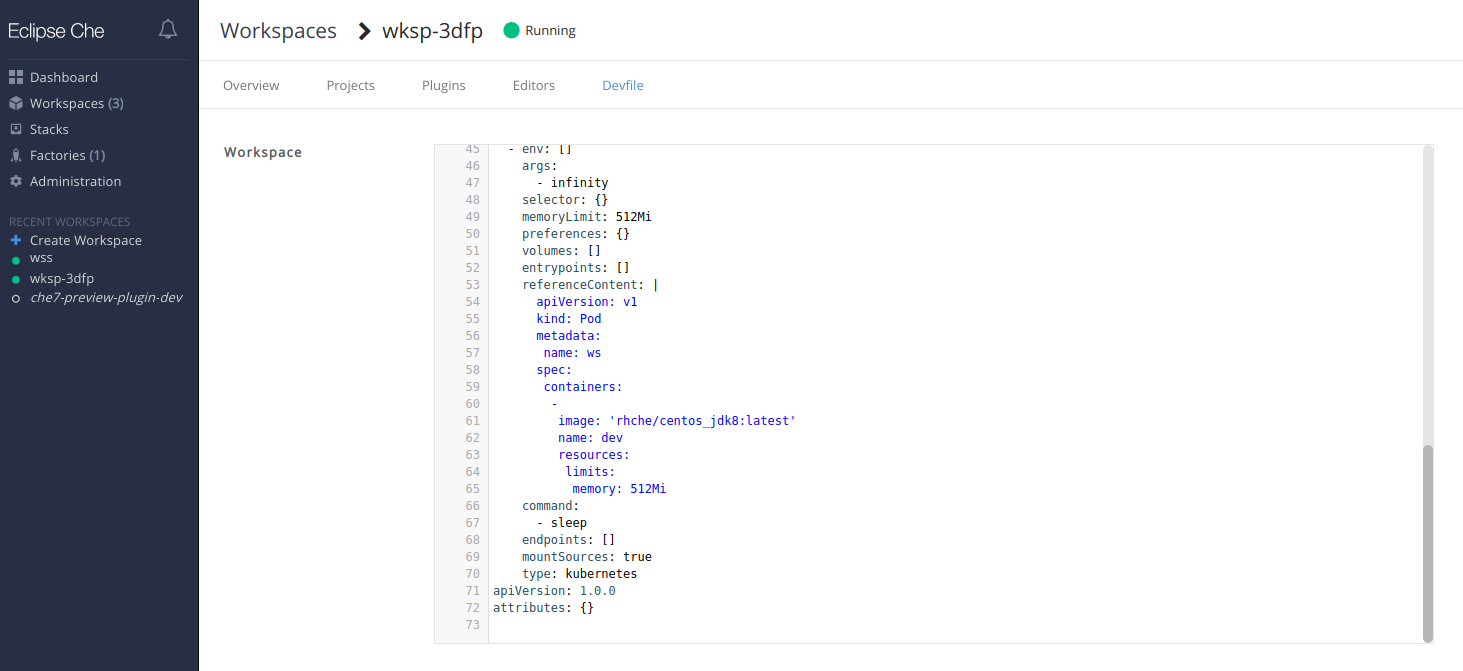
- Navigate to the CodeReady Workspaces Dashboard.
- Select the workspace in which the problem happened.
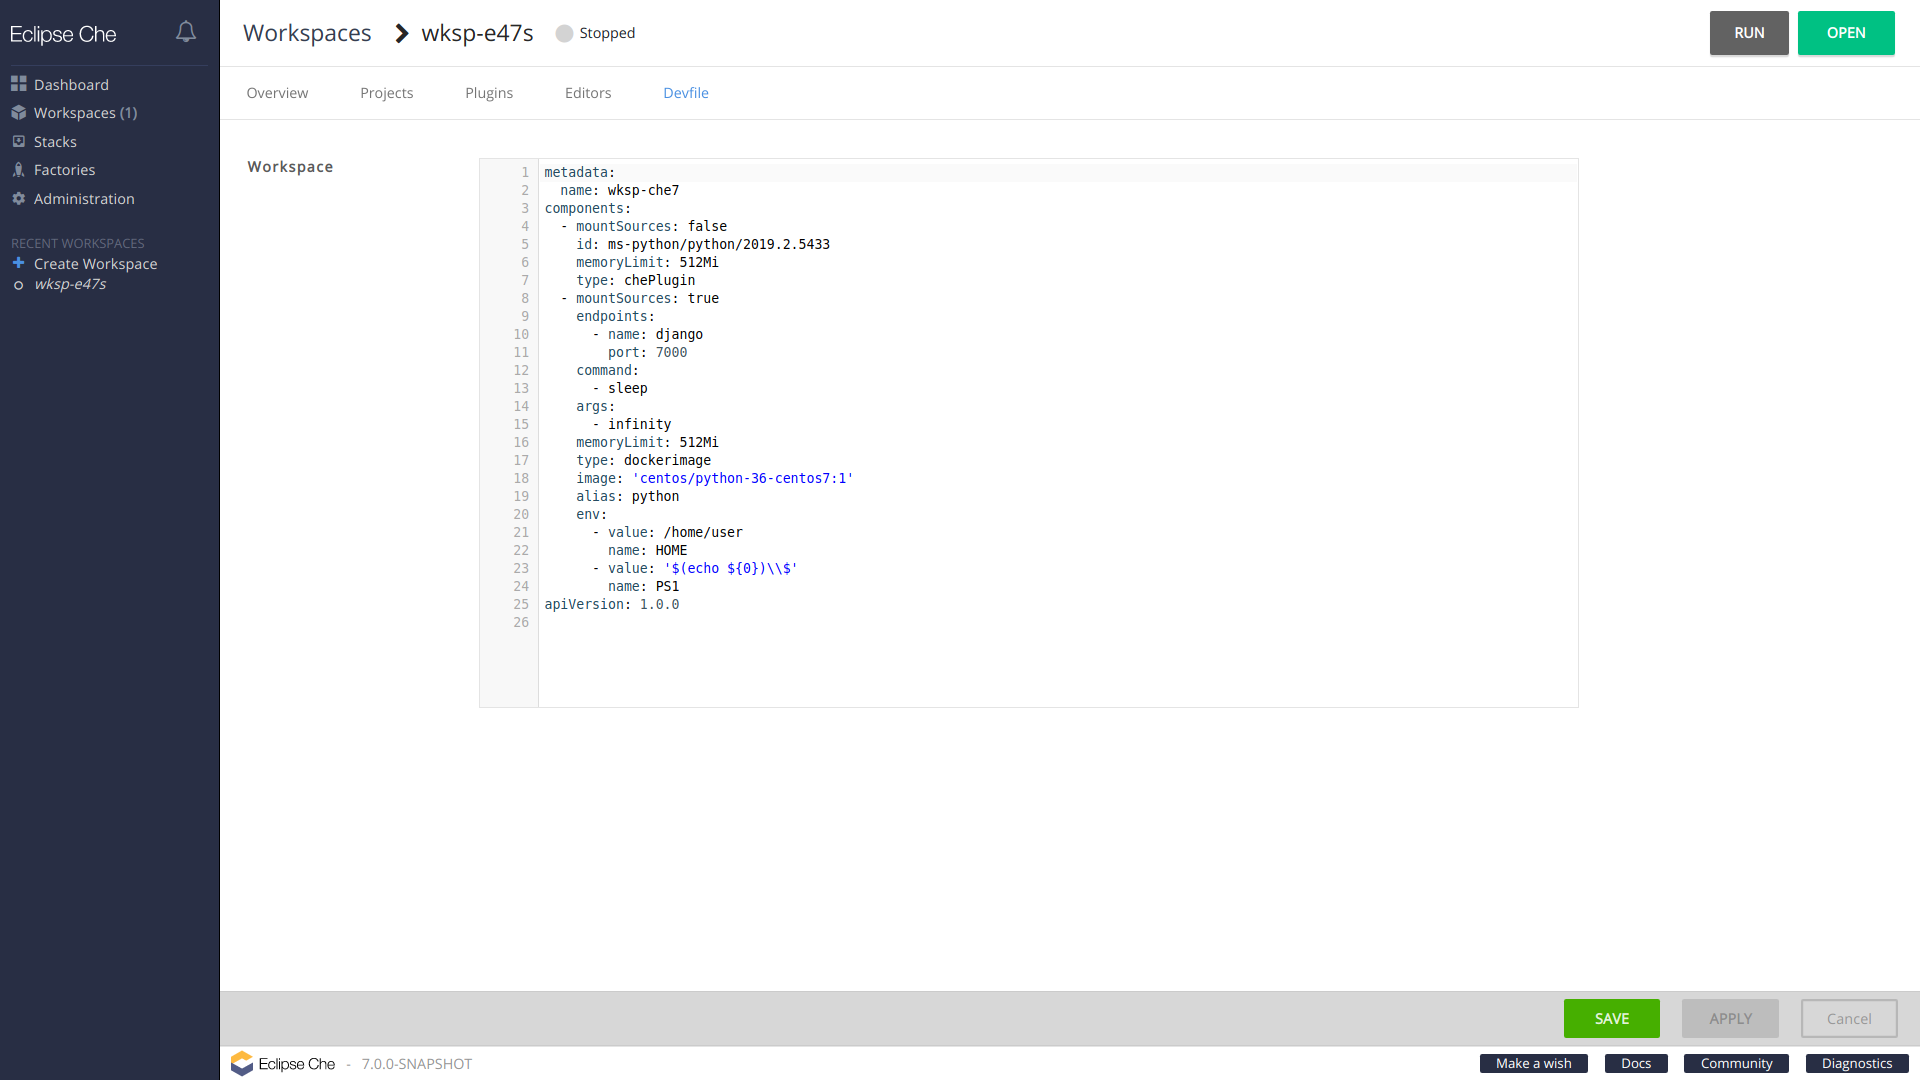
- Switch to the Devfile tab.
-
In the
componentssection of the devfile, find a component of thecheEditortype. -
Add a new property,
memoryLimit: 1024M(or increase the value if it already exists). - Save changes and restart the workspace.
Additional resources
- Asking the community for help: Mattermost channel dedicated to Red Hat CodeReady Workspaces.
- Reporting a bug: Red Hat CodeReady Workspaces repository issues.
Chapter 3. Workspaces overview
Red Hat CodeReady Workspaces provides developer workspaces with everything needed to a code, build, test, run, and debug applications. To allow that, the developer workspaces provide four main components:
- The source code of a project.
- A web-based IDE.
- Tool dependencies, needed by developers to work on a project
- Application runtime: a replica of the environment where the application runs in production
Pods manage each component of a workspace. Therefore, everything running in a workspace is running inside containers. This makes a workspace highly portable.
The embedded browser-based IDE is the point of access for everything running in a workspace. This makes a workspace easily shareable.
By default, it is possible to run only one workspace at a time.
To change the default value, see the CodeReady Workspaces 2.0 Installation Guide.
| Features | Traditional IDE workspaces | Red Hat CodeReady Workspaces workspaces |
|---|---|---|
| Configuration and installation required | Yes. | No. |
| Embedded tools | Partial. IDE plug-ins need configuration. Dependencies need installation and configuration. Example: JDK, Maven, Node. | Yes. Plug-ins provide their dependencies. |
| Application runtime provided | No. Developers have to manage that separately. | Yes. Application runtime is replicated in the workspace. |
| Shareable | No. Or not easily | Yes. Developer workspaces are shareable with a URL. |
| Versionable | No | Yes. Devfiles exist with project source code. |
| Accessible from anywhere | No. Installation is needed. | Yes. Only requires a browser. |
To start a workspace, following options are available:
Use the Dashboard to discover CodeReady Workspaces 2.0:
Use a devfile as the preferred way to start a CodeReady Workspaces 2.0 workspace:
See the CodeReady Workspaces 2.0 End-user Guide.
Use the browser-based IDE as the preferred way to interact with a CodeReady Workspaces 2.0 workspace. For an alternative way to interact with a CodeReady Workspaces 2.0 workspace, see: Section 3.8, “Remotely accessing workspaces”.
3.1.1. Creating a new workspace from the dashboard
This procedure describes how to create and edit a new CodeReady Workspaces 2.0 devfile using the Dashboard.
Prerequisites
- A running instance of Red Hat CodeReady Workspaces. To install an instance of Red Hat CodeReady Workspaces, see the CodeReady Workspaces 2.0 Installation Guide.
Procedure
To edit the devfile:
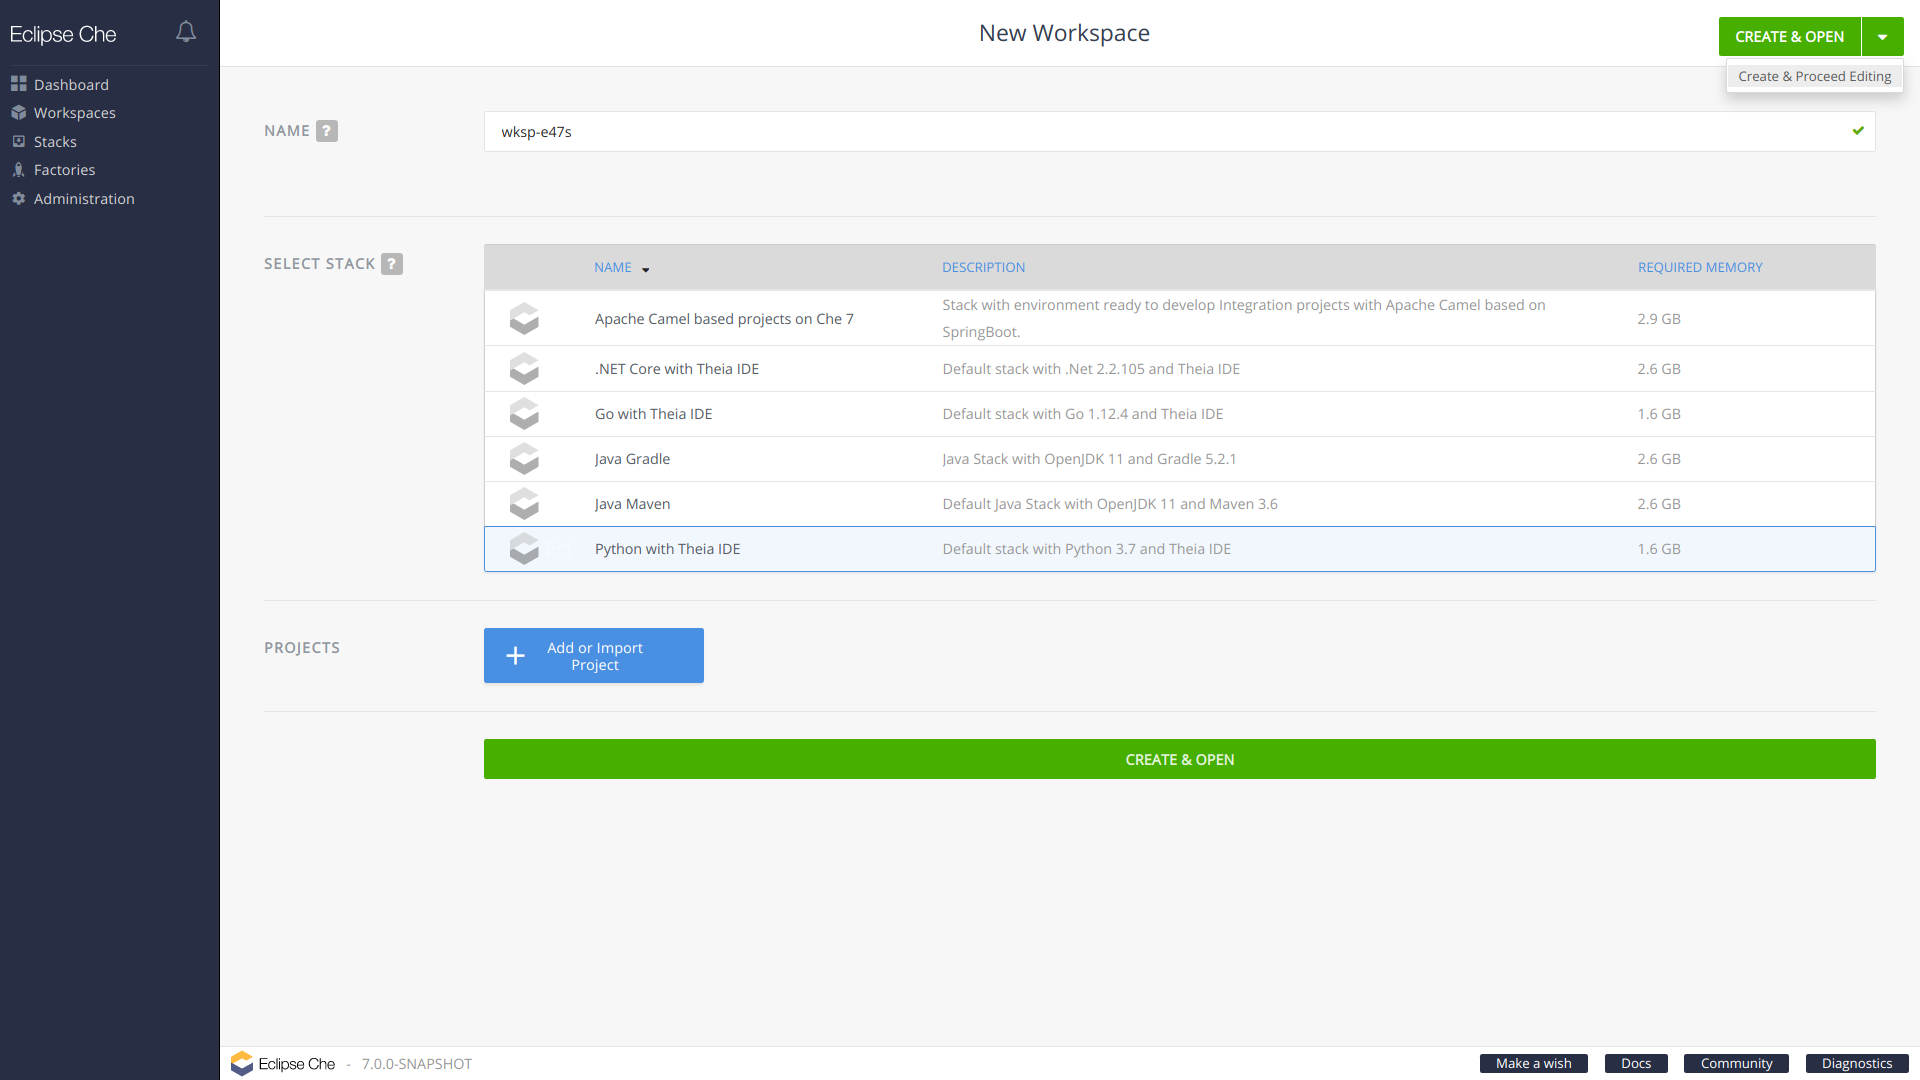
- In the Workspaces window, click the button.
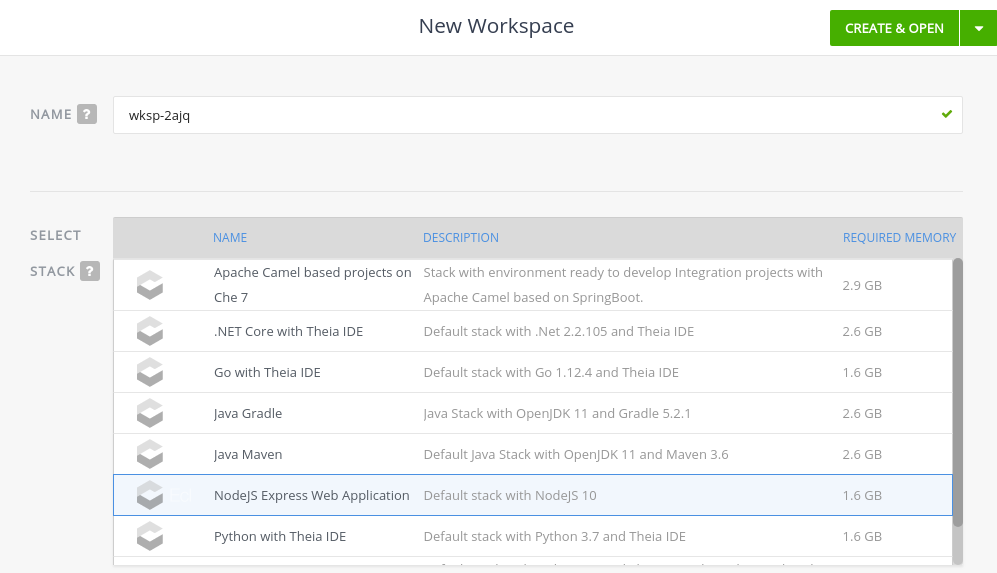
In the SELECT STACK list, select one of the default stacks.
Click the button. The Workspaces → Configs page is shown.
Change the workspace name and click the Devfile tab.
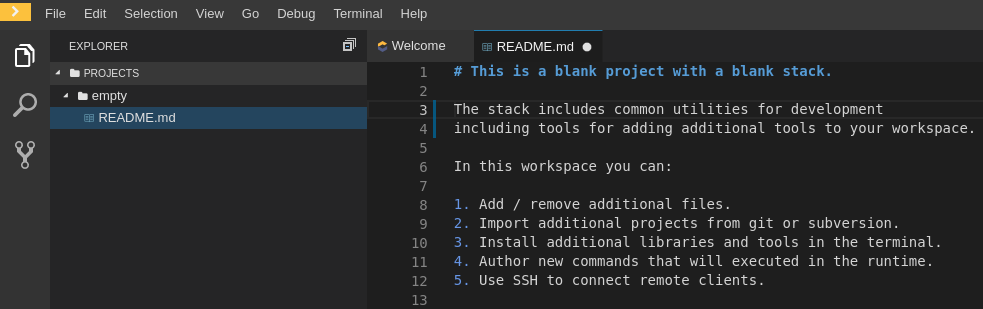
Delete all the components and commands in the devfile to get an empty devfile.


3.1.2. Adding projects to your workspace
Prerequisites
- A running instance of Red Hat CodeReady Workspaces. To install an instance of Red Hat CodeReady Workspaces, see the CodeReady Workspaces 2.0 Installation Guide.
- An existing workspace defined on this instance of Red Hat CodeReady Workspaces Section 3.1, “Creating and configuring a new CodeReady Workspaces 2.0 workspace”.
Procedure
To add a project to your workspace:
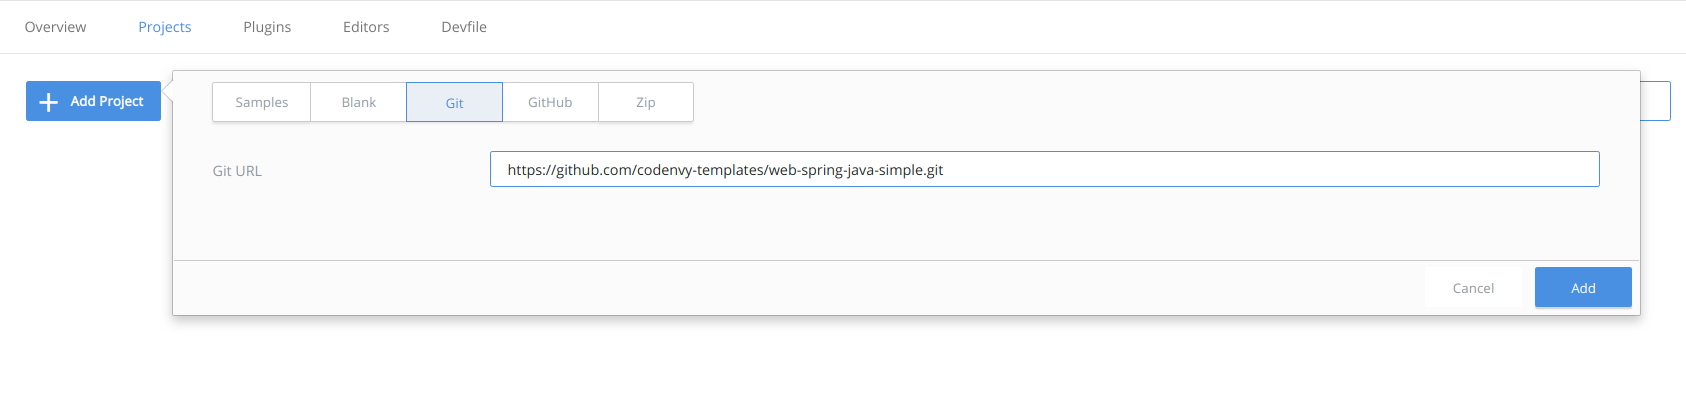
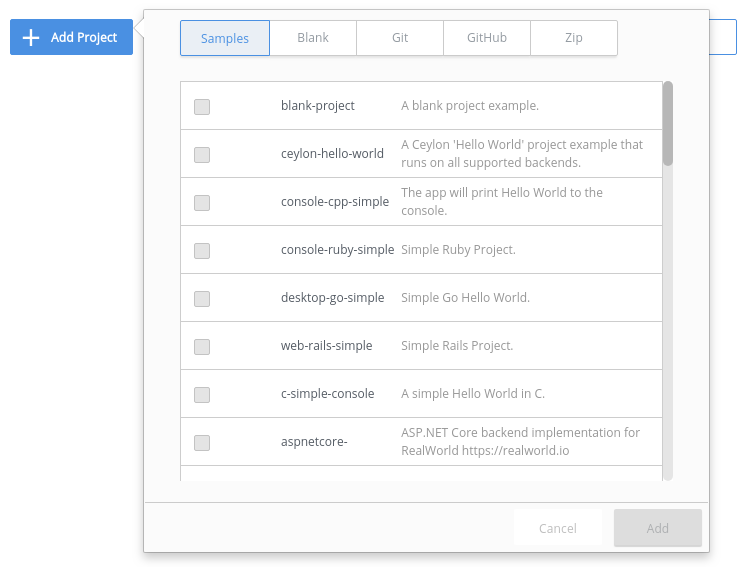
- Click the Projects tab, and then click the button.
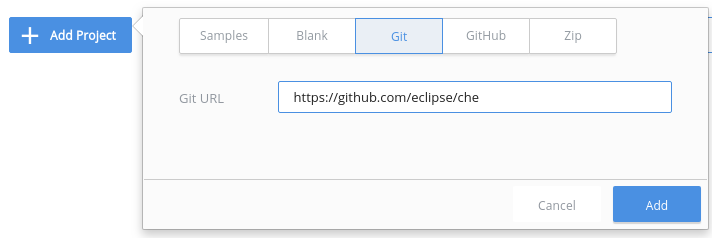
- Select the type of the project. Choose from: Samples, Blank, Git, GitHub, or Zip.
Fill in the required details for the project type that you selected, and click the button.
- To add another project to the workspace, click the button.
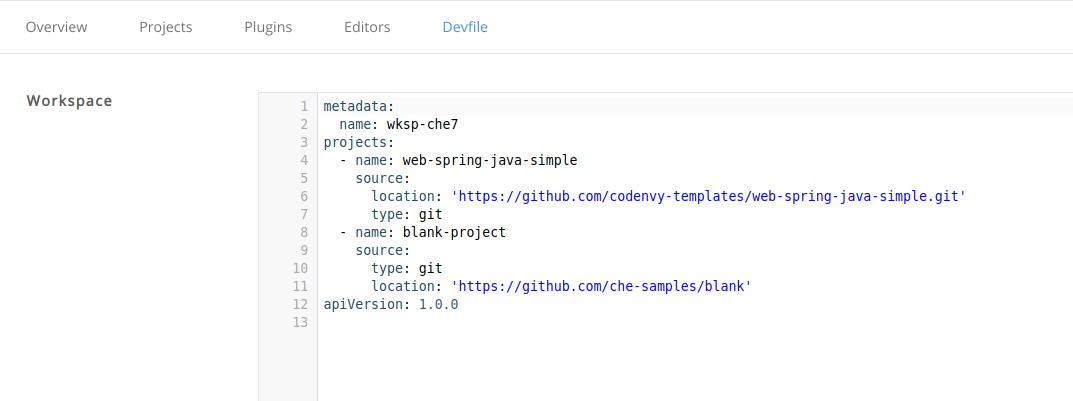
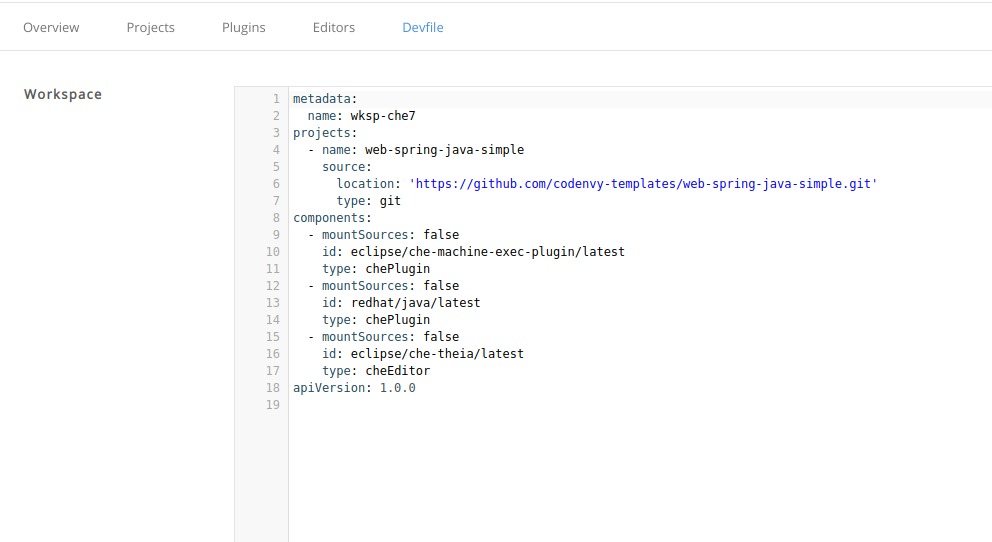
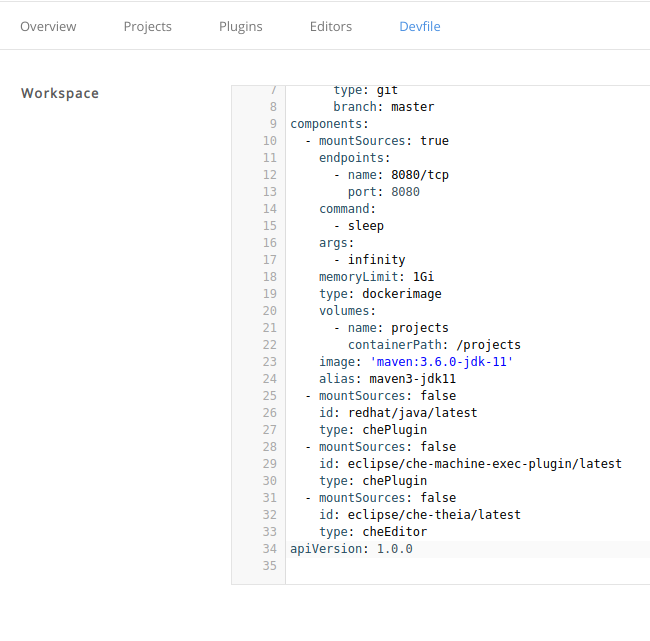
After configuring the project for the workspace, check the change in the devfile, which is the configuration file of the workspace, by opening the Devfile tab.
3.1.3. Configuring the workspace and adding tooling
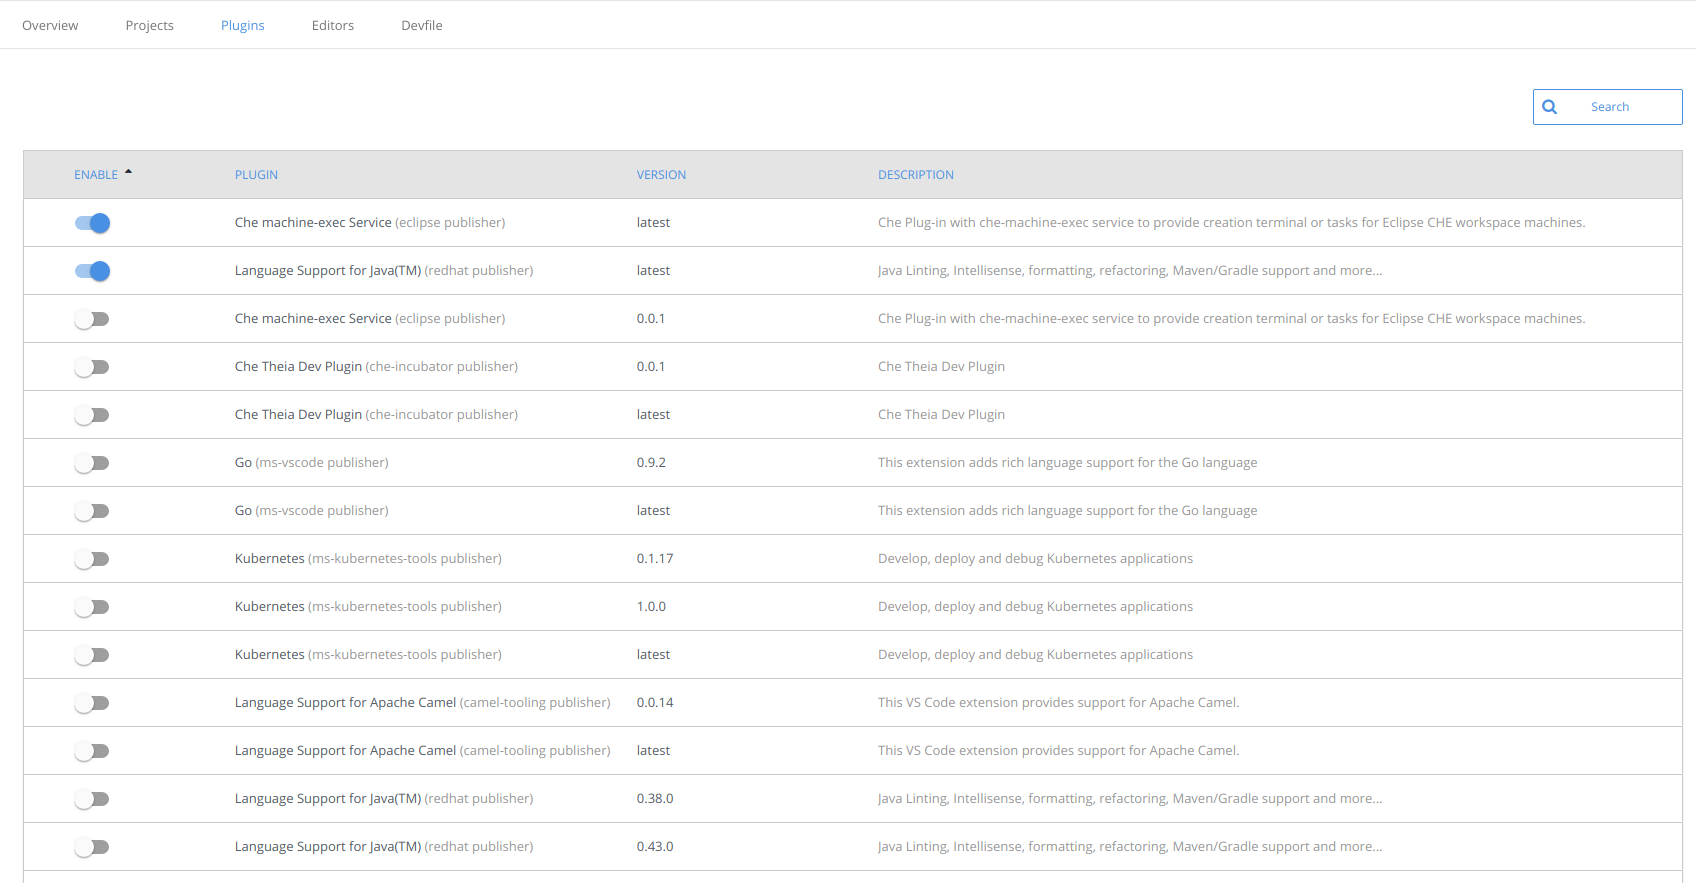
3.1.3.1. Adding plug-ins
CodeReady Workspaces 2.0 plug-ins replace CodeReady Workspaces 1.2 installers. The following table lists the CodeReady Workspaces 2.0 plug-ins that have replaced CodeReady Workspaces 1.2 installers.
| CodeReady Workspaces 1.2 installer | CodeReady Workspaces 2.0 plug-in |
|---|---|
| org.eclipse.che.ws-agent | Deprecated and not necessary |
| org.eclipse.che.terminal | Deprecated and not necessary anymore- |
| org.eclipse.che.exec | CodeReady Workspaces machine-exec Service |
| org.eclipse.che.ls.java | Language Support for Java |
Prerequisites
- A running instance of Red Hat CodeReady Workspaces. To install an instance of Red Hat CodeReady Workspaces, see the CodeReady Workspaces 2.0 Installation Guide.
- An existing workspace defined on this instance of Red Hat CodeReady Workspaces Section 3.1, “Creating and configuring a new CodeReady Workspaces 2.0 workspace”.
Procedure
To add plug-ins to your workspace:
- Click the Plugins tab.
Enable the plug-in that you want to add and click the button.
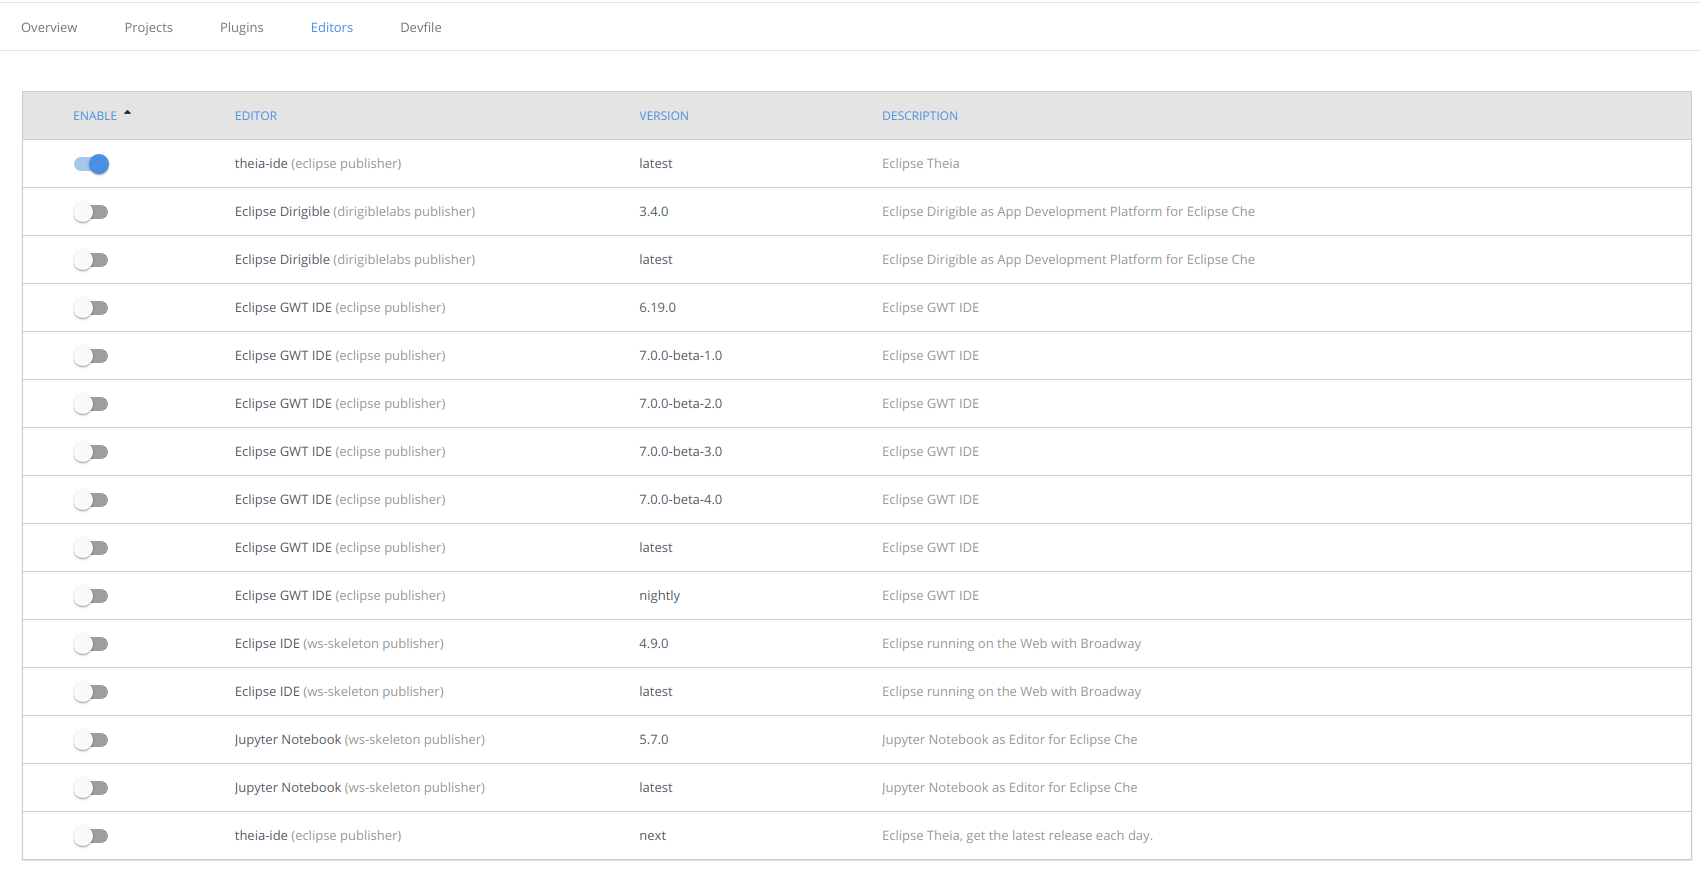
3.1.3.2. Defining the workspace editor
Prerequisites
- A running instance of Red Hat CodeReady Workspaces. To install an instance of Red Hat CodeReady Workspaces, see the CodeReady Workspaces 2.0 Installation Guide.
- An existing workspace defined on this instance of Red Hat CodeReady Workspaces Section 3.1, “Creating and configuring a new CodeReady Workspaces 2.0 workspace”.
Procedure
To define the editor to use with the workspace:
Click the Editors tab.
NoteThe recommended editor for CodeReady Workspaces 2.0 is Che-Theia.
Enable the editor to add and click the button.
Click the Devfile tab to view the changes.
3.1.3.3. Defining specific container images
Procedure
To add a new container image:
Copy the following section from the devfile into components:
Copy to Clipboard Copied! Toggle word wrap Toggle overflow When using
type: kubernetesortype: openshift, you must:Use seperate recipe files.
NoteTo use separate recipe files, the paths can be relative or absolute. For example:
...
    type: kubernetes
    reference: deploy_k8s.yaml
...
... type: kubernetes reference: deploy_k8s.yaml ...Copy to Clipboard Copied! Toggle word wrap Toggle overflow ... type: openshift reference: deploy_openshift.yaml ...... type: openshift reference: deploy_openshift.yaml ...Copy to Clipboard Copied! Toggle word wrap Toggle overflow Alternatively, add the content as
referenceContent(thereferenceContentfield replaces the CodeReady Workspaces 1.2 recipe content).
Add a CodeReady Workspaces 1.2 recipe content to the CodeReady Workspaces 2.0 devfile as
referenceContent:Click the Containers tab (Workspace → Details → Containers).
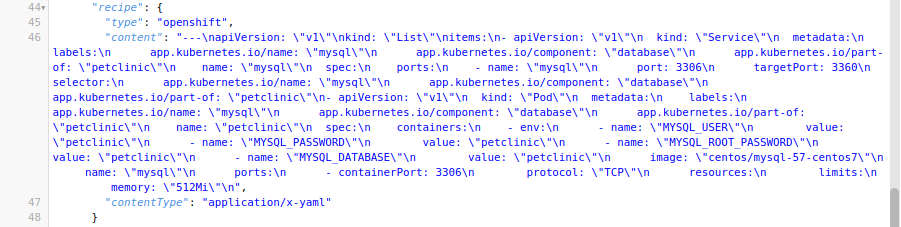
Copy the CodeReady Workspaces 1.2 recipe, and paste it into the separate CodeReady Workspaces 2.0 component as a referenceContent.
Set the type from the original CodeReady Workspaces 1.2 configuration. The following is an example of the resulting file:
Copy to Clipboard Copied! Toggle word wrap Toggle overflow
Copy the required fields from the old workspace (
image,volumes,endpoints). For example:Expand Table 3.3. Сhe 6 and Сhe 7 equivalence table CodeReady Workspaces 1.2 workspace configuration CodeReady Workspaces 2.0 workspace devfile environments['defaultEnv'].machines['target'].serverscomponents[n].endpointsenvironments['defaultEnv'].machines['machineName'].volumescomponents[n].volumesenvironments['defaultEnv'].recipe.typecomponents[n].typeenvironments['defaultEnv'].recipe.contentcomponents[n].imageChange the
memoryLimitandaliasvariables, if needed. Here, the fieldaliasis used to set a name for the component. It is generated automatically from theimagefield, if not set.image: 'maven:3.6.0-jdk-11' alias: maven3-jdk11
image: 'maven:3.6.0-jdk-11' alias: maven3-jdk11Copy to Clipboard Copied! Toggle word wrap Toggle overflow Change the
memoryLimitfield to specify theRAMrequired for the component.alias: maven3-jdk11 memoryLimit: 256M
alias: maven3-jdk11 memoryLimit: 256MCopy to Clipboard Copied! Toggle word wrap Toggle overflow Open the Devfile tab to see the changes.
- Repeat the steps to add additional container images.

3.1.3.4. Adding commands to your workspace
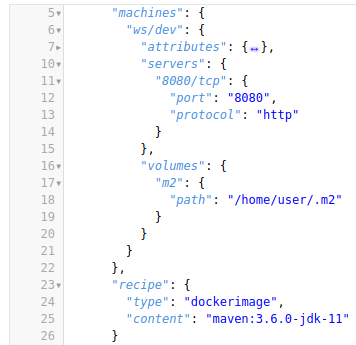
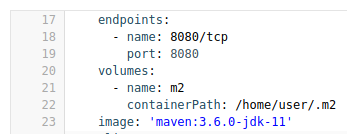
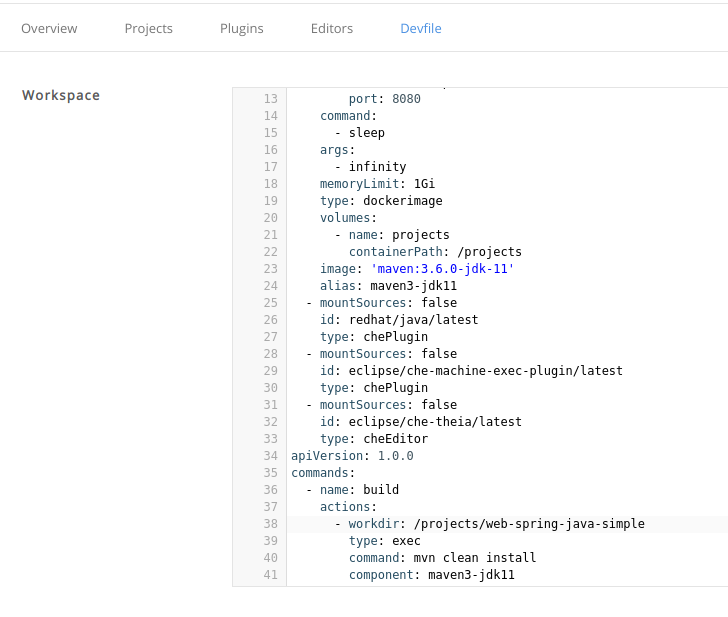
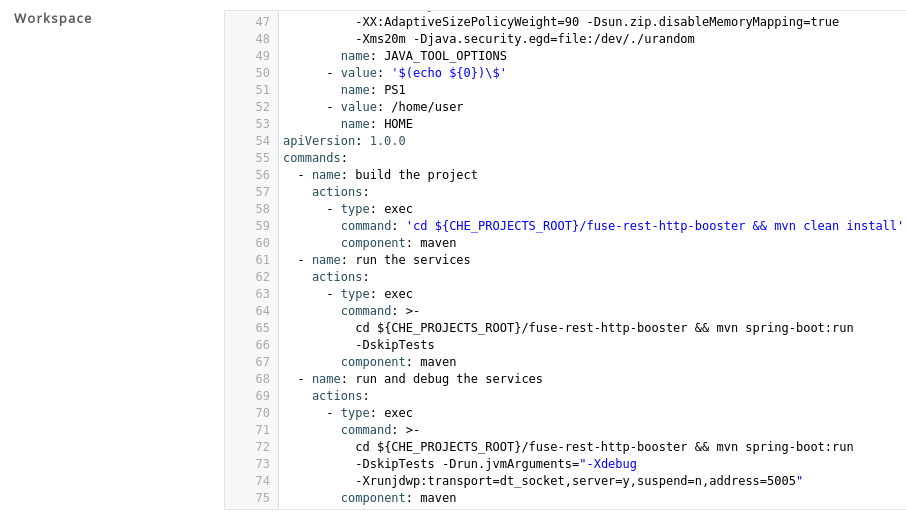
The following is a comparison between workspace configuration commands in CodeReady Workspaces 1.2 (Figure 1) and CodeReady Workspaces 2.0 (Figure 2):
Figure 3.1. An example of the Workspace configuration commands in CodeReady Workspaces 1.2
Figure 3.2. An example of the Workspace configuration commands in CodeReady Workspaces 2.0
| CodeReady Workspaces 1.2 workspace configuration | CodeReady Workspaces 2.0 workspace devfile |
|---|---|
|
|
|
|
|
|
Procedure
To define commands to your workspace, edit the workspace devfile:
Add (or replace) the
commandssection with the first command. Change thenameand thecommandfields from the original workspace configuration (see the preceding equivalence table).commands: - name: build actions: - type: exec command: mvn clean installcommands: - name: build actions: - type: exec command: mvn clean installCopy to Clipboard Copied! Toggle word wrap Toggle overflow Copy the following YAML code into the
commandssection to add a new command. Change thenameand thecommandfields from the original workspace configuration (see the preceding equivalence table).- name: build and run actions: - type: exec command: mvn clean install && java -jar- name: build and run actions: - type: exec command: mvn clean install && java -jarCopy to Clipboard Copied! Toggle word wrap Toggle overflow -
Optionally, add the
componentfield intoactions. This indicates the component alias where the command will be performed. - Repeat step 2 to add more commands to the devfile.
Click the Devfile tab to view the changes.
Save changes and start the new CodeReady Workspaces 2.0 workspace.
3.2. Configuring a workspace using a devfile
To quickly and easily configure a workspace, use a devfile. For an introduction to devfiles and instructions for their use, see below.
3.2.1. What is a devfile
A devfile is a file that describes and define a development environment:
- the source code
- the development components (browser IDE tools and application runtimes)
- a list of pre-defined commands
- projects to clone
Devfiles are YAML files that CodeReady Workspaces consumes and transforms into a cloud workspace composed of multiple containers. The devfile can be saved in the root folder of a Git repository, a feature branch of a Git repository, a publicly accessible destination, or as a separate, locally stored artifact.
When creating a workspace, CodeReady Workspaces uses that definition to initiate everything and run all the containers for the required tools and application runtimes. CodeReady Workspaces also mounts file-system volumes to make source code available to the workspace.
Devfiles can be versioned with the project source code. When there is a need for a workspace to fix an old maintenance branch, the project devfile provides a definition of the workspace with the tools and the exact dependencies to start working on the old branch. Use it to instantiate workspaces on demand.
CodeReady Workspaces maintains the devfile up-to-date with the tools used in the workspace:
- Projects of the workspace (path, Git location, branch)
- Commands to perform daily tasks (build, run, test, debug)
- Runtime environment (container images to run the application)
- Che-Theia plug-ins with tools, IDE features, and helpers that a developer would use in the workspace (Git, Java support, Sonarlint, Pull Request)
3.2.2. Disambiguation between stacks and devfiles
This section describes differences between stacks in CodeReady Workspaces 1.2 and devfiles in CodeReady Workspaces 2.0
Starting with CodeReady Workspaces 2.0:
- A stack is a pre-configured workspace.
- A devfile is a configuration YAML file that CodeReady Workspaces consumes and transforms in a cloud workspace composed of multiple containers.
In CodeReady Workspaces 1.2, stacks were defined by a stacks.json file that was included with the che server. In contrast, in CodeReady Workspaces 2.0, the stacks.json file does not exist. Instead, a stack is defined in the devfile registry, which is a separate service. Every single devfile in the registry corresponds to a stack.
Note that in CodeReady Workspaces 1.2, stacks and workspaces were defined using two different formats. However, with CodeReady Workspaces 2.0, the devfile format is used to define both. Nevertheless, a user opening the user dashboard does not notice any difference: in CodeReady Workspaces 2.0, a list of stacks is still present to choose from as a starting point to create a workspace.
A workspace can be created by pointing to a devfile that is stored in a Git source repository. The CodeReady Workspaces instance then uses the discovered devfile.yaml file to build a workspace using the /f?url= API.
Prerequisites
- A running instance of Red Hat CodeReady Workspaces. To install an instance of Red Hat CodeReady Workspaces, see the CodeReady Workspaces 2.0 Installation Guide.
-
The
devfile.yamlfile in the root folder of a Git repository available over HTTPS. See Section 3.5, “Making a workspace portable using a devfile” for detailed information about creating and using devfiles.
Procedure
Run the workspace by opening the following URL: https://<CheHost>/f?url=https://<GitRepository>
Example
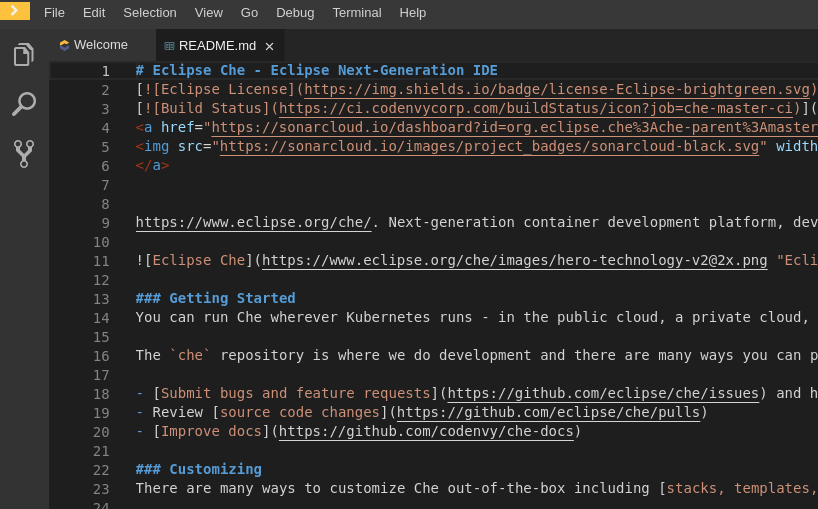
https://che.openshift.io/f?url=https://github.com/eclipse/che
https://che.openshift.io/f?url=https://github.com/eclipse/cheA workspace can be created by pointing to devfile that is stored in a Git source repository on a feature branch of the user’s choice. The CodeReady Workspaces instance then uses the discovered devfile to build a workspace.
Prerequisites
- A running instance of Red Hat CodeReady Workspaces. To install an instance of Red Hat CodeReady Workspaces, see the CodeReady Workspaces 2.0 Installation Guide.
-
The
devfile.yamlfile in the root folder of a Git repository on a specific branch of the user’s choice available over HTTPS. See Section 3.5, “Making a workspace portable using a devfile” for detailed information about creating and using devfiles.
Procedure
Execute the workspace by opening the following URL: https://<CheHost>/f?url=<GitHubBranch>
Example
Use following URL format to open an experimental quarkus-quickstarts branch hosted on che.openshift.io.
https://che.openshift.io/f?url=https://github.com/maxandersen/quarkus-quickstarts/tree/che
https://che.openshift.io/f?url=https://github.com/maxandersen/quarkus-quickstarts/tree/cheA workspace can be created using a devfile, the URL of which is pointing to the raw content of the devfile. The CodeReady Workspaces instance then uses the discovered devfile to build a workspace.
Prerequisites
- A running instance of Red Hat CodeReady Workspaces. To install an instance of Red Hat CodeReady Workspaces, see the CodeReady Workspaces 2.0 Installation Guide.
-
The publicly-accessible standalone
devfile.yamlfile. See Section 3.5, “Making a workspace portable using a devfile” for detailed information about creating and using devfiles.
Procedure
-
Execute the workspace by opening the following URL:
https://<your-che-host>/f?url=https://<yourhosturl>/devfile.yaml
Example
https://che.openshift.io/f?url=https://gist.githubusercontent.com/themr0c/ef8e59a162748a8be07e900b6401e6a8/raw/8802c20743cde712bbc822521463359a60d1f7a9/devfile.yaml
https://che.openshift.io/f?url=https://gist.githubusercontent.com/themr0c/ef8e59a162748a8be07e900b6401e6a8/raw/8802c20743cde712bbc822521463359a60d1f7a9/devfile.yamlValues in the following sections of a remote devfile can be overridden using specially constructed additional factory parameters:
-
apiVersion -
metadata -
projects
Prerequisites
- A running instance of Red Hat CodeReady Workspaces. To install an instance of Red Hat CodeReady Workspaces, see the CodeReady Workspaces 2.0 Installation Guide.
-
A publicly accessible standalone
devfile.yamlfile. See Section 3.5, “Making a workspace portable using a devfile” for detailed information about creating and using devfiles.
Procedure
-
Open the workspace by navigating to the following URL:
https://<che-host>/f?url=https://<hostURL>/devfile.yaml&override.<parameter.path>=<value>
Example of overriding the generateName property
https://che.openshift.io/f?url=https://gist.githubusercontent.com/themr0c/ef8e59a162748a8be07e900b6401e6a8/raw/8802c20743cde712bbc822521463359a60d1f7a9/devfile.yaml&override.metadata.generateName=myprefix
https://che.openshift.io/f?url=https://gist.githubusercontent.com/themr0c/ef8e59a162748a8be07e900b6401e6a8/raw/8802c20743cde712bbc822521463359a60d1f7a9/devfile.yaml&override.metadata.generateName=myprefixExample of overriding project source branch property
https://che.openshift.io/f?url=https://gist.githubusercontent.com/themr0c/ef8e59a162748a8be07e900b6401e6a8/raw/8802c20743cde712bbc822521463359a60d1f7a9/devfile.yaml&override.projects.web-java-spring-petclinic.source.branch=1.0.x
https://che.openshift.io/f?url=https://gist.githubusercontent.com/themr0c/ef8e59a162748a8be07e900b6401e6a8/raw/8802c20743cde712bbc822521463359a60d1f7a9/devfile.yaml&override.projects.web-java-spring-petclinic.source.branch=1.0.x
A workspace can be created by pointing the crwctl tool to a locally stored devfile. The CodeReady Workspaces instance then uses the discovered devfile to build a workspace.
Prerequisites
- A running instance of Red Hat CodeReady Workspaces. To install an instance of Red Hat CodeReady Workspaces, see the CodeReady Workspaces 2.0 Installation Guide.
- The CodeReady Workspaces CLI management tool. See the CodeReady Workspaces 2.0 Installation Guide.
The devfile is available on the local filesystem in the current working directory. See Section 3.5, “Making a workspace portable using a devfile” for detailed information about creating and using devfiles.
Example
Download the
devfile.yamlfile from the GitHub repository to the current working directory.
Procedure
-
Run a workspace from a devfile using the
workspace:startparameter with thecrwctltool as follows:
crwctl workspace:start --devfile=devfile.yaml
$ crwctl workspace:start --devfile=devfile.yamlAdditional resources
3.3. Creating a workspace from code sample
Every stack includes a sample codebase, which is defined by the devfile of the stack. This section explains how to create a workspace from this code sample in a sequence of three procedures.
For more information on devfiles, see Section 3.2, “Configuring a workspace using a devfile”.
3.3.1. Creating a workspace from User Dashboard
This section describes how to create a workspace from the User Dashboard.
Prerequisites
- A running instance of Red Hat CodeReady Workspaces. To install an instance of Red Hat CodeReady Workspaces, see the CodeReady Workspaces 2.0 Installation Guide
Procedure
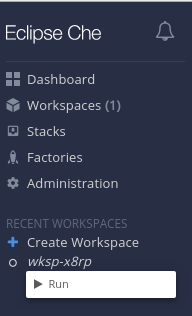
- Navigate to the CodeReady Workspaces Dashboard. See Chapter 1, Navigating CodeReady Workspaces using the Dashboard.
- In the left navigation panel, navigate to Workspaces.
- Click on the button.
- Define a Name for the workspace. A generated name is proposed. It can be modified.
In the Stack section, select the workspace runtime environment that will be used to build and run projects from the list.
Viewing the compute resource limitsThe memory needed by the stack is pre-calculated and displayed on the stack description line. Changing the memory requirements is only possible from the devfile.
Start the workspace: click on the button at the top or bottom of the form:

Instead of configuring the workspace once it has started, it is possible to configure the workspace before start.
- From the top of the page, click the down arrow next to the button.
- Select the menu item below to edit the workspace configuration.

The dashboard always use name specified in step 4. as a workspace name. The stack’s underlying devfile’s name and generateName are overriden by it.
This section describes how to change the configuration of an existing workspace from the User Dashboard.
Prerequisites
- A running instance of Red Hat CodeReady Workspaces. To install an instance of Red Hat CodeReady Workspaces, see the CodeReady Workspaces 2.0 Installation Guide.
- An existing workspace defined on this instance of Red Hat CodeReady Workspaces Section 3.1, “Creating and configuring a new CodeReady Workspaces 2.0 workspace”.
Procedure
- Navigate to the CodeReady Workspaces Dashboard. See Chapter 1, Navigating CodeReady Workspaces using the Dashboard.
- In the left navigation panel, navigate to Workspaces.
- Click on the name of a workspace to navigate to the configuration overview page.
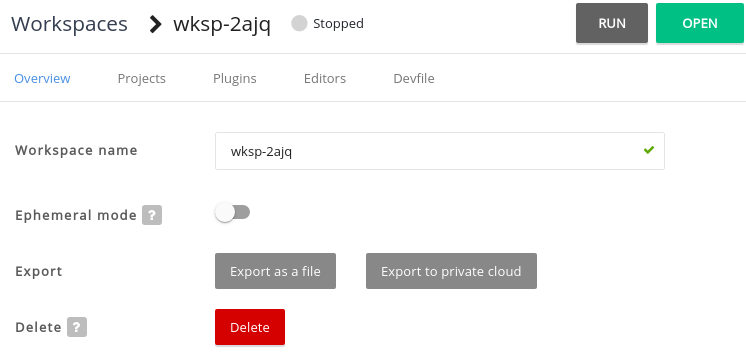
Click on the Overview tab, to execute following actions:
- Change the Workspace name.
- Toggle Ephemeral mode.
- Export the workspace configuration to a file or private cloud.
Delete the workspace.
In the Projects section, choose the projects to integrate in the workspace.
- Click on the button
- Select the projects to integrate in the workspace.
Click on th button.
In the Plugins section, choose the plugins to integrate in the workspace.
ExampleStart with a generic Java-based stack, then later add support for Node or Python.
In the Editors section, choose the editors to integrate in the workspace. The CodeReady Workspaces 2.0 editor is based on Che-Theia.
Example: Switch to the CodeReady Workspaces 1.2 editor- To Switch to the CodeReady Workspaces 1.2 editor, select the GWT IDE.
From the Devfile tab, edit the workspace’s YAML configuration. See Section 3.5.5, “Devfile reference”.
Example: add commandsExample: add a projectTo add a project into the workspace, add or edit the following section:
projects:
  - name: che
    source:
      type: git
      location: 'https://github.com/eclipse/che.git'
projects: - name: che source: type: git location: 'https://github.com/eclipse/che.git'Copy to Clipboard Copied! Toggle word wrap Toggle overflow
This section describes how to run an existing workspace from the User Dasboard
This section describes how to run an existing workspace from the User Dashboard using the Run button.
Prerequisites
- A running instance of Red Hat CodeReady Workspaces. To install an instance of Red Hat CodeReady Workspaces, see the CodeReady Workspaces 2.0 Installation Guide.
- An existing workspace defined on this instance of Red Hat CodeReady Workspaces Section 3.1, “Creating and configuring a new CodeReady Workspaces 2.0 workspace”.
Procedure
- Navigate to the CodeReady Workspaces Dashboard. See Chapter 1, Navigating CodeReady Workspaces using the Dashboard.
- In the left navigation panel, navigate to Workspaces.
- Click on the name of a non-running workspace to navigate to the overview page.
- Click on the button in the top right corner of the page.
- The workspace is started.
- The browser does not navigates to the workspace.
This section describes how to run an existing workspace from the User Dashboard using the Open button.
Prerequisites
- A running instance of Red Hat CodeReady Workspaces. To install an instance of Red Hat CodeReady Workspaces, see the CodeReady Workspaces 2.0 Installation Guide.
- An existing workspace defined on this instance of Red Hat CodeReady Workspaces Section 3.1, “Creating and configuring a new CodeReady Workspaces 2.0 workspace”.
Procedure
- Navigate to the CodeReady Workspaces Dashboard. See Chapter 1, Navigating CodeReady Workspaces using the Dashboard.
- In the left navigation panel, navigate to Workspaces.
- Click on the name of a non-running workspace to navigate to the overview page.
- Click on the button in the top right corner of the page.
- The workspace is started.
- The browser navigates to the workspace.
This section describes how to run an existing workspace from the User Dashboard using the Recent Workspaces.
Prerequisites
- A running instance of Red Hat CodeReady Workspaces. To install an instance of Red Hat CodeReady Workspaces, see the CodeReady Workspaces 2.0 Installation Guide.
- An existing workspace defined on this instance of Red Hat CodeReady Workspaces Section 3.1, “Creating and configuring a new CodeReady Workspaces 2.0 workspace”.
Procedure
- Navigate to the CodeReady Workspaces Dashboard. See Chapter 1, Navigating CodeReady Workspaces using the Dashboard.
In the left navigation panel, in the Recent Workspaces section, right-click on the name of a non-running workspace and click on Start in the contextual menu to start it.
This section describes how to create a new workspace to edit an existing codebase.
Prerequisites
- A running instance of Red Hat CodeReady Workspaces. To install an instance of Red Hat CodeReady Workspaces, see the CodeReady Workspaces 2.0 Installation Guide.
- An existing workspace with plug-ins related to your development environment defined on this instance of Red Hat CodeReady Workspaces Section 3.1, “Creating and configuring a new CodeReady Workspaces 2.0 workspace”.
There are two ways to do that before starting a workspace:
To create a new workspace to edit an existing codebase, use one of the following three methods after you have started the workspace:
Import the project. There are at least two ways to import a project via the Dashboard.
- From the Dashboard, select Workspaces, then select your workspace by clicking on its name. This will link you to the workspace’s Overview tab.
- Or, use the gear icon. This will link to the Devfile tab where you can enter your own YAML configuration.
- Click the Projects tab.
- Click Add Project. You can then import a sample project, create a blank project, import from a Git project, or import from a zip file.
You can add a project to a non-running workspace, but you must start the workspace to delete it.
3.4.1.1. Creating a new repository
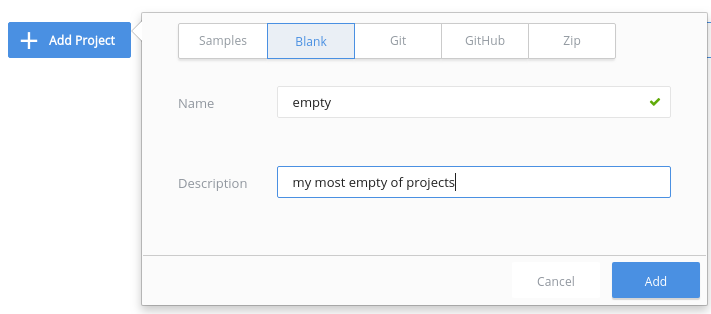
To add a blank project:
Type a name and a description in the Name and Description fields.
- Click Open to open your workspace.
3.4.1.2. Editing an existing repository
To edit an existing repository:
Choose the Git project or zip file, and CodeReady Workspaces will load it into your workspace.
- To open the workspace, click the button.
3.4.1.3. Editing the commands after importing a project
After you have a project in your workspace, you can add commands to it. Adding commands to your projects allows you to run, debug, or launch your application in a browser.
To add commands to the project:
Open the workspace configuration in the Dashboard, then select the Devfile tab.
- Open the workspace.
To run a command, select Terminal > Run Task from the main menu.
To configure commands, select Terminal > Configure Tasks from the main menu.

To import to a running workspace using the Git: Clone command:
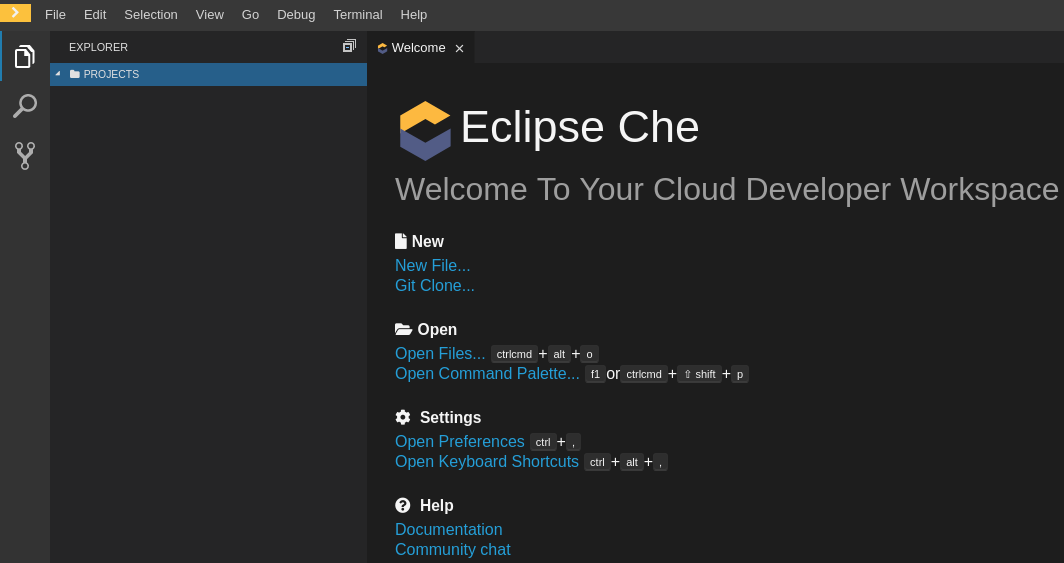
Start a workspace, then use the Git: Clone command from the command palette or the Welcome screen to import a project to a running workspace.
Open the command palette using
F1orCTRL-SHIFT-P, or from the link in the Welcome screen.Enter the path to the project you want to clone.


In addition to the approaches above, you can also start a workspace, open a Terminal, and type git clone to pull code.
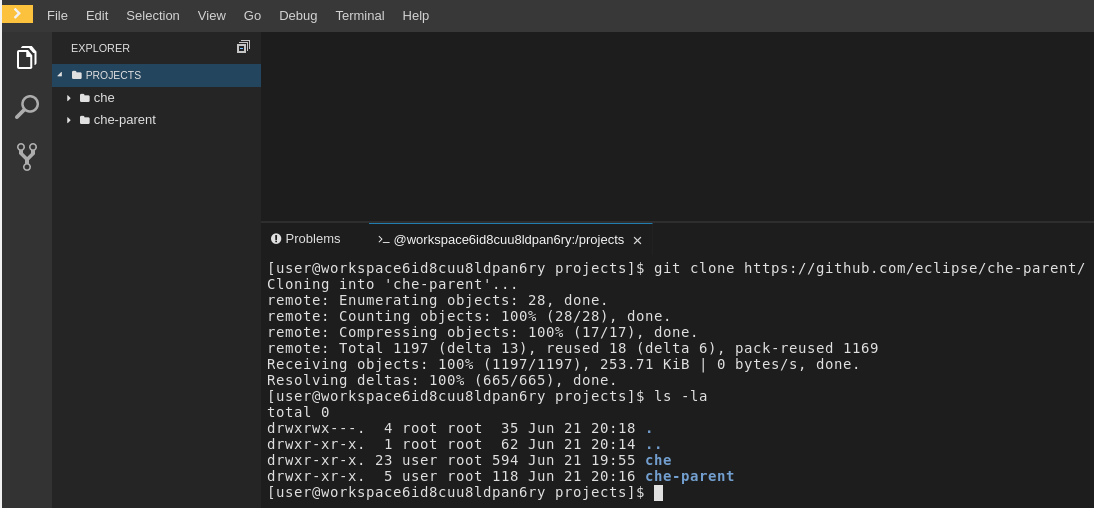
Importing or deleting workspace projects in the terminal does not update the workspace configuration, and the change is not reflected in the Project and Devfile tabs in the dashboard.
Similarly, if you add a project via the Dashboard, then delete it with rm -fr myproject, it may still appear in the Projects or Devfile tab.
3.5. Making a workspace portable using a devfile
To transfer a configured CodeReady Workspaces workspace, create and export the devfile of the workspace and load the devfile on a different host to initialize a new instance of the workspace. For detailed instructions on how to create such a devfile, see below.
3.5.1. What is a devfile
A devfile is a file that describes and define a development environment:
- the source code
- the development components (browser IDE tools and application runtimes)
- a list of pre-defined commands
- projects to clone
Devfiles are YAML files that CodeReady Workspaces consumes and transforms into a cloud workspace composed of multiple containers. The devfile can be saved in the root folder of a Git repository, a feature branch of a Git repository, a publicly accessible destination, or as a separate, locally stored artifact.
When creating a workspace, CodeReady Workspaces uses that definition to initiate everything and run all the containers for the required tools and application runtimes. CodeReady Workspaces also mounts file-system volumes to make source code available to the workspace.
Devfiles can be versioned with the project source code. When there is a need for a workspace to fix an old maintenance branch, the project devfile provides a definition of the workspace with the tools and the exact dependencies to start working on the old branch. Use it to instantiate workspaces on demand.
CodeReady Workspaces maintains the devfile up-to-date with the tools used in the workspace:
- Projects of the workspace (path, Git location, branch)
- Commands to perform daily tasks (build, run, test, debug)
- Runtime environment (container images to run the application)
- Che-Theia plug-ins with tools, IDE features, and helpers that a developer would use in the workspace (Git, Java support, Sonarlint, Pull Request)
3.5.2. A minimal devfile
The following is the minimum content required in a devfile.yaml file:
For a complete devfile example, see Red Hat CodeReady Workspaces in CodeReady Workspaces devfile.yaml.
name or generateName must be defined
Both name and generateName are optional parameters, but at least one of them must be defined. See Section 3.5.3, “Generating workspace names”.
3.5.3. Generating workspace names
To specify a prefix for automatically generated workspace names, set the generateName parameter in the devfile.yaml file:
apiVersion: 1.0.0
metadata:
  generateName: che-
apiVersion: 1.0.0
metadata:
  generateName: che-
The workspace name will be in the <generateName>YYYYY format (for example, che-2y7kp). Y is random [a-z0-9] character.
The following naming rules apply when creating workspaces:
-
When
nameis defined, it is used as the workspace name:<name> -
When only
generateNameis defined, it is used as the base of the generated name:<generateName>YYYYY
For workspaces created using a factory, defining name or generateName has the same effect. The defined value is used as the name prefix: <name>YYYYY or <generateName>YYYYY. The generateName has precedence over name when both are defined.
3.5.4. Writing a devfile for a project
This section describes how to create a minimal devfile for your project and how to include more than one projects in a devfile.
3.5.4.1. Preparing a minimal devfile
A minimal devfile sufficient to run a workspace consists of the following parts:
- Specification version
- Name
Example of a minimal devfile with no project
apiVersion: 1.0.0
metadata:
  name: minimal-workspace
apiVersion: 1.0.0
metadata:
name: minimal-workspaceWithout any further configuration, a workspace with the default editor is launched along with its default plug-ins, which are configured on the CodeReady Workspaces Server. Che-Theia is configured as the default editor along with the CodeReady Workspaces Machine Exec plug-in.
Add the following parts for a more functional workspace:
- List of components: Development components and user runtimes
- List of projects: Source code repositories
- List of commands: Actions to manage the workspace components, such as running the development tools, starting the runtime environments, and others
Example of a minimal devfile with a project
3.5.4.2. Specifying multiple projects in a devfile
A single devfile can specify multiple projects. For each project, specify the type of the source repository, its location, and optionally also the directory to which the project should be cloned to.
Example of a devfile with two projects
In the preceding example, there are two projects defined, frontend and backend. Each project is located in its own repository. The backend project has a specific requirement to be cloned into the src/github.com/acmecorp/backend/ directory under the source root (implicitly defined by the CodeReady Workspaces runtime) while the frontend project will be cloned into the frontend/ directory under the source root.
Additional resources
For a detailed explanation of all devfile component assignments and possible values, see:
These sample devfiles are a good source of inspiration:
3.5.5. Devfile reference
This section contains devfile reference and instructions on how to use the various elements that devfiles consist of.
3.5.5.1. Adding projects to a devfile
In most cases, a devfile contains one or more projects. A workspace is created to develop those projects. Projects are added in the projects section of devfiles.
Each project in a single devfile must have:
- Unique name
- Source specified
Project source consists of two mandatory values: type and location.
type- The kind of project-source provider.
location- The URL of project source.
CodeReady Workspaces supports the following project types:
git- Projects with sources in Git. The location points to a clone link.
github-
Same as
gitbut for projects hosted on GitHub only. Usegitfor projects that do not use GitHub-specific features. zip- Projects with sources in a ZIP archive. Location points to a ZIP file.
3.5.5.1.1. Project-source type: git
- 1
startPointis the general value fortag,commitId, andbranch. ThestartPoint,tag,commitId, andbranchparameters are mutually exclusive. When more than one is supplied, the following order is used:startPoint,tag,commitId,branch.- 2
sparseCheckoutDirthe template for the sparse checkout Git feature. This is useful when only a part of a project (typically only a single directory) is needed.
Example 3.1. sparseCheckoutDir parameter settings
-
Set to
/my-module/to create only the rootmy-moduledirectory (and its content). Omit the leading slash (
my-module/) to create allmy-moduledirectories that exist in the project. Including, for example,/addons/my-module/.The trailing slash indicates that only directories with the given name (including their content) should be created.
-
Use wildcards to specify more than one directory name. For example, setting
module-*checks out all directories of the given project that start withmodule-.
For more information, see Sparse checkout in Git documentation.
3.5.5.1.2. Project-source type: zip
source:
    type: zip
    location: http://host.net/path/project-src.zip
source:
    type: zip
location: http://host.net/path/project-src.zip3.5.5.1.3. Project clone-path parameter: clonePath
The clonePath parameter specifies the path into which the project is to be cloned. The path must be relative to the /projects/ directory, and it cannot leave the /projects/ directory. The default value is the project name.
Example devfile with projects
See Section 3.5.5.2, “Adding components to a devfile” for instructions on how to add tooling to a devfile.
3.5.5.2. Adding components to a devfile
Each component in a single devfile must have a unique name.
3.5.5.2.1. Component type: cheEditor
Describes the editor used in the workspace by defining its id. A devfile can only contain one component of the cheEditor type.
components:
  - alias: theia-editor
    type: cheEditor
    id: eclipse/che-theia/next
components:
  - alias: theia-editor
    type: cheEditor
    id: eclipse/che-theia/next
When cheEditor is missing, a default editor is provided along with its default plug-ins. The default plug-ins are also provided for an explicitly defined editor with the same id as the default one (even if it is a different version). Che-Theia is configured as default editor along with the CodeReady Workspaces Machine Exec plug-in.
To specify that a workspace requires no editor, use the editorFree:true attribute in the devfile attributes.
3.5.5.2.2. Component type: chePlugin
Describes plug-ins in a workspace by defining their id. It is allowed to have several chePlugin components.
  components:
   - alias: exec-plugin
     type: chePlugin
     id: eclipse/che-machine-exec-plugin/0.0.1
  components:
   - alias: exec-plugin
     type: chePlugin
     id: eclipse/che-machine-exec-plugin/0.0.1
Both types above use an ID, which is slash-separated publisher, name and version of plug-in from the CodeReady Workspaces Plug-in registry.
List of available CodeReady Workspaces plugins and more information about registry can be found in the CodeReady Workspaces plug-in registry GitHub repository.
3.5.5.2.3. Specifying an alternative component registry
To specify an alternative registry for the cheEditor and chePlugin component types, use the registryUrl parameter:
  components:
   - alias: exec-plugin
     type: chePlugin
     registryUrl: https://my-customregistry.com
     id: eclipse/che-machine-exec-plugin/0.0.1
  components:
   - alias: exec-plugin
     type: chePlugin
     registryUrl: https://my-customregistry.com
     id: eclipse/che-machine-exec-plugin/0.0.1
An alternative way of specifying cheEditor or chePlugin, instead of using the editor or plug-in id (and optionally an alternative registry), is to provide a direct link to the component descriptor (typically named meta.yaml) by using the reference field:
  components:
   - alias: exec-plugin
     type: chePlugin
     reference: https://raw.githubusercontent.com.../plugin/1.0.1/meta.yaml
  components:
   - alias: exec-plugin
     type: chePlugin
     reference: https://raw.githubusercontent.com.../plugin/1.0.1/meta.yaml
It is not possible to mix the id and reference fields in a single component definition; they are mutually exclusive.
3.5.5.2.5. Tuning chePlugin component configuration
A chePlugin component may need to be precisely tuned, and in such case, component preferences can be used. The example shows how to configure JVM using plug-in preferences.
  id: redhat/java/0.38.0
  type: chePlugin
  preferences:
     java.jdt.ls.vmargs: '-noverify -Xmx1G -XX:+UseG1GC -XX:+UseStringDeduplication'
  id: redhat/java/0.38.0
  type: chePlugin
  preferences:
java.jdt.ls.vmargs: '-noverify -Xmx1G -XX:+UseG1GC -XX:+UseStringDeduplication'3.5.5.2.6. Component type: kubernetes
A complex component type that allows to apply configuration from a list of OpenShift components.
The content can be provided either via the reference attribute, which points to the file with the component content.
Alternatively, to post a devfile with such components to REST API, the contents of the OpenShift list can be embedded into the devfile using the referenceContent field:
3.5.5.2.7. Overriding container entrypoints
As with the understood by OpenShift).
There can be more containers in the list (contained in pods or pod templates of deployments). To select which containers to apply the entrypoint changes to.
The entrypoints can be defined as follows:
The entrypoints list contains constraints for picking the containers along with the command and args parameters to apply to them. In the example above, the constraint is parentName: mysqlServer, which will cause the command to be applied to all containers defined in any parent object called mysqlServer. The parent object is assumed to be a top level object in the list defined in the referenced file, which is app-deployment.yaml in the example above.
Other types of constraints (and their combinations) are possible:
containerName- the name of the container
parentName- the name of the parent object that (indirectly) contains the containers to override
parentSelector- the set of labels the parent object needs to have
A combination of these constraints can be used to precisely locate the containers inside the referenced OpenShift list.
3.5.5.2.8. Overriding container environment variables
To provision or override entrypoints in a OpenShift or OpensShift component, configure it in the following way:
This is useful for temporary content or without access to editing the referenced content. The specified environment variables are provisioned into each init container and containers inside all Pods and Deployments.
3.5.5.2.9. Specifying mount-source option
To specify a project sources directory mount into container(s), use the mountSources parameter:
   components:
      - alias: appDeployment
        type: kubernetes
        reference: app-deployment.yaml
        mountSources: true
   components:
      - alias: appDeployment
        type: kubernetes
        reference: app-deployment.yaml
        mountSources: true
If enabled, project sources mounts will be applied to every container of the given component. This parameter is also applicable for chePlugin type components.
3.5.5.2.10. Component type: dockerimage
A component type that allows to define a container image-based configuration of a container in a workspace. A devfile can only contain one component of the dockerimage type. The dockerimage type of component brings in custom tooling into the workspace. The component is identified by its image.
Example of a minimal dockerimage component
It specifies the type of the component, dockerimage and the image attribute names the image to be used for the component using the usual docker naming conventions, that is, the above type attribute is equal to docker.io/library/golang:latest.
A dockerimage component has many features that enable augmenting the image with additional resources and information needed for meaningful integration of the tool provided by the image with Red Hat CodeReady Workspaces.
3.5.5.2.10.1. Mounting project sources
For the dockerimage component to have access to the project sources, you must set the mountSources attribute to true.
The sources is mounted on a location stored in the CHE_PROJECTS_ROOT environment variable that is made available in the running container of the image. This location defaults to /projects.
3.5.5.2.10.2. Container Entrypoint
The command attribute of the dockerimage along with other arguments, is used to modify the entrypoint command of the container created from the image. In Red Hat CodeReady Workspaces the container is needed to run indefinitely so that you can connect to it and execute arbitrary commands in it at any time. Because the availability of the sleep command and the support for the infinity argument for it is different and depends on the base image used in the particular images, CodeReady Workspaces cannot insert this behavior automatically on its own. However, you can take advantage of this feature to, for example, start up necessary servers with modified configurations, etc.
3.5.5.2.10.3. Persistent Storage
Docker image tools can specify the custom volumes to be mounted on specific locations within the image. Note that the volume names are shared across all components and therefore this mechanism can also be used to share file systems between components.
To specify a container(s) memory limit for dockerimage, chePlugin, cheEditor, kubernetes, openshift, use the memoryLimit parameter:
This limit will be applied to every container of the given component.
3.5.5.2.12. Environment variables
Red Hat CodeReady Workspaces allows you to configure Docker containers by modifying the environment variables available in component’s configuration. Environment variables are supported by the following component types: dockerimage, chePlugin, cheEditor, kubernetes, openshift. In case component has multiple containers, environment variables will be provisioned to each container.
- The variable expansion works between the environment variables, and it uses the OpenShift convention for the variable references.
- The predefined variables are available for use in custom definitions.
The following environment variables are pre-set by the CodeReady Workspaces server:
-
CHE_PROJECTS_ROOT: The location of the projects directory (note that if the component does not mount the sources, the projects will not be accessible). -
CHE_WORKSPACE_LOGS_ROOT__DIR: The location of the logs common to all the components. If the component chooses to put logs into this directory, the log files are accessible from all other components. -
CHE_API_INTERNAL: The URL to the CodeReady Workspaces server API endpoint used for communication with the CodeReady Workspaces server. -
CHE_WORKSPACE_ID: The ID of the current workspace. -
CHE_WORKSPACE_NAME: The name of the current workspace. -
CHE_WORKSPACE_NAMESPACE: The namespace of the current workspace. -
CHE_MACHINE_TOKEN: The token used to authenticate the request against the CodeReady Workspaces server. -
CHE_MACHINE_AUTH_SIGNATUREPUBLICKEY: The public key used to secure the communication with the CodeReady Workspaces server. -
CHE_MACHINE_AUTH_SIGNATURE__ALGORITHM: The encryption algorithm used in the secured communication with the CodeReady Workspaces server.
A devfiles may only need the CHE_PROJECTS_ROOT environment variable to locate the cloned projects in the component’s container. More advanced devfiles might use the CHE_WORKSPACE_LOGS_ROOT__DIR environment variable to read the logs (for example as part of a devfile command). The environment variables used to securely access the CodeReady Workspaces server are mostly out of scope for devfiles and are present only for advanced use cases that are usually handled by the CodeReady Workspaces plug-ins.
3.5.5.2.12.1. Endpoints
You can specify the endpoints that the docker image exposes. These endpoints can be made accessible to the users if the CodeReady Workspaces cluster is running using a OpenShift ingress or an OpenShift route and to the other components within the workspace. You can create an endpoint for your application or database, if your application or database server is listening on a port and you want to be able to directly interact with it yourself or you want other components to interact with it.
Endpoints have a number of properties as shown in the following example:
Here, there are two dockerimages, each defining a single endpoint. Endpoint is an accessible port that can be made accessible inside the workspace or also publicly (example, from the UI). Each endpoint has a name and port, which is the port on which certain server running inside the container is listening. The following are a few attributes that you can set on the endpoint:
-
discoverable: If an endpoint is discoverable, it means that it can be accessed using its name as the hostname within the workspace containers (in the OpenShift parlance, a service is created for it with the provided name). -
public: The endpoint will be accessible outside of the workspace, too (such endpoint can be accessed from the CodeReady Workspaces user interface). Such endpoints are publicized always on port80or443(depending on whethertlsis enabled in CodeReady Workspaces). -
protocol: For public endpoints the protocol is a hint to the UI on how to construct the URL for the endpoint access. Typical values arehttp,https,ws,wss. -
secure: A boolean (defaulting tofalse) specifying whether the endpoint is put behind a JWT proxy requiring a JWT workspace token to grant access. -
path: The URL of the endpoint -
unsecuredPaths: A comma-separated list of paths in the endpoint that should not be secured, even if thesecureattribute is set totrue cookiesAuthEnabled: When set totrue(the default isfalse), the JWT workspace token is automatically fetched and included in a workspace-specific cookie to allow requests to pass through the JWT proxy.WarningThis setting potentially allows a CSRF attack when used in conjunction with a server using POST requests.
When starting a new server within a component, CodeReady Workspaces autodetects this, and the UI offers to automatically expose this port as a public port. This is useful for debugging a web application, for example. It is not possible to do this for servers that autostart with the container (for example, a database server). For such components, specify the endpoints explicitly.
3.5.5.2.12.2. OpenShift resources
Complex deployments can be described using OpenShift resource lists that can be referenced in the devfile. This makes them a part of the workspace.
- Because a workspace is internally represented as a single deployment, all resources from the OpenShift list are merged into that single deployment.
- Be careful when designing such lists because this can result in name conflicts and other problems.
-
Only the following subset of the OpenShift objects are supported:
deployments,pods,services,persistent volume claims,secrets, andconfig maps. Kubernetes Ingresses are ignored, but OpenShift routes are supported. A workspace created from a devfile using any other object types fails to start. - When running CodeReady Workspaces on a OpenShift cluster, only OpenShift lists are supported. When running CodeReady Workspaces on an OpenShift cluster, both OpenShift lists are supported.
The preceding component references a file that is relative to the location of the devfile itself. Meaning, this devfile is only loadable by a CodeReady Workspaces factory to which you supply the location of the devfile and therefore it is able to figure out the location of the referenced OpenShift resource list.
The following is an example of the postgres.yaml file.
For a basic example of a devfile with an associated OpenShift list, see web-nodejs-with-db-sample on redhat-developer GitHub.
If you use generic or large resource lists from which you will only need a subset of resources, you can select particular resources from the list using a selector (which, as the usual OpenShift selectors, works on the labels of the resources in the list).
Additionally, it is also possible to modify the entrypoints (command and arguments) of the containers present in the resource list. For details of the advanced use case, see the reference (TODO: link).
3.5.5.3. Adding commands to a devfile
A devfile allows to specify commands to be available for execution in a workspace. Every command can contain a subset of actions, which are related to a specific component in whose container it will be executed.
You can use commands to automate the workspace. You can define commands for building and testing your code, or cleaning the database.
The following are two kinds of commands:
- CodeReady Workspaces specific commands: You have full control over what component executes the command.
-
Editor specific commands: You can use the editor-specific command definitions (example:
tasks.jsonandlaunch.jsonin Che-Theia, which is equivalent to how these files work in VS Code).
3.5.5.3.1. CodeReady Workspaces-specific commands
Each che-specific command has an action attribute that is a command to execute and a component attribute that specifies the container in which the command should be executed. The commands are run using the default shell in the container.
+
-
If a component to be used in a command must have an alias. This alias is used to reference the component in the command definition. Example:
alias: go-cliin the component definition andcomponent: go-cliin the command definition. This ensures that Red Hat CodeReady Workspaces can find the correct container to run the command in. - A command can have only one action.
3.5.5.3.2. Editor-specific commands
If the editor in the workspace supports it, the devfile can specify additional configuration in the editor-specific format. This is dependent on the integration code present in the workspace editor itself and so is not a generic mechanism. However, the default Che-Theia editor within Red Hat CodeReady Workspaces is equipped to understand the tasks.json and launch.json files provided in the devfile.
This example shows association of a tasks.json file with a devfile. Notice the vscode-task type that instructs the Che-Theia editor to interpret this command as a tasks definition and referenceContent attribute that contains the contents of the file itself. You can also save this file separately from the devfile and use reference attribute to specify a relative or absolute URL to it.
In addition to the vscode-task commands, the Che-Theia editor understands vscode-launch type using which you can specify the launch configurations.
3.5.5.3.3. Command preview URL
This is a Beta feature. Definition may change in future releases without any warning. It’s available in devfile version 1.0.1-beta.
It is possible to specify a preview URL for commands that expose web UI. This URL is offered for opening when the command is executed.
The example above opens http://__<server-domain>__/myweb, where <server-domain> is the URL to the dynamically created OpenShift Ingress or OpenShift Route.
By default, a notification is displayed to ask the user how the URL should be opened. To specify the preferred way of previewing a service URL, use preferences.
-
Open CodeReady Workspaces preferences in File → Settings → Open Preferences and find
che.task.preview.notificationsin the Che section. Choose from the list of possible values:
-
on— enables a notification to ask the user how the URL should be opened -
alwaysPreview— the preview URL opens automatically in the Preview panel as soon as a task is running -
alwaysGoTo— the preview URL opens automatically in a separate browser tab as soon as a task is running -
off— disables opening the preview URL (automatically and with a notification)
-
3.5.5.4. Devfile attributes
Devfile attributes can be used to configure various features.
3.5.5.4.1. Attribute: editorFree
When an editor is not specified in a devfile, a default is provided. When no editor is needed, the editorFree attribute should be used. The default value is false, and it means that the devfile needs the default editor to be provisioned.
Example of a devfile without an editor
3.5.5.4.2. Attribute: persistVolumes (ephemeral mode)
By default, volumes and PVCs specified in a devfile are bound to a host folder to persist data even after a container restart. Sometimes, it may be necessary to disable data persistence, such as when volume backend is slow, and it is needed to make workspace faster. To achieve it, the persistVolumes devfile attribute should be used. The default value is true, and in case of false, emptyDir volumes will be used for configured volumes and PVC.
Example of a devfile with ephemeral mode enabled
The following table lists the objects that are partially supported in Red Hat CodeReady Workspaces 2.0:
| Object | API | OpenShift Infra | OpenShift Infra | Notes |
|---|---|---|---|---|
| Pod | OpenShift | Yes | Yes | - |
| Deployment | OpenShift | Yes | Yes | - |
| ConfigMap | OpenShift | Yes | Yes | - |
| PVC | OpenShift | Yes | Yes | - |
| Secret | OpenShift | Yes | Yes | - |
| Service | OpenShift | Yes | Yes | - |
| Ingress | OpenShift | Yes | No |
Minishift allows you to create Ingress and it works when the host is specified (OpenShift creates a route for it). But, the |
| Route | OpenShift | No | Yes | The OpenShift recipe must be made compatible with the OpenShift Infrastructure and, instead of the provided route, generate Ingress. |
| Template | OpenShift | Yes | Yes | The OpenShift API does not support templates. A workspace with a template in the recipe starts successfully and the default parameters are resolved. |
Additional resources
This section describes how to manually convert an old CodeReady Workspaces 1.2 workspace configuration to a CodeReady Workspaces 2.0 devfile. The following are the benefits of using a CodeReady Workspaces 2.0 devfile:
- Using a portable file that works with any installation of CodeReady Workspaces; nothing needs to be changed on the server to start a workspace.
-
Configuration can be stored in project repository and automatically used by CodeReady Workspaces to start a workspace. To start a workspace, specify a devfile using the following format:
<che-instance-domain>/f?url=path, for example:
https://che.openshift.io/f?url=https://raw.githubusercontent.com/redhat-developer/devfile/master/getting-started/vertx/devfile.yaml
https://che.openshift.io/f?url=https://raw.githubusercontent.com/redhat-developer/devfile/master/getting-started/vertx/devfile.yamlThis creates and starts a new workspace based on the devfile defined in the URL attribute. * A human-readable YAML format for all content.
Below, there is a comparison of a CodeReady Workspaces 1.2 workspace configuration and a CodeReady Workspaces 2.0 devfile. Both are Java Vert.x stacks with a default project and default settings:
CodeReady Workspaces 1.2 configuration file
CodeReady Workspaces 2.0 devfile
This section describes how to convert a CodeReady Workspaces 1.2 workspace to a CodeReady Workspaces 2.0 devfile. The result is a basic CodeReady Workspaces 2.0 devfile that can be used for further workspace creation.
Prerequisites
- A running instance of Red Hat CodeReady Workspaces. To install an instance of Red Hat CodeReady Workspaces, see the CodeReady Workspaces 2.0 Installation Guide.
- An existing workspace defined on this instance of Red Hat CodeReady Workspaces Section 3.1, “Creating and configuring a new CodeReady Workspaces 2.0 workspace”.
Procedure
To convert a CodeReady Workspaces 1.2 workspace to a CodeReady Workspaces 2.0 devfile:
- Open an old CodeReady Workspaces 1.2 configuration file to identify which CodeReady Workspaces 1.2 stack is used in the workspace. Below, there is a detailed guide for Section 3.6.2, “Accessing a CodeReady Workspaces 1.2 workspace configuration”.
Create a new workspace from the CodeReady Workspaces 2.0 devfile that corresponds to the CodeReady Workspaces 1.2 stack.
Expand Table 3.5. CodeReady Workspaces 2.0 devfile corresponding to the respective CodeReady Workspaces 1.2 stacks. CodeReady Workspaces 1.2 stacks CodeReady Workspaces 2.0 devfile Apache Camel based projects,
Apache Camel based projects on CodeReady Workspaces 2.0Apache Camel based on Spring Boot
.NET,
.NET Core with Che-Theia IDE.NET Core
Go,
CentOS Go,
Go with Che-Theia IDEGo
Java Gradle
Java Gradle
Blank,
Java,
Java-MySQL,
Red Hat CodeReady Workspaces,
Java CentOSJava Maven
Node,
CentOS nodejsNodeJS Express Web Application
Python,
Python with Che-Theia IDEPython
Eclipse Vert.x
Java Vert.x
PHP
PHP Simple
Spring Boot
Java Spring Boot
By default, the example project is added to the workspace. To remove the default project, click the button:
To import a custom project that was used in CodeReady Workspaces 1.2 workspace, click the Add or Import Project and select Git or GitHub option:
-
Various commands can be added to devfiles of imported projects, for example,
run,build, andtest. The commands are then accessible from the IDE when a workspace is started. Custom commands and other devfile components can be added in the Devfile configuration. Click the button.
Select the Devfile tab to update the configuration. Machine servers in CodeReady Workspaces 1.2 workspaces can be specified as components endpoints in a Devfile and CodeReady Workspaces 1.2 installers as components of type chePlugin. See the Devfile specification for the detailed information about the supported properties and attributes.
- Once the Devfile configuration is completed, click the button to start a newly created CodeReady Workspaces 2.0 workspace.


CodeReady Workspaces 1.2 workspace configuration is not supported in CodeReady Workspaces 2.0 but can be accessed for further conversion to a devfile.
Prerequisites
- A running instance of Red Hat CodeReady Workspaces. To install an instance of Red Hat CodeReady Workspaces, see the CodeReady Workspaces 2.0 Installation Guide.
- An existing workspace defined on this instance of Red Hat CodeReady Workspaces Section 3.1, “Creating and configuring a new CodeReady Workspaces 2.0 workspace”.
Procedure
To access the CodeReady Workspaces 1.2 workspace configuration:
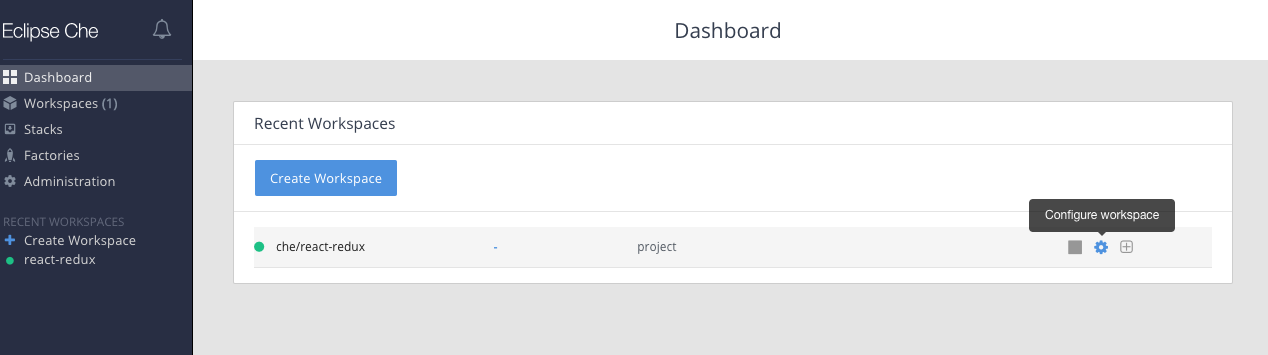
- In the Dashboard, click the Workspaces menu to open the workspaces list and locate the workspace to migrate to CodeReady Workspaces 2.0.
In the Actions column, click the Configure workspace icon. The raw workspace configuration is available under the Config tab.


3.7. Importing a OpenShift application into a workspace
This section describes how to import a OpenShift application into a workspace.
For demonstration purposes, the section uses a sample OpenShift application having the following two pods:
- A NodeJS application specified by this nodejs-app.yaml
- A MongoDB pod specified by this mongo-db.yaml
To run the application on a OpenShift cluster:
node=https://raw.githubusercontent.com/redhat-developer/devfile/master/samples/web-nodejs-with-db-sample/nodejs-app.yaml && \
mongo=https://raw.githubusercontent.com/redhat-developer/devfile/master/samples/web-nodejs-with-db-sample/mongo-db.yaml && \
oc apply -f ${mongo} && \
oc apply -f ${node}
$ node=https://raw.githubusercontent.com/redhat-developer/devfile/master/samples/web-nodejs-with-db-sample/nodejs-app.yaml && \
mongo=https://raw.githubusercontent.com/redhat-developer/devfile/master/samples/web-nodejs-with-db-sample/mongo-db.yaml && \
oc apply -f ${mongo} && \
oc apply -f ${node}To deploy a new instance of this application in a workspace, use one of the following three scenarios:
- Starting from scratch: Section 3.7.1, “Including a OpenShift application in a workspace devfile definition”
- Modifying an existing workspace: Section 3.7.2, “Adding a OpenShift application to an existing workspace using the dashboard”
- From a running application: Section 3.7.3, “Generating a devfile from an existing OpenShift application”
This procedure demonstrates how to define the CodeReady Workspaces 2.0 workspace devfile by OpenShift application.
Prerequisites
- A running instance of Red Hat CodeReady Workspaces. To install an instance of Red Hat CodeReady Workspaces, see the CodeReady Workspaces 2.0 Installation Guide.
-
crwctlmanagement tool is installed. See the CodeReady Workspaces 2.0 Installation Guide
The devfile format is used to define a workspace, and its format is described in the Section 3.5, “Making a workspace portable using a devfile” section. The following is an example of the simplest devfile:
apiVersion: 1.0.0
metadata:
 name: minimal-workspace
apiVersion: 1.0.0
metadata:
name: minimal-workspaceOnly the name (minimal-workspace) is specified. After the CodeReady Workspaces server processes this devfile, the devfile is converted to a minimal workspace that only has the default editor (Che-Theia) and the default editor plug-ins (example: the terminal).
Use the OpenShift type of components in the devfile to add OpenShift applications to a workspace.
For example, the user can embed the NodeJS-Mongo application in the minimal-workspace defined in this paragraph by adding a components section.
Note that the sleep infinity command is added as the entrypoint of the Node.js application. This prevents the application from starting at the workspace start phase. It allows the user to start it when needed for testing or debugging purposes.
To make it easier for a developer to test the application, add the commands in the devfile:
Use this devfile to create and start a workspace with the crwctl command:
crwctl worspace:start --devfile <devfile-path>
$ crwctl worspace:start --devfile <devfile-path>
The run command added to the devfile is available as a task in Che-Theia from the command palette. When executed, the command starts the NodeJS application.
This procedure demonstrates how to modify an existing workspace and import the OpenShift application using the newly created devfile.
Prerequisites
- A running instance of Red Hat CodeReady Workspaces. To install an instance of Red Hat CodeReady Workspaces, see the CodeReady Workspaces 2.0 Installation Guide.
- An existing workspace defined on this instance of Red Hat CodeReady Workspaces Section 3.1, “Creating and configuring a new CodeReady Workspaces 2.0 workspace”.
Procedure
After the creation of a workspace, use the Workspace menu and then the Configure workspace icon to manage the workspace.
To modify the workspace details, use the Devfile tab. The workspace details are displayed in this tab in the devfile format.
- To add a OpenShift component, use the Devfile editor on the dashboard.
- For the changes to take effect, save the devfile and restart the workspace.

This procedure demonstrates how to generate a devfile from an existing OpenShift application using the crwctl tool.
Prerequisites
- A running instance of Red Hat CodeReady Workspaces. To install an instance of Red Hat CodeReady Workspaces, see the CodeReady Workspaces 2.0 Installation Guide.
-
crwctlmanagement tool is installed. See the CodeReady Workspaces 2.0 Installation Guide
Procedure
Use the
crwctl devfile:generatecommand to generate a devfile:crwctl devfile:generate
$ crwctl devfile:generateCopy to Clipboard Copied! Toggle word wrap Toggle overflow The user can also use the
crwctl devfile:generatecommand to generate a devfile from, for example, theNodeJS-MongoDBapplication.The following example generates a devfile that includes the
NodeJScomponent:Copy to Clipboard Copied! Toggle word wrap Toggle overflow The NodeJS application YAML definition is included in the devfile, inline, using the
referenceContentattribute.To include support for a language, use the
--languageparameter:Copy to Clipboard Copied! Toggle word wrap Toggle overflow
-
Use the generated devfile to start a workspace with
crwctl.
3.8. Remotely accessing workspaces
This section describes how to remotely access workspaces outside of the browser.
workspaces exist as containers and are, by default, modified from a browser window. In addition to this, there are the following methods of interacting with a workspace:
-
Opening a command line in the workspace container using the OpenShift command-line tool,
kubectl -
Uploading and downloading files using the
kubectltool
To access workspaces remotely using OpenShift command-line tool (kubectl), follow the instructions in this section.
The kubectl tool is used in this section to open a shell and manage files in a workspace. Alternatively, it is possible to use the oc OpenShift command-line tool.
Prerequisites
-
The
kubectlbinary from the OpenShift website. Verify the installation of
kubectlusing theoc versioncommand:oc version Client Version: version.Info{Major:"1", Minor:"15", GitVersion:"v1.15.0", GitCommit:"e8462b5b5dc2584fdcd18e6bcfe9f1e4d970a529", GitTreeState:"clean", BuildDate:"2019-06-19T16:40:16Z", GoVersion:"go1.12.5", Compiler:"gc", Platform:"darwin/amd64"} Server Version: version.Info{Major:"1", Minor:"15", GitVersion:"v1.15.0", GitCommit:"e8462b5b5dc2584fdcd18e6bcfe9f1e4d970a529", GitTreeState:"clean", BuildDate:"2019-06-19T16:32:14Z", GoVersion:"go1.12.5", Compiler:"gc", Platform:"linux/amd64"}$ oc version Client Version: version.Info{Major:"1", Minor:"15", GitVersion:"v1.15.0", GitCommit:"e8462b5b5dc2584fdcd18e6bcfe9f1e4d970a529", GitTreeState:"clean", BuildDate:"2019-06-19T16:40:16Z", GoVersion:"go1.12.5", Compiler:"gc", Platform:"darwin/amd64"} Server Version: version.Info{Major:"1", Minor:"15", GitVersion:"v1.15.0", GitCommit:"e8462b5b5dc2584fdcd18e6bcfe9f1e4d970a529", GitTreeState:"clean", BuildDate:"2019-06-19T16:32:14Z", GoVersion:"go1.12.5", Compiler:"gc", Platform:"linux/amd64"}Copy to Clipboard Copied! Toggle word wrap Toggle overflow For versions 1.5.0 or higher, proceed with the steps in this section.
Procedure
-
Use the
execcommand to open a remote shell. To find the name of the OpenShift namespace and pod that runs the workspace:
oc get pod -l che.workspace_id --all-namespaces
NAMESPACE   NAME                                               READY   STATUS    RESTARTS   AGE
che         workspace7b2wemdf3hx7s3ln.maven-74885cf4d5-kf2q4   4/4     Running   0          6m4s
$ oc get pod -l che.workspace_id --all-namespaces
NAMESPACE   NAME                                               READY   STATUS    RESTARTS   AGE
che         workspace7b2wemdf3hx7s3ln.maven-74885cf4d5-kf2q4   4/4     Running   0          6m4s
Copy to Clipboard Copied! Toggle word wrap Toggle overflow
In the example above, the pod name is workspace7b2wemdf3hx7s3ln.maven-74885cf4d5-kf2q4, and the namespace is workspaces.
To find the name of the container:
NAMESPACE=che
POD=workspace7b2wemdf3hx7s3ln.maven-74885cf4d5-kf2q4
oc get pod ${POD} -o custom-columns=CONTAINERS:.spec.containers[*].name
CONTAINERS
maven,che-machine-execpau,theia-ide6dj,vscode-javaw92
$ NAMESPACE=che $ POD=workspace7b2wemdf3hx7s3ln.maven-74885cf4d5-kf2q4 $ oc get pod ${POD} -o custom-columns=CONTAINERS:.spec.containers[*].name CONTAINERS maven,che-machine-execpau,theia-ide6dj,vscode-javaw92Copy to Clipboard Copied! Toggle word wrap Toggle overflow When you have the namespace, pod name, and the name of the container, use the
kubectlcommand to open a remote shell:NAMESPACE=che POD=workspace7b2wemdf3hx7s3ln.maven-74885cf4d5-kf2q4 CONTAINER=maven oc exec -ti -n ${NAMESPACE} ${POD} -c ${CONTAINER} bash user@workspace7b2wemdf3hx7s3ln $$ NAMESPACE=che $ POD=workspace7b2wemdf3hx7s3ln.maven-74885cf4d5-kf2q4 $ CONTAINER=maven $ oc exec -ti -n ${NAMESPACE} ${POD} -c ${CONTAINER} bash user@workspace7b2wemdf3hx7s3ln $Copy to Clipboard Copied! Toggle word wrap Toggle overflow From the container, execute the
buildandruncommands (as if from the workspace terminal):user@workspace7b2wemdf3hx7s3ln $ mvn clean install [INFO] Scanning for projects... (...)
user@workspace7b2wemdf3hx7s3ln $ mvn clean install [INFO] Scanning for projects... (...)Copy to Clipboard Copied! Toggle word wrap Toggle overflow
Additional resources
-
For more about
kubectl, see the OpenShift documentation.
This procedure describes how to use the kubectl tool to download or upload files remotely from or to an Red Hat CodeReady Workspaces workspace.
Prerequisites
- A running instance of Red Hat CodeReady Workspaces. To install an instance of Red Hat CodeReady Workspaces, see the CodeReady Workspaces 2.0 Installation Guide.
- Remote access to the workspace you intend to modify. For instructions see Section 3.8.1, “Remotely accessing workspaces using the OpenShift command-line tool”.
-
The
kubectlbinary from the OpenShift website. -
Verify the installation of
kubectlusing theoc versioncommand:
Procedure
To download a local file named
downloadme.txtfrom a workspace container to the current home directory of the user, use the following in the CodeReady Workspaces remote shell.REMOTE_FILE_PATH=/projects/downloadme.txt NAMESPACE=che POD=workspace7b2wemdf3hx7s3ln.maven-74885cf4d5-kf2q4 CONTAINER=maven oc cp ${NAMESPACE}/${POD}:${REMOTE_FILE_PATH} ~/downloadme.txt -c ${CONTAINER}$ REMOTE_FILE_PATH=/projects/downloadme.txt $ NAMESPACE=che $ POD=workspace7b2wemdf3hx7s3ln.maven-74885cf4d5-kf2q4 $ CONTAINER=maven $ oc cp ${NAMESPACE}/${POD}:${REMOTE_FILE_PATH} ~/downloadme.txt -c ${CONTAINER}Copy to Clipboard Copied! Toggle word wrap Toggle overflow -
To upload a local file named
uploadme.txtto a workspace container in the/projectsdirectory:
LOCAL_FILE_PATH=./uploadme.txt
NAMESPACE=che
POD=workspace7b2wemdf3hx7s3ln.maven-74885cf4d5-kf2q4
CONTAINER=maven
oc cp ${LOCAL_FILE_PATH} ${NAMESPACE}/${POD}:/projects -c ${CONTAINER}
$ LOCAL_FILE_PATH=./uploadme.txt
$ NAMESPACE=che
$ POD=workspace7b2wemdf3hx7s3ln.maven-74885cf4d5-kf2q4
$ CONTAINER=maven
$ oc cp ${LOCAL_FILE_PATH} ${NAMESPACE}/${POD}:/projects -c ${CONTAINER}Using the preceding steps, the user can also download and upload directories.
Chapter 4. Customizing developer environments
Red Hat CodeReady Workspaces is an extensible and customizable developer-workspaces platform.
There are three different ways to extend Red Hat CodeReady Workspaces:
- Alternative IDEs allow to provide specialized tooling within Red Hat CodeReady Workspaces. For example, a Jupyter notebook for a data analyst. Alternate IDEs can be based on Eclipse Theia or any other web IDE. The default IDE in Red Hat CodeReady Workspaces is Che-Theia.
- Che-Theia plug-ins add capabilities to the Che-Theia IDE. They rely on plug-in APIs that are compatible with Visual Studio Code. The plug-ins are isolated from the IDE itself. They can be packaged as files or as containers to provide their own dependencies.
- Stacks are pre-configured workspaces with a dedicated set of tools, which cover different developer personas. For example, it is possible to pre-configure a workbench for a tester with only the tools needed for their purposes.
Figure 4.1. CodeReady Workspaces extensibility
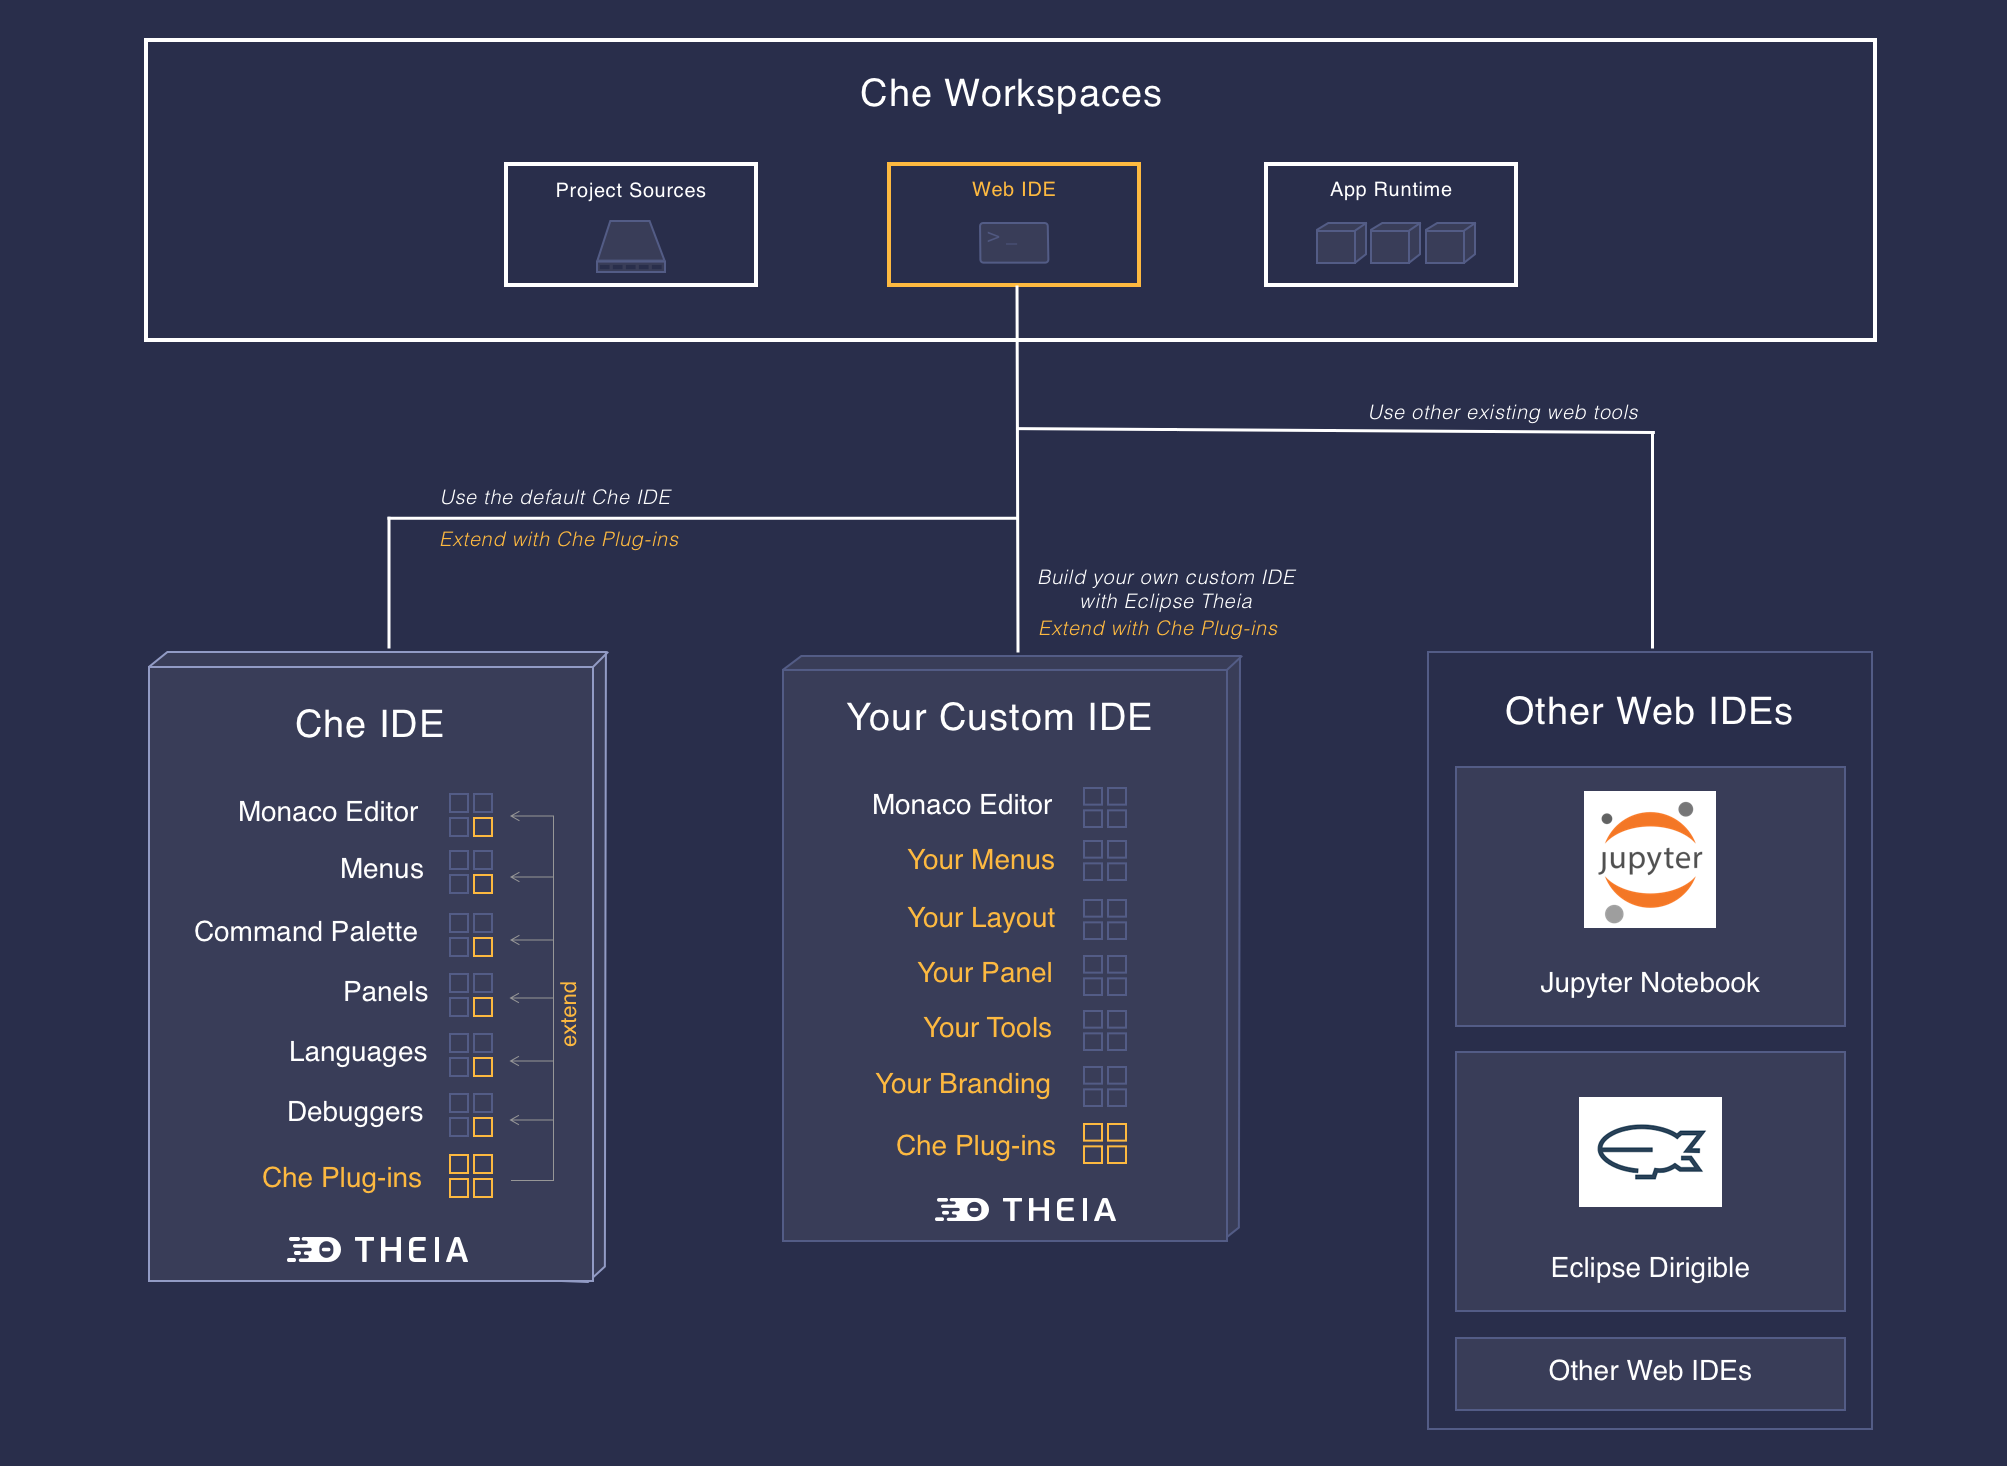
Extending Red Hat CodeReady Workspaces can be done entirely using Red Hat CodeReady Workspaces. Since version 7, Red Hat CodeReady Workspaces provides a self-hosting mode.
4.1. What is a Che-Theia plug-in
A Che-Theia plug-in is an extension of the development environment isolated from the IDE. Plug-ins can be packaged as files or containers to provide their own dependencies.
Extending Che-Theia using plug-ins can enable the following capabilities:
- Language support: Extend the supported languages by relying on the Language Server Protocol.
- Debuggers: Extend debugging capabilities with the Debug Adapter Protocol.
- Development Tools: Integrate your favorite linters, and as testing and performance tools.
- Menus, panels, and commands: Add your own items to the IDE components.
- Themes: Build custom themes, extend the UI, or customize icon themes.
- Snippets, formatters, and syntax highlighting: Enhance comfort of use with supported programming languages.
- Keybindings: Add new keymaps and popular keybindings to make the environment feel natural.
4.1.1. Features and benefits of Che-Theia plug-ins
| Features | Description | Benefits |
|---|---|---|
| Fast Loading | Plug-ins are loaded at runtime and are already compiled. IDE is loading the plug-in code. | Avoid any compilation time. Avoid post-installation steps. |
| Secure Loading | Plug-ins are loaded separately from the IDE. The IDE stays always in a usable state. | Plug-ins do not break the whole IDE if it has bugs. Handle network issue. |
| Tooling Dependencies | Dependencies for the plug-in are packaged with the plug-in in its own container. | No-installation for tools. Dependencies running into container. |
| Code isolation | Guarantee that plug-ins cannot block the main functions of the IDE like opening a file or typing | Plug-ins are running into separate threads. Avoid dependencies mismatch. |
| VS Code Extension Compatibility | Extend the capabilities of the IDE with existing VS Code Extensions. | Target multiple platform. Allow easy discovery of Visual Studio Code Extension with required installation. |
4.1.2. Che-Theia plug-in concept in detail
Red Hat CodeReady Workspaces provides a default web IDE for workspaces: Che-Theia. It is based on Eclipse Theia. It is a slightly different version than the plain Eclipse Theia one because there are functionalities that have been added based on the nature of the Red Hat CodeReady Workspaces workspaces. This version of Eclipse Theia for CodeReady Workspaces is called Che-Theia.
You can extend the IDE provided with Red Hat CodeReady Workspaces by building a Che-Theia plug-in. Che-Theia plug-ins are compatible with any other Eclipse Theia-based IDE.
4.1.2.1. Client-side and server-side Che-Theia plug-ins
The Che-Theia editor plug-ins let you add languages, debuggers, and tools to your installation to support your development workflow. Plug-ins run when the editor completes loading. If a Che-Theia plug-in fails, the main Che-Theia editor continues to work.
Che-Theia plug-ins run either on the client side or on the server side. This is a scheme of the client and server-side plug-in concept:
Figure 4.2. Client and server-side Che-Theia plug-ins
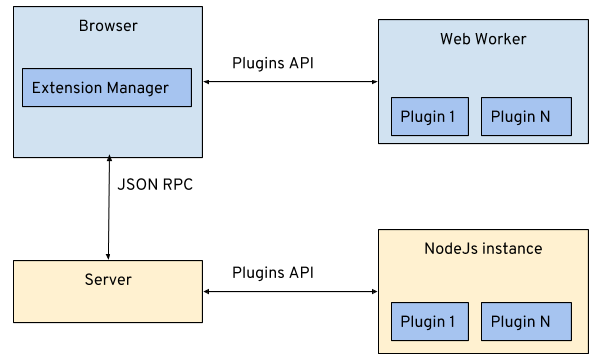
The same Che-Theia plug-in API is exposed to plug-ins running on the client side (Web Worker) or the server side (Node.js).
4.1.2.2. Che-Theia plug-in APIs
For the purpose of providing tool isolation and easy extensibility in Red Hat CodeReady Workspaces, the Che-Theia IDE has a set of plug-in APIs. The APIs are compatible with Visual Studio Code extension APIs. In most cases, Che-Theia can run VS Code extensions as its own plug-ins.
When developing a plug-in that depends on or interacts with components of workspaces (containers, preferences, factories), use the CodeReady Workspaces APIs embedded in Che-Theia.
4.1.2.3. Che-Theia plug-in capabilities
Che-Theia plug-ins have the following capabilities:
| Plug-in | Description | Repository |
|---|---|---|
| CodeReady Workspaces Extended Tasks | Handles the CodeReady Workspaces commands and provides the ability to start those into a specific container of the workspace. | |
| CodeReady Workspaces Extended Terminal | Allows to provide terminal for any of the containers of the workspace. | |
| CodeReady Workspaces Factory | Handles the Red Hat CodeReady Workspaces Factories | |
| CodeReady Workspaces Container | Provides a container view that shows all the containers that are running in the workspace and allows to interact with them. | |
| Dashboard | Integrates the IDE with the Dashboard and facilitate the navigation. | |
| CodeReady Workspaces APIs | Extends the IDE APIs to allow interacting with CodeReady Workspaces-specific components (workspaces, preferences). |
4.1.2.4. VS Code extensions and Eclipse Theia plug-ins
A Che-Theia plug-in can be based on a VS Code extension or an Eclipse Theia plug-in.
- A Visual Studio Code extension
- To repackage a VS Code extension as a Che-Theia plug-in with its own set of dependencies, package the dependencies into a container. This ensures that Red Hat CodeReady Workspaces users do not need to install the dependencies when using the extension. See Section 4.3, “Using a Visual Studio Code extension in CodeReady Workspaces”.
- An Eclipse Theia plug-in
- You can build a Che-Theia plug-in by implementing an Eclipse Theia plug-in and packaging it to Red Hat CodeReady Workspaces.
Additional resources
4.1.3. Che-Theia plug-in metadata
Che-Theia plug-in metadata is information about individual plug-ins for the plug-in registry.
4.1.3.1. meta.yaml
The Che-Theia plug-in metadata is defined in a meta.yaml file for the specific plug-in.
Interface for a Che-Theia plug-in metadata object
The most important part of the object is the url, which defines the location of plug-in configuration. Typically, it is a tar archive with the plug-in meta.yaml file.
When adding a VS Code extension from the oficial marketplace using its ID, the url field should be replaced with an attributes section that would contain extension and container-image fields:
Interface for a VS Code plug-in metadata object
4.1.3.2. che-plugin.yaml
The most detailed information about a plug-in is in the che-plugin.yaml file. For example:
che-plugin.yaml file for the che-editor-theia plug-in
che-plugin.yaml file for the che-machine-exec plug-in
4.1.4. Che-Theia plug-in lifecycle
When a user is starting a workspace, the following procedure is followed:
- CodeReady Workspaces master checks for plug-ins to start from the workspace definition.
- Plug-in metadata is retrieved, and the type of each plug-in is recognized.
- A broker is selected according to the plug-in type.
- The broker processes the installation and deployment of the plug-in (the installation process is different for each broker).
There are different types of plug-ins. A broker ensures all installation requirements are met for a plug-in to deploy correctly.
Figure 4.3. Che-Theia plug-in lifecycle
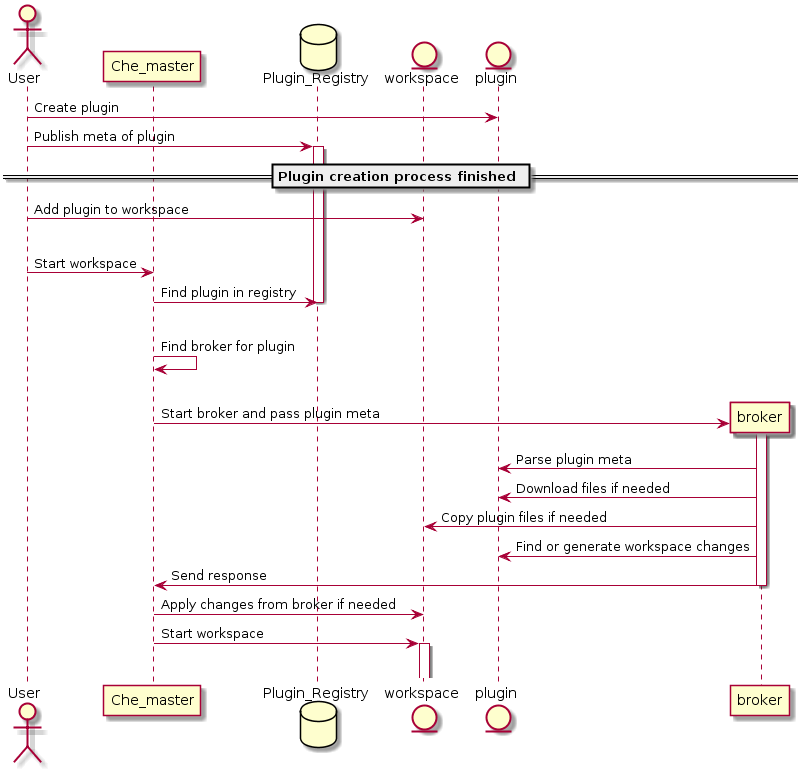
Before a workspace is launched, CodeReady Workspaces master starts containers for the workspace:
-
The Che-Theia plug-in broker extracts the plug-in (from the
.theiafile) to get the sidecar containers that the plug-in needs. - The broker sends the appropriate container informations to CodeReady Workspaces master.
- The broker copies the Che-Theia plug-in to a volume to have it available for the Che-Theia editor container.
- workspace master then starts all the containers of the workspace.
- Che-Theia is started in its own container and checks the correct folder to load the plug-ins.
Che-Theia plug-in lifecycle:
-
When a user is opening a browser tab or window with Che-Theia, Che-Theia starts a new plug-in session (browser or remote TODO: 'what is remote in this context?'). Every Che-Theia plug-in is notified that a new session has been started (the
start()function of the plug-in triggered). - A Che-Theia plug-in session is running and interacting with the Che-Theia backend and frontend.
-
When the user is closing the browser tab or there is a timeout, every plug-in is notified (the
stop()function of the plug-in triggered).
4.1.5. Embedded and remote Che-Theia plug-ins
Developer workspaces in Red Hat CodeReady Workspaces provide all dependencies needed to work on a project. The application includes the dependencies needed by all the tools and plug-ins used.
There are two different ways a Che-Theia plug-in can run. This is based on the dependencies that are needed for the plug-in: embedded (or local) and remote.
4.1.5.1. Embedded (or local) plug-ins
The plug-in does not have specific dependencies - it only uses a Node.js runtime, and it runs in the same container as the IDE. The plug-in is injected into the IDE.
Examples:
- Code linting
- New set of commands
- New UI components
To include a Che-Theia plug-in as embedded, define a URL to the plug-in binary (the .theia archive) in the meta.yaml file. In the case of a VS Code extension, provide the extension ID from the Visual Studio Code marketplace (see Section 4.3, “Using a Visual Studio Code extension in CodeReady Workspaces”).
When starting a workspace, CodeReady Workspaces downloads and unpacks the plug-in binaries and includes them in the Che-Theia editor container. The Che-Theia editor initializes the plug-ins when it starts.
Figure 4.4. Local Che-Theia plug-in
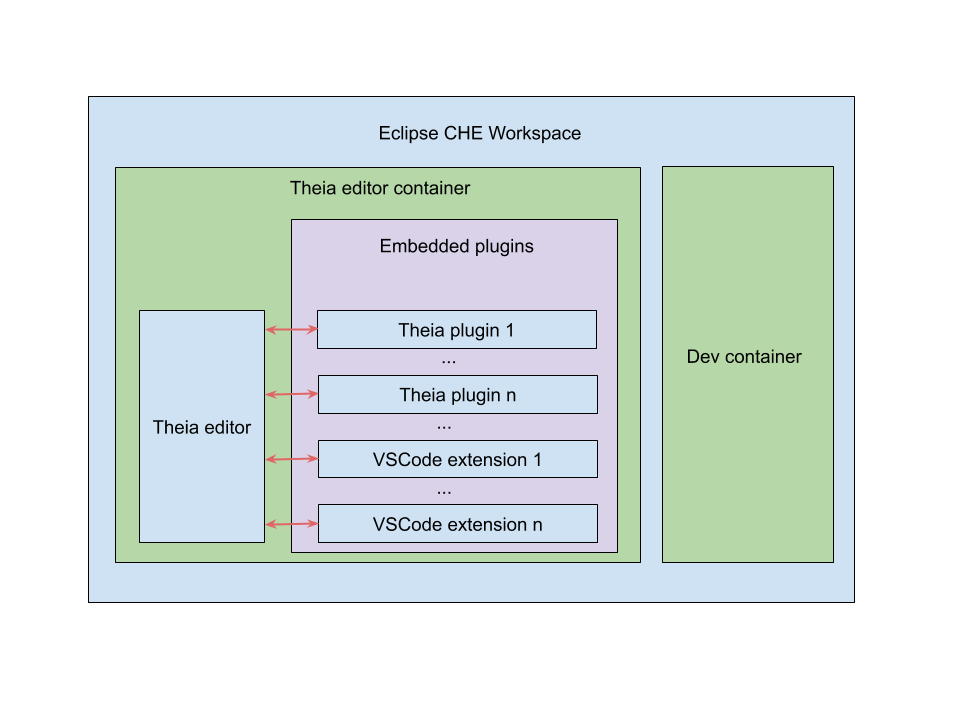
4.1.5.2. Remote plug-ins
The plug-in relies on dependencies or it has a backend. It runs in its own sidecar container, and all dependencies are packaged in the container.
A remote Che-Theia plug-in consist of two parts:
-
Che-Theia plug-in or VS Code extension binaries. The definition in the
meta.yamlfile is the same as for embedded plug-ins. -
Container image definition, for example,
eclipse/che-theia-dev:nightly. From this image, CodeReady Workspaces creates a separate container inside a workspace.
Examples:
- Java Language Server
- Python Language Server
When starting a workspace, CodeReady Workspaces creates a container from the plug-in image, downloads and unpacks the plug-in binaries, and includes them in the created container. The Che-Theia editor connects to the remote plug-ins when it starts.
Figure 4.5. Remote Che-Theia plug-in
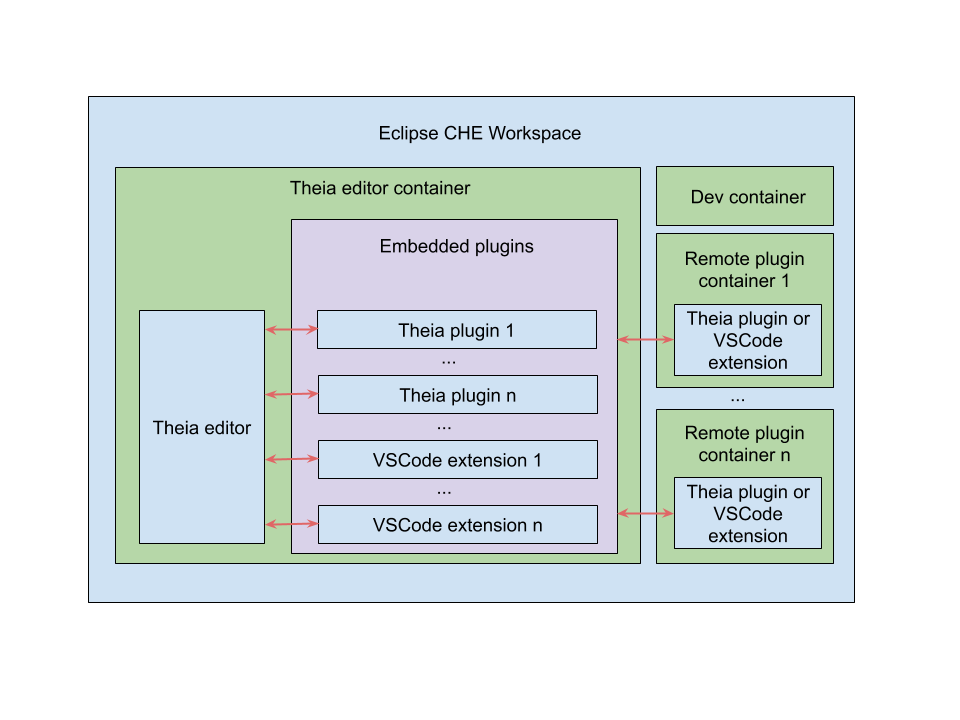
4.1.5.3. Comparison matrix
When a Che-Theia plug-in (or a VS Code extension) does not need extra dependencies inside its container, it is an embedded plug-in. A container with extra dependencies that includes a plug-in is a remote plug-in.
| Configure RAM per plug-in | Environment dependencies | Create separated container | |
|---|---|---|---|
| Remote | TRUE | Plug-in uses dependencies defined in the remote container. | TRUE |
| Embedded | FALSE (users can configure RAM for the whole editor container, but not per plug-in) | Plug-in uses dependencies from the editor container; if container does not include these dependencies, the plug-in fails or does not function as expected. | FALSE |
Depending on your use case and the capabilities provided by your plug-in, select one of the described running modes.
4.2. Using alternative IDEs in CodeReady Workspaces
Extending Red Hat CodeReady Workspaces developer workspaces using different IDEs (integrated development environments) enables:
- Re-purposing the environment for different use cases.
- Providing a dedicated custom IDE for specific tools.
- Providing different perspectives for individual users or groups of users.
Red Hat CodeReady Workspaces provides a default web IDE to be used with the developer workspaces. This IDE is completely decoupled. You can bring your own custom IDE for Red Hat CodeReady Workspaces:
- Built from Eclipse Theia, which is a framework to build web IDEs. Example: Sirius on the web.
- Completely different web IDEs, such as Jupyter, Eclipse Dirigible, or others. Example: Jupyter in Red Hat CodeReady Workspaces workspaces.
Bringing custom IDE built from Eclipse Theia
- Creating your own custom IDE based on Eclipse Theia
- Adding CodeReady Workspaces-specific tools to your custom IDE
- Packaging your custom IDE into the available editors for CodeReady Workspaces
Bringing your completely different web IDE into CodeReady Workspaces
- Packaging your custom IDE into the available editors for CodeReady Workspaces
Starting with Red Hat CodeReady Workspaces 2.0, Visual Studio Code (VS Code) extensions can be installed to extend the functionality of a workspace. VS Code extensions can run in the Che-Theia editor container, or they can be packaged in their own isolated and pre-configured containers with their prerequisites.
This document describes:
- Use of a VS Code extension in CodeReady Workspaces with workspaces
- CodeReady Workspaces Plug-ins panel
How to publish a VS Code extension in the CodeReady Workspaces plug-in registry (to share the extension with other CodeReady Workspaces users)
- The extension-hosting sidecar container and the use of the extension in a devfile are optional for this.
- How to review the compatibility of the VS Code extensions to be informed whether a specific API is supported or has not been implemented yet.
The plug-in meta information is required to publish a VS Code extension in an Red Hat CodeReady Workspaces plug-in registry. This meta information is provided as a meta.yaml file. This section describes how to create a meta.yaml file for an extension.
Procedure
-
Create a
meta.yamlfile in the following plug-in registry directory:<apiVersion>/plugins/<publisher>/<plug-inName>/<plug-inVersion>/. Edit the
meta.yamlfile and provide the necessary information. The configuration file must adhere to the following structure:Copy to Clipboard Copied! Toggle word wrap Toggle overflow - 1
- Version of the file structure.
- 2
- Name of the plug-in publisher. Must be the same as the publisher in the path.
- 3
- Plug-in name. Must be the same as in path.
- 4
- The CodeReady Workspaces plug-in version. Must be the same as in path.
- 5
- Type of the CodeReady Workspaces plug-in. For VS Code extensions, it must be
VS Code extension. - 6
- A short name of the plug-in.
- 7
- Plug-in title.
- 8
- A brief explanation of the plug-in and what it does.
- 9
- The link to the plug-in logo.
- 10
- Optional. The link to the source-code repository of the plug-in.
- 11
- Defines the category that this plug-in belongs to. Should be one of the following:
Editor,Debugger,Formatter,Language,Linter,Snippet,Theme, orOther. - 12
- If this section is omitted, the VS Code extension is added into the Che-Theia IDE container.
- 13
- The Docker image from which the sidecar container will be started. Example:
eclipse/che-theia-endpoint-runtime:next. - 14
- The RAM which is given for the sidecar container by default. Example: "256Mi". This value might be overridden by the user in the component configuration.
- 15
- A list of VS Code extensions that should be run in this sidecar container.
When the required VS Code extension is added into a CodeReady Workspaces plug-in registry, the user can add it into the workspace through the CodeReady Workspaces Plugins panel or through the workspace configuration.
Prerequisites
- A running instance of Red Hat CodeReady Workspaces. To install an instance of Red Hat CodeReady Workspaces, see the CodeReady Workspaces 2.0 Installation Guide
Procedure
To add the VS Code extension using the CodeReady Workspaces Plugins panel:
- Open the CodeReady Workspaces Plugin panel.
- Change the current registry to the registry in which the VS Code extension was added.
In the search bar, click the Menu button and then click Change Registry to choose the registry from the list. If the required registry is not in the list, add it using the Add Registry menu option. The registry link should point to the
pluginssegment of the registry. For example:https://my-registry.com/v3/plugins/index.json.- Search for the required plug-in using the filter, and then click the button.
- Restart the workspace for the changes to take effect.

Prerequisites
- A running instance of Red Hat CodeReady Workspaces. To install an instance of Red Hat CodeReady Workspaces, see the CodeReady Workspaces 2.0 Installation Guide.
- An existing workspace defined on this instance of Red Hat CodeReady Workspaces Section 3.1, “Creating and configuring a new CodeReady Workspaces 2.0 workspace”.
Procedure
To add the VS Code extension using the workspace configuration:
- Click the Workspaces tab on the Dashboard and select the workspace in which you want to add the plug-in. The Workspace <workspace-name> window is opened showing the details of the workspace.
- Click the devfile tab.
Locate the components section, and add a new entry with the following structure:
 - type: chePlugin
   id:
 - type: chePlugin
   id:
1 Copy to Clipboard Copied! Toggle word wrap Toggle overflow - 1
- Link to the
meta.yamlfile in your registry, for example,https://my-plug-in-registry/v3/plugins/<publisher>/<plug-inName>/<plug-inVersion>/meta.yaml
CodeReady Workspaces automatically adds the other fields to the new component.
- Restart the workspace for the changes to take effect.
4.3.3. Choosing the sidecar image
CodeReady Workspaces plug-ins are special services that extend the workspace capabilities. CodeReady Workspaces plug-ins are packaged as containers. The containers that the plug-ins are packaged into run as sidecars of the workspace editor and augment its capabilities.
Prerequisites
- A running instance of Red Hat CodeReady Workspaces. To install an instance of Red Hat CodeReady Workspaces, see the CodeReady Workspaces 2.0 Installation Guide.
Procedure
To choose a sidecar image:
If the VS code extension does not have any external dependencies, use
eclipse/che-theia-endpoint-runtime: nextas a sidecar container image for the extension.NoteIn addition to the
eclipse/che-theia-endpoint-runtime:nextbase image, the following ready-to-use sidecar images that include language-specific dependencies are available:- eclipse/che-remote-plugin-runner-java8
- eclipse/che-remote-plugin-runner-java11
- eclipse/che-remote-plugin-go-1.10.7
- eclipse/che-remote-plugin-python-3.7.3
- eclipse/che-remote-plugin-dotnet-2.2.105
- eclipse/che-remote-plugin-php7
- eclipse/che-remote-plugin-kubernetes-tooling-1.0.0
- eclipse/che-remote-plugin-kubernetes-tooling-0.1.17
- eclipse/che-remote-plugin-openshift-connector-0.0.17
- eclipse/che-remote-plugin-openshift-connector-0.0.21
If a VS Code extension has external dependencies that are not found in one of the ready-to-use images, use a container image that contains the needed dependencies for the extension and is based on the
eclipse/che-theia-endpoint-runtime:nextimage.Example: The
FROMdirective should be similar toFROM eclipse/che-theia-endpoint-runtime:next. This is required because this base image contains tools for running the remote VS Code extension and communications between the sidecar and the Che-Theia editor, so that the VS Code extension does not have to know that it is a remote one.
Che-Theia does not fully support the VS Code extensions API. The vscode-theia-comparator is used to analyze the compatibility between the Che-Theia plug-in API and the VS Code extension API. This tool runs in a nightly cycle, and the results are published on the vscode-theia-comparator GitHub page.
Prerequisites
- Personal GitHub access token. For information on creating a personal access token for the command line see Creating a personal access token for the command line. A GitHub access token is required to increase the GitHub download limit for your IP address.
Procedure
To run the vscode-theia comparator manually:
-
Clone the vscode-theia-comparator repository, and build it using the
yarncommand. -
Set the
GITHUB_TOKENenvironment variable to your token. -
Execute the
yarn run generatecommand to generate a report. -
Open the
out/status.htmlfile to view the report.