此内容没有您所选择的语言版本。
Configuring Data Grid Caches
Configure Data Grid caches to customize your deployment
Abstract
Red Hat Data Grid
Data Grid is a high-performance, distributed in-memory data store.
- Schemaless data structure
- Flexibility to store different objects as key-value pairs.
- Grid-based data storage
- Designed to distribute and replicate data across clusters.
- Elastic scaling
- Dynamically adjust the number of nodes to meet demand without service disruption.
- Data interoperability
- Store, retrieve, and query data in the grid from different endpoints.
Data Grid documentation
Documentation for Data Grid is available on the Red Hat customer portal.
Data Grid downloads
Access the Data Grid Software Downloads on the Red Hat customer portal.
You must have a Red Hat account to access and download Data Grid software.
Making open source more inclusive
Red Hat is committed to replacing problematic language in our code, documentation, and web properties. We are beginning with these four terms: master, slave, blacklist, and whitelist. Because of the enormity of this endeavor, these changes will be implemented gradually over several upcoming releases. For more details, see our CTO Chris Wright’s message.
Chapter 1. Data Grid caches
Data Grid caches provide flexible, in-memory data stores that you can configure to suit use cases such as:
- Boosting application performance with high-speed local caches.
- Optimizing databases by decreasing the volume of write operations.
- Providing resiliency and durability for consistent data across clusters.
1.1. Cache API
Cache<K,V> is the central interface for Data Grid and extends java.util.concurrent.ConcurrentMap.
Cache entries are highly concurrent data structures in key:value format that support a wide and configurable range of data types, from simple strings to much more complex objects.
1.2. Cache Managers
The CacheManager API is the entry point for interacting with Data Grid. Cache Managers control cache lifecycle; creating, modifying, and deleting cache instances. Cache Managers also provide cluster management and monitoring along with the ability to execute code across nodes.
Data Grid provides two CacheManager implementations:
EmbeddedCacheManager- Entry point for caches when running Data Grid inside the same Java Virtual Machine (JVM) as the client application.
RemoteCacheManager-
Entry point for caches when running Data Grid Server in its own JVM. When you instantiate a
RemoteCacheManagerit establishes a persistent TCP connection to Data Grid Server through the Hot Rod endpoint.
Both embedded and remote CacheManager implementations share some methods and properties. However, semantic differences do exist between EmbeddedCacheManager and RemoteCacheManager.
1.3. Cache modes
Data Grid Cache Managers can create and control multiple caches that use different modes. For example, you can use the same Cache Manager for local caches, distributed caches, and caches with invalidation mode.
- Local
- Data Grid runs as a single node and never replicates read or write operations on cache entries.
- Replicated
- Data Grid replicates all cache entries on all nodes in a cluster and performs local read operations only.
- Distributed
-
Data Grid replicates cache entries on a subset of nodes in a cluster and assigns entries to fixed owner nodes.
Data Grid requests read operations from owner nodes to ensure it returns the correct value. - Invalidation
- Data Grid evicts stale data from all nodes whenever operations modify entries in the cache. Data Grid performs local read operations only.
- Scattered
-
Data Grid stores cache entries across a subset of nodes.
By default Data Grid assigns a primary owner and a backup owner to each cache entry in scattered caches.
Data Grid assigns primary owners in the same way as with distributed caches, while backup owners are always the nodes that initiate the write operations.
Data Grid requests read operations from at least one owner node to ensure it returns the correct value.
1.3.1. Comparison of cache modes
The cache mode that you should choose depends on the qualities and guarantees you need for your data.
The following table summarizes the primary differences between cache modes:
| Cache mode | Clustered? | Read performance | Write performance | Capacity | Availability | Capabilities |
|---|---|---|---|---|---|---|
| Local | No | High (local) | High (local) | Single node | Single node | Complete |
| Simple | No | Highest (local) | Highest (local) | Single node | Single node | Partial: no transactions, persistence, or indexing. |
| Invalidation | Yes | High (local) | Low (all nodes, no data) | Single node | Single node | Partial: no indexing. |
| Replicated | Yes | High (local) | Lowest (all nodes) | Smallest node | All nodes | Complete |
| Distributed | Yes | Medium (owners) | Medium (owner nodes) | Sum of all nodes capacity divided by the number of owners. | Owner nodes | Complete |
| Scattered | Yes | Medium (primary) | Higher (single RPC) | Sum of all nodes capacity divided by 2. | Owner nodes | Partial: no transactions. |
1.4. Local caches
Data Grid offers a local cache mode that is similar to a ConcurrentHashMap.
Caches offer more capabilities than simple maps, including write-through and write-behind to persistent storage as well as management capabilities such as eviction and expiration.
The Data Grid Cache API extends the ConcurrentMap API in Java, making it easy to migrate from a map to a Data Grid cache.
Local cache configuration
XML
<local-cache name="mycache"
             statistics="true">
  <encoding media-type="application/x-protostream"/>
</local-cache>
<local-cache name="mycache"
             statistics="true">
  <encoding media-type="application/x-protostream"/>
</local-cache>JSON
YAML
localCache:
  name: "mycache"
  statistics: "true"
  encoding:
    mediaType: "application/x-protostream"
localCache:
  name: "mycache"
  statistics: "true"
  encoding:
mediaType: "application/x-protostream"1.4.1. Simple caches
A simple cache is a type of local cache that disables support for the following capabilities:
- Transactions and invocation batching
- Persistent storage
- Custom interceptors
- Indexing
- Transcoding
However, you can use other Data Grid capabilities with simple caches such as expiration, eviction, statistics, and security features. If you configure a capability that is not compatible with a simple cache, Data Grid throws an exception.
Simple cache configuration
XML
<local-cache simple-cache="true" />
<local-cache simple-cache="true" />JSON
{
  "local-cache" : {
    "simple-cache" : "true"
  }
}
{
  "local-cache" : {
    "simple-cache" : "true"
  }
}YAML
localCache:
  simpleCache: "true"
localCache:
simpleCache: "true"Chapter 2. Clustered caches
You can create embedded and remote caches on Data Grid clusters that replicate data across nodes.
2.1. Replicated caches
Data Grid replicates all entries in the cache to all nodes in the cluster. Each node can perform read operations locally.
Replicated caches provide a quick and easy way to share state across a cluster, but is suitable for clusters of less than ten nodes. Because the number of replication requests scales linearly with the number of nodes in the cluster, using replicated caches with larger clusters reduces performance. However you can use UDP multicasting for replication requests to improve performance.
Each key has a primary owner, which serializes data container updates in order to provide consistency.
Figure 2.1. Replicated cache
Synchronous or asynchronous replication
-
Synchronous replication blocks the caller (e.g. on a
cache.put(key, value)) until the modifications have been replicated successfully to all the nodes in the cluster. - Asynchronous replication performs replication in the background, and write operations return immediately. Asynchronous replication is not recommended, because communication errors, or errors that happen on remote nodes are not reported to the caller.
Transactions
If transactions are enabled, write operations are not replicated through the primary owner.
With pessimistic locking, each write triggers a lock message, which is broadcast to all the nodes. During transaction commit, the originator broadcasts a one-phase prepare message and an unlock message (optional). Either the one-phase prepare or the unlock message is fire-and-forget.
With optimistic locking, the originator broadcasts a prepare message, a commit message, and an unlock message (optional). Again, either the one-phase prepare or the unlock message is fire-and-forget.
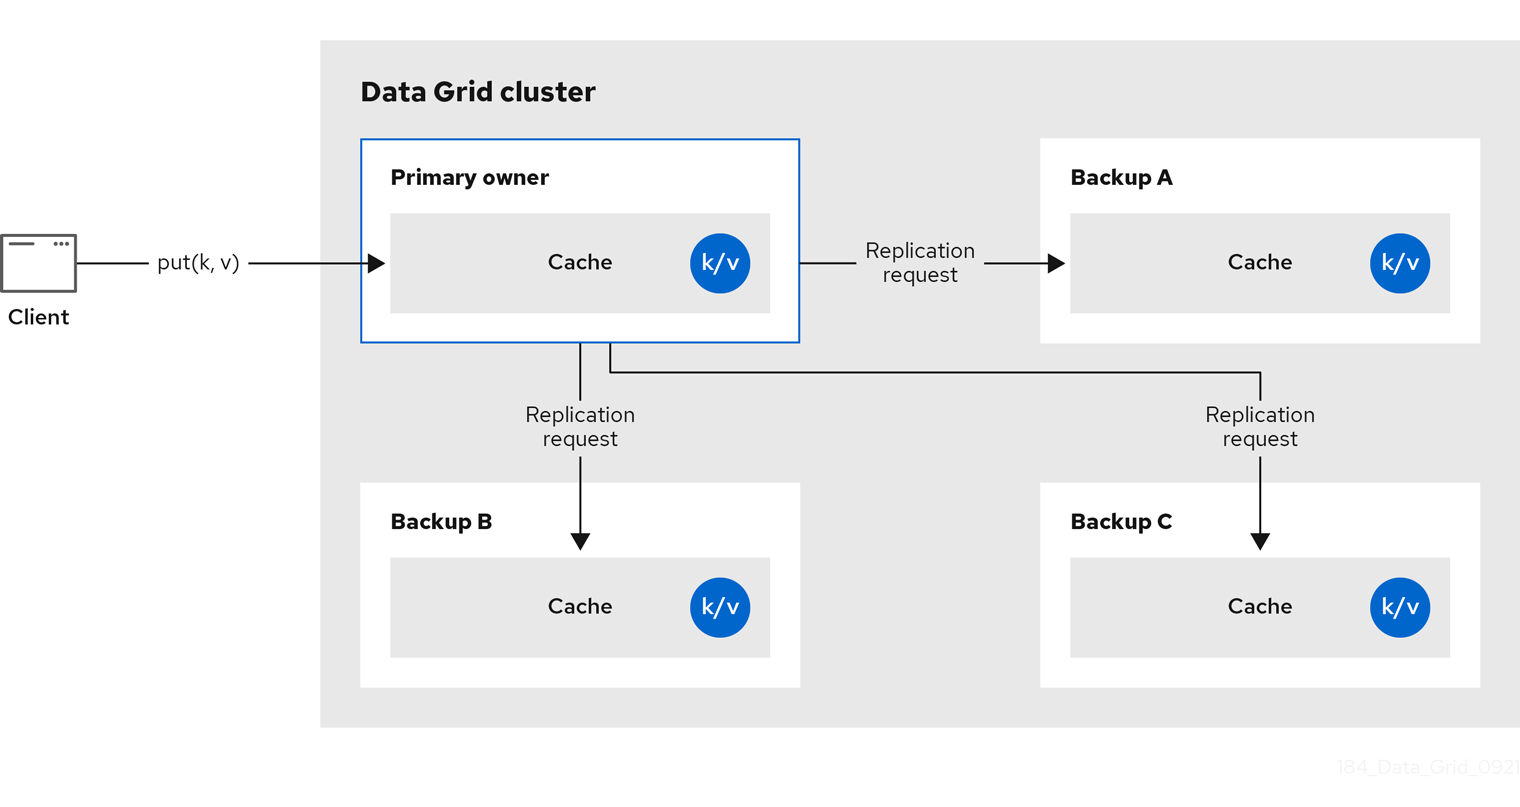
2.2. Distributed caches
Data Grid attempts to keep a fixed number of copies of any entry in the cache, configured as numOwners. This allows distributed caches to scale linearly, storing more data as nodes are added to the cluster.
As nodes join and leave the cluster, there will be times when a key has more or less than numOwners copies. In particular, if numOwners nodes leave in quick succession, some entries will be lost, so we say that a distributed cache tolerates numOwners - 1 node failures.
The number of copies represents a trade-off between performance and durability of data. The more copies you maintain, the lower performance will be, but also the lower the risk of losing data due to server or network failures.
Data Grid splits the owners of a key into one primary owner, which coordinates writes to the key, and zero or more backup owners.
The following diagram shows a write operation that a client sends to a backup owner. In this case the backup node forwards the write to the primary owner, which then replicates the write to the backup.
Figure 2.2. Cluster replication

Figure 2.3. Distributed cache

Read operations
Read operations request the value from the primary owner. If the primary owner does not respond in a reasonable amount of time, Data Grid requests the value from the backup owners as well.
A read operation may require 0 messages if the key is present in the local cache, or up to 2 * numOwners messages if all the owners are slow.
Write operations
Write operations result in at most 2 * numOwners messages. One message from the originator to the primary owner and numOwners - 1 messages from the primary to the backup nodes along with the corresponding acknowledgment messages.
Cache topology changes may cause retries and additional messages for both read and write operations.
Synchronous or asynchronous replication
Asynchronous replication is not recommended because it can lose updates. In addition to losing updates, asynchronous distributed caches can also see a stale value when a thread writes to a key and then immediately reads the same key.
Transactions
Transactional distributed caches send lock/prepare/commit/unlock messages to the affected nodes only, meaning all nodes that own at least one key affected by the transaction. As an optimization, if the transaction writes to a single key and the originator is the primary owner of the key, lock messages are not replicated.
2.2.1. Read consistency
Even with synchronous replication, distributed caches are not linearizable. For transactional caches, they do not support serialization/snapshot isolation.
For example, a thread is carrying out a single put request:
cache.get(k) -> v1
cache.put(k, v2)
cache.get(k) -> v2
cache.get(k) -> v1
cache.put(k, v2)
cache.get(k) -> v2But another thread might see the values in a different order:
cache.get(k) -> v2
cache.get(k) -> v1
cache.get(k) -> v2
cache.get(k) -> v1The reason is that read can return the value from any owner, depending on how fast the primary owner replies. The write is not atomic across all the owners. In fact, the primary commits the update only after it receives a confirmation from the backup. While the primary is waiting for the confirmation message from the backup, reads from the backup will see the new value, but reads from the primary will see the old one.
2.2.2. Key ownership
Distributed caches split entries into a fixed number of segments and assign each segment to a list of owner nodes. Replicated caches do the same, with the exception that every node is an owner.
The first node in the list of owners is the primary owner. The other nodes in the list are backup owners. When the cache topology changes, because a node joins or leaves the cluster, the segment ownership table is broadcast to every node. This allows nodes to locate keys without making multicast requests or maintaining metadata for each key.
The numSegments property configures the number of segments available. However, the number of segments cannot change unless the cluster is restarted.
Likewise the key-to-segment mapping cannot change. Keys must always map to the same segments regardless of cluster topology changes. It is important that the key-to-segment mapping evenly distributes the number of segments allocated to each node while minimizing the number of segments that must move when the cluster topology changes.
| Consistent hash factory implementation | Description |
|---|---|
|
| Uses an algorithm based on consistent hashing. Selected by default when server hinting is disabled. This implementation always assigns keys to the same nodes in every cache as long as the cluster is symmetric. In other words, all caches run on all nodes. This implementation does have some negative points in that the load distribution is slightly uneven. It also moves more segments than strictly necessary on a join or leave. |
|
|
Equivalent to |
|
|
Achieves a more even distribution than |
|
|
Equivalent to |
|
| Used internally to implement replicated caches. You should never explicitly select this algorithm in a distributed cache. |
Hashing configuration
You can configure ConsistentHashFactory implementations, including custom ones, with embedded caches only.
XML
<distributed-cache name="distributedCache"
                   owners="2"
                   segments="100"
                   capacity-factor="2" />
<distributed-cache name="distributedCache"
                   owners="2"
                   segments="100"
capacity-factor="2" />ConfigurationBuilder
2.2.3. Capacity factors
Capacity factors allocate the number of segments based on resources available to each node in the cluster.
The capacity factor for a node applies to segments for which that node is both the primary owner and backup owner. In other words, the capacity factor specifies is the total capacity that a node has in comparison to other nodes in the cluster.
The default value is 1 which means that all nodes in the cluster have an equal capacity and Data Grid allocates the same number of segments to all nodes in the cluster.
However, if nodes have different amounts of memory available to them, you can configure the capacity factor so that the Data Grid hashing algorithm assigns each node a number of segments weighted by its capacity.
The value for the capacity factor configuration must be a positive number and can be a fraction such as 1.5. You can also configure a capacity factor of 0 but is recommended only for nodes that join the cluster temporarily and should use the zero capacity configuration instead.
2.2.3.1. Zero capacity nodes
You can configure nodes where the capacity factor is 0 for every cache, user defined caches, and internal caches. When defining a zero capacity node, the node does not hold any data.
Zero capacity node configuration
XML
<infinispan>
  <cache-container zero-capacity-node="true" />
</infinispan>
<infinispan>
  <cache-container zero-capacity-node="true" />
</infinispan>JSON
YAML
infinispan:
  cacheContainer:
    zeroCapacityNode: "true"
infinispan:
  cacheContainer:
zeroCapacityNode: "true"ConfigurationBuilder
new GlobalConfigurationBuilder().zeroCapacityNode(true);
new GlobalConfigurationBuilder().zeroCapacityNode(true);2.2.4. Level one (L1) caches
Data Grid nodes create local replicas when they retrieve entries from another node in the cluster. L1 caches avoid repeatedly looking up entries on primary owner nodes and adds performance.
The following diagram illustrates how L1 caches work:
Figure 2.4. L1 cache
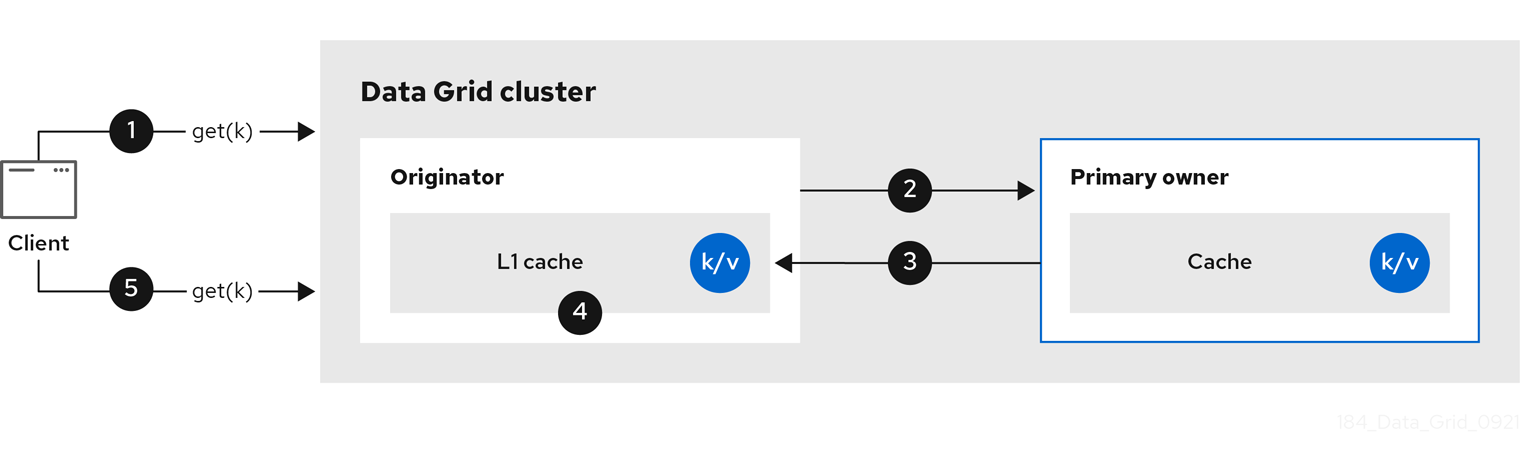
In the "L1 cache" diagram:
-
A client invokes
cache.get()to read an entry for which another node in the cluster is the primary owner. - The originator node forwards the read operation to the primary owner.
- The primary owner returns the key/value entry.
- The originator node creates a local copy.
-
Subsequent
cache.get()invocations return the local entry instead of forwarding to the primary owner.
L1 caching performance
Enabling L1 improves performance for read operations but requires primary owner nodes to broadcast invalidation messages when entries are modified. This ensures that Data Grid removes any out of date replicas across the cluster. However this also decreases performance of write operations and increases memory usage, reducing overall capacity of caches.
Data Grid evicts and expires local replicas, or L1 entries, like any other cache entry.
L1 cache configuration
XML
<distributed-cache l1-lifespan="5000"
                   l1-cleanup-interval="60000">
</distributed-cache>
<distributed-cache l1-lifespan="5000"
                   l1-cleanup-interval="60000">
</distributed-cache>JSON
YAML
distributedCache:
  l1Lifespan: "5000"
  l1-cleanup-interval: "60000"
distributedCache:
  l1Lifespan: "5000"
l1-cleanup-interval: "60000"ConfigurationBuilder
ConfigurationBuilder builder = new ConfigurationBuilder();
builder.clustering().cacheMode(CacheMode.DIST_SYNC)
         .l1()
         .lifespan(5000, TimeUnit.MILLISECONDS)
         .cleanupTaskFrequency(60000, TimeUnit.MILLISECONDS);
ConfigurationBuilder builder = new ConfigurationBuilder();
builder.clustering().cacheMode(CacheMode.DIST_SYNC)
         .l1()
         .lifespan(5000, TimeUnit.MILLISECONDS)
.cleanupTaskFrequency(60000, TimeUnit.MILLISECONDS);2.2.5. Server hinting
Server hinting increases availability of data in distributed caches by replicating entries across as many servers, racks, and data centers as possible.
Server hinting applies only to distributed caches.
When Data Grid distributes the copies of your data, it follows the order of precedence: site, rack, machine, and node. All of the configuration attributes are optional. For example, when you specify only the rack IDs, then Data Grid distributes the copies across different racks and nodes.
Server hinting can impact cluster rebalancing operations by moving more segments than necessary if the number of segments for the cache is too low.
An alternative for clusters in multiple data centers is cross-site replication.
Server hinting configuration
XML
JSON
YAML
GlobalConfigurationBuilder
2.2.6. Key affinity service
In a distributed cache, a key is allocated to a list of nodes with an opaque algorithm. There is no easy way to reverse the computation and generate a key that maps to a particular node. However, Data Grid can generate a sequence of (pseudo-)random keys, see what their primary owner is, and hand them out to the application when it needs a key mapping to a particular node.
Following code snippet depicts how a reference to this service can be obtained and used.
The service is started at step 2: after this point it uses the supplied Executor to generate and queue keys. At step 3, we obtain a key from the service, and at step 4 we use it.
Lifecycle
KeyAffinityService extends Lifecycle, which allows stopping and (re)starting it:
public interface Lifecycle {
   void start();
   void stop();
}
public interface Lifecycle {
   void start();
   void stop();
}
The service is instantiated through KeyAffinityServiceFactory. All the factory methods have an Executor parameter, that is used for asynchronous key generation (so that it won’t happen in the caller’s thread). It is the user’s responsibility to handle the shutdown of this Executor.
The KeyAffinityService, once started, needs to be explicitly stopped. This stops the background key generation and releases other held resources.
The only situation in which KeyAffinityService stops by itself is when the Cache Manager with which it was registered is shutdown.
Topology changes
When the cache topology changes, the ownership of the keys generated by the KeyAffinityService might change. The key affinity service keep tracks of these topology changes and doesn’t return keys that would currently map to a different node, but it won’t do anything about keys generated earlier.
As such, applications should treat KeyAffinityService purely as an optimization, and they should not rely on the location of a generated key for correctness.
In particular, applications should not rely on keys generated by KeyAffinityService for the same address to always be located together. Collocation of keys is only provided by the Grouping API.
2.2.7. Grouping API
Complementary to the Key affinity service, the Grouping API allows you to co-locate a group of entries on the same nodes, but without being able to select the actual nodes.
By default, the segment of a key is computed using the key’s hashCode(). If you use the Grouping API, Data Grid will compute the segment of the group and use that as the segment of the key.
When the Grouping API is in use, it is important that every node can still compute the owners of every key without contacting other nodes. For this reason, the group cannot be specified manually. The group can either be intrinsic to the entry (generated by the key class) or extrinsic (generated by an external function).
To use the Grouping API, you must enable groups.
Configuration c = new ConfigurationBuilder()
   .clustering().hash().groups().enabled()
   .build();
Configuration c = new ConfigurationBuilder()
   .clustering().hash().groups().enabled()
.build();<distributed-cache> <groups enabled="true"/> </distributed-cache>
<distributed-cache>
   <groups enabled="true"/>
</distributed-cache>
If you have control of the key class (you can alter the class definition, it’s not part of an unmodifiable library), then we recommend using an intrinsic group. The intrinsic group is specified by adding the @Group annotation to a method, for example:
The group method must return a String
If you don’t have control over the key class, or the determination of the group is an orthogonal concern to the key class, we recommend using an extrinsic group. An extrinsic group is specified by implementing the Grouper interface.
public interface Grouper<T> {
    String computeGroup(T key, String group);

    Class<T> getKeyType();
}
public interface Grouper<T> {
    String computeGroup(T key, String group);

    Class<T> getKeyType();
}
If multiple Grouper classes are configured for the same key type, all of them will be called, receiving the value computed by the previous one. If the key class also has a @Group annotation, the first Grouper will receive the group computed by the annotated method. This allows you even greater control over the group when using an intrinsic group.
Example Grouper implementation
Grouper implementations must be registered explicitly in the cache configuration. If you are configuring Data Grid programmatically:
Configuration c = new ConfigurationBuilder()
   .clustering().hash().groups().enabled().addGrouper(new KXGrouper())
   .build();
Configuration c = new ConfigurationBuilder()
   .clustering().hash().groups().enabled().addGrouper(new KXGrouper())
.build();Or, if you are using XML:
<distributed-cache>
   <groups enabled="true">
      <grouper class="com.example.KXGrouper" />
   </groups>
</distributed-cache>
<distributed-cache>
   <groups enabled="true">
      <grouper class="com.example.KXGrouper" />
   </groups>
</distributed-cache>Advanced API
AdvancedCache has two group-specific methods:
-
getGroup(groupName)retrieves all keys in the cache that belong to a group. -
removeGroup(groupName)removes all the keys in the cache that belong to a group.
Both methods iterate over the entire data container and store (if present), so they can be slow when a cache contains lots of small groups.
2.3. Invalidation caches
Invalidation cache mode in Data Grid is designed to optimize systems that perform high volumes of read operations to a shared permanent data store. You can use invalidation mode to reduce the number of database writes when state changes occur.
Invalidation cache mode is deprecated for Data Grid remote deployments. Use invalidation cache mode with embedded caches that are stored in shared cache stores only.
Invalidation cache mode is effective only when you have a permanent data store, such as a database, and are only using Data Grid as an optimization in a read-heavy system to prevent hitting the database for every read.
When a cache is configured for invalidation, each data change in a cache triggers a message to other caches in the cluster, informing them that their data is now stale and should be removed from memory. Invalidation messages remove stale values from other nodes' memory. The messages are very small compared to replicating the entire value, and also other caches in the cluster look up modified data in a lazy manner, only when needed. The update to the shared store is typically handled by user application code or Hibernate.
Figure 2.5. Invalidation cache
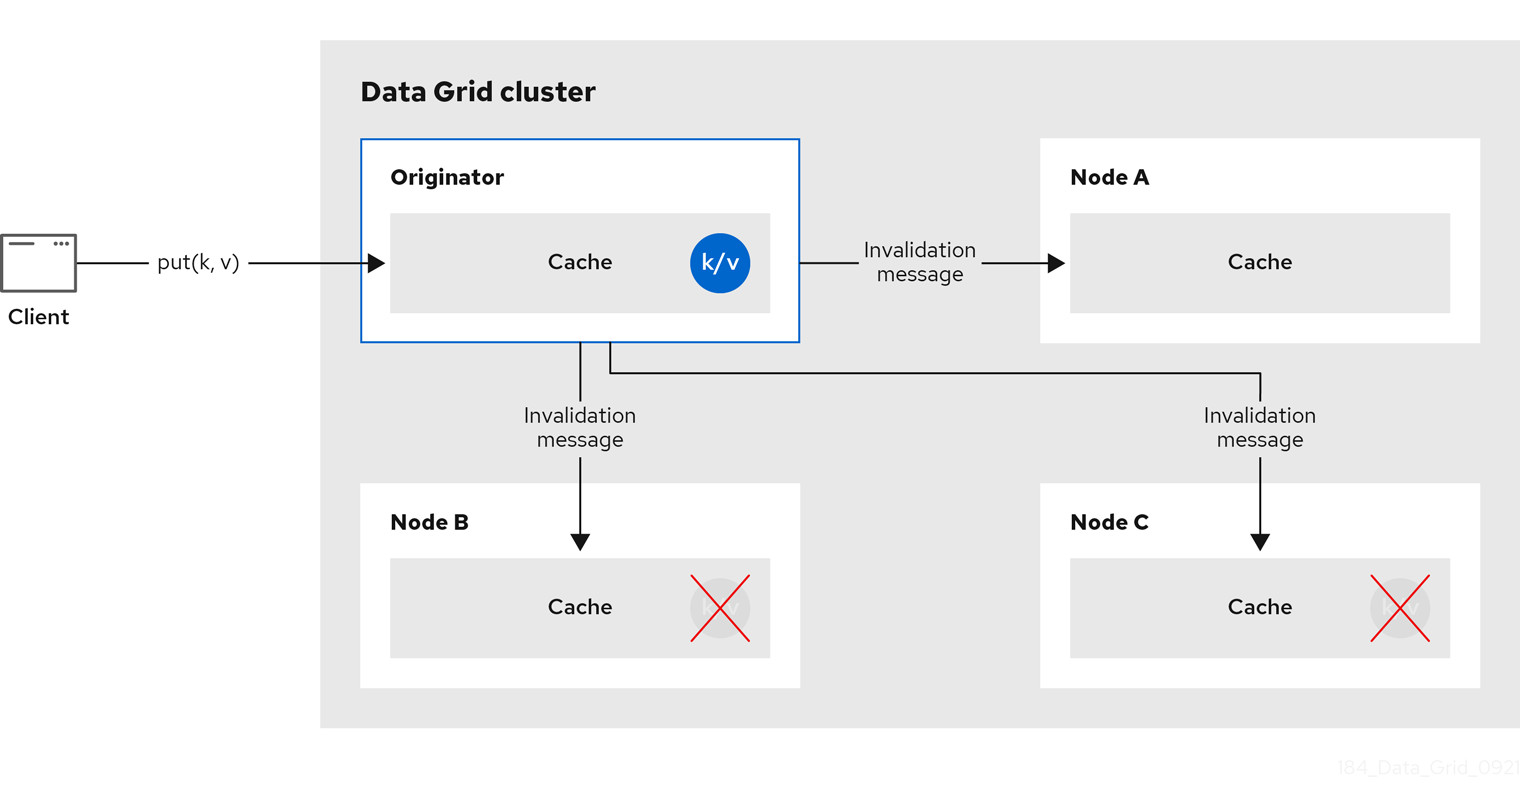
Sometimes the application reads a value from the external store and wants to write it to the local cache, without removing it from the other nodes. To do this, it must call Cache.putForExternalRead(key, value) instead of Cache.put(key, value).
Invalidation mode is suitable only for shared stores where all nodes can access the same data. Using invalidation mode without a persistent store is impractical, as updated values need to be read from a shared store for consistency across nodes.
Never use invalidation mode with a local, non-shared, cache store. The invalidation message will not remove entries in the local store, and some nodes will keep seeing the stale value.
An invalidation cache can also be configured with a special cache loader, ClusterLoader. When ClusterLoader is enabled, read operations that do not find the key on the local node will request it from all the other nodes first, and store it in memory locally. This can lead to storing stale values, so only use it if you have a high tolerance for stale values.
Synchronous or asynchronous replication
When synchronous, a write operation blocks until all nodes in the cluster have evicted the stale value. When asynchronous, the originator broadcasts invalidation messages but does not wait for responses. That means other nodes still see the stale value for a while after the write completed on the originator.
Transactions
Transactions can be used to batch the invalidation messages. Transactions acquire the key lock on the primary owner.
With pessimistic locking, each write triggers a lock message, which is broadcast to all the nodes. During transaction commit, the originator broadcasts a one-phase prepare message (optionally fire-and-forget) which invalidates all affected keys and releases the locks.
With optimistic locking, the originator broadcasts a prepare message, a commit message, and an unlock message (optional). Either the one-phase prepare or the unlock message is fire-and-forget, and the last message always releases the locks.
2.4. Scattered caches
Scattered caches are very similar to distributed caches as they allow linear scaling of the cluster. Scattered caches allow single node failure by maintaining two copies of the data (numOwners=2). Unlike distributed caches, the location of data is not fixed; while we use the same Consistent Hash algorithm to locate the primary owner, the backup copy is stored on the node that wrote the data last time. When the write originates on the primary owner, backup copy is stored on any other node (the exact location of this copy is not important).
This has the advantage of single Remote Procedure Call (RPC) for any write (distributed caches require one or two RPCs), but reads have to always target the primary owner. That results in faster writes but possibly slower reads, and therefore this mode is more suitable for write-intensive applications.
Storing multiple backup copies also results in slightly higher memory consumption. In order to remove out-of-date backup copies, invalidation messages are broadcast in the cluster, which generates some overhead. This lowers the performance of scattered caches in clusters with a large number of nodes.
When a node crashes, the primary copy may be lost. Therefore, the cluster has to reconcile the backups and find out the last written backup copy. This process results in more network traffic during state transfer.
Since the writer of data is also a backup, even if we specify machine/rack/site IDs on the transport level the cluster cannot be resilient to more than one failure on the same machine/rack/site.
You cannot use scattered caches with transactions or asynchronous replication.
The cache is configured in a similar way as the other cache modes, here is an example of declarative configuration:
<scattered-cache name="scatteredCache" />
<scattered-cache name="scatteredCache" />Configuration c = new ConfigurationBuilder() .clustering().cacheMode(CacheMode.SCATTERED_SYNC) .build();
Configuration c = new ConfigurationBuilder()
   .clustering().cacheMode(CacheMode.SCATTERED_SYNC)
.build();Scattered mode is not exposed in the server configuration as the server is usually accessed through the Hot Rod protocol. The protocol automatically selects primary owner for the writes and therefore the write (in distributed mode with two owner) requires single RPC inside the cluster, too. Therefore, scattered cache would not bring the performance benefit.
2.5. Asynchronous replication
All clustered cache modes can be configured to use asynchronous communications with the mode="ASYNC" attribute on the <replicated-cache/>, <distributed-cache>, or <invalidation-cache/> element.
With asynchronous communications, the originator node does not receive any acknowledgement from the other nodes about the status of the operation, so there is no way to check if it succeeded on other nodes.
We do not recommend asynchronous communications in general, as they can cause inconsistencies in the data, and the results are hard to reason about. Nevertheless, sometimes speed is more important than consistency, and the option is available for those cases.
Asynchronous API
The Asynchronous API allows you to use synchronous communications, but without blocking the user thread.
There is one caveat: The asynchronous operations do NOT preserve the program order. If a thread calls cache.putAsync(k, v1); cache.putAsync(k, v2), the final value of k may be either v1 or v2. The advantage over using asynchronous communications is that the final value can’t be v1 on one node and v2 on another.
2.5.1. Return values with asynchronous replication
Because the Cache interface extends java.util.Map, write methods like put(key, value) and remove(key) return the previous value by default.
In some cases, the return value may not be correct:
-
When using
AdvancedCache.withFlags()withFlag.IGNORE_RETURN_VALUE,Flag.SKIP_REMOTE_LOOKUP, orFlag.SKIP_CACHE_LOAD. -
When the cache is configured with
unreliable-return-values="true". - When using asynchronous communications.
- When there are multiple concurrent writes to the same key, and the cache topology changes. The topology change will make Data Grid retry the write operations, and a retried operation’s return value is not reliable.
Transactional caches return the correct previous value in cases 3 and 4. However, transactional caches also have a gotcha: in distributed mode, the read-committed isolation level is implemented as repeatable-read. That means this example of "double-checked locking" won’t work:
The correct way to implement this is to use cache.getAdvancedCache().withFlags(Flag.FORCE_WRITE_LOCK).get(k).
In caches with optimistic locking, writes can also return stale previous values. Write skew checks can avoid stale previous values.
2.6. Configuring initial cluster size
Data Grid handles cluster topology changes dynamically. This means that nodes do not need to wait for other nodes to join the cluster before Data Grid initializes the caches.
If your applications require a specific number of nodes in the cluster before caches start, you can configure the initial cluster size as part of the transport.
Procedure
- Open your Data Grid configuration for editing.
-
Set the minimum number of nodes required before caches start with the
initial-cluster-sizeattribute orinitialClusterSize()method. -
Set the timeout, in milliseconds, after which the Cache Manager does not start with the
initial-cluster-timeoutattribute orinitialClusterTimeout()method. - Save and close your Data Grid configuration.
Initial cluster size configuration
XML
JSON
YAML
infinispan:
  cacheContainer:
    transport:
      initialClusterSize: "4"
      initialClusterTimeout: "30000"
infinispan:
  cacheContainer:
    transport:
      initialClusterSize: "4"
initialClusterTimeout: "30000"ConfigurationBuilder
GlobalConfiguration global = GlobalConfigurationBuilder.defaultClusteredBuilder()
   .transport()
   .initialClusterSize(4)
   .initialClusterTimeout(30000, TimeUnit.MILLISECONDS);
GlobalConfiguration global = GlobalConfigurationBuilder.defaultClusteredBuilder()
   .transport()
   .initialClusterSize(4)
.initialClusterTimeout(30000, TimeUnit.MILLISECONDS);Chapter 3. Data Grid cache configuration
Cache configuration controls how Data Grid stores your data.
As part of your cache configuration, you declare the cache mode you want to use. For instance, you can configure Data Grid clusters to use replicated caches or distributed caches.
Your configuration also defines the characteristics of your caches and enables the Data Grid capabilities that you want to use when handling data. For instance, you can configure how Data Grid encodes entries in your caches, whether replication requests happen synchronously or asynchronously between nodes, if entries are mortal or immortal, and so on.
3.1. Declarative cache configuration
You can configure caches declaratively, in XML, JSON, and YAML format, according to the Data Grid schema.
Declarative cache configuration has the following advantages over programmatic configuration:
- Portability
-
Define each configuration in a standalone file that you can use to create embedded and remote caches.
You can also use declarative configuration to create caches with Data Grid Operator for clusters running on OpenShift. - Simplicity
-
Keep markup languages separate to programming languages.
For example, to create remote caches it is generally better to not add complex XML directly to Java code.
Data Grid Server configuration extends infinispan.xml to include cluster transport mechanisms, security realms, and endpoint configuration. If you declare caches as part of your Data Grid Server configuration you should use management tooling, such as Ansible or Chef, to keep it synchronized across the cluster.
To dynamically synchronize remote caches across Data Grid clusters, create them at runtime.
3.1.1. Cache configuration
You can create declarative cache configuration in XML, JSON, and YAML format.
All declarative caches must conform to the Data Grid schema. Configuration in JSON format must follow the structure of an XML configuration, elements correspond to objects and attributes correspond to fields.
Data Grid restricts characters to a maximum of 255 for a cache name or a cache template name. If you exceed this character limit, Data Grid throws an exception. Write succinct cache names and cache template names.
A file system might set a limitation for the length of a file name, so ensure that a cache’s name does not exceed this limitation. If a cache name exceeds a file system’s naming limitation, general operations or initialing operations towards that cache might fail. Write succinct file names.
Distributed caches
XML
JSON
YAML
Replicated caches
XML
JSON
YAML
Multiple caches
XML
JSON
YAML
3.2. Adding cache templates
The Data Grid schema includes *-cache-configuration elements that you can use to create templates. You can then create caches on demand, using the same configuration multiple times.
Procedure
- Open your Data Grid configuration for editing.
-
Add the cache configuration with the appropriate
*-cache-configurationelement or object to the Cache Manager. - Save and close your Data Grid configuration.
Cache template example
XML
JSON
YAML
3.2.1. Creating caches from templates
Create caches from configuration templates.
Templates for remote caches are available from the Cache templates menu in Data Grid Console.
Prerequisites
- Add at least one cache template to the Cache Manager.
Procedure
- Open your Data Grid configuration for editing.
-
Specify the template from which the cache inherits with the
configurationattribute or field. - Save and close your Data Grid configuration.
Cache configuration inherited from a template
XML
<distributed-cache configuration="my-dist-template" />
<distributed-cache configuration="my-dist-template" />JSON
{
  "distributed-cache": {
    "configuration": "my-dist-template"
  }
}
{
  "distributed-cache": {
    "configuration": "my-dist-template"
  }
}YAML
distributedCache:
  configuration: "my-dist-template"
distributedCache:
configuration: "my-dist-template"3.2.2. Cache template inheritance
Cache configuration templates can inherit from other templates to extend and override settings.
Cache template inheritance is hierarchical. For a child configuration template to inherit from a parent, you must include it after the parent template.
Additionally, template inheritance is additive for elements that have multiple values. A cache that inherits from another template merges the values from that template, which can override properties.
Template inheritance example
XML
JSON
YAML
3.2.3. Cache template wildcards
You can add wildcards to cache configuration template names. If you then create caches where the name matches the wildcard, Data Grid applies the configuration template.
Data Grid throws exceptions if cache names match more than one wildcard.
Template wildcard example
XML
JSON
YAML
Using the preceding example, if you create a cache named "async-dist-cache-prod" then Data Grid uses the configuration from the async-dist-cache-* template.
3.2.4. Cache templates from multiple XML files
Split cache configuration templates into multiple XML files for granular flexibility and reference them with XML inclusions (XInclude).
Data Grid provides minimal support for the XInclude specification. This means you cannot use the xpointer attribute, the xi:fallback element, text processing, or content negotiation.
You must also add the xmlns:xi="http://www.w3.org/2001/XInclude" namespace to infinispan.xml to use XInclude.
Xinclude cache template
Data Grid also provides an infinispan-config-fragment-14.0.xsd schema that you can use with configuration fragments.
Configuration fragment schema
<local-cache xmlns:xsi="http://www.w3.org/2001/XMLSchema-instance"
             xsi:schemaLocation="urn:infinispan:config:14.0 https://infinispan.org/schemas/infinispan-config-fragment-14.0.xsd"
             xmlns="urn:infinispan:config:14.0"
             name="mycache"/>
<local-cache xmlns:xsi="http://www.w3.org/2001/XMLSchema-instance"
             xsi:schemaLocation="urn:infinispan:config:14.0 https://infinispan.org/schemas/infinispan-config-fragment-14.0.xsd"
             xmlns="urn:infinispan:config:14.0"
name="mycache"/>3.3. Creating remote caches
When you create remote caches at runtime, Data Grid Server synchronizes your configuration across the cluster so that all nodes have a copy. For this reason you should always create remote caches dynamically with the following mechanisms:
- Data Grid Console
- Data Grid Command Line Interface (CLI)
- Hot Rod or HTTP clients
3.3.1. Default Cache Manager
Data Grid Server provides a default Cache Manager that controls the lifecycle of remote caches. Starting Data Grid Server automatically instantiates the Cache Manager so you can create and delete remote caches and other resources like Protobuf schema.
After you start Data Grid Server and add user credentials, you can view details about the Cache Manager and get cluster information from Data Grid Console.
-
Open
127.0.0.1:11222in any browser.
You can also get information about the Cache Manager through the Command Line Interface (CLI) or REST API:
- CLI
Run the
describecommand in the default container.[//containers/default]> describe
[//containers/default]> describeCopy to Clipboard Copied! Toggle word wrap Toggle overflow - REST
-
Open
127.0.0.1:11222/rest/v2/cache-managers/default/in any browser.
Default Cache Manager configuration
XML
JSON
YAML
3.3.2. Creating caches with Data Grid Console
Use Data Grid Console to create remote caches in an intuitive visual interface from any web browser.
Prerequisites
-
Create a Data Grid user with
adminpermissions. - Start at least one Data Grid Server instance.
- Have a Data Grid cache configuration.
Procedure
-
Open
127.0.0.1:11222/console/in any browser. - Select Create Cache and follow the steps as Data Grid Console guides you through the process.
3.3.3. Creating remote caches with the Data Grid CLI
Use the Data Grid Command Line Interface (CLI) to add remote caches on Data Grid Server.
Prerequisites
-
Create a Data Grid user with
adminpermissions. - Start at least one Data Grid Server instance.
- Have a Data Grid cache configuration.
Procedure
Start the CLI.
bin/cli.sh
bin/cli.shCopy to Clipboard Copied! Toggle word wrap Toggle overflow -
Run the
connectcommand and enter your username and password when prompted. Use the
create cachecommand to create remote caches.For example, create a cache named "mycache" from a file named
mycache.xmlas follows:create cache --file=mycache.xml mycache
create cache --file=mycache.xml mycacheCopy to Clipboard Copied! Toggle word wrap Toggle overflow
Verification
List all remote caches with the
lscommand.ls caches mycache
ls caches mycacheCopy to Clipboard Copied! Toggle word wrap Toggle overflow View cache configuration with the
describecommand.describe caches/mycache
describe caches/mycacheCopy to Clipboard Copied! Toggle word wrap Toggle overflow
3.3.4. Creating remote caches from Hot Rod clients
Use the Data Grid Hot Rod API to create remote caches on Data Grid Server from Java, C++, .NET/C#, JS clients and more.
This procedure shows you how to use Hot Rod Java clients that create remote caches on first access. You can find code examples for other Hot Rod clients in the Data Grid Tutorials.
Prerequisites
-
Create a Data Grid user with
adminpermissions. - Start at least one Data Grid Server instance.
- Have a Data Grid cache configuration.
Procedure
-
Invoke the
remoteCache()method as part of your theConfigurationBuilder. -
Set the
configurationorconfiguration_uriproperties in thehotrod-client.propertiesfile on your classpath.
ConfigurationBuilder
hotrod-client.properties
infinispan.client.hotrod.cache.another-cache.configuration=<distributed-cache name=\"another-cache\"/>
infinispan.client.hotrod.cache.[my.other.cache].configuration_uri=file:///path/to/infinispan.xml
infinispan.client.hotrod.cache.another-cache.configuration=<distributed-cache name=\"another-cache\"/>
infinispan.client.hotrod.cache.[my.other.cache].configuration_uri=file:///path/to/infinispan.xml
If the name of your remote cache contains the . character, you must enclose it in square brackets when using hotrod-client.properties files.
3.3.5. Creating remote caches with the REST API
Use the Data Grid REST API to create remote caches on Data Grid Server from any suitable HTTP client.
Prerequisites
-
Create a Data Grid user with
adminpermissions. - Start at least one Data Grid Server instance.
- Have a Data Grid cache configuration.
Procedure
-
Invoke
POSTrequests to/rest/v2/caches/<cache_name>with cache configuration in the payload.
3.4. Creating embedded caches
Data Grid provides an EmbeddedCacheManager API that lets you control both the Cache Manager and embedded cache lifecycles programmatically.
3.4.1. Adding Data Grid to your project
Add Data Grid to your project to create embedded caches in your applications.
Prerequisites
- Configure your project to get Data Grid artifacts from the Maven repository.
Procedure
-
Add the
infinispan-coreartifact as a dependency in yourpom.xmlas follows:
3.4.2. Creating and using embedded caches
Data Grid provides a GlobalConfigurationBuilder API that controls the Cache Manager and a ConfigurationBuilder API that configures caches.
Prerequisites
-
Add the
infinispan-coreartifact as a dependency in yourpom.xml.
Procedure
Initialize a
CacheManager.NoteYou must always call the
cacheManager.start()method to initialize aCacheManagerbefore you can create caches. Default constructors do this for you but there are overloaded versions of the constructors that do not.Cache Managers are also heavyweight objects and Data Grid recommends instantiating only one instance per JVM.
-
Use the
ConfigurationBuilderAPI to define cache configuration. Obtain caches with
getCache(),createCache(), orgetOrCreateCache()methods.Data Grid recommends using the
getOrCreateCache()method because it either creates a cache on all nodes or returns an existing cache.-
If necessary use the
PERMANENTflag for caches to survive restarts. -
Stop the
CacheManagerby calling thecacheManager.stop()method to release JVM resources and gracefully shutdown any caches.
getCache() method
Invoke the getCache(String) method to obtain caches, as follows:
Cache<String, String> myCache = manager.getCache("myCache");
Cache<String, String> myCache = manager.getCache("myCache");
The preceding operation creates a cache named myCache, if it does not already exist, and returns it.
Using the getCache() method creates the cache only on the node where you invoke the method. In other words, it performs a local operation that must be invoked on each node across the cluster. Typically, applications deployed across multiple nodes obtain caches during initialization to ensure that caches are symmetric and exist on each node.
createCache() method
Invoke the createCache() method to create caches dynamically across the entire cluster.
Cache<String, String> myCache = manager.administration().createCache("myCache", "myTemplate");
Cache<String, String> myCache = manager.administration().createCache("myCache", "myTemplate");The preceding operation also automatically creates caches on any nodes that subsequently join the cluster.
Caches that you create with the createCache() method are ephemeral by default. If the entire cluster shuts down, the cache is not automatically created again when it restarts.
PERMANENT flag
Use the PERMANENT flag to ensure that caches can survive restarts.
Cache<String, String> myCache = manager.administration().withFlags(AdminFlag.PERMANENT).createCache("myCache", "myTemplate");
Cache<String, String> myCache = manager.administration().withFlags(AdminFlag.PERMANENT).createCache("myCache", "myTemplate");For the PERMANENT flag to take effect, you must enable global state and set a configuration storage provider.
For more information about configuration storage providers, see GlobalStateConfigurationBuilder#configurationStorage().
3.4.3. Cache API
Data Grid provides a Cache interface that exposes simple methods for adding, retrieving and removing entries, including atomic mechanisms exposed by the JDK’s ConcurrentMap interface. Based on the cache mode used, invoking these methods will trigger a number of things to happen, potentially even including replicating an entry to a remote node or looking up an entry from a remote node, or potentially a cache store.
For simple usage, using the Cache API should be no different from using the JDK Map API, and hence migrating from simple in-memory caches based on a Map to Data Grid’s Cache should be trivial.
Performance Concerns of Certain Map Methods
Certain methods exposed in Map have certain performance consequences when used with Data Grid, such as size() , values() , keySet() and entrySet() . Specific methods on the keySet, values and entrySet are fine for use please see their Javadoc for further details.
Attempting to perform these operations globally would have large performance impact as well as become a scalability bottleneck. As such, these methods should only be used for informational or debugging purposes only.
It should be noted that using certain flags with the withFlags() method can mitigate some of these concerns, please check each method’s documentation for more details.
Mortal and Immortal Data
Further to simply storing entries, Data Grid’s cache API allows you to attach mortality information to data. For example, simply using put(key, value) would create an immortal entry, i.e., an entry that lives in the cache forever, until it is removed (or evicted from memory to prevent running out of memory). If, however, you put data in the cache using put(key, value, lifespan, timeunit) , this creates a mortal entry, i.e., an entry that has a fixed lifespan and expires after that lifespan.
In addition to lifespan , Data Grid also supports maxIdle as an additional metric with which to determine expiration. Any combination of lifespans or maxIdles can be used.
putForExternalRead operation
Data Grid’s Cache class contains a different 'put' operation called putForExternalRead . This operation is particularly useful when Data Grid is used as a temporary cache for data that is persisted elsewhere. Under heavy read scenarios, contention in the cache should not delay the real transactions at hand, since caching should just be an optimization and not something that gets in the way.
To achieve this, putForExternalRead() acts as a put call that only operates if the key is not present in the cache, and fails fast and silently if another thread is trying to store the same key at the same time. In this particular scenario, caching data is a way to optimise the system and it’s not desirable that a failure in caching affects the on-going transaction, hence why failure is handled differently. putForExternalRead() is considered to be a fast operation because regardless of whether it’s successful or not, it doesn’t wait for any locks, and so returns to the caller promptly.
To understand how to use this operation, let’s look at basic example. Imagine a cache of Person instances, each keyed by a PersonId , whose data originates in a separate data store. The following code shows the most common pattern of using putForExternalRead within the context of this example:
Note that putForExternalRead should never be used as a mechanism to update the cache with a new Person instance originating from application execution (i.e. from a transaction that modifies a Person’s address). When updating cached values, please use the standard put operation, otherwise the possibility of caching corrupt data is likely.
3.4.3.1. AdvancedCache API
In addition to the simple Cache interface, Data Grid offers an AdvancedCache interface, geared towards extension authors. The AdvancedCache offers the ability to access certain internal components and to apply flags to alter the default behavior of certain cache methods. The following code snippet depicts how an AdvancedCache can be obtained:
AdvancedCache advancedCache = cache.getAdvancedCache();
AdvancedCache advancedCache = cache.getAdvancedCache();3.4.3.1.1. Flags
Flags are applied to regular cache methods to alter the behavior of certain methods. For a list of all available flags, and their effects, see the Flag enumeration. Flags are applied using AdvancedCache.withFlags() . This builder method can be used to apply any number of flags to a cache invocation, for example:
advancedCache.withFlags(Flag.CACHE_MODE_LOCAL, Flag.SKIP_LOCKING)
   .withFlags(Flag.FORCE_SYNCHRONOUS)
   .put("hello", "world");
advancedCache.withFlags(Flag.CACHE_MODE_LOCAL, Flag.SKIP_LOCKING)
   .withFlags(Flag.FORCE_SYNCHRONOUS)
.put("hello", "world");3.4.3.2. Asynchronous API
In addition to synchronous API methods like Cache.put() , Cache.remove() , etc., Data Grid also has an asynchronous, non-blocking API where you can achieve the same results in a non-blocking fashion.
These methods are named in a similar fashion to their blocking counterparts, with "Async" appended. E.g., Cache.putAsync() , Cache.removeAsync() , etc. These asynchronous counterparts return a CompletableFuture that contains the actual result of the operation.
For example, in a cache parameterized as Cache<String, String>, Cache.put(String key, String value) returns String while Cache.putAsync(String key, String value) returns CompletableFuture<String>.
3.4.3.2.1. Why use such an API?
Non-blocking APIs are powerful in that they provide all of the guarantees of synchronous communications - with the ability to handle communication failures and exceptions - with the ease of not having to block until a call completes. This allows you to better harness parallelism in your system. For example:
There are 4 things in Data Grid that can be considered to be on the critical path of a typical write operation. These are, in order of cost:
- network calls
- marshalling
- writing to a cache store (optional)
- locking
Using the async methods will take the network calls and marshalling off the critical path. For various technical reasons, writing to a cache store and acquiring locks, however, still happens in the caller’s thread.
Data Grid can provide Cache Manager and cache statistics as well as export JMX MBeans.
4.1. Configuring Data Grid metrics
Data Grid generates metrics that are compatible with any monitoring system.
- Gauges provide values such as the average number of nanoseconds for write operations or JVM uptime.
- Histograms provide details about operation execution times such as read, write, and remove times.
By default, Data Grid generates gauges when you enable statistics but you can also configure it to generate histograms.
Data Grid metrics are provided at the vendor scope. Metrics related to the JVM are provided in the base scope.
Procedure
- Open your Data Grid configuration for editing.
-
Add the
metricselement or object to the cache container. -
Enable or disable gauges with the
gaugesattribute or field. -
Enable or disable histograms with the
histogramsattribute or field. - Save and close your client configuration.
Metrics configuration
XML
JSON
YAML
4.2. Registering JMX MBeans
Data Grid can register JMX MBeans that you can use to collect statistics and perform administrative operations. You must also enable statistics otherwise Data Grid provides 0 values for all statistic attributes in JMX MBeans.
Procedure
- Open your Data Grid configuration for editing.
-
Add the
jmxelement or object to the cache container and specifytrueas the value for theenabledattribute or field. -
Add the
domainattribute or field and specify the domain where JMX MBeans are exposed, if required. - Save and close your client configuration.
JMX configuration
XML
JSON
YAML
4.2.1. Enabling JMX remote ports
Provide unique remote JMX ports to expose Data Grid MBeans through connections in JMXServiceURL format.
You can enable remote JMX ports using one of the following approaches:
- Enable remote JMX ports that require authentication to one of the Data Grid Server security realms.
- Enable remote JMX ports manually using the standard Java management configuration options.
Prerequisites
-
For remote JMX with authentication, define JMX specific user roles using the default security realm. Users must have
controlRolewith read/write access or themonitorRolewith read-only access to access any JMX resources.
Procedure
Start Data Grid Server with a remote JMX port enabled using one of the following ways:
Enable remote JMX through port
9999.bin/server.sh --jmx 9999
bin/server.sh --jmx 9999Copy to Clipboard Copied! Toggle word wrap Toggle overflow WarningUsing remote JMX with SSL disabled is not intended for production environments.
Pass the following system properties to Data Grid Server at startup.
bin/server.sh -Dcom.sun.management.jmxremote.port=9999 -Dcom.sun.management.jmxremote.authenticate=false -Dcom.sun.management.jmxremote.ssl=false
bin/server.sh -Dcom.sun.management.jmxremote.port=9999 -Dcom.sun.management.jmxremote.authenticate=false -Dcom.sun.management.jmxremote.ssl=falseCopy to Clipboard Copied! Toggle word wrap Toggle overflow WarningEnabling remote JMX with no authentication or SSL is not secure and not recommended in any environment. Disabling authentication and SSL allows unauthorized users to connect to your server and access the data hosted there.
4.2.2. Data Grid MBeans
Data Grid exposes JMX MBeans that represent manageable resources.
org.infinispan:type=Cache- Attributes and operations available for cache instances.
org.infinispan:type=CacheManager- Attributes and operations available for Cache Managers, including Data Grid cache and cluster health statistics.
For a complete list of available JMX MBeans along with descriptions and available operations and attributes, see the Data Grid JMX Components documentation.
4.2.3. Registering MBeans in custom MBean servers
Data Grid includes an MBeanServerLookup interface that you can use to register MBeans in custom MBeanServer instances.
Prerequisites
-
Create an implementation of
MBeanServerLookupso that thegetMBeanServer()method returns the custom MBeanServer instance. - Configure Data Grid to register JMX MBeans.
Procedure
- Open your Data Grid configuration for editing.
-
Add the
mbean-server-lookupattribute or field to the JMX configuration for the Cache Manager. -
Specify fully qualified name (FQN) of your
MBeanServerLookupimplementation. - Save and close your client configuration.
JMX MBean server lookup configuration
XML
JSON
YAML
4.3. Exporting metrics during a state transfer operation
You can export time metrics for clustered caches that Data Grid redistributes across nodes.
A state transfer operation occurs when a clustered cache topology changes, such as a node joining or leaving a cluster. During a state transfer operation, Data Grid exports metrics from each cache, so that you can determine a cache’s status. A state transfer exposes attributes as properties, so that Data Grid can export metrics from each cache.
You cannot perform a state transfer operation in invalidation mode.
Data Grid generates time metrics that are compatible with the REST API and the JMX API.
Prerequisites
- Configure Data Grid metrics.
- Enable metrics for your cache type, such as embedded cache or remote cache.
- Initiate a state transfer operation by changing your clustered cache topology.
Procedure
Choose one of the following methods:
- Configure Data Grid to use the REST API to collect metrics.
- Configure Data Grid to use the JMX API to collect metrics.
4.4. Monitoring the status of cross-site replication
Monitor the site status of your backup locations to detect interruptions in the communication between the sites. When a remote site status changes to offline, Data Grid stops replicating your data to the backup location. Your data become out of sync and you must fix the inconsistencies before bringing the clusters back online.
Monitoring cross-site events is necessary for early problem detection. Use one of the following monitoring strategies:
- Monitoring cross-site replication with the REST API
- Monitoring cross-site replication with the Prometheus metrics or any other monitoring system
Monitoring cross-site replication with the REST API
Monitor the status of cross-site replication for all caches using the REST endpoint. You can implement a custom script to poll the REST endpoint or use the following example.
Prerequisites
- Enable cross-site replication.
Procedure
Implement a script to poll the REST endpoint.
The following example demonstrates how you can use a Python script to poll the site status every five seconds.
When a site status changes from online to offline or vice-versa, the function on_event is invoked.
If you want to use this script, you must specify the following variables:
-
USERNAMEandPASSWORD: The username and password of Data Grid user with permission to access the REST endpoint. -
POLL_INTERVAL_SEC: The number of seconds between polls. -
SERVERS: The list of Data Grid Servers at this site. The script only requires a single valid response but the list is provided to allow fail over. -
REMOTE_SITES: The list of remote sites to monitor on these servers. -
CACHES: The list of cache names to monitor.
Monitoring cross-site replication with the Prometheus metrics
Prometheus, and other monitoring systems, let you configure alerts to detect when a site status changes to offline.
Monitoring cross-site latency metrics can help you to discover potential issues.
Prerequisites
- Enable cross-site replication.
Procedure
- Configure Data Grid metrics.
Configure alerting rules using the Prometheus metrics format.
-
For the site status, use
1foronlineand0foroffline. For the
exprfiled, use the following format:vendor_cache_manager_default_cache_<cache name>_x_site_admin_<site name>_status.In the following example, Prometheus alerts you when the NYC site gets
offlinefor cache namedworkorsessions.Copy to Clipboard Copied! Toggle word wrap Toggle overflow The following image shows an alert that the NYC site is
offlinefor cachework.Figure 4.1. Prometheus Alert

-
For the site status, use
Chapter 5. Configuring JVM memory usage
Control how Data Grid stores data in JVM memory by:
- Managing JVM memory usage with eviction that automatically removes data from caches.
- Adding lifespan and maximum idle times to expire entries and prevent stale data.
- Configuring Data Grid to store data in off-heap, native memory.
5.1. Default memory configuration
By default Data Grid stores cache entries as objects in the JVM heap. Over time, as applications add entries, the size of caches can exceed the amount of memory that is available to the JVM. Likewise, if Data Grid is not the primary data store, then entries become out of date which means your caches contain stale data.
XML
<distributed-cache>
  <memory storage="HEAP"/>
</distributed-cache>
<distributed-cache>
  <memory storage="HEAP"/>
</distributed-cache>JSON
YAML
distributedCache:
  memory:
    storage: "HEAP"
distributedCache:
  memory:
storage: "HEAP"5.2. Eviction and expiration
Eviction and expiration are two strategies for cleaning the data container by removing old, unused entries. Although eviction and expiration are similar, they have some important differences.
- ✓ Eviction lets Data Grid control the size of the data container by removing entries when the container becomes larger than a configured threshold.
-
✓ Expiration limits the amount of time entries can exist. Data Grid uses a scheduler to periodically remove expired entries. Entries that are expired but not yet removed are immediately removed on access; in this case
get()calls for expired entries return "null" values. - ✓ Eviction is local to Data Grid nodes.
- ✓ Expiration takes place across Data Grid clusters.
- ✓ You can use eviction and expiration together or independently of each other.
-
✓ You can configure eviction and expiration declaratively in
infinispan.xmlto apply cache-wide defaults for entries. - ✓ You can explicitly define expiration settings for specific entries but you cannot define eviction on a per-entry basis.
- ✓ You can manually evict entries and manually trigger expiration.
5.3. Eviction with Data Grid caches
Eviction lets you control the size of the data container by removing entries from memory in one of two ways:
-
Total number of entries (
max-count). -
Maximum amount of memory (
max-size).
Eviction drops one entry from the data container at a time and is local to the node on which it occurs.
Eviction removes entries from memory but not from persistent cache stores. To ensure that entries remain available after Data Grid evicts them, and to prevent inconsistencies with your data, you should configure persistent storage.
When you configure memory, Data Grid approximates the current memory usage of the data container. When entries are added or modified, Data Grid compares the current memory usage of the data container to the maximum size. If the size exceeds the maximum, Data Grid performs eviction.
Eviction happens immediately in the thread that adds an entry that exceeds the maximum size.
5.3.1. Eviction strategies
When you configure Data Grid eviction you specify:
- The maximum size of the data container.
- A strategy for removing entries when the cache reaches the threshold.
You can either perform eviction manually or configure Data Grid to do one of the following:
- Remove old entries to make space for new ones.
Throw
ContainerFullExceptionand prevent new entries from being created.The exception eviction strategy works only with transactional caches that use 2 phase commits; not with 1 phase commits or synchronization optimizations.
Refer to the schema reference for more details about the eviction strategies.
Data Grid includes the Caffeine caching library that implements a variation of the Least Frequently Used (LFU) cache replacement algorithm known as TinyLFU. For off-heap storage, Data Grid uses a custom implementation of the Least Recently Used (LRU) algorithm.
5.3.2. Configuring maximum count eviction
Limit the size of Data Grid caches to a total number of entries.
Procedure
- Open your Data Grid configuration for editing.
-
Specify the total number of entries that caches can contain before Data Grid performs eviction with either the
max-countattribute ormaxCount()method. Set one of the following as the eviction strategy to control how Data Grid removes entries with the
when-fullattribute orwhenFull()method.-
REMOVEData Grid performs eviction. This is the default strategy. -
MANUALYou perform eviction manually for embedded caches. -
EXCEPTIONData Grid throws an exception instead of evicting entries.
-
- Save and close your Data Grid configuration.
Maximum count eviction
In the following example, Data Grid removes an entry when the cache contains a total of 500 entries and a new entry is created:
XML
<distributed-cache>
  <memory max-count="500" when-full="REMOVE"/>
</distributed-cache>
<distributed-cache>
  <memory max-count="500" when-full="REMOVE"/>
</distributed-cache>JSON
YAML
distributedCache:
  memory:
    maxCount: "500"
    whenFull: "REMOVE"
distributedCache:
  memory:
    maxCount: "500"
whenFull: "REMOVE"ConfigurationBuilder
ConfigurationBuilder builder = new ConfigurationBuilder();
builder.memory().maxCount(500).whenFull(EvictionStrategy.REMOVE);
ConfigurationBuilder builder = new ConfigurationBuilder();
builder.memory().maxCount(500).whenFull(EvictionStrategy.REMOVE);5.3.3. Configuring maximum size eviction
Limit the size of Data Grid caches to a maximum amount of memory.
Procedure
- Open your Data Grid configuration for editing.
Specify
application/x-protostreamas the media type for cache encoding.You must specify a binary media type to use maximum size eviction.
-
Configure the maximum amount of memory, in bytes, that caches can use before Data Grid performs eviction with the
max-sizeattribute ormaxSize()method. Optionally specify a byte unit of measurement.
The default is B (bytes). Refer to the configuration schema for supported units.
Set one of the following as the eviction strategy to control how Data Grid removes entries with either the
when-fullattribute orwhenFull()method.-
REMOVEData Grid performs eviction. This is the default strategy. -
MANUALYou perform eviction manually for embedded caches. -
EXCEPTIONData Grid throws an exception instead of evicting entries.
-
- Save and close your Data Grid configuration.
Maximum size eviction
In the following example, Data Grid removes an entry when the size of the cache reaches 1.5 GB (gigabytes) and a new entry is created:
XML
<distributed-cache>
  <encoding media-type="application/x-protostream"/>
  <memory max-size="1.5GB" when-full="REMOVE"/>
</distributed-cache>
<distributed-cache>
  <encoding media-type="application/x-protostream"/>
  <memory max-size="1.5GB" when-full="REMOVE"/>
</distributed-cache>JSON
YAML
ConfigurationBuilder
ConfigurationBuilder builder = new ConfigurationBuilder();
builder.encoding().mediaType("application/x-protostream")
       .memory()
         .maxSize("1.5GB")
         .whenFull(EvictionStrategy.REMOVE);
ConfigurationBuilder builder = new ConfigurationBuilder();
builder.encoding().mediaType("application/x-protostream")
       .memory()
         .maxSize("1.5GB")
.whenFull(EvictionStrategy.REMOVE);5.3.4. Manual eviction
If you choose the manual eviction strategy, Data Grid does not perform eviction. You must do so manually with the evict() method.
You should use manual eviction with embedded caches only. For remote caches, you should always configure Data Grid with the REMOVE or EXCEPTION eviction strategy.
This configuration prevents a warning message when you enable passivation but do not configure eviction.
XML
<distributed-cache>
  <memory max-count="500" when-full="MANUAL"/>
</distributed-cache>
<distributed-cache>
  <memory max-count="500" when-full="MANUAL"/>
</distributed-cache>JSON
YAML
distributedCache:
  memory:
    maxCount: "500"
    whenFull: "MANUAL"
distributedCache:
  memory:
    maxCount: "500"
whenFull: "MANUAL"ConfigurationBuilder
ConfigurationBuilder builder = new ConfigurationBuilder();
builder.encoding().mediaType("application/x-protostream")
       .memory()
         .maxSize("1.5GB")
         .whenFull(EvictionStrategy.REMOVE);
ConfigurationBuilder builder = new ConfigurationBuilder();
builder.encoding().mediaType("application/x-protostream")
       .memory()
         .maxSize("1.5GB")
.whenFull(EvictionStrategy.REMOVE);5.3.5. Passivation with eviction
Passivation persists data to cache stores when Data Grid evicts entries. You should always enable eviction if you enable passivation, as in the following examples:
XML
JSON
YAML
distributedCache:
  memory:
    maxCount: "100"
  persistence:
    passivation: "true"
distributedCache:
  memory:
    maxCount: "100"
  persistence:
passivation: "true"ConfigurationBuilder
ConfigurationBuilder builder = new ConfigurationBuilder();
builder.memory().maxCount(100);
builder.persistence().passivation(true); //Persistent storage configuration
ConfigurationBuilder builder = new ConfigurationBuilder();
builder.memory().maxCount(100);
builder.persistence().passivation(true); //Persistent storage configuration5.4. Expiration with lifespan and maximum idle
Expiration configures Data Grid to remove entries from caches when they reach one of the following time limits:
- Lifespan
- Sets the maximum amount of time that entries can exist.
- Maximum idle
- Specifies how long entries can remain idle. If operations do not occur for entries, they become idle.
Maximum idle expiration does not currently support caches with persistent storage.
If you use expiration and eviction with the EXCEPTION eviction strategy, entries that are expired, but not yet removed from the cache, count towards the size of the data container.
5.4.1. How expiration works
When you configure expiration, Data Grid stores keys with metadata that determines when entries expire.
-
Lifespan uses a
creationtimestamp and the value for thelifespanconfiguration property. -
Maximum idle uses a
last usedtimestamp and the value for themax-idleconfiguration property.
Data Grid checks if lifespan or maximum idle metadata is set and then compares the values with the current time.
If (creation + lifespan < currentTime) or (lastUsed + maxIdle < currentTime) then Data Grid detects that the entry is expired.
Expiration occurs whenever entries are accessed or found by the expiration reaper.
For example, k1 reaches the maximum idle time and a client makes a Cache.get(k1) request. In this case, Data Grid detects that the entry is expired and removes it from the data container. The Cache.get(k1) request returns null.
Data Grid also expires entries from cache stores, but only with lifespan expiration. Maximum idle expiration does not work with cache stores. In the case of cache loaders, Data Grid cannot expire entries because loaders can only read from external storage.
Data Grid adds expiration metadata as long primitive data types to cache entries. This can increase the size of keys by as much as 32 bytes.
5.4.2. Expiration reaper
Data Grid uses a reaper thread that runs periodically to detect and remove expired entries. The expiration reaper ensures that expired entries that are no longer accessed are removed.
The Data Grid ExpirationManager interface handles the expiration reaper and exposes the processExpiration() method.
In some cases, you can disable the expiration reaper and manually expire entries by calling processExpiration(); for instance, if you are using local cache mode with a custom application where a maintenance thread runs periodically.
If you use clustered cache modes, you should never disable the expiration reaper.
Data Grid always uses the expiration reaper when using cache stores. In this case you cannot disable it.
5.4.3. Maximum idle and clustered caches
Because maximum idle expiration relies on the last access time for cache entries, it has some limitations with clustered cache modes.
With lifespan expiration, the creation time for cache entries provides a value that is consistent across clustered caches. For example, the creation time for k1 is always the same on all nodes.
For maximum idle expiration with clustered caches, last access time for entries is not always the same on all nodes. To ensure that entries have the same relative access times across clusters, Data Grid sends touch commands to all owners when keys are accessed.
The touch commands that Data Grid send have the following considerations:
-
Cache.get()requests do not return until all touch commands complete. This synchronous behavior increases latency of client requests. - The touch command also updates the "recently accessed" metadata for cache entries on all owners, which Data Grid uses for eviction.
- With scattered cache mode, Data Grid sends touch commands to all nodes, not just primary and backup owners.
Additional information
- Maximum idle expiration does not work with invalidation mode.
- Iteration across a clustered cache can return expired entries that have exceeded the maximum idle time limit. This behavior ensures performance because no remote invocations are performed during the iteration. Also note that iteration does not refresh any expired entries.
Set lifespan and maximum idle times for all entries in a cache.
Procedure
- Open your Data Grid configuration for editing.
-
Specify the amount of time, in milliseconds, that entries can stay in the cache with the
lifespanattribute orlifespan()method. -
Specify the amount of time, in milliseconds, that entries can remain idle after last access with the
max-idleattribute ormaxIdle()method. - Save and close your Data Grid configuration.
Expiration for Data Grid caches
In the following example, Data Grid expires all cache entries after 5 seconds or 1 second after the last access time, whichever happens first:
XML
<replicated-cache>
  <expiration lifespan="5000" max-idle="1000" />
</replicated-cache>
<replicated-cache>
  <expiration lifespan="5000" max-idle="1000" />
</replicated-cache>JSON
YAML
replicatedCache:
expiration:
lifespan: "5000"
maxIdle: "1000"
replicatedCache:
expiration:
lifespan: "5000"
maxIdle: "1000"ConfigurationBuilder
ConfigurationBuilder builder = new ConfigurationBuilder();
builder.expiration().lifespan(5000, TimeUnit.MILLISECONDS)
.maxIdle(1000, TimeUnit.MILLISECONDS);
ConfigurationBuilder builder = new ConfigurationBuilder();
builder.expiration().lifespan(5000, TimeUnit.MILLISECONDS)
.maxIdle(1000, TimeUnit.MILLISECONDS);Specify lifespan and maximum idle times for individual entries. When you add lifespan and maximum idle times to entries, those values take priority over expiration configuration for caches.
When you explicitly define lifespan and maximum idle time values for cache entries, Data Grid replicates those values across the cluster along with the cache entries. Likewise, Data Grid writes expiration values along with the entries to persistent storage.
Procedure
For remote caches, you can add lifespan and maximum idle times to entries interactively with the Data Grid Console.
With the Data Grid Command Line Interface (CLI), use the
--max-idle=and--ttl=arguments with theputcommand.For both remote and embedded caches, you can add lifespan and maximum idle times with
cache.put()invocations.Copy to Clipboard Copied! Toggle word wrap Toggle overflow
5.5. JVM heap and off-heap memory
Data Grid stores cache entries in JVM heap memory by default. You can configure Data Grid to use off-heap storage, which means that your data occupies native memory outside the managed JVM memory space.
The following diagram is a simplified illustration of the memory space for a JVM process where Data Grid is running:
Figure 5.1. JVM memory space
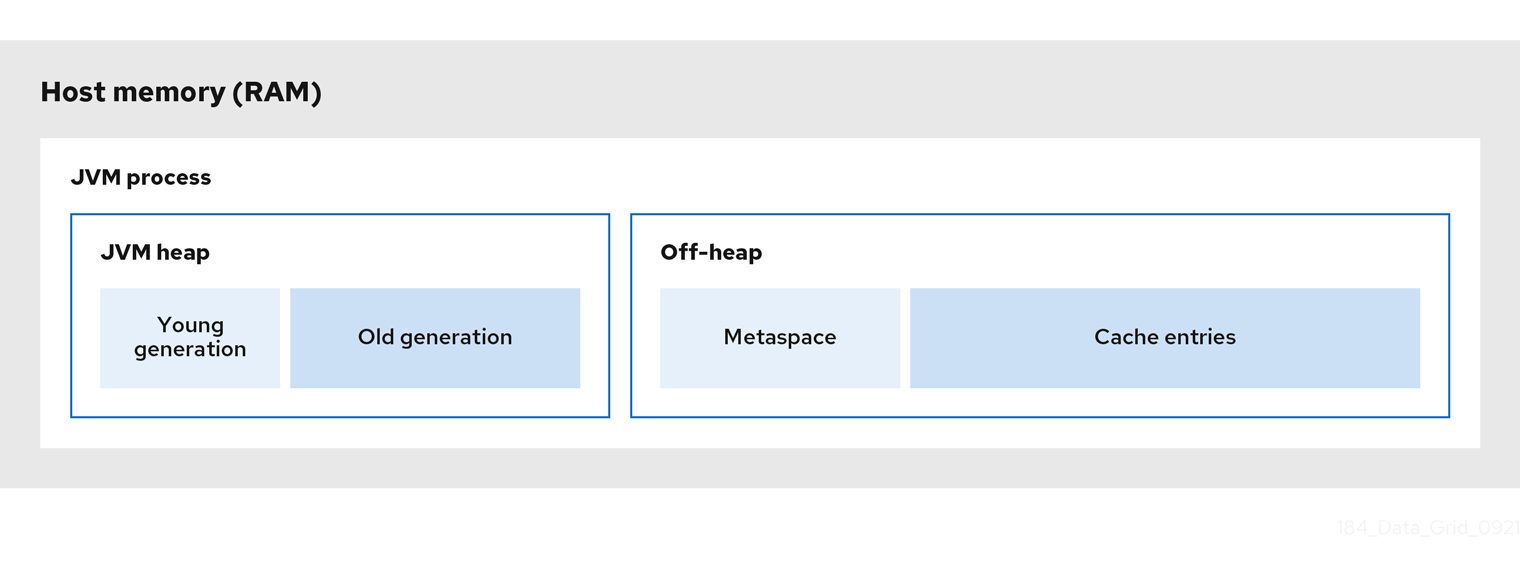
JVM heap memory
The heap is divided into young and old generations that help keep referenced Java objects and other application data in memory. The GC process reclaims space from unreachable objects, running more frequently on the young generation memory pool.
When Data Grid stores cache entries in JVM heap memory, GC runs can take longer to complete as you start adding data to your caches. Because GC is an intensive process, longer and more frequent runs can degrade application performance.
Off-heap memory
Off-heap memory is native available system memory outside JVM memory management. The JVM memory space diagram shows the Metaspace memory pool that holds class metadata and is allocated from native memory. The diagram also represents a section of native memory that holds Data Grid cache entries.
Off-heap memory:
- Uses less memory per entry.
- Improves overall JVM performance by avoiding Garbage Collector (GC) runs.
One disadvantage, however, is that JVM heap dumps do not show entries stored in off-heap memory.
5.5.1. Off-heap data storage
When you add entries to off-heap caches, Data Grid dynamically allocates native memory to your data.
Data Grid hashes the serialized byte[] for each key into buckets that are similar to a standard Java HashMap. Buckets include address pointers that Data Grid uses to locate entries that you store in off-heap memory.
Even though Data Grid stores cache entries in native memory, run-time operations require JVM heap representations of those objects. For instance, cache.get() operations read objects into heap memory before returning. Likewise, state transfer operations hold subsets of objects in heap memory while they take place.
Object equality
Data Grid determines equality of Java objects in off-heap storage using the serialized byte[] representation of each object instead of the object instance.
Data consistency
Data Grid uses an array of locks to protect off-heap address spaces. The number of locks is twice the number of cores and then rounded to the nearest power of two. This ensures that there is an even distribution of ReadWriteLock instances to prevent write operations from blocking read operations.
5.5.2. Configuring off-heap memory
Configure Data Grid to store cache entries in native memory outside the JVM heap space.
Procedure
- Open your Data Grid configuration for editing.
-
Set
OFF_HEAPas the value for thestorageattribute orstorage()method. - Set a boundary for the size of the cache by configuring eviction.
- Save and close your Data Grid configuration.
Off-heap storage
Data Grid stores cache entries as bytes in native memory. Eviction happens when there are 100 entries in the data container and Data Grid gets a request to create a new entry:
XML
<replicated-cache> <memory storage="OFF_HEAP" max-count="500"/> </replicated-cache>
<replicated-cache>
<memory storage="OFF_HEAP" max-count="500"/>
</replicated-cache>JSON
YAML
replicatedCache:
memory:
storage: "OFF_HEAP"
maxCount: "500"
replicatedCache:
memory:
storage: "OFF_HEAP"
maxCount: "500"ConfigurationBuilder
ConfigurationBuilder builder = new ConfigurationBuilder(); builder.memory().storage(StorageType.OFF_HEAP).maxCount(500);
ConfigurationBuilder builder = new ConfigurationBuilder();
builder.memory().storage(StorageType.OFF_HEAP).maxCount(500);Chapter 6. Configuring persistent storage
Data Grid uses cache stores and loaders to interact with persistent storage.
- Durability
- Adding cache stores allows you to persist data to non-volatile storage so it survives restarts.
- Write-through caching
- Configuring Data Grid as a caching layer in front of persistent storage simplifies data access for applications because Data Grid handles all interactions with the external storage.
- Data overflow
- Using eviction and passivation techniques ensures that Data Grid keeps only frequently used data in-memory and writes older entries to persistent storage.
6.1. Passivation
Passivation configures Data Grid to write entries to cache stores when it evicts those entries from memory. In this way, passivation prevents unnecessary and potentially expensive writes to persistent storage.
Activation is the process of restoring entries to memory from the cache store when there is an attempt to access passivated entries. For this reason, when you enable passivation, you must configure cache stores that implement both CacheWriter and CacheLoader interfaces so they can write and load entries from persistent storage.
When Data Grid evicts an entry from the cache, it notifies cache listeners that the entry is passivated then stores the entry in the cache store. When Data Grid gets an access request for an evicted entry, it lazily loads the entry from the cache store into memory and then notifies cache listeners that the entry is activated while keeping the value still in the store.
- Passivation uses the first cache loader in the Data Grid configuration and ignores all others.
Passivation is not supported with:
- Transactional stores. Passivation writes and removes entries from the store outside the scope of the actual Data Grid commit boundaries.
- Shared stores. Shared cache stores require entries to always exist in the store for other owners. For this reason, passivation is not supported because entries cannot be removed.
If you enable passivation with transactional stores or shared stores, Data Grid throws an exception.
6.1.1. How passivation works
Passivation disabled
Writes to data in memory result in writes to persistent storage.
If Data Grid evicts data from memory, then data in persistent storage includes entries that are evicted from memory. In this way persistent storage is a superset of the in-memory cache. This is recommended when you require highest consistency as the store will be able to be read again after a crash.
If you do not configure eviction, then data in persistent storage provides a copy of data in memory.
Passivation enabled
Data Grid adds data to persistent storage only when it evicts data from memory, an entry is removed or upon shutting down the node.
When Data Grid activates entries, it restores data in memory but keeps the data in the store still. This allows for writes to be just as fast as without a store, and still maintains consistency. When an entry is created or updated only the in memory will be updated and thus the store will be outdated for the time being.
Passivation is not supported when a store is also configured as shared. This is due to entries can become out of sync between nodes depending on when a write is evicted versus read.
To gurantee data consistency any store that is not shared should always have purgeOnStartup enabled. This is true for both passivation enabled or disabled since a store could hold an outdated entry while down and resurrect it at a later point.
The following table shows data in memory and in persistent storage after a series of operations:
| Operation | Passivation disabled | Passivation enabled |
|---|---|---|
| Insert k1. |
Memory: k1 |
Memory: k1 |
| Insert k2. |
Memory: k1, k2 |
Memory: k1, k2 |
| Eviction thread runs and evicts k1. |
Memory: k2 |
Memory: k2 |
| Read k1. |
Memory: k1, k2 |
Memory: k1, k2 |
| Eviction thread runs and evicts k2. |
Memory: k1 |
Memory: k1 |
| Remove k2. |
Memory: k1 |
Memory: k1 |
6.2. Write-through cache stores
Write-through is a cache writing mode where writes to memory and writes to cache stores are synchronous. When a client application updates a cache entry, in most cases by invoking Cache.put(), Data Grid does not return the call until it updates the cache store. This cache writing mode results in updates to the cache store concluding within the boundaries of the client thread.
The primary advantage of write-through mode is that the cache and cache store are updated simultaneously, which ensures that the cache store is always consistent with the cache.
However, write-through mode can potentially decrease performance because the need to access and update cache stores directly adds latency to cache operations.
Write-through configuration
Data Grid uses write-through mode unless you explicitly add write-behind configuration to your caches. There is no separate element or method for configuring write-through mode.
For example, the following configuration adds a file-based store to the cache that implicitly uses write-through mode:
6.3. Write-behind cache stores
Write-behind is a cache writing mode where writes to memory are synchronous and writes to cache stores are asynchronous.
When clients send write requests, Data Grid adds those operations to a modification queue. Data Grid processes operations as they join the queue so that the calling thread is not blocked and the operation completes immediately.
If the number of write operations in the modification queue increases beyond the size of the queue, Data Grid adds those additional operations to the queue. However, those operations do not complete until Data Grid processes operations that are already in the queue.
For example, calling Cache.putAsync returns immediately and the Stage also completes immediately if the modification queue is not full. If the modification queue is full, or if Data Grid is currently processing a batch of write operations, then Cache.putAsync returns immediately and the Stage completes later.
Write-behind mode provides a performance advantage over write-through mode because cache operations do not need to wait for updates to the underlying cache store to complete. However, data in the cache store remains inconsistent with data in the cache until the modification queue is processed. For this reason, write-behind mode is suitable for cache stores with low latency, such as unshared and local file-based cache stores, where the time between the write to the cache and the write to the cache store is as small as possible.
Write-behind configuration
XML
JSON
YAML
ConfigurationBuilder
ConfigurationBuilder builder = new ConfigurationBuilder();
builder.persistence()
.async()
.modificationQueueSize(2048)
.failSilently(true);
ConfigurationBuilder builder = new ConfigurationBuilder();
builder.persistence()
.async()
.modificationQueueSize(2048)
.failSilently(true);Failing silently
Write-behind configuration includes a fail-silently parameter that controls what happens when either the cache store is unavailable or the modification queue is full.
-
If
fail-silently="true"then Data Grid logs WARN messages and rejects write operations. If
fail-silently="false"then Data Grid throws exceptions if it detects the cache store is unavailable during a write operation. Likewise if the modification queue becomes full, Data Grid throws an exception.In some cases, data loss can occur if Data Grid restarts and write operations exist in the modification queue. For example the cache store goes offline but, during the time it takes to detect that the cache store is unavailable, write operations are added to the modification queue because it is not full. If Data Grid restarts or otherwise becomes unavailable before the cache store comes back online, then the write operations in the modification queue are lost because they were not persisted.
6.4. Segmented cache stores
Cache stores can organize data into hash space segments to which keys map.
Segmented stores increase read performance for bulk operations; for example, streaming over data (Cache.size, Cache.entrySet.stream), pre-loading the cache, and doing state transfer operations.
However, segmented stores can also result in loss of performance for write operations. This performance loss applies particularly to batch write operations that can take place with transactions or write-behind stores. For this reason, you should evaluate the overhead for write operations before you enable segmented stores. The performance gain for bulk read operations might not be acceptable if there is a significant performance loss for write operations.
The number of segments you configure for cache stores must match the number of segments you define in the Data Grid configuration with the clustering.hash.numSegments parameter.
If you change the numSegments parameter in the configuration after you add a segmented cache store, Data Grid cannot read data from that cache store.
6.6. Transactions with persistent cache stores
Data Grid supports transactional operations with JDBC-based cache stores only. To configure caches as transactional, you set transactional=true to keep data in persistent storage synchronized with data in memory.
For all other cache stores, Data Grid does not enlist cache loaders in transactional operations. This can result in data inconsistency if transactions succeed in modifying data in memory but do not completely apply changes to data in the cache store. In these cases manual recovery is not possible with cache stores.
6.7. Global persistent location
Data Grid preserves global state so that it can restore cluster topology and cached data after restart.
Remote caches
Data Grid Server saves cluster state to the $RHDG_HOME/server/data directory.
You should never delete or modify the server/data directory or its content. Data Grid restores cluster state from this directory when you restart your server instances.
Changing the default configuration or directly modifying the server/data directory can cause unexpected behavior and lead to data loss.
Embedded caches
Data Grid defaults to the user.dir system property as the global persistent location. In most cases this is the directory where your application starts.
For clustered embedded caches, such as replicated or distributed, you should always enable and configure a global persistent location to restore cluster topology.
You should never configure an absolute path for a file-based cache store that is outside the global persistent location. If you do, Data Grid writes the following exception to logs:
ISPN000558: "The store location 'foo' is not a child of the global persistent location 'bar'"
ISPN000558: "The store location 'foo' is not a child of the global persistent location 'bar'"6.7.1. Configuring the global persistent location
Enable and configure the location where Data Grid stores global state for clustered embedded caches.
Data Grid Server enables global persistence and configures a default location. You should not disable global persistence or change the default configuration for remote caches.
Prerequisites
- Add Data Grid to your project.
Procedure
Enable global state in one of the following ways:
-
Add the
global-stateelement to your Data Grid configuration. -
Call the
globalState().enable()methods in theGlobalConfigurationBuilderAPI.
-
Add the
Define whether the global persistent location is unique to each node or shared between the cluster.
Expand Location type Configuration Unique to each node
persistent-locationelement orpersistentLocation()methodShared between the cluster
shared-persistent-locationelement orsharedPersistentLocation(String)methodSet the path where Data Grid stores cluster state.
For example, file-based cache stores the path is a directory on the host filesystem.
Values can be:
- Absolute and contain the full location including the root.
- Relative to a root location.
If you specify a relative value for the path, you must also specify a system property that resolves to a root location.
For example, on a Linux host system you set
global/stateas the path. You also set themy.dataproperty that resolves to the/opt/dataroot location. In this case Data Grid uses/opt/data/global/stateas the global persistent location.
Global persistent location configuration
XML
JSON
YAML
cacheContainer:
globalState:
persistentLocation:
path: "global/state"
relativeTo : "my.data"
cacheContainer:
globalState:
persistentLocation:
path: "global/state"
relativeTo : "my.data"GlobalConfigurationBuilder
new GlobalConfigurationBuilder().globalState()
.enable()
.persistentLocation("global/state", "my.data");
new GlobalConfigurationBuilder().globalState()
.enable()
.persistentLocation("global/state", "my.data");6.8. File-based cache stores
File-based cache stores provide persistent storage on the local host filesystem where Data Grid is running. For clustered caches, file-based cache stores are unique to each Data Grid node.
Never use filesystem-based cache stores on shared file systems, such as an NFS or Samba share, because they do not provide file locking capabilities and data corruption can occur.
Additionally if you attempt to use transactional caches with shared file systems, unrecoverable failures can happen when writing to files during the commit phase.
Soft-Index File Stores
SoftIndexFileStore is the default implementation for file-based cache stores and stores data in a set of append-only files.
When append-only files:
- Reach their maximum size, Data Grid creates a new file and starts writing to it.
- Reach the compaction threshold of less than 50% usage, Data Grid overwrites the entries to a new file and then deletes the old file.
Using SoftIndexFileStore in a clustered cache should enable purge on startup to ensure stale entries are not resurrected.
B+ trees
To improve performance, append-only files in a SoftIndexFileStore are indexed using a B+ Tree that can be stored both on disk and in memory. The in-memory index uses Java soft references to ensure it can be rebuilt if removed by Garbage Collection (GC) then requested again.
Because SoftIndexFileStore uses Java soft references to keep indexes in memory, it helps prevent out-of-memory exceptions. GC removes indexes before they consume too much memory while still falling back to disk.
SoftIndexFileStore creates a B+ tree per configured cache segment. This provides an additional "index" as it only has so many elements and provides additional parallelism for index updates. Currently we allow for a parallel amount based on one sixteenth of the number of cache segments.
Each entry in the B+ tree is a node. By default, the size of each node is limited to 4096 bytes. SoftIndexFileStore throws an exception if keys are longer after serialization occurs.
File limits
SoftIndexFileStore will use two plus the configured openFilesLimit amount of files at a given time. The two additional file pointers are reserved for the log appender for newly updated data and another for the compactor which writes compacted entries into a new file.
The amount of open allocated files allocated for indexing is one tenth of the total number of the configured openFilesLimit. This number has a minimum of 1 or the number of cache segments. Any number remaning from configured limit is allocated for open data files themselves.
Segmentation
Soft-index file stores are always segmented. The append log(s) are not directly segmented and segmentation is handled directly by the index.
Expiration
The SoftIndexFileStore has full support for expired entries and their requirements.
Single File Cache Stores
Single file cache stores are now deprecated and planned for removal.
Single File cache stores, SingleFileStore, persist data to file. Data Grid also maintains an in-memory index of keys while keys and values are stored in the file.
Because SingleFileStore keeps an in-memory index of keys and the location of values, it requires additional memory, depending on the key size and the number of keys. For this reason, SingleFileStore is not recommended for use cases where the keys are larger or there can be a larger number of them.
In some cases, SingleFileStore can also become fragmented. If the size of values continually increases, available space in the single file is not used but the entry is appended to the end of the file. Available space in the file is used only if an entry can fit within it. Likewise, if you remove all entries from memory, the single file store does not decrease in size or become defragmented.
Segmentation
Single file cache stores are segmented by default with a separate instance per segment, which results in multiple directories. Each directory is a number that represents the segment to which the data maps.
6.8.1. Configuring file-based cache stores
Add file-based cache stores to Data Grid to persist data on the host filesystem.
Prerequisites
- Enable global state and configure a global persistent location if you are configuring embedded caches.
Procedure
-
Add the
persistenceelement to your cache configuration. -
Optionally specify
trueas the value for thepassivationattribute to write to the file-based cache store only when data is evicted from memory. -
Include the
file-storeelement and configure attributes as appropriate. Specify
falseas the value for thesharedattribute.File-based cache stores should always be unique to each Data Grid instance. If you want to use the same persistent across a cluster, configure shared storage such as a JDBC string-based cache store .
-
Configure the
indexanddataelements to specify the location where Data Grid creates indexes and stores data. -
Include the
write-behindelement if you want to configure the cache store with write-behind mode.
File-based cache store configuration
XML
JSON
YAML
ConfigurationBuilder
6.8.2. Configuring single file cache stores
If required, you can configure Data Grid to create single file stores.
Single file stores are deprecated. You should use soft-index file stores for better performance and data consistency in comparison with single file stores.
Prerequisites
- Enable global state and configure a global persistent location if you are configuring embedded caches.
Procedure
-
Add the
persistenceelement to your cache configuration. -
Optionally specify
trueas the value for thepassivationattribute to write to the file-based cache store only when data is evicted from memory. -
Include the
single-file-storeelement. -
Specify
falseas the value for thesharedattribute. - Configure any other attributes as appropriate.
-
Include the
write-behindelement to configure the cache store as write behind instead of as write through.
Single file cache store configuration
XML
JSON
YAML
ConfigurationBuilder
ConfigurationBuilder builder = new ConfigurationBuilder();
builder.persistence().passivation(true)
.addStore(SingleFileStoreConfigurationBuilder.class)
.shared(false)
.preload(true);
ConfigurationBuilder builder = new ConfigurationBuilder();
builder.persistence().passivation(true)
.addStore(SingleFileStoreConfigurationBuilder.class)
.shared(false)
.preload(true);6.9. JDBC connection factories
Data Grid provides different ConnectionFactory implementations that allow you to connect to databases. You use JDBC connections with SQL cache stores and JDBC string-based caches stores.
Connection pools
Connection pools are suitable for standalone Data Grid deployments and are based on Agroal.
XML
JSON
YAML
ConfigurationBuilder
Managed datasources
Datasource connections are suitable for managed environments such as application servers.
XML
<distributed-cache>
<persistence>
<data-source jndi-url="java:/StringStoreWithManagedConnectionTest/DS" />
</persistence>
</distributed-cache>
<distributed-cache>
<persistence>
<data-source jndi-url="java:/StringStoreWithManagedConnectionTest/DS" />
</persistence>
</distributed-cache>JSON
YAML
distributedCache:
persistence:
dataSource:
jndiUrl: "java:/StringStoreWithManagedConnectionTest/DS"
distributedCache:
persistence:
dataSource:
jndiUrl: "java:/StringStoreWithManagedConnectionTest/DS"ConfigurationBuilder
ConfigurationBuilder builder = new ConfigurationBuilder();
builder.persistence()
.dataSource()
.jndiUrl("java:/StringStoreWithManagedConnectionTest/DS");
ConfigurationBuilder builder = new ConfigurationBuilder();
builder.persistence()
.dataSource()
.jndiUrl("java:/StringStoreWithManagedConnectionTest/DS");Simple connections
Simple connection factories create database connections on a per invocation basis and are intended for use with test or development environments only.
XML
JSON
YAML
ConfigurationBuilder
6.9.1. Configuring managed datasources
Create managed datasources as part of your Data Grid Server configuration to optimize connection pooling and performance for JDBC database connections. You can then specify the JDNI name of the managed datasources in your caches, which centralizes JDBC connection configuration for your deployment.
Prerequisites
Copy database drivers to the
server/libdirectory in your Data Grid Server installation.TipUse the
installcommand with the Data Grid Command Line Interface (CLI) to download the required drivers to theserver/libdirectory, for example:install org.postgresql:postgresql:42.4.3
install org.postgresql:postgresql:42.4.3Copy to Clipboard Copied! Toggle word wrap Toggle overflow
Procedure
- Open your Data Grid Server configuration for editing.
-
Add a new
data-sourceto thedata-sourcessection. -
Uniquely identify the datasource with the
nameattribute or field. Specify a JNDI name for the datasource with the
jndi-nameattribute or field.TipYou use the JNDI name to specify the datasource in your JDBC cache store configuration.
-
Set
trueas the value of thestatisticsattribute or field to enable statistics for the datasource through the/metricsendpoint. Provide JDBC driver details that define how to connect to the datasource in the
connection-factorysection.-
Specify the name of the database driver with the
driverattribute or field. -
Specify the JDBC connection url with the
urlattribute or field. -
Specify credentials with the
usernameandpasswordattributes or fields. - Provide any other configuration as appropriate.
-
Specify the name of the database driver with the
-
Define how Data Grid Server nodes pool and reuse connections with connection pool tuning properties in the
connection-poolsection. - Save the changes to your configuration.
Verification
Use the Data Grid Command Line Interface (CLI) to test the datasource connection, as follows:
Start a CLI session.
bin/cli.sh
bin/cli.shCopy to Clipboard Copied! Toggle word wrap Toggle overflow List all datasources and confirm the one you created is available.
server datasource ls
server datasource lsCopy to Clipboard Copied! Toggle word wrap Toggle overflow Test a datasource connection.
server datasource test my-datasource
server datasource test my-datasourceCopy to Clipboard Copied! Toggle word wrap Toggle overflow
Managed datasource configuration
XML
JSON
YAML
6.9.1.1. Configuring caches with JNDI names
When you add a managed datasource to Data Grid Server you can add the JNDI name to a JDBC-based cache store configuration.
Prerequisites
- Configure Data Grid Server with a managed datasource.
Procedure
- Open your cache configuration for editing.
-
Add the
data-sourceelement or field to the JDBC-based cache store configuration. -
Specify the JNDI name of the managed datasource as the value of the
jndi-urlattribute. - Configure the JDBC-based cache stores as appropriate.
- Save the changes to your configuration.
JNDI name in cache configuration
XML
JSON
YAML
6.9.1.2. Connection pool tuning properties
You can tune JDBC connection pools for managed datasources in your Data Grid Server configuration.
| Property | Description |
|---|---|
|
| Initial number of connections the pool should hold. |
|
| Maximum number of connections in the pool. |
|
| Minimum number of connections the pool should hold. |
|
|
Maximum time in milliseconds to block while waiting for a connection before throwing an exception. This will never throw an exception if creating a new connection takes an inordinately long period of time. Default is |
|
|
Time in milliseconds between background validation runs. A duration of |
|
|
Connections idle for longer than this time, specified in milliseconds, are validated before being acquired (foreground validation). A duration of |
|
| Time in minutes a connection has to be idle before it can be removed. |
|
| Time in milliseconds a connection has to be held before a leak warning. |
You can use a properties file to configure pooled connection factories for JDBC string-based cache stores.
Procedure
Specify JDBC connection pool configuration with
org.infinispan.agroal.*properties, as in the following example:Copy to Clipboard Copied! Toggle word wrap Toggle overflow Configure Data Grid to use your properties file with the
properties-fileattribute or thePooledConnectionFactoryConfiguration.propertyFile()method.XML
<connection-pool properties-file="path/to/agroal.properties"/>
<connection-pool properties-file="path/to/agroal.properties"/>Copy to Clipboard Copied! Toggle word wrap Toggle overflow JSON
"persistence": { "connection-pool": { "properties-file": "path/to/agroal.properties" } }"persistence": { "connection-pool": { "properties-file": "path/to/agroal.properties" } }Copy to Clipboard Copied! Toggle word wrap Toggle overflow YAML
persistence: connectionPool: propertiesFile: path/to/agroal.propertiespersistence: connectionPool: propertiesFile: path/to/agroal.propertiesCopy to Clipboard Copied! Toggle word wrap Toggle overflow ConfigurationBuilder
.connectionPool().propertyFile("path/to/agroal.properties").connectionPool().propertyFile("path/to/agroal.properties")Copy to Clipboard Copied! Toggle word wrap Toggle overflow
6.10. SQL cache stores
SQL cache stores let you load Data Grid caches from existing database tables. Data Grid offers two types of SQL cache store:
- Table
- Data Grid loads entries from a single database table.
- Query
- Data Grid uses SQL queries to load entries from single or multiple database tables, including from sub-columns within those tables, and perform insert, update, and delete operations.
Visit the code tutorials to try a SQL cache store in action. See the Persistence code tutorial with remote caches.
Both SQL table and query stores:
- Allow read and write operations to persistent storage.
- Can be read-only and act as a cache loader.
Support keys and values that correspond to a single database column or a composite of multiple database columns.
For composite keys and values, you must provide Data Grid with Protobuf schema (
.protofiles) that describe the keys and values. With Data Grid Server you can add schema through the Data Grid Console or Command Line Interface (CLI) with theschemacommand.
The SQL cache store is intended for use with an existing database table. As a result, it does not store any metadata, which includes expiration, segments, and, versioning metadata. Due to the absence of version storage, SQL store does not support optimistic transactional caching and asynchronous cross-site replication. This limitation also extends to Hot Rod versioned operations.
Use expiration with the SQL cache store when it is configured as read only. Expiration removes stale values from memory, causing the cache to fetch the values from the database again and cache them anew.
6.10.1. Data types for keys and values
Data Grid loads keys and values from columns in database tables via SQL cache stores, automatically using the appropriate data types. The following CREATE statement adds a table named "books" that has two columns, isbn and title:
Database table with two columns
CREATE TABLE books (
isbn NUMBER(13),
title varchar(120)
PRIMARY KEY(isbn)
);
CREATE TABLE books (
isbn NUMBER(13),
title varchar(120)
PRIMARY KEY(isbn)
);
When you use this table with a SQL cache store, Data Grid adds an entry to the cache using the isbn column as the key and the title column as the value.
6.10.1.1. Composite keys and values
You can use SQL stores with database tables that contain composite primary keys or composite values.
To use composite keys or values, you must provide Data Grid with Protobuf schema that describe the data types. You must also add schema configuration to your SQL store and specify the message names for keys and values.
Data Grid recommends generating Protobuf schema with the ProtoStream processor. You can then upload your Protobuf schema for remote caches through the Data Grid Console, CLI, or REST API.
Composite values
The following database table holds a composite value of the title and author columns:
Data Grid adds an entry to the cache using the isbn column as the key. For the value, Data Grid requires a Protobuf schema that maps the title column and the author columns:
Composite keys and values
The following database table holds a composite primary key and a composite value, with two columns each:
For both the key and the value, Data Grid requires a Protobuf schema that maps the columns to keys and values:
6.10.1.2. Embedded keys
Protobuf schema can include keys within values, as in the following example:
Protobuf schema with an embedded key
To use embedded keys, you must include the embedded-key="true" attribute or embeddedKey(true) method in your SQL store configuration.
6.10.1.3. SQL types to Protobuf types
The following table contains default mappings of SQL data types to Protobuf data types:
| SQL type | Protobuf type |
|---|---|
|
|
|
|
|
|
|
|
|
|
|
|
|
|
|
|
|
|
|
|
|
|
|
|
|
|
|
|
|
|
6.10.2. Loading Data Grid caches from database tables
Add a SQL table cache store to your configuration if you want Data Grid to load data from a database table. When it connects to the database, Data Grid uses metadata from the table to detect column names and data types. Data Grid also automatically determines which columns in the database are part of the primary key.
Prerequisites
-
Have JDBC connection details.
You can add JDBC connection factories directly to your cache configuration.
For remote caches in production environments, you should add managed datasources to Data Grid Server configuration and specify the JNDI name in the cache configuration. Generate Protobuf schema for any composite keys or composite values and register your schemas with Data Grid.
TipData Grid recommends generating Protobuf schema with the ProtoStream processor. For remote caches, you can register your schemas by adding them through the Data Grid Console, CLI, or REST API.
Procedure
Add database drivers to your Data Grid deployment.
Remote caches: Copy database drivers to the
server/libdirectory in your Data Grid Server installation.TipUse the
installcommand with the Data Grid Command Line Interface (CLI) to download the required drivers to theserver/libdirectory, for example:install org.postgresql:postgresql:42.4.3
install org.postgresql:postgresql:42.4.3Copy to Clipboard Copied! Toggle word wrap Toggle overflow Embedded caches: Add the
infinispan-cachestore-sqldependency to yourpomfile.<dependency> <groupId>org.infinispan</groupId> <artifactId>infinispan-cachestore-sql</artifactId> </dependency>
<dependency> <groupId>org.infinispan</groupId> <artifactId>infinispan-cachestore-sql</artifactId> </dependency>Copy to Clipboard Copied! Toggle word wrap Toggle overflow
- Open your Data Grid configuration for editing.
Add a SQL table cache store.
Declarative
table-jdbc-store xmlns="urn:infinispan:config:store:sql:14.0"
table-jdbc-store xmlns="urn:infinispan:config:store:sql:14.0"Copy to Clipboard Copied! Toggle word wrap Toggle overflow Programmatic
persistence().addStore(TableJdbcStoreConfigurationBuilder.class)
persistence().addStore(TableJdbcStoreConfigurationBuilder.class)Copy to Clipboard Copied! Toggle word wrap Toggle overflow -
Specify the database dialect with either
dialect=""ordialect(), for exampledialect="H2"ordialect="postgres". Configure the SQL cache store with the properties you require, for example:
-
To use the same cache store across your cluster, set
shared="true"orshared(true). -
To create a read only cache store, set
read-only="true"or.ignoreModifications(true).
-
To use the same cache store across your cluster, set
-
Name the database table that loads the cache with
table-name="<database_table_name>"ortable.name("<database_table_name>"). Add the
schemaelement or the.schemaJdbcConfigurationBuilder()method and add Protobuf schema configuration for composite keys or values.-
Specify the package name with the
packageattribute orpackage()method. -
Specify composite values with the
message-nameattribute ormessageName()method. -
Specify composite keys with the
key-message-nameattribute orkeyMessageName()method. -
Set a value of
truefor theembedded-keyattribute orembeddedKey()method if your schema includes keys within values.
-
Specify the package name with the
- Save the changes to your configuration.
SQL table store configuration
The following example loads a distributed cache from a database table named "books" using composite values defined in a Protobuf schema:
XML
JSON
YAML
ConfigurationBuilder
SQL query cache stores let you load caches from multiple database tables, including from sub-columns in database tables, and perform insert, update, and delete operations.
Prerequisites
-
Have JDBC connection details.
You can add JDBC connection factories directly to your cache configuration.
For remote caches in production environments, you should add managed datasources to Data Grid Server configuration and specify the JNDI name in the cache configuration. Generate Protobuf schema for any composite keys or composite values and register your schemas with Data Grid.
TipData Grid recommends generating Protobuf schema with the ProtoStream processor. For remote caches, you can register your schemas by adding them through the Data Grid Console, CLI, or REST API.
Procedure
Add database drivers to your Data Grid deployment.
Remote caches: Copy database drivers to the
server/libdirectory in your Data Grid Server installation.TipUse the
installcommand with the Data Grid Command Line Interface (CLI) to download the required drivers to theserver/libdirectory, for example:install org.postgresql:postgresql:42.4.3
install org.postgresql:postgresql:42.4.3Copy to Clipboard Copied! Toggle word wrap Toggle overflow Embedded caches: Add the
infinispan-cachestore-sqldependency to yourpomfile and make sure database drivers are on your application classpath.<dependency> <groupId>org.infinispan</groupId> <artifactId>infinispan-cachestore-sql</artifactId> </dependency>
<dependency> <groupId>org.infinispan</groupId> <artifactId>infinispan-cachestore-sql</artifactId> </dependency>Copy to Clipboard Copied! Toggle word wrap Toggle overflow
- Open your Data Grid configuration for editing.
Add a SQL query cache store.
Declarative
query-jdbc-store xmlns="urn:infinispan:config:store:sql:14.0"
query-jdbc-store xmlns="urn:infinispan:config:store:sql:14.0"Copy to Clipboard Copied! Toggle word wrap Toggle overflow Programmatic
persistence().addStore(QueriesJdbcStoreConfigurationBuilder.class)
persistence().addStore(QueriesJdbcStoreConfigurationBuilder.class)Copy to Clipboard Copied! Toggle word wrap Toggle overflow -
Specify the database dialect with either
dialect=""ordialect(), for exampledialect="H2"ordialect="postgres". Configure the SQL cache store with the properties you require, for example:
-
To use the same cache store across your cluster, set
shared="true"orshared(true). -
To create a read only cache store, set
read-only="true"or.ignoreModifications(true).
-
To use the same cache store across your cluster, set
Define SQL query statements that load caches with data and modify database tables with the
querieselement or thequeries()method.Expand Query statement Description SELECTLoads a single entry into caches. You can use wildcards but must specify parameters for keys. You can use labelled expressions.
SELECT ALLLoads multiple entries into caches. You can use the
*wildcard if the number of columns returned match the key and value columns. You can use labelled expressions.SIZECounts the number of entries in the cache.
DELETEDeletes a single entry from the cache.
DELETE ALLDeletes all entries from the cache.
UPSERTModifies entries in the cache.
NoteDELETE,DELETE ALL, andUPSERTstatements do not apply to read only cache stores but are required if cache stores allow modifications.Parameters in
DELETEstatements must match parameters inSELECTstatements exactly.Variables in
UPSERTstatements must have the same number of uniquely named variables thatSELECTandSELECT ALLstatements return. For example, ifSELECTreturnsfooandbarthis statement must take only:fooand:baras variables. However you can apply the same named variable more than once in a statement.SQL queries can include
JOIN,ON, and any other clauses that the database supports.Add the
schemaelement or the.schemaJdbcConfigurationBuilder()method and add Protobuf schema configuration for composite keys or values.-
Specify the package name with the
packageattribute orpackage()method. -
Specify composite values with the
message-nameattribute ormessageName()method. -
Specify composite keys with the
key-message-nameattribute orkeyMessageName()method. -
Set a value of
truefor theembedded-keyattribute orembeddedKey()method if your schema includes keys within values.
-
Specify the package name with the
- Save the changes to your configuration.
6.10.3.1. SQL query store configuration
This section provides an example configuration for a SQL query cache store that loads a distributed cache with data from two database tables: "person" and "address".
SQL statements
The following examples show SQL data definition language (DDL) statements for the "person" and "address" tables. The data types described in the example are only valid for PostgreSQL database.
SQL statement for the "person" table
SQL statement for the "address" table
Protobuf schemas
Protobuf schema for the "person" and "address" tables are as follows:
Protobuf schema for the "address" table
Protobuf schema for the "person" table
Cache configuration
The following example loads a distributed cache from the "person" and "address" tables using a SQL query that includes a JOIN clause:
XML
JSON
YAML
ConfigurationBuilder
6.10.4. SQL cache store troubleshooting
Find out about common issues and errors with SQL cache stores and how to troubleshoot them.
ISPN008064: No primary keys found for table <table_name>, check case sensitivity
ISPN008064: No primary keys found for table <table_name>, check case sensitivityData Grid logs this message in the following cases:
- The database table does not exist.
- The database table name is case sensitive and needs to be either all lower case or all upper case, depending on the database provider.
- The database table does not have any primary keys defined.
To resolve this issue you should:
- Check your SQL cache store configuration and ensure that you specify the name of an existing table.
- Ensure that the database table name conforms to an case sensitivity requirements.
- Ensure that your database tables have primary keys that uniquely identify the appropriate rows.
6.11. JDBC string-based cache stores
JDBC String-Based cache stores, JdbcStringBasedStore, use JDBC drivers to load and store values in the underlying database.
JDBC String-Based cache stores:
- Store each entry in its own row in the table to increase throughput for concurrent loads.
-
Use a simple one-to-one mapping that maps each key to a
Stringobject using thekey-to-string-mapperinterface.
Data Grid provides a default implementation,DefaultTwoWayKey2StringMapper, that handles primitive types.
In addition to the data table used to store cache entries, the store also creates a _META table for storing metadata. This table is used to ensure that any existing database content is compatible with the current Data Grid version and configuration.
By default Data Grid shares are not stored, which means that all nodes in the cluster write to the underlying store on each update. If you want operations to write to the underlying database once only, you must configure JDBC store as shared.
Segmentation
JdbcStringBasedStore uses segmentation by default and requires a column in the database table to represent the segments to which entries belong.
6.11.1. Configuring JDBC string-based cache stores
Configure Data Grid caches with JDBC string-based cache stores that can connect to databases.
Prerequisites
-
Remote caches: Copy database drivers to the
server/libdirectory in your Data Grid Server installation. Embedded caches: Add the
infinispan-cachestore-jdbcdependency to yourpomfile.<dependency> <groupId>org.infinispan</groupId> <artifactId>infinispan-cachestore-jdbc</artifactId> </dependency>
<dependency> <groupId>org.infinispan</groupId> <artifactId>infinispan-cachestore-jdbc</artifactId> </dependency>Copy to Clipboard Copied! Toggle word wrap Toggle overflow
Procedure
Create a JDBC string-based cache store configuration in one of the following ways:
Declaratively, add the
persistenceelement or field then addstring-keyed-jdbc-storewith the following schema namespace:xmlns="urn:infinispan:config:store:jdbc:14.0"
xmlns="urn:infinispan:config:store:jdbc:14.0"Copy to Clipboard Copied! Toggle word wrap Toggle overflow Programmatically, add the following methods to your
ConfigurationBuilder:persistence().addStore(JdbcStringBasedStoreConfigurationBuilder.class)
persistence().addStore(JdbcStringBasedStoreConfigurationBuilder.class)Copy to Clipboard Copied! Toggle word wrap Toggle overflow
-
Specify the dialect of the database with either the
dialectattribute or thedialect()method. Configure any properties for the JDBC string-based cache store as appropriate.
For example, specify if the cache store is shared with multiple cache instances with either the
sharedattribute or theshared()method.- Add a JDBC connection factory so that Data Grid can connect to the database.
- Add a database table that stores cache entries.
Configuring the string-keyed-jdbc-store with inappropriate data type can lead to exceptions during loading or storing cache entries. For more information and a list of data types that are tested as part of the Data Grid release, see Tested database settings for Data Grid string-keyed-jdbc-store persistence (Login required).
JDBC string-based cache store configuration
XML
JSON
YAML
ConfigurationBuilder
6.12. RocksDB cache stores
RocksDB provides key-value filesystem-based storage with high performance and reliability for highly concurrent environments.
RocksDB cache stores, RocksDBStore, use two databases. One database provides a primary cache store for data in memory; the other database holds entries that Data Grid expires from memory.
| Parameter | Description |
|---|---|
|
| Specifies the path to the RocksDB database that provides the primary cache store. If you do not set the location, it is automatically created. Note that the path must be relative to the global persistent location. |
|
| Specifies the path to the RocksDB database that provides the cache store for expired data. If you do not set the location, it is automatically created. Note that the path must be relative to the global persistent location. |
|
| Sets the size of the in-memory queue for expiring entries. When the queue reaches the size, Data Grid flushes the expired into the RocksDB cache store. |
|
| Sets the maximum number of entries before deleting and re-initializing (re-init) the RocksDB database. For smaller size cache stores, iterating through all entries and removing each one individually can provide a faster method. |
Tuning parameters
You can also specify the following RocksDB tuning parameters:
-
compressionType -
blockSize -
cacheSize
Configuration properties
Optionally set properties in the configuration as follows:
-
Prefix properties with
databaseto adjust and tune RocksDB databases. -
Prefix properties with
datato configure the column families in which RocksDB stores your data.
<property name="database.max_background_compactions">2</property> <property name="data.write_buffer_size">64MB</property> <property name="data.compression_per_level">kNoCompression:kNoCompression:kNoCompression:kSnappyCompression:kZSTD:kZSTD</property>
<property name="database.max_background_compactions">2</property>
<property name="data.write_buffer_size">64MB</property>
<property name="data.compression_per_level">kNoCompression:kNoCompression:kNoCompression:kSnappyCompression:kZSTD:kZSTD</property>Segmentation
RocksDBStore supports segmentation and creates a separate column family per segment. Segmented RocksDB cache stores improve lookup performance and iteration but slightly lower performance of write operations.
You should not configure more than a few hundred segments. RocksDB is not designed to have an unlimited number of column families. Too many segments also significantly increases cache store start time.
RocksDB cache store configuration
XML
JSON
YAML
ConfigurationBuilder
ConfigurationBuilder with properties
6.13. Remote cache stores
Remote cache stores, RemoteStore, use the Hot Rod protocol to store data on Data Grid clusters.
If you configure remote cache stores as shared you cannot preload data. In other words if shared="true" in your configuration then you must set preload="false".
Segmentation
RemoteStore supports segmentation and can publish keys and entries by segment, which makes bulk operations more efficient. However, segmentation is available only with Data Grid Hot Rod protocol version 2.3 or later.
When you enable segmentation for RemoteStore, it uses the number of segments that you define in your Data Grid server configuration.
If the source cache is segmented and uses a different number of segments than RemoteStore, then incorrect values are returned for bulk operations. In this case, you should disable segmentation for RemoteStore.
Remote cache store configuration
XML
JSON
YAML
ConfigurationBuilder
6.14. Cluster cache loaders
ClusterCacheLoader retrieves data from other Data Grid cluster members but does not persist data. In other words, ClusterCacheLoader is not a cache store.
ClusterLoader is deprecated and planned for removal in a future version.
ClusterCacheLoader provides a non-blocking partial alternative to state transfer. ClusterCacheLoader fetches keys from other nodes on demand if those keys are not available on the local node, which is similar to lazily loading cache content.
The following points also apply to ClusterCacheLoader:
-
Preloading does not take effect (
preload=true). - Segmentation is not supported.
Cluster cache loader configuration
XML
<distributed-cache>
<persistence>
<cluster-loader preload="true" remote-timeout="500"/>
</persistence>
</distributed-cache>
<distributed-cache>
<persistence>
<cluster-loader preload="true" remote-timeout="500"/>
</persistence>
</distributed-cache>JSON
YAML
distributedCache:
persistence:
clusterLoader:
preload: "true"
remoteTimeout: "500"
distributedCache:
persistence:
clusterLoader:
preload: "true"
remoteTimeout: "500"ConfigurationBuilder
ConfigurationBuilder b = new ConfigurationBuilder();
b.persistence()
.addClusterLoader()
.remoteCallTimeout(500);
ConfigurationBuilder b = new ConfigurationBuilder();
b.persistence()
.addClusterLoader()
.remoteCallTimeout(500);6.15. Creating custom cache store implementations
You can create custom cache stores through the Data Grid persistent SPI.
6.15.1. Data Grid Persistence SPI
The Data Grid Service Provider Interface (SPI) enables read and write operations to external storage through the NonBlockingStore interface and has the following features:
- Portability across JCache-compliant vendors
-
Data Grid maintains compatibility between the
NonBlockingStoreinterface and theJSR-107JCache specification by using an adapter that handles blocking code. - Simplified transaction integration
- Data Grid automatically handles locking so your implementations do not need to coordinate concurrent access to persistent stores. Depending on the locking mode you use, concurrent writes to the same key generally do not occur. However, you should expect operations on the persistent storage to originate from multiple threads and create implementations to tolerate this behavior.
- Parallel iteration
- Data Grid lets you iterate over entries in persistent stores with multiple threads in parallel.
- Reduced serialization resulting in less CPU usage
- Data Grid exposes stored entries in a serialized format that can be transmitted remotely. For this reason, Data Grid does not need to deserialize entries that it retrieves from persistent storage and then serialize again when writing to the wire.
6.15.2. Creating cache stores
Create custom cache stores with implementations of the NonBlockingStore API.
Procedure
- Implement the appropriate Data Grid persistent SPIs.
-
Annotate your store class with the
@ConfiguredByannotation if it has a custom configuration. Create a custom cache store configuration and builder if desired.
-
Extend
AbstractStoreConfigurationandAbstractStoreConfigurationBuilder. Optionally add the following annotations to your store Configuration class to ensure that your custom configuration builder parses your cache store configuration from XML:
-
@ConfigurationFor @BuiltByIf you do not add these annotations, then
CustomStoreConfigurationBuilderparses the common store attributes defined inAbstractStoreConfigurationand any additional elements are ignored.NoteIf a configuration does not declare the
@ConfigurationForannotation, a warning message is logged when Data Grid initializes the cache.
-
-
Extend
6.15.3. Examples of custom cache store configuration
The following are examples show how to configure Data Grid with custom cache store implementations:
XML
<distributed-cache>
<persistence>
<store class="org.infinispan.persistence.example.MyInMemoryStore" />
</persistence>
</distributed-cache>
<distributed-cache>
<persistence>
<store class="org.infinispan.persistence.example.MyInMemoryStore" />
</persistence>
</distributed-cache>JSON
YAML
distributedCache:
persistence:
store:
class: "org.infinispan.persistence.example.MyInMemoryStore"
distributedCache:
persistence:
store:
class: "org.infinispan.persistence.example.MyInMemoryStore"ConfigurationBuilder
Configuration config = new ConfigurationBuilder()
.persistence()
.addStore(CustomStoreConfigurationBuilder.class)
.build();
Configuration config = new ConfigurationBuilder()
.persistence()
.addStore(CustomStoreConfigurationBuilder.class)
.build();6.15.4. Deploying custom cache stores
To use your cache store implementation with Data Grid Server, you must provide it with a JAR file.
Prerequisites
Stop Data Grid Server if it is running.
Data Grid loads JAR files at startup only.
Procedure
- Package your custom cache store implementation in a JAR file.
-
Add your JAR file to the
server/libdirectory of your Data Grid Server installation.
6.16. Migrating data between cache stores
Data Grid provides a utility to migrate data from one cache store to another.
6.16.1. Cache store migrator
Data Grid provides the StoreMigrator.java utility that recreates data for the latest Data Grid cache store implementations.
StoreMigrator takes a cache store from a previous version of Data Grid as source and uses a cache store implementation as target.
When you run StoreMigrator, it creates the target cache with the cache store type that you define using the EmbeddedCacheManager interface. StoreMigrator then loads entries from the source store into memory and then puts them into the target cache.
StoreMigrator also lets you migrate data from one type of cache store to another. For example, you can migrate from a JDBC string-based cache store to a RocksDB cache store.
StoreMigrator cannot migrate data from segmented cache stores to:
- Non-segmented cache store.
- Segmented cache stores that have a different number of segments.
6.16.2. Getting the cache store migrator
StoreMigrator is available as part of the Data Grid tools library, infinispan-tools, and is included in the Maven repository.
Procedure
Configure your
pom.xmlforStoreMigratoras follows:Copy to Clipboard Copied! Toggle word wrap Toggle overflow
6.16.3. Configuring the cache store migrator
Use the migrator.properties file to configure properties for source and target cache stores.
Procedure
-
Create a
migrator.propertiesfile. Configure properties for source and target cache store using the
migrator.propertiesfile.Add the
source.prefix to all configuration properties for the source cache store.Example source cache store
source.type=SOFT_INDEX_FILE_STORE source.cache_name=myCache source.location=/path/to/source/sifs source.version=<version>
source.type=SOFT_INDEX_FILE_STORE source.cache_name=myCache source.location=/path/to/source/sifs source.version=<version>Copy to Clipboard Copied! Toggle word wrap Toggle overflow ImportantFor migrating data from segmented cache stores, you must also configure the number of segments using the
source.segment_countproperty. The number of segments must matchclustering.hash.numSegmentsin your Data Grid configuration. If the number of segments for a cache store does not match the number of segments for the corresponding cache, Data Grid cannot read data from the cache store.Add the
target.prefix to all configuration properties for the target cache store.Example target cache store
target.type=SINGLE_FILE_STORE target.cache_name=myCache target.location=/path/to/target/sfs.dat
target.type=SINGLE_FILE_STORE target.cache_name=myCache target.location=/path/to/target/sfs.datCopy to Clipboard Copied! Toggle word wrap Toggle overflow
Configure source and target cache stores in a StoreMigrator properties.
| Property | Description | Required/Optional |
|---|---|---|
|
| Specifies the type of cache store for a source or target cache store.
| Required |
| Property | Description | Example Value | Required/Optional |
|---|---|---|---|
|
| The name of the cache that you want to back up. |
| Required |
|
| The number of segments for target cache stores that can use segmentation.
The number of segments must match |
| Optional |
| Property | Description | Required/Optional |
|---|---|---|
|
| Specifies the dialect of the underlying database. | Required |
|
|
Specifies the marshaller version for source cache stores.
*
*
*
*
*
* | Required for source stores only. |
|
| Specifies a custom marshaller class. | Required if using custom marshallers. |
|
|
Specifies a comma-separated list of custom | Optional |
|
| Specifies the JDBC connection URL. | Required |
|
| Specifies the class of the JDBC driver. | Required |
|
| Specifies a database username. | Required |
|
| Specifies a password for the database username. | Required |
|
| Disables database upsert. | Optional |
|
| Specifies if table indexes are created. | Optional |
|
| Specifies additional prefixes for the table name. | Optional |
|
| Specifies the column name. | Required |
|
| Specifies the column type. | Required |
|
|
Specifies the | Optional |
To migrate from Binary cache stores in older Data Grid versions, change table.string.* to table.binary.\* in the following properties:
-
source.table.binary.table_name_prefix -
source.table.binary.<id\|data\|timestamp>.name -
source.table.binary.<id\|data\|timestamp>.type
| Property | Description | Required/Optional |
|---|---|---|
|
| Sets the database directory. | Required |
|
| Specifies the compression type to use. | Optional |
# Example configuration for migrating from a RocksDB cache store. source.type=ROCKSDB source.cache_name=myCache source.location=/path/to/rocksdb/database source.compression=SNAPPY
# Example configuration for migrating from a RocksDB cache store.
source.type=ROCKSDB
source.cache_name=myCache
source.location=/path/to/rocksdb/database
source.compression=SNAPPY| Property | Description | Required/Optional |
|---|---|---|
|
|
Sets the directory that contains the cache store | Required |
# Example configuration for migrating to a Single File cache store. target.type=SINGLE_FILE_STORE target.cache_name=myCache target.location=/path/to/sfs.dat
# Example configuration for migrating to a Single File cache store.
target.type=SINGLE_FILE_STORE
target.cache_name=myCache
target.location=/path/to/sfs.dat| Property | Description | Value |
|---|---|---|
| Required/Optional |
| Sets the database directory. |
| Required |
| Sets the database index directory. |
# Example configuration for migrating to a Soft-Index File cache store. target.type=SOFT_INDEX_FILE_STORE target.cache_name=myCache target.location=path/to/sifs/database target.location=path/to/sifs/index
# Example configuration for migrating to a Soft-Index File cache store.
target.type=SOFT_INDEX_FILE_STORE
target.cache_name=myCache
target.location=path/to/sifs/database
target.location=path/to/sifs/index6.16.4. Migrating Data Grid cache stores
You can use the StoreMigrator to migrate data between cache stores with different Data Grid versions or to migrate data from one type of cache store to another.
Prerequisites
-
Have a
infinispan-tools.jar. -
Have the source and target cache store configured in the
migrator.propertiesfile.
Procedure
If you built the
infinispan-tools.jarfrom the source code, do the following:-
Add
infinispan-tools.jarto your classpath. - Add dependencies for your source and target databases, such as JDBC drivers to your classpath.
-
Specify
migrator.propertiesfile as an argument forStoreMigrator.
-
Add
If you pulled
infinispan-tools.jarfrom the Maven repository, run the following command:mvn exec:java
mvn exec:javaCopy to Clipboard Copied! Toggle word wrap Toggle overflow
Data Grid clusters can split into network partitions in which subsets of nodes become isolated from each other. This condition results in loss of availability or consistency for clustered caches. Data Grid automatically detects crashed nodes and resolves conflicts to merge caches back together.
7.1. Split clusters and network partitions
Network partitions are the result of error conditions in the running environment, such as when a network router crashes. When a cluster splits into partitions, nodes create a JGroups cluster view that includes only the nodes in that partition. This condition means that nodes in one partition can operate independently of nodes in the other partition.
Detecting a split
To automatically detect network partitions, Data Grid uses the FD_ALL protocol in the default JGroups stack to determine when nodes leave the cluster abruptly.
Data Grid cannot detect what causes nodes to leave abruptly. This can happen not only when there is a network failure but also for other reasons, such as when Garbage Collection (GC) pauses the JVM.
Data Grid suspects that nodes have crashed after the following number of milliseconds:
FD_ALL[2|3].timeout + FD_ALL[2|3].interval + VERIFY_SUSPECT[2].timeout + GMS.view_ack_collection_timeout
FD_ALL[2|3].timeout + FD_ALL[2|3].interval + VERIFY_SUSPECT[2].timeout + GMS.view_ack_collection_timeoutWhen it detects that the cluster is split into network partitions, Data Grid uses a strategy for handling cache operations. Depending on your application requirements Data Grid can:
- Allow read and/or write operations for availability
- Deny read and write operations for consistency
Merging partitions together
To fix a split cluster, Data Grid merges the partitions back together. During the merge, Data Grid uses the .equals() method for values of cache entries to determine if any conflicts exist. To resolve any conflicts between replicas it finds on partitions, Data Grid uses a merge policy that you can configure.
7.1.1. Data consistency in a split cluster
Network outages or errors that cause Data Grid clusters to split into partitions can result in data loss or consistency issues regardless of any handling strategy or merge policy.
Between the split and detection
If a write operation takes place on a node that is in a minor partition when a split occurs, and before Data Grid detects the split, that value is lost when Data Grid transfers state to that minor partition during the merge.
In the event that all partitions are in the DEGRADED mode that value is not lost because no state transfer occurs but the entry can have an inconsistent value. For transactional caches write operations that are in progress when the split occurs can be committed on some nodes and rolled back on other nodes, which also results in inconsistent values.
During the split and the time that Data Grid detects it, it is possible to get stale reads from a cache in a minor partition that has not yet entered DEGRADED mode.
During the merge
When Data Grid starts removing partitions nodes reconnect to the cluster with a series of merge events. Before this merge process completes it is possible that write operations on transactional caches succeed on some nodes but not others, which can potentially result in stale reads until the entries are updated.
7.2. Cache availability and degraded mode
To preserve data consistency, Data Grid can put caches into DEGRADED mode if you configure them to use either the DENY_READ_WRITES or ALLOW_READS partition handling strategy.
Data Grid puts caches in a partition into DEGRADED mode when the following conditions are true:
-
At least one segment has lost all owners.
This happens when a number of nodes equal to or greater than the number of owners for a distributed cache have left the cluster. -
There is not a majority of nodes in the partition.
A majority of nodes is any number greater than half the total number of nodes in the cluster from the most recent stable topology, which was the last time a cluster rebalancing operation completed successfully.
When caches are in DEGRADED mode, Data Grid:
- Allows read and write operations only if all replicas of an entry reside in the same partition.
Denies read and write operations and throws an
AvailabilityExceptionif the partition does not include all replicas of an entry.NoteWith the
ALLOW_READSstrategy, Data Grid allows read operations on caches inDEGRADEDmode.
DEGRADED mode guarantees consistency by ensuring that write operations do not take place for the same key in different partitions. Additionally DEGRADED mode prevents stale read operations that happen when a key is updated in one partition but read in another partition.
If all partitions are in DEGRADED mode then the cache becomes available again after merge only if the cluster contains a majority of nodes from the most recent stable topology and there is at least one replica of each entry. When the cluster has at least one replica of each entry, no keys are lost and Data Grid can create new replicas based on the number of owners during cluster rebalancing.
In some cases a cache in one partition can remain available while entering DEGRADED mode in another partition. When this happens the available partition continues cache operations as normal and Data Grid attempts to rebalance data across those nodes. To merge the cache together Data Grid always transfers state from the available partition to the partition in DEGRADED mode.
7.2.1. Degraded cache recovery example
This topic illustrates how Data Grid recovers from split clusters with caches that use the DENY_READ_WRITES partition handling strategy.
As an example, a Data Grid cluster has four nodes and includes a distributed cache with two replicas for each entry (owners=2). There are four entries in the cache, k1, k2, k3 and k4.
With the DENY_READ_WRITES strategy, if the cluster splits into partitions, Data Grid allows cache operations only if all replicas of an entry are in the same partition.
In the following diagram, while the cache is split into partitions, Data Grid allows read and write operations for k1 on partition 1 and k4 on partition 2. Because there is only one replica for k2 and k3 on either partition 1 or partition 2, Data Grid denies read and write operations for those entries.

When network conditions allow the nodes to re-join the same cluster view, Data Grid merges the partitions without state transfer and restores normal cache operations.
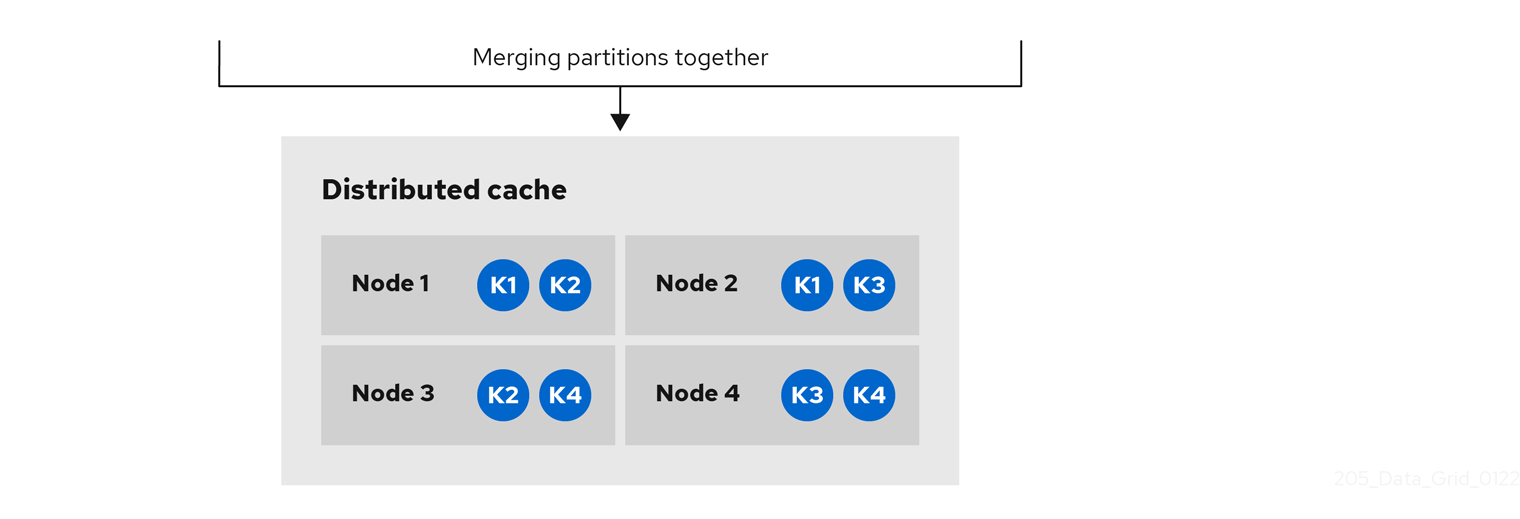
Determine if caches on Data Grid clusters are in AVAILABLE mode or DEGRADED mode during a network partition.
When Data Grid clusters split into partitions, nodes in those partitions can enter DEGRADED mode to guarantee data consistency. In DEGRADED mode clusters do not allow cache operations resulting in loss of availability.
Procedure
Verify availability of clustered caches in network partitions in one of the following ways:
-
Check Data Grid logs for
ISPN100011messages that indicate if the cluster is available or if at least one cache is inDEGRADEDmode. Get the availability of remote caches through the Data Grid Console or with the REST API.
- Open the Data Grid Console in any browser, select the Data Container tab, and then locate the availability status in the Health column.
Retrieve cache health from the REST API.
GET /rest/v2/cache-managers/<cacheManagerName>/health
GET /rest/v2/cache-managers/<cacheManagerName>/healthCopy to Clipboard Copied! Toggle word wrap Toggle overflow
-
Programmatically retrieve the availability of embedded caches with the
getAvailability()method in theAdvancedCacheAPI.
7.2.3. Making caches available
Make caches available for read and write operations by forcing them out of DEGRADED mode.
You should force clusters out of DEGRADED mode only if your deployment can tolerate data loss and inconsistency.
Procedure
Make caches available in one of the following ways:
- Open the Data Grid Console and select the Make available option.
Change the availability of remote caches with the REST API.
POST /rest/v2/caches/<cacheName>?action=set-availability&availability=AVAILABLE
POST /rest/v2/caches/<cacheName>?action=set-availability&availability=AVAILABLECopy to Clipboard Copied! Toggle word wrap Toggle overflow Programmatically change the availability of embedded caches with the
AdvancedCacheAPI.Copy to Clipboard Copied! Toggle word wrap Toggle overflow
7.3. Configuring partition handling
Configure Data Grid to use a partition handling strategy and merge policy so it can resolve split clusters when network issues occur. By default Data Grid uses a strategy that provides availability at the cost of lowering consistency guarantees for your data. When a cluster splits due to a network partition clients can continue to perform read and write operations on caches.
If you require consistency over availability, you can configure Data Grid to deny read and write operations while the cluster is split into partitions. Alternatively you can allow read operations and deny write operations. You can also specify custom merge policy implementations that configure Data Grid to resolve splits with custom logic tailored to your requirements.
Prerequisites
Have a Data Grid cluster where you can create either a replicated or distributed cache.
NotePartition handling configuration applies only to replicated and distributed caches.
Procedure
- Open your Data Grid configuration for editing.
-
Add partition handling configuration to your cache with either the
partition-handlingelement orpartitionHandling()method. Specify a strategy for Data Grid to use when the cluster splits into partitions with the
when-splitattribute orwhenSplit()method.The default partition handling strategy is
ALLOW_READ_WRITESso caches remain availabile. If your use case requires data consistency over cache availability, specify theDENY_READ_WRITESstrategy.Specify a policy that Data Grid uses to resolve conflicting entries when merging partitions with the
merge-policyattribute ormergePolicy()method.By default Data Grid does not resolve conflicts on merge.
- Save the changes to your Data Grid configuration.
Partition handling configuration
XML
<distributed-cache>
<partition-handling when-split="DENY_READ_WRITES"
merge-policy="PREFERRED_ALWAYS"/>
</distributed-cache>
<distributed-cache>
<partition-handling when-split="DENY_READ_WRITES"
merge-policy="PREFERRED_ALWAYS"/>
</distributed-cache>JSON
YAML
distributedCache:
partitionHandling:
whenSplit: DENY_READ_WRITES
mergePolicy: PREFERRED_ALWAYS
distributedCache:
partitionHandling:
whenSplit: DENY_READ_WRITES
mergePolicy: PREFERRED_ALWAYSConfigurationBuilder
ConfigurationBuilder builder = new ConfigurationBuilder();
builder.clustering().cacheMode(CacheMode.DIST_SYNC)
.partitionHandling()
.whenSplit(PartitionHandling.DENY_READ_WRITES)
.mergePolicy(MergePolicy.PREFERRED_NON_NULL);
ConfigurationBuilder builder = new ConfigurationBuilder();
builder.clustering().cacheMode(CacheMode.DIST_SYNC)
.partitionHandling()
.whenSplit(PartitionHandling.DENY_READ_WRITES)
.mergePolicy(MergePolicy.PREFERRED_NON_NULL);7.4. Partition handling strategies
Partition handling strategies control if Data Grid allows read and write operations when a cluster is split. The strategy you configure determines whether you get cache availability or data consistency.
| Strategy | Description | Availability or consistency |
|---|---|---|
|
| Data Grid allows read and write operations on caches while a cluster is split into network partitions. Nodes in each partition remain available and function independently of each other. This is the default partition handling strategy. | Availability |
|
| Data Grid allows read and write operations only if all replicas of an entry are in the partition. If a partition does not include all replicas of an entry, Data Grid prevents cache operations for that entry. | Consistency |
|
| Data Grid allows read operations for entries and prevents write operations unless the partition includes all replicas of an entry. | Consistency with read availability |
7.5. Merge policies
Merge policies control how Data Grid resolves conflicts between replicas when bringing cluster partitions together. You can use one of the merge policies that Data Grid provides or you can create a custom implementation of the EntryMergePolicy API.
| Merge policy | Description | Considerations |
|---|---|---|
|
| Data Grid does not resolve conflicts when merging split clusters. This is the default merge policy. | Nodes drop segments for which they are not the primary owner, which can result in data loss. |
|
| Data Grid finds the value that exists on the majority of nodes in the cluster and uses it to resolve conflicts. | Data Grid could use stale values to resolve conflicts. Even if an entry is available the majority of nodes, the last update could happen on the minority partition. |
|
| Data Grid uses the first non-null value that it finds on the cluster to resolve conflicts. | Data Grid could restore deleted entries. |
|
| Data Grid removes any conflicting entries from the cache. | Results in loss of any entries that have different values when merging split clusters. |
7.6. Configuring custom merge policies
Configure Data Grid to use custom implementations of the EntryMergePolicy API when handling network partitions.
Prerequisites
Implement the
EntryMergePolicyAPI.Copy to Clipboard Copied! Toggle word wrap Toggle overflow
Procedure
Deploy your merge policy implementation to Data Grid Server if you use remote caches.
Package your classes as a JAR file that includes a
META-INF/services/org.infinispan.conflict.EntryMergePolicyfile that contains the fully qualified class name of your merge policy.# List implementations of EntryMergePolicy with the full qualified class name org.example.CustomMergePolicy
# List implementations of EntryMergePolicy with the full qualified class name org.example.CustomMergePolicyCopy to Clipboard Copied! Toggle word wrap Toggle overflow Add the JAR file to the
server/libdirectory.TipUse the
installcommand with the Data Grid Command Line Interface (CLI) to download the JAR to theserver/libdirectory.
- Open your Data Grid configuration for editing.
Configure cache encoding with the
encodingelement orencoding()method as appropriate.For remote caches, if you use only object metadata for comparison when merging entries then you can use
application/x-protostreamas the media type. In this case Data Grid returns entries to theEntryMergePolicyasbyte[].If you require the object itself when merging conflicts then you should configure caches with the
application/x-java-objectmedia type. In this case you must deploy the relevant ProtoStream marshallers to Data Grid Server so it can performbyte[]to object transformations if clients use Protobuf encoding.-
Specify your custom merge policy with the
merge-policyattribute ormergePolicy()method as part of the partition handling configuration. - Save your changes.
Custom merge policy configuration
XML
<distributed-cache name="mycache">
<partition-handling when-split="DENY_READ_WRITES"
merge-policy="org.example.CustomMergePolicy"/>
</distributed-cache>
<distributed-cache name="mycache">
<partition-handling when-split="DENY_READ_WRITES"
merge-policy="org.example.CustomMergePolicy"/>
</distributed-cache>JSON
YAML
distributedCache:
partitionHandling:
whenSplit: DENY_READ_WRITES
mergePolicy: org.example.CustomMergePolicy
distributedCache:
partitionHandling:
whenSplit: DENY_READ_WRITES
mergePolicy: org.example.CustomMergePolicyConfigurationBuilder
ConfigurationBuilder builder = new ConfigurationBuilder();
builder.clustering().cacheMode(CacheMode.DIST_SYNC)
.partitionHandling()
.whenSplit(PartitionHandling.DENY_READ_WRITES)
.mergePolicy(new CustomMergePolicy());
ConfigurationBuilder builder = new ConfigurationBuilder();
builder.clustering().cacheMode(CacheMode.DIST_SYNC)
.partitionHandling()
.whenSplit(PartitionHandling.DENY_READ_WRITES)
.mergePolicy(new CustomMergePolicy());7.7. Manually merging partitions in embedded caches
Detect and resolve conflicting entries to manually merge embedded caches after network partitions occur.
Procedure
Retrieve the
ConflictManagerfrom theEmbeddedCacheManagerto detect and resolve conflicting entries in a cache, as in the following example:Copy to Clipboard Copied! Toggle word wrap Toggle overflow
Although the ConflictManager::getConflicts stream is processed per entry, the underlying spliterator lazily loads cache entries on a per segment basis.
Role-based access control (RBAC) capabilities use different permissions levels to restrict user interactions with Data Grid.
For information on creating users and configuring authorization specific to remote or embedded caches, see:
8.1. Data Grid user roles and permissions
Data Grid includes several roles that provide users with permissions to access caches and Data Grid resources.
| Role | Permissions | Description |
|---|---|---|
|
| ALL | Superuser with all permissions including control of the Cache Manager lifecycle. |
|
| ALL_READ, ALL_WRITE, LISTEN, EXEC, MONITOR, CREATE |
Can create and delete Data Grid resources in addition to |
|
| ALL_READ, ALL_WRITE, LISTEN, EXEC, MONITOR |
Has read and write access to Data Grid resources in addition to |
|
| ALL_READ, MONITOR |
Has read access to Data Grid resources in addition to |
|
| MONITOR |
Can view statistics via JMX and the |
8.1.1. Permissions
User roles are sets of permissions with different access levels.
| Permission | Function | Description |
| CONFIGURATION |
| Defines new cache configurations. |
| LISTEN |
| Registers listeners against a Cache Manager. |
| LIFECYCLE |
| Stops the Cache Manager. |
| CREATE |
| Create and remove container resources such as caches, counters, schemas, and scripts. |
| MONITOR |
|
Allows access to JMX statistics and the |
| ALL | - | Includes all Cache Manager permissions. |
| Permission | Function | Description |
| READ |
| Retrieves entries from a cache. |
| WRITE |
| Writes, replaces, removes, evicts data in a cache. |
| EXEC |
| Allows code execution against a cache. |
| LISTEN |
| Registers listeners against a cache. |
| BULK_READ |
| Executes bulk retrieve operations. |
| BULK_WRITE |
| Executes bulk write operations. |
| LIFECYCLE |
| Starts and stops a cache. |
| ADMIN |
| Allows access to underlying components and internal structures. |
| MONITOR |
|
Allows access to JMX statistics and the |
| ALL | - | Includes all cache permissions. |
| ALL_READ | - | Combines the READ and BULK_READ permissions. |
| ALL_WRITE | - | Combines the WRITE and BULK_WRITE permissions. |
8.1.2. Role and permission mappers
Data Grid implements users as a collection of principals. Principals represent either an individual user identity, such as a username, or a group to which the users belong. Internally, these are implemented with the javax.security.auth.Subject class.
To enable authorization, the principals must be mapped to role names, which are then expanded into a set of permissions.
Data Grid includes the PrincipalRoleMapper API for associating security principals to roles, and the RolePermissionMapper API for associating roles with specific permissions.
Data Grid provides the following role and permission mapper implementations:
- Cluster role mapper
- Stores principal to role mappings in the cluster registry.
- Cluster permission mapper
- Stores role to permission mappings in the cluster registry. Allows you to dynamically modify user roles and permissions.
- Identity role mapper
- Uses the principal name as the role name. The type or format of the principal name depends on the source. For example, in an LDAP directory the principal name could be a Distinguished Name (DN).
- Common name role mapper
-
Uses the Common Name (CN) as the role name. You can use this role mapper with an LDAP directory or with client certificates that contain Distinguished Names (DN); for example
cn=managers,ou=people,dc=example,dc=commaps to themanagersrole.
Consider the following user retrieved from an LDAP server, as a collection of DNs:
CN=myapplication,OU=applications,DC=mycompany CN=dataprocessors,OU=groups,DC=mycompany CN=finance,OU=groups,DC=mycompany
CN=myapplication,OU=applications,DC=mycompany
CN=dataprocessors,OU=groups,DC=mycompany
CN=finance,OU=groups,DC=mycompanyUsing the Common name role mapper, the user would be mapped to the following roles:
dataprocessors finance
dataprocessors
financeData Grid has the following role definitions:
dataprocessors: ALL_WRITE ALL_READ finance: LISTEN
dataprocessors: ALL_WRITE ALL_READ
finance: LISTENThe user would have the following permissions:
ALL_WRITE ALL_READ LISTEN
ALL_WRITE ALL_READ LISTEN8.1.3. Configuring role mappers
Data Grid enables the cluster role mapper and cluster permission mapper by default. To use a different implementation for role mapping, you must configure the role mappers.
Procedure
- Open your Data Grid configuration for editing.
- Declare the role mapper as part of the security authorization in the Cache Manager configuration.
- Save the changes to your configuration.
Role mapper configuration
XML
JSON
YAML
infinispan:
cacheContainer:
security:
authorization:
commonNameRoleMapper: ~
infinispan:
cacheContainer:
security:
authorization:
commonNameRoleMapper: ~8.2. Configuring caches with security authorization
Add security authorization to caches to enforce role-based access control (RBAC). This requires Data Grid users to have a role with a sufficient level of permission to perform cache operations.
Prerequisites
- Create Data Grid users and either grant them with roles or assign them to groups.
Procedure
- Open your Data Grid configuration for editing.
-
Add a
securitysection to the configuration. Specify roles that users must have to perform cache operations with the
authorizationelement.You can implicitly add all roles defined in the Cache Manager or explicitly define a subset of roles.
- Save the changes to your configuration.
Implicit role configuration
The following configuration implicitly adds every role defined in the Cache Manager:
XML
<distributed-cache>
<security>
<authorization/>
</security>
</distributed-cache>
<distributed-cache>
<security>
<authorization/>
</security>
</distributed-cache>JSON
YAML
distributedCache:
security:
authorization:
enabled: true
distributedCache:
security:
authorization:
enabled: trueExplicit role configuration
The following configuration explicitly adds a subset of roles defined in the Cache Manager. In this case Data Grid denies cache operations for any users that do not have one of the configured roles.
XML
<distributed-cache>
<security>
<authorization roles="admin supervisor"/>
</security>
</distributed-cache>
<distributed-cache>
<security>
<authorization roles="admin supervisor"/>
</security>
</distributed-cache>JSON
YAML
distributedCache:
security:
authorization:
enabled: true
roles: ["admin","supervisor"]
distributedCache:
security:
authorization:
enabled: true
roles: ["admin","supervisor"]Chapter 9. Configuring transactions
Data that resides on a distributed system is vulnerable to errors that can arise from temporary network outages, system failures, or just simple human error. These external factors are uncontrollable but can have serious consequences for quality of your data. The effects of data corruption range from lower customer satisfaction to costly system reconciliation that results in service unavailability.
Data Grid can carry out ACID (atomicity, consistency, isolation, durability) transactions to ensure the cache state is consistent.
9.1. Transactions
Data Grid can be configured to use and to participate in JTA compliant transactions.
Alternatively, if transaction support is disabled, it is equivalent to using autocommit in JDBC calls, where modifications are potentially replicated after every change (if replication is enabled).
On every cache operation Data Grid does the following:
- Retrieves the current Transaction associated with the thread
- If not already done, registers XAResource with the transaction manager to be notified when a transaction commits or is rolled back.
In order to do this, the cache has to be provided with a reference to the environment’s TransactionManager. This is usually done by configuring the cache with the class name of an implementation of the TransactionManagerLookup interface. When the cache starts, it will create an instance of this class and invoke its getTransactionManager() method, which returns a reference to the TransactionManager.
Data Grid ships with several transaction manager lookup classes:
Transaction manager lookup implementations
- EmbeddedTransactionManagerLookup: This provides with a basic transaction manager which should only be used for embedded mode when no other implementation is available. This implementation has some severe limitations to do with concurrent transactions and recovery.
-
JBossStandaloneJTAManagerLookup: If you’re running Data Grid in a standalone environment, or in JBoss AS 7 and earlier, and WildFly 8, 9, and 10, this should be your default choice for transaction manager. It’s a fully fledged transaction manager based on JBoss Transactions which overcomes all the deficiencies of the
EmbeddedTransactionManager. - WildflyTransactionManagerLookup: If you’re running Data Grid in WildFly 11 or later, this should be your default choice for transaction manager.
-
GenericTransactionManagerLookup: This is a lookup class that locate transaction managers in the most popular Java EE application servers. If no transaction manager can be found, it defaults on the
EmbeddedTransactionManager.
Once initialized, the TransactionManager can also be obtained from the Cache itself:
//the cache must have a transactionManagerLookupClass defined Cache cache = cacheManager.getCache(); //equivalent with calling TransactionManagerLookup.getTransactionManager(); TransactionManager tm = cache.getAdvancedCache().getTransactionManager();
//the cache must have a transactionManagerLookupClass defined
Cache cache = cacheManager.getCache();
//equivalent with calling TransactionManagerLookup.getTransactionManager();
TransactionManager tm = cache.getAdvancedCache().getTransactionManager();9.1.1. Configuring transactions
Transactions are configured at cache level. Below is the configuration that affects a transaction behaviour and a small description of each configuration attribute.
or programmatically:
-
isolation- configures the isolation level. Check section Isolation Levels for more details. Default isREPEATABLE_READ. -
locking- configures whether the cache uses optimistic or pessimistic locking. Check section Transaction Locking for more details. Default isOPTIMISTIC. -
auto-commit- if enable, the user does not need to start a transaction manually for a single operation. The transaction is automatically started and committed. Default istrue. -
complete-timeout- the duration in milliseconds to keep information about completed transactions. Default is60000. mode- configures whether the cache is transactional or not. Default isNONE. The available options are:-
NONE- non transactional cache -
FULL_XA- XA transactional cache with recovery enabled. Check section Transaction recovery for more details about recovery. -
NON_DURABLE_XA- XA transactional cache with recovery disabled. -
NON_XA- transactional cache with integration via Synchronization instead of XA. Check section Enlisting Synchronizations for details. -
BATCH- transactional cache using batch to group operations. Check section Batching for details.
-
-
notifications- enables/disables triggering transactional events in cache listeners. Default istrue. -
reaper-interval- the time interval in millisecond at which the thread that cleans up transaction completion information kicks in. Defaults is30000. -
recovery-cache- configures the cache name to store the recovery information. Check section Transaction recovery for more details about recovery. Default isrecoveryInfoCacheName. -
stop-timeout- the time in millisecond to wait for ongoing transaction when the cache is stopping. Default is30000. -
transaction-manager-lookup- configures the fully qualified class name of a class that looks up a reference to ajavax.transaction.TransactionManager. Default isorg.infinispan.transaction.lookup.GenericTransactionManagerLookup.
For more details on how Two-Phase-Commit (2PC) is implemented in Data Grid and how locks are being acquired see the section below. More details about the configuration settings are available in Configuration reference.
9.1.2. Isolation levels
Data Grid offers two isolation levels - READ_COMMITTED and REPEATABLE_READ.
These isolation levels determine when readers see a concurrent write, and are internally implemented using different subclasses of MVCCEntry, which have different behaviour in how state is committed back to the data container.
Here’s a more detailed example that should help understand the difference between READ_COMMITTED and REPEATABLE_READ in the context of Data Grid. With READ_COMMITTED, if between two consecutive read calls on the same key, the key has been updated by another transaction, the second read may return the new updated value:
With REPEATABLE_READ, the final get will still return v. So, if you’re going to retrieve the same key multiple times within a transaction, you should use REPEATABLE_READ.
However, as read-locks are not acquired even for REPEATABLE_READ, this phenomena can occur:
9.1.3. Transaction locking
9.1.3.1. Pessimistic transactional cache
From a lock acquisition perspective, pessimistic transactions obtain locks on keys at the time the key is written.
- A lock request is sent to the primary owner (can be an explicit lock request or an operation)
The primary owner tries to acquire the lock:
- If it succeed, it sends back a positive reply;
- Otherwise, a negative reply is sent and the transaction is rollback.
As an example:
transactionManager.begin(); cache.put(k1,v1); //k1 is locked. cache.remove(k2); //k2 is locked when this returns transactionManager.commit();
transactionManager.begin();
cache.put(k1,v1); //k1 is locked.
cache.remove(k2); //k2 is locked when this returns
transactionManager.commit();
When cache.put(k1,v1) returns, k1 is locked and no other transaction running anywhere in the cluster can write to it. Reading k1 is still possible. The lock on k1 is released when the transaction completes (commits or rollbacks).
For conditional operations, the validation is performed in the originator.
9.1.3.2. Optimistic transactional cache
With optimistic transactions locks are being acquired at transaction prepare time and are only being held up to the point the transaction commits (or rollbacks). This is different from the 5.0 default locking model where local locks are being acquire on writes and cluster locks are being acquired during prepare time.
- The prepare is sent to all the owners.
The primary owners try to acquire the locks needed:
- If locking succeeds, it performs the write skew check.
- If the write skew check succeeds (or is disabled), send a positive reply.
- Otherwise, a negative reply is sent and the transaction is rolled back.
As an example:
transactionManager.begin(); cache.put(k1,v1); cache.remove(k2); transactionManager.commit(); //at prepare time, K1 and K2 is locked until committed/rolled back.
transactionManager.begin();
cache.put(k1,v1);
cache.remove(k2);
transactionManager.commit(); //at prepare time, K1 and K2 is locked until committed/rolled back.For conditional commands, the validation still happens on the originator.
From a use case perspective, optimistic transactions should be used when there is not a lot of contention between multiple transactions running at the same time. That is because the optimistic transactions rollback if data has changed between the time it was read and the time it was committed (with write skew check enabled).
On the other hand, pessimistic transactions might be a better fit when there is high contention on the keys and transaction rollbacks are less desirable. Pessimistic transactions are more costly by their nature: each write operation potentially involves a RPC for lock acquisition.
9.1.4. Write Skews
Write skews occur when two transactions independently and simultaneously read and write to the same key. The result of a write skew is that both transactions successfully commit updates to the same key but with different values.
Data Grid automatically performs write skew checks to ensure data consistency for REPEATABLE_READ isolation levels in optimistic transactions. This allows Data Grid to detect and roll back one of the transactions.
When operating in LOCAL mode, write skew checks rely on Java object references to compare differences, which provides a reliable technique for checking for write skews.
To avoid write skews with pessimistic transactions, lock keys at read-time with Flag.FORCE_WRITE_LOCK.
-
In non-transactional caches,
Flag.FORCE_WRITE_LOCKdoes not work. Theget()call reads the key value but does not acquire locks remotely. -
You should use
Flag.FORCE_WRITE_LOCKwith transactions in which the entity is updated later in the same transaction.
Compare the following code snippets for an example of Flag.FORCE_WRITE_LOCK:
9.1.5. Dealing with exceptions
If a CacheException (or a subclass of it) is thrown by a cache method within the scope of a JTA transaction, then the transaction is automatically marked for rollback.
9.1.6. Enlisting Synchronizations
By default Data Grid registers itself as a first class participant in distributed transactions through XAResource. There are situations where Data Grid is not required to be a participant in the transaction, but only to be notified by its lifecycle (prepare, complete): e.g. in the case Data Grid is used as a 2nd level cache in Hibernate.
Data Grid allows transaction enlistment through Synchronization. To enable it just use NON_XA transaction mode.
Synchronizations have the advantage that they allow TransactionManager to optimize 2PC with a 1PC where only one other resource is enlisted with that transaction (last resource commit optimization). E.g. Hibernate second level cache: if Data Grid registers itself with the TransactionManager as a XAResource than at commit time, the TransactionManager sees two XAResource (cache and database) and does not make this optimization. Having to coordinate between two resources it needs to write the tx log to disk. On the other hand, registering Data Grid as a Synchronization makes the TransactionManager skip writing the log to the disk (performance improvement).
9.1.7. Batching
Batching allows atomicity and some characteristics of a transaction, but not full-blown JTA or XA capabilities. Batching is often a lot lighter and cheaper than a full-blown transaction.
Generally speaking, one should use batching API whenever the only participant in the transaction is an Data Grid cluster. On the other hand, JTA transactions (involving TransactionManager) should be used whenever the transactions involves multiple systems. E.g. considering the "Hello world!" of transactions: transferring money from one bank account to the other. If both accounts are stored within Data Grid, then batching can be used. If one account is in a database and the other is Data Grid, then distributed transactions are required.
You do not have to have a transaction manager defined to use batching.
9.1.7.1. API
Once you have configured your cache to use batching, you use it by calling startBatch() and endBatch() on Cache. E.g.,
9.1.7.2. Batching and JTA
Behind the scenes, the batching functionality starts a JTA transaction, and all the invocations in that scope are associated with it. For this it uses a very simple (e.g. no recovery) internal TransactionManager implementation. With batching, you get:
- Locks you acquire during an invocation are held until the batch completes
- Changes are all replicated around the cluster in a batch as part of the batch completion process. Reduces replication chatter for each update in the batch.
- If synchronous replication or invalidation are used, a failure in replication/invalidation will cause the batch to roll back.
- All the transaction related configurations apply for batching as well.
9.1.8. Transaction recovery
Recovery is a feature of XA transactions, which deal with the eventuality of a resource or possibly even the transaction manager failing, and recovering accordingly from such a situation.
9.1.8.1. When to use recovery
Consider a distributed transaction in which money is transferred from an account stored in an external database to an account stored in Data Grid. When TransactionManager.commit() is invoked, both resources prepare successfully (1st phase). During the commit (2nd) phase, the database successfully applies the changes whilst Data Grid fails before receiving the commit request from the transaction manager. At this point the system is in an inconsistent state: money is taken from the account in the external database but not visible yet in Data Grid (since locks are only released during 2nd phase of a two-phase commit protocol). Recovery deals with this situation to make sure data in both the database and Data Grid ends up in a consistent state.
9.1.8.2. How does it work
Recovery is coordinated by the transaction manager. The transaction manager works with Data Grid to determine the list of in-doubt transactions that require manual intervention and informs the system administrator (via email, log alerts, etc). This process is transaction manager specific, but generally requires some configuration on the transaction manager.
Knowing the in-doubt transaction ids, the system administrator can now connect to the Data Grid cluster and replay the commit of transactions or force the rollback. Data Grid provides JMX tooling for this - this is explained extensively in the Transaction recovery and reconciliation section.
9.1.8.3. Configuring recovery
Recovery is not enabled by default in Data Grid. If disabled, the TransactionManager won’t be able to work with Data Grid to determine the in-doubt transactions. The Transaction configuration section shows how to enable it.
NOTE: recovery-cache attribute is not mandatory and it is configured per-cache.
For recovery to work, mode must be set to FULL_XA, since full-blown XA transactions are needed.
9.1.8.3.1. Enable JMX support
In order to be able to use JMX for managing recovery JMX support must be explicitly enabled.
9.1.8.4. Recovery cache
In order to track in-doubt transactions and be able to reply them, Data Grid caches all transaction state for future use. This state is held only for in-doubt transaction, being removed for successfully completed transactions after when the commit/rollback phase completed.
This in-doubt transaction data is held within a local cache: this allows one to configure swapping this info to disk through cache loader in the case it gets too big. This cache can be specified through the recovery-cache configuration attribute. If not specified Data Grid will configure a local cache for you.
It is possible (though not mandated) to share same recovery cache between all the Data Grid caches that have recovery enabled. If the default recovery cache is overridden, then the specified recovery cache must use a TransactionManagerLookup that returns a different transaction manager than the one used by the cache itself.
9.1.8.5. Integration with the transaction manager
Even though this is transaction manager specific, generally a transaction manager would need a reference to a XAResource implementation in order to invoke XAResource.recover() on it. In order to obtain a reference to an Data Grid XAResource following API can be used:
XAResource xar = cache.getAdvancedCache().getXAResource();
XAResource xar = cache.getAdvancedCache().getXAResource();It is a common practice to run the recovery in a different process from the one running the transaction.
9.1.8.6. Reconciliation
The transaction manager informs the system administrator on in-doubt transaction in a proprietary way. At this stage it is assumed that the system administrator knows transaction’s XID (a byte array).
A normal recovery flow is:
- STEP 1: The system administrator connects to an Data Grid server through JMX, and lists the in doubt transactions. The image below demonstrates JConsole connecting to an Data Grid node that has an in doubt transaction.
Figure 9.1. Show in-doubt transactions
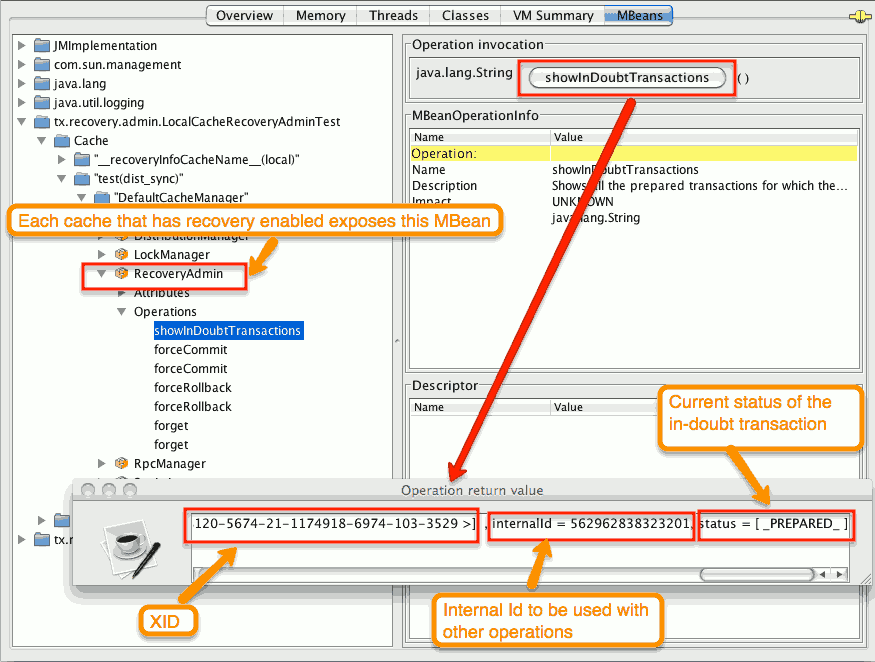
The status of each in-doubt transaction is displayed(in this example " PREPARED "). There might be multiple elements in the status field, e.g. "PREPARED" and "COMMITTED" in the case the transaction committed on certain nodes but not on all of them.
- STEP 2: The system administrator visually maps the XID received from the transaction manager to an Data Grid internal id, represented as a number. This step is needed because the XID, a byte array, cannot conveniently be passed to the JMX tool (e.g. JConsole) and then re-assembled on Data Grid’s side.
- STEP 3: The system administrator forces the transaction’s commit/rollback through the corresponding jmx operation, based on the internal id. The image below is obtained by forcing the commit of the transaction based on its internal id.
Figure 9.2. Force commit
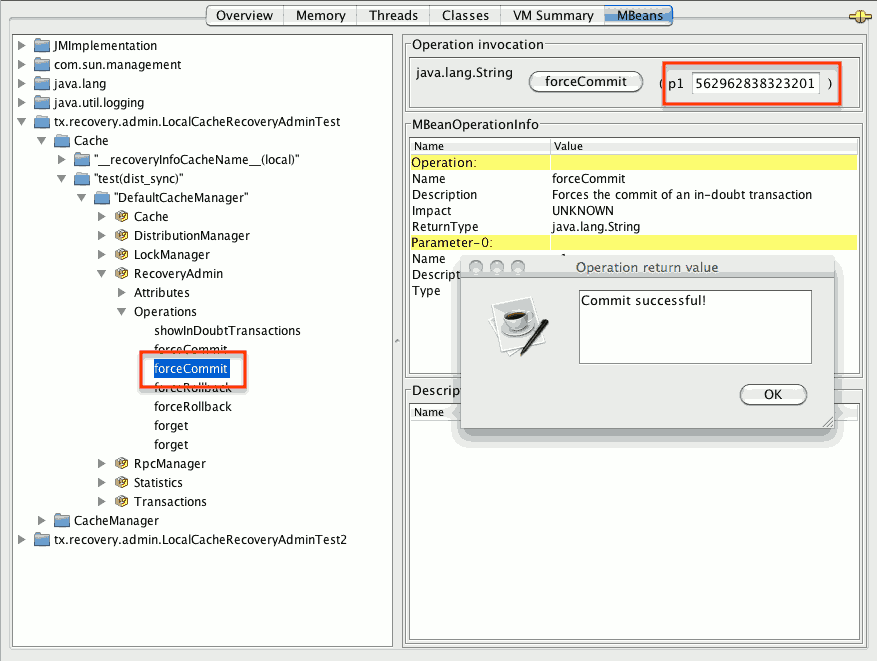
All JMX operations described above can be executed on any node, regardless of where the transaction originated.
9.1.8.6.1. Force commit/rollback based on XID
XID-based JMX operations for forcing in-doubt transactions' commit/rollback are available as well: these methods receive byte[] arrays describing the XID instead of the number associated with the transactions (as previously described at step 2). These can be useful e.g. if one wants to set up an automatic completion job for certain in-doubt transactions. This process is plugged into transaction manager’s recovery and has access to the transaction manager’s XID objects.
Chapter 10. Configuring locking and concurrency
Data Grid uses multi-versioned concurrency control (MVCC) to improve access to shared data.
- Allowing concurrent readers and writers
- Readers and writers do not block one another
- Write skews can be detected and handled
- Internal locks can be striped
10.1. Locking and concurrency
Multi-versioned concurrency control (MVCC) is a concurrency scheme popular with relational databases and other data stores. MVCC offers many advantages over coarse-grained Java synchronization and even JDK Locks for access to shared data.
Data Grid’s MVCC implementation makes use of minimal locks and synchronizations, leaning heavily towards lock-free techniques such as compare-and-swap and lock-free data structures wherever possible, which helps optimize for multi-CPU and multi-core environments.
In particular, Data Grid’s MVCC implementation is heavily optimized for readers. Reader threads do not acquire explicit locks for entries, and instead directly read the entry in question.
Writers, on the other hand, need to acquire a write lock. This ensures only one concurrent writer per entry, causing concurrent writers to queue up to change an entry.
To allow concurrent reads, writers make a copy of the entry they intend to modify, by wrapping the entry in an MVCCEntry. This copy isolates concurrent readers from seeing partially modified state. Once a write has completed, MVCCEntry.commit() will flush changes to the data container and subsequent readers will see the changes written.
10.1.1. Clustered caches and locks
In Data Grid clusters, primary owner nodes are responsible for locking keys.
For non-transactional caches, Data Grid forwards the write operation to the primary owner of the key so it can attempt to lock it. Data Grid either then forwards the write operation to the other owners or throws an exception if it cannot lock the key.
If the operation is conditional and fails on the primary owner, Data Grid does not forward it to the other owners.
For transactional caches, primary owners can lock keys with optimistic and pessimistic locking modes. Data Grid also supports different isolation levels to control concurrent reads between transactions.
10.1.2. The LockManager
The LockManager is a component that is responsible for locking an entry for writing. The LockManager makes use of a LockContainer to locate/hold/create locks. LockContainers come in two broad flavours, with support for lock striping and with support for one lock per entry.
10.1.3. Lock striping
Lock striping entails the use of a fixed-size, shared collection of locks for the entire cache, with locks being allocated to entries based on the entry’s key’s hash code. Similar to the way the JDK’s ConcurrentHashMap allocates locks, this allows for a highly scalable, fixed-overhead locking mechanism in exchange for potentially unrelated entries being blocked by the same lock.
The alternative is to disable lock striping - which would mean a new lock is created per entry. This approach may give you greater concurrent throughput, but it will be at the cost of additional memory usage, garbage collection churn, etc.
lock striping is disabled by default, due to potential deadlocks that can happen if locks for different keys end up in the same lock stripe.
The size of the shared lock collection used by lock striping can be tuned using the concurrencyLevel attribute of the <locking /> configuration element.
Configuration example:
<locking striping="false|true"/>
<locking striping="false|true"/>Or
new ConfigurationBuilder().locking().useLockStriping(false|true);
new ConfigurationBuilder().locking().useLockStriping(false|true);10.1.4. Concurrency levels
In addition to determining the size of the striped lock container, this concurrency level is also used to tune any JDK ConcurrentHashMap based collections where related, such as internal to DataContainers. Please refer to the JDK ConcurrentHashMap Javadocs for a detailed discussion of concurrency levels, as this parameter is used in exactly the same way in Data Grid.
Configuration example:
<locking concurrency-level="32"/>
<locking concurrency-level="32"/>Or
new ConfigurationBuilder().locking().concurrencyLevel(32);
new ConfigurationBuilder().locking().concurrencyLevel(32);10.1.5. Lock timeout
The lock timeout specifies the amount of time, in milliseconds, to wait for a contented lock.
Configuration example:
<locking acquire-timeout="10000"/>
<locking acquire-timeout="10000"/>Or
new ConfigurationBuilder().locking().lockAcquisitionTimeout(10000); //alternatively new ConfigurationBuilder().locking().lockAcquisitionTimeout(10, TimeUnit.SECONDS);
new ConfigurationBuilder().locking().lockAcquisitionTimeout(10000);
//alternatively
new ConfigurationBuilder().locking().lockAcquisitionTimeout(10, TimeUnit.SECONDS);10.1.6. Consistency
The fact that a single owner is locked (as opposed to all owners being locked) does not break the following consistency guarantee: if key K is hashed to nodes {A, B} and transaction TX1 acquires a lock for K, let’s say on A. If another transaction, TX2, is started on B (or any other node) and TX2 tries to lock K then it will fail with a timeout as the lock is already held by TX1. The reason for this is the that the lock for a key K is always, deterministically, acquired on the same node of the cluster, regardless of where the transaction originates.
10.1.7. Data Versioning
Data Grid supports two forms of data versioning: simple and external. The simple versioning is used in transactional caches for write skew check.
The external versioning is used to encapsulate an external source of data versioning within Data Grid, such as when using Data Grid with Hibernate which in turn gets its data version information directly from a database.
In this scheme, a mechanism to pass in the version becomes necessary, and overloaded versions of put() and putForExternalRead() will be provided in AdvancedCache to take in an external data version. This is then stored on the InvocationContext and applied to the entry at commit time.
Write skew checks cannot and will not be performed in the case of external data versioning.
Chapter 11. Using clustered counters
Data Grid provides counters that record the count of objects and are distributed across all nodes in a cluster.
11.1. Clustered Counters
Clustered counters are counters which are distributed and shared among all nodes in the Data Grid cluster. Counters can have different consistency levels: strong and weak.
Although a strong/weak consistent counter has separate interfaces, both support updating its value, return the current value and they provide events when its value is updated. Details are provided below in this document to help you choose which one fits best your uses-case.
11.1.1. Installation and Configuration
In order to start using the counters, you needs to add the dependency in your Maven pom.xml file:
pom.xml
<dependency> <groupId>org.infinispan</groupId> <artifactId>infinispan-clustered-counter</artifactId> </dependency>
<dependency>
<groupId>org.infinispan</groupId>
<artifactId>infinispan-clustered-counter</artifactId>
</dependency>
The counters can be configured Data Grid configuration file or on-demand via the CounterManager interface detailed later in this document. A counters configured in Data Grid configuration file is created at boot time when the EmbeddedCacheManager is starting. These counters are started eagerly and they are available in all the cluster’s nodes.
configuration.xml
or programmatically, in the GlobalConfigurationBuilder:
On other hand, the counters can be configured on-demand, at any time after the EmbeddedCacheManager is initialized.
CounterConfiguration is immutable and can be reused.
The method defineCounter() will return true if the counter is successful configured or false otherwise. However, if the configuration is invalid, the method will throw a CounterConfigurationException. To find out if a counter is already defined, use the method isDefined().
CounterManager manager = ...
if (!manager.isDefined("someCounter")) {
manager.define("someCounter", ...);
}
CounterManager manager = ...
if (!manager.isDefined("someCounter")) {
manager.define("someCounter", ...);
}11.1.1.1. List counter names
To list all the counters defined, the method CounterManager.getCounterNames() returns a collection of all counter names created cluster-wide.
11.1.2. CounterManager interface
The CounterManager interface is the entry point to define, retrieve and remove counters.
Embedded deployments
CounterManager automatically listen to the creation of EmbeddedCacheManager and proceeds with the registration of an instance of it per EmbeddedCacheManager. It starts the caches needed to store the counter state and configures the default counters.
Retrieving the CounterManager is as simple as invoke the EmbeddedCounterManagerFactory.asCounterManager(EmbeddedCacheManager) as shown in the example below:
// create or obtain your EmbeddedCacheManager EmbeddedCacheManager manager = ...; // retrieve the CounterManager CounterManager counterManager = EmbeddedCounterManagerFactory.asCounterManager(manager);
// create or obtain your EmbeddedCacheManager
EmbeddedCacheManager manager = ...;
// retrieve the CounterManager
CounterManager counterManager = EmbeddedCounterManagerFactory.asCounterManager(manager);Server deployments
For Hot Rod clients, the CounterManager is registered in the RemoteCacheManager and can be retrieved as follows:
// create or obtain your RemoteCacheManager RemoteCacheManager manager = ...; // retrieve the CounterManager CounterManager counterManager = RemoteCounterManagerFactory.asCounterManager(manager);
// create or obtain your RemoteCacheManager
RemoteCacheManager manager = ...;
// retrieve the CounterManager
CounterManager counterManager = RemoteCounterManagerFactory.asCounterManager(manager);11.1.2.1. Remove a counter via CounterManager
There is a difference between remove a counter via the Strong/WeakCounter interfaces and the CounterManager. The CounterManager.remove(String) removes the counter value from the cluster and removes all the listeners registered in the counter in the local counter instance. In addition, the counter instance is no longer reusable and it may return an invalid results.
On the other side, the Strong/WeakCounter removal only removes the counter value. The instance can still be reused and the listeners still works.
The counter is re-created if it is accessed after a removal.
11.1.3. The Counter
A counter can be strong (StrongCounter) or weakly consistent (WeakCounter) and both is identified by a name. They have a specific interface but they share some logic, namely, both of them are asynchronous ( a CompletableFuture is returned by each operation), provide an update event and can be reset to its initial value.
If you don’t want to use the async API, it is possible to return a synchronous counter via sync() method. The API is the same but without the CompletableFuture return value.
The following methods are common to both interfaces:
-
getName()returns the counter name (identifier). -
getValue()returns the current counter’s value. -
reset()allows to reset the counter’s value to its initial value. -
addListener()register a listener to receive update events. More details about it in the Notification and Events section. -
getConfiguration()returns the configuration used by the counter. -
remove()removes the counter value from the cluster. The instance can still be used and the listeners are kept. -
sync()creates a synchronous counter.
The counter is re-created if it is accessed after a removal.
The strong counter provides uses a single key stored in Data Grid cache to provide the consistency needed. All the updates are performed under the key lock to updates its values. On other hand, the reads don’t acquire any locks and reads the current value. Also, with this scheme, it allows to bound the counter value and provide atomic operations like compare-and-set/swap.
A StrongCounter can be retrieved from the CounterManager by using the getStrongCounter() method. As an example:
CounterManager counterManager = ...
StrongCounter aCounter = counterManager.getStrongCounter("my-counter");
CounterManager counterManager = ...
StrongCounter aCounter = counterManager.getStrongCounter("my-counter");
Since every operation will hit a single key, the StrongCounter has a higher contention rate.
The StrongCounter interface adds the following method:
-
incrementAndGet()increments the counter by one and returns the new value. -
decrementAndGet()decrements the counter by one and returns the new value. -
addAndGet()adds a delta to the counter’s value and returns the new value. -
compareAndSet()andcompareAndSwap()atomically set the counter’s value if the current value is the expected.
A operation is considered completed when the CompletableFuture is completed.
The difference between compare-and-set and compare-and-swap is that the former returns true if the operation succeeds while the later returns the previous value. The compare-and-swap is successful if the return value is the same as the expected.
11.1.3.1.1. Bounded StrongCounter
When bounded, all the update method above will throw a CounterOutOfBoundsException when they reached the lower or upper bound. The exception has the following methods to check which side bound has been reached:
public boolean isUpperBoundReached(); public boolean isLowerBoundReached();
public boolean isUpperBoundReached();
public boolean isLowerBoundReached();11.1.3.1.2. Uses cases
The strong counter fits better in the following uses cases:
- When counter’s value is needed after each update (example, cluster-wise ids generator or sequences)
- When a bounded counter is needed (example, rate limiter)
11.1.3.1.3. Usage Examples
And below, there is another example using a bounded counter:
Compare-and-set vs Compare-and-swap examples:
With compare-and-swap, it saves one invocation counter invocation (counter.getValue())
To use a strong counter as a rate limiter, configure upper-bound and lifespan parameters as follows:
The lifespan parameter is an experimental capability and may be removed in a future version.
The WeakCounter stores the counter’s value in multiple keys in Data Grid cache. The number of keys created is configured by the concurrency-level attribute. Each key stores a partial state of the counter’s value and it can be updated concurrently. It main advantage over the StrongCounter is the lower contention in the cache. On other hand, the read of its value is more expensive and bounds are not allowed.
The reset operation should be handled with caution. It is not atomic and it produces intermediates values. These value may be seen by a read operation and by any listener registered.
A WeakCounter can be retrieved from the CounterManager by using the getWeakCounter() method. As an example:
CounterManager counterManager = ...
StrongCounter aCounter = counterManager.getWeakCounter("my-counter);
CounterManager counterManager = ...
StrongCounter aCounter = counterManager.getWeakCounter("my-counter);11.1.3.2.1. Weak Counter Interface
The WeakCounter adds the following methods:
They are similar to the `StrongCounter’s methods but they don’t return the new value.
11.1.3.2.2. Uses cases
The weak counter fits best in uses cases where the result of the update operation is not needed or the counter’s value is not required too often. Collecting statistics is a good example of such an use case.
11.1.3.2.3. Examples
Below, there is an example of the weak counter usage.
11.1.4. Notifications and Events
Both strong and weak counter supports a listener to receive its updates events. The listener must implement CounterListener and it can be registered by the following method:
<T extends CounterListener> Handle<T> addListener(T listener);
<T extends CounterListener> Handle<T> addListener(T listener);
The CounterListener has the following interface:
public interface CounterListener {
void onUpdate(CounterEvent entry);
}
public interface CounterListener {
void onUpdate(CounterEvent entry);
}
The Handle object returned has the main goal to remove the CounterListener when it is not longer needed. Also, it allows to have access to the CounterListener instance that is it handling. It has the following interface:
public interface Handle<T extends CounterListener> {
T getCounterListener();
void remove();
}
public interface Handle<T extends CounterListener> {
T getCounterListener();
void remove();
}
Finally, the CounterEvent has the previous and current value and state. It has the following interface:
The state is always State.VALID for unbounded strong counter and weak counter. State.LOWER_BOUND_REACHED and State.UPPER_BOUND_REACHED are only valid for bounded strong counters.
The weak counter reset() operation will trigger multiple notification with intermediate values.
Chapter 12. Listeners and notifications
Use listeners with Data Grid to get notifications when events occur for the Cache Manager or for caches.
12.1. Listeners and notifications
Data Grid offers a listener API, where clients can register for and get notified when events take place. This annotation-driven API applies to 2 different levels: cache level events and Cache Manager level events.
Events trigger a notification which is dispatched to listeners. Listeners are simple POJOs annotated with @Listener and registered using the methods defined in the Listenable interface.
Both Cache and CacheManager implement Listenable, which means you can attach listeners to either a cache or a Cache Manager, to receive either cache-level or Cache Manager-level notifications.
For example, the following class defines a listener to print out some information every time a new entry is added to the cache, in a non blocking fashion:
For more comprehensive examples, please see the Javadocs for @Listener.
12.2. Cache-level notifications
Cache-level events occur on a per-cache basis, and by default are only raised on nodes where the events occur. Note in a distributed cache these events are only raised on the owners of data being affected. Examples of cache-level events are entries being added, removed, modified, etc. These events trigger notifications to listeners registered to a specific cache.
Please see the Javadocs on the org.infinispan.notifications.cachelistener.annotation package for a comprehensive list of all cache-level notifications, and their respective method-level annotations.
Please refer to the Javadocs on the org.infinispan.notifications.cachelistener.annotation package for the list of cache-level notifications available in Data Grid.
Cluster listeners
The cluster listeners should be used when it is desirable to listen to the cache events on a single node.
To do so all that is required is set to annotate your listener as being clustered.
@Listener (clustered = true)
public class MyClusterListener { .... }
@Listener (clustered = true)
public class MyClusterListener { .... }There are some limitations to cluster listeners from a non clustered listener.
-
A cluster listener can only listen to
@CacheEntryModified,@CacheEntryCreated,@CacheEntryRemovedand@CacheEntryExpiredevents. Note this means any other type of event will not be listened to for this listener. - Only the post event is sent to a cluster listener, the pre event is ignored.
Event filtering and conversion
All applicable events on the node where the listener is installed will be raised to the listener. It is possible to dynamically filter what events are raised by using a KeyFilter (only allows filtering on keys) or CacheEventFilter (used to filter for keys, old value, old metadata, new value, new metadata, whether command was retried, if the event is before the event (ie. isPre) and also the command type).
The example here shows a simple KeyFilter that will only allow events to be raised when an event modified the entry for the key Only Me.
This can be useful when you want to limit what events you receive in a more efficient manner.
There is also a CacheEventConverter that can be supplied that allows for converting a value to another before raising the event. This can be nice to modularize any code that does value conversions.
The mentioned filters and converters are especially beneficial when used in conjunction with a Cluster Listener. This is because the filtering and conversion is done on the node where the event originated and not on the node where event is listened to. This can provide benefits of not having to replicate events across the cluster (filter) or even have reduced payloads (converter).
Initial State Events
When a listener is installed it will only be notified of events after it is fully installed.
It may be desirable to get the current state of the cache contents upon first registration of listener by having an event generated of type @CacheEntryCreated for each element in the cache. Any additionally generated events during this initial phase will be queued until appropriate events have been raised.
This only works for clustered listeners at this time. ISPN-4608 covers adding this for non clustered listeners.
Duplicate Events
It is possible in a non transactional cache to receive duplicate events. This is possible when the primary owner of a key goes down while trying to perform a write operation such as a put.
Data Grid internally will rectify the put operation by sending it to the new primary owner for the given key automatically, however there are no guarantees in regards to if the write was first replicated to backups. Thus more than 1 of the following write events (CacheEntryCreatedEvent, CacheEntryModifiedEvent & CacheEntryRemovedEvent) may be sent on a single operation.
If more than one event is generated Data Grid will mark the event that it was generated by a retried command to help the user to know when this occurs without having to pay attention to view changes.
Also when using a CacheEventFilter or CacheEventConverter the EventType contains a method isRetry to tell if the event was generated due to retry.
12.3. Cache Manager notifications
Events that occur on a Cache Manager level are cluster-wide and involve events that affect all caches created by a single Cache Manager. Examples of Cache Manager events are nodes joining or leaving a cluster, or caches starting or stopping.
See the org.infinispan.notifications.cachemanagerlistener.annotation package for a comprehensive list of all Cache Manager notifications, and their respective method-level annotations.
12.4. Synchronicity of events
By default, all async notifications are dispatched in the notification thread pool. Sync notifications will delay the operation from continuing until the listener method completes or the CompletionStage completes (the former causing the thread to block). Alternatively, you could annotate your listener as asynchronous in which case the operation will continue immediately, while the notification is completed asynchronously on the notification thread pool. To do this, simply annotate your listener such:
Asynchronous Listener
@Listener (sync = false)
public class MyAsyncListener {
@CacheEntryCreated
void listen(CacheEntryCreatedEvent event) { }
}
@Listener (sync = false)
public class MyAsyncListener {
@CacheEntryCreated
void listen(CacheEntryCreatedEvent event) { }
}Blocking Synchronous Listener
@Listener
public class MySyncListener {
@CacheEntryCreated
void listen(CacheEntryCreatedEvent event) { }
}
@Listener
public class MySyncListener {
@CacheEntryCreated
void listen(CacheEntryCreatedEvent event) { }
}Non-Blocking Listener
@Listener
public class MyNonBlockingListener {
@CacheEntryCreated
CompletionStage<Void> listen(CacheEntryCreatedEvent event) { }
}
@Listener
public class MyNonBlockingListener {
@CacheEntryCreated
CompletionStage<Void> listen(CacheEntryCreatedEvent event) { }
}Asynchronous thread pool
To tune the thread pool used to dispatch such asynchronous notifications, use the <listener-executor /> XML element in your configuration file.